EPSON LQ-580 - FTP Directory Listing
239
Printer Parts printer cover control panel paper guide paper release lever edge guides front cover (closed) paper guide cover tractor shield plate ribbon cartridge parallel interface paper tension unit paper thickness lever knob power switch power cord front edge guide front cover (open)
-
Upload
khangminh22 -
Category
Documents
-
view
0 -
download
0
Transcript of EPSON LQ-580 - FTP Directory Listing

RProof Sign-off:SEI Y.Ohkawara T.Takahashi
T.TakahashiSEI M.Kauppi K.Blair
R4C4620Rev. CA5 size PARTS.FM3/13/00 Pass 3
Printer Parts
printer cover
control panel
paper guide
paper release lever
edge guides
front cover (closed)
paper guide cover
tractor
shield plate
ribbon cartridge
parallel interfacepaper tension unit
paper thickness lever
knob
power switchpower cord
front edge guide front cover (open)

R4C4620Rev. CA5 size COVER.FM3/13/00 Pass 3
L Proof Sign-off:SEI Y.Ohkawara T.Takahashi
T.TakahashiSEI M.Kauppi K.Blair
Control Panel Buttons and Lights
n = Onf = Flashingo = Off
Tear Off/Bin button● Advances continuous paper to the
tear-off position.● Feeds continuous paper backward
from the tear-off position to the top-of-form position.
● Selects a cut-sheet feeder bin when the cut-sheet feeder is installed.
● Turns on the card mode to print on postcards and envelopes. See Chapter 3.
Tear Off/Bin lights● f f when continuous paper is in the
tear-off position. ● o n when bin 1 of the optional cut-
sheet feeder is selected. ● n o when bin 2 of the optional cut-
sheet feeder is selected. ● n n when the printer is in the card
mode.*Micro Adjust modeWhen you hold down the Pause button for three seconds, the printer enters the micro adjust mode. In this mode, you can press the LF/FFD and Load/EjectU buttons to adjust the top-of-form or tear-off position. See Chapter 2.
Pause button Stops printing temporarily, and resumes printing when pressed again. When pressed for three seconds, turns on the *micro adjust mode. To turn off, press again.
Pause light● On when the printer is
paused.● Flashes when the
printer is in the *micro adjust mode.
● Flashes when the print head has overheated.
Font buttonSelects the font. See Chapter 5.
Font lightsIndicate which font is selected.
Paper Out light● On when no paper is
loaded in the selected paper source or paper is not loaded correctly.
● Flashes when paper has not been fully ejected or a paper jam has occurred.
LF/FF button● Feeds paper line by
line when pressing shortly.
● Ejects a single sheet or advances continuous paper to the next top-of-form position when held down.
Load/Eject button● Loads a single sheet of
paper. ● Ejects a single sheet of
paper if a sheet is loaded. ● Loads continuous paper
from the standby position.
● Feeds continuous paper backward to the standby position.
Condensed buttonTurns on and off the condensed mode.
Condensed lightLights up when the condensed mode is on.

Proof Sign-off:SEI Y.Ohkawara T.Takahashi
T.TakahashiSEI M.Kauppi K.Blair
R4C4620Rev. CA5 size FRONT.FM3/13/00 Pass 3
R
User’s Guide
24-Pin Dot Matrix Printer
All rights reserved. No part of this publication may be reproduced, stored in a retrieval system, or transmitted in any form or by any means, electronic, mechanical, photocopying, recording, or otherwise, without the prior written permission of SEIKO EPSON CORPORATION. The information contained herein is designed only for use with this EPSON printer. EPSON is not responsible for any use of this information as applied to other printers.
Neither SEIKO EPSON CORPORATION nor its affiliates shall be liable to the purchaser of this product or third parties for damages, losses, costs, or expenses incurred by the purchaser or third parties as a result of: accident, misuse, or abuse of this product or unauthorized modifications, repairs, or alterations to this product, or (excluding the U.S.) failure to strictly comply with SEIKO EPSON CORPORATION’s operating and maintenance instructions.
SEIKO EPSON CORPORATION shall not be liable for any damages or problems arising from the use of any options or any consumable products other than those designated as Original EPSON Products or EPSON Approved Products by SEIKO EPSON CORPORATION.
EPSON and EPSON ESC/P are registered trademarks of SEIKO EPSON CORPORATION.
Microsoft, Windows, and Windows NT are registered trademarks of Microsoft Corporation.
IBM is a registered trademark of International Business Machines Corporation.
General Notice: Other product names used herein are for identification purposes only and may be trademarks of their respective owners. EPSON disclaims any and all rights in those marks.
Copyright © 1999 by SEIKO EPSON CORPORATION, Nagano, Japan.
®

RProof Sign-off:SEI Y.Ohkawara T.Takahashi
T.TakahashiSEI M.Kauppi K.Blair
R4C4620Rev. CA5 size USERS.TOC3/13/00 Pass 3
Contents
Getting to Know Your Printer
Easy-to-Use Features. . . . . . . . . . . . . . . . . . . . . . . . . . . . . . . . . . . . . 2Available Paper Paths . . . . . . . . . . . . . . . . . . . . . . . . . . . . . . . . . . . . 4
Printing on continuous paper. . . . . . . . . . . . . . . . . . . . . . . . . 4Printing on single sheets . . . . . . . . . . . . . . . . . . . . . . . . . . . . . 7
Options . . . . . . . . . . . . . . . . . . . . . . . . . . . . . . . . . . . . . . . . . . . . . . . . 9Ribbon Cartridge . . . . . . . . . . . . . . . . . . . . . . . . . . . . . . . . . . . . . . . . 9Important Safety Instructions . . . . . . . . . . . . . . . . . . . . . . . . . . . . . 10Print Head Caution Symbol . . . . . . . . . . . . . . . . . . . . . . . . . . . . . . . 11ENERGY STAR Compliance . . . . . . . . . . . . . . . . . . . . . . . . . . . . . . 12How To Use Your Manuals . . . . . . . . . . . . . . . . . . . . . . . . . . . . . . . 12Warnings, Cautions, and Notes. . . . . . . . . . . . . . . . . . . . . . . . . . . . 12
Chapter 1 Setting Up the Printer
Unpacking the Printer. . . . . . . . . . . . . . . . . . . . . . . . . . . . . . . . . . . . 1-2Choosing a Place for the Printer . . . . . . . . . . . . . . . . . . . . . . . . . . . 1-3
Positioning the continuous paper supply. . . . . . . . . . . . . . . 1-4Installing or Replacing the Ribbon Cartridge . . . . . . . . . . . . . . . . 1-5Attaching the Paper Guide. . . . . . . . . . . . . . . . . . . . . . . . . . . . . . . . 1-11Plugging in the Printer . . . . . . . . . . . . . . . . . . . . . . . . . . . . . . . . . . . 1-13Connecting the Printer to Your Computer . . . . . . . . . . . . . . . . . . 1-14Installing the Printer Software. . . . . . . . . . . . . . . . . . . . . . . . . . . . . 1-16
Installing the printer software in Windows 95, 98, or NT 4.0 . . . . . . . . . . . . . . . . . . . . . . . 1-17
Installing the printer software in Windows 3.1 or NT 3.5x 1-19For DOS programs . . . . . . . . . . . . . . . . . . . . . . . . . . . . . . . . . . 1-21
Chapter 2 Printing on Continuous Paper
Setting the Paper Release Lever . . . . . . . . . . . . . . . . . . . . . . . . . . . 2-2
Contents i

L R4C4620Rev. CA5 size USERS.TOC3/13/00 Pass 3
Proof Sign-off:SEI Y.Ohkawara T.Takahashi
T.TakahashiSEI M.Kauppi K.Blair
Setting the Paper Thickness Lever . . . . . . . . . . . . . . . . . . . . . . . . . 2-4Using the Push Tractor . . . . . . . . . . . . . . . . . . . . . . . . . . . . . . . . . . 2-6
Loading paper onto the push tractor . . . . . . . . . . . . . . . . . . 2-6Removing a printed document from the push tractor. . . . 2-11Removing the push tractor . . . . . . . . . . . . . . . . . . . . . . . . . . 2-12Reinstalling the tractor in the push position . . . . . . . . . . . . 2-13
Using the Tractor in the Pull Position . . . . . . . . . . . . . . . . . . . . . . 2-14Installing the tractor in the pull position . . . . . . . . . . . . . . . 2-14Loading paper onto the pull tractor . . . . . . . . . . . . . . . . . . . 2-16Removing the paper from the pull tractor. . . . . . . . . . . . . . 2-21Using two tractors in the push/pull combination . . . . . . . 2-22Removing the pull tractor . . . . . . . . . . . . . . . . . . . . . . . . . . . 2-24
Loading Multipart Forms . . . . . . . . . . . . . . . . . . . . . . . . . . . . . . . . 2-26Loading Continuous Paper With Labels. . . . . . . . . . . . . . . . . . . . 2-27
Removing continuous paper with labels . . . . . . . . . . . . . . . 2-28Switching Between Printing on Continuous Paper
and Printing on Single Sheets . . . . . . . . . . . . . . . . . . . . . . . . . . 2-29Switching to printing on single sheets . . . . . . . . . . . . . . . . . 2-29Switching to printing on continuous paper. . . . . . . . . . . . . 2-30
Adjusting the Top-of-Form Position . . . . . . . . . . . . . . . . . . . . . . . 2-31Advancing the Paper to the Tear-Off Edge . . . . . . . . . . . . . . . . . 2-34
Using the Tear Off/Bin button . . . . . . . . . . . . . . . . . . . . . . . 2-34Advancing the paper to the tear-off position automatically2-35Adjusting the tear-off position . . . . . . . . . . . . . . . . . . . . . . . 2-35
Chapter 3 Printing on Single Sheets
Using Single Sheets . . . . . . . . . . . . . . . . . . . . . . . . . . . . . . . . . . . . . 3-2Available paper types and paper slots . . . . . . . . . . . . . . . . . 3-2Loading single-sheet multipart forms . . . . . . . . . . . . . . . . . 3-4Loading envelopes . . . . . . . . . . . . . . . . . . . . . . . . . . . . . . . . . 3-5Loading postcards . . . . . . . . . . . . . . . . . . . . . . . . . . . . . . . . . . 3-6
Loading Single Sheets in the Top Paper Slot . . . . . . . . . . . . . . . . 3-8Loading Single Sheets in the Front Paper Slot . . . . . . . . . . . . . . . 3-11
ii Contents

RProof Sign-off:SEI Y.Ohkawara T.Takahashi
T.TakahashiSEI M.Kauppi K.Blair
R4C4620Rev. CA5 size USERS.TOC3/13/00 Pass 3
Chapter 4 Using the Printer Software
About Your Printer Software . . . . . . . . . . . . . . . . . . . . . . . . . . . . . . 4-2Using the Printer Driver With Windows 95 and 98 . . . . . . . . . . . 4-3
Accessing the printer driver from Windows applications . 4-3Accessing the printer driver from the Start menu. . . . . . . . 4-6Printer driver settings overview. . . . . . . . . . . . . . . . . . . . . . . 4-6
Using the Printer Driver With Windows 3.1 . . . . . . . . . . . . . . . . . 4-13Accessing the printer driver from Windows applications . 4-13Accessing the printer driver from the Control Panel . . . . . 4-15Printer driver settings overview. . . . . . . . . . . . . . . . . . . . . . . 4-15
Using the Printer Driver With Windows NT 4.0 . . . . . . . . . . . . . 4-17Accessing the printer driver from Windows applications . 4-17Accessing the printer driver from the Start menu. . . . . . . . 4-19Printer driver settings overview. . . . . . . . . . . . . . . . . . . . . . . 4-20
Using the Printer Driver With Windows NT 3.5x . . . . . . . . . . . . 4-27Accessing the printer driver from Windows applications . 4-27Accessing the printer driver from the Control Panel . . . . . 4-29Printer driver settings overview. . . . . . . . . . . . . . . . . . . . . . . 4-30
Using the EPSON Remote! Utility . . . . . . . . . . . . . . . . . . . . . . . . . 4-32Installing EPSON Remote! . . . . . . . . . . . . . . . . . . . . . . . . . . . 4-32Accessing EPSON Remote! . . . . . . . . . . . . . . . . . . . . . . . . . . . 4-32
Chapter 5 Changing Printer Settings From the Printer’s Control Panel
Selecting a Built-In Font and Pitch . . . . . . . . . . . . . . . . . . . . . . . . . 5-2About Your Printer’s Default Settings . . . . . . . . . . . . . . . . . . . . . . 5-4
Changing default settings . . . . . . . . . . . . . . . . . . . . . . . . . . . . 5-10
Chapter 6 Using EPSON Status Monitor 3
About the EPSON Status Monitor 3 Utility . . . . . . . . . . . . . . . . . . 6-2Accessing EPSON Status Monitor 3. . . . . . . . . . . . . . . . . . . . 6-2
Contents iii

L R4C4620Rev. CA5 size USERS.TOC3/13/00 Pass 3
Proof Sign-off:SEI Y.Ohkawara T.Takahashi
T.TakahashiSEI M.Kauppi K.Blair
Chapter 7 Troubleshooting
Using the Error Indicators. . . . . . . . . . . . . . . . . . . . . . . . . . . . . . . . 7-2Problems and Solutions. . . . . . . . . . . . . . . . . . . . . . . . . . . . . . . . . . 7-4
Power supply problems . . . . . . . . . . . . . . . . . . . . . . . . . . . . . 7-5Single-sheet paper loading or feeding problems . . . . . . . . 7-6Continuous paper loading or feeding problems . . . . . . . . 7-8Wrong top-of-form position . . . . . . . . . . . . . . . . . . . . . . . . . 7-9Wrong tear-off position . . . . . . . . . . . . . . . . . . . . . . . . . . . . . 7-10Printing or printout quality problems . . . . . . . . . . . . . . . . . 7-11
Clearing Paper Jams. . . . . . . . . . . . . . . . . . . . . . . . . . . . . . . . . . . . . 7-16Aligning Vertical Lines in Your Printout . . . . . . . . . . . . . . . . . . . 7-17Printing a Self Test . . . . . . . . . . . . . . . . . . . . . . . . . . . . . . . . . . . . . . 7-18Printing a Hex Dump. . . . . . . . . . . . . . . . . . . . . . . . . . . . . . . . . . . . 7-20
Appendix A Enhancing Your Printer With Options
Options. . . . . . . . . . . . . . . . . . . . . . . . . . . . . . . . . . . . . . . . . . . . . . . . A-2Paper handling options . . . . . . . . . . . . . . . . . . . . . . . . . . . . . A-2Optional interface cards . . . . . . . . . . . . . . . . . . . . . . . . . . . . . A-3
Using the Optional Cut-Sheet Feeders . . . . . . . . . . . . . . . . . . . . . A-5Installing an optional cut-sheet feeder . . . . . . . . . . . . . . . . . A-6Loading paper in the single-bin cut-sheet feeder . . . . . . . . A-8Loading paper in the high-capacity cut-sheet feeder. . . . . A-12Assembling the double-bin cut-sheet feeder. . . . . . . . . . . . A-16Selecting your paper path (bin 1 or bin 2) . . . . . . . . . . . . . . A-17Switching between continuous paper
and single-sheet paper in the cut-sheet feeder . . . . . . . . A-18Using the Roll Paper Holder. . . . . . . . . . . . . . . . . . . . . . . . . . . . . . A-20
Assembling the roll paper holder . . . . . . . . . . . . . . . . . . . . . A-20Installing the roll paper holder . . . . . . . . . . . . . . . . . . . . . . . A-21Loading roll paper. . . . . . . . . . . . . . . . . . . . . . . . . . . . . . . . . . A-22Removing roll paper . . . . . . . . . . . . . . . . . . . . . . . . . . . . . . . . A-24
Using an Optional Front Sheet Guide . . . . . . . . . . . . . . . . . . . . . . A-25Installing the front sheet guide . . . . . . . . . . . . . . . . . . . . . . . A-25Loading paper in the front sheet guide . . . . . . . . . . . . . . . . A-27
Installing an Interface Card. . . . . . . . . . . . . . . . . . . . . . . . . . . . . . . A-30
iv Contents
RProof Sign-off:SEI Y.Ohkawara T.Takahashi
T.TakahashiSEI M.Kauppi K.Blair
R4C4620Rev. CA5 size USERS.TOC3/13/00 Pass 3
Appendix B Cleaning and Transporting the Printer
Cleaning the Printer . . . . . . . . . . . . . . . . . . . . . . . . . . . . . . . . . . . . . B-2Transporting the Printer . . . . . . . . . . . . . . . . . . . . . . . . . . . . . . . . . . B-3
Appendix C Specifications
Printer Specifications . . . . . . . . . . . . . . . . . . . . . . . . . . . . . . . . . . . . C-2Mechanical. . . . . . . . . . . . . . . . . . . . . . . . . . . . . . . . . . . . . . . . . C-2Electrical. . . . . . . . . . . . . . . . . . . . . . . . . . . . . . . . . . . . . . . . . . . C-6Environmental . . . . . . . . . . . . . . . . . . . . . . . . . . . . . . . . . . . . . C-6Paper. . . . . . . . . . . . . . . . . . . . . . . . . . . . . . . . . . . . . . . . . . . . . . C-6Paper alignment . . . . . . . . . . . . . . . . . . . . . . . . . . . . . . . . . . . . C-10Printable area . . . . . . . . . . . . . . . . . . . . . . . . . . . . . . . . . . . . . . C-11Safety approvals . . . . . . . . . . . . . . . . . . . . . . . . . . . . . . . . . . . . C-13CE marking . . . . . . . . . . . . . . . . . . . . . . . . . . . . . . . . . . . . . . . . C-14
Command Lists . . . . . . . . . . . . . . . . . . . . . . . . . . . . . . . . . . . . . . . . . C-15EPSON ESC/P2 control codes . . . . . . . . . . . . . . . . . . . . . . . . C-15IBM 2390 Plus emulation control codes . . . . . . . . . . . . . . . . C-19
Character Tables . . . . . . . . . . . . . . . . . . . . . . . . . . . . . . . . . . . . . . . . C-20International character sets for the Italic table . . . . . . . . . . . C-32
Appendix D Customer Support Information
Contacting Customer Support. . . . . . . . . . . . . . . . . . . . . . . . . . . . . D-1
Glossary
Index
Contents v

RProof Sign-off:SEI Y.Ohkawara T.Takahashi
T.TakahashiSEI M.Kauppi K.Blair
R4C4620Rev. CA5 size INTRO.FM3/13/00 Pass 3
Getting to Know Your Printer
Your EPSON® LQ-580 24-pin dot matrix printer provides high-quality printing and great performance in a compact design.Features include:
❏ A variety of paper paths to suit your printing needs
❏ The ability to handle a wide range of paper types, including continuous paper, multipart forms with one original and up to four copies, labels, single sheets, envelopes, and postcards
❏ High-speed printing of up to 400 characters per second at 10 characters per inch
Your printer also comes with printer driver software, the EPSON Status Monitor 3 utility for Microsoft® Windows® 95, 98, or NT 4.0 that lets you check the status of your printer quickly and easily, and other software. In addition, many options are available to suit your individual needs.
Getting to Know Your Printer 1

L R4C4620Rev. CA5 size INTRO.FM3/13/00 Pass 3
Proof Sign-off:SEI Y.Ohkawara T.Takahashi
T.TakahashiSEI M.Kauppi K.Blair
Easy-to-Use Features
This section highlights some easy-to-use features that you’ll find helpful.
❏ Use the tear-off feature to save paper.
If you load paper in the push tractor, you can use the tear-off feature to advance your continuous paper to the printer’s tear-off edge when you finish printing. Then you can easily tear off printed sheets and save paper normally lost between documents. For more information, see Chapter 2.
2 Getting to Know Your Printer

RProof Sign-off:SEI Y.Ohkawara T.Takahashi
T.TakahashiSEI M.Kauppi K.Blair
R4C4620Rev. CA5 size INTRO.FM3/13/00 Pass 3
❏ Use the paper release lever to change the paper path without removing continuous paper from the push tractor.
When using the paper release lever, you can easily switch to printing on single sheets without removing the continuous paper loaded in the push tractor. For more information, see Chapter 2.
❏ Use the micro adjust feature to adjust the top-of-form and tear-off positions. (See the Glossary for explanations of the top-of-form and tear-off positions.)
The micro adjust feature allows you to move the paper forward or backward in 1/180-inch increments so that you can make precise adjustments to the top-of-form and tear-off positions. For more information, see Chapter 2.
paper release lever
Getting to Know Your Printer 3

L R4C4620Rev. CA5 size INTRO.FM3/13/00 Pass 3
Proof Sign-off:SEI Y.Ohkawara T.Takahashi
T.TakahashiSEI M.Kauppi K.Blair
Available Paper Paths
Your printer provides a variety of paper paths for printing on continuous and single-sheet paper. As described below, paper can be fed into the printer from the top, front, bottom, or rear. You can select the paper path that best suits your current printing needs.
Printing on continuous paper
You can choose from two tractor positions (push and pull) and three paper entry slots (front, rear, and bottom) for continuous paper printing. This section helps you determine which paper paths and tractor positions are best for your continuous paper printing needs. See the appropriate sections in Chapter 2 for tractor installation and paper loading instructions.
Using the push tractor
If you often need to tear off sheets of continuous paper (for example, if you are printing purchase orders or sales slips), it is best to use the push tractor. This allows you to use the printer’s tear-off edge to easily tear off printed sheets of continuous paper at the perforation. Also, when continuous paper is loaded on the push tractor, you can load single sheets of paper from the paper guide without removing the continuous paper from the tractor.
The tractor is installed in the rear push position when the printer is shipped. See the table below for details about the corresponding paper-feeding path.
Tractor position Description
push
Caution:Do not load continuous paper with labels in the rear slot; the labels may come off their backing sheet inside the printer and cause a paper jam.
4 Getting to Know Your Printer

RProof Sign-off:SEI Y.Ohkawara T.Takahashi
T.TakahashiSEI M.Kauppi K.Blair
R4C4620Rev. CA5 size INTRO.FM3/13/00 Pass 3
Using a pull tractor
If you often print on thick or heavy continuous paper, such as multipart forms or continuous paper with labels, use a tractor in the pull position. The pull tractor provides you with the best paper jam prevention, and allows you to load continuous paper from the front, rear, or bottom of the printer. However, you cannot use the tear-off feature with the pull tractor.
Note:If you plan to use a tractor in the pull position, you can remove the tractor from the rear push position and reinstall it in the pull position, or you can purchase an optional tractor unit (C800202) and install it in the pull position. See Chapter 2 for instructions.
You can use the front, bottom, or rear paper slot with the pull tractor.
Paper slot Description
front
If you print on thick paper such as multipart forms or continuous paper with labels, use the front paper slot because this paper path is almost straight. This reduces the chance of paper jams.
bottom
The bottom paper slot has the straightest paper path, so it is the best slot to use when printing on thick paper, such as multipart forms or continuous paper with labels.
Note:When loading paper in the bottom slot, be sure to use a printer stand with an opening large enough for the paper to feed through it without obstruction.
Getting to Know Your Printer 5
L R4C4620Rev. CA5 size INTRO.FM3/13/00 Pass 3
Proof Sign-off:SEI Y.Ohkawara T.Takahashi
T.TakahashiSEI M.Kauppi K.Blair
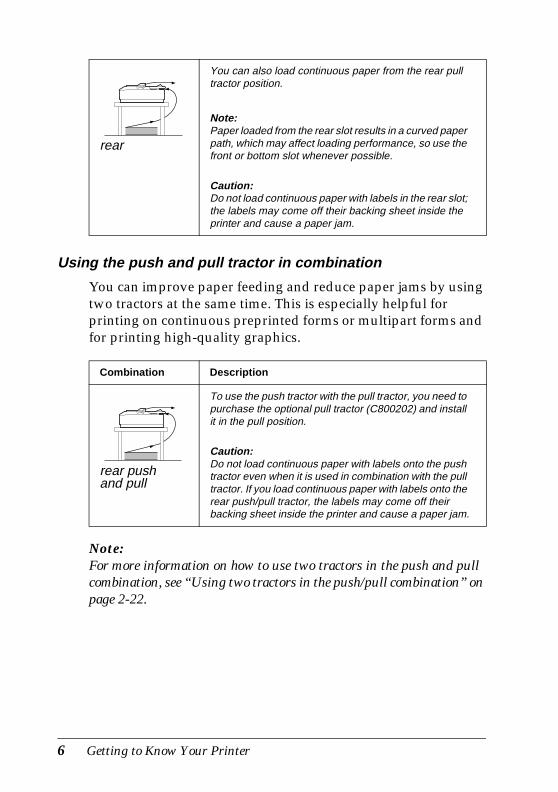
Using the push and pull tractor in combination
You can improve paper feeding and reduce paper jams by using two tractors at the same time. This is especially helpful for printing on continuous preprinted forms or multipart forms and for printing high-quality graphics.
Note:For more information on how to use two tractors in the push and pull combination, see “Using two tractors in the push/pull combination” on page 2-22.
rear
You can also load continuous paper from the rear pull tractor position.
Note:Paper loaded from the rear slot results in a curved paper path, which may affect loading performance, so use the front or bottom slot whenever possible.
Caution:Do not load continuous paper with labels in the rear slot; the labels may come off their backing sheet inside the printer and cause a paper jam.
Combination Description
rear push and pull
To use the push tractor with the pull tractor, you need to purchase the optional pull tractor (C800202) and install it in the pull position.
Caution:Do not load continuous paper with labels onto the push tractor even when it is used in combination with the pull tractor. If you load continuous paper with labels onto the rear push/pull tractor, the labels may come off their backing sheet inside the printer and cause a paper jam.
6 Getting to Know Your Printer

RProof Sign-off:SEI Y.Ohkawara T.Takahashi
T.TakahashiSEI M.Kauppi K.Blair
R4C4620Rev. CA5 size INTRO.FM3/13/00 Pass 3
Printing on single sheets
You can load single sheets from the top or the front of the printer. You can load ordinary single sheets from either position, even with continuous paper already loaded in the push tractor.
This section helps you determine which paper slot best suits your single-sheet printing needs. See Chapter 3 for paper loading instructions.
Loading paper in the top slot
You can load ordinary single sheets, envelopes, or postcards in the top slot.
Note:Load envelopes in the top slot only.
Getting to Know Your Printer 7

L R4C4620Rev. CA5 size INTRO.FM3/13/00 Pass 3
Proof Sign-off:SEI Y.Ohkawara T.Takahashi
T.TakahashiSEI M.Kauppi K.Blair
Loading paper in the front slot
You can load ordinary single sheets, single-sheet multipart forms, or postcards in the front slot.
Note:Always use the front paper slot to load single-sheet multipart forms.
8 Getting to Know Your Printer

RProof Sign-off:SEI Y.Ohkawara T.Takahashi
T.TakahashiSEI M.Kauppi K.Blair
R4C4620Rev. CA5 size INTRO.FM3/13/00 Pass 3
Options
Your printer comes with everything necessary to print on continuous paper and single sheets using a variety of paper paths. By adding options, such as a cut-sheet feeder, pull tractor unit, roll paper holder, or front sheet guide, you can further expand your printer’s versatility. Optional interface cards are also available to supplement your printer’s built-in parallel interface. For more information on options for your printer, see Appendix A, “Enhancing Your Printer With Options.”
Ribbon Cartridge
Your printer uses the following ribbon cartridges:
When printing becomes faint, you need to replace the ribbon cartridge. Genuine EPSON ribbon cartridges are designed and manufactured to work properly with your EPSON printer. They ensure proper operation and long life of the print head and other printer parts.
To replace a used ribbon cartridge, follow the instructions in “Installing or Replacing the Ribbon Cartridge” on page 1-5.
Note:❏ Use the optional film ribbon cartridge when you want especially
high quality printing. For everyday operations, use the standard black ribbon cartridge.
❏ EPSON recommends the use of original EPSON ribbon cartridges only. Other products not manufactured by EPSON may cause damage to your printer not covered by EPSON’s warranties.
EPSON black ribbon cartridge #7753
EPSON film ribbon cartridge #7768
Getting to Know Your Printer 9
L R4C4620Rev. CA5 size INTRO.FM3/13/00 Pass 3
Proof Sign-off:SEI Y.Ohkawara T.Takahashi
T.TakahashiSEI M.Kauppi K.Blair
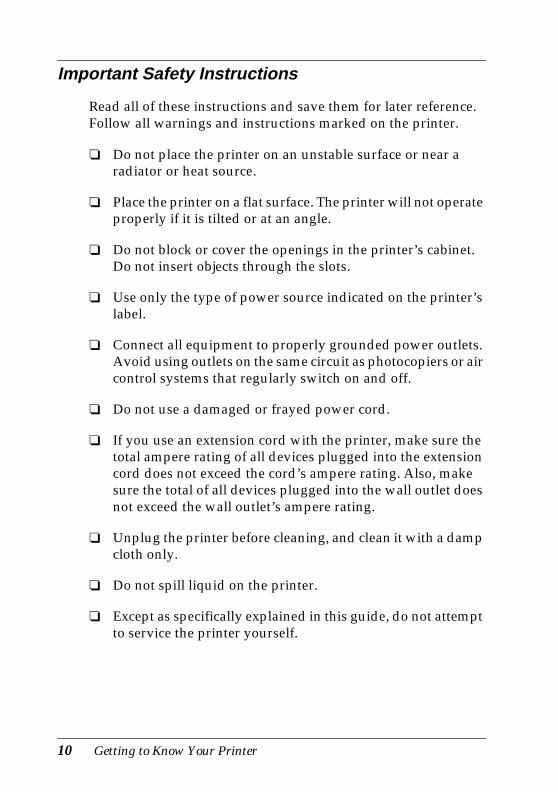
Important Safety Instructions
Read all of these instructions and save them for later reference. Follow all warnings and instructions marked on the printer.
❏ Do not place the printer on an unstable surface or near a radiator or heat source.
❏ Place the printer on a flat surface. The printer will not operate properly if it is tilted or at an angle.
❏ Do not block or cover the openings in the printer’s cabinet. Do not insert objects through the slots.
❏ Use only the type of power source indicated on the printer’s label.
❏ Connect all equipment to properly grounded power outlets. Avoid using outlets on the same circuit as photocopiers or air control systems that regularly switch on and off.
❏ Do not use a damaged or frayed power cord.
❏ If you use an extension cord with the printer, make sure the total ampere rating of all devices plugged into the extension cord does not exceed the cord’s ampere rating. Also, make sure the total of all devices plugged into the wall outlet does not exceed the wall outlet’s ampere rating.
❏ Unplug the printer before cleaning, and clean it with a damp cloth only.
❏ Do not spill liquid on the printer.
❏ Except as specifically explained in this guide, do not attempt to service the printer yourself.
10 Getting to Know Your Printer

RProof Sign-off:SEI Y.Ohkawara T.Takahashi
T.TakahashiSEI M.Kauppi K.Blair
R4C4620Rev. CA5 size INTRO.FM3/13/00 Pass 3
❏ Unplug the printer and refer servicing to qualified personnel under the following conditions:
If the power cord or plug is damaged; if liquid has entered the printer; if the printer has been dropped or the cabinet damaged; or if the printer does not operate normally or exhibits a distinct change in performance. Adjust only those controls that are covered by the operating instructions.
❏ Printer parts marked with this symbol may be hot. Turn off the printer and let it cool for a few minutes before you touch any printer part marked with this symbol.
❏ If you plan to use the printer in Germany, observe the following:
To provide adequate short-circuit protection and over-current protection for this printer, the building installation must be protected by a 16 amp circuit breaker.
Print Head Caution Symbol
The symbol on the print head indicates that this part may be hot. Never touch the print head just after the printer has been used. Let the print head cool for a few minutes before touching it.
K
K
Getting to Know Your Printer 11

L R4C4620Rev. CA5 size INTRO.FM3/13/00 Pass 3
Proof Sign-off:SEI Y.Ohkawara T.Takahashi
T.TakahashiSEI M.Kauppi K.Blair
ENERGY STAR Compliance
As an ENERGY STAR Partner, EPSON has determined that this product meets the ENERGY STAR guidelines for energy efficiency.
The International ENERGY STAR Office Equipment program is a voluntary partnership with the computer and office equipment industry to promote the introduction of energy-efficient personal computers, monitors, printers, fax machines, copiers, and scanners in an effort to reduce air pollution caused by power generation.
How To Use Your Manuals
This User’s Guide provides detailed information on setting up and using your printer. The Quick Reference Guide that also comes with the printer summarizes basic information on how to use the printer.
Warnings, Cautions, and Notes
This guide uses the following conventions:
wWarnings must be followed to avoid bodily injury.
cCautions must be observed to avoid damage to your equipment.
Notes contain important information and useful tips on the operation of your printer.
12 Getting to Know Your Printer

1
R4C4620Rev. CA5 size SETUP.FM3/13/00 Pass 3
RProof Sign-off:SEI Y.Ohkawara T.Takahashi
T.TakahashiSEI M.Kauppi K.Blair
Chapter 1
Setting Up the Printer
Unpacking the Printer. . . . . . . . . . . . . . . . . . . . . . . . . . . . . . . . . . . . . 1-2
Choosing a Place for the Printer . . . . . . . . . . . . . . . . . . . . . . . . . . . . 1-3Positioning the continuous paper supply. . . . . . . . . . . . . . . . 1-4
Installing or Replacing the Ribbon Cartridge . . . . . . . . . . . . . . . . . 1-5
Attaching the Paper Guide. . . . . . . . . . . . . . . . . . . . . . . . . . . . . . . . . 1-11
Plugging in the Printer . . . . . . . . . . . . . . . . . . . . . . . . . . . . . . . . . . . . 1-13
Connecting the Printer to Your Computer . . . . . . . . . . . . . . . . . . . 1-14
Installing the Printer Software. . . . . . . . . . . . . . . . . . . . . . . . . . . . . . 1-16Installing the printer software
in Windows 95, 98, or NT 4.0. . . . . . . . . . . . . . . . . . . . . . . 1-17Installing the printer software
in Windows 3.1 or NT 3.5x. . . . . . . . . . . . . . . . . . . . . . . . . 1-19For DOS programs . . . . . . . . . . . . . . . . . . . . . . . . . . . . . . . . . . . 1-21
Setting Up the Printer 1-1

R4C4620Rev. CA5 size SETUP.FM3/13/00 Pass 3
L Proof Sign-off:SEI Y.Ohkawara T.Takahashi
T.TakahashiSEI M.Kauppi K.Blair
Unpacking the Printer
Besides this guide, your printer box should include an EPSON printer software CD-ROM, a Notice Sheet, and the following items:
Note:Depending on your printer model, the power cord may be permanently attached to the printer. Also, the shape of the power cord plug varies depending on the country of purchase; be sure the plug you have is the right one for your location.
cCaution:There are several models of the printer designed for different voltages, and it is not possible to adjust the printer for use with another voltage. If the label on the back of the printer does not show the correct voltage for your country, contact your dealer.
ribbon cartridge
printer
power cord
paper guide
1-2 Setting Up the Printer

1
R4C4620Rev. CA5 size SETUP.FM3/13/00 Pass 3
RProof Sign-off:SEI Y.Ohkawara T.Takahashi
T.TakahashiSEI M.Kauppi K.Blair
You must remove all protective materials packed around and inside your printer before you set it up and turn on the power. Follow the directions on the Notice Sheet (packed with the printer) to remove these materials.
Save all packing and protective materials in case you need to ship the printer in the future. It should always be transported in its original packaging or equivalent materials.
Choosing a Place for the Printer
Follow the guidelines below when selecting a location for your printer.
❏ Place the printer on a flat, stable surface. The printer will not operate properly if it is tilted or at an angle.
❏ Place the printer where you can easily connect it to a network interface cable, if necessary.
❏ Leave adequate room around the printer for easy operation and maintenance.
❏ Avoid using or storing the printer in places subject to rapid changes in temperature and humidity. Keep it away from direct sunlight, strong light, heat sources, or excessive moisture or dust.
❏ Avoid places subject to shocks and vibrations.
❏ Place the printer near a wall outlet where you can easily unplug the power cord.
❏ Avoid electrical outlets controlled by wall switches or automatic timers. An interruption in power can erase information in the memory of your printer or computer. Also avoid outlets on the same circuit as large motors or other appliances that can cause voltage fluctuations.
Setting Up the Printer 1-3

R4C4620Rev. CA5 size SETUP.FM3/13/00 Pass 3
L Proof Sign-off:SEI Y.Ohkawara T.Takahashi
T.TakahashiSEI M.Kauppi K.Blair
❏ Keep the entire computer system away from potential sources of electromagnetic interference, such as loudspeakers or the base units of cordless telephones.
❏ Use a grounded power outlet; do not use an adapter plug.
❏ Make sure the paper path is clear and unobstructed before you print on continuous paper. (See the next section.)
If you plan to use a printer stand, follow these guidelines:
❏ Use a stand that supports at least 20 kg.
❏ Never use a stand that tilts the printer. The printer should always be kept level.
❏ Position your printer’s power cord and interface cable so they do not interfere with paper feeding. If possible, secure the cables to a leg of the printer stand.
Positioning the continuous paper supply
Before using continuous paper, make sure you line up your paper supply with the tractor feeder so the paper feeds smoothly into the printer, as shown below.
rear front bottom
1-4 Setting Up the Printer
1
R4C4620Rev. CA5 size SETUP.FM3/13/00 Pass 3
RProof Sign-off:SEI Y.Ohkawara T.Takahashi
T.TakahashiSEI M.Kauppi K.Blair
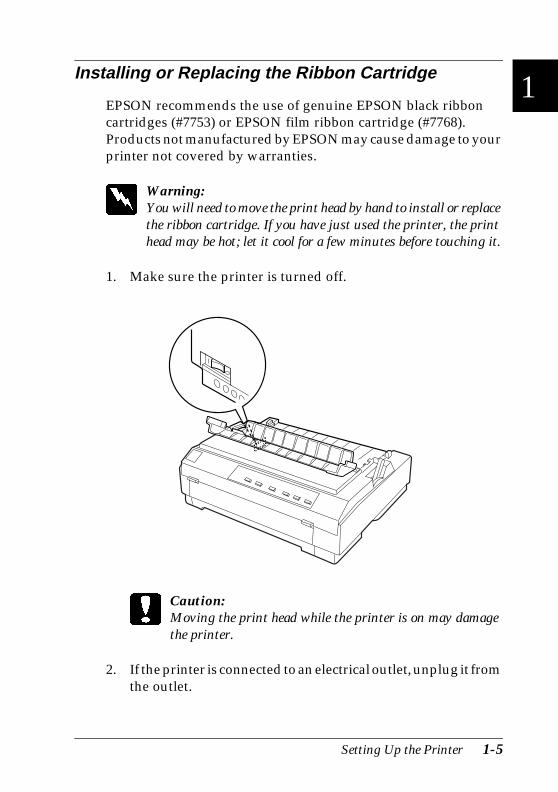
Installing or Replacing the Ribbon Cartridge
EPSON recommends the use of genuine EPSON black ribbon cartridges (#7753) or EPSON film ribbon cartridge (#7768). Products not manufactured by EPSON may cause damage to your printer not covered by warranties.
wWarning:You will need to move the print head by hand to install or replace the ribbon cartridge. If you have just used the printer, the print head may be hot; let it cool for a few minutes before touching it.
1. Make sure the printer is turned off.
cCaution:Moving the print head while the printer is on may damage the printer.
2. If the printer is connected to an electrical outlet, unplug it from the outlet.
Setting Up the Printer 1-5

R4C4620Rev. CA5 size SETUP.FM3/13/00 Pass 3
L Proof Sign-off:SEI Y.Ohkawara T.Takahashi
T.TakahashiSEI M.Kauppi K.Blair
3. Lift the printer cover by its back edge and then pull it straight up and off.
4. Push up the tabs on each side of the paper tension unit and lift the unit up and off the printer. Store the paper tension unit in a safe place.
Note:When the pull tractor is installed, it is not necessary to remove the paper tension unit.
1-6 Setting Up the Printer

1
R4C4620Rev. CA5 size SETUP.FM3/13/00 Pass 3
RProof Sign-off:SEI Y.Ohkawara T.Takahashi
T.TakahashiSEI M.Kauppi K.Blair
5. Make sure that the print head is not hot; if it is, let it cool for a few minutes before touching it. Then slide the print head to the middle of the printer by hand.
6. If a used ribbon cartridge is installed, grasp the cartridge by its handle and pull it straight up. Properly dispose of the used ribbon cartridge.
Setting Up the Printer 1-7

R4C4620Rev. CA5 size SETUP.FM3/13/00 Pass 3
L Proof Sign-off:SEI Y.Ohkawara T.Takahashi
T.TakahashiSEI M.Kauppi K.Blair
7. Remove the new ribbon cartridge from the package. Turn the ribbon-tightening knob in the direction of the arrow to remove any slack in the ribbon.
8. Hold the ribbon cartridge by its handle and push it firmly down into position; then press on both ends of the cartridge to make sure the plastic hooks fit into the slots.
ribbon-tightening knob
1-8 Setting Up the Printer

1
R4C4620Rev. CA5 size SETUP.FM3/13/00 Pass 3
RProof Sign-off:SEI Y.Ohkawara T.Takahashi
T.TakahashiSEI M.Kauppi K.Blair
9. Use a pointed object, such as a ball point pen, to guide the ribbon between the print head and ribbon guide. Turn the ribbon-tightening knob to help feed the ribbon into place.
10. Slide the print head from side to side to make sure it moves smoothly. Also check that the ribbon is not twisted or creased.
Setting Up the Printer 1-9

R4C4620Rev. CA5 size SETUP.FM3/13/00 Pass 3
L Proof Sign-off:SEI Y.Ohkawara T.Takahashi
T.TakahashiSEI M.Kauppi K.Blair
11. To replace the paper tension unit, lower it onto the printer’s mounting pegs. Then press down both ends of the unit until it clicks into place.
12. Replace the printer cover by first inserting the front tabs into the slots on the printer and then lowering the cover into place. Push it down until it clicks.
Note:You install the optional #7768 film ribbon cartridge the same way you install the ribbon cartridge. However, you should follow the guidelines below when using a film ribbon:
1-10 Setting Up the Printer

1
R4C4620Rev. CA5 size SETUP.FM3/13/00 Pass 3
RProof Sign-off:SEI Y.Ohkawara T.Takahashi
T.TakahashiSEI M.Kauppi K.Blair
❏ Print on ordinary paper only.
❏ Move the paper-thickness lever to the next lowest position.
Attaching the Paper Guide
To install the paper guide follow these steps:
1. Make sure the paper guide cover is open as shown below. Attach the paper guide by sliding the slots on the bottom of the paper guide over the printer’s pegs. Then tilt the guide back until it stops.
cCaution:Make sure to slide the slots on the bottom of the paper guide over the printer’s pegs on each side of the printer.
paper tension unit
paper guide cover
Setting Up the Printer 1-11

R4C4620Rev. CA5 size SETUP.FM3/13/00 Pass 3
L Proof Sign-off:SEI Y.Ohkawara T.Takahashi
T.TakahashiSEI M.Kauppi K.Blair
2. Close the paper guide cover.
1-12 Setting Up the Printer

1
R4C4620Rev. CA5 size SETUP.FM3/13/00 Pass 3
RProof Sign-off:SEI Y.Ohkawara T.Takahashi
T.TakahashiSEI M.Kauppi K.Blair
Plugging in the Printer
1. Make sure the printer is turned off.
2. Check the label on the back of the printer to make sure its voltage matches that of your electrical outlet. Also make sure the plug on your printer’s power cord matches your electrical outlet.
wWarning:It is not possible to change the printer’s voltage. If the rated voltage and your outlet voltage do not match, contact your dealer for assistance. Do not plug in the power cord.
3. If the power cord is not attached to the printer, plug the appropriate end into the AC inlet on the back of the printer.
4. Plug the power cord into a properly grounded electrical outlet.
Setting Up the Printer 1-13

R4C4620Rev. CA5 size SETUP.FM3/13/00 Pass 3
L Proof Sign-off:SEI Y.Ohkawara T.Takahashi
T.TakahashiSEI M.Kauppi K.Blair
Connecting the Printer to Your Computer
Your printer has two separate interface connections: an IEEE-1284 compatible parallel interface and Type B optional interface. See “Optional interface cards” on page A-3 for more information.
If your computer requires a different type of printer interface, you should be able to use one of the optional interfaces described on “Optional interface cards” on page A-3.
Follow the steps below to connect the printer to your computer using a parallel interface connector, or a ground wire connector.
1. Make sure both the printer and computer are turned off.
2. Plug the cable connector securely into the parallel interface connector.
.
parallel interface connector
1-14 Setting Up the Printer

1
R4C4620Rev. CA5 size SETUP.FM3/13/00 Pass 3
RProof Sign-off:SEI Y.Ohkawara T.Takahashi
T.TakahashiSEI M.Kauppi K.Blair
3. Squeeze the wire clips together until they lock in place on both sides of the connector.
4. If your cable has a ground wire, connect it to the printer’s ground connector as shown below.
5. Plug the other end of the cable into the computer.
After you connect the printer to your computer, install the printer software as described in the next section.
Setting Up the Printer 1-15

R4C4620Rev. CA5 size SETUP.FM3/13/00 Pass 3
L Proof Sign-off:SEI Y.Ohkawara T.Takahashi
T.TakahashiSEI M.Kauppi K.Blair
Installing the Printer Software
After you connect the printer to your computer, you need to install the software included on the EPSON printer software CD-ROM shipped with your printer.
Your printer software includes:
❏ Printer driverThe printer driver is the software that runs, or “drives,” your printer. With it, you can make printer settings such as print quality, resolution, and paper size.
❏ EPSON Status Monitor 3 (Windows 95, 98, or NT 4.0 only)The EPSON Status Monitor 3 notifies you of printer errors and displays printer status information.
❏ EPSON Remote! (a DOS-based printer setup utility)The EPSON Remote! utility allows you to easily change the printer’s default settings from the computer screen. See “Using the EPSON Remote! Utility” on page 4-32.
To install the printer software, see “Installing the printer software in Windows 95, 98, or NT 4.0” or “Installing the printer software in Windows 3.1 or NT 3.5x” in this section. If you are using DOS, see “For DOS programs” on page 1-21.
1-16 Setting Up the Printer

1
R4C4620Rev. CA5 size SETUP.FM3/13/00 Pass 3
RProof Sign-off:SEI Y.Ohkawara T.Takahashi
T.TakahashiSEI M.Kauppi K.Blair
Installing the printer software in Windows 95, 98, or NT 4.0
Follow the steps below to install the printer software in Windows 95, 98, or NT 4.0:
Note:❏ Installing the printer software for Windows NT 4.0 may require
network administration privileges. Ask your administrator for more information.
❏ If you wish to make a diskette version of the printer software on your CD-ROM, insert the CD and run the EPSETUP program. In the dialog box that appears, click the Driver disk creation utility button and follow the on-screen instructions.
❏ If you are using the diskette version of the EPSON software, make a backup copy of the EPSON printer software disk or disks before you begin installation.
1. Make sure that the printer and computer are switched off.
2. Switch the PC on. Windows starts automatically. Then switch the printer on.
3. Insert the CD-ROM containing the printer software into the CD-ROM drive. TheAutoPlay function of the CD-ROM drive automatically starts the installation program on the CD-ROM.
If the installation program does not start automatically, click on Start and then on Run. In the Run dialog box, enter the drive letter of your CD-ROM drive in the command line (e.g. E:\), followed by the command START.EXE (e.g. E:\START.EXE) and click on the OK button.
Setting Up the Printer 1-17

R4C4620Rev. CA5 size SETUP.FM3/13/00 Pass 3
L Proof Sign-off:SEI Y.Ohkawara T.Takahashi
T.TakahashiSEI M.Kauppi K.Blair
Note:If your CD-ROM drive has a drive letter other than "E", substitute the appropriate letter. The installation program starts. The subsequent procedure is menu-driven, i.e., you can select the relevant options from a list simply by clicking with the mouse. The remainder of the installation is automatic and you do not need to enter any more information.
4. Select the desired options and follow the on-screeen instructions.
5. After the printer software has been successfully installed, click on the button identified by a door icon to exit the installation program.
Note:❏ If the New Hardware Found screen or any other wizard appears
when you turn on your computer, click Cancel and follow the steps above.
❏ Installation time varies depending on your computer.
For information on opening and using the software, see Chapter 4, “Using the Printer Software.” When you install the printer driver on Windows 95, 98 or NT 4.0, EPSON Status Monitor 3 will also be installed. See Chapter 6 for information on installing and using the Status Monitor.
1-18 Setting Up the Printer

1
R4C4620Rev. CA5 size SETUP.FM3/13/00 Pass 3
RProof Sign-off:SEI Y.Ohkawara T.Takahashi
T.TakahashiSEI M.Kauppi K.Blair
Installing the printer software in Windows 3.1 or NT 3.5x
Follow the steps below to install the printer software in Windows 3.1 or NT 3.5x systems.
Note:Installing the printer software on Windows NT 3.5x may require network administration privileges. Ask your administrator for more information.
1. Make sure Windows 3.1 is running and the Program Manager window is open.
2. Insert the EPSON printer software CD shipped with your printer in the CD-ROM drive.
Note:If your system does not have a CD-ROM drive, you can make a floppy disk version from which to install the printer software.
3. From the File menu, choose Run. The Run dialog box appears. In the Command Line box, type E:\START and click OK.
Note:If your CD-ROM drive has a drive letter other than “E” , substitute the appropriate letter.
Setting Up the Printer 1-19
R4C4620Rev. CA5 size SETUP.FM3/13/00 Pass 3
L Proof Sign-off:SEI Y.Ohkawara T.Takahashi
T.TakahashiSEI M.Kauppi K.Blair
The installation program starts. The subsequent procedure is menu-driven, i.e., you can select the relevant options from a list simply by clicking with the mouse. The remainder of the installation is automatic and you do not need to enter any more information.
4. Select the desired options and follow the on-screen instructions.
5. After the printer software has been successfully installed, click on the button identified by a door icon to exit the installation program. The installation program automatically selects this printer as the default printer for Windows applications.
For information on opening and using the software, see Chapter 4, “Using the Printer Software.”
1-20 Setting Up the Printer
1
R4C4620Rev. CA5 size SETUP.FM3/13/00 Pass 3
RProof Sign-off:SEI Y.Ohkawara T.Takahashi
T.TakahashiSEI M.Kauppi K.Blair
For DOS programs
To control the printer from DOS application programs, you need to select the printer you are using or another available printer from the printer list of your application.
Choose the EPSON LQ-580 printer at the appropriate step in the setup or installation procedure of your DOS application program. If the list in your application does not include the LQ-580 printer, choose the first available printer from this list:
LQ-580LQ-870LQ-570/570+LQ-850+LQ-850LQ-510/550LQ-200LQ-500LQ-860+LQ-2550LQ-2500LQ-800LQ-1500
Note:If your application does not list a suitable alternative, contact the software manufacturer to see if an update is available.
Setting Up the Printer 1-21

2
R4C4620Rev. CA5 size CONT.FM3/13/00 Pass 3
RProof Sign-off:SEI Y.Ohkawara T.Takahashi
T.TakahashiSEI M.Kauppi K.Blair
Chapter 2
Printing on Continuous Paper
Setting the Paper Release Lever . . . . . . . . . . . . . . . . . . . . . . . . . . . . 2-2
Setting the Paper Thickness Lever . . . . . . . . . . . . . . . . . . . . . . . . . . 2-4
Using the Push Tractor . . . . . . . . . . . . . . . . . . . . . . . . . . . . . . . . . . . . 2-6Loading paper onto the push tractor. . . . . . . . . . . . . . . . . . . . 2-6Removing a printed document from the push tractor . . . . . 2-11Removing the push tractor . . . . . . . . . . . . . . . . . . . . . . . . . . . . 2-12Reinstalling the tractor in the push position . . . . . . . . . . . . . 2-13
Using the Tractor in the Pull Position . . . . . . . . . . . . . . . . . . . . . . . 2-14Installing the tractor in the pull position . . . . . . . . . . . . . . . . 2-14Loading paper onto the pull tractor . . . . . . . . . . . . . . . . . . . . 2-16Removing the paper from the pull tractor . . . . . . . . . . . . . . . 2-21Using two tractors in the push/pull combination. . . . . . . . . 2-22Removing the pull tractor . . . . . . . . . . . . . . . . . . . . . . . . . . . . . 2-24
Loading Multipart Forms. . . . . . . . . . . . . . . . . . . . . . . . . . . . . . . . . . 2-26
Loading Continuous Paper With Labels . . . . . . . . . . . . . . . . . . . . . 2-27Removing continuous paper with labels . . . . . . . . . . . . . . . . 2-28
Switching Between Printing on Continuous Paper and Printing on Single Sheets. . . . . . . . . . . . . . . . . . . . . . . . . . . . 2-29
Switching to printing on single sheets . . . . . . . . . . . . . . . . . . 2-29Switching to printing on continuous paper . . . . . . . . . . . . . . 2-30
Adjusting the Top-of-Form Position. . . . . . . . . . . . . . . . . . . . . . . . . 2-31
Advancing the Paper to the Tear-Off Edge . . . . . . . . . . . . . . . . . . . 2-34Using the Tear Off/Bin button . . . . . . . . . . . . . . . . . . . . . . . . . 2-34Advancing the paper
to the tear-off position automatically . . . . . . . . . . . . . . . . 2-35Adjusting the tear-off position . . . . . . . . . . . . . . . . . . . . . . . . . 2-35
Printing on Continuous Paper 2-1

R4C4620Rev. CA5 size CONT.FM3/13/00 Pass 3
L Proof Sign-off:SEI Y.Ohkawara T.Takahashi
T.TakahashiSEI M.Kauppi K.Blair
Setting the Paper Release Lever
There are several ways you can load continuous paper in the printer, including the push tractor. Use the paper release lever to indicate the paper source you want to use, as described in the table below.
Note:To decide which paper source and paper path best suits your printing needs, see “Available Paper Paths” on page 4.
paper release lever
2-2 Printing on Continuous Paper

2
R4C4620Rev. CA5 size CONT.FM3/13/00 Pass 3
RProof Sign-off:SEI Y.Ohkawara T.Takahashi
T.TakahashiSEI M.Kauppi K.Blair
The table below describes each paper release lever position.
Paper release lever position
Description
Single-sheet positionFor loading single-sheet paper from the top or front slot. For information on loading single sheets, see Chapter 3.
Push tractor positionFor loading continuous paper from the tractor installed in the push position. Also set the lever to this position when using the push and pull tractor in combination.
Pull tractor positionFor loading continuous paper from the tractor installed on top of the printer in the pull position. When the tractor is in the pull position, you can load paper in the front, rear, or bottom slot.
Printing on Continuous Paper 2-3

R4C4620Rev. CA5 size CONT.FM3/13/00 Pass 3
L Proof Sign-off:SEI Y.Ohkawara T.Takahashi
T.TakahashiSEI M.Kauppi K.Blair
Setting the Paper Thickness Lever
Setting the paper thickness lever allows the printer to accommodate various thicknesses of paper. The paper thickness lever is located under the printer cover. You can select one of eight positions identified by the scale next to the lever.
paper thickness lever
2-4 Printing on Continuous Paper
2
R4C4620Rev. CA5 size CONT.FM3/13/00 Pass 3
RProof Sign-off:SEI Y.Ohkawara T.Takahashi
T.TakahashiSEI M.Kauppi K.Blair
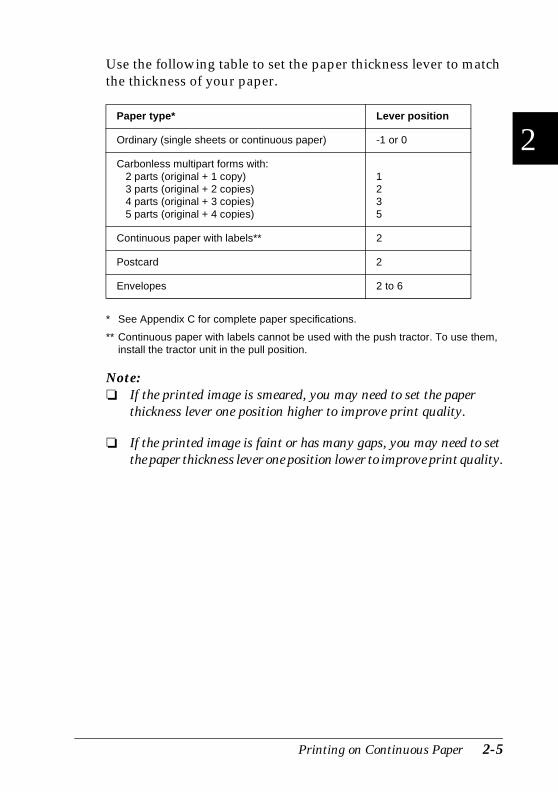
Use the following table to set the paper thickness lever to match the thickness of your paper.
* See Appendix C for complete paper specifications.
** Continuous paper with labels cannot be used with the push tractor. To use them, install the tractor unit in the pull position.
Note:❏ If the printed image is smeared, you may need to set the paper
thickness lever one position higher to improve print quality.
❏ If the printed image is faint or has many gaps, you may need to set the paper thickness lever one position lower to improve print quality.
Paper type* Lever position
Ordinary (single sheets or continuous paper) -1 or 0
Carbonless multipart forms with: 2 parts (original + 1 copy) 3 parts (original + 2 copies) 4 parts (original + 3 copies) 5 parts (original + 4 copies)
1235
Continuous paper with labels** 2
Postcard 2
Envelopes 2 to 6
Printing on Continuous Paper 2-5

R4C4620Rev. CA5 size CONT.FM3/13/00 Pass 3
L Proof Sign-off:SEI Y.Ohkawara T.Takahashi
T.TakahashiSEI M.Kauppi K.Blair
Using the Push Tractor
To use the push tractor, load continuous paper in the rear slot. For information on when to use the push tractor, see “Available Paper Paths” on page 4.
Note:The tractor is installed in the push position when the printer is shipped. If a tractor is not installed in the push position, go to “Reinstalling the tractor in the push position” on page 2-13.
Loading paper onto the push tractor
If a tractor is installed in the pull position, you need to remove it and install the paper tension unit as described on “Removing the pull tractor” on page 2-24 before using the push tractor.
Note:To avoid paper jams, it is best to load thick multipart forms using the front or bottom slot and the pull tractor.
cCaution:Do not load continuous paper with labels in the rear paper slot; the labels may come off their backing sheet inside the printer and cause a paper jam.
2-6 Printing on Continuous Paper

2
R4C4620Rev. CA5 size CONT.FM3/13/00 Pass 3
RProof Sign-off:SEI Y.Ohkawara T.Takahashi
T.TakahashiSEI M.Kauppi K.Blair
To load paper onto the push tractor, follow these steps:
1. Make sure the printer is turned off.
2. Open the paper guide cover and remove the paper guide by holding both edges and lifting it up.
3. Set the paper release lever to the push tractor position. Set the paper thickness lever (located under the printer cover) to the proper position for your paper’s thickness.
Printing on Continuous Paper 2-7

R4C4620Rev. CA5 size CONT.FM3/13/00 Pass 3
L Proof Sign-off:SEI Y.Ohkawara T.Takahashi
T.TakahashiSEI M.Kauppi K.Blair
4. Release the left and right sprockets by pulling the sprocket lock levers forward.
5. Slide the left sprocket to the left margin of the paper using the scale on the printer. (Printing starts at the “0” mark.) Then push the lever back to lock it in place.
Note:See Appendix C, “Paper alignment” and “Printable area,” for more information on the left margin position.
front of the printer
front of the printer
2-8 Printing on Continuous Paper

2
R4C4620Rev. CA5 size CONT.FM3/13/00 Pass 3
RProof Sign-off:SEI Y.Ohkawara T.Takahashi
T.TakahashiSEI M.Kauppi K.Blair
6. Slide the right sprocket to match the width of your paper, but do not lock it. Move the paper support midway between the two sprockets as shown in step 5.
7. Make sure your paper has a clean, straight edge. Then open both sprocket covers and fit the first three holes of the paper, printable side down, over the tractor pins. Then close the sprocket covers.
8. Slide the right sprocket to remove any slack in the paper; then lock it in place by pushing the sprocket lock down.
9. Attach the paper guide as described on “Attaching the Paper Guide” on page 1-11. After installing the paper guide, grab the center section of the paper guide, lift it up and lay it flat.
front of the printer
Printing on Continuous Paper 2-9

R4C4620Rev. CA5 size CONT.FM3/13/00 Pass 3
L Proof Sign-off:SEI Y.Ohkawara T.Takahashi
T.TakahashiSEI M.Kauppi K.Blair
10. Slide the edge guides to the middle of the paper guide. Then close the paper guide cover.
11. Turn on the printer. You may need to check and change the printer driver settings as described in Chapter 4. When the printer receives data, it automatically loads the paper and starts printing. The printed pages are fed over the paper guide toward the back of the printer.
12. After you finish printing, follow the steps in the next section to tear off your printed document. If the first printed line on your page appears too high or low, you can change its position by using the micro adjust feature. See “Adjusting the Top-of-Form Position” on page 2-31.
cCaution:Never use the knob to adjust the top-of-form position; this may damage the printer or cause it to lose the top-of-form position.
2-10 Printing on Continuous Paper

2
R4C4620Rev. CA5 size CONT.FM3/13/00 Pass 3
RProof Sign-off:SEI Y.Ohkawara T.Takahashi
T.TakahashiSEI M.Kauppi K.Blair
Removing a printed document from the push tractor
To remove the printed document, follow these steps:
1. Make sure the Tear Off/Bin lights are flashing. (This indicates your paper is at the current tear-off position.) You may need to press the Tear Off/Bin button.
2. Open the paper guide cover, and tear off the printed document using the tear-off edge of the paper tension unit.
Note:If your paper’s perforation is not properly aligned with the tear-off edge, you can adjust the tear-off position using the micro adjust feature. See “Adjusting the tear-off position” on page 2-35.
cCaution:Never use the knob to adjust the tear-off position; this may damage the printer or cause it to lose the tear-off position.
3. Close the paper guide cover.
When you resume printing, the printer automatically feeds the paper back to the top-of-form position and starts printing.
Printing on Continuous Paper 2-11

R4C4620Rev. CA5 size CONT.FM3/13/00 Pass 3
L Proof Sign-off:SEI Y.Ohkawara T.Takahashi
T.TakahashiSEI M.Kauppi K.Blair
To feed continuous paper to the standby position where you can remove the paper, press the Load/Eject button. (See the Glossary for an explanation of the standby position.) Then open the sprocket covers of the tractor and remove the paper.
cCaution:Always tear off your printed document before you press the Load/Eject button. Reverse feeding several pages at a time may cause a paper jam.
Removing the push tractor
To remove the tractor from the push position, follow these steps:
1. Remove any paper from the tractor as described in the previous section.
2. Turn off the printer.
3. Remove the paper guide by holding both edges and lifting it up.
4. Press the tractor’s lock tabs, tilt the tractor up, and lift it out of the printer.
2-12 Printing on Continuous Paper
2
R4C4620Rev. CA5 size CONT.FM3/13/00 Pass 3
RProof Sign-off:SEI Y.Ohkawara T.Takahashi
T.TakahashiSEI M.Kauppi K.Blair
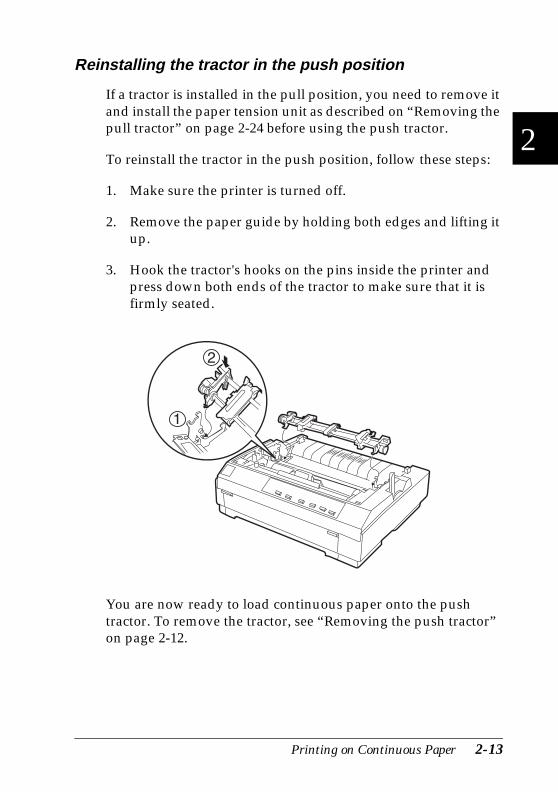
Reinstalling the tractor in the push position
If a tractor is installed in the pull position, you need to remove it and install the paper tension unit as described on “Removing the pull tractor” on page 2-24 before using the push tractor.
To reinstall the tractor in the push position, follow these steps:
1. Make sure the printer is turned off.
2. Remove the paper guide by holding both edges and lifting it up.
3. Hook the tractor's hooks on the pins inside the printer and press down both ends of the tractor to make sure that it is firmly seated.
You are now ready to load continuous paper onto the push tractor. To remove the tractor, see “Removing the push tractor” on page 2-12.
Printing on Continuous Paper 2-13

R4C4620Rev. CA5 size CONT.FM3/13/00 Pass 3
L Proof Sign-off:SEI Y.Ohkawara T.Takahashi
T.TakahashiSEI M.Kauppi K.Blair
Using the Tractor in the Pull Position
Using the tractor in the pull position is ideal for printing on thick and heavy continuous paper, such as multipart forms or continuous paper with labels. However, you cannot use the tear-off feature with the pull tractor.
Because thick paper requires a straight paper path to avoid paper jams, you should load paper in the front or bottom slot when using the pull tractor.
cCaution:Do not load continuous paper with labels in the rear paper slot; the labels may come off their backing sheet inside the printer and cause a paper jam.
To further reduce the chance of paper jams and improve the performance of continuous paper, you can use two tractors in combination. When using this printing method, load the paper onto both the push tractor and the pull tractor. See “Using two tractors in the push/pull combination” on page 2-22.
Installing the tractor in the pull position
To install a tractor in the pull position, you must either remove the push tractor or purchase the optional pull tractor (C800202). To remove the push tractor, see “Removing the push tractor” on page 2-12.
To install a tractor in the pull position, follow these steps:
1. Make sure the printer is turned off. Then lift the printer cover up and off the printer.
2-14 Printing on Continuous Paper

2
R4C4620Rev. CA5 size CONT.FM3/13/00 Pass 3
RProof Sign-off:SEI Y.Ohkawara T.Takahashi
T.TakahashiSEI M.Kauppi K.Blair
2. Push up the tabs on each side of the paper tension unit and lift the unit up and off the printer. Store the paper tension unit in a safe place.
3. Lower the tractor into the printer’s mounting slots and press down both ends of the tractor to make sure that it is firmly seated.
You are now ready to load continuous paper onto the pull tractor as described in the next section. To remove the pull tractor, see “Removing the pull tractor” on page 2-24.
Printing on Continuous Paper 2-15

R4C4620Rev. CA5 size CONT.FM3/13/00 Pass 3
L Proof Sign-off:SEI Y.Ohkawara T.Takahashi
T.TakahashiSEI M.Kauppi K.Blair
Loading paper onto the pull tractor
When using the pull tractor, load continuous paper in the front or bottom slot, if possible; loading paper in the rear slot may increase the chance of a paper jam.
cCaution:Do not load continuous paper with labels in the rear paper slot; the labels may come off their backing sheet inside the printer and cause a paper jam.
To load paper onto the pull tractor, follow these steps:
1. Make sure the printer is turned off, and the printer cover is removed. Also check that the tractor is installed in the pull position.
2. Slide the edge guides to the middle of the paper guide. Lift the center section of the paper guide up and lay it flat.
3. Set the paper release lever to the pull tractor position. Set the paper thickness lever to the proper position for your paper’s thickness.
2-16 Printing on Continuous Paper

2
R4C4620Rev. CA5 size CONT.FM3/13/00 Pass 3
RProof Sign-off:SEI Y.Ohkawara T.Takahashi
T.TakahashiSEI M.Kauppi K.Blair
4. Release the left and right sprockets by pulling the sprocket lock levers forward.
5. Slide the left sprocket to the left margin of the paper using the scale on the paper guide as a guide. (Printing starts at the arrow mark.) Then push the lever back to lock it in place.
Note:See Appendix C, “Paper alignment” and “Printable area,” for more information on the left margin position.
Printing on Continuous Paper 2-17

R4C4620Rev. CA5 size CONT.FM3/13/00 Pass 3
L Proof Sign-off:SEI Y.Ohkawara T.Takahashi
T.TakahashiSEI M.Kauppi K.Blair
6. Slide the right sprocket to match the width of your paper, but do not lock it. Move the paper support midway between the two sprockets as shown in step 5.
7. Make sure your paper has a clean, straight edge. Then open both sprocket covers.
8. Insert the paper into the front, bottom, or rear paper slot as described below until it emerges between the platen and the ribbon guide. Then pull up the paper until the perforation between the first and second pages is even with the top of the printer’s ribbon.
Before you load paper in the front slot, open the front cover and remove it. Then load paper printable side up.
Load paper in the bottom slot printable side up (forward).
Before you load paper in the rear slot, remove the paper guide. Then load paper in the rear slot, printable side down and attach the paper guide.
2-18 Printing on Continuous Paper

2
R4C4620Rev. CA5 size CONT.FM3/13/00 Pass 3
RProof Sign-off:SEI Y.Ohkawara T.Takahashi
T.TakahashiSEI M.Kauppi K.Blair
9. Fit three holes on each side of the paper over the tractor pins on both sprockets. Then close the sprocket covers.
10. Slide the right sprocket to remove any slack in the paper, then lock it in place by pushing the sprocket lock down.
11. If you use the front slot, attach the front cover with the continuous paper positioned as shown below. Then close it.
12. If you use the rear slot, replace the paper guide and make sure the edge guides are together in the middle of the paper guide and lift the center section of the paper guide up and lay it flat.
13. Turn on the printer.
Printing on Continuous Paper 2-19

R4C4620Rev. CA5 size CONT.FM3/13/00 Pass 3
L Proof Sign-off:SEI Y.Ohkawara T.Takahashi
T.TakahashiSEI M.Kauppi K.Blair
14. Remove any slack in the paper and adjust the top-of-form position (the position where the printer will start printing) by pressing the LF/FF button or using the micro adjust feature. (To use the micro adjust feature, see “Adjusting the Top-of-Form Position” on page 2-31.) The printer will start printing at the current position without advancing the paper.
cCaution:❏ Never use the knob to remove slack in the paper or to
adjust the top-of-form position; this may damage the printer or cause it to lose the top-of-form position.
❏ Always remove any slack from the paper; otherwise print quality may be reduced.
15. Attach the printer cover and close the paper guide cover.
16. You may need to check and change the printer driver settings as described in Chapter 4. Then send a print job to the printer. The printer starts printing from the current position without advancing the paper. The printed pages are fed over the paper guide toward the back of the printer.
2-20 Printing on Continuous Paper

2
R4C4620Rev. CA5 size CONT.FM3/13/00 Pass 3
RProof Sign-off:SEI Y.Ohkawara T.Takahashi
T.TakahashiSEI M.Kauppi K.Blair
17. After you finish printing, open the paper guide cover; then tear off the printed document at the perforation nearest the paper exit slot.
Removing the paper from the pull tractor
1. After you finish printing, tear off the supply of paper at the perforation nearest the paper entry slot.
2. To eject the paper, hold down the LF/FF button.
Printing on Continuous Paper 2-21

R4C4620Rev. CA5 size CONT.FM3/13/00 Pass 3
L Proof Sign-off:SEI Y.Ohkawara T.Takahashi
T.TakahashiSEI M.Kauppi K.Blair
Using two tractors in the push/pull combination
To improve continuous paper feeding and reduce paper jams, you can use two tractors at the same time. When using two tractors in combination, you can load paper in the rear paper slot onto both the push tractor and the pull tractor.
To use the push tractor with the pull tractor, you need to purchase the optional pull tractor (C800202). Install the optional pull tractor as described in “Installing the tractor in the pull position” on page 2-14.
To load paper onto two tractors, follow these steps:
1. Remove the printer cover and paper guide.
2. Make sure one tractor is in the push position and one tractor is in the pull position as described earlier in this chapter.
3. Set the paper release lever to the push tractor position. Set the paper thickness lever to the proper position for your paper’s thickness.
4. Load continuous paper onto the push tractor as described earlier in this chapter.
5. Turn on the printer. Press the Load/Eject button to advance the paper to the top-of-form position. Then press the LF/FF button until the perforation between the first and second page is even with the top of the printer’s ribbon.
cCaution:Never use the knob to move the paper; this may damage the printer or cause it to lose the top-of-form position.
6. Load the paper onto the pull tractor’s sprockets as described in “Loading paper onto the pull tractor” on page 2-16.
2-22 Printing on Continuous Paper

2
R4C4620Rev. CA5 size CONT.FM3/13/00 Pass 3
RProof Sign-off:SEI Y.Ohkawara T.Takahashi
T.TakahashiSEI M.Kauppi K.Blair
7. Set the paper release lever to the pull tractor position. Then remove any slack in the paper between the push and pull tractor using the micro adjust feature (described on “Adjusting the Top-of-Form Position” on page 2-31.) if necessary.
8. Move the paper release lever back to the push tractor position you set in step 2.
9. When the printer receives data, it will start printing at the current position. If necessary, follow the steps in “Adjusting the Top-of-Form Position” on page 2-31 to adjust the current position of the paper.
cCaution❏ Never use the knob to remove slack in the paper or to
adjust the top-of-form position; this may damage the printer or cause it to lose the top-of-form position.
❏ Always remove any slack from the paper; otherwise print quality may be reduced.
10. Attach the paper guide. Then slide the edge guides to the middle of the paper guide. Lift the center section of the paper guide up and lay it flat.
11. Attach the printer cover and close the paper guide cover.
12. You may need to check and change the printer driver settings as described in Chapter 4. Then send a print job to the printer. The printer starts printing from the current position without advancing the paper. The printed pages are fed over the paper guide toward the back of the printer.
Printing on Continuous Paper 2-23

R4C4620Rev. CA5 size CONT.FM3/13/00 Pass 3
L Proof Sign-off:SEI Y.Ohkawara T.Takahashi
T.TakahashiSEI M.Kauppi K.Blair
13. After you finish printing, open the paper guide cover; then tear off the printed document at the perforation nearest the paper exit slot.
To remove the paper from the tractor, follow the steps under “Removing the paper from the pull tractor” on page 2-21.
Removing the pull tractor
To remove the tractor from the pull position, follow these steps:
1. Remove any paper loaded on the pull tractor as described on “Removing the paper from the pull tractor” on page 2-21.
2. Turn off the printer. Then remove the printer cover and lift the paper guide up and off the printer.
3. Press the tractor’s lock tabs, tilt the tractor toward you, and lift it off the printer.
2-24 Printing on Continuous Paper

2
R4C4620Rev. CA5 size CONT.FM3/13/00 Pass 3
RProof Sign-off:SEI Y.Ohkawara T.Takahashi
T.TakahashiSEI M.Kauppi K.Blair
4. Store the tractor in a safe place, or install it in the push position as described on “Reinstalling the tractor in the push position” on page 2-13.
5. To replace the paper tension unit, lower it onto the printer’s mounting pegs. Then press down both ends of the unit until it clicks into place.
6. Replace the paper guide and the printer cover. Then close the paper guide cover.
Printing on Continuous Paper 2-25

R4C4620Rev. CA5 size CONT.FM3/13/00 Pass 3
L Proof Sign-off:SEI Y.Ohkawara T.Takahashi
T.TakahashiSEI M.Kauppi K.Blair
Loading Multipart Forms
You can use carbonless multipart forms of up to five parts (four copies in addition to the original). Make sure you set the paper thickness lever to the proper position based on the number of layers in your form.
For best results with thick paper, such as multipart forms, select a straight or almost straight paper path. It is best to load multipart forms using the front or bottom slot and the pull tractor.
Except for setting the paper thickness lever, you load multipart forms the same way you load ordinary continuous paper. For details, see the sections on loading continuous paper earlier in this chapter.
Note:❏ Be sure your multipart forms do not exceed 0.39 mm in thickness
for the printable area and 0.76 mm for the perforated edges.
❏ Do not load paper that is damaged, curled, or wrinkled.
❏ If you are using crimp bound paper, be sure the protruding side of the crimp faces away from the print head when you print. Hitting the crimp protrusion with print head could severely damage the print head.
2-26 Printing on Continuous Paper

2
R4C4620Rev. CA5 size CONT.FM3/13/00 Pass 3
RProof Sign-off:SEI Y.Ohkawara T.Takahashi
T.TakahashiSEI M.Kauppi K.Blair
Loading Continuous Paper With Labels
When printing on labels, use only the type of labels that are mounted on continuous backing sheets with sprocket holes for use with a tractor feeder. Do not try to print on single sheets with labels because the printer may not feed labels on a shiny backing sheet properly.
Thick paper, such as continuous paper with labels, requires a straight or almost straight paper path. When you load labels, be sure to use the tractor in the pull position and load the labels in the front or bottom.
You load labels the same way you load ordinary continuous paper, except you must set the paper thickness lever to 2 before printing on labels. See “Loading paper onto the pull tractor” on page 2-16 for more information.
cCaution:❏ Do not load continuous paper with labels in the rear paper
slot because the paper path from the rear slot is curved; labels may come off their backing sheet inside the printer and cause a paper jam.
❏ Because labels are sensitive to temperature and humidity, use them only under normal operating conditions, as follows:
❏ Do not load continuous paper with labels that is damaged, curled, or wrinkled.
❏ Do not leave labels loaded in the printer between jobs; they may curl around the platen and jam when you resume printing.
Temperature 15 to 25 °C
Humidity 30 to 60% RH
Printing on Continuous Paper 2-27

R4C4620Rev. CA5 size CONT.FM3/13/00 Pass 3
L Proof Sign-off:SEI Y.Ohkawara T.Takahashi
T.TakahashiSEI M.Kauppi K.Blair
Removing continuous paper with labels
To avoid peeling labels off the backing sheet and jamming the printer, follow the steps below when you remove continuous paper with labels from the printer.
1. Tear off the supply of continuous labels at the perforation nearest the paper entry slot.
2. Hold down the LF/FF button to eject the remaining labels from the printer.
cCaution:Never press the Load/Eject or Tear Off/Bin button. When fed backward, labels can easily come off the backing sheet and cause a paper jam.
2-28 Printing on Continuous Paper

2
R4C4620Rev. CA5 size CONT.FM3/13/00 Pass 3
RProof Sign-off:SEI Y.Ohkawara T.Takahashi
T.TakahashiSEI M.Kauppi K.Blair
Switching Between Printing on Continuous Paper and Printing on Single Sheets
You can easily switch back and forth between printing on continuous paper with the push tractor and printing on single sheets without having to remove or reload the continuous paper.
Switching to printing on single sheets
To switch from printing on continuous paper with the push tractor to printing on single sheets, follow these steps:
Note:If a tractor is in the pull position, remove any continuous paper from it before switching to single-sheet printing. See “Removing the paper from the pull tractor” on page 2-21.
1. If any printed pages remain in the printer, press the Tear Off/Bin button to advance the paper to the tear-off position. Then tear off the printed pages.
cCaution:❏ Tear off your printed document before you press the
Load/Eject button in the next step. Reverse feeding several pages at a time may cause a paper jam.
❏ Never use the knob to eject paper while the printer is on; this may damage the printer or cause it to lose the tear-off position.
2. Press the Load/Eject button to feed the continuous paper backward to the standby position. The paper is still attached to the push tractor but is no longer in the paper path.
3. Load single sheets in the top or front cover as described in Chapter 3.
Printing on Continuous Paper 2-29

R4C4620Rev. CA5 size CONT.FM3/13/00 Pass 3
L Proof Sign-off:SEI Y.Ohkawara T.Takahashi
T.TakahashiSEI M.Kauppi K.Blair
Switching to printing on continuous paper
To switch from printing on single sheets to printing on continuous paper with the push tractor, follow these steps:
1. If a single sheet remains in the printer, press the Load/Eject button to eject it.
cCaution:Never use the knob to eject paper while the printer is on; this may damage the printer or cause it to lose the top-of-form position.
2. Make sure that the tractor is installed in the push position. To install the tractor in the position, see “Reinstalling the tractor in the push position” on page 2-13.
3. Load continuous paper onto the push tractor as described earlier in this chapter.
The printer loads your continuous paper automatically when you begin printing.
2-30 Printing on Continuous Paper

2
R4C4620Rev. CA5 size CONT.FM3/13/00 Pass 3
RProof Sign-off:SEI Y.Ohkawara T.Takahashi
T.TakahashiSEI M.Kauppi K.Blair
Adjusting the Top-of-Form Position
The top-of-form position is the position on the page where the printer starts printing. If your printing appears too high or low on the page, you can use the micro adjust feature to adjust the top-of-form position. Follow these steps:
cCaution:Never use the knob to adjust the top-of-form position; this may damage the printer or cause it to lose the top-of-form position.
Note:❏ Your top-of-form position setting remains in effect until you change
it, even if you turn off the printer.
❏ The top margin setting made in some application software overrides the top-of-form position setting you make with the micro adjust feature. If necessary, adjust the top-of-form position in your software.
1. Make sure printer is turned on.
2. If necessary, load paper as described earlier in this chapter. If you load paper onto the push tractor, press the Load/Eject button to advance the paper to the current top-of-form position.
3. Lift the printer cover up and off the printer.
4. Hold down the Pause button for about three seconds. The Pause light starts flashing and the printer enters the micro adjust mode.
Printing on Continuous Paper 2-31

R4C4620Rev. CA5 size CONT.FM3/13/00 Pass 3
L Proof Sign-off:SEI Y.Ohkawara T.Takahashi
T.TakahashiSEI M.Kauppi K.Blair
5. Press the LF/FF D button to move the top-of-form position up on the page, or press the Load/Eject U button to move the top-of-form position down on the page.
cCaution:Never use the knob to adjust the top-of-form position; this may damage the printer or cause it to lose the top-of-form position.
Note:❏ The printer has a minimum and a maximum top-of-form
position. If you try to adjust it beyond these limits, the printer beeps and stops moving the paper.
❏ When the paper reaches the default top-of-form position, the printer also beeps and stops moving the paper briefly. You can use the default position as a reference point when adjusting the top-of-form position.
plastic ribbon cover
2-32 Printing on Continuous Paper

2
R4C4620Rev. CA5 size CONT.FM3/13/00 Pass 3
RProof Sign-off:SEI Y.Ohkawara T.Takahashi
T.TakahashiSEI M.Kauppi K.Blair
To adjust the top-of-form position for continuous paper loaded on the pull tractor, see the following example:
First mark a point 6.5 mm above the paper’s perforation; then position the paper so that the mark is even with the top edge of the plastic ribbon cover. This gives you an 8.5 mm margin on the next page, meaning the printer starts printing 8.5 mm below the perforation. If you mark a point 5.5 mm above the perforation, you get a 9.5 mm margin on the next page.
6. After you set the top-of-form position, press the Pause button to exit micro adjust mode.
Printing on Continuous Paper 2-33

R4C4620Rev. CA5 size CONT.FM3/13/00 Pass 3
L Proof Sign-off:SEI Y.Ohkawara T.Takahashi
T.TakahashiSEI M.Kauppi K.Blair
Advancing the Paper to the Tear-Off Edge
If you use the push tractor, you can use the tear-off feature to advance your continuous paper to the printer’s tear-off edge when you finish printing. You can then easily tear off the printed document. When you resume printing, the printer automatically feeds the paper back to the top-of-form position so that you can save the paper normally lost between documents.
As described below, you can use the tear-off feature in two ways: manually by pressing the printer’s Tear Off/Bin button, or automatically by turning on the auto tear-off mode.
If the perforation between pages is not aligned with the tear-off edge, you can adjust the position of the perforation using the micro adjust feature. See “Adjusting the tear-off position” on page 2-35.
cCaution:Never use the tear-off feature (by pressing the Tear Off/Bin button or turning on the auto tear-off mode as described below) to feed continuous paper with labels backward; they may come off their backing sheet and jam the printer.
Using the Tear Off/Bin button
After the printer finishes printing your document, check that the Tear Off/Bin lights are not flashing. Then press the Tear Off/Bin button. The printer advances the paper to the tear-off edge.
Note:If the Tear Off/Bin lights are flashing, the paper is in the tear-off position. If you press the Tear Off/Bin button again, the printer feeds your paper to the next top-of-form position.
2-34 Printing on Continuous Paper

2
R4C4620Rev. CA5 size CONT.FM3/13/00 Pass 3
RProof Sign-off:SEI Y.Ohkawara T.Takahashi
T.TakahashiSEI M.Kauppi K.Blair
Advancing the paper to the tear-off position automatically
To automatically advance your printed documents to the tear-off position, you need to turn on the auto tear-off mode and select the appropriate page length for continuous paper in the default-setting mode. For instructions, see “Changing default settings” on page 5-10.
When auto tear-off is on, the printer automatically advances the paper to the tear-off position whenever it receives a full page of data or a form feed command followed by no more data.
Adjusting the tear-off position
If your paper’s perforation is not aligned with the tear-off edge, you can use the micro adjust feature to move the perforation to the tear-off position. Follow these steps:
cCaution:Never use the knob to adjust the tear-off position; this may damage the printer or cause it to lose the tear-off position.
Note:Your tear-off position setting remains in effect until you change it, even if you turn off the printer.
1. Make sure the Tear Off/Bin lights are flashing (the paper is at the current tear-off position). You may need to press the Tear Off/Bin button to advance the paper to the tear-off position.
2. Open the paper guide cover.
3. Hold down the Pause button for about three seconds. The Pause light begins flashing and the printer enters the micro adjust mode.
Printing on Continuous Paper 2-35

R4C4620Rev. CA5 size CONT.FM3/13/00 Pass 3
L Proof Sign-off:SEI Y.Ohkawara T.Takahashi
T.TakahashiSEI M.Kauppi K.Blair
4. Press the LF/FF D button to feed the paper backward, or press the Load/Eject U button to feed the paper forward, until the paper perforation is aligned with the tear-off edge.
Note:The printer has a minimum and a maximum tear-off position. If you try to adjust the tear-off position beyond these limits, the printer beeps and stops moving the paper.
5. After you set the tear-off position, press the Pause button to turn off the micro adjust mode.
6. Tear off the printed pages.
When you resume printing, the printer automatically feeds the paper back to the top-of-form position and begins printing.
tear-off edge
2-36 Printing on Continuous Paper

3
R4C4620Rev. CA5 size SINGLE.FM3/13/00 Pass 3
RProof Sign-off:SEI Y.Ohkawara T.Takahashi
T.TakahashiSEI M.Kauppi K.Blair
Chapter 3
Printing on Single Sheets
Using Single Sheets . . . . . . . . . . . . . . . . . . . . . . . . . . . . . . . . . . . . . . . 3-2Available paper types and paper slots . . . . . . . . . . . . . . . . . . 3-2Loading single-sheet multipart forms . . . . . . . . . . . . . . . . . . . 3-4Loading envelopes . . . . . . . . . . . . . . . . . . . . . . . . . . . . . . . . . . . 3-5Loading postcards . . . . . . . . . . . . . . . . . . . . . . . . . . . . . . . . . . . 3-6
Loading Single Sheets in the Top Paper Slot . . . . . . . . . . . . . . . . . . 3-8
Loading Single Sheets in the Front Paper Slot . . . . . . . . . . . . . . . . 3-11
Printing on Single Sheets 3-1

R4C4620Rev. CA5 size SINGLE.FM3/13/00 Pass 3
L Proof Sign-off:SEI Y.Ohkawara T.Takahashi
T.TakahashiSEI M.Kauppi K.Blair
Using Single Sheets
Available paper types and paper slots
As shown below, you can load single-sheet paper one sheet at a time using the paper guide on top of the printer or the front cover. You can print on ordinary single sheets, single-sheet multipart forms, postcards, and envelopes. Your single-sheet paper may be from 100 to 257 mm wide.
Note:❏ To load a stack of single-sheet paper, use the optional cut-sheet
feeder. See Appendix A, “Enhancing Your Printer With Options.”
❏ For detailed specifications on the types of single-sheet paper you can use, see Appendix C.
top paper slot
front paper slot
3-2 Printing on Single Sheets

3
R4C4620Rev. CA5 size SINGLE.FM3/13/00 Pass 3
RProof Sign-off:SEI Y.Ohkawara T.Takahashi
T.TakahashiSEI M.Kauppi K.Blair
The table below shows the types of paper you can load in the top and front paper slots and the paper thickness lever setting for each paper type. For more information on the paper thickness lever, see “Setting the Paper Thickness Lever” on page 2-4.
Note:❏ If the printed image is smeared, you may need to set the paper
thickness lever one position higher to improve print quality.
❏ If the printed image is faint or has many gaps, you may need to set the paper thickness lever one position lower to improve print quality.
❏ Do not load paper that is damaged, curled, or has been folded.
Paper type Available paper slots
Paper thickness lever position
Ordinary single-sheet paper Top and front -1 or 0
Multipart forms (carbonless)2 parts (original + 1 copy)3 parts (original + 2 copies)4 parts (original + 3 copies)5 parts (original + 4 copies)
Front
1235
Postcards Top and front 2
Envelopes Top 2 to 6
Printing on Single Sheets 3-3

R4C4620Rev. CA5 size SINGLE.FM3/13/00 Pass 3
L Proof Sign-off:SEI Y.Ohkawara T.Takahashi
T.TakahashiSEI M.Kauppi K.Blair
Loading single-sheet multipart forms
You can load single-sheet multipart forms in the front paper slot only, as described in “Loading Single Sheets in the Front Paper Slot” on page 3-11. Be sure to follow these guidelines:
❏ Use only carbonless multipart forms bound as shown below.
❏ You can use the front paper slot to load single-sheet multipart forms that are fastened at the top.
Insert the of form in the front slot, bound edge first and printable side up, as shown below.
fastened only at the top by line gluing
printable side up
3-4 Printing on Single Sheets

3
R4C4620Rev. CA5 size SINGLE.FM3/13/00 Pass 3
RProof Sign-off:SEI Y.Ohkawara T.Takahashi
T.TakahashiSEI M.Kauppi K.Blair
❏ Before printing, set the paper thickness lever (located under the printer cover) to the proper position for your paper. See the table on page 3-3, for details.
❏ Be sure your multipart forms do not exceed 0.39 mm in thickness.
Loading envelopes
You can load envelopes in the top paper slot only, as described in “Loading Single Sheets in the Top Paper Slot” on page 3-8. Also follow these guidelines:
❏ Load envelopes one at a time in the top slot, with the flap fold first and the flap side up.
❏ Set the paper thickness lever (located under the printer cover) to position 2 or 6 to match the thickness of the envelope.
❏ Do not use envelopes that are curled or folded. Also avoid using envelopes that are too thin; they may curl during printing and become jammed.
❏ If you are using No. 6 envelopes, align the left edge of the envelope with the arrow mark on the printer.
flap side up, printable side down
Printing on Single Sheets 3-5

R4C4620Rev. CA5 size SINGLE.FM3/13/00 Pass 3
L Proof Sign-off:SEI Y.Ohkawara T.Takahashi
T.TakahashiSEI M.Kauppi K.Blair
Use envelopes only under normal temperature and humidity conditions, as follows:
cCaution:Because printing on the edge of an envelope may damage the print head, make sure the printing stays entirely within the printable area of your envelopes. See Appendix C for details on the printable area of envelopes.
Loading postcards
You can load postcards one at a time in the top or front paper slot as described in “Loading Single Sheets in the Top Paper Slot” on page 3-8 or “Loading Single Sheets in the Front Paper Slot” on page 3-11. Also follow these guidelines:
❏ When you are loading postcards long edge first, always load them in the top slot.
Temperature 15 to 25 °C
Humidity 30 to 60% RH
3-6 Printing on Single Sheets

3
R4C4620Rev. CA5 size SINGLE.FM3/13/00 Pass 3
RProof Sign-off:SEI Y.Ohkawara T.Takahashi
T.TakahashiSEI M.Kauppi K.Blair
❏ Set the paper thickness lever (located under the printer cover) to position 2.
❏ Before printing, turn on the card mode by pressing the Tear Off/Bin button until both Tear Off/Bin lights are on. After you finish printing on postcards, press the Tear Off/Bin button once to exit the card mode. (Bin 1 of the optional cut-sheet feeder is selected.)
Use postcards only under normal temperature and humidity conditions, as follows:
Temperature 15 to 25 °C
Humidity 30 to 60% RH
Printing on Single Sheets 3-7

R4C4620Rev. CA5 size SINGLE.FM3/13/00 Pass 3
L Proof Sign-off:SEI Y.Ohkawara T.Takahashi
T.TakahashiSEI M.Kauppi K.Blair
Loading Single Sheets in the Top Paper Slot
To load paper in the top slot, follow these steps:
1. Make sure the paper guide is installed properly. If not, attach it as described on “Attaching the Paper Guide” on page 1-11.
2. Slide the left edge guide until it locks in place next to the arrow on the paper guide. Next adjust the right edge guide to match the width of your paper.
3-8 Printing on Single Sheets

3
R4C4620Rev. CA5 size SINGLE.FM3/13/00 Pass 3
RProof Sign-off:SEI Y.Ohkawara T.Takahashi
T.TakahashiSEI M.Kauppi K.Blair
3. Set the paper release lever to the single-sheet position. Also set the paper thickness lever (located under the printer cover) to the proper position for your paper’s thickness. (See the table on page 3-3.)
4. Close the paper guide cover.
5. Turn on the printer, if necessary.
Printing on Single Sheets 3-9

R4C4620Rev. CA5 size SINGLE.FM3/13/00 Pass 3
L Proof Sign-off:SEI Y.Ohkawara T.Takahashi
T.TakahashiSEI M.Kauppi K.Blair
6. Insert a sheet of paper, printable side down, between the edge guides until it meets resistance. The printer feeds the paper automatically and is ready to print.
Note:The time from when the paper is inserted until it feeds can be set with the default-setting mode’s Manual feed time. For instructions, see “Changing default settings” on page 5-10.
7. Check the printer driver settings as described in Chapter 4, and change them if necessary. Then send a print job to the printer.
When the printer receives data, it prints the page and ejects it back onto the paper guide. To continue printing your document, remove the printed page and insert a new sheet of paper. If you need to eject a sheet, press the Load/Eject button.
If the first line on your page appears too high or low, you can fix this using the micro adjust feature. See “Adjusting the Top-of-Form Position” on page 2-31.
cCaution:Never use the knob to adjust the top-of-form position or eject a sheet when the printer is on; this may damage the printer or cause it to lose the top-of-form position.
3-10 Printing on Single Sheets
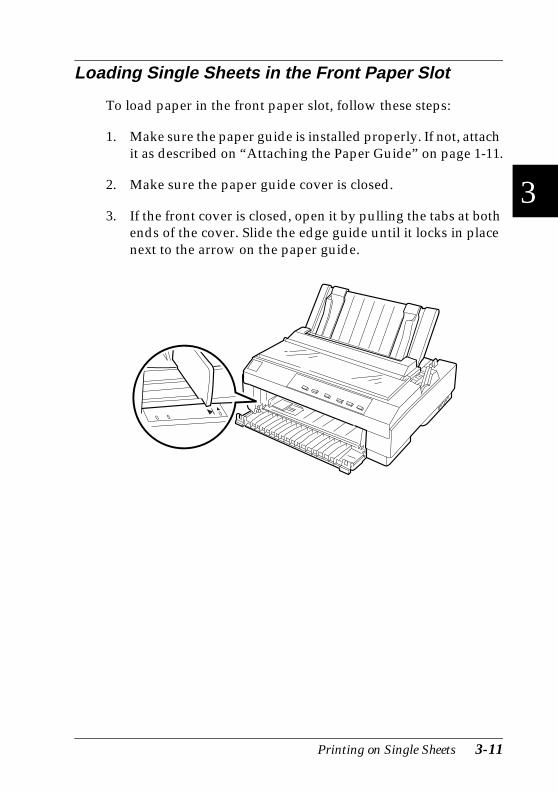
3
R4C4620Rev. CA5 size SINGLE.FM3/13/00 Pass 3
RProof Sign-off:SEI Y.Ohkawara T.Takahashi
T.TakahashiSEI M.Kauppi K.Blair
Loading Single Sheets in the Front Paper Slot
To load paper in the front paper slot, follow these steps:
1. Make sure the paper guide is installed properly. If not, attach it as described on “Attaching the Paper Guide” on page 1-11.
2. Make sure the paper guide cover is closed.
3. If the front cover is closed, open it by pulling the tabs at both ends of the cover. Slide the edge guide until it locks in place next to the arrow on the paper guide.
Printing on Single Sheets 3-11
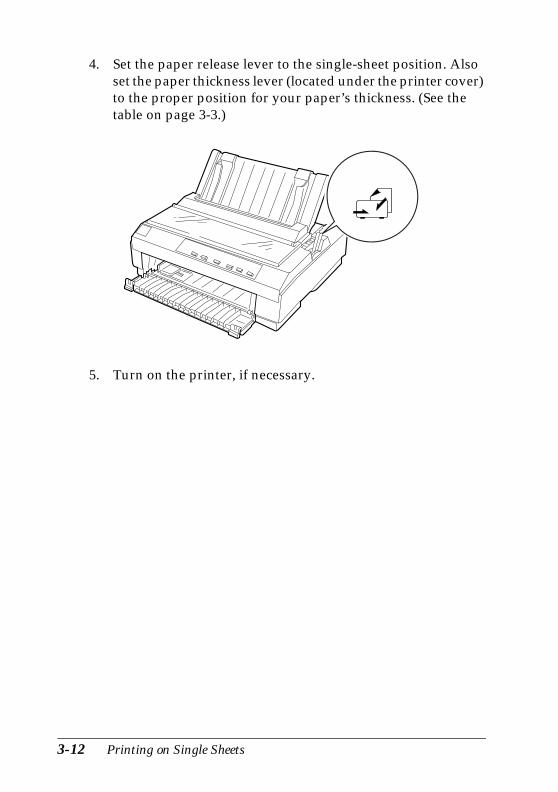
R4C4620Rev. CA5 size SINGLE.FM3/13/00 Pass 3
L Proof Sign-off:SEI Y.Ohkawara T.Takahashi
T.TakahashiSEI M.Kauppi K.Blair
4. Set the paper release lever to the single-sheet position. Also set the paper thickness lever (located under the printer cover) to the proper position for your paper’s thickness. (See the table on page 3-3.)
5. Turn on the printer, if necessary.
3-12 Printing on Single Sheets

3
R4C4620Rev. CA5 size SINGLE.FM3/13/00 Pass 3
RProof Sign-off:SEI Y.Ohkawara T.Takahashi
T.TakahashiSEI M.Kauppi K.Blair
6. Making sure it is aligned with the edge guide, load the paper, printable side up, until it meets resistance. The printer feeds the paper automatically and is ready to print.
Note:The time from when the paper is inserted until it feeds can be set with the default-setting mode’s Manual feed time. For instructions, see “Changing default settings” on page 5-10.
7. You may need to check and change the printer driver settings as described in Chapter 4. Then send a print job to the printer.
When the printer receives data, it prints the page and ejects it onto the paper guide on top of the printer. To continue printing your document, remove the printed page and insert a new sheet of paper in the front cover. If you need to eject a sheet, press the Load/Eject button.
If the first line on your page appears too high or low, you can fix this using the micro adjust feature. See “Adjusting the Top-of-Form Position” on page 2-31.
cCaution:Never use the knob to adjust the top-of-form position or eject a sheet when the printer is on; this may damage the printer or cause it to lose the top-of-form position.
Printing on Single Sheets 3-13

4
R4C4620Rev. CA5 size Software.fm3/13/00 Pass 3
RProof Sign-off:SEI Y.Ohkawara T.Takahashi
T.TakahashiSEI M.Kauppi K.Blair
Chapter 4
Using the Printer Software
About Your Printer Software . . . . . . . . . . . . . . . . . . . . . . . . . . . . . . . 4-2
Using the Printer Driver With Windows 95 and 98 . . . . . . . . . . . . 4-3Accessing the printer driver from Windows applications . . 4-3Accessing the printer driver from the Start menu. . . . . . . . . 4-6Printer driver settings overview. . . . . . . . . . . . . . . . . . . . . . . . 4-6
Using the Printer Driver With Windows 3.1 . . . . . . . . . . . . . . . . . . 4-13Accessing the printer driver from Windows applications . . 4-13Accessing the printer driver from the Control Panel . . . . . . 4-15Printer driver settings overview. . . . . . . . . . . . . . . . . . . . . . . . 4-15
Using the Printer Driver With Windows NT 4.0 . . . . . . . . . . . . . . 4-17Accessing the printer driver from Windows applications . . 4-17Accessing the printer driver from the Start menu. . . . . . . . . 4-19Printer driver settings overview. . . . . . . . . . . . . . . . . . . . . . . . 4-20
Using the Printer Driver With Windows NT 3.5x . . . . . . . . . . . . . 4-27Accessing the printer driver from Windows applications . . 4-27Accessing the printer driver from the Control Panel . . . . . . 4-29Printer driver settings overview. . . . . . . . . . . . . . . . . . . . . . . . 4-30
Using the EPSON Remote! Utility . . . . . . . . . . . . . . . . . . . . . . . . . . 4-32Installing EPSON Remote! . . . . . . . . . . . . . . . . . . . . . . . . . . . . 4-32Accessing EPSON Remote! . . . . . . . . . . . . . . . . . . . . . . . . . . . . 4-32
Using the Printer Software 4-1

R4C4620Rev. CA5 size Software.fm3/13/00 Pass 3
L Proof Sign-off:SEI Y.Ohkawara T.Takahashi
T.TakahashiSEI M.Kauppi K.Blair
About Your Printer Software
The EPSON printer software that comes with your printer includes the printer driver software, the EPSON Remote! utility, and the EPSON Status Monitor 3 utility for Windows 95, 98 and NT 4.0.
As described in Chapter 1, a printer driver is software that allows your computer to control the printer. You need to install the printer driver so your Windows software applications can take full advantage of the printer’s capabilities.
Note:Before proceeding, make sure you have installed the printer driver on your PC as described in Chapter 1.
EPSON Remote! is a DOS-based printer setup utility that allows you to easily change the printer’s default settings from the computer screen. To use the EPSON Remote! utility with DOS, see “Using the EPSON Remote! Utility” on page 4-32.
The EPSON Status Monitor 3 utility program is available for Windows 95, 98 and NT 4.0. It allows you to monitor the status of your printer, alerts you when errors occur, and provides you with troubleshooting tips. To use the Status Monitor, see Chapter 6, “Using EPSON Status Monitor 3.”
To use the printer driver, see the appropriate page below, depending on your Windows version.
Windows 95 and 98 . . . . . . . . . . . . . . . . . page 4-3
Windows 3.1 . . . . . . . . . . . . . . . . . . . . . . . page 4-13
Windows NT 4.0 . . . . . . . . . . . . . . . . . . . . page 4-17
Windows NT 3.5x . . . . . . . . . . . . . . . . . . . page 4-27
4-2 Using the Printer Software

4
R4C4620Rev. CA5 size Software.fm3/13/00 Pass 3
RProof Sign-off:SEI Y.Ohkawara T.Takahashi
T.TakahashiSEI M.Kauppi K.Blair
Using the Printer Driver With Windows 95 and 98
You can access the printer driver from your Windows applications or from the Start menu. When you access the printer driver from a Windows application, any settings you make apply only to the application you are using. See “Accessing the printer driver from Windows applications” below. When you access the printer driver from the Start menu, the printer driver settings you make apply to all your applications. See “Accessing the printer driver from the Start menu” on page 4-6. To check and change printer driver settings, see “Printer driver settings overview” on page 4-6.
Note:While many Windows applications override the settings made with the printer driver, some do not, so you must verify that the printer driver settings match your requirements.
Accessing the printer driver from Windows applications
To access the printer driver from a Windows application, follow the steps on the next page.
Note:The steps on the next page provide general guidelines on accessing the printer driver. How you access the printer driver may differ depending on your application. See your application manual for details.
Using the Printer Software 4-3
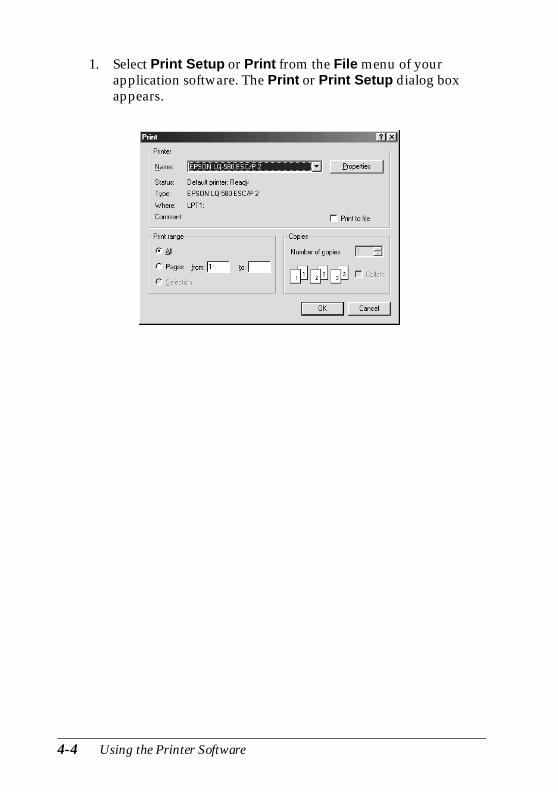
R4C4620Rev. CA5 size Software.fm3/13/00 Pass 3
L Proof Sign-off:SEI Y.Ohkawara T.Takahashi
T.TakahashiSEI M.Kauppi K.Blair
1. Select Print Setup or Print from the File menu of your application software. The Print or Print Setup dialog box appears.
4-4 Using the Printer Software

4
R4C4620Rev. CA5 size Software.fm3/13/00 Pass 3
RProof Sign-off:SEI Y.Ohkawara T.Takahashi
T.TakahashiSEI M.Kauppi K.Blair
2. Make sure that your printer is selected and then click Printer, Setup, Properties, or Options. (You may need to click a combination of these buttons.) The Properties window appears, and you see the Paper, Graphics, and Device Options menu. These menus contain the printer driver settings.
3. To view a menu, click the corresponding tab at the top of the window. See “Printer driver settings overview” below for detailed information about the settings.
Using the Printer Software 4-5

R4C4620Rev. CA5 size Software.fm3/13/00 Pass 3
L Proof Sign-off:SEI Y.Ohkawara T.Takahashi
T.TakahashiSEI M.Kauppi K.Blair
Accessing the printer driver from the Start menu
To access the printer driver from the Start menu, follow these steps:
1. Click the Start button, and then point to Settings.
2. Click Printers.
3. Right-click your printer icon, and click Properties. The screen displays the Properties window, which contains the Paper, Graphics, and Device Options menus. These menus display the printer driver settings.
4. To view a menu, click the corresponding tab at the top of the window. See the next section for detailed information about the printer driver settings.
Printer driver settings overview
Your printer driver has four menus: Paper, Graphics, Device Options, and Utility. The printer driver settings on each of these menus are described below. To open the menus, see the previous sections on accessing the printer driver.
When you finish making your printer driver settings, click OK to apply the settings, or click Restore Defaults to return the settings to their default values.
4-6 Using the Printer Software

4
R4C4620Rev. CA5 size Software.fm3/13/00 Pass 3
RProof Sign-off:SEI Y.Ohkawara T.Takahashi
T.TakahashiSEI M.Kauppi K.Blair
Paper menu
❏ Paper size Select the size of the paper you want to use. If you don’t see your paper size, use the scroll bar to scroll through the list. If your paper size is not included in the list, click Custom and enter the paper size in the dialog box that appears.
❏ Orientation Select Portrait or Landscape.
❏ Paper source Click the paper source you want to use.
Using the Printer Software 4-7

R4C4620Rev. CA5 size Software.fm3/13/00 Pass 3
L Proof Sign-off:SEI Y.Ohkawara T.Takahashi
T.TakahashiSEI M.Kauppi K.Blair
Graphics menu
❏ Resolution Click the printing resolution you want. The higher the resolution you select, the more detailed your printout will be; however, increasing the resolution slows printing.
❏ Dithering You can leave this option set to Fine, which is the default setting, or select another dithering pattern depending on the kind of printout you want. The display to the left of the dithering options shows the effect of your selection.
❏ Intensity Move the slider to make your printout lighter or darker.
4-8 Using the Printer Software

4
R4C4620Rev. CA5 size Software.fm3/13/00 Pass 3
RProof Sign-off:SEI Y.Ohkawara T.Takahashi
T.TakahashiSEI M.Kauppi K.Blair
Device Options menu
Once you’ve checked your printer driver settings and changed them if necessary, you are ready to print with continuous paper as described in Chapter 2, or with single sheets as described in Chapter 3.
❏ Print quality Select a print quality option from the Print quality list.If you turn on High Speed, you will enter bi-directional printing mode and printing speed will increase.Turning High Speed off will return the printer to uni-directional printing mode. Printing speed will decrease, but printing precision will improve.Default printing uses the settings stored in the printer.
Using the Printer Software 4-9

R4C4620Rev. CA5 size Software.fm3/13/00 Pass 3
L Proof Sign-off:SEI Y.Ohkawara T.Takahashi
T.TakahashiSEI M.Kauppi K.Blair
Utility menu
To use the utilities, click the Utility tab in the printer software window, then click the button for the utility you want to use.
Note:This utility is available only when:
❏ The printer is connected directly to the host computer via the parallel port [LPT1].
❏ EPSON Status Monitor 3
You can access EPSON Status Monitor 3 when you click this button. Whenever you monitor the printer, make sure there is a checkmark in the Monitor the printing status check box.
4-10 Using the Printer Software

4
R4C4620Rev. CA5 size Software.fm3/13/00 Pass 3
RProof Sign-off:SEI Y.Ohkawara T.Takahashi
T.TakahashiSEI M.Kauppi K.Blair
❏ Your system is configured to support bidirectional communication.
❏ Monitoring Preferences
Click this button to open the Monitoring Preferences dialog box where you can make settings for EPSON Status Monitor 3.
Using the Printer Software 4-11

R4C4620Rev. CA5 size Software.fm3/13/00 Pass 3
L Proof Sign-off:SEI Y.Ohkawara T.Takahashi
T.TakahashiSEI M.Kauppi K.Blair
You can change the following settings:
Note:Click the Default button to revert all items to the default settings.
Select Notification Displays the error item check box ON/OFF status.
Turn on this check box to display the selected error notification.
Select Shortcut icon
The selected icons are displayed in the task tray on the PC screen. The setting example is shown on the right window. By clicking the shortcut icon, you can access the Monitoring Preferences dialog easily.
Receive error notification for shared printers
Error notification for a shared printer can be received when this check box is turned on.
Allow monitoring of shared printer
When this check box is turned on, a shared printer can be monitored by other PCs.
4-12 Using the Printer Software

4
R4C4620Rev. CA5 size Software.fm3/13/00 Pass 3
RProof Sign-off:SEI Y.Ohkawara T.Takahashi
T.TakahashiSEI M.Kauppi K.Blair
Using the Printer Driver With Windows 3.1
You can access the printer driver from your Windows applications or from the Control Panel. When you access the printer driver from a Windows application, any settings you make apply only to the application you are using. See “Accessing the printer driver from Windows applications,” below. When you access the printer driver from the Control Panel, the printer driver settings you make apply to all your applications. See “Accessing the printer driver from the Control Panel” on page 4-15. To check and change printer driver settings, see “Printer driver settings overview” on page 4-15.
Note:While many Windows applications override the settings made with the printer driver, some do not, so you must verify that the printer driver settings match your requirements.
Accessing the printer driver from Windows applications
To access the printer driver from a Windows application, follow the steps on the next page.
Note:The steps on the next page provide general guidelines on accessing the printer driver. How you access the printer driver may differ depending on your application. See your application manual for details.
Using the Printer Software 4-13

R4C4620Rev. CA5 size Software.fm3/13/00 Pass 3
L Proof Sign-off:SEI Y.Ohkawara T.Takahashi
T.TakahashiSEI M.Kauppi K.Blair
1. Select Print Setup or Print from the File menu of your application software. The Print or Print Setup dialog box appears. See “Printer driver settings overview” on page 4-15 for detailed information about the settings in this dialog box.
2. Make sure that your printer is selected and then click Printer, Setup, or Options. (You may need to click a combination of these buttons.) The Options dialog box appears. See “Printer driver settings overview” on page 4-15 for detailed information about the settings in this dialog box.
4-14 Using the Printer Software

4
R4C4620Rev. CA5 size Software.fm3/13/00 Pass 3
RProof Sign-off:SEI Y.Ohkawara T.Takahashi
T.TakahashiSEI M.Kauppi K.Blair
Accessing the printer driver from the Control Panel
To access the printer driver from the Control Panel, follow these steps:
1. In the Main window, double-click the Control Panel icon.
2. Double-click the Printers icon. The Printers dialog box appears.
3. Make sure your printer is highlighted, then click Setup. The Print Setup dialog box appears. To access more settings, you may need to click Options. See the next section for detailed information.
Printer driver settings overview
The printer driver settings are described in this section. To access the printer driver settings, see the previous sections on accessing the printer driver.
When you finish making your printer driver settings, click OK to apply the settings, or click Cancel to cancel your changes.
Print or Print Setup dialog box
❏ Resolution Click the printing resolution you want. The higher the resolution you select, the more detailed your printout will be; however, increasing the resolution slows printing. This setting is available only from the Control Panel.
❏ Orientation Select Portrait or Landscape. The diagram on the screen changes according to the orientation you select.
Using the Printer Software 4-15

R4C4620Rev. CA5 size Software.fm3/13/00 Pass 3
L Proof Sign-off:SEI Y.Ohkawara T.Takahashi
T.TakahashiSEI M.Kauppi K.Blair
Options dialog box
Once you’ve checked your printer driver settings and changed them if necessary, you are ready to print with continuous paper as described in Chapter 2, or with single sheets as described in Chapter 3.
❏ Paper Size Select the size of the paper you want to use. If you don’t see your paper size, use the scroll bar to scroll through the list. If your paper size is not included in the list, click User Defined Size and enter the paper size in the dialog box that appears.
❏ Paper Source Click the paper source you want to use.
❏ Dithering You can leave this option set to Fine, which is the default setting, or select another dithering pattern depending on the kind of printout you want.
❏ Intensity Control Move the slider to make your printout lighter or darker.
❏ Print quality Select a print quality option from the Print quality list.If you turn on High Speed, you will enter bi-directional printing mode and printing speed will increase.Turning High Speed off will return the printer to uni-directional printing mode. Printing speed will decrease, but printing precision will improve.Default printing uses the settings stored in the printer.
4-16 Using the Printer Software

4
R4C4620Rev. CA5 size Software.fm3/13/00 Pass 3
RProof Sign-off:SEI Y.Ohkawara T.Takahashi
T.TakahashiSEI M.Kauppi K.Blair
Using the Printer Driver With Windows NT 4.0
You can access the printer driver from your Windows applications or from the Start menu. When you access the printer driver from a Windows application, any settings you make apply only to the application you are using. See “Accessing the printer driver from Windows applications” below. When you access the printer driver from the Start menu, the printer driver settings you make apply to all your applications. See “Accessing the printer driver from the Start menu” on page 4-19. To check and change printer driver settings, see “Printer driver settings overview” on page 4-20.
Note:While many Windows applications override the settings made with the printer driver, some do not, so you must verify that the printer driver settings match your requirements.
Accessing the printer driver from Windows applications
To access the printer driver from a Windows application, follow the steps on the next page.
Note:The steps on the next page provide general guidelines on accessing the printer driver. How you access the printer driver may differ depending on your application. See your application manual for details.
Using the Printer Software 4-17

R4C4620Rev. CA5 size Software.fm3/13/00 Pass 3
L Proof Sign-off:SEI Y.Ohkawara T.Takahashi
T.TakahashiSEI M.Kauppi K.Blair
1. Select Print Setup or Print from the File menu of your application software. The Print or Print Setup dialog box appears.
4-18 Using the Printer Software

4
R4C4620Rev. CA5 size Software.fm3/13/00 Pass 3
RProof Sign-off:SEI Y.Ohkawara T.Takahashi
T.TakahashiSEI M.Kauppi K.Blair
2. Make sure that your printer is selected and then click Printer, Setup, Properties, or Options. (You may need to click a combination of these buttons.) The Document Properties window appears, and you see the Page Setup and Advanced menus. These menus contain the printer driver settings.
3. To view a menu, click the corresponding tab at the top of the window. See “Printer driver settings overview” below, for detailed information about the settings.
Accessing the printer driver from the Start menu
To access the printer driver from the Start menu, follow these steps:
1. Click the Start button, and then point to Settings.
2. Click Printers.
Using the Printer Software 4-19

R4C4620Rev. CA5 size Software.fm3/13/00 Pass 3
L Proof Sign-off:SEI Y.Ohkawara T.Takahashi
T.TakahashiSEI M.Kauppi K.Blair
3. Right-click your printer icon, and click Document Defaults. The screen displays the Default Document Properties window, which contains the Page Setup and Advanced menus. These menus display the printer driver settings.
4. To view a menu, click the corresponding tab at the top of the window. See the next section for detailed information about the printer driver settings.
Printer driver settings overview
Your printer driver has two menus: Page Setup and Advanced. The printer driver settings on each of these menus are described below. To open these menus, see the previous sections on accessing the printer driver.
When you finish making your printer driver settings, click OK to apply the settings, or click Cancel to cancel your changes.
Page Setup menu
4-20 Using the Printer Software

4
R4C4620Rev. CA5 size Software.fm3/13/00 Pass 3
RProof Sign-off:SEI Y.Ohkawara T.Takahashi
T.TakahashiSEI M.Kauppi K.Blair
Advanced menu
❏ Paper Size Select the size of the paper you want to use from the Paper Size list.
❏ Paper Source Select the paper source you want to use from the Paper Source list.
❏ Orientation Select Portrait or Landscape.
Using the Printer Software 4-21
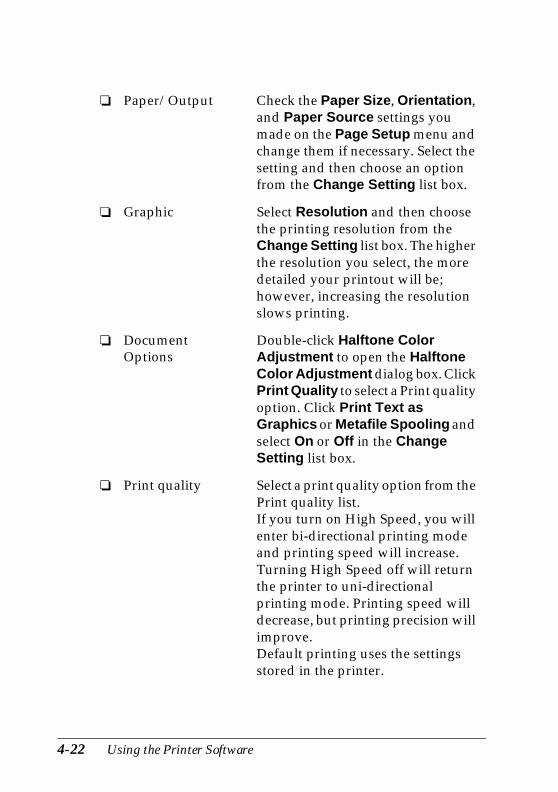
R4C4620Rev. CA5 size Software.fm3/13/00 Pass 3
L Proof Sign-off:SEI Y.Ohkawara T.Takahashi
T.TakahashiSEI M.Kauppi K.Blair
❏ Paper/Output Check the Paper Size, Orientation, and Paper Source settings you made on the Page Setup menu and change them if necessary. Select the setting and then choose an option from the Change Setting list box.
❏ Graphic Select Resolution and then choose the printing resolution from the Change Setting list box. The higher the resolution you select, the more detailed your printout will be; however, increasing the resolution slows printing.
❏ Document Options
Double-click Halftone Color Adjustment to open the Halftone Color Adjustment dialog box. Click Print Quality to select a Print quality option. Click Print Text as Graphics or Metafile Spooling and select On or Off in the Change Setting list box.
❏ Print quality Select a print quality option from the Print quality list.If you turn on High Speed, you will enter bi-directional printing mode and printing speed will increase.Turning High Speed off will return the printer to uni-directional printing mode. Printing speed will decrease, but printing precision will improve.Default printing uses the settings stored in the printer.
4-22 Using the Printer Software

4
R4C4620Rev. CA5 size Software.fm3/13/00 Pass 3
RProof Sign-off:SEI Y.Ohkawara T.Takahashi
T.TakahashiSEI M.Kauppi K.Blair
Once you’ve checked your printer driver settings and changed them if necessary, you are ready to print with continuous paper as described in Chapter 2, or with single sheets as described in Chapter 3.
Utility menu
To use the utilities, click the Utility tab in the printer software window, then click the button for the utility you want to use.If you are using NT 4.0, you can open the printer software window by selecting Properties on the File menu in the Printer window.
Using the Printer Software 4-23

R4C4620Rev. CA5 size Software.fm3/13/00 Pass 3
L Proof Sign-off:SEI Y.Ohkawara T.Takahashi
T.TakahashiSEI M.Kauppi K.Blair
Note:This utility is available only when:
❏ The printer is connected directly to the host computer via the parallel port [LPT1].
❏ Your system is configured to support bidirectional communication.
❏ EPSON Status Monitor 3
You can access EPSON Status Monitor 3 when you click this button. Whenever you monitor the printer, make sure there is a checkmark in the Monitor the printing status check box.
4-24 Using the Printer Software

4
R4C4620Rev. CA5 size Software.fm3/13/00 Pass 3
RProof Sign-off:SEI Y.Ohkawara T.Takahashi
T.TakahashiSEI M.Kauppi K.Blair
❏ Monitoring Preferences
Click this button to open the Monitoring Preferences dialog box where you can make settings for EPSON Status Monitor 3.
Using the Printer Software 4-25
R4C4620Rev. CA5 size Software.fm3/13/00 Pass 3
L Proof Sign-off:SEI Y.Ohkawara T.Takahashi
T.TakahashiSEI M.Kauppi K.Blair
You can change the following settings:
Note:Click the Default button to revert all items to the default settings.
Select Notification Displays the error item check box ON/OFF status.
Turn on this check box to display the selected error notification.
Select Shortcut icon
The selected icons are displayed in the task tray on the PC screen. The setting example is shown on the right window. By clicking the shortcut icon, you can access the Monitoring Preferences dialog easily.
Receive error notification for shared printers
Error notification for a shared printer can be received when this check box is turned on.
Allow monitoring of shared printer
When this check box is turned on, a shared printer can be monitored by other PCs.
4-26 Using the Printer Software

4
R4C4620Rev. CA5 size Software.fm3/13/00 Pass 3
RProof Sign-off:SEI Y.Ohkawara T.Takahashi
T.TakahashiSEI M.Kauppi K.Blair
Using the Printer Driver With Windows NT 3.5x
You can access the printer driver from your Windows applications or from the Control Panel. When you access the printer driver from a Windows application, any settings you make apply only to the application you are using. See “Accessing the printer driver from Windows applications” below. When you access the printer driver from the Control Panel, the printer driver settings you make apply to all your applications. See “Accessing the printer driver from the Control Panel” on page 4-29. To check and change printer driver settings, see “Printer driver settings overview” on page 4-30.
Note:While many Windows applications override the settings made with the printer driver, some do not, so you must verify that the printer driver settings match your requirements.
Accessing the printer driver from Windows applications
To access the printer driver from a Windows application, follow the steps on the next page.
Note:The steps on the next page provide general guidelines on accessing the printer driver. How you access the printer driver may differ depending on your application. See your application manual for details.
Using the Printer Software 4-27

R4C4620Rev. CA5 size Software.fm3/13/00 Pass 3
L Proof Sign-off:SEI Y.Ohkawara T.Takahashi
T.TakahashiSEI M.Kauppi K.Blair
1. Select Print Setup or Print from the File menu of your application software. The Print or Print Setup dialog box appears.
2. Make sure that your printer is selected and then click Printer, Setup, Properties, or Options. (You may need to click a combination of these buttons.) The screen displays the Document Properties dialog box, which contains the Form and Orientation printer driver settings. See “Printer driver settings overview” on page 4-30 for detailed information about these settings.
4-28 Using the Printer Software

4
R4C4620Rev. CA5 size Software.fm3/13/00 Pass 3
RProof Sign-off:SEI Y.Ohkawara T.Takahashi
T.TakahashiSEI M.Kauppi K.Blair
3. Click Options (or a similar button) to view the Advanced Document Properties dialog box, which includes the Graphics Resolution, Color, and Optimizations printer driver settings. See “Document Properties dialog box” on page 4-30 for detailed information about these settings.
Accessing the printer driver from the Control Panel
To access the printer driver from the Control Panel, follow these steps:
1. In the Main window, double-click the Print Manager icon. The Print Manager window opens.
2. Make sure your printer is highlighted, then click Printer and select Properties. The Printer Properties dialog box appears.
3. Click the Details button, then click Job Default. You see the Document Properties dialog box, which includes the Form and Orientation printer driver settings. See “Printer driver settings overview” on page 4-30 for detailed information about these settings.
Using the Printer Software 4-29

R4C4620Rev. CA5 size Software.fm3/13/00 Pass 3
L Proof Sign-off:SEI Y.Ohkawara T.Takahashi
T.TakahashiSEI M.Kauppi K.Blair
4. Click Options to open the Advanced Document Properties dialog box, which contains the Graphics Resolution, Color, and Optimizations printer driver settings. See “Printer driver settings overview” on page 4-30 for detailed information about these settings.
Printer driver settings overview
Your printer driver has two dialog boxes: Document Properties and Advanced Document Properties. The printer driver settings in each of these dialog boxes are described below. To open these dialog boxes, see the previous sections on accessing the printer driver.
When you finish making your printer driver settings, click OK to apply the settings, or click Cancel to cancel your changes.
Document Properties dialog box
Click the Halftone button to set the brightness and contrast, input the RGB gamma, or make other settings. The Halftone Color Adjustment dialog box appears. For details, click Help in this dialog box.
❏ Form Select the type of paper you want to use. If you don’t see your paper type, select it from the Form list.
❏ Orientation Select Portrait or Landscape. The diagram on the screen changes according to the orientation you select.
4-30 Using the Printer Software
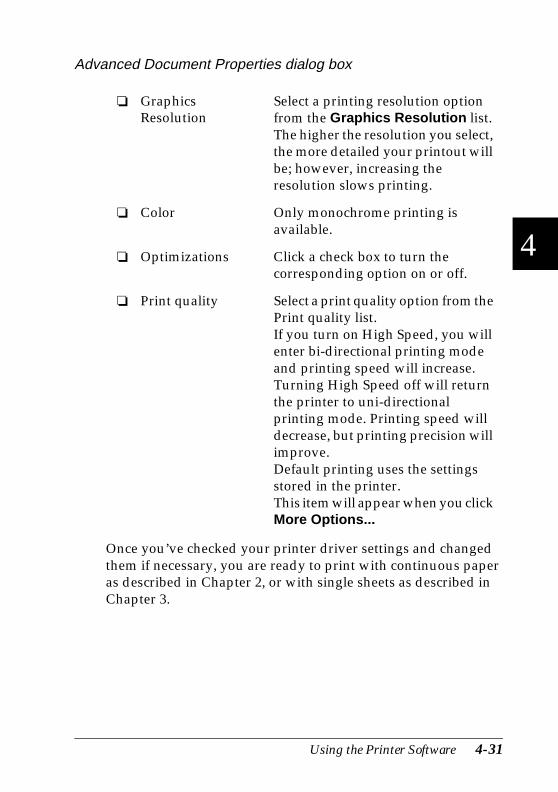
4
R4C4620Rev. CA5 size Software.fm3/13/00 Pass 3
RProof Sign-off:SEI Y.Ohkawara T.Takahashi
T.TakahashiSEI M.Kauppi K.Blair
Advanced Document Properties dialog box
Once you’ve checked your printer driver settings and changed them if necessary, you are ready to print with continuous paper as described in Chapter 2, or with single sheets as described in Chapter 3.
❏ Graphics Resolution
Select a printing resolution option from the Graphics Resolution list. The higher the resolution you select, the more detailed your printout will be; however, increasing the resolution slows printing.
❏ Color Only monochrome printing is available.
❏ Optimizations Click a check box to turn the corresponding option on or off.
❏ Print quality Select a print quality option from the Print quality list.If you turn on High Speed, you will enter bi-directional printing mode and printing speed will increase.Turning High Speed off will return the printer to uni-directional printing mode. Printing speed will decrease, but printing precision will improve.Default printing uses the settings stored in the printer.This item will appear when you click More Options...
Using the Printer Software 4-31

R4C4620Rev. CA5 size Software.fm3/13/00 Pass 3
L Proof Sign-off:SEI Y.Ohkawara T.Takahashi
T.TakahashiSEI M.Kauppi K.Blair
Using the EPSON Remote! Utility
The EPSON Remote! utility allows you to easily change the printer’s default settings from your computer’s DOS prompt.
Installing EPSON Remote!
Follow the steps below to install EPSON Remote!
Note:If you want to install EPSON Remote!, you must start your computer in DOS mode. Do not open a DOS window from Windows.
1. Insert the printer software CD-ROM in a disk drive.
2. At the DOS prompt, type D:\SETUP. (If you inserted the disk in a drive other than drive D, substitute the appropriate letter.) Then press Enter.
3. Select your printer’s name in the Printer Model window and press Enter. C:\EPUTIL appears as the default directory.
4. Press Enter again. The EPSON Remote! utility is copied to the C:\EPUTIL directory.
Accessing EPSON Remote!
To access EPSON Remote!, type C:\PRNSET at the DOS prompt and press Enter. Then follow the on-screen instructions to use this utility. You can also access EPSON Remote! by typing C:\PANEL at the DOS prompt and pressing Enter. The PRNSET and PANEL access methods differ slightly. The PANEL method opens a condensed version of EPSON Remote! that only provides the most often used settings.
4-32 Using the Printer Software

5
R4C4620Rev. CA5 size CHANGE.FM3/13/00 Pass 3
RProof Sign-off:SEI Y.Ohkawara T.Takahashi
T.TakahashiSEI M.Kauppi K.Blair
Chapter 5
Changing Printer Settings From the Printer’s Control Panel
Selecting a Built-In Font and Pitch . . . . . . . . . . . . . . . . . . . . . . . . . . 5-2
About Your Printer’s Default Settings . . . . . . . . . . . . . . . . . . . . . . . 5-4Changing default settings . . . . . . . . . . . . . . . . . . . . . . . . . . . . . 5-10
Changing Printer Settings From the Printer’s Control Panel 5-1

R4C4620Rev. CA5 size CHANGE.FM3/13/00 Pass 3
L Proof Sign-off:SEI Y.Ohkawara T.Takahashi
T.TakahashiSEI M.Kauppi K.Blair
Selecting a Built-In Font and Pitch
Your printer comes with the twelve built-in fonts shown in the table below. You can also change the pitch by turning the condensed mode on or off. You can select the font and pitch using the buttons on the printer’s control panel as described below.
Note:Settings you make in your application programs usually override settings you make from the printer’s control panel. For best results, use your application to select a font and pitch.
5-2 Changing Printer Settings From the Printer’s Control Panel

5
R4C4620Rev. CA5 size CHANGE.FM3/13/00 Pass 3
RProof Sign-off:SEI Y.Ohkawara T.Takahashi
T.TakahashiSEI M.Kauppi K.Blair
Follow these steps to select a built-in font or pitch using the buttons on the printer’s control panel:
1. Make sure that the printer is not printing. If it is, wait until printing has finished.
2. To select a font, press the Font button until the three Font lights indicate the font you want as shown below.
n = On, o = Off
* others means the font selected in the default-setting mode
Note:The Font button cannot directly select OCR-B, Orator, Orator-S, Script-C, Roman-T, or Sans Serif H. To select one of these fonts, you must first use the default-setting mode to register it as the “other” font. Note that the default “other” setting is Roman-T.
3. Press the Condensed button to turn the condensed mode on or off. The table below shows normal and condensed printing.
Font lights Font
o o n Draft
o n o Roman
o n n Sans Serif
n o o Courier
n o n Prestige
n n o Script
n n n Others
Changing Printer Settings From the Printer’s Control Panel 5-3

R4C4620Rev. CA5 size CHANGE.FM3/13/00 Pass 3
L Proof Sign-off:SEI Y.Ohkawara T.Takahashi
T.TakahashiSEI M.Kauppi K.Blair
About Your Printer’s Default Settings
The default settings control many printer functions. While you can often set these functions through your software or printer driver, you may sometimes need to change a default setting from the printer’s control panel using the default-setting mode.
The following table lists the default settings and the options you can select in the default-setting mode. The settings are explained in detail after the table. For instructions on changing the default settings, see “Changing default settings” on page 5-10.
Settings Options
Page length for tractor* Length in inches: 3, 3.5, 4, 5.5, 6, 7, 8, 8.5, 11, 70/6, 12, 14, 17
Skip over perforation On, Off
Auto tear-off On, Off
Auto line feed On, Off
Print direction Bi-D, Uni-D, Auto
Software ESC/P2, IBM 2390Plus
0 slash 0,
High speed draft On, Off
I/F mode Auto, Parallel, Optional
Auto I/F wait time 10 seconds, 30 seconds
Parallel I/F bidirectional mode
On, Off
Packet mode Auto, Off
Auto CR (IBM 2390 Plus)** On, Off
A.G.M. (IBM 2390 Plus)** On, Off
0
5-4 Changing Printer Settings From the Printer’s Control Panel

5
R4C4620Rev. CA5 size CHANGE.FM3/13/00 Pass 3
RProof Sign-off:SEI Y.Ohkawara T.Takahashi
T.TakahashiSEI M.Kauppi K.Blair
* The options available vary depending on the country of purchase.
** These settings take effect only when IBM 2390 Plus emulation is selected.
Page length for tractor
This setting allows you to set the page length (in inches) for continuous paper.
Character table* Standard model:Italic, PC 437, PC 850, PC 860, PC 863, PC 865, PC 861, BRASCII, Abicomp, Roman 8, ISO Latin 1, PC 858, ISO 8859-15, All other models: Italic, PC 437, PC 850, PC 437 Greek, PC 853, PC 855, PC 852, PC 857, PC 864, PC 866, PC 869, MAZOWIA, Code MJK, ISO 8859-7, ISO Latin 1T, Bulgaria, PC 774, Estonia, ISO 8859-2, PC 866 LAT, PC 866 UKR, PC APTEC, PC 708, PC 720, PC AR864, PC 860, PC863, PC 865, PC 861, BRASCII, Abicomp, Roman 8, ISO Latin 1, PC 858, ISO 8859-15, PC 771
International character set for Italic table
Italic U.S.A., Italic France, Italic Germany, Italic U.K., Italic Denmark1, Italic Sweden, Italic Italy, Italic Spain1
Font OCR-B, Orator, Orator-S, Script C, Roman T, Sans Serif H
Manual feed wait time 1 second, 1.5 seconds, 2 seconds, 3 seconds
Buzzer On, Off
Roll paper On, off
Settings Options
Changing Printer Settings From the Printer’s Control Panel 5-5

R4C4620Rev. CA5 size CHANGE.FM3/13/00 Pass 3
L Proof Sign-off:SEI Y.Ohkawara T.Takahashi
T.TakahashiSEI M.Kauppi K.Blair
Skip over perforation
This feature is available only when continuous paper is selected. When you select On, the printer provides a 25.4 mm margin between the last line printed on one page and the first line printed on the next page. Because the program margin settings in most applications override margin settings made from the control panel, you should use this setting only if you cannot set your top and bottom margins using your application.
Auto tear off
When auto tear off is on and you are using continuous paper with the push tractor, the printer automatically advances the paper perforation to the tear-off position, where you can easily tear off the printed pages. When the printer receives the next print job, it automatically moves the unused paper back to the top-of-form position and starts printing, so you can use all of the next page.
When auto tear off is off and you are using continuous paper with the push tractor, you need to move the perforation to the tear-off position manually by pressing the Tear Off/Bin button. See “Advancing the Paper to the Tear-Off Edge” on page 2-34 for more information. (The tear-off feature is not available for paper loaded on the pull tractor.)
Auto line feed
When auto line feed is on, the printer accompanies each carriage return (CR) code received with a line feed code. When this feature is on, the print position moves to the next line. If the printer adds an extra line after every carriage return, select Off.
Print direction
You can select auto print direction (Auto), bidirectional printing (Bi-D), or unidirectional printing (Uni-D). Printing is normally bidirectional; however, unidirectional printing allows for precise vertical printing alignment, which is useful for printing graphics.
5-6 Changing Printer Settings From the Printer’s Control Panel

5
R4C4620Rev. CA5 size CHANGE.FM3/13/00 Pass 3
RProof Sign-off:SEI Y.Ohkawara T.Takahashi
T.TakahashiSEI M.Kauppi K.Blair
When set to Auto, the printer analyzes the data and uses unidirectional printing for any lines which require vertical printing alignment.
Software
When you select ESC/P2, the printer operates in the EPSON ESC/P2 mode. When you select IBM 2390 Plus, the printer emulates an IBM printer.
0 slash
The zero character has a slash ( ) when this feature is on. It has no slash (0) when this feature is off. The slash allows you to easily distinguish between the uppercase letter “O” and a zero.
High speed draft
When you choose On, the printer prints up to 400 cps (characters per second) at 10 cpi (characters per inch). When you choose Off, the printer prints up to 300 cps at 10 cpi.
I/F (interface) mode
The printer comes with a built-in parallel interface and an interface slot in which you can install one optional interface. For information on using an optional interface, see “Optional interface cards” on page A-3.
If your printer is connected to only one computer, select Parallel or Optional for the interface mode, depending on the interface you use. If your printer is connected to two computers, select Auto (automatic) to allow the printer to automatically switch between interfaces depending on which one is receiving data.
0
Changing Printer Settings From the Printer’s Control Panel 5-7

R4C4620Rev. CA5 size CHANGE.FM3/13/00 Pass 3
L Proof Sign-off:SEI Y.Ohkawara T.Takahashi
T.TakahashiSEI M.Kauppi K.Blair
Auto I/F (interface) wait time
This setting takes effect only if an optional interface is installed and the auto interface mode is selected. This setting determines how long the printer waits when it no longer receives data from an interface before it checks whether a print job is being sent through the other interface. You can specify 10 seconds or 30 seconds for the auto interface wait time.
Parallel I/F bidirectional mode
The Parallel Interface bidirectional transfer mode is used when this feature is on. If bidirectional transfer mode is unnecessary, turn this off.
Packet mode
Select Auto to use the IEEE-1284.4 packet transfer mode. If packet transfer mode is unnecessary, or if you cannot connect, turn this off.
Auto CR (carriage return)
This setting is available only in IBM 2390 Plus emulation mode. When auto carriage return is on, each line feed (LF) code or ESC J code is accompanied by a carriage return code. This moves the print position to the beginning of the next line. If the printer adds an extra line after every carriage return, select Off.
A.G.M. (Alternate Graphic Mode)
When A.G.M. is on, the printer can use some advanced graphics commands like those available in ESC/P2 mode. When you select IBM 2390 mode, this setting is available. The default setting is off.
Character table
You can select among 13 standard character tables as well as tables for 23 other countries. See Appendix C for character samples.
5-8 Changing Printer Settings From the Printer’s Control Panel

5
R4C4620Rev. CA5 size CHANGE.FM3/13/00 Pass 3
RProof Sign-off:SEI Y.Ohkawara T.Takahashi
T.TakahashiSEI M.Kauppi K.Blair
International character set for Italic table
You can select among several international character sets for the Italic character table. Each character set contains eight characters that vary depending on the country or language, so you can customize the Italic table to suit your printing needs. See Appendix C for character samples.
Font
You can select six fonts in default-setting mode. The following fonts are indicated on the control panel and can’t be selected by default settings: Draft, Roman, Sans Serif, Courier, Prestige, and Script.
Manual feed wait time
This sets the amount of wait time between when paper is inserted into the paper guide and it is fed. If the paper feeds before you can adjust its position to your satisfaction, you can increase the wait time.
Buzzer (beeper)
The printer beeps when an error occurs. (See “Using the Error Indicators” on page 7-2 for more information on printer errors.) If you do not want the printer to beep when an error occurs, turn this setting off.
Roll paper
When you turn on this mode, the printer recognizes that single sheets are not loaded in the printer, so it does not try to eject the paper and advance it forward to the next page when you press the LF/FF button.
Changing Printer Settings From the Printer’s Control Panel 5-9

R4C4620Rev. CA5 size CHANGE.FM3/13/00 Pass 3
L Proof Sign-off:SEI Y.Ohkawara T.Takahashi
T.TakahashiSEI M.Kauppi K.Blair
Changing default settings
Follow the steps on the next page to enter the default-setting mode and change the printer’s default settings.
Note:❏ To print the language selection and default-setting mode
instructions, you need five sheets of A4 or letter size single-sheet paper, or five pages of continuous paper that is at least 279 mm long and 210 mm wide. See Chapter 2 for instructions on loading continuous paper, or Chapter 3 for instructions on loading single sheets.
❏ If you use single sheets, you need to load a new sheet of paper each time the printer ejects a printed sheet.
1. Make sure paper is loaded and the printer is turned off.
cCaution:Whenever you turn off the printer, wait at least five seconds before turning it back on; otherwise you may damage the printer.
2. While holding down the Font button, turn on the printer. The printer enters the default-setting mode and prints the language selection instructions.
3. Press the Font button until the Font lights indicate the language you want, as described in the language selection instructions.
5-10 Changing Printer Settings From the Printer’s Control Panel

5
R4C4620Rev. CA5 size CHANGE.FM3/13/00 Pass 3
RProof Sign-off:SEI Y.Ohkawara T.Takahashi
T.TakahashiSEI M.Kauppi K.Blair
4. Press the Tear Off/Bin button to print the default-setting mode instructions (four pages) in the language you selected.
The printed instructions list the default settings you can change, describe how to change them, and show you how the control panel lights help you make settings. Follow these instructions to change the default settings using the buttons on the printer’s control panel.
Note:The arrows on the instruction sheets indicate the printer’s current settings.
5. When you finish making settings, turn off the printer and exit the default-setting mode. Any settings you have made remain in effect until you change them again.
Note:You may exit the default-setting mode by turning off the printer when the printer is not printing.
Changing Printer Settings From the Printer’s Control Panel 5-11

R4C4620Rev. CA5 size CHANGE.FM3/13/00 Pass 3
L Proof Sign-off:SEI Y.Ohkawara T.Takahashi
T.TakahashiSEI M.Kauppi K.Blair
5-12 Changing Printer Settings From the Printer’s Control Panel

6
R4C4620Rev. CA5 size Monitor3.fm3/13/00 Pass 3
RProof Sign-off:SEI Y.Ohkawara T.Takahashi
T.TakahashiSEI M.Kauppi K.Blair
Chapter 6
Using EPSON Status Monitor 3
About the EPSON Status Monitor 3 Utility . . . . . . . . . . . . . . . . . . . 6-2Accessing EPSON Status Monitor 3. . . . . . . . . . . . . . . . . . . . . 6-2
Using EPSON Status Monitor 3 6-1

R4C4620Rev. CA5 size Monitor3.fm3/13/00 Pass 3
L Proof Sign-off:SEI Y.Ohkawara T.Takahashi
T.TakahashiSEI M.Kauppi K.Blair
About the EPSON Status Monitor 3 Utility
The EPSON Status Monitor 3 utility comes with your printer but is available only when using Windows 95, 98, or NT 4.0. It allows you to monitor your printer’s status, alerts you when printer errors occur, and provides troubleshooting instructions when needed.
The EPSON Status Monitor 3 is available only when:
❏ The printer is connected directly to the host computer via the parallel port [LPT1].
❏ Your system is configured to support bidirectional communication.
You can install the EPSON Status Monitor 3 utility when you install the printer driver.
Before using the Status Monitor, be sure to read the README file in the Disk 1 folder on the driver disk. This file contains the latest information on the Status Monitor.
Note:If you install the driver by using Add Printer in the Printers folder, or by using the “Point and Print” method, Status Monitor 3 may not function properly. If you want to use Status Monitor 3, reinstall the driver as described in Chapter 1.
Accessing EPSON Status Monitor 3
There are two ways to access EPSON Status Monitor 3:
❏ Double-click the printer-shaped shortcut icon on the taskbar at the bottom of your computer screen. To add a shortcut icon to the taskbar, see “Utility menu.”
❏ Open the printer software window, click the Utility tab, then click EPSON Status Monitor 3.
6-2 Using EPSON Status Monitor 3

6
R4C4620Rev. CA5 size Monitor3.fm3/13/00 Pass 3
RProof Sign-off:SEI Y.Ohkawara T.Takahashi
T.TakahashiSEI M.Kauppi K.Blair
Printer Status window
To get more detailed information on printer status, you can access Status Monitor 3 from the printer software window. Click the Utility tab, then click EPSON Status Monitor 3.
If you access the Printer Status window as described above, the following window appears.
You can view the following information in the Printer Status window.
❏ Current Status
Provides you with detailed printer status information, a graphic display, and status messages.
Using EPSON Status Monitor 3 6-3

R4C4620Rev. CA5 size Monitor3.fm3/13/00 Pass 3
L Proof Sign-off:SEI Y.Ohkawara T.Takahashi
T.TakahashiSEI M.Kauppi K.Blair
6-4 Using EPSON Status Monitor 3

7
R4C4620Rev. CA5 size TRBLE.FM3/13/00 Pass 3
RProof Sign-off:SEI Y.Ohkawara T.Takahashi
T.TakahashiSEI M.Kauppi K.Blair
Chapter 7
Troubleshooting
Using the Error Indicators . . . . . . . . . . . . . . . . . . . . . . . . . . . . . . . . . 7-2
Problems and Solutions . . . . . . . . . . . . . . . . . . . . . . . . . . . . . . . . . . . 7-4Power supply problems. . . . . . . . . . . . . . . . . . . . . . . . . . . . . . . 7-5Single-sheet paper loading or feeding problems . . . . . . . . . . 7-6Continuous paper loading or feeding problems . . . . . . . . . . 7-8Wrong top-of-form position . . . . . . . . . . . . . . . . . . . . . . . . . . . 7-9Wrong tear-off position . . . . . . . . . . . . . . . . . . . . . . . . . . . . . . . 7-10Printing or printout quality problems. . . . . . . . . . . . . . . . . . . 7-11
Clearing Paper Jams . . . . . . . . . . . . . . . . . . . . . . . . . . . . . . . . . . . . . . 7-16
Aligning Vertical Lines in Your Printout . . . . . . . . . . . . . . . . . . . . . 7-17
Printing a Self Test. . . . . . . . . . . . . . . . . . . . . . . . . . . . . . . . . . . . . . . . 7-18
Printing a Hex Dump . . . . . . . . . . . . . . . . . . . . . . . . . . . . . . . . . . . . . 7-20
Troubleshooting 7-1

R4C4620Rev. CA5 size TRBLE.FM3/13/00 Pass 3
L Proof Sign-off:SEI Y.Ohkawara T.Takahashi
T.TakahashiSEI M.Kauppi K.Blair
Using the Error Indicators
You can identify many common printer problems using the lights on the control panel. If your printer stops working and one or more control panel lights are on or flashing or the printer beeps, use the following table to diagnose and fix the problem. If you can’t fix your printer problem using this table, go to the next section.
State of panel lights
Beep pattern
Problem
Solution
n Pause – The printer is paused.
Press the Pause button to resume printing.
••••• Paper from another paper source is currently in the paper path.
Move the paper release lever back to the appropriate position and press the Load/Eject button to feed the paper out of the paper path. Then set the lever to the position you want to use. Press the Pause button to turn off the Pause light, if necessary.
n Paper Outn Pause
••• No paper is loaded in the selected paper source.
Load paper in the printer. Then press the Pause button to turn off the Pause light, if necessary.
••• The paper is not loaded correctly.
Remove your paper and reload it. See Chapter 2 (continuous paper) or Chapter 3 (single sheets) for instructions on loading paper. Then press the Pause button to turn off the Pause light, if necessary.
••• Paper is jammed in the printer.
Clear the paper jam as described “Clearing Paper Jams” on page 7-16.
7-2 Troubleshooting

7
R4C4620Rev. CA5 size TRBLE.FM3/13/00 Pass 3
RProof Sign-off:SEI Y.Ohkawara T.Takahashi
T.TakahashiSEI M.Kauppi K.Blair
n = on, f = flashing••• = short series of beeps (three beeps)•••••= long series of beeps (five beeps)
Note:The printer beeps once if you press a control panel button when the corresponding function is not available.
f Paper Outn Pause
••• Continuous paper is not fed to the standby position.
Tear off the printed document at the perforation; then press the Load/Eject button. The printer feeds the paper to the standby position. Press the Pause button to turn off the Pause light.
••• A single sheet of paper is not fully ejected.
Press the Load/Eject button to eject the sheet. Then press the Pause button to turn off the Pause light, if necessary.
••• Paper is jammed in the printer.
Clear the paper jam as described on “Clearing Paper Jams” on page 7-16.
f Pause – The print head is overheated.
Wait a few minutes; the printer resumes printing automatically once the print head cools.
f Paper Outf Pausef f Tear Off/Binf f f Font
An unknown printer error has occurred.
Turn off the printer and leave it off for several minutes; then turn on the printer again. If the error recurs, contact your dealer.
State of panel lights
Beep pattern
Problem
Solution
Troubleshooting 7-3

R4C4620Rev. CA5 size TRBLE.FM3/13/00 Pass 3
L Proof Sign-off:SEI Y.Ohkawara T.Takahashi
T.TakahashiSEI M.Kauppi K.Blair
Problems and Solutions
Most printer problems are easy to solve. Use the information in this section to find the source of and solution to any printer problems that occur.
Determine the type of problem that occurred, and see the appropriate page below:
Power supply problems. . . . . . . . . . . . . . . . . . . page 7-5
Single-sheet paper loading or feeding problems . . . . . . . . . . . . . . . . . . . . . . . . page 7-6
Continuous paper loading or feeding problems . . . . . . . . . . . . . . . . . . . . . . . . page 7-8
Wrong top-of-form position . . . . . . . . . . . . . . . page 7-9
Wrong tear-off position . . . . . . . . . . . . . . . . . . . page 7-10
Printing or printout quality problems. . . . . . . page 7-11
You can also use the self test feature to determine whether the printer or the computer is causing the problem. See “Printing a Self Test” on page 7-18 for instructions on printing a self test.
To pinpoint communication problems, experienced users may want to use the printer’s hex dump mode, described on “Printing a Hex Dump” on page 7-20.
To clear a paper jam, see “Clearing Paper Jams” on page 7-16.
7-4 Troubleshooting

7
R4C4620Rev. CA5 size TRBLE.FM3/13/00 Pass 3
RProof Sign-off:SEI Y.Ohkawara T.Takahashi
T.TakahashiSEI M.Kauppi K.Blair
Power supply problems
The control panel lights come on briefly, but then go off and stay off.
Cause What to do
The printer’s voltage rating does not match the voltage of your electrical outlet.
Check the printer and the outlet voltage ratings. If the voltages do not match, unplug the printer immediately and contact your dealer.
wWarning:Do not reconnect the power cord to an electrical outlet that has the wrong voltage for your printer.
The printer does not work and the control panel lights are off even though you turned on the printer.
Cause What to do
The power cord is not properly plugged into the electrical outlet or your printer.
Turn off the printer, and make sure the power cord is firmly plugged into the electrical outlet and the printer, if necessary. Then turn on the printer.
The electrical outlet does not work.
Use a different outlet.
Troubleshooting 7-5

R4C4620Rev. CA5 size TRBLE.FM3/13/00 Pass 3
L Proof Sign-off:SEI Y.Ohkawara T.Takahashi
T.TakahashiSEI M.Kauppi K.Blair
Single-sheet paper loading or feeding problems
The printer does not load single-sheet paper or does not feed it properly.
Cause What to do
The paper release lever is set to a tractor position.
Set the paper release lever to the single-sheet position. For more information on setting the paper release lever, see Chapter 2.
Continuous paper is in the paper path.
Set the paper release lever to the appropriate tractor position and press the Load/Eject button to feed the continuous paper to the standby position. Then set the paper release lever to the single-sheet position. (See “Switching to printing on single sheets” on page 2-29 for more information.)
The paper on the paper guide is positioned too far to the right for the printer to detect that it is there.
Move the paper a little to the left.
Single-sheet paper is not loaded properly.
See Chapter 3 for instructions on loading single-sheet paper.
The paper thickness lever is not set correctly.
Set the paper thickness lever to match the thickness of your paper. See “Setting the Paper Release Lever” on page 2-2.
Your paper is creased, old, too thin, or too thick.
See the paper specifications in Appendix C and use new, clean sheets of paper.
7-6 Troubleshooting

7
R4C4620Rev. CA5 size TRBLE.FM3/13/00 Pass 3
RProof Sign-off:SEI Y.Ohkawara T.Takahashi
T.TakahashiSEI M.Kauppi K.Blair
The printer does not fully eject a single sheet.
Cause What to do
Your paper is too long. Press the Load/Eject button to eject the sheet. Make sure the page length of your paper is within the range specified for single-sheet paper in Appendix C. Also check and adjust the paper size setting in your application or printer driver.
The optional cut-sheet feeder does not feed your single-sheet paper properly.
Cause What to do
The cut-sheet feeder is not installed properly.
Reinstall it as described in “Installing an optional cut-sheet feeder” on page A-6.
Too many sheets are loaded in the cut-sheet feeder.
Load no more than 150 single sheets in the high-capacity cut-sheet feeder. See “Switching between continuous paper and single-sheet paper in the cut-sheet feeder” on page A-18 for more information.
The edge guides of the cut-sheet feeder are not positioned correctly.
Align the left edge guide with the arrow mark, then move the right edge guide to match your paper’s width.
There is only one sheet left in the bin.
Load more paper in the cut-sheet feeder.
Troubleshooting 7-7

R4C4620Rev. CA5 size TRBLE.FM3/13/00 Pass 3
L Proof Sign-off:SEI Y.Ohkawara T.Takahashi
T.TakahashiSEI M.Kauppi K.Blair
Continuous paper loading or feeding problems
The printer does not load continuous paper or does not feed it properly.
Cause What to do
The paper release lever is not set correctly.
Set the paper release lever to the tractor position for the paper source you want to use. For more information on setting the paper release lever, see Chapter 2.
Single-sheet paper is in the paper path.
Set the paper release lever to the single-sheet position and press the Load/Eject button to eject the sheet. Then set the paper release lever back to the appropriate tractor position. (See “Switching to printing on continuous paper” on page 2-30 for more information.
Continuous paper is not loaded properly.
See Chapter 2 for instructions on loading continuous paper on the tractor you want to use.
The paper thickness lever is not set correctly.
Set the paper thickness lever to match the thickness of your paper. See “Setting the Paper Thickness Lever” on page 2-4.
The printer does not feed continuous paper to the standby position.
Cause What to do
You did not tear off the printed pages before pressing the Load/Eject button.
Tear off the printed pages at the perforation. Then press the Load/Eject button to feed the paper backward to the standby position.
7-8 Troubleshooting
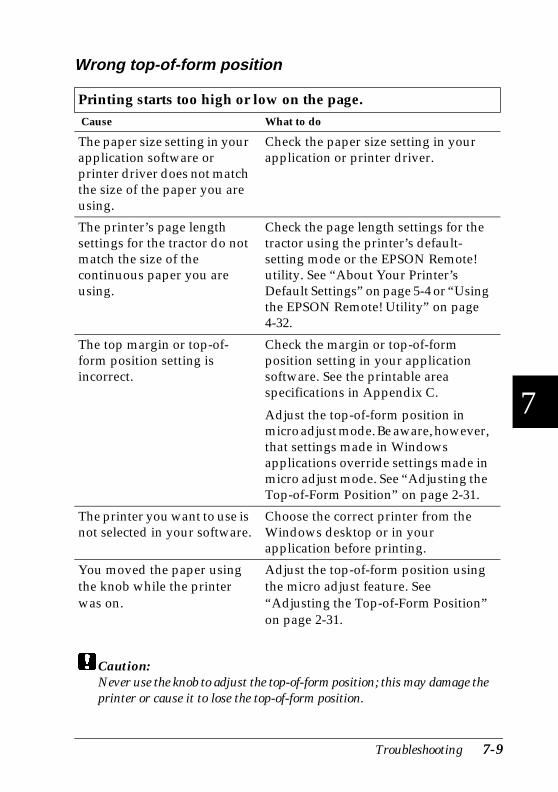
7
R4C4620Rev. CA5 size TRBLE.FM3/13/00 Pass 3
RProof Sign-off:SEI Y.Ohkawara T.Takahashi
T.TakahashiSEI M.Kauppi K.Blair
Wrong top-of-form position
Printing starts too high or low on the page. Cause What to do
The paper size setting in your application software or printer driver does not match the size of the paper you are using.
Check the paper size setting in your application or printer driver.
The printer’s page length settings for the tractor do not match the size of the continuous paper you are using.
Check the page length settings for the tractor using the printer’s default-setting mode or the EPSON Remote! utility. See “About Your Printer’s Default Settings” on page 5-4 or “Using the EPSON Remote! Utility” on page 4-32.
The top margin or top-of-form position setting is incorrect.
Check the margin or top-of-form position setting in your application software. See the printable area specifications in Appendix C.
Adjust the top-of-form position in micro adjust mode. Be aware, however, that settings made in Windows applications override settings made in micro adjust mode. See “Adjusting the Top-of-Form Position” on page 2-31.
The printer you want to use is not selected in your software.
Choose the correct printer from the Windows desktop or in your application before printing.
You moved the paper using the knob while the printer was on.
Adjust the top-of-form position using the micro adjust feature. See “Adjusting the Top-of-Form Position” on page 2-31.
cCaution:Never use the knob to adjust the top-of-form position; this may damage the printer or cause it to lose the top-of-form position.
Troubleshooting 7-9

R4C4620Rev. CA5 size TRBLE.FM3/13/00 Pass 3
L Proof Sign-off:SEI Y.Ohkawara T.Takahashi
T.TakahashiSEI M.Kauppi K.Blair
Wrong tear-off position
The printer prints on (or too far away from) the perforation of your continuous paper.
Cause What to do
The tear-off position setting is incorrect.
Adjust the tear-off position using the micro adjust feature. See “Adjusting the tear-off position” on page 2-35.
You moved the paper using the knob while the printer was on.
Adjust the tear-off position using the micro adjust feature. See “Adjusting the tear-off position” on page 2-35.
cCaution:Never use the knob to adjust the tear-off position; this may damage the printer or cause it to lose the tear-off position.
The printer you want to use is not selected in your software.
Choose the correct printer from the Windows desktop or in your application before printing.
The paper size setting in your application or printer driver does not match the size of the paper you are using.
Check the paper size setting in your application or printer driver.
The printer’s page length settings for the tractor do not match the size of the continuous paper you are using.
Check the page length settings for the tractor using the printer’s default-setting mode or the EPSON Remote! utility. See “About Your Printer’s Default Settings” on page 5-4 or “Using the EPSON Remote! Utility” on page 4-32.
7-10 Troubleshooting

7
R4C4620Rev. CA5 size TRBLE.FM3/13/00 Pass 3
RProof Sign-off:SEI Y.Ohkawara T.Takahashi
T.TakahashiSEI M.Kauppi K.Blair
Printing or printout quality problems
The printer does not print when the computer sends data.
Cause What to do
The printer is paused. Press the Pause button.
The interface cable is not plugged in securely.
Check that both ends of the cable between the printer and the computer are plugged in securely. If the cable is connected correctly, run a self test as described later in this chapter.
Your interface cable does not meet the printer and/or computer specifications.
Use an interface cable that meets the requirements of both the printer and computer. See “Optional interface cards” on page A-3 and your computer’s documentation.
Your software is not properly set up for your printer.
Select your printer from the Windows desktop or in your application. If necessary, install or reinstall the printer driver software as described in Chapter 1.
The printer makes noise, but nothing prints or printing stops abruptly
Cause What to do
The paper thickness lever is set incorrectly.
Set the paper thickness lever to match the thickness of your paper. See “Setting the Paper Thickness Lever” on page 2-4.
The ribbon has too much slack, the ribbon has come loose, or the ribbon cartridge is not installed properly.
Remove any slack in the ribbon by turning the ribbon-tightening knob, or reinstall the ribbon cartridge as described in Chapter 1.
Troubleshooting 7-11

R4C4620Rev. CA5 size TRBLE.FM3/13/00 Pass 3
L Proof Sign-off:SEI Y.Ohkawara T.Takahashi
T.TakahashiSEI M.Kauppi K.Blair
The printout is faint.
Cause What to do
The paper thickness lever is set incorrectly for your paper.
Move the paper thickness lever to a lower setting.
The ribbon is worn out. Replace the ribbon cartridge as described in Chapter 1.
The printout has gaps.
Cause What to do
The paper thickness lever is not set correctly.
Set the paper thickness lever to match the thickness of your paper. See page 2-5 for continuous paper, or page 3-3 for single sheets.
Part of the printout is missing, or dots are missing in random positions.
Cause What to do
The ribbon has too much slack, the ribbon has come loose, or the ribbon cartridge is not installed properly.
Remove any slack in the ribbon by turning the ribbon-tightening knob, or reinstall the ribbon cartridge as described in Chapter 1.
The ribbon is worn out. Replace the ribbon cartridge as described in Chapter 1.
7-12 Troubleshooting

7
R4C4620Rev. CA5 size TRBLE.FM3/13/00 Pass 3
RProof Sign-off:SEI Y.Ohkawara T.Takahashi
T.TakahashiSEI M.Kauppi K.Blair
Lines of dots are missing in the printout.
Cause What to do
The print head is damaged. Stop printing and contact your dealer to have the print head replaced.
cCaution:Never replace the print head yourself; you may damage the printer. Other parts of the printer must also be checked when the print head is replaced.
All the text is printed on the same line.
Cause What to do
No line feed command is sent at the end of each line of text.
Turn on the auto line feed setting using the printer’s default-setting mode or the EPSON Remote! utility so that the printer automatically adds a line feed code to each carriage return. See “About Your Printer’s Default Settings” on page 5-4 or “Using the EPSON Remote! Utility” on page 4-32.
The printout has extra blank lines between lines of text.
Cause What to do
Two line feed commands are being sent at the end of each line of text.
Turn off the auto line feed setting using the printer’s default-setting mode or the EPSON Remote! utility. See “About Your Printer’s Default Settings” on page 5-4 or “Using the EPSON Remote! Utility” on page 4-32.
The line space setting in your application software is incorrect.
Adjust the line space setting in your application software.
Troubleshooting 7-13

R4C4620Rev. CA5 size TRBLE.FM3/13/00 Pass 3
L Proof Sign-off:SEI Y.Ohkawara T.Takahashi
T.TakahashiSEI M.Kauppi K.Blair
The skip over perforation setting is on.
Turn off the skip over perforation setting in the default-setting mode or the EPSON Remote! utility. See “About Your Printer’s Default Settings” on page 5-4 or “Using the EPSON Remote! Utility” on page 4-32.
The printer prints strange symbols, incorrect fonts, or other inappropriate characters.
Cause What to do
Your printer and computer are not communicating correctly.
Make sure that you are using the correct interface cable and that the communications protocol is correct. See “Optional interface cards” on page A-3 and your computer documentation. If you installed an optional serial interface card, also see “Installing an Interface Card” on page A-30.
The wrong character table is selected in your software.
Select the correct character table using your software, the default-setting mode, or the EPSON Remote! utility. The character table setting in your software overrides settings made in the default-setting mode or the EPSON Remote! utility.
The printer you want to use is not selected in your software.
Choose the correct printer from the Windows desktop or in your application before printing.
Your application software is not configured correctly for your printer.
Make sure that your application software is set up correctly for your printer. See your application documentation. If necessary, install or reinstall the printer driver software as described in Chapter 1.
7-14 Troubleshooting

7
R4C4620Rev. CA5 size TRBLE.FM3/13/00 Pass 3
RProof Sign-off:SEI Y.Ohkawara T.Takahashi
T.TakahashiSEI M.Kauppi K.Blair
Software settings override settings you make using the default-setting mode, EPSON Remote!, or the control panel buttons.
Use your application software to select the font.
Vertical printed lines are not aligned.
Cause What to do
Bidirectional printing, which is the printer’s standard printing mode, is out of alignment.
Use the printer’s bidirectional adjustment mode to correct this problem. See “Aligning Vertical Lines in Your Printout,” later in this chapter.
Troubleshooting 7-15

R4C4620Rev. CA5 size TRBLE.FM3/13/00 Pass 3
L Proof Sign-off:SEI Y.Ohkawara T.Takahashi
T.TakahashiSEI M.Kauppi K.Blair
Clearing Paper Jams
To clear a paper jam, follow these steps:
1. Turn off the printer.
2. If a single sheet of paper is stuck on the paper guide, gently remove it.
3. Remove the printer cover. If continuous paper from the rear slot is loaded in the printer, remove the paper guide.
4. If continuous paper is jammed in the printer, tear off the supply at the perforation nearest the paper entry slot.
5. Turn the knob on the left side of the printer away from you to eject the paper in the printer. Remove any remaining pieces of paper.
cCaution:Use the knob on the left side of the printer to clear paper jams only when the printer is off. Otherwise, you may damage the printer or lose the top-of-form or tear-off position.
6. Replace the paper guide if necessary, and replace the printer cover. Then close the paper guide cover.
7. Turn on the printer. Make sure the Paper Out and Pause lights are off.
7-16 Troubleshooting

7
R4C4620Rev. CA5 size TRBLE.FM3/13/00 Pass 3
RProof Sign-off:SEI Y.Ohkawara T.Takahashi
T.TakahashiSEI M.Kauppi K.Blair
Aligning Vertical Lines in Your Printout
If you notice that the vertical lines in your printout are not properly aligned, you can use the printer’s bidirectional adjustment mode to correct this problem.
Note:❏ To complete the steps below, you need four sheets of A4 or letter size
single-sheet paper or four pages of continuous paper that are at least 279 mm long and 241 mm wide. See Chapter 2 for instructions on loading continuous paper, or Chapter 3 for instructions on loading single sheets.
❏ If you use single sheets, you need to load a new sheet of paper each time the printer ejects a printed sheet onto the paper guide.
Follow these steps to perform the bidirectional adjustment:
1. Make sure paper is loaded and the printer is turned off.
cCaution:Whenever you turn off the printer, wait at least five seconds before turning it back on; otherwise you may damage the printer.
2. While holding down the Pause button, turn on the printer. The printer enters the bidirectional adjustment mode and then prints instructions and the first set of alignment patterns.
3. As described in the instructions, compare the alignment patterns and select the pattern with the best alignment.
4. Follow the instructions to print the remaining sets of alignment patterns and select the pattern with the best alignment in each set.
5. After you select the best pattern in the final set of alignment patterns, turn off the printer and exit the bidirectional adjustment mode. Your selections are saved automatically.
Troubleshooting 7-17

R4C4620Rev. CA5 size TRBLE.FM3/13/00 Pass 3
L Proof Sign-off:SEI Y.Ohkawara T.Takahashi
T.TakahashiSEI M.Kauppi K.Blair
Printing a Self Test
Running the printer’s self test helps you determine whether the printer or the computer is causing the problem:
❏ If the self test results are satisfactory, the printer is working properly and the problem probably results from your printer driver settings, application settings, computer, or interface cable. (Be sure to use a shielded interface cable.)
❏ If the self test does not print properly, there is a problem with the printer. See “Problems and Solutions” for possible causes and solutions to the problem.
You can print a self test using either single sheets or continuous paper. See Chapter 2 for instructions on loading continuous paper, or Chapter 3 for instructions on loading single sheets.
Note:Use continuous paper that is at least 241 mm wide or A4 or letter size single-sheet paper.
To perform a self test, follow these steps:
1. Make sure paper is loaded and the printer is turned off.
cCaution:Whenever you turn off the printer, wait at least five seconds before turning it back on; otherwise you may damage the printer.
2. To run the test using the Draft font, hold down the LF/FF button while you turn on the printer. To run the test using the printer’s letter-quality fonts, hold down the Load/Eject button while you turn on the printer. Either self test can help you determine the source of your printing problem; however, the draft test prints faster than the near-letter-quality test.
7-18 Troubleshooting
7
R4C4620Rev. CA5 size TRBLE.FM3/13/00 Pass 3
RProof Sign-off:SEI Y.Ohkawara T.Takahashi
T.TakahashiSEI M.Kauppi K.Blair
After a few seconds, the printer loads the paper automatically and begins printing a self test. A series of characters is printed.
Note:To temporarily stop the self test, press the Pause button. To resume the test, press the Pause button again.
3. To end the self test, press the Pause button to stop printing and the Load/Eject button to eject the printed page. Then turn off the printer.
Troubleshooting 7-19

R4C4620Rev. CA5 size TRBLE.FM3/13/00 Pass 3
L Proof Sign-off:SEI Y.Ohkawara T.Takahashi
T.TakahashiSEI M.Kauppi K.Blair
Printing a Hex Dump
If you are an experienced user or a programmer, you can print a hexadecimal dump to isolate communication problems between the printer and your software program. In hex dump mode, the printer prints all data received from the computer as hexadecimal values.
You can print a hex dump using either single sheets or continuous paper. See Chapter 2 for instructions on loading continuous paper, or Chapter 3 for instructions on loading single sheets.
Note:Use continuous paper that is at least 241 mm wide or A4 or letter size single-sheet paper.
To print a hex dump, follow the steps below.
1. Make sure paper is loaded and the printer is turned off.
cCaution:Whenever you turn off the printer, wait at least five seconds before turning it back on; otherwise you may damage the printer.
2. To enter hex dump mode, hold down both the LF/FF and Load/Eject buttons while you turn on the printer.
7-20 Troubleshooting

7
R4C4620Rev. CA5 size TRBLE.FM3/13/00 Pass 3
RProof Sign-off:SEI Y.Ohkawara T.Takahashi
T.TakahashiSEI M.Kauppi K.Blair
3. Open a software program and send a print job to the printer. Your printer prints all the codes it receives in hexadecimal format.
If characters are printable, they appear in the right column as ASCII characters. Nonprintable codes, such as control codes, are represented by dots. By comparing the characters printed in the right column with the printout of the hexadecimal codes, you can check the codes the printer is receiving.
4. To turn off hex dump mode, press the Pause button to stop printing and the Load/Eject button to eject the printed page(s). Then turn off the printer.
Troubleshooting 7-21

R4C4620Rev. CA5 size TRBLE.FM3/13/00 Pass 3
L Proof Sign-off:SEI Y.Ohkawara T.Takahashi
T.TakahashiSEI M.Kauppi K.Blair
7-22 Troubleshooting

A
R4C4620Rev. CA5 size OPTIONS.FM3/13/00 Pass 3
RProof Sign-off:SEI Y.Ohkawara T.Takahashi
T.TakahashiSEI M.Kauppi K.Blair
Appendix A
Enhancing Your Printer With Options
Options . . . . . . . . . . . . . . . . . . . . . . . . . . . . . . . . . . . . . . . . . . . . . . . . . A-2Paper handling options . . . . . . . . . . . . . . . . . . . . . . . . . . . . . . . A-2Optional interface cards. . . . . . . . . . . . . . . . . . . . . . . . . . . . . . . A-3
Using the Optional Cut-Sheet Feeders . . . . . . . . . . . . . . . . . . . . . . . A-5Installing an optional cut-sheet feeder . . . . . . . . . . . . . . . . . . A-6Loading paper in the single-bin cut-sheet feeder . . . . . . . . . A-8Loading paper in the high-capacity cut-sheet feeder . . . . . . A-12Assembling the double-bin cut-sheet feeder . . . . . . . . . . . . . A-16Selecting your paper path (bin 1 or bin 2). . . . . . . . . . . . . . . . A-17Switching between continuous paper
and single-sheet paper in the cut-sheet feeder . . . . . . . . A-18
Using the Roll Paper Holder . . . . . . . . . . . . . . . . . . . . . . . . . . . . . . . A-20Assembling the roll paper holder . . . . . . . . . . . . . . . . . . . . . . A-20Installing the roll paper holder. . . . . . . . . . . . . . . . . . . . . . . . . A-21Loading roll paper . . . . . . . . . . . . . . . . . . . . . . . . . . . . . . . . . . . A-22Removing roll paper . . . . . . . . . . . . . . . . . . . . . . . . . . . . . . . . . A-24
Using an Optional Front Sheet Guide . . . . . . . . . . . . . . . . . . . . . . . A-25Installing the front sheet guide. . . . . . . . . . . . . . . . . . . . . . . . . A-25Loading paper in the front sheet guide. . . . . . . . . . . . . . . . . . A-27
Installing an Interface Card . . . . . . . . . . . . . . . . . . . . . . . . . . . . . . . . A-30
Enhancing Your Printer With Options A-1

R4C4620Rev. CA5 size OPTIONS.FM3/13/00 Pass 3
L Proof Sign-off:SEI Y.Ohkawara T.Takahashi
T.TakahashiSEI M.Kauppi K.Blair
Options
The following table shows the paper handling options and interface cards available for your printer. To purchase options, contact your dealer or customer support as described in Appendix D.
Paper handling options
High-capacity cut-sheet feeder (C806382)
Feeds up to 150 sheets of paper or 25 plain bond envelopes into the printer without reloading. See “Switching between continuous paper and single-sheet paper in the cut-sheet feeder” on page A-18 for instructions.
If you also install the single-bin cut-sheet feeder, you can use both feeders as a double-bin cut-sheet feeder.
Single-bin cut-sheet feeder (C806372)
You can load up to 50 sheets of ordinary single-sheet paper in the single-bin cut-sheet feeder. You can also connect it to the high-capacity cut-sheet feeder to create a double-bin. See “Switching between continuous paper and single-sheet paper in the cut-sheet feeder” on page A-18 for instructions.
A-2 Enhancing Your Printer With Options

A
R4C4620Rev. CA5 size OPTIONS.FM3/13/00 Pass 3
RProof Sign-off:SEI Y.Ohkawara T.Takahashi
T.TakahashiSEI M.Kauppi K.Blair
Optional interface cards
You can install an optional interface card to supplement your printer’s built-in parallel interface and provide added network compatibility. The EPSON interface cards in the table below are compatible with your printer. (Not all the interfaces in the table are available worldwide.)
Additional tractor unit (C800202)
This option is available because using two tractors in combination improves continuous paper handling and reduces the chances of paper jams. This printing method is especially useful for printing on continuous multipart forms. For instructions on using this option, see “Using the Tractor in the Pull Position” on page 2-14.
Roll paper holder (#8310)
Allows you to use your printer with 8.5-inch roll paper like that used with telex machines. See “Using the Roll Paper Holder” on page A-20 for instructions.
Front sheet guide (C814232)
The front sheet guide allows you to load single sheets from the front paper slot. (This option may not be available in some countries.)
Enhancing Your Printer With Options A-3
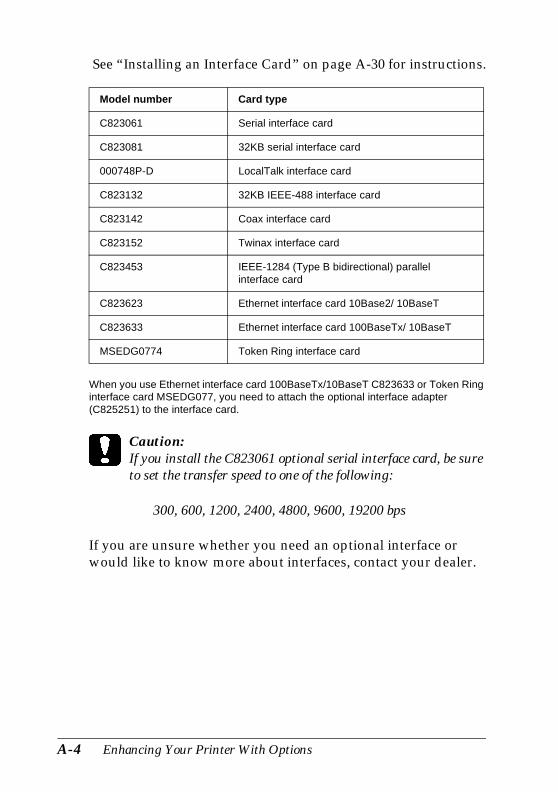
R4C4620Rev. CA5 size OPTIONS.FM3/13/00 Pass 3
L Proof Sign-off:SEI Y.Ohkawara T.Takahashi
T.TakahashiSEI M.Kauppi K.Blair
See “Installing an Interface Card” on page A-30 for instructions.
When you use Ethernet interface card 100BaseTx/10BaseT C823633 or Token Ring interface card MSEDG077, you need to attach the optional interface adapter (C825251) to the interface card.
cCaution:If you install the C823061 optional serial interface card, be sure to set the transfer speed to one of the following:
300, 600, 1200, 2400, 4800, 9600, 19200 bps
If you are unsure whether you need an optional interface or would like to know more about interfaces, contact your dealer.
Model number Card type
C823061 Serial interface card
C823081 32KB serial interface card
000748P-D LocalTalk interface card
C823132 32KB IEEE-488 interface card
C823142 Coax interface card
C823152 Twinax interface card
C823453 IEEE-1284 (Type B bidirectional) parallel interface card
C823623 Ethernet interface card 10Base2/ 10BaseT
C823633 Ethernet interface card 100BaseTx/ 10BaseT
MSEDG0774 Token Ring interface card
A-4 Enhancing Your Printer With Options

A
R4C4620Rev. CA5 size OPTIONS.FM3/13/00 Pass 3
RProof Sign-off:SEI Y.Ohkawara T.Takahashi
T.TakahashiSEI M.Kauppi K.Blair
Using the Optional Cut-Sheet Feeders
Two types of optional cut-sheet feeders are available for use with your printer: the single-bin cut-sheet feeder (C806372) and the high-capacity cut-sheet feeder (C806382). You can use either one of these separately, or you can use both feeders together as a double-bin cut-sheet feeder to automatically load two different types of paper.
The single-bin cut-sheet feeder holds up to 50 single sheets. The high-capacity cut-sheet feeder holds up to 150 single sheets or up to 25 envelopes.
cCaution:Do not load multipart forms, carbon paper, or labels in the cut-sheet feeder.
To install the single-bin, high-capacity, or double-bin cut-sheet feeder, see the next section. However, before installing the double-bin cut-sheet feeder, you must assemble it as described a “Assembling the double-bin cut-sheet feeder” on page A-16. To load paper in a bin, see “Loading paper in the single-bin cut-sheet feeder” on page A-8, or “Loading paper in the high-capacity cut-sheet feeder” on page A-12.
Note:You cannot install and use the optional cut-sheet feeders when the tractor unit is installed in the pull position. To remove the tractor from the pull position, see “Removing the pull tractor” on page 2-24.
Enhancing Your Printer With Options A-5
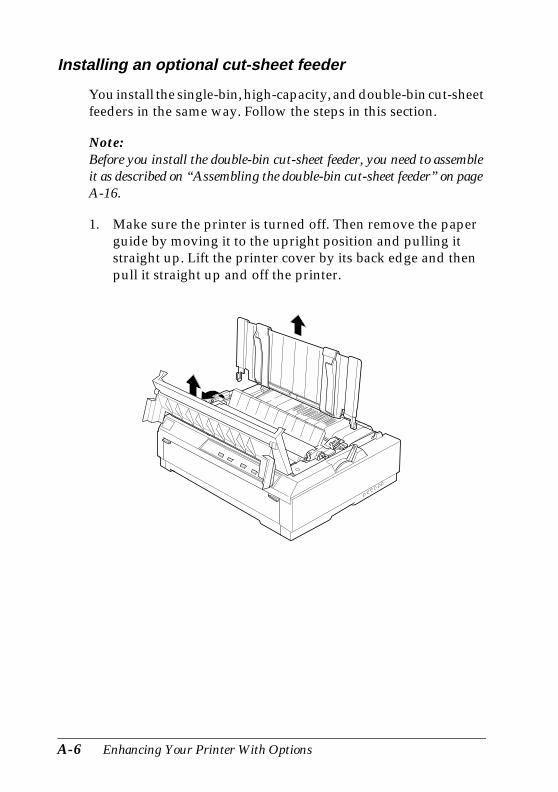
R4C4620Rev. CA5 size OPTIONS.FM3/13/00 Pass 3
L Proof Sign-off:SEI Y.Ohkawara T.Takahashi
T.TakahashiSEI M.Kauppi K.Blair
Installing an optional cut-sheet feeder
You install the single-bin, high-capacity, and double-bin cut-sheet feeders in the same way. Follow the steps in this section.
Note:Before you install the double-bin cut-sheet feeder, you need to assemble it as described on “Assembling the double-bin cut-sheet feeder” on page A-16.
1. Make sure the printer is turned off. Then remove the paper guide by moving it to the upright position and pulling it straight up. Lift the printer cover by its back edge and then pull it straight up and off the printer.
A-6 Enhancing Your Printer With Options

A
R4C4620Rev. CA5 size OPTIONS.FM3/13/00 Pass 3
RProof Sign-off:SEI Y.Ohkawara T.Takahashi
T.TakahashiSEI M.Kauppi K.Blair
2. Holding the cut-sheet feeder in both hands, press down on the latch levers and fit the notches over the printer’s mounting posts, as shown below. Release the latch levers to lock the feeder in place.
Note:To use both cut-sheet feeders together as a double-bin cut-sheet feeder, you need to install the single-bin cut-sheet feeder behind the high-capacity cut-sheet feeder. For installation details see “Assembling the double-bin cut-sheet feeder” on page A-16.
single-bin cut-sheet feeder
high-capacity cut-sheet feeder / double-bin cut-sheet feeder
Enhancing Your Printer With Options A-7

R4C4620Rev. CA5 size OPTIONS.FM3/13/00 Pass 3
L Proof Sign-off:SEI Y.Ohkawara T.Takahashi
T.TakahashiSEI M.Kauppi K.Blair
3. To replace the printer cover, first insert the front tabs into the slots on the printer, then lower the cover into place.
If you installed the double-bin cut-sheet feeder, you need to select your paper path (bin 1 or bin 2). See “Selecting your paper path (bin 1 or bin 2)” on page A-17.
You are now ready to load paper with your single-bin, high-capacity, or double-bin cut-sheet feeder.
Loading paper in the single-bin cut-sheet feeder
The single-bin cut-sheet feeder holds up to 50 sheets of paper. When the single-bin cut-sheet feeder is installed, you can still use the paper guide to load single sheets and envelopes one at a time.
cCaution:Do not load multipart forms, carbon paper, envelopes, or labels in the single-bin cut-sheet feeder.
1. Make sure the paper guide is removed, and set the paper thickness lever to the single-sheet position. Also make sure the paper thickness lever (located under the printer cover) is set to the proper position for your paper’s thickness.
A-8 Enhancing Your Printer With Options

A
R4C4620Rev. CA5 size OPTIONS.FM3/13/00 Pass 3
RProof Sign-off:SEI Y.Ohkawara T.Takahashi
T.TakahashiSEI M.Kauppi K.Blair
2. Slide the left paper guide of the cut-sheet feeder so it is aligned with the triangle mark. Next, slide the right paper guide to roughly match the width of your paper. Slide the paper support midway between the paper guides.
3. Pull both paper set levers forward until the paper guides retract and lock open to allow paper loading.
4. Open the paper guide cover.
paper support
paper guides of the cut-sheet feeder
Enhancing Your Printer With Options A-9

R4C4620Rev. CA5 size OPTIONS.FM3/13/00 Pass 3
L Proof Sign-off:SEI Y.Ohkawara T.Takahashi
T.TakahashiSEI M.Kauppi K.Blair
5. Take a stack of paper (up to 50 sheets) and fan it. Next, tap the side and bottom edges of the paper on a flat surface to even up the stack.
6. Insert the paper stack printable side down along the left paper guide.
7. Adjust the right paper guide so that it matches your paper’s width. Make sure the position of the guide allows the paper to move up and down freely.
8. Push back the paper set levers to clamp the paper against the guide rollers.
A-10 Enhancing Your Printer With Options

A
R4C4620Rev. CA5 size OPTIONS.FM3/13/00 Pass 3
RProof Sign-off:SEI Y.Ohkawara T.Takahashi
T.TakahashiSEI M.Kauppi K.Blair
9. Attach the stacker-support wires to the paper guide as shown below, if necessary.
10. Install the paper guide with the attached stacker-support by fitting the notches on the paper guide straight down over the mounting posts on the printer. Slide the edge guides to the middle of your paper.
The cut-sheet feeder automatically loads paper when the printer receives data.
Enhancing Your Printer With Options A-11

R4C4620Rev. CA5 size OPTIONS.FM3/13/00 Pass 3
L Proof Sign-off:SEI Y.Ohkawara T.Takahashi
T.TakahashiSEI M.Kauppi K.Blair
If the first line on your page appears too high or low, you can fix this by adjusting the top-of-form position using the micro adjust feature. See “Adjusting the Top-of-Form Position” on page 2-31.
Loading paper in the high-capacity cut-sheet feeder
The high-capacity cut-sheet feeder holds up to 150 sheets of paper or up to 25 envelopes.
cCaution:Do not load multipart forms, carbon paper, or labels in the high-capacity cut-sheet feeder.
1. Set the paper release lever to the single-sheet position. Also make sure the paper thickness lever (located under the printer cover) is set to the proper position for your paper’s thickness.
A-12 Enhancing Your Printer With Options

A
R4C4620Rev. CA5 size OPTIONS.FM3/13/00 Pass 3
RProof Sign-off:SEI Y.Ohkawara T.Takahashi
T.TakahashiSEI M.Kauppi K.Blair
2. Pull the lock levers on the edge guides forward to release them.
3. Slide the left paper guide until it is aligned with the triangle mark; then lock it in place by pushing back its lock lever. Next, slide the right paper guide to roughly match the width of your paper. Slide the paper support to midway between the paper guides.
Enhancing Your Printer With Options A-13

R4C4620Rev. CA5 size OPTIONS.FM3/13/00 Pass 3
L Proof Sign-off:SEI Y.Ohkawara T.Takahashi
T.TakahashiSEI M.Kauppi K.Blair
4. Pull both paper set levers forward until the paper guides retract and lock open to allow paper loading.
5. Open the paper guide cover.
6. Take a stack of paper (up to 150 sheets) and fan it. Next, tap the side and bottom edges of the paper on a flat surface to even up the stack.
7. Insert the paper stack, printable side down, along the left paper guide.
A-14 Enhancing Your Printer With Options

A
R4C4620Rev. CA5 size OPTIONS.FM3/13/00 Pass 3
RProof Sign-off:SEI Y.Ohkawara T.Takahashi
T.TakahashiSEI M.Kauppi K.Blair
8. Adjust the right paper guide so that it matches your paper’s width and lock it in place. Make sure the position of the guide allows the paper to move up and down freely.
If you are loading envelopes, push back the envelope levers as shown below.
9. Push back the paper set levers to clamp the paper or envelopes against the guide rollers.
The cut-sheet feeder automatically loads paper when the printer receives data.
If the first line on your page appears too high or low, you can fix this by adjusting the top-of-form position using the micro adjust feature. See “Adjusting the Top-of-Form Position” on page 2-31.
Enhancing Your Printer With Options A-15
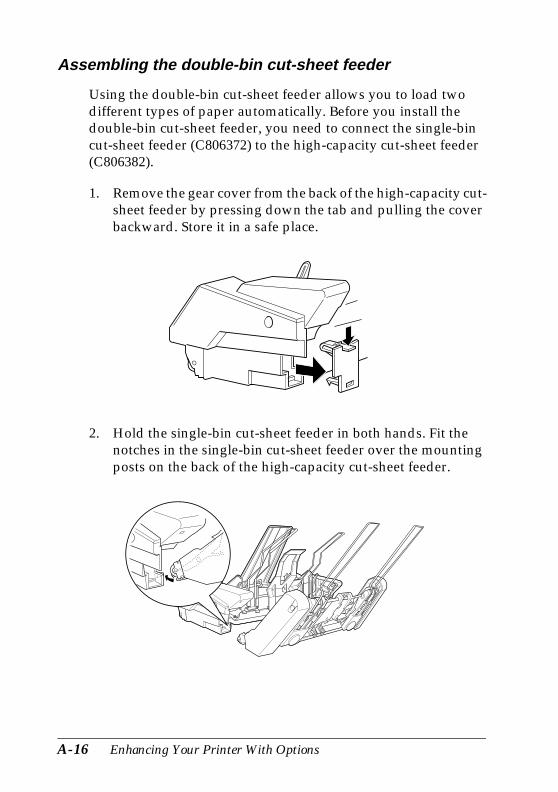
R4C4620Rev. CA5 size OPTIONS.FM3/13/00 Pass 3
L Proof Sign-off:SEI Y.Ohkawara T.Takahashi
T.TakahashiSEI M.Kauppi K.Blair
Assembling the double-bin cut-sheet feeder
Using the double-bin cut-sheet feeder allows you to load two different types of paper automatically. Before you install the double-bin cut-sheet feeder, you need to connect the single-bin cut-sheet feeder (C806372) to the high-capacity cut-sheet feeder (C806382).
1. Remove the gear cover from the back of the high-capacity cut-sheet feeder by pressing down the tab and pulling the cover backward. Store it in a safe place.
2. Hold the single-bin cut-sheet feeder in both hands. Fit the notches in the single-bin cut-sheet feeder over the mounting posts on the back of the high-capacity cut-sheet feeder.
A-16 Enhancing Your Printer With Options

A
R4C4620Rev. CA5 size OPTIONS.FM3/13/00 Pass 3
RProof Sign-off:SEI Y.Ohkawara T.Takahashi
T.TakahashiSEI M.Kauppi K.Blair
3. Lock the two cut-sheet feeders together by pushing firmly on the tab locks.
To install the double-bin cut-sheet feeder on your printer, see “Installing an optional cut-sheet feeder” on page A-6.
Selecting your paper path (bin 1 or bin 2)
When the double-bin cut-sheet feeder is installed, the high-capacity cut-sheet feeder becomes bin 1 and the single-bin cut-sheet feeder becomes bin 2 for paper path selection purposes.
bin 2: single-bin cut-sheet feederbin 1: high-capacity cut-sheet feeder
Enhancing Your Printer With Options A-17

R4C4620Rev. CA5 size OPTIONS.FM3/13/00 Pass 3
L Proof Sign-off:SEI Y.Ohkawara T.Takahashi
T.TakahashiSEI M.Kauppi K.Blair
It is best to select the paper path in your application program because software settings usually override the printer’s control panel settings. However, if you cannot select the paper path in your application, select a path by pressing the Tear off/Bin button until the light indicates the bin you want as shown below.
The cut-sheet feeder you selected automatically loads paper when the printer receives data.
Switching between continuous paper and single-sheet paper in the cut-sheet feeder
You can easily switch between continuous paper on a push tractor and single-sheet paper in the cut-sheet feeder without removing the continuous paper.
Switching to continuous paper
1. If any sheets are in the paper path, press the Load/Eject button to eject them.
2. Move the printer’s paper release lever to the push tractor position. Also set the paper thickness lever to the proper position for your paper.
■ ❑ : bin 1 (high-capacity cut-sheet feeder) is selected.
❑ ■ : bin 2 (single-bin cut-sheet feeder) is selected.
A-18 Enhancing Your Printer With Options

A
R4C4620Rev. CA5 size OPTIONS.FM3/13/00 Pass 3
RProof Sign-off:SEI Y.Ohkawara T.Takahashi
T.TakahashiSEI M.Kauppi K.Blair
Switching to single-sheet paper in the cut-sheet feeder
1. If any continuous paper remains in the printer, press the Tear Off/Bin button to advance the paper to the tear-off position. Then tear off the printed pages.
cCaution:Tear off any printed documents before pressing the Load/Eject button in the next step. Reverse feeding several pages at a time may cause a paper jam.
2. Press the Load/Eject button. The printer feeds the paper backward to the standby position. The paper is still attached to the push tractor but is no longer in the paper path.
3. Move the printer’s paper release lever to the single-sheet position. Also set the paper thickness lever to the proper position for the thickness of your single-sheet paper.
4. If you are using the double-bin cut-sheet feeder, select the bin you want to use as described on “Selecting your paper path (bin 1 or bin 2)” on page A-17.
Enhancing Your Printer With Options A-19

R4C4620Rev. CA5 size OPTIONS.FM3/13/00 Pass 3
L Proof Sign-off:SEI Y.Ohkawara T.Takahashi
T.TakahashiSEI M.Kauppi K.Blair
Using the Roll Paper Holder
The optional roll paper holder (#8310) allows you to use 8.5-inch roll paper like that used with telex machines. This provides an inexpensive alternative to using continuous paper for applications that require variable paper lengths. Before you install and use the roll paper holder, you need to assemble it.
Assembling the roll paper holder
To assemble the roll paper holder, follow the steps below.
1. Fit the arc bearings into the stand as shown.
2. Make sure you orient the stand and base plate as shown below. Then place the base plate on the stand and fasten the two together with the plastic spacing clips.
A-20 Enhancing Your Printer With Options

A
R4C4620Rev. CA5 size OPTIONS.FM3/13/00 Pass 3
RProof Sign-off:SEI Y.Ohkawara T.Takahashi
T.TakahashiSEI M.Kauppi K.Blair
3. Hook the tension lever onto both ends of the stand as shown below. While pulling up the tension lever, fit the wire ends of the tension lever into the holes in the stand. The roll paper holder is assembled.
Installing the roll paper holder
To install the roll paper holder, follow the steps below.
1. Make sure the printer is turned off.
2. Position the roll paper holder underneath the printer as shown below. Fit the two positioning pegs on the bottom of the printer into the two holes in the base plate.
cCaution:The roll paper holder is not fastened to the printer; only the printer’s weight and the two positioning pegs hold it in place. If you pick up the printer, be careful not to drop the roll paper holder.
tension lever
Enhancing Your Printer With Options A-21

R4C4620Rev. CA5 size OPTIONS.FM3/13/00 Pass 3
L Proof Sign-off:SEI Y.Ohkawara T.Takahashi
T.TakahashiSEI M.Kauppi K.Blair
To remove the roll paper holder, carefully lift up the printer and pull out the roll paper holder from beneath the printer.
Loading roll paper
After you install the roll paper holder, follow the steps below to load a roll of paper,
1. Make sure the printer is turned off. Open the paper guide cover and remove the paper guide.
2. Make sure the paper tension unit is installed.
3. Set the paper thickness lever (located under the printer cover) to the proper position for the thickness of your roll paper.
4. Set the paper release lever to the single-sheet position.
5. Cut the leading edge of the roll paper straight across.
6. Insert the roll paper holder shaft into the center of the paper roll as shown.
A-22 Enhancing Your Printer With Options

A
R4C4620Rev. CA5 size OPTIONS.FM3/13/00 Pass 3
RProof Sign-off:SEI Y.Ohkawara T.Takahashi
T.TakahashiSEI M.Kauppi K.Blair
7. Place the shaft and paper roll on the roll paper holder so the paper feeds from the bottom of the roll.
8. Turn on the printer. Bring the leading edge of the paper up over the push tractor and insert it until it meets resistance. The printer loads the roll paper automatically.
9. Replace the paper guide and close the paper guide cover. You are now ready to print. The printed roll paper is fed over the paper guide to the back of the printer, as shown below.
Enhancing Your Printer With Options A-23

R4C4620Rev. CA5 size OPTIONS.FM3/13/00 Pass 3
L Proof Sign-off:SEI Y.Ohkawara T.Takahashi
T.TakahashiSEI M.Kauppi K.Blair
When you finish printing, open the paper guide cover and press the LF/FF button to advance the paper. Tear off the paper using the tear-off edge of the printer.
Removing roll paper
Roll paper cannot be fed backward. To remove roll paper, open the paper guide cover and remove the paper guide, then cut the paper behind where it feeds into the printer. Press the Load/Eject button to eject the remaining paper.
A-24 Enhancing Your Printer With Options

A
R4C4620Rev. CA5 size OPTIONS.FM3/13/00 Pass 3
RProof Sign-off:SEI Y.Ohkawara T.Takahashi
T.TakahashiSEI M.Kauppi K.Blair
Using an Optional Front Sheet Guide
The optional front sheet guide (C814232) fits inside the front of the printer. This option allows you to load single sheets and carbonless single-sheet multipart forms of up to 5 parts (one original and four copies). Paper used with front sheet guide must be 148 to 257 mm wide and can only be loaded one sheet at a time.
The optional front sheet guide (C814232) provides you with the best paper jam prevention, but you cannot load continuos paper in the front when it is installed.
Note:This option is not available in some countries.
Installing the front sheet guide
1. Open the front cover.
Enhancing Your Printer With Options A-25

R4C4620Rev. CA5 size OPTIONS.FM3/13/00 Pass 3
L Proof Sign-off:SEI Y.Ohkawara T.Takahashi
T.TakahashiSEI M.Kauppi K.Blair
2. Remove the edge guide from the bottom of the printer by pushing in the pegs.
3. Insert the front of the front paper guide into the holder on both sides of the printer’s interior. Insert the pegs on the back of the front paper guide into the holes on the inside-bottom of the printer.
A-26 Enhancing Your Printer With Options

A
R4C4620Rev. CA5 size OPTIONS.FM3/13/00 Pass 3
RProof Sign-off:SEI Y.Ohkawara T.Takahashi
T.TakahashiSEI M.Kauppi K.Blair
4. Open the edge guides on the paper guide all the way to the left and right, then place the paper guide in the upright position.
Loading paper in the front sheet guide
You can load single sheets or multipart forms one at a time in the front sheet guide.
cCaution:Do not load envelopes in the front sheet guide.
1. Make sure that the paper guide is in the upright position and the edge guides are open all the way to the left and right. Set the paper release lever to the single-sheet position.
Enhancing Your Printer With Options A-27

R4C4620Rev. CA5 size OPTIONS.FM3/13/00 Pass 3
L Proof Sign-off:SEI Y.Ohkawara T.Takahashi
T.TakahashiSEI M.Kauppi K.Blair
2. If you are using ordinary single-sheet paper, set the paper thickness lever (located under the printer cover) to 0 as shown below. If you are loading a single-sheet multipart form, set the paper thickness lever to the proper position.
3. Slide the edge guide to the triangle mark on the front sheet guide.
Note:You can slide the edge guide to the left in 1/10-inch increments to increase the left margin on your printout.
A-28 Enhancing Your Printer With Options

A
R4C4620Rev. CA5 size OPTIONS.FM3/13/00 Pass 3
RProof Sign-off:SEI Y.Ohkawara T.Takahashi
T.TakahashiSEI M.Kauppi K.Blair
4. Making sure it is aligned with the edge guide, load the paper printable side up until it meets resistance. The printer loads the paper automatically.
Enhancing Your Printer With Options A-29

R4C4620Rev. CA5 size OPTIONS.FM3/13/00 Pass 3
L Proof Sign-off:SEI Y.Ohkawara T.Takahashi
T.TakahashiSEI M.Kauppi K.Blair
Installing an Interface Card
Follow the steps below to install an optional interface card.
1. Make sure the printer is turned off. Unplug the printer’s power cord and disconnect the interface cable.
2. Remove the screws from the shield plate on the back of the printer and remove the plate.
3. Slide the interface card along the slots on both sides of the interface compartment. Firmly push in the card to make sure the connector at the back of the interface card is fully inserted into the printer’s internal socket. Then replace the screws and tighten them.
Note:Store the shield plate in a safe place; you will need to reattach it if you remove the interface card later.
A-30 Enhancing Your Printer With Options

A
R4C4620Rev. CA5 size OPTIONS.FM3/13/00 Pass 3
RProof Sign-off:SEI Y.Ohkawara T.Takahashi
T.TakahashiSEI M.Kauppi K.Blair
To remove the interface card, perform the procedure above in reverse order.
Enhancing Your Printer With Options A-31

B
R4C4620Rev. CA5 size CLEANING.FM3/13/00 Pass 3
RProof Sign-off:SEI Y.Ohkawara T.Takahashi
T.TakahashiSEI M.Kauppi K.Blair
Appendix B
Cleaning and Transporting the Printer
Cleaning the Printer . . . . . . . . . . . . . . . . . . . . . . . . . . . . . . . . . . . . . . B-2
Transporting the Printer . . . . . . . . . . . . . . . . . . . . . . . . . . . . . . . . . . . B-3
Cleaning and Transporting the Printer B-1
R4C4620Rev. CA5 size CLEANING.FM3/13/00 Pass 3
L Proof Sign-off:SEI Y.Ohkawara T.Takahashi
T.TakahashiSEI M.Kauppi K.Blair
Cleaning the Printer
To keep your printer operating at its best, you should clean it thoroughly several times a year. To clean your printer, follow these steps:
1. Remove any paper loaded in the printer. Make sure the printer is turned off.
2. Remove the paper guide. If a pull tractor or an optional cut-sheet feeder is installed, remove it.
3. Use a soft brush to carefully brush away all dust and dirt from the outer case and paper guide.
4. If the outer case or paper guide is still dirty or dusty, clean them with a soft, clean cloth dampened with mild detergent dissolved in water. Keep the printer cover in place and lower it until it lies flat on the top of the printer to prevent water from getting inside the printer.
cCaution:❏ Never use alcohols or thinners to clean the printer; these
chemicals can damage the printer components as well as the case.
❏ Be careful not to get water on the printer mechanism or electronic components.
❏ Do not use a hard or abrasive brush.
❏ Do not spray the inside of the printer with lubricants; unsuitable lubricants can damage the printer mechanism. Contact an EPSON dealer if you think lubrication is needed.
B-2 Cleaning and Transporting the Printer
B
R4C4620Rev. CA5 size CLEANING.FM3/13/00 Pass 3
RProof Sign-off:SEI Y.Ohkawara T.Takahashi
T.TakahashiSEI M.Kauppi K.Blair
Transporting the Printer
If you need to transport your printer some distance, carefully repack it using the original box and packing materials, as described below.
wWarning:You need to move the print head by hand to remove the ribbon cartridge. If you have just used the printer, the print head may be hot; let it cool for a few minutes before touching it.
1. Remove any paper loaded in the printer. Make sure the printer is turned off.
2. Unplug the power cord from the electrical outlet; then disconnect the interface cable from the printer.
3. Remove the paper guide.
4. If a pull tractor is installed, remove it as described in “Removing the pull tractor” on page 2-24. If any options are installed, remove them and pack them in their original boxes.
5. Make sure that the print head is not hot. Then remove the ribbon cartridge as described in Chapter 1.
6. Remove the paper tension unit as described on “Installing the tractor in the pull position” on page 2-14. Attach the protective locking clips on both sides of the printer roller. Then install the paper tension unit as described on “Removing the pull tractor” on page 2-24.
7. Make sure the tractor that comes with your printer is installed in the push position. See “Loading paper onto the push tractor” on page 2-6 for instructions.
8. Repack the printer, ribbon cartridge, paper guide, and power cord in the original packing materials and place them in the printer’s original box.
Cleaning and Transporting the Printer B-3

R4C4620Rev. CA5 size CLEANING.FM3/13/00 Pass 3
L Proof Sign-off:SEI Y.Ohkawara T.Takahashi
T.TakahashiSEI M.Kauppi K.Blair
B-4 Cleaning and Transporting the Printer

C
R4C4620Rev. CA5 size Spec.fm3/13/00 Pass 3
RProof Sign-off:SEI Y.Ohkawara T.Takahashi
T.TakahashiSEI M.Kauppi K.Blair
Appendix C
Specifications
Printer Specifications . . . . . . . . . . . . . . . . . . . . . . . . . . . . . . . . . . . . . C-2Mechanical. . . . . . . . . . . . . . . . . . . . . . . . . . . . . . . . . . . . . . . . . . C-2Electrical. . . . . . . . . . . . . . . . . . . . . . . . . . . . . . . . . . . . . . . . . . . . C-6Environmental . . . . . . . . . . . . . . . . . . . . . . . . . . . . . . . . . . . . . . C-6Paper. . . . . . . . . . . . . . . . . . . . . . . . . . . . . . . . . . . . . . . . . . . . . . . C-6Paper alignment . . . . . . . . . . . . . . . . . . . . . . . . . . . . . . . . . . . . . C-10Printable area . . . . . . . . . . . . . . . . . . . . . . . . . . . . . . . . . . . . . . . C-11Safety approvals . . . . . . . . . . . . . . . . . . . . . . . . . . . . . . . . . . . . . C-13CE marking . . . . . . . . . . . . . . . . . . . . . . . . . . . . . . . . . . . . . . . . . C-14
Command Lists . . . . . . . . . . . . . . . . . . . . . . . . . . . . . . . . . . . . . . . . . . C-15EPSON ESC/P2 control codes . . . . . . . . . . . . . . . . . . . . . . . . . C-15IBM 2390 Plus emulation control codes . . . . . . . . . . . . . . . . . C-19
Character Tables . . . . . . . . . . . . . . . . . . . . . . . . . . . . . . . . . . . . . . . . . C-20International character sets for the Italic table . . . . . . . . . . . . C-32
Specifications C-1

R4C4620Rev. CA5 size Spec.fm3/13/00 Pass 3
L Proof Sign-off:SEI Y.Ohkawara T.Takahashi
T.TakahashiSEI M.Kauppi K.Blair
Printer Specifications
Mechanical
Printing method: 24-pin impact dot matrix
Printing speed: High-speed draft 400 cps at 10 cpiDraft 300 cps at 10 cpi
360 cps at 12 cpi450 cps at 15 cpi
Draft condensed 257 cps at 17 cpi300 cps at 20 cpi
LQ 100 cps at 10 cpi120 cps at 12 cpi150 cps at 15 cpi
LQ condensed 171 cps at 17 cpi200 cps at 20 cpi
Printing direction: Bidirectional logic seeking for text and graphics printing. Unidirectional text or graphics printing can be selected using software commands.
Line spacing: 1/6-inch or programmable in 1/360-inch increments
Printable columns: 80 columns (at 10 cpi)
Resolution: 360 × 180 dpi maximum (letter quality)360 × 360 dpi maximum (raster graphics)
Interfaces: One standard bidirectional, 8-bit, parallel interface with IEEE 1284 nibble mode support and one optional interface slot
C-2 Specifications

C
R4C4620Rev. CA5 size Spec.fm3/13/00 Pass 3
RProof Sign-off:SEI Y.Ohkawara T.Takahashi
T.TakahashiSEI M.Kauppi K.Blair
Paper feed methods: Friction (front or top paper entry)Push tractor (rear paper entry) Pull tractor (front, bottom, or rear paper entry)Push and pull tractor (optional)Cut-sheet feeder (optional)Roll paper holder (optional)
Paper feed speed: Continuous 5 inches/secondIntermittent 45 ms/line at 1/6-inch
line spacing
Paper capacity: High-capacity cut-sheet feederup to 150 sheets of 82 g/m² paperup to 25 plain or bond envelopesup to 30 airmail envelopesup to 30 postcards
Note:The total thickness of the paper stack can be up to 15 mm.
Single-bin cut-sheet feederup to 50 sheets of 82 g/m² paper
Note:The total thickness of the paper stack can be up to 5 mm.
Buffer: 64KB
Specifications C-3

R4C4620Rev. CA5 size Spec.fm3/13/00 Pass 3
L Proof Sign-off:SEI Y.Ohkawara T.Takahashi
T.TakahashiSEI M.Kauppi K.Blair
Built-in fonts: Bitmap fontsEPSON Draft 10, 12, 15 cpiEPSON Roman 10, 12, 15 cpi,
proportionalEPSON Sans Serif 10, 12, 15 cpi,
proportionalEPSON Courier 10, 12, 15 cpiEPSON Prestige 10, 12 cpiEPSON Script 10 cpiEPSON OCR-B 10 cpiEPSON Orator 10 cpiEPSON Orator-S 10 cpiEPSON Script C proportional
Scalable fontsEPSON Roman 10.5, 8-32 pt
(every 2 pt)EPSON Sans Serif 10.5, 8-32 pt
(every 2 pt)EPSON Roman T 10.5, 8-32 pt
(every 2 pt)EPSON Sans Serif H 10.5, 8-32 pt
(every 2 pt)
Barcode fontsEAN-13, EAN-8, Interleaved 2 of 5, UPC-A, UPC-E, Code 39, Code 128, POSTNET
Character tables: One Italic and 12 graphical character tables. (35 graphical character tables are available in some countries.) See “Character Tables” on page C-20 for more information.
Character sets: 14 international character sets and one legal character set
C-4 Specifications

C
R4C4620Rev. CA5 size Spec.fm3/13/00 Pass 3
RProof Sign-off:SEI Y.Ohkawara T.Takahashi
T.TakahashiSEI M.Kauppi K.Blair
Note:EPSON recommends the use of original EPSON ribbon cartridges only. Other products not manufactured by EPSON may cause damage to your printer not covered by EPSON’s warranties.
Reliability: Total print volume 19 million lines (except print head)MTBF 10,000 POH (25% duty)
Print head life approx. 200 millionstrokes per wire
Dimensions and weight:
Height 160 mm Width 415 mm Depth 368 mm Weight approx. 7.5 kg
Ribbon: Black ribbon cartridge (#7753)Film ribbon cartridge (#7768)Black ribbon life 2 million characters
(LQ, 10 cpi, 48 dots/character)
Film ribbon life 0.2 million characters (LQ, 10 cpi, 48 dots/character)
Specifications C-5

R4C4620Rev. CA5 size Spec.fm3/13/00 Pass 3
L Proof Sign-off:SEI Y.Ohkawara T.Takahashi
T.TakahashiSEI M.Kauppi K.Blair
Electrical
Note:Check the label on the back of the printer for the voltage of your printer.
Environmental
Paper
Note:❏ Use recycled paper and envelopes only under normal temperature
and humidity conditions, as follows:
❏ Do not load paper that has been folded or is damaged, wrinkled, or curled.
Input voltage range 198 to 264 V
Rated frequency range 50 to 60 Hz
Input frequency range 49.5 to 60.5 Hz
Rated current 0.5 A (maximum 1.4 A depending on the character type)
Power consumption Approx. 36 W (ISO/IEC 10561 letter pattern)
Temperature Humidity(without condensation)
Operation 5 to 35 °C 10 to 80% RH
Storage –30 to 60 °C 0 to 85% RH
Temperature 15 to 25 °C
Humidity 30 to 60% RH
C-6 Specifications

C
R4C4620Rev. CA5 size Spec.fm3/13/00 Pass 3
RProof Sign-off:SEI Y.Ohkawara T.Takahashi
T.TakahashiSEI M.Kauppi K.Blair
Ordinary single sheets: front, top, and cut-sheet feeder entry
Single-sheet multipart forms: front entry only
Width Front and top:257 to 356 mm
High-capacity cut-sheet feeder:100 to 364 mm
Second-bin cut-sheet feeder:182 to 216 mm
Length Front and top:100 to 364 mm
High-capacity cut-sheet feeder:257 to 356 mm
Second-bin cut-sheet feeder:257 to 356 mm
Thickness 0.065 to 0.14 mm Cut sheet feeder:
0.07 to 0.14 mm
Weight 52 to 90 g/m² Cut sheet feeder:
64 to 90 g/m²
Width 100 to 257 mm
Length 100 to 364 mm
Copies 1 original + up to 4 copies
Thickness 0.12 to 0.39 mm
Weight 40 to 58 g/m²
Binding Line glue at the top of form
Specifications C-7

R4C4620Rev. CA5 size Spec.fm3/13/00 Pass 3
L Proof Sign-off:SEI Y.Ohkawara T.Takahashi
T.TakahashiSEI M.Kauppi K.Blair
Envelopes: top entry only
Postcards: front and top entry
Continuous paper(standard and multipart): front, rear, and bottom entry
Size No. 6: 165 × 92 mm No. 10: 241 × 105 mm
Thickness 0.16 to 0.52 mm
Weight 45 to 90 g/m²
Width Front and top:100 to 200 mm
Cut sheet feeder:100 to 148 mm
Length Front:148 to 200 mm Top: 100 to 200 mm Cut sheet feeder:
100 to 148 mm
Thickness 0.22 mm
Weight 192 g/m²
Width 101.6 to 254 mm
Length (one page) 101.6 to 558.8 mm
Copies 1 original + up to 4 copies
Thickness Printable area 0.065 to 0.39 mm
Perforated edges up to 0.9 mm
Weight (not multipart)
52 to 82 g/m²
Weight (one sheet of multipart)
40 to 58 g/m²
C-8 Specifications

C
R4C4620Rev. CA5 size Spec.fm3/13/00 Pass 3
RProof Sign-off:SEI Y.Ohkawara T.Takahashi
T.TakahashiSEI M.Kauppi K.Blair
Continuous paper with labels: front and bottom entry
Roll paper: rear entry with optional roll paper holder only
Binding Point glue or paper staples on both sides (front, bottom, or rear entry)
❏ The continuous multipart forms should be securely joined together along the left and right edges by crimping. Crimping should be pressed in from the original sheet side and go completely through all copy sheets.
❏ The ratio of the cut/uncut length at the perforation should be between 3:1 and 5:1.
❏ The perforation between pages should not extend all the way to the edges of the paper.
❏ At the perforation between pages, the horizontal and vertical perforation cuts should not cross.
❏ The thickness of the perforation part when extended should be 1 mm or less.
Label size 23.8 × 63.5 mm minimum2.5 mm corner radius, minimum
Backing sheet width 101.6 to 254 mm
Backing sheet length(one page)
101.6 to 558.8 mm
Backing sheet thickness 0.07 to 0.09 mm
Total thickness 0.16 to 0.19 mm
Label weight 64 g/m²
Width 216 ± 3 mm
Thickness 0.07 to 0.09 mm
Weight 52 to 82 g/m²
Specifications C-9

R4C4620Rev. CA5 size Spec.fm3/13/00 Pass 3
L Proof Sign-off:SEI Y.Ohkawara T.Takahashi
T.TakahashiSEI M.Kauppi K.Blair
Paper alignment
Front entry
Printing starts at “0” on the scale. The unprintable area is to the left of the “0.”
Rear entry
Printing starts at “0” on the scale. The unprintable area is to the left of the “0.”
C-10 Specifications

C
R4C4620Rev. CA5 size Spec.fm3/13/00 Pass 3
RProof Sign-off:SEI Y.Ohkawara T.Takahashi
T.TakahashiSEI M.Kauppi K.Blair
Printable area
Single sheets, envelopes, and postcards:
A The minimum top margin is 4.2 mm.
B The minimum left margin is 3.0 mm.The minimum right margin is 3.0 mm.The maximum paper width is 257 mm and the maximum printable width is 203.2 mm.For single sheets wider than 209.2 mm, the side margins increase proportionally to match the width of the paper.
C The minimum bottom margin is 4.2 mm.
B
B C
B
C
A
A
printablearea
printablearea
Specifications C-11
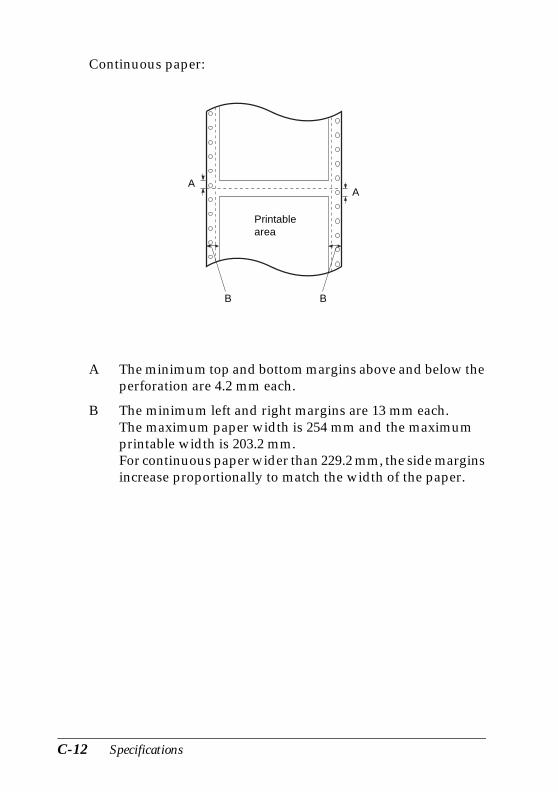
R4C4620Rev. CA5 size Spec.fm3/13/00 Pass 3
L Proof Sign-off:SEI Y.Ohkawara T.Takahashi
T.TakahashiSEI M.Kauppi K.Blair
Continuous paper:
A The minimum top and bottom margins above and below the perforation are 4.2 mm each.
B The minimum left and right margins are 13 mm each.The maximum paper width is 254 mm and the maximum printable width is 203.2 mm.For continuous paper wider than 229.2 mm, the side margins increase proportionally to match the width of the paper.
AA
B B
Printable area
C-12 Specifications

C
R4C4620Rev. CA5 size Spec.fm3/13/00 Pass 3
RProof Sign-off:SEI Y.Ohkawara T.Takahashi
T.TakahashiSEI M.Kauppi K.Blair
Roll paper:
Safety approvals
Acoustic noise: Approx. 49 dB (A) (ISO 7779 pattern)
A The minimum top margin is 4.2 mm.
B The minimum left margin is 3.0 mm.The minimum right margin is 3.0 mm.The maximum printable width is 203.2 mm.
Safety standards EN 60950
EMI EN 55022 (CISPR pub. 22) class BAS/NZS 3548 class B
A B
printable area
Specifications C-13

R4C4620Rev. CA5 size Spec.fm3/13/00 Pass 3
L Proof Sign-off:SEI Y.Ohkawara T.Takahashi
T.TakahashiSEI M.Kauppi K.Blair
CE marking
Low Voltage Directive 73/23/EECEMC Directive 89/336/EEC
EN 60950EN 55022 Class BEN 61000-3-2EN 61000-3-3EN 50082-1
IEC 60801-2IEC 60801-3IEC 60801-4
C-14 Specifications

C
R4C4620Rev. CA5 size Spec.fm3/13/00 Pass 3
RProof Sign-off:SEI Y.Ohkawara T.Takahashi
T.TakahashiSEI M.Kauppi K.Blair
Command Lists
Your printer supports the following EPSON ESC/P2 control codes and IBM 2390 Plus emulation control codes:
EPSON ESC/P2 control codes
Selecting an EPSON ESC/P2 printer in your software allows you to use advanced fonts and graphics.
General operation:ESC @, ESC U, ESC EM
Paper feeding:FF, LF, ESC 0, ESC 2, ESC 3, ESC +, CR
Page format:ESC (C, ESC C, ESC C 0, ESC Q, ESC l, ESC (c, ESC N, ESC O
Print position motion:ESC $, ESC \, ESC (V, ESC (v, ESC D, HT, ESC B, VT, ESC J
Font selection:ESC k, ESC x, ESC y, ESC X, ESC P, ESC M, ESC g, ESC p, ESC 4, ESC 5, ESC E, ESC F, ESC !
Font enhancement:ESC W, DC4, SO, DC2, SI, ESC w, ESC G, ESC H, ESC T, ESC S, ESC -, ESC (-, ESC q
Spacing:ESC Space, ESC c, ESC (U
Character handling:ESC t, ESC (t, ESC R, ESC %, ESC &, ESC :, ESC 6, ESC 7, ESC (^
Bit image: ESC *
Bar code:ESC (B
Specifications C-15

R4C4620Rev. CA5 size Spec.fm3/13/00 Pass 3
L Proof Sign-off:SEI Y.Ohkawara T.Takahashi
T.TakahashiSEI M.Kauppi K.Blair
Barcode commands
Your printer has powerful barcode printing capabilities and includes the following resident barcode fonts: EAN-13, EAN-8, Interleaved 2 of 5, UPC-A, UPC-E, Code 39, Code 128, and POSTNET. See the barcode commands below:
Function:
ESC ( B n1 n2 k m s v1 v2 c data n = (n1 + (256 × n2))
k: Select barcodek = 0: EAN-13, 1: EAN-8, 2: Interleaved 2 of 5, 3: UPC-A, 4: UPC-E, 5: Code 39, 6: Code 128, 7: POSTNET
m: Module width (180 dpi)m = 2: 2 dots, 3: 3 dots, 4: 4 dots, 5: 5 dots
s: Space adjustment value-3 ≤ s ≤ 3 (1/360-inch units)
v1, v2: Bar lengthv1 + v2 × 256 (1/180-inch units)
Note:❏ The v1 and v2 values are ignored when POSTNET is selected.
❏ The long bar length of POSTNET is always 0.125 inch; the short bar length is always 0.050 inch.
ESC ( B Select Barcode Printing
Format:ASCII code:Decimal:Hexadecimal:
ESC271B
(4028
B6642
mmm
nnn
C-16 Specifications

C
R4C4620Rev. CA5 size Spec.fm3/13/00 Pass 3
RProof Sign-off:SEI Y.Ohkawara T.Takahashi
T.TakahashiSEI M.Kauppi K.Blair
c: Control flag
Bit 0 = Check digit
0: The printer does not add a check digit. 1: The printer adds a check digit.
Bit 1 = Human readable character (HRC)
0: The printer adds the HRC. 1: The printer does not add the HRC.
Bit 2 = Position of flag character (for EAN-13 and UPC-A only)
0: Center 1: Under
Bits 3−7 = Not used
Barcode data
Barcode data corresponds to the barcode symbology. The data number of each barcode type is constant. The barcode is printed only if the following valid characters are set:
Number of valid characters 1: Control flag c b0=0
Number of valid characters 2: Control flag c b0=1
Barcode type Number of valid characters 1 (HEX)
Number of valid characters 2 (HEX)
EAN-13EAN-8Interleaved 2 of 5UPC-AUPC-ECode 39Code 128POSTNET
0D82 to FF0C0C or 81 to FF2 to FF6 or 0A or 0C
0C72 to FF0B0B or 71 to FF2 to FF5 or 9 or 0B
Specifications C-17

R4C4620Rev. CA5 size Spec.fm3/13/00 Pass 3
L Proof Sign-off:SEI Y.Ohkawara T.Takahashi
T.TakahashiSEI M.Kauppi K.Blair
The valid data for each barcode type is described below. If invalid data is included in the barcode data string, the barcode is not printed.
The following conditions are required for barcode printing:
❏ Barcode printing is always performed unidirectionally. However, when it is mixed with raster bit image data, neither barcode nor raster bit image data is printed.
❏ A barcode is not printed when part of the barcode extends beyond the right margin.
❏ When barcode data and text data are mixed in a data sequence, barcodes and text are printed in the same place.
❏ The start and stop (*) characters of Code 39 are added to human readable characters.
❏ The initial data of Code 128 (Set A, B, or C) is identified as the first data of Code 128, and must be hexadecimal (41, 42, and 43, respectively).
❏ When Code 128 Set C and Interleaved 2 of 5 are selected, barcode data requires an even number data string. However, if an odd number string is sent, a 0 is automatically added, making it an even number data string.
❏ The barcode print start position (except for POSTNET) is always 40/360 inch above the baseline.
Barcode type Barcode data
EAN-13EAN-8UPC-AUPC-EInterleaved 2 of 5POSTNETCode 39
Code 128
0-9 (Hex 30-39)0-9 (Hex 30-39)0-9 (Hex 30-39)0-9 (Hex 30-39)0-9 (Hex 30-39)0-9 (Hex 30-39)0-9 (Hex 30-39), (Hex 41-5A), (Hex 20, 24, 25, 2B, 2D, 2E, 2F)Set A, Set B, Set C
C-18 Specifications

C
R4C4620Rev. CA5 size Spec.fm3/13/00 Pass 3
RProof Sign-off:SEI Y.Ohkawara T.Takahashi
T.TakahashiSEI M.Kauppi K.Blair
IBM 2390 Plus emulation control codes
This printer emulates the IBM Proprinter using the commands below. For detailed information, see the IBM 2390 Plus reference manual.
General operation:NUL, DC3, ESC j, BEL, CAN, DC1, ESC Q, ESC [ K, ESC U, ESC [ F
Paper feeding:FF, LF, ESC 5, ESC A, ESC A (AGM*), ESC 0, ESC 1, ESC 2, ESC 3, ESC 3 (AGM*), CR, ESC ]
Page format:ESC C, ESC C0, ESC X, ESC N, ESC O, ESC 4
Print position motion:ESC d, ESC R, ESC D, HT, ESC B, VT, ESC J, ESC J (AGM*)
Font selection:DC2, ESC P, ESC :, ESC E, ESC F, ESC I, ESC [d, ESC [I
Font enhancement:DC4, SO, ESC SO, ESC W, ESC [ @, SI, ESC SI, ESC G, ESC H, ESC T, ESC S, ESC -, ESC _, ESC [-
Spacing:BS, SP, ESC [¥
Character handling:ESC 6, ESC 7, ESC [ T, ESC ^, ESC ¥
Bit image:ESC K, ESC L, ESC Y, ESC Z, ESC [g, ESC * (AGM*)
* Alternate Graphic Mode
Barcode:ESC [f, ESC [p
Download:Download command is not provided.
Specifications C-19

R4C4620Rev. CA5 size Spec.fm3/13/00 Pass 3
L Proof Sign-off:SEI Y.Ohkawara T.Takahashi
T.TakahashiSEI M.Kauppi K.Blair
Character Tables
You can select the character tables shown in this section using the printer’s default-setting mode or with software commands.
Note:❏ Most of the character tables are the same as the PC 437 table for hex
codes 00 through 7F; only the characters for hex codes 80 through FF are shown for these tables.
❏ The character tables with an asterisk (*) after the table name are available only in some countries.
PC 437 (US Standard Europe)
C-20 Specifications
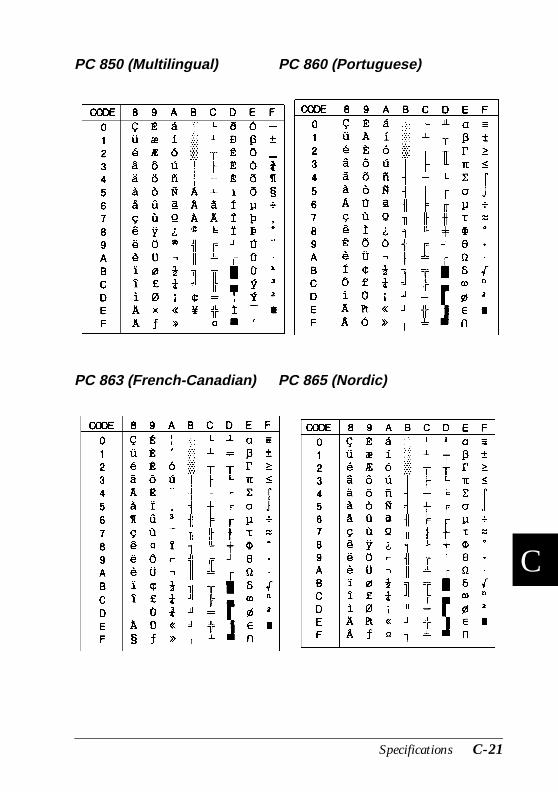
C
R4C4620Rev. CA5 size Spec.fm3/13/00 Pass 3
RProof Sign-off:SEI Y.Ohkawara T.Takahashi
T.TakahashiSEI M.Kauppi K.Blair
PC 850 (Multilingual) PC 860 (Portuguese)
PC 863 (French-Canadian) PC 865 (Nordic)
Specifications C-21

R4C4620Rev. CA5 size Spec.fm3/13/00 Pass 3
L Proof Sign-off:SEI Y.Ohkawara T.Takahashi
T.TakahashiSEI M.Kauppi K.Blair
PC 861 (Icelandic) BRASCII
Abicomp ISO Latin 1
C-22 Specifications

C
R4C4620Rev. CA5 size Spec.fm3/13/00 Pass 3
RProof Sign-off:SEI Y.Ohkawara T.Takahashi
T.TakahashiSEI M.Kauppi K.Blair
Roman 8
PC 858
Specifications C-23

R4C4620Rev. CA5 size Spec.fm3/13/00 Pass 3
L Proof Sign-off:SEI Y.Ohkawara T.Takahashi
T.TakahashiSEI M.Kauppi K.Blair
ISO 8859-15 PC 437 Greek*
PC 853 (Turkish)* PC 855 (Cyrillic)*
C-24 Specifications

C
R4C4620Rev. CA5 size Spec.fm3/13/00 Pass 3
RProof Sign-off:SEI Y.Ohkawara T.Takahashi
T.TakahashiSEI M.Kauppi K.Blair
PC 852 (Eastern Europe)* PC 857 (Turkish)*
PC 866 (Russian)* PC864 (Arabic)
Specifications C-25
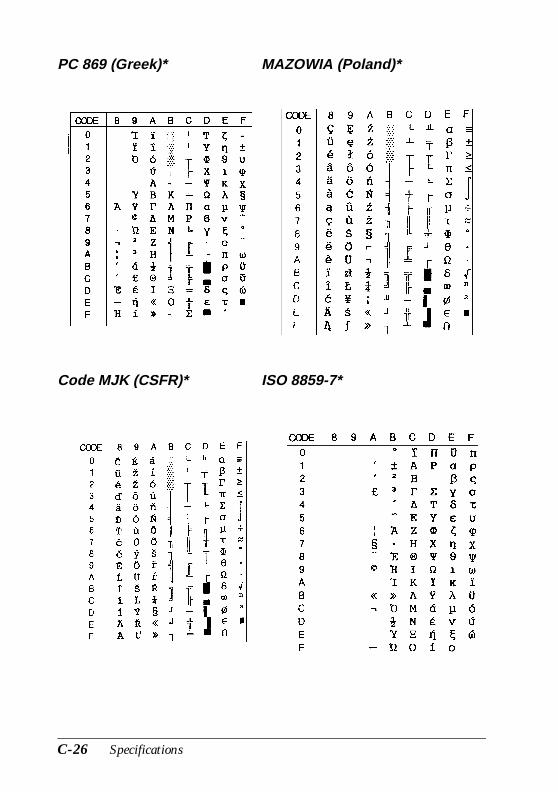
R4C4620Rev. CA5 size Spec.fm3/13/00 Pass 3
L Proof Sign-off:SEI Y.Ohkawara T.Takahashi
T.TakahashiSEI M.Kauppi K.Blair
PC 869 (Greek)* MAZOWIA (Poland)*
Code MJK (CSFR)* ISO 8859-7*
C-26 Specifications

C
R4C4620Rev. CA5 size Spec.fm3/13/00 Pass 3
RProof Sign-off:SEI Y.Ohkawara T.Takahashi
T.TakahashiSEI M.Kauppi K.Blair
ISO Latin 1T (Turkish)* Bulgaria (Bulgarian)*
PC 774 (LST 1283: 1993)* Estonia (Estonian)*
Specifications C-27

R4C4620Rev. CA5 size Spec.fm3/13/00 Pass 3
L Proof Sign-off:SEI Y.Ohkawara T.Takahashi
T.TakahashiSEI M.Kauppi K.Blair
PC 771 (Lithuanian)
ISO 8859-2*
C-28 Specifications

C
R4C4620Rev. CA5 size Spec.fm3/13/00 Pass 3
RProof Sign-off:SEI Y.Ohkawara T.Takahashi
T.TakahashiSEI M.Kauppi K.Blair
PC 866 LAT. (Latvian)* PC 866 UKR (Ukranian)*
PC APTEC (Arabic)* PC 708 (Arabic)*
Specifications C-29

R4C4620Rev. CA5 size Spec.fm3/13/00 Pass 3
L Proof Sign-off:SEI Y.Ohkawara T.Takahashi
T.TakahashiSEI M.Kauppi K.Blair
PC 720 (Arabic)* PC AR 864 (Arabic)*
C-30 Specifications

C
R4C4620Rev. CA5 size Spec.fm3/13/00 Pass 3
RProof Sign-off:SEI Y.Ohkawara T.Takahashi
T.TakahashiSEI M.Kauppi K.Blair
Italic table
No character is available for hex code 15 in the Italic table
Specifications C-31

R4C4620Rev. CA5 size Spec.fm3/13/00 Pass 3
L Proof Sign-off:SEI Y.Ohkawara T.Takahashi
T.TakahashiSEI M.Kauppi K.Blair
International character sets for the Italic table
You can select one of the following eight international character sets for the Italic character table shown below using the default-setting mode or the ESC R command. For example, when you select “Italic France,” the characters in the “France” row are used in the Italic character table.
Country ASCII code hex
23 24 40 5B 5C 5D 5E 60 7B 7C 7D 7E
US # $ @ [ \ ] ^ ‘ { | } ~
France # $ à ° ç § ^ ` é ù è "
Germany # $ § Ä Ö Ü ^ ` ä ö ü ß
UK £ $ @ [ \ ] ^ ` { | } ~
Denmark # $ @ Æ Ø Å ^ ` æ ø å ~
Sweden # ¤ É Ä Ö Å Ü é ä ö å ü
Italy # $ @ ° \ é ^ ù à ò è ì
Spain Pt $ @ ¡ Ñ ¿ ^ ` " ñ } ~
C-32 Specifications

C
R4C4620Rev. CA5 size Spec.fm3/13/00 Pass 3
RProof Sign-off:SEI Y.Ohkawara T.Takahashi
T.TakahashiSEI M.Kauppi K.Blair
You can select one of the following seven additional sets only with the ESC R command.
Japan # $ @ [ ¥ ] ^ ` { | } ~
Norway # ¤ É Æ Ø Å Ü é æ ø å ü
DenmarkII # $ É Æ Ø Å Ü é æ ø å ü
Spain II # $ á ¡ Ñ ¿ é ` í ñ ó ú
Latin America # $ á ¡ Ñ ¿ é ü í ñ ó ú
Korea* # $ @ [ W ] ^ ` { | } ~
Legal* # $ § ° ´ " ¶ ‘ ò
Specifications C-33

D
R4C4620Rev. CA5 size SUPPORT.FM3/13/00 Pass 3
RProof Sign-off:SEI Y.Ohkawara T.Takahashi
T.TakahashiSEI M.Kauppi K.Blair
Appendix D
Customer Support Information
Contacting Customer Support
If your printer is not operating properly and you cannot solve the problem using the troubleshooting information in Chapter 7, contact customer support services for assistance. You will find the telephone number and further important information for your country in the Service and Support brochure provided with your printer.
We will be able to help you much more quickly if you give us the following information:
❏ Printer model
❏ Serial number of your printer(The serial number label is on the back of the printer.)
❏ Brand and model of your computer
❏ Printer software version(Click the About button in your printer driver.)
❏ Windows version (for example, 95, 98, NT 4.0, or 3.1)
❏ Software application(s) you normally use with the printer and their version number(s)
Customer Support Information D-1

RProof Sign-off:SEI Y.Ohkawara T.Takahashi
T.TakahashiSEI M.Kauppi K.Blair
R4C4620Rev. CA5 size GLOSS.FM3/13/00 Pass 3
Glossary
ASCIIAmerican Standard Code for Information Interchange. A standardized coding system for assigning numeral codes to letters and symbols.
auto line feedWhen this option is turned on in the default-setting mode or the EPSON Remote! utility, each carriage return (CR) code is automatically followed by a line feed (LF) code.
bidirectional printingPrinting in which the print head prints in both directions (bidirectionally), from left to right and then right to left. This increases the print speed but may reduce precise vertical alignment. Bidirectional printing is the printer’s standard printing mode. See also unidirectional printing.
bufferThe portion of the printer’s memory used to store data before it is printed.
character tableA collection of letters, numbers, and symbols that provides you with the set of characters used in a particular language.
characters per inch (cpi)The number of characters that can fit in one inch of a text line, determined by the size of the characters. See also pitch.
continuous paperPaper that has sprocket-feed holes on both long edges, is perforated between pages, and is supplied in a folded stack. Also called fanfold paper.
control codesSpecial codes used to control printer functions, such as a carriage return or line feed, instead of printing characters.
cpiSee characters per inch.
cut-sheet feederAn optional, detachable device that automatically feeds single sheets of paper into the printer.
data dumpSee hex dump.
defaultValue settings or settings that take effect when a device (such as a printer) is turned on, reset, or initialized. See also factory settings.
Glossary 1

L R4C4620Rev. CA5 size GLOSS.FM3/13/00 Pass 3
Proof Sign-off:SEI Y.Ohkawara T.Takahashi
T.TakahashiSEI M.Kauppi K.Blair
ditheringA halftoning method in which dots are printed in a predetermined pattern to simulate a shade or tone. Dithering works best for images with solid colors, such as charts and graphs. See also halftoning.
dot matrixA method of printing in which each letter or symbol is formed by a pattern (matrix) of individual dots.
draftThe print mode used by your printer when you select Draft as the font. The Draft font uses fewer dots per character for faster printing. See also letter quality.
driverSee printer driver.
ESC/PAbbreviation for EPSON Standard Code for Printers, the system of commands your computer uses to control your printer. It is standard for all EPSON printers and supported by most application software for personal computers.
ESC/P2The enhanced version of the ESC/P printer command language.
factory settingsThe configuration settings for a computer or printer that are set at the factory. If the device reverts to these settings when initialized, they are called default settings, see also default.
fanfold paperSee continuous paper.
fontA style of type designated by a name such as Roman or Sans Serif.
form feed (FF)A control panel button and control code that advances the paper to the next top-of-form position.
halftoningA method of using dot patterns to represent an image. Halftoning makes it possible to produce varying shades of gray using only black dots, or a nearly infinite array of colors using only a few colors of dots. See also dithering.
hex dumpA troubleshooting feature that helps identify the cause of communication problems between the printer and the computer. When the printer is in hex dump mode, it prints each code that it receives in hexadecimal notation as well as in ASCII codes that stand for characters. Also called data dump.
2 Glossary

RProof Sign-off:SEI Y.Ohkawara T.Takahashi
T.TakahashiSEI M.Kauppi K.Blair
R4C4620Rev. CA5 size GLOSS.FM3/13/00 Pass 3
interfaceThe connection (via a cable) between the computer and the printer through which print data is transmitted to the printer.
initializationReturns the printer to its default settings (a fixed set of conditions).
landscapePrinting that is oriented sideways on the page. This orientation gives you a page that is wider than it is high and is useful for printing spreadsheets. See also portrait.
letter quality (LQ)The print mode used by your printer, printing with letter-quality fonts provides better readability and appearance at a reduced print speed. See also draft.
line feed (LF)A control panel button and control code that advances the paper one line space.
micro adjustA printer feature that allows you to precisely adjust the tear-off and top-of-form positions.
paper positionsThere are three paper positions for continuous paper printing: standby, tear-off, and top-of-form. For single-sheet printing, there is only the top-of-form position. See also standby position, tear-off position, and top-of-form position. For detailed information on these positions, see “Paper positions” on page 5 of the Glossary.
pitchThe size of the font, which is measured in the number of character per inch (cpi). The standard is 10 cpi. See also character per inch.
platenThe black roller that provides a backing for the paper during printing.
portraitPrinting that is oriented upright on the page (as opposed to landscape, in which printing is sideways on the page). This is the standard orientation for printing letters or documents. See also landscape.
printable areaThe area of a page on which the printer can print. It is smaller than the physical size of the page because of margins.
printer driverA software program that sends commands for using the functions of a particular printer.
resetTo return a printer to its default settings.
Glossary 3

L R4C4620Rev. CA5 size GLOSS.FM3/13/00 Pass 3
Proof Sign-off:SEI Y.Ohkawara T.Takahashi
T.TakahashiSEI M.Kauppi K.Blair
resolutionA measure of the amount of detail that can be represented. Resolution of printed images is measured by using the number of dots per inch (dpi).
self testA method for checking the operation of the printer. When you run the self test, an internally stored self-pattern is printed.
standby positionThe position of your continuous paper when it is attached to the tractor but not loaded in the printer. See also page 5 of the Glossary.
Tear Off/Bin buttonA control panel button that feeds the perforation of continuous paper to the tear-off position. When pressed again, the paper feeds back to the top-of-form position. Selects the bin when the double-bin cut-sheet feeder is installed.
tear-off positionThe position of your continuous paper when you finish printing if the auto tear-off mode is on or if you press the Tear Off/Bin button. Using the micro adjust feature, you can adjust the tear-off position so that the paper’s perforation is aligned with the printer’s tear-off edge. See also page 5 of the Glossary for paper positions.
top-of-form positionThe position on the paper that the printer recognizes as the first printable line. This is the default top margin position. Using the micro adjust feature, you can adjust the top-of-form position. See also page 6 of the Glossary for top-of-form positions.
unidirectional printingPrinting in which the print head prints in one direction only. Unidirectional printing is useful for printing graphics because it provides precise vertical alignment. You can select unidirectional printing using the printer’s default-setting mode or the EPSON Remote! utility. See also bidirectional printing.
4 Glossary

RProof Sign-off:SEI Y.Ohkawara T.Takahashi
T.TakahashiSEI M.Kauppi K.Blair
R4C4620Rev. CA5 size GLOSS.FM3/13/00 Pass 3
Paper positions
Standby position
In the standby position, your paper is attached to the printer but is not inside the printer.
Tear-off position
Tear off your printed document at the printer’s tear-off edge.
Glossary 5

L R4C4620Rev. CA5 size GLOSS.FM3/13/00 Pass 3
Proof Sign-off:SEI Y.Ohkawara T.Takahashi
T.TakahashiSEI M.Kauppi K.Blair
Top-of-form position
The letters ABC above are printed at the top-of-form position.
6 Glossary

RR4C4620Rev. CA5 size USERS.IX3/13/00 Pass 3
Proof Sign-off:SEI Y.Ohkawara T.Takahashi
T.TakahashiSEI M.Kauppi K.Blair
Index
Paper paths 8
AAdjusting
tear-off position 2-35–2-36top-of-form
position 2-31–2-33Advanced document properties4-31Advanced menu 4-21Advancing to the
tear-off edge 2-34–2-36Aligning vertical lines 7-17Attaching
paper guide 1-11–1-12printer cover 1-10
BBuilt-in font 5-2
CCharacter Tables C-20–C-33Choosing a place for
the printer 1-3–1-4Cleaning the printer B-2Clearing
paper jams 7-16printer B-2
Connecting the printer 1-14–1-15Continuous paper
printing 4–6problems 7-8
Control panel 5-2–5-11Cut-sheet feeder
switching between
continuous paper and single-sheet paper A-18
DDefault setting 5-4–5-11Document properties 4-30
EEdge guide 2-19ENERGY STAR compliance 12EPSON Remote! 1-16EPSON Remote! Utility 4-32EPSON Status Monitor 3 1-16Error indicator 7-2–7-3
FFront
paper guide 2-19slot 8, 3-2, 3-11–3-13
GGraphics menu 4-8
HHex dump 7-20–7-21High-capacity cut-sheet
feeder A-2
IInstalling
interface card A-30paper tension unit 1-10, 2-25ribbon cartridge 1-5–1-10
Index 1

L R4C4620Rev. CA5 size USERS.IX3/13/00 Pass 3
Proof Sign-off:SEI Y.Ohkawara T.Takahashi
T.TakahashiSEI M.Kauppi K.Blair
tractor in the pull position 2-14–2-15
Interface card A-3installing A-30
LLoading
continuous multipart forms 2-26
continuous paper with labels 2-27
envelopes 3-5–3-6paper onto
pull tractor 2-16–2-21push tractor 2-6–2-10
postcards 3-6–3-7roll paper A-22–A-24single sheets in
front paper slot 3-11–3-13
top paper slot 3-8–3-10single-sheet multipart
forms 3-4–3-5
MMicro adjust
feature 3mode 2-31–2-33
OOptions 9, 4-16, A-2–A-31
PPaper guide
attaching 1-11–1-12Paper jam
clearing 7-16Paper menu 4-7
Paper paths 4Paper release lever 3, 2-2–2-3Paper tension unit
installing 1-10, 2-25removing 1-6, 2-15
Paper thickness lever 2-4–2-5Plugging in the printer 1-13Print head caution symbol 11Print Setup 4-15Printer driver 1-16
accessingfrom Windows 3.1
4-13–4-15from Windows 95 or 98
4-3–4-6from Windows NT 3.5x
4-27–4-30from Windows NT 4.0
4-17–4-20installing
for DOS 1-21for Windows 3.1
1-19–1-20for Windows 98, 95
1-17–1-18for Windows NT 3.5x
1-19–1-20for Windows NT 4.0
1-17–1-18setting
for Windows 3.1 4-15–4-16
for Windows 95 or 98 4-6–4-9
for Windows NT 3.5x 4-30–4-31
2 Index
RR4C4620Rev. CA5 size USERS.IX3/13/00 Pass 3
Proof Sign-off:SEI Y.Ohkawara T.Takahashi
T.TakahashiSEI M.Kauppi K.Blair
for Windows NT 4.0 4-20–4-23
Printer softwareinstalling 1-16–1-21
Printing oncontinuous paper 2-1–2-36single sheets 3-1–3-13
Pull tractor 5–6, A-3Pull tractor position 2-3Push tractor 4, 2-6–2-12Push tractor position 2-3
RRemoving
continuous paper with labels 2-28
paper tension unit 1-6, 2-15printed document from
pull tractor 2-21push tractor 2-11–2-12
pull tractor 2-24–2-25push tractor 2-12roll paper A-24
Ribbon cartridge 9, 1-5–1-10Ribbon installation position 1-7Roll paper
loading A-22–A-24removing A-24
Roll paper holder A-3, A-20–A-24assembling A-20–A-21installing A-21
SSafety instructions 10–11Second bin cut-sheet feeder A-2Selecting
built-in font 5-2
Self test 7-18–7-19Separator
ribbon 1-8Setting
paper release lever 2-2–2-3paper thickness lever 2-4–2-5
Setup 4-20Single-sheet
position 2-3printing 7–8, 3-1–3-13problems 7-6–7-7
Specificationsenvironmental C-6mechanical C-2–C-5paper C-6–C-9paper alignment C-10printable area C-11–C-13
Switchingbetween continuous paper
and single sheet 2-29–2-30
TTear Off/Bin
button 2-34Tear-off
edge 2-34–2-36feature 2position 2-35–2-36problems 7-10
Top slot 7, 3-2, 3-8–3-10Top-of-form
problems 7-9Transporting the printer B-3Troubleshooting
Continuous paper loading orfeeding problems 7-8
power supply problem 7-5printing or printout quality
Index 3

L R4C4620Rev. CA5 size USERS.IX3/13/00 Pass 3
Proof Sign-off:SEI Y.Ohkawara T.Takahashi
T.TakahashiSEI M.Kauppi K.Blair
problems 7-11–7-15Single-sheet paper loading
or feeding problems 7-6–7-7
tear-off position problems 7-10
top-of-form position problems 7-9
UUnpacking the Printer 1-2–1-3Using
push and pull tractor combination 2-22–2-24
push tractor 2-6–2-12
4 Index