User's Guide - FTP Directory Listing - Epson Europe
469
User's Guide Printing Copying Scanning Faxing Maintaining the Printer Solving Problems NPD6221-01 EN
-
Upload
khangminh22 -
Category
Documents
-
view
0 -
download
0
Transcript of User's Guide - FTP Directory Listing - Epson Europe

User's Guide
Printing
Copying
Scanning
Faxing
Maintaining the Printer
Solving Problems
NPD6221-01 EN
Contents
Guide to This ManualIntroduction to the Manuals. . . . . . . . . . . . . . . . . . .7Searching for Information. . . . . . . . . . . . . . . . . . . . 7Printing Only the Pages You Need. . . . . . . . . . . . . . 8About This Manual. . . . . . . . . . . . . . . . . . . . . . . . . 8
Marks and Symbols. . . . . . . . . . . . . . . . . . . . . . . 8Notes on Screenshots and Illustrations. . . . . . . . . 9Operating System References. . . . . . . . . . . . . . . . 9
Trademarks. . . . . . . . . . . . . . . . . . . . . . . . . . . . . . 10Copyright. . . . . . . . . . . . . . . . . . . . . . . . . . . . . . . 11
Important InstructionsSafety Instructions. . . . . . . . . . . . . . . . . . . . . . . . . 13
Safety Instructions for Ink. . . . . . . . . . . . . . . . . 14Printer Advisories and Warnings. . . . . . . . . . . . . . 14
Advisories and Warnings for Setting Up thePrinter. . . . . . . . . . . . . . . . . . . . . . . . . . . . . . . .14Advisories and Warnings for Using the Printer. . 15Advisories and Warnings for Using theTouchscreen. . . . . . . . . . . . . . . . . . . . . . . . . . . 15Advisories and Warnings for Using thePrinter with a Wireless Connection. . . . . . . . . . .15Advisories and Warnings for Transporting orStoring the Printer. . . . . . . . . . . . . . . . . . . . . . . 16
Protecting Your Personal Information. . . . . . . . . . . 16
Part Names and FunctionsFront. . . . . . . . . . . . . . . . . . . . . . . . . . . . . . . . . . .18Inside. . . . . . . . . . . . . . . . . . . . . . . . . . . . . . . . . . 20Rear. . . . . . . . . . . . . . . . . . . . . . . . . . . . . . . . . . . 21
Guide to the Control PanelControl Panel. . . . . . . . . . . . . . . . . . . . . . . . . . . . 23Home Screen Configuration. . . . . . . . . . . . . . . . . . 24
Guide to the Network Icon. . . . . . . . . . . . . . . . . 25Menu Screen Configuration. . . . . . . . . . . . . . . . . . 26Job/Status Screen Configuration. . . . . . . . . . . . . . . 27Entering Characters. . . . . . . . . . . . . . . . . . . . . . . . 28Viewing Animations. . . . . . . . . . . . . . . . . . . . . . . 28
Loading PapersPaper Handling Precautions. . . . . . . . . . . . . . . . . . 31Paper Size and Type Settings. . . . . . . . . . . . . . . . . .31
List of Paper Type. . . . . . . . . . . . . . . . . . . . . . . 32Loading Paper. . . . . . . . . . . . . . . . . . . . . . . . . . . . 32
Loading Pre-punched Paper. . . . . . . . . . . . . . . . 33Loading Long Papers. . . . . . . . . . . . . . . . . . . . . 34
Placing OriginalsOriginals that are not Supported by the ADF. . . . . . 36Detecting the Original Size Automatically. . . . . . . . 36Placing Originals. . . . . . . . . . . . . . . . . . . . . . . . . . 37
Inserting and Removing a Memory DeviceInserting an External USB Device. . . . . . . . . . . . . . 40Removing an External USB Device. . . . . . . . . . . . . 40Sharing Data on a Memory Device. . . . . . . . . . . . . 40
PrintingPrinting Documents. . . . . . . . . . . . . . . . . . . . . . . .43
Printing from a Computer - Windows. . . . . . . . . 43Printing from a Computer - Mac OS. . . . . . . . . . 66Printing Documents from Smart Devices (iOS). . 74Printing Documents from Smart Devices(Android). . . . . . . . . . . . . . . . . . . . . . . . . . . . . 76
Printing on Envelopes. . . . . . . . . . . . . . . . . . . . . . 77Printing on Envelopes from a Computer(Windows). . . . . . . . . . . . . . . . . . . . . . . . . . . . 77Printing on Envelopes from a Computer(Mac OS). . . . . . . . . . . . . . . . . . . . . . . . . . . . . .77
Printing Photos. . . . . . . . . . . . . . . . . . . . . . . . . . . 78Printing JPEG Files from a Memory Device. . . . .78Printing TIFF Files from a Memory Device. . . . . 79
Printing Web Pages. . . . . . . . . . . . . . . . . . . . . . . . 80Printing Web Pages from a Computer. . . . . . . . . 80Printing Web Pages from Smart Devices. . . . . . . 80
Printing Using a Cloud Service. . . . . . . . . . . . . . . . 81Registering to Epson Connect Service fromthe Control Panel. . . . . . . . . . . . . . . . . . . . . . . . 81
CopyingAvailable Copying Methods. . . . . . . . . . . . . . . . . . 84
Copying Originals. . . . . . . . . . . . . . . . . . . . . . . 84Copying on 2-Sides. . . . . . . . . . . . . . . . . . . . . . 84Copying by Enlarging or Reducing. . . . . . . . . . . 85
2
Copying Multiple Originals onto One Sheet. . . . .86Copying in Page Order. . . . . . . . . . . . . . . . . . . . 87Copying Originals Using Good Quality. . . . . . . . 87Copying ID card. . . . . . . . . . . . . . . . . . . . . . . . 88Copying Books. . . . . . . . . . . . . . . . . . . . . . . . . 88
Basic Menu Options for Copying. . . . . . . . . . . . . . 89Color Mode:. . . . . . . . . . . . . . . . . . . . . . . . . . . 89Density:. . . . . . . . . . . . . . . . . . . . . . . . . . . . . . .89Paper Setting:. . . . . . . . . . . . . . . . . . . . . . . . . . 89Reduce/Enlarge:. . . . . . . . . . . . . . . . . . . . . . . . .89Original Type:. . . . . . . . . . . . . . . . . . . . . . . . . . 902-Sided:. . . . . . . . . . . . . . . . . . . . . . . . . . . . . . .90
Advanced Menu Options for Copying. . . . . . . . . . . 90Multi-Page:. . . . . . . . . . . . . . . . . . . . . . . . . . . . 90Original Size:. . . . . . . . . . . . . . . . . . . . . . . . . . . 90Finishing:. . . . . . . . . . . . . . . . . . . . . . . . . . . . . 91Mixed Size Originals:. . . . . . . . . . . . . . . . . . . . . 91Orientation (Original):. . . . . . . . . . . . . . . . . . . .91Book->2 Pages:. . . . . . . . . . . . . . . . . . . . . . . . . 91Image Quality:. . . . . . . . . . . . . . . . . . . . . . . . . . 91Binding Margin:. . . . . . . . . . . . . . . . . . . . . . . . .92Reduce to Fit Paper:. . . . . . . . . . . . . . . . . . . . . . 92Remove Shadow:. . . . . . . . . . . . . . . . . . . . . . . . 92Remove Punch Holes:. . . . . . . . . . . . . . . . . . . . 92ID Card Copy:. . . . . . . . . . . . . . . . . . . . . . . . . . 92
ScanningAvailable Scanning Methods. . . . . . . . . . . . . . . . . .94Scanning Originals to a Network Folder. . . . . . . . . 94
Destination Menu Options for Scanning to aFolder. . . . . . . . . . . . . . . . . . . . . . . . . . . . . . . . 95Scan Menu Options for Scanning to a Folder. . . . 96
Scanning Originals to an Email. . . . . . . . . . . . . . . .97Recipient Menu Options for Scanning to anEmail. . . . . . . . . . . . . . . . . . . . . . . . . . . . . . . . 98Scan Menu Options for Scanning to an Email. . . 98
Scanning Originals to a Computer. . . . . . . . . . . . 101Scanning Originals to a Memory Device. . . . . . . . 101
Basic Menu Options for Scanning to aMemory Device. . . . . . . . . . . . . . . . . . . . . . . . 102Advanced Menu Options for Scanning to aMemory Device. . . . . . . . . . . . . . . . . . . . . . . . 103
Scanning Originals to the Cloud. . . . . . . . . . . . . . 104Basic Menu Options for Scanning to the Cloud. 104Advanced Menu Options for Scanning to theCloud. . . . . . . . . . . . . . . . . . . . . . . . . . . . . . . 105
Scanning Using WSD. . . . . . . . . . . . . . . . . . . . . . 105Setting Up a WSD Port. . . . . . . . . . . . . . . . . . . 106
Scanning Originals to a Smart Device. . . . . . . . . . 107
FaxingBefore Using Fax Features. . . . . . . . . . . . . . . . . . .110Overview of this Printer's Fax Features. . . . . . . . . 110
Feature: Sending Faxes. . . . . . . . . . . . . . . . . . . 110Feature: Receiving Faxes. . . . . . . . . . . . . . . . . . 111Feature: PC-FAX Send/Receive(Windows/Mac OS). . . . . . . . . . . . . . . . . . . . .113Features: Various Fax Reports. . . . . . . . . . . . . . 113Feature: Status or Logs for Fax Jobs. . . . . . . . . . 113Feature: Fax Box. . . . . . . . . . . . . . . . . . . . . . . .114Feature: Security when Sending andReceiving Faxes. . . . . . . . . . . . . . . . . . . . . . . . 114Features: Other Useful Features. . . . . . . . . . . 114
Sending Faxes Using the Printer. . . . . . . . . . . . . . 115Selecting Recipients. . . . . . . . . . . . . . . . . . . . . 115Various Ways of Sending Faxes. . . . . . . . . . . . . 116
Receiving Faxes on the Printer. . . . . . . . . . . . . . . 123Receiving Incoming Faxes. . . . . . . . . . . . . . . . .123Receiving Faxes by Making a Phone Call. . . . . . 124Saving and Forwarding Received Faxes. . . . . . . 126Viewing Received Faxes Saved in the Printeron the LCD Screen. . . . . . . . . . . . . . . . . . . . . . 127
Menu Options for Faxing. . . . . . . . . . . . . . . . . . . 128Recipient. . . . . . . . . . . . . . . . . . . . . . . . . . . . . 128Fax Settings. . . . . . . . . . . . . . . . . . . . . . . . . . . 129More. . . . . . . . . . . . . . . . . . . . . . . . . . . . . . . . 131
Menu Options for Fax Box. . . . . . . . . . . . . . . . . . 133Inbox/Confidential. . . . . . . . . . . . . . . . . . . . . .133Stored Documents:. . . . . . . . . . . . . . . . . . . . . .134Polling Send/Board. . . . . . . . . . . . . . . . . . . . . 135
Checking the Status or Logs for Fax Jobs. . . . . . . . 139Displaying Information when Received Faxesare Unprocessed (Unread/Not Printed/NotSaved/Not Forwarded). . . . . . . . . . . . . . . . . . . 139Checking Fax Jobs in Progress. . . . . . . . . . . . . .140Checking the Fax Job History. . . . . . . . . . . . . . 140Reprinting Received Documents. . . . . . . . . . . . 141
Sending a Fax from a Computer. . . . . . . . . . . . . . 141Sending Documents Created Using anApplication (Windows). . . . . . . . . . . . . . . . . . 142Sending Documents Created Using anApplication (Mac OS). . . . . . . . . . . . . . . . . . . .144
Receiving Faxes on a Computer. . . . . . . . . . . . . . .145Saving Incoming Faxes on a Computer. . . . . . . 146Canceling the Feature that Saves IncomingFaxes to the Computer. . . . . . . . . . . . . . . . . . . 146Checking for New Faxes (Windows). . . . . . . . . 146Checking for New Faxes (Mac OS). . . . . . . . . . 147
3
Maintaining the PrinterChecking the Status of Consumables. . . . . . . . . . . 150Improving Print, Copy, Scan, and Fax Quality. . . . 150
Adjusting the Print Quality. . . . . . . . . . . . . . . . 150Checking and Cleaning the Print Head. . . . . . . 151Running Power Cleaning. . . . . . . . . . . . . . . . . 153Preventing nozzle clogging. . . . . . . . . . . . . . . . 155Aligning Ruled Lines. . . . . . . . . . . . . . . . . . . . 155Cleaning the Paper Path for Ink Smears. . . . . . .155Cleaning the Scanner Glass and Document Mat 156Cleaning the ADF. . . . . . . . . . . . . . . . . . . . . . 158
Cleaning the Printer. . . . . . . . . . . . . . . . . . . . . . . 160Cleaning Spilled ink. . . . . . . . . . . . . . . . . . . . . . . 160Checking the Total Number of Pages FedThrough the Printer. . . . . . . . . . . . . . . . . . . . . . . 161
Checking the Total Number of Pages FedThrough the Printer (Control Panel). . . . . . . . . 161Checking the Total Number of Pages FedThrough the Printer (Windows). . . . . . . . . . . . 161Checking the Total Number of Pages FedThrough the Printer (Mac OS). . . . . . . . . . . . . 161
Saving Power. . . . . . . . . . . . . . . . . . . . . . . . . . . . 162Saving Power (Control Panel). . . . . . . . . . . . . . 162
Installing or Uninstalling Applications Separately. 162Installing the Applications Separately. . . . . . . . 162Adding the Printer (for Mac OS Only). . . . . . . .165Uninstalling Applications. . . . . . . . . . . . . . . . . 165Updating Applications and Firmware. . . . . . . . 167
Transporting and Storing the Printer. . . . . . . . . . . 169
Solving ProblemsThe Printer Does Not Work as Expected. . . . . . . . 176
The Printer Does Not Turn On or Off. . . . . . . . 176Power Turns Off Automatically. . . . . . . . . . . . . 176Paper Does Not Feed Properly. . . . . . . . . . . . . 176Cannot Print. . . . . . . . . . . . . . . . . . . . . . . . . . 181Cannot Start Scanning. . . . . . . . . . . . . . . . . . . 197Cannot Send or Receive Faxes. . . . . . . . . . . . . .209Error Code is Displayed on the Status Menu. . . 225Cannot Operate the Printer as Expected. . . . . . 229
A Message is Displayed on the LCD Screen. . . . . . 234Paper Gets Jammed. . . . . . . . . . . . . . . . . . . . . . . 235
Preventing Paper Jams. . . . . . . . . . . . . . . . . . . 235It is Time to Refill the Ink. . . . . . . . . . . . . . . . . . . 236
Ink Bottle Handling Precautions. . . . . . . . . . . . 236Refilling the Ink Tanks. . . . . . . . . . . . . . . . . . . 237
It is Time to Replace the Maintenance Box. . . . . . .241Maintenance Box Handling Precautions. . . . . . 241
Replacing a Maintenance Box. . . . . . . . . . . . . . 241Printing, Copying, Scanning, and FaxingQuality is Poor. . . . . . . . . . . . . . . . . . . . . . . . . . . 243
Print Quality is Poor. . . . . . . . . . . . . . . . . . . . .243Copy Quality is Poor. . . . . . . . . . . . . . . . . . . . 252Scanned Image Problems. . . . . . . . . . . . . . . . . 259The Quality of the Sent Fax is Poor. . . . . . . . . . 261Received Fax Quality is Poor. . . . . . . . . . . . . . .263
Cannot Solve Problem After Trying All Solutions. .264Cannot Solve Printing or Copying Problems. . . 264
Adding or Replacing the Computer or DevicesConnecting to a Printer that has beenConnected to the Network. . . . . . . . . . . . . . . . . . 267
Using a Network Printer from a SecondComputer. . . . . . . . . . . . . . . . . . . . . . . . . . . . 267Using a Network Printer from a Smart Device. . 268
Re-setting the Network Connection. . . . . . . . . . . 268When Replacing the Wireless Router. . . . . . . . .269When Changing the Computer. . . . . . . . . . . . . 270Changing the Connection Method to theComputer. . . . . . . . . . . . . . . . . . . . . . . . . . . . 270Making Wi-Fi Settings from the Control Panel. .272
Connecting a Smart Device and Printer Directly(Wi-Fi Direct). . . . . . . . . . . . . . . . . . . . . . . . . . . 275
About Wi-Fi Direct. . . . . . . . . . . . . . . . . . . . . 275Connecting to an iPhone, iPad or iPod touchusing Wi-Fi Direct. . . . . . . . . . . . . . . . . . . . . . 275Connecting to Android Devices using Wi-FiDirect. . . . . . . . . . . . . . . . . . . . . . . . . . . . . . . 278Connecting to Devices other than iOS andAndroid using Wi-Fi Direct. . . . . . . . . . . . . . . 280Disconnecting Wi-Fi Direct (Simple AP)Connection. . . . . . . . . . . . . . . . . . . . . . . . . . . 284Changing the Wi-Fi Direct (Simple AP)Settings Such as the SSID. . . . . . . . . . . . . . . . . 284
Checking the Network Connection Status. . . . . . . 285Checking the Network Connection Statusfrom the Control Panel. . . . . . . . . . . . . . . . . . . 285Printing a Network Connection Report. . . . . . . 286Printing a Network Status Sheet. . . . . . . . . . . . 292Checking the Network of the Computer(Windows only). . . . . . . . . . . . . . . . . . . . . . . . 292
Product InformationPaper Information. . . . . . . . . . . . . . . . . . . . . . . . 295
Available Paper and Capacities. . . . . . . . . . . . . 295Unavailable Paper Types. . . . . . . . . . . . . . . . . . 300
4
Consumable Products Information. . . . . . . . . . . . 300Ink Bottle Codes. . . . . . . . . . . . . . . . . . . . . . . 300Maintenance Box Code. . . . . . . . . . . . . . . . . . .301
Software Information. . . . . . . . . . . . . . . . . . . . . . 301Software for Printing. . . . . . . . . . . . . . . . . . . . 301Software for Scanning. . . . . . . . . . . . . . . . . . . .305Software for Faxing. . . . . . . . . . . . . . . . . . . . . 305Software for Package Creation. . . . . . . . . . . . . .306Software for Making Settings or ManagingDevices. . . . . . . . . . . . . . . . . . . . . . . . . . . . . . 307Software for Updating. . . . . . . . . . . . . . . . . . . 309
Settings Menu List. . . . . . . . . . . . . . . . . . . . . . . . 310General Settings. . . . . . . . . . . . . . . . . . . . . . . . 310Print Counter. . . . . . . . . . . . . . . . . . . . . . . . . .330Supply Status. . . . . . . . . . . . . . . . . . . . . . . . . . 330Maintenance. . . . . . . . . . . . . . . . . . . . . . . . . . 331Language. . . . . . . . . . . . . . . . . . . . . . . . . . . . . 332Printer Status/Print. . . . . . . . . . . . . . . . . . . . . 332Contacts Manager. . . . . . . . . . . . . . . . . . . . . . 333User Settings. . . . . . . . . . . . . . . . . . . . . . . . . . 333
Product Specifications. . . . . . . . . . . . . . . . . . . . . 334Printer Specifications. . . . . . . . . . . . . . . . . . . . 334Scanner Specifications. . . . . . . . . . . . . . . . . . . 335ADF Specifications. . . . . . . . . . . . . . . . . . . . . .335Fax Specifications. . . . . . . . . . . . . . . . . . . . . . .336Using Port for the Printer. . . . . . . . . . . . . . . . . 336Interface Specifications. . . . . . . . . . . . . . . . . . . 338Network Specifications. . . . . . . . . . . . . . . . . . . 338Supported Third Party Services. . . . . . . . . . . . . 340Memory Device Specifications. . . . . . . . . . . . . 340Supported Data Specifications. . . . . . . . . . . . . .341Dimensions. . . . . . . . . . . . . . . . . . . . . . . . . . . 341Electrical Specifications. . . . . . . . . . . . . . . . . . 342Environmental Specifications. . . . . . . . . . . . . . 342Installation Location and Space. . . . . . . . . . . . .343System Requirements. . . . . . . . . . . . . . . . . . . . 343
Regulatory Information. . . . . . . . . . . . . . . . . . . . 344Standards and Approvals. . . . . . . . . . . . . . . . . 344Restrictions on Copying. . . . . . . . . . . . . . . . . . 346
Administrator InformationConnecting the Printer to the Network. . . . . . . . . 348
Before Making Network Connection. . . . . . . . . 348Connecting to the Network from the ControlPanel. . . . . . . . . . . . . . . . . . . . . . . . . . . . . . . . 350
Settings to Use the Printer. . . . . . . . . . . . . . . . . . .352Using the Print Functions. . . . . . . . . . . . . . . . . 352Setting Up AirPrint. . . . . . . . . . . . . . . . . . . . . 358Configuring a Mail Server. . . . . . . . . . . . . . . . .359
Setting a Shared Network Folder. . . . . . . . . . . . 363Making Contacts Available. . . . . . . . . . . . . . . . 379Preparing to Scan. . . . . . . . . . . . . . . . . . . . . . . 391Making Fax Features Available. . . . . . . . . . . . . 392Making Basic Operation Settings for the Printer 408Problems when Making Settings. . . . . . . . . . . . 411
Managing the Printer. . . . . . . . . . . . . . . . . . . . . . 412Introduction of Product Security Features. . . . . 412Administrator Settings. . . . . . . . . . . . . . . . . . . 413Restricting Available Features. . . . . . . . . . . . . . 422Disabling the External Interface. . . . . . . . . . . . 424Monitoring a Remote Printer. . . . . . . . . . . . . . 425Backing Up the Settings. . . . . . . . . . . . . . . . . . 427
Advanced Security Settings. . . . . . . . . . . . . . . . . .428Security Settings and Prevention of Danger. . . . 428Controlling Using Protocols. . . . . . . . . . . . . . . 430Using a Digital Certificate. . . . . . . . . . . . . . . . .434SSL/TLS Communication with the Printer. . . . .439Encrypted Communication Using IPsec/IPFiltering. . . . . . . . . . . . . . . . . . . . . . . . . . . . . .441Connecting the Printer to an IEEE802.1XNetwork. . . . . . . . . . . . . . . . . . . . . . . . . . . . . 452Solving Problems for Advanced Security. . . . . . 455
Where to Get HelpTechnical Support Web Site. . . . . . . . . . . . . . . . . .463Contacting Epson Support. . . . . . . . . . . . . . . . . . 463
Before Contacting Epson. . . . . . . . . . . . . . . . . 463Help for Users in Europe. . . . . . . . . . . . . . . . . .463Help for Users in Australia. . . . . . . . . . . . . . . . 463Help for Users in New Zealand. . . . . . . . . . . . . 464Help for Users in Singapore. . . . . . . . . . . . . . . 465Help for Users in Thailand. . . . . . . . . . . . . . . . 465Help for Users in Vietnam. . . . . . . . . . . . . . . . 465Help for Users in Indonesia. . . . . . . . . . . . . . . .466Help for Users in Hong Kong. . . . . . . . . . . . . . 467Help for Users in Malaysia. . . . . . . . . . . . . . . . 468Help for Users in India. . . . . . . . . . . . . . . . . . . 468Help for Users in the Philippines. . . . . . . . . . . . 469
5
Guide to This Manual
Introduction to the Manuals. . . . . . . . . . . . . . . . . . . . . . . . . . . . . . . . . . . . . . . . . . . 7
Searching for Information. . . . . . . . . . . . . . . . . . . . . . . . . . . . . . . . . . . . . . . . . . . . . 7
Printing Only the Pages You Need. . . . . . . . . . . . . . . . . . . . . . . . . . . . . . . . . . . . . . . 8
About This Manual. . . . . . . . . . . . . . . . . . . . . . . . . . . . . . . . . . . . . . . . . . . . . . . . . . 8
Trademarks. . . . . . . . . . . . . . . . . . . . . . . . . . . . . . . . . . . . . . . . . . . . . . . . . . . . . . 10
Copyright. . . . . . . . . . . . . . . . . . . . . . . . . . . . . . . . . . . . . . . . . . . . . . . . . . . . . . . . 11

Introduction to the ManualsThe following manuals are supplied with your Epson printer. As well as the manuals, check the various types ofhelp information available from the printer itself or from the Epson software applications.
❏ Important Safety Instructions (paper manual)Provides you with instructions to ensure the safe use of this printer.
❏ Start Here (paper manual)Provides you with information on setting up the printer and installing the software.
❏ User's Guide (digital manual)This manual. Provides overall information and instructions on using the printer, on network settings whenusing the printer on a network, and on solving problems.
You can obtain the latest versions of the above manuals with the following methods.
❏ Paper manualVisit the Epson Europe support website at http://www.epson.eu/Support, or the Epson worldwide supportwebsite at http://support.epson.net/.
❏ Digital manualThis manual is available in PDF and HTML versions. You can view the HTML version from the epson.snsupport page. Start EPSON Software Updater on your computer to view the PDF version. EPSON SoftwareUpdater checks for available updates of Epson software applications and the digital manuals, and allows you todownload the latest ones.http://epson.sn
Related Information
& “Application for Updating Software and Firmware (EPSON Software Updater)” on page 309
Searching for InformationThe PDF manual allows you to search for information you are looking for by keyword, or jump directly to specificections using the bookmarks. This section explains how to use a PDF manual that has been opened in AdobeReader X on your computer.
Searching by keyword
Click Edit > Advanced Search. Enter the keyword (text) for information you want to find in the search window,and then click Search. Hits are displayed as a list. Click one of the displayed hits to jump to that page.
Guide to This Manual > Searching for Information
7
Jumping directly from bookmarks
Click a title to jump to that page. Click + or > to view the lower level titles in that section. To return to the previouspage, perform the following operation on your keyboard.
❏ Windows: Hold down Alt. and then press ←.
❏ Mac OS: Hold down the command key, and then press ←.
Printing Only the Pages You NeedYou can extract and print only the pages you need. Click Print in the File menu, and then specify the pages youwant to print in Pages in Pages to Print.
❏ To specify a series of pages, enter a hyphen between the start page and the end page.Example: 20-25
❏ To specify pages that are not in series, divide the pages with commas.Example: 5, 10, 15
About This ManualThis section explains the meaning of marks and symbols, notes on descriptions, and operating system referenceinformation used in this manual.
Marks and Symbols
!Caution:
Instructions that must be followed carefully to avoid bodily injury.
Guide to This Manual > About This Manual > Marks and Symbols
8
cImportant:
Instructions that must be observed to avoid damage to your equipment.
Note:Provides complementary and reference information.
Related Information
& Links to related sections.
Notes on Screenshots and Illustrations❏ Screenshots of the printer driver are from Windows 10 or macOS High Sierra. The content displayed on the
screens varies depending on the model and situation.
❏ Illustrations used in this manual are examples only. Although there may be slight differences depending on themodel, the method of operation is the same.
❏ Some of the menu items on the LCD screen vary depending on the model and settings.
❏ You can read the QR code using dedicated app.
❏ The setting items on the Web Config screen differ depending on the model and setup environment.
Operating System References
Windows
In this manual, terms such as "Windows 10", "Windows 8.1", "Windows 8", "Windows 7", "Windows Vista","Windows XP", "Windows Server 2019", "Windows Server 2016", "Windows Server 2012 R2", "Windows Server2012", "Windows Server 2008 R2", "Windows Server 2008", "Windows Server 2003 R2", and "Windows Server2003" refer to the following operating systems. Additionally, "Windows" is used to refer to all versions.
❏ Microsoft® Windows® 10 operating system
❏ Microsoft® Windows® 8.1 operating system
❏ Microsoft® Windows® 8 operating system
❏ Microsoft® Windows® 7 operating system
❏ Microsoft® Windows Vista® operating system
❏ Microsoft® Windows® XP operating system
❏ Microsoft® Windows® XP Professional x64 Edition operating system
❏ Microsoft® Windows Server® 2019 operating system
❏ Microsoft® Windows Server® 2016 operating system
❏ Microsoft® Windows Server® 2012 R2 operating system
❏ Microsoft® Windows Server® 2012 operating system
❏ Microsoft® Windows Server® 2008 R2 operating system
❏ Microsoft® Windows Server® 2008 operating system
❏ Microsoft® Windows Server® 2003 R2 operating system
Guide to This Manual > About This Manual > Operating System References
9

❏ Microsoft® Windows Server® 2003 operating system
Mac OS
In this manual, "Mac OS" is used to refer to macOS Mojave, macOS High Sierra, macOS Sierra, OS X El Capitan,OS X Yosemite, OS X Mavericks, OS X Mountain Lion, Mac OS X v10.7.x, and Mac OS X v10.6.8.
Trademarks❏ EPSON® is a registered trademark, and EPSON EXCEED YOUR VISION or EXCEED YOUR VISION is a
trademark of Seiko Epson Corporation.
❏ Epson Scan 2 software is based in part on the work of the Independent JPEG Group.
❏ libtiffCopyright © 1988-1997 Sam LefflerCopyright © 1991-1997 Silicon Graphics, Inc.Permission to use, copy, modify, distribute, and sell this software and its documentation for any purpose ishereby granted without fee, provided that (i) the above copyright notices and this permission notice appear inall copies of the software and related documentation, and (ii) the names of Sam Leffler and Silicon Graphicsmay not be used in any advertising or publicity relating to the software without the specific, prior writtenpermission of Sam Leffler and Silicon Graphics.THE SOFTWARE IS PROVIDED "AS-IS" AND WITHOUT WARRANTY OF ANY KIND, EXPRESS,IMPLIED OR OTHERWISE, INCLUDING WITHOUT LIMITATION, ANY WARRANTY OFMERCHANTABILITY OR FITNESS FOR A PARTICULAR PURPOSE.IN NO EVENT SHALL SAM LEFFLER OR SILICON GRAPHICS BE LIABLE FOR ANY SPECIAL,INCIDENTAL, INDIRECT OR CONSEQUENTIAL DAMAGES OF ANY KIND, OR ANY DAMAGESWHATSOEVER RESULTING FROM LOSS OF USE, DATA OR PROFITS, WHETHER OR NOT ADVISEDOF THE POSSIBILITY OF DAMAGE, AND ON ANY THEORY OF LIABILITY, ARISING OUT OF OR INCONNECTION WITH THE USE OR PERFORMANCE OF THIS SOFTWARE.
❏ QR Code is a registered trademark of DENSO WAVE INCORPORATED in Japan and other countries.
❏ Microsoft®, Windows®, Windows Server®, and Windows Vista® are registered trademarks of MicrosoftCorporation.
❏ Apple, Mac, macOS, OS X, Bonjour, ColorSync, Safari, AirPrint, iPad, iPhone, iPod touch, and iTunes aretrademarks of Apple Inc., registered in the U.S. and other countries.
❏ Use of the Works with Apple badge means that an accessory has been designed to work specifically with thetechnology identified in the badge and has been certified by the developer to meet Apple performancestandards.
❏ Chrome, Google Play, and Android are trademarks of Google LLC.
❏ Adobe and Adobe Reader are either registered trademarks or trademarks of Adobe Systems Incorporated in theUnited States and/or other countries.
❏ Firefox is a trademark of the Mozilla Foundation in the U.S. and other countries.
❏ General Notice: Other product names used herein are for identification purposes only and may be trademarksof their respective owners. Epson disclaims any and all rights in those marks.
Guide to This Manual > Trademarks
10

CopyrightNo part of this publication may be reproduced, stored in a retrieval system, or transmitted in any form or by anymeans, electronic, mechanical, photocopying, recording, or otherwise, without the prior written permission ofSeiko Epson Corporation. No patent liability is assumed with respect to the use of the information containedherein. Neither is any liability assumed for damages resulting from the use of the information herein. Theinformation contained herein is designed only for use with this Epson product. Epson is not responsible for anyuse of this information as applied to other products.
Neither Seiko Epson Corporation nor its affiliates shall be liable to the purchaser of this product or third parties fordamages, losses, costs, or expenses incurred by the purchaser or third parties as a result of accident, misuse, orabuse of this product or unauthorized modifications, repairs, or alterations to this product, or (excluding the U.S.)failure to strictly comply with Seiko Epson Corporation's operating and maintenance instructions.
Seiko Epson Corporation and its affiliates shall not be liable for any damages or problems arising from the use ofany options or any consumable products other than those designated as Original Epson Products or EpsonApproved Products by Seiko Epson Corporation.
Seiko Epson Corporation shall not be held liable for any damage resulting from electromagnetic interference thatoccurs from the use of any interface cables other than those designated as Epson Approved Products by SeikoEpson Corporation.
© 2019 Seiko Epson Corporation
The contents of this manual and the specifications of this product are subject to change without notice.
Guide to This Manual > Copyright
11
Important Instructions
Safety Instructions. . . . . . . . . . . . . . . . . . . . . . . . . . . . . . . . . . . . . . . . . . . . . . . . . 13
Printer Advisories and Warnings. . . . . . . . . . . . . . . . . . . . . . . . . . . . . . . . . . . . . . . 14
Protecting Your Personal Information. . . . . . . . . . . . . . . . . . . . . . . . . . . . . . . . . . . 16
Safety InstructionsRead and follow these instructions to ensure safe use of this printer. Make sure you keep this manual for futurereference. Also, be sure to follow all warnings and instructions marked on the printer.
❏ Some of the symbols used on your printer are to ensure safety and proper use of the printer. Visit the followingWeb site to learn the meaning of the symbols.http://support.epson.net/symbols
❏ Use only the power cord supplied with the printer and do not use the cord with any other equipment. Use ofother cords with this printer or the use of the supplied power cord with other equipment may result in fire orelectric shock.
❏ Be sure your AC power cord meets the relevant local safety standard.
❏ Never disassemble, modify, or attempt to repair the power cord, plug, printer unit, scanner unit, or options byyourself, except as specifically explained in the printer's manuals.
❏ Unplug the printer and refer servicing to qualified service personnel under the following conditions:The power cord or plug is damaged; liquid has entered the printer; the printer has been dropped or the casingdamaged; the printer does not operate normally or exhibits a distinct change in performance. Do not adjustcontrols that are not covered by the operating instructions.
❏ Place the printer near a wall outlet where the plug can be easily unplugged.
❏ Do not place or store the printer outdoors, near excessive dirt or dust, water, heat sources, or in locationssubject to shocks, vibrations, high temperature or humidity.
❏ Take care not to spill liquid on the printer and not to handle the printer with wet hands.
❏ Keep the printer at least 22 cm away from cardiac pacemakers. Radio waves from this printer may adverselyaffect the operation of cardiac pacemakers.
❏ If the LCD screen is damaged, contact your dealer. If the liquid crystal solution gets on your hands, wash themthoroughly with soap and water. If the liquid crystal solution gets into your eyes, flush them immediately withwater. If discomfort or vision problems remain after a thorough flushing, see a doctor immediately.
❏ Avoid using a telephone during an electrical storm. There may be a remote risk of electric shock from lightning.
❏ Do not use a telephone to report a gas leak in the vicinity of the leak.
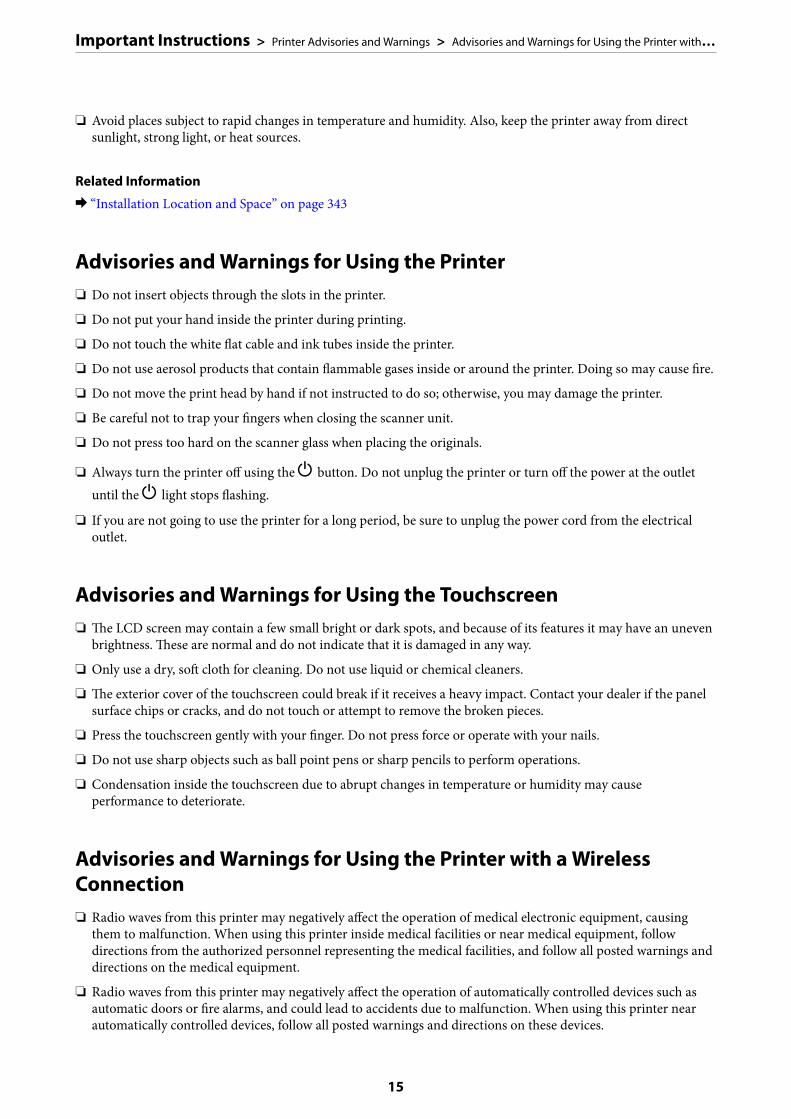
❏ The printer is heavy and should not be lifted or carried by less than two people. When lifting the printer, twopeople should assume the correct positions as shown below.
Important Instructions > Safety Instructions
13

Safety Instructions for Ink❏ Be careful not to touch any ink when you handle the ink tanks, ink tank caps, and opened ink bottles or ink
bottle caps.
❏ If ink gets on your skin, wash the area thoroughly with soap and water.
❏ If ink gets into your eyes, flush them immediately with water. If discomfort or vision problems continue aftera thorough flushing, see a doctor immediately.
❏ If ink gets into your mouth, see a doctor right away.
❏ Do not disassemble the maintenance box; otherwise ink may get into your eyes or on your skin.
❏ Do not shake an ink bottle too vigorously or subject it to strong impacts as this can cause ink to leak.
❏ Keep ink bottles, the ink tank unit, and maintenance box out of the reach of children. Do not allow children todrink from or handle the ink bottles and ink bottle cap.
Printer Advisories and WarningsRead and follow these instructions to avoid damaging the printer or your property. Make sure you keep thismanual for future reference.
Advisories and Warnings for Setting Up the Printer❏ Do not block or cover the vents and openings in the printer.
❏ Use only the type of power source indicated on the printer's label.
❏ Avoid using outlets on the same circuit as photocopiers or air control systems that regularly switch on and off.
❏ Avoid electrical outlets controlled by wall switches or automatic timers.
❏ Keep the entire computer system away from potential sources of electromagnetic interference, such asloudspeakers or the base units of cordless telephones.
❏ The power-supply cords should be placed to avoid abrasions, cuts, fraying, crimping, and kinking. Do not placeobjects on top of the power-supply cords and do not allow the power-supply cords to be stepped on or run over.Be particularly careful to keep all the power-supply cords straight at the ends and the points where they enterand leave the transformer.
❏ If you use an extension cord with the printer, make sure that the total ampere rating of the devices plugged intothe extension cord does not exceed the cord's ampere rating. Also, make sure that the total ampere rating of alldevices plugged into the wall outlet does not exceed the wall outlet's ampere rating.
❏ If you plan to use the printer in Germany, the building installation must be protected by a 10 or 16 amp circuitbreaker to provide adequate short-circuit protection and over-current protection for the printer.
❏ When connecting the printer to a computer or other device with a cable, ensure the correct orientation of theconnectors. Each connector has only one correct orientation. Inserting a connector in the wrong orientationmay damage both devices connected by the cable.
❏ Place the printer on a flat, stable surface that extends beyond the base of the printer in all directions. The printerwill not operate properly if it is tilted at an angle.
❏ Allow space above the printer so that you can fully raise the document cover.
❏ Leave enough space in front of the printer for the paper to be fully ejected.
Important Instructions > Printer Advisories and Warnings > Advisories and Warnings for Setting Up the Printer
14
❏ Avoid places subject to rapid changes in temperature and humidity. Also, keep the printer away from directsunlight, strong light, or heat sources.
Related Information
& “Installation Location and Space” on page 343
Advisories and Warnings for Using the Printer❏ Do not insert objects through the slots in the printer.
❏ Do not put your hand inside the printer during printing.
❏ Do not touch the white flat cable and ink tubes inside the printer.
❏ Do not use aerosol products that contain flammable gases inside or around the printer. Doing so may cause fire.
❏ Do not move the print head by hand if not instructed to do so; otherwise, you may damage the printer.
❏ Be careful not to trap your fingers when closing the scanner unit.
❏ Do not press too hard on the scanner glass when placing the originals.
❏ Always turn the printer off using the P button. Do not unplug the printer or turn off the power at the outletuntil the P light stops flashing.
❏ If you are not going to use the printer for a long period, be sure to unplug the power cord from the electricaloutlet.
Advisories and Warnings for Using the Touchscreen❏ The LCD screen may contain a few small bright or dark spots, and because of its features it may have an uneven
brightness. These are normal and do not indicate that it is damaged in any way.
❏ Only use a dry, soft cloth for cleaning. Do not use liquid or chemical cleaners.
❏ The exterior cover of the touchscreen could break if it receives a heavy impact. Contact your dealer if the panelsurface chips or cracks, and do not touch or attempt to remove the broken pieces.
❏ Press the touchscreen gently with your finger. Do not press force or operate with your nails.
❏ Do not use sharp objects such as ball point pens or sharp pencils to perform operations.
❏ Condensation inside the touchscreen due to abrupt changes in temperature or humidity may causeperformance to deteriorate.
Advisories and Warnings for Using the Printer with a WirelessConnection❏ Radio waves from this printer may negatively affect the operation of medical electronic equipment, causing
them to malfunction. When using this printer inside medical facilities or near medical equipment, followdirections from the authorized personnel representing the medical facilities, and follow all posted warnings anddirections on the medical equipment.
❏ Radio waves from this printer may negatively affect the operation of automatically controlled devices such asautomatic doors or fire alarms, and could lead to accidents due to malfunction. When using this printer nearautomatically controlled devices, follow all posted warnings and directions on these devices.
Important Instructions > Printer Advisories and Warnings > Advisories and Warnings for Using the Printer with …
15
Advisories and Warnings for Transporting or Storing the Printer❏ When storing or transporting the printer, avoid tilting it, placing it vertically, or turning it upside down;
otherwise ink may leak.
❏ Before transporting the printer, make sure that the transportation lock is set to the locked (Transport) positionand that the print head is in the home (far right) position.
Protecting Your Personal InformationWhen you give the printer to someone else or dispose of it, erase all the personal information stored in the printer'smemory by selecting Settings > General Settings > System Administration > Restore Default Settings > ClearAll Data and Settings on the control panel. Also, make sure you delete the printer's internal memory data byselecting Settings > General Settings > System Administration > Clear Internal Memory Data > Delete AllInternal Memory Jobs on the control panel.
Important Instructions > Protecting Your Personal Information
16
Part Names and Functions
Front. . . . . . . . . . . . . . . . . . . . . . . . . . . . . . . . . . . . . . . . . . . . . . . . . . . . . . . . . . . 18
Inside. . . . . . . . . . . . . . . . . . . . . . . . . . . . . . . . . . . . . . . . . . . . . . . . . . . . . . . . . . . 20
Rear. . . . . . . . . . . . . . . . . . . . . . . . . . . . . . . . . . . . . . . . . . . . . . . . . . . . . . . . . . . . 21

Front
A ADF (Automatic Document Feeder) cover Open when removing jammed originals in the ADF.
B ADF edge guide Feeds originals straight into the printer. Slide to the edge of theoriginals.
C ADF input tray Feeds originals automatically.
D ADF document support Supports originals larger than legal size paper.
E ADF output tray Holds originals ejected from the ADF.
F Paper cassette1 Loads paper.
G Paper cassette2
A Paper support Supports loaded paper.
B Edge guide Feeds the paper straight into the printer. Slide to the edges of thepaper.
Part Names and Functions > Front
18
C Paper tray Loads all paper types supported by the printer.
D Output tray Holds the ejected paper. When you start printing, this tray is ejectedto fit the paper size automatically. To store the tray, push it manually
or select on the control panel.
E Edge guide Feeds the paper straight into the printer. Slide to the edges of thepaper.
F Paper cassette Loads paper.
G Paper cassette cover Prevents foreign substance from entering the paper cassette. Thiscover can be attached to paper cassette 1 and 2. Attach it to cover thepaper cassette that is extended to load paper larger than A4-size.When you load paper without extending the paper cassette, you canattach the cover to any of the cassettes.
A Document cover Blocks external light while scanning.
B Document mat Grips the originals so that they do not move.
C Scanner glass Place the originals. You can place originals that are not fed from theADF such as envelopes or thick books.
D Control panel Allows you to make settings and perform operations on the printer.Also displays the printer’s status.
E External interface USB port Connects memory devices.
F Ink tank cover Open to refill the ink tank.
G Ink tank Supplies ink to the print head.
H Ink tank cap Open to refill the ink tank.
Part Names and Functions > Front
19
Inside
A Maintenance box cover Open when replacing the maintenance box. The maintenance box isa container that collects a very small amount of surplus ink duringcleaning or printing.
B Scanner unit Scans placed originals. Open to remove jammed paper. This unitshould usually be kept closed.
C Print head Ink is ejected from the print head nozzles underneath.
D Transportation lock Stops ink supply. Set to the locked (Transport) position whentransporting the printer.
E Inner cover Open to remove jammed paper.
Part Names and Functions > Inside
20

Rear
A Rear cover Remove when removing jammed paper.
B AC inlet Connects the power cord.
C LINE port Connects a phone line.
D USB port Connects a USB cable to connect with a computer.
E LAN port Connects a LAN cable.
F EXT. port Connects external phone devices.
Part Names and Functions > Rear
21

Guide to the Control Panel
Control Panel. . . . . . . . . . . . . . . . . . . . . . . . . . . . . . . . . . . . . . . . . . . . . . . . . . . . . 23
Home Screen Configuration. . . . . . . . . . . . . . . . . . . . . . . . . . . . . . . . . . . . . . . . . . 24
Menu Screen Configuration. . . . . . . . . . . . . . . . . . . . . . . . . . . . . . . . . . . . . . . . . . .26
Job/Status Screen Configuration. . . . . . . . . . . . . . . . . . . . . . . . . . . . . . . . . . . . . . . 27
Entering Characters. . . . . . . . . . . . . . . . . . . . . . . . . . . . . . . . . . . . . . . . . . . . . . . . 28
Viewing Animations. . . . . . . . . . . . . . . . . . . . . . . . . . . . . . . . . . . . . . . . . . . . . . . . 28
Control Panel
A Turns the printer on or off.
Unplug the power cord when the power light is off.
B Displays the home screen.
C Displays the Help screen.
You can check solutions to problems from here.
D Pauses the current printing job and allows you to interrupt another job. However, you cannot interrupt a new jobfrom the computer.
Press this button again to restart a paused job.
E Resets the current settings to user default settings. If user default settings have not been made, resets to thefactory default.
F Displays the Contacts list. You can register, edit or delete the contacts.
G Clears number settings such as the number of copies.
H Enters numbers, characters, and symbols.
I Displays the Job/Status menu. You can check the printer's status and job history.
The error light on the left flashes or turns on when an error occurs.
The data light on the right flashes when the printer is processing data. It turns on when there are queued jobs.
J Displays the Paper Setting screen. You can select the paper size and paper type settings for each paper source.
K Stops the current operation.
L Displays menus and messages. You can change the angle of the control panel.
When no operations are performed for a specific length of time, the printer enters sleep mode and the displayturns off. Tap anywhere on the touch screen to turn on the display. Depending on the current settings, pressingthe buttons on the control panel wakes the printer from sleep mode.
M Stores the output tray.
N Turns on when received documents that have not yet been read, printed, or saved, are stored in the printer'smemory.
Guide to the Control Panel > Control Panel
23
Home Screen Configuration
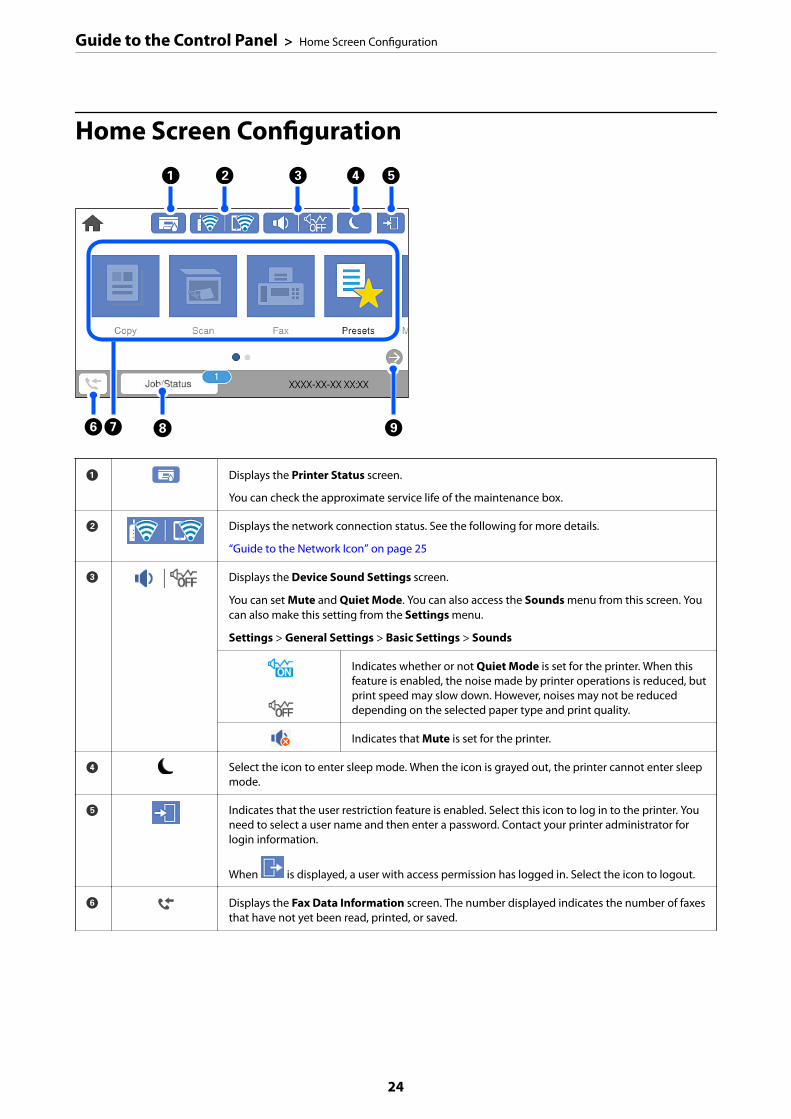
A Displays the Printer Status screen.
You can check the approximate service life of the maintenance box.
B Displays the network connection status. See the following for more details.
“Guide to the Network Icon” on page 25
C Displays the Device Sound Settings screen.
You can set Mute and Quiet Mode. You can also access the Sounds menu from this screen. Youcan also make this setting from the Settings menu.
Settings > General Settings > Basic Settings > Sounds
Indicates whether or not Quiet Mode is set for the printer. When thisfeature is enabled, the noise made by printer operations is reduced, butprint speed may slow down. However, noises may not be reduceddepending on the selected paper type and print quality.
Indicates that Mute is set for the printer.
D Select the icon to enter sleep mode. When the icon is grayed out, the printer cannot enter sleepmode.
E Indicates that the user restriction feature is enabled. Select this icon to log in to the printer. Youneed to select a user name and then enter a password. Contact your printer administrator forlogin information.
When is displayed, a user with access permission has logged in. Select the icon to logout.
F Displays the Fax Data Information screen. The number displayed indicates the number of faxesthat have not yet been read, printed, or saved.
Guide to the Control Panel > Home Screen Configuration
24

G Displays each menu.
❏ Copy
Allows you to copy documents.
❏ Scan
Allows you to scan documents and save them to a memory device or a computer.
❏ Fax
Allows you to send faxes.
❏ Presets
Allows you to register frequently used settings for copying, scanning, or faxing as a preset.
❏ Memory Device
Allows you to print JPEG or TIFF data on a memory device such as a USB flash drive connected to the printer.
❏ Fax Box
Allows you to store received documents, documents to be sent, or documents for polling faxes.
❏ Confidential Job
Allows you to print a password protected job sent from the printer driver.
❏ Settings
Allows you to make settings related to maintenance, printer settings, and operations.
H Job/Status Displays on-going jobs that are standing by. Tap to display the type of jobs, arrival timer, usernames, and so on as a list. The number displayed indicates the number of jobs that are standingby.
I Scrolls the screen to the right.
Guide to the Network Icon
The printer is not connected to a wired (Ethernet) network or unset it.
The printer is connected to a wired (Ethernet) network.
The printer is not connected to a wireless (Wi-Fi) network.
The printer is searching for SSID, unset IP address, or having a problem with a wireless(Wi-Fi) network.
The printer is connected to a wireless (Wi-Fi) network.
The number of bars indicates the signal strength of the connection. The more barsthere are, the stronger the connection.
The printer is not connected to a wireless (Wi-Fi) network in Wi-Fi Direct (Simple AP)mode.
The printer is connected to a wireless (Wi-Fi) network in Wi-Fi Direct (Simple AP) mode.
Guide to the Control Panel > Home Screen Configuration > Guide to the Network Icon
25

Menu Screen Configuration
A Returns to the previous screen.
B Switches the list of settings using the tabs. The Basic Settings tab displays frequently used items. The Advanced tabdisplays other items that you can set as necessary.
C
Displays the list of setting items. When is displayed, you can view additional information by selecting the icon.Make settings by selecting the item or adding a check mark. When you have changed an item from the user default
or the factory default, is displayed on the item.
Grayed out items are not available. Select the item to check why it is unavailable.
If any problems occur, is displayed on the item. Select the icon to check how to solve the problem.
D Starts operations using the current settings. Items vary depending on the menu.
Presets Displays the preset list. You can register current setting as a preset, or load registered presets.
Copies Displays the on-screen keypad allowing you to enter the number of copies.
Preview Displays a preview of the image before printing, copying, scanning, or sending faxes.
x Starts printing, copying, scanning, or sending faxes.
Guide to the Control Panel > Menu Screen Configuration
26

Job/Status Screen ConfigurationPress the button to display the Job/Status menu. You can check the status of the printer or the jobs.
A Switches the displayed lists.
B Filter the jobs by functional.
C When Active is selected, displays the list of ongoing jobs and jobs waiting to be processed.
When Log is selected, displays the job history.
You can cancel jobs or check the error code displayed in the history when the job has failed.
D Indicates the approximate service life of the maintenance box.
E Displays any errors that have occurred in the printer. Select the error from the list to display the error message.
Related Information
& “Error Code is Displayed on the Status Menu” on page 225
Guide to the Control Panel > Job/Status Screen Configuration
27
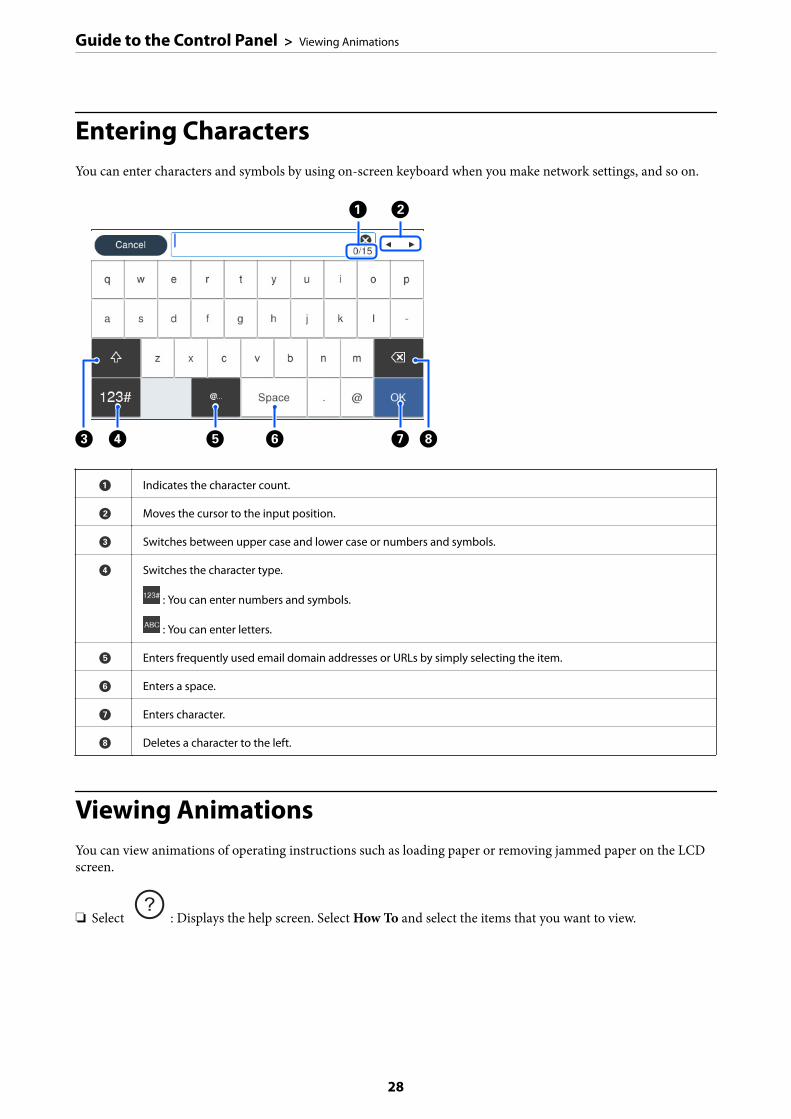
Entering CharactersYou can enter characters and symbols by using on-screen keyboard when you make network settings, and so on.
A Indicates the character count.
B Moves the cursor to the input position.
C Switches between upper case and lower case or numbers and symbols.
D Switches the character type.
: You can enter numbers and symbols.
: You can enter letters.
E Enters frequently used email domain addresses or URLs by simply selecting the item.
F Enters a space.
G Enters character.
H Deletes a character to the left.
Viewing AnimationsYou can view animations of operating instructions such as loading paper or removing jammed paper on the LCDscreen.
❏ Select : Displays the help screen. Select How To and select the items that you want to view.
Guide to the Control Panel > Viewing Animations
28

❏ Select How To at the bottom of the operation screen: Displays the context-sensitive animation. Note that theanimation depends on the printer model.
Guide to the Control Panel > Viewing Animations
29

Loading Papers
Paper Handling Precautions. . . . . . . . . . . . . . . . . . . . . . . . . . . . . . . . . . . . . . . . . . 31
Paper Size and Type Settings. . . . . . . . . . . . . . . . . . . . . . . . . . . . . . . . . . . . . . . . . . 31
Loading Paper. . . . . . . . . . . . . . . . . . . . . . . . . . . . . . . . . . . . . . . . . . . . . . . . . . . . 32

Paper Handling Precautions❏ Read the instruction sheets supplied with the paper.
❏ To achieve high-quality printouts with genuine Epson paper, use the paper in the environment stated on thesheets supplied with the paper.
❏ Fan and align the edges of the paper before loading. Do not fan or curl photo paper. Doing so may damage theprintable side.
❏ If the paper is curled, flatten it or curl it slightly in the opposite direction before loading. Printing on curledpaper may cause paper jams and smears on the printout.
❏ Paper feed problems may occur frequently for manual 2-sided printing when printing on one side of pre-printed paper. Reduce the number of sheets to half or less, or load one sheet of paper at a time if paper jamscontinue.
❏ Make sure you are using long-grain paper. If you are not sure what type of paper you are using, check the paperpackaging or contact the manufacturer to confirm the paper specifications.
❏ Fan and align the edges of the envelopes before loading. When the stacked envelopes are puffed up with air,press them down to flatten them before loading.
Related Information
& “Unavailable Paper Types” on page 300
Paper Size and Type SettingsIf you register the paper size and type on the screen displayed when you insert the paper cassette, the printerinforms you when the registered information and print settings differ. This prevents you from wasting paper and
Loading Papers > Paper Size and Type Settings
31

ink by making sure you are not printing on the wrong paper size or printing in the wrong color due to usingsettings that do not match the paper type.
If displayed paper size and type differ from the loaded paper, select the item to change. If the settings match theloaded paper, close the screen.
Note:You can also display the paper size and paper type settings screen by pressing the button on the control panel.
List of Paper TypeTo obtain optimum printing results, select the paper type that suits the paper.
Media Name Media Type
Control Panel Printer Driver
Epson Business Paper
Epson Bright White Ink Jet Paper
Epson Bright White Paper
Plain paper Plain paper
Epson Ultra Glossy Photo Paper Ultra Glossy Epson Ultra Glossy
Epson Premium Glossy Photo Paper Prem. Glossy Epson Premium Glossy
Epson Premium Semigloss PhotoPaper
Prem. Semigloss Epson Premium Semigloss
Epson Photo Paper Glossy Glossy Photo Paper Glossy
Epson Matte Paper-Heavyweight Matte Epson Matte
Epson Photo Quality Ink Jet Paper
Epson Double-sided Photo Quality InkJet Paper
Super Fine Paper Epson Photo Quality Ink Jet
Loading PaperYou can load paper or envelopes by referring to the animations displayed on the printer's LCD screen.
Loading Papers > Loading Paper
32

Select , and then select How To > Load paper. Select the paper type and paper source you want to use to displaythe animations. Select Finish to close the animation screen.
Loading Pre-punched PaperLoad a single sheet of pre-punched paper in the paper tray.
Paper size: A3, B4, A4, B5, A5, Letter, Legal
❏ Adjust the print position of your file to avoid printing over the holes.
❏ Automatic 2-sided printing is not available for pre-punched paper.
Loading Papers > Loading Paper > Loading Pre-punched Paper
33

Loading Long Papers❏ Paper tray
Load long paper in the paper tray by allowing the leading edge of the paper to roll over. Select User-Defined asthe paper size setting.
❏ Make sure the end of the paper is cut perpendicularly. A diagonal cut may cause paper feed problems.
❏ Long paper cannot be held in the output tray. Prepare a box and so on to make sure that paper does not fallon the floor.
❏ Do not touch paper that is being fed or ejected. It could injure your hand or cause print quality to decline.
❏ Paper cassetteExtend the paper cassette to load long paper. Select User-Defined as the paper size setting.
❏ Make sure the end of the paper is cut perpendicularly. A diagonal cut may cause paper feed problems.
❏ Do not touch paper that is being fed or ejected. It could injure your hand or cause print quality to decline.
Loading Papers > Loading Paper > Loading Long Papers
34
Placing Originals
Originals that are not Supported by the ADF. . . . . . . . . . . . . . . . . . . . . . . . . . . . . . 36
Detecting the Original Size Automatically. . . . . . . . . . . . . . . . . . . . . . . . . . . . . . . . 36
Placing Originals. . . . . . . . . . . . . . . . . . . . . . . . . . . . . . . . . . . . . . . . . . . . . . . . . . 37

Originals that are not Supported by the ADF
cImportant:
Do not feed photographs or valuable original artwork into the ADF. Misfeeding may wrinkle or damage theoriginal. Scan these documents on the scanner glass instead.
To prevent paper jams, avoid placing the following originals in the ADF. For these types, use the scanner glass.
❏ Originals that are torn, folded, wrinkled, deteriorated, or curled
❏ Originals with binder holes
❏ Originals held together with tape, staples, paper clips etc.
❏ Originals that have stickers or labels stuck to them
❏ Originals that are cut irregularly or not right angled
❏ Originals that are bound
❏ OHPs, thermal transfer paper, or carbon backs
Detecting the Original Size AutomaticallyWhen you select Auto Detectas the paper setting, the following types of paper size are identified automatically.
❏ Placing vertically: A3, B4, A4, B5, A5 (scanner glass only)Place the short edge of the original toward the paper feed entrance of the ADF or the left side of the scannerglass.
❏ Placing horizontally: A4Place the long edge of the original toward the paper feed entrance of the ADF or the left side of the scannerglass.
Note:The sizes for the following originals may not be detected correctly. If the sizes are not detected, set the size manually on thecontrol panel.
❏ Originals that are torn, folded, wrinkled, or curled (if the originals are curled, flatten the curl before placing theoriginals.)
❏ Originals with a lot of binder holes
❏ OHPs, translucent originals, or glossy originals
Placing Originals > Detecting the Original Size Automatically
36

Placing OriginalsYou can place the originals by referring to the animations displayed on the printer's LCD screen.
Select , and then select How To > Place Originals. Select the method of placing originals that you want to view.Select Finish to close the animation screen.
If you want to copy multiple originals, place all of the originals on the ADF.
When using the scanner glass
!Caution:
Be careful not to trap your fingers when closing the document cover. Otherwise you may be injured.
cImportant:
❏ When placing bulky originals such as books, prevent exterior light from shining directly onto the scanner glass.
❏ Do not apply too much force to the scanner glass or the document cover. Otherwise, they may be damaged.
Note:❏ If there is any trash or dirt on the scanner glass, the scanning range may expand to include it, so the image of the original
may be displaced or reduced. Remove any trash and dirt on the scanner glass before scanning.
❏ A range of 1.5 mm from the corner of the scanner glass is not scanned.
❏ When originals are placed in the ADF and on the scanner glass, priority is given to the originals in the ADF.
❏ Some sizes may not be automatically detected. In this situation, manually select the size of the originals.
❏ If you leave the originals on the scanner glass for a long time, they may stick to the surface of the glass.
Placing Originals > Placing Originals
37

When using the ADF
cImportant:
❏ Do not load originals above the line just under the triangle symbol inside the ADFedge guide.
❏ Do not add originals while scanning.
Note:❏ You can place A4 size originals with the long edge facing toward the ADF.
❏ Some sizes may not be automatically detected. In this situation, manually select the size of the originals.
Related Information
& “Originals that are not Supported by the ADF” on page 36& “Detecting the Original Size Automatically” on page 36& “Scanner Specifications” on page 335& “ADF Specifications” on page 335
Placing Originals > Placing Originals
38
Inserting and Removing a MemoryDevice
Inserting an External USB Device. . . . . . . . . . . . . . . . . . . . . . . . . . . . . . . . . . . . . . 40
Removing an External USB Device. . . . . . . . . . . . . . . . . . . . . . . . . . . . . . . . . . . . . .40
Sharing Data on a Memory Device. . . . . . . . . . . . . . . . . . . . . . . . . . . . . . . . . . . . . .40

Inserting an External USB DeviceInsert an external USB device into the external interface USB port.
Related Information
& “Memory Device Specifications” on page 340
Removing an External USB DeviceRemove the external USB device.
cImportant:
If you remove the external USB device while operating the printer, the data on the external USB device may be lost.
Sharing Data on a Memory DeviceFrom a computer, you can write or read data on a memory device such as a USB flash drive that has beenconnected to the printer.
Inserting and Removing a Memory Device > Sharing Data on a Memory Device
40
cImportant:
When sharing a memory device inserted in the printer between computers connected by USB or over a network,write access is only allowed to the computers that are connected by the method you selected on the printer. To writeto the memory device, enter Settings > General Settings > Printer Settings > Memory Device Interface > FileSharing on the control panel and then select a connection method.
Note:It takes a while to recognize data from a computer if a large memory device, such as 2 TB HDD, is connected.
Windows
Select a memory device from Computer or My Computer. The data on the memory device is displayed.
Note:If you connected the printer to the network without using the software disc or Web Installer, map an external interface USBport as a network drive. Open Run and enter a printer name \\XXXXX or a printer's IP address \\XXX.XXX.XXX.XXX toOpen:. Right-click a device icon displayed to assign the network. The network drive appears in Computer or My Computer.
Mac OS
Select a corresponding device icon. The data on the external storage device is displayed.
Note:❏ To remove a memory device, drag and drop the device icon to the trash icon. Otherwise, data on the shared drive may
not be displayed correctly when another memory device is inserted.
❏ To access a memory device through the network, select Go > Connect to Server from the menu on the desktop. Enter aprinter name cifs://XXXXX or smb://XXXXX (Where "XXXXX" is the printer name) in the Server Address, and thenclick Connect.
Related Information
& “Memory Device Specifications” on page 340
Inserting and Removing a Memory Device > Sharing Data on a Memory Device
41
Printing
Printing Documents. . . . . . . . . . . . . . . . . . . . . . . . . . . . . . . . . . . . . . . . . . . . . . . . 43
Printing on Envelopes. . . . . . . . . . . . . . . . . . . . . . . . . . . . . . . . . . . . . . . . . . . . . . . 77
Printing Photos. . . . . . . . . . . . . . . . . . . . . . . . . . . . . . . . . . . . . . . . . . . . . . . . . . . .78
Printing Web Pages. . . . . . . . . . . . . . . . . . . . . . . . . . . . . . . . . . . . . . . . . . . . . . . . . 80
Printing Using a Cloud Service. . . . . . . . . . . . . . . . . . . . . . . . . . . . . . . . . . . . . . . . 81

Printing Documents
Printing from a Computer - WindowsIf you cannot change some of the printer driver settings, they may have been restricted by the administrator.Contact your printer administrator for assistance.
Printing Using Easy Settings
Note:Operations may differ depending on the application. See the application's help for details.
1. Load paper in the printer.
“Loading Paper” on page 32
2. Open the file you want to print.
3. Select Print or Print Setup from the File menu.
4. Select your printer.
5. Select Preferences or Properties to access the printer driver window.
Printing > Printing Documents > Printing from a Computer - Windows
43
6. Change the settings as necessary.
See the menu options for the printer driver for details.
Note:❏ You can also see the online help for explanations of the setting items. Right-clicking an item displays Help.
❏ When you select Print Preview, you can see a preview of your document before printing.
7. Click OK to close the printer driver window.
8. Click Print.
Note:❏ When you select Print Preview, a preview window is displayed. To change the settings, click Cancel, and then repeat
the procedure from step 2.
❏ If you want to cancel printing, on your computer right-click on your printer in Devices and Printers, Printer, or inPrinters and Faxes. Click See what's printing, right-click on the job you want to cancel, and then select Cancel.However, you cannot cancel a print job from the computer once it has been completely sent to the printer. In thiscase, cancel the print job by using the printer's control panel.
Related Information
& “Available Paper and Capacities” on page 295& “List of Paper Type” on page 32& “Menu Options for the Printer Driver” on page 44
Menu Options for the Printer Driver
Open the print window in an application, select the printer, and then access the printer driver window.
Note:Menus vary depending on the option you selected.
Main Tab
Printing Presets:
Add/Remove Presets:
You can add or remove your own presets for frequently used print settings. Select the preset you wantto use from the list.
Paper Source:
Select the paper source from which the paper is fed. Select Auto Select to automatically select thepaper source selected in the print settings on the printer.
Document Size:
Select the paper size on which you want to print. If you select User-Defined, enter the paper widthand height.
Borderless:
Enlarges the print data slightly more than the paper size so that no margins are printed around theedges of the paper. Click Settings to select the amount of enlargement.
Printing > Printing Documents > Printing from a Computer - Windows
44
Orientation:
Select the orientation you want to use to print.
Paper Type:
Select the type of paper on which you print.
Quality:
Select the pint quality you want to use for printing. Available settings depend on the paper type youselect. Selecting High provides higher quality printing, but the printing speed may be slower.
Color:
Select whether to print in color or in monochrome.
2-Sided Printing:
Allows you to perform 2-sided printing.
Settings:
You can specify the binding edge and the binding margins. When printing multi-pagedocuments, you can select to print starting from either the front or the back side of the page.
Print Density:
Select the document type to adjust the print density. If the appropriate print density is selected,you can prevent images from bleeding through to the reverse side. Select User Defined toadjust the print density manually.
Multi-Page:
Allows you to print several pages on one sheet or perform poster printing. Click Layout Order tospecify the order in which pages are printed.
Copies:
Set the number of copies you want to print.
Collate:
Prints multi-page documents collated in order and sorted into sets.
Reverse Order:
Allows you to print from the last page so that the pages are stacked in the correct order afterprinting.
Quiet Mode:
Reduces the noise the printer makes. However, enabling this may reduce print speed.
Print Preview:
Displays a preview of your document before printing.
Job Arranger Lite:
Job Arranger Lite allows you to combine several files created by different applications and print themas a single print job.
Printing > Printing Documents > Printing from a Computer - Windows
45
Show Settings/Hide Settings:
Displays a list of items currently set on the Main and More Options tabs. You can show or hide thecurrent setting list screen.
Restore Defaults:
Return all settings to their factory default values. The settings on the More Options tab are also resetto their defaults.
Ink Levels:
Displays the approximate ink level.
More Options Tab
Printing Presets:
Add/Remove Presets:
You can add or remove your own presets for frequently used print settings. Select the preset you wantto use from the list.
Document Size:
Select the paper size on which you want to print. If you select User-Defined, enter the paper widthand height.
Output Paper:
Select the paper size on which you want to print. If the Document Size differs from the OutputPaper, Reduce/Enlarge Document is selected automatically. You do not have to select it whenprinting without reducing or enlarging the size of a document.
Reduce/Enlarge Document:
Allows you to reduce or enlarge the size of a document.
Fit to Page:
Automatically reduce or enlarge the document to fit to the paper size selected in OutputPaper.
Zoom to:
Prints with a specific percentage.
Center:
Prints images in the center of the paper.
Color Correction:
Automatic:
Adjusts the tone of images automatically.
Printing > Printing Documents > Printing from a Computer - Windows
46

Custom:
Adjusts the colors of images automatically. Clicking Advanced opens the Color Correctionscreen where you can select a detailed method of color correction. Click Image Options toenable Color Universal Print, Fix Red-Eye, and sharpen printing for thin lines.
Watermark Features:
Allows you to make settings for anti-copy patterns, watermarks, or headers and footers.
Add/Delete:
Allows you to add or remove any anti-copy patterns or watermarks that you want to use.
Settings:
Allows you to set the printing method for anti-copy patterns or watermarks.
Header/Footer:
You can print information such as a user name and printing date in headers or footers. You canthen set color, font, size, or style.
Confidential Job:
Password-protect confidential documents when printing. If you use this feature, the print data isstored in the printer and can only be printed after the password has been entered using the printer'scontrol panel. Click Settings to change the settings.
Additional Settings:
Rotate 180°:
Rotates pages 180 degrees before printing. Select this item when printing on paper such asenvelopes that are loaded in fixed direction in the printer.
Bidirectional Printing:
Prints when the print head moves in both directions. The print speed is faster, but the qualitymay decline.
Mirror Image:
Inverts the image so that it prints as it would appear in a mirror.
Show Settings/Hide Settings:
Displays a list of items currently set on the Main and More Options tabs. You can show or hide thecurrent setting list screen.
Restore Defaults:
Return all settings to their factory default values. The settings on the Main tab are also reset to theirdefaults.
Maintenance Tab
Print Head Nozzle Check:
Prints a nozzle check pattern to check if the print head nozzles are clogged.
Printing > Printing Documents > Printing from a Computer - Windows
47
Print Head Cleaning:
Cleans the clogged nozzles in the print head. Because this feature uses some ink, clean the print headonly if some nozzles are clogged as shown in the illustration of the nozzle check pattern.
Power Cleaning:
Runs power cleaning to clean the clogged nozzles in the print head. Because this feature uses moreink than head cleaning, run power cleaning only if most nozzles are clogged as shown in theillustration of the nozzle check pattern.
Job Arranger Lite:
Opens the Job Arranger Lite window. Here you can open and edit previously saved data.
EPSON Status Monitor 3:
Opens the EPSON Status Monitor 3 window. Here you can confirm the status of the printer and theconsumables.
Monitoring Preferences:
Allows you to make settings for items on the EPSON Status Monitor 3 window.
Extended Settings:
Allows you to make a variety of settings. Right-click each item to view the Help for more details.
Print Queue:
Displays the jobs waiting to be printed. You can check, pause, or resume print jobs.
Printer and Option Information:
Displays the number of sheets of paper fed into the printer or the ADF.
Language:
Changes the language to be used on the printer driver window. To apply the settings, close the printerdriver, and then open it again.
Printing > Printing Documents > Printing from a Computer - Windows
48

Software Update:
Starts EPSON Software Updater to check for the latest version of applications on the Internet.
Technical Support:
If the manual is installed on your computer, the manual is displayed. If it is not installed, you canconnect to the Epson Web site to check the manual and available technical support.
Adding Printing Presets for Easy Printing
If you create your own preset of frequently used print settings on the printer driver, you can print easily byselecting the preset from the list.
1. On the printer driver's Main or More Options tab, set each item (such as Document Size and Paper Type).
2. in Main or More Options.
3. Click Add/Remove Presets in Printing Presets.
4. Enter a Name and, if necessary, enter a comment.
5. Click Save.
Note:To delete an added preset, click Add/Remove Presets, select the preset name you want to delete from the list, and thendelete it.
“Main Tab” on page 44
“More Options Tab” on page 46
6. Click Print.
The next time you want to print using the same settings, select the registered setting name from Printing Presets,and click OK.
Related Information
& “Loading Paper” on page 32& “Printing Using Easy Settings” on page 43
Printing > Printing Documents > Printing from a Computer - Windows
49

Printing on 2-Sides
You can use either of the following methods to print on both sides of the paper.
❏ Automatic 2-sided printing
❏ Manual 2-sided printingWhen the printer has finished printing the first side, flip the paper over to print on the other side.
Note:❏ This feature is not available for borderless printing.
❏ If you do not use paper that is suitable for 2-sided printing, the print quality may decline and paper jams may occur.“Paper for 2-Sided Printing” on page 299
❏ Depending on the paper and the data, ink may bleed through to the other side of the paper.
❏ You cannot perform manual 2-sided printing unless EPSON Status Monitor 3 is enabled. If EPSON Status Monitor 3 isdisabled, access the printer driver window, click Extended Settings on the Maintenance tab, and then select EnableEPSON Status Monitor 3.
❏ However, it may not be available when the printer is accessed over a network or is used as a shared printer.
1. On the printer driver's Main tab, select the method of 2-Sided Printing.
2. Click Settings, make the appropriate settings, and then click OK.
3. Click Print Density, make the appropriate settings, and then click OK.
When setting Print Density, you can adjust print density according to the document type.
Note:❏ This setting is not available when you select manual 2-sided printing.
❏ Printing may be slow depending on the combination of options selected for Print Density in the Select DocumentType window and for Quality on the Main tab.
4. Set the other items on the Main and More Options tabs as necessary, and then click OK.
“Main Tab” on page 44
“More Options Tab” on page 46
5. Click Print.
For manual 2-sided printing, when the first side has finished printing, a pop-up window is displayed on thecomputer. Follow the on-screen instructions.
Printing > Printing Documents > Printing from a Computer - Windows
50
Related Information
& “Available Paper and Capacities” on page 295& “Loading Paper” on page 32& “Printing Using Easy Settings” on page 43
Printing a Booklet
You can also print a booklet that can be created by re-ordering the pages and folding the printout.
Note:❏ This feature is not available with borderless printing.
❏ If you do not use paper that is suitable for 2-sided printing, the print quality may decline and paper jams may occur.“Paper for 2-Sided Printing” on page 299
❏ Depending on the paper and the data, ink may bleed through to the other side of the paper.
❏ You cannot perform manual 2-sided printing unless EPSON Status Monitor 3 is enabled. If EPSON Status Monitor 3 isdisabled, access the printer driver window, click Extended Settings on the Maintenance tab, and then select EnableEPSON Status Monitor 3.
❏ However, it may not be available when the printer is accessed over a network or is used as a shared printer.
1. On the printer driver's Main tab, select the method of 2-Sided Printing.
2. Click Settings, and then select Booklet.
3. Click OK.
❏ Center Binding: Use this method when printing a small number of pages that can be stacked and easilyfolded in half.
❏ Side Binding. Use this method when printing one sheet (four pages) at a time, folding each in half, and thenputting them together in one volume.
4. Click Print Density, make the appropriate settings, and then click OK.
When setting Print Density, you can adjust print density according to the document type.
Note:Printing may be slow depending on the combination of options selected for Select Document Type in the Print DensityAdjustment window and for Quality on the Main tab.
Printing > Printing Documents > Printing from a Computer - Windows
51

5. Set the other items on the Main and More Options tabs as necessary, and then click OK.
“Main Tab” on page 44
“More Options Tab” on page 46
6. Click Print.
Related Information
& “Available Paper and Capacities” on page 295& “Loading Paper” on page 32& “Printing Using Easy Settings” on page 43
Printing Several Pages on One Sheet
You can print several pages of data on a single sheet of paper.
Note:This feature is not available with borderless printing.
1. On the printer driver's Main tab, select 2-Up, 4-Up, 6-Up, 8-Up, 9-Up, or 16-Up as the Multi-Page setting.
2. Click Layout Order, make the appropriate settings, and then click OK.
3. Set the other items on the Main and More Options tabs as necessary, and then click OK.
“Main Tab” on page 44
“More Options Tab” on page 46
4. Click Print.
Related Information
& “Loading Paper” on page 32& “Printing Using Easy Settings” on page 43
Printing > Printing Documents > Printing from a Computer - Windows
52
Printing to Fit the Paper Size
Select the paper size you loaded in the printer as the Destination Paper Size setting.
Note:This feature is not available with borderless printing.
1. On the printer driver's More Options tab, make the following settings.
❏ Document Size: Select the size of the paper you set in the application setting.
❏ Output Paper: Select the paper size you loaded in the printer.Fit to Page is automatically selected.
Note:Click Center to print the reduced image in the middle of the paper.
2. Set the other items on the Main and More Options tabs as necessary, and then click OK.
“Main Tab” on page 44
“More Options Tab” on page 46
3. Click Print.
Related Information
& “Loading Paper” on page 32& “Printing Using Easy Settings” on page 43
Printing > Printing Documents > Printing from a Computer - Windows
53

Printing a Reduced or Enlarged Document at any Magnification
You can reduce or enlarge the size of a document by a specific percentage.
1. On the printer driver's More Options tab, select the document size from the Document Size setting.
2. Select the paper size you want to print on from the Output Paper setting.
3. Select Reduce/Enlarge Document, Zoom to, and then enter a percentage.
4. Set the other items on the Main and More Options tabs as necessary, and then click OK.
“Main Tab” on page 44
“More Options Tab” on page 46
5. Click Print.
Related Information
& “Loading Paper” on page 32& “Printing Using Easy Settings” on page 43
Printing One Image on Multiple Sheets for Enlargement (Creating a Poster)
This feature allows you to print one image on multiple sheets of paper. You can create a larger poster by tapingthem together.
Printing > Printing Documents > Printing from a Computer - Windows
54

Note:This feature is not available with borderless printing.
1. On the printer driver's Main tab, select 2x1 Poster, 2x2 Poster, 3x3 Poster, or 4x4 Poster as the Multi-Pagesetting.
2. Click Settings, make the appropriate settings, and then click OK.
Note:Print Cutting Guides allows you to print a cutting guide.
3. Set the other items on the Main and More Options tabs as necessary, and then click OK.
“Main Tab” on page 44
“More Options Tab” on page 46
4. Click Print.
Related Information
& “Loading Paper” on page 32& “Printing Using Easy Settings” on page 43
Making Posters Using Overlapping Alignment Marks
Here is an example of how to make a poster when 2x2 Poster is selected, and Overlapping Alignment Marks isselected in Print Cutting Guides.
Printing > Printing Documents > Printing from a Computer - Windows
55

1. Prepare Sheet 1 and Sheet 2. Cut off the margins of Sheet 1 along the vertical blue line through the center ofthe top and bottom cross marks.
2. Place the edge of Sheet 1 on top of Sheet 2 and align the cross marks, then temporarily tape the two sheetstogether from the back.
Printing > Printing Documents > Printing from a Computer - Windows
56
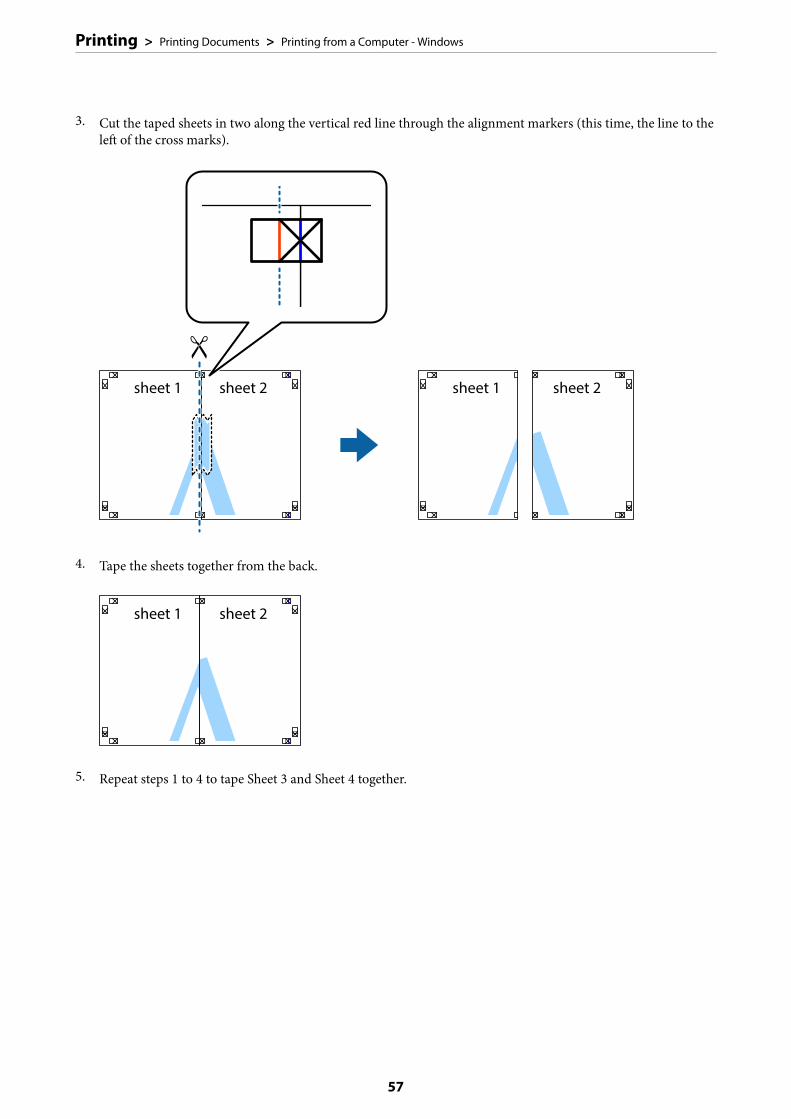
3. Cut the taped sheets in two along the vertical red line through the alignment markers (this time, the line to theleft of the cross marks).
4. Tape the sheets together from the back.
5. Repeat steps 1 to 4 to tape Sheet 3 and Sheet 4 together.
Printing > Printing Documents > Printing from a Computer - Windows
57
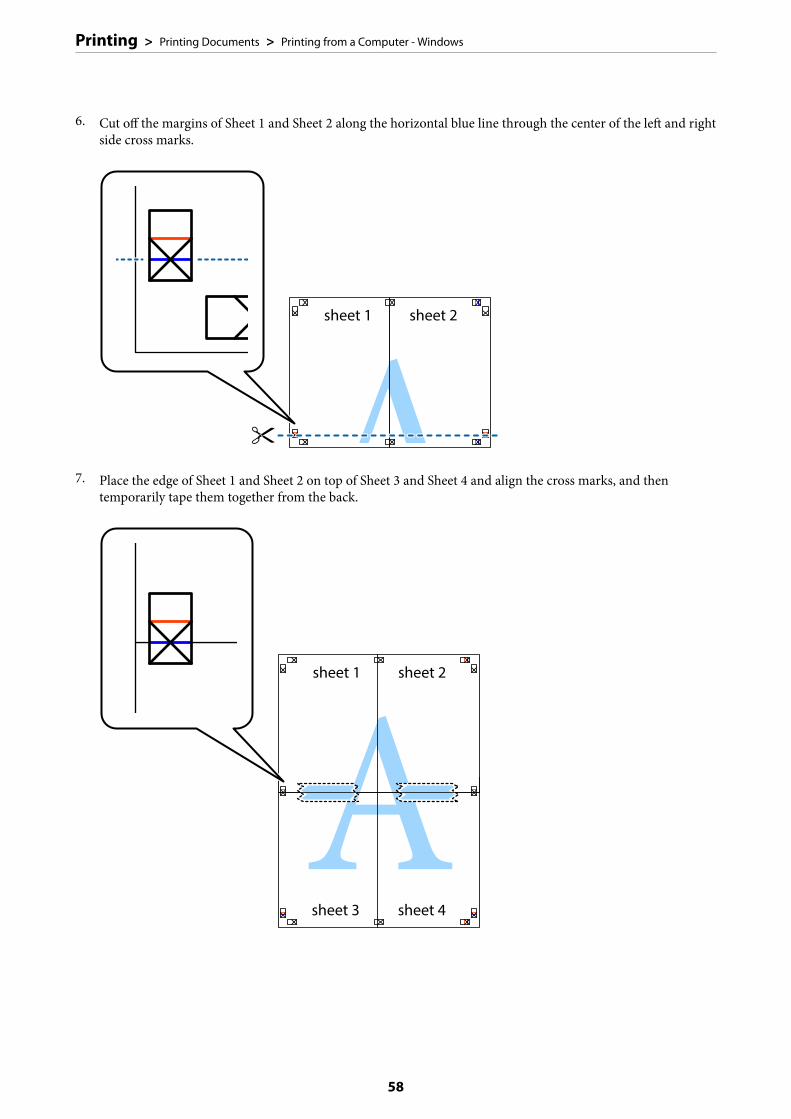
6. Cut off the margins of Sheet 1 and Sheet 2 along the horizontal blue line through the center of the left and rightside cross marks.
7. Place the edge of Sheet 1 and Sheet 2 on top of Sheet 3 and Sheet 4 and align the cross marks, and thentemporarily tape them together from the back.
Printing > Printing Documents > Printing from a Computer - Windows
58
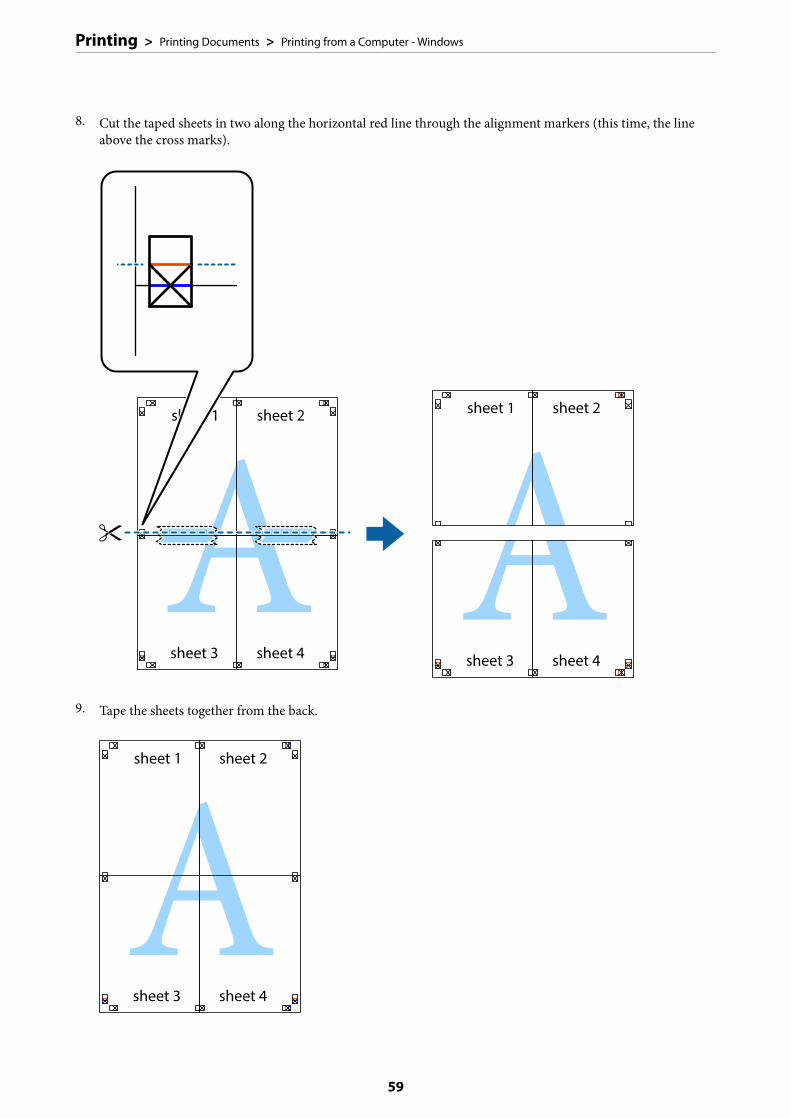
8. Cut the taped sheets in two along the horizontal red line through the alignment markers (this time, the lineabove the cross marks).
9. Tape the sheets together from the back.
Printing > Printing Documents > Printing from a Computer - Windows
59
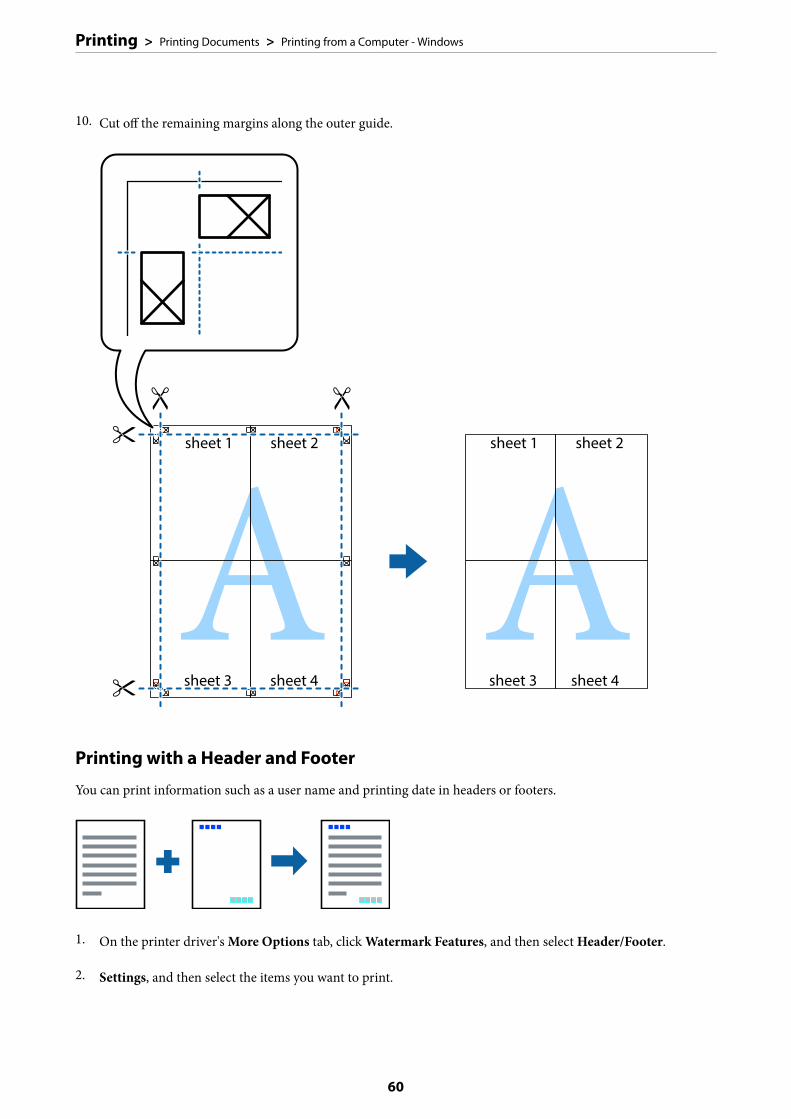
10. Cut off the remaining margins along the outer guide.
Printing with a Header and Footer
You can print information such as a user name and printing date in headers or footers.
1. On the printer driver's More Options tab, click Watermark Features, and then select Header/Footer.
2. Settings, and then select the items you want to print.
Printing > Printing Documents > Printing from a Computer - Windows
60
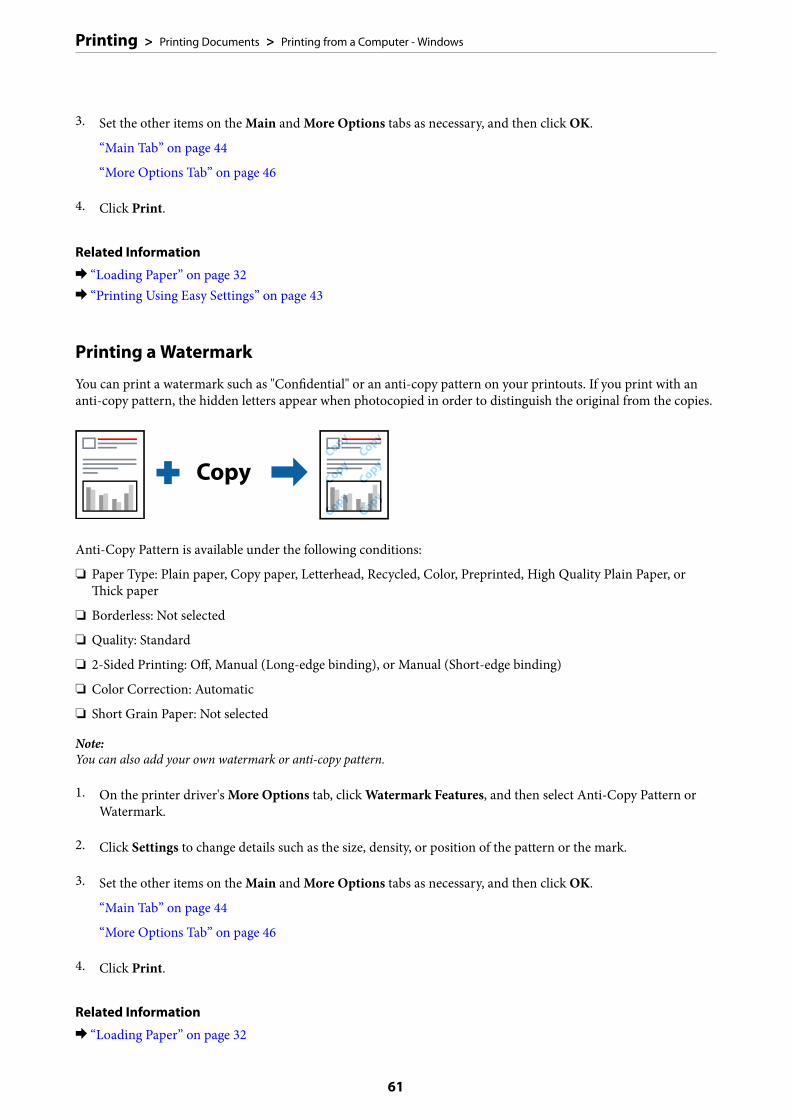
3. Set the other items on the Main and More Options tabs as necessary, and then click OK.
“Main Tab” on page 44
“More Options Tab” on page 46
4. Click Print.
Related Information
& “Loading Paper” on page 32& “Printing Using Easy Settings” on page 43
Printing a Watermark
You can print a watermark such as "Confidential" or an anti-copy pattern on your printouts. If you print with ananti-copy pattern, the hidden letters appear when photocopied in order to distinguish the original from the copies.
Anti-Copy Pattern is available under the following conditions:
❏ Paper Type: Plain paper, Copy paper, Letterhead, Recycled, Color, Preprinted, High Quality Plain Paper, orThick paper
❏ Borderless: Not selected
❏ Quality: Standard
❏ 2-Sided Printing: Off, Manual (Long-edge binding), or Manual (Short-edge binding)
❏ Color Correction: Automatic
❏ Short Grain Paper: Not selected
Note:You can also add your own watermark or anti-copy pattern.
1. On the printer driver's More Options tab, click Watermark Features, and then select Anti-Copy Pattern orWatermark.
2. Click Settings to change details such as the size, density, or position of the pattern or the mark.
3. Set the other items on the Main and More Options tabs as necessary, and then click OK.
“Main Tab” on page 44
“More Options Tab” on page 46
4. Click Print.
Related Information
& “Loading Paper” on page 32
Printing > Printing Documents > Printing from a Computer - Windows
61
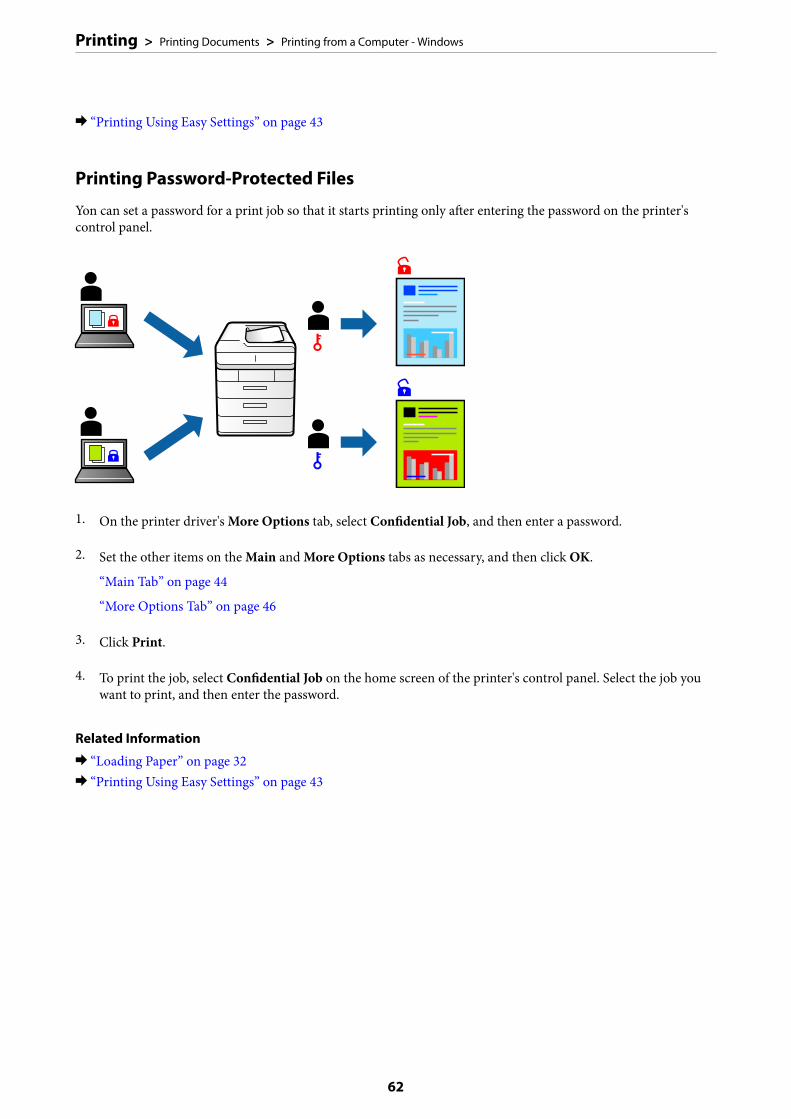
& “Printing Using Easy Settings” on page 43
Printing Password-Protected Files
Yon can set a password for a print job so that it starts printing only after entering the password on the printer'scontrol panel.
1. On the printer driver's More Options tab, select Confidential Job, and then enter a password.
2. Set the other items on the Main and More Options tabs as necessary, and then click OK.
“Main Tab” on page 44
“More Options Tab” on page 46
3. Click Print.
4. To print the job, select Confidential Job on the home screen of the printer's control panel. Select the job youwant to print, and then enter the password.
Related Information
& “Loading Paper” on page 32& “Printing Using Easy Settings” on page 43
Printing > Printing Documents > Printing from a Computer - Windows
62
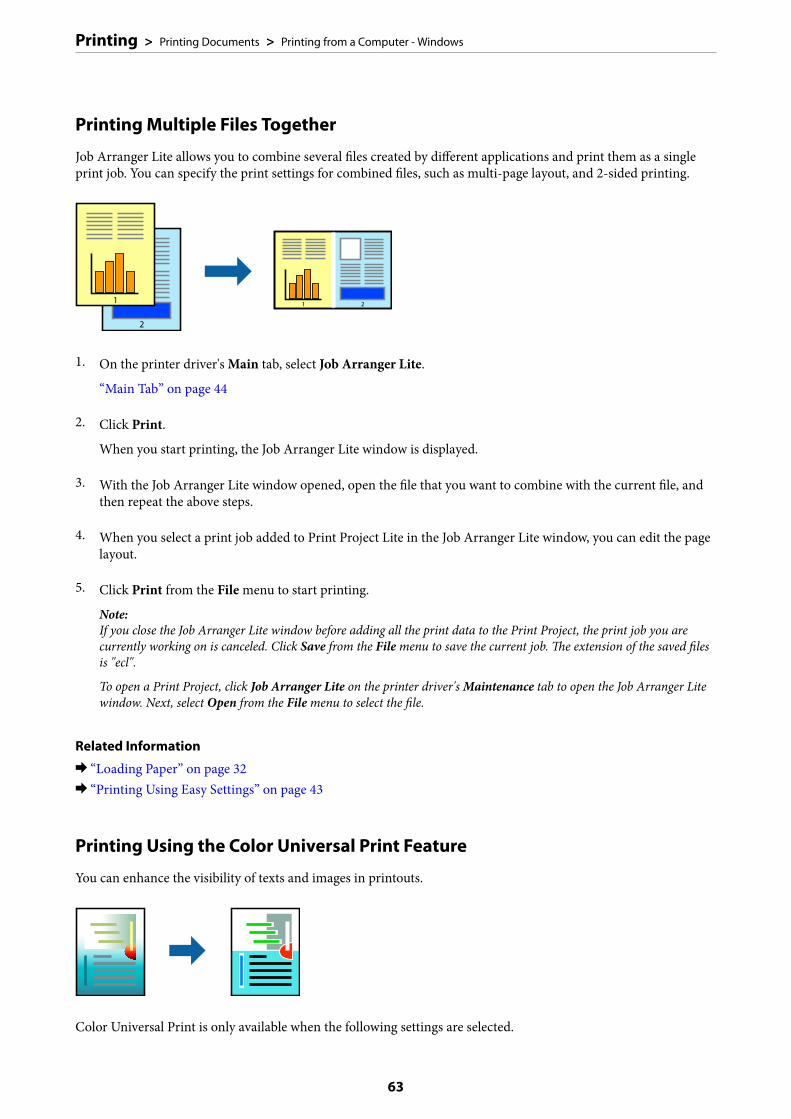
Printing Multiple Files Together
Job Arranger Lite allows you to combine several files created by different applications and print them as a singleprint job. You can specify the print settings for combined files, such as multi-page layout, and 2-sided printing.
1. On the printer driver's Main tab, select Job Arranger Lite.
“Main Tab” on page 44
2. Click Print.
When you start printing, the Job Arranger Lite window is displayed.
3. With the Job Arranger Lite window opened, open the file that you want to combine with the current file, andthen repeat the above steps.
4. When you select a print job added to Print Project Lite in the Job Arranger Lite window, you can edit the pagelayout.
5. Click Print from the File menu to start printing.
Note:If you close the Job Arranger Lite window before adding all the print data to the Print Project, the print job you arecurrently working on is canceled. Click Save from the File menu to save the current job. The extension of the saved filesis "ecl".
To open a Print Project, click Job Arranger Lite on the printer driver's Maintenance tab to open the Job Arranger Litewindow. Next, select Open from the File menu to select the file.
Related Information
& “Loading Paper” on page 32& “Printing Using Easy Settings” on page 43
Printing Using the Color Universal Print Feature
You can enhance the visibility of texts and images in printouts.
Color Universal Print is only available when the following settings are selected.
Printing > Printing Documents > Printing from a Computer - Windows
63

❏ Paper Type: Plain paper, Copy paper, Letterhead, Recycled paper, Colored paper, Preprinted paper, High qualityplain paper
❏ Quality: Standard or a higher quality
❏ Print Color:Color
❏ Applications: Microsoft® Office 2007 or later
❏ Text Size: 96 pts or smaller
1. On the printer driver's More Options tab, click Image Options in the Color Correction setting.
2. Select an option from the Color Universal Print setting.
3. Enhancement Options to make further settings.
4. Set the other items on the Main and More Options tabs as necessary, and then click OK.
“Main Tab” on page 44
“More Options Tab” on page 46
5. Click Print.
Note:❏ Certain characters may be altered by patterns, such as "+" appearing as "±".
❏ Application-specific patterns and underlines may alter content printed using these settings.
❏ Print quality may decrease in photos and other images when using Color Universal Print settings.
❏ Printing is slower when using Color Universal Print settings.
Related Information
& “Loading Paper” on page 32& “Printing Using Easy Settings” on page 43
Adjusting the Print Color
You can adjust the colors used in the print job. These adjustments are not applied to the original data.
PhotoEnhance produces sharper images and more vivid colors by automatically adjusting the contrast, saturation,and brightness of the original image data.
Note:PhotoEnhance adjusts the color by analyzing the location of the subject. Therefore, if you have changed the location of thesubject by reducing, enlarging, cropping, or rotating the image, the color may change unexpectedly. Selecting the borderlesssetting also changes the location of the subject resulting in changes in color. If the image is out of focus, the tone may beunnatural. If the color is changed or becomes unnatural, print in a mode other than PhotoEnhance.
Printing > Printing Documents > Printing from a Computer - Windows
64
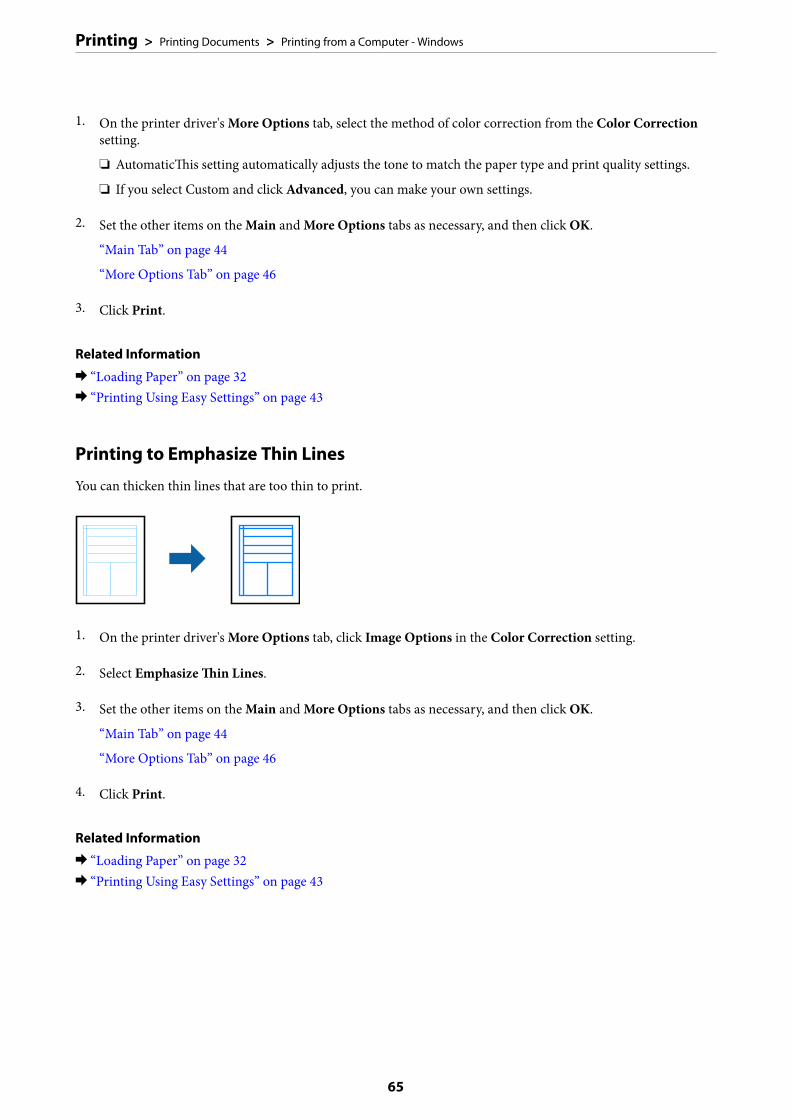
1. On the printer driver's More Options tab, select the method of color correction from the Color Correctionsetting.
❏ AutomaticThis setting automatically adjusts the tone to match the paper type and print quality settings.
❏ If you select Custom and click Advanced, you can make your own settings.
2. Set the other items on the Main and More Options tabs as necessary, and then click OK.
“Main Tab” on page 44
“More Options Tab” on page 46
3. Click Print.
Related Information
& “Loading Paper” on page 32& “Printing Using Easy Settings” on page 43
Printing to Emphasize Thin Lines
You can thicken thin lines that are too thin to print.
1. On the printer driver's More Options tab, click Image Options in the Color Correction setting.
2. Select Emphasize Thin Lines.
3. Set the other items on the Main and More Options tabs as necessary, and then click OK.
“Main Tab” on page 44
“More Options Tab” on page 46
4. Click Print.
Related Information
& “Loading Paper” on page 32& “Printing Using Easy Settings” on page 43
Printing > Printing Documents > Printing from a Computer - Windows
65

Printing Clear Bar Codes
You can print a bar code clearly and make it easy to scan. Only enable this feature if the bar code you printedcannot be scanned.
You can use this feature under the following conditions.
❏ Paper Type: Plain paper, Copy paper, Letterhead, Recycled, Color, Preprinted, High Quality Plain Paper, Thickpaper, Epson Photo Quality Ink Jet, Epson Matte, or Envelope
❏ Quality: Standard
1. On the printer driver's Maintenance tab, click Extended Settings, and then select Barcode mode.
2. Set the other items on the Main and More Options tabs as necessary, and then click OK.
“Main Tab” on page 44
“More Options Tab” on page 46
3. Click Print.
Note:Deblurring may not always be possible depending on the circumstances.
Related Information
& “Loading Paper” on page 32& “Printing Using Easy Settings” on page 43
Printing from a Computer - Mac OS
Printing Using Easy Settings
Note:Operations and screens differ depending on the application. See the application's help for details.
Printing > Printing Documents > Printing from a Computer - Mac OS
66
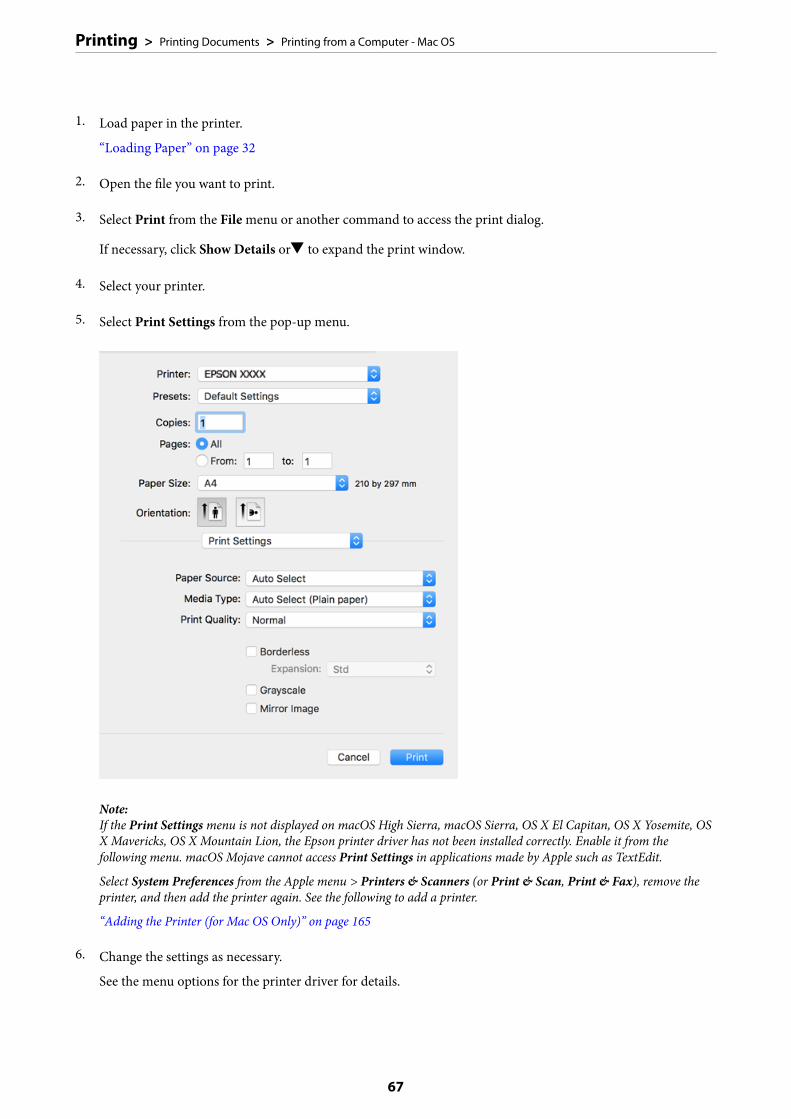
1. Load paper in the printer.
“Loading Paper” on page 32
2. Open the file you want to print.
3. Select Print from the File menu or another command to access the print dialog.
If necessary, click Show Details ord to expand the print window.
4. Select your printer.
5. Select Print Settings from the pop-up menu.
Note:If the Print Settings menu is not displayed on macOS High Sierra, macOS Sierra, OS X El Capitan, OS X Yosemite, OSX Mavericks, OS X Mountain Lion, the Epson printer driver has not been installed correctly. Enable it from thefollowing menu. macOS Mojave cannot access Print Settings in applications made by Apple such as TextEdit.
Select System Preferences from the Apple menu > Printers & Scanners (or Print & Scan, Print & Fax), remove theprinter, and then add the printer again. See the following to add a printer.
“Adding the Printer (for Mac OS Only)” on page 165
6. Change the settings as necessary.
See the menu options for the printer driver for details.
Printing > Printing Documents > Printing from a Computer - Mac OS
67

7. Click Print.
Note:If you want to cancel printing, on your computer click the printer icon in the Dock. Select the job you want to cancel,and then do one of the following. However, you cannot cancel a print job from the computer once it has been completelysent to the printer. In this case, cancel the print job by using the printer's control panel.
❏ OS X Mountain Lion or later
Click next to the progress meter.
❏ Mac OS X v10.6.8 to v10.7.xClick Delete.
Related Information
& “Available Paper and Capacities” on page 295& “List of Paper Type” on page 32& “Menu Options for Print Settings” on page 69
Menu Options for the Printer Driver
Open the print window in an application, select the printer, and then access the printer driver window.
Note:Menus vary depending on the option you selected.
Menu Options for Layout
Pages per Sheet
Select the number of pages to be printed on one sheet.
Layout Direction
Specify the order in which the pages will be printed.
Border
Prints a border around the pages.
Reverse page orientation
Rotates pages 180 degrees before printing. Select this item when printing on paper such as envelopesthat are loaded in fixed direction in the printer.
Flip horizontally
Inverts an image to print as it would appear in a mirror.
Menu Options for Color Matching
ColorSync/EPSON Color Controls
Select the method for color adjustment. These options adjusts colors between the printer and thecomputer display to minimize the difference in color.
Printing > Printing Documents > Printing from a Computer - Mac OS
68
Menu Options for Paper Handling
Collate pages
Prints multi-page documents collated in order and sorted into sets.
Pages to Print
Select to print only odd pages or even pages.
Page Order
Select to print from the top or the last page.
Scale to fit paper size
Prints to fit to the paper size you loaded.
❏ Destination Paper SizeSelect the paper size to print on.
❏ Scale down onlySelect when reducing the size of the document.
Menu Options for Cover Page
Print Cover Page
Select whether or not to print a cover page. When you want to add a back cover, select After document.
Cover Page Type
Select the contents of the cover page.
Menu Options for Print Settings
Paper Source
Select the paper source from which the paper is fed. Select Auto Select to automatically select the papersource selected in the print settings on the printer.
Media Type
Select the type of paper on which you print.
Print Quality
Select the pint quality you want to use for printing. The options vary depending on the paper type.
Borderless
This checkbox is selected when you select a borderless paper size.
In borderless printing, the print data is enlarged slightly more than the paper size so that no marginsare printed around the edges of the paper.
Expansion: Select the amount of enlargement.
Printing > Printing Documents > Printing from a Computer - Mac OS
69
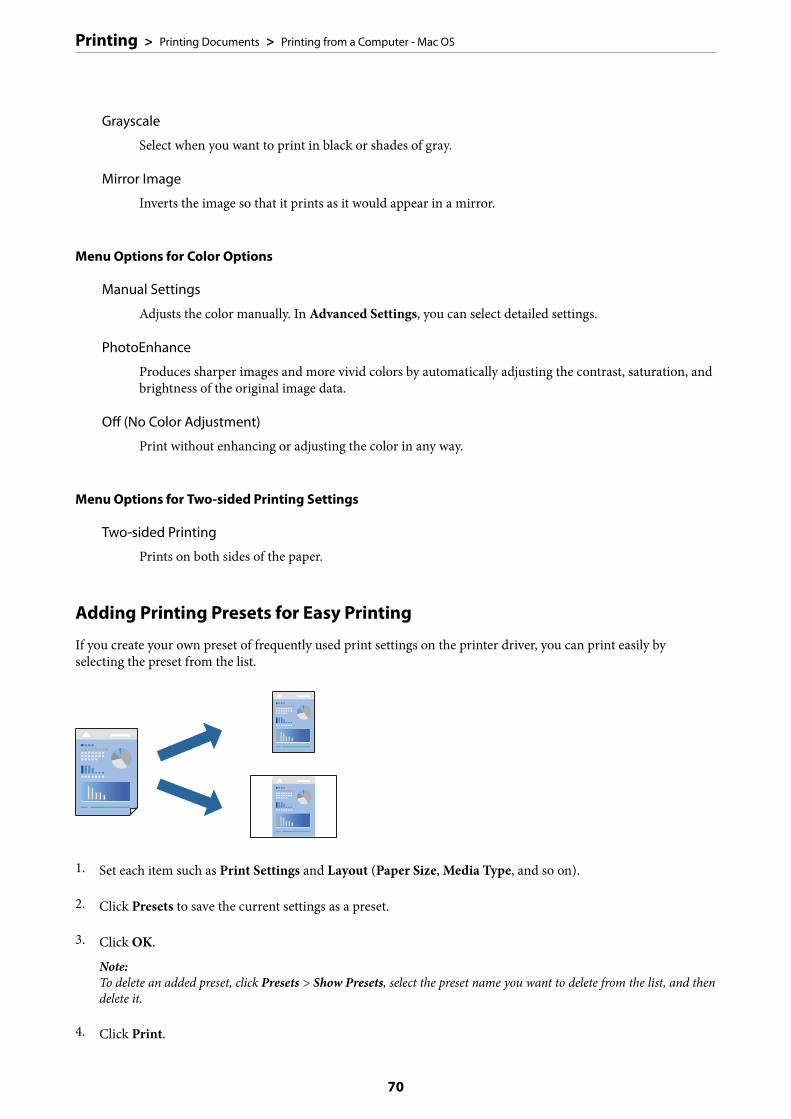
Grayscale
Select when you want to print in black or shades of gray.
Mirror Image
Inverts the image so that it prints as it would appear in a mirror.
Menu Options for Color Options
Manual Settings
Adjusts the color manually. In Advanced Settings, you can select detailed settings.
PhotoEnhance
Produces sharper images and more vivid colors by automatically adjusting the contrast, saturation, andbrightness of the original image data.
Off (No Color Adjustment)
Print without enhancing or adjusting the color in any way.
Menu Options for Two-sided Printing Settings
Two-sided Printing
Prints on both sides of the paper.
Adding Printing Presets for Easy Printing
If you create your own preset of frequently used print settings on the printer driver, you can print easily byselecting the preset from the list.
1. Set each item such as Print Settings and Layout (Paper Size, Media Type, and so on).
2. Click Presets to save the current settings as a preset.
3. Click OK.
Note:To delete an added preset, click Presets > Show Presets, select the preset name you want to delete from the list, and thendelete it.
4. Click Print.
Printing > Printing Documents > Printing from a Computer - Mac OS
70

The next time you want to print using the same settings, select the registered preset name from the Presets.
Related Information
& “Loading Paper” on page 32& “Printing Using Easy Settings” on page 66
Printing on 2-Sides
You can print on both sides of the paper.
Note:❏ This feature is not available with borderless printing.
❏ If you do not use paper that is suitable for 2-sided printing, the print quality may decline and paper jams may occur.“Paper for 2-Sided Printing” on page 299
❏ Depending on the paper and the data, ink may bleed through to the other side of the paper.
1. Select Two-sided Printing Settings from the pop-up menu.
2. Select the bindings in Two-sided Printing.
3. Select the type of original in Document Type.
Note:❏ Printing may be slow depending on the Document Type setting.
❏ If you are printing high-density data such as photos or graphs, select Text & Photos or Text & Graphics as theDocument Type setting. If scuffing occurs or the image bleeds through to the reverse side, adjust the print densityand ink drying time by clicking the arrow mark next to Adjustments.
4. Set the other items as necessary.
5. Click Print.
Related Information
& “Available Paper and Capacities” on page 295& “Loading Paper” on page 32
Printing > Printing Documents > Printing from a Computer - Mac OS
71

& “Printing Using Easy Settings” on page 66
Printing Several Pages on One Sheet
You can print several pages of data on a single sheet of paper.
1. Select Layout from the pop-up menu.
2. Set the number of pages in Pages per Sheet, the Layout Direction (page order), and Border.
“Menu Options for Layout” on page 68
3. Set the other items as necessary.
4. Click Print.
Printing to Fit the Paper Size
Select the paper size you loaded in the printer as the Destination Paper Size setting.
1. Select the size of the paper you set in the application as the Paper Size setting.
Printing > Printing Documents > Printing from a Computer - Mac OS
72
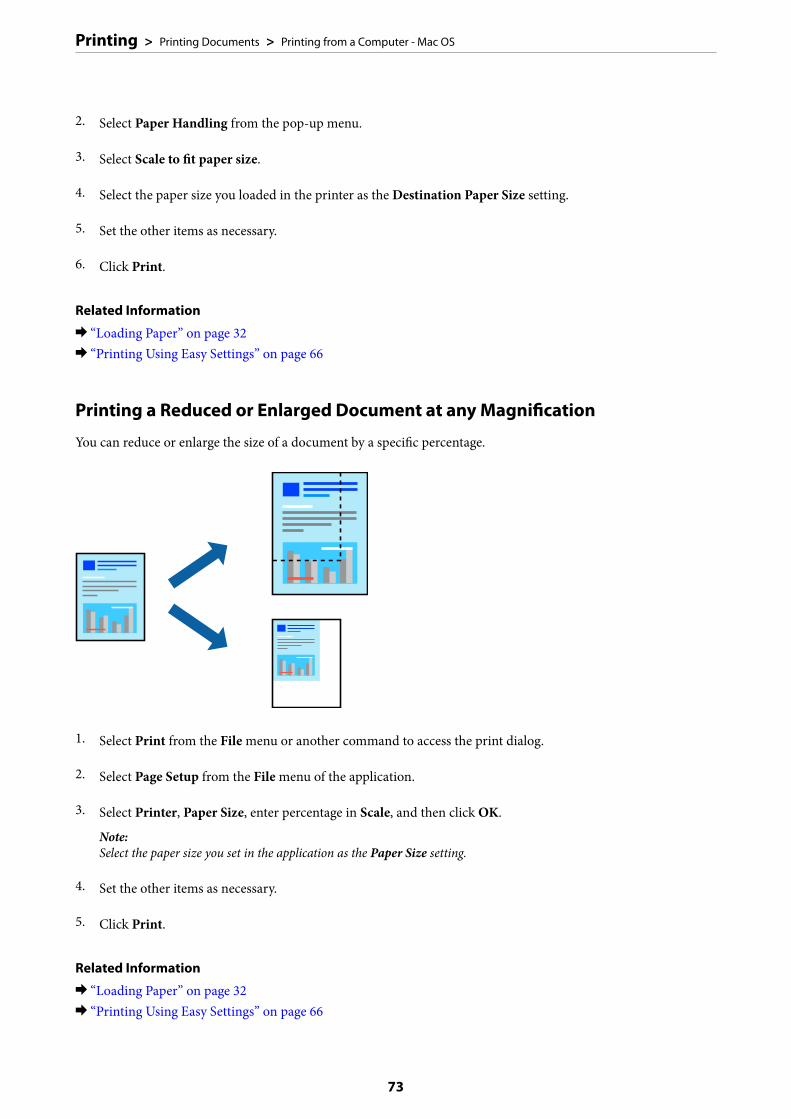
2. Select Paper Handling from the pop-up menu.
3. Select Scale to fit paper size.
4. Select the paper size you loaded in the printer as the Destination Paper Size setting.
5. Set the other items as necessary.
6. Click Print.
Related Information
& “Loading Paper” on page 32& “Printing Using Easy Settings” on page 66
Printing a Reduced or Enlarged Document at any Magnification
You can reduce or enlarge the size of a document by a specific percentage.
1. Select Print from the File menu or another command to access the print dialog.
2. Select Page Setup from the File menu of the application.
3. Select Printer, Paper Size, enter percentage in Scale, and then click OK.
Note:Select the paper size you set in the application as the Paper Size setting.
4. Set the other items as necessary.
5. Click Print.
Related Information
& “Loading Paper” on page 32& “Printing Using Easy Settings” on page 66
Printing > Printing Documents > Printing from a Computer - Mac OS
73
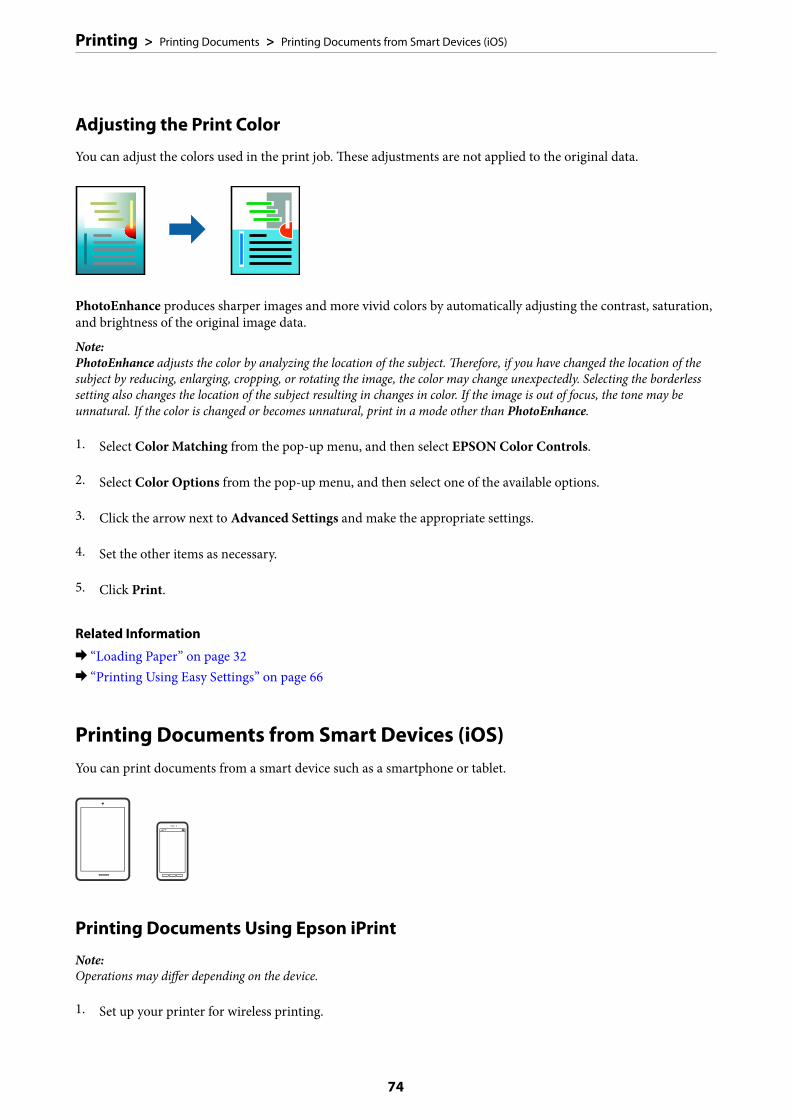
Adjusting the Print Color
You can adjust the colors used in the print job. These adjustments are not applied to the original data.
PhotoEnhance produces sharper images and more vivid colors by automatically adjusting the contrast, saturation,and brightness of the original image data.
Note:PhotoEnhance adjusts the color by analyzing the location of the subject. Therefore, if you have changed the location of thesubject by reducing, enlarging, cropping, or rotating the image, the color may change unexpectedly. Selecting the borderlesssetting also changes the location of the subject resulting in changes in color. If the image is out of focus, the tone may beunnatural. If the color is changed or becomes unnatural, print in a mode other than PhotoEnhance.
1. Select Color Matching from the pop-up menu, and then select EPSON Color Controls.
2. Select Color Options from the pop-up menu, and then select one of the available options.
3. Click the arrow next to Advanced Settings and make the appropriate settings.
4. Set the other items as necessary.
5. Click Print.
Related Information
& “Loading Paper” on page 32& “Printing Using Easy Settings” on page 66
Printing Documents from Smart Devices (iOS)You can print documents from a smart device such as a smartphone or tablet.
Printing Documents Using Epson iPrint
Note:Operations may differ depending on the device.
1. Set up your printer for wireless printing.
Printing > Printing Documents > Printing Documents from Smart Devices (iOS)
74
2. If Epson iPrint is not installed, install it.
“Installing Epson iPrint” on page 304
3. Connect your smart device to the wireless router.
4. Start Epson iPrint.
5. Tap Document on the home screen.
6. Tap the location of the document you want to print.
7. Select the document, and then tap Next.
8. Tap Print.
Printing Documents Using AirPrint
AirPrint enables instant wireless printing from iPhone, iPad, iPod touch, and Mac without the need to installdrivers or download software.
Note:If you disabled paper configuration messages on your printer control panel, you cannot use AirPrint. See the link below toenable the messages, if necessary.
1. Set up your printer for wireless printing. See the link below.
http://epson.sn
2. Connect your Apple device to the same wireless network that your printer is using.
3. Print from your device to your printer.
Note:For details, see the AirPrint page on the Apple website.
Related Information
& “Cannot Print Even Though a Connection has been Established (iOS)” on page 196
Printing > Printing Documents > Printing Documents from Smart Devices (iOS)
75
Printing Documents from Smart Devices (Android)You can print documents from a smart device such as a smartphone or tablet.
Printing Documents Using Epson iPrint
Note:Operations may differ depending on the device.
1. Set up your printer for wireless printing.
2. If Epson iPrint is not installed, install it.
“Installing Epson iPrint” on page 304
3. Connect your smart device to the wireless router.
4. Start Epson iPrint.
5. Tap Document on the home screen.
6. Tap the location of the document you want to print.
7. Select the document, and then tap Next.
8. Tap Print.
Printing Documents Using Epson Print Enabler
You can wirelessly print your documents, emails, photos, and web pages right from your Android phone or tablet(Android v4.4 or later). With a few taps, your Android device will discover an Epson printer that is connected tothe same wireless network.
Note:Operations may differ depending on the device.
1. Set up your printer for wireless printing.
2. On your Android device, install the Epson Print Enabler plug-in from Google Play.
3. Connect your Android device to the same wireless network as your printer.
4. Go to Settings on your Android device, select Printing, and then enable Epson Print Enabler.
Printing > Printing Documents > Printing Documents from Smart Devices (Android)
76
5. From an Android application such as Chrome, tap the menu icon and print whatever is on the screen.
Note:If you do not see your printer, tap All Printers and select your printer.
Printing on Envelopes
Printing on Envelopes from a Computer (Windows)
1. Load envelopes in the printer.
“Loading Paper” on page 32
2. Open the file you want to print.
3. Access the printer driver window.
4. Select the envelope size from Document Size on the Main tab, and then select Envelope from Paper Type.
5. Set the other items on the Main and More Options tabs as necessary, and then click OK.
6. Click Print.
Printing on Envelopes from a Computer (Mac OS)
1. Load envelopes in the printer.
“Loading Paper” on page 32
2. Open the file you want to print.
3. Select Print from the File menu or another command to access the print dialog.
4. Select the size as the Paper Size setting.
5. Select Print Settings from the pop-up menu.
6. Select Envelope as the Media Type setting.
7. Set the other items as necessary.
8. Click Print.
Printing > Printing on Envelopes > Printing on Envelopes from a Computer (Mac OS)
77

Printing Photos
Printing JPEG Files from a Memory DeviceYou can print JPEG files from a memory device connected to the printer.
1. Connect the memory device to the printer's external interface USB port.
“Inserting an External USB Device” on page 40
2. Select Memory Device on the home screen.
3. Select JPEG.
4. Select the file, and then proceed to the next screen.
5. Tap x.
JPEG Settings
(Options) :
Make settings for ordering, selecting, and deselecting image data.
Basic Settings:
❏ Paper SettingSpecify the paper source settings which you want to print on.
❏ Color ModeSelect a color setting whether you normally print in B&W or Color.
Advanced:
❏ LayoutSelect how to layout the JPEG files. 1-up is for printing one file per sheet with margins around theedges. Borderless is for printing one file per sheet without margins around the edges. The image isenlarged a little to remove borders from the edges of the paper. 20-up is for printing 20 files on onesheet. Index is for making index printing with information.
❏ Fit FrameSelect On to crop the image to fit into the selected print layout automatically. If the aspect ratio ofthe image data and the paper size is different, the image is automatically enlarged or reduced so thatthe short sides match the short sides of the paper. The long side of the image is cropped if it extendsbeyond the long side of the paper. This feature may not work for panorama photos.
❏ QualitySelect Best for higher quality printing, but the printing speed may be slower.
❏ DateSelect the format of the date the photo was taken or saved. The date is not printed for some layouts.
Printing > Printing Photos > Printing JPEG Files from a Memory Device
78

❏ Fix PhotoSelect this mode to improve the brightness, contrast, and saturation of the photo automatically. Toturn off automatic improvement, select Enhance Off.
❏ Fix Red-EyeSelect On to automatically fix the red-eye effect in photos. Corrections are not applied to theoriginal file, only to the printouts. Depending on the type of photo, parts of the image other than theeyes may be corrected.
Printing TIFF Files from a Memory DeviceYou can print TIFF files from a memory device connected to the printer.
1. Connect the memory device to the printer's external interface USB port.
“Inserting an External USB Device” on page 40
2. Select Memory Device on the home screen.
3. Select TIFF.
4. Select the file, and then proceed to the next screen.
5. Tap x.
TIFF Settings
You can make print settings for TIFF format files in you memory devices.
(Display order) :
Changes the order of the files.
Basic Settings:
❏ Paper SettingSpecify the paper source settings which you want to print on.
❏ Color ModeSelect a color setting whether you normally print in B&W or Color.
Advanced:
❏ LayoutSelect how to layout the Multi-TIFF file. 1-up is for printing one page per sheet with margins aroundthe edges. Borderless is for printing one page per sheet without margins around the edges. Theimage is enlarged a little to remove borders from the edges of the paper. 20-up is for printing 20pages on one sheet. Index is for making index printing with information.
Printing > Printing Photos > Printing TIFF Files from a Memory Device
79
❏ Fit FrameSelect On to crop the photo to fit into the selected photo layout automatically. If the aspect ratio ofthe image data and the paper size is different, the image is automatically enlarged or reduced so thatthe short sides match the short sides of the paper. The long side of the image is cropped if it extendsbeyond the long side of the paper. This feature may not work for panorama photos.
❏ QualitySelect Best for higher quality printing, but the printing speed may be slower.
❏ Print OrderSelect the order for printing multi-page TIFF files.
❏ DateSelect the format of the date the photo was taken or saved. The date is not printed for some layouts.
Printing Web Pages
Printing Web Pages from a ComputerEpson Photo+ allows you to display web pages, crop the specified area, and then edit and print them. See theapplication’s help for details.
Printing Web Pages from Smart DevicesNote:Operations may differ depending on the device.
1. Set up your printer for wireless printing.
2. If Epson iPrint is not installed, install it.
“Installing Epson iPrint” on page 304
3. Connect your smart device to the wireless router.
4. Open the web page you want to print in your web browser app.
5. Tap Share from the menu of the web browser application.
6. Select iPrint.
7. Tap Print.
Printing > Printing Web Pages > Printing Web Pages from Smart Devices
80
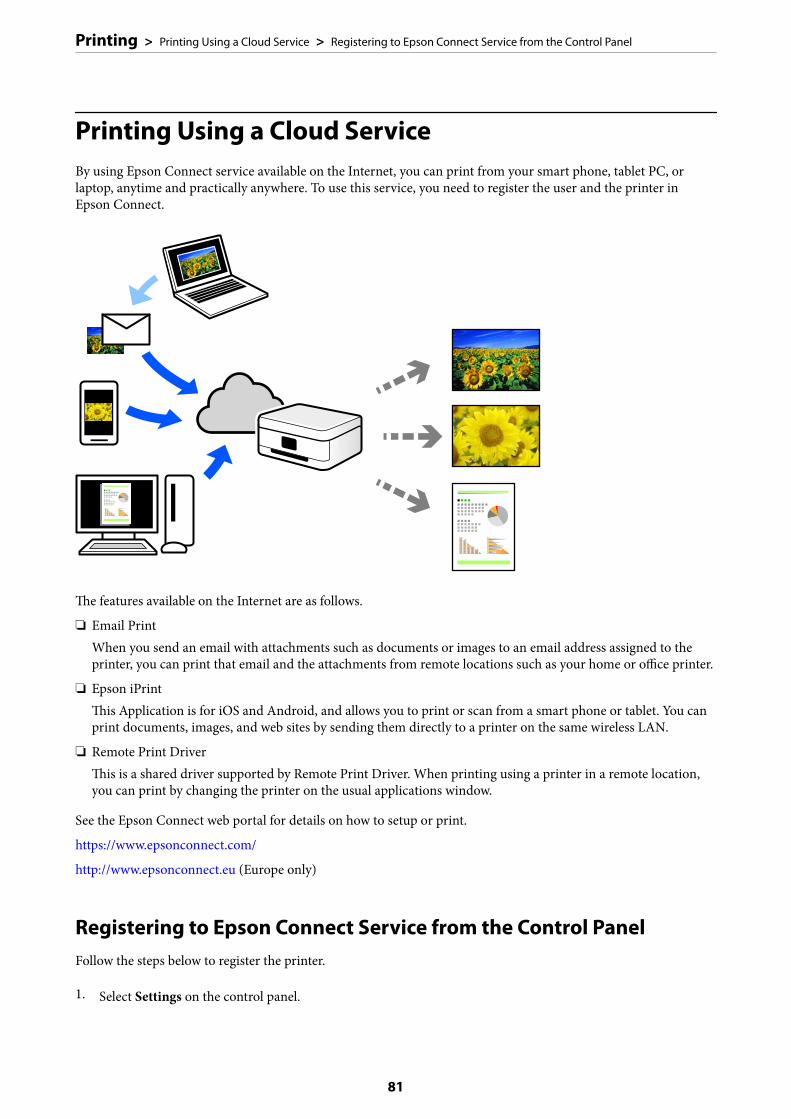
Printing Using a Cloud ServiceBy using Epson Connect service available on the Internet, you can print from your smart phone, tablet PC, orlaptop, anytime and practically anywhere. To use this service, you need to register the user and the printer inEpson Connect.
The features available on the Internet are as follows.
❏ Email PrintWhen you send an email with attachments such as documents or images to an email address assigned to theprinter, you can print that email and the attachments from remote locations such as your home or office printer.
❏ Epson iPrintThis Application is for iOS and Android, and allows you to print or scan from a smart phone or tablet. You canprint documents, images, and web sites by sending them directly to a printer on the same wireless LAN.
❏ Remote Print DriverThis is a shared driver supported by Remote Print Driver. When printing using a printer in a remote location,you can print by changing the printer on the usual applications window.
See the Epson Connect web portal for details on how to setup or print.
https://www.epsonconnect.com/
http://www.epsonconnect.eu (Europe only)
Registering to Epson Connect Service from the Control PanelFollow the steps below to register the printer.
1. Select Settings on the control panel.
Printing > Printing Using a Cloud Service > Registering to Epson Connect Service from the Control Panel
81

2. Select General Settings > Web Service Settings > Epson Connect Services > Unregister to print theregistration sheet.
3. Follow the instructions on the registration sheet to register the printer.
Printing > Printing Using a Cloud Service > Registering to Epson Connect Service from the Control Panel
82
Copying
Available Copying Methods. . . . . . . . . . . . . . . . . . . . . . . . . . . . . . . . . . . . . . . . . . . 84
Basic Menu Options for Copying. . . . . . . . . . . . . . . . . . . . . . . . . . . . . . . . . . . . . . . 89
Advanced Menu Options for Copying. . . . . . . . . . . . . . . . . . . . . . . . . . . . . . . . . . . 90
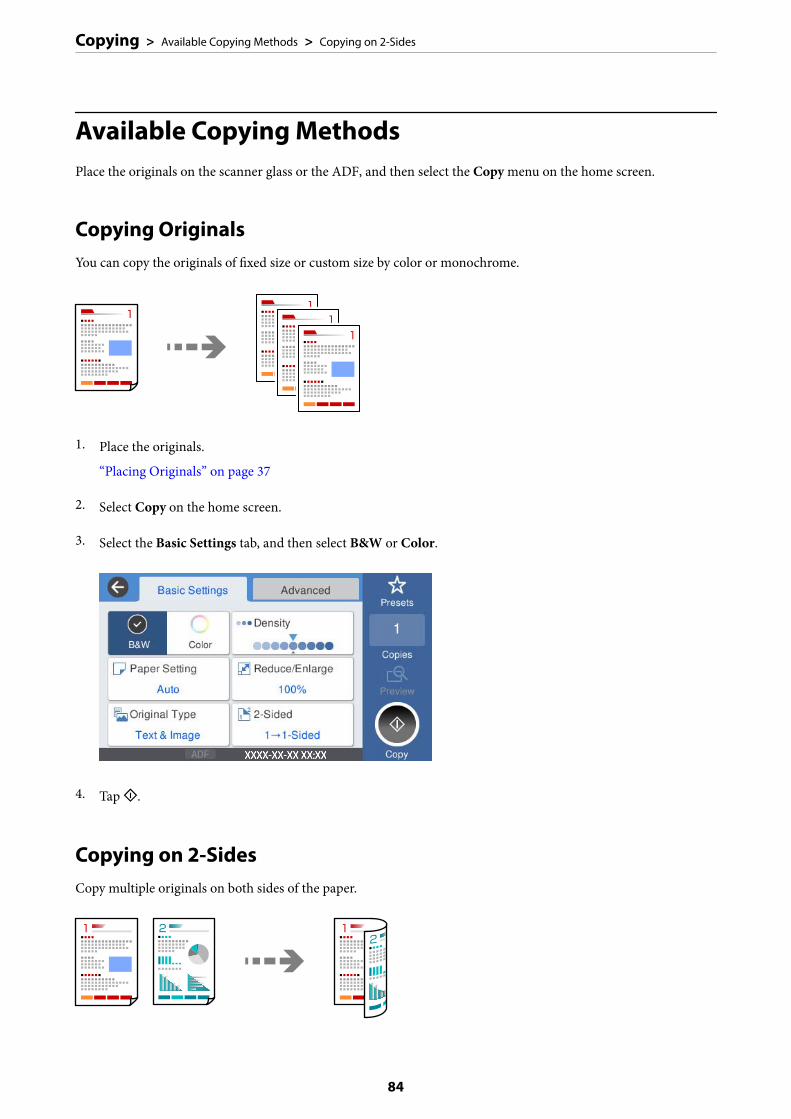
Available Copying MethodsPlace the originals on the scanner glass or the ADF, and then select the Copy menu on the home screen.
Copying OriginalsYou can copy the originals of fixed size or custom size by color or monochrome.
1. Place the originals.
“Placing Originals” on page 37
2. Select Copy on the home screen.
3. Select the Basic Settings tab, and then select B&W or Color.
4. Tap x.
Copying on 2-SidesCopy multiple originals on both sides of the paper.
Copying > Available Copying Methods > Copying on 2-Sides
84
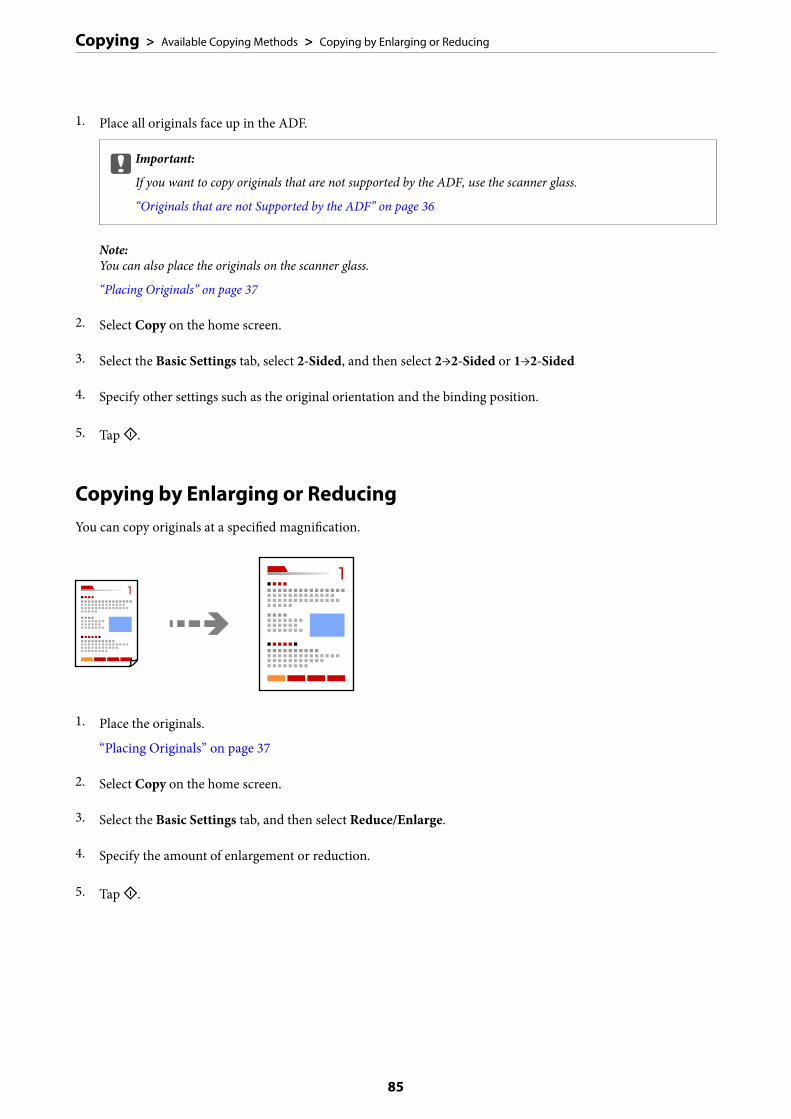
1. Place all originals face up in the ADF.
cImportant:
If you want to copy originals that are not supported by the ADF, use the scanner glass.
“Originals that are not Supported by the ADF” on page 36
Note:You can also place the originals on the scanner glass.
“Placing Originals” on page 37
2. Select Copy on the home screen.
3. Select the Basic Settings tab, select 2-Sided, and then select 2→2-Sided or 1→2-Sided
4. Specify other settings such as the original orientation and the binding position.
5. Tap x.
Copying by Enlarging or ReducingYou can copy originals at a specified magnification.
1. Place the originals.
“Placing Originals” on page 37
2. Select Copy on the home screen.
3. Select the Basic Settings tab, and then select Reduce/Enlarge.
4. Specify the amount of enlargement or reduction.
5. Tap x.
Copying > Available Copying Methods > Copying by Enlarging or Reducing
85

Copying Multiple Originals onto One SheetYou can copy the multiple originals onto a single sheet.
1. Place all originals face up in the ADF.
Place them in the direction shown in the illustration.
❏ Readable Direction
❏ Left Direction
cImportant:
If you want to copy originals that are not supported by the ADF, use the scanner glass.
“Originals that are not Supported by the ADF” on page 36
Note:You can also place the originals on the scanner glass.
“Placing Originals” on page 37
2. Select Copy on the home screen.
3. Select the Advanced tab, select Multi-Page, and then select 2-up or 4-up.
Copying > Available Copying Methods > Copying Multiple Originals onto One Sheet
86
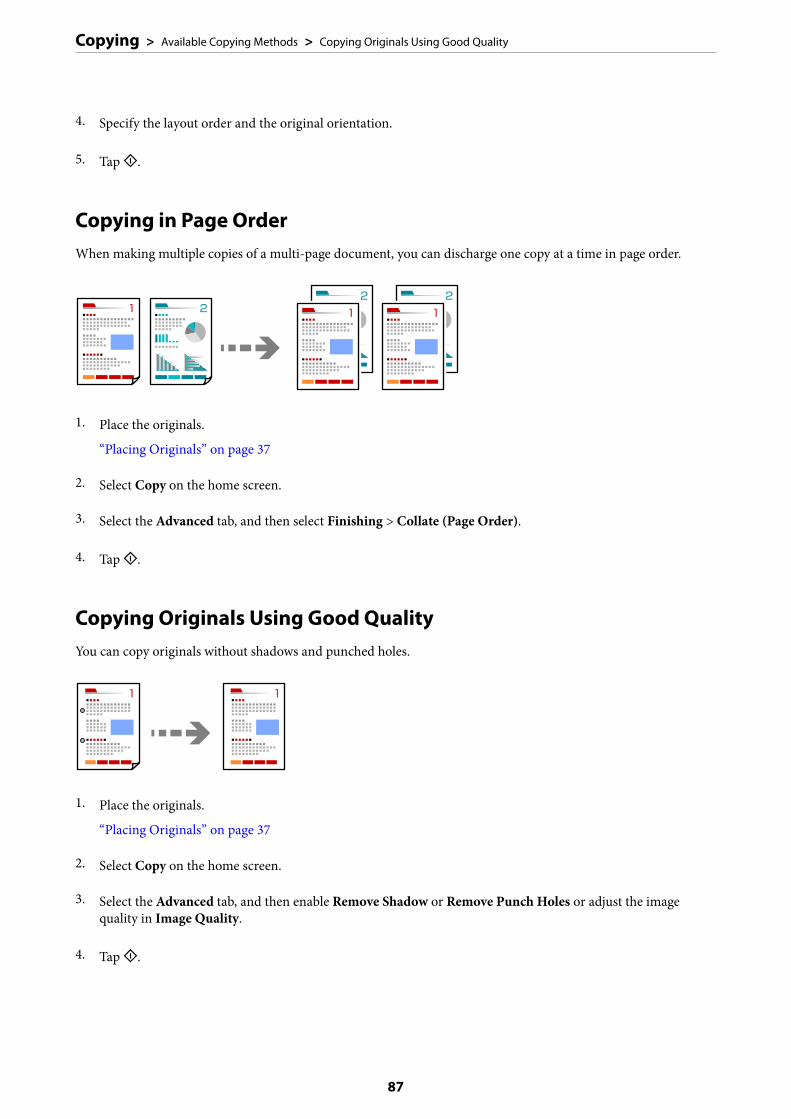
4. Specify the layout order and the original orientation.
5. Tap x.
Copying in Page OrderWhen making multiple copies of a multi-page document, you can discharge one copy at a time in page order.
1. Place the originals.
“Placing Originals” on page 37
2. Select Copy on the home screen.
3. Select the Advanced tab, and then select Finishing > Collate (Page Order).
4. Tap x.
Copying Originals Using Good QualityYou can copy originals without shadows and punched holes.
1. Place the originals.
“Placing Originals” on page 37
2. Select Copy on the home screen.
3. Select the Advanced tab, and then enable Remove Shadow or Remove Punch Holes or adjust the imagequality in Image Quality.
4. Tap x.
Copying > Available Copying Methods > Copying Originals Using Good Quality
87
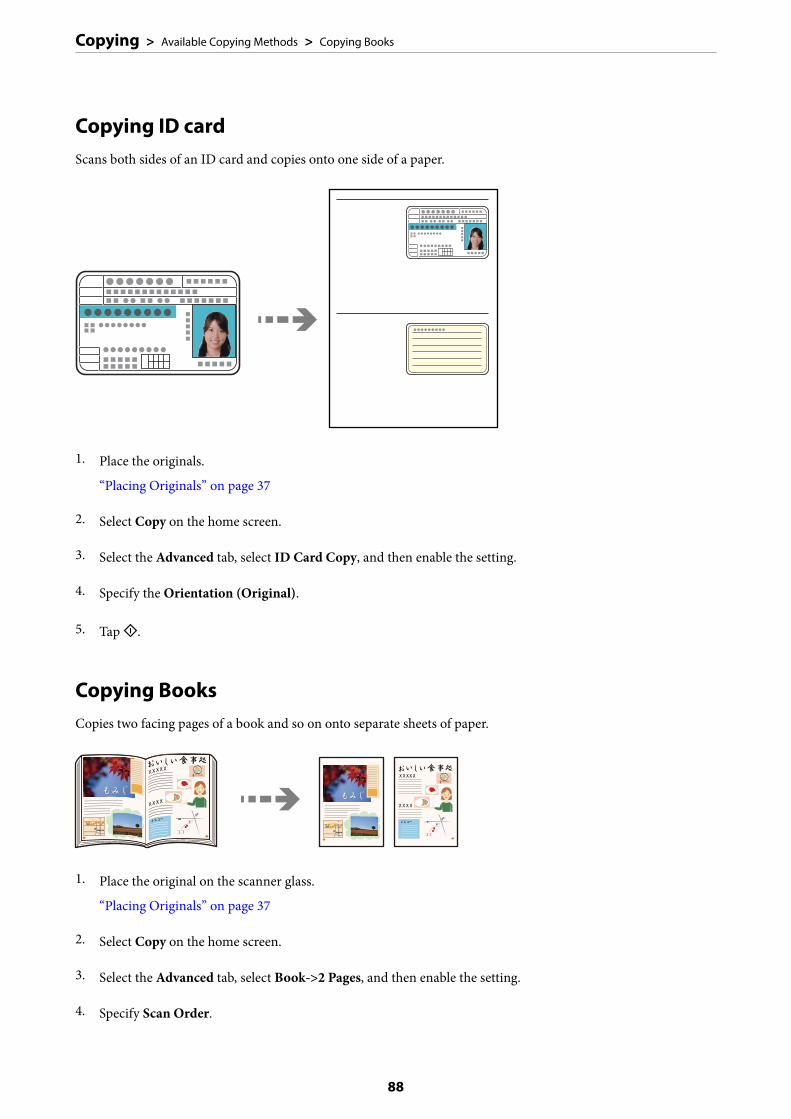
Copying ID cardScans both sides of an ID card and copies onto one side of a paper.
1. Place the originals.
“Placing Originals” on page 37
2. Select Copy on the home screen.
3. Select the Advanced tab, select ID Card Copy, and then enable the setting.
4. Specify the Orientation (Original).
5. Tap x.
Copying BooksCopies two facing pages of a book and so on onto separate sheets of paper.
1. Place the original on the scanner glass.
“Placing Originals” on page 37
2. Select Copy on the home screen.
3. Select the Advanced tab, select Book->2 Pages, and then enable the setting.
4. Specify Scan Order.
Copying > Available Copying Methods > Copying Books
88

5. Tap x.
Basic Menu Options for CopyingNote:The items may not be available depending on other settings you made.
Color Mode:
Select whether to copy in color or in monochrome.
❏ B&WCopies the original in black and white (monochrome).
❏ ColorCopies the original in color.
Density:
Increase the level of density when the copying results are faint. Decrease the level of density when inksmears.
Paper Setting:
Select the paper source that you want to use. When Auto is selected, a suitable size is fedautomatically depending on the auto detected original size and the specified magnification ratio.
Reduce/Enlarge:
Configures the magnification ratio of the enlargement or reduction. Tap the value and specify themagnification used to enlarge or reduce the original within a range of 25 to 400%.
❏ AutoDetects the scan area and automatically enlarges or reduces the original to fit to the paper size youselected. When there are white margins around the original, the white margins from the corner
mark ( ) of the scanner glass are detected as the scan area, but the margins at the opposite sidemay be cropped.
❏ Reduce to Fit PaperCopies the scanned image at a smaller size than the Reduce/Enlarge value to fit within the papersize. If the Reduce/Enlarge value is larger than the paper size, data may be printed beyond theedges of the paper.
Copying > Basic Menu Options for Copying
89

❏ Actual SizeCopies at 100 % magnification.
❏ A3→A4 and othersAutomatically enlarges or reduces the original to fit to a specific paper size.
Original Type:
Select the type of your original. Copies in optimal quality to match the type of original.
2-Sided:
Select 2-sided layout.
❏ 1→1-SidedCopies one side of an original onto a single side of paper.
❏ 2→2-SidedCopies both sides of a double-sided original onto both sides of a single sheet of paper. Select theorientation of your original and the binding position of the original and the paper.
❏ 1→2-SidedCopies two single-sided originals onto both sides of a single sheet of paper. Select the orientationof your original and the binding position of the paper.
❏ 2→1-SidedCopies both sides of a double-sided original onto one side of two sheets of paper. Select theorientation of your original and the binding position of the original.
Advanced Menu Options for CopyingNote:The items may not be available depending on other settings you made.
Multi-Page:
Select the copy layout.
❏ Single PageCopies a single-sided original onto a single sheet.
❏ 2-upCopies two single-sided originals onto a single sheet in 2-up layout. Select the layout order and theorientation of your original.
❏ 4-upCopies four single-sided originals onto a single sheet in 4-up layout. Select the layout order andthe orientation of your original.
Original Size:
Select the size of your original. When you select Auto Detect, the size of your original isautomatically detected. When copying non-standard size originals, select the size closest to youroriginal.
Copying > Advanced Menu Options for Copying
90

Finishing:
Select how to eject the paper for multiple copies of multiple originals.
❏ Group (Same Pages)Copies the originals by page as a group.
❏ Collate (Page Order)Copies the originals collated in order and sorted into sets.
Mixed Size Originals:
You can place the following combination of sizes in the ADF at the same time. A3 and A4; B4 and B5.When using these combinations, originals are copied at the actual size of the originals. Place youroriginals by aligning the width of the originals as shown below.
Orientation (Original):
Select the orientation of your original.
Book->2 Pages:
Copies two facing pages of a booklet onto separate sheets of paper.
Select which page of a booklet to scan.
Image Quality:
Adjust image settings.
❏ ContrastAdjust the difference between the bright and dark parts.
❏ SaturationAdjust the vividness of the colors.
❏ Red Balance, Green Balance, Blue BalanceAdjust the density for each color.
❏ SharpnessAdjust the outline of the image.
Copying > Advanced Menu Options for Copying
91
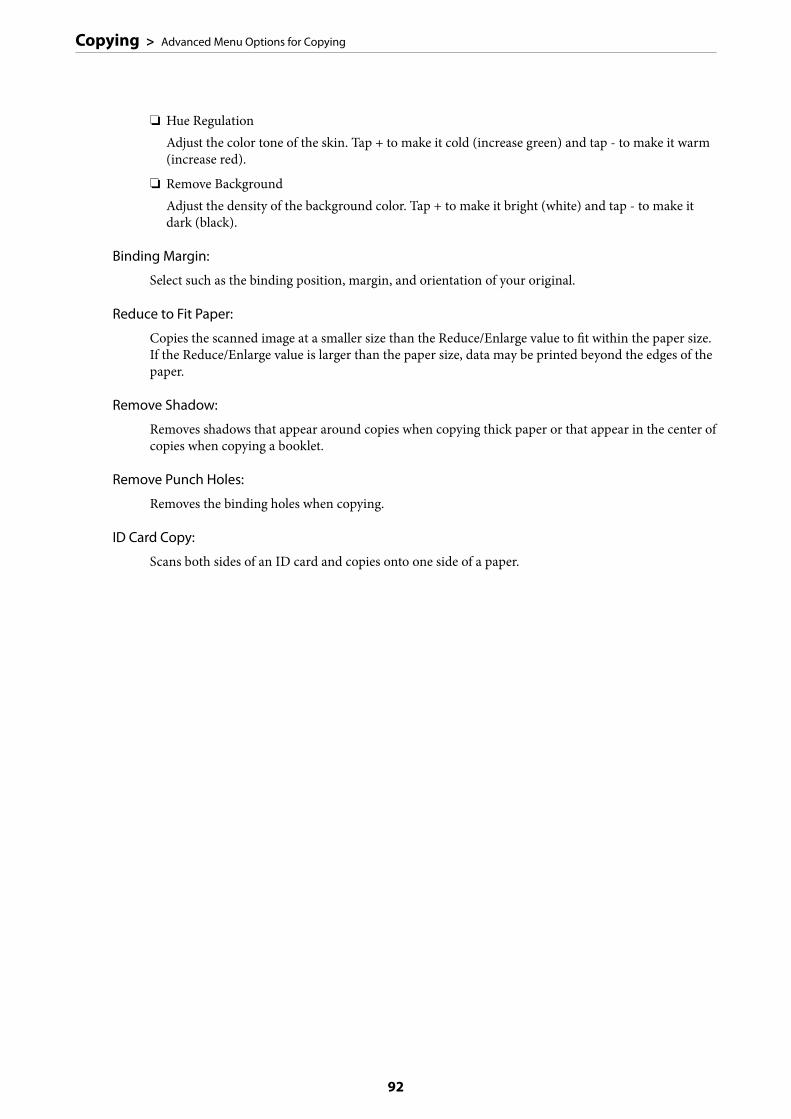
❏ Hue RegulationAdjust the color tone of the skin. Tap + to make it cold (increase green) and tap - to make it warm(increase red).
❏ Remove BackgroundAdjust the density of the background color. Tap + to make it bright (white) and tap - to make itdark (black).
Binding Margin:
Select such as the binding position, margin, and orientation of your original.
Reduce to Fit Paper:
Copies the scanned image at a smaller size than the Reduce/Enlarge value to fit within the paper size.If the Reduce/Enlarge value is larger than the paper size, data may be printed beyond the edges of thepaper.
Remove Shadow:
Removes shadows that appear around copies when copying thick paper or that appear in the center ofcopies when copying a booklet.
Remove Punch Holes:
Removes the binding holes when copying.
ID Card Copy:
Scans both sides of an ID card and copies onto one side of a paper.
Copying > Advanced Menu Options for Copying
92
Scanning
Available Scanning Methods. . . . . . . . . . . . . . . . . . . . . . . . . . . . . . . . . . . . . . . . . . 94
Scanning Originals to a Network Folder. . . . . . . . . . . . . . . . . . . . . . . . . . . . . . . . . . 94
Scanning Originals to an Email. . . . . . . . . . . . . . . . . . . . . . . . . . . . . . . . . . . . . . . . 97
Scanning Originals to a Computer. . . . . . . . . . . . . . . . . . . . . . . . . . . . . . . . . . . . . 101
Scanning Originals to a Memory Device. . . . . . . . . . . . . . . . . . . . . . . . . . . . . . . . .101
Scanning Originals to the Cloud. . . . . . . . . . . . . . . . . . . . . . . . . . . . . . . . . . . . . . 104
Scanning Using WSD. . . . . . . . . . . . . . . . . . . . . . . . . . . . . . . . . . . . . . . . . . . . . . 105
Scanning Originals to a Smart Device. . . . . . . . . . . . . . . . . . . . . . . . . . . . . . . . . . .107
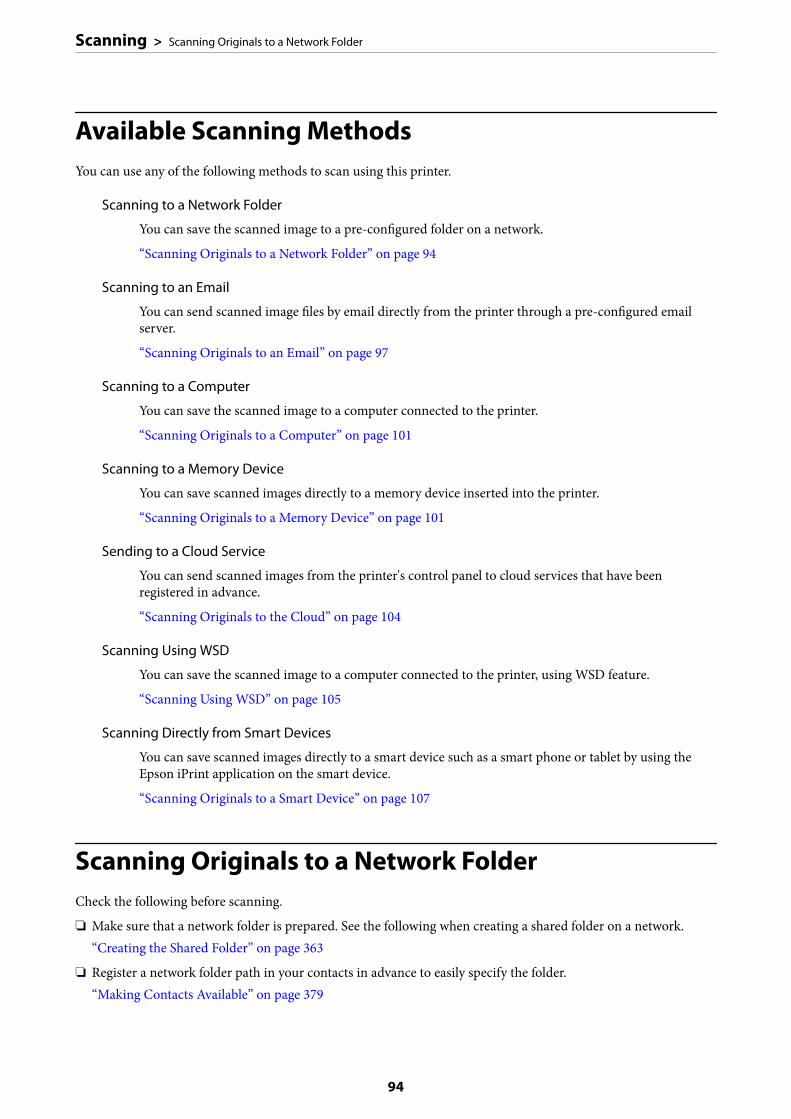
Available Scanning MethodsYou can use any of the following methods to scan using this printer.
Scanning to a Network Folder
You can save the scanned image to a pre-configured folder on a network.
“Scanning Originals to a Network Folder” on page 94
Scanning to an Email
You can send scanned image files by email directly from the printer through a pre-configured emailserver.
“Scanning Originals to an Email” on page 97
Scanning to a Computer
You can save the scanned image to a computer connected to the printer.
“Scanning Originals to a Computer” on page 101
Scanning to a Memory Device
You can save scanned images directly to a memory device inserted into the printer.
“Scanning Originals to a Memory Device” on page 101
Sending to a Cloud Service
You can send scanned images from the printer's control panel to cloud services that have beenregistered in advance.
“Scanning Originals to the Cloud” on page 104
Scanning Using WSD
You can save the scanned image to a computer connected to the printer, using WSD feature.
“Scanning Using WSD” on page 105
Scanning Directly from Smart Devices
You can save scanned images directly to a smart device such as a smart phone or tablet by using theEpson iPrint application on the smart device.
“Scanning Originals to a Smart Device” on page 107
Scanning Originals to a Network FolderCheck the following before scanning.
❏ Make sure that a network folder is prepared. See the following when creating a shared folder on a network.“Creating the Shared Folder” on page 363
❏ Register a network folder path in your contacts in advance to easily specify the folder.“Making Contacts Available” on page 379
Scanning > Scanning Originals to a Network Folder
94

Note:Make sure the printer's Date/Time and Time Difference settings are correct. Access the menus from Settings > GeneralSettings > Basic Settings > Date/Time Settings.
1. Place the originals.
“Placing Originals” on page 37
2. Select Scan > Network Folder/FTP on the control panel.
3. Specify the destination.
“Destination Menu Options for Scanning to a Folder” on page 95
Note:You can print the history of the folder in which documents are saved, by selecting .
4. Select Scan Settings, and then check settings such as the save format, and change them if necessary.
“Scan Menu Options for Scanning to a Folder” on page 96
Note:Select to save your settings as a preset.
5. Tap x.
Destination Menu Options for Scanning to a Folder
Keyboard:
Open the Edit Location screen. Enter the folder path and set each item on the screen.
Edit Location:
Enter the folder path and set each item on the screen.
❏ Communication Mode:Select the communication mode for the folder.
❏ Location (Required):Enter a folder path in which to save the scanned image.
❏ User Name:Enter a user name to log on to the specified folder.
❏ Password:Enter a password corresponding to the user name.
❏ Connection Mode:Select the connection mode for the folder.
❏ Port Number:Enter a port number for the folder.
Contacts:
Select a destination from the contacts list.
Scanning > Scanning Originals to a Network Folder > Destination Menu Options for Scanning to a Folder
95
You can search for a contact from the contacts list. Enter the search keyword into the box at the top ofthe screen.
Scan Menu Options for Scanning to a FolderNote:The items may not be available depending on other settings you made.
Color Mode:
Select whether to scan in color or in monochrome.
File Format:
Select the format in which to save the scanned image.
When you select PDF, PDF/A, or TIFF as the file format, select whether to save all originals as one file(multi-page) or save each original separately (single page).
❏ Compression Ratio:Select how much to compress the scanned image.
❏ PDF Settings:When you have selected PDF as the save format setting, use these settings to protect PDF files.To create a PDF file that requires a password when opening, set Document Open Password. Tocreate a PDF file that requires a password when printing or editing, set Permissions Password.
Resolution:
Select the scanning resolution.
2-Sided:
Scan both sides of the original.
❏ Orientation (Original):Select the orientation of the original.
❏ Binding(Original):Select the binding direction of the original.
Scan Area:
Select the scan area. To scan at the maximum area of the scanner glass, select Max Area.
❏ Orientation (Original):Select the orientation of the original.
Original Type:
Select the type of your original.
Orientation (Original):
Select the orientation of the original.
Scanning > Scanning Originals to a Network Folder > Scan Menu Options for Scanning to a Folder
96

Mixed Size Originals:
You can place the following combination of sizes in the ADF at the same time. A3 and A4; B4 and B5.When using these combinations, originals are scanned at the actual size of the originals. Place youroriginals by aligning the width of the originals as shown below.
Density:
Select the contrast of the scanned image.
Remove Shadow:
Remove the shadows of the original that appear in the scanned image.
❏ Surround:Remove the shadows at the edge of the original.
❏ Center:Remove the shadows of the binding margin of the booklet.
Remove Punch Holes:
Remove the punch holes that appear in the scanned image. You can specify the area to erase thepunch holes by entering a value in the box on the right.
❏ Erasing Position:Select the position to remove the punch holes.
❏ Orientation (Original):Select the orientation of the original.
File Name:
❏ Filename Prefix:Enter a prefix for the name of the images in alphanumeric characters and symbols.
❏ Add Date:Add the date to the file name.
❏ Add Time:Add the time to the file name.
Scanning Originals to an EmailYou need to setup the following before scanning.
❏ Configure the email server.“Configuring a Mail Server” on page 359
❏ Register an email address in your contacts in advance so that you can easily specify the address by selecting itfrom your contacts.
Scanning > Scanning Originals to an Email
97

❏ Make sure the printer's Date/Time and Time Difference settings are correct. Access the menus from Settings >General Settings > Basic Settings > Date/Time Settings.
1. Place the originals.
“Placing Originals” on page 37
2. Select Scan > Email on the control panel.
3. Specify the recipient.
“Recipient Menu Options for Scanning to an Email” on page 98
Note:❏ The number of recipients you selected is displayed on the right of the screen. You can send emails to up to 10
addresses and groups.If groups is included in recipients, you can select up to 200 individual addresses in total, taking addresses in thegroups into account.
❏ Select the address box at the top of the screen to display the list of selected addresses.
❏ Select to display or print the sending history, or change the email server settings.
4. Select Scan Settings, and then check settings such as the save format, and change them if necessary.
“Scan Menu Options for Scanning to an Email” on page 98
Note:Select to save your settings as a preset.
5. Tap x.
Recipient Menu Options for Scanning to an Email
Keyboard:
Enter the email address manually.
Contacts:
Select a destination from the contacts list.
You can search for a contact from the contacts list. Enter the search keyword into the box at the top ofthe screen.
History:
Select the address from the history list.
Scan Menu Options for Scanning to an EmailNote:The items may not be available depending on other settings you made.
Color Mode:
Select whether to scan in color or in monochrome.
Scanning > Scanning Originals to an Email > Scan Menu Options for Scanning to an Email
98

File Format:
Select the format in which to save the scanned image.
When you select PDF, PDF/A, or TIFF as the file format, select whether to save all originals as one file(multi-page) or save each original separately (single page).
❏ Compression Ratio:Select how much to compress the scanned image.
❏ PDF Settings:When you have selected PDF as the save format setting, use these settings to protect PDF files.To create a PDF file that requires a password when opening, set Document Open Password. Tocreate a PDF file that requires a password when printing or editing, set Permissions Password.
Resolution:
Select the scanning resolution.
2-Sided:
Scan both sides of the original.
❏ Orientation (Original):Select the orientation of the original.
❏ Binding(Original):Select the binding direction of the original.
Scan Area:
Select the scan area. To scan at the maximum area of the scanner glass, select Max Area.
❏ Orientation (Original):Select the orientation of the original.
Original Type:
Select the type of your original.
Orientation (Original):
Select the orientation of the original.
Mixed Size Originals:
You can place the following combination of sizes in the ADF at the same time. A3 and A4; B4 and B5.When using these combinations, originals are scanned at the actual size of the originals. Place youroriginals by aligning the width of the originals as shown below.
Density:
Select the contrast of the scanned image.
Scanning > Scanning Originals to an Email > Scan Menu Options for Scanning to an Email
99
Remove Shadow:
Remove the shadows of the original that appear in the scanned image.
❏ Surround:Remove the shadows at the edge of the original.
❏ Center:Remove the shadows of the binding margin of the booklet.
Remove Punch Holes:
Remove the punch holes that appear in the scanned image. You can specify the area to erase thepunch holes by entering a value in the box on the right.
❏ Erasing Position:Select the position to remove the punch holes.
❏ Orientation (Original):Select the orientation of the original.
Subject:
Enter a subject for the email in alphanumeric characters and symbols.
Attached File Max Size:
Select the maximum file size that can be attached to the email.
File Name:
❏ Filename Prefix:Enter a prefix for the name of the images in alphanumeric characters and symbols.
❏ Add Date:Add the date to the file name.
❏ Add Time:Add the time to the file name.
Scanning > Scanning Originals to an Email > Scan Menu Options for Scanning to an Email
100
Scanning Originals to a ComputerNote:To use this feature, make sure the following applications are installed on your computer.
❏ Epson ScanSmart (Windows 7 or later, or OS X El Capitan or later)
❏ Epson Event Manager (Windows Vista/Windows XP, or OS X Yosemite/OS X Mavericks/OS X Mountain Lion/Mac OSX v10.7.x/Mac OS X v10.6.8)
❏ Epson Scan 2 (application required to use the scanner feature)
See the following to check for installed applications.
Windows 10: Click on the start button, and then select Windows System-Control Panel-Programs-Programs andFeatures.
Windows 8.1/Windows 8: Select Desktop-Settings-Control Panel-Programs-Programs and Features.
Windows 7/Windowes Vista: Click the start button, and then select Control Panel-Programs-Programs and Features.
Windows XP: Click the start button, and then select Control Panel-Add or Remove Programs.
Mac OS: Select Go > Applications > Epson Software.
1. Place the originals.
“Placing Originals” on page 37
2. Select Scan > Computer on the control panel.
3. Select a computer on which to save the scanned images.
4. Make the scan settings.
❏ Select action: Select saving method.When using Windows 7 or later, or OS X El Capitan or later: Select Preview on Computer to preview thescanned image on your computer before saving images.
❏ 2-Sided: Scan both sides of the original.
❏ Scan Size: Select the scan size.
5. Tap x.
When using Windows 7 or later, or OS X El Capitan or later: Epson ScanSmart automatically starts on yourcomputer, and scanning starts.
Note:❏ See the Epson ScanSmart help for detailed operation information for the software. Click Help on the Epson
ScanSmart screen to open the help.
❏ You can not only start scanning from the printer but also from your computer by using Epson ScanSmart.
Scanning Originals to a Memory Device1. Place the originals.
“Placing Originals” on page 37
Scanning > Scanning Originals to a Memory Device
101

2. Insert a memory device into the printer.
“Inserting an External USB Device” on page 40
3. Select Scan > Memory Device on the control panel.
4. Make the scan settings.
“Basic Menu Options for Scanning to a Memory Device” on page 102
“Advanced Menu Options for Scanning to a Memory Device” on page 103
Note:Select to save your settings as a preset.
5. Tap x.
Basic Menu Options for Scanning to a Memory DeviceNote:The items may not be available depending on other settings you made.
B&W/Color
Select whether to scan in monochrome or in color.
File Format:
Select the format in which to save the scanned image.
When you select PDF, PDF/A, or TIFF as the file format, select whether to save all originals as one file(multi-page) or save each original separately (single page).
❏ Compression Ratio:Select how much to compress the scanned image.
❏ PDF Settings:When you have selected PDF as the save format setting, use these settings to protect PDF files.To create a PDF file that requires a password when opening, set Document Open Password. Tocreate a PDF file that requires a password when printing or editing, set Permissions Password.
Resolution:
Select the scanning resolution.
2-Sided:
Scan both sides of the original.
❏ Orientation (Original):Select the orientation of the original.
❏ Binding(Original):Select the binding direction of the original.
Scan Area:
Select the scan area. To scan at the maximum area of the scanner glass, select Max Area.
Scanning > Scanning Originals to a Memory Device > Basic Menu Options for Scanning to a Memory Device
102
❏ Orientation (Original):Select the orientation of the original.
Original Type:
Select the type of your original.
Advanced Menu Options for Scanning to a Memory DeviceNote:The items may not be available depending on other settings you made.
Orientation (Original):
Select the orientation of the original.
Mixed Size Originals:
You can place the following combination of sizes in the ADF at the same time. A3 and A4; B4 and B5.When using these combinations, originals are scanned at the actual size of the originals. Place youroriginals by aligning the width of the originals as shown below.
Density:
Select the contrast of the scanned image.
Remove Shadow:
Remove the shadows of the original that appear in the scanned image.
❏ Surround:Remove the shadows at the edge of the original.
❏ Center:Remove the shadows of the binding margin of the booklet.
Remove Punch Holes:
Remove the punch holes that appear in the scanned image. You can specify the area to erase thepunch holes by entering a value in the box on the right.
❏ Erasing Position:Select the position to remove the punch holes.
❏ Orientation (Original):Select the orientation of the original.
File Name:
❏ Filename Prefix:Enter a prefix for the name of the images in alphanumeric characters and symbols.
Scanning > Scanning Originals to a Memory Device > Advanced Menu Options for Scanning to a Memory Device
103
❏ Add Date:Add the date to the file name.
❏ Add Time:Add the time to the file name.
Scanning Originals to the CloudBefore using this feature, make settings using Epson Connect. See the following Epson Connect portal website fordetails.
https://www.epsonconnect.com/
http://www.epsonconnect.eu (Europe only)
1. Place the originals.
“Placing Originals” on page 37
2. Select Scan > Cloud on the control panel.
3. Select on the top of the screen, and then select a destination.
4. Make the scan settings.
“Basic Menu Options for Scanning to the Cloud” on page 104
“Advanced Menu Options for Scanning to the Cloud” on page 105
Note:Select to save your settings as a preset.
5. Tap x.
Basic Menu Options for Scanning to the CloudNote:The items may not be available depending on other settings you made.
B&W/Color
Select whether to scan in monochrome or in color.
File Format:
Select the format in which to save the scanned image.
When you select PDF as the file format, select whether to save all originals as one file (multi-page) orsave each original separately (single page).
2-Sided:
Scan both sides of the original.
❏ Orientation (Original):Select the orientation of the original.
Scanning > Scanning Originals to the Cloud > Basic Menu Options for Scanning to the Cloud
104
❏ Binding(Original):Select the binding direction of the original.
Scan Area:
Select the scan area. To scan at the maximum area of the scanner glass, select Max Area.
❏ Orientation (Original):Select the orientation of the original.
Advanced Menu Options for Scanning to the CloudNote:The items may not be available depending on other settings you made.
Original Type:
Select the type of your original.
Orientation (Original):
Select the orientation of the original.
Density:
Select the contrast of the scanned image.
Remove Shadow:
Remove the shadows of the original that appear in the scanned image.
❏ Surround:Remove the shadows at the edge of the original.
❏ Center:Remove the shadows of the binding margin of the booklet.
Remove Punch Holes:
Remove the punch holes that appear in the scanned image. You can specify the area to erase thepunch holes by entering a value in the box on the right.
❏ Erasing Position:Select the position to remove the punch holes.
❏ Orientation (Original):Select the orientation of the original.
Scanning Using WSDNote:❏ This feature is only available for computers running Windows 10/Windows 8.1/Windows 8/Windows 7/Windows Vista.
❏ If you are using Windows 7/Windows Vista, you need to setup your computer in advance using this feature.“Setting Up a WSD Port” on page 106
Scanning > Scanning Using WSD
105
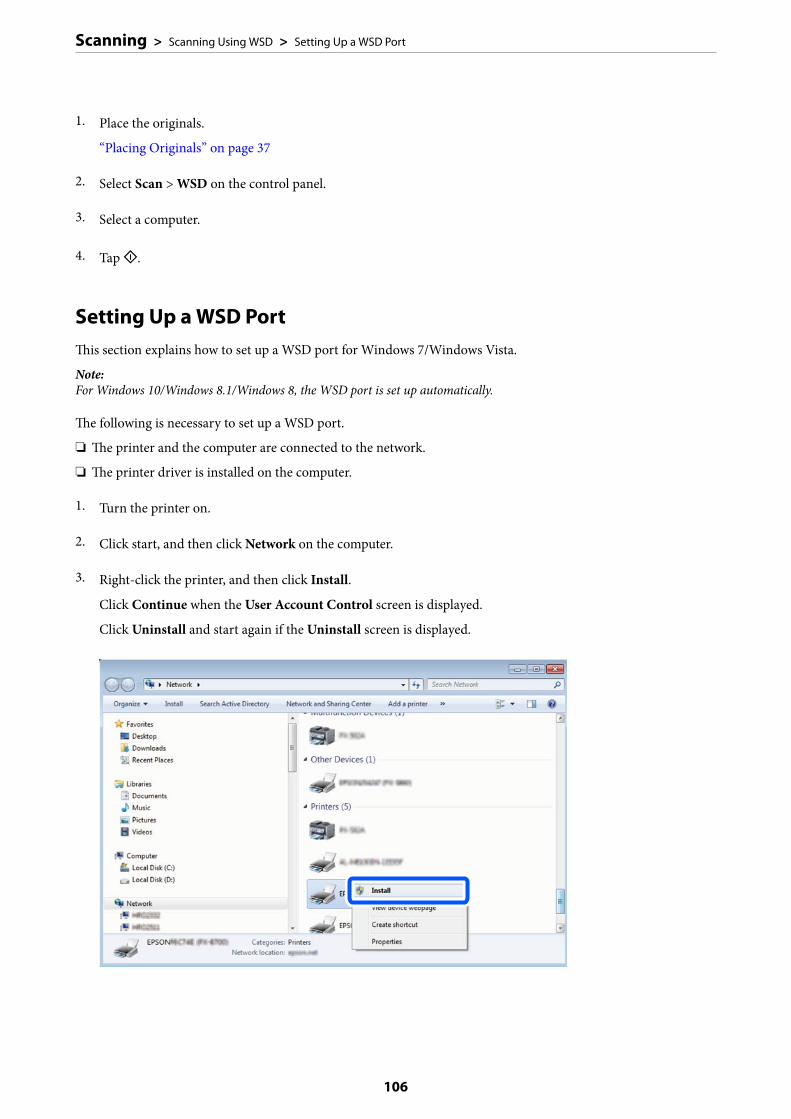
1. Place the originals.
“Placing Originals” on page 37
2. Select Scan > WSD on the control panel.
3. Select a computer.
4. Tap x.
Setting Up a WSD PortThis section explains how to set up a WSD port for Windows 7/Windows Vista.
Note:For Windows 10/Windows 8.1/Windows 8, the WSD port is set up automatically.
The following is necessary to set up a WSD port.
❏ The printer and the computer are connected to the network.
❏ The printer driver is installed on the computer.
1. Turn the printer on.
2. Click start, and then click Network on the computer.
3. Right-click the printer, and then click Install.
Click Continue when the User Account Control screen is displayed.
Click Uninstall and start again if the Uninstall screen is displayed.
Scanning > Scanning Using WSD > Setting Up a WSD Port
106
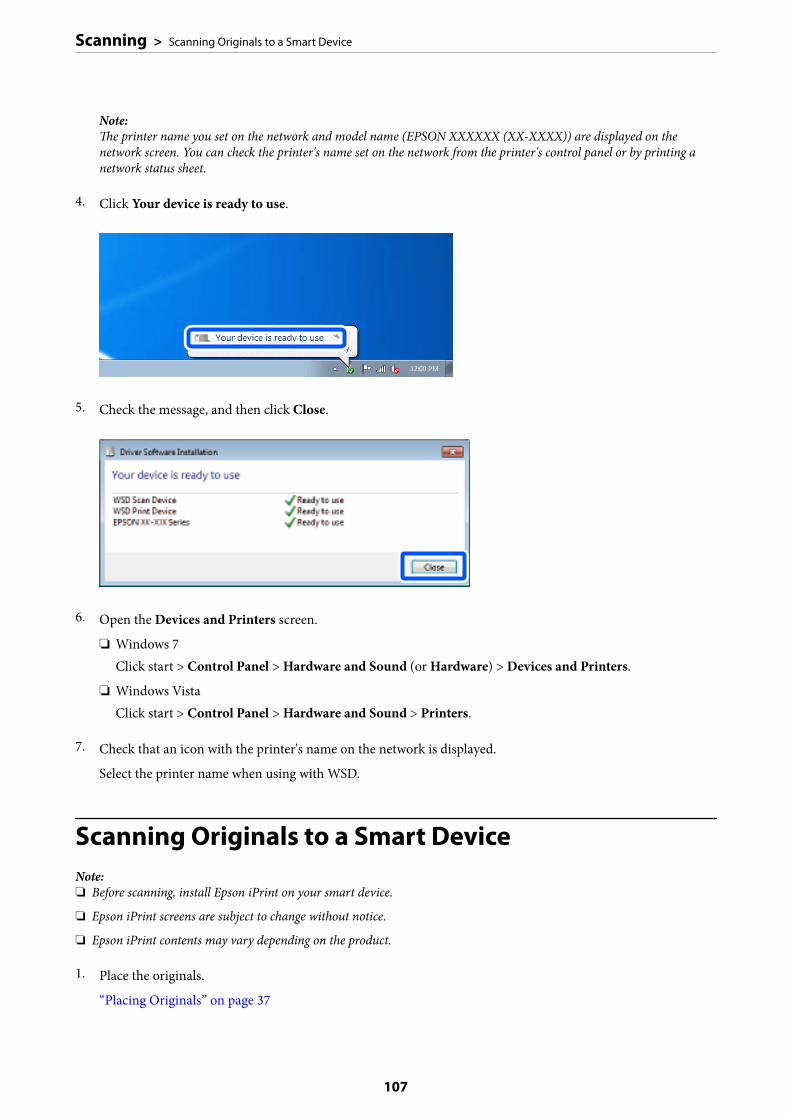
Note:The printer name you set on the network and model name (EPSON XXXXXX (XX-XXXX)) are displayed on thenetwork screen. You can check the printer's name set on the network from the printer's control panel or by printing anetwork status sheet.
4. Click Your device is ready to use.
5. Check the message, and then click Close.
6. Open the Devices and Printers screen.
❏ Windows 7Click start > Control Panel > Hardware and Sound (or Hardware) > Devices and Printers.
❏ Windows VistaClick start > Control Panel > Hardware and Sound > Printers.
7. Check that an icon with the printer's name on the network is displayed.
Select the printer name when using with WSD.
Scanning Originals to a Smart DeviceNote:❏ Before scanning, install Epson iPrint on your smart device.
❏ Epson iPrint screens are subject to change without notice.
❏ Epson iPrint contents may vary depending on the product.
1. Place the originals.
“Placing Originals” on page 37
Scanning > Scanning Originals to a Smart Device
107

2. Start Epson iPrint.
3. Tap Scan on the home screen.
4. Tap Scan.
Note:You can set the scan settings. Tap the icon at the top-right of the screen.
Scanning starts.
5. Check the scanned image, and then select the saving method.
❏ : Displays the screen where you can save the scanned images.
❏ : Displays the screen where you can send scanned images by email.
❏ : Displays the screen where you can print scanned images.
6. Finally, follow the on-screen instructions.
Scanning > Scanning Originals to a Smart Device
108

Faxing
Before Using Fax Features. . . . . . . . . . . . . . . . . . . . . . . . . . . . . . . . . . . . . . . . . . . 110
Overview of this Printer's Fax Features. . . . . . . . . . . . . . . . . . . . . . . . . . . . . . . . . . 110
Sending Faxes Using the Printer. . . . . . . . . . . . . . . . . . . . . . . . . . . . . . . . . . . . . . . 115
Receiving Faxes on the Printer. . . . . . . . . . . . . . . . . . . . . . . . . . . . . . . . . . . . . . . . 123
Menu Options for Faxing. . . . . . . . . . . . . . . . . . . . . . . . . . . . . . . . . . . . . . . . . . . .128
Menu Options for Fax Box. . . . . . . . . . . . . . . . . . . . . . . . . . . . . . . . . . . . . . . . . . .133
Checking the Status or Logs for Fax Jobs. . . . . . . . . . . . . . . . . . . . . . . . . . . . . . . . .139
Sending a Fax from a Computer. . . . . . . . . . . . . . . . . . . . . . . . . . . . . . . . . . . . . . . 141
Receiving Faxes on a Computer. . . . . . . . . . . . . . . . . . . . . . . . . . . . . . . . . . . . . . . 145
Before Using Fax FeaturesCheck the following before you start using the fax features.
❏ The printer and the phone line, and (if necessary) the phone machine are connected correctly
❏ Fax basic settings (Fax Setting Wizard) is complete
❏ Other necessary Fax Settings are complete
See "Related Information" below to make settings.
Related Information
& “Connecting the Printer to a Phone Line” on page 393& “Making the Printer Ready to Send and Receive Faxes” on page 396& “Making Settings for the Printer's Fax Features According to Use” on page 398& “Basic Settings” on page 317& “Send Settings” on page 319& “Making Fax Features Available” on page 392& “Setting a Shared Network Folder” on page 363& “Configuring a Mail Server” on page 359& “Making Contacts Available” on page 379& “User Settings” on page 333
Overview of this Printer's Fax Features
Feature: Sending Faxes“Before Using Fax Features” on page 110
Sending Methods
❏ Sending automatically
When you scan an original by tapping x (Send), the printer dials the recipients and sends the fax.“Sending Faxes Using the Printer” on page 115
❏ Sending manually
When you perform a manual check on the line connection by dialing the recipient, tap x (Send) to startsending a fax directly.“Sending Faxes Manually After Confirming the Recipient's Status” on page 117“Sending Faxes Dialing from the External Phone Device” on page 117
Recipient Designation when Sending a Fax
You can enter recipients using Keypad, Contacts, and Recent.
“Recipient” on page 128
“Making Contacts Available” on page 379
Faxing > Overview of this Printer's Fax Features > Feature: Sending Faxes
110

Scan Settings when Sending a Fax
You can select items such as Resolution or Original Size (Glass) when sending faxes.
“Scan Settings:” on page 129
Using Fax Send Settings when Sending a Fax
You can use Fax Send Settings such as Direct Send (to send a large document stably) or Backup when normalsending fails. If you make settings to back up sent faxes when sending a fax but the backup fails, the printer cansend an email notification automatically when the backup is performed.
“Fax Send Settings:” on page 130
“Backup Error Report:” on page 326
“Configuring a Mail Server” on page 359
Reports on Sent Result
You can get various reports on sent results.
“Features: Various Fax Reports” on page 113
Secure Send
You can send faxes securely.
“Feature: Security when Sending and Receiving Faxes” on page 114
Other Sending Related Features
There are other useful features related to sending faxes.
“Quick Operation Button 1, Quick Operation Button 2, Quick Operation Button 3:” on page 317
“Quick Operation Button:” on page 129
Feature: Receiving Faxes“Before Using Fax Features” on page 110
Receive Mode
There are two options in Receive Mode for receiving incoming faxes.
❏ ManualMainly for phoning, but also for faxing“Usage of Manual Mode” on page 123
❏ Auto- Only for faxing (external phone device is not required)- Mainly for faxing, and sometimes phoning“Usage of Auto Mode” on page 124
Receiving Faxes by Operating a Connected Phone
You can receive faxes by only operating an external phone device.
Faxing > Overview of this Printer's Fax Features > Feature: Receiving Faxes
111
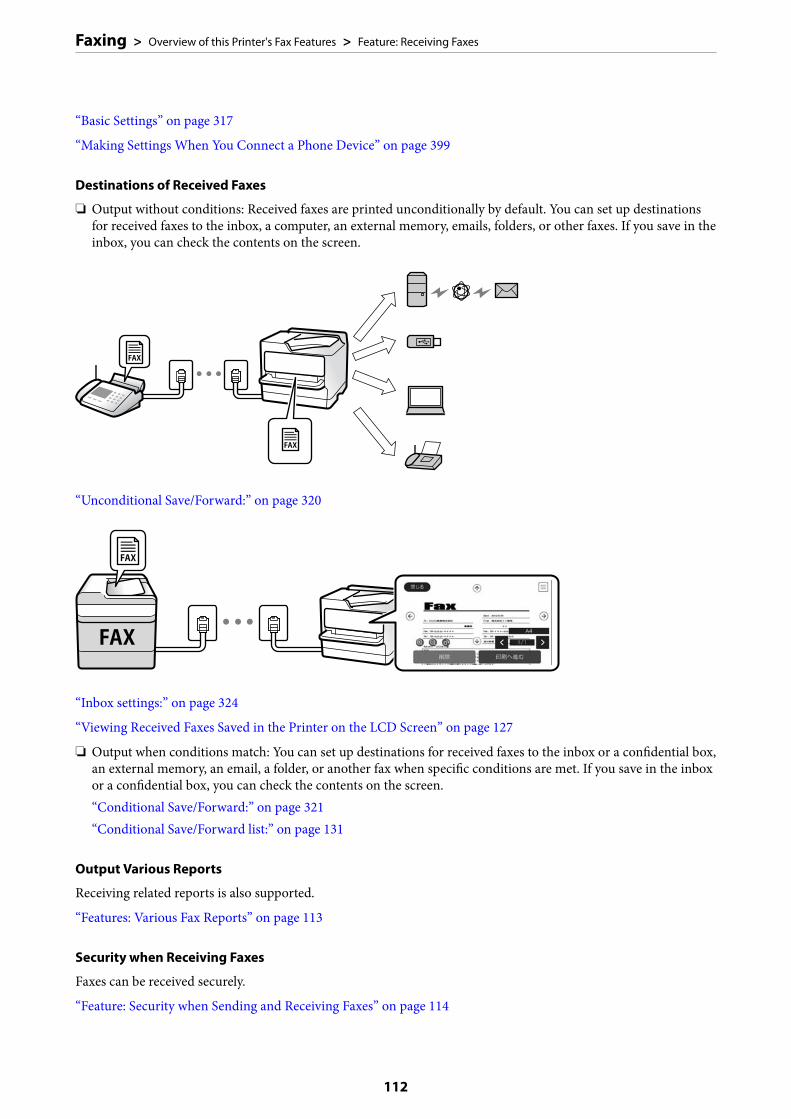
“Basic Settings” on page 317
“Making Settings When You Connect a Phone Device” on page 399
Destinations of Received Faxes
❏ Output without conditions: Received faxes are printed unconditionally by default. You can set up destinationsfor received faxes to the inbox, a computer, an external memory, emails, folders, or other faxes. If you save in theinbox, you can check the contents on the screen.
“Unconditional Save/Forward:” on page 320
“Inbox settings:” on page 324
“Viewing Received Faxes Saved in the Printer on the LCD Screen” on page 127
❏ Output when conditions match: You can set up destinations for received faxes to the inbox or a confidential box,an external memory, an email, a folder, or another fax when specific conditions are met. If you save in the inboxor a confidential box, you can check the contents on the screen.“Conditional Save/Forward:” on page 321“Conditional Save/Forward list:” on page 131
Output Various Reports
Receiving related reports is also supported.
“Features: Various Fax Reports” on page 113
Security when Receiving Faxes
Faxes can be received securely.
“Feature: Security when Sending and Receiving Faxes” on page 114
Faxing > Overview of this Printer's Fax Features > Feature: Receiving Faxes
112
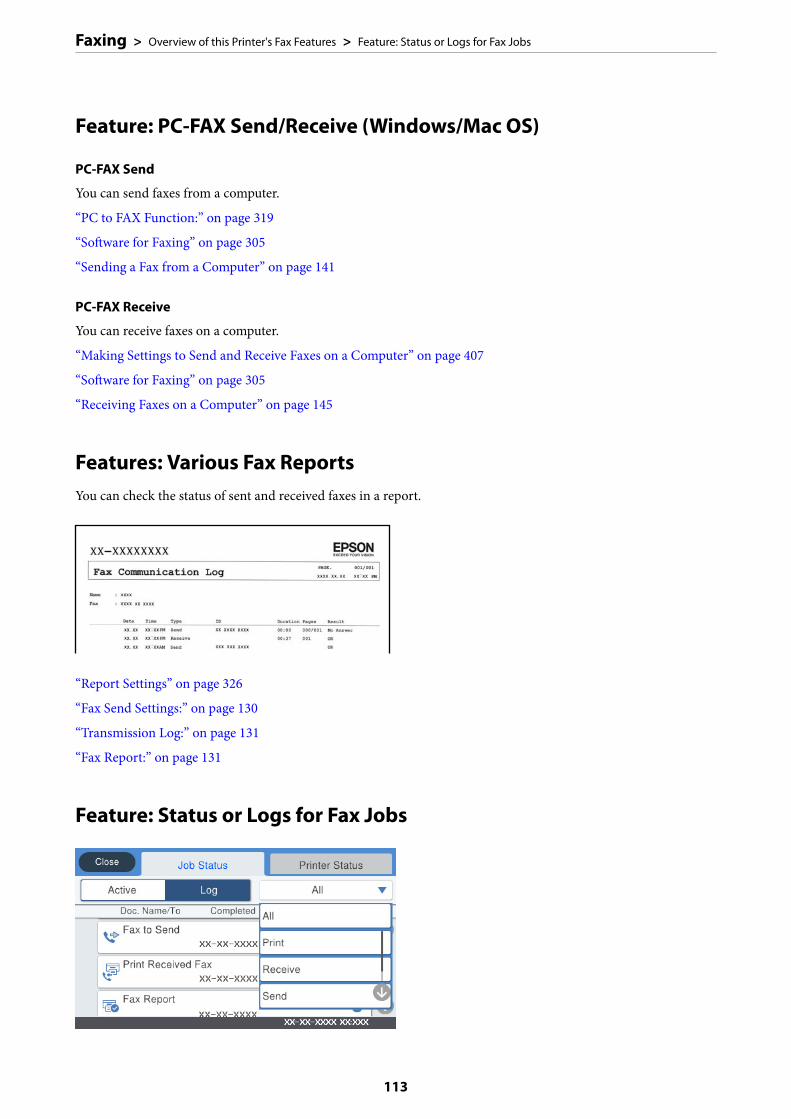
Feature: PC-FAX Send/Receive (Windows/Mac OS)
PC-FAX Send
You can send faxes from a computer.
“PC to FAX Function:” on page 319
“Software for Faxing” on page 305
“Sending a Fax from a Computer” on page 141
PC-FAX Receive
You can receive faxes on a computer.
“Making Settings to Send and Receive Faxes on a Computer” on page 407
“Software for Faxing” on page 305
“Receiving Faxes on a Computer” on page 145
Features: Various Fax ReportsYou can check the status of sent and received faxes in a report.
“Report Settings” on page 326
“Fax Send Settings:” on page 130
“Transmission Log:” on page 131
“Fax Report:” on page 131
Feature: Status or Logs for Fax Jobs
Faxing > Overview of this Printer's Fax Features > Feature: Status or Logs for Fax Jobs
113

You can check the fax jobs in progress or check the job history.
“Checking the Status or Logs for Fax Jobs” on page 139
Feature: Fax Box
Inbox and confidential boxes
“Inbox/Confidential” on page 133
Stored Documents Box
“Stored Documents:” on page 134
Polling Send/Board Box
“Polling Send/Board” on page 135
Security for Fax Box feature
You can set a password for each box.
“Feature: Security when Sending and Receiving Faxes” on page 114
Feature: Security when Sending and Receiving FaxesYou can use many security features such as Direct Dialing Restrictions to prevent sending to the wrongdestination, or Backup Data Auto Clear to prevent information leakage. You can set a password for each fax boxin the printer.
“Security Settings” on page 327
“Inbox Password Settings:” on page 324
“Menu Options for Fax Box” on page 133
Features: Other Useful Features
Blocking Junk Faxes
“Rejection Fax:” on page 318
Faxing > Overview of this Printer's Fax Features > Features: Other Useful Features
114
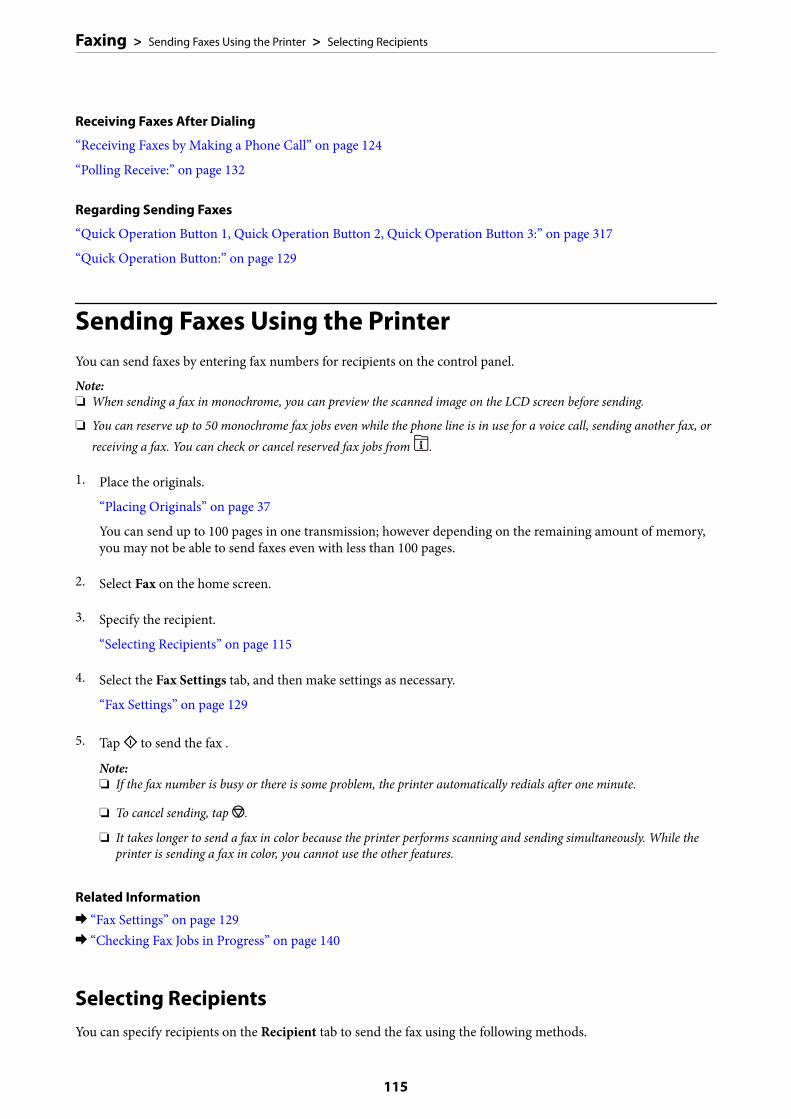
Receiving Faxes After Dialing
“Receiving Faxes by Making a Phone Call” on page 124
“Polling Receive:” on page 132
Regarding Sending Faxes
“Quick Operation Button 1, Quick Operation Button 2, Quick Operation Button 3:” on page 317
“Quick Operation Button:” on page 129
Sending Faxes Using the PrinterYou can send faxes by entering fax numbers for recipients on the control panel.
Note:❏ When sending a fax in monochrome, you can preview the scanned image on the LCD screen before sending.
❏ You can reserve up to 50 monochrome fax jobs even while the phone line is in use for a voice call, sending another fax, orreceiving a fax. You can check or cancel reserved fax jobs from .
1. Place the originals.
“Placing Originals” on page 37
You can send up to 100 pages in one transmission; however depending on the remaining amount of memory,you may not be able to send faxes even with less than 100 pages.
2. Select Fax on the home screen.
3. Specify the recipient.
“Selecting Recipients” on page 115
4. Select the Fax Settings tab, and then make settings as necessary.
“Fax Settings” on page 129
5. Tap x to send the fax .
Note:❏ If the fax number is busy or there is some problem, the printer automatically redials after one minute.
❏ To cancel sending, tap y.
❏ It takes longer to send a fax in color because the printer performs scanning and sending simultaneously. While theprinter is sending a fax in color, you cannot use the other features.
Related Information
& “Fax Settings” on page 129& “Checking Fax Jobs in Progress” on page 140
Selecting RecipientsYou can specify recipients on the Recipient tab to send the fax using the following methods.
Faxing > Sending Faxes Using the Printer > Selecting Recipients
115

Entering Fax Number Manually
Select Keypad, enter a fax number on the screen displayed, and then tap OK.
- To add a pause (pause for three seconds during dialing), enter a hyphen(-).
- If you have set an external access code in Line Type, enter "#" (hash) instead of the actual external access code atthe beginning of the fax number.
Note:If you cannot manually enter a fax number, Direct Dialing Restrictions in Security Settings is set to On. Select faxrecipients from the contacts list or the sent fax history.
Select the recipients from the contacts list
Select Contacts and select recipients you want to send. If the recipient you want to send to has not been registered
in Contacts yet, tap to register it.
Select the recipients from the sent fax history
Select Recent, and then select a recipient.
Select from the list on the Recipient tab
Select a recipient from the list registered in Settings > Contacts Manager > Frequent.
Note:To delete recipients you entered, display the list of recipients by tapping on the field of a fax number or the number ofrecipients on the LCD screen, select the recipient from the list, and then select Remove.
Related Information
& “Making Contacts Available” on page 379& “Recipient” on page 128
Various Ways of Sending Faxes
Sending the Fax after Checking the Scanned Image
You can preview the scanned image on the LCD screen before sending the fax. (Monochrome faxes only)
1. Place the originals.
“Placing Originals” on page 37
2. Select Fax on the home screen.
3. Specify the recipient.
“Selecting Recipients” on page 115
4. Select the Fax Settings tab, and then make settings as necessary.
“Fax Settings” on page 129
Faxing > Sending Faxes Using the Printer > Various Ways of Sending Faxes
116
5. Tap on the fax top screen to scan, check the scanned document image.
6. Select Start Sending. Otherwise, select Cancel
- : Moves the screen in the direction of the arrows.
- : Reduces or enlarges.
- : Moves to the previous or the next page.
Note:❏ When Direct Send is enabled, you cannot preview.
❏ When the preview screen is left untouched for the time set in Settings > General Settings > Fax Settings > SendSettings > Fax Preview Display Time, the fax is sent automatically.
❏ The image quality of a sent fax may be different from what you previewed depending on the capability of therecipient machine.
Sending Faxes Manually After Confirming the Recipient's Status
You can send a fax while listening to sounds or voices through the printer's speaker while dialing, communicating,and transmitting.
1. Select Fax on the home screen.
2. Make necessary settings on the Fax Settings tab.
3. On the Recipient tab, tap and then specify the recipient.
Note:You can adjust the sound volume of the speaker.
4. When you hear a fax tone, select Send/Receive at the upper right corner of the LCD screen, and then selectSend.
Note:When receiving a fax from a fax polling service, and you hear the audio guidance, follow the guidance to make theprinter operations.
5. Tap x to send the fax.
Related Information
& “Fax Settings” on page 129
Sending Faxes Dialing from the External Phone Device
You can send a fax by dialing using the connected telephone when you want to talk over the phone before sendinga fax, or when the recipient's fax machine does not switch to the fax automatically.
1. Pick up the handset of the connected telephone, and then dial the recipient's fax number using the phone.
Note:When the recipient answers the phone, you can talk with the recipient.
Faxing > Sending Faxes Using the Printer > Various Ways of Sending Faxes
117

2. Select Fax on the home screen.
3. Make necessary settings on theFax Settings.
“Fax Settings” on page 129
4. When you hear a fax tone, tap x, and then hang up the handset.
Note:When a number is dialed using the connected telephone, it takes longer to send a fax because the printer performsscanning and sending simultaneously. While sending the fax, you cannot use the other features.
Related Information
& “Fax Settings” on page 129
Sending Faxes on Demand (Using Polling Send/Bulletin Board Box)
If you store a monochrome document in the printer in advance, the stored document can be sent upon requestfrom another fax machine that has a polling receive feature. There is one Polling Send box and 10 bulletin boardboxes in the printer for this feature. In each box, you can store one document with up to 100 pages. To use abulletin board box, the one box to store a document must be registered beforehand, and the fax machine of therecipient must support the subaddress/password feature.
Related Information
& “Setting the Polling Send Box” on page 118& “Registering a Bulletin Board Box” on page 119& “Storing a Document in the Polling Send/Bulletin Board Box” on page 119
Setting the Polling Send Box
You can store a document in the Polling Send Box without registering. Make the following settings as necessary.
1. Select Fax Box > Polling Send/Board from the home screen.
2. Select Polling Send, tap , and then select Settings.
Note:If a password entry screen is displayed, enter the password.
3. Make the appropriate settings, such as Notify Send Result.
Note:If you set a password in Box Open Password, you will be asked to enter the password from the next time you open thebox.
4. Select OK to apply the settings.
Related Information
& “Polling Send:” on page 136
Faxing > Sending Faxes Using the Printer > Various Ways of Sending Faxes
118

Registering a Bulletin Board Box
You must register a bulletin board box for storing a document beforehand. Follow the steps below to register thebox.
1. Select Fax Box > Polling Send/Board from the home screen.
2. Select one of the boxes named Unregistered Bulletin Board.
Note:If a password entry screen is displayed, enter the password.
3. Make settings for the items on the screen.
❏ Enter a name in Name (Required)
❏ Enter a subaddress in Subaddress(SEP)
❏ Enter a password in Password(PWD)
4. Make the appropriate settings such as Notify Send Result.
Note:If you set a password in Box Open Password, you will be asked to enter the password from the next time you open thebox.
5. Select OK to apply the settings.
To display the screen for changing settings or deleting registered boxes, select the box you want to change/delete,and then tap .
Related Information
& “Unregistered Bulletin Board:” on page 137
Storing a Document in the Polling Send/Bulletin Board Box
1. Select Fax Box on the home screen, and then select Polling Send/Board.
2. Select Polling Send or one of the bulletin board boxes that have already been registered.
If the password entry screen is displayed, enter the password to open the box.
3. Tap Add Document.
4. On the fax top screen that is displayed, check the fax settings, and then tap x to scan and store the document.
To check the document you stored, select Fax Box > Polling Send/Board, select the box containing the documentyou want to check, and then tap Check Document. On the screen that is displayed, you can view, print or deletethe scanned document.
Related Information
& “Each Registered Bulletin Board” on page 137
Faxing > Sending Faxes Using the Printer > Various Ways of Sending Faxes
119

Sending Many Pages of a Monochrome Document (Direct Send)
When sending a fax in monochrome, the scanned document is temporarily stored in the printer's memory.Therefore, sending a lot of pages may cause the printer to run out of memory and stop sending the fax. You canavoid this by enabling the Direct Send feature, however, it takes longer to send the fax because the printerperforms scanning and sending simultaneously. You can use this feature when there is only one recipient.
Accessing the Menu
You can find the menu on the printer's control panel below.
Fax > Fax Settings > Direct Send.
Sending a Fax Preferentially (Priority Send)
You can send an urgent document ahead of the other faxes waiting to be sent.
Note:You cannot send your document preferentially while one of the following is in progress because the printer cannot acceptanother fax.
❏ Sending a monochrome fax with Direct Send enabled
❏ Sending a color fax
❏ Sending a fax using a connected telephone
❏ Sending a fax sent from the computer (except when sending from memory)
Accessing the Menu
You can find the menu on the printer's control panel below.
Fax > Fax SettingsPriority Send.
Related Information
& “Checking the Status or Logs for Fax Jobs” on page 139
Sending Faxes in Monochrome at Specified Time of the Day (Send Fax Later)
You can set to send a fax at a specified time. Only monochrome faxes can be sent when the time to send isspecified.
Accessing the Menu
You can find the menu on the printer's control panel below.
Fax > Fax Settings
Enable Send Fax Later, and then specify the time of day to send the fax.
Note:To cancel the fax while the printer is waiting for the specified time to arrive, cancel it from .
Related Information
& “Checking the Status or Logs for Fax Jobs” on page 139
Faxing > Sending Faxes Using the Printer > Various Ways of Sending Faxes
120
Sending Different Size Documents Using ADF (Continuous Scan(ADF))
Sending faxes by placing originals one by one, or by placing originals by size, you can send them as one documentat their original sizes.
If you place different sized originals in the ADF, all of the originals are sent at the largest size among them. To sendoriginals at their original sizes, do not place originals with mixed sizes.
1. Place the first batch of originals at the same size.
2. Select Fax on the home screen.
3. Specify the recipient.
4. Select the Fax Settings tab, and then tap Continuous Scan(ADF) to set this to On.
You can also make settings such as the resolution and the sending method as necessary.
5. Tap x (Send).
6. When scanning the first set of originals is complete and a message is displayed on the control panel asking youto scan the next set of originals, set the next originals, and then select Start Scanning.
Note:If you leave the printer untouched for the time set in Wait Time for Next Original after you have been prompted to setthe next originals, the printer stops storing and starts sending the document.
Sending a Fax with a Subaddress(SUB) and Password(SID)
You can send faxes to the confidential boxes or the relay boxes in the recipient's fax machine when the recipient'sfax machine has the feature to receive confidential faxes or relay faxes. The recipients can receive them securely, orcan forward them to specified fax destinations.
1. Place the originals.
2. Select Fax on the home screen.
3. Select Contacts and select a recipient with a registered subaddress and password.
You can also select the recipient from Recent if it was sent with a subaddress and password.
4. Select the Fax Settings tab, and then make settings such as the resolution and the sending method asnecessary.
5. Send the fax.
Related Information
& “Making Contacts Available” on page 379
Faxing > Sending Faxes Using the Printer > Various Ways of Sending Faxes
121

Sending the Same Documents Multiple Times
Related Information
& “Storing a Fax Without Specifying a Recipient (Store Fax Data)” on page 122& “Sending Faxes Using the Stored Document Feature” on page 122
Storing a Fax Without Specifying a Recipient (Store Fax Data)
Since you can send faxes using documents stored in the printer, you can save the time spent scanning documentswhen you need to send the same document frequently. You can store up to 100 pages of a single document inmonochrome. You can store 10 documents in the printer's stored documents box.
Note:Saving 10 documents may not be possible depending on the usage conditions such as the file size of stored documents.
1. Place the originals.
2. Select Fax Box on the home screen.
3. Select Stored Documents, tap (Box Menu), and then select Store Fax Data.
4. In the Fax Settings tab that is displayed, make settings such as the resolution as necessary.
5. Tap x to store the document.
After storing a document is complete, you can preview the scanned image by selecting Fax Box > Stored
Documents and then tapping the box for the document, or you can delete it by tapping on the right of the boxfor the document.
Related Information
& “Stored Documents:” on page 134
Sending Faxes Using the Stored Document Feature
1. Select Fax Box on the home screen, and then select Stored Documents.
2. Select the document you want to send, check the content of the document, and then select Start Sending.
When the message Delete this document after sending? is displayed, select Yes or No.
3. Specify the recipient.
4. Select the Fax Settings tab, and then make settings such as the sending method as necessary.
5. Tap x to send the fax.
Related Information
& “Stored Documents:” on page 134& “Checking the Status or Logs for Fax Jobs” on page 139
Faxing > Sending Faxes Using the Printer > Various Ways of Sending Faxes
122
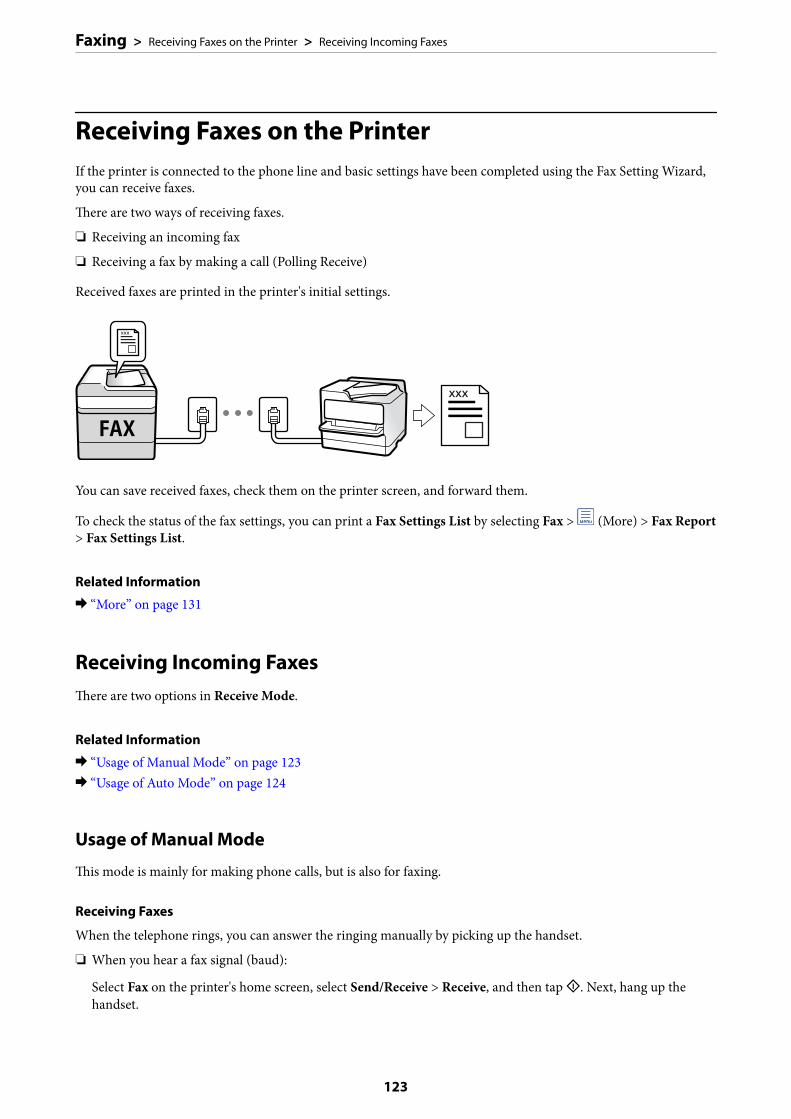
Receiving Faxes on the PrinterIf the printer is connected to the phone line and basic settings have been completed using the Fax Setting Wizard,you can receive faxes.
There are two ways of receiving faxes.
❏ Receiving an incoming fax
❏ Receiving a fax by making a call (Polling Receive)
Received faxes are printed in the printer's initial settings.
You can save received faxes, check them on the printer screen, and forward them.
To check the status of the fax settings, you can print a Fax Settings List by selecting Fax > (More) > Fax Report> Fax Settings List.
Related Information
& “More” on page 131
Receiving Incoming FaxesThere are two options in Receive Mode.
Related Information
& “Usage of Manual Mode” on page 123& “Usage of Auto Mode” on page 124
Usage of Manual Mode
This mode is mainly for making phone calls, but is also for faxing.
Receiving Faxes
When the telephone rings, you can answer the ringing manually by picking up the handset.
❏ When you hear a fax signal (baud):
Select Fax on the printer's home screen, select Send/Receive > Receive, and then tap x. Next, hang up thehandset.
Faxing > Receiving Faxes on the Printer > Receiving Incoming Faxes
123
❏ If the ringing is for a voice call:You can answer the phone as normal.
Receiving Faxes Using only the Connected Telephone
When Remote Receive is set, you can receive faxes by simply entering the Start Code.
When the telephone rings, pick up the handset. When you hear a fax tone (baud), dial the two digit Start Code,and then hang up the handset. If you do not know the start code, ask the administrator.
Usage of Auto Mode
This mode allows you to use the line for the following uses.
❏ Using the line for faxing only (external telephone is not necessary)
❏ Using the line for faxing mainly, and sometimes phoning
Receiving Faxes Without an External Phone Device
The printer automatically switches to receive faxes when the number of rings you set in Rings to Answer iscomplete.
Receiving Faxes With an External Phone Device
A printer with an external phone device works as follows.
❏ When the answering machine answers within the number of rings set in Rings to Answer:- If the ringing is for a fax: The printer automatically switches to receive faxes.- If the ringing is for a voice call; The answering machine can receive voice calls and record voice messages.
❏ When you pick up the handset within the number of rings set in Rings to Answer:- If the ringing is for a fax: Hold the line until the printer automatically starts receiving the fax. Once the printerstarts receiving the fax, you can hang up the handset. To start receiving the fax immediately, use the same stepsas for Manual. You can receive the fax using the same steps as for Manual. Select Fax on the home screen, andthen select Send/Receive > Receive. Next, tap x, and then hang up the handset.- If the ringing is for a voice call: You can answer the phone as normal.
❏ When the ringing stops and the printer automatically switches to receive faxes:- If the ringing is for a fax: The printer starts receiving faxes.- If the ringing is for a voice call: You cannot answer the phone. Ask the person to call you back.
Note:Set the number of rings to answer for the answering machine to a lower number than the number set in Rings to Answer.Otherwise, the answering machine cannot receive voice calls to record voice messages. For details on setting up the answeringmachine, see the manual supplied with the answering machine.
Receiving Faxes by Making a Phone CallYou can receive a fax stored on another fax machine by dialing the fax number.
Related Information
& “Receiving Faxes After Confirming the Sender's Status” on page 125
Faxing > Receiving Faxes on the Printer > Receiving Faxes by Making a Phone Call
124
& “Receiving Faxes by Polling (Polling Receive)” on page 125& “Receiving Faxes from a Board with a Subaddress (SEP) and Password (PWD) (Polling Receive)” on page 126
Receiving Faxes After Confirming the Sender's Status
You can receive a fax while listening to sounds or voices through the printer's speaker while dialing,communicating, and transmitting. You can use this feature when you want to receive a fax from a fax informationservice by following an audio guide.
1. Select Fax on the home screen.
2. Tap , and then specify the sender.
Note:You can adjust the sound volume of the speaker.
3. Wait until the sender answers your call. When you hear a fax tone, select Send/Receive at the upper rightcorner of the LCD screen, and then select Receive.
Note:When receiving a fax from a fax information service, and you hear the audio guidance, follow the guidance to make theprinter operations.
4. Tap x.
Receiving Faxes by Polling (Polling Receive)
You can receive a fax stored on another fax machine by dialing the fax number. Use this feature to receive adocument from a fax information service.
Note:❏ If the fax information service has an audio guidance feature that you need to follow to receive a document, you cannot
use this feature.
❏ To receive a document from a fax information service that uses audio guidance, just dial the fax number using the OnHook feature or the connected telephone, and operate the phone and the printer following the audio guidance.
1. Select Fax on the home screen.
2. Tap (More).
3. Select Extended Fax.
4. Tap the Polling Receive box to set this to On.
5. Tap Close, and then tap Close again.
6. Enter the fax number.
Note:If you cannot manually enter a fax number, Direct Dialing Restrictions in Security Settings is set to On. Select faxrecipients from the contacts list or the sent fax history.
Faxing > Receiving Faxes on the Printer > Receiving Faxes by Making a Phone Call
125

7. Tap x.
Related Information
& “Polling Receive:” on page 132
Receiving Faxes from a Board with a Subaddress (SEP) and Password (PWD)(Polling Receive)
By dialing to a sender, you can receive faxes from a board stored on sender's fax machine with a subaddress (SEP)and password (PWD) feature. To use this feature, register the contact with the subaddress (SEP) and password(PWD) in the contacts list in advance.
1. Select Fax on the home screen.
2. Select (More).
3. Select Extended Fax.
4. Tap Polling Receive to set this to On.
5. Tap Close, and then tap Close again.
6. Select Contacts, and then select the contact with the registered subaddress (SEP) and password (PWD) tomatch the destination board.
7. Tap x.
Related Information
& “Making Contacts Available” on page 379& “Making Contacts Available” on page 379& “Sending Faxes Dialing from the External Phone Device” on page 117& “Receiving Faxes After Confirming the Sender's Status” on page 125& “More” on page 131
Saving and Forwarding Received Faxes
Summary of the Features
If your organization has a printer administrator, contact your administrator to check the status of the printersettings.
Saving Received Faxes in the Printer
The received faxes can be saved in the printer, and you can view them on the printer's screen. You can print onlythe faxes you want to print or delete unnecessary faxes.
Faxing > Receiving Faxes on the Printer > Saving and Forwarding Received Faxes
126

Saving and/or Forwarding Received Faxes to Destinations Other than the Printer
The following can be set as destinations.
❏ Computer (PC-FAX reception)
❏ External memory device
❏ Email address
❏ Shared folder on a network
❏ Another fax machine
Note:❏ The fax data is saved as PDF format.
❏ Color documents cannot be forwarded to another fax machine. They are processed as documents that failed to beforwarded.
Sorting Received Faxes by Conditions such as Subaddress and Password
You can sort and save received faxes to your Inbox or bulletin board boxes. You can also forward received faxes todestinations other than the printer.
❏ Email address
❏ Shared folder on a network
❏ Another fax machine
Note:❏ The fax data is saved as PDF format.
❏ Color documents cannot be forwarded to another fax machine. They are processed as documents that failed to beforwarded.
❏ You can print the save/forward conditions set in the printer. Select Fax on the home screen, and then select (More) >Fax Report > Conditional Save/Forward list.
❏ If your organization has a printer administrator, contact the administrator to set or change the save/forward conditions.For the administrator, see "Related Information" below to check or change settings.
Related Information
& “Making Settings to Save and Forward Received Faxes” on page 399& “Making Settings to Save and Forward Received Faxes with Specific Conditions” on page 403& “More” on page 131& “Viewing Received Faxes Saved in the Printer on the LCD Screen” on page 127
Viewing Received Faxes Saved in the Printer on the LCD ScreenIf you set up to save received faxes in the printer, you can view the contents and print as necessary.
“Making Saving Settings to Receive Faxes” on page 400
“Unconditional Save/Forward:” on page 320
“Making Saving Settings to Receive Faxes” on page 400
“Save to Fax Box:” on page 322
Faxing > Receiving Faxes on the Printer > Viewing Received Faxes Saved in the Printer on the LCD Screen
127
1. Select Fax Box on the home screen.
Note:
When there are received faxes that have not been read, the number of unread documents is displayed on the on thehome screen.
2. Select Inbox/Confidential.
3. Select the inbox or the confidential box you want to view.
4. If the inbox, or the confidential box has been password protected, enter the inbox password, the confidentialbox password, or the administrator password.
5. Select the fax you want to view from the list.
The contents of the fax are displayed.
❏ : Rotates the image to the right by 90 degrees.
❏ : Moves the screen in the direction of the arrows.
❏ : Reduces or enlarges.
❏ : Moves to the previous or the next page.
❏ : Displays menus such as save and forward.
❏ To hide the operation icons, tap anywhere on the preview screen except for the icons. Tap again to displaythe icons.
6. Select whether to print or delete the document you have viewed, and then follow the on-screen instructions.
cImportant:
If the printer runs out of memory, receiving and sending faxes is disabled. Delete documents that you havealready read or printed.
Related Information
& “Inbox/Confidential” on page 133
Menu Options for Faxing
RecipientSelect the menus on the control panel as described below.
Fax > Recipient
Keypad:
Manually enter a fax number.
Faxing > Menu Options for Faxing > Recipient
128
Contacts:
Select a recipient from the contacts list. You can also add or edit a contact.
Recent:
Select a recipient from the sent fax history. You can also add the recipient to the contacts list.
Fax SettingsSelect the menus on the control panel as described below.
Fax > Fax Settings
Quick Operation Button:
Assigning up to three frequently used items such as Transmission Log and Original Type inSettings > General Settings > Fax Settings > Quick Operation Button, displays the items at the topof the Fax Settings tab.
Scan Settings:
Resolution:
Select the resolution of the outgoing fax. If you select a higher resolution, the data sizebecomes larger and it takes time to send the fax.
Density:
Sets the density of the outgoing fax. + makes the density darker, and - makes it lighter.
Original Type:
Select the type of your original.
Remove Background:
Detects the paper color (background color) of the original document, and removes or lightensthe color. Depending on the darkness and vividness of the color, it may not be removed orlightened
Sharpness:
Enhances or defocuses the outline of the image. + enhances the sharpness, and - defocuses thesharpness.
ADF 2-Sided:
Scans both sides of originals placed in the ADF and sends a monochrome fax.
Continuous Scan(ADF):
Sending faxes by placing originals one by one, or by placing originals by size, you can sendthem as one document at their original sizes. See the related information below on this topic.
Original Size (Glass):
Select the size and orientation of the original you placed on the scanner glass.
Faxing > Menu Options for Faxing > Fax Settings
129

Color Mode:
Select whether to scan in color or in monochrome.
Fax Send Settings:
Direct Send:
Sends a monochrome fax while scanning the originals. Since scanned originals are not storedtemporarily in the printer's memory even when sending a large volume of pages, you can avoidprinter errors due to a lack of memory. Note that sending using this feature takes longer thannot using this feature. See the related information below on this topic.
You cannot use this feature when:
❏ Sending a fax using the ADF 2-Sided option
❏ Sending a fax to multiple recipients
Priority Send:
Sends the current fax before other faxes waiting to be sent. See the related information belowon this topic.
Send Fax Later:
Sends a fax at a time you specified. Only a monochrome fax is available when using thisoption. See the related information below on this topic.
Add Sender Information:
❏ Add Sender InformationSelect the position where you want to include the header information (sender name and faxnumber) in the outgoing fax, or not to include the information.- Off: Sends a fax with no header information.- Outside of Image: Sends a fax with header information in the top white margin of the fax.This keeps the header from overlapping with the scanned image, however, the fax receivedby the recipient may be printed across two sheets depending on the size of the originals.- Inside of Image: Sends a fax with header information approximately 7 mm lower than thetop of the scanned image. The header may overlap with the image, however, the fax receivedby the recipient will not be split into two documents.
❏ Fax HeaderSelect the header for the recipient. To use this feature, you should register multiple headersin advance.
❏ Additional InformationSelect the information you want to add. You can select one from Your Phone Number,Destination List, and None.
Notify Send Result:
Sends a notification after you send a fax.
Transmission Report:
Prints a transmission report after you send the fax.
Print on Error prints a report only when an error occurs.
Faxing > Menu Options for Faxing > Fax Settings
130

When Attach Fax image to report has been set in Settings > General Settings > Fax Settings> Report Settings, the fax with an error is also printed with the report.
Backup:
Saves a backup of the sent fax that is scanned and saved to the printer's memory automatically.The backup feature is available when:
❏ Sending a fax in monochrome
❏ Sending a fax using the Send Fax Later feature
❏ Sending a fax using the Batch Send feature
❏ Sending a fax using the Store Fax Data feature
Related Information
& “Sending Different Size Documents Using ADF (Continuous Scan(ADF))” on page 121& “Sending Many Pages of a Monochrome Document (Direct Send)” on page 120& “Sending a Fax Preferentially (Priority Send)” on page 120& “Sending Faxes in Monochrome at Specified Time of the Day (Send Fax Later)” on page 120
More
Selecting in Fax on the home screen displays the More menu.
Transmission Log:
You can check the history of sent or received fax jobs.
Note that you can also check the history of sent or received fax jobs from Job/Status.
Fax Report:
Last Transmission:
Prints a report for the previous fax that was sent or received through polling.
Fax Log:
Prints a transmission report. You can set to print this report automatically using the followingmenu.
Settings > General Settings > Fax Settings > Report Settings > Fax Log Auto Print
Stored Fax Documents:
Prints a list of fax documents stored in the printer’s memory, such as unfinished jobs.
Fax Settings List:
Prints the current fax settings.
Conditional Save/Forward list:
Prints the Conditional Save/Forward List.
Faxing > Menu Options for Faxing > More
131

Protocol Trace:
Prints a detailed report for the previous fax that was sent or received.
Extended Fax:
Polling Receive:
When this is set to On and you call the sender's fax number, you can receive documents fromthe sender's fax machine. See the related information below for details on how to receive faxesusing Polling Receive.
When you leave the Fax menu, the setting returns to Off (default).
Polling Send/Board:
When this is set to On by selecting the polling send box or a bulletin board box, you can scanand store documents to the box you selected by tapping x on the Fax Settings tab.
You can store one document to the polling send box. You can store up to 10 documents to upto 10 bulletin boards in the printer, but you must register them from Fax Box before storingdocuments. See the related information below for details on how to register a bulletin boardbox.
When you leave the Fax menu, the setting returns to Off (default).
Store Fax Data:
When this is set to On, and you tap x on the Fax Settings tab, you can scan and storedocuments to the Stored Documents box. You can store up to 10 documents.
You can also scan and save documents to the Stored Documents box from Fax Box. See therelated information below for details on how to store documents from Fax Box
When you leave the Fax menu, the setting returns to Off (default).
Fax Box:
Accesses the Fax Box on the home screen.
Fax Settings:
Accesses Settings > General Settings > Fax Settings. Access the setting menu as an administrator.
Related Information
& “Receiving Faxes by Polling (Polling Receive)” on page 125& “Setting the Polling Send Box” on page 118& “Registering a Bulletin Board Box” on page 119& “Storing a Document in the Polling Send/Bulletin Board Box” on page 119& “Polling Send/Board” on page 135& “Storing a Fax Without Specifying a Recipient (Store Fax Data)” on page 122& “Stored Documents:” on page 134& “Checking the Status or Logs for Fax Jobs” on page 139& “Checking the Fax Job History” on page 140
Faxing > Menu Options for Faxing > More
132
Menu Options for Fax Box
Inbox/ConfidentialYou can find Inbox/Confidential in Fax Box on the home screen.
Inbox and Confidential Boxes
Inbox and confidential boxes are in Fax Box > Inbox/Confidential.
You can save up to 100 documents in the inbox and the confidential box in total.
You can use one Inbox and register up to 10 confidential boxes. The box name is displayed on thebox. Confidential XX is the default name for each confidential box.
Inbox and Confidential Boxes
Displays the received faxes list by date received, sender name, and pages.
Tapping one of the faxes from the list opens the preview screen, and you can check thecontents of the fax. You can print or delete the fax while you are previewing.
preview screen
❏ : Reduces or enlarges.
❏ : Rotates the image to the right by 90 degrees.
❏ : Moves the screen in the direction of the arrows.
❏ : Moves to the previous or the next page.
To hide the operation icons, tap anywhere on the preview screen except for the icons.Tap again to display the icons.
(Preview menu)
❏ Save to Memory Device
❏ Forward(Email)
❏ Forward(Network Folder)
❏ Send Fax
❏ Details
When the message Delete When Complete is displayed, select On to delete faxes aftercompleting processes such as Save to Memory Device or Forward(Email).
(Box Menu)
Print All:
This is displayed only when there are stored faxes in the box. Prints all faxes in the box.Selecting On in Delete When Complete deletes all faxes when printing is complete.
Faxing > Menu Options for Fax Box > Inbox/Confidential
133
Save All to Memory Device:
This is displayed only when there are stored faxes in the box. Saves all faxes to externalmemory devices in the box. Selecting On in Delete When Complete deletes alldocuments when saving is complete.
Delete All:
This is displayed only when there are stored faxes in the box. Deletes all faxes in the box.
Settings:
The following items are displayed when you select Inbox > Box Menu > Settings.
❏ Options when memory is full: Select one option to print or to decline incoming faxesafter the Inbox is full.
❏ Inbox Password Settings: You can set a password or change it.
The following items are displayed when you select a confidential box and select BoxMenu > Settings.
❏ Name: Enter a name for the confidential box.
❏ Box Open Password: You can set a password or change it.
Delete Box:
This item is displayed only when you select a confidential box and select Box Menu.Clears the current settings for Confidential Boxes and deletes all stored documents.
Related Information
& “Checking the Fax Job History” on page 140
Stored Documents:You can find Stored Documents in Fax Box on the home screen.
You can store up to 100 pages of a single document in monochrome, and up to 10 documents in the box. Thisallows you to save time spent scanning documents when you need to send the same document frequently.
Note:You may not be able to save 10 documents depending on the usage conditions such as the size of saved documents.
Stored Documents Box
Displays the stored documents list with stored dates and pages.
Tapping one of the stored documents from the list displays the preview screen. Tap Start Sending togo to the fax sending screen, or tap Delete to delete the document while you are previewing.
preview screen
❏ : Reduces or enlarges.
❏ : Rotates the image to the right by 90 degrees.
❏ : Moves the screen in the direction of the arrows.
❏ : Moves to the previous or the next page.
Faxing > Menu Options for Fax Box > Stored Documents:
134

To hide the operation icons, tap anywhere on the preview screen except for the icons. Tapagain to display the icons.
(Preview menu)
❏ Save to Memory Device
❏ Forward(Email)
❏ Forward(Network Folder)
When the message Delete When Complete is displayed, select On to delete faxes aftercompleting processes such as Save to Memory Device or Forward(Email).
(Box Menu)
Store Fax Data:
Displays the screen for the Fax > Fax Settings tab. Tapping x on the screen starts scanningdocuments to store to the Stored Documents Box.
Print All:
This is displayed only when there are stored faxes in the box. Prints all faxes in the box.Selecting On in Delete When Complete deletes all faxes when printing is complete.
Save All to Memory Device:
This is displayed only when there are stored faxes in the box. Saves all faxes to externalmemory devices in the box. Selecting On in Delete When Complete deletes all documentswhen saving is complete.
Delete All:
This is displayed only when there are stored faxes in the box. Deletes all faxes in the box.
Settings:
Box Open Password: You can set a password or change it.
Related Information
& “Sending the Same Documents Multiple Times” on page 122& “Checking the Fax Job History” on page 140
Polling Send/BoardYou can find Polling Send/Board in Fax Box on the home screen.
There is a Polling Send Box and 10 bulletin boards. You can store up to 100 pages of a single document inmonochrome, and one document in each box.
Related Information
& “Sending Faxes on Demand (Using Polling Send/Bulletin Board Box)” on page 118
Faxing > Menu Options for Fax Box > Polling Send/Board
135

Polling Send:
You can find Polling Send in Fax Box > Polling Send/Board.
Polling Send Box:
Displays the setting items and values in Settings in (Menu).
Add Document:
Displays the screen for the Fax > Fax Settings tab. Tapping x on the screen starts scanningdocuments to store them in the box.
When a document is in the box, Check Document is displayed instead.
Check Document:
Displays the preview screen when a document is in the box. You can print or delete the documentwhile you are previewing.
preview screen
❏ : Reduces or enlarges.
❏ : Rotates the image to the right by 90 degrees.
❏ : Moves the screen in the direction of the arrows.
❏ : Moves to the previous or the next page.
To hide the operation icons, tap anywhere on the preview screen except for the icons. Tapagain to display the icons.
(Preview menu)
❏ Save to Memory Device
❏ Forward(Email)
❏ Forward(Network Folder)
❏ Send Fax
When the message Delete When Complete is displayed, select On to delete faxes aftercompleting processes such as Save to Memory Device or Forward(Email).
(Menu)
Delete Document:
This item is displayed only when there is a stored document in the box. Deletes the documentstored in the box.
Settings:
❏ Box Open Password: You can set a password or change it.
❏ Delete Document After Sending: Setting this to On deletes the document in the box whenthe next request from a recipient to send the document (Polling Send) is completed.
Faxing > Menu Options for Fax Box > Polling Send/Board
136

❏ Notify Send Result: When Email Notifications is set to On, the printer sends a notificationto the destination specified in Recipient when a request to send the document (PollingSend) is completed.
Related Information
& “Checking the Fax Job History” on page 140
Unregistered Bulletin Board:
You can find Unregistered Bulletin Board in Fax Box > Polling Send/Board. Select one of the UnregisteredBulletin Board boxes. After registering a board, the registered name is displayed on the box instead ofUnregistered Bulletin Board.
You can register up to 10 bulletin boards.
Bulletin Board Box Settings:
Name (Required):
Enter a name for the bulletin board box.
Subaddress(SEP):
Make or change the conditions for a recipient to receive the fax.
Password(PWD):
Make or change the conditions for a recipient to receive the fax.
Box Open Password:
Set or change the password used to open the box.
Delete Document After Sending:
Setting this to On deletes the document in the box when the next request from a recipient tosend the document (Polling Send) is completed.
Notify Send Result:
When Email Notifications is set to On, the printer sends a notification to the Recipient whena request to send the document (Polling Send) is completed.
Related Information
& “Each Registered Bulletin Board” on page 137
Each Registered Bulletin Board
You can find bulletin boards in Fax Box > Polling Send/Board. Select the box for which the registered name isdisplayed. The name displayed on the box is the name registered in Unregistered Bulletin Board.
You can register up to 10 bulletin boards.
Faxing > Menu Options for Fax Box > Polling Send/Board
137

(Registered Bulletin Board Name)
Displays the setting values of the items in Settings in (Menu).
Add Document:
Displays the screen for the Fax > Fax Settings tab. Tapping x on the screen starts scanningdocuments to store them in the box.
When a document is in the box, Check Document is displayed instead.
Check Document:
Displays the preview screen when a document is in the box. You can print or delete the documentwhile you are previewing.
preview screen
❏ : Reduces or enlarges.
❏ : Rotates the image to the right by 90 degrees.
❏ : Moves the screen in the direction of the arrows.
❏ : Moves to the previous or the next page.
To hide the operation icons, tap anywhere on the preview screen except for the icons. Tapagain to display the icons.
(Preview menu)
❏ Save to Memory Device
❏ Forward(Email)
❏ Forward(Network Folder)
❏ Send Fax
When the message Delete When Complete is displayed, select On to delete faxes aftercompleting processes such as Save to Memory Device or Forward(Email).
(Menu)
Delete Document:
This item is displayed only when there is a stored document in the box. Deletes the documentstored in the box.
Settings:
❏ Box Open Password: You can set a password or change it.
❏ Delete Document After Sending: Setting this to On deletes the document in the box whenthe next request from a recipient to send the document (Polling Send) is completed.
❏ Notify Send Result: When Email Notifications is set to On, the printer sends a notificationto the destination specified in Recipient when a request to send the document (PollingSend) is completed.
Faxing > Menu Options for Fax Box > Polling Send/Board
138

Delete Box:
This item is displayed only when you select a confidential box and select Box Menu. Clears thecurrent settings for Confidential Boxes and deletes all stored documents.
Related Information
& “Unregistered Bulletin Board:” on page 137& “Checking the Fax Job History” on page 140
Checking the Status or Logs for Fax Jobs
Displaying Information when Received Faxes are Unprocessed(Unread/Not Printed/Not Saved/Not Forwarded)
When there are unprocessed received documents, the number of unprocessed jobs is displayed on the on thehome screen. See the table below for a definition of the "unprocessed".
cImportant:
When the inbox is full, receiving faxes is disabled. You should delete the documents from the inbox once they havebeen checked.
Received Fax Save/ForwardSetting
Unprocessed Status
Printing*1 There are received documents waiting to be printed or printing is in progress.
Saving in the inbox or theconfidential box
There are unread received documents in the inbox or the confidential box.
Saving in an external memorydevice
There are received documents that have not been saved in the device because there isno device containing a folder specifically created to save received documents connectedto the printer or for other reasons.
Saving on a computer There are received documents that have not been saved on the computer because thecomputer is in sleep mode or for other reasons.
Forwarding There are received documents that have not been forwarded or failed to be forwarded*2.
Faxing > Checking the Status or Logs for Fax Jobs > Displaying Information when Received Faxes are Unprocessed (Unr…
139

*1 : When you have not set any of the fax save/forward settings, or when you have set to print received documents whilesaving them to an external memory device or a computer.
*2 : When you have set to save documents that could not be forwarded in the inbox, there are unread documents that failed tobe forwarded in the inbox. When you have set to print documents that failed to be forwarded, printing is not complete.
Note:If you are using more than one of the fax save/forward settings, the number of unprocessed jobs may be displayed as "2" or"3" even if only one fax has been received. For example, if you have set to save faxes in the inbox and on a computer and onefax is received, the number of unprocessed jobs is displayed as "2" if the fax has not been saved to the inbox and on acomputer.
Related Information
& “Viewing Received Faxes Saved in the Printer on the LCD Screen” on page 127& “Checking Fax Jobs in Progress” on page 140
Checking Fax Jobs in ProgressYou can display the screen to check fax jobs for which processing is incomplete. The following jobs are displayedon the check screen. From this screen, you can also print documents that have not yet been printed, or you canresend documents that have failed to send.
❏ Received fax jobs below
❏ Not printed yet (When the jobs are set to be printed)
❏ Not saved yet (When the jobs are set to be saved)
❏ Not forwarded yet (When the jobs are set to be forwarded)
❏ Outgoing fax jobs that have failed to be sent (If you have enabled Save Failure Data)
Follow the steps below to display the check screen.
1. Tap Job/Status on the home screen.
2. Tap the Job Status tab, and then tap Active.
3. Select the job you want to check.
Related Information
& “Displaying Information when Received Faxes are Unprocessed (Unread/Not Printed/Not Saved/NotForwarded)” on page 139
Checking the Fax Job HistoryYou can check the history of sent or received fax jobs, such as the date, time and result for each job.
1. Tap Job/Status on the home screen.
2. Select Log on the Job Status tab.
Faxing > Checking the Status or Logs for Fax Jobs > Checking the Fax Job History
140
3. Tap d on the right, and then select Send or Receive.
The log for sent or received fax jobs is displayed in reverse chronological order. Tap a job you want to check todisplay the details.
You can also check the fax history by printing Fax Log by selecting Fax > (More) > Fax Report > Fax Log.
Related Information
& “More” on page 131
Reprinting Received DocumentsYou can reprint received documents from the logs of printed fax jobs.
Note that the printed received documents are deleted in chronological order when the printer runs out of memory.
1. Tap Job/Status on the home screen.
2. Select Log on the Job Status tab.
3. Tap d on the right, and then select Print.
The history of sent or received fax jobs is displayed in reverse chronological order.
4. Select a job with from the history list.
Check the date, time, and result to determine if it is the document you want print.
5. Tap Print Again to print the document.
Sending a Fax from a ComputerYou can send faxes from the computer by using the FAX Utility and PC-FAX driver.
Note:❏ Check if the FAX Utility and the printer's PC-FAX driver has been installed before using this feature.
“Application for Configuring Fax Operations and Sending Faxes (FAX Utility)” on page 305“Application for Sending Faxes (PC-FAX Driver)” on page 306
❏ If the FAX Utility is not installed, use one of the following methods and install the FAX Utility.
❏ Using the EPSON Software Updater (application for updating software)“Application for Updating Software and Firmware (EPSON Software Updater)” on page 309
❏ Using the disc supplied with your printer. (Windows users Only )
Related Information
& “Enabling Sending Faxes from a Computer” on page 407
Faxing > Sending a Fax from a Computer
141

Sending Documents Created Using an Application (Windows)By selecting a printer fax from the Print menu of an application like Microsoft Word or Excel, you can directlytransmit data such as documents, drawings, and tables you have created, with a cover sheet.
Note:The following explanation uses Microsoft Word as an example. The actual operation may differ depending on the applicationyou use. For details, see the application’s help.
1. Using an application, create a document to transmit by fax.
2. Click Print from the File menu.
The application’s Print window appears.
3. Select XXXXX (FAX) (where XXXXX is your printer name) in Printer, and then check the settings for faxsending.
❏ Specify 1 in Number of copies. Fax may not be transmitted correctly if you specify 2 or more.
❏ You cannot use functions such as Print to File that change the output port.
❏ You may transmit up to 100 pages including cover sheet in one fax transmission.
4. Click Printer Properties or Properties if you want to specify Paper Size, Orientation, Color, Image Quality,or Character Density.
For details, see the PC-FAX driver help.
5. Click Print.
Note:When Using FAX Utility for the first time, a window for registering your information is displayed. Enter the necessaryinformation, and then click OK. FAX Utility uses Nickname to manage fax jobs internally. Other information isautomatically added to the cover sheet.
Recipient Settings screen of FAX Utility is displayed.
6. Specify a recipient and click Next.
❏ Selecting a recipient (name, fax number and so on) from PC-FAX Phone Book:If the recipient is saved in the phone book, do the steps below.A Click the PC-FAX Phone Book tab.B Select the recipient from the list and click Add.
Faxing > Sending a Fax from a Computer > Sending Documents Created Using an Application (Windows)
142

❏ Selecting a recipient (name, fax number and so on) from the contacts on the printer:If the recipient is saved in the contacts on the printer, do the steps below.A Click the Contacts on Printer tab.Note that because the printer has a security function that allows administrators to restrict users fromchanging the printer's fax settings, you may need to enter an administrator password to continue.B Select contacts from the list and click Add to proceed to Add to Recipient window.C Select the contacts from the list displayed, and then click Edit.D Add the personal data such as Company/Corp. and Title as necessary, and then click OK to return tothe Add to Recipient window.E As necessary, select the checkbox of Register in the PC-FAX Phone Book to save the contacts to PC-FAX Phone Book.F Click OK.
❏ Specifying a recipient (name, fax number and so on) directly:Do the steps below.A Click the Manual Dial tab.B Enter the necessary information.C Click Add.Furthermore, by clicking Save to Phone Book, you can save the recipient in the list under the PC-FAXPhone Book tab.
Note:❏ If your printer's Line Type is set to PBX and the access code has been set to use # (hash) instead of entering the exact
prefix code, enter # (hash). For details, see Line Type in Basic Settings from related information link below.
❏ If you have selected Enter fax number twice in the Optional Settings on the FAX Utility main screen, you need toenter the same number again when you click Add or Next.
The recipient is added to the Recipient List displayed in the upper part of the window.
7. Specify the content of the cover sheet.
A To attach a cover sheet, select one of the samples from Cover Sheet. Enter the Subject and Message. Notethat there is no function to create an original cover sheet or to add an original cover sheet to the list.
If you do not want to attach a cover sheet, select No cover sheet from Cover Sheet.
B Click Cover Sheet Formatting if you want to change the order of the items on the cover sheet. You canselect the cover sheet size in Paper Size. You can also select a cover sheet at a different size to the documentbeing transmitted.
CClick Font if you want to change the font or font size used for the text on the cover sheet.
D Click Sender Settings if you want to change the sender information.
E Click Detailed Preview if you want to check the cover sheet with the subject and the message you entered.
F Click Next.
8. Check the transmission content and click Send.
Make sure the name and fax number of the recipient are correct before transmitting. Click Preview to previewthe cover sheet and document to transmit.
Once transmission starts, a window displaying the transmission status appears.
Faxing > Sending a Fax from a Computer > Sending Documents Created Using an Application (Windows)
143

Note:
❏ To stop transmitting, select the data, and click Cancel . You can also cancel using the printer's control panel.
❏ If an error occurs during transmission, the Communication error window appears. Check the error informationand retransmit.
❏ The Fax Status Monitor screen (the screen mentioned above where you can check the transmission status) is notdisplayed if Display Fax Status Monitor During Transmission is not selected in the Optional Settings screen of theFAX Utility main screen.
Sending Documents Created Using an Application (Mac OS)By selecting a fax-capable printer from the Print menu of a commercially available application, you can send datasuch as documents, drawings, and tables, you have created.
Note:The following explanation uses Text Edit, a standard Mac OS application as an example.
1. Create the document you want to send by fax in an application.
2. Click Print from the File menu.
The application’s Print window is displayed.
3. Select your printer (fax name) in Name, click d to display the detailed settings, check the print settings, andthen click OK.
4. Make settings for each item.
❏ Specify 1 in Number of copies. Even if you specify 2 or more, only 1 copy is sent.
❏ You can send up to 100 pages in one fax transmission.
Note:The page size of documents you can send is the same as the paper size you can fax from the printer.
5. Select Fax Settings from the popup menu, and then make settings for each item.
See the PC-FAX driver's help for explanations on each setting item.
Click at the bottom left of the window to open the PC-FAX driver's help.
6. Select the Recipient Settings menu, and then specify the recipient.
❏ Specifying a recipient (name, fax number, and so on) directly:
Click the Add item, enter the necessary information, and then click . The recipient is added to theRecipient List displayed in the upper part of the window.If you have selected "Enter fax number twice" in the PC-FAX driver settings, you need to enter the same
number again when you click .If your fax connection line requires a prefix code, enter External Access Prefix.
Note:If your printer's Line Type is set to PBX and the access code has been set to use # (hash) instead of entering the exactprefix code, enter # (hash). For details, see Line Type in Basic Settings from Related Information link below.
Faxing > Sending a Fax from a Computer > Sending Documents Created Using an Application (Mac OS)
144
❏ Selecting a recipient (name, fax number, and so on) from the phone book:
If the recipient is saved in the phone book, click . Select the recipient from the list, and then click Add> OK.If your fax connection line requires a prefix code, enter External Access Prefix.
Note:If your printer's Line Type is set to PBX and the access code has been set to use # (hash) instead of entering the exactprefix code, enter # (hash). For details, see Line Type in Basic Settings from Related Information link below.
7. Check the recipient settings, and then click Fax.
Sending starts.
Make sure the name and fax number of the recipient are correct before transmitting.
Note:❏ If you click the printer icon in Dock, the transmission status check screen is displayed. To stop sending, click the data,
and then click Delete.
❏ If an error occurs during transmission, the Sending failed message is displayed. Check the transmission records onthe Fax Transmission Record screen.
❏ Mixed paper size documents may not be sent correctly.
Receiving Faxes on a ComputerYou can receive faxes and save them as PDF files to the computer connected to the printer. The FAX Utility comeswith features including how to specify a folder to save the faxes.
Note:❏ Check if the FAX Utility and the printer's PC-FAX driver has been installed before using this feature.
“Application for Configuring Fax Operations and Sending Faxes (FAX Utility)” on page 305“Application for Sending Faxes (PC-FAX Driver)” on page 306
❏ If the FAX Utility is not installed, use one of the following methods and install the FAX Utility.
❏ Using the EPSON Software Updater (application for updating software)“Application for Updating Software and Firmware (EPSON Software Updater)” on page 309
❏ Using the disc supplied with your printer. (Windows users Only )
cImportant:
❏ To receive faxes on a computer, the Receive Mode on the printer's control panel must be set to Auto. Contactyour administrator for information on the printer settings status.
❏ The computer set to receive faxes should always be on. Received documents are saved in the printer's memorytemporarily before the documents are saved on the computer. If you turn off the computer, the printer's memorymight become full as it cannot send the documents to the computer.
❏ The number of documents that have been temporarily saved to the printer’s memory are displayed on the onthe home screen.
❏ To read the received faxes, you need to install a PDF viewer such as Adobe Reader in the computer.
Faxing > Receiving Faxes on a Computer
145
Related Information
& “Receiving Incoming Faxes” on page 123
Saving Incoming Faxes on a ComputerYou can make settings to save incoming faxes on a computer by using the FAX Utility. Install the FAX Utility onthe computer in advance.
For details, see Basic Operations in the FAX Utility help (displayed on the main window). If the password entryscreen is displayed on the computer screen while you are making settings, enter the password. If you do not knowthe password, contact your administrator.
Note:You can receive faxes on a computer and print from the printer at the same time. Contact your administrator for details onthe printer settings status.
Related Information
& “Receiving Faxes on a Computer” on page 145& “Making Save to Computer Setting to Also Print on the Printer to Receive Faxes” on page 407
Canceling the Feature that Saves Incoming Faxes to the ComputerYou can cancel saving faxes to the computer by using the FAX Utility.
For details, see Basic Operations in the FAX Utility help (displayed on the main window).
Note:❏ If there are any faxes that have not been saved to the computer, you cannot cancel the feature that saves faxes on the
computer.
❏ You cannot change settings that have been locked by your administrator.
❏ You can also change the settings on the printer. Contact your administrator for information on canceling settings to savereceived faxes on the computer.
Related Information
& “Making Save to Computer Setting not to Receive Faxes” on page 408& “Application for Configuring Fax Operations and Sending Faxes (FAX Utility)” on page 305
Checking for New Faxes (Windows)By setting up a computer to save faxes received by the printer, you can check the processing status of received faxes,and whether or not there are any new faxes using the fax icon on the Windows task bar. By setting up the computerto display a notification when new faxes are received, a notification screen pops up near the Windows system tray,and you can check the new faxes.
Note:❏ Received fax data saved to the computer is removed from the printer's memory.
❏ You need Adobe Reader to view the received faxes because they are saved as PDF files.
Faxing > Receiving Faxes on a Computer > Checking for New Faxes (Windows)
146
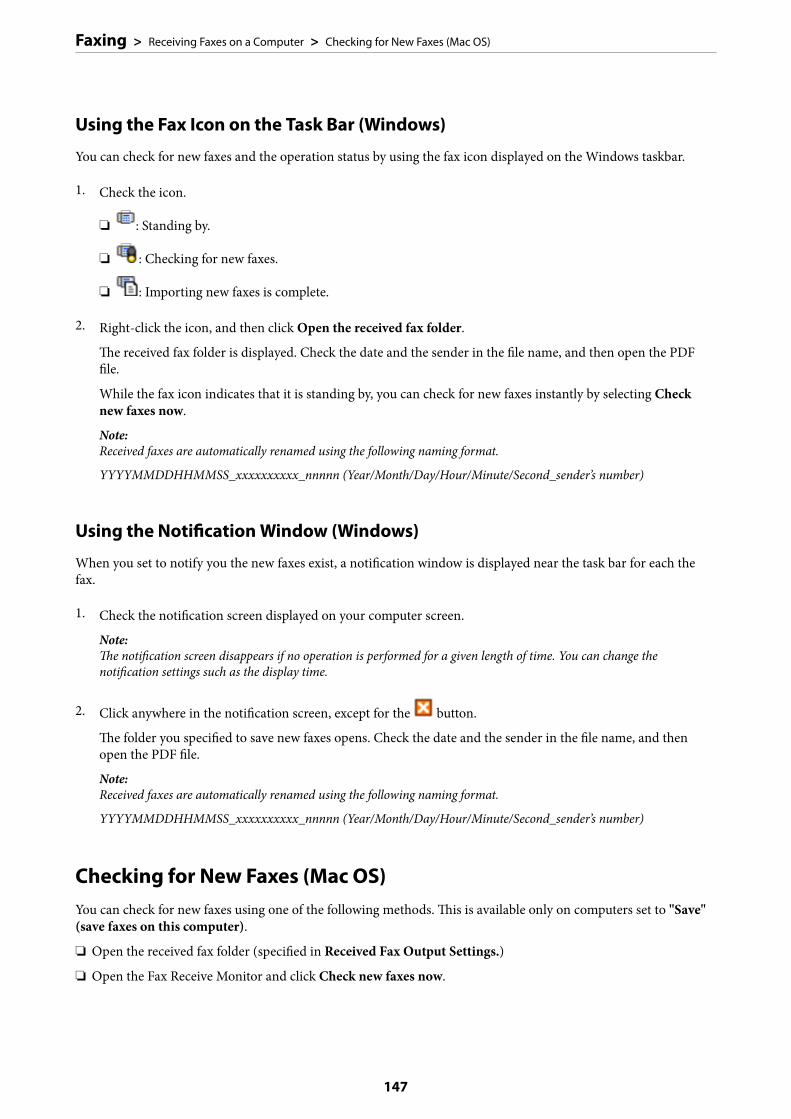
Using the Fax Icon on the Task Bar (Windows)
You can check for new faxes and the operation status by using the fax icon displayed on the Windows taskbar.
1. Check the icon.
❏ : Standing by.
❏ : Checking for new faxes.
❏ : Importing new faxes is complete.
2. Right-click the icon, and then click Open the received fax folder.
The received fax folder is displayed. Check the date and the sender in the file name, and then open the PDFfile.
While the fax icon indicates that it is standing by, you can check for new faxes instantly by selecting Checknew faxes now.
Note:Received faxes are automatically renamed using the following naming format.
YYYYMMDDHHMMSS_xxxxxxxxxx_nnnnn (Year/Month/Day/Hour/Minute/Second_sender’s number)
Using the Notification Window (Windows)
When you set to notify you the new faxes exist, a notification window is displayed near the task bar for each thefax.
1. Check the notification screen displayed on your computer screen.
Note:The notification screen disappears if no operation is performed for a given length of time. You can change thenotification settings such as the display time.
2. Click anywhere in the notification screen, except for the button.
The folder you specified to save new faxes opens. Check the date and the sender in the file name, and thenopen the PDF file.
Note:Received faxes are automatically renamed using the following naming format.
YYYYMMDDHHMMSS_xxxxxxxxxx_nnnnn (Year/Month/Day/Hour/Minute/Second_sender’s number)
Checking for New Faxes (Mac OS)You can check for new faxes using one of the following methods. This is available only on computers set to "Save"(save faxes on this computer).
❏ Open the received fax folder (specified in Received Fax Output Settings.)
❏ Open the Fax Receive Monitor and click Check new faxes now.
Faxing > Receiving Faxes on a Computer > Checking for New Faxes (Mac OS)
147

❏ Notification that new faxes have been receivedSelect the Notify me of new faxes via a dock icon in the Fax Receive Monitor > Preferences in the FAX Utility,the fax receive monitor icon on the Dock jumps to notify you that new faxes have arrived.
Open the Received Fax Folder from Received Fax Monitor (Mac OS)
You can open the save folder from the computer specified to receive faxes when selecting "Save" (save faxes onthis computer).
1. Click the received fax monitor icon on the Dock to open Fax Receive Monitor.
2. Select the printer and click Open folder, or double click the printer name.
3. Check the date and the sender in the file name, and then open the PDF file.
Note:Received faxes are automatically renamed using the following naming format.
YYYYMMDDHHMMSS_xxxxxxxxxx_nnnnn (Year/Month/Day/Hour/Minute/Second_sender's number)
Information sent from the sender is displayed as the sender's number. This number may not be displayed depending onthe sender.
Faxing > Receiving Faxes on a Computer > Checking for New Faxes (Mac OS)
148

Maintaining the Printer
Checking the Status of Consumables. . . . . . . . . . . . . . . . . . . . . . . . . . . . . . . . . . . 150
Improving Print, Copy, Scan, and Fax Quality. . . . . . . . . . . . . . . . . . . . . . . . . . . . .150
Cleaning the Printer. . . . . . . . . . . . . . . . . . . . . . . . . . . . . . . . . . . . . . . . . . . . . . . 160
Cleaning Spilled ink. . . . . . . . . . . . . . . . . . . . . . . . . . . . . . . . . . . . . . . . . . . . . . . 160
Checking the Total Number of Pages Fed Through the Printer. . . . . . . . . . . . . . . . . 161
Saving Power. . . . . . . . . . . . . . . . . . . . . . . . . . . . . . . . . . . . . . . . . . . . . . . . . . . . 162
Installing or Uninstalling Applications Separately. . . . . . . . . . . . . . . . . . . . . . . . . . 162
Transporting and Storing the Printer. . . . . . . . . . . . . . . . . . . . . . . . . . . . . . . . . . . 169

Checking the Status of ConsumablesYou can check the approximate service life of the maintenance box from the control panel. Press the button,and then select Printer Status.
You can check the approximate ink levels and the approximate service life of the maintenance box from thecomputer. See the related information link below for details.
To confirm the actual ink remaining, visually check the ink levels in all of the printer's tanks.
Related Information
& “Maintenance Tab” on page 47& “Guide to Mac OS Printer Driver” on page 303& “It is Time to Refill the Ink” on page 236& “It is Time to Replace the Maintenance Box” on page 241
Improving Print, Copy, Scan, and Fax Quality
Adjusting the Print QualityIf you notice a misaligned vertical lines, blurred images, or horizontal banding, adjust the print quality. If you wantto adjust the print quality per paper, make this setting first. The setting value per paper is reset if you make thissetting after adjusting per paper.
1. Load A4-size plain paper in the printer.
2. Select Settings on the home screen.
3. Select Maintenance > Print Quality Adjustment.
4. Follow the on-screen instructions to check the printer to improve print quality.
If a message is displayed recommending that you clean the print head, perform print head cleaning.
Maintaining the Printer > Improving Print, Copy, Scan, and Fax Quality > Adjusting the Print Quality
150

5. Follow the on-screen instructions to print the patterns for print head alignment, and then align the print head.
❏ This pattern allows you to perform alignment if vertical ruled lines appear misaligned or your printoutslook blurry.
❏ Find and select the number for the most solid pattern in each group.
❏ Find and enter the number for the pattern that has the least misaligned vertical line.
❏ This pattern allows you to perform alignment if you see horizontal banding at regular intervals.Find and enter the number for the least separated and overlapping pattern.
Checking and Cleaning the Print HeadIf the nozzles are clogged, the printouts become faint, there is visible banding, or unexpected colors appear. If thenozzles are severely clogged, a blank sheet will be printed. When print quality has declined, first use the nozzlecheck feature to check if the nozzles are clogged. If the nozzles are clogged, clean the print head.
Maintaining the Printer > Improving Print, Copy, Scan, and Fax Quality > Checking and Cleaning the Print Head
151

cImportant:
❏ Do not open the scanner unit or turn off the printer during head cleaning. If the head cleaning is incomplete, youmay not be able to print.
❏ Head cleaning consumes ink and should not be performed more than necessary.
❏ When ink is low, you may not be able to clean the print head.
❏ If print quality has not improved after repeating nozzle check and head cleaning 3 times, wait for at least 12hours without printing, and then run the nozzle check again and repeat the head cleaning if necessary. Werecommend turning off the printer by using the P button. If print quality has still not improved, run PowerCleaning.
❏ To prevent the print head from drying out, do not unplug the printer while the power is on.
Related Information
& “Running Power Cleaning” on page 153
Checking and Cleaning the Print Head (Control Panel)
You can check and clean the print head by using the printer's control panel.
Note:You can also check and run head cleaning from a Windows or Mac OS printer driver.
1. Select Settings on the home screen.
2. Select Maintenance > Print Head Nozzle Check.
3. Follow the on-screen instructions to print the nozzle check pattern.
4. Examine the printed pattern. If there are broken lines or missing segments as shown in the "NG" pattern, theprint head nozzles may be clogged. Go to the next step. If you cannot see any broken lines or missing segments
as in the following "OK" pattern, the nozzles are not clogged. Select to close the nozzle check feature.
5. Select , and then follow the on-screen instructions to clean the print head.
6. When cleaning is finished, print the nozzle check pattern again. Repeat cleaning and printing the pattern untilall lines are printed completely.
Maintaining the Printer > Improving Print, Copy, Scan, and Fax Quality > Checking and Cleaning the Print Head
152
cImportant:
If print quality has not improved after repeating nozzle check and head cleaning 3 times, wait for at least 12 hourswithout printing, and then run the nozzle check again and repeat the head cleaning if necessary. We recommendturning off the printer by using the P button. If print quality has still not improved, run Power Cleaning.
Related Information
& “Running Power Cleaning (Control Panel)” on page 154
Running Power CleaningThe Power Cleaning feature may improve print quality in the following cases.
❏ When most nozzles are clogged.
❏ When you have performed a nozzle check and head cleaning 3 times and waited for at least 12 hours withoutprinting, but print quality still did not improve.
Before running this feature, use the nozzle check feature to check if the nozzles are clogged, read the followinginstructions, and then run Power Cleaning.
cImportant:
Make sure that there is enough ink in the ink tanks.
Visually check all ink tanks are at least a third full. Low ink levels during Power Cleaning could damage theproduct.
cImportant:
An interval of 12 hours is required between each Power Cleaning.
Normally, a single Power Cleaning should resolve the print quality issue within 12 hours. Therefore, to avoidunnecessary ink usage, you must wait 12 hours before you try it again.
cImportant:
Maintenance box replacement may be required.
Ink will be deposited to the maintenance box. If it becomes full, you must prepare and install a replacementmaintenance box to continue printing.
Note:When the ink levels or the free space in the maintenance box are insufficient for Power Cleaning, you cannot run thisfeature. Even in this case, the levels and the free space for printing may remain.
Related Information
& “Checking and Cleaning the Print Head” on page 151
Maintaining the Printer > Improving Print, Copy, Scan, and Fax Quality > Running Power Cleaning
153
Running Power Cleaning (Control Panel)
Read the instructions for Power Cleaning before running this feature.
1. Press the P button to turn off the printer.
2. While holding down the button and button, press the P power button until the power light flashes todisplay the confirmation screen.
3. Follow the on-screen instructions to run the Power Cleaning feature.
Note:If you cannot run this feature, solve the problems that are displayed on the screen. Next, follow this procedure from step1 to run this feature again.
4. After running this feature, run the nozzle check to make sure the nozzles are not clogged.
For details on how to run the nozzle check, see the related information below.
cImportant:
If print quality has not improved after running Power Cleaning, wait for at least 12 hours without printing, andthen print the nozzle check pattern again. Run Head Cleaning or Power Cleaning again depending on theprinted pattern. If quality still does not improve, contact Epson support.
Running Power Cleaning (Windows)
1. Access the printer driver window.
2. Click Power Cleaning on the Maintenance tab.
3. Follow the on-screen instructions.
Note:If you cannot run this feature, solve the problems that are displayed on the printer's control panel. Next, follow thisprocedure from step 1 to run this feature again.
cImportant:
If print quality has not improved after running Power Cleaning, wait for at least 12 hours without printing, andthen print the nozzle check pattern again. Run Head Cleaning or Power Cleaning again depending on the printedpattern. If quality still does not improve, contact Epson support.
Running Power Cleaning (Mac OS)
1. Select System Preferences from the Apple menu > Printers & Scanners (or Print & Scan, Print & Fax) andthen select the printer.
2. Click Options & Supplies > Utility > Open Printer Utility.
3. Click Power Cleaning.
Maintaining the Printer > Improving Print, Copy, Scan, and Fax Quality > Running Power Cleaning
154
4. Follow the on-screen instructions.
Note:If you cannot run this feature, solve the problems that are displayed on the printer's control panel. Next, follow thisprocedure from step 1 to run this feature again.
cImportant:
If print quality has not improved after running Power Cleaning, wait for at least 12 hours without printing, andthen print the nozzle check pattern again. Run Head Cleaning or Power Cleaning again depending on the printedpattern. If quality still does not improve, contact Epson support.
Preventing nozzle cloggingAlways use the power button when turning the printer on and off.
Check that the power light is off before you disconnect the power cord.
The ink itself can dry out if it is not covered. Just like placing a cap on a fountain pen or an oil pen to prevent itfrom drying, make sure the print head is capped properly to prevent the ink from drying.
When the power cord is unplugged or a power outage occurs while the printer is in operation, the print head maynot be capped properly. If the print head is left as it is, it will dry out causing nozzles (ink outlets) to clog.
In these cases, turn the printer on and off again as soon as possible to cap the print head.
Aligning Ruled LinesIf vertical lines look misaligned, align the ruled lines.
1. Select Settings on the home screen.
2. Select Maintenance > Ruled Line Alignment.
3. Follow the on-screen instructions to print an alignment pattern.
4. Follow the on-screen instructions to align the ruled lines.
Cleaning the Paper Path for Ink SmearsWhen the printouts are smeared or scuffed, clean the roller inside.
cImportant:
Do not use tissue paper to clean the inside of the printer. The print head nozzles may be clogged with lint.
1. Select Settings on the home screen.
2. Select Maintenance > Paper Guide Cleaning.
Maintaining the Printer > Improving Print, Copy, Scan, and Fax Quality > Cleaning the Paper Path for Ink Smears
155

3. Select the paper source, load A4-size plain paper in the paper source you selected, and then follow the on-screen instructions to clean the paper path.
“Loading Paper” on page 32
Note:Repeat this procedure until the paper is not smeared with ink. If the printouts are still smeared or scuffed, clean theother paper sources.
Cleaning the Scanner Glass and Document MatWhen the following occurs, clean the scanner glass and document mat.
❏ When copies or scanned images are smeared
❏ When the copy or scanned area extends to include dust or stains, resulting in the wrong copying or scanningposition or small images
!Caution:
Be careful not to trap your hand or fingers when opening or closing the document cover. Otherwise you may beinjured.
cImportant:
Never use alcohol or thinner to clean the printer. These chemicals can damage the printer.
1. Open the document cover.
Maintaining the Printer > Improving Print, Copy, Scan, and Fax Quality > Cleaning the Scanner Glass and Doc…
156

2. Use a soft, dry, clean cloth to clean the surface of the scanner glass.
cImportant:
❏ If the glass surface is stained with grease or some other hard-to-remove material, use a small amount ofglass cleaner and a soft cloth to remove it. Wipe off all remaining liquid.
❏ Do not press the glass surface too hard.
❏ Be careful not to scratch or damage the surface of the glass. A damaged glass surface can decrease the scanquality.
3. Clean the surface of the document mat using a soft, clean, and moist cloth moistened with a mild detergent.
4. Wipe off the document mat with a dry cloth.
Use the scanner after the document mat has dried.
Maintaining the Printer > Improving Print, Copy, Scan, and Fax Quality > Cleaning the Scanner Glass and Doc…
157

Cleaning the ADFWhen the copied or scanned images from the ADF are smeared or the originals do not feed in the ADF correctly,clean the ADF.
cImportant:
Never use alcohol or thinner to clean the printer. These chemicals can damage the printer.
1. Open the ADF cover.
2. Use a soft, moist cloth to clean the roller and the interior of the ADF.
cImportant:
❏ Using a dry cloth may damage the surface of the roller.
❏ Use the ADF after the roller has dried.
Maintaining the Printer > Improving Print, Copy, Scan, and Fax Quality > Cleaning the ADF
158
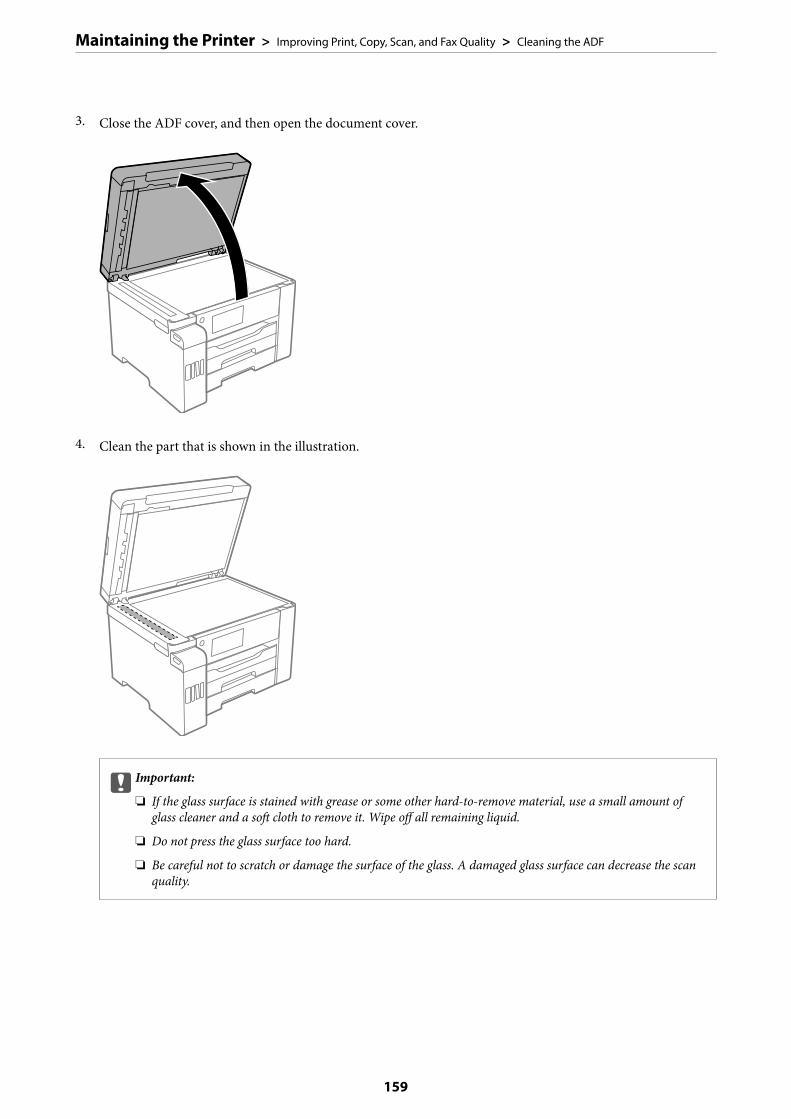
3. Close the ADF cover, and then open the document cover.
4. Clean the part that is shown in the illustration.
cImportant:
❏ If the glass surface is stained with grease or some other hard-to-remove material, use a small amount ofglass cleaner and a soft cloth to remove it. Wipe off all remaining liquid.
❏ Do not press the glass surface too hard.
❏ Be careful not to scratch or damage the surface of the glass. A damaged glass surface can decrease the scanquality.
Maintaining the Printer > Improving Print, Copy, Scan, and Fax Quality > Cleaning the ADF
159
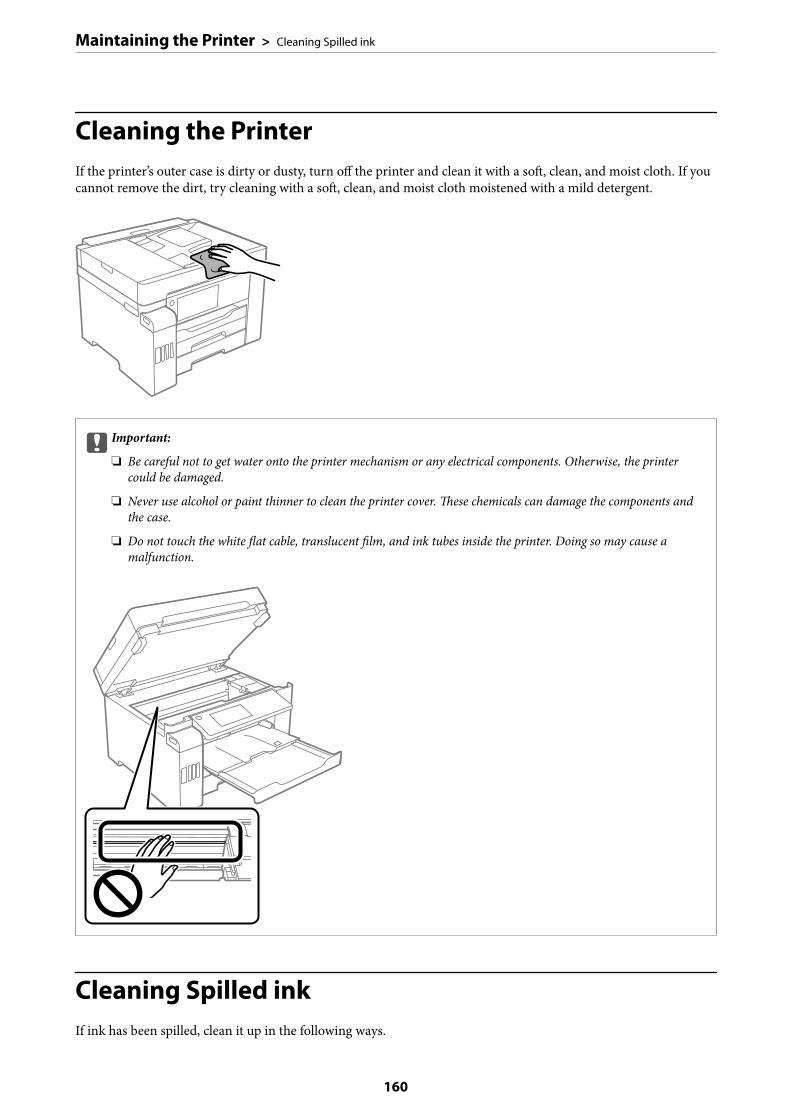
Cleaning the PrinterIf the printer’s outer case is dirty or dusty, turn off the printer and clean it with a soft, clean, and moist cloth. If youcannot remove the dirt, try cleaning with a soft, clean, and moist cloth moistened with a mild detergent.
cImportant:
❏ Be careful not to get water onto the printer mechanism or any electrical components. Otherwise, the printercould be damaged.
❏ Never use alcohol or paint thinner to clean the printer cover. These chemicals can damage the components andthe case.
❏ Do not touch the white flat cable, translucent film, and ink tubes inside the printer. Doing so may cause amalfunction.
Cleaning Spilled inkIf ink has been spilled, clean it up in the following ways.
Maintaining the Printer > Cleaning Spilled ink
160

❏ If ink adheres to the area around the tank, wipe it off using a napless, clean cloth or cotton swab.
❏ If ink spills on the desk or floor, wipe it off immediately. When ink is dried, it will be difficult to remove thesmear. To prevent the smear from spreading, blot the ink with a dry cloth, and then wipe it with a moist cloth.
❏ If ink gets on your hands, wash them with water and soap.
Checking the Total Number of Pages Fed Through thePrinterYou can check the total number of pages fed through the printer.
Checking the Total Number of Pages Fed Through the Printer(Control Panel)The information is printed together with the nozzle check pattern.
1. Select Settings on the home screen.
2. Select Maintenance > Print Head Nozzle Check.
3. Follow the on-screen instructions to print the nozzle check pattern.
Checking the Total Number of Pages Fed Through the Printer(Windows)
1. Access the printer driver window.
2. Click Printer and Option Information on the Maintenance tab.
Related Information
& “Application for Printing from a Computer (Windows Printer Driver)” on page 301
Checking the Total Number of Pages Fed Through the Printer (MacOS)
1. Select System Preferences from the Apple menu > Printers & Scanners (or Print & Scan, Print & Fax), andthen select the printer.
2. Click Options & Supplies > Utility > Open Printer Utility.
3. Click Printer and Option Information.
Maintaining the Printer > Checking the Total Number of Pages Fed Through the Printer > Checking the Total …
161

Saving PowerThe printer enters sleep mode or turns off automatically if no operations are performed for a set period. You canadjust the time before power management is applied. Any increase will affect the product's energy efficiency. Pleaseconsider the environment before making any change.
Depending on the location of purchase, the printer may have a feature that turns it off automatically if it is notconnected to the network for 30 minutes.
Saving Power (Control Panel)
1. Select Settings on the home screen.
2. Select General Settings > Basic Settings.
3. Do one of the following.
Note:Your product may have the Power Off Settings or Power Off Timer feature depending on the location of purchase.
❏ Select Sleep Timer or Power Off Settings > Power Off If Inactive or Power Off If Disconnected, and thenmake settings.
❏ Select Sleep Timer or Power Off Timer, and then make settings.
Installing or Uninstalling Applications SeparatelyConnect your computer to the network and install the latest version of applications from the website. Log in toyour computer as an administrator. Enter the administrator password if the computer prompts you.
Installing the Applications SeparatelyNote:When reinstalling an application, you need to uninstall it first.
1. Make sure the printer and the computer are available for communication, and the printer is connected to theInternet.
Maintaining the Printer > Installing or Uninstalling Applications Separately > Installing the Applications Separ…
162
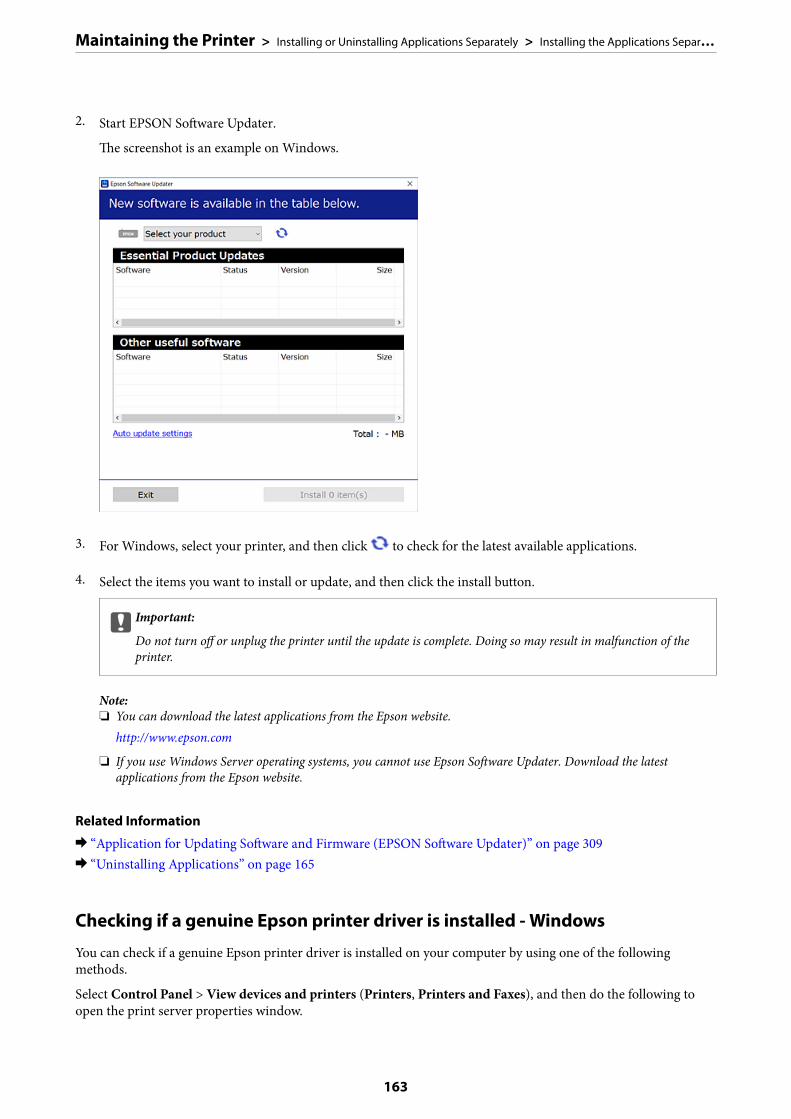
2. Start EPSON Software Updater.
The screenshot is an example on Windows.
3. For Windows, select your printer, and then click to check for the latest available applications.
4. Select the items you want to install or update, and then click the install button.
cImportant:
Do not turn off or unplug the printer until the update is complete. Doing so may result in malfunction of theprinter.
Note:❏ You can download the latest applications from the Epson website.
http://www.epson.com
❏ If you use Windows Server operating systems, you cannot use Epson Software Updater. Download the latestapplications from the Epson website.
Related Information
& “Application for Updating Software and Firmware (EPSON Software Updater)” on page 309& “Uninstalling Applications” on page 165
Checking if a genuine Epson printer driver is installed - Windows
You can check if a genuine Epson printer driver is installed on your computer by using one of the followingmethods.
Select Control Panel > View devices and printers (Printers, Printers and Faxes), and then do the following toopen the print server properties window.
Maintaining the Printer > Installing or Uninstalling Applications Separately > Installing the Applications Separ…
163

❏ Windows Windows 10/Windows 8.1/Windows 8/Windows 7/Windows Server 2019/Windows Server 2016/Windows Server 2012 R2/Windows Server 2012/Windows Server 2008 R2Click the printer icon, and then click Print server properties at the top of the window.
❏ Windows Vista/Windows Server 2008Right-click on the Printers folder, and then click Run as administrator > Server Properties.
❏ Windows XP/Windows Server 2003 R2/Windows Server 2003From the File menu, select Server Properties.
Click the Driver tab. If your printer name is displayed in the list, a genuine Epson printer driver is installed onyour computer.
Related Information
& “Installing the Applications Separately” on page 162
Checking if a genuine Epson printer driver is installed - Mac OS
You can check if a genuine Epson printer driver is installed on your computer by using one of the followingmethods.
Maintaining the Printer > Installing or Uninstalling Applications Separately > Installing the Applications Separ…
164
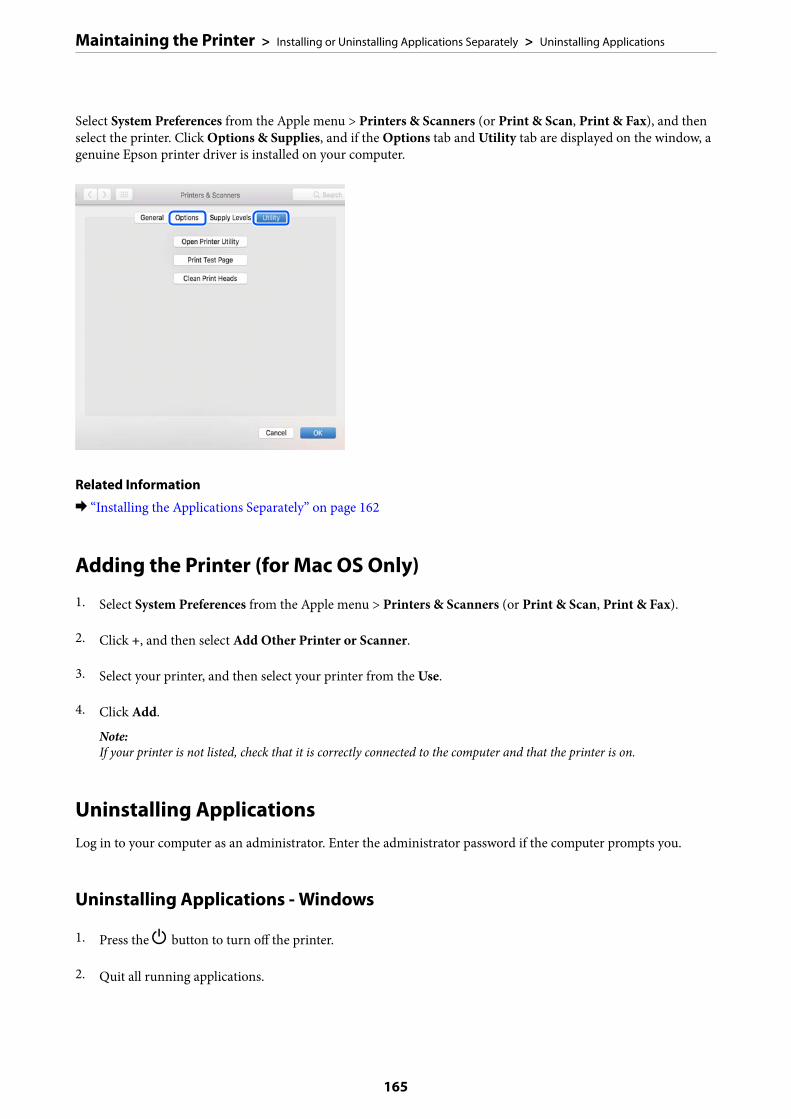
Select System Preferences from the Apple menu > Printers & Scanners (or Print & Scan, Print & Fax), and thenselect the printer. Click Options & Supplies, and if the Options tab and Utility tab are displayed on the window, agenuine Epson printer driver is installed on your computer.
Related Information
& “Installing the Applications Separately” on page 162
Adding the Printer (for Mac OS Only)
1. Select System Preferences from the Apple menu > Printers & Scanners (or Print & Scan, Print & Fax).
2. Click +, and then select Add Other Printer or Scanner.
3. Select your printer, and then select your printer from the Use.
4. Click Add.
Note:If your printer is not listed, check that it is correctly connected to the computer and that the printer is on.
Uninstalling ApplicationsLog in to your computer as an administrator. Enter the administrator password if the computer prompts you.
Uninstalling Applications - Windows
1. Press the P button to turn off the printer.
2. Quit all running applications.
Maintaining the Printer > Installing or Uninstalling Applications Separately > Uninstalling Applications
165
3. Open Control Panel:
❏ Windows 10/Windows Server 2019/Windows Server 2016Click on the start button, and then select Windows System > Control Panel.
❏ Windows 8.1/Windows 8/Windows Server 2012 R2/Windows Server 2012Select Desktop > Settings > Control Panel.
❏ Windows 7/Windows Vista/Windows XP/Windows Server 2008 R2/Windows Server 2008/Windows Server2003 R2/Windows Server 2003Click the start button and select Control Panel.
4. Open Uninstall a program (or Add or Remove Programs):
❏ Windows 10/Windows 8.1/Windows 8/Windows 7/Windows Vista/Windows Server 2019/Windows Server2016/Windows Server 2012 R2/Windows Server 2012/Windows Server 2008 R2/Windows Server 2008Select Uninstall a program in Programs.
❏ Windows XP/Windows Server 2003 R2/Windows Server 2003Click Add or Remove Programs.
5. Select the application you want to uninstall.
You cannot uninstall the printer driver if there is any print jobs. Delete or wait to be printed the jobs beforeuninstalling.
6. Uninstall the applications:
❏ Windows 10/Windows 8.1/Windows 8/Windows 7/Windows Vista/Windows Server 2019/Windows Server2016/Windows Server 2012 R2/Windows Server 2012/Windows Server 2008 R2/Windows Server 2008Click Uninstall/Change or Uninstall.
❏ Windows XP/Windows Server 2003 R2/Windows Server 2003Click Change/Remove or Remove.
Note:If the User Account Control window is displayed, click Continue.
7. Follow the on-screen instructions.
Uninstalling Applications - Mac OS
1. Download the Uninstaller using EPSON Software Updater.
Once you have downloaded the Uninstaller, you do not need to download it again each time you uninstall theapplication.
2. Press the P button to turn off the printer.
3. To uninstall the printer driver or PC-FAX driver, select System Preferences from the Apple menu > Printers &Scanners (or Print & Scan, Print & Fax), and then remove the printer from the enabled printers list.
4. Quit all running applications.
5. Select Go > Applications > Epson Software > Uninstaller.
Maintaining the Printer > Installing or Uninstalling Applications Separately > Uninstalling Applications
166
6. Select the application you want to uninstall, and then click Uninstall.
cImportant:
The Uninstaller removes all drivers for Epson inkjet printers on the computer. If you use multiple Epson inkjetprinters and you only want to delete some drivers, delete all of them first, and then install the necessary printerdriver again.
Note:If you cannot find the application you want to uninstall in the application list, you cannot uninstall using theUninstaller. In this situation, select Go > Applications > Epson Software, select the application you want to uninstall,and then drag it to the trash icon.
Related Information
& “Application for Updating Software and Firmware (EPSON Software Updater)” on page 309
Updating Applications and FirmwareYou may be able to clear certain problems and improve or add functions by updating the applications and thefirmware. Make sure you use the latest version of the applications and firmware.
1. Make sure that the printer and the computer are connected, and the computer is connected to the internet.
2. Start EPSON Software Updater, and update the applications or the firmware.
cImportant:
Do not turn off the computer or the printer until the update is complete; otherwise, the printer maymalfunction.
Note:If you cannot find the application you want to update in the list, you cannot update using the EPSON Software Updater.Check for the latest versions of the applications from your local Epson website.
http://www.epson.com
Related Information
& “Application for Updating Software and Firmware (EPSON Software Updater)” on page 309
Updating the Printer's Firmware using the Control Panel
If the printer can be connected to the Internet, you can update the printer's firmware using the control panel. Youcan also set the printer to regularly check for firmware updates and notify you if any are available.
1. Select Settings on the home screen.
2. Select General Settings > System Administration > Firmware Update > Update.
Note:Select Notification > On to set the printer to regularly check for available firmware updates.
Maintaining the Printer > Installing or Uninstalling Applications Separately > Updating Applications and Firm…
167
3. Check the message displayed on the screen and tap Start Checking to start searching for available updates.
4. If a message is displayed on the LCD screen informing you that a firmware update is available, follow the on-screen instructions to start the update.
cImportant:
❏ Do not turn off or unplug the printer until the update is complete; otherwise, the printer may malfunction.
❏ If the firmware update is not completed or is unsuccessful, the printer does not start up normally and"Recovery Mode" is displayed on the LCD screen the next time the printer is turned on. In this situation, youneed to update the firmware again using a computer. Connect the printer to the computer with a USB cable.While "Recovery Mode" is displayed on the printer, you cannot update the firmware over a networkconnection. On the computer, access your local Epson website, and then download the latest printerfirmware. See the instructions on the website for the next steps.
Updating Firmware Using Web Config
When the printer can connect to the Internet, you can update the firmware from Web Config.
1. Access Web Config and select the Device Management tab > Firmware Update.
2. Click Start, and then follow the on-screen instructions.
The firmware confirmation starts, and the firmware information is displayed if the updated firmware exists.
Note:You can also update the firmware using Epson Device Admin. You can visually confirm the firmware information on thedevice list. It is useful when you want to update multiple devices' firmware. See the Epson Device Admin guide or help formore details.
Related Information
& “Application for Configuring Printer Operations (Web Config)” on page 307
Updating Firmware without Connecting to the Internet
You can download the device's firmware from Epson website on the computer, and then connect the device and thecomputer by USB cable to update the firmware. If you cannot update over the network, try this method.
1. Access Epson website and download the firmware.
2. Connect the computer that contains the downloaded firmware to the printer by USB cable.
3. Double-click the downloaded .exe file.
Epson Firmware Updater starts.
4. Follow the on-screen instructions.
Maintaining the Printer > Installing or Uninstalling Applications Separately > Updating Applications and Firm…
168
Transporting and Storing the PrinterWhen you need to store the printer or transport it when moving or for repairs, follow the steps below to pack theprinter.
1. Turn off the printer by pressing the P button.
2. Make sure the power light turns off, and then unplug the power cord.
cImportant:
Unplug the power cord when the power light is off. Otherwise, the print head does not return to the homeposition causing the ink to dry, and printing may become impossible.
3. Disconnect all cables such as the power cord and USB cable.
4. Make sure there is no external USB device inserted.
5. Remove all of the paper from the printer.
6. Make sure there are no originals on the printer.
7. Open the scanner unit with the document cover closed.
!Caution:
Be careful not to trap your hand or fingers when opening or closing the scanner unit. Otherwise you may beinjured.
8. Set the transportation lock to the locked (Transport) position.
The transportation lock stops ink supply to prevent ink leakage when transporting and storing.
Maintaining the Printer > Transporting and Storing the Printer
169

If the print head is not in the position shown below, move it by hand.
9. Secure the print head to the case with tape.
Maintaining the Printer > Transporting and Storing the Printer
170
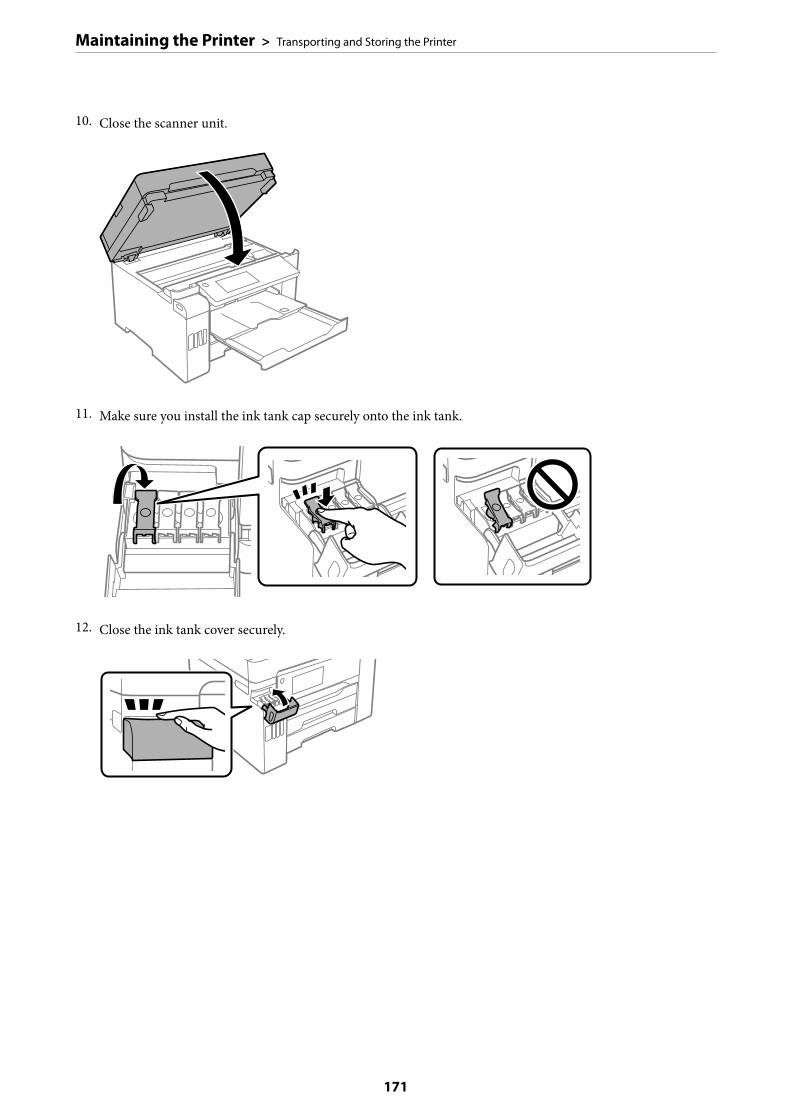
10. Close the scanner unit.
11. Make sure you install the ink tank cap securely onto the ink tank.
12. Close the ink tank cover securely.
Maintaining the Printer > Transporting and Storing the Printer
171

13. Prepare to pack the printer as shown below.
14. Place the printer in the plastic bag and fold it closed.
15. Pack the printer in its box using the protective materials.
Maintaining the Printer > Transporting and Storing the Printer
172

cImportant:
❏ When carrying the printer, lift it using a stable position. Lifting the printer using an unstable position may resultin injury.
❏ Because this printer is heavy, it should always be carried by two or more people when unpacking andtransporting.
❏ When lifting the printer, place your hands in the positions shown below. If you lift the printer holding otherpositions, the printer may fall or you may trap your fingers when placing the printer.
❏ When carrying the printer, do not tilt it more than 10 degrees; otherwise the printer may fall.
❏ When storing or transporting the printer, place the printer in the plastic bag and fold it closed. Avoid tilting theprinter, placing it vertically, or turning it upside down; otherwise ink may leak.
Maintaining the Printer > Transporting and Storing the Printer
173
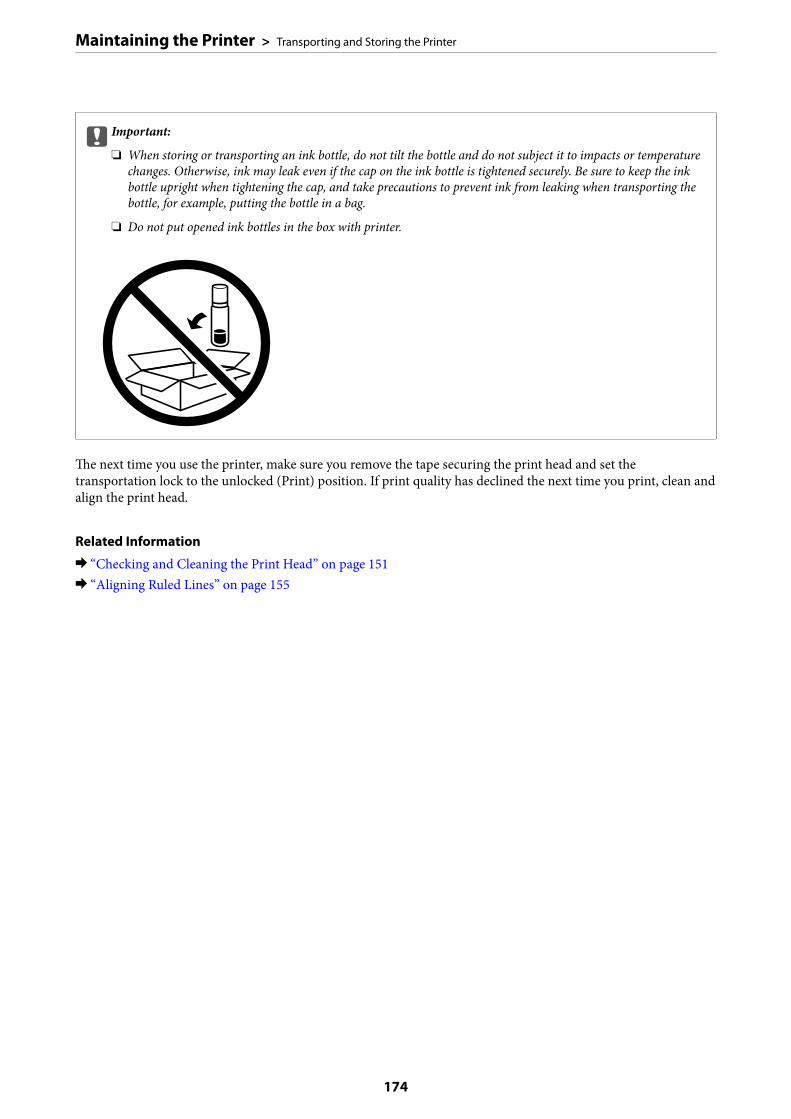
cImportant:
❏ When storing or transporting an ink bottle, do not tilt the bottle and do not subject it to impacts or temperaturechanges. Otherwise, ink may leak even if the cap on the ink bottle is tightened securely. Be sure to keep the inkbottle upright when tightening the cap, and take precautions to prevent ink from leaking when transporting thebottle, for example, putting the bottle in a bag.
❏ Do not put opened ink bottles in the box with printer.
The next time you use the printer, make sure you remove the tape securing the print head and set thetransportation lock to the unlocked (Print) position. If print quality has declined the next time you print, clean andalign the print head.
Related Information
& “Checking and Cleaning the Print Head” on page 151& “Aligning Ruled Lines” on page 155
Maintaining the Printer > Transporting and Storing the Printer
174
Solving Problems
The Printer Does Not Work as Expected. . . . . . . . . . . . . . . . . . . . . . . . . . . . . . . . . 176
A Message is Displayed on the LCD Screen. . . . . . . . . . . . . . . . . . . . . . . . . . . . . . .234
Paper Gets Jammed. . . . . . . . . . . . . . . . . . . . . . . . . . . . . . . . . . . . . . . . . . . . . . . . 235
It is Time to Refill the Ink. . . . . . . . . . . . . . . . . . . . . . . . . . . . . . . . . . . . . . . . . . . 236
It is Time to Replace the Maintenance Box. . . . . . . . . . . . . . . . . . . . . . . . . . . . . . . 241
Printing, Copying, Scanning, and Faxing Quality is Poor. . . . . . . . . . . . . . . . . . . . . 243
Cannot Solve Problem After Trying All Solutions. . . . . . . . . . . . . . . . . . . . . . . . . . 264
The Printer Does Not Work as Expected
The Printer Does Not Turn On or Off
Power Does Not Turn OnThe following causes can be considered.
The power cord is not plugged in properly to the electrical outlet.
Solutions
Make sure the power cord is securely plugged in.
The P button was not pressed for long enough.
Solutions
Hold down the P button for a little longer.
Power Does Not Turn Off
The P button was not pressed for long enough.
Solutions
Hold down the P button for a little longer. If you still cannot turn off the printer, unplug the power cord.To prevent the print head from drying out, turn the printer back on and turn it off by pressing the Pbutton.
Power Turns Off Automatically
The Power Off Settings or Power Off Timer feature is enabled.
Solutions
❏ Select Settings > General Settings > Basic Settings > Power Off Settings, and then disable the PowerOff If Inactive and Power Off If Disconnected settings.
❏ Select Settings > General Settings > Basic Settings, and then disable the Power Off Timer Setting.
Note:Your product may have the Power Off Settings or Power Off Timer feature depending on the location of purchase.
Paper Does Not Feed Properly
No Paper FeedsThe following causes can be considered.
Solving Problems > The Printer Does Not Work as Expected > Paper Does Not Feed Properly
176

The installation location is inappropriate.
Solutions
Place the printer on a flat surface and operate in the recommended environmental conditions.
& “Environmental Specifications” on page 342
Unsupported paper is being used.
Solutions
Use paper supported by this printer.
& “Available Paper and Capacities” on page 295& “Unavailable Paper Types” on page 300
Paper handling is inappropriate.
Solutions
Follow paper handling precautions.
& “Paper Handling Precautions” on page 31
Too many sheets are loaded in the printer.
Solutions
Do not load more than the maximum number of sheets specified for the paper.
& “Available Paper and Capacities” on page 295
The paper settings on the printer are incorrect.
Solutions
Make sure the paper size and paper type settings match the actual paper size and paper type loaded in theprinter.
& “Paper Size and Type Settings” on page 31
Paper Feeds at a SlantThe following causes can be considered.
The installation location is inappropriate.
Solutions
Place the printer on a flat surface and operate in the recommended environmental conditions.
& “Environmental Specifications” on page 342
Unsupported paper is being used.
Solutions
Use paper supported by this printer.
& “Available Paper and Capacities” on page 295
Solving Problems > The Printer Does Not Work as Expected > Paper Does Not Feed Properly
177
& “Unavailable Paper Types” on page 300
Paper handling is inappropriate.
Solutions
Follow paper handling precautions.
& “Paper Handling Precautions” on page 31
The paper is loaded incorrectly.
Solutions
Load paper in the correct direction, and slide the edge guide against the edge of the paper.
& “Loading Paper” on page 32
Too many sheets are loaded in the printer.
Solutions
Do not load more than the maximum number of sheets specified for the paper.
& “Available Paper and Capacities” on page 295
The paper settings on the printer are incorrect.
Solutions
Make sure the paper size and paper type settings match the actual paper size and paper type loaded in theprinter.
& “Paper Size and Type Settings” on page 31
Several Sheets of Paper are Fed at a TimeThe following causes can be considered.
The installation location is inappropriate.
Solutions
Place the printer on a flat surface and operate in the recommended environmental conditions.
& “Environmental Specifications” on page 342
Unsupported paper is being used.
Solutions
Use paper supported by this printer.
& “Available Paper and Capacities” on page 295& “Unavailable Paper Types” on page 300
Solving Problems > The Printer Does Not Work as Expected > Paper Does Not Feed Properly
178

Paper handling is inappropriate.
Solutions
Follow paper handling precautions.
& “Paper Handling Precautions” on page 31
The paper is moist or damp.
Solutions
Load new paper.
Static electricity is causing sheets of paper to stick to each other.
Solutions
Fan the paper before loading. If the paper still does not feed, load one sheet of paper at a time.
Too many sheets are loaded in the printer.
Solutions
Do not load more than the maximum number of sheets specified for the paper.
& “Available Paper and Capacities” on page 295
The paper settings on the printer are incorrect.
Solutions
Make sure the paper size and paper type settings match the actual paper size and paper type loaded in theprinter.
& “Paper Size and Type Settings” on page 31
Multiple sheets of paper feed at the same time during manual 2-sided printing.
Solutions
Remove any paper that is loaded in the paper source before you reload the paper.
Paper Out Error Occurs
Paper is not loaded in the center of the paper tray.
Solutions
When a paper out error occurs although paper is loaded in the paper tray, reload paper in the center ofthe paper tray.
Original Does Not Feed in the ADFThe following causes can be considered.
Solving Problems > The Printer Does Not Work as Expected > Paper Does Not Feed Properly
179
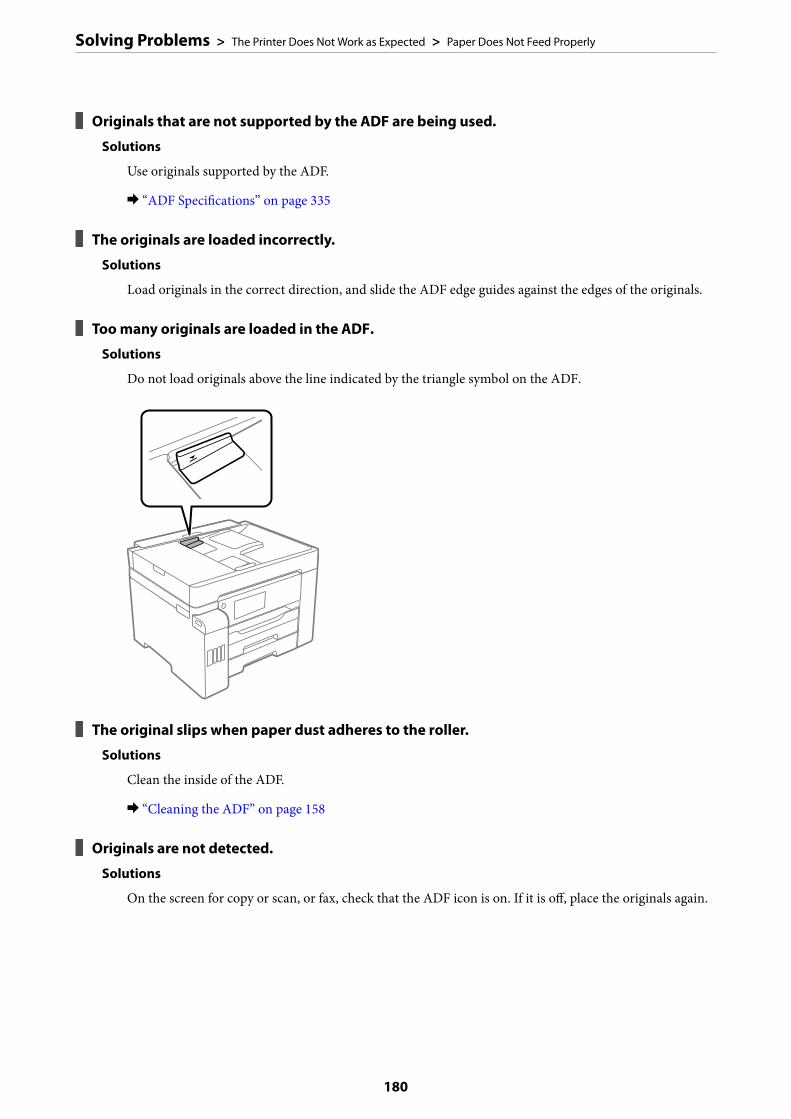
Originals that are not supported by the ADF are being used.
Solutions
Use originals supported by the ADF.
& “ADF Specifications” on page 335
The originals are loaded incorrectly.
Solutions
Load originals in the correct direction, and slide the ADF edge guides against the edges of the originals.
Too many originals are loaded in the ADF.
Solutions
Do not load originals above the line indicated by the triangle symbol on the ADF.
The original slips when paper dust adheres to the roller.
Solutions
Clean the inside of the ADF.
& “Cleaning the ADF” on page 158
Originals are not detected.
Solutions
On the screen for copy or scan, or fax, check that the ADF icon is on. If it is off, place the originals again.
Solving Problems > The Printer Does Not Work as Expected > Paper Does Not Feed Properly
180

Cannot Print
Cannot Print from Windows
Make sure the computer and the printer are connected correctly.
The cause and solution to the problem differ depending on whether or not they are connected.
Checking the Connection Status
Use Epson Printer Connection Checker to check the connection status for the computer and the printer. You maybe able to solve the problem depending on the results of the check.
1. Double-click the Epson Printer Connection Checker icon on the desktop.
Epson Printer Connection Checker starts.
If there is no icon on the desktop, follow the methods below to start Epson Printer Connection Checker.
❏ Windows 10Click the start button, and then select Epson Software > Epson Printer Connection Checker.
❏ Windows 8.1/Windows 8Enter the application name in the search charm, and then select the displayed icon.
❏ Windows 7Click the start button, and then select All Programs > Epson Software > Epson Printer ConnectionChecker.
2. Follow the on-screen instructions to check.
Note:If the printer name is not displayed, install a genuine Epson printer driver.
“Checking if a genuine Epson printer driver is installed - Windows” on page 163
When you have identified the problem, follow the solution displayed on the screen.
When you cannot solve the problem, check the following according to your situation.
❏ The printer is not recognized over a network connection“Cannot connect to a Network” on page 181
❏ The printer is not recognized using a USB connection“The Printer Cannot Connect by USB (Windows)” on page 184
❏ The printer is recognized, but printing cannot be performed.“Cannot Print Even Though a Connection has been Established (Windows)” on page 184
Cannot connect to a NetworkThe problem could be one of the following issues.
Solving Problems > The Printer Does Not Work as Expected > Cannot Print
181

Something is wrong with the network devices for Wi-Fi connection.
Solutions
Turn off the devices you want to connect to the network. Wait for about 10 seconds, and then turn on thedevices in the following order; wireless router, computer or smart device, and then printer. Move theprinter and computer or smart device closer to the wireless router to help with radio wavecommunication, and then try to make network settings again.
Devices cannot receive signals from the wireless router because they are too far apart.
Solutions
After moving the computer or the smart device and the printer closer to the wireless router, turn off thewireless router, and then turn it back on.
When changing the wireless router, the settings do not match the new router.
Solutions
Make the connection settings again so that they match the new wireless router.
& “When Replacing the Wireless Router” on page 269
The SSIDs connected from the computer or smart device and computer are different.
Solutions
When you are using multiple wireless routers at the same time or the wireless router has multiple SSIDsand devices are connected to different SSIDs, you cannot connect to the wireless router.
Connect the computer or smart device to the same SSID as the printer.
Solving Problems > The Printer Does Not Work as Expected > Cannot Print
182
A privacy separator on the wireless router is available.
Solutions
Most wireless routers have a privacy separator feature that blocks communication between connecteddevices. If you cannot communicate between the printer and the computer or smart device even if theyare connected to the same network, disable the privacy separator on the wireless router. See the manualprovided with the wireless router for details.
The IP address is incorrectly assigned.
Solutions
If the IP address assigned to the printer is 169.254.XXX.XXX, and the subnet mask is 255.255.0.0, the IPaddress may not be assigned correctly.
Select Settings > General Settings > Network Settings > Advanced on the printer’s control panel, andthen check the IP address and the subnet mask assigned to the printer.
Restart the wireless router or reset the network settings for the printer.
& “Re-setting the Network Connection” on page 268
There is a problem with the network settings on the computer.
Solutions
Try accessing any website from your computer to make sure that your computer's network settings arecorrect. If you cannot access any website, there is a problem on the computer.
Check the network connection of the computer. See the documentation provided with the computer fordetails.
The printer has been connected by Ethernet using devices that support IEEE802.3az (EnergyEfficient Ethernet).
Solutions
When you connect the printer by Ethernet using devices that support IEEE802.3az (Energy EfficientEthernet), the following problems may occur depending on the hub or router that you are using.
❏ Connection becomes unstable, the printer is connected and disconnected again and again.
❏ Cannot connect to the printer.
❏ The communication speed becomes slow.
Follow the steps below to disable IEEE802.3az for the printer and then connect.
1. Remove the Ethernet cable connected to the computer and the printer.
2. When IEEE802.3az for the computer is enabled, disable it.
See the documentation provided with the computer for details.
3. Connect the computer and the printer with an Ethernet cable directly.
4. On the printer, print a network connection report.
“Printing a Network Connection Report” on page 286
5. Check the printer's IP address on the network connection report.
Solving Problems > The Printer Does Not Work as Expected > Cannot Print
183

6. On the computer, access Web Config.
Launch a Web browser, and then enter the printer's IP address.
“Running Web Config on a Web Browser” on page 307
7. Select the Network Settings tab > Wired LAN.
8. Select OFF for IEEE 802.3az.
9. Click Next.
10. Click OK.
11. Remove the Ethernet cable connected to the computer and the printer.
12. If you disabled IEEE802.3az for the computer in step 2, enable it.
13. Connect the Ethernet cables that you removed in step 1 to the computer and the printer.
If the problem still occurs, devices other than the printer may be causing the problem.
The Printer Cannot Connect by USB (Windows)The following causes can be considered.
The USB cable is not plugged into the electrical outlet correctly.
Solutions
Connect the USB cable securely to the printer and the computer.
There is a problem with the USB hub.
Solutions
If you are using a USB hub, try to connect the printer directly to the computer.
There is a problem with the USB cable or the USB inlet.
Solutions
If the USB cable cannot be recognized, change the port, or change the USB cable.
Cannot Print Even Though a Connection has been Established (Windows)The following causes can be considered.
There is a problem with the software or data.
Solutions
❏ Make sure that a genuine Epson printer driver (EPSON XXXXX) is installed. If a genuine Epsonprinter driver is not installed, the available functions are limited. We recommend using a genuineEpson printer driver.
❏ If you are printing a large data size image, the computer may run out of memory. Print the image at alower resolution or a smaller size.
Solving Problems > The Printer Does Not Work as Expected > Cannot Print
184

❏ If you have tried all of the solutions and have not solved the problem, try uninstalling and thenreinstalling the printer driver.
❏ You may be able to clear the problem by updating the software to the latest version. To check thesoftware status, use the software update tool.
& “Checking if a genuine Epson printer driver is installed - Windows” on page 163& “Checking if a genuine Epson printer driver is installed - Mac OS” on page 164& “Installing or Uninstalling Applications Separately” on page 162& “Updating Applications and Firmware” on page 167
There is a problem with the printer's status.
Solutions
Click EPSON Status Monitor 3 on the printer driver's Maintenance tab, and then check the printerstatus. If EPSON Status Monitor 3 is disabled, click Extended Settings on the Maintenance tab, andthen select Enable EPSON Status Monitor 3.
There is still a job waiting to be printed.
Solutions
Click Print Queue on the printer driver's Maintenance tab. If unnecessary data remains, select Cancel alldocuments from the Printer menu.
The printer is pending or offline.
Solutions
Click Print Queue on the printer driver's Maintenance tab.
If the printer is offline or pending, clear the offline or pending setting from the Printer menu.
Solving Problems > The Printer Does Not Work as Expected > Cannot Print
185
The printer is not selected as the default printer.
Solutions
Right-click the printer icon in Control Panel > View devices and printers (or Printers, Printers andFaxes) and click Set as default printer.
Note:If there are multiple printer icons, see the following to select the correct printer.
Example)
USB connection: EPSON XXXX Series
Network connection: EPSON XXXX Series (network)
If you install the printer driver multiple times, copies of the printer driver may be created. If copies suchas "EPSON XXXX Series (copy 1)" are created, right-click the copied driver icon, and then click RemoveDevice.
The printer port is not set correctly.
Solutions
Click Print Queue on the printer driver's Maintenance tab.
Make sure the printer port is set correctly as shown below in Property > Port from the Printer menu.
USB connection: USBXXX, Network connection: EpsonNet Print Port
Suddenly the Printer Cannot Print over a Network ConnectionThe problem could be one of the following issues.
The network environment has been changed.
Solutions
When you have changed the network environment, such as the wireless router or provider, try makingnetwork settings for the printer again.
Connect the computer or smart device to the same SSID as the printer.
& “Re-setting the Network Connection” on page 268
Something is wrong with the network devices for Wi-Fi connection.
Solutions
Turn off the devices you want to connect to the network. Wait for about 10 seconds, and then turn on thedevices in the following order; wireless router, computer or smart device, and then printer. Move the
Solving Problems > The Printer Does Not Work as Expected > Cannot Print
186
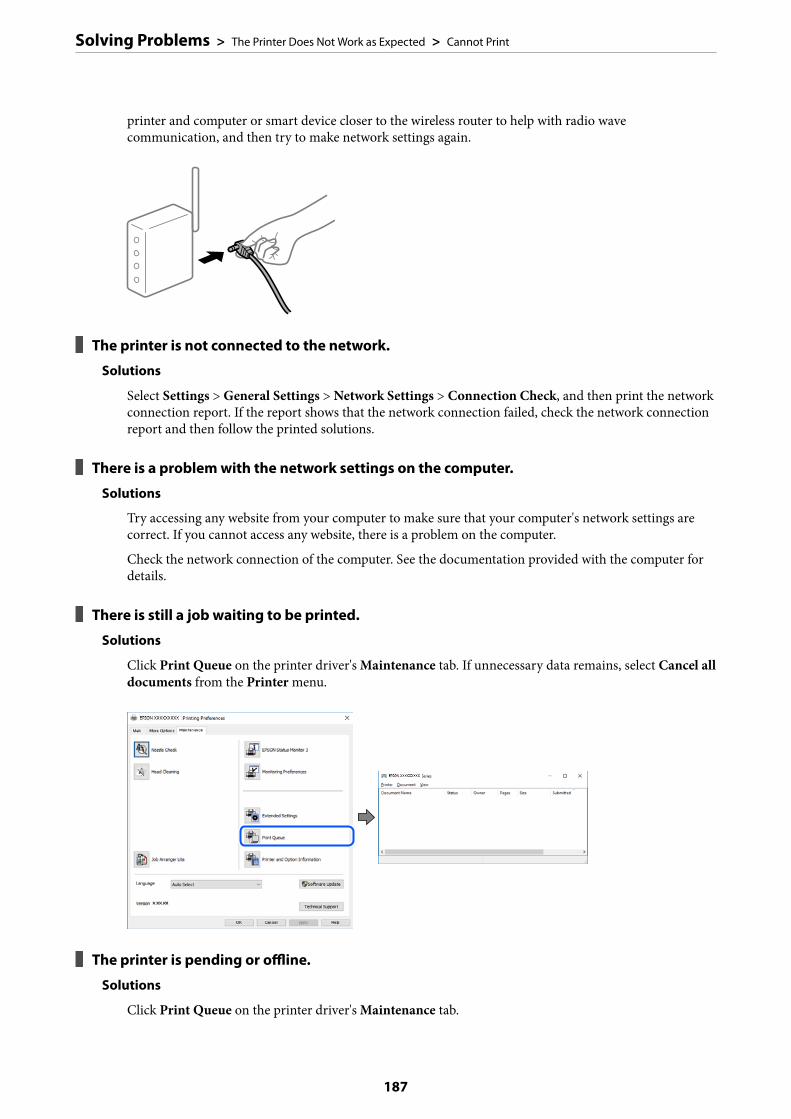
printer and computer or smart device closer to the wireless router to help with radio wavecommunication, and then try to make network settings again.
The printer is not connected to the network.
Solutions
Select Settings > General Settings > Network Settings > Connection Check, and then print the networkconnection report. If the report shows that the network connection failed, check the network connectionreport and then follow the printed solutions.
There is a problem with the network settings on the computer.
Solutions
Try accessing any website from your computer to make sure that your computer's network settings arecorrect. If you cannot access any website, there is a problem on the computer.
Check the network connection of the computer. See the documentation provided with the computer fordetails.
There is still a job waiting to be printed.
Solutions
Click Print Queue on the printer driver's Maintenance tab. If unnecessary data remains, select Cancel alldocuments from the Printer menu.
The printer is pending or offline.
Solutions
Click Print Queue on the printer driver's Maintenance tab.
Solving Problems > The Printer Does Not Work as Expected > Cannot Print
187

If the printer is offline or pending, clear the offline or pending setting from the Printer menu.
The printer is not selected as the default printer.
Solutions
Right-click the printer icon in Control Panel > View devices and printers (or Printers, Printers andFaxes) and click Set as default printer.
Note:If there are multiple printer icons, see the following to select the correct printer.
Example)
USB connection: EPSON XXXX Series
Network connection: EPSON XXXX Series (network)
If you install the printer driver multiple times, copies of the printer driver may be created. If copies suchas "EPSON XXXX Series (copy 1)" are created, right-click the copied driver icon, and then click RemoveDevice.
The printer port is not set correctly.
Solutions
Click Print Queue on the printer driver's Maintenance tab.
Make sure the printer port is set correctly as shown below in Property > Port from the Printer menu.
USB connection: USBXXX, Network connection: EpsonNet Print Port
Cannot Print from Mac OS
Make sure the computer and the printer are connected correctly.
The cause and solution to the problem differ depending on whether or not they are connected.
Checking the Connection Status
Use EPSON Status Monitor to check the connection status for the computer and the printer.
1. Select System Preferences from the Apple menu > Printers & Scanners (or Print & Scan, Print & Fax), andthen select the printer.
2. Click Options & Supplies > Utility > Open Printer Utility.
3. Click EPSON Status Monitor.
Solving Problems > The Printer Does Not Work as Expected > Cannot Print
188

When the remaining ink levels are displayed, a connection has been successfully established between the computerand the printer.
Check the following if a connection has not been established.
❏ The printer is not recognized over a network connection“Cannot connect to a Network” on page 189
❏ The printer is not recognized using a USB connection“The Printer Cannot Connect by USB (Mac OS)” on page 192
Check the following if a connection has been established.
❏ The printer is recognized, but printing cannot be performed.“Cannot Print Even Though a Connection has been Established (Mac OS)” on page 192
Cannot connect to a NetworkThe problem could be one of the following issues.
Something is wrong with the network devices for Wi-Fi connection.
Solutions
Turn off the devices you want to connect to the network. Wait for about 10 seconds, and then turn on thedevices in the following order; wireless router, computer or smart device, and then printer. Move theprinter and computer or smart device closer to the wireless router to help with radio wavecommunication, and then try to make network settings again.
Devices cannot receive signals from the wireless router because they are too far apart.
Solutions
After moving the computer or the smart device and the printer closer to the wireless router, turn off thewireless router, and then turn it back on.
When changing the wireless router, the settings do not match the new router.
Solutions
Make the connection settings again so that they match the new wireless router.
& “When Replacing the Wireless Router” on page 269
Solving Problems > The Printer Does Not Work as Expected > Cannot Print
189
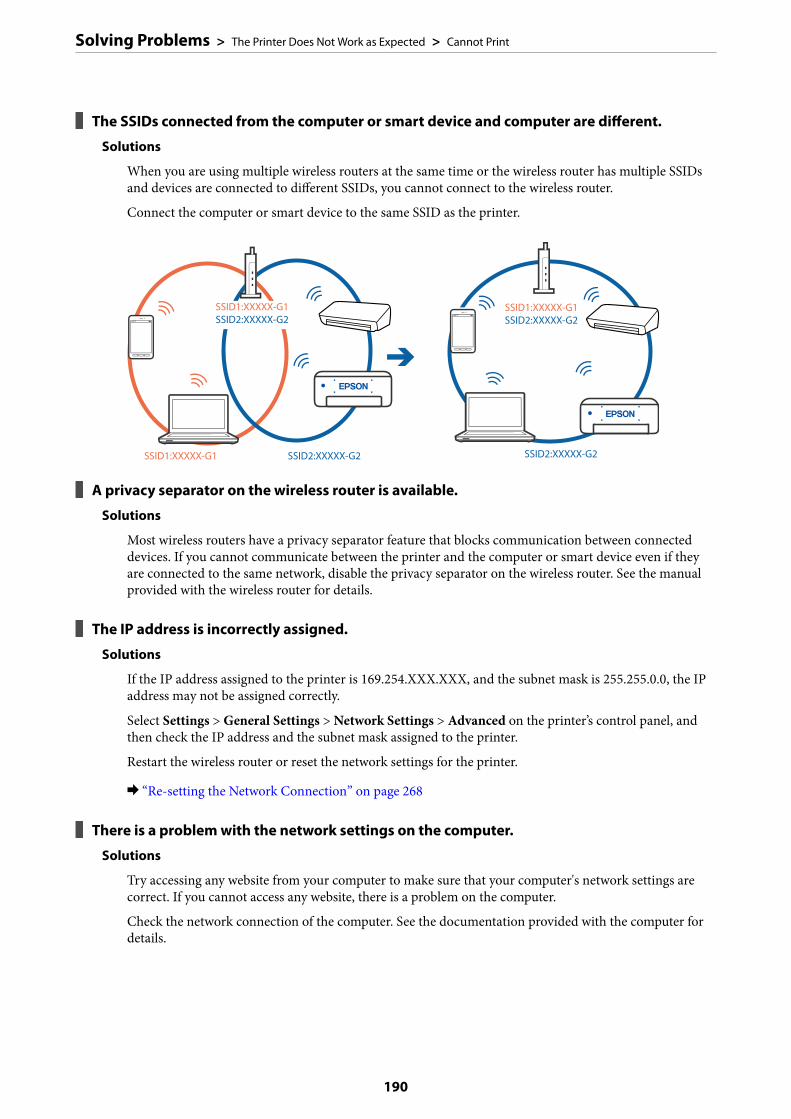
The SSIDs connected from the computer or smart device and computer are different.
Solutions
When you are using multiple wireless routers at the same time or the wireless router has multiple SSIDsand devices are connected to different SSIDs, you cannot connect to the wireless router.
Connect the computer or smart device to the same SSID as the printer.
A privacy separator on the wireless router is available.
Solutions
Most wireless routers have a privacy separator feature that blocks communication between connecteddevices. If you cannot communicate between the printer and the computer or smart device even if theyare connected to the same network, disable the privacy separator on the wireless router. See the manualprovided with the wireless router for details.
The IP address is incorrectly assigned.
Solutions
If the IP address assigned to the printer is 169.254.XXX.XXX, and the subnet mask is 255.255.0.0, the IPaddress may not be assigned correctly.
Select Settings > General Settings > Network Settings > Advanced on the printer’s control panel, andthen check the IP address and the subnet mask assigned to the printer.
Restart the wireless router or reset the network settings for the printer.
& “Re-setting the Network Connection” on page 268
There is a problem with the network settings on the computer.
Solutions
Try accessing any website from your computer to make sure that your computer's network settings arecorrect. If you cannot access any website, there is a problem on the computer.
Check the network connection of the computer. See the documentation provided with the computer fordetails.
Solving Problems > The Printer Does Not Work as Expected > Cannot Print
190
The device connected to the USB 3.0 port causes radio frequency interference.
Solutions
When you connect a device to the USB 3.0 port on a Mac, radio frequency interference may occur. Trythe following if you cannot connect to wireless LAN (Wi-Fi) or if operations become unstable.
❏ Place the device that is connected to the USB 3.0 port further away from the computer.
❏ Connect to the SSID for the 5 GHz range.
See the following to connect the printer to the SSID.
& “Making Wi-Fi Settings by Entering the SSID and Password” on page 272
The printer has been connected by Ethernet using devices that support IEEE802.3az (EnergyEfficient Ethernet).
Solutions
When you connect the printer by Ethernet using devices that support IEEE802.3az (Energy EfficientEthernet), the following problems may occur depending on the hub or router that you are using.
❏ Connection becomes unstable, the printer is connected and disconnected again and again.
❏ Cannot connect to the printer.
❏ The communication speed becomes slow.
Follow the steps below to disable IEEE802.3az for the printer and then connect.
1. Remove the Ethernet cable connected to the computer and the printer.
2. When IEEE802.3az for the computer is enabled, disable it.
See the documentation provided with the computer for details.
3. Connect the computer and the printer with an Ethernet cable directly.
4. On the printer, print a network connection report.
“Printing a Network Connection Report” on page 286
5. Check the printer's IP address on the network connection report.
6. On the computer, access Web Config.
Launch a Web browser, and then enter the printer's IP address.
“Running Web Config on a Web Browser” on page 307
7. Select the Network Settings tab > Wired LAN.
8. Select OFF for IEEE 802.3az.
9. Click Next.
10. Click OK.
11. Remove the Ethernet cable connected to the computer and the printer.
Solving Problems > The Printer Does Not Work as Expected > Cannot Print
191

12. If you disabled IEEE802.3az for the computer in step 2, enable it.
13. Connect the Ethernet cables that you removed in step 1 to the computer and the printer.
If the problem still occurs, devices other than the printer may be causing the problem.
The Printer Cannot Connect by USB (Mac OS)The following causes can be considered.
The USB cable is not plugged into the electrical outlet correctly.
Solutions
Connect the USB cable securely to the printer and the computer.
There is a problem with the USB hub.
Solutions
If you are using a USB hub, try to connect the printer directly to the computer.
There is a problem with the USB cable or the USB inlet.
Solutions
If the USB cable cannot be recognized, change the port, or change the USB cable.
Cannot Print Even Though a Connection has been Established (Mac OS)The following causes can be considered.
There is a problem with the software or data.
Solutions
❏ Make sure that a genuine Epson printer driver (EPSON XXXXX) is installed. If a genuine Epsonprinter driver is not installed, the available functions are limited. We recommend using a genuineEpson printer driver.
❏ If you are printing a large data size image, the computer may run out of memory. Print the image at alower resolution or a smaller size.
❏ If you have tried all of the solutions and have not solved the problem, try uninstalling and thenreinstalling the printer driver.
❏ You may be able to clear the problem by updating the software to the latest version. To check thesoftware status, use the software update tool.
& “Checking if a genuine Epson printer driver is installed - Windows” on page 163& “Checking if a genuine Epson printer driver is installed - Mac OS” on page 164& “Installing or Uninstalling Applications Separately” on page 162& “Updating Applications and Firmware” on page 167
There is a problem with the status of the printer.
Solutions
Make sure the printer status is not Pause.
Solving Problems > The Printer Does Not Work as Expected > Cannot Print
192

Select System Preferences from the Apple menu > Printers & Scanners (or Print & Scan, Print & Fax),and then double-click the printer. If the printer is paused, click Resume.
User feature restrictions are enabled for the printer.
Solutions
The printer may not print when the user feature restriction is enabled. Contact your printeradministrator.
Suddenly the Printer Cannot Print over a Network ConnectionThe problem could be one of the following issues.
The network environment has been changed.
Solutions
When you have changed the network environment, such as the wireless router or provider, try makingnetwork settings for the printer again.
Connect the computer or smart device to the same SSID as the printer.
& “Re-setting the Network Connection” on page 268
Something is wrong with the network devices for Wi-Fi connection.
Solutions
Turn off the devices you want to connect to the network. Wait for about 10 seconds, and then turn on thedevices in the following order; wireless router, computer or smart device, and then printer. Move theprinter and computer or smart device closer to the wireless router to help with radio wavecommunication, and then try to make network settings again.
The printer is not connected to the network.
Solutions
Select Settings > General Settings > Network Settings > Connection Check, and then print the networkconnection report. If the report shows that the network connection failed, check the network connectionreport and then follow the printed solutions.
There is a problem with the network settings on the computer.
Solutions
Try accessing any website from your computer to make sure that your computer's network settings arecorrect. If you cannot access any website, there is a problem on the computer.
Solving Problems > The Printer Does Not Work as Expected > Cannot Print
193

Check the network connection of the computer. See the documentation provided with the computer fordetails.
Cannot Print from Smart Device
Make sure the smart device and the printer are connected correctly.
The cause and solution to the problem differ depending on whether or not they are connected.
Checking the Connection Status
Use Epson iPrint to check the connection status for the smart device and the printer.
See the following to install Epson iPrint if it is not already installed.
“Application for Printing Easily from a Smart Device” on page 304
1. On the smart device, start Epson iPrint.
2. Check that the printer name is displayed on the home screen.
When the printer name is displayed, a connection has been successfully established between the smart deviceand the printer.
If the following are displayed, a connection has not been established between the smart device and the printer.
❏ Printer is not selected.
❏ Communication error.
Check the following if a connection has not been established.
❏ The printer is not recognized over a network connection“Cannot connect to a Network” on page 194
Check the following if a connection has been established.
❏ The printer is recognized, but printing cannot be performed.“Cannot Print Even Though a Connection has been Established (iOS)” on page 196
Cannot connect to a NetworkThe problem could be one of the following issues.
Something is wrong with the network devices for Wi-Fi connection.
Solutions
Turn off the devices you want to connect to the network. Wait for about 10 seconds, and then turn on thedevices in the following order; wireless router, computer or smart device, and then printer. Move the
Solving Problems > The Printer Does Not Work as Expected > Cannot Print
194

printer and computer or smart device closer to the wireless router to help with radio wavecommunication, and then try to make network settings again.
Devices cannot receive signals from the wireless router because they are too far apart.
Solutions
After moving the computer or the smart device and the printer closer to the wireless router, turn off thewireless router, and then turn it back on.
When changing the wireless router, the settings do not match the new router.
Solutions
Make the connection settings again so that they match the new wireless router.
& “When Replacing the Wireless Router” on page 269
The SSIDs connected from the computer or smart device and computer are different.
Solutions
When you are using multiple wireless routers at the same time or the wireless router has multiple SSIDsand devices are connected to different SSIDs, you cannot connect to the wireless router.
Connect the computer or smart device to the same SSID as the printer.
A privacy separator on the wireless router is available.
Solutions
Most wireless routers have a privacy separator feature that blocks communication between connecteddevices. If you cannot communicate between the printer and the computer or smart device even if they
Solving Problems > The Printer Does Not Work as Expected > Cannot Print
195

are connected to the same network, disable the privacy separator on the wireless router. See the manualprovided with the wireless router for details.
The IP address is incorrectly assigned.
Solutions
If the IP address assigned to the printer is 169.254.XXX.XXX, and the subnet mask is 255.255.0.0, the IPaddress may not be assigned correctly.
Select Settings > General Settings > Network Settings > Advanced on the printer’s control panel, andthen check the IP address and the subnet mask assigned to the printer.
Restart the wireless router or reset the network settings for the printer.
& “Re-setting the Network Connection” on page 268
There is a problem with the network settings on the smart device.
Solutions
Try accessing any website from your smart device to make sure that your smart device's network settingsare correct. If you cannot access any website, there is a problem on the smart device.
Check the network connection of the computer. See the documentation provided with the smart devicefor details.
Cannot Print Even Though a Connection has been Established (iOS)The following causes can be considered.
Paper Setup Auto Display is disabled.
Solutions
Enable Paper Setup Auto Display in the following menu.
Settings > General Settings > Printer Settings > Paper Source Settings > Paper Setup Auto Display
AirPrint is disabled.
Solutions
Enable the AirPrint setting on Web Config.
& “Application for Configuring Printer Operations (Web Config)” on page 307
Suddenly the Printer Cannot Print over a Network ConnectionThe problem could be one of the following issues.
The network environment has been changed.
Solutions
When you have changed the network environment, such as the wireless router or provider, try makingnetwork settings for the printer again.
Connect the computer or smart device to the same SSID as the printer.
& “Re-setting the Network Connection” on page 268
Solving Problems > The Printer Does Not Work as Expected > Cannot Print
196
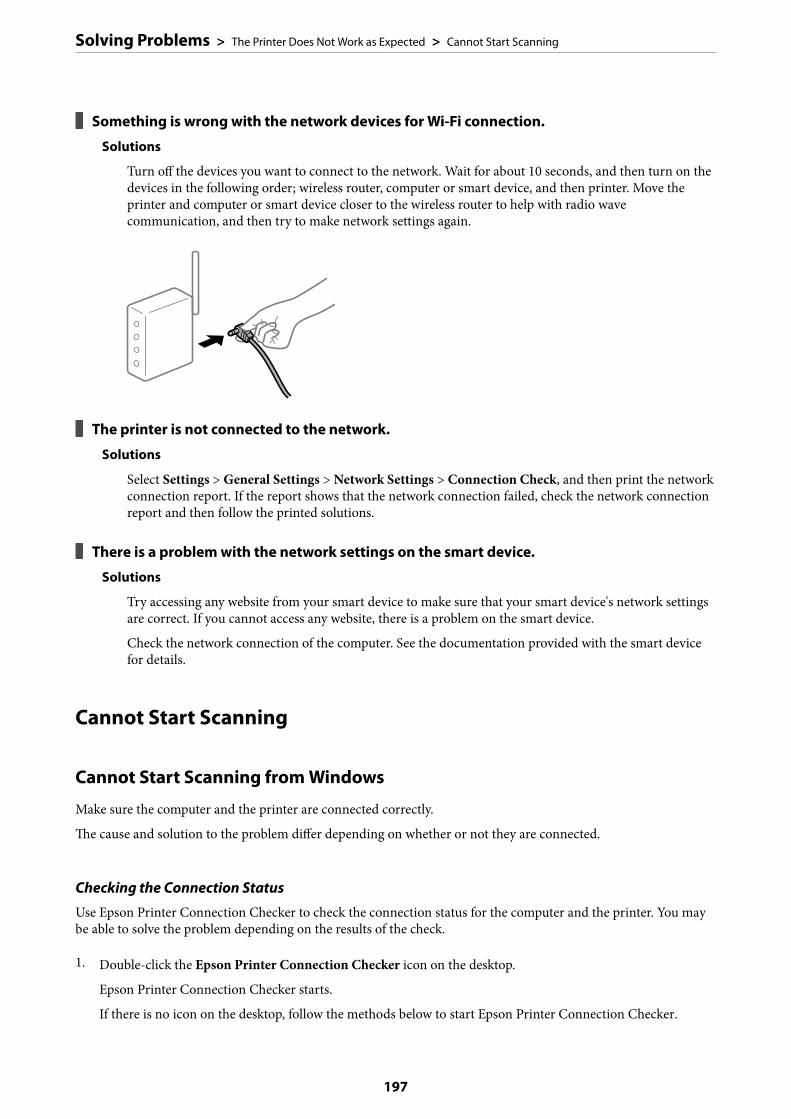
Something is wrong with the network devices for Wi-Fi connection.
Solutions
Turn off the devices you want to connect to the network. Wait for about 10 seconds, and then turn on thedevices in the following order; wireless router, computer or smart device, and then printer. Move theprinter and computer or smart device closer to the wireless router to help with radio wavecommunication, and then try to make network settings again.
The printer is not connected to the network.
Solutions
Select Settings > General Settings > Network Settings > Connection Check, and then print the networkconnection report. If the report shows that the network connection failed, check the network connectionreport and then follow the printed solutions.
There is a problem with the network settings on the smart device.
Solutions
Try accessing any website from your smart device to make sure that your smart device's network settingsare correct. If you cannot access any website, there is a problem on the smart device.
Check the network connection of the computer. See the documentation provided with the smart devicefor details.
Cannot Start Scanning
Cannot Start Scanning from Windows
Make sure the computer and the printer are connected correctly.
The cause and solution to the problem differ depending on whether or not they are connected.
Checking the Connection Status
Use Epson Printer Connection Checker to check the connection status for the computer and the printer. You maybe able to solve the problem depending on the results of the check.
1. Double-click the Epson Printer Connection Checker icon on the desktop.
Epson Printer Connection Checker starts.
If there is no icon on the desktop, follow the methods below to start Epson Printer Connection Checker.
Solving Problems > The Printer Does Not Work as Expected > Cannot Start Scanning
197
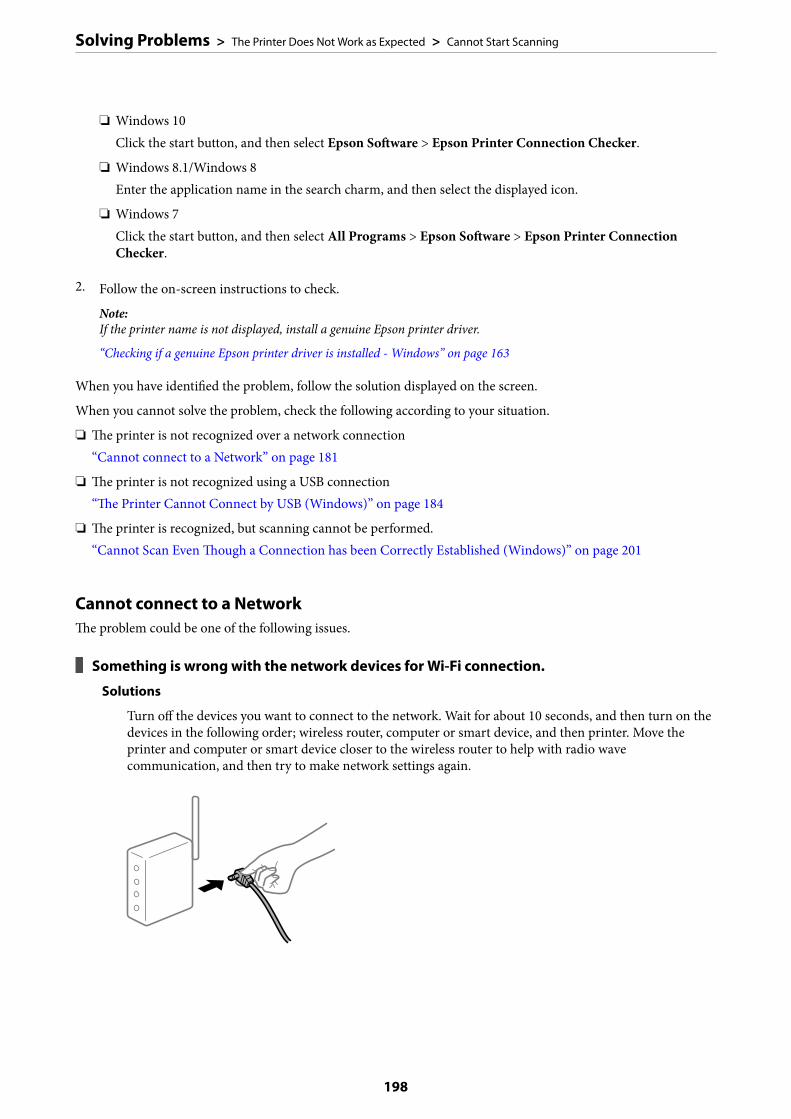
❏ Windows 10Click the start button, and then select Epson Software > Epson Printer Connection Checker.
❏ Windows 8.1/Windows 8Enter the application name in the search charm, and then select the displayed icon.
❏ Windows 7Click the start button, and then select All Programs > Epson Software > Epson Printer ConnectionChecker.
2. Follow the on-screen instructions to check.
Note:If the printer name is not displayed, install a genuine Epson printer driver.
“Checking if a genuine Epson printer driver is installed - Windows” on page 163
When you have identified the problem, follow the solution displayed on the screen.
When you cannot solve the problem, check the following according to your situation.
❏ The printer is not recognized over a network connection“Cannot connect to a Network” on page 181
❏ The printer is not recognized using a USB connection“The Printer Cannot Connect by USB (Windows)” on page 184
❏ The printer is recognized, but scanning cannot be performed.“Cannot Scan Even Though a Connection has been Correctly Established (Windows)” on page 201
Cannot connect to a NetworkThe problem could be one of the following issues.
Something is wrong with the network devices for Wi-Fi connection.
Solutions
Turn off the devices you want to connect to the network. Wait for about 10 seconds, and then turn on thedevices in the following order; wireless router, computer or smart device, and then printer. Move theprinter and computer or smart device closer to the wireless router to help with radio wavecommunication, and then try to make network settings again.
Solving Problems > The Printer Does Not Work as Expected > Cannot Start Scanning
198
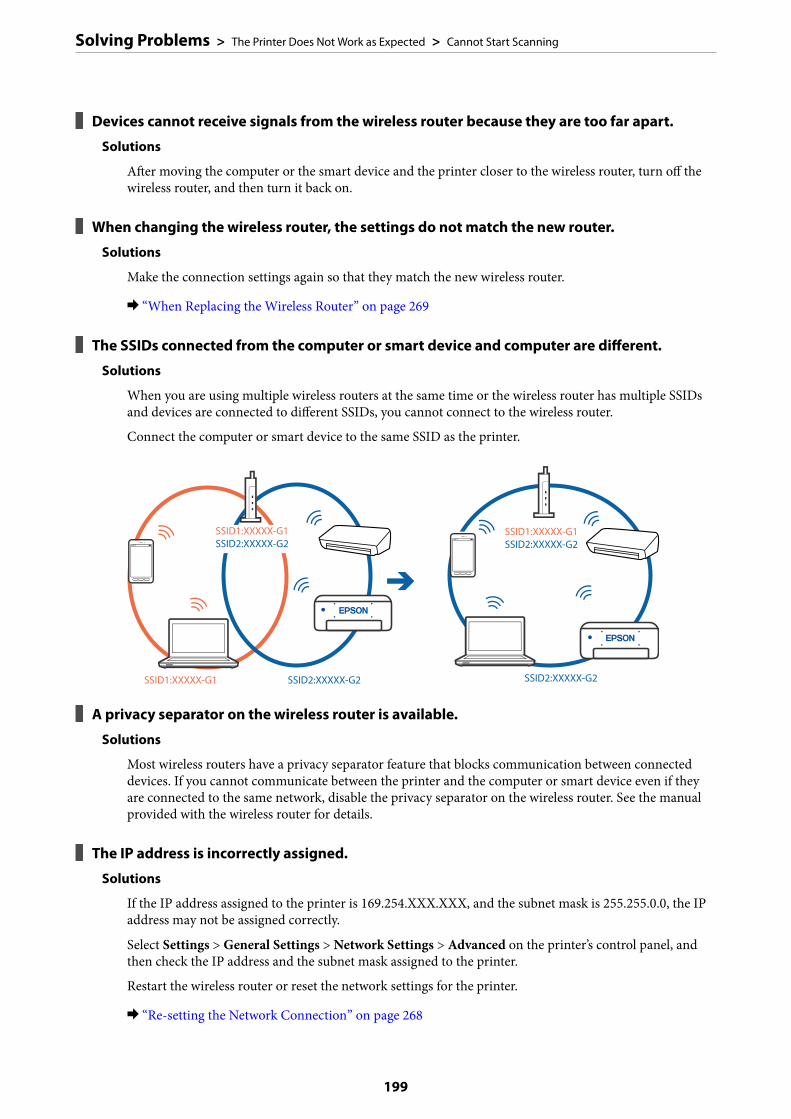
Devices cannot receive signals from the wireless router because they are too far apart.
Solutions
After moving the computer or the smart device and the printer closer to the wireless router, turn off thewireless router, and then turn it back on.
When changing the wireless router, the settings do not match the new router.
Solutions
Make the connection settings again so that they match the new wireless router.
& “When Replacing the Wireless Router” on page 269
The SSIDs connected from the computer or smart device and computer are different.
Solutions
When you are using multiple wireless routers at the same time or the wireless router has multiple SSIDsand devices are connected to different SSIDs, you cannot connect to the wireless router.
Connect the computer or smart device to the same SSID as the printer.
A privacy separator on the wireless router is available.
Solutions
Most wireless routers have a privacy separator feature that blocks communication between connecteddevices. If you cannot communicate between the printer and the computer or smart device even if theyare connected to the same network, disable the privacy separator on the wireless router. See the manualprovided with the wireless router for details.
The IP address is incorrectly assigned.
Solutions
If the IP address assigned to the printer is 169.254.XXX.XXX, and the subnet mask is 255.255.0.0, the IPaddress may not be assigned correctly.
Select Settings > General Settings > Network Settings > Advanced on the printer’s control panel, andthen check the IP address and the subnet mask assigned to the printer.
Restart the wireless router or reset the network settings for the printer.
& “Re-setting the Network Connection” on page 268
Solving Problems > The Printer Does Not Work as Expected > Cannot Start Scanning
199
There is a problem with the network settings on the computer.
Solutions
Try accessing any website from your computer to make sure that your computer's network settings arecorrect. If you cannot access any website, there is a problem on the computer.
Check the network connection of the computer. See the documentation provided with the computer fordetails.
The printer has been connected by Ethernet using devices that support IEEE802.3az (EnergyEfficient Ethernet).
Solutions
When you connect the printer by Ethernet using devices that support IEEE802.3az (Energy EfficientEthernet), the following problems may occur depending on the hub or router that you are using.
❏ Connection becomes unstable, the printer is connected and disconnected again and again.
❏ Cannot connect to the printer.
❏ The communication speed becomes slow.
Follow the steps below to disable IEEE802.3az for the printer and then connect.
1. Remove the Ethernet cable connected to the computer and the printer.
2. When IEEE802.3az for the computer is enabled, disable it.
See the documentation provided with the computer for details.
3. Connect the computer and the printer with an Ethernet cable directly.
4. On the printer, print a network connection report.
“Printing a Network Connection Report” on page 286
5. Check the printer's IP address on the network connection report.
6. On the computer, access Web Config.
Launch a Web browser, and then enter the printer's IP address.
“Running Web Config on a Web Browser” on page 307
7. Select the Network Settings tab > Wired LAN.
8. Select OFF for IEEE 802.3az.
9. Click Next.
10. Click OK.
11. Remove the Ethernet cable connected to the computer and the printer.
12. If you disabled IEEE802.3az for the computer in step 2, enable it.
13. Connect the Ethernet cables that you removed in step 1 to the computer and the printer.
Solving Problems > The Printer Does Not Work as Expected > Cannot Start Scanning
200
If the problem still occurs, devices other than the printer may be causing the problem.
The Printer Cannot Connect by USB (Windows)The following causes can be considered.
The USB cable is not plugged into the electrical outlet correctly.
Solutions
Connect the USB cable securely to the printer and the computer.
There is a problem with the USB hub.
Solutions
If you are using a USB hub, try to connect the printer directly to the computer.
There is a problem with the USB cable or the USB inlet.
Solutions
If the USB cable cannot be recognized, change the port, or change the USB cable.
Cannot Scan Even Though a Connection has been Correctly Established (Windows)
Scanning at a high resolution over a network.
Solutions
Try scanning at a lower resolution.
Cannot Start Scanning from Mac OS
Make sure the computer and the printer are connected correctly.
The cause and solution to the problem differ depending on whether or not they are connected.
Checking the Connection Status
Use EPSON Status Monitor to check the connection status for the computer and the printer.
1. Select System Preferences from the Apple menu > Printers & Scanners (or Print & Scan, Print & Fax), andthen select the printer.
2. Click Options & Supplies > Utility > Open Printer Utility.
3. Click EPSON Status Monitor.
When the remaining ink levels are displayed, a connection has been successfully established between the computerand the printer.
Check the following if a connection has not been established.
Solving Problems > The Printer Does Not Work as Expected > Cannot Start Scanning
201
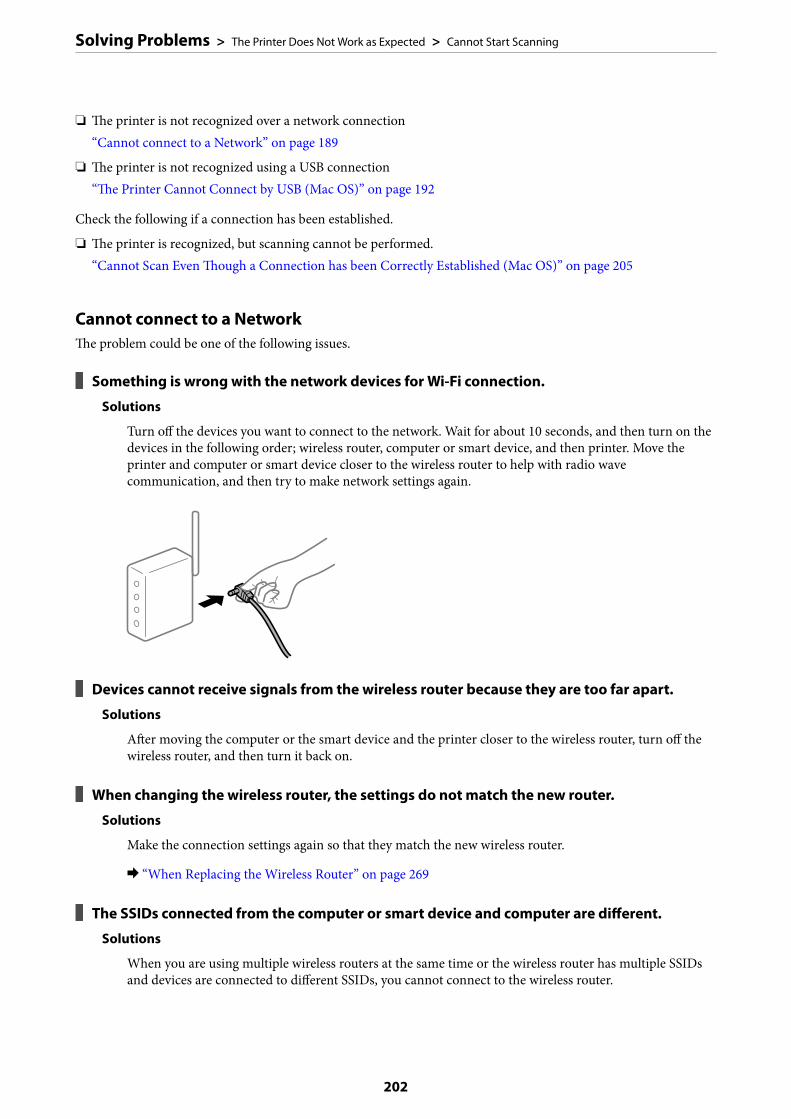
❏ The printer is not recognized over a network connection“Cannot connect to a Network” on page 189
❏ The printer is not recognized using a USB connection“The Printer Cannot Connect by USB (Mac OS)” on page 192
Check the following if a connection has been established.
❏ The printer is recognized, but scanning cannot be performed.“Cannot Scan Even Though a Connection has been Correctly Established (Mac OS)” on page 205
Cannot connect to a NetworkThe problem could be one of the following issues.
Something is wrong with the network devices for Wi-Fi connection.
Solutions
Turn off the devices you want to connect to the network. Wait for about 10 seconds, and then turn on thedevices in the following order; wireless router, computer or smart device, and then printer. Move theprinter and computer or smart device closer to the wireless router to help with radio wavecommunication, and then try to make network settings again.
Devices cannot receive signals from the wireless router because they are too far apart.
Solutions
After moving the computer or the smart device and the printer closer to the wireless router, turn off thewireless router, and then turn it back on.
When changing the wireless router, the settings do not match the new router.
Solutions
Make the connection settings again so that they match the new wireless router.
& “When Replacing the Wireless Router” on page 269
The SSIDs connected from the computer or smart device and computer are different.
Solutions
When you are using multiple wireless routers at the same time or the wireless router has multiple SSIDsand devices are connected to different SSIDs, you cannot connect to the wireless router.
Solving Problems > The Printer Does Not Work as Expected > Cannot Start Scanning
202
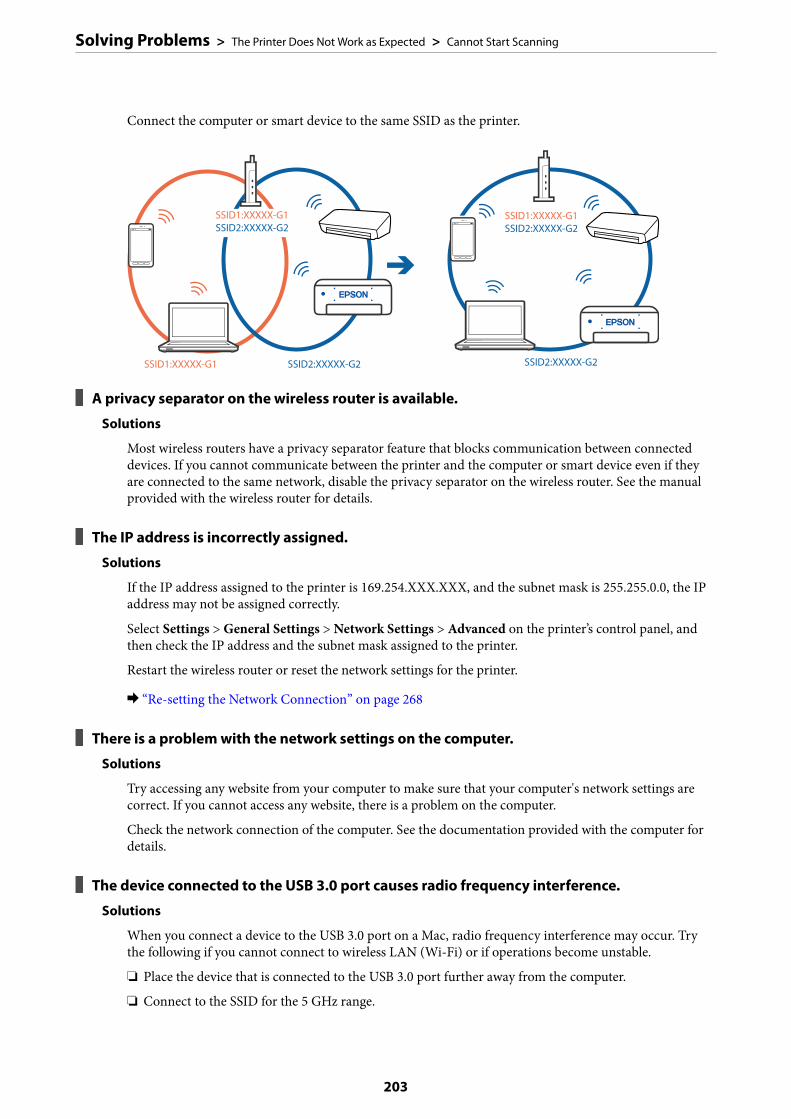
Connect the computer or smart device to the same SSID as the printer.
A privacy separator on the wireless router is available.
Solutions
Most wireless routers have a privacy separator feature that blocks communication between connecteddevices. If you cannot communicate between the printer and the computer or smart device even if theyare connected to the same network, disable the privacy separator on the wireless router. See the manualprovided with the wireless router for details.
The IP address is incorrectly assigned.
Solutions
If the IP address assigned to the printer is 169.254.XXX.XXX, and the subnet mask is 255.255.0.0, the IPaddress may not be assigned correctly.
Select Settings > General Settings > Network Settings > Advanced on the printer’s control panel, andthen check the IP address and the subnet mask assigned to the printer.
Restart the wireless router or reset the network settings for the printer.
& “Re-setting the Network Connection” on page 268
There is a problem with the network settings on the computer.
Solutions
Try accessing any website from your computer to make sure that your computer's network settings arecorrect. If you cannot access any website, there is a problem on the computer.
Check the network connection of the computer. See the documentation provided with the computer fordetails.
The device connected to the USB 3.0 port causes radio frequency interference.
Solutions
When you connect a device to the USB 3.0 port on a Mac, radio frequency interference may occur. Trythe following if you cannot connect to wireless LAN (Wi-Fi) or if operations become unstable.
❏ Place the device that is connected to the USB 3.0 port further away from the computer.
❏ Connect to the SSID for the 5 GHz range.
Solving Problems > The Printer Does Not Work as Expected > Cannot Start Scanning
203

See the following to connect the printer to the SSID.
& “Making Wi-Fi Settings by Entering the SSID and Password” on page 272
The printer has been connected by Ethernet using devices that support IEEE802.3az (EnergyEfficient Ethernet).
Solutions
When you connect the printer by Ethernet using devices that support IEEE802.3az (Energy EfficientEthernet), the following problems may occur depending on the hub or router that you are using.
❏ Connection becomes unstable, the printer is connected and disconnected again and again.
❏ Cannot connect to the printer.
❏ The communication speed becomes slow.
Follow the steps below to disable IEEE802.3az for the printer and then connect.
1. Remove the Ethernet cable connected to the computer and the printer.
2. When IEEE802.3az for the computer is enabled, disable it.
See the documentation provided with the computer for details.
3. Connect the computer and the printer with an Ethernet cable directly.
4. On the printer, print a network connection report.
“Printing a Network Connection Report” on page 286
5. Check the printer's IP address on the network connection report.
6. On the computer, access Web Config.
Launch a Web browser, and then enter the printer's IP address.
“Running Web Config on a Web Browser” on page 307
7. Select the Network Settings tab > Wired LAN.
8. Select OFF for IEEE 802.3az.
9. Click Next.
10. Click OK.
11. Remove the Ethernet cable connected to the computer and the printer.
12. If you disabled IEEE802.3az for the computer in step 2, enable it.
13. Connect the Ethernet cables that you removed in step 1 to the computer and the printer.
If the problem still occurs, devices other than the printer may be causing the problem.
Solving Problems > The Printer Does Not Work as Expected > Cannot Start Scanning
204
The Printer Cannot Connect by USB (Mac OS)The following causes can be considered.
The USB cable is not plugged into the electrical outlet correctly.
Solutions
Connect the USB cable securely to the printer and the computer.
There is a problem with the USB hub.
Solutions
If you are using a USB hub, try to connect the printer directly to the computer.
There is a problem with the USB cable or the USB inlet.
Solutions
If the USB cable cannot be recognized, change the port, or change the USB cable.
Cannot Scan Even Though a Connection has been Correctly Established (Mac OS)
Scanning at a high resolution over a network.
Solutions
Try scanning at a lower resolution.
Cannot Start Scanning from Smart Device
Make sure the smart device and the printer are connected correctly.
The cause and solution to the problem differ depending on whether or not they are connected.
Checking the Connection Status
Use Epson iPrint to check the connection status for the smart device and the printer.
See the following to install Epson iPrint if it is not already installed.
“Application for Printing Easily from a Smart Device” on page 304
1. On the smart device, start Epson iPrint.
2. Check that the printer name is displayed on the home screen.
When the printer name is displayed, a connection has been successfully established between the smart deviceand the printer.
If the following are displayed, a connection has not been established between the smart device and the printer.
❏ Printer is not selected.
❏ Communication error.
Check the following if a connection has not been established.
Solving Problems > The Printer Does Not Work as Expected > Cannot Start Scanning
205
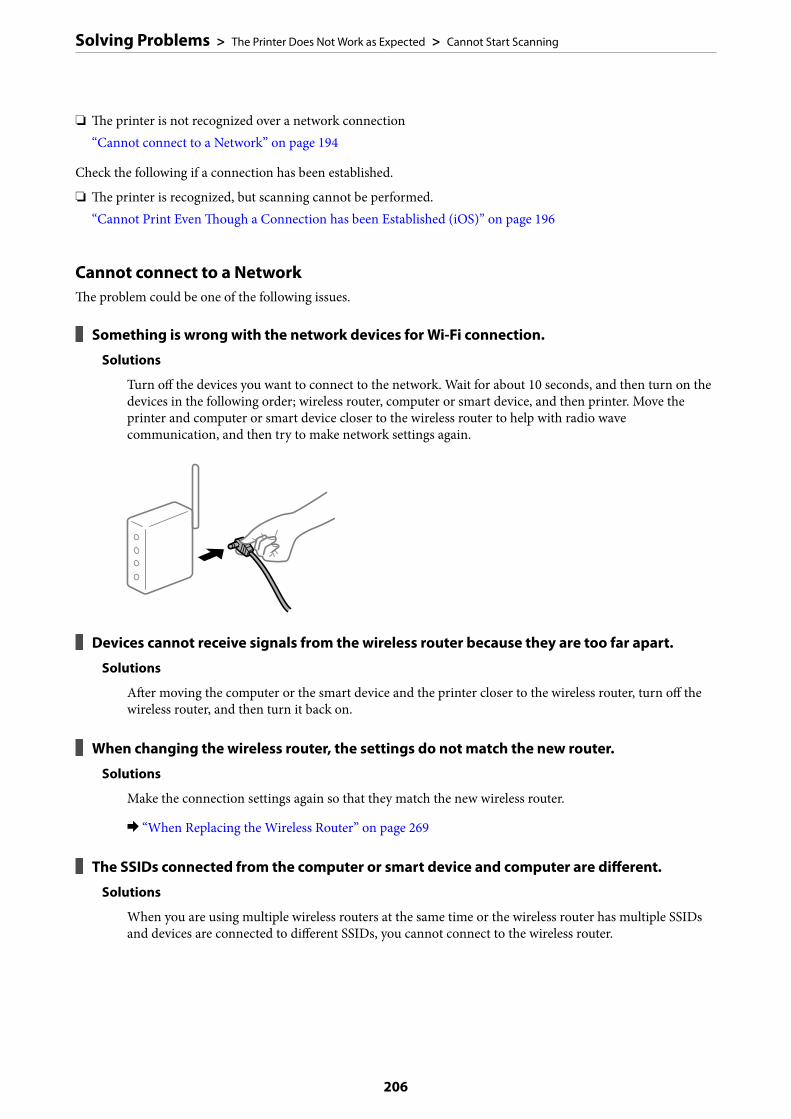
❏ The printer is not recognized over a network connection“Cannot connect to a Network” on page 194
Check the following if a connection has been established.
❏ The printer is recognized, but scanning cannot be performed.“Cannot Print Even Though a Connection has been Established (iOS)” on page 196
Cannot connect to a NetworkThe problem could be one of the following issues.
Something is wrong with the network devices for Wi-Fi connection.
Solutions
Turn off the devices you want to connect to the network. Wait for about 10 seconds, and then turn on thedevices in the following order; wireless router, computer or smart device, and then printer. Move theprinter and computer or smart device closer to the wireless router to help with radio wavecommunication, and then try to make network settings again.
Devices cannot receive signals from the wireless router because they are too far apart.
Solutions
After moving the computer or the smart device and the printer closer to the wireless router, turn off thewireless router, and then turn it back on.
When changing the wireless router, the settings do not match the new router.
Solutions
Make the connection settings again so that they match the new wireless router.
& “When Replacing the Wireless Router” on page 269
The SSIDs connected from the computer or smart device and computer are different.
Solutions
When you are using multiple wireless routers at the same time or the wireless router has multiple SSIDsand devices are connected to different SSIDs, you cannot connect to the wireless router.
Solving Problems > The Printer Does Not Work as Expected > Cannot Start Scanning
206
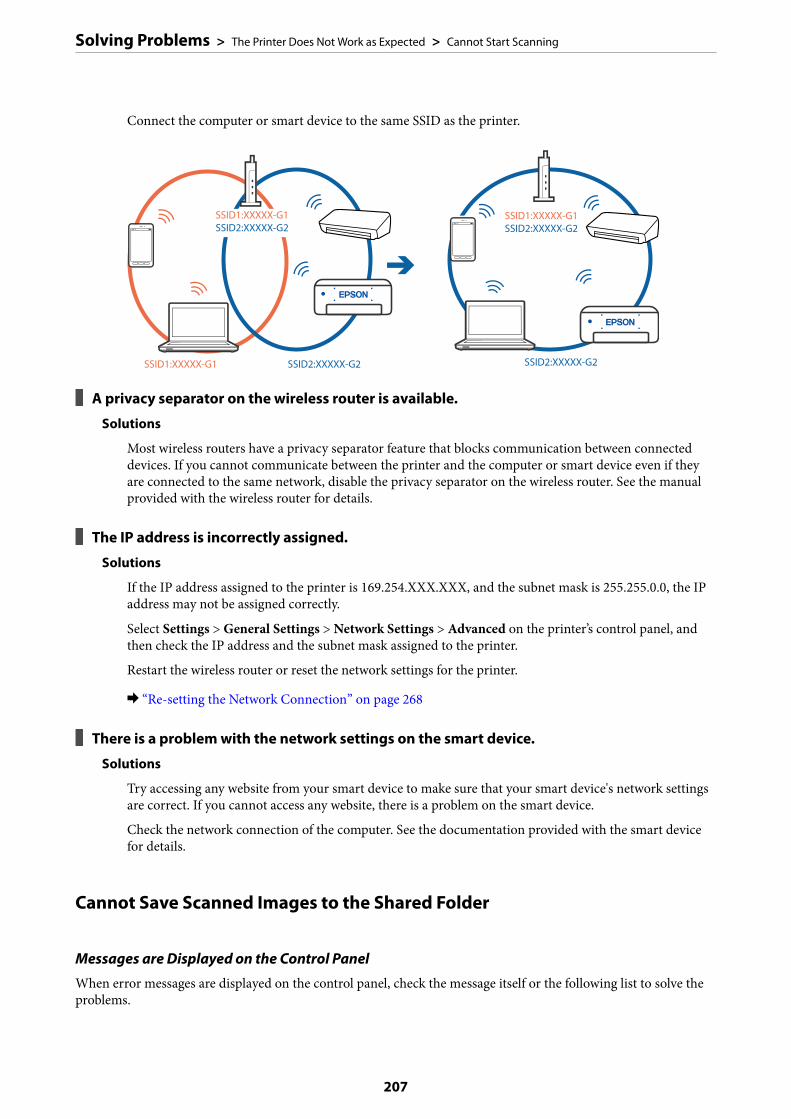
Connect the computer or smart device to the same SSID as the printer.
A privacy separator on the wireless router is available.
Solutions
Most wireless routers have a privacy separator feature that blocks communication between connecteddevices. If you cannot communicate between the printer and the computer or smart device even if theyare connected to the same network, disable the privacy separator on the wireless router. See the manualprovided with the wireless router for details.
The IP address is incorrectly assigned.
Solutions
If the IP address assigned to the printer is 169.254.XXX.XXX, and the subnet mask is 255.255.0.0, the IPaddress may not be assigned correctly.
Select Settings > General Settings > Network Settings > Advanced on the printer’s control panel, andthen check the IP address and the subnet mask assigned to the printer.
Restart the wireless router or reset the network settings for the printer.
& “Re-setting the Network Connection” on page 268
There is a problem with the network settings on the smart device.
Solutions
Try accessing any website from your smart device to make sure that your smart device's network settingsare correct. If you cannot access any website, there is a problem on the smart device.
Check the network connection of the computer. See the documentation provided with the smart devicefor details.
Cannot Save Scanned Images to the Shared Folder
Messages are Displayed on the Control Panel
When error messages are displayed on the control panel, check the message itself or the following list to solve theproblems.
Solving Problems > The Printer Does Not Work as Expected > Cannot Start Scanning
207
Messages Solutions
DNS error. Check DNS settings. Cannnot connect to the computer. Check the following.
❏ Make sure that the address in the contacts list on the printer and the addressof the shared folder are the same.
❏ If the IP address of the computer is static and is set manually, change thecomputer name in the network path to the IP address.
Example: \\EPSON02\SCAN to \\192.168.xxx.xxx\SCAN
❏ Make sure that the computer is turned on and does not sleep. If the computersleeps, you cannot save scanned images to the shared folder.
❏ Temporarily disable the computer's Firewall and security software. If this clearsthe error, check the settings in the security software.
❏ If Public network is selected as the network place, you cannot save thescanned images to the shared folder. Set the forward settings for each port.
❏ If you are using a laptop computer and the IP address is set as DHCP, the IPaddress may change when reconnecting to the network. Obtain the IP addressagain.
❏ Make sure the DNS setting is correct. Contact your network administratorabout the DNS settings.
❏ The computer name and the IP address may differ when the managementtable of the DNS server is not updated. Contact your DNS server administrator.
Authentication error. Check theauthentication method, authenticatedaccount, and authenticated password.
Make sure the user name and the password are correct on the computer and thecontacts on the printer. Also, make sure that the password has not expired.
Communication error. Check the Wi-Fi/network connection.
Cannot communicate with a network folder that is registered on the contacts list.Check the following.
❏ Make sure that Use Microsoft network sharing is enabled on the Web Config.
Select Network > MS Network on the Web Config.
❏ Make sure that the address in the contacts list on the printer and the addressof the shared folder are the same.
❏ Access rights for the user in the contacts list should be added on the Sharingtab and the Security tab of the shared folder's properties. Also, thepermissions for the user should be set to "allowed".
The file name is already in use. Renamethe file and scan again.
Change the file name settings. Otherwise, move or delete the files, or change thefile name on the shared folder.
Scanned file(s) are too large. Only XXpage(s) have been sent. Check if thedestination has enough space.
There is not enough disk space on the computer. Increase the free space on thecomputer.
Checking the Point where the Error Occurred
When saving scanned images to the shared folder, saving process proceeds as following. You can then check thepoint where the error occurred.
Items Operation Error Messages
Connecting Connect to the computer from the printer. DNS error. Check DNS settings.
Solving Problems > The Printer Does Not Work as Expected > Cannot Start Scanning
208

Items Operation Error Messages
Logging on to thecomputer
Log on to the computer with the user name andthe password.
Authentication error. Check theauthentication method, authenticatedaccount, and authenticated password.
Checking the folder tosave
Check the network path of the shared folder. Communication error. Check the Wi-Fi/network connection.
Checking the file name Check if there is a file with the same name as thefile you want to save in the folder.
The file name is already in use. Renamethe file and scan again.
Writing the file Write a new file. Scanned file(s) are too large. Only XXpage(s) have been sent. Check if thedestination has enough space.
Saving the Scanned Images Takes a Long Time
It takes a long time for the name resolution to correspond to the "Domain Name" and the "IPAddress".
Solutions
Check the following points.
❏ Make sure the DNS setting is correct.
❏ Make sure each DNS setting is correct when checking the Web Config.
❏ Make sure the DNS domain name is correct.
Cannot Send or Receive Faxes
Cannot Send or Receive FaxesThe following causes can be considered.
There are some problems in telephone wall jack.
Solutions
Check that the telephone wall jack works by connecting a phone to it and testing it. If you cannot make orreceive calls, contact your telecommunication company.
There are some problems in connecting to the telephone line.
Solutions
Select Settings > General Settings > Fax Settings > Check Fax Connection on the control panel to runthe automatic fax connection check. Try the solutions printed on the report.
Communication error occurs.
Solutions
Select Slow(9,600bps) in Settings > General Settings > Fax Settings > Basic Settings > Fax Speed onthe control panel.
Solving Problems > The Printer Does Not Work as Expected > Cannot Send or Receive Faxes
209
Connected to a DSL phone line without DSL filter.
Solutions
To connect to a DSL phone line, you need to use a DSL modem equipped with a built-in DSL filter, orinstall a separate DSL filter to the line. Contact your DSL provider.
“Connecting to DSL or ISDN” on page 394
There are some problems in the DSL filter when you connect to a DSL phone line.
Solutions
If you can not send or receive fax, connect the printer directly to a telephone wall jack to see if the printercan send a fax. If it works, the problem may be caused by the DSL filter. Contact your DSL provider.
Cannot Send FaxesThe following causes can be considered.
The connection line is set to PSTN in a facility where a private branch exchange (PBX) isbeing used.
Solutions
Select PBX in Settings > General Settings > Fax Settings > Basic Settings > Line Type on the controlpanel.
Sending faxes without entering an access code in an environment in which a PBX isinstalled.
Solutions
If your phone system requires an external access code to get an outside line, register the access code to theprinter, and enter # (hash) at the beginning of a fax number when sending.
The header information for outgoing faxes is not registered.
Solutions
Select Settings > General Settings > Fax Settings > Basic Settings > Header and set up the headerinformation. Some fax machines automatically reject incoming faxes that do not include headerinformation.
Your caller ID is blocked.
Solutions
Contact your telecommunication company to unblock your caller ID. Some phones or fax machinesautomatically reject anonymous calls.
The recipient's fax number is wrong.
Solutions
Check that the recipient's number registered in your contacts list or that you entered directly using thekeypad is correct. Or, check with the recipient that the fax number is correct.
Solving Problems > The Printer Does Not Work as Expected > Cannot Send or Receive Faxes
210

The recipient's fax machine is not ready to receive faxes.
Solutions
Ask the recipient if the recipient's fax machine is ready to receive a fax.
Sending a fax accidently using the subaddress feature.
Solutions
Check if you accidentally sent a fax using the subaddress feature. If you select a recipient with asubaddress from the contact list, the fax may be sent using the subaddress feature.
The recipient's fax machine is not capable of receiving faxes using the subaddress feature.
Solutions
When sending faxes using the subaddress feature, ask the recipient if their fax machine is capable ofreceiving faxes using the subaddress feature.
The subaddress and password are wrong.
Solutions
When sending faxes using the subaddress feature, check that the subaddress and password are correct.Check with the recipient that the subaddress and password match.
The data being sent is too large.
Solutions
You can send faxes at a smaller data size using one of the following methods.
❏ When you send the fax in monochrome, enable Direct Send in Fax > Fax Settings > Fax SendSettings.“Sending Many Pages of a Monochrome Document (Direct Send)” on page 120
❏ Using the connected phone“Sending Faxes Dialing from the External Phone Device” on page 117
❏ Using On Hook“Sending Faxes Manually After Confirming the Recipient's Status” on page 117
❏ Separating the originals
Cannot Receive FaxesThe following causes can be considered.
We also recommend checking the printer status in Job/Status, such as whether or not the printer is currentlyreceiving the fax.
Subscribing to a call forwarding service.
Solutions
If you have subscribed to a call forwarding service, the printer may not be able to receive faxes. Contactthe service provider.
Solving Problems > The Printer Does Not Work as Expected > Cannot Send or Receive Faxes
211

The Receive Mode is set to Manual, while an external phone device is connected to theprinter.
Solutions
If an external phone device is connected to the printer to share a line with the phone and the printer,select Settings >General Settings > Fax Settings > Basic Settings, and then set Receive Mode to Auto.
The available memory of the inbox and the confidential box is not enough.
Solutions
100 received documents have been saved in the inbox and the confidential box in total. Delete theunnecessary documents.
The computer that will save the received faxes is not turned on.
Solutions
When you have made settings to save received faxes to a computer, turn on the computer. The receivedfax is deleted once it has been saved to the computer.
The subaddress and password are wrong.
Solutions
When receiving faxes using the subaddress feature, check that the subaddress and password are correct.Check with the sender that the subaddress and password match.
The sender's fax number has been registered to the Rejection Number List.
Solutions
Make sure that the sender's number can be deleted from the Rejection Number List before deleting it.Delete it from Settings > General Settings > Fax Settings > Basic Settings > Rejection Fax > EditBlocked Number list. Or disable the Rejection Number List in Settings > General Settings > FaxSettings > Basic Settings > Rejection Fax > Rejection Fax. Faxes sent from numbers that have not beenregistered to this list are blocked when this setting is enabled.
The sender's fax number has not been registered in the contacts list.
Solutions
Register the sender's fax number to contact list. Or disable Unregistered Contacts in Settings > GeneralSettings > Fax Settings > Basic Settings > Rejection Fax > Rejection Fax. Faxes sent from numbers thathave not been registered to this list are blocked.
The sender has sent the fax without header information.
Solutions
Ask the sender if header information is setup on their fax machine. Or, disable Fax Header Blank inSettings > General Settings > Fax Settings > Basic Settings > Rejection Fax > Rejection Fax. Faxes thatdo not include header information are blocked when this setting is enabled.
Cannot Send Faxes to a Specific RecipientThe following causes can be considered.
Solving Problems > The Printer Does Not Work as Expected > Cannot Send or Receive Faxes
212
The recipient's machine takes a long time to answer.
Solutions
If the recipient machine does not pick up your call within 50 seconds after the printer has finisheddialing, the call ends with an error. Dial using the (On Hook) feature or using a connectedtelephone to check how long it takes before you hear a fax tone. If it takes more than 50 seconds, add
pauses after the fax number to send the fax. Tap to enter the pause. A hyphen is entered as the pausemark. One pause is about three seconds. Add multiple pauses as needed.
The Fax Speed setting registered in the contact list is wrong.
Solutions
Select the recipient from the contact list, and then select Edit > Fax Speed > Slow(9,600bps).
Cannot Send Faxes at a Specified Time
The printer's date and time is wrong.
Solutions
Select Settings > General Settings > Basic Settings > Date/Time Settings, and then set the correct dateand time.
Faxes Are Sent at the Wrong SizeThe following causes can be considered.
The recipient's fax machine does not support A3 size.
Solutions
Before you send an A3 size document, ask the recipient if the recipient's machine supports A3 size. If yousee OK (Reduced Size) in the fax transmission report, the recipient's fax machine does not support A3
size. You can print a fax transmission report from Fax > (More) > Fax Report > Last Transmission.
The originals are not placed correctly.
Solutions
❏ Make sure the original is placed correctly against the alignment marks.
❏ If the edge of the scanned image is missing, move the original slightly away from the edge of thescanner glass. You cannot scan the area within approximately 1.5 mm (0.06 in.) from the edge of thescanner glass.
& “Placing Originals” on page 37
If the printer is placed in a location near a light source or subjected to direct sunlight, theoriginal size may not be detected correctly.
Solutions
Select the original size manually, and then try again.
Solving Problems > The Printer Does Not Work as Expected > Cannot Send or Receive Faxes
213

There is dust or dirt on the scanner glass or document mat.
Solutions
When scanning from the control panel and selecting the auto scan area cropping function, remove anytrash or dirt from the scanner glass and document mat. If there is any trash or dirt around the original,the scanning range expands to include it.
& “Cleaning the Scanner Glass and Document Mat” on page 156
Original is too thin to detect the size automatically.
Solutions
Select the original size manually, and then try again.
Cannot Save Received Faxes to a Memory DeviceThe following causes can be considered.
The setting for saving received faxes to external memory is disabled.
Solutions
Select Settings > General Settings > Fax Settings > Receive Settings, and then enable Save to MemoryDevice in each menu.
A memory device is not connected to the printer.
Solutions
Connect a memory device, in which you have created a folder to save faxes, to the printer. Once the faxesare saved in the device, they are deleted from the printer's memory.
There is not enough free space in the device.
Solutions
Delete unnecessary data from the device to increase the amount of free space. Or, connect another devicethat has enough free space.
The memory device is write protected.
Solutions
Check if the device is write protected.
Cannot Receive A3 Size FaxesThe following causes can be considered.
The paper source setting is wrong.
Solutions
Check that the paper size setting of the paper source that contains A3 paper has been set to A3, and thatthe paper source is set for use with the fax feature. Select Settings > General Settings >Printer Settings >Paper Source Settings > Auto Select Settings > Fax, and then check the enabled paper source(s).
Solving Problems > The Printer Does Not Work as Expected > Cannot Send or Receive Faxes
214

Received Faxes Are Not PrintedThe following causes can be considered.
An error has occurred on the printer, such as a paper jam.
Solutions
Clear the printer error, and then ask the sender to resend the fax.
Printing received faxes is disabled under the current settings.
Solutions
Make settings to print received faxes in Settings > General Settings > Fax Settings > Receive Settings >Save/Forward Settings.
Cannot Send and Receive Faxes (Windows)
Make sure the computer and the printer are connected correctly. The cause and solution to the problem differdepending on whether or not they are connected.
Checking the Connection Status
Use Epson Printer Connection Checker to check the connection status for the computer and the printer. You maybe able to solve the problem depending on the results of the check.
1. Double-click the Epson Printer Connection Checker icon on the desktop.
Epson Printer Connection Checker starts.
If there is no icon on the desktop, follow the methods below to start Epson Printer Connection Checker.
❏ Windows 10Click the start button, and then select Epson Software > Epson Printer Connection Checker.
❏ Windows 8.1/Windows 8Enter the application name in the search charm, and then select the displayed icon.
❏ Windows 7Click the start button, and then select All Programs > Epson Software > Epson Printer ConnectionChecker.
2. Follow the on-screen instructions to check.
Note:If the printer name is not displayed, install a genuine Epson printer driver.
“Checking if a genuine Epson printer driver is installed - Windows” on page 163
When you have identified the problem, follow the solution displayed on the screen.
When you cannot solve the problem, check the following according to your situation.
❏ The printer is not recognized over a network connection“Cannot connect to a Network” on page 181
❏ The printer is not recognized using a USB connection“The Printer Cannot Connect by USB (Windows)” on page 184
Solving Problems > The Printer Does Not Work as Expected > Cannot Send or Receive Faxes
215
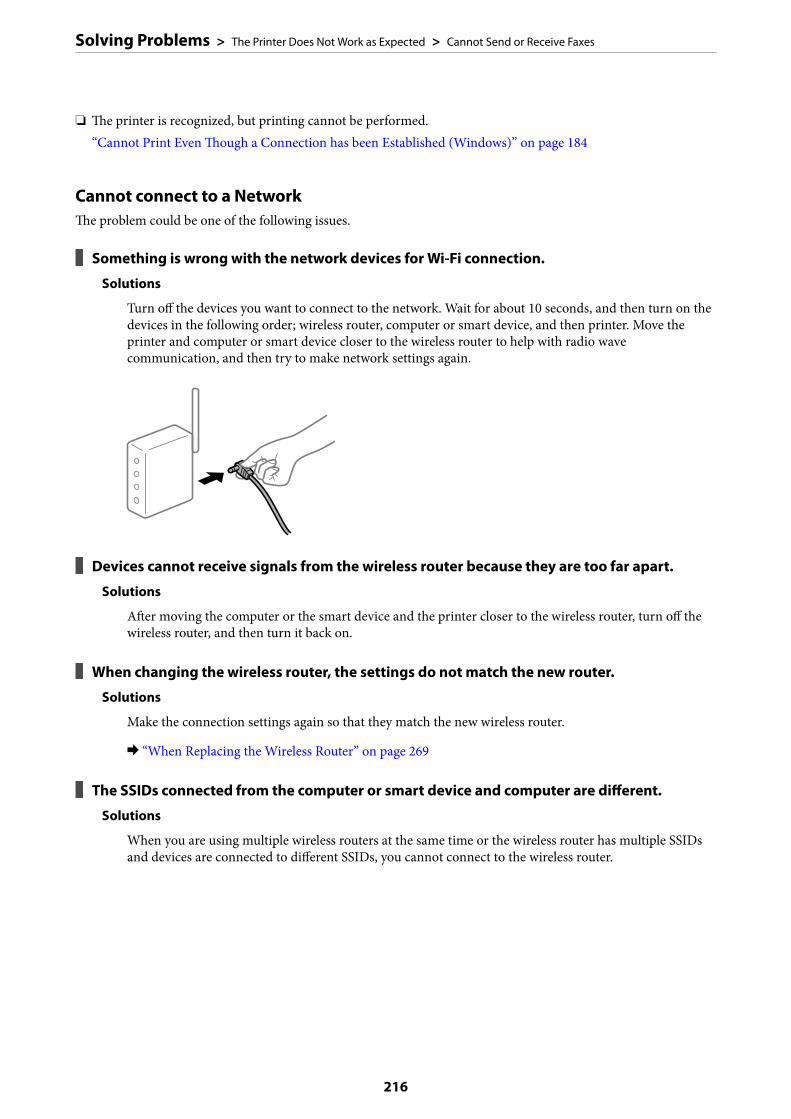
❏ The printer is recognized, but printing cannot be performed.“Cannot Print Even Though a Connection has been Established (Windows)” on page 184
Cannot connect to a NetworkThe problem could be one of the following issues.
Something is wrong with the network devices for Wi-Fi connection.
Solutions
Turn off the devices you want to connect to the network. Wait for about 10 seconds, and then turn on thedevices in the following order; wireless router, computer or smart device, and then printer. Move theprinter and computer or smart device closer to the wireless router to help with radio wavecommunication, and then try to make network settings again.
Devices cannot receive signals from the wireless router because they are too far apart.
Solutions
After moving the computer or the smart device and the printer closer to the wireless router, turn off thewireless router, and then turn it back on.
When changing the wireless router, the settings do not match the new router.
Solutions
Make the connection settings again so that they match the new wireless router.
& “When Replacing the Wireless Router” on page 269
The SSIDs connected from the computer or smart device and computer are different.
Solutions
When you are using multiple wireless routers at the same time or the wireless router has multiple SSIDsand devices are connected to different SSIDs, you cannot connect to the wireless router.
Solving Problems > The Printer Does Not Work as Expected > Cannot Send or Receive Faxes
216

Connect the computer or smart device to the same SSID as the printer.
A privacy separator on the wireless router is available.
Solutions
Most wireless routers have a privacy separator feature that blocks communication between connecteddevices. If you cannot communicate between the printer and the computer or smart device even if theyare connected to the same network, disable the privacy separator on the wireless router. See the manualprovided with the wireless router for details.
The IP address is incorrectly assigned.
Solutions
If the IP address assigned to the printer is 169.254.XXX.XXX, and the subnet mask is 255.255.0.0, the IPaddress may not be assigned correctly.
Select Settings > General Settings > Network Settings > Advanced on the printer’s control panel, andthen check the IP address and the subnet mask assigned to the printer.
Restart the wireless router or reset the network settings for the printer.
& “Re-setting the Network Connection” on page 268
There is a problem with the network settings on the computer.
Solutions
Try accessing any website from your computer to make sure that your computer's network settings arecorrect. If you cannot access any website, there is a problem on the computer.
Check the network connection of the computer. See the documentation provided with the computer fordetails.
The printer has been connected by Ethernet using devices that support IEEE802.3az (EnergyEfficient Ethernet).
Solutions
When you connect the printer by Ethernet using devices that support IEEE802.3az (Energy EfficientEthernet), the following problems may occur depending on the hub or router that you are using.
❏ Connection becomes unstable, the printer is connected and disconnected again and again.
❏ Cannot connect to the printer.
Solving Problems > The Printer Does Not Work as Expected > Cannot Send or Receive Faxes
217
❏ The communication speed becomes slow.
Follow the steps below to disable IEEE802.3az for the printer and then connect.
1. Remove the Ethernet cable connected to the computer and the printer.
2. When IEEE802.3az for the computer is enabled, disable it.
See the documentation provided with the computer for details.
3. Connect the computer and the printer with an Ethernet cable directly.
4. On the printer, print a network connection report.
“Printing a Network Connection Report” on page 286
5. Check the printer's IP address on the network connection report.
6. On the computer, access Web Config.
Launch a Web browser, and then enter the printer's IP address.
“Running Web Config on a Web Browser” on page 307
7. Select the Network Settings tab > Wired LAN.
8. Select OFF for IEEE 802.3az.
9. Click Next.
10. Click OK.
11. Remove the Ethernet cable connected to the computer and the printer.
12. If you disabled IEEE802.3az for the computer in step 2, enable it.
13. Connect the Ethernet cables that you removed in step 1 to the computer and the printer.
If the problem still occurs, devices other than the printer may be causing the problem.
The Printer Cannot Connect by USB (Windows)The following causes can be considered.
The USB cable is not plugged into the electrical outlet correctly.
Solutions
Connect the USB cable securely to the printer and the computer.
There is a problem with the USB hub.
Solutions
If you are using a USB hub, try to connect the printer directly to the computer.
Solving Problems > The Printer Does Not Work as Expected > Cannot Send or Receive Faxes
218

There is a problem with the USB cable or the USB inlet.
Solutions
If the USB cable cannot be recognized, change the port, or change the USB cable.
You need to reconfigure the USB connection.
Solutions
Disconnect the USB cable from the computer. Right-click on the printer icon displayed on the computer,and then select Remove Device. Next, connect the USB cable to the computer.
If you cannot use the USB cable, re-set the USB connection by following the steps for changing theconnection method to a computer. See the related information link below for details.
& “Making Settings for Connecting to the Computer” on page 269
Cannot Send or Receive Faxes Even Though a Connection has been CorrectlyEstablished (Windows)
The software is not installed.
Solutions
Make sure that the PC-FAX driver have been installed on the computer. The PC-FAX driver is installedwith FAX Utility. Follow the steps below to check if it is installed.
Make sure the printer (fax) is displayed in Devices and Printers, Printer, or Printers and OtherHardware. The printer (fax) is displayed as "EPSON XXXXX (FAX)". If the printer (fax) is not displayed,uninstall and then re-install the FAX Utility. See the following to access Devices and Printers, Printer, orPrinters and Other Hardware.
❏ Windows 10Click on the start button, and then select Windows System > Control Panel > View devices andprinters in Hardware and Sound.
❏ Windows 8.1/Windows 8Select Desktop > Settings > Control Panel > View devices and printers in Hardware and Sound orHardware.
Solving Problems > The Printer Does Not Work as Expected > Cannot Send or Receive Faxes
219
❏ Windows 7Click the start button, and select Control Panel > View devices and printers in Hardware and Soundor Hardware.
❏ Windows VistaClick the start button, and select Control Panel > Printers in Hardware and Sound.
❏ Windows XPClick the start button, and select Settings > Control Panel > Printers and Other Hardware > Printersand Faxes.
User authentication failed when a fax is sent from a computer.
Solutions
Set the username and password in the printer driver. When sending a fax from a computer when thesecurity function that allows administrators to restrict users from changing the printer's fax function isset, user authentication is performed with the username and password set in the printer driver.
There are some problems with fax connection and fax settings.
Solutions
Try the resolutions for fax connection and fax settings.
Cannot Send and Receive Faxes (Mac OS)
Make sure the computer and the printer are connected correctly. The cause and solution to the problem differdepending on whether or not they are connected.
Checking the Connection Status
Use EPSON Status Monitor to check the connection status for the computer and the printer.
1. Select System Preferences from the Apple menu > Printers & Scanners (or Print & Scan, Print & Fax), andthen select the printer.
2. Click Options & Supplies > Utility > Open Printer Utility.
3. Click EPSON Status Monitor.
When the remaining ink levels are displayed, a connection has been successfully established between the computerand the printer.
Check the following if a connection has not been established.
❏ The printer is not recognized over a network connection“Cannot connect to a Network” on page 189
❏ The printer is not recognized using a USB connection“The Printer Cannot Connect by USB (Mac OS)” on page 192
Check the following if a connection has been established.
❏ The printer is recognized, but printing cannot be performed.“Cannot Print Even Though a Connection has been Established (Mac OS)” on page 192
Solving Problems > The Printer Does Not Work as Expected > Cannot Send or Receive Faxes
220
Cannot connect to a NetworkThe problem could be one of the following issues.
Something is wrong with the network devices for Wi-Fi connection.
Solutions
Turn off the devices you want to connect to the network. Wait for about 10 seconds, and then turn on thedevices in the following order; wireless router, computer or smart device, and then printer. Move theprinter and computer or smart device closer to the wireless router to help with radio wavecommunication, and then try to make network settings again.
Devices cannot receive signals from the wireless router because they are too far apart.
Solutions
After moving the computer or the smart device and the printer closer to the wireless router, turn off thewireless router, and then turn it back on.
When changing the wireless router, the settings do not match the new router.
Solutions
Make the connection settings again so that they match the new wireless router.
& “When Replacing the Wireless Router” on page 269
The SSIDs connected from the computer or smart device and computer are different.
Solutions
When you are using multiple wireless routers at the same time or the wireless router has multiple SSIDsand devices are connected to different SSIDs, you cannot connect to the wireless router.
Solving Problems > The Printer Does Not Work as Expected > Cannot Send or Receive Faxes
221
Connect the computer or smart device to the same SSID as the printer.
A privacy separator on the wireless router is available.
Solutions
Most wireless routers have a privacy separator feature that blocks communication between connecteddevices. If you cannot communicate between the printer and the computer or smart device even if theyare connected to the same network, disable the privacy separator on the wireless router. See the manualprovided with the wireless router for details.
The IP address is incorrectly assigned.
Solutions
If the IP address assigned to the printer is 169.254.XXX.XXX, and the subnet mask is 255.255.0.0, the IPaddress may not be assigned correctly.
Select Settings > General Settings > Network Settings > Advanced on the printer’s control panel, andthen check the IP address and the subnet mask assigned to the printer.
Restart the wireless router or reset the network settings for the printer.
& “Re-setting the Network Connection” on page 268
There is a problem with the network settings on the computer.
Solutions
Try accessing any website from your computer to make sure that your computer's network settings arecorrect. If you cannot access any website, there is a problem on the computer.
Check the network connection of the computer. See the documentation provided with the computer fordetails.
The printer has been connected by Ethernet using devices that support IEEE802.3az (EnergyEfficient Ethernet).
Solutions
When you connect the printer by Ethernet using devices that support IEEE802.3az (Energy EfficientEthernet), the following problems may occur depending on the hub or router that you are using.
❏ Connection becomes unstable, the printer is connected and disconnected again and again.
❏ Cannot connect to the printer.
Solving Problems > The Printer Does Not Work as Expected > Cannot Send or Receive Faxes
222
❏ The communication speed becomes slow.
Follow the steps below to disable IEEE802.3az for the printer and then connect.
1. Remove the Ethernet cable connected to the computer and the printer.
2. When IEEE802.3az for the computer is enabled, disable it.
See the documentation provided with the computer for details.
3. Connect the computer and the printer with an Ethernet cable directly.
4. On the printer, print a network connection report.
“Printing a Network Connection Report” on page 286
5. Check the printer's IP address on the network connection report.
6. On the computer, access Web Config.
Launch a Web browser, and then enter the printer's IP address.
“Running Web Config on a Web Browser” on page 307
7. Select the Network Settings tab > Wired LAN.
8. Select OFF for IEEE 802.3az.
9. Click Next.
10. Click OK.
11. Remove the Ethernet cable connected to the computer and the printer.
12. If you disabled IEEE802.3az for the computer in step 2, enable it.
13. Connect the Ethernet cables that you removed in step 1 to the computer and the printer.
If the problem still occurs, devices other than the printer may be causing the problem.
The Printer Cannot Connect by USB (Mac OS)The following causes can be considered.
The USB cable is not plugged into the electrical outlet correctly.
Solutions
Connect the USB cable securely to the printer and the computer.
There is a problem with the USB hub.
Solutions
If you are using a USB hub, try to connect the printer directly to the computer.
Solving Problems > The Printer Does Not Work as Expected > Cannot Send or Receive Faxes
223
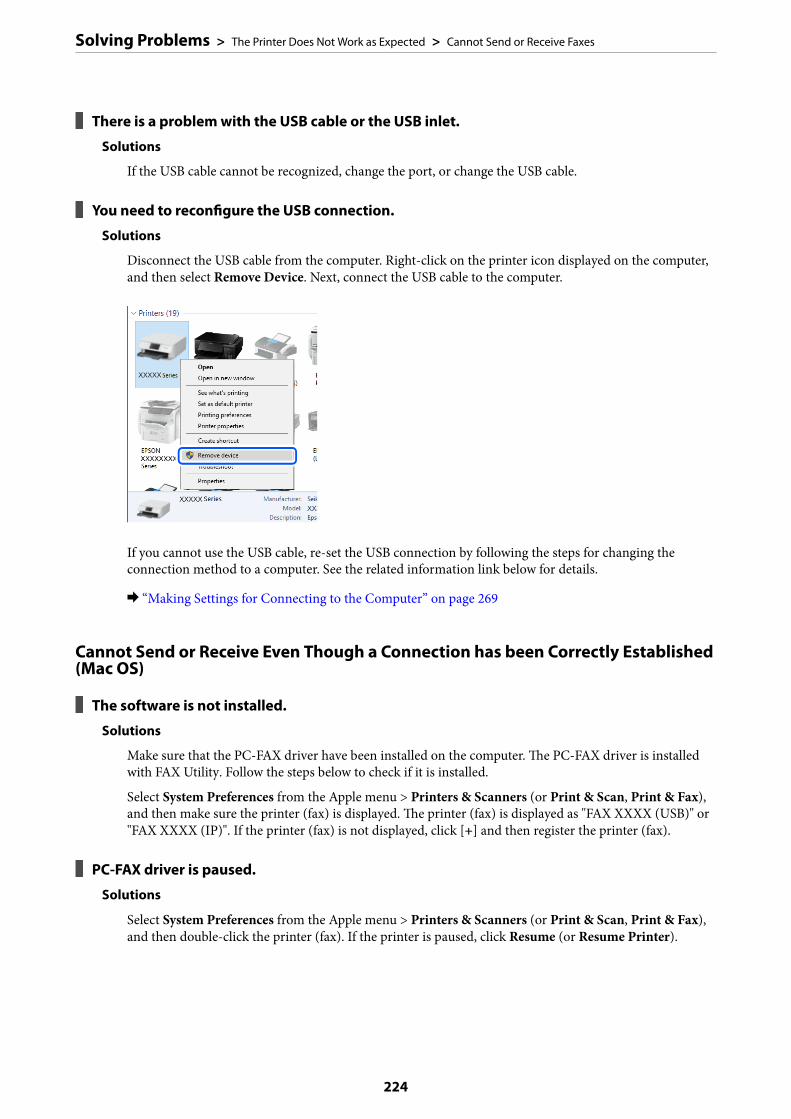
There is a problem with the USB cable or the USB inlet.
Solutions
If the USB cable cannot be recognized, change the port, or change the USB cable.
You need to reconfigure the USB connection.
Solutions
Disconnect the USB cable from the computer. Right-click on the printer icon displayed on the computer,and then select Remove Device. Next, connect the USB cable to the computer.
If you cannot use the USB cable, re-set the USB connection by following the steps for changing theconnection method to a computer. See the related information link below for details.
& “Making Settings for Connecting to the Computer” on page 269
Cannot Send or Receive Even Though a Connection has been Correctly Established(Mac OS)
The software is not installed.
Solutions
Make sure that the PC-FAX driver have been installed on the computer. The PC-FAX driver is installedwith FAX Utility. Follow the steps below to check if it is installed.
Select System Preferences from the Apple menu > Printers & Scanners (or Print & Scan, Print & Fax),and then make sure the printer (fax) is displayed. The printer (fax) is displayed as "FAX XXXX (USB)" or"FAX XXXX (IP)". If the printer (fax) is not displayed, click [+] and then register the printer (fax).
PC-FAX driver is paused.
Solutions
Select System Preferences from the Apple menu > Printers & Scanners (or Print & Scan, Print & Fax),and then double-click the printer (fax). If the printer is paused, click Resume (or Resume Printer).
Solving Problems > The Printer Does Not Work as Expected > Cannot Send or Receive Faxes
224
User authentication failed when a fax is sent from a computer.
Solutions
Set the username and password in the printer driver. When sending a fax from a computer when thesecurity function that allows administrators to restrict users from changing the printer's fax function isset, user authentication is performed with the username and password set in the printer driver.
There are some problems with fax connection and fax settings.
Solutions
Try the resolutions for fax connection and fax settings.
Error Code is Displayed on the Status MenuIf a job does not complete successfully, check the error code displayed on the history of each job. You can check theerror code by pressing the button, and then selecting Job Status. See the following table to find the problem andits solution.
Code Problem Solution
001 The product was turned off by a power failure. -
106 Cannot print from the computer due to the accesscontrol settings.
Contact your printer administrator.
107 User authentication failed. The job has beencanceled.
❏ Make sure that the user name and password arecorrect.
❏ Select Settings > General Settings > SystemAdministration > Security Settings > AccessControl. Enable the user restriction function, andthen allow the job without an authenticationinformation.
108 Confidential job data was deleted when the printerwas turned off.
-
109 The received fax was already deleted. -
110 The job was printed on one side only because thepaper loaded does not support double sidedprinting.
If you want to perform 2-sided printing, load paperthat supports 2-sided printing.
201 The memory is full. ❏ Print received faxes from Job Status in Job/Status .
❏ Delete received faxes saved in the inbox from JobStatus in Job/Status.
❏ If you are sending a monochrome fax to a singledestination, you can send it by using Direct Send.
❏ Divide your originals in two or more to send themin several batches.
202 The line was disconnected by the recipient machine. Wait for a while and then try again.
Solving Problems > The Printer Does Not Work as Expected > Error Code is Displayed on the Status Menu
225
Code Problem Solution
203 The product cannot detect the dial tone. ❏ Make sure that the phone cable is connectedcorrectly and the phone line is working.
❏ When the printer is connected to the PBX or theterminal adapter, change the Line Type setting toPBX.
❏ Select Settings > General Settings > FaxSettings > Basic Settings > Dial ToneDetection, and then disable the dial tone setting.
204 The recipient machine is busy. ❏ Wait for a while and then try again.
❏ Check the recipient's fax number.
205 The recipient machine does not answer. Wait for a while and then try again.
206 The phone cable is incorrectly connected to the LINEand EXT. port of the product.
Check the connection of the LINE port and the EXT.port of the printer.
207 The product is not connected to the phone line. Connect the phone cable to the phone line.
208 The fax could not be sent to some of the specifiedrecipients.
Print a Fax Log or Last Transmission report forprevious faxes from Fax Report in the Fax mode tocheck the failed destination. When the Save FailureData setting is enabled, you can resend a fax fromJob Status in Job/Status.
301 There is not enough storage space available to savethe data in the memory device.
❏ Increase the storage space in the memory device.
❏ Reduce the number of documents.
❏ Lower the scanning resolution or increase thecompression ratio to reduce the size of thescanned image.
302 The memory device is write-protected. Disable write protection on the memory device.
303 No folder has been created to save the scannedimage.
Insert another memory device.
304 The memory device has been removed. Reinsert the memory device.
305 An error occurred while saving the data to thememory device.
If the external device is accessed from a computer,wait for a while and then try again.
306 The memory is full. Wait until other ongoing jobs are finished.
311 A DNS error has occurred. ❏ Select Settings > General Settings > NetworkSettings > Advanced > TCP/IP, and then checkthe DNS settings.
❏ Check the DNS settings for the server, thecomputer, or the access point.
312 An authentication error has occurred. Select Settings > General Settings > NetworkSettings > Advanced > Email Server > ServerSettings, and then check the server settings.
Solving Problems > The Printer Does Not Work as Expected > Error Code is Displayed on the Status Menu
226

Code Problem Solution
313 A communication error has occurred. ❏ Print a network connection report to check if theprinter is connected to the network.
❏ Select Settings > General Settings > NetworkSettings > Advanced > Email Server > ServerSettings to check the email server settings. Youcan check the cause of the error by runningconnection check.
❏ The authentication method of the settings andthe email server may not match. When you selectOff as the authentication method, make sure theauthentication method of the email server is setto None.
314 The data size exceeds the maximum size for attachedfiles.
❏ Increase the Attached File Max Size setting inthe scan settings.
❏ Lower the scanning resolution or increase thecompression ratio to reduce the size of thescanned image.
315 The memory is full. Retry after other ongoing jobs are finished.
321 A DNS error has occurred. ❏ Select Settings > General Settings > NetworkSettings > Advanced > TCP/IP, and then checkthe DNS settings.
❏ Check the DNS settings for the server, thecomputer, or the access point.
322 An authentication error has occurred. Check the Location settings.
323 A communication error has occurred. ❏ Check the Location settings.
❏ Print a network connection report to check if theprinter is connected to the network.
324 A file with the same name already exists in thespecified folder.
❏ Delete the file with the same name.
❏ Change the file name prefix in File Settings.
325
326
There is not enough storage space available in thespecified folder.
❏ Increase the storage space in the specified folder.
❏ Reduce the number of documents.
❏ Lower the scanning resolution or increase thecompression ratio to reduce the size of thescanned image.
327 The memory is full. Wait until other ongoing jobs are finished.
328 The destination was wrong or the destination doesnot exist.
Check the Location settings.
331 A communication error occurred while acquiring thedestination list.
Print a network connection report to check if theprinter is connected to the network.
332 There is not enough storage space available to savethe scanned image in the destination storage.
Reduce the number of documents.
333 The destination could not be found because thedestination information was uploaded to the serverbefore sending the scanned image.
Select the destination again.
Solving Problems > The Printer Does Not Work as Expected > Error Code is Displayed on the Status Menu
227

Code Problem Solution
334 An error occurred while sending the scanned image. -
341 A communication error has occurred. ❏ Check the connections for the printer and thecomputer. If you are connecting over a network,print a network connection report to check if theprinter is connected to the network.
❏ Make sure that Epson Event Manager is installedon the computer.
401 There is not enough storage space available to savethe data in the memory device.
Increase the storage space in the memory device.
402 The memory device is write-protected. Disable write protection on the memory device.
404 The memory device has been removed. Reinsert the memory device.
405 An error occurred while saving the data to thememory device.
❏ Reinsert the memory device.
❏ Use a different memory device on which you havecreated a folder using the Create a folder to savefax data function.
411 A DNS error has occurred. ❏ Select Settings > General Settings > NetworkSettings > Advanced > TCP/IP, and then checkthe DNS settings.
❏ Check the DNS settings for the server, thecomputer, or the access point.
412 An authentication error has occurred. Select Settings > General Settings > NetworkSettings > Advanced > Email Server > ServerSettings, and then check the server settings.
413 A communication error has occurred. ❏ Select Settings > General Settings > NetworkSettings > Advanced > Email Server > ServerSettings to check the email server settings. Youcan check the cause of the error by runningconnection check.
❏ The authentication method of the settings andthe email server may not match. When you selectOff as the authentication method, make sure theauthentication method of the email server is setto None.
❏ Print a network connection report to check if theprinter is connected to the network.
421 A DNS error has occurred. ❏ Select Settings > General Settings > NetworkSettings > Advanced > TCP/IP, and then checkthe DNS settings.
❏ Check the DNS settings for the server, thecomputer, or the access point.
422 An authentication error has occurred. Select Settings > General Settings > Fax Settings >Receive Settings > Save/Forward Settings, andthen check the settings of the folder selected inSave/Forward Destination.
Solving Problems > The Printer Does Not Work as Expected > Error Code is Displayed on the Status Menu
228
Code Problem Solution
423 A communication error has occurred. ❏ Print a network connection report to check if theprinter is connected to the network.
❏ Select Settings > General Settings > FaxSettings > Receive Settings > Save/ForwardSettings, and then check the settings of thefolder selected in Save/Forward Destination.
425 There is not enough storage space available in theforwarding destination folder.
Increase the storage space in the forwardingdestination folder.
428 The destination was wrong or the destination doesnot exist.
Select Settings > General Settings > Fax Settings >Receive Settings > Save/Forward Settings, andthen check the settings of the folder selected inSave/Forward Destination.
Cannot Operate the Printer as Expected
Operations are Slow
Printing Is Too SlowThe following causes can be considered.
Unnecessary applications are running.
Solutions
Close any unnecessary applications on your computer or smart device.
The print quality is set to high.
Solutions
Lower the quality setting.
Bidirectional printing is disabled.
Solutions
Enable the bidirectional (or high speed) setting. When this setting is enabled, the print head prints whilemoving in both directions, and the printing speed increases.
❏ Control panelSelect Settings > General Settings > Printer Settings, and then enable Bidirectional.
❏ WindowsSelect Bidirectional Printing on the printer driver's More Options tab.
❏ Mac OSSelect System Preferences from the Apple menu > Printers & Scanners (or Print & Scan, Print&Fax), and then select the printer. Click Options & Supplies > Options (or Driver). Select On as theBidirectional Printing setting.
Solving Problems > The Printer Does Not Work as Expected > Cannot Operate the Printer as Expected
229

Quiet Mode is enabled.
Solutions
Disable Quiet Mode. The printing speed slows down when the printer is running in Quiet Mode.
❏ Control panel
Select on the home screen, and then select Off.
❏ WindowsSelect Off as the Quiet Mode setting on the printer driver's Main tab.
❏ Mac OSSelect System Preferences from the Apple menu > Printers & Scanners (or Print & Scan, Print &Fax), and then select the printer. Click Options & Supplies > Options (or Driver). Select Off as theQuiet Mode setting.
Printing Slows Down Dramatically During Continuous Printing
The function that prevents the printer mechanism from overheating and being damaged isoperating.
Solutions
You can continue printing. To return to normal printing speed, leave the printer idle for at least 30minutes. Printing speed does not return to normal if the power is off.
Scanning Speed Is Slow
Scanning at a high resolution.
Solutions
Try scanning at a lower resolution.
LCD Screen Gets Dark
The printer is in sleep mode.
Solutions
Tap anywhere on the LCD screen to return it to its former state.
Touch Screen Does Not RespondThe following causes can be considered.
A protective sheet has been stuck on the touch screen.
Solutions
If you stick a protective sheet on the touch screen, the optical touch screen may not respond. Remove thesheet.
Solving Problems > The Printer Does Not Work as Expected > Cannot Operate the Printer as Expected
230

The screen is smeared.
Solutions
Turn off the printer, and then wipe the screen using a soft, dry cloth. If the screen is smeared, it may notrespond.
Cannot Operate from the Control Panel
When the user feature restriction is enabled, a user ID and password are required to print.
Solutions
If you do not know the password, contact your printer administrator.
"x" is Displayed on the Screen and you Cannot Select Photos
The image file is not supported.
"!" is displayed on the LCD screen when the image file is not supported by the product. Use files supported by theproduct.
Related Information
& “Supported Data Specifications” on page 341
Memory Device Is not Recognized
The memory device is set to disabled.
Solutions
On the control panel, select Settings > General Settings > Printer Settings > Memory Device Interface,and the enable the memory device.
Cannot Save Data to a Memory DeviceThe following causes can be considered.
The memory device is write-protected.
Solutions
Disable write protection on the memory device.
There is not enough free space on the memory device.
Solutions
Delete unnesesary data or insert another memory device.
Solving Problems > The Printer Does Not Work as Expected > Cannot Operate the Printer as Expected
231
Operation Sounds Are Loud
Quiet Mode is disabled.
Solutions
If operations sounds are too loud, enable Quiet Mode. Enabling this feature may reduce printing speed.
❏ Control panel
Select on the home screen, and then enable Quiet Mode.
❏ Windows printer driverEnable Quiet Mode on the Main tab.
❏ Mac OS printer driverSelect System Preferences from the Apple menu > Printers & Scanners (or Print & Scan, Print &Fax), and then select the printer. Click Options & Supplies > Options (or Driver). Select On as theQuiet Mode setting.
The Date and Time Are Incorrect
Error occurred in power supply.
Solutions
After a power failure caused by a lightning strike or if the power is left off for a long time, the clock mayshow the wrong time. Set the date and the time correctly in Settings > General Settings > Basic Settings> Date/Time Settings on the control panel.
The Root Certificate Needs to be Updated
The root certificate has expired.
Solutions
Run Web Config, and then update the root certificate.
Cannot Cancel Printing from a Computer Running Mac OS X v10.6.8
There is a problem with your AirPrint setup.
Solutions
Run Web Config, and then select Port9100 as the Top Priority Protocol setting in AirPrint Setup. SelectSystem Preferences from the Apple menu > Printers & Scanners (or Print & Scan, Print & Fax), removethe printer, and then add the printer again.
& “Application for Configuring Printer Operations (Web Config)” on page 307
Solving Problems > The Printer Does Not Work as Expected > Cannot Operate the Printer as Expected
232
Forgot Your Password
You need help from service personnel.
Solutions
If you forget the administrator's password, contact Epson support.
Copies are Made or Faxes are Sent Unintentionally
Foreign objects are touching the optical touch panel.
Solutions
Select Settings > General Settings > Basic Settings > Wake from Sleep, and then turn off Wake withLCD Screen Touch. The printer will not return from sleep mode (power saving) until you press the Pbutton.
Sender's Fax Number Not Displayed
The sender's fax number is not set to the sender's machine.
Solutions
The sender may not have set the fax number. Contact the sender.
Sender's Fax Number Displayed on Received Faxes is Wrong
The sender's fax number set to the sender's machine is wrong.
Solutions
The sender may have set the fax number incorrectly. Contact the sender.
Cannot Make Calls on the Connected Telephone
The phone cable is not connected correctly.
Solutions
Connect the telephone to the EXT. port on the printer, and pick up the receiver. If you cannot hear a dialtone through the receiver, connect the phone cable correctly.
Answering Machine Cannot Answer Voice Calls
The printer's Rings to Answer setting is set to less than the number of rings for youranswering machine.
Solutions
Select Slow(9,600bps) in Settings > General Settings > Fax Settings > Basic Settings > Rings toAnswer, and then set to a number higher than the number of rings for your answering machine.
Solving Problems > The Printer Does Not Work as Expected > Cannot Operate the Printer as Expected
233
A Message is Displayed on the LCD ScreenIf an error message is displayed on the LCD screen, follow the on-screen instructions or the solutions below tosolve the problem.
Error Messages Solutions
Printer error. Turn the power off and on again. Ifthe problem persists, contact Epson Support.
Remove any paper or protective material in the printer. If the errormessage is still displayed, contact Epson support.
Printer error. Contact Epson Support. Non-printing features are available.
The printer may be damaged. Contact Epson support or an authorisedEpson service provider to request repairs. However, non-printingfeatures such as scanning are available.
Printer error. For details, see yourdocumentation.
The printer may be damaged. Contact Epson support or an authorisedEpson service provider to request repairs.
Paper out in XX. Load paper. Paper Size: XX/Paper Type: XX
Load paper in the displayed paper source, and if you load paper in thepaper cassette, insert it all the way.
The printer's borderless printing ink pad isnearing the end of its service life. It is not a user-replaceable part. Please contact Epson support.
Contact Epson or an authorised Epson service provider to replace theborderless printing ink pad*. It is not a user-serviceable part.
Tap OK to resume printing.
The printer's borderless printing ink pad hasreached the end of its service life. It is not a user-replaceable part. Please contact Epson support.
Contact Epson or an authorised Epson service provider to replace theborderless printing ink pad*. It is not a user-serviceable part.
Borderless printing is not available, but printing with a border isavailable.
Paper Setup Auto Display is set to Off. Somefeatures may not be available. For details, seeyour documentation.
If Paper Setup Auto Display is disabled, you cannot use AirPrint.
No dial tone is detected. This problem might be resolved by selecting Settings > GeneralSettings > Fax Settings > Basic Settings > Line Type and thenselecting PBX. If your phone system requires an external access code toget an outside line, set the access code after selecting PBX. Use # (hash)instead of the actual access code when entering an outside fax number.This makes connection more secure.
If the error message is still displayed, set the Dial Tone Detectionsettings to disabled. However, disabling this feature may drop the firstdigit of a fax number and send the fax to the wrong number.
Failed to receive faxes because the fax datacapacity is full. Touch the Job/Status at thebottom of the Home Screen for details.
Received faxes may accumulate without being processed due to thefollowing reasons.
❏ Cannot print because a printer error has occurred.
Clear the printer error. To check the details and solutions to the error,
press the button and then select Printer Status.
❏ Cannot save in the computer or the memory device.
To check whether or not received faxes have been saved, press the
button and then select Job Status. To save received faxes, turnon the computer or connect a memory device to the printer.
The combination of the IP address and thesubnet mask is invalid. See your documentationfor more details.
Enter the correct IP address or default gateway. Contact the person whosetup the network for assistance.
Solving Problems > A Message is Displayed on the LCD Screen
234
Error Messages Solutions
To use cloud services, update the root certificatefrom the Epson Web Config utility.
Run Web Config, and then update the root certificate.
Check that the printer driver is installed on thecomputer and that the port settings for theprinter are correct.
Make sure the printer port is selected correctly in Property > Port fromthe Printer menu as follows.
Select "USBXXX" for a USB connection, or "EpsonNet Print Port" for anetwork connection.Check that the printer driver is installed on the
computer and that the port settings for theprinter are correct.
Recovery Mode
Update Firmware
The printer has started in recovery mode because the firmware updatefailed. Follow the steps below to try to update the firmware again.
1. Connect the computer and the printer with a USB cable. (Duringrecovery mode, you cannot update the firmware over a networkconnection.)
2. Visit your local Epson website for further instructions.
*In some print cycles a very small amount of surplus ink may be collected in the borderless printing ink pad. Toprevent ink leakage from the pad, the product is designed to stop borderless printing when the pad has reached itslimit. Whether and how often this is required will vary according to the number of pages you print using theborderless print option. The need for replacement of the pad does not mean that your printer has ceased to operatein accordance with its specifications. The printer will advise you when the pad requires replacing and this can onlybe performed by an authorised Epson Service provider. The Epson warranty does not cover the cost of thisreplacement.
Paper Gets JammedCheck the error displayed on the control panel and follow the instructions to remove the jammed paper includingany torn pieces. The LCD screen displays an animation that shows you how to remove jammed paper. Next, selectOK to clear the error.
!Caution:
Never touch the buttons on the control panel while your hand is inside the printer. If the printer starts operating, itcould cause an injury. Be careful not to touch the protruding parts to avoid injury.
cImportant:
❏ Remove the jammed paper carefully. Removing the paper vigorously may cause damage to the printer.
❏ When removing jammed paper, avoid tilting the printer, placing it vertically, or turning it upside down;otherwise ink may leak.
Preventing Paper JamsCheck the following if paper jams occur frequently.
❏ Place the printer on a flat surface and operate in the recommended environmental conditions.“Environmental Specifications” on page 342
Solving Problems > Paper Gets Jammed > Preventing Paper Jams
235
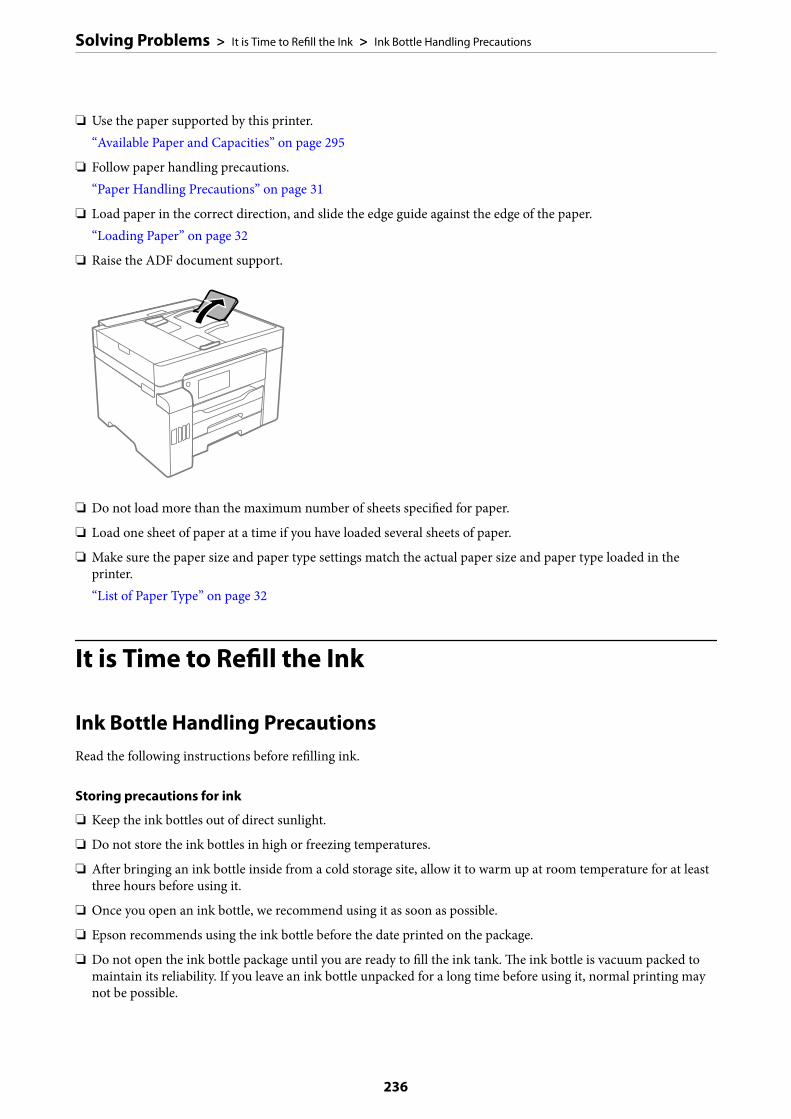
❏ Use the paper supported by this printer.“Available Paper and Capacities” on page 295
❏ Follow paper handling precautions.“Paper Handling Precautions” on page 31
❏ Load paper in the correct direction, and slide the edge guide against the edge of the paper.“Loading Paper” on page 32
❏ Raise the ADF document support.
❏ Do not load more than the maximum number of sheets specified for paper.
❏ Load one sheet of paper at a time if you have loaded several sheets of paper.
❏ Make sure the paper size and paper type settings match the actual paper size and paper type loaded in theprinter.“List of Paper Type” on page 32
It is Time to Refill the Ink
Ink Bottle Handling PrecautionsRead the following instructions before refilling ink.
Storing precautions for ink
❏ Keep the ink bottles out of direct sunlight.
❏ Do not store the ink bottles in high or freezing temperatures.
❏ After bringing an ink bottle inside from a cold storage site, allow it to warm up at room temperature for at leastthree hours before using it.
❏ Once you open an ink bottle, we recommend using it as soon as possible.
❏ Epson recommends using the ink bottle before the date printed on the package.
❏ Do not open the ink bottle package until you are ready to fill the ink tank. The ink bottle is vacuum packed tomaintain its reliability. If you leave an ink bottle unpacked for a long time before using it, normal printing maynot be possible.
Solving Problems > It is Time to Refill the Ink > Ink Bottle Handling Precautions
236
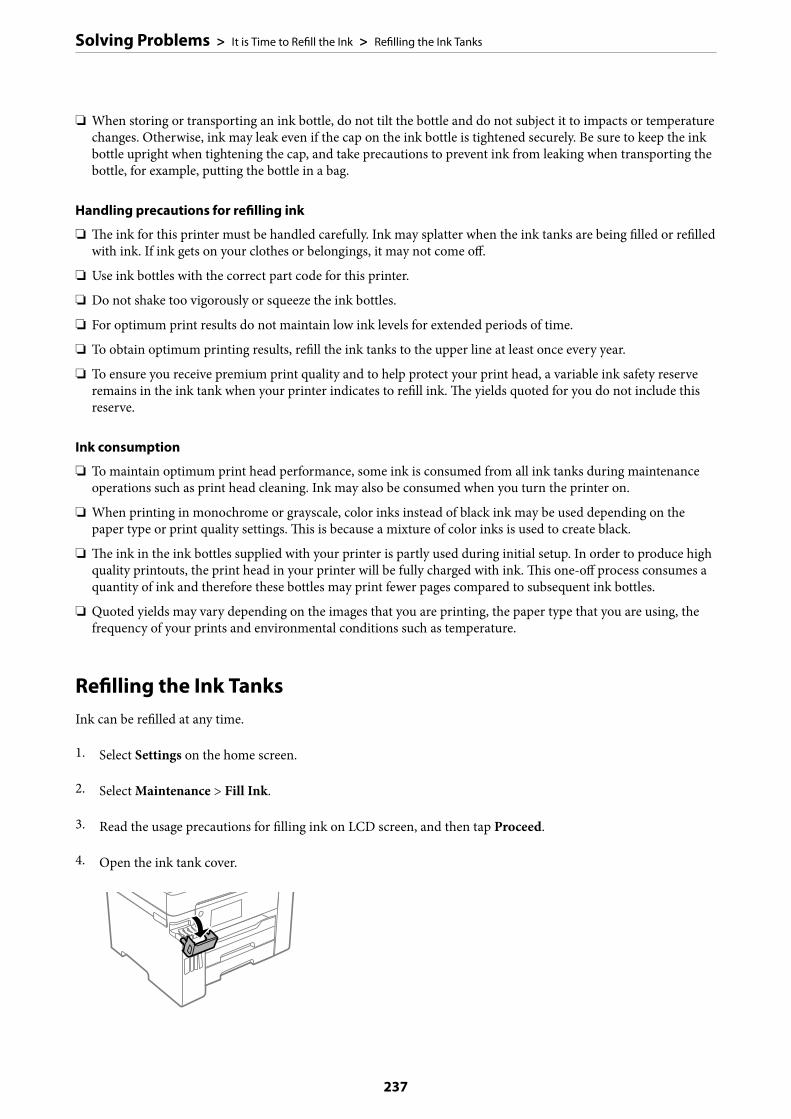
❏ When storing or transporting an ink bottle, do not tilt the bottle and do not subject it to impacts or temperaturechanges. Otherwise, ink may leak even if the cap on the ink bottle is tightened securely. Be sure to keep the inkbottle upright when tightening the cap, and take precautions to prevent ink from leaking when transporting thebottle, for example, putting the bottle in a bag.
Handling precautions for refilling ink
❏ The ink for this printer must be handled carefully. Ink may splatter when the ink tanks are being filled or refilledwith ink. If ink gets on your clothes or belongings, it may not come off.
❏ Use ink bottles with the correct part code for this printer.
❏ Do not shake too vigorously or squeeze the ink bottles.
❏ For optimum print results do not maintain low ink levels for extended periods of time.
❏ To obtain optimum printing results, refill the ink tanks to the upper line at least once every year.
❏ To ensure you receive premium print quality and to help protect your print head, a variable ink safety reserveremains in the ink tank when your printer indicates to refill ink. The yields quoted for you do not include thisreserve.
Ink consumption
❏ To maintain optimum print head performance, some ink is consumed from all ink tanks during maintenanceoperations such as print head cleaning. Ink may also be consumed when you turn the printer on.
❏ When printing in monochrome or grayscale, color inks instead of black ink may be used depending on thepaper type or print quality settings. This is because a mixture of color inks is used to create black.
❏ The ink in the ink bottles supplied with your printer is partly used during initial setup. In order to produce highquality printouts, the print head in your printer will be fully charged with ink. This one-off process consumes aquantity of ink and therefore these bottles may print fewer pages compared to subsequent ink bottles.
❏ Quoted yields may vary depending on the images that you are printing, the paper type that you are using, thefrequency of your prints and environmental conditions such as temperature.
Refilling the Ink TanksInk can be refilled at any time.
1. Select Settings on the home screen.
2. Select Maintenance > Fill Ink.
3. Read the usage precautions for filling ink on LCD screen, and then tap Proceed.
4. Open the ink tank cover.
Solving Problems > It is Time to Refill the Ink > Refilling the Ink Tanks
237

5. Open the ink tank cap.
cImportant:
Make sure that the color of the ink tank matches the ink color that you want to refill.
6. While holding the ink bottle upright, turn the cap slowly to remove it.
cImportant:
❏ Epson recommends the use of genuine Epson ink bottles.
❏ Be careful not to spill any ink.
Solving Problems > It is Time to Refill the Ink > Refilling the Ink Tanks
238
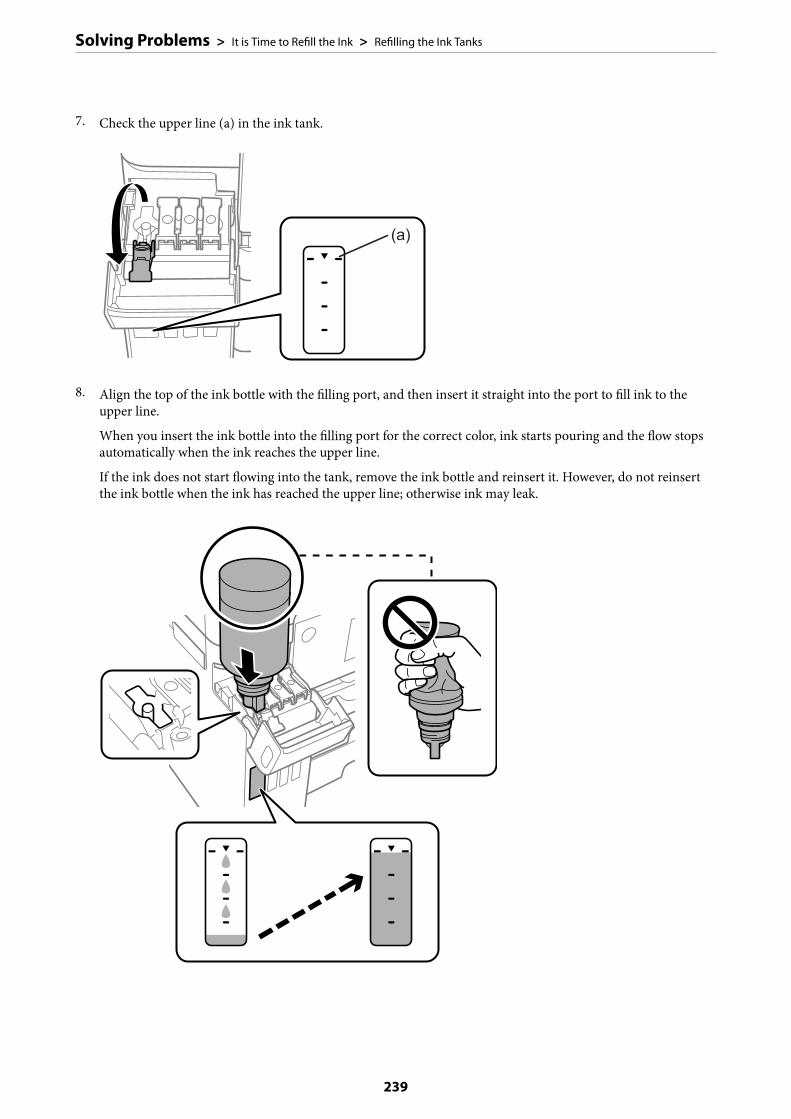
7. Check the upper line (a) in the ink tank.
8. Align the top of the ink bottle with the filling port, and then insert it straight into the port to fill ink to theupper line.
When you insert the ink bottle into the filling port for the correct color, ink starts pouring and the flow stopsautomatically when the ink reaches the upper line.
If the ink does not start flowing into the tank, remove the ink bottle and reinsert it. However, do not reinsertthe ink bottle when the ink has reached the upper line; otherwise ink may leak.
Solving Problems > It is Time to Refill the Ink > Refilling the Ink Tanks
239

cImportant:
Do not allow the top of the ink bottle to hit against any objects after removing its cap; otherwise ink may spill.
9. When you have finished refilling the ink, remove the ink bottle, and then close the ink tank cap securely.
cImportant:
Do not leave the ink bottle inserted; otherwise the bottle may be damaged or ink may leak.
Note:If any ink remains in the ink bottle, tighten the cap and store the bottle upright for later use.
10. Close the ink tank cover firmly.
11. Follow the on-screen instructions to set the ink level of the color of the ink you refilled.
Solving Problems > It is Time to Refill the Ink > Refilling the Ink Tanks
240
cImportant:
Even if you do not refill ink up to the upper line on the ink tank, you can continue using the printer. To keep yourprinter operating at its best, however, fill ink tank up to the upper line and reset the ink level immediately.
Related Information
& “Ink Bottle Codes” on page 300& “Ink Bottle Handling Precautions” on page 236& “Cleaning Spilled ink” on page 160
It is Time to Replace the Maintenance Box
Maintenance Box Handling PrecautionsRead the following instructions before replacing the maintenance box.
❏ Do not touch the green chip on the side of the maintenance box. Doing so may prevent normal operation andprinting.
❏ Do not replace the maintenance box during printing; otherwise, ink may leak.
❏ Do not remove the maintenance box or open its cover except when replacing the maintenance box; otherwiseink may leak.
❏ Do not reuse a maintenance box which has been removed and left detached for a long period. Ink inside the boxwill have solidified and no more ink can be absorbed.
❏ Do not tilt the used maintenance box until after it is sealed in the plastic bag; otherwise ink may leak.
❏ Do not store the maintenance box in high or freezing temperatures.
❏ Keep the maintenance box out of direct sunlight.
❏ Do not drop the maintenance box or subject it to strong shocks.
❏ Do not touch the openings in the maintenance box as you may get smeared with ink.
Replacing a Maintenance BoxIn some print cycles a very small amount of surplus ink may be collected in the maintenance box. To prevent inkleakage from the maintenance box, the printer is designed to stop printing when the absorbing capacity of themaintenance box has reached its limit. Whether and how often this is required will vary according to the numberof pages you print, the type of material that you print and the number of cleaning cycles that the printer performs.
When a message is displayed prompting you to replace the maintenance box, refer to the animations displayed onthe control panel. The need for replacement of the box does not mean that your printer has ceased to operate in
Solving Problems > It is Time to Replace the Maintenance Box > Replacing a Maintenance Box
241

accordance with its specifications. The Epson warranty does not cover the cost of this replacement. It is a user-serviceable part.
Note:❏ When the maintenance box is full, you cannot print and clean the print head until it is replaced to avoid ink leakage.
However, you can perform operations that do not use ink such as scanning.
❏ When the following screen is displayed, the part cannot be replaced by users. Contact Epson support.
Related Information
& “Maintenance Box Code” on page 301& “Maintenance Box Handling Precautions” on page 241
Solving Problems > It is Time to Replace the Maintenance Box > Replacing a Maintenance Box
242
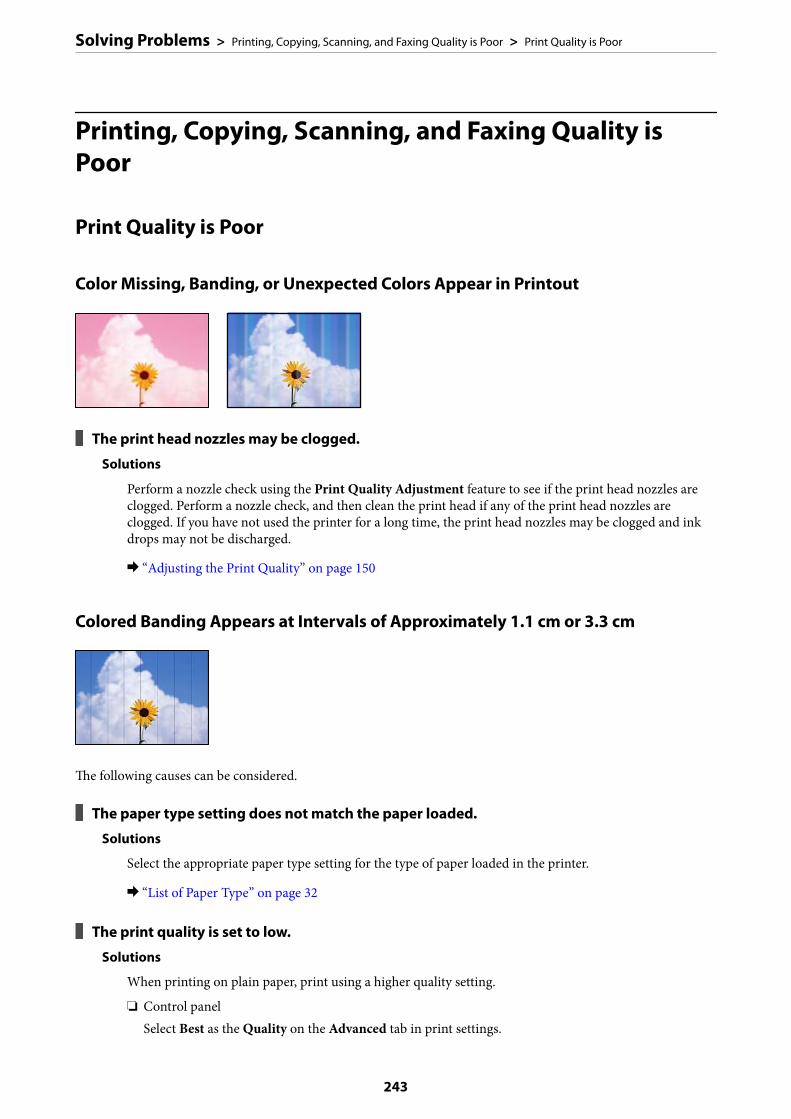
Printing, Copying, Scanning, and Faxing Quality isPoor
Print Quality is Poor
Color Missing, Banding, or Unexpected Colors Appear in Printout
The print head nozzles may be clogged.
Solutions
Perform a nozzle check using the Print Quality Adjustment feature to see if the print head nozzles areclogged. Perform a nozzle check, and then clean the print head if any of the print head nozzles areclogged. If you have not used the printer for a long time, the print head nozzles may be clogged and inkdrops may not be discharged.
& “Adjusting the Print Quality” on page 150
Colored Banding Appears at Intervals of Approximately 1.1 cm or 3.3 cm
The following causes can be considered.
The paper type setting does not match the paper loaded.
Solutions
Select the appropriate paper type setting for the type of paper loaded in the printer.
& “List of Paper Type” on page 32
The print quality is set to low.
Solutions
When printing on plain paper, print using a higher quality setting.
❏ Control panelSelect Best as the Quality on the Advanced tab in print settings.
Solving Problems > Printing, Copying, Scanning, and Faxing Quality is Poor > Print Quality is Poor
243

❏ WindowsSelect High from Quality on the printer driver's Main tab.
❏ Mac OSSelect Fine as Print Quality from the print dialog's Print Settings menu.
The print head position is out of alignment.
Solutions
Align the print head using the Print Quality Adjustment feature.
& “Adjusting the Print Quality” on page 150
Blurry Prints, Vertical Banding, or Misalignment
The following causes can be considered.
The print head position is out of alignment.
Solutions
Align the print head using the Print Quality Adjustment feature.
& “Adjusting the Print Quality” on page 150
The bidirectional printing setting is enabled.
Solutions
If print quality does not improve even after aligning the print head, disable the bidirectional setting.
During bidirectional (or high speed) printing, the print head prints while moving in both directions, andvertical lines may be misaligned. Disabling this setting may slow down printing speed but improve printquality.
❏ Control panelSelect Settings > General Settings > Printer Settings, and then disable Bidirectional.
❏ WindowsClear Bidirectional Printing on the printer driver’s More Options tab.
❏ Mac OSSelect System Preferences from the Apple menu > Printers & Scanners (or Print & Scan, Print &Fax), and then select the printer. Click Options & Supplies > Options (or Driver). Select Off as theBidirectional Printing setting.
Solving Problems > Printing, Copying, Scanning, and Faxing Quality is Poor > Print Quality is Poor
244
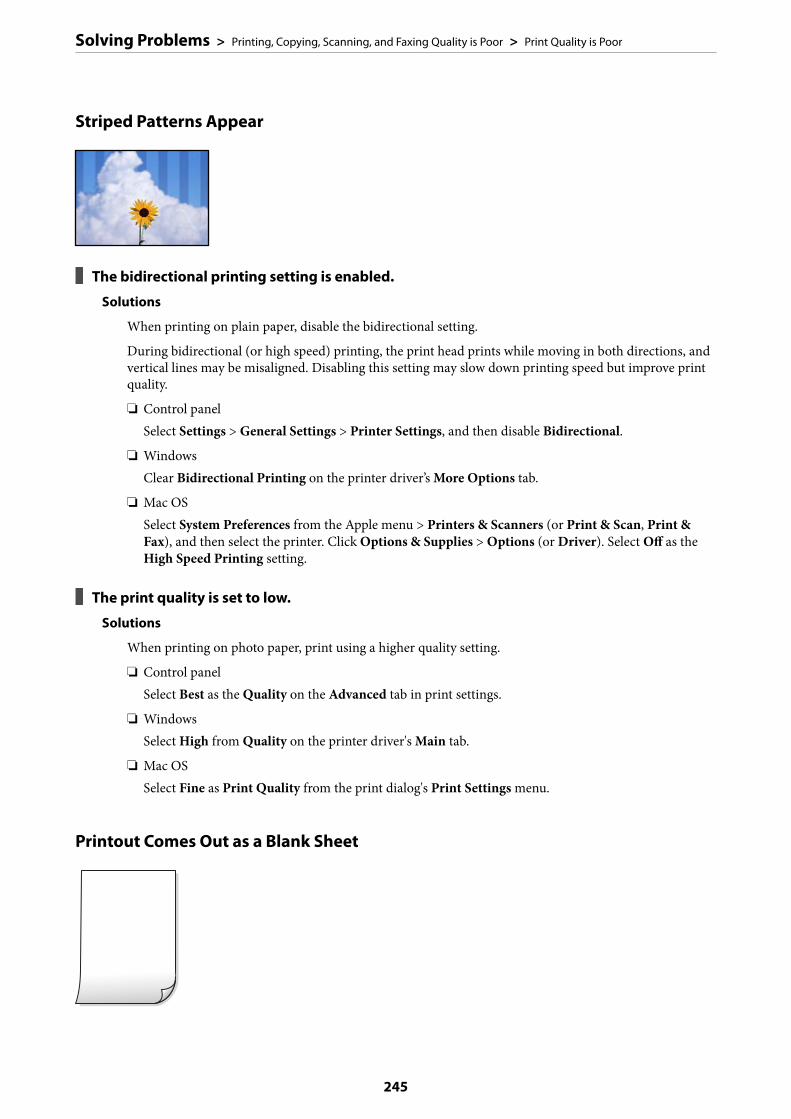
Striped Patterns Appear
The bidirectional printing setting is enabled.
Solutions
When printing on plain paper, disable the bidirectional setting.
During bidirectional (or high speed) printing, the print head prints while moving in both directions, andvertical lines may be misaligned. Disabling this setting may slow down printing speed but improve printquality.
❏ Control panelSelect Settings > General Settings > Printer Settings, and then disable Bidirectional.
❏ WindowsClear Bidirectional Printing on the printer driver’s More Options tab.
❏ Mac OSSelect System Preferences from the Apple menu > Printers & Scanners (or Print & Scan, Print &Fax), and then select the printer. Click Options & Supplies > Options (or Driver). Select Off as theHigh Speed Printing setting.
The print quality is set to low.
Solutions
When printing on photo paper, print using a higher quality setting.
❏ Control panelSelect Best as the Quality on the Advanced tab in print settings.
❏ WindowsSelect High from Quality on the printer driver's Main tab.
❏ Mac OSSelect Fine as Print Quality from the print dialog's Print Settings menu.
Printout Comes Out as a Blank Sheet
Solving Problems > Printing, Copying, Scanning, and Faxing Quality is Poor > Print Quality is Poor
245

The print head nozzles may be clogged.
Solutions
Perform a nozzle check using the Print Quality Adjustment feature to see if the print head nozzles areclogged. Perform a nozzle check, and then clean the print head if any of the print head nozzles areclogged. If you have not used the printer for a long time, the print head nozzles may be clogged and inkdrops may not be discharged.
& “Adjusting the Print Quality” on page 150
The print settings and the paper size loaded in the printer are different.
Solutions
Change the print settings according to the paper size loaded in the paper cassette. Load paper in thepaper cassette that matches the print settings.
Multiple sheets of paper are fed into the printer at the same time.
Solutions
See the following to prevent multiple sheets of paper being fed into the printer at the same time.
& “Several Sheets of Paper are Fed at a Time” on page 178
Paper Is Smeared or Scuffed
The following causes can be considered.
Paper is loaded incorrectly.
Solutions
When horizontal banding (perpendicular to the printing direction) appears, or the top or bottom of thepaper is smeared, load paper in the correct direction and slide the edge guides to the edges of the paper.
& “Loading Paper” on page 32
The paper path is smeared.
Solutions
When vertical banding (horizontal to the printing direction) appears, or the paper is smeared, clean thepaper path.
& “Cleaning the Paper Path for Ink Smears” on page 155
Solving Problems > Printing, Copying, Scanning, and Faxing Quality is Poor > Print Quality is Poor
246
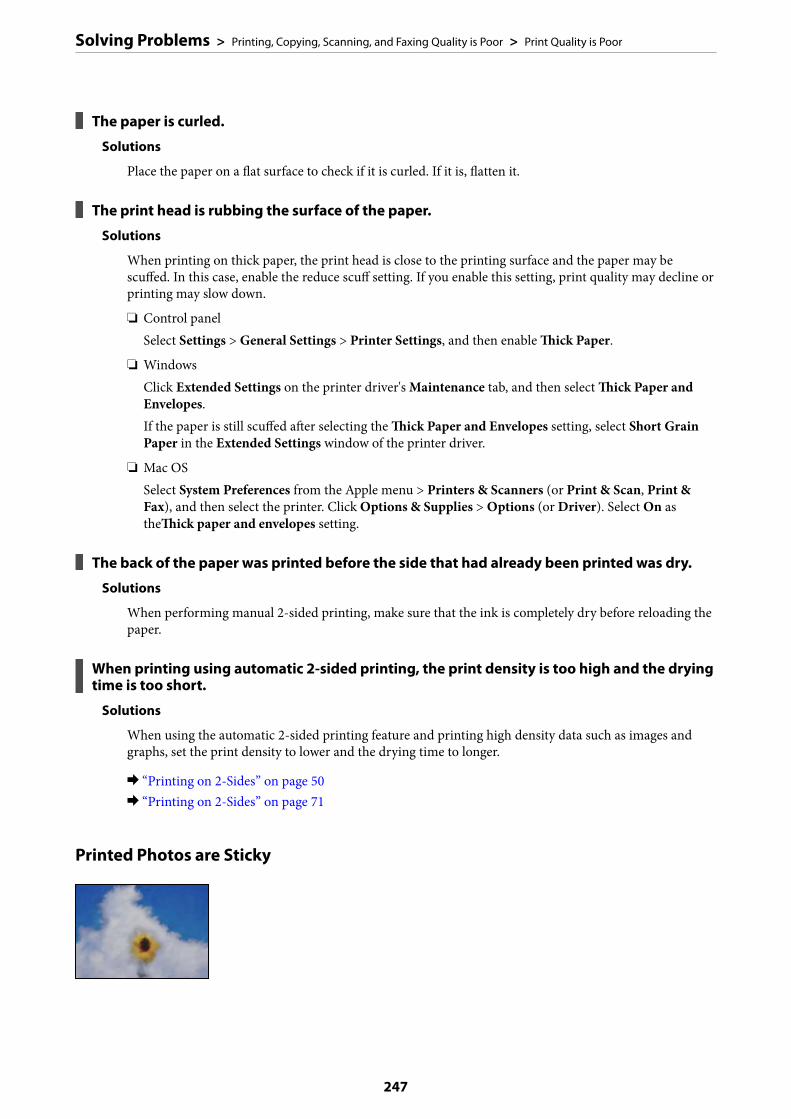
The paper is curled.
Solutions
Place the paper on a flat surface to check if it is curled. If it is, flatten it.
The print head is rubbing the surface of the paper.
Solutions
When printing on thick paper, the print head is close to the printing surface and the paper may bescuffed. In this case, enable the reduce scuff setting. If you enable this setting, print quality may decline orprinting may slow down.
❏ Control panelSelect Settings > General Settings > Printer Settings, and then enable Thick Paper.
❏ WindowsClick Extended Settings on the printer driver's Maintenance tab, and then select Thick Paper andEnvelopes.If the paper is still scuffed after selecting the Thick Paper and Envelopes setting, select Short GrainPaper in the Extended Settings window of the printer driver.
❏ Mac OSSelect System Preferences from the Apple menu > Printers & Scanners (or Print & Scan, Print &Fax), and then select the printer. Click Options & Supplies > Options (or Driver). Select On astheThick paper and envelopes setting.
The back of the paper was printed before the side that had already been printed was dry.
Solutions
When performing manual 2-sided printing, make sure that the ink is completely dry before reloading thepaper.
When printing using automatic 2-sided printing, the print density is too high and the dryingtime is too short.
Solutions
When using the automatic 2-sided printing feature and printing high density data such as images andgraphs, set the print density to lower and the drying time to longer.
& “Printing on 2-Sides” on page 50& “Printing on 2-Sides” on page 71
Printed Photos are Sticky
Solving Problems > Printing, Copying, Scanning, and Faxing Quality is Poor > Print Quality is Poor
247
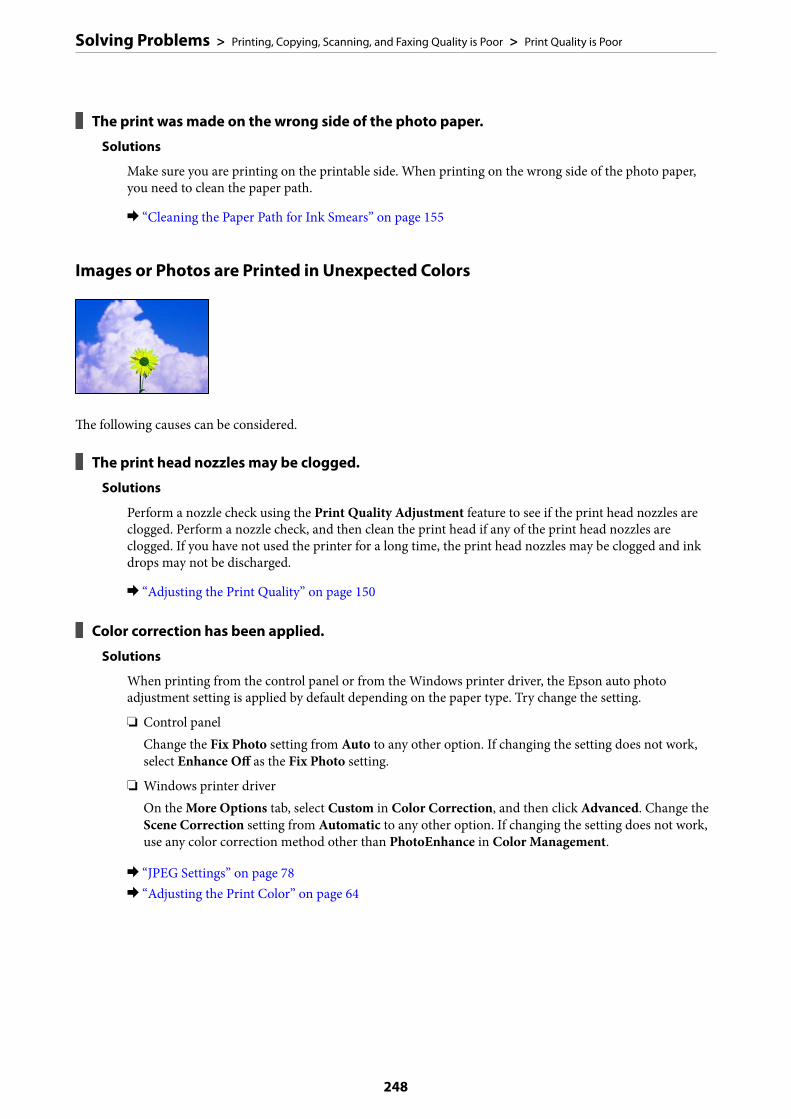
The print was made on the wrong side of the photo paper.
Solutions
Make sure you are printing on the printable side. When printing on the wrong side of the photo paper,you need to clean the paper path.
& “Cleaning the Paper Path for Ink Smears” on page 155
Images or Photos are Printed in Unexpected Colors
The following causes can be considered.
The print head nozzles may be clogged.
Solutions
Perform a nozzle check using the Print Quality Adjustment feature to see if the print head nozzles areclogged. Perform a nozzle check, and then clean the print head if any of the print head nozzles areclogged. If you have not used the printer for a long time, the print head nozzles may be clogged and inkdrops may not be discharged.
& “Adjusting the Print Quality” on page 150
Color correction has been applied.
Solutions
When printing from the control panel or from the Windows printer driver, the Epson auto photoadjustment setting is applied by default depending on the paper type. Try change the setting.
❏ Control panelChange the Fix Photo setting from Auto to any other option. If changing the setting does not work,select Enhance Off as the Fix Photo setting.
❏ Windows printer driverOn the More Options tab, select Custom in Color Correction, and then click Advanced. Change theScene Correction setting from Automatic to any other option. If changing the setting does not work,use any color correction method other than PhotoEnhance in Color Management.
& “JPEG Settings” on page 78& “Adjusting the Print Color” on page 64
Solving Problems > Printing, Copying, Scanning, and Faxing Quality is Poor > Print Quality is Poor
248

Cannot Print Without Margins
Borderless is not set in the print settings.
Solutions
Make borderless setting in the print settings. If you select a paper type that does not support borderlessprinting, you cannot select Borderless. Select a paper type that supports borderless printing.
❏ Control panelSelect Borderless as Layout.
❏ WindowsSelect Borderless on the printer driver's Main tab.
❏ Mac OSSelect a borderless paper size from Paper Size.
& “JPEG Settings” on page 78& “TIFF Settings” on page 79& “Paper for Borderless Printing” on page 298
Edges of the Image are Cropped During Borderless Printing
Because the image is slightly enlarged, the protruding area is cropped.
Solutions
Select a smaller enlargement setting.
❏ WindowsClick Settings next to the Borderless checkbox on the printer driver's Main tab, and then change thesettings.
❏ Mac OSChange the Expansion setting from the print dialog's Print Settings menu.
Solving Problems > Printing, Copying, Scanning, and Faxing Quality is Poor > Print Quality is Poor
249
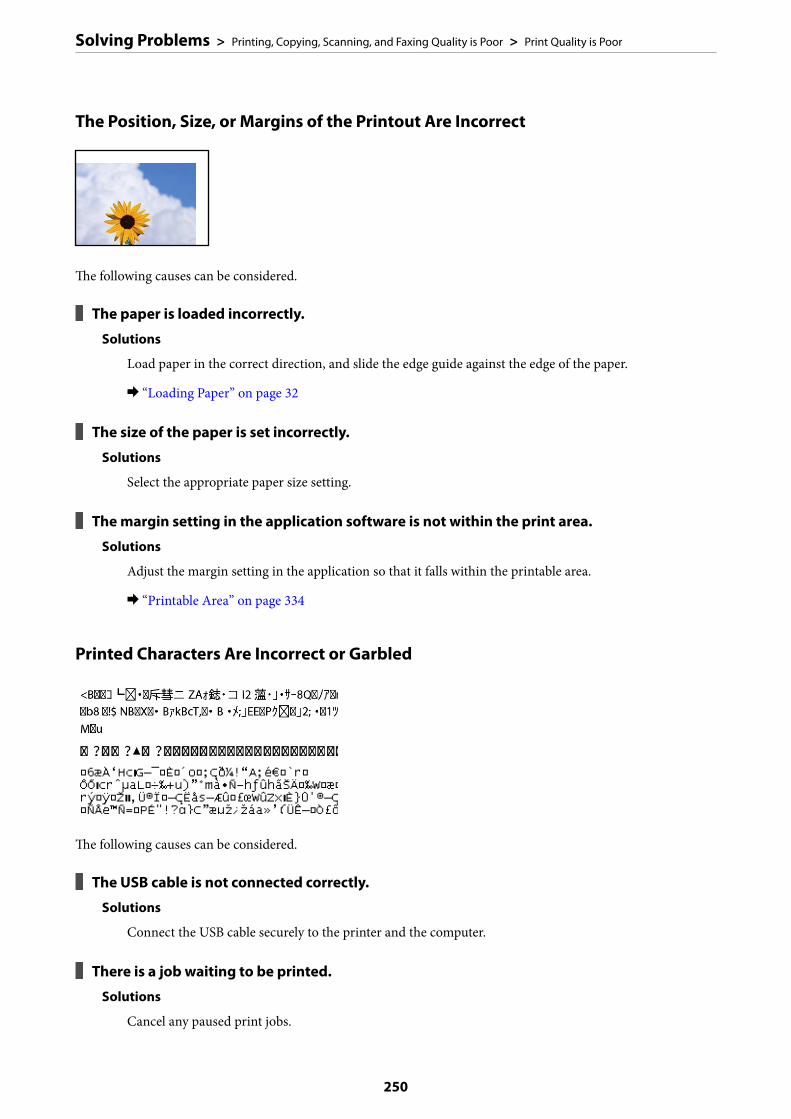
The Position, Size, or Margins of the Printout Are Incorrect
The following causes can be considered.
The paper is loaded incorrectly.
Solutions
Load paper in the correct direction, and slide the edge guide against the edge of the paper.
& “Loading Paper” on page 32
The size of the paper is set incorrectly.
Solutions
Select the appropriate paper size setting.
The margin setting in the application software is not within the print area.
Solutions
Adjust the margin setting in the application so that it falls within the printable area.
& “Printable Area” on page 334
Printed Characters Are Incorrect or Garbled
The following causes can be considered.
The USB cable is not connected correctly.
Solutions
Connect the USB cable securely to the printer and the computer.
There is a job waiting to be printed.
Solutions
Cancel any paused print jobs.
Solving Problems > Printing, Copying, Scanning, and Faxing Quality is Poor > Print Quality is Poor
250

The computer has been manually put into the Hibernate mode or the Sleep mode whileprinting.
Solutions
Do not put the computer manually into the Hibernate mode or the Sleep mode while printing. Pages ofgarbled text may be printed next time you start the computer.
You are using the printer driver for a different printer.
Solutions
Make sure that the printer driver you are using is for this printer. Check the printer name on the top ofthe printer driver window.
The Printed Image Is Inverted
The image is set to invert horizontally in the print settings.
Solutions
Clear any mirror image settings in the printer driver or the application.
❏ WindowsClear Mirror Image on the printer driver’s More Options tab.
❏ Mac OSClear Mirror Image from the print dialog's Print Settings menu.
Mosaic-Like Patterns in the Prints
Images or photos with a low resolution were printed.
Solutions
When printing images or photos, print using high-resolution data. Images on web sites are often lowresolution although they look good enough on the display, and so print quality may decline.
Solving Problems > Printing, Copying, Scanning, and Faxing Quality is Poor > Print Quality is Poor
251

Copy Quality is Poor
Color Missing, Banding, or Unexpected Colors Appear in Copies
The print head nozzles may be clogged.
Solutions
Perform a nozzle check using the Print Quality Adjustment feature to see if the print head nozzles areclogged. Perform a nozzle check, and then clean the print head if any of the print head nozzles areclogged. If you have not used the printer for a long time, the print head nozzles may be clogged and inkdrops may not be discharged.
& “Adjusting the Print Quality” on page 150
Colored Banding Appears at Intervals of Approximately 1.1 cm or 3.3 cm
The following causes can be considered.
The paper type setting does not match the paper loaded.
Solutions
Select the appropriate paper type setting for the type of paper loaded in the printer.
& “List of Paper Type” on page 32
The print head position is out of alignment.
Solutions
Align the print head using the Print Quality Adjustment feature.
& “Adjusting the Print Quality” on page 150
Solving Problems > Printing, Copying, Scanning, and Faxing Quality is Poor > Copy Quality is Poor
252

Blurry Copies, Vertical Banding, or Misalignment
The following causes can be considered.
The print head position is out of alignment.
Solutions
Align the print head using the Print Quality Adjustment feature.
& “Adjusting the Print Quality” on page 150
The bidirectional printing setting is enabled.
Solutions
If print quality does not improve even after aligning the print head, disable the bidirectional setting.
During bidirectional (or high speed) printing, the print head prints while moving in both directions, andvertical lines may be misaligned. Disabling this setting may slow down printing speed but improve printquality.
Select Settings > General Settings > Printer Settings, and then disable Bidirectional on the controlpanel.
Striped Patterns Appear
The bidirectional printing setting is enabled.
Solutions
When printing on plain paper, disable the bidirectional setting.
During bidirectional (or high speed) printing, the print head prints while moving in both directions, andvertical lines may be misaligned. Disabling this setting may slow down printing speed but improve printquality.
Select Settings > General Settings > Printer Settings, and then disable Bidirectional on the controlpanel.
Solving Problems > Printing, Copying, Scanning, and Faxing Quality is Poor > Copy Quality is Poor
253
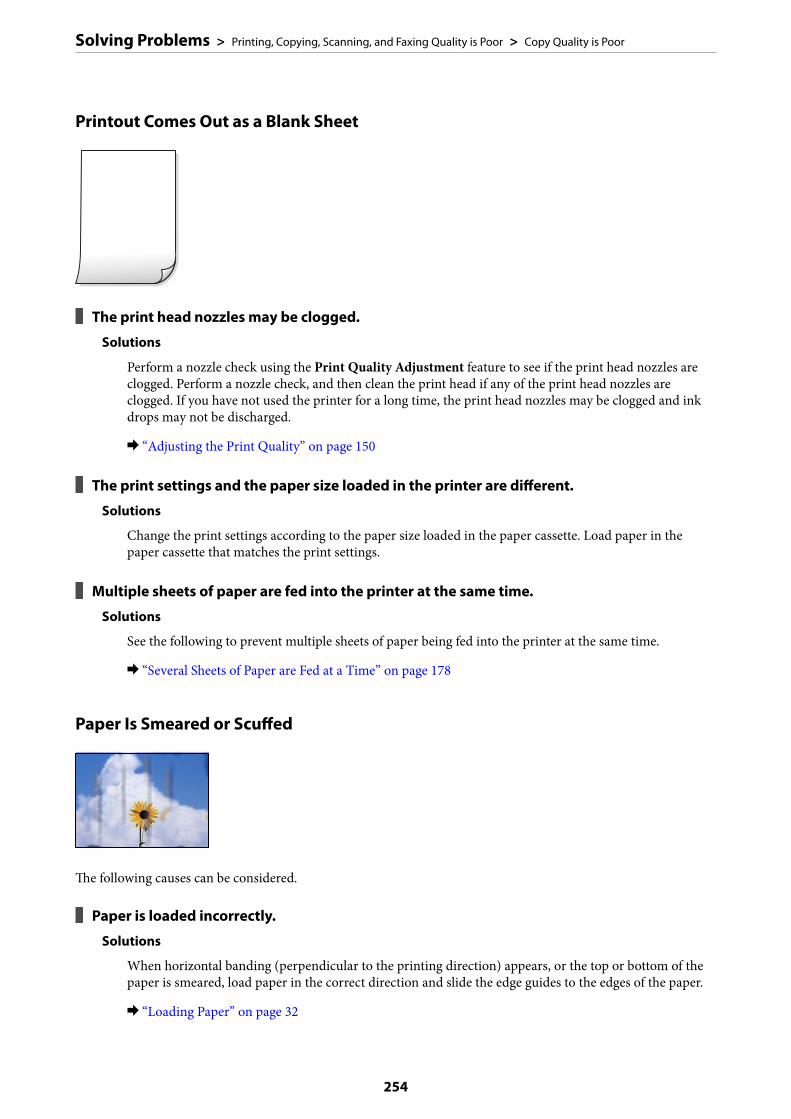
Printout Comes Out as a Blank Sheet
The print head nozzles may be clogged.
Solutions
Perform a nozzle check using the Print Quality Adjustment feature to see if the print head nozzles areclogged. Perform a nozzle check, and then clean the print head if any of the print head nozzles areclogged. If you have not used the printer for a long time, the print head nozzles may be clogged and inkdrops may not be discharged.
& “Adjusting the Print Quality” on page 150
The print settings and the paper size loaded in the printer are different.
Solutions
Change the print settings according to the paper size loaded in the paper cassette. Load paper in thepaper cassette that matches the print settings.
Multiple sheets of paper are fed into the printer at the same time.
Solutions
See the following to prevent multiple sheets of paper being fed into the printer at the same time.
& “Several Sheets of Paper are Fed at a Time” on page 178
Paper Is Smeared or Scuffed
The following causes can be considered.
Paper is loaded incorrectly.
Solutions
When horizontal banding (perpendicular to the printing direction) appears, or the top or bottom of thepaper is smeared, load paper in the correct direction and slide the edge guides to the edges of the paper.
& “Loading Paper” on page 32
Solving Problems > Printing, Copying, Scanning, and Faxing Quality is Poor > Copy Quality is Poor
254

The paper path is smeared.
Solutions
When vertical banding (horizontal to the printing direction) appears, or the paper is smeared, clean thepaper path.
& “Cleaning the Paper Path for Ink Smears” on page 155
The paper is curled.
Solutions
Place the paper on a flat surface to check if it is curled. If it is, flatten it.
The printhead is rubbing the surface of the paper.
Solutions
When copying on thick paper, the print head is close to the printing surface and the paper may bescuffed. In this case, enable the reduce scuff setting.
Select Settings > General Settings > Printer Settings, and then enable Thick Paper on the control panel.If you enable this setting, copy quality may decline or may slow down.
Copied Photos are Sticky
The copy was made on the wrong side of the photo paper.
Solutions
Make sure you are copying on the printable side. If you have accidentally copied on the wrong side of thephoto paper, you need to clean the paper path.
& “Loading Paper” on page 32& “Cleaning the Paper Path for Ink Smears” on page 155
The Position, Size, or Margins of the Copies are Incorrect
The following causes can be considered.
Solving Problems > Printing, Copying, Scanning, and Faxing Quality is Poor > Copy Quality is Poor
255

The paper is loaded incorrectly.
Solutions
Load paper in the correct direction, and slide the edge guide against the edge of the paper.
& “Loading Paper” on page 32
The size of the paper is set incorrectly.
Solutions
Select the appropriate paper size setting.
The originals are not placed correctly.
Solutions
❏ Make sure the original is placed correctly against the alignment marks.
❏ If the edge of the scanned image is missing, move the original slightly away from the edge of thescanner glass. You cannot scan the area within approximately 1.5 mm (0.06 in.) from the edge of thescanner glass.
& “Placing Originals” on page 37
There is dust or dirt on the scanner glass or document mat.
Solutions
When scanning from the control panel and selecting the auto scan area cropping function, remove anytrash or dirt from the scanner glass and document mat. If there is any trash or dirt around the original,the scanning range expands to include it.
& “Cleaning the Scanner Glass and Document Mat” on page 156
Original Size is wrong in copy setting.
Solutions
Select the appropriate Original Size in the copy setting.
& “Advanced Menu Options for Copying” on page 90
If the printer is placed in a location near a light source or subjected to direct sunlight, theoriginal size may not be detected correctly.
Solutions
Select the original size manually, and then try again.
Original is too thin to detect the size automatically.
Solutions
Select the original size manually, and then try again.
Solving Problems > Printing, Copying, Scanning, and Faxing Quality is Poor > Copy Quality is Poor
256

Uneven Colors, Smears, Dots, or Straight Lines Appear in the Copied Image
The following causes can be considered.
The paper path is dirty.
Solutions
Load and eject paper without printing to clean the paper path.
& “Cleaning the Paper Path for Ink Smears” on page 155
There is dust or dirt on the originals or the scanner glass.
Solutions
Remove any dust or dirt that adheres to the originals, and clean the scanner glass.
& “Cleaning the Scanner Glass and Document Mat” on page 156
There is dust or dirt on the ADF or originals.
Solutions
Clean the ADF, and remove any dust or dirt that adheres to the originals.
& “Cleaning the ADF” on page 158
The original was pressed with too much force.
Solutions
If you press with too much force, blurring, smudges, and spots may occur.
Do not press with too much force on the original or the document cover.
& “Placing Originals” on page 37
The copy density setting is too high.
Solutions
Lower the copy density setting.
& “Basic Menu Options for Copying” on page 89
Solving Problems > Printing, Copying, Scanning, and Faxing Quality is Poor > Copy Quality is Poor
257
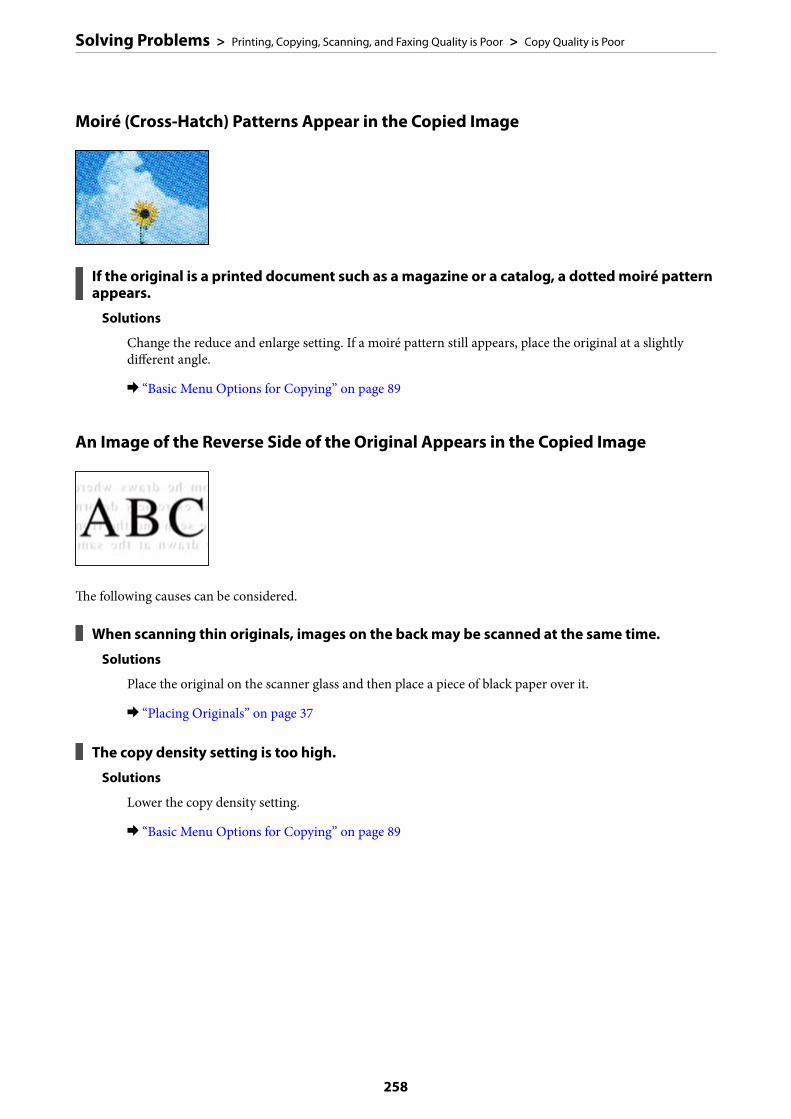
Moiré (Cross-Hatch) Patterns Appear in the Copied Image
If the original is a printed document such as a magazine or a catalog, a dotted moiré patternappears.
Solutions
Change the reduce and enlarge setting. If a moiré pattern still appears, place the original at a slightlydifferent angle.
& “Basic Menu Options for Copying” on page 89
An Image of the Reverse Side of the Original Appears in the Copied Image
The following causes can be considered.
When scanning thin originals, images on the back may be scanned at the same time.
Solutions
Place the original on the scanner glass and then place a piece of black paper over it.
& “Placing Originals” on page 37
The copy density setting is too high.
Solutions
Lower the copy density setting.
& “Basic Menu Options for Copying” on page 89
Solving Problems > Printing, Copying, Scanning, and Faxing Quality is Poor > Copy Quality is Poor
258
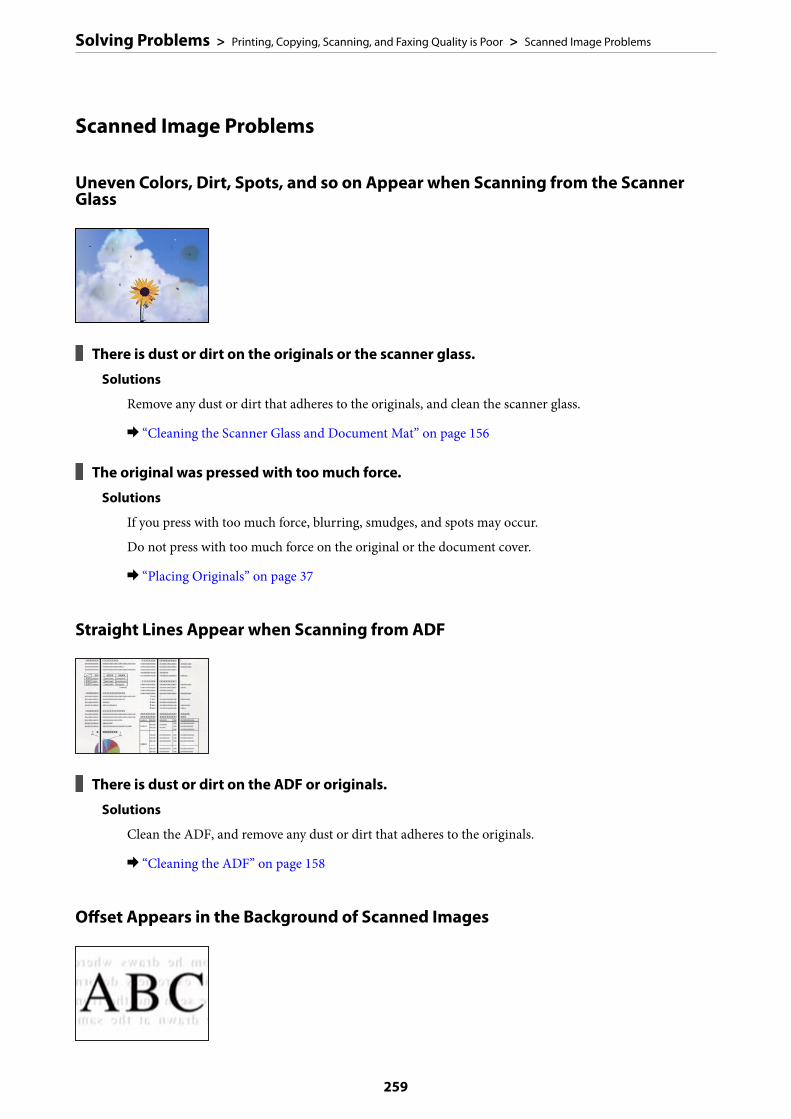
Scanned Image Problems
Uneven Colors, Dirt, Spots, and so on Appear when Scanning from the ScannerGlass
There is dust or dirt on the originals or the scanner glass.
Solutions
Remove any dust or dirt that adheres to the originals, and clean the scanner glass.
& “Cleaning the Scanner Glass and Document Mat” on page 156
The original was pressed with too much force.
Solutions
If you press with too much force, blurring, smudges, and spots may occur.
Do not press with too much force on the original or the document cover.
& “Placing Originals” on page 37
Straight Lines Appear when Scanning from ADF
There is dust or dirt on the ADF or originals.
Solutions
Clean the ADF, and remove any dust or dirt that adheres to the originals.
& “Cleaning the ADF” on page 158
Offset Appears in the Background of Scanned Images
Solving Problems > Printing, Copying, Scanning, and Faxing Quality is Poor > Scanned Image Problems
259

When scanning thin originals, images on the back may be scanned at the same time.
Solutions
When scanning from the scanner glass, place black paper or a desk pad over the original.
& “Placing Originals” on page 37
Cannot Scan the Correct Area on the Scanner Glass
The originals are not placed correctly.
Solutions
❏ Make sure the original is placed correctly against the alignment marks.
❏ If the edge of the scanned image is missing, move the original slightly away from the edge of thescanner glass. You cannot scan the area within approximately 1.5 mm (0.06 in.) from the edge of thescanner glass.
& “Placing Originals” on page 37
If the printer is placed in a location near a light source or subjected to direct sunlight, theoriginal size may not be detected correctly.
Solutions
Select the original size manually, and then try again.
There is dust or dirt on the scanner glass or document mat.
Solutions
When scanning from the control panel and selecting the auto scan area cropping function, remove anytrash or dirt from the scanner glass and document mat. If there is any trash or dirt around the original,the scanning range expands to include it.
& “Cleaning the Scanner Glass and Document Mat” on page 156
Original is too thin to detect the size automatically.
Solutions
Select the original size manually, and then try again.
Cannot Solve Problems in the Scanned ImageCheck the following if you have tried all of the solutions and have not solved the problem.
Solving Problems > Printing, Copying, Scanning, and Faxing Quality is Poor > Scanned Image Problems
260
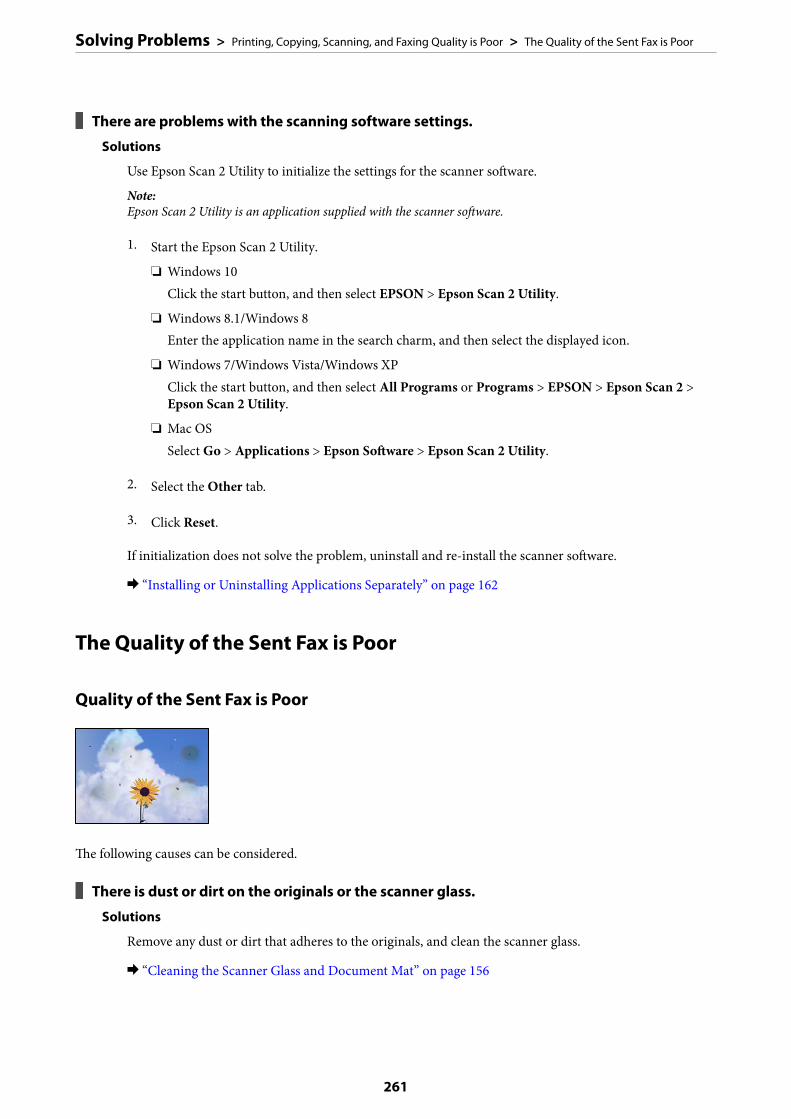
There are problems with the scanning software settings.
Solutions
Use Epson Scan 2 Utility to initialize the settings for the scanner software.
Note:Epson Scan 2 Utility is an application supplied with the scanner software.
1. Start the Epson Scan 2 Utility.
❏ Windows 10Click the start button, and then select EPSON > Epson Scan 2 Utility.
❏ Windows 8.1/Windows 8Enter the application name in the search charm, and then select the displayed icon.
❏ Windows 7/Windows Vista/Windows XPClick the start button, and then select All Programs or Programs > EPSON > Epson Scan 2 >Epson Scan 2 Utility.
❏ Mac OSSelect Go > Applications > Epson Software > Epson Scan 2 Utility.
2. Select the Other tab.
3. Click Reset.
If initialization does not solve the problem, uninstall and re-install the scanner software.
& “Installing or Uninstalling Applications Separately” on page 162
The Quality of the Sent Fax is Poor
Quality of the Sent Fax is Poor
The following causes can be considered.
There is dust or dirt on the originals or the scanner glass.
Solutions
Remove any dust or dirt that adheres to the originals, and clean the scanner glass.
& “Cleaning the Scanner Glass and Document Mat” on page 156
Solving Problems > Printing, Copying, Scanning, and Faxing Quality is Poor > The Quality of the Sent Fax is Poor
261

The original was pressed with too much force.
Solutions
If you press with too much force, blurring, smudges, and spots may occur.
Do not press with too much force on the original or the document cover.
& “Placing Originals” on page 37
Straight Lines Appear when Sending Faxes from the ADF
The following causes can be considered.
There is dust or dirt on the ADF or originals.
Solutions
Clean the ADF, and remove any dust or dirt that adheres to the originals.
& “Cleaning the ADF” on page 158
The Iimage Quality of the Sent Fax is Poor
The following causes can be considered.
The Original Type setting is wrong.
Solutions
Select Fax > Fax Settings > Scan Settings > Original Type, and then change the setting. When theoriginal you are sending contains text and images, set this to Photo.
The resolution is set to low.
Solutions
If you do not know the performance of the sender’s fax machine, set the following before sending a fax.
❏ Select Fax > Fax Settings and then make the Resolution setting to set the highest quality image.
Solving Problems > Printing, Copying, Scanning, and Faxing Quality is Poor > The Quality of the Sent Fax is Poor
262

❏ Select Fax > Fax Settings and then enable Direct Send.Note that if you set Resolution to Super Fine or Ultra Fine but you send the fax without enablingDirect Send, the fax may be sent at a lower resolution.
ECM setting is disabled.
Solutions
Select Settings > General Settings > Fax Settings > Basic Settings and enable the ECM setting on thecontrol panel. This may clear errors that occur due to connection problems. Note that the speed ofsending and receiving faxes may be slower than when ECM is disabled.
An Image of the Reverse Side of the Original Appears in the Sent Fax
The following causes can be considered.
When scanning thin originals, images on the back may be scanned at the same time.
Solutions
Place the original on the scanner glass and then place a piece of black paper over it.
& “Placing Originals” on page 37
The density setting is high when sending faxes.
Solutions
Select Fax > Fax Settings > Scan Settings > Density, and then lower the setting.
Received Fax Quality is Poor
The Image Quality of Received Faxes is Poor
The following causes can be considered.
Solving Problems > Printing, Copying, Scanning, and Faxing Quality is Poor > Received Fax Quality is Poor
263

ECM setting is disabled.
Solutions
Select Settings > General Settings > Fax Settings > Basic Settings and enable the ECM setting on thecontrol panel. This may clear errors that occur due to connection problems. Note that the speed ofsending and receiving faxes may be slower than when ECM is disabled.
The image quality setting is low on the sender's fax machine.
Solutions
Ask the sender to send faxes at a higher quality.
Cannot Solve Problem After Trying All SolutionsIf you cannot solve the problem after trying all of the solutions, contact Epson support.
If you cannot solve printing or copying problems, see the following related information.
Related Information
& “Cannot Solve Printing or Copying Problems” on page 264
Cannot Solve Printing or Copying ProblemsTry the following problems in order starting at the top until you solve the problem.
❏ Make sure you match the paper type loaded in the printer and the paper type set on the printer to the papertype settings in the printer driver.“Paper Size and Type Settings” on page 31
❏ Use a higher quality setting on the control panel or the printer driver.
❏ Align the print head.“Adjusting the Print Quality” on page 150
❏ Run a nozzle check to see if the print head nozzles are clogged.If there are missing segments in the nozzle check pattern, the nozzles may be clogged. Repeat head cleaning andthe nozzle check alternately 3 times and check if the clogging has cleared.Note that print head cleaning uses some ink.“Checking and Cleaning the Print Head” on page 151
❏ Turn off the printer, wait for at least 12 hours, and then check if the clogging has cleared.If the problem is clogging, leaving the printer for a while without printing may solve the problem.You can check the following items while the printer is off.
❏ Check that you are using genuine Epson ink bottles.Try to use genuine Epson ink bottles. The use of non-genuine ink bottles may cause print quality to decline.
❏ Make sure that there are no paper fragments left inside the printer.When you remove the paper, do not touch the translucent film with your hand or the paper.
Solving Problems > Cannot Solve Problem After Trying All Solutions > Cannot Solve Printing or Copying Problems
264

❏ Check the paper.Check if the paper is curled or loaded with the printable side facing up.“Paper Handling Precautions” on page 31“Available Paper and Capacities” on page 295“Unavailable Paper Types” on page 300
❏ If you turn off the printer, wait for at least 12 hours, and if print quality has still not improved, run PowerCleaning.“Running Power Cleaning” on page 153
If you cannot solve the problem by checking the solutions above, you may need to request repairs. Contact Epsonsupport.
Related Information
& “Before Contacting Epson” on page 463& “Contacting Epson Support” on page 463
Solving Problems > Cannot Solve Problem After Trying All Solutions > Cannot Solve Printing or Copying Problems
265

Adding or Replacing the Computer orDevices
Connecting to a Printer that has been Connected to the Network. . . . . . . . . . . . . . .267
Re-setting the Network Connection. . . . . . . . . . . . . . . . . . . . . . . . . . . . . . . . . . . . 268
Connecting a Smart Device and Printer Directly (Wi-Fi Direct). . . . . . . . . . . . . . . .275
Checking the Network Connection Status. . . . . . . . . . . . . . . . . . . . . . . . . . . . . . . .285
Connecting to a Printer that has been Connected tothe NetworkWhen the printer has already been connected to the network, you can connect a computer or a smart device to theprinter over the network.
Using a Network Printer from a Second ComputerWe recommend using the installer to connect the printer to a computer. You can run the installer using one of thefollowing methods.
❏ Setting up from the websiteAccess the following website, and then enter the product name. Go to Setup, and then start setting up.http://epson.sn
❏ Setting up using the software disc (only for the models that come with a software disc and users with Windowscomputers with disc drives.)Insert the software disc into the computer, and then follow the on-screen instructions.
Selecting the Connection Methods
Follow the on-screen instructions until the following screen is displayed, select the printer name you want toconnect to, and then click Next.
Adding or Replacing the Computer or Devices > Connecting to a Printer that has been Connected t…
267
Select the connection type and then click Next.
Follow the on-screen instructions.
Using a Network Printer from a Smart DeviceYou can connect a smart device to the printer using one of the following methods.
Connecting over a wireless router
Connect the smart device to the same Wi-Fi network (SSID) as the printer.
See the following for more details.
“Making Settings for Connecting to the Smart Device” on page 270
Connecting by Wi-Fi Direct
Connect the smart device to the printer directly without a wireless router.
See the following for more details.
“Connecting a Smart Device and Printer Directly (Wi-Fi Direct)” on page 275
Re-setting the Network ConnectionThis section explains how to make the network connection settings and change the connection method whenreplacing the wireless router or the computer.
Adding or Replacing the Computer or Devices > Re-setting the Network Connection
268
When Replacing the Wireless RouterWhen you replace the wireless router, make settings for the connection between the computer or the smart deviceand the printer.
Making Settings for Connecting to the Computer
We recommend using the installer to connect the printer to a computer. You can run the installer using one of thefollowing methods.
❏ Setting up from the websiteAccess the following website, and then enter the product name. Go to Setup, and then start setting up.http://epson.sn
❏ Setting up using the software disc (only for the models that come with a software disc and users with Windowscomputers with disc drives.)Insert the software disc into the computer, and then follow the on-screen instructions.
Selecting the Connection Methods
Follow the on-screen instructions until the following screen is displayed.
Select Change connection method for printer (for new network router or changing USB to network, etc.) onthe Select Your Operation screen, and then click Next.
Follow the on-screen instructions.
If you cannot connect, see the following to try to solve the problem.
❏ Windows: “Cannot connect to a Network” on page 181
❏ Mac OS: “Cannot connect to a Network” on page 189
Adding or Replacing the Computer or Devices > Re-setting the Network Connection > When Repl…
269
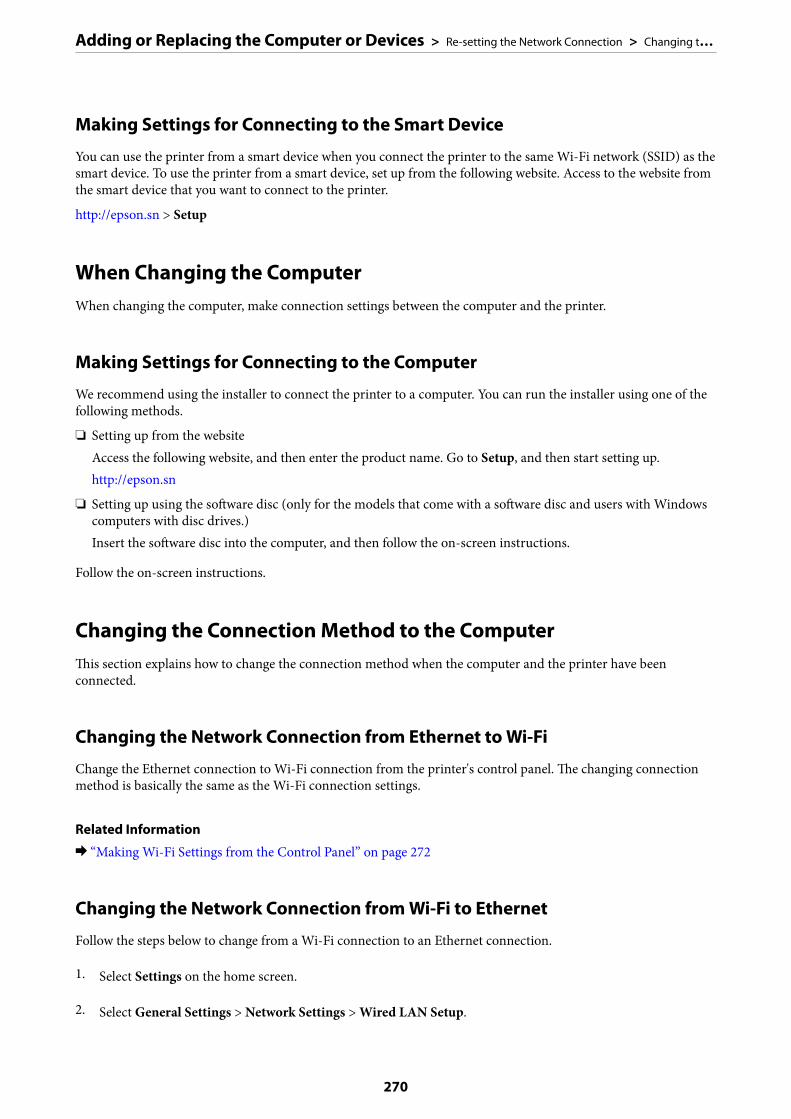
Making Settings for Connecting to the Smart Device
You can use the printer from a smart device when you connect the printer to the same Wi-Fi network (SSID) as thesmart device. To use the printer from a smart device, set up from the following website. Access to the website fromthe smart device that you want to connect to the printer.
http://epson.sn > Setup
When Changing the ComputerWhen changing the computer, make connection settings between the computer and the printer.
Making Settings for Connecting to the Computer
We recommend using the installer to connect the printer to a computer. You can run the installer using one of thefollowing methods.
❏ Setting up from the websiteAccess the following website, and then enter the product name. Go to Setup, and then start setting up.http://epson.sn
❏ Setting up using the software disc (only for the models that come with a software disc and users with Windowscomputers with disc drives.)Insert the software disc into the computer, and then follow the on-screen instructions.
Follow the on-screen instructions.
Changing the Connection Method to the ComputerThis section explains how to change the connection method when the computer and the printer have beenconnected.
Changing the Network Connection from Ethernet to Wi-Fi
Change the Ethernet connection to Wi-Fi connection from the printer's control panel. The changing connectionmethod is basically the same as the Wi-Fi connection settings.
Related Information
& “Making Wi-Fi Settings from the Control Panel” on page 272
Changing the Network Connection from Wi-Fi to Ethernet
Follow the steps below to change from a Wi-Fi connection to an Ethernet connection.
1. Select Settings on the home screen.
2. Select General Settings > Network Settings > Wired LAN Setup.
Adding or Replacing the Computer or Devices > Re-setting the Network Connection > Changing t…
270

3. Follow the on-screen instructions.
Changing from USB to a Network Connection
Using the installer and re-set up in a different connection method.
❏ Setting up from the websiteAccess the following website, and then enter the product name. Go to Setup, and then start setting up.http://epson.sn
❏ Setting up using the software disc (only for the models that come with a software disc and users with Windowscomputers with disc drives.)Insert the software disc into the computer, and then follow the on-screen instructions.
Selecting Change the Connection Methods
Follow the on-screen instructions until the following screen is displayed.
Select Change connection method for printer (for new network router or changing USB to network, etc.) onthe Select Your Operation screen, and then click Next.
Adding or Replacing the Computer or Devices > Re-setting the Network Connection > Changing t…
271
Select the network connection that you want to use, Connect via wireless network (Wi-Fi) or Connect via wiredLAN (Ethernet), and then click Next.
Follow the on-screen instructions.
Making Wi-Fi Settings from the Control PanelYou can make network settings from the printer's control panel in several ways. Choose the connection methodthat matches the environment and conditions that you are using.
If you know the information for the wireless router such as SSID and password, you can make settings manually.
If the wireless router supports WPS, you can make settings by using push button setup.
After connecting the printer to the network, connect to the printer from the device that you want to use (computer,smart device, tablet, and so on.)
Related Information
& “Making Wi-Fi Settings by Entering the SSID and Password” on page 272& “Making Wi-Fi Settings by Push Button Setup (WPS)” on page 273& “Making Wi-Fi Settings by PIN Code Setup (WPS)” on page 274
Making Wi-Fi Settings by Entering the SSID and Password
You can set up a Wi-Fi network by entering the information necessary to connect to a wireless router from theprinter's control panel. To set up using this method, you need the SSID and password for a wireless router.
Adding or Replacing the Computer or Devices > Re-setting the Network Connection > Making Wi-…
272

Note:If you are using an wireless router with its default settings, the SSID and password are on the label. If you do not know theSSID and password, contact the person who set up the wireless router, or see the documentation provided with the wirelessrouter.
1. Tap on the home screen.
2. Select Router.
3. Tap Start Setup.
If the network connection is already set up, the connection details are displayed. Tap Change to Wi-Ficonnection. or Change Settings to change the settings.
4. Select Wi-Fi Setup Wizard .
5. Follow the on-screen instructions to select the SSID, enter the password for the wireless router, and start setup.
If you want to check the network connection status for the printer after setup is complete, see the relatedinformation link below for details.
Note:❏ If you do not know the SSID, check if it is written on the label of the wireless router. If you are using the wireless
router with its default settings, use the SSID written on the label. If you cannot find any information, see thedocumentation provided with the wireless router.
❏ The password is case-sensitive.
❏ If you do not know the password, check if the information is written on the label of the wireless router. On the label,the password may be written "Network Key", "Wireless Password", and so on. If you are using the wireless routerwith its default settings, use the password written on the label.
Related Information
& “Entering Characters” on page 28& “Checking the Network Connection Status” on page 285
Making Wi-Fi Settings by Push Button Setup (WPS)
You can automatically set up a Wi-Fi network by pressing a button on the wireless router. If the followingconditions are met, you can set up by using this method.
❏ The wireless router is compatible with WPS (Wi-Fi Protected Setup).
❏ The current Wi-Fi connection was established by pressing a button on the wireless router.
Adding or Replacing the Computer or Devices > Re-setting the Network Connection > Making Wi-…
273
Note:If you cannot find the button or you are setting up using the software, see the documentation provided with the wirelessrouter.
1. Tap on the home screen.
2. Select Router.
3. Tap Start Setup.
If the network connection is already set up, the connection details are displayed. Tap Change to Wi-Ficonnection. or Change Settings to change the settings.
4. Select Push Button Setup(WPS).
5. Follow the on-screen instructions.
If you want to check the network connection status for the printer after setup is complete, see the relatedinformation link below for details.
Note:If connection fails, restart the wireless router, move it closer to the printer, and try again. If it still does not work, print anetwork connection report and check the solution.
Related Information
& “Checking the Network Connection Status” on page 285
Making Wi-Fi Settings by PIN Code Setup (WPS)
You can automatically connect to an wireless router by using a PIN code. You can use this method to set up if anwireless router is capable of WPS (Wi-Fi Protected Setup). Use a computer to enter a PIN code into the wirelessrouter.
1. Tap on the home screen.
2. Select Router.
3. Tap Start Setup.
If the network connection is already set up, the connection details are displayed. Tap Change to Wi-Ficonnection. or Change Settings to change the settings.
4. Select Others > PIN Code Setup(WPS)
5. Follow the on-screen instructions.
If you want to check the network connection status for the printer after setup is complete, see the relatedinformation link below for details.
Note:See the documentation provided with your wireless router for details on entering a PIN code.
Adding or Replacing the Computer or Devices > Re-setting the Network Connection > Making Wi-…
274
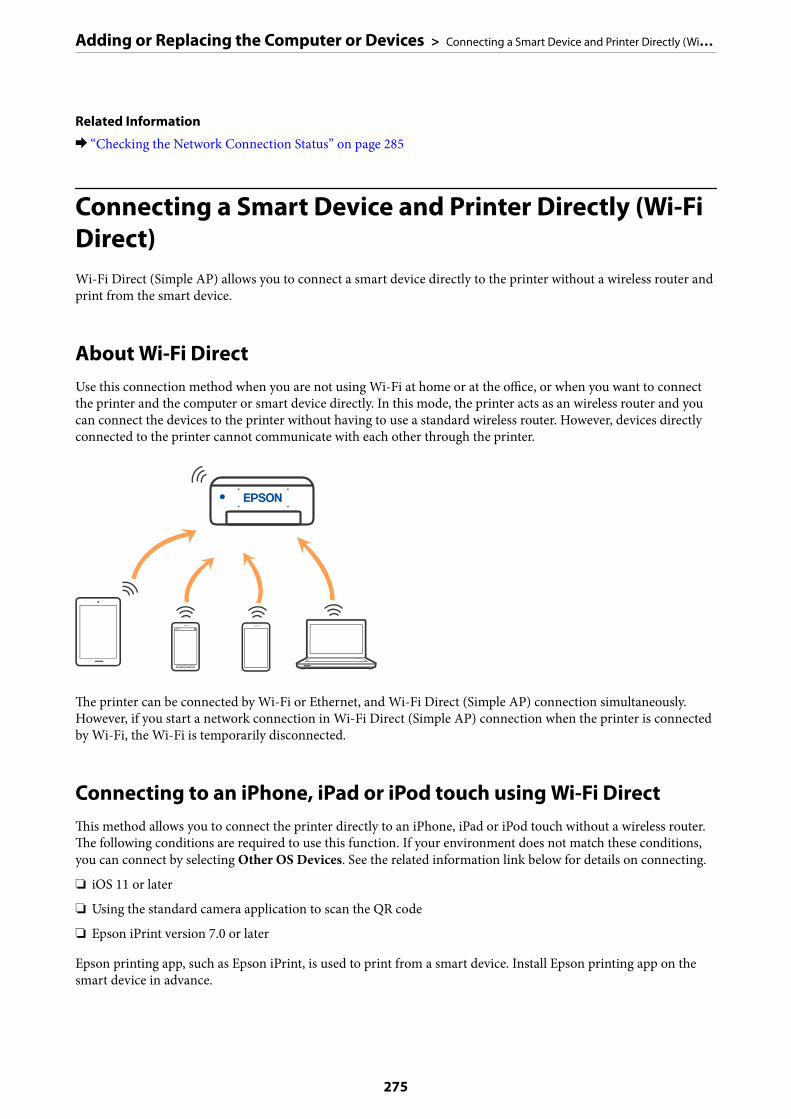
Related Information
& “Checking the Network Connection Status” on page 285
Connecting a Smart Device and Printer Directly (Wi-FiDirect)Wi-Fi Direct (Simple AP) allows you to connect a smart device directly to the printer without a wireless router andprint from the smart device.
About Wi-Fi DirectUse this connection method when you are not using Wi-Fi at home or at the office, or when you want to connectthe printer and the computer or smart device directly. In this mode, the printer acts as an wireless router and youcan connect the devices to the printer without having to use a standard wireless router. However, devices directlyconnected to the printer cannot communicate with each other through the printer.
The printer can be connected by Wi-Fi or Ethernet, and Wi-Fi Direct (Simple AP) connection simultaneously.However, if you start a network connection in Wi-Fi Direct (Simple AP) connection when the printer is connectedby Wi-Fi, the Wi-Fi is temporarily disconnected.
Connecting to an iPhone, iPad or iPod touch using Wi-Fi DirectThis method allows you to connect the printer directly to an iPhone, iPad or iPod touch without a wireless router.The following conditions are required to use this function. If your environment does not match these conditions,you can connect by selecting Other OS Devices. See the related information link below for details on connecting.
❏ iOS 11 or later
❏ Using the standard camera application to scan the QR code
❏ Epson iPrint version 7.0 or later
Epson printing app, such as Epson iPrint, is used to print from a smart device. Install Epson printing app on thesmart device in advance.
Adding or Replacing the Computer or Devices > Connecting a Smart Device and Printer Directly (Wi…
275
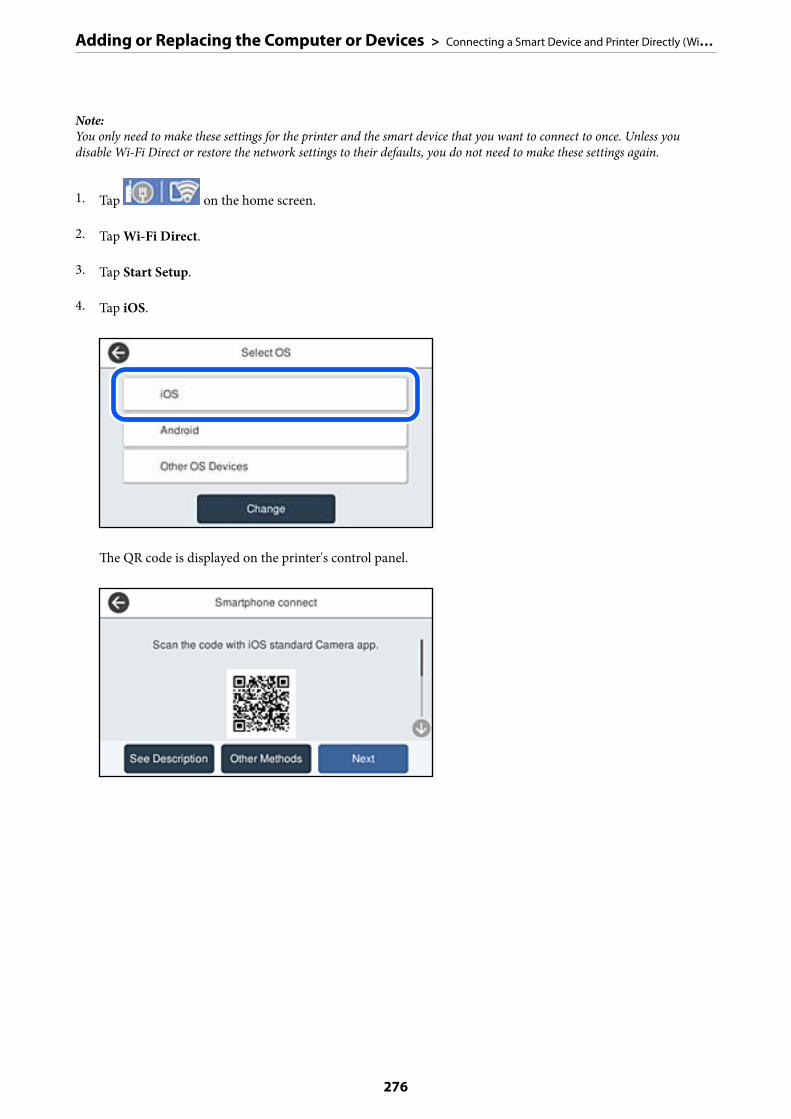
Note:You only need to make these settings for the printer and the smart device that you want to connect to once. Unless youdisable Wi-Fi Direct or restore the network settings to their defaults, you do not need to make these settings again.
1. Tap on the home screen.
2. Tap Wi-Fi Direct.
3. Tap Start Setup.
4. Tap iOS.
The QR code is displayed on the printer's control panel.
Adding or Replacing the Computer or Devices > Connecting a Smart Device and Printer Directly (Wi…
276
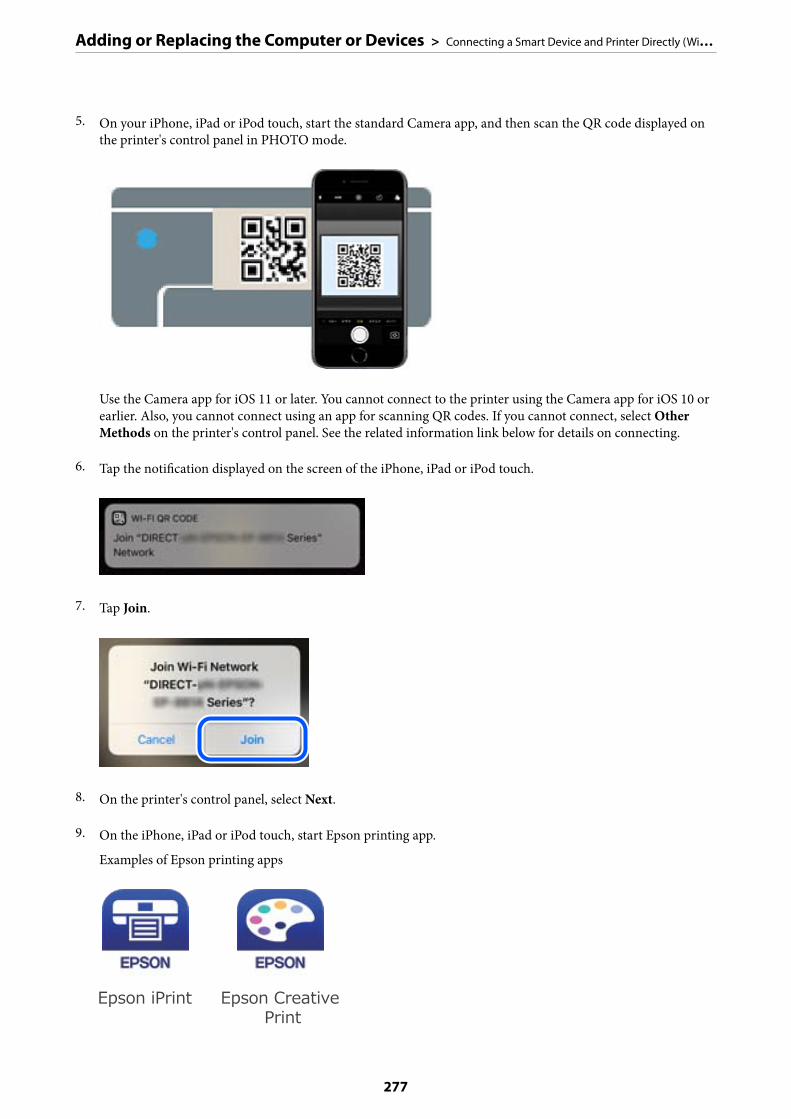
5. On your iPhone, iPad or iPod touch, start the standard Camera app, and then scan the QR code displayed onthe printer's control panel in PHOTO mode.
Use the Camera app for iOS 11 or later. You cannot connect to the printer using the Camera app for iOS 10 orearlier. Also, you cannot connect using an app for scanning QR codes. If you cannot connect, select OtherMethods on the printer's control panel. See the related information link below for details on connecting.
6. Tap the notification displayed on the screen of the iPhone, iPad or iPod touch.
7. Tap Join.
8. On the printer's control panel, select Next.
9. On the iPhone, iPad or iPod touch, start Epson printing app.
Examples of Epson printing apps
Adding or Replacing the Computer or Devices > Connecting a Smart Device and Printer Directly (Wi…
277
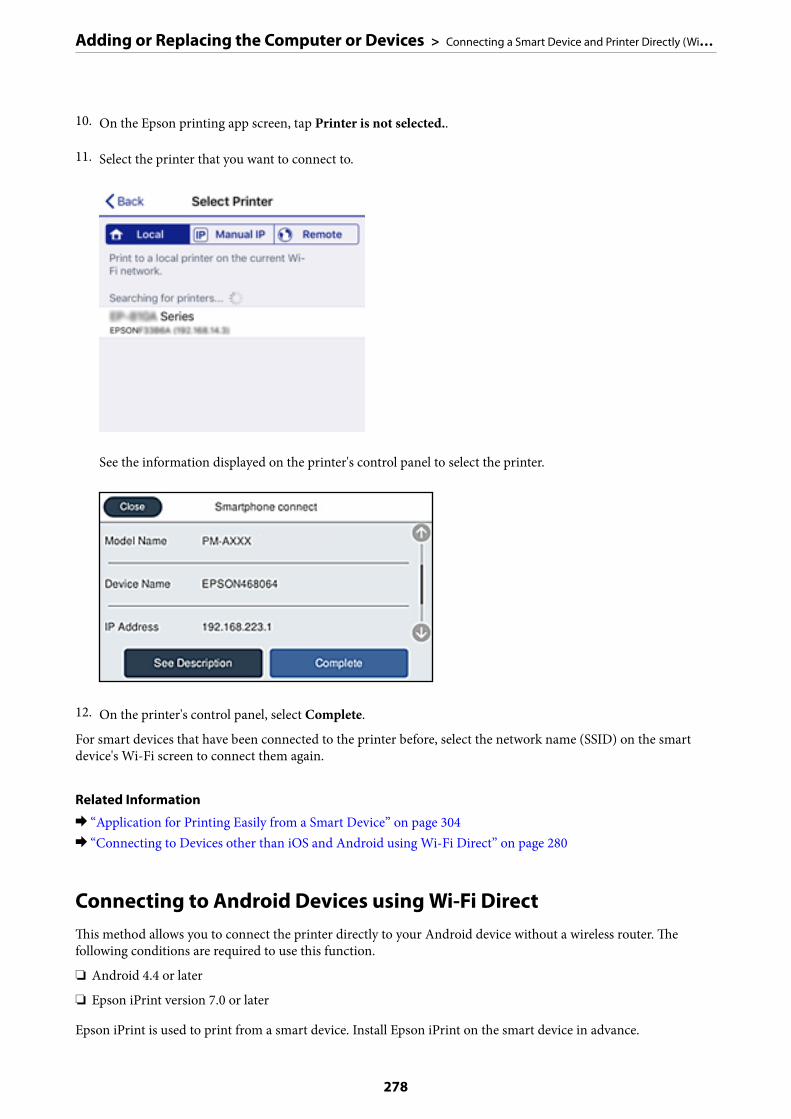
10. On the Epson printing app screen, tap Printer is not selected..
11. Select the printer that you want to connect to.
See the information displayed on the printer's control panel to select the printer.
12. On the printer's control panel, select Complete.
For smart devices that have been connected to the printer before, select the network name (SSID) on the smartdevice's Wi-Fi screen to connect them again.
Related Information
& “Application for Printing Easily from a Smart Device” on page 304& “Connecting to Devices other than iOS and Android using Wi-Fi Direct” on page 280
Connecting to Android Devices using Wi-Fi DirectThis method allows you to connect the printer directly to your Android device without a wireless router. Thefollowing conditions are required to use this function.
❏ Android 4.4 or later
❏ Epson iPrint version 7.0 or later
Epson iPrint is used to print from a smart device. Install Epson iPrint on the smart device in advance.
Adding or Replacing the Computer or Devices > Connecting a Smart Device and Printer Directly (Wi…
278
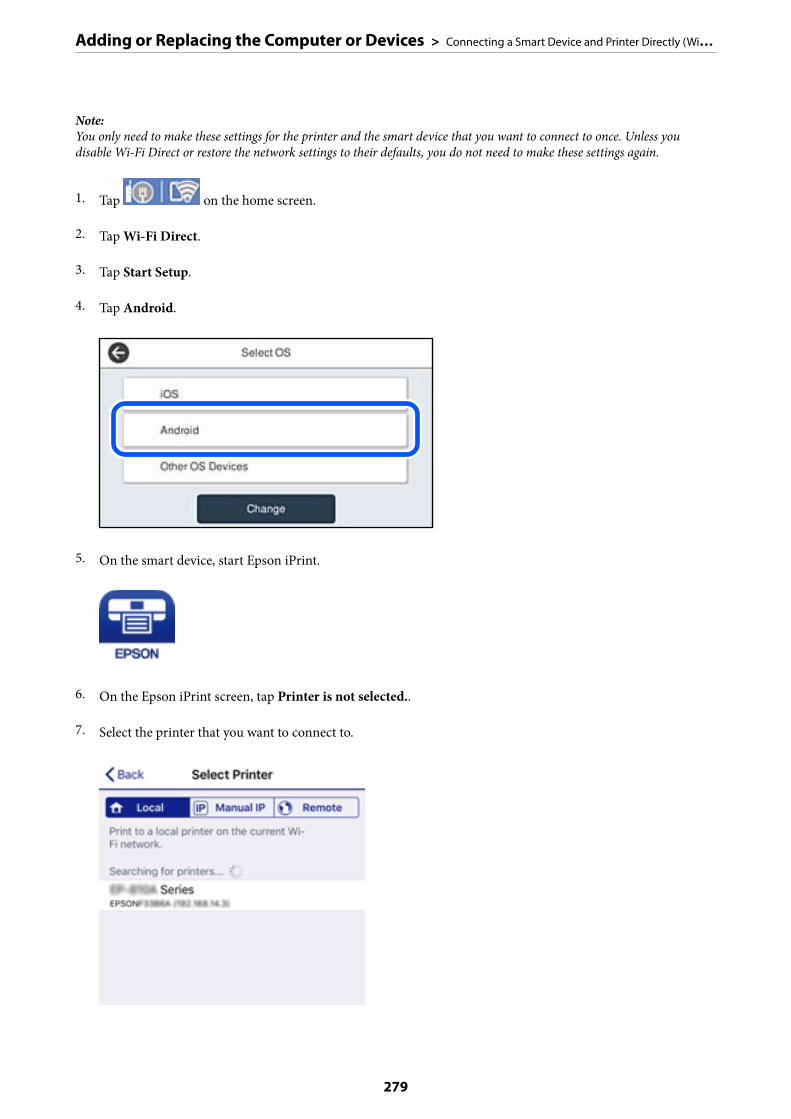
Note:You only need to make these settings for the printer and the smart device that you want to connect to once. Unless youdisable Wi-Fi Direct or restore the network settings to their defaults, you do not need to make these settings again.
1. Tap on the home screen.
2. Tap Wi-Fi Direct.
3. Tap Start Setup.
4. Tap Android.
5. On the smart device, start Epson iPrint.
6. On the Epson iPrint screen, tap Printer is not selected..
7. Select the printer that you want to connect to.
Adding or Replacing the Computer or Devices > Connecting a Smart Device and Printer Directly (Wi…
279
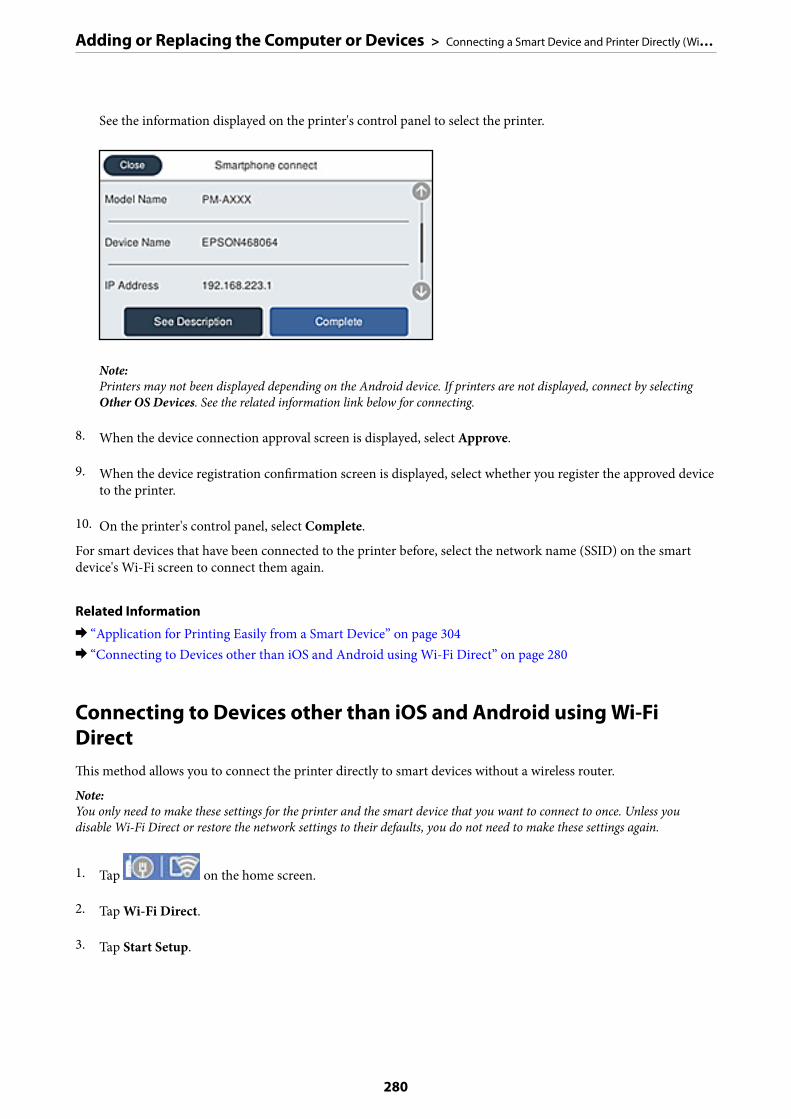
See the information displayed on the printer's control panel to select the printer.
Note:Printers may not been displayed depending on the Android device. If printers are not displayed, connect by selectingOther OS Devices. See the related information link below for connecting.
8. When the device connection approval screen is displayed, select Approve.
9. When the device registration confirmation screen is displayed, select whether you register the approved deviceto the printer.
10. On the printer's control panel, select Complete.
For smart devices that have been connected to the printer before, select the network name (SSID) on the smartdevice's Wi-Fi screen to connect them again.
Related Information
& “Application for Printing Easily from a Smart Device” on page 304& “Connecting to Devices other than iOS and Android using Wi-Fi Direct” on page 280
Connecting to Devices other than iOS and Android using Wi-FiDirectThis method allows you to connect the printer directly to smart devices without a wireless router.
Note:You only need to make these settings for the printer and the smart device that you want to connect to once. Unless youdisable Wi-Fi Direct or restore the network settings to their defaults, you do not need to make these settings again.
1. Tap on the home screen.
2. Tap Wi-Fi Direct.
3. Tap Start Setup.
Adding or Replacing the Computer or Devices > Connecting a Smart Device and Printer Directly (Wi…
280
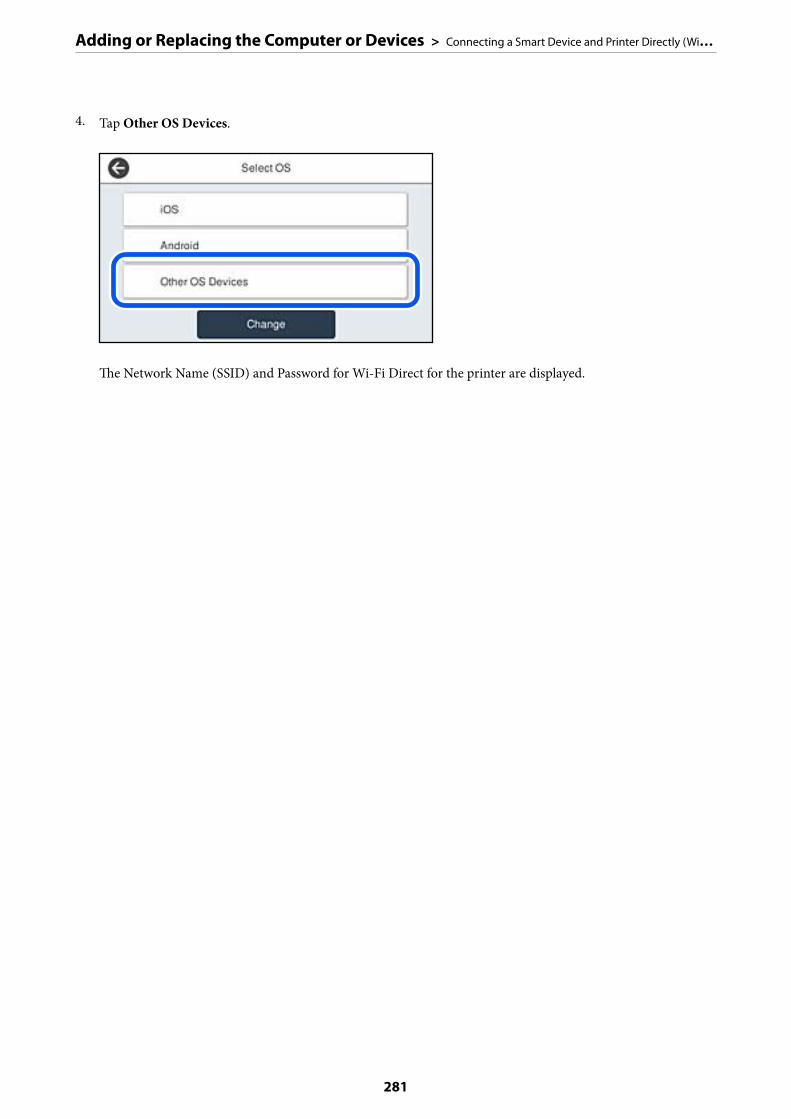
4. Tap Other OS Devices.
The Network Name (SSID) and Password for Wi-Fi Direct for the printer are displayed.
Adding or Replacing the Computer or Devices > Connecting a Smart Device and Printer Directly (Wi…
281
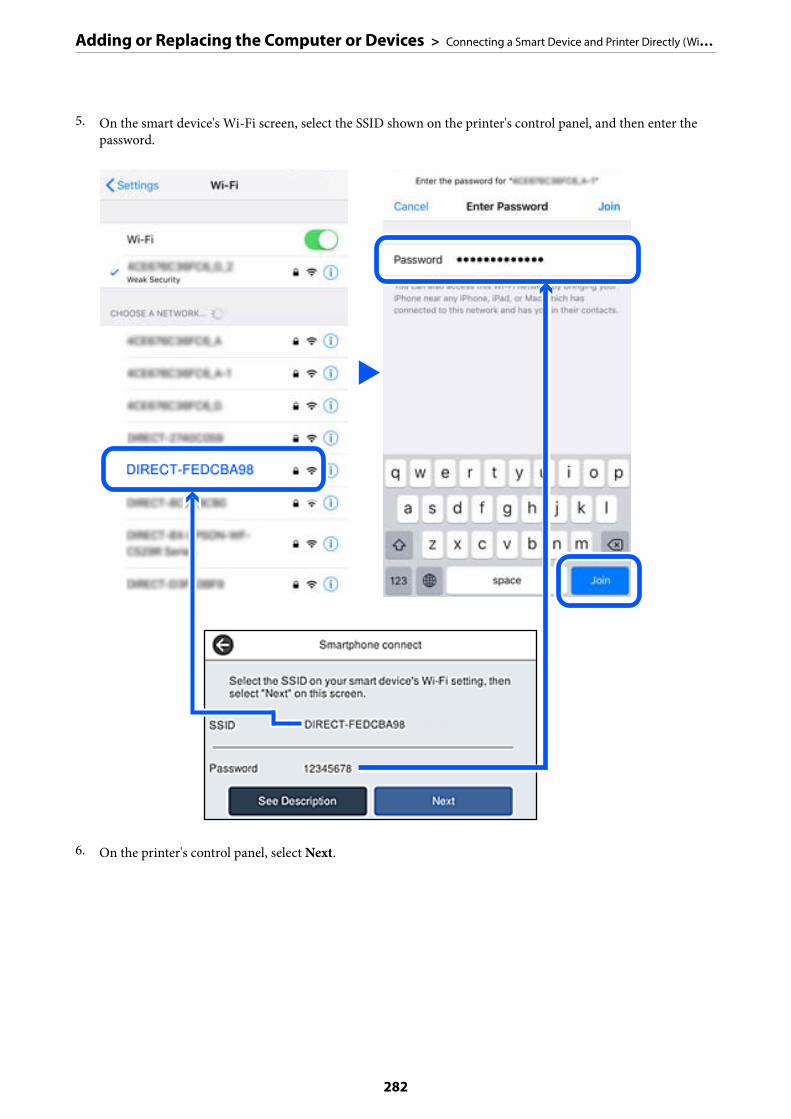
5. On the smart device's Wi-Fi screen, select the SSID shown on the printer's control panel, and then enter thepassword.
6. On the printer's control panel, select Next.
Adding or Replacing the Computer or Devices > Connecting a Smart Device and Printer Directly (Wi…
282
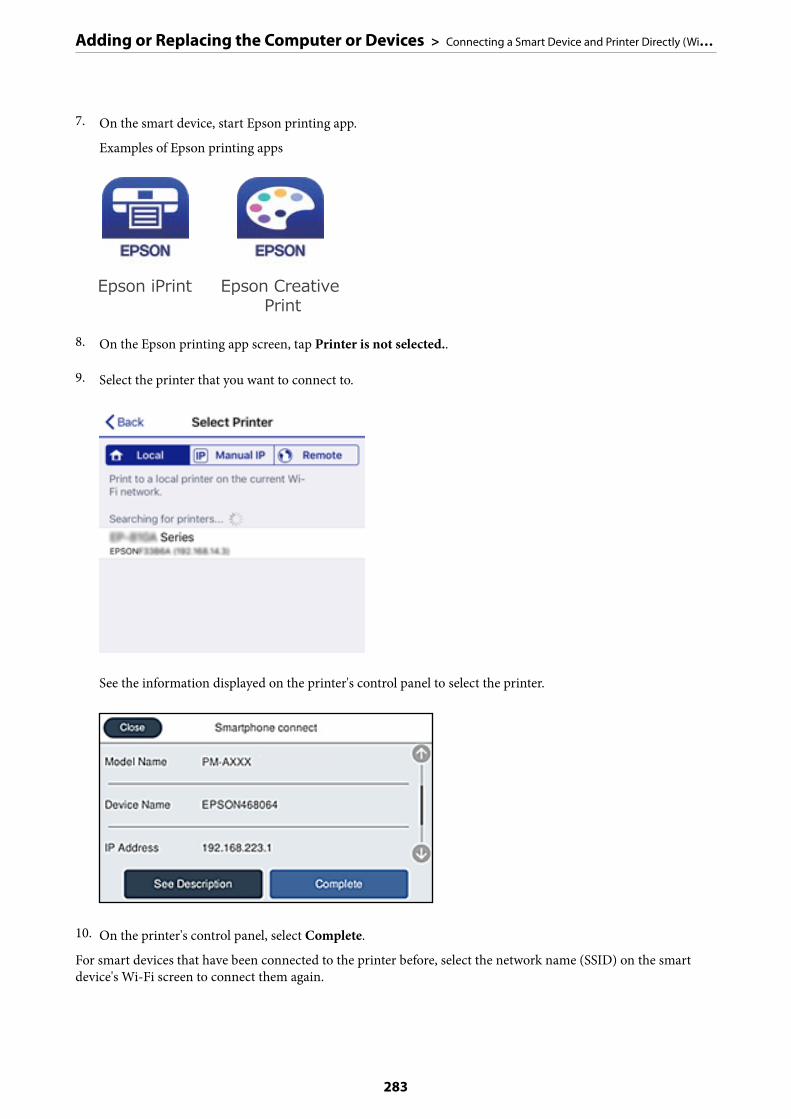
7. On the smart device, start Epson printing app.
Examples of Epson printing apps
8. On the Epson printing app screen, tap Printer is not selected..
9. Select the printer that you want to connect to.
See the information displayed on the printer's control panel to select the printer.
10. On the printer's control panel, select Complete.
For smart devices that have been connected to the printer before, select the network name (SSID) on the smartdevice's Wi-Fi screen to connect them again.
Adding or Replacing the Computer or Devices > Connecting a Smart Device and Printer Directly (Wi…
283

Related Information
& “Application for Printing Easily from a Smart Device” on page 304
Disconnecting Wi-Fi Direct (Simple AP) ConnectionThere are two methods available to disable a Wi-Fi Direct (Simple AP) connection; you can disable all connectionsby using the printer's control panel, or disable each connection from the computer or the smart device. When youwant to disable all connections, see the related information link below for details.
cImportant:
When Wi-Fi Direct (Simple AP) connection disabled, all computers and smart devices connected to the printer inWi-Fi Direct (Simple AP) connection are disconnected.
Note:If you want to disconnect a specific device, disconnect from the device instead of the printer. Use one of the followingmethods to disconnect the Wi-Fi Direct (Simple AP) connection from the device.
❏ Disconnect the Wi-Fi connection to the printer's network name (SSID).
❏ Connect to another network name (SSID).
Changing the Wi-Fi Direct (Simple AP) Settings Such as the SSID
When Wi-Fi Direct (simple AP) connection is enabled, you can change the settings from > Wi-FiDirect > Start Setup > Change, and then the following menu items are displayed.
Change Network Name
Change the Wi-Fi Direct (simple AP) network name (SSID) used for connecting to the printer to your arbitraryname. You can set the network name (SSID) in ASCII characters that is displayed on the software keyboard on thecontrol panel. You can enter up to 22 characters.
When changing the network name (SSID), all connected devices are disconnected. Use the new network name(SSID) if you want to re-connect the device.
Change Password
Change the Wi-Fi Direct (simple AP) password for connecting to the printer to your arbitrary value. You can setthe password in ASCII characters that is displayed on the software keyboard on the control panel. You can enter 8to 22 characters.
When changing the password, all connected devices are disconnected. Use the new password if you want to re-connect the device.
Change Frequency Range
Change the frequency range of Wi-Fi Direct used for connecting to the printer. You can select 2.4 GHz or 5 GHz.
When changing the frequency range, all connected devices are disconnected. Re-connect the device.
Note that you cannot re-connect from devices that do not support 5 GHz frequency range when changing to 5GHz.
Depending on the region, this setting may not be displayed.
Adding or Replacing the Computer or Devices > Connecting a Smart Device and Printer Directly (Wi…
284

Disable Wi-Fi Direct
Disable Wi-Fi Direct (simple AP) settings of the printer. When disabling it, all devices connected to the printer inWi-Fi Direct (Simple AP) connection are disconnected.
Restore Default Settings
Restore all Wi-Fi Direct (simple AP) settings to their defaults.
The Wi-Fi Direct (simple AP) connection information of the smart device saved to the printer is deleted.
Note:You can also set up from the Network tab > Wi-Fi Direct on Web Config for the following settings.
❏ Enabling or disabling Wi-Fi Direct (simple AP)
❏ Changing network name (SSID)
❏ Changing password
❏ Changing the frequency rangeDepending on the region, this setting may not be displayed.
❏ Restoring the Wi-Fi Direct (simple AP) settings
Checking the Network Connection StatusYou can check the network connection status in the following way.
Related Information
& “Checking the Network Connection Status from the Control Panel” on page 285& “Printing a Network Connection Report” on page 286
Checking the Network Connection Status from the Control PanelYou can check the network connection status using the network icon or the network information on the printer’scontrol panel.
Checking the Network Connection Status using the Network Icon
You can check the network connection status and strength of the radio wave using the network icon on theprinter's home screen.
Adding or Replacing the Computer or Devices > Checking the Network Connection Status > Chec…
285
Related Information
& “Guide to the Network Icon” on page 25
Displaying Detailed Network Information on the Control Panel
When your printer is connected to the network, you can also view other network-related information by selectingthe network menus you want to check.
1. Select Settings on the home screen.
2. Select General Settings > Network Settings > Network Status.
3. To check the information, select the menus that you want to check.
❏ Wired LAN/Wi-Fi StatusDisplays the network information (device name, connection, signal strength, and so on) for Ethernet or Wi-Fi connections.
❏ Wi-Fi Direct StatusDisplays whether Wi-Fi Direct is enabled or disabled, and the SSID, password and so on for Wi-Fi Directconnections.
❏ Email Server StatusDisplays the network information for email server.
❏ Print Status SheetPrints a network status sheet. The information for Ethernet, Wi-Fi, Wi-Fi Direct, and so on is printed ontwo or more pages.
Printing a Network Connection ReportYou can print a network connection report to check the status between the printer and the wireless router.
1. Select Settings on the home screen.
2. Select General Settings > Network Settings > Connection Check.
The connection check starts.
3. Select Print Check Report.
4. Print the network connection report.
If an error has occurred, check the network connection report, and then follow the printed solutions.
Related Information
& “Messages and Solutions on the Network Connection Report” on page 287
Adding or Replacing the Computer or Devices > Checking the Network Connection Status > Printi…
286
Messages and Solutions on the Network Connection Report
Check the messages and error codes on the network connection report, and then follow the solutions.
a. Error code
b. Messages on the Network Environment
Related Information
& “E-1” on page 288& “E-2, E-3, E-7” on page 288& “E-5” on page 289& “E-6” on page 289& “E-8” on page 289& “E-9” on page 290& “E-10” on page 290& “E-11” on page 290& “E-12” on page 291& “E-13” on page 291& “Message on the Network Environment” on page 292
Adding or Replacing the Computer or Devices > Checking the Network Connection Status > Printi…
287
E-1
Solutions:
❏ Make sure the Ethernet cable is securely connected to your printer and to your hub or other network device.
❏ Make sure your hub or other network device is turned on.
❏ If you want to connect the printer by Wi-Fi, make Wi-Fi settings for the printer again because it is disabled.
E-2, E-3, E-7
Solutions:
❏ Make sure your wireless router is turned on.
❏ Confirm that your computer or device is connected correctly to the wireless router.
❏ Turn off the wireless router. Wait for about 10 seconds, and then turn it on.
❏ Place the printer closer to your wireless router and remove any obstacles between them.
❏ If you have entered the SSID manually, check if it is correct. Check the SSID from the Network Status part onthe network connection report.
❏ If an wireless router has multiple SSIDs, select the SSID that is displayed. When the SSID is using a non-compliant frequency, the printer does not display them.
❏ If you are using push button setup to establish a network connection, make sure your wireless router supportsWPS. You cannot use push button setup if your wireless router does not support WPS.
❏ Makes sure your SSID uses only ASCII characters (alphanumeric characters and symbols). The printer cannotdisplay an SSID that contains non-ASCII characters.
❏ Makes sure you know your SSID and password before connecting to the wireless router. If you are using awireless router with its default settings, the SSID and password are located on a label on the wireless router. Ifyou do not know your SSID and password, contact the person who set up the wireless router, or see thedocumentation provided with the wireless router.
❏ If you are connecting to an SSID generated from a tethering smart device, check for the SSID and password inthe documentation provided with the smart device.
❏ If your Wi-Fi connection suddenly disconnects, check for the conditions below. If any of these conditions areapplicable, reset your network settings by downloading and running the software from the following website.http://epson.sn > Setup
❏ Another smart device was added to the network using push button setup.
❏ The Wi-Fi network was set up using any method other than push button setup.
Related Information
& “Making Settings for Connecting to the Computer” on page 270& “Making Wi-Fi Settings from the Control Panel” on page 272
Adding or Replacing the Computer or Devices > Checking the Network Connection Status > Printi…
288
E-5
Solutions:
Make sure the wireless router’s security type is set to one of the following. If it is not, change the security type onthe wireless router, and then reset the printer’s network settings.
❏ WEP-64 bit (40 bit)
❏ WEP-128 bit (104 bit)
❏ WPA PSK (TKIP/AES)*
❏ WPA2 PSK (TKIP/AES)*
❏ WPA (TKIP/AES)
❏ WPA2 (TKIP/AES)
❏ WPA3-SAE (AES)
❏ WPA2/WPA3-Enterprise
* WPA PSK is also known as WPA Personal. WPA2 PSK is also known as WPA2 Personal.
E-6
Solutions:
❏ Check if MAC address filtering is disabled. If it is enabled, register the printer’s MAC address so that it is notfiltered. See the documentation provided with the wireless router for details. You can check the printer’s MACaddress from the Network Status part on the network connection report.
❏ If your wireless router is using shared authentication with WEP security, make sure the authentication key andindex are correct.
❏ If the number of connectable devices on the wireless router is less than the number of network devices that youwant to connect, make settings on the wireless router to increase the number of connectable devices. See thedocumentation provided with the wireless router to make settings.
Related Information
& “Making Settings for Connecting to the Computer” on page 270
E-8
Solutions:
❏ Enable DHCP on the wireless router if the printer’s Obtain IP Address setting is set to Auto.
❏ If the printer’s Obtain IP Address setting is set to Manual, the IP address you manually set is invalid due to outof range (for example: 0.0.0.0). Set a valid IP address from the printer’s control panel.
Related Information
& “Network Settings” on page 314
Adding or Replacing the Computer or Devices > Checking the Network Connection Status > Printi…
289
E-9
Solutions:
Check the following.
❏ Devices are turned on.
❏ You can access the Internet and other computers or network devices on the same network from the devices youwant to connect to the printer.
If still does not connect your printer and network devices after confirming the above, turn off the wireless router.Wait for about 10 seconds, and then turn it on. Then reset your network settings by downloading and running theinstaller from the following website.
http://epson.sn > Setup
Related Information
& “Making Settings for Connecting to the Computer” on page 270
E-10
Solutions:
Check the following.
❏ Other devices on the network are turned on.
❏ Network addresses (IP address, subnet mask, and default gateway) are correct if you have set the printer’sObtain IP Address to Manual.
Reset the network address if they are incorrect. You can check the IP address, subnet mask, and default gatewayfrom the Network Status part on the network connection report.
If DHCP is enabled, change the printer’s Obtain IP Address setting to Auto. If you want to set the IP addressmanually, check the printer’s IP address from the Network Status part on the network connection report, and thenselect Manual on the network settings screen. Set the subnet mask to [255.255.255.0].
If still does not connect your printer and network devices, turn off the wireless router. Wait for about 10 seconds,and then turn it on.
Related Information
& “Network Settings” on page 314
E-11
Solutions:
Check the following.
❏ The default gateway address is correct if you set the printer’s TCP/IP Setup setting to Manual.
❏ The device that is set as the default gateway is turned on.
Set the correct default gateway address. You can check the default gateway address from the Network Status parton the network connection report.
Adding or Replacing the Computer or Devices > Checking the Network Connection Status > Printi…
290
Related Information
& “Network Settings” on page 314
E-12
Solutions:
Check the following.
❏ Other devices on the network are turned on.
❏ The network addresses (IP address, subnet mask, and default gateway) are correct if you are entering themmanually.
❏ The network addresses for other devices (subnet mask and default gateway) are the same.
❏ The IP address does not conflict with other devices.
If still does not connect your printer and network devices after confirming the above, try the following.
❏ Turn off the wireless router. Wait for about 10 seconds, and then turn it on.
❏ Make network settings again using the installer. You can run it from the following website.http://epson.sn > Setup
❏ You can register several passwords on a wireless router that uses WEP security type. If several passwords areregistered, check if the first registered password is set on the printer.
Related Information
& “Network Settings” on page 314& “Making Settings for Connecting to the Computer” on page 270
E-13
Solutions:
Check the following.
❏ Network devices such as a wireless router, hub, and router are turned on.
❏ The TCP/IP Setup for network devices has not been set up manually. (If the printer’s TCP/IP Setup is setautomatically while the TCP/IP Setup for other network devices is performed manually, the printer’s networkmay differ from the network for other devices.)
If it still does not work after checking the above, try the following.
❏ Turn off the wireless router. Wait for about 10 seconds, and then turn it on.
❏ Make network settings on the computer that is on the same network as the printer using the installer. You canrun it from the following website.http://epson.sn > Setup
❏ You can register several passwords on a wireless router that uses the WEP security type. If several passwords areregistered, check if the first registered password is set on the printer.
Adding or Replacing the Computer or Devices > Checking the Network Connection Status > Printi…
291
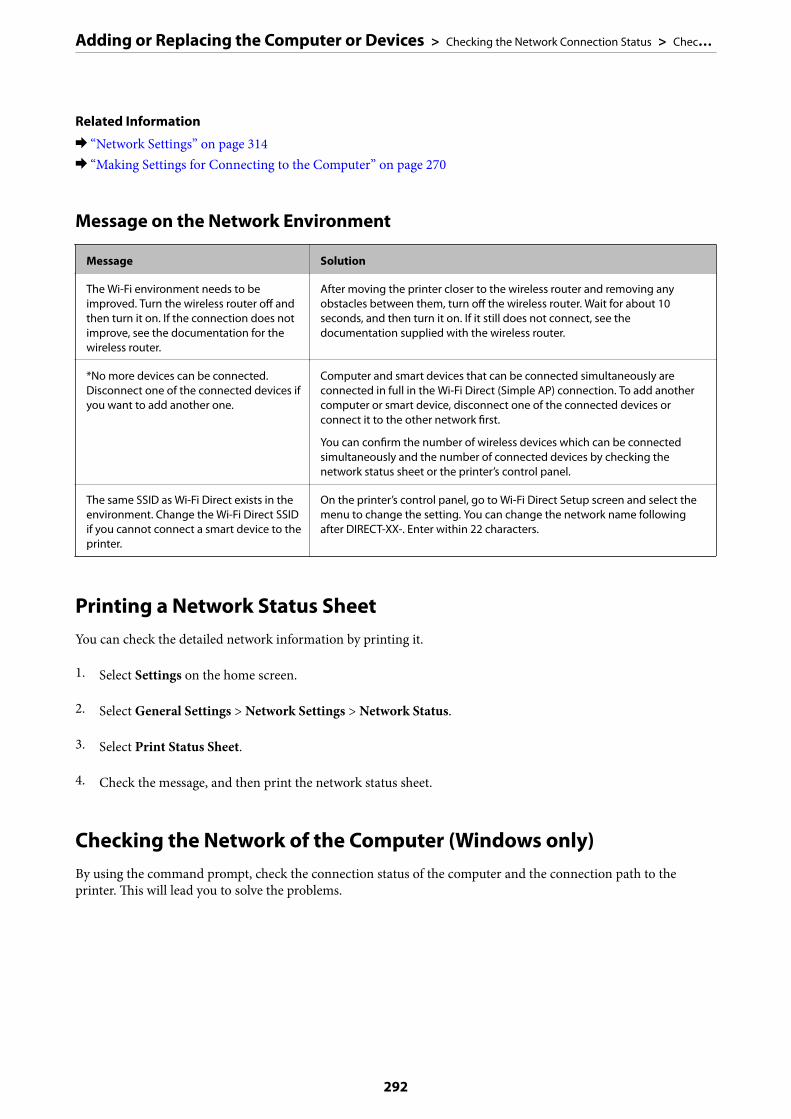
Related Information
& “Network Settings” on page 314& “Making Settings for Connecting to the Computer” on page 270
Message on the Network Environment
Message Solution
The Wi-Fi environment needs to beimproved. Turn the wireless router off andthen turn it on. If the connection does notimprove, see the documentation for thewireless router.
After moving the printer closer to the wireless router and removing anyobstacles between them, turn off the wireless router. Wait for about 10seconds, and then turn it on. If it still does not connect, see thedocumentation supplied with the wireless router.
*No more devices can be connected.Disconnect one of the connected devices ifyou want to add another one.
Computer and smart devices that can be connected simultaneously areconnected in full in the Wi-Fi Direct (Simple AP) connection. To add anothercomputer or smart device, disconnect one of the connected devices orconnect it to the other network first.
You can confirm the number of wireless devices which can be connectedsimultaneously and the number of connected devices by checking thenetwork status sheet or the printer’s control panel.
The same SSID as Wi-Fi Direct exists in theenvironment. Change the Wi-Fi Direct SSIDif you cannot connect a smart device to theprinter.
On the printer’s control panel, go to Wi-Fi Direct Setup screen and select themenu to change the setting. You can change the network name followingafter DIRECT-XX-. Enter within 22 characters.
Printing a Network Status SheetYou can check the detailed network information by printing it.
1. Select Settings on the home screen.
2. Select General Settings > Network Settings > Network Status.
3. Select Print Status Sheet.
4. Check the message, and then print the network status sheet.
Checking the Network of the Computer (Windows only)By using the command prompt, check the connection status of the computer and the connection path to theprinter. This will lead you to solve the problems.
Adding or Replacing the Computer or Devices > Checking the Network Connection Status > Chec…
292

❏ ipconfig commandDisplay the connection status of the network interface that is currently used by the computer.By comparing the setting information with actual communication, you can check whether the connection iscorrect. In case there are multiple DHCP servers on the same network, you can find out the actual addressassigned to the computer, the referred DNS server, etc.
❏ Format : ipconfig /all
❏ Examples :
❏ pathping commandYou can confirm the list of routers passing through the destination host and the routing of communication.
❏ Format : pathping xxx.xxx.xxx.xxx
❏ Examples : pathping 192.0.2.222
Adding or Replacing the Computer or Devices > Checking the Network Connection Status > Chec…
293

Product Information
Paper Information. . . . . . . . . . . . . . . . . . . . . . . . . . . . . . . . . . . . . . . . . . . . . . . . .295
Consumable Products Information. . . . . . . . . . . . . . . . . . . . . . . . . . . . . . . . . . . . .300
Software Information. . . . . . . . . . . . . . . . . . . . . . . . . . . . . . . . . . . . . . . . . . . . . . 301
Settings Menu List. . . . . . . . . . . . . . . . . . . . . . . . . . . . . . . . . . . . . . . . . . . . . . . . .310
Product Specifications. . . . . . . . . . . . . . . . . . . . . . . . . . . . . . . . . . . . . . . . . . . . . . 334
Regulatory Information. . . . . . . . . . . . . . . . . . . . . . . . . . . . . . . . . . . . . . . . . . . . . 344
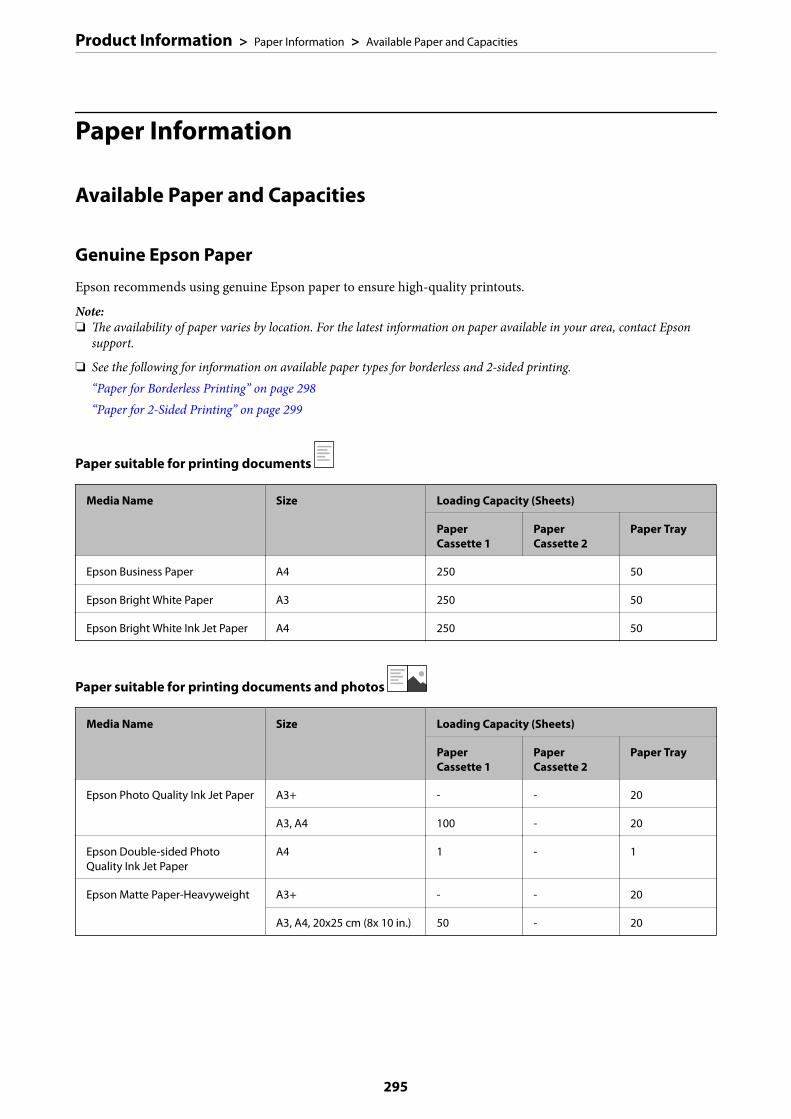
Paper Information
Available Paper and Capacities
Genuine Epson Paper
Epson recommends using genuine Epson paper to ensure high-quality printouts.
Note:❏ The availability of paper varies by location. For the latest information on paper available in your area, contact Epson
support.
❏ See the following for information on available paper types for borderless and 2-sided printing.“Paper for Borderless Printing” on page 298“Paper for 2-Sided Printing” on page 299
Paper suitable for printing documents
Media Name Size Loading Capacity (Sheets)
PaperCassette 1
PaperCassette 2
Paper Tray
Epson Business Paper A4 250 50
Epson Bright White Paper A3 250 50
Epson Bright White Ink Jet Paper A4 250 50
Paper suitable for printing documents and photos
Media Name Size Loading Capacity (Sheets)
PaperCassette 1
PaperCassette 2
Paper Tray
Epson Photo Quality Ink Jet Paper A3+ - - 20
A3, A4 100 - 20
Epson Double-sided PhotoQuality Ink Jet Paper
A4 1 - 1
Epson Matte Paper-Heavyweight A3+ - - 20
A3, A4, 20x25 cm (8x 10 in.) 50 - 20
Product Information > Paper Information > Available Paper and Capacities
295
Paper suitable for printing photos
Media Name Size Loading Capacity (Sheets)
PaperCassette 1
PaperCassette 2
Paper Tray
Epson Ultra Glossy Photo Paper A4, 13x18 cm (5x7 in.),10x15 cm (4x6 in.), 20x25cm (8x10 in.)
50 - 20
Epson Premium Glossy PhotoPaper
A3+ - - 20
A3, A4, 13x18 cm (5x7 in.),10x15 cm (4x6 in.), 20x25cm (8x10 in.), 16:9 wide(4x7.11 in.)
50 - 20
Epson Premium Semigloss PhotoPaper
A3+ - - 20
A3, A4, 13x18 cm (5x 7in.),10x15 cm (4x6 in.)
50 - 20
Epson Photo Paper Glossy A3+ - - 20
A3, A4, 13x18 cm (5x7 in.),10x15 cm (4x6 in.)
50 - 20
Commercially Available Paper
Note:See the following for information on available paper types for borderless and 2-sided printing.
“Paper for Borderless Printing” on page 298
“Paper for 2-Sided Printing” on page 299
Product Information > Paper Information > Available Paper and Capacities
296
Plain papers
Media Name Size Loading Capacity (Sheets)
Paper Cassette1
Paper Cassette2
Paper Tray
Plain paper, Copy paper
Preprinted paper*1
Letterhead
Color paper
Recycled paper
High quality plain paper
A3+ – – 50
A3, B4, Legal, Letter,8.5×13 in., A4,Executive*2, B5, 16K(195×270 mm), 8K(270×390 mm), Indian-Legal
250 50
A5, A6, B6 250 – 50
User Defined*2(mm)
89 to 297×127 to 431.8
250 – –
User Defined*2(mm)
89 to 297×431.9 to 1200
1 – –
User Defined*2(mm)
182 to 297×257 to 431.8
– 250 –
User Defined*2(mm)
182 to 297×431.9 to1200
– 1 –
User Defined*2(mm)
64 to 329×127 to 483
– – 50
User Defined*2(mm)
64 to 329×483.1 to 6000
– – 1
*1 Paper on which various forms are pre-printed such as slips or securities.
*2 Only printing from computer is available.
Product Information > Paper Information > Available Paper and Capacities
297

Thick papers
Media Name Size Loading Capacity (Sheets)
Paper Cassette1
Paper Cassette2
Paper Tray
Thick paper A3+ – – 20
A3, B4, Legal, Letter,8.5×13 in., A4,Executive*, B5, A5, A6,B6, 16K (195×270 mm),8K (270×390 mm),Indian-Legal
50 – 20
User Defined*(mm)
89 to 297×127 to 431.8
50 – –
User Defined*(mm)
89 to 297×431.9 to 1200
1 – –
User Defined*(mm)
64 to 329×127 to 483
– – 20
User Defined*(mm)
64 to 329×483.1 to 6000
– – 1
* Only printing from computer is available.
Envelope
Media Name Size Loading Capacity (Envelopes)
Paper Cassette1
Paper Cassette2
Paper Tray
Envelope Envelope #10, EnvelopeDL, Envelope C6,Envelope C4
10 – 10
Paper for Borderless Printing
Genuine Epson Paper
❏ Epson Business Paper
❏ Epson Bright White Paper
❏ Epson Bright White Ink Jet Paper
❏ Epson Photo Quality Ink Jet Paper*
❏ Epson Double-sided Photo Quality Ink Jet Paper
❏ Epson Matte Paper-Heavyweight*
Product Information > Paper Information > Available Paper and Capacities
298

❏ Epson Ultra Glossy Photo Paper
❏ Epson Premium Glossy Photo Paper*
❏ Epson Premium Semigloss Photo Paper*
❏ Epson Photo Paper Glossy*
* A3+ size paper is not supported for borderless printing.
Related Information
& “Available Paper and Capacities” on page 295
Commercially Available Paper
❏ Plain paper, Copy paper, Preprinted paper, Letterhead, Color paper, Recycled paper, High quality plain paper(A3, Letter, A4)
❏ Thick paper (A3, Letter, A4)
Related Information
& “Available Paper and Capacities” on page 295
Paper for 2-Sided Printing
Genuine Epson Paper
❏ Epson Business Paper
❏ Epson Bright White Paper
❏ Epson Bright White Ink Jet Paper
❏ Epson Double-sided Photo Quality Ink Jet Paper
Related Information
& “Available Paper and Capacities” on page 295
Commercially Available Paper
❏ Plain paper, Copy paper, Preprinted paper, Letterhead, Color paper, Recycled paper, High quality plain paper*
❏ Thick paper*
* A3+ size paper is not supported for automatic 2-sided printing.
For automatic 2-sided printing with User Defined paper sizes, you can use 182 to 297 x 257 to 431.8 mm paper sizes.
Related Information
& “Available Paper and Capacities” on page 295
Product Information > Paper Information > Available Paper and Capacities
299

Unavailable Paper TypesDo not use the following papers. Using these types of paper causes paper jams and smears on the printout.
❏ Papers that are wavy
❏ Papers that are torn or cut
❏ Papers that are folded
❏ Papers that are damp
❏ Papers that are too thick or too thin
❏ Papers that have stickers
Do not use the following envelopes. Using these types of envelope causes paper jams and smears on the printout.
❏ Envelopes that are curled or folded
❏ Envelopes with adhesive surfaces on the flaps or window envelopes
❏ Envelopes that are too thinThey may curl during printing.
Consumable Products Information
Ink Bottle CodesEpson recommends the use of genuine Epson ink bottles.
The following are the codes for genuine Epson ink bottles.
cImportant:
❏ Epson warranty does not cover damage caused by inks other than those specified, including any genuine Epsonink not designed for this printer or any third party ink.
❏ Other products not manufactured by Epson may cause damage that is not covered by Epson’s warranties, andunder certain circumstances, may cause erratic printer behavior.
Note:❏ Ink bottle codes may vary by location. For the correct codes in your area, contact Epson support.
❏ Although the ink bottles may contain recycled materials, this does not affect printer function or performance.
❏ Specifications and appearance of the ink bottle are subject to change without prior notice for improvement.
For Europe
Product BK: Black C: Cyan M: Magenta Y: Yellow
ET-16600 113 113 113 113
L15150 112 112 112 112
Product Information > Consumable Products Information > Ink Bottle Codes
300
Note:Visit the following website for information on Epson's ink bottle yields.
http://www.epson.eu/pageyield
For Australia and New Zealand
BK: Black C: Cyan M: Magenta Y: Yellow
542 542 542 542
For Asian countries except for China
BK: Black C: Cyan M: Magenta Y: Yellow
008 008 008 008
Maintenance Box CodeEpson recommends the use of a genuine Epson maintenance box.
Maintenance box code: C9345
cImportant:
Once a maintenance box has been installed in a printer it cannot be used with other printers.
Software InformationThis section introduces the network services and software products available for your printer from the Epsonwebsite or the supplied software disc.
Software for Printing
Application for Printing from a Computer (Windows Printer Driver)
The printer driver controls the printer according to the commands from an application. Making settings on theprinter driver provides the best printing results. You can also check the status of the printer or keep it in topoperating condition using the printer driver utility.
Note:You can change the language of the printer driver. Select the language you want to use from the Language setting on theMaintenance tab.
Accessing the printer driver from applications
To make settings that apply only to the application you are using, access from that application.
Select Print or Print Setup from the File menu. Select your printer, and then click Preferences or Properties.
Product Information > Software Information > Software for Printing
301

Note:Operations differ depending on the application. See the application's help for details.
Accessing the printer driver from the control panel
To make settings that apply to all of the applications, access from the control panel.
❏ Windows 10/Windows Server 2019/Windows Server 2016Click on the start button, and then select Windows System > Control Panel > View devices and printers inHardware and Sound. Right-click on your printer, or press and hold it and then select Printing preferences
❏ Windows 8.1/Windows 8/Windows Server 2012 R2/Windows Server 2012Select Desktop > Settings > Control Panel > View devices and printers in Hardware and Sound. Right-clickon your printer, or press and hold it and then select Printing preferences
❏ Windows 7/Windows Server 2008 R2Click the start button, and select Control Panel > View devices and printers in Hardware and Sound. Right-click on your printer and select Printing preferences.
❏ Windows Vista/Windows Server 2008Click the start button, and select Control Panel > Printers in Hardware and Sound. Right-click on your printerand select Printing preferences.
❏ Windows XP/Windows Server 2003 R2/Windows Server 2003Click the start button, and select Control Panel > Printers and Other Hardware > Printers and Faxes. Right-click on your printer and select Printing preferences.
Accessing the printer driver from the printer icon on the task bar
The printer icon on the desktop task bar is a shortcut icon allowing you to quickly access the printer driver.
If you click the printer icon and select Printer Settings, you can access the same printer settings window as the onedisplayed from the control panel. If you double-click this icon, you can check the status of the printer.
Note:If the printer icon is not displayed on the task bar, access the printer driver window, click Monitoring Preferences on theMaintenance tab, and then select Register the shortcut icon to the taskbar.
Starting the utility
Access the printer driver window. Click the Maintenance tab.
Related Information
& “Menu Options for the Printer Driver” on page 44
Application for Printing from a Computer (Mac OS Printer Driver)
The printer driver controls the printer according to the commands from an application. Making settings on theprinter driver provides the best printing results. You can also check the status of the printer or keep it in topoperating condition using the printer driver utility.
Accessing the printer driver from applications
Click Page Setup or Print on the File menu of your application. If necessary, click Show Details (or d) to expandthe print window.
Product Information > Software Information > Software for Printing
302

Note:Depending on the application being used, Page Setup may not be displayed in the File menu, and the operations fordisplaying the print screen may differ.See the application's help for details.
Starting the utility
Select System Preferences from the Apple menu > Printers & Scanners (or Print & Scan, Print & Fax), and thenselect the printer. Click Options & Supplies > Utility > Open Printer Utility.
Related Information
& “Menu Options for the Printer Driver” on page 68
Guide to Mac OS Printer Driver
Epson Printer Utility
You can run a maintenance feature such as nozzle check and print head cleaning, and by starting EPSON StatusMonitor, you can check printer status and error information.
Application for Quick and Fun Printing from a Computer (Epson Photo+)
Epson Photo+ is an application that allows you to easily print images with a variety of layouts. You can alsoperform image correction and adjust the position while viewing a preview of your document. You can alsobrighten up your images by adding text and stamps wherever you like. When printing on genuine Epson photopaper, the ink performance is maximized creating a beautiful finish with excellent coloring.
Product Information > Software Information > Software for Printing
303

See the application's help for details.
Note:❏ Windows Server operating systems are not supported.
❏ To use this application the printer driver for this printer must be installed.
Starting on Windows
❏ Windows 10Click the start button, and then select Epson Software > Epson Photo+.
❏ Windows 8.1/Windows 8Enter the application name in the search charm, and then select the displayed icon.
❏ Windows 7/Windows Vista/Windows XPClick the start button, and select All Programs or Programs > Epson Software > Epson Photo+.
Starting on Mac OS
Select Go > Applications > Epson Software > Epson Photo+.
Related Information
& “Installing the Applications Separately” on page 162
Application for Printing Easily from a Smart Device
Epson iPrint is an application that allows you to print photos, documents, and web pages from a smart device suchas a smart phone or tablet. You can use local print, printing from a smart device that is connected to the samewireless network as your printer, or remote print, printing from a remote location over the Internet. To use remoteprint, register your printer in the Epson Connect service.
Installing Epson iPrint
You can install Epson iPrint on your smart device from the following URL or QR code.
http://ipr.to/c
Product Information > Software Information > Software for Printing
304
Application for Printing Easily from an Android Application (Epson PrintEnabler)
Epson Print Enabler is an application that allows you to wirelessly print your documents, emails, photos, and webpages right from your Android phone or tablet (Android v4.4 or later). With a few taps, your Android device willdiscover an Epson printer that is connected to the same wireless network.
Search for and install Epson Print Enabler from Google Play.
Software for Scanning
Application for Scanning from a Computer (Epson ScanSmart)
This application allows you to scan documents easily, and then save the scanned images in simple steps.
See the Epson ScanSmart help for details on using the features.
Starting on Windows
❏ Windows 10Click the start button, and then select Epson Software > Epson ScanSmart.
❏ Windows 8.1/Windows 8Enter the application name in the search charm, and then select the displayed icon.
❏ Windows 7Click the start button, and then select All Programs > Epson Software > Epson ScanSmart.
Starting on Mac OS
Select Go > Applications > Epson Software > Epson ScanSmart.
Software for Faxing
Application for Configuring Fax Operations and Sending Faxes (FAX Utility)
FAX Utility is an application that allows you to configure various settings for sending faxes from a computer. Youcan create or edit the contacts list to be used when sending a fax, configure to save received faxes in PDF format onthe computer, and so on. See the application's help for details.
Note:❏ Windows Server operating systems are not supported.
❏ Make sure you have installed the printer driver before installing FAX Utility.
❏ Make sure you have installed the printer driver before installing FAX Utility. See "Starting on Windows" or "Starting onMac OS" below to check if the application has been installed.
Starting on Windows
❏ Windows 10Click the start button, and select Epson Software > FAX Utility.
Product Information > Software Information > Software for Faxing
305
❏ Windows 8.1/Windows 8Enter the application name in the search charm, and then select the displayed icon.
❏ Windows 7/Windows Vista/Windows XPClick the start button, and select All Programs (or Programs) > Epson Software > FAX Utility.
Starting on Mac OS
Select System Preferences from the Apple menu > Printers & Scanners (or Print & Scan, Print & Fax), and thenselect the printer (FAX). Click Options & Supplies > Utility > Open Printer Utility.
Related Information
& “Sending a Fax from a Computer” on page 141& “Receiving Faxes on a Computer” on page 145
Application for Sending Faxes (PC-FAX Driver)
PC-FAX driver is an application that allows you to send a document created on a separate application as a faxdirectly from the computer. PC-FAX driver is installed when you install FAX Utility. See the application's help fordetails.
Note:❏ Windows Server operating systems are not supported.
❏ The operation differs depending on the application you used to create the document. See the application's help for details.
❏ Check if the application has been installed. See "Accessing from Windows" or "Accessing from Mac OS" below.
Accessing from Windows
In the application, select Print or Print Setup from the File menu. Select your printer (FAX), and then clickPreferences or Properties.
Accessing from Mac OS
In the application, select Print from the File menu. Select your printer (FAX) as the Printer setting, and then selectFax Settings or Recipient Settings from the pop-up menu.
Related Information
& “Sending a Fax from a Computer” on page 141
Software for Package Creation
Application for Creating Driver Packages (EpsonNet SetupManager)
EpsonNet SetupManager is a software to create a package for a simple printer installation, such as installing theprinter driver, installing EPSON Status Monitor and creating a printer port. This software allows the administratorto create unique software packages and distribute them among groups.
For more information, visit your regional Epson website.
http://www.epson.com
Product Information > Software Information > Software for Package Creation
306

Software for Making Settings or Managing Devices
Application for Configuring Printer Operations (Web Config)
Web Config is an application that runs in a web browser, such as Internet Explorer and Safari, on a computer orsmart device. You can confirm the printer status or change the network service and printer settings. To use theWeb Config, connect the printer and the computer or device to the same network.
The following browsers are supported.
Microsoft Edge, Internet Explorer 8 or later, Firefox*, Chrome*, Safari*
* Use the latest version.
Running Web Config on a Web Browser
1. Check the printer's IP address.
Select the network icon on the printer's home screen, and then select the active connection method to confirmthe printer's IP address.
Note:You can also check the IP address by printing the network connection report.
2. Launch a Web browser from a computer or smart device, and then enter the printer's IP address.
Format:
IPv4: http://the printer's IP address/
IPv6: http://[the printer's IP address]/
Examples:
IPv4: http://192.168.100.201/
IPv6: http://[2001:db8::1000:1]/
Note:Using the smart device, you can also run Web Config from the maintenance screen of Epson iPrint.
Since the printer uses a self-signed certificate when accessing HTTPS, a warning is displayed on the browserwhen you start Web Config; this does not indicate a problem and can be safely ignored.
Related Information
& “Application for Printing Easily from a Smart Device” on page 304& “Printing a Network Connection Report” on page 286
Running Web Config on Windows
When connecting a computer to the printer using WSD, follow the steps below to run Web Config.
1. Open the printer list on the computer.
❏ Windows 10Click on the start button, and then select Windows System > Control Panel > View devices and printersin Hardware and Sound.
Product Information > Software Information > Software for Making Settings or Managing Devices
307

❏ Windows 8.1/Windows 8Select Desktop > Settings > Control Panel > View devices and printers in Hardware and Sound (orHardware).
❏ Windows 7Click the start button, and select Control Panel > View devices and printers in Hardware and Sound.
❏ Windows VistaClick the start button, and select Control Panel > Printers in Hardware and Sound.
2. Right-click on your printer and select Properties.
3. Select the Web Service tab and click the URL.
Since the printer uses a self-signed certificate when accessing HTTPS, a warning is displayed on the browserwhen you start Web Config; this does not indicate a problem and can be safely ignored.
Running Web Config on Mac OS
1. Select System Preferences from the Apple menu > Printers & Scanners (or Print & Scan, Print & Fax), andthen select the printer.
2. Click Options & Supplies> Show Printer Webpage.
Since the printer uses a self-signed certificate when accessing HTTPS, a warning is displayed on the browserwhen you start Web Config; this does not indicate a problem and can be safely ignored.
Software for Configuring the Device on a Network (EpsonNet Config)
EpsonNet Config is an application that allows you to set the network interface addresses and protocols. See theoperations guide for EpsonNet Config or the application's help for more details.
Starting on Windows
❏ Windows 10/Windows Server 2019/Windows Server 2016Click the start button, and then select EpsonNet > EpsonNet Config.
❏ Windows 8.1/Windows 8/Windows Server 2012 R2/Windows Server 2012Enter the application name in the search charm, and then select the displayed icon.
❏ Windows 7/Windows Vista/Windows XP/Windows Server 2008 R2/Windows Server 2008/Windows Server2003 R2/Windows Server 2003Click the start button, and select All Programs or Programs > EpsonNet > EpsonNet Config SE > EpsonNetConfig.
Starting on Mac OS
Go > Applications > Epson Software > EpsonNet > EpsonNet Config SE > EpsonNet Config.
Related Information
& “Installing the Applications Separately” on page 162
Product Information > Software Information > Software for Making Settings or Managing Devices
308
Software for Managing Devices on the Network (Epson Device Admin)
Epson Device Admin is a multifunctional application software that manages the device on the network.
The following functions are available.
❏ Monitor or manage up to 2,000 printers or scanners over the segment
❏ Make a detailed report, such as for the consumable or product status
❏ Update the firmware of the product
❏ Introduce the device to the network
❏ Apply the unified settings to multiple devices.
You can download Epson Device Admin from Epson support website. For more information, see thedocumentation or help of Epson Device Admin.
Software for Updating
Application for Updating Software and Firmware (EPSON Software Updater)
EPSON Software Updater is an application that installs new software, and updates firmware and manuals over theInternet.
Note:Windows Server operating systems are not supported.
Starting on Windows
❏ Windows 10Click the start button, and then select Epson Software > EPSON Software Updater.
❏ Windows 8.1/Windows 8Enter the application name in the search charm, and then select the displayed icon.
❏ Windows 7/Windows Vista/Windows XPClick the start button, and then select All Programs (or Programs) > Epson Software > EPSON SoftwareUpdater.
Note:You can also start EPSON Software Updater by clicking the printer icon on the task bar on the desktop, and then selectingSoftware Update.
Starting on Mac OS
Select Go > Applications > Epson Software > EPSON Software Updater.
Related Information
& “Installing the Applications Separately” on page 162
Product Information > Software Information > Software for Updating
309
Settings Menu ListSelect Settings on the home screen of the printer to make various settings.
General SettingsSelect the menus on the control panel as described below.
Settings > General Settings
Basic Settings
Select the menus on the control panel as described below.
Settings > General Settings > Basic Settings
You cannot change settings that have been locked by your administrator.
LCD Brightness:
Adjust the brightness of the LCD screen.
Sounds:
Adjust the volume.
❏ MuteSelect On to mute all sound.
❏ Normal ModeSelect the volume such as Button Press.
❏ Quiet ModeSelect the volume such as Button Press in Quiet Mode.
Sleep Timer:
Adjust the time period to enter a sleep mode (energy saving mode) when the printer has notperformed any operations. The LCD screen turns black when the setting time passes.
Wake from Sleep:
Wake with LCD Screen Touch:
Select On to return from sleep mode (energy saving mode) by tapping the touch panel. Whenthis is off, you need to press a button on the control panel to wake the printer. Turning thisfeature off prevents any unintentional operations caused due to foreign objects touching thescreen. You can also set a time period during this feature is on.
Power Off Timer:
Your product may have this feature or the Power Off Settings feature depending on the location ofpurchase.
Product Information > Settings Menu List > General Settings
310
Select this setting to turn the printer off automatically when it is not used for a specified period oftime. You can adjust the time before power management is applied. Any increase will affect theproduct’s energy efficiency. Please consider the environment before making any change.
Power Off Settings:
Your product may have this feature or the Power Off Timer feature depending on the location ofpurchase.
❏ Power Off If InactiveSelect this setting to turn the printer off automatically if it is not used for a specified period oftime. Any increase will affect the product’s energy efficiency. Please consider the environmentbefore making any change.
❏ Power Off If DisconnectedSelect this setting to turn the printer off after 30 minutes when all ports including the LINE portare disconnected. This feature may not be available depending on your region.
Date/Time Settings:
❏ Date/TimeEnter the current date and time.
❏ Daylight Saving TimeSelect the summer time setting that applies to your area.
❏ Time DifferenceEnter the time difference between your local time and UTC (Coordinated Universal Time).
Country/Region:
Select the country or region in which you are using your printer. If you change the country or region,your fax settings return to their defaults and you must select them again.
Language:
Select the language used on the LCD screen.
Start-up Screen:
Specify the initial menu displayed on the LCD screen when the printer turns on and Operation TimeOut is enable.
Edit Home:
Change the layout of the icons on the LCD screen. You can also add, remove, and move icons.
Wall Paper:
Change the background color of the LCD screen.
Operation Time Out:
Select On to return to the initial screen when no operations have been performed for the specifiedtime. When user restrictions have been applied and no operations are performed for the specifiedtime, you are logged out and returned to the initial screen.
Keyboard:
Change the layout of the keyboard on the LCD screen.
Product Information > Settings Menu List > General Settings
311
Default Screen(Job/Status):
Select the default information you want to display when you press the button.
Related Information
& “Saving Power” on page 162& “Entering Characters” on page 28
Printer Settings
Select the menus on the control panel as described below.
Settings > General Settings > Printer Settings
You cannot change settings that have been locked by your administrator.
Paper Source Settings:
Paper Setting:
Select the paper source to specify the paper size and paper type you loaded. When Paper SizeAuto Detect is enabled, the printer detects the paper size you loaded.
Paper Tray Priority:
Select On to give printing priority to paper loaded in the paper tray.
A4/Letter Auto Switching:
Select On to feed paper from the paper source set as A4 size when there is no paper source setas Letter, or feed from the paper source set as Letter size when there is no paper source set asA4.
Auto Select Settings:
When paper runs out, paper is automatically fed from a paper source that has the samesettings as the paper settings for the print jobs. You can set automatic selection for every papersource for each function in copy, fax, or other. You cannot set everything to off.
This setting is disabled when you select a specific paper source in the paper settings for theprint jobs. Depending on the paper type setting on the Main tab of the printer driver, papermay not be fed automatically.
Error Notice:
Select On to display an error message when the selected paper size or type does not match theloaded paper.
Paper Setup Auto Display:
Select On to display the Paper Setting screen when loading paper in the paper cassette. If youdisable this feature, you cannot print from an iPhone, iPad, or iPod touch using AirPrint.
Universal Print Settings:
These print settings are applied when you print by an external device without using the printer driver.
Product Information > Settings Menu List > General Settings
312

Top Offset:
Adjust the top margin of the paper.
Left Offset:
Adjust the left margin of the paper.
Top Offset in Back:
Adjust the top margin for the back of the page when performing 2-sided printing.
Left Offset in Back:
Adjust the left margin for the back of the page when performing 2-sided printing.
Check Paper Width:
Select On to check the paper width before printing. This prevents printing beyond the edges ofthe paper when the paper size setting is incorrect, but this may lower the print speed.
Skip Blank Page:
Skips blank pages in the print data automatically.
Auto Error Solver:
Select an action to perform when a 2-sided printing error or a memory full error occurs.
❏ OnDisplays a warning and prints in single-sided mode when a 2-sided printing error occurs, or printsonly what the printer could process when a memory full error occurs.
❏ OffDisplays an error message and cancels printing.
Memory Device Interface:
❏ Memory Device:Select Enable to allow the printer to access an inserted memory device. If Disable is selected, youcannot save data to the memory device with the printer. This prevents confidential documentsfrom being removed illegally.
❏ File Sharing:Select whether to give write access to the memory device from a USB-connected computer or anetwork-connected computer.
Thick Paper:
Select On to prevent ink from smearing on your printouts, however, this may lower the print speed.
Quiet Mode:
Select On to reduce noise during printing, however, this may lower the print speed. Depending onthe paper type and print quality settings you selected, there may be no difference in the printer's noiselevel.
Ink Drying Time:
Select the ink drying time you want to use when performing 2-sided printing. The printer prints theother side after printing one side. If your printout is smeared, increase the time setting.
Product Information > Settings Menu List > General Settings
313

Bidirectional:
Select On to change the print direction; Prints while the print head moves to the left and to the right.If vertical or horizontal ruled lines on your printout look blurred or misaligned, disabling this featuremay solve the problem; however, doing so may reduce print speed.
Output Tray Auto Extension:
Select On to extend the paper output support automatically when printing A3 size paper.
PC Connection via USB:
Select Enable to allow a computer to access the printer when connected by USB. When Disable isselected, printing and scanning that is not sent over a network connection is restricted.
Related Information
& “Loading Paper” on page 32
Network Settings
Select the menus on the control panel as described below.
Settings > General Settings > Network Settings
Wi-Fi Setup:
Set up or change wireless network settings. Choose the connection method from following and thenfollow the instructions on the control panel.
Router:
❏ Wi-Fi Setup Wizard
❏ Push Button Setup(WPS)
❏ Others
❏ PIN Code Setup(WPS)
❏ Wi-Fi Auto Connect
❏ Disable Wi-FiYou may be able to resolve network problems by disabling the Wi-Fi settings or making
the Wi-Fi settings again. Tap > Router > Change Settings > Others >Disable Wi-Fi > Start Setup.
Wi-Fi Direct:
❏ iOS
❏ Android
❏ Other OS Devices
Product Information > Settings Menu List > General Settings
314

❏ Change
❏ Change Network Name
❏ Change Password
❏ Change Frequency RangeThis setting may not be displayed depending on the region.
❏ Disable Wi-Fi Direct
❏ Restore Default Settings
Wired LAN Setup:
Set up or change a network connection that uses a LAN cable and router. When this is being used,Wi-Fi connections are disabled.
Network Status:
Displays or prints the current network settings.
❏ Wired LAN/Wi-Fi Status
❏ Wi-Fi Direct Status
❏ Email Server Status
❏ Print Status Sheet
Connection Check:
Checks the current network connection and prints a report. If there are any problems with theconnection, see the report to solve the problem.
Advanced:
Make the following detailed settings.
❏ Device Name
❏ TCP/IP
❏ Proxy Server
❏ Email Server
❏ IPv6 Address
❏ MS Network Sharing
❏ Link Speed & Duplex
❏ Redirect HTTP to HTTPS
❏ Disable IPsec/IP Filtering
❏ Disable IEEE802.1X
Related Information
& “Making Wi-Fi Settings by Entering the SSID and Password” on page 272& “Making Wi-Fi Settings by Push Button Setup (WPS)” on page 273& “Making Wi-Fi Settings by PIN Code Setup (WPS)” on page 274& “Connecting a Smart Device and Printer Directly (Wi-Fi Direct)” on page 275& “Printing a Network Connection Report” on page 286
Product Information > Settings Menu List > General Settings
315

& “Checking the Network Connection Status” on page 285
Web Service Settings
Select the menus on the control panel as described below.
Settings > General Settings > Web Service Settings
You cannot change settings that have been locked by your administrator.
Epson Connect Services:
Displays whether the printer is registered and connected to Epson Connect.
You can register to the service by selecting Register and follow the instructions.
When you have registered, you can change the following settings.
❏ Suspend/Resume
❏ Unregister
For details, see the following web site.
https://www.epsonconnect.com/
http://www.epsonconnect.eu (Europe only)
Related Information
& “Printing Using a Cloud Service” on page 81
Fax Settings
Selecting Settings > General Settings > Fax Settings from the printer's control panel displays thismenu.
Note:❏ You can also access Fax Settings from Web Config. Click the Fax tab on the Web Config screen.
❏ When you use Web Config to display the Fax Settings menu, there may be slight differences in the user interface and inlocation compared to the printer's control panel.
Related Information
& “Quick Operation Button” on page 317& “Basic Settings” on page 317& “Send Settings” on page 319& “Receive Settings” on page 320& “Report Settings” on page 326& “Security Settings” on page 327& “Check Fax Connection” on page 327& “Fax Setting Wizard” on page 328
Product Information > Settings Menu List > General Settings
316

Quick Operation Button
You can find the menu on the printer's control panel below.
Settings > General Settings > Fax Settings > Quick Operation Button
Note:❏ If a password entry screen is displayed, enter the administrator password.
❏ You cannot display this menu on the Web Config screen.
Quick Operation Button 1, Quick Operation Button 2, Quick Operation Button 3:
Registers up to three shortcuts allowing you to quickly access the menu you use often when sendingfaxes. The shortcuts are displayed on the following menu.
Fax > Fax Settings tab.
Basic Settings
You can find the menu on the printer's control panel below.
Settings > General Settings > Fax Settings > Basic Settings
Note:❏ On the Web Config screen, you can find the menu below.
Fax tab > Basic Settings
❏ If a password entry screen is displayed, enter the password.
Fax Speed:
Select the fax transmission speed. We recommend selecting Slow(9,600bps) when a communicationerror occurs frequently, when sending/receiving a fax to/from abroad, or when you are using an IP(VoIP) phone service.
ECM:
Automatically corrects errors in the fax transmission (Error Correction Mode), mostly caused bytelephone line noise. If this is disabled, you cannot send or receive documents in color.
Dial Tone Detection:
Detects a dial tone before starting to dial. If the printer is connected to a PBX (Private BranchExchange) or digital phone line, the printer may fail to start dialing. In this situation, change the LineType setting to PBX. If this does not work, disable this feature. However, disabling this feature maydrop the first digit of a fax number and send the fax to the wrong number.
Dial Mode:
Select the type of phone system to which you have connected the printer. When set to Pulse, you cantemporarily switch the dialing mode from pulse to tone by pressing ("T" is entered) while enteringnumbers on the fax top screen. This setting may not be displayed depending on your region orcountry.
Line Type:
Select the line type to which you have connected the printer.
Product Information > Settings Menu List > General Settings
317

When using the printer in an environment that uses extensions and requires an external access code,such as 0 and 9, to get an outside line, select PBX. For an environment that uses a DSL modem orterminal adapter, setting to PBX is also recommended.
Access Code
Select Use, and then register an external access code such as 0 or 9. Then, when sending a faxto an outside fax number, enter # (hash) instead of the real code. # (hash) must also be used inContacts as an external access code. If an external access code such as 0 or 9 is set in a contact,you cannot send faxes to the contact. In this case, set Access Code to Do Not Use, otherwiseyou must change the code in Contacts to #.
Header:
Enter your sender name and fax number. These appear as a header on outgoing faxes.
❏ Your Phone Number: You can enter up to 20 characters using 0-9 + or space. For Web Config, youcan enter up to 30 characters.
❏ Fax Header: You can register up to 21 sender names as necessary. You can enter up to 40 charactersfor each sender name. For Web Config, enter the header in Unicode (UTF-8).
Receive Mode:
Select the receive mode. For details, see the related Information below.
DRD:
If you have subscribed to a distinctive ring service from your telephone company, select the ringpattern to be used for incoming faxes. The distinctive ring service, offered by many telephonecompanies (the service name differs by company), allows you to have several phone numbers on onephone line. Each number is assigned different ring pattern. You can use one number for voice callsand another for fax calls. Depending on the region, this option may be On or Off.
Rings to Answer:
Select the number of rings that must occur before the printer automatically receives a fax.
Remote Receive:
Remote Receive
When you answer an incoming fax call on a phone connected to the printer, you can startreceiving the fax by entering the code using the phone.
Start Code
Set the start code of Remote Receive. Enter two characters using 0-9, *, #.
Rejection Fax:
Rejection Fax
Select options to reject receiving junk faxes.
❏ Rejection Number List: If the other party's phone number is in the rejection number list, setwhether to reject the incoming faxes.
❏ Fax Header Blank: If the other party's phone number is blocked, set whether to rejectreceiving the faxes.
Product Information > Settings Menu List > General Settings
318
❏ Unregistered Contacts: If the other party's phone number is not in the contacts, set whetherto reject receiving the faxes.
Edit Blocked Number list
You can register up to 30 fax numbers to reject the faxes and calls. Enter up to 20 charactersusing 0-9, *, #, or space.
Related Information
& “Enabling Sending Faxes from a Computer” on page 407& “Making the Printer Ready to Send and Receive Faxes” on page 396& “Making Settings for a PBX Phone System” on page 398& “Receiving Incoming Faxes” on page 123& “Making Settings for Blocking Junk Faxes” on page 407
Send Settings
You can find the menu on the printer's control panel below.
Settings > General Settings > Fax Settings > Send Settings
Note:❏ On the Web Config screen, you can find the menu below.
Fax tab > Send Settings
❏ If a password entry screen is displayed, enter the password.
Auto Rotation:
An A4 size original placed in the ADF or on the scanner glass with its long edge facing to the left issent as an A3 size fax. Enable this to rotate the scanned image to send it at A4 size.
Batch Send:
When there are multiple faxes waiting to be sent to the same recipient, this groups them together tosend them at once. Up to five documents (up to 100 pages in total) can be sent at one time. This helpsyou save on transmission costs by reducing the number of connection times.
Save Failure Data:
Saves documents that failed to be sent in the printer's memory. You can resend the documents fromthe Job/Status.
Wait Time for Next Original:
Set the time to wait for the next original. The printer starts sending the fax after the time has passed.
Fax Preview Display Time:
You can preview the scanned document for a set time before sending it. The printer stars sending thefax after the time has passed.
PC to FAX Function:
This item is displayed on the Web Config screen only. Enables sending faxes using a client computer.
Product Information > Settings Menu List > General Settings
319
Receive Settings
Related Information
& “Save/Forward Settings” on page 320& “Print Settings” on page 324
Save/Forward Settings
Unconditional Save/Forward:
You can find the menu on the printer's control panel below.
Settings > General Settings > Fax Settings > Receive Settings > Save/Forward Settings >Unconditional Save/Forward
Note:On the Web Config screen, you can find the menu below.
Fax tab > Save/Forward Settings > Unconditional Save/Forward
You can set saving and forwarding destinations to the Inbox, a computer, an external memory device,email addresses, shared folders, and other fax machines. You can use these features at the same time.If you set all items to Off on the printer's control panel, the printer is set to print received faxes.
Related Information
& “Making Saving Settings to Receive Faxes” on page 400& “Making Forwarding Settings to Receive Faxes” on page 401
Save to Inbox:
Saves received faxes to the printer's Inbox. Up to 100 documents can be saved. Note that saving100 documents may not be possible depending on the usage conditions such as the file size ofsaved documents, and using of multiple fax saving features at a time.
Though the received faxes are not automatically printed, you can view them on the printer'sscreen and print only the ones you need. However, if you select Yes and Print in another item,such as Save to Computer in Unconditional Save/Forward, the received faxes are printedautomatically.
Save to Computer:
Saves received faxes as PDF files on a computer connected to the printer. You can set this toYes by using only the FAX Utility. Install FAX Utility on the computer in advance. After settingthis to Yes, you can change this to Yes and Print.
Save to Memory Device:
Saves received faxes as PDF files to an external memory device connected to the printer.Selecting Yes and Print prints received faxes while saving them to the memory device.
Received documents are saved in the printer's memory temporarily before the documents aresaved in the memory device connected to the printer. Because a memory full error disablessending and receiving faxes, keep the memory device connected to the printer.
Product Information > Settings Menu List > General Settings
320

Forward:
Forwards received faxes to another fax machine, or forwards them as PDF files to a sharedfolder on a network or to an email address. Forwarded faxes are deleted from the printer.Selecting Yes and Print prints received faxes while forwarding them. First add the forwardingdestinations to the contacts list. To forward to an email address, configure the email serversettings.
❏ Destination: You can select forwarding destinations from the contacts list you added inadvance.If you have selected a shared folder on a network or an email address as the forwardingdestination, we recommend that you test if you can send a scanned image to the destinationin the scan mode. Select Scan > Email, or Scan > Network Folder/FTP from the homescreen, select the destination, and then start scanning.
❏ Options When Forwarding Failed: You can select whether to print the failed fax or save it tothe Inbox.When the Inbox is full, receiving faxes is disabled. You should delete the documents fromthe inbox once they have been checked. The number of documents that have failed to be
forwarded is displayed on the on the home screen, in addition to other unprocessedjobs.
Email Notifications:
Sends an email notification when the process you select below is complete. You can use thefeatures below at the same time.
Recipient
Set the destination of the process completion notification.
Notify on Receive
Sends a notification when receiving a fax is complete.
Notify on Print
Sends a notification when printing a fax is complete.
Notify on Save
Sends a notification when saving a fax to a memory device is complete.
Notify on Forward
Sends a notification when forwarding a fax is complete.
Related Information
& “Making Saving Settings to Receive Faxes” on page 400& “Making Forwarding Settings to Receive Faxes” on page 401
Conditional Save/Forward:
You can find the menu on the printer's control panel below.
Settings > General Settings > Fax Settings > Receive Settings > Save/Forward Settings >Conditional Save/Forward
Product Information > Settings Menu List > General Settings
321
Note:On the Web Config screen, you can find the menu below.
Fax tab > Save/Forward Settings > Conditional Save/Forward
You can set saving and/or forwarding destinations to the Inbox, confidential boxes, an externalmemory device, email addresses, shared folders, and another fax machine.
To switch between enabling or disabling the conditions, tap anywhere in the box except for .
Related Information
& “Making Saving Settings to Receive Faxes with Specific Conditions” on page 403& “Making Forwarding Settings to Receive Faxes with Specified Conditions” on page 405
Name:
Enter name of the condition.
Condition(s):
Select the conditions and make the settings.
Sender Fax Number match
When the sender fax number matches, the received fax is saved and forwarded.
Subaddress(SUB) perfect match
When the subaddress (SUB) matches perfectly, the received fax is saved and forwarded.
Password(SID) perfect match
When the password (SID) matches perfectly, the received fax is saved and forwarded.
Receiving Time
Saves and forwards a fax received during the specified period of time.
Save/Forward Destination:
Select the destination to save and forward received documents that match the conditions. Youcan use the features below at the same time.
Save to Fax Box:
Saves received faxes in the printer's Inbox or confidential box.
You can save up to 100 documents in total. Note that saving 100 documents may not bepossible depending on the usage conditions such as the file size of saved documents,and using of multiple fax saving features at a time.
Save to Memory Device:
Saves received faxes as PDF files to an external memory device connected to the printer.
Received documents are saved in the printer's memory temporarily before thedocuments are saved in the memory device connected to the printer. Because a memoryfull error disables sending and receiving faxes, keep the memory device connected tothe printer.
Product Information > Settings Menu List > General Settings
322
Forward:
Forwards received faxes to another fax machine, or forwards them as PDF files to ashared folder on a network or to an email address. Forwarded faxes are deleted from theprinter. First add the forwarding destination to the contacts list. To forward to an emailaddress, you also need to configure the email server settings.
❏ Destination: You can select a forwarding destination from the contacts list you addedin advance.If you have selected a shared folder on a network or an email address as theforwarding destination, we recommend that you test if you can send a scanned imageto the destination in the scan mode. Select Scan > Email, or Scan > NetworkFolder/FTP from the home screen, select the destination, and then start scanning.
❏ Options When Forwarding Failed: You can select whether to print the failed fax orsave it to the Inbox.
Print:
Prints received faxes.
Email Notifications:
Sends an email notification when the process you select below is complete. You can use thefeatures below at the same time.
Recipient
Set the destination of the process completion notification.
Notify on Receive
Sends a notification when receiving a fax is complete.
Notify on Print
Sends a notification when printing a fax is complete.
Notify on Save
Sends a notification when saving a fax to a memory device is complete.
Notify on Forward
Sends a notification when forwarding a fax is complete.
Transmission Report:
Prints a transmission report automatically after you save or forward a received fax.
Selecting Print on Error prints a report only when you save or forward a received fax and anerror occurs.
Related Information
& “Making Saving Settings to Receive Faxes with Specific Conditions” on page 403& “Making Forwarding Settings to Receive Faxes with Specified Conditions” on page 405
Common Settings:
You can find the menu on the printer's control panel below.
Product Information > Settings Menu List > General Settings
323
Settings > General Settings > Fax Settings > Receive Settings > Save/Forward Settings > CommonSettings
Note:On the Web Config screen, you can find the menu below.
❏ Fax tab > Fax Box > Inbox
❏ Fax tab > Save/Forward Settings > Common Settings
Inbox settings:
Options when memory is full:
You can select the operation to print the received fax or refuse to receive it when theInbox memory is full.
Inbox Password Settings:
Password protects the Inbox to restrict users from viewing received faxes. Select Changeto change the password, and select Reset to cancel password protection. When changingor resetting the password, you need the current password.
You cannot set a password when Options when memory is full has been set to Receiveand print faxes.
Email Subject to Forward:
You can specify a subject for the email when forwarding to an email address.
Menu:
You can find on the printer's control panel by accessing the following menus in order.
Settings > General Settings > Fax Settings > Receive Settings > Save/Forward Settings >
Note:You cannot print the list from the Web Config screen.
Print Conditional Save/Forward list:
Prints the Conditional Save/Forward list.
Print Settings
You can find the menu on the printer's control panel below.
Settings > General Settings > Fax Settings > Receive Settings > Print Settings
Note:❏ On the Web Config screen, you can find the menu below.
Fax Settings > Print Settings
❏ If a password entry screen is displayed, enter the password.
Auto Reduction:
Prints received faxes with large-size documents reduced to fit on the paper in the paper source.Reducing may not always be possible depending on the received data. If this is turned off, largedocuments are printed at their original size on multiple sheets, or a blank second page may beejected.
Product Information > Settings Menu List > General Settings
324
Split Page Settings:
Prints received faxes with the page split when the size of the received documents is larger than thesize of the paper loaded in the printer.
Auto Rotation:
Rotates faxes received as landscape-oriented A4 (Letter, B5, or A5) size documents so that they areprinted on A4 (Letter, B5, or A5) size paper. This setting is applied when the paper size setting for atleast one paper source used for printing faxes is set to A4 (B5, A5, or Letter).
By selecting Off, faxes received as landscape-oriented A4 (Letter, B5, or A5) size, which are the samewidth as A3 (Tabloid, B4, or A4) portrait documents, are assumed to be A3 (Tabloid, B4, or A4) sizefaxes and printed as such.
Check the paper source settings for printing faxes and paper size for the paper sources in thefollowing menus in Settings > General Settings > Printer Settings > Paper Source Settings.
❏ Auto Select Settings
❏ Paper Setting > Paper Size
Add Reception Information:
Prints reception information on the received fax, even if the sender does not set the headerinformation. The reception information includes the received date and time, sender's ID, receptionID (such as " #001"), and page number (such as "P1"). By collating the reception ID printed on thereceived fax, you can check the transmission log in the fax report and the fax job history. When SplitPage Settings is enabled, the split page number is also included.
2-Sided:
Prints multiple pages of received faxes on both sides of the paper.
Print Start Timing:
Select options to start printing the faxes to receive.
❏ All Pages Received: Printing starts after receiving all of the pages. To start printing from the firstpage or last page depends on the setting of Collation Stack feature. See the explanation forCollation Stack.
❏ First Page Received: Starts printing when the first page is received, and then prints in order as thepages are received. If the printer cannot start printing, such as when it is printing other jobs, theprinter starts printing received pages as a batch when it is available.
Collation Stack:
Since the first page is printed last (output to the top), the printed documents are stacked in the correctpage order. When the printer is running low on memory, this feature may not be available.
Print Suspend Time:
Print Suspend Time
During the specified time period, the printer saves documents received in the printer'smemory without printing them. This feature can be used for noise prevention at night or toprevent confidential documents from being disclosed while you are away. Before using thisfeature, make sure there is enough free memory. Even before the restarting time, you can checkand print the received documents individually from Job/Status on the home screen.
Product Information > Settings Menu List > General Settings
325
Time to Stop
Stops printing documents.
Time to Restart
Restarts printing documents automatically.
Quiet Mode:
Reduces the noise the printer makes when printing faxes, however, print speed may be reduced.
Report Settings
You can find the menu on the printer's control panel below.
Settings > General Settings > Fax Settings > Report Settings
Note:❏ On the Web Config screen, you can find the menu below.
Fax tab > Report Settings
❏ If a password entry screen is displayed, enter the password.
Forwarding Report:
Prints a report after forwarding a received fax document. Select Print to print every time a documentis forwarded.
Backup Error Report:
Prints a report when a backup error occurs on forwarding the sent fax to Backup Destination. Youcan set the destination in Fax > Fax Settings > Backup. Note that the backup feature is availablewhen:
❏ Sending a fax in monochrome
❏ Sending a fax using the Send Fax Later feature
❏ Sending a fax using the Batch Send feature
❏ Sending a fax using the Store Fax Data feature
Fax Log Auto Print:
Prints the fax log automatically. Select On(Every 30) to print a log every time 30 fax jobs arecompleted. Select On(Time) to print the log at a specified time. However, if the number of fax jobsexceeds 30, the log is printed before the specified time.
Attach Fax image to report:
Prints a Transmission Report with an image of the first page of the sent document. Select On(LargeImage) to print the upper part of the page without reducing. Select On(Small Image) to print theentire page reducing it to fit onto the report.
Report Format:
Selects a format for fax reports in Fax > More tab > Fax Report other than Protocol Trace. SelectDetail to print with error codes.
Product Information > Settings Menu List > General Settings
326

Output Method:
Select an output method for fax reports, such as Save to Memory Device. When you select Forward,select Destination from the contacts.
Security Settings
You can find the menu on the printer's control panel below.
Settings > General Settings > Fax Settings > Security Settings
Note:❏ On the Web Config screen, you can find the menu below.
Fax tab > Security Settings
❏ If a password entry screen is displayed, enter the password.
Direct Dialing Restrictions:
Selecting On disables manual entry of the recipient's fax numbers allowing the operator to selectrecipients only from the contacts list or sent history.
Selecting Enter Twice requires the operator to enter the fax number again when the number wasmanually entered.
Selecting Off enables manual entry of the recipient's fax numbers.
Confirm Address List:
Selecting On displays a recipient confirmation screen before starting the transmission.
You can select the recipients from All or Only for Broadcasting.
Broadcasting Restrictions:
Selecting On allows only one fax number to be entered as the Recipient.
Backup Data Auto Clear:
Selecting On automatically erases the backups when sending or receiving a document completessuccessfully and the backups become unnecessary.
Selecting Off, to prepare for an unexpected power off due to an electricity failure or an incorrectoperation, temporarily stores backup copies of sent and received documents in its memory.
Clear Backup Data:
Erases all backup copies temporarily stored in the printer's memory. Run this before you give theprinter to someone else or dispose of it.
This menu is not displayed on the Web Config screen.
Check Fax Connection
You can find the menu on the printer's control panel below.
Settings > General Settings > Fax Settings > Check Fax Connection
Note:You cannot display this menu on the Web Config screen.
Product Information > Settings Menu List > General Settings
327
Selecting Check Fax Connection checks that the printer is connected to the phone line and ready for faxtransmission. You can print the check result on A4 size plain paper.
Fax Setting Wizard
You can find the menu on the printer's control panel below:
Settings > General Settings > Fax Settings > Fax Setting Wizard
Note:You cannot display this menu on the Web Config screen.
Selecting Fax Setting Wizard makes basic fax settings. Follow the on-screen instructions.
Related Information
& “Basic Settings” on page 317& “Making the Printer Ready to Send and Receive Faxes” on page 396
Scan Settings
Confirm Recipient
Check destination before scanning.
Email Server
Set the email server settings for scanning Email.
❏ Server SettingsSpecify the authentication method for the printer to access the mail server.“Mail Server Setting Items” on page 360
❏ Connection CheckCheck the connection to the mail server.
System Administration
By using this menu, you can maintain the product as a system administrator. It also allows you to restrict productfeatures for individual users to suite your work or office style.
Select the menus on the control panel as described below.
Settings > General Settings > System Administration
Contacts Manager:
You can make the following settings for contacts.
Register/Delete:
Register and/or delete contacts for the Fax, Scan to Email, and Scan to Network Folder/FTPmenus.
Product Information > Settings Menu List > General Settings
328

Frequent:
Register frequently used contacts to access them quickly. You can also change the order of thelist.
Print Contacts:
Print your contact list.
View Options:
Change the way the contact list is displayed.
Search Options:
Change the method for searching contacts.
Clear Internal Memory Data:
Delete the printer's internal memory data, such as jobs with passwords.
Security Settings:
You can make the following security settings.
Restrictions:
Permit to change the settings of the following items when panel lock is enabled.
❏ Job Log Access
❏ Access to Register/Delete Contacts
❏ Fax Recent Access
❏ Fax Transmission Log Access
❏ Access to Fax Report
❏ Access to Print Save History of Scan to Network Folder/FTP
❏ Access to Recent of Scan to Email
❏ Access to Show Sent History of Scan to Email
❏ Access to Print Sent History of Scan to Email
❏ Access to Language
❏ Access to Thick Paper
❏ Access to Quiet Mode
❏ Protection of Personal Data
Access Control:
Select On to restrict product features. This requires users to log into the product control panelwith their user name and password before they can use control panel features. In AcceptUnknown User Jobs, you can select whether or not to allow jobs that do not have thenecessary authentication information.
Admin Settings:
❏ Admin PasswordSet, change, and clear an administrator password.
Product Information > Settings Menu List > General Settings
329
❏ Lock SettingSelect whether or not to lock the control panel using the password registered in AdminPassword.
Password Encryption:
Select On to encrypt your password. If you turn the power off while restart is in progress, datamay be damaged and the printer settings are restores to defaults. In that case, set passwordinformation again.
Customer Research:
Select Approve to provide product usage information such as the number of prints to Seiko EpsonCorporation.
Restore Default Settings:
Reset the settings in the following menus to their defaults.
❏ Network Settings
❏ Copy Settings
❏ Scan Settings
❏ Fax Settings
❏ Clear All Data and Settings
Firmware Update:
You can get firmware information such as your current version and information on available updates.
Update:
Check if the latest version of the firmware has been uploaded to the network server. If anupdate is available, you can select whether or not to start updating.
Notification:
Select On to receive a notification if a firmware update is available.
Related Information
& “Updating the Printer's Firmware using the Control Panel” on page 167
Print CounterSelect the menus on the control panel as described below.
Settings > Print Counter
Displays the total number of prints, B&W prints, and color prints including items such as the status sheet from thetime you purchased the printer.
Supply StatusSelect the menus on the control panel as described below.
Product Information > Settings Menu List > Supply Status
330
Settings > Supply Status
Displays the approximate service life of the maintenance box. When is displayed, the maintenance box is
nearly full. When is displayed, the maintenance box is full.
Related Information
& “Refilling the Ink Tanks” on page 237
MaintenanceSelect the menus on the control panel as described below.
Settings > Maintenance
Print Quality Adjustment:
Select this feature if there are any problems with your print outs. You can check for clogged nozzlesand clean the print head if necessary, and then adjust some parameters to improve print quality.
Print Head Nozzle Check:
Select this feature to check if the print head nozzles are clogged. The printer prints a nozzle checkpattern.
Print Head Cleaning:
Select this feature to clean clogged nozzles in the print head.
Power Cleaning:
Select this feature to replace all of the ink inside the ink tubes. More ink is consumed than in usualcleaning. See the "Related Information" below for details on using this feature.
Print Head Alignment:
Select this feature to adjust the print head to improve print quality.
❏ Ruled Line AlignmentSelect this feature to align vertical lines.
❏ Horizontal AlignmentSelect this feature if horizontal banding appears at regular intervals in your printouts.
Fill Ink:
Select this feature to reset the ink levels to 100% when refilling the ink tank.
Ink Level Setting:
Select this feature to set the ink level according to the actual ink remaining.
Paper Guide Cleaning:
Select this feature if there are ink stains on the internal rollers. The printer feeds paper to clean theinternal rollers.
Product Information > Settings Menu List > Maintenance
331

Remove Paper:
Select this feature if there are still some torn pieces of paper inside the printer even after removingjammed paper. The printer makes more space between the print head and the surface of the paper toeasily remove the torn pieces of paper.
Periodic Cleaning:
The printer automatically performs Print Head Nozzle Check and Print Head Cleaning based onthe specific period of time. Select On to maintain premium print quality. Under the followingconditions, perform Print Head Nozzle Check and Print Head Cleaning yourself.
❏ Printout problems
❏ When Off is selected for Periodic Cleaning
❏ When printing at high quality, such as photos
❏ When the Print Head Cleaning message is displayed on the LCD screen
Related Information
& “Checking and Cleaning the Print Head” on page 151& “Running Power Cleaning” on page 153& “Refilling the Ink Tanks” on page 237& “Cleaning the Paper Path for Ink Smears” on page 155
LanguageSelect the menus on the control panel as described below.
Settings > Language
Select the language used on the LCD screen.
Printer Status/PrintSelect the menus on the control panel as described below.
Settings > Printer Status/Print
Print Status Sheet:
Configuration Status Sheet:
Print information sheets showing the current printer status and settings.
Supply Status Sheet:
Print information sheets showing the status of consumables.
Usage History Sheet:
Print information sheets showing the usage history of the printer.
Product Information > Settings Menu List > Printer Status/Print
332

Network:
Displays the current network settings. You can also print a status sheet.
Contacts ManagerSelect the menus on the control panel as described below.
Settings > Contacts Manager
Register/Delete:
Register and/or delete contacts for the Fax, Scan to Email, and Scan to Network Folder/FTP menus.
Frequent:
Register frequently used contacts to access them quickly. You can also change the order of the list.
Print Contacts:
Print your contact list.
View Options:
Change the way the contact list is displayed.
Search Options:
Change the method for searching contacts.
User SettingsSelect the menus on the control panel as described below.
Settings > User Settings
You can change the default settings for your frequently used scanning, copying, and faxing settings. See thefollowing related information for details.
❏ Scan to Network Folder/FTP
❏ Scan to Email
❏ Scan to Computer
❏ Scan to Memory Device
❏ Scan to Cloud
❏ Copy Settings
❏ Fax
Product Information > Settings Menu List > User Settings
333
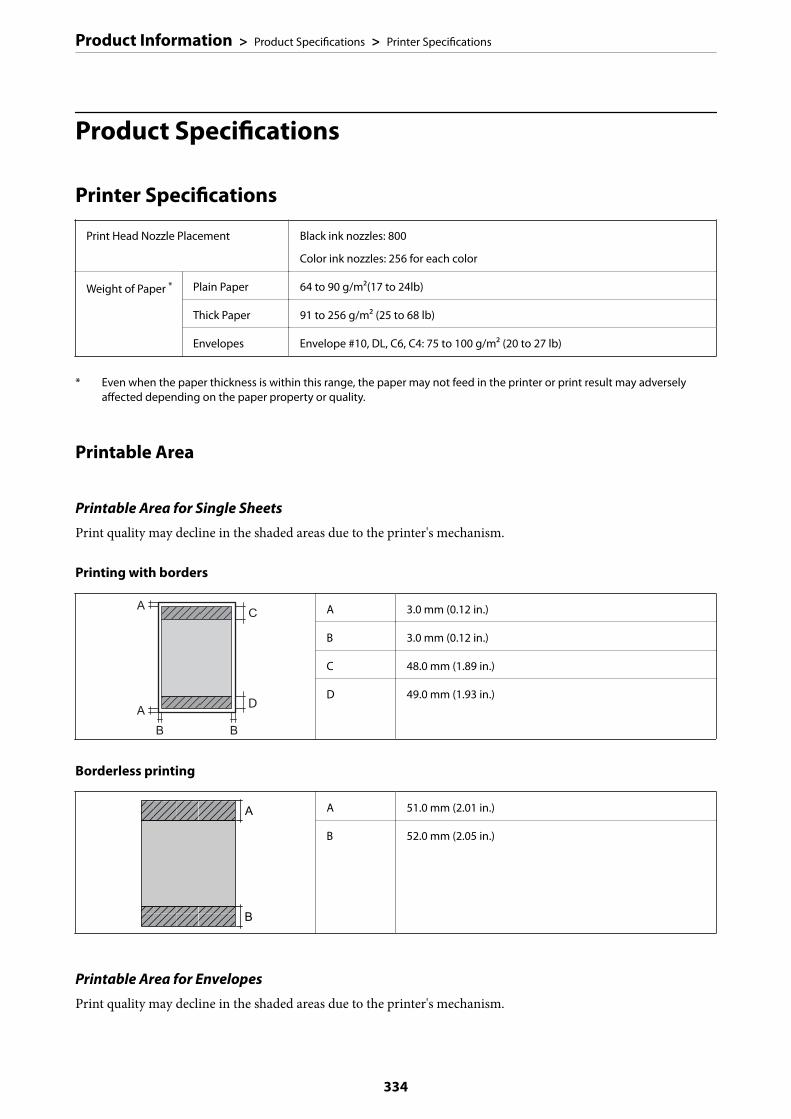
Product Specifications
Printer Specifications
Print Head Nozzle Placement Black ink nozzles: 800
Color ink nozzles: 256 for each color
Weight of Paper * Plain Paper 64 to 90 g/m2(17 to 24lb)
Thick Paper 91 to 256 g/m2 (25 to 68 lb)
Envelopes Envelope #10, DL, C6, C4: 75 to 100 g/m2 (20 to 27 lb)
* Even when the paper thickness is within this range, the paper may not feed in the printer or print result may adverselyaffected depending on the paper property or quality.
Printable Area
Printable Area for Single Sheets
Print quality may decline in the shaded areas due to the printer's mechanism.
Printing with borders
A 3.0 mm (0.12 in.)
B 3.0 mm (0.12 in.)
C 48.0 mm (1.89 in.)
D 49.0 mm (1.93 in.)
Borderless printing
A 51.0 mm (2.01 in.)
B 52.0 mm (2.05 in.)
Printable Area for Envelopes
Print quality may decline in the shaded areas due to the printer's mechanism.
Product Information > Product Specifications > Printer Specifications
334

A 3.0 mm (0.12 in.)
B 3.0 mm (0.12 in.)
C 48.0 mm (1.89 in.)
D 49.0 mm (1.93 in.)
Scanner Specifications
Scanner Type Flatbed
Photoelectric Device CIS
Effective Pixels 14040×20400 pixels (1200 dpi)
Maximum Document Size 297×431.8 mm (11.7×17 in.)
A3
Scanning Resolution 1200 dpi (main scan)
2400 dpi (sub scan)
Output Resolution 50 to 9600 dpi in 1 dpi increments
Color Depth Color
❏ 48 bits per pixel internal (16 bits per pixel per color internal)
❏ 24 bits per pixel external (8 bits per pixel per color external)
Grayscale
❏ 16 bits per pixel internal
❏ 8 bits per pixel external
Black and white
❏ 16 bits per pixel internal
❏ 1 bits per pixel external
Light Source LED
ADF Specifications
ADF Type Auto duplex scanning
Available Paper Sizes A5, A4, A3, B5, B4, Letter, Legal
Paper Type Plain Paper
Weight of Paper 64 to 95 g/m2
Loading Capacity Except for A5, B5: 50 sheets or 5.5 mm
A5, B5: 20 sheets
Product Information > Product Specifications > ADF Specifications
335
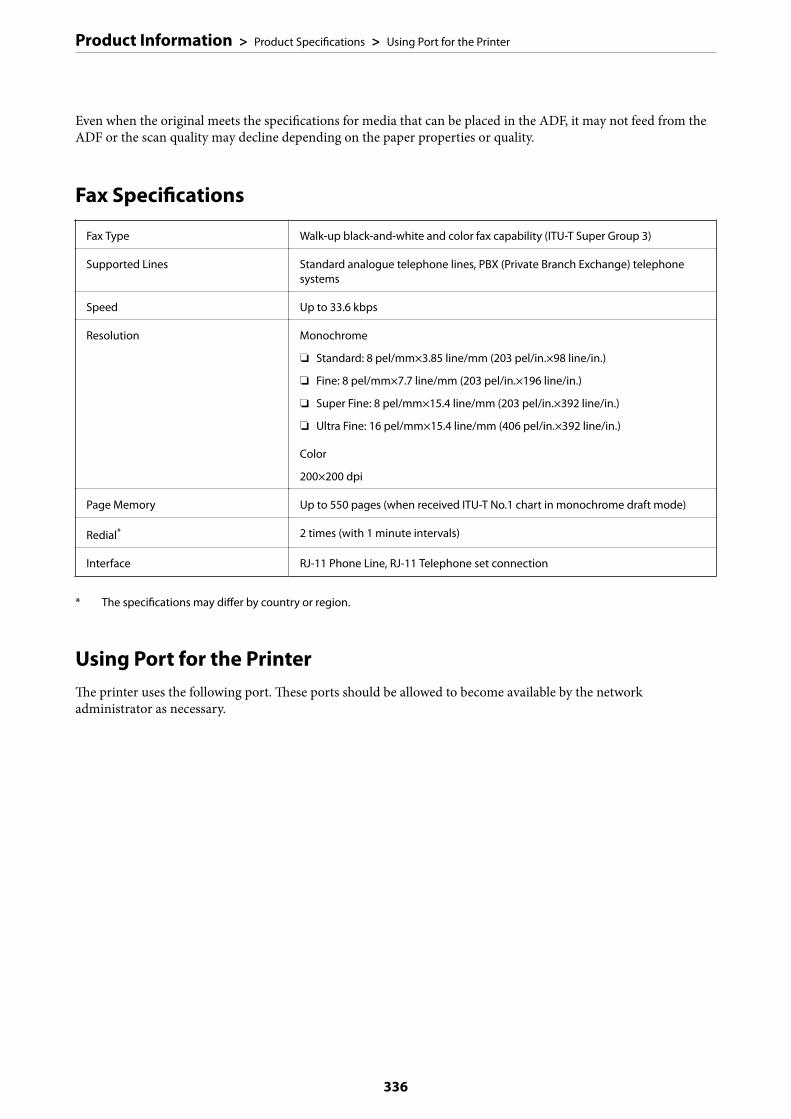
Even when the original meets the specifications for media that can be placed in the ADF, it may not feed from theADF or the scan quality may decline depending on the paper properties or quality.
Fax Specifications
Fax Type Walk-up black-and-white and color fax capability (ITU-T Super Group 3)
Supported Lines Standard analogue telephone lines, PBX (Private Branch Exchange) telephonesystems
Speed Up to 33.6 kbps
Resolution Monochrome
❏ Standard: 8 pel/mm×3.85 line/mm (203 pel/in.×98 line/in.)
❏ Fine: 8 pel/mm×7.7 line/mm (203 pel/in.×196 line/in.)
❏ Super Fine: 8 pel/mm×15.4 line/mm (203 pel/in.×392 line/in.)
❏ Ultra Fine: 16 pel/mm×15.4 line/mm (406 pel/in.×392 line/in.)
Color
200×200 dpi
Page Memory Up to 550 pages (when received ITU-T No.1 chart in monochrome draft mode)
Redial* 2 times (with 1 minute intervals)
Interface RJ-11 Phone Line, RJ-11 Telephone set connection
* The specifications may differ by country or region.
Using Port for the PrinterThe printer uses the following port. These ports should be allowed to become available by the networkadministrator as necessary.
Product Information > Product Specifications > Using Port for the Printer
336

Sender(Client)
Use Destination(Server)
Protocol PortNumber
Printer File sending (When scan to networkfolder is used from the printer)
FTP server FTP (TCP) 20
21
File server SMB (TCP) 445
NetBIOS (UDP) 137
138
NetBIOS (TCP) 139
Email sending (When scan to mail isused from the printer)
SMTP server SMTP (TCP) 25
SMTP SSL/TLS (TCP) 465
SMTP STARTTLS (TCP) 587
POP before SMTP connection (Whenscan to mail is used from the printer)
POP server POP3 (TCP) 110
When Epson Connect is used Epson ConnectServer
HTTPS 443
XMPP 5222
Collecting user information (Use thecontacts from the printer)
LDAP server LDAP (TCP) 389
LDAP SSL/TLS (TCP) 636
LDAP STARTTLS (TCP) 389
User authentication when collectinguser information (When using thecontacts from the printer)
User authentication when using thescan to network folder (SMB) from theprinter
KDC server Kerberos 88
Control WSD Client computer WSD (TCP) 5357
Search the computer when pushscanning from Epson ScanSmart
Client computer Network Push ScanDiscovery
2968
Product Information > Product Specifications > Using Port for the Printer
337

Sender(Client)
Use Destination(Server)
Protocol PortNumber
Clientcomputer
Discover the printer from anapplication such as EpsonNet Config,printer driver, and scanner driver.
Printer ENPC (UDP) 3289
Collect and set up the MIB informationfrom an application such as EpsonNetConfig, printer driver, and scannerdriver.
Printer SNMP (UDP) 161
Forwarding LPR data Printer LPR (TCP) 515
Forwarding RAW data Printer RAW (Port9100) (TCP) 9100
Forwarding AirPrint (IPP/IPPS printing)data
Printer IPP/IPPS (TCP) 631
Searching WSD printer Printer WS-Discovery (UDP) 3702
Forwarding the scan data from EpsonScanSmart
Printer Network Scan (TCP) 1865
Collecting the job information whenpush scanning from Epson ScanSmart
Printer Network Push Scan 2968
Interface Specifications
For Computer Hi-Speed USB*
For External USB Device Hi-Speed USB
* USB 3.0 cables are not supported.
Network Specifications
Wi-Fi Specifications
See the following table for your product's Wi-Fi specifications.
Australia
New Zealand
China
Hong Kong
South Korea
https://support.epson.net/wifi/04/
Countries or regions except for theabove
https://support.epson.net/wifi/02/
Product Information > Product Specifications > Network Specifications
338
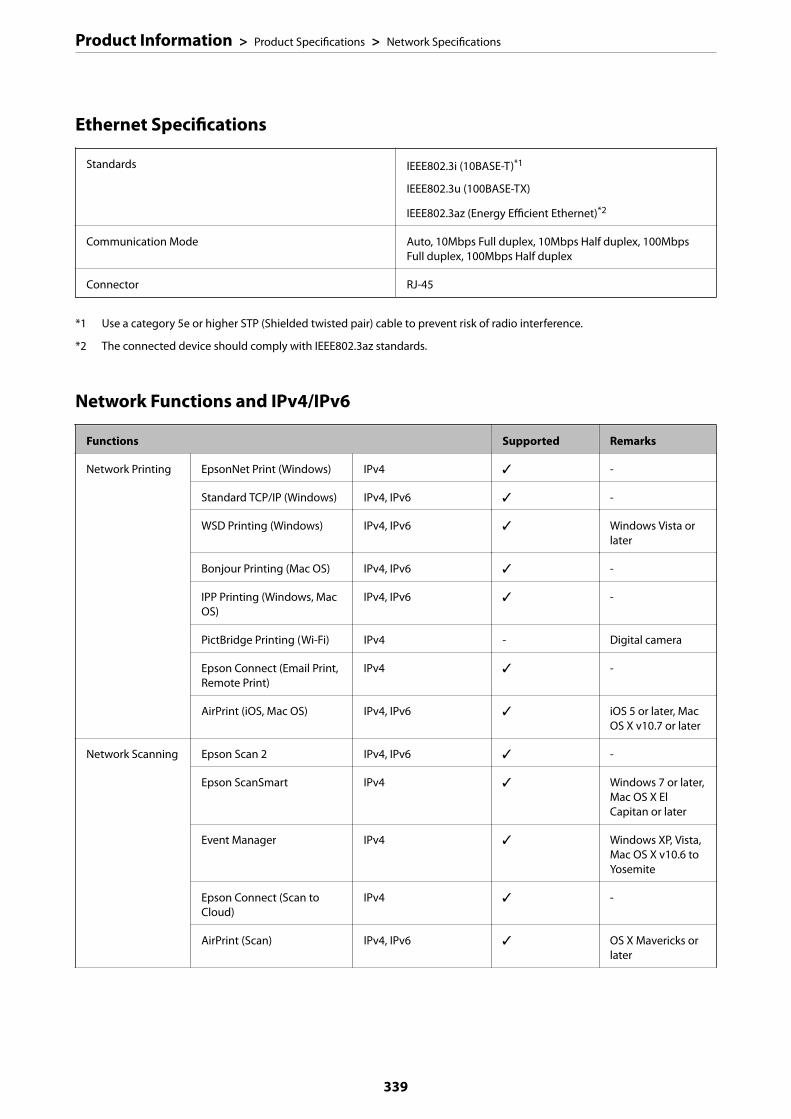
Ethernet Specifications
Standards IEEE802.3i (10BASE-T)*1
IEEE802.3u (100BASE-TX)
IEEE802.3az (Energy Efficient Ethernet)*2
Communication Mode Auto, 10Mbps Full duplex, 10Mbps Half duplex, 100MbpsFull duplex, 100Mbps Half duplex
Connector RJ-45
*1 Use a category 5e or higher STP (Shielded twisted pair) cable to prevent risk of radio interference.
*2 The connected device should comply with IEEE802.3az standards.
Network Functions and IPv4/IPv6
Functions Supported Remarks
Network Printing EpsonNet Print (Windows) IPv4 ✓ -
Standard TCP/IP (Windows) IPv4, IPv6 ✓ -
WSD Printing (Windows) IPv4, IPv6 ✓ Windows Vista orlater
Bonjour Printing (Mac OS) IPv4, IPv6 ✓ -
IPP Printing (Windows, MacOS)
IPv4, IPv6 ✓ -
PictBridge Printing (Wi-Fi) IPv4 - Digital camera
Epson Connect (Email Print,Remote Print)
IPv4 ✓ -
AirPrint (iOS, Mac OS) IPv4, IPv6 ✓ iOS 5 or later, MacOS X v10.7 or later
Network Scanning Epson Scan 2 IPv4, IPv6 ✓ -
Epson ScanSmart IPv4 ✓ Windows 7 or later,Mac OS X ElCapitan or later
Event Manager IPv4 ✓ Windows XP, Vista,Mac OS X v10.6 toYosemite
Epson Connect (Scan toCloud)
IPv4 ✓ -
AirPrint (Scan) IPv4, IPv6 ✓ OS X Mavericks orlater
Product Information > Product Specifications > Network Specifications
339
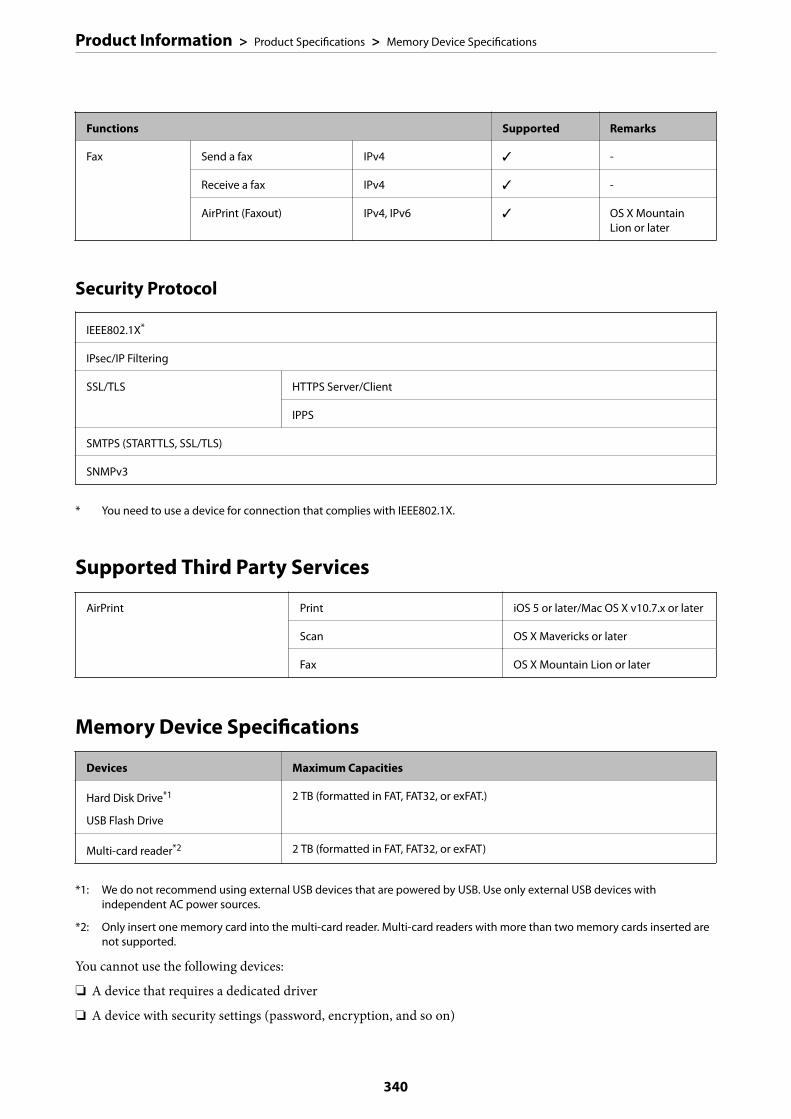
Functions Supported Remarks
Fax Send a fax IPv4 ✓ -
Receive a fax IPv4 ✓ -
AirPrint (Faxout) IPv4, IPv6 ✓ OS X MountainLion or later
Security Protocol
IEEE802.1X*
IPsec/IP Filtering
SSL/TLS HTTPS Server/Client
IPPS
SMTPS (STARTTLS, SSL/TLS)
SNMPv3
* You need to use a device for connection that complies with IEEE802.1X.
Supported Third Party Services
AirPrint Print iOS 5 or later/Mac OS X v10.7.x or later
Scan OS X Mavericks or later
Fax OS X Mountain Lion or later
Memory Device Specifications
Devices Maximum Capacities
Hard Disk Drive*1
USB Flash Drive
2 TB (formatted in FAT, FAT32, or exFAT.)
Multi-card reader*2 2 TB (formatted in FAT, FAT32, or exFAT)
*1: We do not recommend using external USB devices that are powered by USB. Use only external USB devices withindependent AC power sources.
*2: Only insert one memory card into the multi-card reader. Multi-card readers with more than two memory cards inserted arenot supported.
You cannot use the following devices:
❏ A device that requires a dedicated driver
❏ A device with security settings (password, encryption, and so on)
Product Information > Product Specifications > Memory Device Specifications
340
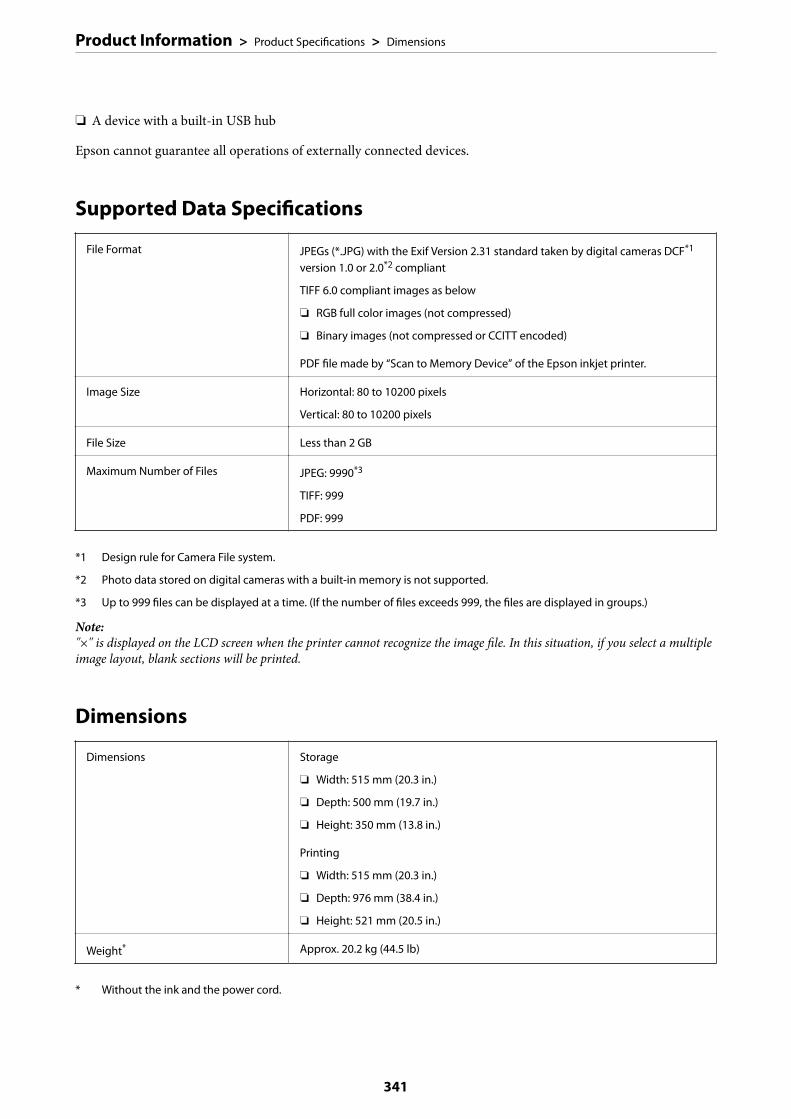
❏ A device with a built-in USB hub
Epson cannot guarantee all operations of externally connected devices.
Supported Data Specifications
File Format JPEGs (*.JPG) with the Exif Version 2.31 standard taken by digital cameras DCF*1
version 1.0 or 2.0*2 compliant
TIFF 6.0 compliant images as below
❏ RGB full color images (not compressed)
❏ Binary images (not compressed or CCITT encoded)
PDF file made by “Scan to Memory Device” of the Epson inkjet printer.
Image Size Horizontal: 80 to 10200 pixels
Vertical: 80 to 10200 pixels
File Size Less than 2 GB
Maximum Number of Files JPEG: 9990*3
TIFF: 999
PDF: 999
*1 Design rule for Camera File system.
*2 Photo data stored on digital cameras with a built-in memory is not supported.
*3 Up to 999 files can be displayed at a time. (If the number of files exceeds 999, the files are displayed in groups.)
Note:"×" is displayed on the LCD screen when the printer cannot recognize the image file. In this situation, if you select a multipleimage layout, blank sections will be printed.
Dimensions
Dimensions Storage
❏ Width: 515 mm (20.3 in.)
❏ Depth: 500 mm (19.7 in.)
❏ Height: 350 mm (13.8 in.)
Printing
❏ Width: 515 mm (20.3 in.)
❏ Depth: 976 mm (38.4 in.)
❏ Height: 521 mm (20.5 in.)
Weight* Approx. 20.2 kg (44.5 lb)
* Without the ink and the power cord.
Product Information > Product Specifications > Dimensions
341

Electrical Specifications
Model 100 to 240 V Model 220 to 240 V Model
Rated Frequency Range 50 to 60 Hz 50 to 60 Hz
Rated Current 0.7 to 0.4 A 0.4 A
Power Consumption (with USB Con-nection)
Standalone copying: Approx. 19.0 W(ISO/IEC24712)
Ready mode: Approx. 8.9 W
Sleep mode: Approx. 0.8 W
Power off: Approx. 0.15 W
Standalone copying: Approx. 19.0 W(ISO/IEC24712)
Ready mode: Approx. 9.1 W
Sleep mode: Approx. 0.8 W
Power off: Approx. 0.2 W
Note:❏ Check the label on the printer for its voltage.
❏ For European users, see the following Website for details on power consumption.http://www.epson.eu/energy-consumption
Environmental Specifications
Operation Use the printer within the range shown in the following graph.
Temperature: 10 to 35°C (50 to 95°F)
Humidity: 20 to 80% RH (without condensation)
Storage Temperature after initial ink charging: -15 to 40°C (5 to 104°F)*
Temperature before initial ink charging: -20 to 40°C (-4 to 104°F)*
Humidity: 5 to 85% RH (without condensation)
* You can store for one month at 40°C (104°F).
Environmental Specifications for Ink Bottles
Storage Temperature -20 to 40 °C (-4 to 104 °F)*
Freezing Temperature -15 °C (5 °F)
Ink thaws and is usable after approximately 2 hours at 25 °C (77 °F).
* You can store for one month at 40 °C (104 °F).
Product Information > Product Specifications > Environmental Specifications
342

Installation Location and SpaceSecure enough place to install and operate the printer correctly.
A 681mm
B 1207.4mm
C 515mm
D 331mm
E 740.6mm
F 466.8mm
See "Safety Instructions" in this manual to confirm the environmental conditions.
Related Information
& “Safety Instructions” on page 13
System Requirements❏ Windows 10 (32-bit, 64-bit)/Windows 8.1 (32-bit, 64-bit)/Windows 8 (32-bit, 64-bit)/Windows 7 (32-bit, 64-
bit)/Windows Vista (32-bit, 64-bit)/Windows XP SP3 or later (32-bit)/Windows XP Professional x64 EditionSP2 or later/Windows Server 2019/Windows Server 2016/Windows Server 2012 R2/Windows Server 2012/Windows Server 2008 R2/Windows Server 2008/Windows Server 2003 R2/Windows Server 2003 SP2 or later
Product Information > Product Specifications > System Requirements
343
❏ macOS Mojave/macOS High Sierra/macOS Sierra/OS X El Capitan/OS X Yosemite/OS X Mavericks/OS XMountain Lion/Mac OS X v10.7.x/Mac OS X v10.6.8
Note:❏ Mac OS may not support some applications and features.
❏ The UNIX File System (UFS) for Mac OS is not supported.
Regulatory Information
Standards and Approvals
Standards and Approvals for U.S. Model
Safety UL60950-1
CAN/CSA-C22.2 No.60950-1
EMC FCC Part 15 Subpart B Class B
CAN ICES-3 (B)/NMB-3 (B)
This equipment contains the following wireless module.
Manufacturer: Seiko Epson Corporation
Type: J26H005
This product conforms to Part 15 of the FCC Rules and RSS-210 of the IC Rules. Epson cannot acceptresponsibility for any failure to satisfy the protection requirements resulting from a non-recommendedmodification of the product. Operation is subject to the following two conditions: (1) this device may not causeharmful interference, and (2) this device must accept any interference received, including interference that maycause undesired operation of the device.
To prevent radio interference to the licensed service, this device is intended to be operated indoors and away fromwindows to provide maximum shielding. Equipment (or its transmit antenna) that is installed outdoors is subjectto licensing.
This equipment complies with FCC/IC radiation exposure limits set forth for an uncontrolled environment andmeets the FCC radio frequency (RF) Exposure Guidelines in Supplement C to OET65 and RSS-102 of the IC radiofrequency (RF) Exposure rules. This equipment should be installed and operated so that the radiator is kept at least7.9 inches (20 cm) or more away from a person's body (excluding extremities: hands, wrists, feet and ankles).
Standards and Approvals for European Model
For European users
Hereby, Seiko Epson Corporation declares that the following radio equipment model is in compliance withDirective 2014/53/EU. The full text of the EU declaration of conformity is available at the following website.
http://www.epson.eu/conformity
C754B
Product Information > Regulatory Information > Standards and Approvals
344
For use only in Ireland, UK, Austria, Germany, Liechtenstein, Switzerland, France, Belgium, Luxemburg,Netherlands, Italy, Portugal, Spain, Denmark, Finland, Norway, Sweden, Iceland, Croatia, Cyprus, Greece,Slovenia, Malta, Bulgaria, Czech, Estonia, Hungary, Latvia, Lithuania, Poland, Romania, and Slovakia.
Epson cannot accept responsibility for any failure to satisfy the protection requirements resulting from a non-recommended modification of the products.
Frequency Maximum Radio-Frequency Power Transmitted
2400-2483.5 MHz 20 dBm (EIRP)
Regarding resource efficiency information
Do you know that you can influence the impact you have on the environment when printing?
1. The type of paper you use has an influence on the environmental impact of your printer. Choosing papercertified under environmental stewardship initiatives, such as EN 12281:2002, or carrying recognised ecolabels,can help reduce your impact on the environment through the initiatives the manufacturers implement. For specificapplications, lighter paper, such as 64 g/m² paper, can be used.
2. You can reduce your power consumption by purchasing Energy Star compliant products.
3. You can reduce your paper consumption and the impact on the environment by automatically printing on bothsides of the page.
4. As standard, your printer has a power management function that powers down your product when not in use,which is a great energy saving feature.
Standards and Approvals for Australian Model
EMC AS/NZS CISPR32 Class B
Epson hereby declares that the following equipment Models are in compliance with the essential requirements andother relevant provisions of AS/NZS4268:
C754A
Epson cannot accept responsibility for any failure to satisfy the protection requirements resulting from a non-recommended modification of the products.
Standards and Approvals for New Zealand Model
General Warning
The grant of a Telepermit for any item of terminal equipment indicates only that Telecom has accepted that theitem complies with minimum conditions for connection to its network. It indicates no endorsement of the productby Telecom, nor does it provide any sort of warranty. Above all, it provides no assurance that any item will workcorrectly in all respects with another item of Telepermitted equipment of a different make or model, nor does itimply that any product is compatible with all of Telecom's network services.
Product Information > Regulatory Information > Standards and Approvals
345
Telepermitted equipment only may be connected to the EXT telephone port. This port is not specifically designedfor 3-wire-connected equipment. 3-wire-connected equipment might not respond to incoming ringing whenattached to this port.
Important Notice
Under power failure conditions, this telephone may not operate. Please ensure that a separate telephone, notdependent on local power, is available for emergency use.
This equipment is not capable, under all operating conditions, of correct operation at the higher speeds for which itis designed. Telecom will accept no responsibility should difficulties arise in such circumstances.
This equipment shall not be set up to make automatic calls to the Telecom '111' Emergency Service.
Restrictions on CopyingObserve the following restrictions to ensure the responsible and legal use of the printer.
Copying of the following items is prohibited by law:
❏ Bank bills, coins, government-issued marketable securities, government bond securities, and municipalsecurities
❏ Unused postage stamps, pre-stamped postcards, and other official postal items bearing valid postage
❏ Government-issued revenue stamps, and securities issued according to legal procedure
Exercise caution when copying the following items:
❏ Private marketable securities (stock certificates, negotiable notes, checks, etc.), monthly passes, concessiontickets, etc.
❏ Passports, driver’s licenses, warrants of fitness, road passes, food stamps, tickets, etc.
Note:Copying these items may also be prohibited by law.
Responsible use of copyrighted materials:
Printers can be misused by improperly copying copyrighted materials. Unless acting on the advice of aknowledgeable attorney, be responsible and respectful by obtaining the permission of the copyright holder beforecopying published material.
Product Information > Regulatory Information > Restrictions on Copying
346
Administrator Information
Connecting the Printer to the Network. . . . . . . . . . . . . . . . . . . . . . . . . . . . . . . . . . 348
Settings to Use the Printer. . . . . . . . . . . . . . . . . . . . . . . . . . . . . . . . . . . . . . . . . . . 352
Managing the Printer. . . . . . . . . . . . . . . . . . . . . . . . . . . . . . . . . . . . . . . . . . . . . . .412
Advanced Security Settings. . . . . . . . . . . . . . . . . . . . . . . . . . . . . . . . . . . . . . . . . . 428
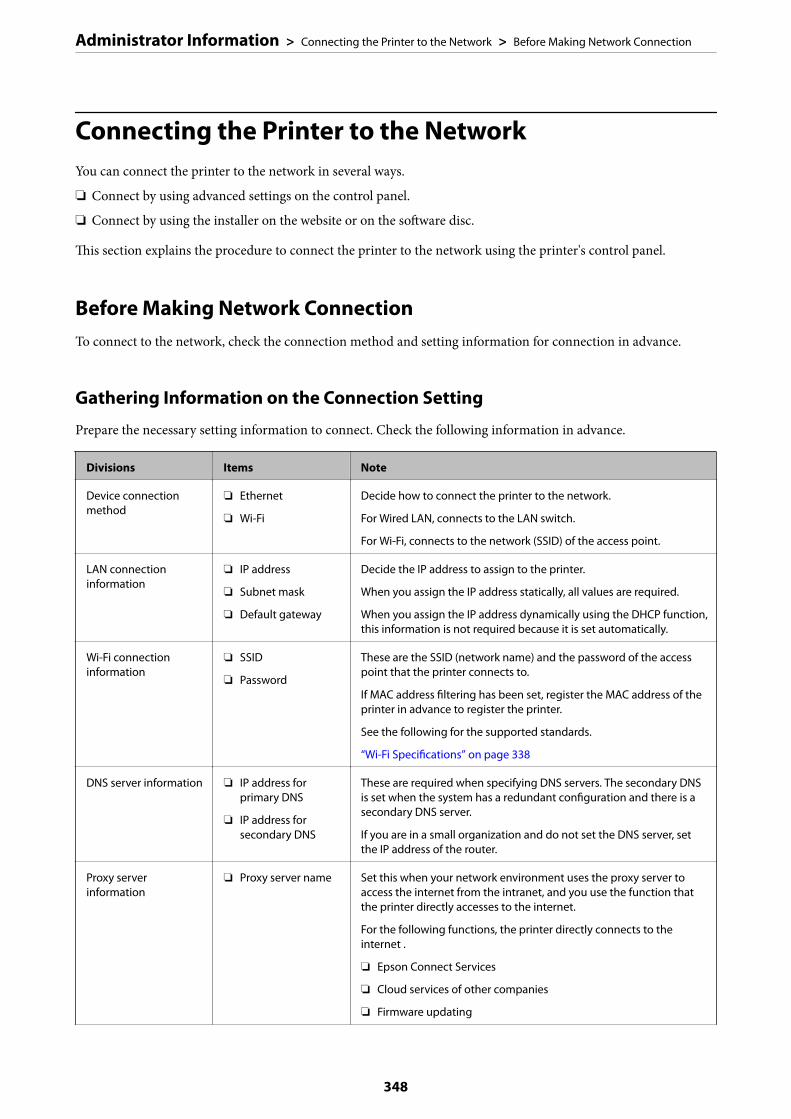
Connecting the Printer to the NetworkYou can connect the printer to the network in several ways.
❏ Connect by using advanced settings on the control panel.
❏ Connect by using the installer on the website or on the software disc.
This section explains the procedure to connect the printer to the network using the printer's control panel.
Before Making Network ConnectionTo connect to the network, check the connection method and setting information for connection in advance.
Gathering Information on the Connection Setting
Prepare the necessary setting information to connect. Check the following information in advance.
Divisions Items Note
Device connectionmethod
❏ Ethernet
❏ Wi-Fi
Decide how to connect the printer to the network.
For Wired LAN, connects to the LAN switch.
For Wi-Fi, connects to the network (SSID) of the access point.
LAN connectioninformation
❏ IP address
❏ Subnet mask
❏ Default gateway
Decide the IP address to assign to the printer.
When you assign the IP address statically, all values are required.
When you assign the IP address dynamically using the DHCP function,this information is not required because it is set automatically.
Wi-Fi connectioninformation
❏ SSID
❏ Password
These are the SSID (network name) and the password of the accesspoint that the printer connects to.
If MAC address filtering has been set, register the MAC address of theprinter in advance to register the printer.
See the following for the supported standards.
“Wi-Fi Specifications” on page 338
DNS server information ❏ IP address forprimary DNS
❏ IP address forsecondary DNS
These are required when specifying DNS servers. The secondary DNSis set when the system has a redundant configuration and there is asecondary DNS server.
If you are in a small organization and do not set the DNS server, setthe IP address of the router.
Proxy serverinformation
❏ Proxy server name Set this when your network environment uses the proxy server toaccess the internet from the intranet, and you use the function thatthe printer directly accesses to the internet.
For the following functions, the printer directly connects to theinternet .
❏ Epson Connect Services
❏ Cloud services of other companies
❏ Firmware updating
Administrator Information > Connecting the Printer to the Network > Before Making Network Connection
348
Divisions Items Note
Port numberinformation
❏ Port number torelease
Check the port number used by the printer and computer, thenrelease the port that is blocked by a firewall, if necessary.
See the following for the port number used by the printer.
“Using Port for the Printer” on page 336
IP Address Assignment
These are the following types of IP address assignment.
Static IP address:
Assign the predetermined IP address to the printer (host) manually.
The information to connect to the network (subnet mask, default gateway, DNS server and so on) need to be setmanually.
The IP address does not change even when the device is turned off, so this is useful when you want to managedevices with an environment where you cannot change the IP address or you want to manage devices using the IPaddress. We recommend settings to the printer, server, etc. that many computers access. Also, when using securityfeatures such as IPsec / IP filtering, assign a fixed IP address so that the IP address does not change.
Automatic assignment by using DHCP function (dynamic IP address):
Assign the IP address automatically to the printer (host) by using the DHCP function of the DHCP server orrouter.
The information to connect to the network (subnet mask, default gateway, DNS server and so on) is setautomatically, so you can easily connect the device to the network.
If the device or the router is turned off, or depending on the DHCP server settings, IP address may change whenre-connecting.
We recommend managing devices other than the IP address and communicating with protocols that can followthe IP address.
Note:When you use the IP address reservation function of the DHCP, you can assign the same IP address to the devices at anytime.
DNS Server and Proxy Server
The DNS server has a host name, domain name of the email address, etc. in association with the IP addressinformation.
Communication is impossible if the other party is described by host name, domain name, etc. when the computeror the printer performs IP communication.
Queries the DNS server for that information and gets the IP address of the other party. This process is called nameresolution.
Therefore, the devices such as computers and printers can communicate using the IP address.
Name resolution is necessary for the printer to communicate using the email function or Internet connectionfunction.
When you use those functions, make the DNS server settings.
Administrator Information > Connecting the Printer to the Network > Before Making Network Connection
349

When you assign the printer's IP address by using the DHCP function of the DHCP server or router, it isautomatically set.
The proxy server is placed at the gateway between the network and the Internet, and it communicates to thecomputer, printer, and Internet (opposite server) on behalf of each of them. The opposite server communicatesonly to the proxy server. Therefore, printer information such as the IP address and port number cannot be readand increased security is expected.
When you connect to the Internet via a proxy server, configure the proxy server on the printer.
Connecting to the Network from the Control PanelConnect the printer to the network by using the printer's control panel.
Assigning the IP Address
Set up the basic items such as Host Address, Subnet Mask, Default Gateway.
This section explains the procedure for setting a static IP address.
1. Turn on the printer.
2. Select Settings on the home screen on the printer's control panel.
3. Select General Settings > Network Settings > Advanced > TCP/IP.
4. Select Manual for Obtain IP Address.
When you set the IP address automatically by using the DHCP function of router, select Auto. In that case, theIP Address, Subnet Mask, and Default Gateway on step 5 to 6 are also set automatically, so go to step 7.
5. Enter the IP address.
Focus moves to the forward segment or the back segment separated by a period if you select l and r.
Confirm the value reflected on the previous screen.
6. Set up the Subnet Mask and Default Gateway.
Confirm the value reflected on the previous screen.
cImportant:
If the combination of the IP Address, Subnet Mask and Default Gateway is incorrect, Start Setup is inactiveand cannot proceed with the settings. Confirm that there is no error in the entry.
7. Enter the IP address for the primary DNS server.
Confirm the value reflected on the previous screen.
Note:When you select Auto for the IP address assignment settings, you can select the DNS server settings from Manual orAuto. If you cannot obtain the DNS server address automatically, select Manual and enter the DNS server address.Then, enter the secondary DNS server address directly. If you select Auto, go to step 9.
Administrator Information > Connecting the Printer to the Network > Connecting to the Network from the …
350

8. Enter the IP address for the secondary DNS server.
Confirm the value reflected on the previous screen.
9. Tap Start Setup.
Setting the Proxy Server
Set up the proxy server if both of the following are true.
❏ The proxy server is built for Internet connection.
❏ When using a function in which a printer directly connects to the Internet, such as Epson Connect service oranother company's cloud services.
1. Select Settings on the home screen.
When making settings after IP address setting, the Advanced screen is displayed. Go to step 3.
2. Select General Settings > Network Settings > Advanced.
3. Select Proxy Server.
4. Select Use for Proxy Server Settings.
5. Enter the address for the proxy server by IPv4 or FQDN format.
Confirm the value reflected on the previous screen.
6. Enter the port number for the proxy server.
Confirm the value reflected on the previous screen.
7. Tap Start Setup.
Connecting to LAN
Connect the printer to the network by Ethernet or Wi-Fi.
Connecting to Ethernet
Connect the printer to the network by using the Ethernet cable, and check the connection.
1. Connect the printer and hub (LAN switch) by Ethernet cable.
2. Select Settings on the home screen.
3. Select General Settings > Network Settings > Connection Check.
The connection diagnosis result is displayed. Confirm the connection is correct.
4. Tap OK to finish.
When you tap Print Check Report, you can print the diagnosis result. Follow the on-screen instructions toprint it.
Administrator Information > Connecting the Printer to the Network > Connecting to the Network from the …
351

Related Information
& “Changing the Network Connection from Wi-Fi to Ethernet” on page 270
Connecting to the Wireless LAN (Wi-Fi)
You can connect the printer to the wireless LAN (Wi-Fi) in several ways. Choose the connection method thatmatches the environment and conditions that you are using.
If you know the information for the wireless router such as SSID and password, you can make settings manually.
If the wireless router supports WPS, you can make settings by using push button setup.
After connecting the printer to the network, connect to the printer from the device that you want to use (computer,smart device, tablet, and so on.)
Related Information
& “Making Wi-Fi Settings by Entering the SSID and Password” on page 272& “Making Wi-Fi Settings by Push Button Setup (WPS)” on page 273& “Making Wi-Fi Settings by PIN Code Setup (WPS)” on page 274
Settings to Use the Printer
Using the Print FunctionsEnable to use the print function through the network.
To use the printer on the network, you need to set the port for network connection on the computer as well as theprinter’s network connection.
Printer Connection Types
The following two methods are available for the printer's network connection.
❏ Peer to peer connection (direct printing)
❏ Server / client connection (printer sharing using the Windows server)
Peer to Peer Connection Settings
This is the connection to connect the printer on the network and the computer directly. Only a network-capablemodel can be connected.
Connection method:
Connect the printer to the network directly via hub or access point.
Printer driver:
Install the printer driver on each client computer.
When using EpsonNet SetupManager, you can provide the driver's package that includes the printer settings.
Administrator Information > Settings to Use the Printer > Using the Print Functions
352
Features:
❏ The print job starts immediately because the print job is sent to the printer directly.
❏ You can print as long as the printer runs.
Server / Client Connection Settings
This is the connection that the server computer shares with the printer. To prohibit the connection without goingthrough the server computer, you can enhance the security.
When using USB, the printer without the network function can be also shared.
Connection method:
Connect the printer to the network via LAN switch or access point.
You can also connect the printer to the server directly by USB cable.
Printer driver:
Install the printer driver on the Windows server depending on the OS of the client computers.
By accessing the Windows server and linking the printer, the printer driver is installed on the client computer andcan be used.
Features:
❏ Manage the printer and the printer driver in batch.
❏ Depending on the server spec, it may take time to start the print job because all print jobs go through the printserver.
❏ You cannot print when the Windows server is turned off.
Print Settings for Peer to Peer Connection
For peer to peer connection (direct printing), a printer and a client computer have a one-to-one relationship.
The printer driver must be installed on each client computer.
Print Settings for Server / Client Connection
Enable to print from the printer that is connected as the server / client connection.
For the server / client connection, set up the print server first, and then share the printer on the network.
When using the USB cable to connect to the server, also set the print server first, and then share the printer on thenetwork.
Setting Up the Network Ports
Create the print queue for network printing on the print server by using standard TCP/IP, and then set the networkport.
This example is when using Windows 2012 R2.
Administrator Information > Settings to Use the Printer > Using the Print Functions
353
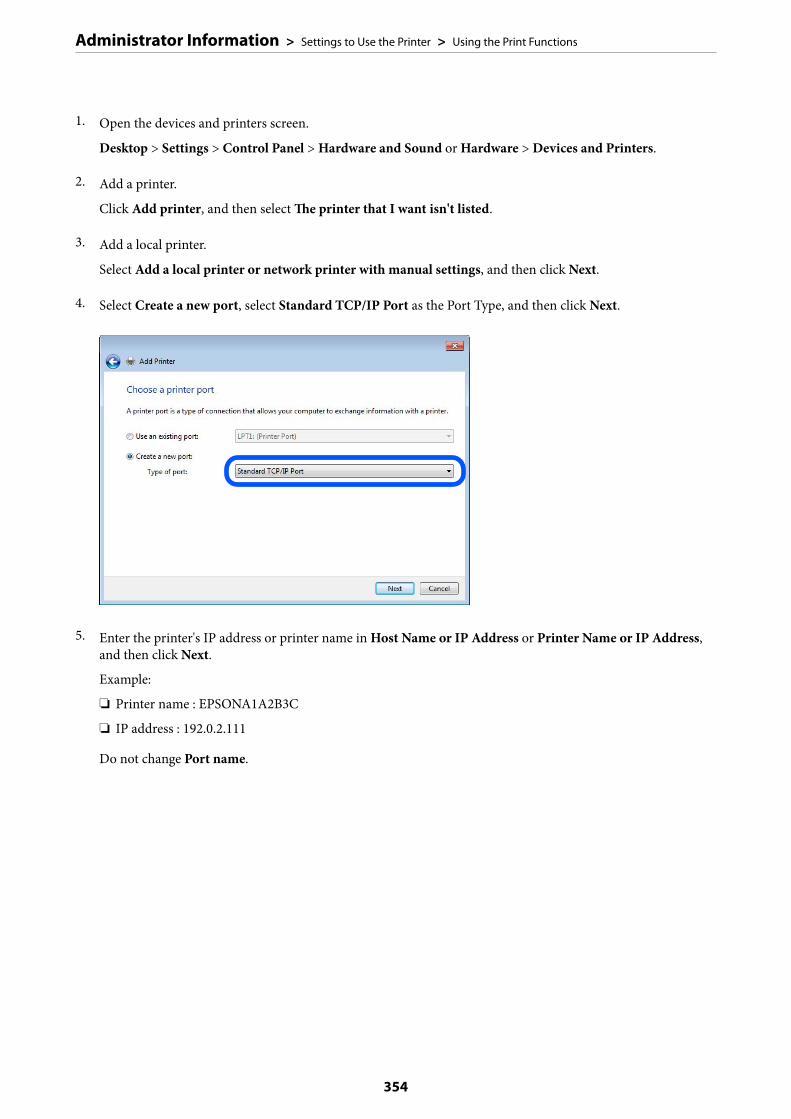
1. Open the devices and printers screen.
Desktop > Settings > Control Panel > Hardware and Sound or Hardware > Devices and Printers.
2. Add a printer.
Click Add printer, and then select The printer that I want isn't listed.
3. Add a local printer.
Select Add a local printer or network printer with manual settings, and then click Next.
4. Select Create a new port, select Standard TCP/IP Port as the Port Type, and then click Next.
5. Enter the printer's IP address or printer name in Host Name or IP Address or Printer Name or IP Address,and then click Next.
Example:
❏ Printer name : EPSONA1A2B3C
❏ IP address : 192.0.2.111
Do not change Port name.
Administrator Information > Settings to Use the Printer > Using the Print Functions
354
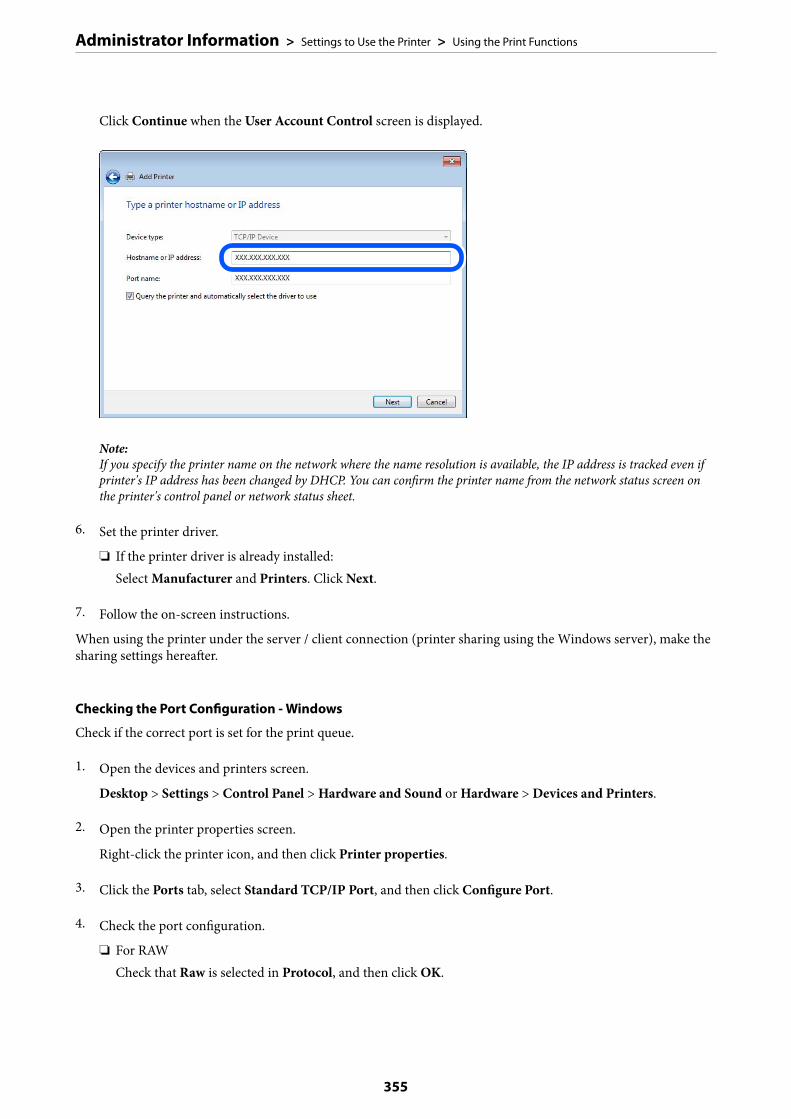
Click Continue when the User Account Control screen is displayed.
Note:If you specify the printer name on the network where the name resolution is available, the IP address is tracked even ifprinter's IP address has been changed by DHCP. You can confirm the printer name from the network status screen onthe printer's control panel or network status sheet.
6. Set the printer driver.
❏ If the printer driver is already installed:Select Manufacturer and Printers. Click Next.
7. Follow the on-screen instructions.
When using the printer under the server / client connection (printer sharing using the Windows server), make thesharing settings hereafter.
Checking the Port Configuration - Windows
Check if the correct port is set for the print queue.
1. Open the devices and printers screen.
Desktop > Settings > Control Panel > Hardware and Sound or Hardware > Devices and Printers.
2. Open the printer properties screen.
Right-click the printer icon, and then click Printer properties.
3. Click the Ports tab, select Standard TCP/IP Port, and then click Configure Port.
4. Check the port configuration.
❏ For RAWCheck that Raw is selected in Protocol, and then click OK.
Administrator Information > Settings to Use the Printer > Using the Print Functions
355
❏ For LPRCheck that LPR is selected in Protocol. Enter "PASSTHRU" in Queue name from LPR Settings. Select LPRByte Counting Enabled, and then click OK.
Sharing the Printer (Windows only)
When using the printer under the server / client connection (printer sharing using the Windows server), set up theprinter sharing from the print server.
1. Select Control Panel > View devices and printers on the print server.
2. Right-click the printer icon (print queue) that you want to share with, and then select Printer Properties >Sharing tab.
3. Select Share this printer and then enter to Share name.
For Windows Server 2012, click Change Sharing Options and then configure the settings.
Installing Additional Drivers (Windows only)
If the Windows versions for a server and clients are different, it is recommended to install additional drivers to theprint server.
1. Select Control Panel > View devices and printers on the print server.
2. Right-click the printer icon that you want to share with the clients, and then click Printer Properties >Sharing tab.
3. Click Additional Drivers.
For Windows Server 2012, click Change Sharing Options and then configure the settings.
4. Select versions of Windows for clients, and then click OK.
5. Select the information file for the printer driver (*.inf) and then install the driver.
Using the Shared Printer – Windows
The administrator needs to inform the clients of the computer name assigned to the print server and how to add itto their computers. If the additional driver(s) have not been configured yet, inform the clients how to use Devicesand Printers to add the shared printer.
If additional driver(s) have already been configured on the print server, follow these steps:
1. Select the name assigned to the print server in Windows Explorer.
2. Double-click the printer that you want to use.
Basic Settings for Printing
Set the print settings, such as paper size or printing error.
Administrator Information > Settings to Use the Printer > Using the Print Functions
356
Setting the Paper Source
Set the size and type of paper to be loaded in each paper source.
1. Access Web Config and select the Print tab > Paper Source Settings.
2. Set each item.
The displayed items may vary by the situation.
❏ Paper source nameDisplay the target paper source name, such as Rear Paper Feed, Cassette 1.
❏ Paper SizeSelect the paper size you want to set from the pull-down menu.
❏ UnitSelect the unit of the user-defined size. You can select it when User defined is selected on Paper Size.
❏ WidthSet the horizontal length of the user-defined size.The range you can enter here depends on the paper source, which is indicated on the side of Width.When you select mm in Unit, you can enter up to one decimal place.When you select inch in Unit, you can enter up to two decimal places.
❏ HeightSet the vertical length of the user-defined size.The range you can enter here depends on the paper source, which is indicated on the side of Height.When you select mm in Unit, you can enter up to one decimal place.When you select inch in Unit, you can enter up to two decimal places.
❏ Paper TypeSelect the paper type you want to set from the pull-down menu.
3. Check the settings, and then click OK.
Setting Errors
Set the displaying error for the device.
1. Access Web Config and select the Print tab > Error Settings.
2. Set each item.
❏ Paper Size NoticeSet whether to display an error on the control panel when the paper size of the specified paper source isdifferent from the paper size of the print data.
❏ Paper Type NoticeSet whether to display an error on the control panel when the paper type of the specified paper source isdifferent from the paper type of the print data.
❏ Auto Error SolverSet whether to automatically cancel the error if there is no operation on the control panel for 5 secondsafter displaying the error.
Administrator Information > Settings to Use the Printer > Using the Print Functions
357

3. Check the settings, and then click OK.
Setting Universal Print
Set when you print from external devices without using the printer driver.
Some items are not displayed depending on the printing language of your printer.
1. Access Web Config and select the Print tab > Universal Print Settings.
2. Set each item.
3. Check the settings, and then click OK.
Basic
Items Explanation
Top Offset(-30.0-30.0mm) Sets the vertical position of the paper on which printing starts.
Left Offset(-30.0-30.0mm) Sets the horizontal position of the paper on which printing starts.
Top Offset in Back(-30.0-30.0mm) Sets the vertical position of the paper on which the printing of the back side ofthe paper starts in duplex printing.
Left Offset in Back(-30.0-30.0mm) Sets the horizontal position of the paper on which the printing of the back side ofthe paper starts in duplex printing.
Check Paper Width Set whether to check paper width when printing.
Skip Blank Page If there is a blank page in the print data, set not to print a blank page.
Setting Up AirPrintSet when using AirPrint printing and scanning.
Access Web Config and select the Network tab > AirPrint Setup.
Items Explanation
Bonjour Service Name Enter the Bonjour service name between 1 and 41 characters in ASCII (0x20-0x7E).
Bonjour Location Enter location information such as the printer's placement within 127 bytes or lessin Unicode (UTF-8).
Geolocation
Latitude and Longitude (WGS84)
Enter the printer's location information. This entry is optional.
Enter values by using WGS-84 datum, which separates latitude and longitude witha comma.
You can enter -90 to +90 for the latitude value, and -180 to +180 for the longitudevalue. You can enter less than a decimal to the sixth place, and you can omit "+".
Top Priority Protocol Select top priority protocol from IPP and Port9100.
Wide-Area Bonjour Set whether or not to use Wide-Area Bonjour. If you use it, the printers must beregistered on the DNS server to be able to search the printer over the segment.
Administrator Information > Settings to Use the Printer > Setting Up AirPrint
358
Items Explanation
iBeacon Transmission Select whether to enable or disable the iBeacon transmission function. Whenenabled, you can search for the printer from iBeacon-enabled devices.
Require PIN Code when using IPPprinting
Select whether or not to require a PIN code when using IPP printing. If you selectYes, IPP print jobs without PIN codes are not saved in the printer.
Enable AirPrint IPP, Bonjour, AirPrint (Scan service) are enabled, and IPP is established only withsecure communication.
Configuring a Mail ServerSet the mail server from Web Config.
When the printer can send the email by setting the mail server, the following are possible.
❏ Transfers the scan results or fax by using email
❏ Receives the email notification from the printer
Check below before setting up.
❏ The printer is connected to the network that can access the mail server.
❏ Email setting information of the computer that uses the same mail server as the printer.
Note:❏ When you use the mail server on the Internet, confirm the setting information from the provider or website.
❏ You can also set the mail server from the printer’s control panel. Access as below.Settings > General Settings > Network Settings > Advanced > Email Server > Server Settings
1. Access Web Config and select the Network tab > Email Server > Basic.
2. Enter a value for each item.
3. Select OK.
The settings you have selected are displayed.
When the setup completes, perform the connection check.
Related Information
& “Running Web Config on a Web Browser” on page 307
Administrator Information > Settings to Use the Printer > Configuring a Mail Server
359

Mail Server Setting Items
Items Settings and Explanation
Authentication Method Specify the authentication method for the printer to access the mail server.
Off Set when the mail server does not need authentication.
SMTP AUTH Authenticates on the SMTP server (outgoing mail server)when sending the email. The mail server needs to supportSMTP authentication.
POP before SMTP Authenticates on the POP3 server (receiving mail server)before sending the email. When you select this item, set thePOP3 server.
Authenticated Account If you select SMTP AUTH or POP before SMTP as the Authentication Method, enter theauthenticated account name between 0 and 255 characters in ASCII (0x20-0x7E).
When you select SMTP AUTH, enter the SMTP server account. When you select POP beforeSMTP, enter the POP3 server account.
Authenticated Password If you select SMTP AUTH or POP before SMTP as the Authentication Method, enter theauthenticated password between 0 and 20 characters in ASCII (0x20-0x7E).
When you select SMTP AUTH, enter the authenticated account for the SMTP server. Whenyou select POP before SMTP, enter the authenticated account for the POP3 server.
Administrator Information > Settings to Use the Printer > Configuring a Mail Server
360
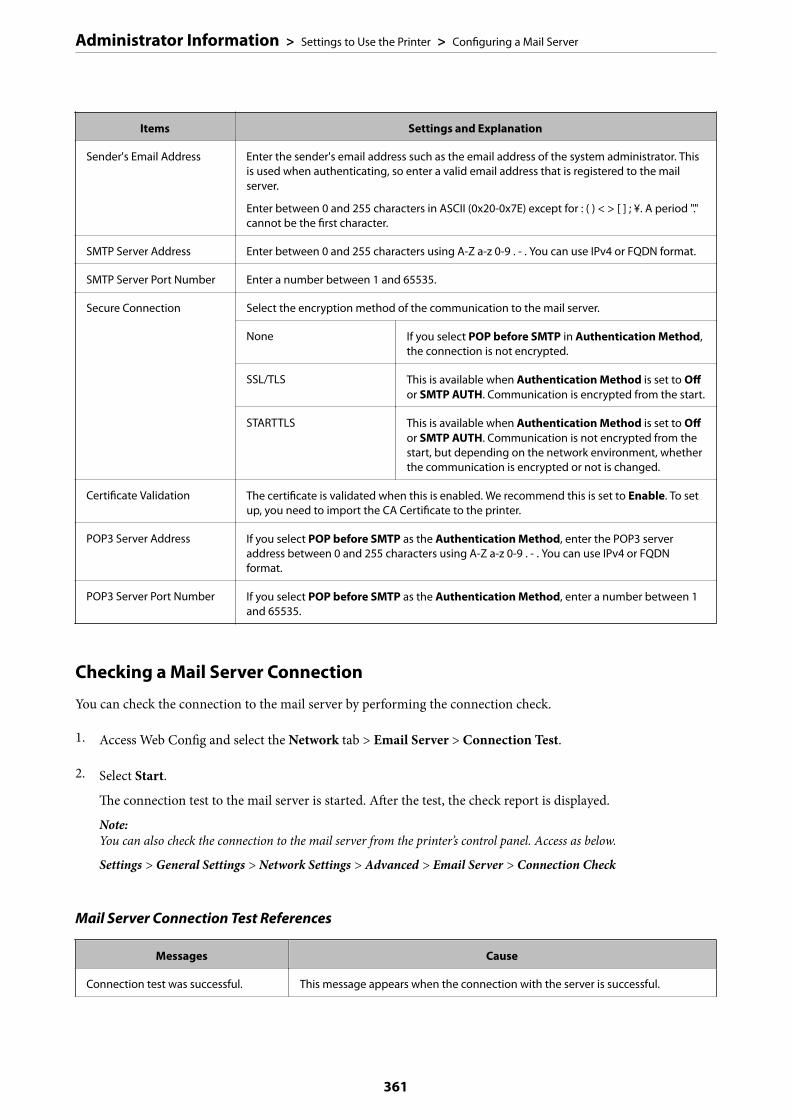
Items Settings and Explanation
Sender's Email Address Enter the sender's email address such as the email address of the system administrator. Thisis used when authenticating, so enter a valid email address that is registered to the mailserver.
Enter between 0 and 255 characters in ASCII (0x20-0x7E) except for : ( ) < > [ ] ; ¥. A period "."cannot be the first character.
SMTP Server Address Enter between 0 and 255 characters using A-Z a-z 0-9 . - . You can use IPv4 or FQDN format.
SMTP Server Port Number Enter a number between 1 and 65535.
Secure Connection Select the encryption method of the communication to the mail server.
None If you select POP before SMTP in Authentication Method,the connection is not encrypted.
SSL/TLS This is available when Authentication Method is set to Offor SMTP AUTH. Communication is encrypted from the start.
STARTTLS This is available when Authentication Method is set to Offor SMTP AUTH. Communication is not encrypted from thestart, but depending on the network environment, whetherthe communication is encrypted or not is changed.
Certificate Validation The certificate is validated when this is enabled. We recommend this is set to Enable. To setup, you need to import the CA Certificate to the printer.
POP3 Server Address If you select POP before SMTP as the Authentication Method, enter the POP3 serveraddress between 0 and 255 characters using A-Z a-z 0-9 . - . You can use IPv4 or FQDNformat.
POP3 Server Port Number If you select POP before SMTP as the Authentication Method, enter a number between 1and 65535.
Checking a Mail Server Connection
You can check the connection to the mail server by performing the connection check.
1. Access Web Config and select the Network tab > Email Server > Connection Test.
2. Select Start.
The connection test to the mail server is started. After the test, the check report is displayed.
Note:You can also check the connection to the mail server from the printer’s control panel. Access as below.
Settings > General Settings > Network Settings > Advanced > Email Server > Connection Check
Mail Server Connection Test References
Messages Cause
Connection test was successful. This message appears when the connection with the server is successful.
Administrator Information > Settings to Use the Printer > Configuring a Mail Server
361

Messages Cause
SMTP server communication error.Check the following. - NetworkSettings
This message appears when
❏ The printer is not connected to a network
❏ SMTP server is down
❏ Network connection is disconnected while communicating
❏ Received incomplete data
POP3 server communication error.Check the following. - NetworkSettings
This message appears when
❏ The printer is not connected to a network
❏ POP3 server is down
❏ Network connection is disconnected while communicating
❏ Received incomplete data
An error occurred while connecting toSMTP server. Check the followings. -SMTP Server Address - DNS Server
This message appears when
❏ Connecting to a DNS server failed
❏ Name resolution for an SMTP server failed
An error occurred while connecting toPOP3 server. Check the followings. -POP3 Server Address - DNS Server
This message appears when
❏ Connecting to a DNS server failed
❏ Name resolution for an POP3 server failed
SMTP server authentication error.Check the followings. - AuthenticationMethod - Authenticated Account -Authenticated Password
This message appears when SMTP server authentication failed.
POP3 server authentication error.Check the followings. - AuthenticationMethod - Authenticated Account -Authenticated Password
This message appears when POP3 server authentication failed.
Unsupported communication method.Check the followings. - SMTP ServerAddress - SMTP Server Port Number
This message appears when you try to communicate with unsupported protocols.
Connection to SMTP server failed.Change Secure Connection to None.
This message appears when an SMTP mismatch occurs between a server and aclient, or when the server does not support SMTP secure connection (SSLconnection).
Connection to SMTP server failed.Change Secure Connection to SSL/TLS.
This message appears when an SMTP mismatch occurs between a server and aclient, or when the server requests to use an SSL/TLS connection for an SMTPsecure connection.
Connection to SMTP server failed.Change Secure Connection toSTARTTLS.
This message appears when an SMTP mismatch occurs between a server and aclient, or when the server requests to use an STARTTLS connection for an SMTPsecure connection.
The connection is untrusted. Check thefollowing. - Date and Time
This message appears when the printer’s date and time setting is incorrect or thecertificate has expired.
The connection is untrusted. Check thefollowing. - CA Certificate
This message appears when the printer does not have a root certificatecorresponding to the server or a CA Certificate has not been imported.
The connection is not secured. This message appears when the obtained certificate is damaged.
Administrator Information > Settings to Use the Printer > Configuring a Mail Server
362

Messages Cause
SMTP server authentication failed.Change Authentication Method toSMTP-AUTH.
This message appears when an authentication method mismatch occurs betweena server and a client. The server supports SMTP AUTH.
SMTP server authentication failed.Change Authentication Method toPOP before SMTP.
This message appears when an authentication method mismatch occurs betweena server and a client. The server does not support SMTP AUTH.
Sender's Email Address is incorrect.Change to the email address for youremail service.
This message appears when the specified sender’s Email address is wrong.
Cannot access the printer untilprocessing is complete.
This message appears when the printer is busy.
Setting a Shared Network FolderSet a shared network folder to save the scanned image and the results of faxing.
When saving a file to the folder, the printer logs on as the user of the computer on which the folder was created.
Also, make sure you setup MS Network when creating the shared network folder.
Creating the Shared Folder
Before Creating the Shared Folder
Before creating the shared folder, check the following.
❏ The printer is connected to the network where it can access the computer where the shared folder will becreated.
❏ A multi-byte character is not included in the name of the computer where the shared folder will be created.
cImportant:
When a multi-byte character is included in the computer name, saving the file to the shared folder may fail.
In that case, change to the computer that does not include the Multi-byte character in the name or change thecomputer name.
When changing the computer name, make sure to confirm with the administrator in advance because it may affectsome settings, such as computer management, resource access, etc.
Checking the Network Profile
On the computer where the shared folder will be created, check whether folder sharing is available.
1. Log in to the computer where the shared folder will be created by the administrator authority user account.
2. Select Control Panel > Network and Internet > Network and Sharing Center.
Administrator Information > Settings to Use the Printer > Setting a Shared Network Folder
363

3. Click Advanced sharing settings, and then click for the profile with (current profile) in the displayednetwork profiles.
4. Check whether Turn on file and printer sharing is selected on File and Printer Sharing.
If already selected, click Cancel and close the window.
When you change the settings, click Save Changes and close the window.
Related Information
& “Location Where the Shared Folder is Created and an Example of the Security” on page 364
Location Where the Shared Folder is Created and an Example of the Security
Depending on the location where the shared folder is created, security and convenience vary.
To operate the shared folder from the printers or other computers, the following reading and changing permissionsfor the folder are required.
❏ Sharing tab > Advanced Sharing > PermissionsIt controls the network access permission of the shared folder.
❏ Access permission of Security tabIt controls permission of the network access and local access of the shared folder.
When you set Everyone to the shared folder that is created on the desktop, as an example of creating a sharedfolder, all users who can access the computer will be permitted access.
However, the user who does not have authority cannot access them because the desktop (folder) is under thecontrol of the user folder, and then the security settings of the user folder are handed down to it. The user who ispermitted access on the Security tab (user logged in and administrator in this case) can operate the folder.
See below to create the proper location.
This example is when creating the "scan_folder" folder.
Related Information
& “Example of Configuration for File Servers” on page 364& “Example of Configuration for a Personal Computer” on page 370
Example of Configuration for File Servers
This explanation is an example for creating the shared folder on the root of the drive on the shared computer, suchas the file server under the following condition.
Access controllable users, such as someone who has the same domain of a computer to create a shared folder, canaccess the shared folder.
Set this configuration when you permit any user to read and write to the shared folder on the computer, such as thefile server and the shared computer.
❏ Place for creating shared folder: Root of drive
❏ Folder path: C:\scan_folder
❏ Access permission via network (Share Permissions): Everyone
❏ Access permission on file system (Security): Authenticated Users
Administrator Information > Settings to Use the Printer > Setting a Shared Network Folder
364

1. Log in to the computer where the shared folder will be created by the administrator authority user account.
2. Start explorer.
3. Create the folder on the root of drive, and then name it "scan_folder".
For the folder name, enter between 1 and 12 alphanumeric characters. If the character limit of the folder nameis exceeded, you may not be able to access it normally by the varied environment.
4. Right click the folder, and then select Properties.
Administrator Information > Settings to Use the Printer > Setting a Shared Network Folder
365
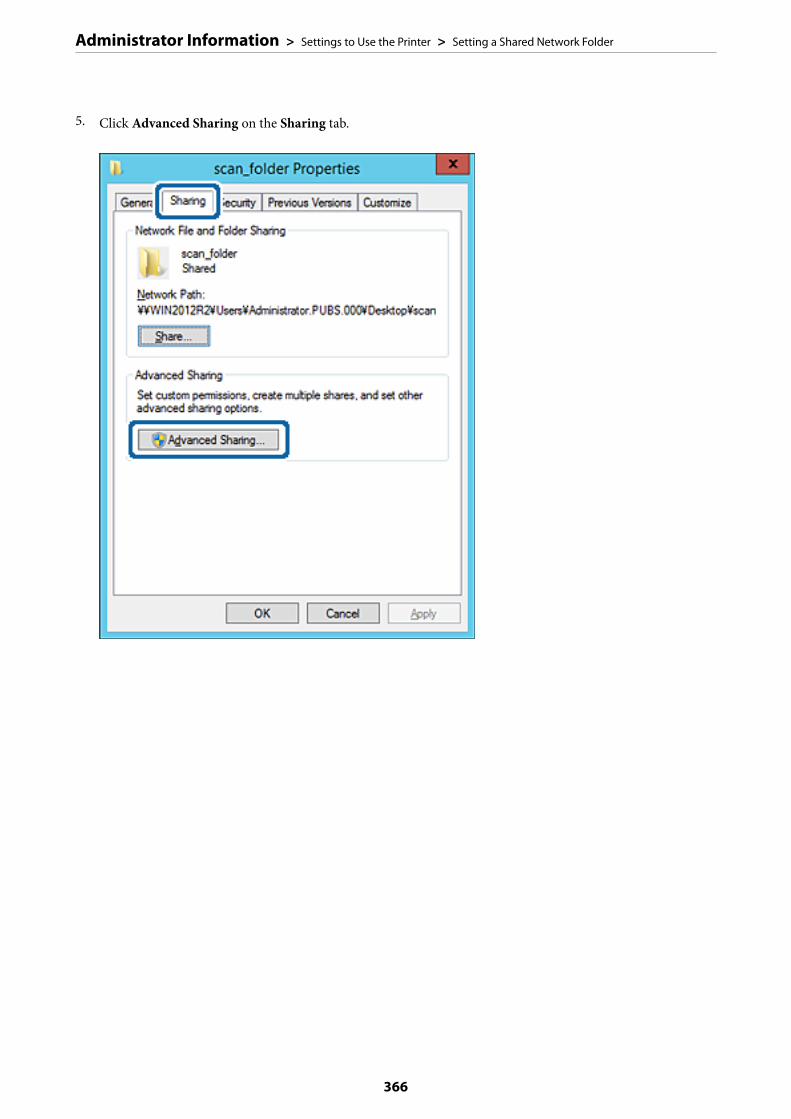
5. Click Advanced Sharing on the Sharing tab.
Administrator Information > Settings to Use the Printer > Setting a Shared Network Folder
366

6. Select Share this folder, and then click Permissions.
7. Select Everyone group of Group or user names, select Allow on Change, and then click OK.
Administrator Information > Settings to Use the Printer > Setting a Shared Network Folder
367
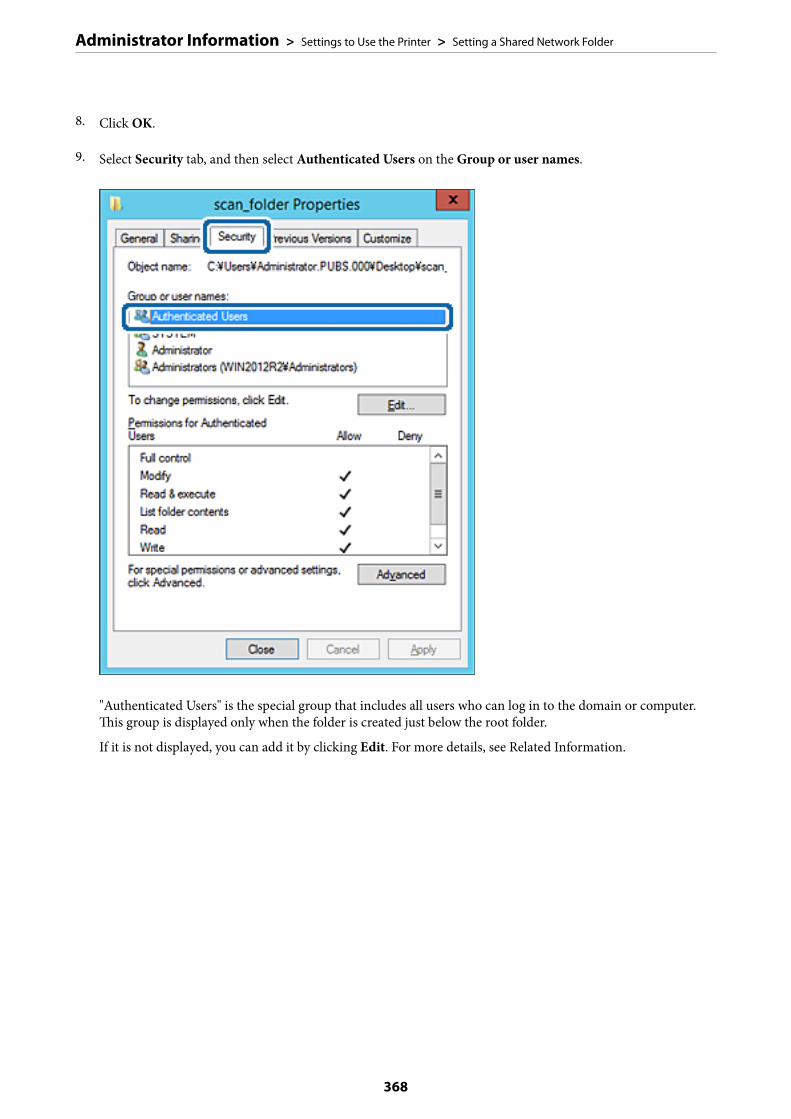
8. Click OK.
9. Select Security tab, and then select Authenticated Users on the Group or user names.
"Authenticated Users" is the special group that includes all users who can log in to the domain or computer.This group is displayed only when the folder is created just below the root folder.
If it is not displayed, you can add it by clicking Edit. For more details, see Related Information.
Administrator Information > Settings to Use the Printer > Setting a Shared Network Folder
368
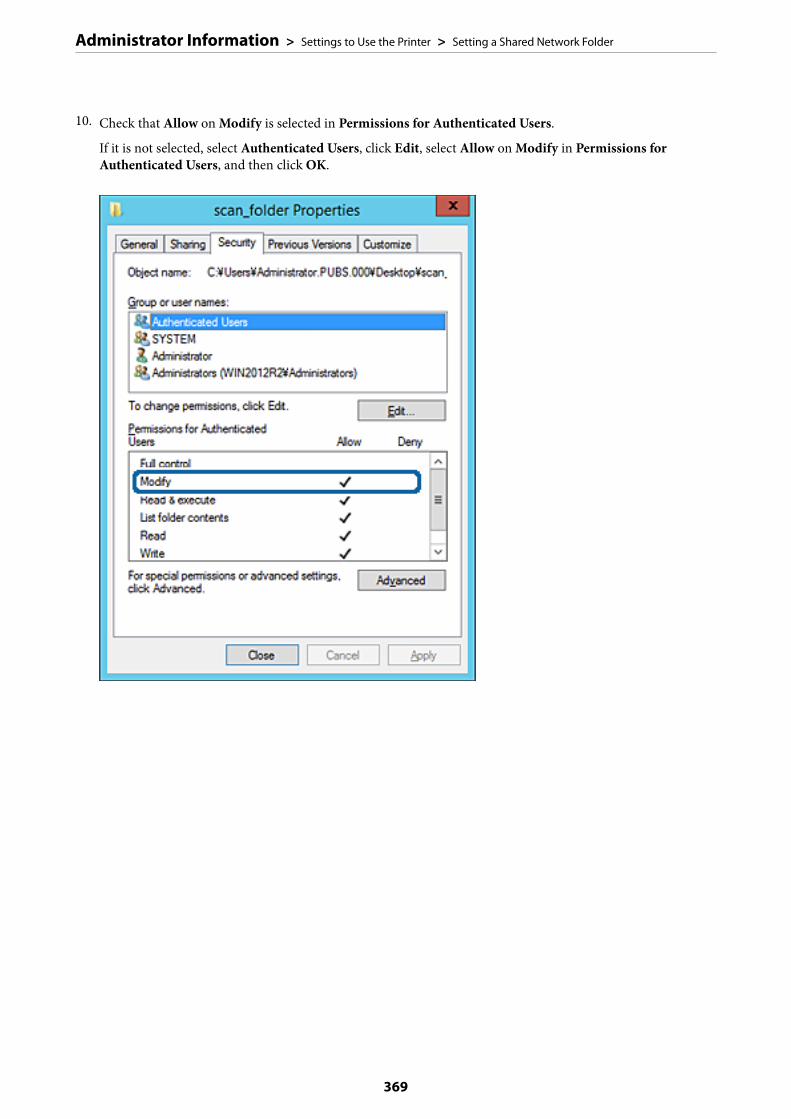
10. Check that Allow on Modify is selected in Permissions for Authenticated Users.
If it is not selected, select Authenticated Users, click Edit, select Allow on Modify in Permissions forAuthenticated Users, and then click OK.
Administrator Information > Settings to Use the Printer > Setting a Shared Network Folder
369

11. Select Sharing tab.
The network path of the shared folder is displayed. This is used when registering to the contacts of the printer.Please write it down.
12. Click OK or Close to close the screen.
Check whether the file can be written or read on the shared folder from the computers of the same domain.
Related Information
& “Adding Group or User Which Permits Access” on page 375
Example of Configuration for a Personal Computer
This explanation is an example for creating the shared folder on the desktop of the user currently logging in to thecomputer.
The user who logs in to the computer and who has administrator authority can access the desktop folder and thedocument folder that are under the User folder.
Set this configuration when you DO NOT permit reading and writing to another user to the shared folder on apersonal computer.
❏ Place for creating shared folder: Desktop
❏ Folder path: C:\Users\xxxx\Desktop\scan_folder
Administrator Information > Settings to Use the Printer > Setting a Shared Network Folder
370
❏ Access permission via network (Share Permissions): Everyone
❏ Access permission on file system (Security): do not add, or add User/Group names to permit access
1. Log in to the computer where the shared folder will be created by the administrator authority user account.
2. Start explorer.
3. Create the folder on the desktop, and then name it "scan_folder".
For the folder name, enter between 1 and 12 alphanumeric characters. If the character limit of the folder nameis exceeded, you may not be able to access it normally by the varied environment.
4. Right click the folder, and then select Properties.
Administrator Information > Settings to Use the Printer > Setting a Shared Network Folder
371

5. Click Advanced Sharing on the Sharing tab.
Administrator Information > Settings to Use the Printer > Setting a Shared Network Folder
372
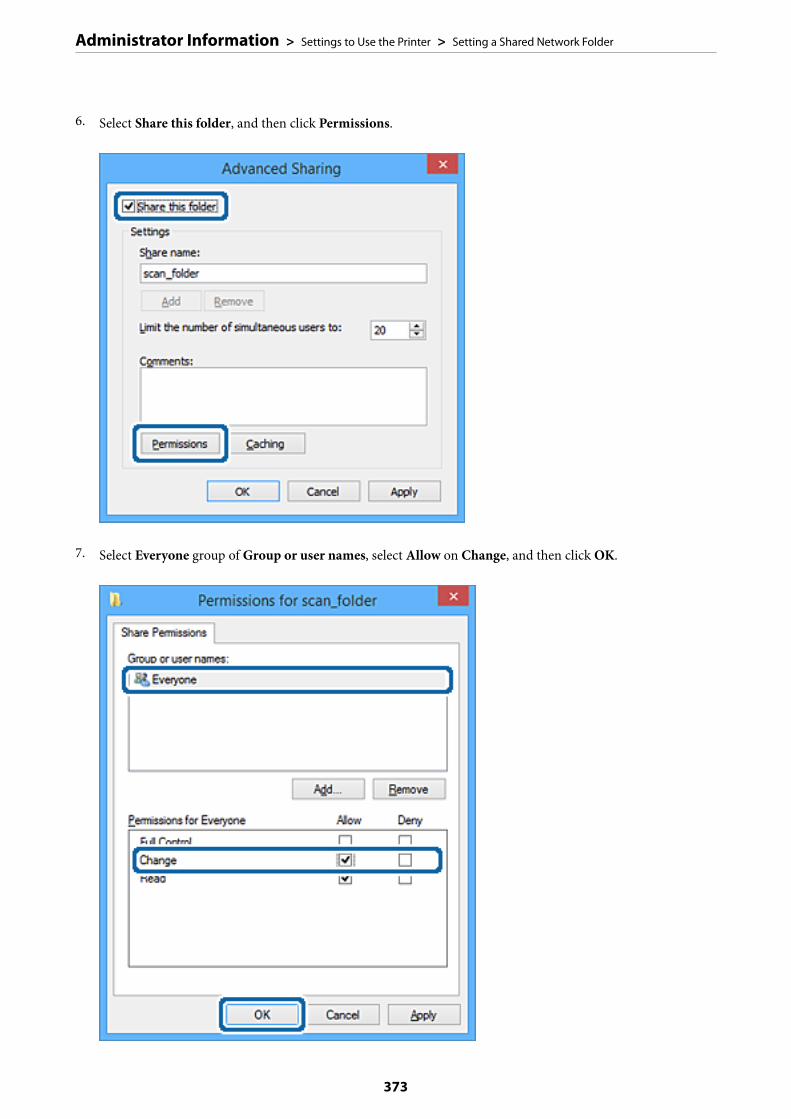
6. Select Share this folder, and then click Permissions.
7. Select Everyone group of Group or user names, select Allow on Change, and then click OK.
Administrator Information > Settings to Use the Printer > Setting a Shared Network Folder
373
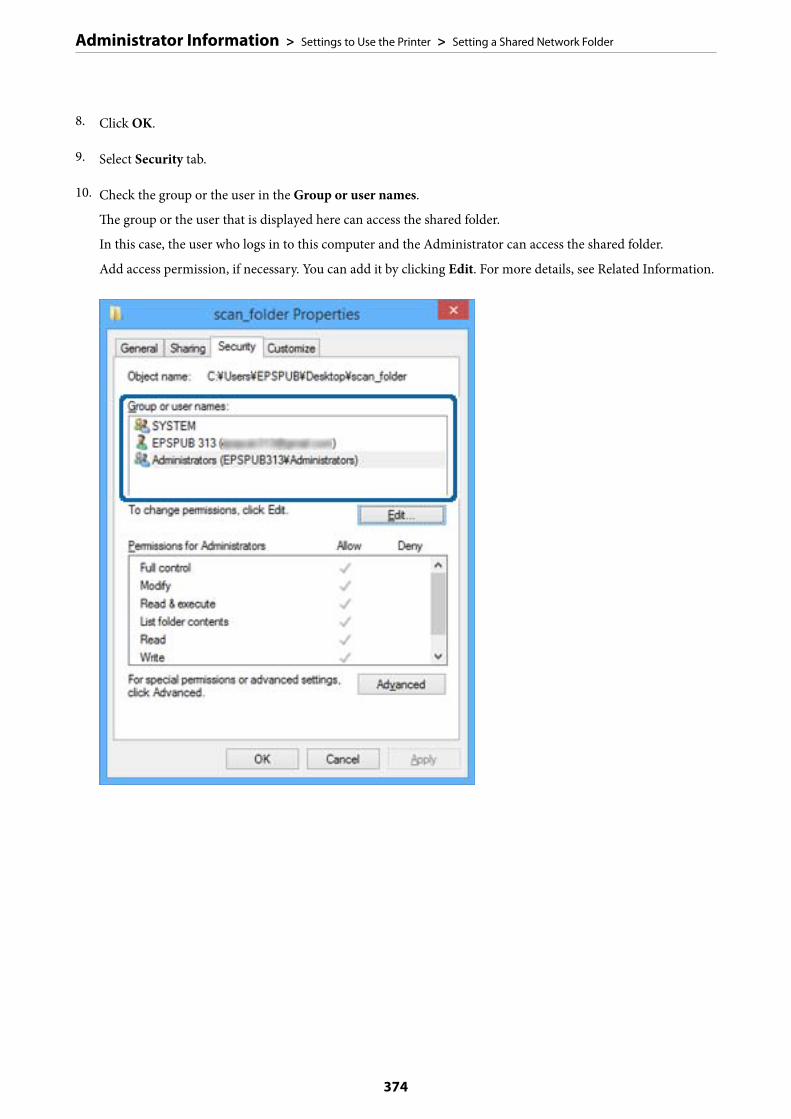
8. Click OK.
9. Select Security tab.
10. Check the group or the user in the Group or user names.
The group or the user that is displayed here can access the shared folder.
In this case, the user who logs in to this computer and the Administrator can access the shared folder.
Add access permission, if necessary. You can add it by clicking Edit. For more details, see Related Information.
Administrator Information > Settings to Use the Printer > Setting a Shared Network Folder
374
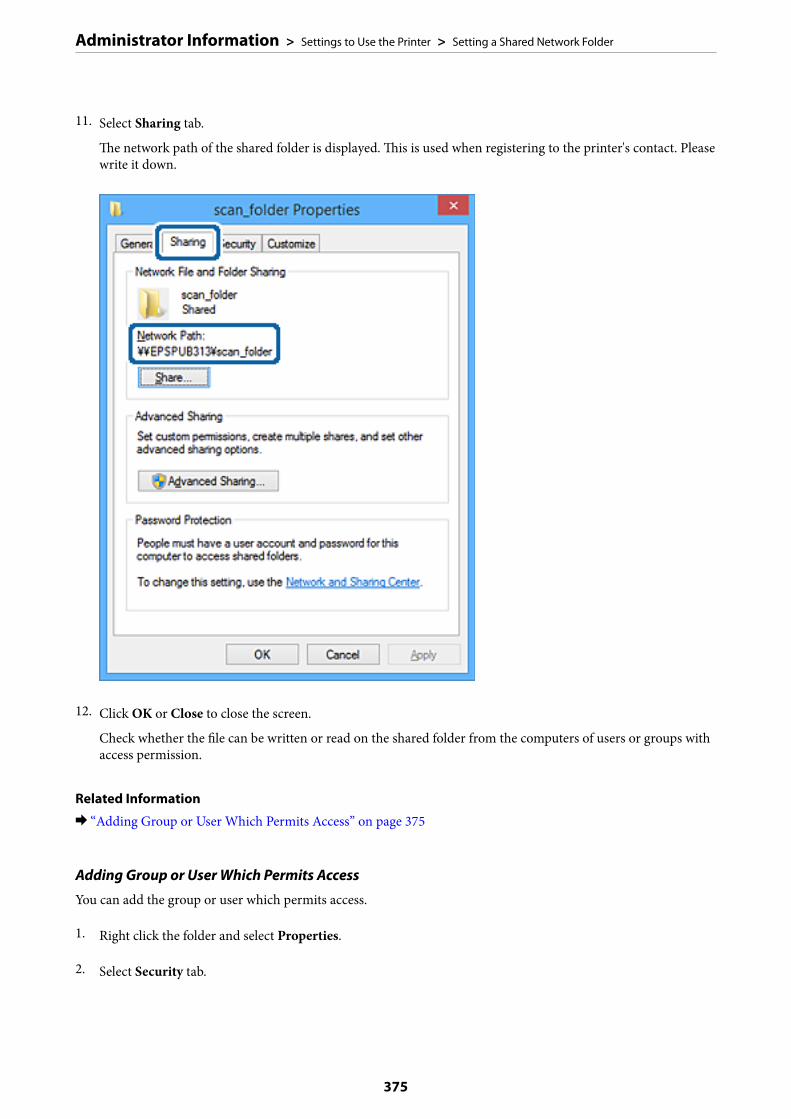
11. Select Sharing tab.
The network path of the shared folder is displayed. This is used when registering to the printer's contact. Pleasewrite it down.
12. Click OK or Close to close the screen.
Check whether the file can be written or read on the shared folder from the computers of users or groups withaccess permission.
Related Information
& “Adding Group or User Which Permits Access” on page 375
Adding Group or User Which Permits Access
You can add the group or user which permits access.
1. Right click the folder and select Properties.
2. Select Security tab.
Administrator Information > Settings to Use the Printer > Setting a Shared Network Folder
375

3. Click Edit.
Administrator Information > Settings to Use the Printer > Setting a Shared Network Folder
376

4. Click Add under the Group or user names.
5. Enter the group or user name that you want to permit access, and then click Check Names.
An underline is added to the name.
Note:If you do not know the full name of the group or user, enter part of the name, and then click Check Names. The groupnames or user names that match part of the name are listed, and then you can select the full name from the list.
If just one name matches, the full name with underlining is displayed in Enter the object name to select.
Administrator Information > Settings to Use the Printer > Setting a Shared Network Folder
377
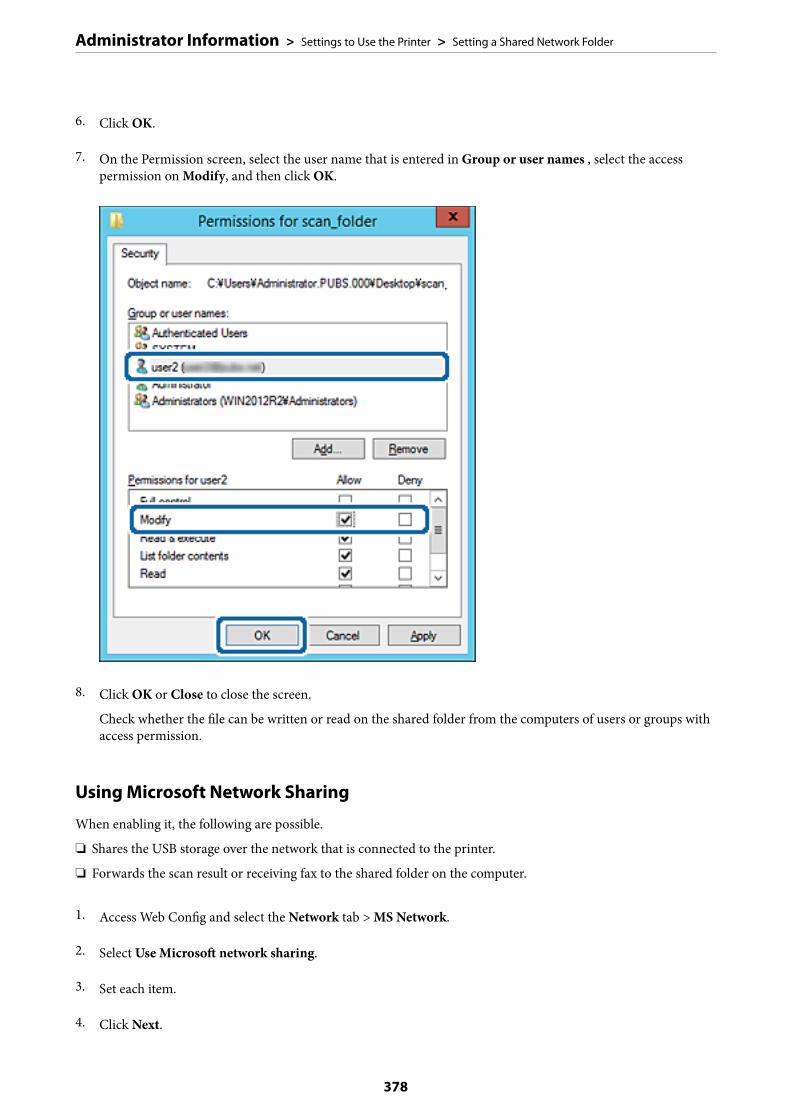
6. Click OK.
7. On the Permission screen, select the user name that is entered in Group or user names , select the accesspermission on Modify, and then click OK.
8. Click OK or Close to close the screen.
Check whether the file can be written or read on the shared folder from the computers of users or groups withaccess permission.
Using Microsoft Network Sharing
When enabling it, the following are possible.
❏ Shares the USB storage over the network that is connected to the printer.
❏ Forwards the scan result or receiving fax to the shared folder on the computer.
1. Access Web Config and select the Network tab > MS Network.
2. Select Use Microsoft network sharing.
3. Set each item.
4. Click Next.
Administrator Information > Settings to Use the Printer > Setting a Shared Network Folder
378

5. Confirm the settings, and then click OK.
6. Enter the following on the computer's explorer, and then press the Enter key.
Check whether there is a network folder and that you can access it.
\\Printer's IP address
Example : \\192.0.2.111
Related Information
& “Running Web Config on a Web Browser” on page 307
MS Network Setting items
Items Explanation
Use Microsoft network sharing Select when enabling MS Network sharing.
SMB1.0
SMB2/SMB3
Enable the protocol you want to use. You can only enable SMB1.0 or SMB2/SMB3.
File Sharing Select whether to enable file sharing or not.
Enable it for the following situations.
❏ Shares the USB storage over the network that is connected to the printer.
❏ Forwards the scan result or receiving fax to the shared folder on the computer.
User Authentication Select whether to perform user authentication or not when accessing USB storageon the network that is connected to the printer.
User Name Set the user name for user authentication. Enter between 1 and 127 characters inASCII except "/\[]:;|=,+*?<>@%. However, you cannot enter a single period or acombination of the period "." and a space alone.
Password Set the password for user authentication. Enter between 1 and 64 characters inASCII. However, you cannot just set 10 asterisks "*".
Encrypted Communication Set whether to enable encrypted communication or not. You can select it whenEnable is selected on User Authentication.
Host Name Display the MS Network host name of the printer. To change this, select theNetwork tab > Basic, and then change the Device Name.
Workgroup Name Enter the work group name of MS Network. Enter between 0 and 15 characters inASCII.
Access Attribute Set the Access Attribute of file sharing.
Shared Name(USB Host) Display as the shared name when sharing the file.
Making Contacts AvailableRegistering destinations in the printer's contacts list allows you to easily enter the destination when scanning orsending faxes.
You can also use the LDAP server (LDAP search) to enter the destination.
Administrator Information > Settings to Use the Printer > Making Contacts Available
379
Note:❏ You can switch between your printer's contacts list and the LDAP using the printer’s control panel.
❏ You can register the following types of destinations in the contacts list. You can register up to 200 entries in total.
Fax Destination for fax
Email Destination for email
You need to configure the email server settings beforehand.
Network Folder (SMB) Destination for scan data and fax forwarding data
Network Folder/FTP
Contacts Configuration Comparison
There are three tools for configuring the printer's contacts: Web Config, Epson Device Admin, and the printer’scontrol panel. The differences between three tools are listed in the table below.
Features Web Config Epson Device Admin Printer’s control panel
Registering a destination ✓ ✓ ✓
Editing a destination ✓ ✓ ✓
Adding a group ✓ ✓ ✓
Editing a group ✓ ✓ ✓
Deleting a destination orgroups
✓ ✓ ✓
Deleting all destinations ✓ ✓ –
Importing a file ✓ ✓ –
Exporting to a file ✓ ✓ –
Assigning destinations tofrequent use
✓ ✓ ✓
Sorting destinationsassigned to frequent use
– – ✓
Note:You can also configure the fax destination using the FAX Utility.
Registering a Destination to Contacts using Web Config
Note:You can also register the contacts on the printer’s control panel.
1. Access Web Config and select the Scan/Copy or Fax tab > Contacts.
2. Select the number that you want to register, and then click Edit.
Administrator Information > Settings to Use the Printer > Making Contacts Available
380

3. Enter Name and Index Word.
4. Select the destination type as the Type option.
Note:You cannot change the Type option after registration is complete. If you want to change the type, delete the destinationand then register again.
5. Enter a value for each item, and then click Apply.
Destination Setting Items
Items Settings and Explanation
Common Settings
Name Enter a name displayed in the contacts in 30 characters or less in Unicode (UTF-8).If you do not specify this, leave it blank.
Index Word Enter words to search in 30 characters or less in Unicode (UTF-8). If you do notspecify this, leave it blank.
Type Select the type of the address that you want to register.
Assign to Frequent Use Select to set the registered address as a frequently used address.
When setting as a frequently used address, it is displayed on the top screen of faxand scan, and you can specify the destination without displaying the contacts.
Administrator Information > Settings to Use the Printer > Making Contacts Available
381

Items Settings and Explanation
Fax
Fax Number Enter between 1 and 64 characters using 0-9 - * # and space.
Fax Speed Select a communication speed for a destination.
Subaddress (SUB/SEP) Set the sub address that is appended when fax is sent. Enter within 20 charactersor less using 0-9, *, # or spaces. If you do not specify this, leave it blank.
Password (SID/PWD) Set the password for the sub address. Enter within 20 characters or less using 0-9,*, # or spaces. If you do not specify this, leave it blank.
Email Address Enter between 1 and 255 characters using A-Z a-z 0-9 ! # $ % & ' * + - . / = ? ^ _ { | }~ @.
Network Folder (SMB)
Save to \\“Folder path”
Enter the location where the target folder is located between 1 and 253 charactersin Unicode (UTF-8), omitting "\\".
User Name Enter a user name to access a network folder in 30 characters or less in Unicode(UTF-8). However, avoid using control characters (0x00 to 0x1f, 0x7F).
Password Enter a password to access a network folder in 20 characters or less in Unicode(UTF-8). However, avoid using control characters (0x00 to 0x1f, 0x7F).
FTP
Save to Enter the server name between 1 and 253 characters in ASCII (0x20-0x7E),omitting "ftp://".
User Name Enter a user name to access an FTP server in 30 characters or less in Unicode(UTF-8). However, avoid using control characters (0x00 to 0x1f, 0x7F). If the serverallows anonymous connections, enter a user name such as Anonymous and FTP. Ifyou do not specify this, leave it blank.
Password Enter a password to access to an FTP server within 20 characters or less in Unicode(UTF-8). However, avoid using control characters (0x00 to 0x1f, 0x7F). If you do notspecify this, leave it blank.
Connection Mode Select the connection mode from the menu. If a firewall is set between the printerand the FTP server, select Passive Mode.
Port Number Enter the FTP server port number between 1 and 65535.
Registering Destinations as a Group Using Web Config
If the destination type is set to Fax or Email, you can register the destinations as a group.
1. Access Web Config and select the Scan/Copy or Fax tab > Contacts.
2. Select the number that you want to register, and then click Edit.
3. Select a group from Type.
Administrator Information > Settings to Use the Printer > Making Contacts Available
382

4. Click Select for Contact(s) for Group.
The available destinations are displayed.
5. Select the destination that you want to register to the group, and then click Select.
6. Enter a Name and Index Word.
7. Select whether or not you assign the registered group to the frequently used group.
Note:Destinations can be registered to multiple groups.
8. Click Apply.
Registering Frequently Used Contacts
When you register frequently used contacts, the contacts are displayed at the top of the screen where you specifythe address.
1. Select Settings on the home screen.
2. Select Contacts Manager, and then select Frequent.
3. Select the type of contact you want to register.
Administrator Information > Settings to Use the Printer > Making Contacts Available
383
4. Select Edit.
Note:To edit the order of the contacts, select Sort.
5. Select frequently used contacts that you want to register, and then select OK.
Note:❏ To deselect a contact, tap it again.
❏ You can search for addresses from the contacts list. Enter the search keyword into the box on the top of the screen.
6. Select Close.
Backing Up and Importing Contacts
Using Web Config or other tools, you can back up and import contacts.
For Web Config, you can back up contacts by exporting the printer settings that include contacts. The exported filecannot be edited because it is exported as a binary file.
When importing the printer settings to the printer, contacts are overwritten.
For Epson Device Admin, only contacts can be exported from the device’s property screen. Also, if you do notexport the security-related items, you can edit the exported contacts and import them because this can be saved asa SYLK file or CSV file.
Importing Contacts Using Web Config
If you have a printer that allows you to backup contacts and is compatible with this printer, you can registercontacts easily by importing the backup file.
Note:For instructions on how to back up the printer contacts, see the manual provided with the printer.
Follow the steps below to import the contacts to this printer.
1. Access Web Config, select Device Management > Export and Import Setting Value > Import.
2. Select the backup file you created in File, enter the password, and then click Next.
3. Select the Contacts checkbox, and then click Next.
Backing up Contacts Using Web Config
Contacts data may be lost due to a printer malfunction. We recommend that you make a backup of the datawhenever you update the data. Epson shall not be responsible for the loss of any data, for backing up or recoveringdata and/or settings even during a warranty period.
Using Web Config, you can back up the contact data stored in the printer to the computer.
1. Access Web Config, and then select the Device Management tab > Export and Import Setting Value >Export.
Administrator Information > Settings to Use the Printer > Making Contacts Available
384

2. Select one of the Contacts checkboxes.
For example, if you select Contacts under the Scan/Copy category, the same checkbox under the Fax categoryis also selected.
3. Enter a password to encrypt the exported file.
You need the password to import the file. Leave this blank if you do not want to encrypt the file.
4. Click Export.
Export and Bulk Registration of Contacts Using Tool
If you use Epson Device Admin, you can back up just the contacts and edit the exported files, then register them allat once.
It is useful if you want to back up only the contacts or when you replace the printer and you want to transfer thecontacts from the old one to new one.
Exporting Contacts
Save the contacts information to the file.
You can edit files saved in SYLK format or csv format by using a spreadsheet application or text editor. You canregister all at once after deleting or adding the information.
Information that includes security items such as password and personal information can be saved in binary formatwith a password. You cannot edit the file. This can be used as the backup file of the information including thesecurity items.
1. Start Epson Device Admin.
2. Select Devices on the side bar task menu.
3. Select the device you want to configure from the device list.
4. Click Device Configuration on the Home tab on the ribbon menu.
When the administrator password has been set, enter the password and click OK.
5. Click Common > Contacts.
6. Select the export format from Export > Export items.
❏ All ItemsExport the encrypted binary file. Select when you want to include the security items such as password andpersonal information. You cannot edit the file. If you select it, you have to set the password. ClickConfiguration and set a password between 8 and 63 characters long in ASCII. This password is requiredwhen importing the binary file.
❏ Items except Security InformationExport the SYLK format or csv format files. Select when you want to edit the information of the exportedfile.
7. Click Export.
Administrator Information > Settings to Use the Printer > Making Contacts Available
385

8. Specify the place to save the file, select the file type, and then click Save.
The completion message is displayed.
9. Click OK.
Check that the file is saved to the specified place.
Importing Contacts
Import the contacts information from the file.
You can import the files saved in SYLK format or csv format or the backed-up binary file that includes the securityitems.
1. Start Epson Device Admin.
2. Select Devices on the side bar task menu.
3. Select the device you want to configure from the device list.
4. Click Device Configuration on the Home tab on the ribbon menu.
When the administrator password has been set, enter the password and click OK.
5. Click Common > Contacts.
6. Click Browse on Import.
7. Select the file you want to import and then click Open.
When you select the binary file, in Password enter the password you set when exporting the file.
8. Click Import.
The confirmation screen is displayed.
9. Click OK.
The validation result is displayed.
❏ Edit the information readClick when you want to edit the information individually.
❏ Read more fileClick when you want to import multiple files.
10. Click Import, and then click OK on the import completion screen.
Return to the device's property screen.
11. Click Transmit.
12. Click OK on the confirmation message.
The settings are sent to the printer.
Administrator Information > Settings to Use the Printer > Making Contacts Available
386

13. On the sending completion screen, click OK.
The printer's information is updated.
Open the contacts from Web Config or printer's control panel, and then check that the contact is updated.
Cooperation between the LDAP Server and Users
When cooperating with the LDAP server, you can use the address information registered to the LDAP server as thedestination of an email or fax.
Configuring the LDAP Server
To use the LDAP server information, register it on the printer.
1. Access the Web Config and select the Network tab > LDAP Server > Basic.
2. Enter a value for each item.
3. Select OK.
The settings you have selected are displayed.
LDAP Server Setting Items
Administrator Information > Settings to Use the Printer > Making Contacts Available
387
Items Settings and Explanation
Use LDAP Server Select Use or Do Not Use.
LDAP Server Address Enter the address of the LDAP server. Enter between 1 and 255 characters ofeither IPv4, IPv6, or FQDN format. For the FQDN format, you can use alphanumericcharacters in ASCII (0x20-0x7E) and "- " except for the beginning and end of theaddress.
LDAP server Port Number Enter the LDAP server port number between 1 and 65535.
Secure Connection Specify the authentication method when the printer accesses the LDAP server.
Certificate Validation When this is enabled, the certificate of the LDAP sever is validated. Werecommend this is set to Enable.
To set up, the CA Certificate needs to be imported to the printer.
Search Timeout (sec) Set the length of time for searching before timeout occurs between 5 and 300.
Authentication Method Select one of the methods.
If you select Kerberos Authentication, select Kerberos Settings to makesettings for Kerberos.
To perform Kerberos Authentication, the following environment is required.
❏ The printer and the DNS server can communicate.
❏ The time of the printer, KDC server, and the server that is required forauthentication (LDAP server, SMTP server, File server) are synchronized.
❏ When the service server is assigned as the IP address, the FQDN of the serviceserver is registered on the DNS server reverse lookup zone.
Kerberos Realm to be Used If you select Kerberos Authentication for Authentication Method, select theKerberos realm that you want to use.
Administrator DN / User Name Enter the user name for the LDAP server in 128 characters or less in Unicode(UTF-8). You cannot use control characters, such as 0x00-0x1F and 0X7F. Thissetting is not used when Anonymous Authentication is selected as theAuthentication Method. If you do not specify this, leave it blank.
Password Enter the password for the LDAP server authentication in 128 characters or less inUnicode (UTF-8). You cannot use control characters, such as 0x00-0x1F and 0X7F.This setting is not used when Anonymous Authentication is selected as theAuthentication Method. If you do not specify this, leave it blank.
Kerberos Settings
If you select Kerberos Authentication for Authentication Method of LDAP Server > Basic, make the followingKerberos settings from the Network tab > Kerberos Settings. You can register up to 10 settings for the Kerberossettings.
Items Settings and Explanation
Realm (Domain) Enter the realm of the Kerberos authentication in 255 characters or less in ASCII(0x20-0x7E). If you do not register this, leave it blank.
KDC Address Enter the address of the Kerberos authentication server. Enter 255 characters orless in either IPv4, IPv6 or FQDN format. If you do not register this, leave it blank.
Port Number (Kerberos) Enter the Kerberos server port number between 1 and 65535.
Administrator Information > Settings to Use the Printer > Making Contacts Available
388
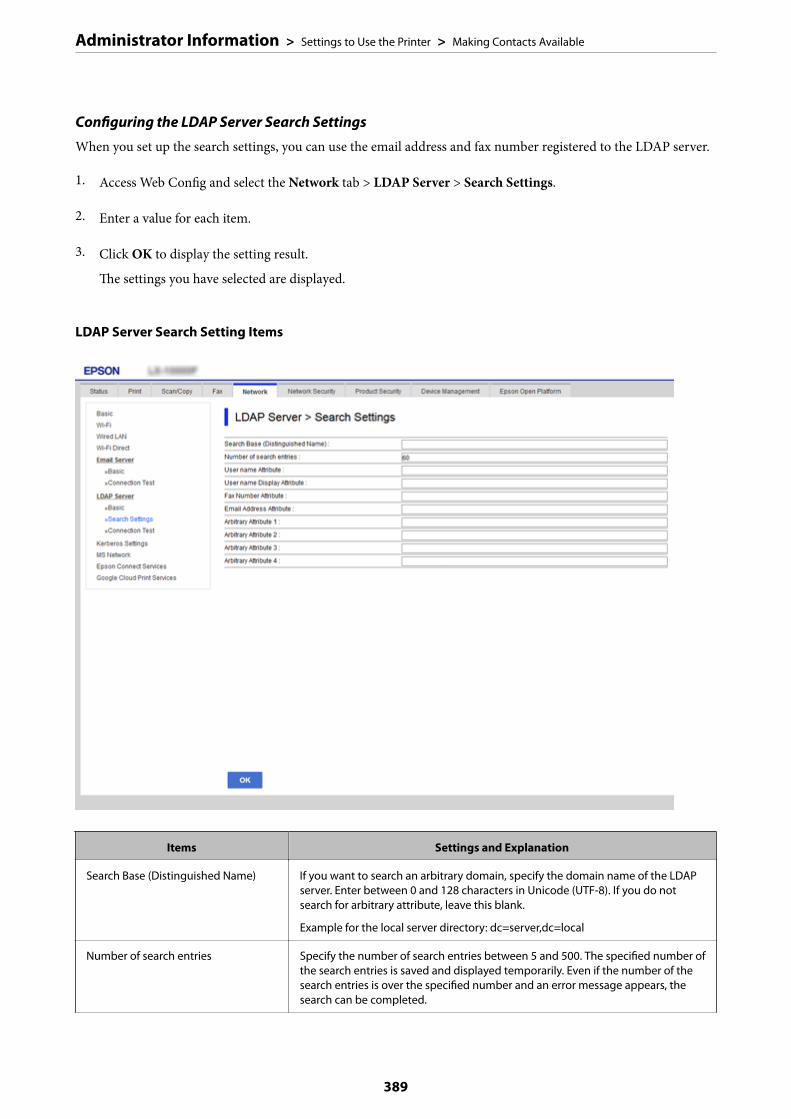
Configuring the LDAP Server Search Settings
When you set up the search settings, you can use the email address and fax number registered to the LDAP server.
1. Access Web Config and select the Network tab > LDAP Server > Search Settings.
2. Enter a value for each item.
3. Click OK to display the setting result.
The settings you have selected are displayed.
LDAP Server Search Setting Items
Items Settings and Explanation
Search Base (Distinguished Name) If you want to search an arbitrary domain, specify the domain name of the LDAPserver. Enter between 0 and 128 characters in Unicode (UTF-8). If you do notsearch for arbitrary attribute, leave this blank.
Example for the local server directory: dc=server,dc=local
Number of search entries Specify the number of search entries between 5 and 500. The specified number ofthe search entries is saved and displayed temporarily. Even if the number of thesearch entries is over the specified number and an error message appears, thesearch can be completed.
Administrator Information > Settings to Use the Printer > Making Contacts Available
389
Items Settings and Explanation
User name Attribute Specify the attribute name to display when searching for user names. Enterbetween 1 and 255 characters in Unicode (UTF-8). The first character should be a-zor A-Z.
Example: cn, uid
User name Display Attribute Specify the attribute name to display as the user name. Enter between 0 and 255characters in Unicode (UTF-8). The first character should be a-z or A-Z.
Example: cn, sn
Fax Number Attribute Specify the attribute name to display when searching for fax numbers. Enter acombination of between 1 and 255 characters using A-Z, a-z, 0-9, and -. The firstcharacter should be a-z or A-Z.
Example: facsimileTelephoneNumber
Email Address Attribute Specify the attribute name to display when searching for email addresses. Enter acombination of between 1 and 255 characters using A-Z, a-z, 0-9, and -. The firstcharacter should be a-z or A-Z.
Example: mail
Arbitrary Attribute 1 - ArbitraryAttribute 4
You can specify other arbitrary attributes to search for. Enter between 0 and 255characters in Unicode (UTF-8). The first character should be a-z or A-Z. If you donot want to search for arbitrary attributes, leave this blank.
Example: o, ou
Checking the LDAP Server Connection
Performs the connection test to the LDAP server by using the parameter set on LDAP Server > Search Settings.
1. Access Web Config and select the Network tab > LDAP Server > Connection Test.
2. Select Start.
The connection test is started. After the test, the check report is displayed.
LDAP Server Connection Test References
Messages Explanation
Connection test was successful. This message appears when the connection with the server is successful.
Connection test failed.
Check the settings.
This message appears for the following reasons:
❏ The LDAP server address or the port number is incorrect.
❏ A timeout has occurred.
❏ Do Not Use is selected as the Use LDAP Server.
❏ If Kerberos Authentication is selected as the Authentication Method,settings such as Realm (Domain), KDC Address and Port Number (Kerberos)are incorrect.
Connection test failed.
Check the date and time on yourproduct or server.
This message appears when the connection fails because the time settings for theprinter and the LDAP server are mismatched.
Administrator Information > Settings to Use the Printer > Making Contacts Available
390

Messages Explanation
Authentication failed.
Check the settings.
This message appears for the following reasons:
❏ User Name and/or Password is incorrect.
❏ If Kerberos Authentication is selected as the Authentication Method, thetime/date may not be configured.
Cannot access the printer untilprocessing is complete.
This message appears when the printer is busy.
Preparing to Scan
Scanning using the control panel
The scan to network folder function and the scan to mail function using the printer’s control panel, as well as thetransfer of scan results to mail, folders, etc. are performed by executing a job from the computer.
Settings of Servers and Folders
Name Settings Location Requirement
Scan to Network Folder(SMB)
Create and set up sharing ofthe save folder
A computer that has a savefolder location
The administrative useraccount to the computerthat creates save folders.
Destination for Scan toNetwork Folder (SMB)
Contacts of the device User name and passwordto log on to thecomputer that has thesave folder, and theprivilege to update thesave folder.
Scan to Network Folder(FTP)
Setup for FTP server log on Contacts of the device Logon information forthe FTP server and theprivilege to update thesave folder.
Scan to Email Setup for email server Device Setup information foremail server
Scan to Cloud Printer registration to EpsonConnect
Device Internet connectionenvironment
Contact registration to EpsonConnect
Epson Connect service User and printerregistration to EpsonConnect
Related Information
& “Setting a Shared Network Folder” on page 363& “Configuring a Mail Server” on page 359
Administrator Information > Settings to Use the Printer > Preparing to Scan
391

Scanning From a Computer
Install the software and check that the network scan service is enabled to scan via a network from the computer.
Software to be installed
❏ Epson ScanSmart
❏ Epson Scan 2 (application required to use the scanner feature)
Confirming that Network Scan is Enabled
You can set the network scan service when you scan from a client computer over the network. The default setting isenabled.
1. Access Web Config and select the Scan/Copy tab > Network Scan.
2. Make sure that Enable scanning of EPSON Scan is selected.
If it is selected, this task is completed. Close Web Config.
If it is cleared, select it and go to next step.
3. Click Next.
4. Click OK.
The network is re-connected, and then the settings are enabled.
Related Information
& “Running Web Config on a Web Browser” on page 307
Making Fax Features Available
Before Using Fax Features
Set up the following to use the fax features.
❏ Connect the printer correctly with the phone line and, if necessary, with a phone
❏ Complete the Fax Setting Wizard, which is required to make basic settings.
Set the following as necessary.
❏ Output destinations and related settings, such as network settings and mail server settings
❏ Contacts registration
❏ User Settings that define default values for Fax menu items
❏ Report Settings to print reports when faxes are sent, received, or forwarded
Related Information
& “Connecting the Printer to a Phone Line” on page 393
Administrator Information > Settings to Use the Printer > Making Fax Features Available
392

& “Making the Printer Ready to Send and Receive Faxes” on page 396& “Making the Printer Ready to Send and Receive Faxes” on page 396& “Fax Settings” on page 316& “Configuring a Mail Server” on page 359& “Setting a Shared Network Folder” on page 363& “Making Contacts Available” on page 379& “Report Settings” on page 326
Connecting the Printer to a Phone Line
Compatible Telephone Lines
You can use the printer over standard analogue telephone lines (PSTN = Public Switched Telephone Network) andPBX (Private Branch Exchange) telephone systems.
You may not be able to use the printer with the following phone lines or systems.
❏ VoIP phone line such as DSL or fiber-optic digital service
❏ Digital phone line (ISDN)
❏ Some PBX telephone systems
❏ When adapters such as terminal adapters, VoIP adapters, splitters, or DSL router are connected between thetelephone wall jack and the printer
Connecting the Printer to a Phone Line
Connect the printer to a telephone wall jack using an RJ-11 (6P2C) phone cable. When connecting a telephone tothe printer, use a second RJ-11 (6P2C) phone cable.
Depending on the area, a phone cable may be included with the printer. If it is included, use that cable.
You may need to connect the phone cable to an adapter provided for your country or region.
Note:Remove the cap from the EXT. port of the printer only when connecting your telephone to the printer. Do not remove the capif you are not connecting your telephone.
In areas where lightning strikes occur frequently, we recommend that you use a surge protector.
Administrator Information > Settings to Use the Printer > Making Fax Features Available
393
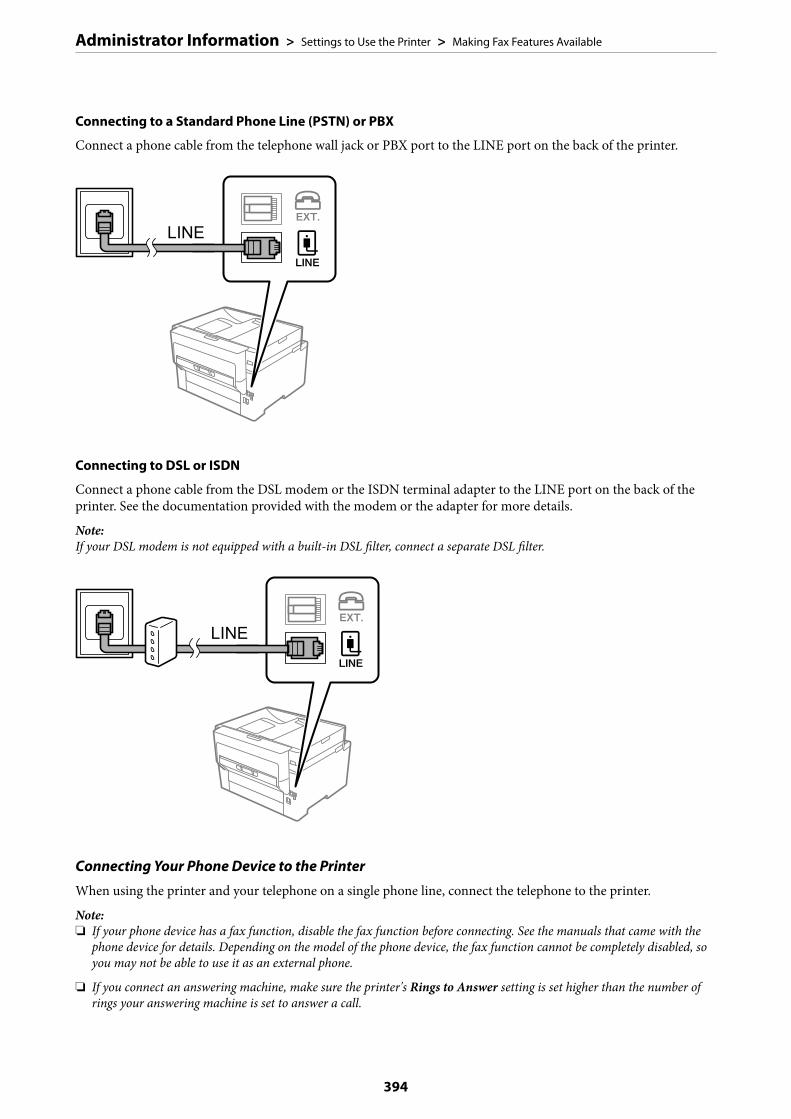
Connecting to a Standard Phone Line (PSTN) or PBX
Connect a phone cable from the telephone wall jack or PBX port to the LINE port on the back of the printer.
Connecting to DSL or ISDN
Connect a phone cable from the DSL modem or the ISDN terminal adapter to the LINE port on the back of theprinter. See the documentation provided with the modem or the adapter for more details.
Note:If your DSL modem is not equipped with a built-in DSL filter, connect a separate DSL filter.
Connecting Your Phone Device to the Printer
When using the printer and your telephone on a single phone line, connect the telephone to the printer.
Note:❏ If your phone device has a fax function, disable the fax function before connecting. See the manuals that came with the
phone device for details. Depending on the model of the phone device, the fax function cannot be completely disabled, soyou may not be able to use it as an external phone.
❏ If you connect an answering machine, make sure the printer's Rings to Answer setting is set higher than the number ofrings your answering machine is set to answer a call.
Administrator Information > Settings to Use the Printer > Making Fax Features Available
394
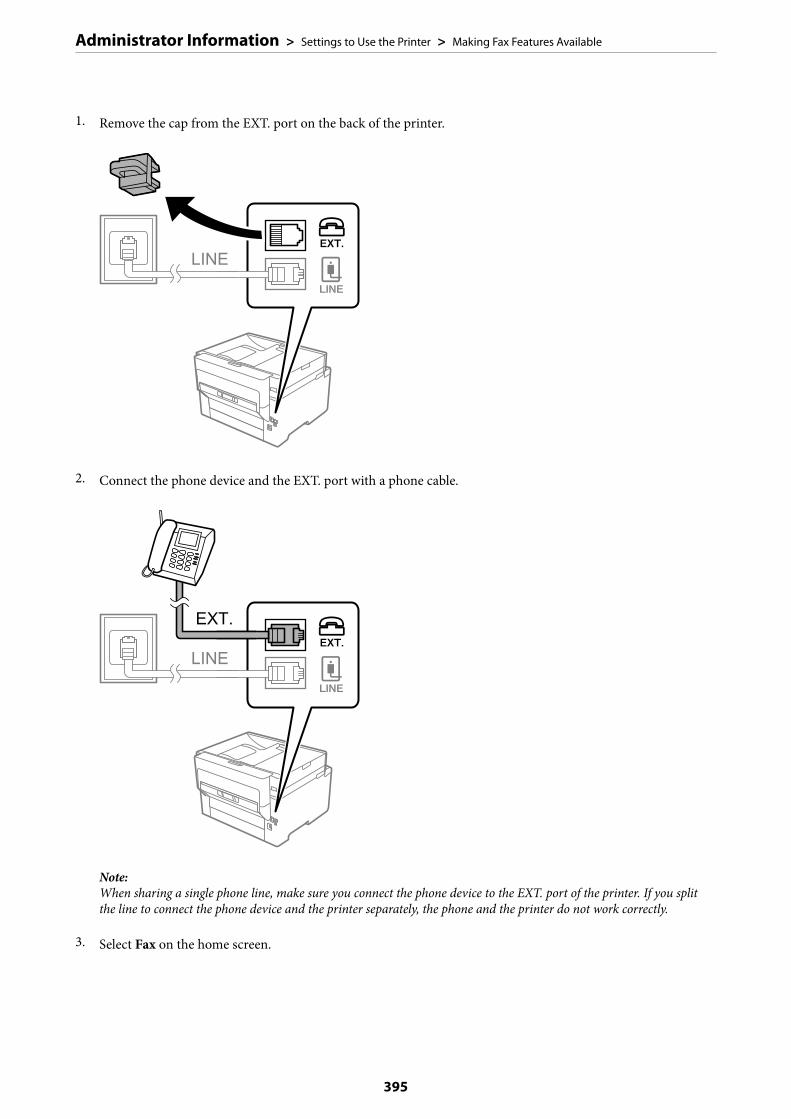
1. Remove the cap from the EXT. port on the back of the printer.
2. Connect the phone device and the EXT. port with a phone cable.
Note:When sharing a single phone line, make sure you connect the phone device to the EXT. port of the printer. If you splitthe line to connect the phone device and the printer separately, the phone and the printer do not work correctly.
3. Select Fax on the home screen.
Administrator Information > Settings to Use the Printer > Making Fax Features Available
395

4. Pick up the handset.
If a message to start sending or receiving faxes is displayed as shown on the following screen, the connectionhas been established.
Related Information
& “Making the Printer Ready to Send and Receive Faxes” on page 396& “Making Settings to Use an Answering Machine” on page 399& “Making Settings to Receive Faxes Operating Only a Connected Phone” on page 399& “Receive Mode:” on page 318
Making the Printer Ready to Send and Receive Faxes
Fax Setting Wizard configures the basic fax features to make the printer ready to send and receive faxes.
The Wizard is displayed automatically when the printer is turned on for the first time. You can also display thewizard manually from the printer's control panel. You need to run the wizard again in case the wizard is skippedwhen the printer is first turned on or when the connection environment has changed.
❏ The items below are what you can set through the wizard.
❏ Header (Your Phone Number and Fax Header)
❏ Receive Mode (Auto or Manual)
❏ Distinctive Ring Detection (DRD) Setting
❏ The items below are set automatically according to the connection environment.
❏ Dial Mode (such as Tone or Pulse)
❏ Other items in Basic Settings remain as they are.
Related Information
& “Basic Settings” on page 317
Making the Printer Ready to Send and Receive Faxes Using Fax Setting Wizard
1. Select Settings on the home screen on the printer's control panel, and then select General Settings > FaxSettings > Fax Setting Wizard.
Administrator Information > Settings to Use the Printer > Making Fax Features Available
396
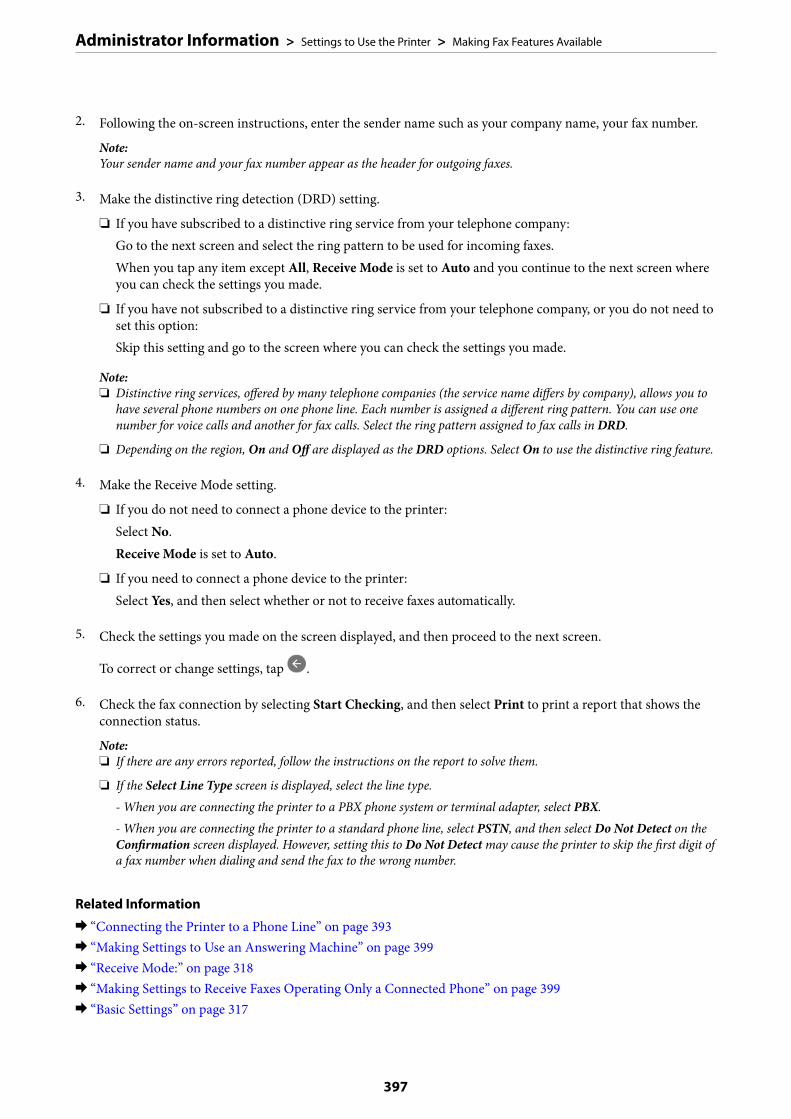
2. Following the on-screen instructions, enter the sender name such as your company name, your fax number.
Note:Your sender name and your fax number appear as the header for outgoing faxes.
3. Make the distinctive ring detection (DRD) setting.
❏ If you have subscribed to a distinctive ring service from your telephone company:Go to the next screen and select the ring pattern to be used for incoming faxes.When you tap any item except All, Receive Mode is set to Auto and you continue to the next screen whereyou can check the settings you made.
❏ If you have not subscribed to a distinctive ring service from your telephone company, or you do not need toset this option:Skip this setting and go to the screen where you can check the settings you made.
Note:❏ Distinctive ring services, offered by many telephone companies (the service name differs by company), allows you to
have several phone numbers on one phone line. Each number is assigned a different ring pattern. You can use onenumber for voice calls and another for fax calls. Select the ring pattern assigned to fax calls in DRD.
❏ Depending on the region, On and Off are displayed as the DRD options. Select On to use the distinctive ring feature.
4. Make the Receive Mode setting.
❏ If you do not need to connect a phone device to the printer:Select No.Receive Mode is set to Auto.
❏ If you need to connect a phone device to the printer:Select Yes, and then select whether or not to receive faxes automatically.
5. Check the settings you made on the screen displayed, and then proceed to the next screen.
To correct or change settings, tap .
6. Check the fax connection by selecting Start Checking, and then select Print to print a report that shows theconnection status.
Note:❏ If there are any errors reported, follow the instructions on the report to solve them.
❏ If the Select Line Type screen is displayed, select the line type.- When you are connecting the printer to a PBX phone system or terminal adapter, select PBX.- When you are connecting the printer to a standard phone line, select PSTN, and then select Do Not Detect on theConfirmation screen displayed. However, setting this to Do Not Detect may cause the printer to skip the first digit ofa fax number when dialing and send the fax to the wrong number.
Related Information
& “Connecting the Printer to a Phone Line” on page 393& “Making Settings to Use an Answering Machine” on page 399& “Receive Mode:” on page 318& “Making Settings to Receive Faxes Operating Only a Connected Phone” on page 399& “Basic Settings” on page 317
Administrator Information > Settings to Use the Printer > Making Fax Features Available
397

Making Settings for the Printer's Fax Features According to Use
You can configure the printer's fax features individually using the printer's control panel according to use. Thesettings made using Fax Setting Wizard can also be changed. For more details, see the descriptions of the FaxSettings menu.
Note:❏ Using Web Config, you can configure the printer's fax features.
❏ When you use Web Config to display the Fax Settings menu, there may be slight differences in the user interface and inlocation compared to the printer's control panel.
Related Information
& “Fax Settings” on page 316& “Receiving Incoming Faxes” on page 123& “Making Settings for a PBX Phone System” on page 398& “Making Settings When You Connect a Phone Device” on page 399& “Making Settings to Save and Forward Received Faxes” on page 399& “Making Settings to Save and Forward Received Faxes with Specific Conditions” on page 403& “Making Settings for Blocking Junk Faxes” on page 407& “Making Settings to Send and Receive Faxes on a Computer” on page 407
Making Settings for a PBX Phone System
Make the following settings when using the printer in offices that use extensions and require external access codes,such as 0 and 9, to get an outside line.
1. Select Settings on the home screen.
2. Select General Settings > Fax Settings > Basic Settings.
3. Select Line Type, and then select PBX.
4. When sending a fax to an outside fax number using # (hash) instead of the actual external access code, selectthe Access Code box, and then select Use.
The # entered instead of the actual access code, is replaced with the stored access code when dialing. Using #helps avoid connection problems when connecting to an outside line.
Note:You cannot send faxes to recipients in Contacts in which an external access code such as 0 or 9 is set.
If you have registered recipients in Contacts using an external access code such as 0 or 9, set the Access Code to Do NotUse. Otherwise, you must change the code to # in Contacts.
5. Tap the Access Code input box, enter the external access code used for your phone system, and then tap OK.
6. Select OK to apply the settings.
The access code is stored in the printer.
Administrator Information > Settings to Use the Printer > Making Fax Features Available
398
Making Settings When You Connect a Phone Device
Making Settings to Use an Answering Machine
You need settings to use an answering machine.
1. Select Settings on the home screen on the printer's control panel..
2. Select General Settings > Fax Settings > Basic Settings.
3. Set Receive Mode to Auto.
4. Set the Rings to Answer setting of the printer to a higher number than the number of rings for the answeringmachine.
If Rings to Answer is set lower than the number of rings for the answering machine, the answering machinecannot receive voice calls to record voice messages. See the manuals that came with the answering machine forits settings.
The printer's Rings to Answer setting may not be displayed, depending on the region.
Related Information
& “Basic Settings” on page 317
Making Settings to Receive Faxes Operating Only a Connected Phone
You can start receiving incoming faxes by only picking up the handset and operating the phone, without operatingthe printer at all.
The Remote Receive feature is available for telephones that support tone dialing.
1. Select Settings on the home screen on the printer's control panel.
2. Select General Settings > Fax Settings > Basic Settings > Remote Receive.
3. Tap Remote Receive to set this to On.
4. Select Start Code, enter a two digit code (you can enter 0 to 9, *, and #), and then tap OK.
5. Select OK to apply the settings.
Related Information
& “Basic Settings” on page 317
Making Settings to Save and Forward Received Faxes
The printer is set to print received faxes by default. Besides printing, you can set the printer to save and/or forwardreceived faxes.
Note:As well as using the printer's control panel, you can also make settings using Web Config.
Administrator Information > Settings to Use the Printer > Making Fax Features Available
399

Related Information
& “Making Saving Settings to Receive Faxes” on page 400& “Making Forwarding Settings to Receive Faxes” on page 401& “Making Saving Settings to Receive Faxes with Specific Conditions” on page 403& “Making Forwarding Settings to Receive Faxes with Specified Conditions” on page 405
Making Saving Settings to Receive Faxes
You can make saving settings to receive faxes to the inbox and an external memory device regardless of the senderor time. Saving a fax to the inbox allows you to confirm the contents of the received fax by viewing the fax on theprinter's LCD screen before the printer prints the fax.
To make settings to save received faxes to a computer using the PC-FAX feature, see “ Feature: PC-FAX Send/Receive (Windows/Mac OS)” on page 113.
Note:❏ As well as using the printer's control panel, you can use Web Config to make saving settings to receive faxes. Select the
Fax tab > Save/Forward Settings > Unconditional Save/Forward, and then make the saving destination settings inFax Output.
❏ You can also print and/or forward the received faxes at the same time. Make the settings on the Fax Output screenmentioned above.
1. Select Settings on the printer's control panel, and then select General Settings > Fax Settings.
2. Select Receive Settings > Save/Forward Settings > Unconditional Save/Forward.
When a message is displayed, check the content, and then tap OK.
3. Make settings for the saving destinations, the inbox and/or an external memory device.
❏ To save received faxes to the Inbox:A Select Save to Inbox to set this to On.B If a message is displayed, check the content, and then select OK.
Administrator Information > Settings to Use the Printer > Making Fax Features Available
400
❏ To save received faxes to an external memory device:A Insert a memory device into the printer's external interface USB port.B Select Save to Memory Device.C Select Yes. To print the documents automatically while saving them in the memory device, select Yesand Print instead.D Check the message that is displayed, and then tap Create.A folder for saving received documents is created in the memory device.E Check the message, tap Close or wait until the message is cleared, and then tap Close.F When the next message is displayed, check it, and then tap OK.
cImportant:
Received documents are saved in the printer's memory temporarily before the documents are saved in thememory device connected to the printer. Because a memory full error disables sending and receiving faxes, keepthe memory device connected to the printer.
Note:You can set the printer to send emails to people you want to notify about the results of saving faxes, when saving iscomplete. As necessary, select Email Notifications, set the processes, and then set the destination to which you want tosend notifications.
4. Select Close to complete the Unconditional Save/Forward Settings.
This completes making unconditional saving settings to receive faxes. You can set Common Settings as necessary.For details, see the explanation for Common Settings in the Save/Forward Settings menu.
Related Information
& “Save/Forward Settings” on page 320
Making Forwarding Settings to Receive Faxes
You can make forwarding settings to up to five destinations, email addresses, shared folders, and/or another faxmachine regardless of the sender or time. If you make settings to forward received faxes, first add the forwardingdestinations to the contacts list. To forward to an email address, you also need to configure the email serversettings beforehand.
“Configuring a Mail Server” on page 359
“Setting a Shared Network Folder” on page 363
“Making Contacts Available” on page 379
Color documents cannot be forwarded to another fax machine. They are processed as documents that failed to beforwarded.
Note:❏ As well as using the printer's control panel, you can use Web Config to make forwarding settings to receive faxes. Select
the Fax tab > Save/Forward Settings > Unconditional Save/Forward, and then make the forwarding destinationsettings in Fax Output.
❏ You can also print and/or save received faxes at the same time. Make the settings on the Fax Output screen mentionedabove.
1. Select Settings on the printer's control panel, then select General Settings > Fax Settings.
Administrator Information > Settings to Use the Printer > Making Fax Features Available
401
2. Select Receive Settings > Save/Forward Settings > Unconditional Save/Forward.
When a message is displayed, check the content, and then tap OK.
3. Make settings for up to five forwarding destinations.
A Select Forward.
B Select Yes. To print the documents automatically while forwarding them, select Yes and Print instead.
CDestination > Add Entry, and then select forwarding destinations from the contacts list. You can specify upto five forwarding destinations.
D Tap Close to finish selecting forwarding destinations, and then tap Close.
E In Options When Forwarding Failed, select whether to print received documents or save them in theprinter's Inbox when forwarding fails.
F Tap OK.
cImportant:
When the Inbox is full, receiving faxes is disabled. You should delete the documents from the inbox once they
have been checked. The number of documents that have failed to be forwarded is displayed on the on thehome screen, in addition to other unprocessed jobs.
Note:You can set the printer to send emails to people you want to notify about the results of forwarding faxes when theforwarding process is complete. As necessary, select Email Notifications, set the processes, and then select thedestination to which you want to send notifications from the contacts list.
4. Select Close to complete the Unconditional Save/Forward Settings.
Note:❏ This completes making unconditional forwarding settings to receive faxes. You can set Common Settings as necessary.
For details, see the explanation for Common Settings in the Save/Forward Settings menu.
❏ If you have selected a shared folder on a network or an email address as the forwarding destination, we recommend thatyou test if you can send a scanned image to the destination in the scan mode. Select Scan > Email, or Scan > NetworkFolder/FTP from the home screen, select the destination, and then start scanning.
Related Information
& “Save/Forward Settings” on page 320
Administrator Information > Settings to Use the Printer > Making Fax Features Available
402
Making Settings to Save and Forward Received Faxes with Specific Conditions
You can save and/or forward received faxes under set conditions.
Note:❏ The printer is set to print received faxes by default.
❏ You can also receive and save faxes without any conditions.“Making Settings to Save and Forward Received Faxes” on page 399
Related Information
& “Making Saving Settings to Receive Faxes with Specific Conditions” on page 403& “Making Forwarding Settings to Receive Faxes with Specified Conditions” on page 405
Making Saving Settings to Receive Faxes with Specific Conditions
You can make settings to save received faxes to the inbox and an external memory device from a specified senderor at a specified time. Saving a fax in a confidential box or the inbox allows you to confirm the contents of thereceived fax by viewing the fax on the printer's LCD screen before the printer prints the fax.
Before you use the feature to save received faxes at a specified time, make sure the printer's Date/Time and TimeDifference settings are correct. Access the menu from Settings > General Settings > Basic Settings > Date/TimeSettings.
Note:❏ As well as using the printer's control panel, you can use Web Config to make saving settings to receive faxes. Select the
Fax tab > Save/Forward Settings > Conditional Save/Forward, select the number of the confidential box, and thenselect Edit and make the saving destination settings.
❏ You can also print and/or forward received faxes at the same time. Make the settings on the Edit screen mentioned above.
1. Select Settings on the printer's control panel, and then select General Settings > Fax Settings.
2. Select Receive Settings > Save/Forward Settings > Conditional Save/Forward, and then tap on anunregistered box under Conditional Save/Forward.
3. Select the Name box and enter the name you want to register.
4. Select the Condition(s) box to make a condition setting.
❏ Sender Fax Number match: If the incoming fax number matches the conditions you selected in this item,the printer saves and forwards the received faxes.Select the Sender Fax Number match condition and enter the fax number (max. 20 digits) by selecting theFax Number box.
❏ Subaddress(SUB) perfect match: If the subaddress (SUB) is a perfect match, the printer saves and forwardsthe received faxes.Enable the Subaddress(SUB) perfect match setting and enter the password by selecting theSubaddress(SUB) box.
❏ Password(SID) perfect match: If the password (SID) is perfectly matched, the printer saves and forwardsthe received faxes.Enable the Password(SID) perfect match setting and input the password by selecting the Password(SID)box.
Administrator Information > Settings to Use the Printer > Making Fax Features Available
403
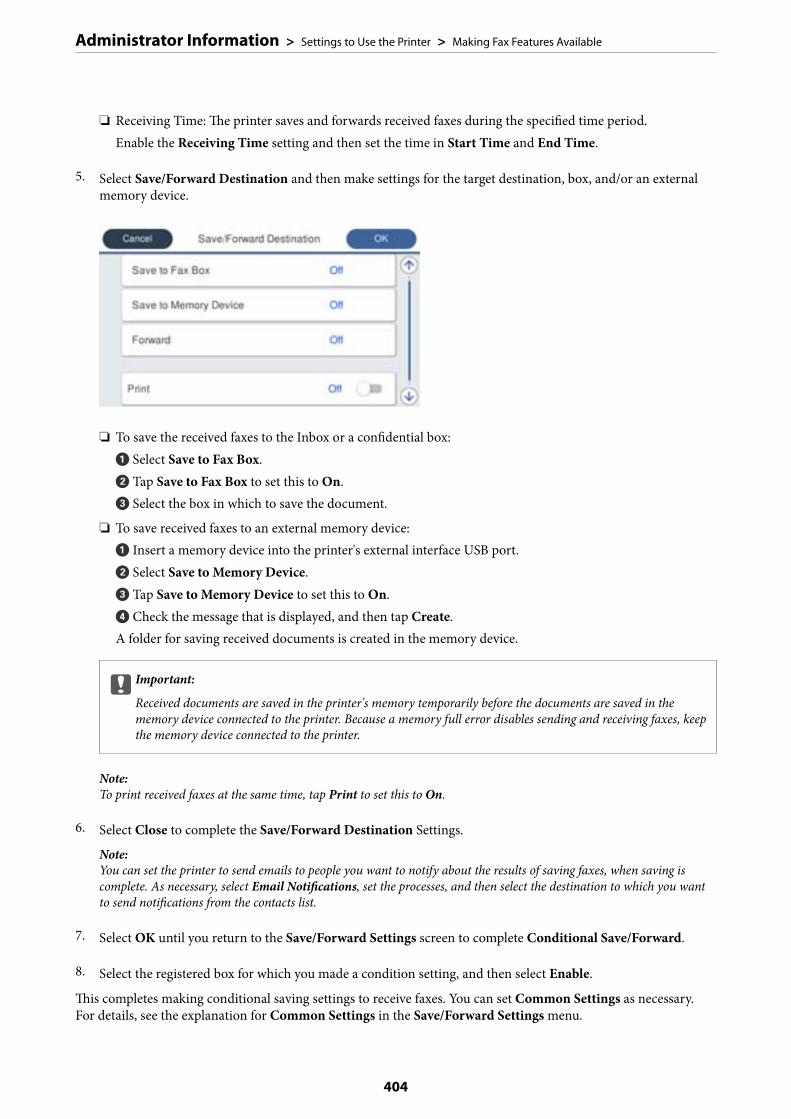
❏ Receiving Time: The printer saves and forwards received faxes during the specified time period.Enable the Receiving Time setting and then set the time in Start Time and End Time.
5. Select Save/Forward Destination and then make settings for the target destination, box, and/or an externalmemory device.
❏ To save the received faxes to the Inbox or a confidential box:A Select Save to Fax Box.B Tap Save to Fax Box to set this to On.C Select the box in which to save the document.
❏ To save received faxes to an external memory device:A Insert a memory device into the printer's external interface USB port.B Select Save to Memory Device.C Tap Save to Memory Device to set this to On.D Check the message that is displayed, and then tap Create.A folder for saving received documents is created in the memory device.
cImportant:
Received documents are saved in the printer's memory temporarily before the documents are saved in thememory device connected to the printer. Because a memory full error disables sending and receiving faxes, keepthe memory device connected to the printer.
Note:To print received faxes at the same time, tap Print to set this to On.
6. Select Close to complete the Save/Forward Destination Settings.
Note:You can set the printer to send emails to people you want to notify about the results of saving faxes, when saving iscomplete. As necessary, select Email Notifications, set the processes, and then select the destination to which you wantto send notifications from the contacts list.
7. Select OK until you return to the Save/Forward Settings screen to complete Conditional Save/Forward.
8. Select the registered box for which you made a condition setting, and then select Enable.
This completes making conditional saving settings to receive faxes. You can set Common Settings as necessary.For details, see the explanation for Common Settings in the Save/Forward Settings menu.
Administrator Information > Settings to Use the Printer > Making Fax Features Available
404

Related Information
& “Save/Forward Settings” on page 320
Making Forwarding Settings to Receive Faxes with Specified Conditions
You can make forwarding settings to a destination, an email address, shared folders or another fax machine from aspecified sender or at a specified time. If you make settings to forward received faxes, first add the forwardingdestination to the contacts list. To forward to an email address, you also need to configure the email server settingsbeforehand.
“Configuring a Mail Server” on page 359
“Setting a Shared Network Folder” on page 363
“Making Contacts Available” on page 379
Before you use the feature to forward received faxes at a specified time, make sure the printer's Date/Time andTime Difference settings are correct. Access the menu from Settings > General Settings > Basic Settings > Date/Time Settings.
Color documents cannot be forwarded to another fax machine. They are processed as documents that failed to beforwarded.
Note:❏ As well as using the printer's control panel, you can use Web Config to make forwarding settings to receive faxes. Select
the Fax tab > Save/Forward Settings > Conditional Save/Forward, select the number of the confidential box, and thenselect Edit and make the forwarding destination settings.
❏ You can also print and/or save received faxes at the same time. Make the settings on the Edit screen mentioned above.
1. Select Settings on the printer's control panel, and then select General Settings > Fax Settings.
2. Select Receive Settings > Save/Forward Settings > Conditional Save/Forward, and then tap on anunregistered box under Conditional Save/Forward.
3. Select the Name box and enter the name you want to register.
4. Select the Condition(s) box to make a condition setting.
❏ Sender Fax Number match: If the incoming fax number matches the conditions you selected in this item,the printer saves and forwards the received faxes.Select the Sender Fax Number match condition and enter the fax number (max. 20 digits) by selecting theFax Number box.
❏ Subaddress(SUB) perfect match: If the subaddress (SUB) is a perfect match, the printer saves and forwardsthe received faxes.Enable the Subaddress(SUB) perfect match setting and enter the password by selecting theSubaddress(SUB) box.
❏ Password(SID) perfect match: If the password (SID) is perfectly matched, the printer saves and forwardsthe received faxes.Enable the Password(SID) perfect match setting and input the password by selecting the Password(SID)box.
❏ Receiving Time: The printer saves and forwards received faxes during the specified time period.Enable the Receiving Time setting and then set the time in Start Time and End Time.
Administrator Information > Settings to Use the Printer > Making Fax Features Available
405

5. Select Save/Forward Destination, and then make settings for a forwarding destination.
A Select Forward.
B Select Yes. To print the documents automatically while forwarding them, select Yes and Print instead.
C Select Destination > Add Entry, and then select forwarding destinations from the contacts list. You canspecify a forwarding destination.
D When you have finished selecting forwarding destinations, tap Close.
E Check that the forwarding destination you selected is correct, and then select Close.
F In Options When Forwarding Failed, select whether to print received documents or save them in theprinter's Inbox when forwarding fails.
cImportant:
When the Inbox or a confidential box is full, receiving faxes is disabled. You should delete the documents fromthe inbox once they have been checked. The number of documents that have failed to be forwarded is displayed
on the on the home screen, in addition to other unprocessed jobs.
6. Select Close to complete the Save/Forward Destination Settings.
Note:You can set the printer to send emails to people you want to notify about the results of forwarding faxes when theforwarding process is complete. As necessary, select Email Notifications, set the processes, and then select thedestination to which you want to send notifications from the contacts list.
7. Select OK until you return to the Save/Forward Settings screen to complete Conditional Save/Forward.
8. Select the registered box for which you made a condition setting, and then select Enable.
This is completes making conditional saving settings to receive faxes. You can set Common Settings as necessary.For details, see the explanation for Common Settings in the Save/Forward Settings menu.
Note:❏ This completes making conditional forwarding settings to receive faxes. You can set Common Settings as necessary. For
details, see the explanation for Common Settings in the Save/Forward Settings menu.
❏ If you have selected a shared folder on a network or an email address as the forwarding destination, we recommend thatyou test if you can send a scanned image to the destination in the scan mode. Select Scan > Email, or Scan > NetworkFolder/FTP from the home screen, select the destination, and then start scanning.
Related Information
& “Save/Forward Settings” on page 320
Administrator Information > Settings to Use the Printer > Making Fax Features Available
406

Making Settings for Blocking Junk Faxes
You can block junk faxes.
1. Select Settings on the home screen on the printer's control panel.
2. Select General Settings > Fax Settings > Basic Settings > Rejection Fax.
3. Set the condition to block junk faxes.
Select Rejection Fax, and then enable the following options.
❏ Rejection Number List: Rejects faxes that are in the Rejection Number List.
❏ Fax Header Blank: Rejects faxes that have blank header information.
❏ Unregistered Contacts: Rejects faxes that have not been added to the contact list.
4. Tap to return to the Rejection Fax screen.
5. If you are using the Rejection Number List, select Edit Blocked Number list, and then edit the list.
Making Settings to Send and Receive Faxes on a Computer
To send and receive faxes on a client computer, FAX Utility must be installed on the computer connected bynetwork or USB cable.
Enabling Sending Faxes from a Computer
Set up the following using Web Config.
1. Access Web Config, click the Fax tab, and then click Send Settings.
2. Select Use for the PC to FAX Function.
The default setting value of the PC to FAX Function is Use. To disable sending faxes from anycomputer, select Do Not Use.
3. Click OK.
Making Save to Computer Setting to Receive Faxes
You can receive faxes on a computer by using the FAX Utility. Install FAX Utility on the clientcomputer and make the setting. For details, see Basic Operations in the FAX Utility help (displayedon the main window).
The setting item below on the printer's control panel is set to Yes, and the faxes received can be savedon the computer.
Settings > General Settings > Fax Settings > Receive Settings > Save/Forward Settings >Unconditional Save/Forward > Save to Computer
Making Save to Computer Setting to Also Print on the Printer to Receive Faxes
You can make the setting to print received faxes on the printer as well as save them on a computer.
1. Select Settings on the home screen on the printer's control panel.
Administrator Information > Settings to Use the Printer > Making Fax Features Available
407

2. Select General Settings > Fax Settings > Receive Settings.
3. Select Save/Forward Settings > Unconditional Save/Forward > Save to Computer > Yes andPrint.
Making Save to Computer Setting not to Receive Faxes
To set the printer not to save received faxes on the computer, change the settings on the printer.
Note:You can also change the settings using the FAX Utility. However, if there are any faxes that have been unsavedto the computer, the feature does not work.
1. Select Settings on the home screen on the printer's control panel.
2. Select General Settings > Fax Settings > Receive Settings.
3. Select Save/Forward Settings > Unconditional Save/Forward > Save to Computer > No.
Making Basic Operation Settings for the Printer
Setting the Control Panel
Setup for the printer's control panel. You can set up as follows.
1. Access Web Config and select the Device Management tab > Control Panel.
2. Set up the following items as necessary.
❏ LanguageSelect the displayed language on the control panel.
❏ Panel LockIf you select ON, you cannot select items that require the administrator's authority. To select them, log in tothe printer as the administrator. If the administrator password is not set, the panel lock is disabled.
❏ Operation TimeoutIf you select ON, when you log in as the access control user or administrator, you are automatically loggedout and go to the initial screen if there is no activity for a certain period of time.You can set between 10 seconds and 240 minutes by the second.
Note:You can also set up from the printer’s control panel.
❏ Language : Settings > General Settings > Basic Settings > Language
❏ Panel Lock : Settings > General Settings > System Administration > Security Settings > Admin Settings > LockSetting
❏ Operation Time Out : Settings > General Settings > Basic Settings > Operation Time Out (You can specify On orOff.)
3. Click OK.
Administrator Information > Settings to Use the Printer > Making Basic Operation Settings for the Printer
408
Power Saving Settings During Inactivity
You can set up the time to shift to the power saving mode or to turn the power off when the printer’s control panelis not operated for a certain period of time. Set the time depending on your usage environment.
1. Access Web Config and select the Device Management tab > Power Saving.
2. Enter the time for the Sleep Timer to switch to power saving mode when inactivity occurs.
Note:You can also set up from the printer’s control panel.
Settings > General Settings > Basic Settings > Sleep Timer
3. Select the turning off time for the Power Off Timer or Power Off If Inactive depending on the location ofpurchase. If you use the fax function, set to None or Off depending on the location of purchase.
Note:You can also set up from the printer’s control panel.
Settings > General Settings > Basic Settings > Power Off Timer or Power Off Settings
4. Click OK.
Setting the Sound
Make the sound settings when operating the control panel, printing, faxing and so on.
Note:You can also set up from the printer’s control panel.
Settings > General Settings > Basic Settings > Sounds
1. Access Web Config and select the Device Management tab > Sound.
2. Set up the following items as necessary.
❏ Normal ModeSet the sound when the printer is set to Normal Mode.
❏ Quiet ModeSet the sound when the printer is set to Quiet Mode.This is enabled when the one of the following items is enabled.
❏ Printer's control panel:Settings > General Settings > Printer Settings > Quiet ModeSettings > General Settings > Fax Settings > Receive Settings > Print Settings > Quiet Mode
❏ Web Config :Fax tab > Print Settings > Quiet Mode
3. Click OK.
Administrator Information > Settings to Use the Printer > Making Basic Operation Settings for the Printer
409
Synchronizing the Date and Time with Time Server
When synchronizing with the time server (NTP server), you can synchronize the time of the printer and thecomputer on the network. The time server may be operated within the organization or published on the Internet.
When using the CA certificate or Kerberos authentication, time-related trouble can be prevented by synchronizingwith the time server.
1. Access Web Config and select the Device Management tab > Date and Time > Time Server.
2. Select Use for Use Time Server.
3. Enter the time server address for Time Server Address.
You can use IPv4, IPv6 or FQDN format. Enter 252 characters or less. If you do not specify this, leave it blank.
4. Enter Update Interval (min).
You can set up to 10,800 minutes by the minute.
5. Click OK.
Note:You can confirm the connection status with the time server on Time Server Status.
Setting the Default Value for Scanning,Copying and Sending Faxes. (UserDefault Settings)
You can set the default value for the functions.
You can set the following functions.
❏ Scan to Network Folder/FTP
❏ Scan to Email
❏ Scan to Memory Device
❏ Scan to Cloud
❏ Copy
❏ Fax
1. Access Web Config and select the functions for which you want to set the default value for the Scan/Copy tab> User Default Settings.
Select the Fax tab > User Default Settings to set the default value for fax.
2. Set each item.
3. Click OK.
If the combination of the value is invalid, it is automatically modified, and then a valid value is set.
Administrator Information > Settings to Use the Printer > Making Basic Operation Settings for the Printer
410

Problems when Making Settings
Hints to Solving Problems
❏ Checking the error messageWhen trouble has occurred, first check whether there are any messages on the printer's control panel or driverscreen. If you have the notification email set when the events occur, you can promptly learn the status.
❏ Network connection reportDiagnose the network and the printer status, and then print the result.You can find the diagnosed error from the printer side.
❏ Checking the communication statusCheck the communication status of server computer or client computer by using the command such as pingand ipconfig.
❏ Connection testFor checking the connection between the printer to the mail server, perform the connection test from theprinter. Also, check the connection from the client computer to the server to check the communication status.
❏ Initializing the settingsIf the settings and communication status show no problem, the problems may be solved by disabling orinitializing the network settings of the printer, and then setting up again.
Cannot Access Web Config
The IP address is not assigned to the printer.
A valid IP address may not be assigned to the printer. Configure the IP address using the printer’scontrol panel. You can confirm the current setting information with a network status sheet or fromthe printer’s control panel.
Web browser does not support the Encryption Strength for SSL/TLS.
SSL/TLS has the Encryption Strength. You can open Web Config by using a web browser thatsupports bulk encryptions as indicated below. Check you are using the a supported browser.
❏ 80bit: AES256/AES128/3DES
❏ 112bit: AES256/AES128/3DES
❏ 128bit: AES256/AES128
❏ 192bit: AES256
❏ 256bit: AES256
CA-signed Certificate is expired.
If there is a problem with the expiration date of the certificate, "The certificate has expired" isdisplayed when connecting to Web Config with SSL/TLS communication (https). If the messageappears before its expiration date, make sure that the printer's date is configured correctly.
Administrator Information > Settings to Use the Printer > Problems when Making Settings
411

The common name of the certificate and the printer do not match.
If the common name of the certificate and the printer do not match, the message "The name of thesecurity certificate does not match···" is displayed when accessing Web Config using SSL/TLScommunication (https). This happens because the following IP addresses do not match.
❏ The printer's IP address entered to common name for creating a Self-signed Certificate or CSR
❏ IP address entered to web browser when running Web Config
For Self-signed Certificate, update the certificate.
For CA-signed Certificate, take the certificate again for the printer.
The proxy server setting of local address is not set to web browser.
When the printer is set to use a proxy server, configure the web browser not to connect to the localaddress via the proxy server.
❏ Windows:Select Control Panel > Network and Internet > Internet Options > Connections > LAN settings> Proxy server, and then configure not to use the proxy server for LAN (local addresses).
❏ Mac OS:Select System Preferences > Network > Advanced > Proxies, and then register the local addressfor Bypass proxy settings for these Hosts & Domains.Example:192.168.1.*: Local address 192.168.1.XXX, subnet mask 255.255.255.0192.168.*.*: Local address 192.168.XXX.XXX, subnet mask 255.255.0.0
Managing the Printer
Introduction of Product Security FeaturesThis section introduces the security function of the Epson Devices.
Feature name Feature type What to set What to prevent
Setup for theadministratorpassword
Locks the system settings,such as connection setup fornetwork or USB, detail setupfor fax reception/transmissionor transferring, and the userdefault settings.
An administrator sets apassword to the device.
You can set or change fromboth Web Config and theprinter's control panel.
Prevent from illegally readingand changing theinformation stored in thedevice such as ID, password,network settings, andcontacts. Also, reduce a widerange of security risks such asleakage of information for thenetwork environment orsecurity policy.
Administrator Information > Managing the Printer > Introduction of Product Security Features
412

Feature name Feature type What to set What to prevent
Setup for accesscontrol
Limits the functions that canbe used on devices, such asprint, scan, copy, and fax foreach user. If you log on with auser account registered inadvance, you are allowed touse certain functions.
In addition, after logging onfrom the control panel, youwill be logged offautomatically if there is noactivity for a certain period oftime.
Register any user account,and then select the functionyou want to allow, such ascopy and scan.
You can register up to 10 useraccounts.
The risk of leakage andunauthorized viewing of datacan be reduced byminimizing the numbers offunctions in accordance withthe business content and therole of the user.
Setup for externalinterface
Controls the interface, such asUSB port that connects to thedevice.
Enable or disable the USBport for connecting externaldevices such as USB memoryand USB connection with thecomputer.
❏ USB port control: Reducesthe possibility of databeing taken throughunauthorized scanning ofconfidential documents.
❏ USB connection ofcomputer: Preventsunauthorized use of thedevice by prohibitingprinting or scanningwithout going throughthe network.
Related Information
& “Application for Configuring Printer Operations (Web Config)” on page 307& “Configuring the Administrator Password” on page 413& “Restricting Available Features” on page 422& “Disabling the External Interface” on page 424
Administrator Settings
Configuring the Administrator Password
When you set the administrator password, you can prevent the users from changing system management settings.You can set and change the administrator password using either Web Config, the printer's control panel, or EpsonDevice Admin. When using Epson Device Admin, see the Epson Device Admin guide or help.
Related Information
& “Application for Configuring Printer Operations (Web Config)” on page 307& “Software for Managing Devices on the Network (Epson Device Admin)” on page 309
Configuring the Administrator Password from the Control Panel
You can set the administrator password from the printer's control panel.
Administrator Information > Managing the Printer > Administrator Settings
413
1. Select Settings on the printer's control panel.
2. Select General Settings > System Administration > Security Settings > Admin Settings.
3. Select Admin Password > Register.
4. Enter the new password.
5. Enter the password again.
Note:You can change or delete the administrator password when you select Change or Reset on the Admin Password screen andenter the administrator password.
Configuring the Administrator Password from a Computer
You can set the administrator password using Web Config.
1. Access Web Config and select the Product Security tab > Change Administrator Password.
2. Enter a password to New Password and Confirm New Password. Enter the user name, if necessary.
If you want to change the password to new one, enter a current password.
3. Select OK.
Note:❏ To set or change the locked menu items, click Administrator Login, and then enter the administrator password.
❏ To delete the administrator password, click Product Security tab > Delete Administrator Password, and then enterthe administrator password.
Related Information
& “Application for Configuring Printer Operations (Web Config)” on page 307
Controlling the Panel Operation
If you set the administrator password and enable the Lock Setting, you can lock the items related to the printer’ssystem settings so that users cannot change them.
Enabling the Lock Setting
Enable the Lock Setting for the printer where the password is set.
Specify an administrator's password first.
Enabling the Lock Setting from the Control Panel
1. Select Settings on the printer's control panel.
2. Select General Settings > System Administration > Security Settings > Admin Settings.
Administrator Information > Managing the Printer > Administrator Settings
414
3. Select On on Lock Setting.
Check that is displayed on the home screen.
Enabling the Lock Setting from a Computer
1. Access Web Config and click the Administrator Login.
2. Enter the user name and password, and then click OK.
3. Select the Device Management tab > Control Panel.
4. On the Panel Lock, select ON.
5. Click OK.
6. Check that is displayed on the home screen on the printer's control panel.
Related Information
& “Application for Configuring Printer Operations (Web Config)” on page 307
Lock Setting Items for General Settings Menu
This is a list of the Lock Setting items in Settings > General Settings on the control panel.
Some functions can be set enabled or disabled individually.
General Settings menu Panel Lock
Basic Settings -
Administrator Information > Managing the Printer > Administrator Settings
415
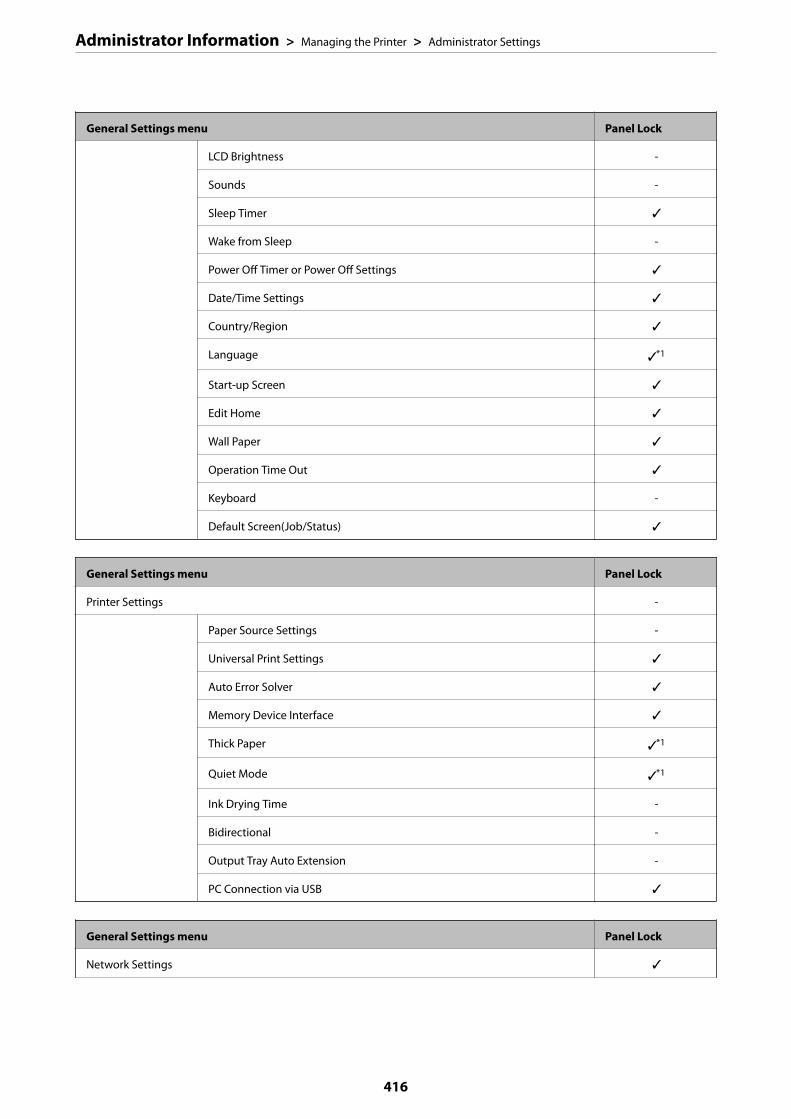
General Settings menu Panel Lock
LCD Brightness -
Sounds -
Sleep Timer ✓
Wake from Sleep -
Power Off Timer or Power Off Settings ✓
Date/Time Settings ✓
Country/Region ✓
Language ✓*1
Start-up Screen ✓
Edit Home ✓
Wall Paper ✓
Operation Time Out ✓
Keyboard -
Default Screen(Job/Status) ✓
General Settings menu Panel Lock
Printer Settings -
Paper Source Settings -
Universal Print Settings ✓
Auto Error Solver ✓
Memory Device Interface ✓
Thick Paper ✓*1
Quiet Mode ✓*1
Ink Drying Time -
Bidirectional -
Output Tray Auto Extension -
PC Connection via USB ✓
General Settings menu Panel Lock
Network Settings ✓
Administrator Information > Managing the Printer > Administrator Settings
416
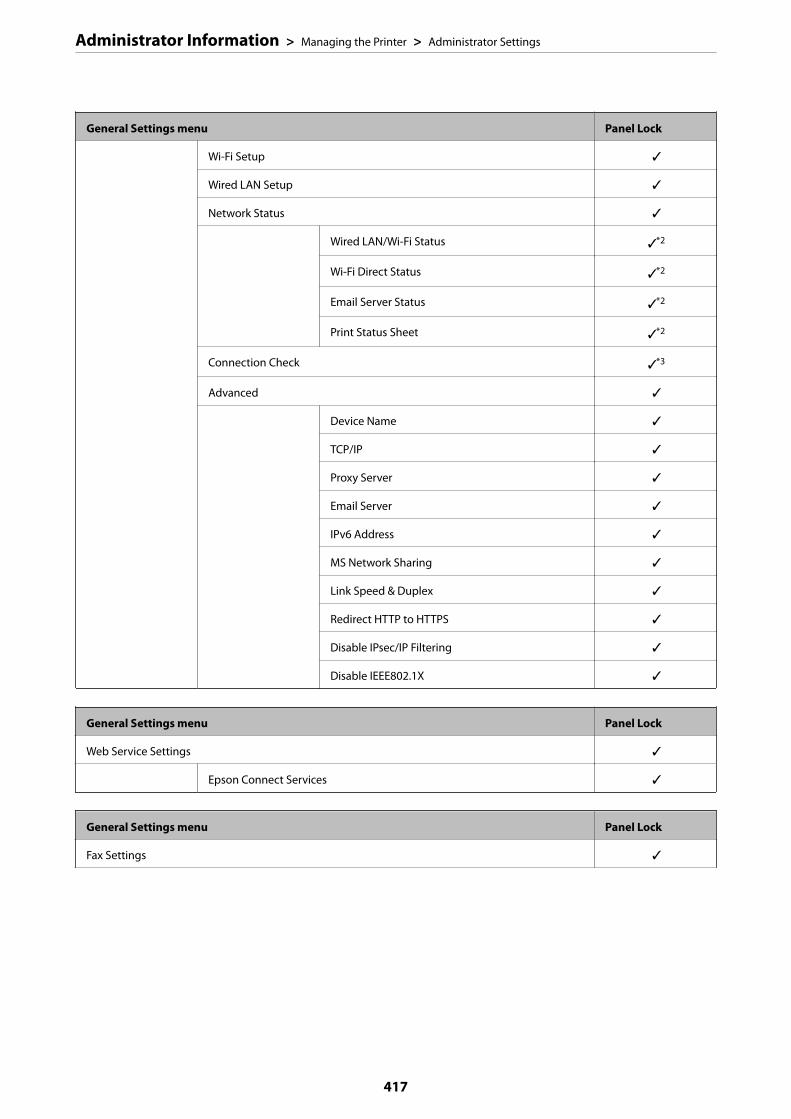
General Settings menu Panel Lock
Wi-Fi Setup ✓
Wired LAN Setup ✓
Network Status ✓
Wired LAN/Wi-Fi Status ✓*2
Wi-Fi Direct Status ✓*2
Email Server Status ✓*2
Print Status Sheet ✓*2
Connection Check ✓*3
Advanced ✓
Device Name ✓
TCP/IP ✓
Proxy Server ✓
Email Server ✓
IPv6 Address ✓
MS Network Sharing ✓
Link Speed & Duplex ✓
Redirect HTTP to HTTPS ✓
Disable IPsec/IP Filtering ✓
Disable IEEE802.1X ✓
General Settings menu Panel Lock
Web Service Settings ✓
Epson Connect Services ✓
General Settings menu Panel Lock
Fax Settings ✓
Administrator Information > Managing the Printer > Administrator Settings
417
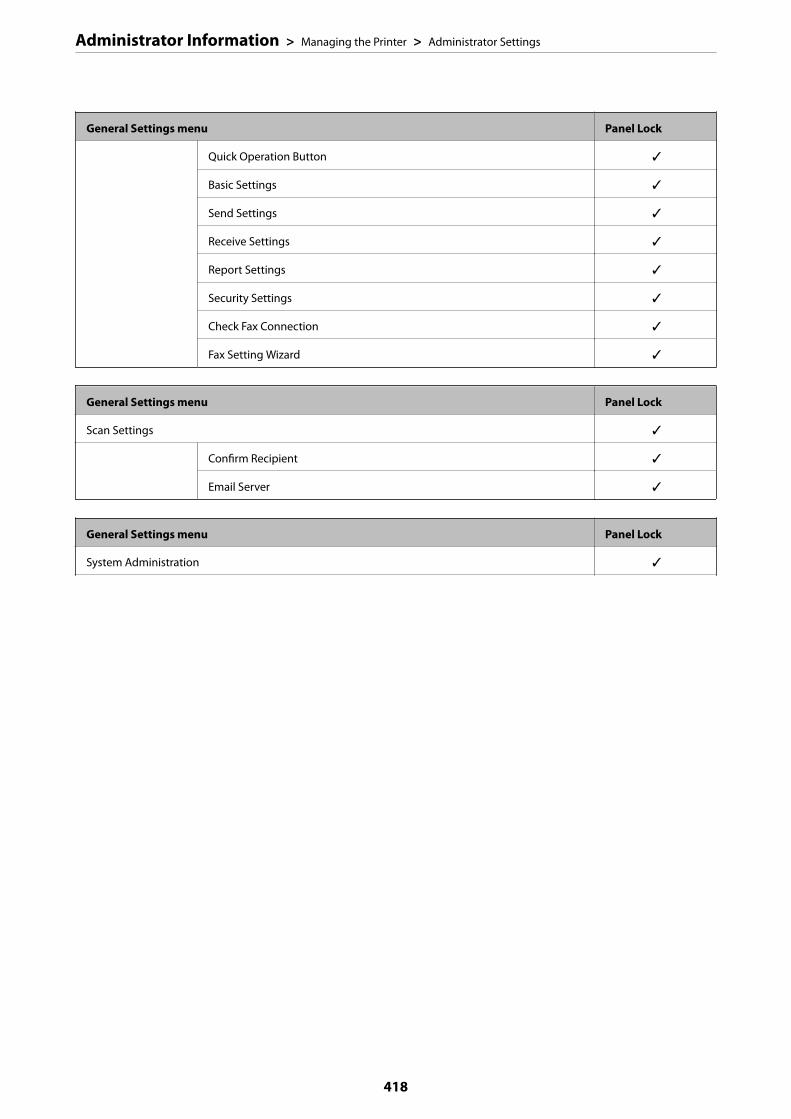
General Settings menu Panel Lock
Quick Operation Button ✓
Basic Settings ✓
Send Settings ✓
Receive Settings ✓
Report Settings ✓
Security Settings ✓
Check Fax Connection ✓
Fax Setting Wizard ✓
General Settings menu Panel Lock
Scan Settings ✓
Confirm Recipient ✓
Email Server ✓
General Settings menu Panel Lock
System Administration ✓
Administrator Information > Managing the Printer > Administrator Settings
418

General Settings menu Panel Lock
Contacts Manager ✓
Register/Delete ✓*1*4
Frequent ✓*4
Print Contacts ✓
View Options ✓*4
Search Options ✓*4
Clear Internal Memory Data ✓
Security Settings ✓
Restrictions ✓
Access Control ✓
Admin Settings ✓
Admin Password ✓
Lock Setting ✓
Password Encryption ✓
Customer Research ✓
Restore Default Settings ✓
Firmware Update ✓
✓ = To be locked.
- = Not to be locked.
*1 : You can enable or disable the lock from General Settings > System Administration > Security Settings > Restrictions.
*2 : Even though items on the upper level can be locked by administrator lock, you can still access them from the same namemenu of Settings > Printer Status/Print.
*3 : Even though items on the upper level can be locked by administrator lock, you can still access them from Home >
> Description > When you cannot connect to the network.
*4 : Even though items on the upper level can be locked by administrator lock, you can still access them from the same namemenu of Settings > Contacts Manager.
Related Information
& “Other Lock Setting Items” on page 419& “Items That Can Be Set Individually” on page 420
Other Lock Setting Items
Besides the General Settings menu, Lock Setting would be enabled to the items below.
Administrator Information > Managing the Printer > Administrator Settings
419
❏ Presets
❏ Add New
❏ Delete
❏ Rename
❏ Add or remove to Home screen
❏ Changing user settings
❏ Settings > User Settings.
Related Information
& “Lock Setting Items for General Settings Menu” on page 415& “Items That Can Be Set Individually” on page 420
Operating Display and Function Setting Individually
For the some target items of the Lock Setting, you can individually set whether they are enabled or disabled.
You can set each user’s availability as necessary, such as registering or changing the contacts, displaying job history,etc.
1. Select Settings on the printer's control panel.
2. Select General Settings > System Administration > Security Settings > Restrictions.
3. Select the item for the function that you want to change the setting of, and then set to On or Off.
Items That Can Be Set Individually
The administrator can permit the items below to display and change settings individually.
❏ Job Log Access : Job/Status > LogControl the display of the status monitor's job history. Select On to permit the job history to display.
❏ Access to Register/Delete Contacts : Settings > Contacts Manager > Register/DeleteControl the registering and changing of contacts. Select On to register or change the contacts.
❏ Fax Recent Access : Fax > Recipient > RecentControl the display of destination when sending and receiving a fax. Select On to display the destination.
❏ Fax Transmission Log Access : Fax > Menu > Transmission LogControl the display of the communication history of a fax. Select On to display the communication history.
❏ Access to Fax Report : Fax > Menu > Fax ReportControl the printing of the fax report. Select On to permit printing.
❏ Access to Print Save History of Scan to Network Folder/FTP : Scan > Network Folder/FTP > Menu > PrintSave HistoryControl the printing of save history for scan to network folder function. Select On to permit the printing.
❏ Access to Recent of Scan to Email : Scan > Email > Recipient > HistoryControl the display of the history for the scan to mail function. Select On to display the history.
Administrator Information > Managing the Printer > Administrator Settings
420

❏ Access to Show Sent History of Scan to Email : Scan > Email > Menu > Show Sent HistoryControl the display of the history of email sending for the scan to mail function. Select On to display the historyof email sending.
❏ Access to Print Sent History of Scan to Email : Scan > Email > Menu > Print Sent HistoryControl the printing of the history of email sending for the scan to mail function. Select On to permit theprinting.
❏ Access to Language : Settings > LanguageControl the changing of the language displayed on the control panel. Select On to change the languages.
❏ Access to Thick Paper : Settings > General Settings > Printer Settings > Thick PaperControl the changing of the settings of the Thick Paper function. Select On to change the settings.
❏ Access to Quiet Mode : Settings > General Settings > Printer Settings > Quiet ModeControl the changing of settings of the Quiet Mode function. Select On to change the settings.
❏ Protection of Personal Data :Control the display of the destination information on speed dial registration. Select On to display thedestination as (***).
Related Information
& “Lock Setting Items for General Settings Menu” on page 415& “Other Lock Setting Items” on page 419
Logging on to the Printer as an Administrator
If the administrator password is set to the printer, you need to log on as an administrator to operate the lockedmenu items.
Logging on the Printer Using the Control Panel
1. Tap .
2. Tap Administrator.
3. Enter the administrator password, and then tap OK.
is displayed when being authenticated, then you can operate the locked menu items.
Tap to log off.
Note:When you select On for Settings > General Settings > Basic Settings > Operation Time Out, you log off automaticallyafter a specific length of time if there is no activity on the control panel.
Logging on to the Printer from a Computer
When you log in to Web Config as an administrator, you can operate items that are set in the Lock Setting.
1. Enter the printer's IP address into a browser to run Web Config.
Administrator Information > Managing the Printer > Administrator Settings
421

2. Click Administrator Login.
3. Enter the user name and administrator password in User Name and Current password.
4. Click OK.
The locked items and Administrator Logout are displayed when being authenticated.
Click Administrator Logout to log off.
Note:When you select ON for the Device Management tab > Control Panel > Operation Timeout, you log off automaticallyafter a specific length of time if there is no activity on the control panel.
Related Information
& “Application for Configuring Printer Operations (Web Config)” on page 307
Restricting Available FeaturesYou can register user accounts on the printer, link them with functions, and control functions that users can use.
When enabling access control, the user can use functions such as copy, fax, etc. by entering the password on theprinter’s control panel and logging in to the printer.
The unavailable functions will be grayed out and cannot be selected.
From the computer, when you register the authentication information to the printer driver or scanner driver, youwill be able to print or scan. For details of the driver settings, see the driver's help or manual.
Creating the User Account
Create the user account for access control.
1. Access Web Config and select the Product Security tab > Access Control Settings > User Settings.
2. Click Add for the number you want to register.
3. Set each item.
❏ User Name :Enter the name displayed on the user name list between 1 and 14 characters long using alphanumericcharacters.
❏ Password :Enter a password between 0 and 20 characters long in ASCII (0x20-0x7E). When initializing the password,leave it blank.
❏ Select the check box to enable or disable each function.Select the function that you permit to use.
4. Click Apply.
Return to the user setting list after a specific length of time.
Check that the user name you registered on User Name is displayed and changed Add to Edit.
Administrator Information > Managing the Printer > Restricting Available Features
422

Related Information
& “Application for Configuring Printer Operations (Web Config)” on page 307
Editing the User Account
Edit the account registered to access control.
1. Access Web Config and select the Product Security tab > Access Control Settings > User Settings.
2. Click Edit for the number you want to edit.
3. Change each item.
4. Click Apply.
Return to the user setting list after a specific length of time.
Related Information
& “Application for Configuring Printer Operations (Web Config)” on page 307
Deleting the User Account
Delete the account registered to access control.
1. Access Web Config and select the Product Security tab > Access Control Settings > User Settings.
2. Click Edit for the number you want to delete.
3. Click Delete.
cImportant:
When clicking Delete, the user account will be deleted without a confirmation message. Take care whendeleting the account.
Return to the user setting list after a specific length of time.
Related Information
& “Application for Configuring Printer Operations (Web Config)” on page 307
Enabling Access Control
When enabling access control, only the registered user will be able to use the printer.
1. Access Web Config and select the Product Security tab > Access Control Settings > Basic.
Administrator Information > Managing the Printer > Restricting Available Features
423
2. Select Enables Access Control.
If you select Allows printing and scanning without authentication information, you can print or scan fromthe drivers that are not set with the authentication information. Set it when you want to control the operationonly from the printer's control panel and to permit printing and scanning from the computers.
3. Click OK.
The completion message is displayed after a certain period of time.
Confirm that the icons such as copy and scan are grayed out on the printer's control panel.
Related Information
& “Application for Configuring Printer Operations (Web Config)” on page 307
Disabling the External InterfaceYou can disable the interface that is used to connect the device to the printer. Make the restriction settings torestrict printing and scanning other than via network.
Note:You can also make the restriction settings on the printer's control panel.
❏ Memory Device : Settings > General Settings > Printer Settings > Memory Device Interface > Memory Device
❏ PC Connection via USB : Settings > General Settings > Printer Settings > PC Connection via USB
1. Access Web Config and select the Product Security tab > External Interface.
2. Select Disable on the functions you want to set.
Select Enable when you want to cancel controlling.
❏ Memory DeviceProhibit saving the data to external memory via USB port for external device connection.
❏ PC Connection via USBYou can restrict the usage of the USB connection from the computer. If you want to restrict it, selectDisable.
3. Click OK.
4. Check that the disabled port cannot be used.
❏ Memory DeviceConfirm that there is no response when connecting a storage device such as USB memory to the externalinterface USB port.
Administrator Information > Managing the Printer > Disabling the External Interface
424
❏ PC Connection via USBIf the driver was installed on the computerConnect the printer to the computer using a USB cable, and then confirm that the printer does not printand scan.If the driver was not installed on the computerWindows:Open the device manager and keep it, connect the printer to the computer using a USB cable, and thenconfirm that the device manager's display contents stays unchanged.Mac OS:Connect the printer to the computer using a USB cable, and then confirm that the printer is not listed if youwant to add the printer from Printers & Scanners.
Related Information
& “Application for Configuring Printer Operations (Web Config)” on page 307
Monitoring a Remote Printer
Checking Information for a Remote Printer
You can check the following information of the operating printer from Status by using Web Config.
❏ Product StatusCheck the status, cloud service, product number, MAC address, etc.
❏ Network StatusCheck the information of the network connection status, IP address, DNS server, etc.
❏ Usage StatusCheck the first day of printings, printed pages, printing count for each language, scanning count, etc.
❏ Hardware StatusCheck the status of each function of the printer.
❏ Job HistoryCheck the job log for print jobs, transmission jobs, and so on.
Related Information
& “Application for Configuring Printer Operations (Web Config)” on page 307
Receiving Email Notifications When Events Occur
About Email Notifications
This is the notification function that, when events such as printing stop and printer error occur, send the email tothe specified address.
You can register up to five destinations and set the notification settings for each destination.
Administrator Information > Managing the Printer > Monitoring a Remote Printer
425

To use this function, you need to set up the mail server before setting up notifications.
Related Information
& “Configuring a Mail Server” on page 359
Configuring Email Notification
Configure email notification by using Web Config.
1. Access Web Config and select the Device Management tab > Email Notification.
2. Set the subject of email notification.
Select the contents displayed on the subject from the two pull-down menus.
❏ The selected contents are displayed next to Subject.
❏ The same contents cannot be set on left and right.
❏ When the number of characters in Location exceeds 32 bytes, characters exceeding 32 bytes are omitted.
3. Enter the email address for sending the notification email.
Use A-Z a-z 0-9 ! # $ % & ' * + - . /= ? ^ _ { | } ~ @, and enter between 1 and 255 characters.
4. Select the language for the email notifications.
5. Select the check box on the event for which you want to receive a notification.
The number of Notification Settings is linked to the destination number of Email Address Settings.
Example :
If you want a notification sent to the email address set for number 1 in Email Address Settings when theprinter is out of paper, select the check box column 1 in line Paper out.
6. Click OK.
Confirm that an email notification will be sent by causing an event.
Example : Print by specifying the Paper Source where paper is not set.
Related Information
& “Application for Configuring Printer Operations (Web Config)” on page 307& “Configuring a Mail Server” on page 359
Items for Email Notification
Items Settings and Explanation
Reset Ink Level Notice when the ink is expended.
Ink low Notice when the ink is nearing expended.
Maintenance box: end of service life Notice when the maintenance box is full.
Administrator Information > Managing the Printer > Monitoring a Remote Printer
426
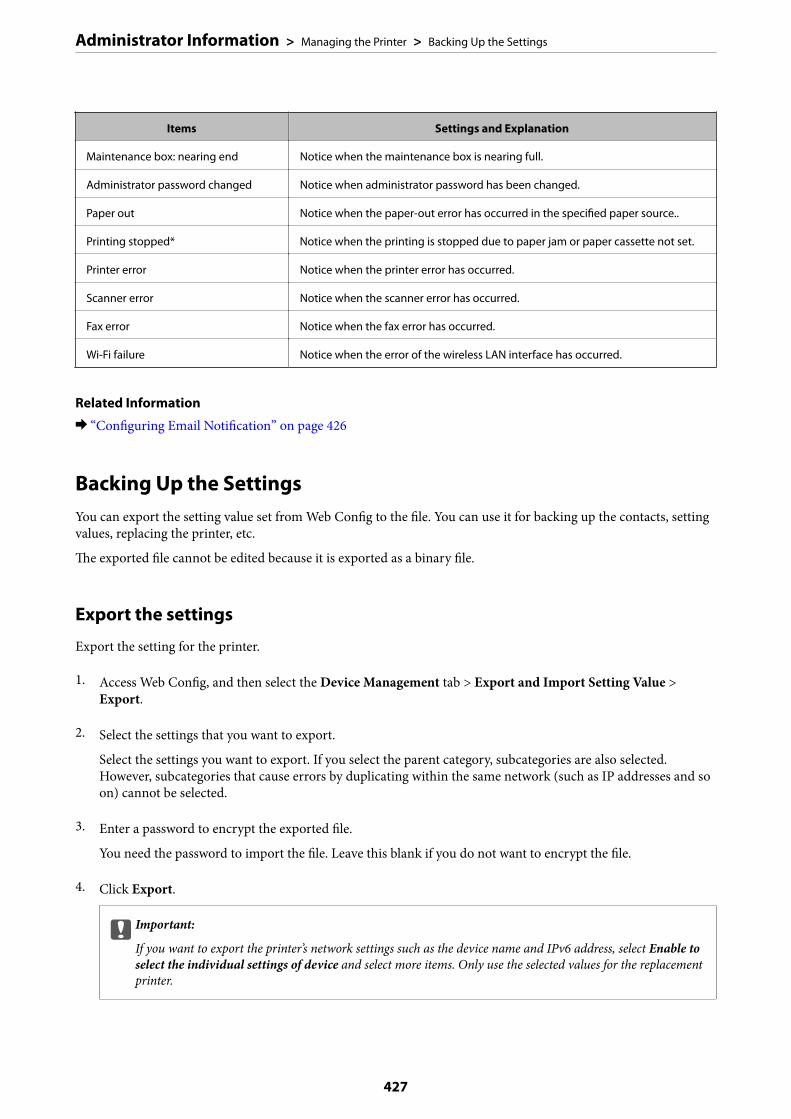
Items Settings and Explanation
Maintenance box: nearing end Notice when the maintenance box is nearing full.
Administrator password changed Notice when administrator password has been changed.
Paper out Notice when the paper-out error has occurred in the specified paper source..
Printing stopped* Notice when the printing is stopped due to paper jam or paper cassette not set.
Printer error Notice when the printer error has occurred.
Scanner error Notice when the scanner error has occurred.
Fax error Notice when the fax error has occurred.
Wi-Fi failure Notice when the error of the wireless LAN interface has occurred.
Related Information
& “Configuring Email Notification” on page 426
Backing Up the SettingsYou can export the setting value set from Web Config to the file. You can use it for backing up the contacts, settingvalues, replacing the printer, etc.
The exported file cannot be edited because it is exported as a binary file.
Export the settings
Export the setting for the printer.
1. Access Web Config, and then select the Device Management tab > Export and Import Setting Value >Export.
2. Select the settings that you want to export.
Select the settings you want to export. If you select the parent category, subcategories are also selected.However, subcategories that cause errors by duplicating within the same network (such as IP addresses and soon) cannot be selected.
3. Enter a password to encrypt the exported file.
You need the password to import the file. Leave this blank if you do not want to encrypt the file.
4. Click Export.
cImportant:
If you want to export the printer’s network settings such as the device name and IPv6 address, select Enable toselect the individual settings of device and select more items. Only use the selected values for the replacementprinter.
Administrator Information > Managing the Printer > Backing Up the Settings
427

Related Information
& “Application for Configuring Printer Operations (Web Config)” on page 307
Import the settings
Import the exported Web Config file to the printer.
cImportant:
When importing values that include individual information such as a printer name or IP address, make sure thesame IP address does not exist on the same network.
1. Access Web Config, and then select the Device Management tab > Export and Import Setting Value >Import.
2. Select the exported file, and then enter the encrypted password.
3. Click Next.
4. Select the settings that you want to import, and then click Next.
5. Click OK.
The settings are applied to the printer.
Related Information
& “Application for Configuring Printer Operations (Web Config)” on page 307
Advanced Security SettingsThis section explains advanced security features.
Security Settings and Prevention of DangerWhen a printer is connected to a network, you can access it from a remote location. In addition, many people canshare the printer, which is helpful in improving operational efficiency and convenience. However, risks such asillegal access, illegal use, and tampering with data are increased. If you use the printer in an environment whereyou can access the Internet, the risks are even higher.
For printers that do not have access protection from the outside, it will be possible to read the print job logs thatare stored in the printer from the Internet.
In order to avoid this risk, Epson printers have a variety of security technologies.
Set the printer as necessary according to the environmental conditions that have been built with the customer'senvironment information.
Administrator Information > Advanced Security Settings > Security Settings and Prevention of Danger
428
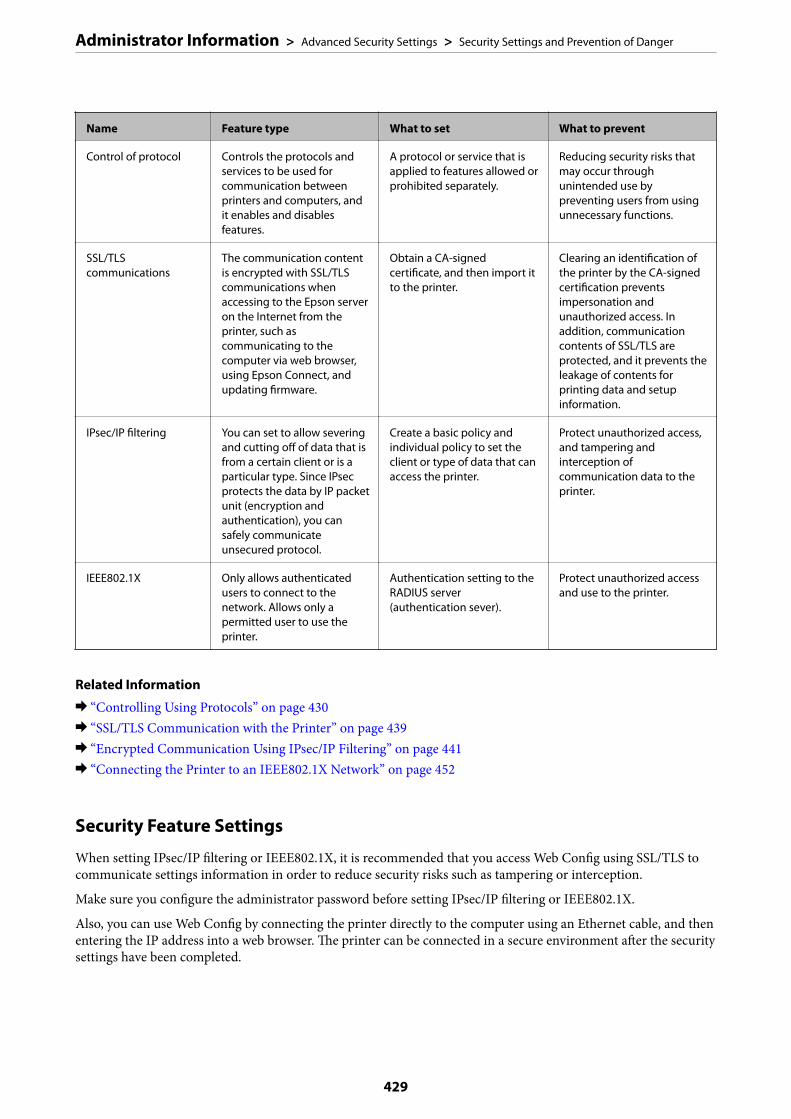
Name Feature type What to set What to prevent
Control of protocol Controls the protocols andservices to be used forcommunication betweenprinters and computers, andit enables and disablesfeatures.
A protocol or service that isapplied to features allowed orprohibited separately.
Reducing security risks thatmay occur throughunintended use bypreventing users from usingunnecessary functions.
SSL/TLScommunications
The communication contentis encrypted with SSL/TLScommunications whenaccessing to the Epson serveron the Internet from theprinter, such ascommunicating to thecomputer via web browser,using Epson Connect, andupdating firmware.
Obtain a CA-signedcertificate, and then import itto the printer.
Clearing an identification ofthe printer by the CA-signedcertification preventsimpersonation andunauthorized access. Inaddition, communicationcontents of SSL/TLS areprotected, and it prevents theleakage of contents forprinting data and setupinformation.
IPsec/IP filtering You can set to allow severingand cutting off of data that isfrom a certain client or is aparticular type. Since IPsecprotects the data by IP packetunit (encryption andauthentication), you cansafely communicateunsecured protocol.
Create a basic policy andindividual policy to set theclient or type of data that canaccess the printer.
Protect unauthorized access,and tampering andinterception ofcommunication data to theprinter.
IEEE802.1X Only allows authenticatedusers to connect to thenetwork. Allows only apermitted user to use theprinter.
Authentication setting to theRADIUS server(authentication sever).
Protect unauthorized accessand use to the printer.
Related Information
& “Controlling Using Protocols” on page 430& “SSL/TLS Communication with the Printer” on page 439& “Encrypted Communication Using IPsec/IP Filtering” on page 441& “Connecting the Printer to an IEEE802.1X Network” on page 452
Security Feature Settings
When setting IPsec/IP filtering or IEEE802.1X, it is recommended that you access Web Config using SSL/TLS tocommunicate settings information in order to reduce security risks such as tampering or interception.
Make sure you configure the administrator password before setting IPsec/IP filtering or IEEE802.1X.
Also, you can use Web Config by connecting the printer directly to the computer using an Ethernet cable, and thenentering the IP address into a web browser. The printer can be connected in a secure environment after the securitysettings have been completed.
Administrator Information > Advanced Security Settings > Security Settings and Prevention of Danger
429
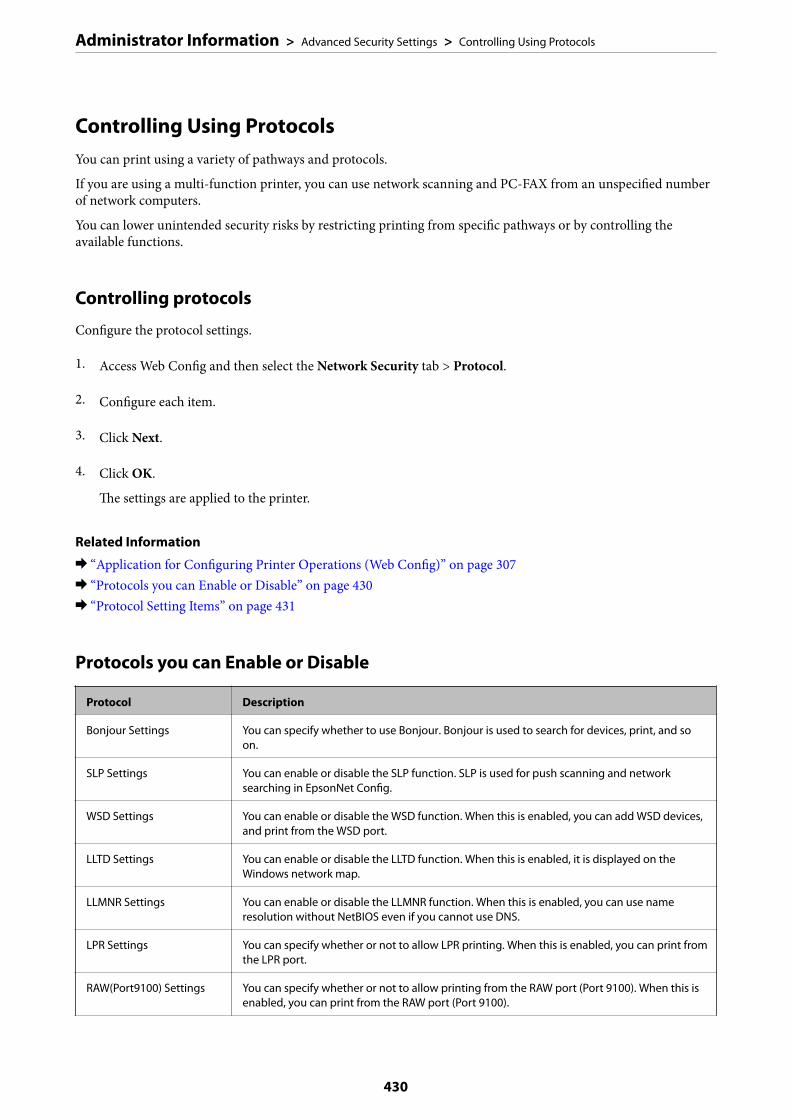
Controlling Using ProtocolsYou can print using a variety of pathways and protocols.
If you are using a multi-function printer, you can use network scanning and PC-FAX from an unspecified numberof network computers.
You can lower unintended security risks by restricting printing from specific pathways or by controlling theavailable functions.
Controlling protocols
Configure the protocol settings.
1. Access Web Config and then select the Network Security tab > Protocol.
2. Configure each item.
3. Click Next.
4. Click OK.
The settings are applied to the printer.
Related Information
& “Application for Configuring Printer Operations (Web Config)” on page 307& “Protocols you can Enable or Disable” on page 430& “Protocol Setting Items” on page 431
Protocols you can Enable or Disable
Protocol Description
Bonjour Settings You can specify whether to use Bonjour. Bonjour is used to search for devices, print, and soon.
SLP Settings You can enable or disable the SLP function. SLP is used for push scanning and networksearching in EpsonNet Config.
WSD Settings You can enable or disable the WSD function. When this is enabled, you can add WSD devices,and print from the WSD port.
LLTD Settings You can enable or disable the LLTD function. When this is enabled, it is displayed on theWindows network map.
LLMNR Settings You can enable or disable the LLMNR function. When this is enabled, you can use nameresolution without NetBIOS even if you cannot use DNS.
LPR Settings You can specify whether or not to allow LPR printing. When this is enabled, you can print fromthe LPR port.
RAW(Port9100) Settings You can specify whether or not to allow printing from the RAW port (Port 9100). When this isenabled, you can print from the RAW port (Port 9100).
Administrator Information > Advanced Security Settings > Controlling Using Protocols
430
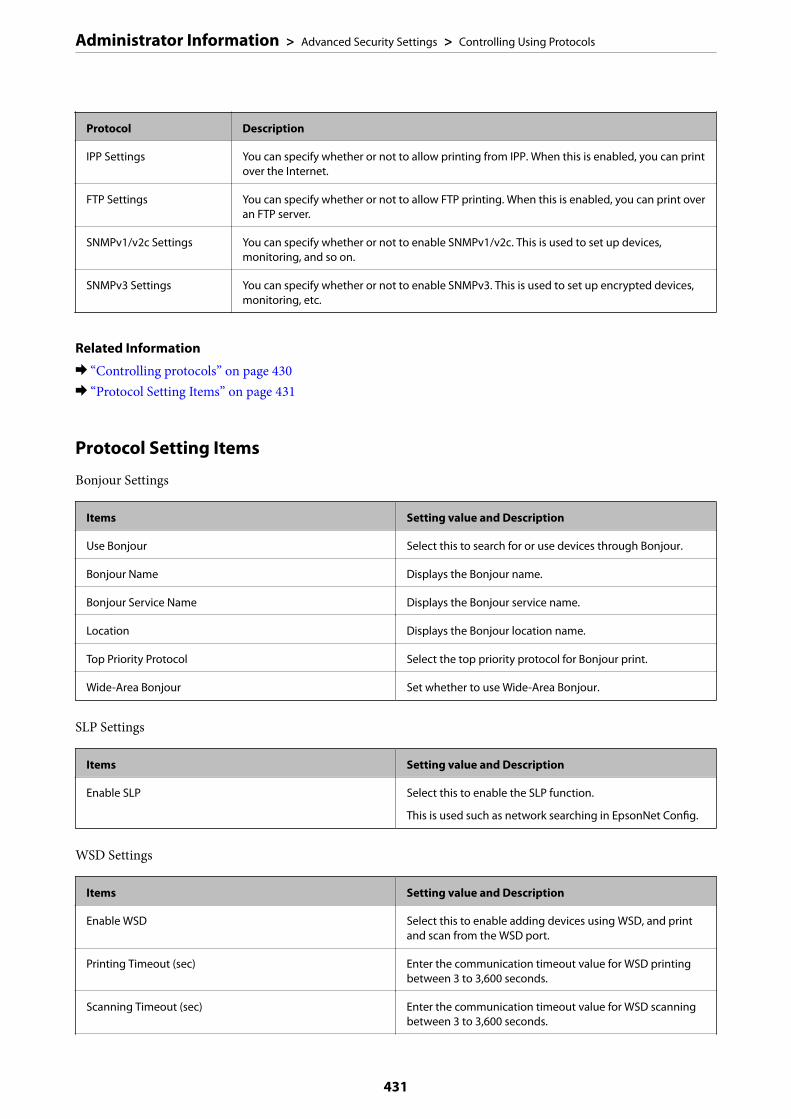
Protocol Description
IPP Settings You can specify whether or not to allow printing from IPP. When this is enabled, you can printover the Internet.
FTP Settings You can specify whether or not to allow FTP printing. When this is enabled, you can print overan FTP server.
SNMPv1/v2c Settings You can specify whether or not to enable SNMPv1/v2c. This is used to set up devices,monitoring, and so on.
SNMPv3 Settings You can specify whether or not to enable SNMPv3. This is used to set up encrypted devices,monitoring, etc.
Related Information
& “Controlling protocols” on page 430& “Protocol Setting Items” on page 431
Protocol Setting Items
Bonjour Settings
Items Setting value and Description
Use Bonjour Select this to search for or use devices through Bonjour.
Bonjour Name Displays the Bonjour name.
Bonjour Service Name Displays the Bonjour service name.
Location Displays the Bonjour location name.
Top Priority Protocol Select the top priority protocol for Bonjour print.
Wide-Area Bonjour Set whether to use Wide-Area Bonjour.
SLP Settings
Items Setting value and Description
Enable SLP Select this to enable the SLP function.
This is used such as network searching in EpsonNet Config.
WSD Settings
Items Setting value and Description
Enable WSD Select this to enable adding devices using WSD, and printand scan from the WSD port.
Printing Timeout (sec) Enter the communication timeout value for WSD printingbetween 3 to 3,600 seconds.
Scanning Timeout (sec) Enter the communication timeout value for WSD scanningbetween 3 to 3,600 seconds.
Administrator Information > Advanced Security Settings > Controlling Using Protocols
431
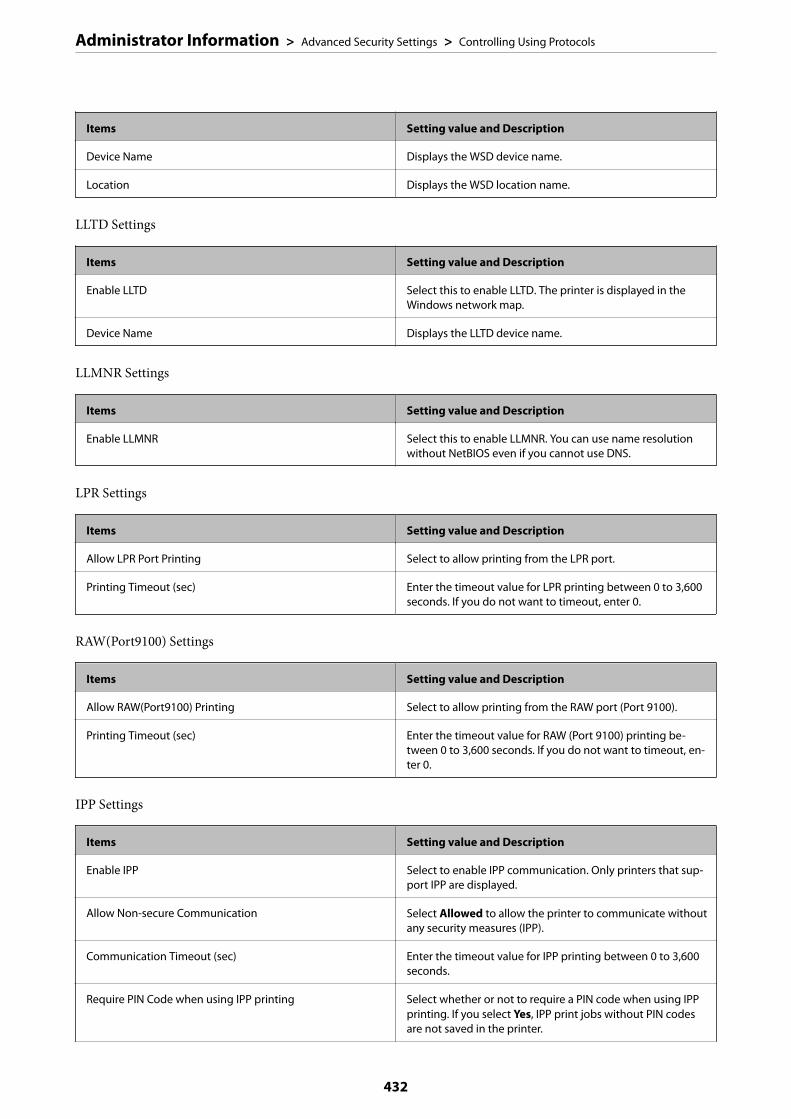
Items Setting value and Description
Device Name Displays the WSD device name.
Location Displays the WSD location name.
LLTD Settings
Items Setting value and Description
Enable LLTD Select this to enable LLTD. The printer is displayed in theWindows network map.
Device Name Displays the LLTD device name.
LLMNR Settings
Items Setting value and Description
Enable LLMNR Select this to enable LLMNR. You can use name resolutionwithout NetBIOS even if you cannot use DNS.
LPR Settings
Items Setting value and Description
Allow LPR Port Printing Select to allow printing from the LPR port.
Printing Timeout (sec) Enter the timeout value for LPR printing between 0 to 3,600seconds. If you do not want to timeout, enter 0.
RAW(Port9100) Settings
Items Setting value and Description
Allow RAW(Port9100) Printing Select to allow printing from the RAW port (Port 9100).
Printing Timeout (sec) Enter the timeout value for RAW (Port 9100) printing be-tween 0 to 3,600 seconds. If you do not want to timeout, en-ter 0.
IPP Settings
Items Setting value and Description
Enable IPP Select to enable IPP communication. Only printers that sup-port IPP are displayed.
Allow Non-secure Communication Select Allowed to allow the printer to communicate withoutany security measures (IPP).
Communication Timeout (sec) Enter the timeout value for IPP printing between 0 to 3,600seconds.
Require PIN Code when using IPP printing Select whether or not to require a PIN code when using IPPprinting. If you select Yes, IPP print jobs without PIN codesare not saved in the printer.
Administrator Information > Advanced Security Settings > Controlling Using Protocols
432

Items Setting value and Description
URL(Network) Displays IPP URLs (http and https) when the printer is con-nected to the network. The URL is a combined value of theprinter’s IP address, Port number, and IPP printer name.
URL(Wi-Fi Direct) Displays IPP URLs (http and https) when the printer is con-nected by Wi-Fi Direct. The URL is a combined value of theprinter’s IP address, Port number, and IPP printer name.
Printer Name Displays the IPP printer name.
Location Displays the IPP location.
FTP Settings
Items Setting value and Description
Enable FTP Server Select to enable FTP printing. Only printers that support FTPprinting are displayed.
Communication Timeout (sec) Enter the timeout value for FTP communication between 0to 3,600 seconds. If you do not want to timeout, enter 0.
SNMPv1/v2c Settings
Items Setting value and Description
Enable SNMPv1/v2c Select to enable SNMPv1/v2c.
Access Authority Set the access authority when SNMPv1/v2c is enabled. Se-lect Read Only or Read/Write.
Community Name (Read Only) Enter 0 to 32 ASCII (0x20 to 0x7E) characters.
Community Name (Read/Write) Enter 0 to 32 ASCII (0x20 to 0x7E) characters.
SNMPv3 Settings
Items Setting value and Description
Enable SNMPv3 SNMPv3 is enabled when the box is checked.
User Name Enter between 1 and 32 characters using 1 byte characters.
Authentication Settings
Algorithm Select an algorithm for an authentication for SNMPv3.
Password Enter the password for an authentication for SNMPv3.
Enter between 8 and 32 characters in ASCII (0x20-0x7E). Ifyou do not specify this, leave it blank.
Confirm Password Enter the password you configured for confirmation.
Encryption Settings
Administrator Information > Advanced Security Settings > Controlling Using Protocols
433
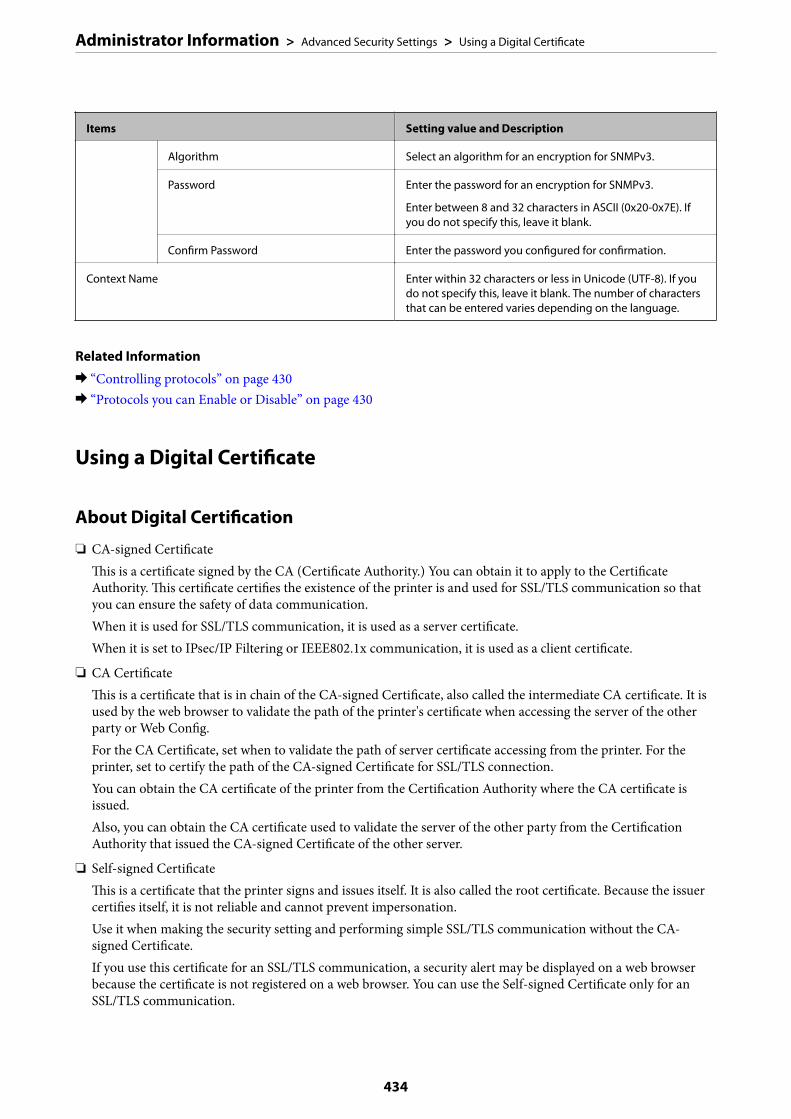
Items Setting value and Description
Algorithm Select an algorithm for an encryption for SNMPv3.
Password Enter the password for an encryption for SNMPv3.
Enter between 8 and 32 characters in ASCII (0x20-0x7E). Ifyou do not specify this, leave it blank.
Confirm Password Enter the password you configured for confirmation.
Context Name Enter within 32 characters or less in Unicode (UTF-8). If youdo not specify this, leave it blank. The number of charactersthat can be entered varies depending on the language.
Related Information
& “Controlling protocols” on page 430& “Protocols you can Enable or Disable” on page 430
Using a Digital Certificate
About Digital Certification
❏ CA-signed CertificateThis is a certificate signed by the CA (Certificate Authority.) You can obtain it to apply to the CertificateAuthority. This certificate certifies the existence of the printer is and used for SSL/TLS communication so thatyou can ensure the safety of data communication.When it is used for SSL/TLS communication, it is used as a server certificate.When it is set to IPsec/IP Filtering or IEEE802.1x communication, it is used as a client certificate.
❏ CA CertificateThis is a certificate that is in chain of the CA-signed Certificate, also called the intermediate CA certificate. It isused by the web browser to validate the path of the printer's certificate when accessing the server of the otherparty or Web Config.For the CA Certificate, set when to validate the path of server certificate accessing from the printer. For theprinter, set to certify the path of the CA-signed Certificate for SSL/TLS connection.You can obtain the CA certificate of the printer from the Certification Authority where the CA certificate isissued.Also, you can obtain the CA certificate used to validate the server of the other party from the CertificationAuthority that issued the CA-signed Certificate of the other server.
❏ Self-signed CertificateThis is a certificate that the printer signs and issues itself. It is also called the root certificate. Because the issuercertifies itself, it is not reliable and cannot prevent impersonation.Use it when making the security setting and performing simple SSL/TLS communication without the CA-signed Certificate.If you use this certificate for an SSL/TLS communication, a security alert may be displayed on a web browserbecause the certificate is not registered on a web browser. You can use the Self-signed Certificate only for anSSL/TLS communication.
Administrator Information > Advanced Security Settings > Using a Digital Certificate
434
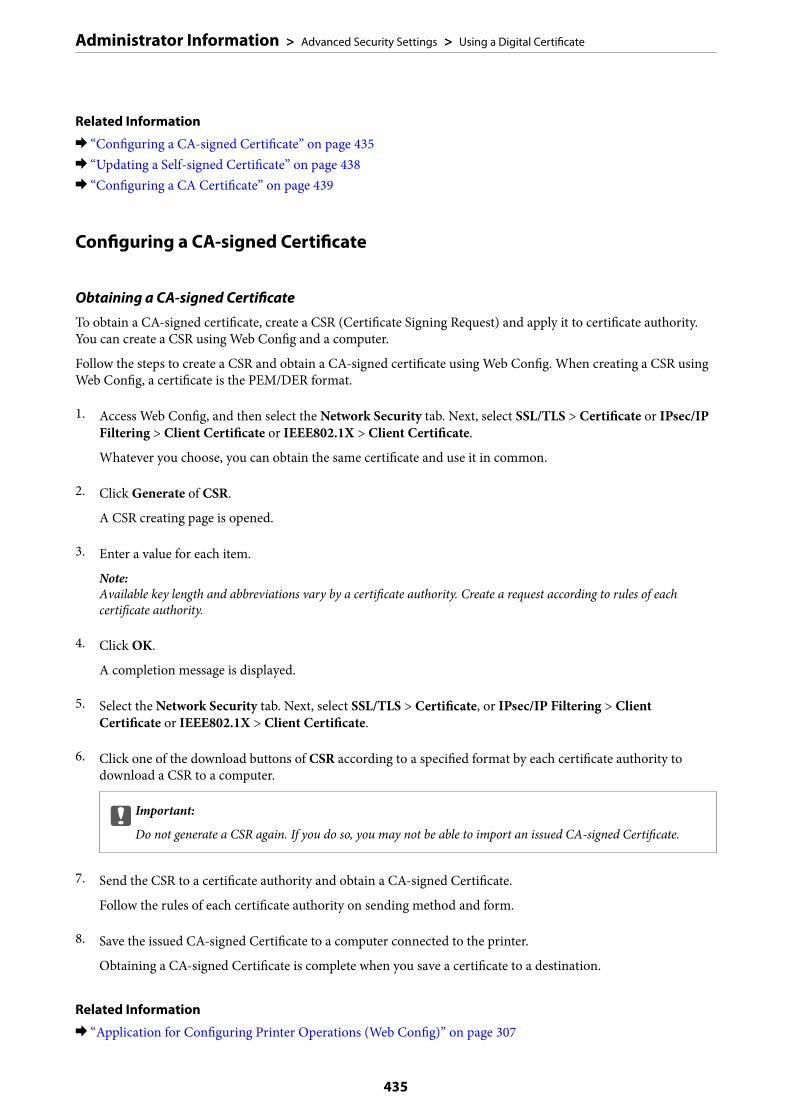
Related Information
& “Configuring a CA-signed Certificate” on page 435& “Updating a Self-signed Certificate” on page 438& “Configuring a CA Certificate” on page 439
Configuring a CA-signed Certificate
Obtaining a CA-signed Certificate
To obtain a CA-signed certificate, create a CSR (Certificate Signing Request) and apply it to certificate authority.You can create a CSR using Web Config and a computer.
Follow the steps to create a CSR and obtain a CA-signed certificate using Web Config. When creating a CSR usingWeb Config, a certificate is the PEM/DER format.
1. Access Web Config, and then select the Network Security tab. Next, select SSL/TLS > Certificate or IPsec/IPFiltering > Client Certificate or IEEE802.1X > Client Certificate.
Whatever you choose, you can obtain the same certificate and use it in common.
2. Click Generate of CSR.
A CSR creating page is opened.
3. Enter a value for each item.
Note:Available key length and abbreviations vary by a certificate authority. Create a request according to rules of eachcertificate authority.
4. Click OK.
A completion message is displayed.
5. Select the Network Security tab. Next, select SSL/TLS > Certificate, or IPsec/IP Filtering > ClientCertificate or IEEE802.1X > Client Certificate.
6. Click one of the download buttons of CSR according to a specified format by each certificate authority todownload a CSR to a computer.
cImportant:
Do not generate a CSR again. If you do so, you may not be able to import an issued CA-signed Certificate.
7. Send the CSR to a certificate authority and obtain a CA-signed Certificate.
Follow the rules of each certificate authority on sending method and form.
8. Save the issued CA-signed Certificate to a computer connected to the printer.
Obtaining a CA-signed Certificate is complete when you save a certificate to a destination.
Related Information
& “Application for Configuring Printer Operations (Web Config)” on page 307
Administrator Information > Advanced Security Settings > Using a Digital Certificate
435

CSR Setting Items
Items Settings and Explanation
Key Length Select a key length for a CSR.
Common Name You can enter between 1 and 128 characters. If this is an IP address, it should be astatic IP address. You can enter 1 to 5 IPv4 addresses, IPv6 addresses, host names,FQDNs by separating them with commas.
The first element is stored to the common name, and other elements are stored tothe alias field of the certificate subject.
Example:
Printer's IP address : 192.0.2.123, Printer name : EPSONA1B2C3
Common Name : EPSONA1B2C3,EPSONA1B2C3.local,192.0.2.123
Organization/ Organizational Unit/Locality/ State/Province
You can enter between 0 and 64 characters in ASCII (0x20-0x7E). You can dividedistinguished names with commas.
Country Enter a country code in two-digit number specified by ISO-3166.
Sender's Email Address You can enter the sender's email address for the mail server setting. Enter thesame email address as the Sender's Email Address for the Network tab > EmailServer > Basic.
Related Information
& “Obtaining a CA-signed Certificate” on page 435
Importing a CA-signed Certificate
Import the obtained CA-signed Certificate to the printer.
cImportant:
❏ Make sure that the printer’s date and time is set correctly. Certificate may be invalid.
❏ If you obtain a certificate using a CSR created from Web Config, you can import a certificate one time.
1. Access Web Config and then select the Network Security tab. Next, select SSL/TLS > Certificate, or IPsec/IPFiltering > Client Certificate or IEEE802.1X > Client Certificate.
2. Click Import
A certificate importing page is opened.
3. Enter a value for each item. Set CA Certificate 1 and CA Certificate 2 when verifying the path of thecertificate on the web browser that accesses the printer.
Depending on where you create a CSR and the file format of the certificate, required settings may vary. Entervalues to required items according to the following.
❏ A certificate of the PEM/DER format obtained from Web Config
❏ Private Key: Do not configure because the printer contains a private key.
❏ Password: Do not configure.
❏ CA Certificate 1/CA Certificate 2: Optional
Administrator Information > Advanced Security Settings > Using a Digital Certificate
436
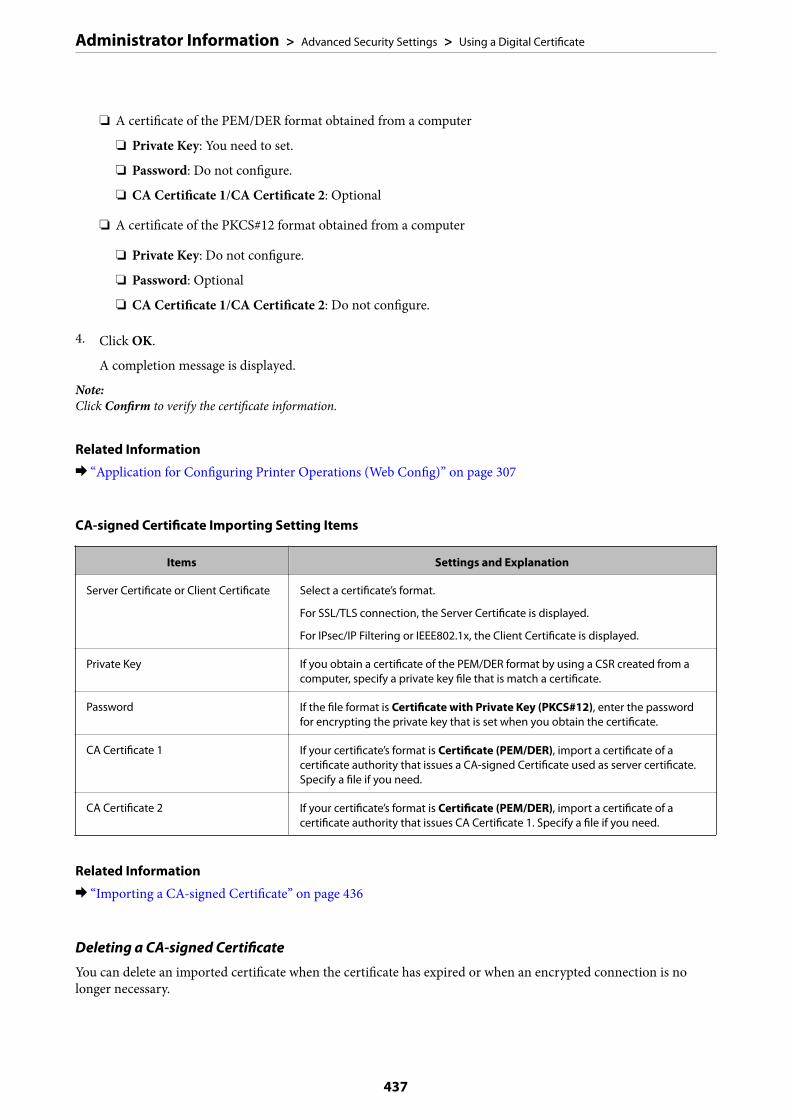
❏ A certificate of the PEM/DER format obtained from a computer
❏ Private Key: You need to set.
❏ Password: Do not configure.
❏ CA Certificate 1/CA Certificate 2: Optional
❏ A certificate of the PKCS#12 format obtained from a computer
❏ Private Key: Do not configure.
❏ Password: Optional
❏ CA Certificate 1/CA Certificate 2: Do not configure.
4. Click OK.
A completion message is displayed.
Note:Click Confirm to verify the certificate information.
Related Information
& “Application for Configuring Printer Operations (Web Config)” on page 307
CA-signed Certificate Importing Setting Items
Items Settings and Explanation
Server Certificate or Client Certificate Select a certificate’s format.
For SSL/TLS connection, the Server Certificate is displayed.
For IPsec/IP Filtering or IEEE802.1x, the Client Certificate is displayed.
Private Key If you obtain a certificate of the PEM/DER format by using a CSR created from acomputer, specify a private key file that is match a certificate.
Password If the file format is Certificate with Private Key (PKCS#12), enter the passwordfor encrypting the private key that is set when you obtain the certificate.
CA Certificate 1 If your certificate’s format is Certificate (PEM/DER), import a certificate of acertificate authority that issues a CA-signed Certificate used as server certificate.Specify a file if you need.
CA Certificate 2 If your certificate’s format is Certificate (PEM/DER), import a certificate of acertificate authority that issues CA Certificate 1. Specify a file if you need.
Related Information
& “Importing a CA-signed Certificate” on page 436
Deleting a CA-signed Certificate
You can delete an imported certificate when the certificate has expired or when an encrypted connection is nolonger necessary.
Administrator Information > Advanced Security Settings > Using a Digital Certificate
437
cImportant:
If you obtain a certificate using a CSR created from Web Config, you cannot import a deleted certificate again. Inthis case, create a CSR and obtain a certificate again.
1. Access Web Config, and then select the Network Security tab. Next, select SSL/TLS > Certificate or IPsec/IPFiltering > Client Certificate or IEEE802.1X > Client Certificate.
2. Click Delete.
3. Confirm that you want to delete the certificate in the message displayed.
Related Information
& “Application for Configuring Printer Operations (Web Config)” on page 307
Updating a Self-signed Certificate
Because the Self-signed Certificate is issued by the printer, you can update it when it has expired or when thecontent described changes.
1. Access Web Config and select the Network Security tab > SSL/TLS > Certificate.
2. Click Update.
3. Enter Common Name.
You can enter up to 5 IPv4 addresses, IPv6 addresses, host names, FQDNs between 1 to 128 characters andseparating them with commas. The first parameter is stored to the common name, and the others are stored tothe alias field for the subject of the certificate.
Example:
Printer's IP address : 192.0.2.123, Printer name : EPSONA1B2C3
Common name : EPSONA1B2C3,EPSONA1B2C3.local,192.0.2.123
4. Specify a validity period for the certificate.
5. Click Next.
A confirmation message is displayed.
6. Click OK.
The printer is updated.
Note:You can check the certificate information from Network Security tab > SSL/TLS > Certificate > Self-signed Certificateand click Confirm.
Related Information
& “Application for Configuring Printer Operations (Web Config)” on page 307
Administrator Information > Advanced Security Settings > Using a Digital Certificate
438
Configuring a CA Certificate
When you set the CA Certificate, you can validate the path to the CA certificate of the server that the printeraccesses. This can prevent impersonation.
You can obtain the CA Certificate from the Certification Authority where the CA-signed Certificate is issued.
Importing a CA Certificate
Import the CA Certificate to the printer.
1. Access Web Config and then select the Network Security tab > CA Certificate.
2. Click Import.
3. Specify the CA Certificate you want to import.
4. Click OK.
When importing is complete, you are returned to the CA Certificate screen, and the imported CA Certificate isdisplayed.
Related Information
& “Application for Configuring Printer Operations (Web Config)” on page 307
Deleting a CA Certificate
You can delete the imported CA Certificate.
1. Access Web Config and then select the Network Security tab > CA Certificate.
2. Click Delete next to the CA Certificate that you want to delete.
3. Confirm that you want to delete the certificate in the message displayed.
4. Click Reboot Network, and then check that the deleted CA Certificate is not listed on the updated screen.
Related Information
& “Application for Configuring Printer Operations (Web Config)” on page 307
SSL/TLS Communication with the PrinterWhen the server certificate is set using SSL/TLS (Secure Sockets Layer/Transport Layer Security) communicationto the printer, you can encrypt the communication path between computers. Do this if you want to prevent remoteand unauthorized access.
Administrator Information > Advanced Security Settings > SSL/TLS Communication with the Printer
439

Configuring Basic SSL/TLS Settings
If the printer supports the HTTPS server feature, you can use an SSL/TLS communication to encryptcommunications. You can configure and manage the printer using Web Config while ensuring security.
Configure encryption strength and redirect feature.
1. Access Web Config and select the Network Security tab > SSL/TLS > Basic.
2. Select a value for each item.
❏ Encryption StrengthSelect the level of encryption strength.
❏ Redirect HTTP to HTTPSRedirect to HTTPS when HTTP is accessed.
3. Click Next.
A confirmation message is displayed.
4. Click OK.
The printer is updated.
Related Information
& “Application for Configuring Printer Operations (Web Config)” on page 307
Configuring a Server Certificate for the Printer
1. Access Web Config and select the Network Security tab > SSL/TLS > Certificate.
2. Specify a certificate to use on Server Certificate.
❏ Self-signed CertificateA self-signed certificate has been generated by the printer. If you do not obtain a CA-signed certificate,select this.
❏ CA-signed CertificateIf you obtain and import a CA-signed certificate in advance, you can specify this.
3. Click Next.
A confirmation message is displayed.
4. Click OK.
The printer is updated.
Related Information
& “Application for Configuring Printer Operations (Web Config)” on page 307& “Configuring a CA-signed Certificate” on page 435& “Updating a Self-signed Certificate” on page 438
Administrator Information > Advanced Security Settings > SSL/TLS Communication with the Printer
440
Encrypted Communication Using IPsec/IP Filtering
About IPsec/IP Filtering
You can filter traffic based on IP addresses, services, and port by using IPsec/IP Filtering function. By combining ofthe filtering, you can configure the printer to accept or block specified clients and specified data. Additionally, youcan improve security level by using an IPsec.
Note:Computers that run Windows Vista or later or Windows Server 2008 or later support IPsec.
Configuring Default Policy
To filter traffic, configure the default policy. The default policy applies to every user or group connecting to theprinter. For more fine-grained control over users and groups of users, configure group policies.
1. Access Web Config and then select the Network Security tab > IPsec/IP Filtering > Basic.
2. Enter a value for each item.
3. Click Next.
A confirmation message is displayed.
4. Click OK.
The printer is updated.
Related Information
& “Application for Configuring Printer Operations (Web Config)” on page 307
Default Policy Setting Items
Default Policy
Items Settings and Explanation
IPsec/IP Filtering You can enable or disable an IPsec/IP Filtering feature.
❏ Access ControlConfigure a control method for traffic of IP packets.
Items Settings and Explanation
Permit Access Select this to permit configured IP packets to pass through.
Refuse Access Select this to refuse configured IP packets to pass through.
IPsec Select this to permit configured IPsec packets to pass through.
Administrator Information > Advanced Security Settings > Encrypted Communication Using IPsec/IP Filtering
441

❏ IKE VersionSelect IKEv1 or IKEv2 for IKE Version. Select one of them according to the device that the printer is connectedto.
❏ IKEv1The following items are displayed when you select IKEv1 for IKE Version.
Items Settings and Explanation
Authentication Method To select Certificate, you need to obtain and import a CA-signed certificate in advance.
Pre-Shared Key If you select Pre-Shared Key for Authentication Method, enter a pre-shared keybetween 1 and 127 characters.
Confirm Pre-Shared Key Enter the key you configured for confirmation.
❏ IKEv2The following items are displayed when you select IKEv2 for IKE Version.
Items Settings and Explanation
Local Authentication Method To select Certificate, you need to obtain and import a CA-signed certificate inadvance.
ID Type If you select Pre-Shared Key for Authentication Method, select the type ofID for the printer.
ID Enter the printer's ID that matches the type of ID.
You cannot use "@", "#", and "=" for the first character.
Distinguished Name : Enter 1 to 255 1-byte ASCII (0x20 to 0x7E) characters.You need to include "=".
IP Address : Enter IPv4 or IPv6 format.
FQDN : Enter a combination of between 1 and 255 characters using A-Z, a-z,0-9, "-", and period (.).
Email Address : Enter 1 to 255 1-byte ASCII (0x20 to 0x7E) characters. Youneed to include "@".
Key ID : Enter 1 to 255 1-byte ASCII (0x20 to 0x7E) characters.
Pre-Shared Key If you select Pre-Shared Key for Authentication Method, enter a pre-sharedkey between 1 and 127 characters.
Confirm Pre-SharedKey
Enter the key you configured for confirmation.
Administrator Information > Advanced Security Settings > Encrypted Communication Using IPsec/IP Filtering
442
Items Settings and Explanation
Remote Authentication Method To select Certificate, you need to obtain and import a CA-signed certificate inadvance.
ID Type If you select Pre-Shared Key for Authentication Method, select the type ofID for the device that you want to authenticate.
ID Enter the printer's ID that matches to the type of ID.
You cannot use "@", "#", and "=" for the first character.
Distinguished Name : Enter 1 to 255 1-byte ASCII (0x20 to 0x7E) characters.You need to include "=".
IP Address : Enter IPv4 or IPv6 format.
FQDN : Enter a combination of between 1 and 255 characters using A-Z, a-z,0-9, "-", and period (.).
Email Address : Enter 1 to 255 1-byte ASCII (0x20 to 0x7E) characters. Youneed to include "@".
Key ID : Enter 1 to 255 1-byte ASCII (0x20 to 0x7E) characters.
Pre-Shared Key If you select Pre-Shared Key for Authentication Method, enter a pre-sharedkey between 1 and 127 characters.
Confirm Pre-SharedKey
Enter the key you configured for confirmation.
❏ EncapsulationIf you select IPsec for Access Control, you need to configure an encapsulation mode.
Items Settings and Explanation
Transport Mode If you only use the printer on the same LAN, select this. IP packets of layer 4 or later areencrypted.
Tunnel Mode If you use the printer on the Internet-capable network such as IPsec-VPN, select thisoption. The header and data of the IP packets are encrypted.
Remote Gateway(Tunnel Mode): If you select Tunnel Mode for Encapsulation, enter agateway address between 1 and 39 characters.
❏ Security ProtocolIf you select IPsec for Access Control, select an option.
Items Settings and Explanation
ESP Select this to ensure the integrity of an authentication and data, and encrypt data.
AH Select this to ensure the integrity of an authentication and data. Even if encrypting data isprohibited, you can use IPsec.
Administrator Information > Advanced Security Settings > Encrypted Communication Using IPsec/IP Filtering
443

❏ Algorithm SettingsIt is recommended that you select Any for all settings or select an item other than Any for each setting. If youselect Any for some of the settings and select an item other than Any for the other settings, the device may notcommunicate depending on the other device that you want to authenticate.
Items Settings and Explanation
IKE Encryption Select the encryption algorithm for IKE.
The items vary depending on the version of IKE.
Authentication Select the authentication algorithm for IKE.
Key Exchange Select the key exchange algorithm for IKE.
The items vary depending on the version of IKE.
ESP Encryption Select the encryption algorithm for ESP.
This is available when ESP is selected for Security Protocol.
Authentication Select the authentication algorithm for ESP.
This is available when ESP is selected for Security Protocol.
AH Authentication Select the encryption algorithm for AH.
This is available when AH is selected for Security Protocol.
Related Information
& “Configuring Default Policy” on page 441
Configuring Group Policy
A group policy is one or more rules applied to a user or user group. The printer controls IP packets that match withconfigured policies. IP packets are authenticated in the order of a group policy 1 to 10 then a default policy.
1. Access Web Config and then select the Network Security tab > IPsec/IP Filtering > Basic.
2. Click a numbered tab you want to configure.
3. Enter a value for each item.
4. Click Next.
A confirmation message is displayed.
5. Click OK.
The printer is updated.
Related Information
& “Application for Configuring Printer Operations (Web Config)” on page 307
Administrator Information > Advanced Security Settings > Encrypted Communication Using IPsec/IP Filtering
444

Group Policy Setting Items
Items Settings and Explanation
Enable this Group Policy You can enable or disable a group policy.
Access Control
Configure a control method for traffic of IP packets.
Items Settings and Explanation
Permit Access Select this to permit configured IP packets to pass through.
Refuse Access Select this to refuse configured IP packets to pass through.
IPsec Select this to permit configured IPsec packets to pass through.
Local Address(Printer)
Select an IPv4 address or IPv6 address that matches your network environment. If an IP address is assignedautomatically, you can select Use auto-obtained IPv4 address.
Note:If an IPv6 address is assigned automatically, the connection may be unavailable. Configure a static IPv6 address.
Remote Address(Host)
Enter a device's IP address to control access. The IP address must be 43 characters or less. If you do not enter an IPaddress, all addresses are controlled.
Note:If an IP address is assigned automatically (e.g. assigned by DHCP), the connection may be unavailable. Configure a static IPaddress.
Method of Choosing Port
Select a method to specify ports.
❏ Service NameIf you select Service Name for Method of Choosing Port, select an option.
❏ Transport ProtocolIf you select Port Number for Method of Choosing Port, you need to configure an encapsulation mode.
Items Settings and Explanation
Any Protocol Select this to control all protocol types.
TCP Select this to control data for unicast.
UDP Select this to control data for broadcast and multicast.
ICMPv4 Select this to control ping command.
Administrator Information > Advanced Security Settings > Encrypted Communication Using IPsec/IP Filtering
445
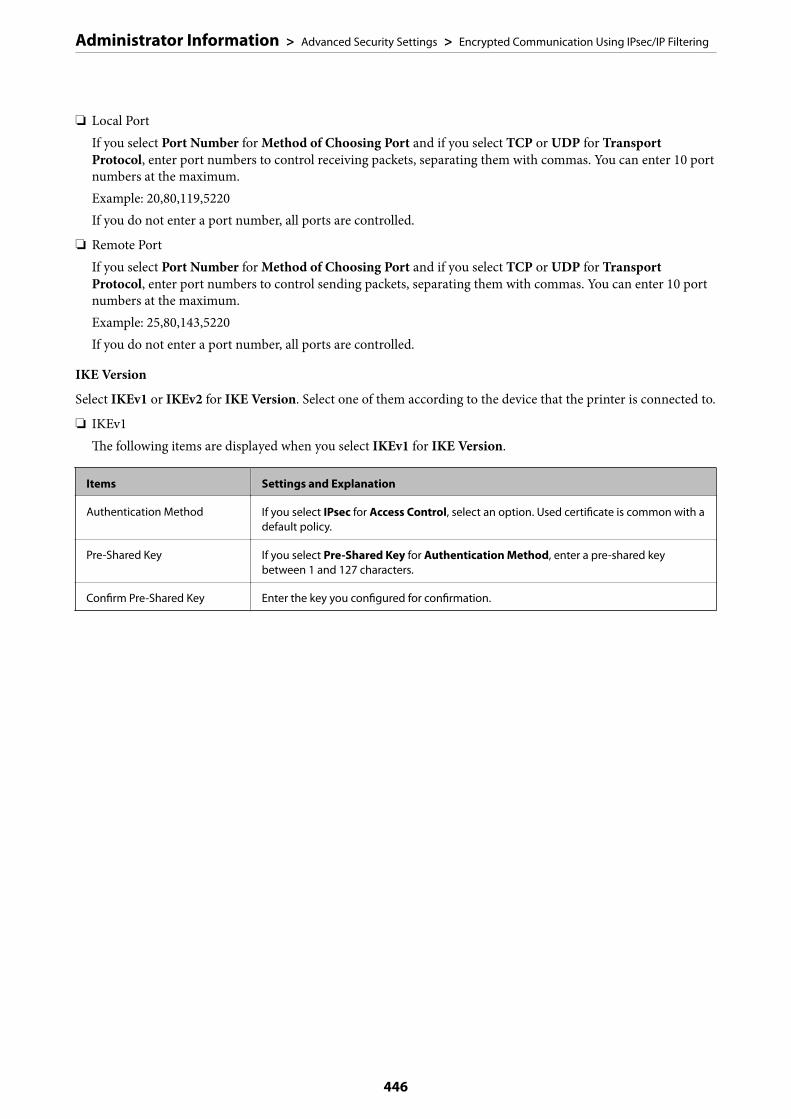
❏ Local PortIf you select Port Number for Method of Choosing Port and if you select TCP or UDP for TransportProtocol, enter port numbers to control receiving packets, separating them with commas. You can enter 10 portnumbers at the maximum.Example: 20,80,119,5220If you do not enter a port number, all ports are controlled.
❏ Remote PortIf you select Port Number for Method of Choosing Port and if you select TCP or UDP for TransportProtocol, enter port numbers to control sending packets, separating them with commas. You can enter 10 portnumbers at the maximum.Example: 25,80,143,5220If you do not enter a port number, all ports are controlled.
IKE Version
Select IKEv1 or IKEv2 for IKE Version. Select one of them according to the device that the printer is connected to.
❏ IKEv1The following items are displayed when you select IKEv1 for IKE Version.
Items Settings and Explanation
Authentication Method If you select IPsec for Access Control, select an option. Used certificate is common with adefault policy.
Pre-Shared Key If you select Pre-Shared Key for Authentication Method, enter a pre-shared keybetween 1 and 127 characters.
Confirm Pre-Shared Key Enter the key you configured for confirmation.
Administrator Information > Advanced Security Settings > Encrypted Communication Using IPsec/IP Filtering
446

❏ IKEv2The following items are displayed when you select IKEv2 for IKE Version.
Items Settings and Explanation
Local Authentication Method If you select IPsec for Access Control, select an option. Used certificate iscommon with a default policy.
ID Type If you select Pre-Shared Key for Authentication Method, select the type ofID for the printer.
ID Enter the printer's ID that matches the type of ID.
You cannot use "@", "#", and "=" for the first character.
Distinguished Name : Enter 1 to 255 1-byte ASCII (0x20 to 0x7E) characters.You need to include "=".
IP Address : Enter IPv4 or IPv6 format.
FQDN : Enter a combination of between 1 and 255 characters using A-Z, a-z,0-9, "-", and period (.).
Email Address : Enter 1 to 255 1-byte ASCII (0x20 to 0x7E) characters. Youneed to include "@".
Key ID : Enter 1 to 255 1-byte ASCII (0x20 to 0x7E) characters.
Pre-Shared Key If you select Pre-Shared Key for Authentication Method, enter a pre-sharedkey between 1 and 127 characters.
Confirm Pre-SharedKey
Enter the key you configured for confirmation.
Remote Authentication Method If you select IPsec for Access Control, select an option. Used certificate iscommon with a default policy.
ID Type If you select Pre-Shared Key for Authentication Method, select the type ofID for the device that you want to authenticate.
ID Enter the printer's ID that matches to the type of ID.
You cannot use "@", "#", and "=" for the first character.
Distinguished Name : Enter 1 to 255 1-byte ASCII (0x20 to 0x7E) characters.You need to include "=".
IP Address : Enter IPv4 or IPv6 format.
FQDN : Enter a combination of between 1 and 255 characters using A-Z, a-z,0-9, "-", and period (.).
Email Address : Enter 1 to 255 1-byte ASCII (0x20 to 0x7E) characters. Youneed to include "@".
Key ID : Enter 1 to 255 1-byte ASCII (0x20 to 0x7E) characters.
Pre-Shared Key If you select Pre-Shared Key for Authentication Method, enter a pre-sharedkey between 1 and 127 characters.
Confirm Pre-SharedKey
Enter the key you configured for confirmation.
Encapsulation
If you select IPsec for Access Control, you need to configure an encapsulation mode.
Administrator Information > Advanced Security Settings > Encrypted Communication Using IPsec/IP Filtering
447

Items Settings and Explanation
Transport Mode If you only use the printer on the same LAN, select this. IP packets of layer 4 or later areencrypted.
Tunnel Mode If you use the printer on the Internet-capable network such as IPsec-VPN, select thisoption. The header and data of the IP packets are encrypted.
Remote Gateway(Tunnel Mode): If you select Tunnel Mode for Encapsulation, enter agateway address between 1 and 39 characters.
Security Protocol
If you select IPsec for Access Control, select an option.
Items Settings and Explanation
ESP Select this to ensure the integrity of an authentication and data, and encrypt data.
AH Select this to ensure the integrity of an authentication and data. Even if encrypting data isprohibited, you can use IPsec.
Algorithm Settings
It is recommended that you select Any for all settings or select an item other than Any for each setting. If youselect Any for some of the settings and select an item other than Any for the other settings, the device may notcommunicate depending on the other device that you want to authenticate.
Items Settings and Explanation
IKE Encryption Select the encryption algorithm for IKE.
The items vary depending on the version of IKE.
Authentication Select the authentication algorithm for IKE.
Key Exchange Select the key exchange algorithm for IKE.
The items vary depending on the version of IKE.
ESP Encryption Select the encryption algorithm for ESP.
This is available when ESP is selected for Security Protocol.
Authentication Select the authentication algorithm for ESP.
This is available when ESP is selected for Security Protocol.
AH Authentication Select the encryption algorithm for AH.
This is available when AH is selected for Security Protocol.
Related Information
& “Configuring Group Policy” on page 444& “Combination of Local Address(Printer) and Remote Address(Host) on Group Policy” on page 449& “References of Service Name on Group Policy” on page 449
Administrator Information > Advanced Security Settings > Encrypted Communication Using IPsec/IP Filtering
448
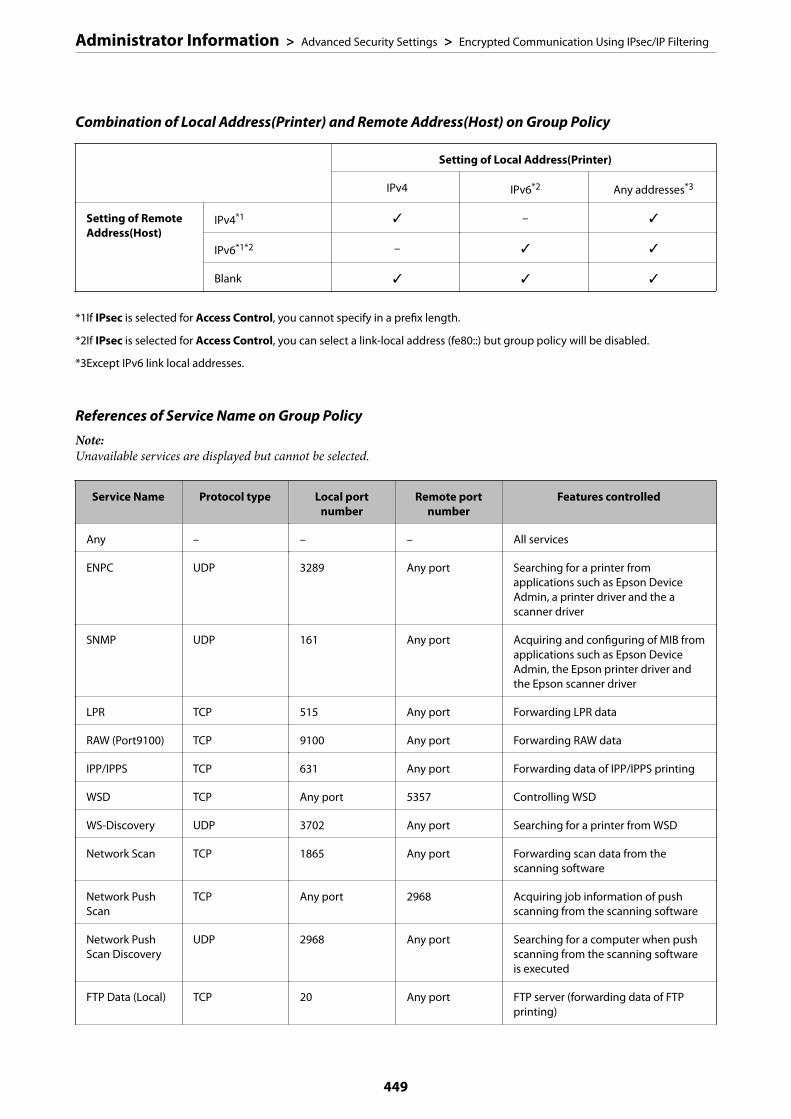
Combination of Local Address(Printer) and Remote Address(Host) on Group Policy
Setting of Local Address(Printer)
IPv4 IPv6*2 Any addresses*3
Setting of RemoteAddress(Host)
IPv4*1 ✓ – ✓
IPv6*1*2 – ✓ ✓
Blank ✓ ✓ ✓
*1If IPsec is selected for Access Control, you cannot specify in a prefix length.
*2If IPsec is selected for Access Control, you can select a link-local address (fe80::) but group policy will be disabled.
*3Except IPv6 link local addresses.
References of Service Name on Group Policy
Note:Unavailable services are displayed but cannot be selected.
Service Name Protocol type Local portnumber
Remote portnumber
Features controlled
Any – – – All services
ENPC UDP 3289 Any port Searching for a printer fromapplications such as Epson DeviceAdmin, a printer driver and the ascanner driver
SNMP UDP 161 Any port Acquiring and configuring of MIB fromapplications such as Epson DeviceAdmin, the Epson printer driver andthe Epson scanner driver
LPR TCP 515 Any port Forwarding LPR data
RAW (Port9100) TCP 9100 Any port Forwarding RAW data
IPP/IPPS TCP 631 Any port Forwarding data of IPP/IPPS printing
WSD TCP Any port 5357 Controlling WSD
WS-Discovery UDP 3702 Any port Searching for a printer from WSD
Network Scan TCP 1865 Any port Forwarding scan data from thescanning software
Network PushScan
TCP Any port 2968 Acquiring job information of pushscanning from the scanning software
Network PushScan Discovery
UDP 2968 Any port Searching for a computer when pushscanning from the scanning softwareis executed
FTP Data (Local) TCP 20 Any port FTP server (forwarding data of FTPprinting)
Administrator Information > Advanced Security Settings > Encrypted Communication Using IPsec/IP Filtering
449
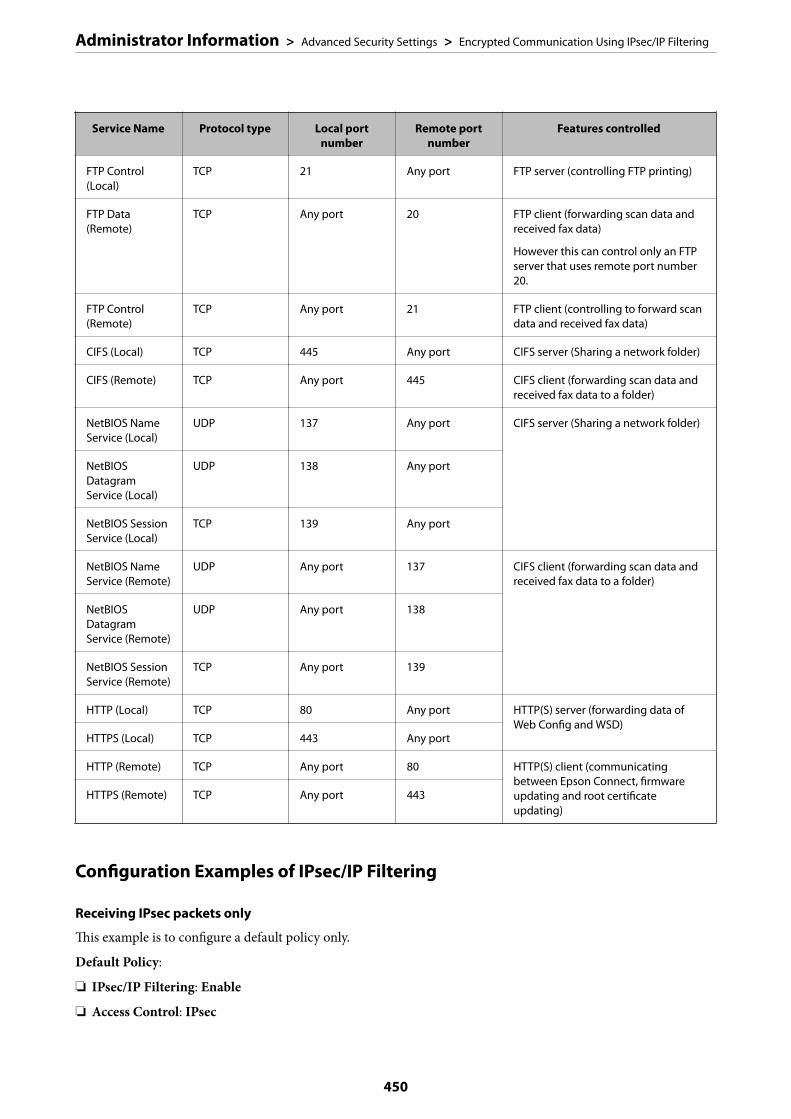
Service Name Protocol type Local portnumber
Remote portnumber
Features controlled
FTP Control(Local)
TCP 21 Any port FTP server (controlling FTP printing)
FTP Data(Remote)
TCP Any port 20 FTP client (forwarding scan data andreceived fax data)
However this can control only an FTPserver that uses remote port number20.
FTP Control(Remote)
TCP Any port 21 FTP client (controlling to forward scandata and received fax data)
CIFS (Local) TCP 445 Any port CIFS server (Sharing a network folder)
CIFS (Remote) TCP Any port 445 CIFS client (forwarding scan data andreceived fax data to a folder)
NetBIOS NameService (Local)
UDP 137 Any port CIFS server (Sharing a network folder)
NetBIOSDatagramService (Local)
UDP 138 Any port
NetBIOS SessionService (Local)
TCP 139 Any port
NetBIOS NameService (Remote)
UDP Any port 137 CIFS client (forwarding scan data andreceived fax data to a folder)
NetBIOSDatagramService (Remote)
UDP Any port 138
NetBIOS SessionService (Remote)
TCP Any port 139
HTTP (Local) TCP 80 Any port HTTP(S) server (forwarding data ofWeb Config and WSD)
HTTPS (Local) TCP 443 Any port
HTTP (Remote) TCP Any port 80 HTTP(S) client (communicatingbetween Epson Connect, firmwareupdating and root certificateupdating)
HTTPS (Remote) TCP Any port 443
Configuration Examples of IPsec/IP Filtering
Receiving IPsec packets only
This example is to configure a default policy only.
Default Policy:
❏ IPsec/IP Filtering: Enable
❏ Access Control: IPsec
Administrator Information > Advanced Security Settings > Encrypted Communication Using IPsec/IP Filtering
450
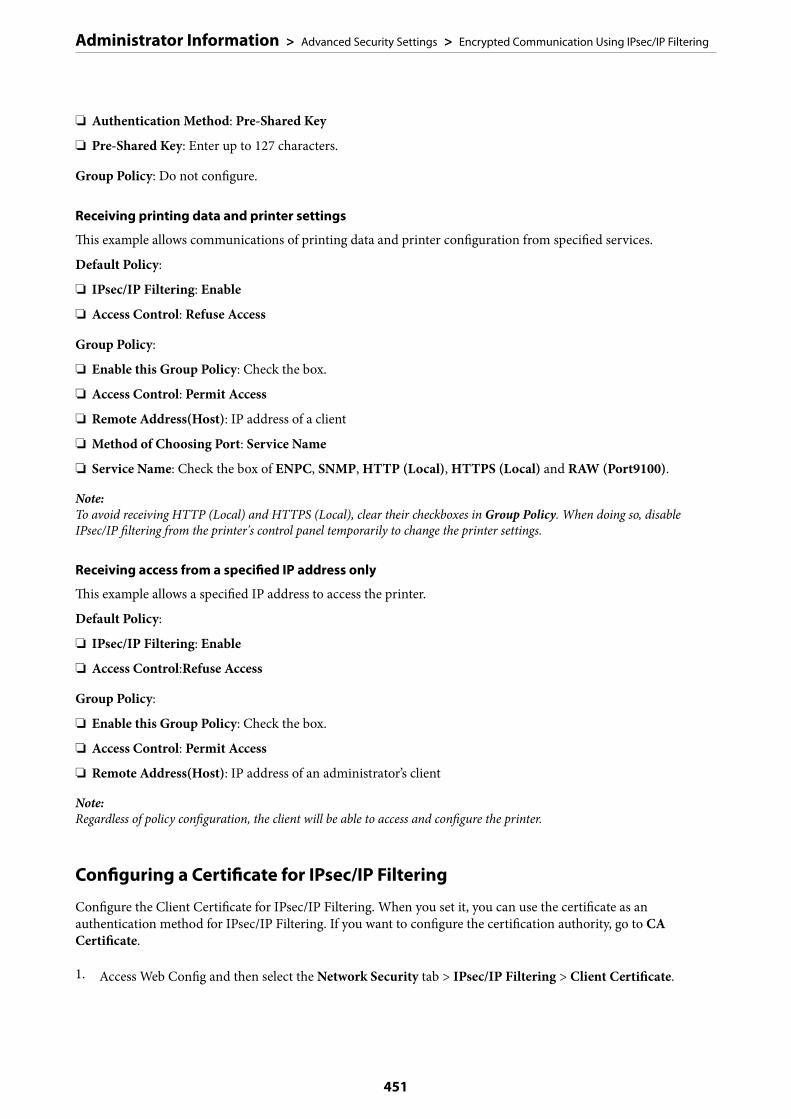
❏ Authentication Method: Pre-Shared Key
❏ Pre-Shared Key: Enter up to 127 characters.
Group Policy: Do not configure.
Receiving printing data and printer settings
This example allows communications of printing data and printer configuration from specified services.
Default Policy:
❏ IPsec/IP Filtering: Enable
❏ Access Control: Refuse Access
Group Policy:
❏ Enable this Group Policy: Check the box.
❏ Access Control: Permit Access
❏ Remote Address(Host): IP address of a client
❏ Method of Choosing Port: Service Name
❏ Service Name: Check the box of ENPC, SNMP, HTTP (Local), HTTPS (Local) and RAW (Port9100).
Note:To avoid receiving HTTP (Local) and HTTPS (Local), clear their checkboxes in Group Policy. When doing so, disableIPsec/IP filtering from the printer's control panel temporarily to change the printer settings.
Receiving access from a specified IP address only
This example allows a specified IP address to access the printer.
Default Policy:
❏ IPsec/IP Filtering: Enable
❏ Access Control:Refuse Access
Group Policy:
❏ Enable this Group Policy: Check the box.
❏ Access Control: Permit Access
❏ Remote Address(Host): IP address of an administrator’s client
Note:Regardless of policy configuration, the client will be able to access and configure the printer.
Configuring a Certificate for IPsec/IP Filtering
Configure the Client Certificate for IPsec/IP Filtering. When you set it, you can use the certificate as anauthentication method for IPsec/IP Filtering. If you want to configure the certification authority, go to CACertificate.
1. Access Web Config and then select the Network Security tab > IPsec/IP Filtering > Client Certificate.
Administrator Information > Advanced Security Settings > Encrypted Communication Using IPsec/IP Filtering
451

2. Import the certificate in Client Certificate.
If you have already imported a certificate published by a Certification Authority, you can copy the certificateand use it in IPsec/IP Filtering. To copy, select the certificate from Copy From, and then click Copy.
Related Information
& “Application for Configuring Printer Operations (Web Config)” on page 307& “Configuring a CA-signed Certificate” on page 435& “Configuring a CA Certificate” on page 439
Connecting the Printer to an IEEE802.1X Network
Configuring an IEEE802.1X Network
When you set IEEE802.1X to the printer, you can use it on the network connected to a RADIUS server, a LANswitch with authentication function, or an access point.
1. Access Web Config and then select the Network Security tab > IEEE802.1X > Basic.
2. Enter a value for each item.
If you want to use the printer on a Wi-Fi network, click Wi-Fi Setup and select or enter an SSID.
Note:You can share settings between Ethernet and Wi-Fi.
3. Click Next.
A confirmation message is displayed.
4. Click OK.
The printer is updated.
Related Information
& “Application for Configuring Printer Operations (Web Config)” on page 307
IEEE802.1X Network Setting Items
Items Settings and Explanation
IEEE802.1X (Wired LAN) You can enable or disable settings of the page (IEEE802.1X > Basic) for IEEE802.1X (WiredLAN).
IEEE802.1X (Wi-Fi) The connection status of IEEE802.1X (Wi-Fi) is displayed.
Connection Method The connection method of a current network is displayed.
Administrator Information > Advanced Security Settings > Connecting the Printer to an IEEE802.1X Network
452

Items Settings and Explanation
EAP Type Select an option for an authentication method between the printer and a RADIUS server.
EAP-TLS You need to obtain and import a CA-signed certificate.
PEAP-TLS
EAP-TTLS You need to configure a password.
PEAP/MSCHAPv2
User ID Configure an ID to use for an authentication of a RADIUS server.
Enter 1 to 128 1-byte ASCII (0x20 to 0x7E) characters.
Password Configure a password to authenticate the printer.
Enter 1 to 128 1-byte ASCII (0x20 to 0x7E) characters. If you are using a Windows server as aRADIUS server, you can enter up to 127 characters.
Confirm Password Enter the password you configured for confirmation.
Server ID You can configure a server ID to authenticate with a specified RADIUS server. Authenticatorverifies whether a server ID is contained in the subject/subjectAltName field of a servercertificate that is sent from a RADIUS server or not.
Enter 0 to 128 1-byte ASCII (0x20 to 0x7E) characters.
Certificate Validation You can set certificate validation regardless of the authentication method. Import thecertificate in CA Certificate.
Anonymous Name If you select PEAP-TLS, EAP-TTLS or PEAP/MSCHAPv2 for EAP Type, you can configure ananonymous name instead of a user ID for a phase 1 of a PEAP authentication.
Enter 0 to 128 1-byte ASCII (0x20 to 0x7E) characters.
Encryption Strength You can select one of the followings.
High AES256/3DES
Middle AES256/3DES/AES128/RC4
Related Information
& “Configuring an IEEE802.1X Network” on page 452
Configuring a Certificate for IEEE802.1X
Configure the Client Certificate for IEEE802.1X. When you set it, you can use EAP-TLS and PEAP-TLS as anauthentication method of IEEE802.1x. If you want to configure the certification authority certificate, go to CACertificate.
1. Access Web Config and then select the Network Security tab > IEEE802.1X > Client Certificate.
2. Enter a certificate in the Client Certificate.
If you have already imported a certificate published by a Certification Authority, you can copy the certificateand use it in IEEE802.1X. To copy, select the certificate from Copy From, and then click Copy.
Administrator Information > Advanced Security Settings > Connecting the Printer to an IEEE802.1X Network
453

Related Information
& “Application for Configuring Printer Operations (Web Config)” on page 307& “Configuring a CA-signed Certificate” on page 435& “Configuring a CA Certificate” on page 439
Checking IEEE802.1X Network Status
You can check the IEEE802.1X status by printing a network status sheet.
Status ID IEEE802.1X Status
Disable IEEE802.1X feature is disable.
EAP Success IEEE802.1X authentication has succeeded and network connection is available.
Authenticating IEEE802.1X authentication has not been completed.
Config Error Authentication has failed since the user ID has not been set.
Client Certificate Error Authentication has failed since the client certificate is out of date.
Timeout Error Authentication has failed since there is no answer from the RADIUS server and/orauthenticator.
User ID Error Authentication has failed since the printer's user ID and/or certificate protocol isincorrect.
Server ID Error Authentication has failed since the server ID of the server certificate and theserver's ID do not match.
Server Certificate Error Authentication has failed since there are the following errors in the servercertificate.
❏ The server certificate is out of date.
❏ The chain of the server certificate is incorrect.
CA Certificate Error Authentication has failed since there are the following errors in a CA certificate.
❏ Specified CA certificate is incorrect.
❏ The correct CA certificate is not imported.
❏ CA certificate is out of date.
EAP Failure Authentication has failed since there are the following errors in the printersettings.
❏ If EAP Type is EAP-TLS or PEAP-TLS, client certificate is incorrect or hascertain problems.
❏ If EAP Type is EAP-TTLS or PEAP/MSCHAPv2, user ID or password is notcorrect.
Related Information
& “Printing a Network Status Sheet” on page 292
Administrator Information > Advanced Security Settings > Connecting the Printer to an IEEE802.1X Network
454

Solving Problems for Advanced Security
Restoring the Security Settings
When you establish a highly secure environment such as IPsec/IP Filtering or IEEE802.1X, you may not be able tocommunicate with devices because of incorrect settings or trouble with the device or server. In this case, restorethe security settings in order to make settings for the device again or to allow you temporary use.
Disabling the Security Function Using the Control Panel
You can disable IPsec/IP Filtering or IEEE802.1X using the printer's control panel.
1. Select Settings > General Settings > Network Settings.
2. Select Advanced.
3. Select from the following items that you want to disable.
❏ Disable IPsec/IP Filtering
❏ Disable IEEE802.1X
4. Select Start Setup on the confirmation screen.
Problems Using Network Security Features
Forgot a Pre–shared Key
Re-configure a pre-shared key.
To change the key, access Web Config and select the Network Security tab > IPsec/IP Filtering > Basic > DefaultPolicy or Group Policy.
When you change the pre-shared key, configure the pre-shared key for computers.
Related Information
& “Application for Configuring Printer Operations (Web Config)” on page 307& “Encrypted Communication Using IPsec/IP Filtering” on page 441
Cannot Communicate with IPsec Communication
Specify the algorithm that the printer or the computer does not support.
The printer supports the following algorithms. Check the settings of the computer.
Security Methods Algorithms
IKE encryption algorithm AES-CBC-128, AES-CBC-192, AES-CBC-256, AES-GCM-128*, AES-GCM-192*,AES-GCM-256*, 3DES
Administrator Information > Advanced Security Settings > Solving Problems for Advanced Security
455
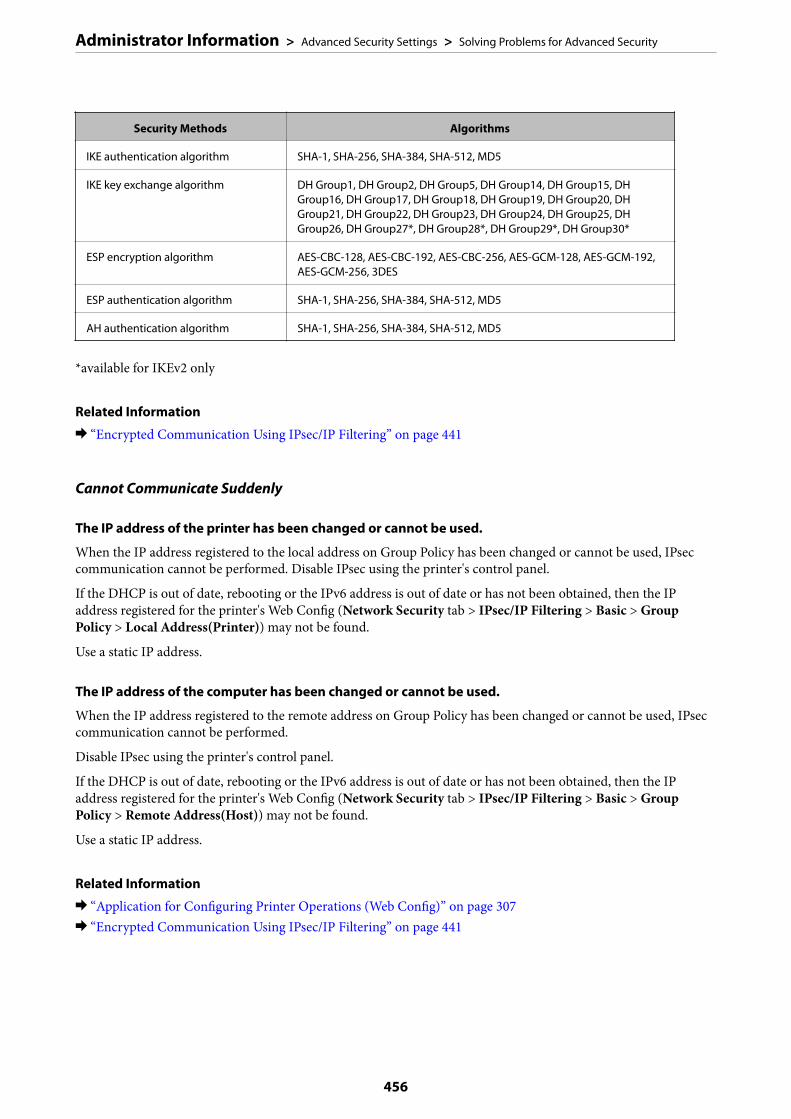
Security Methods Algorithms
IKE authentication algorithm SHA-1, SHA-256, SHA-384, SHA-512, MD5
IKE key exchange algorithm DH Group1, DH Group2, DH Group5, DH Group14, DH Group15, DHGroup16, DH Group17, DH Group18, DH Group19, DH Group20, DHGroup21, DH Group22, DH Group23, DH Group24, DH Group25, DHGroup26, DH Group27*, DH Group28*, DH Group29*, DH Group30*
ESP encryption algorithm AES-CBC-128, AES-CBC-192, AES-CBC-256, AES-GCM-128, AES-GCM-192,AES-GCM-256, 3DES
ESP authentication algorithm SHA-1, SHA-256, SHA-384, SHA-512, MD5
AH authentication algorithm SHA-1, SHA-256, SHA-384, SHA-512, MD5
*available for IKEv2 only
Related Information
& “Encrypted Communication Using IPsec/IP Filtering” on page 441
Cannot Communicate Suddenly
The IP address of the printer has been changed or cannot be used.
When the IP address registered to the local address on Group Policy has been changed or cannot be used, IPseccommunication cannot be performed. Disable IPsec using the printer's control panel.
If the DHCP is out of date, rebooting or the IPv6 address is out of date or has not been obtained, then the IPaddress registered for the printer's Web Config (Network Security tab > IPsec/IP Filtering > Basic > GroupPolicy > Local Address(Printer)) may not be found.
Use a static IP address.
The IP address of the computer has been changed or cannot be used.
When the IP address registered to the remote address on Group Policy has been changed or cannot be used, IPseccommunication cannot be performed.
Disable IPsec using the printer's control panel.
If the DHCP is out of date, rebooting or the IPv6 address is out of date or has not been obtained, then the IPaddress registered for the printer's Web Config (Network Security tab > IPsec/IP Filtering > Basic > GroupPolicy > Remote Address(Host)) may not be found.
Use a static IP address.
Related Information
& “Application for Configuring Printer Operations (Web Config)” on page 307& “Encrypted Communication Using IPsec/IP Filtering” on page 441
Administrator Information > Advanced Security Settings > Solving Problems for Advanced Security
456
Cannot Create the Secure IPP Printing Port
The correct certificate is not specified as the server certificate for SSL/TLS communication.
If the specified certificate is not correct, creating a port may fail. Make sure you are using the correct certificate.
The CA certificate is not imported to the computer accessing the printer.
If a CA certificate is not imported to the computer, creating a port may fail. Make sure a CA certificate is imported.
Related Information
& “Configuring a Server Certificate for the Printer” on page 440
Cannot Connect After Configuring IPsec/IP Filtering
The settings of IPsec/IP Filtering are incorrect.
Disable IPsec/IP filtering from the printer’s control panel. Connect the printer and computer and make theIPsec/IP Filtering settings again.
Related Information
& “Encrypted Communication Using IPsec/IP Filtering” on page 441
Cannot Access the Printer or Scanner after Configuring IEEE802.1X
The settings of IEEE802.1X are incorrect.
Disable IEEE802.1X and Wi-Fi from the printer’s control panel. Connect the printer and a computer, and thenconfigure IEEE802.1X again.
Related Information
& “Configuring an IEEE802.1X Network” on page 452
Problems on Using a Digital Certificate
Cannot Import a CA-signed Certificate
CA-signed Certificate and the information on the CSR do not match.
If the CA-signed Certificate and CSR do not have the same information, the CSR cannot be imported. Check thefollowing:
❏ Are you trying to import the certificate to a device that does not have the same information?Check the information of the CSR and then import the certificate to a device that has the same information.
❏ Did you overwrite the CSR saved into the printer after sending the CSR to a certificate authority?Obtain the CA-signed certificate again with the CSR.
Administrator Information > Advanced Security Settings > Solving Problems for Advanced Security
457
CA-signed Certificate is more than 5KB.
You cannot import a CA-signed Certificate that is more than 5KB.
The password for importing the certificate is incorrect.
Enter the correct password. If you forget the password, you cannot import the certificate. Re-obtain the CA-signedCertificate.
Related Information
& “Importing a CA-signed Certificate” on page 436
Cannot Update a Self-Signed Certificate
The Common Name has not been entered.
Common Name must be entered.
Unsupported characters have been entered to Common Name.
Enter between 1 and 128 characters of either IPv4, IPv6, host name, or FQDN format in ASCII (0x20-0x7E).
A comma or space is included in the common name.
If a comma is entered, the Common Name is divided at that point. If only a space is entered before or after acomma, an error occurs.
Related Information
& “Updating a Self-signed Certificate” on page 438
Cannot Create a CSR
The Common Name has not been entered.
The Common Name must be entered.
Unsupported characters have been entered to Common Name, Organization, Organizational Unit,Locality, and State/Province.
Enter characters of either IPv4, IPv6, host name, or FQDN format in ASCII (0x20-0x7E).
A comma or space is included in the Common Name.
If a comma is entered, the Common Name is divided at that point. If only a space is entered before or after acomma, an error occurs.
Related Information
& “Obtaining a CA-signed Certificate” on page 435
Administrator Information > Advanced Security Settings > Solving Problems for Advanced Security
458

Warning Relating to a Digital Certificate Appears
Messages Cause/What to do
Enter a Server Certificate. Cause:
You have not selected a file to import.
What to do:
Select a file and click Import.
CA Certificate 1 is not entered. Cause:
CA certificate 1 is not entered and only CA certificate 2 is entered.
What to do:
Import CA certificate 1 first.
Invalid value below. Cause:
Unsupported characters are contained in the file path and/or password.
What to do:
Make sure that the characters are entered correctly for the item.
Invalid date and time. Cause:
Date and time for the printer have not been set.
What to do:
Set date and time using Web Config, EpsonNet Config or the printer's controlpanel.
Invalid password. Cause:
The password set for CA certificate and entered password do not match.
What to do:
Enter the correct password.
Invalid file. Cause:
You are not importing a certificate file in X509 format.
What to do:
Make sure that you are selecting the correct certificate sent by a trusted certificateauthority.
Cause:
The file you have imported is too large. The maximum file size is 5KB.
What to do:
If you select the correct file, the certificate might be corrupted or fabricated.
Cause:
The chain contained in the certificate is invalid.
What to do:
For more information on the certificate, see the website of the certificateauthority.
Administrator Information > Advanced Security Settings > Solving Problems for Advanced Security
459
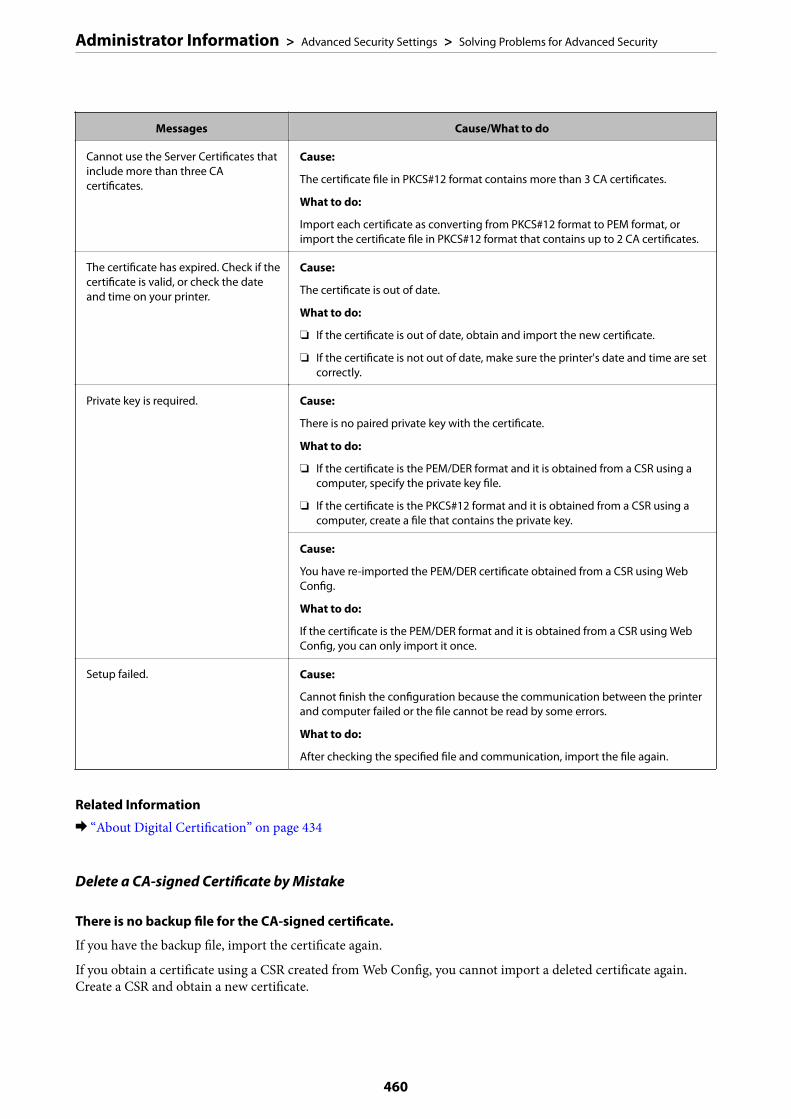
Messages Cause/What to do
Cannot use the Server Certificates thatinclude more than three CAcertificates.
Cause:
The certificate file in PKCS#12 format contains more than 3 CA certificates.
What to do:
Import each certificate as converting from PKCS#12 format to PEM format, orimport the certificate file in PKCS#12 format that contains up to 2 CA certificates.
The certificate has expired. Check if thecertificate is valid, or check the dateand time on your printer.
Cause:
The certificate is out of date.
What to do:
❏ If the certificate is out of date, obtain and import the new certificate.
❏ If the certificate is not out of date, make sure the printer's date and time are setcorrectly.
Private key is required. Cause:
There is no paired private key with the certificate.
What to do:
❏ If the certificate is the PEM/DER format and it is obtained from a CSR using acomputer, specify the private key file.
❏ If the certificate is the PKCS#12 format and it is obtained from a CSR using acomputer, create a file that contains the private key.
Cause:
You have re-imported the PEM/DER certificate obtained from a CSR using WebConfig.
What to do:
If the certificate is the PEM/DER format and it is obtained from a CSR using WebConfig, you can only import it once.
Setup failed. Cause:
Cannot finish the configuration because the communication between the printerand computer failed or the file cannot be read by some errors.
What to do:
After checking the specified file and communication, import the file again.
Related Information
& “About Digital Certification” on page 434
Delete a CA-signed Certificate by Mistake
There is no backup file for the CA-signed certificate.
If you have the backup file, import the certificate again.
If you obtain a certificate using a CSR created from Web Config, you cannot import a deleted certificate again.Create a CSR and obtain a new certificate.
Administrator Information > Advanced Security Settings > Solving Problems for Advanced Security
460

Related Information
& “Importing a CA-signed Certificate” on page 436& “Deleting a CA-signed Certificate” on page 437
Administrator Information > Advanced Security Settings > Solving Problems for Advanced Security
461
Where to Get Help
Technical Support Web Site. . . . . . . . . . . . . . . . . . . . . . . . . . . . . . . . . . . . . . . . . . 463
Contacting Epson Support. . . . . . . . . . . . . . . . . . . . . . . . . . . . . . . . . . . . . . . . . . . 463

Technical Support Web SiteIf you need further help, visit the Epson support website shown below. Select your country or region and go to thesupport section of your local Epson website. The latest drivers, FAQs, manuals, or other downloadables are alsoavailable from the site.
http://support.epson.net/
http://www.epson.eu/Support (Europe)
If your Epson product is not operating properly and you cannot solve the problem, contact Epson support servicesfor assistance.
Contacting Epson Support
Before Contacting EpsonIf your Epson product is not operating properly and you cannot solve the problem using the troubleshootinginformation in your product manuals, contact Epson support services for assistance. If Epson support for your areais not listed below, contact the dealer where you purchased your product.
Epson support will be able to help you much more quickly if you give them the following information:
❏ Product serial number(The serial number label is usually on the back of the product.)
❏ Product model
❏ Product software version(Click About, Version Info, or a similar button in the product software.)
❏ Brand and model of your computer
❏ Your computer operating system name and version
❏ Names and versions of the software applications you normally use with your product
Note:Depending on the product, the dial list data for fax and/or network settings may be stored in the product’s memory. Due tobreakdown or repair of a product, data and/or settings may be lost. Epson shall not be responsible for the loss of any data, forbacking up or recovering data and/or settings even during a warranty period. We recommend that you make your ownbackup data or take notes.
Help for Users in EuropeCheck your Pan-European Warranty Document for information on how to contact Epson support.
Help for Users in AustraliaEpson Australia wishes to provide you with a high level of customer service. In addition to your product manuals,we provide the following sources for obtaining information:
Where to Get Help > Contacting Epson Support > Help for Users in Australia
463

Internet URL
http://www.epson.com.au
Access the Epson Australia World Wide Web pages. Worth taking your modem here for the occasional surf! Thesite provides a download area for drivers, Epson contact points, new product information and technical support (e-mail).
Epson Helpdesk
Phone: 1300-361-054
Epson Helpdesk is provided as a final backup to make sure our clients have access to advice. Operators on theHelpdesk can aid you in installing, configuring and operating your Epson product. Our Pre-sales Helpdesk staffcan provide literature on new Epson products and advise where the nearest dealer or service agent is located. Manytypes of queries are answered here.
We encourage you to have all the relevant information on hand when you ring. The more information you prepare,the faster we can help solve the problem. This information includes your Epson product manuals, type ofcomputer, operating system, application programs, and any information you feel is required.
Transportation of Product
Epson recommends retaining product packaging for future transportation. Securing the ink tank with tape andkeeping the product upright is also recommended.
Help for Users in New ZealandEpson New Zealand wishes to provide you with a high level of customer service. In addition to your productdocumentation, we provide the following sources for obtaining information:
Internet URL
http://www.epson.co.nz
Access the Epson New Zealand World Wide Web pages. Worth taking your modem here for the occasional surf!The site provides a download area for drivers, Epson contact points, new product information and technicalsupport (e-mail).
Epson Helpdesk
Phone: 0800 237 766
Epson Helpdesk is provided as a final backup to make sure our clients have access to advice. Operators on theHelpdesk can aid you in installing, configuring and operating your Epson product. Our Pre-sales Helpdesk staffcan provide literature on new Epson products and advise where the nearest dealer or service agent is located. Manytypes of queries are answered here.
We encourage you to have all the relevant information on hand when you ring. The more information you prepare,the faster we can help solve the problem. This information includes your Epson product documentation, type ofcomputer, operating system, application programs, and any information you feel is required.
Transportation of Product
Epson recommends retaining product packaging for future transportation. Securing the ink tank with tape andkeeping the product upright is also recommended.
Where to Get Help > Contacting Epson Support > Help for Users in New Zealand
464
Help for Users in SingaporeSources of information, support, and services available from Epson Singapore are:
World Wide Web
http://www.epson.com.sg
Information on product specifications, drivers for download, Frequently Asked Questions (FAQ), Sales Enquiries,and Technical Support via e-mail are available.
Epson HelpDesk
Toll Free: 800-120-5564
Our HelpDesk team can help you with the following over the phone:
❏ Sales enquiries and product information
❏ Product usage questions or problem troubleshooting
❏ Enquiries on repair service and warranty
Help for Users in ThailandContacts for information, support, and services are:
World Wide Web
http://www.epson.co.th
Information on product specifications, drivers for download, Frequently Asked Questions (FAQ), and e-mail areavailable.
Epson Call Centre
Phone: 66-2685-9899
Email: [email protected]
Our Call Centre team can help you with the following over the phone:
❏ Sales enquiries and product information
❏ Product usage questions or problems
❏ Enquiries on repair service and warranty
Help for Users in VietnamContacts for information, support, and services are:
Epson Service Center
65 Truong Dinh Street, District 1, Hochiminh City, Vietnam.
Phone(Ho Chi Minh City): 84-8-3823-9239, 84-8-3825-6234
29 Tue Tinh, Quan Hai Ba Trung, Hanoi City, Vietnam
Where to Get Help > Contacting Epson Support > Help for Users in Vietnam
465

Phone(Hanoi City): 84-4-3978-4785, 84-4-3978-4775
Help for Users in IndonesiaContacts for information, support, and services are:
World Wide Web
http://www.epson.co.id
❏ Information on product specifications, drivers for download
❏ Frequently Asked Questions (FAQ), Sales Enquiries, questions through e-mail
Epson Hotline
Phone: +62-1500-766
Fax: +62-21-808-66-799
Our Hotline team can help you with the following over the phone or fax:
❏ Sales enquiries and product information
❏ Technical support
Epson Service Center
Province Company Name Address Phone
DKI JAKARTA ESS JAKARTAMANGGADUA
Ruko Mall Mangga Dua No. 48 Jl. ArteriMangga Dua, Jakarta Utara - DKI JAKARTA
(+6221) 62301104
NORTHSUMATERA
ESC MEDAN Jl. Bambu 2 Komplek Graha Niaga NomorA-4, Medan - North Sumatera
(+6261) 42066090 / 42066091
WEST JAWA ESC BANDUNG Jl. Cihampelas No. 48 A Bandung JawaBarat 40116
(+6222) 4207033
DIYOGYAKARTA
ESC YOGYAKARTA YAP Square, Block A No. 6 Jl. C SimanjutakYogyakarta - DIY
(+62274) 581065
EAST JAWA ESC SURABAYA Hitech Mall Lt. 2 Block A No. 24 Jl. KusumaBangsa No. 116 - 118 Surabaya - JATIM
(+6231) 5355035
SOUTHSULAWESI
ESC MAKASSAR Jl. Cendrawasih NO. 3A, kunjung mae,mariso, MAKASSAR - SULSEL 90125
(+62411) 8911071
WESTKALIMANTAN
ESC PONTIANAK Komp. A yani Sentra Bisnis G33, Jl. AhmadYani - Pontianak Kalimantan Barat
(+62561) 735507 / 767049
Where to Get Help > Contacting Epson Support > Help for Users in Indonesia
466
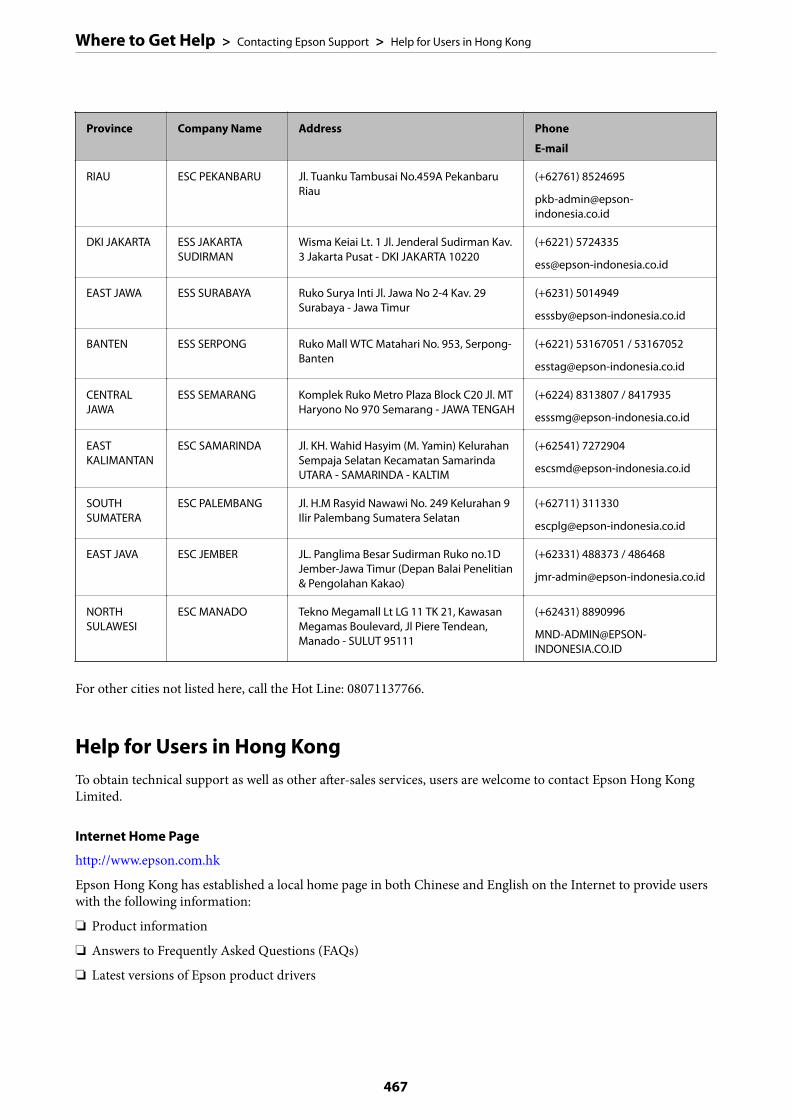
Province Company Name Address Phone
RIAU ESC PEKANBARU Jl. Tuanku Tambusai No.459A PekanbaruRiau
(+62761) 8524695
DKI JAKARTA ESS JAKARTASUDIRMAN
Wisma Keiai Lt. 1 Jl. Jenderal Sudirman Kav.3 Jakarta Pusat - DKI JAKARTA 10220
(+6221) 5724335
EAST JAWA ESS SURABAYA Ruko Surya Inti Jl. Jawa No 2-4 Kav. 29Surabaya - Jawa Timur
(+6231) 5014949
BANTEN ESS SERPONG Ruko Mall WTC Matahari No. 953, Serpong-Banten
(+6221) 53167051 / 53167052
CENTRALJAWA
ESS SEMARANG Komplek Ruko Metro Plaza Block C20 Jl. MTHaryono No 970 Semarang - JAWA TENGAH
(+6224) 8313807 / 8417935
EASTKALIMANTAN
ESC SAMARINDA Jl. KH. Wahid Hasyim (M. Yamin) KelurahanSempaja Selatan Kecamatan SamarindaUTARA - SAMARINDA - KALTIM
(+62541) 7272904
SOUTHSUMATERA
ESC PALEMBANG Jl. H.M Rasyid Nawawi No. 249 Kelurahan 9Ilir Palembang Sumatera Selatan
(+62711) 311330
EAST JAVA ESC JEMBER JL. Panglima Besar Sudirman Ruko no.1DJember-Jawa Timur (Depan Balai Penelitian& Pengolahan Kakao)
(+62331) 488373 / 486468
NORTHSULAWESI
ESC MANADO Tekno Megamall Lt LG 11 TK 21, KawasanMegamas Boulevard, Jl Piere Tendean,Manado - SULUT 95111
(+62431) 8890996
For other cities not listed here, call the Hot Line: 08071137766.
Help for Users in Hong KongTo obtain technical support as well as other after-sales services, users are welcome to contact Epson Hong KongLimited.
Internet Home Page
http://www.epson.com.hk
Epson Hong Kong has established a local home page in both Chinese and English on the Internet to provide userswith the following information:
❏ Product information
❏ Answers to Frequently Asked Questions (FAQs)
❏ Latest versions of Epson product drivers
Where to Get Help > Contacting Epson Support > Help for Users in Hong Kong
467
Technical Support Hotline
You can also contact our technical staff at the following telephone and fax numbers:
Phone: 852-2827-8911
Fax: 852-2827-4383
Help for Users in MalaysiaContacts for information, support, and services are:
World Wide Web
http://www.epson.com.my
❏ Information on product specifications, drivers for download
❏ Frequently Asked Questions (FAQ), Sales Enquiries, questions through e-mail
Epson Call Centre
Phone: +60 1800-8-17349
❏ Sales enquiries and product information
❏ Product usage questions or problems
❏ Enquiries on repair services and warranty
Head Office
Phone: 603-56288288
Fax: 603-5628 8388/603-5621 2088
Help for Users in IndiaContacts for information, support, and services are:
World Wide Web
http://www.epson.co.in
Information on product specifications, drivers for download, and products enquiry are available.
Helpline
❏ Service, product information, and ordering consumables (BSNL Lines)Toll-free number: 18004250011Accessible 9am to 6pm, Monday through Saturday (Except public holidays)
❏ Service (CDMA & Mobile Users)Toll-free number: 186030001600Accessible 9am to 6pm, Monday through Saturday (Except public holidays)
Where to Get Help > Contacting Epson Support > Help for Users in India
468
Help for Users in the PhilippinesTo obtain technical support as well as other after sales services, users are welcome to contact the Epson PhilippinesCorporation at the telephone, fax numbers and e-mail address below:
World Wide Web
http://www.epson.com.ph
Information on product specifications, drivers for download, Frequently Asked Questions (FAQ), and E-mailEnquiries are available.
Epson Philippines Customer Care
Toll Free: (PLDT) 1-800-1069-37766
Toll Free: (Digital) 1-800-3-0037766
Metro Manila: (+632)441-9030
Web Site: https://www.epson.com.ph/contact
E-mail: [email protected]
Accessible 9am to 6pm, Monday through Saturday (Except public holidays)
Our Customer Care team can help you with the following over the phone:
❏ Sales enquiries and product information
❏ Product usage questions or problems
❏ Enquiries on repair service and warranty
Epson Philippines Corporation
Trunk Line: +632-706-2609
Fax: +632-706-2663
Where to Get Help > Contacting Epson Support > Help for Users in the Philippines
469