EPSON EPL-N2120
230
-1 Glossary ASCII American Standard Code for Information Interchange. A standardized way of assigning codes to characters and control codes. The system is widely used by manufacturers of computers, printers, and software. auto line feed A printer feature in which each carriage return (CR) code is automatically accompanied by a line feed (LF) code. bitmap font The dot-by-dot representation of a font. Bitmap fonts are displayed on computer screens and printed on dot matrix printers. See “outline font”. buffer See “memory”. character set A collection of letters, numbers, and symbols used in a particular language. cpi (characters per inch) A measure of the size of fixed-width text characters. default A value or setting that takes effect when the printer is turned on, reset, or initialized. dots per inch (dpi) The number of dots per inch is a measure of printer resolution. The higher the number of dots, the higher the resolution. download To transfer information from the computer to the printer. downloaded font A font that is loaded into the printer’s memory from an outside source, such as a computer. Also called soft font. dpi See “dots per inch (dpi)”. driver The part of a software program that converts commands from the program into commands used by the printer. Also known as the printer driver. drum The part of the printer mechanism where the image is formed and transferred to paper.
-
Upload
khangminh22 -
Category
Documents
-
view
0 -
download
0
Transcript of EPSON EPL-N2120

Glossary
ASCIIAmerican Standard Code for Information Interchange. A standardized way ofassigning codes to characters and control codes. The system is widely used bymanufacturers of computers, printers, and software.
auto line feedA printer feature in which each carriage return (CR) code is automaticallyaccompanied by a line feed (LF) code.
bitmap fontThe dot-by-dot representation of a font. Bitmap fonts are displayed on computerscreens and printed on dot matrix printers. See “outline font”.
bufferSee “memory”.
character setA collection of letters, numbers, and symbols used in a particular language.
cpi (characters per inch)A measure of the size of fixed-width text characters.
defaultA value or setting that takes effect when the printer is turned on, reset, orinitialized.
dots per inch (dpi)The number of dots per inch is a measure of printer resolution. The higher thenumber of dots, the higher the resolution.
downloadTo transfer information from the computer to the printer.
downloaded fontA font that is loaded into the printer’s memory from an outside source, such asa computer. Also called soft font.
dpiSee “dots per inch (dpi)”.
driverThe part of a software program that converts commands from the program intocommands used by the printer. Also known as the printer driver.
drumThe part of the printer mechanism where the image is formed and transferred topaper.
-1

emulationSee “printer emulation”.
fixed-width fontA font whose characters are allotted the same amount of horizontal space, nomatter the width of the character. Thus the uppercase M receives the sameamount of space as the letter l.
fontA set of characters and symbols that share a common typographic design andstyle.
font familyThe collection of all sizes and styles of a font.
halftoneA grayscale image that is composed of small dots. The dots can be close togetherto create black or more widely spaced to create gray or white areas in the image.Newspaper photographs are common examples of halftones.
imaging cartridgeThe imaging cartridge contains a photosensitive print drum and supply of toner.
initializationThe act of returning the printer to its defaults (fixed set of conditions).
interfaceThe connection between the printer and the computer. A parallel interfacetransmits data one character or code at a time, and a serial interface transmitsdata one bit at a time.
landscapePrinting that is oriented sideways on the page. This orientation gives you a pagethat is wider than it is high and is useful for printing spreadsheets.
memoryThe part of the printer’s electronic system that is used to store information. Someinformation is fixed and is used to control how the printer operates. Informationthat is sent to the printer from the computer (such as downloaded fonts) is storedin memory temporarily. See also “RAM” and “ROM”.
orientationRefers to the direction in which characters are printed on a page. This directionis either portrait or landscape.
outline fontA font whose outline is described mathematically, allowing it to be rendered(printed or drawn) smoothly at any size.
PCLThe command language built into the Hewlett-Packard LaserJet series printers.
-2

pitchA measure of the number of characters per inch (cpi) for fixed-width fonts.
point sizeThe height of a particular font as measured from the top of the tallest characterto the bottom of the lowest. A point is a typographic unit of measure equivalentto 1/72 of an inch.
portraitPrinting that is oriented upright on the page (as opposed to landscape, in whichprinting is oriented sideways on the page). This is the standard orientation forprinting letters or documents.
printer driverSee “driver”.
printer emulationA set of operating commands that determines how data sent from the computeris interpreted and acted upon. Printer emulations replicate existing printers, suchas the HP LaserJet 4.
proportional fontA font whose characters have varying amounts of horizontal space dependingon the width of the character. Thus the uppercase M takes up more horizontalspace than the lowercase l.
RAMRandom Access Memory (RAM) is where temporary information is stored.
resetTo refresh the printer’s memory and erase the current print jobs.
resident fontA font that is stored permanently in the printer’s memory.
resolutionA measure of the fineness and clarity of images produced by the printeror monitor. Printer resolution is measured in dots per inch. Monitor resolutionis measured in pixels.
RITechResolution Improvement Technology. A feature that smooths the jagged edgesof printed lines or shapes.
ROMRead Only Memory (ROM) is where permanent information is stored.
sans serif fontA font lacking serifs.
scalable fontSee “outline font”.
-3

serifThe small decorative strokes that come off the main lines of a character.
status sheetA report that lists the printer settings and other printer information.
symbol setA collection of symbols and special characters. Symbols are assigned to specificcodes in a character table.
TrueTypeAn outline font format that was developed jointly by Apple Computer andMicrosoft Corporation. TrueType fonts are outline fonts that can be easily resizedfor screen display or for printing.
-4

Safety Information
Safety Precautions
Be sure to follow these precautions carefully to ensure safe,efficient operation:
❏ Because the printer weighs approximately 19.3 kg (42.5 lb)without the consumable or optional products installed, youshould not lift or carry it by yourself. Two or more peopleshould carry it, lifting it by the correct positions as shownbelow.
-5

❏ Be careful not to touch the fuser, which is marked CAUTION!HIGH TEMPERATURE, or the surrounding areas. If the printerhas been in use, the fuser and the surrounding areas may bevery hot.
* CAUTION! HIGH TEMPERATURE
❏ Avoid touching the components inside the printer unlessinstructed to do so in this guide.
❏ Never force the printer’s components into place. Although theprinter is designed to be sturdy, rough handling can damageit.
❏ When handling the imaging cartridge, always place it on aclean, smooth surface.
❏ Do not turn the imaging cartridge upside down or stand it onits ends.
-6

❏ Do not attempt to modify or take the imaging cartridge apart.It cannot be refilled.
❏ Do not touch the toner and avoid all contact with your eyes.
❏ Do not dispose of used imaging cartridges in fire, as they canexplode and cause injury. Dispose of them according to localregulations.
❏ Do not use an imaging cartridge for at least one hour aftermoving it from a cool to a warm environment to preventdamage from condensation.
❏ Do not open the drum’s protective cover and avoid exposingthe imaging cartridge to room light any longer than necessary.Overexposing the cartridge may cause abnormally dark orlight areas to appear on the printed page and reduce the lifeof the cartridge.
❏ Be sure to keep consumable components out of the reach ofchildren.
❏ Do not leave jammed paper inside the printer. This can causethe printer to overheat.
❏ Avoid using outlets that other appliances are plugged into.
-7

❏ Use only an outlet that meets the power requirements of thisprinter.
Important Safety Instructions
❏ Connect your printer to an electrical outlet that meets thepower requirements of this printer. Your printer’s powerrequirements are indicated on a label attached to the printer.If you are not sure of the power supply specifications in yourarea, contact your local power company or consult yourdealer.
❏ If you are unable to insert the AC plug into the electricaloutlet, contact an electrician.
❏ Adjust only those controls that are covered by the operatinginstructions, as improper adjustment of other controls mayresult in damage and may require repairs by a qualifiedservice representative.
ENERGY STAR® Compliance
As an International ENERGY STAR® Partner, EPSON hasdetermined that this product meets the International ENERGYSTAR® Program guidelines for energy efficiency.
The International ENERGY STAR® Office Equipment Program isa voluntary partnership with the computer and office equipmentindustry to promote the introduction of energy-efficient personalcomputers, monitors, printers, fax machines, copiers, andscanners, in an effort to reduce air pollution caused by powergeneration.
-8
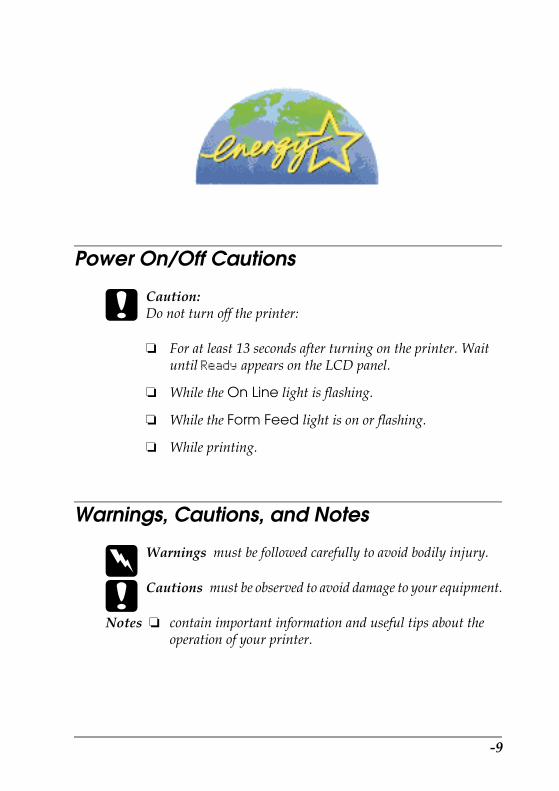
Power On/Off Cautions
c Caution:Do not turn off the printer:
❏ For at least 13 seconds after turning on the printer. Waituntil Ready appears on the LCD panel.
❏ While the On Line light is flashing.
❏ While the Form Feed light is on or flashing.
❏ While printing.
Warnings, Cautions, and Notes
w Warnings must be followed carefully to avoid bodily injury.
c Cautions must be observed to avoid damage to your equipment.
Notes ❏ contain important information and useful tips about theoperation of your printer.
-9

-10

Product Information
Printer Parts
1. Printer cover2. Control panel3. Power switch4. Paper size switch of the MP tray5. Paper size switch of the standard lower paper cassette6. Standard lower paper cassette7. MP tray extension8. MP (Multi-Purpose) tray9. Output tray extension
-11

1. Latch2. Option cover3. AC inlet4. Type-B interface slot cover5. Parallel interface connector
About Your Printer
Your printer is the latest in EPSON’s advanced line of laserprinters. It emulates the Hewlett-Packard® LaserJet 4™ (LJ4)printer, allowing you to print using the wide variety of softwareprograms that support HP LaserJet printers.
When using the printer driver provided, 1200 dpi printing isavailable. The printer’s 1200-dpi (dots per inch) resolutionsmooths the jagged edges of diagonal lines in both text andgraphics. This gives your documents a clean, crisp look thatcontributes to a professional appearance.
-12

The printer is easy to install and use. You simply set up the printer,connect it to your computer, and install the printer driver asdescribed in the Setup Guide.
The printer supports ECP (Extended Capabilities Port) mode inWindows 95, Windows 98 and Windows Me. ECP mode is usefulfor high-speed data transfer and bidirectional communicationwith your computer.
Features
The printer comes with a full set of features that contributes toease of use and consistent, high-quality output. The main featuresare described below.
High-quality printing
When using the driver provided, your printer provides 1200-dpiprinting at a speed of up to 21 pages per minute when printingon A4 paper. You’ll appreciate the professional print qualityproduced by your printer and its quick processing speed.
Warm-up time reduction
The printer warms up faster than conventional printers. About 13seconds is required from power supply ON to when printing canbe done. Furthermore, if printing data is received in thepower-saving mode, printing will be started after a warm up timeof about 7 seconds.
Wide variety of fonts
The printer comes with a selection of 80 LaserJet-compatiblescalable fonts, and 3 bitmap fonts in LJ4 emulation mode to provideyou with the fonts you need to create professional-lookingdocuments.
-13

Toner Save mode
To reduce the amount of toner used in printing documents, youcan print rough drafts using the Toner Save mode.
Resolution Improvement Technology (RITech)
Resolution Improvement Technology (RITech) is an originalEPSON printer technology that improves the appearance ofprinted lines, text, and graphics. This feature is not available whenthe Print Quality setting of the printer driver is set to True 1200dpi.
Options and Consumable Products
To purchase options or consumable products, contact your dealeror the customer support representative in your area.
Options
500-Sheet Lower Paper Cassette Unit A4 (C813711)
This unit increases paper feeding capacity (up to 500 sheets of A4size paper size).
250-Sheet Lower Paper Cassette Unit A3 Universal (C813721)
This unit increases paper feeding capacity (up to 250 sheets of A3or other paper sizes).
Duplex Unit (C813731)
This unit enables you to do double-sided printing.
Memory Module
The printer comes with 16 MB of memory, which can be expandedup to a total of 528 MB.
-14

Interface
The printer comes with a bi-directional parallel interface.Optional interface cards and modules provide a variety ofinterfaces, allowing you to use your EPL-N2120 with an Ethernetnetwork, a Macintosh, an IBM mainframe and other specializedinterfaces.
Each of these options is discussed in its own section. For details,see the section under “How To - Installing and RemovingOptions.”
Consumable products
Imaging Cartridge (S051077)
The imaging cartridge is specially designed for your high-quality1200-dpi printer.
-15

-16

Technical Specifications
Paper
Available paper types
This section explains what kind of paper you can use with yourprinter. Be sure only to use paper mentioned in this section.
Note:The printer is extremely sensitive to moisture. Be sure to store your paperin a dry environment.
Technical Specifications -17

General paper
You can use the following paper.
* Use recycled paper only under normal temperature and humidityconditions. Poor quality paper may reduce print quality, cause paper jamsand other problems.
** Gaps between labels may cause the labels to peel off inside the printer anddamage the printer.
Note:❏ Since the quality of any particular brand or type of media may be
changed by the manufacturer at any time, EPSON cannotguarantee the quality of any type of media. Always test samples ofmedia stock before purchasing large quantities or printing large jobs.
❏ You may use paper with preprinted letterheads, provided that thepaper and ink are both compatible with laser printers.
Paper Type Description
Plain paper Recycled paper is acceptable*
Weight: 60 to 90 g/m² (16 to 24 lb)
Envelopes No paste and no tape
No plastic window (unless specificallydesigned for laser printers)
Labels The backing sheet should be coveredcompletely, with no gaps between labels**
Thick paper Weight: 90 to 135 g/m²
Transparencies Transparencies for monochrome laser printeror printer can be used.
Colored paper Non-coated
Letterhead Paper with preprinted letterhead, providedthat the paper and ink are both compatiblewith laser printers. Paper which has beenprinted on with laser printer, ink Jet printer, orother printers cannot be used.
-18 Technical Specifications

Paper that should not be used
You cannot use the following paper in this printer. They maycause printer damage, paper jams, and poor print quality.
❏ Media meant for other color laser printers, black-and-whitelaser printers, color copiers, black-and-white copiers, or inkjet printers
❏ Previously printed paper by any other color laser printers,black-and-white laser printers, color copiers, black-and-whitecopiers, ink jet printers, or thermal transfer printers
❏ Carbon paper, no-carbon paper, thermal-sensitive paper,pressure-sensitive paper, acid paper, or paper that useshigh-temperature-sensitive ink (around 180°C)
❏ Labels that peel easily or labels that do not cover the backingsheet completely
❏ Coated paper or special colored paper
❏ Paper that has binder holes or is perforated
❏ Paper that has glue, staples, paper clips, or tape on it
❏ Paper that attracts static electricity
❏ Moist or damp paper
❏ Paper of uneven thickness
❏ Overly thick or thin paper
❏ Paper that is too smooth or too rough
❏ Paper that is different on the front and back
❏ Paper that is folded, curled, wavy, or torn
❏ Paper of irregular shape, or paper that does not have rightangle corners
Technical Specifications -19

Specifications
Since the quality of any particular brand or type of paper may bechanged by the manufacturer at any time, EPSON cannotguarantee the quality of any paper. Always test samples of paperstock before purchasing large quantities or printing large jobs.
Paper Types: Plain paper, recycled paper, labels, envelopes,transparencies, colored paper, thick paper,letterhead
-20 Technical Specifications

Note:Use recycled paper under normal temperature and humidity conditionsonly. Poor quality paper may reduce print quality, cause paper jams andother problems.
c Caution:Only load paper of the sizes listed above.
Paper weight:
Plain paper: 60 to 90 g/m², 16 to 24 lb*
Thick paper: 90 to 135 g/m², 24 to 36 lb
*lb: Ream Weight (lb/500 sheets/17in. × 22in.)
Paper size:
Paper: A3 (297 × 420 mm)B4 (257 × 364 mm)A4 (210 × 297 mm)A5 (148 × 210 mm)B5 (182 × 257 mm)B (11 × 17 in.)Letter (216 × 279 mm, 8.5 × 11 in.)Half-Letter (140 × 216 mm, 5.5 × 8.5 in.)Legal (215.9 × 355.6 mm, 8.5 × 14 in.)Government Letter(203 × 267 mm, 8.5 × 10.5 in.)Government legal(215.9 × 330.2 mm, 8.5 × 13 in.)Executive (184 × 267 mm, 7.25 × 10.5 in.)F4 (210 × 330 mm)Custom (86 to 305 mm × 148 to 508 mm)
Envelopes: Monarch (98 × 191 mm, 3 7/8 × 7 1/2 in.)Commercial 10(105 × 241 mm, 4 1/8 × 9 1/2 in.)DL (110 × 220 mm)C5 (162 × 229 mm)
Technical Specifications -21

Printable area
5-mm minimum margin on all sides
Note:The printable area varies according to the emulation mode.
Printer
General
Printing method: Laser beam scanning and dryelectrophotographic process
Resolution: 300, 600 or 1200 dpi
Printing speed: Up to 21 pages per minute with A4paper, depending on the font and dataquantity
First print: Stand-by mode: Less than 10.4 secondswith A4 paper/Less than 10.5 secondswith Letter paperSleep mode: Less than 14 seconds withA4 paper/Letter paper(When feeding from MP tray at 600 dpi)
Paper feed: Automatic or manual feed
Paper feed alignment: Center alignment for all sizes
Input paper supply(75 g/m² paper):
MP tray: Up to 150 sheets of plain paperUp to 10 envelopes, depending onthickness
-22 Technical Specifications

Environmental
Standard lowerpaper cassette:
Up to 250 sheets of plain paper
Optional lowerpaper cassette units:
Up to 250 sheets of plain paper in the250-Sheet Lower Paper Cassette UnitUp to 500 sheets of plain paper in the500-Sheet Lower Paper Cassette Unit
Paper output: Face-down
Paper output capacity(75 g/m² paper):
Up to 250 sheets of plain paper
Internal emulation: HP LaserJet 4 emulation (LJ4 mode)
HP-GL/2 emulations (GL2 mode)
ESC/P 24-pin printer emulation(ESC/P2 mode)
ESC/P 9-pin printer emulation (FXmode)
IBM Proprinter emulation (I239Xmode)
Resident fonts: 80 scalable fonts, and 3 bitmap fonts(in LJ4 mode)
RAM: 16 MB, expandable up to 528 MB
Temperature: Operation:Storage:
5 to 35°C (41 to 95°F)-20 to 40°C (-4 to 104°F)
Humidity: Operation:Storage:
15 to 85% RH5 to 85% RH
Altitude: 2,500 meters (8,200 feet) maximum
Technical Specifications -23

Mechanical
Electrical
Note:Check the label on the back of the printer for the voltage of your printer.
Dimensions andweight:
Height: 320 mm
Width: 478 mm
Depth: 454 mm
Weight: Approx. 19.3 kg,excluding the imaging cartridge
Durability: 5 years or 300,000 sheets, whichever comesfirst
Model 110 V model 220 to 240 V model
Voltage 110 V ± 10% 220 V - 240 V ± 10%
Rated frequency 50 Hz ± 3 Hz / 60 Hz ± 3 Hz
Rated current 7.5 A 3.9 A
Power consumption Less than 800 W Less than 840 W
Power consumptionin standby mode
Less than 10 W(When heater is off)
Less than 12 W(When heater is off)
-24 Technical Specifications
Interfaces
Parallel interface
Use only an IEEE 1284-II compliant parallel connector.
Using the ECP mode in Windows Me / Windows98 and Windows 95
To use the ECP mode with a parallel (IEEE 1284-II compliant)connector, your computer must support the ECP mode.
Note:The ECP mode is not available with Windows 3.1, 3.11 for Workgroups,Windows 2000, Windows NT 3.51 and NT 4.0.
Follow these steps to use the ECP mode:
1. Make the ECP mode settings in the BIOS setting program thatcomes with your computer. (For details of the settings and theprogram, see your computer’s documentation).
2. Click the Start button, point to Settings, and then clickControl Panel.
3. Right-click the System icon, then click Open in the menu thatappears.
4. Select the Device Manager tab.
5. Select the ECP Printer Port under Ports [COM & LPT], thenclick the Properties button.
6. Select the Resources tab.
Technical Specifications -25

7. Make the appropriate setting in the Resource Settings dialogbox. (This setting depends on your computer system. Fordetails, see your computer manual.)
8. Click OK to save the settings.
Options and Consumables
500-Sheet Lower Paper Casette Unit A4(C813711)
Paper size: A4
Paper weight: 60 to 90 g/m² (16 to 24 lb)
Paper feed: Automatic feed delivery systemCassette capacity up to 500 sheets (75 g/m²or 20 lb paper)
Feeding speed: 9.5 seconds for the first sheet of A421 pages per minute for subsequent sheets
Paper type: Plain paper, such as copier paper, andrecycled paper
Power supply: DC 5 V supplied by the printer
Dimensions andweight:
Height: 111 mm
Width: 459 mm
Depth: 420 mm including the paper cassette
Weight: 6.1 kg including the paper cassette
-26 Technical Specifications

250-Sheet Lower Paper Cassette Unit A3Universal (C813721)
Paper size: A3, A5, B4, A4, B5, Legal, Letter
Paper weight: 60 to 90 g/m² (16 to 24 lb)
Paper feed: Automatic feed delivery systemCassette capacity up to 250 sheets (75 g/m²or 20 lb paper)
Feeding speed: 9.5 seconds for the first sheet of A4/9.6seconds for the first sheet of Letter paper21 pages per minute for subsequent sheetsof A4 or Letter paper
Paper type: Plain paper, such as copier paper, andrecycled paper
Power supply: DC 5 V supplied by the printer
Dimensions andweight:
Height: 83 mm
Width: 459 mm
Depth: 420 mm including the paper cassette(When the output tray is not extended)
Weight: 5.3 kg including the paper cassette
Technical Specifications -27

Duplex Unit (C813731)
Paper size: A3, A4, A5, B4, B5, Legal, Letter,Half-Letter, Executive, Government Legal,Government Letter, Ledger
Paper weight: 60 to 90g/m² (16 to 24 lb)
Paper type: Plain paper, such as copier paper, andrecycled paper
Power supply: DC 5 V and 24 V supplied by the printer
Dimensions andweight:
Height: 278 mm
Width: 407 mm
Depth: 99 mm
Weight: 2.1 kg
-28 Technical Specifications

Memory Module
* Contact your dealer or a qualified service representative about compatible.
** SPD (Serial Presence Detect) is a chip residing on the memory module thatcontains information about the size, speed, and other specifications of thememory as well as manufacturer information that can be retrieved by themotherboard through electronic signals.
Imaging Cartridge (S051077)
* The imaging cartridge included with the printer prints up to 6,000 pages.
DRAM type: Synchronous Dynamic RAM Dual In-lineMemory Module (SDRAM DIMM)
Capacity: 32 MB, 64 MB, 128 MB, 256 MB, or 512 MB*
CAS Latency: CL=2
Type: 168-pin type, 64 bit, with SPD**PC 100 compliant
Dimensions: Within 134 × 36 mmwith a thickness of 10 mm
Storagetemperature: 0 to 35°C (32 to 95°F)
Storage humidity: 15 to 80% RH
Shelf life: 24 months after production
Life: Up to 10,000 pages under the followingconditions: Letter or A4 paper,continuous printing, and 5% printratio*
Technical Specifications -29

The number of pages you can print with an imaging cartridgevaries depending on the type of printing. If you print a few pagesat a time or print dense text exceeding the 5% print ratio, the unitmay print fewer pages. The 5% print ratio is equivalent to printingdouble-spaced standard text.
-30 Technical Specifications

Symbol Sets
Introduction to Symbol Sets
Your printer can access a variety of symbol sets. Many of thesesymbol sets differ only in the international characters specific toeach language.
Note:Since most software handle fonts and symbols automatically, you wouldprobably never need to adjust the printer’s settings. However, if you arewriting your own printer control programs, or if you are using oldersoftware that cannot control fonts, refer to the following sections forsymbol set details.
When you are considering which font to use, you should alsoconsider which symbol set to combine with the font. Availablesymbol sets vary depending on which emulation mode you useand which font you choose.
Symbol Sets -31

In the LJ4 Emulation Mode
The following symbol sets are available in LJ4 emulation mode.
Symbol set name: 76 typefaces + Line Printer are availablefor the following symbol sets:IBM-US (10U),Roman-8 (8U)* (includes another 19 sets),Roman-9 (4U), ECM94-1 (0N),8859-2 ISO (2N), 8859-9 ISO (5N),8859-10 ISO (6N), 8859-15 ISO (9N),IBM-DN (11U), PcMultilingual (12U),PcEur858 (13U), Legal (1U)
76 typefaces are available for thefollowing symbol sets:PcBlt775 (26U), PcE.Europe (17U), PcTk437(9T), Pc1004 (9J),WiAnsi (19U), WiE.Europe (9E),WiTurkish (5T), WiBALT (19L),DeskTop (7J), PsText (10J),VeInternational (13J), VeUS (14J),MsPublishing (6J), Math-8(8M),PsMath(5M), VeMath(6M),PiFont (15U), Windows (9U),McText (12J)
Line Printer is available for:Roman Extension (0E)
Symbol Set SWA and Symbol Set SWMare available for:Symbol (19M)
More WingBats SWM is available for:Wingdings (579L)
-32 Symbol Sets

* The other 19 sets are the following: ANSI ASCII, Norweg1, French, HP German,Italian, JIS ASCll, Swedis 2, Norweg 2, UK, French 2, German, HP Spanish,Chinese, Spanish, IRV, Swedish, Portuguese, IBM Portuguese, and IBMSpanish. These are partial variations of the Roman-8 set.
The 76 typefaces refer to those listed below:
OCR A is available for:OCR A (0O)
OCR B is available for:OCR B (1O), OCR B Extension (3Q)
Code 39 (2 types) is available for:Code 39 (0Y)
EAN/UPC (2 types) is available for:EAN/UPC (8Y)
Courier SWCDutch 801 SWCZapf Humanist 601 SWCRibbon 131 SWCClarendon Condensed SWCSwiss 742 SWCSwiss 742 Condensed SWCIncised 901 SWCOriginal Garamond SWCAudrey Two SWCFlareserif 821 SWCSwiss 721 SWMDutch 801 SWMSwiss 721 SWA
Swiss 721 Narrow SWAZapf Calligraphic 801 SWAITC Avant Garde SWAITC Bookman SWACentury Schoolbook SWADutch 801 SWAITC Zapf Chancery SWA ItalicLetter Gothic SWCCourier SWA
Symbol Sets -33

International character sets for ISO
The following are the available international character sets forISO.
Character sets: ANSI ASCII (0U),Norweg 1 (0D), French (0F),HP German (0G), Italian (0l),JlS ASCII (0K), Swedis 2 (0S),Norweg 2 (1D), UK (1E),French 2 (1F), German (1G),HP Spanish (1S), Chinese (2K),Spanish (2S), IRV (2U),Swedish (3S), Portuguese (4S),IBM Portuguese (5S),IBM Spanish (6S)
-34 Symbol Sets

In the ESC/P2 or FX Modes
* Available only in ESC/P2 mode.
Pc 437(U.S./StandardEurope)
Pc 850(Multilingual),Pc 860(Portuguese),Pc 863(Canadian-French),Pc 865(Nordic),Roman-8,8859-15 ISO
Pc 857(Turkish),Pc 861(Icelandic),Pc 852(East Europe,BpBRASCIl,Abicomp, ISOLatin1
Pc858(13U)
OCR A
CourierSWC
available available available available notavailable
EPSONPrestige
available available not available available notavailable
EPSONRoman
available available not available available notavailable
EPSONSansserif
available available not available available notavailable
Swiss721SWM*
available available available available notavailable
LetterGothicSWC
available available available available notavailable
Dutch801SWM*
available available available available notavailable
EPSONScript
available available not available available notavailable
OCR A not available not available not available notavailable
available
OCR B available not available not available available notavailable
Symbol Sets -35

Note:❏ Swiss 721 SWM is a type face compatible with RomanT.
❏ Letter Gothic SWC is a type face compatible with OratorS.
❏ Dutch 801 SWM is a type face compatible with SansH.
International character sets
You can select one of the following international character setsusing the Remote Control Panel utility or the ESC R command:
* Available for ESC/P 2 emulation only
Characters available with the ESC (^ command
To print the characters in the table below, use the ESC(^ command.
Character sets: USA, France, Germany, UK,Japan, Denmark1, Denmark2,Sweden, Italy, Spain1, Spain2,Norway, Latin America,Korea*, Legal*
-36 Symbol Sets

In the I239X Emulation Mode
The available symbol sets in the I239X mode are Pc437, Pc850,Pc858, Pc860, Pc863 and Pc865. See “In the ESC/P2 or FX Modes”.
The available fonts are EPSON Sans Serif, Courier SWC, EPSONPrestige, EPSON Gothic, EPSON Presentor, EPSON Orator, andEPSON Script.
In the EPSON GL/2 Mode
The available symbol sets in the EPSON GL/2 mode are the sameas those in LaserJet4 emulation mode. See “In the LJ4 EmulationMode”.
Symbol Sets -37

-38 Symbol Sets

How To
Handling Paper
Paper Sources
The table below gives you an overview of all the standard andoptional paper sources available for your printer and the papertypes that you can use.
Paper Source Paper Size and Type Capacity
MP tray A3, A4, A5, B, B4, B5, F4,Legal (LGL/LG), Letter (LT),Half-Letter (HLT),Executive (EXE),Government Letter (GLT),Custom-size paper:87 × 98.4 mm minimum297 × 508 mm maximum
Up to 150 sheetswith paper thatweighs 75 g/m²
Monarch (MON),C10, DL, C5
Plain paper, preprintedpaper, letterhead, recycledpaper, colored paper,transparencies, labels, thickpaper
Up to 10 envelopes
Up to 75 sheetstransparencies orlabels
Standard lowerpaper cassette
A3, A4, A5, B4, B5,Legal (LGL/LG), Letter (LT)
Plain paper, preprintedpaper, recycled paper,colored paper
Up to 250 sheets
Optional250-Sheet LowerPaper CassetteUnit
A3, A4, A5, B4, B5,Legal (LGL/LG), Letter (LT)
Plain paper, preprintedpaper, recycled paper,colored paper
Up to 250 sheets
Handling Paper -39
Loading Paper
The printer can feed paper from the MP tray, the standard lowerpaper cassette and an optional lower paper cassette unit.
Please note the following points when choosing paper:
❏ Paper should be of high quality and be relatively smooth, witha weight between 60 and 90 g/m² (16 to 24 lb) in the case ofplain paper, and 90 and 135 g/m² (24 to 36 lb) for thick paper.
❏ The printer is extremely sensitive to moisture. Be sure to storeyour paper in a dry environment.
❏ The use of colored paper is acceptable, but coated papershould be avoided.
❏ You may use paper with preprinted letterheads, providedthat the paper and ink are both laser-printer type.
MP tray
The MP tray is the most flexible of all the paper sources andaccommodates a wide range of paper sizes and types. See “PaperSources” for details.
Follow these steps to load paper into the MP tray:
Optional500-Sheet LowerPaper CassetteUnit
A4
Plain paper, preprintedpaper, recycled paper,colored paper
Up to 500 sheets
Paper Source Paper Size and Type Capacity
-40 Handling Paper

1. Open the MP tray by pulling on the indentation in the middleof the cover.
2. Slide both paper guides outward to accommodate the paperyou are loading.
Note:To set B4 or larger size paper, extend the feeder extension.
Handling Paper -41

3. Fan a stack of paper and tap it on a flat surface to even theedges, and set the paper into the MP tray with the printablesurface facing up. Then adjust the paper guides to the size ofthe paper.
Note:❏ Make sure to load the paper as far as it will go inside the MP
tray.
❏ Load A4, A5, B5, LT, HLT, EXE, GLT, and C5 paper sizes withthe long edge first.
❏ Load A3, B, B4, F4, LGL, GLG, Monarch, C-10, DL, andCustom paper sizes with the short edge first. See the illustrationbelow.
-42 Handling Paper

4. Extend the output tray so it accommodates the size of thepaper loaded in the printer.
5. Set the paper size switch of the MP tray so that it matches thesize of the paper loaded in the tray.
Handling Paper -43

Set the switch to By Cont. Panel if there is no matching choicefor the size of the paper loaded, and use the control panel to setthe paper size. See “OneTouch mode 1” for more information.
When printing on envelopes, heavy paper, or other media suchas labels and transparencies, use the manual feed mode to feedthe media. See “Choosing Paper” and “Manually loading paper”for more information.
By default, the printer is set up to print on A4 size paper. If youare printing on any other paper size, you need to change theprinter’s paper size setting by using either the paper size switchdescribed above, or the printer’s control panel.You can also change the paper size setting through the printerdriver, or from within the software you are using. Softwaresettings override settings made by other methods. See “Howto - Using the Printer Driver” for detailed instruction.
Standard lower paper cassette
For information on the paper sizes and types supported by thestandard lower paper cassette, see “Paper Sources”.
-44 Handling Paper
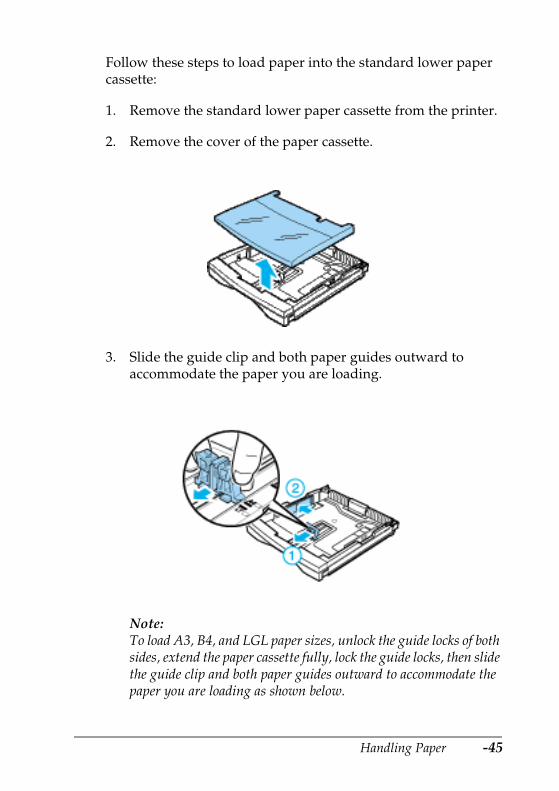
Follow these steps to load paper into the standard lower papercassette:
1. Remove the standard lower paper cassette from the printer.
2. Remove the cover of the paper cassette.
3. Slide the guide clip and both paper guides outward toaccommodate the paper you are loading.
Note:To load A3, B4, and LGL paper sizes, unlock the guide locks of bothsides, extend the paper cassette fully, lock the guide locks, then slidethe guide clip and both paper guides outward to accommodate thepaper you are loading as shown below.
Handling Paper -45

* pad
c Caution:Do not touch the pad to avoid paper feed trouble.
-46 Handling Paper

4. Set paper into the paper cassette with the printable surfacefacing up. Then adjust the paper guides to the size of thepaper.
Note:❏ Load A4, A5, B5, or LT paper with the long edge first.
❏ Load A3, B4, or LGL paper with the short edge first.
❏ If your printouts are curled or do not stack properly when usingplain paper, try turning the stack over and reloading it.
5. Reattach the cassette cover over the sides of the paper cassettefirmly, then close it.
6. Insert the lower paper cassette back into the printer.
Handling Paper -47

Note:Make sure you insert the paper cassette as far as it will go inside theprinter.
7. Set the cassette paper size switch so that it matches the size ofthe paper loaded in the cassette.
-48 Handling Paper

8. Extend the output tray to accommodate the size of the paperloaded in the lower paper cassette to prevent it from fallingoff the edge.
Handling Paper -49

Optional 250-Sheet Lower Paper Cassette Unit
The paper sizes and types supported by the optional 250-SheetLower Paper Cassette Unit is the same as the standard lowerpaper cassette. For more information, see “Paper Sources”.
The paper-loading procedure is also the same as that for thestandard lower paper cassette. For detailed information, see“Standard lower paper cassette”.
Optional 500-Sheet Lower Paper Cassette Unit
For information on the paper sizes and types supported by theoptional 500-Sheet Lower Paper Cassette Unit, see “PaperSources”.
Follow these steps to load paper into the optional 500-Sheet LowerPaper Cassette Unit:
1. Remove the paper cassette from the 500-Sheet Lower PaperCassette Unit.
2. Remove the cover of the paper cassette.
3. Fan a stack of paper and tap it on a flat surface to even theedges. Then set the paper printable-surface up into the papercassette.
-50 Handling Paper

Note:❏ Make sure the paper loaded is under the metal retaining clips
on both sides of the paper cassette.
❏ If your printouts are curled or do not stack properly when usingplain paper, try turning the stack over and reloading it.
4. Reattach the cover of the paper cassette and insert it back intothe unit.
Handling Paper -51
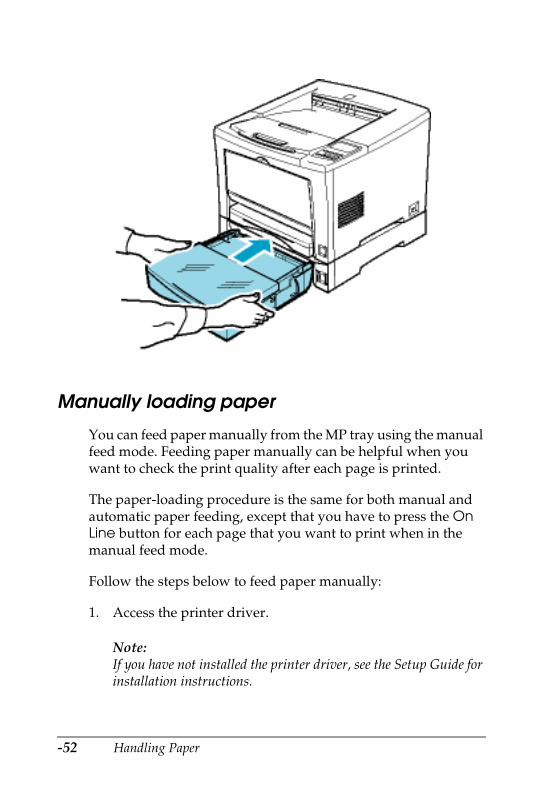
Manually loading paper
You can feed paper manually from the MP tray using the manualfeed mode. Feeding paper manually can be helpful when youwant to check the print quality after each page is printed.
The paper-loading procedure is the same for both manual andautomatic paper feeding, except that you have to press the OnLine button for each page that you want to print when in themanual feed mode.
Follow the steps below to feed paper manually:
1. Access the printer driver.
Note:If you have not installed the printer driver, see the Setup Guide forinstallation instructions.
-52 Handling Paper

2. In the Basic Settings menu, select the Manual Feed checkbox.
3. In the Paper Size drop-down list, scroll through the list ofpaper sizes and click the size that matches the paper you willload in the printer.
Handling Paper -53

4. Insert a sheet or stack of paper of the correct size into thedesired paper source. Make sure to adjust the paper guides tomatch the paper size you are loading.
-54 Handling Paper

5. Send a print job from your application. The LCD panel showsManual Feed and the selected page size and tray.
6. Press the On Line button on the control panel to print. A sheetof paper is fed and printed on.
7. Press On Line again to print the next page of print data, ifnecessary. Repeat this step for every page to be printed.
Loading an uncommon paper size
To load an uncommon, or custom, paper size from 87 × 98.4 mm(3.4 × 3.9 in.) to 297 × 508 mm (11.7 × 20 in.), use the MP tray.
1. Access the printer driver.
2. In the Basic Settings menu, select User Defined Size.
Handling Paper -55

3. Choose a Unit size and type the Paper Width and PaperHeight settings for your custom sized paper.
-56 Handling Paper

4. Click OK to save your custom paper size.
5. Set the paper size switch of the MP tray to By Cont. Panel.
To make this setting from the printer’s control panel, accessOneTouch mode 1 and set the page size to CTM (custom). Fordetails, see “OneTouch mode 1”.
Note:After making custom paper size settings in the printer driver orSelecType menus, set the paper size for the MP tray using the SelecTypeTray Menu. For instructions, see “Tray Menu”.
Handling Paper -57

Selecting the paper size
By default, the printer driver is set up for A4 paper to be loaded.If you load paper of a different size, you need to change the papersize setting using one of the following methods.
Using the printer driver:Choose the paper size on the Basic Settings menu. For moreinformation on using the printer driver, see the printer driver’sonline help.
Using the SelecType mode:For information on changing the paper size in SelecType mode,see “Printing Menu”.
Choosing Paper
You can use many kinds of media including stock paper,envelopes, labels, and overhead projector transparencies. Theprinter feeds most types of media automatically from the MP tray.This section describes the paper feed and delivery choices andhow to select and load paper.
The type of paper you use in your printer can affect the quality ofthe printed output. The smoother the paper you use, the smootherand sharper your printing looks.
For best results, store your paper supply in its original wrapper.Your printouts can be marred by moisture absorbed in the paper.Do not store paper in a humid or damp environment.
Note:Since the quality of any particular brand or type of paper may be changedby the manufacturer at any time, EPSON cannot guarantee the qualityof any type of paper. Always test samples of paper stock before purchasinglarge quantities or printing large jobs.
-58 Handling Paper
Below are some recommendations for selecting paper and otherprint media for your printer.
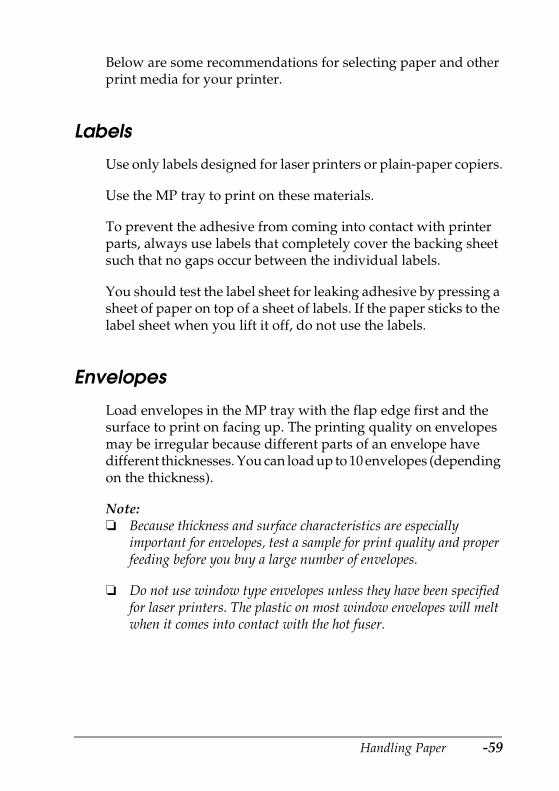
Labels
Use only labels designed for laser printers or plain-paper copiers.
Use the MP tray to print on these materials.
To prevent the adhesive from coming into contact with printerparts, always use labels that completely cover the backing sheetsuch that no gaps occur between the individual labels.
You should test the label sheet for leaking adhesive by pressing asheet of paper on top of a sheet of labels. If the paper sticks to thelabel sheet when you lift it off, do not use the labels.
Envelopes
Load envelopes in the MP tray with the flap edge first and thesurface to print on facing up. The printing quality on envelopesmay be irregular because different parts of an envelope havedifferent thicknesses. You can load up to 10 envelopes (dependingon the thickness).
Note:❏ Because thickness and surface characteristics are especially
important for envelopes, test a sample for print quality and properfeeding before you buy a large number of envelopes.
❏ Do not use window type envelopes unless they have been specifiedfor laser printers. The plastic on most window envelopes will meltwhen it comes into contact with the hot fuser.
Handling Paper -59

Colored paper
You can use colored paper as long as it meets the weight limitsshown in the paper specifications. Do not, however, use coatedpaper (paper to which a clear or colored coating has been added).See “Specifications” for more information.
Thick paper
You can use thick paper as long as it meets the weight limitsshown in the paper specifications.
Transparencies
You can use overhead projector transparencies and adhesivedrafting film if they are made for use with plain-paper copiers orlaser printers. Use the MP tray to print on these materials.
-60 Handling Paper

Using the Printer Driver
About the Printer Driver
The printer driver lets you choose from a wide variety of settingsto get the best results from your printer. The printer driver alsoincludes the EPSON Status Monitor 3 utility, which is accessedthrough the Utility tab. The EPSON Status Monitor 3 utility letsyou check the status of your printer. See “Monitoring YourPrinter(EPSON Status Monitor 3)” for more information.
Accessing the Printer Driver
You can access the printer driver directly from any applicationprograms, from your Windows operating system.
The printer settings made from many Windows applicationsoverride settings made when the printer driver is accessed fromthe operating system, so you should access the printer driver fromyour application to make sure you get the result you want.
Note:Online help provides details on printer driver settings.
❏ To access the printer driver from your application, click thePrint or Page Setup command on the File menu. You alsoneed to click Setup, Options, Properties, or a combination ofthese buttons.
❏ To access the printer driver from Windows, click Start, pointto Settings, and click Printers. Next, right-click the EPSONEPL-N2120 Advanced icon and click Properties (inWindows Me/98/95), Printing Preferences (in Windows2000) or Document Defaults (in Windows NT 4.0).
Using the Printer Driver -61

Making Changes to Printer Settings
Choosing the print quality
You can change the print quality or resolution of printouts tofavor speed or detail. If you need high quality output, choose ahigher number. Please note that doing so reduces the print speed.
There are three levels of print output, 600 dpi, Class 1200 dpi, andTrue 1200 dpi. True 1200 dpi provides high quality, preciseprinting, but requires more memory and slows the printingspeed. Class 1200 dpi is actually a slightly lower resolution,however it provides high quality printing results on par with 1200dpi with the Enh.MG and RITech functions. Printing speed isgenerally faster when Class 1200 dpi is selected than when True1200 dpi is selected.
1. Click the Basic Settings tab.
2. Select the desired printing resolution from the Print Qualitydrop down list.
-62 Using the Printer Driver

3. Click the OK button to accept the setting.
Note:❏ For details about the Enh. or RI Teck functions, see the Online
Guide.
❏ If printing is unsuccessful or a memory-related error messageappears, selecting a lower resolution may allow printing toproceed.
Resizing printouts
You can have your document enlarged or reduced duringprinting.
Using the Printer Driver -63

To automatically resize pages to fit the output paper
1. Click the Layout tab.
2. Check the Zoom Options check box.
3. Select the desired paper size from the Output Paperdrop-down list. The page will be printed to fit on the paperyou have selected.
4. Select Upper Left for Location to print reduced page imageat upper left corner of the paper. Select Center to printreduced page image with centering.
5. Click the OK button to accept the settings.
-64 Using the Printer Driver

To resize pages by a specified percentage:
1. Click the Layout tab.
2. Check the Zoom Options check box.
3. Check the Zoom To check box.
4. Specify the magnification percentage in the box, then clickOK. The percentage can be set between 50% and 200% in 1%increments.
If necessary, select the paper size to be printed from the OutputPaper drop-down list.
Using the Printer Driver -65

Modifying the print layout
“Layout printing” prints either two or four pages onto a singlepage and specifies the printing order, automatically resizing eachpage to fit the specified paper size. You can also choose to printdocuments surrounded by a frame.
1. Click the Layout tab.
2. Check the Print Layout check box, and click the Print LayoutSettings button. The Print Layout Settings dialog boxappears.
3. Select the Number of Pages you want to print on one sheet ofpaper.
-66 Using the Printer Driver

4. Select the Page Order in which the pages are printed on eachsheet.
Note:The Page Order choices depend on the Pages selected above, and thepaper orientation (Portrait or Landscape) selected on the BasicSettings tab.
5. Click OK to close the Print Layout Settings dialog box.
6. Click the OK button on the Layout menu to accept the settings.
Duplex and Layout printing functions are combined in thePrinting for Binding feature.
Using a watermark
Follow the steps to use a watermark on your document. In theWatermark dialog box, you can select from a list of predefinedwatermarks, or you can select a bitmap (.BMP) file as your owncustom watermark. The Watermark dialog box also allows you tomake a variety of detailed watermark settings. For example, youcan select the size, intensity, and position of your watermark.
1. Click the Special tab.
Using the Printer Driver -67
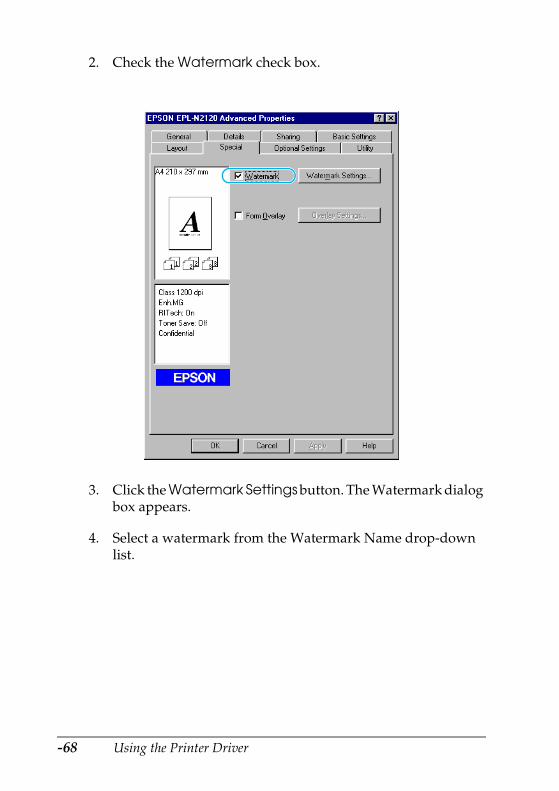
2. Check the Watermark check box.
3. Click the Watermark Settings button. The Watermark dialogbox appears.
4. Select a watermark from the Watermark Name drop-downlist.
-68 Using the Printer Driver
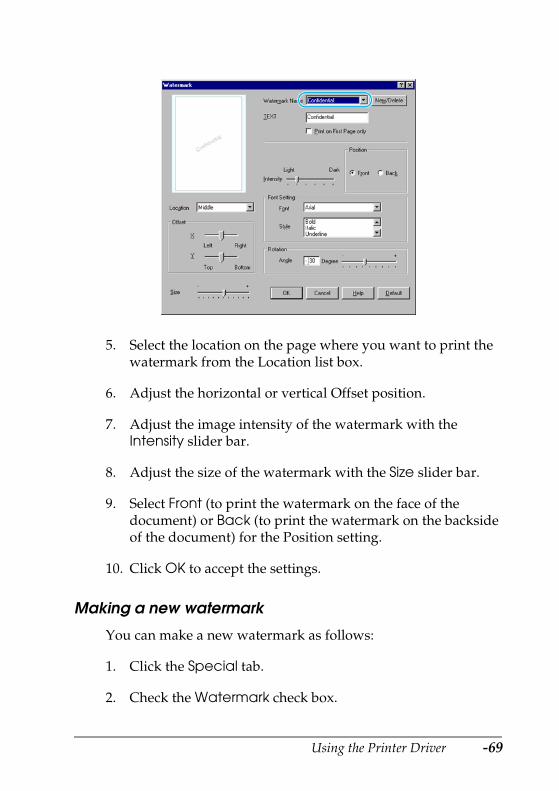
5. Select the location on the page where you want to print thewatermark from the Location list box.
6. Adjust the horizontal or vertical Offset position.
7. Adjust the image intensity of the watermark with theIntensity slider bar.
8. Adjust the size of the watermark with the Size slider bar.
9. Select Front (to print the watermark on the face of thedocument) or Back (to print the watermark on the backsideof the document) for the Position setting.
10. Click OK to accept the settings.
Making a new watermark
You can make a new watermark as follows:
1. Click the Special tab.
2. Check the Watermark check box.
Using the Printer Driver -69

3. Click the Watermark Settings button. The Watermark dialogbox appears.
4. Click the New/Delete button. The User Defined Watermarksdialog box appears.
5. Select Text or BMP and type a name for the new watermarkin the Name box.
6. If you select Text, type the watermark text in the Text box. Ifyou select BMP, click the Browse button, select the BMP fileyou want to use, then click OK.
Note:Before making a custom watermark, you should prepare a bitmap(.bmp) file.
7. Click the Save button to close the User Defined Watermarksdialog box. Your watermark will appear in the list box.
8. Click OK to register the new watermark settings.
Using an overlay
The Overlay settings dialog box allows you to print form dataoverlaid with data made by another application.
Note:The overlay function is available only when the High Quality (Printer)is selected for the Graphic Mode in the Extended Settings dialog box fromthe Optional Settings Menu.
Creating an overlay
You can create form data and save it as a file.
1. Open the application that you will use to create the overlay.
-70 Using the Printer Driver

2. From the application, access the printer driver. Open the Filemenu and choose Print or Print Setup. Then click Printer,Setup, Options, or Properties, or click a combination of thesebuttons, depending on the application you use.
3. Select the Special tab.
4. Check the Form Overlay check box, and click the OverlaySettings button to open the Overlay Settings dialog box.
5. Click the Create Overlay Data button.
Using the Printer Driver -71

6. Click the Settings button.
7. Check the Use Form Name check box. Then click the AddForm Name button. The Add Form dialog box appears.
8. In the Add Form dialog box, input the form name in the FormName box and its description in the Description box.
-72 Using the Printer Driver

9. Click the To Front (to print the overlay on the face of thedocument) or To Back (to print the overlay on the back sideof the document) button.
10. In the Add Form dialog box, click the Register button.
11. In the Form Settings dialog box, click OK.
12. In the Overlay Settings dialog box, click OK. If you want tostop the procedure, click Cancel.
Note:The file you send to the printer after step 10, from an applicationprogram such as Windows Notepad or Word, will be saved as anoverlay using the form name you entered at step 8.
13. Print the file saved as overlay data. It is possible to save anykind of file as an overlay. The overlay data is created.
Printing with an overlay
Follow the steps to print a document with overlay data.
1. Open the file to print with overlay data.
2. From the application, access the printer driver. Open the Filemenu and choose Print or Print Setup. Then click Printer,Setup, Options, or Properties, or click a combination of thesebuttons, depending on the application you use.
3. Select the Special tab.
4. Check the Form Overlay check box, and click the OverlaySettings button to open the Overlay Settings dialog box.
5. In the Overlay Settings dialog box, choose the form from theForm list, then click OK.
6. Click OK to print the data.
Using the Printer Driver -73

Different printer settings overlay data
The overlay data is made with the current printer settings (suchas Resolution: 600 dpi). If you want to make the same overlay withdifferent printer settings (such as 300 dpi), follow the instructionsbelow.
❏ Re-access the printer driver as described in step 2.
❏ Make the printer settings and exit the printer driver.
❏ Send the same data that you made by application to theprinter like step 12.
This setting is available only for Form Name data.
Printing with the Duplex Unit
Duplex printing prints on both sides of the paper. When printingfor binding, the binding edge can be specified as required toproduce the desired page order.
To use Printing for Binding, the Duplex Print Unit must beinstalled and enabled in the Duplex Print Unit check box on theOptional Settings dialog box. However, this check box is checkedautomatically if the printer is connected to a bi-directional portand EPSON Status Monitor 3 is running.
As an ENERGY STAR® partner, EPSON recommends the use ofthe double-sided printing function. Refer to “ENERGY STAR®Compliance” for more information on the ENERGY STAR®
program.
1. Select the Layout tab.
2. Check the Duplex check box.
3. Select a Binding position from Left, Top, or Right.
-74 Using the Printer Driver

4. Click the Duplex Settings button to open the Duplex Settingsdialog box.
5. Specify the Binding Margin for the front and back sides of thepaper.
6. Select whether the front or back side of the paper is to beprinted as the Start Page.
7. Click OK to close the Duplex Settings dialog box.
8. Click OK on the Layout menu to accept the settings.
Monitoring Your Printer(EPSON Status Monitor 3)
About EPSON Status Monitor 3 utility
The EPSON Status Monitor 3 is a utility program that monitorsyour printer and gives you information about its current status.For example, you can find out the amount of remaining toner orthe remaining functional life of the imaging cartridge through thisutility. If a print error occurs, the utility provides you with amessage describing the error. The Status Monitor 3 utility isaccessed from within the printer driver. See the following sectionfor more information.
Before using Status Monitor 3, be sure to read the printer driver’sREADME file. This file contains the latest information on theprinter driver and Status Monitor 3.
Installing the EPSON Status Monitor 3 utility
Follow these steps to install the EPSON Status Monitor 3 utilityprogram:
Using the Printer Driver -75

1. Insert the printer software CD-ROM in the CD-ROM drive.The Installation Program screen appears as shown below:
If it does not appear, double-click the My Computer icon.Click the CD-ROM icon, then select Open from the filemenu.Then double-click Epsetup.exe.
2. In the Installation Program screen, double-click Install EPSONStatus Monitor 3. Alternatively, you can install it by selectingInstall EPSON Status Monitor 3 and then clicking the arrowat the top right.
3. In the dialog box that appears, make sure that your printer’sicon is selected, and click OK. This automatically installs theutility program.
-76 Using the Printer Driver

4. When the installation is complete, click OK.
Accessing the EPSON Status Monitor 3
EPSON Status Monitor 3 monitors the printer during printing andwhile the EPSON Status Monitor 3 dialog box is open.
You can access the EPSON Status Monitor 3 directly from anyapplication programs, from your Windows operating system.
❏ To access the EPSON Status Monitor 3 from your application,click the Print or Page Setup command on the File menu. Youalso need to click Setup, Options, Properties, or acombination of these buttons.Then click the Utility tab, and click the EPSON Status Monitor3 icon to start the EPSON Status Monitor 3 utility.
❏ To access the EPSON Status Monitor 3 from Windows, clickStart, point to Settings, and click Printers. Next, right-clickProperties (in Windows Me/98/95), Printing Preferences(in Windows 2000) or Document Defaults (in Windows NT4.0).Then click the Utility tab, and click the EPSON Status Monitor3 icon to start the EPSON Status Monitor 3 utility.
Using the Printer Driver -77

Note:Clearing the Monitor the printing status check box during normaloperation causes the Status Alert window to stop monitoring someerrors. See “Status Alert window” for more information on thisfunction.
Getting printer status details
You can monitor printer status and obtain information onconsumable products using the EPSON Status Monitor 3 dialogbox.
-78 Using the Printer Driver
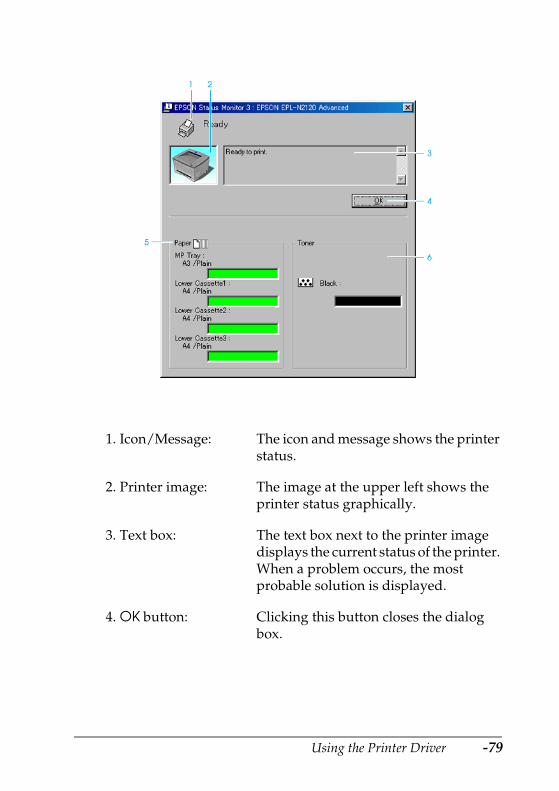
1. Icon/Message: The icon and message shows the printerstatus.
2. Printer image: The image at the upper left shows theprinter status graphically.
3. Text box: The text box next to the printer imagedisplays the current status of the printer.When a problem occurs, the mostprobable solution is displayed.
4. OK button: Clicking this button closes the dialogbox.
Using the Printer Driver -79

Monitored printers settings
You can use “Monitored Printers” utility, to change the type ofprinters that EPSON Status Monitor 3 will monitor. When youinstall the EPSON Status Monitor 3, this utility is also installed.Usually, it is not necessary to change a setup. Use this utility whenyou want change the settings for some reason.
1. Click the Start button, point to Program, point to EPSON,then click the Monitored printers.
2. Uncheck the check box of the printer which is not monitored.
5. Paper: Displays the paper size, paper type, andthe approximate amount of paperremaining in the paper source.Information for the optional cassettesare displayed only if this option isinstalled.
6. Toner: Indicates the amountof remaining toner.The toner icon flashes if toner is low (10percent or less).
-80 Using the Printer Driver

3. Click OK.
Setting Monitoring Preferences
To make specific monitoring settings, click the MonitoringPreferences button in the Utility tab of the printer driver. TheMonitoring Preferences dialog box appears.
The following settings and buttons appear in the dialog box:
1. Select Notification: Use the check boxes in this area to selectthe types of error that you wish to benotified about.
2. Default button: Restores default settings.
Using the Printer Driver -81

Status Alert window
This window indicates what type of error has occurred and offersyou a possible solution. It closes automatically once the problemis cleared.
The Status Alert window opens under the conditions you selectin the Monitoring Preferences dialog box.
3. Select Shortcut Icon: To use the shortcut icon, select theShortcut Icon check box and choose anicon. The icon you select appears on theright side of the task bar.Once the shortcut icon is in the task bar,you can double-click it to open theStatus Monitor 3 dialog box.Alternatively, you can right-click theshortcut icon and select MonitoringPreferences to open the MonitoringPreferences dialog box, and EPSONEPL-N2120 Advanced to open theEPSON Status Monitor 3 dialog box.
4. Allow monitoringof shared printerscheck box:
To monitor a shared printer, check thisbox. You need to make this setting onthe server.
5. OK button: Saves new changes.
6. Cancel button: Cancels any changes.
7. Help button: Opens online help for the MonitoringPreferences dialog box.
-82 Using the Printer Driver

If you wish to see information about printer consumables, clickthe Consumables button. Once this button is clicked, the StatusAlert window will not disappear even after a problem is cleared.To close the box you need to click the OK button.
Stopping monitoring
The EPSON Status Monitor 3 monitors the printer during printingand while the EPSON Status Monitor 3 dialog box is open.
To monitor during printing only, close the EPSON Status Monitor3 dialog box.
To stop all monitoring completely, clear the Monitor the PrintingStatus check box in the printer driver’s Utility tab. You may wantto do this to speed up printing or if you don’t need to monitor theprinter at all.
If you clear the Monitor the Printing Status check box, the StatusAlert window no longer comes up to notify you when an erroroccurs. However, you can still find out the current printer statusby clicking the EPSON Status Monitor 3 icon in the printerdriver’s Utility tab.
Note:The Monitor the Printing Status check box is displayed in the Utilitytab of Document Defaults in Windows NT 4.0, or in the Utility tab ofPrinting Preference in Windows 2000.
Using the Printer Driver -83
Setting up Your Printer on a Network
For Windows Me, 98 and 95 users
This section tells you how to set up your printer so that othercomputers on a network can use it.
First, you need to set up the printer as a shared printer on thecomputer to which the printer is connected. Then, you mustspecify the network path to the printer from each computer thatwill use it and install the printer software on those computers.
Note:❏ This section describes how to use your printer as a shared printer
on a network. To connect your printer directly to a network withoutsetting it up as a shared printer, consult your networkadministrator.
❏ When the IPX/SPX compatible protocol setting is turned on inWindows 95/98/Me, you may have a communication error. To avoidthis error, disable IPX/SPX compatible protocol.
Setting up your printer as a shared printer
To share a printer with other computers on a network, follow thesteps below to configure to computer to which the printer isconnected.
1. Click the Start button, point to Settings, then click ControlPanel.
2. Double-click the Network icon.
3. Click the File and Print Sharing button.
4. Select the I want to be able to allow others to print to myprinter(s) check box and click OK.
-84 Using the Printer Driver

5. In the Network dialog box, click OK.
6. In the Control Panel, double-click the Printers icon.
Note:❏ If a dialog box requesting the insertion of the Windows Me, 98
or 95 CD-ROM appears, insert the CD in the CD-ROM driveand follow the on-screen instructions.
❏ If a dialog box requesting that you restart your computerappears, do so. Then, open the Printers folder, and continuefrom step 7.
7. Select the icon for your printer in the Printers folder, then clickSharing on the File menu.
8. Select Shared As, then type the printer information asrequired and click OK.
Accessing the printer through a network
To access your printer from other computers on a network, followthe steps below for each computer that will access the printer.
Note:Your printer must be set up as a shared resource on the computer to
which it is directly connected before you can access it from anothercomputer. For instructions, see “Setting up your printer as a sharedprinter”.
1. Click the Start button, point to Settings, and click Printers.
2. Double-click the Add Printer icon. The Add Printer Wizardscreen opens.
3. Click Next.
4. Select Network printer, then click Next.
5. Click Browse.
Using the Printer Driver -85

6. Double-click the icon of the computer that is directlyconnected to the printer. Then, click the icon for theappropriate printer.
7. Click OK and follow the on-screen instructions.
For Windows 2000 and NT 4.0 users
This section tells you how to set up your printer so that othercomputers on the network can use it.
Note:❏ This section is written for small network users only. If you are on a
large network and would like to share your printer, consult yournetwork administrator.
❏ The screens shown in this section are from Windows NT 4.0.
First, you need to set up the printer as a shared printer on thecomputer to which the printer is connected. Then, you mustspecify the network path to the printer from each computer thatwill use it and install the printer software on those computers.
Setting up Your Printer as a Shared Printer
To share a printer with other computers on a network, follow thesteps below to configure the computer to which the printer isconnected.
1. Click the Start button, point to Settings, and click Printers.
2. Select the icon for your printer, then click Sharing on the Filemenu.
3. Click Shared (for Windows 2000 users, select Shared as),then type the Share Name.
4. Click OK.
-86 Using the Printer Driver

Note:For Windows NT 4.0 users, do not select a driver from the AlternateDrivers list. For Windows 2000 users, do not select a driver fromAdditional Drivers list in the Additional Drivers dialog box.
Accessing the printer through a network
To access your printer from other computers on the network,follow the steps in this section for each computer that will accessthe printer.
Note:Your printer must be set up as a shared resource on the computer towhich it is directly connected before you can access it from anothercomputer. For instructions, see “Setting up your printer as a sharedprinter”.
1. Install the printer driver from the software CD-ROM.
2. Click the Start button, point to Settings, and then clickControl Panel.
3. Double-click the Printers icon.
4. Right-click the icon for your printer, then click Properties onthe menu that appears. The printer driver opens.
5. Click the Ports tab, then click Add Port.
Using the Printer Driver -87

6. In the Printer Ports dialog box, select Local Port, then clickNew Port.
7. In the Port Name dialog box, enter the path information foryour printer using the format below:\\name of computer that is connected to the printer\name ofthe shared printer.
-88 Using the Printer Driver

8. Click OK to return to the Printer Ports dialog box.
9. Click Close to return to the Ports menu.
10. On the Ports menu, make sure that the new port is includedin the list and that the corresponding check box is selected.Click OK to close the printer driver.
Canceling Printing
If the printouts are not what you expected and display incorrector garbled characters or images, you may need to cancel printing.To cancel printing, follow the instructions below.
1. Press the On Line button on the control panel.
The On Line light is off.
2. When a print job continues on the PC, double-click the printericon on the task bar, click the Printer menu, then click PurgePrint Documents.
Using the Printer Driver -89
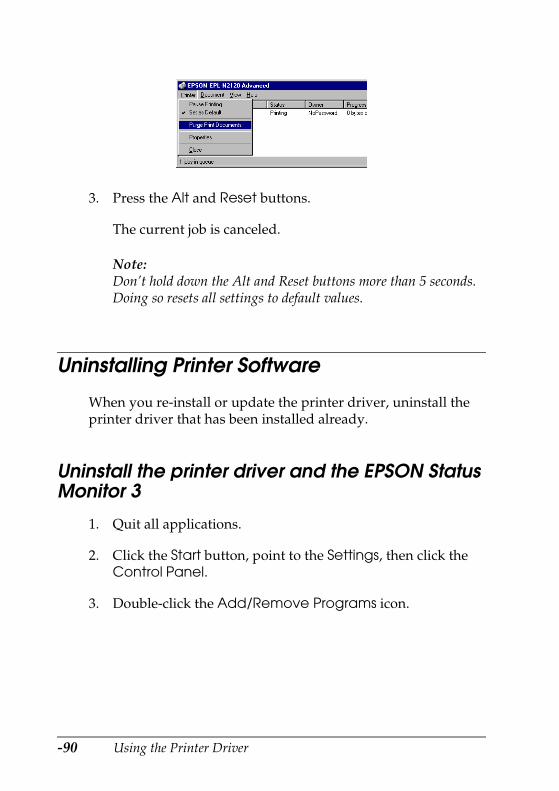
3. Press the Alt and Reset buttons.
The current job is canceled.
Note:Don’t hold down the Alt and Reset buttons more than 5 seconds.Doing so resets all settings to default values.
Uninstalling Printer Software
When you re-install or update the printer driver, uninstall theprinter driver that has been installed already.
Uninstall the printer driver and the EPSON StatusMonitor 3
1. Quit all applications.
2. Click the Start button, point to the Settings, then click theControl Panel.
3. Double-click the Add/Remove Programs icon.
-90 Using the Printer Driver

4. Select the EPSON Printer Software, then click theAdd/Remove button.
Note:When using Windows 2000, click the Change or RemovePrograms, select the EPSON Printer Software, then click theChange/Remove button.
5. Click the Printer Model tab, then select the printer icon.
Using the Printer Driver -91

6. Click the Utility tab, confirm the EPSON Status Monitor 3check box is on, then click OK.
7. Follow the on-screen instructions.
Uninstall only the EPSON Status Monitor 3
1. Quit all applications.
2. Click the Start button, point to the Settings, then click theControl Panel.
3. Double-click the Add/Remove Programs icon.
-92 Using the Printer Driver

4. Select the EPSON Printer Software, then click theAdd/Remove button.
Note:When using Windows 2000, click the Change or RemovePrograms, select the EPSON Printer Software, then click theChange/Remove button.
5. Click the Printer Model tab, then click the white space not toselect any icon.
Using the Printer Driver -93

6. Click the Utility tab, check the EPSON Status Monitor 3 checkbox, then click OK.
7. Click Yes.
8. Click OK.
-94 Using the Printer Driver

Using the Control Panel
Control Panel Overview
The printer’s control panel gives you easy control over mostcommon printer operations. The panel is made up of threeelements: an LCD (liquid crystal display) panel, indicator lights,and buttons. The LCD panel and indicator lights tell you thecurrent status of the printer, and you can use the buttons to selectprinter settings and functions. However, software settings alwaysoverride control panel settings.
LCD panel
The LCD panel shows the following:
❏ Status messages, such as Warming Up, indicate the printer’scurrent status.
❏ Error messages, such as Paper Out, identify maintenanceprocedures you must perform or error conditions you needto correct.
❏ SelecType options, such as Emulation Menu, allow you tocontrol printer mode, font selection, paper handling, andother printer functions.
Using the Control Panel -95

For solutions to error messages, see “Status and Error Messages”.
-96 Using the Control Panel

Indicator lights
1 On Line On when the printer is online, indicatingthat the printer is ready to receive andprint data.When the printer is offline, this light isoff. The light flashes as the systemswitches between online and offlinestatus.
2 Form Feed On when data is received and stored inthe printer’s buffer but not yet printed.Flashing indicates that the printer isprocessing data. When no data remainsin the printer buffer (the section ofmemory reserved for receiving data),this light is off.
3 Continue Flashes when an error is detected or amaintenance procedure must beperformed. At the same time, an error ormaintenance message appears on theLCD panel.
4 OneTouch mode 1 On when the printer is in OneTouchmode 1. For details on OneTouch modes,see “Using the OneTouch Modes”.
Using the Control Panel -97

5 OneTouch mode 2 On when the printer is in OneTouchmode 2. For details on the OneTouchmodes, see “Using the OneTouchModes”.
6 SelecType On when the printer is in the SelecTypemode.
-98 Using the Control Panel

Buttons
Using the Control Panel -99

1 On Line Switches the printer between online andoffline status.
2 Continue(Reset)
Enables the printer to resume printing aftercertain maintenance-required conditions orerrors have been cleared. If the Continuelight is flashing, read the status or errormessage on the LCD panel and correct theproblem as described in “Status and ErrorMessages”. If used in combination with theAlt button, the printer is reset.
3 Form Feed When the printer is offline and data remainsin the printer’s memory (Form Feed light ison), pressing this button prints out the dataand clears the buffer.
4 SelecType/(Alt)
Selects a OneTouch mode or SelecType mode.Press this button once to enter OneTouchmode 1. Press this button again to enterOneTouch mode 2. Press this button oncemore to enter SelecType mode. Pressing thisbutton while in SelecType mode returns theprinter to online status.
5 Menu Selects the corresponding OneTouch modesetting listed above this button if in OneTouchmode 1 or 2, or selects the SelecType menu ifin SelecType mode. Press this button whenthe printer is online to enter SelecType mode.
6 Item Selects the corresponding OneTouch modesetting listed above this button if in OneTouchmode 1 or 2, or selects the function availablewithin the current menu after entering theSelecType mode.
-100 Using the Control Panel

Using the OneTouch Modes
The OneTouch modes allow you to make the most commonprinter settings from the control panel when printing from anapplication or operating system that does not support yourprinter driver. Be sure to use the printer driver to make thesesettings whenever you can, since settings made in the applicationsoftware always override OneTouch mode settings.
To make OneTouch mode settings, access one of the modes asdescribed below and press the button located under the settingyou want to change to cycle forward through the availableoptions. You can also cycle backward through available optionsby holding down the Alt button while pressing the button underthe setting you want to change.
7 Value Selects the corresponding OneTouch modesetting listed above this button if in OneTouchmode 1 or 2, or selects the parameter availablewithin the current item, after entering theSelecType mode menu.
8 Enter(Status Sheet)
Selects the corresponding OneTouch modeoption listed above this button if in OneTouchmode 1 or 2, or accepts the setting currentlyshown on the LCD panel as a new settingwhen in SelecType mode. Press this buttontwo times when the printer is online to printthe status sheet.
9 Alt + Menu,Item, or Value
Returns the shown parameter or setting ineach group to its previous value.
Using the Control Panel -101

OneTouch mode 1
To enter OneTouch mode 1, press the SelecType button(repeatedly if necessary) until the light next to Paper Sourcecomes on, indicating that the printer is now in OneTouch mode 1.The current OneTouch mode 1 settings for Paper Source, PageSize, Manual Feed, and Orientation are shown on the displayabove the corresponding setting. For example, Port or Land isshown above Orientation.
Paper Source
Specifies whether paper feeds into the printer from the MP tray,the standard lower paper cassette or an optional lower papercassette unit (if installed). If you select Auto, the paper sourcecontaining the paper that matches the paper size setting you havemade will be used.
Page Size
Specifies the paper size.
Manual feed
Turns the manual feed mode on or off. For details on the manualfeed mode, see “Manually loading paper”.
Orientation
Specifies whether the page is printed in portrait (Port) orlandscape (Land) orientation.
-102 Using the Control Panel

To make OneTouch settings, access one of the modes as describedabove and press the button located under the setting you want tochange to cycle forward through the available options. You canalso press Alt (SelecType) and the button to cycle backwardthrough the available options.
OneTouch mode 2
To enter OneTouch mode 2, press the SelecType button(repeatedly if necessary) until the indicator light next to RITechcomes on, indicating that the printer is now in OneTouch mode 2.The current OneTouch mode 2 settings for RITech, Copies, MPTray Size, and Toner Save Mode are shown on the display abovethe corresponding setting. For example, On or Off is shown aboveToner Save Mode.
RITech
Allows you to turn the RITech setting on or off. RlTech producessmoother and crisper lines, text, and graphics.
Copies
Selects the number of copies to be printed, up to 999.
MP Tray Size
Allows you to set the paper size for the MP tray.
Using the Control Panel -103

Toner Save Mode
Turns the Toner Save mode on or off. When turned on, the printersaves toner by substituting a gray shade for the black inside ofcharacters. The characters are outlined in full black on the rightand lower edges.
Using SelecType
The control panel’s SelecType mode allows you to make detailedprinter settings that you cannot make from your application orprinter driver. It is also useful for making settings when you areusing DOS applications. For more information on when youshould use SelecType, see “When to use SelecType”.
The SelecType mode is accessed by using the control panelbuttons. The functions of the control panel buttons are differentin OneTouch and SelecType modes. For detailed information onthe functions of the buttons, see “Buttons”.
When to use SelecType
In general, use SelecType only for settings you cannot make inyour software, including the following:
❏ Changing the emulation modes and selecting the IES(Intelligent Emulation switching) mode.
❏ Specifying the channel and configuring the interface.
❏ Choosing the size of the memory buffer used to receive data.
You should keep the following points in mind when usingSelecType settings:
❏ A number of SelecType settings can also be made using theOneTouch modes.
-104 Using the Control Panel

❏ Application programs may send commands to the printer thatoverride SelecType settings. If you are not getting the resultsyou expect, check your application software settings.
❏ To see the currently active SelecType settings, print a statussheet.
Entering the SelecType mode
Use the buttons on the printer’s control panel to enter theSelecType mode. SelecType settings appear on the LCD panel.
Note:You can directly access certain menu items using the OneTouch modes.For more information, see “Using the OneTouch Modes”.
Using the Control Panel -105

Follow these steps to enter, navigate, and exit the SelecTypemode:
1. To enter the SelecType mode, press Menu.
2. To change the settings, press Menu, Item, or Value.
❏ To select a new menu (menu category), press Menu.
-106 Using the Control Panel
❏ To select an item (setting) in a menu, press Item.
❏ To select a value (parameter) for an item, press Value.
❏ To accept a new setting, press Enter.
❏ Press Alt in combination with Menu, Item or Value toselect a menu, item, or parameter in reverse order.
3. To exit the SelecType mode, press On Line or SelecType.
Overview of SelecType menus
This section gives a brief description of the menus in SelecTypeand lists the settings available on each menu. For more detaileddescriptions of the settings, see “SelecType Menu Settings”.
Test Menu
These settings select and perform the printer’s internal testprinting. You can obtain information on the printer’s currentsettings, available fonts, and a brief summary of features. See“Test Menu” for more information.
Status Sheet, AUX Status Sheet*, LJ4 Font Sample, ESCP2 FontSample, FX Font Sample, I239X Font Sample
* Available only when an optional Ethernet Interface Card (C82362✽ orC82363✽) is installed.
Emulation Menu
These settings select the default emulation for each interface. See“Emulation Menu” for more information.
Parallel, AUX*
* Available only when an optional Type-B interface card is installed.
Using the Control Panel -107

Printing Menu
These are the most basic settings that you will need for everydayuse. Most can be set using your software. Always check thesoftware settings as they override settings made in SelecType. See“Printing Menu” for more information.
Paper Source, Page Size, Wide A4, Orientation, Copies,Manual Feed, Resolution, Skip Blank Page, Auto Eject Page,Duplex*, Binding*, Start Page*
* Available only when an optional duplex unit is installed.
Tray Menu
These settings allow you to select the size and type of paper youloaded in the paper sources. Accessing this menu also lets youcheck the size of the paper currently loaded. This information isautomatically transmitted to the printer through the position ofthe paper guides in the paper source. Also see “Tray Menu”.
MP Mode, MP Tray Size***, LC1 Size*, LC2 Size**, LC3 Size**,MP Type, LC1 Type*, LC2 Type**, LC3 Type**
* LC1 size and LC2 size display the currently loaded paper size.
** Available only when an optional lower paper cassette unit is installed.
***Do not change the setting during printing.
Config Menu
These settings affect the printer’s performance. See “ConfigMenu” for more information.
RITech, Toner Save, Density, Top Offset, Left Offset,T offset B*., L offset B*., Size Ignore, Auto Cont, Page Protect,Image Optimum, Paper Type
* Available only when an optional duplex unit is installed.
-108 Using the Control Panel

Setup Menu
These settings provide the printer with information necessary forprinting. See “Setup Menu” for more information.
Time Out, Toner, Toner Out, Total Pages, SelecType Init
Parallel Menu
These settings control communication between the printer andthe computer when using a parallel interface. See “Parallel Menu”for more information.
Parallel I/F, Speed, Bi-D, Buffer Size
AUX* Menu
This setting controls the optional interface settings. Also see“AUX Menu”.
AUX I/F, AUX Config**, Get IP Address**, IP Byte 1**, IP Byte2**, IP Byte 3**, IP Byte 4**, SM Byte 1**, SM Byte 2**, SM Byte3**, SM Byte 4**, GW Byte 1**, GW Byte 2**, GW Byte 3**,GW Byte 4**, NetWare**, AppleTalk**, NetBEUI**, AUX Init**,Buffer Size
* Available only when an optional Type-B interface card is installed.
** Available only when an optional Ethernet Interface Card (C82362✽ orC82363✽) is installed.
LJ4 Menu
These settings control the fonts and symbol sets when in the LJ4mode. See “LJ4 Menu” for more information.
FontSource, Font Number, Pitch, Height, SymSet, Form,Source SymSet, Dest SymSet, CR Function, LF Function, TrayAssign
Using the Control Panel -109
GL2 Menu
These settings are available only when the printer is in the GL2mode. See “GL/2 Menu” for more information.
GLMode, Scale, Origin, Pen, End, Join, Pen0 through Pen6
ESCP2 Menu
These settings are available only when the printer is in theESC/P 2 mode. See “ESC/P 2 Menu” for more information.
Font, Pitch, Condensed, T.Margin, Text, CG Table, Country,Auto CR, Auto LF, Bit Image, ZeroChar
FX Menu
These settings are available only when the printer is in the FXmode. See “FX Menu” for more information.
Font, Pitch, Condensed, T.Margin, Text, CG Table, Country,Auto CR, Auto LF, Bit Image, ZeroChar
I239X Menu
These settings are available only when the printer is in the I239Xmode. See “I239X Menu” for more information.
Font, Pitch, Code Page, T.Margin, Text, Auto CR, Auto LF,Alt. Graphics, Bit Image, ZeroChar, CharacterSet
SelecType Menu Settings
Read this section for a complete description of the settingsavailable on the SelecType menus.
-110 Using the Control Panel

Test Menu
For the settings below, press Enter to print. No values areselectable by pressing Value.
Note:After you print these samples, user-defined data stored in the printer,such as downloaded fonts, may be erased depending on the sample youprinted.
Status Sheet, AUX Status Sheet*
Prints a sample printout describing the current printer features.Use this option to check whether your printer is workingcorrectly.
* Available only when an optional Ethernet Interface Card (C82362✽ orC82363✽) is installed.
LJ4 Font Sample, ESCP2 Font Sample, FX Font Sample, I239XFont Sample
Prints a sample of the fonts available for your selected printeremulation.
Using the Control Panel -111

Emulation Menu
Use this menu to select the printer emulation mode. You canspecify different emulations for each interface; in other words, foreach computer you connect the printer to. Since each emulationmode has its own specific options, make settings in the LJ4,ESCP2, FX, GL2, or I239X menus, as necessary. The options youcan set are the same for every interface.
* Available only when on optional Type-B interface card is installed.
Note:The default setting may change depending on which option is installed.Print a status sheet to confirm the current default settings.
Printing Menu
The settings in the Printing Menu can be set from within yoursoftware. Settings you make in your software override SelecTypesettings.
Item Values (default in bold)
Parallel Auto, LJ4, ESCP2, FX, I239X, GL2
AUX* Auto, LJ4, ESCP2, FX, I239X, GL2
-112 Using the Control Panel

All items in the Printing Menu except Resolution, Wide A4, Skip Blank Page, and Auto Eject Page can be accessed directly withthe OneTouch Modes. See “Using the OneTouch Modes” forfurther information.
* These appear only when the corresponding options are installed.
Paper Source
Specifies whether paper feeds into the printer from the MP tray,the standard lower paper cassette, or an optional lower papercassette.
If you select Auto, paper feeds from the tray containing the paperthat matches the paper size setting you have made.
Page Size
Specifies the paper size.
Item Values (default in bold)
Paper Source Auto, MP, LC1, LC2*, LC3*
Page Size A4, A3, A5, B4, B5, LT, B, HLT, LGLGLT, GLG, EXE, F4, MON, C10, DL,C5, CTM
Wide A4 Off, On
Orientation Port, Land
Copies 1 - 999
Manual Feed Off, On
Resolution 600, 1200, 300
Skip Blank Page Off, On
Auto Eject Page Off, On
Duplex* Off, On
Binding* Long Edge, Short Edge
Start Page* Front, Back
Using the Control Panel -113

Wide A4
Specifies whether to extend the printing area of the shorter side.When turned on, the printing area is extended.
Orientation
Specifies whether the page is printed in portrait or landscapeorientation.
Copies
Selects the number of copies to be printed, up to 999.
Manual Feed
This item selects the manual feed mode. For details on the manualfeed mode, see “Manually loading paper”.
Resolution
Switches the resolution between 300, 600 and 1200 dpi.
Skip Blank Page
Turns the Skip Blank Page mode on. When turned on, the printerskips pages that have no images or characters, allowing you tosave paper.
Auto Eject Page
Sets whether or not to output paper when the time-out limit isreached according to the Time Out setting in the Setup Menu. Thedefault is Off, or paper is not printed when the time-out limit isreached.
Duplex
Sets whether or not to duplex printing when the optional duplexunit is installed. The default is Off.
-114 Using the Control Panel

Binding
Sets the position of a binding margin when the optional duplexunit is installed.
Note:You can change the width of a binding margin in the Config Menu.
Start Page
Sets whether to start the printing from the front or back of the firstpage when the duplex setting is on. This setting is available whenthe optional duplex unit is installed.
Tray Menu
This menu allows you to specify the size and type of paper loadedin the various paper sources. Accessing this menu also lets youcheck the size of the paper currently loaded.
Using the Control Panel -115
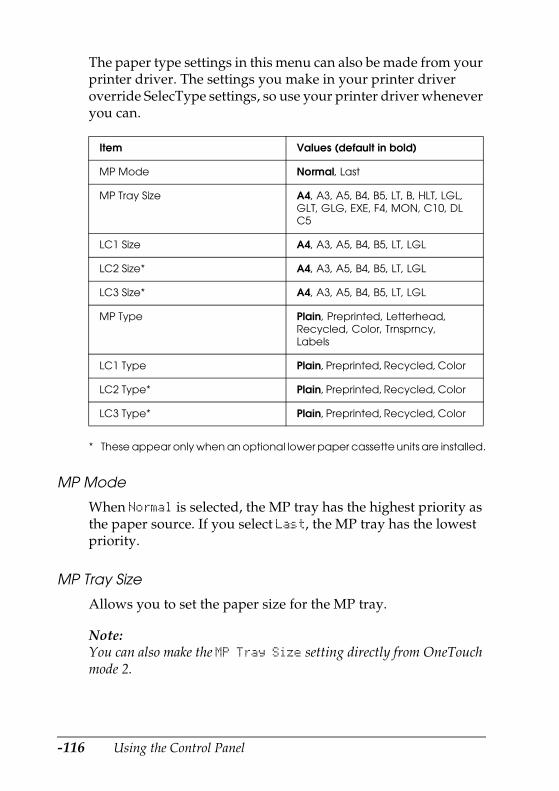
The paper type settings in this menu can also be made from yourprinter driver. The settings you make in your printer driveroverride SelecType settings, so use your printer driver wheneveryou can.
* These appear only when an optional lower paper cassette units are installed.
MP Mode
When Normal is selected, the MP tray has the highest priority asthe paper source. If you select Last, the MP tray has the lowestpriority.
MP Tray Size
Allows you to set the paper size for the MP tray.
Note:You can also make the MP Tray Size setting directly from OneTouchmode 2.
Item Values (default in bold)
MP Mode Normal, Last
MP Tray Size A4, A3, A5, B4, B5, LT, B, HLT, LGL,GLT, GLG, EXE, F4, MON, C10, DLC5
LC1 Size A4, A3, A5, B4, B5, LT, LGL
LC2 Size* A4, A3, A5, B4, B5, LT, LGL
LC3 Size* A4, A3, A5, B4, B5, LT, LGL
MP Type Plain, Preprinted, Letterhead,Recycled, Color, Trnsprncy,Labels
LC1 Type Plain, Preprinted, Recycled, Color
LC2 Type* Plain, Preprinted, Recycled, Color
LC3 Type* Plain, Preprinted, Recycled, Color
-116 Using the Control Panel

LC1 Size, LC2 Size, LC3 Size
Displays the actual paper size loaded in the standard or optionallower paper cassette.
Note:LC1 Size, LC2 Size and LC3 Size only display the currently loadedpaper size. You cannot change this parameter; it is set automatically.
MP Type
Lets you specify the paper type setting for paper loaded in the MPtray.
LC1 Type, LC2 Type, LC3 Type
Lets you select the paper type loaded in the standard and optionallower paper cassettes.
Using the Control Panel -117

Config Menu
* These appear only when an optional duplex unit is installed.
RITech
Allows you to adjust the RITech setting. RITech producessmoother and crisper lines, text, and graphics.
Note:You can also make the RITech setting directly from OneTouch mode 2.
Item Values (default in bold)
RiTech On, Off
Toner Save Off, On
Density 1, 2, 3, 4, 5
Top Offset -150.0 ... 0.0 ... 150.0 mm inincrements of 0.5
Left Offset -150.0 ... 0.0 ... 150.0 mm inincrements of 0.5
T offset B.* -150.0 ... 0.0 ... 150.0 mm inincrements of 0.5
L offset B.* -150.0 ... 0.0 ... 150.0 mm inincrements of 0.5
Size Ignore Off, On
Auto Cont Off, On
Page Protect Auto, On
Image Optimum Auto, Off, On
Paper Type Normal, Thick, Trnsprnc
-118 Using the Control Panel

Toner Save
Turns the Toner Save mode on. When turned on, the printer savestoner by substituting a gray shade for the black inside ofcharacters. The characters are outlined in full black on the rightand lower edges.
Note:You can also make the Toner Save setting directly from OneTouchmode 2.
Top Offset
Use this option to make fine adjustments to the vertical positionof the printing on the page.
c Caution:Be sure that the printed image does not exceed the edge of thepaper. Otherwise, you may damage the printer.
Left Offset
Use this option to make fine adjustments to the horizontalposition of the printing on the page.
c Caution:Be sure that the printed image does not exceed the edge of thepaper. Otherwise, you may damage the printer.
T Offset B
Use this option to make adjustments to the vertical position of theprinting on the back page when you do duplex printing.
L Offset B
Use this option to make adjustments to the horizontal position ofthe printing on the back page when you do duplex printing.
Using the Control Panel -119

Size Ignore
Allows you to specify whether a paper size error is ignored.Turning this item on causes the printer to print even if the imagesize does not match the specified paper size. This can causesmudges because of toner that is not transferred onto the paperproperly. When this item is turned off, the printer stops printingif a paper size error occurs.
Auto Cont
Permits the printer to automatically continue printing after acertain period of time when one of the following errors occurs:Paper Set, Print Overrun and Mem Overflow. When this optionis off, you, must press the Continue button to resume printing.In most cases, it is best to leave this option set to Off.
Page Protect
Use this list to make use of the Page Protect function. This allowsyou to allocate additional printer memory for printing data, asopposed to receiving it. You may need to use Page Protect if youare printing a highly complex page. If a Print Overrun erroroccurs, change the setting to On and reprint your data. Thisreduces the amount of memory reserved for receiving data soyour computer may take longer to send the print job, but it willallow you to print complex jobs.Page Protectusually works bestif set to Auto. You will need to increase your printer’s memory ifmemory errors continue to occur.
Note:Changing thePage Protect setting reconfigures the printer’s memory,which causes any downloaded fonts to be erased.
Image Optimum
Reduces the amount of graphics data when the data reaches thememory limit, allowing complex documents to be printed. Whenthis mode is on and memory is limited, the quality of graphics isreduced.
-120 Using the Control Panel

Paper Type
Allows you to use various types of paper. Thick is useful forenvelopes and irregularly sized plain paper over 75g/m². Alwaysuse Normal unless print quality problems occur.
Setup Menu
Time Out
Sets the length of time the printer waits when it is online and nonew data is received. When this time is up, the printer searchesfor new print data on other channels.
Toner
Displays the amount of toner left in the imaging cartridge.
Item Values (default in bold)
Time Out 0, 5 ... 60 ... 300 seconds inincrements of 1
Toner E****F
Toner Out Stop, Continue
Total Pages 0 to 99999999
SelecType Init –
E**** F (100-75%)
E*** F (75-50%)
E** F (50-25%)
E* F (25-0%)
E F (0%)
Using the Control Panel -121

Toner Out
Printing automatically stops when the Toner Out messageappears. You can continue to print by pressing the Continuebutton for every page that you want to print. However, thisprocedure can be circumvented by setting Toner Out to Continue.
Total Pages
Displays the total number of sheets printed to date by this printer.
SelecType Init
Erases all the SelecType settings you have changed, and resetsthem to the factory default settings.
Parallel Menu
Parallel I/F
Allows you to activate or deactivate the parallel interface.
Speed
Specifies the transfer speed by selecting the delay period from theSTROBE to the ACKNLG signal.
Item Values (default in bold)
Parallel I/F On, Off
Speed Fast, Normal
Bi-D Nibble, ECP, Off
Buffer Size Normal, Maximum, Minimum
-122 Using the Control Panel

Bi-D
Enables or disables bidirectional communication.
Buffer Size
Determines the amount of memory to be used for receiving dataand printing data. If set to Maximum, more memory is allocated forreceiving data. If set to Minimum, more memory is allocated forprinting data. The factory default setting is Normal.
Note:❏ After changing these settings, reset the printer to make the new
settings effective. To reset the printer, Press the Alt and Resetbuttons simultaneously untilReset All appears on the LCD panel.Alternatively, turn off the printer, then after 5 seconds, turn it backon.
❏ Resetting the printer erases all print jobs. Make sure the On Linelight is not blinking when you reboot the printer.
Using the Control Panel -123

AUX Menu
This menu allows you to set up the optional interface.
* Available only when an optional Ethernet Interface Card (C82362✽ orC82363✽) is installed.
** These settings are displayed when AUX Config is set to Yes.
Item Values (default in bold)
AUX I/F On, Off
AUX Config* No, Yes
Get IPAddress* Panel, Auto, PING
IP Byte 1** 0 to 255
IP Byte 2** 0 to 255
IP Byte 3** 0 to 255
IP Byte 4** 0 to 255
SM Byte 1** 0 to 255
SM Byte 2** 0 to 255
SM Byte 3** 0 to 255
SM Byte 4** 0 to 255
GW Byte 1** 0 to 255
GW Byte 2** 0 to 255
GW Byte 3** 0 to 255
GW Byte 4** 0 to 255
NetWare** On, Off
AppleTalk** On, Off
NetBEUI** On, Off
AUX Init** –
Buffer Size Normal, Maximum, Minimum
-124 Using the Control Panel

Note:The settings marked with asterisks are the network settings that aredisplayed when an Ethernet Interface Card (C82362✽, C82363✽) isattached. Refer to the optional interface card’s User’s Guide for furtherdetails on network settings.
AUX I/F
Allows you to activate or deactivate the AUX interface when anoptional interface card is installed.
Buffer Size
Determines the amount of memory to be used for receiving dataand printing data. If set to Maximum, more memory is allocated forreceiving data. If set to Minimum, more memory is allocated forprinting. The factory default setting is Normal.
Note:❏ After changing these settings, reset the printer to make the new
settings effective. To reset the printer, Press the Alt and Resetbuttons simultaneously untilReset All appears on the LCD panel.Alternatively, turn off the printer, then after 5 seconds, turn it backon.
❏ Resetting the printer erases all print jobs. Make sure the On Linelight is not blinking when you reboot the printer.
LJ4 Menu
Item Values (default in bold)
Font Source Resident, Download, DIMM A
Font Number 0 to 65535
Pitch 0.44 ... 10.00 ... 99.99 cpi, in0.01-cpi increments
Using the Control Panel -125

Note:If you always use the HP LaserJet 4 printer driver in your software, youshould change settings using that software. Software settings alwaysoverride the settings made in the SelecType LJ4 Menu.
Height 4.00 ... 12.00 ... 999.75 pt, in 0.25-ptincrements
SymSet IBM-US, Roman-8, Roman-9,ECM94-1, 8859-2 ISO, 8859-9 ISO,8859-10ISO, 8859-15ISO, PcBlt775,IBM-DN, PcMultiling, PcE. Europe,PcTk437, PcEur858, Pc1004,WiAnsi, WiE.Europe, WiTurkish,WiBALT, DeskTop, PsText,Velnternati, VeUS, MsPublishin,Math-8, PsMath, VeMath, PiFont,Legal, UK, ANSI ASCII, Swedis2,Italian, Spanish, German,Norweg1, French2, Windows,McText, PcIcelandic, PcLt774,PcTurk1, PcPortugues, PcEt850,PcTurk2, PcCanFrench, PcS1437,PcNordic, 8859-3 ISO, 8859-4 ISO,WiBaltic, WiEstonian, WiLatvian,Mazowia, CodeMJK, BpBRASCII,BpAbicomp, PcGk437, PcGk851,PcGk869, 8859-7 ISO, WiGreek,Europe3, PcCy855, PcCy866,PcLt866, PcUkr866, PcLit771,8859-5 ISO, WiCyrillic, Bulgarian,Hebrew7, 8859-8 ISO, Hebrew8,PcHe862, Arabic8, PcAr864,8859-6 ISO, OCR A, OCR B
Form 5 ... 64 ... 128 lines
Source SymSet 0 ... 277 ... 3199
Dest SymSet 0 ... 277 ... 3199
CR Function CR, CR+LF
LF Function LF, CR+LF
Tray Assign 4, 4K, 5S
Item Values (default in bold)
-126 Using the Control Panel
Font Source
Selects the default font source.
Font Number
Selects the default font number from the default font source.
Pitch
Specifies the default font pitch if the font is scalable and offixed-pitch. You can select from 0.44 to 99.99 cpi, in increments of0.01 cpi.
Height
Specifies the default font height if the font is scalable andproportional. You can select from 4.00 to 999.75 points, inincrements of 0.25 points.
SymSet
Selects the default symbol set. If the font you selected inFontSource and Font Number is not available in the new SymSetsetting, the FontSource and the Font Number values areautomatically replaced with the default value.
Form
Selects the number of lines for the selected paper size andorientation. This causes a line spacing (VMI) change also, and thenew VMI value is stored in the printer. This means that laterchanges in Page Size or Orientation settings cause changes inthe Form value, based on the stored VMI.
Source SymSet
Available only when an optional font ROM module is installed.
Using the Control Panel -127

Dest SymSet
Available only when an optional font ROM module is installed.
CR Function
When CR is set for the CR Function, the printer does not performa line feed (LF) command with each carriage return (CR). SettingCR+LF for the CR Function causes the printer to add a line feed toeach carriage return it receives. Select CR+LF for this function ifyou find that lines of text are overlapping in your document.
LF Function
When LF is set for the LF Function, the printer does not performa carriage return (CR) command with each line feed (LF) or formfeed (FF). Setting CR+LF for the LF Function causes the printer toadd a carriage return to each line feed or form feed it receives.Select CR+LF for this function if you find that the printer does notprint characters beyond the right margin.
Tray Assign
Changes the assignment for the paper source select command.When 4 is selected, the commands are set as compatible with theHP LaserJet 4. When 4K is selected, the commands are set ascompatible with the HP LaserJet 4000, 5000, and 8000. When 5S isselected, the commands are set as compatible with the HP LaserJet5Si.
-128 Using the Control Panel

GL/2 Menu
In the EPSON GL/2 mode, you can use your printer with plotterapplications. This mode is similar to the GL/2 mode supportedin the HP LaserJet 4 mode. The EPSON GL/2 mode emulatessome of the HP-GL plotter commands and includes all of thecommands found in HP’s GL/2 mode, plus two additionalcommands.
* Pen2 through Pen6 are available only when GLlike is selected.
GLMode
Selects whether the emulation is similar to GL/2 or the HPLaserJet 4 emulation of GL/2.
Scale
Specifies whether the output from the software is scaled. The scalefactor is based on the output paper size of the application.
Origin
Selects whether the logical origin of the “plotter” is from thecorner or the center of the paper.
Item Values (default in bold)
GLMode GLlike, LJ4GL2
Scale Off, A0, A1, A2, A3
Origin Corner, Center
Pen Pen0, Pen1, Pen2*, Pen3*, Pen4*,Pen5*, Pen6*
End Butt, Square, Triangular, Round
Join Mitered, Miteredbeveled,Triangular, Round, Beveled, None
Pen0 through Pen6* 0.05 ... 0.35 ... 5.00 mm in 0.05-mmincrements
Using the Control Panel -129

Pen
Selects the logical “pen” which is used to “plot” the drawing.
End
Selects the way in which lines end.
Join
Selects the way in which lines are joined.
Pen0 through Pen6
Selects the thickness of the seven “pens” used to make theprintout.
Differences between the two emulations
The table below shows the differences betweenHewlett-Packard’s and EPSON’s emulation of the GL/2 mode.
Command HP GL/2 mode EPSON GL/2 mode
Orientation Printer setting Landscape only
Plotter unit 1/1016 inch 1/1021 inch
Picture frame Same as LaserJet 4mode
Depends on thehard-clip limit
Default positionof P1 and P2
Lower left and lowerright corners,respectively, ofpicture frame
Inside of picture frame
Undefinedcommands
First character isignored
First two charactersare ignored
CS, CAcommands
Not supported Partially supported
PG, AFcommands
Not supported Supported
-130 Using the Control Panel

Before printing in the EPSON GL/2 mode
You may need to change the printer settings, depending on youroutput needs. Always check the printer’s setting to make surethey match the data you are trying to print.
If you need to configure the printer settings, first switch to theGL/2 emulation mode, then change the settings using the printerdriver, or SelecType.
Note:Settings or data saved in the printer’s RAM (such as downloaded fonts)may be erased when you change the emulation mode.
Results when a DTcommand withno secondparameter is sent
Terminator is notplotted
Terminator is plotted
ESC %#Acommands
Supported Not supported
Print Options Settings
Paper size Printer’s paper size setting
Driver (plotterselection)
HP-GL/2 or HP-GL
Pen configuration Pen thickness
Plot origin Center or Corner
Orientation GLlike offers landscape only.LJ4GL2 offers landscape and portrait.
Command HP GL/2 mode EPSON GL/2 mode
Using the Control Panel -131

ESC/P 2 Menu
The table below lists the ESCP2 menu options.
Font
Allows you to specify the font by typeface.
The factory default font is Courier. After selecting the desiredfont, you can also adjust the character spacing and size of the fontwith the Pitch and Condensed options described below.
Item Values (default in bold)
Font Courier, Prestige, Roman, Sans Serif, Roman T,Orator S, Sans H, Script, OCR A, OCR B
Pitch 10 cpi, 12 cpi, 15 cpi, Prop.
Condensed Off, On
T. Margin 0.40 ... 0.50 ... 1.50 inch, in 0.05-inch increments
Text 1... 66 ... 117 Lines
CG Table PcUSA, Italic, PcMultilin, PcPortugue,PcCanFrenc, PcNordic, PcTurkish2, PcIcelandic,PcE.Europe, BpBRASCII, BpAbicomp, Roman-8,PcEur858, ISO Latin1, 8859-15ISO, PcS1437,PcTurkish1, 8859-9 ISO, Mazowia, CodeMJK,PcGk437, PcGk851, PcGk869, 8859-7 ISO,PcCy855, PcCy866, PcUkr866, PcLit771,Bulgarian, Hebrew7, PcHe862, Hebrew8, PcAr864
Country USA, France, Germany, UK, Denmark, Sweden,Italy, Spain1, Japan, Norway, Denmark2, Spain2,LatinAmeric, Korea, Legal.
Auto CR On, Off
Auto LF Off, On
Bit Image Dark, Light, BarCode
ZeroChar 0, (or the zero character with a slash)
-132 Using the Control Panel
Pitch
You can select a character pitch of 10, 12, or 15 cpi (characters perinch), or choose proportional spacing.
Condensed
Use this option to change the character spacing. Condensedprinting is useful for spreadsheets and other applications thatneed to fit a large amount of information on each line. However,l5-cpi characters cannot be condensed.
T.Margin
Use this option to specify the distance from the top of the sheet tothe baseline of the first printable line. This is measured in 0.05-inchincrements.
Text
Use this option to set the page length in lines. The unit of measurefor this option is a l/6-inch line.
If you change the Orientation, Page Size, or T.Margin settings,the page length setting automatically returns to the default settingfor each paper size.
CG Table
Use the character generator table option to select the graphicscharacter table, or the italics table. The graphics table containsgraphic characters for printing lines, corners, shaded areas,international characters, Greek characters, and mathematicalsymbols. Selecting the italics table defines the upper half of thecharacter table as italic characters.
Country
Use this option to select one of the fifteen international symbolsets.
Using the Control Panel -133

Auto CR
Use the automatic carriage return option to perform acarriage-return line-feed (CR-LF) operation whenever the printposition exceeds the right margin. If Auto CR is Off, the printerdoes not print characters beyond the right margin, and it does notperform a linewrap until it receives a carriage return command.Most software programs take care of this function.
Auto LF
When you set Auto LF to Off, the printer does not send anautomatic line feed (LF) command with each carriage return (CR).When you set Auto LF to On, the printer adds a line feed to eachcarriage return it receives. If your text lines overprint each other,set Auto LF to On.
Bit Image
With Bit Image set to Dark or Light, your printer can correctlyemulate the graphics densities set with the printer commands.When you select Dark, the bit image density is high. When youselect Light, the bit image density is low.
The BarCode setting converts bit images to barcodes byautomatically filling in any vertical gaps between dots. Thisproduces unbroken vertical lines that can be read by a barcodereader. This mode reduces the size of the image being printed andmay cause some distortion when printing bit-image graphics.BarCode is not available in the I239X mode.
ZeroChar
Specifies whether the printer prints a slashed or unslashed zero.
-134 Using the Control Panel

FX Menu
The table below lists the FX Menu options. The details of eachoptions are the same as the options of ESC/P 2 Menu.
I239X Menu
The l239X mode emulates lBM 2390/2391 Plus commands.
Item Values (default in bold)
Font Courier, Prestige, Roman, Sans Serif, Orator S,Script, OCR A, OCR B
Pitch 10 cpi, 12 cpi, 15 cpi, Prop.
Condensed Off, On
T.Margin 0.40 … 0.50 … 1.50 inch, in 0.05-inch increments
Text 1 … 66 … 117 lines
CG Table PcUSA, Italic, PcMultilin, PcPortugue,PcCanFrenc, PcNordic, PcTurkish2, PcIcelandic,PcE.Europe, BpBRASCII, BpAbicomp, Roman-8,PcEur858, ISO Latin1, 8859-15ISO
Country USA, France, Germany, UK, Denmark, Sweden,Italy, Spain1, Japan, Norway, Denmark2, Spain2,LatinAmeric, Korea
Auto CR Off, On
Auto LF Off, On
Bit Image Dark, Light
ZeroChar 0, (or the zero character with a slash)
Item Values (default in bold)
Font Courier, Prestige, Gothic, Orator, Script,Presentor, Sans serif
Pitch 10 cpi, 12 cpi, 15 cpi, I7 cpi, 20 cpi, 24 cpi, Prop.
Code page 437, 850, 858, 860, 863, 865
Using the Control Panel -135

Font
Allows you to specify the font by typeface.
Pitch
Selects the pitch (the horizontal spacing) of the font in fixed pitch,measured in cpi (characters per inch). You can also chooseproportional spacing.
Code page
Selects the character tables. Character tables contain thecharacters and symbols used in different languages. The printerprints text based on the selected character table.
T. Margin
Sets the distance from the top of the page to the baseline of thefirst printable line. The distance is measured in inches. Thesmaller the value, the closer the printable line is to the top.
T. Margin 0.30 ... 0.40 ... 1.50 inch, in 0.05-inch increments
Text 1 ... 67 ... 117 Lines
Auto CR Off, On
Auto LF Off, On
Alt. Graphics Off, On
Bit lmage Dark, Light
ZeroChar 0, (or the zero character with a slash)
CharacterSet 1, 2
Item Values (default in bold)
-136 Using the Control Panel

Text
Sets the page length in lines. For this option, a line is assumed tobe 1 pica (1/6 inch). If you change the Orientation, Page Size,or T. Margin settings, the page length setting automaticallyreturns to the default setting for each paper size.
Auto CR
Specifies whether the printer performs acarriage-return/line-feed (CR-LF) operation whenever theprinter position goes beyond the right margin. If this setting is off,the printer does not print any characters beyond the right marginand does not perform any line wrapping until it receives acarriage-return character. This function is handled automaticallyby most applications.
Auto LF
If you set this option to Off, the printer does not send an automaticline-feed (LF) command with each carriage return (CR). If this isset to On, a line-feed command is sent with each carriage return.Set to On if your text lines overlap.
Alt.Graphics
Turns the Alternate Graphics option on or off. The default settingis Off.
Bit Image
The printer is able to emulate the graphics densities set with theprinter commands. If you select Dark, the bit image density ishigh, and if you select Light, the bit image density is low.
ZeroChar
Selects whether the printer prints a slashed or unslashed zero.
Using the Control Panel -137

CharacterSet
Selects character table 1 or 2.
Understanding Printer Emulation
Your printer is designed to work best in its LJ4 emulation mode,so LJ4 emulation mode is recommended whenever possible. Ifyou want to use an emulation other than LJ4, you can select theESC/P 2, FX, l239X, or GL/2 emulation mode.
Match the emulation mode in the Emulation Menu with driversor print data already formatted for EPSON LQ or FX seriesprinters, or IBM printers.
Note:The printer’s intelligent emulation switching (IES) featureautomatically switches between emulation modes, depending on the datareceived. The available emulation modes are LJ4, GL2, I239X, ESC/P 2and FX.
The default emulation mode setting is Auto. Use SelecType tochange the emulation mode. For more information, see“Emulation Menu”.
-138 Using the Control Panel

Installing and Removing Options
Optional 250-Sheet Lower Paper Cassette Unit
Installing the optional 250-Sheet Lower Paper Cassette Unitincreases the paper-feeding capacity of your printer. Forinformation on the paper sizes and types supported by theoptional 250-Sheet Lower Paper Cassette Unit, see “PaperSources”.
c Caution:Before installing an option, carefully read the manual that comeswith the option.
Installing the 250-Sheet Lower Paper CassetteUnit
The installation procedure for both the optional 250-Sheet LowerPaper Cassette Unit and 500-Sheet Lower Paper Cassette Unit isthe same. Refer to the instructions below for the installation ofboth units.
Follow these steps to install the optional 250-Sheet Lower PaperCassette Unit or 500-Sheet Lower Paper Cassette Unit:
Note:The illustrations show the 250-Sheet Lower Paper Cassette Unit.
1. Make sure the printer is turned off.
2. Unplug the printer’s power cord from the electrical outlet andfrom the printer.
3. Remove all interface cables.
Installing and Removing Options -139
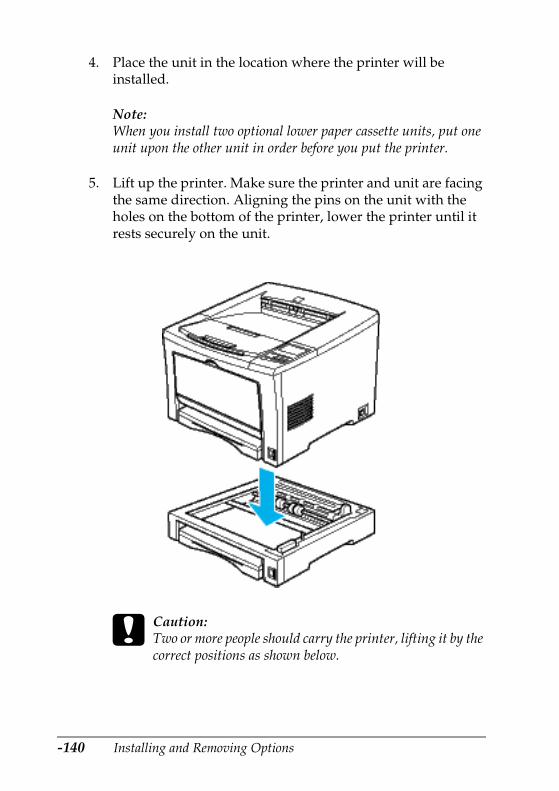
4. Place the unit in the location where the printer will beinstalled.
Note:When you install two optional lower paper cassette units, put oneunit upon the other unit in order before you put the printer.
5. Lift up the printer. Make sure the printer and unit are facingthe same direction. Aligning the pins on the unit with theholes on the bottom of the printer, lower the printer until itrests securely on the unit.
c Caution:Two or more people should carry the printer, lifting it by thecorrect positions as shown below.
-140 Installing and Removing Options

Note:When you install two optional lower paper cassette units, put oneunit upon the other unit in order, then put the printer on top of them.
6. Secure the printer to the unit with the provided fittings. Installfour fittings at the locations noted below.
Installing and Removing Options -141

Note:When you install two optional lower paper cassette units, secureboth units with the same procedure.
7. Reconnect any interface cable you removed.
8. Make sure the printer’s power switch is turned off, then plugthe power cord into the printer and into an electrical outlet.
9. Turn on the printer.
To confirm that the 250-Sheet Lower Paper Cassette Unit or the500-Sheet Lower Paper Cassette Unit is installed correctly, printa status sheet by pressing the Enter button two times when theprinter is online. The 250-Sheet Lower Paper Cassette Unit or the500-Sheet Lower Paper Cassette Unit will be listed under OtherOptions on the status sheet as one of the available options. If theunit is not listed on the status sheet, try reinstalling it.
-142 Installing and Removing Options

When printing on paper loaded in the optional 250-Sheet LowerPaper Cassette Unit or 500-Sheet Lower Paper Cassette Unit, besure to select the option as the paper source in your applicationprogram. Since the selection method varies from application toapplication, see your software documentation for moreinformation.
Note:The paper-loading procedure for the optional 250-Sheet Lower PaperCassette Unit is the same as that for the standard lower paper cassette.See “Loading Paper” for a detailed description of the procedure.
Removing the Optional 250-Sheet Lower PaperCassette Unit
To remove the unit, do the installation procedure in reverse order.
Optional 500-Sheet Lower Paper Cassette Unit
Installing the optional 500-Sheet Lower Paper Cassette Unitincreases the paper-feeding capacity of your printer. Forinformation on the paper sizes and types supported by theoptional 500-Sheet Lower Paper Cassette Unit, see “PaperSources”.
Installing the 500-Sheet Lower Paper CassetteUnit
The installation procedure for the optional 500-Sheet Lower PaperCassette Unit is the same as that for the optional 250-Sheet LowerPaper Cassette Unit. See “Installing the 250-Sheet Lower PaperCassette Unit” for installation instructions.
Installing and Removing Options -143

Note:See “Loading Paper” in the Online Guide for a detailed description ofthe paper-loading procedure for the optional 500-Sheet Lower PaperCassette Unit.
Removing the Optional 500-Sheet Lower PaperCassette Unit
To remove the unit, do the installation procedure in reverse order.
Duplex Unit
Installing the Duplex Unit enables duplex printing.
For information on the paper size and types supported by theDuplex Unit, see “Paper Sources”.
As an ENERGY STAR® partner, EPSON recommends the use ofthe double-sided printing function. Refer to “ENERGYSTAR® Compliance” for more information on the ENERGYSTAR® program.
Installing a Duplex Unit
1. Make sure the printer is turned off.
2. Unplug the printer’s power cord from the electrical outlet andfrom the printer.
3. Remove all interface cables.
4. Remove both covers from the printer’s backside using the toolprovided.
-144 Installing and Removing Options

5. Install the Duplex Unit.Hook the projections of the unit as shown.
6. Secure the unit to the printer with the three screws provided.
Installing and Removing Options -145

To verify that memory is correctly installed, print a status sheet.For instructions on how to print a status sheet, see the Setup Guide.
If the Duplex Unit is not listed on the status sheet, try reinstallingit.
Removing a Duplex Unit
To remove the unit, do the installation procedure in reverse order.
Memory Module
By installing a DIMM (Dual In-line Memory Module), you canincrease printer memory up to 528 MB. You may want to addadditional memory if you are having difficulty printing complex,graphics-intensive pages or if you regularly use numerousdownloaded fonts.
See “Options and Consumables” for details about memorymodule requirements.
-146 Installing and Removing Options

Installing a memory module
1. Make sure the printer is turned off and unplug the powercord.
w Warning:To avoid electrical shock, do not attempt to install a DIMMunless the printer is turned off.
2. Open the printer cover by pressing the latch, then remove theprinter’s right side cover.
3. Loosen the screws that secure the shield cover, then removethe cover.
Installing and Removing Options -147

* screws
w Warning:Avoid touching the electrical components that are exposedafter you remove the shield cover. They may be very hot if theprinter has been in use.
c Caution:Before you install the module, be sure to discharge any staticelectricity by touching the printer’s shield cover or agrounded piece of metal. Otherwise, you may damagestatic-sensitive components.
4. Push the clips on each side of the RAM slot outward.
-148 Installing and Removing Options

5. Align the two depressions on the base of the DIMM with theprotrusions inside the RAM slot to determine the position ofattachment.
6. Insert one end of the DIMM into the slot and push until theretaining clip comes up.
7. Push the other end of the DIMM into the slot until the clipcomes up to retain the memory module securely.
8. Replace the shield cover, then secure it with its screws.
Installing and Removing Options -149

c Caution:When replacing the shield cover, be sure not to pinch thewires inside the printer between the printer case and theshield cover.
9. Replace the printer’s right side cover.
-150 Installing and Removing Options

10. Press down on the printer cover until it clicks shut.
To verify that memory is correctly installed, print a status sheet.For instructions on how to print a status sheet, see the Setup Guide.
If an incorrect amount of memory is shown on the status sheet,turn off the printer and review the steps above to make sure youcorrectly installed the DIMM. If the amount of memory is stillincorrect, contact your dealer or a qualified service representativefor assistance.
Installing and Removing Options -151

Removing a memory module
To remove the unit, do the installation procedure in reverse order.
Interface Card
Your printer comes with a Type B interface slot. Various optionalinterface cards are available to expand your printer’s interfaceoptions.
c Caution:Before you install the interface card, be sure to discharge anystatic electricity by touching a grounded piece of metal.Otherwise, you may damage static-sensitive components.
Installing an interface card
1. Make sure the printer is turned off and unplug the powercord.
2. Remove the two screws that secure the Type-B interface slotcover and remove the cover.
-152 Installing and Removing Options

3. Slide the interface card into the grooves in the interface slot.Push it in firmly to lock the card into place.
Note:When inserting the interface card, make sure that the componentside of the card is on the left.
4. Secure the interface card with the two retaining screws.
To verify that the interface card is correctly installed, print a statussheet. For instructions on how to print a status sheet, see the SetupGuide.
Installing and Removing Options -153

If the interface is not listed on the status sheet, try reinstalling thecard making sure the card is securely fastened to the socket insidethe printer.
Removing an interface card
To remove the unit, do the installation procedure in reverse order.
-154 Installing and Removing Options

Replacing Consumable Products
Replacing the Imaging Cartridge
The imaging cartridge prints up to 10,000 pages, depending onthe complexity of your print jobs. (The imaging cartridge includedwith the printer prints up to 6,000 pages.)
If your printed images become faint, enter the SelecType SetupMenu to use the Toner function to find out approximately howmuch toner remains in the imaging cartridge.
Simply count the asterisks between the E (empty) and the F (full)on the LCD panel. Each asterisk represents about 25% of the totaltoner capacity. If you see only one asterisk on the LCD panelindicating that there is less than 25% toner left, you should getready to replace the imaging cartridge.
When replacing a cartridge, be sure to use the imaging cartridgewith the product number S051077. Even if you have a cartridgeother than the S051077, do not use it; order the S051077 cartridgebecause it is specially designed for your high-quality 600-dpiprinter.
EPSON recommends the use of genuine EPSON imagingcartridges. Other products not manufactured by EPSON maycause damage to your printer and will not be covered by EPSON’swarranties.
Follow these steps to replace the imaging cartridge and reset thetoner counter:
Replacing Consumable Products -155

w Warning:Be careful not to touch the fuser, which is marked CAUTION!HIGH TEMPERATURE, or the surrounding areas. If the printerhas been in use, the fuser and the surrounding areas may be veryhot.
1. Make sure the printer is turned on.
2. Gently open the printer cover and remove the imagingcartridge by pulling it up toward you.
3. Dispose of the used imaging cartridge as a nonburnable item.
w Warning:Do not dispose of used imaging cartridges in fire, as they canexplode and cause injury. Dispose of them according to localregulations.
c Caution:Do not turn the imaging cartridge upside down and do notexpose it to light any longer than necessary.
4. While holding the new imaging cartridge horizontally, gentlyshake it a few times to distribute the toner evenly.
-156 Replacing Consumable Products

5. Pull the clear seal all the way out with firm, even pressure.
6. Press the latch on the left side of the printer and open theprinter cover.
Replacing Consumable Products -157

7. Turn the arrow on the cartridge toward the printer cover sideand slide the cartridge into place. Align the guides on bothsides, then insert the cartridge firmly.
8. Gently press down on the printer cover until it clicks shut.
-158 Replacing Consumable Products

c Caution:Never transport the printer with the imaging cartridgeinstalled.
Replacing Consumable Products -159

-160 Replacing Consumable Products

Clean and Transport the Printer
Cleaning the Printer
The printer needs only minimal cleaning. If you notice a declinein print quality, clean the inside of the printer as described in thissection.
You should also clean the paper cassette and the printer coverevery few months. These procedures are described later in thissection.
Cleaning the printer case
If the printer’s outer case is dirty or dusty, turn off the printer andclean it with a soft, clean cloth dampened with a mild detergent.
Clean and Transport the Printer -161

c Caution:Never use alcohol or thinner to clean the printer cover; thesechemicals can damage the components and the case. Be carefulnot to get water on the printer mechanism or any electroniccomponents.
Cleaning the paper roller
Paper is sometimes dusted with a powder to keep the image onone sheet from bleeding over to the back of the sheet stacked ontop of it. When feeding such paper from the MP tray, the dusttends to get onto the paper roller and eventually causes misfeedsto occur. Use the following procedure to clean the paper rollerwhen you start having feed problems from the MP tray.
Follow these steps to clean the paper roller:
1. Make sure the printer is turned off.
2. Open the printer cover by pressing the latch.
-162 Clean and Transport the Printer
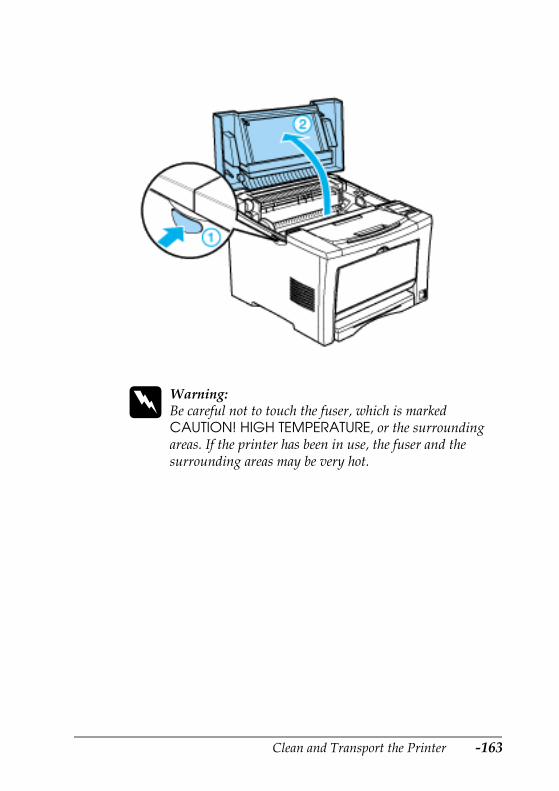
w Warning:Be careful not to touch the fuser, which is markedCAUTION! HIGH TEMPERATURE, or the surroundingareas. If the printer has been in use, the fuser and thesurrounding areas may be very hot.
Clean and Transport the Printer -163

3. Remove the imaging cartridge from the printer.
c Caution:Do not touch the transfer roller to avoid the degradation ofthe print quality.
-164 Clean and Transport the Printer

4. Grip the tabs on the ring located on the both sides of the paperrollers, and move them to the outside as shown in theillustration below.
5. Move the paper rollers slightly to the outside and then detachthem from the shaft.
Clean and Transport the Printer -165

6. Gently wipe the rubber part of the paper roller with awell-wrung cloth.
The printer has two paper rollers.
* Wipe the rubber part carefully.
-166 Clean and Transport the Printer

7. Reattach the paper rollers onto the shaft, making sure that thearrow on the paper roller is on the right as shown in theillustration below.
Clean and Transport the Printer -167

8. Move the paper rollers toward the center of the shaft, makingsure that the pins on the shaft fit into the grooves on eachroller.
* pins
9. Move the rings back into position so they secure the paperrollers in place.
-168 Clean and Transport the Printer

10. Reinstall the imaging cartridge.
Clean and Transport the Printer -169

11. Close the printer cover until it clicks shut.
Transporting the Printer
If you need to transport your printer, carefully repack it using itsoriginal box and packing materials.
c Caution:Two or more people should carry the printer, lifting it by thecorrect positions as shown below.
-170 Clean and Transport the Printer

Follow these steps to repack the printer:
1. Turn off the printer.
2. Open the printer cover and remove the imaging cartridge.
c Caution:Do not expose the imaging cartridge to light any longer thannecessary.
3. Remove all paper from the MP tray.
4. Remove the standard lower paper cassette from the printer.
5. Remove the loaded paper from the lower paper cassette.
6. Unplug the power cord from the electrical outlet; thendisconnect the interface cable from the printer.
7. Remove the optional lower paper cassette unit, if installed.
8. Repack the printer in its original box using the protectivematerials that came with it.
Clean and Transport the Printer -171

-172 Clean and Transport the Printer

Working with Fonts
Available Fonts
The following table lists the fonts that are installed on yourprinter. The names of all the fonts appear in your applicationsoftware’s font list if you are using the driver provided with theprinter. If you are using a different driver, all of these fonts maynot be available.
The fonts provided with the printer are shown below, accordingto the emulation mode.
LJ4/GL2 mode
Font name Family HPequivalent
Courier SWC Medium, Bold, Italic, BoldItalic
Courier
Dutch 801 SWC Medium, Bold, Italic, BoldItalic
CG Times
Zapf Humanist 601SWC
Medium, Bold, Italic, BoldItalic
CG Omega
Ribbon 131 SWC - Coronet
ClarendonCondensed SWC
- ClarendonCondensed
Swiss 742 SWC Medium, Bold, Italic, BoldItalic
Univers
Swiss 742Condensed SWC
Medium, Bold, Italic, BoldItalic
UniversCondensed
Incised 901 SWC Medium, Bold, Italic AntiqueOlive
Working with Fonts -173

OriginalGaramondSWC
Medium, Bold, Italic, BoldItalic
Garamond
Audrey Two SWC - Marigold
Flareserif 821 SWC Medium, Extra Bold Albertus
Swiss 721 SWM Medium, Bold, Italic, BoldItalic
Arial
Dutch 801 SWM Medium, Bold, Italic, BoldItalic
Times New
Swiss 721 SWA Medium, Bold, Italic,Bold Italic
Helvetica
Swiss 721 NarrowSWA
Medium, Bold, Italic,Bold Italic
HelveticaNarrow
Zapf Calligraphic801 SWA
Medium, Bold, Italic,Bold Italic
PalatinoRoman
ITC Avant GardeSWA
Medium, Bold, Italic,Bold Italic
ITC AvantGardeGothic
ITC Bookman SWA Medium, Bold, Italic,Bold Italic
ITC Bookman
CenturySchoolbook SWA
Medium, Bold, Italic,Bold Italic
New CenturySchoolbook
Dutch 801 SWA Medium, Bold, Italic,Bold Italic
Times
ITC Zapf ChancerySWA Italic
- ITC ZapfChanceryMediumItalic
Symbol Set SWM - Symbol
Symbol Set SWA - SymbolPS
More WingBatsSWM
- Wingdings
ITC Zapf DingbatsSWA
- ITC ZapfDingbats
Font name Family HPequivalent
-174 Working with Fonts

When selecting fonts in your application software, choose the fontname listed in the HP equivalent column.
Note:Depending on the print density, or on the quality or color of the paper,OCR A, OCR B, Code39, FAN/UPC fonts may not be readable. Print asample and make sure the fonts can be read before printing largequantities.
Letter Gothic SWC Medium, Bold, Italic Letter Gothic
Courier SWA Medium, Bold, Italic,Bold Italic
CourierPS
Line Printer - Line Printer
OCR A - -
OCR B - -
Code39 9.37 pitch, 4.68 pitch -
EAN/UPC Bold, Medium -
Font name Family HPequivalent
Working with Fonts -175

ESC/P 2 and FX modes
* Available only in ESC/P2 mode.
Note:Depending on the print density, or on the quality or color of the paper,OCR A and OCR B fonts may not be readable. Print a sample and makesure the fonts can be read before printing large quantities.
I239X mode
Font name Family
Courier SWC Medium, Bold
EPSON Prestige -
EPSON Roman -
EPSON Sans serif -
Swiss 721 SWM* Medium, Bold
Letter Gothic SWC Medium, Bold
Dutch 801 SWM* Medium, Bold
EPSON Script -
OCR A -
OCR B -
Font name Family
Courier SWC Medium, Bold
EPSON Prestige -
EPSON Gothic -
EPSON Orator -
EPSON Script -
-176 Working with Fonts

Note:Depending on the print density, or on the quality or color of the paper,OCR B font may not be readable. Print a sample and make sure the fontcan be read before printing large quantities.
You can print font samples for viewing by using the SelecTypeTest Menu. Follow these steps to print font samples:
1. Make sure that paper is loaded.
2. Press Menu while the printer is online.
3. Press Item until the font sample you want appears.
4. Press Enter, and a Font Sample sheet is printed.
Adding More Fonts
You can install more fonts into your Windows operating system.Most font packages include an installer for this purpose.
If you’re running Windows, you can also install fonts from withinthe Fonts window. To access this window, open the Control Paneland double-click the Fonts icon. Once installed, the fonts areavailable in all your Windows applications.
Selecting Fonts
Whenever possible select fonts from the font list in yourapplication. See your software documentation for instructions.
EPSON Presentor -
EPSON Sans serif -
OCR B -
Working with Fonts -177
If you are sending unformatted text to the printer directly fromDOS or if you are using a simple software package that does notinclude font selection, you can select fonts with SelecType whenin the LJ4, ESC/P 2, FX, or I239X menu.
Downloading Fonts
Fonts that reside on your computer’s hard disk can bedownloaded, or transferred, to the printer so they can be printed.Downloaded fonts, also called soft fonts, remain in printermemory until you turn off the printer or otherwise reinitialize it.If you plan on downloading many fonts, make sure your printerhas sufficient memory.
Most font packages make it easy to manage fonts by providingtheir own installer. The installer gives you the option of havingthe fonts automatically downloaded whenever you start yourcomputer or having fonts downloaded only when you need toprint a particular font.
EPSON Font Manager
The EPSON Font Manager provides you with 31 printer fonts and96 software fonts.
Installing the EPSON Font Manager
Follow these steps to install the EPSON Font Manager:
1. Make sure that the printer is turned off and that Windows isrunning on your computer.
2. Insert the CD-ROM that comes with your printer into yourCD-ROM drive.
-178 Working with Fonts

3. In the dialog box that appears, double-click Install EPSONFont Manager. Alternatively, you can install it by selectingInstall EPSON Font Manager and then clicking the arrow atthe top right.
4. Follow the on-screen instructions.
5. When installation is complete, click OK.
The EPSON Font Manager is now installed on your computer.
EPSON BarCode Fonts
EPSON BarCode Fonts let you easily create and print many typesof bar codes.
Working with Fonts -179
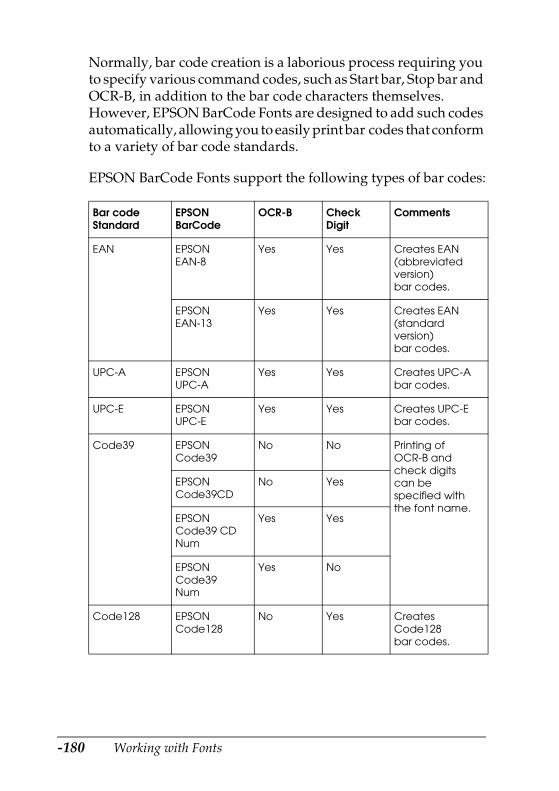
Normally, bar code creation is a laborious process requiring youto specify various command codes, such as Start bar, Stop bar andOCR-B, in addition to the bar code characters themselves.However, EPSON BarCode Fonts are designed to add such codesautomatically, allowing you to easily print bar codes that conformto a variety of bar code standards.
EPSON BarCode Fonts support the following types of bar codes:
Bar codeStandard
EPSONBarCode
OCR-B CheckDigit
Comments
EAN EPSONEAN-8
Yes Yes Creates EAN(abbreviatedversion)bar codes.
EPSONEAN-13
Yes Yes Creates EAN(standardversion)bar codes.
UPC-A EPSONUPC-A
Yes Yes Creates UPC-Abar codes.
UPC-E EPSONUPC-E
Yes Yes Creates UPC-Ebar codes.
Code39 EPSONCode39
No No Printing ofOCR-B andcheck digitscan bespecified withthe font name.
EPSONCode39CD
No Yes
EPSONCode39 CDNum
Yes Yes
EPSONCode39Num
Yes No
Code128 EPSONCode128
No Yes CreatesCode128bar codes.
-180 Working with Fonts
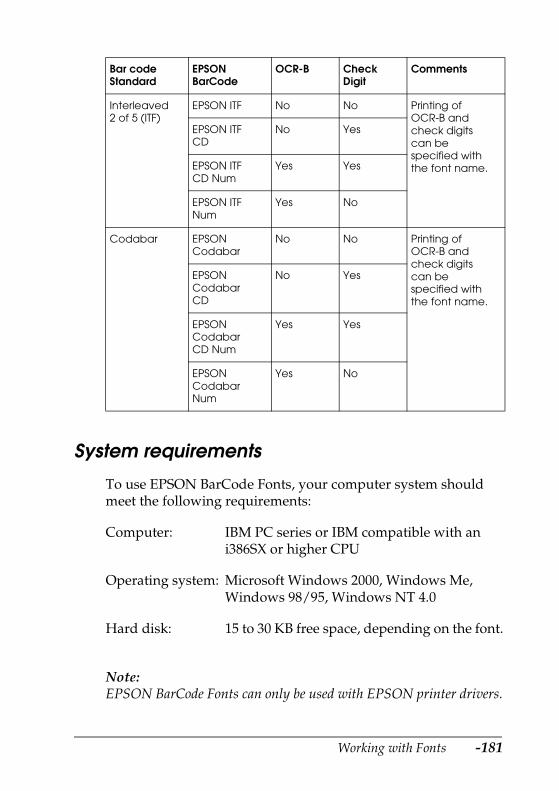
System requirements
To use EPSON BarCode Fonts, your computer system shouldmeet the following requirements:
Note:EPSON BarCode Fonts can only be used with EPSON printer drivers.
Interleaved2 of 5 (ITF)
EPSON ITF No No Printing ofOCR-B andcheck digitscan bespecified withthe font name.
EPSON ITFCD
No Yes
EPSON ITFCD Num
Yes Yes
EPSON ITFNum
Yes No
Codabar EPSONCodabar
No No Printing ofOCR-B andcheck digitscan bespecified withthe font name.
EPSONCodabarCD
No Yes
EPSONCodabarCD Num
Yes Yes
EPSONCodabarNum
Yes No
Computer: IBM PC series or IBM compatible with ani386SX or higher CPU
Operating system: Microsoft Windows 2000, Windows Me,Windows 98/95, Windows NT 4.0
Hard disk: 15 to 30 KB free space, depending on the font.
Bar codeStandard
EPSONBarCode
OCR-B CheckDigit
Comments
Working with Fonts -181

Installing EPSON BarCode Fonts
Follow these steps to install EPSON BarCode Fonts. Theprocedure described here is for installation in Windows 98; theprocedure for other Windows operating systems is nearly thesame.
1. Turn on the computer and start Windows.
2. Insert the CD-ROM or floppy disk containing the EPSONBarCode Fonts into the appropriate drive.
3. Click Start, point to Settings, then click Control Panel.
4. Double click Fonts.
5. From the File menu, select Install New Font.
6. Select the appropriate CD-ROM or floppy drive, then selectthe BarCode Fonts folder from the Folders list.
7. In the List of fonts box, select the BarCode Font you want toinstall, or click the Select All button to install all EPSONBarCode Fonts.
-182 Working with Fonts

Note:Make sure that the Copy fonts to Fonts folder check box isselected.
8. Click OK. The selected EPSON BarCode Fonts are installed inthe Windows Fonts folder.
Printing with EPSON BarCode Fonts
Follow these steps to create and print bar codes using EPSONBarCode Fonts. The application featured in these instructions isMicrosoft WordPad. The actual procedure may differ slightlywhen printing from other applications.
1. Open a document in your application and enter the charactersyou want to convert into a bar code.
2. Select the characters, then select Font from the Format menu.
Working with Fonts -183

3. Select the EPSON BarCode Font you want to use, then set thefont size and click OK.
Note:In Windows NT 4.0 and Windows 2000, you cannot use font sizeslarger than 96 points when printing bar codes.
-184 Working with Fonts
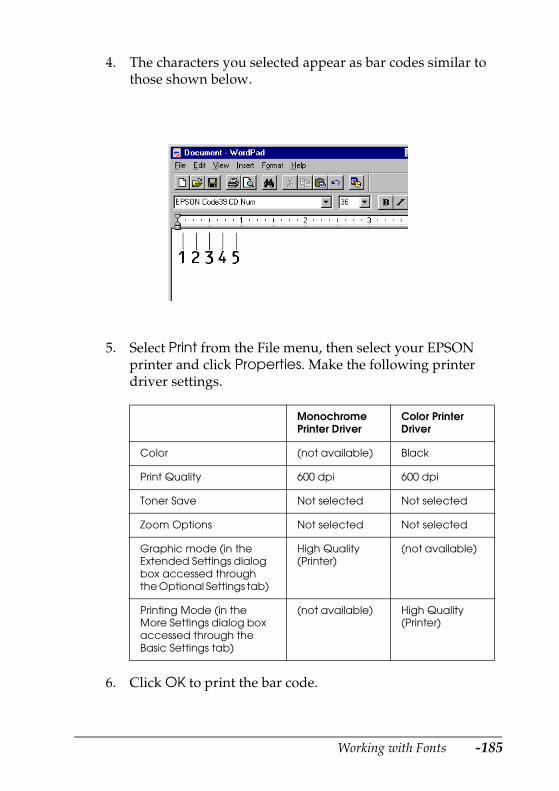
4. The characters you selected appear as bar codes similar tothose shown below.
5. Select Print from the File menu, then select your EPSONprinter and click Properties. Make the following printerdriver settings.
6. Click OK to print the bar code.
MonochromePrinter Driver
Color PrinterDriver
Color (not available) Black
Print Quality 600 dpi 600 dpi
Toner Save Not selected Not selected
Zoom Options Not selected Not selected
Graphic mode (in theExtended Settings dialogbox accessed throughthe Optional Settings tab)
High Quality(Printer)
(not available)
Printing Mode (in theMore Settings dialog boxaccessed through theBasic Settings tab)
(not available) High Quality(Printer)
Working with Fonts -185

Note:If there is an error in the bar code character string, such asinappropriate data, the bar code will be printed as it appears on thescreen, but it cannot be read by a bar code reader.
Notes on inputting and formatting bar codes
Please note the following when inputting and formatting bar codecharacters:
❏ Do not apply shading or special character formatting, such asbold, italic, or underline.
❏ Print bar codes in black and white only.
❏ When rotating characters, only specify rotation angles of 90°,180° and 270°.
❏ Turn off all automatic character and word spacing settings inyour application.
❏ Do not use features in your application which enlarge orreduce the size of characters in only the vertical or horizontaldirection.
❏ Turn off your application’s auto-correct features for spelling,grammar, spacing, etc.
❏ To more easily distinguish bar codes from other text in yourdocument, set your application to show text symbols, such asparagraph marks, tabs, etc.
❏ Because special characters such as Start bar and Stop bar areadded when an EPSON BarCode Font is selected, theresulting bar code may have more characters than wereoriginally input.
-186 Working with Fonts

❏ For best results, use only the font sizes recommended in“EPSON BarCode Font specifications” for the EPSONBarCode Font you are using. Bar codes in other sizes may notbe readable with all bar code readers.
Note:Depending on the print density, or on the quality or color of the paper,bar codes may not be readable with all bar code readers. Print a sampleand make sure the bar code can be read before printing large quantities.
EPSON BarCode Font specifications
This section contains details on the character input specificationsfor each EPSON BarCode Font.
EPSON EAN-8
❏ EAN-8 is an eight-digit abbreviated version of the EANbar code standard.
❏ Because the check digit is added automatically, only 7characters can be input.
The following codes are inserted automatically and need not beinput by hand:
❏ Left/Right margin
❏ Left/Right guard bar
❏ Center bar
Character type Numbers (0 to 9)
Number of characters Up to 7 characters
Font size 52 pt to130 pt (up to 96 pt in WindowsNT/Windows 2000). Recommended sizesare 52 pt, 65 pt (standard), 97.5 pt and130 pt.
Working with Fonts -187
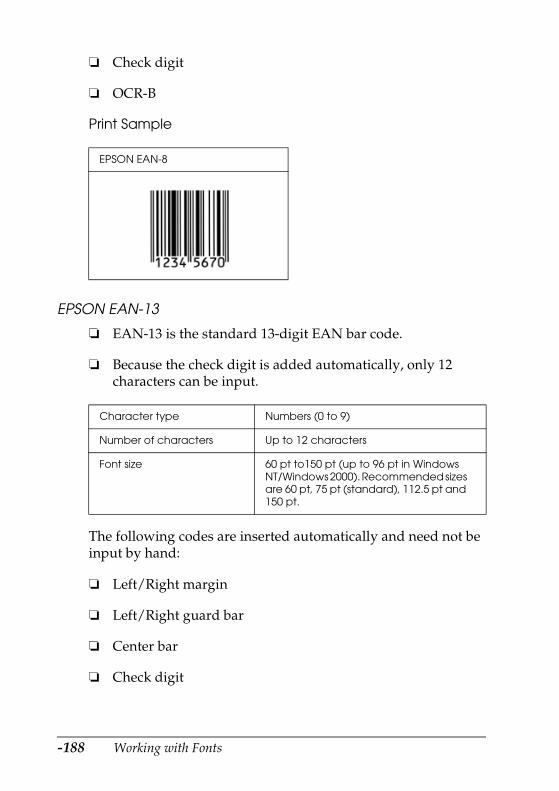
❏ Check digit
❏ OCR-B
Print Sample
EPSON EAN-13
❏ EAN-13 is the standard 13-digit EAN bar code.
❏ Because the check digit is added automatically, only 12characters can be input.
The following codes are inserted automatically and need not beinput by hand:
❏ Left/Right margin
❏ Left/Right guard bar
❏ Center bar
❏ Check digit
EPSON EAN-8
Character type Numbers (0 to 9)
Number of characters Up to 12 characters
Font size 60 pt to150 pt (up to 96 pt in WindowsNT/Windows 2000). Recommended sizesare 60 pt, 75 pt (standard), 112.5 pt and150 pt.
-188 Working with Fonts

❏ OCR-B
Print Sample
EPSON UPC-A
❏ UPC-A is the UPC-A standard bar code specified by theAmerican Universal Product Code (UPC SymbolSpecification Manual).
❏ Only regular UPC codes are supported. Supplementary codesare not supported.
The following codes are inserted automatically and need not beinput by hand:
❏ Left/Right margin
❏ Left/Right guard bar
❏ Center bar
❏ Check digit
EPSON EAN-13
Character type Numbers (0 to 9)
Number of characters Up to 11 characters
Font size 60 pt to150 pt (up to 96 pt in WindowsNT/Windows 2000). Recommended sizesare 60 pt, 75 pt (standard), 112.5 pt and150 pt.
Working with Fonts -189

❏ OCR-B
Print Sample
EPSON UPC-E
❏ UPC-E is the UPC-A zero-suppression (deletes extra zeros)bar code specified by the American Universal Product Code(UPC Symbol Specification Manual).
The following codes are inserted automatically and need not beinput by hand:
❏ Left/Right margin
❏ Left/Right guard bar
❏ Check digit
❏ OCR-B
❏ The numeral “0”
EPSON UPC-A
Character type Numbers (0 to 9)
Number of characters Up to 6 characters
Font size 60 pt to150 pt (up to 96 pt in WindowsNT/Windows 2000). Recommended sizesare 60 pt, 75 pt (standard), 112.5 pt and150 pt.
-190 Working with Fonts

Print Sample
EPSON Code39
❏ Four Code39 fonts are available, allowing you to enable anddisable the automatic insertion of check digits and OCR-B.
❏ The height of the bar code is automatically adjusted to 15% ormore of its total length, in conformance to the Code39standard. For this reason, it is important to keep at least onespace between the bar code and the surrounding text toprevent overlapping.
❏ Spaces in Code39 bar codes should be input as “_” underbars.
❏ When printing two or more bar codes on one line, separatethe bar codes with a tab, or select a font other than a BarCodeFont and input the space. If a space is input while a Code39font is selected, the bar code will not be correct.
EPSON UPC-E
Character type Alphanumeric characters (A to Z, 0 to 9)Symbols (- . space $ / + %)
Number of characters No limit
Working with Fonts -191

The following codes are inserted automatically and need not beinput by hand:
❏ Left/Right quiet zone
❏ Check digit
❏ Start/Stop character
Print Sample
EPSON Code128
❏ Code128 fonts support code sets A, B, and C. When the codeset of a line of characters is changed in the middle of the line,a conversion code is automatically inserted.
Font size When OCR-B is not used: 26 pt or more(up to 96 pt in Windows NT/Windows2000).Recommended sizes are 26 pt, 52 pt, 78pt and 104 pt.
When OCR-B is used: 36 pt or more (upto 96 pt in Windows NT/Windows 2000).Recommended sizes are 36 pt, 72 pt, 108pt and 144 pt.
EPSON Code39 EPSON Code39 CD
EPSON Code39 Num EPSON Code39 CD Num
-192 Working with Fonts
❏ The height of the bar code is automatically adjusted to 15% ormore of its total length, in conformance to the Code128standard. For this reason, it is important to keep at least onespace between the bar code and the surrounding text toprevent overlapping.
❏ Some application software automatically deletes the spaces atthe end of lines or changes multiple spaces into tabs. Bar codescontaining spaces may not be correctly printed fromapplications that automatically delete spaces from the ends oflines or change multiple spaces into tabs.
❏ When printing two or more bar codes on one line, separatethe bar codes with a tab, or select a font other than a BarCodeFont and input the space. If a space is input while Code128 isselected, the bar code will not be correct.
The following codes are inserted automatically and need not beinput by hand:
❏ Left/Right quiet zone
❏ Start/Stop character
❏ Check digit
❏ Change code set character
Character type All ASCII characters (95 in total)
Number of characters No limit
Font size 26 pt to 104 pt (up to 96 pt in WindowsNT/Windows 2000). Recommended sizesare 26 pt, 52 pt, 78 pt and 104 pt.
Working with Fonts -193
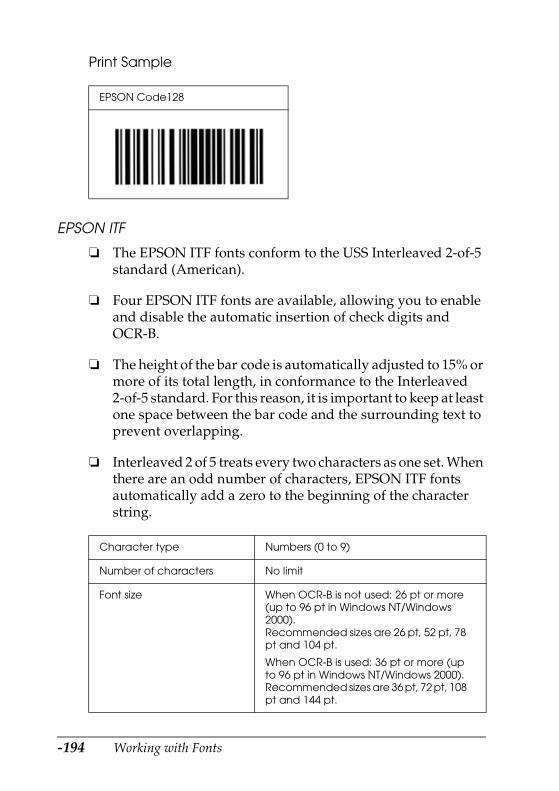
Print Sample
EPSON ITF
❏ The EPSON ITF fonts conform to the USS Interleaved 2-of-5standard (American).
❏ Four EPSON ITF fonts are available, allowing you to enableand disable the automatic insertion of check digits andOCR-B.
❏ The height of the bar code is automatically adjusted to 15% ormore of its total length, in conformance to the Interleaved2-of-5 standard. For this reason, it is important to keep at leastone space between the bar code and the surrounding text toprevent overlapping.
❏ Interleaved 2 of 5 treats every two characters as one set. Whenthere are an odd number of characters, EPSON ITF fontsautomatically add a zero to the beginning of the characterstring.
EPSON Code128
Character type Numbers (0 to 9)
Number of characters No limit
Font size When OCR-B is not used: 26 pt or more(up to 96 pt in Windows NT/Windows2000).Recommended sizes are 26 pt, 52 pt, 78pt and 104 pt.
When OCR-B is used: 36 pt or more (upto 96 pt in Windows NT/Windows 2000).Recommended sizes are 36 pt, 72 pt, 108pt and 144 pt.
-194 Working with Fonts

The following codes are inserted automatically and need not beinput by hand:
❏ Left/Right quiet zone
❏ Start/Stop character
❏ Check digit
❏ The numeral “0” (added to the beginning of character stringsas needed)
Print Sample
EPSON Codabar
❏ Four Codabar fonts are available, allowing you to enable anddisable the automatic insertion of check digits and OCR-B.
EPSON ITF EPSON ITF CD
EPSON ITF Num EPSON ITF CD Num
Working with Fonts -195

❏ The height of the bar code is automatically adjusted to 15% ormore of its total length, in conformance to the Codabarstandard. For this reason, it is important to keep at least onespace between the bar code and the surrounding text toprevent overlapping.
❏ When either a Start or a Stop character is input, Codabar fontsautomatically insert the complementary character.
❏ If neither a Start nor a Stop character is input, these charactersare automatically input as the letter A.
The following codes are inserted automatically and need not beinput by hand:
❏ Left/Right quiet zone
❏ Start/Stop character (when not input)
❏ Check digit
Character type Numbers (0 to 9)
Symbols (- $ : / . +)
Number of characters No limit
Font size When OCR-B is not used: 26 pt or more(up to 96 pt in Windows NT/Windows2000).Recommended sizes are 26 pt, 52 pt, 78pt and 104 pt.
When OCR-B is used: 36 pt or more (upto 96 pt in Windows NT/Windows 2000).Recommended sizes are 36 pt, 72 pt, 108pt and 144 pt.
-196 Working with Fonts
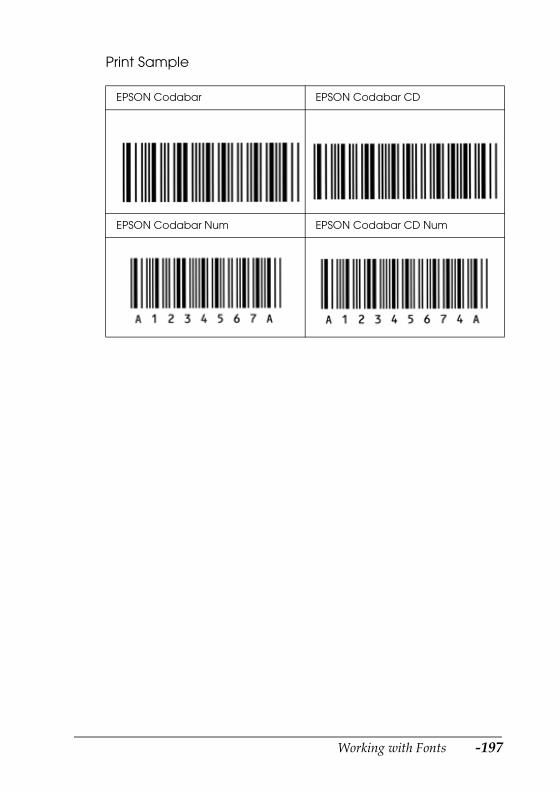
Print Sample
EPSON Codabar EPSON Codabar CD
EPSON Codabar Num EPSON Codabar CD Num
Working with Fonts -197

-198 Working with Fonts

Problem Solver
Clearing Jammed Paper
When the paper is jammed in the printer, the LCD panel and theStatus Monitor 3 utility provide alert messages.
Feed Jam
The Feed Jam message appears on the LCD panel when there isa paper jam at the MP tray or the standard lower paper cassette.
Clearing the MP tray
Follow these steps to clear paper jams when using MP tray.
1. Open the MP tray. Carefully remove all the paper in the MPtray along with any sheets that have fed part way into theprinter.
* MP tray
-199

2. Open the printer cover. Be sure to remove any pieces of paperthat may have torn off or are remaining in the printer.
w Warning:Be careful not to touch the fuser, which is markedCAUTION! HIGH TEMPERATURE, or the surroundingareas. If the printer has been in use, the fuser and thesurrounding areas may be very hot.
If necessary, remove the imaging cartridge and any paper leftin the paper feed path, and then reinsert the imagingcartridge.
3. Close the printer cover.
4. Tap the stack of paper on a flat surface to even out the edges.Then carefully reload it into the tray. (Do not reload curled orwrinkled sheets.)
5. Close the MP tray if the paper loaded fits inside the printer.
The jammed page’s print data is automatically reprinted.
Clearing the standard lower paper cassette
Follow these steps to clear paper jams when using the standardlower paper cassette:
1. Open the printer cover. Be sure to remove any pieces of paperthat may have torn off or are remaining in the printer.
w Warning:Be careful not to touch the fuser, which is markedCAUTION! HIGH TEMPERATURE, or the surroundingareas. If the printer has been in use, the fuser and thesurrounding areas may be very hot.
-200

If necessary, remove the imaging cartridge and any paper leftin the paper feed path, and then reinsert the imagingcartridge.
2. Close the printer cover.
3. Remove the lower paper cassette from the printer.
4. Remove any folded paper from the paper cassette, anddiscard any curled or wrinkled sheets.
5. Remove the cover of the paper cassette and take the paperstack out. Tap the edge on a flat surface and reinsert it into thepaper cassette making sure the paper is evenly aligned andrests below the maximum paper mark.
Note:Make sure you are using the correct paper size. Also make sure youare using paper that meets the specifications for this printer.
6. Reattach the cassette cover and reinsert the lower papercassette into the printer.
The jammed page’s print data is automatically reprinted.
-201
Paper Jam
The Paper Jammessage appears when the paper is jammed in theprinter.
Follow these steps to clear paper jams in the printer.
1. Open the printer cover and remove the imaging cartridge.
w Warning:Be careful not to touch the fuser, which is markedCAUTION! HIGH TEMPERATURE, or the surroundingareas. If the printer has been in use, the fuser and thesurrounding areas may be very hot.
c Caution:Do not touch the transfer roller to avoid the degradation ofthe print quality.
-202

2. Gently pull out any jammed paper. If it tears, make sure youremove all pieces remaining in the printer. Pull the jammedpaper in the direction of the arrow. Failure to do so may causedegradation of the print quality.
Note:Because the toner on the paper inside the printer may not have beenfixed on the page, toner may come off on your hands when youremove the paper. If you spill toner on your clothing, rinse it off withcold water. Using hot water may leave a permanent stain.
3. Reinstall the imaging cartridge.
4. Close the printer cover.
The jammed page’s print data is automatically reprinted.
-203
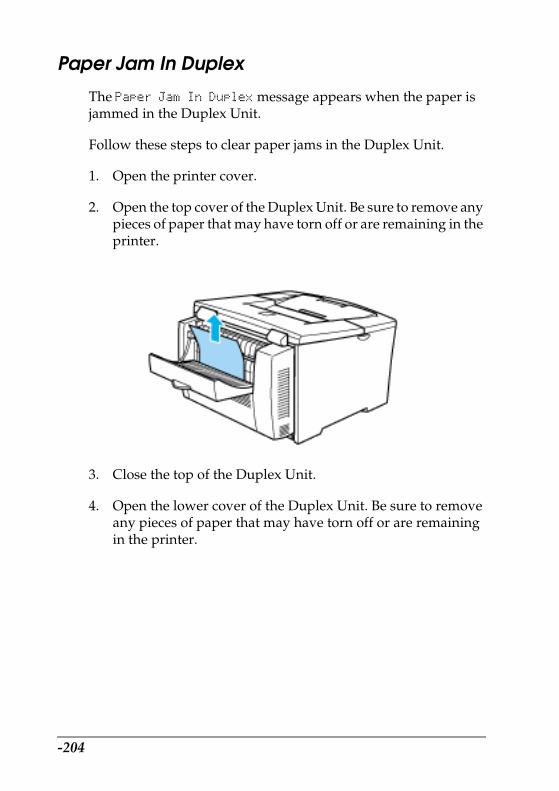
Paper Jam In Duplex
The Paper Jam In Duplex message appears when the paper isjammed in the Duplex Unit.
Follow these steps to clear paper jams in the Duplex Unit.
1. Open the printer cover.
2. Open the top cover of the Duplex Unit. Be sure to remove anypieces of paper that may have torn off or are remaining in theprinter.
3. Close the top of the Duplex Unit.
4. Open the lower cover of the Duplex Unit. Be sure to removeany pieces of paper that may have torn off or are remainingin the printer.
-204

5. Close the lower cover of the Duplex Unit.
6. Close the printer cover.
Preventing Paper Feed and Paper Jam Problems
If you have frequent paper feed or paper jam problems, use thischecklist of corrective measures:
❏ Use a higher-quality paper that is not too thin or rough.
❏ Fan the stack of paper and then tap its edges to align it beforeyou load it.
❏ Be sure that you do not load too much paper into the tray orcassette.
❏ Be sure to adjust the paper guides so that paper feeds freely.
❏ Never let more than 250 sheets accumulate on the output tray.
❏ Try turning over the stack of paper in the paper tray orcassette. Most paper packages indicate the top side of thepaper with an arrow at the side of the package.
-205

Operational problems
The printer is making abnormal noise
Cause What to do
Abnormal noise may comefrom the printermomentarily immediatelyafter a new imagingcartridge is loaded. This doesnot indicate malfunction.
Remove the imaging cartridge fromthe printer, gently rock it back andforth two or three times, then reload itinto the printer.
The LCD panel stays blank when you turn the printer on
Cause What to do
The printer may not beconnected to the electricaloutlet.
Turn off the printer and check thepower cable connections between theprinter and the electrical outlet; thenturn the printer back on.
If the electrical outlet is controlled byan outside source such as a wallswitch, make sure the switch is turnedon or plug another electrical deviceinto the outlet to check whether theoutlet is operating properly.
The printer doesn’t print and the On Line light is off
-206

Printout problems
Cause What to do
The printer is offline. Press On Line once to put the printeronline (the On Line light comes on).
The On Line light is on but nothing prints
Cause What to do
Your computer may not beproperly connected to theprinter.
Perform the procedure described in“Connecting to the Computer” in theSetup Guide.
The interface cable may notbe plugged in securely.
Check both ends of the cable betweenthe printer and the computer. Be sureto secure the connector using the wireretaining clips.
You may not be using thecorrect interface cable.
If you are using the parallel interface,make sure you use a double-shielded,twisted-pair interface cable no longerthan six feet in length.
The imaging cartridge maybe empty.
Replace the imaging cartridge asdescribed under “Replacing theImaging Cartridge”.
The font selected with software commands won’t print
-207
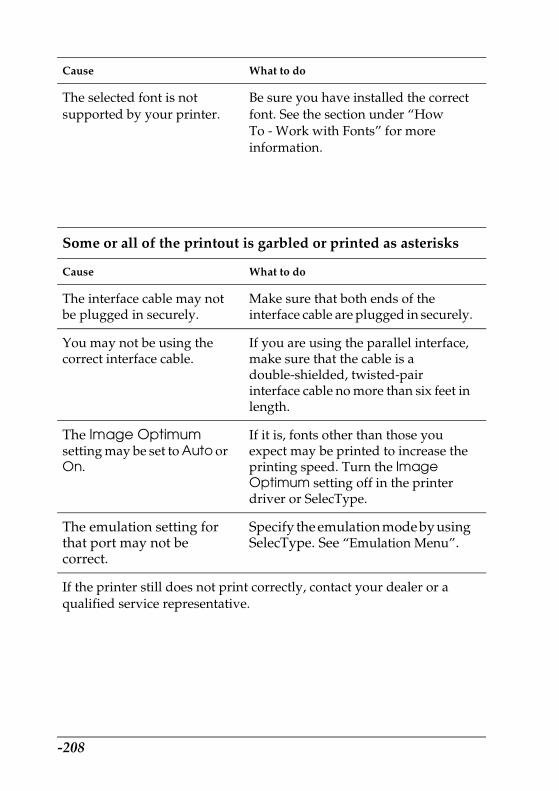
Cause What to do
The selected font is notsupported by your printer.
Be sure you have installed the correctfont. See the section under “HowTo - Work with Fonts” for moreinformation.
Some or all of the printout is garbled or printed as asterisks
Cause What to do
The interface cable may notbe plugged in securely.
Make sure that both ends of theinterface cable are plugged in securely.
You may not be using thecorrect interface cable.
If you are using the parallel interface,make sure that the cable is adouble-shielded, twisted-pairinterface cable no more than six feet inlength.
The Image Optimumsetting may be set to Auto orOn.
If it is, fonts other than those youexpect may be printed to increase theprinting speed. Turn the ImageOptimum setting off in the printerdriver or SelecType.
The emulation setting forthat port may not becorrect.
Specify the emulation mode by usingSelecType. See “Emulation Menu”.
If the printer still does not print correctly, contact your dealer or aqualified service representative.
-208

Position of the printout is not correct
Cause What to do
The page length and marginsare set incorrectly in yourapplication software.
Make sure that you are using thecorrect page length and marginsettings in your application software.
-209

Print quality problems
Graphics don’t print correctly
Cause What to do
The printer emulationsetting in your softwareprogram may be incorrect.
Make sure that your applicationsoftware is set for the printeremulation you are using. For example,if you are using the LJ4 emulationmode, make sure that your softwareprogram is set to use a LaserJet 4printer.
You may need morememory.
Graphics require large amounts ofmemory. For more information, See“Memory problems”.
-210

The background is dark or dirty
Cause What to do
The paper path inside theprinter may be dusty.
Turn off the printer. Clean internalprinter components by printing threepages with only one character perpage.
There may be a problem withthe imaging cartridge.
Turn off the printer. Remove thecartridge, shake it gently from side toside, and then reinstall it. If this doesnot solve the problem, replace theimaging cartridge as described under“Replacing the Imaging Cartridge”.
You may not be using thecorrect type of paper for yourprinter.
If the surface of your paper is toorough, printed characters may appeardistorted or broken. Smooth,high-quality copier paper isrecommended for best results. See“Paper” for information on choosingpaper.
-211

Black or white bands appear in the printout
Cause What to do
The paper path inside theprinter may be dusty.
Turn off the printer. Clean internalprinter components by printing threepages with only one character perpage.
There may be a problem withthe imaging cartridge.
Turn off the printer. Remove thecartridge, shake it gently from side toside, and then reinstall it. If this doesnot solve the problem, replace theimaging cartridge as described under“Replacing the Imaging Cartridge”.
Uneven darkness
Cause What to do
Your paper may be moist ordamp.
Do not store paper in a humid ordamp environment.
There may be a problem withthe imaging cartridge.
Turn off the printer. Remove thecartridge, shake it gently from side toside, and then reinstall it.
If this does not solve the problem, replace the imaging cartridge asdescribed under “Replacing the Imaging Cartridge”. Then printseveral pages to check the print quality.
-212

Toner smudges
Cause What to do
Your paper may be moist ordamp.
Do not store your paper in a humid ordamp environment.
You may not be using thecorrect type of paper for yourprinter.
If the surface of your paper is toorough, printed characters may appeardistorted or broken. Smooth,high-quality copier paper isrecommended for best results. See“Paper” for information on choosingpaper.
The paper path inside theprinter may be dusty.
Turn off the printer. Clean internalprinter components by printing threepages with only one character perpage.
There may be a problem withthe imaging cartridge.
Turn off the printer. Remove theimaging cartridge, shake it side to sideto distribute the toner, and wipe thebottom of it with a clean, dry cloth.
If the problem remains, replace the imaging cartridge as describedunder “Replacing the Imaging Cartridge”.
-213

Missing areas on printed image
Cause What to do
Your paper may be moist ordamp.
This printer is sensitive to moistureabsorbed by the paper. The higher themoisture content in the paper, thelighter the printed output. Do notstore paper in a humid or dampenvironment.
You may not be using thecorrect type of paper for yourprinter.
If the surface of your paper is toorough, printed characters may appeardistorted or broken. Smooth,high-quality copier paper isrecommended for best results. See“Paper” for information on choosingpaper.
-214
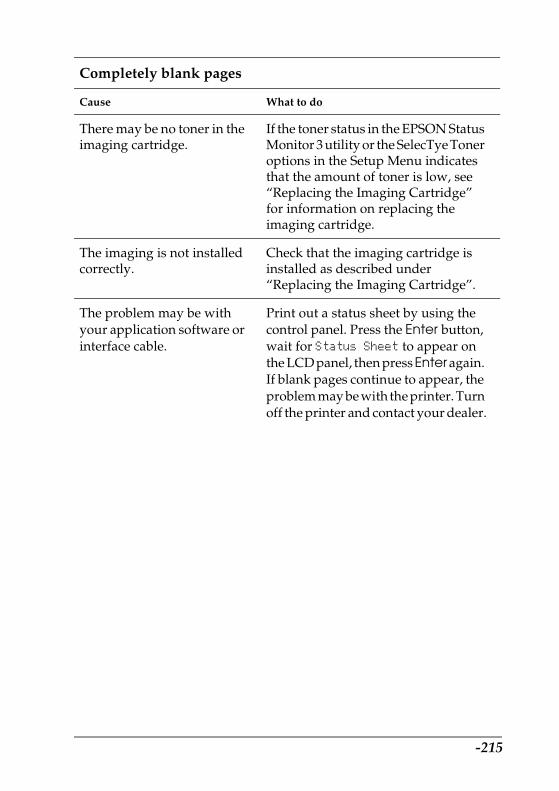
Completely blank pages
Cause What to do
There may be no toner in theimaging cartridge.
If the toner status in the EPSON StatusMonitor 3 utility or the SelecTye Toneroptions in the Setup Menu indicatesthat the amount of toner is low, see“Replacing the Imaging Cartridge”for information on replacing theimaging cartridge.
The imaging is not installedcorrectly.
Check that the imaging cartridge isinstalled as described under“Replacing the Imaging Cartridge”.
The problem may be withyour application software orinterface cable.
Print out a status sheet by using thecontrol panel. Press the Enter button,wait for Status Sheet to appear onthe LCD panel, then press Enter again.If blank pages continue to appear, theproblem may be with the printer. Turnoff the printer and contact your dealer.
-215

The printed image is light or faint
Cause What to do
Your paper may be moist ordamp.
The higher the moisture content in thepaper, the lighter the printed output.Do not store paper in a humid ordamp environment.
The TonerSavemode may beon.
Turn off the Toner Save mode usingthe printer driver, OneTouch mode 2,or SelecType.
There may be a problem withthe imaging cartridge.
Take out the imaging cartridge, shakeit gently to side to side to distribute thetoner, and then reinstall it. If theproblem persists, replace thecartridgeas described under “Replacing theImaging Cartridge”.
The image is too dark
Cause What to do
There may be a problem withthe imaging cartridge.
If the problem persists, replace theimaging cartridge as described under“Replacing the Imaging Cartridge”.
-216

Memory problems
Non-printed side of the page is dirty
Cause What to do
Toner may have spilled ontothe paper feed path.
Turn off the printer. Clean internalprinter components.
The message Mem Overflow appears on the LCD panel.
Cause What to do
The printer has insufficientmemory to execute thecurrent task.
You need to simplify the page you aretrying to print, change your memoryallocation, or add more memory toyour printer. Try simplifying yourpage by reducing the number or sizeof fonts or the number or size ofgraphics, or both.
To correct the error, press theContinue button on the control panel.
-217

Problems using options
The message Image Optimum appears on the LCD panel.
Cause What to do
The printer has insufficientmemory to print the page atthe specified print quality,and the printer reduces thequality automatically so thatthe printer can continueprinting.
Check to see if the printouts isacceptable. If not, add more memoryfor a permanent solution or lower thePrint Quality and Page Protect to Offtemporarily in the printer driver.
The message Invalid AUX I/F Card appears
Cause What to do
The printer cannot read theinstalled optional interfacecard
Turn off the printer, then remove thecard. Make sure the interface card isof a supported model.
Paper does not feed from the optional lower paper cassette
Cause What to do
-218

Status and Error Messages
This section contains an alphabetical list of the status, error, andwarning messages that appear in the LCD panel.
The paper source settingmay not be correct.
Make sure you have selected theproper paper source in yourapplication software.
There may be no paper in thepaper cassette.
Load it with paper.
Too many sheets may beloaded in the paper cassette.
Make sure that you have not tried toload it with too many sheets of paper.The cassette can hold a maximum of500 sheets or 250 sheets of 75g/m²(20lb) paper, depending on whichoptional lower paper cassette unit isinstalled.
The optional lower papercassette may not installedproperly.
See “Installing and RemovingOptions”for instructions on installingand optional paper cassette unit.
Feed jam when using an optional lower paper cassette unit
Cause What to do
The paper is jammed at theoptional paper cassette.
See “Clearing the standard lowerpaper cassette”.
-219

If Auto Continue is turned on in the printer driver or SelecType,some error messages are not displayed even though the problemremains. Ordinarily, you should leave Auto Continue off.
Can’t Print Duplex
The printer cannot work in double-sided printing feature. Makesure you are using an appropriate type and size of paper for theDuplex Unit.
Check Duplex P-Size
This message appears when the size of the paper you loadeddoesn’t match the one selected in the printer driver’s BasicSettings tab or SelecType. Load the correct size of paper, or changethe paper size setting. Then, open the Duplex Unit cover andremove any jammed paper. Close the cover of the Duplex Unit,and press the Continue button. The printer resumes printing.
Check Paper Size
The paper size setting is different from the size loaded in theprinter. Check to see if the correct size of paper is loaded in thetray; then press the Continue button.
If you turn on Size Ignore in the SelecType Config Menu or theprinter driver, this error message does not appear.
Check Paper Type
The paper type setting on the printer driver’s Basic Settings menu,or in SelecType, is different from the type of paper loaded in theprinter. Make sure the correct type of paper is loaded in theprinter, then press the Continue button to clear the message.
-220

Collate was disabled
The printer does not have sufficient memory to collate print jobs.Only one set of copies will be printed. Reduce the contents of yourprint job or add more memory to your printer. Press the Continuebutton to clear the message.
Cooling Down
The engine is cooling down to maintain print quality. The printjob continues after a short period.
Duplex Mem Overflow
The printer has insufficient memory available for the current task.
Lower the Print Quality setting.
Turn the Buffer Size setting to Minimum in the SelecType Menu.
You can also add more memory to the printer as described in“Installing a memory module”.
Duplex Unit Open
The cover of the Duplex Unit is open or not closes completely.Close the cover of the Duplex Unit.
Exiting Paper Jam
Paper is jammed in the printer. See “Paper Jam” for removingpaper jams in the printer.
Feed Jam
Paper is not feeding into the printer from the tray (or lower papercassette) or has jammed inside the printer. Remove the jammedpaper. See “Clearing the MP tray” for feed jams in the printer. See“Clearing the standard lower paper cassette” for feed jams in thelower paper cassette. See “Preventing Paper Feed and Paper JamProblems” for advice on preventing this problem.
-221

Format Error ROM A
A format error has occurred on the ROM module in slot A.Replace the module with a new one.
Form Feed
When the printer is offline and data remains in the printer’smemory, pressing Form Feed prints out the data and clears thebuffer.
Image Optimum
There is insufficient memory to print the page using the specifiedprint quality. The printer automatically reduces the print qualityso it can continue printing. If the printout is not acceptable, trysimplifying the page by limiting the number of graphics orreducing the number of fonts or font sizes.
Lower the Print Quality setting.
Turn the Image Optimum setting off in the SelecType Config Menu.
You may also need to increase the amount of printer memory. See“Installing a memory module” for more information on addingmemory.
Imag. Crt ID Error
The installed imaging cartridge is not compatible. Install arecommended imaging cartridge.
Imag. Crt W Error
A error has occurred when reading/writing the imaging cartridgeinformation. Install a recommended imaging cartridge.
Install Imaging Crtg
The printer does not have an imaging cartridge installed. Tocorrect the problem, install an imaging cartridge.
-222

Install LC (1 or 2)
The standard lower paper cassette or the paper cassette of theoptional lower paper cassette unit is not inserted. To correct theproblem, insert the paper cassette into the printer or the unit.
Invalid AUX I/F Card
The printer cannot read the installed optional interface card. Turnoff the printer, then remove the card.
Invalid ROM A
An incompatible ROM module is installed in the printer.
To correct this error, turn off the printer and remove the ROMmodule. Then turn on the printer.
Job Cancel
The print job sent to your printer is canceled.
Manual Feed xxx yyy
The manual feed mode is specified for the current print job. Makesure the paper size indicated by yyy is loaded in xxx paper source,then press the On Line button.
If you do not want to print this job in the manual feed mode, pressContinue. The printer feeds paper according to the Paper Sourcesetting.
For detailed information on the manual feed mode, see “Manuallyloading paper”.
-223

Mem Overflow
The printer has insufficient memory available for the current task.To correct the error, press the Continue button on the controlpanel. If the message remains, reset the printer as described under“Resetting the Printer”. You can also clear this message by turningthe printer off, waiting 10 seconds, and then turning it back on.
If you continue to receive this message when printing a particularpage, try simplifying the page by limiting the number of graphicsor reducing the number and size of fonts.
Lower the Print Quality setting.
You can also add more memory to the printer as described in“Installing a memory module”.
Need Memory
The printer has insufficient memory available for the current task.Add more memory to your printer.
Offline
The printer is not ready to print.
Paper Jam
Paper is jammed in the paper path. Open the printer cover andclear the jammed paper as described under “Paper Jam”. Afterthe jam is cleared, the jammed page’s print data is automaticallyreprinted.
w Warning:Be careful not to touch the fuser, which is marked CAUTION!HIGH TEMPERATURE, or the surrounding areas. If the printerhas been in use, the fuser and the surrounding areas may be veryhot.
-224
Paper Jam In Duplex
Paper is jammed in the Duplex Unit. Open the top cover of theDuplex Unit and clear the jammed paper as described under“Paper Jam In Duplex”.
Paper Out xxx yyy
There is no paper in the specified paper source (xxx). Load paperof the indicated size (yyy) into the source. See your Setup Guide or“Loading Paper” for instructions on loading paper.
Paper Set xxx yyy
The paper loaded in the tray (xxx) does not match the requiredpaper size (yyy). Replace the paper with the correct size of paperand press Continue.
Print Overrun
The required time to process the print data exceeds the printengine speed because the current page is too complex. Press theContinue button to resume printing. If this message appearsagain, turn on Page Protect in the SelecType Config Menu.
If you continue to receive this message when printing a particularpage, try simplifying the page by limiting the number of graphicsor reducing the number and size of fonts.
Lower the Print Quality Setting.
You can also add more memory to the printer as described in“Installing a memory module”.
Printer Open
The printer cover is open. Close the printer cover to continueprinting.
-225

RAM Check
The printer is checking the RAM.
Ready
The printer is ready to receive data or print.
Replace Imaging Ctrg
The imaging cartridge has run out. Replace the imaging cartridge.
Reset
The printer’s current interface has been reset and the buffer iscleared. However, other interfaces are still active and retain theirsettings and data.
Reset All
All printer settings have been reset to the user defaultconfiguration, the last settings that were saved.
Reset to Save
You have changed a SelecType setting but the new setting is notactivated immediately after exiting SelecType. To activate thenew setting, do one of the following: (1) exit SelecType by pressingContinue or On Line (the new setting is activated after thecurrent print job is finished), or (2) reset the printer by pressingthe Alt and Reset buttons at the same time.
ROM Check
The printer is checking the ROM.
Self Test
The printer is performing its internal check cycle.
-226

Service Req Exxx (Cxxxx)
A controller error or a print engine error has been detected. Writedown the error number listed on the LCD panel and turn off theprinter. Wait at least five seconds and then turn it back on. If thiserror still occurs, turn off the printer, unplug the power cord, andcontact a qualified service representative.
Standby
The printer is in its low power state; however, it is still online ifthe On Line light is on.
Toner Low
The printer is almost out of toner. You should prepare a newimaging cartridge for replacement.
Toner Out
You must replace the Imaging Cartridge. See “Replacing theImaging Cartridge”. This message is not displayed when Toner
Out is set to Continue in SelecType.
Press Continue to print one more page.
Warming Up
The printer is warming up. When the printer is ready, thismessage will change to Ready.
Write Error ROM A
A write error has occurred on the ROM module in slot A. Replacethe module with a new one.
-227

Writing ROM A
This message appears when the printer is accessing data storedin the ROM module in slot A. You can continue printing after theprinter finishes this job, which normally requires about threeminutes.
Hex Dump Mode
Hex Dump mode (also called data dump) is a special feature thatmakes it easy for experienced users to find the cause ofcommunication problems between the printer and the computer.In the Hex Dump mode, the printer produces an exact printout ofthe codes it receives.
Follow these steps to print in the Hex Dump mode:
1. Make sure that paper is loaded and the printer is off.
2. Hold down the Form Feed button while you turn on theprinter. Make sure you hold the button down until you seethe message HEX Dump on the LCD panel.
3. Run any program that causes the printer to print. Your printerprints out all the codes it receives in hexadecimal format.
Note:Before entering the Hex Dump mode, turn off the printer monitoringfunction of the EPSON Status Monitor 3 utility software byclearing the Monitor the printing status check box in the Utilitymenu of the printer driver, as this function interferes with printingin the Hex Dump mode.
To disable the Hex Dump mode, turn off the printer or reset it bypressing and holding down the Alt and Reset buttons at the sametime. When Reset All appears on the LCD panel, release thebuttons.
-228

Resetting the Printer
There are two ways to reset the printer.
Reset
Resetting the printer stops printing and clears the current printjob received from the active interface. You may want to reset theprinter when there is a problem with the print job itself and theprinter cannot print successfully.
To reset the printer, hold down the Alt and Reset buttons untilReset appears on the LCD panel. Your printer is now reset andready to receive a new print job.
Note:Don’t hold down the Alt and Reset buttons more than 5 seconds. Doingso resets all settings to default values.
Reset All
Performing a Reset All stops printing, clears the printer memory,and restores the printer settings to their default values. The printjobs received in printer memory from all interfaces are erased.Current settings and downloaded fonts are also erased.
To perform a Reset All, hold down the Alt and Reset buttons untilReset All appears on the LCD panel.
You can also perform a Reset All by turning off the printer.
Note:Performing a Reset All clears print jobs received from all interfaces. Becareful not to interrupt someone else’s job.
-229

Where to Get Help
If your EPSON product is not operating properly and you cannotsolve the problem using the troubleshooting information in yourproduct documentation, contact customer support services forassistance. If customer support for your area is not listed below,contact the dealer where you purchased your product.
Customer support will be able to help you much more quickly ifyou give them the following information.
❏ Product serial number(The serial number label is usually on the back of the product.)
❏ Product model
❏ Product software version(Click About, Version Info, or similar buttons in the productsoftware.)
❏ Brand and model of your computer
❏ Your computer operating system name and version
❏ Names and versions of the software applications younormally use with your product
-230