User Manual - Endpoint Protector
267
User Manual User Manual for Version 5.5.0.0
-
Upload
khangminh22 -
Category
Documents
-
view
0 -
download
0
Transcript of User Manual - Endpoint Protector
User Manual
User Manual for Version 5.5.0.0
I | Endpoint Protector | User Manual
Table of Contents
1. Introduction ........................................... 1
1.1. Main components .............................................................. 2
2. Server Functionality ................................ 3
2.1. Endpoint Protector Configuration Wizard .............................. 4
2.2. General Dashboard ........................................................... 5
2.3. System Status .................................................................. 5
2.4. Live Update ...................................................................... 6
2.5. Effective Rights ................................................................. 8
3. Device Control ........................................ 9
3.1. Dashboard ....................................................................... 9
3.2. Devices.......................................................................... 10
3.2.1. Device Rights .............................................................. 12
3.2.2. Device History ............................................................. 13
3.3. Computers ..................................................................... 13
3.3.1. Computer Rights .......................................................... 15
3.3.2. Computer Settings ....................................................... 16
3.3.3. Computer History ......................................................... 17
3.3.4. Terminal Servers and Thin Clients ................................... 18
3.4. Users ............................................................................ 21
3.4.1. User Rights ................................................................. 23
3.4.2. User Settings .............................................................. 24
3.4.3. User History ................................................................ 25
3.5. Groups .......................................................................... 25
3.5.1. Group Types ............................................................... 26
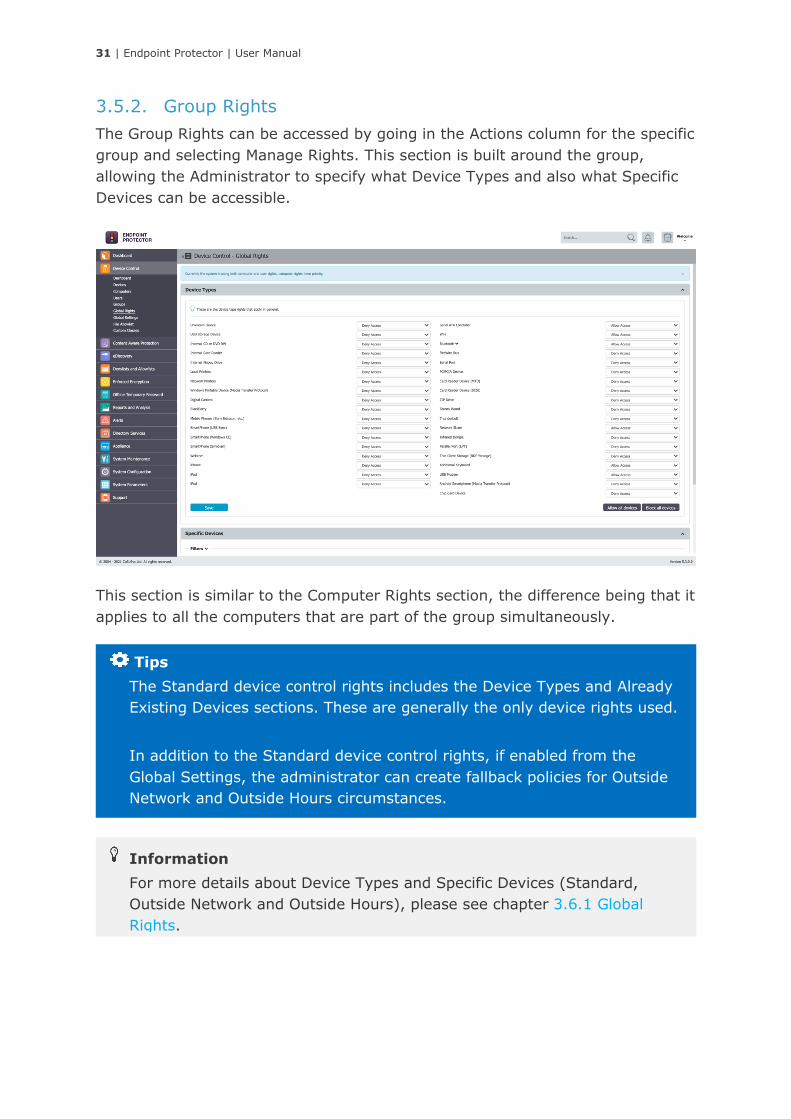
3.5.2. Group Rights ............................................................... 31
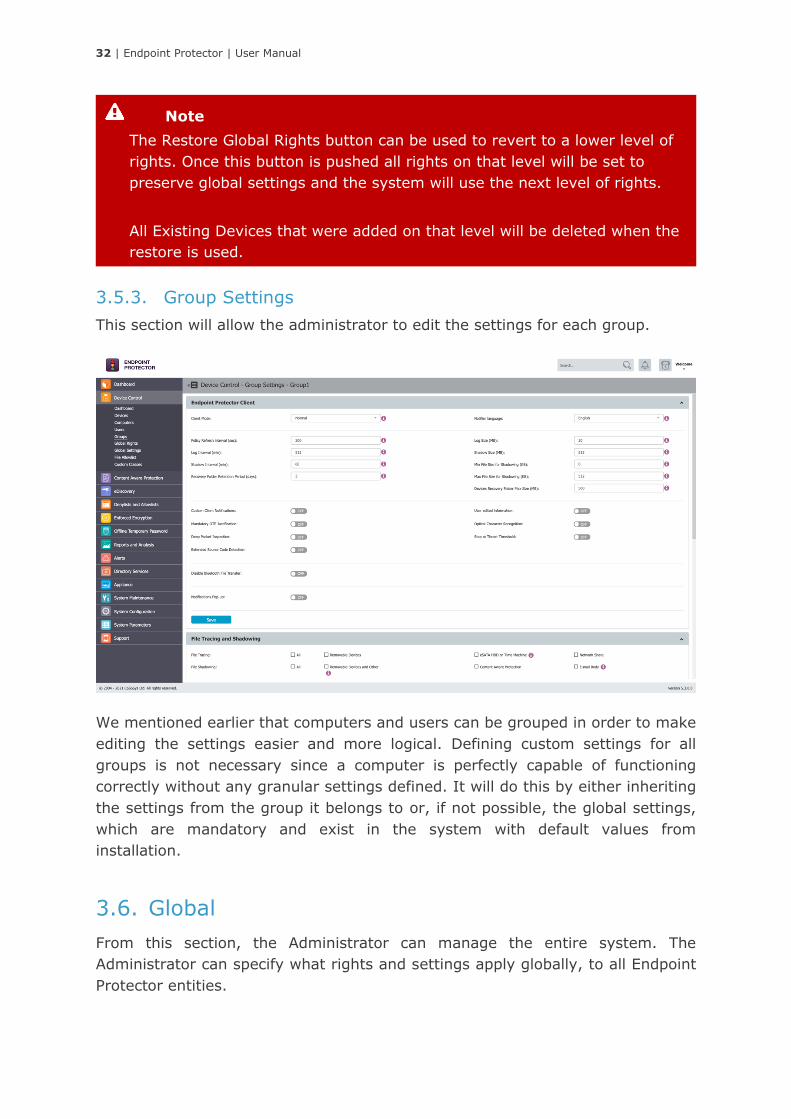
3.5.3. Group Settings ............................................................ 32
3.6. Global ........................................................................... 32
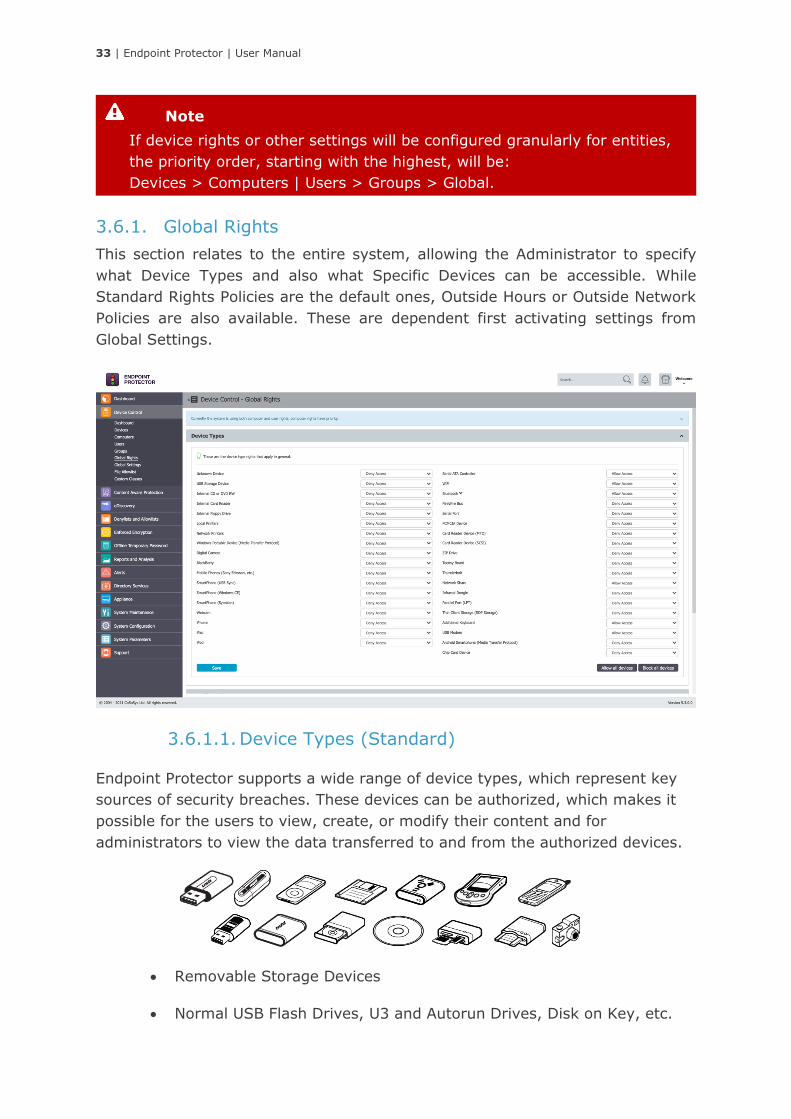
3.6.1. Global Rights ............................................................... 33
3.6.2. Global Settings ............................................................ 39
3.7. File Allowlist ................................................................... 53
3.8. Custom Classes .............................................................. 54
II | Endpoint Protector | User Manual
3.9. Priorities for device rights ................................................ 57
3.9.1. Priorities for Device Control Policies ................................ 58
4. Content Aware Protection ....................... 60
4.1. Content Aware Protection Activation .................................. 61
4.2. Dashboard ..................................................................... 62
4.3. Content Aware Policies .................................................... 62
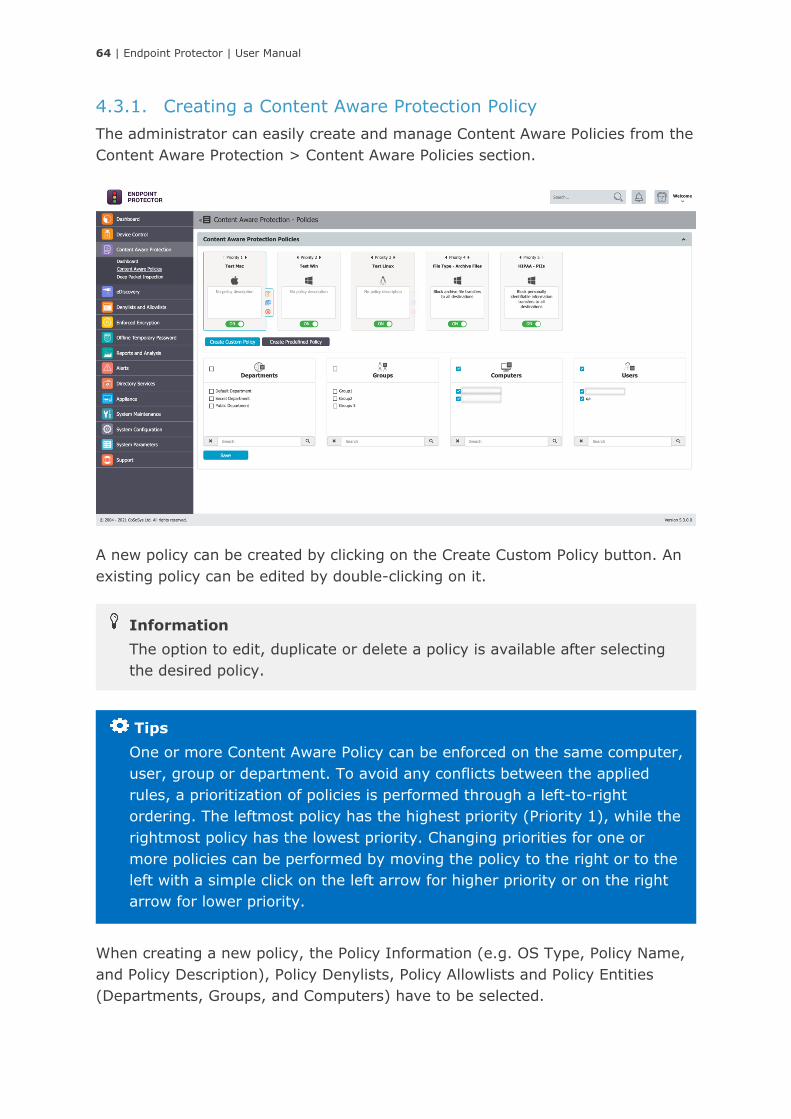
4.3.1. Creating a Content Aware Protection Policy ...................... 64
4.3.2. Predefined policies ....................................................... 71
4.3.3. Block and Remediate Policies ......................................... 71
4.3.4. Applying multiple Content Aware Policies ......................... 73
4.3.5. HIPAA compliance ........................................................ 74
4.4. Deep Packet Inspection ................................................... 77
4.4.1. Deep Packet Inspection Ports & Settings .......................... 81
4.4.2. Deep Packet Inspection Applications ............................... 83
5. eDiscovery ........................................... 85
5.1. eDiscovery Activation ...................................................... 85
5.2. Dashboards .................................................................... 86
5.3. eDiscovery Policies and Scans .......................................... 87
5.3.1. Creating an eDiscovery Policy and Scan ........................... 88
5.4. eDiscovery Scan Result and Actions .................................. 91
5.4.1. Viewing Scan Results and taking Actions .......................... 92
6. Denylists and Allowlists .......................... 93
6.1. File Type Denylists .......................................................... 93
6.2. Predefined Content Allowlists ............................................ 95
6.3. Custom Content Denylists ................................................ 96
6.4. File Name Denylists ......................................................... 98
6.5. File Location Denylists ................................................... 100
6.6. Scan Location Denylists ................................................. 101
6.7. Regex Denylists ............................................................ 102
6.8. Domain and URL Denylists ............................................. 105
6.9. MIME Type Allowlists ..................................................... 106
6.10. Allowed Files Allowlists .................................................. 108

III | Endpoint Protector | User Manual
6.11. File Location Allowlists ................................................... 109
6.12. Network Share Allowlists ................................................ 110
6.13. E-mail Domain Allowlists ................................................ 112
6.14. URL Name Allowlists ...................................................... 113
6.15. Deep Packet Inspection Allowlists .................................... 115
6.16. URL Categories ............................................................. 117
7. Enforced Encryption ............................ 119
7.1. EasyLock ..................................................................... 119
7.1.1. EasyLock Deployment ................................................. 120
7.1.2. EasyLock Settings ...................................................... 121
7.1.3. EasyLock Clients ........................................................ 124
8. Offline Temporary Password ................. 125
8.1. Generating the Offline Temporary Password ..................... 127
9. Reports and Analysis ........................... 129
9.1. Log Report ................................................................... 129
9.2. File Tracing .................................................................. 130
9.3. File Shadowing ............................................................. 131
9.4. Content Aware Report ................................................... 131
9.5. Content Aware File Shadowing ........................................ 132
9.6. Admin Actions .............................................................. 133
9.7. Online Computers ......................................................... 133
9.8. Online Users ................................................................. 134
9.9. Online Devices .............................................................. 135
9.10. Statistics ...................................................................... 135
10. Alerts ............................................ 137
10.1. System Alerts ............................................................... 138
10.1.1. Creating a System Alert .............................................. 138
10.1.2. System Alerts History ................................................. 140
10.2. Device Control Alerts ..................................................... 140
10.2.1. Creating a Device Control Alert .................................... 141
10.2.2. Device Control Alerts History ....................................... 143
IV | Endpoint Protector | User Manual
10.3. Content Aware Alerts ..................................................... 143
10.3.1. Creating a Content Aware Alert .................................... 144
10.3.2. Content Aware Alerts History ....................................... 144
10.4. EasyLock Alert .............................................................. 145
10.4.1. Creating an EasyLock Alert .......................................... 145
10.4.2. EasyLock Alert History ................................................ 146
11. Directory Services ........................... 147
11.1. Microsoft Active Directory .............................................. 147
11.2. Azure Active Directory ................................................... 149
12. Appliance ....................................... 164
12.1. Server Information ........................................................ 164
12.2. Server Maintenance ...................................................... 164
12.2.1. Time Zone Settings .................................................... 165
12.2.2. Network Settings ....................................................... 166
12.2.3. Reset Appliance to Factory Default ................................ 166
12.2.4. SSH Server ............................................................... 166
12.3. SIEM Integration ........................................................... 167
13. System Maintenance ........................ 169
13.1. File Maintenance ........................................................... 169
13.2. Exported Entities .......................................................... 170
13.3. System Snapshots ........................................................ 173
13.4. Audit Log Backup .......................................................... 175
13.4.1. Audit Log Backup Scheduler......................................... 176
13.5. External Storage ........................................................... 177
13.5.1. FTP Server ................................................................ 177
13.5.2. SFTP Server .............................................................. 178
13.5.3. Samba / Network Share Server .................................... 179
13.6. System Backup ............................................................. 180
13.6.1. From the Web Interface .............................................. 180
13.6.2. From the Console ....................................................... 184
13.7. System Backup v2 ........................................................ 185
13.7.1. Creating a System Backup v2 (Migration) ...................... 186
13.7.2. Importing and Restore (Migrate) .................................. 187
V | Endpoint Protector | User Manual
13.8. File Shadow Repository .................................................. 188
14. System Configuration ....................... 190
14.1. Client Software ............................................................. 190
14.2. Client Software Upgrade ................................................ 191
14.3. Client Uninstall ............................................................. 191
14.4. System Administrators .................................................. 192
14.5. Administrators Groups ................................................... 196
14.6. System Departments ..................................................... 197
14.7. System Security ........................................................... 199
14.8. System Settings ........................................................... 200
14.8.1. Endpoint Protector Rights Functionality .......................... 200
14.8.2. Log Settings .............................................................. 201
14.8.3. Deep Packet Inspection Certificate ................................ 201
14.8.4. Server Certificate Stack .............................................. 201
14.8.5. Active Directory Authentication .................................... 202
14.8.6. Proxy Settings ........................................................... 203
14.9. System Licensing .......................................................... 204
14.9.1. Free Trial .................................................................. 205
14.9.2. Import and manage Licenses ....................................... 205
14.10. Single Sign On ......................................................... 207
14. System Parameters ......................... 229
14.11. Device Types and Notifications ................................... 229
14.11.1. Trusted Devices ...................................................... 231
14.12. Contextual Detection ................................................ 234
14.12.1. Creating the XML .................................................... 234
14.12.2. Uploading the XML .................................................. 236
14.13. Advanced Scanning Detection .................................... 239
14.14. Device Rights ........................................................... 240
14.15. Events .................................................................... 241
14.16. User Remediation ..................................................... 242
15. Endpoint Protector Client .................. 245
15.1. Client Installation .......................................................... 245
VI | Endpoint Protector | User Manual
15.1.1. Endpoint Protector Client installation on macOS with Deep Packet
Inspection and VPN Traffic Intercept active ................................ 247
15.1.2. Debian based distributions .......................................... 253
15.1.3. RedHat based distributions .......................................... 256
16. Support ......................................... 259
17. Disclaimer ...................................... 260
1 | Endpoint Protector | User Manual
1. Introduction
Portable storage devices such as USB flash drives, external HDDs, digital
cameras, MP3 players and iPods are virtually everywhere and are connected to a
Windows, Mac or Linux computer within seconds. With virtually every computer
having access to internet, online applications and collaboration tools, data theft
or accidental data loss becomes a mere child’s play.
Data loss and data theft through a simple internet connection or USB device is
easy and does not take more than a few seconds. Network Administrators had
little chance to prevent this from happening or to identify the responsible users.
This was the hard reality until now.
Endpoint Protector, through its Device Control, Content Aware Protection,
eDiscovery and Enforced Encryption modules, helps companies stop these
threats. It not only controls all device activity at the endpoints, but monitors and
scans all possible exit points for sensitive content detection. It ensures critical
business data does not leave the internal network either by being copied on
devices or sent via the Internet without authorization, reporting all sensitive
data incidents. Moreover, data at rest residing on endpoints can be inspected for
sensitive content and remediation actions can be taken. Additionally, enforcing
encryption on the USB removable devices is also possible. Everything from a
single web-based interface.
Information
Endpoint Protector is a complete Data Loss Prevention and the DLP related
features and functionality will be explained below. Additional information
regarding deployment of the Endpoint Protector Server can be found in the
Virtual and Hardware Appliance User Manual.
2 | Endpoint Protector | User Manual
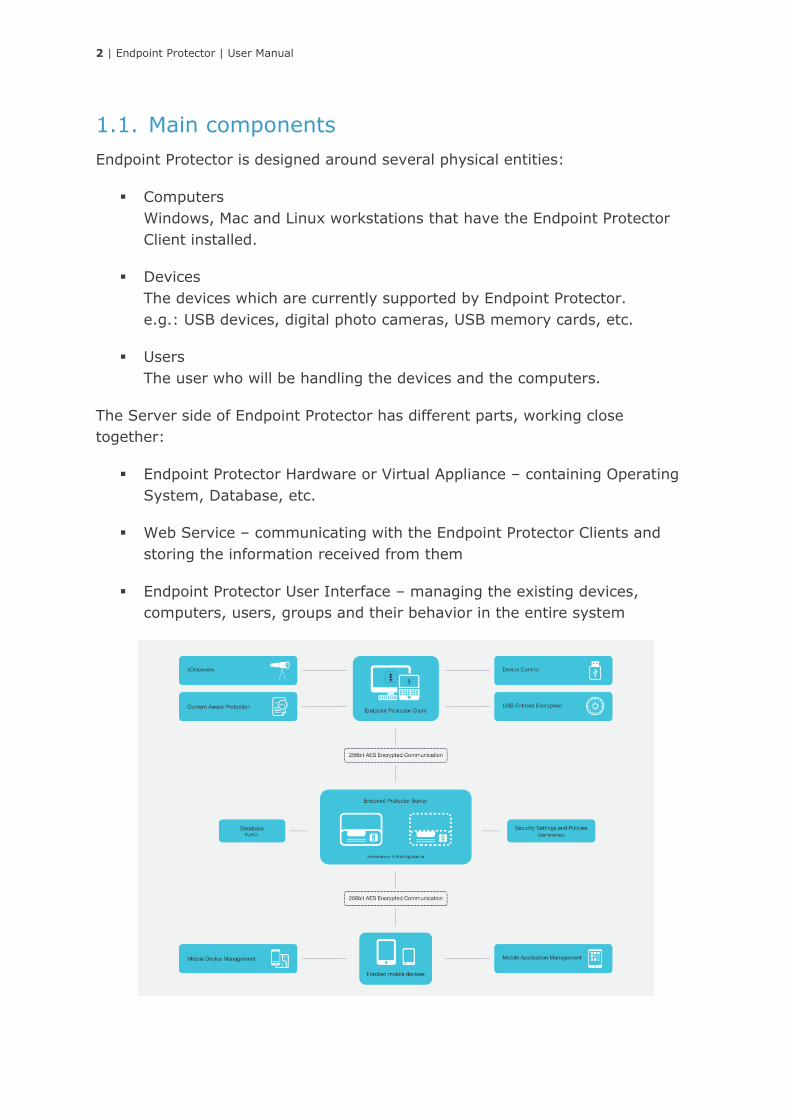
1.1. Main components
Endpoint Protector is designed around several physical entities:
▪ Computers
Windows, Mac and Linux workstations that have the Endpoint Protector
Client installed.
▪ Devices
The devices which are currently supported by Endpoint Protector.
e.g.: USB devices, digital photo cameras, USB memory cards, etc.
▪ Users
The user who will be handling the devices and the computers.
The Server side of Endpoint Protector has different parts, working close
together:
▪ Endpoint Protector Hardware or Virtual Appliance – containing Operating
System, Database, etc.
▪ Web Service – communicating with the Endpoint Protector Clients and
storing the information received from them
▪ Endpoint Protector User Interface – managing the existing devices,
computers, users, groups and their behavior in the entire system
3 | Endpoint Protector | User Manual
2. Server Functionality
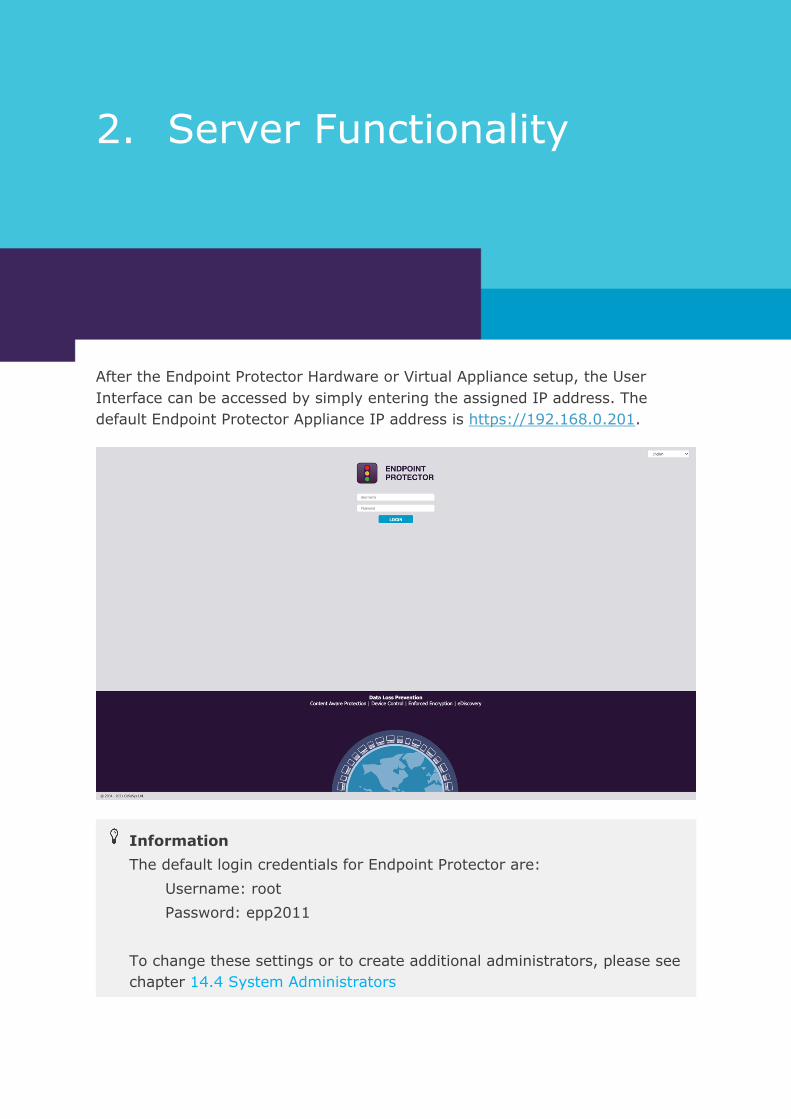
After the Endpoint Protector Hardware or Virtual Appliance setup, the User
Interface can be accessed by simply entering the assigned IP address. The
default Endpoint Protector Appliance IP address is https://192.168.0.201.
Information
The default login credentials for Endpoint Protector are:
Username: root
Password: epp2011
To change these settings or to create additional administrators, please see
chapter 14.4 System Administrators
.

4 | Endpoint Protector | User Manual
2.1. Endpoint Protector Configuration Wizard
The Configuration Wizard offers the Administrator some simple steps to define
some basic settings. These include setting up the Server Time Zone, importing
Licenses, Server Update or uploading Offline Patches, Global device rights, E-
mail Server settings, Main Administrator details, etc. The settings can later be
changed at any time.
Information
The Configuration Wizard only appears if the basic settings for Endpoint
Protector have never been configured.
Note
When entering the IP address, the HTTPS (Hypertext Transfer Protocol
Secure) prefix must be used.
5 | Endpoint Protector | User Manual
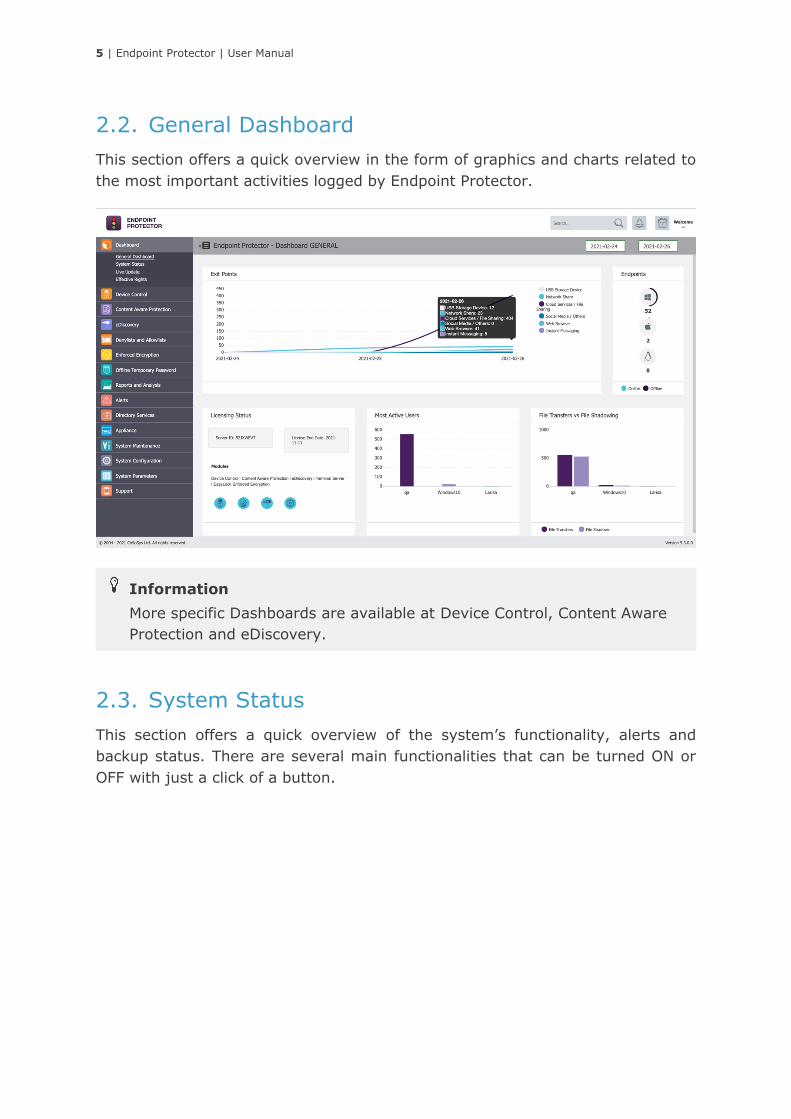
2.2. General Dashboard
This section offers a quick overview in the form of graphics and charts related to
the most important activities logged by Endpoint Protector.
2.3. System Status
This section offers a quick overview of the system’s functionality, alerts and
backup status. There are several main functionalities that can be turned ON or
OFF with just a click of a button.
Information
More specific Dashboards are available at Device Control, Content Aware
Protection and eDiscovery.

6 | Endpoint Protector | User Manual
From the System Functionality subsection, Endpoint Protector can be turned ON
or OFF, as well as just specific modules (Device Control, Content Aware
Protection or eDiscovery).
From the System Status subsection, the HDD Disk Space and Log Rotation can
be turned ON or OFF.
From the System Alerts subsection, important alerts notifying the expiration of
the APNS Certificate, Updates and Support or Passwords can be turned ON or
OFF.
From the System Backup subsection, the System Backup can be turned ON or
OFF.
2.4. Live Update
This section allows checking and applying the latest Endpoint Protector Server
updates.
Information
If this setting is ON, when the Server’s disk space reaches a certain
percentage, old logs will be automatically overwritten with the new ones
coming in.
The percentage can be set starting with 50%, 60%, etc. up to 90%.
7 | Endpoint Protector | User Manual
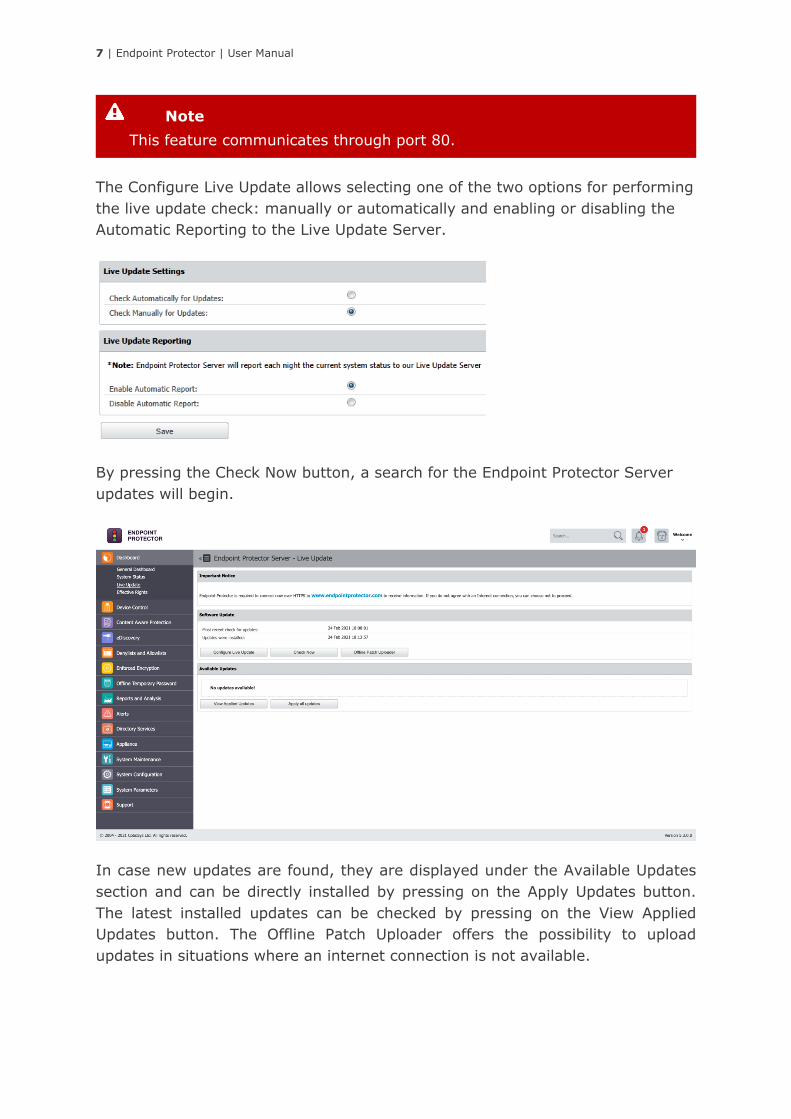
The Configure Live Update allows selecting one of the two options for performing
the live update check: manually or automatically and enabling or disabling the
Automatic Reporting to the Live Update Server.
By pressing the Check Now button, a search for the Endpoint Protector Server
updates will begin.
In case new updates are found, they are displayed under the Available Updates
section and can be directly installed by pressing on the Apply Updates button.
The latest installed updates can be checked by pressing on the View Applied
Updates button. The Offline Patch Uploader offers the possibility to upload
updates in situations where an internet connection is not available.
Note
This feature communicates through port 80.

8 | Endpoint Protector | User Manual
2.5. Effective Rights
This section displays the Device Control or Content Aware Protection policies
applied at that time. Depending on the options selected from the drop-down
menus, information can be displayed based on rights, users, computers, device
types, specific devices, report type (PDF or XLS), include Outside Hours and
Outside Network Policies and more.
Once generated, the report will be ready for download and used as desired.
Note
Contact [email protected] to request the Offline Patch.
9 | Endpoint Protector | User Manual
3. Device Control
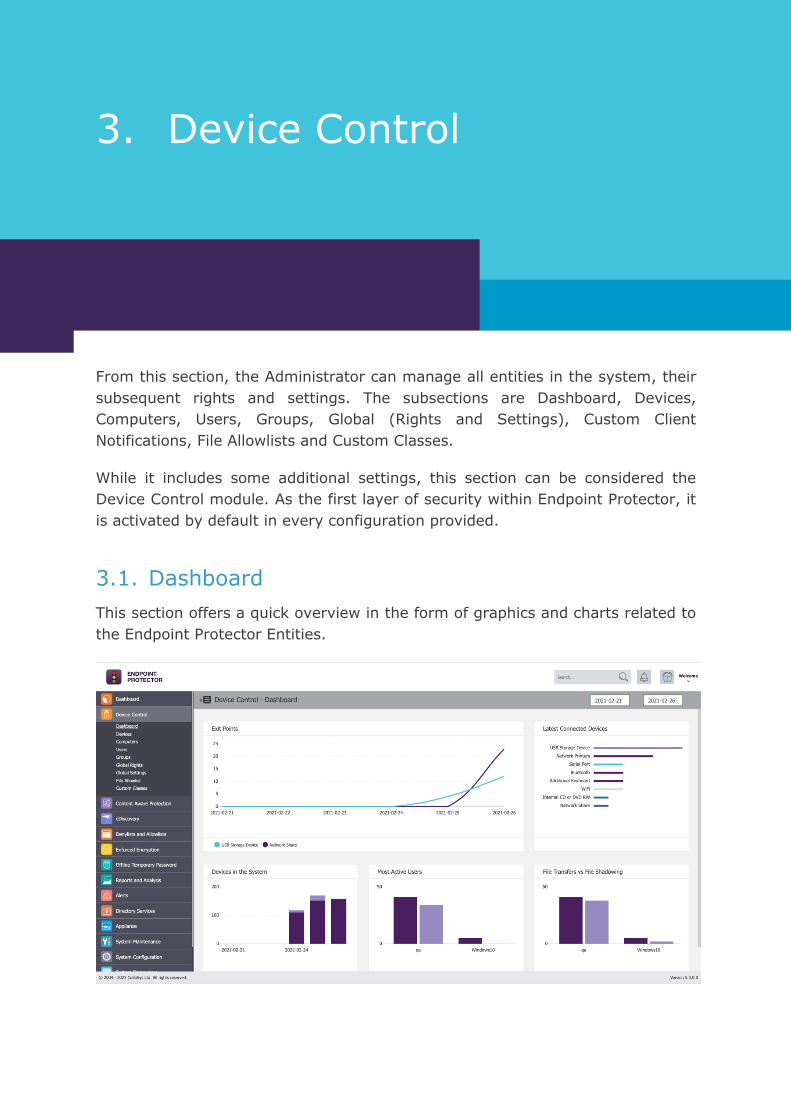
From this section, the Administrator can manage all entities in the system, their
subsequent rights and settings. The subsections are Dashboard, Devices,
Computers, Users, Groups, Global (Rights and Settings), Custom Client
Notifications, File Allowlists and Custom Classes.
While it includes some additional settings, this section can be considered the
Device Control module. As the first layer of security within Endpoint Protector, it
is activated by default in every configuration provided.
3.1. Dashboard
This section offers a quick overview in the form of graphics and charts related to
the Endpoint Protector Entities.
10 | Endpoint Protector | User Manual
3.2. Devices
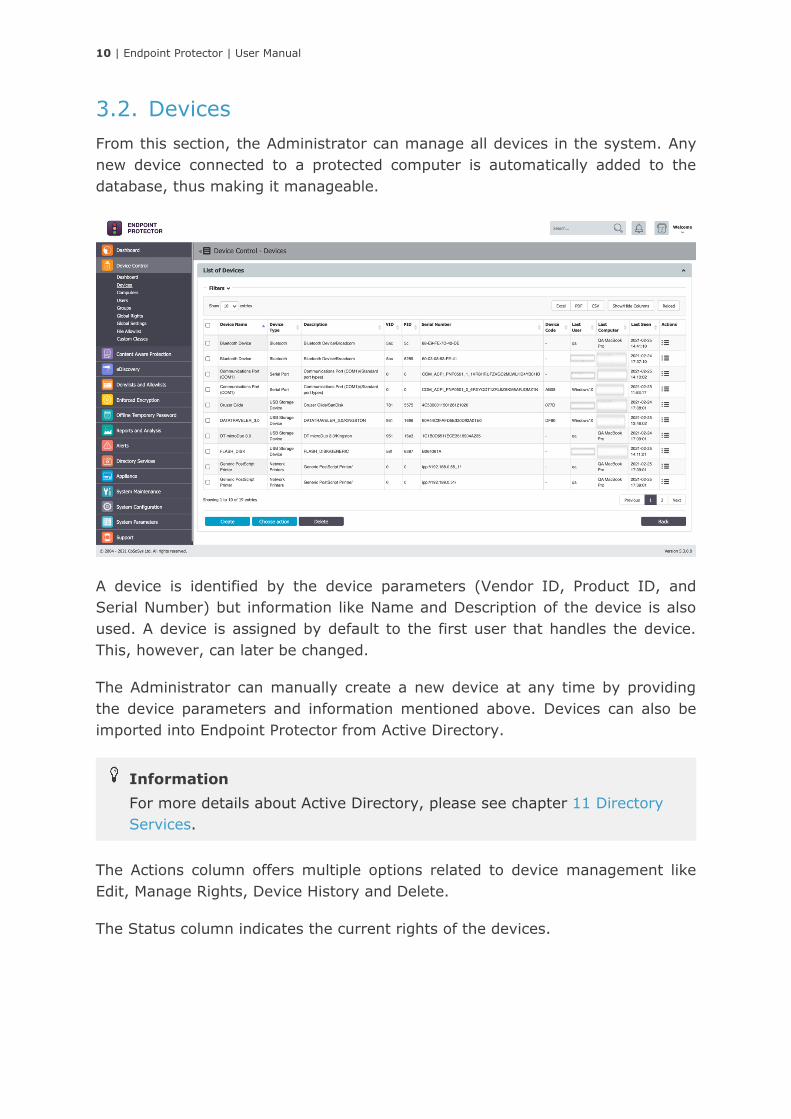
From this section, the Administrator can manage all devices in the system. Any
new device connected to a protected computer is automatically added to the
database, thus making it manageable.
A device is identified by the device parameters (Vendor ID, Product ID, and
Serial Number) but information like Name and Description of the device is also
used. A device is assigned by default to the first user that handles the device.
This, however, can later be changed.
The Administrator can manually create a new device at any time by providing
the device parameters and information mentioned above. Devices can also be
imported into Endpoint Protector from Active Directory.
The Actions column offers multiple options related to device management like
Edit, Manage Rights, Device History and Delete.
The Status column indicates the current rights of the devices.
Information
For more details about Active Directory, please see chapter 11 Directory
Services.
11 | Endpoint Protector | User Manual
If not otherwise configured, the device rights are inherited from the default
Global Rights that are set per Device Types (USB Storage Device, Digital
Camera, iPod, Thunderbolt, Chip Card Device, etc.).
Information
The option to Export/Import Devices in JSON format is also available. This
allows a list of devices to be exported from one Endpoint Protector Server
and imported in a different Endpoint Protector Server.
This feature is intended to correlate the device rights and the Groups.
Therefore, if the same Groups exist on both Servers, the imported devices
will also maintain the access rights. If the Groups do not exist, the devices
will still be imported but the access rights will be ignored.
Example
If global rights indicate that no computer on the system has access to a
specific device, and for one computer that device has been authorized,
then that computer will have access to that device.
Note
If device rights will be configured granularly for all entities, the priority
order, starting with the highest, will be:
Devices > Computers | Users > Groups > Global.
Information
For more details about Device Type, please see paragraph 3.6.1.1 Device
Types.
Information
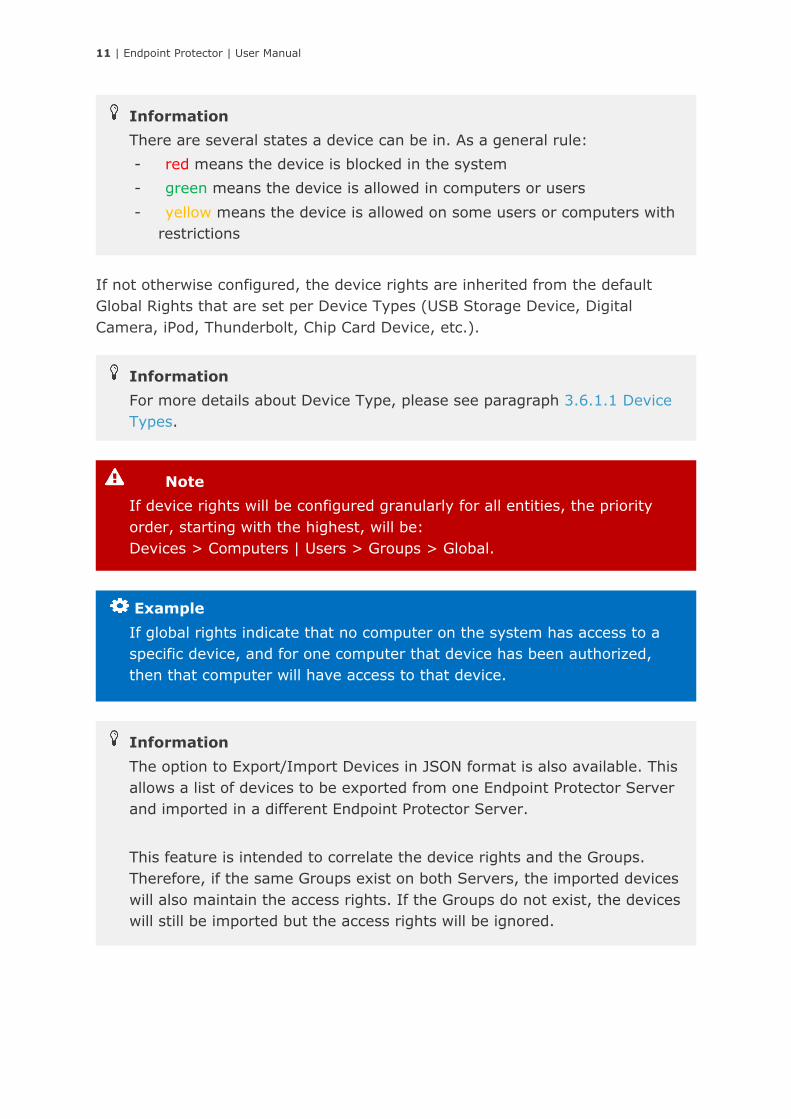
There are several states a device can be in. As a general rule:
- red means the device is blocked in the system
- green means the device is allowed in computers or users
- yellow means the device is allowed on some users or computers with
restrictions
12 | Endpoint Protector | User Manual
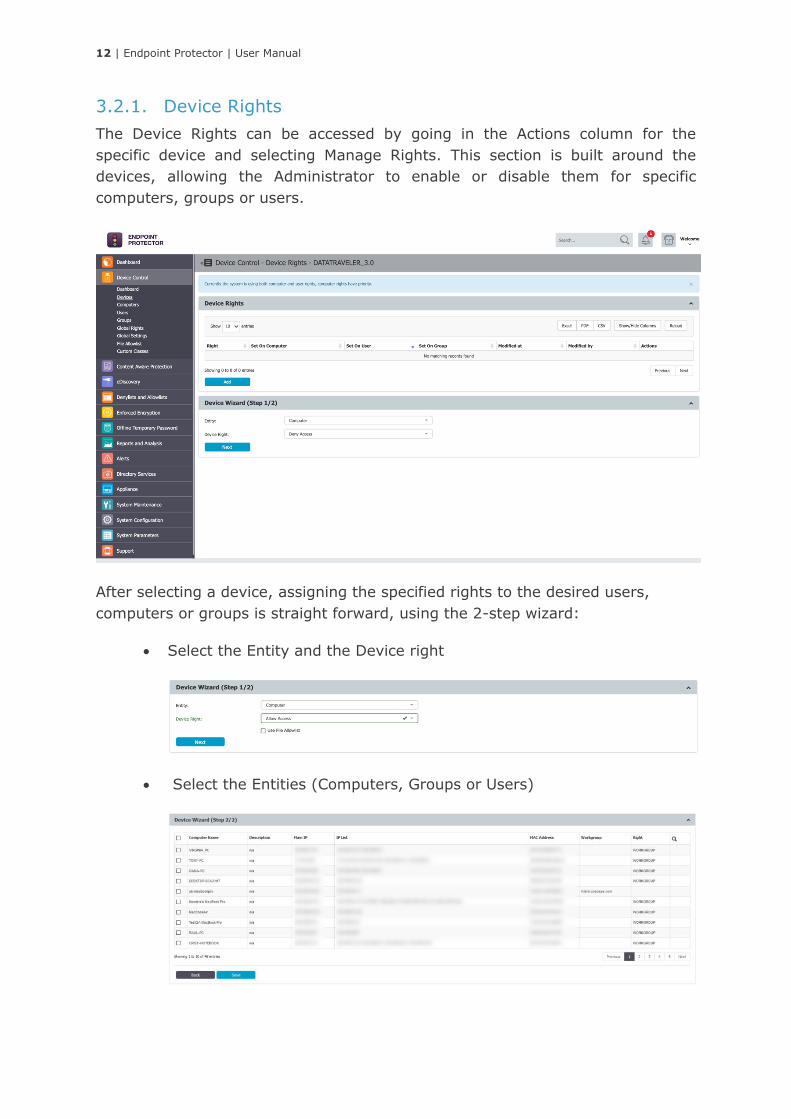
3.2.1. Device Rights
The Device Rights can be accessed by going in the Actions column for the
specific device and selecting Manage Rights. This section is built around the
devices, allowing the Administrator to enable or disable them for specific
computers, groups or users.
After selecting a device, assigning the specified rights to the desired users,
computers or groups is straight forward, using the 2-step wizard:
• Select the Entity and the Device right
• Select the Entities (Computers, Groups or Users)
13 | Endpoint Protector | User Manual
3.2.2. Device History
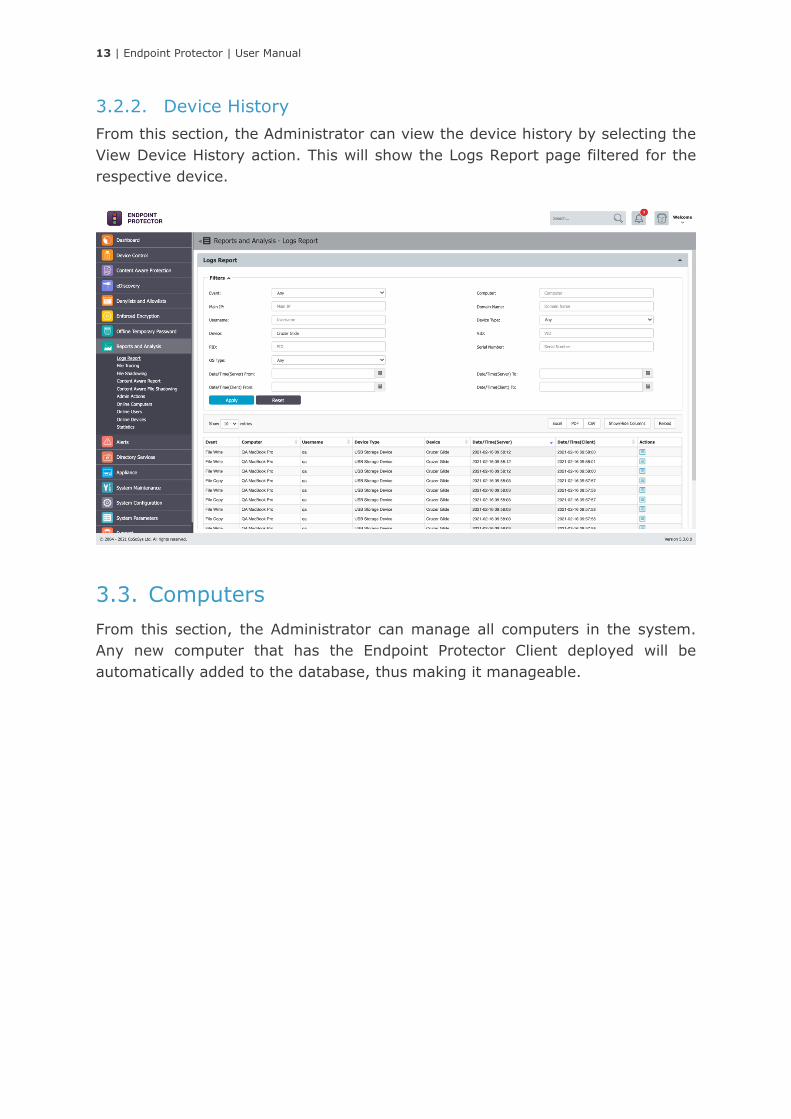
From this section, the Administrator can view the device history by selecting the
View Device History action. This will show the Logs Report page filtered for the
respective device.
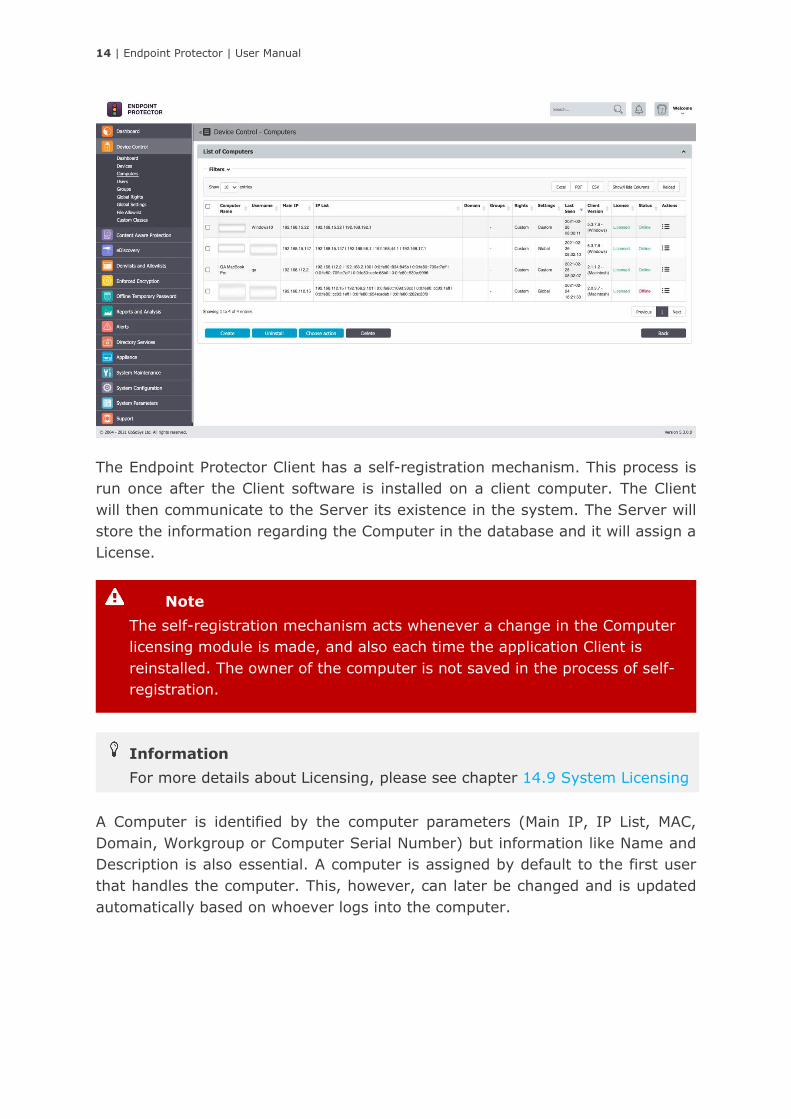
3.3. Computers
From this section, the Administrator can manage all computers in the system.
Any new computer that has the Endpoint Protector Client deployed will be
automatically added to the database, thus making it manageable.
14 | Endpoint Protector | User Manual
The Endpoint Protector Client has a self-registration mechanism. This process is
run once after the Client software is installed on a client computer. The Client
will then communicate to the Server its existence in the system. The Server will
store the information regarding the Computer in the database and it will assign a
License.
A Computer is identified by the computer parameters (Main IP, IP List, MAC,
Domain, Workgroup or Computer Serial Number) but information like Name and
Description is also essential. A computer is assigned by default to the first user
that handles the computer. This, however, can later be changed and is updated
automatically based on whoever logs into the computer.
Information
For more details about Licensing, please see chapter 14.9 System Licensing
Note
The self-registration mechanism acts whenever a change in the Computer
licensing module is made, and also each time the application Client is
reinstalled. The owner of the computer is not saved in the process of self-
registration.
15 | Endpoint Protector | User Manual
The Administrator can manually create a new computer at any time by providing
the computer parameters and information mentioned above. Computers can also
be imported into Endpoint Protector from Active Directory.
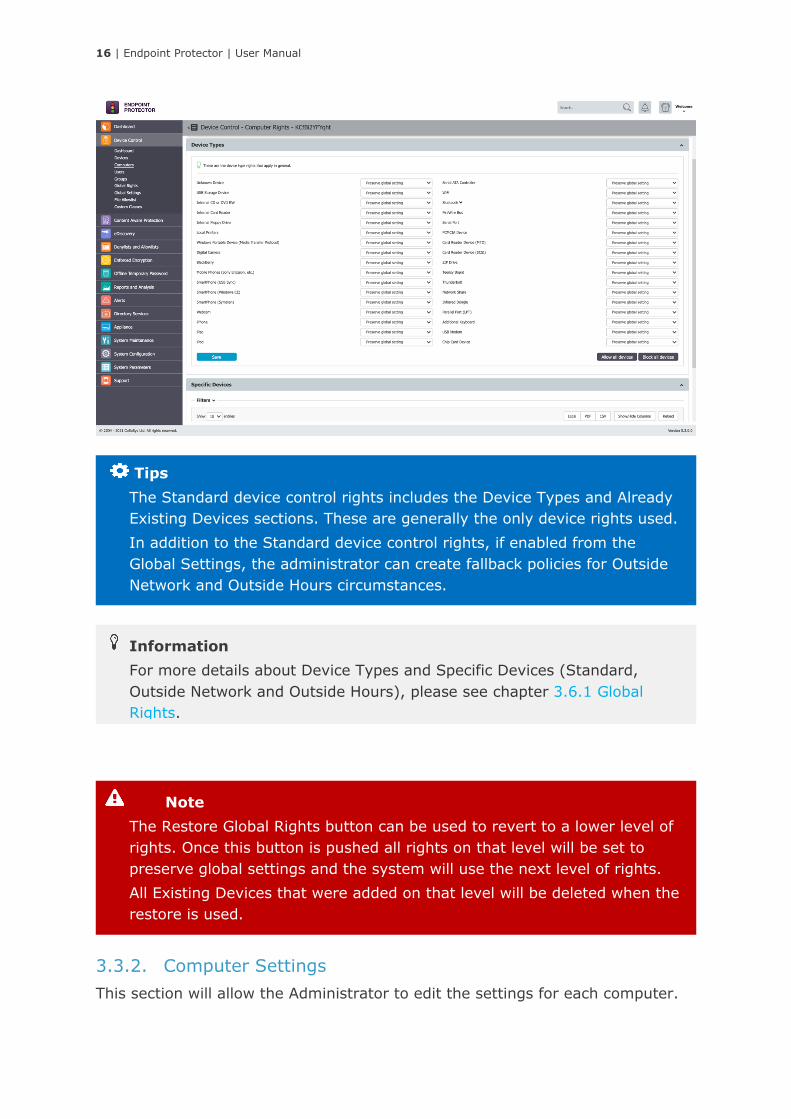
3.3.1. Computer Rights
The Computer Rights can be accessed by going in the Actions column for the
specific computer and selecting Manage Rights. This section is built around the
computers, allowing the Administrator to specify which Device Types and also
which Specific Devices can be accessible.
Tips
For a better organization, computers can be assigned to:
- Groups (e.g. several computers within the same office)
For more details about Groups, please see chapter 3.5 Groups.
- Department (an alternative organization to Groups).
For more details about Departments, please see chapter 14.6 System
Departments.
Information
For more details about Active Directory, please see chapter 11 Directory
Services.
Note
Computer Serial Number may not be taken for Virtual Machines dues to
System Limitations.
16 | Endpoint Protector | User Manual
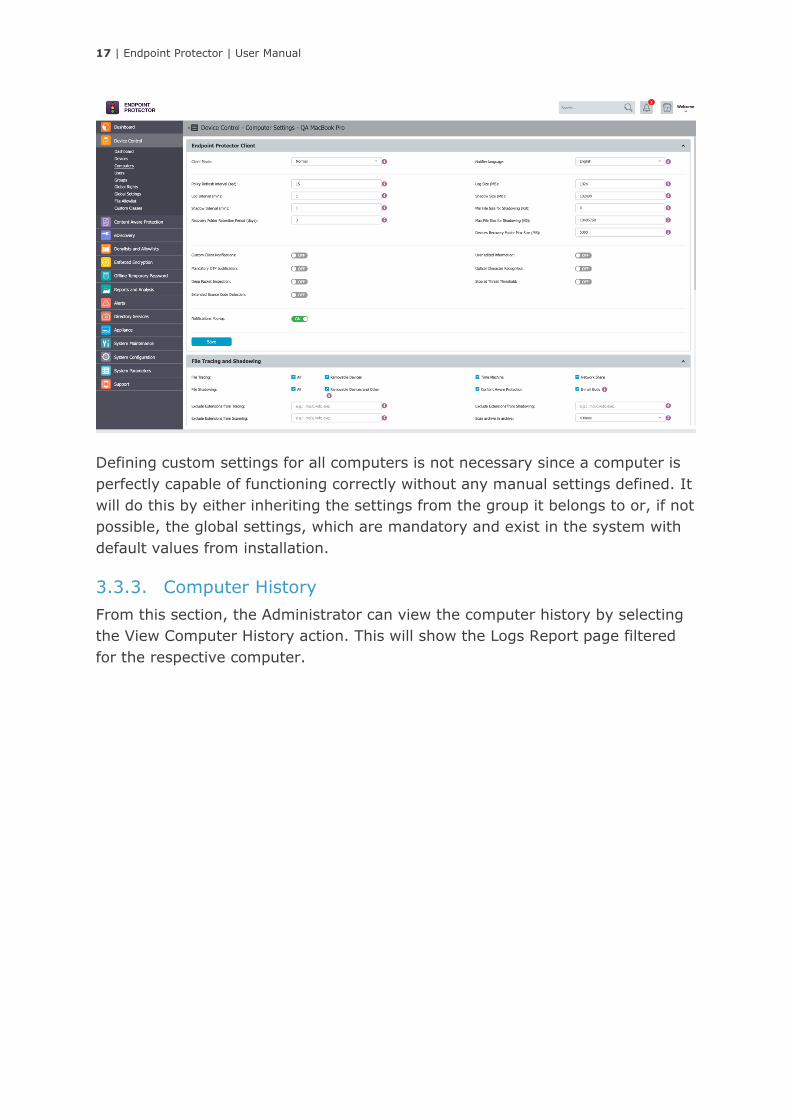
3.3.2. Computer Settings
This section will allow the Administrator to edit the settings for each computer.
Note
The Restore Global Rights button can be used to revert to a lower level of
rights. Once this button is pushed all rights on that level will be set to
preserve global settings and the system will use the next level of rights.
All Existing Devices that were added on that level will be deleted when the
restore is used.
Information
For more details about Device Types and Specific Devices (Standard,
Outside Network and Outside Hours), please see chapter 3.6.1 Global
Rights.
Tips
The Standard device control rights includes the Device Types and Already
Existing Devices sections. These are generally the only device rights used.
In addition to the Standard device control rights, if enabled from the
Global Settings, the administrator can create fallback policies for Outside
Network and Outside Hours circumstances.
17 | Endpoint Protector | User Manual
Defining custom settings for all computers is not necessary since a computer is
perfectly capable of functioning correctly without any manual settings defined. It
will do this by either inheriting the settings from the group it belongs to or, if not
possible, the global settings, which are mandatory and exist in the system with
default values from installation.
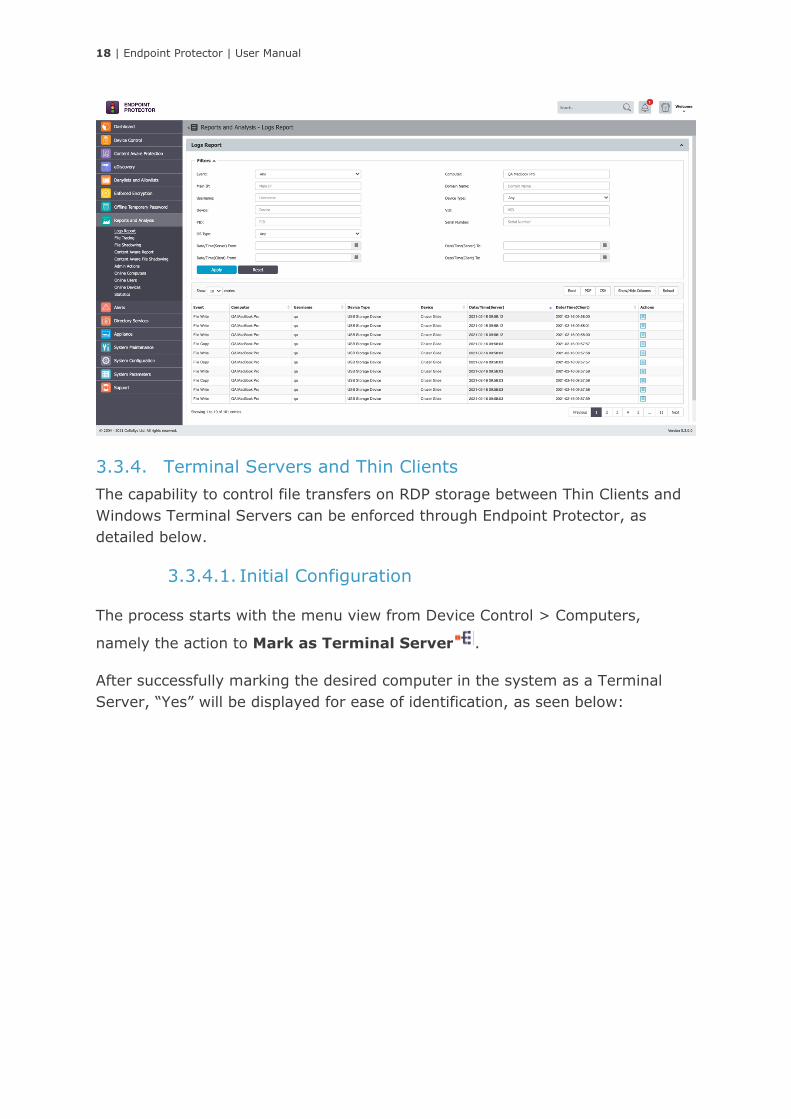
3.3.3. Computer History
From this section, the Administrator can view the computer history by selecting
the View Computer History action. This will show the Logs Report page filtered
for the respective computer.
18 | Endpoint Protector | User Manual
3.3.4. Terminal Servers and Thin Clients
The capability to control file transfers on RDP storage between Thin Clients and
Windows Terminal Servers can be enforced through Endpoint Protector, as
detailed below.
3.3.4.1. Initial Configuration
The process starts with the menu view from Device Control > Computers,
namely the action to Mark as Terminal Server .
After successfully marking the desired computer in the system as a Terminal
Server, “Yes” will be displayed for ease of identification, as seen below:
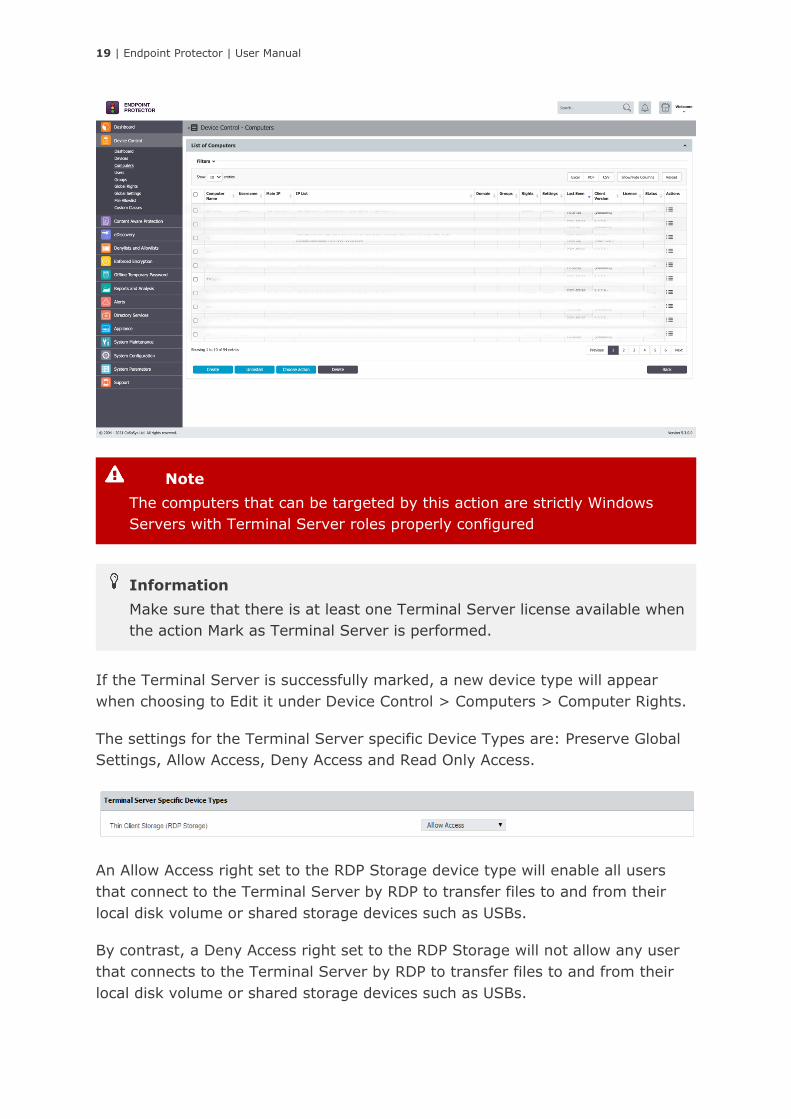
19 | Endpoint Protector | User Manual
If the Terminal Server is successfully marked, a new device type will appear
when choosing to Edit it under Device Control > Computers > Computer Rights.
The settings for the Terminal Server specific Device Types are: Preserve Global
Settings, Allow Access, Deny Access and Read Only Access.
An Allow Access right set to the RDP Storage device type will enable all users
that connect to the Terminal Server by RDP to transfer files to and from their
local disk volume or shared storage devices such as USBs.
By contrast, a Deny Access right set to the RDP Storage will not allow any user
that connects to the Terminal Server by RDP to transfer files to and from their
local disk volume or shared storage devices such as USBs.
Information
Make sure that there is at least one Terminal Server license available when
the action Mark as Terminal Server is performed.
Note
The computers that can be targeted by this action are strictly Windows
Servers with Terminal Server roles properly configured
20 | Endpoint Protector | User Manual
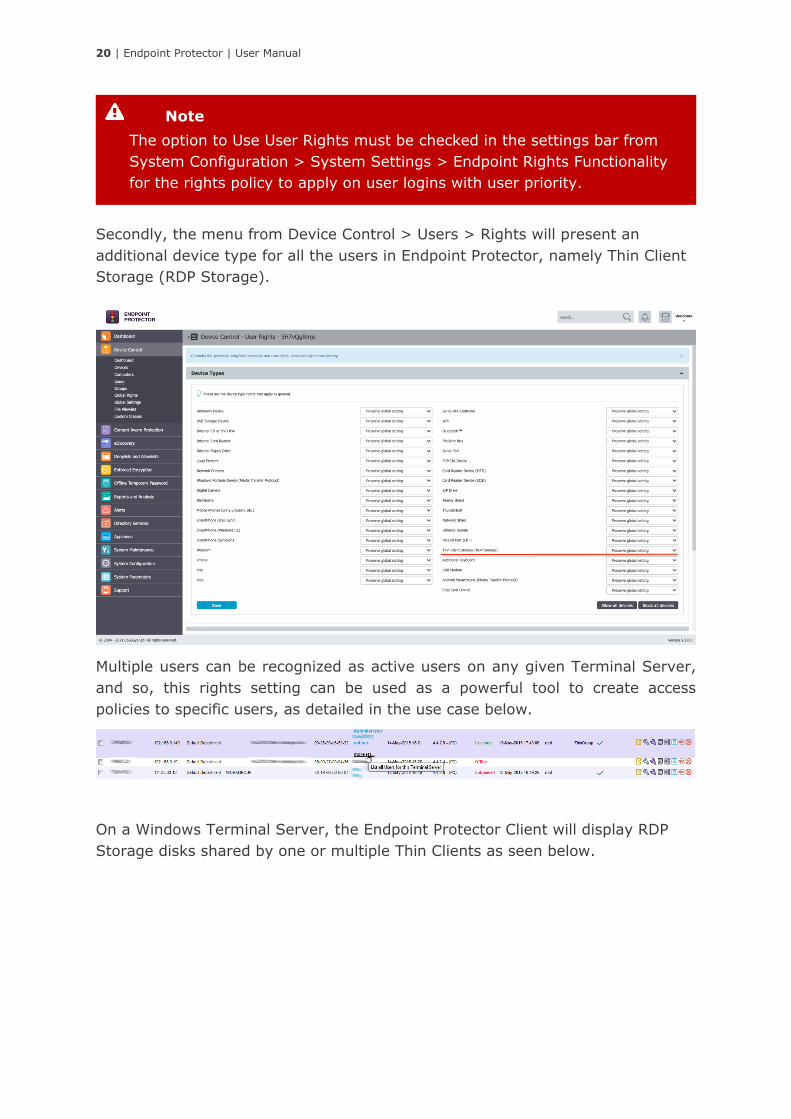
Secondly, the menu from Device Control > Users > Rights will present an
additional device type for all the users in Endpoint Protector, namely Thin Client
Storage (RDP Storage).
Multiple users can be recognized as active users on any given Terminal Server,
and so, this rights setting can be used as a powerful tool to create access
policies to specific users, as detailed in the use case below.
On a Windows Terminal Server, the Endpoint Protector Client will display RDP
Storage disks shared by one or multiple Thin Clients as seen below.
Note
The option to Use User Rights must be checked in the settings bar from
System Configuration > System Settings > Endpoint Rights Functionality
for the rights policy to apply on user logins with user priority.
21 | Endpoint Protector | User Manual
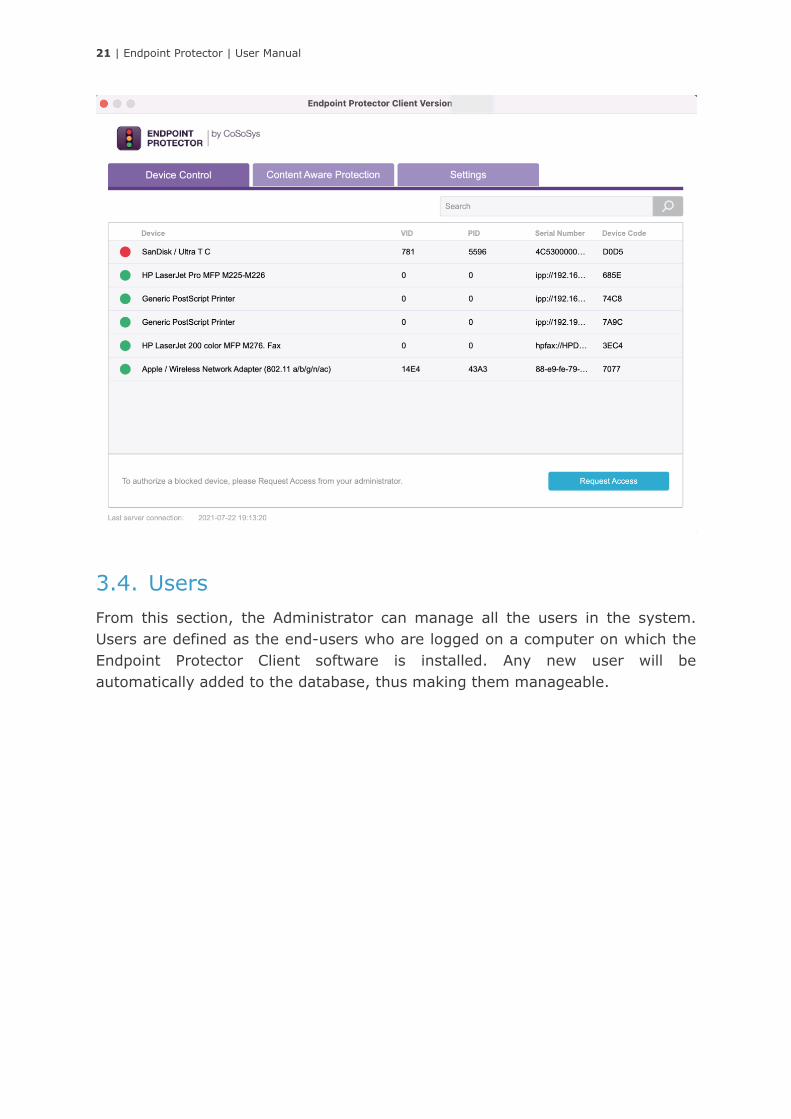
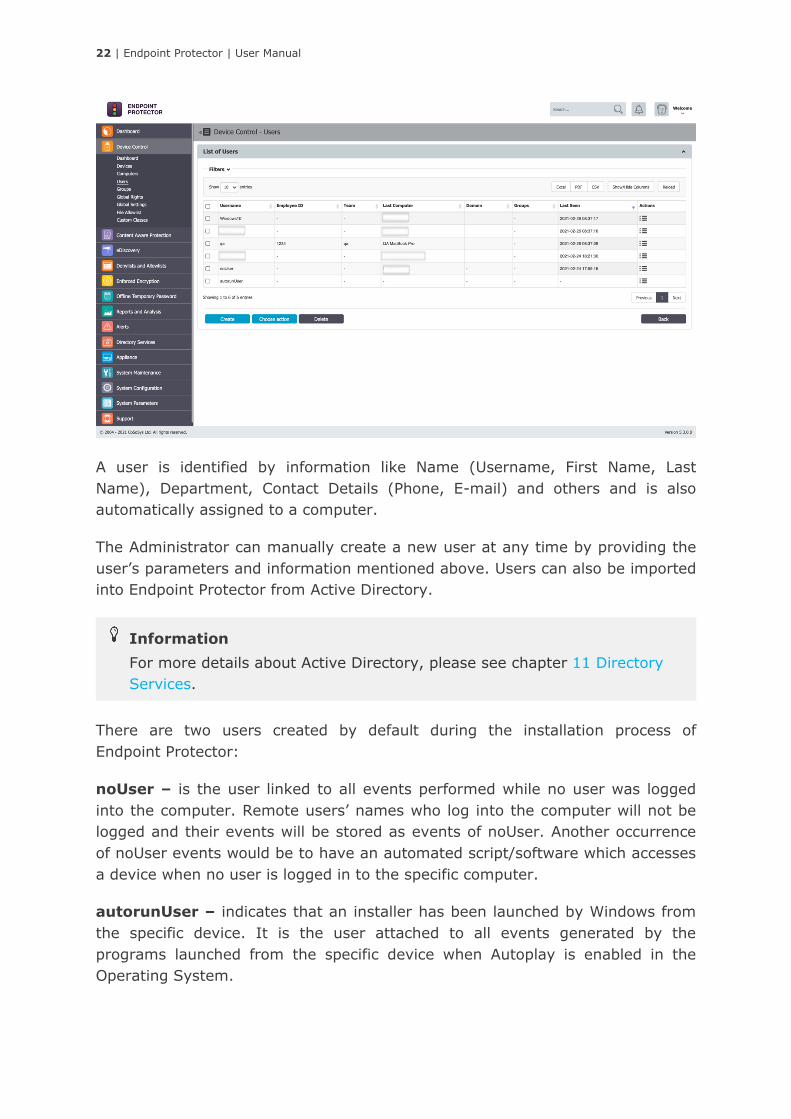
3.4. Users
From this section, the Administrator can manage all the users in the system.
Users are defined as the end-users who are logged on a computer on which the
Endpoint Protector Client software is installed. Any new user will be
automatically added to the database, thus making them manageable.
22 | Endpoint Protector | User Manual
A user is identified by information like Name (Username, First Name, Last
Name), Department, Contact Details (Phone, E-mail) and others and is also
automatically assigned to a computer.
The Administrator can manually create a new user at any time by providing the
user’s parameters and information mentioned above. Users can also be imported
into Endpoint Protector from Active Directory.
There are two users created by default during the installation process of
Endpoint Protector:
noUser – is the user linked to all events performed while no user was logged
into the computer. Remote users’ names who log into the computer will not be
logged and their events will be stored as events of noUser. Another occurrence
of noUser events would be to have an automated script/software which accesses
a device when no user is logged in to the specific computer.
autorunUser – indicates that an installer has been launched by Windows from
the specific device. It is the user attached to all events generated by the
programs launched from the specific device when Autoplay is enabled in the
Operating System.
Information
For more details about Active Directory, please see chapter 11 Directory
Services.
23 | Endpoint Protector | User Manual
The Actions column offers multiple options related to user management like Edit,
Manage Rights, History and Delete.
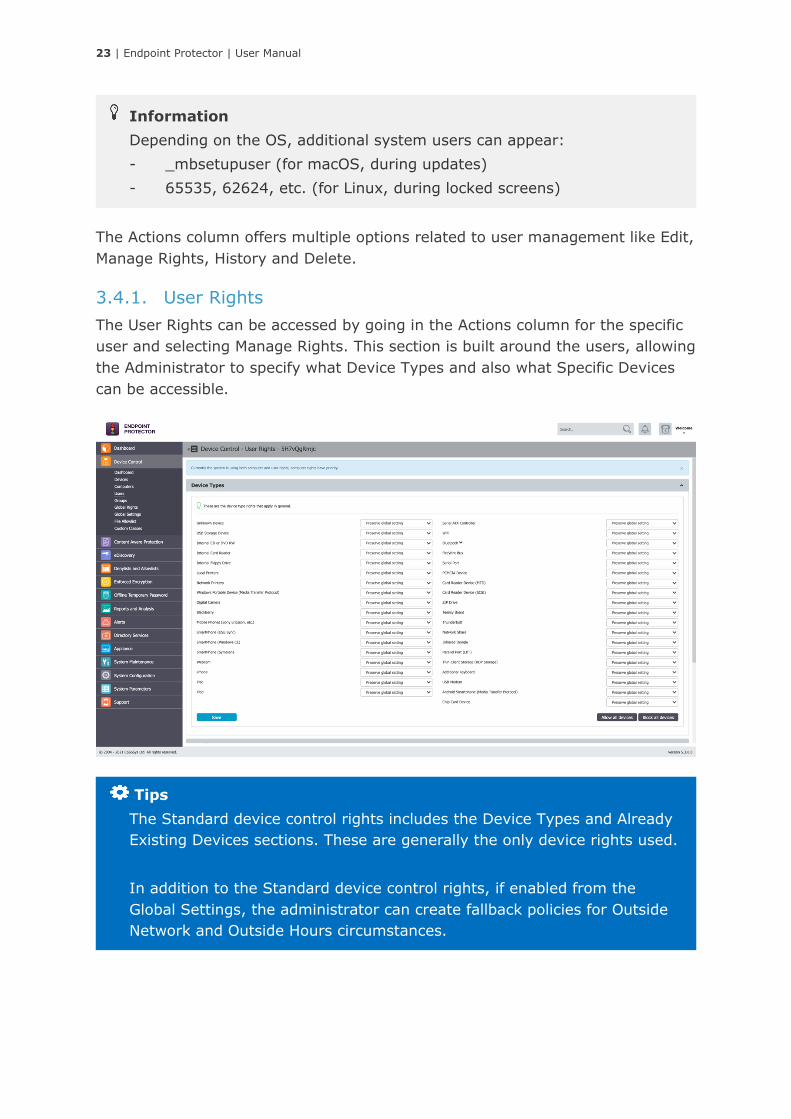
3.4.1. User Rights
The User Rights can be accessed by going in the Actions column for the specific
user and selecting Manage Rights. This section is built around the users, allowing
the Administrator to specify what Device Types and also what Specific Devices
can be accessible.
Tips
The Standard device control rights includes the Device Types and Already
Existing Devices sections. These are generally the only device rights used.
In addition to the Standard device control rights, if enabled from the
Global Settings, the administrator can create fallback policies for Outside
Network and Outside Hours circumstances.
Information
Depending on the OS, additional system users can appear:
- _mbsetupuser (for macOS, during updates)
- 65535, 62624, etc. (for Linux, during locked screens)
24 | Endpoint Protector | User Manual
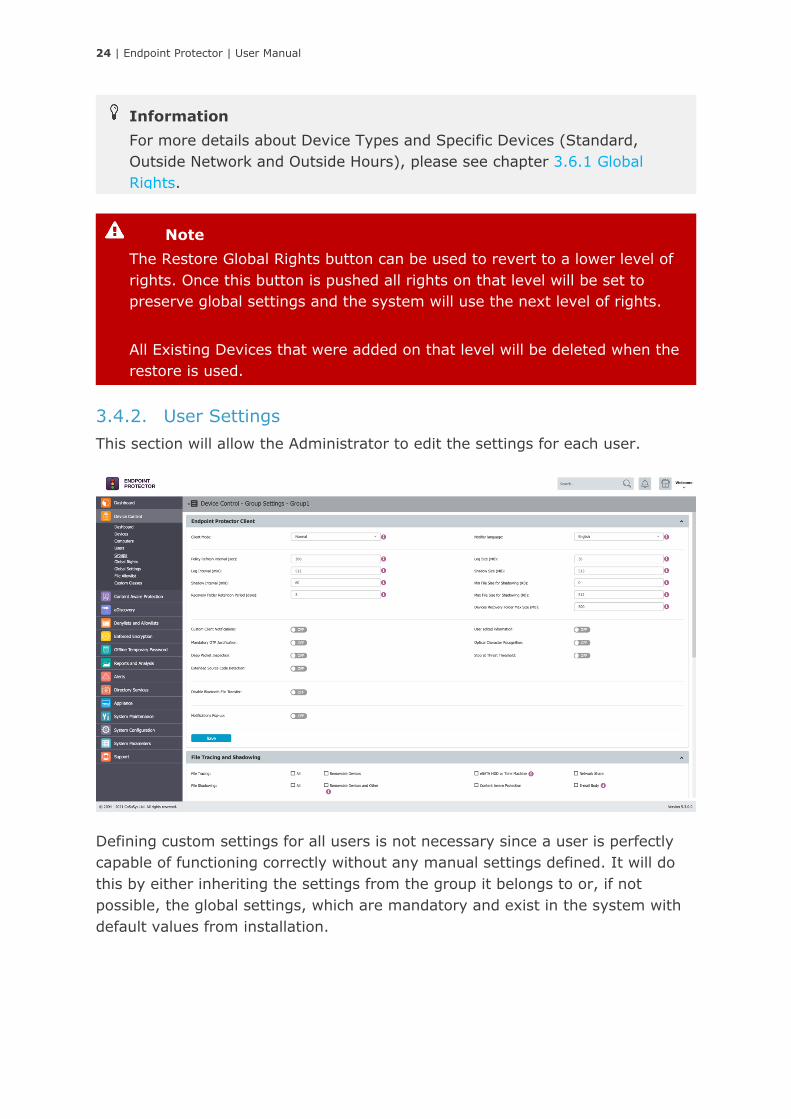
3.4.2. User Settings
This section will allow the Administrator to edit the settings for each user.
Defining custom settings for all users is not necessary since a user is perfectly
capable of functioning correctly without any manual settings defined. It will do
this by either inheriting the settings from the group it belongs to or, if not
possible, the global settings, which are mandatory and exist in the system with
default values from installation.
Note
The Restore Global Rights button can be used to revert to a lower level of
rights. Once this button is pushed all rights on that level will be set to
preserve global settings and the system will use the next level of rights.
All Existing Devices that were added on that level will be deleted when the
restore is used.
Information
For more details about Device Types and Specific Devices (Standard,
Outside Network and Outside Hours), please see chapter 3.6.1 Global
Rights.
25 | Endpoint Protector | User Manual
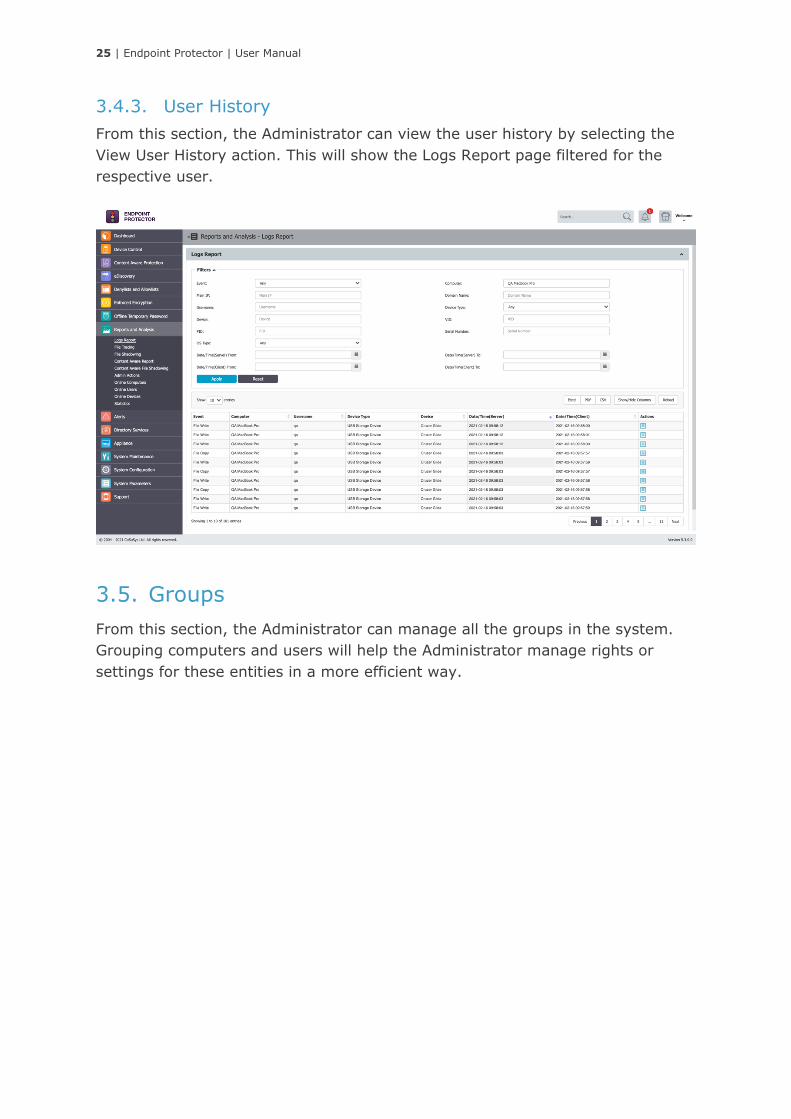
3.4.3. User History
From this section, the Administrator can view the user history by selecting the
View User History action. This will show the Logs Report page filtered for the
respective user.
3.5. Groups
From this section, the Administrator can manage all the groups in the system.
Grouping computers and users will help the Administrator manage rights or
settings for these entities in a more efficient way.
26 | Endpoint Protector | User Manual
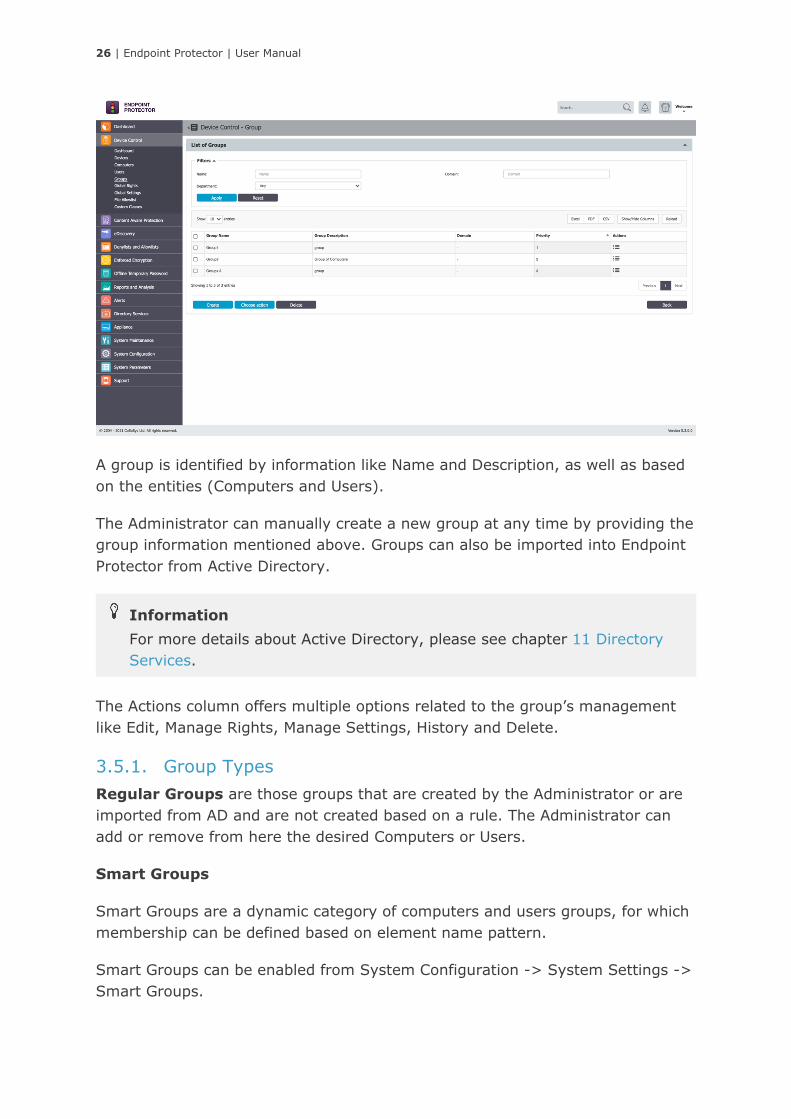
A group is identified by information like Name and Description, as well as based
on the entities (Computers and Users).
The Administrator can manually create a new group at any time by providing the
group information mentioned above. Groups can also be imported into Endpoint
Protector from Active Directory.
The Actions column offers multiple options related to the group’s management
like Edit, Manage Rights, Manage Settings, History and Delete.
3.5.1. Group Types
Regular Groups are those groups that are created by the Administrator or are
imported from AD and are not created based on a rule. The Administrator can
add or remove from here the desired Computers or Users.
Smart Groups
Smart Groups are a dynamic category of computers and users groups, for which
membership can be defined based on element name pattern.
Smart Groups can be enabled from System Configuration -> System Settings ->
Smart Groups.
Information
For more details about Active Directory, please see chapter 11 Directory
Services.
27 | Endpoint Protector | User Manual
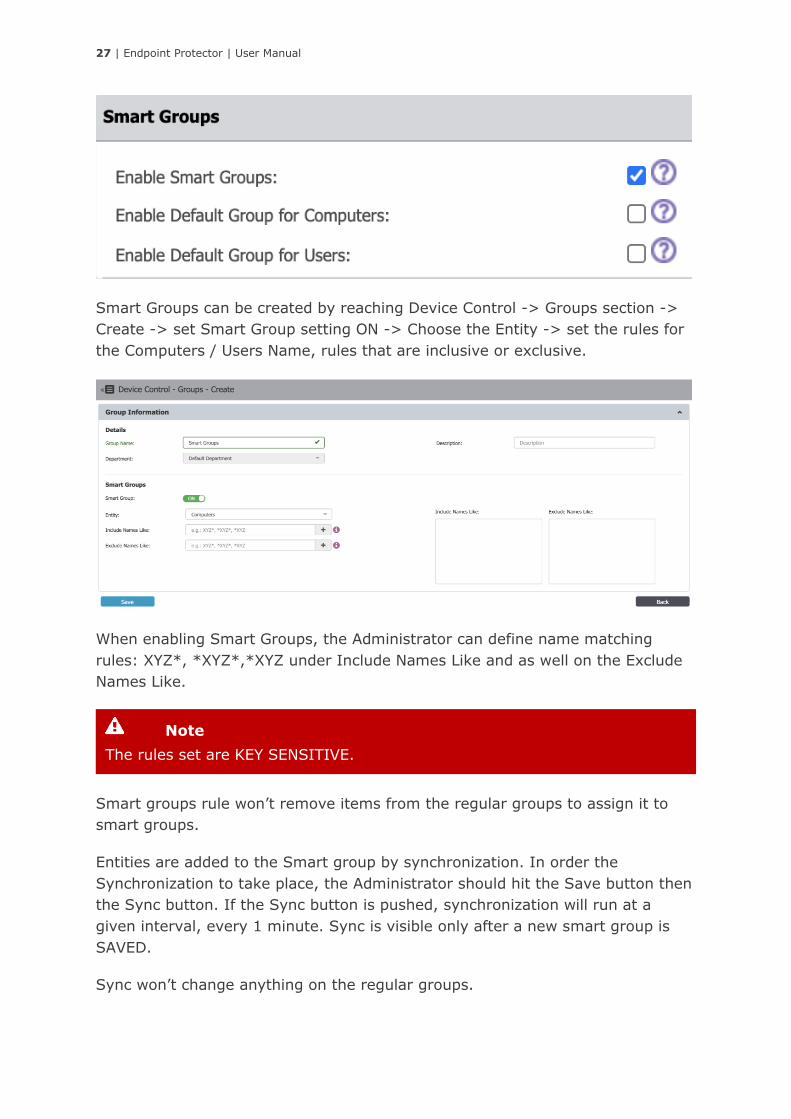
Smart Groups can be created by reaching Device Control -> Groups section ->
Create -> set Smart Group setting ON -> Choose the Entity -> set the rules for
the Computers / Users Name, rules that are inclusive or exclusive.
When enabling Smart Groups, the Administrator can define name matching
rules: XYZ*, *XYZ*,*XYZ under Include Names Like and as well on the Exclude
Names Like.
Smart groups rule won’t remove items from the regular groups to assign it to
smart groups.
Entities are added to the Smart group by synchronization. In order the
Synchronization to take place, the Administrator should hit the Save button then
the Sync button. If the Sync button is pushed, synchronization will run at a
given interval, every 1 minute. Sync is visible only after a new smart group is
SAVED.
Sync won’t change anything on the regular groups.
Note
The rules set are KEY SENSITIVE.
28 | Endpoint Protector | User Manual
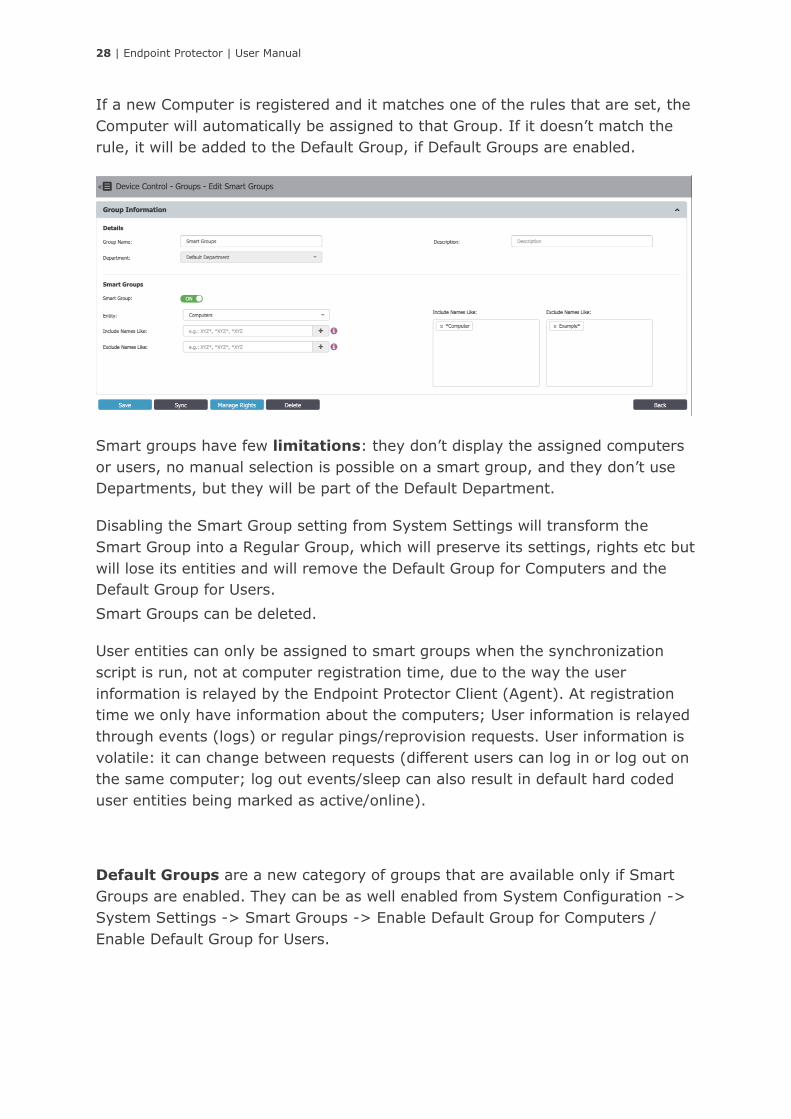
If a new Computer is registered and it matches one of the rules that are set, the
Computer will automatically be assigned to that Group. If it doesn’t match the
rule, it will be added to the Default Group, if Default Groups are enabled.
Smart groups have few limitations: they don’t display the assigned computers
or users, no manual selection is possible on a smart group, and they don’t use
Departments, but they will be part of the Default Department.
Disabling the Smart Group setting from System Settings will transform the
Smart Group into a Regular Group, which will preserve its settings, rights etc but
will lose its entities and will remove the Default Group for Computers and the
Default Group for Users.
Smart Groups can be deleted.
User entities can only be assigned to smart groups when the synchronization
script is run, not at computer registration time, due to the way the user
information is relayed by the Endpoint Protector Client (Agent). At registration
time we only have information about the computers; User information is relayed
through events (logs) or regular pings/reprovision requests. User information is
volatile: it can change between requests (different users can log in or log out on
the same computer; log out events/sleep can also result in default hard coded
user entities being marked as active/online).
Default Groups are a new category of groups that are available only if Smart
Groups are enabled. They can be as well enabled from System Configuration ->
System Settings -> Smart Groups -> Enable Default Group for Computers /
Enable Default Group for Users.
29 | Endpoint Protector | User Manual
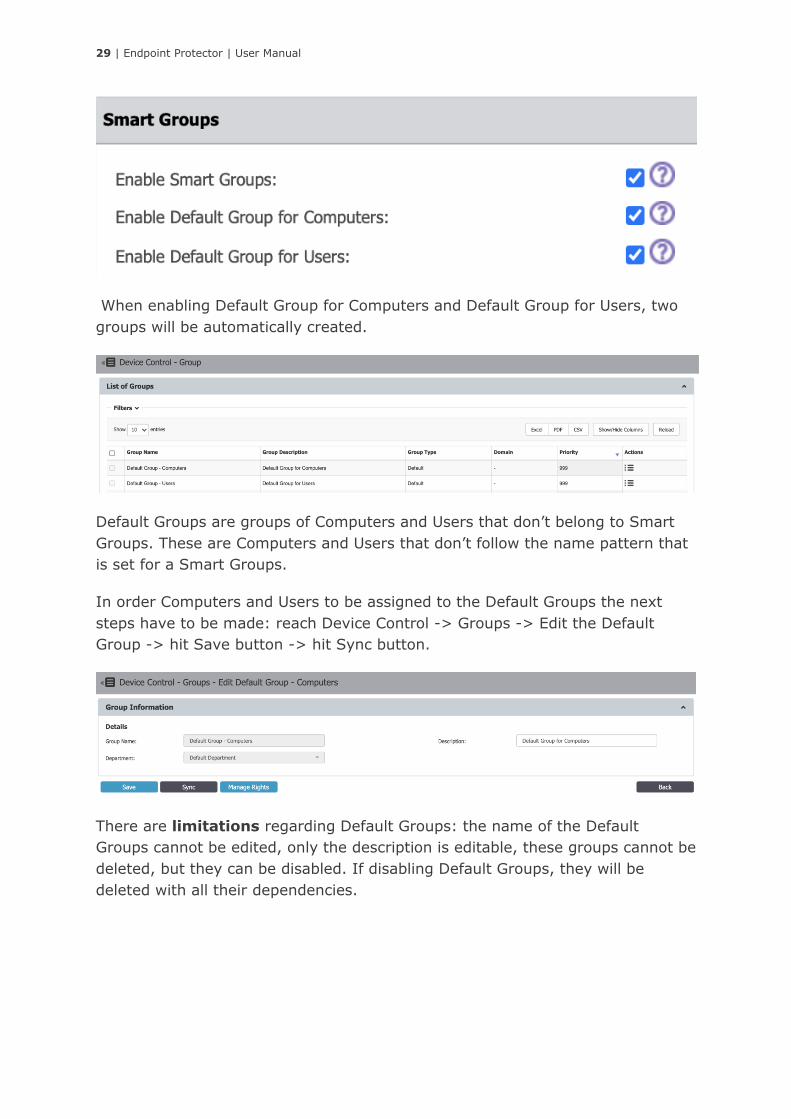
When enabling Default Group for Computers and Default Group for Users, two
groups will be automatically created.
Default Groups are groups of Computers and Users that don’t belong to Smart
Groups. These are Computers and Users that don’t follow the name pattern that
is set for a Smart Groups.
In order Computers and Users to be assigned to the Default Groups the next
steps have to be made: reach Device Control -> Groups -> Edit the Default
Group -> hit Save button -> hit Sync button.
There are limitations regarding Default Groups: the name of the Default
Groups cannot be edited, only the description is editable, these groups cannot be
deleted, but they can be disabled. If disabling Default Groups, they will be
deleted with all their dependencies.
30 | Endpoint Protector | User Manual
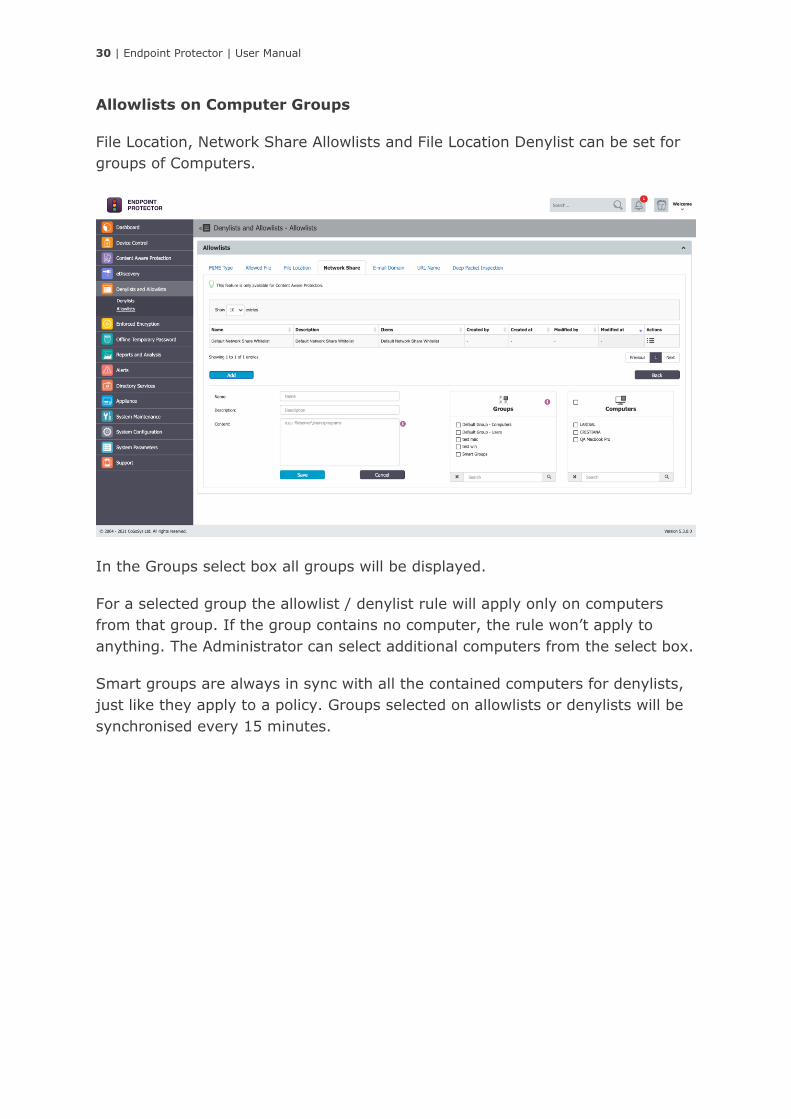
Allowlists on Computer Groups
File Location, Network Share Allowlists and File Location Denylist can be set for
groups of Computers.
In the Groups select box all groups will be displayed.
For a selected group the allowlist / denylist rule will apply only on computers
from that group. If the group contains no computer, the rule won’t apply to
anything. The Administrator can select additional computers from the select box.
Smart groups are always in sync with all the contained computers for denylists,
just like they apply to a policy. Groups selected on allowlists or denylists will be
synchronised every 15 minutes.
31 | Endpoint Protector | User Manual
3.5.2. Group Rights
The Group Rights can be accessed by going in the Actions column for the specific
group and selecting Manage Rights. This section is built around the group,
allowing the Administrator to specify what Device Types and also what Specific
Devices can be accessible.
This section is similar to the Computer Rights section, the difference being that it
applies to all the computers that are part of the group simultaneously.
Information
For more details about Device Types and Specific Devices (Standard,
Outside Network and Outside Hours), please see chapter 3.6.1 Global
Rights.
Tips
The Standard device control rights includes the Device Types and Already
Existing Devices sections. These are generally the only device rights used.
In addition to the Standard device control rights, if enabled from the
Global Settings, the administrator can create fallback policies for Outside
Network and Outside Hours circumstances.
32 | Endpoint Protector | User Manual
3.5.3. Group Settings
This section will allow the administrator to edit the settings for each group.
We mentioned earlier that computers and users can be grouped in order to make
editing the settings easier and more logical. Defining custom settings for all
groups is not necessary since a computer is perfectly capable of functioning
correctly without any granular settings defined. It will do this by either inheriting
the settings from the group it belongs to or, if not possible, the global settings,
which are mandatory and exist in the system with default values from
installation.
3.6. Global
From this section, the Administrator can manage the entire system. The
Administrator can specify what rights and settings apply globally, to all Endpoint
Protector entities.
Note
The Restore Global Rights button can be used to revert to a lower level of
rights. Once this button is pushed all rights on that level will be set to
preserve global settings and the system will use the next level of rights.
All Existing Devices that were added on that level will be deleted when the
restore is used.
33 | Endpoint Protector | User Manual
3.6.1. Global Rights
This section relates to the entire system, allowing the Administrator to specify
what Device Types and also what Specific Devices can be accessible. While
Standard Rights Policies are the default ones, Outside Hours or Outside Network
Policies are also available. These are dependent first activating settings from
Global Settings.
3.6.1.1. Device Types (Standard)
Endpoint Protector supports a wide range of device types, which represent key
sources of security breaches. These devices can be authorized, which makes it
possible for the users to view, create, or modify their content and for
administrators to view the data transferred to and from the authorized devices.
• Removable Storage Devices
• Normal USB Flash Drives, U3 and Autorun Drives, Disk on Key, etc.
Note
If device rights or other settings will be configured granularly for entities,
the priority order, starting with the highest, will be:
Devices > Computers | Users > Groups > Global.

34 | Endpoint Protector | User Manual
• USB 1.1, USB 2.0, USB 3.0
• Memory Cards - SD Cards, MMC Cards, and Compact Flash Cards, etc.
• Card Readers - internal and external
• CD/DVD-Player/Burner - internal and external
• Digital Cameras
• Smartphones / Handhelds / PDAs (includes Nokia N-Series,
Blackberry, and Windows CE compatible devices, Windows Mobile
devices, etc.)
• iPods / iPhones / iPads
• MP3 Player / Media Player Devices
• External HDDs / portable hard disks
• FireWire Devices
• PCMCIA Devices
• Biometric Devices
• Bluetooth
• Printers (applies to serial, USB and LTP connection methods)
• Express Card (SSD)
• Wireless USB
• LPT/Parallel ports *applies only to storage devices
• Floppy disk drives
• Serial ATA Controllers
Depending on the device type, besides the Allow and Deny Access rights,
additional rights are also available. These include Read-Only Access or multiple
combinations of Allow Access but with various limitations, such as Allow access
but exclude from CAP scanning or Allow Access if TrustedDevice Level 1 to 4.
35 | Endpoint Protector | User Manual
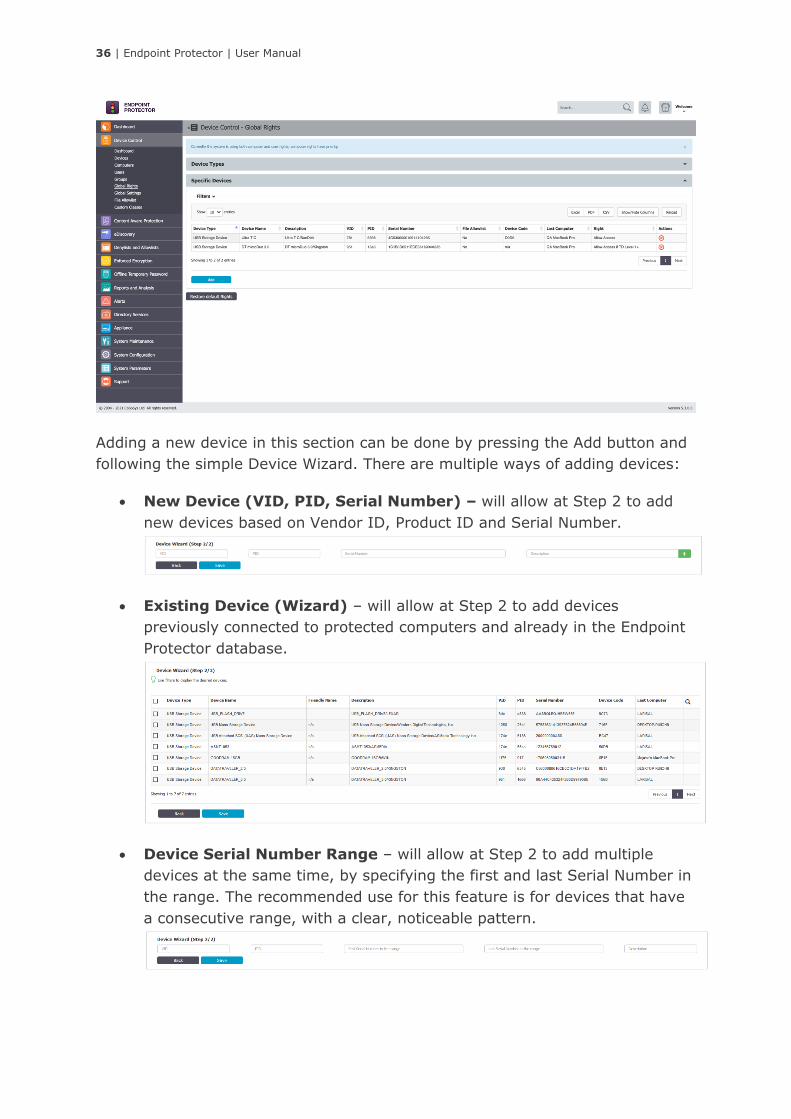
3.6.1.2. Specific Devices (Standard)
From this section, the administrator can manage access rights for a specific
device.
Information
Device rights can be set either Globally or, per Group, User or Computer,
by using the Manage Rights action from each section/entity.
Note
By default, the majority of device types are blocked. However, as a
working internet connection or wireless keyboards are needed during the
configuration process, several devices are set to Allow Access. These
include WiFi, Bluetooth, Network Share, Additional Keyboard and USB
Modem.
Tips
WiFi – Block if wired network is present
With this option the administrator can disable the WiFi connection, while a
wired network connection is present. The WiFi connection will be available
when the wired network is not present.
Information
The TrustedDevices™ technology integrated within Endpoint Protector is
available in four security levels, depending on the degree of protection
offered by a device (trusted devices using EasyLock™ are TD level 1).
For more information on TrustedDevices™ and EasyLock™, please see
chapter 15.1.1 Trusted Devices.
36 | Endpoint Protector | User Manual
Adding a new device in this section can be done by pressing the Add button and
following the simple Device Wizard. There are multiple ways of adding devices:
• New Device (VID, PID, Serial Number) – will allow at Step 2 to add
new devices based on Vendor ID, Product ID and Serial Number.
• Existing Device (Wizard) – will allow at Step 2 to add devices
previously connected to protected computers and already in the Endpoint
Protector database.
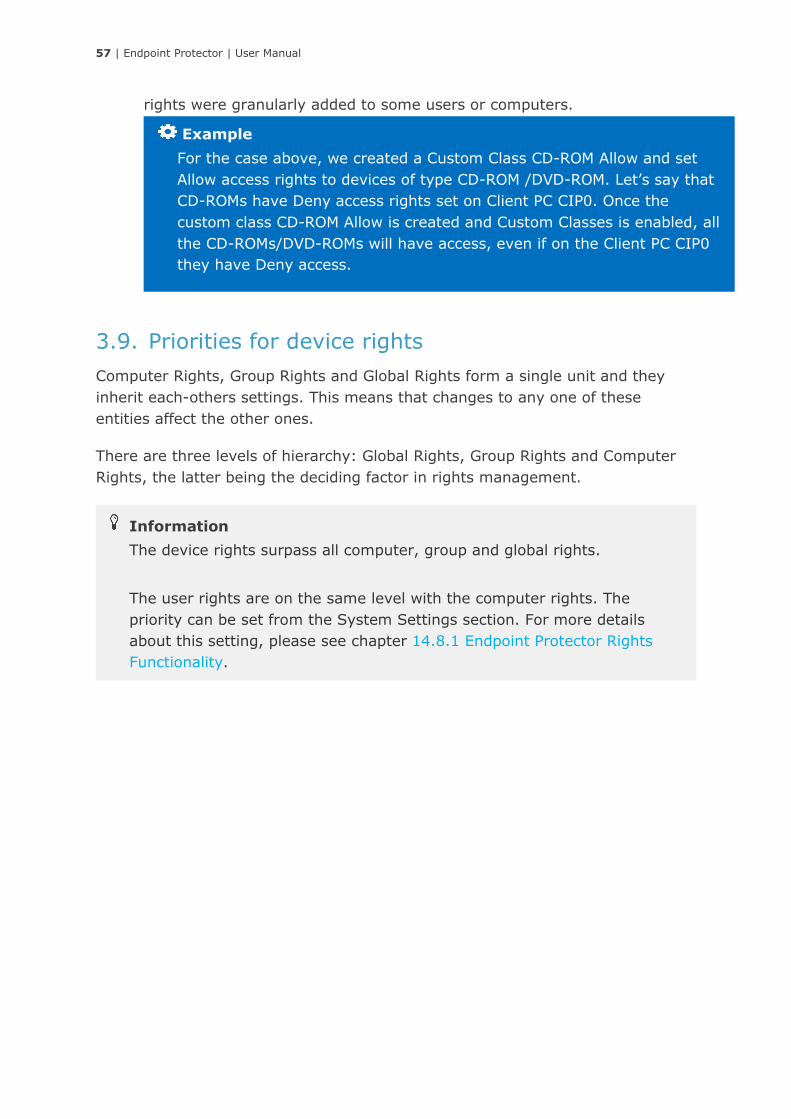
• Device Serial Number Range – will allow at Step 2 to add multiple
devices at the same time, by specifying the first and last Serial Number in
the range. The recommended use for this feature is for devices that have
a consecutive range, with a clear, noticeable pattern.
37 | Endpoint Protector | User Manual
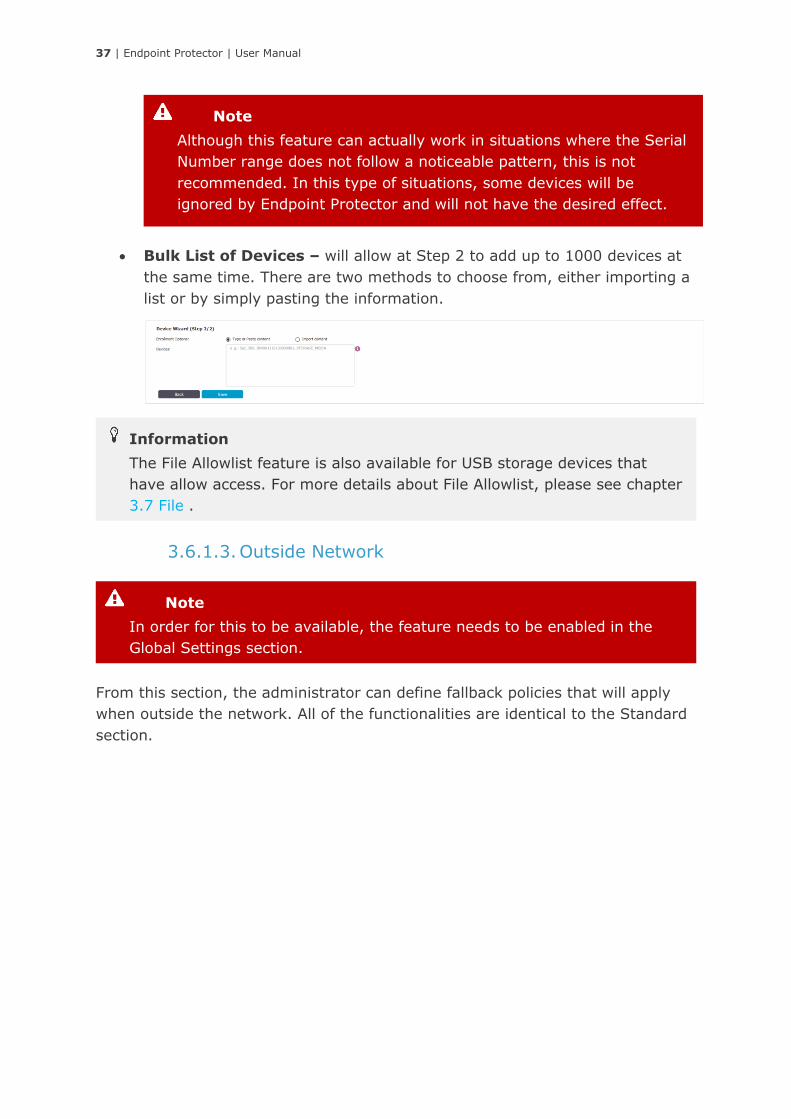
• Bulk List of Devices – will allow at Step 2 to add up to 1000 devices at
the same time. There are two methods to choose from, either importing a
list or by simply pasting the information.
3.6.1.3. Outside Network
From this section, the administrator can define fallback policies that will apply
when outside the network. All of the functionalities are identical to the Standard
section.
Note
In order for this to be available, the feature needs to be enabled in the
Global Settings section.
Information
The File Allowlist feature is also available for USB storage devices that
have allow access. For more details about File Allowlist, please see chapter
3.7 File .
Note
Although this feature can actually work in situations where the Serial
Number range does not follow a noticeable pattern, this is not
recommended. In this type of situations, some devices will be
ignored by Endpoint Protector and will not have the desired effect.
38 | Endpoint Protector | User Manual
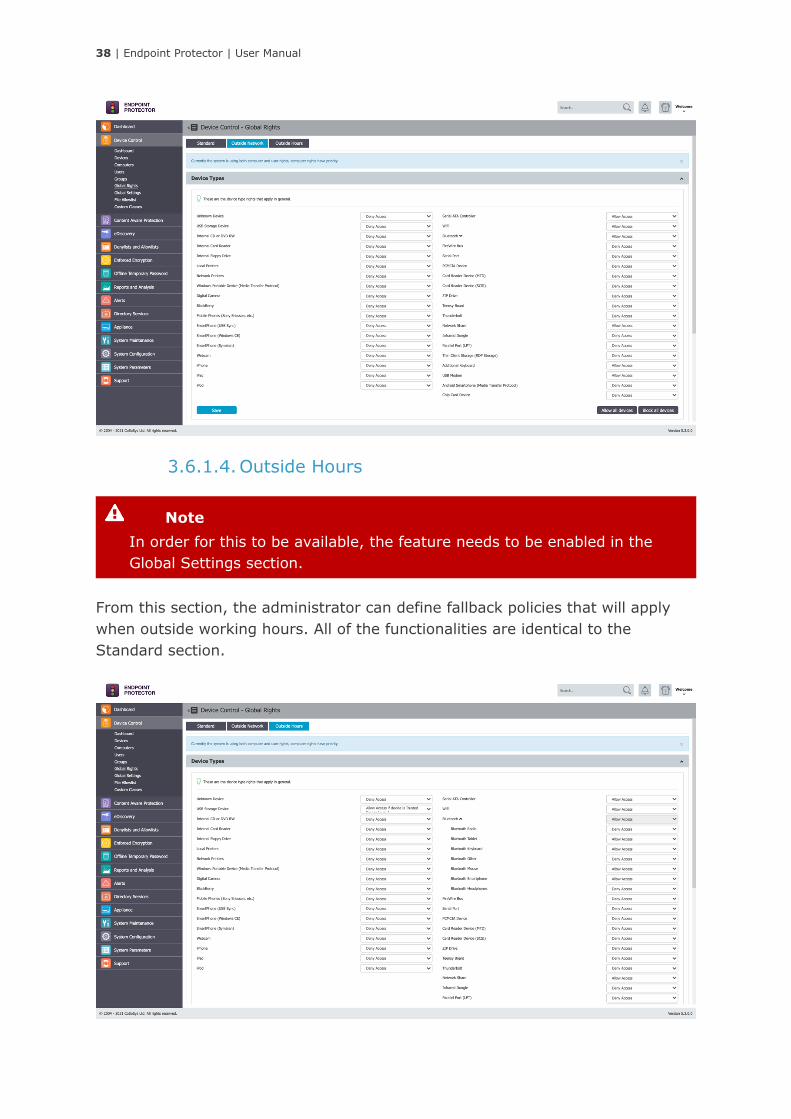
3.6.1.4. Outside Hours
From this section, the administrator can define fallback policies that will apply
when outside working hours. All of the functionalities are identical to the
Standard section.
Note
In order for this to be available, the feature needs to be enabled in the
Global Settings section.
39 | Endpoint Protector | User Manual
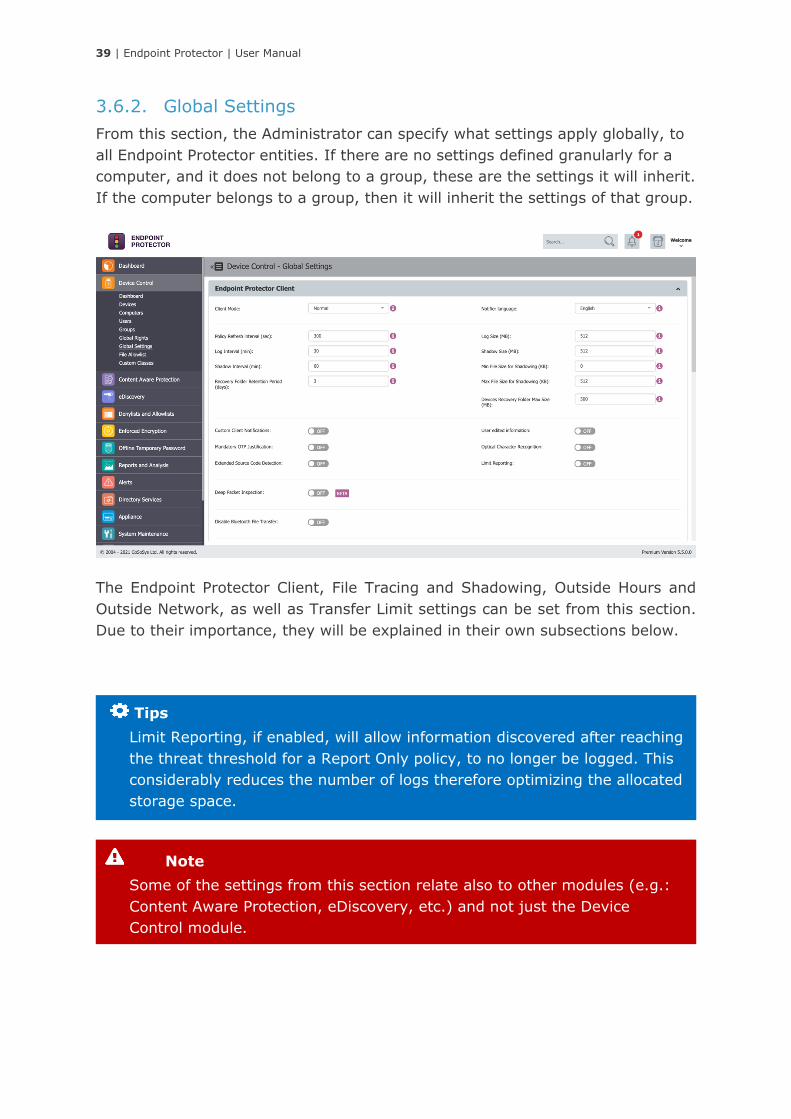
3.6.2. Global Settings
From this section, the Administrator can specify what settings apply globally, to
all Endpoint Protector entities. If there are no settings defined granularly for a
computer, and it does not belong to a group, these are the settings it will inherit.
If the computer belongs to a group, then it will inherit the settings of that group.
The Endpoint Protector Client, File Tracing and Shadowing, Outside Hours and
Outside Network, as well as Transfer Limit settings can be set from this section.
Due to their importance, they will be explained in their own subsections below.
Note
Some of the settings from this section relate also to other modules (e.g.:
Content Aware Protection, eDiscovery, etc.) and not just the Device
Control module.
Tips
Limit Reporting, if enabled, will allow information discovered after reaching
the threat threshold for a Report Only policy, to no longer be logged. This
considerably reduces the number of logs therefore optimizing the allocated
storage space.
40 | Endpoint Protector | User Manual
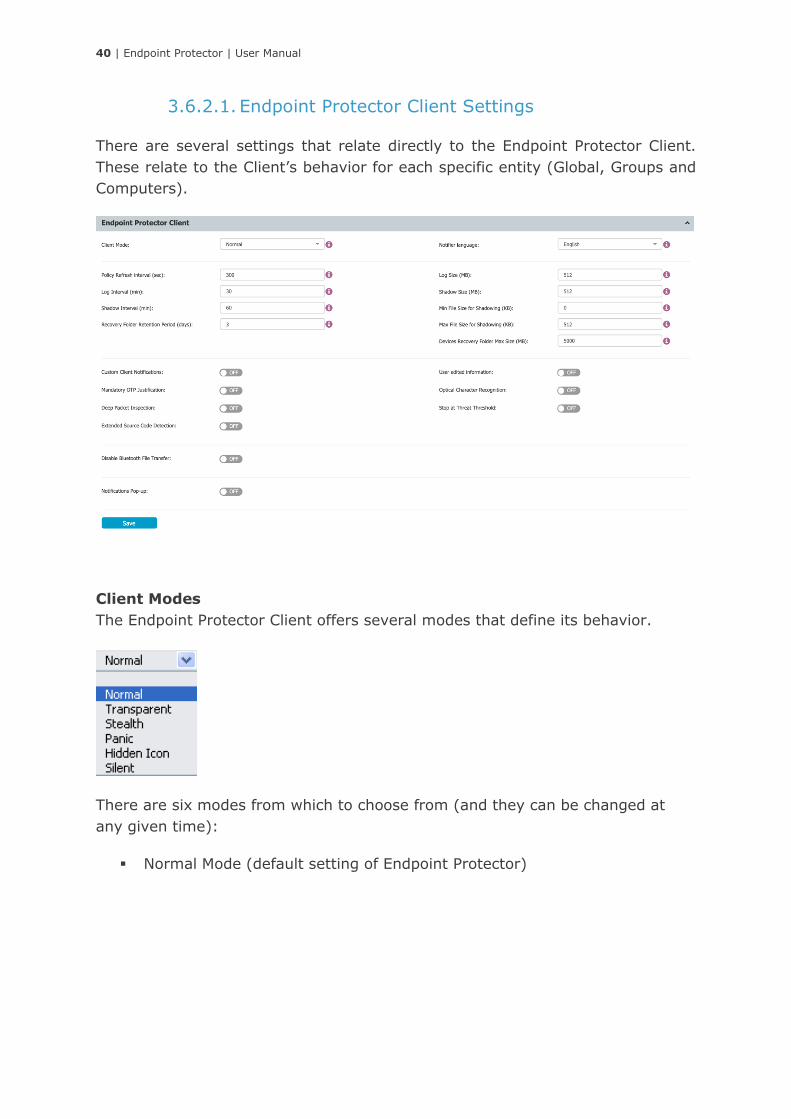
3.6.2.1. Endpoint Protector Client Settings
There are several settings that relate directly to the Endpoint Protector Client.
These relate to the Client’s behavior for each specific entity (Global, Groups and
Computers).
Client Modes
The Endpoint Protector Client offers several modes that define its behavior.
There are six modes from which to choose from (and they can be changed at
any given time):
▪ Normal Mode (default setting of Endpoint Protector)

41 | Endpoint Protector | User Manual
▪ Transparent Mode
▪ Stealth Mode
Information
This mode provides the following behavior:
• no system tray icon is displayed
• no system tray notifications are shown
• everything is allowed, regardless if authorized or not
• file shadowing and file tracing are enabled to see and monitor
all user activity
• Administrator receives alerts for all activities
Tips
This mode is useful to block all devices but users remain unaware of
any restrictions or presence of the Endpoint Protector Client and its
activity.
Information
This mode provides the following behavior:
• no system tray icon is displayed
• no system tray notifications are shown
• everything is blocked, regardless if authorized or not
• Administrator receives alerts for all activities
Note
We recommend not to change the Normal Mode without being fully
aware of what the other modes imply.
If the Normal Mode does not suit your needs, Hidden or Silent Mode
are usually the best alternatives to consider.

42 | Endpoint Protector | User Manual
▪ Panic Mode
▪ Hidden Icon Mode
Tips
This mode is very similar to the Normal Mode. The difference is that
Endpoint Protector Client is not visible to the user.
Information
This mode provides the following behavior:
• no system tray icon is displayed
• no system tray notifications are shown
• all set rights and settings are applied as per their configuration
Note
This mode could be triggered automatically under extreme
situations, when user’s malicious intent or activity is detected.
Under special circumstances, it can also be set manually by the
Administrator in order to block all devices. However, using this mode
in such a manner is not recommended!
Information
This mode provides the following behavior:
• system tray icon is displayed
• system tray notifications are shown
• everything is blocked, regardless if authorized or not
• file shadowing and file tracing are enabled to see and monitor
all user activity
• Administrator receives alerts when computers go in and out of
Panic Mode
Tips
This mode is useful to monitor all users and computers but users
remain unaware of any restrictions or presence of the Endpoint
Protector Client and its activity. As everything is on allow, there will
be no disruptions in the day to day activities of the users.
43 | Endpoint Protector | User Manual
▪ Silent Mode
Notifier Language
The Endpoint Protector Client Notifier language.
Policy Refresh Interval (sec)
The time interval at which the Client checks with the Server and updates with
the latest settings, rights and policies.
Log Size (MB)
The largest size of all logs stored on the Client. If the value is reached, new logs
will overwrite the oldest ones. These circumstances occur only when the Client
and Server do not communicate for a large period of time.
Log Interval (min)
The time interval at which the Client attempts to re-send the Logs to the Server.
Shadow Size (MB)
The largest size of all file shadow on the Client. If the value is reached, new
shadows will overwrite the oldest ones. These circumstances occur only when
the Client and Server do not communicate for a large period of time.
Shadow Interval (min)
The time interval at which the Client sends the Shadows to the Server.
Min File Size for Shadowing (KB)
The smallest size of a file at which a File Shadow is created.
Device Recovery Folder Retention Period (days)
Specific for Mac and Linux computers. It acts like a quarantine folder before a
transferred file has been fully inspected for content, avoiding any potential file
loss due to blocked transfers. After the specified time interval, the files are
permanently deleted.
Tips
This mode is very similar to the Normal Mode. The difference is that
the pop-up notifications are not visible to the user.
Information
This mode provides the following behavior:
• system tray icon is displayed
• no system tray notifications are shown
• all set rights and settings are applied as per their configuration
44 | Endpoint Protector | User Manual
Max File Size for Shadowing (KB)
The largest size of a file at which a File Shadow is created.
Recovery Folder Max Size (MB)
Specific for Mac and Linux computers. Maximum size for the quarantine folder. If
the value is reached, new files will overwrite the oldest ones.
Custom Client Notifications
If enabled, the Client Notifications can be customized.
User edited information
If enabled, the User can edit the user and computer information from within the
Endpoint Protector Client
Mandatory OTP Justification
If enabled, the Justification a User has to provide when requesting or using an
Offline Temporary Password is mandatory.
Optical Character Recognition
If enabled, JPEG, PNG, GIF, BMP and TIFF file types can be inspected for
content. This option will also change the global MIME Type Allowlists.
Deep Packet Inspection
If enabled, network and browser traffic can be inspected for content. This option
is required for both the Deep Packet Inspection Allowlists and URL and Domain
Denylist.
Block unsecured connection
If enabled, unsecured access through HTTP will be blocked and user access
restricted.
Intercept VPN Traffic
If enabled, Endpoint Protector Client will intercept VPN traffic on macOS using
the network extension framework.
Information
The Intercept VPN Traffic feature is only available when the Deep Packet
Inspection feature is enabled. It will only work for macOS from version
11.0 onwards and only if Deep Packet Inspection Certificate is also added.
Information
The Block unsecured connection feature is only available when the Deep
Packet Inspection feature is enabled.
45 | Endpoint Protector | User Manual
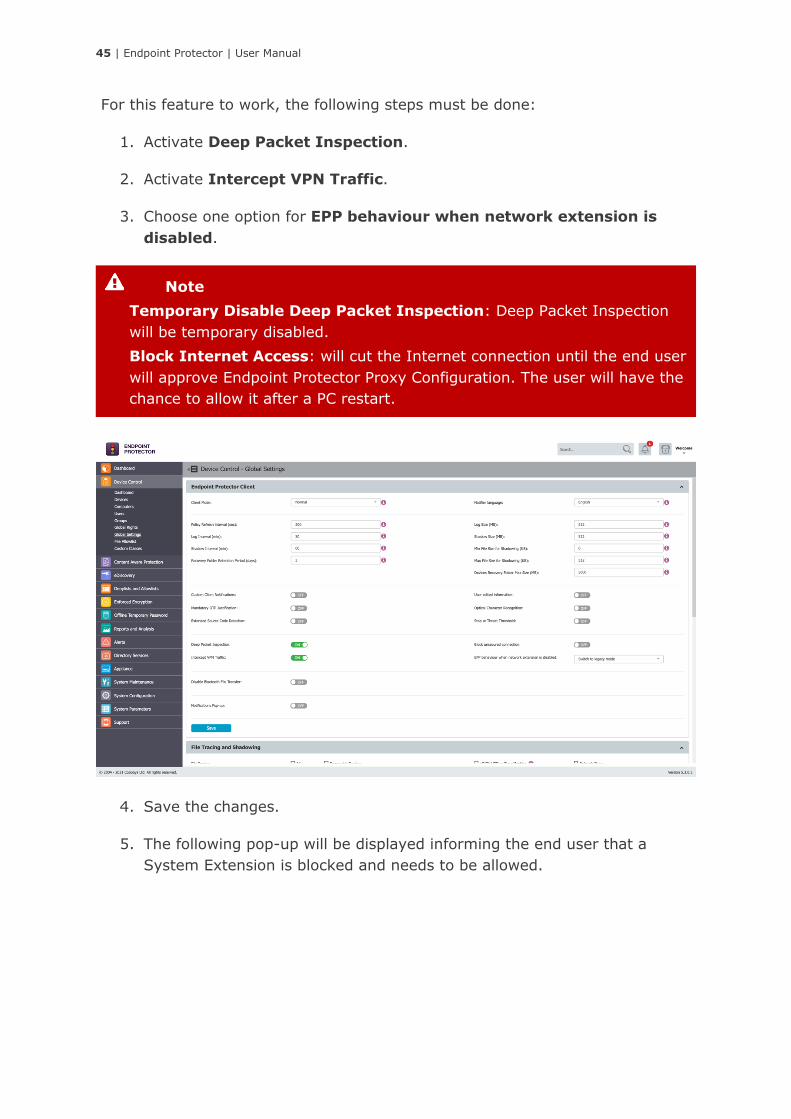
For this feature to work, the following steps must be done:
1. Activate Deep Packet Inspection.
2. Activate Intercept VPN Traffic.
3. Choose one option for EPP behaviour when network extension is
disabled.
4. Save the changes.
5. The following pop-up will be displayed informing the end user that a
System Extension is blocked and needs to be allowed.
Note
Temporary Disable Deep Packet Inspection: Deep Packet Inspection
will be temporary disabled.
Block Internet Access: will cut the Internet connection until the end user
will approve Endpoint Protector Proxy Configuration. The user will have the
chance to allow it after a PC restart.
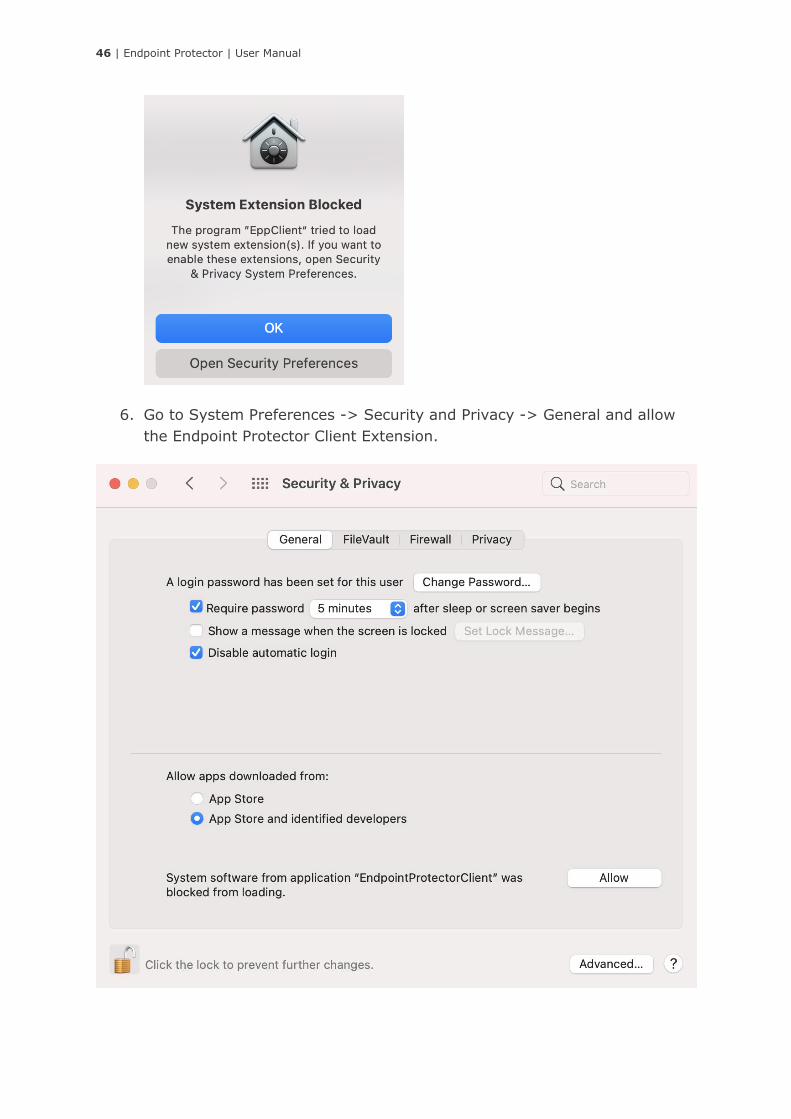
46 | Endpoint Protector | User Manual
6. Go to System Preferences -> Security and Privacy -> General and allow
the Endpoint Protector Client Extension.
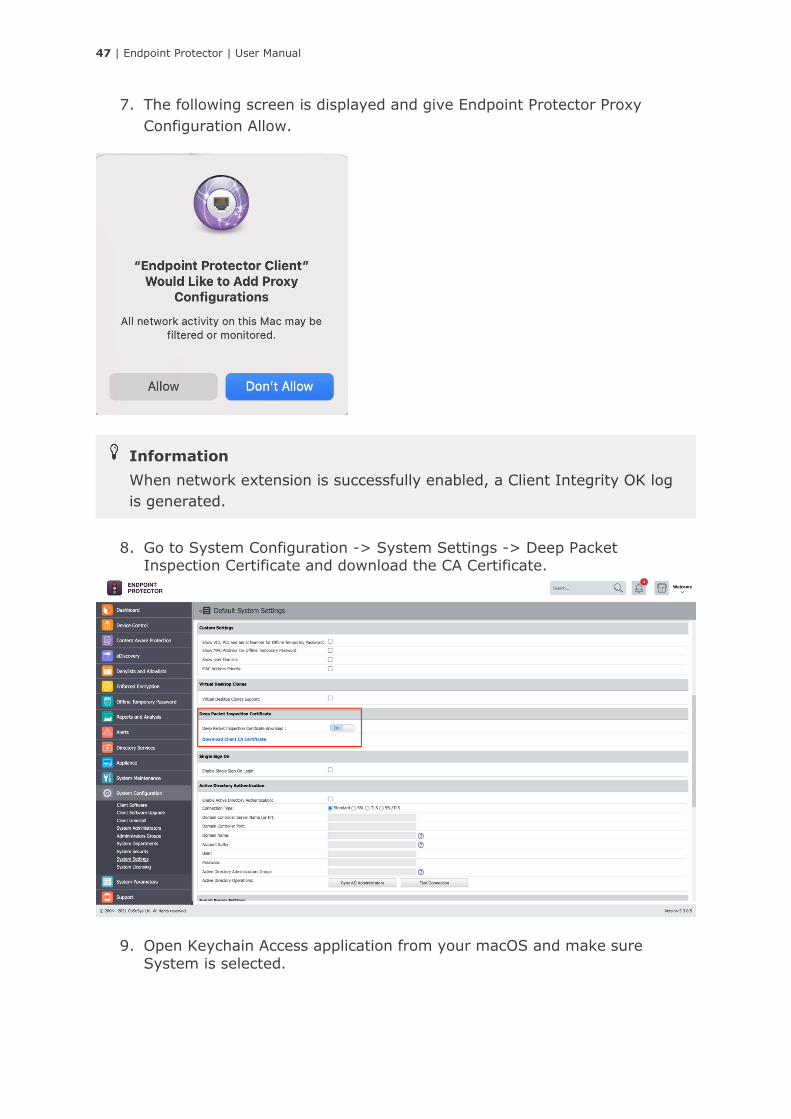
47 | Endpoint Protector | User Manual
7. The following screen is displayed and give Endpoint Protector Proxy
Configuration Allow.
8. Go to System Configuration -> System Settings -> Deep Packet Inspection Certificate and download the CA Certificate.
9. Open Keychain Access application from your macOS and make sure
System is selected.
Information
When network extension is successfully enabled, a Client Integrity OK log
is generated.

48 | Endpoint Protector | User Manual
10.Decompress the downloaded ClientCerts file.
11.Select cacert.pem file and drag and drop it on Keychain Access - >
System
12.The newly added certificate will have an ‘x’ on it. Double click on it and at
Trust section select ‘Always Trust’.
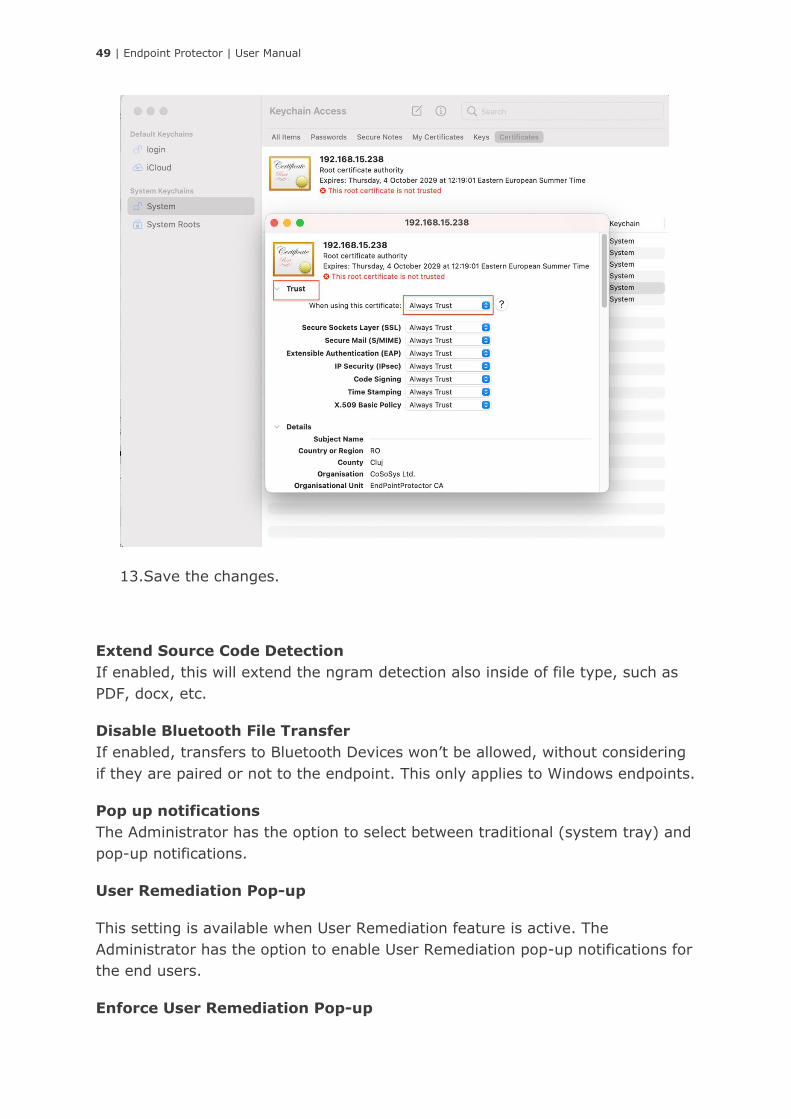
49 | Endpoint Protector | User Manual
13.Save the changes.
Extend Source Code Detection
If enabled, this will extend the ngram detection also inside of file type, such as
PDF, docx, etc.
Disable Bluetooth File Transfer
If enabled, transfers to Bluetooth Devices won’t be allowed, without considering
if they are paired or not to the endpoint. This only applies to Windows endpoints.
Pop up notifications
The Administrator has the option to select between traditional (system tray) and
pop-up notifications.
User Remediation Pop-up
This setting is available when User Remediation feature is active. The
Administrator has the option to enable User Remediation pop-up notifications for
the end users.
Enforce User Remediation Pop-up

50 | Endpoint Protector | User Manual
This setting is available only if User Remediation Pop-up setting is enabled.
When this setting is enabled, the end user does not have the possibility to
disable User Remediation Pop-up notifications.
3.6.2.2. File Tracing and Shadowing
The File Tracing feature allows monitoring of data traffic between protected
endpoints and removable devices, internal eSATA HDDs and Network Shares. It
also shows other actions that took place, such as file renamed, deleted,
accessed, modified, etc.
File Tracing can be disabled for specific file types using the Exclude Extensions
from Tracing option.
File Tracing Direction confers the Administrator the opportunity to monitor file
transfers based on transfer direction: outgoing, incoming or both directions.
Outgoing File Tracing Direction is defined by transfers made from the local
machine to removable devices.
Incoming File Tracing Direction indicates transfers from the removable devices to
the local machine.
Note
Time Machine backups on macOS can be blocked from this section by
checking Block Time Machine.
Information
It can be enabled from Device Control > Global Settings, or granularly for
Groups or Computers.
51 | Endpoint Protector | User Manual
By choosing Both for File Tracing Direction setting, the Administrator has the
possibility to monitor all types of transfers that are made between removable
devices and the local machine.
The File Shadowing feature extends the information provided by File Tracing,
creating exact copies of files accessed by users. The creation of shadow copies
can be triggered by the following events: file copy, file write, and file read.
Events such as file deleted, file renamed, etc. do not trigger the function.
Depending on each administrator’s needs, File Shadowing can be enabled on all
supported Removable Devices (including eSATA HDDs and Network Shares, if
selected) or Content Aware Protection (file transfers through various exit points
such as online applications, printers, clipboard, etc.) and E-mail Body.
File Shadowing can be disabled for specific file types using the “Exclude
Extensions from Shadowing” option.
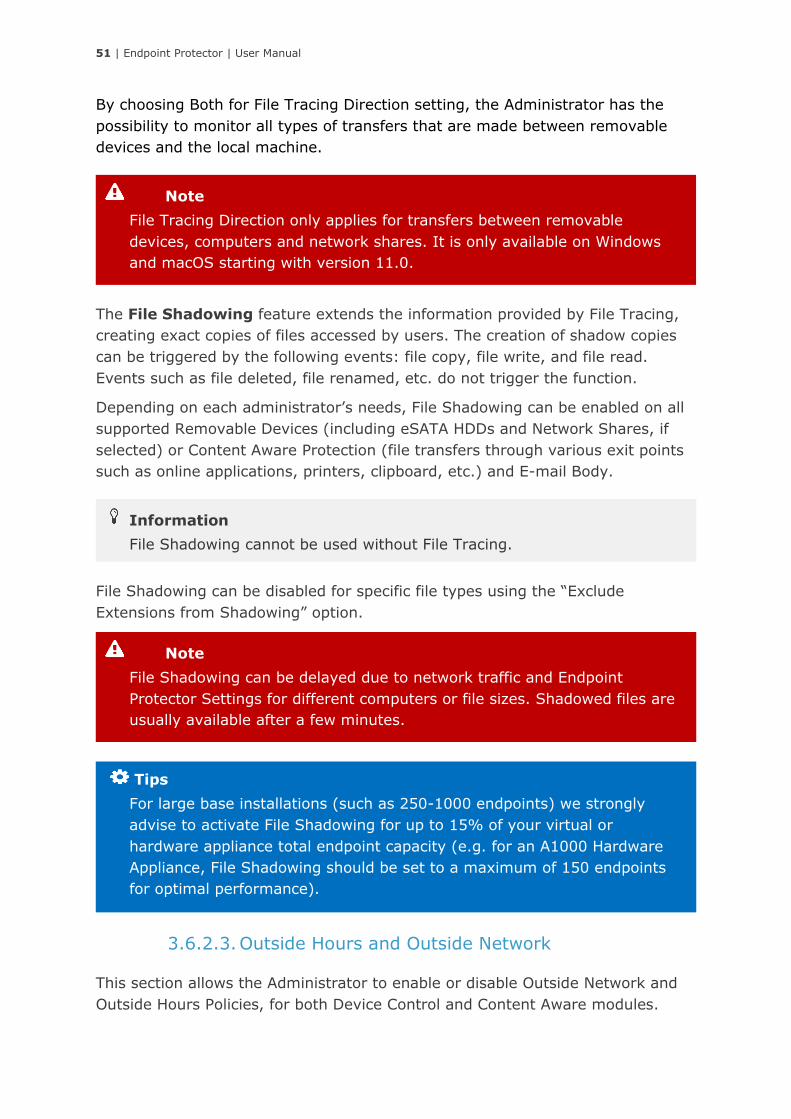
3.6.2.3. Outside Hours and Outside Network
This section allows the Administrator to enable or disable Outside Network and
Outside Hours Policies, for both Device Control and Content Aware modules.
Tips
For large base installations (such as 250-1000 endpoints) we strongly
advise to activate File Shadowing for up to 15% of your virtual or
hardware appliance total endpoint capacity (e.g. for an A1000 Hardware
Appliance, File Shadowing should be set to a maximum of 150 endpoints
for optimal performance).
Note
File Shadowing can be delayed due to network traffic and Endpoint
Protector Settings for different computers or file sizes. Shadowed files are
usually available after a few minutes.
Information
File Shadowing cannot be used without File Tracing.
Note
File Tracing Direction only applies for transfers between removable
devices, computers and network shares. It is only available on Windows
and macOS starting with version 11.0.
52 | Endpoint Protector | User Manual
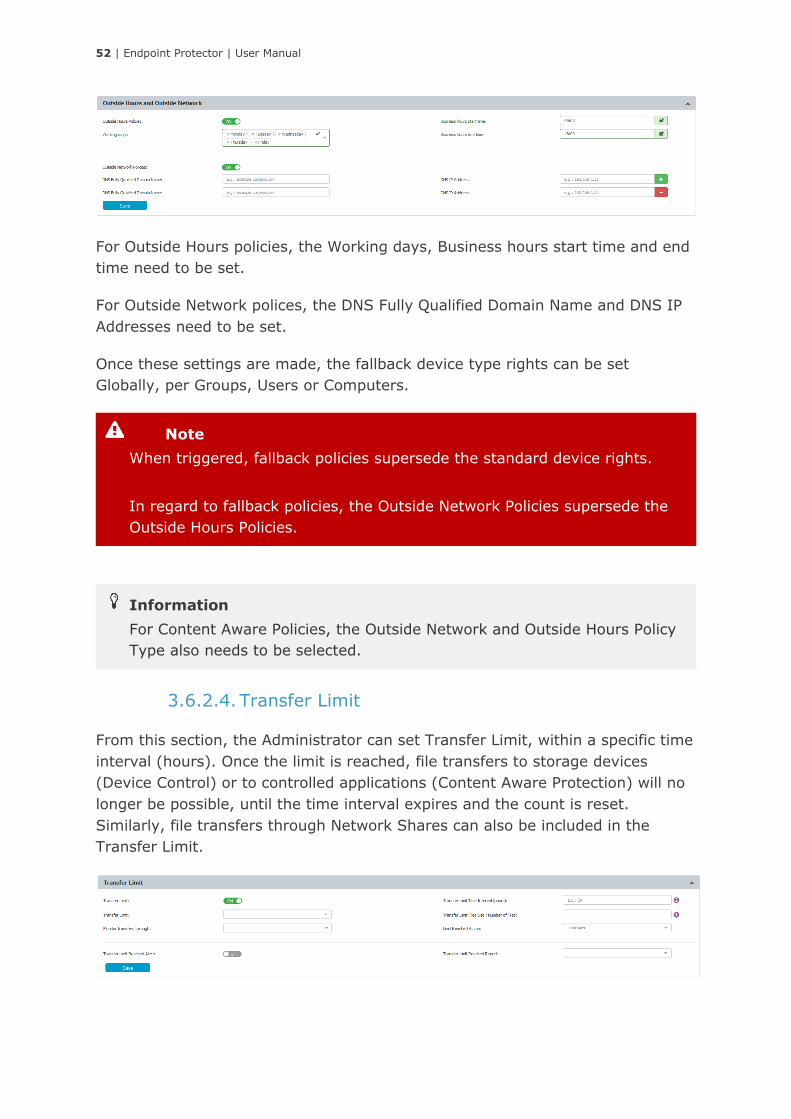
For Outside Hours policies, the Working days, Business hours start time and end
time need to be set.
For Outside Network polices, the DNS Fully Qualified Domain Name and DNS IP
Addresses need to be set.
Once these settings are made, the fallback device type rights can be set
Globally, per Groups, Users or Computers.
3.6.2.4. Transfer Limit
From this section, the Administrator can set Transfer Limit, within a specific time
interval (hours). Once the limit is reached, file transfers to storage devices
(Device Control) or to controlled applications (Content Aware Protection) will no
longer be possible, until the time interval expires and the count is reset.
Similarly, file transfers through Network Shares can also be included in the
Transfer Limit.
Information
For Content Aware Policies, the Outside Network and Outside Hours Policy
Type also needs to be selected.
Note
When triggered, fallback policies supersede the standard device rights.
In regard to fallback policies, the Outside Network Policies supersede the
Outside Hours Policies.
53 | Endpoint Protector | User Manual
There are three actions to choose from when the Transfer Limit is reached:
• Monitor Only – simply reports when the limit is reached
• Restrict – blocks the devices and applications that have been defined in
the Device Control policies
• Lockdown – blocks all devices, regardless if they have been defined
within the Device Control policies; this includes the network interfaces and
therefore, any type of transfer
The option to enable a Transfer Limit Reached Alert is also possible. Additionally,
a Transfer Limit Reached Report can be scheduled on a daily, weekly or monthly
basis.
3.7. File Allowlist
From this section, the Administrator can control the transfer of only authorized
files to previously authorized portable storage devices.
Information
To re-establish the Server-Client communication before the Transfer
Limit Time Interval expires, a Transfer Limit Reached Offline
Temporary Password is available. For more information, please see
chapter 8 Offline Temporary Password.
Note
The mechanism that checks when the Transfer Limit is reached has been
designed in such a way that it does not impact the performance of the
computer.
Therefore, there might be a slight delay between the exact time the limit is
reached and the enforcing of the transfer restrictions. In general, it’s just a
few seconds but also depending on the network, it could be up to a few
minutes.
54 | Endpoint Protector | User Manual
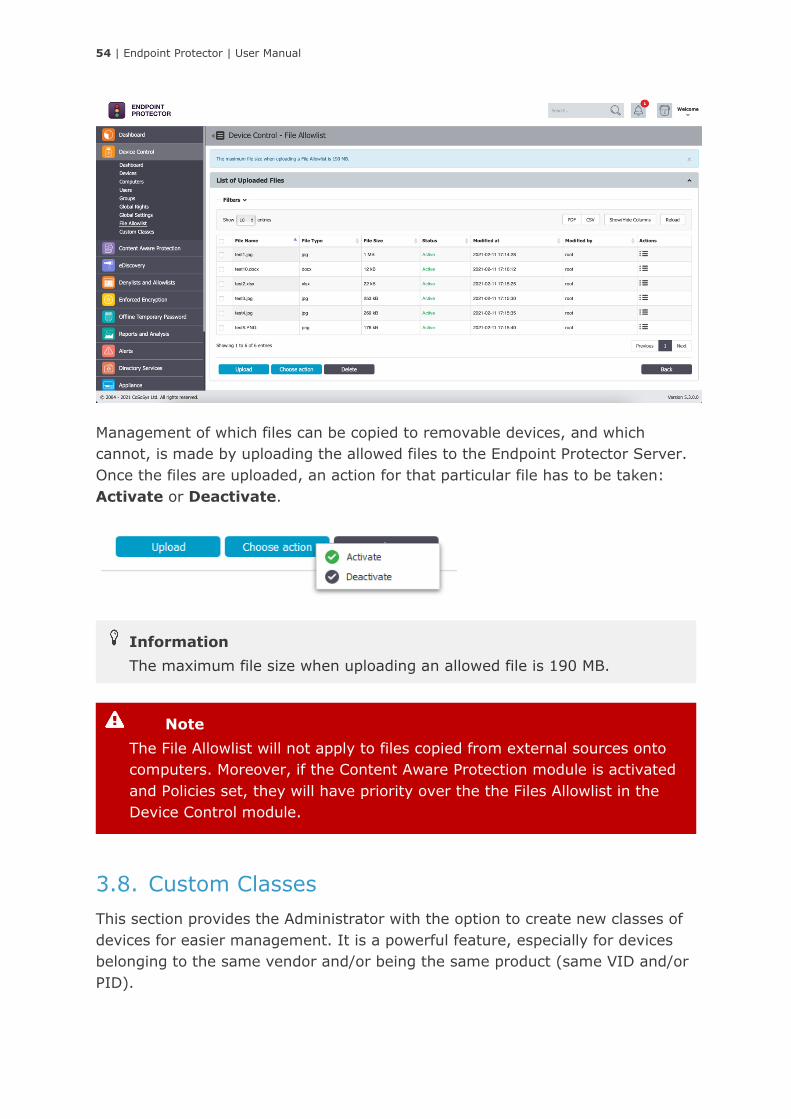
Management of which files can be copied to removable devices, and which
cannot, is made by uploading the allowed files to the Endpoint Protector Server.
Once the files are uploaded, an action for that particular file has to be taken:
Activate or Deactivate.
3.8. Custom Classes
This section provides the Administrator with the option to create new classes of
devices for easier management. It is a powerful feature, especially for devices
belonging to the same vendor and/or being the same product (same VID and/or
PID).
Note
The File Allowlist will not apply to files copied from external sources onto
computers. Moreover, if the Content Aware Protection module is activated
and Policies set, they will have priority over the the Files Allowlist in the
Device Control module.
Information
The maximum file size when uploading an allowed file is 190 MB.

55 | Endpoint Protector | User Manual
A new Custom Class can be created by clicking on the Create. An existing policy
can be edited by double-clicking on it.
Before adding devices to a Custom Class, the Name, Description, Device Type
(USB Storage Devices, Cameras, etc.), Device Right (Allow Access, Block Access,
etc.) must be provided. Once this is done, there are multiple ways of adding
devices to a Custom Class:
• New Device (VID, PID, Serial Number) – will allow at Step 2 to add
new devices based on Vendor ID, Product ID and Serial Number.
• Existing Device (Wizard) – will allow at Step 2 to add devices
previously connected to protected computers and already in the Endpoint
Information
The option to edit, duplicate or delete a policy is available after selecting
the desired policy.
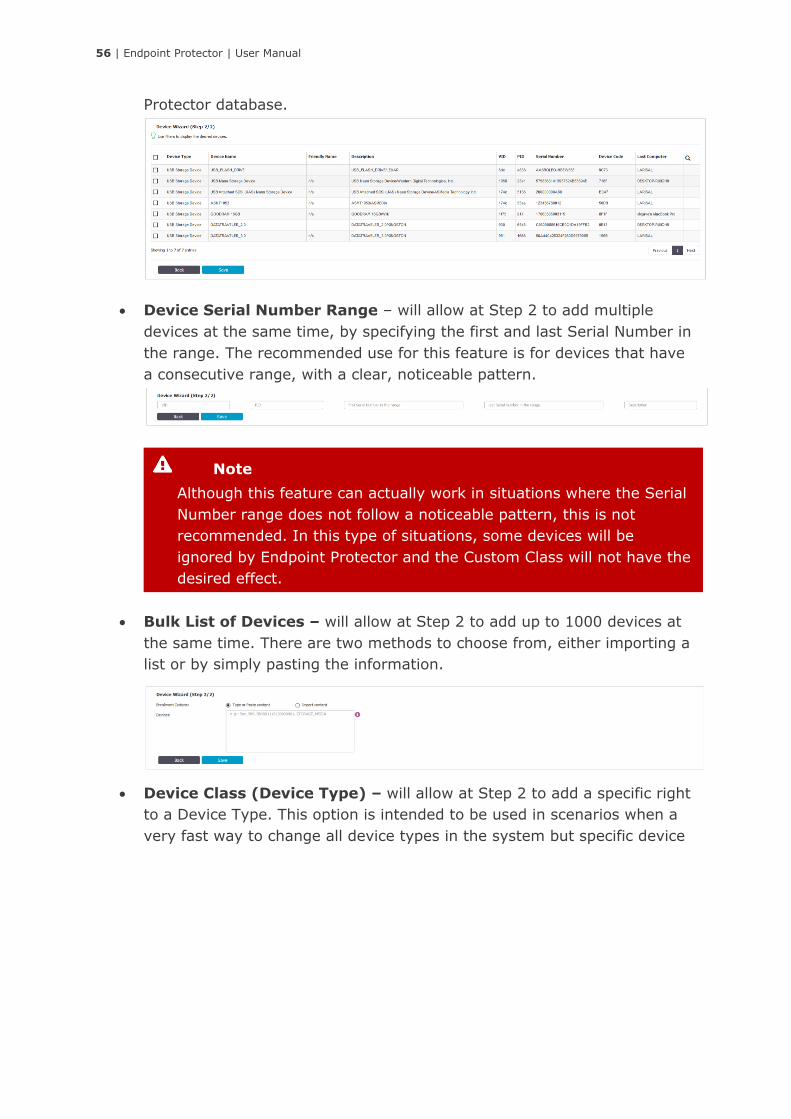
56 | Endpoint Protector | User Manual
Protector database.
• Device Serial Number Range – will allow at Step 2 to add multiple
devices at the same time, by specifying the first and last Serial Number in
the range. The recommended use for this feature is for devices that have
a consecutive range, with a clear, noticeable pattern.
• Bulk List of Devices – will allow at Step 2 to add up to 1000 devices at
the same time. There are two methods to choose from, either importing a
list or by simply pasting the information.
• Device Class (Device Type) – will allow at Step 2 to add a specific right
to a Device Type. This option is intended to be used in scenarios when a
very fast way to change all device types in the system but specific device
Note
Although this feature can actually work in situations where the Serial
Number range does not follow a noticeable pattern, this is not
recommended. In this type of situations, some devices will be
ignored by Endpoint Protector and the Custom Class will not have the
desired effect.
57 | Endpoint Protector | User Manual
rights were granularly added to some users or computers.
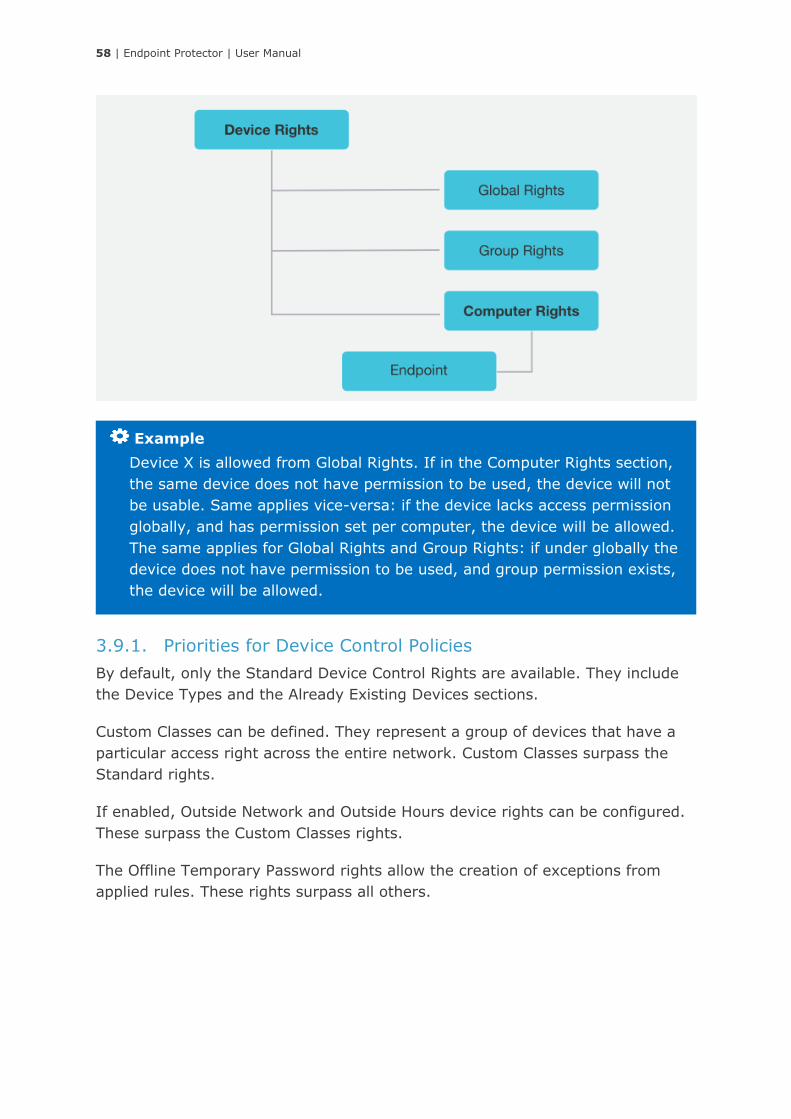
3.9. Priorities for device rights
Computer Rights, Group Rights and Global Rights form a single unit and they
inherit each-others settings. This means that changes to any one of these
entities affect the other ones.
There are three levels of hierarchy: Global Rights, Group Rights and Computer
Rights, the latter being the deciding factor in rights management.
Information
The device rights surpass all computer, group and global rights.
The user rights are on the same level with the computer rights. The
priority can be set from the System Settings section. For more details
about this setting, please see chapter 14.8.1 Endpoint Protector Rights
Functionality.
Example
For the case above, we created a Custom Class CD-ROM Allow and set
Allow access rights to devices of type CD-ROM /DVD-ROM. Let’s say that
CD-ROMs have Deny access rights set on Client PC CIP0. Once the
custom class CD-ROM Allow is created and Custom Classes is enabled, all
the CD-ROMs/DVD-ROMs will have access, even if on the Client PC CIP0
they have Deny access.
58 | Endpoint Protector | User Manual
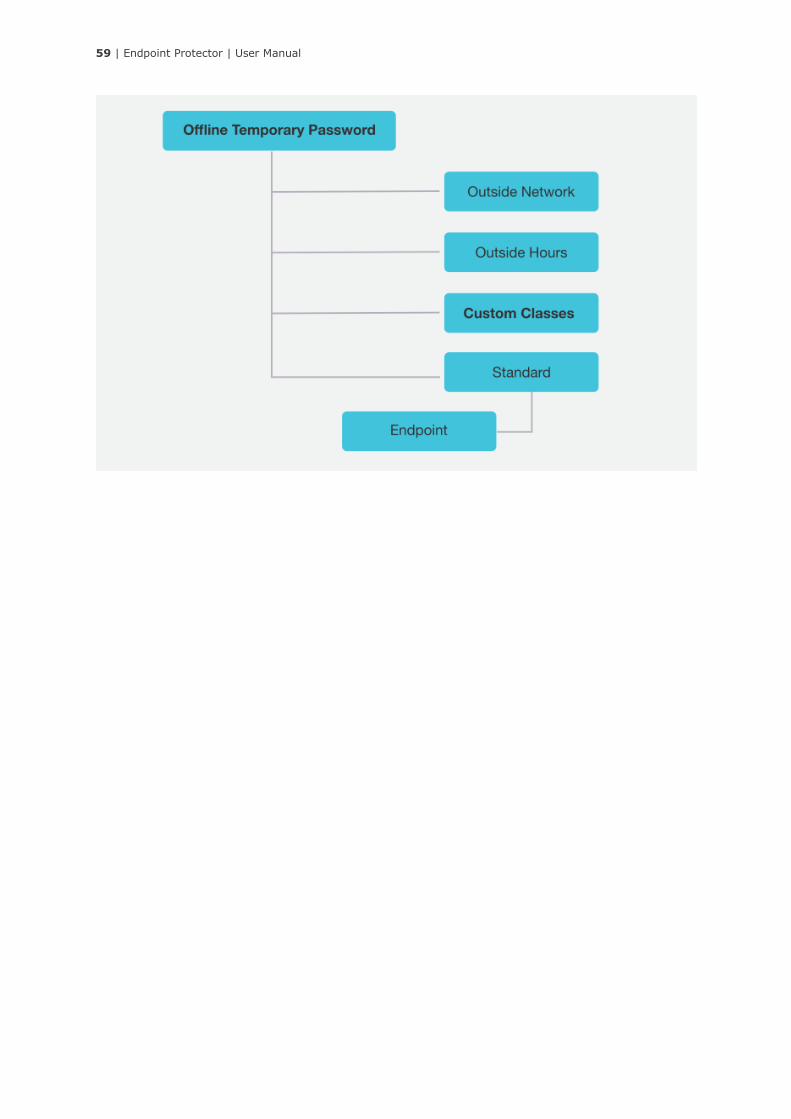
3.9.1. Priorities for Device Control Policies
By default, only the Standard Device Control Rights are available. They include
the Device Types and the Already Existing Devices sections.
Custom Classes can be defined. They represent a group of devices that have a
particular access right across the entire network. Custom Classes surpass the
Standard rights.
If enabled, Outside Network and Outside Hours device rights can be configured.
These surpass the Custom Classes rights.
The Offline Temporary Password rights allow the creation of exceptions from
applied rules. These rights surpass all others.
Example
Device X is allowed from Global Rights. If in the Computer Rights section,
the same device does not have permission to be used, the device will not
be usable. Same applies vice-versa: if the device lacks access permission
globally, and has permission set per computer, the device will be allowed.
The same applies for Global Rights and Group Rights: if under globally the
device does not have permission to be used, and group permission exists,
the device will be allowed.
59 | Endpoint Protector | User Manual
60 | Endpoint Protector | User Manual
4. Content Aware Protection
This module allows the Administrator to set up and enforce strong content
filtering policies for selected users, computers, groups or departments and take
control over the risks posed by accidental or intentional file transfers of sensitive
company data, such as:
• Personal Identifiable Information (PII): social security numbers (SSN),
driving license numbers, E-mail addresses, passport numbers, phone
numbers, addresses, dates, etc.
• Financial and credit card information: credit card numbers for Visa,
MasterCard, American Express, JCB, Discover Card, Dinners Club, bank
account numbers etc.
• Confidential files: sales and marketing reports, technical documents,
accounting documents, customer databases etc.
To prevent sensitive data leakage, Endpoint Protector closely monitors all
activity at various exit points:
• Transfers on portable storage and other media devices (USB Drives,
external HDDs, CDs, DVDs, SD cards etc.), either directly or through
encryption software (e.g. EasyLock)
• Transfers on local networks (Network Share)
• Transfers via Internet (E-mail Clients, File Sharing Application, Web
Browsers, Instant Messaging, Social Media, etc.)
• Transfers to the cloud (iCloud, Google Drive, Dropbox, Microsoft SkyDrive,
etc.)
• Transfers through Copy & Paste / Cut & Paste
61 | Endpoint Protector | User Manual
• Print screens
• Printers and others
4.1. Content Aware Protection Activation
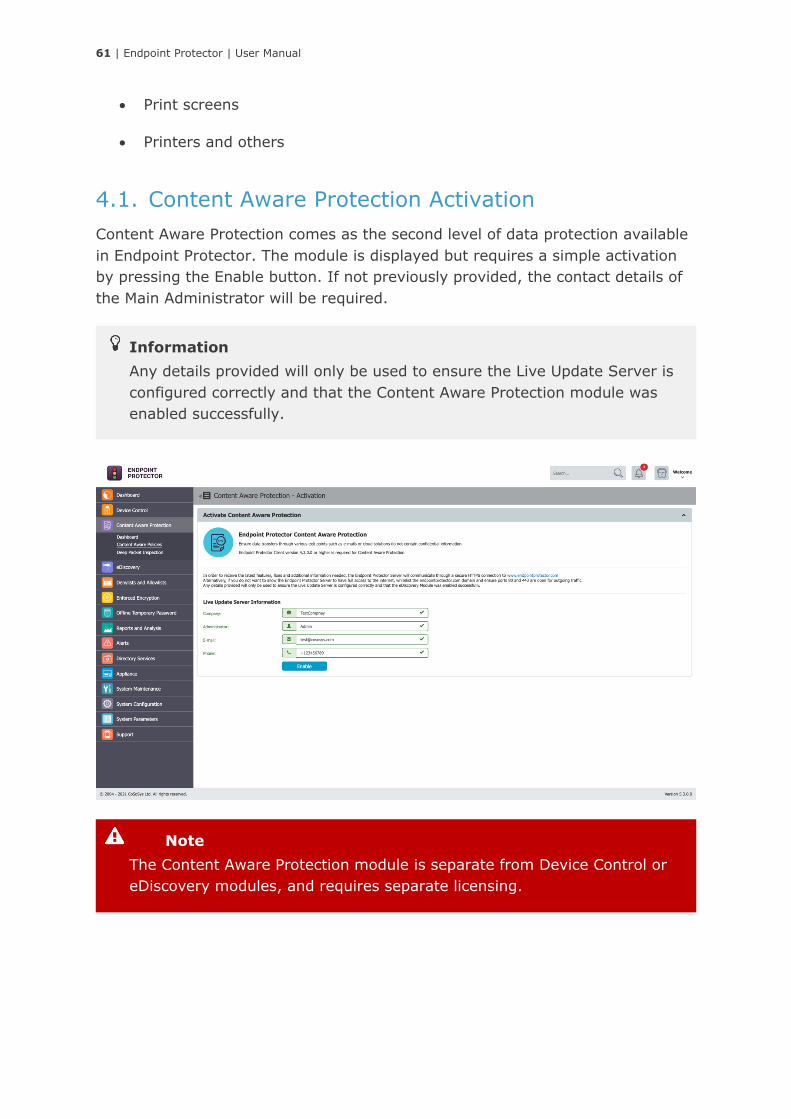
Content Aware Protection comes as the second level of data protection available
in Endpoint Protector. The module is displayed but requires a simple activation
by pressing the Enable button. If not previously provided, the contact details of
the Main Administrator will be required.
Note
The Content Aware Protection module is separate from Device Control or
eDiscovery modules, and requires separate licensing.
Information
Any details provided will only be used to ensure the Live Update Server is
configured correctly and that the Content Aware Protection module was
enabled successfully.
62 | Endpoint Protector | User Manual
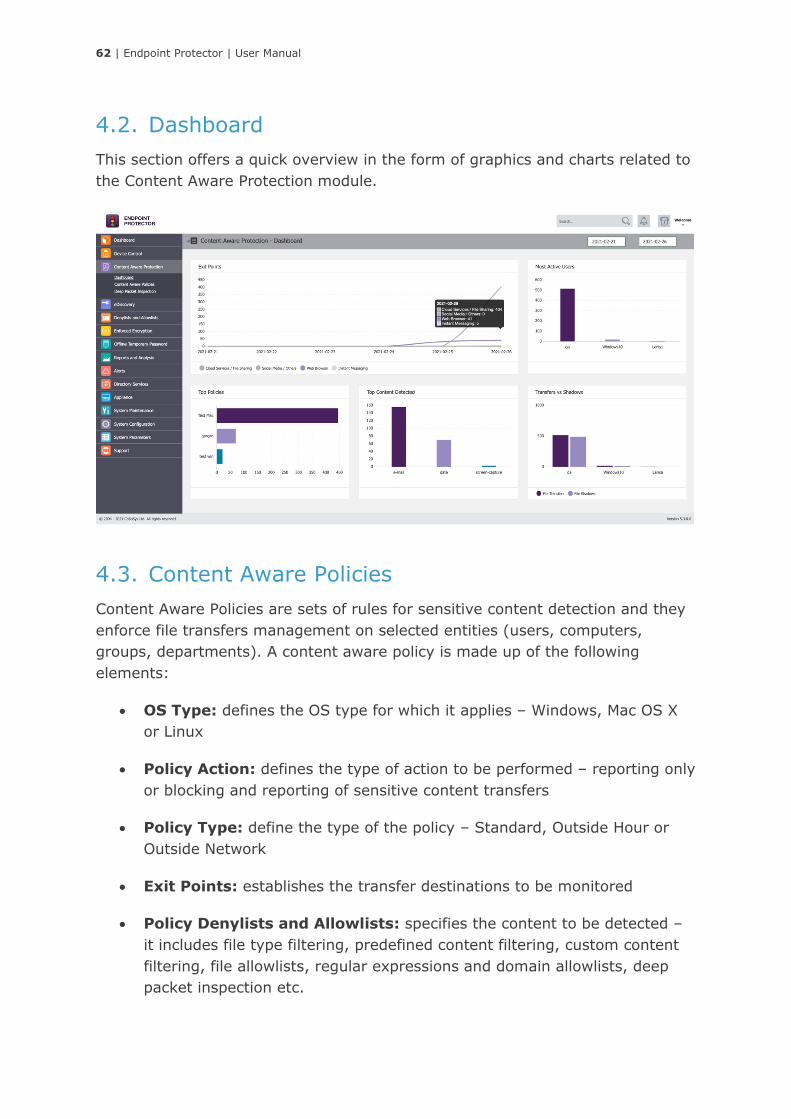
4.2. Dashboard
This section offers a quick overview in the form of graphics and charts related to
the Content Aware Protection module.
4.3. Content Aware Policies
Content Aware Policies are sets of rules for sensitive content detection and they
enforce file transfers management on selected entities (users, computers,
groups, departments). A content aware policy is made up of the following
elements:
• OS Type: defines the OS type for which it applies – Windows, Mac OS X
or Linux
• Policy Action: defines the type of action to be performed – reporting only
or blocking and reporting of sensitive content transfers
• Policy Type: define the type of the policy – Standard, Outside Hour or
Outside Network
• Exit Points: establishes the transfer destinations to be monitored
• Policy Denylists and Allowlists: specifies the content to be detected –
it includes file type filtering, predefined content filtering, custom content
filtering, file allowlists, regular expressions and domain allowlists, deep
packet inspection etc.
63 | Endpoint Protector | User Manual
• Content Detection Summary: displays all predefined content, custom
content, regular expressions and HIPPA which were checked in the
Content Aware Policy. Customers that have Premium license enabled will
be able to edit the policy and combine multiple criteria using AND operator
beside the OR operator. It also enables Restrict Content Detection to
specific file types.
Each company can define its own sensitive content data lists as Custom Content
Dictionaries corresponding to their specific domain of activity, targeted industry
and roles. To ease this task, the Content Aware Protection module comes with a
Predefined Content Dictionary that covers the most used sets of confidential
terms and expressions.
Exactly like Device Control policies, the Content Aware policies continue to be
enforced on a computer even after it is disconnected from the company network.
Information
Exactly like Device Control policies, the Content Aware Protection policies
continue to be enforced on a computer even after it is disconnected from
the company network.
Note
Content Aware Policies also apply to File Allowlist (Device Control > File
Allowlist). This means that all files that were previously allowed will be
inspected for sensitive content detection, reported and / or blocked,
according to the defined policy.
Example
A policy can be setup for the Financial Department of the company to block
Excel reports sent via E-mail or to report all transfers of files containing
personally identifiable and financial information (e.g. credit card numbers,
E-mail, phone numbers, social security numbers etc.).
Example
A Content Aware Policy can be set to only block Credit Cards AND Email
Addresses. In this case, a file that contains a Credit Card AND an email
address will be blocked, but if transferring a file that only contains Credit
Cards, it will not be blocked.
64 | Endpoint Protector | User Manual
4.3.1. Creating a Content Aware Protection Policy
The administrator can easily create and manage Content Aware Policies from the
Content Aware Protection > Content Aware Policies section.
A new policy can be created by clicking on the Create Custom Policy button. An
existing policy can be edited by double-clicking on it.
When creating a new policy, the Policy Information (e.g. OS Type, Policy Name,
and Policy Description), Policy Denylists, Policy Allowlists and Policy Entities
(Departments, Groups, and Computers) have to be selected.
Tips
One or more Content Aware Policy can be enforced on the same computer,
user, group or department. To avoid any conflicts between the applied
rules, a prioritization of policies is performed through a left-to-right
ordering. The leftmost policy has the highest priority (Priority 1), while the
rightmost policy has the lowest priority. Changing priorities for one or
more policies can be performed by moving the policy to the right or to the
left with a simple click on the left arrow for higher priority or on the right
arrow for lower priority.
Information
The option to edit, duplicate or delete a policy is available after selecting
the desired policy.
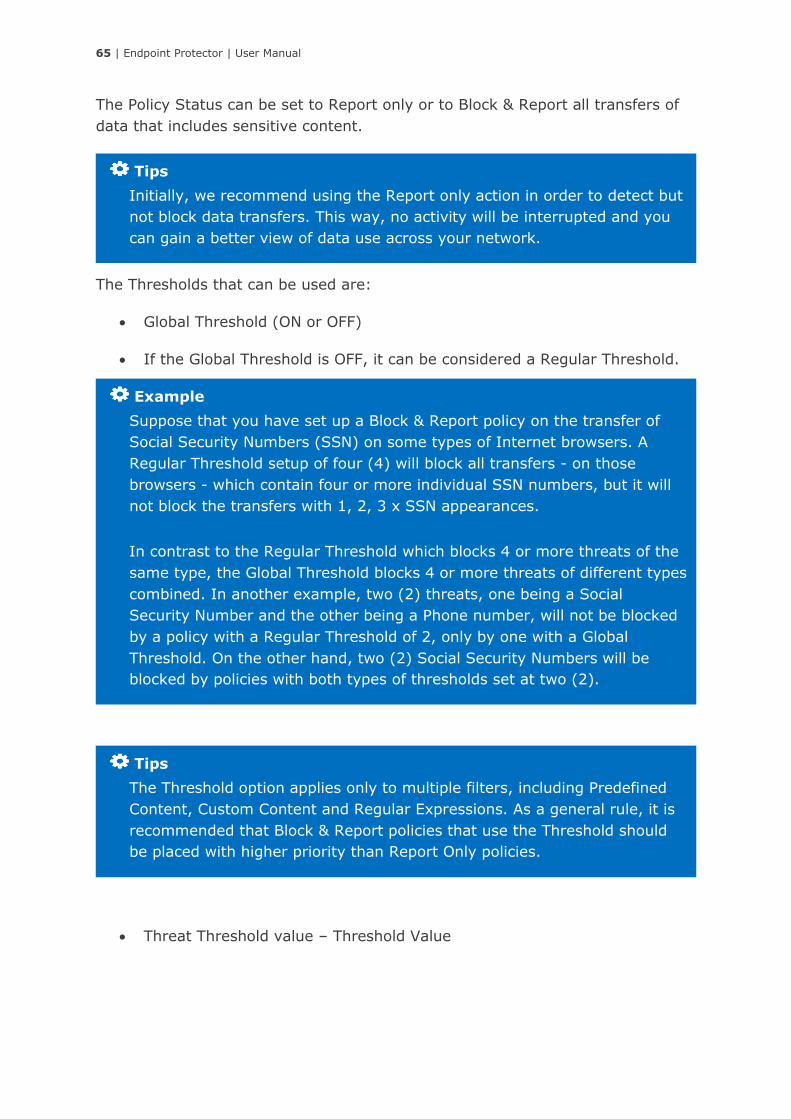
65 | Endpoint Protector | User Manual
The Policy Status can be set to Report only or to Block & Report all transfers of
data that includes sensitive content.
The Thresholds that can be used are:
• Global Threshold (ON or OFF)
• If the Global Threshold is OFF, it can be considered a Regular Threshold.
• Threat Threshold value – Threshold Value
Tips
The Threshold option applies only to multiple filters, including Predefined
Content, Custom Content and Regular Expressions. As a general rule, it is
recommended that Block & Report policies that use the Threshold should
be placed with higher priority than Report Only policies.
Example
Suppose that you have set up a Block & Report policy on the transfer of
Social Security Numbers (SSN) on some types of Internet browsers. A
Regular Threshold setup of four (4) will block all transfers - on those
browsers - which contain four or more individual SSN numbers, but it will
not block the transfers with 1, 2, 3 x SSN appearances.
In contrast to the Regular Threshold which blocks 4 or more threats of the
same type, the Global Threshold blocks 4 or more threats of different types
combined. In another example, two (2) threats, one being a Social
Security Number and the other being a Phone number, will not be blocked
by a policy with a Regular Threshold of 2, only by one with a Global
Threshold. On the other hand, two (2) Social Security Numbers will be
blocked by policies with both types of thresholds set at two (2).
Tips
Initially, we recommend using the Report only action in order to detect but
not block data transfers. This way, no activity will be interrupted and you
can gain a better view of data use across your network.

66 | Endpoint Protector | User Manual
File Size Threshold Not linked to the Regular and Global Threshold
mentioned above, The File Size Threshold value defines the size (in MB)
starting from which the file transfer is either blocked or reported.
To enable the File Size Threshold, a value bigger than 0 must be set.
To disable the File Size Threshold, 0 or no value must be set.
• Apply Policy if File Size Threshold is Matched
If this is enabled, the Policy will apply in combination with the threshold.
All what is checked on the Denylist side will be blocked taking in the
consideration also the threshold.
The exit points that can be monitored via the Controlled transfers to are:
• Applications
o Web Browsers (e.g. Internet Explorer, Chrome, Firefox, Safari, etc.)
o E-mail Clients (e.g. Outlook, Thunderbird, Lotus Notes, etc.)
Note
This setting does not apply for File Name and File Location.
Information
Depending on the specific application and OS, some limitations may
apply.
Note
If a File Size Threshold is set, it will be applied to the whole policy,
regardless of what file types or custom contents are checked inside
the policy. The value used in the File Size Threshold must be a
positive, whole number.

67 | Endpoint Protector | User Manual
o Instant Messaging (e.g. Skype, Pidgin, Google Talk, etc.)
o File Sharing (e.g. Google Drive Client, iCloud, Dropbox, DC++, etc.)
o Other (e.g. iTunes, Total Commander, GoToMeeting, etc.)
• Storage Devices (the list of all controlled types can be viewed at System
Parameters > Device Types > Content Aware Protection)
• Network Share
• Thin Clients
• Clipboard (refers to all content captured through Copy & Paste or Cut &
Paste operations
Information
For Network Share for Macs, Endpoint Protector will report all
the events for Report Only policies. For Block & Report
policies the transfer from a Local Share towards the Local
Disk, Controlled Storage Device Types and Controlled
Applications are blocked.
Information
The option to monitor confidential data transfers only to
Custom Classes and not all Storage Devices is also available.
Note
For Windows, file transfers will be monitored both to and from
removable media.
Information
The complete list of controlled Applications can be found
directly in the Endpoint Protector User Interface.
Note
Adobe Flash Player must be checked inside the Web Browser category
in order to block sites that use Adobe Flash Active X.
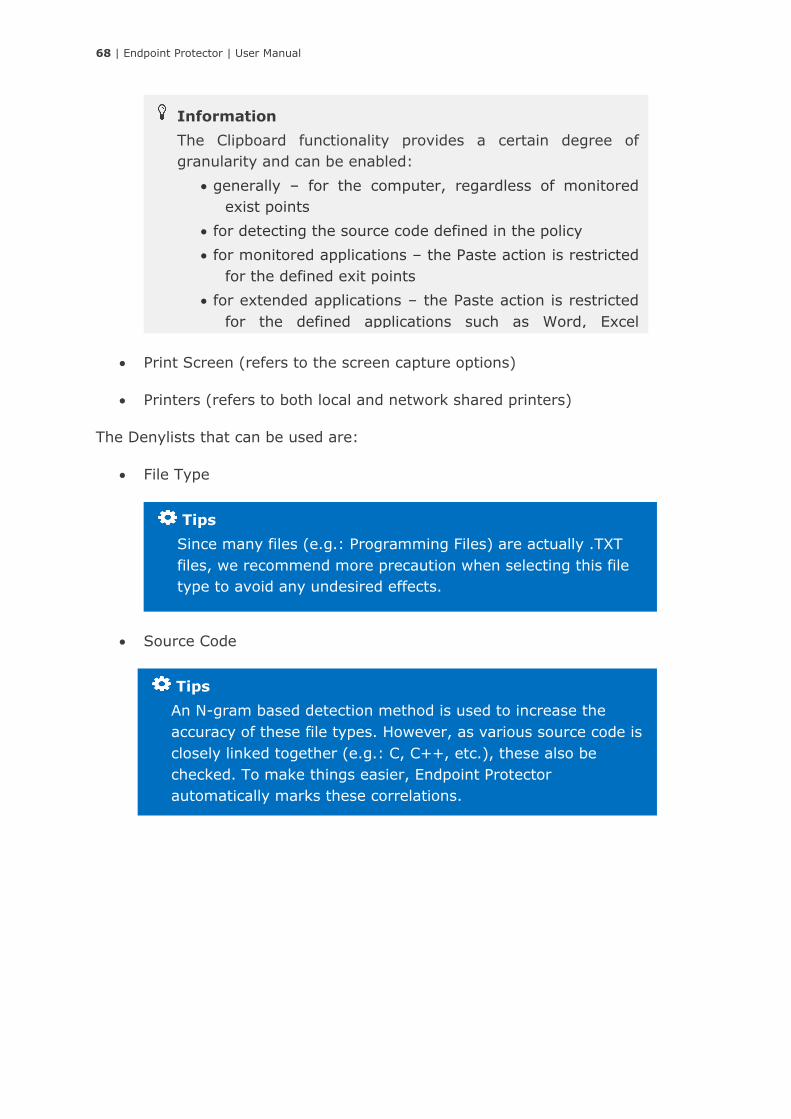
68 | Endpoint Protector | User Manual
• Print Screen (refers to the screen capture options)
• Printers (refers to both local and network shared printers)
The Denylists that can be used are:
• File Type
• Source Code
Tips
An N-gram based detection method is used to increase the
accuracy of these file types. However, as various source code is
closely linked together (e.g.: C, C++, etc.), these also be
checked. To make things easier, Endpoint Protector
automatically marks these correlations.
Tips
Since many files (e.g.: Programming Files) are actually .TXT
files, we recommend more precaution when selecting this file
type to avoid any undesired effects.
Information
The Clipboard functionality provides a certain degree of
granularity and can be enabled:
• generally – for the computer, regardless of monitored
exist points
• for detecting the source code defined in the policy
• for monitored applications – the Paste action is restricted
for the defined exit points
• for extended applications – the Paste action is restricted
for the defined applications such as Word, Excel
Notepad++, etc.
69 | Endpoint Protector | User Manual
• Predefined Content
• Custom Content
• File Name
• File Location
• Regular Expressions
• HIPAA
• Domain and URL
Tips
The majority of the Predefined Content items are country
specific (e.g. Australia, Canada, Germany, Korea, United
Kingdom, United States, .etc.). To avoid a large number of logs
or potential false positives, only enable the Passports that
apply to your region or sensitive data.
Note
If Git is selected from Restricted Apps, no Endpoint Protector
client notifications and logs will be generated for the Git
related actions (fetch, clone, push, pull).
Note
All Git traffic is encrypted. Therefore, allowing a specific
domain will result in any file transfers to be allowed,
regardless of content or other policy restrictions defined.
Information
When the Deep Packet Inspection is enabled, and extended
way to monitor Git is available.
If Git is selected as from the Restricted Apps, Git related
actions (fetch, clone, push, pull) will be blocked, regardless of
git application used. This will result in completely blocking Git.
However, Deep Packet Inspection Allowlists can be used to
allow a specific Git, linked to a specific domain (e.g.:
internalgit.mydomain.com).
70 | Endpoint Protector | User Manual
The Allowlists that can be used are:
• MIME Type
• Allowed Files
• File Location
• Network Share
• E-mail Domain
• URL Name
• Deep Packet Inspection
The final step in creating a policy is selecting the entities that it will apply to. The
entities that can be used are:
• Departments
• Groups
• Computers
• Users
Tips
If a Content Aware Policy was already enforced on a computer, user, group
or department, when clicking on it, the corresponding network entities on
which it was applied will be highlighted.
Note
The Content Aware Protection Policies continue to report and/or block
sensitive data transfers from protected computers even after they are
disconnected from the company network. Logs will be saved within the
Endpoint Protector Client and will be sent to the Server once connection
has been reestablished.
Information
For more details about Denylists and Allowlist, please see chapter 6
Denylists and Allowlists.

71 | Endpoint Protector | User Manual
4.3.2. Predefined policies
A second option is to use the Predefined policy button. This redirects the
administrator to two lists of predefined policies that come with Action set to
“Block and Report” by default, for both Windows and Mac. The administrator can
select by the description a policy of interest and press the “Create Policy” button
for it to be displayed in the list of active policies.
4.3.3. Block and Remediate Policies
Block and Remediate policies are a category of Content Aware Policies only
available if Premium licenses are available.
This category of policies gives the end user the possibility to resolve the Content
Aware threats by using justifications.
The administrator can easily create Block and Remediate Content Aware Policies
from the Content Aware Protection section -> Create Content Aware Policies ->
Policy Action -> Block and Remediate.
When Content Aware threats are made, the end user will see them in the
Content Aware tab from the Endpoint Protector notifier or they will be displayed
as pop-up notifications if this option is enabled from Settings section.
To remediate the threat, the end user has to select the file for which he wants
the remediation from the Content Aware Protection tab.
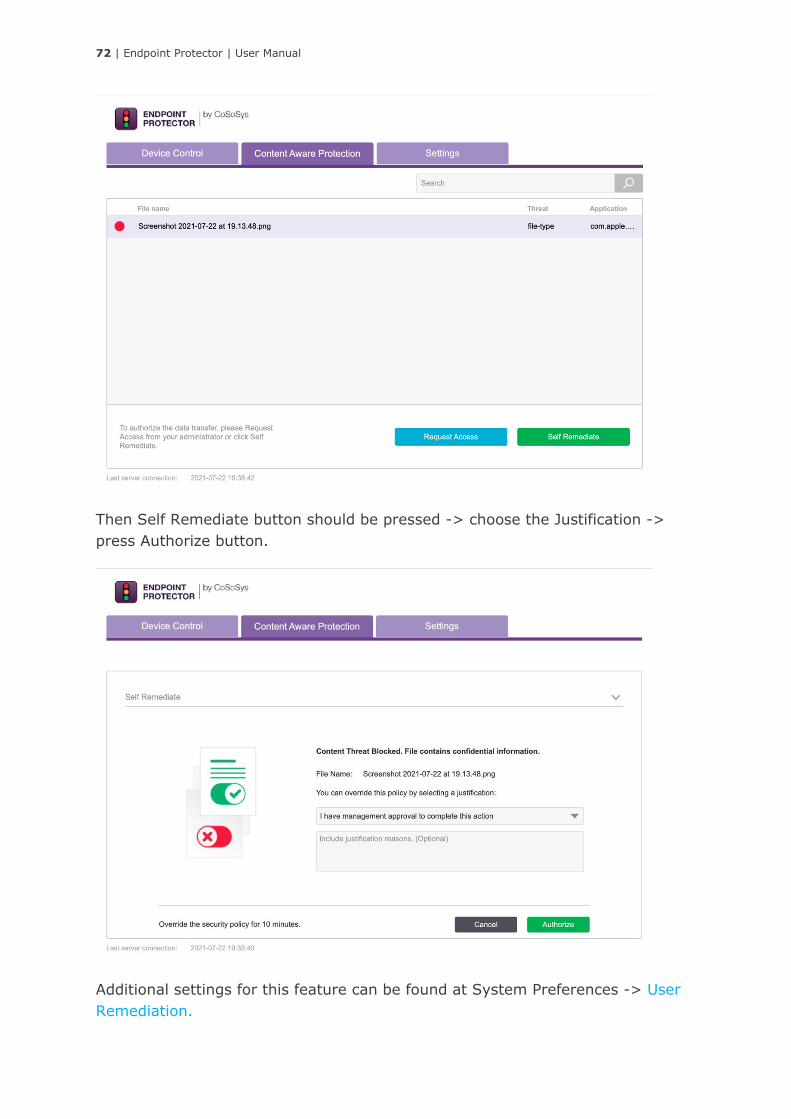
72 | Endpoint Protector | User Manual
Then Self Remediate button should be pressed -> choose the Justification ->
press Authorize button.
Additional settings for this feature can be found at System Preferences -> User
Remediation.
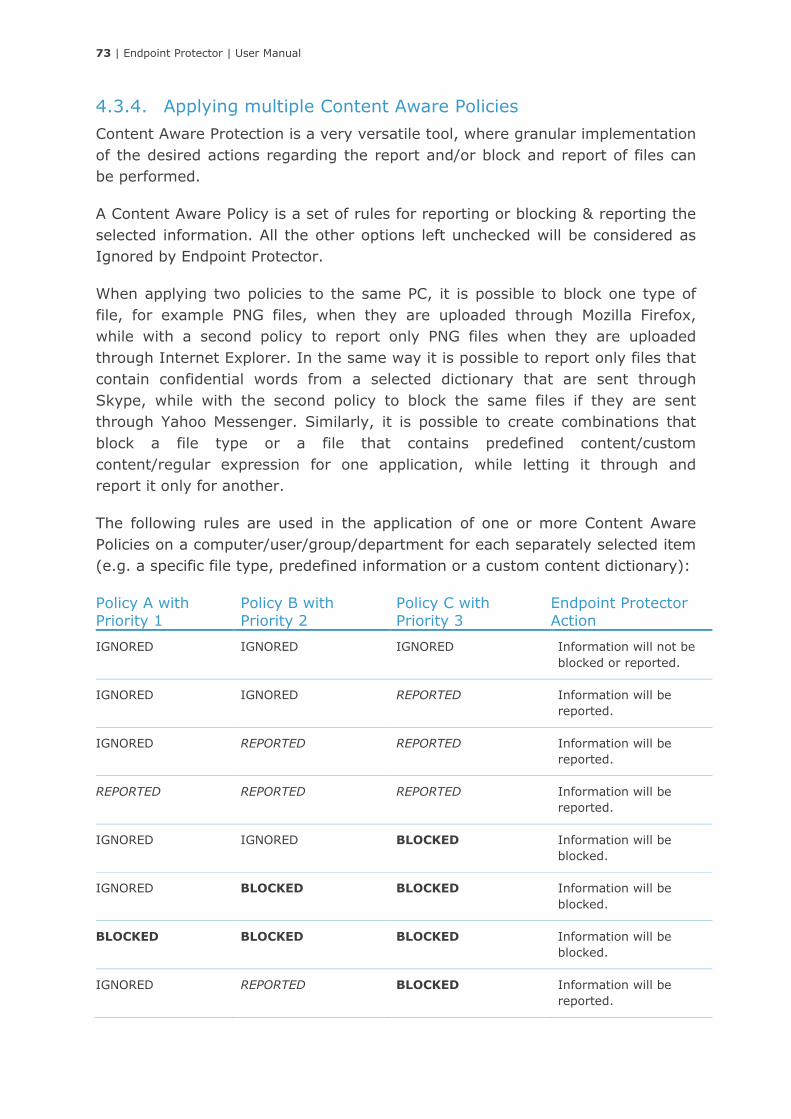
73 | Endpoint Protector | User Manual
4.3.4. Applying multiple Content Aware Policies
Content Aware Protection is a very versatile tool, where granular implementation
of the desired actions regarding the report and/or block and report of files can
be performed.
A Content Aware Policy is a set of rules for reporting or blocking & reporting the
selected information. All the other options left unchecked will be considered as
Ignored by Endpoint Protector.
When applying two policies to the same PC, it is possible to block one type of
file, for example PNG files, when they are uploaded through Mozilla Firefox,
while with a second policy to report only PNG files when they are uploaded
through Internet Explorer. In the same way it is possible to report only files that
contain confidential words from a selected dictionary that are sent through
Skype, while with the second policy to block the same files if they are sent
through Yahoo Messenger. Similarly, it is possible to create combinations that
block a file type or a file that contains predefined content/custom
content/regular expression for one application, while letting it through and
report it only for another.
The following rules are used in the application of one or more Content Aware
Policies on a computer/user/group/department for each separately selected item
(e.g. a specific file type, predefined information or a custom content dictionary):
Policy A with Priority 1
Policy B with Priority 2
Policy C with Priority 3
Endpoint Protector Action
IGNORED IGNORED IGNORED Information will not be
blocked or reported.
IGNORED IGNORED REPORTED Information will be
reported.
IGNORED REPORTED REPORTED Information will be
reported.
REPORTED REPORTED REPORTED Information will be
reported.
IGNORED IGNORED BLOCKED Information will be
blocked.
IGNORED BLOCKED BLOCKED Information will be
blocked.
BLOCKED BLOCKED BLOCKED Information will be
blocked.
IGNORED REPORTED BLOCKED Information will be
reported.
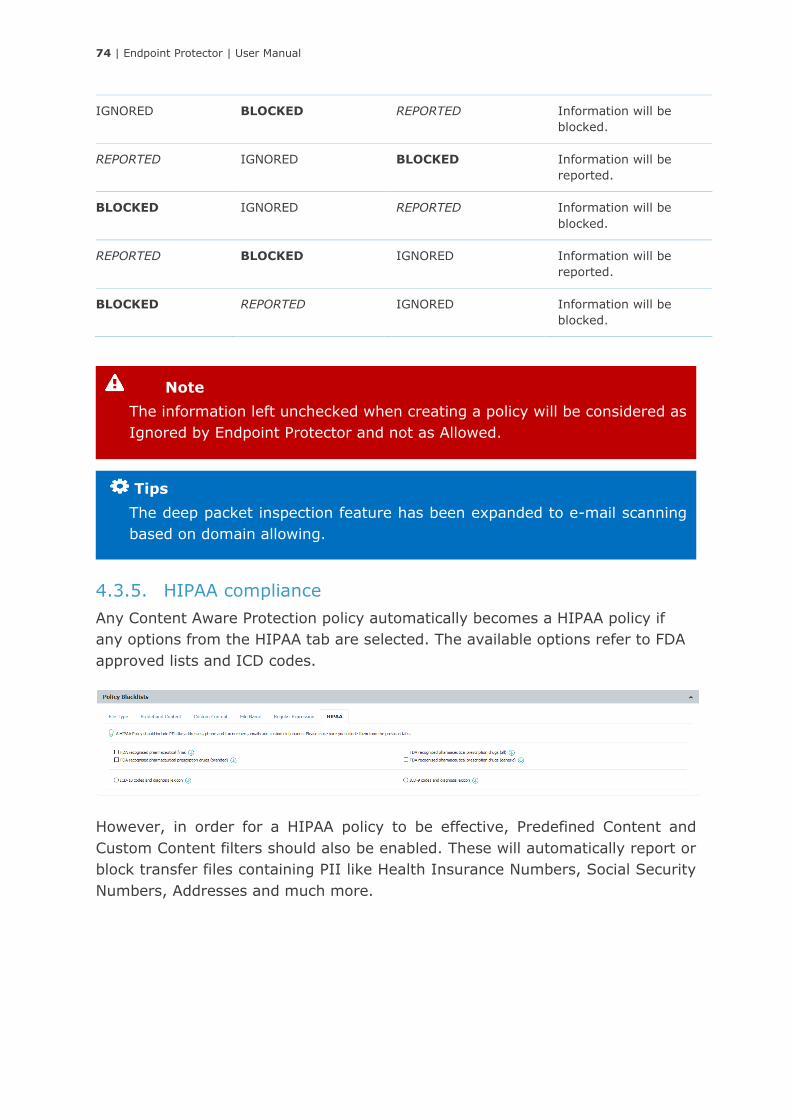
74 | Endpoint Protector | User Manual
IGNORED BLOCKED REPORTED Information will be
blocked.
REPORTED IGNORED BLOCKED Information will be
reported.
BLOCKED IGNORED REPORTED Information will be
blocked.
REPORTED BLOCKED IGNORED Information will be
reported.
BLOCKED REPORTED IGNORED Information will be
blocked.
4.3.5. HIPAA compliance
Any Content Aware Protection policy automatically becomes a HIPAA policy if
any options from the HIPAA tab are selected. The available options refer to FDA
approved lists and ICD codes.
However, in order for a HIPAA policy to be effective, Predefined Content and
Custom Content filters should also be enabled. These will automatically report or
block transfer files containing PII like Health Insurance Numbers, Social Security
Numbers, Addresses and much more.
Tips
The deep packet inspection feature has been expanded to e-mail scanning
based on domain allowing.
Note
The information left unchecked when creating a policy will be considered as
Ignored by Endpoint Protector and not as Allowed.
75 | Endpoint Protector | User Manual
A recommended HIPAA should be considered a Content Aware Policy that,
besides the options in the HIPAA tab, also has the below configuration:
▪ All the File Types recognized should be included.
▪ All Personal Identifiable Information should be Country Specific to the
United States (Address, Phone/Fax and Social Security Numbers)
▪ Both Internet Protocol Addresses Access should be selected
▪ The URL and Domain Allowlists options should also be checked
HIPAA policies can be created and used on their own or in combination with
regular policies, for a better control of the data inside the network. These
policies are available for Windows, Mac OS X or Linux computers.
4.3.5.1. Use Case Nr. 1
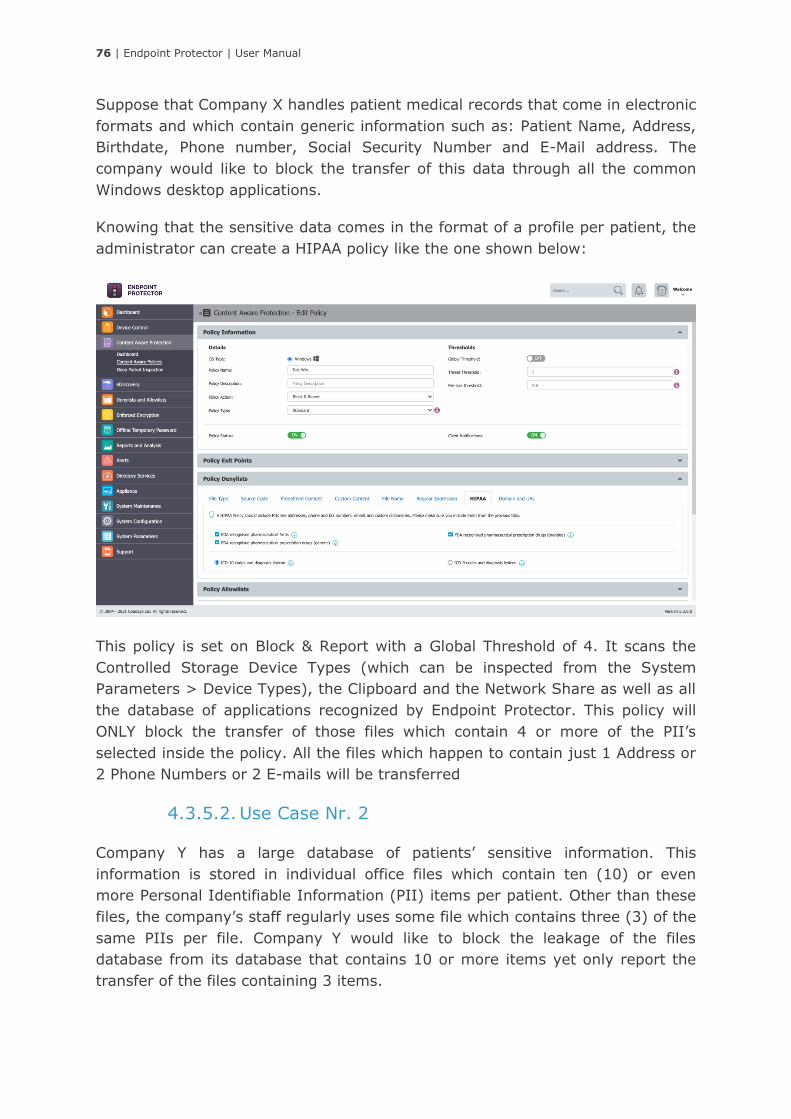
76 | Endpoint Protector | User Manual
Suppose that Company X handles patient medical records that come in electronic
formats and which contain generic information such as: Patient Name, Address,
Birthdate, Phone number, Social Security Number and E-Mail address. The
company would like to block the transfer of this data through all the common
Windows desktop applications.
Knowing that the sensitive data comes in the format of a profile per patient, the
administrator can create a HIPAA policy like the one shown below:
This policy is set on Block & Report with a Global Threshold of 4. It scans the
Controlled Storage Device Types (which can be inspected from the System
Parameters > Device Types), the Clipboard and the Network Share as well as all
the database of applications recognized by Endpoint Protector. This policy will
ONLY block the transfer of those files which contain 4 or more of the PII’s
selected inside the policy. All the files which happen to contain just 1 Address or
2 Phone Numbers or 2 E-mails will be transferred
4.3.5.2. Use Case Nr. 2
Company Y has a large database of patients’ sensitive information. This
information is stored in individual office files which contain ten (10) or even
more Personal Identifiable Information (PII) items per patient. Other than these
files, the company’s staff regularly uses some file which contains three (3) of the
same PIIs per file. Company Y would like to block the leakage of the files
database from its database that contains 10 or more items yet only report the
transfer of the files containing 3 items.
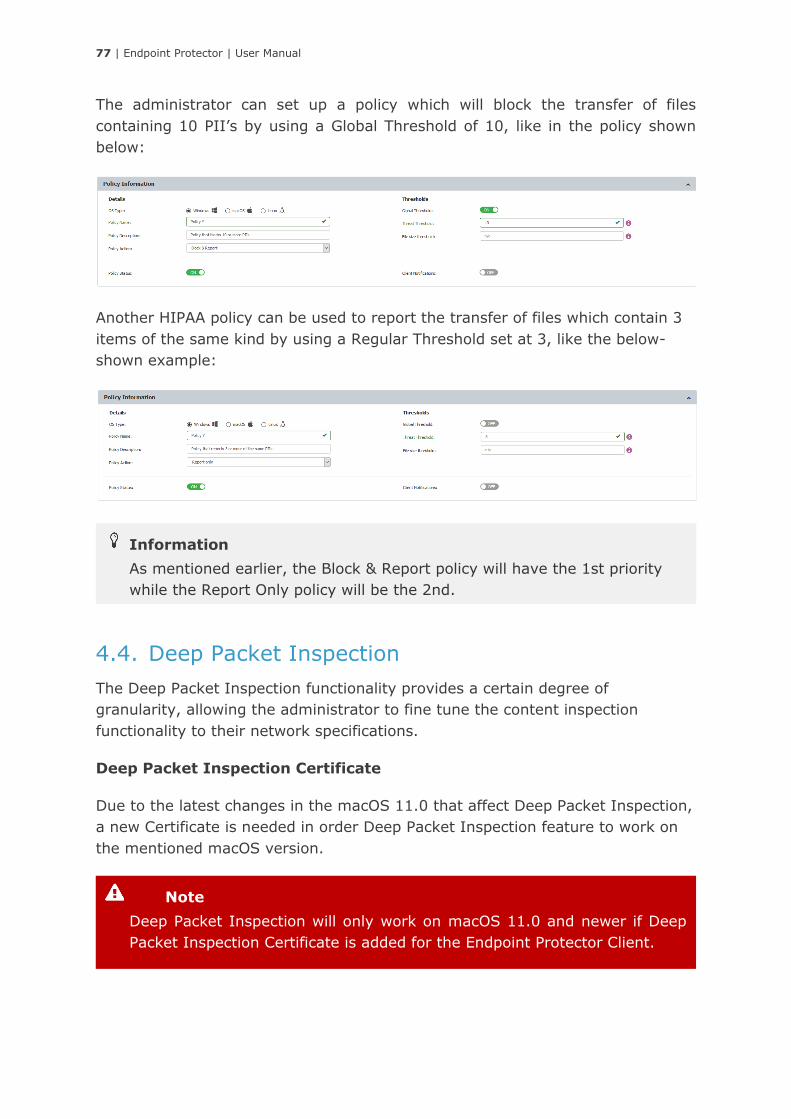
77 | Endpoint Protector | User Manual
The administrator can set up a policy which will block the transfer of files
containing 10 PII’s by using a Global Threshold of 10, like in the policy shown
below:
Another HIPAA policy can be used to report the transfer of files which contain 3
items of the same kind by using a Regular Threshold set at 3, like the below-
shown example:
4.4. Deep Packet Inspection
The Deep Packet Inspection functionality provides a certain degree of
granularity, allowing the administrator to fine tune the content inspection
functionality to their network specifications.
Deep Packet Inspection Certificate
Due to the latest changes in the macOS 11.0 that affect Deep Packet Inspection,
a new Certificate is needed in order Deep Packet Inspection feature to work on
the mentioned macOS version.
Note
Deep Packet Inspection will only work on macOS 11.0 and newer if Deep
Packet Inspection Certificate is added for the Endpoint Protector Client.
Information
As mentioned earlier, the Block & Report policy will have the 1st priority
while the Report Only policy will be the 2nd.

78 | Endpoint Protector | User Manual
This certificate can be downloaded from System Configuration -> System
Settings -> Deep Packet Inspection Certificate. It can be added manually or
automatically through deployment solutions.
To add it manually, follow the next steps:
1. Go to System Configuration -> System Settings -> Deep Packet Inspection Certificate and download the CA Certificate.
2. Open Keychain Access application from your macOS and make sure System is selected.

79 | Endpoint Protector | User Manual
3. Decompress the downloaded ClientCerts file.
4. Select cacert.pem file and drag and drop it on Keychain Access - > System
80 | Endpoint Protector | User Manual
5. The newly added certificate will have an ‘x’ on it. Double click on it and at Trust section select ‘Always Trust’.
6. Save the changes.
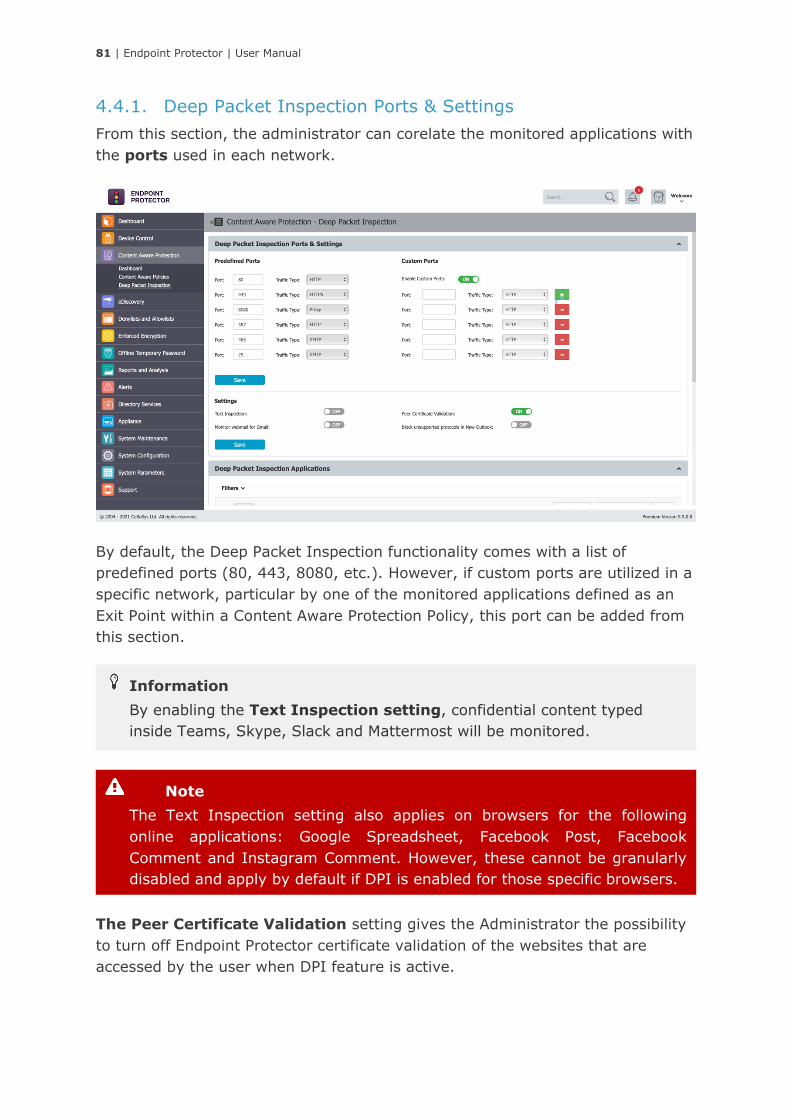
81 | Endpoint Protector | User Manual
4.4.1. Deep Packet Inspection Ports & Settings
From this section, the administrator can corelate the monitored applications with
the ports used in each network.
By default, the Deep Packet Inspection functionality comes with a list of
predefined ports (80, 443, 8080, etc.). However, if custom ports are utilized in a
specific network, particular by one of the monitored applications defined as an
Exit Point within a Content Aware Protection Policy, this port can be added from
this section.
The Peer Certificate Validation setting gives the Administrator the possibility
to turn off Endpoint Protector certificate validation of the websites that are
accessed by the user when DPI feature is active.
Note
The Text Inspection setting also applies on browsers for the following
online applications: Google Spreadsheet, Facebook Post, Facebook
Comment and Instagram Comment. However, these cannot be granularly
disabled and apply by default if DPI is enabled for those specific browsers.
Information
By enabling the Text Inspection setting, confidential content typed
inside Teams, Skype, Slack and Mattermost will be monitored.

82 | Endpoint Protector | User Manual
Use case example:
Your organization uses an SSL inspection proxy or gateway. The certificates
injected by the proxy/gateway cannot be validated on the endpoint. Example:
because they are either invalid or the issuer CA certificate is not installed in the
"Trusted Root Certification Authorities" in the computer certificate store.
To permit Endpoint Protector Deep Packet Inspection to work in this case is to
tell it to skip validation of the peer certificates. Endpoint Protector Client
assumes that in this case the peer certificate validation is performed by the
proxy or gateway so that security is not compromised.
Monitor webmail for Gmail enables subject and body scanning for Gmail in
browsers.
Block unsupported protocols in New Outlook setting will block all emails
sent from accounts that are configured to use Microsoft sync technology.
Information
Attachments will be monitored regardless of this Setting.
Example
Access the badssl.com website while Deep Packet Inspection is on and
Peer Certificate Validation is ON: “You’re connection is not private” and
other certificate warnings are in place.
Access the badssl.com website while Deep Packet Inspection is on and
Peer Certificate Validation is OFF: Endpoint Protector Client will not
validate the server certificate and the browser will let the user visit the site
without any warning.
Note
This setting should be changed with caution and only when there is
another network traffic inspection product that validates the website
certificates, like a Secure Web Gateway Solution.
83 | Endpoint Protector | User Manual
4.4.2. Deep Packet Inspection Applications
From this section, the administrator can enable or disable the Deep Packet
Inspection functionality for each application that is subject to this functionality.
Information
Only the applications that support DPI are available in the list below.
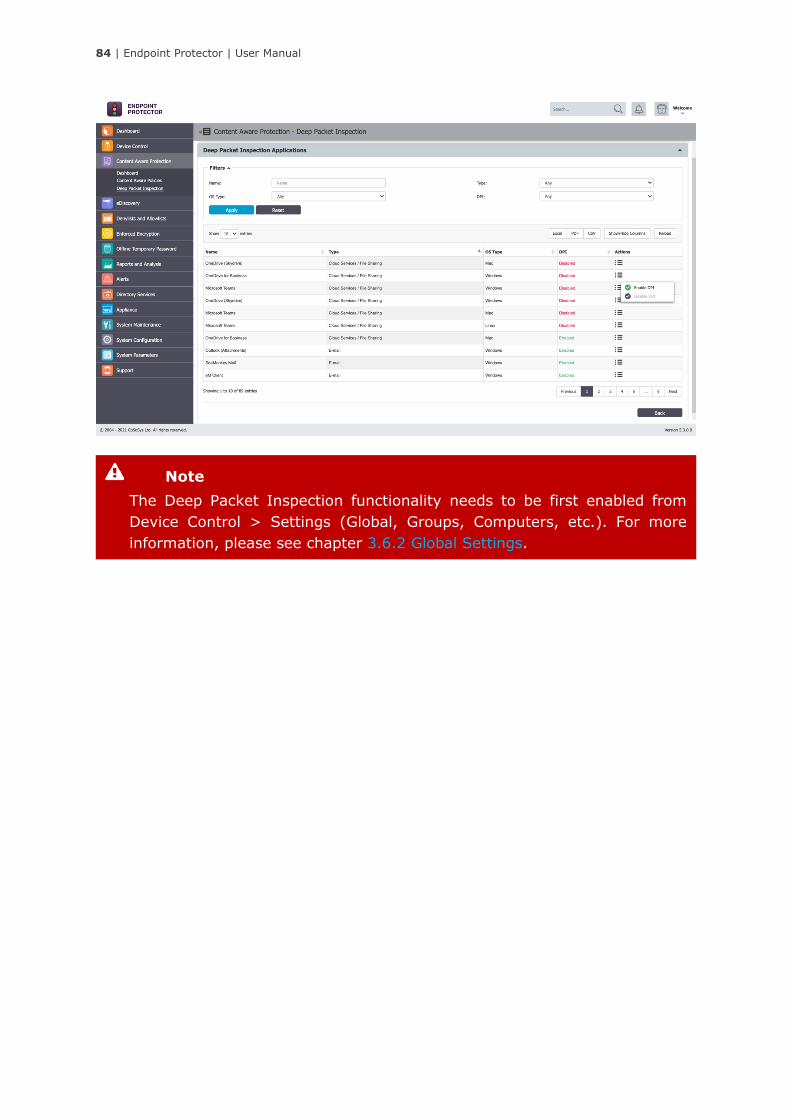
84 | Endpoint Protector | User Manual
Note
The Deep Packet Inspection functionality needs to be first enabled from
Device Control > Settings (Global, Groups, Computers, etc.). For more
information, please see chapter 3.6.2 Global Settings.

85 | Endpoint Protector | User Manual
5. eDiscovery
This module allows the Administrator to create policies that inspect data residing
on protected Windows, Macs and Linux computers. The company’s data
protection strategy can be enforced and risks posed by accidental or intentional
data leaks can be managed. The Administrator can mitigate problems posed by
data at rest by discovering sensitive data, such as:
• Personal Identifiable Information (PII): social security numbers (SSN),
driving license numbers, E-mail addresses, passport numbers, phone
numbers, addresses, dates, etc.
• Financial and credit card information: credit card numbers for Visa,
MasterCard, American Express, JCB, Discover Card, Dinners Club, bank
account numbers etc.
• Confidential files: sales and marketing reports, technical documents,
accounting documents, customer databases etc.
5.1. eDiscovery Activation
eDiscovery comes as the third level of data protection available in Endpoint
Protector. The module is displayed but requires a simple activation by pressing
the Enable button. If not previously provided, the contact details of the Main
Administrator will be required.
Information
Any details provided will only be used to ensure the Live Update Server is
configured correctly and that the eDiscovery module was enabled
successfully.
86 | Endpoint Protector | User Manual
5.2. Dashboards
This section offers a quick overview in the form of graphics and charts related to
the eDiscovery module.
Note
The eDiscovery module is separate from Device Control or Content Aware
Protection modules, and requires separate licensing.
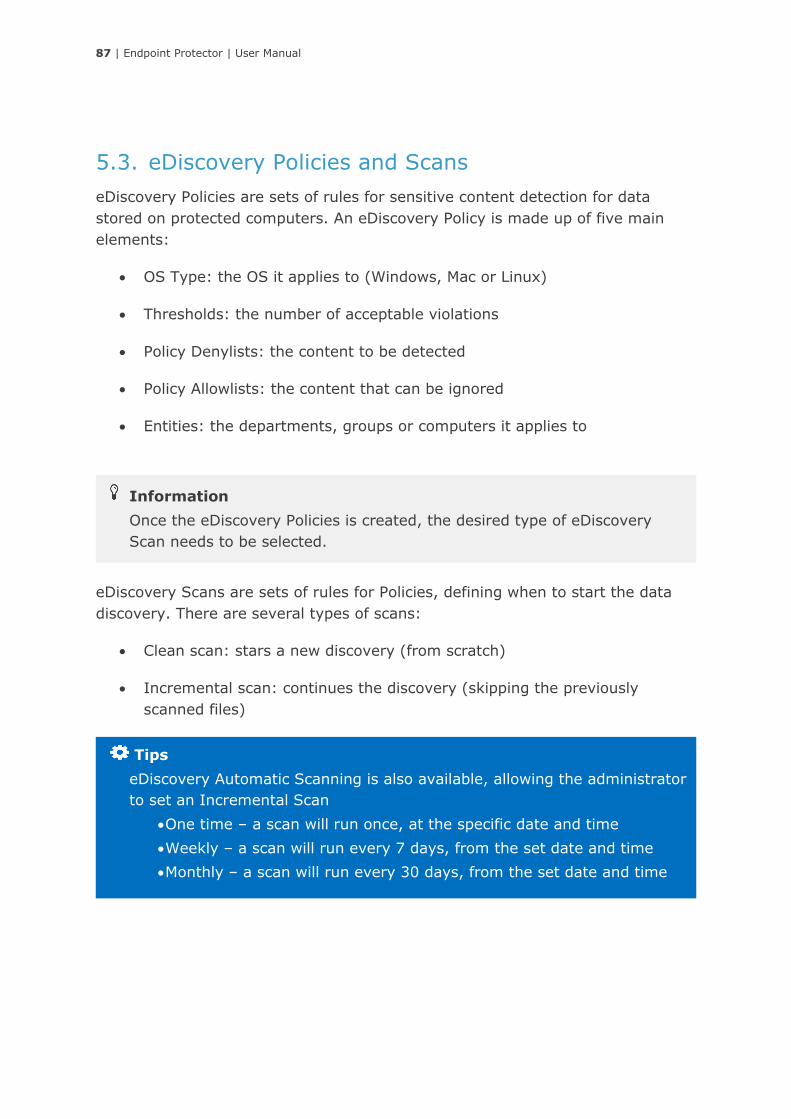
87 | Endpoint Protector | User Manual
5.3. eDiscovery Policies and Scans
eDiscovery Policies are sets of rules for sensitive content detection for data
stored on protected computers. An eDiscovery Policy is made up of five main
elements:
• OS Type: the OS it applies to (Windows, Mac or Linux)
• Thresholds: the number of acceptable violations
• Policy Denylists: the content to be detected
• Policy Allowlists: the content that can be ignored
• Entities: the departments, groups or computers it applies to
eDiscovery Scans are sets of rules for Policies, defining when to start the data
discovery. There are several types of scans:
• Clean scan: stars a new discovery (from scratch)
• Incremental scan: continues the discovery (skipping the previously
scanned files)
Tips
eDiscovery Automatic Scanning is also available, allowing the administrator
to set an Incremental Scan
• One time – a scan will run once, at the specific date and time
• Weekly – a scan will run every 7 days, from the set date and time
• Monthly – a scan will run every 30 days, from the set date and time
Information
Once the eDiscovery Policies is created, the desired type of eDiscovery
Scan needs to be selected.
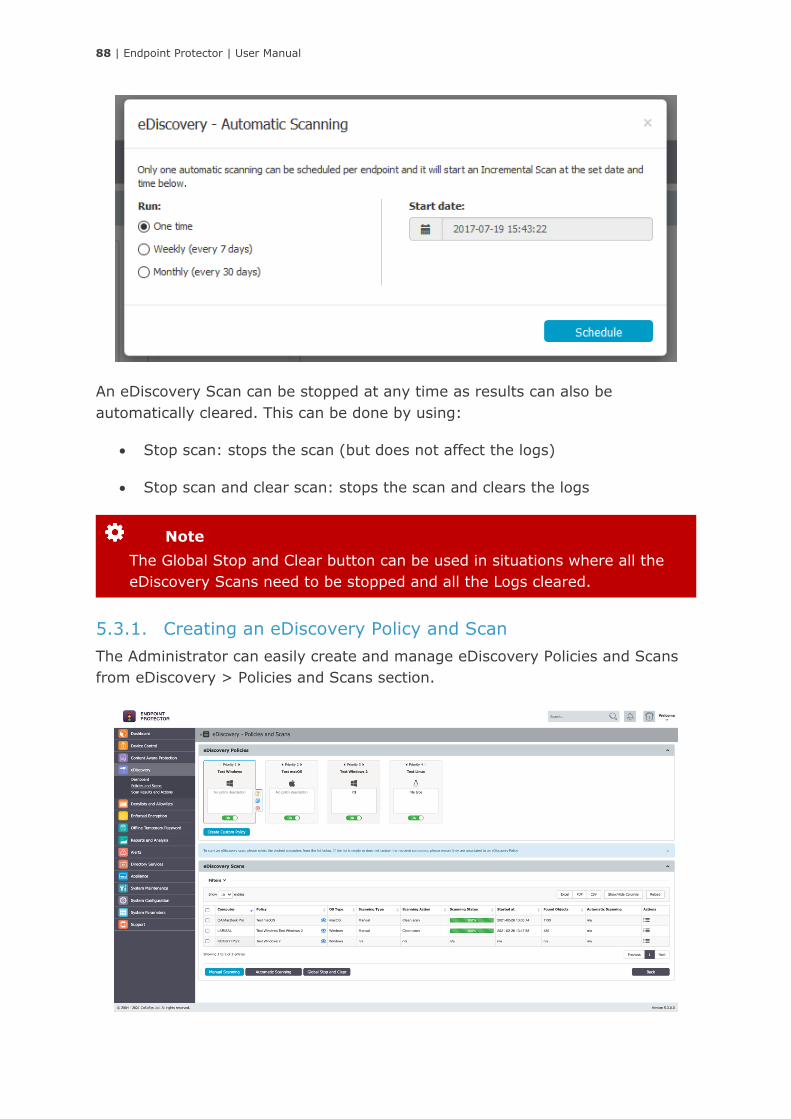
88 | Endpoint Protector | User Manual
An eDiscovery Scan can be stopped at any time as results can also be
automatically cleared. This can be done by using:
• Stop scan: stops the scan (but does not affect the logs)
• Stop scan and clear scan: stops the scan and clears the logs
5.3.1. Creating an eDiscovery Policy and Scan
The Administrator can easily create and manage eDiscovery Policies and Scans
from eDiscovery > Policies and Scans section.
Note
The Global Stop and Clear button can be used in situations where all the
eDiscovery Scans need to be stopped and all the Logs cleared.
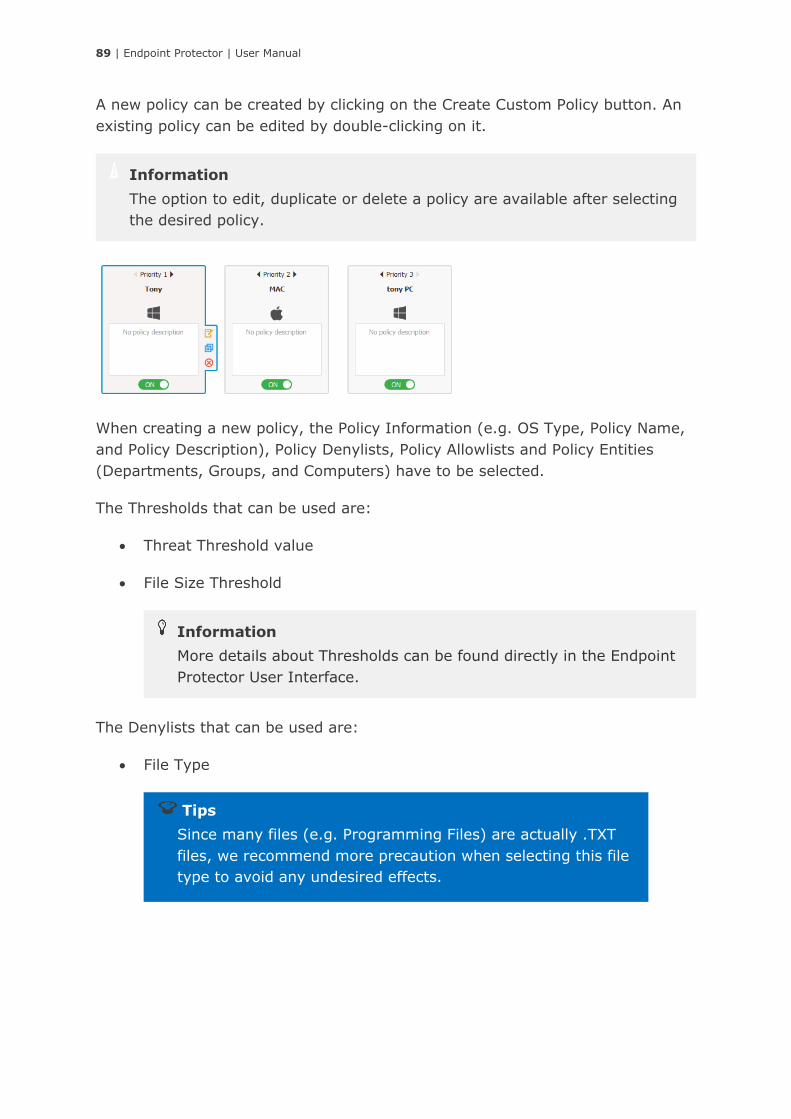
89 | Endpoint Protector | User Manual
A new policy can be created by clicking on the Create Custom Policy button. An
existing policy can be edited by double-clicking on it.
When creating a new policy, the Policy Information (e.g. OS Type, Policy Name,
and Policy Description), Policy Denylists, Policy Allowlists and Policy Entities
(Departments, Groups, and Computers) have to be selected.
The Thresholds that can be used are:
• Threat Threshold value
• File Size Threshold
The Denylists that can be used are:
• File Type
Tips
Since many files (e.g. Programming Files) are actually .TXT
files, we recommend more precaution when selecting this file
type to avoid any undesired effects.
Information
More details about Thresholds can be found directly in the Endpoint
Protector User Interface.
Information
The option to edit, duplicate or delete a policy are available after selecting
the desired policy.
90 | Endpoint Protector | User Manual
• Source Code
• Predefined Content
• Custom Content
• File Name
• Regular Expressions
• HIPAA
The Allowlists that can be used are:
• MIME Type
• Allowed Files
After the eDiscovery Policy has been created, Scanning Actions can be assigned.
These include Start clean scan, Start incremental scan, Stop scan and clear logs.
Information
For more details about Denylists and Allowlist, please see chapter 6
Denylists and Allowlists.
Tips
The majority of the Predefined Content items are country specific
(e.g. Australia, Canada, Germany, Korea, United Kingdom, United
States, .etc.). To avoid a large number of logs or potential false
positives, only enable the Passports that apply to your region or
sensitive data.
Tips
An N-gram based detection method is used to increase the
accuracy of these file types. However, as various source code is
closely linked together (e.g.: C, C++, etc.), these also be checked.
To make things easier, Endpoint Protector automatically marks
these correlations.
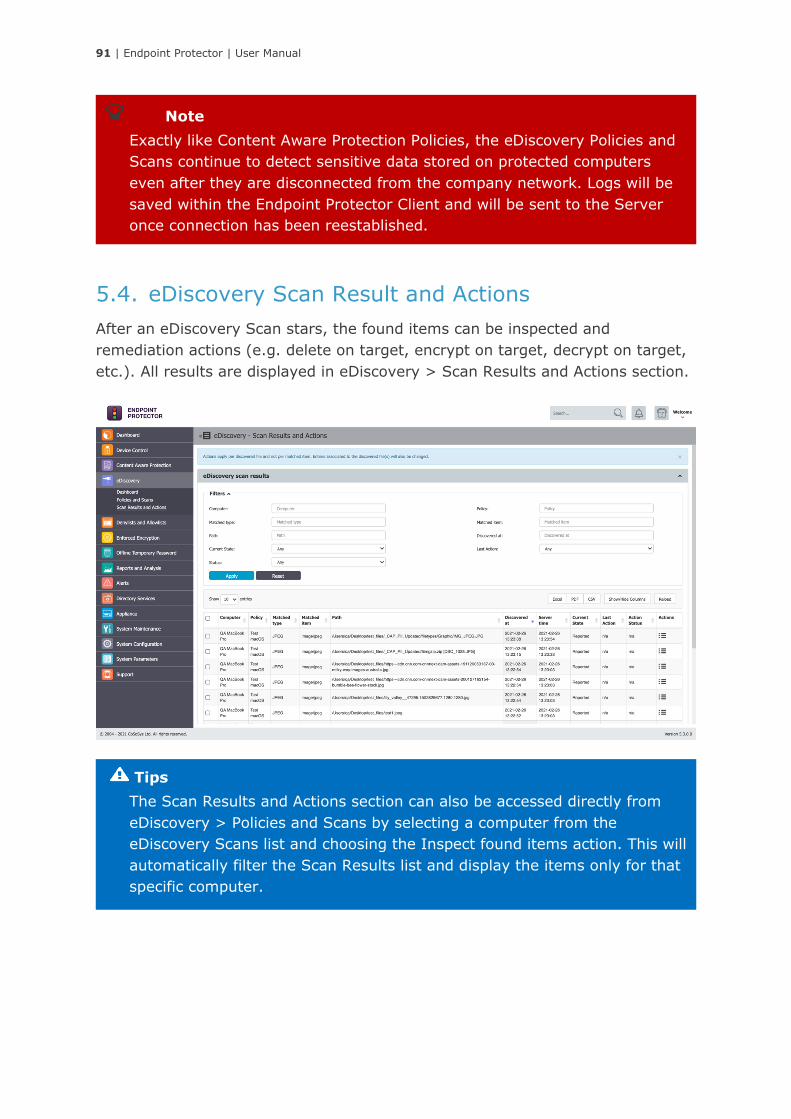
91 | Endpoint Protector | User Manual
5.4. eDiscovery Scan Result and Actions
After an eDiscovery Scan stars, the found items can be inspected and
remediation actions (e.g. delete on target, encrypt on target, decrypt on target,
etc.). All results are displayed in eDiscovery > Scan Results and Actions section.
Tips
The Scan Results and Actions section can also be accessed directly from
eDiscovery > Policies and Scans by selecting a computer from the
eDiscovery Scans list and choosing the Inspect found items action. This will
automatically filter the Scan Results list and display the items only for that
specific computer.
Note
Exactly like Content Aware Protection Policies, the eDiscovery Policies and
Scans continue to detect sensitive data stored on protected computers
even after they are disconnected from the company network. Logs will be
saved within the Endpoint Protector Client and will be sent to the Server
once connection has been reestablished.
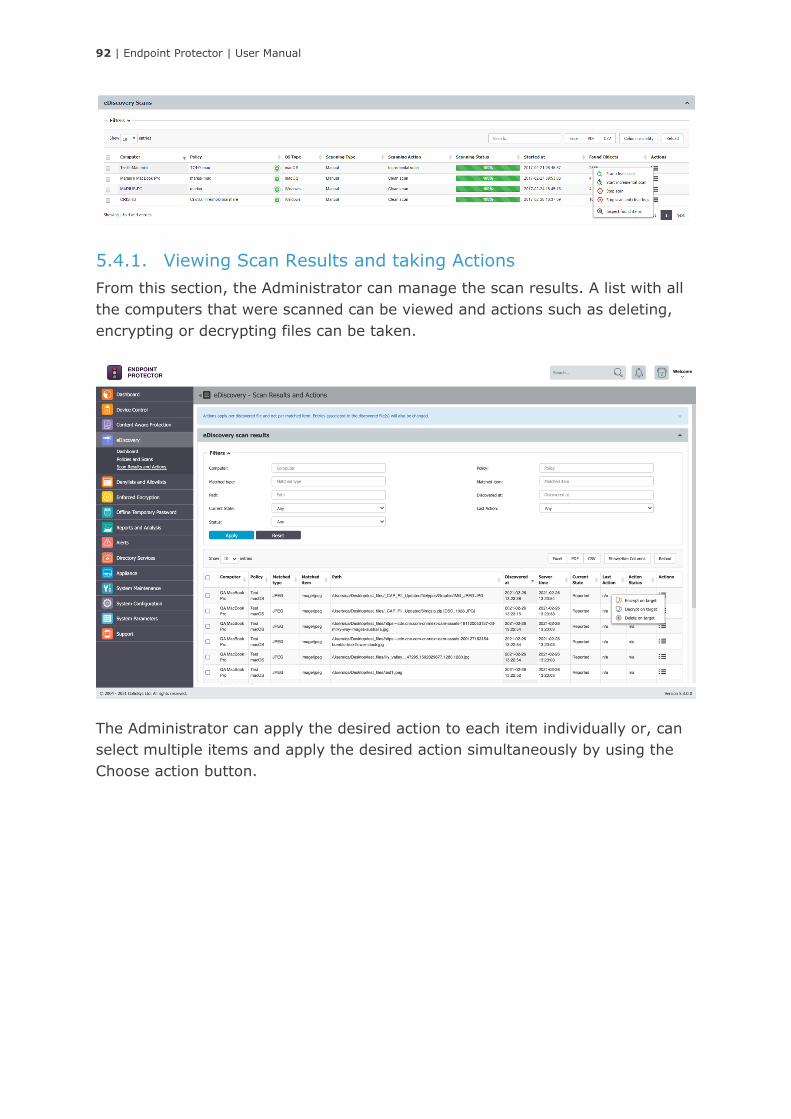
92 | Endpoint Protector | User Manual
5.4.1. Viewing Scan Results and taking Actions
From this section, the Administrator can manage the scan results. A list with all
the computers that were scanned can be viewed and actions such as deleting,
encrypting or decrypting files can be taken.
The Administrator can apply the desired action to each item individually or, can
select multiple items and apply the desired action simultaneously by using the
Choose action button.
93 | Endpoint Protector | User Manual
6. Denylists and Allowlists
From this section, the Administrator can create Denylists and Allowlists that can
be used in both the Content Aware Protection and eDiscovery modules. Once
defined, these denylists and allowlists can be enabled in the desired Policy. The
list of all Denylists and Allowlists will be detailed below.
6.1. File Type Denylists
The content inspection functionally within Endpoint Protector can identify
multiple file types. Additional file types are continually added, extending the
available list with each Endpoint Protector Update. The Administrator can define
what file types a Content Aware Protection or eDiscovery Policy scans for, but
cannot directly extend the supported file type list. Since this is a predefined list,
it only requires the Administrator to select the desired content from the File Type
Content tab, within a Policy. This process has already been detailed in earlier
paragraphs.
Note
Some Denylist and Allowlists are OS related (e.g. E-mail Domain and URL
Name are only available for Windows) or are not available for both
modules.
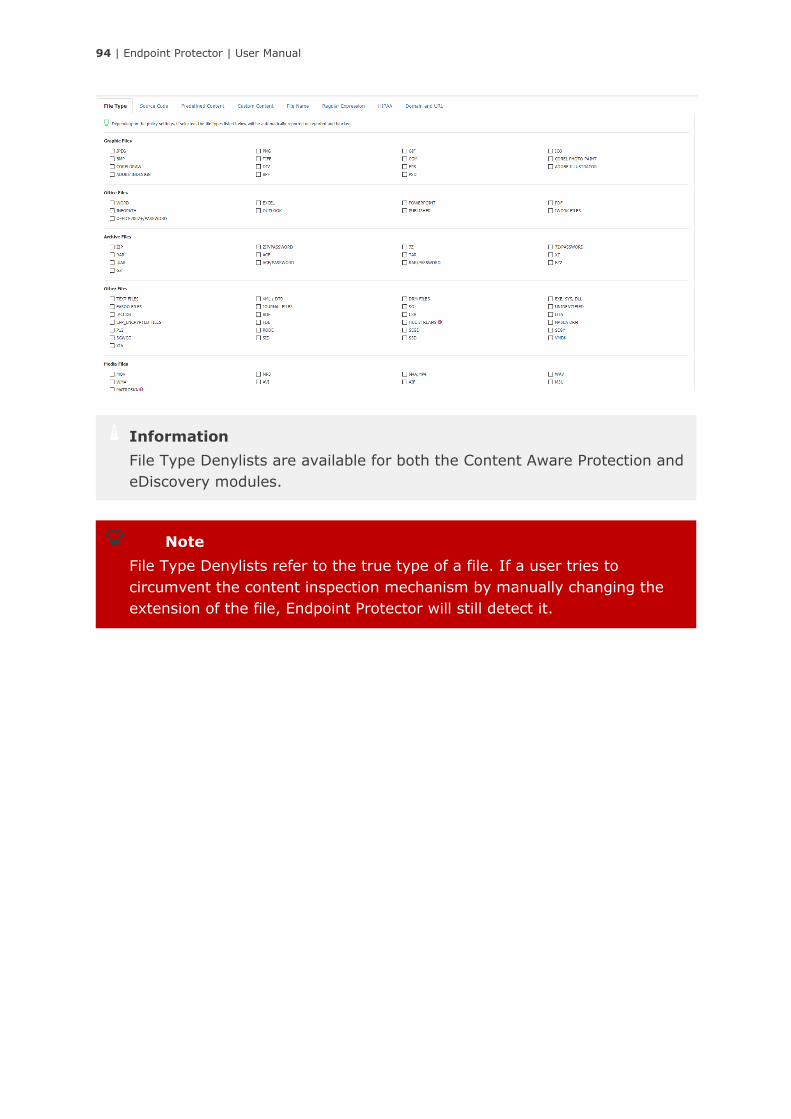
94 | Endpoint Protector | User Manual
Note
File Type Denylists refer to the true type of a file. If a user tries to
circumvent the content inspection mechanism by manually changing the
extension of the file, Endpoint Protector will still detect it.
Information
File Type Denylists are available for both the Content Aware Protection and
eDiscovery modules.

95 | Endpoint Protector | User Manual
6.2. Predefined Content Allowlists
Predefined Content Denylists are predefined lists of terms and expressions to be
detected as sensitive content by Endpoint Protector. Since this is a predefined
list, it only requires the Administrator to select the desired content from within a
Policy, from the Predefined Content tab.
Predefined Content Denylist includes:
• Credit Cards
Amex, Diners, China UnionPay, Discovery, JCB, MasterCard, MIR, Maestro,
Visa
• Personal Identifiable Information
IBAN, Date, E-mail, Address, etc.
• Social Security Numbers (SSNs)
• Identifiers (IDs)
• Passports
• Tax IDs
Information
Predefined Content Denylists are available for both the Content Aware
Protection and eDiscovery modules.
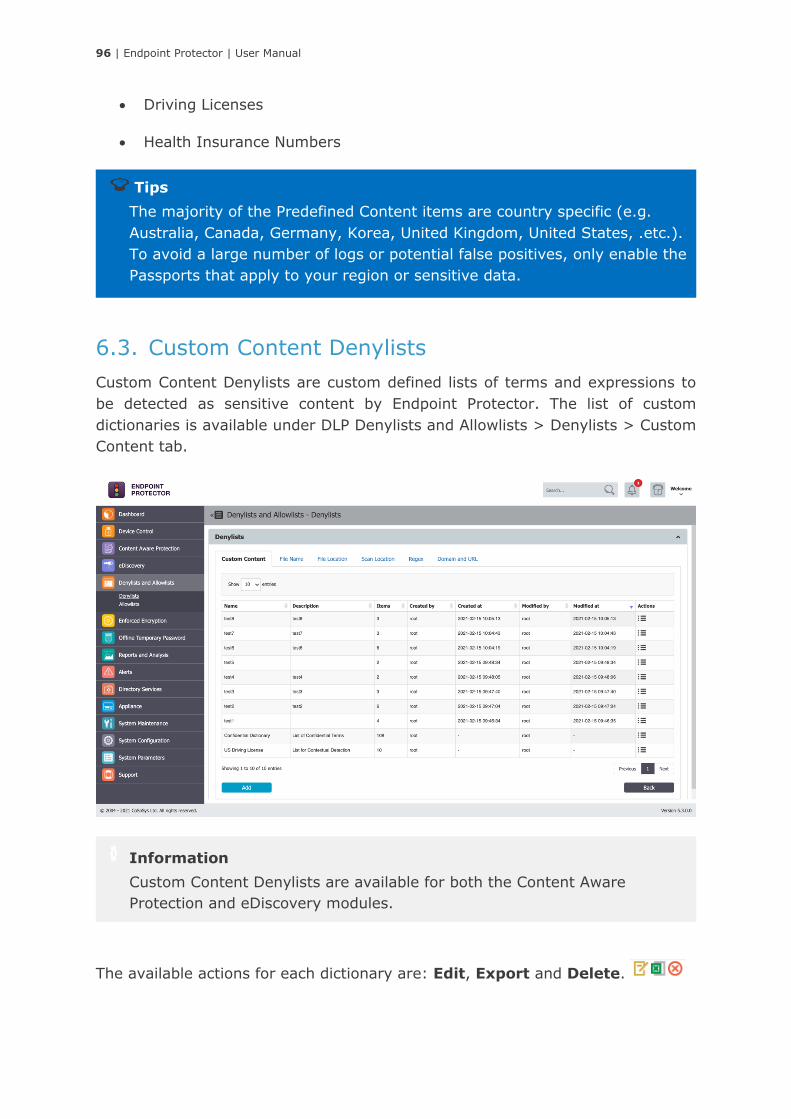
96 | Endpoint Protector | User Manual
• Driving Licenses
• Health Insurance Numbers
6.3. Custom Content Denylists
Custom Content Denylists are custom defined lists of terms and expressions to
be detected as sensitive content by Endpoint Protector. The list of custom
dictionaries is available under DLP Denylists and Allowlists > Denylists > Custom
Content tab.
The available actions for each dictionary are: Edit, Export and Delete.
Information
Custom Content Denylists are available for both the Content Aware
Protection and eDiscovery modules.
Tips
The majority of the Predefined Content items are country specific (e.g.
Australia, Canada, Germany, Korea, United Kingdom, United States, .etc.).
To avoid a large number of logs or potential false positives, only enable the
Passports that apply to your region or sensitive data.
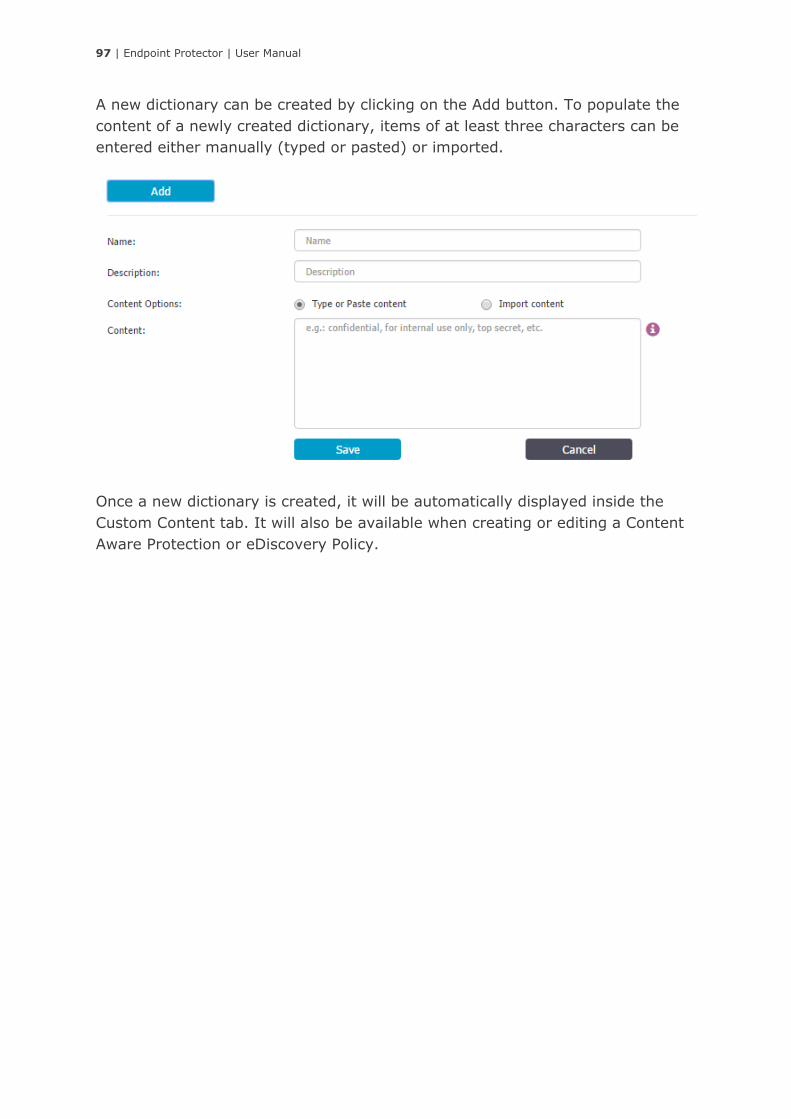
97 | Endpoint Protector | User Manual
A new dictionary can be created by clicking on the Add button. To populate the
content of a newly created dictionary, items of at least three characters can be
entered either manually (typed or pasted) or imported.
Once a new dictionary is created, it will be automatically displayed inside the
Custom Content tab. It will also be available when creating or editing a Content
Aware Protection or eDiscovery Policy.
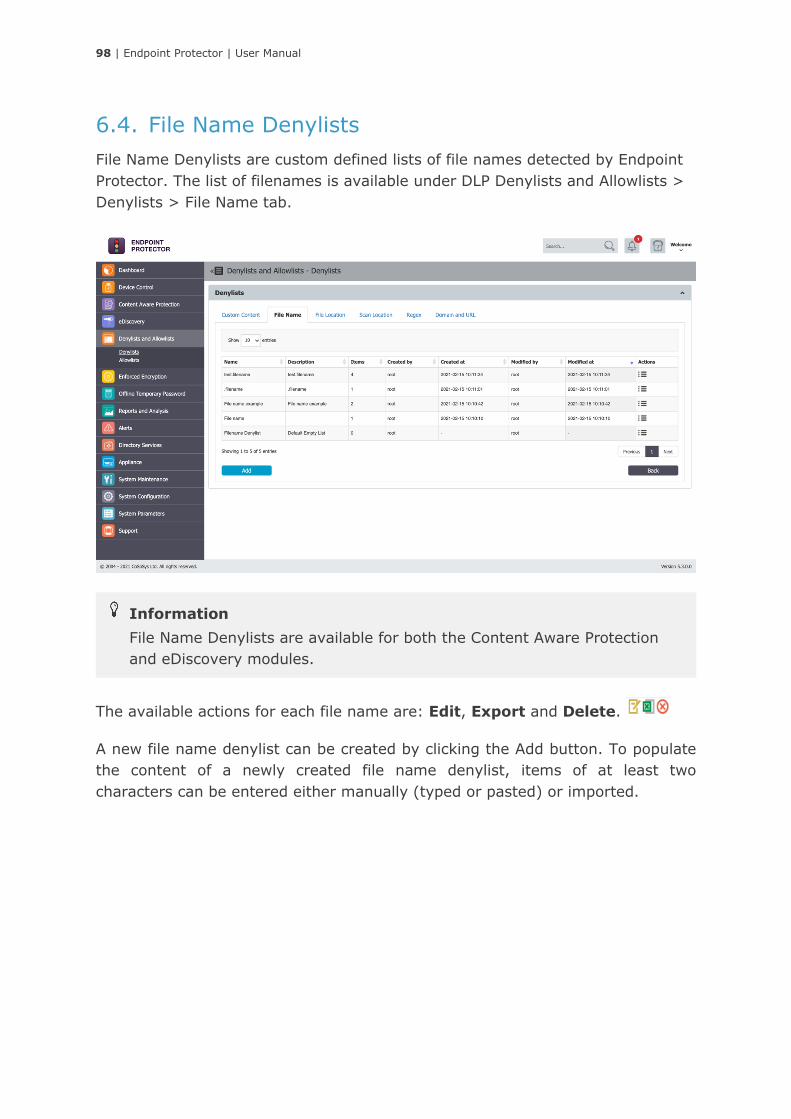
98 | Endpoint Protector | User Manual
6.4. File Name Denylists
File Name Denylists are custom defined lists of file names detected by Endpoint
Protector. The list of filenames is available under DLP Denylists and Allowlists >
Denylists > File Name tab.
The available actions for each file name are: Edit, Export and Delete.
A new file name denylist can be created by clicking the Add button. To populate
the content of a newly created file name denylist, items of at least two
characters can be entered either manually (typed or pasted) or imported.
Information
File Name Denylists are available for both the Content Aware Protection
and eDiscovery modules.
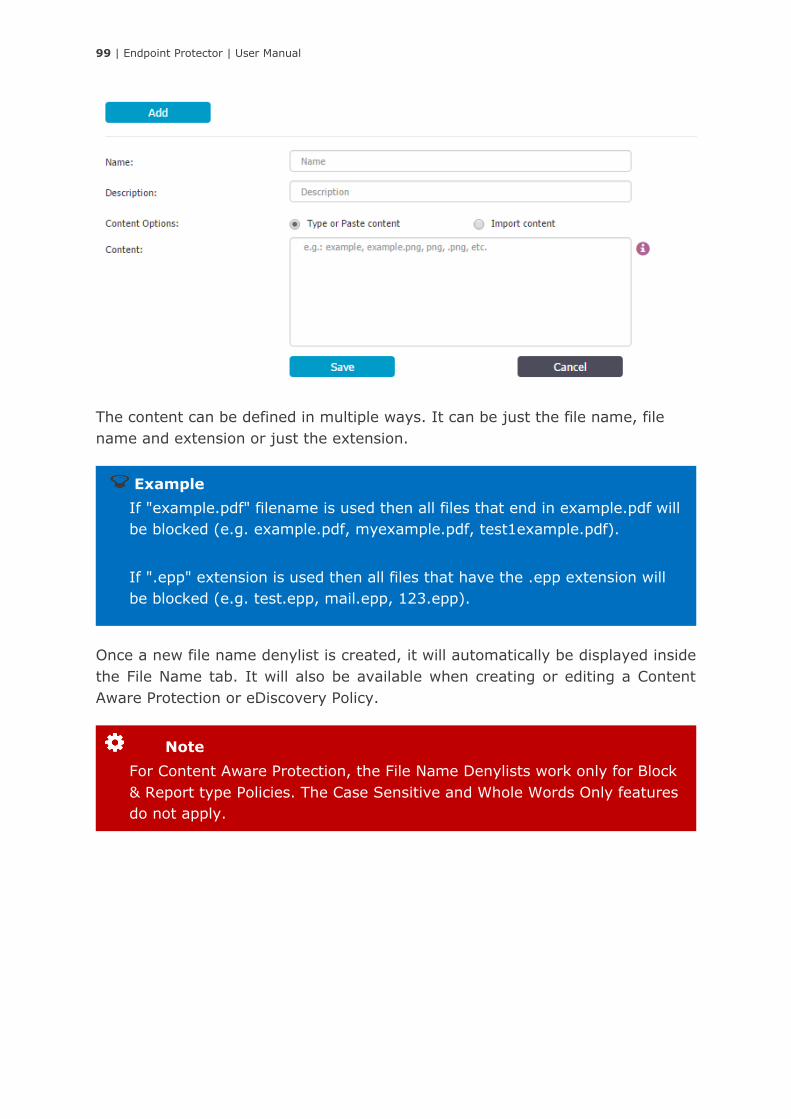
99 | Endpoint Protector | User Manual
The content can be defined in multiple ways. It can be just the file name, file
name and extension or just the extension.
Once a new file name denylist is created, it will automatically be displayed inside
the File Name tab. It will also be available when creating or editing a Content
Aware Protection or eDiscovery Policy.
Note
For Content Aware Protection, the File Name Denylists work only for Block
& Report type Policies. The Case Sensitive and Whole Words Only features
do not apply.
Example
If "example.pdf" filename is used then all files that end in example.pdf will
be blocked (e.g. example.pdf, myexample.pdf, test1example.pdf).
If ".epp" extension is used then all files that have the .epp extension will
be blocked (e.g. test.epp, mail.epp, 123.epp).
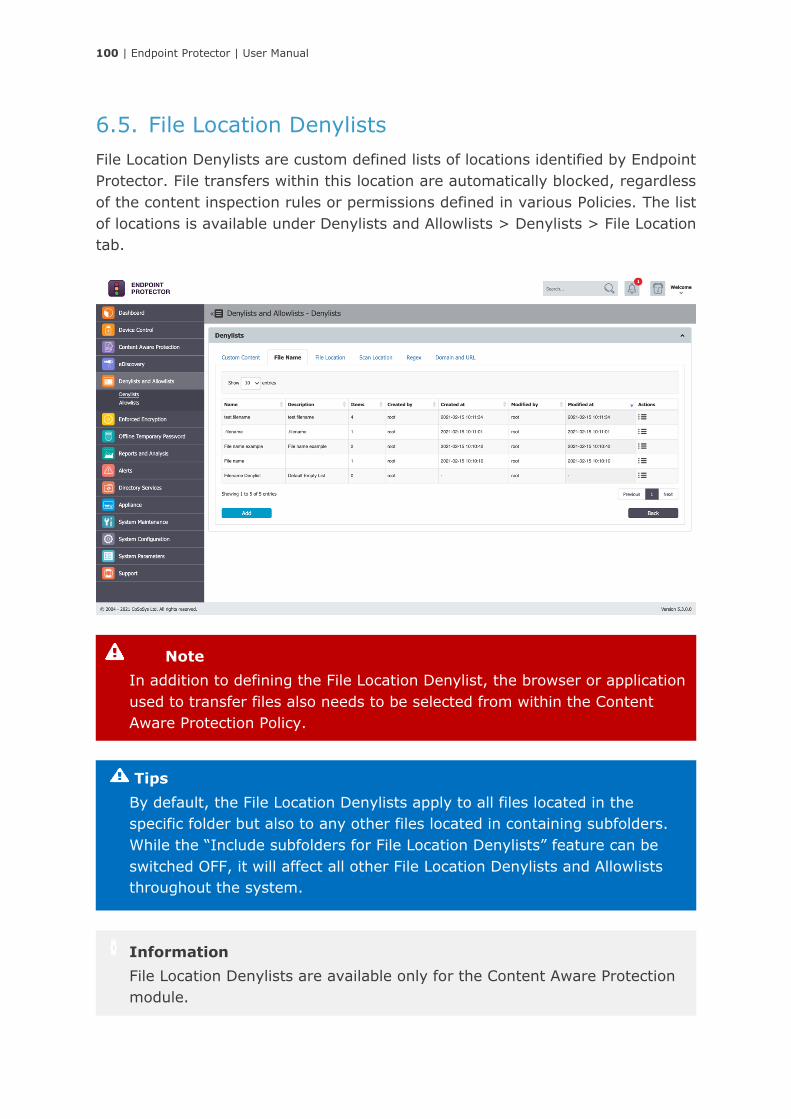
100 | Endpoint Protector | User Manual
6.5. File Location Denylists
File Location Denylists are custom defined lists of locations identified by Endpoint
Protector. File transfers within this location are automatically blocked, regardless
of the content inspection rules or permissions defined in various Policies. The list
of locations is available under Denylists and Allowlists > Denylists > File Location
tab.
Information
File Location Denylists are available only for the Content Aware Protection
module.
Tips
By default, the File Location Denylists apply to all files located in the
specific folder but also to any other files located in containing subfolders.
While the “Include subfolders for File Location Denylists” feature can be
switched OFF, it will affect all other File Location Denylists and Allowlists
throughout the system.
Note
In addition to defining the File Location Denylist, the browser or application
used to transfer files also needs to be selected from within the Content
Aware Protection Policy.
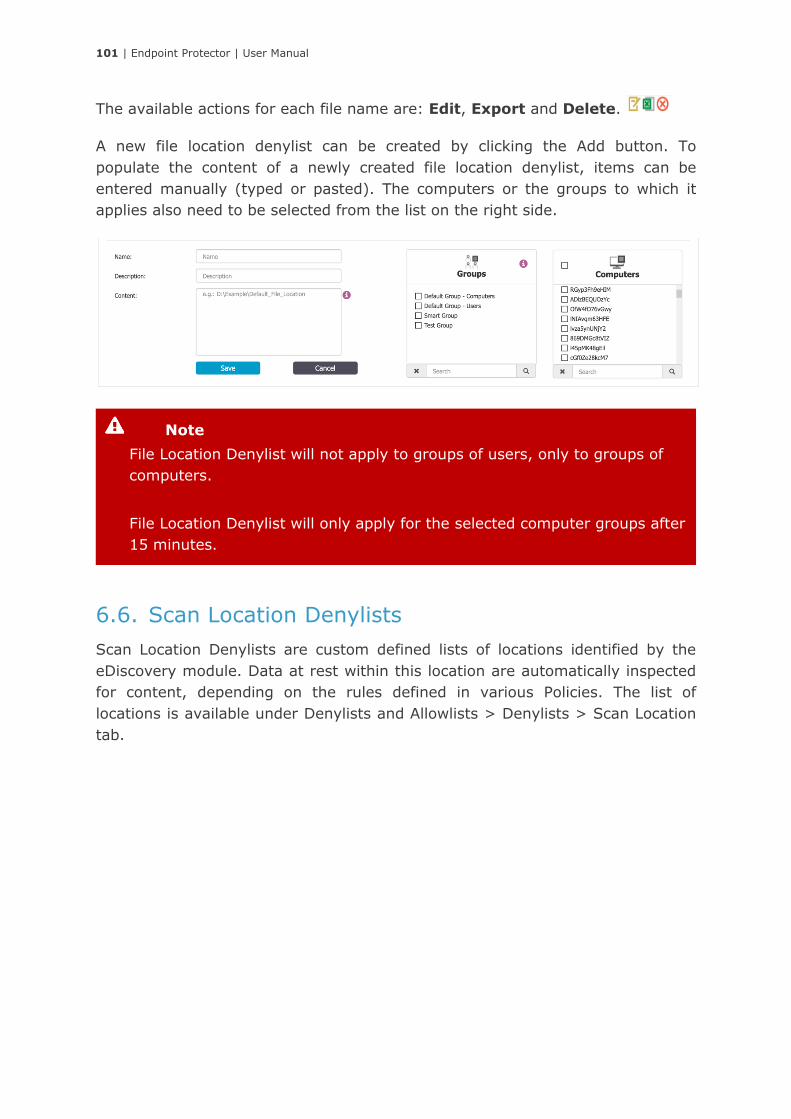
101 | Endpoint Protector | User Manual
The available actions for each file name are: Edit, Export and Delete.
A new file location denylist can be created by clicking the Add button. To
populate the content of a newly created file location denylist, items can be
entered manually (typed or pasted). The computers or the groups to which it
applies also need to be selected from the list on the right side.
6.6. Scan Location Denylists
Scan Location Denylists are custom defined lists of locations identified by the
eDiscovery module. Data at rest within this location are automatically inspected
for content, depending on the rules defined in various Policies. The list of
locations is available under Denylists and Allowlists > Denylists > Scan Location
tab.
Note
File Location Denylist will not apply to groups of users, only to groups of
computers.
File Location Denylist will only apply for the selected computer groups after
15 minutes.
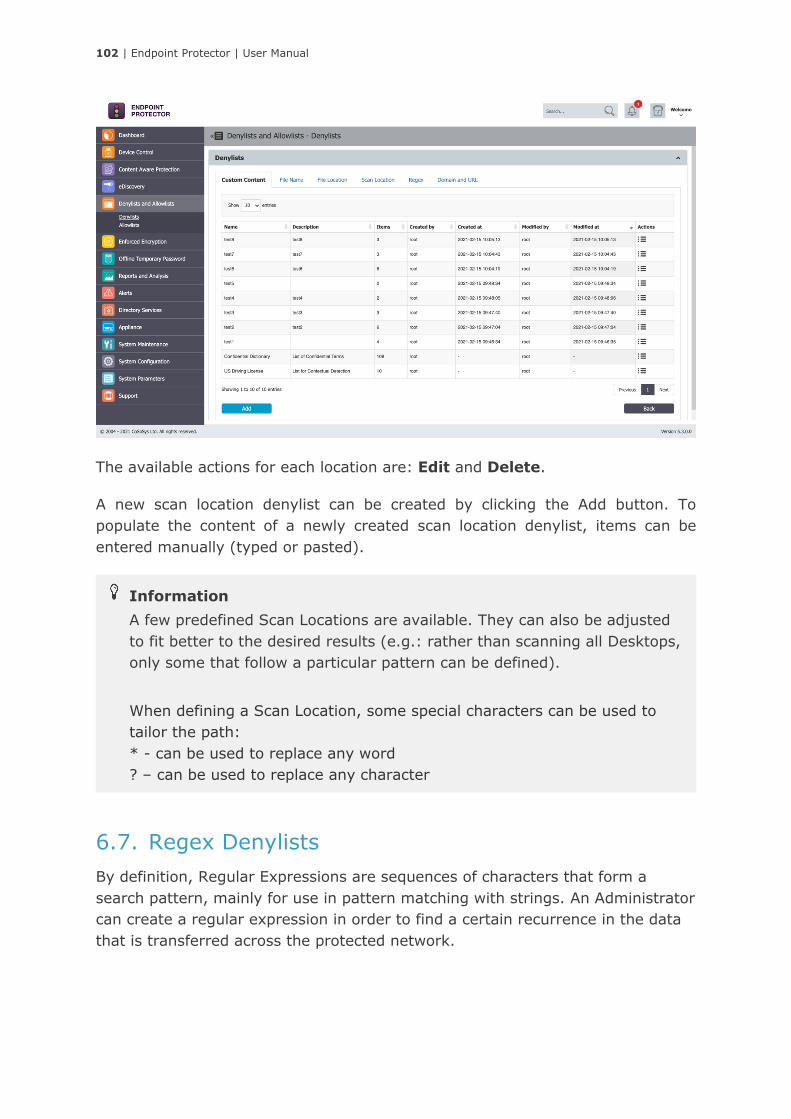
102 | Endpoint Protector | User Manual
The available actions for each location are: Edit and Delete.
A new scan location denylist can be created by clicking the Add button. To
populate the content of a newly created scan location denylist, items can be
entered manually (typed or pasted).
6.7. Regex Denylists
By definition, Regular Expressions are sequences of characters that form a
search pattern, mainly for use in pattern matching with strings. An Administrator
can create a regular expression in order to find a certain recurrence in the data
that is transferred across the protected network.
Information
A few predefined Scan Locations are available. They can also be adjusted
to fit better to the desired results (e.g.: rather than scanning all Desktops,
only some that follow a particular pattern can be defined).
When defining a Scan Location, some special characters can be used to
tailor the path:
* - can be used to replace any word
? – can be used to replace any character

103 | Endpoint Protector | User Manual
The available actions for each file name are: Edit, Export and Delete.
A new file regex denylist can be created by clicking the Add button. Regular
Expressions can be tested for accuracy. Insert into the Enter test content box a
general example of something on which the regex applies to, and press the Test
button. If the Regular Expression has no errors inside of it, then the same
content should appear into the Matched content box, as shown below:
Example
To match an E-mail:
[-0-9a-zA-Z.+_]+@[-0-9a-zA-Z.+_]+\.[a-zA-Z]{2,4}
Information
Regex Denylists are available for both the Content Aware Protection and
eDiscovery modules.
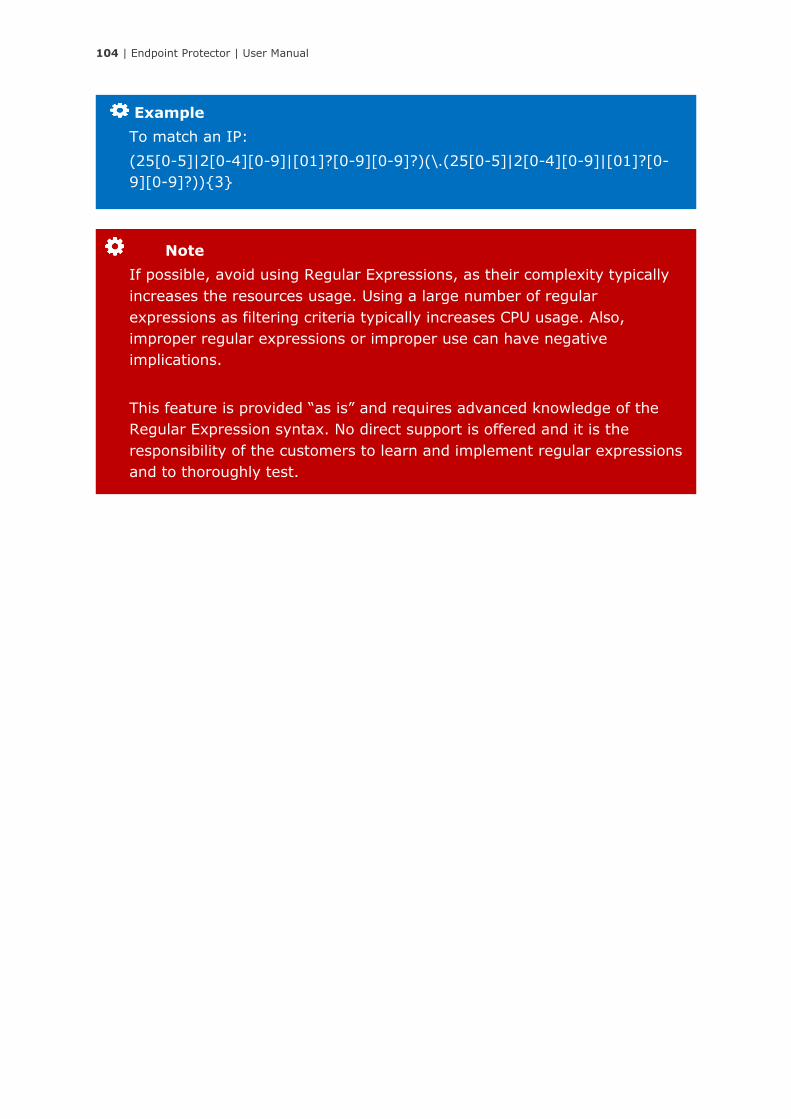
104 | Endpoint Protector | User Manual
Note
If possible, avoid using Regular Expressions, as their complexity typically
increases the resources usage. Using a large number of regular
expressions as filtering criteria typically increases CPU usage. Also,
improper regular expressions or improper use can have negative
implications.
This feature is provided “as is” and requires advanced knowledge of the
Regular Expression syntax. No direct support is offered and it is the
responsibility of the customers to learn and implement regular expressions
and to thoroughly test.
Example
To match an IP:
(25[0-5]|2[0-4][0-9]|[01]?[0-9][0-9]?)(\.(25[0-5]|2[0-4][0-9]|[01]?[0-
9][0-9]?)){3}

105 | Endpoint Protector | User Manual
6.8. Domain and URL Denylists
Domain and URL Denylists are custom defined lists of web addresses identified
by Endpoint Protector. Access to domains and URLs from these lists will be
denied. The list of domains and URLs is available under Denylists and Allowlists
> Denylists > Domain and URL tab.
The available actions for each file name are: Edit, Export and Delete.
A new domain and URL denylist can be created by clicking the Add button. To
populate the content of a newly created domain and URL denylist, items can be
entered either manually (typed or pasted) or imported.

106 | Endpoint Protector | User Manual
The content can be defined in multiple ways. It can be just the file name, file
name and extension or just the extension.
Once a new domain and URL denylist is created, it will automatically be
displayed inside the Domain and URL tab. It will also be available when creating
or editing a Content Aware Protection Policy.
6.9. MIME Type Allowlists
The content inspection functionally within Endpoint Protector identifies multiple
file types. While some files (e.g. Word, Excel, PDFs, etc.) can contain
confidential information (e.g. PIIs, SSNs, Credit Cards, etc.), other files are
highly unlikely to contain such data (e.g. .dll, .exe, .mp3, .avi, etc.).
The purpose of the MIME Type Allowlists is to eliminate the use of resources to
inspect redundant and unnecessary files for content, as well as reducing false
positives due to information detected in the metadata of files where the risk of
data loss is extremely low.
Example
pdf, test1example.pdf. example.endpointprotector.com, *example.com,
*example*example, https://website.com
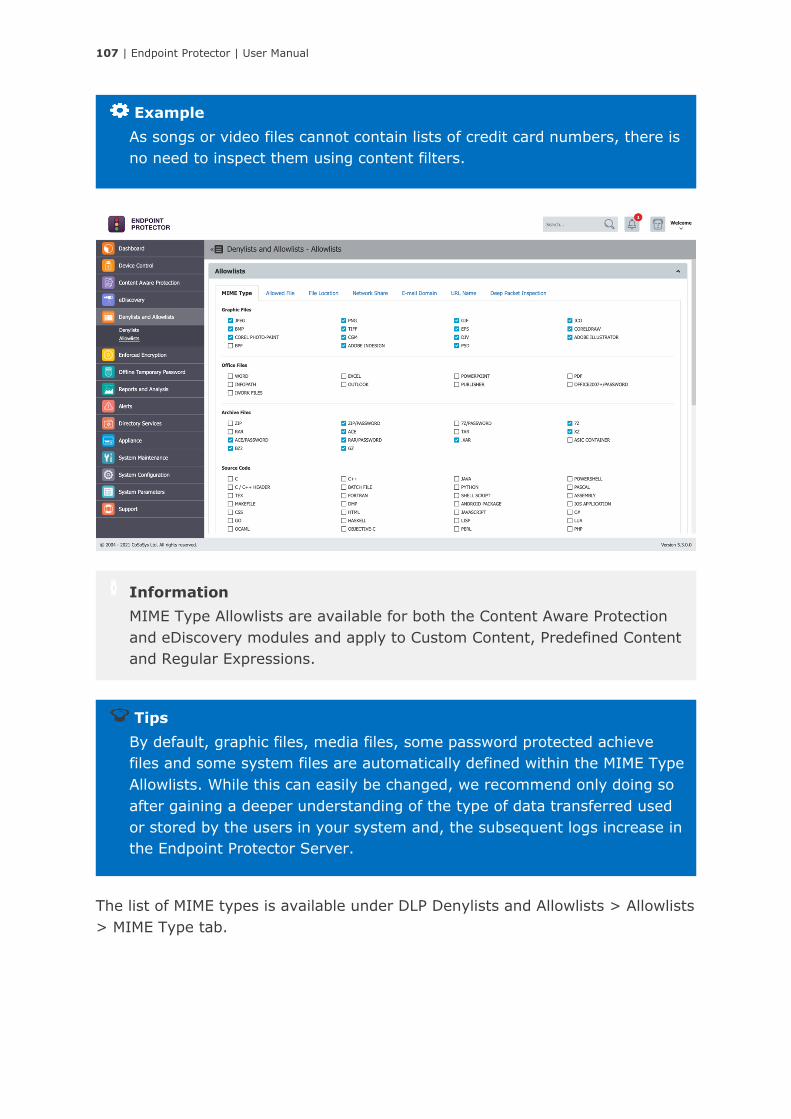
107 | Endpoint Protector | User Manual
The list of MIME types is available under DLP Denylists and Allowlists > Allowlists
> MIME Type tab.
Tips
By default, graphic files, media files, some password protected achieve
files and some system files are automatically defined within the MIME Type
Allowlists. While this can easily be changed, we recommend only doing so
after gaining a deeper understanding of the type of data transferred used
or stored by the users in your system and, the subsequent logs increase in
the Endpoint Protector Server.
Information
MIME Type Allowlists are available for both the Content Aware Protection
and eDiscovery modules and apply to Custom Content, Predefined Content
and Regular Expressions.
Example
As songs or video files cannot contain lists of credit card numbers, there is
no need to inspect them using content filters.

108 | Endpoint Protector | User Manual
6.10. Allowed Files Allowlists
Allowed Files Allowlists are custom groups of files which the administrator wishes
to exclude from sensitive content detection by Endpoint Protector. The group of
allowed files is available under DLP Denylists and Allowlists > Allowlists >
Allowed Files tab.
The available actions for each dictionary are: Edit, Export and Delete.
A new allowed file allowlist can be created by clicking on the Add button. To
populate the content of a newly created allowlist, allowed files need to be
uploaded to the Endpoint Protector Server. Once files are uploaded, they can be
used in multiple allowlists.
Information
Allowed Files Allowlists are available for both the Content Aware Protection
and eDiscovery modules.
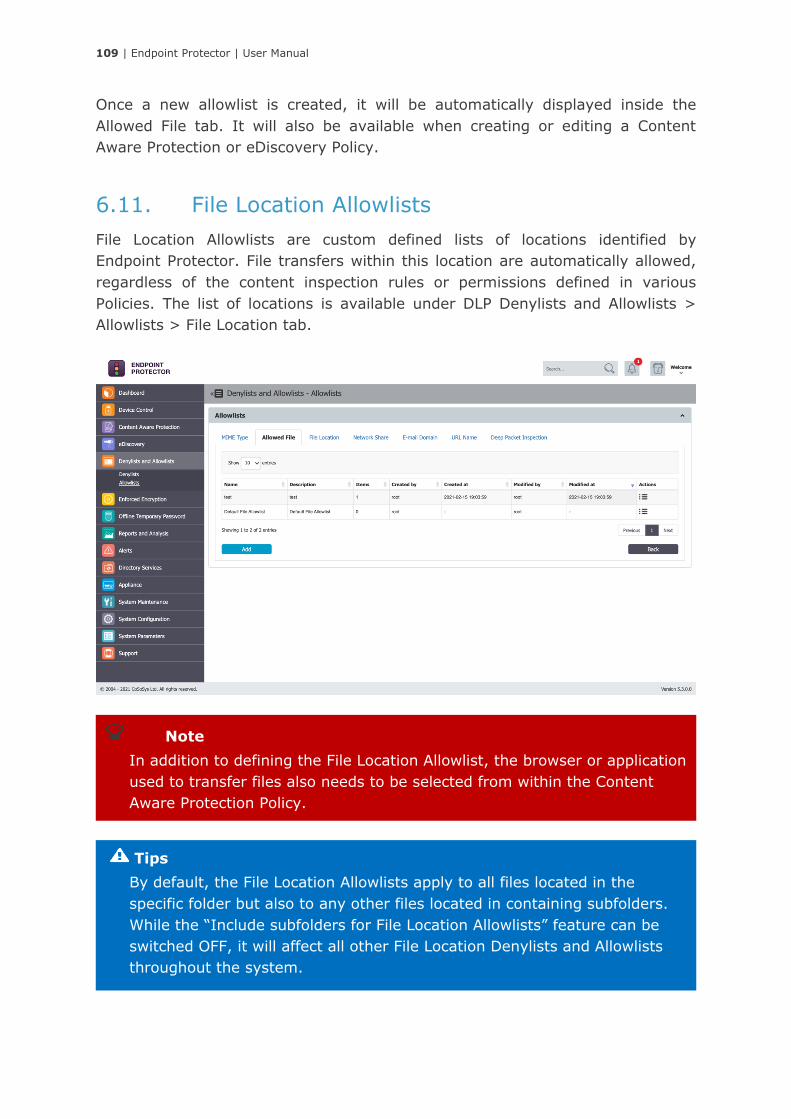
109 | Endpoint Protector | User Manual
Once a new allowlist is created, it will be automatically displayed inside the
Allowed File tab. It will also be available when creating or editing a Content
Aware Protection or eDiscovery Policy.
6.11. File Location Allowlists
File Location Allowlists are custom defined lists of locations identified by
Endpoint Protector. File transfers within this location are automatically allowed,
regardless of the content inspection rules or permissions defined in various
Policies. The list of locations is available under DLP Denylists and Allowlists >
Allowlists > File Location tab.
Tips
By default, the File Location Allowlists apply to all files located in the
specific folder but also to any other files located in containing subfolders.
While the “Include subfolders for File Location Allowlists” feature can be
switched OFF, it will affect all other File Location Denylists and Allowlists
throughout the system.
Note
In addition to defining the File Location Allowlist, the browser or application
used to transfer files also needs to be selected from within the Content
Aware Protection Policy.
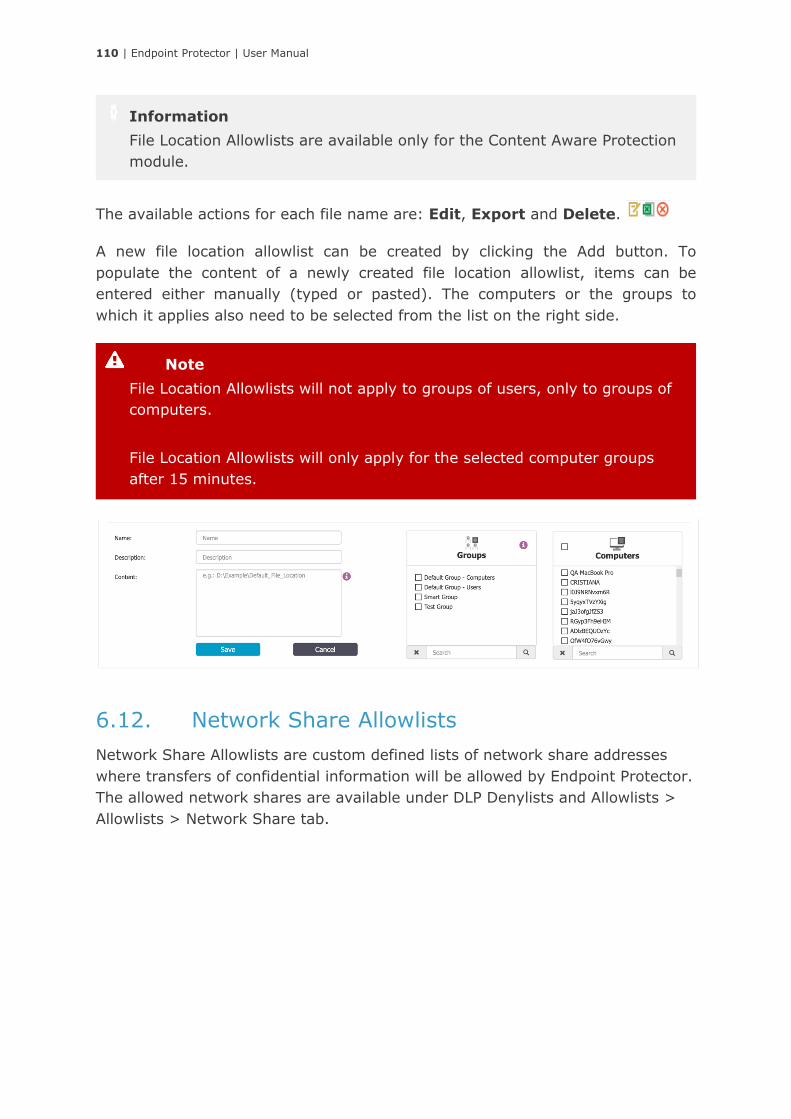
110 | Endpoint Protector | User Manual
The available actions for each file name are: Edit, Export and Delete.
A new file location allowlist can be created by clicking the Add button. To
populate the content of a newly created file location allowlist, items can be
entered either manually (typed or pasted). The computers or the groups to
which it applies also need to be selected from the list on the right side.
6.12. Network Share Allowlists
Network Share Allowlists are custom defined lists of network share addresses
where transfers of confidential information will be allowed by Endpoint Protector.
The allowed network shares are available under DLP Denylists and Allowlists >
Allowlists > Network Share tab.
Note
File Location Allowlists will not apply to groups of users, only to groups of
computers.
File Location Allowlists will only apply for the selected computer groups
after 15 minutes.
Information
File Location Allowlists are available only for the Content Aware Protection
module.
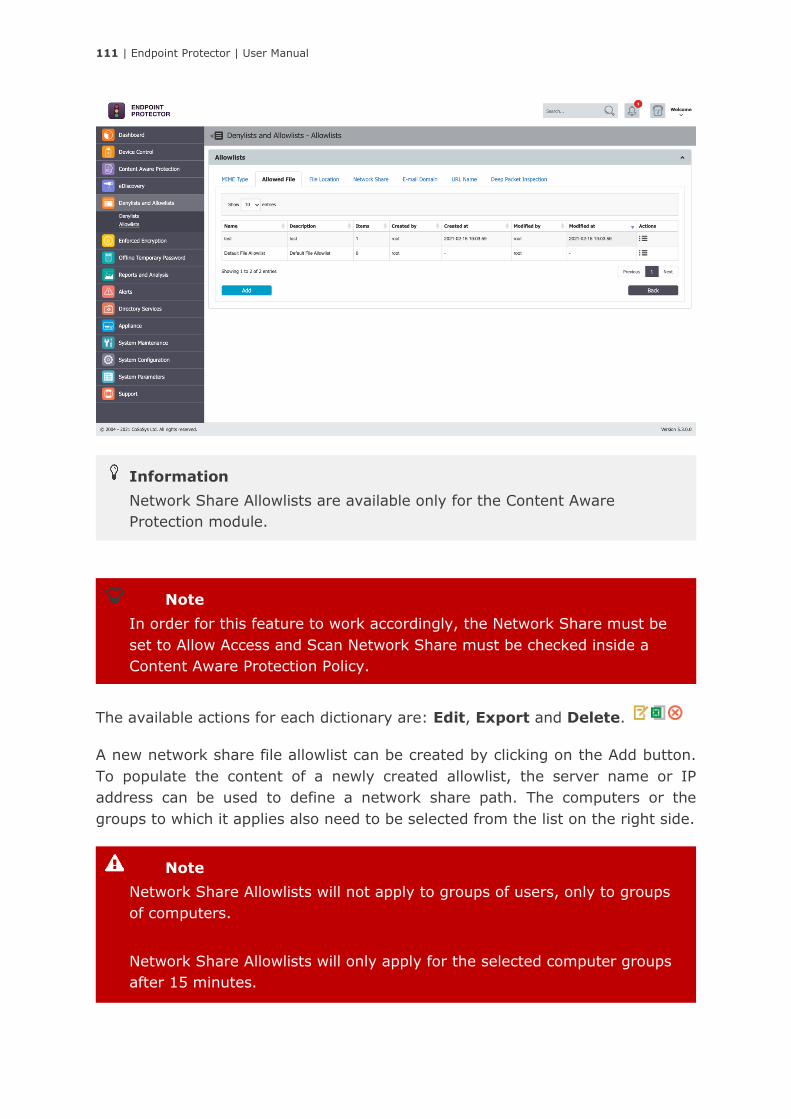
111 | Endpoint Protector | User Manual
The available actions for each dictionary are: Edit, Export and Delete.
A new network share file allowlist can be created by clicking on the Add button.
To populate the content of a newly created allowlist, the server name or IP
address can be used to define a network share path. The computers or the
groups to which it applies also need to be selected from the list on the right side.
Note
Network Share Allowlists will not apply to groups of users, only to groups
of computers.
Network Share Allowlists will only apply for the selected computer groups
after 15 minutes.
Note
In order for this feature to work accordingly, the Network Share must be
set to Allow Access and Scan Network Share must be checked inside a
Content Aware Protection Policy.
Information
Network Share Allowlists are available only for the Content Aware
Protection module.
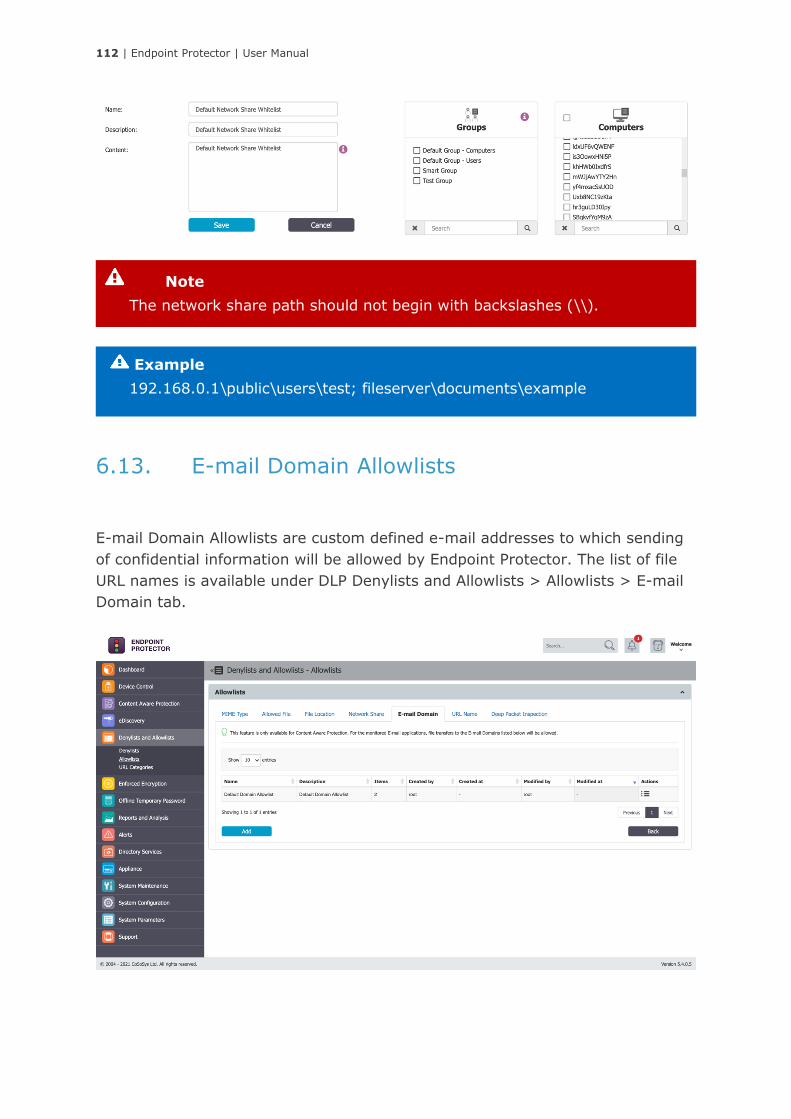
112 | Endpoint Protector | User Manual
6.13. E-mail Domain Allowlists
E-mail Domain Allowlists are custom defined e-mail addresses to which sending
of confidential information will be allowed by Endpoint Protector. The list of file
URL names is available under DLP Denylists and Allowlists > Allowlists > E-mail
Domain tab.
Example
192.168.0.1\public\users\test; fileserver\documents\example
Note
The network share path should not begin with backslashes (\\).
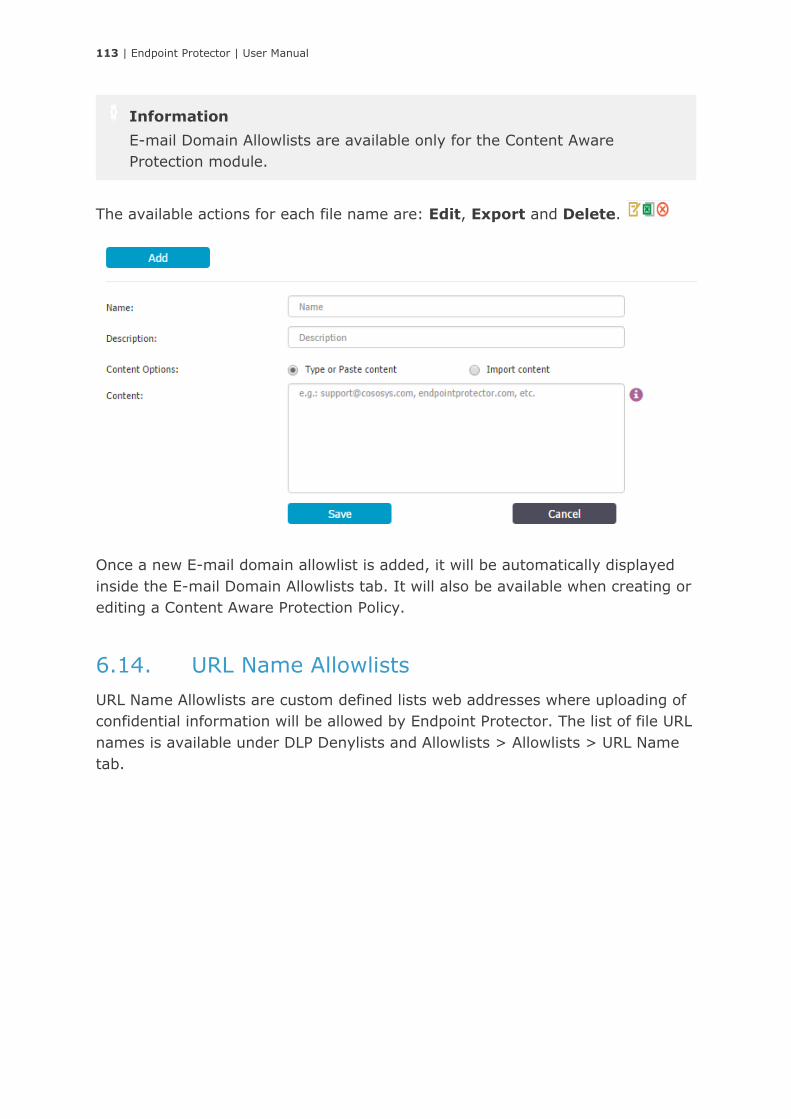
113 | Endpoint Protector | User Manual
The available actions for each file name are: Edit, Export and Delete.
Once a new E-mail domain allowlist is added, it will be automatically displayed
inside the E-mail Domain Allowlists tab. It will also be available when creating or
editing a Content Aware Protection Policy.
6.14. URL Name Allowlists
URL Name Allowlists are custom defined lists web addresses where uploading of
confidential information will be allowed by Endpoint Protector. The list of file URL
names is available under DLP Denylists and Allowlists > Allowlists > URL Name
tab.
Information
E-mail Domain Allowlists are available only for the Content Aware
Protection module.
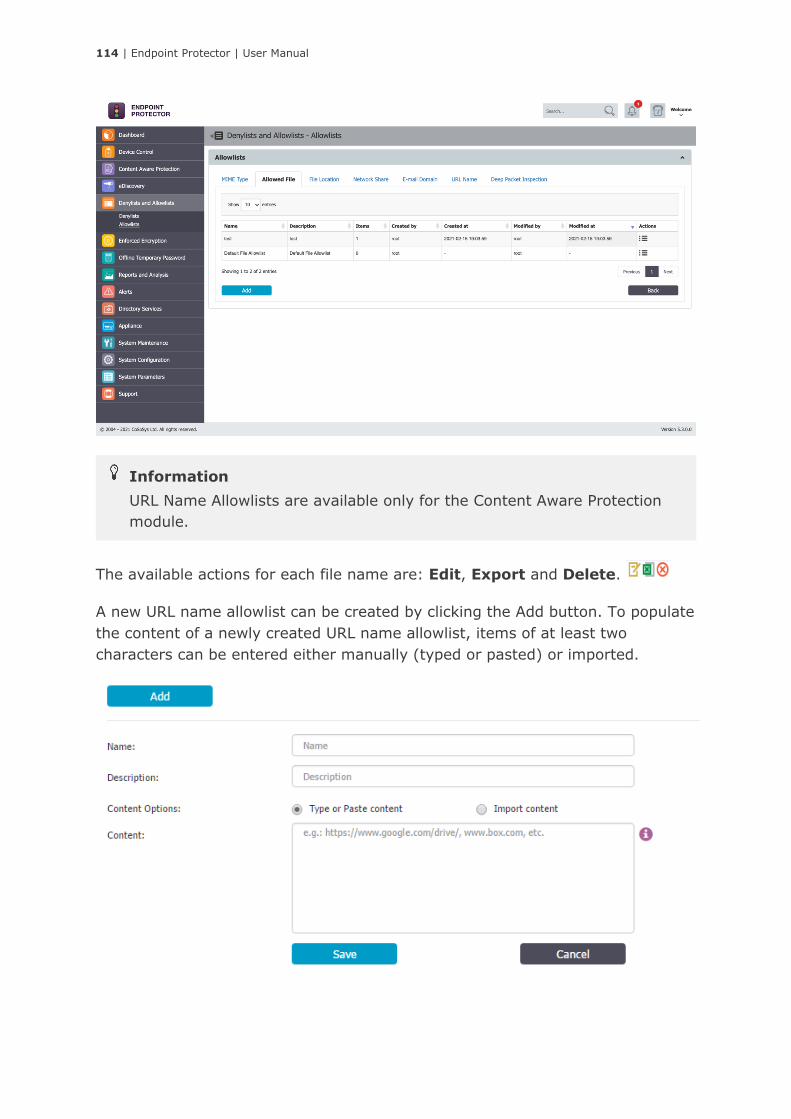
114 | Endpoint Protector | User Manual
The available actions for each file name are: Edit, Export and Delete.
A new URL name allowlist can be created by clicking the Add button. To populate
the content of a newly created URL name allowlist, items of at least two
characters can be entered either manually (typed or pasted) or imported.
Information
URL Name Allowlists are available only for the Content Aware Protection
module.
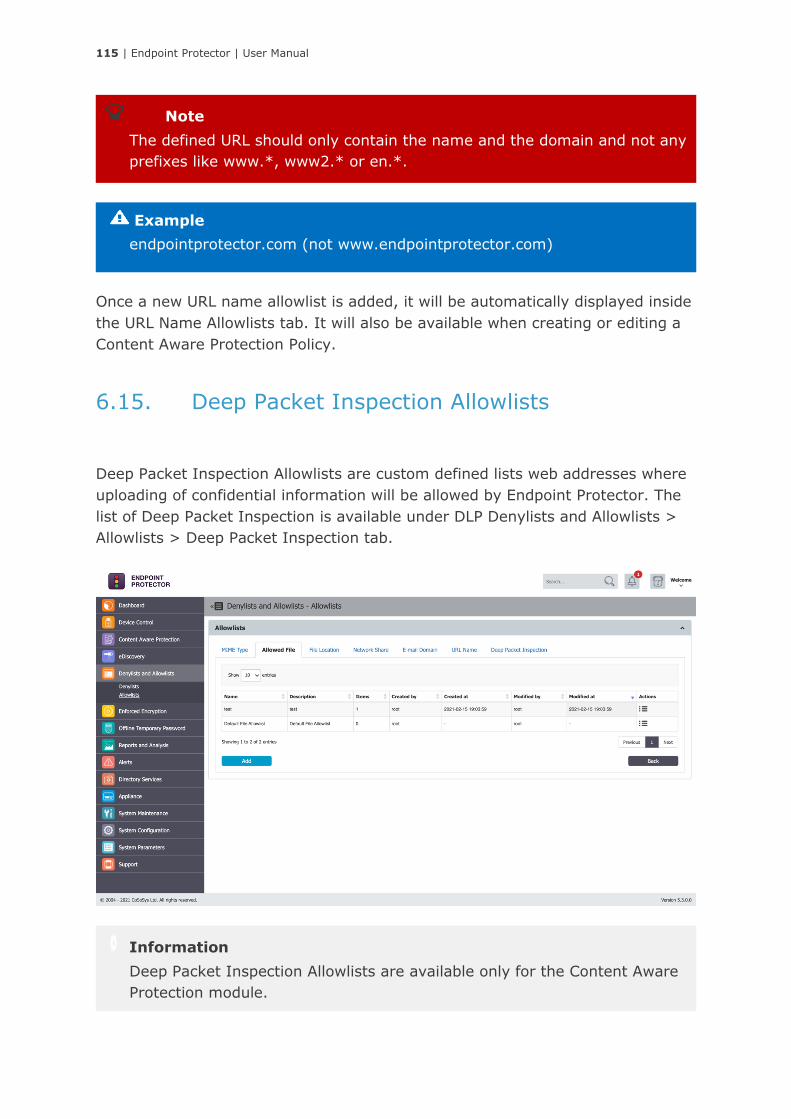
115 | Endpoint Protector | User Manual
Once a new URL name allowlist is added, it will be automatically displayed inside
the URL Name Allowlists tab. It will also be available when creating or editing a
Content Aware Protection Policy.
6.15. Deep Packet Inspection Allowlists
Deep Packet Inspection Allowlists are custom defined lists web addresses where
uploading of confidential information will be allowed by Endpoint Protector. The
list of Deep Packet Inspection is available under DLP Denylists and Allowlists >
Allowlists > Deep Packet Inspection tab.
Information
Deep Packet Inspection Allowlists are available only for the Content Aware
Protection module.
Example
endpointprotector.com (not www.endpointprotector.com)
Note
The defined URL should only contain the name and the domain and not any
prefixes like www.*, www2.* or en.*.
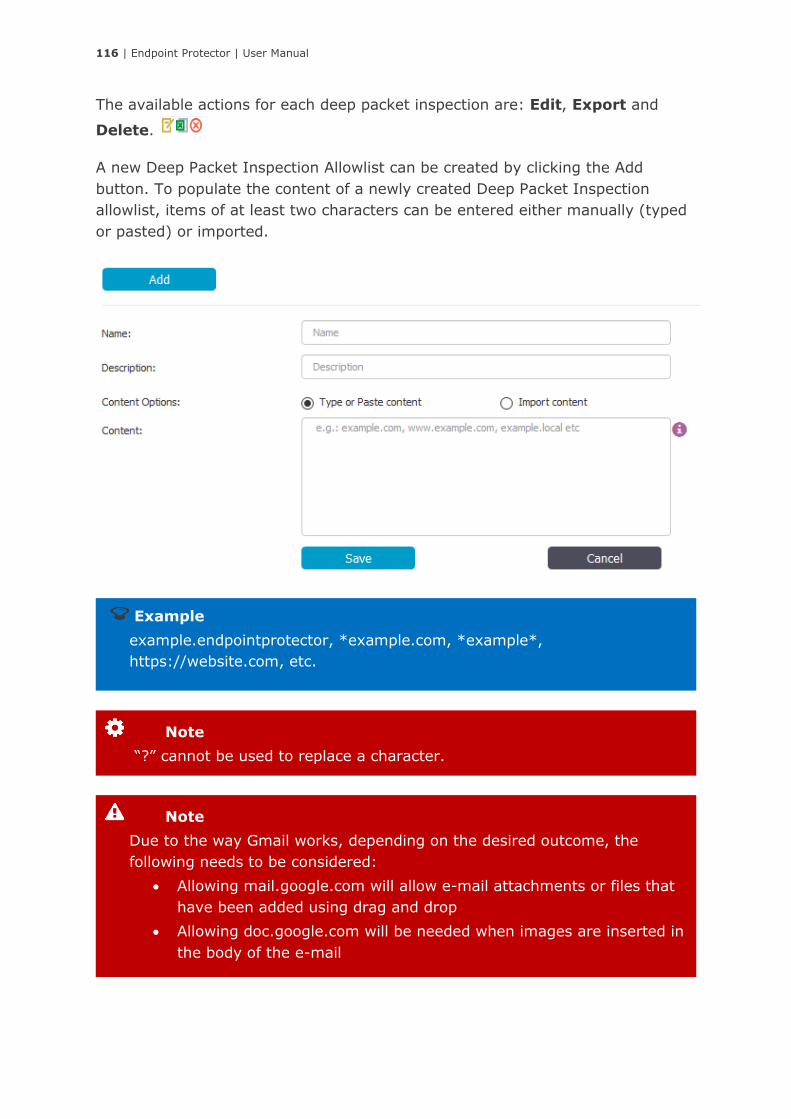
116 | Endpoint Protector | User Manual
The available actions for each deep packet inspection are: Edit, Export and
Delete.
A new Deep Packet Inspection Allowlist can be created by clicking the Add
button. To populate the content of a newly created Deep Packet Inspection
allowlist, items of at least two characters can be entered either manually (typed
or pasted) or imported.
Note
Due to the way Gmail works, depending on the desired outcome, the
following needs to be considered:
• Allowing mail.google.com will allow e-mail attachments or files that
have been added using drag and drop
• Allowing doc.google.com will be needed when images are inserted in
the body of the e-mail
Note
“?” cannot be used to replace a character.
Example
example.endpointprotector, *example.com, *example*,
https://website.com, etc.
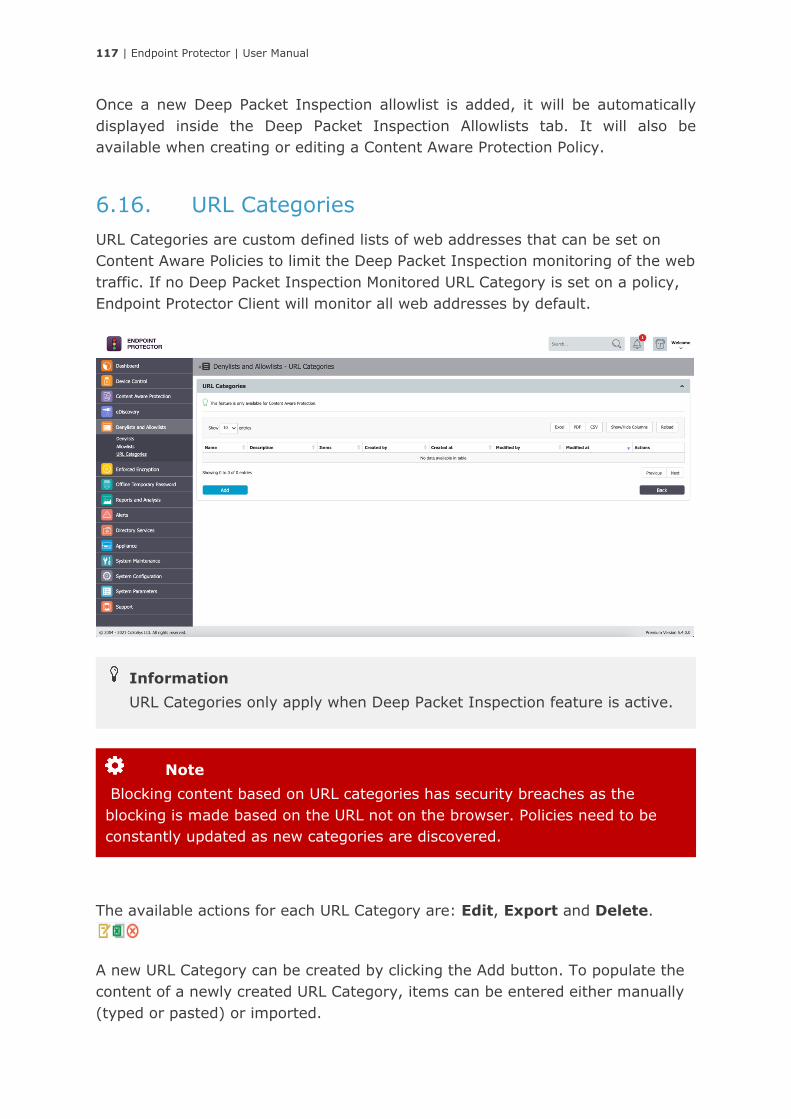
117 | Endpoint Protector | User Manual
Once a new Deep Packet Inspection allowlist is added, it will be automatically
displayed inside the Deep Packet Inspection Allowlists tab. It will also be
available when creating or editing a Content Aware Protection Policy.
6.16. URL Categories
URL Categories are custom defined lists of web addresses that can be set on
Content Aware Policies to limit the Deep Packet Inspection monitoring of the web
traffic. If no Deep Packet Inspection Monitored URL Category is set on a policy,
Endpoint Protector Client will monitor all web addresses by default.
The available actions for each URL Category are: Edit, Export and Delete.
A new URL Category can be created by clicking the Add button. To populate the
content of a newly created URL Category, items can be entered either manually
(typed or pasted) or imported.
Note
Blocking content based on URL categories has security breaches as the
blocking is made based on the URL not on the browser. Policies need to be
constantly updated as new categories are discovered.
Information
URL Categories only apply when Deep Packet Inspection feature is active.
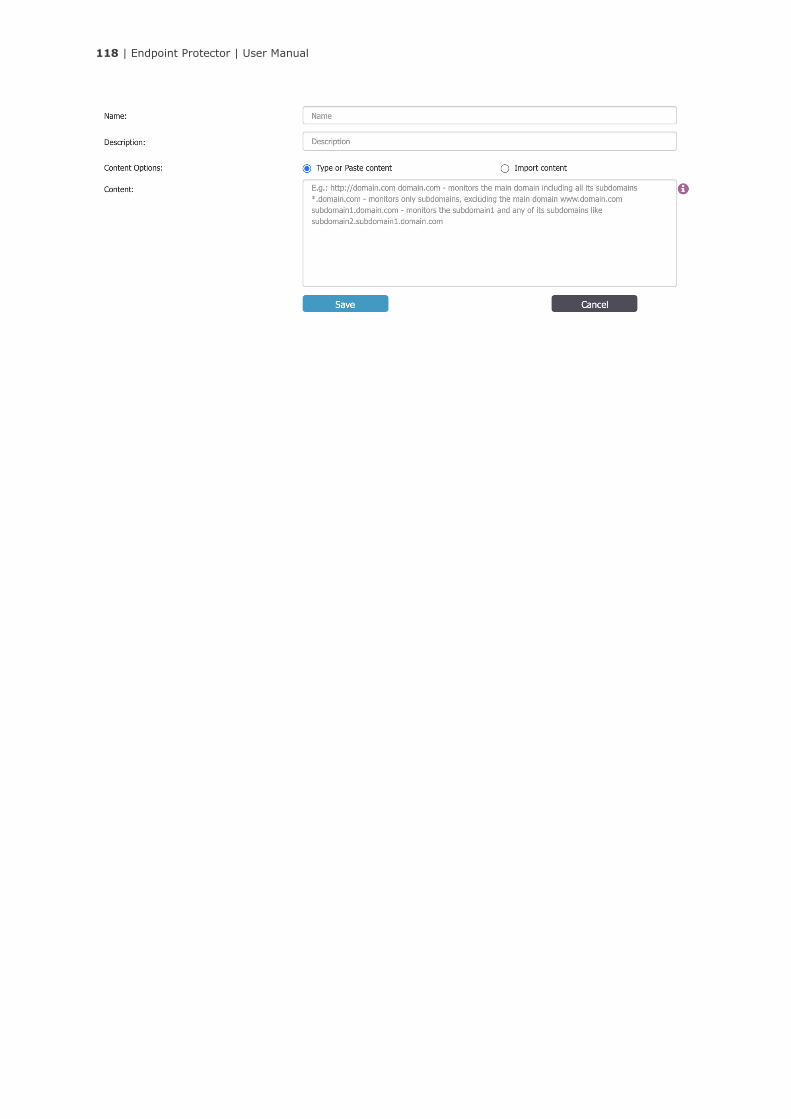
118 | Endpoint Protector | User Manual
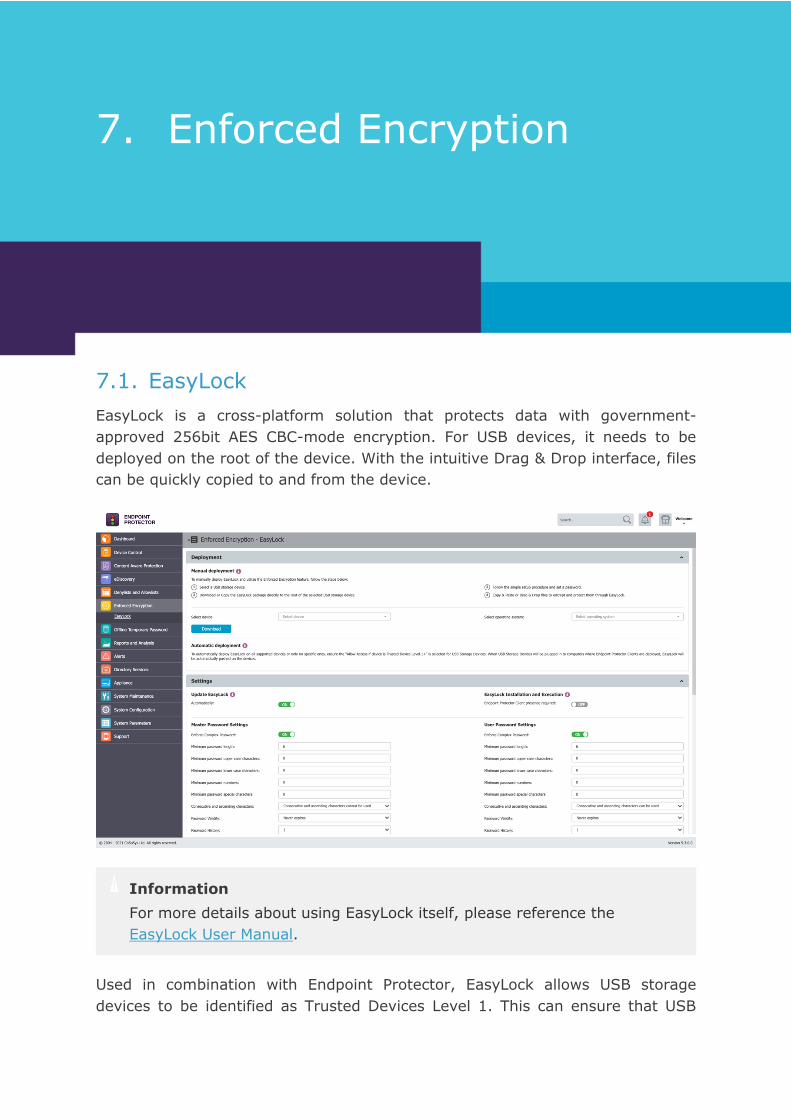
119 | Endpoint Protector | User Manual
7. Enforced Encryption
7.1. EasyLock
EasyLock is a cross-platform solution that protects data with government-
approved 256bit AES CBC-mode encryption. For USB devices, it needs to be
deployed on the root of the device. With the intuitive Drag & Drop interface, files
can be quickly copied to and from the device.
Used in combination with Endpoint Protector, EasyLock allows USB storage
devices to be identified as Trusted Devices Level 1. This can ensure that USB
Information
For more details about using EasyLock itself, please reference the
EasyLock User Manual.
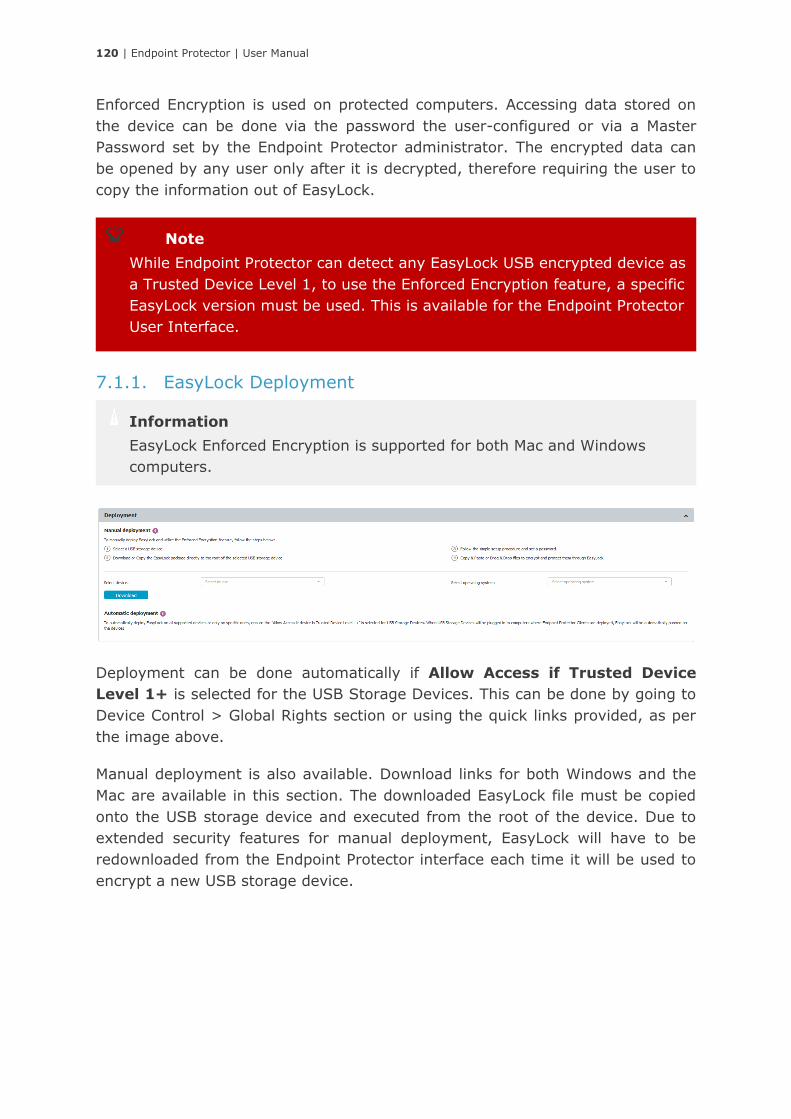
120 | Endpoint Protector | User Manual
Enforced Encryption is used on protected computers. Accessing data stored on
the device can be done via the password the user-configured or via a Master
Password set by the Endpoint Protector administrator. The encrypted data can
be opened by any user only after it is decrypted, therefore requiring the user to
copy the information out of EasyLock.
7.1.1. EasyLock Deployment
Deployment can be done automatically if Allow Access if Trusted Device
Level 1+ is selected for the USB Storage Devices. This can be done by going to
Device Control > Global Rights section or using the quick links provided, as per
the image above.
Manual deployment is also available. Download links for both Windows and the
Mac are available in this section. The downloaded EasyLock file must be copied
onto the USB storage device and executed from the root of the device. Due to
extended security features for manual deployment, EasyLock will have to be
redownloaded from the Endpoint Protector interface each time it will be used to
encrypt a new USB storage device.
Information
EasyLock Enforced Encryption is supported for both Mac and Windows
computers.
Note
While Endpoint Protector can detect any EasyLock USB encrypted device as
a Trusted Device Level 1, to use the Enforced Encryption feature, a specific
EasyLock version must be used. This is available for the Endpoint Protector
User Interface.
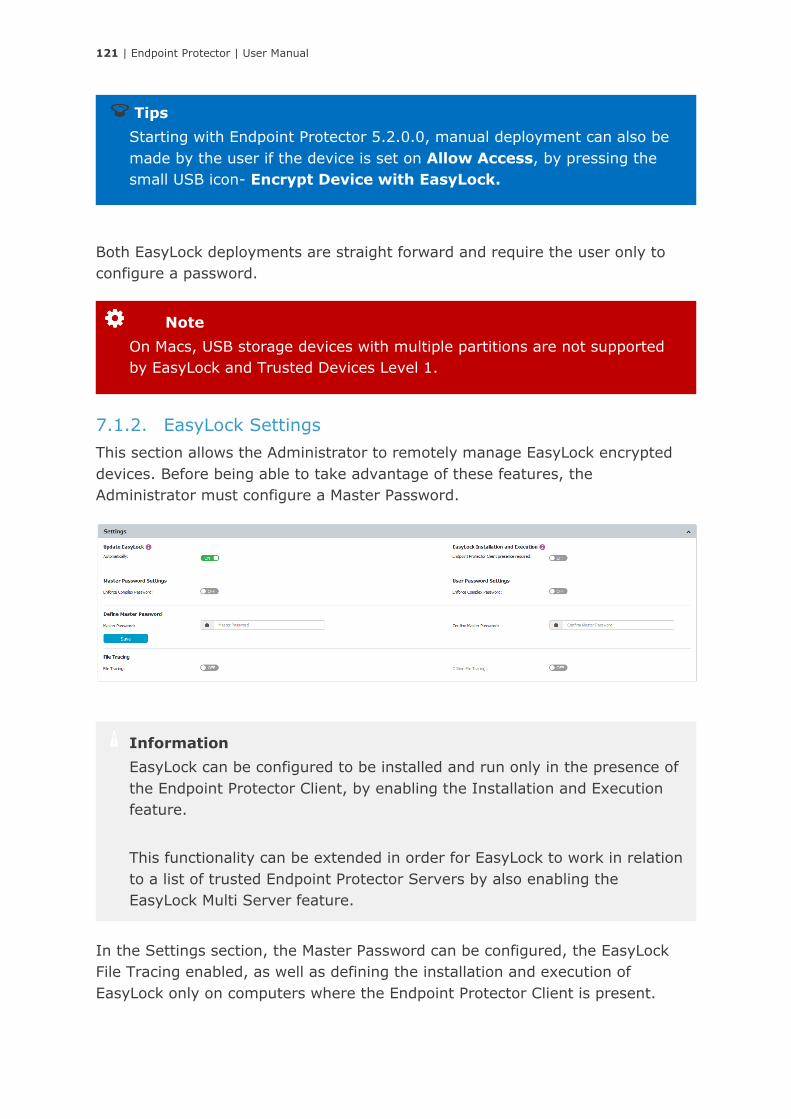
121 | Endpoint Protector | User Manual
Both EasyLock deployments are straight forward and require the user only to
configure a password.
7.1.2. EasyLock Settings
This section allows the Administrator to remotely manage EasyLock encrypted
devices. Before being able to take advantage of these features, the
Administrator must configure a Master Password.
In the Settings section, the Master Password can be configured, the EasyLock
File Tracing enabled, as well as defining the installation and execution of
EasyLock only on computers where the Endpoint Protector Client is present.
Information
EasyLock can be configured to be installed and run only in the presence of
the Endpoint Protector Client, by enabling the Installation and Execution
feature.
This functionality can be extended in order for EasyLock to work in relation
to a list of trusted Endpoint Protector Servers by also enabling the
EasyLock Multi Server feature.
Note
On Macs, USB storage devices with multiple partitions are not supported
by EasyLock and Trusted Devices Level 1.
Tips
Starting with Endpoint Protector 5.2.0.0, manual deployment can also be
made by the user if the device is set on Allow Access, by pressing the
small USB icon- Encrypt Device with EasyLock.
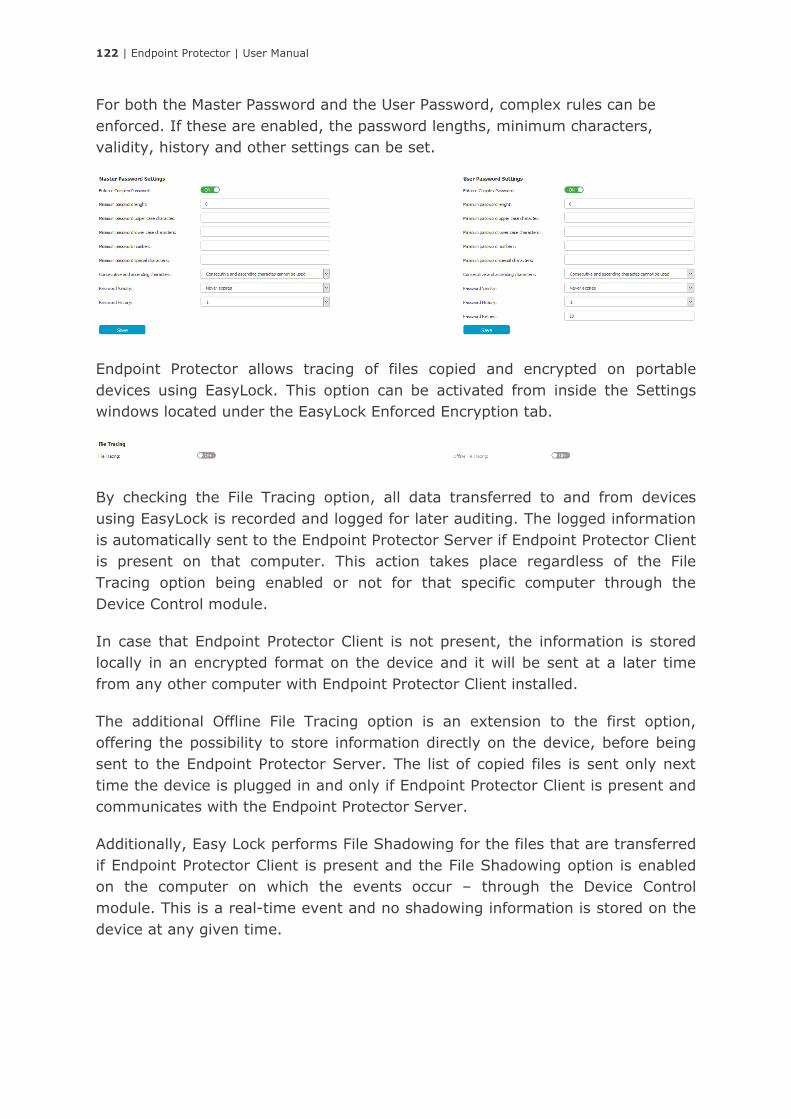
122 | Endpoint Protector | User Manual
For both the Master Password and the User Password, complex rules can be
enforced. If these are enabled, the password lengths, minimum characters,
validity, history and other settings can be set.
Endpoint Protector allows tracing of files copied and encrypted on portable
devices using EasyLock. This option can be activated from inside the Settings
windows located under the EasyLock Enforced Encryption tab.
By checking the File Tracing option, all data transferred to and from devices
using EasyLock is recorded and logged for later auditing. The logged information
is automatically sent to the Endpoint Protector Server if Endpoint Protector Client
is present on that computer. This action takes place regardless of the File
Tracing option being enabled or not for that specific computer through the
Device Control module.
In case that Endpoint Protector Client is not present, the information is stored
locally in an encrypted format on the device and it will be sent at a later time
from any other computer with Endpoint Protector Client installed.
The additional Offline File Tracing option is an extension to the first option,
offering the possibility to store information directly on the device, before being
sent to the Endpoint Protector Server. The list of copied files is sent only next
time the device is plugged in and only if Endpoint Protector Client is present and
communicates with the Endpoint Protector Server.
Additionally, Easy Lock performs File Shadowing for the files that are transferred
if Endpoint Protector Client is present and the File Shadowing option is enabled
on the computer on which the events occur – through the Device Control
module. This is a real-time event and no shadowing information is stored on the
device at any given time.

123 | Endpoint Protector | User Manual
Note
Enabling global File Tracing will not automatically activate the File Tracing
option on EasyLock Trusted Devices and vice versa.
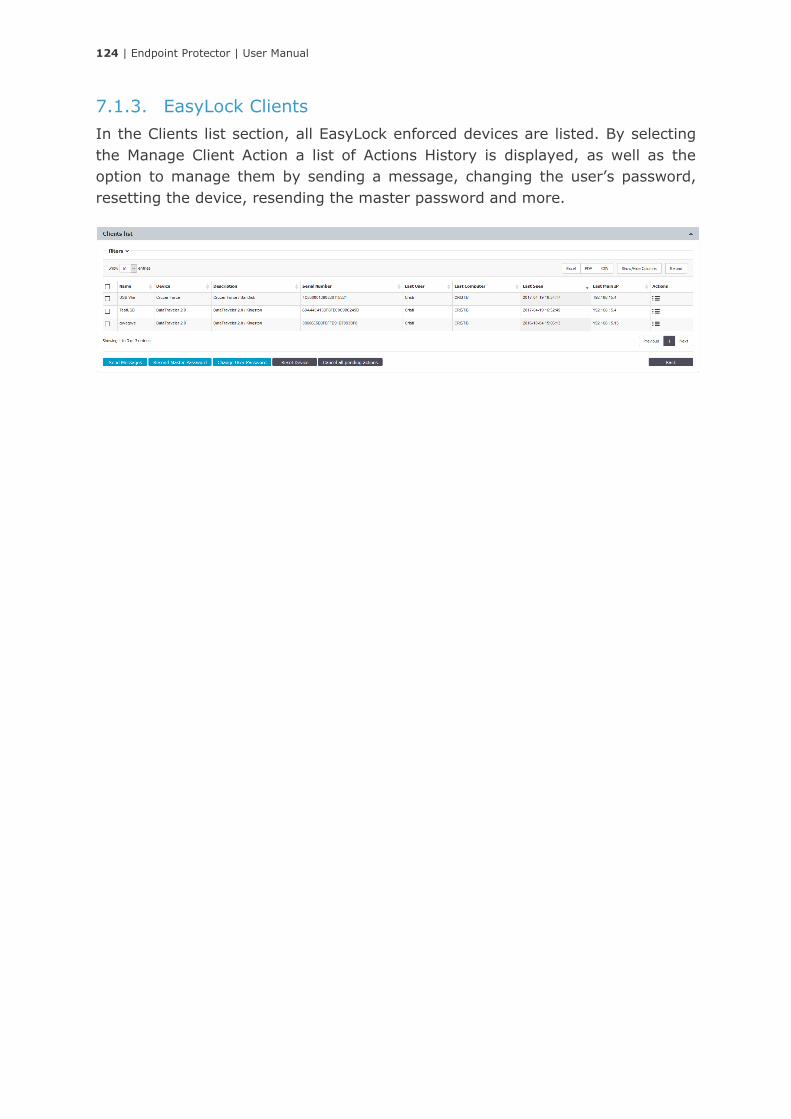
124 | Endpoint Protector | User Manual
7.1.3. EasyLock Clients
In the Clients list section, all EasyLock enforced devices are listed. By selecting
the Manage Client Action a list of Actions History is displayed, as well as the
option to manage them by sending a message, changing the user’s password,
resetting the device, resending the master password and more.
125 | Endpoint Protector | User Manual
8. Offline Temporary
Password
This section allows the Administrator to generate Offline Temporary Passwords
(or OTPs) and grant temporary access rights. In addition to situations when only
temporary access is needed, it can also be used when there is no network
connection between the protected computers and the Endpoint Protector Server.
The Offline Temporary Password can be generated for the below entities:
• Device (a specific device)
• Computer and User (all devices)
• Computer and User (all file transfers)
A password is linked to a time period and is unique for a certain device and
computer. This means the same password cannot be used for a different device
or computer. It also cannot be used twice (except for Universal Offline
Temporary Password). The time intervals available are: 15 minutes, 30 minutes,
1 hour, 2 hours, 4 hours, 8 hours, 1 day, 2 days, 5 days, 14 days and 30 days or
Custom.
Information
The Offline Temporary Password Duration offers a customized option,
allowing the generation of time-based OTP Codes, with a Start Date/Time
and an End Date/Time.
For large companies or multinational that have the Endpoint Protector
Server and the protected endpoints on different time zones, taking into
consideration how the Server Time and Client Time work is essential.
126 | Endpoint Protector | User Manual
The Universal Offline Temporary Password can be made visible only for Super
Administrators. If this setting is enabled, Normal and Offline Temporary
Password Administrators will not be able to see and use it. This setting can be
enabled from System Configuration -> System Settings -> Custom settings.
The Administrator also has the option to add a justification, mentioning the
reason why the password was created. This can later be used for a better
overview or various audit purposes.
Information
Once an Offline Temporary Password has been authorized, any other rights
and settings saved afterwards on the Endpoint Protector Server will not
take immediate effect. The Offline Temporary Password has to expire and
the connection with the Server re-established.
Note
The Universal Offline Temporary Password feature can also be turned on. If
enabled, it can be used by any user, on any computer, for any device or
file transfers – it eliminates security restrictions for one hour. It can be
used multiple times, by any users that knows it.
Example
The Endpoint Protector Server is located in Germany, making the Server
Time UTC+01:00
The protected endpoints are located in Romania, making the Client Time
UTC+02:00
When generating an OTP Code that should take effect tomorrow, from
16:00 on the endpoint time, it should actually be generated for tomorrow,
from 15:00 (to adjust for the 1h difference in the time zone)
For the predefined durations, the above adjustment is not necessary. The
OTP Code will be valid for that specific amount of time, starting with the
moment it was redeemed. The only thing to consider is that the OTP Code
needs to be redeemed the same day it was generated.

127 | Endpoint Protector | User Manual
8.1. Generating the Offline Temporary Password
Depending on the options selected from the drop-down menus, the Offline
Temporary Password (or OTP) can be generated for an exact device, all devices
or all file transfers.
When generating an Offline Temporary Password for a Device, the administrator
can either introduce the Device Code communicated by the user or search the
Endpoint Protector database for an existing device.
Tips
Another way to generate an Offline Temporary Password is directly from
the Device Control > Computers section, and selecting the Offline
Temporary Password option form the Actions column.
Note
The Transfer Limit Reached Offline Temporary Password is only available if
the Transfer Limit Reached feature is enabled and the actions are set to
Lockdown. The main purpose of this type of Offline Temporary Password is
to re-establish the Server-Client communication before the Transfer Limit
Reached Time Interval has expired.
128 | Endpoint Protector | User Manual
Once the OTP Code has been generated, it will be displayed as per the right side
of the image above.
As it needs to be provided to the person that made the request, Endpoint
Protector offers two quick ways of doing this, either by sending a direct e-mail or
by printing it out.
Information
Similar to generating an Offline Temporary Password for a specific device,
when generating one for all devices or all file transfer, the Computer Name
and the Username fields are not both mandatory. The OTP Code is
perfectly valid if only one of them is provided. However, if the OTP Code
needs to be valid for an exact computer and an exact user, all of the
relevant fields need to be filled in.
Note
The Administrator contact information that are displayed to a user can be
edited under System Configuration > System Settings, as the Main
Administrator Contact Details.
Information
For more details about how and Offline Temporary Password can be
redeemed, please see chapter Error! Reference source not found.
REF _Ref489019965 \h \* MERGEFORMAT Error! Reference source not
found.
Information
When generating an OTP Code for a device, either the Device Code or the
Device Name has to be entered (one of them will automatically fill in the
other field).
The Computer Name and the Username fields do not need to be both filled
in. The OTP Code is perfectly valid if only one of them is provided.
However, if the OTP Code needs to be valid for an exact device, on an
exact computer, for an exact user, all of the relevant fields need to be
filled in.
129 | Endpoint Protector | User Manual
9. Reports and Analysis
This section offers the administrator an overview of the System Logs, Device
Control Logs and Shadows, and Content Aware Logs and Shadows. In addition,
Admin Actions, Statistics, and other helpful information can be view from this
section.
Details regarding eDiscovery Scans and EasyLock Enforced Encryption can be
viewed in their own specific sections and not in the Reports and Analysis section.
9.1. Log Report
This section offers the administrator an overview of the main logs in the system.
There are several event types such as User Login, User Logout, AD Import, AD
Synchronization, Uninstall Attempt, etc., included in this section. Additionally,
the main Device Control logs can be viewed in this section.
Tips
For a complete list of the log types included in this section, please use the
Event drop-down available in the Filters part of this page.
Information
As an additional data security measure, this section may be protected by
an additional password set by the Super Administrator. This can be set
from System Configuration > System Security.
For more details about System Security, please see chapter 14.7 System
Security.
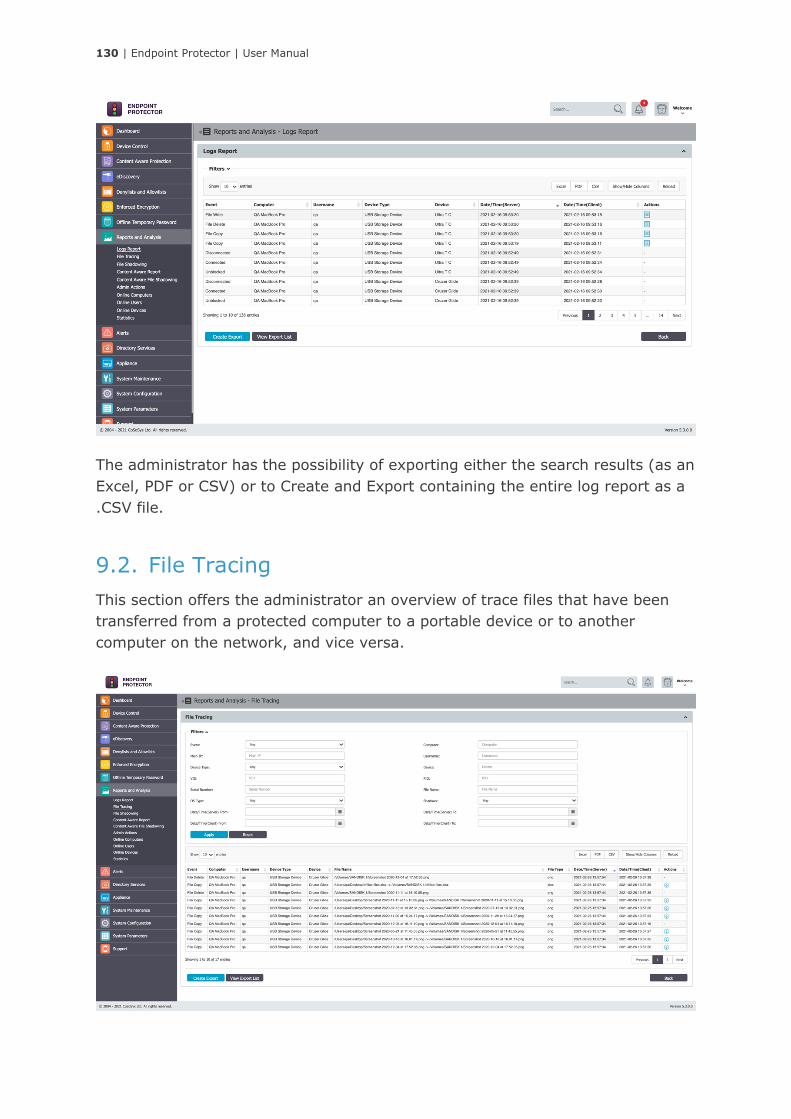
130 | Endpoint Protector | User Manual
The administrator has the possibility of exporting either the search results (as an
Excel, PDF or CSV) or to Create and Export containing the entire log report as a
.CSV file.
9.2. File Tracing
This section offers the administrator an overview of trace files that have been
transferred from a protected computer to a portable device or to another
computer on the network, and vice versa.
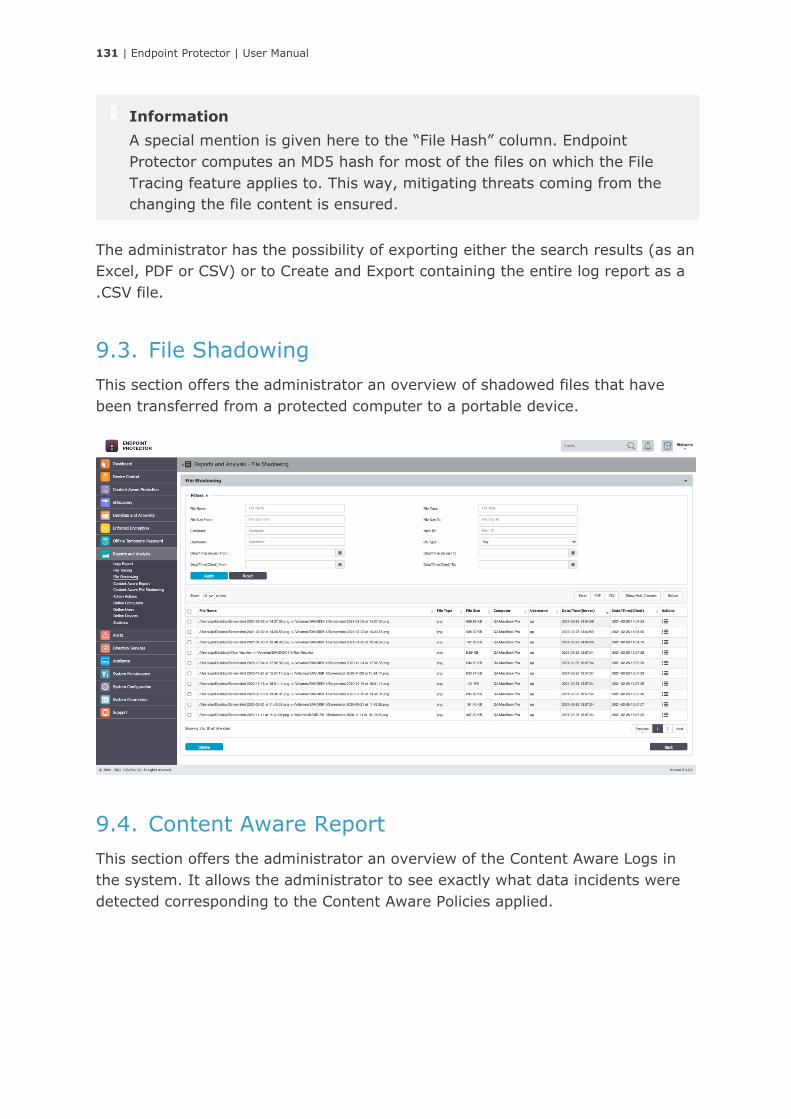
131 | Endpoint Protector | User Manual
The administrator has the possibility of exporting either the search results (as an
Excel, PDF or CSV) or to Create and Export containing the entire log report as a
.CSV file.
9.3. File Shadowing
This section offers the administrator an overview of shadowed files that have
been transferred from a protected computer to a portable device.
9.4. Content Aware Report
This section offers the administrator an overview of the Content Aware Logs in
the system. It allows the administrator to see exactly what data incidents were
detected corresponding to the Content Aware Policies applied.
Information
A special mention is given here to the “File Hash” column. Endpoint
Protector computes an MD5 hash for most of the files on which the File
Tracing feature applies to. This way, mitigating threats coming from the
changing the file content is ensured.
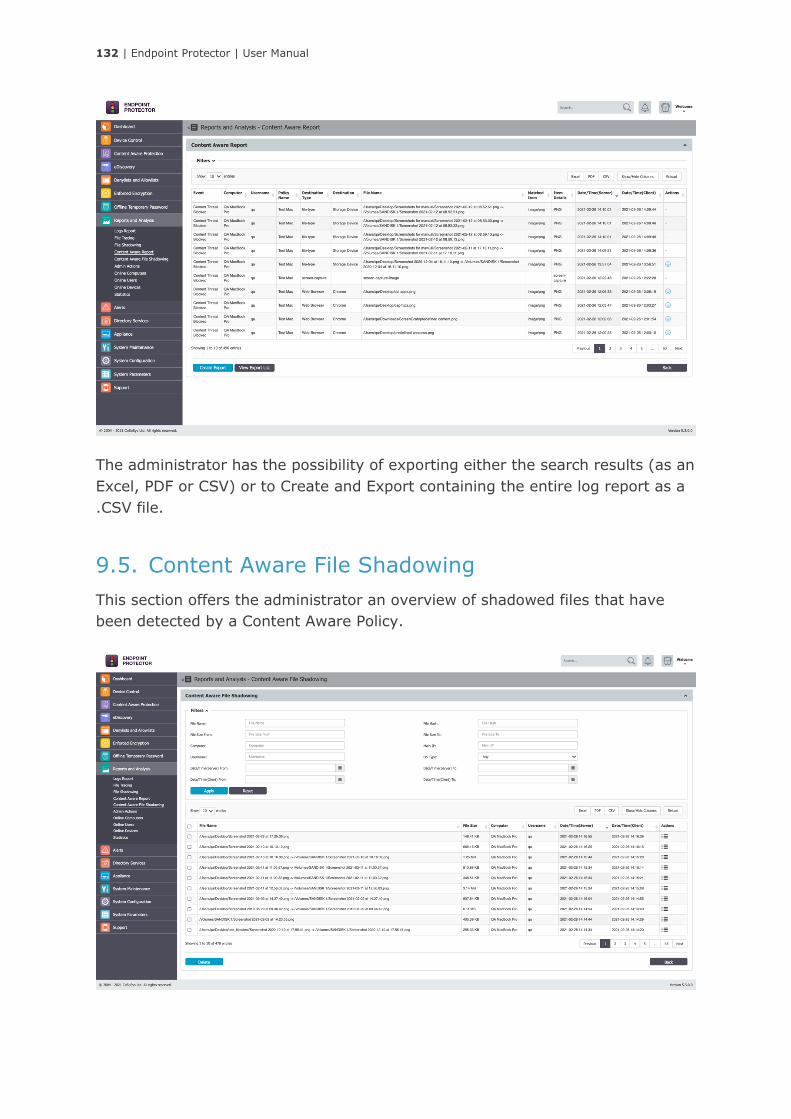
132 | Endpoint Protector | User Manual
The administrator has the possibility of exporting either the search results (as an
Excel, PDF or CSV) or to Create and Export containing the entire log report as a
.CSV file.
9.5. Content Aware File Shadowing
This section offers the administrator an overview of shadowed files that have
been detected by a Content Aware Policy.

133 | Endpoint Protector | User Manual
9.6. Admin Actions
This section offers the administrator an overview of every important action
performed in the interface. The Action column offers the option to view
additional information on each action.
9.7. Online Computers
This section offers the administrator an overview of computers registered on the
system which have an established connection with the server.

134 | Endpoint Protector | User Manual
9.8. Online Users
This section offers the administrator an overview of users registered on the
system which have an established connection with the server.
Information
If the Refresh Interval for computer X is 1 minute, then the computer X
was communicating with the server in the last 1 minute.
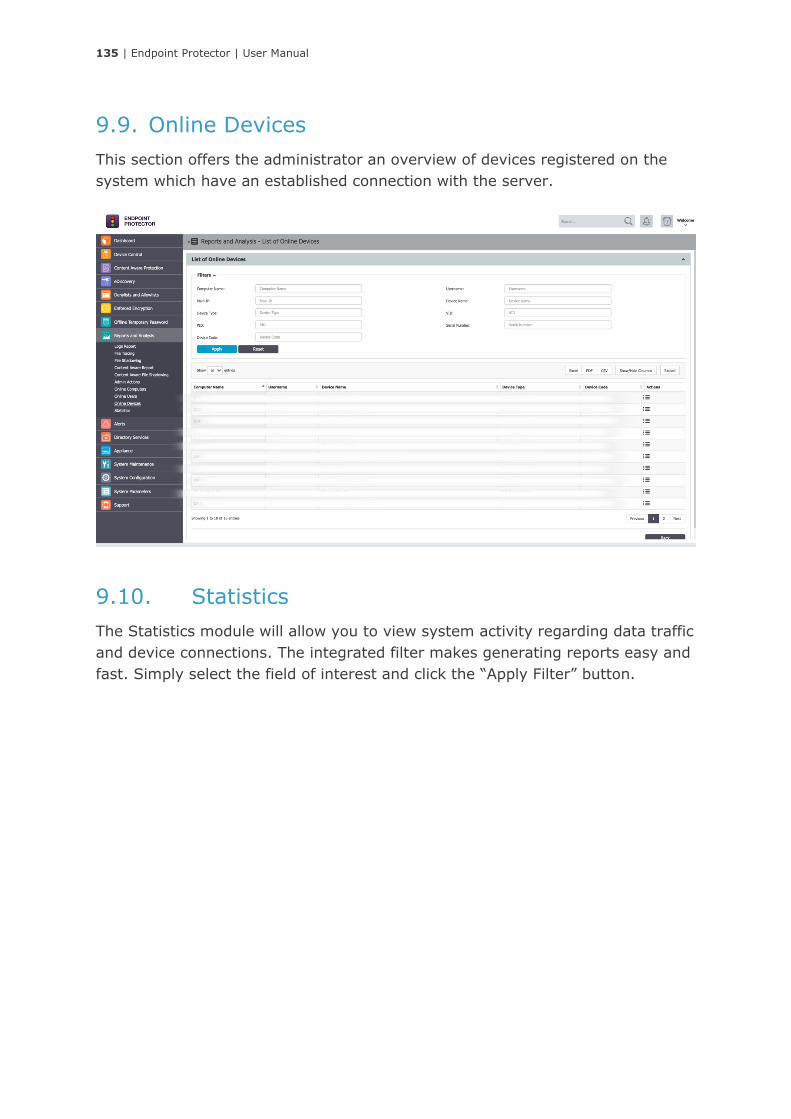
135 | Endpoint Protector | User Manual
9.9. Online Devices
This section offers the administrator an overview of devices registered on the
system which have an established connection with the server.
9.10. Statistics
The Statistics module will allow you to view system activity regarding data traffic
and device connections. The integrated filter makes generating reports easy and
fast. Simply select the field of interest and click the “Apply Filter” button.
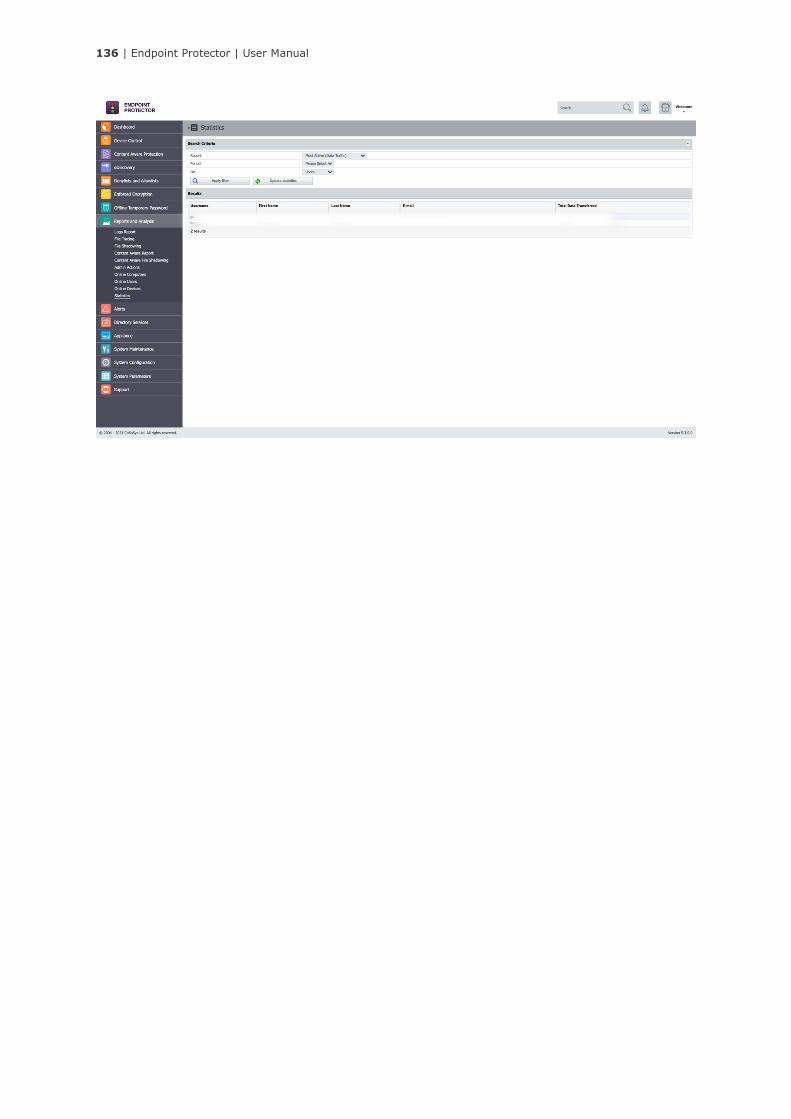
136 | Endpoint Protector | User Manual
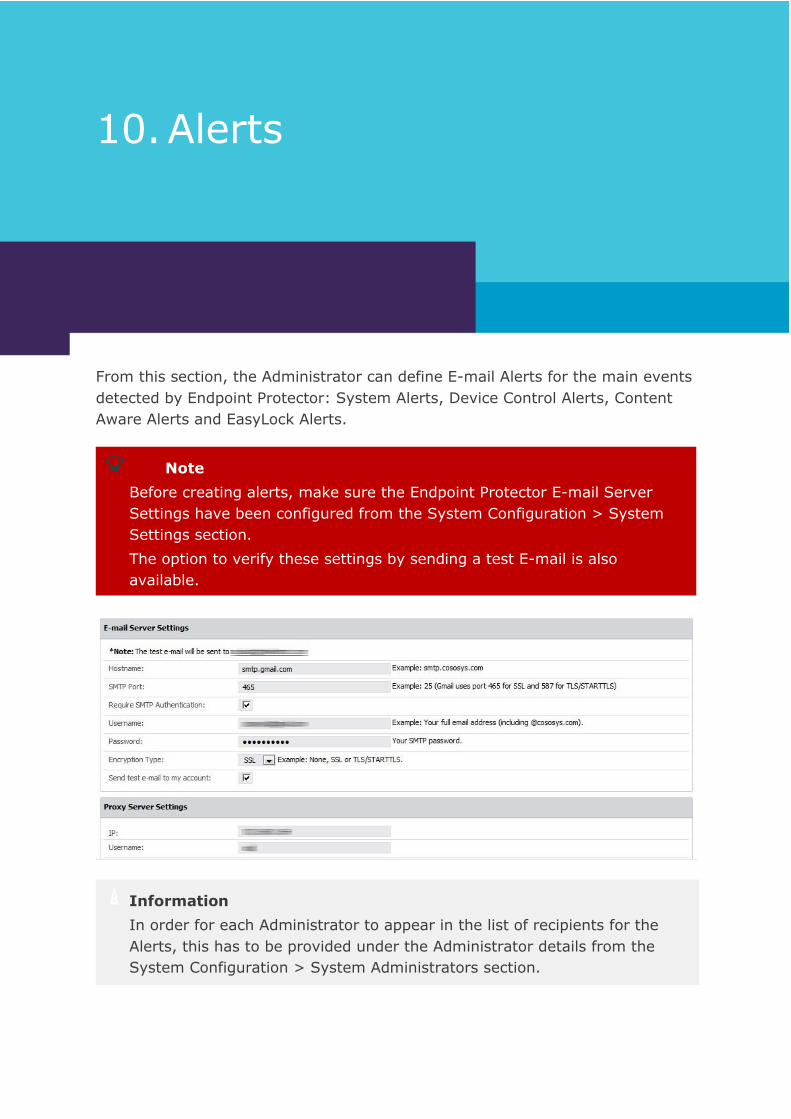
137 | Endpoint Protector | User Manual
10. Alerts
From this section, the Administrator can define E-mail Alerts for the main events
detected by Endpoint Protector: System Alerts, Device Control Alerts, Content
Aware Alerts and EasyLock Alerts.
Information
In order for each Administrator to appear in the list of recipients for the
Alerts, this has to be provided under the Administrator details from the
System Configuration > System Administrators section.
Note
Before creating alerts, make sure the Endpoint Protector E-mail Server
Settings have been configured from the System Configuration > System
Settings section.
The option to verify these settings by sending a test E-mail is also
available.
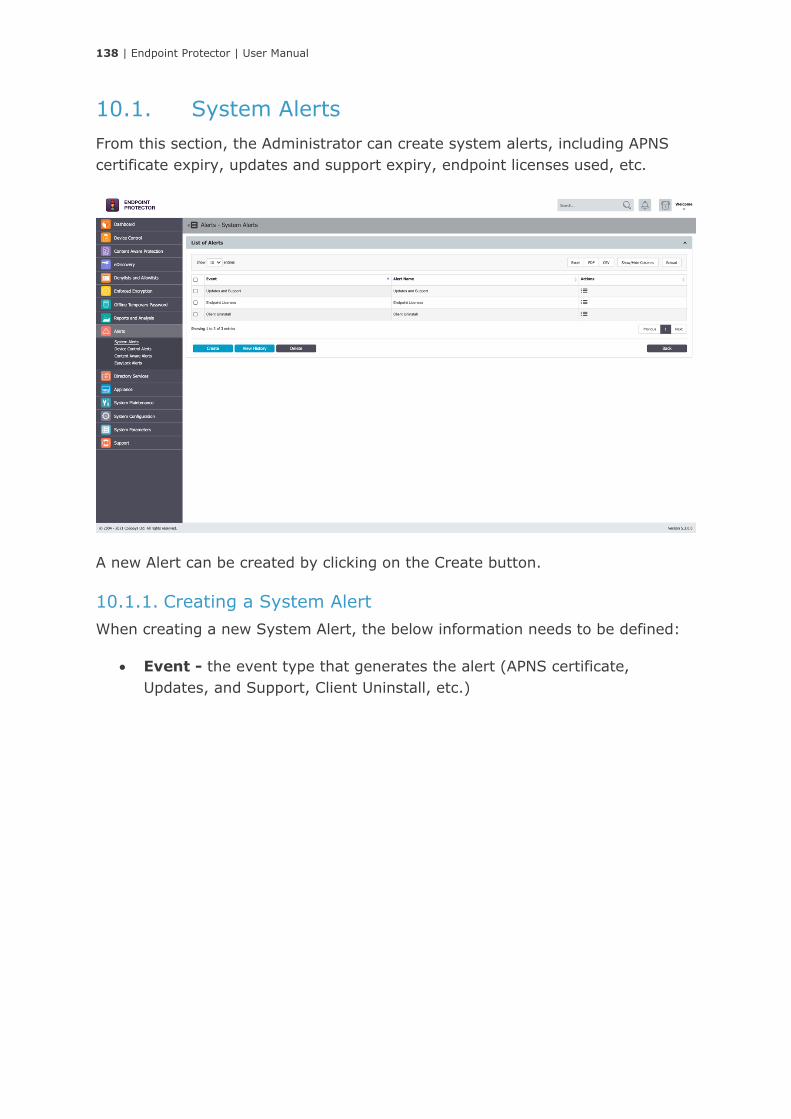
138 | Endpoint Protector | User Manual
10.1. System Alerts
From this section, the Administrator can create system alerts, including APNS
certificate expiry, updates and support expiry, endpoint licenses used, etc.
A new Alert can be created by clicking on the Create button.
10.1.1. Creating a System Alert
When creating a new System Alert, the below information needs to be defined:
• Event - the event type that generates the alert (APNS certificate,
Updates, and Support, Client Uninstall, etc.)
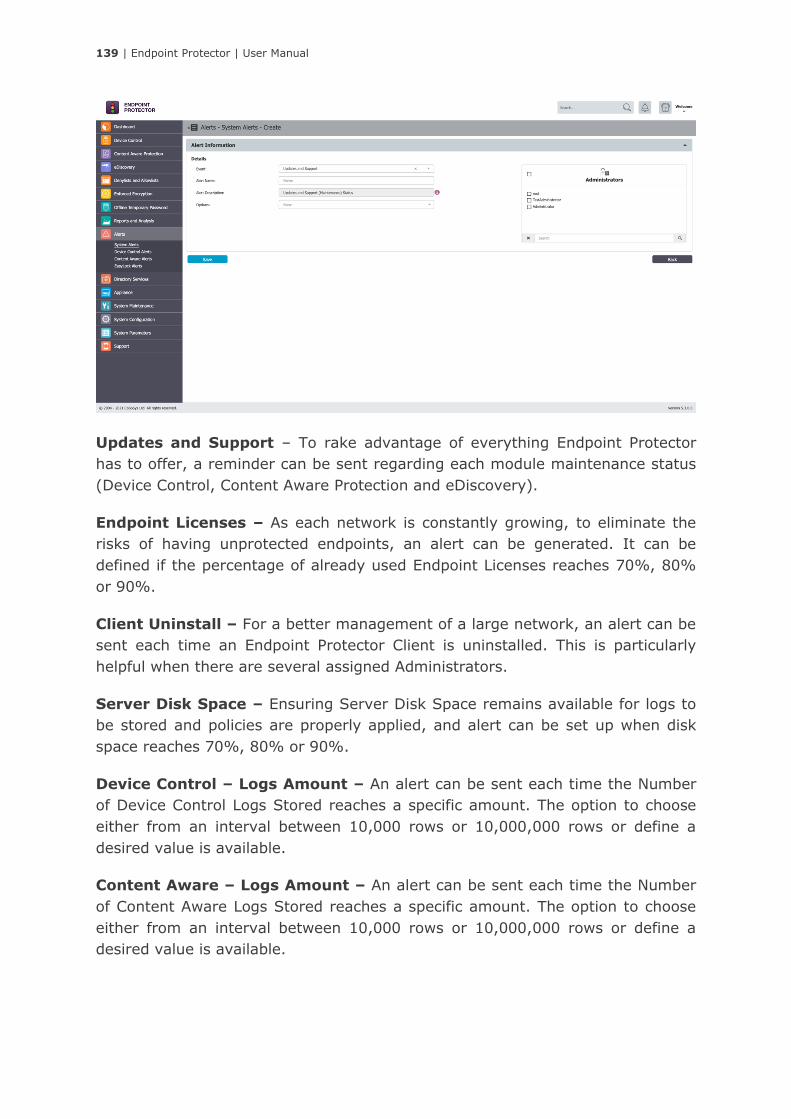
139 | Endpoint Protector | User Manual
Updates and Support – To rake advantage of everything Endpoint Protector
has to offer, a reminder can be sent regarding each module maintenance status
(Device Control, Content Aware Protection and eDiscovery).
Endpoint Licenses – As each network is constantly growing, to eliminate the
risks of having unprotected endpoints, an alert can be generated. It can be
defined if the percentage of already used Endpoint Licenses reaches 70%, 80%
or 90%.
Client Uninstall – For a better management of a large network, an alert can be
sent each time an Endpoint Protector Client is uninstalled. This is particularly
helpful when there are several assigned Administrators.
Server Disk Space – Ensuring Server Disk Space remains available for logs to
be stored and policies are properly applied, and alert can be set up when disk
space reaches 70%, 80% or 90%.
Device Control – Logs Amount – An alert can be sent each time the Number
of Device Control Logs Stored reaches a specific amount. The option to choose
either from an interval between 10,000 rows or 10,000,000 rows or define a
desired value is available.
Content Aware – Logs Amount – An alert can be sent each time the Number
of Content Aware Logs Stored reaches a specific amount. The option to choose
either from an interval between 10,000 rows or 10,000,000 rows or define a
desired value is available.

140 | Endpoint Protector | User Manual
Not Seen Online – An alert can be sent each when a protected endpoint has
not been seen online in the specific timeframe. This can also be used to identify
computers where the Endpoint Protector Client might have been uninstalled.
10.1.2. System Alerts History
From this section, the Administrator can view a history of the System Alerts.
Alerts that are no longer needed for auditing purposes can later be deleted.
10.2. Device Control Alerts
From this section, the Administrator can create Device Control alerts, for events
such as Connected, File Read, File Write, EasyLock – successfully deployed, etc.
Note
Update and Support system alert can be disabled from General Dashboard
> System Status.
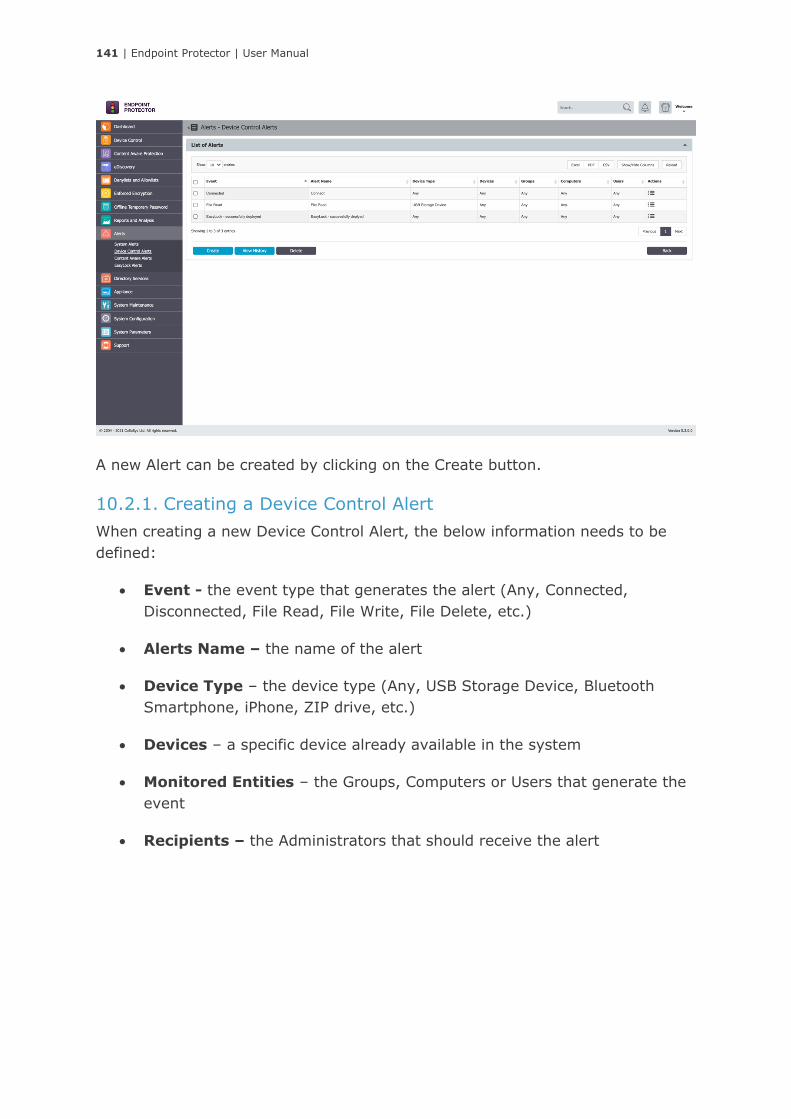
141 | Endpoint Protector | User Manual
A new Alert can be created by clicking on the Create button.
10.2.1. Creating a Device Control Alert
When creating a new Device Control Alert, the below information needs to be
defined:
• Event - the event type that generates the alert (Any, Connected,
Disconnected, File Read, File Write, File Delete, etc.)
• Alerts Name – the name of the alert
• Device Type – the device type (Any, USB Storage Device, Bluetooth
Smartphone, iPhone, ZIP drive, etc.)
• Devices – a specific device already available in the system
• Monitored Entities – the Groups, Computers or Users that generate the
event
• Recipients – the Administrators that should receive the alert
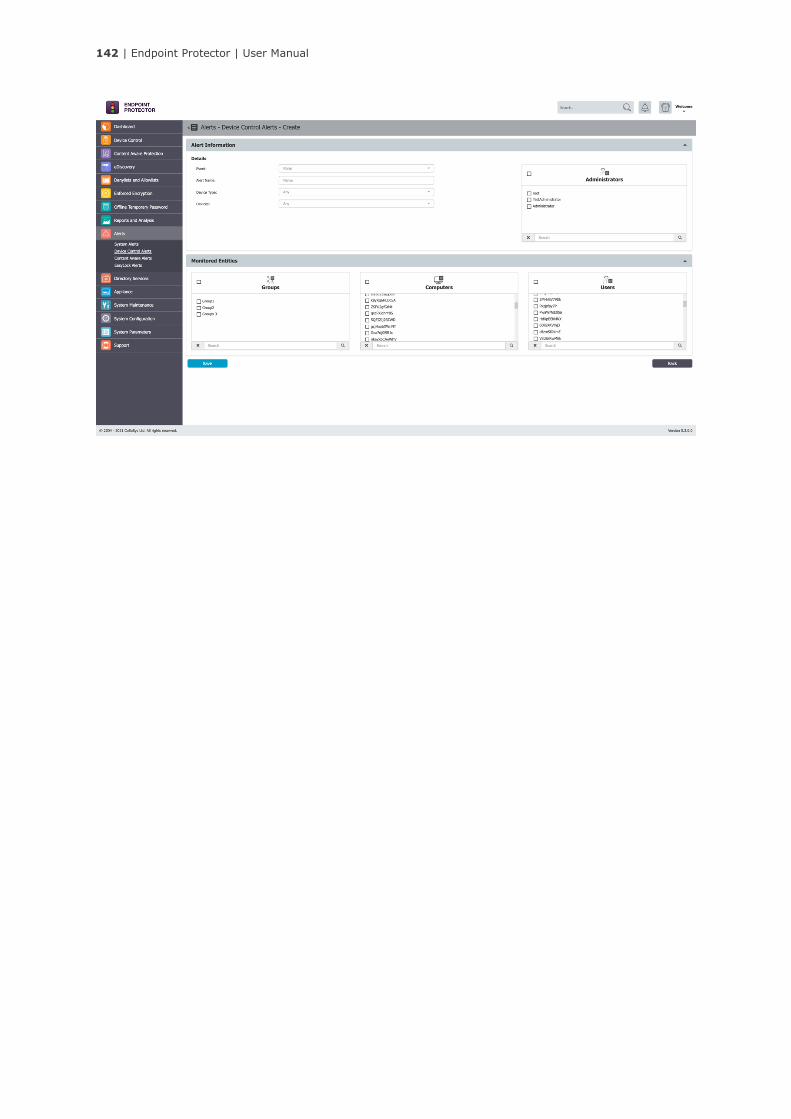
142 | Endpoint Protector | User Manual
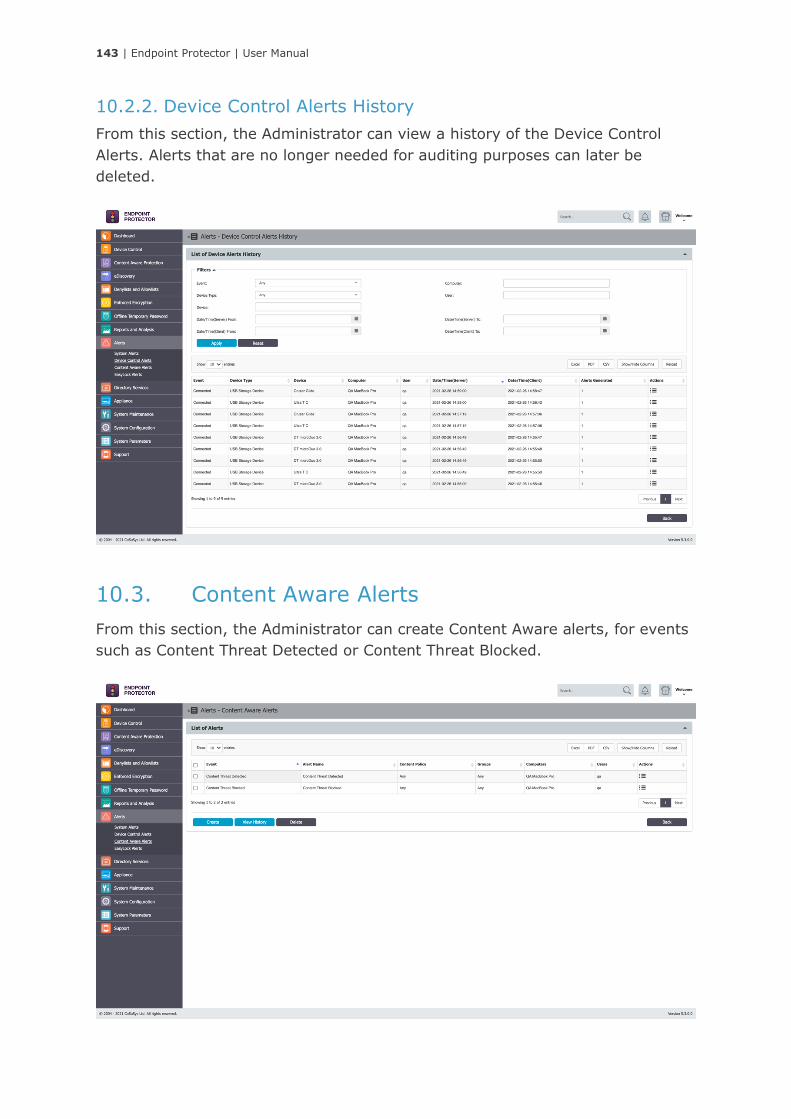
143 | Endpoint Protector | User Manual
10.2.2. Device Control Alerts History
From this section, the Administrator can view a history of the Device Control
Alerts. Alerts that are no longer needed for auditing purposes can later be
deleted.
10.3. Content Aware Alerts
From this section, the Administrator can create Content Aware alerts, for events
such as Content Threat Detected or Content Threat Blocked.
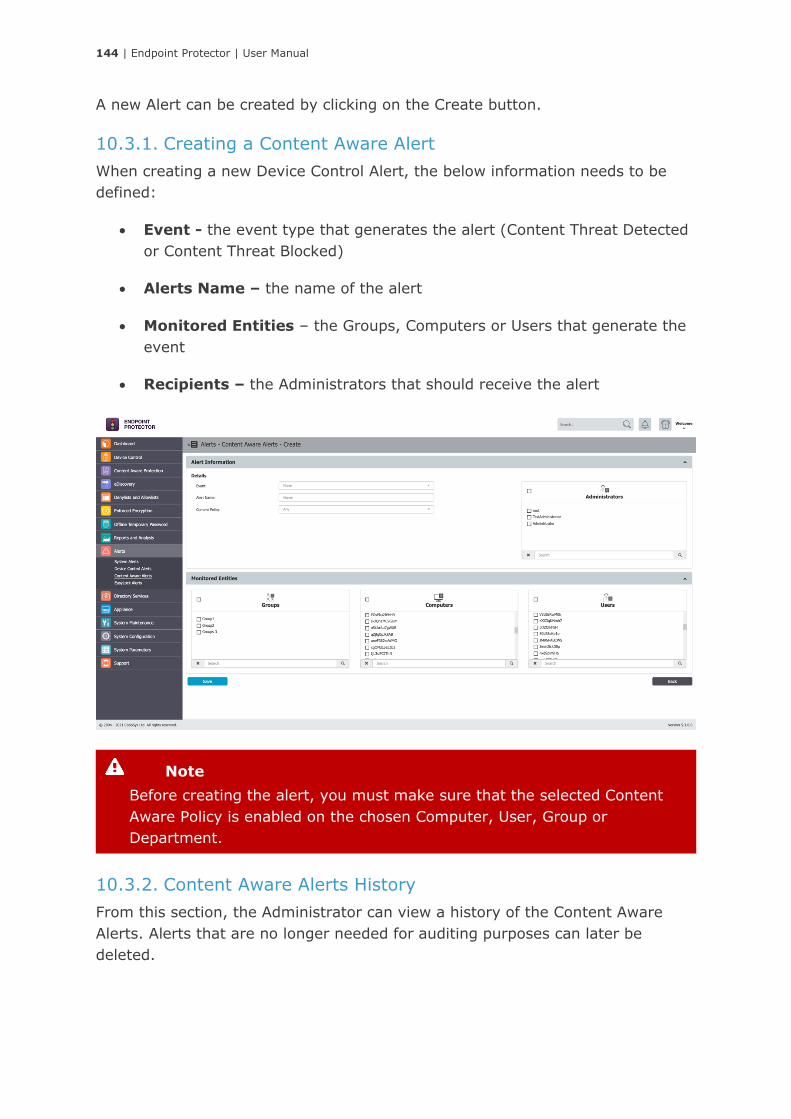
144 | Endpoint Protector | User Manual
A new Alert can be created by clicking on the Create button.
10.3.1. Creating a Content Aware Alert
When creating a new Device Control Alert, the below information needs to be
defined:
• Event - the event type that generates the alert (Content Threat Detected
or Content Threat Blocked)
• Alerts Name – the name of the alert
• Monitored Entities – the Groups, Computers or Users that generate the
event
• Recipients – the Administrators that should receive the alert
10.3.2. Content Aware Alerts History
From this section, the Administrator can view a history of the Content Aware
Alerts. Alerts that are no longer needed for auditing purposes can later be
deleted.
Note
Before creating the alert, you must make sure that the selected Content
Aware Policy is enabled on the chosen Computer, User, Group or
Department.
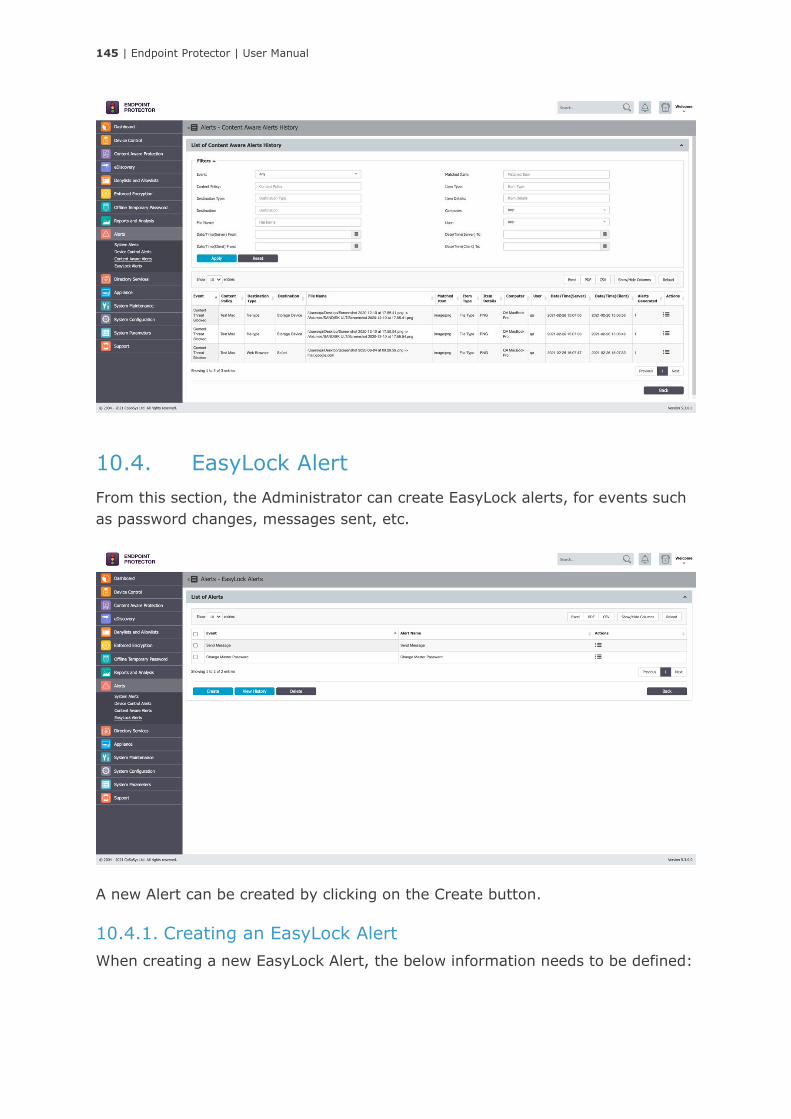
145 | Endpoint Protector | User Manual
10.4. EasyLock Alert
From this section, the Administrator can create EasyLock alerts, for events such
as password changes, messages sent, etc.
A new Alert can be created by clicking on the Create button.
10.4.1. Creating an EasyLock Alert
When creating a new EasyLock Alert, the below information needs to be defined:
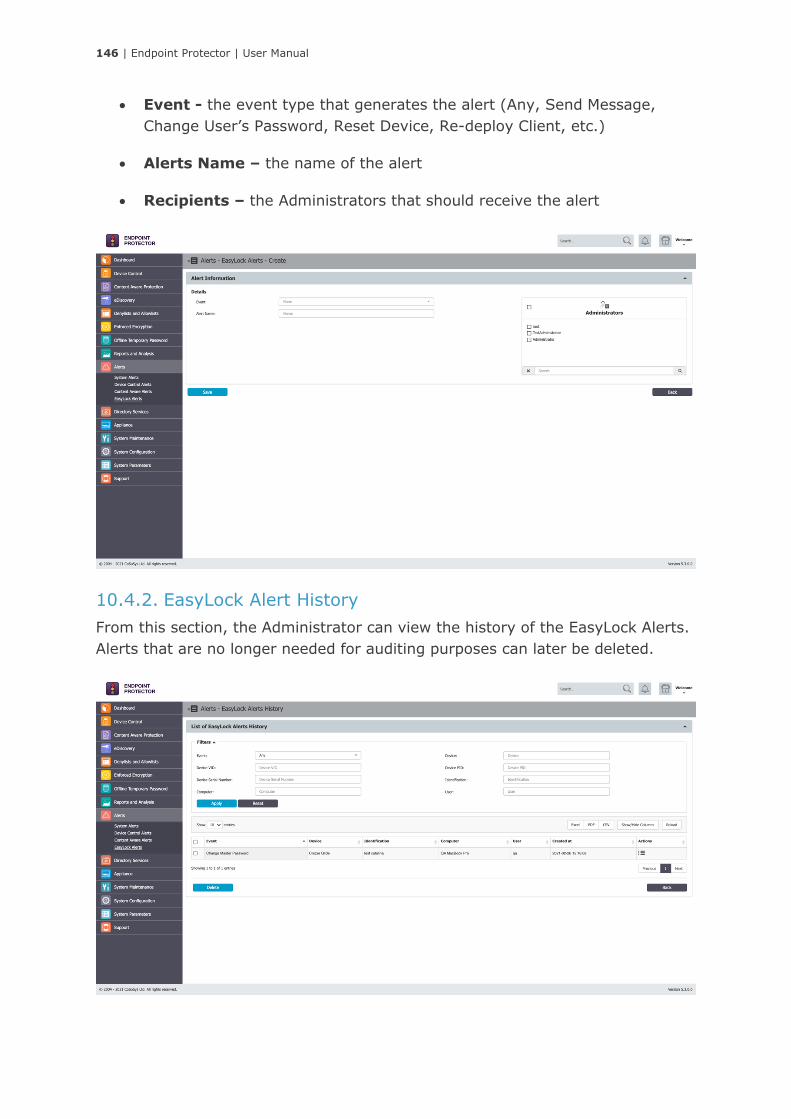
146 | Endpoint Protector | User Manual
• Event - the event type that generates the alert (Any, Send Message,
Change User’s Password, Reset Device, Re-deploy Client, etc.)
• Alerts Name – the name of the alert
• Recipients – the Administrators that should receive the alert
10.4.2. EasyLock Alert History
From this section, the Administrator can view the history of the EasyLock Alerts.
Alerts that are no longer needed for auditing purposes can later be deleted.
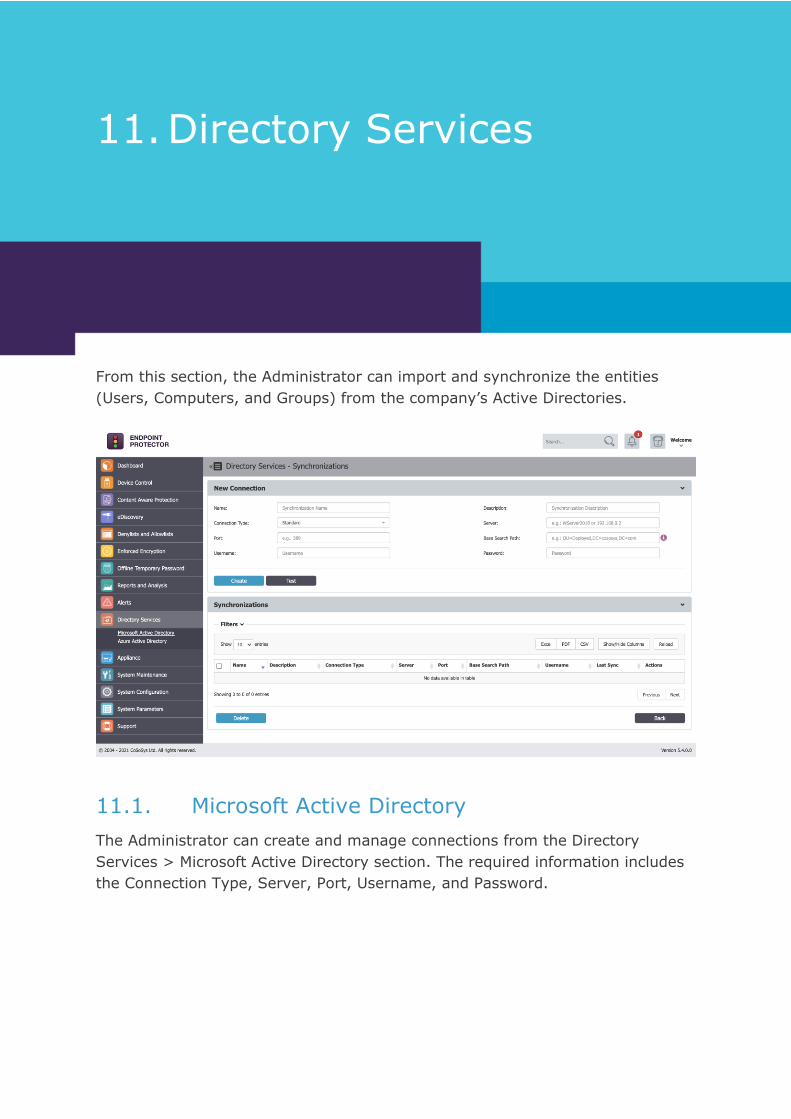
147 | Endpoint Protector | User Manual
11. Directory Services
From this section, the Administrator can import and synchronize the entities
(Users, Computers, and Groups) from the company’s Active Directories.
11.1. Microsoft Active Directory
The Administrator can create and manage connections from the Directory
Services > Microsoft Active Directory section. The required information includes
the Connection Type, Server, Port, Username, and Password.

148 | Endpoint Protector | User Manual
One a new connection has been created, it is available in the synchronization list
and can be further edited, to include the required entities.
For the defined connections, several synchronization options are available. From
this section, the connection credentials and synchronization interval can also be
changed.
Tips
To ensure the provided information is correct, a new connection can be
tested by pressing the Test button.
Note
When having to import a very large number of entities, we recommend
using the Base Search Path in order to get only the relevant information
displayed. Due to browser limitations, importing the whole AD structure
may impede the display of the import tree if it contains a very large
number of entities.

149 | Endpoint Protector | User Manual
From the Directory Browser section, the Administrator can select the entities
that need to be synced.
Once the desired entities have been chosen, they can be saved to sync.
11.2. Azure Active Directory
The Administrator can create and manage connections from the Directory
Services > Azure Active Directory. From this section, Groups from the Azure
Active Directory will have their users synchronized with the Endpoint Protector
Server. Group membership will be retrieved recursively by the API platform
itself.
Tips
The Advanced Groups Filer can be used to import and synchronize only
specific groups, ignoring all other entities.
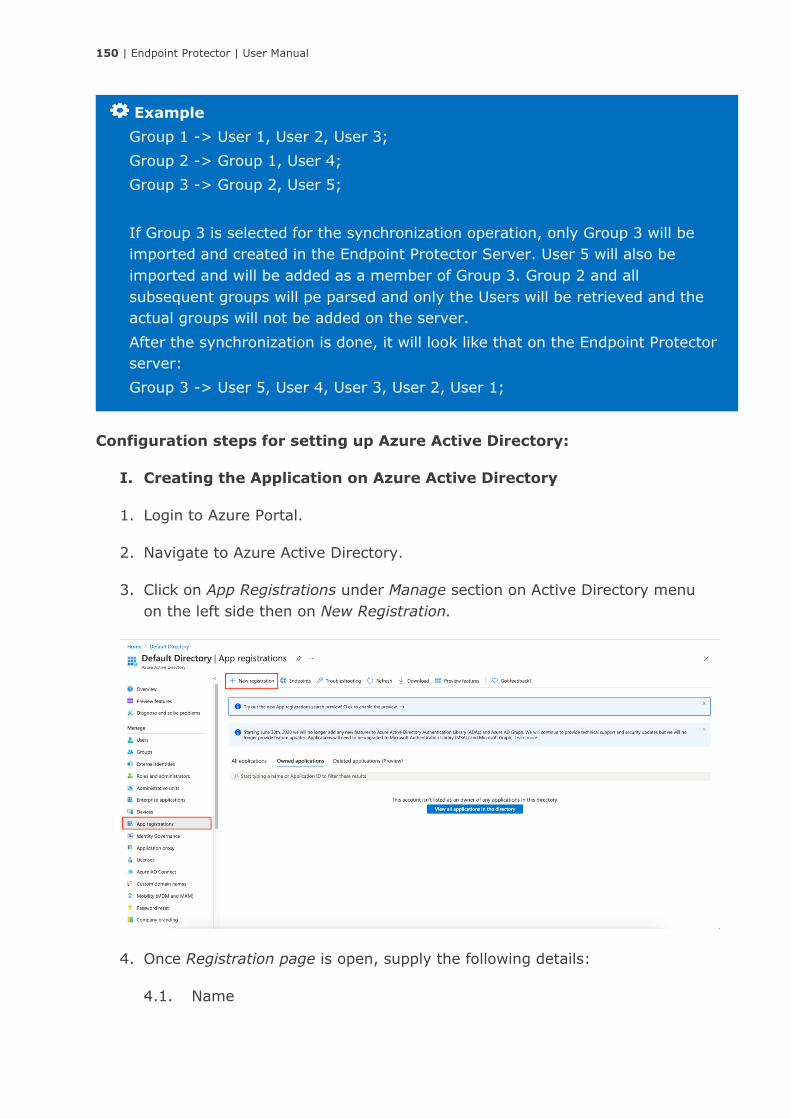
150 | Endpoint Protector | User Manual
Configuration steps for setting up Azure Active Directory:
I. Creating the Application on Azure Active Directory
1. Login to Azure Portal.
2. Navigate to Azure Active Directory.
3. Click on App Registrations under Manage section on Active Directory menu
on the left side then on New Registration.
4. Once Registration page is open, supply the following details:
4.1. Name
Example
Group 1 -> User 1, User 2, User 3;
Group 2 -> Group 1, User 4;
Group 3 -> Group 2, User 5;
If Group 3 is selected for the synchronization operation, only Group 3 will be
imported and created in the Endpoint Protector Server. User 5 will also be
imported and will be added as a member of Group 3. Group 2 and all
subsequent groups will pe parsed and only the Users will be retrieved and the
actual groups will not be added on the server.
After the synchronization is done, it will look like that on the Endpoint Protector
server:
Group 3 -> User 5, User 4, User 3, User 2, User 1;
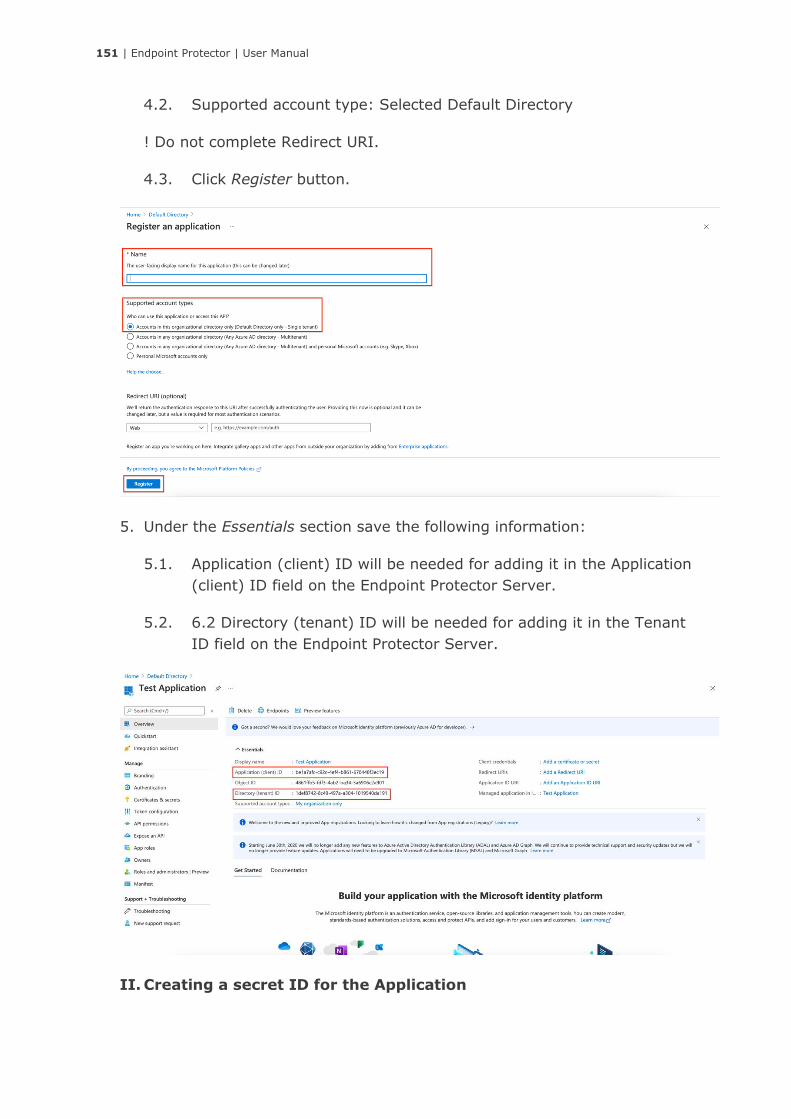
151 | Endpoint Protector | User Manual
4.2. Supported account type: Selected Default Directory
! Do not complete Redirect URI.
4.3. Click Register button.
5. Under the Essentials section save the following information:
5.1. Application (client) ID will be needed for adding it in the Application
(client) ID field on the Endpoint Protector Server.
5.2. 6.2 Directory (tenant) ID will be needed for adding it in the Tenant
ID field on the Endpoint Protector Server.
II. Creating a secret ID for the Application
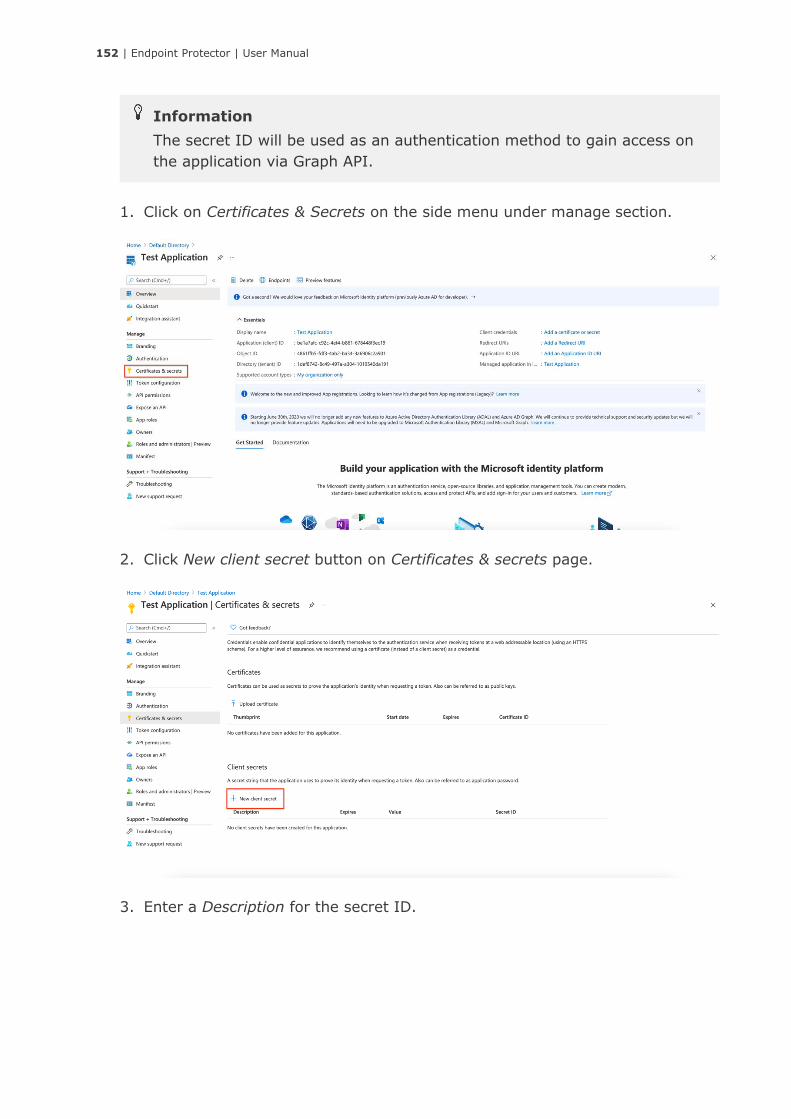
152 | Endpoint Protector | User Manual
1. Click on Certificates & Secrets on the side menu under manage section.
2. Click New client secret button on Certificates & secrets page.
3. Enter a Description for the secret ID.
Information
The secret ID will be used as an authentication method to gain access on
the application via Graph API.
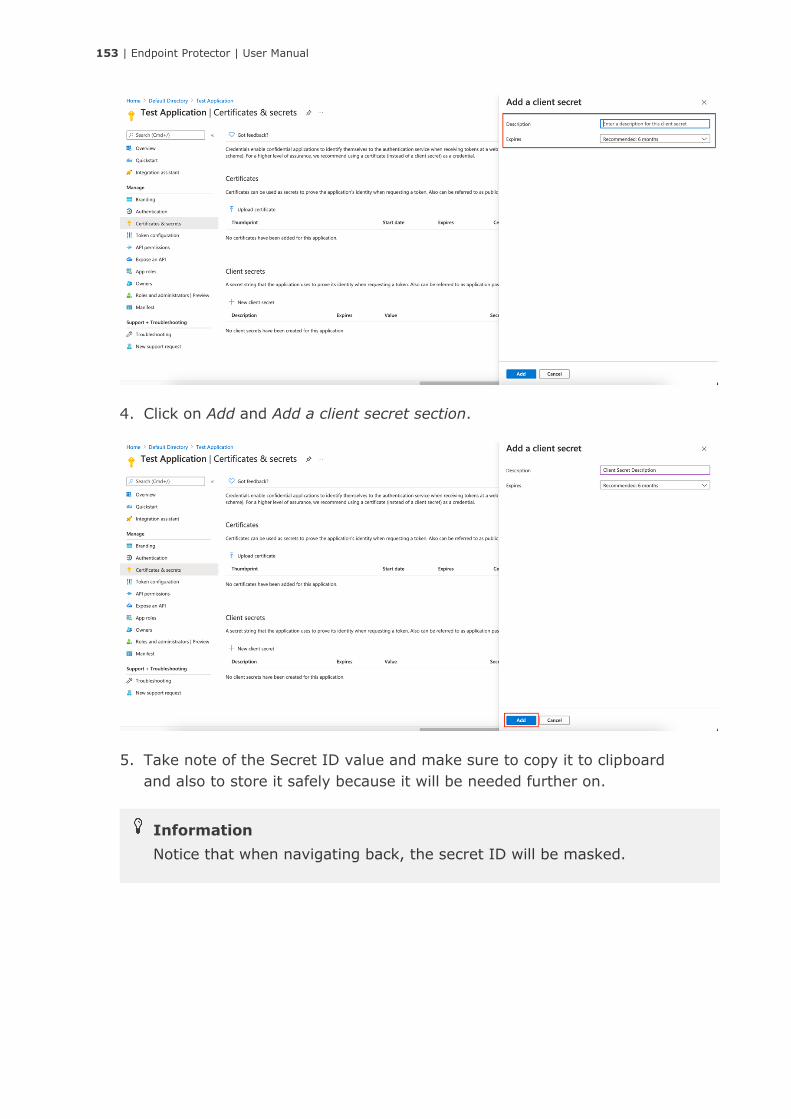
153 | Endpoint Protector | User Manual
4. Click on Add and Add a client secret section.
5. Take note of the Secret ID value and make sure to copy it to clipboard
and also to store it safely because it will be needed further on.
Information
Notice that when navigating back, the secret ID will be masked.
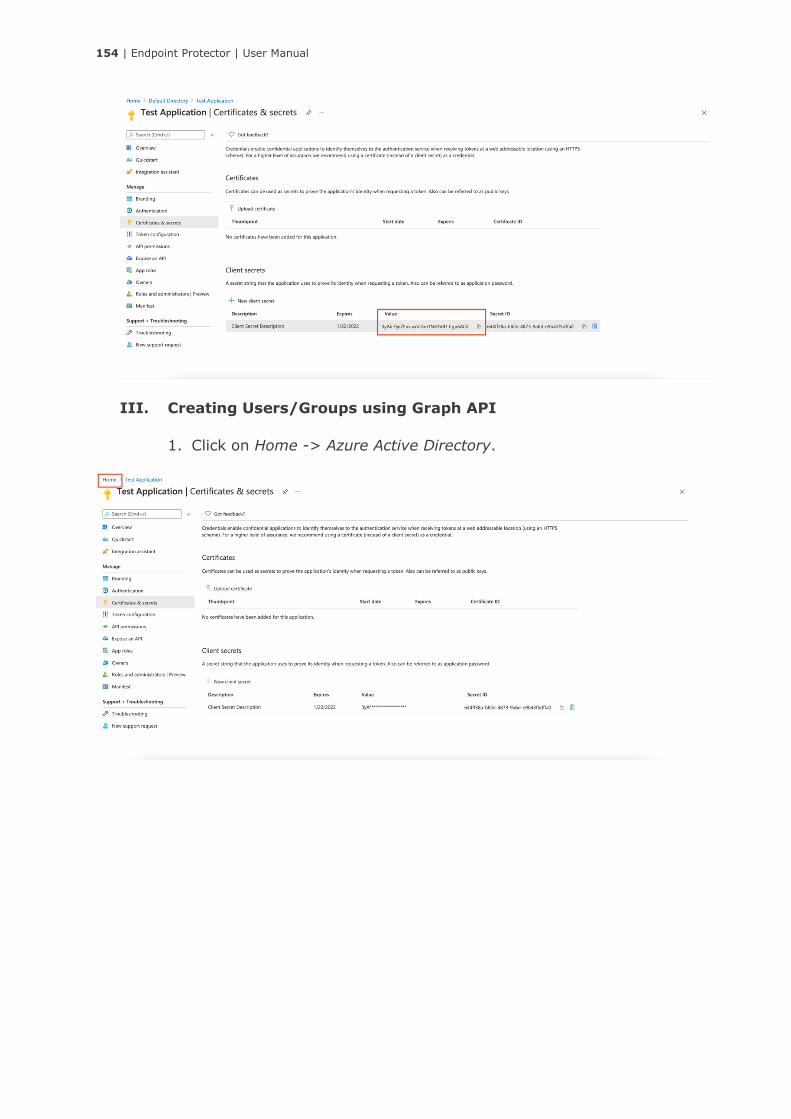
154 | Endpoint Protector | User Manual
III. Creating Users/Groups using Graph API
1. Click on Home -> Azure Active Directory.
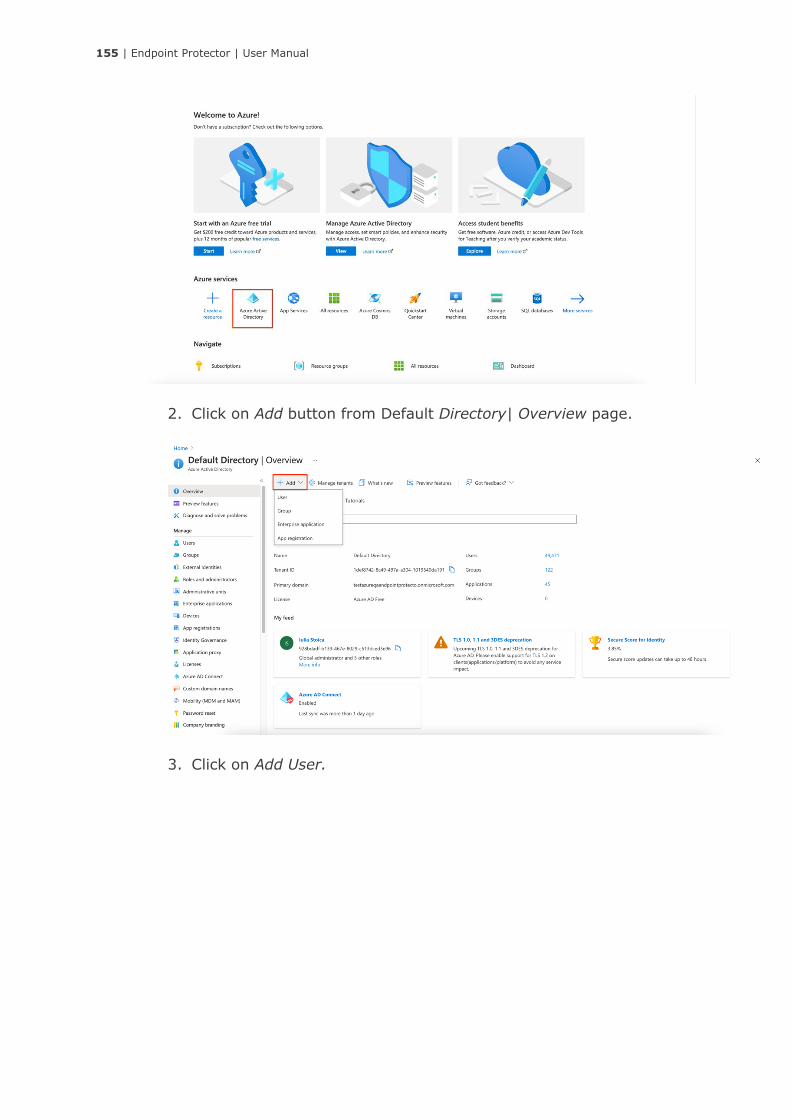
155 | Endpoint Protector | User Manual
2. Click on Add button from Default Directory| Overview page.
3. Click on Add User.
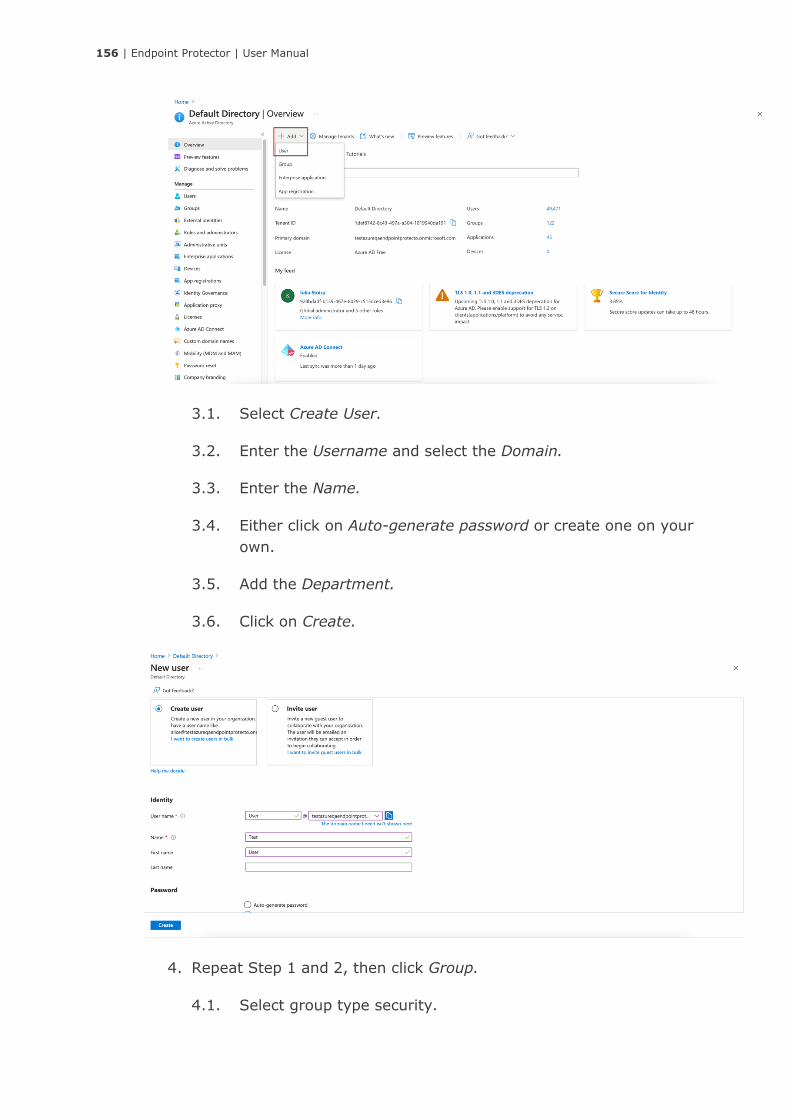
156 | Endpoint Protector | User Manual
3.1. Select Create User.
3.2. Enter the Username and select the Domain.
3.3. Enter the Name.
3.4. Either click on Auto-generate password or create one on your
own.
3.5. Add the Department.
3.6. Click on Create.
4. Repeat Step 1 and 2, then click Group.
4.1. Select group type security.
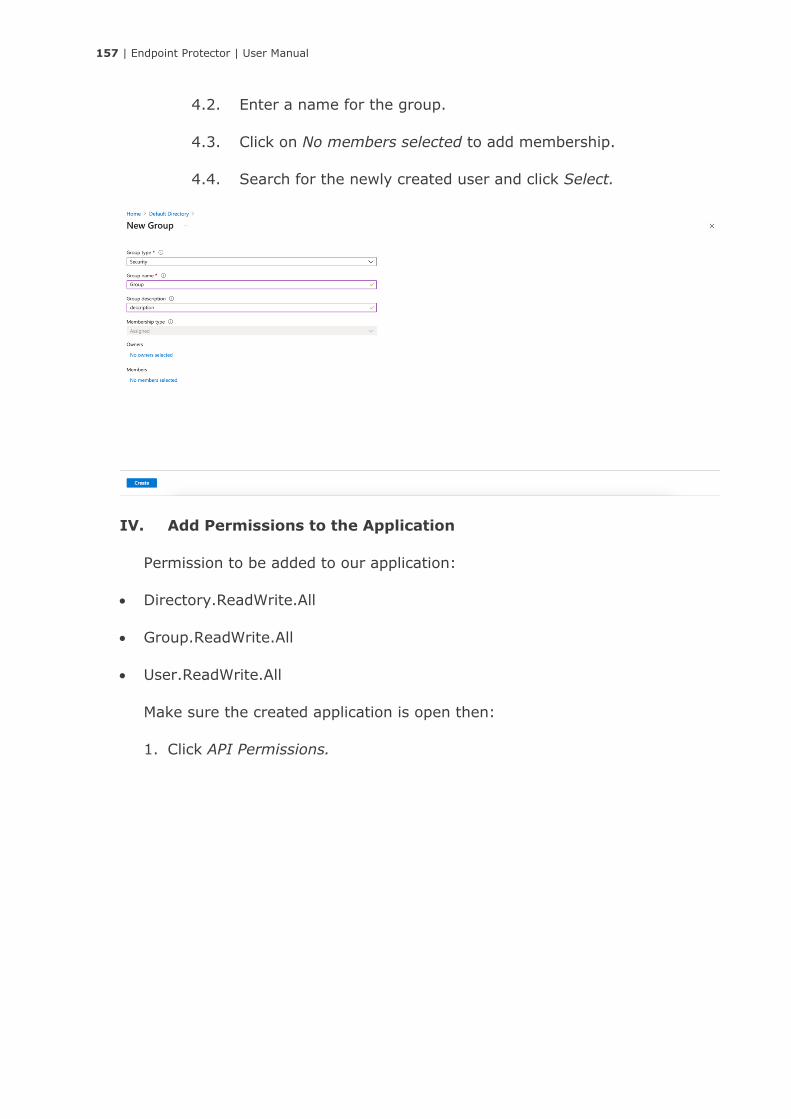
157 | Endpoint Protector | User Manual
4.2. Enter a name for the group.
4.3. Click on No members selected to add membership.
4.4. Search for the newly created user and click Select.
IV. Add Permissions to the Application
Permission to be added to our application:
• Directory.ReadWrite.All
• Group.ReadWrite.All
• User.ReadWrite.All
Make sure the created application is open then:
1. Click API Permissions.
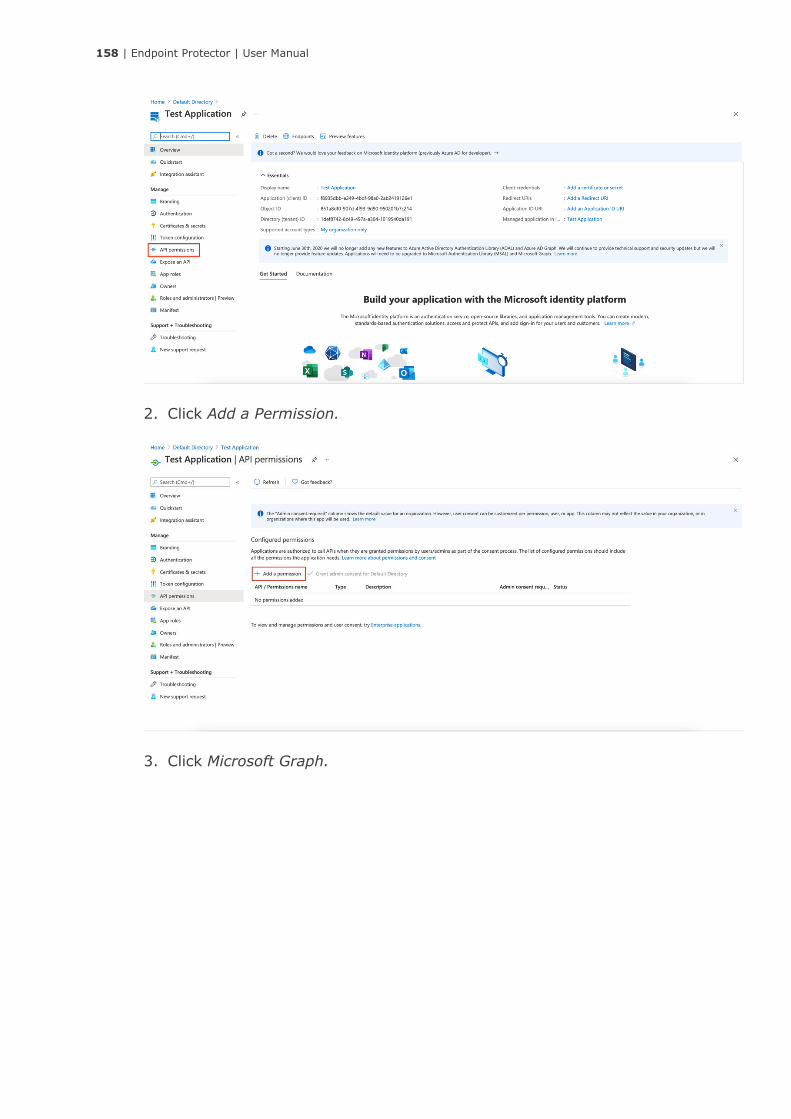
158 | Endpoint Protector | User Manual
2. Click Add a Permission.
3. Click Microsoft Graph.
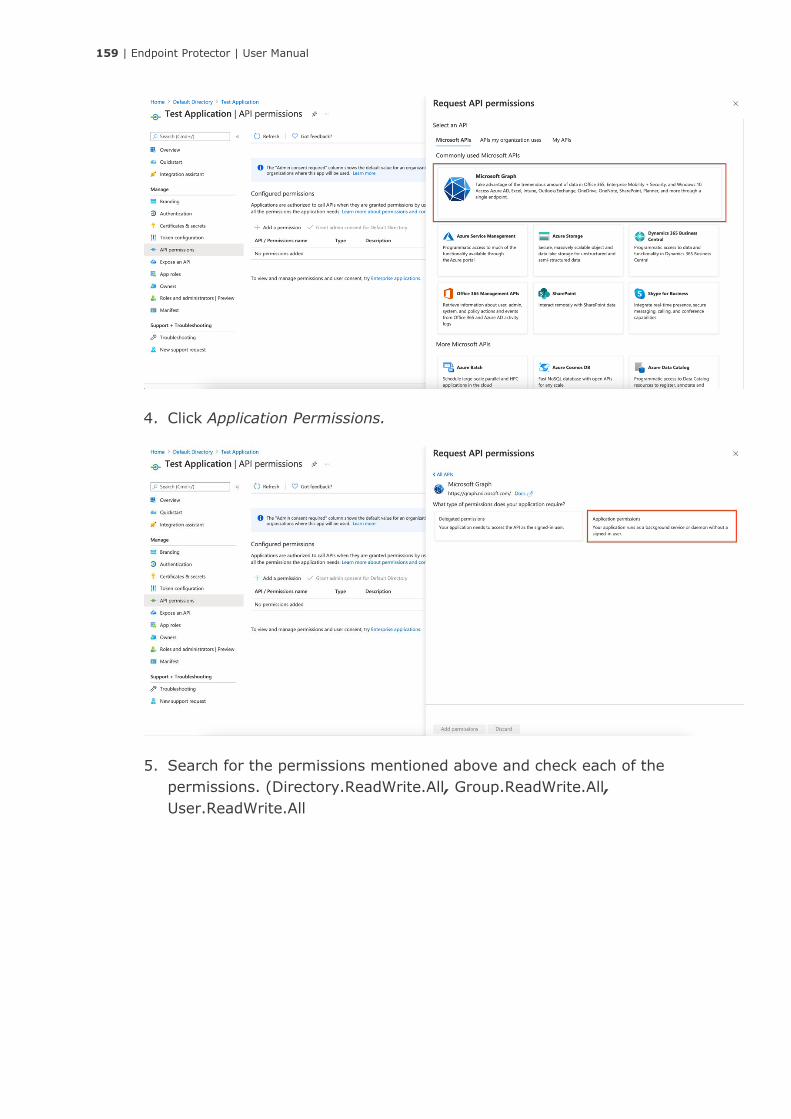
159 | Endpoint Protector | User Manual
4. Click Application Permissions.
5. Search for the permissions mentioned above and check each of the
permissions. (Directory.ReadWrite.All, Group.ReadWrite.All,
User.ReadWrite.All

160 | Endpoint Protector | User Manual
6. Click Add Permissions.
7. Click on Grant admin consent for Default Directory button from the API
Permission page.
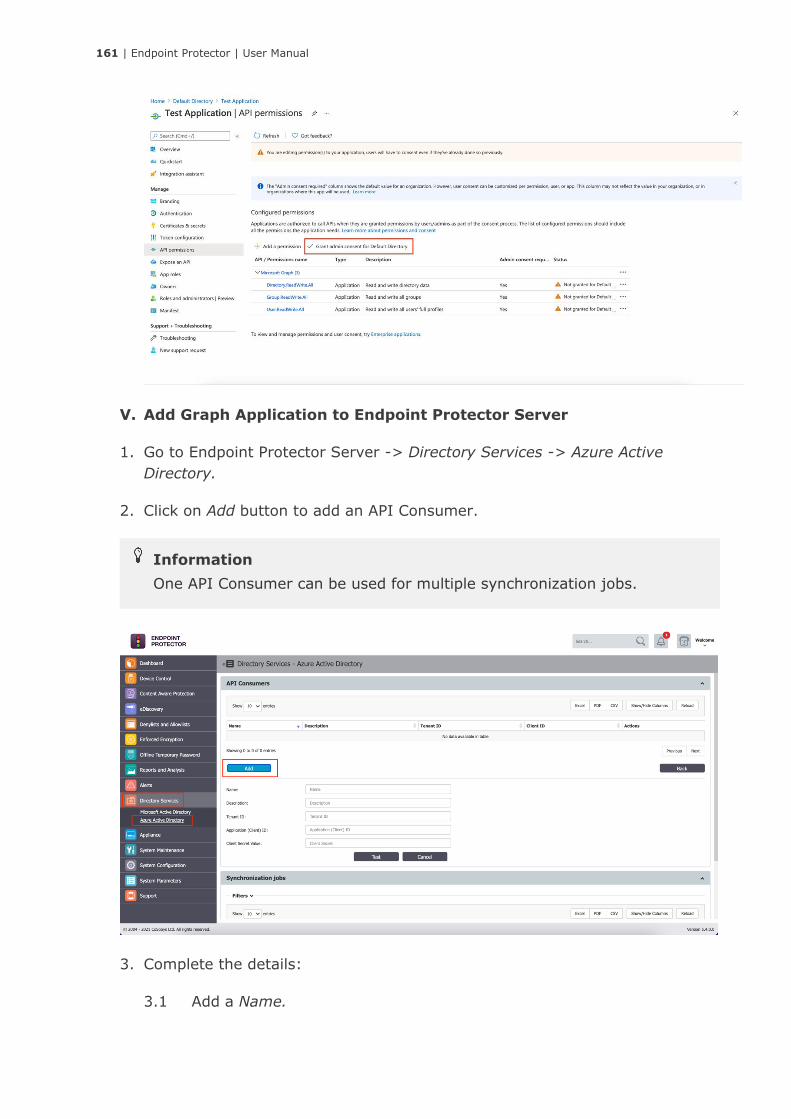
161 | Endpoint Protector | User Manual
V. Add Graph Application to Endpoint Protector Server
1. Go to Endpoint Protector Server -> Directory Services -> Azure Active
Directory.
2. Click on Add button to add an API Consumer.
3. Complete the details:
3.1 Add a Name.
Information
One API Consumer can be used for multiple synchronization jobs.
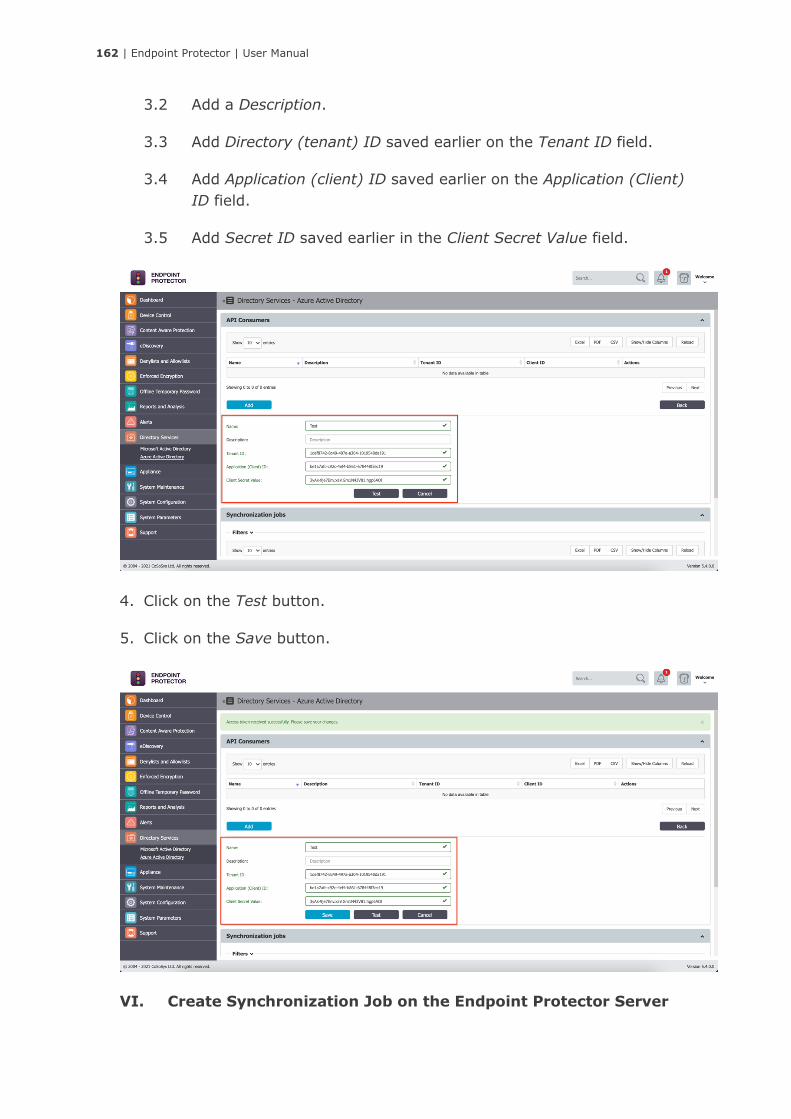
162 | Endpoint Protector | User Manual
3.2 Add a Description.
3.3 Add Directory (tenant) ID saved earlier on the Tenant ID field.
3.4 Add Application (client) ID saved earlier on the Application (Client)
ID field.
3.5 Add Secret ID saved earlier in the Client Secret Value field.
4. Click on the Test button.
5. Click on the Save button.
VI. Create Synchronization Job on the Endpoint Protector Server
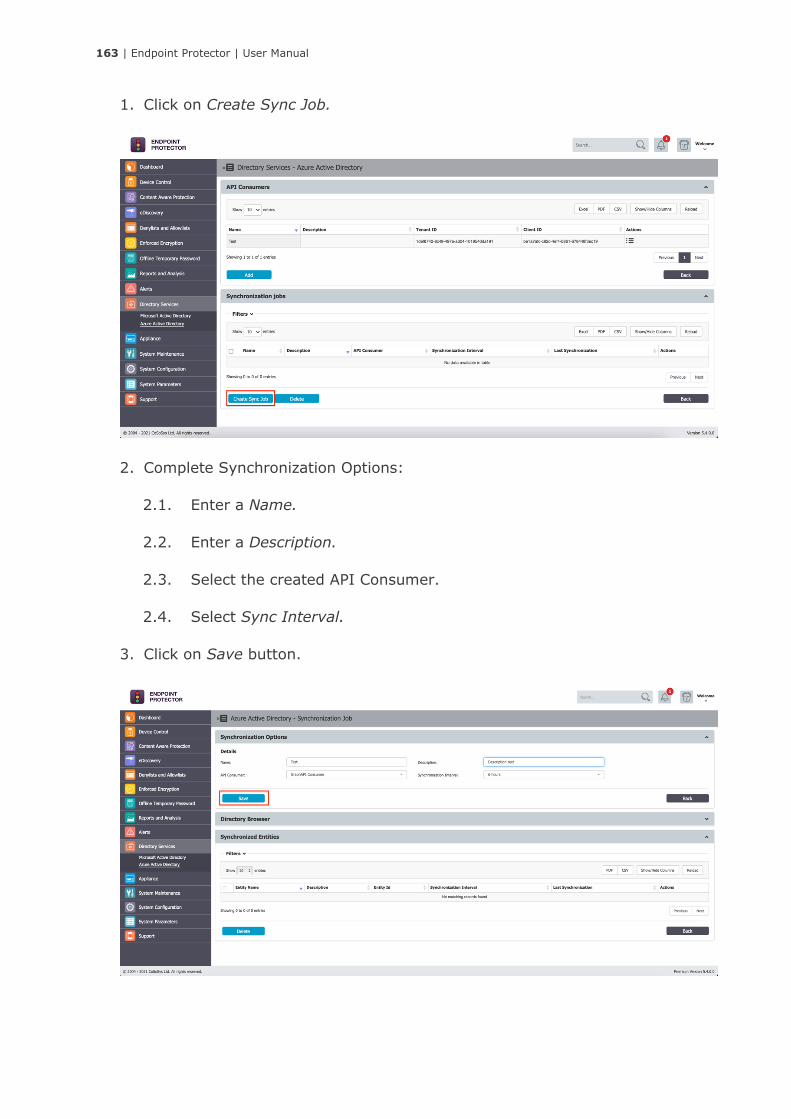
163 | Endpoint Protector | User Manual
1. Click on Create Sync Job.
2. Complete Synchronization Options:
2.1. Enter a Name.
2.2. Enter a Description.
2.3. Select the created API Consumer.
2.4. Select Sync Interval.
3. Click on Save button.
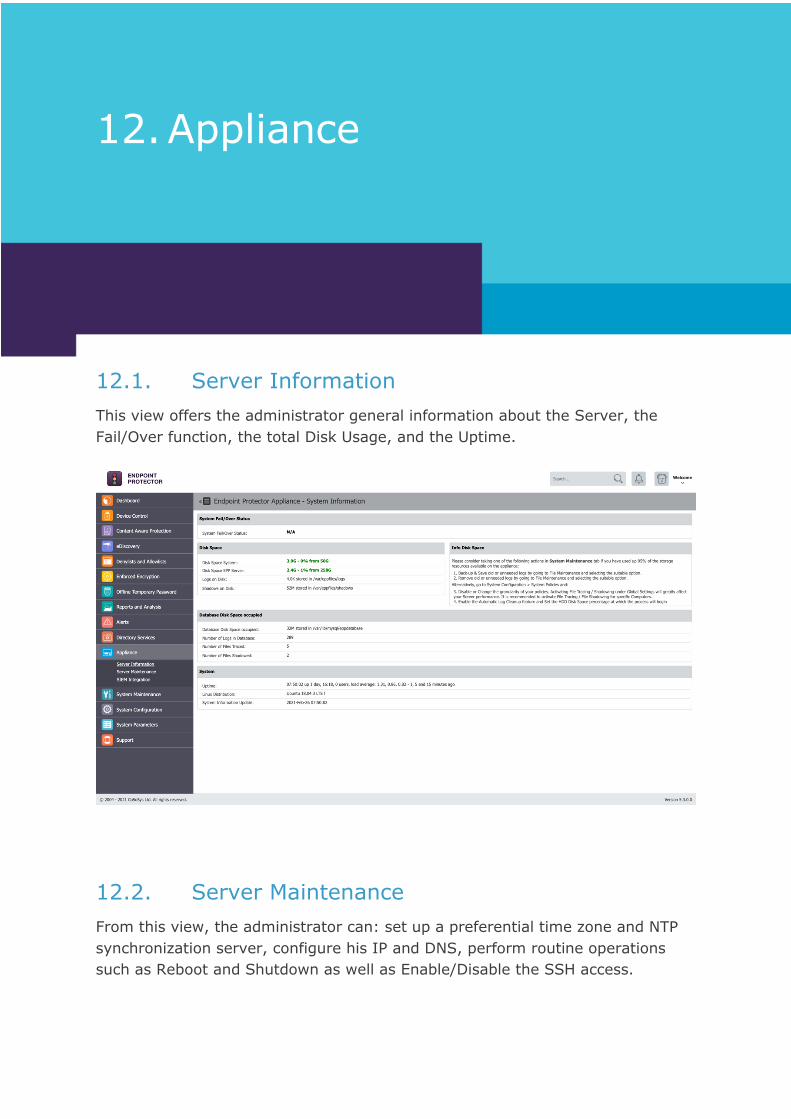
164 | Endpoint Protector | User Manual
12. Appliance
12.1. Server Information
This view offers the administrator general information about the Server, the
Fail/Over function, the total Disk Usage, and the Uptime.
12.2. Server Maintenance
From this view, the administrator can: set up a preferential time zone and NTP
synchronization server, configure his IP and DNS, perform routine operations
such as Reboot and Shutdown as well as Enable/Disable the SSH access.
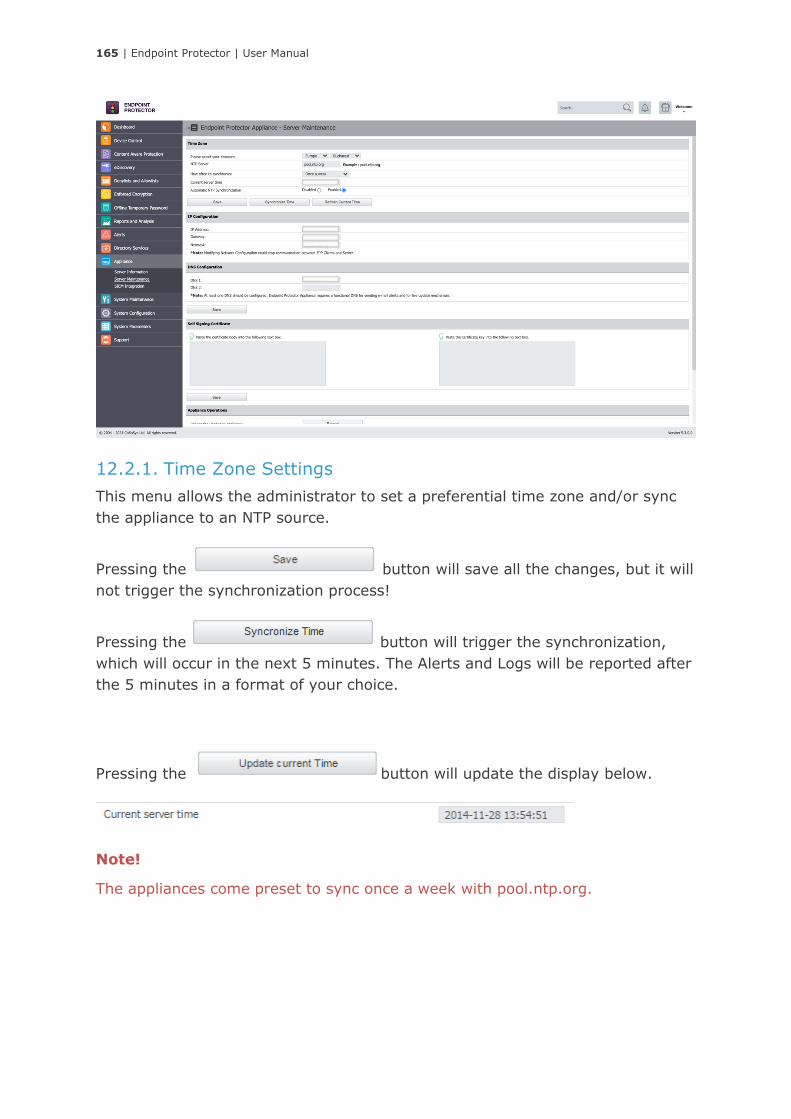
165 | Endpoint Protector | User Manual
12.2.1. Time Zone Settings
This menu allows the administrator to set a preferential time zone and/or sync
the appliance to an NTP source.
Pressing the button will save all the changes, but it will
not trigger the synchronization process!
Pressing the button will trigger the synchronization,
which will occur in the next 5 minutes. The Alerts and Logs will be reported after
the 5 minutes in a format of your choice.
Pressing the button will update the display below.
Note!
The appliances come preset to sync once a week with pool.ntp.org.
166 | Endpoint Protector | User Manual
12.2.2. Network Settings
Here you can change the network settings for the appliance to communicate
correctly in your network.
Attention!
After you change the IP address, close the Internet browser, then reopen a new
instance of your browser. Afterward, try to access the Endpoint Protector
Administration and Reporting Tool with the NEW IP address!
12.2.3. Reset Appliance to Factory Default
A reset to Factory will erase all settings, policies, certificates and other data on
the Appliance. If you reset to factory default, all settings and the communication
between Appliance and Endpoint Protector Clients will be interrupted.
12.2.4. SSH Server
This option will either enable or disable the access to the Appliance through the
SSH protocol. It is recommended to be set on Enable before requesting Support
access.
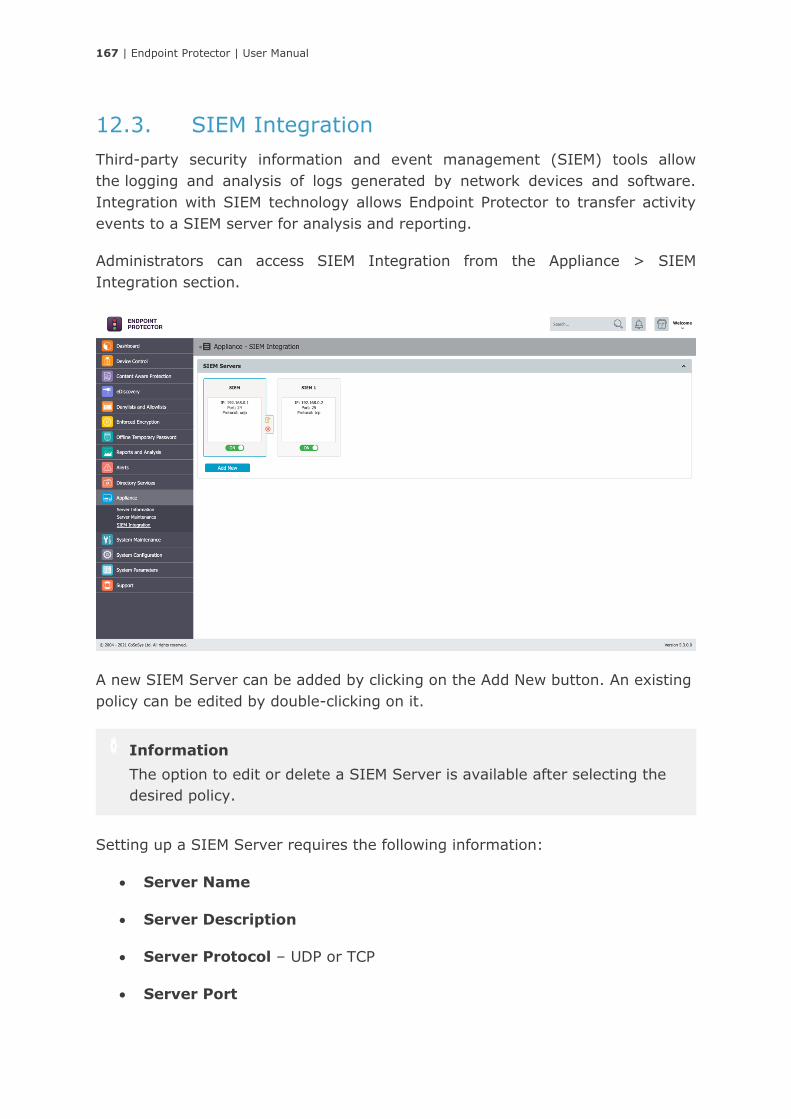
167 | Endpoint Protector | User Manual
12.3. SIEM Integration
Third-party security information and event management (SIEM) tools allow
the logging and analysis of logs generated by network devices and software.
Integration with SIEM technology allows Endpoint Protector to transfer activity
events to a SIEM server for analysis and reporting.
Administrators can access SIEM Integration from the Appliance > SIEM
Integration section.
A new SIEM Server can be added by clicking on the Add New button. An existing
policy can be edited by double-clicking on it.
Setting up a SIEM Server requires the following information:
• Server Name
• Server Description
• Server Protocol – UDP or TCP
• Server Port
Information
The option to edit or delete a SIEM Server is available after selecting the
desired policy.
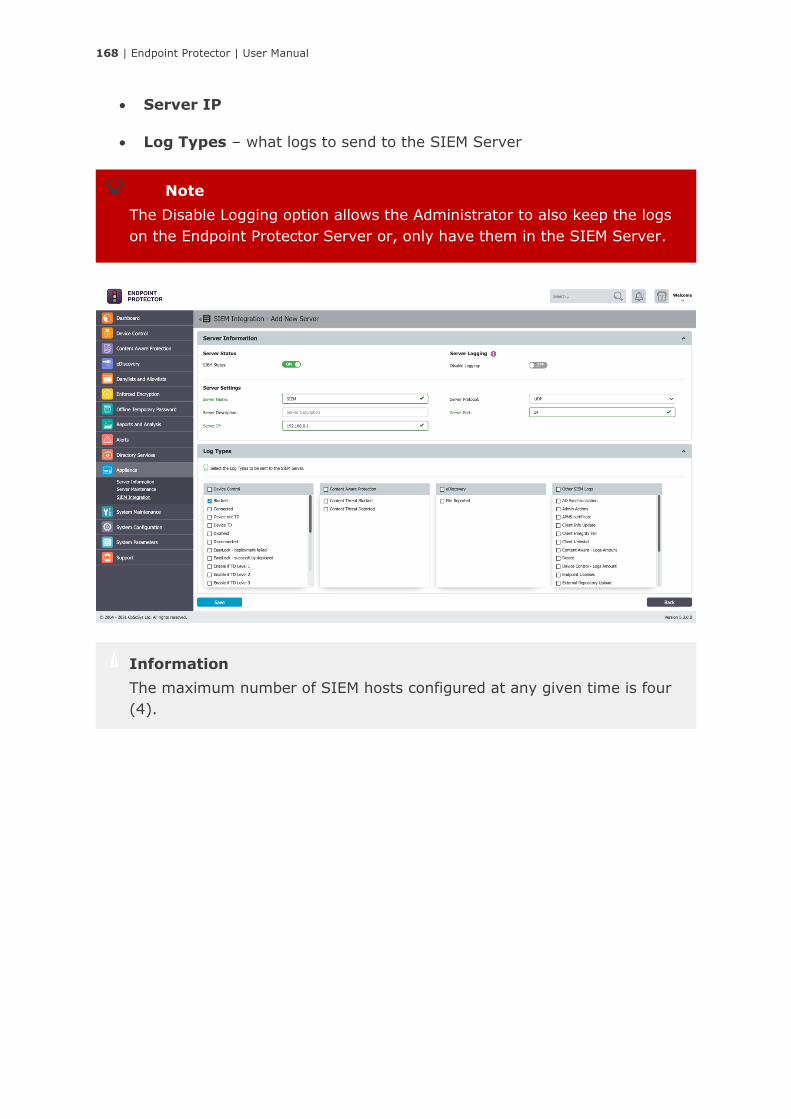
168 | Endpoint Protector | User Manual
• Server IP
• Log Types – what logs to send to the SIEM Server
Information
The maximum number of SIEM hosts configured at any given time is four
(4).
Note
The Disable Logging option allows the Administrator to also keep the logs
on the Endpoint Protector Server or, only have them in the SIEM Server.
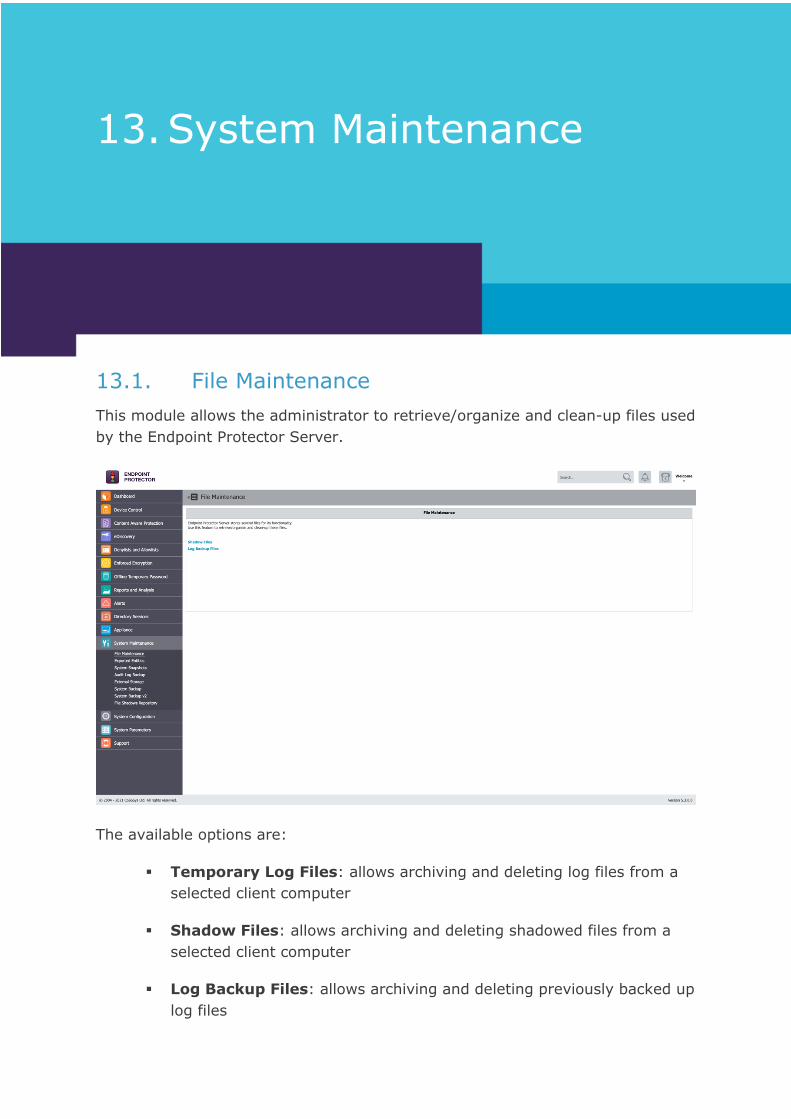
169 | Endpoint Protector | User Manual
13. System Maintenance
13.1. File Maintenance
This module allows the administrator to retrieve/organize and clean-up files used
by the Endpoint Protector Server.
The available options are:
▪ Temporary Log Files: allows archiving and deleting log files from a
selected client computer
▪ Shadow Files: allows archiving and deleting shadowed files from a
selected client computer
▪ Log Backup Files: allows archiving and deleting previously backed up
log files

170 | Endpoint Protector | User Manual
To archive, a previously selected set of files, click the “Save as Zip” button, while
to permanently remove a set of files from the Endpoint Protector Server use the
“Delete” button.
13.2. Exported Entities
From this section, the Administrator has the ability to view the list of exported
entities, download or delete them, as well as seeing the scheduled export in the
system and, reschedule them accordingly.
Information
To initial manual generation or the scheduled export is a straight forward
process that be done from the Device Control > List of Devices / List of
Computers / List of Users / List of Groups sections.

171 | Endpoint Protector | User Manual
Tips
The scheduled exports can be sent automatically via e-mail to all the
Administrators that have the Scheduled Export Alert setting enabled.
172 | Endpoint Protector | User Manual
Note
The Scheduled Exports are reoccurring (Daily / Weekly or Monthly), and, as
such, will continuously take up more and more storage on the Endpoint
Protector Server.
To maintain performance and, since these exports can also be sent
automatically via e-mail to the desired Administrators, the Scheduled
Exports already generate are automatically deleted from the Server after 14
days.
For performance reasons, the Scheduled Exports and Disable Logging option
allows the Administrator to also keep the logs on the Endpoint Protector
Server or, only have them in the SIEM Server.

173 | Endpoint Protector | User Manual
13.3. System Snapshots
The System Snapshots module allows you to save all device control rights and
settings in the system and restore them later if needed.
After installing the Endpoint Protector Server, we strongly recommend that you
create a System Snapshot before modifying anything. In this case, you can
revert back to the original settings if you configure the server incorrectly.
To create a System Snapshot, access the module from System Configuration and
click “Make Snapshot”.
Enter a name for the snapshot and a description. Select also what you wish to
store in the snapshot, Only Rights, Only Settings, or Both. Finally, click “Save”.
Your snapshot will appear in the list of System Snapshots.
To restore a previously created snapshot, click the “Restore” button next to the
desired snapshot. - Restore
Confirm the action by clicking the “Restore” button again in the next window.

174 | Endpoint Protector | User Manual
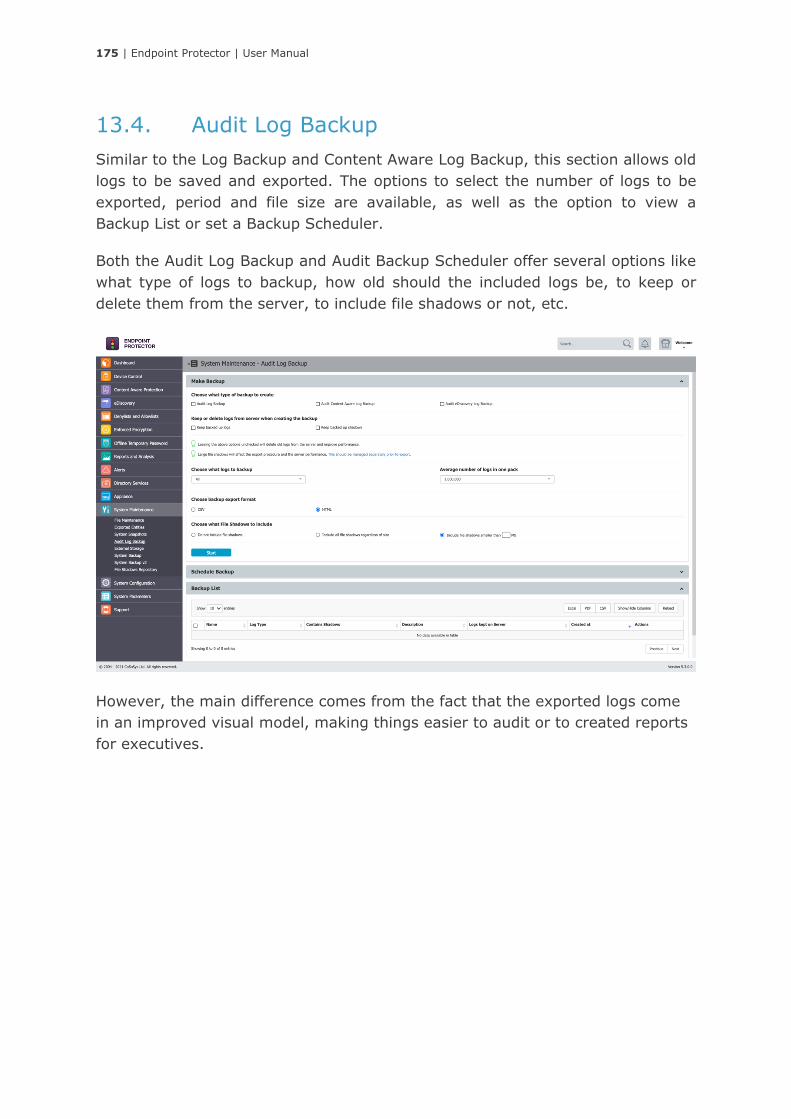
175 | Endpoint Protector | User Manual
13.4. Audit Log Backup
Similar to the Log Backup and Content Aware Log Backup, this section allows old
logs to be saved and exported. The options to select the number of logs to be
exported, period and file size are available, as well as the option to view a
Backup List or set a Backup Scheduler.
Both the Audit Log Backup and Audit Backup Scheduler offer several options like
what type of logs to backup, how old should the included logs be, to keep or
delete them from the server, to include file shadows or not, etc.
However, the main difference comes from the fact that the exported logs come
in an improved visual model, making things easier to audit or to created reports
for executives.
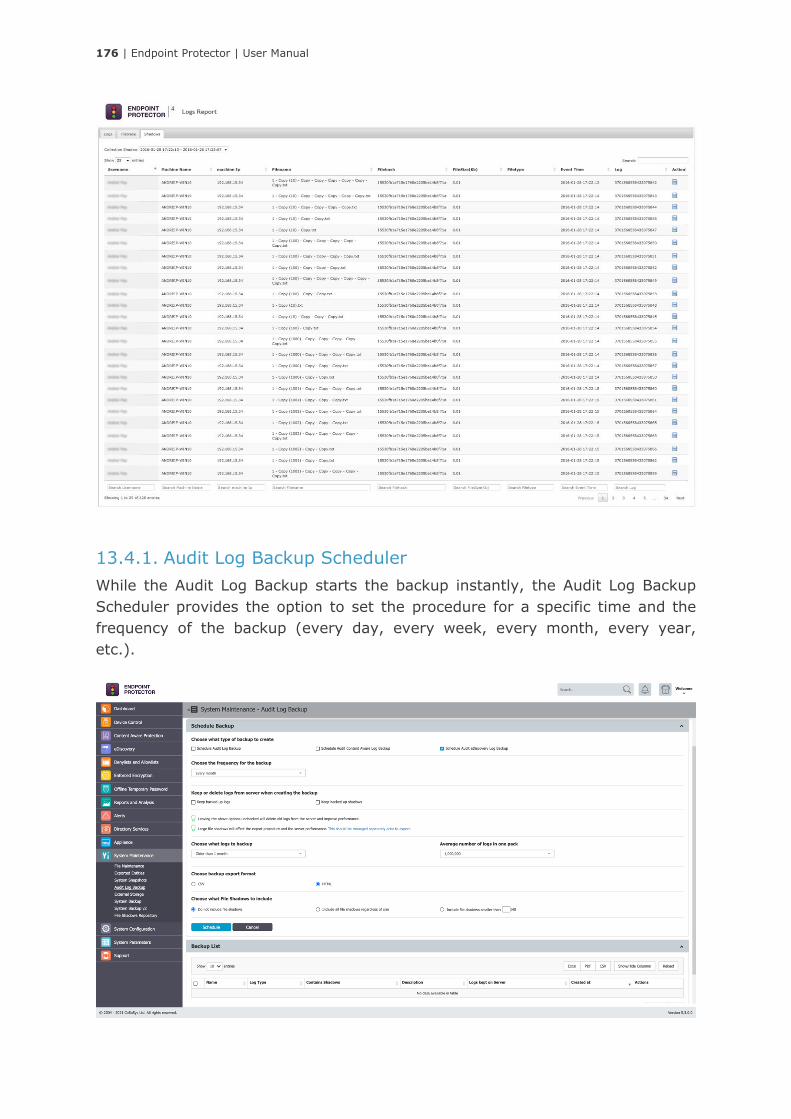
176 | Endpoint Protector | User Manual
13.4.1. Audit Log Backup Scheduler
While the Audit Log Backup starts the backup instantly, the Audit Log Backup
Scheduler provides the option to set the procedure for a specific time and the
frequency of the backup (every day, every week, every month, every year,
etc.).
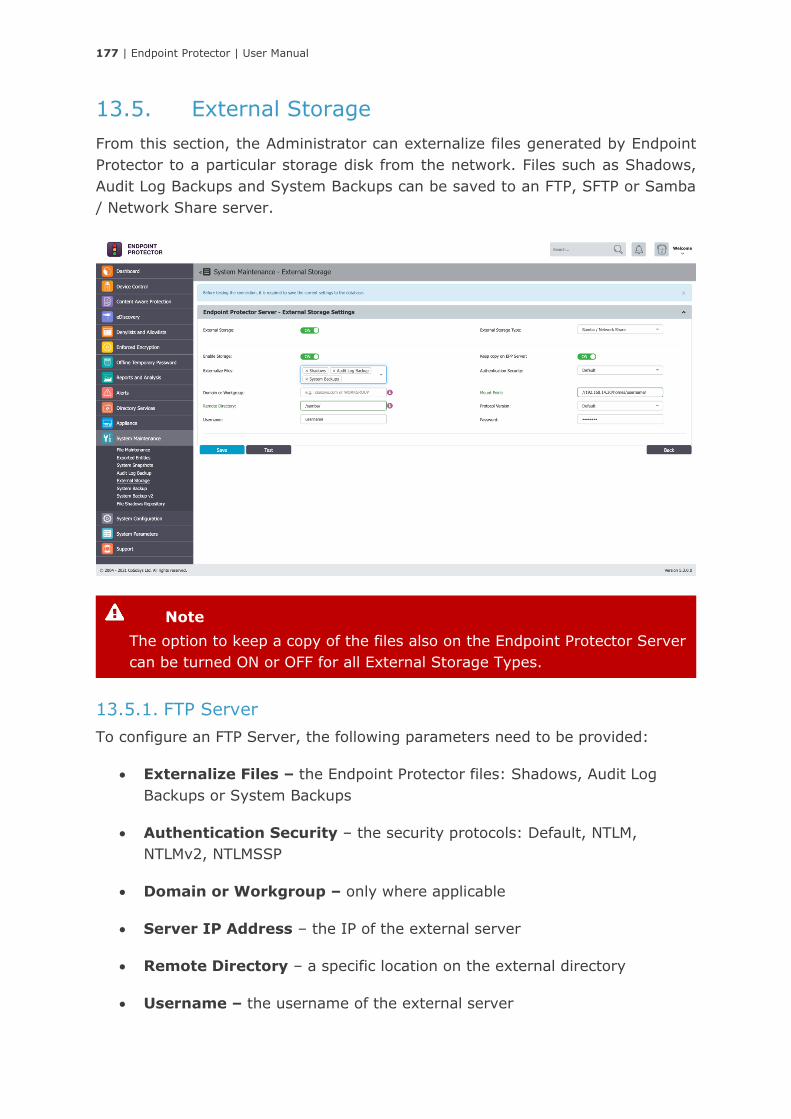
177 | Endpoint Protector | User Manual
13.5. External Storage
From this section, the Administrator can externalize files generated by Endpoint
Protector to a particular storage disk from the network. Files such as Shadows,
Audit Log Backups and System Backups can be saved to an FTP, SFTP or Samba
/ Network Share server.
13.5.1. FTP Server
To configure an FTP Server, the following parameters need to be provided:
• Externalize Files – the Endpoint Protector files: Shadows, Audit Log
Backups or System Backups
• Authentication Security – the security protocols: Default, NTLM,
NTLMv2, NTLMSSP
• Domain or Workgroup – only where applicable
• Server IP Address – the IP of the external server
• Remote Directory – a specific location on the external directory
• Username – the username of the external server
Note
The option to keep a copy of the files also on the Endpoint Protector Server
can be turned ON or OFF for all External Storage Types.
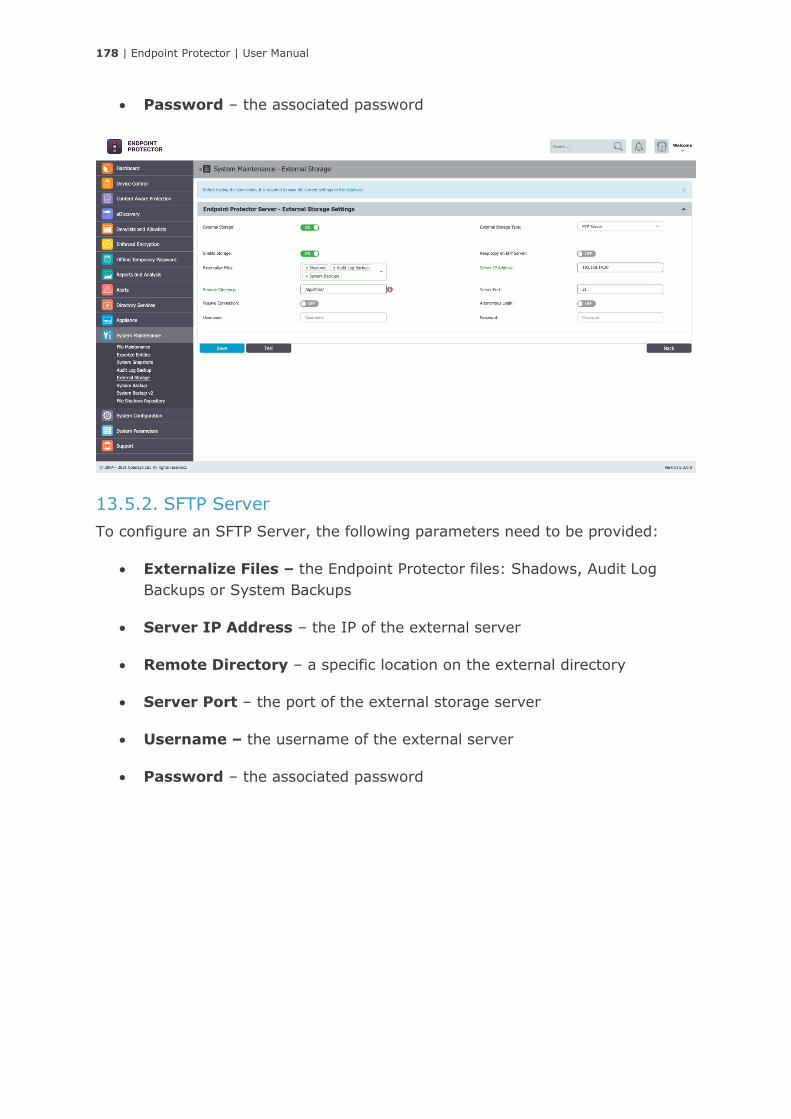
178 | Endpoint Protector | User Manual
• Password – the associated password
13.5.2. SFTP Server
To configure an SFTP Server, the following parameters need to be provided:
• Externalize Files – the Endpoint Protector files: Shadows, Audit Log
Backups or System Backups
• Server IP Address – the IP of the external server
• Remote Directory – a specific location on the external directory
• Server Port – the port of the external storage server
• Username – the username of the external server
• Password – the associated password

179 | Endpoint Protector | User Manual
13.5.3. Samba / Network Share Server
To configure a Samba / Network Share Server, the following parameters need to
be provided:
• Externalize Files – the Endpoint Protector files: Shadows, Audit Log
Backups or System Backups
• Authentication Security – the security protocols: Default, NTLM,
NTLMv2, NTLMSSP
• Domain or Workgroup – only where applicable
• Server IP Address – the IP of the external server
• Remote Directory – a specific location on the external directory
• Username – the username of the external server
• Password – the associated password
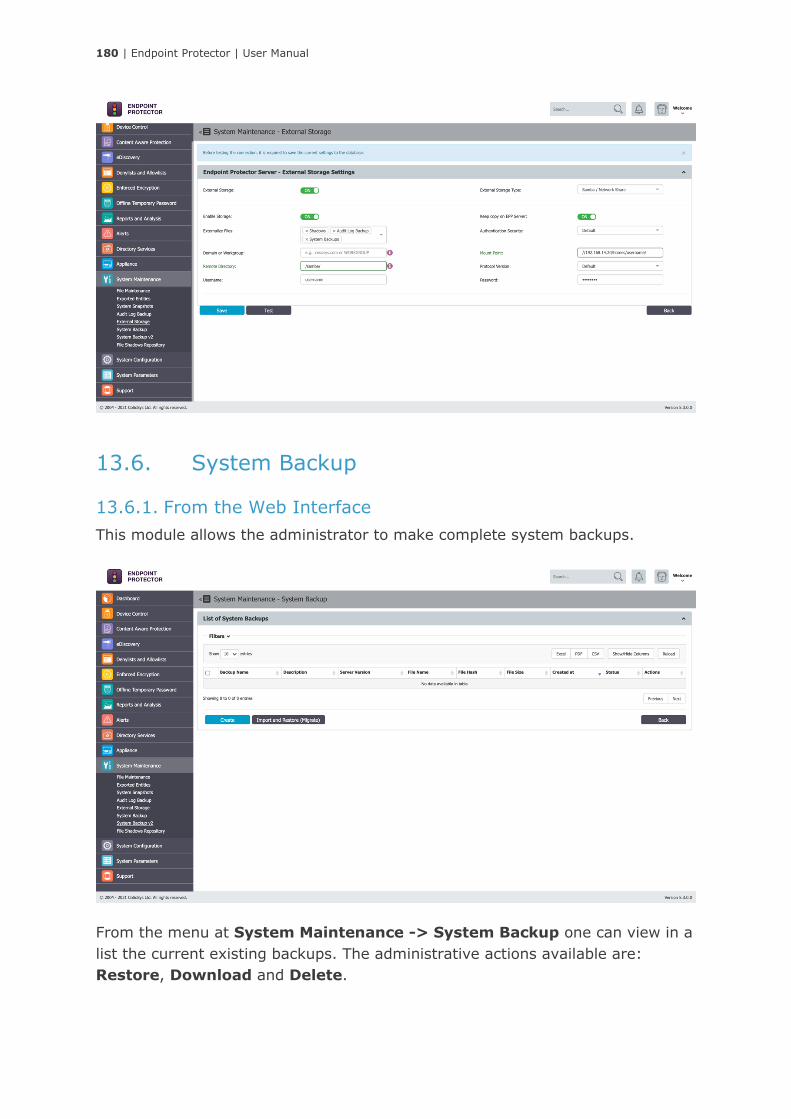
180 | Endpoint Protector | User Manual
13.6. System Backup
13.6.1. From the Web Interface
This module allows the administrator to make complete system backups.
From the menu at System Maintenance -> System Backup one can view in a
list the current existing backups. The administrative actions available are:
Restore, Download and Delete.
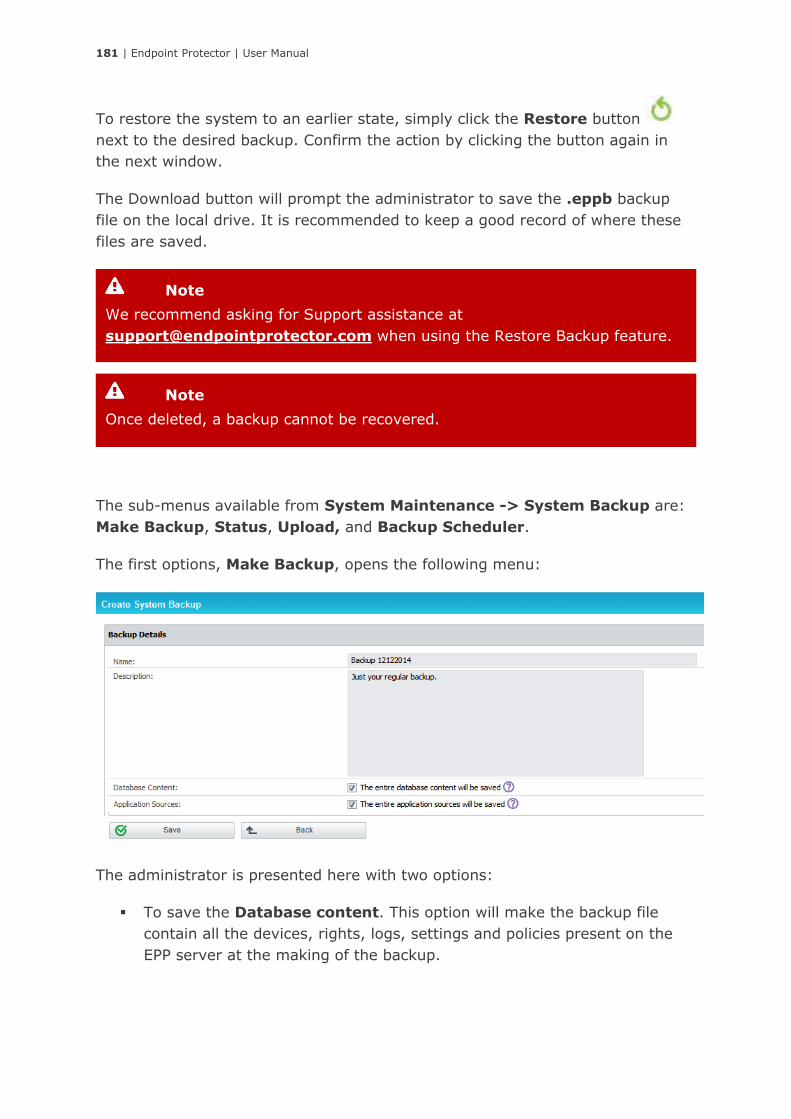
181 | Endpoint Protector | User Manual
To restore the system to an earlier state, simply click the Restore button
next to the desired backup. Confirm the action by clicking the button again in
the next window.
The Download button will prompt the administrator to save the .eppb backup
file on the local drive. It is recommended to keep a good record of where these
files are saved.
The sub-menus available from System Maintenance -> System Backup are:
Make Backup, Status, Upload, and Backup Scheduler.
The first options, Make Backup, opens the following menu:
The administrator is presented here with two options:
▪ To save the Database content. This option will make the backup file
contain all the devices, rights, logs, settings and policies present on the
EPP server at the making of the backup.
Note
Once deleted, a backup cannot be recovered.
Note
We recommend asking for Support assistance at
[email protected] when using the Restore Backup feature.

182 | Endpoint Protector | User Manual
▪ To save the Application sources. This option will make the backup
contain files such as the EPP clients and others related to the proper
functioning of the server.
The second menu, Status, returns the state of the system. If a backup creation
is in progress, it will be reported as seen below.
If the system is idle, the button will return the last known status, which by
default is set at 100% done.
The next menu, Upload, allows the administrator to populate the backup list
with .eppb files from the local filesystem. This functionality is useful in cases of
server migration or crash recovery. The view is as seen below:
Note
The System Backup will not contain nor preserve the IP Address, File
Shadowing copies or the Temporary Logs Files.
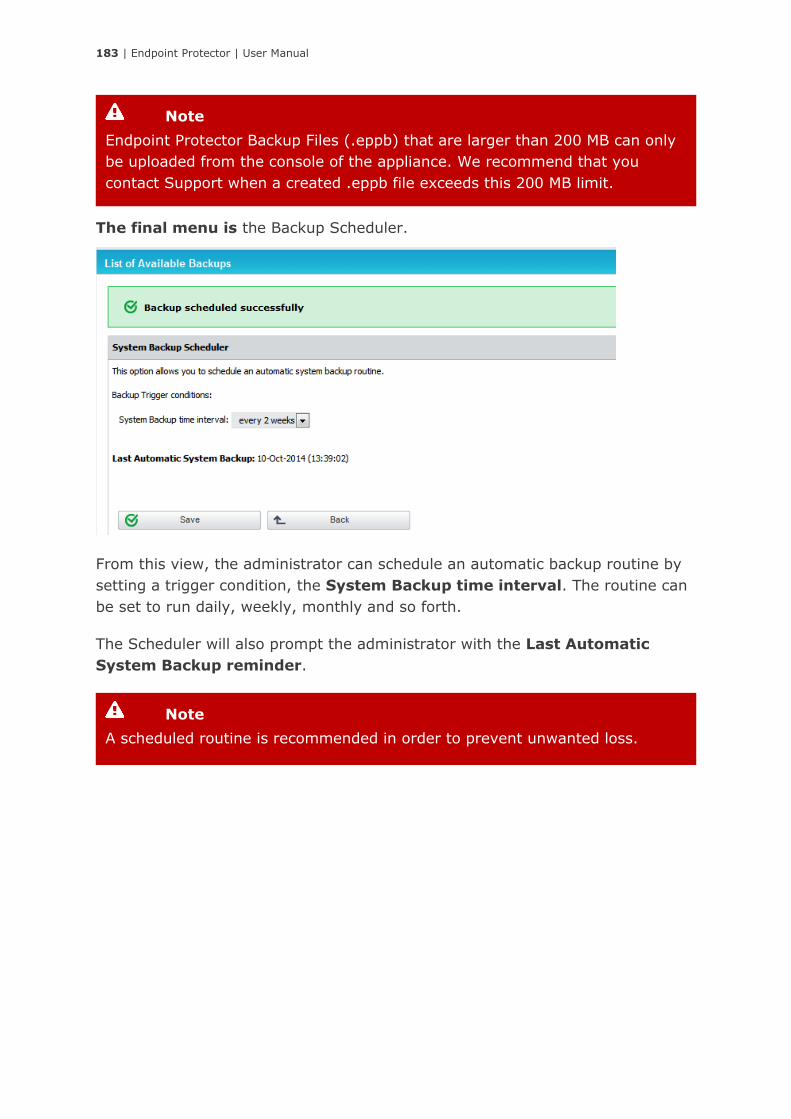
183 | Endpoint Protector | User Manual
The final menu is the Backup Scheduler.
From this view, the administrator can schedule an automatic backup routine by
setting a trigger condition, the System Backup time interval. The routine can
be set to run daily, weekly, monthly and so forth.
The Scheduler will also prompt the administrator with the Last Automatic
System Backup reminder.
Note
A scheduled routine is recommended in order to prevent unwanted loss.
Note
Endpoint Protector Backup Files (.eppb) that are larger than 200 MB can only
be uploaded from the console of the appliance. We recommend that you
contact Support when a created .eppb file exceeds this 200 MB limit.
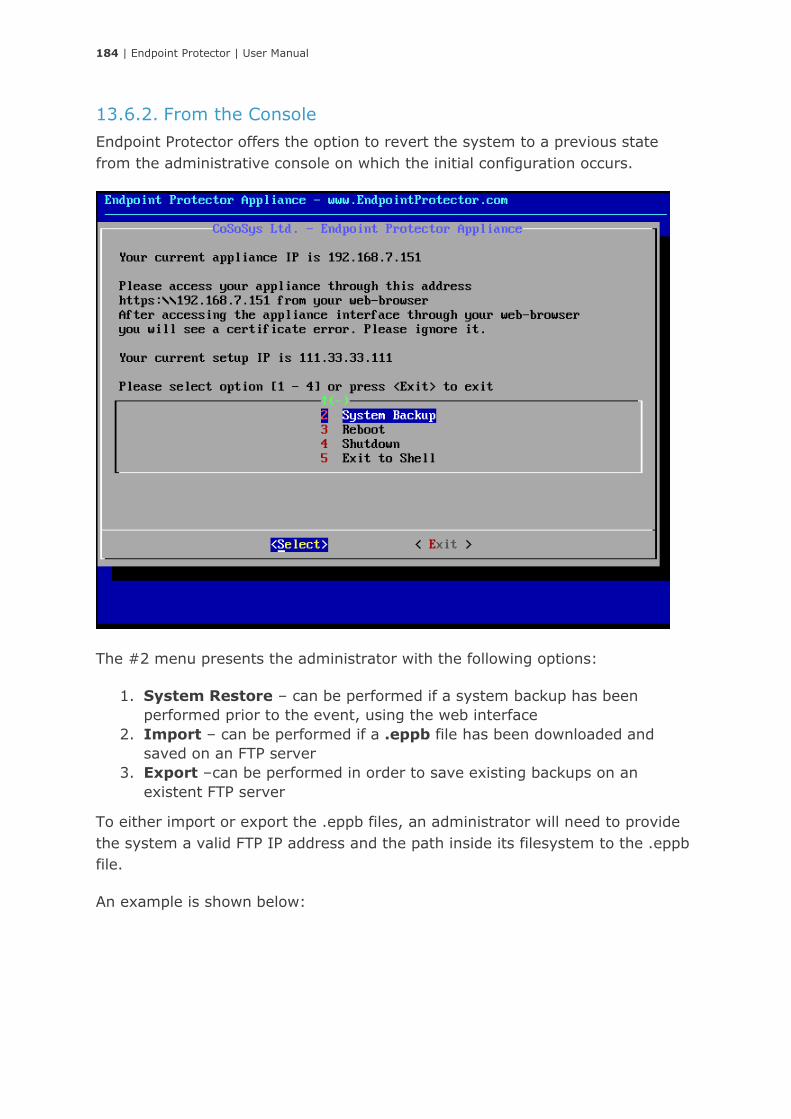
184 | Endpoint Protector | User Manual
13.6.2. From the Console
Endpoint Protector offers the option to revert the system to a previous state
from the administrative console on which the initial configuration occurs.
The #2 menu presents the administrator with the following options:
1. System Restore – can be performed if a system backup has been
performed prior to the event, using the web interface
2. Import – can be performed if a .eppb file has been downloaded and
saved on an FTP server
3. Export –can be performed in order to save existing backups on an
existent FTP server
To either import or export the .eppb files, an administrator will need to provide
the system a valid FTP IP address and the path inside its filesystem to the .eppb
file.
An example is shown below:
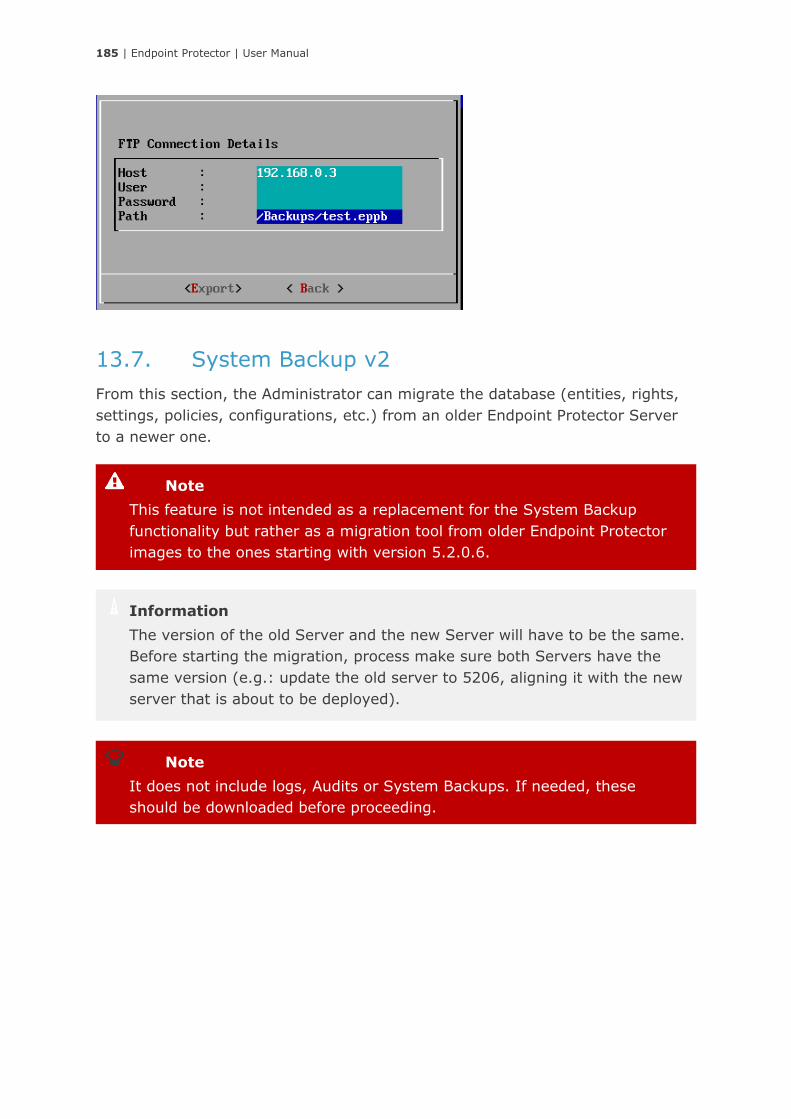
185 | Endpoint Protector | User Manual
13.7. System Backup v2
From this section, the Administrator can migrate the database (entities, rights,
settings, policies, configurations, etc.) from an older Endpoint Protector Server
to a newer one.
Note
It does not include logs, Audits or System Backups. If needed, these
should be downloaded before proceeding.
Information
The version of the old Server and the new Server will have to be the same.
Before starting the migration, process make sure both Servers have the
same version (e.g.: update the old server to 5206, aligning it with the new
server that is about to be deployed).
Note
This feature is not intended as a replacement for the System Backup
functionality but rather as a migration tool from older Endpoint Protector
images to the ones starting with version 5.2.0.6.
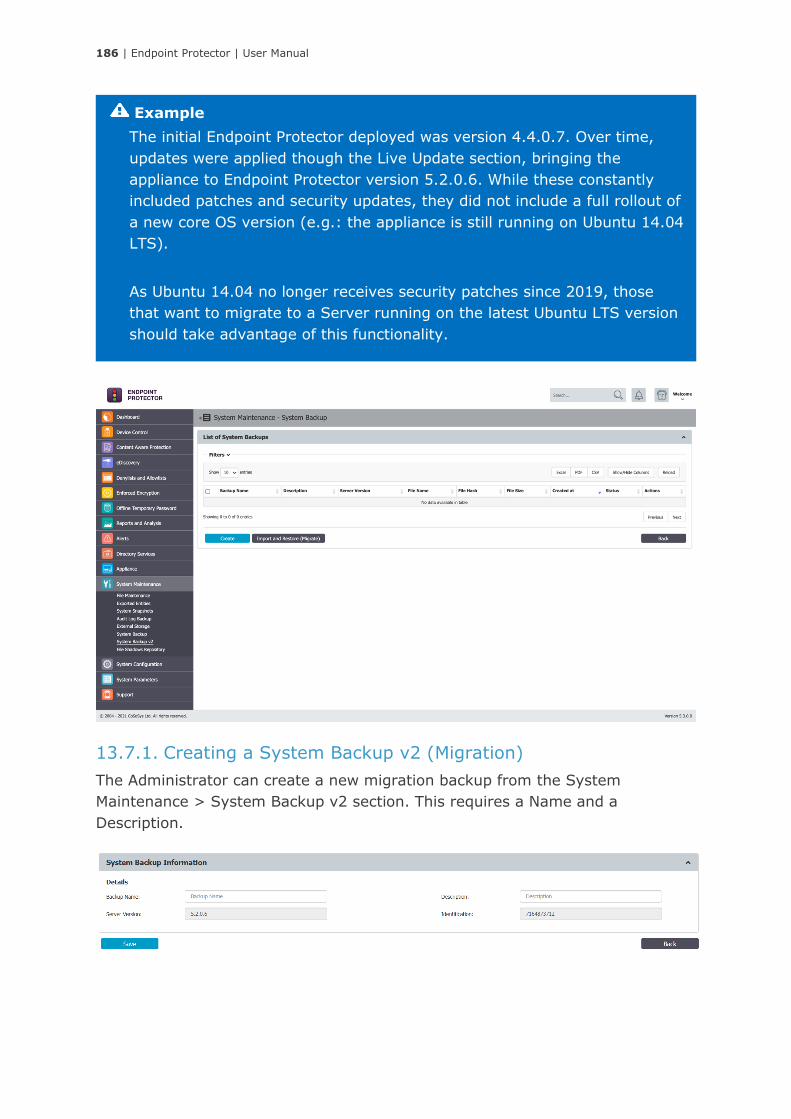
186 | Endpoint Protector | User Manual
13.7.1. Creating a System Backup v2 (Migration)
The Administrator can create a new migration backup from the System
Maintenance > System Backup v2 section. This requires a Name and a
Description.
Example
The initial Endpoint Protector deployed was version 4.4.0.7. Over time,
updates were applied though the Live Update section, bringing the
appliance to Endpoint Protector version 5.2.0.6. While these constantly
included patches and security updates, they did not include a full rollout of
a new core OS version (e.g.: the appliance is still running on Ubuntu 14.04
LTS).
As Ubuntu 14.04 no longer receives security patches since 2019, those
that want to migrate to a Server running on the latest Ubuntu LTS version
should take advantage of this functionality.
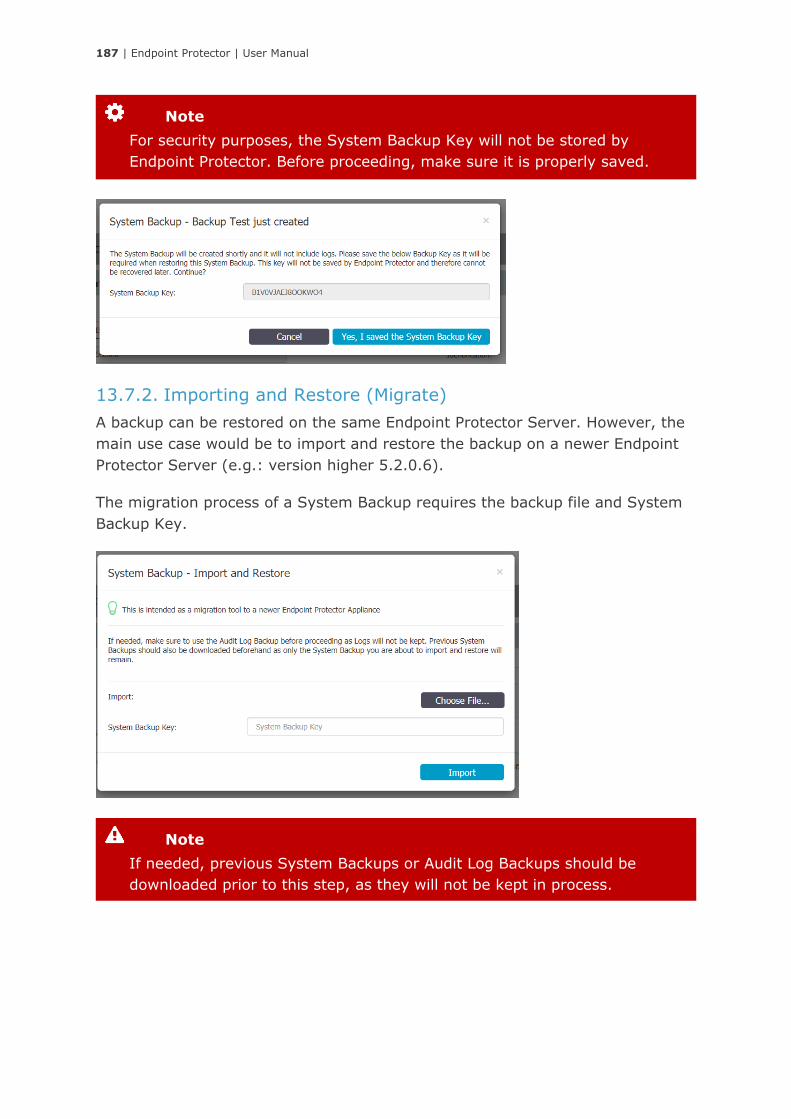
187 | Endpoint Protector | User Manual
13.7.2. Importing and Restore (Migrate)
A backup can be restored on the same Endpoint Protector Server. However, the
main use case would be to import and restore the backup on a newer Endpoint
Protector Server (e.g.: version higher 5.2.0.6).
The migration process of a System Backup requires the backup file and System
Backup Key.
Note
If needed, previous System Backups or Audit Log Backups should be
downloaded prior to this step, as they will not be kept in process.
Note
For security purposes, the System Backup Key will not be stored by
Endpoint Protector. Before proceeding, make sure it is properly saved.
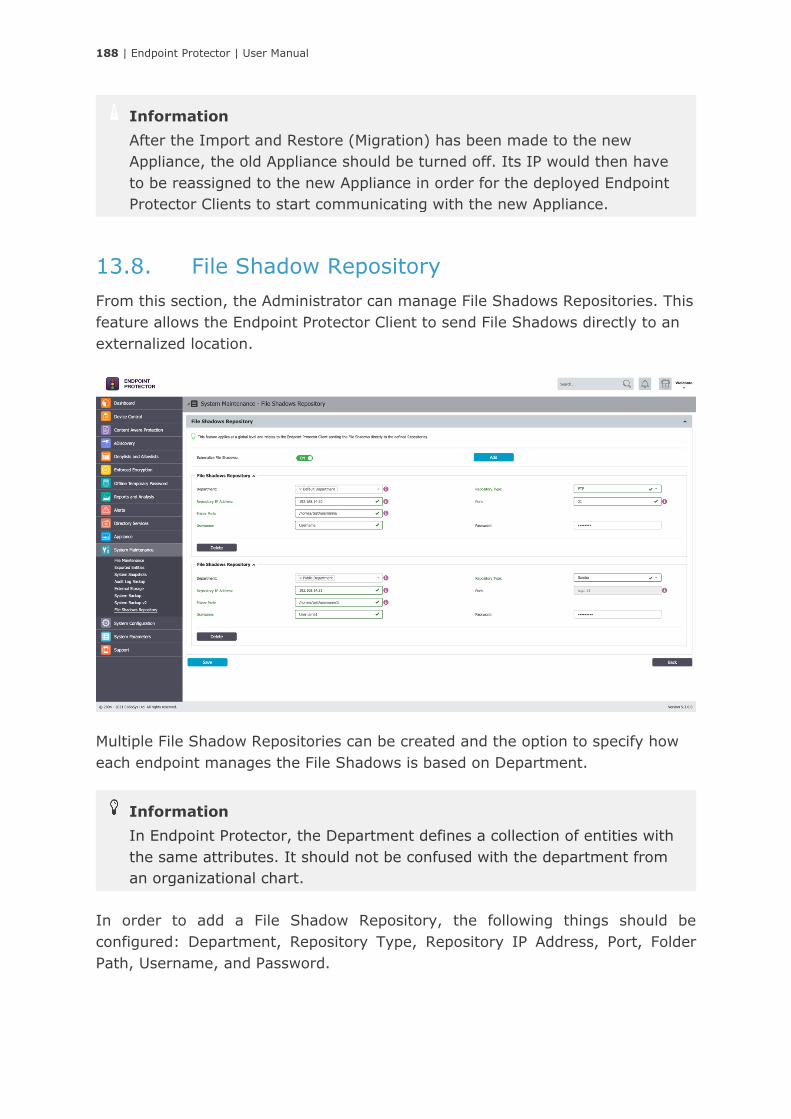
188 | Endpoint Protector | User Manual
13.8. File Shadow Repository
From this section, the Administrator can manage File Shadows Repositories. This
feature allows the Endpoint Protector Client to send File Shadows directly to an
externalized location.
Multiple File Shadow Repositories can be created and the option to specify how
each endpoint manages the File Shadows is based on Department.
In order to add a File Shadow Repository, the following things should be
configured: Department, Repository Type, Repository IP Address, Port, Folder
Path, Username, and Password.
Information
In Endpoint Protector, the Department defines a collection of entities with
the same attributes. It should not be confused with the department from
an organizational chart.
Information
After the Import and Restore (Migration) has been made to the new
Appliance, the old Appliance should be turned off. Its IP would then have
to be reassigned to the new Appliance in order for the deployed Endpoint
Protector Clients to start communicating with the new Appliance.

189 | Endpoint Protector | User Manual
Information
Depending on the Repository Type – FTP or Samba – the Port may not be
required and will be greyed out.

190 | Endpoint Protector | User Manual
14. System Configuration
This section contains the Endpoint Protector Clients, System Licensing and other
advanced settings, which influence the functionality and stability of the system.
14.1. Client Software
From this section, the administrator can download and install the Endpoint
Protector Client corresponding to the used operating system.
Information
The Server and Client communicate through port 443.

191 | Endpoint Protector | User Manual
14.2. Client Software Upgrade
From this section, the Administrator can perform an automatic update of the
installed Endpoint Protector Client.
The button under the Actions column allows setting the default Endpoint
Protector Client version that will be available for download under the Client
Software section.
14.3. Client Uninstall
From this section, the Administrator can perform a remote uninstall of the
Endpoint Protector Client.
Note
The feature is not available for Linux clients. Also, for really old versions
(e.g. Windows Client version lower than 4.0.1.4), the update will not work.
Tips
The Windows Client installers offer the option to download the package
with or without add-ons. This option fixes any incompatibility that may
arise between Endpoint Protector and the specific solutions.
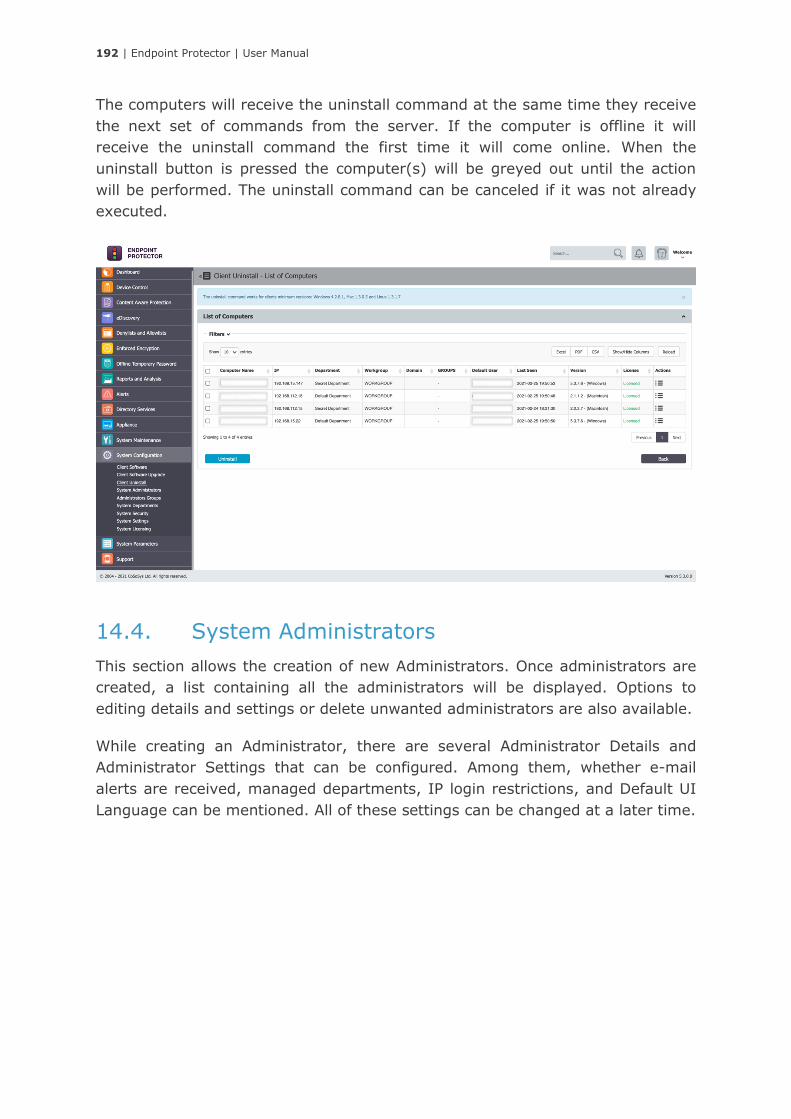
192 | Endpoint Protector | User Manual
The computers will receive the uninstall command at the same time they receive
the next set of commands from the server. If the computer is offline it will
receive the uninstall command the first time it will come online. When the
uninstall button is pressed the computer(s) will be greyed out until the action
will be performed. The uninstall command can be canceled if it was not already
executed.
14.4. System Administrators
This section allows the creation of new Administrators. Once administrators are
created, a list containing all the administrators will be displayed. Options to
editing details and settings or delete unwanted administrators are also available.
While creating an Administrator, there are several Administrator Details and
Administrator Settings that can be configured. Among them, whether e-mail
alerts are received, managed departments, IP login restrictions, and Default UI
Language can be mentioned. All of these settings can be changed at a later time.

193 | Endpoint Protector | User Manual
Account is active
If ON, the account will be enabled
Super Administrator
If ON, the account will be considered a Super Administrator, having access to all
Departments and all sections of Endpoint Protector.
Ignore AD Authentication
If ON, the AD credentials can be used to login to Endpoint Protector
Two Factor Authentication
If ON, 2FA will be enforced using Google Authenticator
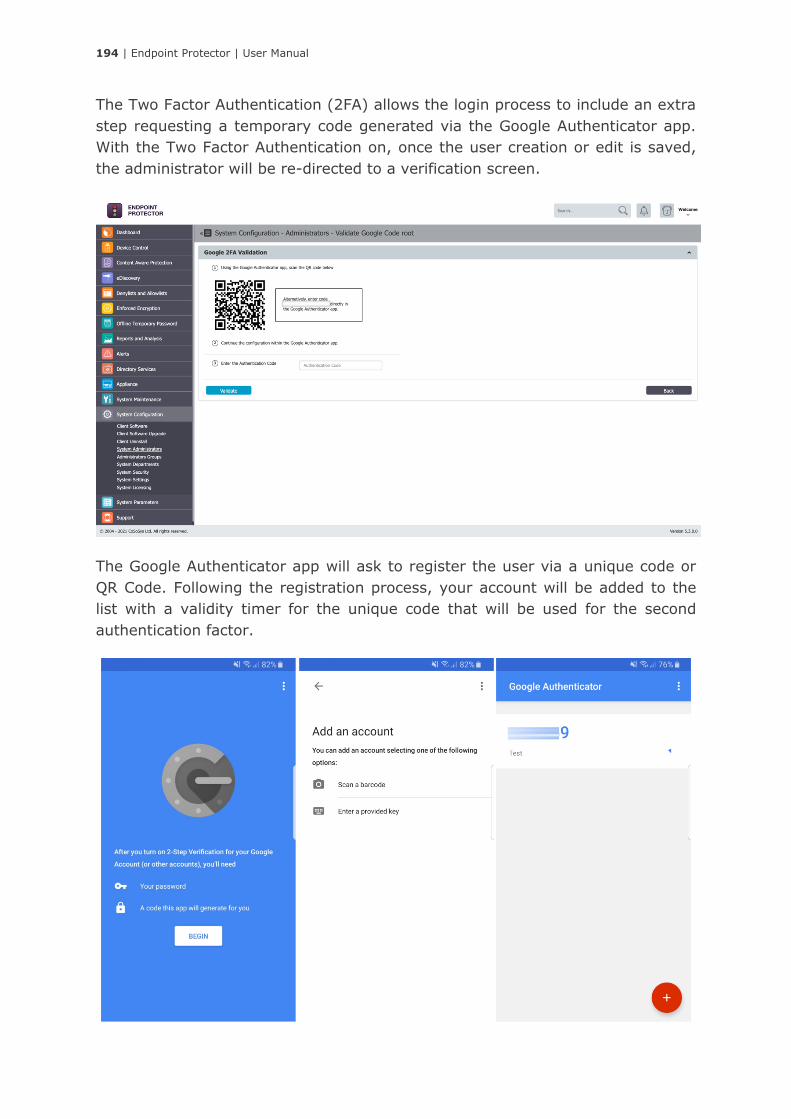
194 | Endpoint Protector | User Manual
The Two Factor Authentication (2FA) allows the login process to include an extra
step requesting a temporary code generated via the Google Authenticator app.
With the Two Factor Authentication on, once the user creation or edit is saved,
the administrator will be re-directed to a verification screen.
The Google Authenticator app will ask to register the user via a unique code or
QR Code. Following the registration process, your account will be added to the
list with a validity timer for the unique code that will be used for the second
authentication factor.

195 | Endpoint Protector | User Manual
Note
All administrators imported from an AD Admin Group will automatically be
Super Administrators. These will have to be changed to different roles after
the sync.
For more information on how to allow AD Authentication for
Administrators, please see paragraph 14.8.7 Active Directory
Authentication.
Information
If the Super Administrator option is enabled, the Administrator will have
full privileges over the entire system.
If the Super Administrator option is not enabled, the Administrator will
have normal privileges and will be restricted from certain things in the
system (e.g.: the administrator will only be able to manage the entities
belonging to the system departments he is managing). These will be
Normal Administrators.
Normal Administrators can be restricted even further by taking advantage
of various roles. For a more restrictive access, the Normal Administrators
would have to be included into Administrators Groups, each having a
specific role attached to them (e.g.: Administrators can be added into a
Helpdesk group, having the Offline Temporary Password and Enforced
Encryption roles or limit the Administrator rights to various modules,
Content Aware, Device Control etc.)

196 | Endpoint Protector | User Manual
14.5. Administrators Groups
This section allows the creation and management of Administrators Groups,
providing Normal Administrators with various access roles (e.g.: Offline
Temporary Password Administrators, EasyLock Administrators, Reports and
Analysis Administrators, Maintenance Administrators, etc.).
The main information needed to create such a group is to give it a name, a
description, select the roles and, select the Administrators that will be part of the
group.
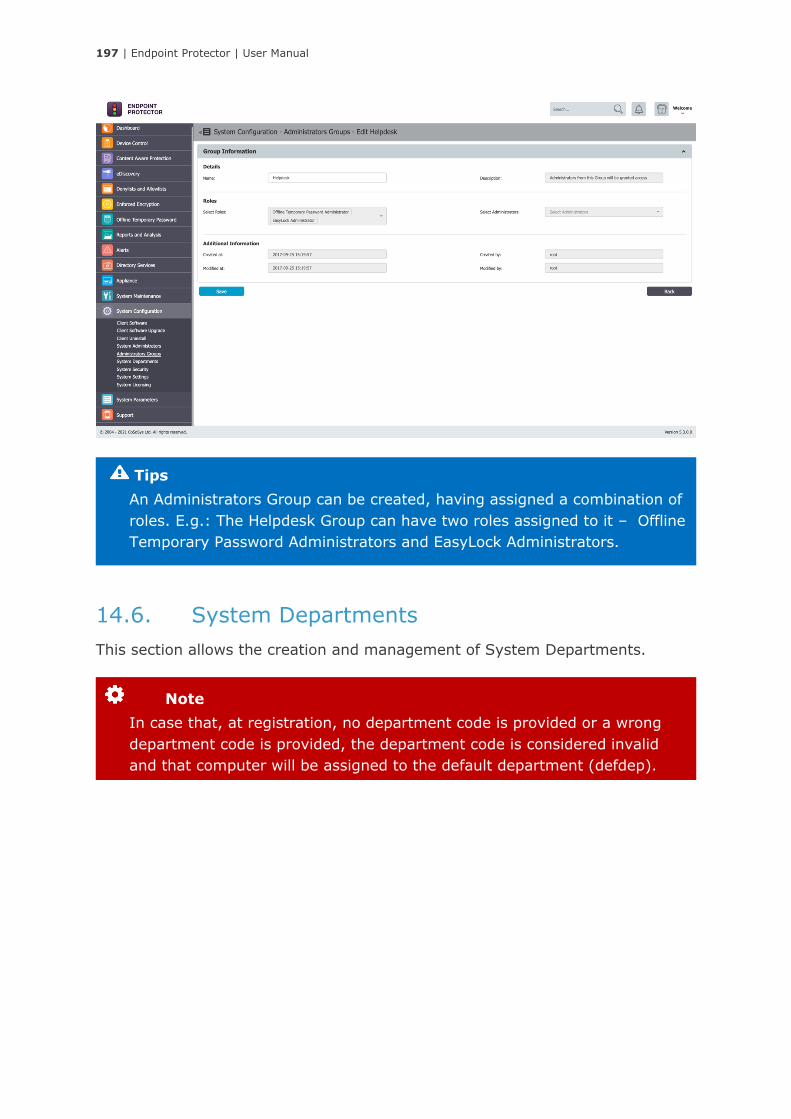
197 | Endpoint Protector | User Manual
14.6. System Departments
This section allows the creation and management of System Departments.
Note
In case that, at registration, no department code is provided or a wrong
department code is provided, the department code is considered invalid
and that computer will be assigned to the default department (defdep).
Tips
An Administrators Group can be created, having assigned a combination of
roles. E.g.: The Helpdesk Group can have two roles assigned to it – Offline
Temporary Password Administrators and EasyLock Administrators.
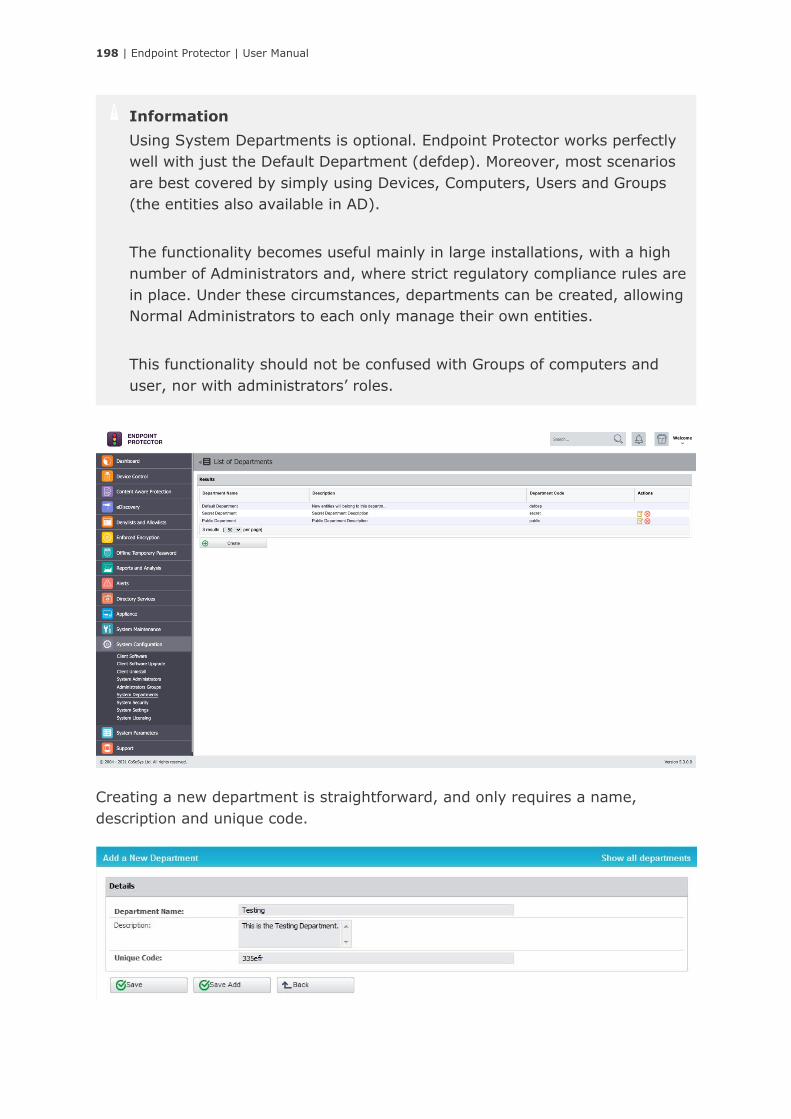
198 | Endpoint Protector | User Manual
Creating a new department is straightforward, and only requires a name,
description and unique code.
Information
Using System Departments is optional. Endpoint Protector works perfectly
well with just the Default Department (defdep). Moreover, most scenarios
are best covered by simply using Devices, Computers, Users and Groups
(the entities also available in AD).
The functionality becomes useful mainly in large installations, with a high
number of Administrators and, where strict regulatory compliance rules are
in place. Under these circumstances, departments can be created, allowing
Normal Administrators to each only manage their own entities.
This functionality should not be confused with Groups of computers and
user, nor with administrators’ roles.
199 | Endpoint Protector | User Manual
In terms of terminology, a similarity between Endpoint Protector and Active
Directory (or any other Director Service software) would make the Department
equivalent to an Organization Unit. Of course, the Organization Unit is not
identical to Department, and again Endpoint Protector leaves the power to the
actual Super Administrator to virtually link one or more Organization Units to an
Endpoint Protector Department.
Each entity (e.g.: computer) must belong to a department. When deploying the
Endpoint Protector Client, if a department having the given code is found, then
the computer will register, and it will belong to that department.
Super Administrators (e.g.: root) will have access to all the main entities
regardless of their departments. They will also be able to create departments, as
well as Normal Administrators or Administrators with other roles. Super
Administrators will also be responsible for assigning administrators to manage
departments.
A regular administrator can only manage the departments it was assigned to. It
cannot see entities relating to other departments.
14.7. System Security
From this section, the Administrator can configure several security settings such
as set a client uninstall password, restrict the access to sensitive information
only to super administrators, set a password protection on that sensitive data,
enforce all administrators’ password security at next login and password
expiration options.
Example
Computer Test-PC is registered to department “developers”. In this case,
user Test logged on that computer will be assigned to the same
department together with the devices connected on the computer Test-PC.
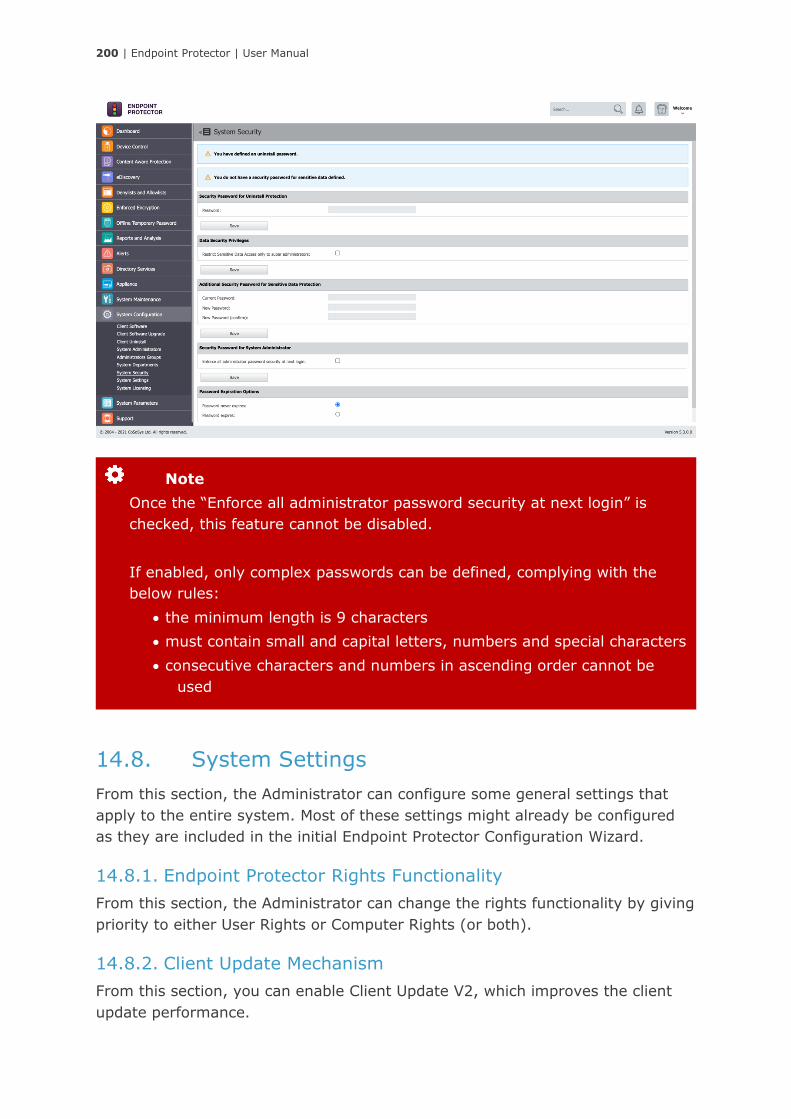
200 | Endpoint Protector | User Manual
14.8. System Settings
From this section, the Administrator can configure some general settings that
apply to the entire system. Most of these settings might already be configured
as they are included in the initial Endpoint Protector Configuration Wizard.
14.8.1. Endpoint Protector Rights Functionality
From this section, the Administrator can change the rights functionality by giving
priority to either User Rights or Computer Rights (or both).
14.8.2. Client Update Mechanism
From this section, you can enable Client Update V2, which improves the client
update performance.
Note
Once the “Enforce all administrator password security at next login” is
checked, this feature cannot be disabled.
If enabled, only complex passwords can be defined, complying with the
below rules:
• the minimum length is 9 characters
• must contain small and capital letters, numbers and special characters
• consecutive characters and numbers in ascending order cannot be
used

201 | Endpoint Protector | User Manual
14.8.3. Log Settings
From this section, the Administrator can set the number of rows in millions for a
Logs Report CSV. Every row coincides with one log. For example, setting 1.0 will
export about 1 million logs in the CSV export.
14.8.4. Content Aware Protection – Report all sensitive information
By enabling this setting, Endpoint Protector will log all sensitive information
found in the scanned files up to the limit set in the Maximum number of reported
threats field.
14.8.5. Deep Packet Inspection Certificate
For more details about this feature, please reach Deep Packet Inspection section.
14.8.6. Server Certificate Stack
This section allows the Administrator to make certificate changes.
Use FQDN in subject allows the administrator to set an FQDN for the common
name that is used in certificates.
Regenerate Server Certificate Stack will regenerate the server and the CA
Certificate that is used for Deep Packet Inspection on macOS.
This new setting is valid for macOS 12.0 or higher, but when regenerating the
CA certificate, it must be replaced on macOS 11.0 as well, because this macOS
also uses a CA certificate.
Note
Notice that Limit Reporting settings has priority over Report all sensitive
information setting. If Limit Reporting is active, the reporting will stop when
the threshold is fulfilled.
Information
When having partitions for logs on the server, make sure the dates are
also selected when making the export.
..
Note
If a custom hostname is used, fill the dedicated field.
202 | Endpoint Protector | User Manual
14.8.7. Active Directory Authentication
This section allows an AD group of administrators to be imported into Endpoint
Protector as Super Administrators. If the Enable Active Directory Authentication
is checked, these administrators can use their AD credentials to log in to
Endpoint Protector.
The process is straight forward and can be summarized in 4 simple steps:
• Input all credentials and requested information
• Scroll to the bottom of the page and save the changes
• Return to the Active Directory Authentication section of the page and
press the Test Connection button to verify everything is working as
expected
• Press the Sync AD Administrators button
Example
The green confirmation messages that appears at the top of the page will
confirm the save was successful.
Information
The settings needed are the same as for the Directory Services
section. For more details, please see chapter 11 Directory Services.
Note
macOS 11.0 (and higher) also uses a CA Certificate. Therefore, after
regenerating the CA certificate, ensure that it is downloaded again for macOS
11.0 (or higher) and added to System -> Keychain Access.
Note
If no instance of macOS 12.0 (or higher) is registered on the Endpoint
Protector server, this setting should not be used.

203 | Endpoint Protector | User Manual
14.8.8. Proxy Settings
This section provides the option to configure a proxy, as seen below.
The required information is IP (Proxy Server IP) and optional, Username and
Password (Proxy access credentials)
Note
If a Proxy Server is not configured, Endpoint Protector will connect directly
to liveupdate.endpointprotector.com.
Note
Once the Active Directory Administrators Group has been defined, only
users that are part of this AD group will be synced and imported as Super
Administrators for Endpoint Protector. Any additional administrators (with
different access control levels) can be created manually from the System
Administrators section.
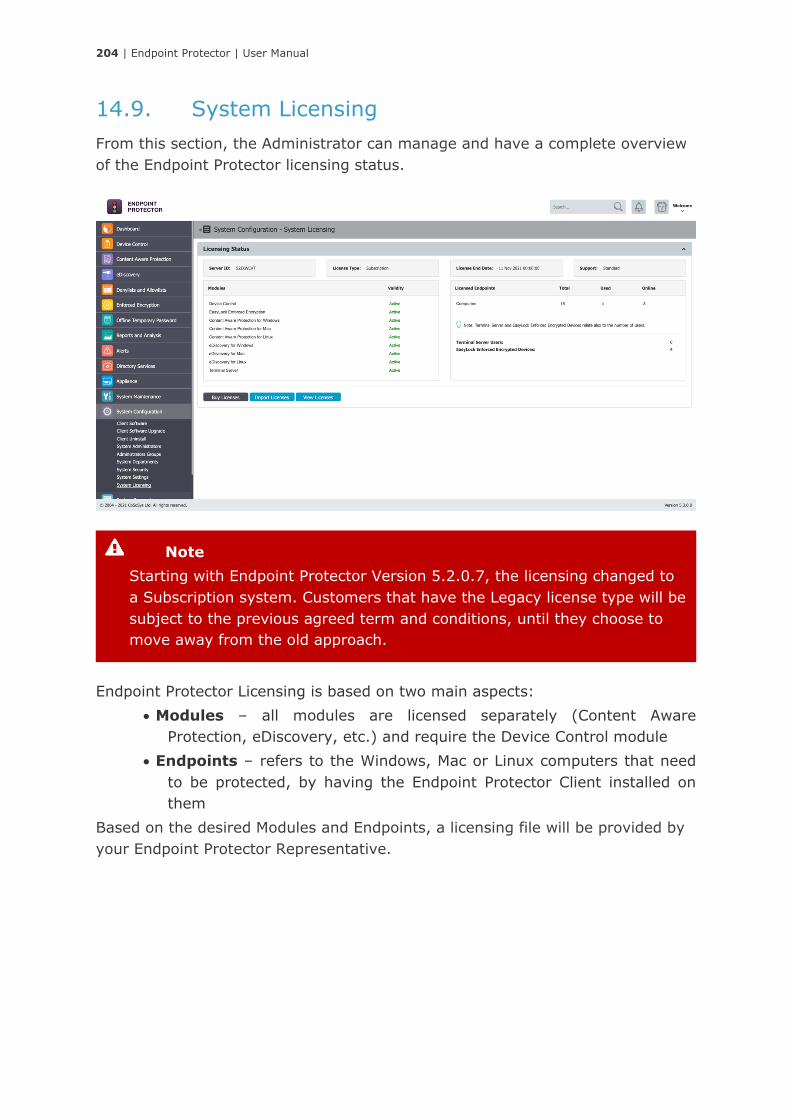
204 | Endpoint Protector | User Manual
14.9. System Licensing
From this section, the Administrator can manage and have a complete overview
of the Endpoint Protector licensing status.
Endpoint Protector Licensing is based on two main aspects:
• Modules – all modules are licensed separately (Content Aware
Protection, eDiscovery, etc.) and require the Device Control module
• Endpoints – refers to the Windows, Mac or Linux computers that need
to be protected, by having the Endpoint Protector Client installed on
them
Based on the desired Modules and Endpoints, a licensing file will be provided by
your Endpoint Protector Representative.
Note
Starting with Endpoint Protector Version 5.2.0.7, the licensing changed to
a Subscription system. Customers that have the Legacy license type will be
subject to the previous agreed term and conditions, until they choose to
move away from the old approach.
205 | Endpoint Protector | User Manual
14.9.1. Free Trial
Endpoint Protector provides a one-time free, 30-day trial period. It can be
activated by pushing the Free Trial button.
This will automatically enable all modules for 50 computers. The endpoint
licenses will be assigned on a “first-in-first-served” basis.
In case that one or more licensed endpoints become inactive and need to be
reassigned, the administrator can release those licenses, which will automatically
be reassigned to other online computers.
14.9.2. Import and manage Licenses
The Import Licenses button will allow browsing for the license file. It contains
all the relevant information in a single file (modules, number of endpoints,
expiry date, type of Support, etc.).
The View Licenses button will allow the management of the endpoint licenses.
Information
The Endpoint Protector Server ID uniquely identifies each server and is
linked to the license file. This needs to be provided to the Endpoint
Protector Representative before purchasing the licenses.
The License End Date displays the Validity of the Licenses in the system.
The Support represents the level of purchased Support (Standard or
Premium)
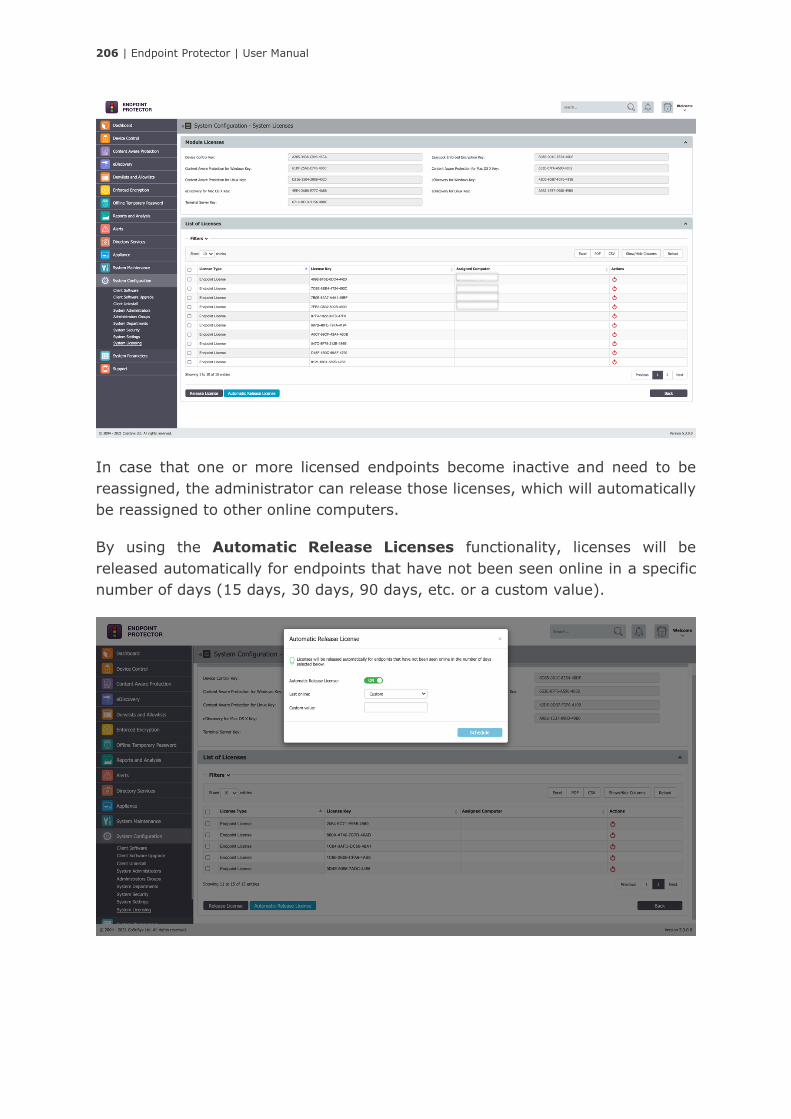
206 | Endpoint Protector | User Manual
In case that one or more licensed endpoints become inactive and need to be
reassigned, the administrator can release those licenses, which will automatically
be reassigned to other online computers.
By using the Automatic Release Licenses functionality, licenses will be
released automatically for endpoints that have not been seen online in a specific
number of days (15 days, 30 days, 90 days, etc. or a custom value).
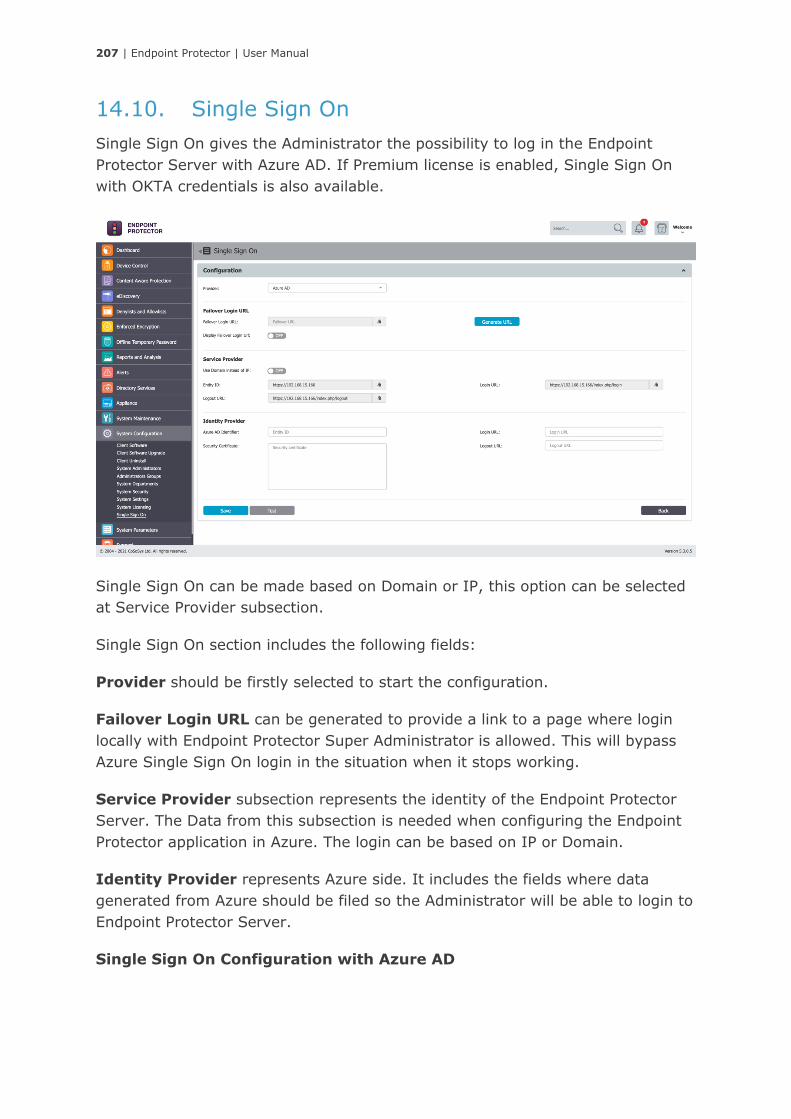
207 | Endpoint Protector | User Manual
14.10. Single Sign On
Single Sign On gives the Administrator the possibility to log in the Endpoint
Protector Server with Azure AD. If Premium license is enabled, Single Sign On
with OKTA credentials is also available.
Single Sign On can be made based on Domain or IP, this option can be selected
at Service Provider subsection.
Single Sign On section includes the following fields:
Provider should be firstly selected to start the configuration.
Failover Login URL can be generated to provide a link to a page where login
locally with Endpoint Protector Super Administrator is allowed. This will bypass
Azure Single Sign On login in the situation when it stops working.
Service Provider subsection represents the identity of the Endpoint Protector
Server. The Data from this subsection is needed when configuring the Endpoint
Protector application in Azure. The login can be based on IP or Domain.
Identity Provider represents Azure side. It includes the fields where data
generated from Azure should be filed so the Administrator will be able to login to
Endpoint Protector Server.
Single Sign On Configuration with Azure AD

208 | Endpoint Protector | User Manual
1. To activate Single Sign on, reach System Configuration -> System
Settings -> Single Sign On. Upon the activation, a drop down will be
displayed in order a Failover Login User to be selected. Root user will be
selected by default.
After the above steps have been completed, a Single Sign On subsection
is displayed in the System Configuration section.
2. Select the Provider in order Single Sign On subsections to be displayed.
Note
The selected Failover Login User cannot be deleted from Endpoint Protector
Server while it is selected.
Single Sign On cannot be activated without a Failover Login User.
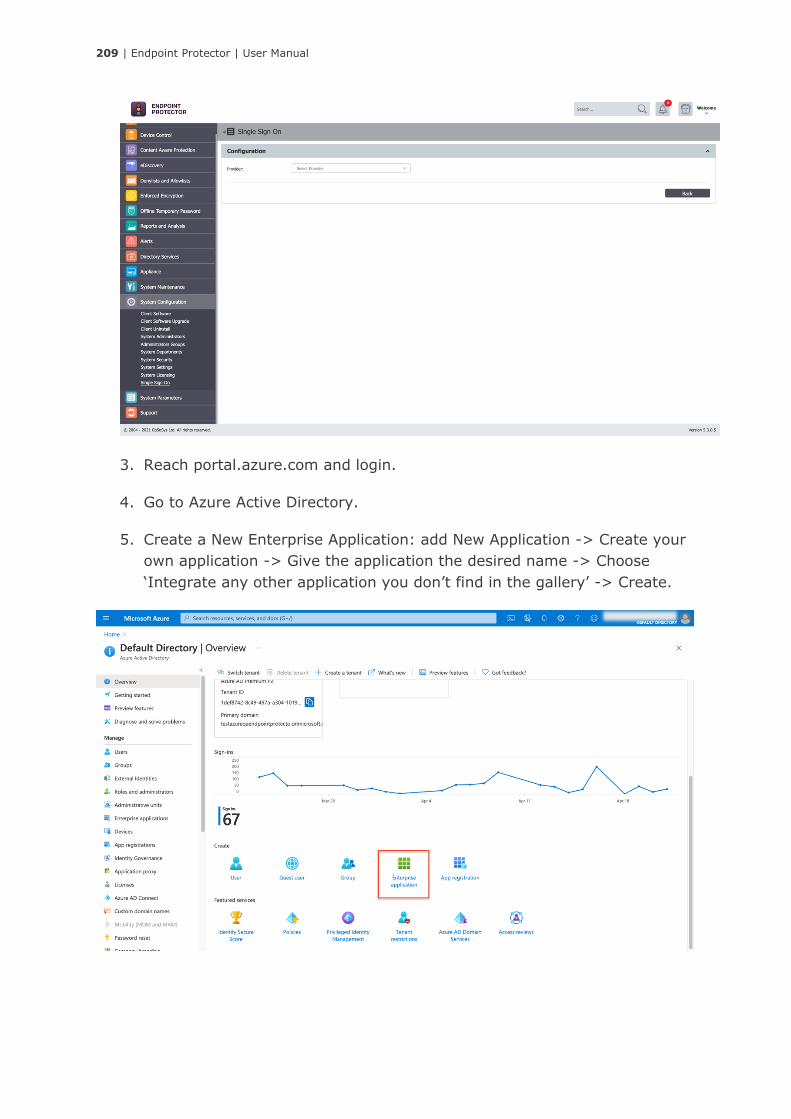
209 | Endpoint Protector | User Manual
3. Reach portal.azure.com and login.
4. Go to Azure Active Directory.
5. Create a New Enterprise Application: add New Application -> Create your
own application -> Give the application the desired name -> Choose
‘Integrate any other application you don’t find in the gallery’ -> Create.
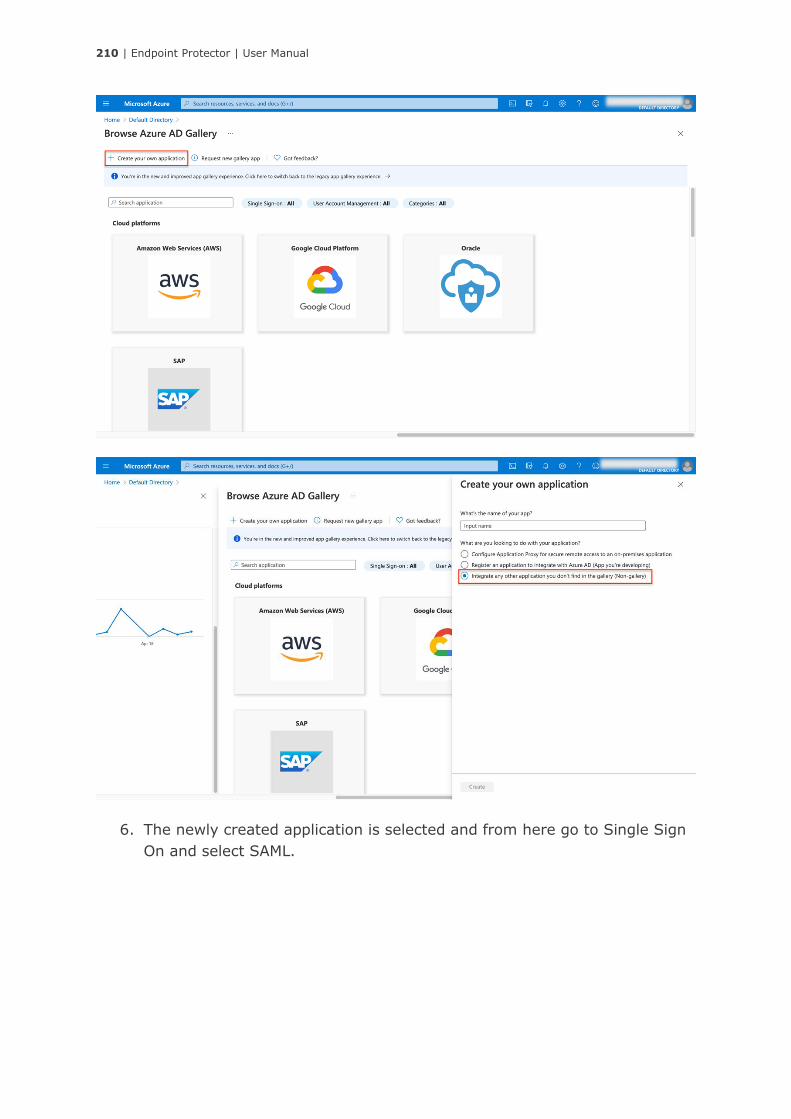
210 | Endpoint Protector | User Manual
6. The newly created application is selected and from here go to Single Sign
On and select SAML.
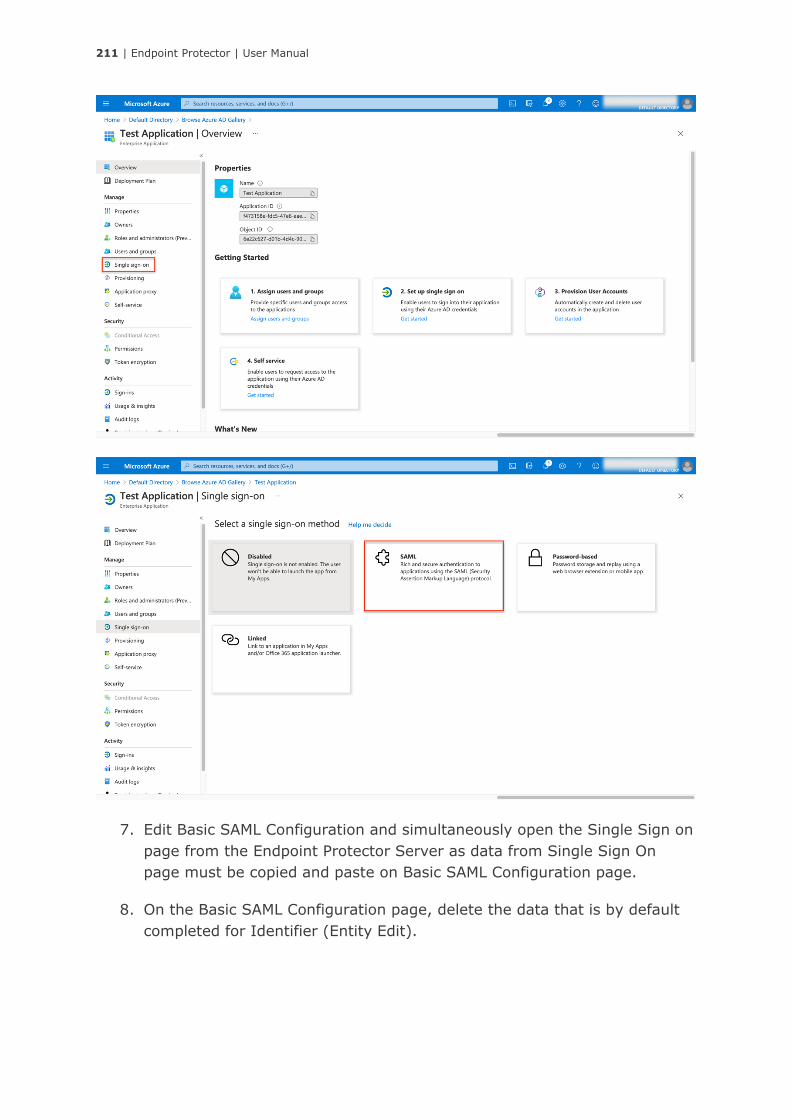
211 | Endpoint Protector | User Manual
7. Edit Basic SAML Configuration and simultaneously open the Single Sign on
page from the Endpoint Protector Server as data from Single Sign On
page must be copied and paste on Basic SAML Configuration page.
8. On the Basic SAML Configuration page, delete the data that is by default
completed for Identifier (Entity Edit).
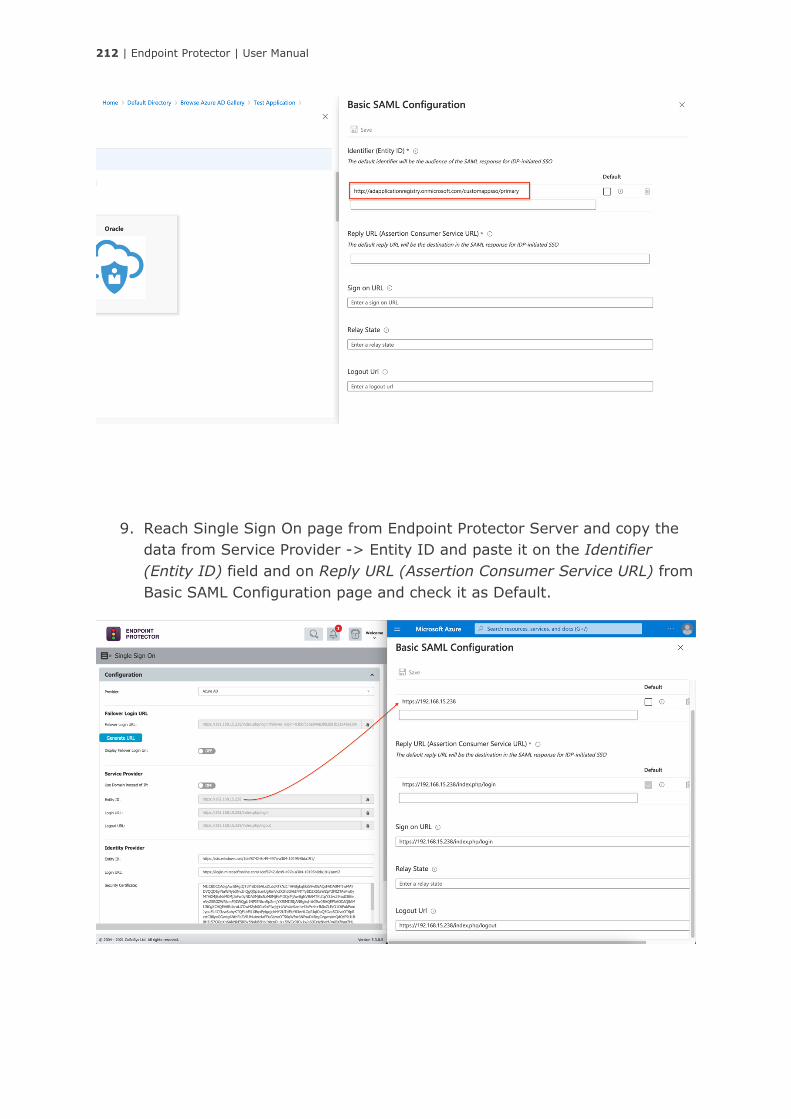
212 | Endpoint Protector | User Manual
9. Reach Single Sign On page from Endpoint Protector Server and copy the
data from Service Provider -> Entity ID and paste it on the Identifier
(Entity ID) field and on Reply URL (Assertion Consumer Service URL) from
Basic SAML Configuration page and check it as Default.
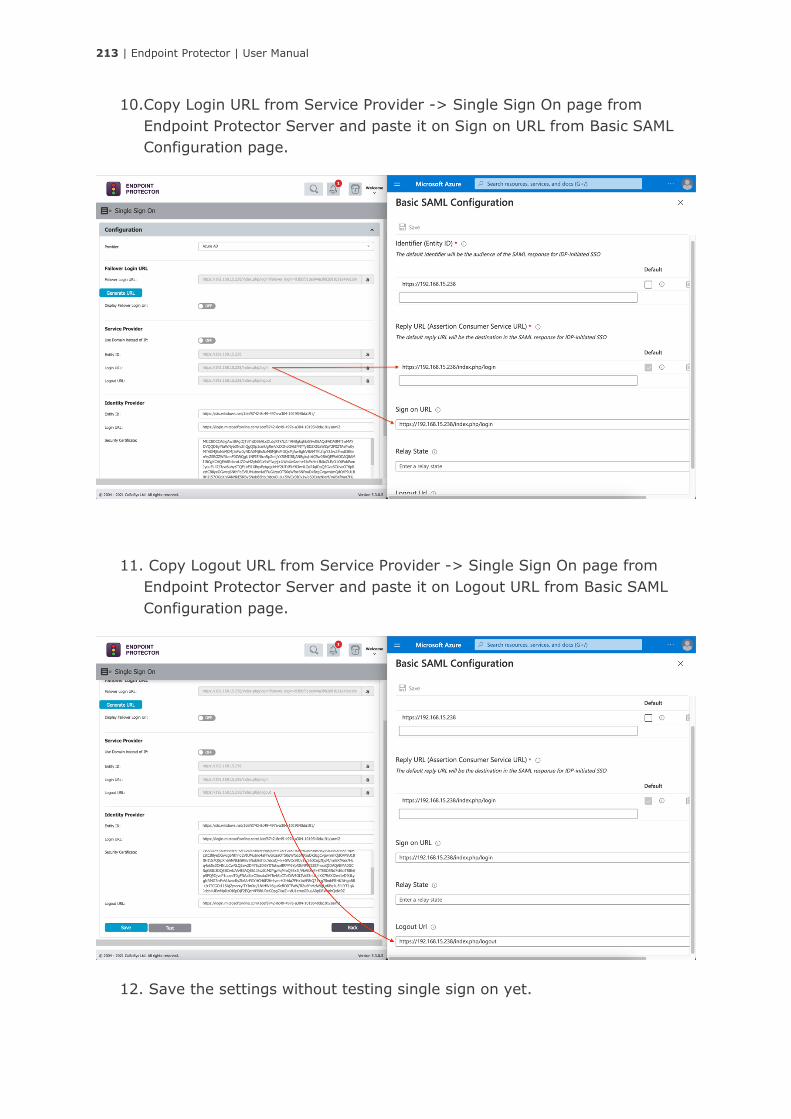
213 | Endpoint Protector | User Manual
10.Copy Login URL from Service Provider -> Single Sign On page from
Endpoint Protector Server and paste it on Sign on URL from Basic SAML
Configuration page.
11. Copy Logout URL from Service Provider -> Single Sign On page from
Endpoint Protector Server and paste it on Logout URL from Basic SAML
Configuration page.
12. Save the settings without testing single sign on yet.

214 | Endpoint Protector | User Manual
13. Go to Step 3 from the page, SAML Signing Certificate and Edit.
14. Change Singing Algorithm to SHA-1 and Save.
15. From Step 3, SAML Singing Certificate, download Certificate (Base64).
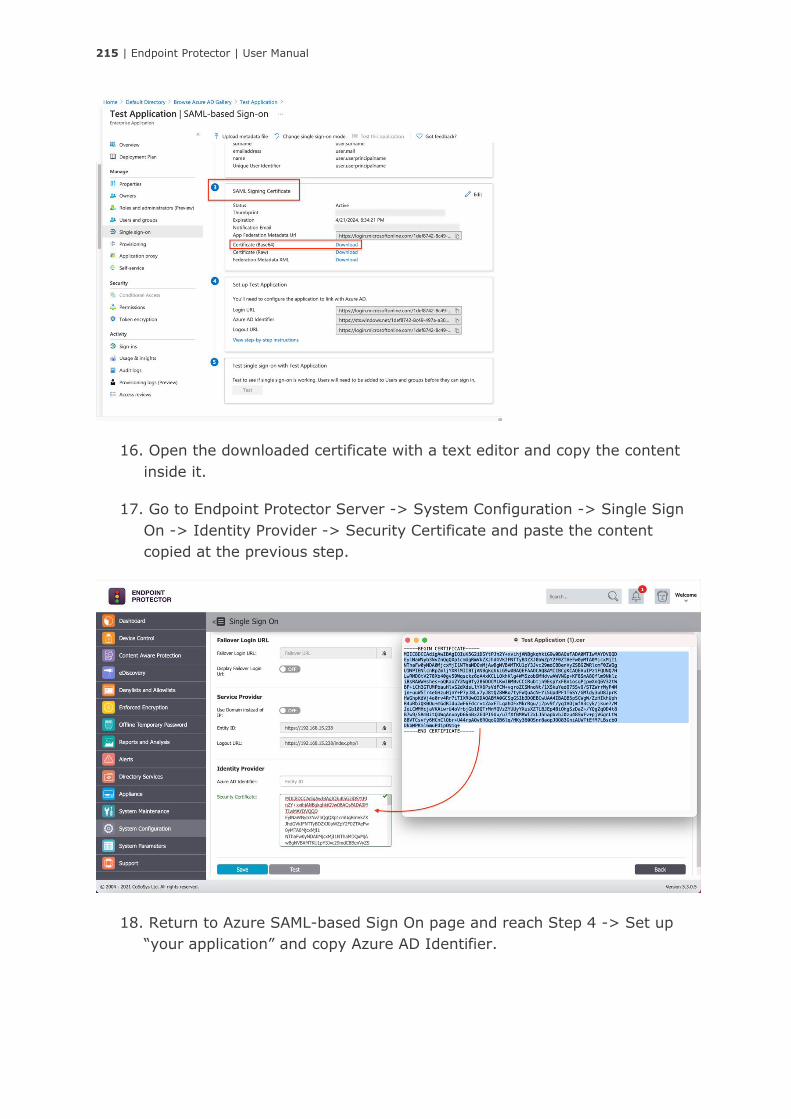
215 | Endpoint Protector | User Manual
16. Open the downloaded certificate with a text editor and copy the content
inside it.
17. Go to Endpoint Protector Server -> System Configuration -> Single Sign
On -> Identity Provider -> Security Certificate and paste the content
copied at the previous step.
18. Return to Azure SAML-based Sign On page and reach Step 4 -> Set up
“your application” and copy Azure AD Identifier.
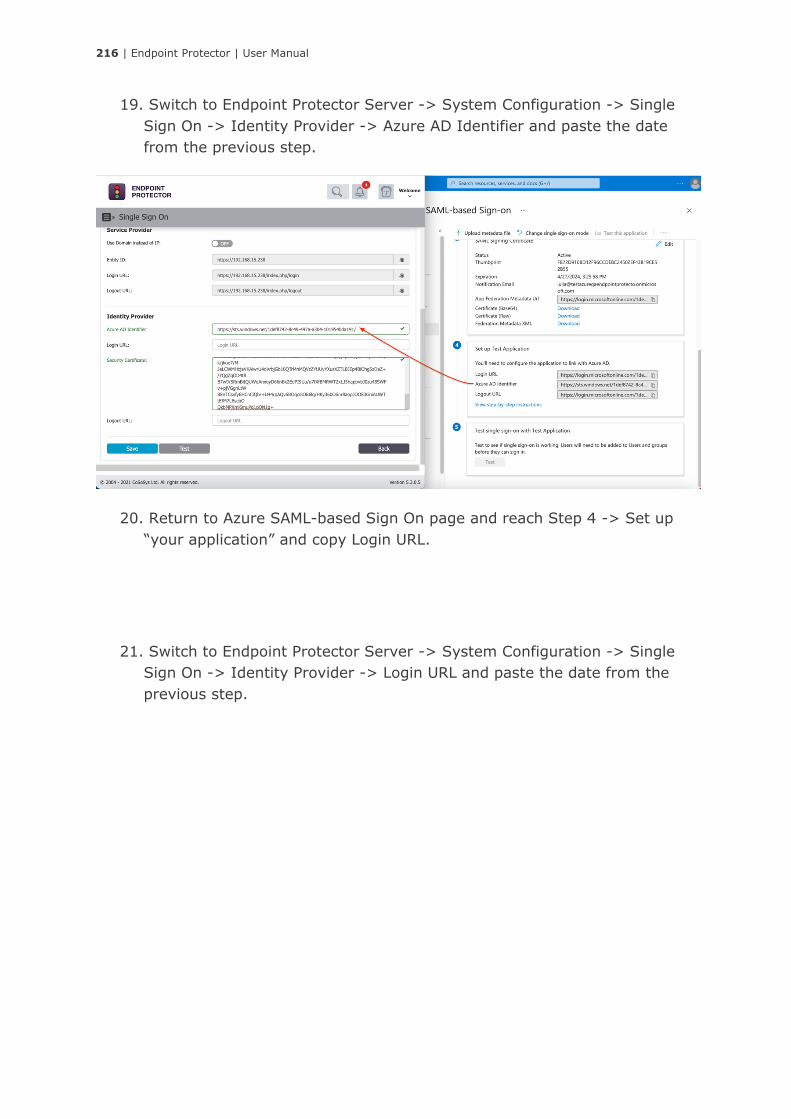
216 | Endpoint Protector | User Manual
19. Switch to Endpoint Protector Server -> System Configuration -> Single
Sign On -> Identity Provider -> Azure AD Identifier and paste the date
from the previous step.
20. Return to Azure SAML-based Sign On page and reach Step 4 -> Set up
“your application” and copy Login URL.
21. Switch to Endpoint Protector Server -> System Configuration -> Single
Sign On -> Identity Provider -> Login URL and paste the date from the
previous step.
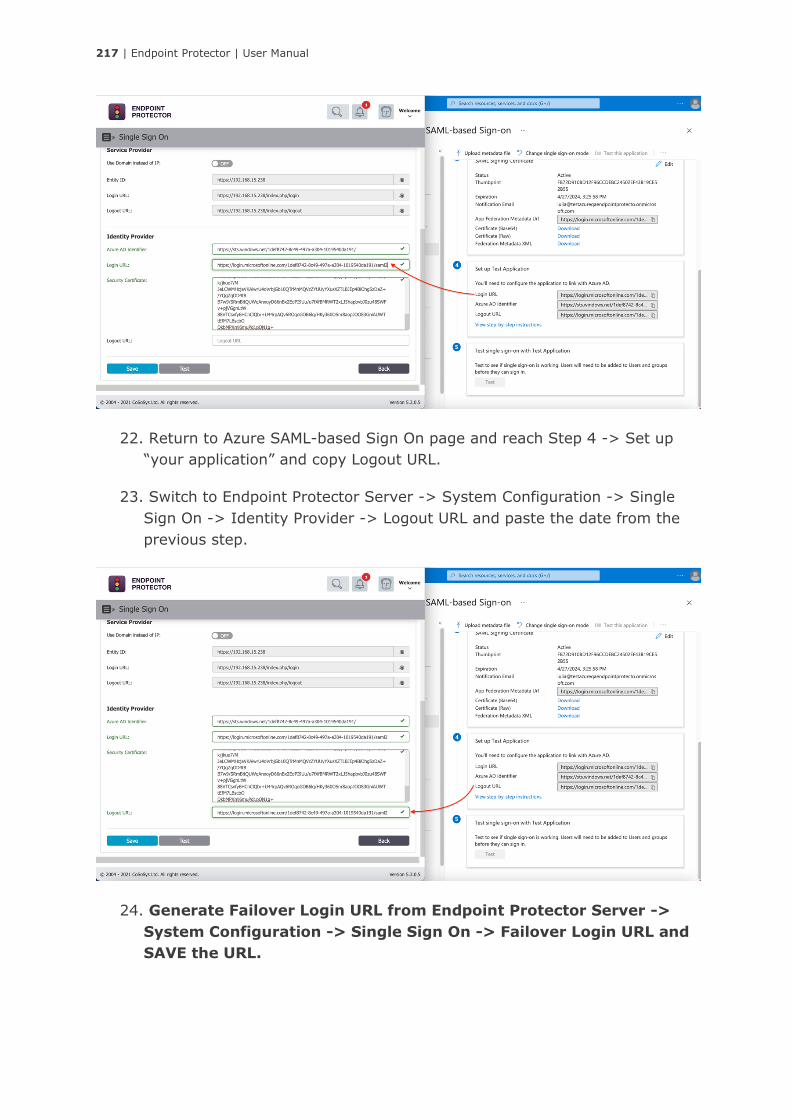
217 | Endpoint Protector | User Manual
22. Return to Azure SAML-based Sign On page and reach Step 4 -> Set up
“your application” and copy Logout URL.
23. Switch to Endpoint Protector Server -> System Configuration -> Single
Sign On -> Identity Provider -> Logout URL and paste the date from the
previous step.
24. Generate Failover Login URL from Endpoint Protector Server ->
System Configuration -> Single Sign On -> Failover Login URL and
SAVE the URL.
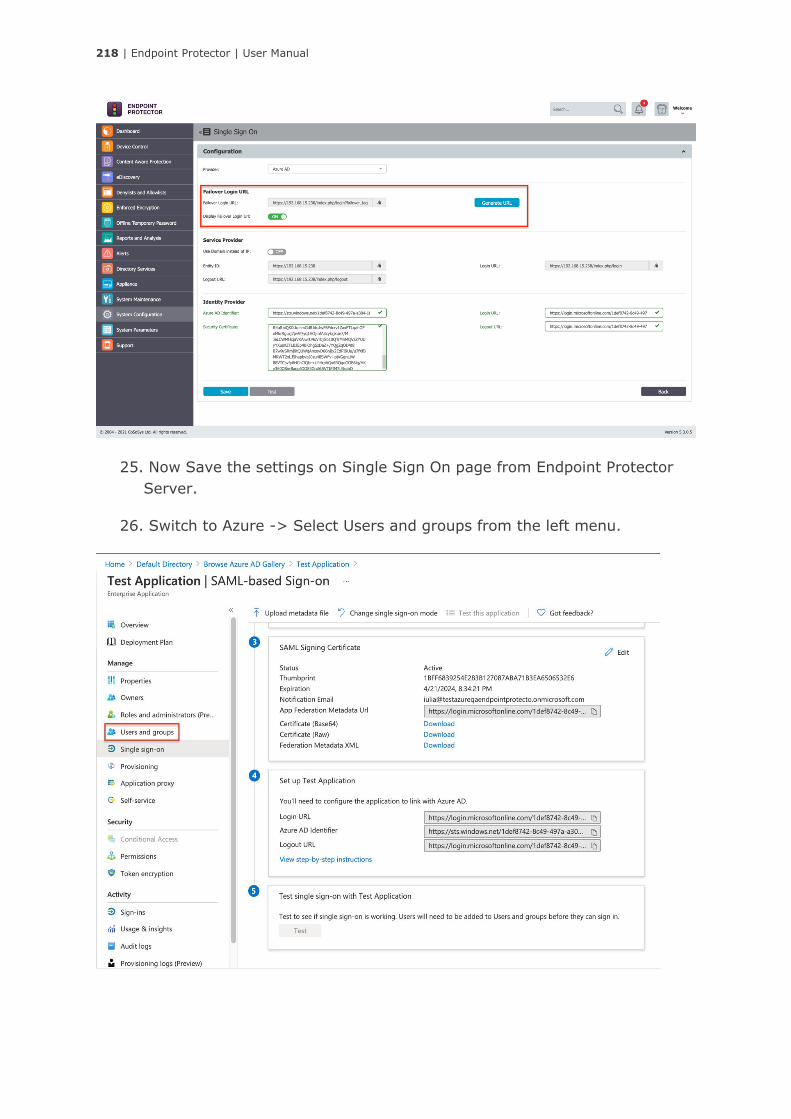
218 | Endpoint Protector | User Manual
25. Now Save the settings on Single Sign On page from Endpoint Protector
Server.
26. Switch to Azure -> Select Users and groups from the left menu.

219 | Endpoint Protector | User Manual
27. Go to Add user/group -> none Selected ->search for the desired Azure
User -> Select -> Assign.
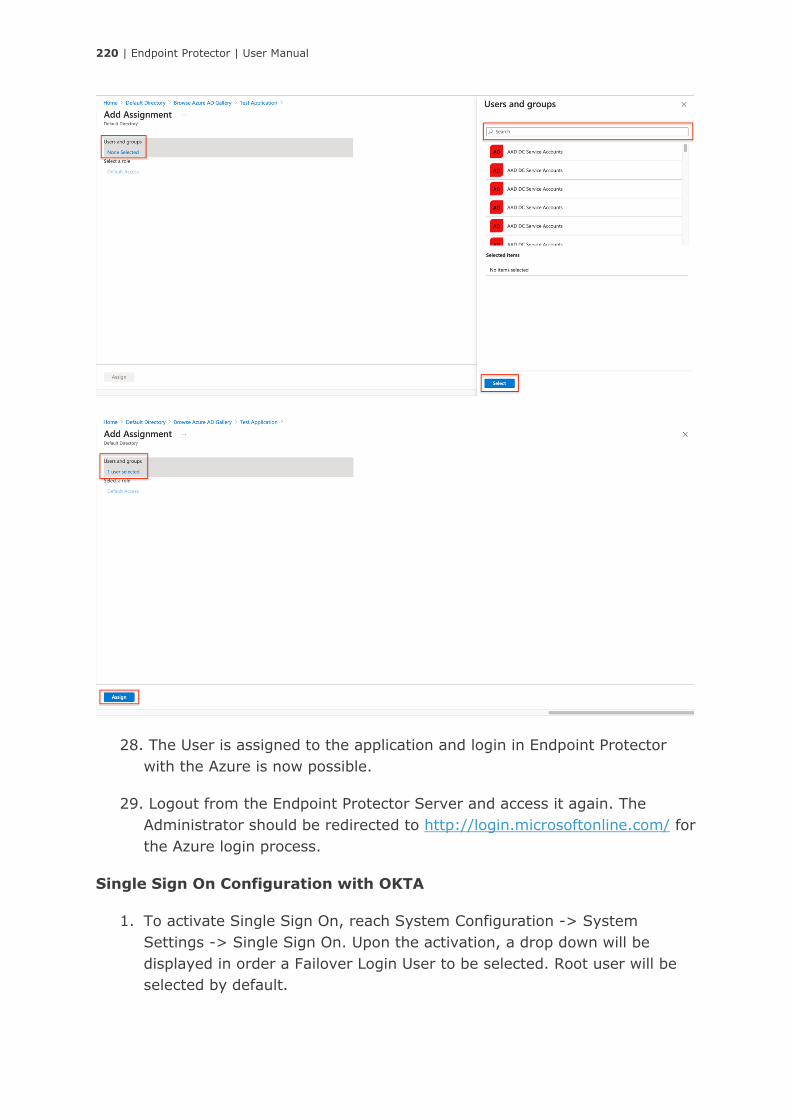
220 | Endpoint Protector | User Manual
28. The User is assigned to the application and login in Endpoint Protector
with the Azure is now possible.
29. Logout from the Endpoint Protector Server and access it again. The
Administrator should be redirected to http://login.microsoftonline.com/ for
the Azure login process.
Single Sign On Configuration with OKTA
1. To activate Single Sign On, reach System Configuration -> System
Settings -> Single Sign On. Upon the activation, a drop down will be
displayed in order a Failover Login User to be selected. Root user will be
selected by default.
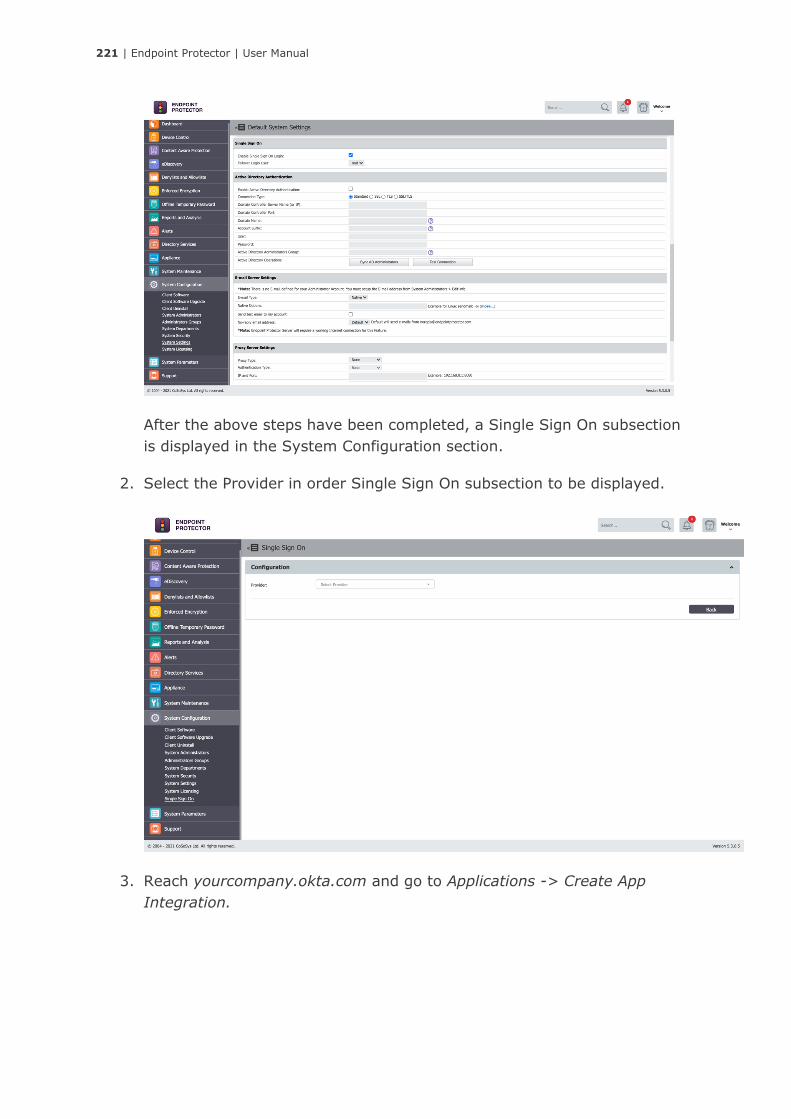
221 | Endpoint Protector | User Manual
After the above steps have been completed, a Single Sign On subsection
is displayed in the System Configuration section.
2. Select the Provider in order Single Sign On subsection to be displayed.
3. Reach yourcompany.okta.com and go to Applications -> Create App
Integration.
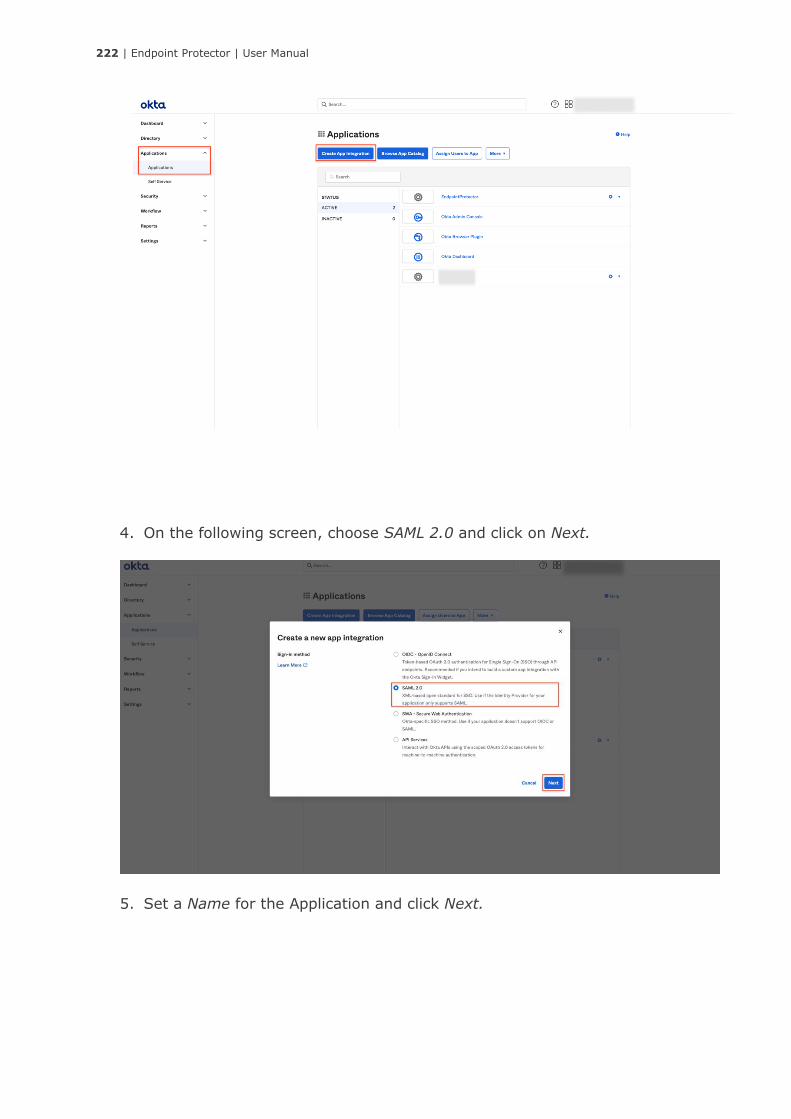
222 | Endpoint Protector | User Manual
4. On the following screen, choose SAML 2.0 and click on Next.
5. Set a Name for the Application and click Next.
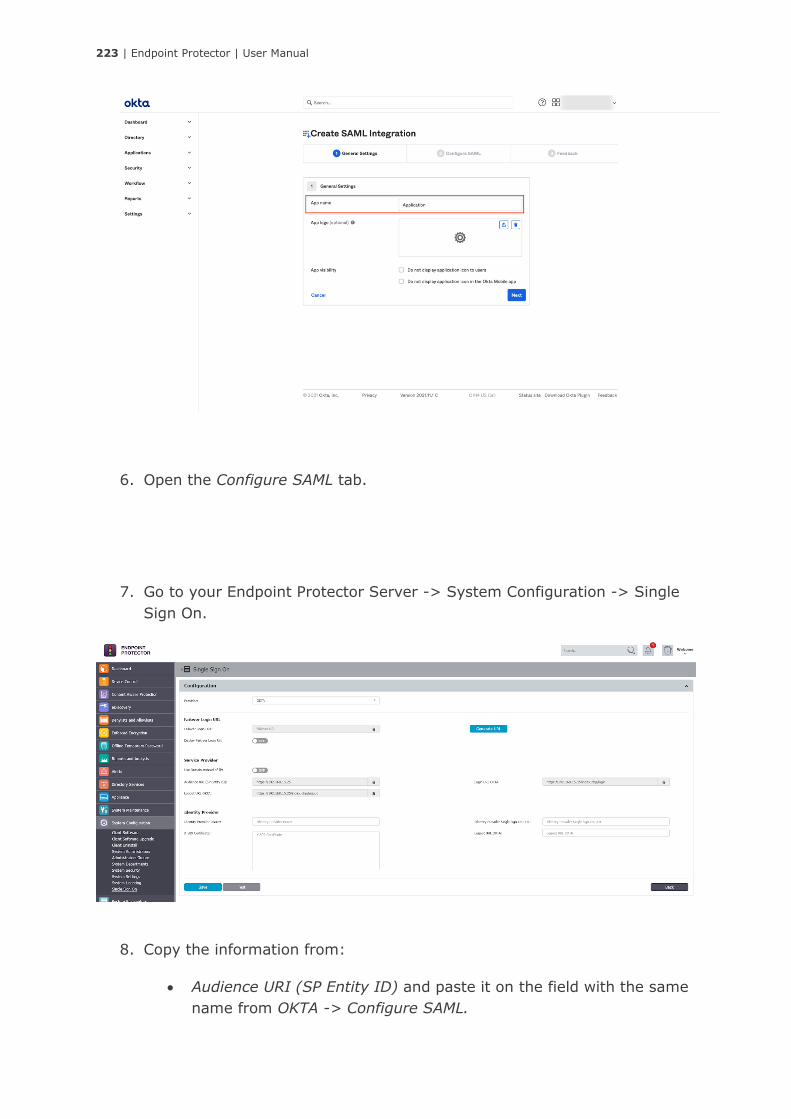
223 | Endpoint Protector | User Manual
6. Open the Configure SAML tab.
7. Go to your Endpoint Protector Server -> System Configuration -> Single
Sign On.
8. Copy the information from:
• Audience URI (SP Entity ID) and paste it on the field with the same
name from OKTA -> Configure SAML.
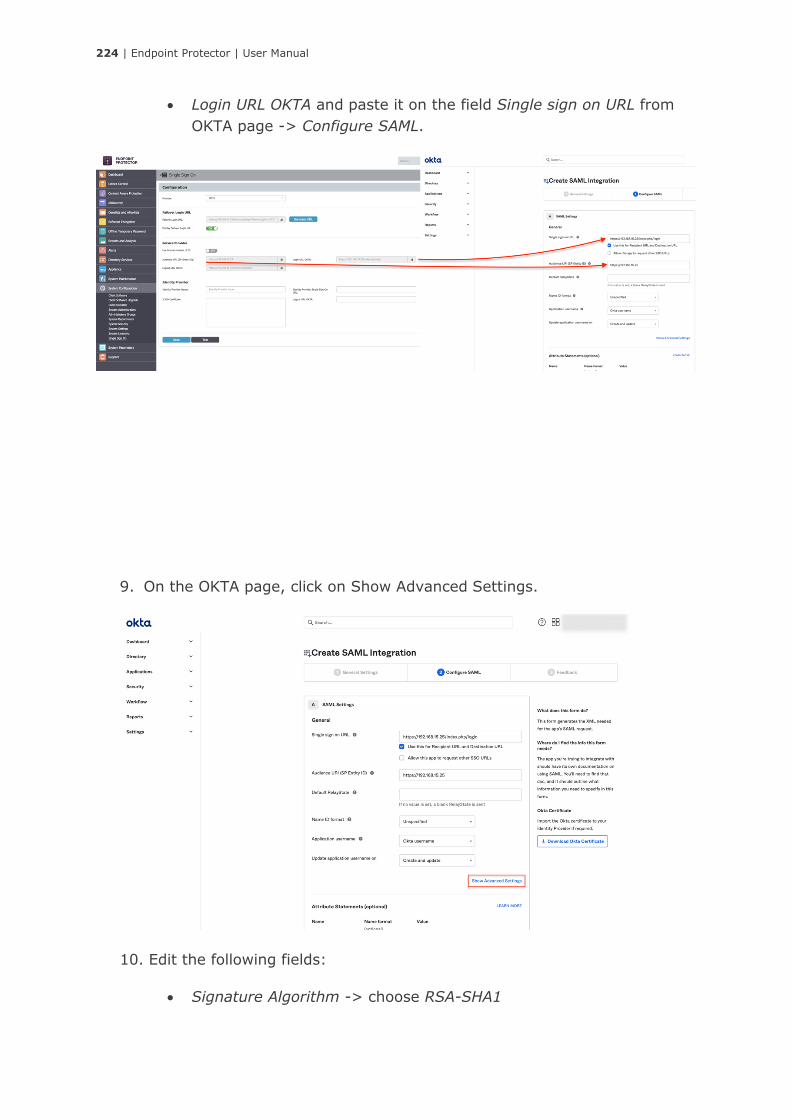
224 | Endpoint Protector | User Manual
• Login URL OKTA and paste it on the field Single sign on URL from
OKTA page -> Configure SAML.
9. On the OKTA page, click on Show Advanced Settings.
10. Edit the following fields:
• Signature Algorithm -> choose RSA-SHA1

225 | Endpoint Protector | User Manual
• Digest Algorithm -> choose SHA1
11. Hide Advanced Settings and click on Next.
12. At step 3, choose an answer for each question and hit Finnish button.
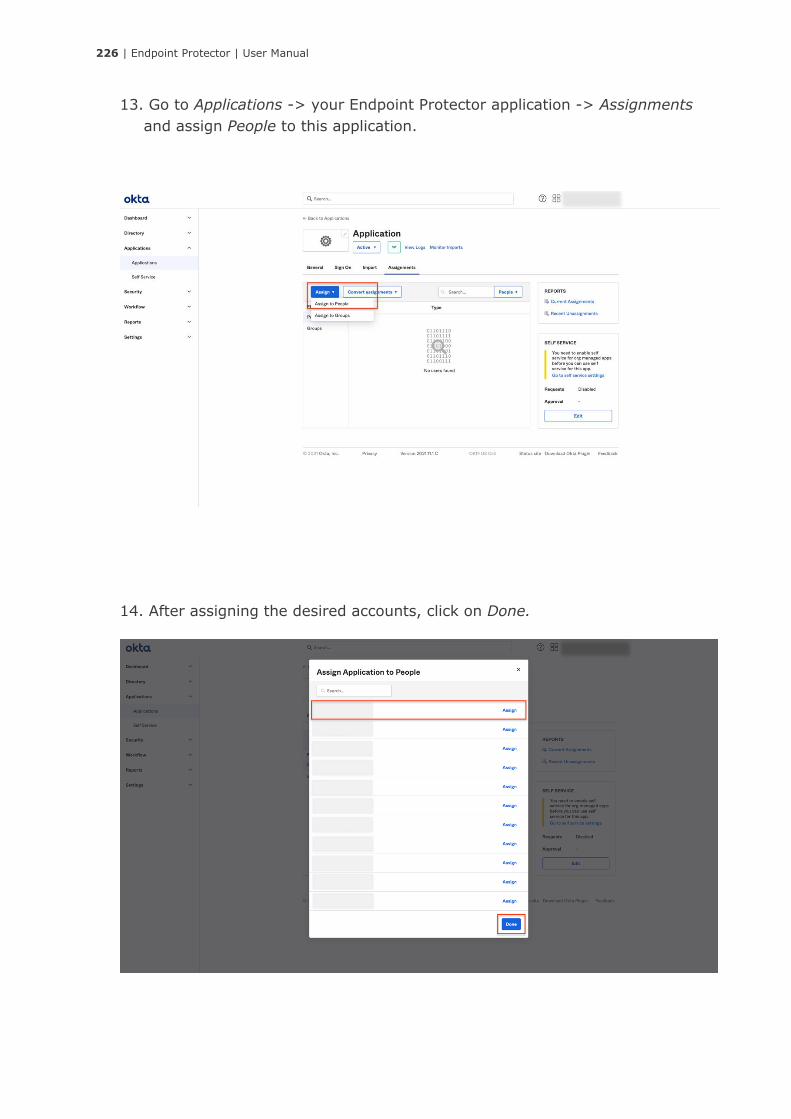
226 | Endpoint Protector | User Manual
13. Go to Applications -> your Endpoint Protector application -> Assignments
and assign People to this application.
14. After assigning the desired accounts, click on Done.

227 | Endpoint Protector | User Manual
15. Go to Applications and open the created app. Click on Sign On -> View
Setup Instructions.
16. From the new opened section, copy the needed information and paste it
on your Endpoint Protector Server:
• Identity Provider Single Sign-On URL to Endpoint Protector Server ->
System configuration -> Single Sign On -> Identity Provider Single Sign-
on URL.
• Identity Provider Issuer to Endpoint Protector Server -> System
configuration -> Single Sign On -> Identity Provider Issuer
• X.509 Certificate to Endpoint Protector Server -> System configuration ->
Single Sign On -> X.509 Certificate.
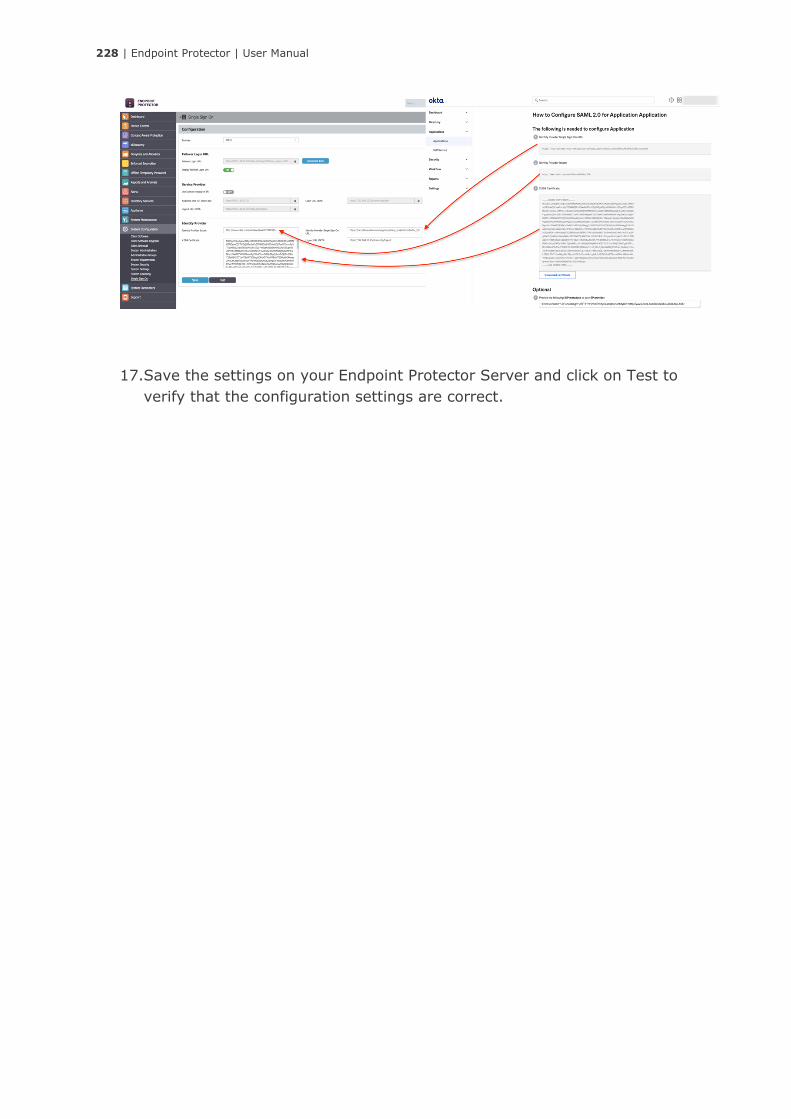
228 | Endpoint Protector | User Manual
17.Save the settings on your Endpoint Protector Server and click on Test to
verify that the configuration settings are correct.
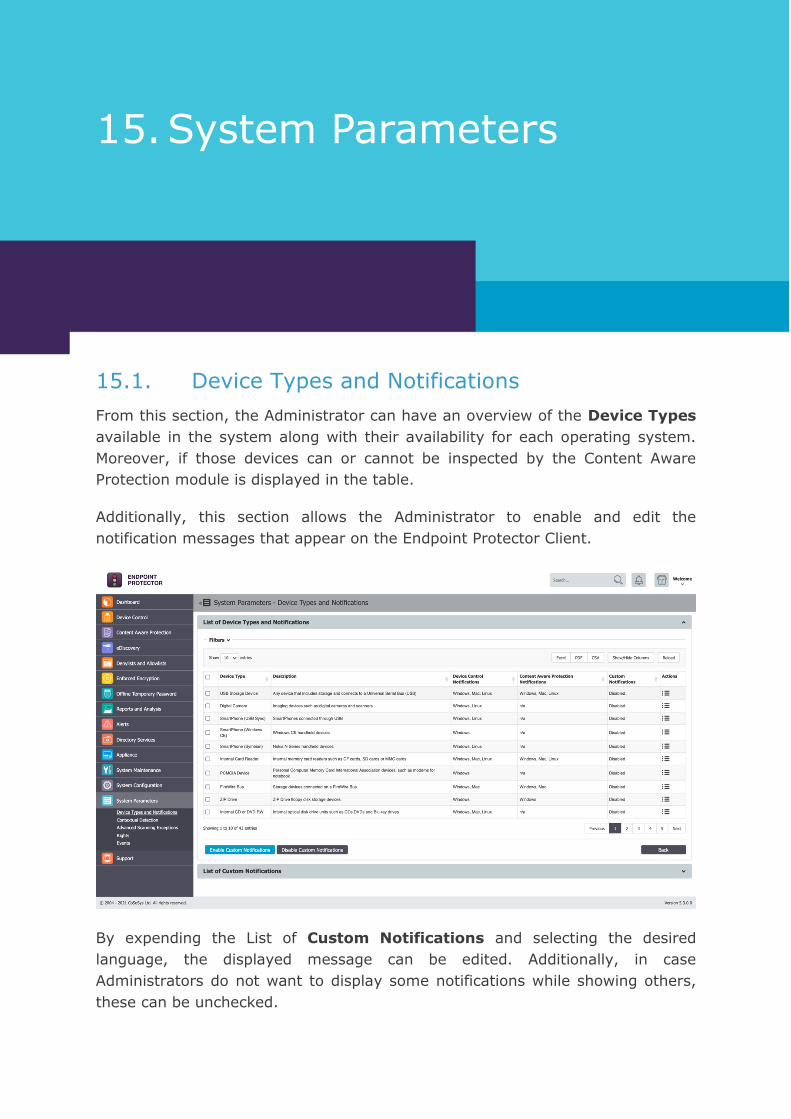
229 | Endpoint Protector | User Manual
15. System Parameters
15.1. Device Types and Notifications
From this section, the Administrator can have an overview of the Device Types
available in the system along with their availability for each operating system.
Moreover, if those devices can or cannot be inspected by the Content Aware
Protection module is displayed in the table.
Additionally, this section allows the Administrator to enable and edit the
notification messages that appear on the Endpoint Protector Client.
By expending the List of Custom Notifications and selecting the desired
language, the displayed message can be edited. Additionally, in case
Administrators do not want to display some notifications while showing others,
these can be unchecked.
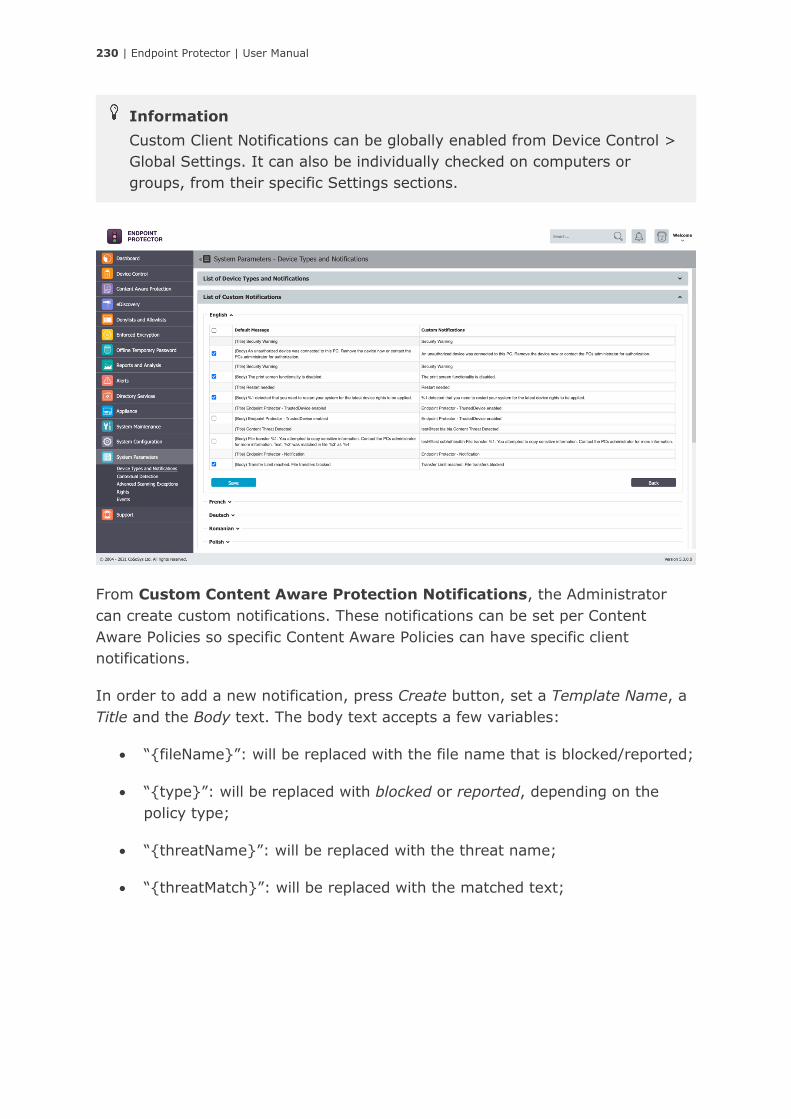
230 | Endpoint Protector | User Manual
From Custom Content Aware Protection Notifications, the Administrator
can create custom notifications. These notifications can be set per Content
Aware Policies so specific Content Aware Policies can have specific client
notifications.
In order to add a new notification, press Create button, set a Template Name, a
Title and the Body text. The body text accepts a few variables:
• “{fileName}”: will be replaced with the file name that is blocked/reported;
• “{type}”: will be replaced with blocked or reported, depending on the
policy type;
• “{threatName}”: will be replaced with the threat name;
• “{threatMatch}”: will be replaced with the matched text;
Information
Custom Client Notifications can be globally enabled from Device Control >
Global Settings. It can also be individually checked on computers or
groups, from their specific Settings sections.
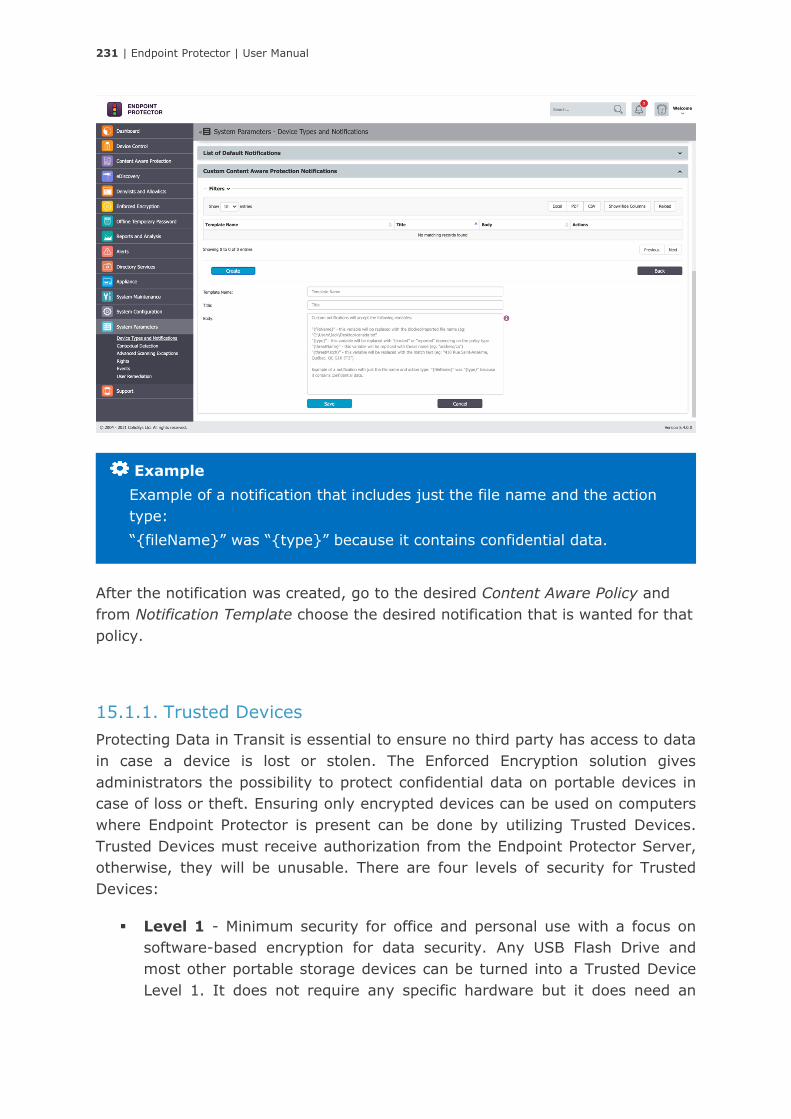
231 | Endpoint Protector | User Manual
After the notification was created, go to the desired Content Aware Policy and
from Notification Template choose the desired notification that is wanted for that
policy.
15.1.1. Trusted Devices
Protecting Data in Transit is essential to ensure no third party has access to data
in case a device is lost or stolen. The Enforced Encryption solution gives
administrators the possibility to protect confidential data on portable devices in
case of loss or theft. Ensuring only encrypted devices can be used on computers
where Endpoint Protector is present can be done by utilizing Trusted Devices.
Trusted Devices must receive authorization from the Endpoint Protector Server,
otherwise, they will be unusable. There are four levels of security for Trusted
Devices:
▪ Level 1 - Minimum security for office and personal use with a focus on
software-based encryption for data security. Any USB Flash Drive and
most other portable storage devices can be turned into a Trusted Device
Level 1. It does not require any specific hardware but it does need an
Example
Example of a notification that includes just the file name and the action
type:
“{fileName}” was “{type}” because it contains confidential data.
232 | Endpoint Protector | User Manual
encryption solution such as EasyLock
http://www.endpointprotector.com/en/index.php/products/easylock
▪ Level 2 - Medium security level with biometric data protection or
advanced software-based data encryption. It requires special hardware
that includes security software and has been tested for Trusted Device
Level 2.
▪ Level 3 - High-security level with strong hardware-based encryption that
is mandatory for regulatory compliance such as SOX, HIPAA, GBLA,
PIPED, Basel II, DPA, or PCI 95/46/EC. It requires special hardware that
includes advanced security software and hardware-based encryption that
has been tested for Trusted Device Level 3.
▪ Level 4 - Maximum security for military and government use. Level 4
Trusted Devices include strong hardware-based encryption for data
protection and are independently certified (e.g. FIPS 140). These devices
have successfully undergone rigorous testing for software and hardware.
It requires special hardware that is available primarily through security-
focused resellers.
▪ Level 1+ - Derived from Level 1, it will ensure that EasyLock 2 with
Master Password will be automatically deployed on USB storage devices
plugged into computers where the Endpoint Protector Client is present.
The table below provides a list of TrustedDevices:
Device Names TrustedDevice Level
EasyLock Encrypted devices 1
AT1177 2
UT169 2
UT176 2
Trek ThumbDrive 2
BitLocker Encrypted devices 3
Information
If a Trusted Device Level 1 right is enabled and a Trusted Device level 2, 3 or
4 is connected, the right will apply accordingly.
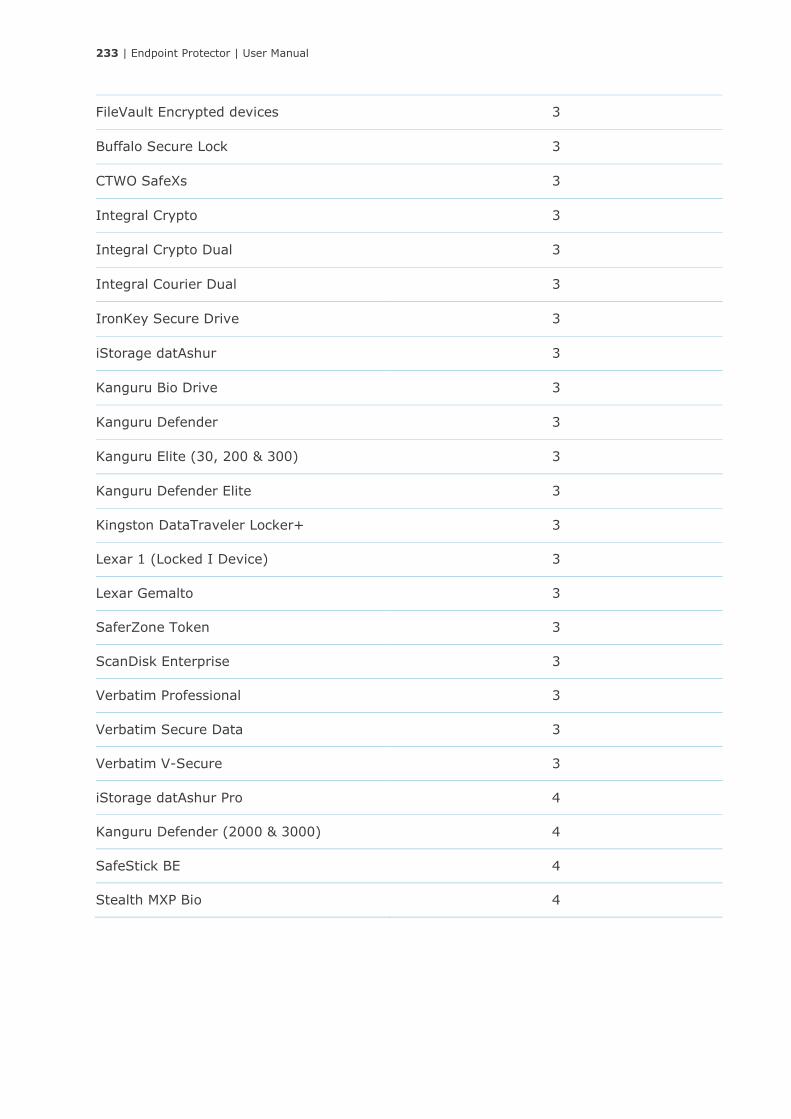
233 | Endpoint Protector | User Manual
FileVault Encrypted devices 3
Buffalo Secure Lock 3
CTWO SafeXs 3
Integral Crypto 3
Integral Crypto Dual 3
Integral Courier Dual 3
IronKey Secure Drive 3
iStorage datAshur 3
Kanguru Bio Drive 3
Kanguru Defender 3
Kanguru Elite (30, 200 & 300) 3
Kanguru Defender Elite 3
Kingston DataTraveler Locker+ 3
Lexar 1 (Locked I Device) 3
Lexar Gemalto 3
SaferZone Token 3
ScanDisk Enterprise 3
Verbatim Professional 3
Verbatim Secure Data 3
Verbatim V-Secure 3
iStorage datAshur Pro 4
Kanguru Defender (2000 & 3000) 4
SafeStick BE 4
Stealth MXP Bio 4
234 | Endpoint Protector | User Manual
15.2. Contextual Detection
From this section, the Administrator can manage the contextual detection for the
entire system. If enabled, the confidential information detected by Endpoint
Protector will be inspected for both content and context. This means that in
addition to the function that detects sensitive information (e.g.: Credit Cards,
IDs, Passports, Driving Licenses, etc.), the context will also be taken into
consideration (e.g.: proximity to other relevant keywords, other related
functions, regular expressions, etc.).
Once the Contextual Detection feature is enabled, it will apply at a global level,
based on the rules defined in the Contextual XML (but also linked to the
configured Content Aware Protection and eDiscovery policies).
There are two options to create the Contextual rules:
• creating it directly from the Endpoint Protector Server.
• manually editing the Contextual XML and then uploading it to the Endpoint
Protector Server,
15.2.1. Creating the XML
Information
This method is recommended for general use as it is the easiest method
and it can cover most use cases.
Note
This feature applies at a global level, for both Content Aware Protection
and eDiscovery Policies. If enabled, the context detection will supersede
the content only detection through the system.
Please ensure the accuracy of the rules and the relevance for your
scenarios before enabling this functionality.
Tips
In addition to providing context to the detected sensitive information, this
functionality also helps decrease false positives.
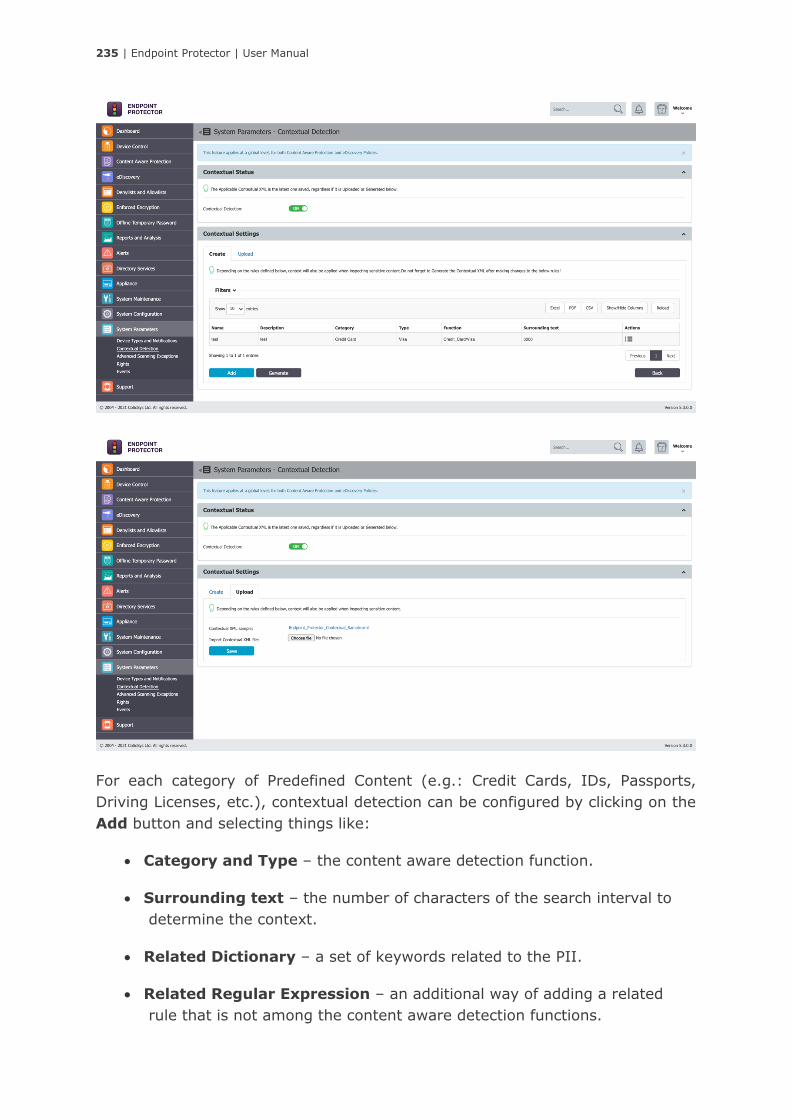
235 | Endpoint Protector | User Manual
For each category of Predefined Content (e.g.: Credit Cards, IDs, Passports,
Driving Licenses, etc.), contextual detection can be configured by clicking on the
Add button and selecting things like:
• Category and Type – the content aware detection function.
• Surrounding text – the number of characters of the search interval to
determine the context.
• Related Dictionary – a set of keywords related to the PII.
• Related Regular Expression – an additional way of adding a related
rule that is not among the content aware detection functions.
236 | Endpoint Protector | User Manual
• Related File Type – the related file type.
• Related File Size (MB) – the related file size, in megabytes.
• Minimum Matches – the minimum number of items to match to validate
the detection rule
• Unrelated Dictionary– a set of keywords not related to the PII.
• Unrelated Regular Expression – an additional way of adding a non-
related rule that is not among the content aware detection functions.
• Unelated File Type – the unrelated file type.
• Unrelated File Size (MB) – the unrelated file size, in megabytes.
• Maximum Matches – the value above which the rule will not be validated
(recommended value is 0).
15.2.2. Uploading the XML
Advance contextual functionalities are also available. For this method, the
Contextual XML file has to be edited manually by the Administrator and then
uploaded to the Endpoint Protector Server.
Proximity, Dictionaries, Regex, etc. all have to be defined within the XML
document. In addition to the functionalities described in the chapter above
15.2.1 Creating the XML, there are more complex options available like:
Confidence Level, additional Functions to consider when determining the Main
Function, etc.
Information
This method is recommended for advanced Administrators as it offers
extended functionalities but it also requires a deeper understanding of the
XML syntax.
Note
Do not forget to Generate the Contextual XML after creating or making
changes to contextual rules!

237 | Endpoint Protector | User Manual
Example
<Rules>
<!-- SSN / Canada this is an example with multiple patterns -->
<Entity id="ssn/canada" patternsProximity="300"
recommendedConfidence="75">
<Pattern confidenceLevel="75">
<Any minMatches="2">
<Match idRef="keywords_Canada_SSN_1" />
<Match idRef="keywords_Canada_SSN_2" />
<Match idRef="validate_date_fct" />
<Match idRef="regex_email_id" /> <!-- This is just an example -->
</Any>
<Any maxMatches="0">
<Match idRef="keywords_exclude_Canada_SSN" />
</Any>
</Pattern>
</Entity>
<Function id="validate_date_fct" name="SEARCH_DATE_INTRL" />
<!-- name should be the same with the one on the client -->
<Function id="func_dlp_is_valid_ssn" name="SEARCH_SSN_Canada"
/> <!-- name should be the same with the one on the client -->
Tips
The best way to understand the syntax needed in the Contextual XML is to
look at the sample available within Endpoint Protector Server as it includes
multiple examples. Additionally, the example below also provides a clear
direction.

238 | Endpoint Protector | User Manual
Example
<Keyword id="keywords_Canada_SSN_1">
<Group matchStyle="word">
<Term>sin</Term>
<Term>social insurance</Term>
<Term>numero d'assurance sociale</Term>
<Term>sins</Term>
<Term>ssn</Term>
<Term>ssns</Term>
<Term>social security</Term>
<Term>numero d'assurance sociala</Term>
<Term>national identification number</Term>
<Term>national id</Term>
<Term>sin#</Term>
</Group>
</Keyword>
<Keyword id="keywords_Canada_SSN_2">
<Group matchStyle="word">
<Term>driver's license</Term>
<Term>drivers license</Term>
<Term>driver's licence</Term>
<Term>drivers licence</Term>
<Term>DOB</Term>
<Term>Birthdate</Term>
</Group>
</Keyword>
<Keyword id="keywords_exclude_Canada_SSN">
<Group matchStyle="word">
<Term>random word</Term>
</Group>
</Keyword>
<Regex id="regex_email_id">[-0-9a-zA-Z.+_]+@[-0-9a-zA-
Z.+_]+\.[a-zA-Z]{2,4}</Regex>
</Rules>
</RulePackage>
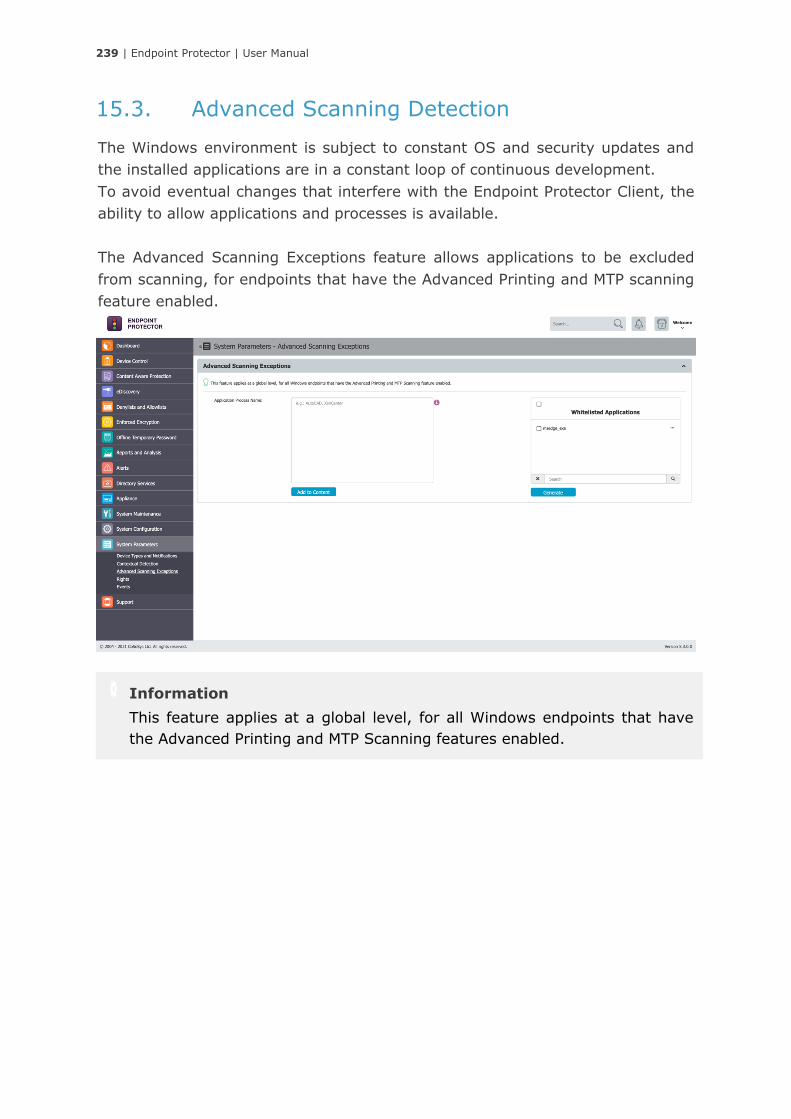
239 | Endpoint Protector | User Manual
15.3. Advanced Scanning Detection
The Windows environment is subject to constant OS and security updates and
the installed applications are in a constant loop of continuous development.
To avoid eventual changes that interfere with the Endpoint Protector Client, the
ability to allow applications and processes is available.
The Advanced Scanning Exceptions feature allows applications to be excluded
from scanning, for endpoints that have the Advanced Printing and MTP scanning
feature enabled.
Information
This feature applies at a global level, for all Windows endpoints that have
the Advanced Printing and MTP Scanning features enabled.
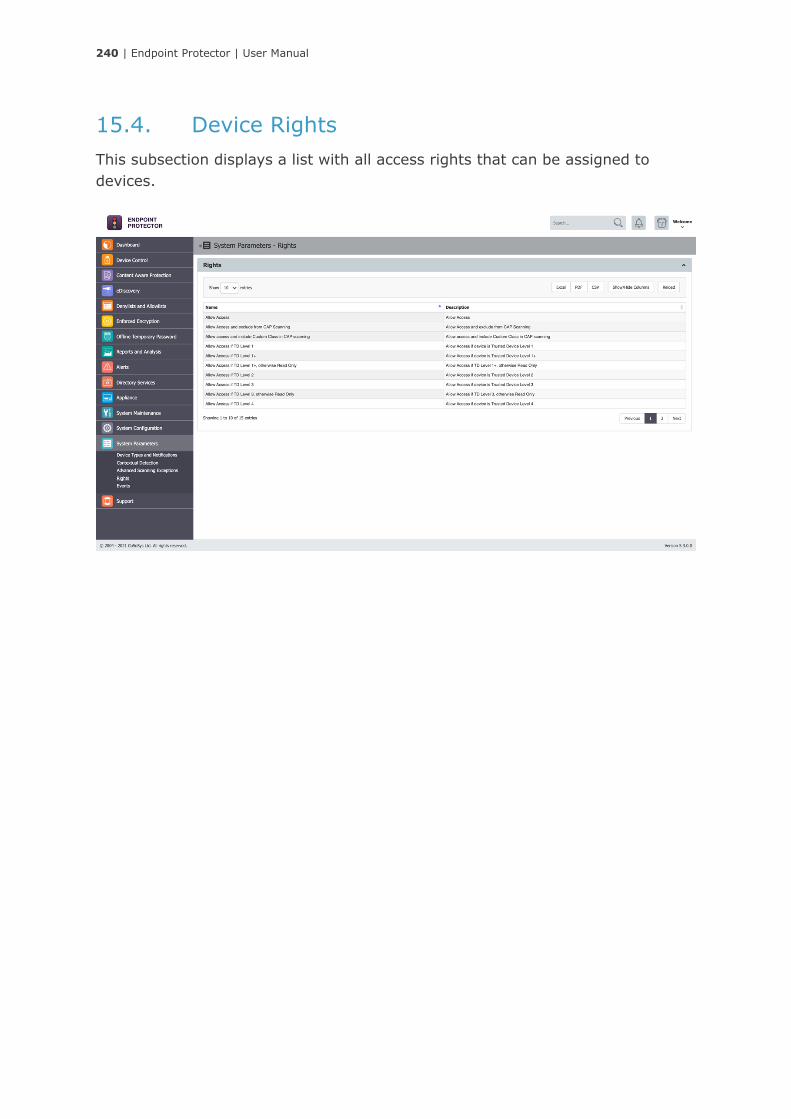
240 | Endpoint Protector | User Manual
15.4. Device Rights
This subsection displays a list with all access rights that can be assigned to
devices.
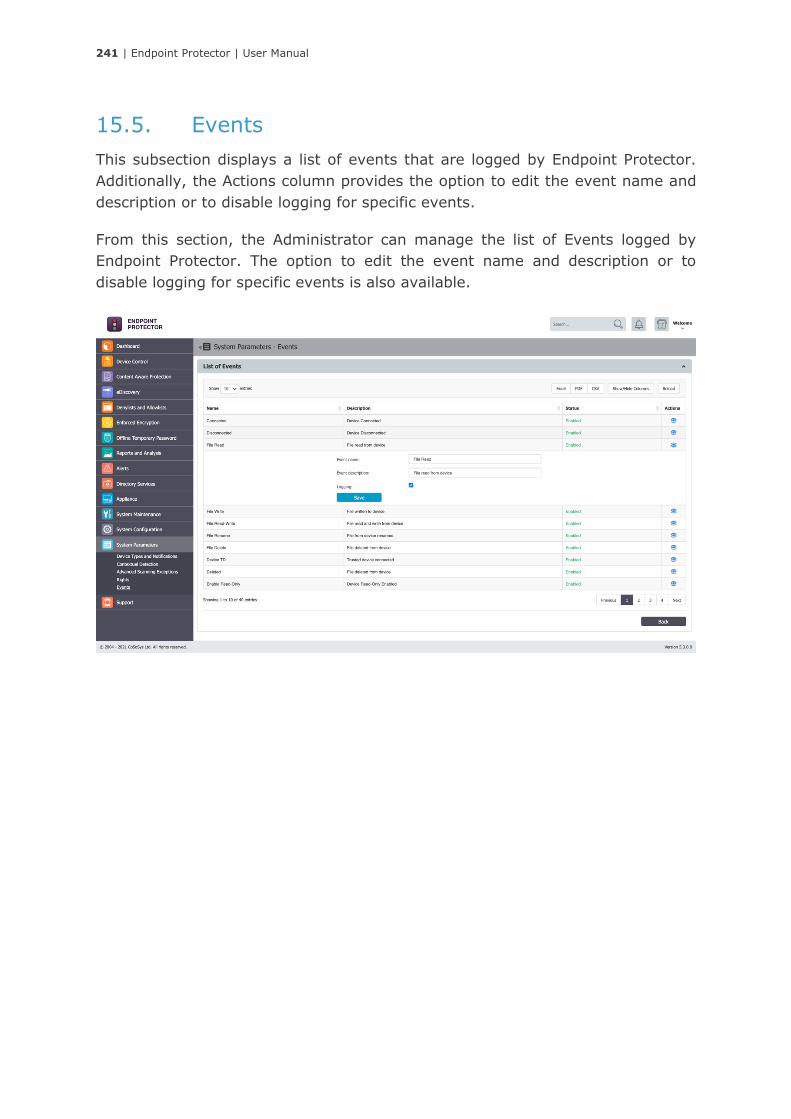
241 | Endpoint Protector | User Manual
15.5. Events
This subsection displays a list of events that are logged by Endpoint Protector.
Additionally, the Actions column provides the option to edit the event name and
description or to disable logging for specific events.
From this section, the Administrator can manage the list of Events logged by
Endpoint Protector. The option to edit the event name and description or to
disable logging for specific events is also available.
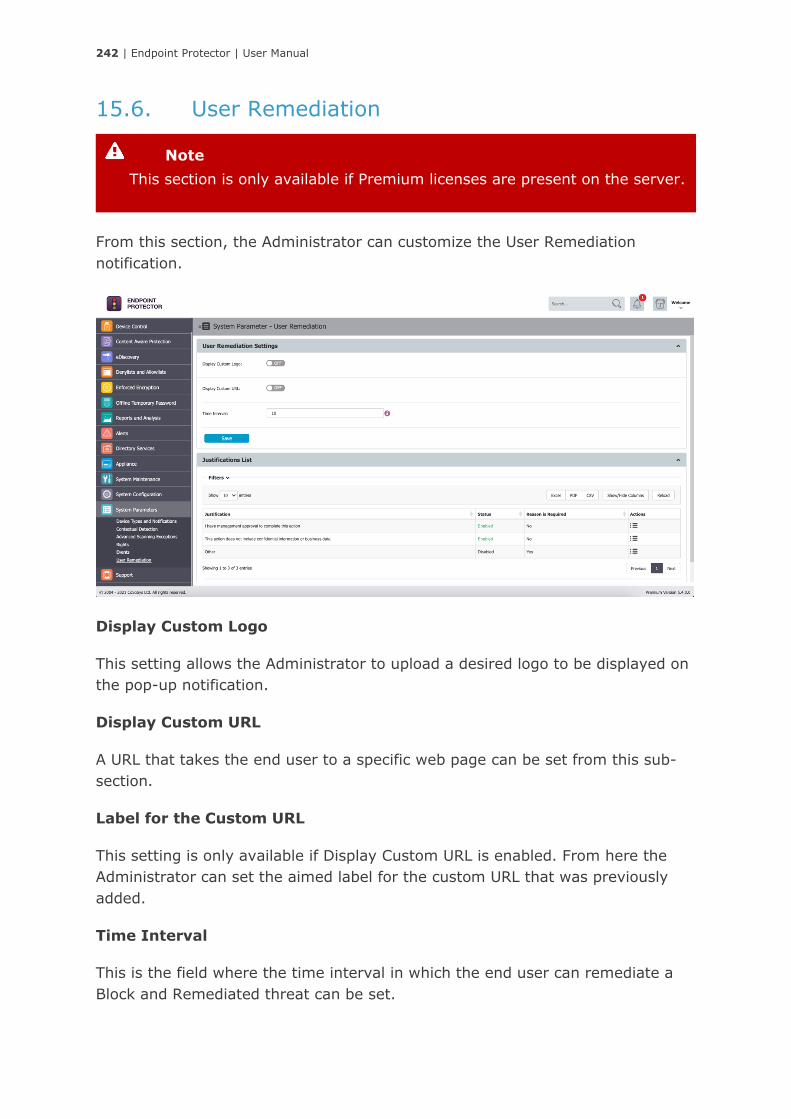
242 | Endpoint Protector | User Manual
15.6. User Remediation
From this section, the Administrator can customize the User Remediation
notification.
Display Custom Logo
This setting allows the Administrator to upload a desired logo to be displayed on
the pop-up notification.
Display Custom URL
A URL that takes the end user to a specific web page can be set from this sub-
section.
Label for the Custom URL
This setting is only available if Display Custom URL is enabled. From here the
Administrator can set the aimed label for the custom URL that was previously
added.
Time Interval
This is the field where the time interval in which the end user can remediate a
Block and Remediated threat can be set.
Note
This section is only available if Premium licenses are present on the server.

243 | Endpoint Protector | User Manual
Justifications List
The Justification represents the reason why the threat is remediated. The end
user must choose a justification to remediate the threat.
Justifications are managed from this section: they can be enabled, disabled or
custom ones can be created.
Some by default justifications are already added in the server, but new
justifications can be created by clicking the Add button.
244 | Endpoint Protector | User Manual
User Remediation Pop-up notifications can be activated, deactivated, or enforced
from Endpoint Protector Client Settings -> User Remediation Pop-up.
Note
At least one justification from the table needs to be enabled all the time.
245 | Endpoint Protector | User Manual
16. Endpoint Protector Client
The Endpoint Protector Client enforces the Rights and Settings received from the
Endpoint Protector Server on the protected endpoints (Windows, Mac, and
Linux).
The Endpoint Protector Client can be downloaded directly from the Endpoint
Protector UI.
16.1. Client Installation
For Windows and Mac, the Endpoint Protector Client Installation is a
straightforward one and can be followed by anyone. The Installation folder and
Server information will have to be set. However, these are already preconfigured
and are downloaded from the Endpoint Protector Server and just a simple Next
or Continue is required.
Tips
Tools like Active Directory or Jamf can be used to deploy the Endpoint
Protector Client in large networks.
Information
For more details about downloading the Endpoint Protector Client, please
see chapter 14.1 Client Software.
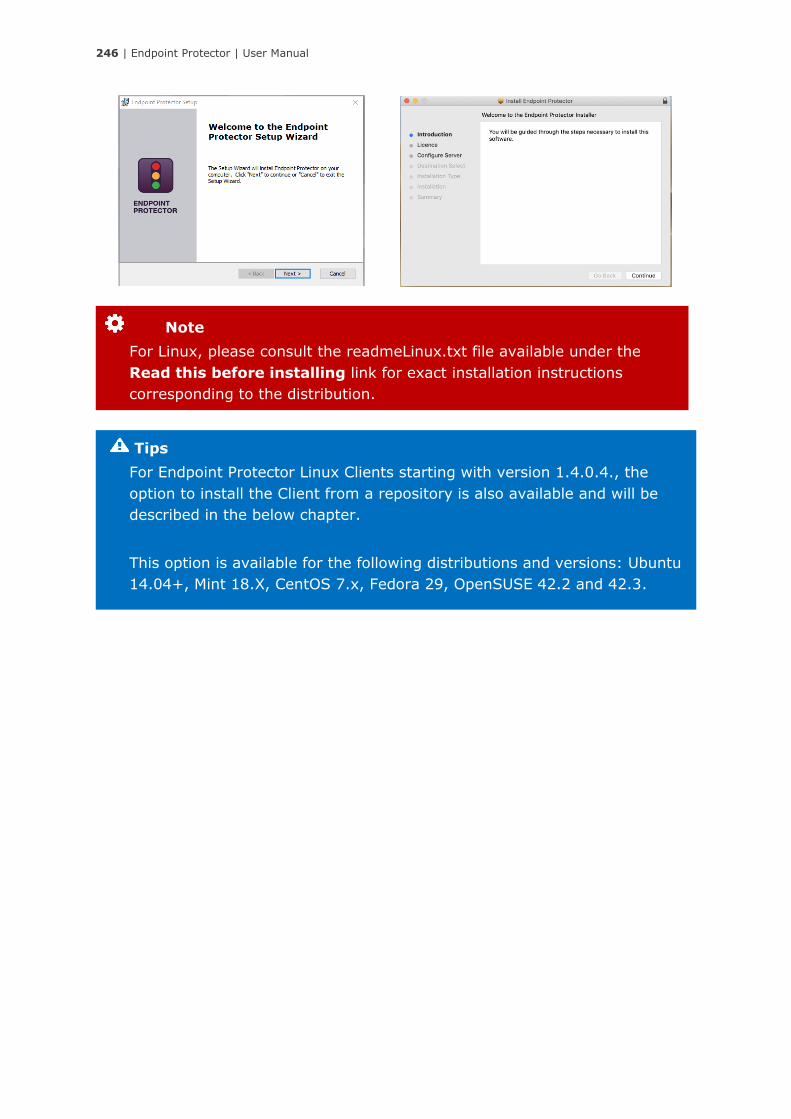
246 | Endpoint Protector | User Manual
Tips
For Endpoint Protector Linux Clients starting with version 1.4.0.4., the
option to install the Client from a repository is also available and will be
described in the below chapter.
This option is available for the following distributions and versions: Ubuntu
14.04+, Mint 18.X, CentOS 7.x, Fedora 29, OpenSUSE 42.2 and 42.3.
Note
For Linux, please consult the readmeLinux.txt file available under the
Read this before installing link for exact installation instructions
corresponding to the distribution.
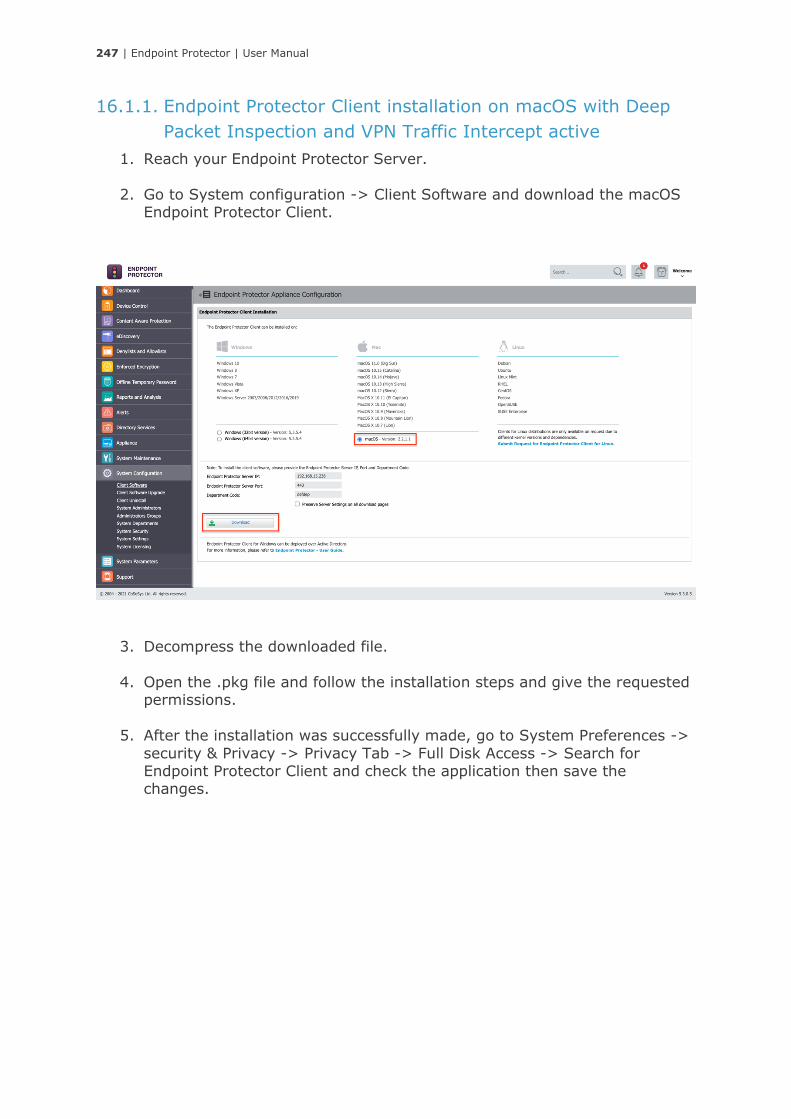
247 | Endpoint Protector | User Manual
16.1.1. Endpoint Protector Client installation on macOS with Deep
Packet Inspection and VPN Traffic Intercept active
1. Reach your Endpoint Protector Server.
2. Go to System configuration -> Client Software and download the macOS Endpoint Protector Client.
3. Decompress the downloaded file.
4. Open the .pkg file and follow the installation steps and give the requested
permissions.
5. After the installation was successfully made, go to System Preferences ->
security & Privacy -> Privacy Tab -> Full Disk Access -> Search for Endpoint Protector Client and check the application then save the changes.
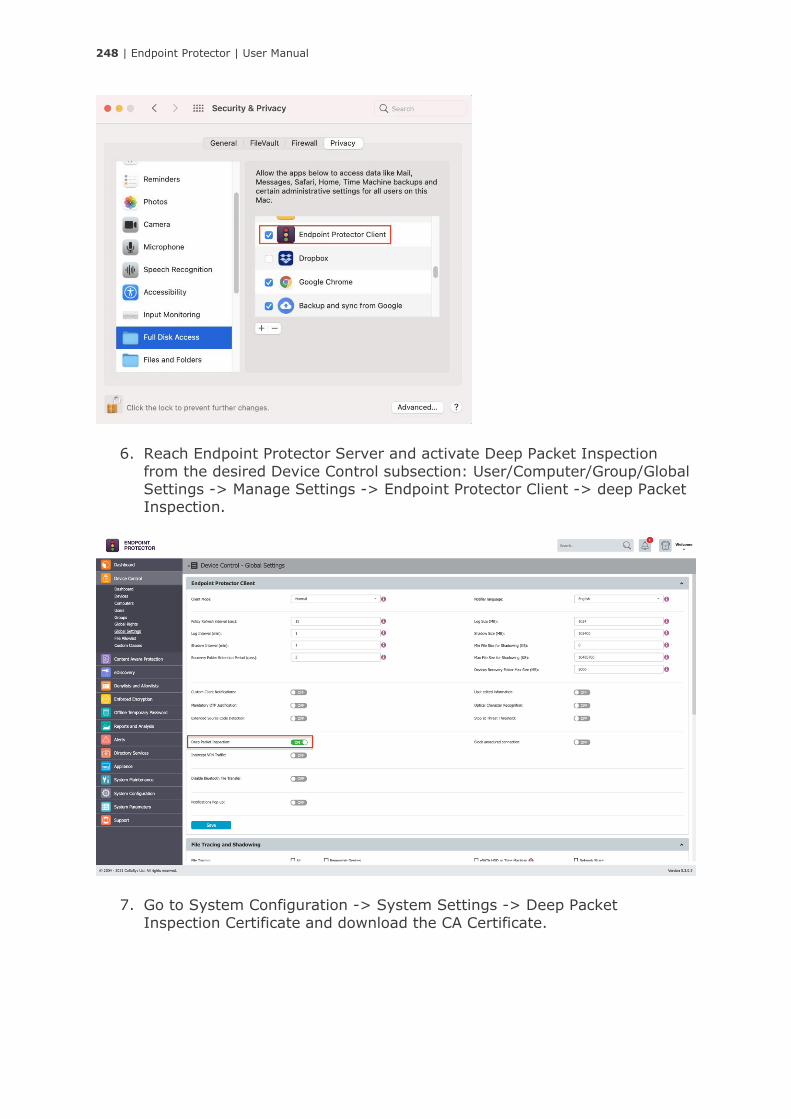
248 | Endpoint Protector | User Manual
6. Reach Endpoint Protector Server and activate Deep Packet Inspection
from the desired Device Control subsection: User/Computer/Group/Global Settings -> Manage Settings -> Endpoint Protector Client -> deep Packet Inspection.
7. Go to System Configuration -> System Settings -> Deep Packet
Inspection Certificate and download the CA Certificate.
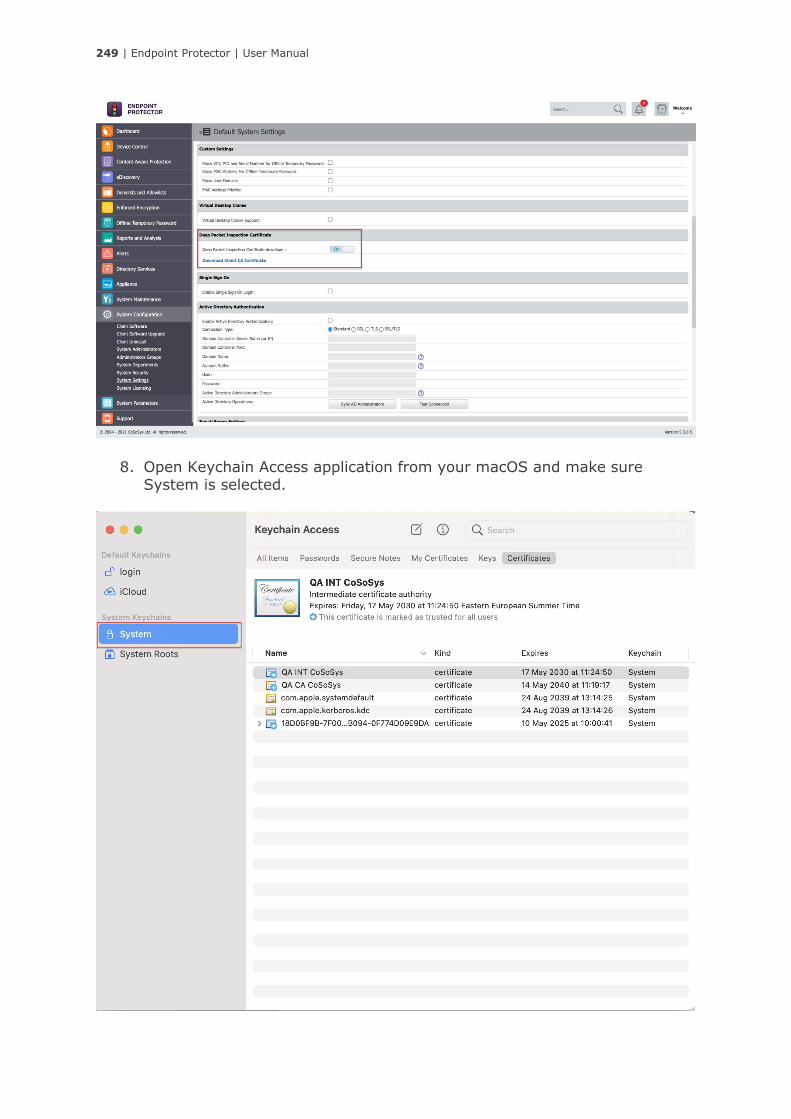
249 | Endpoint Protector | User Manual
8. Open Keychain Access application from your macOS and make sure System is selected.
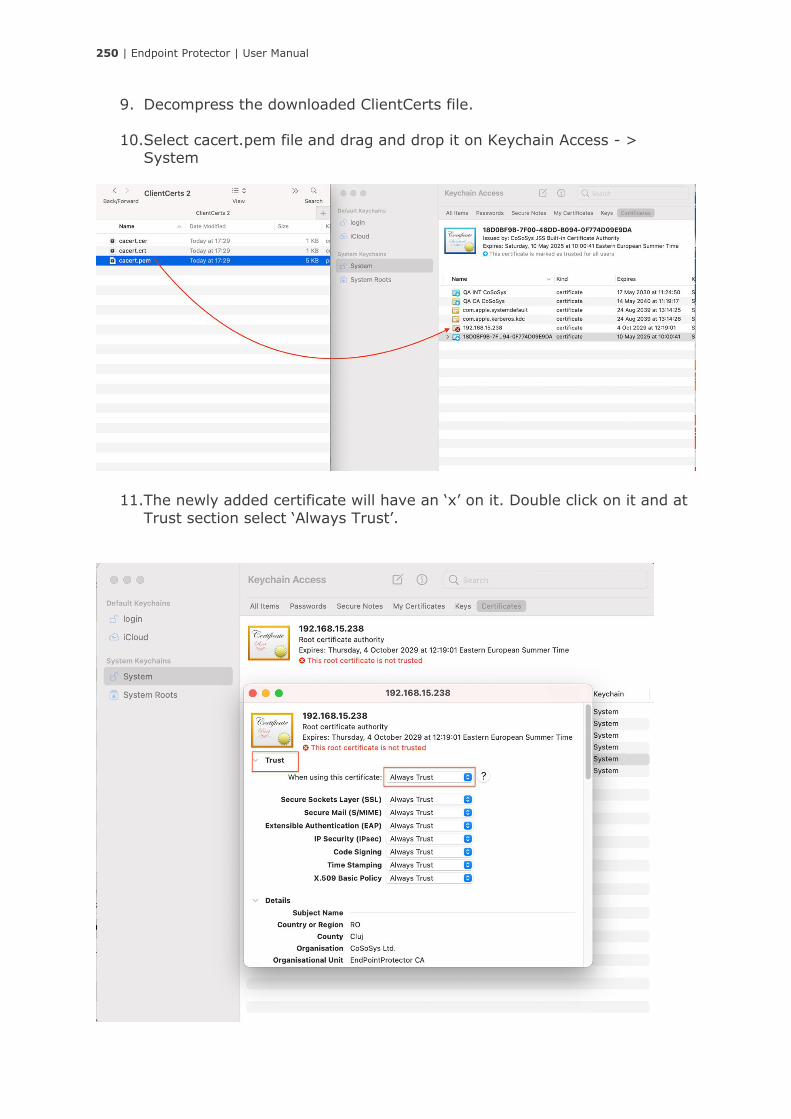
250 | Endpoint Protector | User Manual
9. Decompress the downloaded ClientCerts file.
10.Select cacert.pem file and drag and drop it on Keychain Access - > System
11.The newly added certificate will have an ‘x’ on it. Double click on it and at
Trust section select ‘Always Trust’.
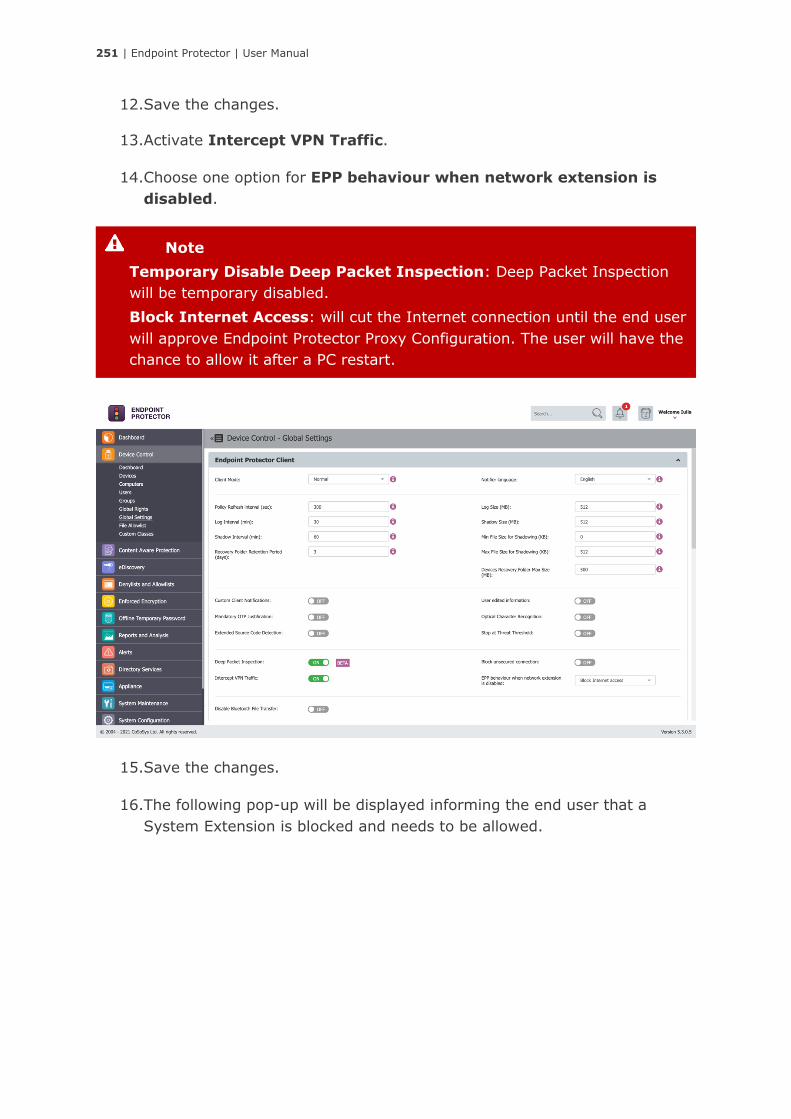
251 | Endpoint Protector | User Manual
12.Save the changes.
13.Activate Intercept VPN Traffic.
14.Choose one option for EPP behaviour when network extension is
disabled.
15.Save the changes.
16.The following pop-up will be displayed informing the end user that a
System Extension is blocked and needs to be allowed.
Note
Temporary Disable Deep Packet Inspection: Deep Packet Inspection
will be temporary disabled.
Block Internet Access: will cut the Internet connection until the end user
will approve Endpoint Protector Proxy Configuration. The user will have the
chance to allow it after a PC restart.

252 | Endpoint Protector | User Manual
17.Go to System Preferences -> Security and Privacy -> General and allow
the Endpoint Protector Client Extension.

253 | Endpoint Protector | User Manual
18.The following screen is displayed and give Endpoint Protector Proxy
Configuration Allow.
19.Installation of the macOS Endpoint Protector Client is done.
16.1.2. Debian based distributions
While the steps are similar, each distro and version have their own
particularities.
Ubuntu 19 - amd64
Ubuntu 18 - amd64
# echo "deb
https://download.endpointprotector.com/repo/deb/Ubuntu/19.04/amd64/ /"
> /etc/apt/sources.list.d/epprepo.list
# wget -q -O -
https://download.endpointprotector.com/repo/deb/Ubuntu/19.04/amd64/KEY.
gpg | apt-key
# apt update
# apt-get install epp-client
Information
When network extension is successfully enabled, a Client Integrity OK log
is generated.
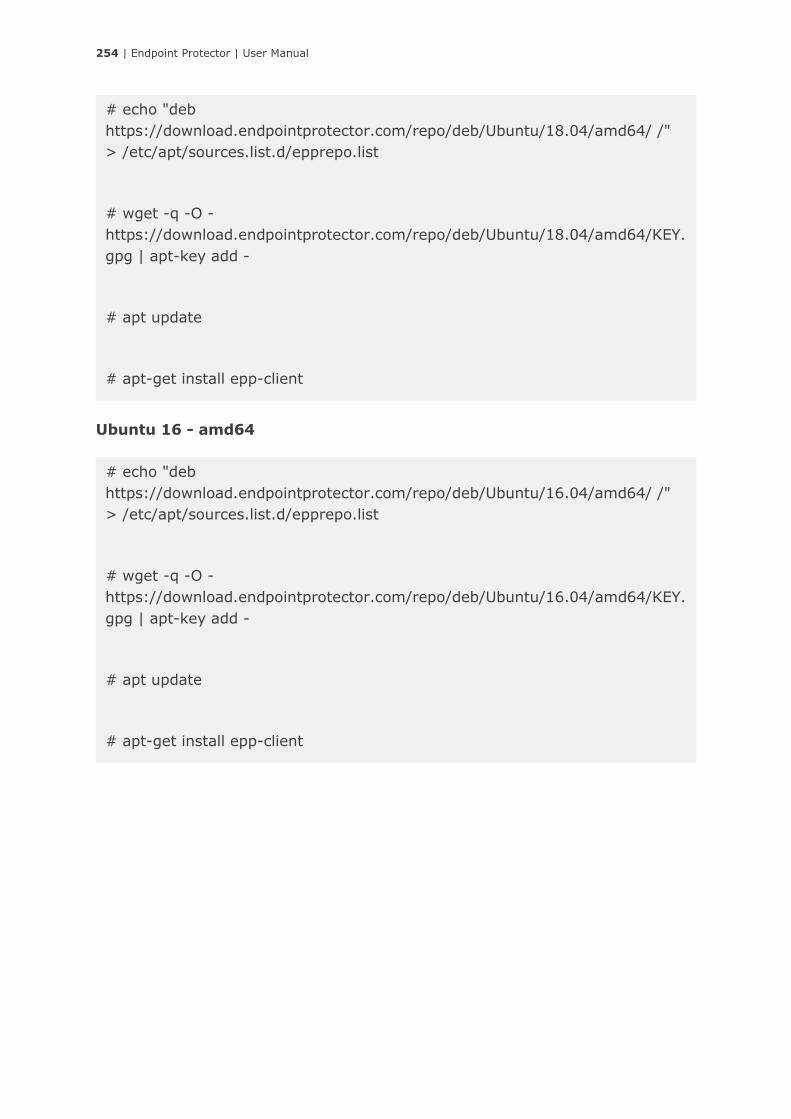
254 | Endpoint Protector | User Manual
Ubuntu 16 - amd64
# echo "deb
https://download.endpointprotector.com/repo/deb/Ubuntu/16.04/amd64/ /"
> /etc/apt/sources.list.d/epprepo.list
# wget -q -O -
https://download.endpointprotector.com/repo/deb/Ubuntu/16.04/amd64/KEY.
gpg | apt-key add -
# apt update
# apt-get install epp-client
# echo "deb
https://download.endpointprotector.com/repo/deb/Ubuntu/18.04/amd64/ /"
> /etc/apt/sources.list.d/epprepo.list
# wget -q -O -
https://download.endpointprotector.com/repo/deb/Ubuntu/18.04/amd64/KEY.
gpg | apt-key add -
# apt update
# apt-get install epp-client
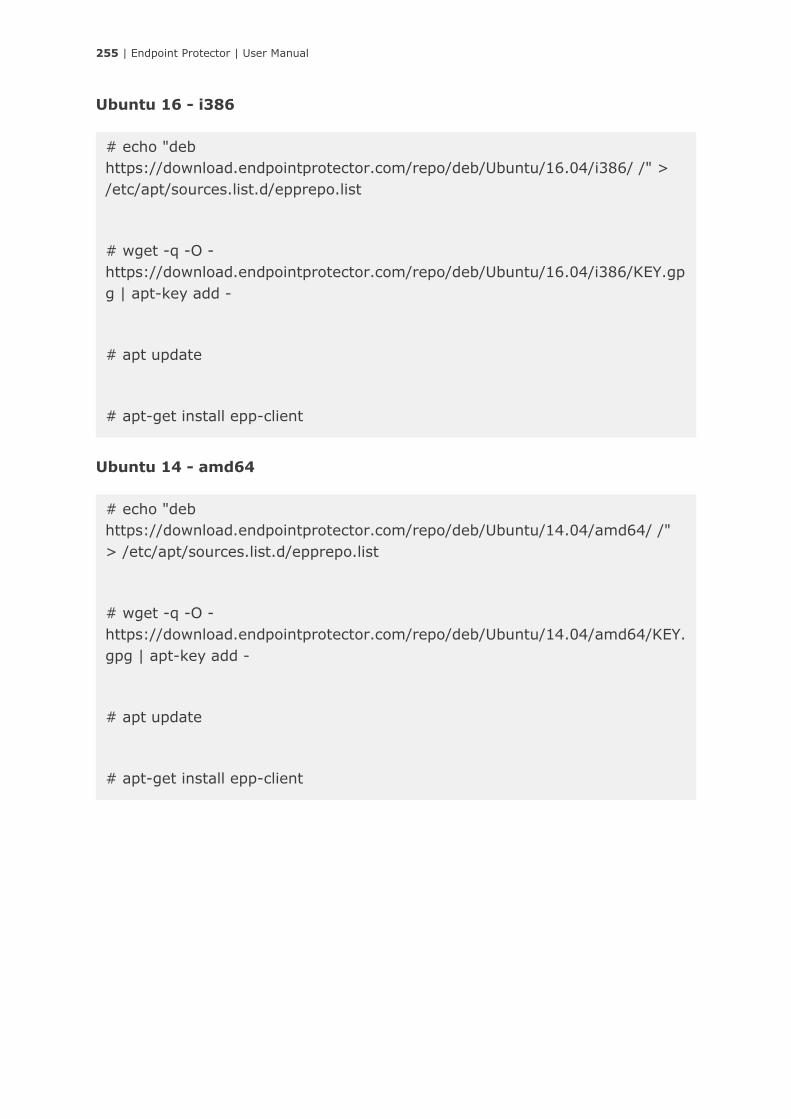
255 | Endpoint Protector | User Manual
Ubuntu 16 - i386
Ubuntu 14 - amd64
# echo "deb
https://download.endpointprotector.com/repo/deb/Ubuntu/14.04/amd64/ /"
> /etc/apt/sources.list.d/epprepo.list
# wget -q -O -
https://download.endpointprotector.com/repo/deb/Ubuntu/14.04/amd64/KEY.
gpg | apt-key add -
# apt update
# apt-get install epp-client
# echo "deb
https://download.endpointprotector.com/repo/deb/Ubuntu/16.04/i386/ /" >
/etc/apt/sources.list.d/epprepo.list
# wget -q -O -
https://download.endpointprotector.com/repo/deb/Ubuntu/16.04/i386/KEY.gp
g | apt-key add -
# apt update
# apt-get install epp-client
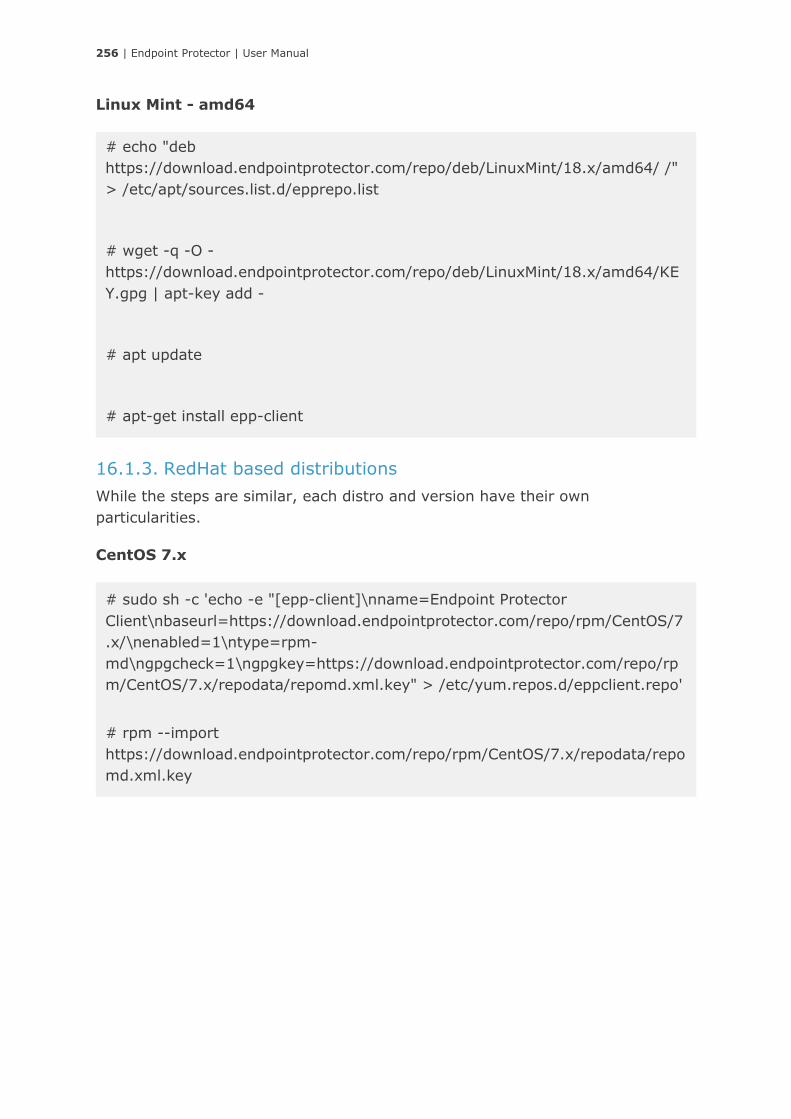
256 | Endpoint Protector | User Manual
Linux Mint - amd64
16.1.3. RedHat based distributions
While the steps are similar, each distro and version have their own
particularities.
CentOS 7.x
# sudo sh -c 'echo -e "[epp-client]\nname=Endpoint Protector
Client\nbaseurl=https://download.endpointprotector.com/repo/rpm/CentOS/7
.x/\nenabled=1\ntype=rpm-
md\ngpgcheck=1\ngpgkey=https://download.endpointprotector.com/repo/rp
m/CentOS/7.x/repodata/repomd.xml.key" > /etc/yum.repos.d/eppclient.repo'
# rpm --import
https://download.endpointprotector.com/repo/rpm/CentOS/7.x/repodata/repo
md.xml.key
# echo "deb
https://download.endpointprotector.com/repo/deb/LinuxMint/18.x/amd64/ /"
> /etc/apt/sources.list.d/epprepo.list
# wget -q -O -
https://download.endpointprotector.com/repo/deb/LinuxMint/18.x/amd64/KE
Y.gpg | apt-key add -
# apt update
# apt-get install epp-client
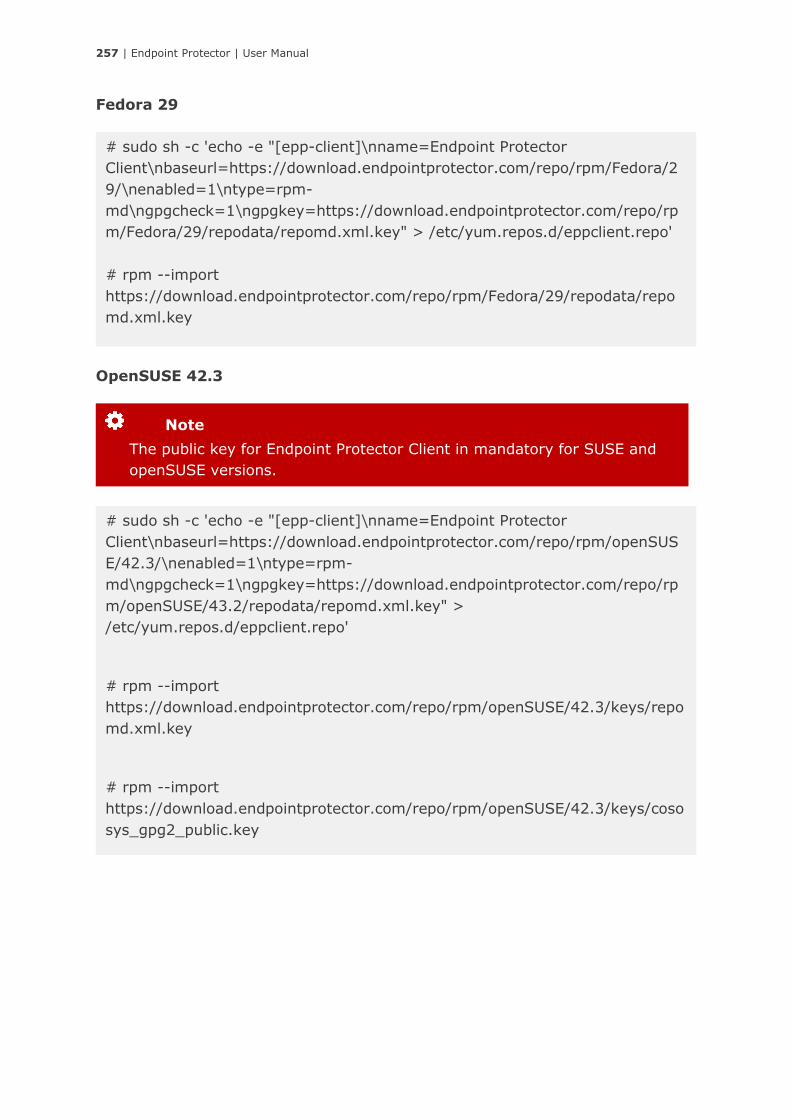
257 | Endpoint Protector | User Manual
Fedora 29
OpenSUSE 42.3
# sudo sh -c 'echo -e "[epp-client]\nname=Endpoint Protector
Client\nbaseurl=https://download.endpointprotector.com/repo/rpm/openSUS
E/42.3/\nenabled=1\ntype=rpm-
md\ngpgcheck=1\ngpgkey=https://download.endpointprotector.com/repo/rp
m/openSUSE/43.2/repodata/repomd.xml.key" >
/etc/yum.repos.d/eppclient.repo'
# rpm --import
https://download.endpointprotector.com/repo/rpm/openSUSE/42.3/keys/repo
md.xml.key
# rpm --import
https://download.endpointprotector.com/repo/rpm/openSUSE/42.3/keys/coso
sys_gpg2_public.key
Note
The public key for Endpoint Protector Client in mandatory for SUSE and
openSUSE versions.
# sudo sh -c 'echo -e "[epp-client]\nname=Endpoint Protector
Client\nbaseurl=https://download.endpointprotector.com/repo/rpm/Fedora/2
9/\nenabled=1\ntype=rpm-
md\ngpgcheck=1\ngpgkey=https://download.endpointprotector.com/repo/rp
m/Fedora/29/repodata/repomd.xml.key" > /etc/yum.repos.d/eppclient.repo'
# rpm --import
https://download.endpointprotector.com/repo/rpm/Fedora/29/repodata/repo
md.xml.key
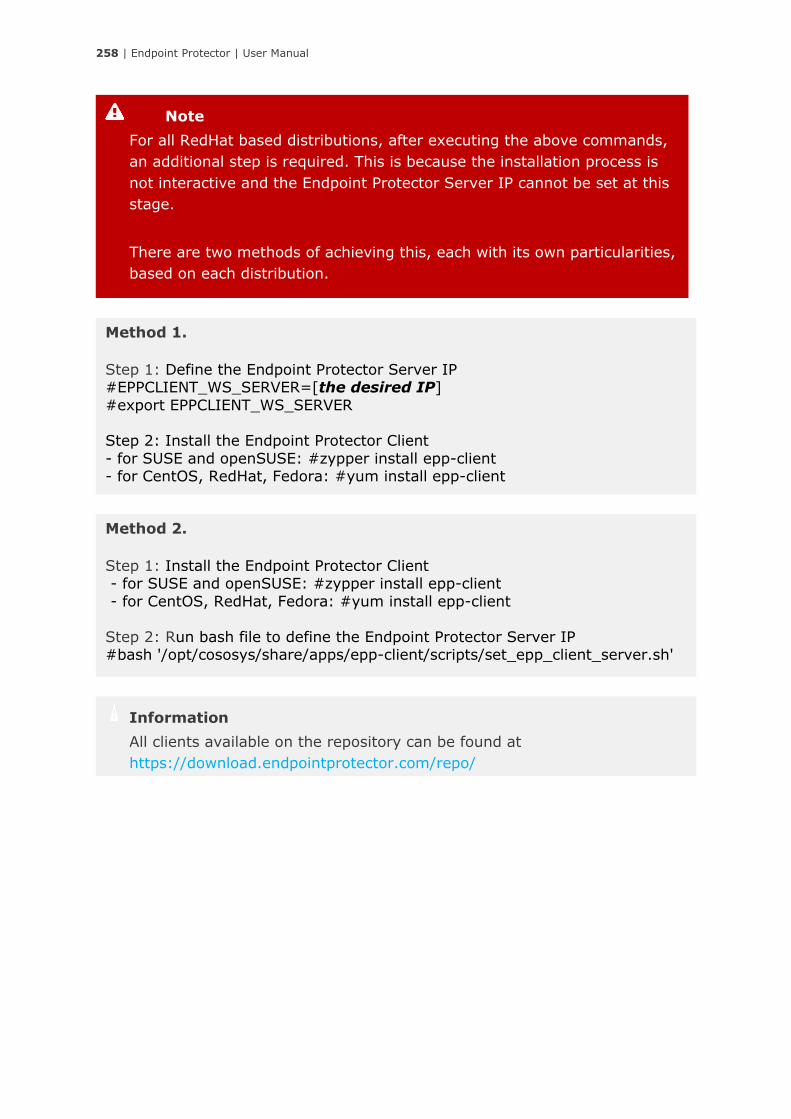
258 | Endpoint Protector | User Manual
Information
All clients available on the repository can be found at
https://download.endpointprotector.com/repo/
Method 2.
Step 1: Install the Endpoint Protector Client - for SUSE and openSUSE: #zypper install epp-client
- for CentOS, RedHat, Fedora: #yum install epp-client
Step 2: Run bash file to define the Endpoint Protector Server IP #bash '/opt/cososys/share/apps/epp-client/scripts/set_epp_client_server.sh'
Method 1.
Step 1: Define the Endpoint Protector Server IP #EPPCLIENT_WS_SERVER=[the desired IP]
#export EPPCLIENT_WS_SERVER Step 2: Install the Endpoint Protector Client
- for SUSE and openSUSE: #zypper install epp-client - for CentOS, RedHat, Fedora: #yum install epp-client
Note
For all RedHat based distributions, after executing the above commands,
an additional step is required. This is because the installation process is
not interactive and the Endpoint Protector Server IP cannot be set at this
stage.
There are two methods of achieving this, each with its own particularities,
based on each distribution.
259 | Endpoint Protector | User Manual
17. Support
Additional support resources are available. Please visit our website for more
manuals, FAQs, videos and tutorials, direct e-mail support and more at
https://www.endpointprotector.com/resources
Our Support department can also be contacted directly from the Endpoint
Protector User Interface from the Support section. One of our team members
will contact you in the shortest time possible.

260 | Endpoint Protector | User Manual
18. Disclaimer
Endpoint Protector Appliance does not communicate outside of your network
except with liveupdate.endpointprotector.com and cloud.endpointprotector.com.
Endpoint Protector does not contain malware software and does not send at any
time any of your private information (if Automatic Live Update Reporting is
DISABLED).
Each Endpoint Protector Server has the default SSH Protocol (22) open for
Support Interventions and there is one (1) System Account enabled (epproot)
protected with a password. The SSH Service can be disabled at customers’
request.
Security safeguards, by their nature, are capable of circumvention. CoSoSys
cannot, and does not, guarantee that data or devices will not be accessed by
unauthorized persons, and CoSoSys disclaims any warranties to that effect to
the fullest extent permitted by law.
© 2004 – 2021 CoSoSys Ltd.; Endpoint Protector, My Endpoint Protector, Endpoint
Protector Basic and EasyLock are trademarks of CoSoSys Ltd. All rights reserved.
Windows is a registered trademark of Microsoft Corporation. Macintosh, Mac OS X,
macOS are trademarks of Apple Corporation. All other names and trademarks are the
property of their respective owners.