HP Data Protector A.06.10 Installation and licensing guide
506
HP Data Protector A.06.10 Installation and licensing guide B6960-96036 Part number: B6960-96036 First edition: November 2008
-
Upload
khangminh22 -
Category
Documents
-
view
1 -
download
0
Transcript of HP Data Protector A.06.10 Installation and licensing guide

HP Data Protector A.06.10
Installation and licensing guide
B6960-96036Part number: B6960-96036First edition: November 2008

Legal and notice information
© Copyright 1999, 2008 Hewlett-Packard Development Company, L.P.
Confidential computer software. Valid license from HP required for possession, use or copying. Consistentwith FAR 12.211 and 12.212, Commercial Computer Software, Computer Software Documentation, andTechnical Data for Commercial Items are licensed to the U.S. Government under vendor's standardcommercial license.
The information contained herein is subject to change without notice. The only warranties for HP productsand services are set forth in the express warranty statements accompanying such products and services.Nothing herein should be construed as constituting an additional warranty. HP shall not be liable fortechnical or editorial errors or omissions contained herein.
Intel, Itanium, Pentium, Intel Inside, and the Intel Inside logo are trademarks or registered trademarks ofIntel Corporation or its subsidiaries in the United States and other countries.
Microsoft, Windows, Windows XP, and Windows NT are U.S. registered trademarks of MicrosoftCorporation.
Adobe and Acrobat are trademarks of Adobe Systems Incorporated.
Java is a US trademark of Sun Microsystems, Inc.
Oracle is a registered US trademark of Oracle Corporation, Redwood City, California.
UNIX is a registered trademark of The Open Group.
Printed in the US

Contents
Publication history .............................................................. 19About this guide ................................................................. 21
Intended audience ............................................................................................. 21Documentation set ............................................................................................. 21
Guides ...................................................................................................... 21Online Help ............................................................................................... 24Documentation map .................................................................................... 25
Abbreviations ...................................................................................... 25Map ................................................................................................... 26Integrations ......................................................................................... 27
Document conventions and symbols ..................................................................... 29Data Protector graphical user interface ................................................................. 30General information .......................................................................................... 31HP technical support .......................................................................................... 31Subscription service ........................................................................................... 32HP websites ...................................................................................................... 32Documentation feedback .................................................................................... 32
1 Overview of the installation procedure ............................... 33In this chapter ................................................................................................... 33Overview of the installation procedure ................................................................. 33
The remote installation concept ..................................................................... 36Data Protector installation DVD-ROMs ............................................................ 38
Choosing the Cell Manager system ...................................................................... 40Choosing the Data Protector user interface system .................................................. 41
The Data Protector graphical user interface .................................................... 42
2 Installing Data Protector on your network ............................ 45In this chapter ................................................................................................... 45Installing the Data Protector Cell Manager (CM) and Installation Server(s) (IS) ........... 46
Installing a UNIX Cell Manager .................................................................... 47Setting kernel parameters ...................................................................... 48
Installation and licensing guide 3

Installation procedure ............................................................................ 49The installed directory structure on HP-UX, Solaris, and Linux ...................... 51Configuring automatic startup and shutdown ............................................ 52Setting environment variables ................................................................. 54Allocating more disk space for the Cell Manager installation ..................... 55What’s next? ....................................................................................... 55
Installing a Windows Cell Manager .............................................................. 55Installation procedure ............................................................................ 57After the installation .............................................................................. 61Troubleshooting .................................................................................... 63What’s next? ....................................................................................... 63
Installing Installation Servers ......................................................................... 64Installing Installation Servers for UNIX ..................................................... 64Installing an Installation Server for Windows ............................................ 69
Installing Data Protector clients ............................................................................ 73Data Protector components ........................................................................... 77Remote installation of Data Protector clients .................................................... 81
Remote installation using secure shell ...................................................... 87Installing Windows clients ............................................................................ 90
Local installation .................................................................................. 92Connecting a backup device to Windows systems ..................................... 95
Installing HP-UX clients ................................................................................. 97Checking the kernel configuration on HP-UX ............................................. 98Connecting a backup device to HP-UX systems ....................................... 100
Installing Solaris clients .............................................................................. 100Post-installation configuration ............................................................... 102Connecting a backup device to a Solaris system ..................................... 106
Installing Linux clients ................................................................................ 107Connecting a backup device to the Linux system ..................................... 112
Installing ESX Server clients ........................................................................ 113Installing AIX clients .................................................................................. 114
Connecting a backup device to an AIX client ......................................... 115Installing Siemens Sinix clients .................................................................... 116
Connecting a backup device to Siemens Sinix system .............................. 117Installing Tru64 clients ............................................................................... 118
Connecting a backup device to Tru64 client ........................................... 119Installing SCO clients ................................................................................ 120
Connecting a backup device to an SCO system ...................................... 121Installing a Media Agent to use the ADIC/GRAU Library or the StorageTekLibrary ..................................................................................................... 122
Connecting library drives .................................................................... 123Preparing Data Protector clients to use the ADIC/GRAU Library ................ 123Installing a Media Agent to use the ADIC/GRAU Library ......................... 125
4

Preparing Data Protector clients to use the StorageTek Library ................... 128Installing a Media Agent to use the StorageTek Library ............................ 129
Local installation of the Novell NetWare clients ............................................. 131Local installation of HP OpenVMS clients ..................................................... 138Installing MPE/iX clients ............................................................................. 146Local installation of UNIX clients ................................................................. 149
Installing the Data Protector integration clients ..................................................... 154Local installation ....................................................................................... 156Remote installation .................................................................................... 156Installing cluster-aware integrations .............................................................. 157Microsoft Exchange Server clients ............................................................... 157Microsoft SQL Server clients ....................................................................... 158Microsoft SharePoint Portal Server Clients ..................................................... 158Sybase clients ........................................................................................... 158Informix Server clients ................................................................................ 159
IBM HACMP Cluster ........................................................................... 159SAP R/3 clients ........................................................................................ 159SAP DB/MaxDB clients .............................................................................. 160Oracle clients ........................................................................................... 160VMware Virtual Infrastructure clients ............................................................ 161DB2 clients .............................................................................................. 161NNM clients ............................................................................................ 162NDMP clients ........................................................................................... 162Microsoft Volume Shadow Copy Service clients ............................................. 162Lotus Notes/Domino Server clients .............................................................. 162
Lotus Domino Cluster ........................................................................... 163EMC Symmetrix integration ........................................................................ 163
EMC Symmetrix Integration with Oracle ................................................ 164EMC Symmetrix Integration with SAP R/3 .............................................. 165EMC Symmetrix Integration with Microsoft SQL Server ............................. 168
HP StorageWorks Disk Array XP integration .................................................. 168HP StorageWorks Disk Array XP integration with Oracle .......................... 169HP StorageWorks Disk Aray XP integration with SAP R/3 ........................ 170HP StorageWorks Disk Array XP integration with Microsoft ExchangeServer ............................................................................................... 174HP StorageWorks Disk Array XP integration with Microsoft SQL Server ...... 174
HP StorageWorks Virtual Array integration ................................................... 175HP StorageWorks VA integration with Oracle ......................................... 175HP StorageWorks VA integration with SAP R/3 ...................................... 177HP StorageWorks VA integration with Microsoft Exchange Server ............. 180HP StorageWorks VA integration with Microsoft SQL Server ..................... 181
HP StorageWorks Enterprise Virtual Array integration .................................... 181HP StorageWorks EVA integration with Oracle ....................................... 182
Installation and licensing guide 5

HP StorageWorks EVA integration with SAP R/3 .................................... 183HP StorageWorks EVA integration with Microsoft Exchange Server ............ 186HP StorageWorks EVA integration with MS SQL ..................................... 187
IAP clients ................................................................................................ 187VLS automigration clients ........................................................................... 189
Installing localized Data Protector user interface .................................................. 189Installing localized Data Protector user interface on Windows systems .............. 190Installing localized Data Protector user interface on UNIX systems .................... 191Troubleshooting ........................................................................................ 192
Installing the Data Protector Single Server Edition ................................................ 192Limitations of SSE for Windows ................................................................... 193Limitations of SSE for HP-UX and Solaris ....................................................... 193
Installing Data Protector web reporting ............................................................... 194Installing Data Protector on MC/ServiceGuard .................................................... 195
Installing a cluster-aware Cell Manager ....................................................... 195Installing a cluster-aware client .................................................................... 196
Installing Data Protector on Microsoft Cluster Server ............................................. 196Installing a cluster-aware Cell Manager ....................................................... 196Installing cluster-aware clients ..................................................................... 206
Installing Data Protector clients on a Veritas Cluster .............................................. 209Installing a Client ...................................................................................... 209
Installing Data Protector clients on a Novell NetWare Cluster ................................ 210Installing a client ....................................................................................... 210
Installing Data Protector on IBM HACMP Cluster .................................................. 212Installing cluster-aware clients ..................................................................... 212
3 Maintaining the installation ............................................ 213In this chapter ................................................................................................. 213Importing clients to a cell ................................................................................. 213Importing an installation server to a cell ............................................................ 216Importing a cluster-aware client to a cell ............................................................ 216
Microsoft Cluster Server ............................................................................. 217Other clusters ........................................................................................... 218
Exporting clients from a cell .............................................................................. 219Security considerations ..................................................................................... 222
Security layers .......................................................................................... 222Client security .................................................................................... 222Data Protector users ............................................................................ 223Cell Manager security ......................................................................... 224Other security aspects ......................................................................... 224
Securing clients ........................................................................................ 225The allow_hosts and deny_hosts files ..................................................... 230
6
Excessive logging to the inet.log file ...................................................... 231Strict hostname checking ............................................................................ 231
Enabling the feature ........................................................................... 233Start backup specification user right ............................................................ 233Hiding the contents of backup specifications ................................................. 234Host trusts ................................................................................................ 234Monitoring security events .......................................................................... 235
Verifying which Data Protector patches are installed ............................................. 235Verifying Data Protector patches using the GUI ............................................. 236Verifying Data Protector Patches Using the CLI .............................................. 237
Uninstalling Data Protector software ................................................................... 238Uninstalling a Data Protector client .............................................................. 239Uninstalling the Cell Manager and Installation Server .................................... 240
Uninstalling from Windows system ........................................................ 240Uninstalling from HP-UX system ............................................................. 242Uninstalling the Cell Manager and/or Installation Server configured onMC/ServiceGuard ............................................................................. 242Uninstalling from Solaris systems ........................................................... 245Uninstalling from Linux systems ............................................................. 247
Manual removal of Data Protector software on UNIX ..................................... 249Changing Data Protector software components ................................................... 251
4 Upgrading to Data Protector A.06.10 ............................... 255In this chapter ................................................................................................. 255Upgrade overview ........................................................................................... 255
Upgrade sequence .................................................................................... 256The need to convert file names in the IDB ..................................................... 257Automigration of encryption keys ................................................................ 258
Upgrading from Data Protector A.05.10, A.05.50, and A.06.00 ........................... 259Upgrading the UNIX Cell Manager and Installation Server ............................. 259
Upgrading a Cell Manager ................................................................. 259Upgrading an Installation Server .......................................................... 263
Upgrading the Windows Cell Manager and Installation Server ....................... 265Checking configuration changes ................................................................. 270Upgrading the clients ................................................................................ 272
Upgrading the Oracle integration ......................................................... 274Upgrading the SAP R/3 integration ...................................................... 276Upgrading the Informix server integration on UNIX systems ...................... 278Upgrading the Informix server integration on Windows systems ................ 279Upgrading the Sybase integration on UNIX systems ................................ 280Upgrading the Sybase integration on Windows systems .......................... 281Upgrading the HP StorageWorks EVA integration ................................... 282
Installation and licensing guide 7

Upgrading the Automatic Disaster Recovery Module ............................... 285Upgrading other integrations ............................................................... 286
Upgrading in a MoM environment .............................................................. 286Conversion of file names in the IDB .................................................................... 287
IDB conversion on a Windows Cell Manager ............................................... 291IDB conversion on a UNIX Cell Manager ..................................................... 293
Upgrading from the Single Server Edition ........................................................... 294Upgrading from earlier versions of SSE to Data Protector A.06.10 SSE ............. 294Upgrading from Data Protector A.06.10 SSE to Data Protector A.06.10 ............ 294
Upgrading the Cell Manager ............................................................... 295Upgrading from multiple installations .................................................... 295
Upgrading from HP StorageWorks Application Recovery Manager A.06.00 ........... 296Internal database backup after the upgrade ................................................. 297Upgrade of backup specifications ............................................................... 297
Changes in omnib usage .................................................................... 297Upgrading from Windows NT to newer version of Windows ................................. 297Upgrading from Solaris 8 to Solaris 9 ................................................................ 298Migrating from HP-UX 11.x (PA-RISC) to HP-UX 11.23/11.31 (IA-64) ......................... 298
MoM specifics .......................................................................................... 302Installation Server specifics ......................................................................... 303
Migrating from 32-bit/64-bit Windows to 64-bit Windows/Windows Server2008 ............................................................................................................. 303
MoM specifics .......................................................................................... 307Installation Server specifics ......................................................................... 308
Upgrading the Cell Manager configured on MC/ServiceGuard ............................ 308Upgrading the Cell Manager configured on Microsoft Cluster Server ...................... 312
5 Data Protector licensing ................................................. 317In this chapter ................................................................................................. 317Introduction .................................................................................................... 317License checking and reporting ......................................................................... 317
Cell Manager related licenses .................................................................... 318Entity based licenses ................................................................................. 318Capacity based licenses ............................................................................ 319
Used capacity calculation .................................................................... 320The advanced backup to disk license .................................................... 323Backup to HP IAP extension ................................................................. 323
Capacity based licensing examples ............................................................. 324Producing a license report on demand ......................................................... 327
Which licenses are available? ........................................................................... 328Password considerations ............................................................................ 329
Data Protector passwords ................................................................................. 330
8

Obtaining and installing permanent passwords using the HP AutoPass utility .... 331Other ways of obtaining and installing permanent passwords ......................... 334Verifying the password .............................................................................. 336Finding the number of installed licenses ....................................................... 337Moving licenses to another Cell Manager System .......................................... 337Centralized licensing ................................................................................. 338
The Data Protector order tool ............................................................................ 339
6 Troubleshooting installation ............................................. 341In this chapter ................................................................................................. 341Name resolution problems when installing the Windows Cell Manager .................. 341Verifying DNS connections within Data Protector cell ........................................... 342
Using the omnicheck command .................................................................. 343Troubleshooting installation and upgrade of Data Protector ................................... 345
Problems with remote installation of Windows clients ..................................... 346Troubleshooting installation of the Data Protector Cell Manager on Solaris .............. 347Troubleshooting installation of UNIX clients ......................................................... 349Troubleshooting installation of Windows XP clients ............................................... 349Troubleshooting installation of Windows Vista and Windows Server 2008 clients .... 349Verifying Data Protector client installation .......................................................... 350Troubleshooting upgrade .................................................................................. 351
Manual upgrade procedure ....................................................................... 353Using log files ................................................................................................. 353
Local installation ....................................................................................... 354Remote installation .................................................................................... 354Data Protector log files .............................................................................. 355
Creating installation execution traces ................................................................. 356
A Appendix A ................................................................. 357Data Protector A.06.10 product structure and licenses ........................................... 357
Starter Packs ............................................................................................ 358Media .............................................................................................. 359Manuals ........................................................................................... 359
Drive and library extensions ....................................................................... 360Functional extensions ................................................................................. 362Single Server Editions (SSE) ........................................................................ 370
License .............................................................................................. 371Migration .......................................................................................... 371Media .............................................................................................. 372Manuals ........................................................................................... 372
License migration to Data Protector A.06.10 .................................................. 372Data Protector A.05.10, A.05.50, and A.06.00 ..................................... 372
Installation and licensing guide 9
Graphical license overview ........................................................................ 373Data Protector licensing forms ........................................................................... 377
B Appendix B .................................................................. 381In this appendix .............................................................................................. 381Installing on HP-UX, Solaris, and Linux systems using native tools ........................... 381
Installing a Cell Manager on HP-UX systems using swinstall ............................ 381Installing the Cell Manager on Solaris systems using pkgadd .......................... 383Installing the Cell Manager on Linux systems using rpm .................................. 385Installing an Installation Server on HP-UX systems using swinstall ..................... 388Installing an Installation Server on Solaris systems using pkgadd ..................... 389Installing an Installation Server on Linux systems using rpm ............................. 393Installing the clients ................................................................................... 398
Upgrading on HP-UX, Solaris, and Linux systems using native tools ........................ 398Upgrading Data Protector on HP-UX systems using swinstall ............................ 398Upgrading Data Protector on Solaris systems using pkgadd ............................ 399Upgrading Data Protector on Linux systems using rpm .................................... 401
Setting up the TCP/IP protocol on Windows systems ............................................ 402Installing and configuring the TCP/IP protocol on Windows ............................ 403Checking the TCP/IP setup ......................................................................... 406
Changing the Cell Manager name .................................................................... 408Changing the default port number ..................................................................... 409
Changing the Data Protector default port number .......................................... 409Changing the default port number for Java GUI ............................................ 411
Preparing a NIS server ..................................................................................... 412Using tape and robotics drivers on Windows ...................................................... 413
Creating device files (SCSI Addresses) on Windows ...................................... 418SCSI robotics configuration on HP-UX ................................................................. 419
Creating device files on HP-UX .................................................................... 423Setting a SCSI controller’s parameters ................................................................ 426Finding the unused SCSI addresses on HP-UX ...................................................... 426Finding the unused SCSI target IDs on Solaris ...................................................... 428Updating the device and driver configuration on a Solaris system .......................... 429
Updating configuration files ....................................................................... 429Creating and checking device files .............................................................. 432
Finding unused SCSI target IDs on a Windows system .......................................... 433Setting SCSI IDs on an HP StorageWorks 330fx library ........................................ 434Connecting backup devices .............................................................................. 435
Connecting an HP StorageWorks 24 standalone device ................................. 439Connecting an HP StorageWorks DAT Autoloader ......................................... 440Connecting an HP StorageWorks DLT Library 28/48-Slot ............................... 442Connecting a Seagate Viper 200 LTO Ultrium Tape Drive ............................... 447
10

Checking the General Media Agent Installation on Novell NetWare ...................... 449Identifying the storage device ..................................................................... 450Testing the general Media Agent startup ...................................................... 450Testing the HPUMA.NLM and the HPDEVBRA.NLM startup ............................. 453
Installing Data Protector on Microsoft Cluster with Veritas Volume Manager ............. 454Configuration files path changes in Data Protector A.06.10 ................................... 455
Configuration files on UNIX ........................................................................ 455Configuration files on Windows .................................................................. 457
Command line changes after upgrading to Data Protector A.06.10 ........................ 458
Index .............................................................................. 485
Installation and licensing guide 11

Figures
Data Protector graphical user interface ............................................... 311
Data Protector Cell .......................................................................... 362
Data Protector installation concept ..................................................... 383
Data Protector graphical user interface .............................................. 424
Installation procedure ....................................................................... 465
Selecting the installation type ............................................................ 586
Selecting software components .......................................................... 597
Component summary list .................................................................. 608
Installation status page ..................................................................... 609
Selecting AutoPass for installation ...................................................... 6110
Selecting the installation type ............................................................ 7111
Component selection summary page .................................................. 7212
Installation status page ..................................................................... 7213
Selecting clients ............................................................................... 8314
Selecting components ..................................................................... 8415
Selecting clients .............................................................................. 8616
Selecting components ..................................................................... 8717
Choosing the Cell Manager .............................................................. 9318
Component selection summary page .................................................. 9419
Installation summary page ................................................................ 9420
Kernel configuration Window ............................................................ 9921
Format of a device filename: ........................................................... 11822
Format of a device filename ............................................................ 12223
Selecting language support at setup ............................................... 19024
12

Installing language support remotely ................................................ 19125
Selecting the installation type ......................................................... 20026
Selecting the cluster resource on Windows Server 2008 ..................... 20127
Selecting the cluster resource on other Windows systems ..................... 20228
Entering the account information ..................................................... 20229
Component selection page ............................................................. 20330
Installation status page ................................................................... 20431
Data Protector user account ........................................................... 20532
Selecting cluster-aware installation mode .......................................... 20733
Data Protector user account ............................................................ 20834
Importing a client to the cell ............................................................ 21535
Importing a Microsoft Cluster Server client to a cell ............................ 21736
Importing a MC/ServiceGuard, Veritas, or Novell NetWare ClusterServices client to a cell ................................................................... 219
37
Exporting a client system ............................................................... 22138
Securing a client ............................................................................ 22739
Enabling security on selected client(s) ............................................... 22840
Enabling security for all clients in the cell .......................................... 22941
Verifying patches installed ............................................................. 23742
Component selection summary page ................................................ 26843
Installation status page ................................................................... 26844
Selecting AutoPass for installation .................................................... 26945
IDB conversion after upgrade .......................................................... 29246
Selecting the components ............................................................... 31347
Component selection summary page ................................................ 31448
Installation status page ................................................................... 31449
Used capacity calculation scenario .................................................. 32150
ZDB-to-Disk sessions ....................................................................... 32451
ZDB-to-Tape sessions ...................................................................... 32552
Installation and licensing guide 13

ZDB-to-Disk+Tape sessions .............................................................. 32653
Direct backup sessions ................................................................... 32754
HP Data Protector product structure .................................................. 32955
HP AutoPass wizard ....................................................................... 33356
Data Protector order tool example .................................................... 34057
HP Data Protector product structure .................................................. 35858
Starter Pack for HP-UX .................................................................... 37359
Mixed environment ........................................................................ 37360
Libraries with 61 - 250 slots - example 1 ........................................... 37461
Libraries with 61 - 250 slots - example 2 ........................................... 37462
Online backup .............................................................................. 37563
Manager-of-Managers ................................................................... 37564
Advanced backup to disk ............................................................... 37665
Zero downtime backup ................................................................... 37666
Single Server Edition ...................................................................... 37767
SD install - software selection window ............................................. 38368
The TCP/IP properties window on Windows ..................................... 40469
Advanced TCP/IP settings on Windows ............................................ 40570
The DNS suffix and NetBIOS computer name on Windows ................ 40671
Driver properties ............................................................................ 41572
Medium changer properties ............................................................ 41773
Disabling robotics drivers ............................................................... 41874
Tape drive properties ..................................................................... 41975
SCSI controlled devices .................................................................. 42076
Managing devices ......................................................................... 42077
Status of the SCSI pass-through driver (sctl) ........................................ 42178
Status of the SCSI pass-through driver - spt ........................................ 42279
List of connected devices ................................................................ 42480
The output of ioscan -f on an HP-UX system: ...................................... 42781
14

Device settings .............................................................................. 43482
Installation and licensing guide 15

Tables
Edition history ................................................................................. 191
Document conventions ...................................................................... 292
Data Protector DVD-ROM list ............................................................. 383
Installing Data Protector client systems ............................................... 734
Installing integrations ....................................................................... 755
Other installations .......................................................................... 766
Data Protector component codes ..................................................... 1527
Data Protector software component dependencies on HP-UX ............... 2528
Data Protector software component dependencies on Solaris ............... 2539
EADR and OBDR compatibility after upgrade .................................... 28510
File name conversion impact on a Windows Cell Manager ................. 28811
File name conversion impact on a UNIX Cell Manager ....................... 28912
Return messages ............................................................................ 34413
HP Data Protector Starter Pack license numbers ................................. 35814
HP Data Protector drive extensions ................................................... 36015
HP Data Protector drive extensions ................................................... 36116
HP Data Protector library extensions ................................................. 36117
HP Data Protector on-line extension .................................................. 36218
HP Data Protector open file backup extension .................................... 36319
HP Data Protector Manager-of-Managers extension ............................ 36320
HP Data Protector Media Operations extension ................................. 36421
HP Data Protector advanced backup to disk extension ........................ 36422
HP Data Protector backup to HP IAP extension ................................... 36623
HP Data Protector Zero Downtime Backup (ZDB) extension .................. 36724
16

HP Data Protector Instant Recovery extension ..................................... 36825
HP Data Protector direct backup extension ........................................ 36826
HP Data Protector direct backup using NDMP ................................... 36927
HP Data Protector encryption extension ............................................ 36928
HP Data Protector functional extensions printed manuals ..................... 36929
HP Data Protector SSE license numbers ............................................. 37030
The content of the new /etc/opt/omni/client directory ....................... 45531
The content of the new /var/opt/omni/server directory ...................... 45632
The content of the new Data_Protector_home\Config\clientdirectory ...................................................................................... 457
33
Upgrade from Data Protector A.05.10 .............................................. 45834
Upgrade from Data Protector A.05.50 .............................................. 46835
Upgrade from Data Protector A.06.00 ............................................. 47536
Upgrade from Application Recovery Manager A.06.00 ...................... 48137
Installation and licensing guide 17

18

Publication history
Guide updates may be issued between editions to correct errors or document productchanges. To ensure that you receive updated or new editions, subscribe to theappropriate product support service. See your HP sales representative for details.
Table 1 Edition history
ProductGuide editionPart number
Data Protector Release A.05.00August 2002B6960-90058
Data Protector Release A.05.10May 2003B6960-90079
Data Protector Release A.05.50October 2004B6960-90107
Data Protector Release A.06.00July 2006B6960-96002
Data Protector Release A.06.10November 2008B6960-96036
Installation and licensing guide 19

Publication history20

About this guide
This guide provides information about:
• installing the Data Protector network product• prerequisites that must be met before starting the installation procedure• upgrading and licensing
Intended audienceThis guide is intended for administrators responsible for installing and maintainingthe environment and backup administrators responsible for planning, installing, andmanaging the backup environment.
Conceptual information can be found in the HP Data Protector concepts guide, whichis recommended to fully understand the fundamentals and the model of Data Protector.
Documentation setOther documents and online Help provide related information.
GuidesData Protector guides are available in printed format and in PDF format. Install thePDF files during the Data Protector setup procedure by selecting the EnglishDocumentation & Help component on Windows or the OB2-DOCS componenton UNIX. Once installed, the guides reside in the Data_Protector_home\docsdirectory on Windows and in the /opt/omni/doc/C directory on UNIX.
You can find these documents from the Manuals page of the HP Business SupportCenter website:
http://www.hp.com/support/manuals
In the Storage section, click Storage Software and then select your product.
Installation and licensing guide 21
• HP Data Protector concepts guideThis guide describes Data Protector concepts and provides background informationon how Data Protector works. It is intended to be used with the task-orientedonline Help.
• HP Data Protector installation and licensing guideThis guide describes how to install the Data Protector software, taking into accountthe operating system and architecture of your environment. This guide also givesdetails on how to upgrade Data Protector, as well as how to obtain the properlicenses for your environment.
• HP Data Protector troubleshooting guideThis guide describes how to troubleshoot problems you may encounter whenusing Data Protector.
• HP Data Protector disaster recovery guideThis guide describes how to plan, prepare for, test and perform a disasterrecovery.
• HP Data Protector integration guidesThese guides describe how to configure and use Data Protector to back up andrestore various databases and applications. They are intended for backupadministrators or operators. There are four guides:• HP Data Protector integration guide for Microsoft applications: SQL Server,
SharePoint Portal Server, Exchange Server, and Volume Shadow Copy ServiceThis guide describes the integrations of Data Protector with the followingMicrosoft applications: Microsoft Exchange Server, Microsoft SQL Server, andVolume Shadow Copy Service.
• HP Data Protector integration guide for Oracle and SAPThis guide describes the integrations of Data Protector with Oracle, SAP R3,and SAP DB/MaxDB.
• HP Data Protector integration guide for IBM applications: Informix, DB2, andLotus Notes/DominoThis guide describes the integrations of Data Protector with the following IBMapplications: Informix Server, IBM DB2, and Lotus Notes/Domino Server.
• HP Data Protector integration guide for VMware Virtual Infrastructure, Sybase,Network Node Manager, and Network Data Management Protocol ServerThis guide describes the integrations of Data Protector with VMware VirtualInfrastructure, Sybase, Network Node Manager, and Network DataManagement Protocol Server.
About this guide22
• HP Data Protector integration guide for HP Service Information PortalThis guide describes how to install, configure, and use the integration of DataProtector with HP Service Information Portal. It is intended for backupadministrators. It discusses how to use the application for Data Protector servicemanagement.
• HP Data Protector integration guide for HP ReporterThis manual describes how to install, configure, and use the integration of DataProtector with HP Reporter. It is intended for backup administrators. It discusseshow to use the application for Data Protector service management.
• HP Data Protector integration guide for HP Operations Manager for UNIXThis guide describes how to monitor and manage the health and performance ofthe Data Protector environment with HP Operations Manager and HP ServiceNavigator on UNIX.
• HP Data Protector integration guide for HP Operations Manager for WindowsThis guide describes how to monitor and manage the health and performance ofthe Data Protector environment with HP Operations Manager and HP ServiceNavigator on Windows.
• HP Data Protector integration guide for HP Performance Manager and HPPerformance AgentThis guide provides information about how to monitor and manage the healthand performance of the Data Protector environment with HP Performance Manager(PM) and HP Performance Agent (PA) on Windows, HP-UX, Solaris, and Linux.
• HP Data Protector zero downtime backup concepts guideThis guide describes Data Protector zero downtime backup and instant recoveryconcepts and provides background information on how Data Protector works ina zero downtime backup environment. It is intended to be used with thetask-oriented HP Data Protector zero downtime backup administrator's guide andthe HP Data Protector zero downtime backup integration guide.
• HP Data Protector zero downtime backup administrator's guideThis guide describes how to configure and use the integration of Data Protectorwith HP StorageWorks Virtual Array, HP StorageWorks Enterprise Virtual Array,EMC Symmetrix Remote Data Facility and TimeFinder, and HP StorageWorksDisk Array XP. It is intended for backup administrators or operators. It covers thezero downtime backup, instant recovery, and the restore of filesystems and diskimages.
• HP Data Protector zero downtime backup integration guideThis guide describes how to configure and use Data Protector to perform zerodowntime backup, instant recovery, and standard restore of Oracle, SAP R/3,
Installation and licensing guide 23

Microsoft Exchange Server, and Microsoft SQL Server databases. The guide alsodescribes how to configure and use Data Protector to perform backup and restoreusing the Microsoft Volume Shadow Copy Service.
• HP Data Protector MPE/iX system user guideThis guide describes how to configure MPE/iX clients and how to back up andrestore MPE/iX data.
• HP Data Protector Media Operations user's guideThis guide provides tracking and management of offline storage media. It describesthe tasks of installing and configuring the application, performing daily mediaoperations and producing reports.
• HP Data Protector product announcements, software notes, and referencesThis guide gives a description of new features of HP Data Protector A.06.10. Italso provides information on supported configurations (devices, platforms andonline database integrations, SAN, and ZDB), required patches, and limitations,as well as known problems and workarounds. An updated version of the supportedconfigurations is available at http://www.hp.com/support/manuals.
• HP Data Protector product announcements, software notes, and references forintegrations to HP Operations Manager, HP Reporter, HP Performance Manager,HP Performance Agent, and HP Service Information PortalThis guide fulfills a similar function for the listed integrations.
• HP Data Protector Media Operations product announcements, software notes,and referencesThis guide fulfills a similar function for Media Operations.
• HP Data Protector command line interface referenceThis guide describes the Data Protector command-line interface, command optionsand their usage as well as provides some basic command-line examples.
Online HelpData Protector provides context-sensitive (F1) Help and Help Topics for Windowsand UNIX platforms.
You can access the online Help from the top-level directory on the installationDVD-ROM without installing Data Protector:
• Windows: Unzip DP_help.zip and open DP_help.chm.• UNIX: Unpack the zipped tar file DP_help.tar.gz, and access the online Help
system through DP_help.htm.
About this guide24

Documentation map
AbbreviationsAbbreviations in the documentation map that follows are explained below. The guidetitles are all preceded by the words “HP Data Protector”.
GuideAbbreviation
Command line interface referenceCLI
Concepts guideConcepts
Disaster recovery guideDR
Getting started guideGS
Online HelpHelp
Integration guide for IBM applications: Informix, DB2, and LotusNotes/Domino
IG-IBM
Integration guide for Microsoft applications: SQL Server, SharePointPortal Server, Exchange Server, and Volume Shadow Copy Service
IG-MS
Integration guide for Oracle and SAPIG-O/S
Integration guide for HP Operations Manager for UNIXIG-OMU
Integration guide for HP Operations Manager for WindowsIG-OMW
Integration guide for HP Performance Manager and HP PerformanceAgent
IG-PM/PA
Integration guide for HP ReporterIG-Report
Integration guide for HP Service Information PortalIG-SIP
Integration guide for VMware Virtual Infrastructure, Sybase, NetworkNode Manager, and Network Data Management Protocol Server
IG-Var
Installation and licensing guide 25

GuideAbbreviation
Installation and licensing guideInstall
Media Operations getting started guideMO GS
Media Operations product announcements, software notes, andreferences
MO RN
Media Operations user guideMO UG
MPE/iX system user guideMPE/iX
Product announcements, software notes, and referencesPA
Troubleshooting guideTrouble
ZDB administrator's guideZDB Admin
ZDB concepts guideZDB Concept
ZDB integration guideZDB IG
MapThe following table shows where to find information of different kinds. Shaded squaresare a good place to look first.
About this guide26

IntegrationsLook in these guides for details of the following integrations:
GuideIntegration
IG-OMU, IG-OMWHP Operations Manager for UNIX/for Windows
IG-PM/PAHP Performance Manager
IG-PM/PAHP Performance Agent
Installation and licensing guide 27

GuideIntegration
IG-RHP Reporter
IG-SIPHP Service Information Portal
all ZDBHP StorageWorks Disk Array XP
all ZDBHP StorageWorks Enterprise Virtual Array (EVA)
all ZDBHP StorageWorks Virtual Array (VA)
IG-IBMIBM DB2 UDB
IG-IBMInformix
IG-IBMLotus Notes/Domino
MO UserMedia Operations
MPE/iXMPE/iX system
IG-MS, ZDB IGMicrosoft Exchange Server
IG-MSMicrosoft Exchange Single Mailbox
IG-MS, ZDB IGMicrosoft SQL Server
IG-MS, ZDB IGMicrosoft Volume Shadow Copy Service (VSS)
IG-VarNDMP Server
IG-VarNetwork Node Manager (NNM)
IG-O/SOracle
ZDB IGOracle ZDB
IG-O/SSAP DB
IG-O/S, ZDB IGSAP R/3
About this guide28

GuideIntegration
IG-VarSybase
all ZDBEMC Symmetrix
IG-VarVMware
Document conventions and symbolsTable 2 Document conventions
ElementConvention
Cross-reference links and e-mail addressesBlue text: Table 2 on page 29
website addressesBlue, underlined text: http://www.hp.com
Text emphasisItalic text
• File and directory names• System output• Code• Commands, their arguments, and
argument values
Monospace text
• Code variables• Command variablesMonospace, italic text
Emphasized monospace texttext
CAUTION:Indicates that failure to follow directions could result in damage to equipment or data.
IMPORTANT:Provides clarifying information or specific instructions.
Installation and licensing guide 29

NOTE:Provides additional information.
TIP:Provides helpful hints and shortcuts.
Data Protector graphical user interfaceData Protector provides a cross-platform (Windows and UNIX) graphical userinterface. You can use the original Data Protector GUI (Windows only) or the DataProtector Java GUI. For information about the Data Protector graphical user interface,see the online Help.
About this guide30

Figure 1 Data Protector graphical user interface
General informationGeneral information about Data Protector can be found at http://www.hp.com/go/dataprotector.
HP technical supportFor worldwide technical support information, see the HP support website:
http://www.hp.com/support
Before contacting HP, collect the following information:
• Product model names and numbers• Technical support registration number (if applicable)• Product serial numbers• Error messages• Operating system type and revision level• Detailed questions
Installation and licensing guide 31

Subscription serviceHP recommends that you register your product at the Subscriber's Choice for Businesswebsite:
http://www.hp.com/go/e-updates
After registering, you will receive e-mail notification of product enhancements, newdriver versions, firmware updates, and other product resources.
HP websitesFor additional information, see the following HP websites:
• http://www.hp.com• http://www.hp.com/go/software• http://www.hp.com/support/manuals• http://www.hp.com/support/downloads
Documentation feedbackHP welcomes your feedback.
To make comments and suggestions about product documentation, please send amessage to [email protected]. All submissions become the property of HP.
About this guide32

1 Overview of the installationprocedure
In this chapterThis chapter provides an overview of the Data Protector installation procedure andintroduces concepts that apply to the installation. The chapter also introduces DataProtector Cell Manager and Data Protector.
Overview of the installation procedureA Data Protector backup environment is a set of systems with a common backuppolicy located in the same time zone and existing on the same LAN/SAN. Thisnetwork environment is referred to as a Data Protector cell. A typical cell consists ofa Cell Manager, Installation Servers, clients, and backup devices.
The Cell Manager is the main system that manages the cell from a central point. Itcontains the Data Protector internal database (IDB) and runs core Data Protectorsoftware and session managers.
The IDB keeps track of backed up files and the cell configuration.
The Installation Server (IS) is a separate system or a Cell Manager component thatcontains the Data Protector software repository used for remote client installations.This Data Protector feature greatly facilitates the software installation process,particularly for remote clients.
A cell typically consists of one Cell Manager and several clients. A computer systembecomes a Data Protector client as soon as one of the Data Protector softwarecomponents is installed on the system. When client components are installed on asystem depends on the role of that system in your backup environment. Data Protectorcomponents can be installed either locally on a single system, or onto several systemsfrom Installation Servers.
Installation and licensing guide 33

The User Interface component is needed to access the Data Protector functionalityand is used to perform all configuration and administration tasks. It must be installedon systems used for backup administration. Data Protector provides a graphical userinterface (GUI) and command-line interface (CLI).
Client systems with disks that need to be backed up must have an appropriate DataProtector Disk Agent components installed. The Disk Agent enables you to back updata from the client disk or restore it.
Client systems that are connected to a backup device must have a Media Agentcomponent installed. This software manages backup devices and media. DataProtector features two Media Agents: the General Media Agent and the NDMP MediaAgent. The NDMP Media Agent is only needed on client systems that controll thebackup of an NDMP server (on client systems controlling NDMP dedicated drives).In all other cases the two Media Agents are interchangeable.
Before installing Data Protector on your network, define the following:
• The system on which the Cell Manager will be installed. See the support matricesat http://www.hp.com/support/manuals for supported operating systems andversions.There can only be one Cell Manager per cell. Data Protector cannot be run withouta Cell Manager installed.
• Systems that will be used to access the Data Protector functionality through theuser interface. These systems must have the User Interface component installed.
• Systems that will be backed up. These must have the Disk Agent componentinstalled for filesystem backup and the relevant Application Agent component foronline database integrations.
• Systems to which the backup devices will be connected. These must have a MediaAgent component installed.
• The system(s) on which the Data Protector Installation Server(s) will be installed.Two types of Installation Servers are available for remote software installation:one for UNIX clients and one for Windows clients.The choice of computer for the Installation Server is independent of the CellManager and the system(s) on which the User Interface is installed. The CellManager and Installation Server can be installed on the same system (if they runon the same platform) or on different systems.An Installation Server can be shared between multiple Data Protector cells.
Overview of the installation procedure34

NOTE:The Installation Server for Windows must be installed on a Windows system. TheInstallation Server for UNIX must be installed on an HP-UX, Solaris, or Linux system.Refer to the HP Data Protector product announcements, software notes, and referencesfor the supported operating system versions.
IMPORTANT:When installing a Data Protector Cell Manager, Installation Server or client on Solarissystems, make sure to save all your files from the /usr/omni directory to some otherdirectory. The Data Protector installation deletes all the files from the /usr/omnidirectory.
After you have defined the roles of the systems in your future Data Protector cell, theinstallation procedure comprises the following general steps:
1. Checking the prerequisites for installation.
2. Installing the Data Protector Cell Manager.
3. Installing the Installation Server(s) and the User Interface.
4. Installing client systems either remotely (recommended option, where possible),or locally from the DVD-ROM.
NOTE:You cannot remotely install a Data Protector client on a Windows system if an InstallationServer has already been installed on this system. To install an Installation Server andclient component(s) on the same system, you must perform a local client installation fromthe Data Protector Windows installation DVD-ROM. In the Custom Setup window, selectall desired client components and the Installation Server component.Remote installation is also not possible for Windows XP Home Edition, MPE/iX, andNovell NetWare clients. These have to be installed locally.
Installation and licensing guide 35

Figure 2 Data Protector Cell
The remote installation conceptOnce you have installed the Data Protector Cell Manager, User Interface, andInstallation Server(s) (at least one Installation Server is needed for each platform,UNIX and Windows), you can distribute Data Protector software to clients usingoperating systems on which remote installation is supported. See Figure 3 on page 38.
Every time you perform a remote installation, you access the Installation Server throughthe GUI. The User Interface component may be installed on the Cell Manager,although this is not a requirement. It would be prudent to install the User Interfaceon several systems so that you can access the Cell Manager from different locations.
Client software can be distributed to any Windows system, except Windows XP HE,from an Installation Server for Windows.
Windows XP HE client systems must be installed locally from the Data ProtectorDVD-ROM for Windows.
Data Protector also supports Novell NetWare clients, although there is no remoteclient installation. Installation is performed through a Windows system connected tothe Novell network.
Overview of the installation procedure36

Client software can be installed remotely on HP-UX, Solaris, Sinix, Linux, AIX, andother supported UNIX operating systems from an Installation Server for UNIX. For alist of supported platforms, refer to HP Data Protector product announcements, softwarenotes, and references.
For UNIX operating systems on which remote installation is not supported, or if youdo not install an Installation Server for UNIX, you can install UNIX clients locally,from the Data Protector UNIX installation DVD-ROM.
Note that there are some exceptions that require remote installation only.
For further information on available installation methods for the various Data Protectorclients, refer to “Installing Data Protector clients” on page 73.
For the procedure for installing UNIX clients locally, refer to “Local installation ofUNIX clients” on page 149.
Installation and licensing guide 37

Figure 3 Data Protector installation concept
Data Protector installation DVD-ROMsData Protector supports various operating systems and several processor architectures.Consequently, 2 DVD-ROMs are required to cover all platforms. Table 3 on page 38lists the components found on the DVD-ROMs.
Table 3 Data Protector DVD-ROM list
ContentsDVD-ROM titleDVDnum.
Data Protector Starter Pack forWindowsIncludes Media Operations; andagents for Netware, MPE, andHP OpenVMS clients
1
Overview of the installation procedure38

ContentsDVD-ROM titleDVDnum.
• Cell Manager and Installation Server forWindows on 32-bit and 64-bit (AMD64/IntelEM64T) systems
• AutoPass1
• All English manuals in PDF format (in theDOCS directory)
• Windows IA-64 clients• Novell NetWare clients• OpenVMS clients (Alpha and IA-64 systems)• MPE/iX clients• Product demo for Windows platforms• Product information• HP software integration packages• Installation package for Media Operations
• Cell Manager and Installation Server forHP-UX (PA-RISC, IA-64)
• Clients for other UNIX systems• All English manuals in PDF format (in the
DOCS directory)• HP software integration packages
Data Protector Starter Pack forHP-UXIncludes agents for HP-UX,Solaris, and Linux clients
2
• Cell Manager and Installation Server forSolaris and Linux
• Clients for other UNIX systems• AutoPass2
• All English manuals in PDF format (in theDOCS directory)
• HP software integration packages
Data Protector Starter Pack forSolaris and LinuxIncludes agents for HP-UX,Solaris, and Linux clients
3
1AutoPass is not available on Windows 2003 x64, Windows Vista x64, and Windows Server 2008x64.2AutoPass is not available on Linux.
Installation and licensing guide 39

Choosing the Cell Manager systemThe Cell Manager is the main system in the Data Protector cell. The Cell Managerdoes the following:
• Manages the cell from one central point.• Contains the IDB (files with information about backup, restore and media
management sessions).• Runs the core Data Protector software.• Runs the Session Manager that starts and stops backup and restore sessions and
writes session information to the IDB.
Before deciding on which system in your environment to install the Cell Manager,be aware of the following:
• Supported platformsThe Cell Manager can be installed on either the Windows, HP-UX, Solaris orLinux platform. See the support matrices athttp://www.hp.com/support/manualsfor details on supported versions or releases of these platforms.
• Reliability of the Cell Manager systemSince the Cell Manager contains the IDB and since backup and restore cannotbe performed if the Cell Manager is down, it is important to choose a very reliablesystem in your environment for the installation.
• Database growth and required disk spaceThe Cell Manager holds the Data Protector Internal Database (IDB). The IDBcontains information regarding the backed up data and its media, sessionmessages and devices.The IDB can grow to a significant size, depending on yourenvironment. For example, if the majority of backups are filesystem backups, thena typical IDB size would be 2% of the disk space used by the backed up data.You can use the IDB_capacity_planning.xls table (located on the DataProtector installation medium) to estimate the size of the IDB.Refer to the online Help index: “growth and performance of the IDB“ forinformation on planning and managing the size and growth of the database.Refer to HP Data Protector product announcements, software notes, and referencesfor minimum disk space requirements for the IDB.
Overview of the installation procedure40

NOTE:You do not have to use the Cell Manager as the graphical user interface system. Forexample, you may have a UNIX Cell Manager, but a user interface component installedon a Windows client.
What’s next?
To determine the minimum requirements for your future Cell Manager system, referto “Installing the Data Protector Cell Manager (CM) and Installation Server(s)(IS)” on page 46.
Choosing the Data Protector user interface systemData Protector provides a GUI and CLI for Windows, HP-UX, Solaris, and Linuxplatforms. The user interface is installed as a Data Protector software component.
The system selected to control the cell will be used by a network administrator or abackup operator.
However, in a large computer environment, it may be desirable to run the userinterface on several systems, and if the environment is a mixed one, on variousplatforms.
For instance, if you have a mixed UNIX network, and the user interface installed onat least one Solaris or HP-UX system, you can export the display of that user interfaceto any other UNIX system running an X-server. However, for purposes of performance,it is recommended to install the Data Protector GUI interface on all systems that willbe used to control the Data Protector cell.
If you have an office area with many Windows systems to back up, you might, as amatter of convenience, want to control local backup and restore operations from alocal Windows system. In this case, install the user interface component on aWindowssystem. In addition, the Data Protector GUI on Windows systems is simpler to handlein heterogeneous environments, because changing the locale is not necessary.
On UNIX Cell Manager platforms you can use the Data Protector Java GUI where itis supported or use the omniusers command to create a remote user account onthe Cell Manager. You can then use this user account to start the GUI and connectto the Cell Manager on any other system on which the Data Protector GUI has beeninstalled. Refer to the omniusers man page for details.
Installation and licensing guide 41

See http://www.hp.com/support/manuals for details on supported operating systemversions/releases for the user interface. For more information on local languagesupport and usage of non-ASCII characters in file names, refer to the online Helpindex: “language settings, customizing”.
Once you have installed the user interface on a system in the cell, you can remotelyaccess the Cell Manager from that system. You do not have to use the graphical userinterface system on the Cell Manager.
The Data Protector graphical user interfaceThe Data Protector GUI is a powerful tool that provides easy access to the DataProtector functionality. The main window contains several views, such as Clients,Users, Devices & Media, Backup, Restore, Copy & Consolidation, Reporting,Monitor,Instant Recovery, and Internal Database, allowing you to perform all related tasks.
For example, in the Clients view, you can remotely install (add) clients by specifyingall the target systems and defining the installation paths and options which are sentto the specified Installation Server. When the setup on the client is running, onlyinstallation specific messages are displayed in the monitor window.
Figure 4 Data Protector graphical user interface
Overview of the installation procedure42

See also Figure 1 on page 31 in the Preface, which defines the most important areasof the Data Protector GUI.
NOTE:On UNIX systems, locale settings must be adjusted on the system on which the DataProtector GUI is running, before starting the GUI. This will enable you to switch characterencoding in GUI and thus choose the right encoding to correctly display non-ASCIIcharacters in filenames and session messages. Refer to the online Help index: “setting,locale for GUI on UNIX” for details.
Installation and licensing guide 43

Overview of the installation procedure44

2 Installing Data Protector onyour network
In this chapterThis chapter contains detailed instructions about:
• Installing the Data Protector Cell Manager (CM) and Installation Servers (IS). Referto “Installing the Data Protector Cell Manager (CM) and Installation Server(s)(IS)” on page 46.
• Installing the Data Protector clients. Refer to “Installing Data Protectorclients” on page 73.
• Installing the Data Protector integration clients. Refer to Installing the Data Protectorintegration clients.
• Installing the localized Data Protector user interface. Refer to “Installing localizedData Protector user interface” on page 189.
• Installing the Data Protector Single Server Edition. Refer to “Installing the DataProtector Single Server Edition” on page 192.
• Installing Data Protector Web Reporting. Refer to “Installing Data Protector webreporting” on page 194.
• Installing Data Protector on MC/ServiceGuard. Refer to “Installing Data Protectoron MC/ServiceGuard” on page 195.
• Installing Data Protector on a Microsoft Cluster Server. Refer to “Installing DataProtector on Microsoft Cluster Server” on page 196.
• Installing Data Protector Clients on a Veritas Cluster. Refer to “Installing DataProtector clients on a Veritas Cluster” on page 209.
• Installing Data Protector Clients on a Novell NetWare Cluster. Refer to “InstallingData Protector clients on a Novell NetWare Cluster” on page 210.
Installation and licensing guide 45

Installing the Data Protector Cell Manager (CM) andInstallation Server(s) (IS)
Refer to Figure 5 on page 46 and for the flow of installation procedure:
Figure 5 Installation procedure
If you install the Cell Manager and the Installation Server on the same system, youcan perform this task in one step.
Installing Data Protector on your network46

IMPORTANT:All configuration and session information files in a Data Protector cell are stored on theCell Manager. It is difficult to transfer this information to another system. Therefore,ensure that the Cell Manager is a reliable system in a stable, controlled environment.
Installing a UNIX Cell ManagerThis section provides step-by-step instructions on how to install a UNIX Cell Manager.If you want to install the Windows Cell Manager only, refer to “Installing a WindowsCell Manager” on page 55.
Prerequisites
• The HP-UX, Solaris, or Linux system that will become the Cell Manager must:• Have sufficient disk space for the Data Protector software. Refer to the HP
Data Protector product announcements, software notes, and references fordetails. You can overcome a shortage of space by installing to linkeddirectories, but you should first refer to “The installed directory structure onHP-UX, Solaris, and Linux” on page 51 and “Allocating more disk space forthe Cell Manager installation” on page 55.
• Have sufficient disk space (about 2% of the planned data to be backed up)for the IDB. Refer to the HP Data Protector product announcements, softwarenotes, and references for details. Note that the current IDB design allows thedatabase binary files to be relocated if growth in database size makes itnecessary. See the online Help index: “IDB, calculating the size of”.
• Support long filenames. To find out if your filesystem supports long filenamesuse the getconf NAME_MAX directory command.
• Have the inetd daemon up and running.• Have the port number 5555 (default) free. If this is not the case, refer to
“Changing the Data Protector default port number” on page 409.• Have the TCP/IP protocol installed and running. The protocol must be able to
resolve hostnames.• Have access to a DVD-ROM drive.• Recognize the Cell Manager, if using a NIS server. Refer to “Preparing a NIS
server” on page 412.• Have the port number 5556 free to install Java GUI Server or Java GUI Client.
Installation and licensing guide 47

• For Java GUI Client, Java Runtime Environment (JRE) 1.5.0_06 or newerupdate (for example, 1.5.0_07) is required.
• You need root permissions on the target system.
NOTE:On Cell Manager platforms where the original Data Protector GUI is not supported, youcan use the Data Protector Java GUI or install the original Data Protector GUI on a systemwhere it is supported. Use the omniusers command to create a remote user accounton the new Cell Manager. You can then use this user account on any system with theData Protector GUI installed to start the GUI and connect to the new Cell Manager. Referto the omniusers man page.
Cluster-aware Cell Manager
Additional prerequisites and steps are required for installing a cluster-aware CellManager. Refer to “Installing a cluster-aware Cell Manager” on page 195.
NOTE:In a multiple-cell environment (MoM), all Cell Managers must have the same DataProtector version installed.
Recommendation
• On UNIX platforms, it is recommended to use Large file support (LFS). Therecommendation applies to the file systems which hold an internal database,including DC binary files that are expected to grow larger than 2 GB.
Setting kernel parametersOn HP-UX, it is recommended to set the kernel parameter maxdsiz (Max DataSegment Size) or maxdsiz_64 (for 64bit systems) to at least 134217728 bytes(128 MB), and the kernel parameter semmnu (Number of Semaphore Undo Structures)to at least 256. After committing these changes, recompile the kernel and reboot themachine.
On Solaris, it is recommended to set the kernel parameter shmsys:shminfo_shmmax(maximum shared memory segment size (SHMMAX)) in /etc/system to at least67108864 bytes (64 MB). After committing this change, reboot the machine.
Installing Data Protector on your network48

Installation procedure
TIP:If you install the Cell Manager and Installation Server on the same system, you canperform the installation in one step by running omnisetup.sh -CM -IS.
For a description of the omnisetup.sh command, refer to the README file located inthe Mount_point/LOCAL_INSTALL directory on the DVD-ROM or to the HP DataProtector command line interface reference located in the Mount_point/DOCS/C/MANdirectory on the DVD-ROM.
Follow the procedure below to install the Cell Manager on an HP-UX, Solaris, orLinux system:
1. Insert and mount the UNIX installation DVD-ROM to a mount point.
For example:
mkdir /dvdrom
mount /dev/dsk/c0t0d0 /dvdrom
Optionally, you can install Data Protector from a depot on the disk:
• To copy the DP_DEPOT, AUTOPASS, and LOCAL_INSTALL directories,where the installation files are stored, to your local disk, run:mkdir directory
cp -r /dvdrom/platform_dir/DP_DEPOT directory
cp -r /dvdrom/platform_dir/AUTOPASS directory
cp -r /dvdrom/platform_dir/LOCAL_INSTALL directory
Where platform_dir is:
hpux_ia HP-UX on IA-64 systems
hpux_pa HP-UX on PA-RISC systems
linux_x86_64 Linux systems on AMD64/Intel EM64T
solaris Solaris systems
Installation and licensing guide 49

• To copy the whole DVD-ROM to your local disk, run:cp -r /dvdrom dvd_image_dir
2. Run the omnisetup.sh command.
To run this command from the DVD-ROM, type:
cd /dvdrom/LOCAL_INSTALL
./omnisetup.sh -CM
To start the installation from disk:
• If you have copied the DP_DEPOT, AUTOPASS, and LOCAL_INSTALLdirectories to your local disk in the directory, run:cd directory/LOCAL_INSTALL
./omnisetup.sh -source directory -CM
• If you have copied the whole DVD-ROM to dvd_image_dir, run theomnisetup.sh command with the -CM parameter:cd dvd_image_dir/LOCAL_INSTALL
./omnisetup.sh -CM
3. On HP-UX and Solaris omnisetup.sh prompts you to install or upgrade theHP AutoPass utility if you want to download and install passwords for thepurchased licenses directly through the internet from the HP password deliverycenter web server. For more information on the AutoPass utility, see “Obtainingand installing permanent passwords using the HP AutoPass utility” on page 331and the HP AutoPass online Help. It is recommended to install AutoPass.
If AutoPass is installed on MC/ServiceGuard, it must be installed on all nodes.
When prompted, press Return to install or upgrade AutoPass. If you do not wantto install or upgrade AutoPass, enter n.
On Linux, HP AutoPass is not installed.
NOTE:If you have installed the Cell Manager on Solaris 9 or Solaris 10, remotely install theDisk Agent on the Cell Manager after the installation is complete, using an InstallationServer. This will replace the generic Solaris Disk Agent with the Solaris 9 or Solaris 10Disk Agent. On Solaris 10, remote installation of the Media Agent on the Cell Manageris also required. Refer to “Remote installation of Data Protector clients” on page 81 orto the ob2install man page.
Installing Data Protector on your network50

If you want to install an Installation Server for UNIX on your Cell Manager, you cando it at this point. Refer to “Installing Installation Servers for UNIX” on page 64 forthe required steps.
The installed directory structure on HP-UX, Solaris, and LinuxWhen the installation completes, the core Data Protector software is located in the/opt/omni/bin directory and the Installation Server for UNIX in the/opt/omni/databases/vendor directory. The following list shows the DataProtector subdirectories and their contents:
IMPORTANT:If you want to install Data Protector to linked directories, for instance:/opt/omni/ -> /prefix/opt/omni/
/var/opt/omni/ -> /prefix/var/opt/omni/
/etc/opt/omni/ -> /prefix/etc/opt/omni/
you must create the links before the installation and ensure that the destination directoriesexist.Refer to “Allocating more disk space for the Cell Manager installation” on page 55 formore information.
/opt/omni/bin All commands
/opt/omni/help/C Online Help files
/opt/omni/lbin Data Protector internal commands
/opt/omni/sbin Superuser commands
/opt/omni/sbin/install Installation scripts
/etc/opt/omni Configuration information
/opt/omni/lib Shared libraries for compression, dataencoding, and device handling
/opt/omni/doc/C Online documentation (optional)
Installation and licensing guide 51

/var/opt/omni/log and/var/opt/omni/server/log
Log files
/opt/omni/lib/nls/C Message catalog files
/opt/omni/lib/man Man pages
/var/opt/omni/tmp Temporary files
/var/opt/omni/server/db40 IDB files. Refer to the online Helpindex: “IDB, location of directories”for details.
/opt/omni/java/server Directory containing Java GUI Serverexecutables
/opt/omni/java/client Directory containing Java GUI Clientexecutables
Configuring automatic startup and shutdownThe Data Protector installation procedure configures an automatic startup andshutdown of all Data Protector processes whenever a system is restarted. Some ofthis configuration is operating system dependent.
The following files are automatically configured:
HP-UX:
/sbin/init.d/omni
A script with startup and shutdown procedures./sbin/rc1.d/K162omni
A link to the /sbin/init.d/omni script that shuts down Data Protector./sbin/rc2.d/S838omni
A link to the /sbin/init.d/omni script that starts up Data Protector./etc/rc.config.d/omni
Contains an omni variable defining:
omni=1 Data Protector is automatically stopped and started at systemreboot. This is the default option.
Installing Data Protector on your network52

omni=0 Data Protector is not automatically stopped and started at systemreboot.
Solaris:
/etc/init.d/omni
A script with startup and shutdown procedures./etc/rc1.d/K09omni
A link to the /etc/init.d/omni script that shuts down Data Protector./etc/rc2.d/S97omni
A link to the /etc/init.d/omni script that starts up Data Protector.
Linux:
/etc/init.d/omni
A script with startup and shutdown procedures./etc/rcinit_level.d/K10omni
A link to the /etc/init.d/omni script that shuts down Data Protector.Where init_level is 1 and 6.
/etc/rcinit_level.d/S90omni
A link to the /etc/init.d/omni script that starts up Data Protector.Where init_level is 2,3,4, and 5.
During the installation, the following system files on the Cell Manager system aremodified:
HP-UX:
/etc/services
The Data Protector port number for the service is added to the file./opt/omni/lbin/crs
The Data Protector CRS service is added.
When the installation is finished, the following processes are running on the CellManager:
/opt/omni/lbin/crs
The Data Protector Cell Request Server (CRS) service runs on the CellManager system and is started when the Cell Manager software is installed onthe system. The CRS starts and controls backup and restore sessions in the cell.
/opt/omni/lbin/rds
Installation and licensing guide 53

The Data Protector Raima Database Server (RDS) service runs on the CellManager system and is started when the Cell Manager software is installed onthe system. The RDS manages the IDB.
/opt/omni/lbin/mmd
The Data Protector Media Management Daemon (MMD) service runs on theCell Manager and is started when the Cell Manager software is installed on thesystem. The MMD manages the device and media management operations.
/opt/omni/lbin/inetd
The Data Protector resident service that allows communication with Data Protectorservices on other systems on the network. The Inet service must run on all systemsin the Data Protector cell.
/opt/omni/lbin/kms
The Data Protector Key Management Server (KMS) service runs on the CellManager and is started when the Cell Manager software is installed on thesystem. The KMS provides key management for the Data Protector encryptionfunctionality.
/opt/omni/java/server/bin/uiproxyd
The Data Protector Java GUI Server (UIProxy service) runs on the Cell Managerand is started when the Cell Manager software is installed on the system. TheUIProxy service is responsible for communication between the Java GUI Clientand the Cell Manager.
Setting environment variablesThe installation procedure for the UNIX Cell Manager described earlier also installsthe Data Protector user interface.
Before using the user interface (either the graphical user interface or the command-lineinterface), you should add the following to your environment variables:
/opt/omni/bin, /opt/omni/lbin and /opt/omni/sbin to the PATH variable
/opt/omni/lib/man to the MANPATH variable
/opt/omni/lib and /opt/omni/lib/arm to the LD_LIBRARY_PATH variable
Before attempting to use the graphical user interface, please ensure that the DISPLAYvariable and locale are set correctly.
Installing Data Protector on your network54

NOTE:If you intend to use the Data Protector user interface to perform backups or restoresacross platforms, refer to the HP Data Protector product announcements, software notes,and references for the limitations incurred and online Help index: “customizing languagesettings” for information on how to customize language settings in the Data ProtectorGUI.
Allocating more disk space for the Cell Manager installationYou need a considerable amount of disk space to install the UNIX Cell Manager, inparticular on the /opt directory and later on the /var directory where the databaseis stored (about 2% of the planned backup data). See the HP Data Protector productannouncements, software notes, and references for details on the required disk space.If you do not have enough disk space, you can use linked directories, but you mustcreate the links before the installation and ensure that the destination directories exist.
What’s next?At this stage, the Cell Manager is installed and – if it was selected – also theInstallation Server for UNIX. Your next tasks are:
1. If you have not installed an Installation Server for UNIX on the same system,refer to “Installing Installation Servers for UNIX” on page 64.
2. Install an Installation Server for Windows, if you wish to remotely install softwareto Windows clients. Refer to “Installing an Installation Server forWindows” on page 69.
3. Distribute the software to clients. Refer to “Installing Data Protectorclients” on page 73.
Installing a Windows Cell Manager
Prerequisites
To install a Windows Cell Manager, you must have Administrator rights. TheWindows system that will become your Cell Manager must meet the followingrequirements:
Installation and licensing guide 55

• Have a supported Windows operating system installed. See the http://www.hp.com/support/manuals for details on supported operating systems forthe Cell Manager.
• Have Microsoft Internet Explorer 5.0 or higher.• Have sufficient disk space for the Data Protector Cell Manager software. Refer
to the HP Data Protector product announcements, software notes, and referencesfor details.
• Have sufficient disk space (about 2% of the backed up data) for the IDB. Referto the HP Data Protector product announcements, software notes, and referencesfor details.
• Have the port number 5555 (default) free. If this is not the case, refer to “Changingthe Data Protector default port number” on page 409.
• Have a static IP address for the system on which the Cell Manager will be installed.If the system is configured as a DHCP client, its IP address changes; therefore, itis required to either assign a permanent DNS entry for the system (and reconfigureit), or to configure a DHCP server to reserve a static IP address for the system (IPaddress is bound to the system's MAC address).
• Have the Microsoft implementation of the TCP/IP protocol installed and running.The protocol must be able to resolve hostnames. The computer name and thehostname must be the same. Refer to “Setting up the TCP/IP protocol on Windowssystems” on page 402 for information on installation and configuration of theTCP/IP protocol.
• Have access to a DVD-ROM drive.• Have the port number 5556 free to install Java GUI Server or Java GUI Client.• For Java GUI Client, Java Runtime Environment (JRE) 1.5.0_06 or newer update
(for example, 1.5.0_07) is required.• Ensure that network access user rights are set under the Windows local security
policy for the account performing the installation.
Microsoft Terminal Services Client
• If you want to install Data Protector on Windows through Microsoft TerminalServices Client, ensure that the system you want to install Data Protector on hasthe Terminal Server Mode specified as Remote Administration:1. In the Windows Control Panel, click Administrative Tools and then Terminal
Services Configuration.
2. In the Terminal Services Configuration dialog box, click Server Settings.Ensure that the Terminal Services server is running in the RemoteAdministration mode.
Installing Data Protector on your network56

Recommendation
• Check if you have Microsoft Installer (MSI) 2.0 prior to installing Data ProtectorA.06.10. If you have an older version of MSI, Data Protector setup willautomatically upgrade it to version 2.0. In this case, Data Protector will displaya note at the end of the upgrade, stating that MSI was upgraded. It is highlyrecommended to restart the system, if MSI was upgraded.It is recommended that you upgrade your MSI to the version 2.0 before installingData Protector A.06.10.
• If you expect DC binary files to grow larger than 2 GB (they are limited only bythe file system settings), it is recommended to use the NTFS file system.
Cluster-aware Cell Manager
Additional prerequisites and steps are required for installing a cluster-aware CellManager. Refer to “Installing a cluster-aware Cell Manager” on page 196.
Installation procedureTo perform a new installation on a Windows system, follow these steps:
1. Insert the Windows installation DVD-ROM.
On Windows Server 2008, the User Account Control dialog is displayed. ClickContinue to proceed with the installation.
2. In the HP Data Protector window, select Install Data Protector to start the DataProtector Setup Wizard.
3. Follow the Setup Wizard and carefully read the license agreement. Click Nextto continue, if you accept the terms of the agreement.
Installation and licensing guide 57

4. In the Installation Type page, select Cell Manager and then click Next to installData Protector Cell Manager software.
Figure 6 Selecting the installation type
5. Provide the username and password for the account under which the DataProtector services will run. Click Next to continue.
6. Click Next to install Data Protector in the default folder.
Otherwise, click Change to open the Change Current Destination Folder windowand enter a new path.
Installing Data Protector on your network58

7. In the Component Selection page, select the components you want to install. Fora list and descriptions of the Data Protector components, see “Data Protectorcomponents” on page 77.
Figure 7 Selecting software components
Disk Agent, General Media Agent, User Interface, and Installation Server areselected by default. Click Next.
8. Windows XP SP1, Windows Server 2003 SP1, and Windows Server 2008: IfData Protector detects Windows Firewall on your system, the Windows Firewallconfiguration page is displayed. Data Protector setup will register all necessaryData Protector executables. By default, the selected option is Initially, enablenewly registered Data Protector binaries to open ports as needed. If you do notwant to enable Data Protector to open ports at the moment, deselect the option.However, note that for proper functioning of Data Protector, the executablesmust be enabled.
Click Next.
Installation and licensing guide 59

9. The component summary list is displayed. Click Install to start installing theselected components. This may take several minutes.
Figure 8 Component summary list
10. The Installation status page is displayed. Click Next.
Figure 9 Installation status page
Installing Data Protector on your network60

11. The Setup Wizard enables you to install or upgrade the HP AutoPass utility ifyou want to download and install passwords for the purchased licenses directlythrough the internet from the HP password delivery center web server. For moreinformation on the AutoPass utility, refer to “Obtaining and installing permanentpasswords using the HP AutoPass utility” on page 331 and the HP AutoPass onlineHelp.
By default, the Start AutoPass installation or the Upgrade AutoPass installationoption is selected. It is recommended to install the HP AutoPass utility. If you donot want to install or upgrade AutoPass, deselect the option.
On Windows 2000 and 2003 x64, Windows Vista x64, and Windows Server2008 x64, AutoPass is not installed.
To start using Data Protector immediately after setup, select Start the DataProtector Manager.
To view the HP Data Protector product announcements, software notes, andreferences, select Open the Product Announcements.
Figure 10 Selecting AutoPass for installation
Click Finish.
After the installationWindows Server 2008: As soon as the setup is finished, the Cell Manager programand data files are located in the Data_Protector_home and the
Installation and licensing guide 61

Data_Protector_program_data directories respectively, whilst the softwaredepot is located in the Data_Protector_program_data\Depot directory.
Other Windows systems: As soon as the setup is finished, the Cell Manager files arelocated in the Data_Protector_home directory, and the software depot is locatedin the Data_Protector_home\Depot directory.
When the installation is finished, the following processes will be running on the CellManager system:
crs.exe The Data Protector Cell Request Server (CRS)service runs on the Cell Manager system and isstarted when the Cell Manager software isinstalled on the system. The CRS starts and controlsbackup and restore sessions in the cell. It runs inthe Data_Protector_home\bin directory.
rds.exe The Data Protector Raima Database Server (RDS)service runs on the Cell Manager system and isstarted when the Cell Manager software isinstalled on the system. The RDS manages the IDB.It runs in the Data_Protector_home\bindirectory.
mmd.exe The Data Protector Media Management Daemon(MMD) service runs on the Cell Manager systemand is started when the Cell Manager software isinstalled on the system. The MMD manages thedevice and media management operations. It runsin the Data_Protector_home\bin directory.
omniinet.exe The Data Protector client service that enables theCell Manager to start agents on other systems.The Data Protector Inet service must runon all systems in the Data Protector cell. It runs inthe Data_Protector_home\bin directory.
kms.exe The Data Protector Key Management Server (KMS)service runs on the Cell Manager system and isstarted when the Cell Manager software isinstalled on the system. The KMS provides keymanagement for the Data Protector encryption
Installing Data Protector on your network62

functionality. It runs in theData_Protector_home\bin directory.
uiproxy.exe The Data Protector Java GUI Server (UIProxyservice) runs on the Cell Manager system in theData_Protector_home\java\server\bindirectory. The UIProxy service is responsible forcommunication between the Java GUI Client andthe Cell Manager.
NOTE:If you intend to use the Data Protector user interface to perform backups or restoresacross platforms, refer to the HP Data Protector product announcements, software notes,and references for the limitations incurred.
TIP:You can install additional code page conversion tables to correctly display filenames, ifthe appropriate encoding is not available from the Data Protector GUI. Refer to theoperating system documentation for detailed steps.
TroubleshootingIn case of an unsuccessful setup, try to verify the requirements that are checked bySetup itself and what could have caused the failure if they had not been fulfilled.Refer to the Prerequisites on page 55.
This is the list of the requirements checked by Setup:
• Service Pack Version• NSLookup, so that Data Protector is able to expand hostnames• Disk Space• Administrative Rights
What’s next?At this stage, the Cell Manager is installed and – if it was selected – also theInstallation Server for Windows. Your next tasks are:
Installation and licensing guide 63
1. Install the Installation Server for UNIX, if you have a mixed backup environment.Refer to “Installing Installation Servers” on page 64. Skip this step if you do notneed the Installation Server for UNIX.
2. Distribute the software to clients. Refer to “Installing Data Protectorclients” on page 73.
Installing Installation ServersInstallation Servers can be installed on the Cell Manager system or any supportedsystem that is connected to the Cell Manager by a LAN. See the http://www.hp.com/support/manuals for details on supported operating systems for the Installation Server.
To keep the Installation Servers on systems separate from the Cell Manager, installthe corresponding software depot locally. The detailed procedure is described in thissection.
Installing Installation Servers for UNIX
Prerequisites
The system that will become your Installation Server must meet the followingrequirements:
• Have the HP-UX, Solaris, or Linux operating system installed. For details onsupported operating systems for the Installation Server, refer to the HP DataProtector product announcements, software notes, and references.
• Have the inetd daemon up and running.• Have the port number 5555 (default) free. If this is not the case, refer to the
“Changing the Data Protector default port number” on page 409.• Have the TCP/IP protocol installed and running. The protocol must be able to
resolve hostnames.• Have enough disk space for the complete Data Protector software depot. Refer
to the HP Data Protector product announcements, software notes, and referencesfor details.
• Have a DVD-ROM drive.• The Cell Manager in the Data Protector cell must be of the A.06.10 version.
Installing Data Protector on your network64

IMPORTANT:To install Data Protector to linked directories, for instance:/opt/omni/ -> /prefix/opt/omni/
/etc/opt/omni/ -> /prefix/etc/opt/omni/
/var/opt/omni/ -> /prefix/var/opt/omni/
Create the links before the installation and ensure that the destination directories exist.
NOTE:To install software from a device across the network, first mount the source directory onyour computer.
Installation procedure
Follow these steps to install the Installation Server for UNIX on an HP-UX, Solaris, orLinux system:
Installation and licensing guide 65

1. Insert and mount the UNIX installation DVD-ROM to a mount point.
For example:
mkdir /dvdrom
mount /dev/dsk/c0t0d0 /dvdrom
Optionally, you can install Data Protector from a depot on the disk:
• To copy the DP_DEPOT, AUTOPASS, and LOCAL_INSTALL directories,where the installation files are stored, to your local disk, run:mkdir directory
cp -r /dvdrom/platform_dir/DP_DEPOT directory
cp -r /dvdrom/platform_dir/AUTOPASS directory
cp -r /dvdrom/platform_dir/LOCAL_INSTALL directory
Where platform_dir is:
hpux_ia HP-UX on IA-64 systems
hpux_pa HP-UX on PA-RISC systems
linux_x86_64 Linux systems on AMD64/Intel EM64T
solaris Solaris systems
• To copy the whole DVD-ROM to your local disk, run:cp -r /dvdrom dvd_image_dir
Installing Data Protector on your network66

2. Run the omnisetup.sh command.
To run this command from the DVD-ROM, type:
cd /dvdrom/LOCAL_INSTALL
./omnisetup.sh -IS
To start the installation from disk:
• If you have copied the DP_DEPOT, AUTOPASS, and LOCAL_INSTALLdirectories to your local disk to the directory, run:cd directory/LOCAL_INSTALL
./omnisetup.sh -source directory -IS
• If you have copied the whole DVD-ROM to dvd_image_dir, run theomnisetup.sh command with the -IS parameter:cd dvd_image_dir/LOCAL_INSTALL
./omnisetup.sh -IS
For a description of the omnisetup.sh command, refer to the README filelocated in the Mount_point/ directory on the DVD-ROM or to the HP DataProtector command line interface reference located in theMount_point/DOCS/C/MAN directory on the DVD-ROM.
When the installation is finished, the software depot for UNIX is located in the/opt/omni/databases/vendor directory.
The omnisetup.sh command installs the Installation Server with all packages. Toinstall only a subset of the packages, use swinstall (for HP-UX), pkgadd (forSolaris) or rpm (for Linux). Refer to “Installing on HP-UX, Solaris, and Linux systemsusing native tools” on page 381.
IMPORTANT:If you do not install the Installation Server for UNIX on your network, you will have toinstall every UNIX client locally from the UNIX installation DVD-ROM.
Installation and licensing guide 67

NOTE:If you install the User Interface component (either the graphical user interface or thecommand-line interface), update your environment variables before using it. Refer to“Setting environment variables” on page 54 for more information.If you intend to use the Data Protector user interface to perform backups or restoresacross platforms, refer to the HP Data Protector product announcements, software notes,and references for the limitations incurred.
What’s next?
At this point, you should have the Installation Servers for UNIX installed on yournetwork. Your next tasks are:
1. If you installed the Installation Server on a different system than the Cell Manager,you must manually add (import) the system to the Data Protector cell. Refer to“Importing an installation server to a cell ” on page 216.
NOTE:When an Installation Server is imported, the file/etc/opt/omni/server/cell/installation_servers on theCell Manager is updated to list the installed push-packets. This can be usedfrom the CLI to check the available push-packets. For this file to be kept upto date, you should export and re-import an Installation Server wheneverpush-packets are installed or deleted. This applies even if an InstallationServer is installed on the same system as the Cell Manager.
2. If you have any Windows systems in your Data Protector cell, install theInstallation Server for Windows. Refer to “Installing an Installation Server forWindows” on page 69.
3. Distribute the software to clients. Refer to “Installing Data Protectorclients” on page 73.
Installing Data Protector on your network68
Installing an Installation Server for Windows
Prerequisites
A Windows system that will become your future Installation Server must meet thefollowing requirements:
• Have one of the supported Windows operating systems installed. See the http://www.hp.com/support/manuals for details on supported operating systems forthe Installation Server.
• Have Microsoft Internet Explorer 5.0 or higher.• Have enough disk space for the complete Data Protector software depot. Refer
to the HP Data Protector product announcements, software notes, and referencesfor details.
• Have access to a DVD-ROM drive.• Have the Microsoft implementation of the TCP/IP protocol up and running. The
protocol must be able to resolve hostnames. The computer name and the hostnamemust be the same. Refer to “Setting up the TCP/IP protocol on Windowssystems” on page 402 for information on the installation and configuration of theTCP/IP protocol.
Limitation
Due to the security restrictions imposed by the Windows operating system, InstallationServer can be used to remotely install clients only in the same domain.
Recommendation
Check if you have Microsoft Installer (MSI) 2.0 prior to installing Data ProtectorA.06.10. If you have an older version of MSI, Data Protector setup will automaticallyupgrade it to version 2.0. In this case, Data Protector will display a note at the endof the upgrade, stating that MSI was upgraded. It is highly recommended to restartthe system, if MSI was upgraded. Consult Microsoft Support about the MSI 2.0prerequisites for various Windows operating systems.
It is recommended that you upgrade your MSI to the version 2.0 before installingData Protector A.06.10.
Installation and licensing guide 69

IMPORTANT:If you do not install the Installation Server for Windows on your network, you will haveto install every Windows client locally from the DVD-ROM.
NOTE:You cannot remotely install a Data Protector client on the Windows system after anInstallation Server has been installed on this system. To install an Installation Server andclient component(s) on the same system, you must perform a local client installation.During the installation procedure, select all desired client components and the InstallationServer component. Refer to “Installing Windows clients” on page 90.
Installation procedure
Follow these steps to install the Installation Server for Windows:
1. Insert the Windows installation DVD-ROM.
On Windows Server 2008, the User Account Control dialog is displayed. ClickContinue to proceed with the installation.
2. In the HP Data Protector window, select Install Data Protector to start the DataProtector Setup Wizard.
3. Follow the Setup Wizard and carefully read the license agreement. Click Nextto continue, if you accept the terms of the agreement.
Installing Data Protector on your network70

4. In the Installation Type page, select Installation Server and then click Next toinstall Data Protector software depot.
Figure 11 Selecting the installation type
5. Click Next to install Data Protector on the default folder.
Otherwise, click Change to open the Change Current Destination Folder windowand enter a new path.
6. Windows XP SP2, Windows Server 2003 SP1, and Windows Server 2008: IfData Protector detects Windows Firewall on your system, the Windows Firewallconfiguration page is displayed. Data Protector setup will register all necessaryData Protector executables. By default, the selected option is Initially, enablenewly registered Data Protector binaries to open ports as needed. If you do notwant to enable Data Protector to open ports at the moment, deselect the option.However, note that for proper functioning of Data Protector, the executablesmust be enabled.
Click Next.
Installation and licensing guide 71
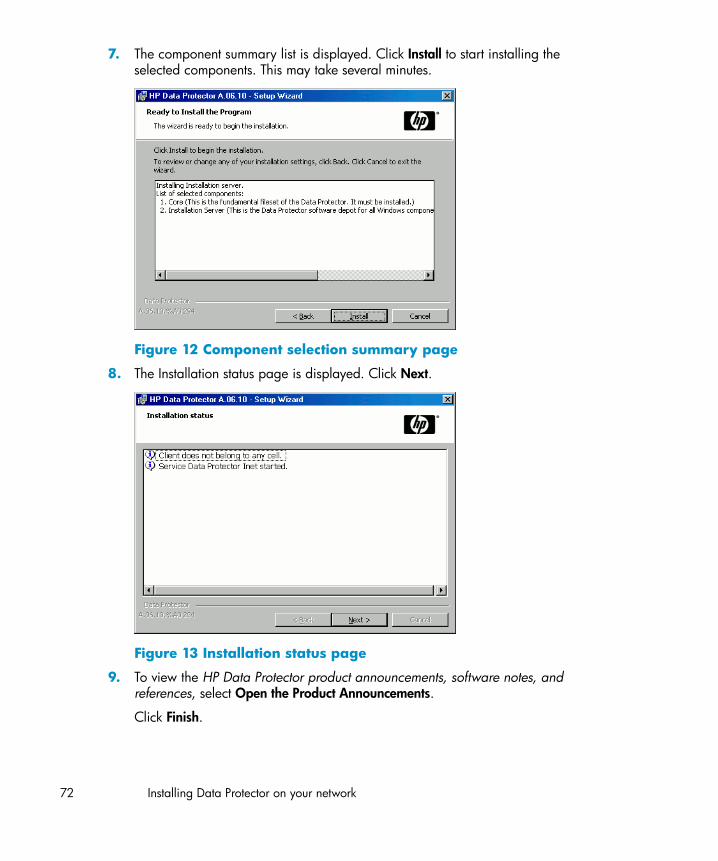
7. The component summary list is displayed. Click Install to start installing theselected components. This may take several minutes.
Figure 12 Component selection summary page
8. The Installation status page is displayed. Click Next.
Figure 13 Installation status page
9. To view the HP Data Protector product announcements, software notes, andreferences, select Open the Product Announcements.
Click Finish.
Installing Data Protector on your network72

As soon as the installation is finished, the software is, by default, installed in thedirectory Data_Protector_program_data\Depot (Windows Server 2008) orData_Protector_home\Depot (other Windows systems). The software is sharedso that it can be accessed from the network.
What’s next?
At this point, you should have Installation Server for Windows installed on yournetwork. Now you should perform the following tasks:
1. If you have set up an independent Installation Server (i.e. not on the CellManager) you must manually add (import) the system to the Data Protector cell.Refer to “Importing an installation server to a cell ” on page 216.
2. Install an Installation Server for UNIX on HP-UX, Solaris, or Linux if you have amixed backup environment. Refer to “Installing Installation Servers forUNIX” on page 64.
3. Distribute the software to clients. Refer to “Installing Data Protectorclients” on page 73.
Installing Data Protector clientsYou can install Data Protector clients remotely, by distributing them using theInstallation Server, or locally, from the appropriate installation DVD-ROM.
For the list of Data Protector installation DVD-ROMs, refer to “Data Protector installationDVD-ROMs” on page 38.
After you have installed the Data Protector clients and eventually imported them intothe Data Protector cell, it is highly recommended to verify the installation and toprotect clients from unwarranted access. For procedure on verifying the clientinstallation, refer to “Verifying Data Protector client installation ” on page 350. Formore information on security protection, refer to “Security considerations” on page 222.
“Installing Data Protector clients” on page 73 lists Data Protector client systems withreferences to detailed descriptions.
Table 4 Installing Data Protector client systems
Installation type and referenceClient system
Remote and local installation; see “Installing Windowsclients” on page 90.
Windows
Installation and licensing guide 73

Installation type and referenceClient system
Remote and local installation; see “Installing HP-UXclients” on page 97.
HP-UX
Remote and local installation; see “Installing Solarisclients” on page 100.
Solaris
Remote and local installation; see “Installing Linuxclients” on page 107.Linux
Remote and local installation; see “Installing ESX Serverclients” on page 113.ESX Server
Remote and local installation; see “Installing AIX clients” on page 114.AIX
Remote and local installation; see “Installing Tru64clients” on page 118.
Tru64
Remote and local installation; see “Installing Siemens Sinixclients” on page 116.
Siemens Sinix
Remote and local installation; see “Installing SCOclients” on page 120.
SCO
Remote and local installation; see “Installing a Media Agent to usethe ADIC/GRAU Library or the StorageTek Library” on page 122.
DAS Client
Remote and local installation; see “Installing a Media Agent to usethe ADIC/GRAU Library or the StorageTek Library” on page 122.
ACS Client
Local installation; see “Local installation of the Novell NetWareclients” on page 131.
Novell NetWare
Local installation; see “Local installation of HP OpenVMSclients” on page 138.
HP OpenVMS
Local installation; see “Installing MPE/iX clients” on page 146.MPE/iX
Local installation; see “Local installation of UNIX clients” on page 149.Other UNIX clients
Installing Data Protector on your network74

ZDB integrations
Data Protector ZDB integrations are software components that allow you to back updatabase applications with Data Protector. The systems running database applicationsare installed the same way as any Windows or UNIX client systems, provided thatthe appropriate software component has been selected (for example, MS ExchangeIntegration component for backing up the Microsoft Exchange Server database,Oracle Integration component for backing up an Oracle database, and soon). Refer to Table 5 on page 75 for the references.
Table 5 Installing integrations
ReferenceApplication
See “Microsoft Exchange Server clients” on page 157.Microsoft ExchangeServer
See “Microsoft SQL Server clients” on page 158.Microsoft SQL Server
See “Microsoft SharePoint Portal Server Clients” on page 158.Microsoft SharePointPortal Server
See “Sybase clients” on page 158.Sybase
See “Informix Server clients” on page 159.Informix Server
See “SAP R/3 clients” on page 159.SAP R/3
See “SAP DB/MaxDB clients” on page 160.SAP DB/MaxDB
See “Oracle clients” on page 160.Oracle
See “VMware Virtual Infrastructure clients” on page 161.VMware VirtualInfrastructure
See “DB2 clients” on page 161.IBM DB2 UDB
See “NNM clients” on page 162.NNM
See “NDMP clients” on page 162.NDMP
See “Microsoft Volume Shadow Copy Service clients” on page 162.Microsoft VolumeShadow CopyService
Installation and licensing guide 75

ReferenceApplication
See “Lotus Notes/Domino Server clients” on page 162.Lotus Domino Server
See “EMC Symmetrix integration” on page 163.EMC Symmetrix
See “HP StorageWorks Disk Array XP integration” on page 168.HP StorageWorksDisk Array XP
See “HP StorageWorks Virtual Array integration” on page 175.HP StorageWorksVirtual Array
See “HP StorageWorks Enterprise Virtual Arrayintegration” on page 181.
HP StorageWorksEnterprise VirtualArray
Table 6 Other installations
ReferenceInstallation
See “IAP clients” on page 187.Integrated Archive Platform (IAP)
See “VLS automigration clients” on page 189.Virtual Library System (VLS) automigration
See “Installing localized Data Protector userinterface” on page 189.
Localized User Interface
See “Installing Data Protector webreporting” on page 194.
Web Reporting
See “Installing Data Protector onMC/ServiceGuard” on page 195.
MC/ServiceGuard
See “Installing Data Protector on MicrosoftCluster Server” on page 196.
Microsoft Cluster Server
See “Installing Data Protector clients on aVeritas Cluster” on page 209
Veritas Cluster Server
See “Installing Data Protector clients on aNovell NetWare Cluster” on page 210
Novell NetWare Cluster
Installing Data Protector on your network76

ReferenceInstallation
See “Installing Data Protector on IBMHACMP Cluster” on page 212IBM HACMP Cluster
Data Protector componentsFor the latest information on the supported platforms, visit the HP Data Protector homepage at http://www.hp.com/support/manuals.
These are the Data Protector components you can select and their descriptions:
User Interface The User Interface component includes the DataProtector graphical user interface on Windowssystems and the command-line interface onWindows and UNIX systems. The software isneeded to access the Data Protector Cell Managerand must be installed at least on the system thatis used for managing the cell.
NOTE:If you intend to use the Data Protectoruser interface to perform backups orrestores across platforms, refer to theHP Data Protector productannouncements, software notes, andreferences for the limitations incurred.
Java GUI Client The Data Protector Java GUI is a Java-basedgraphical user interface with a client-serverarchitecture. The Java GUI Client will not beselected for installation by default; you have toselect it manually. To install the command-lineinterface on a client with Java GUI, you also needto install the User Interface package to that system.
English Documentation & Help This is the Data Protector English languagedocumentation and online Help (OLH) file set.
Installation and licensing guide 77

French Documentation & Help This is the Data Protector French languagedocumentation and online Help (OLH) file set.
Japanese Documentation &Help
This is the Data Protector Japanese languagedocumentation and online Help (OLH) file set.
Manager-of-Managers User In-terface
The Manager-of-Managers User Interface includesthe Data Protector graphical user interface. Thesoftware is needed to access the Data ProtectorManager-of-Managers functionality and controlthe multi-cell environment. TheManager-of-Managers User Interface and theManager User Interface are available as acommon application.
Disk Agent The Disk Agent component must be installed onsystems that have disks that will be backed upwith Data Protector.
IAP Disk Agent Extension The IAP Disk Agent Extension component must beinstalled on systems that will perform backupsdirectly to the IAP appliance using Data Protector.
General Media Agent The General Media Agent component must beinstalled on systems that have backup devicesconnected or have access to a library roboticsand will be managed by Data Protector.
VLS Automigration The VLS Automigration component must beinstalled on clients that will perform Virtual LibrarySystem (VLS) smart media copying using DataProtector.
Automatic Disaster Recovery The Automatic Disaster Recovery component mustbe installed on systems for which you want toenable recovery using an automatic disasterrecovery method; and on the system where theDR CD ISO image for Enhanced Disaster Recoverywill be prepared to provide automatic preparationfor the disaster recovery.
Installing Data Protector on your network78

SAP R/3 Integration The SAP R/3 Integration component must beinstalled on systems that have an SAP R/3database that will be backed up with DataProtector.
SAP DB Integration The SAP DB Integration component must beinstalled on systems that have an SAP DB/MaxDBdatabase that will be backed up using DataProtector.
Oracle Integration The Oracle Integration component must beinstalled on systems that have an Oracle databasethat will be backed up with Data Protector.
VMware Integration The VMware Integration component must beinstalled on VirtualCenter systems (if they exist)and all the ESX Server systems that you plan toback up with Data Protector. If you plan to usethe VCBfile or VCBimage backup methods, theintegration component must also be installed onthe backup proxy systems.
DB2 Integration The DB2 Integration component must be installedon all systems that have a DB2 Server that will bebacked up with Data Protector.
Sybase Integration The Sybase Integration component must beinstalled on systems that have a Sybase databasethat will be backed up with Data Protector.
Informix Integration The Informix Integration component must beinstalled on systems that have an Informix Serverdatabase that will be backed up with DataProtector.
MS Exchange Integration The MS Exchange Integration component must beinstalled on Microsoft Exchange Server systemsthat will be backed up with Data Protector.
MS SQL Integration The SQL Integration component must be installedon the systems that have an Microsoft SQL
Installation and licensing guide 79

database which will be backed up with DataProtector.
MS SharePoint Portal ServerIntegration
The MS SharePoint Portal Server Integrationcomponent must be installed on MicrosoftSharePoint Portal Server systems that will bebacked up with Data Protector.
MS Volume Shadow Copy In-tegration
The MS Volume Shadow Copy Integrationcomponent must be installed on the WindowsServer 2003 systems where you want to runbackups coordinated by Volume Shadow Copyservice.
EMC Symmetrix Agent The EMC Symmetrix Agent component must beinstalled on the application and backup systemto integrate EMC Symmetrix with Data Protector.
HP StorageWorks XP Agent The HP StorageWorks XP Agent component mustbe installed on the application and backup systemto integrate HP StorageWorks Disk Array XP withData Protector.
HP StorageWorks VA Agent The HP StorageWorks VA Agent component mustbe installed on the application and backup systemto integrate HP StorageWorks Virtual Array withData Protector.
HP StorageWorks EVA SMI-SAgent
The HP StorageWorks EVA SMI-S Agentcomponent must be installed on the applicationand the backup system to integrate HPStorageWorks Enterprise Virtual Array with DataProtector.
HP Network Node ManagerIntegration
The NNM Integration component must be installedon all systems in the cell that have an NNMdatabase that will be backed up with DataProtector.
NDMP Media Agent The NDMP Media Agent component must beinstalled on all systems that will be backing up
Installing Data Protector on your network80
data to NDMP dedicated drives through an NDMPserver.
IAP Deduplication Agent The IAP Deduplication Agent component must beinstalled on systems that will perform backupsdirectly to the IAP appliance using Data Protector.
Lotus Integration The Lotus Integration component must be installedon all systems in the Data Protector cell that haveLotus Notes/Domino Server databases that youplan to back up with Data Protector.
NOTE:You cannot install the General Media Agent and the NDMP Media Agent on the samesystem.
Remote installation of Data Protector clientsThis section describes the procedure for distributing the Data Protector software toclients using the Installation Server (remote installation or upgrade).
Prerequisites
• For prerequisites and recommendations on the installation, refer to the sectionthat describes the installation procedure for that particular client. The referencesare listed in Table 4 on page 73 and in Table 5 on page 75.
• See the http://www.hp.com/support/manuals and refer to the HP Data Protectorproduct announcements, software notes, and references for the information onsupported platforms, Data Protector components, and for disk space requirements.
• At this point, you should have the Cell Manager and the Installation Server(s)installed on your network.
NOTE:The Installation Server for Windows must reside in a shared directory so that it is visiblethroughout the network.
Installation and licensing guide 81

Distribute the software to clients using the Data Protector user interface. Cross-platformclient installation is supported.
• To use secure shell installation, install and set up OpenSSH on the client andInstallation Server. If your private key is encrypted, install and set up keychainon the Installation Server. See “Remote installation using secure shell” on page 87for instructions.
NOTE:You cannot distribute software to clients in another Data Protector cell. However, if youhave an independent Installation Server, you can import it into more than one cell. Youcan then distribute software within different cells by using the GUI connected to eachCell Manager in turn.
Adding clients to the cell
To distribute the Data Protector software to the clients that are not in the Data Protectorcell yet, proceed as follows:
1. Start the Data Protector GUI:
• Original Data Protector GUI (on Windows only):• Start > Programs > HP Data Protector > Data Protector Manager.
• Data Protector Java GUI:• On Windows: Select Start > Programs > HP Data Protector > Data
Protector Java GUI Manager.In the Connect to a Cell Manager dialog, select or type the name of aCell Manager and click Connect.
• On UNIX, run:/opt/omni/java/client/bin/javadpgui.sh
Refer to “The Data Protector graphical user interface” on page 42 and to theonline Help for details on the Data Protector graphical user interface.
2. In the Data Protector Manager, switch to the Clients context.
3. In the Scoping Pane, right-click Clients and click Add Clients.
4. If you have more than one Installation Server configured, select the platform ofthe clients you want to install (UNIX or Windows) and the Installation Server tobe used for installing the clients. Click Next.
Installing Data Protector on your network82

5. Type the names of the clients or search for the clients (on Windows GUI only)you want to install as shown in Figure 14 on page 83 and . Click Next.
Figure 14 Selecting clients
Installation and licensing guide 83

6. Select the Data Protector components you want to install as shown in Figure15 on page 84 and . Note that you can select only one type of Media Agent.See “Data Protector components” on page 77.
Figure 15 Selecting components
To change the default user account and target directory (on Windows only) forthe installation, click Options.
If you selected more than one client and you would like to install differentcomponents on each client, click I want to customize this option for client systemsindependently and then click Next. Select the components you want to installfor each client independently.
Click Finish to start the installation.
7. During the installation and when asked, provide the data required (username,password, and on Windows also domain) to access the specific client systemand click OK.
As soon as a system has the Data Protector software installed and is added to theData Protector cell, it becomes a Data Protector client.
Installing Data Protector on your network84

NOTE:Before you start using the Data Protector GUI on the client system, add a user from thatsystem to an appropriate Data Protector user group. For the procedure and thedescriptions of available user rights, refer to the online Help.
Troubleshooting
When the remote installation is finished, you can restart any failed installationprocedures using the GUI by clicking Actions and Restart Failed Clients. If theinstallation fails again, see Chapter 6 on page 341.
Adding components to clients
You can install additional Data Protector software components on your existing clientsand the Cell Manager. Components can be added remotely or locally. For localinstallation, see “Changing Data Protector software components” on page 251.
MC/ServiceGuard clients
In the MC/ServiceGuard cluster environment, make sure that the node to which youadd the components is active.
Prerequisite
The corresponding Installation Server must be available.
To distribute the Data Protector software to clients in the Data Protector cell, proceedas follows:
1. In the Data Protector Manager, switch to the Clients context.
2. In the Scoping Pane, expand Clients, right-click a client, and then click AddComponents.
3. If you have more than one Installation Server configured, select the platform ofthe clients on which you want to install the components (UNIX or Windows) andthe Installation Server to be used for installing the components. Click Next.
Installation and licensing guide 85

4. Select the clients on which you want to install the components as shown in Figure16 on page 86 and . Click Next.
Figure 16 Selecting clients
Installing Data Protector on your network86

5. Select the Data Protector components you want to install as shown in Figure17 on page 87. Note that you can select only one type of Media Agent. See“Data Protector components” on page 77.
Figure 17 Selecting components
If you selected more than one client and you want to install different componentson each client, click I want to customize this option for client systemsindependently and then click Next. Select the components for each clientindependently.
Click Finish to start the installation.
Remote installation using secure shellSecure shell installation helps you protect your client and Installation Server byinstalling Data Protector components in a secure way. High level of protection isachieved by:
• Authenticating the Installation Server user to the client in a secure way throughthe public-private key pair mechanism.
• Sending encrypted installation packages over the network.
Installation and licensing guide 87

NOTE:Secure shell installation is supported on UNIX platforms only.
To use secure shell installation, install and set up OpenSSH on the client andInstallation Server as described below.
Setting up OpenSSH
OpenSSH is an open source implementation of the secure shell protocol. To set upOpenSSH:
1. If openssh is not already installed on your system, download it from http://www.openssh.org and install it on both the Data Protector client and InstallationServer. Alternately, on HP-UX, you can use HP-UX Secure Shell.
NOTE:The default location for the secure shell installation is /opt/ssh.
2. On the Installation Server, run ssh-keygen to generate a public-private keypair. Keep the private key on the Installation Server while transferring the publickey to the client. Note that if you use an encrypted private key (that is, protectedby a passphrase), you need to set up keychain on the Installation Server (seeSetting up keychain on page 90 for details).
For information on ssh-keygen, see http://www.openbsd.org/cgi-bin/man.cgi?query=ssh-keygen&sektion=1.
Installing Data Protector on your network88

3. Store the public key in the $HOME/.ssh directory on the client under the nameauthorized_keys.
NOTE:$HOME/.ssh is usually the home directory of the root user.
To set an SSH protocol version (SSH1 or SSH2), modify the protocol parameterin the following files:
1. On the Installation Server:
ssh_install_directory/ssh/etc/ssh_config
This file will be used by the ssh command.
2. On the client:
ssh_install_directory/ssh/etc/sshd_config
This command will be used by the ssh daemon (sshd).
Note that these two files must be in sync.
NOTE:The default SSH protocol version is SSH2.
4. On the client, start the ssh daemon:
ssh_install_directory/ssh/sbin/sshd
5. Add the client to a list of known hosts (located in $HOME/.ssh/known_hostson the Installation Server) by running:
ssh root@client_host
where client_host must be the fully qualified DNS name, for example:
6. On the Installation Server, set the omnirc variable OB2_SSH_ENABLED to 1.For more information on omnirc variables, see the HP Data Protectortroubleshooting guide.
Installation and licensing guide 89

Setting up keychain
Keychain is a tool eliminating the need to manually supply a passphrase whendecrypting the private key. It is needed only if the private key is encrypted. To setup keychain:
1. Download keychain from http://www.gentoo.org/proj/en/keychain/index.xmlto the Installation Server.
2. Add the following two lines to $HOME/.profile:
HP-UX, Solaris:
keychain_install_directory/keychain-keychain_version/keychain$HOME/.ssh/private_key
. $HOME/.keychain/'hostname'-sh
Linux:
/usr/bin/keychain $HOME/.ssh/private_key
. $HOME/.keychain/'hostname'-sh
3. On the Installation Server, set the OB2_ENCRYPT_PVT_KEY omnirc variableto 1. For more information on omnirc variables, see the HP Data Protectortroubleshooting guide.
What’s next?
After you set up OpenSSH and keychain, add clients to the cell using the GUI asdescribed on Adding clients to the cell on page 82 or using the CLI by running theob2install command. For information on CLI commands and their parameters,see the HP Data Protector command line interface reference.
NOTE:If secure shell installation cannot be performed because the execution of its commandfails, a warning message is issued. However, the installation continues using the standardData Protector remote installation method.
Installing Windows clientsFor details on supported platforms and components for a particular Windowsoperating system, see the http://www.hp.com/support/manuals.
Installing Data Protector on your network90

Prerequisites
To install a Windows client, you must have the Administrator rights. The Windowssystem that will become your future Data Protector client system must meet the followingrequirements:
• Have Microsoft Internet Explorer 5.0 or higher.• Have sufficient disk space for the Data Protector client software. Refer to the HP
Data Protector product announcements, software notes, and references for details.• Have port number 5555 (default) free.• Have the Microsoft implementation of the TCP/IP protocol installed and running.
The protocol must be able to resolve hostnames. The computer name and thehostname must be the same. Refer to “Setting up the TCP/IP protocol on Windowssystems” on page 402 for information on installation and configuration of theTCP/IP protocol.
• For Java GUI Client, Java Runtime Environment (JRE) 1.5.0_06 or newer update(for example, 1.5.0_07) is required.
• Ensure that network access user rights are set under the Windows local securitypolicy for the account performing the installation.
Limitations
• Due to the security restrictions imposed by the Windows operating system,Installation Server can be used to remotely install clients only in the same domain.
• On Windows XP HE, Data Protector clients can only be installed locally.• When installing clients remotely on Windows Vista and Windows Server 2008
systems, you must use one of the following accounts:• A built-in administrator account on the remote host. The account must be
enabled and with disabled Admin Approval Mode.• A domain user account, which is a member of a local Administrators group
on the remote host.
Recommendation
On each Windows client, check if you have Microsoft Installer (MSI) 2.0 prior toinstalling Data Protector A.06.10. If you have an older version of MSI, Data Protectorsetup will automatically upgrade it to version 2.0. In this case, Data Protector willdisplay a note at the end of the upgrade, stating that MSI was upgraded. It is highlyrecommended to restart the client system, if MSI was upgraded. Consult MicrosoftSupport for Microsoft Installer 2.0 prerequisites on the various Windows operatingsystems.
Installation and licensing guide 91

If you start the Data Protector installation with an older version of the MSI, DataProtector setup will upgrade it to version 2.0. However, the system must be rebootedfor the changes to take effect. After the computer is rebooted, restart the installation.
Automatic Disaster Recovery
The Automatic Disaster Recovery component must be installed on clients forwhich you want to enable recovery using an automatic disaster recovery method,and on the system where the DR CD ISO image for Enhanced Disaster Recovery willbe prepared.
Cluster-aware clients
Additional prerequisites are required for installing cluster-aware clients. Refer to“Installing cluster-aware clients” on page 206 for more details.
Before starting the installation procedure, decide which components you need toinstall on your client system. For the list of the Data Protector software componentsand their descriptions, see “Data Protector components” on page 77.
HP StorageWorks Disk Array XP hardware provider limitation
Data Protector and FRS require different versions of HP StorageWorks Disk Array XPhardware provider. However, only one version of the hardware provider can beinstalled on the same system. If you install the Data Protector and FRS on the samesystem that is connected to the HP StorageWorks Disk Array XP, you can use onlyone of these products.
Local installationWindows clients can be installed locally, from the Windows installation DVD-ROM:
1. Insert the DVD-ROM.
OnWindows Vista andWindows Server 2008 systems, the User Account Controldialog box is displayed. Click Continue to proceed with the installation.
2. In the HP Data Protector window, select Install Data Protector to start the DataProtector Setup Wizard.
3. Follow the Setup Wizard and carefully read the license agreement. Click Nextto continue, if you accept the terms of the agreement.
4. In the Installation Type page, select Client. For Itanium clients, the type is selectedautomatically.
Installing Data Protector on your network92

5. Enter the name of the Cell Manager. Refer to Figure 18 on page 93.
If your Cell Manager uses a different port then the default 5555, change theport number. You can test if the Cell Manager is active and uses the selectedport by clicking Check response...
Click Next.
Figure 18 Choosing the Cell Manager
6. Click Next to install Data Protector on the default folder.
Otherwise, click Change to open the Change Current Destination Folder pageand enter the path.
7. Select the Data Protector components that you want to install.
For information on other Data Protector components, refer to “Data Protectorcomponents” on page 77.
Click Next.
8. Windows XP SP2, Windows Server 2003 SP1, Windows Vista, and WindowsServer 2008: If Data Protector detects Windows Firewall on your system, theWindows Firewall configuration page is displayed. Data Protector setup willregister all necessary Data Protector executables. By default, the selected optionis Initially, enable newly registered Data Protector binaries to open ports asneeded. If you do not want to enable Data Protector to open ports at the moment,deselect the option. However, note that for proper functioning of Data Protector,the executables must be enabled.
Click Next.
Installation and licensing guide 93

9. The component selection summary page is displayed. Click Install to install theselected components.
Figure 19 Component selection summary page
10. The Installation status page is displayed. Click Next.
Figure 20 Installation summary page
Installing Data Protector on your network94

11. To start using Data Protector immediately after setup, select Launch Data ProtectorManager.
To view the HP Data Protector product announcements, software notes, andreferences, select Open the Product Announcements.
Click Finish.
Connecting a backup device to Windows systemsOnce you have installed a Media Agent component, you can attach a backup deviceto a Windows system by performing the following steps:
1. Find the available SCSI addresses (referred to as SCSI Target IDs on Windows)for the drives and control device (robotics) of the backup device you want toconnect. Refer to “Finding unused SCSI target IDs on a Windowssystem” on page 433.
2. Set unused SCSI Target IDs for the drives and control device (robotics).Depending on the device type, this can usually be done with switches on thedevice. For details, refer to the documentation that comes with the device.
Also see http://www.hp.com/support/manuals for information about supporteddevices.
3. Switch off your computer and connect your backup device to the system.
4. Switch on the device, then the computer, and wait until the boot processcompletes.
Installation and licensing guide 95

5. To verify that the system correctly recognizes your new backup device, in theData_Protector_home\bin directory, run the devbra -dev command.
You should see a new device listed in the output of the command. For example,you might get the following output from the devbra -dev command:
• If the tape driver for your device is loaded:HP:C1533A
tape3:0:4:0
DDS
...
The first line represents the device specification, the second one is the devicefilename.The path format says that an HP DDS tape device has Drive instance number3 and is connected to SCSI bus 0, SCSI Target ID 4, and LUN number 0.
• If the tape driver for your device is unloaded:HP:C1533A
scsi1:0:4:0
DDS
...
The first line represents the device specification, the second one provides thedevice filename.The path format says that an HP DDS tape device is connected to SCSI port1, SCSI bus 0, and the tape drive has the SCSI Target ID 4, and LUN number0.
For loading or unloading the native tape driver for your device, refer to “Using tapeand robotics drivers on Windows” on page 413. For more information on creating adevice filename, refer to “Creating device files (SCSI Addresses) onWindows” on page 418.
What’s next?
At this stage, you should have client components installed and backup devicesconnected, so that you are able to configure backup devices and media pools. Referto the online Help index: “configuring, backup devices” for information onconfiguration tasks.
Installing Data Protector on your network96

Installing HP-UX clientsHP-UX clients can be installed locally from the UNIX installation DVD-ROM, or remotelyusing the Installation Server for UNIX.
Before starting the installation procedure, decide which components you need toinstall on your client system. For the list of the Data Protector software componentsand their descriptions, see “Data Protector components” on page 77.
Prerequisites
• For system requirements, disk space requirements, supported platforms, processors,and Data Protector components, refer to the HP Data Protector productannouncements, software notes, and references.
• At this point, you should have the Cell Manager and Installation Server for UNIXinstalled on your network. If not, see “Installing the Data Protector Cell Manager(CM) and Installation Server(s) (IS)” on page 46 for instructions.
• You will need either root access or an account with root capabilities.• For Java GUI Client, Java Runtime Environment (JRE) 1.5.0_06 or newer update
(for example, 1.5.0_07) is required.
Local installation
If you do not have an Installation Server for UNIX installed in your environment, youhave to perform local installation from the UNIX installation DVD-ROM. See “Localinstallation of UNIX clients” on page 149 for instructions.
After the local installation, the client system has to be manually imported into the cell.See also “Importing clients to a cell ” on page 213.
Remote installation
You install the client software from the Installation Server for UNIX to clients usingthe Data Protector graphical user interface. For the step-by-step procedure for remotelyinstalling the software, refer to “Remote installation of Data Protectorclients” on page 81.
After the remote installation, the client system automatically becomes a member ofthe Data Protector cell.
If you have installed a Media Agent on your client, you must physically connect thebackup device to the system. To see if the device drivers, appropriate for the type ofyour device, are already build in the kernel, check your kernel configuration beforerunning a backup.
Installation and licensing guide 97

Cluster-aware clients
Additional prerequisites and steps are required for installing cluster-aware clients.Refer to “Installing a cluster-aware client” on page 196 for more details.
Checking the kernel configuration on HP-UXThe following procedure explains how to check and build your kernel configurationon the HP-UX 11.x, using the HP System Administration Manager (SAM) utility. Referto “SCSI robotics configuration on HP-UX” on page 419 for instructions on how tobuild the kernel manually.
Follow this procedure to build the kernel configuration using the HP SystemAdministration Manager (SAM) utility:
1. Log in as a root user, open the terminal and type sam.
2. In the System Administration Manager window, double-click Kernel Configuration,and then Drivers.
Installing Data Protector on your network98

3. In the Kernel Configuration window, verify the following:
• The drivers for the devices you will be using must be listed among the installeddrivers. See Figure 21 on page 99. If the driver you are looking for is notlisted, you have to install it using the /usr/sbin/swinstall utility. Forexample:• A Tape Device Driver is required for tape devices and must be installed
if you have connected a tape device to the system. For example, forgeneric SCSI tape drives, like DLT or LTO, the stape driver is used, andfor DDS devices the tape2 driver.
• A SCSI Pass-Through driver named sctl or spt, or an autochangerrobotics driver named schgr (depending on the hardware) is requiredto control robotics in Tape library devices.Refer to “SCSI robotics configuration on HP-UX” on page 419 for details.
Figure 21 Kernel configuration Window
• The status of a driver that is displayed in the Current State column must beset to In. If the status value is set to Out, proceed as follows:1. Select the driver in the list. Click Actions and select Add Driver to Kernel.
In the Pending State column, the status will be set to In.
Repeat this for each driver for which the Current State is In.
2. Click Actions and select Create a New Kernel to apply the changes, thatis to build a Pending Kernel into the Current Kernel. The action requiresa restart of the system.
Installation and licensing guide 99

Once you have all the required drivers built in the kernel, you can continue byconnecting a backup device to your system.
Connecting a backup device to HP-UX systems1. Determine the available SCSI addresses for the drives and control device
(robotics). Use the /usr/sbin/ioscan -f system command.
Refer to “Finding the unused SCSI addresses on HP-UX” on page 426 for moreinformation.
2. Set the SCSI address on the device. Depending on the device type, this can beusually done with switches on the device. For details, refer to the documentationthat comes with the device.
Refer to http://www.hp.com/support/manuals for details about supporteddevices.
3. Connect the device to the system, switch on the device, and then the computer,and wait until the boot process completes. The device files are usually createdduring the boot process.
4. Verify that the system correctly recognizes your new backup device. Use theioscan utility:
/usr/sbin/ioscan -fn
so that you can see the device files listed for each connected backup device. Ifthe device file has not been created automatically during the boot process youmust create it manually. Refer to “Creating device files on HP-UX” on page 423.
Once the installation procedure has been completed and the backup devices havebeen properly connected to the system, refer to the online Help index: “configuring,backup devices” for detailed information about configuring devices and media poolsor other Data Protector configuration tasks.
Installing Solaris clientsSolaris clients can be installed locally from the UNIX installation DVD-ROM, orremotely using the Installation Server for UNIX.
Before starting the installation procedure, decide which components you need toinstall on your client system. For the list of the Data Protector software componentsand their descriptions, see “Data Protector components” on page 77.
Installing Data Protector on your network100

Prerequisites
• For system requirements, disk space requirements, supported platforms, and DataProtector components, refer to the HP Data Protector product announcements,software notes, and references.
• At this point, you should have the Cell Manager and Installation Server for UNIXalready installed on your network. Refer to “Installing the Data Protector CellManager (CM) and Installation Server(s) (IS)” on page 46 for instructions.
• To install a Solaris client, you will need either root access or an account with rootcapabilities.
• For Java GUI Client, Java Runtime Environment (JRE) 1.5.0_06 or newer update(for example, 1.5.0_07) is required.
Local installation
If you do not have an Installation Server for UNIX installed in your environment, youhave to perform local installation from the UNIX installation DVD-ROM. Refer to “Localinstallation of UNIX clients” on page 149 for instructions.
Remote installation
You install the client software from the Installation Server for UNIX to clients usingthe Data Protector graphical user interface. For the step-by-step procedure for remotelyinstalling the software, refer to “Remote installation of Data Protectorclients” on page 81.
NOTE:If you install the User Interface component (which includes the graphical userinterface and the command-line interface), you should update your environment variablesbefore using it. Refer to “Setting environment variables” on page 54 for more information.If you install the User Interface on a Solaris 2.6 client, only the command-line interfaceis available.
As soon as the client components have been installed, the target system automaticallybecomes a member of the Data Protector cell.
Installation and licensing guide 101

IMPORTANT:If you want to install Data Protector to linked directories, for instance:/opt/omni/ -> /prefix/opt/omni/
/etc/opt/omni/ -> /prefix/etc/opt/omni/
/var/opt/omni/ -> /prefix/var/opt/omni/
you must create the links before the installation and ensure that the destination directoriesexist.
Cluster-aware clients
Additional prerequisites are required for installing cluster-aware clients. Refer to“Installing a Client” on page 209 for more details.
Post-installation configuration
Configuration files
Once you have a Media Agent component installed on the client system, you haveto check your configuration files(/kernel/drv/st.conf), depending on thedevice type you will be using.
• For Exabyte devices (8 mm), no changes to the /kernel/drv/st.conf fileare necessary.
• For an HP DAT (4 mm) device, add the following lines to your/kernel/drv/st.conf file:tape-config-list =
"HP HP35470A", "HP DDS 4mm DAT", "HP-data1","HP HP35480A", "HP DDS-DC 4mm DAT", "HP-data1","HP C1533A", "HP DDS2 4mm DAT", "HP-data2","HP C1537A", "HP DDS3 4mm DAT", "HP-data3","HP C1553A", "HP DDS2 4mm DATloader", "HP-data2","HP C1557A", "HP DDS3 4mm DATloader", "HP-data3";HP-data1 = 1,0x34,0,0x8019,3,0x00,0x13,0x03,2;HP-data2 = 1,0x34,0,0x8239,4,0x0,0x13,0x24,0x3,3;HP-data3 = 1,0x34,0,0x8239,4,0x0,0x13,0x24,0x3,3;
Installing Data Protector on your network102
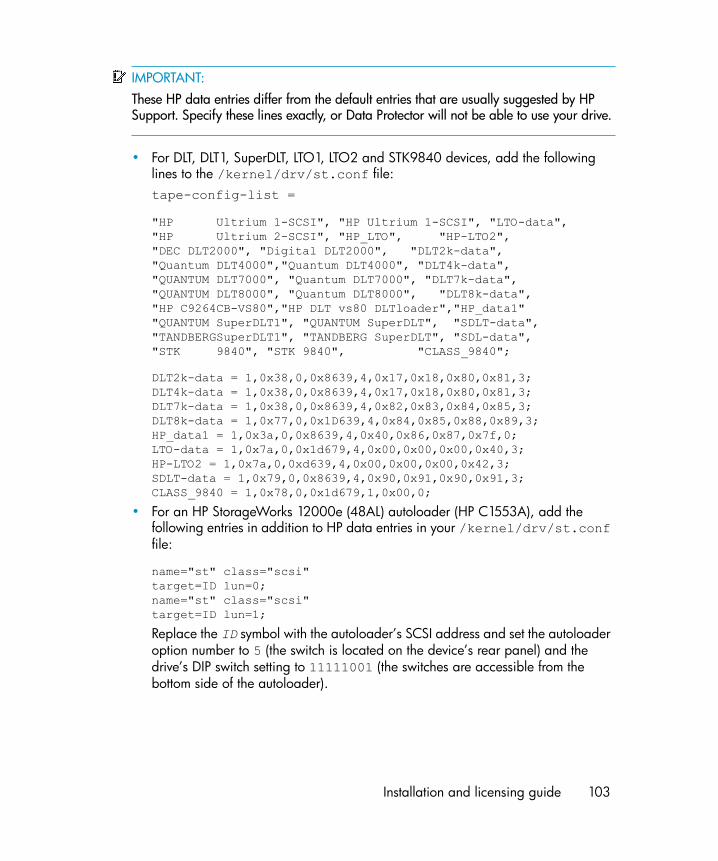
IMPORTANT:These HP data entries differ from the default entries that are usually suggested by HPSupport. Specify these lines exactly, or Data Protector will not be able to use your drive.
• For DLT, DLT1, SuperDLT, LTO1, LTO2 and STK9840 devices, add the followinglines to the /kernel/drv/st.conf file:tape-config-list =
"HP Ultrium 1-SCSI", "HP Ultrium 1-SCSI", "LTO-data","HP Ultrium 2-SCSI", "HP_LTO", "HP-LTO2","DEC DLT2000", "Digital DLT2000", "DLT2k-data","Quantum DLT4000","Quantum DLT4000", "DLT4k-data","QUANTUM DLT7000", "Quantum DLT7000", "DLT7k-data","QUANTUM DLT8000", "Quantum DLT8000", "DLT8k-data","HP C9264CB-VS80","HP DLT vs80 DLTloader","HP_data1""QUANTUM SuperDLT1", "QUANTUM SuperDLT", "SDLT-data","TANDBERGSuperDLT1", "TANDBERG SuperDLT", "SDL-data","STK 9840", "STK 9840", "CLASS_9840";
DLT2k-data = 1,0x38,0,0x8639,4,0x17,0x18,0x80,0x81,3;DLT4k-data = 1,0x38,0,0x8639,4,0x17,0x18,0x80,0x81,3;DLT7k-data = 1,0x38,0,0x8639,4,0x82,0x83,0x84,0x85,3;DLT8k-data = 1,0x77,0,0x1D639,4,0x84,0x85,0x88,0x89,3;HP_data1 = 1,0x3a,0,0x8639,4,0x40,0x86,0x87,0x7f,0;LTO-data = 1,0x7a,0,0x1d679,4,0x00,0x00,0x00,0x40,3;HP-LTO2 = 1,0x7a,0,0xd639,4,0x00,0x00,0x00,0x42,3;SDLT-data = 1,0x79,0,0x8639,4,0x90,0x91,0x90,0x91,3;CLASS_9840 = 1,0x78,0,0x1d679,1,0x00,0;
• For an HP StorageWorks 12000e (48AL) autoloader (HP C1553A), add thefollowing entries in addition to HP data entries in your /kernel/drv/st.conffile:
name="st" class="scsi"target=ID lun=0;name="st" class="scsi"target=ID lun=1;
Replace the ID symbol with the autoloader’s SCSI address and set the autoloaderoption number to 5 (the switch is located on the device’s rear panel) and thedrive’s DIP switch setting to 11111001 (the switches are accessible from thebottom side of the autoloader).
Installation and licensing guide 103

NOTE:The HP StorageWorks 12000e library does not have a dedicated SCSI ID for the pickerdevice but accepts both data drive access commands and picker commands through thesame SCSI ID. However, the data drive access commands must be directed to SCSI lun=0and the picker commands to SCSI lun=1.
For all other devices, check the st.conf.templ template (located in/opt/omni/spt) for required entries in the st.conf file. This is only a templatefile and is not meant as a replacement for the st.conf file.
• For the SCSI Exchanger devices on Solaris using the SCSI Pass-Through driver,you have to install the SCSI Pass-Through driver first, then you install the SCSIdevice.Install the SCSI Pass-Through driver using the following steps:1. Copy the sst module into the /usr/kernel/drv/sparcv9 directory
and the sst.conf configuration file into the /usr/kernel/drv directory:
32-bit Solaris:
$cp /opt/omni/spt/sst /usr/kernel/drv/sst
$cp /opt/omni/spt/sst.conf /usr/kernel/drv/sst.conf
64-bit Solaris:
$cp /opt/omni/spt/sst.64bit /usr/kernel/drv/sparcv9 /sst
$cp /opt/omni/spt/sst.conf /usr/kernel/drv/sst.conf
2. Add the following line to the /etc/devlink.tab file:
IMPORTANT:When editing the /etc/devlink.tab file, do not use [space]characters. Use only [TAB] characters.
“type=ddi_pseudo;name=sst;minor=character rsst\A1”
This will cause devlinks (1M) to create link(s) to devices with names of the/dev/rsstX form, where X is the SCSI target number.
3. Install the driver on the system by entering the following command:
add_drv sst
Installing Data Protector on your network104

4. At this stage, you are ready to install the SCSI device. Before the installation,you must assign the correct SCSI address to each drive and the robotics(picker) of the exchanger device. The chosen addresses must not be used byany other device of the system.
To check the SCSI configuration, shut down the system by the followingcommand:
shutdown -i0
then run the probe-scsi-all command at the ok prompt to check theassigned addresses:
ok probe-scsi-all
When you have finished, restart the system with:
ok boot -r
To install the SCSI device, follow the steps:
a. Edit /kernel/drv/st.conf to set up the device's drive parametersin order to use the assigned SCSI ports (refer to the appropriate device’sdocumentation).
The following example will show the setup of the ADIC-VLS DLT devicewith the SCSI port 5 assigned to the SCSI tape drive and the SCSI port4 assigned to the ADIC SCSI control device (picker):
Example
tape-config-list =“DEC DLT2000", "ADIC DLTDlib”,"ADIC2000-data";ADIC2000-data = 1,0x38,0,0x8639,4,0x17,0x18,0x80,0x81,3;name=”st”class= “scsi”target=5 lun=0;name=”st” class= “scsi”target=4 lun=0;
The data displayed in the example above must be in the
/kernel/drv/st.conf file.
b. Edit /usr/kernel/drv/sst.conf to set up the ADIC SCSI controldevice in order to use the assigned SCSI port 4. Add the following datafor the ADIC drive to the /usr/kernel/drv/sst.conf file:
name=”sst” class= “scsi”target=4 lun=0;
Installation and licensing guide 105

When you have modified the /kernel/drv/st.conf file and the/usr/kernel/drv/sst.conf file, you are ready to physically connect a backupdevice to your system.
Connecting a backup device to a Solaris systemFollow the procedure below to connect a backup device to a Solaris system:
1. Create a reconfigure file:
touch /reconfigure
2. Shut down the system by entering the $shutdown -i0 command, and thenswitch off your computer and physically connect the device to the SCSI bus.Check that no other device is using the same SCSI address you have selectedfor the device.
See http://www.hp.com/support/manuals for details about supported devices.
NOTE:Data Protector does not automatically recognize cleaning tapes on a Solarissystem. If Data Protector detects and inserts a cleaning tape in theStorageWorks 12000e (48AL) device, the tape driver enters an undefinedstate and may require you to reboot your system. Load a cleaning tapemanually, when Data Protector issues a request for it.
3. Switch your computer back on and interrupt the boot process by pressing theStop-A key. Verify that the new device is recognized correctly by entering theprobe-scsi-all command at the ok prompt:
ok > probe-scsi-all
Then, enter:
ok > go
to continue.
Installing Data Protector on your network106

4. The device should work properly at this stage. The device files must be locatedin the /dev/rmt directory for the drives and in the /dev directory for the SCSIcontrol device (picker).
NOTE:On Solaris systems, (especially in case of Solaris 64-bit), links to the SCSI control device (picker)are not always created automatically. In this case, create symbolic links. For example:ln -s /devices/pci@1f,4000/scsi@3,1/sst@4,1:character /dev/rsst4
You can use the Data Protector uma utility to verify the device. To check thepicker of the SCSI Exchanger device from the previous example (using the SCSIport 4), enter:
echo “inq”|/opt/omni/lbin/uma -ioctl /dev/rsst4
The picker must identify itself as a SCSI-2 device library. The library can bechecked by forcing it to initialize itself. The command is:
echo “init”|/opt/omni/lbin/uma -ioctl /dev/rsst4
Make sure you use Berkeley-style device files, in this case, /dev/rmt/ohb (not/dev/rmt/0h)for the exchanger drive and /dev/rsst4 for the SCSI control device(picker).
What’s next?
Once the installation procedure has been completed and the backup devices areproperly connected to the Solaris client, refer to the online Help index: “configuring,backup devices” for more information about configuring backup devices, mediapools, or other configuration tasks.
Installing Linux clientsLinux client systems can be installed locally by using the UNIX installation DVD-ROM,or remotely using the Installation Server for UNIX.
Before starting the installation procedure, decide which components you need toinstall on your client system. For the list of the Data Protector software componentsand their descriptions, see “Data Protector components” on page 77.
Installation and licensing guide 107
Prerequisites
• For system requirements, disk space requirements, supported platforms, and DataProtector components, refer to the HP Data Protector product announcements,software notes, and references.
• At this point, you should have the Cell Manager and Installation Server for UNIXalready installed on your network. See “Installing the Data Protector Cell Manager(CM) and Installation Server(s) (IS)” on page 46 for instructions.
• The rpm utility must be installed and set up. Other packaging systems (like deb)are not supported.
• For Java GUI Client, Java Runtime Environment (JRE) 1.5.0_06 or newer update(for example, 1.5.0_07) is required.
NOTE:On Cell Manager platforms where the original Data Protector GUI is not supported, youcan use the Data Protector Java GUI or install the original Data Protector GUI on a systemwhere it is supported. Use the omniusers command to create a remote user accounton the new Cell Manager. You can then use this user account on any system with theData Protector GUI installed to start the GUI and connect to the new Cell Manager. Referto the omniusers man page.
NOTE:Data Protector uses the default port number 5555. Therefore, this particular port numbershould not be used by another program. Some versions of Linux use this number forother purposes.If the port number 5555 is already in use, you should make it available for Data Protectoror you can change the default port number to an unused port number. See “Changingthe Data Protector default port number” on page 409.
MC/ServiceGuard cluster
With MC/ServiceGuard clusters, the Data Protector agents (Disk agent, Media Agent)must be installed separately on each cluster node (local disk) and not on the shareddisk.
After the installation, you need to import the virtual host (application package) to thecell as a client. Therefore the application package (for example Oracle) must run on
Installing Data Protector on your network108

the cluster with its virtual IP. Use the command cmviewcl -v to check this beforeimporting the client.
Novell Open Enterprise Server (OES)
On Novell OES systems, Data Protector automatically installs the OES aware DiskAgent. However, there are some Novell OES specific aspects:
• If you install Novell OES on 32-bit SUSE Linux Enterprise Server 9.0 (SLES), afterinstalling a Data Protector Linux client on a system, you have to upgrade the DataProtector client as well.Note that the new Novell OES aware Disk Agent will be pushed on the clientsystem during the upgrade.
• If you remove the Novell OES component from SLES, you have to reinstall theData Protector client.
Local installation
If you do not have an Installation Server for UNIX installed in your environment, youhave to perform local installation from the UNIX installation DVD-ROM. See “Localinstallation of UNIX clients” on page 149 for instructions.
Remote installation
You remotely install a Linux client system by distributing the Data Protector componentsfrom the Installation Server for UNIX to the Linux system, using the Data Protectorgraphical user interface. For the step-by-step procedure for distributing the software,refer to “Remote installation of Data Protector clients” on page 81.
As soon as the client components have been installed, the target system automaticallybecomes a member of the Data Protector cell.
Troubleshooting
If you run into problems with remote installation on a Linux client system, ensure thatthe root account has rights to access the system either by using exec or shellservices. To achieve this, do the following:
Installation and licensing guide 109

1. Edit the /etc/xinetd.conf. Find the definitions for exec and shell servicesand add the following line to the definition of these two services:
server_args = -h
For example:
service shell{socket_type = streamprotocol = tcpwait = nouser = rootserver = /usr/sbin/in.rshdserver_args = -L -h}service exec{socket_type = streamprotocol = tcpwait = nouser = rootserver = /usr/sbin/in.rexecdserver_args = -h}
NOTE:Some Linux distributions have these services configured in separate files inthe /etc/xinetd.d directory. In this case, locate the appropriate file(/etc/xinetd.d/rexec and /etc/xinetd.d/rsh) and modify itas described above.
2. Kill the inetd process with the HUP signal:
kill -HUP $(ps ax|grep inet|grep -v grep|cut -c1-6)
3. Create a ~root/.rhosts file with the entry: my_installation_serverroot That will allow administration access from the Installation Server.
After you have installed Data Protector, you can remove the entry from the-root/.rhosts file, and the -h flag from the /etc/xinetd.conf(/etc/inetd.conf for Red Hat Enterprise Linux) file. Then repeat the killcommand from the step Step 2 on page 110.
Installing Data Protector on your network110

For more information, see the rexecd(8), rexec(3), rshd(8), rsh(1) or pam(8)man pages. If this fails, refer to “Local installation of UNIX clients” on page 149.
Kernel configuration
The following procedure explains how to check and build your kernel configuration:
1. Log in as a root user, then in the /usr/src/linux directory run the makemenuconfig command.
2. Select SCSI Support and press Enter. Then select the following options:SCSI support, SCSI tape support, SCSI generic support andoptionally Probe all LUNS on each SCSI device.
If the items are already included in kernel, exit without saving changes. You cancontinue by connecting a backup device to your system. Refer to “Connectinga backup device to the Linux system” on page 112.
3. If you made changes, save the configuration and do the following:
a. Run the make dep command.
This command builds the tree of dependencies in the kernel sources. Thesedependencies could be affected by the options you chose when configuringthe kernel.
b. Run the make clean command to purge files left from previous builds ofthe kernel.
c. Run the make bzImage command. After it is completed, run the makemodules command.
Installation and licensing guide 111
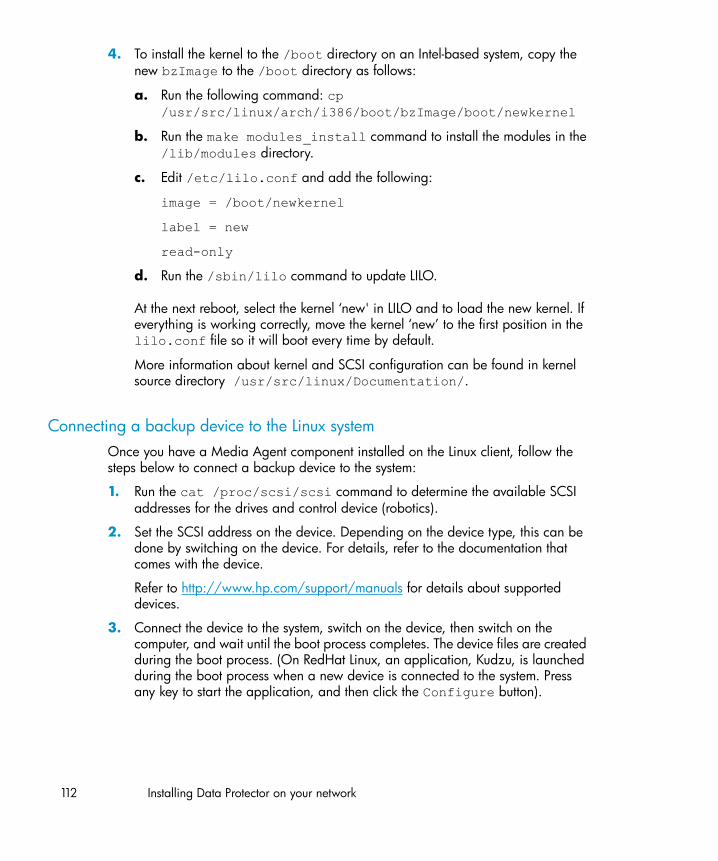
4. To install the kernel to the /boot directory on an Intel-based system, copy thenew bzImage to the /boot directory as follows:
a. Run the following command: cp/usr/src/linux/arch/i386/boot/bzImage/boot/newkernel
b. Run the make modules_install command to install the modules in the/lib/modules directory.
c. Edit /etc/lilo.conf and add the following:
image = /boot/newkernel
label = new
read-only
d. Run the /sbin/lilo command to update LILO.
At the next reboot, select the kernel ‘new' in LILO and to load the new kernel. Ifeverything is working correctly, move the kernel ‘new’ to the first position in thelilo.conf file so it will boot every time by default.
More information about kernel and SCSI configuration can be found in kernelsource directory /usr/src/linux/Documentation/.
Connecting a backup device to the Linux systemOnce you have a Media Agent component installed on the Linux client, follow thesteps below to connect a backup device to the system:
1. Run the cat /proc/scsi/scsi command to determine the available SCSIaddresses for the drives and control device (robotics).
2. Set the SCSI address on the device. Depending on the device type, this can bedone by switching on the device. For details, refer to the documentation thatcomes with the device.
Refer to http://www.hp.com/support/manuals for details about supporteddevices.
3. Connect the device to the system, switch on the device, then switch on thecomputer, and wait until the boot process completes. The device files are createdduring the boot process. (On RedHat Linux, an application, Kudzu, is launchedduring the boot process when a new device is connected to the system. Pressany key to start the application, and then click the Configure button).
Installing Data Protector on your network112

4. To verify if the system correctly recognizes your new backup device, run cat/proc/scsi/scsi and then dmesg |grep scsi. The device files are listedfor each connected backup device.
Examples
For robotics, the output of the dmesg |grep scsi command is:
Detected scsi generic sg2 at scsi2, channel 0, id 4, lun0, type 8
and for drives:
Detected scsi tape st0 at scsi2, channel 0, id 5, lun 0
5. Device files are created in the /dev directory. To check if the links to the devicefiles were created, run:
ll /dev | grep device_file
For example:
ll /dev | grep sg2
The output of this command is:
lrwxrwxrwx 1 root root 3 Nov 27 2001 sg2 -> sgc
where /dev/sg2 is a link to the device file /dev/sgc. This means that thedevice files to be used by Data Protector are /dev/sgc for robotics and/dev/st0 for drive. Device files for robotics are sga, sgb, sgc,… sgh, andfor the drives st0, st1, ... st7.
What’s next?
Once the installation procedure has been completed and the backup devices havebeen properly connected to the Linux client system, refer to the online Help index:“configuring, backup devices” for information about configuring backup devices andmedia pools, or other configuration tasks.
Installing ESX Server clientsESX Server is a modified Linux operating system. For details on how to install DataProtector components on ESX Server systems, see “Installing Linux clients” on page 107.
Installation and licensing guide 113

Installing AIX clientsAIX clients can be installed locally from the UNIX installation DVD-ROM, or remotelyusing the Installation Server for UNIX.
Before starting the installation procedure, decide which components you need toinstall on your client system. For the list of the Data Protector software componentsand their descriptions, see “Data Protector components” on page 77.
Prerequisites
• For system requirements, disk space requirements, supported platforms, and DataProtector components, refer to the HP Data Protector product announcements,software notes, and references.
• At this point, you should have the Cell Manager and Installation Server for UNIXalready installed on your network. Refer to “Installing the Data Protector CellManager (CM) and Installation Server(s) (IS)” on page 46 for instructions.
IMPORTANT:Before installing the Disk Agent component on an AIX system, check that theportmapper is up and running. In the /etc/rc.tcpip file, there must be the line thatstarts the portmapper:start /usr/sbin/portmap “$src_running”
The src_running flag is set to 1 if the srcmstr daemon is running. The srcmstrdaemon is the System Resource Controller (SRC). The srcmstr daemon spawns andcontrols subsystems, handles short subsystem status requests, passes requests on toa subsystem, and handles error notification.
IBM HACMP cluster
In IBM High Availability Cluster Multi-processing environment for AIX, install the DataProtector Disk Agent component on all the cluster nodes. For information on howto install Data Protector in a cluster environment with a cluster-aware applicationdatabase installed, see “Installing the Data Protector integration clients” on page 154.
After the installation, import the cluster nodes and the virtual server (virtual environmentpackage IP address) to the Data Protector cell.
Installing Data Protector on your network114

Local installation
If you do not have an Installation Server for UNIX installed in your environment, youhave to perform local installation from the UNIX installation DVD-ROM. See “Localinstallation of UNIX clients” on page 149 and for instructions.
Remote installation
You install the AIX client software from the Installation Server for UNIX to clients usingthe Data Protector graphical user interface. For the step-by-step procedure for remotelyinstalling the software, refer to “Remote installation of Data Protectorclients” on page 81.
As soon as the client components have been installed, the target system automaticallybecomes a member of the Data Protector cell.
Connecting a backup device to an AIX clientOnce you have a Media Agent component installed on an AIX client, proceed asfollows:
1. Shut down the computer and connect your backup device to the SCSI bus. Checkthat no other device is using the same SCSI address which has been selectedfor your backup device.
See http://www.hp.com/support/manuals for details about supported devices.
2. Switch on the computer and wait until the boot process completes. Start the AIXsystem smit management tool and verify that the system correctly recognizesyour new backup device.
IMPORTANT:Use smit to change the device’s default block size to 0 (variable blocksize).
3. Select the appropriate device files from the /dev directory and configure yourData Protector backup device.
IMPORTANT:Use only non-rewind-style device files. For example, select /dev/rmt0.1 instead of/dev/rmt0.
Installation and licensing guide 115

What’s next?
Once the installation procedure has been completed and your backup devices havebeen properly connected to the AIX system, refer to the online Help index:“configuring, backup devices” for information on configuring backup devices, mediapools, or on other Data Protector configuration tasks.
Installing Siemens Sinix clientsSiemens Sinix clients can be installed locally by using the UNIX installation DVD-ROM,or remotely using the Installation Server for UNIX.
Before starting the installation procedure, decide which components you need toinstall on your client system. For the list of the Data Protector software componentsand their descriptions, see “Data Protector components” on page 77.
Prerequisites
• For system requirements, disk space requirements, supported platforms, and DataProtector components, refer to the HP Data Protector product announcements,software notes, and references.
• At this point, you should have the Cell Manager and Installation Server for UNIXalready installed on your network. See “Installing the Data Protector Cell Manager(CM) and Installation Server(s) (IS)” on page 46 for instructions.
Local installation
If you do not have an Installation Server for UNIX installed in your environment, youhave to perform local installation from the UNIX installation DVD-ROM. See “Localinstallation of UNIX clients” on page 149 for instructions.
Remote installation
You install the Sinix client software from the Installation Server for UNIX to clientsusing the Data Protector graphical user interface. For the step-by-step procedure forremotely installing the software, refer to “Remote installation of Data Protectorclients” on page 81.
As soon as the client components have been installed, the target system automaticallybecomes a member of the Data Protector cell.
Installing Data Protector on your network116

Connecting a backup device to Siemens Sinix systemOnce you have a Media Agent component installed on Siemens Sinix client system,follow the steps below to connect a backup device to the system:
1. Shut down your computer, and then connect your backup device to the SCSIbus.
See http://www.hp.com/support/manuals for details about supported devicesand the documentation that comes with the device.
Check that no other device is using the same SCSI address as the one selectedfor your backup device.
2. Switch your computer back on and wait until the boot process is completed.
3. Select the appropriate device file name from the /dev directory.
You can obtain the list of devices with the autoconf -l command. Use thetape device (for example, ios0/stape006) that was reported in the output ofthis command to get the special device filename that Data Protector can use (forexample, /dev/ios0/rstape006nv).
NOTE:The special device files are located in the /dev directory, so you must add the /devpath in front of the device name.Since Data Protector can use only a character device, the letter r is added in front of thestape006.
Data Protector can handle a tape device if it is opened as non-rewindable and withvariable block size; therefore you must add letters n and v as suffixes.
The /dev/ios0/rstape006nv device filename is explained in Figure22 on page 118.
Installation and licensing guide 117

Figure 22 Format of a device filename:
What’s next?
Once the installation procedure has been completed and the backup devices havebeen properly connected to the Siemens Sinix client system, refer to the online Helpindex: “configuring, backup devices” for information about configuring backupdevices and media pools, or other configuration tasks.
Installing Tru64 clientsTru64 clients can be installed locally by using UNIX installation DVD-ROM, or remotelyusing the Installation Server for UNIX.
Before starting the installation procedure, decide which components you need toinstall on your client system. For the list of the Data Protector software componentsand their descriptions, see “Data Protector components” on page 77.
Prerequisites
• For system requirements, disk space requirements, supported platforms, and DataProtector components, refer to the HP Data Protector product announcements,software notes, and references.
• At this point, you should have the Cell Manager and Installation Server for UNIXalready installed on your network. See “Installing the Data Protector Cell Manager(CM) and Installation Server(s) (IS)” on page 46 for instructions.
Installing Data Protector on your network118
Local installation
If you do not have an Installation Server for UNIX installed in your environment, youhave to perform local installation from the UNIX installation DVD-ROM. See “Localinstallation of UNIX clients” on page 149 for instructions.
Remote installation
You install the Tru64 client software from the Installation Server for UNIX to clientsusing the Data Protector graphical user interface. For the step-by-step procedure forremotely installing the software, refer to “Remote installation of Data Protectorclients” on page 81.
As soon as the client components have been installed, the target system automaticallybecomes a member of the Data Protector cell.
Tru64 Cluster
You must have root permissions on every target system.
Data Protector has to be installed locally or remotely on the shared disk of the Tru64Cluster. Use one of the cluster nodes to perform an installation.
After the installation, the cluster virtual hostname and individual nodes have to beimported to the Data Protector cell. For a detailed procedure, see “Importing acluster-aware client to a cell ” on page 216.
Connecting a backup device to Tru64 clientOnce you have a Media Agent component installed on an Tru64 client, proceed asfollows:
1. Shut down the computer and connect your backup device to the SCSI bus.
NOTE:It is not recommended to connect the backup device on the same SCSI busas the hard disk drive.
Check that no other device is using the same SCSI address which has beenselected for your backup device.
See http://www.hp.com/support/manuals for details about supported devices.
2. Switch on the computer and wait until the boot process completes. Verify thatthe system correctly recognizes your new backup device.
Installation and licensing guide 119
What’s next?
Once the installation procedure has been completed and your backup devices havebeen properly connected to the Tru64 system, refer to the online Help index:“configuring, backup devices” for information on configuring backup devices, mediapools, or on other Data Protector configuration tasks.
Installing SCO clientsSCO clients can be installed locally by using the UNIX installation DVD-ROM, orremotely using the Installation Server for UNIX.
Note that for the UnixWare, remote installation is not available.
Before starting the installation procedure, decide which components you need toinstall on your client system. For the list of the Data Protector software componentsand their descriptions, see “Data Protector components” on page 77.
Prerequisites
• For system requirements, disk space requirements, supported platforms, and DataProtector components, refer to the HP Data Protector product announcements,software notes, and references.
• At this point, you should have the Cell Manager and Installation Server for UNIXalready installed on your network. See “Installing the Data Protector Cell Manager(CM) and Installation Server(s) (IS)” on page 46 for instructions.
Local installation
If you do not have an Installation Server for UNIX installed in your environment, youhave to perform local installation from the UNIX installation DVD-ROM. See “Localinstallation of UNIX clients” on page 149 for instructions.
Remote installation
You install the SCO client software from the Installation Server for UNIX to clientsusing the Data Protector graphical user interface. For the step-by-step procedure forremotely installing the software, refer to “Remote installation of Data Protectorclients” on page 81.
As soon as the client components have been installed, the target system automaticallybecomes a member of the Data Protector cell.
Installing Data Protector on your network120
Connecting a backup device to an SCO systemOnce you have a Media Agent component installed on the SCO client system, followthe steps below to connect a backup device to the system:
1. Find out which SCSI addresses are still free by checking the/etc/conf/cf.d/mscsi file. This file shows the currently connected SCSIdevices.
See http://www.hp.com/support/manuals/ for details about supported devicesand the documentation that comes with the device.
2. Shut down your computer, and then connect your backup device to the SCSIbus.
3. Restart your computer.
4. Configure your device using the mkdev tape command. In the list of tape drivetypes, select the Generic SCSI-1 / SCSI-2 tape drive.
NOTE:Remember the UNIT ID, which is displayed when you run the mkdev tapecommand. You will need it in order to recognize the device filename.
5. After you have configured the device and restarted the system, check in the/etc/conf/cf.d/mscsi file if your device was connected properly.
6. Select the appropriate device filename from the /dev directory.
Use the nrStp# name, where # stands for UNIT ID of the device. The UNIT IDof the device is defined in the step Step 4 on page 121. The /dev/nrStp#device filename is explained in Figure 23 on page 122.
CAUTION:Use only non-rewind-style device files with a variable block size. Verify whether the blocksize is variable by using the tape -s getblk /dev/nrStp# command. The valuefor a variable block size should be 0. If the value is not 0, use thetape -a 0 setblk /dev/nrStp# command to set the value of the block size to0.
Installation and licensing guide 121

Figure 23 Format of a device filename
What’s next?
Once the installation procedure has been completed and the backup devices havebeen properly connected to the SCO client system, refer to the online Help index:“configuring, backup devices” for information about configuring backup devices andmedia pools or other configuration tasks.
Installing a Media Agent to use the ADIC/GRAU Library or theStorageTek Library
Data Protector provides a dedicated ADIC/GRAU and StorageTek ACS librarypolicies used to configure an ADIC/GRAU library or StorageTek ACS library as aData Protector backup device. You need to install a Data Protector Media Agent (theGeneral Media Agent or the NDMP Media Agent) on every system that will bephysically connected to a drive in an ADIC/GRAU or StorageTek library. Also, formultihost configurations, you must install a Data Protector Media Agent on the systemsthat control the ADIC/GRAU or StorageTek library robotics. Note that multihostconfiguration is a configuration where the library and drive are not connected to thesame computer.
For the ADIC/GRAU library, each system on which you install a Media Agent softwareand it accesses the library robotics through the GRAU/ADIC DAS Server is called aDAS Client. For the STK ACS integration, each system on which you install a MediaAgent software and it accesses the library robotics through the STK ACS Server iscalled an ACS Client.
Installing Data Protector on your network122

NOTE:You need special licenses that depend on the number of drives and slots used in theStorageTek library. See Chapter 5 on page 317 for more information.
Connecting library drivesPhysically connect the library drives to the systems where you intend to install a MediaAgent software.
See http://www.hp.com/support/manuals for details about supported ADIC/GRAUor STK libraries.
See “Installing HP-UX clients” on page 97 for information about how to physicallyattach a backup device to the system. Also see the documentation that comes withthe ADIC/GRAU or StorageTek library.
See “Installing Windows clients” on page 90 for information on how to physicallyattach a backup device to a supported Windows system. Also see the documentationthat comes with the ADIC/GRAU or StorageTek library.
Preparing Data Protector clients to use the ADIC/GRAU LibraryThe following steps pertain to configuring an ADIC/GRAU library, and should becompleted before you install a Media Agent software:
Installation and licensing guide 123

1. If the DAS server is based on OS/2, before you configure a Data ProtectorADIC/GRAU backup device, create/update the C:\DAS\ETC\CONFIG file onthe DAS server computer. In this file, a list of all DAS clients must be defined.For Data Protector, this means that each Data Protector client that can controlthe library robotics must be defined in the file.
Each DAS client is identified with a unique client name (no spaces), for exampleDP_C1. For example, the contents of the C:\DAS\ETC\CONFIG file should looklike this:
client client_name = DP_C1,# hostname = AMU,"client1"ip_address = 19.18.17.15,requests = complete,options = (avc,dismount),volumes = ((ALL)),drives = ((ALL)),inserts = ((ALL)),ejects = ((ALL)),scratchpools = ((ALL))
2. On each Data Protector client with a Data Protector Media Agent installed thatneeds to access ADIC/GRAU DAS library robotics, edit the omnirc file(Data_Protector_home\omnirc file on Windows, /opt/omni/.omnircfile on HP-UX and Solaris or /usr/omni/omnirc file on AIX) and set thefollowing variables:
DAS_CLIENT A unique GRAU client name defined on theDAS server. For example, if the name of theclient is “DP_C1”, the appropriate line in theomnirc file is DAS_CLIENT=DP_C1.
DAS_SERVER The name of the DAS server.
Installing Data Protector on your network124

3. You must find out how your ADIC/GRAU library slot allocation policy has beenconfigured, either statically or dynamically. Refer to the AMU Reference Manualfor information on how to check what type of allocation policy is used.
The static policy has a designated slot for each volser, while the dynamicallocation policy assigns the slots randomly. Depending on the policy that hasbeen set, you need to configure Data Protector accordingly.
If the static allocation policy has been configured, you need to add the followingomnirc variable to your system controlling the robotics of the library:
OB2_ACIEJECTTOTAL = 0
NOTE:This applies to HP-UX and Windows.
For further questions on the configuration of your ADIC/GRAU library, pleasecontact your local ADIC/GRAU support or review your ADIC/GRAUdocumentation.
Installing a Media Agent to use the ADIC/GRAU Library
Prerequisites
The following prerequisites for installation must be met before installing a MediaAgent on a system:
• The ADIC/GRAU library must be configured and running. See the documentationthat comes with the ADIC/GRAU library.
• Data Protector must be installed and configured. See “Installing the Data ProtectorCell Manager (CM) and Installation Server(s) (IS)” on page 46 in this chapter.
• DAS server must be up and running.To control the ADIC/GRAU library, the DAS software is required. Every DASclient must have DAS client software installed. Each media- and device-relatedaction initiated by Data Protector first goes from the DAS client to the DAS server.Then, it is passed to the internal part (AMU - AML Management Unit) of theADIC/GRAU library which controls the robotics and moves or loads media. Aftera completed action, the DAS server replies to the DAS client. See thedocumentation that comes with the ADIC/GRAU library.
• The following information must be obtained before you install a Media Agent:• The hostname of the DAS Server (an application that runs on an OS/2 host).
Installation and licensing guide 125
• The list of available drives with the corresponding DAS name of the drive.The obtained drive names are to be used when configuring the ADIC/GRAUdrives in Data Protector.If you have defined the DAS clients for your ADIC/GRAU system, you can getthis list with one of the following dasadmin commands:dasadmin listd2 client
dasadmin listd client
where client is the DAS client for which the reserved drives are to bedisplayed.The dasadmin command can be called from the C:\DAS\BIN directory onthe OS/2 host, or, if installed on other systems, from the directory where theDAS client software has been installed. On a UNIX client system, this directoryis usually the /usr/local/aci/bin system directory.
• The list of available Insert/Eject Areas, with corresponding formatspecifications.You can get the list of available Insert/Eject Areas in the GraphicalConfiguration of AMS (AML Management Software) on an OS/2 host:1. Start this configuration from the menu Admin > Configuration.
2. Open the EIF-Configuration window by double-clicking the I/O unit icon,and then click the Logical Ranges field. In the text box, the availableInsert/Eject Areas are listed.
NOTE:One Data Protector library device can handle only one media type.It is important to remember which media type belongs to each oneof the specified Insert and Eject Areas, because you will need thisdata later for configuring Insert/Eject Areas for the Data Protectorlibrary.
• A list of UNIX device files for the drives, if you want to install a Media Agenton a UNIX system.Run the ioscan -fn system command on your system to display the requiredinformation.For more information on UNIX device files, see “Connecting a backup deviceto HP-UX systems” on page 100.
• A list of SCSI addresses for the drives, if you want to install a Media Agenton a Windows system. For example, scsi4:0:1:0.
Installing Data Protector on your network126
For more information on SCSI addresses, see “Connecting a backup deviceto Windows systems” on page 95.
Installation
The installation procedure consists of the following steps:
1. Distribute a Media Agent component to clients, using the Data Protector graphicaluser interface and Installation Server. See “Remote installation of Data Protectorclients” on page 81 in this chapter.
2. Install the ADIC/GRAU library:
• On a Windows system, do the following:a. Copy the aci.dll, winrpc32.dll and ezrpc32.dll libraries to
the Data_Protector_home\bin directory. (These three libraries arepart of the DAS client software shipped with the ADIC/GRAU library.They can be found either on the installation media or in theC:\DAS\AMU\ directory on the AMU-PC.)
b. Copy these three files to the %SystemRoot%\system32 directory aswell.
c. Copy Portinst and Portmapper service to the DAS client. (Theserequirements are part of the DAS client software shipped with theADIC/GRAU library. They can be found on the installation media.)
d. In the Control Panel, go to Administrative Tools, Servicesand start portinst to install portmapper. The DAS client needs tobe restarted to run the portmapper service.
e. After rebooting the system, check if portmapper and both rpcservices are running (in the Control Panel, go to Administrative Tools,Services and check the status of the services.
• On an HP-UX system, copy the libaci.sl shared library into the/opt/omni/lib directory. You must have permissions to access thisdirectory. Make sure that the shared library has read and execute permissionsfor everyone (root, group and others). The libaci.sl shared library is partof the DAS client software shipped with the ADIC/GRAU library. It can befound on the installation media.
• On an AIX system, copy the libaci.o shared library into the/usr/omni/lib directory. You must have permissions to access thisdirectory. Make sure that the shared library has read and execute permissionsfor everyone (root, group and others). The libaci.o shared library is partof the DAS client software shipped with the ADIC/GRAU library. It can befound on the installation media.
Installation and licensing guide 127

At this stage, you should have your hardware connected and your DAS softwareproperly installed.
Run the following command to check whether the library drives are properly connectedto your system:
• On Windows: Data_Protector_home\bin\devbra -dev
• On HP-UX: /opt/omni/lbin/devbra -dev
• On AIX: /usr/omni/bin/devbra -dev
You should see the library drives with corresponding device files displayed in thelist.
What’s next?
Once a Media Agent is installed and the ADIC/GRAU library is physically connectedto the system, refer to the online Help index: “configuring, backup devices” forinformation about additional configuration tasks, such as configuring backup devicesand media pools.
Preparing Data Protector clients to use the StorageTek LibraryThe following prerequisites for installation must be met before installing a MediaAgent:
• The StorageTek library must be configured and running. See the documentationthat comes with the StorageTek library.
• Data Protector must be installed and configured. See “Installing the Data ProtectorCell Manager (CM) and Installation Server(s) (IS)” on page 46.
• The following information must be obtained before you start installing a MediaAgent software:• The hostname of the host where ACSLS is running.• A list of ACS drive IDs that you want to use with Data Protector. The obtained
drive IDs are to be used when configuring the StorageTek drives in DataProtector. To display the list, log in on the host where ACSLS is running andexecute the following command:rlogin “ACSLS hostname” -l acssa
You will have to enter the terminal type and wait for the command prompt.At the ACSSA prompt, enter the following command:ACSSA> query drive all
The format specification of an ACS drive must be the following:ACS DRIVE: ID:#,#,#,# - (ACS num, LSM num, PANEL, DRIVE)
Installing Data Protector on your network128

• A list of available ACS CAP IDs and the ACS CAP format specification. Todisplay the list, login on the host where ACSLS is running and execute thefollowing command:rlogin “ACSLS hostname” -l acssa
Enter the terminal type and wait for the command prompt. At the ACSSAprompt, enter the following command:ACSSA> query cap all
The format specification of an ACS CAP must be the following:ACS CAP: ID:#,#,# - (ACS num, LSM num, CAP num)
• A list of UNIX device files for the drives, if you want to install a Media Agenton a UNIX system.Run the ioscan -fn system command on your system to display the requiredinformation.For more information on UNIX device files, see “Connecting a backup deviceto HP-UX systems” on page 100.
• A list of SCSI addresses for the drives, if you want to install a Media Agenton a Windows system. For example, scsi4:0:1:0.For more information on SCSI addresses, refer to “Connecting a backup deviceto Windows systems” on page 95.
• Make sure that the drives that will be used for Data Protector are in the onlinestate. If a drive is not in the online state, change the state with the followingcommand on the ACSLS host: vary drive drive_id online
• Make sure that the CAPs that will be used for Data Protector are in the stateonline and in manual operating mode.If a CAP is not in the online state, change the state using the following command:vary cap cap_id online
If a CAP is not in manual operating mode, change the mode using the followingcommand: set cap manual cap_id
Installing a Media Agent to use the StorageTek LibraryThe installation procedure consists of the following steps:
1. Distribute a Media Agent component to clients using the Data Protector graphicaluser interface and Installation Server for UNIX. See “Remote installation of DataProtector clients” on page 81 in this chapter.
Installation and licensing guide 129

2. Start the ACS ssi daemon for every ACS client:• On HP-UX, Solaris, and Linux ACS clients, run the following command:
/opt/omni/acs/ssi.sh start ACS_LS_hostname
• On Windows ACS clients, install the LibAttach service. Refer to the ACSdocumentation for details. Make sure that during the configuration ofLibAttach service the appropriate ACSLS hostname is entered. Aftersuccessful configuration, the LibAttach services are started automaticallyand will be started automatically after every reboot as well.
• On AIX ACS clients, run the following command:/usr/omni/acs/ssi.sh start ACS_LS_hostname
NOTE:After you have installed the LibAttach service, check if thelibattach\bin directory has been added to the system pathautomatically. If not, add it manually.
For more information on the LibAttach service, see the documentation thatcomes with the StorageTek library.
3. Run the following command to check whether or not the library drives areproperly connected to your system:
• On HP-UX, Solaris, and Linux ACS client: /opt/omni/lbin/devbra-dev
• On Windows ACS client: Data_Protector_home\bin\devbra -dev
• On AIX ACS client: /usr/omni/bin/devbra -dev
You should see the library drives with corresponding device files/SCSI addressesdisplayed in the list.
What’s next?
Once a Media Agent is installed and the StorageTek library is physically connectedto the system, refer to the online Help index: “configuring, backup devices” forinformation about additional configuration tasks, such as configuring backup devicesand media pools.
Installing Data Protector on your network130

Local installation of the Novell NetWare clientsThe installation procedure of the Novell NetWare clients has to be performed froma supported Windows system that is connected to the Novell network.
You can install the Data Protector Disk Agent and General Media Agent on thesystems running Novell NetWare. For information on Data Protector components,refer to “Data Protector components” on page 77.
Refer to the HP Data Protector product announcements, software notes, and referencesfor details about supported devices, Novell NetWare platform versions, as well asfor known problems and workarounds.
Prerequisites
Before you install Data Protector on the Novell NetWare platform, check the following:
• For system requirements, disk space requirements, supported platforms, and DataProtector components, refer to the HP Data Protector product announcements,software notes, and references.
• Make sure the TCP/IP transport protocol is installed and functional.• Make sure that one of the following services is running on the Windows system:
• A Gateway Service for Novell NetWare.This service should run on Windows when an installation is executed from theWindows Server.
• A Novell Client for Windows or a Microsoft Client Service for NetWare.This service should run on the Windows when an installation is executed fromthe Windows workstation.
• Log in to the target NetWare server (or the appropriate NDS/eDirectory tree)from the Windows system.
• Ensure that you have supervisor rights for the SYS: volume on the target NetWareserver.
• Make sure that you have at least one local device name free on your Windowssystem.
Cluster-aware clients
Additional prerequisites are required for installing cluster-aware clients. Refer to“Installing a client” on page 210 for more details.
Installation and licensing guide 131

Installation
The installation procedure can be performed from the Data Protector WindowsDVD-ROM. Note that the Novell NetWare installation is not a part of the InstallationServer functionality.
To install Data Protector on the Novell NetWare server, proceed as follows:
1. Run a command prompt on your Windows system and change the current pathto the DVD-ROM root directory
Installing Data Protector on your network132

2. Run the installation script.
To install the Data Protector Novell NetWare client, change the current path tothe NetWare directory and type:
NWInstall target server name ALL|DA|MA port_number
The second parameter defines which part of the Data Protector Novell Clientwill be installed:
• Type ALL to install the whole Data Protector Novell NetWare clientfunctionality.
• Type DA to install only the Data Protector Disk Agent for Novell NetWare.• Type MA to install only the Data Protector General Media Agent for Novell
NetWare.
NOTE:For the Data Protector installation on each Novell NetWare version, theport number is optional. If it is not specified, the default port 5555 will beused.
If your Novell NetWare OS version is not supported by Data Protector, theinstallation is still possible but you receive a corresponding warning.
The installation now verifies whether Data Protector files are already present onthe target server. If so, the old Data Protector installation will be moved to theSYS:\usr\Omni.old directory.
Depending on the installed NetWare client version, check whetherOMNIINET.NLM, HPINET.NLM or HPBRAND.NLM is running on the server. Ifone of these programs is running, unload it by typing the following commandat the Novell NetWare console:
UNLOAD HPINET (UNLOAD OMNIINET / UNLOAD HPBRAND)
The installation automatically creates a Data Protector directory structure andcopies all Data Protector files to the target server.
Installation and licensing guide 133

3. Make sure that you have loaded the following modules on your system:• NETDB.NLM
• TSAFS.NLM
• TSANDS.NLM
This way you enable the loader to resolve public symbols while trying to loadHPINET.NLM.
If you have configured Novell NetWare Cluster Services on your Novell NetWare6.x system, make sure that you have loaded the NCSSDK.NLM module.
4. To load HPINET.NLM, type at the Novell NetWare console:
SEARCH ADD SYS:USR\OMNI\BIN
LOAD HPINET.NLM
NOTE:When not using the default port number 5555, specify the port number byadding the -port port_number option to the LOAD command. Forexample:LOAD HPINET.NLM -port port_number
To enable automatic recognition of the Data Protector Cell Manager by theNovell NetWare server, the installation will automatically add the consolecommands to the AUTOEXEC.NCF file, so that the HPINET.NLM file is alwaysloaded and ready to connect to the Data Protector Cell Manager.
NOTE:You should verify your AUTOEXEC.NCF file after the installation is finished. If thenecessary console commands were not added to the AUTOEXEC.NCF file duringinstallation, you have to add them manually.
To enable backup and restore of the NDS/eDirectory database, complete thefollowing steps:
1. Define the user account to be used when performing backup and restore ofNDS/eDirectory.
Installing Data Protector on your network134
2. From the Novell NetWare console, load the HPLOGIN.NLM module:
LOAD HPLOGIN.NLM
3. Provide the following user information to the HPLOGIN.NLM file to enablesuccessful login to the NDS/eDirectory database:
• NDS/eDirectory Context:The context describes the container where the user objects reside. Thecontainer name must be a fully distinguished name syntax. For example:OU=SDM.0=HSL
• NDS/eDirectory Object Name:This is the Common Name of the user object that will be used as a validNDS/eDirectory user for logging in to the NDS/eDirectory database whenData Protector Disk Agent performs backup or restore of the NDS/eDirectory.The selected user must be located in the previously applied context. Forexample:CN=MarcJ
if the selected user’s fully distinguished name has.CN=MarcJ.OU=SDM.O=HSL syntax.
• NDS/eDirectory Object Password:A valid user password that is used with the user name for logging in to theNDS/eDirectory database when a backup or restore of the NDS/eDirectorydatabase is started.User information entered in the HPLOGIN module is encoded and stored tothe SYS:SYSTEM directory. It is also used in conjunction with NovellNetWare SMS modules that must be loaded and functional.
NOTE:The user account selected in the HPLOGIN module must have permissionsto perform backup and restore of the NDS/eDirectory database.If changes are made on the NDS/eDirectory used object (moved to anothercontainer, deleted, renamed, changed password), the information encodedin the SYS:SYSTEM directory must be updated in the HPLOGIN module.
Installation and licensing guide 135

4. To back up and restore NDS/eDirectory with Novell NetWare StorageManagement Services(SMS), the SMDR.NLM and TSANDS.NLM modules mustbe loaded on at least one server in the NDS/eDirectory tree. You candownload the latest versions of TSANDS.NLM and SMDR.NLM from the Web athttp://support.novell.com/filefinder/.
The installation automatically adds the LOAD TSANDS.NLM line to theAUTOEXEC.NCF file, so the Novell NetWare server can immediately recognizeTSANDS.NLM. The Novell NetWare SMS module SMDR.NLM is loaded as soonas TSANDS.NLM is loaded.
NOTE:If the installation did not add console commands to the AUTOEXEC.NCF file, you shoulddo it manually.
TIP:To minimize network traffic during the backup process, load the modules on the servercontaining a replica of the largest NDS/eDirectory partition.
Now you have fulfilled the requirements for the backup and restore ofNDS/eDirectory. Refer to the online Help index: “configuring” for instructionsabout additional configuration tasks.
Media Agent configuration
At this stage, all Data Protector components are already installed. However, if youselected ALL or the MA parameter at the beginning of the installation procedure,you have to perform a few additional configuration tasks to enable the Data ProtectorGeneral Media Agent to use backup devices connected to the Novell NetWareserver.
Data Protector supports the Adaptec SCSI host adapter controller and itscorresponding .HAM driver. The Data Protector Media Agent can directly communicatewith the .HAM driver in order to access the SCSI host adapter. Therefore, you needto have the SCSI host adapter driver installed. For example, you can download thelatest versions of Adaptec drivers from http://www.adaptec.com.
The driver can be loaded automatically whenever the server is restarted if you adda LOAD command to the STARTUP.NCF file. The command must specify the location
Installing Data Protector on your network136
of the driver, any available options, and the slot number. See the Adaptec DriverUser’s Guide for the list of available options and calculation of the slot number.
Example
To automatically load the AHA-2940 Adaptec driver on the Novell NetWare 6.xserver whenever the server is restarted, add the following lines to the STARTUP.NCFfile:
SET RESERVED BUFFERS BELOW 16 MEG=200
LOAD AHA2940.HAM SLOT=4 lun_enable=03
where SLOT defines the location of the host adapter device and the lun_enablemask enables scanning for specific LUNs on all targets.
A scan for every LUN is enabled for all SCSI addresses by 1 in its corresponding bitposition. For example, lun_enable=03 enables scanning for LUNs 0 and 1 on alltargets.
NOTE:lun_enable is required only if you use devices which have SCSI LUNs higher than 0.For example, when you configure an HP StorageWorks Tape 12000e library device.
TIP:To automatically scan for all devices connected to the Novell NetWare server and theirLUNs whenever the server is restarted, add the following lines to the AUTOEXEC.NCFfile:SCAN FOR NEW DEVICES
SCAN ALL LUNS
The General Media Agent configuration is now complete.
What’s next?
Once you have the General Media Agent software successfully installed on the NovellNetWare platform, it is advisable to check the Data Protector General Media Agentinstallation. See “Checking the General Media Agent Installation on NovellNetWare” on page 449.
Installation and licensing guide 137

As soon as you have verified the installation, you are ready to import the NovellNetWare client to the Data Protector cell using the Data Protector graphical userinterface. Refer to the online Help index: “Novell NetWare” for information onadditional configuration tasks.
Local installation of HP OpenVMS clientsThe installation procedure for OpenVMS clients has to be performed locally on asupported OpenVMS system. Remote installation is not supported.
You can install the Data Protector Disk Agent, General Media Agent, and the UserInterface (command-line interface only) on systems running OpenVMS 7.3-2/IA648.2-1. You can also install the Oracle Integration component on systems runningOpenVMS 7.3-2 or above. For information on Data Protector components, refer to“Data Protector components” on page 77.
Refer to the HP Data Protector product announcements, software notes, and referencesfor information on supported devices, OpenVMS platform versions, as well as forlimitations, known problems and workarounds.
For more OpenVMS specific information, see the OpenVMS Release Notes locatedin the default help document directory on OpenVMS, for example:SYS$COMMON:[SYSHLP]DPA0610.RELEASE_NOTES.
Prerequisites
Before you install a Data Protector client on the OpenVMS platform, check thefollowing:
• Make sure the HP TCP/IP transport protocol is installed and running.• Set the TIMEZONE features of your system by executing the command
SYS$MANAGER:UTC$TIME_SETUP.COM.• Log in to the SYSTEM account of the OpenVMS system. Note that you must have
appropriate permissions.• Make sure that you have access to the Data Protector installation DVD-ROM
containing the OpenVMS client installation package.
Installation
The installation procedure can be performed from the Data Protector Windowsinstallation DVD-ROM. Note that the OpenVMS installation is not a part of theInstallation Server functionality.
To install a Data Protector client on an OpenVMS system, proceed as follows:
Installing Data Protector on your network138

1. If you already have the PCSI installation file go to step Step 2 on page 139. Toget the PCSI installation file, mount the installation DVD on an OpenVMS Serverand copy it to the desired location. You may also ftp the PCSI file from aWindows system.
2. Run the following command:
$ PRODUCT INSTALL DP /SOURCE=device:[directory]
where device:[directory] is the location of the .PCSI installation file.
3. Verify the version of the kit by responding YES to the prompt:
The following product has been selected: HP AXPVMS DPA06.10-xx Layered Product Do you want to continue? [YES]
Installation and licensing guide 139

4. Choose the software components you wish to install. You may take the defaultsand the Disk Agent, General Media Agent, and User Interface will be installed.You may also select each component individually.
You will be asked to choose options, if any, for each selected product and forany product that may be installed to satisfy software dependency requirements.
Example
HP IA64VMS DP A6.10-xx: HP OpenVMS IA64 Data ProtectorV6.10
COPYRIGHT HEWLETT-PACKARD COMPANY 2007
Do you want the defaults for all options? [YES] NO
Do you wish to install Disk Agent for this client node?
[YES] YES
Do you wish to install Media Agent for this client node?
[YES] YES
Do you wish to install Command Language Interface for thisclient node?
[YES] YES
Do you wish to install Oracle Integration Agent for thisclient node?
[YES] YES
Do you want to review the options?
[NO] YES
HP IA64VMS DP A6.10-xx: HP OpenVMS IA64 Data ProtectorV6.10 [Installed]
Do you wish to install Disk Agent for this client node?
YES
Do you wish to install Media Agent for this client node?
YES
Do you wish to install Command Language Interface for thisclient node?
Installing Data Protector on your network140

YES
Do you wish to install Oracle Integration Agent for thisclient node?
[YES] YES
Are you satisfied with these options?
[YES] YES
The default and only location for the Data Protector directories and files is:
SYS$SYSDEVICE:[VMS$COMMON.OMNI]
The directory structure will be created automatically and the files will be placedin this directory tree.
The Data Protector startup and shutdown command procedures will be placedin
SYS$SYSDEVICE:[VMS$COMMON.SYS$STARTUP]
There are four files that are always present for an OpenVMS client and a fifthfile that only exists if you chose the CLI option. The five files concerned are:
• SYS$STARTUP:OMNI$STARTUP.COM This is the command procedure thatstarts Data Protector on this node.
• SYS$STARTUP:OMNI$SYSTARTUP.COM This is the command procedurethat defines the OMNI$ROOT logical name. Any other logical names requiredby this client may be added to this command procedure.
• SYS$STARTUP:OMNI$SHUTDOWN.COM This is the command procedure thatshuts down Data Protector on this node.
• OMNI$ROOT:[BIN]OMNI$STARTUP_INET.COM This is the commandprocedure that is used to start the TCP/IP INET process, which thenexecutes the commands sent by the Cell Manager.
• OMNI$ROOT:[BIN]OMNI$CLI_SETUP.COM This is the command procedurethat defines the symbols needed to invoke the Data Protector CLI. It will onlyexist on the system if you chose the CLI option during installation.Execute this command procedure from the login.com procedures for allusers who will use the CLI interface. Several logical names are defined inthis procedure which are necessary to execute the CLI commands correctly.
5. Insert the following line in SYS$MANAGER:SYSTARTUP_VMS.COM:
@sys$startup:omni$startup.com
Installation and licensing guide 141

6. Insert the following line in SYS$MANAGER:SYSHUTDWN.COM:
@sys$startup:omni$shutdown.com
7. Ensure that you can connect from the OpenVMS client to all possible TCP/IPaliases for the Cell Manager.
8. Import the OpenVMS client to the Data Protector cell using the Data Protectorgraphical user interface as described in “Importing clients to a cell ” on page 213.
An account with the name OMNIADMIN gets created during the installation. TheOMNI service runs under this account.
The login directory for this account is OMNI$ROOT:[LOG] and it holds the log fileOMNI$STARTUP_INET.LOG for each startup of a Data Protector component. Thislog file contains the name of the process executing the request, the name of DataProtector image used and the options for the request.
Any unexpected errors are logged in the DEBUG.LOG in this directory.
NOTE:On OpenVMS 8.3 and above, the Data Protector installation displays the followingmessage:
%PCSI-I-CANNOTVAL, cannot validate [PATH]HP-AXPVMS-DP-A0610-XXX-1.PCSI;1
-PCSI-I-NOTSIGNED, product kit is not signed and therefore hasno manifest file
To avoid the warning being issued, run the product install command using/OPTION=NOVALIDATE_KIT.
Installation in a cluster environment
If you use a common system disk, the client software needs to be installed only once.However, the OMNI$STARTUP.COM procedure needs to be executed for each nodeto be usable as a Data Protector client. If you do not use a common system disk theclient software needs to be installed on each client.
If you use a cluster TCP/IP alias name, you can define a client for the alias name aswell if you are using a cluster common system disk. With the alias client defined youdo not have to configure the individual client nodes. You can choose either clientdefinition or alias definition to run your backups and restores in a cluster. Depending
Installing Data Protector on your network142

on your configuration, the save or restore may or may not use a direct path to yourtape device or tape library.
Disk Agent configuration
The Data Protector Disk Agent on OpenVMS supports mounted FILES-11 ODS-2and ODS-5 disk volumes. There is no need to configure the OpenVMS Disk Agent.There are, however, some points to bear in mind when setting up a backupspecification that will use it. These are described below:
• The file specifications entered into the GUI or passed to the CLI must be in UNIXstyle syntax, for instance:/disk/directory1/directory2/.../filename.ext.n
• The string must begin with a slash, followed by the disk, directories andfilename, separated by slashes.
• Do not place a colon after the disk name.• A period should be used before the version number instead of a semi-colon.• File specifications for OpenVMS files are case-insensitive, except for the files
residing on ODS-5 disks.
Example
An OpenVMS file specification of:
$1$DGA100:[USERS.DOE]LOGIN.COM;1
must be specified to Data Protector in the form:
/$1$DGA100/USERS/DOE/LOGIN.COM.1
NOTE:There is no implicit version number. You must always specify a version number and onlythe file version specified for the backup will be backed up.For some options which allow wildcards the version number can be replaced with anasterisk '*'.
If you want to include all versions of the file in a backup, you must select them all in theGUI or, in the CLI, include the file specifications under the -only option, using wildcardsfor the version number, as follows:/DKA1/dir1/filename.txt.*
Installation and licensing guide 143

Media Agent configuration
You should configure devices on your OpenVMS system using OpenVMS andhardware documentation as a guide. The pseudo devices for the tape library mustbe created first using SYSMAN, as follows:
$ RUN SYS$SYSTEM:SYSMAN
SYSMAN> IO CONNECT gcan/NOADAPTER/DRIVER=SYS$GcDRIVER
where:
• c = K for direct connected SCSI tape libraries.• a = A,B,C, …the adapter character for the SCSI controller.• n = the unit number of the tape library’s robotic control device.
NOTE:This command sequence must be executed after a system boot.
For SAN attached tape libraries the tape drives and robot device name should showup automatically under OpenVMS once the SAN devices have been configuredaccording to SAN guidelines.
If you are installing tape jukeboxes for use with Data Protector, you should verify thatthe hardware is working correctly before configuring it within Data Protector. Youmay use the Media Robot Utility (MRU), available from Hewlett-Packard, to verify thehardware.
NOTE:You can generally use the Data Protector GUI to manually configure or auto-configurethese devices.However, certain older tape libraries and all tape libraries connected to HSx controllerscannot be auto-configured. Use manual configuration methods to add these devices toData Protector.
Media Agent in a cluster
When dealing with devices attached to cluster systems:
1. Configure each tape device and tape library so that it can be accessed fromeach node.
Installing Data Protector on your network144

2. Add the node name to the end of the device name to differentiate between thedevices.
3. For tape devices, set a common Device Lock Name underDevices/Properties/Settings/Advanced/Other.
Example
In a cluster with nodes A and B, a TZ89 is connected to node A and MSCP servedto node B. Configure a device named TZ89_A, with node A as the client andconfigure a device named TZ89_B, with node B as the client. Both devices get acommon device lock name of TZ89. Now Data Protector can use the devices viaeither path, knowing that this is actually only one device. If you run a backup onnode B using TZ89_A, Data Protector moves the data from node B to the device onnode A. If you run a backup on node B using TZ89_B the OpenVMS MSCP servermoves the data from node B to the device on node A.
NOTE:For MSCP served tape devices in a cluster, for all tape devices connected via an HSxcontroller and for all tape devices connected via Fibre Channel, follow the guidelines forSAN configurations in the online Help index: “SAN, configuring devices in”.
Command-line interface
Before you can use the Data Protector command-line interface on OpenVMS youmust run the CLI command setup procedure, as follows:
$ @OMNI$ROOT:[BIN]OMNI$CLI_SETUP.COM See theHP Data Protector commandline interface reference for a description of the available CLI commands.
Oracle integration
After you installed the Oracle integration and configured it as described in the HPData Protector integration guide for Oracle and SAP, verify that the -key Oracle8entry is present in OMNI$ROOT:[CONFIG.CLIENT]omni_info, for example:
-key oracle8 -desc “Oracle Integration” -nlsset 159 -nlsId12172 -flags 0x7 -ntpath ““ -uxpath ““ -version A.06.10
If the entry is not present, copy it fromOMNI$ROOT:[CONFIG.CLIENT]omni_format. Otherwise, the Oracle integrationwill not be shown as installed on the OpenVMS client.
Installation and licensing guide 145
What’s next?
Refer to the online Help index: “HP OpenVMS” for information on additionalconfiguration tasks.
Installing MPE/iX clientsRefer to the HP Data Protector MPE/iX system user guide for detailed information. Ifthe documentation package is installed on your system (on HP-UX, Solaris, Linux orWindows), the guide is available as MPE_user.pdf inData_Protector_home\Docs (on Windows), /opt/omni/doc/C/ (on UNIX),or on the Data Protector Windows installation DVD-ROM in the docs directory.
Before starting the installation procedure, decide which components you need toinstall on your client system. For the list of the Data Protector software componentsand their descriptions, see “Data Protector components” on page 77.
Refer to the HP Data Protector product announcements, software notes, and referencesfor information about supported devices, MPE/iX platform versions, and Data Protectorcomponents.
Prerequisites
Before you install Data Protector on the MPE/iX platform, check the following:
• TurboSTORE/iX or TurboSTORE/iX 7x24 True-Online is installed on your computer.• The TCP/IP protocol is installed and configured.• The name resolving mechanism (DNS of host files) is enabled.• For disk space requirements refer to the HP Data Protector product announcements,
software notes, and references.
Installation
To install Data Protector on the MPE/iX server, proceed as follows:
Installing Data Protector on your network146

1. Transfer installDP6.10_MPE.sh and the DP61_MPE6.5.tar package, orDP61_MPE7.0.tar package (depending on the MPE/iX OS version) to the/tmp directory, using the ftp utility. See Example 1 on page 147.
It is important that you transfer the installDP6.10_MPE.sh file with thefollowing characteristics:• Record size: -150• Block factor: -empty• Variable length of the records of the file: V• Type of coded records: ASCII
Example 1. Transfer of the install DP6.10_MPE.sh script andDP10_MPE6.5.tar package
Installation and licensing guide 147

2. Log in to the target system and start the unpacking process, as shown in thefollowing example:
Example 2. Unpacking process on target system
After this operation, the files are located in the /usr/omni directory.
NOTE:Use EDIT/3000 (invoked with the editor command) to change the filesbelow. Refer to EDIT/3000 Reference Manual for more information.
3. Add the following line to the DCNF.NET.SYS file:
omni stream tcp nowait MANAGER.SYS /usr/omni/bin/inet inet-log /tmp/inet.log
4. Add the following line to the SERVICES.NET.SYS file:
omni 5555/tcp #Data Protector inet
Installing Data Protector on your network148

5. Restart inetd to update the configuration with the new settings.
Refer to the Configuring and Managing MPE/iX Internet Services manual formore information.
6. To check if the Data Protector Inet is running, telnet port 5555 from adifferent system:
telnet hostname 5555
You will get a message from Data Protector. If there is no response in 10 seconds,check the INETDCNF.NET.SYS and SERVICES.NET.SYS files.
7. Import the system to the Data Protector cell. For the procedure, refer to “Importingclients to a cell ” on page 213.
8. When the client system is successfully imported, add the MANAGER.SYS user tothe Data Protector Admin user group.
For more information on MPE/iX clients, refer to the HP Data Protector MPE/iX systemuser guide, which is located on the Windows installation DVD-ROM at\Docs\MPE_user.pdf.
Local installation of UNIX clientsIf you do not have an Installation Server for UNIX installed on your network, or if forsome reason you cannot remotely install a client system, Data Protector clients canbe installed locally from the UNIX installation DVD-ROM.
Before starting the installation procedure, decide which components you need toinstall on your client system. For the list of the Data Protector software componentsand their descriptions, see “Data Protector components” on page 77.
Prerequisites
• For system requirements, disk space requirements, supported platforms, processors,and Data Protector components, refer to the HP Data Protector productannouncements, software notes, and references.
• You must have root permissions on every target system.
A POSIX shell (sh) is required for the installation.
Installation and licensing guide 149

NOTE:You can also use the following procedure to upgrade the UNIX clients locally. The scriptwill detect a previous installation and will prompt you to perform the upgrade.
Procedure
Follow the procedure below to install UNIX clients locally:
1. Insert and mount the UNIX installation DVD-ROM.
2. From the Mount_Point/LOCAL_INSTALL directory run the omnisetup.shcommand. The syntax of the command is as follows:
omnisetup.sh [-source directory] [-server name] [-installcomponent_list]
where:
• directory is the location where the installation DVD-ROM is mounted. Ifnot specified, the current directory is used.
• name is a full hostname of the Cell Manager of the cell to which you wantto import the client. If not specified, the client will not be automaticallyimported to the cell.
NOTE:In case of upgrading the client that does not reside on the Cell Manager, youdo not need to specify -install component_list. In this case, the setupwill select the same components that were installed on the system before theupgrade without issuing a prompt.However, to upgrade the client components residing on the Cell Manager, runthe omnisetup.sh command with the -install component_listparameter after the Cell Manager upgrade has been completed.
Installing Data Protector on your network150

• component_list is a comma-separated list of component codes to beinstalled. No spaces are allowed. If the -install parameter is not specified,Setup will prompt you separately about installing each available componenton the system.
NOTE:In case of upgrading the client, if you do not specify the -install parameter,Setup will select the same components that were installed on the system beforethe upgrade started, without issuing a prompt.
The list of the components is presented in the table below. The exact list ofthe components is subject to the availability on the particular system. For thedescription of the components, see “Data Protector components” on page 77.
Installation and licensing guide 151

Table 7 Data Protector component codes
ComponentComponent code
User Interfacecc
Disk Agentda
General Media Agentma
NDMP Media Agentndmp
Informix Integrationinformix
Lotus Integrationlotus
Oracle Integrationoracle
VMware Integrationvmware
HP Network Node Managerov
Sybase Integrationsybase
SAP R/3 Integrationsap
SAP DB Integrationsapdb
DB2 Integrationdb2
EMC Symmetrix Agentemc
HP StorageWorks Disk Array XP Agentssea
HP StorageWorks VA Agentsnapa
HP StorageWorks EVA SMIS-S Agentsmisa
VLS Automigrationvls_am
English Language Documentation andonline Helpdocs
Installing Data Protector on your network152

ComponentComponent code
Java Graphical User Interfacejavagui
French Language Supportfra_ls
Japanese Language Supportjpn_ls
Example
The example below shows how you can install the Disk Agent, GeneralMedia Agent, User Interface, and Informix components on a clientthat will be automatically imported to the cell with the Cell Managercomputer.company.com:
./omnisetup.sh -server computer.company.com -installda,ma,cc,informix
3. Setup informs you if the installation was completed and if the client was importedto the Data Protector cell.
The CORE component is installed the first time any software component is selectedfor installation.
The CORE-INTEG component is installed the first time any integration softwarecomponent is selected for installation or reinstallation.
Running the installation from the hard disk
To copy the installation DVD-ROM to your computer and run the installation/upgradeof UNIX clients from the hard disk, copy at least the DP_DEPOT directory and theLOCAL_INSTALL/omnisetup.sh command. For example, if you copy installationpackages to /var/dp61, DP_DEPOT must be a subdirectory of /var/dp61:
# pwd
/var/dp61
# ls
DP_DEPOT
omnisetup.sh
After you have copied this to the hard disk, you can run:
Installation and licensing guide 153

omnisetup.sh -source directory [-server name] [-installcomponent_list]
Note, that the -source option is required. For example:
./omnisetup.sh -source /var/dp61
What’s next?
If you did not specify the name of the Cell Manager during the installation, the clientwill not be imported to the cell. In this case, you should import it using the DataProtector graphical user interface. For the procedure, refer to “Importing clients to acell ” on page 213. See the online Help for information on additional configurationtasks.
Installing the Data Protector integration clientsData Protector integrations are software components that allow you to run an onlinebackup of the database applications, such as Oracle or Microsoft Exchange, withData Protector. Data Protector ZDB integrations are software components that allowyou to run a ZDB using ZDB disk arrays, such as HP StorageWorks Enterprise VirtualArray.
The systems running database applications are called integration clients; the systemsusing ZDB disk arrays for backing up and storing data are called ZDB integrationclients. Such clients are installed with the same installation procedure as any otherclients on Windows or on UNIX, provided that the appropriate software componenthas been selected (for example, MS Exchange Integration component forbacking up the Microsoft Exchange Server database, HP StorageWorks EVASMI-S Agent component for a ZDB on HP StorageWorks Enterprise Virtual Array,and so on).
Prerequisites
• For system requirements, disk space requirements, supported platforms, processors,and Data Protector components, refer to the HP Data Protector productannouncements, software notes, and references.
• You need a license to use the Data Protector integration with a databaseapplication (except for the VSS integration). For information about licensing, see“Functional extensions” on page 362.
• At this point, you should have the Cell Manager and Installation Server (optionally,for remote installation) already installed on your network. See “Installing the Data
Installing Data Protector on your network154

Protector Cell Manager (CM) and Installation Server(s) (IS)” on page 46 forinstructions.
Before starting the installation procedure, decide which other Data Protector softwarecomponents you want to install on your client together with an integration component.For the list of the Data Protector software components and their descriptions, see“Data Protector components” on page 77.
Note that in the cases stated below you need to install the following Data Protectorcomponents:
• The Disk Agent component to be able to back up filesystem data with DataProtector. You can use the Disk Agent for the following purposes:• To run a filesystem backup of important data that cannot be backed up using
a database application backup.• To run a filesystem test backup of a database application server (for example,
Oracle Server or MS SQL Server). You need to test a filesystem backup beforeconfiguring the Data Protector integration with a database application andresolve communication and other problems related to the application andData Protector.
• To run disk image and filesystem ZDB.• To restore from backup media to the application system on LAN in case of
SAP R/3 ZDB integrations.
• The User Interface component to gain access to the Data Protector GUI andthe Data Protector CLI on the Data Protector integration client.
• The General Media Agent component if you have backup devices connectedto the Data Protector integration client. On Data Protector clients used to accessan NDMP dedicated drive through the NDMP Server, the NDMP Media Agentis required.
Integration clients can be installed locally from the Windows or UNIX InstallationServer installation DVD-ROM, or remotely using the Installation Server for Windowsor for UNIX.
For additional information on specific integration clients, refer to the correspondingsections below:
• “Microsoft Exchange Server clients” on page 157• “Microsoft SQL Server clients” on page 158• “Microsoft SharePoint Portal Server Clients” on page 158• “Sybase clients” on page 158• “Informix Server clients” on page 159• “SAP R/3 clients” on page 159
Installation and licensing guide 155

• “SAP DB/MaxDB clients” on page 160• “Oracle clients” on page 160• “VMware Virtual Infrastructure clients” on page 161• “DB2 clients” on page 161• “NNM clients” on page 162• “NDMP clients” on page 162• “Microsoft Volume Shadow Copy Service clients” on page 162• “Lotus Notes/Domino Server clients” on page 162• “EMC Symmetrix integration” on page 163• “HP StorageWorks Disk Array XP integration” on page 168• “HP StorageWorks Virtual Array integration” on page 175• “HP StorageWorks Enterprise Virtual Array integration” on page 181• “IAP clients” on page 187• “VLS automigration clients” on page 189
When you have finished installing Data Protector integration software to Data Protectorintegration clients as described in the listed sections, refer to the appropriate HP DataProtector integration guide, HP Data Protector zero downtime backup administrator'sguide, or to the HP Data Protector zero downtime backup integration guide toconfigure Data Protector integration clients.
Local installationIf you do not have an Installation Server for the respective operating system installedin your environment, you have to perform local installation from the Windows orUNIX installation DVD-ROM depending on the platform you install a client to. See“Installing Windows clients” on page 90 or “Local installation of UNIXclients” on page 149 for instructions.
If you do not choose a Cell Manager during the installation, the client system has tobe manually imported into the cell after the local installation. See also “Importingclients to a cell ” on page 213.
Remote installationYou install the client software from the Installation Server to clients using the DataProtector graphical user interface. For the step-by-step procedure for remotely installingthe software, refer to “Remote installation of Data Protector clients” on page 81.
Installing Data Protector on your network156

After the remote installation, the client system automatically becomes a member ofthe Data Protector cell.
Installing cluster-aware integrationsThe Data Protector cluster-aware integration clients must be installed locally, from theDVD-ROM, on each cluster node. During the local client setup, install, in addition tothe other client software components, the appropriate integration software components(such as Oracle Integration or HP StorageWorks EVA SMI-S Agent).
You can also install a cluster-aware database application and a ZDB Agent on theData Protector Cell Manager. Select the appropriate integration software componentduring the Cell Manager setup.
The installation procedure depends on a cluster environment where you install yourintegration client. See the clustering related sections corresponding to your operatingsystem:
• “Installing Data Protector on MC/ServiceGuard” on page 195.• “Installing Data Protector on Microsoft Cluster Server” on page 196.• “Installing Data Protector clients on a Veritas Cluster” on page 209.• “Installing Data Protector clients on a Novell NetWare Cluster” on page 210.• “Installing Data Protector on IBM HACMP Cluster” on page 212.
For more information on clustering, refer to the online Help index: “cluster,MC/ServiceGuard” and HP Data Protector concepts guide.
What’s next?
When the installation has been completed, refer to the appropriate HP Data Protectorintegration guide for information on configuring the integration.
Microsoft Exchange Server clientsIt is assumed that your Microsoft Exchange Server is up and running.
To be able to back up the Microsoft Exchange Server database or individualmailboxes, you need to select the MS Exchange Integration component duringthe installation procedure.
The Microsoft Exchange Single Mailbox integration agent will be installed as partof the Data Protector Microsoft Exchange Server integration package.
On Microsoft Exchange Server 2007 systems, you need to install an additionalpackage to enable the functionality of the Data Protector Microsoft Exchange Single
Installation and licensing guide 157

Mailbox integration. The package is named Microsoft Exchange Server MAPI Clientand Collaboration Data Objects (ExchangeMapiCdo.EXE), and can be downloadedfree of charge from the Microsoft web site http://www.microsoft.com/downloads/Search.aspx?DisplayLang=en.
Microsoft SQL Server clientsIt is assumed that your Microsoft SQL Server is up and running.
To be able to back up the Microsoft SQL Server database, you need to select the MSSQL Integration component during the installation procedure.
On Microsoft SQL Server 2005 systems, a specific package is required to enablenormal operation of the Data Protector integration. The package must be installedbefore the MS SQL Server Integration component. You can install the packageusing either of the following actions:
• In the Microsoft SQL Server 2005 Setup Wizard, in the Feature Selection window,expand Client Components and select Legacy Components. Follow the SetupWizard to complete installation.
• From the Microsoft web site http://www.microsoft.com/downloads/details.aspx?familyid=D09C1D60-A13C-4479-9B91-9E8B9D835CDC&DisplayLang=en, download the package Microsoft SQL Server 2005 BackwardCompatibility Components and install it.
Microsoft SharePoint Portal Server ClientsIt is assumed that your Microsoft SharePoint Portal Server and the Microsoft SQLServer instances are up and running.
To be able to back up Microsoft SharePoint Portal Server objects, install the followingData Protector components:
• MS SharePoint Integration - on Microsoft SharePoint Portal Server systems• MS SQL Integration - on Microsoft SQL Server systems
Sybase clientsIt is assumed that your Sybase Backup Server is running.
For backing up the Sybase database, you need to select the following Data Protectorcomponent during the installation procedure:
• Sybase Integration - to be able to back up a Sybase database
Installing Data Protector on your network158

• Disk Agent - install the Disk Agent for two reasons:• To run a filesystem backup of Sybase Backup Server. Make this backup before
configuring your Data Protector Sybase integration and resolve all problemsrelated to Sybase Backup Server and Data Protector.
• To run a filesystem backup of important data that cannot be backed up usingSybase Backup Server.
Informix Server clientsIt is assumed that your Informix Server is up and running.
For backing up the Informix Server database, you need to select the following DataProtector component during the installation procedure:
• Informix Integration - to be able to back up an Informix Server database• Disk Agent - install the Disk Agent for two reasons:
• To run a filesystem backup of Informix Server. Make this backup beforeconfiguring your Data Protector Informix Server integration and resolve allproblems related to Informix Server and Data Protector.
• To run a filesystem backup of important Informix Server data (such as,ONCONFIG file, sqlhosts file, ON-Bar emergency boot file,oncfg_INFORMIXSERVER.SERVERNUM, configuration files, etc.) that cannotbe backed up using ON-Bar.
IBM HACMP ClusterIf Informix Server is installed in the IBM HACMP cluster environment, install theInformix Integration component on all the cluster nodes.
SAP R/3 clients
Prerequisites
• Ensure that the following Oracle software is installed and configured:• Oracle Enterprise Server (RDBMS)• Oracle Net8 software• SQL*Plus
• It is assumed that your SAP R/3 Database Server is up and running.
Installation and licensing guide 159

NOTE:The Data Protector SAP R/3 integration backup specifications are fully compatible withthe previous version of Data Protector. Data Protector will run all backup specificationscreated by earlier Data Protector versions. You cannot use backup specifications createdby the current version of Data Protector on older versions of Data Protector.
To be able to back up the SAP R/3 database, select the following components duringthe installation procedure:
• SAP R/3 Integration
• Disk Agent
Data Protector requires a Disk Agent to be installed on Backup Servers (clientswith filesystem data to be backed up).
SAP DB/MaxDB clientsIt is assumed that your SAP DB/MaxDB Server is up and running.
To be able to back up the SAP DB/MaxDB database, you need to select the followingData Protector components during the installation procedure:
• SAP DB Integration - to be able to run an integrated online backup of anSAP DB/MaxDB database
• Disk Agent - to be able to run a non-integrated offline backup of an SAPDB/MaxDB database
Oracle clientsIt is assumed that your Oracle Server is up and running.
To be able to back up the Oracle database, you need to select the OracleIntegration component during the installation procedure.
HP OpenVMS
On HP OpenVMS, after you installed the Oracle integration and configured it asdescribed in the HP Data Protector integration guide for Oracle and SAP, verify thatthe -key Oracle8 entry is present in OMNI$ROOT:[CONFIG.CLIENT]omni_info,for example:
Installing Data Protector on your network160
-key oracle8 -desc “Oracle Integration” -nlsset 159 -nlsId12172 -flags 0x7 -ntpath ““ -uxpath ““ -version A.06.10
If the entry is not present, copy it fromOMNI$ROOT:[CONFIG.CLIENT]omni_format. Otherwise, the Oracle integrationwill not be shown as installed on the OpenVMS client.
VMware Virtual Infrastructure clientsIt is assumed that VirtualCenter systems (if they exist) and ESX Server systems are upand running. To be able to install VMware clients remotely, first set OpenSSH. Fordetails, see the online Help index: “installing, client systems”.
Install the Data Protector VMware Integration component on the following clients:
• All ESX Server systems from which you plan to back up virtual machines• VirtualCenter systems (if they exist)• Backup proxy systems (if you plan to use the VCBfile and VCBimage backup
methods)• Windows systems (physical or virtual) to which you plan to restore filesystems of
virtual machines
Clusters
Install the VMware Integration component on both cluster nodes, regardless ofwhether you have ESX Server systems or VirtualCenter systems in a cluster.
DB2 clientsIt is assumed that your DB2 Server is up and running.
To be able to back up the DB2 database, you need to select the DB2 Integrationand the Disk Agent components during the installation procedure.
In a physically partitioned environment, install the DB2 Integration and DiskAgent components on every physical node (system) on which the database resides.
NOTE:Log in as user root to perform the installation.
Installation and licensing guide 161

NNM clientsIt is assumed that your NNM system is up and running.
To be able to back up the NNM database, you need to select the HP NNM BackupIntegration and the Disk Agent components during the installation procedure.You will need the Disk Agent to run pre-backup and post-backup scripts used forbackup purposes.
NDMP clientsIt is assumed that your NDMP Server is up and running.
During the installation procedure, select the NDMP Media Agent and install it toall Data Protector clients accessing the NDMP dedicated drives.
NOTE:If a Data Protector client will not be used to access an NDMP dedicated drive throughthe NDMP Server, but it will be used only to control the robotics of the library, either theNDMP Media Agent or the General Media Agent can be installed on such aclient.
Note that only one Media Agent can be installed on one Data Protector client.
Microsoft Volume Shadow Copy Service clientsTo perform backups of VSS writers (Microsoft Exchange Server and Microsoft SQLServer) or only filesystem backup using VSS, install the following Data Protectorsoftware components on both the application and backup systems or, in case of localbackup, on the application system only:
• MS Volume Shadow Copy Integration.• Depending on the disk array used, HP StorageWorks XP Agent or HP
StorageWorks EVA SMI-S Agent.• General Media Agent
Lotus Notes/Domino Server clientsIt is assumed that your Lotus Notes/Domino Server is up and running.
Installing Data Protector on your network162

To be able to back up the Lotus Notes/Domino Server database, you need to selectthe Lotus Integration and the Disk Agent components during the installationprocedure. You will need the Disk Agent component to be able to back upfilesystem data with Data Protector in the following purposes:
• Backing up important data that cannot be backed up using Lotus IntegrationAgent. These are so called non-database files, which need to be backed up toprovide a complete data protection solution for a Lotus Notes/Domino Server,such as notes.ini, desktop.dsk, all *.id files.
• Testing the filesystem backup to resolve communication and other problems relatedto the application and Data Protector.
Lotus Domino ClusterInstall the Lotus Integration and the Disk Agent components on the Dominoservers that will be used for backup, and, if you plan to restore Domino databasesto other Domino servers containing replicas of these databases, install the componentson these Domino servers as well.
EMC Symmetrix integrationTo integrate EMC Symmetrix with Data Protector, install the following Data Protectorsoftware components on the application and backup systems:
• EMC Symmetrix Agent (SYMA)Before pushing the EMC Symmetrix Agent component, install the followingtwo EMC components:• EMC Solution Enabler• EMC Symmetrix TimeFinder or EMC Symmetrix Remote Data Facility (SRDF)
microcode and license.
• General Media Agent
Install the General Media Agent component on the backup system to backup the bulk data. Install it on the application system to back up archive logs orto perform a restore to the application system.
• Disk Agent
Install the Disk Agent component on the application and backup systems torun disk image and filesystem ZDB. Clients without Disk Agent installed are notlisted in the Application system and Backup system drop-down lists whencreating a ZDB specification.
Installation and licensing guide 163

Installing in a cluster
You can install the EMC Symmetrix integration in a cluster environment. For thesupported cluster configurations and specific installation requirements, see the HPData Protector zero downtime backup administrator's guide.
Integrating with other applications
If you want to install the EMC Symmetrix integration with a database application,install the Data Protector component specific for the particular integration to theapplication and backup systems and perform the installation tasks specific for thisintegration. You can install the EMC Symmetrix integration with Oracle and SAPR/3.
EMC Symmetrix Integration with Oracle
Prerequisites
• The following software must be installed and configured on the application system:• Oracle Enterprise Server (RDBMS)• Oracle Net services• SQL*Plus
• The Oracle database files used by the application system must be installed onEMC Symmetrix devices which are mirrored to the backup system.The database can be installed on disk images, logical volumes or filesystems.The following Oracle files have to be mirrored:• Datafiles• Control file• Online redo log filesThe archive redo log files have to reside on non-mirrored disks.
Installation procedure
Perform the following installation tasks:
1. Install the Oracle recovery catalog database. Preferably, install it on a separatesystem, on non-mirrored disks. Leave the recovery catalog unregistered. Fordetails on how to install the database, see the Oracle documentation.
Installing Data Protector on your network164

2. Install the following Data Protector software components:
• EMC Symmetrix Agent - on both the application system and backupsystem
• Oracle Integration - on both the application system and backup system
NOTE:• The Data Protector Oracle Integration component on the backup
system is needed only for the backup set ZDB method. It is not neededfor the proxy-copy ZDB method.
• In a RAC cluster environment, the Oracle application database isaccessed by multiple Oracle instances. Therefore, install the DataProtector Oracle Integration and EMC Symmetrix Agentcomponents on all the systems where the Oracle instances are running.
• If you installed the Oracle recovery catalog database on a separatesystem, you do not need to install any Data Protector softwarecomponents there.
EMC Symmetrix Integration with SAP R/3
Prerequisites
• The following Oracle software must be installed and configured on the applicationsystem:• Oracle Enterprise Server (RDBMS)• Oracle Net8 software• SQL*Plus
• If you plan to run SAP compliant ZDB sessions (BRBACKUP started on the backupsystem and not on the application system), configure the backup system. Fordetails, see the SAP database guide for Oracle (split mirror backup, softwareconfiguration).
• The database on the application system can be installed on disk images, logicalvolumes, or filesystems.• The Oracle datafiles must reside on a disk array.• For online backup, the control file and online redo logs do not have to reside
on a disk array. Online SAP compliant ZDB sessions are an exception, forwhich the control file must reside on a disk array.
Installation and licensing guide 165
• For offline backup, the control file and online redo logs must reside on a diskarray.
• The archived redo log files do not have to reside on a disk array.
NOTE:If some of the Oracle data files are installed on symbolic links, create the linkson the backup system too.UNIX only: If the Oracle database is installed on raw partitions (rawdisk or rawlogical volumes), ensure that the volume/disk group names on the applicationsystem and backup system are identical.
• On UNIX, ensure that the following users exist on the application system:• oraORACLE_SID with the primary group dba• ORACLE_SIDadm in the UNIX group sapsys
• The SAP R/3 software must be correctly installed on the application system.The following is a list of standard directories that must be installed on theapplication system after installing SAP R/3:
NOTE:The location of the directories depends on the environment variables. Refer tothe SAP R/3 documentation for more information.
• ORACLE_HOME/dbs - the Oracle and SAP R/3 profiles• ORACLE_HOME/bin - the Oracle binaries• SAPDATA_HOME/sapbackup - the SAPBACKUP directory with BRBACKUP
log files• SAPDATA_HOME/saparch - the SAPARCH directory with BRARCHIVE log
files• SAPDATA_HOME/sapreorg
• SAPDATA_HOME/sapcheck
• SAPDATA_HOME/saptrace
• /usr/sap/ORACLE_SID/SYS/exe/run
Installing Data Protector on your network166

NOTE:If you plan to do instant recovery, ensure that the sapbackup, saparch,and sapreorg directories reside on different source volumes than the Oracledata files.
If the last six directories do not reside at the above specified destinations, createappropriate links to them.The directory /usr/sap/ORACLE_SID/SYS/exe/run must be owned by theUNIX user oraORACLE_SID. The owner of the SAP R/3 files must be the UNIXuser oraORACLE_SID and the UNIX group dba with setuid bit set (chmod 4755...). The exception is the file BRRESTORE, which must be owned by the UNIX userORACLE_SIDadm.
Example
If ORACLE_SID is PRO, then the permissions inside the directory/usr/sap/PRO/SYS/exe/run should look like:
-rwsr-xr-x 1 orapro dba 4598276 Apr 17 1998 brarchive-rwsr-xr-x 1 orapro dba 4750020 Apr 17 1998 brbackup-rwsr-xr-x 1 orapro dba 4286707 Apr 17 1998 brconnect-rwsr-xr-x 1 proadm sapsys 430467 Apr 17 1998 brrestore-rwsr-xr-x 1 orapro dba 188629 Apr 17 1998 brtools
Installation procedure
1. Install SAP R/3 BRTOOLS on the application system.
2. Install the following Data Protector software components on both the applicationsystem and backup system:
• EMC Symmetrix Agent
• SAP R/3 Integration
• Disk Agent
NOTE:You need to install SAP R/3 Integration on the backup system only if you plan torun SAP compliant ZDB sessions in which BRBACKUP is started on the backup system.
Installation and licensing guide 167

EMC Symmetrix Integration with Microsoft SQL Server
Prerequisite
Microsoft SQL Server has to be installed on the application system. User databasesmust reside on the disk array source volumes, while system databases can be installedanywhere. However, if the system databases are also installed on the disk array,they must be installed on different source volumes than user databases.
Installation procedure
Install the following Data Protector software components on both the application andthe backup systems:• EMC Symmetrix Agent
• MS SQL Integration
HP StorageWorks Disk Array XP integrationTo integrate HP StorageWorks Disk Array XP with Data Protector, install the followingData Protector software components on the application and backup systems:
• HP StorageWorks XP Agent
• General Media Agent
Install the General Media Agent component on the backup system to backup the bulk data. Install it on the application system to back up archive logs orto perform a restore to the application system.
• Disk Agent
Install the Disk Agent component on the application and backup systems torun disk image and filesystem ZDB. Clients without Disk Agent installed are notlisted in the Application system and Backup system drop-down lists whencreating a ZDB specification.
Installing in a cluster
You can install the HP StorageWorks Disk Array XP integration in a clusterenvironment. For the supported cluster configurations and specific installationrequirements, see HP Data Protector zero downtime backup administrator's guide.
Installing Data Protector on your network168

Integrating with other applications
If you want to install the HP StorageWorks XP integration with a database application,install the Data Protector component specific for the particular integration to theapplication and backup systems and perform the installation tasks specific for thisintegration. You can install the HP StorageWorks Disk Array XP integration withOracle, SAP R/3, Microsoft Exchange Server, Microsoft SQL Server, and MicrosoftVSS.
HP StorageWorks Disk Array XP integration with Oracle
Prerequisites
• The following software must be installed and configured on the application systemand on the backup system for the backup set ZDB method:• Oracle Enterprise Server (RDBMS)• Oracle Net services• SQL*PlusThe Oracle software on the backup system must be installed in the same directoryas on the application system. The binaries should be identical to the binaries onthe application system. You can achieve this either by copying the files and systemenvironment from the application system to the backup system, or by a cleaninstallation of the Oracle binaries on the backup system with the same installationparameters as on the application system.
• The Oracle data files on the application system must be installed on HPStorageWorks Disk Array XP LDEVs that are mirrored to the backup system.In case of the backup set method, if some Oracle data files are installed onsymbolic links, then these links have to be created on the backup system too.Depending on the location of the Oracle control file, online redo log files, andOracle SPFILE, the following two options are possible:• Oracle control file, online redo log files, and Oracle SPFILE reside on a
different volume group (if LVM is used) or source volume than Oracle datafiles.By default, instant recovery is enabled for such configuration.
• Oracle control file, online redo log files, and Oracle SPFILE reside on the samevolume group (if LVM is used) or source volume as Oracle datafiles.By default, instant recovery is not enabled for such configuration. You canenable instant recovery by setting the ZDB_ORA_INCLUDE_CF_OLF,ZDB_ORA_INCLUDE_SPF, and ZDB_ORA_NO_CHECKCONF_IR omnircvariables. For more information, see the HP Data Protector zero downtimebackup integration guide.
Installation and licensing guide 169

The Oracle archive redo log files do not have to reside on source volumes.
Installation procedure
Perform the following installation tasks:
1. Install the Oracle recovery catalog database. Preferably, install it on a separatesystem, on non-mirrored disks. Leave the recovery catalog unregistered. Fordetails on how to install the database, see the Oracle documentation.
2. Install the following Data Protector software components:
• HP StorageWorks XP Agent - on both the application system and backupsystem
• Oracle Integration - on both the application system and backup system
NOTE:• The Data Protector Oracle Integration component on the backup
system is needed only for the backup set ZDB method. It is not neededfor the proxy-copy ZDB method.
• In a RAC cluster environment, the Oracle application database isaccessed by multiple Oracle instances. Therefore, install the DataProtector Oracle Integration andHP StorageWorks XP Agent components on all the systems wherethe Oracle instances are running.
• If you installed the Oracle recovery catalog database on a separatesystem, you do not need to install any Data Protector softwarecomponents there.
HP StorageWorks Disk Aray XP integration with SAP R/3
Prerequisites
• The following Oracle software must be installed and configured on the applicationsystem:• Oracle Enterprise Server (RDBMS)• Oracle Net services• SQL*Plus
Installing Data Protector on your network170

• If you plan to run SAP compliant ZDB sessions (BRBACKUP started on the backupsystem and not on the application system), configure the backup system. Fordetails, see the SAP database guide for Oracle (split mirror backup, softwareconfiguration).
• The database on the application system can be installed on disk images, logicalvolumes, or filesystems.• The Oracle datafiles must reside on a disk array.• For online backup, the control file and online redo logs do not have to reside
on a disk array. Online SAP compliant ZDB sessions are an exception, forwhich the control file must reside on a disk array.
• For offline backup, the control file and online redo logs must reside on a diskarray.
• Archived redo log files do not have to reside on a disk array.If the Oracle control file, online redo logs, and Oracle SPFILE reside on the sameLVM volume group or source volume as Oracle datafiles, set the Data ProtectorZDB_ORA_NO_CHECKCONF_IR, ZDB_ORA_INCLUDE_CF_OLF, andZDB_ORA_INCLUDE_SPF omnirc variables. Otherwise, you cannot runZDB–to–disk and ZDB–to–disk+tape sessions. For details, see the HP Data Protectorzero downtime backup integration guide.
NOTE:If some of the Oracle data files are installed on symbolic links, create the linkson the backup system too.UNIX only: If the Oracle database is installed on raw partitions (rawdisk or rawlogical volumes), ensure that the volume/disk group names on the applicationsystem and backup system are identical.
• On UNIX, ensure that the following users exist on the application system:• oraORACLE_SID with the primary group dba• ORACLE_SIDadm in the UNIX group sapsys
• The SAP R/3 software must be correctly installed on the application system.The following is a list of standard directories that must be installed on theapplication system after installing SAP R/3:
Installation and licensing guide 171

NOTE:The location of the directories is dependent on the environment (UNIX systems)or registry (Windows system) variables. See the SAP R/3 documentation formore information.
• ORACLE_HOME/dbs (UNIX systems)ORACLE_HOME\database (Windows systems) - the Oracle and SAP R/3profiles)
• ORACLE_HOME/bin or (UNIX systems)ORACLE_HOME\bin (Windows systems) - the Oracle binaries
• SAPDATA_HOME/sapbackup (UNIX systems)SAPDATA_HOME\sapbackup (Windows systems) - theSAPBACKUP directory with BRBACKUP log files
• SAPDATA_HOME/saparch (UNIX systems)SAPDATA_HOME\saparch (Windows systems) - the SAPARCHdirectory with BRARCHIVE log files
• SAPDATA_HOME/sapreorg (UNIX systems)SAPDATA_HOME\sapreorg (Windows systems)
• SAPDATA_HOME/sapcheck (UNIX systems)SAPDATA_HOME\sapcheck (Windows systems)
• SAPDATA_HOME/saptrace (UNIX systems)SAPDATA_HOME\saptrace (Windows systems)
• /usr/sap/ORACLE_SID/SYS/exe/run (UNIX systems)c:\Oracle\ORACLE_SID\sys\exe\run (Windows systems)
NOTE:If you plan to do instant recovery, ensure that the sapbackup, saparch,and sapreorg directories reside on different source volumes than the Oracledata files.
Installing Data Protector on your network172

UNIX systems
On UNIX systems, if the last six directories do not reside at the above specifieddestinations, create appropriate links to them.On UNIX systems, the directory /usr/sap/ORACLE_SID/SYS/exe/run mustbe owned by the UNIX user oraORACLE_SID. The owner of the SAP R/3 filesmust be the UNIX user oraORACLE_SID and the UNIX group dba with setuidbit set (chmod 4755 ...). The exception is the file BRRESTORE, which must beowned by the UNIX user ORACLE_SIDadm.
UNIX example
If ORACLE_SID is PRO, then the permissions inside the directory/usr/sap/PRO/SYS/exe/run should look like:
-rwsr-xr-x 1 orapro dba 4598276 Apr 17 2007 brarchive-rwsr-xr-x 1 orapro dba 4750020 Apr 17 2007 brbackup-rwsr-xr-x 1 orapro dba 4286707 Apr 17 2007 brconnect-rwsr-xr-x 1 proadm sapsys 430467 Apr 17 2007
brrestore-rwsr-xr-x 1 orapro dba 188629 Apr 17 2007 brtools
Installation procedure
1. Install SAP R/3 BRTOOLS on the application system.
2. Install the following Data Protector software components on both the applicationsystem and backup system:
• HP StorageWorks XP Agent
• SAP R/3 Integration
• Disk Agent
NOTE:You need to install SAP R/3 Integration on the backup system only if you plan torun SAP compliant ZDB sessions in which BRBACKUP is started on the backup system.On Windows systems, the Data Protector software components must be installed usingthe SAP R/3 administrator user account, and this account must be included in theORA_DBA or ORA_SID_DBA local group on the system where the SAP R/3 instance isrunning.
Installation and licensing guide 173

HP StorageWorks Disk Array XP integration with Microsoft Exchange Server
Prerequisite
The Microsoft Exchange Server database must be installed on the application systemon the HP StorageWorks Disk Array XP volumes (LDEVs), which are mirrored to thebackup system. The mirroring can be BC or CA and the database installed on afilesystem. The following objects must be located on volumes that are mirrored:
• Microsoft Information Store (MIS)• optionally, Key Management Service (KMS)• optionally, Site Replication Service (SRS)
To be able to back up transaction logs, disable Circular Logging on the MicrosoftExchange Server.
Installation procedure
Install the following Data Protector software components:• HP StorageWorks XP Agent - on both the application and the backup system• MS Exchange Integration - on the application system only
HP StorageWorks Disk Array XP integration with Microsoft SQL Server
Prerequisite
Microsoft SQL Server has to be installed on the application system. User databasesmust reside on the disk array source volumes, while system databases can be installedanywhere. However, if the system databases are also installed on the disk array,they must be installed on different source volumes than user databases.
Installation procedure
Install the following Data Protector software components on both the application andthe backup systems:• HP StorageWorks XP Agent
• MS SQL Integration
Installing Data Protector on your network174

HP StorageWorks Virtual Array integrationTo integrate HP StorageWorks VA with Data Protector, install the following DataProtector software components to the application and backup systems:
• HP StorageWorks VA Agent
• General Media Agent
Install the General Media Agent component on the backup system to backup the bulk data. Install it on the application system to back up archive logs orto perform a restore to the application system.
• Disk Agent
Install the Disk Agent component on the application and backup systems torun disk image and filesystem ZDB. Clients without Disk Agent installed are notlisted in the Application system and Backup system drop-down lists whencreating a ZDB specification.
Installing in a cluster
You can install the HP StorageWorks VA integration in a cluster environment. Forthe supported cluster configurations and specific installation requirements, refer tothe HP Data Protector zero downtime backup administrator's guide.
Integrating with other applications
If you want to install the HP StorageWorks VA integration with a database application,install the Data Protector component specific for the particular integration to theapplication and backup systems and perform the installation tasks specific for thisintegration. You can install the HP StorageWorks VA integration with Oracle, SAPR/3, Microsoft Exchange Server, and Microsoft SQL Server.
HP StorageWorks VA integration with Oracle
Prerequisites
• The following software must be installed and configured on the application systemand on the backup system for the backup set ZDB method:• Oracle Enterprise Server (RDBMS)• Oracle Net services• SQL*Plus
Installation and licensing guide 175
The Oracle software on the backup system must be installed in the same directoryas on the application system. The binaries should be identical to the binaries onthe application system. You can achieve this either by copying the files and systemenvironment from the application system to the backup system, or by a cleaninstallation of the Oracle binaries on the backup system with the same installationparameters as on the application system.
• The Oracle database files used by the application system must be installed onthe source volumes that will be replicated using the VA Agent (SNAPA).Depending on the location of the Oracle control file, online redo log files, andOracle SPFILE, the following two options are possible:• Oracle control file, online redo log files, and Oracle SPFILE reside on a
different volume group (if LVM is used) or source volume than Oracle datafiles.By default, instant recovery is enabled for such configuration.
• Oracle control file, online redo log files, and Oracle SPFILE reside on the samevolume group (if LVM is used) or source volume as Oracle datafiles.By default, instant recovery is not enabled for such configuration. You canenable instant recovery by setting the ZDB_ORA_INCLUDE_CF_OLF,ZDB_ORA_INCLUDE_SPF_OLF, and ZDB_ORA_NO_CHECKCONF_IR omnircvariables. For more information, see the HP Data Protector zero downtimebackup integration guide.
The Oracle archive redo log files do not have to reside on source volumes.
Installation procedure
Perform the following installation tasks:
1. Install the Oracle recovery catalog database. Preferably, install it on a separatesystem, on non-mirrored disks. Leave the recovery catalog unregistered. Fordetails on how to install the database, see the Oracle documentation.
Installing Data Protector on your network176

2. Install the following Data Protector software components:
• HP StorageWorks VA Agent - on both the application system and backupsystem
• Oracle Integration - on both the application system and backup system
NOTE:• The Data Protector Oracle Integration component on the backup
system is needed only for the backup set ZDB method. It is not neededfor the proxy-copy ZDB method.
• In a RAC cluster environment, the Oracle application database isaccessed by multiple Oracle instances. Therefore, install the DataProtector Oracle Integration andHP StorageWorks VA Agent components on all the systems wherethe Oracle instances are running.
• If you installed the Oracle recovery catalog database on a separatesystem, you do not need to install any Data Protector softwarecomponents there.
HP StorageWorks VA integration with SAP R/3
Prerequisites
• The following Oracle software must be installed on the application system:• Oracle Enterprise Server (RDBMS)• Oracle Net services• SQL*Plus
• If you plan to run SAP compliant ZDB sessions (BRBACKUP started on the backupsystem and not on the application system), configure the backup system. Fordetails, see the SAP database guide for Oracle (split mirror backup, softwareconfiguration).
• The database on the application system can be installed on disk images, logicalvolumes, or filesystems.• The Oracle datafiles must reside on a disk array.• For online backup, the control file and online redo logs do not have to reside
on a disk array. Online SAP compliant ZDB sessions are an exception, forwhich the control file must reside on a disk array.
Installation and licensing guide 177

• For offline backup, the control file and online redo logs must reside on a diskarray.
• Archived redo log files do not have to reside on a disk array.If the Oracle control file, online redo logs, and Oracle SPFILE reside on the sameLVM volume group or source volume as Oracle datafiles, set the Data ProtectorZDB_ORA_NO_CHECKCONF_IR, ZDB_ORA_INCLUDE_CF_OLF, andZDB_ORA_INCLUDE_SPF omnirc variables. Otherwise, you cannot runZDB–to–disk and ZDB–to–disk+tape sessions. For details, see the HP Data Protectorzero downtime backup integration guide.
NOTE:If some of the Oracle data files are installed on symbolic links, create the linkson the backup system too.UNIX only: If the Oracle database is installed on raw partitions (rawdisk or rawlogical volumes), ensure that the volume/disk group names on the applicationsystem and backup system are identical.
• On UNIX, ensure that the following users exist on the application system:• oraORACLE_SID with the primary group dba• ORACLE_SIDadm in the UNIX group sapsys
• The SAP R/3 software must be correctly installed on the application system.The following is a list of standard directories that must be installed on theapplication system after installing SAP R/3:
NOTE:The location of the directories is dependent on the environment (UNIX systems)or registry (Windows system) variables. Refer to the SAP R/3 documentation formore information.
• ORACLE_HOME/dbs (UNIX systems)ORACLE_HOME\database (Windows systems)- the Oracle and SAP profiles)
• ORACLE_HOME/bin (UNIX systems)ORACLE_HOME\bin (Windows systems)- the Oracle binaries
Installing Data Protector on your network178

• SAPDATA_HOME/sapbackup (UNIX systems)SAPDATA_HOME\sapbackup (Windows systems)- the SAPBACKUP directory with BRBACKUP log files
• SAPDATA_HOME/saparch (UNIX systems)SAPDATA_HOME\saparch
(Windows systems) - the SAPARCH directory with BRARCHIVE log files
• SAPDATA_HOME/sapreorg (UNIX systems)SAPDATA_HOME\sapreorg (Windows systems)
• SAPDATA_HOME/sapcheck (UNIX systems)SAPDATA_HOME\sapcheck (Windows systems)
• SAPDATA_HOME/saptrace (UNIX systems)SAPDATA_HOME\saptrace (Windows systems)
• /usr/sap/ORACLE_SID/SYS/exe/run (UNIX systems)BRTOOLS (Windows systems)
NOTE:If you plan to do instant recovery, ensure that the sapbackup, saparch,and sapreorg directories reside on different source volumes than the Oracledata files.
UNIX systems
On UNIX systems, if the last six directories do not reside at the above specifieddestinations, create appropriate links to them.On UNIX systems, the directory /usr/sap/ORACLE_SID/SYS/exe/run mustbe owned by the UNIX user oraORACLE_SID. The owner of the SAP R/3 filesmust be the UNIX user oraORACLE_SID and the UNIX group dba with setuidbit set (chmod 4755 ...). The exception is the file BRRESTORE, which must beowned by the UNIX user ORACLE_SIDadm.
UNIX example
If ORACLE_SID is PRO, then the permissions inside the directory/usr/sap/ORACLE_SID/SYS/exe/run should look like:
Installation and licensing guide 179

-rwsr-xr-x 1 orapro dba 4598276 Apr 17 1998 brarchive-rwsr-xr-x 1 orapro dba 4750020 Apr 17 1998 brbackup-rwsr-xr-x 1 orapro dba 4286707 Apr 17 1998 brconnect-rwsr-xr-x 1 proadm sapsys 430467 Apr 17 1998
brrestore-rwsr-xr-x 1 orapro dba 188629 Apr 17 1998 brtools
Installation procedure
1. Install SAP R/3 BRTOOLS on the application system.
2. Install the following Data Protector software components on both the applicationsystem and backup system:
• HP StorageWorks VA Agent
• SAP R/3 Integration
• Disk Agent
NOTE:You need to install SAP R/3 Integration on the backup system only if you plan torun SAP compliant ZDB sessions in which BRBACKUP is started on the backup system.On Windows systems, the Data Protector software components must be installed usingthe SAP R/3 administrator user account, and this account must be included in theORA_DBA or ORA_SID_DBA local group on the system where the SAP R/3 instance isrunning.
HP StorageWorks VA integration with Microsoft Exchange Server
Prerequisite
The Microsoft Exchange Server database must be installed on the application systemsource volumes. The following objects must be located on source volumes:
• Microsoft Information Store (MIS)• optionally, Key Management Service (KMS)• optionally, Site Replication Service (SRS)
To be able to back up transaction logs, disable Circular Logging on the MicrosoftExchange Server.
Installing Data Protector on your network180

Installation procedure
Install the following Data Protector software components:• HP StorageWorks VA Agent - on both the application and the backup system• MS Exchange Integration - on the application system only
HP StorageWorks VA integration with Microsoft SQL Server
Prerequisite
Microsoft SQL Server has to be installed on the application system. User databasesmust reside on the disk array source volumes, while system databases can be installedanywhere. However, if the system databases are also installed on the disk array,they must be installed on different source volumes than user databases.
Installation procedure
Install the following Data Protector software components on both the application andthe backup systems:• HP StorageWorks VA Agent
• MS SQL Integration
HP StorageWorks Enterprise Virtual Array integrationTo integrate HP StorageWorks EVA with Data Protector, install the following DataProtector software components on the application and backup systems:
• HP StorageWorks EVA SMI-S Agent
• General Media Agent
Install the General Media Agent component on the backup system to backup the bulk data. Install it on the application system to back up archive logs orto perform a restore to the application system.
• Disk Agent
Install the Disk Agent component on the application and backup systems torun disk image and filesystem ZDB. Clients without Disk Agent installed are notlisted in the Application system and Backup system drop-down lists whencreating a ZDB specification.
Installation and licensing guide 181

Installing in a cluster
You can install the HP StorageWorks EVA integration in a cluster environment. Forthe supported cluster configurations and specific installation requirements, see theHP Data Protector zero downtime backup administrator's guide.
Integrating with other applications
To install the HP StorageWorks EVA integration with a database application, installthe Data Protector component specific for the particular integration to the applicationand backup systems and perform the installation tasks specific for this integration.You can install the HP StorageWorks EVA integration with Oracle, SAP R/3, MicrosoftExchange Server, Microsoft SQL Server, and Microsoft VSS.
HP StorageWorks EVA integration with Oracle
Prerequisites
• The following software must be installed and configured on the application systemand on the backup system for the backup set ZDB method:• Oracle Enterprise Server (RDBMS)• Oracle Net services• SQL*PlusThe Oracle software on the backup system must be installed in the same directoryas on the application system. The binaries should be identical to the binaries onthe application system. You can achieve this either by copying the files and systemenvironment from the application system to the backup system, or by a cleaninstallation of the Oracle binaries on the backup system with the same installationparameters as on the application system.
• The Oracle datafiles on the application system must be installed on source volumesthat will be replicated using the SMI-S agent you have installed.Depending on the location of the Oracle control file, online redo log files, andOracle SPFILE, the following two options are possible:• Oracle control file, online redo log files, and Oracle SPFILE reside on a
different volume group (if LVM is used) or source volume than Oracle datafiles.By default, instant recovery is enabled for such configuration.
• Oracle control file, online redo log files, and Oracle SPFILE reside on the samevolume group (if LVM is used) or source volume as Oracle datafiles.By default, instant recovery is not enabled for such configuration. You canenable instant recovery by setting the ZDB_ORA_INCLUDE_CF_OLF,
Installing Data Protector on your network182

ZDB_ORA_INCLUDE_SPF, and ZDB_ORA_NO_CHECKCONF_IR omnircvariables. For more information, see the HP Data Protector zero downtimebackup integration guide.
The Oracle archive redo log files do not have to reside on source volumes.If some Oracle data files are installed on symbolic links, then these links have tobe created on the backup system too.
Installation procedure
Perform the following installation tasks:
1. Install the Oracle recovery catalog database. Preferably, install it on a separatesystem, on non-mirrored disks. Leave the recovery catalog unregistered. Fordetails on how to install the database, see the Oracle documentation.
2. Install the following Data Protector software components:
• HP StorageWorks EVA SMI-S Agent - on both the application systemand backup system
• Oracle Integration - on both the application system and backup system
NOTE:• The Data Protector Oracle Integration component on the backup
system is needed only for the backup set ZDB method. It is not neededfor the proxy-copy ZDB method.
• In a RAC cluster environment, the Oracle application database isaccessed by multiple Oracle instances. Therefore, install the DataProtector Oracle Integration andHP StorageWorks EVA SMI-S Agent components on all thesystems where the Oracle instances are running.
• If you installed the Oracle recovery catalog database on a separatesystem, you do not need to install any Data Protector softwarecomponents there.
HP StorageWorks EVA integration with SAP R/3
Prerequisites
• The following Oracle software must be installed on the application system.
Installation and licensing guide 183

• Oracle Enterprise Server (RDBMS)• Oracle Net services• SQL*Plus
• If you plan to run SAP compliant ZDB sessions (BRBACKUP started on the backupsystem and not on the application system), configure the backup system. Fordetails, see the SAP database guide for Oracle (split mirror backup, softwareconfiguration).
• The database on the application system can be installed on disk images, logicalvolumes, or filesystems.• The Oracle datafiles must reside on a disk array.• For online backup, the control file and online redo logs do not have to reside
on a disk array. Online SAP compliant ZDB sessions are an exception, forwhich the control file must reside on a disk array.
• For offline backup, the control file and online redo logs must reside on a diskarray.
• Archived redo log files do not have to reside on a disk array.If the Oracle control file, online redo logs, and Oracle SPFILE reside on the sameLVM volume group or source volume as Oracle datafiles, set the Data ProtectorZDB_ORA_NO_CHECKCONF_IR, ZDB_ORA_INCLUDE_CF_OLF, andZDB_ORA_INCLUDE_SPF omnirc variables. Otherwise, you cannot runZDB–to–disk and ZDB–to–disk+tape sessions. For details, see the HP Data Protectorzero downtime backup integration guide.
NOTE:If some of the Oracle data files are installed on symbolic links, create the linkson the backup system too.UNIX only: If the Oracle database is installed on raw partitions (rawdisk or rawlogical volumes), ensure that the volume/disk group names on the applicationsystem and backup system are identical.
• On UNIX, ensure that the following users exist on the application system:• oraORACLE_SID with the primary group dba• ORACLE_SIDadm in the UNIX group sapsys
• The SAP R/3 software must be correctly installed on the application system.The following is a list of standard directories that must be installed on theapplication system after installing SAP R/3:
Installing Data Protector on your network184

NOTE:The location of the directories is dependent on the environment (UNIX systems)or registry (Windows system) variables. Refer to the SAP R/3 documentation formore information.
• ORACLE_HOME/dbs (UNIX systems) ORACLE_HOME\database (Windowssystems) - the Oracle and SAP profiles)
• ORACLE_HOME/bin (UNIX systems) ORACLE_HOME\bin (Windows systems)- the Oracle binaries
• SAPDATA_HOME/sapbackup (UNIX systems) SAPDATA_HOME\sapbackup(Windows systems) - the SAPBACKUP directory with BRBACKUP log files
• SAPDATA_HOME/saparch (UNIX systems) SAPDATA_HOME\saparch(Windows systems) - the SAPARCH directory with BRARCHIVE log files
• SAPDATA_HOME/sapreorg (UNIX systems) SAPDATA_HOME\sapreorg(Windows systems)
• SAPDATA_HOME/sapcheck (UNIX systems) SAPDATA_HOME\sapcheck(Windows systems)
• SAPDATA_HOME/saptrace (UNIX systems) SAPDATA_HOME\saptrace(Windows systems)
• /usr/sap/ORACLE_SID/SYS/exe/run (UNIX systems)c:\Oracle\ORACLE_SID\sys\exe\run (Windows systems)
NOTE:If you plan to do instant recovery, ensure that the sapbackup, saparch,and sapreorg directories reside on different source volumes than the Oracledata files.
UNIX systems
On UNIX systems, if the last six directories do not reside at the above specifieddestinations, create appropriate links to them.On UNIX systems, the directory /usr/sap/ORACLE_SID/SYS/exe/run mustbe owned by the UNIX user oraORACLE_SID. The owner of the SAP R/3 filesmust be the UNIX user oraORACLE_SID and the UNIX group dba with setuid
Installation and licensing guide 185

bit set (chmod 4755 ...). The exception is the file BRRESTORE, which must beowned by the UNIX user ORACLE_SIDadm.
UNIX example
If ORACLE_SID is PRO, then the permissions inside the directory/usr/sap/PRO/SYS/exe/run should look like:
-rwsr-xr-x 1 orapro dba 4598276 Apr 17 2007 brarchive-rwsr-xr-x 1 orapro dba 4750020 Apr 17 2007 brbackup-rwsr-xr-x 1 orapro dba 4286707 Apr 17 2007 brconnect-rwsr-xr-x 1 proadm sapsys 430467 Apr 17 2007
brrestore-rwsr-xr-x 1 orapro dba 188629 Apr 17 2007 brtools
Installation procedure
1. Install SAP R/3 BRTOOLS on the application system.
2. Install the following Data Protector software components on both the applicationsystem and backup system:
• HP StorageWorks EVA SMI-S Agent
• SAP R/3 Integration
• Disk Agent
NOTE:You need to install SAP R/3 Integration on the backup system only if you plan torun SAP compliant ZDB sessions in which BRBACKUP is started on the backup system.On Windows systems, the Data Protector software components must be installed usingthe SAP R/3 administrator user account, and this account must be included in theORA_DBA or ORA_SID_DBA local group on the system where the SAP R/3 instance isrunning.
HP StorageWorks EVA integration with Microsoft Exchange Server
Prerequisite
The Microsoft Exchange Server database must be installed on the application systemsource volumes. The following objects must be located on the source volumes:
Installing Data Protector on your network186

• Microsoft Information Store (MIS)• optionally, Key Management Service (KMS)• optionally, Site Replication Service (SRS)
To be able to back up transaction logs, disable Circular Logging on the MicrosoftExchange Server.
Installation procedure
Install the following Data Protector software components:• HP StorageWorks EVA SMI-S Agent on both the application and backup
systems• MS Exchange Integration - on the application system only
HP StorageWorks EVA integration with MS SQL
Prerequisite
Microsoft SQL Server has to be installed on the application system. User databasesmust reside on the disk array source volumes, while system databases can be installedanywhere. However, if the system databases are also installed on the disk array,they must be installed on different source volumes than user databases.
Installation procedure
Install the following Data Protector software components on both the application andthe backup systems:• HP StorageWorks EVA SMI-S Agent on both the application and backup
systems• MS SQL Integration
IAP clientsThe Data Protector integration with HP Integrated Archive Platform (IAP) provides thedata backup directly to the IAP appliance. This solution takes advantage of thepowerful IAP capabilities, such as the ability of holding many terabytes of data,eliminating redundancies in the stored data, advanced search tools and reliable andfast single file point-in-time restores.
To integrate IAP with Data Protector, install the following Data Protector softwarecomponents on the client system:
Installation and licensing guide 187

• IAP Disk Agent Extension
• IAP Deduplication Agent
PrerequisitesBefore starting the installation, perform the following steps on the IAP:
1. Set up the Domain Account Synchronization (DAS) to connect the IAP to MicrosoftActive Directory. Import to the IAP a subset of domain users who will then beable to access the IAP. For detailed information, see the HP File Gateway andthe IAP documentation.
2. Add the user who will run IAP backups to the application users group on theIAP:
/opt/fg/fgcreate appuser account_name [-d | --descriptiondescription] password
To verify if a particular user is part of the application users group, run:
/opt/fg/fglist appusers
3. Register the system to be used for backups. For Data Protector backups, this isdone by importing the IAP Server to the cell. Before this is done, the IAP musthave a registration rule, which is a pattern that needs to match to the systemregistered. To do this, execute:
/opt/fg/fgcreate regrule rule_name [-h | --hostdnsdns-regex] [-n | --network network_address]iap_domain_name, for example:
/opt/fg/fgcreate regrule testRule -h test.*\.mydomain\.com$iap
The above example allows to register the systems with the names starting withtest and located in mydomain.com. The system is registered and the AIP assignsa client ID to it. If the system is not registered, backups using Data Protector willfail. To verify that the registration rule is created, run:
/opt/fg/fglist regrules
For further information, see the HP File Gateway user guide.
In addition, upload the certificate for accessing the IAP appliance to the Cell Managerand import at least one IAP Server to the Data Protector cell.
Installing Data Protector on your network188

VLS automigration clientsThe Data Protector media copy functionality allows you to copy media after performinga backup. The integration with the HP StorageWorks Virtual Library System (VLS)enhances this functionality by providing a solution that combines the internal VLScopy capabilities with the Data Protector media management and monitoringfunctionality.
To integrate Data Protector with VLS automigration to perform smart media copying,install the VLS Automigration Data Protector software component.
PrerequisitesPerform the following steps:
1. Configure the VLS virtual storage as required using the Command View VLS.See the VLS documentation for more information.
2. Connect one or more physical tape libraries to the VLS.
3. Import the VLS client to the Data Protector cell.
Installing localized Data Protector user interfaceData Protector A.06.10 provides a localized Data Protector user interface onWindows and UNIX systems. This consists of the localized Data Protector GUI andCLI. Localized online Help and printed documentation is also provided. For moreinformation on which Data Protector manuals are localized, refer to the HP DataProtector product announcements, software notes, and references.
NOTE:By default, during the Data Protector installation, the English language support is installed.When you install an additional language support, the localized Data Protector userinterface is started according to the locale environment set on the system.
Installation and licensing guide 189

Installing localized Data Protector user interface on Windows systems
Local installation
To install the localized Data Protector user interface on Windows systems, select theappropriate language support (French or Japanese) in the Custom Setup page of theSetup wizard, as shown on Figure 24 on page 190.
For the local installation procedure, refer to “Installing the Data Protector Cell Manager(CM) and Installation Server(s) (IS)” on page 46.
Figure 24 Selecting language support at setup
Remote installation
When distributing the Data Protector language support remotely using the InstallationServer, select the appropriate language support in the Component Selection page ofthe Add Components wizard, as shown on Figure 25 on page 191.
For the procedure on how to remotely add the Data Protector software componentsto clients, refer to “Remote installation of Data Protector clients” on page 81.
Installing Data Protector on your network190

Figure 25 Installing language support remotely
Installing localized Data Protector user interface on UNIX systems
Local installation
You can install the Japanese or French language support locally only on a DataProtector client using the omnisetup.sh command. Specify the jpn_ls or fra_lssoftware components depending on the language support you need. For the detailedprocedure, refer to “Local installation of UNIX clients” on page 149.
If you are using the swinstall, pkgadd, or rpm utility to install the Data ProtectorCell Manager or Installation Server, you can only install the English language support.If you want the localized Data Protector user interface to reside on the same systemwith the Cell Manager or Installation Server, you need to install the additionallanguage support remotely.
Remote installation
When distributing the Data Protector language support remotely using the InstallationServer, select the appropriate language support in the Component Selection page ofthe Add Components wizard, as shown on Figure 25 on page 191.
Installation and licensing guide 191

For the procedure on how to remotely add the Data Protector software componentsto clients, refer to “Remote installation of Data Protector clients” on page 81.
TroubleshootingIf the English version of original Data Protector GUI is started after you installed adifferent language support, verify the following:
1. Check that the following files exist:
For French Language Support:
• On Windows: Data_Protector_home\bin\OmniFra.dll• On HP-UX: /opt/omni/lib/nls/fr.iso88591/omni.cat• On Solaris: /opt/omni/lib/nls/fr.ISO8859-1/omni.cat
For Japanese Language Support:
• On Windows: Data_Protector_home\bin\OmniJpn.dll• On HP-UX: /opt/omni/lib/nls/ja.eucJP/omni.cat and
/opt/omni/lib/nls/ja.SJIS/omni.cat
• On Solaris: /opt/omni/lib/nls/ja.eucJP/omni.cat and/opt/omni/lib/nls/ja.PCK/omni.cat
2. Check the locale environment settings on your system:• OnWindows: In theWindows Control Panel, click Regional Options
and check that you have an appropriate language selected in locale andlanguage settings.
• On UNIX: Run the following command to set the locale environment:export LANG=lang locale
where lang represents the locale environment setting in the following format:language[_territory].codeset.For example, ja_JP.eucJP, ja_JP.SJIS, or ja_JP.PCK for Japaneselocale; and fr_FR.iso88591 for French locale. Note that the codeset partof the LANG variable is required and must match the codeset part of thecorresponding directory name.
Installing the Data Protector Single Server EditionThe Single Server Edition (SSE) of Data Protector is designed for small environmentswhere backups run on only one device connected to a Cell Manager. It is availablefor supported Windows and for HP-UX and Solaris platforms.
Installing Data Protector on your network192
To install the Cell Manager and (optionally) Installation Server, follow the instructionsin “Installing the Data Protector Cell Manager (CM) and Installation Server(s)(IS)” on page 46.
Limitations
When considering the SSE license, be aware of the following limitations:
Limitations of SSE for Windows• SSE supports backups to only one device concurrently, connected to a single Cell
Manager.• One 10-slot DDS autochanger only is supported.• UNIX (also HP-UX) clients and servers are not supported. If a backup is attempted
to a UNIX machine, the session is aborted.• If a cell has a Windows Cell Manager, you can back up only Windows clients.
Backup to Novell Netware clients is not supported.• Adding extension products is not supported with SSE.• Clustering is not supported with SSE.• Disaster Recovery is not supported with SSE.
The number of Windows clients is not limited.
For supported devices, please refer to the HP Data Protector product announcements,software notes, and references.
Limitations of SSE for HP-UX and Solaris• SSE supports backups to only one device concurrently, connected to a single Cell
Manager.• One 10-slot DDS autochanger only is supported.• On a UNIX Cell Manager, you cannot back up servers - only UNIX clients,
Windows clients, Solaris clients, and Novell NetWare clients.• Adding extension products is not supported with SSE.• Clustering is not supported with SSE.
The number of clients (UNIX, Windows) is not limited.
For supported devices, please refer to the HP Data Protector product announcements,software notes, and references.
Installation and licensing guide 193

Installing a password
For the step-by-step instructions on how to install a password on the Cell Manager,refer to “Data Protector passwords” on page 330.
Installing Data Protector web reportingData Protector Web Reporting is installed with other Data Protector components bydefault, and as such, you can use it locally from your system.
You can also install it on a Web server and in that way make it available on othersystems which do not need to have any of the Data Protector software componentsinstalled.
Prerequisites
To use Data Protector Web Reporting on your system, refer to the HP Data Protectorproduct announcements, software notes, and references for prerequisites andlimitations.
Installation
To install Data Protector Web Reporting to a Web server, do the following:
1. Copy the following Data Protector Java reporting files to the server. The serverdoes not have to be a Data Protector client.
• On Windows systems with the Data Protector user interface installed, thefiles are located in the following directory:Data_Protector_home\java\bin
• On a UNIX system with the Data Protector user interface installed, the filesare located in the following directory:/opt/omni/java/bin
2. Open the WebReporting.html file in your browser to access the Data ProtectorWeb Reporting.
You must make the file available to the users of the Web reporting in the fullURL form. For example, you can put a link to this file from your Intranet site.
Installing Data Protector on your network194

TIP:By default, no password is needed to use Data Protector Web Reporting. You can provideone and in that way restrict the access to the Web reporting. For the procedure, refer tothe online Help index: “Web reports, limiting access to”.
What’s next?
When the installation has been completed, refer to the online Help index: “Webreporting interface, configuring notifications” for more information on configurationissues and creating your own reports.
Installing Data Protector on MC/ServiceGuardData Protector supports MC/ServiceGuard (MC/SG) for HP-UX and Linux. For detailson supported operating system versions, refer to the HP Data Protector productannouncements, software notes, and references.
If your Cell Manager is to be cluster-aware, note that the virtual server IP addressshould be used for licenses.
Installing a cluster-aware Cell Manager
Prerequisites
Before you install a Data Protector Cell Manager on MC/ServiceGuard, check thefollowing:
• Decide which systems are going to be the Primary Cell Manager and theSecondary Cell Manager(s). All of them must have MC/ServiceGuard installedand must be configured as cluster members.
• Data Protector Cell Manager, with recommended patches, and all other DataProtector software components for the integrations you want to have in the cluster,must be installed on the Primary node and each of the Secondary nodes.The installation procedure is standard procedure for installing the Cell Managersystem. See the “Installing the Data Protector Cell Manager (CM) and InstallationServer(s) (IS)” on page 46.
Installation and licensing guide 195

What’s next?
When the installation has been completed, you must configure the installed PrimaryCell Manager and the Secondary Cell Manager(s), and the Cell Manager package.Refer to the online Help index: “cluster, MC/ServiceGuard” for more information onconfiguring MC/ServiceGuard with Data Protector.
Installing a cluster-aware client
IMPORTANT:The Data Protector cluster-aware clients must be installed on all the cluster nodes.
The installation procedure is standard procedure for installing Data Protector on anUNIX client. Refer to “Installing HP-UX clients” on page 97 and “Installing Linuxclients” on page 107 for detailed instructions.
What’s next?
When the installation has been completed, you must import the virtual server (thehostname specified in the cluster package) to the Data Protector cell. See “Importinga cluster-aware client to a cell ” on page 216.
Refer to the online Help index: “configuration” for more information on how toconfigure backup devices, media pools, or any additional Data Protector configurationtasks.
Installing Data Protector on Microsoft Cluster ServerFor supported operating systems for Microsoft Cluster Server integration, see thehttp://www.hp.com/support/manuals.
If your Cell Manager is to be cluster-aware, note that the virtual server IP addressshould be used for licenses.
Installing a cluster-aware Cell Manager
Prerequisites
Before you install the cluster-aware Cell Manager, make sure that you do not haveresources with the following names on the cluster:
Installing Data Protector on your network196
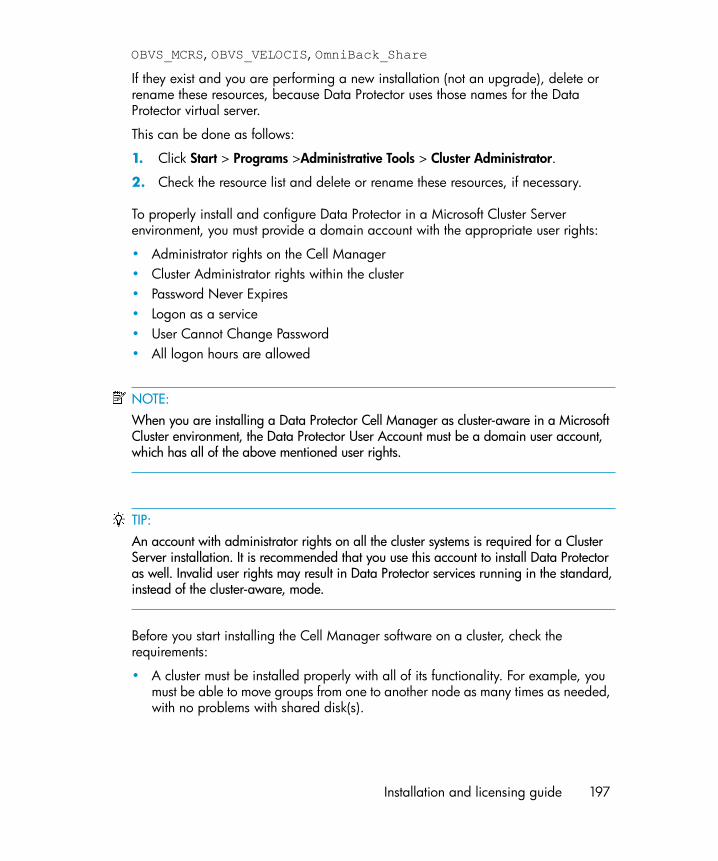
OBVS_MCRS, OBVS_VELOCIS, OmniBack_Share
If they exist and you are performing a new installation (not an upgrade), delete orrename these resources, because Data Protector uses those names for the DataProtector virtual server.
This can be done as follows:
1. Click Start > Programs >Administrative Tools > Cluster Administrator.
2. Check the resource list and delete or rename these resources, if necessary.
To properly install and configure Data Protector in a Microsoft Cluster Serverenvironment, you must provide a domain account with the appropriate user rights:
• Administrator rights on the Cell Manager• Cluster Administrator rights within the cluster• Password Never Expires• Logon as a service• User Cannot Change Password• All logon hours are allowed
NOTE:When you are installing a Data Protector Cell Manager as cluster-aware in a MicrosoftCluster environment, the Data Protector User Account must be a domain user account,which has all of the above mentioned user rights.
TIP:An account with administrator rights on all the cluster systems is required for a ClusterServer installation. It is recommended that you use this account to install Data Protectoras well. Invalid user rights may result in Data Protector services running in the standard,instead of the cluster-aware, mode.
Before you start installing the Cell Manager software on a cluster, check therequirements:
• A cluster must be installed properly with all of its functionality. For example, youmust be able to move groups from one to another node as many times as needed,with no problems with shared disk(s).
Installation and licensing guide 197

• If you start the cluster-aware Cell Manager installation from a network share youmust have access to this share from all cluster nodes.
• At least one group in the cluster should have a file cluster resource defined. DataProtector will install some of its data files in this file cluster resource under a specificfolder.OnWindows Server 2008, data files are installed on the File Server resourceunder the shared folder selected by the user at installation.On other Windows systems, data files are installed on the File Share resourceunder the folder specified when the file cluster resource was created.Refer to the cluster-specific documentation to define a file cluster resource. Notethat the file share name of the file cluster resource cannot be OmniBack.
• If the virtual server does not exist in the same group as the file cluster resource,create a new virtual server using a free registered IP address and associating anetwork name with it.
• The file cluster resource where Data Protector is to be installed must have the IPAddress, Network Name, and Physical Disk set among the file cluster resourcedependencies. This ensures that the Data Protector cluster group can run on anynode independently of any other group.
• Ensure that only the cluster administrator has access to the file cluster resourceshared folder and that he has full access to it.
• Setup must be started under the cluster service account on the system (node) wherethe file cluster resource is active, so that the file cluster resource shared folder canbe directly accessed. The resource owner (the system where the resource is active)can be determined using the Cluster Administrator.
• Each system of the cluster should be up and running properly.• If a system in the cluster has the Data Protector software installed as
non-cluster-aware, you need to uninstall it prior to the setup. The upgrade optionis supported only if the previously installed Data Protector software is the CellManager, installed in cluster-aware mode.
• Data Protector will be installed on the same location (drive and pathname) on allcluster nodes. Ensure that these locations are free.
• Ensure no other Microsoft Installer-based installations are running on other clusternodes.
Local installation
The Data Protector cluster-aware Cell Manager software must be installed locally,from the DVD-ROM. This can be done as follows:
Installing Data Protector on your network198

1. Insert the Windows installation DVD-ROM.
On Windows Server 2008, the User Account Control dialog is displayed. ClickContinue to proceed with the installation.
2. In the HP Data Protector window, select Install Data Protector to start the DataProtector Setup Wizard.
3. Follow the Setup Wizard and carefully read the license agreement. Click Nextto continue, if you accept the terms of the agreement.
Installation and licensing guide 199

4. In the Installation Type page, select Cell Manager and then click Next to installData Protector Cell Manager software.
Figure 26 Selecting the installation type
Installing Data Protector on your network200

5. Setup automatically detects that it is running in a cluster environment. SelectInstall cluster-aware Cell Manager to enable a cluster setup.
Select the cluster group, the virtual hostname, and the file cluster resource onwhich Data Protector shared files and the database will reside.
NOTE:If you select Install Cell Manager on this node only, the Cell Manager willnot be cluster aware. Refer to “Installing a Windows CellManager” on page 55.
Figure 27 Selecting the cluster resource on Windows Server 2008
Installation and licensing guide 201

Figure 28 Selecting the cluster resource on other Windows systems
6. Enter the username and password for the account that will be used to start DataProtector services.
Figure 29 Entering the account information
7. Click Next to install Data Protector on the default folder.
Otherwise, click Change to open the Change Current Destination Folder windowand enter a new path.
Installing Data Protector on your network202

8. In the Component Selection window, select the components you want to installon all cluster nodes and cluster virtual servers. Click Next.
The MS Cluster Support files are installed automatically.
The selected components will be installed on all the cluster nodes.
Figure 30 Component selection page
9. The component selection summary page is displayed. Click Install.
Installation and licensing guide 203

10. The Installation setup page is displayed. Click Next.
Figure 31 Installation status page
11. To start Data Protector immediately after install, select Start the Data ProtectorManager.
To view the HP Data Protector product announcements, software notes, andreferences, select Open the Product Announcements.
To install or upgrade the HP AutoPass utility, select the Start AutoPass installationor the Upgrade AutoPass installation option.
It is not recommended to install the HP AutoPass utility in Microsoft Cluster,because it will be installed only on the node used for the installation. If you didinstall AutoPass, you must uninstall Data Protector from the same node on whichit was installed, when you decide to remove Data Protector from the system.
On Windows 2000 and 2003 x64, Windows Vista x64, and Windows Server2008 x64, AutoPass is not installed.
Click Finish to complete the installation.
Checking the installation
When the setup procedure has been completed, you can check whether or not theData Protector software has been properly installed. Proceed as follows:
Installing Data Protector on your network204
1. Check if the Cluster service account is assigned to the Data Protector Inetservice on each cluster node. Make sure the same user is also added to the DataProtector admin user group. The logon account type should be set to Thisaccount as shown in Figure 32 on page 205 and .
Figure 32 Data Protector user account
2. Switch to the Data_Protector_home\bin directory and run the followingcommand:
omnirsh host INFO_CLUS
where host is the name of the cluster virtual server (case-sensitive). The outputshould list the names of the systems within the cluster and the name of virtualserver. If the output returns 0 “NONE”, Data Protector is not installed in thecluster-aware mode.
3. Start the Data Protector GUI, select the Clients context, and then clickMS Clusters.You should see the newly installed systems listed in the Results Area.
Data Protector Inet and CRS services
If needed, change the accounts under which the Data Protector Inet and CRS servicesare running.
Installation and licensing guide 205

Installing cluster-aware clients
Prerequisites
Before you install a cluster-aware Data Protector client, the following prerequisitesmust be fulfilled:
• A cluster must be installed properly with all of its functionality on all cluster nodes.For example, you must be able to move groups from one to another node asmany times as needed, with no problems with shared disk(s).
• Each system of the cluster should be up and running properly.
Local installation
The Data Protector cluster-aware clients must be installed locally, from the DVD-ROM,on each cluster node. The cluster nodes (Data Protector cluster clients) are importedto the specified cell during the installation process. You will need then to import thevirtual server name.
The cluster Administrator account is required to perform the installation. Apart fromthat, the cluster client setup is the same as for the ordinary Windows client setup.The MS Cluster Support files are installed automatically.
See “Installing Windows clients” on page 90 for information on how to locally installa Data Protector Windows client system.
The Data Protector installation reports that a cluster was detected. Select Install clientin cluster-aware mode.
Installing Data Protector on your network206
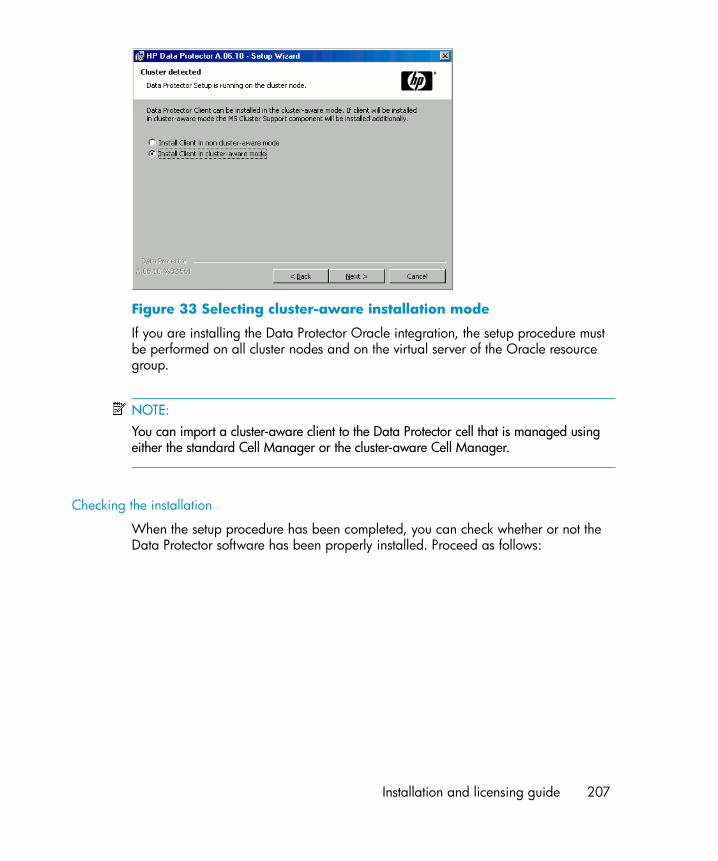
Figure 33 Selecting cluster-aware installation mode
If you are installing the Data Protector Oracle integration, the setup procedure mustbe performed on all cluster nodes and on the virtual server of the Oracle resourcegroup.
NOTE:You can import a cluster-aware client to the Data Protector cell that is managed usingeither the standard Cell Manager or the cluster-aware Cell Manager.
Checking the installation
When the setup procedure has been completed, you can check whether or not theData Protector software has been properly installed. Proceed as follows:
Installation and licensing guide 207

1. Check if the Cluster service account is assigned to the Data Protector Inetservice on each cluster node. Make sure the same user is also added to the DataProtector admin user group. The logon account type should be set to This accountas shown in Figure 34 on page 208.
Figure 34 Data Protector user account
2. Switch to the Data_Protector_home\bin directory.
3. Run the following command:
omnirsh host INFO_CLUS
where host is the name of the cluster client system. The output should return thename of the cluster-aware client system. If the output returns 0 “NONE”, DataProtector is not installed in the cluster-aware mode.
Veritas Volume Manager
If you have Veritas Volume Manager installed on the cluster, additional steps arerequired after you have completed the installation of Data Protector on MicrosoftCluster Server. See “Installing Data Protector on Microsoft Cluster with Veritas VolumeManager” on page 454, for the additional steps to be performed.
Installing Data Protector on your network208

What’s next?
When the installation has been completed, you must import the virtual server hostname(cluster-aware application) to the Data Protector cell. See “Importing a cluster-awareclient to a cell ” on page 216.
Refer to the online Help index: “configuring” for more information on how to configurebackup devices, media pools, or any additional Data Protector configuration tasks.
Changing the Inet and CRS accounts
If needed, change the accounts under which the Data Protector Inet and CRS servicesare running.
Installing Data Protector clients on a Veritas ClusterData Protector clients can be installed on Veritas Cluster nodes, with a Cell Manageroutside of the cluster. Using this configuration, backup of the local disks is supported.
Note that if you want to back up shared disks or cluster-aware applications, thevirtual server IP address should be used for licenses.
IMPORTANT:For Data Protector, cluster-aware backups with failover are not supported.
Installing a ClientThe installation procedure is standard procedure for installing Data Protector on aSolaris client system. Refer to “Installing Solaris clients” on page 100 for detailedinstructions.
What’s next?
When the installation has been completed:• If you want to back up the virtual server, you must import it into the cell.• If you want to back up the physical nodes, you must also import them into the
cell.See “Importing a cluster-aware client to a cell ” on page 216.Refer to the online Helpindex: “configuring” for more information on how to configure backup devices, mediapools, or any additional Data Protector configuration tasks.
Installation and licensing guide 209

Installing Data Protector clients on a Novell NetWareCluster
Data Protector clients can be installed on Novell NetWare Cluster Services clusternodes, with a Cell Manager outside of the cluster. Using this configuration, backupof local disks is supported, as well as backup of shared cluster pools via the virtualserver. For supported operating systems for Novell NetWare Cluster refer to the HPData Protector product announcements, software notes, and references.
Note that if you want to back up shared disks or cluster-aware applications, thevirtual server IP address should be used for licenses.
IMPORTANT:Cluster-aware backups with failover are not supported. In case of failover, backup orrestore sessions have to be restarted manually.
Backup devices should be configured on cluster nodes and not on the virtual server,because cluster nodes control the devices.
Installing a client
Before installation
Before installing Data Protector clients on Novell NetWare Cluster Services clusternodes, it is recommended that you edit unload scripts for every virtual server in thecluster so that the secondary IP address remains active during the migration of thevirtual server to another node. You can edit the unload scripts using the Novell’sConsole One utility or NetWare Remote Manager as described in the Novell NetWaredocumentation.
Example
The default unload script for every virtual server is:
del secondary ipaddress 10.81.1.173CLUSTER CVSBIND DEL TREENW6_CLUSTER_FIRST_SERVER 10.81.1.173NUDP DEL TREENW6_CLUSTER_FIRST_SERVER 10.81.1.173nss /pooldeactivate=FIRST /overridetype=question
The modified unload script for every virtual server is:
Installing Data Protector on your network210
nss /pooldeactivate=FIRST /overridetype=questiondel secondary ipaddress 10.81.1.173CLUSTER CVSBIND DEL TREENW6_CLUSTER_FIRST_SERVER 10.81.1.173NUDP DEL TREENW6_CLUSTER_FIRST_SERVER 10.81.1.173
The modified unload script will first dismount and deactivate all cluster shared poolson the virtual server, and only then will delete the secondary IP address. This meansthat the secondary IP address will remain active during the migration.
To activate the modified unload script, put the virtual server offline and then backonline on the preferred node.
Editing the smsrun.bas script
After you have edited the unload script(s), you have to edit the smsrun.bas scriptto include loading of the TSA600.NLM module (or TSAFS.NLM - depending onwhich module you are using) with the appropriate parameter which disables supportfor the cluster. For more information, refer to the Novell Support Knowledge databasefor “Known Backup/Restore Issues for NetWare 6.x”.
Perform the following steps to edit the smsrun.bas script:
1. Change the write protection for the SYS:NSN/user/smsrun.bas script fromread only to read/write and open it in a standard console editor.
2. Change the nlmArray = Array(“SMDR”, “TSA600”, “TSAPROXY”) (ornlmArray = Array(“SMDR”, “TSAFS /NoCluster”)) line in the SubMain() section to:
• nlmArray = Array(“SMDR”, “TSA600 /cluster=off”,“TSAPROXY”) if you have TSA600 installed.
• nlmArray = Array(“SMDR”, “TSAFS /NoCluster”) if you haveTSAFS installed.
Save the changes.
3. At the file server console, type SMSSTOP.
4. At the file server console, type SMSSTART.
Cluster shared volumes are now seen by the TSA600.NLM (TSAFS.NLM) module.
Installation
The installation procedure is the standard procedure for local installation of DataProtector on a Novell Netware client. Refer to “Local installation of the NovellNetWare clients” on page 131 for detailed instructions.
Installation and licensing guide 211

What’s next?
When the installation has been completed:• If you want to back up the physical nodes, you must also import them into the
cell.• If you want to back up the virtual server (shared cluster volumes), you must import
it into the cell.See “Importing a cluster-aware client to a cell ” on page 216.Refer to the online Helpindex: “configuring” for more information on how to configure backup devices, mediapools, or any additional Data Protector configuration tasks.
Installing Data Protector on IBM HACMP ClusterData Protector supports IBM High Availability Cluster Multi-processing for AIX.
IMPORTANT:Install the Data Protector Disk Agent component on all the cluster nodes.
Installing cluster-aware clientsTo install Data Protector components on a cluster node, use the standard procedurefor installing Data Protector on UNIX systems. For details, see Local installation ofUNIX clients or Remote installation of Data Protector clients.
What’s next?
After the installation, import the cluster nodes and the virtual server (virtual environmentpackage IP address) to the Data Protector cell. See “Importing a cluster-aware clientto a cell ” on page 216.
For information on how to configure backup devices, media pools, or any additionalData Protector configuration tasks, see the online Help index: “configuration”.
Installing Data Protector on your network212

3 Maintaining the installation
In this chapterThis chapter describes the procedures most frequently performed to modify theconfiguration of your backup environment. The following sections provide informationabout:
• How to import clients to a cell using the graphical user interface. Refer to“Importing clients to a cell ” on page 213.
• How to import an Installation Server to a cell using the graphical user interface.Refer to “Importing an installation server to a cell ” on page 216.
• How to import clusters/virtual servers using the graphical user interface. Refer to“Importing a cluster-aware client to a cell ” on page 216.
• How to export clients using the graphical user interface. Refer to “UninstallingData Protector software” on page 238.
• How to ensure security using the graphical user interface. Refer to “Securityconsiderations” on page 222.
• How to verify which Data Protector patches are installed. Refer to “Verifying whichData Protector patches are installed” on page 235.
• How to uninstall the Data Protector software. Refer to “Uninstalling Data Protectorsoftware” on page 238.
• How to add or remove Data Protector software components. Refer to “ChangingData Protector software components” on page 251.
Importing clients to a cellWhen you distribute Data Protector software to clients using the Installation Server,the client systems are automatically added to the cell. As soon as the remoteinstallation has finished, the client becomes a member of the cell.
Installation and licensing guide 213

When to import?
Some of the clients, such as Novell NetWare, HP OpenVMS, and Windows XP HomeEdition, must be imported to the cell after the installation. Importing means manuallyadding a computer to a cell after the Data Protector software has been installed.When added to a Data Protector cell, the system becomes a Data Protector client.Once the system is a member of the cell, information about the new client is writtento the IDB, which is located on the Cell Manager.
A client can only be a member of one cell. If you wish to move a client to a differentcell, you first export it from its current cell and then import it to the new cell. For theprocedure on how to export clients, refer to “Exporting clients from a cell” on page 219.
NOTE:Before importing an IAP Server, make sure you have added a certificate file for accessingthe IAP appliance to the Cell Manager. For a detailed procedure, see the online Helpindex: “adding, IAP certificates”.
IMPORTANT:After you have installed Data Protector clients and imported them to a cell, it is highlyrecommended to protect the clients from access by unwanted cell authorities. Refer to“Securing clients” on page 225.
How to import?
You import a client system using the graphical user interface by performing thefollowing steps:
1. In the Context List, click Clients.
2. In the Scoping Pane, right-click Clients and click Import Client.
Maintaining the installation214

3. Type the name of the client or browse the network to select the client (onWindows GUI only) you want to import. See Figure 35 on page 215.
Figure 35 Importing a client to the cell
If you are importing a client configured with multiple LAN cards, select the VirtualHost option. With this option you must import all names of the same system.
If you are importing an NDMP client, select the NDMP Server option and clickNext. Specify the information about the NDMP Server.
If you are importing an HP OpenVMS client, type the TCP/IP name of theOpenVMS client in the Name text box.
If you are importing an IAP Server, select the IAP Server option and click Next.Specify the information about the IAP Server.
If you are importing a VLS device, select the VLS Device option and click Next.Specify the information about the VLS device.
Click Finish to import the client.
The name of the imported client is displayed in the Results Area.
Installation and licensing guide 215

Importing an installation server to a cellWhen to add?
An Installation Server must be added to a cell in the following circumstances:
• If it is installed as an independent UNIX Installation Server, i.e., it is not installedon a Cell Manager.In this case, it will not be possible to remotely (push) install any clients within acell until the Installation Server has been added to that cell.
• If it is installed on a Cell Manager, but you also want to use it to perform remoteinstallations in another cell. It must then be added to the other cell (using the GUIconnected to the Cell Manager of the other cell).
Unlike a client, an Installation Server can be a member of more than one cell.Therefore it does not have to be deleted (exported) from one cell before it can beadded (imported) to another cell.
How to add?
The process for importing an Installation Server is similar to that for importing a client.The task is performed using the Data Protector GUI (connected to the Cell Managerof the cell to which the Installation Server is to be added) by performing the followingsteps:
1. In the Context List, click Clients.
2. In the Scoping Pane, right-click Installation Servers, and then click ImportInstallation Server to start the wizard. See Figure 35 on page 215.
3. Enter or select the name of the system that you want to import. Click Finish toimport the Installation Server.
Importing a cluster-aware client to a cellAfter you have locally installed the Data Protector software on a cluster-aware client,import the virtual server representing the cluster-aware client to the Data Protectorcell.
Prerequisites
• Data Protector must be installed on all cluster nodes.
Maintaining the installation216

• All cluster packages must be running within the cluster.
Microsoft Cluster ServerTo import a Microsoft Cluster Server client to the Data Protector cell, proceed asfollows:
1. In the Data Protector , switch to the Clients context.
2. In the scoping pane, right-click MS Clusters and click Import Cluster.
3. Type the name of the virtual server representing the cluster client to be importedor browse the network to select the virtual server. See Figure 36 on page 217 .
Figure 36 Importing a Microsoft Cluster Server client to a cell
4. Click Finish to import the cluster client.
TIP:To import a specific cluster node or a virtual server, right click its cluster in the ScopingPane and click Import Cluster Node or Import Cluster Virtual Server.
Installation and licensing guide 217

Other clusters
Tru64 Cluster prerequisites
Before importing cluster hostnames, make sure that:
• Data Protector is installed on the shared disk in the cluster• All Tru64 Cluster nodes are running within the Tru64 Cluster• Data Protector inetd process is running on each node
Procedure
To import a MC/ServiceGuard, Veritas, Tru64 Cluster, IBM HACMP Cluster or NovellNetWare Cluster Services client to the Data Protector cell, proceed as follows:
1. In the Data Protector Manager, switch to the Clients context.
2. In the Scoping Pane, right-click Clients and click Import Client.
3. Type the hostname of the virtual server as specified in the application clusterpackage, or browse the network to select the virtual server (on Windows GUIonly) you want to import.
Select the Virtual Host option to indicate that this is a cluster virtual server. SeeFigure 37 on page 219.
4. Click Finish to import the virtual server.
Maintaining the installation218

Figure 37 Importing a MC/ServiceGuard, Veritas, or Novell NetWareCluster Services client to a cell
TIP:To configure backups of data on the local disks of the cluster nodes, you need to importthe cluster nodes representing the Data Protector clients. For the procedure, see “Importingclients to a cell ” on page 213.
Exporting clients from a cellExporting a client from a Data Protector cell means removing its references from theIDB on the Cell Manager without uninstalling the software from the client. This canbe done using the Data Protector GUI.
You may want to use the export functionality if you:
• Want to move a client to another cell• Want to remove a client from the Data Protector cell configuration which is no
longer part of the network• Want to fix problems caused by insufficient licenses
Installation and licensing guide 219

By exporting a client from a cell, the license becomes available to some othersystem.
Prerequisites
Before you export a client, check the following:
• All the occurrences of the client have been removed from backup specifications.Otherwise, Data Protector will try to back up unknown clients and this part of thebackup specification will fail. Refer to online Help index: “modifying, backupspecification” for instructions on how to modify backup specifications.
• The client does not have any connected and configured backup devices. Oncethe system is exported, Data Protector can no longer use its backup devices inthe original cell.
How to export?
You export a client using the Data Protector GUI by performing these steps:
1. In the Context List, click Clients.
Maintaining the installation220

2. In the Scoping Pane, click Clients, right-click the client system that you want toexport, and then click Delete. See Figure 38 on page 221.
Figure 38 Exporting a client system
3. You will be asked if you want to uninstall Data Protector software as well. ClickNo to export the client, and then click Finish.
The client will be removed from the list in the Results Area.
NOTE:You cannot export or delete a Data Protector client if the Cell Manager is installed onthe same system as the client you would like to export. However, you can export theclients from systems where only the client and Installation Server are installed. In thiscase, Installation Server is also removed from the cell.
Microsoft Cluster Server clients
To export a Microsoft Cluster Server client from the Data Protector cell, proceed asfollows:
1. In the Context List, click Clients.
Installation and licensing guide 221

2. In the Scoping Pane, expand MS Clusters, right-click the cluster client that youwant to export, and then click Delete.
3. You are asked if you also want to uninstall the Data Protector software. ClickNo to only export the cluster client.
The cluster client will be removed from the list in the Results Area.
TIP:To export a specific cluster node or a virtual server, right-click the cluster node or virtualserver in the Scoping Pane and click Delete.
Security considerationsThis section describes the security elements of Data Protector. It describes the advancedsettings that can be used to enhance the security of Data Protector with prerequisitesand considerations that have to be taken into account.
Since enhancing security in an entire environment requires additional effort, manysecurity features cannot be enabled by default.
The considerations described in this chapter apply not only when the security settingsare changed, but must also be followed when configuring new users, adding clients,configuring Application Agents, or making any other changes these considerationsapply to. Any changes in the security settings can have cell-wide implications andshould be carefully planned.
Security layersSecurity has to be planned, tested and implemented on different security-critical layersto ensure the secure operation of Data Protector. Such layers are Data Protectorclients, Cell Manager and users. This section explains how to configure security oneach of these layers.
Client securityData Protector agents installed on clients in the cell provide numerous powerfulcapabilities, like access to all the data on the system. It is important that thesecapabilities are available only to the processes running on cell authorities (CellManager and Installation Server), and that all other requests are rejected.
Maintaining the installation222

Before securing clients, it is important to determine a list of trusted hosts. This list mustinclude:
• Cell Manager• Relevant Installation Servers• For some clients also a list of clients that will access the robotics remotely.
IMPORTANT:The list must contain all possible hostnames (or IP addresses) where connections cancome from. Multiple hostnames may be needed if any of the above clients is multihomed(has multiple network adapters and/or multiple IP addresses) or is a cluster.If the DNS configuration in the cell is not uniform, additional considerations may apply.For more information, refer to “Securing clients” on page 225.
While it may not always be necessary to secure each and every client in the cell, itis important that the computers that other clients will trust are secured themselves:
• Cell Manager / MoM• Installation Servers• Media Agent (MA) clients.
NOTE:User interface clients do not need to be added to the list of trusted clients. Depending onthe user rights, you can either use the GUI to access the complete Data Protectorfunctionality or to access only specific contexts.
Data Protector usersConsider the following important aspects when configuring Data Protector users:
• Some user rights are very powerful. For example, the User configurationand Clients configuration user rights enable the user to change the securitysettings. Restore to other clients user right is also very powerful,especially if (but not only if) combined with either the Back up as root orRestore as root user rights.
• Even less powerful user rights bear an inherent risk associated with them. DataProtector can be configured to restrict certain user rights to reduce these risks.
Installation and licensing guide 223

These settings are described later on in this chapter. See also “Start backupspecification user right” on page 233.
• Data Protector comes with only a few predefined user groups. It is recommendedto define specific groups for each type of user in the Data Protector environmentto minimize the set of rights assigned to them.
• The configuration of users is connected with user validation (see “Strict hostnamechecking” on page 231). Enhanced validation can be worthless without carefuluser configuration and vice versa - even the most careful user configuration canbe worked around without the enhanced validation.
• It is important that there are no “weak” user specifications in the Data Protectoruser list.
NOTE:The host part of a user specification is the strong part (especially with the enhancedvalidation), while user and group parts cannot be verified reliably. Any user withpowerful user rights should be configured for the specific client they will use for DataProtector administration. If multiple clients are used, an entry should be added foreach client, rather than specifying such a user as user, group, <Any>. Non-trustedusers should not be allowed to log on to any of those systems.
See also the online Help index: “configuring, users” for details on configuring users.
Cell Manager securityCell Manager security is important because the Cell Manager has access to all clientsand all data in the cell.
Security of the Cell Manager can be enhanced via the strict hostname checkingfunctionality. However, it is important that the Cell Manager is also secured as aclient and that Data Protector users are configured carefully. Refer to “Strict hostnamechecking” on page 231 and “Securing clients” on page 225.
Other security aspectsThere are also some other security related aspects you should consider:
• Users should not have access to any of the trusted clients (Cell Manager,Installation Servers, MA, and robotics clients). Even granting anonymous log onor ftp access could introduce a serious risk to overall security.
Maintaining the installation224
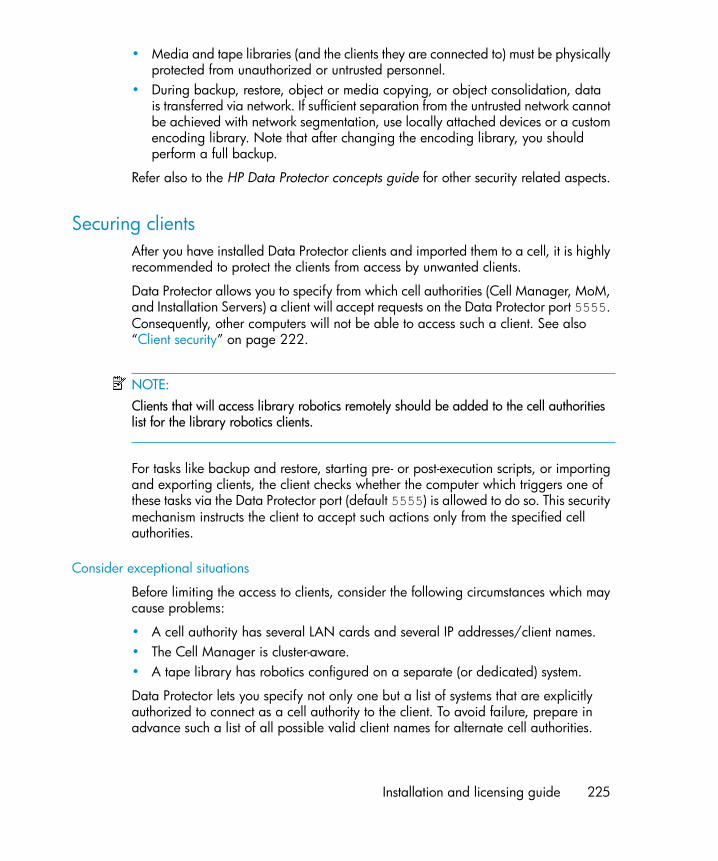
• Media and tape libraries (and the clients they are connected to) must be physicallyprotected from unauthorized or untrusted personnel.
• During backup, restore, object or media copying, or object consolidation, datais transferred via network. If sufficient separation from the untrusted network cannotbe achieved with network segmentation, use locally attached devices or a customencoding library. Note that after changing the encoding library, you shouldperform a full backup.
Refer also to the HP Data Protector concepts guide for other security related aspects.
Securing clientsAfter you have installed Data Protector clients and imported them to a cell, it is highlyrecommended to protect the clients from access by unwanted clients.
Data Protector allows you to specify from which cell authorities (Cell Manager, MoM,and Installation Servers) a client will accept requests on the Data Protector port 5555.Consequently, other computers will not be able to access such a client. See also“Client security” on page 222.
NOTE:Clients that will access library robotics remotely should be added to the cell authoritieslist for the library robotics clients.
For tasks like backup and restore, starting pre- or post-execution scripts, or importingand exporting clients, the client checks whether the computer which triggers one ofthese tasks via the Data Protector port (default 5555) is allowed to do so. This securitymechanism instructs the client to accept such actions only from the specified cellauthorities.
Consider exceptional situations
Before limiting the access to clients, consider the following circumstances which maycause problems:
• A cell authority has several LAN cards and several IP addresses/client names.• The Cell Manager is cluster-aware.• A tape library has robotics configured on a separate (or dedicated) system.
Data Protector lets you specify not only one but a list of systems that are explicitlyauthorized to connect as a cell authority to the client. To avoid failure, prepare inadvance such a list of all possible valid client names for alternate cell authorities.
Installation and licensing guide 225

The list should include:
• All additional client names (for all LAN cards) of the cell authority.• Client names of all cluster nodes where the Cell Manager might failover, as well
as a cluster virtual server hostname.• The target system name to which a cell authority will be moved in case of a total
hardware failure of the cell authority. This target system has to be defined in thedisaster recovery strategy.
• For clients that are allowed to access a client that controls the robotics of a library,all clients that use the drives of that library.
The concept of allowing and denying access can be applied to all systems with DataProtector installed. For example, you can allow or deny access of Cell Managers toclients, Cell Managers to Cell Managers, Installation Servers to clients, or clients toclients.
NOTE:If an Installation Server residing on a system other than the Cell Manager is not addedto the list of allowed clients, it will not have access to a secured client. In this case, theoperations dependent on the Installation Server (such as checking installation, addingcomponents and removing clients) will fail. If you want these operations to be availableon the secured client, add the Installation Server to the list of allowed clients.
How to secure a client
To enable verification of a cell authority on the client side (secure a client), performthe following steps in the Data Protector GUI:
1. In the Context List, click Clients.
Maintaining the installation226

2. In the Scoping Pane, expand Clients, right-click the client(s) you want to secure,and click Secure. See Figure 39 on page 227.
Figure 39 Securing a client
Installation and licensing guide 227

3. Type the names of the systems that will be allowed to access the selected client(s)or search for the systems using the Network or Search tabs. Click Add to addeach system to the list. See Figure 40 on page 228.
Figure 40 Enabling security on selected client(s)
The Cell Manager is automatically provided with access and added to the listof trusted clients. You cannot exclude the Cell Manager from the list.
4. Click Finish to add the selected systems to the allow_hosts file.
What happens?
Clients will verify the source for each request from other clients and allow only thoserequests received from clients selected in the Enable Security on selected client(s)window. These clients are listed in the allow_hosts file. If a request is denied, theevent is logged to the inet.log file in the following directory:• On Windows Vista, Windows Server 2008:
Data_Protector_program_data\log
• On other Windows systems: Data_Protector_home\log• On HP-UX, Solaris, and Linux: /var/opt/omni/log• On other UNIX systems: /usr/omni/log
Maintaining the installation228

To secure all clients in the cell, perform the following steps in the Data Protector GUI:
1. In the Context List, click Clients.
2. Type the names of the systems that will be allowed to access all clients in thecell or search for the systems using the Network (on Windows GUI only) orSearch tabs. Click Add to add each system to the list. See Figure 41 on page 229.
Figure 41 Enabling security for all clients in the cell
3. Click Finish to add the selected systems to the allow_hosts file.
What happens?
Clients will verify the source of each request and allow only those requests receivedfrom clients selected in the Enable Security on Cell Manager window. These clientsare listed in the allow_hosts file. If a request is denied, the event is logged to theinet.log file in thefollowing directory:
• On Windows Vista, Windows Server 2008:Data_Protector_program_data\log
• On other Windows systems: Data_Protector_home\log• On HP-UX, Solaris, and Linux: /var/opt/omni/log• On other UNIX systems: /usr/omni/log
When you secure an entire cell, all clients residing in this cell at the time are secured.When you add new clients to the cell, you should also secure them.
Installation and licensing guide 229

How to remove security
If you want to remove security from the selected system(s), perform the following stepsin the Data Protector GUI:
1. In the Context List, click Clients.
2. In the Scoping Pane, right-click the client(s) from which you want to removesecurity and click Unsecure.
3. Click Yes to confirm that you allow access to the selected client(s).
If you want to remove security from all the clients in the cell, proceed as follows:
1. In the Context List, click Clients.
2. In the Scoping Pane, right-click Clients and click Cell Unsecure.
3. Click Yes to confirm that you allow access to all client(s) in your cell.
The allow_hosts and deny_hosts filesWhen you secure a client, the client names of the systems allowed to access a clientare written to the allow_hosts file. You can also explicitly deny access to a clientfrom certain computers by adding their names to the deny_hosts file. These filesare located in the following directory:
• On Windows Vista, Windows Server 2008:Data_Protector_program_data\Config\client
• On other Windows systems: Data_Protector_home\Config\client• On HP-UX, Solaris, and Linux systems: /etc/opt/omni/client• On other UNIX systems: /usr/omni/config/client
Specify each client name in a separate line.
NOTE:If you accidentally lock out a client, you can manually edit (or delete) the allow_hostsfile on this client.
On Windows systems, the files are in double-byte format (Unicode), whereas onHP-UX, Solaris, and Linux systems the files are in single-byte format or multi-byteformat (for example, Shift-JIS).
Maintaining the installation230

Excessive logging to the inet.log fileIf the clients are not secured and the Cell Manager is configured in theMC/ServiceGuard environment or has multiple names or IP numbers, the inet.logfile may contain many entries of the following type:
A request 0 came from host name.company.com which is not aCell Manager of this client
This happens because the client, which is not secured, recognizes only the primaryhostname of the Cell Manager. Requests from any other clients are allowed, butlogged to the inet.log file.
When a client is secured, requests from the clients listed in the allow_hosts fileare accepted, and are thus not logged. Requests from other clients are denied.
Securing clients can be used as a workaround to prevent unnecessary entries ininet.log files. However, all possible client names for the Cell Manager should belisted in the allow_hosts file on each client. This enables access to the client alsoin case of a failover.
If this workaround is for any reason not possible in your environment, you can securethe clients and specify * as an IP address range for the systems you want to allowaccess. This means that your clients will accept requests from all systems (any IPaddress) and will practically not be secured, but you will still resolve the excessivelogging issue.
Strict hostname checkingBy default, the Cell Manager uses a relatively simple method for validating users. Ituses the hostname as known by the client where a user interface or an ApplicationAgent is started. This method is easier to configure and it provides a reasonable levelof security in environments where security is considered as “advisory” (i.e. maliciousattacks are not expected).
The strict hostname checking setting on the other hand, provides enhanced validationof users. The validation uses the hostname as it is resolved by the Cell Manager usingthe reverse DNS lookup from the IP obtained from the connection. This imposes thefollowing limitations and considerations:
Limitations
• IP based validation of users can only be as strong as the anti-spoof protection inthe network. The security designer must determine whether the existing networkprovides a sufficient degree of anti-spoof safety for the particular security
Installation and licensing guide 231
requirements. Anti-spoof protection can be added by segmenting the networkwith firewalls, routers, VPN, and such.
• The separation of users within a certain client is not as strong as the separationbetween clients. In a high security environment, one must not mix regular andpowerful users within the same client.
• Hosts that are used in user specifications cannot be configured to use DHCP,unless they are bound to a fixed IP and configured in the DNS.
Be aware of the limitations in order to correctly assess the degree of safety that canbe achieved with the strict hostname checking.
Hostname resolution
The hostname that Data Protector uses for validation may differ between the defaultuser validation and strict hostname checking in the following situations:
• Reverse DNS lookup returns a different hostname. This can be either intentionalor can indicate misconfiguration of either the client or the reverse DNS table.
• The client is multihomed (has multiple network adapters and/or multiple IPaddresses). Whether this consideration applies to a specific multihomed client,depends on its role in the network and on the way it is configured in the DNS.
• The client is a cluster.
The nature of checks that are enabled with this setting may require reconfigurationof Data Protector users. Existing specifications of Data Protector users must be checkedto see if they could be affected by any of the above reasons. Depending on thesituation, existing specifications may need to be changed or new specifications addedto account for all the possible IPs from which the connections can come.
Note that users have to be reconfigured also when reverting back to the default uservalidation, if you had to modify user specifications when you enabled the stricthostname checking. It is therefore recommended to decide which user validation youwould like to use and keep using it.
A prerequisite for a reliable reverse DNS lookup is a secure DNS server. You mustprevent physical access and log on to all unauthorized personnel.
By configuring users with IPs instead of hostnames, you can avoid some DNS relatedvalidation problems, but such configuration is more difficult to maintain.
Requirements
The enhanced validation does not automatically grant access for certain internalconnections. Therefore, when this validation is used, a new user must be added foreach of the following:
Maintaining the installation232

• Any Application Agent (OB2BAR) on Windows clients. For Windows clients, itis required to add the user SYSTEM, NT AUTHORITY, client for each clientwhere an Application Agent is installed. Note that if Inet on a certain client isconfigured to use a specific account, this account must have already beenconfigured. For more information, refer to the online Help index: “strict hostnamechecking”.
• If you are using Web Reporting, user java, applet, hostname must be addedfor every hostname from where Web Reporting will be used. Note that for fullWeb Reporting functionality the users must be in the admin group. Therefore,these clients must be trusted. Also, before making any data or functionality ofWeb Reporting available to other users (for example, via a web server), considerthe security implications of making such data generally available.
For detailed information on user configuration, refer to the online Help index:“configuring, users”.
Enabling the featureTo enable the strict hostname checking, set the StrictSecurityFlags flag0x0003 in the global options file.
For more information about the global options file, refer to the HP Data Protectortroubleshooting guide.
Start backup specification user rightFor general information about the Data Protector users and user rights, refer to theonline Help index: “users”.
The Start backup specification user right alone does not enable a user touse the Backup context in the GUI. The user is allowed to start a backup specificationfrom the command line by using the omnib with the -datalist option.
NOTE:By combining the Start Backup Specification with the Start Backup userrights, a user is allowed to see the configured backup specifications in the GUI and isable to start a backup specification or an interactive backup.
Allowing users to perform interactive backups may not always be desired. To allowinteractive backups only for users who also have the right to save a backupspecification, set the StrictSecurityFlags flag 0x0200 in the global options file.
Installation and licensing guide 233

For more information on the global options file, refer to the HP Data Protectortroubleshooting guide.
Hiding the contents of backup specificationsIn a high security environment, the contents of saved backup specifications may beconsidered to be sensitive or even confidential information. Data Protector can beconfigured to hide the contents of backup specifications for all users, except for thosewho have the Save backup specification user right. To do so, set the StrictSecurityFlagsflag 0x0400 in the global options file.
For more information about the global options file, refer to the HP Data Protectortroubleshooting guide.
Host trustsThe host trusts functionality reduces the need to grant the Restore to other clients userright to users when they only need to restore the data from one client to anotherwithin a limited number of clients. You can define groups of hosts that will trust eachother with the data.
Host trusts are typically used in the following situations:
• For clients in a cluster (nodes and virtual server).• If the hostname of a client is changed and the data from the old backup objects
needs to be restored.• If there is a mismatch between the client hostname and backup objects due to
DNS issues.• If a user owns several clients and needs to restore the data from one client to
another.• When migrating data from one host to another.
Configuration
To configure host trusts, on the Cell Manager, create the fileData_Protector_program_data\Config\Server\cell\host_trusts(Windows Server 2008),Data_Protector_home\Config\Server\cell\host_trusts (otherWindowssystems), or /etc/opt/omni/server/cell/host_trusts (UNIX systems).
The groups of hosts that trust each other are defined as lists of hostnames enclosedin curly brackets. For example:
Maintaining the installation234

Example
GROUP="cluster.domain.com"{cluster.domain.comnode1.domain.comnode2.domain.com}GROUP="Bajo"{computer.domain.comanothercomputer.domain.com}
Monitoring security eventsIf you encounter problems using Data Protector, you can use the information in thelog files to determine your problem. For example, logged events can help you todetermine misconfigured users or clients.
Client security events
Client security events are logged in the inet.log file on every client in the cell:
• On Windows Vista, Windows Server 2008:Data_Protector_program_data\log
• On other Windows systems: Data_Protector_home\log
• On HP-UX, Solaris, and Linux: /var/opt/omni/log• On other UNIX systems: /usr/omni/log
Cell Manager security events
Cell Manager security events are logged in the security.log file on the CellManager:
• OnWindows Server 2008: Data_Protector_program_data\log\server• On other Windows systems : Data_Protector_home\log\server• On UNIX systems: /var/opt/omni/server/log
Verifying which Data Protector patches are installedYou can verify which Data Protector patches are installed on each system in the cell.
Installation and licensing guide 235

Prerequisite
To use this functionality, you should have the User Interface or Java GUI Clientcomponent installed.
NOTE:After you install a site-specific patch, it will always be listed in the patch report, even ifit has been included into later patches.
To verify which Data Protector patches are installed on a particular system in a cell,use the Data Protector GUI or CLI.
Limitations
Below are the limitations for patch verification:
• Patch verification can check which patches are installed only on members thatbelong to the same cell.
Verifying Data Protector patches using the GUITo verify which patches are installed on a particular client using the Data ProtectorGUI, follow the below procedure:
1. In the Context List, select Clients.
2. In the Scoping Pane, expand Clients and select a system in the cell for whichyou want to verify the patches installed.
Maintaining the installation236
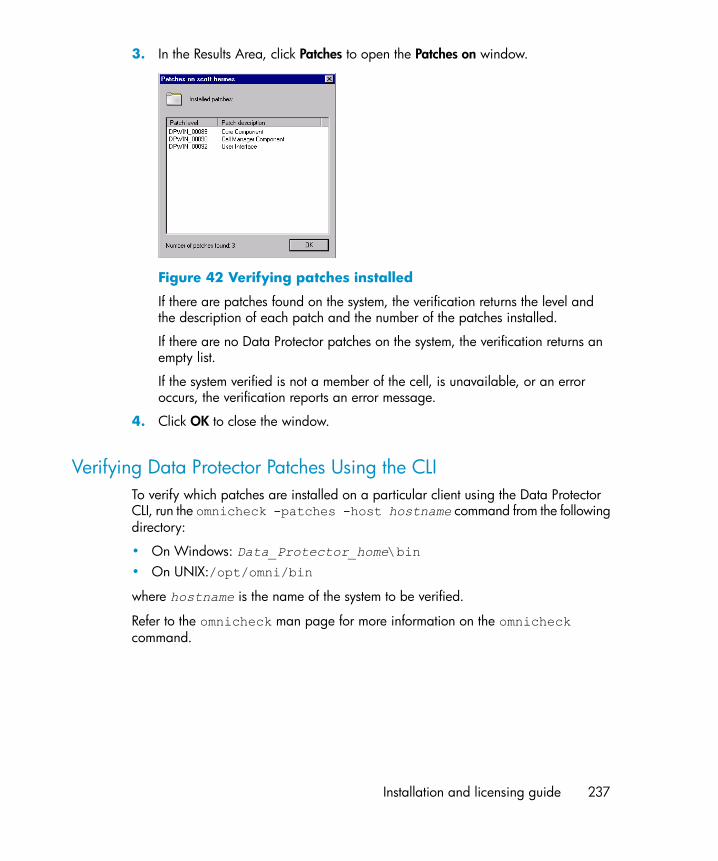
3. In the Results Area, click Patches to open the Patches on window.
Figure 42 Verifying patches installed
If there are patches found on the system, the verification returns the level andthe description of each patch and the number of the patches installed.
If there are no Data Protector patches on the system, the verification returns anempty list.
If the system verified is not a member of the cell, is unavailable, or an erroroccurs, the verification reports an error message.
4. Click OK to close the window.
Verifying Data Protector Patches Using the CLITo verify which patches are installed on a particular client using the Data ProtectorCLI, run the omnicheck -patches -host hostname command from the followingdirectory:
• On Windows: Data_Protector_home\bin• On UNIX:/opt/omni/bin
where hostname is the name of the system to be verified.
Refer to the omnicheck man page for more information on the omnicheckcommand.
Installation and licensing guide 237

Uninstalling Data Protector softwareIf your system configuration changes, you may want to uninstall the Data Protectorsoftware from the system or remove some software components.
Uninstalling is removing all the Data Protector software components from the system,including all references to this system from the IDB on the Cell Manager computer.However, by default, the Data Protector configuration data remains on the systembecause you may need this data in the future upgrade of Data Protector. If you wantto remove the configuration data after uninstalling the Data Protector software, deletethe directories where Data Protector was installed.
If you have some other data in the directory where Data Protector is installed, makesure you copied this data to another location before uninstalling Data Protector.Otherwise, the data will be removed during the uninstallation process.
Uninstalling the Data Protector software from a cell consists of the following steps:
1. Uninstalling the Data Protector client software using the GUI. See “Uninstallinga Data Protector client” on page 239.
2. Uninstalling Data Protector Cell Manager and Installation Server. See“Uninstalling the Cell Manager and Installation Server” on page 240.
You can also uninstall Data Protector software components without uninstalling theCell Manager or client. See “Changing Data Protector softwarecomponents” on page 251
On UNIX, you can also manually remove the Data Protector software. See “Manualremoval of Data Protector software on UNIX” on page 249.
Prerequisites
Before you uninstall the Data Protector software from a computer, check the following:
• Make sure that all references to the computer are removed from the backupspecifications. Otherwise, Data Protector will try to back up unknown systemsand this part of the backup specification will fail. Refer to online Help index:“modifying, backup specification” for instructions on how to modify backupspecifications.
• Make sure that no backup devices are connected and configured on the systemthat you want to uninstall. Once the system is exported, Data Protector can nolonger use its backup devices in the original cell.
Maintaining the installation238
Uninstalling a Data Protector client
NOTE:The remote uninstallation procedure requires the Installation Server to be installed forthe platforms from which you are uninstalling the Data Protector software.
You uninstall a client remotely by performing these steps in the Data Protector GUI:
1. In the Context List, switch to the Clients context.
2. In the Scoping Pane, expand Clients, right-click the client you want to uninstall,and then click Delete. You will be asked if you want to uninstall the Data Protectorsoftware as well.
3. Click Yes to uninstall all the software components from the client, and then clickFinish.
The client will be removed from the list in the Results Area and the Data Protectorsoftware will be deleted from its hard disk.
Note that the Data Protector configuration data remains on the client system. If youwant to remove the configuration data, delete the directories where Data Protectorwas installed.
Uninstalling Data Protector also removes the Java GUI Client. Unless the Permanentlydelete configuration data checkbox is selected when uninstalling Data Protector, theJava GUI configuration data remains on the system.
Cluster clients
If you have cluster aware clients in your Data Protector environment and you wantto uninstall them, you must do this locally. The procedure is the same as for uninstallingCell Manager or Installation Server. Refer to “Uninstalling the Cell Manager andInstallation Server” on page 240.
The cluster client will be removed from the list in the Results Area and the DataProtector software will be deleted from its hard disk.
TruCluster
To uninstall TruCluster clients, export the virtual node first. Then uninstall Data Protectorclients from the node(s).
Installation and licensing guide 239

HP OpenVMS clients
A Data Protector OpenVMS client cannot be removed remotely using an InstallationServer. It must be uninstalled locally.
To uninstall a Data Protector client from an OpenVMS system, follow these steps:
1. First export the client concerned from the Data Protector cell using the DataProtector GUI, as described in “Exporting clients from a cell” on page 219.
When asked whether you want to uninstall the Data Protector software as well,select No.
2. To delete the actual Data Protector client software, log in to the SYSTEM accounton the OpenVMS client and execute the following command: $ PRODUCTREMOVE DP. Respond to the prompt with YES.
IMPORTANT:This will shut down the Data Protector service and delete all the directories,files, and accounts associated with Data Protector on the OpenVMS system.
Uninstalling the Cell Manager and Installation ServerThis section describes the procedure of uninstalling the Data Protector Cell Managerand Installation Server software from Windows, HP-UX, Solaris, and Linux systems.
Uninstalling from Windows system
Uninstalling on a Microsoft Cluster Server system
If you have installed HP AutoPass utility together with Data Protector on a MicrosoftCluster Server node, you must uninstall Data Protector from the same node, otherwiseAutoPass will not be uninstalled.
To uninstall Data Protector software from a Windows system, follow these steps:
1. Make sure you have terminated all Data Protector sessions and exited the GUI.
2. In Windows Control Panel, click Add/Remove Programs.
Maintaining the installation240

3. Depending on whether you installed HP AutoPass or not, and if you want toremove the Data Protector configuration data or not, different actions apply.
IMPORTANT:If you leave the Data Protector configuration data on the system after theuninstallation, and you later install a lower version of the Data ProtectorCell Manager than the uninstalled version was, note that the configurationdata will be unusable.To successfully install a lower version, during the installation choose theoption that will remove the configuration data.
Proceed as follows:
• If AutoPass utility was installed together with Data Protector:Select HP Data Protector A.06.10 and click Change and then Next. In theProgram Maintenance dialog box, select Remove. To permanently removethe Data Protector configuration data, select Permanently remove theconfiguration data. Otherwise, click Next.If AutoPass was installed together with Data Protector and Data Protector isthe only application using it, AutoPass is removed. Otherwise, AutoPass isonly unregistered with Data Protector but remains installed. To manuallyremove AutoPass, run:msiexec.exe /X Package_GUI_ID /qr INSTALLSTANDALONE=1
You can obtain the GUI ID by reading the registry entryHKEY_LOCAL_MACHINE\SOFTWARE\Hewlett-Packard\HpOvLic.
• If AutoPass has not been installed:• To uninstall Data Protector and leave the Data Protector configuration
data on the system, select HP Data Protector A.06.10 and click Remove.• To uninstall Data Protector and remove the Data Protector configuration
data, select HP Data Protector A.06.10, click Change and then Next. Inthe Program Maintenance dialog box, select Remove. Select Permanentlyremove the configuration data and click Next.
4. When uninstalling is completed, click Finish to exit the wizard.
If AutoPass was removed during the uninstallation of the Cell Manager, pressF5 in the Add/Remove Program window to refresh the list of installed programsand components.
Installation and licensing guide 241

Uninstalling from HP-UX system
IMPORTANT:If you leave the Data Protector configuration data on the system after the uninstallation,and you later install a lower version of the Data Protector Cell Manager than theuninstalled version was, note that the configuration data will be unusable.To successfully install a lower version, after the uninstallation remove the remaining DataProtector directories from your system.
Before you start uninstalling Data Protector software, shut down Data Protectorprocesses running on the Cell Manager and/or Installation Server system:
1. Log in as root and execute the omnisv -stop command from the/opt/omni/sbin directory.
2. Enter the ps -ef | grep omni command to verify whether or not all theprocesses have been shut down. There should be no Data Protector processeslisted after executing ps -ef | grep omni.
If you have any Data Protector processes running, stop them using the kill-9 process_ID command before you proceed with uninstalling.
3. Run /usr/sbin/swremove DATA-PROTECTOR to uninstall Data Protectorsoftware.
4. The HP AutoPass utility is not removed during the Data Protector uninstallation.You can manually remove it by running the /usr/sbin/swremove HPOVLICcommand as the user root.
To remove the remaining Data Protector directories from your system refer to “Manualremoval of Data Protector software on UNIX” on page 249.
Uninstalling the Cell Manager and/or Installation Server configured onMC/ServiceGuard
If your Cell Manager and/or Installation Server is configured on an MC/ServiceGuardcluster, perform the following steps to uninstall the software.
Primary node
Log on to the primary node and perform the following steps:
Maintaining the installation242

1. Stop the Data Protector package:
cmhaltpkg pkg_name
where pkg_name stands for the name of the cluster package.
For example:
cmhaltpkg ob2cl
2. Deactivate the cluster mode for the volume group:
vgchange -c n vg_name
(where vg_name stands for the path name of the volume group located in thesubdirectory of the /dev directory).
For example:
vgchange -c n /dev/vg_ob2cm
3. Activate the volume group:
vgchange -a y -q y vg_name
For example:
vgchange -a y -q y /dev/vg_ob2cm
4. Mount the logical volume to the shared disk:
mount lv_path shared_disk
(where lv_path stands for the path name of the logical volume andshared_disk stands for the mount point or shared directory).
For example:
mount /dev/vg_ob2cm/lv_ob2cm /omni_shared
5. Remove Data Protector by using the swremove utility.
6. Remove the soft links:
rm /etc/opt/omni
rm /var/opt/omni
7. Remove the backup directories:
rm -rf /etc/opt/omni.save
rm -rf /var/opt/omni.save
Installation and licensing guide 243

8. Remove the Data Protector directory with its contents:
rm -rf /opt/omni
9. You can remove the HP AutoPass utility by running the /usr/sbin/swremoveHPOVLIC command as the user root.
10. Unmount the shared disk:
umount shared_disk
For example:
umount /omni_shared
11. Deactivate the volume group:
vgchange -a n vg_name
For example:
vgchange -a n /dev/vg_ob2cm
Secondary node
Log on to the secondary node and perform the following steps:
1. Activate the volume group:
vgchange -a y vg_name
2. Mount the shared disk:
mount lv_path shared_disk
3. Remove Data Protector by using the swremove utility.
4. Remove the soft links:
rm /etc/opt/omni
rm /var/opt/omni
5. Remove the backup directories:
rm -rf /etc/opt/omni.save
rm -rf /var/opt/omni.save
6. Remove the Data Protector directory with its contents:
rm -rf /opt/omni
Maintaining the installation244

7. Remove the directories in the shared filesystem:
rm -rf shared_disk/etc_opt_omni
rm -rf shared_disk/var_opt_omni
For example:
rm -rf /omni_shared/etc_opt_omni
rm -rf /omni_shared/etc_opt_omni
8. You can remove the HP AutoPass utility by running the /usr/sbin/swremoveHPOVLIC command as the user root.
9. Unmount the shared disk:
umount shared_disk
10. Deactivate the volume group:
vgchange -a n vg_name
Data Protector is completely removed from the system.
Uninstalling from Solaris systems
Cell Manager
The Cell Manager for Solaris is always installed locally, using the omnisetup.shcommand. Therefore, it must be uninstalled locally, using the pkgrm utility.
IMPORTANT:If you leave the Data Protector configuration data on the system after the uninstallation,and you later install a lower version of the Data Protector Cell Manager than theuninstalled version was, note that the configuration data will be unusable.To successfully install a lower version, after the uninstallation remove the remaining DataProtector directories from your system.
To uninstall the Data Protector Cell Manager, proceed as follows:
1. Make sure you have terminated all Data Protector sessions and exited thegraphical user interface.
Installation and licensing guide 245

2. Enter the pkginfo | grep OB2 command to list all the Data Protectorpackages installed on the Cell Manager.
The packages associated with the Cell Manager are as follows:
OB2-CORE Data Protector Core software
OB2-C-IS Installation Server software
OB2-CS Cell Manager software
OB2-CC Cell Console software, containing the graphical userinterface and the command-line interface
If Data Protector clients or an Installation Server are also installed on the system,other packages will also be listed.
NOTE:If you wish to leave any other Data Protector components installed, youmust leave the OB2-CORE package installed, since it is a dependency forother packages.
3. In reverse order to the sequence in which they were installed, remove thepackages mentioned in the previous step using the pkgrm package namecommand and follow the prompts.
4. The HP AutoPass utility is not removed during a Data Protector uninstallation.You can manually remove it by running the following commands as the userroot:
swremove HPOvLic
Installation Server
The Installation Server for UNIX on Solaris is always installed locally, using theomnisetup.sh command. Therefore, it must be uninstalled locally, using the pkgrmutility.
To uninstall the Data Protector Installation Server, proceed as follows:
1. Make sure you have terminated all Data Protector sessions and exited the GUI.
Maintaining the installation246

2. Enter the pkginfo | grep OB2 command to list all the Data Protectorpackages installed on the Installation Server system.
The packages associated with the Installation Server are as follows:
OB2-CORE Data Protector Core software
OB2-C-IS Installation Server Core software
OB2-SOLUX Disk Agent, Media Agent and GUI packets for remoteSolaris systems
OB2-OTHUX Disk Agent and Media Agent packets for remotenon-Solaris UNIX systems
If other Data Protector components are installed on the system, other packageswill also be listed.
NOTE:If you wish to leave any other Data Protector components installed, youmust leave the OB2-CORE package installed, since it is a dependency forother packages.
3. In reverse order to the sequence in which they were installed, remove thepackages mentioned in the previous step using the pkgrm package namecommand and follow the prompts.
Uninstalling from Linux systems
Cell Manager
The Cell Manager for Linux is always installed locally, using the omnisetup.shcommand. Therefore, it must be uninstalled locally, using the rpm utility.
Installation and licensing guide 247

IMPORTANT:If you leave the Data Protector configuration data on the system after the uninstallation,and you later install a lower version of the Data Protector Cell Manager than theuninstalled version was, note that the configuration data will be unusable.To successfully install a lower version, after the uninstallation remove the remaining DataProtector directories from your system.
To uninstall the Data Protector Cell Manager, proceed as follows:
1. Make sure you have terminated all Data Protector sessions and exited thegraphical user interface.
2. Enter the rpm -qa | grep OB2 command to list all the Data Protector packagesinstalled on the Cell Manager.
The packages associated with the Cell Manager are as follows:
OB2-CORE Data Protector Core software
OB2-CORE-IS Installation Server software
OB2-CS Cell Manager software
OB2-CC Cell Console software, containing the command-lineinterface
If Data Protector clients or an Installation Server are also installed on the system,other packages will also be listed.
NOTE:If you wish to leave any other Data Protector components installed, youmust leave the OB2-CORE package installed, since it is a dependency forother packages.
3. In reverse order to the sequence in which they were installed, remove thepackages mentioned in the previous step using the rpm -e package namecommand and follow the prompts.
Maintaining the installation248

Installation Server
The Installation Server for UNIX on Linux is always installed locally, using theomnisetup.sh command. Therefore, it must be uninstalled locally, using the rpmutility.
To uninstall the Data Protector Installation Server, proceed as follows:
1. Make sure you have terminated all Data Protector sessions and exited the GUI.
2. Enter the rpm -qa | grep OB2 command to list all the Data Protector packagesinstalled on the Installation Server system.
The packages associated with the Installation Server are as follows:
OB2-CORE Data Protector Core software
OB2-CORE-IS Installation Server Core software
OB2-LINUXP Disk Agent, Media Agent and GUI packets forremote Linux systems
OB2-OTHUXP Disk Agent and Media Agent packets for remotenon-Linux UNIX systems
If other Data Protector components are installed on the system, other packageswill also be listed.
NOTE:If you wish to leave any other Data Protector components installed, youmust leave the OB2-CORE package installed, since it is a dependency forother packages.
3. In reverse order to the sequence in which they were installed, remove thepackages mentioned in the previous step using the rpm -e package namecommand and follow the prompts.
Manual removal of Data Protector software on UNIXBefore uninstalling a UNIX client, you should export it from the cell. For procedure,refer to “Exporting clients from a cell” on page 219.
Installation and licensing guide 249

HP-UX systems
To manually remove the files from an HP-UX system, do the following:
1. Run /usr/sbin/swremove DATA-PROTECTOR to remove the Data Protectorsoftware.
2. Remove the following directories using the rm command:
rm -fr /var/opt/omni
rm -fr /etc/opt/omni
rm -fr /opt/omni
At this stage, Data Protector references no longer reside on your system.
Solaris systems
To manually remove files from a Solaris system, delete them from the followingdirectories and then delete the directories using the rm command:
rm -fr /var/opt/omni
rm -fr /etc/opt/omni
rm -fr /opt/omni
Linux systems
To manually remove files from a Linux system, delete them from the followingdirectories and then delete the directories using the rm command:
rm -fr /var/opt/omni
rm -fr /etc/opt/omni
rm -fr /opt/omni
Other UNIX systems
Delete the files from the following directory and then delete the directories using therm command:
rm -fr /usr/omni
Maintaining the installation250

Changing Data Protector software componentsThis section describes the procedure for removing and adding Data Protector softwarecomponents from or to Windows HP-UX, Solaris, and Linux systems. For the list ofsupported Data Protector components for a particular operating system, refer to theHP Data Protector product announcements, software notes, and references.
Data Protector software components can be added on the Cell Manager or on aclient using the Data Protector GUI. You perform the remote installation of selectedcomponents using the Installation Server functionality. For the detailed procedurerefer to “Remote installation of Data Protector clients” on page 81.
The Data Protector components can be removed locally on the Cell Manager or ona client.
On Windows systems
To add or remove the Data Protector software components on a Windows system,follow the steps below:
1. In the Windows Control Panel, click Add or Remove Programs.
2. Select HP Data Protector A.06.10 and click Change.
3. Click Next.
4. In the Program Maintenance window, click Modify and then Next.
5. In the Custom Setup window, select the components you want to add and/orunselect the software components you want to remove. Click Next.
6. Click Install to start the installing or removing the software components.
7. When the installation is completed, click Finish.
Cluster-Aware clients
If you are changing the Data Protector software components on the cluster-awareclients, it must be done locally, from the DVD-ROM, on each cluster node. After that,the virtual server hostname has to be manually imported to the Data Protector cellusing the GUI.
On HP-UX systems
You can add new components using the Installation Server functionality. On an HP-UXsystem, some Data Protector software components depend on each other and cannot
Installation and licensing guide 251

operate properly, if you remove one of them. The table below presents the componentsand their dependencies on each other:
Table 8 Data Protector software component dependencies on HP-UX
Depend onComponents
OMNI-COREOMNI-CC, OMNI-CORE-IS
OMNI-CORE, OMNI-CCOMNI-CS
OMNI-COREOMNI-INTEG , OMNI-DA, OMNI-MA,OMNI-VLSAM, or OMNI-NDMP
OMNI-CORE-ISOMNI-NDMP-P, OMNI-JGUI-P
OMNI-INTEG, OMNI-CORE-ISOMNI-INF-P, OMNI-SYB-P, OMNI-ORA-P,OMNI-OR8-P, OMNI-SAP-P, OMNI-SAPDB-P,OMNI-DB2-P, OMNI-EMC-P, OMNI-SSEA-P,OMNI-SNAPA-P, OMNI-SMISA-P
OMNI- CORE-ISOMNI-HPUX-P, OMNI-OTHUX-P, OMNI-OMNIST
OMNI-CORE-ISOMNI-LOTUS-P, OMNI-OV-P
Procedure
Perform the following procedure to remove Data Protector software components:
1. Log in as root and run the swremove command.
2. Double-click B6960MA, DATA-PROTECTOR, and then OB2-CM to display a listof the Data Protector components.
3. Select the components you want to remove.
4. In the Actions menu, click Mark for Remove to mark the components you wantto remove.
5. When the components you want to remove are marked, click Remove in theActions menu, and then click OK.
Maintaining the installation252

NOTE:When you mark the Data Protector components you want to remove, and if the remainingcomponents cannot operate properly, the Dependency Message Dialog box appearswith a list of dependent components.
Oracle specifics
After uninstalling the Data Protector Oracle integration on an Oracle server system,the Oracle server software is still linked to the Data Protector Database Library. Youhave to remove this link, otherwise the Oracle server cannot be started after removingthe integration. Refer to the HP Data Protector integration guide, “Using Oracle afterremoving the Data Protector Oracle integration”.
On Solaris systems
You can add new components using the Installation Server functionality. On Solarissystems, some Data Protector software components depend on each other and cannotoperate properly, if you remove one of them. The table below presents the componentsand their dependencies on each other:
Table 9 Data Protector software component dependencies on Solaris
Depend onComponents
OB2-COREOB2-CC, OB2-C-IS
OB2-CORE, OB2-CCOB2-CS
OB2-COREOB2-INTGP, OB2-DA, OB2-MA, OB2-VLSAM, orOB2-NDMPP
OB2-C-ISOB2-SOLUX, OB2–JGUI-P
OB2-INTGP, OB2-C-ISOB2-INFP, OB2-SYBP, OB2-OR8P, OB2-SAPP,OB2-SAPDP, OB2-DB2P, OB2-SSEAP, OB2-SMISP
OB2-C-ISOB2-OTHUX, OB2-OSTP, OB2-LOTP, OB2-OVP
Installation and licensing guide 253

Procedure
Perform the following procedure to remove Data Protector software components fromthe Solaris systems:
1. Make sure you have terminated all Data Protector sessions and exited the GUI.
2. Enter the command pkginfo | grep OB2 to list all the Data Protectorpackages installed.
3. In reverse order to the sequence in which they were installed, remove thepackages mentioned in the previous step using the pkgrm package namecommand and follow the prompts.
Other UNIX systems
When manually removing components from a Data Protector client on a UNIX systemother than Solaris or HP-UX, update the omni_info file in/usr/omni/bin/install/omni_info.
For each of the uninstalled components, remove the associated component versionstring from the omni_info file.
If you are only removing components from a Data Protector client and have notexported the client from the cell, you will need to update the cell configuration in thecell_info file (on the Cell Manager). This can be done by running the followingcommand on a system in the cell with the Cell Console installed:
/opt/omni/bin/omnicc -update_host HostName
Maintaining the installation254

4 Upgrading to Data ProtectorA.06.10
In this chapterThis chapter provides instructions for performing Data Protector upgrade and migrationtasks.
Upgrade overviewBefore you begin
Before upgrading an existing product version to Data Protector A.06.10, considerthe following:
• Refer to the HP Data Protector product announcements, software notes, andreferences for information about supported and discontinued platforms andversions.
• After the upgrade, the Cell Manager, and Installation Server must have the sameData Protector version installed. For the clients, it is recommended to that the sameversion is installed. Disk and Media agents clients are also supported.
• After the upgrade of a multiple-cell (MoM) environment, all Cell Managers musthave the same Data Protector version installed.
• If you have a permanent license for Data Protector A.05.10, Data ProtectorA.05.50, or Data Protector A.06.00, it can be used with Data Protector A.06.10.Otherwise, be aware that you work with an Instant-On license, which will bevalid for 60 days from the date of original installation.For details about licensing, refer to Chapter 5 on page 317.
Installation and licensing guide 255

Prerequisite
• Perform a backup of the existing Cell Manager system and the internal database(IDB).
• When migrating the Cell Manager from a system with Data Protector A.05.10,A.05.50, or A.06.00 to to a system with Data Protector A.06.10, you must firstupgrade the existing Cell Manager to Data Protector A.06.10.
Limitations
• The upgrade to Data Protector A.06.10 is only supported for Data ProtectorA.05.10, Data Protector A.05.50, and Data Protector A.06.00.
• A backup of the Internal Database, created with previous versions of DataProtector, cannot be restored with Data Protector A.06.10. After upgrading theCell Manager, backup the Internal Database before you continue using DataProtector.
• Changing the Cell Manager platform is not supported in the A.06.10 release ofData Protector. Upgrades are only supported on the same Cell Manager platform(HP-UX to HP-UX, Solaris to Solaris, Linux to Linux, and Windows to Windows).
• If you are upgrading to Data Protector A.06.10 on Windows and you have theversion of Microsoft Installer (MSI) older than 2.0, the Data Protector setup willautomatically upgrade it to version 2.0. In this case, Data Protector will displaya note at the end of the upgrade, stating that MSI was upgraded. It is highlyrecommended to restart the system, if MSI was upgraded. Consult MicrosoftSupport about the MSI 2.0 prerequisites for various Windows operating systems.To find out the version of MSI on your system, right-click the filec:\winnt\system32\msi.dll in Explorer and select Properties. In theProperties dialog box, select Version.
Upgrade sequenceTo upgrade your cell from the earlier versions of the product to Data ProtectorA.06.10, proceed as follows:
Upgrading to Data Protector A.06.10256

1. Upgrade the Cell Manager and Installation Server to Data Protector A.06.10.The steps are different for UNIX and Windows platforms.
Note that you must first upgrade the Cell Manager in the current cell before youcan upgrade the Installation Server.
For some specific cell configurations, the file names in the IDB need to beconverted after the upgrade of the Cell Manager has been performed. You willbe prompted in such case. Refer to Table 11 on page 288 and Table12 on page 289.
2. Upgrade the GUI clients.
3. Upgrade the clients that have an online application integration installed, suchas Oracle, SAP R/3, Informix Server, Microsoft SQL Server, Microsoft ExchangeServer, and other.
4. Upgrade the clients that have a Media Agent (MA) installed. You can performbackups as soon as MA is upgraded on all MA clients of the same platform asthe Cell Manager. For the Data Protector A.05.10 MA client, certain limitationsapply. Refer to Table 11 on page 288 and Table 12 on page 289.
5. It is recommended that you upgrade the clients that have the filesystem DiskAgent (DA) installed within the next two weeks.
For information on impact of DA version on backup and restore before and afterthe IDB file name conversion, refer to “Conversion of file names in theIDB” on page 287.
Upgrading in a MoM environment
To upgrade your MoM environment to Data Protector A.06.10, you need to upgradethe MoM Manager system first. After this is done, all Cell Managers of the previousversions, which have not been upgraded yet, are able to access the Central MMDBand central licensing, perform backups, but other MoM functionality is not available.Note that device sharing between the Data Protector A.06.10 MoM cell and thecells with earlier versions of the product installed is not supported. During the upgradein a MoM environment, none of the Cell Managers in the MoM environment shouldbe operational.
The need to convert file names in the IDBData Protector versions A.05.50, A.06.00 and A.06.10 have improved handlingand display of file names created with different locales on different platforms. Thisrequires a conversion of the existing file names in the IDB for some specific cellconfigurations in case you are upgrading from Data Protector A.05.10.
Installation and licensing guide 257

The conversion is performed on the:
• UNIX Cell Manager as a part of post-upgrade backups of Windows clients.• Windows Cell Manager as a background process after the upgrade of the Cell
Manager.
You will be prompted, if it is needed to perform the IDB conversion.
UNIX
On a UNIX Cell Manager, the IDB conversion is performed as a part of thepost-upgrade backups of Windows clients until
• the period for conversion expires, or• a full backup of all Windows clients in the cell has been performed. This step is
very important and must be done.
For file name conversion performance related figures refer to the HP Data Protectorproduct announcements, software notes, and references.
Windows
On a Windows Cell Manager, the IDB conversion can be postponed, however,certain limitations apply until it is performed.
More detailed information regarding the file name conversion in the IDB onWindowsand UNIX Cell Managers can be found in “Conversion of file names in theIDB” on page 287.
Automigration of encryption keysAfter the upgrade of the Cell Manager, Installation Server, and all clients to the DataProtector A.06.10, the omnikeymigrate command automatically migrates allexisting key store files from all client systems in the cell and imports them into thecentral key store file on the Data Protector A.06.10 Cell Manager. If an activeencryption key is migrated from the specified client system, all backup specificationsthat are associated with this particular client system are automatically migrated withthe key. After the import, all migrated encryption keys are inactive.
If automigration is not functioning for any reason, you can manually migrate theencryption keys. For details, refer to the omnikeymigrate man page or the HPData Protector command line interface reference.
Upgrading to Data Protector A.06.10258

Upgrading from Data Protector A.05.10, A.05.50,and A.06.00
The Data Protector A.05.10, A.05.50 and A.06.00 release versions can be directlyupgraded to Data Protector A.06.10 for UNIX and Windows platforms.
Licenses
The existing Data Protector A.05.10, A.05.50 and A.06.00 licenses are fullycompatible and valid for use with Data Protector A.06.10. For details about licensing,refer to Chapter 5 on page 317.
Before you begin
Before you begin with the upgrade, refer to “Upgrade overview” on page 255 forinformation on limitations and the upgrade sequence.
Upgrading the UNIX Cell Manager and Installation Server
Prerequisites
• Stop all Data Protector services using the /opt/omni/sbin/omnisv -stopcommand.
• On Solaris, if you have any old patches installed, uninstall them before theupgrade.
• A POSIX shell (sh) is required for the installation.• You must have root permissions to perform the upgrade.
If the HP-UX, Solaris, or Linux Installation Server is installed together with the CellManager, it is upgraded automatically when the omnisetup.sh command is run.
If the HP-UX, Solaris, or Linux Installation Server is installed on a separate system,refer to “Upgrading an Installation Server” on page 263.
Upgrading a Cell ManagerThe HP-UX, Solaris, or Linux Cell Manager is upgraded automatically when theomnisetup.sh command is run.
On HP-UX, this command directly upgrades the existing package set using theswinstall utility. On Solaris, this command removes the existing package set using
Installation and licensing guide 259
the pkgrm utility and installs new packages using the pkgadd utility. On Linux, thiscommand directly upgrades the existing package set using rpm.
If the Installation Server is installed with client components, it will be removed by theomnisetup.sh command. In this case, install a new Installation Server depot usingthe omnisetup.sh -IS command, and then re-import the upgraded InstallationServer. For details, refer to Importing an installation server to a cell .
MC/ServiceGuard
The upgrade procedure for the Cell Manager, configured on MC/SG differs fromthe upgrade procedure for the Cell Manager not running in the MC/SG environment.The detailed steps you need to follow are described in “Upgrading the Cell Managerconfigured on MC/ServiceGuard” on page 308.
Setting kernel parameters
On HP-UX systems, it is recommended that you set the kernel parameter maxdsiz(Max Data Segment Size) or maxdsiz_64 (for 64bit systems) to at least 134217728bytes (128 MB), and the kernel parameter semmnu (Number of Semaphore UndoStructures) to at least 256. After you commit these changes, recompile the kernel andreboot the machine.
On Solaris systems, it is recommended that you set the kernel parametershmsys:shminfo_shmmax (maximum shared memory segment size (SHMMAX)) in/etc/system to at least 67108864 bytes (64 MB). After you commit this change,reboot the machine.
Upgrade procedure
To upgrade the HP-UX, Solaris, or Linux Cell Manager to Data Protector A.06.10,follow the procedure described below:
Upgrading to Data Protector A.06.10260

1. Insert and mount the UNIX installation DVD-ROM to a mount point.
For example:
mkdir /dvdrom mount /dev/c0d0t0 /dvdrom
Optionally, you can install Data Protector from a depot on the disk, perform thefollowing:
• Copy the DP_DEPOT, AUTOPASS, and LOCAL_INSTALL directories, wherethe installation files are stored:mkdir directory
cp -r /dvdrom/platform_dir/DP_DEPOT directory
cp -r /dvdrom/platform_dir/AUTOPASS directory
cp -r /dvdrom/LOCAL_INSTALL directory
Where platform_dir is:
hpux_ia HP-UX on IA-64 systems
hpux_pa HP-UX on PA-RISC systems
solaris Solaris systems
linux Linux systems
• Copy the whole DVD-ROM to your local disk:cp -r /dvdrom dvd_image_dir
Installation and licensing guide 261

2. Run the omnisetup.sh command.
To run this command from the DVD-ROM, execute:
cd /dvdrom/LOCAL_INSTALL ./omnisetup.sh
To start the installation from disk, run:
• If you have copied the DP_DEPOT, AUTOPASS, and LOCAL_INSTALLdirectories to your local disk under directory, go to the directory wherethe omnisetup.sh command is stored, and run:cd directory/LOCAL_INSTALL
./omnisetup.sh
• If you have copied the whole DVD-ROM to dvd_image_dir, run theomnisetup.sh command without any parameters:cd dvd_image_dir/LOCAL_INSTALL
./omnisetup.sh
3. omnisetup.sh prompts you to install or upgrade the HP AutoPass utility if youwant to download and install passwords for the purchased licenses directlythrough the internet from the HP password delivery center web server. For moreinformation on the AutoPass utility, refer to the HP AutoPass online Help. It isrecommended to install AutoPass.
If AutoPass is installed on MC/ServiceGuard, it must be installed or upgradedon all nodes.
When prompted, press Return to install or upgrade AutoPass. If you do not wantto install or upgrade AutoPass, enter n.
After the A.05.10, A.05.50 or A.06.00 version of Data Protector is detected,the upgrade procedure is automatically started. If you want to perform a cleaninstallation (the database of previous version will be deleted), uninstall the oldversion and restart the installation.
For details about installation, refer to “Installing a UNIX CellManager” on page 47 and “Installing Installation Servers for UNIX” on page 64.
4. If you are upgrading from Data Protector A.05.10 and have Windows clientsin the cell, you will be informed that conversion of file names in the IDB will beperformed. The IDB conversion is necessary to correctly handle file names withinternational characters. Refer to “Conversion of file names in theIDB” on page 287 for details.
As soon as the procedure is completed, you can start using Data Protector.
Upgrading to Data Protector A.06.10262

For the description of the omnisetup.sh command, refer to the README file locatedin the Mount_point/LOCAL_INSTALL directory on the DVD-ROM or HP DataProtector command line interface reference located in theMount_point/DOCS/C/MAN directory on the DVD-ROM.
What’s next?
Once the Cell Manager and Installation Server systems are upgraded, check if youhave to apply any modifications to your configuration files. Refer to “Checkingconfiguration changes” on page 270.
On HP-UX 11.23 and 11.31 (Itanium) and SuSE Linux (x86-64) the maximum sizeof database files can exceed the default maximum size of 2 GB. Consequently, duringan upgrade to Data Protector A.06.10 a warning message is displayed with anadvice to adjust the maximum size of database files. This adjustment should be doneafter the upgrade, as it may take a significant amount of time, depending on thedatabase size. See “Maximum size of database files exceeds 2 GB” on page ?.
Upgrading an Installation ServerThe HP-UX, Solaris, or Linux Installation Server is upgraded automatically when theomnisetup.sh command is run.
On HP-UX, this command directly upgrades the existing package set using theswinstall utility. On Solaris, this command removes the existing package set usingthe pkgrm utility and installs new packages using the pkgadd utility. On Linux, thiscommand directly upgrades the existing package set using rpm.
If the Installation Server is installed with client components, it will be removed by theomnisetup.sh command. In this case, install a new Installation Server depot usingthe omnisetup.sh -IS command, and then re-import the upgraded InstallationServer. For details, refer to “Importing an installation server to a cell ” on page 216.
IMPORTANT:You cannot upgrade the Installation Server unless you upgraded the Cell Manager first.
Upgrade procedure
To upgrade the HP-UX, Solaris, or Linux Installation Server to Data Protector A.06.10,follow the procedure described below:
Installation and licensing guide 263

1. Insert and mount the UNIX installation DVD-ROM to a mount point.
For example:
mkdir /dvdrom mount /dev/c0d0t0 /dvdrom
Optionally, to install Data Protector from a depot on the disk, perform thefollowing:
• To copy the DP_DEPOT, and LOCAL_INSTALL directories, where theinstallation files are stored, on your local disk, proceed as follows:mkdir directory
cp -r /dvdrom/platform_dir/DP_DEPOT directory
cp -r /dvdrom/platform_dir/AUTOPASS directory
cp -r /dvdrom/LOCAL_INSTALL directory
Where platform_dir depends on the operating system and processorplatform on which you upgrade Data Protector:
hpux_ia HP-UX on IA-64 systems
hpux_pa HP-UX on PA-RISC systems
solaris Solaris systems
linux Linux systems
• To copy the whole DVD-ROM to your local disk, run:cp -r /dvdrom dvd_image_dir
Upgrading to Data Protector A.06.10264

2. Run the omnisetup.sh command.
To run this command from the DVD-ROM, execute:
cd /dvdrom/LOCAL_INSTALL ./omnisetup.sh
To start the installation from disk, perform one of the following steps:
• If you have copied the DP_DEPOT, and LOCAL_INSTALL directories to yourlocal disk under directory, go to the directory where the omnisetup.shcommand is stored, and run:cd directory/LOCAL_INSTALL ./omnisetup.sh
• If you have copied the whole DVD-ROM to dvd_image_dir, run theomnisetup.sh command without any parameters:cd dvd_image_dir/LOCAL_INSTALL ./omnisetup.sh
As soon as the procedure is completed, you can start using Data Protector.
For the description of the omnisetup.sh command, refer to the README file locatedin the Mount_point/LOCAL_INSTALL directory on the DVD-ROM or HP DataProtector command line interface reference located in theMount_point/DOCS/C/MAN directory on the DVD-ROM.
What’s next?
Once the Installation Server system is upgraded, check if you have to apply anymodifications to your configuration files. Refer to “Checking configurationchanges” on page 270.
Upgrading the Windows Cell Manager and Installation ServerWhen the previous version of Data Protector is detected, the same component set asinstalled is assumed by the operating system (without obsolete components). Theexisting package set is removed and the new package set is installed as for a new(clean) installation.
The Windows Installation Server is upgraded automatically during the upgradeprocedure if it is installed on the same system as the Cell Manager. The old InstallationServer depot is removed and if the Installation Server component is selectedduring the installation, the new Installation Server depot is copied to its place.
If the Installation Server is installed together with the Data Protector client, and thisclient is upgraded remotely (using the Data Protector GUI), the Installation Server isupgraded as well.
Installation and licensing guide 265

IMPORTANT:Re-import the upgraded Installation Server after the installation procedure has finished.For details, refer to “Importing an installation server to a cell ” on page 216.
NOTE:If you want to upgrade your Windows operating system from Windows NT to a newerversion of Windows, first upgrade the operating system and then upgrade the previousversion of the product to Data Protector A.06.10. For details, refer to “Upgrading fromWindows NT to newer version of Windows” on page 297.
Microsoft Cluster Server
The upgrade procedure for the Cell Manager, running in the Microsoft Cluster Serverenvironment, is different from the upgrade procedure for the Cell Manager notconfigured for use with Microsoft Cluster Server. The detailed steps you need to followare described in “Upgrading the Cell Manager configured on Microsoft ClusterServer” on page 312.
Upgrade procedure
To upgrade the Windows Cell Manager and Installation Server to Data ProtectorA.06.10, follow the procedure described below:
1. Insert the Windows installation DVD-ROM and run the Windows_othercommand. Setup detects the old Data Protector installation. Click Next to startthe upgrade.
2. In the Component Selection page, the components previously installed on thesystem are selected. Note that you can change the component set by selectingor deselecting additional components. For a description of selected components,refer to the next step of the wizard. Click Next.
Upgrading to Data Protector A.06.10266

3. Windows XP and Windows Server 2003 SP1 only: If Data Protector detectsWindows Firewall on your system, the Windows Firewall configuration page isdisplayed. Data Protector setup will register all necessary Data Protectorexecutables. By default, the Initially, enable newly registeredData Protector binaries to open ports as needed option isselected. If you do not want to enable Data Protector to open ports at the moment,deselect the option. However, note that for proper functioning of Data Protector,the executables must be enabled.
Click Next.
Installation and licensing guide 267

4. The component summary list is displayed. Click Install to perform the upgrade.
Figure 43 Component selection summary page
5. The Installation status page is displayed. Click Next.
Figure 44 Installation status page
6. If you have UNIX clients in the cell, the IDB Conversion page will be displayed.Refer to “Conversion of file names in the IDB” on page 287.
Upgrading to Data Protector A.06.10268

7. This step is performed only for a Cell Manager upgrade. If the Installation Serverinstalled on a client other than the Cell Manager is being upgraded, this stepdoes not occur.
The Setup Wizard enables you to install or upgrade the HP AutoPass utility ifyou want to download and install passwords for the purchased licenses directlythrough the internet from the HP password delivery center web server. For moreinformation on the AutoPass utility, refer to “Obtaining and installing permanentpasswords using the HP AutoPass utility” on page 331.
By default, the Start AutoPass installation or the Upgrade AutoPass installationoption is selected. It is recommended to install the HP AutoPass utility. If you donot want to install or upgrade AutoPass, deselect the option.
To start using Data Protector immediately after setup, select Start the DataProtector Manager GUI.
To view the HP Data Protector product announcements, software notes, andreferences, select Open the Product Announcements.
Figure 45 Selecting AutoPass for installation
8. Click Finish.
As soon as the procedure is completed, you can start using Data Protector.
What’s next?
Once the Cell Manager and Installation Server systems are upgraded:
Installation and licensing guide 269

• The Data Protector IDB will be converted if you have UNIX clients in the cell toenable correct handling of non-ASCII characters in file names in the Data Protector.Refer to “Conversion of file names in the IDB” on page 287 for details about IDBconversion.
• Check if you have to apply any modifications to your configuration files. Refer to“Checking configuration changes” on page 270.
Checking configuration changes
Global options file
During the upgrade, the contents of the old global options file, residing in the/etc/opt/omni/server/options directory on UNIX Cell Manager, or in theData_Protector_home\Config\server\Options directory on the WindowsCell Manager, are merged with the contents of the new (default) global options fileon the Cell Manager:
• /opt/omni/newconfig/etc/opt/omni/server/options - UNIX CellManager
• Data_Protector_home\NewConfig\Server\Options - Windows CellManager
The merged file, which is named global, resides in the same location as the oldone, /etc/opt/omni/server/options directory on UNIX Cell Manager, or inthe Data_Protector_home\Config\server\Options directory on WindowsCell Manager, and is used by the upgraded version of the product. The old globaloptions file is renamed to global.1, global.2, etc., depending on the numberof upgrades performed.
The following applies when the merged file is created:
• Global options file variables that were active (uncommented) in the old file remainactive in the merged file. The following comment, stating that the value of thevariable was copied from the old file, is added to the merged file:
variable=value# Data Protector A.06.10# This value was automatically copied from previous version.
• Global options file variables, not used anymore, are commented (made inactive)in the merged file and added the following comment stating that the variable isno longer in use:
Upgrading to Data Protector A.06.10270

#variable=value# Data Protector A.06.10# This value is no longer in use.
• Variables with values, not supported anymore, are commented (made inactive)in the merged file. The following comment is added, containing a template(variable_template) and stating the previous value of this variable:
# variable=variable_template# Data Protector A.06.10# This variable cannot be transferred automatically.# The previous setting was:# variable=value
• Comments are not transferred to the newly merged file.
On Windows systems, the global options file is in the UNICODE format and can beedited using, for example, Notepad. After editing this file, make sure that you savedit in the UNICODE format.
The description of new options is in the merged global options file:/etc/opt/omni/server/options/global on UNIX Cell Manager andData_Protector_home\Config\server\options\global on the WindowsCell Manager. For details on how to use global options, see the HP Data Protectortroubleshooting guide.
Manual steps
The following list summarizes the steps to be performed manually once the upgradeprocedure has successfully completed:
• Omnirc fileAfter upgrading the Cell Manager and Installation Server systems, you may wantto edit the omnirc file. For the information on how to edit it, refer to “UsingOmnirc Options” in the HP Data Protector troubleshooting guide.
• Command lineRefer to “Command line changes after upgrading to Data ProtectorA.06.10” on page 458 for a list of commands that have been changed or providedwith extended functionality. You have to check and modify the scripts that usethe old commands. Refer to the corresponding man pages for usage synopsis.
• Default maximum size per DCBF directoryDefault settings for already existing DCBF directories are not changed after anupgrade, only the newly created directories will have the default maximum sizeset to 16 GB. When you increase the default maximum size, you should alsoadjust the free disk space needed for a DCBF binary file (10 to 15% of the
Installation and licensing guide 271

maximum size is recommended). To manually change the maximum size of DCdirectory, use:omnidbutil —modify_dcdir directory -maxsize size_MB-spacelow size_MB
You need to change the settings when drives with large capacity, for exampleLTO 4, are used, and more than 10 million files are backed up on tape. Inaddition, make sure that the file system where DC directories reside supportslarge files.
What’s next?
Once the Cell Manager and Installation Server(s) are installed and all requiredmodifications implemented, it is recommended that you distribute the software toclients. Refer to “Upgrading the clients” on page 272.
Upgrading the clients
Upgrade sequence
For information about the sequence in which the client upgrade is performed, referto “Upgrade overview” on page 255.
Upgrading clients remotely
For the procedure on how to upgrade the clients using the Installation Server, referto “Remote installation of Data Protector clients” on page 81. On UNIX systems, youmust upgrade the already present components before you add new components.After new components are added, the components from previous versions are notdisplayed by Data Protector. In this case, you have to reinstall them.
Upgrading clients locally
If you do not have an Installation Server installed on your network, or if for somereason you cannot distribute the Data Protector software to a client system, DataProtector clients can be upgraded locally.
To upgrade Windows clients locally, refer to “Installing Windows clients” on page 90.To upgrade UNIX clients locally, refer to “Local installation of UNIXclients” on page 149.
Upgrading to Data Protector A.06.10272

Novell NetWare
After upgrading any Novell NetWare client, you need to perform some additionalsteps that will enable you to perform any backup and restore of the NDS/eDirectorydatabase. Refer to “Local installation of the Novell NetWare clients” on page 131 fordetails.
Linux clients
During upgrade of A.05.10 and A.05.50 Linux clients, Data Protector binaries andconfiguration files are moved from /usr/omni to /opt/omni (binaries), or/etc/opt/omni (configuration files). Pre-exec and post-exec scripts are not movedto /opt/omni, but are copied to /tmp/usr_omni. You must manually copy themto /opt/omni/lbin. A.06.00 clients are not affected.
If the xinetd service is used instead of inetd, the /etc/xinetd.d/omni file isnot replaced and thus the settings remain unchanged. To check if the xinetd serviceis running, run the following command:
ps -e | grep xinetd
To replace your settings with the default Data Protector settings or to replace acorrupted file, remove the file and push any Data Protector software component fromthe Data Protector GUI. The /etc/xinetd.d/omni file is then installed with thedefault settings.
IMPORTANT:By replacing the /etc/xinetd.d/omni file, your modifications are lost. To retainyour modifications, create a backup copy and manually transfer the settings to the newfile.
Upgrading clients configured on MC/ServiceGuard
If you are upgrading the client that uses MC/ServiceGuard, and if the Data Protectorintegration component to be upgraded is installed on the same node as the CellManager, first upgrade the physical nodes, and then perform the following:
1. Export the virtual host by running:
omnicc -export_host virtual_hostname
2. Re-import the virtual host by running:
omnicc -import_host virtual_hostname -virtual
Installation and licensing guide 273

Upgrading clients with integrations
If you are upgrading a Data Protector client that has the integration installed (suchas Oracle, SAP R/3, Informix Server, Sybase, Microsoft Exchange Server, HPStorageWorks Disk Array XP, EMC Symmetrix, etc.), follow the steps described insections below to successfully perform the upgrade:
• For instructions on how to upgrade the Oracle integration, refer to “Upgradingthe Oracle integration” on page 274.
• For instructions on how to upgrade the SAP R/3 integration, refer to “Upgradingthe SAP R/3 integration” on page 276.
• For instructions on how to upgrade the Informix Server integration, refer to“Upgrading the Informix server integration on UNIX systems” on page 278 and“Upgrading the Informix server integration on Windows systems” on page 279.
• For instructions on how to upgrade the Sybase integration, refer to “Upgradingthe Sybase integration on UNIX systems” on page 280 and “Upgrading the Sybaseintegration on Windows systems” on page 281.
• For instructions on how to upgrade Microsoft Exchange, Microsoft SQL, HPStorageWorks Disk Array XP, EMC Symmetrix, etc., refer to “Upgrading otherintegrations” on page 286.
Upgrading the Oracle integrationThe clients that have the Oracle integration installed are upgraded either locally byrunning the omnisetup.sh -install oracle8 command on UNIX systemsand the setup.exe command on Windows systems, or remotely by pushing theOracle integration agent to the client using the Data Protector GUI. Note that onUNIX, if you are upgrading the client that does not reside on the Cell Manager, youdo not need to specify the -install oracle8 option. In this case, the setup willselect the same components as installed on the system before the upgrade withoutissuing a prompt.
Data Protector MML
After upgrading a UNIX client, remove the symbolic link to the Data Protector MMLbecause the link is no longer needed:
1. Change to the ORACLE_HOME/lib directory:
Upgrading to Data Protector A.06.10274

2. If the libobk.sl.orig (libobk.so.orig) file exists in theORACLE_HOME/lib directory, run:
HP–UX: mv libobk.sl.orig libobk.sl
Other UNIX: mv libobk.so.orig libobk.so
where libobk.sl.orig (libobk.so.orig) is the Oracle soft link as it existedbefore configuring the integration.
New templates after upgrading
If you are upgrading from Data Protector A.05.10, the Oracle templates are replacedwith newer versions. The new templates are located in the following directory:
/opt/omni/newconfig/etc/opt/omni/server/dltemplates/lists/oracle8(on UNIX systems) orData_Protector_home\NewConfig\server\dltemplates\lists\oracle8(on Windows systems).
To use the new templates, copy them after the upgrade to Data Protector A.06.10to the /etc/opt/omni/server/dltemplates/lists\oracle8 (on UNIXsystems) orData_Protector_home\Config\server\dltemplates\lists\oracle8(on Windows systems) directory. If you wish to keep the old templates, save themunder another name.
ZDB method configuration
Depending on whether the Oracle instance configuration file contains theORACLE_DBID parameter or not, the ZDB method configuration file is set for DataProtector A.06.10 as follows:
• If the Oracle instance configuration file contains the ORACLE_DBID parameter(in Data Protector A.05.10 or A.05.50), the ZDB method configuration file iscreated for each database instance during the upgrade.
The Oracle ZDB method is not changed during the upgrade. For information on howto switch between the proxy-copy and backup set ZDB methods, refer to the HP DataProtector zero downtime backup integration guide.
Installation and licensing guide 275

Oracle ZDB upgrade
If you are upgrading from Data Protector A.05.10, the Oracle ZDB backupspecifications are automatically upgraded at the end of a standard Oracle integrationupgrade procedure.
The following steps are performed during a backup specification upgrade:
• The OB2DMAP and OB2SMB parameters are added to the first RMAN ALLOCATECHANNEL command. The OB2DMAP parameter is set to the number of channelsthat were allocated before the upgrade. For example, with an RMAN script with4 allocated channels, the OB2DMAP parameter will be set to 4.
• All ALLOCATE CHANNEL commands except the first one are removed from thescripts.
• If instant recovery is enabled, the TABLESPACE or DATAFILES backup objectsare changed to DATABASE to allow only backups of the whole database.
• If the proxy copy backup method was used, all RELEASE CHANNEL commandsare removed except the one referring to the first ALOCATE CHANNEL command.
Refer to the HP Data Protector integration guide for Oracle and SAP or HP DataProtector zero downtime backup integration guide for more details.
Configuring an Oracle instance for instant recovery
If the control files, recovery catalogs, or archive redo logs are located on the samevolume group (if LVM is used) or source volume as the database files, you must eitherreconfigure the Oracle instance or set the ZDB_ORA_INCLUDE_CF_OLF,ZDB_ORA_INCLUDE_SPF, and ZDB_ORA_NO_CHECKCONF_IR omnirc variables.Refer to the HP Data Protector zero downtime backup integration guide.
Upgrading the SAP R/3 integrationThe clients that have the SAP R/3 integration installed are upgraded either locallyby running the omnisetup.sh -install sap command on UNIX systems andthe setup.exe command on Windows systems, or remotely by pushing the SAPR/3 integration agent to the client using the Data Protector GUI. Note that on UNIX,if you are upgrading the client that does not reside on the Cell Manager, you do notneed to specify the -install sap option. In this case, the setup will select thesame components as installed on the system before the upgrade without issuing aprompt.
Upgrading to Data Protector A.06.10276
Data Protector MML
After upgrading a UNIX SAP R/3 client, remove the symbolic link to the Data ProtectorMML because the link is no longer needed. For details, see “Data ProtectorMML” on page 274.
The ORA_NLS_CHARACTERSET configuration parameter
If you upgrade a Data Protector A.05.10 or A.05.50 SAP R/3 client to Data ProtectorA.06.10, for each configured SAP R/3 instance on this client, set the Data ProtectorORA_NLS_CHARACTERSET parameter to the encoding used by the Oracle database.Use either of the following methods:
• Using the Data Protector GUI or CLI, reconfigure the SAP R/3 instance anew,specifying the same configuration parameters. Reconfiguration automaticallyupdates the SAP R/3 configuration file with the needed parameter.For details, see the HP Data Protector integration guide for Oracle and SAP.
• Using the Data Protector util_cmd command, manually add the parameter tothe configuration file:util_cmd –putopt SAP SAP_instance ORA_NLS_CHARACTERSET'Oracle_encoding'
Example:util_cmd –putopt SAP ICE ORA_NLS_CHARACTERSET 'US7ASCII'
SAP compliant ZDB sessions
SAP standards recommend that BRBACKUP is started on the backup system duringZDB sessions (SAP compliant ZDB sessions). Data Protector A.06.10 enables you tocomply with these standards. First, configure the backup system as described in theSAP guide for Oracle (split mirror backup, software configuration) and install theData Protector SAP R/3 Integration component on the backup system. Then,configure Data Protector for SAP compliant ZDB sessions as described in the HP DataProtector zero downtime backup integration guide.
Configuring an Oracle instance for instant recovery
If the control files, recovery catalogs, or archive redo logs are located on the samevolume group (if LVM is used) or source volume as the database files, you have threeoptions:
• Reconfigure the Oracle instance.
Installation and licensing guide 277

• Set the ZDB_ORA_INCLUDE_CF_OLF, ZDB_ORA_INCLUDE_SPF, andZDB_ORA_NO_CHECKCONF_IR omnirc variables.
• Configure Data Protector to start BRBACKUP on the backup system (SAP compliantZDB sessions).
For details , see the HP Data Protector zero downtime backup integration guide.
Upgrading the Informix server integration on UNIX systemsWhen upgrading the Informix Server integration from Data Protector A.05.10 toData Protector A.06.10, there are, depending on the environment, three upgradeprocedures:
Procedure 1
If the Informix Server client does not reside on the same system as the Cell Managerand it is not configured as a Data Protector cluster aware client, the Data ProtectorInformix Server configuration parameters are automatically moved from a DataProtector Informix Server client to the Cell Manager during the upgrade. Noreconfiguration of the Informix Server databases is needed after the upgrade.
Upgrade the client either locally by running the omnisetup.sh command or remotelyby pushing the Informix Server integration agent to the client using the Data ProtectorGUI.
Procedure 2
If the Informix Server client does not reside on the same system as the Cell Managerand it is configured as a Data Protector cluster aware client, the Data ProtectorInformix Server configuration parameters are automatically moved from the DataProtector Informix Server client to the Cell Manager during the upgrade. After theupgrade, the Informix Server databases must be reconfigured.
1. Upgrade the client either locally by running the omnisetup.sh command orremotely by pushing the Informix Server integration agent to the client using theData Protector GUI.
2. Configure the Informix Server databases using the Data Protector GUI or CLI asdescribed in the HP Data Protector integration guide.
Configure the Informix Server databases using the virtual hostname of InformixServer.
Upgrading to Data Protector A.06.10278

Procedure 3
If the Informix Server client resides on the same system as a cluster-aware CellManager and it is either configured or not configured as a Data Protector clusteraware client, the Data Protector Informix Server configuration parameters are notautomatically moved from the Data Protector Informix Server client to the Cell Managerduring the upgrade. After the upgrade, the Informix Server databases must bereconfigured.
1. Upgrade the client either locally by running the omnisetup.sh command orremotely by pushing the Informix Server integration agent to the client using theData Protector GUI.
2. Configure the Informix Server databases using the Data Protector GUI or CLI asdescribed in the HP Data Protector integration guide.
Upgrading the Informix server integration on Windows systemsWhen upgrading the Informix Server integration from Data Protector A.05.10 toData Protector A.06.10, there are, depending on the environment, three upgradeprocedures:
Procedure 1
If the Informix Server client does not reside on the same system as the Cell Managerand it is not configured as a Data Protector cluster aware client, the Data ProtectorInformix Server configuration parameters are automatically moved from the DataProtector Informix Server client to the Cell Manager during the upgrade. Noreconfiguration of the Informix Server databases is needed after the upgrade.
Upgrade the client either locally by running the setup.exe command or remotely bypushing the Informix Server integration agent to the client using the Data ProtectorGUI.
Procedure 2
If the Informix Server client does not reside on the same system as the Cell Managerand it is configured as a Data Protector cluster aware client, the Data ProtectorInformix Server configuration parameters are automatically moved from the DataProtector Informix Server client to the Cell Manager during the upgrade. After theupgrade, the Informix Server databases must be reconfigured.
1. Upgrade the client either locally by running the setup.exe command or remotelyby pushing the Informix Server integration agent to the client using the DataProtector GUI.
Installation and licensing guide 279

2. Configure the Informix Server databases using the Data Protector GUI or CLI asdescribed in the HP Data Protector integration guide.
Configure the Informix Server databases using the virtual hostname of InformixServer.
Procedure 3
If the Informix Server client resides on the same system as a cluster-aware CellManager and it is either configured or not configured as a Data Protector clusteraware client, the Data Protector Informix Server configuration parameters are notautomatically moved from the Data Protector Informix Server client to the Cell Managerduring the upgrade. After the upgrade, the Informix Server databases must bereconfigured.
1. Upgrade the client either locally by running the setup.exe command or remotelyby pushing the Informix Server integration agent to the client using the DataProtector GUI.
2. Configure the Informix Server databases using the Data Protector GUI or CLI asdescribed in the HP Data Protector integration guide.
Upgrading the Sybase integration on UNIX systemsWhen upgrading the Sybase integration from Data Protector A.05.10 to DataProtector A.06.10, there are, depending on the environment, three upgradeprocedures:
Procedure 1
If the Sybase client does not reside on the same system as the Cell Manager and itis not configured as a Data Protector cluster aware client, the Data Protector Sybaseconfiguration parameters are automatically moved from the Data Protector Sybaseclient to the Cell Manager during the upgrade. No reconfiguration of the SybaseServer is needed after the upgrade.
Upgrade the client either locally by running the omnisetup.sh command or remotelyby pushing the Sybase integration agent to the client using the Data Protector GUI.
Procedure 2
If the Sybase client does not reside on the same system as the Cell Manager and itis configured as a Data Protector cluster aware client, the Data Protector Sybaseconfiguration parameters are automatically moved from the Data Protector Sybase
Upgrading to Data Protector A.06.10280

client to the Cell Manager during the upgrade. After the upgrade, the Sybase Servermust be reconfigured.
1. Upgrade the client either locally by running the omnisetup.sh command orremotely by pushing the Sybase integration agent to the client using the DataProtector GUI.
2. Configure the Sybase client using the Data Protector GUI or CLI as described inthe HP Data Protector integration guide.
Configure the Sybase Server using the virtual hostname of the Sybase Server.
Procedure 3
If the Sybase client resides on the same system as a cluster-aware Cell Manager andit is either configured or not configured as a Data Protector cluster aware client, theData Protector Sybase configuration parameters are not automatically moved fromthe Data Protector Sybase client to the Cell Manager during the upgrade. After theupgrade, the Sybase Server must be reconfigured.
1. Upgrade the client either locally by running the omnisetup.sh command orremotely by pushing the Sybase integration agent to the client using the DataProtector GUI.
2. Configure the Sybase Server using the Data Protector GUI or CLI as describedin the HP Data Protector integration guide.
If the Sybase Server is configured as a Data Protector cluster aware client,configure it using the virtual hostname of the Sybase Server.
If the Sybase Server is not configured as a Data Protector cluster aware client,configure it using the hostname of the Sybase Server.
Upgrading the Sybase integration on Windows systemsWhen upgrading the Sybase integration from Data Protector A.05.10 to DataProtector A.06.10, there are, depending on the environment, three upgradeprocedures:
Procedure 1
If the Sybase client does not reside on the same system as the Cell Manager and itis not configured as a Data Protector cluster aware client, the Data Protector Sybaseconfiguration parameters are automatically moved from the Data Protector Sybaseclient to the Cell Manager during the upgrade. No reconfiguration of the SybaseServer is needed after the upgrade.
Installation and licensing guide 281

Upgrade the client either locally by running the setup.exe command or remotely bypushing the Sybase integration agent to the client using the Data Protector GUI.
Procedure 2
If the Sybase client does not reside on the same system as the Cell Manager and itis configured as a Data Protector cluster aware client, the Data Protector Sybaseconfiguration parameters are automatically moved from the Data Protector Sybaseclient to the Cell Manager during the upgrade. After the upgrade, the Sybase Servermust be reconfigured.
1. Upgrade the client either locally by running the setup.exe command or remotelyby pushing the Sybase integration agent to the client using the Data ProtectorGUI.
2. Configure the Sybase client using the Data Protector GUI or CLI as described inthe HP Data Protector integration guide.
Configure the Sybase Server using the virtual hostname of the Sybase SQL Server.
Procedure 3
If the Sybase client resides on the same system as a cluster-aware Cell Manager andit is either configured or not configured as a Data Protector cluster aware client, theData Protector Sybase configuration parameters are not automatically moved fromthe Data Protector Sybase client to the Cell Manager during the upgrade. After theupgrade, the Sybase Server must be reconfigured.
1. Upgrade the client either locally by running the setup.exe command orremotely by pushing the Sybase integration agent to the client using the DataProtector GUI.
2. Configure the Sybase client using the Data Protector GUI or CLI as described inthe HP Data Protector integration guide.
If the Sybase Server is configured as a Data Protector cluster aware client,configure it using the virtual hostname of the Sybase Server.
If the Sybase Server is not configured as a Data Protector cluster aware client,configure it using the hostname of the Sybase Server.
Upgrading the HP StorageWorks EVA integrationUpgrading the HP StorageWorks EVA Integration consists of upgrading from the HPStorageWorks EVA Agent (legacy) to the HP StorageWorks EVA SMI-S Agent. Thisupgrade is needed due to the EVA Agent (legacy) obsolescence.
Upgrading to Data Protector A.06.10282

Successful completion of the upgrade procedure results in:
• Upgrading the backup specifications created by the EVA Agent (legacy).• Transferring the information on the backup sessions from the EVADB to the SMISDB
to enable their restore by the SMI-S Agent.• Transferring the login and disk group rules defined for the EVA Agent (legacy)
to the SMISDB.
For detailed information on the supported versions/releases of the dependent products,as well as for a list of the platforms on which the SMI-S Agent is supported, refer tothe HP Data Protector product announcements, software notes, and references.
Prerequisites
• Make sure you meet the minimum requirements for the operating systems on whichthe SMI-S Agent is supported.
• There must be no running EVA backups. The upgrade procedure may cause thebackup to fail; in this case, no session information will appear in the SMIDB anda restore from that session will not be possible.
• Start the agent upgrade only after the Cell Manager upgrade is completed.
Upgrade procedure
To upgrade from the HP StorageWorks EVA Agent (legacy) to the HP StorageWorksEVA SMI-S Agent, carry out the steps described below:
Installation and licensing guide 283

1. On the Cell Manager, run the upgrade_cm_from_evaa command to upgradeall EVADB entries to SMISDB entries. Execute this command only after the CellManager is completed.
The following information is transferred:
• Backup specifications and backup sessions (replicas) created by the EVAAgent (legacy).
• The login entries related to the EVA Management Appliance.
Consider the following:
Login
• If a login entry is already present in the SMISDB, no new entries are createdfor that Management Appliance.
• Login user/password are assumed to be the same between CV EVA and aSMI-S Provider.
• The SMISDB login entry will always use port 5988.
Disk group rules
• If a rule for a certain disk group is already present in the SMISDB, no updatesare made.
• All disk group rules defined for the EVA Agent (legacy) are added at the endof the existing SMISDB disk group rules.
For information on the upgrade_cm_from_evaa command, see the HP DataProtector command line interface reference.
2. On the application system, run the omnisetup.sh -install smisacommand on UNIX systems or the setup.exe command on Windows systemsif you perform a local upgrade. If you upgrade remotely, push the EVA SMI-SAgent to the client using the Add Components GUI wizard and selecting HPStorageWorks EVA SMI-S Agent.
The pre-exec script checks if the EVAA package exists on the system. If thepackage is detected, the information about it is removed from the Cell Manager.
Along with uninstallation of the EVAA package, the information on the EVAbackup sessions (replicas) created by the EVA Agent (legacy) is transferred fromthe EVADB to the SMISDB. It means that after the upgrade, you will be able torestore the backup sessions created by the EVA Agent (legacy) using the SMI-SAgent.
Upgrading to Data Protector A.06.10284

3. After you have upgraded the application system, you need to upgrade thebackup system as well. The scheduled backup specifications will not work untilboth the application and the backup systems are successfully upgraded.
4. Manually verify the omnirc file to make sure that omnirc variables have beensuccessfully upgraded.
Upgrading the Automatic Disaster Recovery ModuleThe Automatic Disaster Recovery Module (Enhanced Automated Disaster Recoveryand One Button Disaster Recovery) in Data Protector A.06.10 is not entirelycompatible with older versions of the module (A.05.10, A.05.50, or A.06.00 withoutthe DPWIN_002700 patch installed):
• Backups on Windows 2000 systems that were created before the upgrade cannotbe used to create disaster recovery images on upgraded clients.
• The Data Protector GUI is compatible with the old disaster recovery module andcan be used to create disaster recovery images on Windows 2000 clients withthe old disaster recovery module. For example, you can have a Windows 2000system with the old disaster recovery module and control it from the new GUI. Insuch a case, the GUI creates a disaster recovery image using a backup createdwith an old disaster recovery module.
• On Windows 2000 systems, you must add the DRM$ADMIN account to the DataProtector Admin user group instead of the client’s local Administrator account(used in Data Protector A.05.10, A.05.50, or A.06.00 without the patch).
Table 10 on page 285 lists all combinations and the compatibility issues.
Table 10 EADR and OBDR compatibility after upgrade
ResultData Protector client version
Image creationBackup
Image iscreated.
A.05.10, A.05.50, or A.06.00 (noDPWIN_002700 patch)
A.05.10, A.05.50, or A.06.00 (noDPWIN_002700 patch)
Error.A.06.00 (with DPWIN_002700patch) or A.06.10
A.05.10, A.05.50, or A.06.00 (noDPWIN_002700 patch)
Error.A.05.10, A.05.50, or A.06.00 (noDPWIN_002700 patch)
A.06.00 (with DPWIN_002700patch) or A.06.10
Installation and licensing guide 285
ResultData Protector client version
Image creationBackup
Image iscreated.
A.06.00 (with DPWIN_002700patch) or A.06.10
A.06.00 (with DPWIN_002700patch) or A.06.10
For details on changes in the EADR and OBDR procedures, see the HP Data Protectordisaster recovery guide.
Upgrading other integrationsIf the Data Protector client has the Microsoft Exchange, Microsoft SQL, HPStorageWorks Disk Array XP, EMC Symmetrix or some other integration installed,upgrade such client either locally using the omnisetup.sh -installcomponent_list command on UNIX systems and the setup.exe command onWindows systems, or remotely using the Data Protector GUI. For a list of the DataProtector component codes, refer to “Local installation of UNIX clients” on page 149.Note that if you are upgrading the client that does not reside on the Cell Manager,you do not need to specify the -install component_list option. In this case,the setup will select the same components as installed on the system before theupgrade without issuing a prompt.
Upgrading in a MoM environmentYou can upgrade a MoM Environment sequentially. However, note the followinglimitations:
Limitations
• After upgrading the MoM Manager/CMMDB Server, you cannot perform arestore of a Data Protector A.05.10 or A.05.50 filesystem or integration fromthe Data Protector A.06.10 MoM GUI. Therefore, use either the old MoM GUIfor restore or upgrade the clients.You can perform filesystem and integration backup of Data Protector A.05.10or A.05.50 clients from the Data Protector A.06.10 MoM GUI.
• You cannot use distributed file media format with your file libraries until all CellManagers have been upgraded to Data Protector A.06.10.
To upgrade your MoM environment to Data Protector A.06.10, proceed as follows:
Upgrading to Data Protector A.06.10286

1. Upgrade the MoM Manager/CMMDB Server to Data Protector A.06.10.
During the upgrade, Cell Managers in a MoM environment must not beoperational. After the upgrade, the MoM Manager can still work with the oldCell Managers.
2. Upgrade each client Cell Manager in a MoM environment.
For the upgrade procedure, refer to “Upgrading the UNIX Cell Manager andInstallation Server” on page 259 and “Upgrading the Windows Cell Managerand Installation Server” on page 265.
3. Upgrade clients with configured devices.
4. Upgrade clients with application integrations.
After this part of the upgrade is finished, you can backup and restore filesystemsand integrations with the Data Protector A.06.10 MoM GUI.
Conversion of file names in the IDBData Protector A.05.50 and later versions have improved handling and display offile names created with different locales on different platforms. This requires aconversion of the existing file names in the IDB for some specific cell configurationsif you are upgrading from Data Protector A.05.10.
The conversion of file names in the IDB must be performed. Otherwise, the browsingand restore selection of file names containing non-ASCII characters depend on manyfactors. The probability of undesirable results is thus high.
The conversion is performed:
• On the UNIX Cell Manager as a part of post-upgrade backups of Windowsclients.
• On the Windows Cell Manager as a background process after the upgrade ofthe Cell Manager.
You will be prompted, if it is needed to perform the IDB conversion.
Installation and licensing guide 287
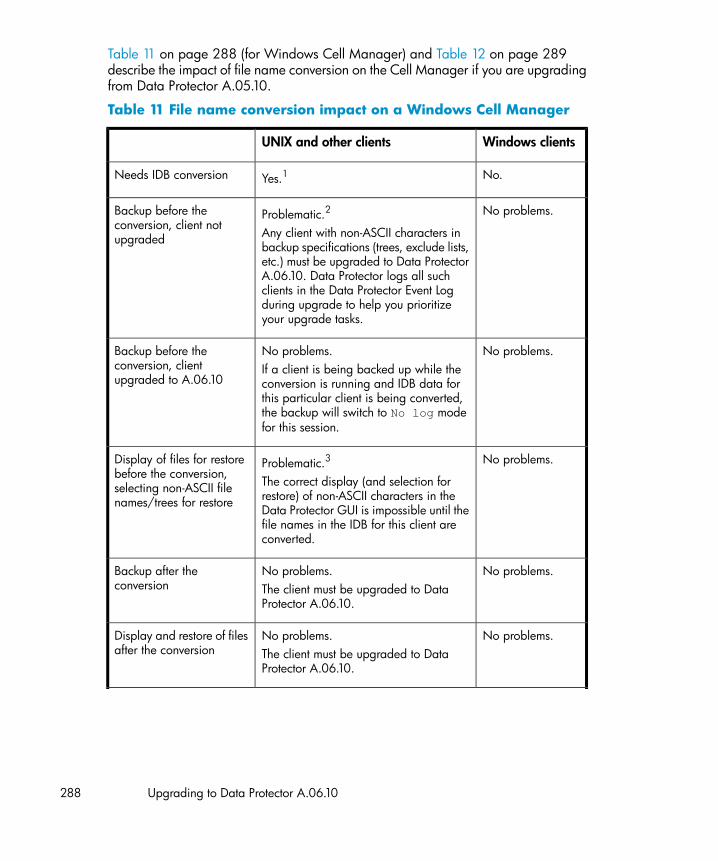
Table 11 on page 288 (for Windows Cell Manager) and Table 12 on page 289describe the impact of file name conversion on the Cell Manager if you are upgradingfrom Data Protector A.05.10.
Table 11 File name conversion impact on a Windows Cell Manager
Windows clientsUNIX and other clients
No.Yes.1Needs IDB conversion
No problems.Problematic.2
Any client with non-ASCII characters inbackup specifications (trees, exclude lists,etc.) must be upgraded to Data ProtectorA.06.10. Data Protector logs all suchclients in the Data Protector Event Logduring upgrade to help you prioritizeyour upgrade tasks.
Backup before theconversion, client notupgraded
No problems.No problems.If a client is being backed up while theconversion is running and IDB data forthis particular client is being converted,the backup will switch to No log modefor this session.
Backup before theconversion, clientupgraded to A.06.10
No problems.Problematic.3
The correct display (and selection forrestore) of non-ASCII characters in theData Protector GUI is impossible until thefile names in the IDB for this client areconverted.
Display of files for restorebefore the conversion,selecting non-ASCII filenames/trees for restore
No problems.No problems.The client must be upgraded to DataProtector A.06.10.
Backup after theconversion
No problems.No problems.The client must be upgraded to DataProtector A.06.10.
Display and restore of filesafter the conversion
Upgrading to Data Protector A.06.10288

Windows clientsUNIX and other clients
DataProtectorA.05.10= YES 4, ,A.05.50.= YES.4
Data Protector A.05.10 = No, A.05.50= YES4 .
Disk Agent compatibility(earlier versions)4
Table 12 File name conversion impact on a UNIX Cell Manager
Windows clientsUNIX andother clients
Yes.1No.Needs IDB conversion
Problematic.2
Any client with non-ASCII characters in backupspecifications (trees, exclude lists, etc.) must beupgraded to Data Protector A.06.10. DataProtector logs all such clients in the Data ProtectorEvent Log to help you prioritize your upgradetasks.
No problems.Backup during theconversion period,client not upgraded
No problems.Note that backing up Windows clients duringthe conversion period is required. IDB data foreach client is automatically converted while theclient is being backed up.You need to perform a full backup to convert allfile names stored in the IDB for this client.
No problems.Backup during theconversion period,client upgraded toA.06.10
Problematic.3
The correct display (and selection for restore) ofnon-ASCII characters in the Data Protector GUIis impossible unless a full backup is performedafter the upgrade of the Cell Manager.
No problems.Display of files forrestore before theconversion, selectingnon-ASCII filenames/trees for restore
No problems.The client must be upgraded to Data ProtectorA.06.10.
No problems.Backup after theconversion period
Installation and licensing guide 289
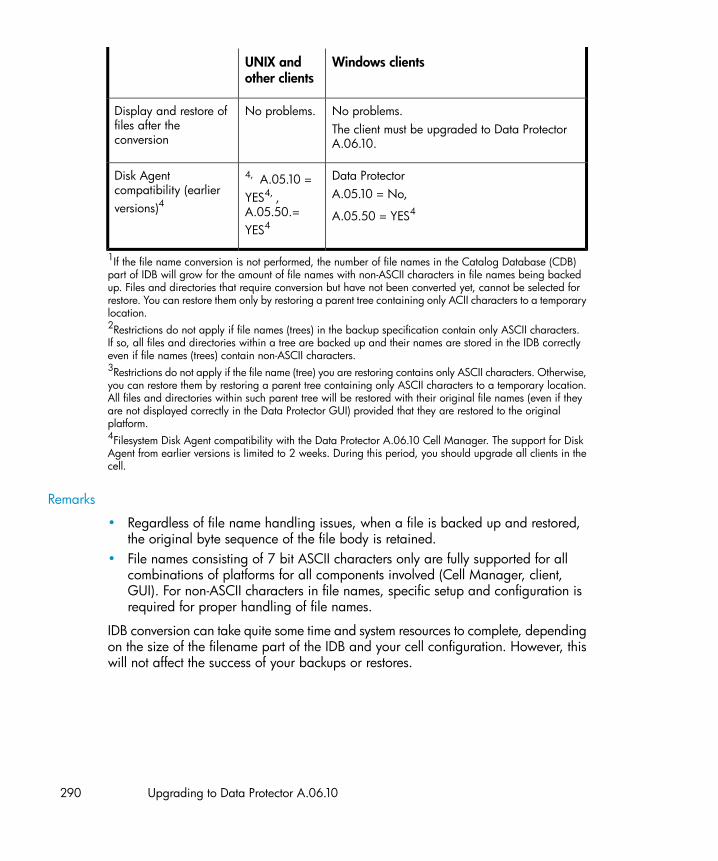
Windows clientsUNIX andother clients
No problems.The client must be upgraded to Data ProtectorA.06.10.
No problems.Display and restore offiles after theconversion
Data ProtectorA.05.10 = No,
A.05.50 = YES4
4, A.05.10 =YES4, ,A.05.50.=YES4
Disk Agentcompatibility (earlierversions)4
1If the file name conversion is not performed, the number of file names in the Catalog Database (CDB)part of IDB will grow for the amount of file names with non-ASCII characters in file names being backedup. Files and directories that require conversion but have not been converted yet, cannot be selected forrestore. You can restore them only by restoring a parent tree containing only ACII characters to a temporarylocation.2Restrictions do not apply if file names (trees) in the backup specification contain only ASCII characters.If so, all files and directories within a tree are backed up and their names are stored in the IDB correctlyeven if file names (trees) contain non-ASCII characters.3Restrictions do not apply if the file name (tree) you are restoring contains only ASCII characters. Otherwise,you can restore them by restoring a parent tree containing only ASCII characters to a temporary location.All files and directories within such parent tree will be restored with their original file names (even if theyare not displayed correctly in the Data Protector GUI) provided that they are restored to the originalplatform.4Filesystem Disk Agent compatibility with the Data Protector A.06.10 Cell Manager. The support for DiskAgent from earlier versions is limited to 2 weeks. During this period, you should upgrade all clients in thecell.
Remarks
• Regardless of file name handling issues, when a file is backed up and restored,the original byte sequence of the file body is retained.
• File names consisting of 7 bit ASCII characters only are fully supported for allcombinations of platforms for all components involved (Cell Manager, client,GUI). For non-ASCII characters in file names, specific setup and configuration isrequired for proper handling of file names.
IDB conversion can take quite some time and system resources to complete, dependingon the size of the filename part of the IDB and your cell configuration. However, thiswill not affect the success of your backups or restores.
Upgrading to Data Protector A.06.10290

IDB conversion on a Windows Cell Manager
Introduction
This section applies only for Windows Cell Managers that have non-Windows clientsin the cell and are being upgraded from Data Protector A.05.10. If you are upgradingfrom A.05.50, no conversion is needed.
IDB conversion will take some time, depending on the size of the IDB and theconfiguration of your cell, but it does not affect the success of your backups or restores.The conversion is performed as a background process in a single run for allnon-Windows clients in the cell, while Data Protector is fully operational. It firstconverts all data for one client before proceeding with conversion of the next client’sdata. After it is finished, IDB conversion is complete and does not need to beperformed again.
If the filenames do not include non-ASCII characters, the IDB conversion will still berun, but nothing will be changed in the IDB.
IDB conversion will not affect the IDB size.
How IDB conversion is performed
After the upgrade of Data Protector is finished, the Data Protector Setup Wizardoffers you conversion of filenames in the IDB.
Installation and licensing guide 291

Figure 46 IDB conversion after upgrade
You are given a rough estimate of how long the IDB conversion will take to finish.The estimate is based on the number of non-Windows clients in the cell and thenumber of their files stored in the IDB.
If you postpone the conversion to later, you will have to run the IDB conversionmanually using the omnidbupgrade command. Refer to HP Data Protector commandline interface reference for details.
NOTE:It is recommended to perform IDB conversion and to upgrade the Disk Agents on clientsas soon as possible.
You can check the status of the IDB conversion (data for which clients has alreadybeen converted) in the Data Protector GUI in the Monitor Context.
Backup during conversion
Backups during IDB filename conversion are possible, because the conversion runsin the background, while Data Protector is fully operational.
If the client’s data in the IDB is being converted during the backup of this client thenthe backup is done using the No Log option (and hence no information about backedup files and directories is logged to the IDB for this client in this session).
Upgrading to Data Protector A.06.10292

Restore during conversion
Restore during the conversion of file names is possible. However, only restores ofentire objects or selections of directories/files from non-Windows systems, containing7-bit ASCII characters, are safe.
If files or directories you have selected for restore to a specific client contain non-ASCIIcharacters (and originate from a non-Windows platform), wait for the IDB conversionof that client’s data to finish. The Disk Agent on that client must be upgraded priorto the restore.
Backup and restore after IDB conversion
After the whole IDB has been converted and all Disk Agents on all clients in the cellhave been upgraded to A.06.10 version, backup and restore will operate normally.
IDB conversion on a UNIX Cell Manager
Introduction
This section applies only for UNIX Cell Managers with Windows clients in the cellare being upgraded from Data Protector A.05.10. If you are upgrading from A.05.50,no conversion is needed.
IDB conversion takes some time, depending on the size of the IDB and theconfiguration of your cell, but it will not affect the success of your backups or restores.The conversion is being performed as a background process during backups ofWindows clients in the cell for a specific period. After a full backup of all filesystembackup objects of all Windows clients in the cell is performed, IDB conversion iscomplete and does not need to be performed again.
The conversion of filenames in the IDB during backups will by default run for onemonth, which is defined by the ConvertFilenamesInIDBDuringBackup globaloption. See the HP Data Protector troubleshooting guide for details on how to editthe global options file.
Impact on performance
The conversion of file names in the IDB has impact on performance. While theconversion is running (the ConvertFilenamesInIDBDuringBackup global optionis enabled), a backup of a Windows client is slower until the first full backup of theclient is performed. Please refer to the HP Data Protector product announcements,software notes, and references for detailed information.
Installation and licensing guide 293

Limitations
Consider the following limitations:
• It is possible that a file, backed up with the previous version of Data Protectorand stored in the IDB using the old encoding, has been deleted from the clientbefore the IDB conversion. In this case, the filename will not be converted in theIDB. The same situation occurs if no backups have been performed during theconversion period (defined by the ConvertFilenamesInIDBDuringBackupglobal option). This makes the restore of such file more difficult if it uses non-ASCIIcharacters in the filename. See the HP Data Protector troubleshooting guide fora workaround.
• For other limitations, refer to Table 12 on page 289.
Upgrading from the Single Server EditionYou can perform the upgrade from one of the following:
• From earlier versions of the Single Server Edition (SSE) to Data Protector A.06.10Single Server Edition. For details, refer to “Upgrading from earlier versions ofSSE to Data Protector A.06.10 SSE” on page 294.
• From Data Protector A.06.10 Single Server Edition to Data Protector A.06.10.For details, refer to “Upgrading from Data Protector A.06.10 SSE to Data ProtectorA.06.10” on page 294.
Upgrading from earlier versions of SSE to Data Protector A.06.10SSE
The upgrade procedure from earlier versions of SSE to Data Protector A.06.10 SSEis the same as the upgrade procedure from earlier versions of Data Protector to DataProtector A.06.10. For the information, refer to “Upgrading from Data ProtectorA.05.10, A.05.50, and A.06.00” on page 259.
Upgrading from Data Protector A.06.10 SSE to Data ProtectorA.06.10
Licenses
You need to have a license to perform the upgrade from Data Protector A.06.10Single Server Edition to Data Protector A.06.10. For details about licensing, refer toChapter 5 on page 317.
Upgrading to Data Protector A.06.10294

The upgrade from Data Protector A.06.10 Single Server Edition to Data ProtectorA.06.10 is offered for two possible scenarios:
• If you have the Data Protector Single Server Edition installed on one system (CellManager) only. Refer to “Upgrading the Cell Manager” on page 295.
• If you have the Data Protector Single Server Edition installed on multiple systemsand you want to merge these cells. Refer to “Upgrading from multipleinstallations” on page 295.
NOTE:If you want to upgrade from a previous version of the Single Server Edition to a full DataProtector installation, first upgrade your Single Server Edition to the full installation ofthe same version level. To upgrade this full installation to Data Protector A.06.10, referto “Upgrading from Data Protector A.05.10, A.05.50, and A.06.00” on page 259.
Upgrading the Cell ManagerTo upgrade the Single Server Edition Cell Manager, do the following:
1. Remove the Single Server Edition license:
• on Windows: delData_Protector_home\Config\server\Cell\lic.dat
• on UNIX: rm /etc/opt/omni/server/cell/lic.dat
2. Start the Data Protector GUI and add a permanent password.
Upgrading from multiple installationsTo upgrade the Data Protector Single Server Edition installed on multiple systems,proceed as follows:
1. Select one of the existing Single Server Edition systems to be the new CellManager. Refer to “Choosing the Cell Manager system” on page 40.
Installation and licensing guide 295

2. Upgrade the selected Cell Manager by performing the following:
a. Remove the Single Server Edition license:
del Data_Protector_home\Config\server\Cell\lic.dat (onWindows systems) or
rm /etc/opt/omni/server/cell/lic.dat (on UNIX systems)
b. Start the Data Protector GUI and add a permanent password.
3. Import the other Single Server Edition systems into the newly created CellManager system as clients using the GUI.
4. Uninstall the Data Protector Single Server Edition from the other systems. Referto “Uninstalling Data Protector software” on page 238.
5. If needed, import the media to the new Cell Manager.
Perform this step if you intend to frequently restore from the media created onthe other Single Server Edition systems. If the probability of these restores isrelatively low, the List from media restore can be used. See the online Helpindex: “importing, media” for the information about importing media and detailsabout the List from media restore.
Upgrading from HP StorageWorks ApplicationRecovery Manager A.06.00Overview
Application Recovery Manager is a scalable recovery software solution providingautomated backup and recovery of Exchange and SQL application data designedto improve application availability with data recovery in minutes.
Data Protector A.06.10 supports the upgrade from Application Recovery ManagerA.06.00 and supports all Application Recovery Manager A.06.00 features. Theconfiguration and internal database are retained after upgrade.
Limitations
• Changing the Cell Manager platform is not supported in the A.06.10 release ofData Protector. Upgrades are only supported on the same Cell Manager platform(32–bit Windows to 32–bit Windows or 64–bit Windows to 64–bit Windows).
Upgrading to Data Protector A.06.10296

Upgrade procedure
The procedures for upgrading from Application Recovery Manager A.06.00 andolder versions of Data Protector to Data Protector A.06.10 are identical. SeeUpgrading the Cell Manager and Upgrading the clients.
Internal database backup after the upgradeOld backups of the internal database created with dbtool.pl are not usable withData Protector. You must configure a new backup specification to back up the internaldatabase and configuration. See the online Help index: “IDB, configuring backups”.
Apart from using a tape device, the IDB backup in Data Protector differs fromApplication Recovery Manager in the following details:
• the Data Protector services are not stopped during the backup as with dbtool.pl• the VSS database is not backed up
Upgrade of backup specificationsBackup specification in Application Recovery Manager do not contain tape devices.After the upgrade to Data Protector, the backup specifications can be used only forZDB to disk. To use tape functionality (ZDB to disk+tape, ZDB to tape), you mustreconfigure the backup specifications, specifying the tape device.
Changes in omnib usageIf no options are specified, Data Protector defaults to ZDB to disk+tape. ApplicationRecovery Manager backup sessions started from the CLI using the omnib commandwill therefore fail due to missing tape devices. To keep your existing backupspecifications without reconfiguring them for ZDB to disk+tape, use the -disk_onlyoption to run ZDB to disk.
Upgrading from Windows NT to newer version ofWindows
If you have the Cell Manager installed on the Windows NT system, you must upgradethe operating system to a newer version, as Windows NT is not supported by DataProtector A.06.10 as a Cell Manager platform.
Installation and licensing guide 297

If you want to upgrade your operating system from Windows NT to a newer versionof Windows, you have to consider the impact of this upgrade on Data Protector.
If you have Data Protector A.05.10 Cell Manager installed on Windows NT, andyou want to upgrade it to Data Protector A.06.10, perform the upgrade in thefollowing sequence:
1. Upgrade the operating system fromWindows NT to a newer version of Windows.For more information, refer to Windows documentation.
2. Upgrade the Data Protector A.05.10 Cell Manager to Data Protector A.06.10.For the procedure, refer to “Upgrading from Data Protector A.05.10, A.05.50,and A.06.00” on page 259.
Upgrading from Solaris 8 to Solaris 9If you have Data Protector A.06.10 Disk Agent (DA) installed on Solaris 8, and youwant to upgrade the operating system to Solaris 9, consider the impact of this upgradeon Data Protector. It is recommended to replace the generic Solaris DA installed onthe system with the Solaris 9 DA to ensure proper operation of Data Protector andenable advanced backup options for Solaris 9, such as backup of extended attributes.
Perform the upgrade in the following sequence:
1. Upgrade the operating system from Solaris 8 to Solaris 9. For more information,refer to Solaris documentation.
2. Remotely install the Disk Agent on the upgraded system using an InstallationServer. This will replace the generic Solaris Disk Agent with Solaris 9 Disk Agent.Refer to “Remote installation of Data Protector clients” on page 81 or toob2install man page.
Migrating from HP-UX 11.x (PA-RISC) to HP-UX11.23/11.31 (IA-64)
This section describes the procedure for migrating your existing Cell Manager froma PA-RISC architecture based HP-UX 11.x system to an HP-UX 11.23/11.31 systemfor the Intel Itanium 2 (IA-64) architecture.
Limitations
For details on supported operating system versions, platforms, processor architecturesand Data Protector components as well as required patches, general limitations, and
Upgrading to Data Protector A.06.10298

installation requirements, see the HP Data Protector product announcements, softwarenotes, and references.
• The migration is supported only from the Data Protector A.06.10 Cell Manageron a PA-RISC based HP-UX 11.x system.
• For the supported combinations of MoM configurations, refer to “MoMspecifics” on page 302.
Prerequisite
• Before the migration, the Data Protector Cell Manager on a a PA-RISC architecturebased HP-UX 11.x system must be upgraded to Data Protector A.06.10.
Recommendation
• It is recommended to perform the conversion of file names in the IDB prior tomigration. Refer to “Conversion of file names in the IDB” on page 287.
Licenses
The new Cell Manager (IA-64 system) will have a different IP address as the old CellManager, therefore you should apply for the licenses migration prior to the migration.For a limited amount of time, licenses on both system will be operational. If licensesare based on an IP range and the new Cell Manager’s IP address is within this range,no license reconfiguration is necessary. Refer to “License migration to Data ProtectorA.06.10” on page 372 for details.
NOTE:On Cell Manager platforms where the original Data Protector GUI is not supported, youcan use the Data Protector Java GUI or install the original Data Protector GUI on a systemwhere it is supported. Use the omniusers command to create a remote user accounton the new Cell Manager. You can then use this user account on any system with theData Protector GUI installed to start the GUI and connect to the new Cell Manager. Referto the omniusers man page.
Migration procedure
Perform the migration procedure as follows:
Installation and licensing guide 299

1. Install a Data Protector client on the IA-64 system and import it to the old CellManager’s cell. If you are planning to configure Data Protector in a cluster,install the client on the primary node. Refer to “Installing HP-UXclients” on page 97.
2. Run the following command on the old Cell Manager to add the hostname ofthe IA-64 system to the list of trusted hosts on secured clients:
omnimigrate.pl -prepare_clients New_CM_Name, where the New_CM_Name isthe client name of the IA-64 system from the previous step.
For more information about trusted hosts and securing Data Protector clients,refer to “Securing clients” on page 225 and “Host trusts” on page 234.
3. Back up the IDB. Make sure that the used media can later be accessed on thenew Cell Manager system. Refer to the online Help index keyword “IDB backup”.
4. Restore the IDB to a temporary location on the IA-64 system. Refer to online Helpindex keyword “IDB restore”.
5. Uninstall the Data Protector client from the IA-64 system. Refer to “Uninstallinga Data Protector client” on page 239.
6. Install Data Protector Cell Manager on the IA-64 system. If you are planning toconfigure Data Protector in a cluster, install the Cell Manager on the primarynode as a standalone Cell Manager (not cluster aware). Refer to “Installing theData Protector Cell Manager (CM) and Installation Server(s) (IS)” on page 46.
7. If you changed the default Data Protector Inet port on the old Cell Manager, setthe same Inet port also on the new Cell Manager. Refer to “Changing the DataProtector default port number” on page 409.
8. Move the restored IDB (residing in a temporary location on the new CellManager), and configuration data to the same location on the new Cell Manageras it was on the old Cell Manager. Refer to online Help index keyword “IDBrestore”.
If the old Cell Manager was cluster-aware, comment out theSHARED_DISK_ROOT and CS_SERVICE_HOSTNAME variables in the/etc/opt/omni/server/sg/sg.conf file. This is necessary even if the newCell Manager will be cluster-aware.
Upgrading to Data Protector A.06.10300

9. To migrate the IDB and clients to the new Cell Manager, and to reconfigure theCell Manager’s settings, perform the following steps on the new Cell Manager:
• If you want to configure a standalone IA-64 Cell Manager, run theomnimigrate.pl -configure command. Refer to the omnimigrate.plman page.
• If you want to configure a cluster-aware IA-64 Cell Manager:a. Run the omnimigrate -configure_idb command to configure the
IDB from the old Cell Manager for use on the new Cell Manager. Referto the omnimigrate.pl man page.
b. Run the omnimigrate -configure_cm command to reconfigure theconfiguration data transferred from the old Cell Manager for use on thenew Cell Manager. Refer to the omnimigrate.pl man page.
c. Export the old virtual server from the cell by running the omnicc-export_host Old_CM_Name.
d. Configure the primary and secondary Cell Manager. Refer to the onlineHelp index keyword “MC/ServiceGuard integration configuring”.
e. Run the omnimigrate -configure_clients command to migratethe clients from the old Cell Manager to the new Cell Manager. Notethat the old Cell Manager will keep the clients in the configuration filesalthough it will not be their Cell Manager anymore.
NOTE:If the /etc/opt/omni/server directory is located on the shared clustervolume, the configuration changes made by the omnimigrate.pl scriptwill affect all nodes in the cluster.
NOTE:The old Cell Manager will automatically become a client in the new cell.You can uninstall the Cell Manager component from the old Cell Manager,because it is not necessary anymore. Refer to “Changing Data Protectorsoftware components” on page 251.
10. Configure the licenses on the new Cell Manager. Refer to “Data ProtectorA.06.10 product structure and licenses” on page 357.
Installation and licensing guide 301

11. Create a remote user account on the new Cell Manager and use the newlycreated user account on any other system with the Data Protector GUI installedto start the GUI and connect to the Cell Manager. Refer to the omniusers manpage for details.
12. Additional steps are required if the following is true:
• Your cell is a part of the MoM environment. Refer to “MoMspecifics” on page 302
• Your cell works across a firewall. Reconfigure all firewall related settings onthe new Cell Manager. Refer to online Help index keyword “firewallenvironments”.
• You want to have an Installation Server on your new Cell Manager. Refer to“Installation Server specifics” on page 303.
MoM specificsIf the new Cell Manager will be configured in the MoM, additional steps are requiredafter the basic migration procedure has been completed. The required steps dependon the configuration of the MoM for the old and new Cell Managers in yourenvironment. The supported combinations are:
• The old Cell Manager was a MoM client; the new Cell Manager will be a MoMclient of the same MoM Manager.Perform the following steps:1. On the MoMManager, export the old Cell Manager from the MoMManager
cell and import the new Cell Manager. Refer to the online Help index keyword“client systems exporting”.
2. Add the MoM administrator to the users list on the new Cell Manager. Referto the online Help index keyword “MoM administrator, adding”.
• The old Cell Manager was a MoM Manager; the new Cell Manager will be aMoM Manager.If the old MoM Manager was the only client in the MoM, no action is necessary.Otherwise, perform the following steps:1. On the old MoM Manager (the old Cell Manager), export all MoM clients.
2. On the new MoM Manager (the new Cell Manager), import all MoM clients.
3. Add the MoM administrator to the users list on all MoM clients.
Upgrading to Data Protector A.06.10302

NOTE:On Cell Manager platforms where the original Data Protector GUI is not supported, youcan use the Data Protector Java GUI or install the original Data Protector GUI on a systemwhere it is supported. Use omniusers command to create a remote user account onthe new Cell Manager. You can then use this user account on any system with the DataProtector GUI installed to start the GUI and connect to the new Cell Manager. Refer tothe omniusers man page.
Installation Server specificsThe migration of the Installation Server is not done as part of the Cell Managermigration. If Installation Server is installed on your old Cell Manager, it will not bemigrated to the new Cell Manager and will stay the Installation Server for your cell.
If you want to use the new Cell Manager also as an Installation Server, install theInstallation Server component on the new Cell Manager after the migration andimport it in the cell. Refer to the online Help index keyword “Installation Server”.
Migrating from 32-bit/64-bit Windows to 64-bitWindows/Windows Server 2008
This section describes the procedure for migrating your existing Cell Manager froma 32-bit Windows system to a 64-bit Windows system, or from a 64-bit Windowssystem to a 64-bit Windows Server 2008 system.
Limitations
See the HP Data Protector product announcements, software notes, and referencesfor details on supported operating system versions, platforms, processors and DataProtector components as well as required patches, general limitations, and installationrequirements.
Prerequisite
• Before the migration, the Data Protector Cell Manager on a 32-bit Windowssystem must be upgraded to Data Protector A.06.10.
Installation and licensing guide 303

Recommendation
• In the case of upgrade from Data Protector A.05.10, it is recommended to performthe conversion of file names in the IDB prior to migration. See “Conversion of filenames in the IDB” on page 287.
Licenses
The new Cell Manager will have a different IP address than the old Cell Manager,therefore you should apply for license migration prior to the migration. For a limitedamount of time, licenses on both systems will be operational. If your licenses arebased on an IP range and the new Cell Manager’s IP address is within this range,no license reconfiguration is necessary. See “License migration to Data ProtectorA.06.10” on page 372 for details.
Migration procedure
Perform the migration as follows:
1. Install a Data Protector client on the 64-bit Windows system or the 64-bitWindows Server 2008 system that will become your new Cell Manager. Fordetails, see “Installing Windows clients” on page 90.
2. Import the system to the old Cell Manager’s cell.
3. On the old Cell Manager, add the hostname of the new Cell Manager to thelist of trusted hosts on secured clients. From the directoryData_Protector_home\bin, run:
perl winomnimigrate.pl -prepare_clients New_CM_Name
New_CM_Name is the client name of the new Cell Manager from the previousstep. For details on winomnimigrate.pl, see HP Data Protector commandline interface reference.
For more information about trusted hosts and securing Data Protector clients,see “Securing clients” on page 225 and “Host trusts” on page 234.
4. Back up the IDB. Make sure that the used media can later be accessed on thenew Cell Manager system. See the online Help index: “IDB backup”.
5. Restore the IDB to a temporary location on the new Cell Manager. Dependingon which option you choose for the IDB backup, you may have to configure thedevice and import the catalog from the appropriate media. Once the IDB backupobject is in the IDB, you can restore the IDB in order to move the configurationdata to the new system. See the online Help index: “IDB restore”.
Upgrading to Data Protector A.06.10304
6. Uninstall the Data Protector client from the new Cell Manager. See “Uninstallinga Data Protector client” on page 239.
7. Install Data Protector Cell Manager on the new Cell Manager. See “Installingthe Data Protector Cell Manager (CM) and Installation Server(s) (IS)” on page 46.
8. If you changed the default Data Protector Inet port on the old Cell Manager, setthe same Inet port on the new Cell Manager. See “Changing the Data Protectordefault port number” on page 409.
9. Move the restored IDB (residing in a temporary location on the new CellManager) and configuration data to the same location on the new Cell Manageras it was on the old Cell Manager. Do not restart the Data Protector services.See the online Help index: “IDB restore”.
Installation and licensing guide 305

10. To migrate the IDB and clients to the new Cell Manager and to reconfigure theCell Manager’s settings, perform the following steps on the new Cell Manager:
• Configure a standalone Cell Manager. From the directoryData_Protector_home\bin, run:perl winomnimigrate.pl -configure
If you are migrating the Cell Manager to a 64-bit Windows Server 2008system, you can use the option -keep_dcdirs to unconditionally preservereferences to additional DCBF directories in the migrated IDB:perl winomnimigrate.pl -configure -keep_dcdirs
• To configure a cluster-aware Cell Manager:a. From the directory Data_Protector_home\bin, run perl
winomnimigrate.pl -configure_idb to configure the IDB fromthe old Cell Manager for use on the new Cell Manager.If you are migrating the Cell Manager to a 64-bit Windows Server 2008system, you can use the option-keep_dcdirs to unconditionallypreserve references to additional DCBF directories in the migrated IDB:perl winomnimigrate.pl -configure_idb -keep_dcdirs
b. From the directory Data_Protector_home\bin, run perlwinomnimigrate.pl -configure_cm to reconfigure theconfiguration data transferred from the old Cell Manager for use on thenew Cell Manager.
c. Export the old virtual server from the cell by running omnicc-export_host Old_CM_Name.
d. From the directory Data_Protector_home\bin, run perlwinomnimigrate.pl -configure_clients to migrate the clientsfrom the old Cell Manager to the new Cell Manager. Note that the oldCell Manager will keep the clients in the configuration files although itwill not be their Cell Manager anymore.
NOTE:The old Cell Manager will automatically become a client in the new cell.You can uninstall the Cell Manager component from the old Cell Manager,because it is not necessary anymore. See “Changing Data Protector softwarecomponents” on page 251.
Upgrading to Data Protector A.06.10306

11. If you installed the new 64-bit Cell Manager in a different directory than the onein which the old Cell Manager was installed, the internal links in the IDB stillinclude the old Cell Manager paths. Manually add the new paths of the DetailCatalog Directories on the new Cell Manager using the Data Protector GUI. Seethe online Help index: “creating DC directories”.
12. Configure the licenses on the new Cell Manager. See “Data Protector A.06.10product structure and licenses” on page 357.
13. Additional steps are required if:
• Your cell is a part of the MoM environment. See “MoM specifics” on page 307.• Your cell works across a firewall. Reconfigure all firewall related settings on
the new Cell Manager. See the online Help index: “firewall environments”.• You want to have an Installation Server on your new Cell Manager. See
“Installation Server specifics” on page 308.
MoM specificsIf the new Cell Manager will be configured in the MoM, additional steps are requiredafter the basic migration procedure has been completed. The required steps dependon the configuration of the MoM for the old and new Cell Managers in yourenvironment. The supported combinations are:
• The old Cell Manager was a MoM client; the new Cell Manager will be a MoMclient of the same MoM Manager.Perform the following steps:1. On the MoMManager, export the old Cell Manager from the MoMManager
cell and import the new Cell Manager. See the online Help index: “clientsystems, exporting”.
2. Add the MoM administrator to the user list on the new Cell Manager. Seethe online Help index: “MoM administrator, adding”.
• The old Cell Manager was a MoM Manager; the new Cell Manager will be aMoM Manager.If the old MoM Manager was the only client in the MoM, no action is necessary.Otherwise, perform the following steps:1. On the old MoM Manager (the old Cell Manager), export all MoM clients.
2. On the new MoM Manager (the new Cell Manager), import all MoM clients.
3. Add the MoM administrator to the user list on all MoM clients.
Installation and licensing guide 307

Installation Server specificsThe migration of the Installation Server is not performed as part of the Cell Managermigration. If Installation Server is installed on your old Cell Manager, it will not bemigrated to the new Cell Manager.
If you want to use the new Cell Manager also as an Installation Server, install theInstallation Server component on the new Cell Manager after the migration andimport it to the cell. See the online Help index: “Installation Server”.
Upgrading the Cell Manager configured onMC/ServiceGuard
During an upgrade procedure, only the database is upgraded, and the old versionof the product is removed. Data Protector A.06.10 is installed with the default selectionof agents, and other agents are removed. In order to obtain a configuration equivalentto the state before the upgrade, you must manually select any other agents duringthe upgrade procedure or reinstall them afterwards on each physical node.
The upgrade procedure from Data Protector A.05.10, Data Protector A.05.50, orData ProtectorA.06.00 consists of upgrading the primary and secondary nodes.Follow the steps described below:
Primary node
Log on to the primary node and perform the following steps:
1. Stop the old OmniBack/Data Protector package by running the cmhaltpkgpkg_name command (where pkg_name is the name of the cluster package).For example:
cmhaltpkg ob2cl
2. Activate the volume group in exclusive mode:
vgchange -a e -q y vg_name
For example:
vgchange -a e -q y /dev/vg_ob2cm
Upgrading to Data Protector A.06.10308

3. Mount the logical volume to the shared disk:
mount lv_path shared_disk
The lv_path parameter is the path name of the logical volume, andshared_disk is the mount point or a shared directory. For example:
mount /dev/vg_ob2cm/lv_ob2cm /omni_shared
4. Upgrade the Cell Manager following the procedure described in the sectionsbelow. Note that some of the steps are different depending on the product versionyou are upgrading from to Data Protector A.06.10. See “Upgrading the UNIXCell Manager and Installation Server” on page 259.
5. Stop the Data Protector services if they are running:
/opt/omni/sbin/omnisv -stop
6. Unmount the shared disk:
umount shared_disk
For example:
umount /omni_shared
7. Deactivate the volume group:
vgchange -a n vg_name
For example:
vgchange -a n /dev/vg_ob2cm
Secondary node
Log on to the secondary node and perform the following steps:
1. Activate the volume group in exclusive mode:
vgchange -a e -q y vg_name
2. Mount the logical volume to the shared disk:
mount lv_path shared_disk
3. Upgrade the Cell Manager. The steps are different depending on the productversion you are upgrading from to Data Protector A.06.10. Follow the stepsdescribed in “Upgrading the UNIX Cell Manager and InstallationServer” on page 259.
Installation and licensing guide 309

4. Rename the csfailover.sh and mafailover.ksh startup scripts in the/etc/opt/omni/server/sg directory (for example, tocsfailover_DP51.sh and mafailover_DP51.ksh) and copy the newcsfailover.sh and the mafailover.ksh scripts from the/opt/omni/newconfig/etc/opt/omni/server/sg directory to the/etc/opt/omni/server/sg directory.
If you customized your old startup scripts, reimplement the changes also in thenew startup scripts.
NOTE:If you are upgrading from Data Protector A.05.10, the default paths ofsome configuration, log and (on UNIX) database files have been changedin Data Protector A.05.50 and later versions. Some of the files are nowsplit in the server and client directory. Refer to “Configuration files onUNIX” on page 455.
5. Stop the Data Protector services if they are running:
/opt/omni/sbin/omnisv -stop
6. Unmount the shared disk:
umount shared_disk
7. Deactivate the volume group:
vgchange -a n vg_name
Primary node
Log on to the primary node again and perform the following steps:
1. Restart the Data Protector package:
cmrunpkg pkg_name
Make sure that the package switching and switching for nodes options areenabled.
2. Configure the Cell Manager. Make sure not to be positioned in the/etc/opt/omni or /var/opt/omni directory or their subdirectories whenrunning the script. Make also sure to have no mounted subdirectories in the/etc/opt/omni or /var/opt/omni. Run:
/opt/omni/sbin/install/omniforsg.ksh -primary -upgrade
Upgrading to Data Protector A.06.10310

3. Stop the Data Protector services if they are running:
/opt/omni/sbin/omnisv -stop
4. Unmount the shared disk:
umount shared_disk
5. Deactivate the volume group:
vgchange -a n vg_name
Secondary node
Log on to the secondary node again and perform the following steps:
1. Restart the Data Protector package:
cmrunpkg pkg_name
Make sure that the package switching and switching for nodes options areenabled.
2. Configure the Cell Manager. Make sure not to be positioned in the/etc/opt/omni or /var/opt/omni directory or their subdirectories whenrunning the script. Make also sure to have no mounted subdirectories in the/etc/opt/omni or /var/opt/omni. Run:
/opt/omni/sbin/install/omniforsg.ksh -secondary /share-upgrade
3. Stop the Data Protector services if they are running:
/opt/omni/sbin/omnisv -stop
4. Unmount the shared disk:
umount shared_disk
5. Deactivate the volume group:
vgchange -a n vg_name
Primary node
Log on to the primary node again and perform the following steps:
Installation and licensing guide 311

1. Restart the Data Protector package:
cmrunpkg pkg_name
Make sure that the package switching and switching for nodes options areenabled.
2. Re-import the virtual host:
omnicc -import_host virtual_hostname -virtual
3. Change the Cell Manager name in the IDB:
omnidbutil -change_cell_name
4. If you have the Installation Server in the same package as the Cell Manager,import the Installation Server virtual hostname:
omnicc -import_is virtual_hostname
NOTE:All requests coming from the Cell Managers are logged in the/var/opt/omni/log/inet.log file on clients. To prevent unnecessary log entries,secure the clients. Refer to “Security considerations” on page 222 for information on howto secure a cell.
Upgrading the Cell Manager configured on MicrosoftCluster Server
The upgrade of Data Protector A.05.10, A.05.50 or A.06.00 Cell Manager to DataProtector A.06.10 on Microsoft Cluster Server (MSCS) is performed locally, from theWindows installation DVD-ROM.
NOTE:It is recommended that all cluster nodes have MSI 2.0 installed.
To perform the upgrade, proceed as follows:
Upgrading to Data Protector A.06.10312

1. Insert the Windows installation DVD-ROM and run\Windows_other\\i386\setup.exe. It is recommended to start the setupon the currently active virtual server node.
Setup automatically detects the old version of the product and prompts you toupgrade it to Data Protector A.06.10.
Click Next to continue.
2. Data Protector automatically selects the components that were installed.
Figure 47 Selecting the components
Installation and licensing guide 313

3. The component selection summary list is displayed. Click Install to perform theupgrade.
Note that after the upgrade, every node has the same component set.
Figure 48 Component selection summary page
4. The Installation status page is displayed. Click Next.
Figure 49 Installation status page
5. If you have UNIX clients in the cell, the IDB Conversion page will be displayed.Refer to “Conversion of file names in the IDB” on page 287.
Upgrading to Data Protector A.06.10314
6. To start using Data Protector immediately after setup, select Start the DataProtector Manager GUI.
To view the HP Data Protector product announcements, software notes, andreferences, select Open the Product Announcements.
It is not recommended to install the HP AutoPass utility on Microsoft ClusterServer, because it will be installed only on one node and not on all nodes.However, if you install AutoPass, you must uninstall Data Protector from the samenode on which it was installed, when you decide to remove Data Protector fromthe system.
Click Finish.
NOTE:If you are upgrading cluster-aware clients, first upgrade every cluster node separately,and then re-import the virtual server. The remote upgrade is not supported.
Installation and licensing guide 315

Upgrading to Data Protector A.06.10316
5 Data Protector licensing
In this chapterThis chapter contains information about how Data Protector licenses are checkedand reported, and about how to obtain and install Data Protector passwords.
IntroductionThe Data Protector A.06.10 product structure and licensing consists of three maincategories:
1. Starter Packs
2. Drive Extensions and Library Extensions
3. Functional Extensions
NOTE:The UNIX product licenses operate on all platforms, providing the functionality regardlessof the platform, while the Windows product licenses operate on the Windows, Linux,and NetWare platforms only.
Passwords are bound to the Cell Manager and are valid for the entire Data Protectorcell. Clients do not require any license for filesystem or disk image backups.
License checking and reportingData Protector licenses are checked and if missing, reported during various DataProtector operations, for example:
• As a part of the Data Protector checking and maintenance mechanism, the licensesare checked and, if missing, reported in the Data Protector Event Log. Data
Installation and licensing guide 317
Protector Event Log is located on the Cell Manager inData_Protector_program_data\log\server\Ob2EventLog.txt(Windows Server 2008) orData_Protector_home\log\server\Ob2EventLog.txt (other Windowssystems). For more information on Data Protector checking and maintenancemechanism, see the online Help index: “Event Log, Data Protector“.
• When the Data Protector User Interface is started, if there are any missing licensesreported in the Data Protector Event Log, an Event Log notification is displayed.For more information on Data Protector Event Log, see the online Help index:“Event Log, Data Protector“.
• When a Data Protector session is started, the licenses are checked and, if missing,reported.
Data Protector licenses are with regard to their characteristics grouped as follows:
• Cell Manager related licenses• entity based licenses• capacity based licenses
Cell Manager related licensesThe Data Protector Cell Manager related licenses are:
• Starter packs• Manager-of-Managers Extension• Single Server Edition
When a certain Data Protector component, such as the Cell Manager (included inthe Starter Pack) or the Manager-of-Managers is present in the cell, only the presenceof the required basic or special license is checked.
Entity based licensesThe Data Protector entity based license are:
• Library extension for one library with 61-250 slots and for one library withunlimited slots
• Drive extension for SAN / UNIX / NAS and Drive extension for Windows /NetWare / Linux (Intel)
• On-line extension for one UNIX system and On-line extension for one Windows/ Linux system
• Data Protector encryption extension
Data Protector licensing318

When any of the items that are the subject of the source based licenses is configuredin the cell, the presence and number of the required entity based licenses is checked.
Data Protector checks the number of configured entity based items against the numberof entity based licenses. If there are less licenses than configured items, Data Protectorissues a notification.
With the first two licenses from the above list the following applies:
When a backup device is configured in a SAN environment for several Data Protectorclients, multipath functionality must be used for Data Protector to recognize it as asingle backup device.
Capacity based licensesThe Data Protector capacity based licenses are:
• Zero Downtime Backup (ZDB) for HP StorageWorks XP for 1 TB and 10 TB• Zero Downtime Backup for HP StorageWorks Enterprise Virtual Array for 1 TB
and 10 TB• Zero Downtime Backup for EMC Symmetrix DMX 1 TB and for 10 TB• Instant Recovery for HP StorageWorks Enterprise Virtual Array for 1TB and 10
TB• Direct Backup for HP StorageWorks disk array XP for 1 TB and 10TB• Direct Backup for HP StorageWorks Enterprise Virtual Array for 1TB and for 10
TB• Direct Backup using NDMP for 1 TB and for 10 TB• Advanced backup to disk for 1 TB, for 10 TB, and for 100 TB• Backup to HP IAP extension for 1 TB
When a capacity based license (other than the advanced backup to disk license) isbeing checked, the amount of total disk space on logical units that have been backedup is compared to the capacity of licenses installed.
License checking is done in such a way as not to prevent you from performing instantrecovery or a backup even if you have run out of licensed capacity. In thesecircumstances a warning message appears during the backup session informing youthat you have exceeded your licensed capacity.
Capacity of used disks is calculated based on historical information gathered duringeach ZDB or direct backup session. The time interval taken into account is twenty-fourhours. Data Protector calculates used disk capacity based on the disks that were usedin all sessions in the last twenty-four hours and compares the calculated capacity withthe licensed capacity.
Installation and licensing guide 319
If a license violation occurs, a warning message is issued during the backup. Inaddition, the license reporting tool is run daily and writes a notification to the DataProtector Event Log if the licensed capacity is exceeded.
Used capacity calculationThe used capacity calculation calculates the licensed capacity of each disk arraytype used in the past twenty-four hours. Disks used two or more times in the specifiedtime interval are only counted once. Disk array units are identified by theiridentification numbers taken from each array. The use of array identification numbersmeans that it is possible to know when an array has already been counted.
If a ZDB backup has been run that includes instant recovery or direct backup, theoriginal unit’s total capacity is calculated both for ZDB used capacity per disk array,and in addition, that used for instant recovery or direct backup capacity per diskarray.
For example, imagine a scenario where there are two EVA disk arrays. On one arraythere is a single disk (App. 1) with a capacity of 200 GB being used for dataprotection. An instant recovery option is included with each backup session whichare triggered three times a day. Three snapshots at a time are kept, these are rotatedfor instant recovery purposes. On the second disk array there are two disks (App. 2and App. 3) with capacities of 150 GB and 120GB respectively. Backup is run oncea day on App.2 disk and the snapshot is deleted after the data is moved to tape.On App. 3, backup is run three times a day and five different snapshots are rotatedfor instant recovery. See Figure 50 on page 321.
Data Protector licensing320
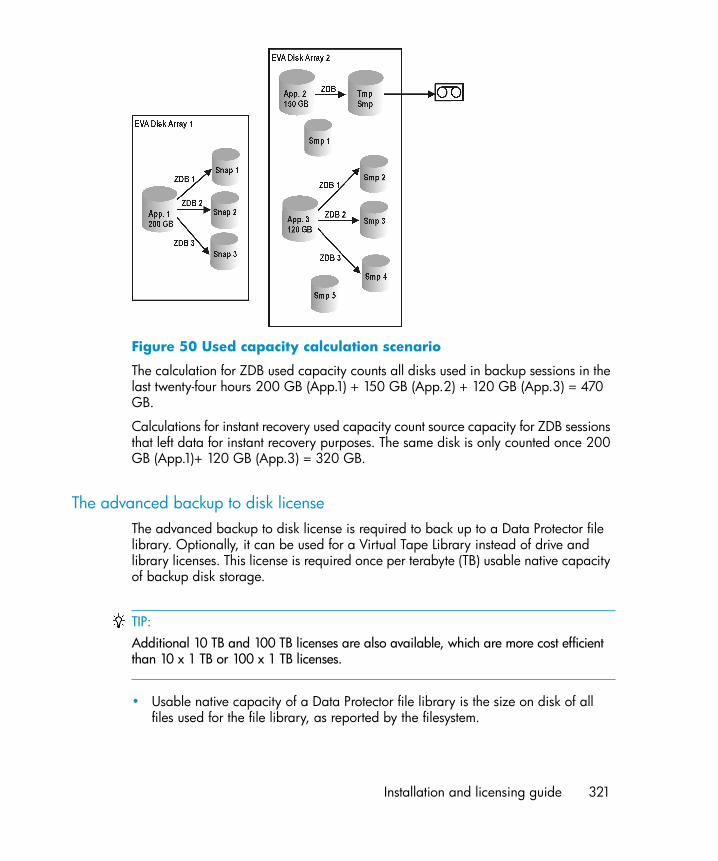
Figure 50 Used capacity calculation scenario
The calculation for ZDB used capacity counts all disks used in backup sessions in thelast twenty-four hours 200 GB (App.1) + 150 GB (App.2) + 120 GB (App.3) = 470GB.
Calculations for instant recovery used capacity count source capacity for ZDB sessionsthat left data for instant recovery purposes. The same disk is only counted once 200GB (App.1)+ 120 GB (App.3) = 320 GB.
The advanced backup to disk licenseThe advanced backup to disk license is required to back up to a Data Protector filelibrary. Optionally, it can be used for a Virtual Tape Library instead of drive andlibrary licenses. This license is required once per terabyte (TB) usable native capacityof backup disk storage.
TIP:Additional 10 TB and 100 TB licenses are also available, which are more cost efficientthan 10 x 1 TB or 100 x 1 TB licenses.
• Usable native capacity of a Data Protector file library is the size on disk of allfiles used for the file library, as reported by the filesystem.
Installation and licensing guide 321

• Data Protector synthetic full and virtual full backup: Virtual full backups andthe incremental backups to be consolidated into a synthetic/virtual full backupmust be stored in the Data Protector file library, which requires this license.
• Usable native capacity of a virtual tape library (VTL) is the size on disk of thevirtual tape library consumed by all protected Data Protector backups as reportedby the VTL.• In case the VTL has the built-in capability to migrate backup data from the disk
cache to cheaper disk or tape, the migrated storage capacity needs to befully licensed. No drive and library licenses are required for the tape libraryexclusively controlled by the VTL, but the used capacity of all tapes in thephysical tape library needs to be licensed. In those cases, it might be cheaperto go for the tape drive licensing model using the SKUs B6953AA andB6963AA. This is not applicable if Data Protector object copy has been usedto migrate the backup data to another disk or tape.
• For each VTL, you can choose whether to use the backup to disk or tape drivelicensing model. Within one VTL, both concepts must not been mixed.
• By default, Data Protector treats VTL devices as ordinary libraries (such asSCSI II libraries). To utilize the advanced backup to disk licenses, the devicemust be marked as a VTL during the device configuration. See the online Helpindex: “virtual tape library” for more information.
• In case this license has been purchased before July 1st, 2008, HP is fullycommitted to protect investments. This means you can choose to use this licensefor the VTL under the old licensing terms: “Usable native capacity of a VTL isthe space occupied by protected backups and protected backup copies andmirrors according to the Data Protector internal database. To keep virtual tapelibrary licensing stress free and simple, a compression rate of 2:1 is assumedfor VTLs with no extra charge.” Continuing with the previous model only makessense in case you do not use compression or deduplication technology.Otherwise, you get a higher value if you use previously purchased licensesunder the new licensing model.
• If Data Protector is using the VTL exclusively, it is recommended to license aquantity matching the physical capacity of the VTL. HP calls the physical VTLcapacity “usable native capacity”. Other vendors call it “raw capacity”.
• VTL replication does not require additional Data Protector licenses.
• Due to this size on disk licensing concept, compression and deduplication ratesdo not need to be considered. The RAID configuration does not need to beconsidered either.
• 1 TB = 1024 GB, 1 GB = 1024 MB, 1 MB = 1024 KB, 1 KB = 1024 bytes• In case of central licensing with MoM, at minimum 1 TB needs to be assigned to
each cell using the Advanced Backup to Disk functionality.
Data Protector licensing322

NOTE:Data Protector is not able to report the required amount of licenses due to the missinginstrumentation and interfaces of today’s Virtual Tape Libraries and some files servershosting the Data Protector file library. It is the responsibility of the user to license thecapacity consistently with the licensing definitions. When you order new backup storagecapacity, always check that the available Data Protector licenses cover the capacity ofyour backup infrastructure.
Examples:
• One backup disk array with a total usable native capacity of 2.5 TB, fully usedfor advanced backup to disk, requires 3 x B7038AA.
• One backup disk array with a total raw capacity of 2.5 TB, fully configured inRAID 1 (mirroring) has only a usable native capacity of 1.25 TB and only requires2 x B7038AA, if fully used for advanced backup to disk.
• Two backup disk arrays with a total usable native capacity of 2.5 TB each, fullyused for advanced backup to disk, require 5 x B7038AA.
• 10 blade servers with 0.75 TB usable native capacity each, fully used foradvanced backup to disk, require 8 x B7038AA (actually it would be cheaperto buy 1 x B7038BA (10 TB)).
• A VTL with 10 TB usable disk capacity and controlling 90 TB of backup data ontape requires 1 x B7038CA (100 TB).
Backup to HP IAP extensionIncludes the license-to-use (LTU) for 1 TB of archive disk storage. Required once perterabyte (TB) usable native capacity of archive disk storage.
• The Backup to HP IAP license is required to back up to the HP Integrated ArchivePlatform (IAP).
• Usable native capacity is the usable space of the file system according to theunderlying operating system.
• Usable capacity differs from raw capacity in that RAID overhead is excluded.This means the RAID configuration does not need to be considered.
• Does not require any drive and library LTU.• Usable native capacity does not charge extra for compression. Compression can
be provided by the underlying operating system. Single instancing falls into thiscategory too.
Installation and licensing guide 323
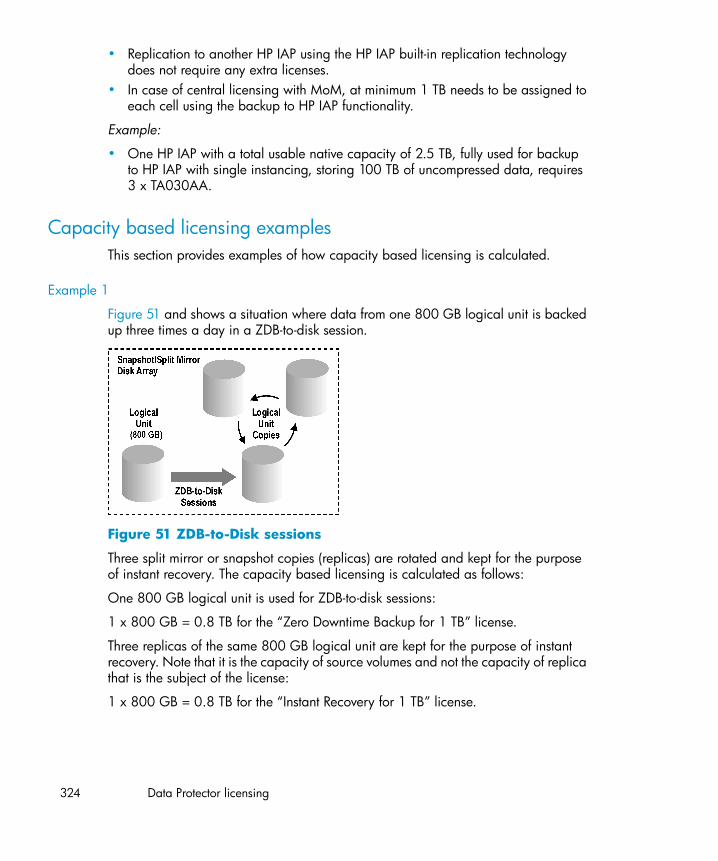
• Replication to another HP IAP using the HP IAP built-in replication technologydoes not require any extra licenses.
• In case of central licensing with MoM, at minimum 1 TB needs to be assigned toeach cell using the backup to HP IAP functionality.
Example:
• One HP IAP with a total usable native capacity of 2.5 TB, fully used for backupto HP IAP with single instancing, storing 100 TB of uncompressed data, requires3 x TA030AA.
Capacity based licensing examplesThis section provides examples of how capacity based licensing is calculated.
Example 1
Figure 51 and shows a situation where data from one 800 GB logical unit is backedup three times a day in a ZDB-to-disk session.
Figure 51 ZDB-to-Disk sessions
Three split mirror or snapshot copies (replicas) are rotated and kept for the purposeof instant recovery. The capacity based licensing is calculated as follows:
One 800 GB logical unit is used for ZDB-to-disk sessions:
1 x 800 GB = 0.8 TB for the “Zero Downtime Backup for 1 TB” license.
Three replicas of the same 800 GB logical unit are kept for the purpose of instantrecovery. Note that it is the capacity of source volumes and not the capacity of replicathat is the subject of the license:
1 x 800 GB = 0.8 TB for the “Instant Recovery for 1 TB” license.
Data Protector licensing324

One “Zero Downtime Backup for 1 TB” license and one “Instant Recovery for 1 TB”license are sufficient for this situation.
Example 2
Figure 52 on page 325 shows a situation where data from one 800 GB logical unitis backed up twice a day in a ZDB-to-tape session. Split mirror or snapshot copies(replicas) are, therefore, not kept for instant recovery. The capacity based licensingis calculated as follows:
One 800 GB logical unit is used for ZDB-to-disk sessions:
1 x 800 GB = 0.8 TB for the “Zero Downtime Backup for 1 TB license.
One “Zero Downtime Backup for 1 TB” license is sufficient.
Figure 52 ZDB-to-Tape sessions
Example 3
Figure 53 on page 326 shows a situation where data from one 800 GB logical unitis backed up three times a day in a ZDB-to-disk+tape session. Five split mirror orsnapshot copies (replicas) are rotated and kept for the purpose of instant recovery.The capacity based licensing is calculated as follows:
One 800 GB logical unit is used for ZDB-to-disk+tape sessions:
1 x 800 GB = 0.8 TB for the “Zero Downtime Backup for 1 TB” license.
Five replicas of the same 800 GB logical unit are kept for the purpose of instantrecovery. Note that it is the capacity of source volumes and not the capacity of replicathat is the subject of the license:
1 x 800 GB = 0.8 TB for the “Instant Recovery for 1 TB” license.
One “Zero Downtime Backup for 1 TB” license and one “Instant Recovery for 1 TB”license are sufficient.
Installation and licensing guide 325

Figure 53 ZDB-to-Disk+Tape sessions
Example 4
Figure 54 on page 327 shows a situation where data from one 800 GB logical unitis backed up 4 times a day in a direct backup session. Three split mirror or snapshotcopies (replicas) created during the direct backup session are rotated and kept forthe purpose of instant recovery. The capacity based licensing is calculated as follows:
One 800 GB logical unit is used for direct backup sessions:
1 x 800 GB = 0.8 TB for the “Direct Backup for 1 TB” license.
The same 800 GB logical unit is used for ZDB-to-disk+tape sessions and is thereforesubject of another license:
1 x 800 GB = 0.8 TB for the “Zero Downtime Backup for 1 TB” license.
Three replicas of the same 800 GB logical unit are kept for the purpose of instantrecovery. Note that it is the capacity of source volumes and not the capacity of replicathat is the subject of the license:
1 x 800 GB = 0.8 TB for the “Instant Recovery for 1 TB” license.
One “Direct Backup for 1 TB” license, one “Zero Downtime Backup for 1 TB” licenseand one “Instant Recovery for 1 TB” license are sufficient for the situation shown inFigure 54 on page 327.
Data Protector licensing326

Figure 54 Direct backup sessions
Example 5
One 200 GB logical unit, one 500 GB logical unit, one 120 GB logical unit, andone 300 GB logical unit are used in ZDB sessions:
1 x 200 GB + 1 x 500 GB + 1 x 120 GB + 1 x 300 GB = 1.12 TB for the “ZeroDowntime Backup for 1 TB” license.
Split mirror or snapshot copies of one 200 GB logical unit, one 120 GB logical unit,and one 300 GB logical unit are kept for the purpose of instant recovery:
1 x 200 GB + 1 x 120 GB + 1 x 300 GB = 0.62 TB for the “Instant Recovery for 1TB” license.
One 300 GB logical unit is used in direct backup sessions:
1 x 300 GB = 0.3 TB for the “Zero Downtime Backup for 1 TB” license.
One “Direct Backup for 1 TB” license, two “Zero Downtime Backup for 1 TB” licensesand one “Instant Recovery for 1 TB” license are sufficient if all four examples in figuresFigure 51 on page 324 to Figure 55 on page 329 are configured in a cell.
Producing a license report on demandTo produce a license report, the Data Protector omnicc command is to be used.Enter the following command:
omnicc -check_licenses [-detail]
If the -detail option is not specified, the command returns information on whetherthe Data Protector licensing is covered or not.
Installation and licensing guide 327
If the -detail option is specified, a detailed report is produced. The followinginformation is returned for every license in the cell: license name, licenses installed,licenses used and licenses required.
omnicc man page for more information. Note that the command does not list theexpiration dates for the licenses. Depending on the environment and the number oflicenses installed, the report may take some time to generate. To get the informationon the licenses expiration dates, enter the following command:
omnicc -password_info
IMPORTANT:In a MoM environment with the CMMDB configured, when producing a license reportfor the items that are subject to libraries and drives, the omnicc command must be runon the Cell Manager with the CMMDB installed.
Which licenses are available?The following table shows the licenses available in this product. For details of eachproduct number, refer to Appendix A on page 357 of this guide.
Data Protector licensing328

Figure 55 HP Data Protector product structure
New product numbers in the above table are colored red.
Data Protector leverages the product numbers of previous Data Protector versions.This is why existing Data Protector licenses remain valid after the migration. Refer to“Data Protector A.06.10 product structure and licenses” on page 357 for moreinformation about available licenses.
Password considerationsConsider the following to help determine the right number of passwords.• Instant-On passwords can be used on any Cell Manager candidate. For all other
types of passwords, however, you must determine the related platform. Thisincludes the system that will become the central Data Protector administrationsystem, the Cell Manager. It is important to use Instant-On passwords to fullyunderstand your cell configuration requirements before requesting a permanentpassword.
Installation and licensing guide 329

• Permanent licenses can be moved to a different Cell Manager. However, youneed to use the License Move Form(s) and send them to the HP Password DeliveryCenter (PDC).
• Passwords are installed on the Cell Manager and are valid for the entire cell.• Centralized licensing is provided within the Manager-of-Managers (MoM)
functionality. You can have all the licenses installed on the MoM system if youpurchase multiple licenses for several cells.
• You need one Cell Manager license for each cell.• The licenses are regularly checked by the software when you perform a Data
Protector configuration task or start a backup session.• Instant-On passwords can be used on any system, while evaluation and permanent
passwords can be used only on the Cell Manager system for which you requestedthe licenses.
• If the system on which the Cell Manager is installed has more than one IP address(multihomed systems, RAS-servers, clusters), you can bind the license to any ofthe IP addresses.
NOTE:If you intend to change the IP address of the Cell Manager, to move the Cell Managerto another system or to move licenses from one cell to another (and you do not use theMoM functionality), you must contact the HP Password Delivery Center (PDC) in orderto update the licenses. See “Other ways of obtaining and installing permanentpasswords” on page 334 for information about contacting the HP Password DeliveryCenter.
Data Protector passwordsOnce you have installed Data Protector product, you can start using it for 60 days.After this period, you must install a permanent password on the Cell Manager toenable the software. You may load the software on the Data Protector Cell Manager,but you cannot perform configuration tasks without a permanent password, becausethe licenses required for particular Data Protector functionality require passwords.
The Data Protector licensing requires one of the following passwords:
• Instant-On passwordAn Instant-On password is built in the product when first installed. You are ableto use the software for 60 days after you have installed it on any system supported
Data Protector licensing330

by Data Protector. Within this period you must request your permanent passwordfrom the HP Password Delivery Center (PDC) and then install it.
• Permanent passwordsThe Data Protector product is shipped with an Entitlement Certificate license thatentitles you to obtain a permanent password. The permanent password permitsyou to configure a Data Protector cell with regard to your backup policy, providedthat you have bought all required licenses. Before you request a permanentpassword, you must determine the Cell Manager system and understand yourcell configuration requirements.
• Emergency passwordEmergency or fallback passwords are available in case the currently installedpasswords do not match the current system configuration due to an emergency.They will allow operation on any system for a duration of 120 days.Emergency passwords are issued by the support organization. They must berequested by and are issued only to HP personnel. Please refer to your supportcontact or to the HP Licensing site at: http://webware.hp.com.The purpose of an emergency password is to enable the backup operation whilethe original system configuration gets reconstructed or until you move to a newpermanent installation. In case of moving the licenses, you need to fill out theLicense Move Form and send it to the HP Password Delivery Center (PDC) or goto the web page http://webware.hp.com where passwords can be generated,moved, and so on.
The recommended way of obtaining passwords is by using the HP AutoPass utility,which can be installed during the Cell Manager installation process. Refer to“Obtaining and installing permanent passwords using the HP AutoPassutility” on page 331 for instructions on how to obtain passwords using the HP AutoPassutility after it has been installed during the Cell Manager installation process.
Refer to “Other ways of obtaining and installing permanent passwords” on page 334for instructions on how to obtain and install a password by means other than HPAutoPass utility.
Obtaining and installing permanent passwords using the HP AutoPassutility
The HP AutoPass utility lets you install passwords for your HP products’ purchasedlicenses directly through the internet from the HP password delivery center web server.Refer to the HP AutoPass online Help for more information on the HP AutoPass utility.
Installation and licensing guide 331

Prerequisites
To obtain and install permanent passwords using the HP AutoPass utility, the followingconditions must be fulfilled:
• Install the HP AutoPass utility with the Cell Manager. If you did not have this utilityinstalled on your system before the Data Protector installation, you can install itusing the omnisetup.sh script (UNIX systems) or during the Cell Managerinstallation (Windows systems).
• Install Java Runtime Environment (JRE) 1.5.0_06 or newer update on the CellManager.
• On MC/ServiceGuard, the HP AutoPass utility must be installed an all nodes.• You need a permanent license entitlement certificate.• You need the HP order number for the purchased licenses.• You need the IP address of the Cell Manager or of the Manager-of-Managers.• To install AutoPass on HP-UX 11.23 (Itanium), make sure the following patches
are installed:• PHSS_36343 1.0 aC++ Runtime (IA: A.06.15, PA: A.0376)• PHSS_37039 1.0 Integrity Unwind Library
Limitations
For HP AutoPass, the following limitations apply:
• The HP AutoPass utility is not installed on Windows 2003 x64, Windows Vistax64, Windows Server 2008 x64, and Linux operating systems.
• It is not recommended to install HP AutoPass in Microsoft Cluster, because it willbe installed only on one node and not on all nodes.
• The omniinstlic command operates only if JRE 1.5.0_06 or newer update isinstalled on the Cell Manager.
For additional prerequisites and limitations, refer to the HP AutoPass online Help.
The passwords are installed on the Cell Manager and are valid for the entire cell.
Procedure
The following is the procedure to obtain and install a permanent password:
1. Gather the information required to obtain a permanent password. Refer to theHP AutoPass online Help to see what information is required.
Data Protector licensing332
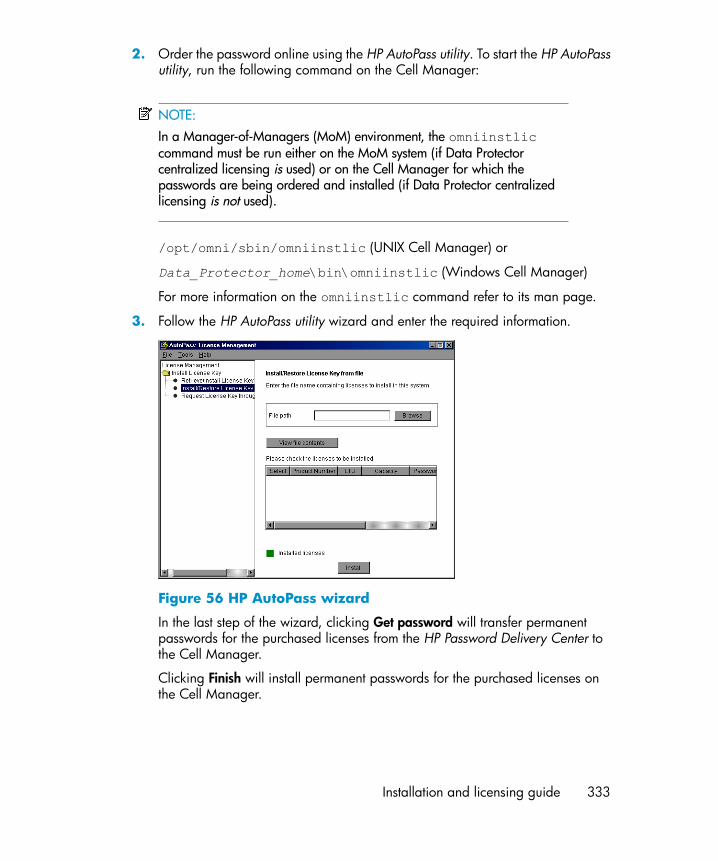
2. Order the password online using the HP AutoPass utility. To start the HP AutoPassutility, run the following command on the Cell Manager:
NOTE:In a Manager-of-Managers (MoM) environment, the omniinstliccommand must be run either on the MoM system (if Data Protectorcentralized licensing is used) or on the Cell Manager for which thepasswords are being ordered and installed (if Data Protector centralizedlicensing is not used).
/opt/omni/sbin/omniinstlic (UNIX Cell Manager) or
Data_Protector_home\bin\omniinstlic (Windows Cell Manager)
For more information on the omniinstlic command refer to its man page.
3. Follow the HP AutoPass utility wizard and enter the required information.
Figure 56 HP AutoPass wizard
In the last step of the wizard, clicking Get password will transfer permanentpasswords for the purchased licenses from the HP Password Delivery Center tothe Cell Manager.
Clicking Finish will install permanent passwords for the purchased licenses onthe Cell Manager.
Installation and licensing guide 333

4. To verify the installed passwords, refer to “Verifying the password” on page 336for instructions.
Other ways of obtaining and installing permanent passwords
Obtaining
The following is the procedure to obtain permanent passwords:
1. Gather the information required in the Permanent Password Request Form. See“Data Protector licensing forms” on page 377 to find the location of the formsand get instructions on how to fill them out.
2. See “Data Protector A.06.10 product structure and licenses” on page 357 formore information about the product structure. The HP Password Delivery Centerwill send your permanent password using the same method that you used whenyou sent your request. For example, if you sent your request by e-mail then youwould receive your permanent password by e-mail.
3. Do one of the following:
• Go to the online HP Password Delivery Center site at http://www.webware.hp.com.
• Complete the Permanent Password Request Form and send it to the HPPassword Delivery Center using one of the following (refer to the EntitlementCertificate shipped with the product for fax numbers, telephone numbers,email addresses, and hours of operation):• Faxing a form to the HP Password Delivery Center• Sending an e-mail to the HP Password Delivery Center
You can use the electronic version of the license forms that are includedin the following files on the Cell Manager and the distribution media:• On Windows Cell Manager:
Data_Protector_home\Docs\license_forms.txt
• On UNIX Cell Manager:/opt/omni/doc/C/license_forms_UNIX
• On Windows installation DVD-ROM:Disk_Label:\Docs\license_forms.txt
to “copy” and “paste” your message to the HP Password Delivery Center(HP PDC).You will receive your permanent password within 24 hours of sendingyour Permanent Password Request Form.
Data Protector licensing334

Installing
The following is the procedure to install a permanent password that the HP PasswordDelivery Center (HP PDC) has sent to you:
Prerequisite
You must have received permanent passwords sent from the HP Password DeliveryCenter and the Data Protector user interface must be installed on the Cell Manager.The passwords are installed on the Cell Manager and are valid for the entire cell.
Using the GUI
To install the permanent password using the Data Protector GUI, proceed as follows:
1. In the Context List, click Clients.
2. In the Scoping Pane, right-click Data Protector Cell and click Add License.
3. Type the password exactly as it appears on the Password Certificate.
A password consists of eight 4-character groups, separated by a space andfollowed by a string. Make sure that you do not have a line-feed or a returncharacter within this sequence. The following is an example of a password:
2VFF 9WZ2 C34W 43L7 RYY7 HBYZ S9MQ 1LZA JUUQ TA48 EPNBQFRN MR9F 2A2A 7UEG 9QR3 Y3QW LZA9 AZA9 EQ97 "Product; CellManager for UNIX"
After you have typed in the password, check the following:• Make sure the password appears correctly on the screen.• Make sure there are no leading or trailing spaces, or extra characters.• Double-check “1” (number one) characters and "l" (letter l) characters.• Double-check "O" (uppercase letter O) characters and "0" (number zero)
characters.• Make sure that you have used the correct case. The password is case-sensitive.
Click OK.
The password is written to the following file on the Cell Manager:
• On Windows Server 2008:Data_Protector_program_data\Config\server\Cell\lic.dat
• On other Windows systems:Data_Protector_home\Config\server\Cell\lic.dat
• On UNIX systems: /etc/opt/omni/server/cell/lic.dat
Installation and licensing guide 335

Using the CLI
To install the permanent password using the Data Protector CLI, proceed as follows:
1. Log on to the Cell Manager.
2. Run the following command:• On Windows:
Data_Protector_home\bin\omnicc -install_license password
• On UNIX: /opt/omni/bin/omnicc -install_license password
The password string must be entered exactly as it appears on the PasswordCertificate. It must be formatted as a single line and must not contain anyembedded carriage returns. The password must be in quotes. If the passwordincludes also a description in quotes, the quotes in this description must bepreceded with backslashes. See the omnicc man page for an example andmore information.
You can also append the password to the following file on the Cell Manager:
• On Windows Server 2008:Data_Protector_program_data\config\server\cell\lic.dat
• On other Windows systems:Data_Protector_home\config\server\cell\lic.dat
• On UNIX systems: /etc/opt/omni/server/cell/lic.dat
If the file does not exist, create it with an editor, such as vi or Notepad. Refer toStep 3 on page 335 in the procedure for the graphical user interface for an exampleof a password.
Verifying the password
Using the GUI
To verify if the password for the license you have installed is correct, proceed asfollows in the Data Protector GUI:
1. In the Help menu, click About.
2. Click the License tab. All installed licenses are displayed. If the password youentered is not correct, it is listed with the remark Password could not bedecoded.
Data Protector licensing336

Using the CLI
To verify if the password for the license you have installed is correct, use the followingcommand:• On Windows:
Data_Protector_home\bin\omnicc -password_info
• On UNIX: /opt/omni/bin/omnicc -password_info
This command displays all installed licenses. If the password you entered is notcorrect, it is listed with the remark Password could not be decoded.
Finding the number of installed licenses
Using the GUI
Once you have installed a permanent password, you can check how many licensesare currently installed on the Cell Manager:
1. Start the Data Protector Manager.
2. In the menu bar, click Help, and then About. The About Manager window willopen, displaying the installed licenses.
Using the CLI
If you use the command line, proceed as follows:
1. Log on to the Cell Manager.
2. Run the following command:• On Windows: Data_Protector_home\bin\omnicc -query
• On UNIX: /opt/omni/bin/omnicc -query
A table listing the currently installed licenses will be displayed.
Moving licenses to another Cell Manager SystemYou must contact the HP Password Delivery Center in any of the following cases:
• If you wish to move the Cell Manager to another system.• If you plan to move a license, installed on a Cell Manager not currently in use in
the cell, to another Data Protector cell.
Installation and licensing guide 337

NOTE:It is possible to move a UNIX license to another UNIX Cell Manager or to a WindowsCell Manager, but it is not possible to move a Windows license to a UNIX Cell Manager.
Use the following process to move licenses from one Cell Manager to another:
1. Fill out one License Move Form for each new Cell Manager and send it to theHP Password Delivery Center. If you want to move licenses for products, whichcan no longer be purchased, then please use the License Move Forms deliveredwith the previous version of the product. Refer to “Data Protector licensingforms” on page 377.
On the form, you must specify the number of licenses you want to move fromthe existing Cell Manager.
2. Delete the following file:• On Windows Server 2008:
Data_Protector_program_data\config\server\cell\lic.dat
• On other Windows systems:Data_Protector_home\config\server\cell\lic.dat
• On UNIX systems: /etc/opt/omni/server/cell/lic.dat
3. As soon as you have filled out the License Move Form and sent it to the HPPassword Delivery Center (PDC), you are legally obliged to delete all DataProtector passwords from the current Cell Manager.
4. Install the new passwords. You will receive one password for each new CellManager. You will also receive one new password for the current Cell Managerif licenses are left on the current Cell Manager. This new password replaces thecurrent password entry on the current Cell Manager.
Centralized licensingData Protector allows you to configure centralized licensing for a whole multi-cellenvironment, which simplifies license management. All licenses are kept on theManager-of-Managers (MoM) Manager system. Licenses are allocated to specificcells although they remain configured on the MoM Manager.
For more information on how to configure licenses, refer to the Data Protector onlineHelp.
Data Protector licensing338

NOTE:It is possible to assign a UNIX license to another UNIX Cell Manager or to a WindowsCell Manager, but it is not possible to assign a Windows license to a UNIX Cell Manager.
The MoM functionality allows you to move (re-assign) licenses among the MoM cells.For more information, see the online Help index: “MoM environment”.
If you are installing a new Data Protector license, ensure that you check the MoMfunctionality before you request any licenses. If you decide to use centralized licensingat a later date, you will then have to go through the procedure of moving licenses.
NOTE:The MoM functionality allows for centralized licensing. This means you can install alllicenses on the MoM Manager and then distribute them to the Cell Managers that belongto the MoM cell. You can later move (re-distribute) licenses among the MoM cells. Formore information, see the online Help index: “MoM environment”.
The Data Protector order toolData Protector offers a simple tool, that can automatically generate a list of DataProtector product numbers needed for your environment. The Data Protector OrderTool guides you through the steps by asking simple questions about your systemconfiguration and intended use, displaying the structure of your cell based on theanswers you provided so far.
After answering all the questions, the Order Tool will display a complete list of productnumbers that need to be ordered for the environment that was described with youranswers. See Figure 57 on page 340 for an example.
The Order Tool is available on the Data Protector DVDs.
Installation and licensing guide 339

Figure 57 Data Protector order tool example
Data Protector licensing340

6 Troubleshooting installation
In this chapterThis chapter contains information specific to installation related problems. For generaltroubleshooting information, see the HP Data Protector troubleshooting guide.
This chapter includes information on:
• “Name resolution problems when installing the Windows CellManager” on page 341
• “Verifying DNS connections within Data Protector cell” on page 342• “Troubleshooting installation and upgrade of Data Protector” on page 345• “Troubleshooting installation of the Data Protector Cell Manager on
Solaris” on page 347• “Troubleshooting installation of UNIX clients” on page 349• “Verifying Data Protector client installation ” on page 350• “Troubleshooting upgrade” on page 351• “Using log files” on page 353• “Creating installation execution traces” on page 356
Name resolution problems when installing theWindows Cell Manager
During the installation of the Data Protector Cell Manager onWindows, Data Protectordetects and warns you if the DNS or the LMHOSTS file is not set up as required. Inaddition, Data Protector notifies you if the TCP/IP protocol is not installed on yoursystem.
Problem
Name resolution fails when using DNS or LMHOSTS
Installation and licensing guide 341

If the name resolution fails, the “error expanding hostname” message isdisplayed and the installation is aborted.
• If you encounter resolution problems when using DNS, you get a warning messageabout your current DNS configuration.
• If you encounter resolution problems when using LMHOSTS file, you get a warningmessage to check your LMHOSTS file configuration.
• If you have not configured either DNS or LMHOSTS, you get a warning messageto enable the DNS or the LMHOSTS resolution in the TCP/IP properties dialog.
Action
Check your DNS or LMHOSTS file configuration or activate it. See the “VerifyingDNS connections within Data Protector cell” on page 342.
Problem
The TCP/IP protocol is not installed and configured on your system
Data Protector uses the TCP/IP protocol for network communications; it must beinstalled and configured on every client in the cell. Otherwise, the installation isaborted.
Action
Check the TCP/IP setup. For information, see “Changing the Data Protector defaultport number” on page 409.
Verifying DNS connections within Data Protector cellDNS (Domain Name System) is a name service for TCP/IP hosts. The DNS isconfigured with a list of host names and IP addresses, enabling users to specifyremote systems by host names rather than by IP addresses. DNS ensures propercommunication among the members of the Data Protector cell.
If DNS is not configured properly, name resolution problems may occur in the DataProtector cell and the members will not be able communicate with each other.
Data Protector provides the omnicheck command to verify the DNS connectionsamong the members of the Data Protector cell. Although all possible connections inthe cell can be checked with this command, it is enough to verify the followingconnections, which are essential in the Data Protector cell:
• Cell Manager to any other member of the cell and vice versa• Media Agent to any other member of the cell and vice versa
Troubleshooting installation342

Using the omnicheck command
Limitations
• The command verifies connections among the cell members only; it does not verifyDNS connections in general.
• It can be used only on Data Protector clients that have Data Protector A.05.10or later installed. If the command encounters a client with an older Data Protectorversion, an error message is returned and the command resumes operation onthe next client.
The omnicheck command resides on the Cell Manager in the following directory:
Windows: Data_Protector_home\bin
UNIX: /opt/omni/bin
The synopsis of the omnicheck command is:
omnicheck -dns [-host Client | -full] [-verbose]
You can verify the following DNS connections in the Data Protector cell using differentoptions:
• To check that the Cell Manager and every Media Agent in the cell resolve DNSconnections to every Data Protector client in the cell properly and vice versa, run:omnicheck -dns [-verbose]
• To check that a particular Data Protector client resolves DNS connections to everyData Protector client in the cell properly and vice versa, run:omnicheck -dns -host client [-verbose]
where client is the name Data Protector client checked.
• To check all possible DNS connections in the cell, run:omnicheck -dns -full [-verbose]
When the [-verbose] option is specified, the command returns all the messages.If this option is not set (default), only the messages that are the result of failed checksare returned.
See the omnicheck man page for more information.
Table 13 on page 344 lists return messages for the omnicheck command. If thereturn message indicates a DNS resolution problem, see the “Troubleshooting
Installation and licensing guide 343

Networking and Communication” chapter of the HP Data Protector troubleshootingguide.
Table 13 Return messages
MeaningReturn message
Timeout connecting to client_2.client_1 cannot connectto client_2
The%SystemRoot%\System32\drivers\etc\hosts/etc/hosts(UNIX systems) file on the client_1 is not correctly configured orthe hostname of the client_2 does not match its DNS name.
client_1 connects toclient_2, but connectedsystem presents itselfas client_3
client_2 is either unreachable (e.g. disconnected) or the%SystemRoot%\System32\drivers\etc\hosts (Windowssystems) or /etc/hosts (UNIX systems) file on the client_1 is notcorrectly configured.
client_1 failed toconnect to client_2
checking connectionbetween client_1 andclient_2
all checks completedsuccessfully.
number_of_failed_checkschecks failed.
client is not a memberof the cell.
client contacted, butis apparently an olderversion. Hostname is notchecked.
Troubleshooting installation344

Troubleshooting installation and upgrade of DataProtectorProblem
One of the following error messages is reported
• The Windows Installer Service could not be accessed.
• This application must be installed to run.
• This patch package could not be opened.
• The system cannot open the device or file specified.
After installation or upgrade to Data Protector A.06.10, Windows may report thatsome applications are not installed or that a reinstall is required.
The reason is an error in the Microsoft Installer upgrade procedure. Microsoft Installerversion 1.x data information is not migrated to the Microsoft Installer version 2.x thatData Protector installs on the computer.
Action
On how to solve the problem, see article Q324906 in the Microsoft KnowledgeBase.
Problem
Cell Manager installation on a Windows system, which is not part of any Windowsdomain, fails
The following error message is reported:
Setup is unable to match the password with the given accountname.
Actions
Two solutions are available:
• Make the Windows system, on which you are installing the Cell Manager, partof a domain.
• Use the local administrator account for the CRS service.
Installation and licensing guide 345

Problem
The following error message is reported
msvcr71.dll file is not found
The MSVCR71.dll library (upper case) cannot be found, because onlymsvcr71.dll (lower case) is available on the network share. Since MSVCR71.dlland msvcr71.dll are not treated as the same files, setup.exe fails to find theappropriate dll.
Action
Rename the file from msvcr71.dll (lower case) to MSCVCR71.dll (upper case)or reconfigure the network share not to be case-sensitive.
Problem
Canceling of installation does not uninstall already installed components
If you cancel the Data Protector installation while some components have been alreadyinstalled, Data Protector does not unistall them. The installation finishes with an error.
Action
Manually uninstall already installed components after you cancelled the installation.
Problems with remote installation of Windows clients
Problem
Error starting setup process
When using Data Protector remote installation to update Windows clients, you getthe following error:
Error starting setup process, err=[1326] Logon failure:unknown user name or bad password.
The problem is that the Data Protector Inet service on the remote computeris running under a user account that does not have access to the OmniBack shareon the Installation Server computer. This is most probably a local user.
Action
Change the user for the Data Protector Inet service to one that can accessthe Data Protector share.
Troubleshooting installation346

Troubleshooting installation of the Data Protector CellManager on SolarisProblem
Unable to make temporary directory
During the installation of the Cell Manager on Solaris, a temporary directory cannotbe created and the installation fails with the following error message:
Processing package instance OB2-CORE from/tmp/DP_A0510_158_SUN78.pkg
pkgadd: ERROR: unable to make temporary directory//tmp/old//installR.aOj3
Action
Manually create the missing temporary directory in the location provided in the errormessage and restart the installation procedure.
For example, if you get the above error message, create the following directory://tmp/old//installR.aOj3.
Troubleshooting installation of UNIX clientsProblem
Remote installation of UNIX clients fails
Remote installation or upgrade of a UNIX client fails with the following error message:
Installation/Upgrade session finished with errors.
When installing or upgrading UNIX clients remotely, the available disk space on aclient system in the folder /tmp should be at least the size of the biggest packagebeing installed. On Solaris client systems, the same amount of disk space should beavailable also in the /var/tmp folder.
Action
Check if you have enough disk space in the above mentioned directories and restartthe installation or upgrade procedure.
Installation and licensing guide 347

For disk space requirements, see the HP Data Protector product announcements,software notes, and references.
Problem
Problems with the installation of an HP-UX client
When adding a new HP-UX client to a Data Protector cell, the following error messageis displayed:
/tmp/omni_tmp/packet: you do not have the required permissionsto perform this SD function.....
Access denied to root at to start agent on registered depot/tmp/omni_tmp/packet. No insert permission on host.
Action
Stop the swagent daemon and restart it by either killing the process and thenrestarting it by running the /opt/omni/sbin/swagentd command, or by runningthe /opt/omni/sbin/swagentd -r command.
Ensure that you have a local host, loopback entry in the hosts file (/etc/hosts).
Problem
Inet process cannot be started after installing the UNIX Cell Manager
When starting the Cell Manager, the following error is displayed:
ERROR: Cannot start "omniinet" service, system error: [1053]Unknown error 1053.
Action
Check if the inetd or xinetd service is running:
HP-UX and Solaris: ps -ef | grep inetd
Linux: ps -ef | grep xinetd
To start the service, run:
HP-UX: /usr/sbin/inetd
Solaris: /usr/sbin/inetd -s
Linux: rcxinetd start
Troubleshooting installation348

Troubleshooting installation of Windows XP clientsProblem
Remote installation of Windows clients fails
When aWindows XP system is a member of a workgroup and the Simple File Sharingsecurity policy setting is turned on, users attempting to access this system through thenetwork are forced to use the Guest account. During remote installation of a DataProtector client, Data Protector repeatedly asks for a valid username and passwordbecause administrator rights are required for the remote installation.
Action
Turn off Simple File Sharing: in Windows XP, open Windows Explorer or MyComputer, click the Tools menu, click Folder Options, click the View tab, then clearthe Use simple file sharing (Recommended) check box.
The Simple File Sharing policy is ignored:
• when the computer is a member of a domain• when the Network access: Sharing and security model for local
accounts security policy setting is set to Classic: Local usersauthenticate as themselves
Troubleshooting installation of Windows Vista andWindows Server 2008 clientsProblem
Remote installation of Windows clients fails
Remote installation of a Data Protector client to a Windows Vista or Windows Server2008 system fails and reports the following error message:
[Normal] Connecting to client computer.company.com...
[Normal] Done.
[Normal] Installing the Data Protector bootstrap service onclient computer.company.com...
Installation and licensing guide 349

[Critical] Cannot connect to the SCM (Service Control Manager)on client computer.company.com: [5] Access is denied.
Action
1. On the Installation Server system, run the following command to mark a useraccount from the local operating system Administrators user group to be usedby the Installation Server during remote installation:omniinetpasswd –inst_srv_user User@Domain
Note that the user account must already be added to the local Inet configuration.For details, see the omniinetpasswd command description in the HP DataProtector command line interface reference.
2. Start remote installation of the Data Protector client once again.
Verifying Data Protector client installationVerifying Data Protector client installation consists of the following:
• Checking the DNS configuration on the Cell Manager and client systems, andensuring that the results of the omnicheck -dns command on the Cell Managerand client system match the specified system.
• Checking the software components installed on the client.• Comparing the list of files required for a certain software component to be installed
with the files installed on the client.• Verifying the checksum for every read-only file required for a certain software
component.
Prerequisite
An Installation Server must be available for the type of client system (UNIX, Windows)that you select.
Limitation
The verification procedure is not applicable for Novell NetWare and MPE/iX clients.
To verify a Data Protector installation using the Data Protector GUI:
1. In the Context List, click Clients.
2. In the Scoping Pane, expand Clients, right-click the Cell Manager system, andthen click Check Installation to start the wizard.
Troubleshooting installation350

3. Follow the wizard to verify the installation of the systems in the cell. The CheckInstallation window opens, displaying the results of the installation.
See online Help for details.
If your installation has not succeeded, see “Using log files” on page 353.
On how to verify the installation on UNIX systems using the Data Protector CLI, seethe ob2install man page.
Troubleshooting upgradeProblem
IDB and configuration files are not available after upgrade
After upgrading the Cell Manager from a previous release version, the IDB and allconfiguration files are not available. This occurs if the upgrade procedure wasinterrupted for any reason.
Action
Restore Data Protector from the backup made before the upgrade, eliminate thereason of the interruption, and start the upgrade again.
Problem
Old Data Protector patches are not removed after upgrade
Old Data Protector patches are listed among installed programs if the swlistcommand is run after the Data Protector upgrade has finished. The patches wereremoved from your system during the upgrade, but they remained in the sw database.
To check which Data Protector patches are installed, see “Verifying which DataProtector patches are installed” on page 235.
Action
To remove the old patches from the sw database, run the following command:
swmodify -u patch.\* patch
For example, to remove a patch “PHSS_30143” from the sw database, run thefollowing command:
swmodify -u PHSS_30143.\* PHSS_30143
Installation and licensing guide 351

Problem
Maximum size of database files exceeds 2 GB
On HP-UX 11.23 and 11.31 (Itanium), and SuSE Linux (x86-64) the maximum sizeof database files (dirs.dat, fnames.dat, fn?.ext, and their extension files)can exceed the default maximum size of 2 GB. Consequently, during an upgradeto Data Protector A.06.10 a warning message is displayed with an advice to adjustthe maximum size of database files:
Please run omnidbutil —modifytblspace to adjust maximum sizeof database files.
Action
This adjustment should be done after the upgrade, as the procedure for adjusting themaximum size of database files can be both, time and space consuming, dependingon the size of the database. Until the adjustment is performed, Data Protector A.06.10will report incorrect tablespace sizes as is the case with A.06.00. However, it is stillpossible to perform backup and restore.
NOTE:Ensure that you have enough free disk space before starting the adjustment. You willneed at least as much additional free space as the current size of the database that youintend to export.Plan enough time for the entire operation. Exporting and importing of the database maytake a significant amount of time (up to several days, depending on the complexity andsize of your database) and you cannot perform a backup or restore while you areexporting or importing the database.
To resolve the issue, proceed as follows:
1. Perform a successful backup of the entire IDB.2. Export the IDB to an existing temporary directory:
omnidbutil –writedb –mmdb MMDBDirectory –cdb CDBDirectory
where CDBDirectory and MMDBDirectory are temporary directories towhich the CDB and MMDB are exported.
3. Initialize the IDB:omnidbinit
4. Add the required number of extension files for the tablespace file:
Troubleshooting installation352
omnidbutil –extendtblspace TablespaceFileName Pathname–maxsize Size_MB
For example, if the size of the file fnames.dat was 7 GB, than you need toadd 3 extension files with a maximum size of 2047 MB by running the samecommand 3 times:omnidbutil –extendtblspace fnames.dat/var/opt/omni/server/db40/datafiles/cdb –maxsize 2047
omnidbutil –extendtblspace fnames.dat/var/opt/omni/server/db40/datafiles/cdb –maxsize 2047
omnidbutil –extendtblspace fnames.dat/var/opt/omni/server/db40/datafiles/cdb –maxsize 2047
This will create 3 extension files, fnames.dat1, fnames.dat2, andfnames.dat3.
5. Adjust the maximum size of the existing database files:omnidbutil –modifytblspace
Following the above example, fnames.dat, which previously reached a sizeof 7 GB, is now limited to 2 GB.
6. Import the IDB:omnidbutil –readdb –mmdb MMDBDirectory –cdb CDBDirectory
If you did not create enough extension files, omnidbutil will exit with thefollowing message:Tablespace TableSpaceName is running out of space.
Add the required number of extension files and restart the import operation.
7. After the successful adjustment, remove the temporary files.
Manual upgrade procedureNormally, you upgrade Data Protector A.05.10, Data Protector A.05.50, or DataProtector A.06.00 on UNIX Cell Manager and Installation Server by running theomnisetup.sh command, which performs an automated upgrade procedure.However, you can also perform the upgrade manually. See “Upgrading on HP-UX,Solaris, and Linux systems using native tools” on page 398.
Using log filesIf you run into problems installing Data Protector, you can examine any of thefollowing log files to determine your problem:
Installation and licensing guide 353

• setup log files (Windows)• system log files (UNIX)• Data Protector log files
Which log files to check in case of installation problems depends on the type of theinstallation (local or remote) and on the operating system.
Local installationIn case of problems with local installation, check the following log files:
HP-UX Cell Manager:
• /var/adm/sw/swinstall.log
• /var/adm/sw/swagent.log (for more details)
On Solaris and Linux Cell Manager:
/var/opt/omni/log/debug.log
Windows clients (on the system where the setup is running):
• Temp\SetupLog.log
• Temp\OB2DBG_did__setup_HostName_DebugNo_setup.txt (for moredetails)where:• did (debugging ID) is the process ID of the first process that accepts the
debugging parameters. This ID is used as an ID for the debugging session.All further processes will use this ID.
• HostName is the name of the host where the trace file is created.• DebugNo is a number generated by Data Protector.
• TEMP\CLUS_DBG_DebugNo.TXT (in cluster environments)
The location of the Temp directory is specified by the TEMP environment variable.To examine the value of this variable run the set command.
Remote installationIn case of problems with a remote installation, check the following log files:
UNIX Installation Server:
/var/opt/omni/log/IS_install.log
Troubleshooting installation354

Windows clients (only on the remote client system):
• SystemRoot\TEMP\OB2DBG_did_INSTALL_SERVICE_DebugNo_debug.txt
• SystemRoot\TEMP\CLUS_DBG_DebugNo.TXT
where Temp is a directory specified in the TEMP environment variable andSystemRoot is a directory specified in the SystemRoot environment variable.
In case the setup log files are not created, run the remote installation with the debugoption. See “Creating installation execution traces” on page 356.
Data Protector log filesThe Data Protector log files listed below are located in:
Windows Vista, Windows Server 2008: Data_Protector_program_data\log
Other Windows systems: Data_Protector_home\log
HP-UX, Solaris, and Linux : /var/opt/omni/log and/var/opt/omni/server/log
Other UNIX systems: /usr/omni/log
Novell NetWare: SYS:\USR\OMNI\LOG
The following log files are important for troubleshooting installation:
debug.log Contains unexpected conditions. While some canbe meaningful to you, the information is mainlyused by the support organization.
inet.log Contains requests made to the Data Protectorinet service. It can be useful to check the recentactivity of Data Protector on clients.
IS_install.log Contains a trace of remote installation and resideson the Installation Server.
omnisv.log Contains information on when Data Protectorservices were stopped and started.
upgrade.log This log is created during upgrade and containsupgrade core part (UCP) and upgrade detail part(UDP) messages.
Installation and licensing guide 355
OB2_Upgrade.log This log is created during upgrade and containstraces of the upgrade process.
For more log files, see the HP Data Protector troubleshooting guide.
Creating installation execution tracesRun the installation with the debug option if this is requested by the HP CustomerSupport Service. For more information on debugging, including the debug optionsbelow, and preparing data to be sent to the HP Customer Support Service, see theHP Data Protector troubleshooting guide.
Windows:
For debugging remote installation on a Windows system, run the Data Protector GUIwith the debug option:
Manager -debug 1-99 DebugPostfix
Once the session is finished/aborted, collect the debug output from the followinglocations:
• On the Installation Server system:Data_Protector_program_data\tmp\OB2DBG_did__BM_Hostname_DebugNo_DebugPostfix (Windows Server 2008)Data_Protector_home\tmp\OB2DBG_did__BM_Hostname_DebugNo_DebugPostfix (other Windows systems)
• On the remote system:SystemRoot:\Temp\OB2DBG_did__INSTALL_SERVICE_Hostname_DebugNo_DebugPostfix
UNIX:
For debugging the installation on a UNIX system, run the Data Protector GUI withthe debug option:
xomni -debug 1-99 DebugPostfix
or
xomniadmin -debug 1-99 Debug_postfix
Once the session is finished/aborted, collect the debug output from the InstallationServer system’s tmp directory.
Troubleshooting installation356

A Appendix A
Data Protector A.06.10 product structure and licensesThis appendix explains the Data Protector product structure in detail, so that productnumbers to be ordered can be easily identified.
The product structure is divided in different sections, as shown in Figure58 on page 358. When ordering a Data Protector solution, go through the sectionsas follows:
1. Select a Starter Pack. The appropriate product number depends on the operatingsystem of your Cell Manager system.
2. Determine the number of configured drives in your environment and the tapelibraries involved.
3. Identify what other functionality you need. The recommended functionality canrange from on-line backup to instant recovery.
The required minimum is a Starter Pack license and media.
NOTE:The licenses delivered for the UNIX products can be applied to all operating systems.
Installation and licensing guide 357

Figure 58 HP Data Protector product structure
New product numbers in the above table are colored red.
Starter PacksTable 14 on page 358 contains Data Protector A.06.10 Starter Pack license numbers.
Table 14 HP Data Protector Starter Pack license numbers
DVD and LTU for HP-UXB6951AA
LTU only for HP-UXB6951BA
DVD and LTU for Sun SolarisB6951DA
LTU only for Sun SolarisB6951CA
DVD and LTU for WindowsB6961AA
Appendix A358

LTU only for WindowsB6961BA
DVD and LTU for LinuxB6961DA
LTU only for LinuxB6961CA
DVD setB6960MA
Starter Pack manuals — printed (English)B6960LA
Starter Pack manuals — printed (Japanese)B6960LJ
Starter Pack manuals — printed (French)B6960LF
The Starter Pack license-to-use (LTU) includes the license for:
• one Cell Manager on the specified platform• unlimited number of Backup Agents on any platform• one drive license (B6951xx contains 1xB6953AA, and B6961xx contains
1xB6963AA)• built-in media management• libraries up to 60 slots• System Disaster Recovery options• sophisticated reporting (in the Data Protector GUI and via the web)• SAN support (with the Cell Manager on HP-UX, Solaris or Linux)• service-centric management through integrations into HP software
MediaData Protector A.06.10 is delivered with two DVDs (UNIX and Windows). In caseyou require CDs, there is also a CD set available (B6960MB) consisting of 15 CDs.The DVD set is recommended.
ManualsAll manuals are available electronically on the DVDs, CDs, and at http://www.hp.com/support/manuals.
Printed manuals can be ordered with two different sets, the Starter Pack set and theFunctional Extensions set. The Starter Pack manuals — printed includes the:
• HP Data Protector concepts guide
Installation and licensing guide 359

• HP Data Protector installation and licensing guide• HP Data Protector troubleshooting guide• HP Data Protector disaster recovery guide• HP Data Protector product announcements, software notes, and references
NOTE:When ordering the DVD and LTU product numbers, you will receive a DVD case thatincludes DVDs, LTU, and the HP Data Protector getting started guide. Further printedmanuals are not included. The manuals are electronically available on the DVD or athttp://www.hp.com/support/manuals and can also be ordered separately.
Drive and library extensionsThe following licenses are for one drive. You need as many licenses as there aredrives in use at any point in time. This is typically the total number of configureddrives to allow all drives to be used simultaneously. A backup drive can be a tapedrive, a logical drive on disk (backup to disk using a file device), or Magneto Optical.The drive can be accessed and managed locally or via the network from a systemwith any Data Protector license. Drive licenses cannot be shared between multiplecells. For details of supported drives, see the Data Protector support matrices underspecifications at http://www.hp.com/support/manuals.
Table 15 on page 360 and Table 17 on page 361 contain Data Protector A.06.10Drive Extension and Library Extension license numbers, respectively.
Table 15 HP Data Protector drive extensions
for SAN, UNIX, and NASB6953AA
Includes the license-to-use (LTU) for one backup drive directly attached to a UNIXsystem, a NAS device, used in a SAN, or used for serverless backup.
Drives attached to HP MPE/iX systems and HP OpenVMS systems require this license.
This LTU is also required for:
NAS systems managed via NDMP (for example, Network Appliance Filers and EMCCelerra File Servers), or NAS systems requiring a Data Protector proprietary DeviceServer (Media Agent), (for example, HP Storage Works NAS 8000).
Appendix A360

NAS systems powered by Windows, NetWare or standard Linux which can run astandard Data Protector Device Server (Media Agent) only require Data Protectordrive extensions for Windows, Netware, Linux (B6963AA).
It can also be used for single drives attached to Windows, NetWare, and Linuxsystems. However, in the case where the drive is not used in a SAN, it is cheaper touse LTU B6963AA.
Table 16 HP Data Protector drive extensions
for Windows, NetWare, and LinuxB6963AA
Includes the license-to-use (LTU) for one additional backup drive directly attached toa Windows, NetWare or Linux (Intel) system.
This license is valid for drives attached to NAS devices powered by Windows,NetWare or Linux, which can run a standard Data Protector Media Agent.
You need as many licenses as there are drives in use at any point in time. This istypically the total number of configured drives to enable all drives to be usedsimultaneously.
For details of supported drives, see the Data Protector support matrices underspecifications at www.hp.com/go/dataprotector.
Table 17 HP Data Protector library extensions
for libraries with 61 to 250 slotsB6957BA
for libraries with unlimited slotsB6958BA
upgrade license to unlimited slotsB6958CA
The library extensions license-to-use (LTU) includes the license for managing tapelibraries within one Data Protector cell. One license per library is required.
• StorageTek silos using ACSLS and GRAU/EMASS library systems using DASrequire the license B6958BA.
• In case of library sharing between multiple cells, the Manager-of-Managers LTUis required for each cell to license the library across all cells with one license.
• This license is based on the physical slots inside the library, not logical slots.• Libraries with the capability to create virtual partitions also require the license
based on the number of physically available slots once per physical library.Examples:• One 120 slot library used within one cell partitioned into two 60 slots libraries
requires one B6957BA.
Installation and licensing guide 361

• One 300 slot library shared between 3 cells (without Manager-of-Managers)using 100 slots each requires one B6957BA for each cell.
• One 300 slot library shared between 5 cells (without Manager-of-Managers)using 60 slots each does not require any library license.
• One 300 slot library shared between 3 cells using 100 slots each managedcentrally via Manager-of-Managers with central media management andcentral licensing requires one B6958BA for all cells.
For details on supported libraries, see the Data Protector support matrices underspecifications at http://www.hp.com/support/manuals.
Functional extensionsThe tables in this section contain Data Protector A.06.10 Functional Extension licensenumbers.
Table 18 HP Data Protector on-line extension
for UNIXB6955BA
for Windows or LinuxB6965BA
The on-line extension license-to-use (LTU) includes the license to perform on-line backupof databases and applications running on the specified platform.
• If a system runs multiple partitions, this LTU is required for each partition.• In a cluster environment, each system participating in the cluster requires this LTU.• In an Oracle Real Application Cluster (RAC), each cluster node with an installed
Application Agent requires one on-line license.• Each node with a configured Oracle DataGuard standby database in Data
Protector requires this license.• On-line backup licenses are required for Zero Downtime Backup (ZDB).• The Windows filesystem backup using Data Protector Disk Agent together with
the Microsoft Volume Shadow Copy Service (VSS) option is supported at no extracharge. However, backups using the Data Protector VSS integration require theon-line backup extension.
• This LTU is required for Microsoft Exchange Single Mailbox backup.• VMware Consolidated Backup (VCB) and VMware ESX Server backup require
one Windows/Linux license per ESX server, VCB Proxy, and VMware VirtualCenter participating in the backup and restore process. Script based VCB andESX Server backup do not require an on-line backup license.
Appendix A362
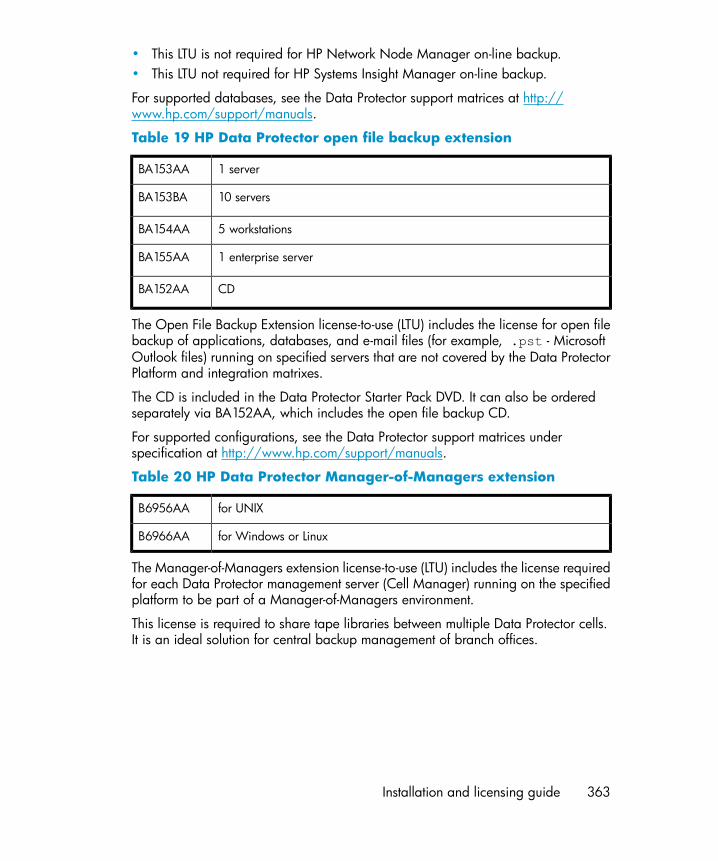
• This LTU is not required for HP Network Node Manager on-line backup.• This LTU not required for HP Systems Insight Manager on-line backup.
For supported databases, see the Data Protector support matrices at http://www.hp.com/support/manuals.
Table 19 HP Data Protector open file backup extension
1 serverBA153AA
10 serversBA153BA
5 workstationsBA154AA
1 enterprise serverBA155AA
CDBA152AA
The Open File Backup Extension license-to-use (LTU) includes the license for open filebackup of applications, databases, and e-mail files (for example, .pst - MicrosoftOutlook files) running on specified servers that are not covered by the Data ProtectorPlatform and integration matrixes.
The CD is included in the Data Protector Starter Pack DVD. It can also be orderedseparately via BA152AA, which includes the open file backup CD.
For supported configurations, see the Data Protector support matrices underspecification at http://www.hp.com/support/manuals.
Table 20 HP Data Protector Manager-of-Managers extension
for UNIXB6956AA
for Windows or LinuxB6966AA
The Manager-of-Managers extension license-to-use (LTU) includes the license requiredfor each Data Protector management server (Cell Manager) running on the specifiedplatform to be part of a Manager-of-Managers environment.
This license is required to share tape libraries between multiple Data Protector cells.It is an ideal solution for central backup management of branch offices.
Installation and licensing guide 363

B6956AA can also be used for a Windows Cell Manager. However, orderingB6966AA is more affordable.
Table 21 HP Data Protector Media Operations extension
Entry levelB7100AA
EnterpriseB7101AA
UnlimitedB7102AA
ManualsB7128AA
MediaB7129AA
• The Entry level includes the license-to-use (LTU) for 2000 media, one managementserver and unlimited clients.
• The Enterprise level includes the license-to-use (LTU) for 10000 media, onemanagement server and unlimited clients.
• Unlimited includes the license-to-use (LTU) for unlimited media, one managementserver and unlimited clients.
• Media refers to the total number of tape media to be tracked in the Data ProtectorMedia Operations internal database. The entry level and enterprise level licensescan be used in any combination to match your total number of tape media to betracked.
• The Data Protector Media Operations CD is included in the Data Protector StarterPack, but it can also be ordered separately via B7129AA.
• The Data Protector Media Operations manuals are included in the Data ProtectorFunctional Extensions manuals pack, but they can be ordered separately viaB7128AA.
Table 22 HP Data Protector advanced backup to disk extension
for 1 TBB7038AA
for 10 TBB7038BA
for 100 TBB7038CA
Includes the license-to-use (LTU) for 1 TB of backup disk storage. Required once perterabyte (TB) usable native capacity of backup disk storage.
Appendix A364

• The Advanced Backup to Disk license is required to back up to a Data Protectorfile library and can be used instead of drive licenses to back up to a Virtual TapeLibrary.
• Usable native capacity of a Data Protector file library is the size on disk of allfiles used for the file library, as reported by the filesystem.• Data Protector synthetic full and virtual full backup: Virtual full backups and
the incremental backups to be consolidated into a synthetic/virtual full backupmust be stored in the Data Protector file library, which requires this license.
• Usable native capacity of a virtual tape library (VTL) is the size on disk of thevirtual tape library consumed by all protected Data Protector backups as reportedby the VTL.• In case the VTL has the built-in capability to migrate backup data from the disk
cache to cheaper disk or tape, the migrated storage capacity needs to befully licensed. No drive and library licenses are required for the tape libraryexclusively controlled by the VTL, but the used capacity of all tapes in thephysical tape library needs to be licensed. In those cases, it might be cheaperto go for the tape drive licensing model using the SKUs B6953AA andB6963AA. This is not applicable if Data Protector object copy has been usedto migrate the backup data to another disk or tape.
• For each VTL, you can choose whether to use the backup to disk or tape drivelicensing model. Within one VTL, both concepts must not been mixed.
• By default, Data Protector treats VTL devices as ordinary libraries (such asSCSI II libraries). To utilize the advanced backup to disk licenses, the devicemust be marked as a VTL during the device configuration. See the online Helpindex: “virtual tape library” for more information.
• In case this license has been purchased before July 1st, 2008, HP is fullycommitted to protect investments. This means you can choose to use this licensefor the VTL under the old licensing terms: “Usable native capacity of a VTL isthe space occupied by protected backups and protected backup copies andmirrors according to the Data Protector internal database. To keep virtual tapelibrary licensing stress free and simple, a compression rate of 2:1 is assumedfor VTLs with no extra charge.” Continuing with the previous model only makessense in case you do not use compression or deduplication technology.Otherwise, you get a higher value if you use previously purchased licensesunder the new licensing model.
• If Data Protector is using the VTL exclusively, it is recommended to license aquantity matching the physical capacity of the VTL. HP calls the physical VTLcapacity “usable native capacity”. Other vendors call it “raw capacity”.
• VTL replication does not require additional Data Protector licenses.
Installation and licensing guide 365

• Due to this size on disk licensing concept, compression and deduplication ratesdo not need to be considered. The RAID configuration does not need to beconsidered either.
• 1 TB = 1024 GB, 1 GB = 1024 MB, 1 MB = 1024 KB, 1 KB = 1024 bytes• In case of central licensing with MoM, at minimum 1 TB needs to be assigned to
each cell using the Advanced Backup to Disk functionality.
NOTE:Data Protector is not able to report the required amount of licenses due to the missinginstrumentation and interfaces of today’s Virtual Tape Libraries and some files servershosting the Data Protector file library. It is the responsibility of the user to license thecapacity consistently with the licensing definitions. When you order new backup storagecapacity, always check that the available Data Protector licenses cover the capacity ofyour backup infrastructure.
Examples:
• One backup disk array with a total usable native capacity of 2.5 TB, fully usedfor advanced backup to disk, requires 3 x B7038AA.
• One backup disk array with a total raw capacity of 2.5 TB, fully configured inRAID 1 (mirroring) has only a usable native capacity of 1.25 TB and only requires2 x B7038AA, if fully used for advanced backup to disk.
• Two backup disk arrays with a total usable native capacity of 2.5 TB each, fullyused for advanced backup to disk, require 5 x B7038AA.
• 10 blade servers with 0.75 TB usable native capacity each, fully used foradvanced backup to disk, require 8 x B7038AA (actually it would be cheaperto buy 1 x B7038BA (10 TB)).
• A VTL with 10 TB usable disk capacity and controlling 90 TB of backup data ontape requires 1 x B7038CA (100 TB).
Table 23 HP Data Protector backup to HP IAP extension
for 1 TBTA030AA
Includes the license-to-use (LTU) for 1 TB of archive disk storage. Required once perterabyte (TB) usable native capacity of archive disk storage.
• The Backup to HP IAP license is required to back up to the HP Integrated ArchivePlatform (IAP).
Appendix A366

• Usable native capacity is the usable space of the file system according to theunderlying operating system.
• Usable capacity differs from raw capacity in that RAID overhead is excluded.This means the RAID configuration does not need to be considered.
• Does not require any drive and library LTU.• Usable native capacity does not charge extra for compression. Compression can
be provided by the underlying operating system. Single instancing falls into thiscategory too.
• Replication to another HP IAP using the HP IAP built-in replication technologydoes not require any extra licenses.
• In case of central licensing with MoM, at minimum 1 TB needs to be assigned toeach cell using the Backup to HP IAP functionality.
Example:
One HP IAP with a total usable native capacity of 2.5 TB, fully used for backup toHP IAP with single instancing, storing 100 TB of uncompressed data, requires 3 xTA030AA.
Table 24 HP Data Protector Zero Downtime Backup (ZDB) extension
for HP StorageWorks Disk Array XP, 1 TBB7023CA
for HP StorageWorks Disk Array XP, 10 TBB7023DA
for HP StorageWorks Enterprise Virtual Array, 1 TBB7025CA
for HP StorageWorks Enterprise Virtual Array, 10 TBB7025DA
for EMC Symmetrix / DMX, 1 TBB6959CA
for EMC Symmetrix / DMX, 10 TBB6959DA
The Zero Downtime Backup extension license-to-use (LTU) includes the license for thenumber of terabytes (TB) of used disk space capacity of the specified disk arrayprotected by zero downtime backup (ZDB) and utilizing:
• HP Business Copy XP/EVA and/or HP Continuous Access XP/EVA or• EMC TimeFinder and/or EMC SRDF
Used disk space capacity is the total capacity of all primary volumes on the diskarray type used for Zero Downtime Backup or Instant Recovery. Primary means theoriginal production data volumes. This amount represents the total usable capacityof these volumes matching with their configured LDEV sizes. Data Protector does not
Installation and licensing guide 367

require licenses for the capacity consumed by secondary volumes, mirrors, orsnapshots that are used for data protection.
• RAID overhead is excluded. This means the RAID configuration does not need tobe considered.
• An on-line backup LTU (B6955BA, B6865BA) is required to run ZDB.• ZDB via a Microsoft Windows 2003 VSS (Volume Shadow copy Service)
hardware provider requires this ZDB extension LTU. For example, file systemsnapshot, Microsoft Exchange Server, or Microsoft SQL Server backup via an HPdisk array provider.
Table 25 HP Data Protector Instant Recovery extension
for HP StorageWorks Disk Array XP, 1 TBB7026CA
for HP StorageWorks Disk Array XP, 10 TBB7026DA
for HP StorageWorks Enterprise Virtual Array, 1 TBB7028AA
for HP StorageWorks Enterprise Virtual Array, 10 TBB7028DA
The Instant Recovery extension license-to-use (LTU) includes the license for the numberof terabytes (TB) specified of used disk space capacity, required for the InstantRecovery of the specified disk array type utilizing Instant Recovery. Data ProtectorInstant Recovery enables recovery of terabytes of data from one or multiple recoverydisks in minutes, rather than recovery from tape, which could take hours.
Used disk space capacity is the total capacity of all volumes on the disk array typesthat are used for Zero Downtime Backup (ZDB) or Instant Recovery (IR). Primary meansthe original production data volumes. This amount represents the total usable capacityof these volumes corresponding with their configured LDEV sizes. Data Protector doesnot require licenses for the capacity consumed by secondary volumes, mirrors, orsnapshots that are used for data protection.
• RAID overhead is excluded. This means the RAID configuration does not need tobe considered.
• Requires a matching quantity of Data Protector ZDB LTUs which at the same timerequires an on-line LTU.
Table 26 HP Data Protector direct backup extension
for HP StorageWorks Disk Array XP, 1 TBB7027AA
for HP StorageWorks Disk Array XP, 10 TBB7027DA
Appendix A368

The direct backup extension license-to-use (LTU) includes the license to perform directbackup with HP StorageWorks Disk Array XP, required for the number of terabytes(TB) specified of used source disk space needed for direct (serverless) backup.
Requires a matching quantity of Data Protector ZDB LTUs, which at the same timerequire an on-line backup LTU.
Table 27 HP Data Protector direct backup using NDMP
for 1 TBB7022BA
for 10 TBB7022DA
Includes the license to perform the backup of the number of terabytes (TB) specifiedon one NDMP Server.
This license is required once per terabyte (TB) of used disk space for each filer backedup via NDMP (e.g., Network Appliance Filer or EMC Celerra File Server).
Used disk space capacity is the total capacity of all volumes of the filer backed upvia NDMP. This amount represents the total usable capacity of these volumes matchingwith their configured LDEV sizes.
Table 28 HP Data Protector encryption extension
for 1 clientBB618AA
for 10 clientsBB618BA
Includes the license-to-use (LTU) and media to encrypt all data of one Data Protectorclient server or workstation. Required once for each Data Protector client (agent) withencryption configured.
• In cluster environments, each system in the cluster requires an LTU.
Table 29 HP Data Protector functional extensions printed manuals
EnglishB6960EA
JapaneseB6960EJ
Manuals are available electronically on the DVDs, CDs, and at http://www.hp.com/support/manuals. Printed manuals can be ordered with two different sets, the StarterPack set and the Functional Extensions set. For a list of Starter Pack manuals, see“Manuals” on page 372.
The functional extensions manuals — printed, includes:
Installation and licensing guide 369

• HP Data Protector integration guide for Microsoft applications: SQL Server,SharePoint Portal Server, Exchange Server, and Volume Shadow Copy Service
• HP Data Protector integration guide for Oracle and SAP• HP Data Protector integration guide for IBM applications: Informix, DB2, and
Lotus Notes/Domino• HP Data Protector integration guide for VMware Virtual Infrastructure, Sybase,
Network Node Manager, and Network Data Management Protocol Server• HP Data Protector zero downtime backup integration guide• HP Data Protector zero downtime backup concepts guide• HP Data Protector zero downtime backup administrator's guide• HP Data Protector integration guide for HP Service Information Portal• HP Data Protector integration guide for HP Reporter• HP Data Protector integration guide for HP Operations Manager for UNIX• HP Data Protector integration guide for HP Operations Manager for Windows• HP Data Protector integration guide for HP Performance Manager and HP
Performance Agent• HP Data Protector product announcements, software notes, and references for
integrations to HP Operations Manager, HP Reporter, HP Performance Manager,HP Performance Agent, and HP Service Information Portal
• Data Protector media operations user's guide• Data Protector media operations product announcements, software notes, and
references
Single Server Editions (SSE)Table 30 on page 370Contains Data Protector A.06.10 Single Server Edition StarterPack license numbers.
Table 30 HP Data Protector SSE license numbers
SSE DVD and LTU for HP-UXB7020AA
SSE LTU only for HP-UXB7020BA
SSE DVD and LTU for SolarisB7020DA
SSE LTU only for SolarisB7020CA
SSE DVD and LTU for WindowsB7030AA
Appendix A370
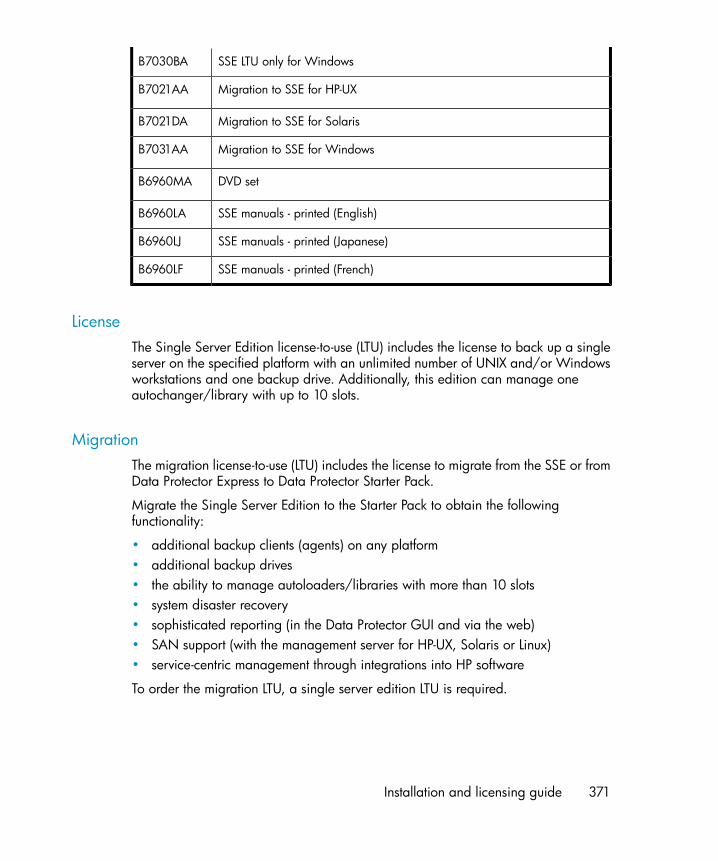
SSE LTU only for WindowsB7030BA
Migration to SSE for HP-UXB7021AA
Migration to SSE for SolarisB7021DA
Migration to SSE for WindowsB7031AA
DVD setB6960MA
SSE manuals - printed (English)B6960LA
SSE manuals - printed (Japanese)B6960LJ
SSE manuals - printed (French)B6960LF
LicenseThe Single Server Edition license-to-use (LTU) includes the license to back up a singleserver on the specified platform with an unlimited number of UNIX and/or Windowsworkstations and one backup drive. Additionally, this edition can manage oneautochanger/library with up to 10 slots.
MigrationThe migration license-to-use (LTU) includes the license to migrate from the SSE or fromData Protector Express to Data Protector Starter Pack.
Migrate the Single Server Edition to the Starter Pack to obtain the followingfunctionality:
• additional backup clients (agents) on any platform• additional backup drives• the ability to manage autoloaders/libraries with more than 10 slots• system disaster recovery• sophisticated reporting (in the Data Protector GUI and via the web)• SAN support (with the management server for HP-UX, Solaris or Linux)• service-centric management through integrations into HP software
To order the migration LTU, a single server edition LTU is required.
Installation and licensing guide 371

MediaData Protector A.06.10 will be delivered with two DVDs. In case you require CDs,there is also a CD set available (B6960MB) consisting of 15 CDs. The DVD set isrecommended.
ManualsAll manuals are available electronically on the DVDs, CDs, and at http://www.hp.com/support/manuals.
Printed manuals can be ordered with two different sets, the Starter Pack set and theFunctional Extensions set. The Starter Pack manuals — printed, includes:
• HP Data Protector concepts guide• HP Data Protector installation and licensing guide• HP Data Protector troubleshooting guide• HP Data Protector disaster recovery guide• HP Data Protector product announcements, software notes, and references
NOTE:The Single Server Edition for Windows can manage only Windows workstations.
For a list of Functional Extension manuals, see Table 29 on page 369.
License migration to Data Protector A.06.10Migration from previous versions of Data Protector is as follows:
Data Protector A.05.10, A.05.50, and A.06.00Migrate directly to Data Protector A.06.10. No license migration is required or anyother kind of migration. Data Protector A.05.10, A.05.50, and A.06.00 customerson support contract will receive Data Protector A.06.10 free of charge. Once youupgrade your environment to Data Protector A.06.10, the functionality you wereusing with A.05.10, A.05.50, or A.06.00 will be available with Data ProtectorA.06.10 at no additional cost. You only need to purchase new licenses if you wantto acquire new functional extensions.
Appendix A372
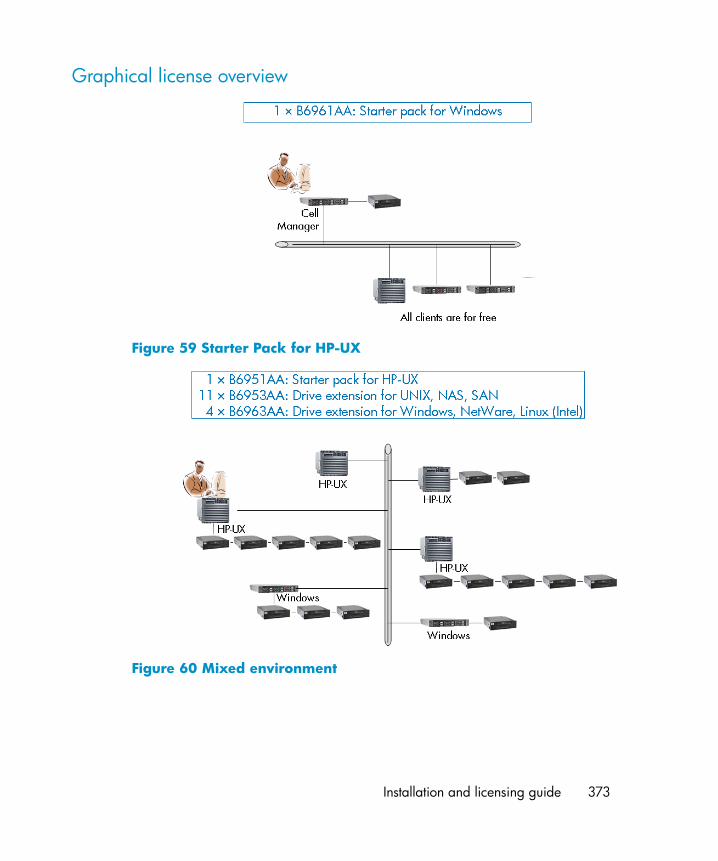
Graphical license overview
Figure 59 Starter Pack for HP-UX
Figure 60 Mixed environment
Installation and licensing guide 373

Figure 61 Libraries with 61 - 250 slots - example 1
Figure 62 Libraries with 61 - 250 slots - example 2
Appendix A374

Figure 63 Online backup
Figure 64 Manager-of-Managers
Installation and licensing guide 375

Figure 65 Advanced backup to disk
Figure 66 Zero downtime backup
Appendix A376

Figure 67 Single Server Edition
Data Protector licensing formsThis chapter discusses Data Protector Licensing forms. Fill them out to order permanentpasswords using one of the following methods:
• Use the HP AutoPass utility to obtain and install permanent passwords directlythrough the internet from the HP password delivery center web server. Refer to“Obtaining and installing permanent passwords using the HP AutoPassutility” on page 331 for more information. This is the recommended method.
• Print the electronic version of the license forms that are included in the followingfiles on the Cell Manager system and the distribution media:• HP-UX, Solaris, and Linux: /opt/omni/doc/C/license_forms_UNIX• Windows DVD-ROM: Disk_Label:Docs\license_forms.txtor use the electronic files to “copy” and “paste” your message to the PasswordDelivery Center (PDC).
• Order permanent passwords using the online Password Delivery Center site athttp://www.webware.hp.com.
IMPORTANT:Make sure that you type information clearly and that you do not forget the requiredfields.
Installation and licensing guide 377

The common fields in the licensing forms that you are required to fill out are brieflydescribed beneath:
Personal Data This field contains customerinformation, including to whom thenew password should be delivered.
Licensing Data Provide licensing information aboutyour Data Protector cell.
Current Cell Manager Enter the required information aboutyour current Cell Manager.
New Cell Manager Enter the required information aboutyour New Cell Manager.
Order Number Enter the Order Number printed onthe Entitlement Certificate. TheOrder Number is required to verifythat you are entitled to request apermanent password.
IP Address This field defines for which systemthe Password Delivery Center willgenerate the passwords. In caseyou want to use centralizedlicensing (MoM environments only)then this system must be the MoMManager system.If the Cell Manager has the severalLAN cards, you can enter any ofthe IP addresses. We recommendthat you enter the primary one.If you have Data Protector in aMC/ServiceGuard or MicrosoftCluster environment, enter the IPaddress of your virtual server. Seethe online Help for more informationon clusters.
Appendix A378
The Password Delivery Center Fax Numbers Refer to the Entitlement Certificate.shipped with your product forcontact information.
Product License Type In the fields next to the ProductNumbers, enter the quantity oflicenses you want to install on thisCell Manager. The quantity can beall or a subset of the licensespurchased with the Order Number.
Installation and licensing guide 379

Appendix A380

B Appendix B
In this appendixThis Appendix provides some additional information about tasks that are beyond thescope of this guide but strongly influence the installation procedure.
Examples are given of system and device setup and configuration for Windows,HP-UX, Solaris, and Linux systems.
Installing on HP-UX, Solaris, and Linux systems usingnative tools
NOTE:The native installation procedures on HP-UX, Solaris, and Linux are only documented ifyou intend to install an Installation Server with a limited set of packages. It isrecommended to install Data Protector using omnisetup.sh.
Installing a Cell Manager on HP-UX systems using swinstallFollow the procedure below to install the UNIX Cell Manager on an HP-UX system:
1. Insert and mount the UNIX installation DVD-ROM and run the/usr/sbin/swinstall utility.
Installation and licensing guide 381

2. In the Specify Source window, select Network Directory/CDROM, and thenenter:
• On a PA-RISC based HP-UX:Mountpoint/hpux_pa/DP_DEPOT/DP_A0610_UX11x.sd_depot
• On a IA-64 based HP-UX:Mountpoint/hpux_ia/DP_DEPOT/DP_A0610_UXia64.sd_depot
in the Source Depot Path. Then click OK to open the SD Install - SoftwareSelection window.
3. In the list of available software packages for the installation, the Data Protectorproduct is displayed under the name B6960MA. Double-click it to display theDATA-PROTECTOR product for UNIX. Double-click it to display the contents.
The following subproducts are included in the product:
OB2-CM Cell Manager software
OB2-DOCS Data Protector documentation subproduct that includes DataProtector manuals in PDF format and online Help (WebHelp).
OMNI-JGUI-P A Java-based graphical user interface. If you want to installthe command-line interface on a client with Java GUI, youneed to install the OB2–CC package.
4. Right-click DATA-PROTECTOR, and then click Mark for Install to install the wholesoftware.
In case you do not need all subproducts, double-click DATA-PROTECTOR andthen right-click an item from the list. Click Unmark for Install to exclude thepackage or Mark for Install to select it for installation.
Make sure that the Marked? status value next to the OB2-CM package is set toYes if you are installing the Cell Manager for UNIX on the system. Refer toFigure 68 on page 383.
NOTE:If you are using user IDs longer than 32 bits, you must remotely install theUser Interface component (OMNI-CS) on the Cell Manager after you haveinstalled the Core Cell Manager software component.
Appendix B382

5. In the Actions list, click Install (analysis), then click OK to proceed. If the Install(analysis) fails, displaying an error message, click Logfile to view the file.
Figure 68 SD install - software selection window
NOTE:If you want to install software from a tape device across the network, you first need tomount the source directory on your computer.
Installing the Cell Manager on Solaris systems using pkgaddFollow the procedure below to install the Cell Manager on a Solaris system:
1. Insert the UNIX installation DVD-ROM.
Installation and licensing guide 383

2. Change to the main package_source directory, i.e. the directory that containsthe installation depot file (in this case Mount_point/solaris/DP_DEPOT).
The following sub-product packages related to Cell Manager installation areincluded in the product:
OB2-CORE Data Protector Core software.
OB2-CC Cell Console software. This contains thegraphical user interface and thecommand-line interface.
OB2-CS Cell Manager software.
OB2-DA Disk Agent software. This is required,otherwise it is not possible to back up theIDB.
and optionally:
OB2-MA The General Media Agent software. Thisis required if you want to attach a backupdevice to the Cell Manager.
OB2-DOCS Data Protector documentation subproductthat includes Data Protector manuals in PDFformat and online Help (WebHelp).
OB2-JGUI-P A Java-based graphical user interface. Ifyou want to install the command-lineinterface on a client with Java GUI, youneed to install the OB2–CC package.
Appendix B384

3. Use the pkgadd facility to install the above packages.
IMPORTANT:The sub-product packages on Solaris are dependent on each other. Youshould install the packages in the order in which they are listed above.
Run the following command to install each package:
pkgadd -d DP_A0610_SUN8.pkg package_name
4. Restart the Data Protector services:
/opt/omni/sbin/omnisv stop
/opt/omni/sbin/omnisv start
NOTE:If you installed the Cell Manager on Solaris 9 or Solaris 10, remotely install the DiskAgent on the Cell Manager using an Installation Server. This will replace the genericSolaris Disk Agent with the Solaris 9 or Solaris 10 Disk Agent. On Solaris 10, remoteinstallation of the Media Agent on the Cell Manager is also required. Refer to “Remoteinstallation of Data Protector clients” on page 81 or to the ob2install man page.
Installing the Cell Manager on Linux systems using rpmFollow the procedure below to install the Cell Manager on a Linux system:
1. Insert and mount the UNIX installation DVD-ROM.
Installation and licensing guide 385

2. Extract individual packages:
• Use rpm2cpio (recommended):Change to the temporary directory where you want to extract the archivesand run:rpm2cpio pkg_source/ DP_A0610_GPLx86_64.rpm | cpio -ivd
Where pkg_source is the directory containing the installation archive (inthis case Mount_point/linux/DP_DEPOT).
• Alternatively, use rpm:Change to the directory containing the installation archive (in this caseMount_point/linux/DP_DEPOT, and run:rpm -i DP_A0610_GPLx86_64.rpm
NOTE:The above rpm -i command does not install the software. Instead, onlyindividual rpm packages are copied to /opt/omni.
However, the package is still registered; therefore you need to remove thepackage OB2-CM after you finish the installation of individual packages.
Appendix B386

3. Change to the directory where the individual packages are extracted:
• If you used rpm2cpio: cd temporary_directory/opt/omni
• If you used rpm: cd /opt/omni
To install a package, run:
rpm -i package_name-A.06.10-1.x86_64.rpm
where package_name is the name of sub-product package.
The following packages must be installed:
OB2-CORE Data Protector Core software.
OB2-CC Cell Console software. Thiscontains the command-lineinterface.
OB2-CS Cell Manager software.
OB2-DA Disk Agent software. This isrequired, otherwise it is notpossible to back up the IDB.
Optionally, install:
OB2-MA The General Media Agentsoftware. This is required if youwant to attach a backup deviceto the Cell Manager.
OB2-DOCS Data Protector documentationsubproduct that includes DataProtector manuals in PDF formatand online Help (WebHelp).
OB2-JGUI-P A Java-based graphical userinterface. If you want to install thecommand-line interface on aclient with Java GUI, you need toinstall the OB2–CC package.
Installation and licensing guide 387

IMPORTANT:The sub-product packages on Linux are dependent on each other. Youshould install the packages in the order in which they are listed above.
4. Restart the Data Protector services:
/opt/omni/sbin/omnisv stop
/opt/omni/sbin/omnisv start
5. If you used rpm for unpacking the main rpm archive, remove the packageOB2-CM:
rpm -e OB2-CM
Installing an Installation Server on HP-UX systems using swinstall1. Insert and mount the UNIX installation DVD-ROM.
2. At the command line, type /usr/sbin/swinstall to run the installationprogram.
3. In the Specify Source window, select NetworkPath/CDROM, and then in theSource Depot Path text box, enter:
• On a PA-RISC based HP-UX:Mount_point/hpux_pa/DP_DEPOT/DP_A0610_UX11x_IS.sd_depot.
• On a IA-64 based HP-UX:Mount_point/hpux_ia/DP_DEPOT/DP_A0610_UXia64_IS.sd_depot.
Then open the SD Install - Software selection window.
4. In the SD Install - Software Selection window, double-click DATA-PROTECTOR tolist the software for the installation. Right-click OB2-IS, and then click Mark forInstall.
5. From the Actions menu, click Install (analysis). Click OK to proceed.
When the installation is finished, the software depot for UNIX is located in the/opt/omni/databases/vendor directory.
Appendix B388

IMPORTANT:If you do not install the Installation Server for UNIX on your network, you will have toinstall every UNIX client locally from the UNIX installation DVD-ROM.
Installing an Installation Server on Solaris systems using pkgadd
Local installation on Solaris
To install the Installation Server for UNIX on a Solaris system:
1. Insert the UNIX installation DVD-ROM.
2. Change to the mainpackage_source directory, that is the directory thatcontains the installation depot file (in this caseMount_point/solaris/DP_DEPOT).
The following sub-product packages related to Installation Server installation areincluded in the product:
OB2-CORE Data Protector Core software. Note that this is alreadyinstalled, if you are installing the Installation Server on theCell Manager system.
OB2-C-IS Installation Server Core software.
OB2-SOLUX Disk Agent, Media Agent, and GUI push packets for remoteSolaris systems.
OB2-OTHUX Disk Agent and Media Agent push packets for remotenon-Solaris UNIX systems.
Also, if you are setting up an independent Installation Server (that is, not on theCell Manager) and want to use the user interface:
OB2-CC Cell Console software. This contains the graphical user interfaceand the command-line interface.
Installation and licensing guide 389

3. Use the pkgadd facility to install the above packages.
IMPORTANT:The sub-product packages on Solaris are dependent on each other. Youshould install the packages in the order in which they are listed above.
Run the following command to install each package:
pkgadd -d DP_A0610_SUN8_IS.pkg package_name
NOTE:The pkgadd facility can only be run locally, not remotely.
Appendix B390

4. Once you have installed these components, use pkgadd to install the pushpackets for all the integration packages that you will want to install remotely.For instance:
OB2-INTGP Data Protector Core Integrations software. Thiscomponent is necessary if you want to installintegrations.
OB2-ORACORE Data Protector Core Oracle and SAP R/3 integrationsoftware. This component is necessary if you wantto install the Data Protector SAP R/3 or Oracleintegration.
OB2-SAPP SAP Integration component.
OB2-SAPDBP SAP DB Integration component.
OB2-INFP Informix Integration component.
OB2-LOTP Lotus Notes/Domino Integration component.
OB2-SYBP Sybase Integration component.
OB2-OR8P Oracle Integration component.
OB2-DB2P DB2 Integration component.
OB2-EMCP EMC Symmetrix Integration component.
OB2-SNAPP HP StorageWorks Virtual Array.
OB2-SMISAP HP StorageWorks Enterprise Virtual Array.
OB2-SSEAP HP StorageWorks Disk Array XP.
OB2-NDMPP The NDMP Media Agent software.
OB2-OVP HP NNM Integration component.
OB2-FRAP French localization package.
Installation and licensing guide 391

OB2-JPNP Japanese localization package.
When the installation is finished, the software depot for UNIX is located in the/opt/omni/databases/vendor directory.
IMPORTANT:If you do not install an Installation Server for UNIX on your network, you will have toinstall every UNIX client locally from the UNIX installation DVD-ROM.
IMPORTANT:If you want to install Data Protector to linked directories, for instance:/opt/omni/ -> /prefix/opt/omni/
/etc/opt/omni/ -> /prefix/etc/opt/omni/
/var/opt/omni/ -> /prefix/var/opt/omni/
you must create the links before the installation and ensure that the destination directoriesexist.
NOTE:If you install the User Interface component (either the graphical user interface or thecommand-line interface), you should update your environment variables before usingit. Refer to “Setting environment variables” on page 54 for more information.If you intend to use the Data Protector user interface to perform backups or restoresacross platforms, refer to the HP Data Protector product announcements, software notes,and references for the limitations incurred.
What’s next?
At this point, you should have the Installation Servers for UNIX installed on yournetwork. Now you should perform the following tasks:
Appendix B392

1. If you have set up an independent Installation Server (i.e. not on the CellManager) you must manually add (import) the system to the Data Protector cell.Refer to “Importing an installation server to a cell ” on page 216.
NOTE:When an Installation Server is imported, the file/etc/opt/omni/server/cell/installation_servers on theCell Manager is updated to list the installed push-packets. This can be usedfrom the CLI to check the available push-packets. For this file to be kept upto date, you should export and re-import an Installation Server wheneverpush-packets are installed or deleted. This applies even if an InstallationServer is installed on the same system as the Cell Manager.
2. Install the Installation Server for Windows in case you have any Windows systemsin your Data Protector cell. Refer to Prerequisites on page 69.
3. Distribute the software to clients. Refer to “Installing Data Protectorclients” on page 73.
Installing an Installation Server on Linux systems using rpm
Local installation on Linux
To install the Installation Server for UNIX on a Linux system:
1. Insert the UNIX installation DVD-ROM.
Installation and licensing guide 393

2. Extract individual packages:
• Use rpm2cpio (recommended):Change to the temporary directory where you want to extract the archivesand run:rpm2cpio pkg_source/ DP_A0610_GPLx86_64.rpm | cpio -ivd
Where pkg_source is the directory containing the installation archive (inthis case Mount_point/linux/DP_DEPOT).
• Alternatively, use rpm:Change to the directory containing the installation archive (in this caseMount_point/linux/DP_DEPOT, and run:rpm -i DP_A0610_GPLx86_64_IS.rpm
NOTE:The above rpm -i command does not install the software. Instead, onlyindividual rpm packages are copied to /opt/omni.
However, the package is still registered; therefore you need to remove thepackage OB2-CM after you finish the installation of individual packages.
Appendix B394

3. Change to the directory where the individual packages are extracted:
• If you used rpm2cpio: cd temporary_directory/opt/omni
• If you used rpm: cd /opt/omni
For each package, run:
rpm -i package_name-A.06.10-1.x86_64.rpm
The following sub-product packages (package_name) related to InstallationServer installation are included in the product:
OB2-CORE Data Protector Core software. Note that this isalready installed, if you are installing the InstallationServer on the Cell Manager system.
OB2-CORE-IS Installation Server Core software.
OB2-LINUXP Disk Agent, Media Agent, and GUI push packetsfor remote Linux systems.
OB2-OTHUXP Disk Agent and Media Agent push packets forremote non-Linux systems.
Also, if you are setting up an independent Installation Server (that is, not on theCell Manager) and want to use the user interface:
OB2-CC Cell Console software. This contains thecommand-line interface.
OB2-DOCS Data Protector documentation subproduct thatincludes Data Protector manuals in PDF format andonline Help (WebHelp).
OB2-JGUI-P A Java-based graphical user interface. If you wantto install the command-line interface on a client withJava GUI, you need to install the OB2–CC package.
Installation and licensing guide 395

4. Once you have installed these components, use rpm to install the push packetsfor all the integration packages you will want to install remotely. For instance:
OB2-INTGP Data Protector Core Integrations software. Thiscomponent is necessary if you want to installintegrations.
OB2-ORACORE Data Protector Core Oracle and SAP R/3 integrationsoftware. This component is necessary if you wantto install the Data Protector SAP R/3 or Oracleintegration.
OB2-SAPP SAP Integration component.
OB2-VMWARE VMware Integration component.
OB2-SAPDBP SAP DB Integration component.
OB2-INFP Informix Integration component.
OB2-LOTP Lotus Notes/Domino Integration component.
OB2-SYBP Sybase Integration component.
OB2-OR8P Oracle Integration component.
OB2-DB2P DB2 Integration component.
OB2-EMCP EMC Symmetrix Integration component.
OB2-SNAPP HP StorageWorks Virtual Array.
OB2-SMISAP HP StorageWorks Enterprise Virtual Array.
OB2-SSEAP HP StorageWorks Disk Array XP.
OB2-NDMPP The NDMP Media Agent software.
OB2-OVP HP NNM Integration component.
Appendix B396

OB2-FRAP French localization package.
OB2-JPNP Japanese localization package.
When the installation is finished, the software depot for UNIX is located in the/opt/omni/databases/vendor directory.
IMPORTANT:If you do not install an Installation Server for UNIX on your network, youwill have to install every UNIX client locally from the UNIX installationDVD-ROM.
5. If you used rpm for unpacking the main rpm archive, remove the packageOB2-CM:
rpm -e OB2-CM
IMPORTANT:If you want to install Data Protector to linked directories, for instance:/opt/omni/ -> /prefix/opt/omni/
/etc/opt/omni/ -> /prefix/etc/opt/omni/
/var/opt/omni/ -> /prefix/var/opt/omni/
you must create the links before the installation and ensure that the destination directoriesexist.
What’s next?
At this point, you should have the Installation Servers for UNIX installed on yournetwork. Now you should perform the following tasks:
Installation and licensing guide 397

1. If you have set up an independent Installation Server (i.e. not on the CellManager) you must manually add (import) the system to the Data Protector cell.Refer to “Importing an installation server to a cell ” on page 216.
NOTE:When an Installation Server is imported, the file/etc/opt/omni/server/cell/installation_servers on theCell Manager is updated to list the installed push-packets. This can be usedfrom the CLI to check the available push-packets. For this file to be kept upto date, you should export and re-import an Installation Server wheneverpush-packets are installed or deleted. This applies even if an InstallationServer is installed on the same system as the Cell Manager.
2. Install the Installation Server for Windows in case you have any Windows systemsin your Data Protector cell. Refer to Prerequisites on page 69.
3. Distribute the software to clients. Refer to “Installing Data Protectorclients” on page 73.
Installing the clientsThe clients are not installed during a Cell Manager or Installation Server installation.The clients must be installed either by using omnisetup.sh or by pushing theinstallation components from the Data Protector GUI. For detailed information onhow to install the clients, refer to “Installing Data Protector clients” on page 73.
Upgrading on HP-UX, Solaris, and Linux systems usingnative tools
Upgrading Data Protector on HP-UX systems using swinstallAn upgrade of a Cell Manager must be performed from UNIX installation DVD-ROM.
If you are upgrading a Cell Manager with an Installation Server installed, you mustfirst upgrade the Cell Manager and then the Installation Server.
Client components that are installed on the Cell Manager system are not upgradedduring a Cell Manager upgrade and must be upgraded either by usingomnisetup.sh or by pushing the installation components from the Installation
Appendix B398

Server. For details refer to “Local installation of UNIX clients” on page 149 or “Remoteinstallation of Data Protector clients” on page 81.
Upgrade procedure
To upgrade Data Protector A.05.10 , A.05.50, or A.06.00 to Data ProtectorA.06.10, using swinstall, proceed as follows:
1. Log in as root and shut down the Data Protector services on the Cell Managerby running the /opt/omni/sbin/omnisv -stop command.
Type ps -ef | grep omni to verify whether all the services have been shutdown. There must be no Data Protector services listed after executing the ps-ef | grep omni command.
2. To upgrade a Cell Manager or/and an Installation Server, follow the proceduresdescribed “Installing a Cell Manager on HP-UX systems usingswinstall” on page 381 or/and “Installing an Installation Server on HP-UX systemsusing swinstall” on page 388.
The installation procedure will automatically detect the previous version and upgradeonly the selected components. If a component that was installed in the previous versionof Data Protector is not selected, it is not upgraded. Therefore, you must ensure thatyou select all components that must be upgraded.
NOTE:The Match what target has option is not supported if you are upgrading both,the Cell Manager and Installation Server on the same system.
Upgrading Data Protector on Solaris systems using pkgaddTo upgrade the Solaris Cell Manager or Installation Server, uninstall the old versionand install the new version of the product.
Client components that are installed on the Cell Manager system are not upgradedduring a Cell Manager upgrade and must be upgraded either by usingomnisetup.sh or by pushing the installation components from the InstallationServer. For details refer to “Local installation of UNIX clients” on page 149 or “Remoteinstallation of Data Protector clients” on page 81.
Installation and licensing guide 399
Upgrade procedure
To upgrade Data Protector A.05.10, A.05.50, or A.06.00 to Data Protector A.06.10using pkgadd, proceed as follows:
1. Log in as root and shut down the Data Protector services on the Cell Managerby running the /opt/omni/sbin/omnisv -stop command.
Type ps -ef | grep omni to verify whether all the services have been shutdown. There must be no Data Protector services listed after executing the ps-ef | grep omni command.
2. Uninstall Data Protector using pkgrm.
The configuration files and the database are preserved during this procedure.
3. Run the pkginfo command to verify that you uninstalled the old version of DataProtector. Old versions of Data Protector should not be listed.
Verify that the database and configuration files are still present. The followingdirectories should still exist and contain binaries:
• /opt/omni
• /var/opt/omni
• /etc/opt/omni
4. If you are upgrading a Cell Manager, insert and mount the UNIX installationDVD-ROM and use pkgadd to install the Cell Manager. For detailed steps, referto “Installing the Cell Manager on Solaris systems using pkgadd” on page 383.
If you are upgrading an Installation Server, insert and mount the UNIX installationDVD-ROM and install the Installation Server. For detailed steps, refer to “Installingan Installation Server on Solaris systems using pkgadd” on page 389.
NOTE:If you upgraded the Cell Manager on Solaris 9 or Solaris 10, remotely install the DiskAgent on the Cell Manager after upgrade is complete, using an Installation Server. Thiswill replace the generic Solaris Disk Agent with the Solaris 9 or Solaris 10 Disk Agent.On Solaris 10, remote installation of the Media Agent on the Cell Manager is alsorequired. Refer to “Remote installation of Data Protector clients” on page 81 or to theob2install man page.
Appendix B400

Upgrading Data Protector on Linux systems using rpmTo upgrade the Linux Cell Manager or Installation Server, uninstall the old versionand install the new version of the product.
Client components that are installed on the Cell Manager system are not upgradedduring a Cell Manager upgrade and must be upgraded either by usingomnisetup.sh or by pushing the installation components from the InstallationServer. For details refer to “Local installation of UNIX clients” on page 149 or “Remoteinstallation of Data Protector clients” on page 81.
Upgrade procedure
To upgrade Data Protector A.05.10, A.05.50, or A.06.00 to Data Protector A.06.10using rpm, proceed as follows:
1. Log in as root and shut down the Data Protector services on the Cell Managerby running the /opt/omni/sbin/omnisv -stop command.
Type ps -ef | grep omni to verify whether all the services have been shutdown. There must be no Data Protector services listed after executing the ps-ef | grep omni command.
2. Uninstall Data Protector using rpm.
The configuration files and the database are preserved during this procedure.
3. Run the rpm —q command to verify that you uninstalled the old version of DataProtector. Old versions of Data Protector should not be listed.
Verify that the database and configuration files are still present. The followingdirectories should still exist and contain binaries:
• /opt/omni
• /var/opt/omni
• /etc/opt/omni
4. If you are upgrading a Cell Manager, insert and mount the UNIX installationDVD-ROM and use rpm to install the Cell Manager. For detailed steps, refer toInstalling the Cell Manager on Linux systems using rpm.
If you are upgrading an Installation Server, insert and mount the UNIX installationDVD-ROM and install the Installation Server. For detailed steps, refer to Installingan Installation Server on Linux systems using rpm.
Installation and licensing guide 401
Setting up the TCP/IP protocol on Windows systems
IMPORTANT:Only the Microsoft implementation of the TCP/IP protocol is supported.
Data Protector uses the TCP/IP protocol for network communications and must beinstalled and configured on every client in the cell.
Entering a command using the Data Protector user interface establishes a connectionto the Cell Manager through the TCP/IP protocol.
The TCP/IP protocol is a group of related protocols and utilities used for networkcommunications. It consists of the TCP (Transmission Control Protocol) and the IP(Internet Protocol).
The TCP/IP software is installed on a hard disk, and each computer that uses thisprotocol must have the following addresses, usually assigned by the networkadministrator:
• The IP address for each network adapter card installed on the computer. Thisis a 32-bit number, usually displayed in the dotted quad or dotted decimal format.
• The Subnet mask for each network adapter card installed on the computer,which, combined with IP address, identifies the Network ID and the host ID.The Subnet mask is displayed in the same format as the IP address.
• The Default Gateway address is required for the default local gateway (IProuter) to enable Internet access.
Prerequisites
Before installing the TCP/IP protocol on Windows computers, you need to know thefollowing:
• There are different configuration options, depending on the type of Windowssoftware installed on your computer.A Windows Server computer can be configured as a Dynamic Host ConfigurationProtocol (DHCP) server, a Windows Internet Name Service (WINS) server, or aDomain Name System (DNS) server, among others. See the Windows onlineHelp for details.
• You can configure the TCP/IP protocol automatically using DHCP as long as youhave the DHCP server installed on your network.
Appendix B402
The TCP/IP protocol must be configured manually if there is no DHCP serveravailable on your network or if you configure the TCP/IP protocol on the DHCPserver computer. See the Windows online Help for details.
• If you configure the TCP/IP manually, make sure that you are logged on as amember of the Administrator group for the local computer. To prevent duplicateaddresses, make sure that all values are obtained from your network administrator.In addition to the IP address, Subnet mask, and Default gatewaymentioned above, you need to obtain:• The name of your DNS domain and the IP addresses of the DNS servers, if
you will be using DNS services.• The IP addresses for WINS servers if there are WINS servers available on
your network.
Installing and configuring the TCP/IP protocol on WindowsThe TCP/IP protocol on Windows systems is installed during the installation of theoperating system.
To check the current TCP/IP settings on Windows 2000 system, proceed as follows:
1. In the Windows Control Panel, double-click Network and Dial-up Connections,and then Local Area Connection.
2. Click Properties and double-click Internet Protocol (TCP/IP). You can then editIP settings.
Installation and licensing guide 403

Figure 69 The TCP/IP properties window on Windows
To edit advanced settings, click Advanced.
Appendix B404

Figure 70 Advanced TCP/IP settings on Windows
DNS suffix
To configure the DNS suffix on a Windows 2000 system, right-click the My Computericon on the desktop and then click Properties, Network Identification, Properties,More. The new DNS settings will take effect after the system is restarted.
Installation and licensing guide 405

Figure 71 The DNS suffix and NetBIOS computer name on Windows
Checking the TCP/IP setupAn important aspect of the TCP/IP configuration process is the setup of a hostnameresolution mechanism.
• If using hosts files, located in the %SystemRoot%\system32\drivers\etcfolder, each system in the cell must be able to resolve the address of the CellManager, and of all systems with Media Agents and backup devices. The CellManager must be able to resolve the names of all systems in the cell.
• If using DNS, make sure the local DNS server is properly configured and specifiedin the IP settings for each system in the cell.
Once you have the TCP/IP protocol installed, you can use the ping and ipconfigutilities to verify that the TCP/IP setup is correct. If you have changed the TCP/IPsettings, restart the computer first.
1. At the command line, type ipconfig /all to display the precise informationon your TCP/IP configuration and the addresses that have been set for yournetwork adapter. Check if the IP address and subnet mask are set correctly.
2. Type ping your_IP_address to confirm the software installation andconfiguration. By default, you should receive four echo packets.
3. Type ping default_gateway.
The gateway should be on your subnet. If you fail to ping the gateway, checkif the gateway IP address is correct and that the gateway is operational.
Appendix B406

4. If the previous steps have worked successfully, you are ready to test the nameresolution. Enter the name of the system while running the ping command totest the hosts file and/or DNS. If your machine name was kesukozi, and thedomain name was campo.com, you would enter: pingkesukozi.campo.com.
If this does not work, refer to “Installing and configuring the TCP/IP protocol onWindows” on page 403, for steps required to access the TCP/IP Propertieswindow. Here, verify that the domain name is correct. You should also checkthe hosts file and the DNS.
Be sure that the name resolution for the system, which is intended to be the CellManager, and the systems, which are intended to be the clients, is working inboth ways:• On the Cell Manager you can ping each client.• On the clients you can ping the Cell Manager and each client with a Media
Agent installed.
NOTE:When using the hosts file for the name resolution, the above test does notguarantee that name resolution works properly. In this case, you may wantto use DNS check tool once Data Protector is installed.
IMPORTANT:If the name resolution, as specified above, is not working, Data Protectorcan not be installed properly.Also note that the Windows computer name must be the same as thehostname. Otherwise, Data Protector setup reports a warning.To check the hostname, refer to “Installing and configuring the TCP/IPprotocol on Windows” on page 403 for steps required to access theTCP/IP Properties window.
Installation and licensing guide 407

5. After Data Protector has been installed and a Data Protector cell has beencreated, you can use the DNS check tool to check that the Cell Manager andevery client with a Media Agent installed resolve DNS connections to all otherclients in the cell properly and vice versa. You do that by running the omnicheck-dns command from the Data_Protector_home\bin directory. Failedchecks and the total number of failed checks are listed. For details, see “VerifyingDNS connections within Data Protector cell” on page 342.
For detailed information on the omnicheck command, refer to the HP DataProtector command line interface reference.
MS Proxy
If the MS Proxy is installed, the port number 5555 is occupied and the Data Protectorservices fail. Solve the problem as follows:
1. Create a file, named wspcfg.ini, in the Data_Protector_home\bindirectory.
2. Add the following lines to the file:
[OmniInet]Disable=1
Changing the Cell Manager nameWhen Data Protector is installed it uses the current hostname for the Cell Managername. If you change the hostname of your Cell Manager, you need to update theData Protector files manually.
IMPORTANT:It is necessary to update the client information about the Cell Manager name. Beforechanging the hostname of your Cell Manager, export the clients from the cell. For theprocedure, refer to “Exporting clients from a cell” on page 219. After you have changedthe hostname, import the clients back to the cell. For the procedure, refer to the “Importingclients to a cell ” on page 213.
NOTE:Any devices and backup specifications that were configured using the old Cell Managername must be modified to reflect the correct name.
Appendix B408

On UNIX
On a UNIX Cell Manager, do the following:
1. Change the Cell Manager hostname entries in the following files:
/etc/opt/omni/client/cell_server
/etc/opt/omni/server/cell/cell_info
/etc/opt/omni/server/users/UserList
2. Verify that Name Resolution works among the members of a Data Protector cell.
3. Change the Cell Manager name in the IDB by running:
/opt/omni/sbin/omnidbutil -change_cell_name [old_host]
On Windows
On a Windows Cell Manager, do the following:
1. Change the Cell Manager hostname entries in the following files:
Data_Protector_home\config\server\cell\cell_infoData_Protector_home\config\server\users\userlist
2. Change the Cell Manager name in the following registry key:HKEY_LOCAL_MACHINE\SOFTWARE\Hewlett-Packard\OpenView\OmniBack\Site\CellServer
Changing the default port number
Changing the Data Protector default port numberThe Data Protector Inet service (process), which starts other processes needed forbackup and restore, should use the same port number on each system within the cell.
By default, Data Protector uses the port number 5555. To verify that this particularport number is not used by another program, you should view the /etc/servicesfile on UNIX systems or run the netstat -a command on Windows systems. If theport number 5555 is already in use by another program, you must change this valueto an unused port number. If the port number is not available only on client systems,you can change it after installing the Cell Manager. If the port number is not availableon the system where you want to install the Cell Manager, you must change the portnumber before the installation.
Installation and licensing guide 409
UNIX
To change the port number on a UNIX system, follow the steps:
• Before you install the Cell Manager:Create the file /tmp/omni_tmp/socket.dat with the required port number.
• After you installed the Cell Manager:1. Edit the /etc/services file. By default, this file should contain the entry:
omni 5555/tcp # DATA-PROTECTOR
Replace the number 5555 with an unused port number.
2. If the files /etc/opt/omni/client/customize/socket and/opt/omni/newconfig/etc/opt/omni/client/customize/socketexist on the system, update their content with the required port number.
3. Restart the Inet service by terminating the process concerned using thekill -HUP inetd_pid command. To determine the process ID(inetd_pid), use the ps -ef command.
4. In the global options file, set a new value for the Port variable.
5. Restart the Data Protector services:
/opt/omni/sbin/omnisv stop
/opt/omni/sbin/omnisv start
Windows
To change the port number on a Windows system, follow the steps:
• Before you install the Cell Manager:1. From the command line, run regedit to open the Registry editor.
2. Create the registry entry InetPort under the keyHKEY_LOCAL_MACHINE\SOFTWARE\Hewlett-Packard\OpenView\OmniBackII\Common.
Name of the registry entry: InetPort
Type of the registry entry: REG_SZ (string)
Value of the registry entry: port_number
• After you installed the Cell Manager:1. From the command line, run regedit to open the Registry editor.
Appendix B410

2. Expand HKEY_LOCAL_MACHINE, SOFTWARE, Hewlett-Packard, OpenView,OmniBack, and select Common.
3. Double-click InetPort to open the Edit String dialog box. In the Value datatext box, enter an unused port number. The same must be done in theParameters subfolder of the Common folder.
4. In the Windows Control Panel, go to Administrative Tools, Services, thenselect the Data Protector Inet service, and restart the service (click the Restarticon on the toolbar).
Novell NetWare
To change the port number on a Novell NetWare system, follow the steps:
1. Ensure that no Data Protector sessions are running in the cell.
2. From the Novell NetWare console, run the command UNLOAD HPINET.
3. Open the AUTOEXEC.NCF file and locate the following line in it:
LOAD HPINET.NLM -PORT 5555
Replace the entry 5555 with an unused port number.
4. Open the SYS:\ETC\SERVICES file and add the following line into it:
omni PortNumber/tcp
PortNumber must be the same as the port number used in step 3 of thisprocedure.
5. From the Novell NetWare console, run the command WS2_32 RELOADSERVICES so that the file SYS:\ETC\SERVICES is re-read.
6. Run the command LOAD HPINET to reload HPINET.
Changing the default port number for Java GUITo change the port number for Java GUI Server (default 5556), follow the stepsbelow:
1. Copy the JGUI_BBC_SERVER_PORT variable to the omnirc file and set itsvalue to an unused port number.
For example:
JGUI_BBC_SERVER_PORT=5557
Installation and licensing guide 411

2. Restart the Data Protector services:
omnisv —stop
omnisv —start
A Java GUI Client has to use the same port in order to connect to the UIProxyservice.
When connecting to the Cell Manager, type CellManagerName:PortNumberin the Connect to a Cell Manager dialog, and click Connect.
For example:
mycellmanager:5557
Preparing a NIS serverThis procedure enables your NIS server to recognize your Data Protector CellManager.
To add the Data Protector information to your NIS server, follow these steps:
1. Log in as root on the NIS server.
2. If you are managing the /etc/services file via NIS, append the followingline to the /etc/services file:
omni 5555/tcp # Data Protector for Data Protector inetserver
Replace 5555 with an alternative if this port it is not available. See “Changingthe Data Protector default port number” on page 409.
If you are managing the /etc/inetd.conf file via NIS, append the followingline to the /etc/inetd.conf file:
#Data Protector
omni stream tcp nowait root /opt/omni/lbin/inet -log/var/opt/omni/log/inet.log
3. Run the following command so that the NIS server reads the file and updatesthe configuration.
cd /var/yp; make
Appendix B412

NOTE:In the NIS environment, the nsswitch.conf file defines the order in which differentconfiguration files will be used. For example, you can define whether the/etc/inetd.conf file will be used on the local machine or from the NIS server. Youcan also insert a sentence in the file, stating that the nsswitch.conf file controls wherethe names are kept. See the man pages for detailed information.If you have already installed Data Protector, you must prepare the NIS server, and thenrestart the inet service by killing the process concerned, using the commandkill -HUP pid on every NIS client that is also a Data Protector client.
Troubleshooting
• If the Data Protector Inet service does not start after you have installedData Protector in your NIS environment, check the /etc/nsswitch.conf file.If you find the following line:services: nis [NOTFOUND=RETURN] files
replace the line with:services: nis [NOTFOUND=CONTINUE] files
Using tape and robotics drivers on WindowsData Protector supports the native tape drivers that are loaded by default for anenabled tape drive attached to a Windows system. The Windows native driversloaded for Medium changers (robotics) devices are not supported by Data Protector.
In the examples below, an HP 4mm DDS tape device is attached to the Windowssystem. The native driver loaded for medium changer devices needs to be disabledif the HP 4mm DDS tape device is connected to the Windows system and will beconfigured for use with Data Protector. This section describes the related procedures.
Tape drivers
A driver is usually delivered with Windows, if the device is listed in the HardwareCompatibility List (HCL). HCL is a list of the devices supported by Windows and canbe found at the following site:
http://www.microsoft.com/whdc/hcl/default.mspx
Installation and licensing guide 413

The device drivers then load automatically for all enabled devices once the computerhas been started. You do not need to load the native tape driver separately, but youcan update it.To update or replace the native tape driver on a Windows system,proceed as follows:
1. In the Windows Control Panel, double-click Administrative Tools.
2. In the Administrative Tools window, double-click the Computer Management.Click Device Manager.
3. Expand Tape Drives. To check which driver is currently loaded for the device,right-click the tape drive and then click Properties.
4. Select the Driver tab and click Update Driver. See Figure 72 on page 415. Then,follow the wizard, where you can specify if you want to update the currentlyinstalled native tape driver or replace it with a different one.
5. Restart the system to apply the changes.
Appendix B414

Figure 72 Driver properties
IMPORTANT:If a device has already been configured for Data Protector without using the native tapedriver, you have to rename the device files for all configured Data Protector backupdevices that reference the particular tape drive (for example, from scsi1:0:4:0 totape3:0:4:0).
Refer to “Creating device files (SCSI Addresses) on Windows” on page 418 for details.
Robotics drivers
OnWindows, the robotics drivers are automatically loaded for enabled tape libraries.In order to use the library robotics with Data Protector, you have to disable therespective driver.
An HP 1557A tape library using the 4mm DDS tapes is used in the example below.Proceed as follows to disable the automatically loaded robotics driver(ddsmc.sys)on a Windows system:
1. In the Windows Control Panel, double-click Administrative Tools.
2. In the Administrative Tools window, double-click the Computer Management.Click Device Manager.
Installation and licensing guide 415

3. In the Results Area of the Device Manager window, expand Medium Changers.
Appendix B416

4. To check which driver is currently loaded, right-click the 4mm DDS MediumChanger and then Properties.
Select the Driver tab and click Driver details. In this case, the following windowwill display:
Figure 73 Medium changer properties
To disable the native robotics driver, right-click the 4mm DDS Medium Changerand then select Disable.
Installation and licensing guide 417

Figure 74 Disabling robotics drivers
5. Restart the system to apply the changes. The robotics can now be configuredwith Data Protector.
Creating device files (SCSI Addresses) on WindowsThe tape device filename syntax depends on whether the native tape driver wasloaded (tapeN:B:T:L) or unloaded (scsiP:B:T:L) for a tape drive.
Windows using the native tape driver
To create a device file for a tape drive connected to a Windows system that uses thenative tape driver, proceed as follows:
1. In the Windows Control Panel, double-click Administrative Tools.
2. In the Administrative Tools window, double-click the Computer Management.Expand Removable Storage, then Physical Locations. Right-click the tape driveand select Properties.
3. If the native tape driver is loaded, the device file name is displayed in the Generalproperty page. Otherwise, you can find the relevant information in the DeviceInformation property page. See Figure 75 on page 419.
Appendix B418

Figure 75 Tape drive properties
The file name for the tape drive in Figure 75 on page 419 is created as follows:
Native Tape Driver Used Tape0 orTape0:0:5:0
Native Tape Driver NOT Used scsii1:0:5:0
Magneto-optical devices
If you connect a magneto-optical device to a Windows system, a drive letter isassigned to the device after you reboot the system. This drive letter is then used whenyou create the device file. For example, E: is the device file created for amagneto-optical drive which has been assigned a drive letter E.
SCSI robotics configuration on HP-UXOn the HP-UX systems, a SCSI Pass-Through Driver is used to manage the SCSIcontroller and control device (also referred to as robotics or picker) of the Tape Librarydevices (like HP StorageWorks 12000e). The control device in a library is responsiblefor loading/unloading media to/from the drives and importing/exporting mediato/from such a device.
Installation and licensing guide 419

Figure 76 SCSI controlled devices
Figure 77 Managing devices
The type of SCSI Robotic Driver in use depends on the hardware. Systems equippedwith the GSC/HSC or PCI bus have the SCSI Autochanger Driver named schgr,and systems equipped with the EISA bus have the SCSI Pass-Through Driver namedsctl, which is already built in the kernel. However, the SCSI Pass-Through Driverused on HP Servers with an NIO Bus is named spt. It is installed on the systemwithout being built into the kernel by default.
If the SCSI Robotic Driver driver has not already been linked to your current kernel,you have to add it yourself and assign it to the robotics of the connected Tapelibraries.
The steps beneath explain how to manually add the SCSI Robotic Driver to the kerneland manually rebuild a new one.
Appendix B420

TIP:On the HP-UX platform, you can also build the kernel using the HP System AdministrationManager (SAM) utility. See “Installing HP-UX clients” on page 97 in Chapter 2.
Use the /opt/omni/sbin/ioscan -f command to check whether or not the SCSIRobotic Driver is assigned to the library that you want to configure.
Figure 78 Status of the SCSI pass-through driver (sctl)
In Figure 78 on page 421, you can see the sctl SCSI Pass-Through Driver assignedto the control device of the Exabyte tape device. The matching hardware path (H/WPath) is 8/12.2.0. (SCSI=2, LUN=0)
There is also a tape drive connected to the same SCSI bus, but the driver controllingthe tape drive is stape. The matching hardware path (H/W Path) is 8/12.1.0.(SCSI=0, LUN=0)
IMPORTANT:The SCSI address 7 is always used by SCSI controllers, although the corresponding linemay not appear in the output of the ioscan -f command. In this example, the controlleris managed by sctl.
Installation and licensing guide 421

Figure 79 Status of the SCSI pass-through driver - spt
In Figure 79 on page 422, you can see an example of a connected tape device withrobotics controlled by the spt SCSI Pass-Through Driver. The particular device is anHP StorageWorks 12000e tape library device that uses the SCSI address 4 and isconnected to the SCSI bus with the H/W Path 52. The matching hardware path is52.4.1. The robotics is correctly assigned to the spt SCSI Pass-Through Driver.
If the sctl, spt, or schgr driver is not assigned to the robotics, you have to addthe H/W Path of the robotics to the driver statement in the system file and rebuildthe kernel. Follow the procedure below.
The following procedure explains how to manually add a SCSI Robotic Driver to thekernel, assign it to the robotics, and then manually rebuild a new kernel:
1. Login as a root user and switch to the build directory:
cd /stand/build
2. Create a new system file from your existing kernel:
/usr/lbin/sysadm/system_prep -s system
3. Check which SCSI Robotic Driver is already built in your current kernel. Fromthe /stand directory, enter the following command:
grep SCSI Robotic Driversystem
where the SCSI Robotic Driver can be either spt, sctl, or schgr. Thesystem will display the corresponding line if the driver is already built in thecurrent kernel.
Appendix B422

4. Use an editor to append a driver statement:
driver H/W Path spt
to the /stand/build/system file, where H/W Path is the complete hardwarepath of the device.
For the HP StorageWorks 12000e Tape library from the previous example youwould enter:
driver 52.4.1 spt
For several libraries connected to the same system, you have to add a driverline for each library robotics with the appropriate hardware path.
When configuring the schgr driver, append the following line to a driverstatement:
schgr
5. Enter the mk_kernel -s./system command to build a new kernel.
6. Save the original old system file using a different name and move the new systemfile to the original name so that it becomes the current one:
mv /stand/system /stand/system.prev
mv /stand/build/system /stand/system
7. Save the old kernel with a different name and move the new kernel to the originalname so that it becomes the current one:
mv /stand/vmunix /stand/vmunix.prev
mv /stand/vmunix_test /stand/vmunix
8. Reboot the system from the new kernel by entering the following command:
shutdown -r 0
9. Once you have rebooted the system, verify the changes you have made usingthe /usr/sbin/ioscan -f command.
Creating device files on HP-UX
Prerequisites
Before you create a device file, you should have the backup device already connectedto the system. Use the /usr/sbin/ioscan -f command to check whether the
Installation and licensing guide 423

device is properly connected. Use the /usr/sbin/infs -e command to createdevice files for some backup devices automatically.
If the device files that correspond to a particular backup device have not been createdduring the system initialization (boot process) or after running the infs -e command,you have to create them manually. This is the case with the device files required tomanage the library control device (library robotics).
We will use an example of creating a device file for the robotics of the HPStorageWorks 12000e library device connected to an HP-UX system. The device filefor the tape drive has already been created automatically after the reboot of thesystem, while the device file for the control device must be created manually.
In Figure 79 on page 422, you can see the output of the ioscan -f command onthe selected HP-UX system.
Figure 80 List of connected devices
The SCSI bus interface is controlled by the scsi1 system driver. This is a SCSI NIOinterface. To access the library robotics on the SCSI NIO bus we must use the sptSCSI Pass-Through driver that is already installed and assigned to the robotics of theHP StorageWorks 12000e Tape device that uses the hardware path 52.4.1.
NOTE:If you do not use a SCSI NIO based bus interface, the spt driver is not required butthe sctl driver is used instead.
To create the device file, you need to know the Major number character of the SCSIPass-Through driver and the Minor Number character, which does not depend onthe SCSI Pass-Through driver you use.
To obtain the character Major number belonging to spt,run the system command:
Appendix B424

lsdev -d spt
In the example (see Figure 80 on page 424) the command reported theMajor numbercharacter 75.
To obtain the character Major number belonging to sctl, run the system command:
lsdev -d sctl
In our case, the command reported the Major number character 203.
The Minor Number character, regardless of which SCSI Pass-Through driver is inuse, has the following format:
0xIITL00
II -> The Instance number of the SCSI bus interface (NOT of the device) reportedby the ioscan -f output is in the second column, labeled with I. In the example,the instance number is 0, so we must enter two hexadecimal digits, 00.
T -> The SCSI address of the library robotics. In the example, the SCSI address is 4,so we must enter 4.
L -> The LUN number of the library robotics. In the example, the LUN number is 1,so we must enter 1.
00 -> Two hexadecimal zeroes.
Creating the device file
The following command is used to create the device file:
mknod /dev/spt/devfile_name c Major # Minor #
Usually the device files for spt are located in the /dev/spt or /dev/scsi directory.In this case, we will name the control device file /dev/spt/SS12000e.
Thus, the complete command for creating a device file named SS12000e in the/dev/spt directory is:
mknod /dev/spt/SS12000e c 75 0x004100
If we create a device file for sctl, which is named SS12000e and located in the/dev/scsi directory, the complete command is:
mknod /dev/scsi/SS12000e c 203 0x004100
Installation and licensing guide 425

Setting a SCSI controller’s parametersData Protector allows you to change the device’s block size, which requires anadditional configuration on some SCSI controllers: in order to enable writing of blocksizes larger than 64K, some SCSI controllers need to have their parameters setdifferently.
On Windows systems, you set the SCSI controller’s parameters by editing the registryvalue for Adaptec SCSI controllers, and for some controllers with Adaptec's chipsets:
1. Set the following registryvalue:HKEY_LOCAL_MACHINE\SYSTEM\CurrentControlSet\Services\aic78xx\Parameters\Device0\MaximumSGList
2. Enter a DWORD value containing the number of 4 kB blocks, increased by one.
MaximumSGList = (OBBlockSize in kB / 4) + 1
For example, to enable block sizes up to 260 kB, MaximumSGList has to beat least (260 / 4) + 1 = 66.
3. Restart the system.
NOTE:This registry value sets the upper limit of the block size. The actual block size for a devicemust be configured using the Data Protector GUI for device configuration.
Finding the unused SCSI addresses on HP-UXA backup device connected to an HP-UX system is accessed and controlled througha device file that must exist for each physical device. Before you can create the devicefile, you have to find out which SCSI addresses (ports) are still unused and availablefor a new device.
On HP-UX, the /usr/sbin/ioscan -f system command is used to display the listof the SCSI addresses that are already occupied. Thus, the addresses not listed inthe output of the /usr/sbin/ioscan -f command are still unused.
In Figure 81 on page 427, there is the output of the /usr/sbin/ioscan -fcommand on an HP-UX 11.x system.
Appendix B426

Figure 81 The output of ioscan -f on an HP-UX system:
Only the third (H/W Path) and the fifth (S/W State) columns are relevant forthe purpose of determining the available SCSI addresses. A dismembered (H/WPath) format would look like this:
SCSI_bus_H/W_Path.SCSI_address.LUN_number
In this particular case, there is just one SCSI bus, using the H/W Path 52. On thisbus, you can use the SCSI addresses 0 and 3 because they do not appear in the list.
You can see in Figure 81 on page 427 which SCSI addresses on the selected SCSIbus are already occupied:
• SCSI address 1 by a SCSI disk• SCSI address 2 by a CD-ROM• SCSI address 4, LUN 0, by a tape drive• SCSI address 4, LUN 1, by the tape library robotics• SCSI address 5 by a SCSI disk• SCSI address 6 by a SCSI disk• SCSI address 7 by a SCSI controller
NOTE:The SCSI address number 7 is not listed although it is, by default, occupied by the SCSIcontroller.
All devices have the S/W State value set to CLAIMED and the H/W Type valueset to H/W DEVICE, meaning that the devices are currently connected. If there was
Installation and licensing guide 427

an UNCLAIMED value in the S/W State or NO-HW in the H/W Type column it wouldmean that the system cannot access the device.
The SCSI address 4 is claimed by the tape library that has the tape drive with LUN0 and the robotics with LUN 1. The drive is controlled by the tape2 driver and therobotics is controlled by the spt SCSI Pass-Through driver. Looking at the description,you can see that the device is an HP StorageWorks 12000e library; it is easilyrecognized among the SCSI libraries because it uses the same SCSI address for thetape drive and robotics but uses different LUNs.
The whole SCSI bus is controlled by the scsi1 interface module.
Finding the unused SCSI target IDs on SolarisA backup device connected to a Solaris system is accessed and controlled througha device file. This device file is created automatically by the Solaris operating system,in the directory /dev/rmt, when the backup device is connected and the clientsystem and backup device are powered up.
Before the backup device is connected, however, the available SCSI addresses mustbe checked and the address of the backup device set to an address not alreadyallocated.
To list the available SCSI addresses on a Solaris system:
1. Stop the system by pressing Stop and A.
2. Run the probe-scsi-all command at the ok prompt:
probe-scsi-all
You may be asked by the system to start the reset-all command beforeexecuting the probe-scsi-all .command
3. To return to normal operation, enter go at the ok prompt:
go
After listing the available addresses and choosing one to use for your backup device,you must update the relevant configuration files before connecting and starting upthe device. Refer to the next section for instructions on updating the configurationfiles.
Appendix B428

Updating the device and driver configuration on aSolaris system
Updating configuration filesThe following configuration files are used for device and driver configuration. Theymust be checked, and if necessary, edited before attached devices can be used:
• st.conf
• sst.conf
st.conf: all devices
This file is required on each Data Protector Solaris client with a tape device connected.It must contain device information and one or more SCSI addresses for each backupdevice connected to that client. A single SCSI entry is required for a single-drivedevice and multiple SCSI entries are required for a multi-drive library device.
1. Check the unused SCSI addresses on the client, as described in the previoussection, and choose an address for the device you want to attach.
2. Set the chosen SCSI address(es) on the backup device.
3. Power down the client system.
4. Attach the backup device.
5. First power up the device and then the client system.
6. Stop the system by pressing Stop and A.
7. Enter the probe-scsi-all command at the ok prompt:
probe-scsi-all
This will provide information on the attached SCSI devices, including the correctdevice ID. string for the newly attached backup device.
8. Return to normal running:
go
Installation and licensing guide 429

9. Edit the /kernel/drv/st.conf file. This file is used by the Solaris st (SCSItape) driver. It contains a list of devices officially supported by Solaris and a setof configuration entries for third party devices. If you are using a supporteddevice, it should be possible to connect the device and use it without any furtherconfiguration. Otherwise, you should add the following types of entries tost.conf:
• A tape configuration list entry (plus a tape data variable definition). Exampleentries are supplied in the file, commented out. You can use one of these, ifapplicable, or modify one to suit your needs.The entry must come before the first name= entry in the file and the requiredformat is as follows:tape-config-list= "Tape unit", "Tape reference name", "Tape data";where:
Tape unit The vendor and product ID stringfor the tape device. This must becorrectly specified as described inthe device manufacturer’sdocumentation.
Tape reference name The name you choose, by whichthe system will identify the tapedevice. The name you providedoes not change the tape productID, but when the system boots, thereference name will be displayedin the list of peripheral devicesrecognized by the system.
Tape data A variable that references a seriesof additional tape deviceconfiguration items. The variabledefinition must also be suppliedand be correctly specified, asdescribed in the devicemanufacturer’s documentation.
For example:tape-config-list= “Quantum DLT4000”, “Quantum DLT4000”,“DLT-data”;
Appendix B430
DLT-data = 1,0x38,0,0xD639,4,0x80,0x81,0x82,0x83,2;
The second parameter, 0x38, designates the DLTtape tape type as "otherSCSI drive". The value specified here should be defined in/usr/include/sys/mtio.h.
NOTE:Ensure that the last entry in the tape-config-list is terminated with a semi-colon(;).
• For multidrive devices, target entries as follows:name="st" class="scsi"
target=X lun=Y;
where:
X is the SCSI port assigned to the data drive (or robotic mechanism).
Y is the logical unit value.
For example:name="st" class="scsi"
target=1 lun=0;
name="st" class="scsi"
target=2 lun=0
Normally target entries are required in st.conf only for the drives, not forthe robotics mechanism, which is on a different target. Entries for these areusually provided in the sst.conf file (See below). However, there aresome devices, for example the HP StorageWorks 24x6, that treat the roboticsmechanism similar to another drive. In this case two entries with the sametarget are required (one for the drive and one for the robotics), but withdifferent LUNs.For example:name="st" class="scsi"
target=1 lun=0;
name="st" class="scsi"
target=1 lun=1
Installation and licensing guide 431

sst.conf: library devices
This file is required on each Data Protector Solaris client to which a multi-drive librarydevice is connected. Generally speaking, it requires an entry for the SCSI addressof the robotic mechanism of each library device connected to the client (there aresome exceptions, such as the HP StorageWorks 24x6 mentioned in the previoussection).
1. Copy the sst driver (module) and configuration file sst.conf to the requireddirectory:
• For 32-bit operating systems:$cp /opt/omni/spt/sst /usr/kernel/drv/sst
$cp /opt/omni/spt/sst.conf /usr/kernel/drv/sst.conf
• For 64-bit operating systems:$cp /opt/omni/spt/sst.64bit /usr/kernel/drv/sparcv9 /sst
$cp /opt/omni/spt/sst.conf /usr/kernel/drv/sst.conf
2. Edit the sst.conf file and add the following entry:
name="sst" class="scsi" target=X lun=Y;
where:
X is the SCSI address of the robotic mechanism.
Y is the logical unit.
For example:
name="sst" class="scsi" target=6 lun=0;
3. Add the driver to the Solaris kernel:
add_drv sst
Creating and checking device filesAfter setting up the configuration files and installing the drivers, you can create newdevice files as follows:
1. Remove all existing device files from the /dev/rmt directory:
cd /dev/rmt rm *
Appendix B432

2. Enter the following to shut down the system:
shutdown -i0 -g0
3. Reboot the system:
boot -rv
The r switch in the boot command enables a kernel compile and includes thecreation of device special files used for communication with the tape device.The v switch enables verbose mode display of system startup. With verbosemode, the system should indicate that the device is attached by displaying theTape reference name string you selected during the /devices directoryconfiguration phase of boot.
4. Enter the following command to verify the installation:
mt -t /dev/rmt/0 status
The output of this command depends on the configured drive. It will be similarto the following:
Quantum DLT7000 tape drive: sense key(0x6)= Unit Attentionresidual= 0 retries= 0 file no= 0 block no= 0
5. When the reboot has completed, you can check the device files that have beencreated using the command ls -all. For a library device, the output of thiscommand might be:
/dev/rmt/0hb for a first tape drive
/dev/rmt/1hb for a second tape drive
/dev/rsst6 for a robotic drive
Finding unused SCSI target IDs on a Windows systemFollow the steps below to determine the unused SCSI Target IDs (SCSI Addresses) ona Windows system:
1. In the Windows Control Panel, click SCSI Adapters.
Installation and licensing guide 433

2. For each device connected to a SCSI Adapter in the list, check its properties.Double-click the name of a device, and then click Settings to open the propertypage. See Figure 82 on page 434.
Remember the SCSI Target IDs and LUNs(Logical Unit Numbers)assigned to the device. This way you can find out which SCSI Target IDsand LUNs are already occupied.
Figure 82 Device settings
Setting SCSI IDs on an HP StorageWorks 330fxlibrary
Once you have chosen the unused SCSI IDs for the robotics and drives, you cancheck and configure them using the Control Panel of the library device.
EXAMPLE: If you have a library model HP StorageWorks 330fx, you can find theconfigured SCSI IDs as follows:
1. From the READY state, press NEXT, and then ADMIN* will appear.
2. Press ENTER, and then you will be asked for the password. Enter the password.
3. TEST* will appear, press NEXT until SCSI IDs* appears.
4. Press ENTER . VIEW IDs* appears.
5. Press ENTER. JKBX ID 6 LUN 0 appears.
6. Press NEXT. DRV 1 ID 5 LUN 0 appears.
7. Press NEXT. DRV 2 ID 4 LUN 0 appears, etc.
Appendix B434

You can return to the READY state by pressing CANCEL several times.
Connecting backup devicesThe following procedure describes the general steps to follow in order to connect abackup device to an HP-UX, Solaris, Linux or Windows system.
1. Select the client to which you will connect the backup device.
2. Install a Media Agent on the selected system. See “Remote installation of DataProtector clients” on page 81.
3. Determine the unused SCSI address that can be used by the device. For HP-UXsystems, see “Finding the unused SCSI addresses on HP-UX” on page 426. ForSolaris systems, see “Finding the unused SCSI target IDs on Solaris” on page 428.For a Windows system, see “Finding unused SCSI target IDs on a Windowssystem” on page 433.
• If connecting to an HP-UX system, check that the required drivers are installedand built into the current kernel. See “Checking the kernel configuration onHP-UX” on page 98.If you need to configure a SCSI Pass-Through Driver, see “SCSI roboticsconfiguration on HP-UX” on page 419.
• If connecting to a Solaris system, check that the required drivers are installedand the configuration files are updated for the device to be installed. See“Updating the device and driver configuration on a Solarissystem” on page 429. This also tells you how to update the sst.conf file ifyou need to configure a SCSI Pass-Through Driver.
• If connecting to a Windows client, the native tape driver can be loaded ordisabled, depending on the Windows system version. See “Using tape androbotics drivers on Windows” on page 413.If you load the native tape driver for a device which has been alreadyconfigured in Data Protector and did not use the native tape driver, makesure that you rename the device filenames for all configured Data Protectorlogical devices that reference this specific device (for example, fromscsi1:0:4:0 to tape3:0:4:0).For more information on an appropriate device filename, see “Creatingdevice files (SCSI Addresses) on Windows” on page 418.
Installation and licensing guide 435

4. Set the SCSI addresses (IDs) on the device. Depending on the device type, thiscan be usually done using the switches on the device. For details, see thedocumentation that comes with the device.
For an example, see “Setting SCSI IDs on an HP StorageWorks 330fxlibrary” on page 434.
Refer to http://www.hp.com/support/manuals for details about supporteddevices.
NOTE:On a Windows systems with the Adaptec SCSI adapter installed and a SCSIdevice connected, the Host Adapter BIOS option must be enabled so thatthe system does not have problems issuing SCSI commands.To set the Host Adapter BIOS option, press Ctrl+A during the boot of the systemto enter the SCSI Adapter menu, then selectConfigure/View Host Adapter Settings > Advanced Configuration Optionsand enable Host Adapter BIOS.
Appendix B436

5. First, switch on the device, and then the computer, and then wait until the bootprocess completes. Verify that the system correctly recognizes your new backupdevice.
• On an HP-UX system, use the ioscan utility/usr/sbin/ioscan -fn
to display a list of connected devices with the corresponding hardware pathsand device files, where you should find your newly connected device withthe correct SCSI addresses.If the device file has not been created automatically, during the boot process,you must create it manually. See “Creating device files onHP-UX” on page 423.
• On a Solaris system, run the ls -all command on the /dev/rmt directoryto display a list of connected devices with the corresponding hardware pathsand device files, where you should find your newly connected device withthe correct SCSI addresses.
• On a Linux system, run the ls -all command on the /dev/rmt directoryto display a list of connected devices with the corresponding hardware pathsand device files, where you should find your newly connected device withthe correct SCSI addresses.
• On a Windows system, you can verify that the system correctly recognizesyour new backup device if you use the devbra utility. In theData_Protector_home\bin directory, run:devbra -dev
In the output of the devbra command you will find the following lines foreach connected and properly recognized device:backup device specification
hardware_path
media_type
...........
For example, the following output:HP:C1533A
tape3:0:4:0
DDS
...
...
Installation and licensing guide 437

means that an HP DDS tape device (with the native tape driver loaded) hasthe Drive instance number 3, and is connected to the SCSI bus 0, the SCSITarget ID 4 and LUN number 0.Or, the following output:HP:C1533A
scsi1:0:4:0
DDS
...
...
means that an HP DDS tape device (with the native tape driver unloaded) isconnected to the SCSI port 1, SCSI bus 0, and the tape drive has the SCSITarget ID 4, and LUN number 0.
• On an AIX system, use the lsdev utilitylsdev -C
to display the list of connected devices with the corresponding device files.
Hardware compression
Most modern backup devices provide built-in hardware compression that can beenabled when you create a device file or SCSI address in the device configurationprocedure. Refer to the online Help for detailed steps.
Hardware compression is done by a device that receives the original data from aMedia Agent client and writes it to the tape in compressed mode. Hardwarecompression increases the speed at which a tape drive can receive data, becauseless data is written to the tape.
When software compression is used and hardware compression is disabled, the datais compressed by the Disk Agent and sent compressed to a Media Agent. Thecompression algorithm can take a substantial amount of resources from the DiskAgent system if software compression is used, but this reduces the network load.
To enable hardware compression on Windows, add “C” to the end of thedevice/drive SCSI address, for example: scsi:0:3:0C (or tape2:0:1:0C if tape driveris loaded). If the device supports hardware compression, it will be used, otherwisethe C option will be ignored.
To disable hardware compression on Windows, add “N” to the end of thedevice/drive SCSI address, for example: scsi:0:3:0:N.
To enable/disable hardware compression on UNIX, select a proper device file.Consult the device and operating system documentation for details.
Appendix B438

What’s next?
At this stage, you should have the backup devices connected that enable you toconfigure backup devices and media pools. See the online Help index: “configuring,backup devices” for more information about further configuration tasks.
You must have a Media Agent installed on your system. See “Remote installation ofData Protector clients” on page 81 for instructions how to do that.
The following sections describe how to connect an HP StorageWorks Standalone 24Tape Device, HP StorageWorks 12000e Library, and HP StorageWorks DLT Library28/48-Slot to an HP-UX and a Windows system.
Connecting an HP StorageWorks 24 standalone deviceThe StorageWorks 24 DDS backup device is a standalone tape drive based on DDS3technology.
Connecting to an HP-UX system
Follow the steps below to connect the HP StorageWorks 24 Standalone device toan HP-UX system:
1. Check that the required drivers (stape or tape2)are installed and built intothe current kernel. See “Checking the kernel configuration on HP-UX” on page 98.
2. Determine an unused SCSI address that can be used by the tape drive. See“Finding the unused SCSI addresses on HP-UX” on page 426.
3. Set the SCSI addresses (IDs) on the device. Use the switches at the back of thedevice.
For details, see the documentation that comes with the device.
4. First, switch on the device, and then the computer, and wait until the boot processcompletes.
5. Verify that the system correctly recognizes the newly connected tape drive. Usethe ioscan utility:
/usr/sbin/ioscan -fn
to display a list of connected devices with the corresponding hardware pathsand device files, where you should find your newly connected tape drive, whichhas the correct SCSI address. The device file for the drive has been createdduring the boot process.
Installation and licensing guide 439

What’s next?
After properly connecting the device, see the online Help index: “configuring, backupdevices”for instructions about configuring a Data Protector backup device for yournewly connected device.
Connecting to a Windows system
Follow the steps below to connect the HP StorageWorks 24 Standalone device to aWindows system:
1. Determine an unused SCSI address (Target ID) that can be used by the tapedrive. See “Finding unused SCSI target IDs on aWindows system” on page 433.
2. Set the SCSI addresses (IDs) on the device. Use the switches at the back of thedevice. For details, see the documentation that comes with the device.
3. First, switch on the device, and then the computer, and then wait until the bootprocess completes.
4. Verify that the system correctly recognizes the newly connected tape drive. Runthe devbra command from the Data_Protector_home\bin directory. Enter
devbra -dev
In the output of the devbra command, you should find the newly connectedtape drive of the HP StorageWorks 24 Standalone device.
What’s next?
After properly connecting the device, see the online Help index: “configuring, backupdevices” for instructions about configuring a Data Protector backup device for yournewly connected device.
Connecting an HP StorageWorks DAT AutoloaderBoth the HP StorageWorks 12000e and the StorageWorks DAT24x6 libraries havea repository for six cartridges, one drive, and one robotic arm used for movingcartridges to and from the drive. The two libraries also have built-in dirty tapedetection.
Connecting to an HP-UX system
Follow the steps below to connect the HP StorageWorks 12000e library device toan HP-UX system:
1. On the rear side of the autoloader, set the mode switch to 6.
Appendix B440

2. Check that the required drivers (stape or tape2)are installed and built intothe current kernel. See “Checking the kernel configuration on HP-UX” on page 98.
3. Check that the required SCSI Pass-Through drivers (sctl or spt) are installedand built into the current kernel. See “SCSI robotics configuration onHP-UX” on page 419.
4. Determine an unused SCSI address that can be used by the tape drive and therobotics. See “Finding the unused SCSI addresses on HP-UX” on page 426.
NOTE:The HP StorageWorks 12000e Library uses the same SCSI address for thetape drive and for the robotics, but uses different LUN numbers.
5. Set the SCSI addresses (IDs) on the device. For details, see the documentationthat comes with the device.
6. First, switch on the device, and then the computer, and then wait until the bootprocess completes.
7. Verify that the system correctly recognizes the newly connected tape drive. Usethe ioscan utility
/usr/sbin/ioscan -fn
to display a list of connected devices with the corresponding hardware pathsand device files, where you should find your newly connected tape drive, havingthe correct SCSI address.
8. The device file for the drive has been created during the boot process, while thedevice file for the robotics must be created manually. See “Creating device fileson HP-UX” on page 423.
9. Verify that the system correctly recognizes the newly created device file for thelibrary robotics. Run the ioscan utility:
/usr/sbin/ioscan -fn
You should see your newly created device file in the output of the command.
What’s next?
After properly connecting the library device, see the online Help index: “configuring,backup devices” for instructions about configuring a Data Protector backup devicefor your newly connected device.
Installation and licensing guide 441

Connecting to a Windows system
Follow the steps below to connect the HP StorageWorks 12000e library device toa Windows system:
1. On the rear side of the autoloader, set the mode switch to 6.
2. Determine an unused SCSI address that can be used by the tape drive and forthe robotics. See “Finding unused SCSI target IDs on a Windowssystem” on page 433.
3. Set the SCSI addresses (IDs) on the device. For details, see the documentationthat comes with the device.
NOTE:The HP StorageWorks 12000e Library uses the same SCSI address for thetape drive and for the robotics, but uses different LUN numbers.
4. First, switch on the device, and then the computer, and wait until the boot processcompletes.
5. Verify that the system correctly recognizes the newly connected tape drive andthe robotics. In the Data_Protector_home\bin directory, run:
devbra -dev
In the output of the devbra command, you should find the newly connectedtape drive and the robotics of the HP StorageWorks 12000e Library device.
What’s next?
After properly connecting the library device, see the online Help index: “configuring,backup devices” for instructions about configuring a Data Protector backup devicefor your newly connected device.
Connecting an HP StorageWorks DLT Library 28/48-SlotThe HP StorageWorks DLT Library 28/48-Slot is a multi-drive library for enterpriseenvironments with 80-600 GB to back up. It has four DLT 4000 or DLT 7000 driveswith multiple data channels, a mail slot, and a barcode reader.
Appendix B442

Connecting to an HP-UX system
Follow the steps below to connect the HP StorageWorks DLT Library 28/48-Slotlibrary device to an HP-UX system:
1. Check that the required drivers (stape or tape2) drivers are installed andbuilt into the current kernel. See “Checking the kernel configuration onHP-UX” on page 98.
2. Check that the required SCSI Pass-Through drivers (sctl or spt) are installedand built into the current kernel. See “SCSI robotics configuration onHP-UX” on page 419.
3. Determine an unused SCSI address that can be used by the tape drive and therobotics. See “Finding the unused SCSI addresses on HP-UX” on page 426.
NOTE:The HP StorageWorks DLT Library 28/48-Slot has four tape drives and therobotics, so you need five unused SCSI addresses in case you will be usingall tape drives. The tape drives and the robotics must use different SCSIaddresses.
4. Set the SCSI addresses (IDs) on the device. For details, see the documentationthat comes with the device.
5. Switch on the device, and then the computer, and wait until the boot processcompletes.
6. Verify that the system correctly recognizes the newly connected tape drives. Usethe ioscan utility
/usr/sbin/ioscan -fn
to display a list of connected devices with the corresponding hardware pathsand device files, where you must find your newly connected tape drives, havingthe correct SCSI addresses.
7. The device files for the drives have been created during the boot process, whilethe device file for the robotics must be created manually. See “Creating devicefiles on HP-UX” on page 423.
8. Verify that the system correctly recognizes the newly created device file for thelibrary robotics. Use the ioscan utility:
/usr/sbin/ioscan -fn
You should see your newly created device file in the output of the command.
Installation and licensing guide 443

What’s next?
After properly connecting the HP StorageWorks DLT Library 28/48-Slot library device,see the online Help index: “configuring, backup devices” for instructions aboutconfiguring a Data Protector backup device for your newly connected device.
Connecting to a Solaris system
To configure the HP C5173-7000 library device on a Solaris system, follow the stepsbelow. For this example, it is assumed that two drives are to be allocated to DataProtector:
1. Copy the sst driver (module) and configuration file sst.conf to the requireddirectory:
• For 32-bit operating systems:$cp /opt/omni/spt/sst /usr/kernel/drv/sst
$cp /opt/omni/spt/sst.conf /usr/kernel/drv/sst.conf
• For 64-bit operating systems:$cp /opt/omni/spt/sst.64 /usr/kernel/drv/sparcv9 /sst
$cp /opt/omni/spt/sst.conf /usr/kernel/drv/sparcv9/sst.conf
2. Add the driver to the Solaris kernel:
add_drv sst
3. Remove all existing device files from the /dev/rmt directory:
cd /dev/rmt rm *
4. Stop the system by pressing Stop and A.
5. Run the probe-scsi-all command at the "ok" prompt to check which SCSIaddresses are available for use.
ok probe-scsi-all
The system may ask you to start the reset-all command before executing theprobe-scsi-all command.
In our case, we will use port 6 for the SCSI control device, port 2 for the firstdrive, and port 1 for the second drive; lun is 0)
6. Return to normal running:
ok go
Appendix B444

7. Copy the st.conf configuration file into the required directory:
$cp /opt/omni/spt/st.conf /kernel/drv/st.conf
The st.conf file is present on each Solaris Data Protector client and containsSCSI addresses for each backup device connected to the client.
8. Edit the /kernel/drv/st.conf file and add the following lines:
tape-config-list= "QUANTUM DLT7000", "Digital DLT7000","DLT-data3";
DLT-data3 = 1,0x77,0,0x8639,4,0x82,0x83,0x84,0x85,3;
name="st" class="scsi"
target=1 lun=0;
name="st" class="scsi"
target=2 lun=0;
name="st" class="scsi"
target=6 lun=0;
These entries provide the SCSI addresses for drive 1, drive 2, and the roboticdrive, respectively.
9. Edit the sst.conf file (that you copied across in step Step 1 on page 444 andadd the following line:
name="sst" class="scsi" target=6 lun=0;
NOTE:This entry must match that for the robotic drive in the st.conf file. Seestep Step 8 on page 445 above.
10. Power down the client system and attach the library device.
Installation and licensing guide 445

11. Power up the library device first and then the client system.
The system will now boot and automatically create device files for the roboticdrive and tape drives. These can be listed using the command ls -all. Inour case:
/dev/rmt/0hb for a first tape drive
/dev/rmt/1hb for a second tape drive
/dev/rsst6 for a robotic drive
What’s next?
After properly connecting the HP StorageWorks DLT Library 28/48-Slot library device,see the online Help index: “configuring, backup devices” for instructions aboutconfiguring a Data Protector backup device for your newly connected device.
Connecting to a Windows system
Follow the steps below to connect the HP StorageWorks DLT 28/48-Slot library deviceto a Windows system:
1. Determine the unused SCSI addresses (Target IDs) that can be used by the tapedrive and by the robotics. See “Finding unused SCSI target IDs on a Windowssystem” on page 433.
2. Set the SCSI addresses (Target IDs) on the device. For details, see thedocumentation that comes with the device.
NOTE:The HP StorageWorks DLT Library 28/48-Slot has four tape drives and therobotics, so you need five unused SCSI addresses in case you will be usingall tape drives. The tape drives and the robotics must use different SCSITarget IDs.
3. First, switch on the device, then the computer, and then wait until the boot processcompletes.
Appendix B446
4. Verify that the system correctly recognizes the newly connected tape drives andthe robotics. In the Data_Protector_home\bin directory, run:
devbra -dev
In the output of the devbra command, you should find the newly connectedtape drives and the robotics of the HP StorageWorks DLT Library 28/48-Slotlibrary device.
What’s next?
After properly connecting the HP StorageWorks DLT Library 28/48-Slot library device,see the online Help index: “configuring, backup devices” for instructions aboutconfiguring a Data Protector backup device for your newly connected library device.
Connecting a Seagate Viper 200 LTO Ultrium Tape DriveThe Seagate Viper 200 LTO Ultrium Tape Drive is a standalone device for enterpriseenvironments with 100-200 GB to back up.
Connecting to a Solaris system
To configure the Seagate Viper 200 LTO Ultrium Tape Drive on a Solaris system,follow the steps below:
Installation and licensing guide 447

1. Determine the unused SCSI addresses that can be used by the tape drive. Runthe modinfo or dmesg command to find the SCSI controllers in use and theSCSI target devices installed:
dmesg | egrep “target” | sort | uniq
The following output should be received:
sd32 at ithps0: target 2 lun 0
sd34 at ithps0: target 4 lun 0
st21 at ithps1: target 0 lun 0
st22 at ithps1: target 1 lun 0
NOTE:It is recommended that you use either a glm or isp SCSI controller whenconnecting the Viper 200 LTO device to a Solaris system. It is alsorecommended that you use either Ultra2 SCSI or Ultra3 SCSI controllers.
2. Edit the /kernel/drv/st.conf file and add the following lines:
tape-config-list=
“SEAGATE ULTRIUM06242-XXX” , “SEAGATE LTO” , \
“SEAGATE_LTO”;
SEAGATE_LTO = 1, 0x7a, 0, 0x1d679, 4, 0x00, 0x00, 0x00, \
0x00, 1;
3. Power down the client system and attach the device.
4. Power up the device first and then the client system.
The system will now boot and automatically create device files for the tape drive.These can be listed using the command ls -all.
What’s next?
After properly connecting the Seagate Viper 200 LTO Ultrium Tape Drive, see theonline Help index: “configuring, backup devices” for instructions about configuringa Data Protector backup device for your newly connected device.
Appendix B448

Connecting to a Windows system
Follow the steps below to connect the Seagate Viper 200 LTO Ultrium Tape Drive toa Windows system:
1. Determine the unused SCSI addresses (Target IDs) that can be used by the tapedrive. See “Finding unused SCSI target IDs on aWindows system” on page 433.
2. Set the SCSI addresses (Target IDs) on the device. For details, see thedocumentation that comes with the device.
1. First, switch on the device, then the computer, and then wait until the boot processcompletes.
2. Verify that the system correctly recognizes the newly connected tape drives andthe robotics. In the Data_Protector_home\bin directory, run:
devbra -dev
In the output of the devbra command, you should find the newly connectedtape drive of the Seagate Viper 200 LTO Ultrium Tape Drive.
What’s next?
After properly connecting the Seagate Viper 200 LTO Ultrium Tape Drive, see theonline Help index: “configuring, backup devices” for instructions about configuringa Data Protector backup device for your newly connected device.
NOTE:When configuring the Seagate Viper 200 LTO Ultrium Tape Drive with Data Protector,make sure that the compression mode is set. This is done by specifying the C parameterafter the SCSI address of the drive, for example:scsi2:0:0:0C
Checking the General Media Agent Installation onNovell NetWare
After you have installed the General Media Agent on the Novell NetWare platform,you should verify the installation by performing the following tasks:
• Identify the storage device.• Test the General Media Agent startup at the Novell NetWare server’s console.
Installation and licensing guide 449

• Test HPUMA.NLM and HPDEVBRA.NLM startup at the Novell NetWare server’sconsole.
Identifying the storage deviceUse the following convention to identify a storage device in the Novell NetWareenvironment:
adapter identification number: target identification number :logical unit numbercompression
For example, string “0:2:0N” identifies a storage device as adapter ID 0, target ID2, a logical unit number (LUN) 0, and no compression.
Another example is string “1:1:0C” that identifies a storage device as adapter ID1, target ID 1, a Logical Unit Number (LUN) 0, with compression.
Testing the general Media Agent startupOnce you have the General Media Agent installed on the Novell NetWare system,you can test a startup of a backup Media Agent HPBMA.NLM at the Novell NetWareserver's console.
The example below uses the Adaptec host bus adapter, AHA-2940, to access theexchanger tape device of the HP StorageWorks Tape 12000e library device.
The following conditions should be fulfilled before you start any of the Data Protector*.NLM components:• HPINET must be up and running.• The Adaptec SCSI host adapter driver must be up and running.• The General Media Agent software must be located in the SYS:USR\OMNI\BIN
directory.• The storage device must be correctly installed and connected.• The Adaptec host bus adapter and the TCP/IP communication protocol must be
properly installed, and up and running.
Once the required conditions have been verified, proceed as follows:
Appendix B450

1. Enter the following to load HPBMA.NLM:
LOAD HPBMA -name testbma -type type_number -policypolicy_number -ioctl control_device -dev data_device -ttytty_number
The type type_number option is the Data Protector device type. Possiblevalues for type_number are:
• 1=DAT/DDS• 2 = Quarter Inch Cartridge(QIC)• 3 = 8mm - Exabyte• 9 = Generic Magnetic tape device• 10 = Digital Linear Tape (DLT)
The policy policy_number option is the Data Protector way to use thedevice. Possible values are:
• 1= standalone device• 10= SCSI - II library
The ioctl control_device option defines the SCSI address of the roboticscontrol. It has the following form:
adapter_identification_number:target_identification_number:logical_unit_number
For example:
• 0:1:1 =>The control device (robotics) uses the SCSI adapter 0, has theSCSI address 1, and has the LUN 1.
The dev data_device option defines the SCSI address of the robotics control.It has the following form:
adapter_identification_number:target_identification_number:logical_unit_numbercompression
For example:
• 0:1:1C =>The control device (robotics) is uses SCSI adapter 0, has the SCSIaddress 1, and has the LUN 1. The data compression has been set.
The -tty tty_number is the TCP/IP communication protocol port number.
The Console Media Agent, HPCONMA.NLM, starts and you will be promptedby the following screen:
*** MA listening on port: number
SLOT: [Load(2), Peek(2), Stop(0), Abort(0)]
Installation and licensing guide 451

SLOT: _
The currently available commands are:
Load(2) - The command is used for loading the tape into the drive andrequires two arguments:
Load Slot numberflipping flag
The flipping flag can be set either to 0 or to 1, meaning that the medium doesnot flip if the value is 0 or it flips if the value is 1.
Stop(0) - Completes the current session normally.
Abort(0) - Aborts the current session.
In this example, you will load the tape from SLOT 3 with no flipping of themedium.
2. Enter the command to load the tape from SLOT 3 with no flipping of the medium.
SLOT:LOAD 3 0
Once the tape is loaded in the drive, the following message will be displayed:
CHECK: [Deny(0), Init(1), Seek(2), Abort(0)]
CHECK: _
The available commands are:
Deny(0)- Denies the current action.
Init(1)- Initializes the loaded tape and requires one parameter:
Init(1) medium_id
Seek(2)- Seeks to the requested position. The argument string is:
Seek segment_numberblock number
Abort(0)- Aborts the current session.
3. To initialize the tape, enter
CHECK: Init test
Appendix B452

4. Switch from Backup Media Agent screen to the Novell NetWare console andstart the backup session using the General Media Agent action/requestcommand.
NOTE:The Data Protector Disk Agent should be started at the selected host usingload -ma host port to enable proper General Media Agent and DiskAgent communication and to display the correct backup session operationsport number as the HPCONMA.NLM starts. A message will appear after thesuccessful backup session.
5. To successfully terminate the Backup Media Agent, press CTRL-C at the BackupMedia Agent screen. The Console Attention Request prompt appearsafter a short time-out:
ATT:[Stop(0), Abort(0), Disconnect(1)] Run Stop to successfullycomplete the session.
Testing the HPUMA.NLM and the HPDEVBRA.NLM startupLoading HPUMA.NLM at the server’s console allows you to test the SCSI commandsmanually.
Load HPUMA.NLM with the following command:
LOAD HPUMA.NLM -ioctl control_device -dev data_device
-tty
The ioctl control_device option defines the SCSI address of the robotics control.It has the following form:
adapter_identification_number:target_identification_number:logical_unit_number
For example:
• 0:1:1 =>The control device (robotics) uses the SCSI adapter 0, has the SCSIaddress 1, and uses the LUN 1.
The dev data_device option defines the SCSI address of the robotics control. Ithas the form:
adapter_identification_number:target_identification_number:logical_unit_number:compression
For example:
Installation and licensing guide 453

• 0:1:1C =>The control device (robotics) uses SCSI adapter 0, has the SCSIaddress 1, and uses the LUN 1. The data compression has been set.
The -tty option is necessary to interact with the Novell NetWare server’s console.
The HPUMA starts and you are prompted with the following screen:
prompt
where prompt has the following form:adapter_identification_number:target_identification_number:logical_unit_number For example,
0:2:1
To see the available commands, type HELP in the HPUMA screen. For example, tosee which slots and drive(s) are full or empty, type STAT at the prompt.
When you have finished, type BYE to close the HPUMA screen.
Loading HPDEVBRA.NLM locally enables you to get information on the devices bothinstalled and detected on the Novell NetWare server.
To load HPDEVBRA.NLM at the server console, enter the following command:
LOAD HPDEVBRA.NLM -dev
where the -dev option is necessary to list all devices attached onto the NovellNetWare server.
To see the currently available commands, load HPDEVBRA.NLM with HELP option:
LOAD HPDEVBRA -HELP
Installing Data Protector on Microsoft Cluster withVeritas Volume Manager
To install Data Protector on Microsoft Cluster Server (MSCS) with Veritas VolumeManager, first follow the general procedure for installation of Data Protector onMSCS. See “Installing Data Protector on Microsoft Cluster Server” on page 196.
After you have completed the installation, some additional steps are required toenable the Data Protector Inet service to differentiate between local andcluster disk resources which use their own resource driver and not the Microsoftresource driver:
1. Run the omnisv -stop command on the Cell Manager to stop the DataProtector services/processes:Data_Protector_home\bin\omnisv -stop
Appendix B454

2. Define a new system environment variable
OB2CLUSTERDISKTYPES with Volume Manager Disk Group as a value,or set the omnirc variable on both cluster nodes as follows:
OB2CLUSTERDISKTYPES=Volume Manager Disk Group
If you want to specify additional proprietary disk resources, such as NetRAID4disk, simply append the resource type name to the
OB2CLUSTERDISKTYPES environment variable value:
OB2CLUSTERDISKTYPES=Volume Manager Disk Group;NETRaid4MDiskset
For more information on using the omnirc file variables, see the HP DataProtector troubleshooting guide.
3. Run the omnisv -start command to start theservices/processes:Data_Protector_home\bin\omnisv -start
Configuration files path changes in Data ProtectorA.06.10
The default paths of some configuration, log and (on UNIX) database files has beenchanged in Data Protector A.05.50 and later versions. Some of the files are nowsplit in the server and client directory.
If you are upgrading from Data Protector A.05.10, check the following tables for thechanges and modify the paths, if necessary.
Configuration files on UNIX
Client configuration files
The following table represents the files and directory that are moved from the/etc/opt/omni to the /etc/opt/omni/client directory during the upgrade.
Table 31 The content of the new /etc/opt/omni/client directory
Current pathOld path
/etc/opt/omni/client/cell_server/etc/opt/omni/cell/cell_server
Installation and licensing guide 455

Current pathOld path
/etc/opt/omni/client/omni_format/etc/opt/omni/cell/omni_format
/etc/opt/omni/client/omni_info/etc/opt/omni/cell/omni_info
/etc/opt/omni/client/allow_hosts/etc/opt/omni/cell/allow_hosts
/etc/opt/omni/client/deny_hosts/etc/opt/omni/cell/deny_hosts
/etc/opt/omni/client/customize/etc/opt/omni/customize
Cell Manager configuration and log files
The rest of the content of the /etc/opt/omni directory is moved to the/etc/opt/omni/server directory. For example, the/etc/opt/omni/cell/cell_info file is now located in the/etc/opt/omni/server/cell directory.
The following table represents the files and directories that are moved from the/var/opt/omni directory to the /var/opt/omni/server directory during theupgrade.
Table 32 The content of the new /var/opt/omni/server directory
Current pathOld path
/var/opt/omni/server/db40/var/opt/omni/db40
/var/opt/omni/server/sessions/var/opt/omni/sessions
/var/opt/omni/server/log/log_file/var/opt/omni/log/log_file
where log_file represents any of the following files: HealthCheck.log,Check_*.txt, Ob2Event*, lic.log, omnisv.log, media.log, sm.log,crsevents.log, security.log, purge.log, readascii.log,cleaning.log, upgrade.log, trace.log, and cluster.log.
All other directories (for example, /var/opt/omni/tmp, /var/opt/omni/windu,or /var/opt/omni/emc) and log files (for example,/var/opt/omni/log/debug.log) are not moved.
Appendix B456

Configuration files on Windows
Client configuration files
The following table represents the files and directories that are moved from theData_Protector_home\Config directory to theData_Protector_home\Config\client and the Data_Protector_home\tmpdirectories during the upgrade.
Table 33 The content of the new Data_Protector_home\Config\clientdirectory
Current pathOld path
Data_Protector_home\Config\client\cell_server
Data_Protector_home\Config\cell\cell_server
Data_Protector_home\Config\client\omni_format
Data_Protector_home\Config\cell\omni_format
Data_Protector_home\Config\client\omni_info
Data_Protector_home\Config\cell\omni_info
Data_Protector_home\Config\client\allow_hosts
Data_Protector_home\Config\cell\allow_hosts
Data_Protector_home\Config\client\deny_hosts
Data_Protector_home\Config\cell\deny_hosts
Data_Protector_home\Config\client\EMC
Data_Protector_home\Config\EMC
Data_Protector_home\tmp\EMCData_Protector_home\Config\tmp\EMC
Cell Manager configuration files
The rest of the content of the Data_Protector_home\Config directory is movedto the Data_Protector_home\Config\Server directory. For example, theData_Protector_home\Config\cell\cell_info file is now located in theData_Protector_home\Config\Server\cell directory.
Installation and licensing guide 457

Log files
The following files are moved from the Data_Protector_home\log directory tothe Data_Protector_home\log\server directory: HealthCheck.log,Check_*.txt, Ob2Event*, lic.log, omnisv.log, media.log, sm.log,crsevents.log, security.log, purge.log, readascii.log,cleaning.log, upgrade.log, trace.log, and cluster.log.
All other log files (for example, Data_Protector_home\log\debug.log) arenot moved.
Command line changes after upgrading to DataProtector A.06.10
The commands listed in this chapter have been changed or provide extendedfunctionality in terms of new options in Data Protector A.06.10. Check and modifythe scripts that use the old commands. For usage synopses, see the HP Data Protectorcommand line interface reference or the corresponding man pages.
Depending on the version from which you upgraded your Cell Manager, refer to thecorresponding table:
• After upgrading from Data Protector A.05.10, see Table 34 on page 458.• After upgrading from Data Protector A.05.50, see Table 35 on page 468.• After upgrading from Data Protector A.06.00, see Table 36 on page 475.• After upgrading from Application Recovery Manager A.06.00, see Table
37 on page 481.
Table 34 Upgrade from Data Protector A.05.10
StatusSubcommand/OptionCommand
NEW COMMANDcjutil
NEW SOFTWARECOMPONENTS
sapdbob2install
smisa
vls_am
sps
Appendix B458

StatusSubcommand/OptionCommand
vmware
OBSOLETEDSOFTWARECOMPONENTS
acs
das
momgui
NEWINTEGRATIONS
-sapdb_listomnib
-mssps_list
-vmware_list
OBSOLETEDOPTION
-vss_list
NEW OPTIONS-msvssw_list
-share_info
-mirror
-enh_incr
-async
-encode aes256
-iap
-clp
NEW OPTIONS-check_licensesomnicc
-detail
-update_all
Installation and licensing guide 459

StatusSubcommand/OptionCommand
-force_cs
-list_trusted_hosts
-secure_client
-unsecure_client
-trusted_hosts
–import_vls
–import_iap
–cert_mode
–cert_name
–add_certificate
–get_certificate
–list_certificates
CHANGEDOPTIONS
–port
–user
–passwd
NEW COMMANDomnicjutil
CHANGEDOPTION
-applidomniclus
NEW OPTIONSFOR HPStorageWorksENTERPRISEVIRTUAL ARRAY
-smisomnicreatedl
-instant_recovery
Appendix B460

StatusSubcommand/OptionCommand
-snapshots number
-snapshot_type clone
-wait_clonecopy number
-replica_conf local
-replica_conf combined
-ca_failover_optionfollow_replica_direction
-ca_faiover_optionmaintain_replica_location
NEWINTEGRATIONS
-sapdbomnidb
-mssps
-vmware
NEW OPTIONS-copyid
-listcopies
-auditing
-timeframe
NEW OPTIONS-keystore
omnidbcheck-summary
OBSOLETEDCOMMAND
omnidbeva
NEW OPTION–keyfileomnidbrestore
Installation and licensing guide 461

StatusSubcommand/OptionCommand
NEW COMMANDomnidbupgrade
NEW COMMANDomnidbvss
NEW OPTIONS-extendtblspaceomnidbutil
-free_cell_resources
-list_large_directories
-list_large_mpos
-list_mpos_without_overs
CHANGEDOPTION
-readdb
NEW COMMANDomnidlc
NEW COMMANDomniinetpasswd
NEW COMMANDomnikeymigrate
NEW COMMANDomnikeytool
NEW COMMANDomnimigrate.pl
NEW OPTION–encryptomnimcopy
NEW OPTION-[no]barcode_as_labelomniminit
CHANGEDOPTION
-[no_]free_poolomnimm
NEW OPTION-create_free_pool
NEW OPTION-ams
omnimcopyCHANGEDOPTIONS
-copy
Appendix B462
StatusSubcommand/OptionCommand
-from
-pool
NEW COMMANDomniinstlic
NEW COMMANDomniiso
NEW COMMANDomniobjcopy
NEW COMMANDomniobjconsoli
date
NEWINTEGRATIONS
-sapdbomnir
-mssps
-vmware
NEW OPTIONSFOR SAPDB/MaxDB
-newinstance
-recover
-endlogs
-time
-nochain
-destination
-from_disk
-instance
NEW OPTIONSFOR MS SPS
-portal
-ssodb
Installation and licensing guide 463

StatusSubcommand/OptionCommand
-doclib
-tohost
-instance
-as
-todir
-changemaster
NEWOPTION FORHP StorageWorksENTERPRISEVIRTUAL ARRAY
-force_prp_replica
NEW OPTIONSFOR MS SQL
-instance SourceInstanceName
-destinstanceDestinationInstanceName
-asbase NewDBName
-file LogicalFileName
NEW OPTIONSFOR ORACLE ANDSAP R/3 INSTANTRECOVERY
-oracle
-sap
-user
-group
-recover
-open
-resetlogs
Appendix B464
StatusSubcommand/OptionCommand
-paralleism
NEW OPTIONSFOR MSEXCHANGESINGLE MAILBOX
-public
-originalfolder
-keep_msg
-overwrite_msg
-folder
-exclude
NEW OPTIONSFOR VSS RESTORE
-instant_restore
-conf_check
-no_recovery
-use_vds
—no_copy_back
-copy_back
-diskarray_wait
-delete_replica
-no_diskarray_wait
-no_retain_source
–exch_check
-exch_throttle
-appsrv
Installation and licensing guide 465

StatusSubcommand/OptionCommand
-target_tree
–exch_RSG
-target_dir
NEW OPTIONS-copyid
-no_auto_dev
-omit_unrequired_object_versions
OBSOLETEDOPTIONReplaced by-omit_unrequired
_object_versions.
-omit_unrequired_incrementals
NEW OPTIONS
-smtp
omnirpt
-copylist_sch
-copylist_post
-no_copylist
-conslist_sch
-conslist_post
-no_conslist
-num_copies
NEW REPORTS
obj_copies
session_objcopies
session_errors
Appendix B466

StatusSubcommand/OptionCommand
session_statistics
OBSOLETEDREPORTS
backup_errors
backup_statistics
NEW COMMANDomniresolve
NEW OPTIONS-CMomnisetup.sh
-IS
-autopass
NEW SOFTWARECOMPONENTS
smisa
sapdb
docs
javagui
vmware
vls_am
OBSOLETEDSOFTWARECOMPONENTS
acs
das
momgui
NEW COMMANDomnistoreapputil
NEW COMMANDomniusers
NEW OPTIONS-[no_]multipathsanconf
-remove_hosts
Installation and licensing guide 467
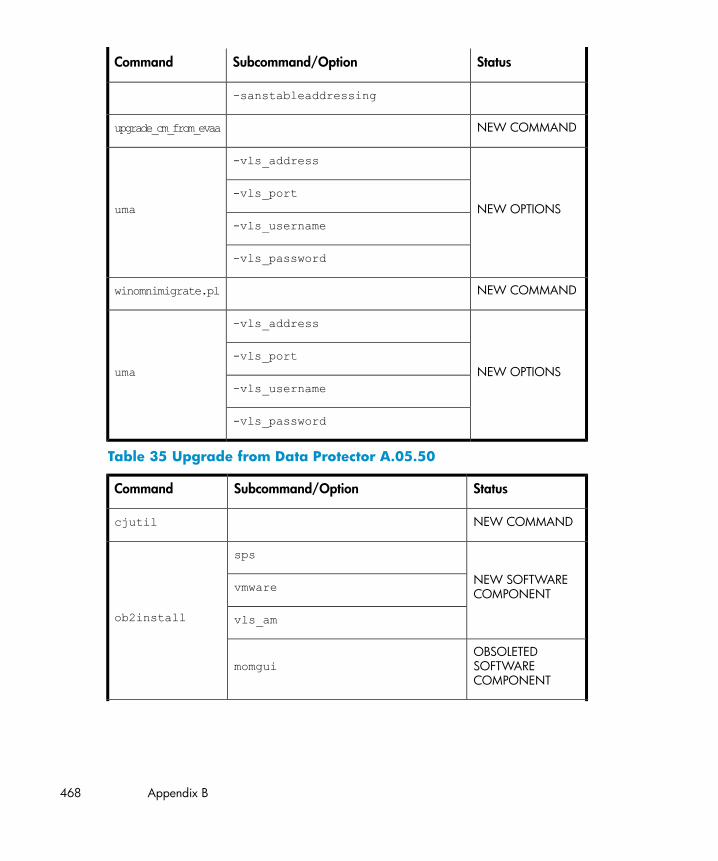
StatusSubcommand/OptionCommand
-sanstableaddressing
NEW COMMANDupgrade_cm_from_evaa
NEW OPTIONS
-vls_address
uma-vls_port
-vls_username
-vls_password
NEW COMMANDwinomnimigrate.pl
NEW OPTIONS
-vls_address
uma-vls_port
-vls_username
-vls_password
Table 35 Upgrade from Data Protector A.05.50
StatusSubcommand/OptionCommand
NEW COMMANDcjutil
NEW SOFTWARECOMPONENT
sps
ob2install
vmware
vls_am
OBSOLETEDSOFTWARECOMPONENT
momgui
Appendix B468

StatusSubcommand/OptionCommand
NEWINTEGRATIONS
-mssps_list
omnib
-vmware_list
NEW OPTIONS-enh_incr
-async
-encode aes256
-iap
-clp
NEW OPTIONS
-import_vls
omnicc
-import_iap
–cert_mode
–cert_name
-add_certificate
-get_certificate
-list_certificates
CHANGEDOPTIONS
-port
-user
-passwd
NEW COMMANDomnicjutil
NEWINTEGRATIONS
-msspsomnidb
-vmware
Installation and licensing guide 469

StatusSubcommand/OptionCommand
NEW OPTIONS-auditing
-timeframe
NEW OPTIONS-keystore
omnidbcheck-summary
NEW OPTIONS-sslomnidbsmis
-caconf
-init
–put filename
-get filename
-list EVA Name
-check DR Group Name
OBSOLETEDCOMMAND
omnidbeva
NEW OPTIONS
-add_info
omnidlc
-pack
-no_config
-any
-del_tracelog
NEWOPTIONS FORHP StorageWorksENTERPRISE VIRTUALARRAY
-replica_conf localomnicreatedl
-replica_conf combined
Appendix B470

StatusSubcommand/OptionCommand
-ca_failover_optionfollow_replica_direction
–ca_faiover_optionmaintain_replica_location
NEW OPTION–keyfileomnidbrestore
NEW OPTIONS-extendtblspaceomnidbutil
-free_cell_resources
-list_large_directories
-list_large_mpos
-list_mpos_without_overs
CHANGEDOPTION-readdb
NEW COMMANDomnidbvss
NEW OPTION-debug_locomnidlc
NEW COMMANDomniinetpasswd
NEW OPTIONS–autoinject
-waik
-inject_drivers
omniiso
NEW COMMANDomnikeymigrate
NEW COMMANDomnikeytool
UPDATEDCOMMAND
omnimigrate.pl
NEW OPTION—encryptomnimcopy
Installation and licensing guide 471

StatusSubcommand/OptionCommand
-ams
CHANGEDOPTIONS
-copy
-from
-pool
CHANGEDOPTION-[no_]free_poolomnimm
NEW OPTION-create_free_pool
NEWINTEGRATIONS
-mssps
omniobjcopy -vmware
NEW OPTION–encrypt
NEW COMMANDomniobjconsolidate
NEWINTEGRATIONS
-mssps
omnir
-vmware
NEWOPTIONS FORMS SPS
-portal
-ssodb
-doclib
-tohost
-instance
-as
-todir
-changemaster
Appendix B472

StatusSubcommand/OptionCommand
NEWOPTIONS FORMS EXCHANGESINGLE MAILBOX
-public
-originalfolder
-keep_msg
-overwrite_msg
-folder
-exclude
NEWOPTIONS FORVSS RESTORE
-instant_restore
-conf_check
-no_recovery
-use_vds
—no_copy_back
-copy_back
-diskarray_wait
-delete_replica
-no_diskarray_wait
-no_retain_source
–exch_check
-exch_throttle
-appsrv
-target_tree
Installation and licensing guide 473
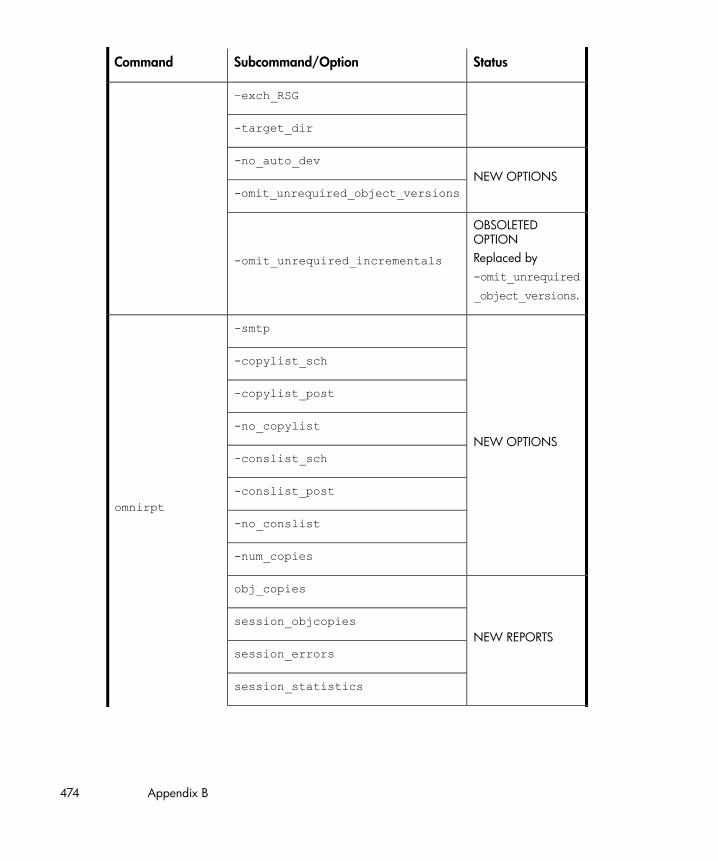
StatusSubcommand/OptionCommand
–exch_RSG
-target_dir
NEW OPTIONS-no_auto_dev
-omit_unrequired_object_versions
OBSOLETEDOPTIONReplaced by-omit_unrequired
_object_versions.
-omit_unrequired_incrementals
NEW OPTIONS
-smtp
omnirpt
-copylist_sch
-copylist_post
-no_copylist
-conslist_sch
-conslist_post
-no_conslist
-num_copies
NEW REPORTS
obj_copies
session_objcopies
session_errors
session_statistics
Appendix B474
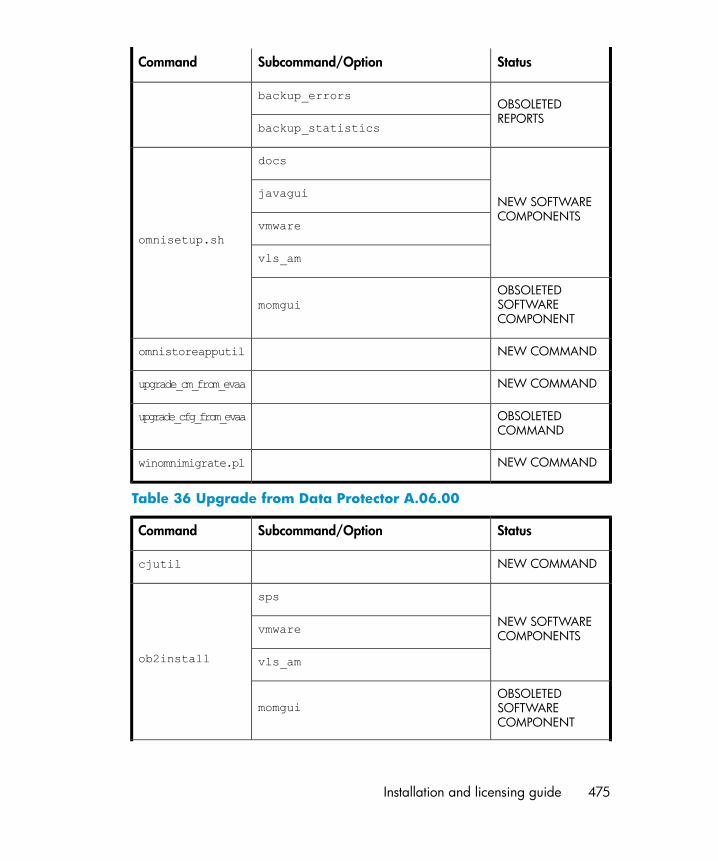
StatusSubcommand/OptionCommand
OBSOLETEDREPORTS
backup_errors
backup_statistics
NEW SOFTWARECOMPONENTS
docs
omnisetup.sh
javagui
vmware
vls_am
OBSOLETEDSOFTWARECOMPONENT
momgui
NEW COMMANDomnistoreapputil
NEW COMMANDupgrade_cm_from_evaa
OBSOLETEDCOMMAND
upgrade_cfg_from_evaa
NEW COMMANDwinomnimigrate.pl
Table 36 Upgrade from Data Protector A.06.00
StatusSubcommand/OptionCommand
NEW COMMANDcjutil
NEW SOFTWARECOMPONENTS
sps
ob2install
vmware
vls_am
OBSOLETEDSOFTWARECOMPONENT
momgui
Installation and licensing guide 475

StatusSubcommand/OptionCommand
NEWINTEGRATIONS
-mssps_list
omnib
-vmware_list
NEW OPTIONS
-async
-encode aes256
-iap
-clp
NEW OPTIONS
-import_vls
omnicc
-import_iap
–cert_mode
–cert_name
-add_certificate
-get_certificate
-list_certificates
CHANGEDOPTIONS
-port
-user
-passwd
NEW COMMANDomnicjutil
NEWINTEGRATIONS
-mssps
omnidb -vmware
NEW OPTIONS-auditing
Appendix B476

StatusSubcommand/OptionCommand
-timeframe
NEW OPTIONS-keystore
omnidbcheck-summary
NEW OPTIONS
–init
–list session
–list disk
–get session
–get disk
–remove session
–remove disk
omnidbvss
OBSOLETEDOPTIONS
–get table
–list table
–remove table
NEW OPTION–keyfileomnidbrestore
NEW OPTIONS
-free_cell_resources
omnidbutil-list_large_directories
-list_large_mpos
-list_mpos_without_overs
NEW OPTIONS
-add_info
omnidlc
-pack
-no_config
–any
-del_tracelog
Installation and licensing guide 477

StatusSubcommand/OptionCommand
NEW COMMANDomniinetpasswd
NEW OPTIONS–autoinject
-waik
-inject_drivers
omniiso
NEW COMMANDomnikeymigrate
NEW COMMANDomnikeytool
NEW OPTION–encrypt
omnimcopy
-ams
CHANGEDOPTIONS
-copy
-from
-pool
NEW OPTION–encryptomniobjconsolidate
NEWINTEGRATIONS
–mssps
omniobjcopy –vmware
NEW OPTION–encrypt
NEWINTEGRATIONS
-mssps
omnir-vmware
NEW OPTIONS-no_auto_dev
-omit_unrequired_object_versions
Appendix B478

StatusSubcommand/OptionCommand
OBSOLETEDOPTIONReplaced by-omit_unrequired
_object_versions.
-omit_unrequired_incrementals
NEWOPTIONS FORVSS RESTORE
-instant_restore
-conf_check
-no_recovery
-use_vds
—no_copy_back
-copy_back
-diskarray_wait
-delete_replica
-no_diskarray_wait
-no_retain_source
–exch_check
-exch_throttle
-appsrv
-target_tree
–exch_RSG
-target_dir
Installation and licensing guide 479

StatusSubcommand/OptionCommand
OBSOLETEDOPTION-delete_current
NEW OPTIONS
-copylist_sch
omnirpt
-copylist_post
-conslist_sch
-conslist_post
-num_copies
OBSOLETEDOPTIONS
-copylist
-conslist
NEW REPORTSobj_copies
session_objcopies
session_errors
session_statistics
OBSOLETEDREPORTS
backup_errors
backup_statistics
NEW SOFTWARECOMPONENTS
docs
omnisetup.sh
javagui
vmware
vls_am
OBSOLETEDSOFTWARECOMPONENT
momgui
Appendix B480

StatusSubcommand/OptionCommand
OBSOLETEOPTIONS
-IS1
-IS2
NEW COMMANDomnistoreapputil
NEW OPTIONS
-vls_address
uma-vls_port
-vls_username
-vls_password
Table 37 Upgrade from Application Recovery Manager A.06.00
StatusSubcommand/OptionCommand
NEW OPTIONNeeded for ZDB todisk.
-disk_onlyomnib
NEW OPTIONSNew options for integrations and filesystem.
NEW OPTIONSNew options related to media managementand other newData Protector functionality.omnidb
NEW OPTIONSNew options related to media managementand other newData Protector functionality.omnidbutil
THE COMMANDUSAGE IS HEAVILYMODIFIEDSee the HP DataProtector commandline interfacereference.
New options for integrations and filesystem.Application Recovery Manager A.06.00options are available.
omnir
NEW OPTIONSNew options for integrations and filesystem.utild_cmd
Installation and licensing guide 481

StatusSubcommand/OptionCommand
OBSOLETEDCOMMANDReplaced by theinternal databasebackup.
dbtool.pl
NOTE:The first part of the table lists only changes to commands already available inApplication Recovery Manager A.06.00 and which may affect your scripts. Allcommands introduced with Data Protector are listed below as “NEW”.
NEW COMMANDcjutil
NEW COMMANDNNMpost
NEW COMMANDNNMpre
NEW COMMANDNNMscript
NEW COMMANDob2install
NEW COMMANDomniamo
NEW COMMANDomnicjutil
NEW COMMANDomnicreatedl
NEW COMMANDomnidbrestore
NEW COMMANDomnidbupgrade
NEW COMMANDomnidbva
NEW COMMANDomnidbxp
NEW COMMANDomnidownload
NEW COMMANDomnidr
Appendix B482

StatusSubcommand/OptionCommand
NEW COMMANDomniinetpasswd
NEW COMMANDomniiso
NEW COMMANDomnimcopy
NEW COMMANDomnimigrate.pl
NEW COMMANDomniminit
NEW COMMANDomnimlist
NEW COMMANDomnimm
NEW COMMANDomnimnt
NEW COMMANDomnimver
NEW COMMANDomniobjcopy
NEW COMMANDomniobjconsolidate
NEW COMMANDomniofflr
NEW COMMANDomniresolve
NEW COMMANDomnirpt
NEW COMMANDomnisetup.sh
NEW COMMANDomnisrdupdate
NEW COMMANDomnistat
NEW COMMANDomnistoreapputil
NEW COMMANDomniupload
NEW COMMANDsanconf
Installation and licensing guide 483

StatusSubcommand/OptionCommand
NEW COMMANDsyb_tool
NEW COMMANDuma
NEW COMMANDupgrade_cm_from_evaa
NEW COMMANDutil_cmd
NEW COMMANDutil_oracle8.pl
Appendix B484

Index
SymbolsCell Managertroubleshooting, 55
AA.05.10, A.05.50, or A.06.00migrating licenses, 372
A.05.10, A.05.50, or A.06.00licenses, 372access rightsadding to root account, on Linux, 109
ACS Client, 122addingaccess rights, on Linux, 109SCSI robotics driver to kernel, onHP-UX, 422
adding software componentsoverview, 251to HP-UX systems, 251
Adding clients to the cellData Protector Java GUI, 82
Adding clients to the cellData Protector GUI, 82
adding software componentsto Solaris systems, 253to Windows systems, 251
ADIC librarySee ADIC/GRAU library
ADIC/GRAU libraryconnecting drives, 123installing Media Agent to clients, 125Media Agent installation, 122preparing clients, 123
AIX clientconnecting backup devices, 115installing, 114
allow_hosts file, 228, 230Application Recovery Managerupgrading, 296
audience, 21authorized systems list, security, 225AutoPass utilityinstalling, on UNIX, 50installing, on Windows, 61licensing, 331uninstalling, on HP-UX, 242
AutoPass utilityuninstalling, on Solaris, 246uninstalling, on Windows, 241
Bbackup devicessetting SCSI IDs, for HPStorageWorks 330fx Library, 434
Installation and licensing guide 485

backup devices, connectingADIC/GRAU library drives, 123AIX clients, 115HP StorageWorks DAT 24 TapeDrive, 439HP StorageWorks DLT Library24/48-Slot, 442HP Surestore 12000e Autoloader,440HP-UX clients, 100Linux clients, 112overview, 435SCO clients, 121Seagate Viper 200 LTO Tape Drive,447Siemens Sinix clients, 117Solaris clients, 106Tru64 clients, 119Windows clients, 95
backup environment concepts, 33
Ccellconcepts, 33enabling security, 229exporting clients, 219exporting Microsoft Cluster Serverclient, 221importing clients, 213importing Installation Server, 216importing clusters, 216licenses, 317securing clients, 226upgrading, overview, 256verifying DNS connections, 342
Cell ManagerCell Request Server (CRS) service, 53functions, 40installing, on Microsoft ClusterServer, 196installing, on Solaris, 49Key Management Server (KMS), 54Media Management Daemon (MMD)service, 54Raima Database Server (RDS)service, 54security concepts, 222troubleshooting, 345, 347uninstalling, from Linux, 248upgrading manually, on UNIX, 353
celllicenses, 318
486
Cell Manager, 54automatically configured files, onUNIX, 52Cell Request Server (CRS) service, 62changing the name, 408changing software components, 251checking configuration changes, 270choosing the system, 40choosing the system, 41concepts, 33configuring for Veritas VolumeManager, on Microsoft ClusterServer, 454directory structure, on UNIX, 51installation prerequisites, on UNIX,47installation prerequisites, onWindows, 55installation sequence, 46installing, on HP-UX, 49installing, on HP-UX, using nativetools, 381installing, on Linux, using nativetools, 385installing, on Solaris, using nativetools, 383installing, on Windows, 55installing, on MC/ServiceGuard, 195Key Management Server (KMS)service, 62Media Management Daemon (MMD)service, 62preparing NIS server, 412Raima Database Server (RDS)service, 62setting environment variables, onUNIX, 54troubleshooting, 351, 353, 356troubleshooting installation, on UNIX,55UIProxy service, 63uninstalling, from Solaris, 245uninstalling, from HP-UX, 242
uninstalling, from MC/ServiceGuard,242uninstalling, from Windows, 240upgrading SSE, 295upgrading from Data ProtectorA.05.10 and A.05.50, on HP-UX,263upgrading from Data ProtectorA.05.10, A.05.50 and A.06.00, onHP-UX, 259upgrading from Windows NT to anewer Windows version, 297upgrading, on MC/ServiceGuard,308upgrading, on Microsoft ClusterServer, 312
Cell Request Server (CRS) service, 53Cell Request Server (CRS) service, 62cell_info file, 254changingCell Manager name, 408default port, 409software components, 251
checkingGeneral Media Agent installation,on Novell NetWare, 449installation on clients, 350licenses, 317log files, installation, 353patches, 235TCP/IP setup, on Windows, 406
CLISee command-line interface
Installation and licensing guide 487

clientadding root access rights, on Linux,109changing software components, 251checking TCP/IP setup, onWindows,406cluster-aware integration installation,overview, 157cluster-aware, importing to a cell, 216concepts, 33configuring after installation, onSolaris, 102configuring kernel, on Linux, 111configuring for backup devicesusage, on Solaris, 429configuring for Veritas VolumeManager, on Microsoft ClusterServer, 454configuring TCP/IP, on Windows,402creating device files, on Solaris, 432creating device files, on HP-UX, 423denying access from hosts, 230enabling access verification, 226exporting from a cell, 219importing to a cell, 213installation, overview, 73integration installation, overview, 154local installation, on HP OpenVMS,138local installation, on NovellNetWare, 131Microsoft Cluster Server, exportingfrom a cell, 221preparing for ADIC/GRAU library,123preparing for StorageTek ACSlibrary, 128remote installation, overview, 81removing access verification, 230securing, 226security concepts, 222troubleshooting,345,347,349,353,356
uninstalling remotely, 239upgrading from Data ProtectorA.05.10, A.05.50 and A.06.00, 272upgrading from Data ProtectorA.05.10, A.05.50 and A.06.00, onMC/ServiceGuard, 273upgrading, on Microsoft ClusterServer, 315verifying installation, 350
client, connecting backup devicesADIC/GRAU library drives, 123
client, installingon AIX systems, 114on HP-UX systems, 97on Linux systems, 107on MPE/iX systems, 146on Novell NetWare Cluster Servicessystems, 210on SCO systems, 120on Solaris systems, 100on Tru64 systems, 118on UNIX systems, 149on Windows systems, 90
client, connecting backup devicesAIX clients, 115HP-UX clients, 100Linux clients, 112SCO clients, 121Siemens Sinix clients, 117Solaris clients, 106Tru64 clients, 119Windows clients, 95
488

client, installingDB2 integration, 161HP StorageWorks Disk Array XPintegration, 168HP StorageWorks EVA integration,181HP StorageWorks VA integration, 175IAP, 187Informix integration, 159Lotus integration, 162Media Agent for ADIC/GRAUlibrary, 125Media Agent for StorageTek ACSlibrary, 129Microsoft Exchange integration, 157Microsoft SharePoint Portal Serverintegration, 158Microsoft Volume Shadow Copyintegration, 162Microsoft SQL integration, 158NDMP integration, 162NNM integration, 162on ESX Server systems, 113on HP OpenVMS systems, 138on IBM HACMP cluster systems, 212on MC/ServiceGuard systems, 196on Microsoft Cluster Server systems,206on Novell NetWare systems, 131on Siemens Sinix systems, 116on Veritas Cluster systems, 209Oracle integration, 160SAP DB integration, 160SAP R/3 integration, 159Single Server Edition, 192Sybase integration, 158VLS automigration, 189Vmware integration, 161
clusterchanging software components, 251changing software components, 251importing to a cell, 216installing Cell Manager, 196installing clients, 209, 210installing clients, 206installing integrations, 157Microsoft Cluster Server, exportingfrom a cell, 221uninstalling, 239
command, 259, 327, 409command-line interface (CLI), 34command-line interface (CLI), 41commandsCLI changes, after upgrade, 458infs, 424ioscan, 421, 423, 426netstat, 409omnicc, 327omnicheck, 237, 342omnikeymigrate, 258omnisetup.sh, 150, 191, 259omnisetup.sh , 263omnisv, 259
conceptsbackup environment, 33cell, 33Cell Manager, 33client, 33Disk Agent, 34exporting, 219graphical user interface (GUI), 41graphical user interface (GUI), 42IDB filename conversion, 287importing, 214Installation Server, 33Media Agent, 34NDMP Media Agent, 34remote installation, 36User Interface, 34
Installation and licensing guide 489

configuration fileschanges, after upgrade, 455inet.conf, 413
configuration filesautomatically configured files, onUNIX Cell Manager, 52cell_info, 254checking changes after upgrade fromData Protector A.05.10, A.05.50and A.06.00, 270global, 270installation_servers, 68modifying, Solaris client installation,102nsswitch.conf, 413omni_info, 254omnirc, 271sst.conf, 432st.conf, 429st.conf file, 102upgrade problems, 351
configuringCell Manager with Veritas VolumeManager, on MSCS, 454clients with Veritas Volume Manager,on Microsoft Cluster Server, 454Disk Agent, on HP OpenVMS, 143kernel, on Linux clients, 111Media Agent, on HP OpenVMS, 144Media Agent, on Novell NetWare,136SCSI robotics, on HP-UX, 419Solaris clients, before using backupdevices, 429Solaris clients, after installation, 102sst.conffile, 432st.conf file, 102st.conffile, 429TCP/IP, on Windows, 402
connecting backup devicesADIC/GRAU library drives, 123AIX clients, 115HP StorageWorks DAT 24 TapeDrive, 439HP StorageWorks DLT Library24/48-Slot, 442HP Surestore 12000e Autoloader,440HP-UX clients, 100Linux clients, 112overview, 435SCO clients, 121Seagate Viper 200 LTO Tape Drive,447Siemens Sinix clients, 117Solaris clients, 106Tru64 clients, 119Windows clients, 95
conventionsdocument, 29
conversion of filenamesSee IDB filename conversion
creatingdevice files, on HP-UX, 423device files, on Solaris, 432device files, on Windows, 418execution trace files, installation, 356
CRSSee Cell Request Server (CRS) service
DDAS Client, 122Data Protector Java GUIadding clients to the cell, 82changing the default port number,411
Data Protector Java GUI , 108database growth
See IDBDB2 integration, installing, 161
490

DCBFSee Detail Catalog Binary Files
debug optionoverview, 356
debugging installation, 356default port, changing, 409default gateway, TCP/IP, 402deny_hosts file, 230denying access from hosts, 230Detail Catalog Binary Filesmanual change of the defaultmaximum size, 271
determininginstalled licenses, 337required licensing passwords, 329unused SCSI addresses, on HP-UX,426unused SCSI addresses, on Solaris,428unused SCSI addresses, onWindows, 433
device filecreating, on HP-UX, 423
device filecreating, on Solaris, 432creating, on Windows, 418
disabling SCSI robotics drivers, onWindows, 415Disk Agentconcepts, 34configuring, on HP OpenVMS, 143
DNSomnicheck command, 342verifying connections in a cell, 342
DNS check tool, 408documentconventions, 29related documentation, 21
documentationHP website, 21providing feedback, 32
domain name systemSee DNS
drive licenses, 317DVD-ROMlist of installation DVD-ROMs, 38
Eenabling access verificationon a client, 226on a cell, 229
encryptionautomigration of encryption keys, 258
environment variables, setting on UNIXCell Manager, 54ESX Server clientinstalling, 113
EVA integrationupgrading from Data ProtectorA.05.10 and A.05.50, 282
excessive logging, 231execution trace filescreating, 356debug option, 356
exportingclients, 220Microsoft Cluster Server client, 221
Ffilenamesconversion
See IDB filename conversionencoding
See IDB filename conversionfilesallow_hosts, 228HPDEVBRA.NLM, 453allow_hosts, 229, 230deny_hosts, 230HPUMA.NLM, 453services, 409
Functional Extensions, licensing, 317
Installation and licensing guide 491

GGeneral Media Agentchecking installation, on NovellNetWare, 449
global file, 270graphical user interface (GUI)concepts, 41starting, UNIX , 41
graphical user interface (GUI)concepts, 42Data Protector Java GUI, 41Data Protector Java GUI , 77views, 42
GRAU librarySee ADIC/GRAU library
GUISee graphical user interface
Hhelpobtaining, 31
HPtechnical support, 31
HP StorageWorks 330fx Library, settingSCSI IDs, 434HP OpenVMS clientconfiguring Disk Agent, 143configuring Media Agent, 144importing, 215uninstalling, 240
HP StorageWorks DAT 24 Tape Drive,connecting, 439HP StorageWorks Disk Array XPintegrationinstalling, 168
HP StorageWorks DLT Library24/48-Slot, connecting, 442HP StorageWorks EVA integrationinstalling, 181
HP StorageWorks VA integrationinstalling, 175
HP Surestore 12000e Autoloader,connecting, 440HP-UX Cell Managerinstalling, using native tools, 381troubleshooting, 55
HP-UX Cell Managerautomatically configured files, 52directory structure, 51installation prerequisites, 47installing, 49migrating from PA-RISC to IA-64, 298setting environment variables, 54troubleshooting, 351, 353troubleshooting installation, 55uninstalling, 242upgrading from Data ProtectorA.05.10 and A.05.50, 263upgrading from Data ProtectorA.05.10, A.05.50 and A.06.00, 259
HP-UX clientconnecting backup devices, 100installing, 97troubleshooting, 347
HP-UX Installation Serverinstalling, using native tools, 388
HPDEVBRA.NLM file, 453HPUMA.NLMfile, 453
IIAPprerequisites, 188
IAP Server, importing, 215IBM HACMP clusterinstalling clients, 212
IDBgrowth, 40troubleshooting upgrade, 351
IDB filename conversionconcepts, 287
492

importingclients, 213clusters, 216HP OpenVMS clients, 215IAP Server, 215Installation Server, 216multiple LAN card clients, 215NDMP clients, 215VLS device, 215
Inet service, 62Inet service, 54inet.conffile, 413
inet.log file, 228, 231inet.logfile, 312Informix integrationupgrading from Data ProtectorA.05.10 and A.05.50, on UNIX, 278upgrading from Data ProtectorA.05.10 and A.05.50, onWindows, 279
Informix integration, installing, 159infscommand, 424
installationclient installation, overview, 73cluster-aware integrations, 157components
See installation componentscreating execution trace files, 356debugging, 356general steps, 35integrations, overview, 154log files, 353omnisetup.sh, 247overview, 33pkgadd utility, 246remote installation, overview, 81remote, concepts, 36software component codes, 151software components, 77troubleshooting clients, on UNIX, 347troubleshooting clients, on Windows,349troubleshooting Cell Manager, onSolaris, 347troubleshooting, on Windows, 345verifying clients, 350
installation componentsDisk Agent, 34Installation Server, 33
Installation Serverinstallation sequence, 46
installation componentsGeneral Media Agent, 34Media Agent, 34NDMP Media Agent, 34User Interface, 34
Installation and licensing guide 493

Installation Serverconcepts, 33directory structure, on UNIX, 51importing to a cell, 216installation prerequisites, on UNIX,64installation prerequisites, onWindows, 69installation overview, 64installing, on HP-UX, using nativetools, 388installing, on Linux, using nativetools, 393installing, on Solaris, using nativetools, 389installing, on UNIX, 64installing, on Windows, 69uninstalling, from MC/ServiceGuard,242uninstalling, from UNIX, 246uninstalling, from HP-UX, 242uninstalling, from Linux, 249uninstalling, from Windows, 240upgrading manually, on UNIX, 353upgrading from Data ProtectorA.05.10, A.05.50 and A.06.00, onHP-UX, 259
Installation Server A.05.10, A.05.50and A.06.00, on Windowsupgrading from Data Protector, 265
installation_servers file, 68
494
installingAutoPass utility, on UNIX, 50AutoPass utility, on Windows, 61clients locally, 146, 149clients locally, 90, 138cluster-aware Cell Manager, 195cluster-aware clients, 212cluster-aware Cell Manager, 196cluster-awareclients,196,206,209,210DB2 integration, 161HP StorageWorks Disk Array XPintegration, 168HP StorageWorks EVA integration,181HP StorageWorks VA integration, 175IAP clients, 187Informix integration, 159integrations, 154localized user interface, 190Lotus integration, 162Media Agent for ADIC/GRAUlibrary, 122Media Agent for ADIC/GRAUlibrary, 125Media Agent for StorageTek ACSlibrary, 122, 129Microsoft Exchange integration, 157Microsoft SharePoint Portal Serverintegration, 158Microsoft SQL integration, 158Microsoft Volume Shadow Copyintegration, 162NDMP integration, 162NNM integration, 162Oracle integration, 160permanent licensing passwords, 331,336SAP DB integration, 160SAP R/3 integration, 159Single Server Edition, 192Sybase integration, 158VLS automigration clients, 189VMware integration, 161
Web Reporting, 194installing Cell Manageron HP-UX systems, 49on Linux systems, 49
installing Installation Serveron UNIX systems, 64on Windows systems, 69prerequisites, on UNIX, 64prerequisites, on Windows, 69
installing Cell Manageron Windows systems, 55on HP-UX systemsusing native tools,381on Linux systemsusing native tools,385on MC/ServiceGuard systems, 195on Microsoft Cluster Server systems,196on Solaris systems, 49on Solaris systemsusing native tools,383prerequisites, on UNIX, 47prerequisites, on Windows, 55
Installation and licensing guide 495

installing clientson AIX systems, 114on ESX Server systems, 113on HP OpenVMS system, 138on HP-UX systems, 97on IBM HACMP cluster systems, 212on Linux systems, 107on MC/ServiceGuard systems, 196on Microsoft Cluster Server systems,206on MPE/iX systems, 146on Novell NetWare Cluster Servicessystems, 210on Novell NetWare systems, 131on SCO systems, 120on Siemens Sinix systems, 116on Solaris systems, 100on Tru64 systems, 118on UNIX systems, 149on Veritas Cluster systems, 209on Windows systems, 90
installing Installation Serveroverview, 64
installing Installation Serveron HP-UX systems, using native tools,388on Linux systems, using native tools,393on Solaris systems, using native tools,389
Integrated Archive Platform (IAP)installing, 187
integration client, 154See also integrations
integrationscluster-aware installation, 157EVA, 282local installation, 156Oracle, on UNIX, 274overview, 154remote installation, 156SAP R/3, on UNIX, 276upgrading EVA, 282upgrading Informix, on UNIX, 278upgrading Oracle, onWindows, 274upgrading SAP R/3, on Windows,276upgrading Informix, on Windows,279upgrading Sybase, on UNIX, 280upgrading Sybase, onWindows, 281
integrations, installingDB2 integration, 161HP StorageWorks Disk Array XPintegration, 168HP StorageWorks EVA integration,181HP StorageWorks VA integration, 175Informix integration, 159Lotus integration, 162Microsoft Exchange integration, 157Microsoft SharePoint Portal Serverintegration, 158Microsoft SQL integration, 158Microsoft Volume Shadow Copyintegration, 162NDMP integration, 162NNM integration, 162Oracle integration, 160SAP DB integration, 160SAP R/3 integration, 159Sybase integration, 158VMware integration, 161
internationalization, IDB, 287ioscan command, 426ioscancommand, 421, 423IP address, TCP/IP, 402
496

JJava GUI Server, 47, 56Java GUI Client, 236, 239Java GUI Server, 63changing the port number, 411
Kkerneladding SCSI robotics driver, onHP-UX, 422configuring on Linux clients, 111rebuilding, on HP-UX, 422
Key Management Server (KMS), 54, 62KMS
See Key Management Server (KMS)service
Llicense-to-use., 328licenses, 328
Installation and licensing guide 497

licensingAutoPass utility, 331capacity based licenses, 319capacity based licensing, examples,324capacity based licensing, examples,327Cell Manager, 318centralized licensing, configuring,338checking and reporting licenses, 317determining installed licenses, 337determining required passwords, 329Drive Extensions, 360drive licenses, 317emergency passwords, 331entity based licenses, 318Functional Extensions, 362Functional Extensions, 317Instant-On passwords, 330license migration, 372licensing forms, 377migrating Data Protector, 372moving licenses, 337obtaining and installing permanentpasswords, 331, 336overview, 328password types, 330permanent passwords, 331permanent passwords, obtaining andinstalling, 331, 336producing license reports, 327product structure, 317, 357product licensing overview, 329product overview, 358product structure, 317Single Server Edition, 370Starter Packs, 317upgrade from Data ProtectorA.05.10, A.05.50, and A.06.00,259upgrade from SSE, 294using licenses, after upgrade, 294
using licenses, after upgrade, 259verifying passwords, 336
licensing forms, 377limitationson Windows systems, 69, 91Single Server Edition, 193upgrade, 256upgrade of Manager-of-Managers,257
Linux Cell Managerinstalling, using native tools, 385troubleshooting, 55troubleshooting installation, 55
Linux Cell Managerautomatically configured files, 53directory structure, 51installation prerequisites, 47installing, 49setting environment variables, 54uninstalling, 248
Linux clientconfiguring kernel, 111connecting backup devices, 112installing, 107troubleshooting remote installation,109
Linux Installation Serverinstalling, using native tools, 393
local installation, clients, 90local installation, clients, 138, 146, 149localized user interface, 189
See also User Interfacelog fileschecking, installation, 353
log filesdescription, 355inet.log, 228, 231, 312location, 355
Lotus integration, installing, 162LTU, 328
498

MManager-of-Managersupgrade overview, 257upgrading from Data ProtectorA.05.10 and A.05.50, 286
MC/ServiceGuardexcessive logging to inet.log file, 231importing, 218installing Cell Manager, 195installing clients, 196uninstalling Cell Manager, 242uninstalling Installation Server, 242upgrading Cell Manager, 308upgrading clients from Data ProtectorA.05.10, A.05.50 and A.06.00, 273
Media Agentconcepts, 34configuring, on HP OpenVMS, 144configuring, on Novell NetWare, 136installing for ADIC/GRAU library,125installing for StorageTek ACS library,129types, 34
Media Management Daemon (MMD)service, 54Media Management Daemon (MMD),62Microsoft Cluster Serverupgrading Cell Manager, 312
Microsoft SharePoint Portal Serverintegrationinstalling, 158
Microsoft Cluster Serverconfiguring Cell Manager withVeritas Volume Manager, 454configuring clients with VeritasVolume Manager, 454exporting, 221importing, 217installing Cell Manager, 196installing clients, 206upgrading clients, 315
Microsoft Exchange integrationinstalling on systems with HPStorageWorks EVA, 186
Microsoft Exchange integrationinstalling, 157installing on systems with HPStorageWorks Disk Array XP, 174installing on systems with HPStorageWorks VA, 180
Microsoft Installer, 57, 256, 312, 345Microsoft SQL integrationinstalling, 158installing on systems with EMCSymmetrix disk array, 168installing on systems with HPStorageWorks Disk Array XP, 174installing on systems with HPStorageWorks EVA, 187installing on systems with HPStorageWorks VA, 181
Microsoft Terminal Services Client, 56Microsoft Volume Shadow Copyintegration, installing, 162MigratingCell Manager on HP-UX, PA-RISC toIA-64, 298Cell Manager on Windows, 32-bitto 64-bit, 303
migratinglicenses, 372
minimizing network traffic, on NovellNetWare clients, 136
Installation and licensing guide 499

MMDSee Media Management Daemon(MMD) service
moving licenses, 337MPE/iX client, installing, 146MSI.
See Microsoft Installermultibyte characters, 287multiple LAN card client, importing, 215
NNDMP client, importing, 215NDMP integration, installing, 162NDMP Media Agent, concepts, 34netstat, 409NIS server, preparing, 412NNM integration, installing, 162Novell NetWare clientchecking General Media Agentinstallation, 449configuring Media Agent, 136HPDEVBRA.NLM file, 453HPUMA.NLM file, 453installing, 131minimizing network traffic, 136
Novell NetWare Cluster Servicesimporting, 218installing clients, 210limitations, failover, 210
nsswitch.conffile, 413
nsswitch.conf file, 413
Oobtaining permanent licensingpasswords, 331, 336omni_info file, 254omnicc, 327omnicheck command, 237, 342omniinet process
See Inet service
omnirc file, 271omnisetup.sh, 247omnisetup.sh commandinstallation, 150, 191upgrade, 259, 263
omnisv command, 259operating systemupgrading Windows NT to a newerWindows version, 297
Oracle integrationinstalling, 160installing on systems with EMCSymmetrix disk array, 164installing on systems with HPStorageWorks Disk Array XP, 169installing on systems with HPStorageWorks EVA, 182installing on systems with HPStorageWorks VA, 175uninstallation specifics, 253upgrading from Data ProtectorA.05.10 and A.05.50, 274
500

overviewchanging software components, 251connecting backup devices, 435debug option, 356execution trace files, 356importing cluster-aware client, 216importing application clusterpackages, 216installing Installation Server, 64installing clients, 73installing cluster-aware integrations,157installing integrations, 154integrations, 154licensing, 328product structure, 317remotely installing clients, 81software components, 77uninstallation, 238upgrade, 255upgrading from Data ProtectorA.05.10, A.05.50, and A.06.00,259
Ppatchesomnicheck command, 237verifying, 235
pkgadd utility, 246pkgrm utility, 245preparing NIS server, 412
prerequisitesCell Manager installation, on UNIX,47Cell Manager installation, onWindows, 55IAP, 188Installation Server installation, onUNIX, 64Installation Server installation, onWindows, 69upgrade from Data ProtectorA.05.10, A.05.50 and A.06.00, 259VLS automigration, 189
processesCell Request Server (CRS) service, 62Cell Request Server (CRS) service, 53Inet service, 54, 62Key Management Server (KMS), 54Key Management Server (KMS), 62Media Management Daemon(MMD), 62Media Management Daemon (MMD)service, 54Raima Database Server (RDS)service, 62Raima Database Server (RDS)service, 54UIProxy service, 63
RRaima Database Server (RDS) service,54Raima Database Server (RDS) service,62RDS
See Raima Database Server (RDS)service
rebuilding kernel, on HP-UX, 422related licenses, 318related documentation, 21
Installation and licensing guide 501

remote installationintegrations, 156troubleshooting, on Linux, 109
remote installationclients, 81
removingaccess verification on a client, 230Data Protector software manually,from UNIX, 250software components, from UNIX, 252software components, fromWindows, 251software components, overview, 251software components, from UNIX, 254
reporting licenses, 317robotics.
See SCSI interfacerobotics.
See SCSI interfacerpm utility, 247
SSAP DB integration, installing, 160SAP R/3 integrationinstalling, 159installing on systems with EMCSymmetrix disk array, 165installing on systems with HPStorageWorks Disk Array XP, 170installing on systems with HPStorageWorks EVA, 183installing on systems with HPStorageWorks VA, 177upgrading from Data ProtectorA.05.10 and A.05.50, 276
SCO clientconnecting backup devices, 121installing, 120
SCSI robotics.See SCSI interface
SCSI addresses.See SCSI interface
SCSI controller.See SCSI interface
SCSI interfaceadding robotics driver to kernel, onHP-UX, 422configuring robotics, on HP-UX, 419determining unused addresses, onHP-UX, 426determining unused addresses, onSolaris, 428determining unused addresses, onWindows, 433disabling robotics drivers, onWindows, 415setting controller parameters, onWindows, 426setting IDs, for HP StorageWorks330fx Library, 434using tape drivers, onWindows, 413
SCSI tape drivers.See SCSI interface
Seagate Viper 200 LTO Tape Drive,connecting, 447securingcell, 229client, 226
securityallow_hosts file, 228, 230deny_hosts file, 230denying access from hosts, 230enabling security for a cell, 229enabling security for a client, 226excessive logging to inet.log file, 231list of authorized systems, 225potential problems, 225removing access verification on aclient, 230
servicesfile, 409
502

settingenvironment variables, on UNIX CellManager, 54SCSI IDs, for HP StorageWorks330fx Library, 434SCSI controller parameters, onWindows, 426
Siemens Sinix clientconnecting backup devices, 117installing, 116
Single Server Editioninstalling, 192upgrading to Data ProtectorA.06.10, 294
Single Server Editionlicense types, 370limitations, 193product overview, licenses, 358upgrading from multiple installations,295upgrading to Data ProtectorA.06.10, 294
software componentsdependencies, on HP-UX, 252removing, from Windows, 251
software componentsadding, to HP-UX, 251adding, to Windows, 251adding, to Solaris, 253changing, on cluster clients, 251changing, overview, 251component codes, 151dependencies, on Solaris, 253overview, 77removing, from UNIX, 254removing, from UNIX, 252
Solaris Cell Managerinstallation prerequisites, 47installing, using native tools, 383troubleshooting, 351
Solaris clienttroubleshooting, 347
Solaris Cell Managerautomatically configured files, 53directory structure, 51installing, 49setting environment variables, 54troubleshooting, 347, 353troubleshooting installation, 55uninstalling, 245
Solaris clientconfiguring, after installation, 102connecting backup devices, 106installing, 100
Solaris Installation Serverinstalling, using native tools, 389
SSE, 294SSE.
See Single Server Editionsst.conffile, 432st.conf file, 102st.conffile, 429Starter Packs, licensing, 317startingGUI, UNIX, 41
STK ACSSee StorageTek ACS library
StorageTek ACS libraryconnecting drives, 123
StorageTek ACS libraryinstalling Media Agent to clients, 129Media Agent installation, 122preparing clients, 128
StorageTek librarySee StorageTek ACS library
subnet mask, TCP/IP, 402Subscriber's Choice, HP, 32swagent daemon, 348Sybase integrationupgrading from Data ProtectorA.05.10 and A.05.50, on UNIX, 280upgrading from Data ProtectorA.05.10 and A.05.50, onWindows, 281
Sybase integration, installing, 158
Installation and licensing guide 503

Ttape drivers.
See SCSI interfaceTCP/IPchecking setup, on Windows, 406configuring, on Windows, 402default gateway, 402IP address, 402subnet mask, 402
technical supportHP, 31
technical supportservice locator website, 32
Terminal Services Client, 56trace files.
See execution trace filestroubleshooting installationexecution trace files, 356
troubleshooting upgradeconfiguration files not available, 351IDB not available, 351
troubleshooting installationCell Manager, on Solaris, 347Cell Manager, on UNIX, 55Cell Manager, on Windows, 63clients, on HP-UX, 348Data Protector software, onWindows, 345debug option, 356debugging, 356localized user interface, 192log files, 353Microsoft Installer problems, 345omnicheck command, 342remote installation, on Linux, 109remote installation, on UNIX, 347remote installation, onWindows, 349swagent daemon, 348
troubleshooting localized user interface,192
troubleshooting upgradeData Protector software, onWindows, 345Data Protector patches, 351Microsoft Installer problems, 345
Tru64 clientconnecting backup devices, 119installing, 118
UUIProxy service, 63uninstallationOracle integration specifics, 253overview, 238pkgrm utility, 245prerequisites, 238rpm utility, 247
uninstallingAutoPass utility, on HP-UX, 242AutoPass utility, on Solaris, 246AutoPass utility, on Windows, 241Cell Manager, from HP-UX, 242Cell Manager, from Windows, 240Cell Manager, from Linux, 248Cell Manager, fromMC/ServiceGuard, 242Cell Manager, from Solaris, 245clients, from HP OpenVMS, 240clients, remotely, 239cluster clients, 239Installation Server, from Linux, 249Installation Server, fromMC/ServiceGuard, 242Installation Server, from HP-UX, 242Installation Server, from UNIX, 246Installation Server, from Windows,240
unused SCSI addresses.See SCSI interface
504

upgradebefore upgrading, 255CLI changes, 458configuration files changes, 455global file , 270limitations, 256omnirc file, 271omnisetup.sh, 259omnisetup.sh command, 263omnisv command, 259overview, 255sequence, 256troubleshooting IDB, 351troubleshooting, on UNIX, 351troubleshooting, on Windows, 345troubleshooting, on Windows, 351
upgradingApplication Primary Manager, 296manually, on UNIX, 353SSE to Data Protector A.06.10, 294,294Windows NT to a newer Windowsversion, 297
upgrading from Data ProtectorA.05.10, A.05.50 and A.06.00Installation Server onWindows, 265
upgrading from Data ProtectorA.05.10, A.05.50 and A.06.00clients, 272clients, on MC/ServiceGuard, 273
upgrading from Data Protector, 372upgrading from Data Protector A.05.10and A.05.50Manager-of-Managers, 286
upgrading from Data ProtectorA.05.10, A.05.50, and A.06.00clients, on Microsoft Cluster Server,315
upgrading from Data Protector A.05.10and A.05.50Informix integration, on Windows,279Sybase integration, onWindows, 281
upgrading from Data Protector A.05.10and A.05.50Cell Manager, on HP-UX, 263EVA integration, 282Informix integration, on UNIX, 278Oracle integration, 274SAP R/3 integration, 276Sybase integration, on UNIX, 280
upgrading from Data ProtectorA.05.10, A.05.50 and A.06.00omnisv command, 259
upgrading from Data ProtectorA.05.10, A.05.50 and A.06.00Cell Manager, on HP-UX, 259checking configuration changes, 270Installation Server, on HP-UX, 259
upgrading from Data ProtectorA.05.10, A.05.50 and A.06.00prerequisites, 259
upgrading from Data ProtectorA.05.10, A.05.50, and A.06.00Cell Manager , on Microsoft ClusterServer, 312Cell Manager, onMC/ServiceGuard, 308overview, 259
Upgrading to HP-UX 11.23, 298User Interfaceinstalling localized user interface, 190
User Interfacechoosing the system, 41concepts, 34troubleshooting localized userinterface installation, 192
user interfaceSee command-line interface (CLI),graphical user interface (GUI)
usinglicenses, 255, 259log files, 353SCSI tape drivers, on Windows, 413
Installation and licensing guide 505

Vverifyingclient installation, 350DNS connections in a cell, 342licensing passwords, 336patches, 235
Veritas Clusterimporting, 218installing clients, 209limitations, failover, 209
Veritas Volume Managerconfiguring Cell Manager, onMicrosoft Cluster Server, 454configuring clients, on MicrosoftCluster Server, 454
views, graphical user interface, 42virtual server, importing to a cell, 216VLS automigrationprerequisites, 189
VLS Automigrationinstalling, 189
VLS device, importing, 215VMware integrationinstalling, 161
WWeb Reporting, installing, 194websitesHP Subscriber's Choice for Business,32HP , 32product manuals, 21
Windows Cell Managerinstalling, 55
Windows Cell Managerinstallation prerequisites, 55migrating from 32-bit to 64-bit, 303troubleshooting, 345, 351troubleshooting installation, 63uninstalling, 240
Windows clientconnecting backup devices, 95installing, 90troubleshooting, 345, 349, 353uninstalling, 239
Windows NT, upgrading to a newerWindows version, 297
ZZDB integration client, 154
See also integrations
506