User Manual - Bell MTS
212
S G H - I 3 3 7 M 4 G L T E S M A R T P H O N E User Manual Please read this manual before operating your phone, and keep it for future reference.
-
Upload
khangminh22 -
Category
Documents
-
view
0 -
download
0
Transcript of User Manual - Bell MTS

O N E
g yource.
S G H - I 3 3 7 M
4 G L T E S M A R T P H
User ManualPlease read this manual before operatin
phone, and keep it for future referen

rty of Samsung or its respective suppliers software relating there to (the “Phone System”), tional treaty provisions. Intellectual Property secrets, copyrights, software, computer fringe or otherwise violate the rights secured by
to) modify, prepare derivative works of, reverse the software. No title to or ownership in the perty shall remain with SAMSUNG and its
GNU General Public License (GPL), GNU pen source licenses. To obtain the source code
Intellectual PropertyAll Intellectual Property, as defined below, owned by or which is otherwise the properelating to the SAMSUNG Phone, including but not limited to, accessories, parts, or is proprietary to Samsung and protected under federal laws, state laws, and internaincludes, but is not limited to, inventions (patentable or unpatentable), patents, tradeprograms, and related documentation and other works of authorship. You may not inthe Intellectual Property. Moreover, you agree that you will not (and will not attempt engineer, decompile, disassemble, or otherwise attempt to create source code fromIntellectual Property is transferred to you. All applicable rights of the Intellectual Prosuppliers.
Open Source SoftwareSome software components of this product incorporate source code covered under Lesser General Public License (LGPL), OpenSSL License, BSD License and other ocovered under the open source licenses, please visit:http://opensource.samsung.com.

RRANTY PAGE ENCLOSED WITH THE KES NO EXPRESS OR IMPLIED CLUDING BUT NOT LIMITED TO THE PURPOSE OR USE; THE DESIGN, DUCT; THE WORKMANSHIP OF THE THE PRODUCT WITH THE ING THERETO. NOTHING CONTAINED IN OR IMPLIED WARRANTY OF ANY KIND ALL NOT BE LIABLE FOR ANY DAMAGES R ARISING FROM THE BREACH OF THE
L DAMAGES, OR LOSS OF ANTICIPATED
CAUSED BY YOUR EDITING OF WARE.
AND APPLICATIONS TO WORK
as been tested against Samsung's own MDM and VPN. The testing includes field the solutions in conjunction with the Samsung solutions work with the device as described by ng with local network connection and menu
Disclaimer of Warranties; Exclusion of LiabilityEXCEPT AS SET FORTH IN THE EXPRESS WARRANTY CONTAINED ON THE WAPRODUCT, THE PURCHASER TAKES THE PRODUCT “AS IS”, AND SAMSUNG MAWARRANTY OF ANY KIND WHATSOEVER WITH RESPECT TO THE PRODUCT, INMERCHANTABILITY OF THE PRODUCT OR ITS FITNESS FOR ANY PARTICULARCONDITION OR QUALITY OF THE PRODUCT; THE PERFORMANCE OF THE PROPRODUCT OR THE COMPONENTS CONTAINED THEREIN; OR COMPLIANCE OFREQUIREMENTS OF ANY LAW, RULE, SPECIFICATION OR CONTRACT PERTAINTHE INSTRUCTION MANUAL SHALL BE CONSTRUED TO CREATE AN EXPRESSWHATSOEVER WITH RESPECT TO THE PRODUCT. IN ADDITION, SAMSUNG SHOF ANY KIND RESULTING FROM THE PURCHASE OR USE OF THE PRODUCT OEXPRESS WARRANTY, INCLUDING INCIDENTAL, SPECIAL OR CONSEQUENTIAPROFITS OR BENEFITS.SAMSUNG IS NOT LIABLE FOR PERFORMANCE ISSUES OR INCOMPATIBILITIESREGISTRY SETTINGS, OR YOUR MODIFICATION OF OPERATING SYSTEM SOFTUSING CUSTOM OPERATING SYSTEM SOFTWARE MAY CAUSE YOUR DEVICE IMPROPERLY. SAFE™: “SAFE™” (Samsung for Enterprise) is a mark for a Samsung device which hinternal criteria for interoperability with certain third party security-related solutions fortesting with local network connection and menu tree testing which tests functionality ofdevice. During the testing, the device is tested with the security solutions to see if the the third party security solution providers. The testing, for example, includes field testi
device. For more information about Samsung's
ARD END USER LICENSE AND WARRANTY, D., SAMSUNG TELECOMMUNICATIONS IN AS THE “SAMSUNG ENTITIES”) CLUDING ANY WARRANTY OF
LITY OR NON-INFRINGEMENT, WITH DEVICES AND APPLICATIONS TESTED BLE FOR ANY DIRECT, INDIRECT, SOEVER WITH RESPECT TO INFORMATION TESTED WITH SAFE™ DEVICES. In addition, associated with, among other things the e-mail the software provider, solution provider or user.
is at the sole discretion of the software provider, ity protection is solely the responsibility of the nty, please refer to www.samsung.com/us/safe, re sold. [101212]
tree testing which tests functionality of the solutions in conjunction with the SamsungSAFE™ program, please refer to www.samsung.com/us/safe.Disclaimer of Warranties: EXCEPT AS OTHERWISE PROVIDED IN THEIR STANDTO THE FULL EXTENT PERMITTED BY LAW SAMSUNG ELECTRONICS CO., LTAMERICA, LLC, AND THEIR AFFILIATES (COLLECTIVELY REFERRED TO HEREEXPRESSLY DISCLAIM ANY AND ALL WARRANTIES, EXPRESS OR IMPLIED, INMERCHANTABILITY, FITNESS FOR A PARTICULAR PURPOSE, INTEROPERABIRESPECT TO INFORMATION TECHNOLOGY SECURITY PROTECTION, SAFE™WITH SAFE™ DEVICES. IN NO EVENT SHALL THE SAMSUNG ENTITIES BE LIAINCIDENTAL, PUNITIVE, OR CONSEQUENTIAL DAMAGES OF ANY KIND WHATTECHNOLOGY SECURITY PROTECTION, SAFE™ DEVICES OR APPLICATIONSinformation technology security protection will be affected by features or functionalityplatform, master data management, and virtual private network solutions selected byChoice of an e-mail, master data management, and virtual private network solution solution provider or user and any associated effect on information technology secursoftware provider, solution provider or user. For complete statement of limited warraavailable on the web and where Samsung smartphone and Galaxy Tab™ devices a
trademarks of Nuance Communications, Inc.,
Bluetooth word mark and “B Design”) are
technologies are incorporated under license
ation or its subsidiaries and are used under
ry of Rovi Corporation. This is an official DivX it www.divx.com for more information and
n order to play purchased DivX Video-on- in your device setup menu (tap Apps >
> Register). Go to vod.divx.com for more
©2013 Samsung Electronics Canada, Inc.
Nuance®, VSuite™, T9® Text Input, and the Nuance logo are trademarks or registeredor its affiliates in the United States and/or other countries.The Bluetooth® word mark, figure mark (stylized “B Design”), and combination mark (registered trademarks and are wholly owned by the Bluetooth SIG.microSD™ and the microSD logo are Trademarks of the SD Card Association.Openwave® is a registered Trademark of Openwave, Inc.LTE is a trademark of ETSI.
and are trademarks of SRS Labs, Inc. CS Headphone and WOW HDfrom SRS Labs, Inc.
, DivX®, DivX Certified® and associated logos are trademarks of Rovi Corporlicense.DivX Certified® to play DivX® video up to HD 720p, including premium content.ABOUT DIVX VIDEO: DivX® is a digital video format created by DivX, LLC, a subsidiaCertified® device that has passed rigorous testing to verify that it plays DivX video. Vissoftware tools to convert your files into DivX videos.ABOUT DIVX VIDEO-ON-DEMAND: This DivX Certified® device must be registered iDemand (VOD) movies. To obtain your registration code, locate the DivX VOD sectionSettings > More tab > About device > Legal information > Licence settings > DivX® VOD information on how to complete your registration.
TM

ail, Google Maps, Google Music, Google Talk,
ights reserved. voice experience, allowing you to hear and be hearing to distinguish sounds, identify your
you.e conversation, and removes background noise - from
even in the noisiest places.obile calls, video chats, even speakerphone calls,
tion is subject to the following two conditions:
ndesired operation of the device.
Google, the Google logo, Android, the Android logo, Google Play, Gmail, Google MPicasa, YouTube and other marks are trademarks of Google Inc.Wi-Fi is a registered trademark of the Wireless Fidelity Alliance, Inc.Swype and the Swype logos are trademarks of Swype, Inc. © 2010 Swype, Inc. All rYour phone features earSmart™, an intelligent voice processor that delivers a clearheard™ in nearly any environment. earSmart technology uses the science of humanvoice and suppress surrounding noise, for clear conversations just about anywhere.How Does It Work?• The earSmart voice processor in your phone captures your voice and all the sounds around• Working like the human ear, it processes and distinguishes these sounds, isolates your voic
both ends of a call.• t also automatically equalizes and adjusts voice volume so you can hear and talk naturally,• With earSmart technology, you can talk where you want, and have clear conversations for m
without worrying about surrounding noise.
IC NoticeThis Class B digital apparatus complies with Canadian ICES-003.This device complies with Industry Canada licence-exempt RSS standard(s). Opera(1) this device may not cause interference, and (2) this device must accept any interference, including interference that may cause u

i
ar . . . . . . . . . . . . . . . . . . . . . . . . . . 40d . . . . . . . . . . . . . . . . . . . . . . . . . . . 41all Functions ..............................43our Phone Number . . . . . . . . . . . . . 43ll . . . . . . . . . . . . . . . . . . . . . . . . . . . 43rgency Calls . . . . . . . . . . . . . . . . . . 44ll Using Speed Dial . . . . . . . . . . . . . 45ll from the Address Book . . . . . . . . 45 Call . . . . . . . . . . . . . . . . . . . . . . . . . 46ns . . . . . . . . . . . . . . . . . . . . . . . . . . 47
. . . . . . . . . . . . . . . . . . . . . . . . . . . . . 47 . . . . . . . . . . . . . . . . . . . . . . . . . . . . 49
ing a Call . . . . . . . . . . . . . . . . . . . . . 49 . . . . . . . . . . . . . . . . . . . . . . . . . . . . 54tering Text ................................55
ethods . . . . . . . . . . . . . . . . . . . . . . . 55t Using the Samsung Keyboard . . . 55
e Text Input Mode - Keypad . . . . . . 56ode . . . . . . . . . . . . . . . . . . . . . . . . 56
ol/Numeric Mode . . . . . . . . . . . . . . . 56
Table of Contents
Section 1: Getting Started .............................. 1Setting Up Your Phone . . . . . . . . . . . . . . . . . . . . . 1Charging a Battery . . . . . . . . . . . . . . . . . . . . . . . . . 4Switching the Phone On or Off . . . . . . . . . . . . . . . 6Locking and Unlocking the Touch Screen . . . . . . . 6Configuring your Phone . . . . . . . . . . . . . . . . . . . . . 7Creating a Samsung Account . . . . . . . . . . . . . . . . 9Creating a New Google Account . . . . . . . . . . . . . . 9Retrieving your Google Account Password . . . . . 10Setting Up Your Voice Mail . . . . . . . . . . . . . . . . . 10
Section 2: Understanding Your Phone ........ 11Features of Your Phone . . . . . . . . . . . . . . . . . . . 11Front View of Your Phone . . . . . . . . . . . . . . . . . . 12Side Views of Your Phone . . . . . . . . . . . . . . . . . . 13Rear View of Your Phone . . . . . . . . . . . . . . . . . . 14Display Layout . . . . . . . . . . . . . . . . . . . . . . . . . . . 15Menu Navigation . . . . . . . . . . . . . . . . . . . . . . . . . 25Using Motions and Gestures . . . . . . . . . . . . . . . . 26Using the Multi Window . . . . . . . . . . . . . . . . . . . . 30Customizing Your Home Screen . . . . . . . . . . . . . 34
Notification BMemory Car
Section 3: CDisplaying YMaking a CaMaking EmeMaking a CaMaking a CaAnswering aDialing OptioCall Log . . .Call DurationOptions DurCall Settings
Section 4: EnText Input MEntering TexChanging thUsing ABC MUsing Symb

. . . . . . . . . . . . . . . . . . . . . . . . . . . . . . . 81 . . . . . . . . . . . . . . . . . . . . . . . . . . . . . . . 84
amera . . . . . . . . . . . . . . . . . . . . . . . . 84odes . . . . . . . . . . . . . . . . . . . . . . . . . . 85ings . . . . . . . . . . . . . . . . . . . . . . . . . . . 86d Camcorder Settings . . . . . . . . . . . . 87hoto . . . . . . . . . . . . . . . . . . . . . . . . . . . 88amcorder . . . . . . . . . . . . . . . . . . . . . . 90essaging .................................... 92
essages . . . . . . . . . . . . . . . . . . . . . . . 92nd Sending Messages . . . . . . . . . . . . . 92ptions . . . . . . . . . . . . . . . . . . . . . . . . . 93w Received Messages . . . . . . . . . . . . 95
essages . . . . . . . . . . . . . . . . . . . . . . . 96earch . . . . . . . . . . . . . . . . . . . . . . . . . 96 Settings . . . . . . . . . . . . . . . . . . . . . . . 97il . . . . . . . . . . . . . . . . . . . . . . . . . . . . . 99il . . . . . . . . . . . . . . . . . . . . . . . . . . . . 100
lk . . . . . . . . . . . . . . . . . . . . . . . . . . . . 102 . . . . . . . . . . . . . . . . . . . . . . . . . . . . . . 103r . . . . . . . . . . . . . . . . . . . . . . . . . . . . . 103 . . . . . . . . . . . . . . . . . . . . . . . . . . . . . . 104
ii
Predictive Text . . . . . . . . . . . . . . . . . . . . . . . . . . 57Entering Text Using Handwriting . . . . . . . . . . . . 58Samsung Keyboard Settings . . . . . . . . . . . . . . . 58Using the Google Voice Typing Feature . . . . . . . 58
Section 5: Contacts and Your Address Book 60Adding a New Contact . . . . . . . . . . . . . . . . . . . . 60Editing an Existing Contact . . . . . . . . . . . . . . . . . 61Using Contacts . . . . . . . . . . . . . . . . . . . . . . . . . . 62Joining Contacts . . . . . . . . . . . . . . . . . . . . . . . . . 63Synchronizing Accounts . . . . . . . . . . . . . . . . . . . 65Address Book Options . . . . . . . . . . . . . . . . . . . . 65Groups . . . . . . . . . . . . . . . . . . . . . . . . . . . . . . . . 67Address Book Favourites . . . . . . . . . . . . . . . . . . 68Managing Address Book Contacts . . . . . . . . . . . 68
Section 6: Multimedia ....................................71Samsung Hub . . . . . . . . . . . . . . . . . . . . . . . . . . . 71Samsung Link . . . . . . . . . . . . . . . . . . . . . . . . . . . 74Music . . . . . . . . . . . . . . . . . . . . . . . . . . . . . . . . . 76Using Playlists . . . . . . . . . . . . . . . . . . . . . . . . . . 78Google Play Music . . . . . . . . . . . . . . . . . . . . . . . 79Video . . . . . . . . . . . . . . . . . . . . . . . . . . . . . . . . . . 80Play Movies . . . . . . . . . . . . . . . . . . . . . . . . . . . . 81
Gallery . .Camera .Using the CCamera MQuick SettCamera anEditing a PUsing the C
Section 7: MTypes of MCreating aMessage OViewing NeDeleting MMessage SMessagingUsing EmaUsing GmaGoogle TaGoogle+ .MessengeChatON .
iii
. . . . . . . . . . . . . . . . . . . . . . . . . . . 126d input . . . . . . . . . . . . . . . . . . . . . 127
Gestures . . . . . . . . . . . . . . . . . . . . 131n . . . . . . . . . . . . . . . . . . . . . . . . . . 133 . . . . . . . . . . . . . . . . . . . . . . . . . . . . 134l . . . . . . . . . . . . . . . . . . . . . . . . . . . 134t . . . . . . . . . . . . . . . . . . . . . . . . . . . 135reset . . . . . . . . . . . . . . . . . . . . . . . 136vices . . . . . . . . . . . . . . . . . . . . . . . 137 . . . . . . . . . . . . . . . . . . . . . . . . . . . . 137
anager . . . . . . . . . . . . . . . . . . . . . 142 . . . . . . . . . . . . . . . . . . . . . . . . . . . . 143 . . . . . . . . . . . . . . . . . . . . . . . . . . . . 143e . . . . . . . . . . . . . . . . . . . . . . . . . . 144e . . . . . . . . . . . . . . . . . . . . . . . . . . 145onnections ...............................147 . . . . . . . . . . . . . . . . . . . . . . . . . . . . 147 . . . . . . . . . . . . . . . . . . . . . . . . . . . . 153 . . . . . . . . . . . . . . . . . . . . . . . . . . . . 156 . . . . . . . . . . . . . . . . . . . . . . . . . . . . 157ions . . . . . . . . . . . . . . . . . . . . . . . . 160pplications .............................161
Section 8: Changing Your Settings ........... 105Accessing Settings . . . . . . . . . . . . . . . . . . . . . . 105Settings Tabs . . . . . . . . . . . . . . . . . . . . . . . . . . . 105Wi-Fi Settings . . . . . . . . . . . . . . . . . . . . . . . . . . 106Bluetooth settings . . . . . . . . . . . . . . . . . . . . . . . 107Data Usage . . . . . . . . . . . . . . . . . . . . . . . . . . . . 107More networks . . . . . . . . . . . . . . . . . . . . . . . . . . 108Flight mode . . . . . . . . . . . . . . . . . . . . . . . . . . . . 108NFC . . . . . . . . . . . . . . . . . . . . . . . . . . . . . . . . . . 112S Beam . . . . . . . . . . . . . . . . . . . . . . . . . . . . . . . 112Nearby devices . . . . . . . . . . . . . . . . . . . . . . . . . 112Screen Mirroring . . . . . . . . . . . . . . . . . . . . . . . . 113Kies via Wi-Fi . . . . . . . . . . . . . . . . . . . . . . . . . . . 113Lock Screen Settings . . . . . . . . . . . . . . . . . . . . . 114Display Settings . . . . . . . . . . . . . . . . . . . . . . . . . 116LED indicator . . . . . . . . . . . . . . . . . . . . . . . . . . . 117Sound Settings . . . . . . . . . . . . . . . . . . . . . . . . . 117Home screen mode . . . . . . . . . . . . . . . . . . . . . . 119Call Settings . . . . . . . . . . . . . . . . . . . . . . . . . . . 119Blocking Mode . . . . . . . . . . . . . . . . . . . . . . . . . . 124Power Saving Mode . . . . . . . . . . . . . . . . . . . . . 125Accessory Settings . . . . . . . . . . . . . . . . . . . . . . 125
AccessibilityLanguage anMotions andSmart screeAir view . . .Voice controAdd AccounBackup and Location SerSecurity . . .Application MBattery . . .Storage . . .Date and timAbout Devic
Section 9: CInternet . . .Wi-Fi . . . . .NFC . . . . .Bluetooth . .PC Connect
Section 10: A

. . . . . . . . . . . . . . . . . . . . . . . . . . . . . . 170 . . . . . . . . . . . . . . . . . . . . . . . . . . . . . 171ader . . . . . . . . . . . . . . . . . . . . . . . . . . 172 . . . . . . . . . . . . . . . . . . . . . . . . . . . . . . 172 . . . . . . . . . . . . . . . . . . . . . . . . . . . . . 172zines . . . . . . . . . . . . . . . . . . . . . . . . . 172s . . . . . . . . . . . . . . . . . . . . . . . . . . . . 173 . . . . . . . . . . . . . . . . . . . . . . . . . . . . . 173 . . . . . . . . . . . . . . . . . . . . . . . . . . . . . 173ice 5 . . . . . . . . . . . . . . . . . . . . . . . . . . 174 . . . . . . . . . . . . . . . . . . . . . . . . . . . . . . 174 . . . . . . . . . . . . . . . . . . . . . . . . . . . . . . 174. . . . . . . . . . . . . . . . . . . . . . . . . . . . . . 176
or . . . . . . . . . . . . . . . . . . . . . . . . . . . . 178 . . . . . . . . . . . . . . . . . . . . . . . . . . . . . . 178
pps . . . . . . . . . . . . . . . . . . . . . . . . . . 179ub . . . . . . . . . . . . . . . . . . . . . . . . . . 179ink . . . . . . . . . . . . . . . . . . . . . . . . . . 179
. . . . . . . . . . . . . . . . . . . . . . . . . . . . . . 179m . . . . . . . . . . . . . . . . . . . . . . . . . . . . 179 . . . . . . . . . . . . . . . . . . . . . . . . . . . . . . 180r . . . . . . . . . . . . . . . . . . . . . . . . . . . . . 180
iv
Calculator . . . . . . . . . . . . . . . . . . . . . . . . . . . . . 161Camera . . . . . . . . . . . . . . . . . . . . . . . . . . . . . . . 162ChatON . . . . . . . . . . . . . . . . . . . . . . . . . . . . . . . 162Chrome . . . . . . . . . . . . . . . . . . . . . . . . . . . . . . . 162Clock . . . . . . . . . . . . . . . . . . . . . . . . . . . . . . . . . 162Contacts . . . . . . . . . . . . . . . . . . . . . . . . . . . . . . 165Downloads . . . . . . . . . . . . . . . . . . . . . . . . . . . . 165Dropbox . . . . . . . . . . . . . . . . . . . . . . . . . . . . . . 166Email . . . . . . . . . . . . . . . . . . . . . . . . . . . . . . . . . 166Flipboard . . . . . . . . . . . . . . . . . . . . . . . . . . . . . . 166Gallery . . . . . . . . . . . . . . . . . . . . . . . . . . . . . . . 166Gmail . . . . . . . . . . . . . . . . . . . . . . . . . . . . . . . . 166Google . . . . . . . . . . . . . . . . . . . . . . . . . . . . . . . 166Google+ . . . . . . . . . . . . . . . . . . . . . . . . . . . . . . 166Group Play . . . . . . . . . . . . . . . . . . . . . . . . . . . . 167Help . . . . . . . . . . . . . . . . . . . . . . . . . . . . . . . . . 167Internet . . . . . . . . . . . . . . . . . . . . . . . . . . . . . . . 168Local . . . . . . . . . . . . . . . . . . . . . . . . . . . . . . . . . 168Maps . . . . . . . . . . . . . . . . . . . . . . . . . . . . . . . . . 168Messaging . . . . . . . . . . . . . . . . . . . . . . . . . . . . 169Messenger . . . . . . . . . . . . . . . . . . . . . . . . . . . . 169Music . . . . . . . . . . . . . . . . . . . . . . . . . . . . . . . . 169
My Files .NavigationOptical RePhone . . .Play BooksPlay MagaPlay MoviePlay MusicPlay StorePolaris OffS Health .S Memo .S Planner S TranslatS Voice . .Samsung ASamsung HSamsung LSettings .Story AlbuTalk . . . .TripAdviso
v
Video . . . . . . . . . . . . . . . . . . . . . . . . . . . . . . . . . 180Voice Recorder . . . . . . . . . . . . . . . . . . . . . . . . . 180Voice Search . . . . . . . . . . . . . . . . . . . . . . . . . . . 181WatchON . . . . . . . . . . . . . . . . . . . . . . . . . . . . . . 181YouTube . . . . . . . . . . . . . . . . . . . . . . . . . . . . . . 185
Section 11: Health and Safety .................... 189Getting the Most Out of Your Reception . . . . . . 189Maintaining Safe Use of and Access to Your Phone
189Caring for the Battery . . . . . . . . . . . . . . . . . . . . 191Acknowledging Special Precautions and Industry
Canada Notice . . . . . . . . . . . . . . . . . . . . . . . . 192Owner’s Record . . . . . . . . . . . . . . . . . . . . . . . . . 194
Index ............................................................195

vi
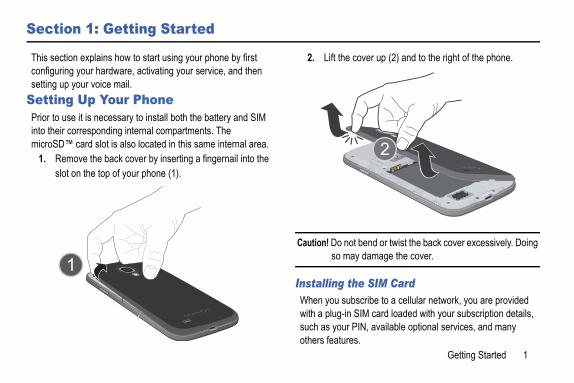
Getting Started 1
ver up (2) and to the right of the phone.
end or twist the back cover excessively. Doing damage the cover.
SIM Cardcribe to a cellular network, you are provided IM card loaded with your subscription details, N, available optional services, and many
Section 1: Getting Started
This section explains how to start using your phone by first configuring your hardware, activating your service, and then setting up your voice mail.
Setting Up Your PhonePrior to use it is necessary to install both the battery and SIM into their corresponding internal compartments. The microSD™ card slot is also located in this same internal area.
1. Remove the back cover by inserting a fingernail into the slot on the top of your phone (1).
2. Lift the co
Caution! Do not bso may
Installing theWhen you subswith a plug-in Ssuch as your PIothers features.
d is not inserted correctly, the phone will not e SIM card. Re-orient the card back into the slot is not detected.
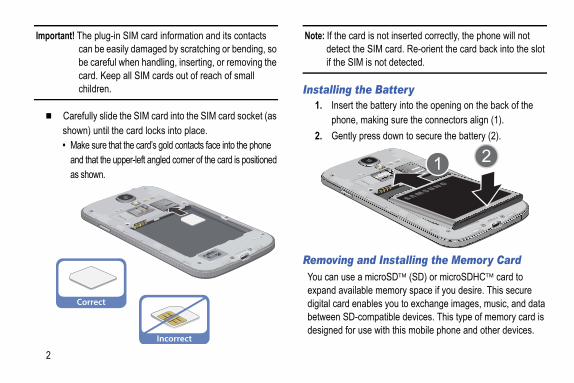
e Batterye battery into the opening on the back of the
making sure the connectors align (1). ress down to secure the battery (2).
nd Installing the Memory Card microSD (SD) or microSDHC card to ble memory space if you desire. This secure ables you to exchange images, music, and data ompatible devices. This type of memory card is se with this mobile phone and other devices.
2
Important! The plug-in SIM card information and its contacts can be easily damaged by scratching or bending, so be careful when handling, inserting, or removing the card. Keep all SIM cards out of reach of small children.
� Carefully slide the SIM card into the SIM card socket (as shown) until the card locks into place. • Make sure that the card’s gold contacts face into the phone
and that the upper-left angled corner of the card is positioned as shown.
Note: If the cardetect thif the SIM
Installing th1. Insert th
phone, 2. Gently p
Removing aYou can use aexpand availadigital card enbetween SD-cdesigned for u

Getting Started 3
ation on Memory Cards, see “Memory Card”
e Memory Cardhe memory card until it clicks and is released. memory card and remove it from the phone. Back Cover
battery cover onto the back of the phone (1) down (2).
Note: Your phone has been tested to support up to a 64GB memory card.
Installing the Memory Card
� Push the microSD card into the slot until it clicks (as shown). • Make sure the microSD’s gold contact pins face downward
and the card is securely inserted.
For more informon page 41.
Removing th1. Push on t2. Grasp the
Installing the1. Place the
and press
Correct
Incorrect
t fully charge the battery before using your r the first time. A discharged battery recharges proximately 4 hours.
klight settings, searching for service, vibrate eb browser use, and other variables may reduce ry’s talk and standby times.
can use the phone while the battery is charging, equire additional charging time. ravel Charger
fy that the handset battery is installed prior to nection. If the battery is not properly installed the wall charger is connected, the handset may er off and on continuously, preventing proper ration.
4
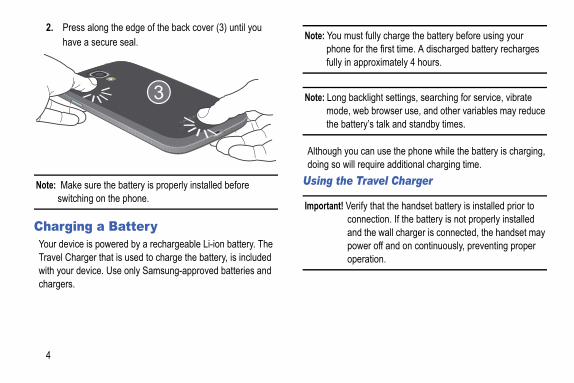
2. Press along the edge of the back cover (3) until you have a secure seal.
Note: Make sure the battery is properly installed before switching on the phone.
Charging a BatteryYour device is powered by a rechargeable Li-ion battery. The Travel Charger that is used to charge the battery, is included with your device. Use only Samsung-approved batteries and chargers.
Note: You musphone fofully in ap
Note: Long bacmode, wthe batte
Although you doing so will r
Using the T
Important! Vericonandpowope
Getting Started 5
andset has a touch screen display, please at a touch screen responds best to a light rom the pad of your finger. Using excessive r a metallic object when pressing on the touch may damage the tempered glass surface and warranty.
nplug the wall charger before you remove the cause damage to the phone.
Indicatory is weak and only a few minutes of talk time ery icon ( ) blinks and the device sounds a regular intervals. In this condition, your phone maining battery power, not by turning off the entering the dimming mode. For a quick ttery level, glance at the battery charge in the upper-right corner of your device’s lor ( ) indicates a full charge.y level becomes too low, the phone rns off.
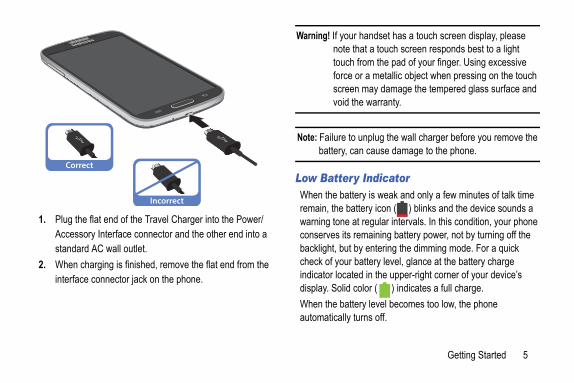
1. Plug the flat end of the Travel Charger into the Power/Accessory Interface connector and the other end into a standard AC wall outlet.
2. When charging is finished, remove the flat end from the interface connector jack on the phone.
Warning! If your hnote thtouch fforce oscreenvoid the
Note: Failure to ubattery, can
Low BatteryWhen the batterremain, the battwarning tone atconserves its rebacklight, but bycheck of your baindicator locateddisplay. Solid coWhen the batterautomatically tu
Correct
Incorrect
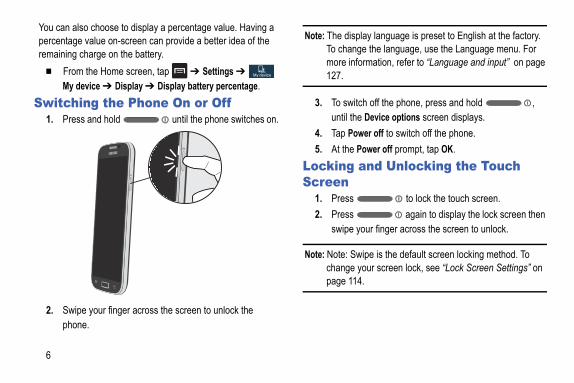
lay language is preset to English at the factory. e the language, use the Language menu. For rmation, refer to “Language and input” on page
h off the phone, press and hold , Device options screen displays.er off to switch off the phone.ower off prompt, tap OK.nd Unlocking the Touch
to lock the touch screen. again to display the lock screen then
our finger across the screen to unlock.
ipe is the default screen locking method. To our screen lock, see “Lock Screen Settings” on .
6
You can also choose to display a percentage value. Having a percentage value on-screen can provide a better idea of the remaining charge on the battery.
� From the Home screen, tap ➔ Settings ➔ My device ➔ Display ➔ Display battery percentage.
Switching the Phone On or Off1. Press and hold until the phone switches on.
2. Swipe your finger across the screen to unlock the phone.
Note: The dispTo changmore info127.
3. To switcuntil the
4. Tap Pow5. At the P
Locking aScreen
1. Press 2. Press
swipe y
Note: Note: Swchange ypage 114
My device
Getting Started 7
d user licence agreement screen, tap “I d and agree to the terms and conditions
place a checkmark in the selection box. Tap llow Samsung to collect error log data or “No prevent data collection.
.sung account display, tap “Create a new
if you don’t have one yet, tap “Sign in” if you ady set up your Samsung account, or tap et up an account later.
ke it Google? display, tap Yes if you already oogle account or No if you do not. on-screen instructions to create a new
ccount or sign in to an existing account.t to wait until later to create a Google account, w.
Configuring your PhoneWhen you first turn on your phone, you will need to set up a few things.
1. The Welcome! screen displays. The default language for your phone is English. If you would like to select another language, tap English and scroll up or down to select one of the listed languages.
2. If you are visually impaired or hard of hearing, tap Accessibility to change the accessibility settings.
3. Tap Next.4. At the Wi-Fi screen, set up a Wi-Fi connection if you
would like to do that now. For more information, refer to “Wi-Fi” on page 153.
5. Tap Next.6. At the Date and time screen, tap “Automatic date and
time” to use network-provided time or tap “Set date”, “Set time” and +Select time zone” and configure the settings.
7. Tap Next.
8. At the Enunderstanabove” to“Yes” to athanks” to
9. Tap Next10. At the Sam
account” have alre“Skip” to s
11. At the Mahave a G
12. Follow theGoogle aIf you wantap Not no

ropbox screen, tap Create a new account if ’t have one yet or tap Sign in if you have set up your Dropbox account. For more tion see “Dropbox” on page 166.earn about key features display, tap each function more about them.t.hank you screen, enter a device name (optional) Finish to complete your setup.in Home screen displays.
8
Note: In order to utilize your device to the fullest extent, you will need to create a Google™ Account when you first use your device. With a Google Account, you will have access to more Google applications and applications will always be in sync between your phone and computer.
13. At the Google & location screen, a blue checkmark displays next to the text that explains that you allow Google’s location service to collect anonymous location data from your phone. If you disagree, tap the checkmark to remove it.
14. A blue checkmark also displays next to the text that explains that you allows your location to be used for Google search results and other Google services. If you disagree, tap the checkmark to remove it. Tap the Next icon .
15. At the This phone belongs to... display, enter your First and Last names in the provided fields so that your phone can personalize some applications. Tap or Done.
16. At the Dyou donalreadyinforma
17. At the Lto learn
18. Tap Nex19. At the T
and tapThe ma
Getting Started 9
New Google Accounte your device to the fullest extent, you will Google™ Account when you first use your oogle Account, Google applications will c between your phone and computer.
eate a new account during the setup you first turned your phone on, follow these
Home screen, tap ➔ Gmail . Google Account screen displays.
o create a new Google account.
ady have a Google account, tap Existing to d add the account to your phone.
on-screen instructions to add a Google
ave created a Google account, you only need
Creating a Samsung AccountAn active Samsung account is required to begin accessing applications such as ChatON and AllShare Play. If you did not create a Samsung account when you first set up your phone, follow these steps:
1. From the home screen, tap ➔ Settings ➔
Accounts ➔ Add account.2. Tap Samsung account.3. Tap Create new account.4. Enter the required information and tap Sign up.5. At the Welcome screen, tap Next.6. Follow the on-screen instructions to verify your email
address and activate your account.
Creating aIn order to utilizneed to create adevice. With a Galways be in synIf you did not crprocedure whensteps:
1. From the The Add a
2. Tap New t– or –If you alresign in an
3. Follow theAccount.
Note: Once you hto sign in.
p Your Voice Maile Home screen, tap , then tap he tutorial to create a password, record a , and record your name.
eps may be different depending on your network.
Your Voice Maile Home screen, tap , then tap y be prompted to enter a password.
onnected, follow the voice prompts from the ail center. Your Voice Mail From Another Phoner wireless phone number.ou hear your voicemail greeting, press the key on the phone you are using.ur password.
10
Retrieving your Google Account PasswordA Google account password is required for Google applications. If you misplace or forget your Google Account password, follow these instructions to retrieve it:
1. From a computer, use an Internet browser and navigate to http://google.com/accounts.
2. Click on the Can’t access your account? link.3. Tap the I don’t know my password radio button.4. Enter your Email address and click Continue. 5. Follow the password recovery procedure.
Setting U1. From th2. Follow t
greeting
Note: These st
Accessing 1. From th
You ma
2. When cvoice m
Accessing 1. Dial you2. When y
asterisk3. Enter yo

Understanding Your Phone 11
mera and camcorder with 2 Megapixel Front
functionality provides real-time navigations high speed download capability andable memory slotand 2 GB RAMersonal Email
e social network applicationspps available to download via Google Play Store™ ubs and TV Shows with Samsung Hub
of Google Mobile™ Services (Gmail, YouTube, Google Voice Search)ing Options: Text/Picture/Video Messaging, and ing with Google Talk™to play DivX® video up to HD 720p, including nto share media content with DLNA certified devices
Section 2: Understanding Your Phone
This section outlines some key features of your phone and describes the screen and the icons that appear when the phone is in use. It also shows how to navigate through the phone and provides information on using a memory card.
Features of Your PhoneYour phone is lightweight, easy-to-use and offers many useful features. The following list outlines a few of the features included in your phone.• LTE network (5-6 bands) with 1.9 gigahertz quad-core processor• Android v 4.2.2, Jelly Bean Platform• Brilliant 4.99" Full HD Super AMOLED display• Touch screen provides quick response to in-phone menus and
options including applications, multi-windows and up to seven home screens
• Virtual (on-screen) QWERTY keyboard• Ready access to the Internet• Built-in Bluetooth and advanced Wi-Fi® technology• Mobile Hotspot and USB Tethering capability• Smart Remote using WatchON
• 13 Megapixel caFacing camera
• GPS Navigation• HSDPA 7.2 mbp• Up to 64GB exp• 16 GB memory • Corporate and P• Sync and updat• Over 650,000 A
and Samsung H• Access to Movie• Full Integration
Google Maps, • Multiple Messag
Instant Messag• DivX Certified®
premium conte• Samsung Link t
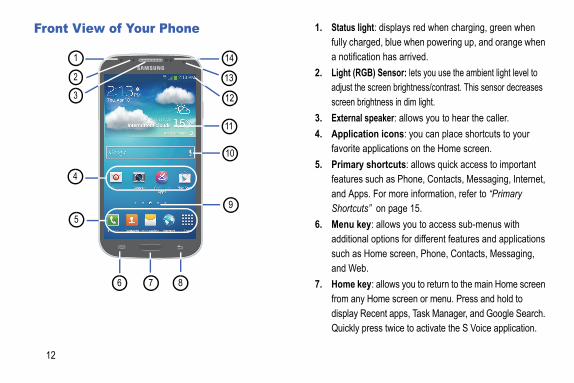
ight: displays red when charging, green when rged, blue when powering up, and orange when ation has arrived.GB) Sensor: lets you use the ambient light level to e screen brightness/contrast. This sensor decreases rightness in dim light.l speaker: allows you to hear the caller.tion icons: you can place shortcuts to your
applications on the Home screen. shortcuts: allows quick access to important such as Phone, Contacts, Messaging, Internet, s. For more information, refer to “Primary ts” on page 15.ey: allows you to access sub-menus with al options for different features and applications Home screen, Phone, Contacts, Messaging, b.ey: allows you to return to the main Home screen y Home screen or menu. Press and hold to Recent apps, Task Manager, and Google Search. press twice to activate the S Voice application.
12
Front View of Your Phone 1. Status lfully chaa notific
2. Light (Radjust thscreen b
3. Externa4. Applica
favorite5. Primary
featuresand AppShortcu
6. Menu kadditionsuch asand We
7. Home kfrom andisplay Quickly
8
4
3
5
6
9
7
1 14
13
12
11
10
2
Understanding Your Phone 13
s of Your Phone
5
43
7 6
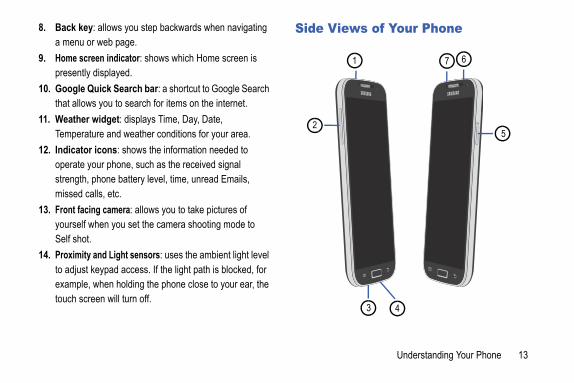
8. Back key: allows you step backwards when navigating a menu or web page.
9. Home screen indicator: shows which Home screen is presently displayed.
10. Google Quick Search bar: a shortcut to Google Search that allows you to search for items on the internet.
11. Weather widget: displays Time, Day, Date, Temperature and weather conditions for your area.
12. Indicator icons: shows the information needed to operate your phone, such as the received signal strength, phone battery level, time, unread Emails, missed calls, etc.
13. Front facing camera: allows you to take pictures of yourself when you set the camera shooting mode to Self shot.
14. Proximity and Light sensors: uses the ambient light level to adjust keypad access. If the light path is blocked, for example, when holding the phone close to your ear, the touch screen will turn off.
Side View
1
2

one: used for noise cancellation and stereo g. of Your Phone
lens: is used to take pictures and shoot videos.l speaker: allows you to hear when the rphone is turned on. used to provide extra light when taking pictures
places.
3
14
1. 3.5mm Headset jack: allows you to plug in headphones.2. Volume keys: allow you to adjust the ringer volume while
in standby mode or adjust the voice volume during a call. When receiving an incoming call, briefly press down either volume key ( ) to mute the ring tone. Adjusts text size when reading a message.
3. Microphone: allows other callers to hear you when you are speaking to them. It is also used for the Speakerphone.
4. Power/Accessory Interface connector: allows you to connect a Travel Charger or other optional accessories such as a USB/data cable or a hands-free headset for convenient, hands-free conversations.
5. Power/Lock key: ( ) lets you power your phone on and off. Also allows you to lock or unlock the touch screen. For more information on locking your phone, see “Locking and Unlocking the Phone” on page 27.
6. Infrared Blaster: Used to emit infrared signals used for controlling external devices.
7. Microphrecordin
Rear View
1. Camera2. Externa
Speake3. Flash: is
in dark
2
1

Understanding Your Phone 15
nss the symbols you’ll see on your phone’s cator area: plays your current signal strength. The greater number of bars, the stronger the signal.
cates that the Flight Mode is active. You cannot d or receive any calls or access online rmation.
plays when there is no SIM card in the phone.
plays when there is no network available.
plays when your phone is in Blocking mode.
plays when there is a system error or alert.
plays to indicate a security warning. You are mpted to set a screen lock password.
plays when a call is in progress.
Display LayoutYour display screen provides a wealth of information about the phone’s status and options, as well as providing access to application icons. For more information, refer to “Front View of Your Phone” on page 12.
Primary ShortcutsThere are four non-movable Application Shortcuts that appear at the bottom of all Home screens. The default shortcuts are: • Phone for dialing a number.• Contacts for managing your daily contacts in your Address
Book.• Messaging for creating and viewing Messages.• Internet for surfing the Internet.• Apps for accessing the applications on your phone. You can change the Phone, Messaging, S Note, and Internet application shortcuts to any icon that is displayed in the Apps menu.For more information, refer to “Adding and Removing Primary Shortcuts” on page 35.
Indicator IcoThis list identifiedisplay and Indi
Disthe
Indiseninfo
Dis
Dis
Dis
Dis
Dispro
Dis

evice Power Very Low – Shows your current attery only has between 5 and 15 percent power maining.
evice Power Critical – Shows your current battery nly has less than 5 percent power remaining and ill immediately shutdown.
isplays when your connection to an EDGE network active.
isplays when your phone is communicating with e EDGE network.
isplays when your connection to a UTMS network active.
isplays when your phone is communicating with a TMS network.
isplays when your connection to an HSDPA,SPA, or HSPA+ network is active.
isplays when your phone is communicating withe HSDPA, HSPA, or HSPA+ network.
16
Displays when a call is on hold.
Displays when the speakerphone is on.
Displays when a call has been missed.
Displays when a call has been muted.
Displays when Call forwarding is set to Always forward. For more information, refer to “Call forwarding” on page 54.
Displays your battery charge level. Icon shown is fully charged.
Displays when your battery is charging. Also displays battery charge level.
Device Power Low – Shows your current battery only has between 15 and 28 percent power remaining.
Dbre
Dow
Dis
Dth
Dis
DU
DH
Dth
3G
3G
Understanding Your Phone 17
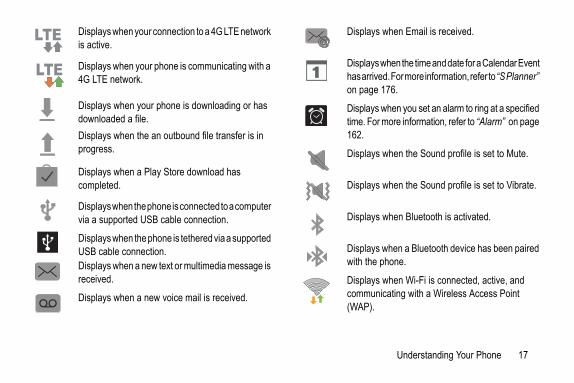
plays when Email is received.
plays when the time and date for a Calendar Event arrived. For more information, refer to “S Planner” page 176.
plays when you set an alarm to ring at a specified . For more information, refer to “Alarm” on page .
plays when the Sound profile is set to Mute.
plays when the Sound profile is set to Vibrate.
plays when Bluetooth is activated.
plays when a Bluetooth device has been paired the phone.
plays when Wi-Fi is connected, active, and municating with a Wireless Access Point P).
Displays when your connection to a 4G LTE network is active.
Displays when your phone is communicating with a 4G LTE network.
Displays when your phone is downloading or has downloaded a file.Displays when the an outbound file transfer is in progress.
Displays when a Play Store download has completed.
Displays when the phone is connected to a computer via a supported USB cable connection.
Displays when the phone is tethered via a supported USB cable connection.Displays when a new text or multimedia message is received.
Displays when a new voice mail is received.
LTE
LTE
Dis
Dishason
Distime162
Dis
Dis
Dis
Diswith
Discom(WA
ils on configuring your phone’s settings, see ur Settings” on page 105.
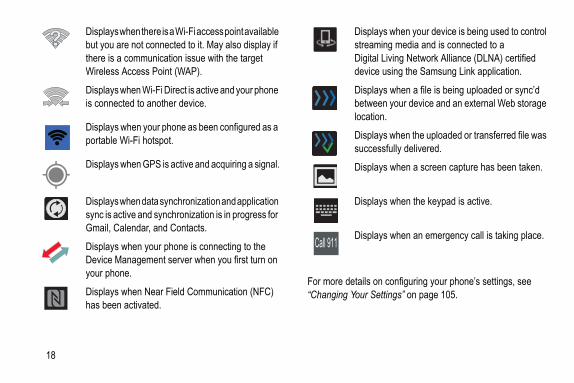
isplays when your device is being used to control reaming media and is connected to a igital Living Network Alliance (DLNA) certified evice using the Samsung Link application.
isplays when a file is being uploaded or sync’d etween your device and an external Web storage cation.
isplays when the uploaded or transferred file was ccessfully delivered.
isplays when a screen capture has been taken.
isplays when the keypad is active.
isplays when an emergency call is taking place.
18
For more deta“Changing Yo
Displays when there is a Wi-Fi access point available but you are not connected to it. May also display if there is a communication issue with the target Wireless Access Point (WAP).
Displays when Wi-Fi Direct is active and your phone is connected to another device.
Displays when your phone as been configured as a portable Wi-Fi hotspot.
Displays when GPS is active and acquiring a signal.
Displays when data synchronization and application sync is active and synchronization is in progress for Gmail, Calendar, and Contacts.
Displays when your phone is connecting to the Device Management server when you first turn on your phone.
Displays when Near Field Communication (NFC) has been activated.
DstDd
Dblo
Dsu
D
D
D
Understanding Your Phone 19
Use your 8.0 megapixel camera feature to photos and videos. For more information, refer era” on page 84.
With the ChatON application, you can interact ds and family with text, images, hand-written d video shared instantly. You can also chat in For more information, refer to “ChatON” on 2.
The Google Chrome app allows you to use the hrome web browser on your camera. For more
ion, refer to “Chrome” on page 162.
he Clock application allows you to access view the World Clock, set a stopwatch, use a d setup a Desk Clock. For more information, Clock” on page 162.
: You can manage your daily contacts by eir name and number in your Address Book. information, refer to “Contacts and Your
Book” on page 60.
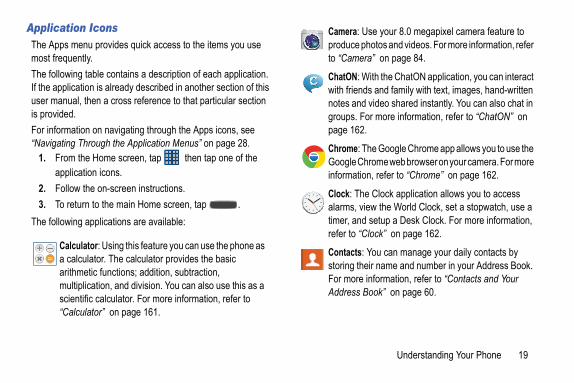
Application IconsThe Apps menu provides quick access to the items you use most frequently.The following table contains a description of each application. If the application is already described in another section of this user manual, then a cross reference to that particular section is provided.For information on navigating through the Apps icons, see “Navigating Through the Application Menus” on page 28.
1. From the Home screen, tap then tap one of the application icons.
2. Follow the on-screen instructions.3. To return to the main Home screen, tap .
The following applications are available:
Calculator: Using this feature you can use the phone as a calculator. The calculator provides the basic arithmetic functions; addition, subtraction, multiplication, and division. You can also use this as a scientific calculator. For more information, refer to “Calculator” on page 161.
Camera:produceto “Cam
ChatON:with friennotes angroups. page 16
Chrome:Google Cinformat
Clock: Talarms, timer, anrefer to “
Contactsstoring thFor moreAddress
Gmail is a web-based email service. Gmail is red when you first set up your phone. Depending r synchronization settings, Gmail can atically synchronize with your Gmail account on b. For more information, refer to “Using Gmail” on 00.
: The Google Search application is the same on- Internet search engine that is on the Google Bar on your main Home screen. For more
ation, see “Google Search Bar” on page 25.
+: makes messaging and sharing with your a lot easier. You can set up Circles of friends, visit eam to get updates from your Circles, use nger for fast messaging with everyone in your , or use Instant Upload to automatically upload and photos to your own private album on +. For more information, refer to “Google+” on 03.
Play: Group Play allows you to share pictures, and documents in real-time with your friends. For nformation, refer to “Group Play” on page 167.
20
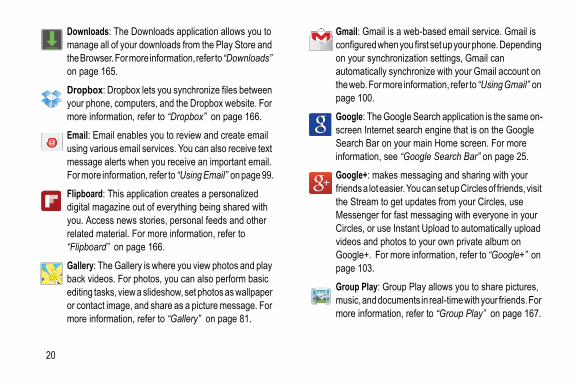
Downloads: The Downloads application allows you to manage all of your downloads from the Play Store and the Browser. For more information, refer to “Downloads” on page 165.
Dropbox: Dropbox lets you synchronize files between your phone, computers, and the Dropbox website. For more information, refer to “Dropbox” on page 166.
Email: Email enables you to review and create email using various email services. You can also receive text message alerts when you receive an important email. For more information, refer to “Using Email” on page 99.
Flipboard: This application creates a personalized digital magazine out of everything being shared with you. Access news stories, personal feeds and other related material. For more information, refer to “Flipboard” on page 166.
Gallery: The Gallery is where you view photos and play back videos. For photos, you can also perform basic editing tasks, view a slideshow, set photos as wallpaper or contact image, and share as a picture message. For more information, refer to “Gallery” on page 81.
Gmail:configuon youautomthe wepage 1
GooglescreenSearchinform
Googlefriendsthe StrMesseCirclesvideosGooglepage 1
Groupmusic,more i
Understanding Your Phone 21
ng: You can send and receive different types of s. For more information, refer to “Messaging”
92.
er: Messenger allows you to bring groups of gether into a simple group conversation. When
a new conversation in Messenger, Google+ update to your phone. For more information, Messenger” on page 103.
usic allows you to play music files that you have n your phone and memory card. You can also laylists. For more information, refer to “Music” 76.
My Files allows you to manage your sounds, videos, bluetooth files, Android files, and other card data in one convenient location. For more ion, refer to “My Files” on page 170.
n: Navigation is an internet-connected GPS n system with voice guidance. You can type or ur destination. For more information, refer to ion” on page 171.
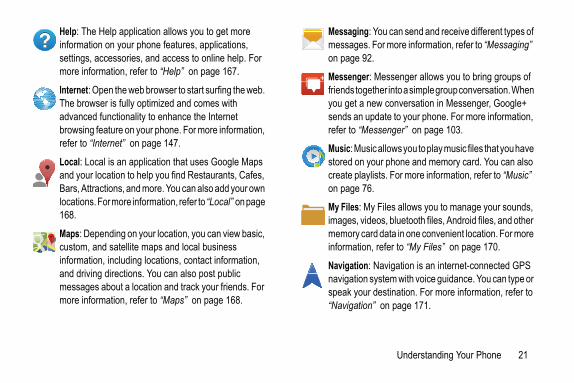
Help: The Help application allows you to get more information on your phone features, applications, settings, accessories, and access to online help. For more information, refer to “Help” on page 167.
Internet: Open the web browser to start surfing the web. The browser is fully optimized and comes with advanced functionality to enhance the Internet browsing feature on your phone. For more information, refer to “Internet” on page 147.
Local: Local is an application that uses Google Maps and your location to help you find Restaurants, Cafes, Bars, Attractions, and more. You can also add your own locations. For more information, refer to “Local” on page 168.
Maps: Depending on your location, you can view basic, custom, and satellite maps and local business information, including locations, contact information, and driving directions. You can also post public messages about a location and track your friends. For more information, refer to “Maps” on page 168.
Messagimessageon page
Messengfriends toyou get sends anrefer to “
Music: Mstored ocreate pon page
My Files:images, memoryinformat
Navigationavigatiospeak yo“Navigat
usic: With the Music application, while online, n play music that you have added to your music ell as any music you copied from your PC. While
you can listen to music you have copied from C. For more information, refer to “Google Play on page 79.
tore: The Play Store provides access to adable applications and games to install on your
. For more information, refer to “Play Store” on 73.
Office 5: Polaris® Office 5 is a Microsoft Office tible office suite. This application provides a l place for managing your documents online or For more information, refer to “Polaris Office 5” e 174.
th: S Health is a wellness application that allows better manage your health by providing you with nt information. For more information, refer to “S ” on page 174.
22
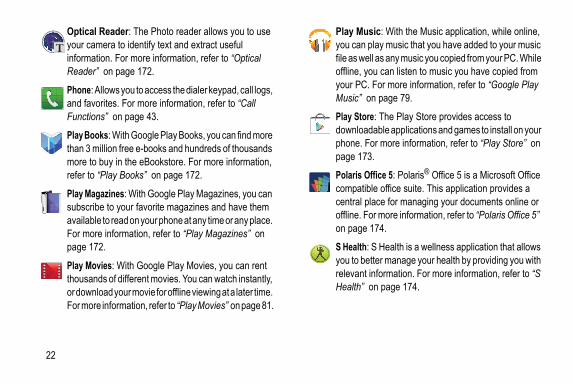
Optical Reader: The Photo reader allows you to use your camera to identify text and extract useful information. For more information, refer to “Optical Reader” on page 172.
Phone: Allows you to access the dialer keypad, call logs, and favorites. For more information, refer to “Call Functions” on page 43.
Play Books: With Google Play Books, you can find more than 3 million free e-books and hundreds of thousands more to buy in the eBookstore. For more information, refer to “Play Books” on page 172.
Play Magazines: With Google Play Magazines, you can subscribe to your favorite magazines and have them available to read on your phone at any time or any place. For more information, refer to “Play Magazines” on page 172.
Play Movies: With Google Play Movies, you can rent thousands of different movies. You can watch instantly, or download your movie for offline viewing at a later time. For more information, refer to “Play Movies” on page 81.
Play Myou cafile as woffline,your PMusic”
Play Sdownlophonepage 1
Polariscompacentraoffline.on pag
S Healyou to relevaHealth
Understanding Your Phone 23
Apps: Samsung Apps allows you to easily d many different types of applications to your ou can download games, news, reference, tworking, navigation, and other applications. information, refer to “Samsung Apps” on page
Hub: Samsung Hub is Samsung’s integrated media content that offers a comprehensive and nt media service experience. You can browse hase all media content within a single store
r more information, refer to “Samsung Hub” on 9.
g Link: With the Samsung Link app, you can d play content across smart devices anytime here. For more information, refer to “Samsung
page 179.
This icon navigates to the sound and phone for your phone. It includes such settings as: security, memory, and any extra settings ed with your phone. For more information, refer ging Your Settings” on page 105.
S Memo: Use this application to create memos using existing templates or your own design. You can use handwriting or the keyboard to enter text. For more information, refer to “S Memo” on page 174.
S Planner: With the S Planner application, you can consult the calendar by day, week, month, year, create events, and set an alarm to act as a reminder, if necessary. For more information, refer to “S Planner” on page 176.
S Translator: With the S Translator you can easily translate words and phrases into many different languages. For more information, refer to “S Translator” on page 178.
S Voice: With the S Voice application you can use your voice to perform operations that you would normally have to do by hand such as dialing a phone number, texting a message, playing music, etc. For more information, refer to “S Voice” on page 178.
Samsungdownloaphone. Ysocial neFor more179.
Samsungstore for consisteand purcfront. Fopage 17
Samsunshare anand anywLink” on
Settings:settings display, associatto “Chan

plications quickly, add the icons of frequently-ations to the Home screen or to the folders you r details, see “Customizing Your Home Screen” .
ecorder: The Voice Recorder allows you to an audio file up to one minute long and then iately send it as a message. For more ation, refer to “Voice Recorder” on page 180.
earch: The Google Voice Search application you to search the web using only your voice. For nformation, refer to “Voice Search” on page 181.
ON: With the Samsung WatchON application, n use your phone as a remote control for your TV. re information, refer to “Settings” on page 179.
e: YouTube is a video sharing website on which can upload and share videos, and view them in -4 format. For more information, refer to be” on page 185.
24
Tip: To open apused appliccreated. Foon page 34
Story Album: With Story Album, you can create a digital Album of your story in media. Special moments will be on a timeline, and if you wish, you can have your album published as a hard copy. For more information, refer to “Story Album” on page 179.
Talk: Google Talk is a free Windows and web-based application for instant messaging offered by Google. Conversation logs are automatically saved to a Chats area in your Gmail account. This allows you to search a chat log and store them in your Gmail accounts. For more information, refer to “Google Talk” on page 102.
TripAdvisor: With the TripAdvisor, you can plan and have your perfect trip. With over 75 million reviews and opinions by travelers, it is easy to find the best hotels, restaurants, and fun things to do. For more information, refer to “TripAdvisor” on page 180.
Video: The Video application plays video files stored on your microSD card. For more information, refer to “Video” on page 180.
Voice Rrecordimmedinform
Voice Sallowsmore i
Watchyou caFor mo
YouTubusers MPEG“YouTu
Understanding Your Phone 25
ome to display the main Home screen. Press lay recently used apps and access the Task
to return to the previous screen, option or
n this user manual
ms to select or launch them. For example:en keyboard to enter characters or text. to select it.
on’s icon to launch the application.den items by a touch and hold gesture. For
a widget on the home screen to move it. on a field to display a pop-up menu of options.m Swipe drag your finger vertically or horizontally n. Use swipe when:
Google Search BarThe Google Search Bar provides you an on-screen Internet search engine powered by Google™.
1. From the main home screen, tap the Google Search bar .
2. Use the on-screen keypad to enter the item you want to search for, then tap .
3. Tap to use Google Voice Search. Follow the on-screen instructions.
Menu NavigationYou can tailor the phone’s range of functions to fit your needs using both menus and widgets. Menus, sub-menus, and features can be accessed by scrolling through the available on-screen menus. Your phone originally has three home screens but you can expand up to seven home screens.
Command KeysMenu KeyPress Menu to display a context-sensitive menu of options for the current screen or feature.
Home KeyPress Hand hold to dispmanager.
Back KeyPress Backstep.
Terms used iTapLightly touch ite• Tap the on scre• Tap a menu item• Tap an applicati
Touch and HolActivate on-screexample: • Touch and hold• Touch and hold
Swipe and PalTo swipe, lightlyacross the scree
tions and Gestureshe various motion and gesture features, you can ty of time saving functions.
sive shaking or impact to the device may cause nded results. To learn how to properly control ns, tap Apps ➔ Settings ➔ My ➔ Motions and gestures. When tapped, each
comes with an on-screen tutorial.
sture: Allows you to control your device by performing s above the sensor (without touching the device).: Allows you to control your device using natural ents (on the screen).otion: Allows you to control your device by touching
reen with your entire hand.cope calibration: Allows you to properly calibrate your ’s touch screen. gesture:e Home screen, press and then tap Settings
My device ➔ Motions and gestures ➔ Air .
My device
v ce
26
• Unlocking the screen• Scrolling through the Home screen or a menuTo palm swipe, swipe the side of your hand horizontally across the screen. Use palm swipe when:• Capturing the screen
PanningTo pan, touch and hold a selected icon, then move the device to the left or right to reposition it to another page. You must first activate Motion on your device. Use panning to:• Move icons on your Home screens or Application Menus to another
page.TiltTo activate the tilt feature, press and hold two points on the screen then tilt the device back and forth to reduce or enlarge the screen. Use tilt to:• Reduce or enlarge the screen in the Gallery or Browser.
Turn overTurn your phone over so that the screen faces downward. For example:• Mute incoming calls and playing sounds by turning your phone over.
Using MoBy activating taccess a varie
Caution! Excesunintemotiodeviceentry
• Air gemotion
• Motionmovem
• Palm mthe sc
• Gyrosdevice
To activate Air1. From th
➔
gesture My de

Understanding Your Phone 27
e feature must be activated before Motion can d.
N/OFF slider located to the right of each turn it on . Motion:Home screen, press and then tap Settings My device ➔ Motions and gestures. motion touch and slide the Palm motion slider t to turn it on.
on-screen notification and tap OK.
e feature must be activated before Palm be activated.
N/OFF slider located to the right of each turn it on .ation, refer to “Motions and Gestures” on
Unlocking the Phonehone:
2. Tap the ON/OFF slider located to the right of Air gesture to turn it on .The Air gesture icon will appear in the status bar.
3. Read the on-screen notification and tap OK.
Note: At least one feature must be activated before Air gesture can be activated.
4. Tap Learn about the sensor and icon field to review on-screen information about the Air gestures sensor and related icon.
5. Tap the ON/OFF slider located to the right of each feature to turn it on .
To activate Motion:1. From the Home screen, press and then tap Settings
➔ My device ➔ Motions and gestures.2. Tap the ON/OFF slider located to the right of Motion to
turn it on .3. Read the on-screen notification and tap OK.
Note: At least onbe activate
4. Tap the Ofeature to
To activate Palm1. From the
➔
2. In a singleto the righ
3. Read the
Note: At least onmotion can
4. Tap the Ofeature to
For more informpage 131.
Locking and To unlock your p
My device
My device

e main Home screen, sweep the screen with ger in either direction. The main Home Screen is in the middle with a Home screen on each side.
Through the Application Menusitially has three Application Menus available. teps to navigate through the Application Menus:ome screen, tap . The first Application Menu isplayed.
the screen left or right to access the other two
28
1. Press the lock button located on the upper right side of your phone.
2. The lock screen will display with Swipe screen to unlock displayed at the bottom of the screen.
3. Swipe the touch screen in any direction.4. The Home screen will be displayed.
Note: There are several additional ways you can lock your screen. For more information, refer to “Security” on page 137.
Home Screen OverviewThe main home screen is the starting point for many applications and functions, and it allows you to add items like application icons, shortcuts, folders, or Google widgets to give you instant access to information and applications. This is the default page and accessible from any menu by pressing
.Navigating Through the Home ScreensYour phone originally has three home screens but you can expand up to seven home screens. If you like, you can place different applications on each of the home screens.
� From thyour finlocated
Navigating Your phone inFollow these s
1. At the Hwill be d
2. Sweep menus.
Understanding Your Phone 29
nu will appear at the bottom of the phone
tion.
ecently-Used Apps hold from any screen to open the sed applications window.n to open the selected application.
o go to the Task manager.
Sub-Menu items
3. Tap one of the application icons.
Note: As you add applications, the number of Application menus that you have available will increase.
Navigating Using Sub-MenusSub-menus are available when you are at any Home screen or have selected a feature or application such as Phone, Contacts, Messaging, or Internet.To access a sub-menu:
1. Press .
A sub-mescreen.
2. Tap an op
Accessing R1. Press and
recently-u2. Tap an ico
– or –Tap t
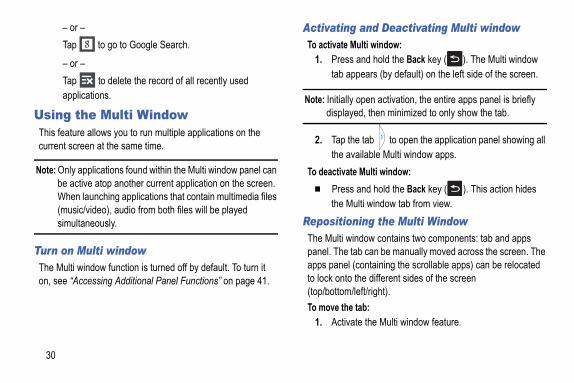
and Deactivating Multi windowlti window:nd hold the Back key ( ). The Multi window ears (by default) on the left side of the screen.
pen activation, the entire apps panel is briefly , then minimized to only show the tab.
tab to open the application panel showing all ilable Multi window apps.Multi window:nd hold the Back key ( ). This action hides ti window tab from view.ng the Multi Windowow contains two components: tab and apps can be manually moved across the screen. The
ontaining the scrollable apps) can be relocated e different sides of the screen ft/right).b: the Multi window feature.
30
– or –Tap to go to Google Search.
– or –Tap to delete the record of all recently used applications.
Using the Multi WindowThis feature allows you to run multiple applications on the current screen at the same time.
Note: Only applications found within the Multi window panel can be active atop another current application on the screen.When launching applications that contain multimedia files (music/video), audio from both files will be played simultaneously.
Turn on Multi windowThe Multi window function is turned off by default. To turn it on, see “Accessing Additional Panel Functions” on page 41.
Activating To activate Mu
1. Press atab app
Note: Initially odisplayed
2. Tap thethe ava
To deactivate � Press a
the MulRepositioniThe Multi windpanel. The tabapps panel (cto lock onto th(top/bottom/leTo move the ta
1. Activate

Understanding Your Phone 31
b to display the apps panel (containing the apps).
when the apps are visible, the tab turns a dark ly in this state that the entire panel can be
motion, touch and hold the tab for ately one-second to detach it from the ), then slowly drag it to its new location along available screen edge (2). You can move it to ottom, or either side.
2. In a single motion, touch and hold the tab for approximately one second, then slowly drag it to its new location along the current screen edge.
Note: This is a quick way to get the tab out of the way if you can’t get to a button or option behind it.
To relocate the Multi window apps panel:1. Activate the Multi window feature.
2. Tap the tascrollable
Note: Notice thatgrey. Its onrelocated.
3. In a singleapproximscreen (1any otherthe top, b
e once you have completed the removal .ulti window application: the Multi window feature. tab to display the apps panel (containing the le apps). Edit button (located at the bottom of the list) to he staging area containing any previously d apps.the desired application.gle motion, touch and hold a desired app until it s from the staging area, then carefully drag it to cation in the current list of apps. Window to run multiple apps on the ns found within the Multi window panel can be e time as a current on-screen app.
apps are running on the same screen, you can o either swap their positions or maximize a
32
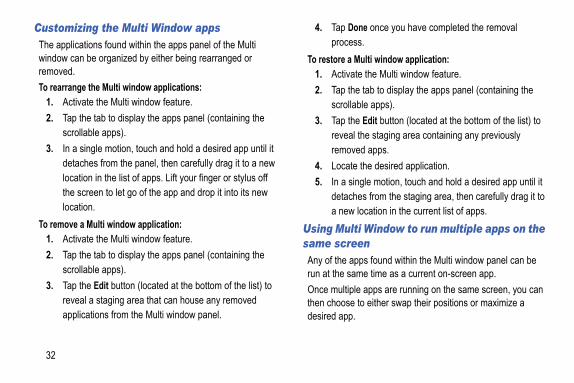
Customizing the Multi Window appsThe applications found within the apps panel of the Multi window can be organized by either being rearranged or removed.To rearrange the Multi window applications:
1. Activate the Multi window feature.2. Tap the tab to display the apps panel (containing the
scrollable apps).3. In a single motion, touch and hold a desired app until it
detaches from the panel, then carefully drag it to a new location in the list of apps. Lift your finger or stylus off the screen to let go of the app and drop it into its new location.
To remove a Multi window application:1. Activate the Multi window feature.2. Tap the tab to display the apps panel (containing the
scrollable apps).3. Tap the Edit button (located at the bottom of the list) to
reveal a staging area that can house any removed applications from the Multi window panel.
4. Tap Donprocess
To restore a M1. Activate2. Tap the
scrollab3. Tap the
reveal tremove
4. Locate 5. In a sin
detachea new lo
Using Multisame screeAny of the apprun at the samOnce multiplethen choose tdesired app.

Understanding Your Phone 33
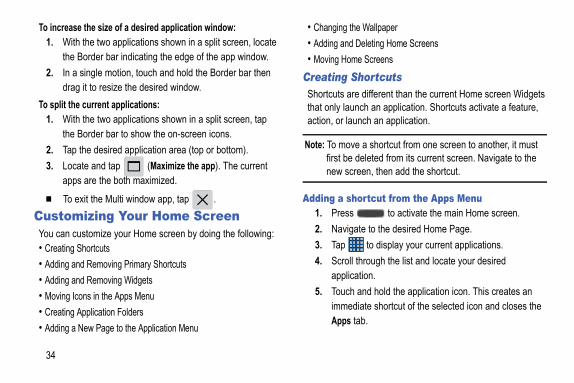
pplications are running, the device displays a view containing both the initial app and the indow app. Each application is still
nt of the other.
angement of : wo ns shown in een, tap the r to show the icons.
esired n area (top or
d tap p location). nt apps are
App #1 Maximize
App #2 Border SwitchPositionsbar
Close
Note: Only applications found within the Multi-window panel can be active atop another current application on the screen.When launching applications that contain multimedia files (music/video), audio from both files will be played simultaneously.
In this example we will be launching both the Internet and Maps applications.
1. Launch an application such as Maps.• From the Home screen, tap Internet .
2. Activate the Multi window feature.3. Tap the tab to display the apps panel.4. Touch and hold the desired app, such as Maps, until it
detaches from the panel.5. In a single motion, drag it over the current app and drop
the new Multi window app over either the top or bottom area of the current on-screen app.
Note: Once two asplit screennew Multi windepende
To switch the arrthe applications
1. With the tapplicatioa split scrBorder baon-screen
2. Tap the dapplicatiobottom).
3. Locate an(Switch apThe curreswitched.
Wallpapereleting Home Screens Screensortcuts
different than the current Home screen Widgets ch an application. Shortcuts activate a feature, ch an application.
a shortcut from one screen to another, it must eleted from its current screen. Navigate to the en, then add the shortcut.
rtcut from the Apps Menu to activate the main Home screen.
e to the desired Home Page. to display your current applications.rough the list and locate your desired ion.nd hold the application icon. This creates an ate shortcut of the selected icon and closes the b.
34
To increase the size of a desired application window:1. With the two applications shown in a split screen, locate
the Border bar indicating the edge of the app window.2. In a single motion, touch and hold the Border bar then
drag it to resize the desired window.To split the current applications:
1. With the two applications shown in a split screen, tap the Border bar to show the on-screen icons.
2. Tap the desired application area (top or bottom).3. Locate and tap (Maximize the app). The current
apps are the both maximized.
� To exit the Multi window app, tap .Customizing Your Home ScreenYou can customize your Home screen by doing the following: • Creating Shortcuts• Adding and Removing Primary Shortcuts• Adding and Removing Widgets• Moving Icons in the Apps Menu• Creating Application Folders• Adding a New Page to the Application Menu
• Changing the• Adding and D• Moving Home
Creating ShShortcuts arethat only launaction, or laun
Note: To movefirst be dnew scre
Adding a sho1. Press 2. Navigat3. Tap 4. Scroll th
applicat5. Touch a
immediApps ta
Understanding Your Phone 35
emoving Primary Shortcuts any of your primary shortcuts with the Apps shortcut.
to activate the main Home screen. d hold the primary shortcut you want to hen drag it to an empty space on any Home
ugh the App menu to find the shortcut you dd as the new primary short cut.d hold the new shortcut, then drag it to the ace in the row of primary shortcuts.primary shortcut will now appear on all Home
emoving Widgetsf-contained applications that reside in either b or on the main or extended Home screens. t, the Widget appears as an on-screen
et to activate the main Home screen.
to the desired Home Page.
6. While still holding the on-screen icon, position it on the current page. Once complete, release the screen to lock the new shortcut into its new position on the current screen.
Adding a shortcut via the Add to Home screen1. Press to activate the main Home screen.2. Navigate to the desired Home Page.3. Touch and hold on an empty area of the Home screen.4. Tap Apps and widgets, Folder, or Page.5. Press and hold a shortcut from the available list and
position it on the current screen.Deleting a shortcut
1. Press to activate the main Home screen. 2. Touch and hold the desired shortcut. This unlocks it from
its location on the current screen.3. Drag the icon over the Remove icon and release it.
As you place the shortcut into the Trash, both items turn red.
Note: This action does not delete the shortcut, it just removes it from the current screen.
Adding and RYou can changeexception of the
1. Press 2. Touch an
replace, tscreen.
3. Scroll throwant to a
4. Touch anempty spThe new screens.
Adding and RWidgets are selyour Widgets taUnlike a shortcuapplication.
Adding a Widg1. Press 2. Navigate

and tap View type.tomizable grid. A green circle will appear next to
on. and tap Edit.
rough the list and locate the icon you wish to
nd drag the icon to the position that you want. To a different page, drag the icon to the edge of e until the page scrolls to the desired page.e.
to return to the Home screen.plication Folders
e application folders to hold similar applications
lder follow these steps: to activate the main Home screen.
to display your current applications. Apps tab at the top of the screen if it is not selected.
and tap Edit.
36
3. Touch and hold on an empty area of the screen.4. Tap Apps and widgets.5. Tap the Widgets tab at the top of the screen.6. Press and hold an available Widget to position it on the
current screen, then release the Widget.Removing a Widget
1. Touch and hold a Widget until you can move it around on the screen.
2. Drag the Widget up to the Remove icon and release it.As you place the Widget into the Trash, both items turn red.
Note: This action does not actually delete the Widget, it just removes it from the current Home screen.
Moving Icons in the Apps Menu1. Press to activate the main Home screen. 2. Tap to display your current applications.3. Tap the Apps tab at the top of the screen if it is not
already selected.
4. Press 5. Tap Cus
the opti6. Press 7. Scroll th
move.8. Touch a
move tothe pag
9. Tap Sav10. Press
Creating ApYou can creatif you wish.To create a fo
1. Press 2. Tap 3. Tap the
already4. Press
Understanding Your Phone 37
icon up to the Create page icon.
ill appear on a new page.
Wallpaper the Wallpaper (background) of your home wing these steps: Home screen, touch and hold on an empty e screen. screen window is displayed.
allpaper. location where you would like to change the . Tap Home screen, Lock screen, or Home and ns.f the following options:select a wallpaper from photographs you have taken r camera.lpapers: select an animated wallpaper. This option is able for the Lock screen option.ers: select from many still-life wallpapers.allpaper and tap Set wallpaper, Done, or
5. Touch and hold the first application that you would like to move to a folder.
6. Drag the icon up to the Create folder icon.7. Enter a folder name and tap OK.
A folder is displayed in the original place of the application icon with the application icon displayed on top of it. You can now drag other Apps into the folder.
8. To view information on an App, drag the App icon up to the App info icon to view information on the application.
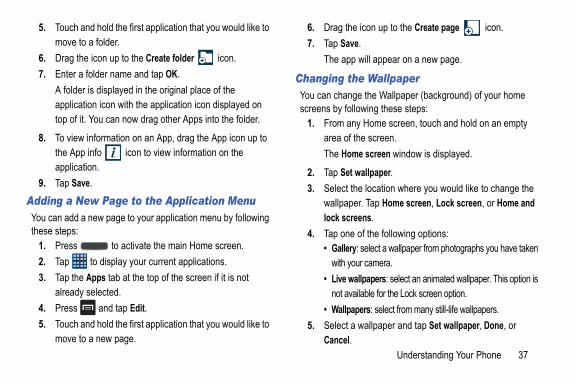
9. Tap Save.Adding a New Page to the Application MenuYou can add a new page to your application menu by following these steps:
1. Press to activate the main Home screen.2. Tap to display your current applications.3. Tap the Apps tab at the top of the screen if it is not
already selected.4. Press and tap Edit.5. Touch and hold the first application that you would like to
move to a new page.
6. Drag the 7. Tap Save.
The app w
Changing theYou can changescreens by follo
1. From anyarea of thThe Home
2. Tap Set w3. Select the
wallpaperlock scree
4. Tap one o• Gallery:
with you• Live wal
not avail• Wallpap
5. Select a wCancel.
to return to the main Home screen. now add items to your new Home screen.
me screen: to activate the main Home screen.
and tap Edit page.nd hold the Home screen you want to delete. to the trash can located at the bottom of the The page will turn red.
are items on the Home screen that you want to the Remove home screen page prompt is d.
38
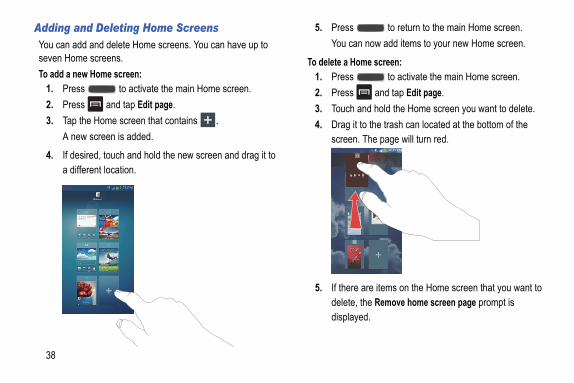
Adding and Deleting Home ScreensYou can add and delete Home screens. You can have up to seven Home screens.To add a new Home screen:
1. Press to activate the main Home screen. 2. Press and tap Edit page.3. Tap the Home screen that contains .
A new screen is added.
4. If desired, touch and hold the new screen and drag it to a different location.
5. Press You can
To delete a Ho1. Press 2. Press 3. Touch a4. Drag it
screen.
5. If there delete, displaye
Understanding Your Phone 39
mple, the Dual clock app screen is moved to osition.
move a Home screen, the other Home re be re-ordered automatically.
to return to the main Home screen.
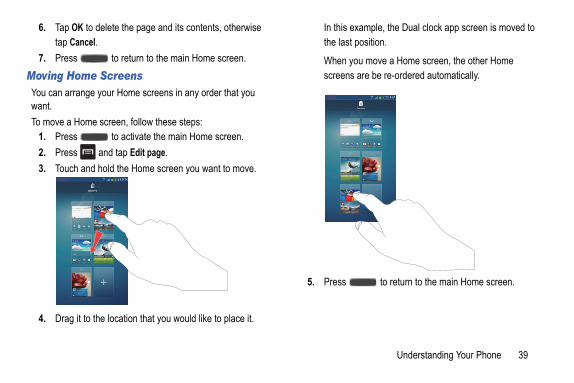
6. Tap OK to delete the page and its contents, otherwise tap Cancel.
7. Press to return to the main Home screen.Moving Home ScreensYou can arrange your Home screens in any order that you want.To move a Home screen, follow these steps:
1. Press to activate the main Home screen. 2. Press and tap Edit page.3. Touch and hold the Home screen you want to move.
4. Drag it to the location that you would like to place it.
In this exathe last p
When youscreens a
5. Press

tificationstifications from the Notification panel:e Home screen, touch and hold the Notification il the pull-down displays, then drag down y.
Clear button.ifications are cleared and the panel closes.
Clear Button
40
Notification BarThe Notification Bar includes a pull-down list to show information about processes that are running, recent notifications, and alerts. To display the Status indicator:
� On the Home screen, touch and hold the Notification Bar until the pull-down displays, then drag down vertically.
Clearing NoTo clear all no
1. From thBar untverticall
2. Tap theThe not

Understanding Your Phone 41
ing functions (default) can either be activated r deactivated (gray): Wi-Fi, GPS, Sound, tation, Bluetooth, Mobile data, Blocking mode, ving, Screen Mirroring, Multi window, Wi-Fi Beam, NFC, Air view, Air Gesture, Driving art stay, Smart scroll, Sync, and Flight mode.
then locate the Notifications panel area t the bottom of the Notifications panel screen. motion, touch and hold a desired function
it to the top row.ard you use a microSD, microSDHC or ard (“SD card”) to expand available memory ure digital card enables you to exchange and data between SD-compatible devices. resses the features and options of your
ctionality.
Accessing Additional Panel FunctionsIn addition to notifications, the Notification panel also provides quick and ready access to separate device functions. These can be quickly activated or deactivated by toggling them on or off. You can choose the functions that will be displayed.
1. From the notification panel, tap to display additional options.
The follow(green) oScreen roPower sahotspot, Smode, Sm
2. Tap located a
3. In a singlethen drag
Memory CYour device letsmicroSDXC cspace. This secimages, music, This section adddevice’s SD fun

ailable Memory Statusemory allocation for your external SD card:e Home screen, tap ➔ Settings ➔ More ➔
.ilable memory for Device and SD card displays e Total space and Available space headings.s from the SD card files from the SD card using the phone.the SD card is mounted. For more information, “Mounting the SD Card” on page 42.e Home screen, tap ➔ Settings ➔ More ➔
.mat SD card.ormat SD card confirmation prompt, tap Format .
rming the next step erases all data stored on the ard.
se everything to format or press to cancel.
42
Mounting the SD CardTo store additional photos, music, videos, and other applications, you must mount (install) the SD card prior to use. Mounting the SD card establishes a USB connection with your computer.
1. Insert the SD card into the external, SD card slot. For more information, refer to “Removing and Installing the Memory Card” on page 2.
2. Your SD card is scanned to see the available information on it.
Unmounting the SD cardUnmounting the SD card prevents corruption and damage to the SD card while removing it from the slot.
1. From the Home screen, tap ➔ Settings ➔ More ➔
Storage.2. Scroll to the bottom of the display and tap Unmount SD
card.3. Tap OK.
For more information, refer to “Removing and Installing the Memory Card” on page 2.
SD card AvTo view the m
1. From thStorage
2. The avaunder th
Erasing FileYou can erase
1. Ensure refer to
1. From thStorage
2. Tap For3. At the F
SD card
Warning! PerfoSD c
4. Tap Era
Call Functions 43
ternational CallHome screen, tap then touch and hold e + character appears.n-screen keypad to enter the country code, , and phone number. ke a mistake, tap until the desired numbers n deleted. to make the call.
e Dialingl a number with pause(s) without storing it in st:Home screen, tap and use the on-screen enter the phone number. to display the dialer sub-menu.
-sec pause to add a two second pause, and eypad to enter the additional numbers.
te pauses longer than two seconds by tiple two second pauses.
Section 3: Call Functions
This section describes how to make or answer a call. It also includes the features and functionality associated with making or answering a call.For more information, refer to “Sound Settings” on page 117.
Displaying Your Phone Number� Tap ➔ Settings ➔ More ➔ About device ➔
Status. Your phone number is displayed in the My phone number field.
Making a Call1. From the Home screen, tap and use the on-screen
keypad to enter the number you wish to dial.2. Tap to make the call.
Note: When you activate the Auto redial option in the Voice Call menu, the phone will automatically redial up to 10 times when the person does not answer the call or is already on the phone. For more information, refer to “Call Settings” on page 54.
Making an In1. From the
. Th2. Use the o
area code• If you ma
have bee3. Tap
Manual PausTo manually calyour Contacts li
1. From the keypad to
2. Press 3. Tap Add 2
use the k
Tip: You can creaentering mul

recent calls is displayed.
desired Contact to enter the Details page, then to make a call.mergency Callsave a SIM card installed the first time you turn the Insert SIM card to make calls message n animated tutorial shows you how to install the
card, you can only make an emergency call e; normal cell phone service is not available. mergency Call without a SIM cardergency call from the on-screen display to make rgency call.-1-1 and tap . Complete your call. During of call, you will have access to the Speaker eypad, and End Call features. to exit this calling mode.
e can drain your battery power more rapidly al calling mode.
44
4. Select Add wait to add a wait. A wait will pause the calling sequence until you enter a number or press a key.
5. Tap to make the call.For more information, refer to “Adding Pauses to Contact Numbers” on page 61.
Correcting an Entered NumberUse the following steps to correct a mis-typed entry when dialing.
� After entering a number using the keypad:• If you make a mistake, tap to erase a single character.• Press and hold to erase the entire string of numbers.
Ending a Call
� Tap the key.Dialing a Recent NumberAll incoming, outgoing and missed calls are recorded in the Call log. If the number or caller is listed in your Address Book, the associated name is also displayed.
1. From the Home screen, tap .2. Tap the Logs tab.
A list of
3. Tap thetap
Making EIf you do not hon the phone,displays and aSIM card.Without a SIMwith the phon
Making an E1. Tap Em
an eme2. Enter 9
this typemode, K
3. Tap
Note: This modthan norm

Call Functions 45
ontact to assign to the number. The selected umber will display in the speed dial number
e a speed dial number or change the order, to display the Speed dial setting sub-menu.
ge order or Remove.a call using Speed Dial, tap ➔ Keypad the Dialer, touch and hold the speed dial
all from the Address Bookhone numbers that you use regularly on the he phone’s memory. These entries are d the Address Book.
ils about the Address Book feature, see ress Book Entry” on page 62.
Making an Emergency Call with a SIM card1. From the Home screen, tap .2. Enter the emergency number (ex: 911) and then tap
.3. Complete your call. During this type of call, you will have
access to the Speaker mode, Keypad, and End Call features.
Making a Call Using Speed DialYou can assign a short cut number to a phone number in your Contacts List for speed dialing.
1. From the Home screen, tap Contacts to display your Contacts List.
2. Press to display the Contacts List sub-menu.3. Tap Speed dial setting.4. The Speed dial setting screen displays showing the
numbers 1 through 9. The number 1 is reserved for Voicemail.
5. Tap an unused number and the Select contact screen displays.
6. Select a ccontact nbox.
7. To removpress
8. Tap Chan9. To make
and from number.
Making a CYou can store pSIM card or in tcollectively calleFor further deta“Finding an Add
to end the call.
answer a call while using the Address Book or nu feature. After ending the call, the phone the previously active function screen.
46
Answering a CallWhen a call is received the phone rings and displays the caller’s phone number, or name if stored in the Address Book.
1. At the incoming call screen:• Touch and drag in any direction to answer the call.• Touch and drag in any direction to reject the call
and send it to your voicemail.• Touch and drag the Reject call with message tab upward and
tap a predefined text message to send to the caller.– I’m driving– I’m at the cinema– I’m in class– I’m in a meeting– Sorry, I’m busy. Call back later.
– or –– Tap Create new message to compose a new message.
2. Tap
Note: You can other mereturns to
Call Functions 47
cent calls is displayed. If the number or caller your Address Book, the associated name is .
eceived, and missed are listed. Types of calls the following icons:
a Missed Call issed call number:Home screen, tap ➔ Logs . cent calls is displayed. If the number or caller your Address Book, the associated name is .
:
:
:
Calls:
Dialing OptionsFrom the Home screen and Application menus, you have the option to access the Dialer and initiate a call by tapping
➔ Keypad. From the Dialer and the Contacts screen, the following tabs are located at the top of your screen:• Keypad: dials the current number entered using the on-screen
keypad.• Logs: displays a list of all dialed, received, and missed calls.• Favourites: displays your contacts that you have marked as
Favourites.• Contacts: takes you to your Address Book where you can select a
contact to call.After you begin to enter numbers, the Add to Contacts option appears so you can save the Contact if needed.
Call LogThe phone stores the numbers of the calls you’ve dialed, received, or missed in the Call log. The Call log displays the details of the call.
1. From the Home screen, tap .2. Tap the Logs tab.
A list of reis listed indisplayed
All calls made, rare identified by
Calling BackTo call back a m
1. From the A list of reis listed indisplayed
• Incoming Calls
• Outgoing Calls
• Missed Calls:
• Rejected Calls
• Auto Rejected
formation into the various fields using the .e to save when you are finished.tails about the Address Book feature, see Contact” on page 60.essage to a Recent Call
e Home screen, tap ➔ Logs . recent calls is displayed.
he entry you want to message to the left.
Add as new
Send a message
contactUpdate an existingcontact
48
2. Swipe the desired missed call to the right to call. – or –Swipe the desired missed call to the left to message.
Saving a Recent Call to your Address Book 1. From the Home screen, tap ➔ Logs .
A list of recent calls is displayed.
2. Tap the call you want to save to your Address Book. 3. The call detail page is displayed. Tap Create contact to
add the call to your Address Book.The Create contact screen is displayed.
– or –If you want to replace the number for an existing contact, tap Update existing.
4. Enter inkeypad
5. Tap SavFor further de“Adding a New
Sending a M1. From th
A list of
2. Swipe t
Call the number

Call Functions 49
d to reject list prompt, tap OK.lls from this number will be rejected and sent icemail.
ionHome screen, tap ➔ Logs . ➔ Call duration.ing times are displayed for Voice and Data:
: shows the length of time for the last call.alls: shows the total length of time for all calls made.d calls: shows the total length of time for all calls . shows the total length of time for all calls made and .reset these times to zero by pressing then eset.ring a Call
vides a number of control functions that you a call.
3. At the Message screen, tap the empty text field and use the on-screen keypad to type in a message.
4. When you are done with your message, tap to send. For more information, refer to “Creating and Sending Messages” on page 92.
Deleting a Call from the Call Log1. From the Home screen, tap ➔ Logs .
A list of recent calls is displayed.
2. Touch and hold the call you want to delete from the Call log.
3. Tap Delete.4. At the Delete log prompt, tap Delete.
The call is deleted from the Call log.
Adding a Call to the Reject List1. From the Home screen, tap ➔ Logs .
A list of recent calls is displayed.
2. Touch and hold the call you want to add to the Reject List.
3. Tap Add to reject list.
4. At the AdFuture cato your vo
Call Durat1. From the 2. Press 3. The follow
• Last call• Dialed c• Receive
received• All calls:
received4. You may
tapping ROptions DuYour phone procan use during
er to route the audio through the speaker. (You can speaker volume using the volume keys.) A green line under the Speaker button.er again to use the phone’s earpiece (see “Using the hone During an Active Call” on page 53). The will disappear when Speaker is not activated. turn the onboard microphone either on or off.
during a call to mute the microphone. A green line will der the Mute button.again to unmute the microphone. The green line will when Mute is not activated.ects to a Bluetooth headset.et during a call to activate a Bluetooth headset. A will appear under the Headset button.et again to de-activate the Bluetooth headset. The will disappear when the Headset is not activated.r more options: allows you to go to your Contact list.ws you to write a memo.
allows you to write a message during a call.
50
Adjusting the Call VolumeDuring a call, to adjust the earpiece volume, use the Volume keys on the left side of the phone.
� Press the Up volume key to increase the volume level and press the Down volume key to decrease the volume level.– or –Quickly add more volume to the incoming audio by tapping the on-screen Extra volume button
From the Home screen, you can also adjust the ringer volume using these same keys.
In-Call OptionsDuring an active call there are several functions available by tapping a corresponding on-screen button.• Hold: place the current active call on hold.• Add call: displays the dialer so you can call another person.• Keypad: displays the on-screen keypad, where you can enter
number using DTMF (Dual Tone Multi-Frequency).• End call: terminates the call.• Speaker: routes the phone’s audio through either the speaker or
through the earpiece.
– Tap Speakadjust the will appear
– Tap SpeakSpeakerpgreen line
• Mute/Unmute– Tap Mute
appear un– Tap Mute
disappear • Headset conn
– Tap Headsgreen line
– Tap Headsgreen line
• Press fo– Contacts:– Memo: allo– Message:
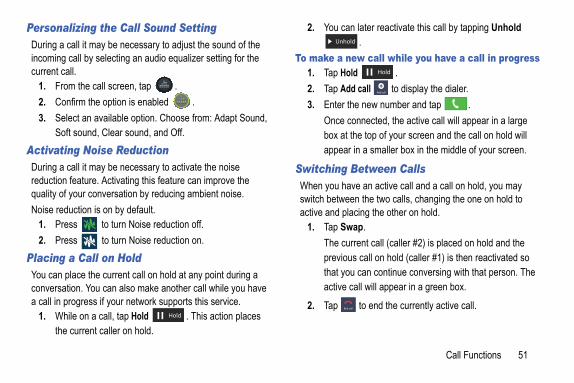
Call Functions 51
ater reactivate this call by tapping Unhold
call while you have a call in progress.
all to display the dialer. new number and tap .nected, the active call will appear in a large top of your screen and the call on hold will a smaller box in the middle of your screen.
tween Calls an active call and a call on hold, you may the two calls, changing the one on hold to ng the other on hold. . nt call (caller #2) is placed on hold and the call on hold (caller #1) is then reactivated so an continue conversing with that person. The l will appear in a green box.
o end the currently active call.
Hold
Personalizing the Call Sound SettingDuring a call it may be necessary to adjust the sound of the incoming call by selecting an audio equalizer setting for the current call.
1. From the call screen, tap .2. Confirm the option is enabled .3. Select an available option. Choose from: Adapt Sound,
Soft sound, Clear sound, and Off.Activating Noise ReductionDuring a call it may be necessary to activate the noise reduction feature. Activating this feature can improve the quality of your conversation by reducing ambient noise.Noise reduction is on by default.
1. Press to turn Noise reduction off.2. Press to turn Noise reduction on.
Placing a Call on HoldYou can place the current call on hold at any point during a conversation. You can also make another call while you have a call in progress if your network supports this service.
1. While on a call, tap Hold . This action places the current caller on hold.
2. You can l.
To make a new1. Tap Hold 2. Tap Add c3. Enter the
Once conbox at theappear in
Switching BeWhen you haveswitch betweenactive and placi
1. Tap SwapThe curreprevious that you cactive cal
2. Tap tHold
Unhold

ng (Multi-Party Calling) Multi-Party feature allows you to answer a
ing calls and place them on hold. If this service y the network, all calls can be joined together. d of an incoming call by a call waiting tone.
ge option combines all of the calls you have ed with your phone (both active and on hold). ces the current call on hold and then activates
ous call.
ins all of the calls you have established with oth active and on hold) into a multi-party call. and slide to the right to answer the call. and slide to the right to answer the next call.
ting "Name/Number" on hold to put the first call . first two callers into a single multi-party call by Merge .orarily leave the conference call, tap Hold .
n the conference call tap Unhold .
Me ge
Unhold
52
To end a specific call1. Tap Swap until the call you want to end appears in a
green box.2. Tap to end the specific call.3. Tap to end the remaining call.
To answer a call while you have a call in progress1. Tap and slide to the right to answer another call.2. Tap Putting "Name/Number" on hold to put the first call
on hold.– or –Tap Ending call with "Name/Number" to end the first call.
3. To switch between the two calls, tap Swap.• Swap: Places the current call on hold and then activates the
previous call. The active call will appear in a green box. Tap Swap again to switch back.
To end a call on hold1. Tap to disconnect the active call. 2. The call on hold will now become the active call. Tap
to end the call.
3-Way CalliThe 3-Way orseries of incomis supported bYou are notifie
Note: The MerestablishSwap plathe previ
This feature joyour phone (b
1. Tap 2. Tap 3. Tap Put
on hold4. Join the
tapping5. To temp
To rejoiHold

Call Functions 53
to deactivate the Mute function and the microphone. dsetset .e will scan for your Bluetooth headset. When nnect to the headset.set button now appears as and the headset is activated.
set to deactivate the Bluetooth headset ivate the phone speaker. r a Number in Address Booke active call, press then tap Contacts.ddress Book entry.ils about the Address Book feature, see ress Book Entry” on page 62.
feature allows you to answer an incoming call a call in progress, if this service is supported and you must first activate the Call Waiting
6. Tap to end the call.Using the Speakerphone During an Active CallWhile in an active call, it is possible to enable the speakerphone feature.
1. Tap Speaker .The Speaker button now appears as and the speakerphone is activated.
2. Use the Volume keys (located on the left side of your phone) to adjust the volume.
3. To deactivate the speakerphone, tap Speaker .Switching off the Microphone (Mute)You can temporarily switch your phone’s microphone off, so that the other person cannot hear you.
Example: You wish to say something to person in the room, but do not want the person on the phone to hear you.
To mute your phone during a call1. Tap Mute .
The Mute button now appears as and Mute is activated.
2. Tap Mutereactivate
Bluetooth hea1. Tap Head2. The phon
found, coThe HeadBluetooth
3. Tap Headand react
Searching fo1. During th2. Tap the A
For further deta“Finding an Add
Call waitingThe Call Waitingwhile you have by the network, feature:
ings Call settings menu:e Home screen, tap ➔ ➔ Call .
e Home screen, tap ➔ Settings ➔ ce ➔ Call.rmation, refer to “Call Settings” on page 119.
My device
54
� From the Home screen, tap ➔ ➔ Call settings ➔ Additional settings ➔Call waiting.You are notified of an incoming call by a call waiting tone.
Call forwarding1. From the Home screen, tap ➔ ➔ Call settings
➔ Additional settings ➔ Call forwarding.2. Tap one of the following options:
• Always forward: allows you to forward all voice calls.• Forward when busy allows you to forward voice calls to a
designated number instead of your voice mail number if you are on another phone call.
• Forward when unanswered: allows you to forward voice calls to a designated number instead of your voicemail number when there is no answer on your phone. You can also select the amount of time that the phone delays before forwarding.
• Forward when unreachable: allows you to forward voice calls to a designated number instead of your voicemail number when you are not in an area covered by your service provider or when your phone is switched off.
Call SettTo access the
� From thsettings– or –
� From thMy devi
For more info

Entering Text 55
ext Using the Samsung
here you can enter text, rotate your phone e to a Landscape orientation. The on-screen d will display.
New Paragraph
DeleteKey
Space Bare TypingSettings
Section 4: Entering Text
This section describes how to select the desired text input method when entering characters into your phone. This section also describes the predictive text entry system that reduces the amount of key strokes associated with entering text.Your phone comes equipped with an orientation detector that can tell if the phone is being held in an upright (Portrait) or sideways (Landscape) orientation. This is useful when entering text.
Text Input MethodsThere are three text input methods available:• Samsung keyboard (default): Samsung’s on-screen QWERTY
keypad that can be used in both portrait and landscape orientation.
• Google Voice typing: allows you to enter text by speaking. To change the input method, see “Keyboards and Input Methods” on page 128.
Entering TKeyboardFrom a screen wcounterclockwisQWERTY keypa
Text Input Mode
ShiftKey
Voicand

desired alphabetic characters.een initially opens in ABC mode. After typing the er, the shift key ( ) will change to owing letters will be lowercase.
to input another upper-case letter or tap twice to switch to ABC mode. The shift key will to in ABC mode. All following letters will rcase until you tap the shift key again.mbol/Numeric Modeumeric Mode to add numbers, symbols, or
your phone counterclockwise to a Landscape ion.
56
Changing the Text Input Mode - KeypadThere are two main keypad layout keys that will change the on-screen keys within the QWERTY keypad.The available Text Input modes are: Sym and Abc.
Note: When in Abc mode, the Sym button will appear. When in Sym mode, the Abc/ABC/abc button will appear.
Using ABC Mode1. If desired, rotate your phone counterclockwise to a
Landscape orientation.2. When you tap the Enter message field, the following
screen displays:
3. Tap the4. The scr
first lettand foll
5. Tap
changebe uppe
Using SyUse Symbol/Nemoticons.
1. Rotate orientat
Symbol/Numeric Mode: activates the symbol keys.
ABC Mode: activates the default alphabet keys. Can also be set to Abc or abc by using the shift ( ) key.
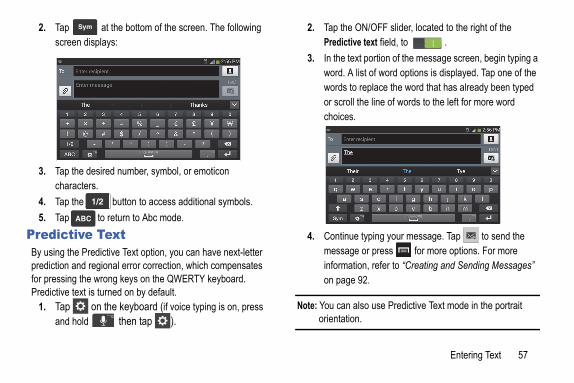
Entering Text 57
N/OFF slider, located to the right of the text field, to . portion of the message screen, begin typing a st of word options is displayed. Tap one of the replace the word that has already been typed he line of words to the left for more word
typing your message. Tap to send the or press for more options. For more n, refer to “Creating and Sending Messages” 2.
so use Predictive Text mode in the portrait .
2. Tap at the bottom of the screen. The following screen displays:
3. Tap the desired number, symbol, or emoticon characters.
4. Tap the button to access additional symbols. 5. Tap to return to Abc mode.
Predictive TextBy using the Predictive Text option, you can have next-letter prediction and regional error correction, which compensates for pressing the wrong keys on the QWERTY keyboard. Predictive text is turned on by default.
1. Tap on the keyboard (if voice typing is on, press and hold then tap ).
2. Tap the OPredictive
3. In the textword. A liwords to or scroll tchoices.
4. Continue messageinformatioon page 9
Note: You can alorientation
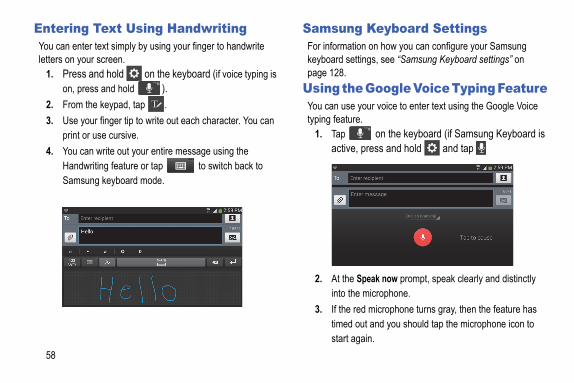
Keyboard Settingsn on how you can configure your Samsung ings, see “Samsung Keyboard settings” on
Google Voice Typing Featureour voice to enter text using the Google Voice .
on the keyboard (if Samsung Keyboard is press and hold and tap
peak now prompt, speak clearly and distinctly microphone.d microphone turns gray, then the feature has ut and you should tap the microphone icon to ain.
58
Entering Text Using HandwritingYou can enter text simply by using your finger to handwrite letters on your screen.
1. Press and hold on the keyboard (if voice typing is on, press and hold ).
2. From the keypad, tap .3. Use your finger tip to write out each character. You can
print or use cursive.4. You can write out your entire message using the
Handwriting feature or tap to switch back to Samsung keyboard mode.
SamsungFor informatiokeyboard settpage 128.
Using theYou can use ytyping feature
1. Tap active,
2. At the Sinto the
3. If the retimed ostart ag
Entering Text 59
The text is displayed in the message as you are speaking.
4. Tap to return to the keyboard.
Note: The feature works best when you break your message down into smaller segments.
o: assign part of the contents of an S Memo as the t image.ve: deletes any previously assigned image on an g contact. Name field and use the on-screen keypad to e full name. For more information, refer to g Text” on page 55.
next to the Name field to display additional elds.
Phone number field.erical keypad is displayed.
bile button initially displays next to the umber field. If you want to add a phone number ot a mobile number, tap the Mobile button and om Mobile, Home, Work, Work fax, Home Fax, ther, Custom (add your own label), or Callback.
e phone number.
60
Section 5: Contacts and Your Address Book
This section allows you to manage your daily contacts by storing their name and number in your Address Book. Address Book entries can be sorted by name, entry, or group.
Adding a New ContactUse the following procedure to add a new contact to your Address Book.
Saving a Number from the Home screen1. From the Home screen, tap Contacts ➔ .2. At the Save contact to prompt, tap on SIM, Phone, or
Account name.3. Tap the image icon and assign a picture to the new entry
by choosing one of three options:• Image: retrieve a previously stored image from your Gallery or
from your My files folder and assign it to this entry. Tap an image to assign the image to the contact, then tap Done.
• Pictures by people: retrieve a previously stored image from your Gallery.
• Take picture: use the camera to take a new picture and assign it to this entry, then tap Done.
• S Memcontac
• Remoexistin
4. Tap theenter th“Enterin– or –Tap name fi
5. Tap theThe num
The MoPhone nthat is nselect frPager, O
6. Enter th

Contacts and Your Address Book 61
will stop the calling sequence for two seconds ause the calling sequence until you enter a a key.
or a wait to an existing Contact:Home screen, tap Contacts , and then tap or number to open the Contact.o edit.hone number field.creen at the position where the pause or wait be added.
. to add a two-second pause or tap Wait to add d use the keypad to enter the additional A pause will be displayed as a comma (,) and l be displayed as a semi-colon (;).to save your changes, or tap Cancel to discard. Existing Contact existing contact, you can tap a field and
e the information, or you can add additional tact’s list of information.Home screen, tap Contacts .
Tap to add another Phone number field or tap to delete a field.
7. Tap any of the following fields that you want to add to your new contact:• Groups: assign the contact to Not assigned, ICE - emergency
contacts, Co-workers, Family, or Friends.• Ringtone: adds a field used to assign a message tone that
will sound when messages are received from this contact.• Message alert: allows you to set the ringtone for your
message alerts.• Vibration pattern: allows you to set the specific type of
vibration. • Add another field: tap this button to add another field such as
Phonetic name, Organization, Email, IM, Address, Notes, Nickname, Website, Internet call, Events, or Relationship.
8. Tap Save to save the new contact.Adding Pauses to Contact NumbersWhen you call automated systems, you are often required to enter a password or account number. Instead of manually entering the numbers each time, you can store the numbers in your Contacts along with special characters called pauses and
waits. A pause and a wait will pnumber or pressTo add a pause
1. From the the name
2. Tap t3. Tap the p4. Tap the s
needs to 5. Tap 6. Tap Pause
a wait, annumbers.a wait wil
7. Tap Save Editing anWhen editing anchange or deletfields to the con
1. From the
he Contacts list (sorted alphabetically), tap a the right side of the display to quickly jump to
tacts beginning with that letter.
contact you wish to call or message.
62
2. Press and hold the Contact that you want to edit.3. Tap Edit.4. Tap any of the fields to add, change, or delete
information.5. Tap Save to save the edited information.
Using ContactsDialing or Messaging from Address BookOnce you have stored phone numbers in the Address Book, you can dial them easily and quickly by either using their SIM card location number or by using the Search field to locate the entry. From the Address book, you can also send messages.
Finding an Address Book EntryYou can store phone numbers and their corresponding names onto your SIM card and phone’s onboard memory. The two locations are physically separate but are used as a single entity, called the Address Book.Depending on your particular SIM card, the maximum number of phone numbers the SIM card can store and how they are stored may differ.
1. From the Home screen, tap Contacts .
2. Within tletter onthe con
3. Tap the
Contacts and Your Address Book 63
ntactsact Informationw maintain multiple email accounts, social s, and other similar account information. For
ebook account login name might differ from a account login because they are maintained for different groups of people. synchronize with multiple accounts such as er, MySpace, Corporate email, and Google. hronize your phone with these accounts, each a separate contact entry in the Contacts list.ntacts (Amy Smith, for example) has a regular at you maintain in Gmail, but also has a nt under her maiden and married name, as
! chat account, when you merge these ur Contacts list you can join all of her entries ormation in one record.u synchronize your phone with your accounts, t contacts make to email account names, , etc. automatically update in your contacts
ation about synchronizing accounts, see Accounts” on page 65.
4. Tap the phone icon to make a phone call or tap the message icon to send a message.
For more information, refer to “Creating and Sending Messages” on page 92.
Tip: From the Contact list, sweep right over a listing to make a call. Sweep left over a listing to send a message.
Joining CoJoining ContMany people nonetworking loginexample, a Faccorporate emailseparately and This device canFacebook, TwittWhen you syncaccount createsIf one of your coemail account thFacebook accouwell as a Yahooaccounts into yoand view the infThe next time yoany updates thaemail addresseslist.For more inform“Synchronizing
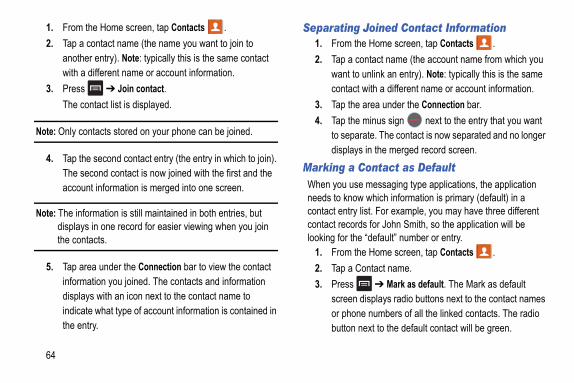
Joined Contact Informatione Home screen, tap Contacts .ontact name (the account name from which you unlink an entry). Note: typically this is the same with a different name or account information. area under the Connection bar. minus sign next to the entry that you want rate. The contact is now separated and no longer in the merged record screen.ontact as Default messaging type applications, the application which information is primary (default) in a
list. For example, you may have three different s for John Smith, so the application will be “default” number or entry.e Home screen, tap Contacts .ontact name.
➔ Mark as default. The Mark as default displays radio buttons next to the contact names e numbers of all the linked contacts. The radio ext to the default contact will be green.
64
1. From the Home screen, tap Contacts .2. Tap a contact name (the name you want to join to
another entry). Note: typically this is the same contact with a different name or account information.
3. Press ➔ Join contact.The contact list is displayed.
Note: Only contacts stored on your phone can be joined.
4. Tap the second contact entry (the entry in which to join). The second contact is now joined with the first and the account information is merged into one screen.
Note: The information is still maintained in both entries, but displays in one record for easier viewing when you join the contacts.
5. Tap area under the Connection bar to view the contact information you joined. The contacts and information displays with an icon next to the contact name to indicate what type of account information is contained in the entry.
Separating1. From th2. Tap a c
want tocontact
3. Tap the4. Tap the
to sepadisplays
Marking a CWhen you useneeds to knowcontact entry contact recordlooking for the
1. From th2. Tap a C3. Press
screen or phonbutton n

Contacts and Your Address Book 65
ook Options Address Book options while at the main age or while in the details page for a specific
dress BookHome screen, tap Contacts then press
ing options are displayed:llows you to delete 1 or more of your contacts.xport: allows you to move contacts to or from your card, USB storage or SIM card. You can also send a rd via Bluetooth, ChatON, Email, Gmail, Messaging, Direct.ccounts: merge with Google or Merge with g.s: allows you to add and manage your Samsung, , Google, LDAP (Lightweight Directory Access ), and Microsoft Exchange ActiveSync accounts. Tap ount and then follow the on-screen instructions.
4. To change the default contact, tap the radio button next to another entry that you want to be the default. The radio button will turn green, then tap Done.
Synchronizing AccountsFrom the Accounts menu you decide if you want applications to synchronize, send, and receive data at any given time, or if you want the applications to synchronize automatically. After determining how you want the accounts to synchronize, indicate which account to synchronize with your Contacts list.
1. From the Home screen, tap Contacts .2. Press then tap Accounts.
If you have previously added any accounts, the Sync settings prompt is displayed with your current accounts listed.
3. Tap an account that you would like to synchronize.4. At the Sync settings screen, tap the options that you
would like to synchronize for that account.5. Tap Sync now to synchronize the account.
The account is synchronized.
6. Press to return to the Contacts list.
Address BYou can accessAddress Book pentry.
Options in Ad1. From the
.2. The follow
• Delete: a• Import/E
memorynamecaor Wi-Fi
• Merge aSamsun
• AccountChatONProtocolAdd acc

Selected Contact Screene Home screen, tap Contacts .ontact and at the contact’s display screen, press
owing options are displayed:y: allows you to view the phone and message history contact.llows you to edit the contact’s information.: allows you to delete the contact from your Address
ontact: allows you to join contacts with other contacts.ate contact: allows you to separate contacts that have oined.s default: when you have multiple contacts linked er, you can mark one of them as default (only displays contact is saved to the phone). For more information, “Marking a Contact as Default” on page 64. namecard via: Send contact’s namecard information via oth, ChatON, Email, Gmail, Messaging, or Wi-Fi Direct.
66
• Speed dial setting: allows you to set up speed-dialing. For more information, refer to “Making a Call Using Speed Dial” on page 45.
• Send message/email: allows you to send a text message, picture message or email.
• Contacts to display: You can choose to display all of your contacts or only display contacts on your Phone, SIM, or contacts stored to other accounts. You can also tap Customized list to change other options on how your contacts are displayed.
• Settings: allows you to choose set the following options:– Only contacts with phones: allows you to only display
contacts that have phone numbers.– Sort list by: allows you to sort by First name or Last name.– Display contacts by: allows you to sort by First name or Last
name first.– Service numbers: allows you to display or edit your service
numbers.– Contact sharing settings: allows you to send all or individual
contacts via Bluetooth in the form of namecards.• Help: View information to help you use Contacts.
Options at 1. From th2. Tap a c
.3. The foll
• Historfor the
• Edit: a• Delete
Book.• Join c• Separ
been j• Mark a
togethwhen refer to
• ShareBlueto
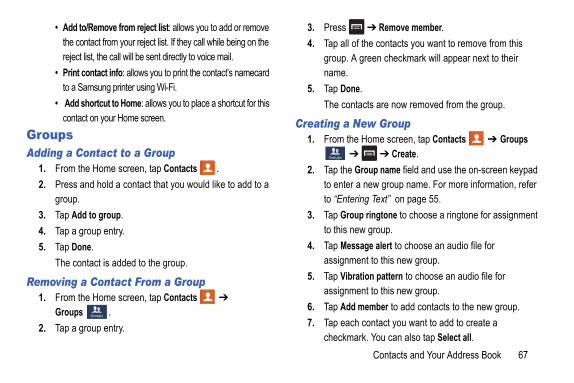
Contacts and Your Address Book 67
➔ Remove member.the contacts you want to remove from this green checkmark will appear next to their
.cts are now removed from the group.
ew GroupHome screen, tap Contacts ➔ Groups
➔ Create.roup name field and use the on-screen keypad new group name. For more information, refer ng Text” on page 55.
ringtone to choose a ringtone for assignment w group. age alert to choose an audio file for nt to this new group. tion pattern to choose an audio file for nt to this new group.ember to add contacts to the new group.
contact you want to add to create a k. You can also tap Select all.
• Add to/Remove from reject list: allows you to add or remove the contact from your reject list. If they call while being on the reject list, the call will be sent directly to voice mail.
• Print contact info: allows you to print the contact’s namecard to a Samsung printer using Wi-Fi.
• Add shortcut to Home: allows you to place a shortcut for this contact on your Home screen.
GroupsAdding a Contact to a Group
1. From the Home screen, tap Contacts .2. Press and hold a contact that you would like to add to a
group.3. Tap Add to group.4. Tap a group entry.5. Tap Done.
The contact is added to the group.
Removing a Contact From a Group1. From the Home screen, tap Contacts ➔
Groups .2. Tap a group entry.
3. Press 4. Tap all of
group. A name.
5. Tap DoneThe conta
Creating a N1. From the
➔ 2. Tap the G
to enter ato “Enteri
3. Tap Groupto this ne
4. Tap Messassignme
5. Tap Vibraassignme
6. Tap Add m7. Tap each
checkmar
Groups
Groups
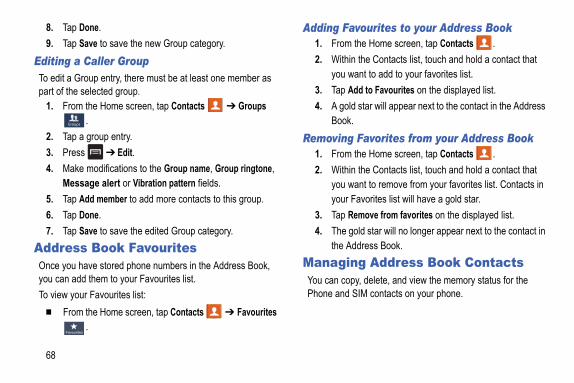
ourites to your Address Booke Home screen, tap Contacts .he Contacts list, touch and hold a contact that t to add to your favorites list. to Favourites on the displayed list.tar will appear next to the contact in the Address
avorites from your Address Booke Home screen, tap Contacts .he Contacts list, touch and hold a contact that t to remove from your favorites list. Contacts in
vorites list will have a gold star.ove from favorites on the displayed list.
d star will no longer appear next to the contact in ress Book. Address Book Contacts
delete, and view the memory status for the M contacts on your phone.
68
8. Tap Done.9. Tap Save to save the new Group category.
Editing a Caller GroupTo edit a Group entry, there must be at least one member as part of the selected group.
1. From the Home screen, tap Contacts ➔ Groups .
2. Tap a group entry.3. Press ➔ Edit.4. Make modifications to the Group name, Group ringtone,
Message alert or Vibration pattern fields. 5. Tap Add member to add more contacts to this group.6. Tap Done.7. Tap Save to save the edited Group category.
Address Book FavouritesOnce you have stored phone numbers in the Address Book, you can add them to your Favourites list.To view your Favourites list:
� From the Home screen, tap Contacts ➔ Favourites .
Adding Fav1. From th2. Within t
you wan3. Tap Add4. A gold s
Book.Removing F
1. From th2. Within t
you wanyour Fa
3. Tap Rem4. The gol
the AddManagingYou can copy,Phone and SI
Groups
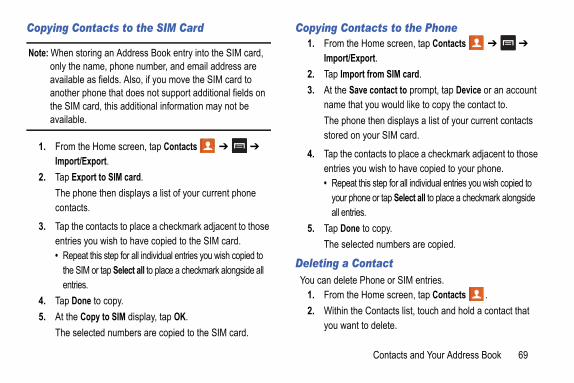
Contacts and Your Address Book 69
tacts to the PhoneHome screen, tap Contacts ➔ ➔ port.rt from SIM card.e contact to prompt, tap Device or an account
t you would like to copy the contact to.e then displays a list of your current contacts your SIM card.
ntacts to place a checkmark adjacent to those u wish to have copied to your phone. his step for all individual entries you wish copied to ne or tap Select all to place a checkmark alongside s. to copy.ted numbers are copied.
ntact Phone or SIM entries.Home screen, tap Contacts . Contacts list, touch and hold a contact that to delete.
Copying Contacts to the SIM Card
Note: When storing an Address Book entry into the SIM card, only the name, phone number, and email address are available as fields. Also, if you move the SIM card to another phone that does not support additional fields on the SIM card, this additional information may not be available.
1. From the Home screen, tap Contacts ➔ ➔ Import/Export.
2. Tap Export to SIM card.The phone then displays a list of your current phone contacts.
3. Tap the contacts to place a checkmark adjacent to those entries you wish to have copied to the SIM card. • Repeat this step for all individual entries you wish copied to
the SIM or tap Select all to place a checkmark alongside all entries.
4. Tap Done to copy.5. At the Copy to SIM display, tap OK.
The selected numbers are copied to the SIM card.
Copying Con1. From the
Import/Ex2. Tap Impo3. At the Sav
name thaThe phonstored on
4. Tap the coentries yo• Repeat t
your phoall entrie
5. Tap DoneThe selec
Deleting a CoYou can delete
1. From the 2. Within the
you want
rough the available numbers (if available).umber and the call is made.
u is available only when your SIM card supports ialing Numbers.
70
3. Tap Delete on the displayed list.At the Delete prompt, tap OK to delete the contact or Cancel to exit.Deleting Multiple Contacts
1. From the Home screen, tap Contacts ➔ ➔ Delete. The phone displays a list of your current contacts.
2. Tap the contacts to place a checkmark adjacent to those entries you wish to delete. • Repeat this step for all individual entries you wish deleted or
tap Select all to place a checkmark alongside all entries.3. Tap Delete.4. At the Delete Contact prompt, tap OK.
The selected contacts are deleted.
Using the Service Dialing NumbersYou can view the list of Service Dialing Numbers (SDN) assigned by your service provider. These numbers may include emergency numbers, customer service numbers, and directory inquiries.
1. From the Home screen, tap Contacts ➔ ➔ Settings.
2. Tap Service numbers.
3. Scroll th4. Tap a n
Note: This menService D

Multimedia 71
amsung account manages the access ation (username/password) to several ations, such as Samsung Link, Chat On, and ung Hub.
ew Samsung Hub Accountrent or buy media, you must first create an he required information.ou have already logged in to your Samsung
Home screen, tap ➔ Samsung Hub .mpted to connect via mobile networks, select ncel or Connect. your Samsung account is not yet active or ap OK. You must be signed in to your account to use the application’s various
Section 6: Multimedia
This section explains how to use the multimedia features of your phone, including Samsung Hub, Samsung Link, Music, Video, Play Movies, Gallery, Camera, and Camcorder.
Samsung HubSamsung Hub makes it easy to find, sample, and purchase movies, TV shows, books, games, and music, in one user-friendly location. With hundreds of titles available, entertaining your family on-the-go has never been easier. You can rent or purchase your favorite content and watch from any location. Samsung Hub is your gateway to mobile entertainment.You must have an active Samsung Account to purchase and rent content via Samsung Hub.
Note: Samsung Hub usage is based on service availability.
Important! You must be using an active Wi-Fi/4G/LTE connection to preview and download a media file. The internal memory acts as a storage location for your downloaded rental or purchase.
Important! The SinformapplicSams
Creating a NBefore you can account. Enter t
1. Confirm yaccount.
2. From the 3. When pro
either Ca4. If notified
verified, tSamsungfeatures.

: displays featured Music content available for se/stream from the Music store & Radio. This page
llows you to search for new content, or navigate directly Music store page by clicking on the Music link at the top page. : displays featured film and TV content available for se/rent from the video store. This page also allows you
rch for new content, or navigate directly to the Movie & re page by clicking the Video link a the top of the page.S: displays featured Book content available for se from the Book store. This page also allows you to for new content, or navigate directly to the Book store y clicking the Books link a the top of the page.S: displays featured Game content available from the store. This page also allows you to search for new t, or navigate directly to the Game store page by
g the Games link a the top of the page.NING: displays featured Learning content available e Learning store. This page also allows you to search content, or navigate directly to the Learning store y clicking the Learning link a the top of the page.
72
Tip: In some cases it might be necessary to sign in to your Samsung account via the application. Press and then select Sign in.
Note: Your Samsung Hub account is managed by the Samsung account application. This application manages your user profile information.
5. Press ➔ Help for additional information.Using Samsung HubThe main Samsung Hub screen provides an overview of all the available categories on one page such as: Music, Video, Books, and Games. The overview page also displays recently added media that you can rent or purchase.
1. From the Home screen, tap ➔ Samsung Hub .• The Overview screen (landing page) displays an main access
for all available categories and recently available content for purchase or rental.
2. Scroll across the screen to select from the following available pages:
• MUSICpurchaalso ato the of the
• VIDEOpurchato seaTV sto
• BOOKpurchasearchpage b
• GAMEGamecontenclickin
• LEARfrom thfor newpage b
Multimedia 73
etwork coverage to access Media Content you have h the Service. , 4G, LTE or Wi-Fi connectivity to download Media
d Media Content, rented Media Content will be ly 1 device in your account at a time. is downloaded and saved to your authorized rd. No SD Card included out of box.tent may pause/stop or not download in networks
a weak signal. watching downloaded Media Content as soon as a) tion has occurred and b) sufficient amount of the has been buffered.watching Media Content within the time limit set out f content (which may be as short as 24 consecutive
, pausing or restarting rented Media Content does d the available viewing time.
3. To purchase or view featured content in more detail, tap on any content (Thumbnail or text) to navigate to the product detail page.
4. Depending on the content, you can either purchase, rent, or stream the content directly from the product detail page.
5. Choose a payment method, then follow the on-screen instructions.
Samsung Hub Notices• Any media item (Media Content) may be rented or purchased after
you create an account in Samsung Hub. • Media Content that is purchased and downloaded may be viewed
concurrently on up to five (5) devices with Samsung Hub (or “the service”) that are also registered to the same account.
• You may remove a device from your account no more than once every 90 days.
• You may remove Media Content from a device as many times as you’d like. You will have the ability to re-download the Media Content later subject to content re-download availability and content provider permissions.
• You may need nacquired throug
• You can use 3GContent.
• Unlike purchaseviewable on on
• Media Content device's SD ca
• Your Media Conwhere there is
• You may begin license acquisiMedia Content
• You must finish for each piece ohours).
• Stoppingnot exten

allows users to share their in-device media ther external devices using DLNA certified™ Network Alliance) Devices. These external also be DLNA-compliant. Wi-Fi capability can be s via a digital multimedia streamer.
must first connect both of your communicating ices to the same Wi-Fi and be using an ve/registered Samsung account prior to using application. For more information, refer to “Wi-Fi tings” on page 106. For more information, refer Creating a Samsung Account” on page 9.
e Home screen, tap ➔ Samsung Link .n in to sign into your Samsung Account if you t already done so.ted, read the on-screen message about network and tap OK to continue and return to the main g Link screen.
rt and follow the on-screen prompts.cross the application screen to view either MY T CONTENT or DEVICES & STORAGE.
74
• In no event will rented Media Content be available for a period of more than thirty (30) days (or shorter on a title-by-title basis) after the Media Content has been rented (e.g., if you begin viewing rented Media Content on the 29th day after the rental transaction, but do not finish viewing the entire title, that rented Media Content may not be available for the entire twenty-four (24) consecutive hour period if such period would extend the viewable time beyond the thirty (30) day rental window).
• Unless otherwise restricted by the Content Providers, you can download Media Content to your TV using HDMI connections; otherwise, you cannot play Media Content downloaded from your mobile device output.
Samsung LinkThis application wirelessly synchronizes your Samsung device with your TV, streams content, and even keeps tabs on who calls or sends text messages with real-time, on-screen monitoring. Samsung Link makes staying connected easy.
Samsung Linkcontent with o(Digital Livingdevices must provided to TV
Important! YoudevactithisSetto “
1. From th2. Tap Sig
have no3. If promp
chargesSamsun
4. Tap Sta5. Scroll a
RECEN

Multimedia 75
: tered storage: allows you to add a Web storage n. Without a storage service/location added, you will not e to use Samsung Link.vice: displays your device name as it is used with ung Link. Tap to change the device name.to: allows you to save your media to your internal phone ry or to an SD card.pload: allows you to setup automatic upload of images
our device to those storage locations specified within the torage list. Touch and slide the slider to the right to turn it
. optimization: allows you to setup the video quality for ed video content. Touch and slide the slider to the right it on .ord lock: allows you to restrict access to Samsung
y requiring a user enter the currently active and iated Samsung account password. Touch and slide the to the right to turn it on .count: displays Samsung account information.mer support: allows you access to Help information.
6. The DEVICES & STORAGE screen contains two separate streaming media options:• Registered storage: allows you to receive and playback
media stored externally (server, laptop, etc.) directly on your device by allowing you to add a Web storage service for streaming content.
• Registered devices: allows you to stream/share selected multimedia content from your device to DLNA compliant device connected to the same Wireless Access Point.
Configuring Samsung Link SettingsSamsung Link must first be configured prior to its initial use. You must setup parameters such as connected Wi-Fi, Items to share, source server address, and external device acceptance rights.
1. From the Home screen, tap ➔ Samsung Link .2. Press and then tap Settings and configure the
following settings as desired:• Refresh: allows you to refresh the screen.• Register storage: allows you to add a Web storage location.
Without a storage service/location added, you will not be able to use Samsung Link.
• Settings– Regis
locatiobe abl
– My deSams
– Save memo
– Auto Ufrom yWeb son
– Videostreamto turn
– PasswLink bassocslider
– My ac– Custo

(Stream to connected devices) to begin ng the selected files.rget device (for example, an Internet TV) select creen Allow button to continue.
age your device is requesting access to share th the external source.
(AllShare Controller enabled) appears in the ea at the top of the device to indicate you are vice as the media source.
plication that can play music files. It supports nsions AAC, AAC+, eAAC+, MP3, WMA, 3GP, A. Launching the Music Player allows you to gh your music library, play songs, and create
ic files bigger than 300 KB are displayed).sic ➔ Music .
brary category at the top of the screen (Songs, , Albums, Artists, Music square, Folders or
Devices) to view the available music files.
76
– About this service: displays version and license information about Samsung Link.
Sharing Media via Samsung Link to a Target Device
Important! Make sure all communicating devices are connected to the same Wi-Fi.
1. Launch Samsung Link on the target device (such as an Internet TV, Samsung Tablet, etc.).
2. From the Home screen, tap ➔ Samsung Link . 3. Tap your device name from the Devices list.4. Tap an available category tab (Pictures, Music, Movies,
Files) and select a file.• Touch and hold to select multiple files.• A file with in the upper-left indicates it is stored remotely
on a web storage location. Selecting this media causes your device to access the file currently stored on your services’ servers.
5. Tap an available on-screen file, image, or video to place a green check mark alongside it.
6. Tap streami
7. On a tathe on-s
Note: At this stmedia wi
Confirm Notification arusing your de
MusicMusic is an apfiles with exteMP4, and M4navigate throuplaylists (mus
Playing Mu1. Tap 2. Tap a li
PlaylistsNearby
Multimedia 77
sional options, follow these steps:ying music, press . options are available:
tooth: scans for devices and pairs with a Bluetooth
usic: allows you to share your music using Group
laylist: allows you to add the current music file to a playlist.llows you to set a music file to Phone ringtone, Caller , or Alarm tone.
uffle Off: songs play in order and are not ffled.
ts the current playlist songs.
plays the current song in the player window.
ign the current song as a Favourite.
eams the current music file to another device via msung Link.
3. Scroll through the list of songs and tap an entry to begin playback.
4. Tap in the control bar to view all music player controls.
5. The following Music controls are available:
Music OptionTo access addit
1. While pla2. The follow
• Via Blueheadset.
• Share mPlay.
• Add to pselected
• Set as: aringtone
Pause the song.
Start the song after being paused.
Press and hold to rewind the song. Tap to go to previous song.
Press and hold to fast-forward the song. Tap to go to next song.Volume control.
Volume control showing volume muted.
Repeat one: repeats the currently playing song.
Repeat all: replays the current list when the list ends.
Play All: plays the current song list once.
Shuffle On: the current list of songs are randomly shuffled for playback.
Shshu
Lis
Dis
Ass
StrSa
menu: this menu allows you to select which categories ant to display. Choices are: Albums, Artists, Genres, square, Folders, Composers, Years, Most played, tly played, or Recently added. Tap each item that you o display in the Music menu. auto off: when activated, music will automatically turn r a set interval.: displays lyrics (when available). volume: automatically adjusts each track’s volume to al level.
control: allows you to use voice commands to control sic player.ylists
sed to assign songs to a list of preferred media n be grouped into a list for later playback. These e created via either the handset’s Music Player
or from within a 3rd party music application ows Media Player) and then downloaded to the
Playliste Home screen, tap ➔ Music .
78
• Show Music view: • Settings: allows you to change your Music Player settings.
For more information, refer to “Music Settings” on page 78.• Details: allows you to view media info such as Artist, Title,
Biography, and other information.• End: allows you to end the Music Player app.
Music SettingsThe Music Settings menu allows you to set preferences for the Music Player such as whether you want the music to play in the background, sound effects, and how the music menu displays.
1. From the Home screen, tap ➔ Music .2. Press ➔ Settings.3. Select one of the following settings:
• SoundAlive: set a type of equalization such as Normal, Pop, Rock, Jazz, Dance, Classic, etc.
• Adapt Sound: allows you to hear incoming calls and notifications when your are listening with earphones.
• Play speed: set the play speed anywhere between 0.5X and 2.0X using the slider.
• Musicyou wMusicRecenwant t
• Musicoff afte
• Lyrics• Smart
an equ• Voice
the MuUsing PlaPlaylists are uwhich can thePlaylists can boptions menu(such as Windhandset.
Creating a 1. From th
Multimedia 79
ylist and removing music files in a playlist, you can playlist.
t:Home screen, tap ➔ Music Player .sts. ➔ Edit title.
ylist name to edit.ew name for the playlist then tap OK.y Music
y Music, you can play music that you have usic file as well as any music you copied from offline, you can listen to music you have r PC.Home screen, tap ➔ Play Music on your device and external SD card is , including Music folders that contain multiple
g to start playback.
2. Tap the Playlists tab.3. Press ➔ Create playlist.4. Type a name for this playlist in the field and tap OK.
Adding Music to a PlaylistTo add files to the playlist:
1. From the Home screen, tap ➔ Music 2. Tap the Playlists tab.3. Tap the playlist name in which to add music.4. Tap Add music.5. Tap a music file, or tap Select all to add all the music
tracks to this playlist then tap Done.Removing Music from a PlaylistTo remove music files from a playlist:
1. From the Home screen, tap ➔ Music 2. Tap the Playlists tab.3. Tap the playlist name in which to delete music.4. Press ➔ Remove.5. Tap the checkbox to the left of each track you want to
remove from this playlist, or tap Select all to remove all the music tracks from this playlist, then tap Remove.
Editing a PlaBesides addingalso rename theTo edit a playlis
1. From the 2. Tap Playli3. Press 4. Tap a pla5. Enter a n
Google PlaWith Google Plaadded to your myour PC. While copied from you
1. From the 2. All music
displayedsongs.
3. Tap a son
owing video controls are available:
Pause the video.
Start the video after being paused.
Press and hold to rewind the video. Tap to go to previous video.
Press and hold to fast-forward the video. Tap to go to next video.Volume control.
PIP (Picture In Picture) view. The video will be played in a small window so you can use your phone for other purposes while watching the video. Double-tap screen to return to previous size.
Original size view. The video will be played in its original size.
Full-screen in ratio view. The video is enlarged as much as possible without becoming distorted.
Full-screen view. The entire screen is used, which may cause some minor distortion.
80
4. From the main Play Music screen, you can tap any of the following tabs for a more detailed listing of songs: Playlists, Recent, Artists, Albums, Songs, and Genres.
5. Tap for the following options:• Shuffle all: allows you to play all of your music in a shuffled
order.• Settings: allows you to view Open source licenses and the
music version for the Play Music application.• Help: allows you to view a help file on the Google Support
website.VideoThe Samsung Video application plays video files stored on your microSD card.
1. Tap ➔ Video .2. All videos that you have on your phone and memory
card will be displayed. Tap the video that you want to play.
3. The video will begin to play.
4. The foll
Multimedia 81
ERSONAL VIDEOS tab to view movies you our phone or memory card. for additional options.
here you view photos and play back videos. can also perform basic editing tasks, view a hotos as wallpaper or contact image, and re message.
Gallery .Albums that hold your pictures and videos will ed with folder name and number of files.
bum and thumbnails of the contents will be .
ice displays that the memory is full when you llery, delete some of the files by using My files management applications and try again. For ation, refer to “My Files” on page 170.
uresmain gallery, Press ➔ Slideshow to see a of all of your pictures.
Note: The screen view icons are a three-way toggle. The icon that is displayed, is the mode that will appear after the icon is tapped.
For more information on downloading videos for your phone, see “Samsung Hub” on page 179.
Play MoviesWith Google Play Movies, you can rent thousands of different movies. You can watch instantly, or download your movie for offline viewing at a later time.
1. From the Home screen, tap ➔Play Movies .2. Log on to your Google account if you have not already
done so. 3. Following the on-screen instructions for renting and
viewing movies and TV shows.4. Tap the MOVIES tab to view movies you can rent.
5. Tap the Phave on y
6. Press GalleryThe Gallery is wFor photos, youslideshow, set pshare as a pictu
1. Tap ➔All of the be display
2. Tap an Aldisplayed
Note: If your devaccess Gaor other filemore inform
Viewing Pict1. From the
slideshow
Stream media to paired device using the Samsung Link application.For more information, refer to “Samsung Link” on page 74.
for additional options.o player controls, see “Video” on page 80.
am to Share Pictureshen activated via NFC) allows you to beam
ctly to another compatible device that is in direct e files can be larger, such as Videos, HD other large files.You can beam images and our gallery, music files from your music player,
e Home screen, tap ➔ Settings ➔
tions ➔ NFC.ready active, in a single motion touch and slide slider to the right to turn it on . eam and make sure the feature is turned on. ready active, in a single motion touch and slide am slider to the right to turn it on .
source device (containing the desired image or tap ➔ Gallery .and tap the selected image to open it in the window.
82
2. Tap a thumbnail to view a single picture.
Note: If no control icons are displayed on the screen in addition to the picture, tap anywhere on the screen to display them.
3. The following options are available at the top of the screen:• Share via : allows you to share the picture via Group
Play, Bluetooth, ChatON, Dropbox, Email, Flipboard, Gmail, Google+, Messaging, Picasa, S Memo, or Wi-Fi Direct.
• Edit allows you to edit the picture, including Rotate, Crop, Colour, Effect, Portrait, Sticker, Drawing, and Frame.
• Delete : allows you to delete the picture.4. Press for additional options.
Viewing Videos
Note: If no control icons are displayed on the screen in addition to the picture, tap anywhere on the screen to display them.
1. Tap a video to select it. 2. Tap to play the video.
3. Press For vide
Using S BeThis feature (wlarge files direcontact. Thespictures, and videos from yand more.
1. From thConnec
2. If not althe NFC
3. Tap S B4. If not al
the S Be5. On the
video), 6. Locate
preview
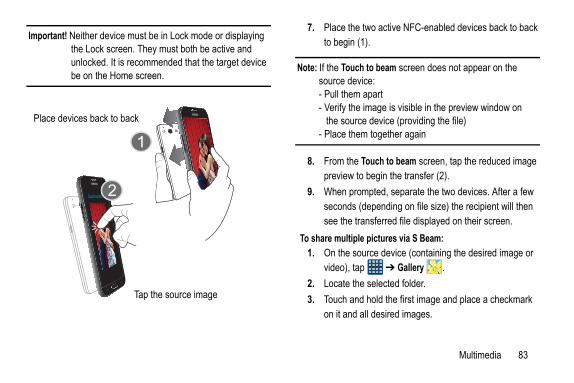
Multimedia 83
two active NFC-enabled devices back to back 1).
h to beam screen does not appear on the ice: apart image is visible in the preview window on e device (providing the file)m together again
Touch to beam screen, tap the reduced image begin the transfer (2). mpted, separate the two devices. After a few depending on file size) the recipient will then ansferred file displayed on their screen.e pictures via S Beam:urce device (containing the desired image or p ➔ Gallery .e selected folder.d hold the first image and place a checkmark all desired images.
Important! Neither device must be in Lock mode or displaying the Lock screen. They must both be active and unlocked. It is recommended that the target device be on the Home screen.
7. Place theto begin (
Note: If the Toucsource dev- Pull them- Verify the the sourc- Place the
8. From the preview to
9. When proseconds (see the tr
To share multipl1. On the so
video), ta2. Locate th3. Touch an
on it and
Touch to bea
Place devices back to back
Tap the source image

Cameratoss with your device’s built-in camera is as simple subject, pointing the camera, then pressing the
king a photo in direct sunlight or in bright s, shadows may appear on the photo.
e main Home screen, tap ➔ Camera te the camera mode.e phone’s main display screen as a viewfinder,
he image by aiming the camera at the subject.you take a picture, use the Up and Down Volume zoom in or out. You can magnify the picture up 00 percent).
e screen to zoom out or pinch outwards to zoom
d, before taking the photo, you can tap en icons to access various camera options and .
84
4. Place the two active NFC-enabled devices back to back to begin.
5. From the Touch to beam screen, tap the reduced image preview to begin the transfer. When prompted, separate the two devices.
CameraThis section explains how to use the camera on your phone. You can take photographs and shoot video by using the built-in camera functionality. Your 13 megapixel camera produces photos in JPEG format.
Important! Do not take photos of people without their permission.Do not take photos in places where cameras are not allowed.Do not take photos in places where you may interfere with another person’s privacy.
Using theTaking PhoTaking pictureas choosing acamera key.
Note: When tacondition
1. From thto activa
2. Using thadjust t
3. Before keys to to x4 (4– or –Pinch thin.
4. If desireon-scresettings
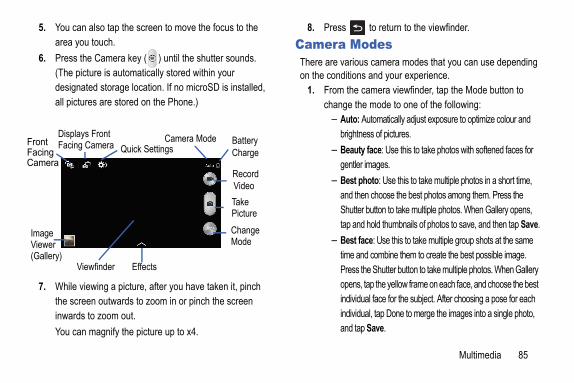
Multimedia 85
to return to the viewfinder. odess camera modes that you can use depending s and your experience.camera viewfinder, tap the Mode button to e mode to one of the following:
Automatically adjust exposure to optimize colour and ess of pictures. y face: Use this to take photos with softened faces for r images.hoto: Use this to take multiple photos in a short time, en choose the best photos among them. Press the r button to take multiple photos. When Gallery opens, d hold thumbnails of photos to save, and then tap Save.ace: Use this to take multiple group shots at the same nd combine them to create the best possible image. the Shutter button to take multiple photos. When Gallery , tap the yellow frame on each face, and choose the best ual face for the subject. After choosing a pose for each ual, tap Done to merge the images into a single photo, p Save.
5. You can also tap the screen to move the focus to the area you touch.
6. Press the Camera key ( ) until the shutter sounds. (The picture is automatically stored within your designated storage location. If no microSD is installed, all pictures are stored on the Phone.)
7. While viewing a picture, after you have taken it, pinch the screen outwards to zoom in or pinch the screen inwards to zoom out.You can magnify the picture up to x4.
8. Press Camera MThere are variouon the condition
1. From the change th
– Auto:brightn
– Beautgentle
– Best pand thShuttetap an
– Best ftime aPress opensindividindividand ta
Viewfinder
Camera Mode
ImageViewer
Effects
ChangeMode
Quick SettingsFront
(Gallery)
VideoRecord
TakePicture
FacingCamera
Displays FrontFacing Camera Battery
Charge
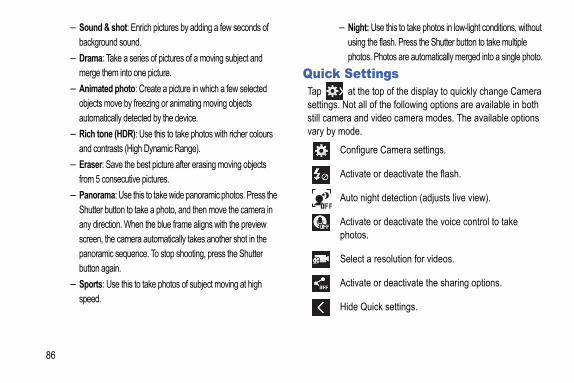
ht: Use this to take photos in low-light conditions, without g the flash. Press the Shutter button to take multiple tos. Photos are automatically merged into a single photo.ttingshe top of the display to quickly change Camera ll of the following options are available in both d video camera modes. The available options
.
gure Camera settings.
te or deactivate the flash.
night detection (adjusts live view).
te or deactivate the voice control to take s.
t a resolution for videos.
te or deactivate the sharing options.
Quick settings.
86
– Sound & shot: Enrich pictures by adding a few seconds of background sound.
– Drama: Take a series of pictures of a moving subject and merge them into one picture.
– Animated photo: Create a picture in which a few selected objects move by freezing or animating moving objects automatically detected by the device.
– Rich tone (HDR): Use this to take photos with richer colours and contrasts (High Dynamic Range).
– Eraser: Save the best picture after erasing moving objects from 5 consecutive pictures.
– Panorama: Use this to take wide panoramic photos. Press the Shutter button to take a photo, and then move the camera in any direction. When the blue frame aligns with the preview screen, the camera automatically takes another shot in the panoramic sequence. To stop shooting, press the Shutter button again.
– Sports: Use this to take photos of subject moving at high speed.
– Nigusinpho
Quick SeTap at tsettings. Not astill camera anvary by mode
Confi
Activa
Auto
Activaphoto
Selec
Activa
Hide
Multimedia 87
ermines how sensitive the light meter is on your mera. Choose from Auto, 100, 200, 400, or 800. Use SO number to make your camera less sensitive to igher ISO number to take photos with less light, or et the camera automatically adjust the ISO for each hots. ke: Compensates for camera movement.ht detection: Camera detects low light and
ically adjusts live view, allowing you to take pictures ithout using the flash.
: r:
ze: Select a resolution for videos. Use higher n for higher quality. Higher resolution videos take up mory.
abilization: Activate or deactivate Optical Image tion.
Camera and Camcorder SettingsThis section describes the different settings that you can configure on your camera. Not all of the following options are available in both still camera and video camera modes. The available options vary by mode.
1. From the viewfinder, tap ➔ (Camera Settings).
2. The follow settings are located under the Camera, Camcorder and General tabs. The settings that are displayed will depend on what camera mode you are in.Camera:
• Photo size: Select a resolution for photos. Use higher resolution for higher quality. Higher resolution photos take up more memory.
• Burst shot: Take multiple shots in quick succession by tapping and holding the Camera key.
• Face detection: This option places the focus on any faces that are detected when you take a photo.
• Metering: Select the area of the image where exposure is measured (Centre-weighted, Matrix or Spot).
• ISO: detdigital caa lower Ilight, a hAuto to lof your s
• Anti sha• Auto nig
automatat night w
• Save asCamcorde• Video si
resolutiomore me
• Video stStabiliza
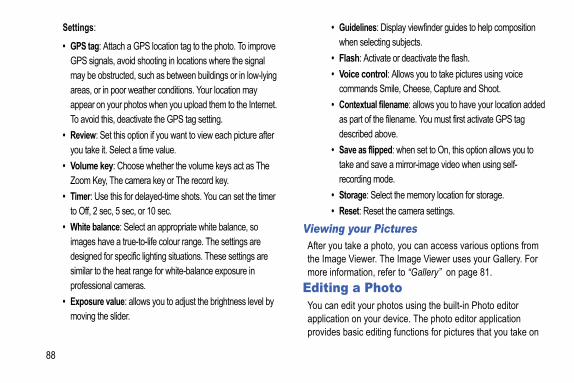
lines: Display viewfinder guides to help composition selecting subjects.: Activate or deactivate the flash. control: Allows you to take pictures using voice ands Smile, Cheese, Capture and Shoot.xtual filename: allows you to have your location added t of the filename. You must first activate GPS tag bed above.s flipped: when set to On, this option allows you to nd save a mirror-image video when using self-ing mode.e: Select the memory location for storage. Reset the camera settings.ur Pictures a photo, you can access various options from wer. The Image Viewer uses your Gallery. For ion, refer to “Gallery” on page 81. Photoour photos using the built-in Photo editor your device. The photo editor application editing functions for pictures that you take on
88
Settings:
• GPS tag: Attach a GPS location tag to the photo. To improve GPS signals, avoid shooting in locations where the signal may be obstructed, such as between buildings or in low-lying areas, or in poor weather conditions. Your location may appear on your photos when you upload them to the Internet. To avoid this, deactivate the GPS tag setting.
• Review: Set this option if you want to view each picture after you take it. Select a time value.
• Volume key: Choose whether the volume keys act as The Zoom Key, The camera key or The record key.
• Timer: Use this for delayed-time shots. You can set the timer to Off, 2 sec, 5 sec, or 10 sec.
• White balance: Select an appropriate white balance, so images have a true-to-life colour range. The settings are designed for specific lighting situations. These settings are similar to the heat range for white-balance exposure in professional cameras.
• Exposure value: allows you to adjust the brightness level by moving the slider.
• Guidewhen
• Flash• Voice
comm• Conte
as pardescri
• Save atake arecord
• Storag• Reset:
Viewing yoAfter you takethe Image Viemore informat
Editing aYou can edit yapplication onprovides basic
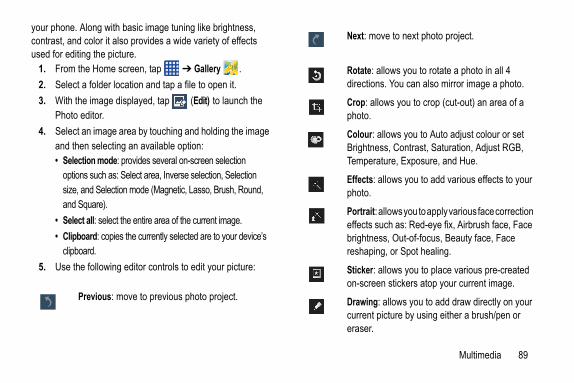
Multimedia 89
t: move to next photo project.
ate: allows you to rotate a photo in all 4 ctions. You can also mirror image a photo.
p: allows you to crop (cut-out) an area of a to.
our: allows you to Auto adjust colour or set htness, Contrast, Saturation, Adjust RGB, perature, Exposure, and Hue.
cts: allows you to add various effects to your to.
trait: allows you to apply various face correction cts such as: Red-eye fix, Airbrush face, Face htness, Out-of-focus, Beauty face, Face
haping, or Spot healing.
ker: allows you to place various pre-created screen stickers atop your current image.
wing: allows you to add draw directly on your ent picture by using either a brush/pen or ser.
your phone. Along with basic image tuning like brightness, contrast, and color it also provides a wide variety of effects used for editing the picture.
1. From the Home screen, tap ➔ Gallery .2. Select a folder location and tap a file to open it.3. With the image displayed, tap (Edit) to launch the
Photo editor.4. Select an image area by touching and holding the image
and then selecting an available option:• Selection mode: provides several on-screen selection
options such as: Select area, Inverse selection, Selection size, and Selection mode (Magnetic, Lasso, Brush, Round, and Square).
• Select all: select the entire area of the current image.• Clipboard: copies the currently selected are to your device’s
clipboard.5. Use the following editor controls to edit your picture:
Previous: move to previous photo project.
Nex
Rotdire
Cropho
ColBrigTem
Effepho
Poreffebrigres
Sticon-
Dracurrera

era may not be able to properly record videos to y card with a slow transfer speed.
ideo
oting video in direct sunlight or in bright , it is recommended that you provide your subject ent light by having the light source behind you.
e main Home screen, tap Camera to the camera mode.e camera’s main display screen as a viewfinder,
he image by aiming the camcorder at the
you take a video, use the Volume control buttons in or out. You can magnify the video up to x4 rcent).
e screen to zoom out or pinch outwards to zoom
Video key ( ) to begin shooting video. The t will blink while recording.
90
6. Press to access the following options:• Save as: allows you to rename your current image and save it
to your gallery.• Select image: allows you to select a new image for editing. • Take picture: allows you to activate the camera and take a
new image for editing. • Share via: allows you to share your saved photo via
Bluetooth, ChatON, Dropbox, Email, Flipboard, Gmail, Google+, Group Play, Messaging, Picasa, S Memo, or Wi-Fi Direct.
• Set as: assigns the currently saved image as either a: Contact photo, Home and lock screens, Home screen, or Lock screen.
Using the CamcorderIn addition to taking photos, the camera also doubles as a camcorder that also allows you to record, view, and send videos.
Note: The cama memor
Shooting V
Tip: When shoconditionswith suffici
1. From thactivate
2. Using thadjust tsubject.
3. Before to zoom(400 pe– or –Pinch thin.
4. Tap thered ligh
Frame: places a pre-created border style atop your current image.

Multimedia 91
5. You can tap the screen to move the focus to the area you touch.
6. To capture an image from the video while recording, tap . This feature is not available while the anti-shake
feature is activated.7. Tap the Pause key ( ) to pause the recording.
To resume recording, tap the Resume key ( ). 8. Tap the Stop key ( ) to stop the recording and save
the video file to your Camera folder.9. Once the file has been saved, tap the image viewer,
then tap to play your video.10. Press to return to the viewer.
Viewing your VideosAfter you take a video, you can access various options from the Image Viewer. The Image Viewer uses your Gallery and the Video Player. For more information, refer to “Gallery” on page 81. Also, see“Video” on page 80.
n creating a message, adding an image, a nd file, or a video clip to a text message nges the message from a text message to a ltimedia message.
ns are displayed at the top of the screen and messages are received and their type. For more fer to “Indicator Icons” on page 15.and Sending Messagese main Home screen, tap Messaging ➔
mpose.
Home screen initially contains the Messaging If you delete it, or if you want to access g from another Home screen, you must tap
➔ Messaging .
the Enter recipient field to manually enter a t or tap to select a recipient from Groups, tes, Contacts or Logs.
92
Section 7: Messaging
This section describes how to send and receive different types of messages. It also includes the features and functionality associated with messaging.
Types of MessagesYour phone provides the following message types:• Text Messages • Multimedia (Picture, Video, and Audio) Messages • Email and Gmail Messages• Google Talk• ChatONThe Short Message Service (SMS) lets you send and receive text messages to and from other mobile phones or email addresses. To use this feature, you may need to subscribe to your service provider’s message service.The Multimedia Messaging Service (MMS) lets you send and receive multimedia messages (such as picture, video, and audio messages) to and from other mobile phones or email addresses. To use this feature, you may need to subscribe to your service provider’s multimedia message service.
Important! Whesouchamu
Messaging icoindicate wheninformation, re
Creating 1. From th
Co
Note: The main icon.
MessaginApps
2. Tap on recipienFavouri
Messaging 93
allows you to search through all of your messages for word or string of words. Enter a search string in the ng Search window and tap .reads: allows you to delete any message thread. e messages to delete and a green checkmark will ext to the message. Tap Delete.ssages: displays the draft messages folder and its .messages: displays the locked messages folder and nts.ed messages: displays the scheduled messages d its contents.essages: displays the spam messages folder and its .: allows you to access Messaging settings. For more ion, refer to “Messaging Settings” on page 97.e composing a messageposing a message, press to reveal
l messaging options.iley: allows you to add emoticons, such as a happy
our message.
3. If adding a recipient from your Contacts, tap the contact to place a checkmark then tap Done.The contact will be placed in the recipient field.
Note: Enter additional recipients by separating each entry with a semicolon (;) then using the previous procedure.
4. Tap the Enter message field and use the on-screen keypad to enter a message. For more information, refer to “Entering Text” on page 55.
5. Review your message and tap Send .
Note: If you exit a message before you send it, it will be automatically saved as a draft.
Message OptionsOptions before composing a message
1. From the main Home screen, tap Messaging .2. Before composing a message, press to reveal
additional messaging options:
• Search: a certainMessagi
• Delete thSelect thappear n
• Draft mecontents
• Locked its conte
• Schedulfolder an
• Spam mcontents
• Settingsinformat
Options whil1. While com
additiona• Insert sm
face to y
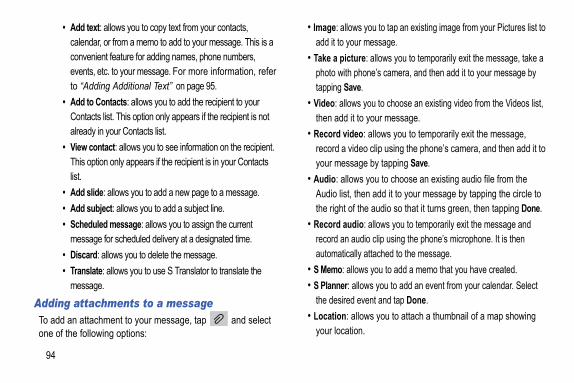
you to tap an existing image from your Pictures list to message.e: allows you to temporarily exit the message, take a one’s camera, and then add it to your message by . you to choose an existing video from the Videos list, your message.: allows you to temporarily exit the message, o clip using the phone’s camera, and then add it to e by tapping Save.
s you to choose an existing audio file from the en add it to your message by tapping the circle to he audio so that it turns green, then tapping Done.: allows you to temporarily exit the message and
dio clip using the phone’s microphone. It is then attached to the message.s you to add a memo that you have created.
ows you to add an event from your calendar. Select vent and tap Done.ows you to attach a thumbnail of a map showing .
94
• Add text: allows you to copy text from your contacts, calendar, or from a memo to add to your message. This is a convenient feature for adding names, phone numbers, events, etc. to your message. For more information, refer to “Adding Additional Text” on page 95.
• Add to Contacts: allows you to add the recipient to your Contacts list. This option only appears if the recipient is not already in your Contacts list.
• View contact: allows you to see information on the recipient. This option only appears if the recipient is in your Contacts list.
• Add slide: allows you to add a new page to a message.• Add subject: allows you to add a subject line.• Scheduled message: allows you to assign the current
message for scheduled delivery at a designated time.• Discard: allows you to delete the message.• Translate: allows you to use S Translator to translate the
message.Adding attachments to a messageTo add an attachment to your message, tap and select one of the following options:
• Image: allowsadd it to your
• Take a picturphoto with phtapping Save
• Video: allowsthen add it to
• Record videorecord a videyour messag
• Audio: allowAudio list, ththe right of t
• Record audiorecord an auautomatically
• S Memo: allow• S Planner: all
the desired e• Location: all
your location
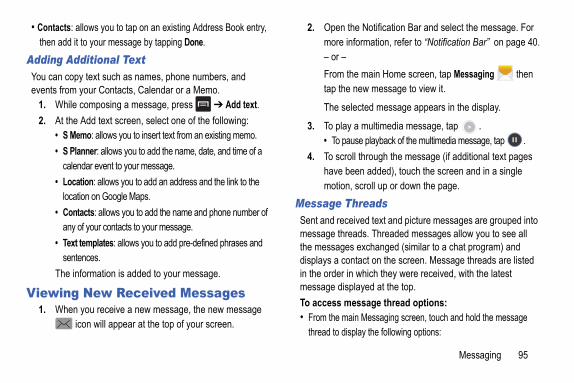
Messaging 95
Notification Bar and select the message. For rmation, refer to “Notification Bar” on page 40.
main Home screen, tap Messaging then w message to view it.
ted message appears in the display.
multimedia message, tap . playback of the multimedia message, tap .hrough the message (if additional text pages n added), touch the screen and in a single croll up or down the page.eads
ed text and picture messages are grouped into s. Threaded messages allow you to see all xchanged (similar to a chat program) and ct on the screen. Message threads are listed hich they were received, with the latest yed at the top.sage thread options:Messaging screen, touch and hold the message y the following options:
• Contacts: allows you to tap on an existing Address Book entry, then add it to your message by tapping Done.
Adding Additional TextYou can copy text such as names, phone numbers, and events from your Contacts, Calendar or a Memo.
1. While composing a message, press ➔ Add text.2. At the Add text screen, select one of the following:
• S Memo: allows you to insert text from an existing memo.• S Planner: allows you to add the name, date, and time of a
calendar event to your message.• Location: allows you to add an address and the link to the
location on Google Maps.• Contacts: allows you to add the name and phone number of
any of your contacts to your message.• Text templates: allows you to add pre-defined phrases and
sentences.The information is added to your message.
Viewing New Received Messages1. When you receive a new message, the new message
icon will appear at the top of your screen.
2. Open themore info– or –From the tap the ne
The selec
3. To play a • To pause
4. To scroll thave beemotion, s
Message ThrSent and receivmessage threadthe messages edisplays a contain the order in wmessage displaTo access mes• From the main
thread to displa
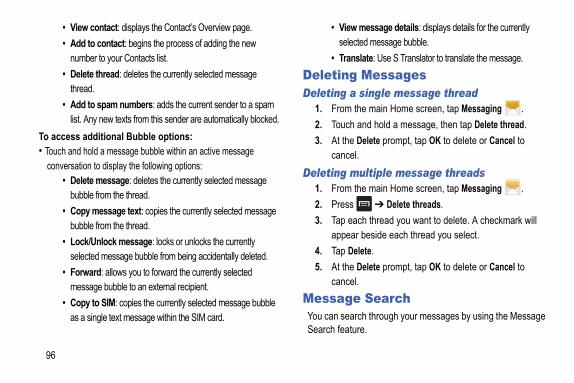
essage details: displays details for the currently ed message bubble.late: Use S Translator to translate the message.Messagesingle message thread
e main Home screen, tap Messaging .nd hold a message, then tap Delete thread. elete prompt, tap OK to delete or Cancel to
ltiple message threadse main Home screen, tap Messaging .
➔ Delete threads.h thread you want to delete. A checkmark will beside each thread you select.ete.elete prompt, tap OK to delete or Cancel to
Searchh through your messages by using the Message e.
96
• View contact: displays the Contact’s Overview page.• Add to contact: begins the process of adding the new
number to your Contacts list.• Delete thread: deletes the currently selected message
thread.• Add to spam numbers: adds the current sender to a spam
list. Any new texts from this sender are automatically blocked.To access additional Bubble options:• Touch and hold a message bubble within an active message
conversation to display the following options:• Delete message: deletes the currently selected message
bubble from the thread.• Copy message text: copies the currently selected message
bubble from the thread.• Lock/Unlock message: locks or unlocks the currently
selected message bubble from being accidentally deleted.• Forward: allows you to forward the currently selected
message bubble to an external recipient.• Copy to SIM: copies the currently selected message bubble
as a single text message within the SIM card.
• View mselect
• TransDeleting Deleting a s
1. From th2. Touch a3. At the D
cancel.Deleting mu
1. From th2. Press 3. Tap eac
appear 4. Tap Del5. At the D
cancel.MessageYou can searcSearch featur
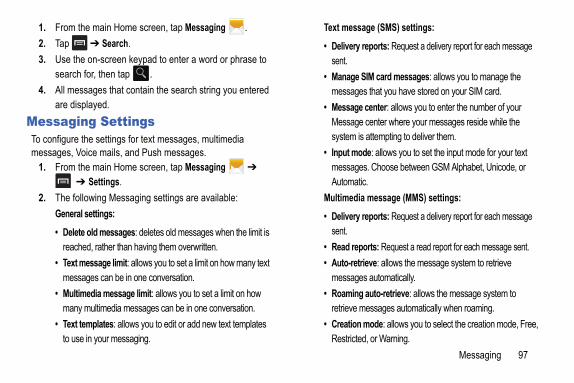
Messaging 97
age (SMS) settings: reports: Request a delivery report for each message
SIM card messages: allows you to manage the s that you have stored on your SIM card. center: allows you to enter the number of your center where your messages reside while the
s attempting to deliver them.de: allows you to set the input mode for your text s. Choose between GSM Alphabet, Unicode, or
ic.a message (MMS) settings: reports: Request a delivery report for each message
orts: Request a read report for each message sent.rieve: allows the message system to retrieve s automatically. auto-retrieve: allows the message system to essages automatically when roaming.
mode: allows you to select the creation mode, Free, d, or Warning.
1. From the main Home screen, tap Messaging .2. Tap ➔ Search.3. Use the on-screen keypad to enter a word or phrase to
search for, then tap .4. All messages that contain the search string you entered
are displayed.Messaging SettingsTo configure the settings for text messages, multimedia messages, Voice mails, and Push messages.
1. From the main Home screen, tap Messaging ➔ ➔ Settings.
2. The following Messaging settings are available:General settings:• Delete old messages: deletes old messages when the limit is
reached, rather than having them overwritten.• Text message limit: allows you to set a limit on how many text
messages can be in one conversation.• Multimedia message limit: allows you to set a limit on how
many multimedia messages can be in one conversation.• Text templates: allows you to edit or add new text templates
to use in your messaging.
Text mess• Delivery
sent.• Manage
message• Message
Messagesystem i
• Input momessageAutomat
Multimedi• Delivery
sent.• Read rep• Auto-ret
message• Roaming
retrieve m• Creation
Restricte

tivation: allows you to receive Cell Broadcast (CB) ges.el configuration: allows you to set up the channel that
ill receive CB messages on.tions settings:ations: allows you to see message notifications on tatus bar. ringtone: allows you to set the ringtone for your ge notifications.
e: allows you to configure the vibration mode iated with message alerts.ge alert repetition: allows you to set the interval for essage alerts. Choose from: Once, Every 2 minutes, ry 10 minutes.w message: when enabled, allows you to view a w of new message text on the Status bar.re settings:ignature: when enabled, this feature allows you to a signature at the end of your outgoing text messages.ure text: allows you to enter a desired signature for essage.
98
– Restricted: you can only create and submit messages with content belonging to the Core MM Content Domain.
– Warning: the phone will warn you via pop up messages that you are creating a multimedia message which does not fit the Core MM Content Domain.
– Free: you may add any content to the message.• MMS alert: allows you to receive an alert when MMS mode
becomes active.Display:• Bubble style: allows you to choose from several bubble styles
for your messages. Bubbles are the rounded boxes that surround each message.
• Background style: allows you to choose from several background styles for your messages.
• Use the volume key: allows you to change the text size by using the up or down volume keys.
Push message settings:• Push messages: allows you to receive push messages from
the network.• Service loading: Select Always, Prompt or Never.Cell Broadcast (CB) settings:
• CB acmessa
• Channyou w
Notifica• Notific
your s• Select
messa• Vibrat
assoc• Messa
new mor Eve
• Previeprevie
Signatu• Add s
create• Signat
your m
Messaging 99
t to see your password as it is being typed, password to create a checkmark.
ount options screen, configure the options as
ame for this email account (optional)..orporate Email Accountg procedure to configure your phone to h a corporate email account.Home screen, tap ➔ Email .unts screen displays with an Email setup
splayed.
email address in the [email protected]
r password in the Password field.t to see your password as it is being typed,
password to create a checkmark.al setup.
Spam message settings:• Spam settings: when enabled, allows you to configure
available spam settings such as:• Add to spam numbers: allows you to manually enter and
assign a phone number as being sent from a spam source.• Add to spam phrases: allows you to assign a specific text
phrase as belonging to a spam message. Ex: Dear friend.• Block unknown senders: when active, automatically blocks
incoming messages from unknown sources or blocked numbers.
Using EmailEmail enables you to review and create email using various email services. You can also receive text message alerts when you receive an important email.
Creating an Email Account1. From the Home screen, tap ➔ Email .
Your accounts screen displays with an Email setup screen displayed.
2. Enter you email address in the [email protected] field.
3. Enter your password in the Password field.
4. If you wantap Show
5. Tap Next.6. At the Acc
required.7. Tap Next.8. Enter a n9. Tap Done
Creating a CUse the followinsynchronize wit
1. From the Your accoscreen di
2. Enter youfield.
3. Enter you4. If you wan
tap Show5. Tap Manu

d account to add another email account.e information required to set up another
t. For more information, refer to “Creating an ccount” on page 99.etween Email Accounts
e Home screen, tap ➔ Email .ail screen displays showing your emails from
ve account.
Inbox button at the top of your screen.ail accounts screen is displayed.
Email account. You can also select Combined ich displays email messages from all accounts. Email account is displayed.
aille’s web-based email. When you first setup the
can be configured. Depending on the n settings, Gmail can be automatically with your Gmail account.
100
6. Tap the Microsoft Exchange ActiveSync field.7. Enter your email address, Domain\User name,
Password, and Exchange server. Configure secure connection and client certificate options as required, then tap Next.
8. At the Activation prompt, tap OK.The Account options screen is displayed.
9. Enter the desired information in the various fields, then tap Next.
10. Enter an Account name for this account (Optional) and tap Done.Wait for the Inbox to synchronize before use.
11. Press ➔ Settings to change the account settings.Creating Additional Email AccountsTo create additional email accounts after setting up your first account, follow these steps:
1. From the Home screen, tap ➔ Email .Your Email screen displays showing your emails from the active account.
2. Press ➔ Settings.
3. Tap Ad4. Enter th
accounEmail A
Switching B1. From th
Your Emthe acti
2. Tap theYour Em
3. Tap an view, whThe new
Using GmGmail is Googphone, Gmailsynchronizatiosynchronized

Messaging 101
to send.ail Message
Gmail Inbox, tap a message to view it.ing options are available at the bottom of the
ter a message has been selected:: archives the selected message.
: deletes the message.: allows you to attach labels to a message. This is
putting it in a folder.read after reading a message, marks as
wipe your screen to the right to see newer s.ipe your screen to the left to see older messages. to select one of the following additional
portant/not important: allows you to set the ce of a message.ows you to mute the sound in a message if le.
Signing into Your Gmail
Note: You must sign in to your Gmail account in order to access Gmail.
1. Sign on to your Google account if you are not already signed on. For more information, refer to “Creating a New Google Account” on page 9.
2. From the Home screen, tap ➔ Gmail .3. Follow the on-screen instructions.
The Inbox loads conversations and email.Creating a Gmail Message
1. From the Gmail Inbox, tap to create a new message.
2. Enter the recipient’s Email address in the To field.Separate multiple recipient email addresses by a comma.
3. To add a carbon or blind copy, tap and select Add Cc/Bcc.
4. Enter the subject of this message in the Subject field.5. Tap the Compose email field and enter your message.
6. Tap Viewing a Gm
1. From the 2. The follow
screen af• Archive • Delete • Labels
similar to• Mark Un
unread.• Newer: s
message• Older: sw
3. Press options:• Mark im
importan• Mute: all
applicab
alk a free Windows and web-based application for ging offered by Google. Conversation logs are saved to a Chats area in your Gmail account. u to search a chat log and store them in your ts.to your Google account if you have not already . For more information, refer to “Creating a New
Account” on page 9.e Home screen, tap ➔ Talk .sing Google Talk.
➔ Help for more information on using Talk.
ork confirms your login and processes. This e up to 5 minutes to complete.
102
• Report spam: allows you to report a message as spam. Tap the UNDO option if you change your mind.
• Report phishing: allows you to report a message as phishing (attempting to acquire information such as username, password, or credit card details). Tap the UNDO option if you change your mind.
• Settings: displays Email settings that you can modify.• Send feedback: allows you to send feedback or report a
problem.• Help: displays the Google.com webpage so you can search
the web for help.Other Gmail Options
1. Tap to refresh the screen, send and receive new emails, and synchronize your email with the Gmail account.
2. Tap to set up and manage Labels for your Gmail messages.
3. Tap to search through your Gmail messages.
Google TGoogle Talk isinstant messaautomatically This allows yoGmail accoun
1. Log on done soGoogle
2. From th3. Begin u4. Press
Note: The Netwcould tak
Messaging 103
your Google account. For more information, reating a New Google Account” on page 9.Home screen, tap ➔ Messenger .
Google+ application, select Messenger. account you want to use to sign in to Google+ K.
account to create another account.
on-screen instructions to add or follow
at the bottom of the screen.ssenger screen, tap to start a new .er text field, enter a name, email address, or
tom message field, enter a message then tap
Messenger screen, tap Learn more for more formation.
Google+Google+ makes messaging and sharing with your friends a lot easier. You can set up Circles of friends, visit the Stream to get updates from your Circles, use Messenger for fast messaging with everyone in your Circles, or use Instant Upload to automatically upload videos and photos to yourown private album on Google+.
1. Sign on to your Google account. For more information, refer to “Creating a New Google Account” on page 9.
2. From the Home screen, tap ➔ Google+ .3. Select the account you want to use to sign in to
Google+.– or –Tap Add account to create another account.
4. Follow the on-screen instructions to use Google+.5. Visit www.google.com/mobile/+/ for more information.
MessengerMessenger allows you to bring groups of friends together into a simple group conversation. When you get a new conversation in Messenger, Google+ sends an update to your phone.
1. Sign on torefer to “C
2. From the – or –From the
3. Select theand tap O– or –Tap Add
4. Follow thepeople.
5. Tap Next6. At the Me
message7. In the upp
circle.8. In the bot
.9. From the
detailed in

104
ChatONChatON provides a global mobile communication service where you can chat with more than two “buddies” via a group chat. Share things such as pictures, videos, animation messages (Scribbles), audio, Contacts, Calendar entries, and Location information. For more information, visit: https://web.samsungchaton.com.
1. From the Home screen, tap ➔ ChatON .2. Tap Sign in to sync ChatOn with your Samsung
account, which lets you use the same data on all devices connected to the account, or tap Skip.
3. Enter your name and tap 4. Follow the on-screen instructions to add a buddy and
begin your chat session.
Changing Your Settings 105
vice: ab provides access to device configuration and mization features. Features include: Lock n, Display, LED indicator, Sound, Home screen , Call, Blocking mode, Power saving mode, sory, Accessibility, Language and input, ns and gestures, Smart screen, Air view, and control.
nts: ab provides the ability to create and modify your nts (Samsung account, Email, etc.) and access p and reset features.
ab provides access to the remaining set of e settings not listed under the other three tabs. include Location services, Security, ation manager, Battery, Storage, Date and and About device.
Section 8: Changing Your Settings
This section explains the settings used for customizing your device.
Accessing Settings1. From any Home screen, tap ➔ Settings .
– or –From any Home screen, press ➔ Settings.
Settings TabsThe Settings are divided into four main groups. When the Settings screen displays, the following four tabs are located at the top of the screen:
Connections: This tab allows you to see all of settings related to the connection of your device to external sources. Features include: Wi-Fi, Bluetooth, Data usage, More networks (Flight mode, Mobile networks, Tethering and portable hotspot, and VPN), NFC, S Beam, Nearby devices, Screen Mirroring, and Kies via Wi-Fi.
My deThis tcustoscreemodeAccesMotioVoice
AccouThis taccouBacku
More:This tdevicTheseApplictime,
My device
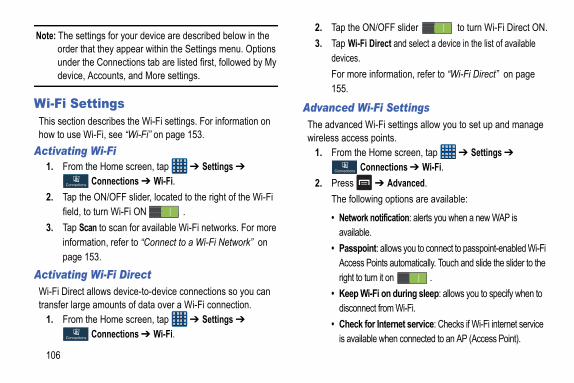
ON/OFF slider to turn Wi-Fi Direct ON.Fi Direct and select a device in the list of available
e information, refer to “Wi-Fi Direct” on page
i-Fi Settings Wi-Fi settings allow you to set up and manage
ss points.e Home screen, tap ➔ Settings ➔
Connections ➔ Wi-Fi. ➔ Advanced.
owing options are available:
rk notification: alerts you when a new WAP is le.oint: allows you to connect to passpoint-enabled Wi-Fi s Points automatically. Touch and slide the slider to the turn it on .Wi-Fi on during sleep: allows you to specify when to nect from Wi-Fi. for Internet service: Checks if Wi-Fi internet service
ilable when connected to an AP (Access Point).
106Note: The settings for your device are described below in the order that they appear within the Settings menu. Options under the Connections tab are listed first, followed by My device, Accounts, and More settings.
Wi-Fi SettingsThis section describes the Wi-Fi settings. For information on how to use Wi-Fi, see “Wi-Fi” on page 153.
Activating Wi-Fi1. From the Home screen, tap ➔ Settings ➔
Connections ➔ Wi-Fi.2. Tap the ON/OFF slider, located to the right of the Wi-Fi
field, to turn Wi-Fi ON .3. Tap Scan to scan for available Wi-Fi networks. For more
information, refer to “Connect to a Wi-Fi Network” on page 153.
Activating Wi-Fi DirectWi-Fi Direct allows device-to-device connections so you can transfer large amounts of data over a Wi-Fi connection.
1. From the Home screen, tap ➔ Settings ➔
Connections ➔ Wi-Fi.
2. Tap the3. Tap Wi-
devices.For mor155.
Advanced WThe advancedwireless acce
1. From th
2. Press The foll
• Netwoavailab
• PasspAccesright to
• Keep discon
• Checkis ava
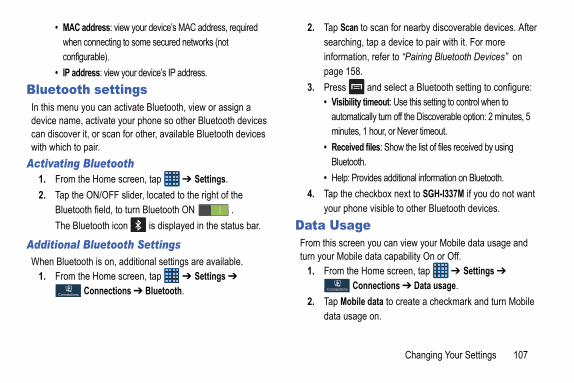
Changing Your Settings 107
to scan for nearby discoverable devices. After , tap a device to pair with it. For more n, refer to “Pairing Bluetooth Devices” on . and select a Bluetooth setting to configure:
timeout: Use this setting to control when to ically turn off the Discoverable option: 2 minutes, 5 1 hour, or Never timeout.d files: Show the list of files received by using h.ovides additional information on Bluetooth.heckbox next to SGH-I337M if you do not want e visible to other Bluetooth devices.e
n you can view your Mobile data usage and data capability On or Off.Home screen, tap ➔ Settings ➔
nnections ➔ Data usage.e data to create a checkmark and turn Mobile e on.
• MAC address: view your device’s MAC address, required when connecting to some secured networks (not configurable).
• IP address: view your device’s IP address.Bluetooth settingsIn this menu you can activate Bluetooth, view or assign a device name, activate your phone so other Bluetooth devices can discover it, or scan for other, available Bluetooth devices with which to pair.
Activating Bluetooth1. From the Home screen, tap ➔ Settings.2. Tap the ON/OFF slider, located to the right of the
Bluetooth field, to turn Bluetooth ON . The Bluetooth icon is displayed in the status bar.
Additional Bluetooth SettingsWhen Bluetooth is on, additional settings are available.
1. From the Home screen, tap ➔ Settings ➔
Connections ➔ Bluetooth.
2. Tap Scan searchinginformatiopage 158
3. Press • Visibility
automatminutes,
• ReceiveBluetoot
• Help: Pr4. Tap the c
your phonData UsagFrom this screeturn your Mobile
1. From the Co
2. Tap Mobildata usag
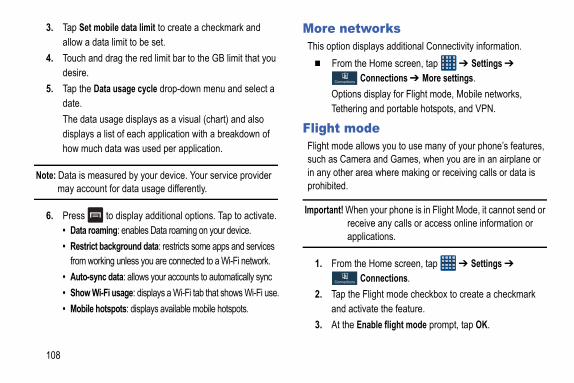
workssplays additional Connectivity information.e Home screen, tap ➔ Settings ➔
Connections ➔ More settings. display for Flight mode, Mobile networks, g and portable hotspots, and VPN.
dellows you to use many of your phone’s features, ra and Games, when you are in an airplane or
rea where making or receiving calls or data is
n your phone is in Flight Mode, it cannot send or eive any calls or access online information or lications.
e Home screen, tap ➔ Settings ➔
Connections. Flight mode checkbox to create a checkmark ivate the feature.nable flight mode prompt, tap OK.
108
3. Tap Set mobile data limit to create a checkmark and allow a data limit to be set.
4. Touch and drag the red limit bar to the GB limit that you desire.
5. Tap the Data usage cycle drop-down menu and select a date.The data usage displays as a visual (chart) and also displays a list of each application with a breakdown of how much data was used per application.
Note: Data is measured by your device. Your service provider may account for data usage differently.
6. Press to display additional options. Tap to activate.• Data roaming: enables Data roaming on your device.• Restrict background data: restricts some apps and services
from working unless you are connected to a Wi-Fi network.• Auto-sync data: allows your accounts to automatically sync• Show Wi-Fi usage: displays a Wi-Fi tab that shows Wi-Fi use.• Mobile hotspots: displays available mobile hotspots.
More netThis option di
� From th
OptionsTetherin
Flight moFlight mode asuch as Camein any other aprohibited.
Important! Wherecapp
1. From th
2. Tap theand act
3. At the E
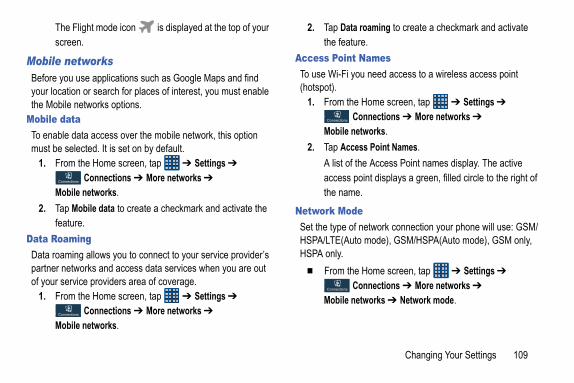
Changing Your Settings 109
roaming to create a checkmark and activate e.ames
u need access to a wireless access point
Home screen, tap ➔ Settings ➔
nnections ➔ More networks ➔
tworks.ss Point Names.e Access Point names display. The active int displays a green, filled circle to the right of
.
etwork connection your phone will use: GSM/ mode), GSM/HSPA(Auto mode), GSM only,
Home screen, tap ➔ Settings ➔
nnections ➔ More networks ➔
tworks ➔ Network mode.
The Flight mode icon is displayed at the top of your screen.
Mobile networksBefore you use applications such as Google Maps and find your location or search for places of interest, you must enable the Mobile networks options.
Mobile dataTo enable data access over the mobile network, this option must be selected. It is set on by default.
1. From the Home screen, tap ➔ Settings ➔
Connections ➔ More networks ➔
Mobile networks.2. Tap Mobile data to create a checkmark and activate the
feature.Data RoamingData roaming allows you to connect to your service provider’s partner networks and access data services when you are out of your service providers area of coverage.
1. From the Home screen, tap ➔ Settings ➔
Connections ➔ More networks ➔
Mobile networks.
2. Tap Data the featur
Access Point NTo use Wi-Fi yo(hotspot).
1. From the Co
Mobile ne2. Tap Acce
A list of thaccess pothe name
Network ModeSet the type of nHSPA/LTE(AutoHSPA only.
� From the Co
Mobile ne
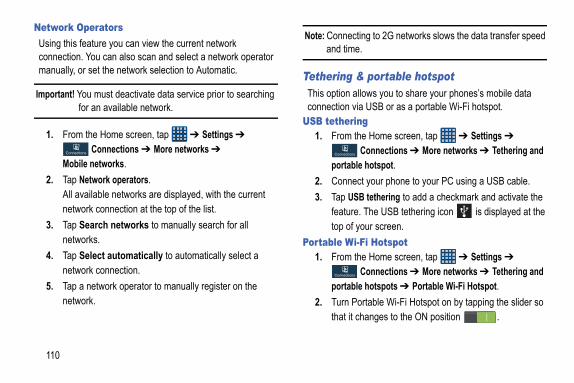
ng to 2G networks slows the data transfer speed .
portable hotspotlows you to share your phones’s mobile data USB or as a portable Wi-Fi hotspot.ge Home screen, tap ➔ Settings ➔
Connections ➔ More networks ➔ Tethering and hotspot.t your phone to your PC using a USB cable. tethering to add a checkmark and activate the
The USB tethering icon is displayed at the our screen.Fi Hotspote Home screen, tap ➔ Settings ➔
Connections ➔ More networks ➔ Tethering and hotspots ➔ Portable Wi-Fi Hotspot.rtable Wi-Fi Hotspot on by tapping the slider so
hanges to the ON position .
110
Network OperatorsUsing this feature you can view the current network connection. You can also scan and select a network operator manually, or set the network selection to Automatic.
Important! You must deactivate data service prior to searching for an available network.
1. From the Home screen, tap ➔ Settings ➔
Connections ➔ More networks ➔
Mobile networks.2. Tap Network operators.
All available networks are displayed, with the current network connection at the top of the list.
3. Tap Search networks to manually search for all networks.
4. Tap Select automatically to automatically select a network connection.
5. Tap a network operator to manually register on the network.
Note: Connectiand time
Tethering &This option alconnection via
USB tetherin1. From th
portable
2. Connec3. Tap USB
feature.top of y
Portable Wi-1. From th
portable
2. Turn Pothat it c
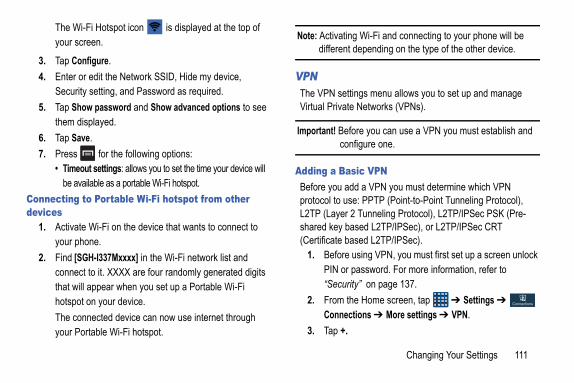
Changing Your Settings 111
Wi-Fi and connecting to your phone will be pending on the type of the other device.
s menu allows you to set up and manage etworks (VPNs).
you can use a VPN you must establish and ure one.
VPNa VPN you must determine which VPN PPTP (Point-to-Point Tunneling Protocol), unneling Protocol), L2TP/IPSec PSK (Pre-d L2TP/IPSec), or L2TP/IPSec CRT d L2TP/IPSec).
ing VPN, you must first set up a screen unlock ssword. For more information, refer to on page 137.Home screen, tap ➔ Settings ➔ ns ➔ More settings ➔ VPN.
The Wi-Fi Hotspot icon is displayed at the top of your screen.
3. Tap Configure.4. Enter or edit the Network SSID, Hide my device,
Security setting, and Password as required.5. Tap Show password and Show advanced options to see
them displayed.6. Tap Save.7. Press for the following options:
• Timeout settings: allows you to set the time your device will be available as a portable Wi-Fi hotspot.
Connecting to Portable Wi-Fi hotspot from other devices
1. Activate Wi-Fi on the device that wants to connect to your phone.
2. Find [SGH-I337Mxxxx] in the Wi-Fi network list and connect to it. XXXX are four randomly generated digits that will appear when you set up a Portable Wi-Fi hotspot on your device.The connected device can now use internet through your Portable Wi-Fi hotspot.
Note: Activating different de
VPNThe VPN settingVirtual Private N
Important! Beforeconfig
Adding a BasicBefore you add protocol to use:L2TP (Layer 2 Tshared key base(Certificate base
1. Before usPIN or pa“Security”
2. From the Connectio
3. Tap +.

C, follow these steps:e Home screen, tap ➔ Settings ➔ tions ➔ NFC. ON/OFF slider, located to the right of the NFC turn NFC ON .
is activated, you can beam files to another device by holding the devices close together. images and videos from your Gallery, music
r Music Player, and more.e Home screen, tap ➔ Settings ➔ tions ➔ S Beam. OFF / ON icon to turn S Beam on .he back of your device with another NFC- device and the content is transferred.eviceslows you to share your media files with nearby DLNA and connected to the same Wi-Fi.t to a Wi-Fi network. For more information, refer ating Wi-Fi” on page 106.
112
4. At the Add VPN acreen, enter a name for the VPN network in the Name field.
5. Select a VPN type from the Type drop-down menu. The options are:• PPTP (Point-to-Point Tunneling Protocol)• L2TP/IPSec PSK (Layer 2 Tunneling Protocol / Internet
Protocol Security Pre-Shared Key)• L2TP/IPSec RSA• IPSec Xauth PSK• IPSec Xauth RSA• IPSec Hybrid RSA
6. Enter the Server address and any other required fields that are dependent upon the Type you entered previously.
7. Tap the Show advanced options check box to display additional VPN options.
8. Tap Save to save your VPN settings.NFCNFC (Near Field Communication) allows data exchange when you touch your device with another compatible device. This is used for applications such as S Beam.
To activate NF1. From th
Connec2. Tap the
field, toS BeamWhen S BeamNFC-capable You can beamfiles from you
1. From thConnec
2. Tap the3. Touch t
capableNearby dThis option aldevices using
1. Connecto “Activ

Changing Your Settings 113
rroringroring feature allows you to share the media vice screen with an HDMI device such as an
e requires an optional AllShare Cast dongle, ailable as an accessory. See your Customer presentative for more information.
Home screen, tap ➔ Settings ➔ ns ➔ Screen Mirroring.he AllShare Cast dongle to the HDMI device HDMI A-to-A cable.
➔ Help for information on using Screen
i-Fillows you to sync your PC wirelessly with your they are both on the same Wi-Fi network. You are videos, photos, music, ringtones, and
2. From the Home screen, tap ➔ Settings ➔ Connections ➔ Nearby devices.
3. Tap the File sharing checkbox to create a checkmark and activate File sharing.
4. Verify (Nearby devices) appears at the top of the screen.
5. At the Nearby devices prompt, tap OK.6. Tap Shared contents, then check the media you would
like to share. Tap OK.7. Tap Allowed devices list, then select the connected
devices you would like to allow. 8. Tap Not-allowed devices list, then select the connected
devices you would like to not allow. 9. Tap Download to, then select the destination of any
downloaded (shared) content. Choose from Device or SD card.
10. Tap Upload from other devices, then select the actions you’ll take when you upload content from other devices. Choose from either Always accept, Always ask, or Always reject.
Screen MiThe Screen Mirfiles on your deHDMI TV.
Note: This featurwhich is avService Re
1. From the Connectio
2. Connect tusing an
3. Press Mirroring.
Kies via WKies via Wi-Fi adevice providedcan view and shmore.

nlock: Look at your phone to unlock it. nd voice: Look at your phone and speak to unlock.
n: A screen unlock pattern is a touch gesture you and use to unlock your device. Follow the prompts to or change your screen unlock pattern.elect a PIN to use for unlocking the screen.ord: Create a password for unlocking the screen.
No pattern, PIN, or password is required. The screen ver lock.n optionsactivates various Unlock screen functions.
screen options will differ depending on the type Lock you have selected.
e Home screen, tap ➔ Settings ➔ ice ➔ Lock screen.owing options are available depending on the Lock type that you have selected:
My deviceMy device
114
1. From your PC, download the Samsung Kies application if you don’t already have it. You can find it at samsung.com.
2. From your PC, launch the Samsung Kies application.3. From your PC, connect to a Wi-Fi network.4. From the Home screen, tap ➔ Settings ➔
Connections ➔ Kies via Wi-Fi.5. From your device, connect to the same Wi-Fi network
that your PC is connected to if you have not already done so. For more information, refer to “Connect to a Wi-Fi Network” on page 153.
Lock Screen SettingsChoose settings for unlocking your screen. For more information about using the lock and unlock features, see “Locking and Unlocking the Touch Screen” on page 6.
Screen Lock1. From the Home screen, tap ➔ Settings ➔
My device ➔ Lock screen.2. Tap Screen lock for these options then follow the
onscreen instructions to set up your Screen lock:• Swipe: Swipe the screen to unlock it.
• Face u• Face a• Patter
createcreate
• PIN: S• Passw• None:
will neLock screeActivate or de
Note: The Lockof Screen
1. From thMy dev
2. The follScreen
My device

Changing Your Settings 115
recognition allows you to improve your device’s apability by capturing your face in different lighting,
glasses, and bearded or clean-shaven. Follow the uctions.k requires that you blink when using the Face This will increase the security of the feature.isible allows you to see the pattern as you draw it.cally locks the screen 5 seconds after the screen rns off.with power key: screen locks when power key is screen off.sidgets allows you to lock the widgets that are ur home screens.isible allows you to see the pattern as you draw it.cally locks the screen 5 seconds after the screen rns off.with power key: screen locks when power key is screen off.
Swipe options• Multiple widgets: display multiple lock screen widgets on your lock
screen.• Lock screen widgets allows you to lock the widgets that are
displayed on your home screens.• Shortcuts sets shortcuts to appear at the bottom of the Lock
screen. Touch and slide the slider to the right to turn it on .
• Unlock effect sets the effect you receive when unlocking the phone. You can select None, Ripple effect, or Light effect.
• Help text shows help information on the Lock screen.• Wake up in lock screen requires that you say a command to wake-
up your phone.• Set wake-up command designates your wake-up commands. Tap
Set wake-up command and follow the on- screen prompts to create a new verbal command.
Face unlock options• Lock screen widgets allows you to lock the widgets that are
displayed on your home screens.
• Improve facial face matching cwith or without on-screen instr
• Presence checunlock feature.
• Make pattern v• Lock automati
automatically tu• Lock instantly
pressed to turnPattern option• Lock screen w
displayed on yo• Make pattern v• Lock automati
automatically tu• Lock instantly
pressed to turn
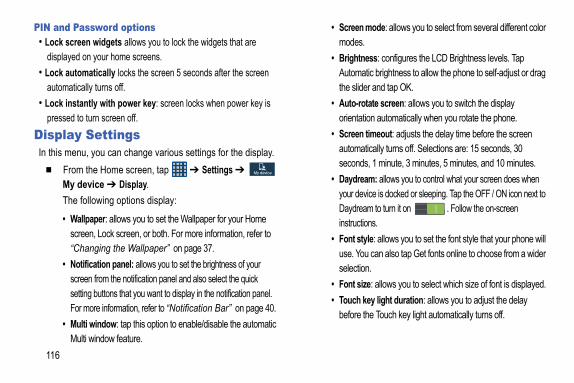
mode: allows you to select from several different color .ness: configures the LCD Brightness levels. Tap atic brightness to allow the phone to self-adjust or drag er and tap OK.otate screen: allows you to switch the display tion automatically when you rotate the phone. timeout: adjusts the delay time before the screen
atically turns off. Selections are: 15 seconds, 30 ds, 1 minute, 3 minutes, 5 minutes, and 10 minutes.eam: allows you to control what your screen does when evice is docked or sleeping. Tap the OFF / ON icon next to am to turn it on . Follow the on-screen
tions.tyle: allows you to set the font style that your phone will ou can also tap Get fonts online to choose from a wider ion.ize: allows you to select which size of font is displayed. key light duration: allows you to adjust the delay the Touch key light automatically turns off.
116
PIN and Password options• Lock screen widgets allows you to lock the widgets that are
displayed on your home screens.• Lock automatically locks the screen 5 seconds after the screen
automatically turns off.• Lock instantly with power key: screen locks when power key is
pressed to turn screen off.Display SettingsIn this menu, you can change various settings for the display.
� From the Home screen, tap ➔ Settings ➔ My device ➔ Display.The following options display:
• Wallpaper: allows you to set the Wallpaper for your Home screen, Lock screen, or both. For more information, refer to “Changing the Wallpaper” on page 37.
• Notification panel: allows you to set the brightness of your screen from the notification panel and also select the quick setting buttons that you want to display in the notification panel. For more information, refer to “Notification Bar” on page 40.
• Multi window: tap this option to enable/disable the automatic Multi window feature.
• Screenmodes
• BrightAutomthe slid
• Auto-rorienta
• Screenautomsecon
• Daydryour dDaydreinstruc
• Font suse. Yselect
• Font s• Touch
before
My device
Changing Your Settings 117
tions: LED lights up when you have missed calls, s, or application events.cording: LED lights up when you are recording e LED only lights up when the screen is off.tings you can control the sounds on the phone. Home screen, tap ➔ Settings ➔
y device ➔ Sound.tions display:
ion allows you to change the volume for all one easy location.
Home screen, tap ➔ Settings ➔
y device ➔ Sound ➔ Volume. drag the slider to adjust the sound volume for eo, games and other media; Ringtone; ns; and System.
• Display battery percentage: allows you to see the battery charge percentage next to the battery charge icon at the top of the display.
• Edit after screen capture: allows you to go edit a screen capture immediately after it is taken.
• Auto adjust screen tone: save power by adjusting screen tone acghcording to analysis of images.
• High touch sensitivity: allows you to increase the touch sensitivity of your phone so you can touch it while wearing gloves.
LED indicatorThis option allows you to turn on your LED lights for charging, missed events, and incoming notifications. The light will turn on by default unless you turn them off.
1. From the Home screen, tap ➔ Settings ➔
My device ➔ LED indicator.2. Tap the following LED indicator options to turn them on
or off:• Charging: LED lights up when the device is connected to the
charger.• Low battery: LED lights up when the battery level is low.
• Notificamessage
• Voice revoice. Th
Sound SetFrom this menu
� From the M
The following opVolumeThe Volume optphone sounds in
1. From the M
2. Touch andMusic, vidNotificatio
3. Tap OK.
My dev ce
My dev ce
My dev ce
e Home screen, tap ➔ Settings ➔
My device ➔ Sound.rations. vibration pattern and tap OK.
ate and follow the on-screen instructions to our own vibration.
ification soundows you to set the default sound that will play for nd alarms.e Home screen, tap ➔ Settings ➔
My device ➔ Sound.ault notification sound.ound and tap OK.en ringinglows you to enable your phone to vibrate ngs.e Home screen, tap ➔ Settings ➔ My device ➔ Sound.rate when ringing to create a checkmark and the feature.
118
Vibration intensityVibration intensity allows you to select how intense the vibration is for different options.
1. From the Home screen, tap ➔ Settings ➔
My device ➔ Sound ➔ Vibration intensity.2. Touch and drag the slider to adjust the Vibration
intensity for Incoming call, Notification, and Haptic feedback.
RingtonesThis option allows you to set the ringtone.
1. From the Home screen, tap ➔ Settings ➔
My device ➔ Sound.2. Tap Ringtones.3. To select a ringtone provided with the phone, tap the
ringtone. To add a new ringtone tap Add and tap Choose music track, Dropbox, or Sound picker, then either Always or Just once.
4. Tap OK.VibrationsThis option allows you to set your phone to vibrate and ring.
1. From th
2. Tap Vib3. Select a
– or –Tap Crecreate y
Default notThis option allnotifications a
1. From th
2. Tap Def3. Tap a s
Vibrate whThis option alwhenever it ri
1. From th
2. Tap Vibenable
My device
My device
My device
My device
My device
Changing Your Settings 119
on-screen instructions to set up your call sound.en mode
ode allows you to set your display to the out of Standard mode or provide an easier for the first-time smartphone users using Easy
Home screen, tap ➔ Settings ➔
y device ➔ Home screen mode.ull-down dropbox and select one of the options: mode: provides conventional layout for the apps ets on your home screens.de: provides easier user experience for first-time
one users on the home screens..gsall settings menu:
Home screen, tap ➔ ➔
gs.
System Tone SettingsThe System tone settings are used when you use the dialing pad, make a screen selection, lock your screen, or tap the screen.
1. From the Home screen, tap ➔ Settings ➔
My device ➔ Sound.2. Tap any of the following options to create a checkmark
and activate the feature:• Dialing keypad tone: makes a sound when you tap a key on
the keyboard.• Touch sounds: makes a sound when you touch the screen.• Screen lock sound: makes a sound when your screen is
locked or unlocked.• Haptic feedback: makes a vibration when you tap soft keys
and on certain UI interactions.Adapt soundThe Adapt sound feature allows you to customize your sound level during calls and while playing music.
1. From the Home screen, tap ➔ Settings ➔
My device ➔ Adapt sound.2. Read the instructions and tap Start.
3. Follow thepersonal
Home screHome screen mconventional layuser experiencemode.
1. From the M
2. Tap the pfollowing • Standard
and widg• Easy mo
smartph3. Tap Apply
Call SettinTo access the C
� From theCall settin– or –
My dev ce
My dev ce
My dev ce
e to save the reject message.ending callse Home screen, tap ➔ ➔ Call settings ering/ending calls.
owing options are available:me key answers calls: Tap this option to be able to
t incoming calls by pressing the Home key.control: Tap this option to be able to accept incoming y using your voice.wer key ends calls: This option will allow you to end a
pressing the power key without turning off the screen. een during callses the proximity sensor to turn off the screen ne is held near your face during a call, saving
e Home screen, tap ➔ ➔ Call settings off screen during calls to create a checkmark ble the feature.
e Home screen, tap ➔ ➔ Call settings alerts.
120
� From the Home screen, tap ➔ Settings ➔
My device ➔ Call.Call rejection
1. From the Call settings screen, tap Call rejection.2. Tap Auto reject mode and tap one of the following
options:• Off: calls are not rejected.• All numbers: to reject all calls.• Auto reject numbers: to reject all calls in your Reject list.
3. Tap Auto reject list.4. Tap Create to manually add numbers to the Reject list.5. Tap Unknown to create a checkmark and automatically
reject all calls that are not in your Contacts list.Set reject messages
1. From the Home screen, tap ➔ ➔ Call settings ➔ Set up call reject messages.
2. Tap Create to manually add a reject message.– or –Tap one of the pre-written messages to be displayed when you want the call to be rejected. You can edit the message if desired.
3. Tap SavAnswering/
1. From th➔ Answ
2. The foll• The ho
accep• Voice
calls b• The po
call byTurn off scrThis option uswhen the phopower.
� From th➔ Turnand ena
Call alerts1. From th
➔ Call
My device

Changing Your Settings 121
g call conditions: allows you to make calls even device is locked.ttings
Home screen, tap ➔ ➔ Call settings nal settings.f the following options:: allows you to choose how your Caller ID will be d. Select Network default, Hide number, or Show
arding: allows you to forward your calls to another
a code: allows you to automatically prepend a rea code to all outbound calls. Enter a code and tap
ing: allows automatically blocking All outgoing calls, nal calls, Int’l (International) calls except home, All calls, or Incoming when roaming.ing: the network service informs you when someone to reach you during another call. Tap to activate.ial: automatically redials the last number if the call er cut off or was unable to connect. Tap to activate.
2. Tap the following options to create a checkmark and activate the features:• Answer vibration: enables your phone to vibrate when the
called party answers the phone.• Call-end vibration: enables your phone to vibrate when the
call ends.• Call connect tone: plays a tone when a call is connected.• Minute minder: beeps twice every minute that you are on a
call.• Call end tone: plays a tone when a call is ended.• Alerts during calls: turns on alarm and message
notifications during a call.Call Accessories
1. From the Home screen, tap ➔ ➔ Call settings ➔ Call accessories.
2. The following options are available:• Automatic answering: configures the device to automatically
answer and incoming call when a headset is detected.• Automatic answering timer: configures the time delay before
the device automatically accepts the incoming call.
• Outgoinwhen the
Additional se1. From the
➔ Additio2. Tap one o
• Caller IDdisplayenumber.
• Call forwnumber.
• Auto arespecific aOK.
• Call barrInternatioincoming
• Call waitis trying
• Auto redwas eith

rompt, enter your old PIN2 code.rompt, enter a new PIN2 code. your PIN2 code.e FDN Listture is enabled, you can make calls only to rs stored in the FDN list on the SIM card.
ou can manage an FDN list a list must be
e Home screen, tap ➔ ➔ Call settings tional settings ➔ Fixed Dialing Numbers. list.
all existing FDN numbers will be displayed.nd keypad tones
e Home screen, tap ➔ ➔ Call settings tones and keypad tones.gtones, select a ringtone, and tap OK.rations, select a vibration type, and tap OK.rate when ringing to create a checkmark if you ur phone to vibrate when a call is incoming.
122
• Fixed Dialing Numbers: allows you to restrict outgoing calls to a limited set of phone numbers.
Using Fixed Dialing NumbersEnabling FDN
1. From the Home screen, tap ➔ ➔ Call settings ➔ Additional settings ➔ Fixed Dialing Numbers.
2. Tap Enable FDN.3. At the prompt, enter your PIN2 code and tap OK.
FDN is enabled.
4. To enable FDN after it has been disabled, tap Disable FDN, enter your PIN2 code and tap OK.
Important! Not all SIM cards use a PIN2 code. If your SIM card does not, this menu does not display.The PIN2 code is provided by your carrier. Entering an incorrect PIN2 code could cause the phone to lock. Contact customer service for assistance.
Changing the PIN2 Code1. From the Home screen, tap ➔ ➔ Call settings
➔ Additional settings ➔ Fixed Dialing Numbers.2. Tap Change PIN2.
3. At the p4. At the p5. Confirm
Managing thWhen this feaphone numbe
Note: Before ycreated.
1. From th➔ Addi
2. Tap FDN3. A list of
Ringtones a1. From th
➔ Ring2. Tap Rin3. Tap Vib4. Tap Vib
want yo
Changing Your Settings 123
Home screen, tap ➔ ➔ Call settings reduction to create a checkmark and enable e.ume in pocketases the ringtone volume when the device is
bag. It uses the proximity sensor to detect its
Home screen, tap ➔ ➔ Call settings se volume in pocket to create a checkmark and e feature.rviceHome screen, tap ➔ ➔ Call settings ail Service.
l service provided by your carrier is the default.
ttings modify your voicemail number from this
Home screen, tap ➔ ➔ Call settings ail settings.
5. Tap Keypad tones to create a checkmark if you want tones to play when the keypad is pressed.
Personalize call soundThis option allows you to personalize the sounds you hear during a call with and without earphones.
1. From the Home screen, tap ➔ ➔ Call settings ➔ Personalize call sound.
2. At the Personalize call sound display, tap one of the following options:• Adapt sound: allows you to customize your sounds. Follow
the on-screen instructions to set up your personal call sound.• Soft sound: plays a softer sound when the other party is in a
noisy environment.• Clear sound: plays a clearer sound when the other party
sounds unclear or muffled.• Off: turns off your customized call sound and plays the default
sounds.Noise reductionThis option helps to suppress background noise from your side during a call.
� From the ➔ Noise the featur
Increase volThis option increin a pocket or alocation.
� From the ➔ Increaenable th
Voicemail se1. From the
➔ VoicemVoicemai
Voicemail seYou can view ormenu.
1. From the ➔ Voicem
ll settings
e Home screen, tap ➔ ➔ Call settings ounts.eive incoming calls to enable reception of
g Internet calls. calling to use Internet calling.e Home screen, tap ➔ ➔ Call settings Internet calling.or all calls when mobile network available, r Internet calls, or Ask for every call. Modeg mode is enabled, notifications for selected e disabled. You will only receive notifications of from people on your allowed list.e Home screen, tap ➔ Settings ➔
My device ➔ Blocking mode.
124
2. Tap the Voicemail number field, backspace to erase the digits, and enter a new voicemail number using the keypad, then tap Done.
3. Tap OK.SoundThis option allows you select the sound played when you receive a voicemail message.
1. From the Home screen, tap ➔ ➔ Call settings ➔ Sound.
2. Tap a ringtone to hear it played.3. Select a ringtone and tap OK.
VibrateThis option allows you set the vibration setting for voicemail notification.
1. From the Home screen, tap ➔ ➔ Call settings.
2. Tap Vibrate to place a checkmark in the selection box or remove the checkmark.
Internet caAccounts
1. From th➔ Acc
2. Tap Recincomin
Use InternetChoose when
1. From th➔ Use
2. Select FOnly fo
BlockingWhen Blockinfeatures will bincoming calls
1. From th My device
Changing Your Settings 125
FF / ON icon next to Power saving mode to r saving mode on.llowing options to create a checkmark and
power:wer saving: allows you to limit the maximum nce of the CPU.
power saving: allows you to lower the screen power
haptic feedback: allows you to turn off vibration u tap or touch the screen. about Power saving mode to learn about
ays to conserve battery power. Settingss you to select the Audio output mode when
esk dock.Home screen, tap ➔ Settings ➔
y device ➔ Accessory. sound to play sounds when inserting or the phone from the dock. output mode to use the external dock
when the phone is docked.
2. Touch and slide the Blocking mode slider to the right to turn it on . Confirm that the Blocking mode active icon appears in the Status bar.
3. Tap the selection box to place a checkmark adjacent to those features you would like to enable. Choose from: Disable incoming calls, Disable notifications, Disable alarm and timer, Disable LED indicator.
4. Configure a timeframe for these features to be active. To set a specific time, remove the checkmark from the Always field and configure the From and To time fields.
5. Tap Allowed contacts to assign those contacts that are exempted from these rules. Choose from None, All contacts, Favourites, or Custom. Allowed contacts will then appear in the Allowed contact list.
Power Saving ModePower saving mode allows you to manage your phone to conserve power.
1. From the Home screen, tap ➔ Settings ➔
My device ➔ Power saving mode.
2. Tap the Oturn Powe
3. Tap the foconserve• CPU po
performa• Screen
level.• Turn off
when yo4. Tap Learn
various wAccessoryThis menu allowusing a car or d
1. From the M
2. Tap Dockremoving
3. Tap Audiospeakers
My dev ce
My dev ce
ering/ending calls: accept incoming calls by pressing me key or end calls using the power key. shortcut: allow the accessibility shortcut under the options to be used by pressing and holding the power
ge accessibility: save and update your accessibility s or share them with another device. You can export ettings, import a previously saved file, or share your file other device.
ack: activate the TalkBack feature.
, when installed and enabled, speaks feedback lind and low-vision users.
ize: change the size of the fonts used on the device menus, options, etc. Choose from: Tiny, Small, Normal, or Huge.ification gestures: use exaggerated gestures such as apping, double pinching, and dragging two fingers the screen.
126
4. Tap Desk home screen display to display the desk home screen whenever the phone is docked.u f
5. Tap Automatic unlock to unlock the screen when S View cover is flipped open.
6. Tap Audio output to set your Audio output to Stereo or Surround.
AccessibilityAccessibility services are special features to make using the device easier for those with certain physical disabilities. Use the Accessibility settings to activate these services.
Note: You can download accessibility applications from Play Store and manage their use here.
1. From the Home screen, tap ➔ Settings ➔
My device ➔ Accessibility.2. The following options are available:
• Auto-rotate screen: automatically rotate the screen from landscape to portrait when you rotate your phone.
• Screen timeout: timeout the accessibility feature after a defined amount of time.
• Speak passwords: reads out password information.
• Answthe ho
• Showdevicekey.
• Manasettingyour swith an
• TalkB
Note: TalkBackto help b
• Font swithin Large,
• Magntriple-tacross
My deviceMy device
Changing Your Settings 127
dio: allows you to combine stereo audio into a ono audio stream for use with a single earbud/e. all sounds: allows you to mute every sound made vice including the receiver.tification: allows you to set your camera light to
enever you receive a notification.nt menu: allows you to improve the device ility for users with reduced dexterity. Touch and slide r to the right to turn it on . Follow the instructions.
hold delay: allows you to select a time interval for n. Choose from: Short, Medium, or Long.ion control: allows you to enable or disable motions en timeout. You can also block areas of the screen ch interaction. Touch and slide the slider to the right to . Follow the on-screen instructions. and inputs you to configure the language in which to us. You can also set onscreen keyboard
• Negative colours: reverse the display of on-screen colours from White text on a Black background to Black text on a White background.
• Colour adjustment: allows you to adjust the display colours if you are colour blind and have difficulty reading the display because of the colours. Touch and slide the slider to the right to turn it on . Follow the on-screen instructions.
• Accessibility shortcut: allows you to quickly enable accessibility features in two quick steps. Touch and slide the slider to the right to turn it on . Follow the on-screen instructions.
• Text-to-speech options: allows you to adjust your text-to-speech settings. For more information, refer to “Speech Settings” on page 130.
• Enhance web accessibility: allows apps to install scripts from Google that make their Web content more accessible. Tap Allow.
• Sound balance: allows you to use the slider to set the Left and Right balance when using stereo earphones.
• Mono ausingle mearphon
• Turn offby the de
• Flash noblink wh
• Assistaaccessibthe slideonscreen
• Tap andthis actio
• Interactand screfrom touturn it on
LanguageThis menu allowdisplay the menoptions.
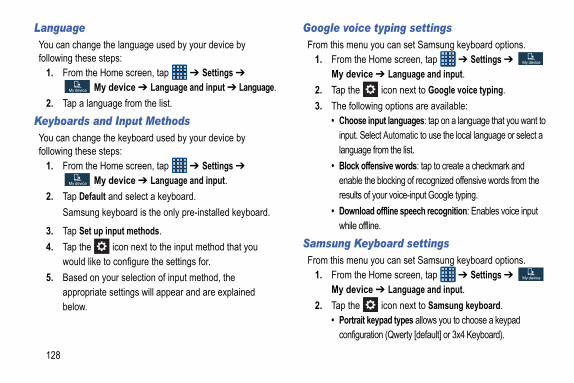
e typing settingsu you can set Samsung keyboard options.e Home screen, tap ➔ Settings ➔ ice ➔ Language and input. icon next to Google voice typing. owing options are available:e input languages: tap on a language that you want to
Select Automatic to use the local language or select a ge from the list.offensive words: tap to create a checkmark and the blocking of recognized offensive words from the of your voice-input Google typing.
load offline speech recognition: Enables voice input ffline.eyboard settingsu you can set Samsung keyboard options.e Home screen, tap ➔ Settings ➔ ice ➔ Language and input. icon next to Samsung keyboard.it keypad types allows you to choose a keypad uration (Qwerty [default] or 3x4 Keyboard).
My device
My device
128
LanguageYou can change the language used by your device by following these steps:
1. From the Home screen, tap ➔ Settings ➔
My device ➔ Language and input ➔ Language.2. Tap a language from the list.
Keyboards and Input MethodsYou can change the keyboard used by your device by following these steps:
1. From the Home screen, tap ➔ Settings ➔
My device ➔ Language and input.2. Tap Default and select a keyboard.
Samsung keyboard is the only pre-installed keyboard.
3. Tap Set up input methods.4. Tap the icon next to the input method that you
would like to configure the settings for.5. Based on your selection of input method, the
appropriate settings will appear and are explained below.
Google voicFrom this men
1. From thMy dev
2. Tap the3. The foll
• Choosinput. langua
• Block enableresults
• Downwhile o
Samsung KFrom this men
1. From thMy dev
2. Tap the• Portra
config
My device
My device

Changing Your Settings 129
cter preview provides an automatic preview of the t character selection within the text string. This is helpful multiple characters are available within one key.p vibration enables vibration feedback when you tap screen key.p sound enables auditory feedback when you tap an een key.nches a brief on-screen tutorial covering the main related to the Samsung keyboard.ttings resets the keyboard settings back to their onfiguration.xt Settings
you can set Predictive Text settings.Home screen, tap ➔ Settings ➔ e ➔ Language and input.
icon next to Samsung keyboard. N/OFF slider, located to the right of the text field, to turn it ON .
ctive text.ing options are available:
My dev ce
• Input languages sets the input language. Tap a language from the available list. The keyboard is updated to the selected language.
• Predictive text enables predictive text entry mode. This must be enabled to gain access to the advanced settings. Touch and hold to access the advanced settings. Touch and slide the slider to the right to turn it on .
• Continuous input allows you to type words by swiping between on-screen keys.
• Cursor control allows you to move the cursor by sliding your finger across the keyboard.
• Handwriting enables the device to recognize on-screen handwriting and convert it to text.
• Advanced displays the following advanced options:– Auto capitalization automatically capitalizes the first letter of
the first word in each sentence (standard English style). – Auto spacing automatically inserts spaces between words.– Auto-punctuate automatically inserts a full stop in a sentence
by tapping the space bar twice when using the on-screen QWERTY keyboard.
– Characurrenwhen
– Key-taan on-
– Key-taon-scr
• Help lauconcepts
• Reset seoriginal c
Predictive TeFrom this menu
1. From the My devic
2. Tap the 3. Tap the O
Predictive4. Tap Predi5. The follow
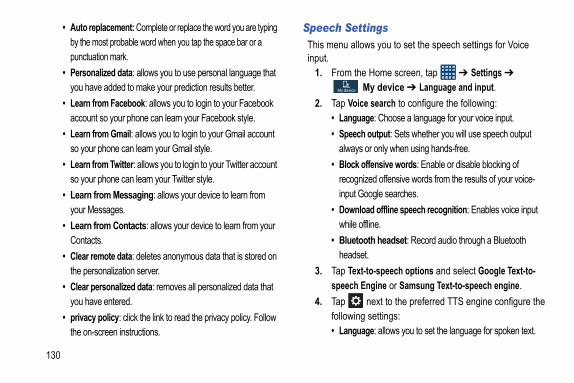
tingsows you to set the speech settings for Voice
e Home screen, tap ➔ Settings ➔
My device ➔ Language and input.ce search to configure the following:age: Choose a language for your voice input.h output: Sets whether you will use speech output or only when using hands-free.offensive words: Enable or disable blocking of ized offensive words from the results of your voice-oogle searches.
load offline speech recognition: Enables voice input ffline.oth headset: Record audio through a Bluetooth
et.t-to-speech options and select Google Text-to-Engine or Samsung Text-to-speech engine. next to the preferred TTS engine configure the
g settings:age: allows you to set the language for spoken text.
130
• Auto replacement: Complete or replace the word you are typing by the most probable word when you tap the space bar or a punctuation mark.
• Personalized data: allows you to use personal language that you have added to make your prediction results better.
• Learn from Facebook: allows you to login to your Facebook account so your phone can learn your Facebook style.
• Learn from Gmail: allows you to login to your Gmail account so your phone can learn your Gmail style.
• Learn from Twitter: allows you to login to your Twitter account so your phone can learn your Twitter style.
• Learn from Messaging: allows your device to learn from your Messages.
• Learn from Contacts: allows your device to learn from your Contacts.
• Clear remote data: deletes anonymous data that is stored on the personalization server.
• Clear personalized data: removes all personalized data that you have entered.
• privacy policy: click the link to read the privacy policy. Follow the on-screen instructions.
Speech SetThis menu allinput.
1. From th
2. Tap Voi• Langu• Speec
always• Block
recogninput G
• Downwhile o
• Bluetoheads
3. Tap Texspeech
4. Tap followin• Langu
My device
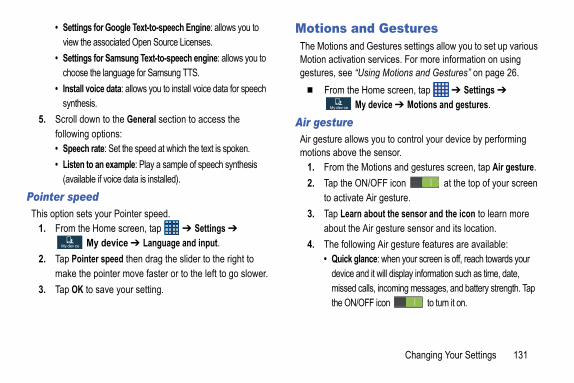
Changing Your Settings 131
d Gesturesd Gestures settings allow you to set up various n services. For more information on using sing Motions and Gestures” on page 26.
Home screen, tap ➔ Settings ➔
y device ➔ Motions and gestures.
s you to control your device by performing the sensor.Motions and gestures screen, tap Air gesture.N/OFF icon at the top of your screen Air gesture. about the sensor and the icon to learn more Air gesture sensor and its location.ing Air gesture features are available:
ance: when your screen is off, reach towards your nd it will display information such as time, date, alls, incoming messages, and battery strength. Tap FF icon to turn it on.
• Settings for Google Text-to-speech Engine: allows you to view the associated Open Source Licenses.
• Settings for Samsung Text-to-speech engine: allows you to choose the language for Samsung TTS.
• Install voice data: allows you to install voice data for speech synthesis.
5. Scroll down to the General section to access the following options:• Speech rate: Set the speed at which the text is spoken.• Listen to an example: Play a sample of speech synthesis
(available if voice data is installed).Pointer speedThis option sets your Pointer speed.
1. From the Home screen, tap ➔ Settings ➔
My device ➔ Language and input.2. Tap Pointer speed then drag the slider to the right to
make the pointer move faster or to the left to go slower.3. Tap OK to save your setting.
Motions anThe Motions anMotion activatiogestures, see “U
� From the M
Air gestureAir gesture allowmotions above
1. From the 2. Tap the O
to activate3. Tap Learn
about the4. The follow
• Quick gldevice amissed cthe ON/O
My dev ce
My dev ce
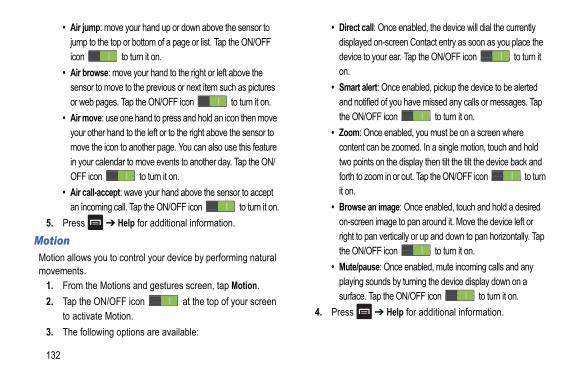
call: Once enabled, the device will dial the currently yed on-screen Contact entry as soon as you place the to your ear. Tap the ON/OFF icon to turn it
alert: Once enabled, pickup the device to be alerted tified of you have missed any calls or messages. Tap /OFF icon to turn it on.
: Once enabled, you must be on a screen where t can be zoomed. In a single motion, touch and hold ints on the display then tilt the tilt the device back and zoom in or out. Tap the ON/OFF icon to turn
e an image: Once enabled, touch and hold a desired een image to pan around it. Move the device left or pan vertically or up and down to pan horizontally. Tap /OFF icon to turn it on.ause: Once enabled, mute incoming calls and any sounds by turning the device display down on a
e. Tap the ON/OFF icon to turn it on. ➔ Help for additional information.
132
• Air jump: move your hand up or down above the sensor to jump to the top or bottom of a page or list. Tap the ON/OFF icon to turn it on.
• Air browse: move your hand to the right or left above the sensor to move to the previous or next item such as pictures or web pages. Tap the ON/OFF icon to turn it on.
• Air move: use one hand to press and hold an icon then move your other hand to the left or to the right above the sensor to move the icon to another page. You can also use this feature in your calendar to move events to another day. Tap the ON/OFF icon to turn it on.
• Air call-accept: wave your hand above the sensor to accept an incoming call. Tap the ON/OFF icon to turn it on.
5. Press ➔ Help for additional information.MotionMotion allows you to control your device by performing natural movements.
1. From the Motions and gestures screen, tap Motion.2. Tap the ON/OFF icon at the top of your screen
to activate Motion.3. The following options are available:
• Directdispladeviceon.
• Smartand nothe ON
• Zoomcontentwo poforth toit on.
• Browson-scrright tothe ON
• Mute/pplayingsurfac
4. Press

Changing Your Settings 133
alibrationration allows you to calibrate motion correctly ’s built-in gyroscope.Motions and gestures screen, tap Gyroscope .r device on a flat surface.
rate.shed, Calibrated will appear on your screen. o return to the previous screen.eenen options allow you to customize your screen the screen more responsive and easier to
Home screen, tap ➔ Settings ➔
y device ➔ Smart screen.f the following options to create a checkmark te the features:
ay: disables the screen timeout if your phone detects face is watching the screen.tation: disables the auto screen rotation by checking tation of your face and the device.
Palm motionPalm motion allows you to control your device by touching your screen with the palm of your hand.
1. From the Motions and gestures screen, tap Palm motion.
2. Tap the ON/OFF icon at the top of your screen to activate Palm motion.
3. The following options are available:• Capture screen: Once enabled, you can capture any
on-screen information swiping across the screen. In a single motion, press the side of your hand on the screen and swipe form left to right. The image is then copied to the clipboard. Tap the ON/OFF icon to turn it on.
• Mute/pause: Once enabled, you can pause any on-screen video or mute any current sound by simply covering the screen with your hand. Once you remove your hand from the screen, the device goes back to normal by either continuing to play the current video or unmuting the current sound. Tap the ON/OFF icon to turn it on.
4. Press ➔ Help for additional information.
Gyroscope cGyroscope calibusing the device
1. From the calibration
2. Place you3. Tap Calib4. When fini
Tap tSmart scrThe Smart scresettings to makeuse.
1. From the M
2. Tap any oand activa• Smart st
that your• Smart ro
the orien
My dev ce
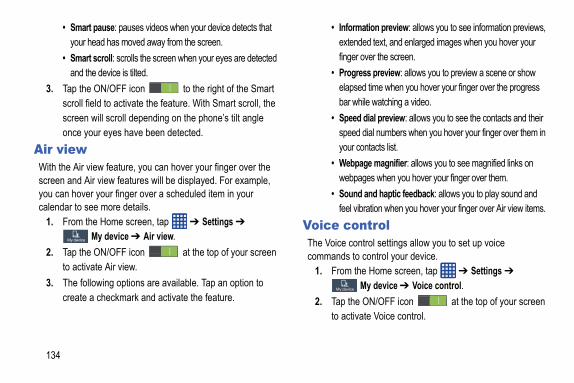
ation preview: allows you to see information previews, ed text, and enlarged images when you hover your over the screen.ss preview: allows you to preview a scene or show d time when you hover your finger over the progress ile watching a video. dial preview: allows you to see the contacts and their dial numbers when you hover your finger over them in ontacts list.age magnifier: allows you to see magnified links on ges when you hover your finger over them. and haptic feedback: allows you to play sound and ration when you hover your finger over Air view items.ntroltrol settings allow you to set up voice
control your device.e Home screen, tap ➔ Settings ➔
My device ➔ Voice control. ON/OFF icon at the top of your screen te Voice control.
134
• Smart pause: pauses videos when your device detects that your head has moved away from the screen.
• Smart scroll: scrolls the screen when your eyes are detected and the device is tilted.
3. Tap the ON/OFF icon to the right of the Smart scroll field to activate the feature. With Smart scroll, the screen will scroll depending on the phone’s tilt angle once your eyes have been detected.
Air viewWith the Air view feature, you can hover your finger over the screen and Air view features will be displayed. For example, you can hover your finger over a scheduled item in your calendar to see more details.
1. From the Home screen, tap ➔ Settings ➔
My device ➔ Air view.2. Tap the ON/OFF icon at the top of your screen
to activate Air view.3. The following options are available. Tap an option to
create a checkmark and activate the feature.
• Informextendfinger
• Progreelapsebar wh
• Speedspeedyour c
• Webpwebpa
• Soundfeel vib
Voice coThe Voice concommands to
1. From th
2. Tap theto activa
Changing Your Settings 135
countHome screen, tap ➔ Settings ➔
ccounts ➔ Add account.f the account types.eyboard and follow the prompts to enter your ls and set up the account.ircle will appear next to the account type once created an account. Your email account will isplayed in the Accounts section of the main
enu.
Account
ving an account also deletes all of its ages, contacts, and other data from the e.
Home screen, tap ➔ Settings ➔
ccounts. Accounts section, tap the account name.ccount name.
3. The following options are available. Tap an option to create a checkmark and activate the feature.• Incoming calls: allows you to answer or reject calls using the
commands Answer and Reject.• ChatON: allows you to answer or reject calls using the
commands Answer and Reject. • Alarm: allows you to stop or snooze an alarm by using the
commands Stop and Snooze.• Camera: allows you to take pictures using the voice
commands Smile, Cheese, Capture, or Shoot.• Music: allows you to control your Music player using the voice
commands Next, Previous, Pause, Play, Volume Up, and Volume Down.
Note: If you set the alert type for calls or alarms to vibration, voice control will not be available.
Add AccountThis menu allows you to set up, manage, and synchronize accounts, including your Google and email accounts.
Adding an Ac1. From the
A2. Tap one o3. Use the k
credentiaA green cyou havealso be dSettings m
Removing an
Important! Remomessdevic
1. From the A
2. In the My3. Tap the a

e Home screen, tap ➔ Settings ➔
Accounts ➔ Backup and reset.k up my data to enable or disable back up of ion data, WI-Fi passwords, and other settings to gle server.ount
abled the Back up my data option, then the nt option is available.e Home screen, tap ➔ Settings ➔
Accounts ➔ Back up and reset.kup account and tap your Google Gmail account dd account to set your Google Gmail account to ed up to the Google server.Restore option, when you reinstall an application, all of p settings and data will be restored.e Home screen, tap ➔ Settings ➔
Accounts ➔ Back up and reset.omatic restore to enable or disable automatic ion of settings and data from the Google server.
136
4. Tap Remove account, then tap Remove account at the prompt to remove the account and delete all its messages, contacts, and other data.
Synchronizing AccountsSelect the items you want to synchronize on your account such as Books, Calendar, Contacts, and more.
1. From the Home screen, tap ➔ Settings ➔
Accounts.2. In the My Accounts section, tap the account name.3. Tap the account name.4. Tap Sync now to synchronize your account or tap Sync
all to synchronize all your accounts. Tap Cancel sync to stop the synchronization.
5. Tap Settings to access your account settings.Backup and resetThe Backup and reset settings allow you to back up your data, back up accounts, automatically restore your phone, and reset your phone settings to the factory settings.
Back Up My DataBy setting this option, the Google server will back up all of your settings and data.
1. From th
2. Tap Bacapplicatthe Goo
Backup AccIf you have enBackup accou
1. From th
2. Tap Bacor tap Abe back
Automatic By setting thisyour backed u
1. From th
2. Tap Autrestorat
Changing Your Settings 137
Home screen, tap ➔ Settings ➔
ore ➔ Location services.f the following options to create a checkmark te the service:
to my location: allows apps that have asked your n to use your location information. Tap the ON/OFF
to turn it on. satellites: allows applications to use GPS to
your location.obile network location: allows applications to use
location service to estimate your location faster. ous location data will be collected and sent to
es: allows you to add location information for your ffice, and Car.
ttings allow you to determine the security level
Factory Data ResetFrom this menu you can reset your phone and sound settings to the factory default settings.
1. From the Home screen, tap ➔ Settings ➔
Accounts ➔ Back up and reset.2. Tap Factory data reset.
The Factory data reset screen displays reset information.
3. Tap Reset device, then follow the prompts to perform the reset.
Warning! Performing a Factory data reset will erase all data from your phone and internal SD card, including your Google account, system and application data and settings, and downloaded applications. It will not erase current system software, bundled applications, and external SD card files such as music and photos.
Location ServicesThe Location services settings allow you to set up how the phone will determine your location and the sensor settings for your phone.
1. From the M
2. Tap any oand activa• Access
permissioslider
• Use GPSpinpoint
• Wi-Fi & mGoogle’sAnonymGoogle.
• My placHome, O
SecurityThe Security sefor your phone.
bilerolsols uses the SamsungDive service to track and evice remotely. Also, using the Find my mobile an find your missing phone. See dive.com for more information.ote controls:e Home screen, tap ➔ Settings ➔
More ➔ Security ➔ Remote controls.. ON/OFF slider to turn Remote controls
Alertlert sends an SMS message to preset phone
ur phone is ever turned on with a different SIM
e Home screen, tap ➔ Settings ➔
More ➔ Security ➔ SIM Change Alert. n in and sign in to your Samsung account.
ate account and set up a Samsung account.
138
EncryptionTo require a numeric PIN or password to decrypt your phone each time you power it on or encrypt the data on your SD card each time it is connected.
Note: You must first set up a screen lock type if you haven’t already done so. For more information, refer to “Screen Lock” on page 114.
1. From the Home screen, tap ➔ Settings ➔
More ➔ Security.2. Tap Encrypt device. For more information, read the
displayed help screen.3. Tap Encrypt external SD card to enable the encryption of
SD card data, which requires a password be entered each time the microSD card is connected.
Tip: Make sure your battery is charged more than 80 percent or the charger is connected. Encryption may take an hour or more.
Find my moRemote contRemote contrcontrol your dfeature, you cwww.samsungTo enable rem
1. From th
2. Tap OK3. Tap the
on.SIM Change SIM Change Anumbers if yocard in it.
1. From th
2. Tap Sig– or –Tap Cre
Changing Your Settings 139
your phone will ask for a PIN number each phone. Using this option you can also PIN number.
Home screen, tap ➔ Settings ➔
ore ➔ Security.p SIM card lock.SIM card, enter your SIM PIN code, then tap
ctivate Lock SIM card before you can change IN code.
ge SIM PIN.r old SIM PIN code and tap OK.r new SIM PIN code and tap OK.our new SIM PIN code and tap OK.ords visiblepassword characters display briefly as you e entering passwords.Home screen, tap ➔ Settings ➔
ore ➔ Security.
3. Tap the ON/OFF slider to turn SIM Change Alert on.
4. Tap Alert message, enter the message to be sent, and tap OK.
5. Tap Create to enter the phone number to receive the SMS message or Contacts to select a number from your contact list.
6. Enter the number and tap OK, or select the number and tap Done.
7. Tap Save.
Note: Requires a Samsung account.
FInd my mobile web pageOpens the SamsungDive web page (www.samsungdive.com)where you can find more information and sign up for the service.
Set up SIM card lockPrevent another user from using your SIM card to make unauthorized calls or from accessing information stored on your SIM card by protecting the information using a PIN code.
When enabled, time you use thechange your SIM
1. From the M
2. Tap Set u3. Tap Lock
OK.
Note: You must ayour SIM P
4. Tap Chan5. Enter you6. Enter you7. Re-type y
Make passwWhen enabled, touch them whil
1. From the M
device administrator and follow the prompts. If ce administrators are listed, you can download m the Play Store.ourcesllows you to download and install applications other than Play Store.e Home screen, tap ➔ Settings ➔
More ➔ Security.nown sources. mark is displayed to indicate it is active.
ling this option causes your phone and personal to be more vulnerable to attack by applications unknown sources.
before installing apps that may cause harm.e Home screen, tap ➔ Settings ➔
More ➔ Security.ify apps. mark is displayed to indicate it is active.
140
2. Tap Make passwords visible to create a checkmark and enable or disable the display of password characters.
Device AdministratorsThe Device Administration feature allows you to select one or more administration applications that control your device for security purposes (for example, if your phone is lost of stolen). These applications enforce remote or local device security policies.Some of the features a device administration application might control are:• Setting the number of failed password attempts before the device is
restored to factory settings.• Automatically locking the device.• Restoring factory settings on the device.
Note: If a device uses multiple enabled administration applications, the strictest policy is enforced.
1. From the Home screen, tap ➔ Settings ➔
More ➔ Security.2. Tap Device administrators.
3. Select ano devithem fro
Unknown sThis feature afrom sources
1. From th
2. Tap UnkA check
Warning! Enabdata from
Verify appsBlock or warn
1. From th
2. Tap VerA check
Changing Your Settings 141
ou disable a system CA certificate, the Disable hanges to Enable, so you can enable the te again, if necessary. When you remove a talled CA certificate, it is permanently deleted st be re-installed, if needed.
return to the certificate list.bled, a check mark appears in the check box.
evice storage certificates from an installed memory card.
ave installed a memory card containing certificates to use this feature.
Home screen, tap ➔ Settings ➔
ore ➔ Security.l from device storage, then choose a certificate the prompts to install.tialsdentials.
Trusted CredentialsIf a certificate authority (CA) certificate gets compromised or for some other reason you do not trust it, you can disable or remove it.
1. From the Home screen, tap ➔ Settings ➔
More ➔ Security.2. Tap Trusted credentials.
The trusted credentials screen has two tabs:
• System: Displays CA certificates that are permanently installed in the ROM of your device.
• User: Displays any CA certificates that you installed, for example, in the process of installing a client certificate.
3. Tap a CA certificate to examine its details.A scrolling screen displays the details.
4. Scroll to the bottom of the details screen and tap Disable to disable a System certificate or Remove to remove a User certificate.
Caution! When ybutton ccertificauser-insand mu
5. Tap OK toWhen ena
Install from dInstall encrypted
Note: You must hencrypted
1. From the M
2. Tap Instaland follow
Clear credenClear stored cre
WNLOADED, RUNNING, or ALL to display usage for that category of applications.ph at the bottom of the Downloaded tab shows d free device memory. The graph at the bottom unning tab shows used and free RAM.
you have downloaded onto your device.e Home screen, tap ➔ Settings ➔
More ➔ Application manager. DOWNLOADED tab to view a list of all the ded applications on your device.h the order of the lists displayed in the aded tabs, press ➔ Sort by size or Sort by
t your application preferences, press ➔ pp preferences.
reset the preferences for disabled apps, disabled ications, default applications for actions, and nd data restrictions for apps. You will not lose data.
142
Note: This setting only appears if you have installed encrypted certificates.
1. From the Home screen, tap ➔ Settings ➔
More ➔ Security.2. Tap Clear credentials to remove all certificates.
Application ManagerYou can download and install applications from Play Store or create applications using the Android SDK and install them on your device. Use Application manager settings to manage applications.
Warning! Because this device can be configured with system software not provided by or supported by Google or any other company, you operate this device at your own risk.
Memory UsageSee how memory is being used by Downloaded or Running applications.
1. From the Home screen, tap ➔ Settings ➔
More ➔ Application manager.
2. Tap DOmemoryThe graused anof the R
DownloadedDisplays apps
1. From th
2. Tap thedownloa
3. To switcDownloname.
4. To reseReset a
Note: This will app notifbackgrouany app

Changing Your Settings 143
ry by application.
battery power is used for device activities.Home screen, tap ➔ Settings ➔
ore ➔ Battery.ry level displays in percentage. The amount of attery was used also displays. Battery usage n percentages per application.
n, Cell standby, Android OS, Android System, ne, or any other listed application to view how ing battery use.
ications may be running that affect battery use.
you can view the memory allocation for the d USB as well as mount or unmount the SD
ation about mounting or unmounting the SD ory Card” on page 41.
5. Tap an application to view and update information about the application, including memory usage, default settings, and permissions.
Running ServicesView and control services running on your device.
1. From the Home screen, tap ➔ Settings ➔
More ➔ Application manager.2. Tap the RUNNING tab. All the applications that are
currently running on the device display.3. Tap Show cached processes to display all the cached
processes that are running. Tap Show services in use to switch back.
4. Tap any application to view application information.The following options display:
• Stop: Stops the application from running on the device. This is usually done prior to uninstalling the application.
Warning! Not all services can be stopped. Stopping services may have undesirable consequences on the application or Android System.
• Report: Report failure and other application information.
Note: Options va
BatterySee how much
1. From the M
The battetime the bdisplays i
2. Tap ScreeWi-Fi, Phoit is affect
Note: Other appl
StorageFrom this menumemory card ancard.For more informcard, see “Mem
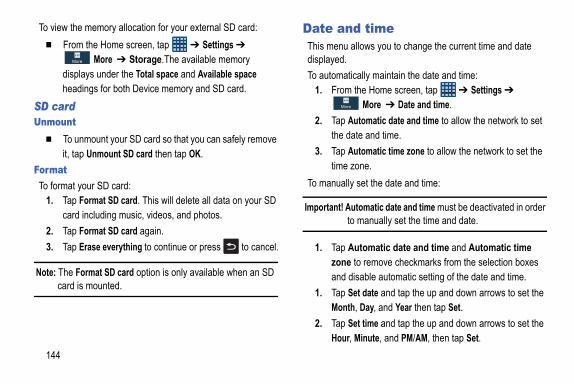
timeows you to change the current time and date
lly maintain the date and time:e Home screen, tap ➔ Settings ➔
More ➔ Date and time.omatic date and time to allow the network to set and time.omatic time zone to allow the network to set the ne.et the date and time:
matic date and time must be deactivated in order anually set the time and date.
tomatic date and time and Automatic time remove checkmarks from the selection boxes able automatic setting of the date and time. date and tap the up and down arrows to set the Day, and Year then tap Set. time and tap the up and down arrows to set the inute, and PM/AM, then tap Set.
144
To view the memory allocation for your external SD card:� From the Home screen, tap ➔ Settings ➔
More ➔ Storage.The available memory displays under the Total space and Available space headings for both Device memory and SD card.
SD cardUnmount
� To unmount your SD card so that you can safely remove it, tap Unmount SD card then tap OK.
FormatTo format your SD card:
1. Tap Format SD card. This will delete all data on your SD card including music, videos, and photos.
2. Tap Format SD card again.3. Tap Erase everything to continue or press to cancel.
Note: The Format SD card option is only available when an SD card is mounted.
Date andThis menu alldisplayed.To automatica
1. From th
2. Tap Autthe date
3. Tap Auttime zo
To manually s
Important! Autoto m
1. Tap Auzone toand dis
1. Tap SetMonth,
2. Tap SetHour, M
Changing Your Settings 145
isplays the Battery status, Battery level (percentage), , Signal strength, Mobile network type, Service state, status, Mobile network state, the phone number for
ce (My phone number), IMEI number, IMEISV IP address, Wi-Fi MAC address, Bluetooth address, mber, Up time, and Device status.ormation: This option displays information about urce licences, Google legal information, Samsung rmation and Licence settings. Read the information s, then press to return to the Settings menu.ame: displays the current device name and allows you e the device name.umber: displays the phone’s model number. version: displays the android version loaded on this
d version: displays the baseband version loaded on set.
ersion: displays the kernel version loaded on this
mber: displays the software, build number.
3. Tap Select time zone, then tap a time zone.4. Optional: Tap Use 24-hour format. If this is not selected
the phone automatically uses a 12-hour format.5. Tap Select date format and tap the date format type.
About DeviceThis menu contains legal information, system tutorial information, and other phone information such as the model number, firmware version, baseband version, kernal version, and software build number. To access phone information:
1. From the Home screen, tap ➔ Settings ➔
More ➔ About device. 2. The following information displays:
• Software update: allows you to update your phone software, if available. For more information, refer to “Software Update” on page 146.
• Status: dNetworkRoamingthis devinumber,Serial nu
• Legal infOpen solegal infoand term
• Device nto chang
• Model n• Android
handset.• Baseban
this hand• Kernel v
handset.• Build nu

pdating software, once the update file is ded, you can delay the update on the start
by postponing it for a certain period of time. If t to resume the update before the selected time,
tinue update.
146
• SELinux status: displays the status of SELinux. SELinux is a set of security policies/modules which is applied to the device to improve the overall security.
Note: Baseband, kernal and build numbers are usually used for updates to the handset or support. For additional information please contact your service representative.
Software UpdateThe Software Update feature enables you to use your phone to connect to the network and upload any new phone software directly to your phone. The phone automatically updates with the latest available software when you access this option.
1. From the Home screen, tap ➔ Settings ➔
More ➔ Software update.2. Tap Update to check for updates.3. At the Software update prompt, tap the checkbox to
accept the Terms and conditions, then tap Confirm to continue.
4. The phone automatically updates the software (if available), otherwise, when the prompt The latest updates have already been installed is displayed, tap OK.
5. When udownloascreen you wantap Con
Connections 147
nd out of the Browseral ways to Zoom in and out on your browser. a link or article, use one of these methods: hold the screen at two points then tilt the device to reduce or enlarge the screen. You must first in the Settings section. For more information, refer d Gestures” on page 131.ickly tap the screen twice on the web page to zoom
p in opposite directions at the same time to zoom in nching-in or pinching-out motion). ions webpage, press to access the following
dow: displays a new window so you can browse URLs. For more information, refer to “Adding and Windows” on page 149.kmark: allows you to add a URL to your bookmark
Section 9: Connections
This section describes the various connections your phone can make including accessing the Internet with your Browser, Wi-Fi, Bluetooth, and Connecting your PC.
InternetThe Browser is your access to the mobile web. This section explains how to navigate the Browser and introduces you to the basic features.
Accessing the Mobile WebTo access the Browser:
� From the Home screen, tap Internet .The default homepage displays.
Navigating with the Browser1. To select an item, tap an entry.2. To scroll through a website, sweep the screen with your
finger in an up or down motion.3. Sweep the screen left to right to move laterally across a
web page.4. To return to a previous page, press .5. To move forward to a web page, press .
Zooming in aThere are severAfter tapping on• Tilting: Tap and
back and forth enable motion to “Motions an
• Double tap: Quin or out.
• Pinching: Sweeor out (use a pi
Browser Opt1. From any
options:• New win
multiple Deleting
• Add boolist
allows you to print the screen or web page on a ung printer using Wi-Fi.gs: allows you to modify your web settings. For more ation, refer to “Browser Settings” on page 151.allows you view additional information concerning the t application.
ss a website quickly by entering the URL. optimized for viewing on your phone.L and go to a particular website, follow these
URL field at the top of your screen.e URL using the on-screen keypad.bsite displays.
Internet internet search using keywords, follow these
y webpage, tap the URL field at the top of the
e keyword(s) to search using the on-screen and tap Go.
148
• Add shortcut: allows you to add a shortcut to your Home screen.
• Save page: allows you to save the page image to the Saved pages folder.
• Share via: allows you to share the page using Bluetooth, ChatON, Dropbox, Email, Flipboard, Gmail, Google, Google+, Messaging, S Memo, or Wi-Fi Direct.
• Find on page: allows you to search in the current page. • Incognito mode: pages viewed in incognito mode won’t
appear within your browser history or search history, and no traces (such as cookies) are left on your device. For more information, refer to “Going Incognito” on page 149.
• Saved pages: shows web pages you have saved using the Save page option.
• History: displays your browsing history. You can tap on a listing to open the page.
• Desktop view: allows you to assign the browser to display the current page in the desktop view (to closely mimic the display as it would appear on a desktop computer).
• Brightness: allows you to set the screen brightness.
• Print: Sams
• Settininform
• Help: Interne
Enter a URLYou can acceWebsites are To enter a URsteps:
1. Tap the2. Enter th
The we
Search theTo perform ansteps:
1. From anscreen.
2. Enter thkeypad
Connections 149
rmation prompt, tap OK.wser window displays.
incognito window:r browser window, tap (Windows).oss the available windows and locate the window. The incognito icon appears in the of browser windows operating in this mode.ext to the incognito listing to delete this
arks a website, you can bookmark a site to quickly
ss it at a future time. The URLs (website e bookmarked sites are displayed on the e. From the Bookmarks page you can also visited websites and view your History. webpage, tap (Bookmarks).marks page is displayed.
to display the following options:
2
3. Tap a link to view the website.Adding and Deleting WindowsYou can have up to eight Internet windows open at one time. To add a new window, follow these steps:
1. From your browser, press ➔ New window.A new browser window is opened.
2. Tap (Windows) to see thumbnails of all open windows.
3. Tap a window listing to open up that Internet window.4. Tap at the top right corner of the web page
thumbnail to delete the window.Going IncognitoThe incognito feature allows you to view Internet sites outside of the normal browsing. Pages viewed in this incognito window won’t appear within your browser history or search history, and no traces (such as cookies) are left on your device.
Note: Any downloaded files will be preserved and will stay on your device after you exit the incognito mode.
To add a new incognito window:1. From your browser, press ➔ Incognito mode.
2. At the info3. A new bro
To exit from the 1. From you2. Scroll acr
incognito upper-left
3. Tap nwindow.
Using BookmWhile navigatingand easily acceaddresses) of thBookmarks pagview your Most
1. From anyThe Book
2. Press
2
bookmark: Allows you to delete a bookmark. For more ation, refer to “Deleting Bookmarks” on page 151. homepage: Sets the bookmark to your new age.kmarksy webpage, tap ➔ .
on-screen keypad to enter the Name, Address, ation.e.
o bookmarks will appear at the bottom of the
kmarkse Bookmarks page, tap and hold the bookmark t to edit.
t bookmark. on-screen keypad to edit the Name, Address, ation.e.
150
• List/Thumbnail view: Select Thumbnail view (default) to view a thumbnail of the webpage with the name listed, or select List view to view a list of the bookmarks with Name and URL listed.
• Create folder: Creates a new folder in which to store new bookmarks.
• Delete: Erases selected bookmarks.• Change order: Rearranges the current bookmarks.• Move to folder: Selected bookmarks are moved to a selected
folder.3. Tap a bookmark to view the webpage, or touch and hold
a bookmark for the following options:• Open in new window: Opens the webpage in a new window.• Edit bookmark: Allows you to edit the name or URL of the
bookmark. For more information, refer to “Editing Bookmarks” on page 150.
• Add shortcut: Adds a shortcut to the bookmarked webpage to your phone’s Home screen.
• Share link: Allows you to share a URL address using many different options.
• Deleteinform
• Set ashomep
Adding Boo1. From an2. Use the
and Loc3. Tap Sav
Saved tpage.
Editing Boo1. From th
you wan2. Tap Edi3. Use the
and Loc4. Tap Sav
Connections 151
our most recently visited websites is displayed e and URL address.
category such as Today, Last 7 days, or Most
ntry to display the webpage. ➔ Clear history to delete the History list.
s list provides you with a list of the websites ved.
webpage, tap ➔ Saved pages.our saved webpages is displayed with Name address. The webpages that have been visited will appear at the top.
ntry to display the webpage.tings
ents in your browser settings, follow these
webpage, tap ➔ Settings.ing options are available:
Deleting Bookmarks1. From the Bookmarks page, tap and hold the bookmark
you want to delete.2. Tap Delete bookmark.3. At the Delete confirmation window, tap OK.
Emptying the CookiesA cookie is a small file that is placed on your phone by a website during navigation. In addition to containing some site-specific information, it can also contain some personal information (such as a username and password) which can pose a security risk if not properly managed. You can clear these cookies from your phone at any time.
1. From any webpage, press ➔ Settings ➔ Privacy ➔ Delete personal data.
2. Tap Cookies and site data to create a checkmark.3. Tap Done.
Using your HistoryThe History list provides you with a list of the most recently visited websites. These entries can be used to return to previously unmarked web pages.
1. From any webpage, press ➔ History.
A list of ywith Nam
2. Tap on a visited.
3. Tap any e4. Press
Saved PagesThe Saved pagethat you have sa
1. From anyA list of yand URL the most
2. Tap any eBrowser SetTo make adjustmsteps:
1. From any2. The follow
Basics:

zoom: allows you to override the website’s request to l zoom.ncoding: adjusts the current text encoding.reen: allows you to use Fullscreen mode to hide the bar.ooster: allows you to view PC websites easily by ng the text size. Note: the layout may change as a
ettings:t cookies: Allows sites, that require cookies, to save ad cookies from your device.e location: Allows websites to request access to your n.e JavaScript: Enables Javascript for the current Web Without this feature, some pages may not display ly. Remove the checkmark to disable this function.pop-ups: Prevents popup advertisement or windows ppearing on-screen. Remove the checkmark to disable nction.lt storage: Allows you to set your default storage to or Memory card.
152
• Set homepage: Sets the current home page for the Web browser.
• Auto-fill forms: allows you to enter text to be used in your web profile. Tap Add profile, then enter text for the Web form auto fill.
Privacy:• Search and URL suggestions: displays predictions of related
queries and popular websites in the address bar as you type.• Preload available links before opening: allows you improve
performance when loading pages.• Remember form data: remember data typed into forms for later
use.• Remember passwords: Save usernames and passwords for
visited sites.• Delete personal data: allows you to delete all personal data
such as Browsing history, Cache, Cookies and site data, Passwords, Auto-fill data, and Location access.
Accessibility:• Text scaling: allows you to preview the text size, scale the
text size using a slider bar, set the zoom amount on double tap, and minimize the font size using a slider bar.
• Force contro
• Text e• Fullsc
status• Text b
boostiresult.
Content s• Accep
and re• Enabl
locatio• Enabl
page. proper
• Block from athis fu
• DefauDevice
Connections 153
requires access to an existing and accessible s Point (WAP). These WAPs can either be d) as within most Hot Spots, or Secured
ledge of the Router name and password).i On device’s Wi-Fi feature is turned off. Turning your device able to discover and connect to nge WAPs.Home screen, tap ➔ Settings ➔
nnections.N/OFF slider, located to the right of the Wi-Fi rn Wi-Fi ON . Wi-Fi NetworkHome screen, tap ➔ Settings ➔
nnections ➔ Wi-Fi.ork names and security settings (Open r Secured with WEP) of detected Wi-Fi are displayed in the Wi-Fi networks section.
etwork you want to use.
• Website settings: View advanced settings for individual websites.
• Enable notifications: Allows website notifications. Select Always on, On demand, or Off.
• Clear notifications: Deletes website notification access information.
• Reset to default: Restores all settings to default.Bandwidth management:
• Preload webpages: Allows the browser to preload pages in the background. You can set to Always, Only on Wi-Fi, and Never.
• Load images: Allows web page images to be loaded along with the other text components of a loaded website.
• Open pages in overview: Displays an overview of newly opened web pages.
Wi-Fi About Wi-FiWi-Fi (short for “wireless fidelity” and sometimes referred to as wifi) is a term used for certain types of Wireless Local Area Networks (WLAN). These device types use an 802.11 wireless specification to transmit and receive wireless data. Wi-Fi
communication Wireless AccesOpen (unsecure(requiring know
Turning Wi-FBy default, yourWi-Fi on makescompatible in-ra
1. From the Co
2. Tap the Ofield, to tu
Connect to a1. From the
CoThe netwnetwork onetworks
2. Tap the n
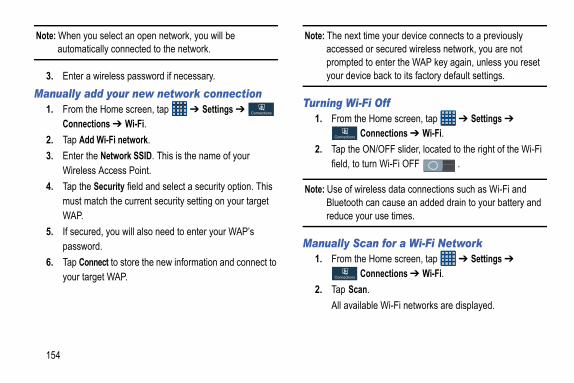
time your device connects to a previously or secured wireless network, you are not to enter the WAP key again, unless you reset
ice back to its factory default settings.
Fi Offe Home screen, tap ➔ Settings ➔
Connections ➔ Wi-Fi. ON/OFF slider, located to the right of the Wi-Fi turn Wi-Fi OFF .
ireless data connections such as Wi-Fi and can cause an added drain to your battery and
our use times.
can for a Wi-Fi Networke Home screen, tap ➔ Settings ➔
Connections ➔ Wi-Fi.n.
lable Wi-Fi networks are displayed.
154
Note: When you select an open network, you will be automatically connected to the network.
3. Enter a wireless password if necessary.Manually add your new network connection
1. From the Home screen, tap ➔ Settings ➔ Connections ➔ Wi-Fi.
2. Tap Add Wi-Fi network.3. Enter the Network SSID. This is the name of your
Wireless Access Point.4. Tap the Security field and select a security option. This
must match the current security setting on your target WAP.
5. If secured, you will also need to enter your WAP’s password.
6. Tap Connect to store the new information and connect to your target WAP.
Note: The nextaccessedpromptedyour dev
Turning Wi-1. From th
2. Tap the
field, to
Note: Use of wBluetoothreduce y
Manually S1. From th
2. Tap Sca
All avai
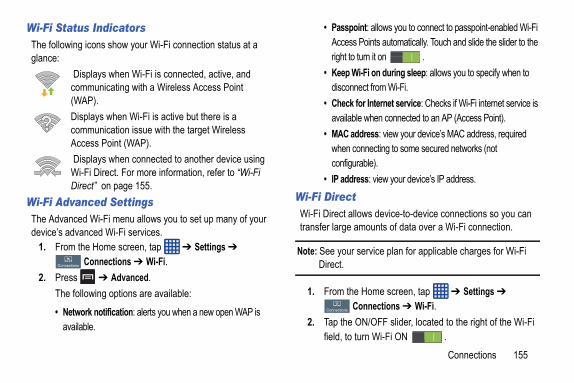
Connections 155
nt: allows you to connect to passpoint-enabled Wi-Fi oints automatically. Touch and slide the slider to the rn it on .
-Fi on during sleep: allows you to specify when to ct from Wi-Fi.r Internet service: Checks if Wi-Fi internet service is when connected to an AP (Access Point).
dress: view your device’s MAC address, required nnecting to some secured networks (not ble).
ss: view your device’s IP address.
ws device-to-device connections so you can ounts of data over a Wi-Fi connection.
ervice plan for applicable charges for Wi-Fi
Home screen, tap ➔ Settings ➔
nnections ➔ Wi-Fi.N/OFF slider, located to the right of the Wi-Fi rn Wi-Fi ON .
Wi-Fi Status IndicatorsThe following icons show your Wi-Fi connection status at a glance:
Displays when Wi-Fi is connected, active, and communicating with a Wireless Access Point (WAP).Displays when Wi-Fi is active but there is a communication issue with the target Wireless Access Point (WAP). Displays when connected to another device using Wi-Fi Direct. For more information, refer to “Wi-Fi Direct” on page 155.
Wi-Fi Advanced SettingsThe Advanced Wi-Fi menu allows you to set up many of your device’s advanced Wi-Fi services.
1. From the Home screen, tap ➔ Settings ➔
Connections ➔ Wi-Fi.2. Press ➔ Advanced.
The following options are available:
• Network notification: alerts you when a new open WAP is available.
• PasspoiAccess Pright to tu
• Keep Widisconne
• Check foavailable
• MAC adwhen coconfigura
• IP addreWi-Fi DirectWi-Fi Direct allotransfer large am
Note: See your sDirect.
1. From the Co
2. Tap the Ofield, to tu
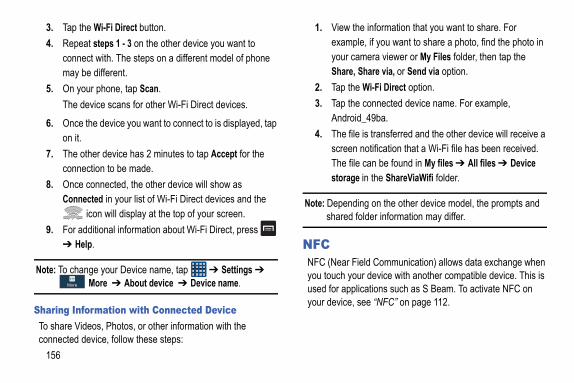
e information that you want to share. For e, if you want to share a photo, find the photo in mera viewer or My Files folder, then tap the hare via, or Send via option.
Wi-Fi Direct option. connected device name. For example, _49ba. is transferred and the other device will receive a notification that a Wi-Fi file has been received. can be found in My files ➔ All files ➔ Device in the ShareViaWifi folder.
ng on the other device model, the prompts and lder information may differ.
ld Communication) allows data exchange when r device with another compatible device. This is cations such as S Beam. To activate NFC on ee “NFC” on page 112.
156
3. Tap the Wi-Fi Direct button.4. Repeat steps 1 - 3 on the other device you want to
connect with. The steps on a different model of phone may be different.
5. On your phone, tap Scan.The device scans for other Wi-Fi Direct devices.
6. Once the device you want to connect to is displayed, tap on it.
7. The other device has 2 minutes to tap Accept for the connection to be made.
8. Once connected, the other device will show as Connected in your list of Wi-Fi Direct devices and the
icon will display at the top of your screen.9. For additional information about Wi-Fi Direct, press
➔ Help.
Note: To change your Device name, tap ➔ Settings ➔
More ➔ About device ➔ Device name.
Sharing Information with Connected DeviceTo share Videos, Photos, or other information with the connected device, follow these steps:
1. View thexamplyour caShare, S
2. Tap the3. Tap the
Android4. The file
screen The filestorage
Note: Dependishared fo
NFCNFC (Near Fieyou touch youused for appliyour device, s

Connections 157
h off:Home screen, tap ➔ Settings ➔ ns.N/OFF slider, located to the right of the field, to turn Bluetooth OFF .atus Indicatorsons show your Bluetooth connection status
lays when Bluetooth is active.
lays when Bluetooth is connected (paired) and unicating.
ttingsettings menu allows you to set up many of the f your device’s Bluetooth service, including:
nging the name your device uses for Bluetooth and descriptionice’s visibility (or “discoverability”) for other es
S BeamWhen S Beam is activated, you can beam files to another NFC-capable device by holding the devices close together. You can beam images and videos from your Gallery, music files from your Music Player, and more. For more information, refer to “S Beam” on page 112.
BluetoothAbout BluetoothBluetooth is a short-range communications technology that allows you to connect wirelessly to a number of Bluetooth devices, such as headsets and hands-free car kits, and Bluetooth-enabled handhelds, computers, printers, and wireless devices. The Bluetooth communication range is usually up to approximately 30 feet.
Turning Bluetooth On and OffTo turn Bluetooth on:
1. From the Home screen, tap ➔ Settings ➔ Connections.
2. Tap the ON/OFF slider, located to the right of the Bluetooth field, to turn Bluetooth ON .When active, appears within the Status area.
To turn Bluetoot1. From the
Connectio2. Tap the O
BluetoothBluetooth StThe following icat a glance:
Disp
Dispcomm
Bluetooth SeThe Bluetooth scharacteristics o• Entering or cha
communication• Setting your dev
Bluetooth devic
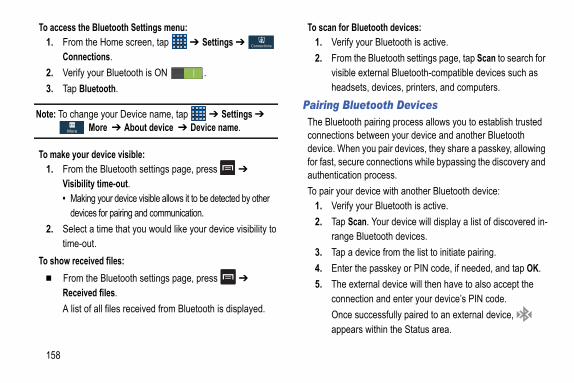
uetooth devices:our Bluetooth is active.e Bluetooth settings page, tap Scan to search for xternal Bluetooth-compatible devices such as
ts, devices, printers, and computers.etooth Devices pairing process allows you to establish trusted etween your device and another Bluetooth you pair devices, they share a passkey, allowing e connections while bypassing the discovery and process.evice with another Bluetooth device:our Bluetooth is active.n. Your device will display a list of discovered in-luetooth devices.evice from the list to initiate pairing.e passkey or PIN code, if needed, and tap OK.ernal device will then have to also accept the tion and enter your device’s PIN code.ccessfully paired to an external device, within the Status area.
158
To access the Bluetooth Settings menu:1. From the Home screen, tap ➔ Settings ➔
Connections.2. Verify your Bluetooth is ON .3. Tap Bluetooth.
Note: To change your Device name, tap ➔ Settings ➔
More ➔ About device ➔ Device name.
To make your device visible:1. From the Bluetooth settings page, press ➔
Visibility time-out.• Making your device visible allows it to be detected by other
devices for pairing and communication.2. Select a time that you would like your device visibility to
time-out.To show received files:
� From the Bluetooth settings page, press ➔ Received files.A list of all files received from Bluetooth is displayed.
To scan for Bl1. Verify y2. From th
visible eheadse
Pairing BluThe Bluetoothconnections bdevice. Whenfor fast, securauthenticationTo pair your d
1. Verify y2. Tap Sca
range B3. Tap a d4. Enter th5. The ext
connecOnce suappears
Connections 159
tacts via Bluetoothour paired devices’ settings and capabilities, to send pictures, Contact information, or g a Bluetooth connection.
ing this feature, Bluetooth must first be nd the recipient’s device must be visible.
share contact information:r Bluetooth is active.Home screen, tap Contacts . ➔ Import/Export ➔ Share namecard via.
contact that you would like to send via . A green checkmark will appear next to each select..ooth. paired device to send the contacts to.
al Bluetooth device must be visible and ting for the pairing to be successful.
Note: Due to different specifications and features of other Bluetooth-compatible devices, display and operations may be different, and functions such as transfer or exchange may not be possible with all Bluetooth compatible devices.
Note: Pairing between two Bluetooth devices is a one-time process. Once a pairing has been created, the devices will continue to recognize their partnership and exchange information without having to re-enter a passcode again.
Deleting a paired device (unpair)Deleting a device from your list removes its “connection record” and upon reconnection would require that you re-enter all the previous pairing information.
1. Verify your Bluetooth is active.2. From the Bluetooth settings page, tap next to the
previously paired device. This opens the connected device’s menu options.
3. Tap Unpair to delete the paired device.
Sending ConDepending on yyou may be ableother items usin
Note: Prior to usenabled, a
For example, to1. Verify you2. From the 3. Press 4. Tap each
Bluetoothentry you
5. Tap Done6. Tap Bluet7. Select the
Note: The externcommunica
a Windows XP user, ensure that you have XP Service Pack 3 or higher installed on your r. Also, ensure that you have Samsung Kies 2.0 ws Media Player 10 or higher installed on your r.
as a Storage Deviceect your device to a PC as a removable disk and directory. If you insert a memory card in the n also access the files directory from the
by using the device as a memory card reader.
irectory of the memory card displays as a le disk, separate from the internal memory.
t the USB cable to the device and connect the the computer. After a few seconds, a pop-up displays on the PC when connected.PC pop-up, click Open device to view files.es from the PC to the memory card.
160
8. A Bluetooth share notification will appear in your notifications list.
PC ConnectionsYou can connect your device to a PC using your PC data cable using various USB connection modes.Storage: allows you to use the onboard storage capacity of the phone to store and upload files. This option allows your computer to detect the phone as a removable storage drive.Kies: allows you to manage music, movies and photos. You can also backup precious contacts and calendars, download apps and podcasts and automatically upgrade device firmware. Kies conveniently syncs your life across all your devices.
Note: To sync your device to your PC, it is highly recommended that you install Samsung Kies, which is available athttp://www.samsung.com/kies (for Windows/ Mac).
Note: If you areWindowscomputeor Windocompute
ConnectingYou can connaccess the filedevice, you camemory card
Note: The file dremovab
1. Conneccable towindow
2. On the 3. Copy fil
Applications 161
Home screen, tap ➔ Calculator . first number using the on-screen numeric
operation for your calculation by tapping the ding on-screen arithmetic function key.
second number.e result, tap equals (=).
alculator history, tap located at the calculator buttons. A history of your past ns is displayed. Tap again to display ator keypad.he calculator history, press ➔ Clear
e the text size, press ➔ Text size. Tap dium, or Large.lculatoralculator open, turn your phone sideways to
cape position to display the scientific .
Section 10: Applications
This section contains a description of each application that is available in the Apps Menu, its function, and how to navigate through that particular application. If the application is already described in another section of this user manual, then a cross reference to that particular section is provided.
Note: This manual only addresses applications that have been preloaded on your device. Information concerning third party applications that you choose to download from the Google Play Store or otherwise should be obtained from the application provider.
Tip: To open applications quickly, add the icons of frequently-used applications to one of the Home screens. For details, see “Customizing Your Home Screen” on page 34.
CalculatorWith this feature, you can use the phone as a calculator. The calculator provides the basic arithmetic functions; addition, subtraction, multiplication, and division. The Calculator also keeps a history of recent calculations.
1. From the 2. Enter the
keys.3. Enter the
correspon4. Enter the5. To view th6. To view c
top of thecalculatiothe calcul
7. To clear thistory.
8. To changSmall, Me
Scientific Ca� With the c
the landscalculator
he on-screen instructions to use Google .
lication allows you to access alarms, view the set a stopwatch, and use a timer.
llows you to set an alarm to ring at a specific
e Home screen, tap ➔ Clock ➔
Create alarm The following options
tap (Up) or (Down) to set the new time for rm to sound. Tap AM or PM. repeat: use this option to set the repeating status for rm by tapping on the days that you want the alarm to . Tap the Repeat weekly checkbox to have the alarm weekly. type: sets the way in which the alarm sounds when ted (Melody, Vibration, Vibration and melody, and g). displays the following additional options:
162
CameraUse your 13 megapixel camera feature to produce photos in a JPEG format. Your phone also functions as a Camcorder to take videos. For more information, refer to “Camera” on page 84.ChatONWith the ChatON application, you can interact with friends and family with text, images, hand-written notes and video shared instantly. You can chat in groups, while a Web client will allow the easy sharing of content and conversations between your phone and PC. For more information, refer to “ChatON” on page 104.
ChromeThe Google Chrome app allows you to use the Google Chrome web browser on your camera.
1. From the Home screen, tap ➔ Chrome .2. Read the Google Chrome Terms of Service and tap
Accept and Continue.3. If you have an existing Chrome account, tap Sign in to
bring your open tabs, bookmarks, and omnibox data from your computer to your camera, otherwise tap No thanks.
4. Follow tChrome
ClockThe Clock appWorld Clock,
AlarmThis feature atime.
1. From thAlarm ➔display:• Time:
the ala• Alarm
the alasoundrepeat
• AlarmactivaBriefin
• More:
Applications 163
ooze Featuree the Snooze feature after an alarm sounds, sweep the icon to the left. Snooze
be set in the alarm settings. For more n, refer to “Alarm” on page 162.s
rm, follow these steps:Home screen, tap ➔ Clock ➔
➔ Delete.larm or alarms you wish to delete. A green k will appear next to each selection. Tap to delete all alarms.e.
ws you to view the time in other parts of the ck displays time in hundreds of different
24 time zones around the world. Home screen, tap ➔ Clock ➔
ck. The clock for your time zone is displayed.ity to add another city to the World Clock.
– Alarm tone: sets the sound file which is played when the alarm is activated. Select an option or tap Add for additional options.
– Alarm volume: drag the slider to adjust the alarm’s volume.– Location alarm: when activated, the alarm only sounds
when you are at a specific location. Touch and slide the slider to the right to turn it on then follow the on-screen instructions to enter a location.
– Snooze: use this option to set a Duration (3, 5, 10, 15, or 30 Minutes) and Snooze repeat (1, 2, 3, 5, or 10 Times). Tap the ON/OFF slider to activate.
– Smart alarm: phone plays a slowly increasing natural sound and displays the alarm screen for a preset time before the set alarm goes off. Set the Interval and the Tone then tap Save.Tap the ON/OFF slider to activate.
– Name: allows you to use a specific name for the alarm. The name will appear on the display when the alarm activates.
2. Tap Save to store the alarm details.Turning Off an Alarm
� To stop an alarm when it sounds, touch and sweep the icon to the right.
Setting the Sn� To activat
touch andmust firstinformatio
Deleting AlarmTo delete an ala
1. From the Alarm ➔
2. Tap the acheckmarSelect all
3. Tap DeletWorld ClockWorld Clock alloworld. World Clocities, within all
1. From the World Clo
2. Tap Add c
p to stop the stopwatch.tart to continue or tap Reset to erase all times d.
his option to set a countdown timer. Use a timer to an event based on a preset time length s, and seconds).e Home screen, tap ➔ Clock ➔
utes field is highlighted and set to 1 minute. Use pad to change the number of minutes as .
y, tap the Hours field to set hours and the s field to set seconds. As you tap fields, they are ted.rt to begin the timer and tap Stop to pause the
pping, tap Restart to continue or tap Reset to set r back to the original setting.
164
3. Scroll through the list of cities to find the city you want to add, or tap the Search bar and use the keypad to enter a city to search for.
4. Tap the city you want to add. The clock for that city will display.
5. To set Daylight Savings time, press and hold a city, then tap DST settings.
6. Select Automatic, Off, or 1 hour.7. If Daylight Savings Time is selected, a sun symbol
appears on the World Clock listing.Deleting a World Clock Entry
1. From the Home screen, tap ➔ Clock ➔
World Clock ➔ ➔ Delete.2. Press and hold the city clocks you wish to delete.3. Tap Delete.
StopwatchYou can use this option to measure intervals of time.
1. From the Home screen, tap ➔ Clock ➔
Stopwatch.2. Tap Start to start the stopwatch and tap Lap to measure
lap time.
3. Tap Sto4. Tap Res
recordeTimerYou can use tto count down(hours, minute
1. From thTimer.
2. The Minthe keyrequired
3. SimilarlSecondhighligh
4. Tap Statimer.
5. After stothe time
Applications 165
lows you to set your Dock settings such as Dock udio output mode, Desk home screen display, ic unlock, and Audio output.
e your daily contacts by storing their name and Address Book. Address Book entries can be , entry, or group.ation, refer to “Contacts and Your Address
60.sccess to tabs containing lists of your current
s (Internet and Other).Home screen, tap ➔ Downloads .r downloads are listed.
y size to see your downloads sorted in size
y date to see your downloads sorted in time
Desk clockYou can use the Desk clock when you have a desk dock and you want your phone to display the time, day, date, location, and weather conditions when it is docked.
1. From the Home screen, tap ➔ Clock ➔
Desk clock.The default Desk clock is displayed.
2. Tap to display the Desk clock in full-screen mode.3. To make changes, tap ➔ Settings.
The following options are available while in full-screen mode:
• Hide status bar: when this is checked, the status bar is hidden from view.
• Wallpaper: tap to select Desk clock wallpaper from Default, Gallery, or Same as home screen.
• Calendar: when this is checked, the calendar is displayed. Tap to uncheck.
• Weather: when this is activated, the location, temperature, and weather condition is displayed. Touch and slide the slider to the right to turn it on .
• Dock: alsound, AAutomat
ContactsYou can managnumber in your sorted by nameFor more informBook” on page
DownloadProvides quick adownloaded file
1. From the All of you
2. Tap Sort border.
3. Tap Sort border.
up ➔ select the desired items -> tap Done.
where you view photos and play back videos. u can also perform basic editing tasks, view a
t photos as wallpaper or contact image, and ture message. For more information, refer to age 81.
b-based email service. Gmail is configured when p your phone. Depending on your n settings, Gmail can automatically synchronize il account on the web. For more information, Gmail” on page 100.
earch application is the same on-screen Internet that is on the Google Search Bar on your main
. For more information, refer to “Google Search 25.
es messaging and sharing with your friends a lot n set up Circles of friends, visit the Stream to om your Circles, use Messenger for fast
166
DropboxDropbox is a free service that lets you bring all your photos, documents, and videos anywhere. Any file you save to your Dropbox will automatically save to all your computers, phones and even the Dropbox website.
1. From the Home screen, tap ➔ Dropbox .2. Follow the onscreen instructions to sign up for your
Dropbox account.EmailEmail enables you to review and create email using various email services. You can also receive message alerts when you receive an important email. For more information, refer to “Using Email” on page 99.
FlipboardThis application creates a personalized digital magazine out of everything being shared with you. Access news stories, personal feeds and other related material. Flip through your Facebook newsfeed, tweets from your Twitter account, photos from friends and much more.
1. From the Home screen, tap ➔ Flipboard .2. Tap Tap to sign in
– or –
Swipe
GalleryThe Gallery isFor photos, yoslideshow, seshare as a pic“Gallery” on p
GmailGmail is a weyou first set usynchronizatiowith your Gmarefer to “Using
GoogleThe Google Ssearch engineHome screenBar” on page
Google+Google+ makeasier. You caget updates fr
Applications 167
setting a group password, enter the password K.f the media items listed under the Sharing
eading.ems you want to share to create a checkmark, one or OK.
r friends sign onto Group Play from their nd they can view your media using you as a .upe media from your friend’s phone, join a
Group Play main screen, tap Join. group.e scans for available groups for you to join.
up to join.ow be able to see your group’s shared media.
➔ Help for additional information.
ation provides detailed help for using your ncluded features and applications.Home screen, tap ➔ Help .
messaging with everyone in your Circles, or use Instant Upload to automatically upload videos and photos to your own private album on Google+. For more information, refer to “Google+” on page 103.
Group PlayGroup Play allows you to share pictures, music, and documents in real-time with your friends. You can create a group from your device or join other groups. You can also play games with your friends.
1. From the Home screen, tap ➔ Group Play .2. Read the Disclaimer and tap OK.
The Group Play main screen is displayed.
Creating a groupIf you have media you want to share, create a group.
1. From the Home screen, tap ➔ Group Play .2. If you want to set a password that participants will need
to enter to join your Group Play session, tap Set group password to create a checkmark.
1. Tap Create group.Mobile AP is enabled.
2. If you areand tap O
3. Tap one ocontent h
4. Tap the itthen tap D
5. Have youdevices aMobile AP
Joining a groIf you want to segroup.
1. From the 2. Your phon3. Tap a gro
You will n
4. Press HelpThe Help applicphone and the i
1. From the

plication that uses Google Maps and your p you find Restaurants, Cafes, Bars, Attractions, inesses. You can also add your own locations.e Home screen, tap ➔ Local .one of the business categories to search for a ar business.e business categories that are close to you will layed.
a business to view the details.iness details such as address, phone, website,
ation are displayed. You can also see reviews und the web and from Google users.
your location, you can view basic, custom, and and local business information, including tact information, and driving directions. You can lic messages about a location and track your
168
2. Tap one of the following for more information:• New features: provides help on all of the new features and
applications such as Motion, Camera, Group Play, Story Album and S Health.
• Basics: provides basic information on using your phone.• Applications: provides information on how to use basic
applications like Contacts, Email, S Memo, Internet, Camera, etc.
• Settings: provides information on important settings such as Wi-Fi, Bluetooth, Ringtone, Power saving mode, and NFC.
• Online help: provides more detailed online help for additional questions you may have.
• Available accessories: provides information on accessories for your phone that are available for purchase.
InternetOpen the web browser to start surfing the web. The browser is fully optimized and comes with advanced functionality to enhance the Internet browsing feature on your phone. For more information, refer to “Internet” on page 147.
LocalLocal is an aplocation to heland other bus
1. From th2. Tap on
particulAll of thbe disp
3. Tap on The busand locfrom aro
MapsDepending onsatellite mapslocations, conalso post pubfriends.
Applications 169
tage or electromagnetic fields tinted windows
Home screen, tap ➔ Maps .ll display with your location in the very center.
on-screen instructions to use the Maps n.
nd receive different types of messages. For n, refer to “Messaging” on page 92.rs you to bring groups of friends together into
conversation. When you get a new Messenger, Google+ sends an update to your e information, refer to “Messenger” on page
u to play music files that you have stored on memory card. You can also create playlists. ation, refer to “Music” on page 76.
Important! Before using Google Maps you must have at least an active data (3G) connection. The Maps application does not cover every country or city.
Enabling a Location SourceBefore you use Google Maps and find your location or search for places of interest, you must enable a location source. To enable the location source you must enable the wireless network, or enable the GPS satellites.
1. From the Home screen, tap ➔ Settings ➔
More ➔ Location services.2. Tap the Use GPS satellites field. A green checkmark will
display next to the field.
Note: Selecting Use GPS satellites allows you to locate places of interest at the street-level. However, this also requires a clear view of the sky and uses more battery power.
To receive better GPS signals, avoid using your device in the following conditions:• inside a building or between buildings• in a tunnel or underground passage
• in poor weather• around high-vol• in a vehicle with
Using Maps1. From the
A map wi
2. Follow theapplicatio
MessagingYou can send amore informatio
MessengeMessenger allowa simple group conversation in phone. For mor103.
MusicMusic allows yoyour phone andFor more inform
: this folder contains your Music files.y:ations: this folder contains all of the notifications you eceived.es: this folder contains your photos.sts: this folder contains all of your podcasts.nes: this folder contains any ringtones you have sed.
ungHub: contains content downloaded using ung Hub.o: this folder contains all the S Memos you have .oExports: images exported from SMemo (such as
capturing a Contact photo from an S Memo).
folders may appear depending on how your configured.
ave an external SD card inserted, tap SD card to see the contents of your external SD emory card).
170
My FilesMy Files allows you to manage your sounds, images, videos, bluetooth files, Android files, and other memory card data in one convenient location.
1. From the Home screen, tap ➔ My Files ➔ All files.
2. Tap Device storage to see the contents of your phone’s internal storage.
3. The following folders may display:• Alarms: this folder contains any alarm files you may have.• Android: the Android folder stores files that are used in
Android applications.• Application: this folder contains app info for S Memo.• Bluetooth: this folder stores files sent via a Bluetooth device.• DCIM: this is the default location for pictures and videos taken
by the device. Tap DCIM ➔ Camera to view the picture or video files. For more information, refer to “Viewing Pictures” on page 81. Also, see “Viewing Videos” on page 82.
• Documents: contains document files.• Download: this folder contains downloads you have made.• Movies: this folder contains your Video and Movie files.
• Music• Nearb• Notific
have r• Pictur• Podca• Ringto
purcha• Sams
Sams• S Mem
written• SMem
when
Note: Differentphone is
4. If you hmemorycard (m

Applications 171
es you to the map location of your present location S.estinations: allows you to access information on
destinations you have used. This option only after you have entered one or more destinations. on-screen instructions.
iving Directionsilt-in GPS hardware allows you to get real-ctions to selected locations or establishments urrent location.al Address
Home screen, tap ➔ Navigation .r Speak Destination or Type Destination. the address, enter the address, City, and g the keypad. As you type, possible
s will be displayed. Tap on one when you see ss you want. will be displayed.
NavigationNavigation is an internet-connected GPS navigation system with voice guidance. You can type or speak your destination.To receive better GPS signals, avoid using your device in the following conditions:• inside a building or between buildings• in a tunnel or underground passage• in poor weather• around high-voltage or electromagnetic fields• in a vehicle with tinted windows
Launching Navigation1. From the Home screen, tap ➔ Navigation .2. Read the Navigation information page and tap Accept to
continue or Don’t accept to exit.3. Select one of the following options:
• Speak destination: allows you to speak your destination.• Type destination: allows you to use the keypad to enter your
destination.• Go home: takes you to your home address. The first time you
are prompted to enter it.
• Map: takusing GP
• Recent Dpreviousappears
4. Follow theObtaining DrYour phone’s butime driving direbased on your c
Using a Physic1. From the 2. Tap eithe3. If typing in
State usinaddressethe addreThe route
g option: choose whether to save capture imagesview additional information on using Photo Reader.
plication allows you to access the dialer keypad, favorites. For more information, refer to “Call page 43.kslay Books, you can find more than 3 million free undreds of thousands more to buy in the
e Home screen, tap ➔ Play Books .to your Google account. For more information, “Creating a New Google Account” on page 9.he on-screen instructions for using the Play pplication.azineslay Magazines, you can subscribe to your
zines and have them available to read on your time or any place.e Home screen, tap ➔ Play Magazines .
172
4. If speaking the address, the Voice guidance screen is displayed. For voice-guided navigation you need to install text-to-speech support from the Play Store. Tap Install to install the application or tap Skip to exit.
5. As you drive the route display will be updated and you will receive voice-guided navigation directions.
6. Tap for additional options.Optical ReaderThe Optical Reader allows you to use your camera to identify text and extract useful information or translate the content.
1. From the Home screen, tap ➔ Optical Reader .2. Aim the pointer at the centre of the screen at words,
contact information or a QR code.The device recognizes the content and the type of information, and provides related functions.
3. Tap a function to execute it.4. Press to access the following options:
• Load image: load a saved image to the photo reader.• History: view previously analyzed content.• Language settings: choose a recognition language.• Dictionaries: choose a dictionary
• Savin• Help:
PhoneThe Phone apcall logs, and Functions” on
Play BooWith Google Pe-books and heBookstore.
1. From th2. Log on
refer to 3. Follow t
Books aPlay MagWith Google Pfavorite magaphone at any
1. From th
Applications 173
y Music, you can play music that you have usic file as well as any music you copied from offline, you can listen to music you have r PC. For more information, refer to “Video”
ides access to downloadable applications and on your phone. Play Store also allows you to k and comments about an application, or flag at might be incompatible with your phone. Play Store you must have a Google Account. ation, refer to “Using Gmail” on page 100.main Home screen, tap Play Store . your Google account.ime you sign in, the Play Store Terms of ill be displayed. Tap Accept to continue or exit. or Games to download or purchase games or ns. You can also download updates to existing ns. the on-screen instructions.
2. Log on to your Google account if you have not already done so. For more information, refer to “Creating a New Google Account” on page 9.
3. At the Welcome! display, tap the shop icon to browse the full catalog.
4. Read the Google Play Terms of Service and tap Accept.5. Sweep the screen to the left or right to view Categories,
Featured, Top Selling, and New Arrivals.6. Tap a magazine to see more information and subscribe.7. Follow the on-screen instructions to subscribe to a
magazine.Play MoviesWith Google Play Movies, you can rent thousands of different movies and view your own personal videos. You can watch movies instantly, or download your movie for offline viewing at a later time. For more information, refer to “Play Movies” on page 81.
Play MusicWith Google Plaadded to your myour PC. While copied from youon page 80.
Play StorePlay Store provgames to installprovide feedbacan application thBefore using theFor more inform
1. From the 2. Sign in to3. The first t
Service wDecline to
4. Tap Appsapplicatioapplicatio
5. Follow on

e Terms and conditions, tap the three Agree xes.t.ur personal information, then tap Start.
he on-screen instructions to use S Health. ➔ Help for more detailed information.
application allows you to create memos using our finger, or both. You can add images, voice d text all in one place.New Memoe Home screen, tap ➔ S Memo .existing Memo to open it then tap the screen to it mode.
to start a new memo in text mode with the displayed or tap to start a new memo in mode using your finger or a compatible en writing tool. You can change back and forth in to add text with the keypad and the pen.
174
Polaris Office 5Polaris® Office Mobile for Android is a Microsoft Office compatible office suite. This application provides a central place for managing your documents online or offline. The application can also open Adobe PDF (Portable Document Format) files.
1. From the Home screen, tap ➔ Polaris Office 5 .
2. Enter your Email information (if desired) and touch Done to complete the process.– or –Touch Skip to ignore this registration.
The main Polaris Office screen displays.
3. Follow the on-screen instructions to use Polaris Office.S HealthS Health is a wellness application that allows you to better manage your health by providing you with relevant information.
1. From the Home screen, tap ➔ S Health .2. Read the introduction and tap Next.
3. Read thcheckbo
4. Tap Nex5. Enter yo6. Follow t7. Tap
S MemoThe S Memo the keypad, yrecordings, an
Creating a 1. From th2. Tap an
enter ed– or –Tap keypaddrawingon-screa memo

Applications 175
to access the following options:
ool allows you to erase marks and drawings.
e last action.
e last action that was undone.
voice recording to add to the memo.
s access to a quick selection bar. Choose from: ture, Images, Clipboard, Maps, and Clip art. lements can be used within the memo.
additional page to the memo.
de: memo can be edited. Tap to change to View
de: memo cannot be edited. Tap to change to de.
The icons that you see displayed on the screen are describedin the following table:3. Press Changes the view mode.
Allows you to add free-format drawing.
Displays the keypad to you can add text.
Toolbar
Add Page
Writing area
Keyboard
Eraser t
Undo th
Redo th
Make a
ProvideTake picThese e
Add an
Edit momode.
View moEdit mo
allows you to print the screen or web page on a ung printer using Wi-Fi. finished creating your memo, tap Save on the
rnner feature, you can consult the calendar by month, create events, and set an alarm to act as necessary. Calendar:e Home screen, tap ➔ S Planner .owing tabs are available on the right side of the
isplays the Year view.: displays the Month view. displays the Week view.isplays the Day view.isplays the List view.allows you to search for tasks.
(Create event) to create a new Calendar
176
Note: Depending on whether you have saved the memo, are in keypad mode, or in handwriting mode, the options will appear differently. The following is a list of the options you may see.
• Share via: allows you to share your memo as either an Image file, a PDF file or S Memo file (.snb) via Group Play, Wi-Fi Direct, Bluetooth, ChatON, Dropbox, Flipboard, Picasa, Google+. Messaging, Gmail, or Email.
• Delete: allows you to delete the S Memo.• Export: allows you to save the memo to your Gallery as either
a JPG or as a PDF.• Save as: allows you to save the memo with a different name.• Add tag: allows you to set tags to add in searches.• Change background: allows you to set the background for
your memo. Tap a background colour and then tap Done.• Edit pages: lets you copy and paste memo pages.• Create event: allows you to link the memo to your Calendar
events.• Set as: allows you to set a memo as a contact icon, Home
screen wallpaper, or Lock screen wallpaper.
• Print: Sams
When you aretop menu bar.
S PlanneWith the S Pladay, week, or a reminder, if To access the
1. From th2. The foll
display:• Year: d• Month• Week:• Day: d• List: d• Task:
3. Tap event.
Applications 177
declined events to activate this option. A check cates selection.time zone (to lock event time based on your er-selected time zone). Select a time zone
in the Select time zone field. week number to display the week numbers side of the week entries.dars and select the type of general ization settings you want. A check mark selection.erts & notifications to adjust the event n method. Choose from: Alert, Status bar n, and Off.t ringtone to assign a ringtone to a calendar ification.tion to set the Event notification tone to
responses to select quick responses to uests.
4. Tap Today to display the current date indicated by a blue box.
5. Tap Calendars to select the calendar options that you want displayed.
6. Press and select one of the following options:• Go to: displays a specific date.• Delete: allows you to delete All events, All events before
today, or an individual event.• Search: allows you to search within your current events.• Sync: allows you to synchronize your calendar with one or all
of your accounts. This option only appears when an account has been opened.
• Settings: displays a list of configurable settings.
S Planner Settings1. From any Calendar view, press ➔ Settings.2. Tap View styles and select an option.
• Tap Month view styles and select an option.• Tap Week view and select a type.
3. Tap First day of week and select either Local default, Saturday, Sunday or Monday.
4. Tap Hide mark indi
5. Tap Lock current usfrom with
6. Tap Showalong the
7. Tap Calensynchronindicates
8. Tap Set alnotificationotificatio
9. Tap Selecevent not
10. Tap Vibravibrate.
11. Tap Quickemailing g
for additional options.
ice application you can use your voice to tions that you would normally have to do by
dialing a phone number, texting a message, , etc.e Home screen, tap ➔ S Voice .e Samsung Disclaimer then tap Confirm to
e.e Terms of Service then tap Agree to continue.e information on the About S Voice screen, then t.e information on the Say what you want screen, Next.e information on the Wake up S Voice screen, Next.e information on the Edit what you said screen, Next.e information on the Help screen, then tap
178
S TranslatorWith the S Translator you can easily translate words and phrases into many different languages.
1. From the Home screen, tap ➔ S Translator .2. Sign in with your Samsung Account if you have not
already done so. For more information, refer to “Creating a Samsung Account” on page 9.
3. At the S Translator screen, tap the top language bar to select your language.
4. Tap the language bar in the middle of the screen to select the language that you would like to translate to.
5. Enter text into the upper box and tap .It will be translated into the language of the upper box.
– or –Enter text into the lower box and tap .It will be translated into the language of the lower box.
6. Tap either of the Speak buttons at the bottom of the screen to translate using either language by using your voice. The translation will appear automatically in the appropriate box.
7. Press S VoiceWith the S Voperform operahand such asplaying music
1. From th2. Read th
continu3. Read th4. Read th
tap Nex5. Read th
then tap6. Read th
then tap7. Read th
then tap8. Read th
Finish.
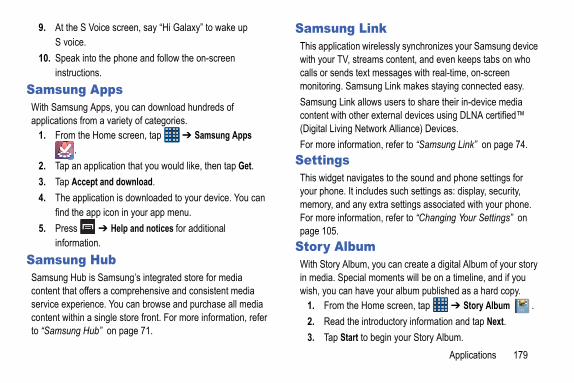
Applications 179
ink wirelessly synchronizes your Samsung device reams content, and even keeps tabs on who xt messages with real-time, on-screen sung Link makes staying connected easy.llows users to share their in-device media er external devices using DLNA certified™ etwork Alliance) Devices. ation, refer to “Samsung Link” on page 74.
igates to the sound and phone settings for cludes such settings as: display, security, y extra settings associated with your phone. ation, refer to “Changing Your Settings” on
mm, you can create a digital Album of your story al moments will be on a timeline, and if you ave your album published as a hard copy.Home screen, tap ➔ Story Album . introductory information and tap Next.to begin your Story Album.
9. At the S Voice screen, say “Hi Galaxy” to wake up S voice.
10. Speak into the phone and follow the on-screen instructions.
Samsung AppsWith Samsung Apps, you can download hundreds of applications from a variety of categories.
1. From the Home screen, tap ➔ Samsung Apps .
2. Tap an application that you would like, then tap Get.3. Tap Accept and download.4. The application is downloaded to your device. You can
find the app icon in your app menu.5. Press ➔ Help and notices for additional
information.Samsung HubSamsung Hub is Samsung’s integrated store for media content that offers a comprehensive and consistent media service experience. You can browse and purchase all media content within a single store front. For more information, refer to “Samsung Hub” on page 71.
Samsung LThis applicationwith your TV, stcalls or sends temonitoring. SamSamsung Link acontent with oth(Digital Living NFor more inform
SettingsThis widget navyour phone. It inmemory, and anFor more informpage 105.
Story AlbuWith Story Albuin media. Speciwish, you can h
1. From the 2. Read the3. Tap Start

cordercorder allows you to record an audio file up to ng and then immediately share it using pbox, Email, Gmail, Messaging or Wi-Fi Direct. e will vary based on the available memory within
e Home screen, tap ➔ Voice Recorder
recording, tap Record and speak into the one.
the recording process you can either tap Stop stop and save the recording or Pause to rily halt the recording. After pausing, tap Record resume recording. Once the audio recording
pped, the message is automatically saved. cel to cancel the recording without
t to display a list of all your voice gs. Tap a voice recording to play it.
to display the following options:
180
4. Follow the on-screen instructions.5. Press ➔ Help for additional information.
TalkGoogle Talk is a free Windows and web-based application for instant messaging offered by Google. Conversation logs are automatically saved to a Chats area in your Gmail account. This allows you to search a chat log and store them in your Gmail accounts. For more information, refer to “Google Talk” on page 102.
TripAdvisorWith the TripAdvisor, you can plan and have your perfect trip. With over 75 million reviews and opinions by travelers, it is easy to find the best hotels, restaurants, and fun things to do.
1. From the Home screen, tap ➔ TripAdvisor .2. Sign in with your Samsung Account if you have not
already done so, or tap Skip for now.3. Follow the on-screen instructions to use TripAdvisor.4. Press for additional options.
VideoThe Video application plays video files stored on your memory card. For more information, refer to “Video” on page 80.
Voice ReThe Voice Reone minute loBluetooth, DroRecording timthe phone.
1. From th.
2. To startmicroph
3. During to
tempora to
has stoTap Cansaving.
4. Tap Lisrecordin
5. Press

Applications 181
ding volume: set recording volume for Quiet place, place, or Auto (default).el: choose whether to record a stereo or mono signal.
nterval: allows you to assign a skip length.ws you to close the application.rchce Search application allows you to search the your voice.Home screen, tap ➔ Voice Search . Google Voice Search screen displays, speak
or words that you would like to search for on et.r expires and the microphone icon changes o gray, tap the icon and speak the word or t you would like to search for on the internet.re displayed on your phone.
ng WatchON application, you can use your ote control for your TV.
• Share via: allows you to share your recording using Bluetooth, Dropbox, Email, Gmail, Messaging, or Wi-Fi Direct.
• Delete: allows you to delete 1 or more voice recordings. Tap the recordings to delete and tap Delete.
• Settings: the following settings are available:– Storage: allows you to choose where your recordings will be
saved. Select between Phone or memory card.– Recording quality: allows you to set the recording quality to
High or Normal.– Limit for MMS: allows you to select On or Off. If you Limit for
MMS by selecting On, you will be assured that the recording can be sent in a message.
– Contextual filename: (requires GPS tagging) allows you to adjust the filename based on contextual information such as your current GPS location.
– Default name: allows you to choose the name prefix for your recordings. For example, if your Default name is Voice, your recordings would be named Voice 001, Voice 002, Voice 003, etc.
– Noise reduction: turn noise reduction on or off.
– RecorNoisy
– Chann– Skip i
• End: alloVoice SeaThe Google Voiweb using only
1. From the 2. When the
the word the intern
3. If the timefrom red twords tha Results a
WatchONWith the Samsuphone as a rem

e Choose your TV Brand screen, tap your TV’s cturer name.have a brand of TV not listed or you are using a tor, select from one of the following two options. e from either Other TV Brands or I Have a Projector.r device at the TV and tap (Power) to
the set up process completed successfully and ect TV IR codes were selected.
ess of the initial TV activation can take up to 10 Please do not press the button again.
turned on, tap Yes.
did not turn on after tapping (Power) and 10 seconds, tap No or Retry.
e Choose Your TV Tuner screen, select the entry responds to your current channel control :
182
Important! Before initiating use, verify you have an active Internet connection available (either mobile network or Wi-Fi connection).
Note: Before beginning your initial WatchON application setup, confirm your TV is turned off.
Initial Configuration1. Sign into your Samsung account. 2. From the Home screen, tap ➔ WatchON .
Note: If you are not connected to an active Wi-Fi, you may be prompted to continue the set up process via a mobile network. Click Connect to proceed.
3. Select your desired country for your TV Guide’s source listing and tap Next.
4. Enter your current zip code and tap Done. This zip code must correspond to the location of your desired TV and set top box.
5. From the Find your TV service screen, select a service provider from the available channel listing.
6. From thmanufa• If you
projecChoos
7. Aim youconfirmthe corr
Note: The procseconds.
8. If the TV– or –If the TVwaiting
9. From ththat cormethod

Applications 183
mpted to Enable IR, tap More Info.. to learn nfigure your set top box to receive and o IR controls. completing the IR setup process and ing your box, press .
gramming of your set top box is a one-time d once successful should not need to be
d to personalize your experience, follow the instructions.ONels:
your Samsung account. Home screen, tap ➔ WatchON .top of the main screen, tap (Remote This launches an on-screen set of remote bs. Choose from one of the following:
ote: provides the most common used control . Scroll down to view additional functions.
• Cable/Satellite/STB/PVR/DVR: selected when changing channels is done via a receiver box. Channels are not changed via the TV remote but rather through the receiver/box.
• My xxx TV: selected when a signal is fed directly into the TV and no box is used. Channels are changed directly on the TV by using the TV remote and not a box’s remote.
Note: Try matching your current channel selection method.
10. Select the Satellite Box Brand from the available list. For example, DirectTV®.• If your brand does not appear in the list, tap Other Satellite
Box Brands and follow the on-screen instructions.
Important! You must configure your set top box for IR communication with your device. If you do not select More Info.. below and follow the on-screen instructions you may not be able to properly use the application.
11. When prohow to corespond t
12. Only afterprogramm
Note: This IR proprocess anrepeated.
13. If prompteon-screen
Using WatchTo change chann
1. Sign into 2. From the 3. From the
Control). control ta• Easy rem
features

and then select an available on-screen
e Room: allows you to select a previously configured
gs: provides access to the Samsung WatchOn settings
isplays on-screen help information.: displays on-screen information about the application. WatchONnalize your application to do things such as only from your selected media categories, or nal room’s set top box.our Just for you settings:ou option displays available content matching media categories. These categories can be ring your initial set up or at any later time.o your Samsung account. e Home screen, tap ➔ WatchON .e main screen Tap (Combined View) ➔
you.e On TV tab, press and then select Settings.
184
• [Set top box]: displays customized control specific to your configured set top box. Ex: satellite dish remote control functions.
• TV: provides access to control functions specific to your TV.4. From the top of the main screen tap (Select Room)
to choose from different receivers/boxes in different rooms. (Example: Living Room box, Bedroom box, etc.).
5. Press to return to the main menu.Locating your favorite programming:
1. Sign into your Samsung account. 2. From the Home screen, tap ➔ WatchON .3. From the main screen Tap (Combined View) to
reveal available media categories. 4. Select an available category.
– or –Tap Guide to display on your TV an on-screen listing of available set top box shows.
For additional information on the WatchON application, press and then select Help.
WatchOn Settings1. From the Home screen, tap ➔ WatchON .
2. Press option:• Chang
room.• Settin
menu.• Help: d• About
PersonalizeYou can persoshow content add an additioTo configure yThe Just for yyour activatedconfigured du
1. Sign int2. From th3. From th
Just for4. From th

Applications 185
video sharing website on which users can re videos. The site is used to display a wide enerated video content, including movie clips, usic videos, as well as video content such as informational shorts and other original videos.
a data-intensive feature. It is recommended e a large data plan or Wi-Fi access to avoid data charges.
Home screen, tap ➔ YouTube . earch field to search for specific videos, n to browse through the main page
ls, or tap and drag the screen to the right and ategory. video, tap an available preview thumbnail or le link.h quality video: then tap Settings ➔ General ➔ High Quality on
ouTube Settings:
5. Access parameters such as Basic info, Genres and Sports to then configure and enable those parameters you would like to show in the Just for you tab.
To add a new room:Your device can be used to control boxes/receivers from several rooms. You could go from controlling your set top box in your living room and then move into your bedroom to do the same.
1. Sign into your Samsung account. 2. From the Home screen, tap ➔ WatchON .3. From the On TV tab, press and then select Settings
➔ Add room.4. Name the new room and tap Next.5. Enter your current postal code and tap Done. This code
must correspond to the location of your desired TV and set top box.
6. Follow steps 4-10 starting on page 182 to complete the process.
YouTubeYouTube™ is a upload and shavariety of user-gTV clips, and mvideo blogging,
Note: YouTube isthat you usexcessive
1. From the 2. Tap the s
scroll dowthumbnaiselect a c
3. To view atap the tit
To watch a hig• Press and
mobile.To configure Y
eSearch filtering allows you to configure block ings for videos containing restricted content. This on blocks these videos from appearing within your rch results. Choose from: Don’t filter, Moderate, or ct blocking.ding
load subscriptions allows you to preload your scription videos while on Wi-Fi and charging.load watch later allows you to preload selected os so you can watch them later. Read the data usage rmation and tap OK to accept the terms.
g YouTube videos will use some of your device’s ace and may result in additional charges if your Wi-Fi
t unlimited.
tp provides answers to most YouTube questions.dback allows you to provide user feedback to Tube.gle Mobile Terms of Service displays the Google ile Terms of Service.
186
• Press and then tap Settings and configure the following parameters:
• General– High quality on mobile allows you to start all videos in high
quality mode while you are connected to a mobile network.– Caption font size allows you to set the font size used by
onscreen captions. Choose from: Small, Medium, Large, or Huge.
– Uploads specifies network preferences for uploads.– Content localization allows you to prioritize channels and
videos from a specific country or region.– Improve YouTube allows you to anonymously send YouTube
information to help improve the application.• Channel Feed Content
– Sets the content that you want to appear within your channel feed. All activity is the default option.
• Search– Clear search history allows you to clear previous YouTube
searches from showing up in the YouTube search box.– Never remember history allows you to force YouTube to
never store search history information.
– SafsettoptiseaStri
• Preloa– Pre
sub– Pre
videinfo
Note: Preloadinstorage spplan is no
• Abou– Hel– Fee
You– Goo
Mob
Applications 187
– YouTube Terms of Service displays the YouTube terms of Service.
– Google Mobile Privacy Policy displays the Google Mobile Privacy Policy.
– YouTube Privacy Policy displays the YouTube Privacy Policy.
– Open source licenses displays the Open source licenses.
– App version displays the software version for the current YouTube application.
Note: t is not necessary to sign in to the YouTube site to view content. However, if you wish to sign in to access additional options, access the page via the Web browser and tap Sign in at the top right corner, enter your YouTube or Google username and password, and tap Sign in.

188

Health and Safety 189
your phone and accessories to rain or liquid spills. If s get wet, immediately turn the power off and tery. If it’s inoperable, return it to a dealer store or upport for service.
t care of your phone, only authorized should service your phone and accessories. ice may void the warranty.
g Safe Use of and Access to e the instructions outlined may lead to serious and possible property damage.hone While Drivingphone while driving (or operating the phone -free device) is prohibited in some ws vary as to specific restrictions. Remember ys comes first.
Section 11: Health and Safety
Getting the Most Out of Your ReceptionKeeping Tabs on Signal StrengthThe quality of each call you make or receive depends on the signal strength in your area. Your phone informs you of the current signal strength by displaying a number of bars next to the signal strength icon. The more bars displayed, the stronger the signal. If you’re inside a building, being near a window may give you better reception.
Understanding How Your Phone OperatesYour phone is basically a radio transmitter and receiver. When it’s turned on, it receives and transmits radio frequency (RF) signals. When you use your phone, the system handling your call controls the power level. This power can range from 0.006 watts to 0.2 watts in digital mode.
Maintaining Your Phone’s Peak PerformanceThere are several simple guidelines for operating your phone properly and maintaining safe, satisfactory service. • Speak directly into the mouthpiece.
• Avoid exposing your phone doeremove the batcall Customer S
Note: For the bespersonnel Faulty serv
MaintaininYour PhonFailure to followpersonal injury
Using Your PTalking on your without a handsjurisdictions. Lathat safety alwa

urn off the phone in health care facilities and ermission before using the phone near medical
nt.
Your Phone Before Flyinghone before boarding any aircraft. To prevent
erence with aircraft systems, Transport Canada quire you to have permission from a crew e your phone while the plane is on the ground. y risk of interference, regulations prohibit using hile the plane is in the air. Your Phone in Dangerous Areasfering with blasting operations, turn off your n a blasting area or in other areas with signs two-way radios should be turned off. rews often use remote-control RF devices to set
. phone when you are in an area with a plosive atmosphere. Although it is rare, your
accessories could generate sparks. Sparks
190
When using your phone in the car:• Get to know your phone and its features, such as speed dial
and re-dial.• When available, use a hands-free device.• Position your phone within easy reach.• Let the person you are speaking to know you are driving. If
necessary, suspend the call in heavy traffic or hazardous weather conditions.
• Do not take notes or look up phone numbers while driving.• Dial sensibly and assess the traffic. If possible, place calls when
stationary or before pulling into traffic.• Do not engage in stressful or emotional conversations that may
divert your attention from the road.• Dial 911 to report serious emergencies. t’s free from your wireless
phone.• Use your phone to help others in emergencies. • Call roadside assistance or a special non-emergency wireless
number when necessary.
Note: Always trequest pequipme
Turning OffTurn off your ppossible interfregulations remember to usTo prevent anyour phone w
Turning OffTo avoid interphone when iindicating thatConstruction coff explosivesTurn off yourpotentially exphone or its
Health and Safety 191
arding Displayyour handset is made of glass or acrylic and ur handset is dropped or if it receives
ct. Do not use if screen is broken or cracked as injury to you. the Batteryour Batterylisted below help you get the most out of your
ance.ng approved batteries and desktop chargers. are designed to maximize battery life. Using other rgers voids your warranty and may cause damage. damage, charge the battery only in temperatures 32º F to 113º F (0º C to 45º C).ttery charger in direct sunlight or in high humidity
the bathroom.f the battery by incineration.contacts on top of the battery clean. disassemble or short-circuit the battery. need recharging if it has not been used for a long
could cause an explosion or a fire resulting in bodily injury or even death. These areas are often, but not always, clearly marked.These areas include:• Fueling areas such as gas stations.• Below deck on boats.• Fuel or chemical transfer or storage facilities.• Areas where the air contains chemicals or particles such as grain,
dust, or metal powders.• Any other area where you would normally be advised to turn off
your vehicle’s engine.
Note: Never transport or store flammable gas, liquid, or explosives in the compartment of your vehicle that contains your phone or its accessories.
Restricting Children’s Access to your PhoneYour phone is not a toy. Children should not be allowed to play with it because they could hurt themselves and others, damage the phone, dial 911 by mistake, or make calls that increase your phone bill.
Warning RegThe display on could break if yosignificant impathis could cause
Caring forProtecting YThe guidelines battery’s perform• Use only Samsu
These chargersbatteries or cha
• In order to avoidthat range from
• Don’t use the baareas, such as
• Never dispose o• Keep the metal • Don’t attempt to• The battery may
period of time.
dging Special Precautions stry Canada Notice
or modifications to your phone not expressly is document could void your warranty for this d void your authority to operate this equipment. oved batteries, antennas, and chargers. The authorized accessories may be dangerous and e warranty if said accessories cause damage or phone. phone is quite sturdy, it is a complex piece of d can be broken. Avoid dropping, hitting, tting on it. to User
nt has been tested and found to comply with the ss B digital device. These limits are designed to nable protection against harmful interference in stallation. This equipment generates, uses, and
dio frequency energy and, if not installed and dance with the instructions, may cause harmful radio communications. However, there is no t interference will not occur in a particular
192
• It’s best to replace the battery when it no longer provides acceptable performance. When used correctly, the battery can be recharged hundreds of times before it needs replacing.
• Don’t store the battery in high temperature areas for long periods of time. t’s best to follow these storage rules:– Less than one month:
-4º F to 140º F (-20º C to 60º C)– More than one month:
-4º F to 113º F (-20º C to 45º C)Disposal of Lithium Ion (LiIon) BatteriesFor safe disposal options of your LiIon batteries, contact your nearest service center.Special Note: Be sure to dispose of your battery properly. In some areas, the disposal of batteries in household or business trash may be prohibited.
Note: For safety, do not handle a damaged or leaking LiIon battery.
Acknowleand InduCautionsAny changes approved in thequipment, anOnly use appruse of any unvoid the phona defect to theAlthough yourequipment anbending, or si
InformationThis equipmelimits of a Claprovide reasoa residential incan radiate raused in accorinterference toguarantee tha
Health and Safety 193
strict laboratory settings. But when in AR of a phone can be substantially less than d to Industry Canada. This is because of a
s including its proximity to a base station design and other factors. What is important to t each phone meets strict federal guidelines. Rs do not represent a variation in safety. meet the federal standard, which incorporates rgin of safety. As stated above, variations in
ween different model phones do not mean ety. SAR values at or below the federal W/kg are considered safe for use by the
orted SAR values for the I337M are:g
been tested and meets RF exposure used with an accessory that contains no ositions the mobile device a minimum of body.
installation; if this equipment does cause harmful interference to radio or television reception, which can be determined by turning the equipment off and on, the user is encouraged to try to correct the interference by one or more of the following measures:• Reorient/relocate the receiving antenna.• Increase the separation between the equipment and receiver.• Connect the equipment into an outlet on a circuit different from that
to which the receiver is connected.Consult the dealer or an experienced radio/TV technician for help.
Warning! At very high volumes, prolonged listening to a headset can damage your hearing.
Specific Absorption Rates (SAR) for Wireless PhonesThe SAR is a value that corresponds to the relative amount of RF energy absorbed in the head of a user of a wireless handset.The SAR value of a phone is the result of an extensive testing, measuring and calculation process. It does not represent how much RF the phone emits. All phone models are tested at their
highest value inoperation, the Sthe level reportevariety of factorantenna, phoneremember is thaVariations in SAAll phones musta substantial maSAR values betvariations in safstandard of 1.6 public. The highest repHead: 0.84 W/kBody: 1.18 W/kgThis phone hasguidelines whenmetal and that p1.0 cm from the
194
Owner’s RecordThe model number, regulatory number, and serial number are located on a nameplate inside the battery compartment. Record the serial number in the space provided below. This will be helpful if you need to contact us about your phone in the future.Model: SGH-I337MSerial No.:

195
Low Battery Indicator 5Battery Care 191Blocking Mode 124, 125Bluetooth 157
Sending contacts 159Books
Play Books 172C
Calculator 161Call Functions 43
3-Way Calling (Multi-Party Calling) 52
Address Book 45Adjusting the Call Volume 50Answering a Call 46Call Back Missed Call 47Call Duration 49Call forwarding 54Call Log 47Call waiting 53Correcting the Number 44Dialing a Recent Number 44
Index
AAbc mode 56About Device 145Accounts 135Add accounts 135Adding a New Contact
Idle Screen 60Address Book 60
Adding a New Contact 60Adding Pauses to Contact
Numbers 61Copying a contact to the Phone 70Copying Contacts to Phone 69Copying Contacts to SIM Card 69Deleting Address Book Entries 69Deleting Contacts from SIM card
70Dialing a Number 62Favorites 68Finding an Address Book Entry 62Group Settings 67
Managing Address Book Contacts 68
Service Dialing Numbers 70Using Contacts List 62
Address Book Options 65Adobe PDF 174Air Gesture
Activate 26Quick Glance 27
Alarm 162Applications
Using the Camcorder 90Using the Camera 84World Clock 163
Applications settingsmanaging 142running services 143
BBack key 25Battery
charging 4Installing 2
Using 123Sym Mode 56Using Abc Mode 56Using Symbol/Numeric Mode 56
FFeatured Apps 166Flight mode 108Flipboard 166
GGallery 81
viewing pictures 81viewing videos 82
Gestures 131Overview 26
Getting Started 1Setting Up Your Phone 1Voice mail 10
Gmail 100Google Chrome 162Google Maps 168Google Play Music 79Google Voice Typing 58Google voice typing settings 128Group
Adding a contact 67
196Ending a Call 44International Call 43Making a Call 43Manual Pause Dialing 43Options During a Call 49Putting a Call on Hold 51Saving a recent call number to
Address Book 48Searching for a Number in Address
Book 53Using the Speakerphone 53
Camcorder 90Settings 87Shooting Video 90
Camera 84Modes 85Quick Settings 86Settings 87Taking Pictures 84
Changing Your Settings 105Charging battery 4ChatON 104Clock 162Contacts 60
CookiesEmptying 151
Creating a Playlist 78D
Dialing Options 47Display
icons 15Downloads 165Draft Messages 93
EEditing a Picture 88Email 99
Creating a Corporate Email Account 99
Creating Additional Email Accounts 100
Switching Between Email Accounts 100
Emergency CallsMaking 44With SIM 45Without SIM 44
Entering Text 55Changing the Text Entry Mode 56
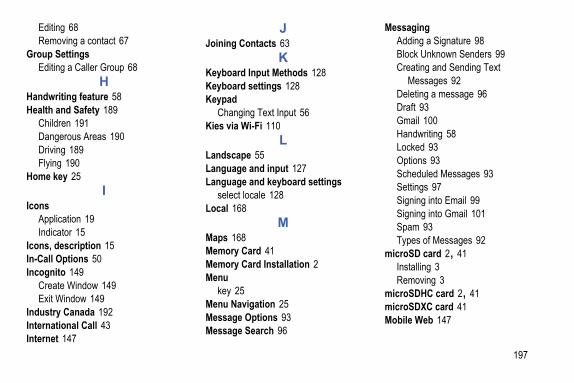
197
MessagingAdding a Signature 98Block Unknown Senders 99Creating and Sending Text
Messages 92Deleting a message 96Draft 93Gmail 100Handwriting 58Locked 93Options 93Scheduled Messages 93Settings 97Signing into Email 99Signing into Gmail 101Spam 93Types of Messages 92
microSD card 2, 41Installing 3Removing 3
microSDHC card 2, 41microSDXC card 41Mobile Web 147
Editing 68Removing a contact 67
Group SettingsEditing a Caller Group 68
HHandwriting feature 58Health and Safety 189
Children 191Dangerous Areas 190Driving 189Flying 190
Home key 25I
IconsApplication 19Indicator 15
Icons, description 15In-Call Options 50Incognito 149
Create Window 149Exit Window 149
Industry Canada 192International Call 43Internet 147
JJoining Contacts 63
KKeyboard Input Methods 128Keyboard settings 128Keypad
Changing Text Input 56Kies via Wi-Fi 110
LLandscape 55Language and input 127Language and keyboard settings
select locale 128Local 168
MMaps 168Memory Card 41Memory Card Installation 2Menu
key 25Menu Navigation 25Message Options 93Message Search 96

OOptical Reader 172Outgoing Call Conditions 121Owner’s Record 194
PPalm Motion
Activate 27On 27
PC Connections 160Phone
Front View 12icons 15Rear View 14Side View 13Switching On/Off 6
Phone information 145Photo
Editing 88Picture
Color Correction 89Face Corrections 89Frame 90
Pictures 81Gallery 81
198
Entering Text in the Mobile Web Browser 148
Navigating the Mobile Web 147Using Bookmarks 149
MotionActivate 27Overview 26
Motions 131Movies 81Multi Window
Activate/Deactivate 30Customizing 32Increase App Window Size 34Maximize App 34Panel Relocation 31Rearrange Apps 32Removing Apps 32Restoring Apps 32Running Multiple Apps 32Switch Arrangement 33Tab Repositioning 30Using 30
Multimedia 71Music 76
Music File Extensions3GP 76AAC 76AAC+ 76eAAC+ 76M4A 76MP3 76MP4 76WMA 76
Music Playeradding music 79creating a playlist 78removing music 79
Mute 50, 53My Files 170My Video 80
NNavigation 171
command keys 25terms used 25touch gestures 25
NFCOn 82

199
Settings 87, 105Shortcuts 15Signal strength 189SIM card
installation 2Installing 1
Snooze 163Software Update 146Sound settings 117Spam
Block Unknown Senders 99Manually Register a Number 99Register a Phrase 99Settings 99
Spam Messages 93Assigning 93
Speakerphone Key 53Specific Absorption Rates 193Stopwatch 164Swap 51Symbol/Numeric mode 56
TTethering 110Text Input
Sharing 82Places 172Play Books 172Play Movies & TV 81Play Music 79Play Store 173Pointer speed 131Polaris Office 4.0 174Polaris® Office 22, 174Portable Wi-Fi Hotspot 110Powering
Off 6On 6
Privacy settingsfactory data reset 137
QQWERTY keypad 55
RRed Eye
Correction 89Reject list 49Reset
factory data 137
SS Beam
On 82Sharing Multiple Pictures 83Sharing Pictures 82
S Memo 174Creating a New Memo 174
S Planner 176S Translator 178S Voice 178Samsung Hub
Using 72Samsung Link 74, 179
Sharing Media 76Samsung Link Settings 75SAR 193scientific calculator 161Screen Mirroring 113SD Card 42Security 136Security settings
device administration 140trusted credentials 141
Service Dialing Numbers 70
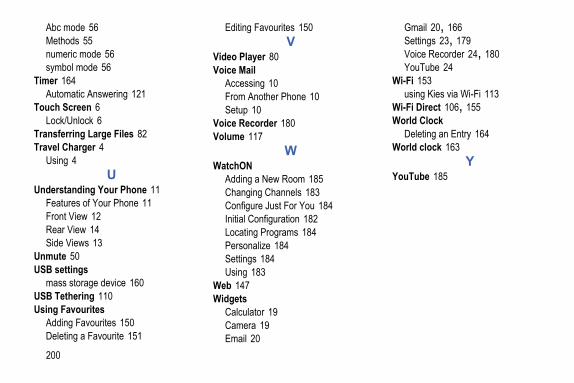
Gmail 20, 166Settings 23, 179Voice Recorder 24, 180YouTube 24
Wi-Fi 153using Kies via Wi-Fi 113
Wi-Fi Direct 106, 155World Clock
Deleting an Entry 164World clock 163
YYouTube 185
200
Abc mode 56Methods 55numeric mode 56symbol mode 56
Timer 164Automatic Answering 121
Touch Screen 6Lock/Unlock 6
Transferring Large Files 82Travel Charger 4
Using 4U
Understanding Your Phone 11Features of Your Phone 11Front View 12Rear View 14Side Views 13
Unmute 50USB settings
mass storage device 160USB Tethering 110Using Favourites
Adding Favourites 150Deleting a Favourite 151
Editing Favourites 150V
Video Player 80Voice Mail
Accessing 10From Another Phone 10Setup 10
Voice Recorder 180Volume 117
WWatchON
Adding a New Room 185Changing Channels 183Configure Just For You 184Initial Configuration 182Locating Programs 184Personalize 184Settings 184Using 183
Web 147Widgets
Calculator 19Camera 19Email 20