USER GUIDE - DisplaySoft
13
DisplaySoft Real Estate TM USER GUIDE Software This publication contains fictitious information and should not be construed as legal training, but as a guide to DisplaySoft software product functions and design. ™ Amortize Program
-
Upload
khangminh22 -
Category
Documents
-
view
4 -
download
0
Transcript of USER GUIDE - DisplaySoft

DisplaySoft Real Estate TM
USER GUIDE
Software
This publication contains fictitious information and should not be construed as legal training, but as a
guide to DisplaySoft software product functions and design.™
Amortize Program

Amortize Table of Contents DisplaySoft™ 2018 Display Systems, Inc.
Chapter Page
Getting Started 1
Data From Start 2
Loan Terms 3
Special Payments 4
Configure Balloon Payment 6
Configure Interest Only Payment 7
Configure Extra Payment(s) 8
Amortization Summary 9
Output 10
Contact Us Help 11

Amortize Page 1 DisplaySoft™ 2018 Display Systems, Inc.
GETTING STARTED
Open a File, click AMORIZE, and then click “Amortization Calculator” to get started.
File name
Program Module
Data Entry

Amortize Page 2 DisplaySoft™ 2018 Display Systems, Inc.
DATA FROM START
Data entered in Start appears on the Amortization Schedule. This information can be changed or keyed in
directly.
Amortize Page 3 DisplaySoft™ 2018 Display Systems, Inc.
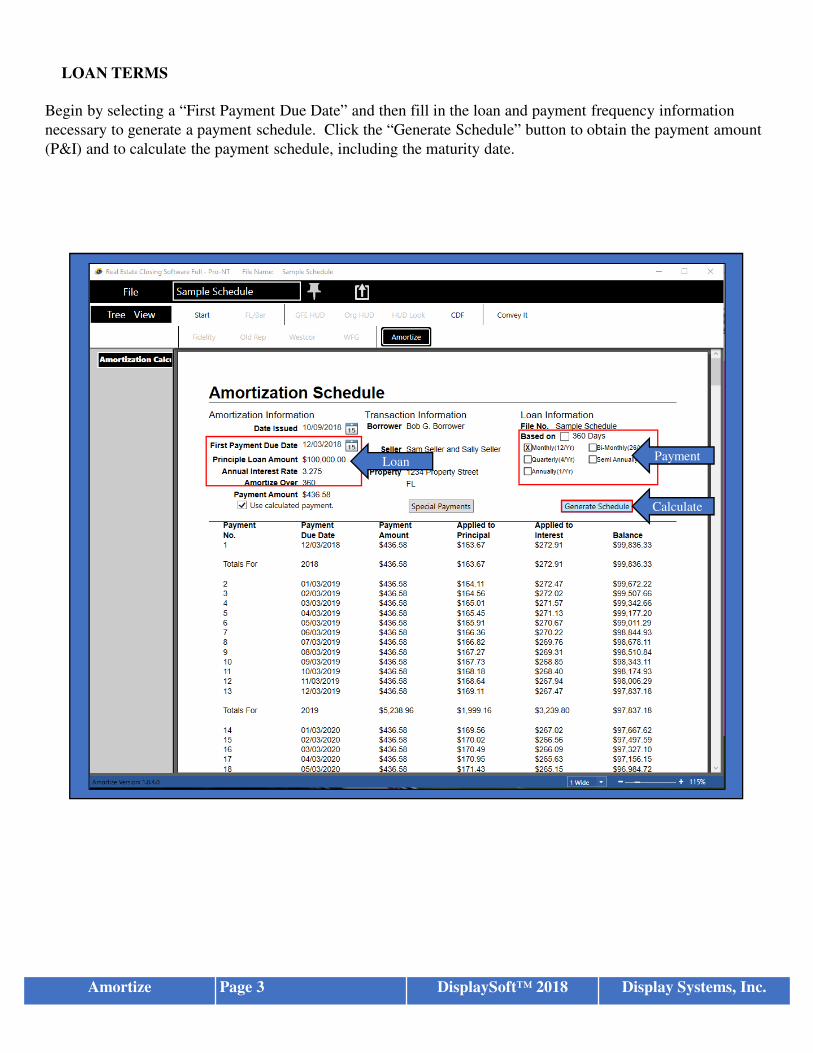
LOAN TERMS
Begin by selecting a “First Payment Due Date” and then fill in the loan and payment frequency information
necessary to generate a payment schedule. Click the “Generate Schedule” button to obtain the payment amount
(P&I) and to calculate the payment schedule, including the maturity date.
PaymentLoan
Calculate

Amortize Page 4 DisplaySoft™ 2018 Display Systems, Inc.
SPECIAL PAYMENTS
The “Special Payments” button opens a window and offers a selection of payment options.
• Fill in the Loan information and then click the “Special Payments” button.
• Set the payment option.
• Click the “Add” button for each change.
• Exit the “Special Payments” window
• Click the “Generate Schedule” button.
In some instances, special payments will cause the loan to be paid in full before the “Amortize Over” payment
number occurs, i.e., a balloon loan amortized over 360 monthly payments (loan information = 360 monthly
payments) could be paid in full on the 60th payment (special payments = balloon).
The “Normal P&I” payment option is used to revert an “interest only” payment option, i.e., the first 12 payments
are “interest only,” and then “Normal P&I” begins on the 13th payment.
Payment Options
Loan Information
Payment Options

To remove one special payment, click the payment number line to select the payment line, then click the
“Delete” button to remove.
The “Clear All” button will remove all payment lines.
Payment
Line
Amortize Page 5 DisplaySoft™ 2018 Display Systems, Inc.

Configure Balloon Payment
Amortize Page 6 DisplaySoft™ 2018 Display Systems, Inc.
This sample loan is amortized over 360 monthly payments. Inside the “Special Payments” button, the balloon
payment is set for the 60th payment.

Cofigure Interest Only Payments
Amortize Page 7 DisplaySoft™ 2018 Display Systems, Inc.
In this sample, the loan is amortized over 360 monthly payments. Inside the “Special Payments” the first 12
payments are set for “Interest Only” then converts to “Normal P&I” beginning on the 13th payment until the loan
is paid in full on the 360th payment. The last payment will include the unpaid interest for the first 12 payments.

Configure Extra Payment
Amortize Page 8 DisplaySoft™ 2018 Display Systems, Inc.
The loan in this example is amortized over 360 monthly payments. Inside the “Special Payments” window, and
extra payment is scheduled to occur on the 2nd payment, re-occurring (optional feature) every 6 payments. This
loan will be paid in full on the 60th payment, including interest.
Optional

Amortize Page 9 DisplaySoft™ 2018 Display Systems, Inc.
AMORTIZATION SUMMARY
The last page of the Amortization Schedule provides a loan summary.

Output
Once the data entry is completed, use “Output” to produce forms via Print, PDF and Email. Choose any form in
any module and print them all at once.
Print, PDF and Outlook Email:
1. Click “File.”
2. Click “Output.”
3. Click the “Terms” program “Module” button.
4. Click the document form name, “Amortization Calculator” to add it to the “Queue.”
5. Click the Print (1 in Q) button; Or click “PDF,” or “Outlook Email,” to produce the queued forms.
Also:
• Click the document name in the queue to deselect a queued document (cancel).
• Click the expander to exit output and return to data entry, or click “File” to return to the “Doc
Menu” for data entry.
OUTPUT
Amortize Page 10 DisplaySoft™ 2018 Display Systems, Inc.
1
Exit Do more than “Print” under “Output”
Queued
forms
3. Module
4. Form

For questions or assistance contact:
Display Systems, Inc.100 S.W. 15th AvenueOkeechobee, FL 34974(863) 763-5555 phone(863) 467-0816 fax
Email:[email protected]@displaysoft.com
Web Site:www.displaysoft.com
Amortize Page 11 - End DisplaySoft™ 2018 Display Systems, Inc.