User Guide - ACDSee
507
-
Upload
khangminh22 -
Category
Documents
-
view
2 -
download
0
Transcript of User Guide - ACDSee


ACDSee Photo Studio Home 2022
Page 1 of 506
Contents
CHAPTER 1: GETT ING STARTED 17
Welcome to ACDSee Photo Studio Home 2022 17
The Benefits of ACDSee 17
Using the User Guide 17
About the ACDSee User Interface 18
ManageMode 18
Media Mode 18
ViewMode 19
Edit Mode 19
People Mode 19
365Mode 19
Dashboard Mode 19
Switching Modes in ACDSee 20
Using Manage Mode 20
About the Manage Mode Panes 20
ManageMode Drop-Down Menus 22
Working with Manage Mode Panes 22
Moving Panes 22
Docking Panes 23
Stacking Panes 23
Resizing Panes 24
Resetting the Layout 24
Using Media Mode 24
Header Button Bar 25
My Folders 30
Display Area 30
Filter By 31
Sort and Group 31
Group By 31
Using View Mode 32
Viewing Images in Full Screen Mode 33
ACDSee Photo Studio Home 2022
Page 2 of 506
Using the ViewMode Panes 33
Using the Bottom Toolbar 33
Using Windows Touch Gestures™ with ViewMode 37
Switching to Manage Mode 37
Using Edit Mode 37
Using 365 Mode 38
Uploading Images 38
Using Dashboard Mode 39
Cataloging Files 39
Dashboard Mode 39
CHAPTER 2: GETT ING HELP 40
Using the Quick Start Guide 40
Finding Other Resources and Support 40
Using the Help Menu 40
Online Help and Our Community 41
CHAPTER 3: MANAGE MODE 42
Importing Files with ACDSee Home 42
Importing Files Using theWindows AutoPlay Dialog Box 42
Importing Files from Specific Types of Devices 43
RAW + JPEG Options 43
About Removable Devices 44
Importing Photos From a Device 44
Importing Photos From a Scanner 49
Importing Photos From a CD or DVD 50
Importing Photos From a Disk 50
Creating a Renaming Template 51
Importing a Lightroom® Database 52
Working with Images on Mobile 53
Sending Images to ACDSee from Your Mobile Device Using ACDSee Mobile Sync 54
Getting Started 55
Sending Images and Videos 56
Troubleshooting for Mobile Sync 57

ACDSee Photo Studio Home 2022
Page 3 of 506
Browsing Files in the File List Pane 57
Using the File List Pane 57
Changing Overlay Icon Visibility 61
Maximizing the File List Pane 61
Browsing Using the Folders Pane 62
Selecting Multiple Folders 62
Creating and Managing Folders 63
Browsing Files By Date or Event 63
Adding Descriptions and Thumbnails in Events View 65
Browsing Your Favorite Files 66
Accessing the Shortcuts Pane 66
Creating a Shortcut 66
Creating a New Folder 66
Deleting a Shortcut or Folder 67
Using the Catalog Pane 67
Easy-Select Bars 67
The ACDSee Home Database 67
Detecting Faces in Manage Mode 68
Embedding, Retrieving, and Importing Face Data 69
Changing Views 70
Customizing the Details View 70
Filtering Files 71
Grouping Files 72
Navigating Through Groups in the File List 72
Removing Groups from the File List 73
Selecting Files in One or More Groups 73
Sorting Files 74
Sorting Files Using Column Headers 74
Custom Sorting Files 75
Selecting Files 75
Previewing Images 76
The Information Palette 76
Rotating Images 77

ACDSee Photo Studio Home 2022
Page 4 of 506
Comparing Images 78
Gathering Images in an Image Basket 82
Cataloging and Managing Files in ACDSee Home 83
Organizing with the Catalog Pane 83
Categories 83
People 83
Keywords 84
Ratings 84
Color Labels 84
Auto Categories 84
Saved Searches 84
Special Items 85
The ACDSee Database and Embedded Data 85
Easy-Select Bars 86
Match All Match Any 87
Creating Categories 88
Manage Categories 88
Create Easy-Access Category Sets 89
Assigning and Searching Categories and Ratings 89
Quickly Assign Ratings in Thumbnail View 89
Assign and Search Categories and Ratings in the Catalog Pane 90
Assign Categories and Ratings in the Properties Pane 91
Remove Categories or Ratings from Files 92
Assigning Color Labels 92
Create a Color Label Set 93
Assign Color Labels 93
Search Files Assigned to a Label 95
Removing Color Labels and Color Label Sets 96
Creating Collections 96
Collections Sets 99
Smart Collections 99
Using the Properties Pane 100
Properties Pane Areas 101

ACDSee Photo Studio Home 2022
Page 5 of 506
Metadata Tab 101
Organize Tab 102
File Tab 102
Embedding ACDSeeMetadata into Files 102
Browsing and Cataloging with Auto Advance 103
ManageMode 103
Keywords and Categories 104
Keywords 104
Categories 105
ViewMode 105
Using the Map Pane 105
Using the Map Pane to Further Your Workflow 107
Creating and Assigning Hierarchical Keywords 108
Creating Keywords 108
Managing Keywords 109
Creating Quick Keywords 109
Importing and Exporting Keywords 110
Copying and Moving Files 111
Copying Images to the Clipboard 112
Pasting Files and Folders 112
Replacing or Overwriting Files 113
Renaming a File or Folder 113
Storing Files in Private Folders 114
Tagging Images or Files 116
Managing Metadata Views and Presets 117
Adding ACDSee Metadata to Multiple Files 118
Removing IPTC Keywords from Auto Categories 120
Changing the Date and Time Properties of Images 121
Backing Up Your Files to Another Computer 122
Updating or Deleting a Synchronization 123
Running a Saved Synchronization 124
Searching with ACDSee Home 124
Using the Quick Search Bar 124

ACDSee Photo Studio Home 2022
Page 6 of 506
Using the Search Pane 126
Search Pane Areas 127
Properties Area 128
Searching with File Name Patterns 129
Using Selective Browsing 130
Setting Selective Browsing Criteria 130
Tips for Selective Browsing 131
Hiding the Selective Browsing Panel 131
Searching with Auto Categories 131
Identifying Commonly Used Search Categories 132
Refining Your Auto Categories Search 132
Finding Duplicate Files 133
Deleting and Renaming Files 134
Finding Images Quickly 135
Sharing Files with ACDSee Home 135
Taking a Screen Capture 135
Emailing Images 138
Share/Email Using ACDSee 365 139
Creating a Desktop Screensaver 139
Viewing and Configuring a Slideshow 142
Sharing Slideshows and Screensavers 146
Creating a Desktop Slideshow 147
Using the ACDSee Showroom Slideshow Controls 148
Creating a PDF 148
Creating a PowerPoint Presentation 149
Creating an HTML Album 150
Uploading Images to Photo Websites 152
Creating a Contact Sheet 152
Creating Archives of Your Files 154
Extracting Archives 155
Printing Images 156
Setting Printer Options 157
Creating Custom Print Layouts 158

ACDSee Photo Studio Home 2022
Page 7 of 506
Setting Image Size and Positioning 159
Setting Print Adjustments 160
Adding Text to Pages 160
Setting Contact Sheet Printing Options 161
About Batch Editing 162
Converting Multiple Images to Another File Format 163
Rotating or Flipping Multiple Images 164
Setting Rotated and Flipped File Options 165
Resizing Multiple Images 166
Setting File Options 172
Adjusting Exposure For Multiple Images 172
Adjusting Batch Exposure Options 173
Renaming Multiple Files 175
About the ACDSee Database 180
Embedding ACDSeeMetadata in Files 180
The Embed Pending Icon 182
Viewing Files That Have Data to Embed 183
Retrieving ACDSeeMetadata That is Embedded in Files 183
Excluding Folders From the Database 183
Cataloging Files in the Database 184
About the ACDSee Indexer 184
Cataloging and the Database. 184
Creating and Switching Between Multiple Databases 185
Converting an Older Database 186
Importing Database Information 186
Importing File Information from Other Sources 187
Importing Photo Discs 187
Importing Albums 188
Working with Descript.ion Files 188
Exporting Database Information 188
Generating File Lists 189
Backing Up Your Database 190
Database Backup Tips and Strategies 191
ACDSee Photo Studio Home 2022
Page 8 of 506
Backup Schedule 191
Backup Location 192
Backup Size 192
Restoring Database Information From a Backup 192
Maintaining the Database 192
Optimizing the Database 193
Mapping Drives for an Incoming Database 194
Rebuilding Thumbnails and Metadata 194
Quarantined Files 195
Working with Plug-Ins 195
Types of Plug-Ins 195
Managing Plug-Ins 196
Disabling a Plug-In 196
Changing the Plug-In Order 196
Viewing Plug-In Properties and Getting Help 196
ACDSee SeeDrive™ 197
Managing Your ACDSee 365 Files with SeeDrive™ 198
Uploading 198
Downloading 199
Making Folders Private or Public 199
Sharing and Downloading with ACDSee SeeDrive™ 200
Sharing a Folder with ACDSee SeeDrive™ 200
Sharing Your Folders by Copying and Pasting its URL Using ACDSee SeeDrive™ 202
CHAPTER 4: MED IA MODE 203
Using Media Mode 203
Header Button Bar 204
My Folders 209
Display Area 209
Filter By 210
Sort and Group 210
Group By 210
CHAPTER 5: VIEW MODE 211

ACDSee Photo Studio Home 2022
Page 9 of 506
Previewing Your Images with Auto Lens 211
Light EQ™ 212
Rotating Images 212
Using the Histogram 213
Using Face Detection and Recognition in View Mode 213
Suggestions 215
Viewing Images with Image Advance 215
Displaying Text on Images in View Mode 216
Hiding Image Text 217
Selecting Part of an Image 217
Viewing File Properties in View Mode 218
Viewing and Using Brush Files 218
Playing Video and Audio Files 219
Automatically Playing Audio and Video Files 219
TheMedia Toolbar 220
Saving Video Frames as Images 220
Adding or Editing Image Audio 221
Recording Audio to an Image 221
Printing Images in View Mode 222
Setting an Image as the Desktop Wallpaper 224
Synchronizing View Mode to a Folder 224
Viewing Offline Images 225
Rebinding Photo Discs 226
Viewing Images in Another Application 226
Showing Originals 226
Committing Changes 227
Changing Image Color Depth 227
Zooming In and Out 228
Setting the Zoom Level 228
Automatically Shrinking or Enlarging Images 229
Using the Navigator to View Select Areas of an Image 230
Panning a Magnified Image 231
Using Pan Lock 231

ACDSee Photo Studio Home 2022
Page 10 of 506
Magnifying Specific Areas of an Image 231
CHAPTER 6: ED IT MODE 233
Using Edit Mode 233
Editing an Image 233
Reverting to Original Settings 234
Histogram and Image Viewing Controls 234
Using Color Pickers in Edit Mode 236
Using Presets in Edit Mode 236
Using the Undo/Redo Button 237
Restoring Originals 237
Using the Edit Brush 238
Edit Brush 238
Using the Gradient Tool 240
Gradient Tool 240
Using the Radial Gradient Tool 241
Radial Gradient Tool 241
Using Blend Modes and Opacity 242
Opacity 242
Blend Modes 242
Saving Images in Edit Mode 245
Saving Images 245
Using Selections 246
The Selection Tools 247
Using the Selection Tools 247
Combining the Tools 250
Applying Edits or Effects to Selections 250
Reducing Red Eye 251
Removing Flaws 252
Adding Drawings to Your Image 254
Adding Text to an Image 258
Adding a Watermark to an Image 261
Adding Borders 262

ACDSee Photo Studio Home 2022
Page 11 of 506
Adding Your Own Textures or Edges 267
Textures 268
Edges 268
Adding a Vignette 269
Adding a Tilt-Shift Effect 271
About Special Effect Filters 272
Applying a Bathroom Window Effect 273
Applying a Blinds Effect 274
Applying a Blue Steel Effect 275
Applying a Bob Ross Effect 275
Applying a Bulge Effect 277
Applying a Cartoon Effect 278
Applying a Childhood Effect 280
Applying a Collage Effect 280
Applying a Colored Edges Effect 281
Applying a Contours Effect 282
Applying a Crayon Drawing Effect 283
Applying a Crosshatch Effect 284
Applying a Dauber Effect 285
Applying a Dramatic Effect 286
Applying an Edge Detect Effect 287
Applying an Emboss Effect 287
Applying a Furry Edges Effect 288
Applying a Glowing Edges Effect 290
Applying a Granite Effect 291
Applying a Lomo Effect 291
Applying a Mirror Effect 292
Applying a Negative Effect 293
Applying an Oil Paint Effect 294
Applying an Old Effect 295
Applying an Orton Effect 296
Applying an Outline Effect 296
Applying a Pencil Drawing Effect 298

ACDSee Photo Studio Home 2022
Page 12 of 506
Applying a Pixel Explosion Effect 298
Applying a Pixelate Effect 300
Applying a Posterize Effect 300
Applying a Purple Haze Effect 301
Applying a Radial Waves Effect 302
Applying a Rain Effect 303
Applying a Ripple Effect 305
Applying a Scattered Tiles Effect 306
Applying a Sepia Effect 307
Applying a Seventies Effect 308
Applying a Sheet Metal Effect 309
Applying a Shift Effect 310
Applying a Slant Effect 311
Applying a Sobel Effect 312
Applying a Solarize Effect 313
Applying a Somber Effect 314
Applying a Stained Glass Effect 315
Applying a Sunspot Effect 316
Applying a Swirl Effect 316
Applying a Threshold Effect 318
Applying a Topography Effect 319
Applying a Water Effect 319
Applying a Water Drops Effect 321
Applying a Waves Effect 322
Applying a Weave Effect 324
Applying a Wind Effect 325
Creating a Custom Special Effect Filter (Convolution Effect) 326
Rotating an Image 328
Flipping an Image 329
Cropping an Image 330
Resizing the Crop Window 330
Resizing an Image 331
Pixel Resize Options and Resulting Action 333

ACDSee Photo Studio Home 2022
Page 13 of 506
Adjusting Image Exposure 336
Adjusting Image Levels 337
Adjusting Levels Automatically 339
Adjusting Tone Curves in Edit Mode 340
Adjusting Lighting 341
Using the 1-Step Tab 342
Using the Basic Tab 342
Adjusting White Balance 343
Adjusting Color with Color EQ 344
Creating a Grayscale Image 349
Color Grading with LUTs 351
Using the Histogram 352
Using the Color Dialog Box 352
The Standard Tab 353
The Custom Tab 353
Selecting and Adjusting Colors 353
Sharpening an Image 354
Blurring an Image 355
About Noise and Noise Reduction 358
Loading Images in ACDSee Home with Noise Reduction from Legacy Versions 359
Removing Noise 359
Adding Noise 361
Adjusting Clarity 362
Using People Mode 363
Named View 364
Unnamed View 364
Person View 364
Folders Pane 365
Named View 365
Unnamed View 366
Person View 367
Assigned Faces Pane 368
The Suggested Faces Pane 368

ACDSee Photo Studio Home 2022
Page 14 of 506
CHAPTER 7: 365 MODE 370
Working in 365 Mode 371
Creating an ACDSee 365 Account 372
Uploading Images to ACDSee 365 372
Setting Folders to Sync to Web 373
Creating Folders and Setting Privacy 375
Changing the Rating System 375
Downloading Images 376
Using the Transfer Manager 376
CHAPTER 8: DASHBOARD MODE 378
Using Dashboard Mode 378
Cataloging Files 378
Dashboard Mode 378
CHAPTER 9: PICAVIEW 379
About ACDSee PicaView 379
Using ACDSee Quick View 380
Using Windows Touch Gestures™ with Quick View 381
CHAPTER 10: OPTIONS AND CONF IGURATION 383
Setting the General Options 383
Setting the Auto Advance Options 384
Setting the Mode Configuration Options 384
Setting the Batch Operation Options 385
Setting the Manage Mode Options 385
Setting the Quick Search Options 386
Setting the Face Detection and Recognition Options 387
Setting the Face Search Options 389
Setting the File List Pane Options 390
Setting the Thumbnail Info Options 393
Setting the Thumbnail Style Options 395
Setting the Details View Options 396
Setting the Preview Pane Options 397

ACDSee Photo Studio Home 2022
Page 15 of 506
Setting the Folders Pane Options 398
Setting the Catalog Pane Options 399
Setting the Calendar Pane Options 400
Setting the CD/DVD Management Options 401
Setting the Properties Pane Options 402
Setting the File Management Options 402
Setting the Database Options 404
Setting the View Mode Options 406
Setting The People Mode Options 408
Setting the Display Options 409
Setting the Edit Mode Options 410
Setting the ACDSee 365 Options 411
Setting the ACDSee Showroom Options 412
Setting the ACDSee Quick View Options 414
Setting the Media Options 415
Setting the ACDSee Indexer Options 416
Setting the ACDSee PicaView Options 416
Setting the ACDSee Mobile Sync Options 417
Auto-hiding Panes and Panels 418
Using the Task Pane 418
Customizing Toolbars 419
Displaying and Hiding Toolbars 419
Customizing Toolbar Contents 419
In ManageMode: 419
In ViewMode: 420
Resetting Toolbars 421
Customizing Toolbar and Pane Locations 421
Hiding Panes 421
Moving Panes and Toolbars in View and Edit Mode 421
Docking Panes and Toolbars in View and Edit Mode 422
Creating a Custom Menu 422
Configuring External Editors 423
Customizing Keyboard Shortcuts 425

ACDSee Photo Studio Home 2022
Page 16 of 506
Changing the Display Theme 426
Setting JPEG Options 427
CHAPTER 11: SHORTCUTS 428
Manage Mode Keyboard Shortcuts 428
Manage Mode Mouse Shortcuts 438
Calendar Pane Shortcuts 439
Media Mode Keyboard Shortcuts 440
View Mode Keyboard Shortcuts 440
View Mode Mouse Shortcuts 455
Edit Mode Keyboard Shortcuts 456
Edit Mode Mouse Shortcuts 464
365 Mode Keyboard Shortcuts 465
365 Mode Mouse Shortcuts 467
ACDSee PicaView Keyboard Shortcuts 468
CHAPTER 12: F ILE FORMATS 469
Supported File Formats in ACDSee Home 469
About RAW Files 474
Associating Files 474
GLOSSARY 475
INDEX 486

ACDSee Photo Studio Home 2022
Page 17 of 506
Chapter 1: Getting Started
Welcome to ACDSee Photo Studio Home 2022
Welcome to ACDSee, the industry-leading digital photo and document management software.
The Benefits of ACDSee
Total workflow control. Build your photography workflow around ACDSee and notice the difference.With flexible cataloging capabilities, unrivaled viewing speed, and a powerful photo editor, ACDSee isthe choice of busy professional and advanced amateur photographers worldwide. Add vastly improvedRAW processing, a full set of metadata tools, and unparalleled viewing speed, and you have a fullyintegrated photography editing and management solution.
Patented editing features including Light EQ™. The Patented Light EQ™ technology single-exposureHDR algorithms powering ACDSee's Light EQ™ tool accurately and intelligently stretch the dynamiclighting range of your photos, making them incredibly realistic or atmospheric.
Wide variety of editing and processing tools. Create, edit, and touch-up your digital images. Use toolssuch as red eye reduction, crop, sharpen, blur, and photo repair to enhance or correct your images.Image editing tools, such as exposure adjustment, convert, resize, rename, and rotate, can beperformed on multiple files at the same time.
Completely customizable UI. The user interface is completely customizable, and provides quick accessto tools and features. You can customize the screen layout, the order of images, toolbar display, andmany other options to suit your preferences.
Impressive organizational capabilities. With ACDSee you can import your photos from your camera toyour computer, categorize and rate your files, and manage photo collections of any size—from a fewhundred to a few hundred thousand. Choose to view thumbnail previews of any size, or use a detailedlist of file properties to sort your files. Can't find a particular photo? No problem. ACDSee includes avariety of powerful searching tools and a Compare Images feature to eliminate duplicates.
Context-sensitive help. ACDSee contains extensive context-sensitive help materials to assist you as youmove through the application. Press F1 when using any feature to open the relevant online help page.
Using the User Guide
This user guide is here to help you get the most out of your ACDSee software. It is categorized bymode and by function. Throughout the guide, you will find icons that help you best use ACDSee.
Notes are things to consider when performing an action.

ACDSee Photo Studio Home 2022
Page 18 of 506
Tips are ways to optimize your work.
Warnings are things to take into account when making an action.
If you need further guidance, check out the Quick Start Guide, or Finding Other Resources andSupport.
About the ACDSee User Interface
The ACDSee Home user interface provides easy access to the various tools and features you can use tobrowse, view, edit, and manage your photos and media files. ACDSee Home consists of seven modes:Manage, Media, View, Edit, People, 365, and Dashboard.
Manage Mode
Manage mode is the main browsing and managing component of the user interface, and is what yousee when you start ACDSee Home using the shortcut icon on your desktop. In Manage mode, youcan find, move, preview, and sort your files, and access organization and sharing tools.
Manage mode consists of 15 panes, most of which can be closed when not in use. The File List paneis always visible, and displays the contents of the current folder, the results of your latest search, orthe files in your database that match your filtering criteria. A status bar at the bottom of the Managemode window displays information about the currently selected file, folder, or category.
You can open and close panes, move them to different areas of your screen, and stack them onother panes or dock them to the edge of the window. Most panes also have additional options youcan set to further customize their behavior and appearance.
Manage mode also features a toolbar and a set of drop-down menus. The toolbar provides buttonsfor your home folder, and for navigating forwards and backwards through your folders. The drop-down menus provide quick access to the most common tasks.
Media Mode
Media mode is ACDSee’s database-driven powerhouse for viewing and accessing the folders you haveeither browsed inManage mode or cataloged into the ACDSee database. This streamlined, unclutteredview of the media assets managed by ACDSee offers sorting, grouping, and filtering in any combination.

ACDSee Photo Studio Home 2022
Page 19 of 506
View Mode
In View mode you can play media files and display images and documents in full resolution, one at atime. You can also open panes to view image properties, display areas of an image at varyingmagnifications, or examine detailed color information.
You can open View mode by selecting an image or document and clicking on the View mode tab,and you can use the Filmstrip in View mode to flip quickly between all of the files in a folder. Viewmode contains a toolbar with shortcuts to commonly-used commands, and a status bar at thebottom of the window, which displays information about the current image or media file.
Edit Mode
Edit mode works on the image data already rendered to RGB. Edits are independently applied to theconverted RGB data in the order that you do them. This chain editing gives you full control over thepixels, allowing creative freedom to apply precise adjustments. This makes operations such as selec-tions and blend modes possible.
People Mode
People mode is born of a union between ACDSee’s industry-leading Face Detection & Recognitionfeature and a keen application of machine learning. Photographers from all walks of life will enjoythe dedicated space for distinguishing by client, family member, or person of interest, allowing forthe management of people by merging, renaming, or deleting faces, or taking labeling suggestionsfrom the AI assistant for grouping similar unnamed people.
Please note that People mode is only available for the 64-bit version of ACDSee PhotoStudio Home.
365 Mode
365 mode provides an easy way to upload images to 365.acdsee.com to share with your contacts orthe public. In 365 mode, you can select the images on your computer and then drag and drop them dir-ectly into 365.acdsee.com.
Dashboard Mode
Dashboardmode allows you to quickly access and browse file, camera, and database statistics basedon your ACDSee database and EXIF information. As Dashboardmode relies on information derivedfrom your database, it is important to catalog in order to get the most out of it.

ACDSee Photo Studio Home 2022
Page 20 of 506
Switching Modes in ACDSee
In ACDSee Home, you can quickly switch between the seven modes—Manage, Media, View, Edit,People, 365, and Dashboard.
The mode buttons are located at the top right of the ACDSee Home window:
To Switch from One Mode to Another:
Click one of the following mode buttons:
Manage: import, browse, organize, compare, find, and publish your photos.
Media: view your entire image collection by date.
View: display and examine photos at any magnification.
Edit: fix and enhance photos using the pixel-based Edit tools.
People: view faces identified through ACDSee's Facial Recognition. (People mode is not available inHome 32-bit).
365: upload images to 365.acdsee.com to share with your contacts or the public.
Dashboard: quickly access and browse file, camera, and database statistics.
Using Manage Mode
In Manage mode, you can browse, sort, catalog, manipulate, and share your files and images. You cancombine different tools and panes to perform sophisticated searching and filtering operations, andview thumbnail previews of images and media files.
You can also switch very quickly to the other modes by clicking the mode buttons in the top rightcorner.
The panes in Manage mode are fully customizable, and can be moved, resized, hidden, docked, orclosed. You can also stack the panes together for easy reference and accessibility, and to maximizeyour screen space.
If the pane you want to view is not visible, click Panes from the top left main toolbar and select a pane.
About the Manage Mode Panes
Manage mode consists of the following panes:

ACDSee Photo Studio Home 2022
Page 21 of 506
File List This pane displays the contents of the currently selected folder, the results of yourlatest search, or the files and folders that match your selective browsing criteria. TheFile List pane is always visible, and cannot be hidden or closed. You can customize theFile List pane by changing the way the files are displayed, or the size of the thumbnails.
Folders This pane displays the directory structure of your computer, much like the directorytree in Windows Explorer. You can use the Folders pane to browse through thefolders and display their contents in the File List pane. You can also display thecontents of multiple folders in the File List by clicking the Easy-Select indicatoropposite each folder, on the left side of the pane.
Calendar This pane displays a calendar that you can use to organize and browse your filesaccording to their associated dates.
Shortcuts This pane stores shortcuts to your favorite images, files, folders or even applications.Dragging an image, file, or folder into the Shortcuts pane creates a shortcut to theoriginal without affecting it in any way.
Search This pane provides access to a powerful search utility. You can specify the type ofsearch you want to perform, and enter your search criteria into the fields provided inthe Search pane.
You can also save a search and give it a name. Saved searches are listed on the Searchpane and the Catalog pane. On the Search pane, can select Saved searches from thedrop-down list to run again. On the Catalog pane, Saved Searches are listed belowAuto Categories, where you can run them again by clicking once on the Saved Searchname.
Preview This pane displays a thumbnail preview of any image or media file currently selectedin the File List pane. You can adjust the size of the thumbnail by resizing the Previewpane, and also specify whether you want the Preview pane to play media files or justdisplay the first frame.
SelectiveBrowsing
This panel combines input from the Folders, Catalog, and Calendar panes to limit thelist of files in the File List pane to those that match a specific set of criteria. You caninclude or exclude files by adjusting the different criteria in the Selective Browsingpane. You can access the Selective Browsing panel from the View menu.
Catalog This pane lists the categories, auto categories, people, ratings, color labels, keywords,and saved searches to help you sort and manage your files. You can also use theSpecial Items area in the Catalog pane to quickly view all of the images on yourcomputer, or see any uncategorized files in the current folder.
Please note that Face Detection is only available for the 64-bit versionof ACDSee Photo Studio Home.
Task This pane displays menus of commonly-used buttons and commands from the menusand toolbars. The menus change dynamically based on your current location and

ACDSee Photo Studio Home 2022
Page 22 of 506
selections in ACDSee.
Properties This pane displays file properties and metadata for any file or folder you select in theFile List pane. You can use the Properties pane to view and edit metadata for yourfiles, and the EXIF metadata included in digital photos.
Map This pane displays marked locations on a map for any file you select in the File Listpane. You can use the Map to view and mark the geographic location of your files.
Image Basket While browsing through your files and folders, you can place images in an ImageBasket to hold them temporarily. You can then edit, print, or share those imageswithout moving them all into a single folder.
Manage Mode Drop-Down Menus
The drop-down menus in Manage mode give you quick access to often-used tasks. The drop-downmenus include the following:
Import: where you can import photos from cameras and other devices.
Batch: where you can run all the batch editing processes.
Create: where you can create slide-show files, PDFs, PowerPoint presentations, online albums, orarchives.
Slideshow: where you can configure and run a slideshow.
Send: where you can upload to photo sites, an FTP, or share photos by email.
Editors: where you can list external editors for easy access.
Working with Manage Mode Panes
You can open and close panes in Manage mode to suit your preferences, and move, float, or stack anyof the panes to customize the layout of the Manage mode window.
To Open or Close Panes in Manage Mode:
Click Panes and select the pane you want to open or close.
Moving Panes
You can move a pane from a docked or floating position to a new location. You can move one pane ata time, or several stacked panes.
To Move a Pane:

ACDSee Photo Studio Home 2022
Page 23 of 506
1. Drag the pane's title bar and hold your cursor over any of the arrows of the Docking Compass.
2. When the shaded marquee displays the position of the pane you want, release the mouse button.
3. To return a pane to its previous location, double-click its title bar.
To Move a Docked or Floating Pane:
Do one of the following:
Drag the pane's tab to a new location. Only one pane moves.
Drag the pane's title bar to a new location. Any panes stacked beneath it also move.
If you use dual monitors, you can move the panes to your second monitor to free up space onyour main monitor.
Docking Panes
When you select a pane in the Manage mode, the Docking Compass activates to help you place thepane precisely. The Docking Compass consists of an outer and inner ring of arrows. When you holdyour cursor over any of the arrows, a shaded marquee displays the potential position of the pane.
To Dock a Pane in Manage Mode Window:
1. Drag the pane's title bar or tab to activate the Docking Compass.
2. To dock a pane around the outer edge of the window, hold your cursor over any of the outer arrows ofthe Docking Compass, and then release the mouse button.
3. To dock a pane around the outer edge of the File List pane, or any another pane, hold your cursor overthe inner arrows of the Docking compass, and then release the mouse button.
Stacking Panes
You can stack panes and reorder their tabs to suit your needs.
To Stack Panes:
1. Do one of the following:
Drag one pane's title bar onto the title bar of another pane until the shaded marquee appears,and then release the mouse button.
Drag one pane inside another, hold your cursor over the center of the Docking Compass, andthen release the mouse button.
2. To reorder the panes, drag a tab to the left or right in the tab order.
3. To separate a tabbed pane, drag the pane’s tab to another location on the screen.

ACDSee Photo Studio Home 2022
Page 24 of 506
Resizing Panes
You can resize all the panes in Manage mode, whether they are docked or floating.
To Resize a Docked Pane:
1. Hold your cursor over the edge of the pane until the cursor changes to arrows and lines.
2. Drag the edge of the pane to the size you want.
To Resize a Floating Pane:
Hold your cursor over the edge or corner of the pane and then drag the pane to the size you want.
Resetting the Layout
All of the panes can be restored to their default positions at any time inManage, Media, Edit, andPeoplemodes.
People mode is not available in Home x32.
To Reset the Layout:
Click View | Reset Layout.
Using Media Mode
Mediamode offers a streamlined, database-driven approach to Digital Asset Management. Only thefolders browsed inManagemode and that have been cataloged into the ACDSee database will bedisplayed inMediamode, offering a clutter-free view of photographs and videos managed by ACDSee.
TheMediamode interface is divided into four separate functional areas:1. Header Button Bar,2. My Folders,3. Display Area, and4. Group By.

ACDSee Photo Studio Home 2022
Page 25 of 506
Header Button Bar
Located directly below the main menu, the Header Button Bar contains three buttons describedbelow:
l Refresh,l Catalog, andl Show Orphan Files.
Header Button Bar Options

ACDSee Photo Studio Home 2022
Page 26 of 506
Refresh
Refreshes the My Folder pane's folder tree and the Display Area pane.
Catalog
Produces the Catalog Files dialog which allows thumbnails and file inform-ation to be added to the database without having to first browse folders.
Folders to Catalog
Subfolders Enabledsubfolderswill also beadded tothe data-base.
Add folder... Click theAddFolder...button tobrowse forfolders tobe addedto the data-base.
Remove folder Select afolder inthe Foldersto Catalogtable andclick theRemovefolder but-ton toremovethe folderfrom thetable.
Import from Cataloged Files
EXIF and IPTC metadata Enable toimportEXIF andIPTCmetadata.

ACDSee Photo Studio Home 2022
Page 27 of 506
ACDSee Metadata, including categories, keywords, tagged,and collections
Enable toimportACDSeemetadata,includingcategories,keywords,tagged,and col-lections.
Face Data, including face outlines and names Enable toimportFace Data,includingface out-lines andnames.Enablingthe FaceDatacheckboxactivatestheACDSeeFace Dataradio but-ton andthe Light-room orPicasaFace Dataradio but-ton.
ACDSee Face Data Enable toimportACDSeeFace Data.TheACDSeeFace Dataradio but-ton is onlyactivated ifthe Face

ACDSee Photo Studio Home 2022
Page 28 of 506
Data,includingface out-lines andnamesckeckboxis enabled.EnablingtheACDSeeFace Dataradio but-ton dis-ables theLightroomor PicasaFace Dataradio but-ton.
Lightroom or Picasa Face Data Enable toimportLightroomor PicasaFace Data.The Light-room orPicasaFace Dataradio but-ton is onlyactivated ifthe FaceData,includingface out-lines andnamesckeckboxis enabled.Enablingthe Light-room orPicasaFace Dataradio but-ton dis-

ACDSee Photo Studio Home 2022
Page 29 of 506
ables theLightroomor PicasaFace Dataradio but-ton.
File Formats
Catalog images Only imagefile typeswill be cata-loged
Catalog images and videos Both imagefile typesand videofile typeswill beimported
Catalog all files All files inthe selec-ted folderwill beimported.
Options
Build and include thumbnails in database Enable tobuildthumbnailsof theimage orvideo filesandinclude thethumbnailsin the data-base.
Include contents of archive files Enable toinclude thecontents ofarchivedfiles.
Create preview files for RAW images Enable tocreate pre-view files

ACDSee Photo Studio Home 2022
Page 30 of 506
for RAWimages.
Help Opens the help file related to cataloging files inMedia mode.
Start Starts the process of adding thumbnails and file information to the data-base.
Cancel Stops the process of adding thumbnails and file information to the data-base.
Show Orphan Files
Displays missing files flagged as orphans. Orphans will be displayed insepia.
To use the Catalog Files tool:
1. Click the Catalog button in the Header Button Bar located directly below the main menu.2. In the Catalog Files dialog, complete the options described in the above table.3. Click the Start button to automatically add thumbnails and file information to the database.
My Folders
Located along the left side of the screen, theMy Folders pane is a simple folder tree populated with allfolders browsed while inManagemode. To add additional folders to theMy Folders pane withoutleavingMediamode, use the Catalog Files tool described above.
TheMy Folders pane is hidden by default. To display theMy Folders pane, click the Hide/Show icon
in the lower left of the Display Area.
Clicking a folder containing media in theMy Folder pane will filter the Display Area's contents todisplay the selected folder's media.
Display Area
The Display Area pane occupies the large central portion of the screen and is used primarily to displayimages and videos that can be filtered, sorted, or grouped.
Double-click any image or video to display them in full screen. Videos displayed in full screen can beplayed without leavingMediamode. Double click the full screen image or video to return to the gridview.
Right-click individual media assets to produce a context-sensitive help menu containing the followingoptions:
l View: opens media asset in View mode.
l Develop: opens media asset in Developmode.
l Edit: opens media asset in Edit mode.

ACDSee Photo Studio Home 2022
Page 31 of 506
l Rotate Left: press Ctrl + L to rotate left.
l Rotate Right: press Ctrl + R to rotate right.
l Show in File Explorer: opens to the media asset file's location in File Explorer.
Filter By
When enabled, the tools in the Filter By toolbar are very powerful for tailoring the results displayed inthe Display Area pane by filtering the results based on specific metadata.
To filter media assets in the Display Area pane, choose from a combination of any of the following:
l Enable the Tagged checkbox to display only those images with a tag.
l Make a selection from the ratings to display media with a specific rating. The button to the left of the rat-ings lets you choose whether the results will include media with a Rating less than or equal, greater thanor equal, or matching the chosen rating.
l Make a selection from the color labels to display media tagged with a specific label.
Changes made to the Filter By tools will affect the results displayed in the Group By pane.
Sort and Group
Located directly above the media asset and to the right-side of the Display Area pane, the Sort andGroup drop downs are used to alter how the contents of the Display Area pane are presented. Unlikethe Filter By field which refines the number of media assets displayed, the Sort and Group drop downsdo not change the number of media assets displayed. Both the Sort and Group drop down results canbe sorted forwards or backwards.
Selections made in the Group field will affect the results displayed in the Group By pane.
Group By
Located along the right side of the screen, the Group By pane lists groups of media assets based onthe selection made in the Filter By drop down and the Group drop down. To display the Group By
pane, click the Hide/Show icon in the lower right of the Display Area.
The Group By pane results can be grouped forward and backwards.
The blue bar within each group tab is representative of the number of media assets in the group.
Clicking a tab in the Group By pane changes the display in the Display Area pane to reflect the groupselected.

ACDSee Photo Studio Home 2022
Page 32 of 506
Using View Mode
You can use Viewmode to display your images, documents, and media files using their actualdimensions or at a variety of magnifications. You can also display a group of images in sequentialorder.
Viewmode contains four main areas:
View area: this is the main viewing area, which displays the current image, document, or media file.You can customize the view, and zoom in or out on your images and media files.
Bottom toolbar: located below the main viewing area, the Bottom toolbar provides shortcut buttons tocommonly-used tools and commands, such as the zoom and scroll tools. You can customize the toolbarto use large or small icons, or you can choose to not display the toolbar.
Filmstrip: this is an area below the main viewing area, which displays thumbnails of the images in thecurrent folder or in the group of images you selected in Manage mode. It provides a scroll bar along thebottom, so that you can scroll through your images, and buttons for moving to the next or previousimage.
Status bar: located at the bottom of the window, the Status bar displays information and properties forthe current image or media file. It also displays icons for rating, color labels, and tagging that you canclick to edit.
Viewmode can also display the Properties pane to show EXIF, IPTC and ACDSeeMetadata informationabout the image or file. Viewmode also has the Navigator, Magnifying Glass, and Histogram panes,each of which show detailed image information.
To Open an Image, Document, or Media File in View Mode:
InManagemode, in the File List pane, do one of the following:
Select a file and press Enter.
Select a file and click the View mode button.
Double-click a file.
Right-click an image, document, or media file, and then select View.
To Open a Group of Images in View Mode:
1. In Manage mode, in the File List pane, select a group of images.
2. Press Enter.
3. To navigate through the images, do the following:
To view the next image in the sequence, click Next.
To view the previous image in the sequence, click Previous.

ACDSee Photo Studio Home 2022
Page 33 of 506
Viewing Images in Full Screen Mode
You can use the entire screen of your monitor to display images. In full screen mode, the windowborders, menu bar, status bar, and toolbars are hidden, and only the image is visible. If you want toalways view your images in full screen mode, you can set this option as the default for Viewmode.
To View Images in Full Screen Mode:
1. Open an image or a group of images in View mode.
2. Click View | Full Screen.
3. Right-click the image to access the View mode tools and options via a context menu.
To Exit Full Screen Mode:
Do one of the following:
Press the F key.
Right-click the image and select View | Full Screen.
Use the keyboard shortcut F in Viewmode to toggle in and out of a full screen view.
Using the View Mode Panes
To Open the View Mode Panes:
1. Open an image in View mode.
2. Do one of the following:
Click Panes | Histogram to display the histogram for the image.
Click Panes |Magnifying glass to display a pane which shows the area of the image under yourcursor at a higher magnification.
Click Panes | Navigator to display a thumbnail overview of a magnified image.
Click Panes | Page View to open the Page View panel for multi-page images.
Click Panes | Properties to display the IPTC, EXIF and ACDSee Metadata for the image.
Click Panes | Face Detection to display and name the detected faces.
Please note that Face Detection is only available for the 64-bit version of ACDSeePhoto Studio Home.
Using the Bottom Toolbar
Use the Bottom toolbar to access commonly-used tools.

ACDSee Photo Studio Home 2022
Page 34 of 506
These tools are only available when viewing image files.
Bottom Toolbar

ACDSee Photo Studio Home 2022
Page 35 of 506
Add to Image Basket Adds the image to the activeImage Basket.
Rotate left Rotates the image to the left.
Rotate right Rotates the image to the right.
Face Tool Uses ACDSee Face Detection todetect people in images.Identified faces can be assignednames.
Scroll Pans or scrolls the image whenthe image is zoomed to a largersize than the View mode area.
Select Selects a rectangular area of theimage.
Zoom Zooms in or out on the image.Click to zoom in or right-click tozoom out.
Full Screen Displays the image on a fullscreen. Press F to view fullscreen.
External Editors Opens the file in an externaleditor of your choosing.
Actions Browser Pane Opens the Actions Browser panethat allows for the recording ofall Edit mode adjustments andthe application of edits to otherimages by "playing" the editsback. Use this method to batchedit multiple photos with anyadjustment available in Editmode. In addition, after applyinga recording with adjustmentlayers, open the image in Editmode and continue tweaking andadjusting the adjustment layersin the Layered Editor, allowingfor non-destructive imageediting.

ACDSee Photo Studio Home 2022
Page 36 of 506
Auto Light EQ Automatically previews a LightEQTM adjustment of the image.
Auto Lens Previews a number of filters forthe image without actuallyapplying the filters to the file.
Snapshots Saves adjustments made to animage. The snapshot save pointin the editing process can bereturned to at any time. Unlikepresets, snapshots save directlyto the image, which allowsswitching between snapshotsaves.
Auto Advance Turns on Auto Advance toquickly move through imageswhile adding tags, ratings, labels,categories, or keywords.
Show Face Outlines Places a box around facescontained in an image.
Toolbar Options Produces a menu containing theAdd or Remove Buttonsmenuitem.
Hide Bottom Panels Hides the bottom filmstrip fromview.
Navigator Displays the Quick Navigatorpane so you can see a thumbnailoverview of a magnified image.(Only visible for images that arezoomed in to a size larger thanwill fit on the screen.)
Zoom slider Controls the size of the image inthe View mode area. Drag theslider to adjust the size.
Zoom drop-down list Displays a list of zoom sizes toselect.
Zoom Lock Displays all images at the zoomoption of the current image. Ifthe zoom level is adjusted, thenew zoom level is applied to all

ACDSee Photo Studio Home 2022
Page 37 of 506
images that you view.
Actual Size Returns the image to its actualsize.
Fit Image Reduces the image to fit withinthe View mode area.
Using Windows Touch Gestures™ with View Mode
If you have a Windows Touch Gestures™-enabled device, you can use it with Viewmode for quick, easyviewing of photos.
To Use Windows Touch Gestures™ with View Mode:
Open an image in Viewmode.
Swipe on the image to scroll through images one at a time. You can also use this method on the Filmstripat the bottom of View mode.
Hold and swipe slowly in one direction to go through all of the images in the folder.
Hold down on an image, and then let go to achieve the same results as right-clicking with a mouse.
Double-tap the image to return to Manage mode in ACDSee.
Move two fingers apart to zoom in, and toward each other to zoom out.
After zooming in further than 100%, you can pan the image with your finger.
Switching to Manage Mode
You can return to Manage mode at any time.
To Return to Manage Mode from View Mode:
Do one of the following:
Double-click the image.
Click the Manage mode button.
Using Edit Mode
Edit mode is where you can apply changes to your images. You can edit the overall look of your imagesby changing the lighting and color, or you can crop, flip, resize, or rotate your images. You can useselections to fix specific parts of your images. And you can also add final touches to your images, suchas red eye removal, borders, and special effects.

ACDSee Photo Studio Home 2022
Page 38 of 506
In Edit mode, you can:
Use the Selection tools or Edit Brush to select and apply edits to a specific part of the image.
Remove flaws or red eye.
Add text, watermarks, borders, a vignette, a tilt-shift, special effects, or drawings.
Crop, flip, resize, or rotate your images.
Adjust lighting using the exposure, levels, auto levels, tone curves, and lighting filters.
Adjust color using the White Balance, Color EQ, Color LUTs, Split Tone or Convert to Black & Whitefilters.
Add details to your image using Sharpen, Clarity, Remove Noise, Add Noise or Blur filters.
Using 365 Mode
You can use 365mode to upload your images to 365.acdsee.com. 365.acdsee.com is an image sharingand storage service available to ACDSee Home users. With 365mode and 365.acdsee.com, you canupload and browse through your online images without having to launch an Internet browser.
365 mode has two parts: 365.acdsee.com and Transfer. In 365.acdsee.com, you can browse throughyour images in your 365.acdsee.com account and modify your account settings. In Transfer, thescreen splits into two. The bottom part of the screen displays the images in your computer, and thetop part of the screen displays your 365.acdsee.com. You can simply click images in your computerdisplayed in the bottom part of the screen, and drag them into the top part of the screen to uploadthe images to your 365.acdsee.com account.
You cannot take an image from 365mode and open it in Edit mode. To edit an image, select animage in Manage or Viewmode and open it in Edit mode.
Uploading Images
To Upload Photos to Your 365.acdsee.com Account:
1. In 365 mode, click Sign In.
2. Log in to your account.
3. Click Transfer.
Your screen splits in two, with the bottom part of the screen displaying images in yourcomputer.
4. Select an image to upload. To select multiple photos, press Shift or Ctrl on your keyboard.
5. Click and drag the image into the top part of the screen to upload it to your 365.acdsee.com account.

ACDSee Photo Studio Home 2022
Page 39 of 506
There is no upload size limit when uploading your images to your 365.acdsee.com account.
Using Dashboard Mode
Dashboard mode is a quick and convenient way to browse your file, camera, and database statistics.Camera statistics are read from your images' metadata, and file information is analyzed from yourACDSee database. Therefore, it is important to catalog your files to get the most out of Dashboardmode.
Cataloging Files
To catalog, do one of the following:
Go to Tools | Database | Catalog.
Browse your folders in Manage mode.
Dashboard Mode
Dashboard mode contains the following tabs:
Overview tab: the Overview tab summarizes the information found on the other tabs. It also displays agraph detailing your monthly or yearly photo counts. You can use the drop-down menu at the top of thetab to switch between viewing a range of months or a range of years. You can use the Prev and Nextbuttons to navigate backward or forward in time.
Database tab: the Database tab displays data relating to your database, such as its location, size, backupinformation, a breakdown of your assets, and more.
Cameras tab: the Cameras tab displays data relating to your camera usage, such as which cameras youuse the most, your favorite ISO setting, and more.
Files tab: the Files tab displays data relating to your image and video files, such as your most used bitdepths, image resolutions, and more.
ACDSee Photo Studio Home 2022
Page 40 of 506
Chapter 2: Getting Help
Using the Quick Start Guide
The Quick Start Guide is designed to give you a brief orientation of the most important features inACDSee. The first two intro pages allow you to configure some settings to facilitate your futureworkflow. After the first two intro pages, the Quick Start Guide contains a set of links on the left sidethat you can click to get a tour of the main features in ACDSee. You can also use the Next button.
To Close the Quick Start:
Uncheck the Always show at start-up option in the bottom left corner of the dialog box, and clickClose.
To Re-Open the Quick Start Guide:
On theMenu bar, click Help | Quick Start Guide.
To Use the Quick Start Guide:
Click the links on the left side of the Quick Start Guide or the Next button for a high-level tour.
To Set Preferences:
On the first page, click the Browse button to select the folder ACDSee will open to in the future.
On the second page, click the Select button to choose which folders you would like the ACDSeedatabase to keep track of.
Also on the second page, you can choose an interval from the drop-down menu on the right side tospecify how often ACDSee should remind you to backup your database.
Finding Other Resources and Support
Using the Help Menu
The Help menu on the ACDSee menu bar contains links to open plug-in help files and options that linkyou to the ACDSee website where you can find updates, newsletters, and system requirements. Otherlinks take you to the registration page, or the community home page where you can join thecommunity and participate in the ACDSee forums. The Help menu is also where you can convert a trialversion of ACDSee to a full version by entering a license code.
Clicking Help displays a menu of links to online and offline help materials including our online help file,that you can open any time you are online by clicking Help Contents. From the help menu, you canalso access in-app resources such as in-build plug-in help, the Quick Start Guide, which helps you

ACDSee Photo Studio Home 2022
Page 41 of 506
navigate the software and its modes, and About, giving you information about your software, yourlicense, and your version.
Press F1 to open related help file pages from within the application.
You will also find a link to Customer Support.
Online Help and Our Community
As well as the links to online help found on the in-app help menu, we also have comprehensivetutorials on our YouTube channel, and have an online forum where you can discuss the software withother ACDSee users. When you visit the ACDSee Community, you will find blogs, tutorial videos, theforum, and online lessons.

ACDSee Photo Studio Home 2022
Page 42 of 506
Chapter 3: Manage ModeManage mode is the main browsing and managing component of the user interface, and is what yousee when you start ACDSee Home using the shortcut icon on your desktop.
In Manage mode, you can:
Import your photos from a device, CD or DVD, or disk.
Browse files and folders.
Catalog files by tagging them, adding categories, color labels, ratings, keywords and other metadata.
Search for files and create saved searches.
Publish and share files, including emailing files, creating slideshows, and uploading images to yourfavorite photo website.
Print images.
Edit batches of files.
Manage and maintain your ACDSee Home database.
Automatically advance to the next image in the folder when you apply metadata.
Detect faces in images.
Please note that Face Detection is only available for the 64-bit version of ACDSee PhotoStudio Home.
Importing Files with ACDSee Home
You can use ACDSee Home to download images from devices like your digital camera, flash drives,CD/DVDs, or other removable devices. In Manage mode, you can also use the File | Import | FromDisk option to import files from a network, and any kind of disk or drive that can be mapped, whilepreserving the original folders and subfolders.
Importing Files Using the Windows AutoPlay Dialog Box
When you connect your digital camera or other device to your computer, theWindows AutoPlaydialog box prompts you to choose one of the following:
Import pictures using ACDSee: select this option to open the Import dialog box. You can then selectsettings to rename, backup, and place the files. You can save your import settings and give them a nameso that you can re-use them later. You can also create advanced settings for import dates and RAW +JPEG options if your camera takes both file formats. You can also create a file renaming template to usewith specific kinds of files or projects.

ACDSee Photo Studio Home 2022
Page 43 of 506
Manage pictures using ACDSee: select this option to browse the files in ACDSee. You can then chooseto import the files or simply copy and paste the files from the device.
Import pictures and videos using Windows: select this option if you prefer to use Windows to importthe files.
Depending on the other applications installed on your computer, there may be additional options.
If you experience difficulty with your computer recognizing your device as a drive, explore yourdevice's manual about mounting the device as a drive. Or, use your computer's card reader toaccess your memory card.
Importing Files from Specific Types of Devices
For more specific instructions, select the type of device you connected:
Importing Photos From a Device
Importing Photos From a CD or DVD
Importing Photos From a Disk
RAW + JPEG Options
Regardless of which type of device is being used to import photos, if the original camera takes bothRAW and JPEG file formats, options are available to tailor the image import to a desired workflow.
To set the RAW + JPEG import options:
1. In the ACDSee Import dialog, click the Advanced... button at the bottom left.
2. In the Advanced Import Options dialog, navigate to the RAW+JPEG field set.
3. Enable one of the following:
l Place both in chosen destination folder: Places both the RAW and JPEG files in the samefolder determined in the Location field set of the ACDSee Import dialog.
l Place JPEG in subfolder: Places only the JPEG files in a subfolder identified in the Subfoldername field.
l Place RAW in subfolder: Places only the RAW files in a subfolder identified in the Subfoldername field.
4. If either the Place JPEG in subfolder or Place RAW in subfolder radio buttons are enabled, enter aname in the Subfolder name field.
5. Click OK in the Advanced Import Options dialog.
6. Click Import in the ACDSee Import dialog.
If Place JPEG in subfolder is enabled, all JPEGs will be placed in the subfolder whether thereare matching RAWs or not. The same also holds true when enabling Place RAW in subfolder.All RAW images will be placed in the subfolder whether there are matching JPEGs or not.

ACDSee Photo Studio Home 2022
Page 44 of 506
About Removable Devices
With ACDSee, there are several ways to obtain images from your digital camera, scanner, or memorycard. For more information about how your device communicates with your computer, please consultyour device's Help file or manual. Some different types of removable devices are:
USB Removable device: removable devices include memory cards that you can attach to yourcomputer using a USB card reader, camera memory cards that insert directly into slots on thecomputer, or flash drives. USB removable devices are detected by your computer and are shown in thestructure as a removable drive.
Windows Image Acquisition (WIA): cameras and scanners that use Windows Image Acquisition (WIA)drivers to communicate with the computer. Some cameras, including Canon cameras, use WIA. ACDSeeHome automatically detects the WIA protocol.
You require DirectX 9.0c and QuickTime to copy and view audio or video files.
Importing Photos From a Device
The Import From dialog box gives you multiple options for importing your files from cameras, cardreaders, flash drives, and other mass storage devices. If you want to simply import files with a fewclicks, you can. Or you can select from several options to streamline your workflow and performmultiple tasks with each import.
In the Import From dialog box, you can view the thumbnails of the files on the device by their date orfile type. You can change the size of the thumbnails to make it easier to select those you want toimport or leave on the device, and then view only those you have selected.
You can also choose the destination folder or subfolders for the files, create a backup set of files as youimport, and rename the files during the import process, automatically rotating them if your camerahas this option. Advanced settings give you options to change the date you want to use, and where toplace RAW and JPEG files if your camera creates both file formats.
You can even organize your files as you import by adding Categories, IPTC and ACDSeeMetadata.
Then you can save all these settings as a preset to use or adapt later.
If your camera connects to the computer as a removable drive, you can also simply copyphotos directly from the File List and Folders pane because ACDSee Home detects and displaysthe removable device in the Folders pane. If you are not sure how your camera connects toyour computer, please see About Removable Devices in Importing Files with ACDSee.
Some cameras, for example, Canon, use Windows Image Acquisition (WIA) to communicatewith a computer. If your devices use these protocols, you can import by clicking From Deviceon the File | Importmenu. ACDSee Home automatically detects these protocols.

ACDSee Photo Studio Home 2022
Page 45 of 506
To Download Photos Using the Import From Dialog Box:
1. Connect your camera or device to the computer. Make sure your camera is turned on, and the cable isproperly connected to your computer.
2. Do one of the following:
If the Windows AutoPlay dialog box opens, select Import pictures using ACDSee.
If you have more than one device connected to your computer, select the device you want touse from the list, and then click OK.
In Manage mode, click File | Import | From Device.
Press Alt + G on the keyboard.
3. In the Import From dialog box, select from the import options as described below.
4. Click Import.
5. To browse your imported photos, click Yes when the Import Complete dialog box displays.
You may require Direct X 9.0c and QuickTime to download audio and video files from yourcamera.
Import From Options

ACDSee Photo Studio Home 2022
Page 46 of 506
Select items to import
Select items to import You can control which items are imported by choosing one of thefollowing:
New: only imports files that have not been imported in the past.All: imports all files.Custom: imports the selected files. You can control which files areimported by checking or unchecking their checkboxes.
View by
Date Displays all the files grouped by the dates they were created. To deselect adate, check the checkbox beside the date. To deselect all dates, uncheckthe All Dates checkbox.
File Type Displays all the files grouped by their file type. To deselect a file type,check the checkbox beside the file type. To deselect all file types,uncheck the All file types checkbox.
View all Displays all the thumbnails of the files on the device.
View selected Displays only the files selected for import.
Choose import preset
Import settings drop-down menu
Displays the names of recently-used import settings to use again, or youcan select one of the following:
Current: uses the current settings to import.Last used: uses the import settings from the last import.None: clears all the current import settings.
Save import settings Saves all the current import settings with a name so that you can use themagain. To save (or edit) import settings, select the Save icon and type innew name (or re-save existing settings).
The new name for the import settings appears in the drop-down menu.
Delete import settings Deletes the saved import settings currently selected in the Import settingsdrop-down menu.
Location
Choose Destinationdrop-down menu
Displays the names of recently-used destinations to use again, or you canselect one of the following:
Last used: uses the destination from the last import.

ACDSee Photo Studio Home 2022
Page 47 of 506
None: clears all the current destination settings.
Place in Subfolders drop-down menu
Displays the following pre-defined subfolder options to select:
Single folder by name: creates a new subfolder with the name youtype into the Name field, which activates when you select this option.All the files are placed into a folder with the new name.Single folder by today's date: creates one folder using today's date asthe name and places all the files into the folder.Nested folder by today's date: creates a series of nested folders,one below the other, based on today's date and the format youselect in the Format field. The folders are created as the sampleshows and all the files are placed in the lowest folder.Nested folders by file's date: creates multiple sets of nested foldersbased on the files' dates and on the format you select in the Formatfield, which activates when you select this option. The folders arecreated as the sample shows and the files are imported into thelowest folders on each date.Separate folders by file's date: creates separate folders based on theindividual file dates in the format selected from the Format drop-down options.Preserve subfolder names: preserves existing folder names whenyou use the From Disk option to import. For example, if you have aflash drive or CD containing images in a complex set of subfolders,the whole folder tree is imported intact.
Format Displays date format options for the Nested folder options (see above).
Sample Displays a sample of the nested folders that will be created using thecurrent settings (see above).
Backup to drop-downmenu
Creates a backup set of files using an exact duplicate of the subfolders youhave selected under Place in.
You can also do one of the following:
Click Browse and then navigate to an existing folder to use as abackup destination.Click Browse and then Make New Folder to create a new folder as abackup destination.
While existing ACDSeeMetadata is included in the backupcopy, any Catalog settings (IPTC or ACDSeeMetadata)added during import will not be included.

ACDSee Photo Studio Home 2022
Page 48 of 506
File
Rename files to drop-down menu
Renames each file as it imports according these predefined renamingtemplates:
Date/time - filename: creates each filename using the file date andtime the file was created plus the original filename.Date/time: creates each filename using the file date and the time itwas created.Camera - sequence number: creates each filename using the cameraname and a sequential number starting at one.Date/time - sequence number: creates each filename using the filedate and the time it was created plus a sequential number starting atone.Camera - filename: creates each filename using the camera nameand the original filename.
When you create and save your own renaming templates, they alsoappear in this list for you to select.
Edit Opens the Rename Templates dialog box where you can create and saveyour own renaming templates.
Apply Metadata drop-down menu
Select the names of saved metadata presets or select Manage presets toopen the Manage Metadata Presets dialog box of options.
Customize Properties pane Metadata tab: enter ACDSee and IPTC Metadata into tothe fields to add to the files you are importing.
Properties pane Categories tab: assigns the imported files to any categoryselected in this tab. You can select multiple categories.
Automatically rotateimages
Rotates your images automatically if your camera creates the informationneeded for this option to work.
Delete items fromsource after import
Deletes the imported items from their original location or locations afterimport.
Advanced
ACDSee database date Opens the Advanced Import Options dialog box where you can change thedate settings for files and specify where to place RAW and JPEG files.
To set the ACDSee Home database, use one of the following as the filedate:
Exif date: uses the EXIF date embedded in the image by the camera.File modified date: uses the date the file was last modified.

ACDSee Photo Studio Home 2022
Page 49 of 506
Specific date: uses the date you select by clicking the in the calendardrop-down arrow.
RAW+JPEG To specify where to place RAW+JPEG files select one of the following:
Place both in chosen destination folder: Places RAW and JPEG filesin the folder you have selected under Choose destination on theImport From dialog box.Place JPEG in subfolder: places the RAW files in the folder you haveselected under Choose destination on the Import From dialog box.Then creates a new subfolder with the name you type into theSubfolder name field, which activates when you select this option. Allthe JPEG files are placed into the new subfolder.Place RAW in subfolder: places the JPEG files in the folder you haveselected under Choose destination on the Import From dialog box.Then creates a new subfolder with the name you type into theSubfolder name field, which activates when you select this option. Allthe RAW files are placed into the new subfolder.
The values set in the IPTC fields are reflected in their corresponding EXIF field.
Importing Photos From a Scanner
You can scan images using ACDSee and import them to specific, accessible locations.
To Specify a Destination for Your Scanned Images:
1. Click Tools | Options |Manage Mode.
2. On the Manage mode page, in the Scanning Destination section, click the Browse For Folder button.
3. In the Browse For Folder dialog, select a destination folder for your scanned images.
4. Press OK.
To Scan Images:
1. In Manage mode, click File | Import | From Scanner.
2. Configure your scanning settings as desired. As the scanning dialog is controlled by Windows, thesesettings will vary, depending on your OS and version of ACDSee.
3. Navigate to the location you set as the destination for your scanned images using the Folders pane.

ACDSee Photo Studio Home 2022
Page 50 of 506
Importing Photos From a CD or DVD
You can download photos from a CD or DVD using the Import From dialog box, or the Folders pane.Before you import photos, you can browse to the CD and view them just like any other folder andthen simply copy and paste them into a new location.
If you use the Import From dialog box, you can set the subfolder options to import complex folderstructures intact, including all the folder names. You can also organize your files as you import them,as well as create a duplicate backup folder, simultaneously.
To Import Photos from a CD or DVD:
1. Insert the CD or DVD into the drive.
2. Do one of the following:
If the Windows AutoPlay dialog box opens, select Import pictures using ACDSee.
If you have more than one CD or DVD drive connected to your computer, select the device youwant to use, and then click OK.
In Manage mode, click File | Import | From CD/DVD.
3. In the Import From dialog box, select the Import From options you want to use, and then click Import.
4. To browse your imported photos, click Yes when the Import Complete dialog box displays.
Importing Photos From a Disk
ACDSee Homemakes it easy to import photos from any other storage device, computer, network,flash drive etc. In fact, any device that your computer can map to. When you connect a removabledrive, or to a network, disk or another computer, ACDSee Home sees it as a removable drive and youcan browse to it, and around it, using the Folders pane. You can just copy and paste the files intoACDSee.
If the files in the disk or drive have a complex folder structure or you want to organize, rename, andback up the files as you import them, it is worth using the Import From dialog box, which has importsettings do all of these tasks simultaneously.
To Import Photos from a Disk:
1. Connect the disk to the computer.
2. Do one of the following:
If the Windows AutoPlay dialog box opens, select Import pictures using ACDSee.
If you have more than one disk or drive connected to your computer, select the device you

ACDSee Photo Studio Home 2022
Page 51 of 506
want to use, and then click OK.
In Manage mode, click File | Import | From Disk.
3. In the Browse for Folder dialog box, navigate to the removable drive or device in the folder tree, andthen click OK.
4. In the Import From dialog box, select the options you want to use, and then click Import.
5. To browse your imported photos, click Yes when the Import Complete dialog box displays.
Creating a Renaming Template
In the Import From dialog box, you can create, name, and save a template that gives each file a uniquename as they are imported and placed on your hard drive. You can then re-use the template each timeyou import photos. Renaming templates can have a numerical sequence, custom text, and file-specificinformation in each new file name. You can create and save different renaming templates for differentsorts of files. For example, you could have a different renaming template for a different camera, or adifferent type of file.
To Create a Renaming Template:
1. In the Import From dialog box, select Rename files to.
2. From the drop-down list, select one of the following system templates:
Date/time - filename: renames the files using the date and time each file was created and theoriginal file name.
Date/time: renames the files using the date and time each file was created.
Camera - sequence number: renames the files using the camera name and a sequentialnumber.
Date/time - sequence number: renames the files using the date and time each file was createdand a sequential number.
Camera - filename: renames the files with the name of the camera and each file's originalname.
3. To create your own renaming template, or add to a system template, click Edit.
4. In the Rename Templates dialog box, select from the options as described in the table below.
5. Click OK.
If you check the Skip video and audio files checkbox, the rename process will not renamevideo and audio files.
Rename Templates Options

ACDSee Photo Studio Home 2022
Page 52 of 506
System template drop-downlist
Click the drop-down list to select a different pre-defined system template.
New rename template Click to open the New Rename Template dialog box where you can typein a name for your own renaming template. Give the renaming template aname that clearly identifies how you plan to use the template, or whatkind of information the name will contain. For example, Camera name_photographer.
When you click Save, the name of your new template is added to thedrop-down list of system templates.
Delete Deletes the renaming template currently selected in the drop-down listunless it is a pre-defined system template, which cannot be deleted.
Rename Template Use this field to create the renaming template. You can type in thephotographer's name and an underscore between each element of thetemplate to make it easier to read.
Use the following placeholders to ensure that each filename is unique:
Insert an *. When your files are renamed, the * will be replacedby the original file name.
Insert a #. When your files are renamed, each # will be replacedby a sequential number. If you have a large number of files, insertseveral ##s. For example, if you enter ###, the first file renamedwill be numbered 001, the next 002, and so on. If you have over1000 files, insert ####.
Insert a metadata placeholder < > and the data inside thesebrackets is replaced with whatever data you have chosen. Forexample, if you choose <Camera:Model>, the model of thecamera is inserted into each file name.
Insert Metadata Click to open the Choose Properties dialog box, where you can selectfrom a long list of metadata to insert into your template.
Sample As you type, or add placeholders in the Rename Template field, the sameupdates to show you a sample of how renaming template will look.
Skip video and audio files Skips the renaming of video and audio files during the rename process.
Importing a Lightroom® Database
You can use the Adobe® Lightroom® Database Importer to import your collections, keywords, ratings,and color labels from Lightroom® into ACDSee. Your keyword hierarchies will import independent of

ACDSee Photo Studio Home 2022
Page 53 of 506
whether they are embedded in the images selected for import.
You cannot import smart collections or Lightroom CC catalogs, only Lightroom Classiccatalogs.
You cannot begin importing while Lightroom® is open.
If you have a hierarchy in your Collections in ACDSee Home that is identical to your hierarchyin Lightroom®, these collections will merge.
To Import Your Lightroom® Database:
1. In Manage mode, choose Tools | Database | Import | Lightroom Database.
2. In the Adobe Lightroom Database Importer, press Next.
3. Check the checkboxes of the database information you would like to import into ACDSee, includingRatings, Labels, Collections, and Keywords.
4. Use the Browse button next to the Location field to navigate to the location of your Lightroom®database file.
By default, the field displays the default location where Lightroom® stores its database, soyou will only need to browse if you have moved your database.
5. Press Next.
6. Check the summary to ensure that the displayed information is correct. If you see a mistake, use theBack button to return to the previous page to make any corrections.
7. Press Next. Green checkmarks will display next to the items that are successfully completed, and redcrossmarks will display next to items that failed.
8. Press Finish.
Lightroom is a registered trademark of Adobe Inc.
Working with Images on Mobile
You can access, browse, view, delete, and copy and paste images on your mobile phone with ACDSee.To edit images on your mobile device, you will need to copy them to a local folder.
To Access the Images on Your Phone Using ACDSee:
Make sure that file sharing is enabled on your mobile device.

ACDSee Photo Studio Home 2022
Page 54 of 506
1. With your phone plugged in, open ACDSee.
2. In Manage mode, using the Folders pane, navigate to your phone under This PC/Computer.
3. Using the Folders pane or File List pane, navigate to your images. They are usually stored in a foldercalled DCIM.
ACDSee displays file information supplied by your device in the Properties pane.
To View an Image from Your Mobile Phone:
In the File List pane, double-click the image.
You can use the Filmstrip to navigate through the images in the folder.
To Copy Images from Your Mobile Phone to Another Folder Using ACDSee:
In the File List pane, select the images and do one of the following:
Right-click and choose Copy. Browse to another folder, right-click and choose Paste.
Right-click and choose Copy To Folder... In the Copy To Folder dialog, select the destination folder andclick OK.
Go to Edit | Copy, or press Ctrl + C. Then, in the destination folder, go to Edit | Paste, or press Ctrl + V.
To Delete Images from Your Mobile Phone Using ACDSee:
It may be necessary to change settings on your mobile device to allow files to be deleted usingyour PC.
In the File List pane, select the images and do one of the following:
Right-click and choose Delete.
Press DEL.
Go to Edit | Delete.
Sending Images to ACDSee from Your Mobile Device Using ACDSeeMobile Sync
You can use the ACDSeeMobile Sync app to send photos and videos directly from your mobile deviceinto ACDSee Photo Studio on your PC. This free app is available on iOS from the Apple App Store andfor Android on the Google Play Store.

ACDSee Photo Studio Home 2022
Page 55 of 506
ACDSeeMobile Sync will keep track of which photos have been sent to ACDSee Home andindicates new and unsent items using a colored border.
In Manage mode, you will be able to access images you have sent to ACDSee Home by clicking theACDSeeMobile Sync node icon in the Folders pane.
Getting Started
To download the app, you can:
Download it in the Apple App Store, for iOS. In the App Store, type ACDSee Mobile Sync in the Searchbar.
Download it in the Google Play Store, for Android. In the Play Store, type ACDSee Mobile Sync in theSearch bar.

ACDSee Photo Studio Home 2022
Page 56 of 506
After installation, open the ACDSeeMobile Sync app on your device. Follow the prompts to give theapp access to your photos and to assign the target (ACDSee on your PC). If your app doesn't find thetarget, you can scan the Quick Response (QR) code found on your PC.
To open the QR code, do one of the following:
Open Tools | Show ACDSee Mobile Sync Details...
In the Notification Area, right-click on the ACDSee app icon and select Show ACDSee Mobile SyncDetails...
Then scan the QR code using your mobile device camera to add your ACDSee software as a target.
If you cannot scan the QR code, you can also add your ACDSee software as a target using your hostname or IP address.
To add your ACDSee software as a target using your host name or IP address:
1. Make sure you are on the same WiFi network as your PC.
2. On the Mobile Sync app, on the QR scanner page, select Add Without QR Code.
If you skipped the intro, or want to add an additional target, you can reopen thescanner page by going to Settings and selecting Add Target.
3. Enter your Host name or IP Address and enter the Port. This information can be found above the QRcode when you select Show ACDSee Mobile Sync Details... on your PC.
4. The name of your target will appear. Select Add this Target.
5. This will add your ACDSee software as a target, allowing you to send photos and videos to it.
You must be connected to the sameWiFi network as the PC that is running ACDSee Home inorder to use ACDSeeMobile Sync to send photos and videos.
Sending Images and Videos
You can send images and videos from the ACDSeeMobile Sync app to ACDSee. ACDSeeMobile Synckeeps track of which items have already been sent. ACDSee Home will notify you with a pop-up in thelower right corner when it has received your sent items. You can then click on the ACDSeeMobile Syncnode icon in the Folders pane in Manage mode to view the received files.
To send all new items, press the Send button. If you press and hold the Send button, it will send theselected photos and videos to the default target.
To send specific items, select them and press the Send button.
You can use context menus within the app for more specific selection options.
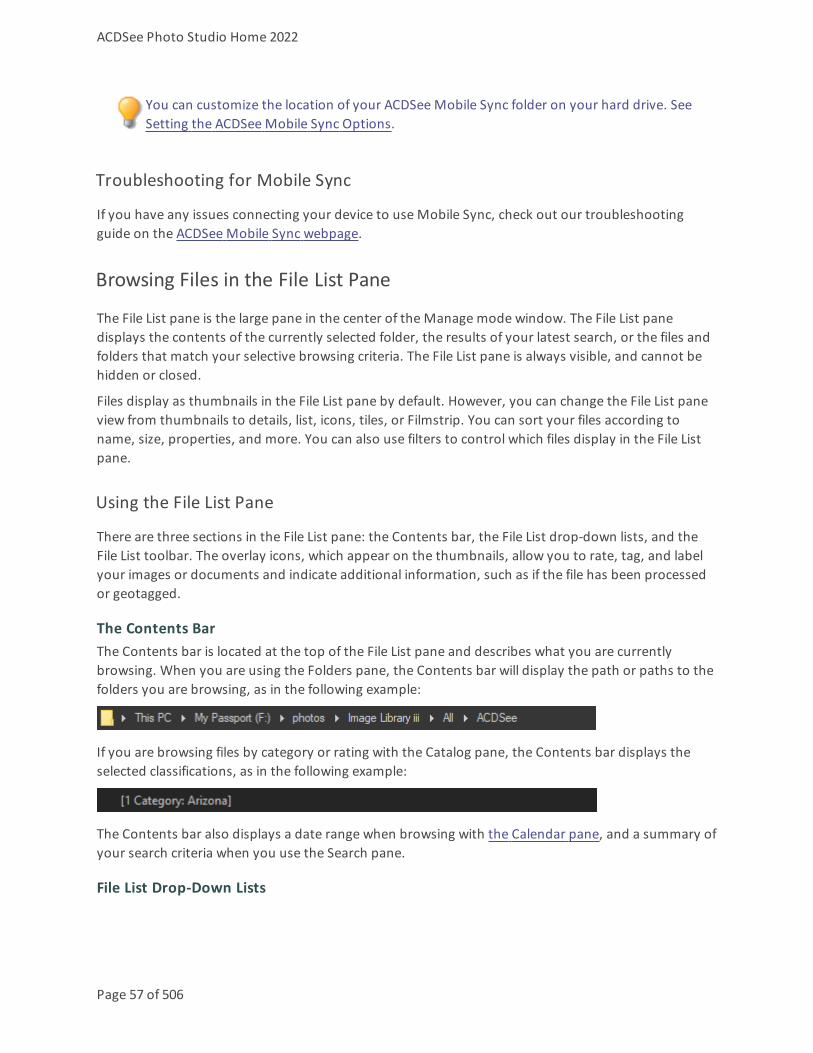
ACDSee Photo Studio Home 2022
Page 57 of 506
You can customize the location of your ACDSeeMobile Sync folder on your hard drive. SeeSetting the ACDSeeMobile Sync Options.
Troubleshooting for Mobile Sync
If you have any issues connecting your device to use Mobile Sync, check out our troubleshootingguide on the ACDSeeMobile Sync webpage.
Browsing Files in the File List Pane
The File List pane is the large pane in the center of the Manage mode window. The File List panedisplays the contents of the currently selected folder, the results of your latest search, or the files andfolders that match your selective browsing criteria. The File List pane is always visible, and cannot behidden or closed.
Files display as thumbnails in the File List pane by default. However, you can change the File List paneview from thumbnails to details, list, icons, tiles, or Filmstrip. You can sort your files according toname, size, properties, and more. You can also use filters to control which files display in the File Listpane.
Using the File List Pane
There are three sections in the File List pane: the Contents bar, the File List drop-down lists, and theFile List toolbar. The overlay icons, which appear on the thumbnails, allow you to rate, tag, and labelyour images or documents and indicate additional information, such as if the file has been processedor geotagged.
The Contents BarThe Contents bar is located at the top of the File List pane and describes what you are currentlybrowsing. When you are using the Folders pane, the Contents bar will display the path or paths to thefolders you are browsing, as in the following example:
If you are browsing files by category or rating with the Catalog pane, the Contents bar displays theselected classifications, as in the following example:
The Contents bar also displays a date range when browsing with the Calendar pane, and a summary ofyour search criteria when you use the Search pane.
File List Drop-Down Lists

ACDSee Photo Studio Home 2022
Page 58 of 506
Filter Displays a list of filter options such as rating and category. You can also selectAdvanced Filters and create a custom filter.
Group Displays a list of file attributes that you can use to group files in the File Listpane.
Sort Displays a list of file attributes that you can use to sort the files in the File Listpane.
View Displays a list of view options for viewing files in the File List pane.
Select Displays a list of file selection options.
File List Toolbar
Add to Image Basket Adds selected images to theImage Basket.
Rotate left Rotates selected images to theleft.
Rotate right Rotates selected images to theright.
Compare images Opens selected images in theCompare Images Viewer.
Auto Advance Turns on Auto Advance to quicklymove through images whileadding tags, ratings, labels,categories, or keywords.
Zoom slider Controls the size of thethumbnails in the File List pane.Drag the slider to adjust thethumbnails.
Photos Displays the contents of the selec-ted folder as thumbnails.
List View Displays the contents of the selec-ted folder as a file list.
Overlay Icons

ACDSee Photo Studio Home 2022
Page 59 of 506
Icon Name Description Instructions
Sound / Playing Sound Appears if thefile containsembedded orassociatedaudio. Thesecond iconappears if youclick on thesound icon andthe embeddedsound beginsplaying.
Left-click to playembeddedaudio.
Rating Appears if thefile has beenrated in theACDSee Homedatabase.
Color Label Appears if thefile has beenassigned acolor label.
Embed Pending Appears if thefile hasACDSeeMetadatastored in thedatabase thathas not yetbeen writtento the file.
Right-click andchoose either:
EmbedACDSeeMetadata:writes themetadatato the file.ClearEmbedPendingIcon...:clears thisoverlayicon, butdoes notwrite themetadatato the file.

ACDSee Photo Studio Home 2022
Page 60 of 506
Icon Name Description Instructions
File format Displays thefile format.
Left-click todisplay the FileInformation,ImageAttributes, andEXIF Metadata(summary) onthe File tab ofthe Propertiespane.
Category Appears if thefile has beencategorized.
Left-click toopen theCategoriessection on theOrganize tab ofthe Propertiespane.
Collection Appears if thefile has beenadded to acollection.
Shortcut Appears if theitem is ashortcut toanother file.
Offline Appears if thefile is storedon an offlinedevice.
Excluded items Appears if thefile has beenexcluded fromthe ACDSeeHomedatabase.
Tagged items Appears if thefile has beentagged.

ACDSee Photo Studio Home 2022
Page 61 of 506
Icon Name Description Instructions
Untagged items Appears if thefile has notbeen tagged.
Geotagged items Appears if thefile has beengeotagged.
Left-click toopen the Mappane.
Auto-rotate Appears if thefile has beenautomaticallyrotated.
Left-click torotate the imageoriginalpermanentlyand update theEXIFinformation.
Edited Appears if thefile has beenedited.
Changing Overlay Icon Visibility
You can change whether overlay icons are visible, visible in color, and which icons are in color.
To Change Overlay Icon Visibility:
In ManageMode, at the top of the File List pane, do one of the following:
Click View | Toggle Overlay Mode to control whether the overlay icons are invisible, visible in grayscale,or visible in color. Toggle the (]) key to move through the available modes.
Click View | Highlight Overlay to select which icons appear in color. Toggle the ([) key to select from theavailable options.
Note that this does not apply to all overlay icons. For more control over which icons arevisible, see Setting the Thumbnail Info Options.
Maximizing the File List Pane
To make the most of your available screen space, you can choose to maximize the File List pane andhide the rest of the Manage mode panes. The only parts of the Manage mode window that remainvisible are the File List pane and whichever toolbars you are currently using.

ACDSee Photo Studio Home 2022
Page 62 of 506
To Maximize the File List Pane:
1. Click View |Maximize File List.
2. To show only the File List pane and its toolbar, click View | Full Screen.
3. Click the Close Full Screen button in the upper right corner to return to Manage mode.
To Manage Your Files:
Do one of the following:
To delete a file, in the File List pane, right-click the file and choose Delete from the context menu, orpress Delete.
To rename a file, right-click the file and choose Rename from the context menu, or press F2. You canalso Type a new name for the file and press Enter.
Browsing Using the Folders Pane
The Folders pane displays a directory tree of all the folders on your computer in the same style as theyappear in Windows Explorer. You can select one or more folders in the Folders pane to display theircontents in the File List pane. The Folders pane also displays your Cloud Sync Drives as a node,allowing you to navigate your cloud content like any other folder.
You can also use the Folders pane to create shortcuts to your favorite files, folders, or applications.Then, instead of having to search for a specific file, you can quickly access it in the Shortcuts pane.
Whenever you browse to a folder using the Folders pane, the ACDSee Home database catalogs anyimages, documents, or media files in the folder.
To Open or Close the Folders Pane:
In Manage mode, click Panes | Folders.
When you connect a removable device, such as a mass storage device or digital camera, the Folderspane displays the device as another drive, and assigns it a drive letter automatically.
You can access the device, and its contents, by clicking on it in the Folders pane.
Selecting Multiple Folders
Easy-Select bars are indicators on the left side of the Folders and Catalog panes, they look like this:. You can use the Easy-Select bars to select multiple folders, categories, or ratings, and display their
contents in the File List pane.
To Use the Easy-Select Bar:
In the Folders pane, select the indicator to the left of each folder with contents you want to display.
You can also use the Easy-Select bars with the Selective Browsing pane.

ACDSee Photo Studio Home 2022
Page 63 of 506
Creating and Managing Folders
You can use the Folders and File List panes to create, delete, rename, and move folders on your harddrive to help organize your files.
To Manage Your Folders:
1. In the Folders pane, browse to where you want to add, delete, or rename a folder.
2. Do one of the following:
To create a folder, click File | New, and then select Folder. Type a name for the new folder andpress Enter.
To delete a folder, select a folder and press Delete.
To rename a folder, right-click the folder you want to rename and select Rename. Type a newname for the folder and press Enter.
You cannot rename a drive or any folder on a read-only file system, such as a CD-ROM.
Browsing Files By Date or Event
With the Calendar pane you can browse your collection of image and media files using the datesassociated with each file. The Calendar pane includes Events, Year, Month, Day view and the PhotoCalendar, which shows thumbnails per day within a month. You can click any date in the Calendarpane to display a list of files associated with that date.
To Open the Calendar Pane:
In Manage mode, click Panes | Calendar.
The Calendar pane opens in the center File List pane area.
Your images will not display in the Calendar pane until you have either browsed the foldercontaining the images or used the Catalog Files wizard to catalog your images so they are inthe ACDSee Home database.
If you are using the Photo Calendar, you only see thumbnails if there are photos on aparticular day in that month. Days that have no photo, are blank.
Calendar Pane View Options
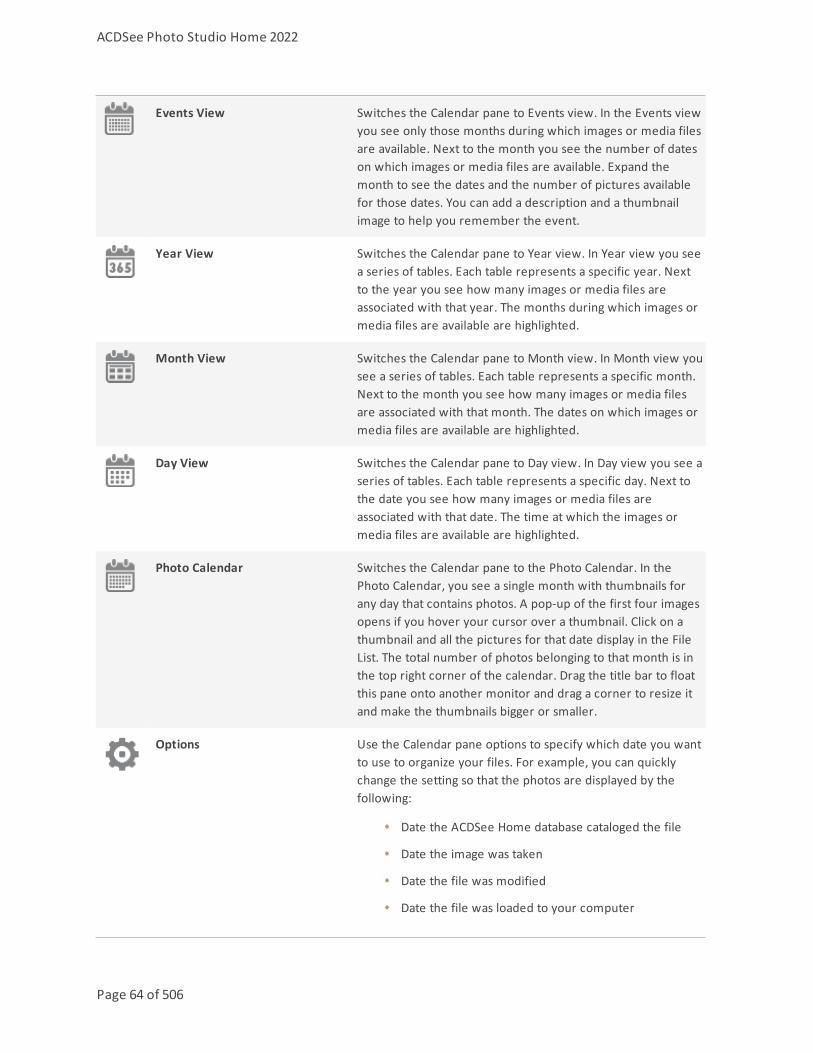
ACDSee Photo Studio Home 2022
Page 64 of 506
Events View Switches the Calendar pane to Events view. In the Events viewyou see only those months during which images or media filesare available. Next to the month you see the number of dateson which images or media files are available. Expand themonth to see the dates and the number of pictures availablefor those dates. You can add a description and a thumbnailimage to help you remember the event.
Year View Switches the Calendar pane to Year view. In Year view you seea series of tables. Each table represents a specific year. Nextto the year you see how many images or media files areassociated with that year. The months during which images ormedia files are available are highlighted.
Month View Switches the Calendar pane to Month view. In Month view yousee a series of tables. Each table represents a specific month.Next to the month you see how many images or media filesare associated with that month. The dates on which images ormedia files are available are highlighted.
Day View Switches the Calendar pane to Day view. In Day view you see aseries of tables. Each table represents a specific day. Next tothe date you see how many images or media files areassociated with that date. The time at which the images ormedia files are available are highlighted.
Photo Calendar Switches the Calendar pane to the Photo Calendar. In thePhoto Calendar, you see a single month with thumbnails forany day that contains photos. A pop-up of the first four imagesopens if you hover your cursor over a thumbnail. Click on athumbnail and all the pictures for that date display in the FileList. The total number of photos belonging to that month is inthe top right corner of the calendar. Drag the title bar to floatthis pane onto another monitor and drag a corner to resize itand make the thumbnails bigger or smaller.
Options Use the Calendar pane options to specify which date you wantto use to organize your files. For example, you can quicklychange the setting so that the photos are displayed by thefollowing:
Date the ACDSee Home database cataloged the file
Date the image was taken
Date the file was modified
Date the file was loaded to your computer

ACDSee Photo Studio Home 2022
Page 65 of 506
Select Options to open the Calendar dialog, where you can setfilter options, choose the day to start the week, and set clockformats.
Table of Contents Opens a list of event dates.
Only available in Events View.
In all views apart from Events View, you can use Shift + Left Arrow or Shift + Right Arrow tonavigate between dates with images. For example, in Month View, if you had taken pictures inAugust, September, and November, by using Shift + Right Arrow, you will skip the emptymonth of October.
Adding Descriptions and Thumbnails in Events View
You can add a description and a thumbnail image to dates in Events view to help you remember theevent.
Try right-clicking the Calendar Title bar and select Floating to move the pane to a new location.
To Add a Description to a Date in Events View:
1. Expand the month to see the dates on which images or media files are available.
2. Click Enter event description here and replace the highlighted text with a new description.
3. Press Enter or click outside of the description area. The description is saved.
To Select a Specific Thumbnail in the Events View or Photo Calendar:
1. Expand the month to see the dates on which images or media files are available.
2. Click on a date to display the images or media files in the File List pane.
3. Click and drag an image or media file and drag it to the thumbnail area for the date.
When you release the mouse button the thumbnail is saved. You can reset the defaultthumbnail by right-clicking the thumbnail and selecting Restore Default Thumbnail.
To Navigate a Long List of Dates in Events View:
1. To expand and collapse specific groups click the +/- signs which are located on the left side of the groupheader.
2. To expand and collapse all groups right-click a group header and select either Open All Groups or CloseAll Groups.

ACDSee Photo Studio Home 2022
Page 66 of 506
3. To scroll through multiple groups click the Next Group and Previous Group buttons, which are located atthe bottom of the File List scroll bar.
4. At the bottom of the Calendar pane scroll bar, click the Table of Contents button and select a date.
Browsing Your Favorite Files
You can create shortcuts to your favorite files for easy access.
Accessing the Shortcuts Pane
Click Panes | Shortcuts.
Creating a Shortcut
You can create shortcuts to folders and files, and even run executable files, from inside the Shortcutspane. Favorite shortcuts can be copied, renamed, moved, or deleted just like a folder. You can evenuse an executable shortcut to start another application from inside ACDSee. You can also create ashortcut by dragging a file, folder, or executable file directly from the File List pane to the Shortcutspane.
To Add Files to the Shortcuts Pane:
1. In the File List pane, select a file, folder, or executable file.
2. Do one of the following:
Right-click the item you selected, and then select Add to Shortcuts.
Click File | Add to Shortcuts.
3. Type a name for the new shortcut and click OK.
Creating a New Folder
You can create a folder, or an entire directory tree, in the Shortcuts pane to help organize yourfavorites.
To Create a New Folder:
1. In the Shortcuts pane, right-click the Shortcuts folder, or a folder you previously created, and then selectNew | Folder.
2. Type the name of the folder and press Enter.
If you move a file or a folder that is a shortcuts, you break the link and the shortcut no longerworks.

ACDSee Photo Studio Home 2022
Page 67 of 506
Deleting a Shortcut or Folder
You can delete a shortcut or folder from within the Shortcuts pane.
To Delete a Shortcut or Folder:
In the Shortcuts pane, right-click the shortcut or folder, click Delete, and then click Yes to confirmthat you want to delete the shortcut or folder.
Using the Catalog Pane
The Catalog pane is one of the most useful panes in Manage mode as it provides so many tools fororganizing, managing, and finding your files. You can drag files into the categories, ratings, keywords,or color labels of the Catalog pane to assign and quickly organize your files. The Auto Categoriessection can be used to find files with specific information such as file size, keywords, or shutter speed.The Saved Searches section allows you to create and run custom searches. Special items such as theImageWell display all the images on the computer in one click, or you can click Uncategorized todisplay only those that are not yet in a category.
To Open the Catalog Pane:
In Manage mode, click Panes | Catalog.
The Catalog pane opens on the left, tabbed with the Folders and Calendar panes.
Easy-Select Bars
Select multiple albums, ratings, keywords, labels, and categories with the Easy-Select bars to displayfiles matching these selections in the File List pane.
To Use the Easy-Select Bar:
Select the indicator to the left of one or more items in the Catalog pane to display the files in theFile List pane that match the specific set of criteria.
The ACDSee Home Database
Any organizing you do using categories, ratings, or labels (on the Catalog pane or the Properties pane)is stored in the ACDSee Home database. If you choose to, you can then also embed this information ineach individual file, making it easier to relocate and share files, or retrieve the information from the fileif you need to.

ACDSee Photo Studio Home 2022
Page 68 of 506
Detecting Faces in Manage Mode
Please note that Face Detection is only available for the 64-bit version of ACDSee Photo StudioHome.
ACDSee automatically adds file information and thumbnails to the database as you browse. Thisprocess is called cataloging. Once the folder you are browsing has been cataloged, ACDSee begins theprocess of detecting faces in your images. As you open other folders, ACDSee will continue scanningfor faces in the first folder, and will queue subsequent folders as you open them. You can view thescanning progress in the bottom right corner of Manage mode. ACDSee will continue scanning untilFace Detection is complete on the folders you browsed.
Scanning for Faces:
In the bottom right corner, you will see a display of the number of images queued for scanning. Youcan hover over this display to view a tooltip with the file name currently being scanned.
If your queue has become too large and you wish to reset it, right-click the display and choose ClearQueue from the context menu, or choose Tools | Face Detection | Clear Queue. You can then browseto the specific photos you wish to scan.
You can also detect faces on an image by image basis in Viewmode. Face Detection will scaneach image for faces as you open it.
After Face Detection has run on the folders you have browsed, you can open the images in Viewmode,where the faces will be outlined. You can assign names to the detected faces in Viewmode.
To Enable or Disable Face Detection:
Choose Tools | Options | Face Detection and check or uncheck the Automatically detect faces inimages checkbox.
Once you have assigned names to detected faces in Viewmode, you can use the People group of theCatalog pane to find photos based on the individuals in them. You can also search by name in theQuick Search bar and the Search pane. You can manage the names assigned to faces through FaceDetection using the People mode.
To Remove Face Detection and Recognition on Selected Images:
You can remove face detection and recognition data on images selected in Manage mode.
1. In Manage mode, select one or more images.
2. Choose Tools | Face Detection | Remove Faces.
These images will remain marked as having been scanned for faces, and Face Detection will not re-scanthem, unless triggered by the Redetect Faces command, or enabling Rerun Face Detection and editingor developing the images and browsing them.

ACDSee Photo Studio Home 2022
Page 69 of 506
To Rerun Face Detection on Selected Images:
You can force Face Detection to re-scan selected images in Manage mode.
1. In Manage mode, select one or more images.
2. Choose Tools | Face Detection | Redetect Faces.
To Rerun Facial Recognition on Selected Images:
In order to correct names mistakenly assigned to faces by ACDSee, you can rerun facial recognition on facesyou have not manually named within the selected image or images. This clears all names assigned by ACDSee'sfacial recognition, but leaves manually entered names. ACDSee will then attempt to recognize unnamed facesbased on names you have entered manually.
1. In Manage mode, select one or more images.
2. Choose Tools | Face Detection | Rerun Recognition.
Embedding, Retrieving, and Importing Face Data
Any interaction you make with the Face Detection feature will create "face data", which is added to thedatabase, and will, therefore, trigger the Embed Pending icon. Face data is embedded in your image'sXMP file, just like any ACDSeeMetadata. By embedding this face data into your files as well, you canshare it, restore it, or make it available in a new database.
To Embed Face Data:
You can embed your face data using the Embed ACDSeeMetadata dialog. See Embedding ACDSeeMetadata in Files.
To Retrieve Face Data Embedded in Files:
Do one of the following:
Choose Tools | Face Detection | Import ACDSee Face Data.
Choose Tools | Database | Catalog Files. In the Catalog Files dialog, in the Import from Cataloged Filessection, check the ACDSee Face Data checkbox. Press Start.
To Import Embedded Face Data From Lightroom or Picasa :
1. In Manage Mode, select the images for which you have embedded face data in another application.
2. Select Tools | Face Detection | Import Lightroom or Picasa Face Data.
3. A warning dialog will pop up asking if you want to overwrite any existing face data and add face datafrom another program to the files. Select OK if so.
4. Your face data will import and the face data will be added to your database.

ACDSee Photo Studio Home 2022
Page 70 of 506
Changing Views
You can select different views to display your files in the File List pane, including thumbnail previewsand file details. You can also customize the appearance and size of thumbnails, and specify theinformation displayed in the Details view.
To Change the File List View:
In Manage mode, in the File List pane, under View, select from the following:
Views
Thumbs+Details Displays file names and details in a list, and adds a thumbnail preview to theFilename column.
Filmstrip Displays thumbnail previews of your files in a single row across the bottom ofthe File List pane, and displays the currently selected file in an expandedPreview pane.
Thumbnails Displays thumbnail previews of all image and media files (and somedocument types) in the File List pane. You can customize the appearance ofthumbnails, and specify what information to display with them.
Tiles Displays each file in the File List pane on a "tile" that includes a thumbnailpreview and file information. You can resize the tiles using the Zoom slider.
Icons Displays files in a list, represented by large default system icons for each filetype.
List Displays a list of file names and extensions.
Details Displays a list of file names and details about each file, such as size, format,and creation date. You can customize the appearance of the Details viewmode, as explained below, and specify what information it displays.
Toggle Overlay Mode Controls whether overlay icons are invisible, visible in grayscale, or visible incolor. Use the (]) key to choose.
Highlight Overlay Controls which overlay icon is colored. Use the ([) key to rotate through.
Customizing the Details View
You can set the Details view to automatically resize columns, display or hide grid lines, and select anentire rowwhen you select a column entry in that row. You can also change the appearance of theDetails view, select which columns to display, and customize the column order.
To Select Columns and Set Column Order:

ACDSee Photo Studio Home 2022
Page 71 of 506
1. In Manage mode, from the File List drop-down, click View | Choose Details.
2. In the Choose Details dialog box, do one or more of the following:
To add a column, select a folder or detail name in the Available Details pane, and then click Add.Adding a folder adds all detail names within the folder.
To remove a column, select a detail name in the Currently Displayed Details pane, and then clickRemove.
To move a column to the left in the File List pane, select its name in the Currently DisplayedDetails pane and clickMove Up.
To move a column to the right in the File List pane, select its name in the Currently DisplayedDetails pane and clickMove Down.
3. Click OK.
You can click Reset to display only the default column names in the Currently Displayed Detailspane, and you can also move a column in the File List pane by dragging its header to a newposition. A vertical line indicates where the column will be inserted.
Filtering Files
You can use the Filter By options to identify the types of files and folders you want to display in the FileList pane.
To Filter Files in the File List Pane:
Do one of the following:
Click View | Filter By and select a filter option.
Click the Filter drop-down and select a filter option.
If all your thumbnails seem to disappear, click Filter | All and they reappear.
To Create a Custom Filter:
1. Do one of the following:
Click View | Filter By | Advanced Filters.
Click the Filter drop-down and select Advanced Filters.
2. Select Apply filtering criteria.
3. Select or clear one or more of the following options to show or hide that file or folder type in the FileList pane:

ACDSee Photo Studio Home 2022
Page 72 of 506
Show image files
Show media files
Show folders
Show archive files
Select Show hidden files and folders to show files and folders that are normally hidden by youroperating system.
Select Show THM files to show thumbnail files.
Select Show XMP files to show the XMP sidecar files.
4. Click OK.
Grouping Files
If you have to browse a lot of images in the File List you should consider using Group By to organizeimages into different groups. You may find it easier to find images when they are organized intogroups. For example, if you use more than one camera, you can quickly organize your imagesaccording to the camera you used to capture the images. Similarly, if you save your images intodifferent file formats you can quickly organize your images according to their file format.
Group By only works in the Thumbs, Thumbs + Details, Details, Tiles, and Icons views.
The Edited State group is particularly useful for finding images that you have edited.
To Group Files in the File List:
1. Browse to the folder or folders containing your files.
2. Do one of the following:
Click View | Group By and select a group option.
Click the Group drop-down and select a group option.
Navigating Through Groups in the File List
To Expand and Collapse Specific Groups:
Click the Expand or Collapse arrows, on the left side of the group header.
To Expand and Collapse All Groups:
Right-click a group header, and then select either Open All Groups or Close All Groups.

ACDSee Photo Studio Home 2022
Page 73 of 506
To Display a Preview of the Images in a Closed Group:
Hover your cursor over the group header.
To Scroll Through Multiple Groups:
Click the Next Group and Previous Group buttons at the bottom of the File List scroll bar.
To Display the Table of Contents:
Do one of the following:
Click View | Group By | Table of Contents.
Click the Group drop-down list and select Table of Contents.
At the bottom of the File List scroll bar, click the Table of Contents button.
To Quickly Jump to a Specific Group:
1. Display the table of contents.
2. Click the group that you want to display.
To Change the Sort Order of the Groups:
Do one of the following:
Click View | Group By and select either Group Forward or Group Backward.
Click the Group drop-down and select either Group Forward or Group Backward.
Removing Groups from the File List
To Remove a Group:
Do one of the following:
Click View | Group By | None.
Click the Group drop-down list and select None.
Selecting Files in One or More Groups
To Select Files in Groups:

ACDSee Photo Studio Home 2022
Page 74 of 506
Do one of the following:
Click the group header to select all of the files in that group.
Press and hold the Ctrl key and click two or more group headers to select all of the files in those groups.
Sorting Files
In Manage mode, you can sort your files according to different file properties to quickly organize yourimages, find specific files, and create a range of files with similar attributes for easy selection.
To Sort Items in the File List:
1. Click View | Sort By, and then select a sort option:
Filename
Size (KB)
Image Type
Modified Date
Image Properties
Caption
Rating
Tagged
More (sort by metadata, EXIF, file properties, image attributes, IPTC information, or multimediaattributes)
2. To set the direction of the sort, click View | Sort By, and then select a direction:
Sort Forward
Sort Backward
Your sort settings are saved until you change them. For example, if you sort images in the FileList pane according to Rating, the images will remain sorted according to Rating until youchange the sort settings.
Sorting Files Using Column Headers
You can quickly sort files in Details viewmode using column headings.
To Sort Files Using a Column Header:

ACDSee Photo Studio Home 2022
Page 75 of 506
1. Click a column header. An arrow appears, indicating the sort direction.
2. Click the column header again to change the sort direction.
Custom Sorting Files
You can use custom sorting to customize the order of files in the File List pane. After custom sortingyour files, ACDSee Home automatically saves the file order for the selected folder until you change it ordelete the custom sort order.
To Customize the Sorting Order of Your Files:
1. Select one or more files.
2. Drag the selected files to a new location in the File List.
To delete a custom sort order, click View | Sort By, and then select Delete Custom Sort.
Selecting Files
In the File List pane, you can select all of your files and folders at once, select all of the files in thecurrent folder, select only the image files, or clear your selection entirely.
You can also set an option to automatically select new files whenever you add them to the File List.Click Tools | Options | File List to set this option.
To Select Your Files or Folders:
Click a thumbnail to select the file.
Ctrl + click to select more than one file.
Shift + click to select a number of files in a row.
Click off to the side in the file list pane to clear your selection.
To Select Your Files or Folders Using the Menu:
1. In Manage mode, click Edit.
2. Select one of the following:
Select All: selects all files and subfolders in the current folder.
Select All Files: selects all files in the current folder.
Select All Images: selects all image files in the current folder.

ACDSee Photo Studio Home 2022
Page 76 of 506
Select Tagged: selects all tagged image files regardless of their folder.
Select by Rating: displays a list of ratings, and selects all files currently assigned to the rating youselect.
Clear Selection: clears your selection.
Invert Selection: selects all files except for your original selections.
Previewing Images
You can preview image, audio, and video files in the Preview pane. By default, the Preview panedisplays a thumbnail of the currently selected image or media file. You can resize the pane to adjustthe thumbnail dimensions, and reposition the pane anywhere on your screen. You can set the Previewpane to display highlights of the image's EXIF information for quick reference.
To Open or Close the Preview Pane:
Do one of the following:
Click Panes | Preview.
Press Ctrl + Shift + P.
To Show or Hide What Displays in the Preview Pane:
You can customize the options displayed in the Preview pane when you have an image displaying.Right-click the image in the Preview pane, select Image and Information, and then select one of thefollowing:
Show Image: displays only a preview of the image.
Show Information: displays EXIF information about the image. This is called the Information palette.
The Information Palette
The Information palette is located in the bottom left of ACDSee and provides immediate access to themost useful elements of an image's EXIF information. It includes:
Camera Name and Lens Model
Dimensions
File Size
Exposure Program
White Balance

ACDSee Photo Studio Home 2022
Page 77 of 506
Metering Mode
Flash
RAW (will be blank for files that are not RAW)
ISO
F-Stop
Shutter Speed
Exposure Compensation
Focal Length
If you are unsure what a certain symbol means, you can hover your mouse over it for a pop-up explanation.
To Customize the Preview Info:
You can customize what information displays at the bottom of the Information palette section of thePreview pane. The date and time that the image was taken is selected by default.
1. Right-click the date and time at the bottom of the Information palette in the Preview pane.
2. Click Choose Preview Info...
3. In the Choose Details dialog box, select the item listed under Currently Displayed Details and press theRemove button.
4. From the Available Details column, choose an item by checking the checkbox next to it and pressing theAdd button.
5. Click OK.
To Preview Audio or Video Files:
1. Click Tools | Options | Preview.
2. Check the Preview audio and video clips checkbox.
3. Click OK.
The Information palette also displays in View and Edit mode. To turn off the Informationpalette, deselect Info Palette under the Viewmenu in Edit mode, or Panes menu in Viewmode.
Rotating Images
You can rotate images in Manage and Viewmodes using the Rotate icons in the bottom toolbar.
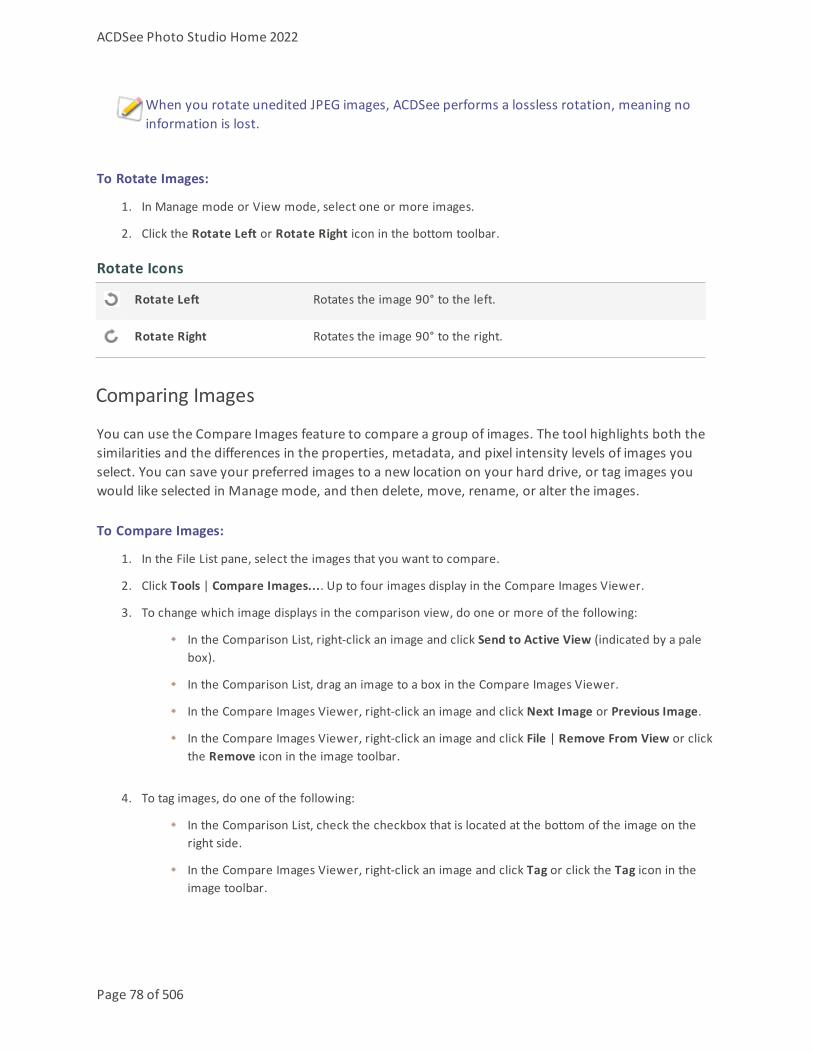
ACDSee Photo Studio Home 2022
Page 78 of 506
When you rotate unedited JPEG images, ACDSee performs a lossless rotation, meaning noinformation is lost.
To Rotate Images:
1. In Manage mode or View mode, select one or more images.
2. Click the Rotate Left or Rotate Right icon in the bottom toolbar.
Rotate Icons
Rotate Left Rotates the image 90° to the left.
Rotate Right Rotates the image 90° to the right.
Comparing Images
You can use the Compare Images feature to compare a group of images. The tool highlights both thesimilarities and the differences in the properties, metadata, and pixel intensity levels of images youselect. You can save your preferred images to a new location on your hard drive, or tag images youwould like selected in Manage mode, and then delete, move, rename, or alter the images.
To Compare Images:
1. In the File List pane, select the images that you want to compare.
2. Click Tools | Compare Images.... Up to four images display in the Compare Images Viewer.
3. To change which image displays in the comparison view, do one or more of the following:
In the Comparison List, right-click an image and click Send to Active View (indicated by a palebox).
In the Comparison List, drag an image to a box in the Compare Images Viewer.
In the Compare Images Viewer, right-click an image and click Next Image or Previous Image.
In the Compare Images Viewer, right-click an image and click File | Remove From View or clickthe Remove icon in the image toolbar.
4. To tag images, do one of the following:
In the Comparison List, check the checkbox that is located at the bottom of the image on theright side.
In the Compare Images Viewer, right-click an image and click Tag or click the Tag icon in theimage toolbar.

ACDSee Photo Studio Home 2022
Page 79 of 506
Click the Tag All button in the bottom left corner to tag all of the images, or click Untag All tountag all of the images.
5. To rate images, right-click an image, click Set Rating, and then select an appropriate rating.
6. To categorize images, right-click an image, click Set Categories, and then select an appropriate category(or create an appropriate category).
7. Click OK, located in the bottom right corner.
Compare Images Toolbar
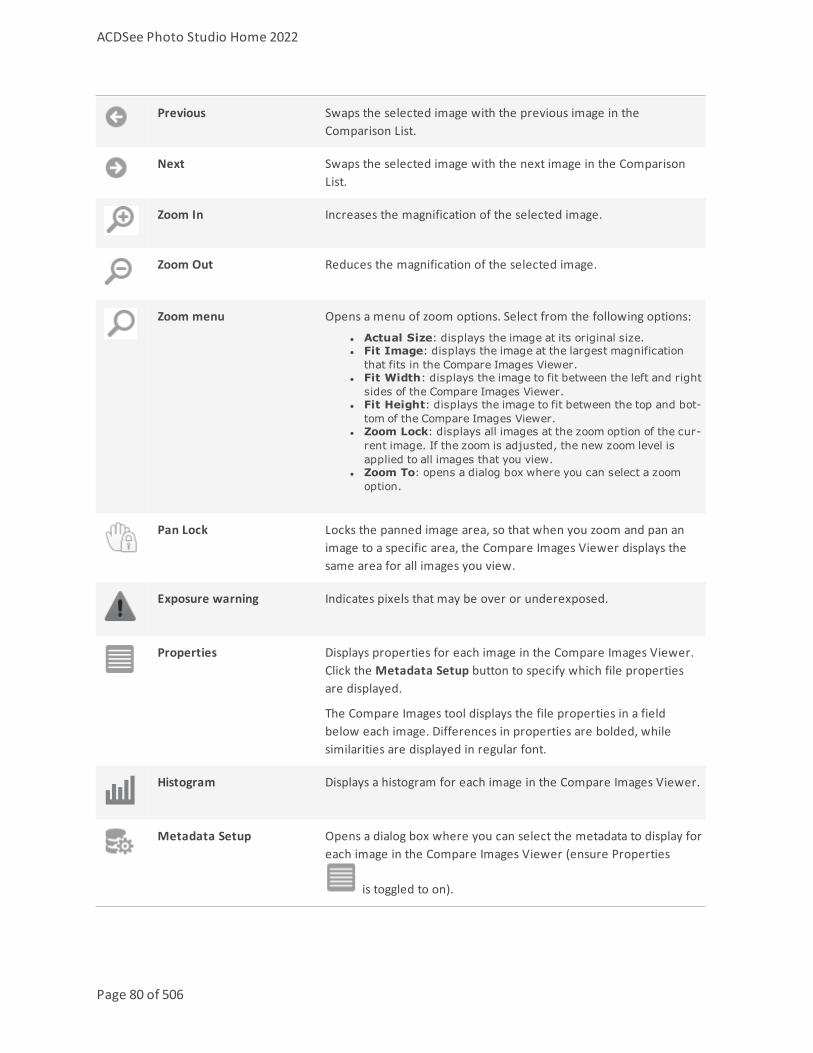
ACDSee Photo Studio Home 2022
Page 80 of 506
Previous Swaps the selected image with the previous image in theComparison List.
Next Swaps the selected image with the next image in the ComparisonList.
Zoom In Increases the magnification of the selected image.
Zoom Out Reduces the magnification of the selected image.
Zoom menu Opens a menu of zoom options. Select from the following options:l Actual Size: displays the image at its original size.l Fit Image: displays the image at the largest magnificationthat fits in the Compare Images Viewer.
l Fit Width: displays the image to fit between the left and rightsides of the Compare Images Viewer.
l Fit Height: displays the image to fit between the top and bot-tom of the Compare Images Viewer.
l Zoom Lock: displays all images at the zoom option of the cur-rent image. If the zoom is adjusted, the new zoom level isapplied to all images that you view.
l Zoom To: opens a dialog box where you can select a zoomoption.
Pan Lock Locks the panned image area, so that when you zoom and pan animage to a specific area, the Compare Images Viewer displays thesame area for all images you view.
Exposure warning Indicates pixels that may be over or underexposed.
Properties Displays properties for each image in the Compare Images Viewer.Click the Metadata Setup button to specify which file propertiesare displayed.
The Compare Images tool displays the file properties in a fieldbelow each image. Differences in properties are bolded, whilesimilarities are displayed in regular font.
Histogram Displays a histogram for each image in the Compare Images Viewer.
Metadata Setup Opens a dialog box where you can select the metadata to display foreach image in the Compare Images Viewer (ensure Properties
is toggled to on).

ACDSee Photo Studio Home 2022
Page 81 of 506
One Image Displays one image in the Compare Images Viewer.
Two Images Displays two images in the Compare Images Viewer.
Three Images Displays three images in the Compare Images Viewer.
Four Images Displays four images in the Compare Images Viewer.
Properties Pane If one image is displayed, this button opens the Properties,Histogram, Magnifying Glass, and Navigator panes.
Help Opens the Help file.
Image ToolbarsEach image in the Compare Images tool has a toolbar located below it. You can use this toolbar toadjust each image individually.
Save Opens a dialog box where you can save the image with a differentfile name and a different file format.
Previous Swaps the displayed image with the previous image in theComparison List.
Next Swaps the displayed image with the next image in the ComparisonList.
Zoom In Increases the magnification of the image.
Zoom Out Reduces the magnification of the image.
Delete Deletes the image from your hard drive.
Remove Removes the image from the Comparison List.
Tag Tags the image so that it will remain selected when you close theCompare Images tool.

ACDSee Photo Studio Home 2022
Page 82 of 506
Gathering Images in an Image Basket
You can use image baskets to gather and hold images and media files from different locations orfolders. Once you have placed items in an image basket, you can use any of the tools or features inACDSee Home to edit, share, or view those files. You can create up to five image baskets and use themsimultaneously.
To Open an Image Basket:
In Manage mode, click Panes | Image Basket | New Image Basket or press Ctrl + Shift + 9. Repeat thisstep to open up to five image baskets.
To Add Files to an Image Basket:
Do one of the following:
In the File List pane, select the files you want to add. Drag the items to the Image Basket.
In the File List pane, right-click selected files and choose Add to Image Basket from the context menu.You can also use this method in View mode.
In the File List pane, select the files you want to add and press Ctrl + B. You can also use this method inView mode.
The last image basket that you interacted with is considered the "active" basket. This will beindicated with a star next to the basket's name. The active basket is the one that images will beadded to when using the context menu or keyboard shortcut in Manage or Viewmode.
You can also add images to an image basket by dragging them from Windows Explorer.
To Remove Files from an Image Basket:
In the Image Basket, right-click the files, and select Remove from Image Basket or press Alt + X.
To remove all files, right-click the Image Basket, and then select Clear Image Basket.
To Rename an Image Basket:
In the Image Basket, right-click and choose Rename Image Basket from the context menu. In theRename Image Basket dialog, enter a name in the field and press OK.
To Delete an Image Basket:
In the Image Basket, right-click and choose Delete Image Basket from the context menu or press Ctrl +Shift + -. Deleting an image basket will not delete the images within it.

ACDSee Photo Studio Home 2022
Page 83 of 506
Cataloging and Managing Files in ACDSee Home
In addition to its browsing, viewing, and editing capabilities, ACDSee Home features integratedmanagement tools you can use to organize and sort your images and media files. These tools includebatch functions (tools that can alter or adjust multiple files at the same time), category and ratingsystems, and a powerful database to hold all of your important image information.
You can use the ACDSee Home batch functions to convert the file format, rotate, resize, rename, andadjust the time stamp or the exposure of a single image, a group of images all at once. With thecategory, color label, and rating systems, you can create a virtual folder structure, and use it to findrelated images and media files with a single click.
ACDSee Home displays file properties and image information in an easily accessible Properties panethat you can use to directly add and edit file information, including ACDSeeMetadata. You can add anauthor, description, notes, and keywords to your files, and adjust the category and ratingassignments at the same time.
Organizing with the Catalog Pane
The Catalog pane is useful panes as it provides many ways to catalog, sort, group, search for, andmanage your files.
Categories
Categories are an easy way to organize your files into context-related sections. When you assign a fileto a category, you do not move the file from its folder or create an extra copy. Your categories can besimple or complex and use any names you choose. There are different icons to use for differentcategories to help you identify them at a glance. Once your files are in categories, you can search, sort,group, and find them by category.
One way to assign files to a category is to select and drag one or more files from the file list and dropthem onto the category. You can choose colored icons to identify your categories, and cycle throughthe available icons using the ] key. A file can belong to multiple categories, but it will only have oneicon. For comprehensive categories management, use the Organize tab of the Properties pane.
People
The People group in the Catalog pane will display the names of individuals you have assigned in theFace Detection Pane in Viewmode. You can select a name to display all of the photos with thatindividual in it, provided that they have been identified using Face Detection. You can also set FaceSearch Options which allow you to choose whether to display assigned names, suggested names, orboth using the settings menu (gear icon) in the top right corner of the People group.
To assign names to faces, use People mode.

ACDSee Photo Studio Home 2022
Page 84 of 506
Please note that Face Detection is only available for the 64-bit version of ACDSee Photo StudioHome.
Keywords
You can use keywords to organize your files into hierarchies. You can create and assign hierarchicalkeywords in the Organize tab of the Properties pane. You can add keywords to images quickly usingdrag and drop. You can also manage your keywords in the context menu, by using right-click.
Ratings
You can assign a numerical rating from 1 to 5 to your images and files. Once you have assigned ratings,you can search, sort, and catalog your files based on the ratings, or a combination of ratings,categories, auto categories etc. A file can have only one rating. When a file has a rating, the numberappears on top of the thumbnail in the File List pane. Ratings can be managed in Assigning andSearching Categories and Ratings.
Color Labels
You can use color labels to catalog your files. You can use different colors to represent different stagesof your workflow. As you review your photos or documents, you can assign color labels and renamethem accordingly.
Auto Categories
Most digital cameras create and embed information about the file as you take a photo. Thisinformation is called metadata and can include the name and model of the camera, the file size,shutter speed, camera settings used in the shot and much more. ACDSee Home uses this informationto create auto categories. You can search using auto categories to find images containing thatmetadata. You can select one or more auto categories to find files, for example, photos of a certainsize, taken by a particular camera. You can also add to this data using the Properties panes.
Saved Searches
If you find yourself creating the same search criteria frequently, you can save the search to use againlater. Saved searches appear at the top of the Search pane but they also appear in the Catalog panefor you to re-run using a single click on the name or in the white checkbox of the Easy-Select bar.
To Create a New Saved Search from the Catalog Pane:
1. In the Saved Searches area of the Catalog pane, click the New saved search icon.
The Search pane opens.
2. Enter your search criteria and then click the Saved searches icon.

ACDSee Photo Studio Home 2022
Page 85 of 506
The new saved search appears in the Saved Searches on the Catalog pane and in the SavedSearches drop-down list of the Search pane.
Special Items
You can use Special Items to quickly view all of the images in your database and any uncategorizedimages. Select one of the following items:
Image Well: displays all images cataloged in the ACDSee Home database. If you have a substantial imagecollection, it may take a few moments to gather all of the information.
Videos: displays all videos cataloged in the ACDSee Home database. This will return any video formatssupported by ACDSee. If you have a substantial file collection, it may take a few moments to gather all ofthe information.
Embed Pending: displays all the files with database data that has changed but has not yet beenembedded in the files.
Uncategorized: displays any images cataloged in the database that have not been assigned to a category.
No Keywords: displays any images cataloged in the database that have no ACDSee keywords assigned.
Unnamed Faces: displays all photos in which one or more faces have been detected but not named.
Please note that Face Detection is only available for the 64-bit version of ACDSee PhotoStudio Home.
Auto-Named Faces: displays all photos with one or more faces that have been automatically named byACDSee using facial recognition.
Please note that Face Detection is only available for the 64-bit version of ACDSee PhotoStudio Home.
Suggested Names: displays all photos with suggested names using Face Search. You can use this item toquickly confirm or deny suggestions across your image collection.
Please note that Face Detection is only available for the 64-bit version of ACDSee PhotoStudio Home.
Tagged: displays all the tagged images in your file collection.
The ACDSee Database and Embedded Data
When you assign a file to a rating, or category, this information is stored in the ACDSee Homedatabase. If you choose to, you can also embed this information in each individual file, making it easierto relocate and share files, or retrieve the information from the file if you need to. In the database,information is always associated with a particular file. If you move or rename files using an applicationother than ACDSee Home (like Windows Explorer) the link between the file and the ACDSee Home
ACDSee Photo Studio Home 2022
Page 86 of 506
database will be broken. If this happens, and you have embedded the information in each file, you canrebuild the database and retrieve all the information.
You can also use the Properties pane to add information to the ACDSee Home database like captions,keywords and much more. Taking the time to assign categories and add keywords, notes, etc., makesit much easier to find and organize your files. Learn more about organizing using the Properties Pane.
ACDsee 2022 uses XMP to embed ACDSeeMetadata into each file. Only some file formats andfile extensions support XMP. These include GIF, JPEG, DNG, PNG, PSD, and TIF. In the case ofthese file formats, the ACDSeeMetadata is embedded inside the file and so you can rename ormove the file outside of ACDSee 2022 and still be able to retrieve the ACDSeeMetadata. Forformats that currently do not support XMP, including RAW and ABR, the ACDSeeMetadata iswritten to a sidecar file that is stored in the same folder as its file. Because a sidecar file isseparate from the file itself, you need to rename or move them together, or you could lose theACDSeeMetadata permanently.
Easy-Select Bars
The Easy-Select bars are the indicators on the left side of the Folders and Catalog panes. They look likethis: . You can use these indicators to select multiple folders or categories, and display theircontents in the File List pane. In the Catalog pane you can also use the Easy-Select indicators to selectcombinations of categories, ratings, auto categories, saved searches, and special items. For example,you could display all your photos with a rating of 1 that belonged to the category People.
You can also use the Easy-Select indicators with the Selective Browsing pane (View | SelectiveBrowsing).
When you use the Match Any/All buttons and the Easy-Select indicators together, the Catalog panebecomes a powerful search tool for finding unique sets of files.
To Use the Easy-Select Bar:
In the Folders or Catalog pane, select the indicator to the left of each item with contents you wantto display. The indicator changes orientation to point to the item you have selected.
If you select a category, rating, or combination that does not have any files that match, theFile List displays a message and shows no thumbnails. The quickest way to return to a folderwith files is to click the back arrow.
To View Cataloged Files:

ACDSee Photo Studio Home 2022
Page 87 of 506
Select one or more categories, ratings, auto categories, saved searches, or special items. Filesassigned to those classifications are displayed in the File List pane.
The Contents bar at the top of the File List pane displays whatever categories or items are currentlyselected. You can browse through specific categories, ratings, or items within specific folders usingthe Selective Browsing pane.
Match All Match Any
There are two Match All/ Match Any drop-down lists on the Catalog pane; one at the top of the panethat affects categories and one that affects saved searches. You can use the Match All and Match Anyoptions to affect the display of thumbnails in the File List in the following way:
Match All: to be included, a file has to belong to all the categories or searches you select. So the file hasto be in both or all of the categories or searches before it will display in the File List. Match All is moreexclusive. You can use it to limit the number of files that display and narrow a search down.
Match Any: to be included, a file can belong to any of the categories or searches you select. So any filesin the selected categories or searches will display in the File List. Match any is more inclusive.
Catalog Icons
Category Identifies files that have been assigned to a category.
Ratings 1-5 Identifies file ratings.
New Saved search Opens the Search pane so that you can create a newsaved search.
Saved search Displays the Save/Save As menu so you can save asearch.
Easy-Select indicator (selected) Selects the category, rating, auto category, or otheritem for display in the File List pane.
Easy-Select indicator (not selected) Does not select the category, rating, auto category, orother item for display in the File List pane.
Match Any/All Controls which images are displayed in the File Listpane.
To hide the icons in the Catalog pane, click Tools | Options, and then select Catalog. Uncheckthe Show Icons checkbox in the Options dialog box.

ACDSee Photo Studio Home 2022
Page 88 of 506
Creating Categories
Create and manage a system of categories for your files in the Organize tab of the Properties pane.You can easily customize your category system in a way that makes sense to you.
Select the Organize tab in the Properties pane to create, rename, delete, and move your categories.You can also access the Categories pane by choosing Panes | Categories.
To Create a Category:
1. Do one of the following:
Right-click a category in the Catalog pane, and then select New Category.
In Manage mode, click Edit | Set Categories | New Category.
2. Select one of the following:
Create a new, top-level category
Create a sub-category within the current selection
3. If you are creating a sub-category, select a top-level (or parent) category from the drop-down list. (If youright-clicked a category in the Catalog pane, the new sub-category will be added below that category bydefault.)
4. Type a name for the new category in the Name field.
5. Click OK.
When you create a new top-level category, you can select an icon to help identify thecategory. The Icon drop-down only appears if the Show Icons checkbox is checked on theCatalog page of the Options dialog box. In Manage mode, click Tools | Options, and thenselect Catalog.
Manage Categories
To Manage Your Categories:
Select a category in the Catalog pane, and do one of the following:
To edit the category, right-click the selected category and select Edit.
To delete the category, right-click the selected category and select Delete.
In the Categories group in the Catalog pane:
To move the category, drag it to the new location.

ACDSee Photo Studio Home 2022
Page 89 of 506
Create Easy-Access Category Sets
If you have a long list of categories, or would like to break your categories up into different events orareas of interest, you can use the Edit Category Sets feature.
To Create Easy-Access Category Sets:
1. First create the categories you want in your set.
2. In the Properties pane, click the Quick Categories drop-down list and select New Quick CategoriesSet....
3. Customize the number of rows and columns for your set by selecting values from the Rows andColumns drop-down menus.
4. Enter your commonly used categories into the entry fields. For sub-categories, use the pipe key.Example: A|B|C.
5. Click the Save button.
6. Click OK. This category set will be listed in the Quick Category drop-down list.
7. Select one or more files and click a button in the category set. The category will be assigned to theselected files. The button text color will change to indicate that the category is assigned to currentlyselected files, and will display in italics if assigned to only some (but not all) of the currently selectedfiles.
Make sure the category button namematches the category name in the category tree.
Assigning and Searching Categories and Ratings
You can assign files to a rating, or one or more categories, without moving the file or making an extracopy.
If the Properties pane or Catalog pane is not visible in Manage mode, click Panes | Propertiesor Panes | Catalog.
Quickly Assign Ratings in Thumbnail View
The rating number you select can be reflected as a star rating in other applications. Give your favoriteshots a high rating, and your least favorite shots a low rating.
To Assign Ratings:
1. Hover over a thumbnail to display the gray box with diagonal line through it.
2. Click the gray box to make your selection.

ACDSee Photo Studio Home 2022
Page 90 of 506
Example of Hovering Over a Thumbnail to Select a Rating:
1.
2.
3.
Use the keyboard shortcut Ctrl + 0-5 to quickly rate a file.
Assign and Search Categories and Ratings in the Catalog Pane
The Catalog pane allows you to both assign categories and ratings as well as search them.
To Assign Files to Categories or Ratings in the Catalog Pane:
1. In Manage mode, do one of the following:
Drag selected files to a category or rating in the Catalog pane.
Drag the category or rating from the Catalog pane to selected files.
Right-click the files, and then click Set Categories and click the category in the fly out, or clickSet Rating and click the rating.

ACDSee Photo Studio Home 2022
Page 91 of 506
2. In View mode, do one of the following:
Click Edit | Set Categories and then click the category to which you want to assign the file.
Right-click the file, click Set Categories, and then click the category to which you want to assignthe file.
Click Edit | Set Rating and then click the rating to which you want to assign the file.
Right-click the file, click Set Rating, and then click the rating to which you want to assign the file.
On the status bar, click the rating icon, and then click a new rating. This icon only appears once arating is set.
3. If you are comparing images and want to categorize them, do one of the following:
Right-click one of the files, click Set Categories, and then click the category to which you wantto assign the file.
Right-click one of the files, click Set Rating, and then click the rating to which you want to assignthe file.
Ratings embedded by ACDSee can be seen in other applications supporting xmp:rating andvice versa. To embed metadata into one or more selected files click Tools |Metadata | EmbedACDSee Metadata | Embed In Selected Files.
Use the Context Menu (Right-Click) in the Category Tree to Do the Following:
Assign Items
Remove Items
Create New Category
Search
Cut
Copy
Paste
Delete
Edit Category
To Search a Category or Rating in the Catalog Pane:
Click the Category name or Rating number to display all corresponding files in the File List pane.
Assign Categories and Ratings in the Properties Pane
The Properties pane provides another way to assign categories and ratings.

ACDSee Photo Studio Home 2022
Page 92 of 506
To Assign Files to Ratings in the Properties Pane:
1. In the File List pane, select the files you want to assign a rating.
2. In the Properties pane, select the Metadata tab.
3. Click the rating you want these files to have from the numbers listed at the top of the Properties pane.
To Assign Files to Categories in the Properties Pane:
1. In the File List pane, select the files you want to assign a rating.
2. In the Properties pane, select the Organize tab.
3. Click the category you want these files to have from your Categories list.
Assign files quickly with a category sets button. See Create Easy-Access Category Sets.
Remove Categories or Ratings from Files
You can remove a file from a category or rating without moving or deleting the original file, or affectingany other files assigned to that classification.
To Remove Categories or Ratings from Files:
1. In the File List pane, select the files you want to remove.
2. Do one of the following:
Right-click a selected file, and then click Set Rating | Clear Rating.
Right-click a selected file, click Set Categories, and then click the name of the category fromwhich you want to remove the file, or to remove all categories, click Uncategorize All SelectedItems.
Uncheck a checkbox for a category or a radio button for a rating in the Catalog pane.
Right-click a category or rating in the Catalog pane, and then click Remove Items.
You can reset ratings in the Properties pane by right-clicking on the rating.
Assigning Color Labels
Color labels are useful for naming and quickly identifying your processing plans for your images anddocuments. Different colors can be used to represent different stages of your workflow. For example,as you review your photos or documents you can quickly label files to upload, print, reject, review, orsharpen, or any other term that matches your workflow needs. Once your files have been labeled, youcan click a color label in the Catalog pane to instantly display all of the files assigned to that label.

ACDSee Photo Studio Home 2022
Page 93 of 506
You can also use color labels in combination with the Group by, or Filter By features to refine your list.Color labels, like tagging, categories, and ratings, are a way to set aside, organize, and group yourphotos or documents without moving them into different folders.
If the Properties pane or Catalog pane is not visible in Manage mode, click Panes | Propertiesor Panes | Catalog.
Create a Color Label Set
Begin by creating a label set so you can quickly select and assign specified labels. Once you have a labelset in place, you can assign your images or documents to the appropriate labels corresponding to yourworkflow.
To Create a Color Label Set:
1. In the Catalog pane, click the Labels settings button and select Edit Label Sets.
2. Enter names for your labels and click the Save icon.
3. Click Save As from the Save Label Set dialog box.
4. Enter a name for your new label set.
5. Click OK.
Once you have created color label sets, you can access them from the Catalog pane by clicking theLabels settings button and selecting from the drop-down list. Before assigning a color label, make surethe intended label set is active. The active label set name is shown in brackets in the label header.
Assign Color Labels
You Can Assign Color Labels to Your Files by Using the Following:
Hover icons in thumbnail view
Catalog pane
Properties pane
Edit menu in Manage and View mode
Context menu
Keyboard shortcuts
ACDsee 2022 uses XMP to embed ACDSeeMetadata into each file. Only some file formats andfile extensions support XMP. These include GIF, JPEG, DNG, PNG, PSD, and TIF. In the case ofthese file formats, the ACDSeeMetadata is embedded inside the file and so you can rename ormove the file outside of ACDSee 2022 and still be able to retrieve the ACDSeeMetadata. For

ACDSee Photo Studio Home 2022
Page 94 of 506
formats that currently do not support XMP, including RAW and ABR, the ACDSeeMetadata iswritten to a sidecar file that is stored in the same folder as its file. Because a sidecar file isseparate from the file itself, you need to rename or move them together, or you could lose theACDSeeMetadata permanently.
You can also set labels from the status bar in View and Edit mode.
To Assign a Color Label Using the Label Line Hover Icon in Thumbnail View:
1. Hover over a thumbnail to display the gray label icon.
2. Click the gray label icon to make your selection.
Example of Hovering Over a Thumbnail to Click and Select a Color Label:
1.
2.
3.
Use the overlay icon on one of a number of selected files or images to assign thelabel to all.
To Assign a Color Label to a File Using the Catalog Pane:

ACDSee Photo Studio Home 2022
Page 95 of 506
1. In Manage mode, do one of the following:
Drag selected files to a color label in the Catalog pane.
Drag the color label from the Catalog pane to selected files.
To Assign Files to Color Labels in the Properties Pane:
1. In the File List pane, select the files you want to assign a color rating.
2. In the Properties pane, select the color label from the boxes along the top.
To Assign Color Labels Using the Edit Menu in Manage and View Mode:
Click Edit | Set Label and then select a color.
To Assign Color Labels with the Context Menu:
Right-click the file, click Set Label, then select a label name.
To Assign Color Labels Using Keyboard Shortcuts:
Keyboard shortcuts are available for the five color labels, plus Alt-0 to clear the label (exactly the sameas ratings, except Alt is used instead of Ctrl)
Alt-1
Alt-2
Alt-3
Alt-4
Alt-5
Alt-0
Search Files Assigned to a Label
To Search All Files in the Database Assigned to a Label:
Click the color label in the Catalog pane to display all corresponding files in the File List pane.
Use the Search box.
Use Quick Search.
To Search All Files in the File List Assigned to a Label:

ACDSee Photo Studio Home 2022
Page 96 of 506
Click the Filter drop-down above the File List pane and select a label name. All files assigned to thatlabel in the current file list will be selected.
To Select All Files in the File List Assigned to a Label:
Use Alt-1 through Alt-5 for the five colors, plus Alt-0 to clear the label, (exactly the same as ratings,except it uses Alt instead of Ctrl).
Removing Color Labels and Color Label Sets
To Remove a Color Label from a File:
1. In the File List pane, select one or more files you want to remove a label from.
2. Do one of the following:
Right-click a selected file, and then click Set Label | Clear Label.
In the Properties pane, click the gray unlabeled icon.
In the Properties pane, right-click on the color label.
To Delete a Label Set:
1. In the Catalog pane, click the Labels settings button and select Edit Label Sets.
2. Select the set you want to delete from the Labels Sets drop-down list.
3. Click the delete button.
Creating Collections
Collections is a powerful grouping and search query tool. You can use the Collections pane to groupaccumulated photos based on a common variable, such as the camera used, location, or size. Youcould also use Collections to group photos for sorting, processing, sharing, and much more.
Collection
Collection Set
SmartCollection
To Create a Collection:
1. In Manage mode, choose Panes | Collection. The Collections pane will appear tabbed in the Folderspane.

ACDSee Photo Studio Home 2022
Page 97 of 506
2. In the Collections pane, right-click and select Create Collection... from the context menu.
3. In the Create Collection dialog box, configure the options as described below.
4. Press the Create button.
Create Collection Dialog Box Options
Name
Name Enter a name for your collection.
Location
Inside a Collection Set Check this checkbox if you would like to place thiscollection inside of another previously-createdcollection set, thereby developing a hierarchy.Choose the collection set you would like to add yourimage to from the drop-down menu.
Options
Include selected photos Check this checkbox to include any currentlyselected photos in the collection.
Set as target collection Check this checkbox to designate this collection asthe target collection for images you will add photosto. You will be able to quickly send images directlyto this collection by selecting images and pressingCtrl + Alt + C. To customize the keyboard shortcut,see Customizing Keyboard Shortcuts.
To Add Photos to a Collection:
Do one of the following:
In the File List pane, select the images before using the Create Collection command described above.Then check the Include selected photos checkbox inside the Create Collection dialog box.
In the File List pane, right-click the images and choose Collections | Add to | [name of the collection].
Drag and drop the images from the File List pane to the collection inside the Collections pane.
Select the image in the File List pane. In the Organize tab of the Properties pane, in the Collectionsgroup, check the checkbox next to the collection.
To Set a Collection as Your Target Collection:
You can set a specific collection as the target collection, allowing you to quickly add images to it using akeyboard shortcut. A target collection will display a blue circle icon next to it in the Collections pane.
You cannot set a smart collection as a target.

ACDSee Photo Studio Home 2022
Page 98 of 506
Do one of the following:
When creating a collection, check the Set as target collection checkbox in the Create Collection dialogbox.
Right-click a collection in the Collections pane and choose Set as Target Collection.
To Add Images to Target Collections:
Select the image and press the Ctrl + Alt + C key.
You can customize this keyboard shortcut. See Customizing Keyboard Shortcuts.
To Search for Collections:
You can search for collections, collection sets, and smart collections in the Filter Collections field at thetop of the Collections pane.
Enter the name, (or portion of the name), of the collection, smart collection, or collection set you arelooking for. If the collection you are searching for is part of a collection set, the search will return theroot collection set if one of the sub-collections contains the text you entered in the Filter Collectionsfield.
To Remove an Image from a Collection:
1. Select the collection.
2. Right-click the image and choose Collections | Remove from Selected Collection.
This will only remove the image from the collection and will not delete the image.
You can remove multiple images from a collection at once by selecting them all and then right-clicking and choosing Collections | Remove from Selected Collection.
To Remove an Image from All Collections:
To remove an image from all collections, right-click the image and choose Collections | Remove fromall collections.
This will only remove the image from all collections and will not delete the image.
You can remove multiple images from all collections at once by selecting them all and thenright-clicking and choosing Collections | Remove from all collections.

ACDSee Photo Studio Home 2022
Page 99 of 506
Collections Sets
You can create a collection set and add other collection folders inside. You can use this method tocreate a hierarchy for further organization. You cannot add images to collection sets themselves. Youcan only add images to folders (collections) inside of collection sets. Selecting the root of a collectionset will display all of the images in all of the collections inside of the root.
To Create a Collection Set:
1. In the Collections pane, right-click and select Create Collection Set... from the context menu.
2. In the Create Collection Set dialog box, enter a name for your collection set.
3. Check the Inside a Collection Set checkbox if you would like to add your collection set inside of anothercollection set. Select the collection set from the drop-down menu.
4. Click Create.
To Add Collections to Collection Sets:
Do one of the following:
Check the Inside a Collection Set checkbox while creating a collection inside the Create Collection dialogbox. Select the collection set from the drop-down menu.
In the Collections pane, drag and drop the collection from the root level to the collection set.
Smart Collections
Smart collections are collections with queries built into them based on search criteria you specify.These search queries get saved to the database. When you catalog new images in the future, thosethat fit the criteria of your search query will automatically show up in your smart collection. You canalso create a search query to locate files based on the date they were cataloged.
To Create a Smart Collection and Add Search Criteria to Your Query:
1. In the Collections pane, right-click and select Create Smart Collection... from the context menu.
2. In the Create Smart Collection dialog box, configure the options as described below.
3. Press the OK button.
Create Smart Collection Dialog Box Options
ACDSee Photo Studio Home 2022
Page 100 of 506
Name Enter a name for your smart collection.
It is recommended that you give your smart collection a name reflective of thesearch query assigned to it. This will save you the time of having to open it to findout what it contains.
Location Inside a Collection Set Check this checkbox ifyou would like toplace this collectioninside of anotherpreviously-createdcollection set, therebydeveloping ahierarchy. Select thecollection set youwould like to add yoursmart collection tofrom the drop-downmenu.
Match Press the Add button to select search criteria for your query. In the Add Search Criteriadialog box, choose criteria by clicking the plus + signs to expand the tree andcheck/uncheck the checkboxes on and off to select your properties. Press OK. Yourchosen criteria will appear in the Match field box. Refine each item by clicking theunderlined variables and selecting an option from the drop-down, or entering a numberinto the field.
For example, if you chose Size as your search criteria, click "is" and select "is not", "is lessthan", "is less than or equal to", "is greater than", "is greater than or equal to", or "isbetween". Then click the "0" and enter the size value.
To Remove Criteria from Your Search Query:
Select the criteria from the Match field and select Remove.
To Edit Your Search Query:
1. Right-click your smart collection in the Collections pane and choose Edit.
2. In the Edit Smart Collection dialog box, add and remove search criteria as described above.
3. Click OK.
Using the Properties Pane
The Properties pane displays all the metadata for your files. It also displays file properties such as filesize, creation date, and read-only or hidden status. You can use the Properties pane to add, change,

ACDSee Photo Studio Home 2022
Page 101 of 506
or delete the metadata for image and media files.
The Properties pane is open in Manage mode on the right of the File List pane by default. TheProperties pane is available in all modes except 365 mode and Media mode.
To Open the Properties Pane in Any Mode:
Click Panes | Properties.
The Metadata panel offers adjustable width for metadata fields. Simply hover between acorresponding label and field to display the double arrow cursor. Click and drag to adjustwidth. Double-click to toggle between the width of the longest label in the group or thelongest label in the pane.
Properties Pane Areas
The Properties pane is divided into 3 tabs: Metadata tab, Organize tab, and File tab.
Use the overlay icons, which appear as you hover over a thumbnail, to tag, rate and add colorlabels to your images. Alternatively, you can display these setting in the Properties pane byclicking Tools | Options | Properties Pane and selecting Show Tagged, Rating, and ColorLabels.
Metadata Tab
TheMetadata tab displays the rating, category, IPTC, EXIF, and ACDSeeMetadata stored with aphoto. The ACDSeeMetadata fields are available for you to enter the caption for your photographs aswell as date, author, and notes. The keywords field is display-only and can be entered in the Organizetab. The label field can be entered here or selected from the Labels section in the Catalog pane. IPTCinformation is automatically embedded into your image, while ACDSeeMetadata is not embedded inyour files, but instead is held in the database. ACDSeeMetadata can be embedded into all your files(or just selected ones) by clicking the Tools |Metadata | Embed ACDSee Metadata command.
The IPTC data fields provide a standard means for entering and storing information about yourphotographs such as description, creator, and copyright information. ACDSee supports fields definedin IPTC Core 1.1.
The EXIF data fields hold information captured by your camera such as shutter speed, camera model,and GPS information.
Certain EXIF fields are no longer visible by default. The EXIF Artist, Copyright, Image Description, andDate/Time Original fields are automatically modified when their matching IPTC fields are modified, (seetable below). This change reflects the recommendations of the Metadata Working Group (MWG). Ifyou need to have these fields visible in the EXIF section you can adjust your settings by clicking Tools |Options | Properties Pane and clicking theManage Metadata Views button.
Matching IPTC and EXIF Fields

ACDSee Photo Studio Home 2022
Page 102 of 506
IPTC EXIF
Description writes to Image Description
Creator writes to Artist
Copyright Notice writes to Copyright
Date Created writes to Date/Time Original
When ACDSee parses metadata from a file, the content of the field is displayed withoutmapping.
Organize Tab
The Organize tab displays a tree of categories and a tree of keywords. The Category tree context-menu(right-click) allows you to add and delete categories and sub-categories. You can create category setsto quickly categorize your files. Right-clicking the keyword tree also allows the same options. Use thekeyword tree to create a hierarchy to easily organize your files in a way that holds meaning for you.
File Tab
The File tab displays detailed file information and image attributes for a selected file or files. You canset or change the Read-Only and Hidden properties of a file or folder, and view a summary of any EXIFinformation contained in a file.
Embedding ACDSee Metadata into Files
If you have metadata in your files and they are copied, moved, or renamed, outside ofACDSee, the link between the file and the database will be broken, but you can rebuild thedatabase using the embedded data in the file.
ACDsee 2022 uses XMP to embed ACDSeeMetadata into each file. Only some file formats andfile extensions support XMP. These include GIF, JPEG, DNG, PNG, PSD, and TIF. In the case ofthese file formats, the ACDSeeMetadata is embedded inside the file and so you can rename ormove the file outside of ACDSee 2022 and still be able to retrieve the ACDSeeMetadata. Forformats that currently do not support XMP, including RAW and ABR, the ACDSeeMetadata iswritten to a sidecar file that is stored in the same folder as its file. Because a sidecar file isseparate from the file itself, you need to rename or move them together, or you could lose theACDSeeMetadata permanently.
ACDSee Photo Studio Home 2022
Page 103 of 506
Browsing and Cataloging with Auto Advance
You can use Auto Advance to quickly move through your images while adding tags, ratings, labels,categories, or keywords. You can use Auto Advance in Manage and Viewmode.
To Turn on Auto Advance in Manage Mode:
At the bottom of the File List toolbar, toggle the Auto Advance button or press Ctrl + Q.
To Use Auto Advance:
When Auto Advance is enabled, adding (or clearing) a tag, rating, color label, keyword, or category willadvance the selection to the next image in the folder, allowing you to continue adding metadata. Thisis particularly useful when paired with keyboard shortcuts, as you can organize entire folders withoutmoving your hands from the keyboard.
To select which types of applied metadata will trigger Auto Advance, see Setting the Auto AdvanceOptions.
Keywords and Categories are disabled by default.
Manage Mode
In Manage mode, using the keys on the numpad, apply the following keyboard shortcutsto make the most out of Auto Advance:

ACDSee Photo Studio Home 2022
Page 104 of 506
Turn on the numpad by pressing the Num Lock key before utilizing any of the followingkeyboard shortcuts.
/ Tag
* Purple Color Label
9 Blue Color Label
8 Green Color Label
7 Yellow Color Label
6 Red Color Label
5 Rating of 5
4 Rating of 4
3 Rating of 3
2 Rating of 2
1 Rating of 1
0 Remove Rating
+ Next
- Previous
. Removes Color Label.
If the Num Lock key has not been activated, this will act as theDelete button.
You can also customize keyboard shortcuts.
Keywords and Categories
You can streamline the process of adding keywords and categories to your images by combiningcustomized keyboard shortcuts and Auto Advance.
Keywords
In the Properties pane, on the Metadata tab, in the IPTC group, you can add keywords to the Keywordfield, press ENTER, and Auto Advance will move to the next image. You can also use the samemethodin the Keywords field on the Organize tab of the Properties pane. In both locations, you can add

ACDSee Photo Studio Home 2022
Page 105 of 506
multiple keywords at once, separating them with commas. You can continue the process for all imageswithout moving your hands from the keyboard.
Categories
In the Properties pane, on the Organize tab, expand the Categories group. Add categories to imagesby checking the checkbox of your desired category. Or do one of the following:
Right-click the image, and choose Set Categories | [your desired category] from the context menu.
Choose Edit | Set Categories | [your desired category].
Use any of the these methods and Auto Advance will move to the next image.
To utilize this same type of convenience in all IPTC fields, see To Use Keyboard Shortcuts to EnterMetadata into the Same Field of Multiple Photos.
View Mode
To Turn on Auto Advance in View Mode:
In the Bottom toolbar, toggle the Auto Advance button or press Ctrl + Q.
To Use Auto Advance in View Mode:
1. Choose Panes | Properties.
2. Add ratings, color labels, tags, categories, or keywords in the Properties pane and Auto Advance willadvance it to the next image in the Filmstrip, allowing you to continue adding metadata.
In View mode, use the following keyboard shortcuts to navigate your folder:
Home Selects the first image in the folder.
End Selects the last image in the folder.
Page Down Next
Page Up Previous
Using the Map Pane
Use the Map pane to add photo locations from anywhere in the world to your photos. You can thenrecall and view that information for reference at any time. Use the map to select groups of files forfurther workflow steps, and select photos for display in Viewmode.

ACDSee Photo Studio Home 2022
Page 106 of 506
The location of files displayed in the Map pane is based on the latitude and longitude information inthe file properties. If you have a camera with geotagging capabilities, the geographic location isautomatically conveyed visually on the map. You can also add map coordinates to files by draggingthem directly onto the map and pressing the Save All button.
Geotagged images are indicated on the map with pins. You can click a pin on the map to select fileswithin a geographic location for viewing or processing. If your geotagged image pin is not displayed onthe map, try using the keyboard shortcut F5 to refresh the map.
The following file formats can be added to the map: JPG, TIFF, RAW, DNG, and PNG.
ACDSee automatically adds file information, including geographical tags, to the database asyou browse. However, if you have a large number of files, you may want to catalog those filesfirst to speed up the loading time for the pins on the map. To catalog your files, click Tools |Database | Catalog Files.
To Open the Map Pane:
In Manage mode, click Panes |Map (Ctrl + Shift + M).
The Map pane appears above the File List pane in Manage mode by default. You can drag the Maptitle bar to a new location and float the pane or dock it in another position like the other movablepanes in ACDSee.
You can toggle the Map on and off with the keyboard shortcut Ctrl + Shift + M in Managemode.
To Add Files to the Map by Dragging:
1. In Manage mode, drag one or more files onto the map.
2. Click Save All in the top left corner of the map.
Ideally images should be geotagged prior to processing. If an image is geotagged after it hasbeen edited and the Restore to Original command is used, then the geotag will be lost.
To Delete a Pinned Location on the Map:
Right-click the geotagged image thumbnail and selectMap | Remove from Map.
To View a Geotagged Image on the Map:
Right-click the geotagged image thumbnail and selectMap | View on Map.
To Find a Location:

ACDSee Photo Studio Home 2022
Page 107 of 506
To find a specific location, enter a place or landmark into the Search for Location field at the top rightof the Map pane.
To Set Default Location, Zoom, and Map Type:
1. Pan to your preferred location on the map, then adjust the zoom-level and select your preferred maptype (Map, Satellite, or Terrain).
2. Click Tools |Map | Set default map location.
Note: the map reflects the current File list. If the File list has images mapped to a differentlocation from your default setting, then that location will be displayed.
To pan and zoom the map to a specific location, enter the location into the Map search fieldand press Enter.
Reverse Geocoding:
The Reverse Geocoding command allows you to save location information into certain IPTC fields.These include: Country, Country Code, State/Province, and Location.
1. In Manage mode, drag one or more files onto the map.
2. Click Save All in the top left corner of the map.
3. Press the Reverse Geocode button to preview the location information.
4. Click Save to save this information into the IPTC fields of the selected images.
If images with multiple different locations are selected, only one of those locations will be usedto do the reverse lookup.
Using the Map Pane to Further Your Workflow
With the images from a particular location all selected, here are a few possible workflow options:
Enter Edit mode to process this selection together.
Use the Batch tool to apply the same settings on photos from the same location.
Click Slideshow to view and present a slideshow of the photos from this location.
Send photos from this location via email.
If a geotagged image does not display, try using the keyboard shortcut F5 to refresh the map.
Pin Legend

ACDSee Photo Studio Home 2022
Page 108 of 506
Indicates geotagged location.
Indicates more than one geotagged location in this area. (Zoom in to see locations)
Indicates selected geotagged location.
A dot on a pin of any color indicates unsaved image location.
Creating and Assigning Hierarchical Keywords
You can add keywords to your files, and build a hierarchy from those keywords. These groups aremaintained in the keyword tree. Select the Organize tab in the Properties pane to create, rename,delete, and move your keywords.
You can also access the keywords pane by choosing Panes | Keywords.
You can view all images assigned to specific keywords by clicking specific keywords in theKeywords group in the Catalog pane.
Creating Keywords
To Create Keywords:
In the Properties pane, located to the right of the File List pane, do one of the following:
In the Organize tab, at the bottom of the Keyword group, right-click Keywords, and then select NewKeyword from the context menu.
Type a keyword into the field at the top of the Keyword group and press Enter.
To Keyword Files with Existing Keywords, Do One of the Following:
Select one or more files, then check the box next to the appropriate keyword.
Select one or more files, then right-click the keyword. Select Assign items from the context menu.
Select one or more files, then drag them onto the keyword.
Select one or more files, then select a keyword from the Quick Keywords set. The keyword will beassigned to your file and also added to the tree.
In the Keywords group in the Catalog pane, you can:
Select one or more files, then drag the keyword from the tree onto them.

ACDSee Photo Studio Home 2022
Page 109 of 506
To Establish a Hierarchy, Do One of the Following:
In the keyword field, type the lesser or more specific keyword, followed by the less than symbol,followed by the greater or more general keyword.
Example:
Owl < Bird
or
Madrid < Spain < Europe
Right-click an existing keyword, then select New Keyword. The new keyword will automatically becomea child to the existing keyword.
When assigning multiple keywords to a file, it is important to note that separating keywordswith commas will not generate a hierarchy.
Managing Keywords
To Manage Your Keywords:
Select a keyword in the Organize tab, and do one of the following:
To unassign a keyword from a file, right-click the selected keyword and choose Remove Items oruncheck the box.
To edit the keyword, right-click the selected keyword and choose Edit.
To delete the keyword, right-click the selected keyword and choose Delete.
To duplicate a keyword, right-click the selected keyword and choose Copy, then Paste where desired.
In the Keywords group in the Catalog pane, you can do any of the management actions above, as wellas:
To edit the keyword tree, click and drag the keyword to other parts of the tree.
Creating Quick Keywords
You can use Quick Keywords to keep organized and to streamline your workflow by creating a group ofrelated keywords that hold an association for you. This is ideal for keywords you would like to be easilyaccessible, rather than buried in the hierarchical tree. You can create multiple groups and choosebetween them based on the photos you are viewing at the time. ACDSee comes pre-loaded with avariety of usable sample Quick Keywords sets. You can also add these keywords to your tree.

ACDSee Photo Studio Home 2022
Page 110 of 506
Example:
Italy
Florence Venice Lake Como
Rome Milan Verona
Genoa Bologna Naples
To Assign a Keyword from Quick Keywords:
Select one or more files, then click the keyword.
To Create Easy-Access Quick Keywords:
1. On the Organize tab, in the Keywords group, select New Quick Keywords Set... from the drop-downmenu. The Quick Keywords dialog box opens.
2. Customize the number of rows and columns for your set by selecting values from the Rows andColumns drop-down menus.
3. Enter up to 250 associated or commonly-used keywords in the open fields. To create a hierarchy withina field, use the pipe key. Example: A|B|C.
4. Click the OK button.
5. In the New Preset dialog, enter a name for your set. Click OK.
6. Apply keywords from your set by selecting a file and clicking the applicable keyword from the QuickKeywords Table. The keyword will be added to the tree. If you specified a hierarchy in the keyword set,the parent keyword will appear in the tree with the child under it. The text of the keywords in the tablewill change color to indicate that the keyword is assigned to the currently selected files, and will displayin italics if assigned to only some (but not all) of the currently selected files.
Quick Keyword sets are saved in the Presets folder under ACDSee in your AppData folder,which you can find using the following path: C:\Users\<Your Name>\AppData\Local\ACDSystems\Presets
Importing and Exporting Keywords
You can import keywords into ACDSee from other users. You can also share your keywords byexporting them. Keywords are imported and exported as .txt files.
You can import Adobe® Lightroom® keywords.
To Export Keywords:
1. Choose Tools |Metadata | Export Keywords...
2. Browse to the location of your keywords file.
ACDSee Photo Studio Home 2022
Page 111 of 506
3. Enter a name for your keywords file.
4. Press Save.
To Import Keywords:
1. Choose Tools |Metadata | Import Keywords...
2. Browse to the location of your keywords file.
3. Select your file and press Open. The keywords within your file will be loaded into the ACDSee keywordstree and listed alphabetically. Conflicting keywords will be merged.
Copying and Moving Files
You can use the Copy To Folder and Move To Folder commands to relocate files and folders on yourhard drive, and specify how to handle overwriting existing files. You can also select from a list ofpreviously accessed folders to save time looking through your directory structure.
When you use ACDSee Home to relocate your files, by default any ACDSeeMetadataassociated with those files is copied to the new location. However, if you do not want to copythe associated files, clear the Include related files for non-RAW images checkbox.
When you do NOT use ACDSee Home to move or copy your files, you break the link to anydatabase information you have added to those files. This is because ACDSee Home cannottrack the files. You will lose important categorizing and other database information. You can fixthis by clicking Change Binding and rebinding the database. If you have embedded thedatabase information in the files themselves, you can also retrieve this information usingTools | Database | Catalog Files.
ACDsee 2022 uses XMP to embed ACDSeeMetadata into each file. Only some file formats andfile extensions support XMP. These include GIF, JPEG, DNG, PNG, PSD, and TIF. In the case ofthese file formats, the ACDSeeMetadata is embedded inside the file and so you can rename ormove the file outside of ACDSee 2022 and still be able to retrieve the ACDSeeMetadata. Forformats that currently do not support XMP, including RAW and ABR, the ACDSeeMetadata iswritten to a sidecar file that is stored in the same folder as its file. Because a sidecar file isseparate from the file itself, you need to rename or move them together, or you could lose theACDSeeMetadata permanently.
To Copy or Move Files:
1. Do one of the following:
In the File List pane, select one or more files, and then click Edit | Copy To Folder or Move ToFolder.

ACDSee Photo Studio Home 2022
Page 112 of 506
While viewing an image or media file in View mode, click Edit | Copy To Folder or Move ToFolder.
2. In the Copy To Folder or Move To Folder dialog box, do one of the following:
Select the Folders tab, and locate the folder on your hard drive where you want to place thefiles.
Select the History tab, and select a folder from the list of recently-accessed folders.
Select Create Folder and enter the name of a new folder.
3. In the Overwriting duplicate files drop-down list, select one of the following options to specify howACDSee Home should handle overwriting files:
Ask: prompts you for confirmation when overwriting a file.
Rename: prompts you to rename a file.
Replace: overwrites any file with the same file name and extension.
Skip: cancels the operation if there is a file with the same file name and extension.
4. Click OK.
Copying Images to the Clipboard
You can copy an image to the Clipboard and then paste it into another application. Using the CopyImage command transfers only the image data to the Clipboard: no EXIF, IPTC or metadatainformation is retained.
To Copy an Image:
1. In Manage mode or View mode, select the image file you want to copy.
2. Click Edit | Copy Image.
3. Paste the image into your other application.
Pasting Files and Folders
You can cut or copy files to the Clipboard, and then paste them into another folder without losingyour ACDSeeMetadata.
To Cut and Paste Files:

ACDSee Photo Studio Home 2022
Page 113 of 506
1. In Manage mode, in the File List or Folders pane, select one or more files or folders.
2. Click Edit | Copy or Cut.
3. In the Folders pane, browse to a new location.
4. Click Edit | Paste to place the files or folders into the new location.
Replacing or Overwriting Files
When copying or moving files from one location to another, a file name collision occurs if a file alreadyexists in the destination folder with the same file name and extension as a file you are relocating. InACDSee, you can view both of the files involved in the Confirm File Replace dialog box. If the filesinvolved are image files, ACDSee Home displays thumbnail previews of both files, and provides optionsto replace the existing file, rename, delete, or skip the file you are moving, or cancel the operationentirely.
To Use the Confirm File Replace Dialog Box:
1. If you are moving a number of files and want to handle all potential file name collisions in the samemanner, check the Apply to all checkbox.
2. To help determine any differences between the two files, use the toolbar between the two previewfields to shrink or enlarge the size of the previews.
3. Do one of the following:
To replace the destination file with the source file, click Replace.
To rename the new file before moving it into the destination folder, type a new name for thefile in the Rename to field, and then click Rename.
To skip this file, and leave both files intact, click Skip.
To delete either the destination or source file, click Delete below the file you want to removefrom your hard drive.
To cancel the operation and not move or copy any more files, click Cancel.
In the Confirm File Replace dialog box, destination file refers to the file that exists in the targetfolder, and source file refers to the file you are moving or copying.
Renaming a File or Folder
You can rename a file or folder on your hard drive in the Folders and File List panes.
To Rename a File or Folder:

ACDSee Photo Studio Home 2022
Page 114 of 506
1. In Manage mode, in the File List or Folders pane, select the item you want to rename.
2. Click Edit | Rename.
3. Without removing or changing the file name extension, such as “.jpg”, type a new name for the file.
4. Press Enter.
You can renamemultiple files at the same time using the Batch Rename tool.
Storing Files in Private Folders
You can store confidential files in private, secure folders. When you add a file to a private folder, it willdisappear from its original location. Private folders are password-protected and you can only view thefiles in them in ACDSee.
When you add files to a private folder, all information related to the file is deleted from the database.This means that though the file can be restored, database information cannot. The only way topreserve database information is to back up or export the database before you add files to a privatefolder. There is also no way to restore images from a private folder if you forget the password, so makesure it is memorable.
To Open the Private Folder Pane:
In Manage mode, click Panes | Private Folder.
To Create a Private Folder:
1. Close any open private folders.
2. Right-click the private folder icon in the Private Folder pane and select Create Private Folder.
3. In the Enter Password text box, type a password for the private folder. Your password must be less than40 characters long.
4. In the Re-enter Password text box, type the password again to verify it.
5. Click OK.
A new folder will not display in the Private Folder pane. Private folders are hidden and are onlyidentified by their password. When you have a private folder open you will see any subfoldersthat exist within the private folder, but do not confuse these subfolders with the private folderitself.
To Open a Private Folder:
1. Close any open private folders.
2. Click Panes | Private Folder.

ACDSee Photo Studio Home 2022
Page 115 of 506
3. Click the Open button in the Private Folder pane header.
4. In the Enter Password text box, type the password of the private folder that you want to open.
5. Click OK.
The contents of an open private folder remain visible until you close it. Remember to closeyour private folder if you have to step away from your computer and do not want anyone tosee its contents.
To Close a Private Folder:
Do one of the following:
Click the Close button in the Private Folder pane header.
Click File | Exit to exit ACDSee. The private folder is closed automatically.
To Add Files to a Private Folder:
1. Open the private folder to which you want to add files.
2. Click and drag the files onto the private folder icon in the Private Folder pane. A warningmessage displays.
3. Click Yes to move the files to the private folder.
When you add files and folders to a private folder they are removed from their originallocation in the file system and added to the password-protected private folder. There is noway to recover files and folders from a private folder if you have forgotten your password.Ensure that you choose a password that you will be able to remember.
To Add an Existing Folder and its Contents to a Private Folder:
1. Open the private folder to which you want to add files.
2. Click and drag the folder onto the private folder icon in the Private Folder pane.
3. Click Yes to move the folder and its contents to the private folder.
To Restore Folders and Files from a Private Folder:
1. Open the private folder containing the folders or files that you want to restore.
2. Select the folders or files and click File | Restore from Private Folder.
3. Click the browse button, navigate to the folder where you would like to move the folders or files, andthen click OK.
4. Click OK.

ACDSee Photo Studio Home 2022
Page 116 of 506
ACDSee Homemoves the folders or files from the private folder to the selected location.These folders and files are now visible to anyone with access to the computer.
To Delete a Private Folder, or the Folders or Files in the Private Folder:
1. Open the private folder containing the folders or files that you want to delete.
2. Do one of the following:
To delete the private folder, right-click the private folder icon and select Delete.
To delete folders or files in a private folder, right-click them and select Delete.
Awarning message displays.
3. Click Yes to delete the private folder and all of its contents, or the selected folders or files in the privatefolder.
Use caution when deleting folders or files in private folders. If you delete folders or files inprivate folders they are permanently destroyed. Restore the folders and files if you want tomove them from the private folder to a non-secure location on your computer.
Tagging Images or Files
You can tag images to identify certain characteristics. This could be your best photos from an event orimages you wish to review. You can use this samemethod for organizing and categorizing yourdocuments and other files.
The tagging checkbox is at the bottom right corner of the thumbnails. Check the checkbox to tag orun-tag photos or documents. Photos remain tagged until you uncheck the checkbox.
You can display all your tagged photos or files with one click by clicking Tagged under Special items inthe Catalog pane. Tagging, like categories and ratings, is a way to set aside, organize, and group yourphotos or files without moving the files into different folders.
Tagging is intended as a temporary means of separating your images and files. Once tagged,you can move or apply categories and ratings to the images and files, and then clear all of thetags. Categories, ratings, color labels, and folders are more effective for organizing andgrouping your images and files over a long period of time.
To Tag a Selected Image or File:
Use the keyboard shortcut \ backslash key to apply the tag.
Check the checkbox in the bottom right corner of the thumbnail.

ACDSee Photo Studio Home 2022
Page 117 of 506
Right-click on one or more thumbnails and select Tag.
In the Properties pane, check the tag checkbox at the top left corner in the Metadata tab.
To Untag a Selected Image or File:
Use the keyboard shortcut \ backslash key to remove the tag.
In the Properties pane, uncheck the tag checkbox at the top left corner in the Metadata tab.
To Untag All Tagged Images or Files:
1. Click Tagged in the Catalog pane to display all tagged files in the File List pane.
2. Use the keyboard shortcut Ctrl + A to select all.
3. Click the backslash key \ to remove the tag.
To Display Tagged Images or Files:
In Manage mode, click Panes | Catalog to display the Catalog pane, then click Tagged in the SpecialItems section.
Tagged photos or files from all your folders display in the File List pane.
To Tag an Image or File in View Mode:
Do one of the following:
In View mode, check the checkbox in the bottom right corner of the status bar.
In View mode, click Panes | Properties to display the Properties pane, click the Metadata tab, thencheck the Tagged checkbox in the top left corner.
To Tag an Image When You Are Comparing Images:
1. In the Comparison List, check the checkbox in the bottom right corner of the image thumbnails.
2. Click OK. The Compare Images Viewer closes. You will see a checkmark in the checkbox of the imagesthat you tagged.
Managing Metadata Views and Presets
To Select a Metadata View:
1. Click Panes | Properties to open the Properties pane.
2. Select the Metadata tab of the Properties pane.

ACDSee Photo Studio Home 2022
Page 118 of 506
3. Click the Metadata View drop-down list in the Metadata tab to select one of the view options: DefaultMetadata View (most commonly used fields), All EXIF, All IPTC, ACDSee Metadata, or saved customviews.
You must have an image selected to view the Metadata tab.
To Create a Customized Metadata View:
1. Click the Metadata View drop-down list in the Metadata pane and selectManage Metadata Views....
2. In the Choose Metadata to Display dialog box, select New Metadata View from the drop-down list.
3. Click the plus + signs to expand the tree and check/uncheck the checkboxes on and off to select yourpreferences. See Manage Metadata View options below.
4. Click the save button and enter a name for your customized view.
5. Click OK.
Manage Metadata Views Options
When all items in a group are selected, the group checkbox is checked.
When no items in a group are selected, the group checkbox is unchecked.
When some, but not all items in a group are selected, the group checkbox issolid.
Check/uncheck the checkboxes to make your selections.
You can choose whether or not to display maker notes by checking or unchecking the DisplayMaker Notes checkbox.
Adding ACDSee Metadata to Multiple Files
We recommend entering and editing metadata prior to processing your images. If you use the Restoreto Original command, the metadata will be lost unless it was entered prior to processing (except in thecase of RAW images).
You cannot set IPTC and EXIF information for read-only files, such as those on a CD-ROM.

ACDSee Photo Studio Home 2022
Page 119 of 506
If the Properties pane is not already open, select Panes | Properties.
To Add Metadata to One or More Files:
1. In Manage mode, select one or more files in the File List pane.
2. In the Properties pane, select the Metadata tab.
3. Enter information into the metadata fields.
4. Click Apply or press Enter to apply your changes.
When you click Apply or Enter in ManageMode, the focus is returned to the File List paneallowing you to quickly make another file selection using your keyboard.
To include numbers in a sequence with your metadata, select the files and enter <#> as thestart number, in whichever field you want. Ex) Entering <5>will begin the sequence at 5.
Metadata Tab Keyboard Shortcuts
This Shortcut Has This Result
Tab Jumps focus forward from field to field.
Shift + Tab Jumps focus backwards from field to field.
Ctrl + K Places the cursor in the ACDSee Metadata Keywords field of the Organize tab in theProperties pane.
Alt + K Places the cursor in the IPTC Keywords field of the Metadata tab in the Properties pane.
Enter Applies your changes.
Esc Discards your changes.
If you click away from the Properties pane, any metadata that you have just entered will belost. You must click Apply or press ENTER to apply your changes.
To Use Keyboard Shortcuts to Enter Metadata into the Same Field of Multiple Photos:
1. Select the first photo in your list and enter content into a Metadata field.
2. Press the Page Down key to move to the next photo. The cursor remains in the same field of theProperties pane for each photo, allowing you to quickly enter content for the same field for multiplephotos.
3. Enter content into the field and again press Page Down to move to the next photo.
4. Continue Step 3 until complete.

ACDSee Photo Studio Home 2022
Page 120 of 506
You do not need to click the Apply button when using this shortcut.
You can use the Page Up key to move back to the previous photo.
Removing IPTC Keywords from Auto Categories
You can remove unused IPTC keywords from the ACDSee Home database. Once removed, theIPTC keywords will no longer display under Keywords (IPTC) in the Photo Properties' Auto Categorieslist of the Catalog Pane.
This process also applies for the Supplemental Categories field. This field is only visible ifselected from the Choose Metadata to Display dialog box found under Tools | Options |Properties Pane by pressing theManage Metadata Views button.
To Remove IPTC Keywords and Supplemental Categories:
1. In Manage mode, select any image which supports IPTC.
2. If the Properties pane is not already displayed, click Panes | Properties.
3. To ensure the image is writable, do the following:
Select the File tab and check to see if there is a checkmark in Read only.
If there is a checkmark, the image is not writable. Uncheck the Read only checkbox to make thefile writable.
4. In the IPTC section of the Metadata tab, click the keyword picker button beside the Keywords field.
5. In the IPTC Keywords Picker dialog box, click Edit List.
6. Select the keyword you want to remove from the Value list.
To select more than one keyword, press and hold the Ctrl key while selecting thekeywords.
7. Click Remove.
8. Click OK.
9. Click OK again to confirm.
Only keywords that are not in use can be removed from the list. To find photos associatedwith a keyword, click the keyword listed under Photo Properties in the Auto Categories list ofthe Catalog pane.

ACDSee Photo Studio Home 2022
Page 121 of 506
Changing the Date and Time Properties of Images
You can use the Batch Adjust Time Stamp tool to change the date and time properties of one or moreimages in Manage mode or in Viewmode.
To Change the Date and Time Properties of a File:
1. Do one of the following:
In Manage mode, select one or more images, and then click Tools | Batch | Adjust Time Stamp.
In View mode, click Tools |Modify | Adjust Image Time Stamp.
2. On the Date to Change tab, choose from the following:
Date to Change
EXIF date and time EXIF date/timeoriginal
The originaldate/time the imagewas captured.
EXIF date/timedigitized
The date/time theimage was convertedto a digital image(usually the same asoriginal).
EXIF date/time The date/time theimage was lastededited.
File last-modified date and time The date/time the image or file waslasted edited. For example, image editingor updates to metadata.
File creation date and time The original date/time the file wascreated.
ACDSee Database date and time The date and time held in the ACDSeeDatabase.
3. On the Advanced Options tab, select the options for the Adjust Image Time Stamp tool describedbelow, then click Next.
Advanced Options

ACDSee Photo Studio Home 2022
Page 122 of 506
Accept defaults and start conversion Accepts the default settings for thenew time stamp options. To startchanging the date and time of yourimages, click Adjust Time Stamp.
Automatically close wizard when finished Closes the Adjust Image Time Stampwizard as soon as the process iscomplete.
Save current settings as defaults Remembers the current settingsand applies them the next time youchange time stamps.
4. On the Choose new time stamp page, select one of the following options:
Use different date and time: replaces the selected date and time with another time stampproperty from the same file. Select the file property you want to use from the Select date andtime drop-down list.
Use specific date and time: changes the selected time stamp in each file to a specific date andtime. Type the new date and time for the time stamp in the Date and Time fields.
Shift to a new starting date and time: replaces the earliest time stamp with a date and timeyou specify, and shifts all later time stamps ahead accordingly. Specify the time stamp for theearliest file in the Date and Time fields.
Shift date and time by a specific number: shifts all the time stamps either forwards orbackwards by a specific number of hours (to adjust for time zones). Select either Shift forwardor Shift backward, and type a number into the Hours,Minutes, and Seconds spin boxes.
5. Click Adjust Time Stamp to begin adjusting your files.
6. When the wizard is finished, click Done to return to ACDSee.
Backing Up Your Files to Another Computer
The Sync wizard will guide you through the process of creating a synchronized copy of your files toprotect you from local hard drive failure. This is also known as a back up. You can synchronize yourlocal folders with a network drive, remote computer, or external hard drive. You can name thesynchronization, specify the actions you want to take each time you synchronize your files, schedulethe synchronization to run at specific intervals, and edit or remove the synchronization at a later time.
The Sync wizard does not backup your database when your files are copied to a new location.To back up files with database information, use the ACD Database Backup wizard.
To Create a Synchronization:

ACDSee Photo Studio Home 2022
Page 123 of 506
1. In Manage mode, click File | Sync | Create Sync.
2. On the Welcome page, click the Next button when you are ready to continue.
3. On the Synchronization Options page, do the following:
In the Source folder field, specify the folder containing files you would like to copy.
In the Backup destination field, specify a folder on a network drive, remote computer, orexternal hard drive in which to place the backup files.
In the Options area, specify how Sync should handle errors and logs.
In the Confirmations area, specify how Sync should handle file duplication conflicts.
Click Next when you are ready to continue.
4. On the Synchronization Schedule page, do the following:
In the Name text box, type a name for your synchronization.
In the Schedule area, specify whether you would like to run the synchronization immediately,or schedule the synchronization.
Click Finish when you are ready to complete the wizard.
Schedule: an account with no password cannot set up a schedule. You must set a passwordfor your account for schedules to work. A blank password will not work; you must have a realpassword with more than one character.
Updating or Deleting a Synchronization
You can adjust the settings of a synchronization, schedule it to run at regular intervals, or delete thesynchronization from ACDSee.
To Update or Delete a Saved Synchronization:
1. In Manage mode, click File | Sync | Edit Sync.
2. In the Saved Synchronizations dialog box, select a synchronization from the list.
3. Do one of the following:
To schedule the synchronization, click Schedule. Specify how often to run your synchronization,and then click OK.
To adjust the settings, click Edit. In the Edit Synchronizations dialog box, update the foldercontaining files you would like to copy, and a folder on a network drive, remote computer, orexternal hard drive in which to place those files. In the Options area, update how Sync shouldhandle errors and logs. In the Confirmations area, update how Sync should handle fileduplication conflicts. Click OK when you are finished.

ACDSee Photo Studio Home 2022
Page 124 of 506
To rename the synchronization, click Rename. Type a new name for the synchronization andclick OK.
To delete the synchronization, click Delete.
4. Click Close.
Running a Saved Synchronization
After you create a synchronization, you can run it at any time, even if it is scheduled to run at regularintervals.
To Run a Saved Synchronization:
In Manage mode, click File | Sync, and then select the name of the synchronization you want torun.
Searching with ACDSee Home
ACDSee Home includes a number of ways to search your computer for files and folders. You can usethe Search pane to search by file name, keywords, or image properties. You can create advancedsearches to locate files that fall within a date or rating range and then save and name the search to uselater. You can also use the Duplicate Finder to locate and manage identical files.
For simpler searches, you can use the Quick Search bar to quickly locate files and folders, or search thedatabase for specific names and keywords. You can also customize the Quick Search bar to only searchfor specific items or certain parts of the database.
Also, you can use the Catalog pane to quickly locate and list all images on your hard drive, or to locateany files in a folder that have not been categorized. If you are working with larger image collections,you can use Selective Browsing to specify broad or narrow criteria for the images you want to displayin the File List pane.
Using the Quick Search Bar
You can use the Quick Search bar in Manage mode to quickly locate files or folders. You can use theQuick Search options or basic operators to refine or expand your search, and view the results in theFile List pane.
The Quick Search feature always searches the following IPTC fields: Title, Headline, Description, People,Keywords, Creator, City, Location, State/Province, Country, and Instructions. The Quick Search alsosearches Color labels and the ACDSeeMetadata fields: Caption, Author, Notes, and Keywords.
You can choose whether the Quick Search searches just the files currently in the file list, or the entire
database, by clicking this icon .

ACDSee Photo Studio Home 2022
Page 125 of 506
When ACDSee Home searches file names, it only considers the first term in the file name. Forexample, a file called Cat_Dog would be found by searching for Cat, but not for Dog. Searchterms are not case-sensitive.
To Run a Quick Search:
Do one of the following:
In the Quick Search bar, type the term or part of a term you want to search for.
Click the drop-down list beside the Quick Search field and select a previously entered search term.
You can use the keyboard shortcut Ctrl + F to put the focus in the Quick Search bar andimmediately begin typing.
Quick Search OperatorsQuick Search Operators are keys that help refine your search. You can use the following operators tofurther refine or expand your searches in the Quick Search bar. A search term cannot begin with anoperator; it must start with a word.
The Quick Search bar treats spaces between words as + operators.

ACDSee Photo Studio Home 2022
Page 126 of 506
Operator Result Examples
- Searches for all items containing the first search term, that don'talso include the second term.
Cat -Dog returns allitems that contain Cat,except those that alsocontain Dog. Be sureto insert a spacebefore the minus sign.If you do not insert aspace, ACDSee Homewill assume you aresearching for ahyphenated word.
+ Searches for all items containing both search terms. Items thatonly contain one of the terms are excluded.
Cat+Dog or Cat Dogreturns itemscontaining both Catand Dog.
Cat+Dog+-Kittensreturns items thatinclude both Cat andDog, but not thosethat include Cat andDog and Kittens.
| Searches for all items containing either of the search elements. Cat|Dog includes allitems with either Cator Dog in the search.
Cat+Dog|Kittensincludes items thatcontain both Cat andDog, and those thatcontain Kittens.
Using the Search Pane
You can use the Search pane to search for your files and folders. You can do basic searching by filename or keyword phrase, and create advanced searches to narrow your results by folders, categories,and image properties. You can also search for patterns in file names and find duplicate files.
You can also save a search and give it a name. Saved Searches are listed on the Search pane and theCatalog pane. On the Search pane, you can select Saved Searches from the drop-down list to runagain. On the Catalog pane, Saved Searches are listed below Auto Categories where you can run themagain by clicking once on the Saved Search name.
ACDSee Photo Studio Home 2022
Page 127 of 506
The Search pane will not return results for folders that are not cataloged in the ACDSee Homedatabase. Cataloging happens automatically when you browse to a folder. You can also clickTools | Database | Catalog Files.
To Open the Search Pane:
In Manage mode, click Panes | Search.
Search Pane Areas
The Search pane contains several areas to help you manage your searches. When you create a search,remember that the search tool will only return files that match all of the criteria that you specify.
Saved SearchesIn the Saved Searches area, you can save a complex search to use later, select a search to run again, ordelete a saved search.
Saved Searches If you have saved a search, it is listed in this drop-down list for you to selectand run again. When you click Start at the bottom of the pane, the searchresults are listed in the File List pane.
Saved Searches are also listed on the Catalog pane, from where you can runthem with a single click on the Saved Search name.
Save a search Click the Save icon, and then Save or Save As to save or overwrite a savedsearch. When the Saved Search dialog opens, type in a name for the search. Ifyou use a descriptive name, it makes it easier to remember the criteria inyour saved search.
Delete a search Select a search from the drop-down list and then click the Delete icon. ClickYes to confirm the deletion, when the prompt opens.
Files and TextIn the Files and Text area, you can identify what you are searching for, and where you want to searchfor it.

ACDSee Photo Studio Home 2022
Page 128 of 506
Search for files or foldersnamed
Type a portion of the file or folder name for which you want to search, orselect a previous search term from the drop-down list. You can also usewildcards to search for file name patterns. To exclude all non-image files,click the right-arrow button beside the field and select Images only.
With the text Type the text you want to search for within the ACDSee Home database. Thiscan include portions of a caption or keyword, or even the name of a folder orcategory that might contain the files you want to find. When you search byboth file name and a keyword or phrase, an item is included in the searchresult only when it includes both criteria.
To specify what parts of the database you want to search, and indicate how totreat the text you type in the field, click the arrow next to the field and selectany of the following options:
l Find all words: only returns files that match all of the words you enter.l Find whole words only: only returns files that contain the entireword, exactly as you type it.
l Search in Caption: searches the Caption field of files in the database.l Search in Keywords: searches the Keyword field of files in the data-base.
l Search in Notes: searches the Notes field of files in the database.l Search in Categories: searches the Category assignments of files inthe database.
l Search in Folders: searches in the name of folders in the database.l Search in Labels: searches the labeled images by color.l Search in People: searches people detected in images and namedusing Face Detection in View mode. You can search by assigned names,suggested names, or both. Named and unnamed faces are available foredit or display in People mode.
Please note that Face Detection is only available for the 64-bit version of ACDSee Photo Studio Home.
Search in Select one of the following options:l Entire database: performs a search on the entire ACDSee Home data-base. Note that any folders on your computer that have not been cata-loged are not included in the search results.
l Specific folders and categories: performs the search only within thecategories and folders you specify. Selecting this option opens the Cat-egories and Folders area, where you can select the location and cat-egories in which you want to search.
Sync to file list settings Imports the current Manage mode settings, including Selective Browsingsettings, into the Search pane. Note that this may also remove criteria fromthe Search pane.
Properties Area
In the Properties area, you can identify file properties that you want to search for, and specify rangesof values to include or exclude from your search.
To Use the Properties Area:

ACDSee Photo Studio Home 2022
Page 129 of 506
1. Below the Search file properties field, click Add.
2. In the Add Search Criteria dialog box, select one or more properties on which to base your search.
3. Click OK.
4. In the Properties area, click the hyperlinks to define conditional statements for each property.
5. Click Start to perform the search.
Searching with File Name Patterns
You can type a text pattern into the Search pane's Search for files and folders named field to searchfor file names. You can search for simple patterns such as portions of file names, or more advancedpatterns that include wildcards.
File Name Pattern Wildcards
Wildcard Result Example
? Matches any single character in the file name. ca?.jpg results in cat.jpg, cap.jpg,and car.jpg, but not cats.jpg
* Matches zero or more characters in the file name. cat* results in cat.jpg, cats.jpg, andcathy.jpg
[…] Matches any of the enclosed characters. ca[tr] results in cat.jpg or car.jpg,but not cap.jpg
[!…] Matches any character not enclosed. cat[!0] results in cata.jpg andcatb.jpg, but not cat0.jpg
[…-…] Matches any character in the specified range. cat[a-f0-9] results in cata.jpg,catb.jpg, catf.jpg and cat0.jpg,cat1.jpg, …, cat9.jpg
\ Blocks the use of other wildcard characters that arealso characters permitted in a file name, such assquare brackets: [ ]. The * and ? characters are notpermitted in file names so this function does notwork with them.
Because square brackets arewildcards, if you wanted to searchfor a file name that contains abracket, you must precede thebracket with a backslash:
ACD\[123\] results in ACD[123].gif
Patterns are not case-sensitive. To use multiple patterns, separate the names with spaces orsemicolons. To match a pattern containing a space or semicolon, enclose the pattern indouble quotation marks. If you do not include the * wildcard in your pattern, the pattern ismatched as a sub-string. For example, cat would match cat, cathy and bobcat, and isequivalent to the pattern *cat*.

ACDSee Photo Studio Home 2022
Page 130 of 506
Using Selective Browsing
You can use selective browsing to browse for files that are located in a specific folder, assigned aspecific date, and/or assigned to a specific Catalog classification. By adjusting the selective browsingcriteria, you can quickly include or exclude files from the File List pane, and view only those files youwant to browse.
To get the most out of selective browsing, it is recommended that you catalog and organize your filesin the ACDSee Home database. The more information you enter for your files, the more helpful youwill find the selective browsing feature.
To Use Selective Browsing:
Open the Selective Browsing panel by clicking View | Selective Browsing. The panel appears on theleft side of the File List pane.
Setting Selective Browsing Criteria
The Selective Browsing panel is divided into three areas: Folders, Catalog, and Calendar, each of whichcorresponds to the Manage mode pane of the same name. When the Selective Browsing panel isopen, the Contents bar in the File List pane is replaced by the Selective Browsing bar, which lists all ofthe current browsing criteria.
When you add a folder, date range, or organize method to the Selective Browsing panel, ACDSeeHome excludes any files that do not match that criteria. You can add or remove criteria to narrow orbroaden your results.
To Add Selective Browsing Criteria:
With the Selective Browsing panel open, do any of the following:
In the Folders pane, select one or more folders.
In the Catalog pane, select one or more categories, and/or a rating.
In the Calendar pane, select one or more date ranges.
As each criteria is added to the Selective Browsing panel, ACDSee Home searches its database for filesin that folder, that match the date range, and are assigned to the classification, and displays them inthe File List pane. You can then select those files and use the ACDSee Home features to edit, share,move, and view them however you want.
You can also adjust or refine your criteria in the Selective Browsing panel:
To remove a selected criteria from the Selective Browsing panel, right-click any of the criteria, and thenselect Remove From Scope.

ACDSee Photo Studio Home 2022
Page 131 of 506
To exclude all of a certain type of criteria, click the bar above the list, and toggle the option to includethat type in the scope. For example, to exclude the listed folders from the scope, click the Folders bar,and then click Include Folders in Scope. The folders you selected will still be displayed in the SelectiveBrowsing panel, but will not factor in the results.
To remove all criteria of a certain type, click the bar above the list, and select Clear All.
The default behavior for categories in the Selective Browsing panel is to display files that match any ofthe categories listed. You can refine your results by choosing to display only those files that areassigned to all of the specified categories. To toggle between behaviors, right-click the bar above thecategories you selected, and selectMatch Any orMatch All.
Tips for Selective Browsing
When you add a criteria to the Selective Browsing panel, you are indicating that the files you want tobrowse must have that attribute. For example, if you select a folder in the Folders pane, then ACDSeeHome displays only files in that folder. If you select a rating in the Catalog pane, ACDSee Home displaysonly files assigned to that rating.
You can combine criteria to refine your selective browsing even further. For example, if you select acategory and a date range, then ACDSee Home displays only those files that belong to both thecategory and date range you selected. ACDSee Home does not display items that fall within the daterange unless they are also assigned to the correct category, and does not display files assigned to thatcategory unless they also match the date range.
Hiding the Selective Browsing Panel
You can use the Auto Hide feature to automatically hide the Selective Browsing panel and increasespace for the File List pane. When the panel is set to auto-hide, it rolls away when you click outside it,leaving only an edge displayed. You can access the panel again by moving the cursor over the edge.
Searching with Auto Categories
Auto categories can help you search for files. This is particularly useful if you tend to take a lot ofphotos, or if you share your pictures with others.
You will find auto categories in the Catalog pane below Labels. Double-click or click the plus sign (+) toexpand auto category groupings. Double-click or click the minus sign (-) to collapse the auto categorygroupings.
Some auto category information is added to images by your camera. This could include camera makeand model, white balance settings, focal length, and aperture. You can supplement that withinformation you think is useful such as the location, keywords or copyright. To do this, you can enterinformation in the Properties pane.

ACDSee Photo Studio Home 2022
Page 132 of 506
When you click on an auto category, ACDSee Home searches for images belonging to that category.For example, if you use more than one camera, you can use auto categories to search for picturestaken using certain camera models. All images captured with that camera model will display.
Below are some tips for searching with auto categories.
Identifying Commonly Used Search Categories
If you use certain auto categories in the Photo Properties grouping frequently, you can save time byadding them to the Commonly Used grouping. Some Photo Properties groupings are available in theCommonly Used grouping by default. You can add and remove as many auto categories as you wantto the Commonly Used grouping.
To Add an Auto Category Grouping to the Commonly Used Grouping:
1. Expand the Photo Properties grouping.
2. Right-click the auto categories grouping that you want to add to the Commonly Used grouping, andselect Add to Commonly Used. The grouping is added to the Commonly Used grouping.
It remains visible in the Photo Properties grouping as well.
To Remove an Auto Category Grouping from the Commonly Used Grouping:
1. Expand the Commonly Used grouping.
2. Right-click the auto categories grouping that you want to remove from the Commonly Used grouping,and select Remove from Commonly Used.
The grouping is removed from the Commonly Used grouping.
Refining Your Auto Categories Search
You can refine your auto categories search by selecting more than one auto category. For example,you can find images with a certain aperture and shutter speed. If you click the Easy-Select indicatorbeside the f/16 aperture auto category and the 1/30 s shutter speed auto category, ACDSee Home willsearch for images that belong to both of those auto categories.
When you select more than one auto category you can further control the search by selectingMatchAll orMatch Any from the Match Any/All drop-down list at the top of the Catalog pane. If you selectMatch Any, ACDSee Home will display any images associated with the selected auto categories. If youselect Match All, ACDSee Home will display only those images that are associated with all of theselected auto categories.
You can also refine your auto categories search by selecting a category or rating. For example, imaginethat you clicked on the Photographer auto category and found over 1000 images. However, you onlywant to see the best images by that photographer. Click the Easy-Select indicator beside 1 in theRatings area of the Catalog pane. Only the images by that photographer with a rating of 1 will display.

ACDSee Photo Studio Home 2022
Page 133 of 506
You can also use the Selective Browsing pane to refine your auto categories search. For example,imagine that you clicked on the Camera Model auto category and ACDSee Home displayed over 1000images. However, you only want to see the images that you took on a specific date. Display theSelective Browsing pane by clicking View | Selective Browsing, then select the Calendar pane andselect the appropriate date. Only the images taken with that camera model on that day will bedisplayed.
Finding Duplicate Files
You can use the Duplicate Finder to find duplicate files across a variety of folders on your hard drive.Once duplicates are found, you can perform rename and delete functions to better manage your filecollection.
Note that identical images saved as different formats (i.e. different extensions, such as JPEG,BMP, GIF), are not recognized as duplicates. If you have a JPEG and save a copy of it, theimage is recompressed. Therefore the original JPEG and the copy are a different file internallyand they are not recognized as duplicates.
To Find Duplicate Files:
1. In Manage mode, select a folder or images to search for duplicates. (Optional)
2. Click Tools | Find Duplicates...
3. In the Duplicate Finder dialog box, do one of the following:
To find duplicates within the selected folder and any added files or folders, select Findduplicates within this single list of files.
To find duplicates by comparing the contents of two separate lists, select Find duplicates withinthese two lists of files. (This will not search for duplicates within one of the two lists. It will onlysearch the two lists against one another.)
4. Add files to your list or lists with the Add Files... and Add Folder... buttons. Remove files by selectingthem in the list and pressing the Remove button. Switch out one file or folder for another by selecting itin the list and pressing the Modify button. To include the contents of any subfolders you selected, checkthe Include subfolders checkbox.
5. Below the File Lists, specify whether you want to find exact duplicates or just files with the same name.Select Find images only if you only want to search for image files.
6. Press Search.
7. If no duplicates are found, click OK and refine your search or click Cancel to exit the Duplicate Finder.
8. If duplicates are found, select sets in the list for further actions.

ACDSee Photo Studio Home 2022
Page 134 of 506
Deleting and Renaming Files
Once duplicates have been found, files can be renamed or deleted. If you are working with image files,a preview is available.
If multiple sets of duplicates have been found, you may want to sort them for easier viewing.
To Sort Files:
1. Right-click in the upper-left list.
2. Select one of the following:
Sort by Filename
Sort by Path
Sort by File Size
Sort by File Type
Sort by Number of Duplicates
To Delete Duplicates:
1. Select the desired file set in the upper-left list.
2. In the bottom field, do one of the following:
Check the checkbox next to the file name. The file name changes to Delete File.
Right-click on the file name and select Delete from the context menu. The file name changes toDelete File.
3. If you searched using two file lists, you can choose Delete from File List 1/File List 2. This will save youtime by selecting all files from File List 1 or File List 2, as specified.
4. Click Next to review your changes, and then click Finish.
To Rename a File:
1. Select the desired file set in the upper-left list.
2. In the bottom field, right-click on the file name and select Rename from the context menu.
3. Type a new name for the file.
4. Click Next to review your changes, and then click Finish.

ACDSee Photo Studio Home 2022
Page 135 of 506
Finding Images Quickly
You can click on the name of a saved search to quickly re-run the search. You can select Special Itemsin the Catalog pane to locate all of the images in your database, or list all of the images that you havenot yet assigned to a category.
To Re-Run a Saved Search:
In Manage mode, in the Catalog pane, click the name of a saved search.
The results of the search display in the File List pane.
To Find All of Your Images at Once:
1. In Manage mode, click Panes | Catalog to open the Catalog pane.
2. In the Catalog pane, under Special Items, click Image Well.
To Locate Uncategorized Images:
1. In Manage mode, click Panes | Catalog to open the Catalog pane.
2. In the Catalog pane, under Special Items, click Uncategorized. The Image Well and Uncategorizedfeatures only display images that have been cataloged in the database; they do not search your harddrive for specific file types.
To Locate Images That Haven't Been Keyworded:
1. In Manage mode, click Panes | Catalog to open the Catalog pane.
2. In the Catalog pane, under Special Items, click No Keywords.
Sharing Files with ACDSee Home
ACDSee Homemakes it easy to share your images and other files with friends and family. You canemail files directly from ACDSee, upload images to a website, create your own webpages with theHTML Album plug-in, or print a contact sheet. You can also create slideshows and screensavers thatyou can give to anyone with a computer—they do not need ACDSee Home to view them.
Taking a Screen Capture
You can use the ACDSee Home Screen Capture utility to create images from different areas of yourscreen. You can select what areas to capture, how you want to perform the capture, and where tostore the captured image.
To Take a Screen Capture:

ACDSee Photo Studio Home 2022
Page 136 of 506
1. In Manage mode or View mode, click Tools | Screen Capture...
2. In the Source area of the Screen Capture dialog box, identify the part of the screen you want to capture.See the table below for a description of the Source options.
3. If you want to include your cursor in the output image, check the Include mouse cursor checkbox.
4. In the Destination area, identify where you want to place the output image.
5. In the Initiate capture area, identify how you want to take the screen capture.
6. Click Start to launch the screen capture tool.
An icon appears in the Taskbar Notification area.
7. Prepare your screen to show the area you want to capture, and then follow the steps that appear in thebubble above the Screen Capture icon.
8. To exit the Screen Capture utility without taking a screen capture, right-click the Screen Capture icon,and then select Exit Screen Capture.
Screen Capture Options
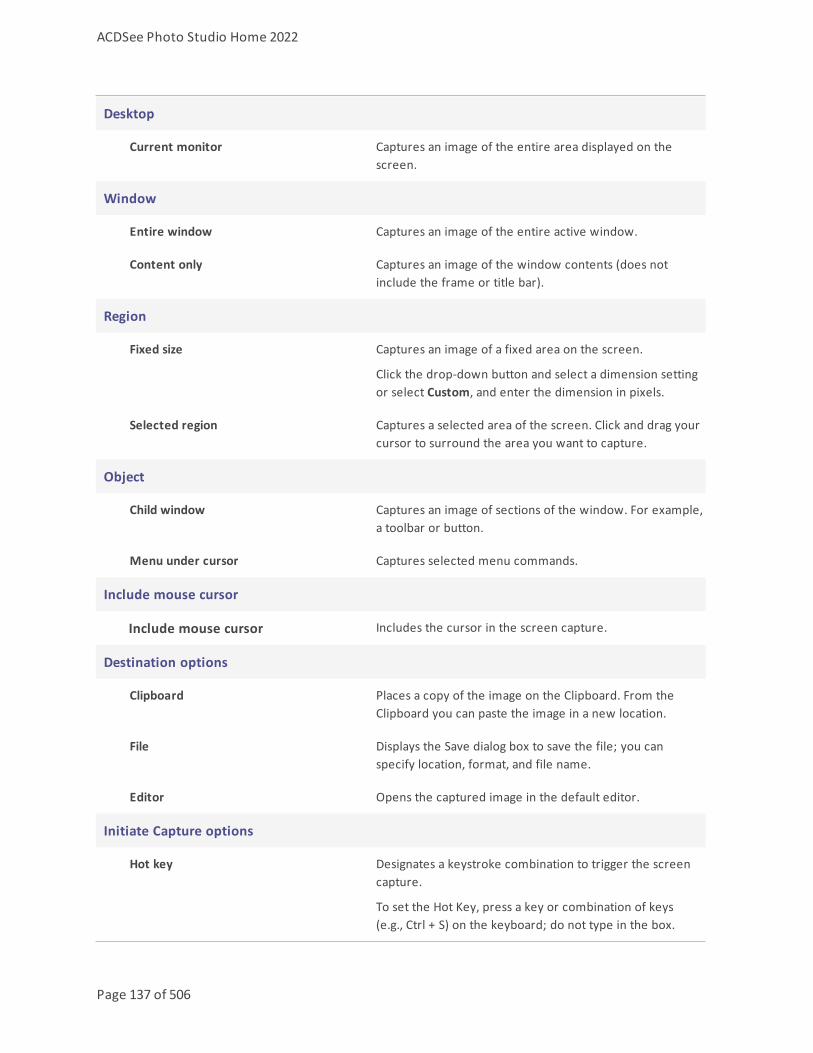
ACDSee Photo Studio Home 2022
Page 137 of 506
Desktop
Current monitor Captures an image of the entire area displayed on thescreen.
Window
Entire window Captures an image of the entire active window.
Content only Captures an image of the window contents (does notinclude the frame or title bar).
Region
Fixed size Captures an image of a fixed area on the screen.
Click the drop-down button and select a dimension settingor select Custom, and enter the dimension in pixels.
Selected region Captures a selected area of the screen. Click and drag yourcursor to surround the area you want to capture.
Object
Child window Captures an image of sections of the window. For example,a toolbar or button.
Menu under cursor Captures selected menu commands.
Include mouse cursor
Include mouse cursor Includes the cursor in the screen capture.
Destination options
Clipboard Places a copy of the image on the Clipboard. From theClipboard you can paste the image in a new location.
File Displays the Save dialog box to save the file; you canspecify location, format, and file name.
Editor Opens the captured image in the default editor.
Initiate Capture options
Hot key Designates a keystroke combination to trigger the screencapture.
To set the Hot Key, press a key or combination of keys(e.g., Ctrl + S) on the keyboard; do not type in the box.

ACDSee Photo Studio Home 2022
Page 138 of 506
Timer Takes a screen capture after a designated period. Chooseenough time to set up your desktop or window for thescreen capture. The maximum setting is 60 seconds.
Emailing Images
You can use the Send Email wizard to send images directly from ACDSee Home without opening anexternal email application. To use the Send Email wizard, you will need an active email account, andhave a default email application set up on your computer, or have access to an SMTP server.
To Email Your Images:
1. In the File List pane, select the images you want to email, and then click File | Send | Email Images.
If you want to add other images, click Add. When you have finished adding images, click OK.
If you want to delete images, select an image and click Remove. The image is removed from thewizard, but not deleted from ACDSee.
If you want to set email and image options, such as the maximum size for emails or theconversion of images to JPEG, click Options. When you have finished selecting options, clickApply.
If you want to change the email account settings, to use either your default email client or anSMTP server, click Change. When you have finished changing your email account settings, clickOK.
2. In the Send Email wizard, click Next.
If you selected Send using your default email client, the wizard adds your images and emailinformation to a new email message. You can edit the message and then send it as you normallywould.
If you selected Send through an SMTP server, in the wizard, enter the email address you wantto send the email to, a subject for the email, and a message. Click Next.
3. When the images have been sent, click Finish to close the wizard.
Some Internet-based email applications such as Hotmail and Yahoo (free accounts) do notsupport SMTP and cannot be used with the Send Email wizard. For others, such as Gmail,Yahoo (upgraded accounts), and AOL, you must configure the account for POP/SMTP. Tolearn how to configure these types of email accounts, visit their specific websites and searchfor SMTP.
See also:
ACDSee Photo Studio Home 2022
Page 139 of 506
Share/Email Using ACDSee 365
Once you have activated your account with ACDSee 365, you can share your images through365.acdsee.com.
To Email Your Images:
1. In the File List pane, select the images you want to share, and then click File | Send | Share/Email usingACDSee 365.
2. In the Share/Email with ACDSee 365 dialog box, enter a Name for your album of photos and select aLocation from your existing online folders.
3. Enter one or more email addresses to send the images to.
You can click the Share with button to pull names from your address book.
4. Select an upload size from the drop-down list.
5. Click Upload.
6. A new window opens providing the option to enter a message, enable download of full sized JPG, andcreate an access password.
7. Click OK.
Creating a Desktop Screensaver
You can create a desktop screensaver using your own images. You can set the screensaver options toadjust how long each image is displayed, set the background color, apply transition effects, and addheader or footer text.
To Create a Screensaver:
1. In Manage mode, in the File List pane, select a group of images, and then click Tools | ConfigureScreensaver.
2. In the ACDSee Screensaver dialog box, click Add to browse for more images to add to your screensaver,or select images you do not want to include and click Remove.
3. Click Configure, specify the options as described below, and then click OK.
4. To automatically use the screensaver on your desktop, check the Set as default screensaver checkbox.
5. When you are satisfied with your choices, click OK.
To Activate the Screensaver on Your Computer:
Select the Screensaver tab in your Windows Display Properties dialog box, and then select ACDSeeScreensaver from the drop-down list.

ACDSee Photo Studio Home 2022
Page 140 of 506
ACDSee Screensaver Options

ACDSee Photo Studio Home 2022
Page 141 of 506
Basic
Select transitions Displays a list of transitions for you to select and playseach transition, variation, or effect in the Preview asyou select it.
Select all: selects all the transitions and displaysthem randomly.
Clear all: clears any selected transitions.
These transitions do not work with the 2-up, 4-up and Collage variations.
Variations Click the drop-down list to select from the following:
None: uses no variations
Pan and Zoom: zooms in and pans across eachslide during the time it is displayed.
2-up: displays two images at a time.
4-up: displays four images at a time.
Collage: displays images as a collage whereimages overlap each other.
Effects Click the drop-down list to select from the following:
None: uses no effects.
Black & white: displays all images in grayscale.
Sepia: displays all images in sepia.
Vivid: increases the saturation of the images tomake colors brighter.
Soft: blurs images slightly for a softening effect.
Background color Specifies the background color. Click the color pickerto select or change the color. Click Other to set acustom color in the Color dialog box.
Slide duration (sec) Specifies how long you want the screensaver to displayeach image.
Advanced

ACDSee Photo Studio Home 2022
Page 142 of 506
General settings Select or clear the following options:
Stretch images to fit screen: enlarges smallimages to fill the entire screen.
Play embedded audio: plays any audio clipsembedded in the images.
Slide order Select one of the following options to specify the orderto display your images:
Forward
Shuffle
Text
Display header text Displays a text caption at the top of each image. Set theoptions to specify the text you want to display.
Display footer text Displays a text caption at the bottom of each image. Setthe options to specify the text you want to display.
Screensaver Text Options
Alignment Specifies the alignment of the text captions.
Background color Specifies a background color for the caption text.
Text Specifies the text to display as a caption.
Font Opens the Font dialog box where you can select or change the font options for yourtext.
Insert MetadataTag
Inserts file-specific information called metadata into the caption.
Click to open the Choose Properties dialog box and select the metadata you want toinsert.
Viewing and Configuring a Slideshow
You can view a slideshow of images and/or videos from Manage mode or from Viewmode. You canalso configure your slideshow to start automatically whenever you run it, and set the slideshowoptions to adjust how long each image is displayed, set the background color, apply transition effects,and add header or footer text.
ACDSee Photo Studio Home 2022
Page 143 of 506
To Start a Slideshow in Manage Mode:
1. Do one of the following:
In the File List pane, select a group of images.
In the Folders pane, select a folder.
Use the Easy-Select bar to select multiple folders that contain images.
2. Click Tools | Slideshow. (Ctrl + S)
To Start a Slideshow in View Mode:
Click Tools | Slideshow.
To Configure a Slideshow:
1. In Manage mode, do one of the following:
In the File List pane, select a group of images.
In the Folders pane, select a folder or use the Easy-Select bar to select multiple folders thatcontain images.
2. Click Tools | Configure Slideshow.
3. In the Slideshow Properties dialog box, select or change the slideshow options as described below.
4. To save your settings as the default slideshow behavior, check the Save current settings as defaultcheckbox.
5. Click OK.
Slideshow Options
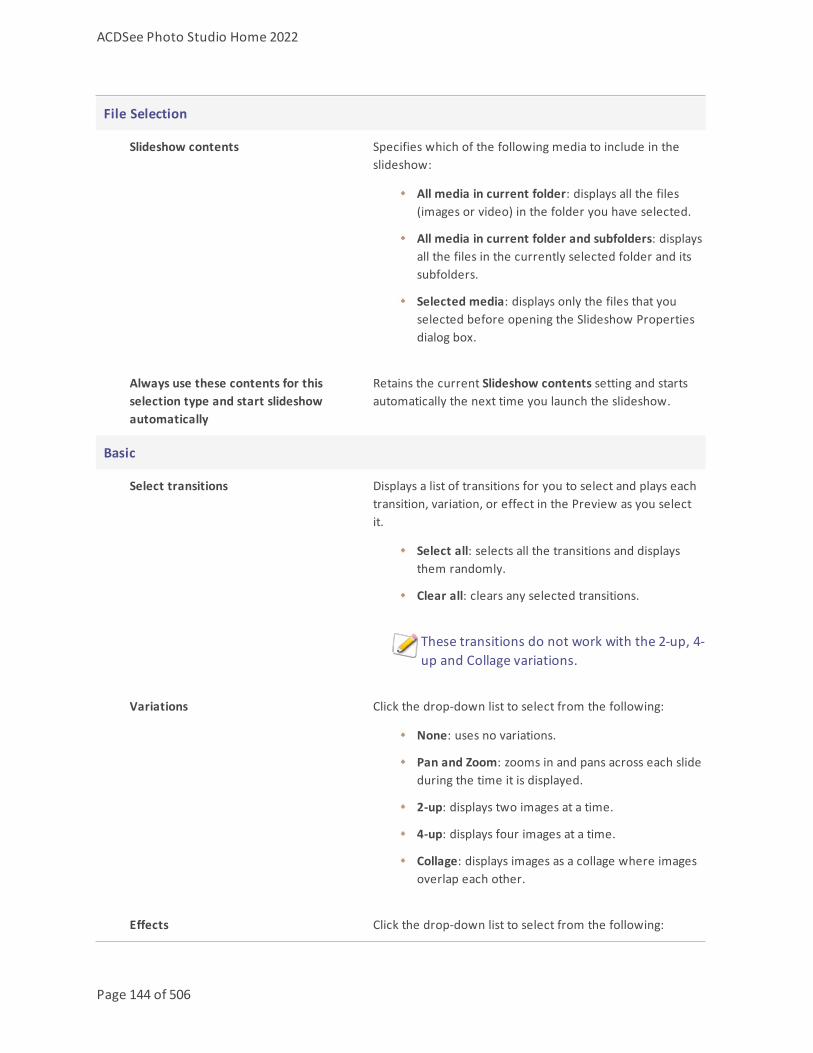
ACDSee Photo Studio Home 2022
Page 144 of 506
File Selection
Slideshow contents Specifies which of the following media to include in theslideshow:
All media in current folder: displays all the files(images or video) in the folder you have selected.
All media in current folder and subfolders: displaysall the files in the currently selected folder and itssubfolders.
Selected media: displays only the files that youselected before opening the Slideshow Propertiesdialog box.
Always use these contents for thisselection type and start slideshowautomatically
Retains the current Slideshow contents setting and startsautomatically the next time you launch the slideshow.
Basic
Select transitions Displays a list of transitions for you to select and plays eachtransition, variation, or effect in the Preview as you selectit.
Select all: selects all the transitions and displaysthem randomly.
Clear all: clears any selected transitions.
These transitions do not work with the 2-up, 4-up and Collage variations.
Variations Click the drop-down list to select from the following:
None: uses no variations.
Pan and Zoom: zooms in and pans across each slideduring the time it is displayed.
2-up: displays two images at a time.
4-up: displays four images at a time.
Collage: displays images as a collage where imagesoverlap each other.
Effects Click the drop-down list to select from the following:

ACDSee Photo Studio Home 2022
Page 145 of 506
None: uses no effects.
Black &White: displays all images in grayscale.
Sepia: displays all images in sepia.
Vivid: increases the saturation of the images tomake colors brighter.
Soft: blurs images slightly for a softening effect.
Background color Specifies the background color. Click the color picker toselect or change the color. Click Other to set a customcolor in the Color dialog.
Slide duration (sec) Specifies how long you want the slideshow to display eachimage.
Advanced
General settings Select or clear any of the following options:
Stretch images to fit screen: enlarges small imagesto fill the entire screen.
Play embedded audio: plays any audio clipsembedded in the images.
Stretch video to fit screen: enlarges video files tofill the entire screen.
Autohide control bar: hides the slideshow controlswhenever the cursor stops moving for more than afew seconds.
Loop: repeats the slideshow after displaying the lastimage.
Slide order Select one of the following options to specify the order todisplay your images:
Forward
Shuffle
Music directory Displays music from the previously-selected folders, or youcan click Browse to find a new folder.
Text
Display header text Displays a text caption at the top of each image. Set the

ACDSee Photo Studio Home 2022
Page 146 of 506
options to specify the text you want to display.
Display footer text Displays a text caption at the bottom of each image. Set theoptions to specify the text you want to display.
Save current settings as default
Save current settings as default Retains the current settings on all of the tabbed pages andapplies them the next time you view a slideshow.
Slideshow Text Options
Alignment Specifies the alignment of the text captions.
Background color Specifies a background color for the caption text.
Text Specifies the text to display as a caption.
Font Opens the Font dialog box where you can select or changethe font options for your text.
Insert Metadata Tag Inserts file-specific information called metadata into thecaption.
Click to open the Choose Properties dialog box and selectthe metadata you want to insert.
Sharing Slideshows and Screensavers
You can view a slideshow of your images from Manage or Viewmode at anytime by clicking Tools| Slideshow (keyboard shortcut Ctrl + S in Manage mode). With ACDSee, you can also createslideshows and screensavers of your favorite photos, and send them to friends and family, or displaythem on your website. You can even save your slideshow or screensaver project to edit at a later time.
To Create a Slideshow:
1. In Manage mode, click Tools | Create | Slideshow File.
2. On the Welcome page, to create a new slideshow, select the Create a new slideshow radio button. Tospecify what type of slideshow you want to create, select one of the following options:
Standalone slideshow: creates a single executable file (.exe) containing all of your images andeverything needed to view them. You can share this type of file with anyone who has acomputer, even if they do not own ACDSee.
Windows screensaver: creates a standard Windows screensaver file (.scr) that can be storedand used on any Windows system.

ACDSee Photo Studio Home 2022
Page 147 of 506
Adobe Flash Player® slideshow: creates a compact Adobe Flash file (.swf) that you can displayon a website.
3. To edit an existing slideshow or screensaver project, select the Load an existing slideshow project radiobutton, and then click Browse to locate your project (.asw file).
4. Click Next to continue.
5. On the Choose your images page, you can view the images included in your slideshow, in the defaultorder they will be displayed. Click Add or Remove to change the images, and use the arrow buttons toreorder them. Click Next when you are ready to continue.
6. On the Set file specific options page, click the underlined words beside each thumbnail to set theindividual options for each image. These include transitions between photos, the duration of thetransition and slide, text captions, and audio files to play when the image is displayed. Note that theoptions available depend on your choice of output file format, and not all formats support all options.Click Next when you are ready to continue.
7. On the Set slideshow options page, set the timing for each slide to automatic or manual, the order todisplay slides, and whether or not to hide the controls. You can also add audio files to play in thebackground, and adjust the quality, or speed, of the transitions. Click Next when you are ready tocontinue.
8. On the following pages, set the options for image size, location of your slideshow file and the projectfile.
9. Finally, click Next, and wait a few moments while ACDSee Home generates your slideshow. Whencomplete, you can launch your slideshow and exit the wizard.
If you assign an audio file to an individual image, as well as to the whole slideshow on the Setslideshow options page, then both audio files will play simultaneously when that slidedisplays.
Creating a Desktop Slideshow
You can use ACDSee Showroom to create a slideshow of your photos and display that slideshow in asmall window on your computer desktop. You can run up to 16 different slideshows on your computerat once.
You can configure the ACDSee Showroom window to always stay on top of other application windows.You can also configure it to open when you start your computer. You do not have to open ACDSeeHome to use ACDSee Showroom.
To Create a Desktop Slideshow with ACDSee Showroom:

ACDSee Photo Studio Home 2022
Page 148 of 506
1. In Manage mode, navigate to a folder containing images that you want to add to the desktop slideshow.
2. Do one of the following:
Click Tools | Create | ACDSee Showroom.
Click Start | Programs | ACD Systems | ACDSee Showroom.
The slideshow starts immediately and the ACDSee Showroom icon appears in the taskbar.
Using the ACDSee Showroom Slideshow Controls
There are a number of slideshow controls in the ACDSee Showroom window.
Click the Back or Forward buttons to display the previous or next photos in the slideshow.
Click the Pause button to pause the slideshow while a particular photo is displayed.
If you cannot see these slideshow controls in the ACDSee Showroom window, click anywherein the window. The controls disappear while the slideshow is playing so you can fully enjoyyour photos.
To Create More Than One ACDSee Showroom:
With ACDSee Showroom open, do one of the following:
Right-click in the ACDSee Showroom window and select New Showroom.
Click the ACDSee Showroom icon in the taskbar and select New Showroom.
To Close ACDSee Showroom:
Do one of the following:
Click Close in the ACDSee Showroom window.
Click the ACDSee Showroom icon in the taskbar and select Exit ACDSee Showroom.
If you have configured ACDSee Showroom to open when you start your computer, it willautomatically open the next time you start your computer.
Creating a PDF
You can use ACDSee Home to combine your images into PDF (portable document format) files. TheCreate PDF wizard will guide you through the process of creating one or more PDF files from yourimages, or adding images to a PDF slideshow.
ACDSee Photo Studio Home 2022
Page 149 of 506
To Create a PDF:
1. In Manage mode, in the File List pane, select the images you want to share.
2. Click Tools | Create | PDF.
3. On the Welcome page of the Create PDF wizard, select one of the following options, and then clickNext:
Create a PDF slideshow: combines all of your images into a single PDF file that you can view as aslideshow.
Create one PDF file containing all images: combines all of the selected images into a single PDFfile with multiple pages.
Create one PDF file for each image: converts each image into a separate PDF file.
4. On the Choose images page, you can change the selected images, and use the arrow buttons to reorderthem. Click Next to continue.
5. Do one of the following:
If you selected to create a PDF slideshow, set or change the transition options by clicking thehyperlink next to each image. Click Next to set the order, color, and file name options for yourslideshow. Click Next when you are ready to continue.
If you selected to create one or more PDF files, specify a file name and location, and then clickNext.
6. Click Finish to close the wizard and return to ACDSee.
Creating a PowerPoint Presentation
You can create a PowerPoint presentation quickly from inside ACDSee Home using the Create PPTwizard. The wizard walks you through the process of creating or editing a presentation using yourphotos. You can set slide duration, the location of the file, number of images per slide and whether ornot to use a design template as a background. You can also add captions, a title, or notes to eachslide.
This feature only works if you have Microsoft PowerPoint® installed on your computer. Thefeature does not support RAW files, so you will need to convert RAW files to another format.Your version of Microsoft PowerPoint® must match your ACDSee architecture. For example, ifyou have a 64-bit version of ACDSee, you must have a 64-bit version of PowerPoint/Office.
To Create a PowerPoint Presentation:
1. In Manage mode, in the File List pane, select the images you want to share.
2. Click Tools | Create | PPT.

ACDSee Photo Studio Home 2022
Page 150 of 506
3. On the Choose images page of the Create PPT wizard, click Add if you want to add more images.
4. Click Next.
5. On the Presentation Options page, do one or all of the following:
In the Presentation Options area, if this is a new presentation, set the duration that you wanteach slide to display.
If you are editing a presentation, select Existing presentation to activate the Path field, andbrowse to your presentation. Select whether you want to Insert slides at the beginning or endof the presentation.
Select the Number of images per slide from the drop-down list. (If you select more than one,the Title and Notes options on the next page do not appear.)
Select Link to Image file if you want your images to stay linked to ACDSee Home rather than beembedded in the presentation.
Click Use a design template if you want to use a background template and browse to the folderon your computer to select it. (PowerPoint templates are usually under Microsoft Office |Templates | Presentation Designs.)
6. Click Next.
7. On the Text Options page, do one or all of the following:
On the Caption tab, type in a caption and select its background color and alignment. You canalso select a different font, or insert metadata like file name or picture dimensions. Captionsappear at the bottom of the slide.
On the Title tab, type in a title for the slide and select its background color and alignment. Youcan also select a different font, or insert metadata.
On the Notes tab, type in any notes that you want to appear in the Notes section attached toeach slide. These notes do not appear on the slide itself.
8. Click Create.
The presentation opens in PowerPoint where you can edit it like any other presentation.
Creating an HTML Album
You can use the HTML Album wizard to prepare photo collections for posting online. The HTML albumincludes slideshow controls and a thumbnail display. You can select from a list of gallery styletemplates and then customize the gallery by adding your own logo as an image or text to the headeror footer. You can also change the fonts and colors used in the gallery.
To Create an HTML Album:

ACDSee Photo Studio Home 2022
Page 151 of 506
1. In Manage mode, in the File List pane, select the images you want to share.
2. Click Tools | Create | HTML Album.
3. On the Style Settings page of the Create HTML Album wizard, select a Gallery Style from the webpagestyles box.
After you select a Gallery Style and other settings, you can click Preview Gallery to see howthose selections affect the appearance of your HTML album. You can also generate your HTMLalbum from any page in the HTML Album wizard by clicking Generate Album.
4. Click Next.
5. On the Gallery Customization page, do one or all of the following:
In the Gallery Title text box, type the title that you want to display at the top of the webpage.
Check Include header to display a header at the top of the webpage, or uncheck the Includeheader checkbox to remove the header.
Check Include footer to display a footer at the bottom of the webpage, or uncheck the Includefooter checkbox to remove the footer.
If you want to display an image in the header or footer, select Use image and click Browse andselect a company logo, a photo of yourself, or another image to display in the header.
If you want to display text in the header or footer, select Use information and click SetInformation and add enter the text that you would like to display.
In the Folder settings section, click Browse and select the folder where you would like to savethe HTML album files.
6. Click Next.
7. On the Thumbnail and Image page, do one or all of the following:
In the Thumbnail settings section, adjust the appearance and format of the thumbnails in thealbum.
In the Image settings section, adjust the appearance and format of full size images in the album.
In the Slideshow duration section, specify how long to display full size images during aslideshow.
In the Color and font settings section, click Color and font, adjust the colors and fonts used inthe webpage, and then click OK.
Click Save Settings to save the settings that you select for specific webpage styles. If you savethe settings, you can quickly reapply them to a webpage style from the Style Settings page ofthe Create HTML Album wizard.
ACDSee Photo Studio Home 2022
Page 152 of 506
8. Click Next to create your HTML album. You may need to wait a few moments while ACDSee Homegenerates the thumbnails and creates the webpage.
9. Click Create Another Album to create another album, or click Finish to exit the wizard and return toACDSee.
You will need to use FTP or another method to post the HTML album files to your website.
Uploading Images to Photo Websites
You can upload your photos or images directly from ACDSee to sites like Flickr, SmugMug, Zenfolio,and FTP sites. You will need an account before you can upload pictures to these sites but if you do nothave one, you can create an account as part of the first upload process.
You can select almost any image file type, including RAW and TIFF, and ACDSee will convertthe file to JPG automatically before uploading.
To Upload Photos to a Photo Website:
You can quickly upload your photos to photo sharing websites without having to leave ACDSee.
1. In Manage mode, select one or more images and click File | Send | To <Photo Website>...
2. In the <Photo Website> Uploader dialog box, press the Help button in the lower right corner and follow theinstructions.
Creating a Contact Sheet
You can create contact sheets—thumbnail previews of your images arranged on pages — that you canuse to organize and share your images. You can use the Create Contact Sheet utility to save yourcontact sheets in multiple image formats, and as HTML image maps. You can save your options as apreset for future use.
The size of the thumbnails depends on howmany columns and rows the contact sheet displays, andhowmuch space is displayed between them.
To Create a Contact Sheet:
1. In Manage mode, in the File List pane, select the images you want to include.
2. Click Tools | Create | Contact Sheet.
3. In the Contact sheet format area, set the Contact sheet format options.
4. In the Output Settings area, set the Output Settings options.

ACDSee Photo Studio Home 2022
Page 153 of 506
5. If desired, add or change the text on the page.
6. Click OK.
If you do not specify an output file path, the Create Contact Sheet utility places a file namedContact Sheet.<ext> in your default image folder. For multiple-page contact sheets, the utilityadds a number to the file name; for example, Contact Sheet3.bmp.
Contact Sheet Format Options

ACDSee Photo Studio Home 2022
Page 154 of 506
Thumbnail settings
Size Specifies the number of columns and rows to create on eachpage.
Spacing Creates a frame around each thumbnail. Specifies theamount of space between rows or columns. In theHorizontal and Vertical spin boxes, type a value to indicatethe amount of space to display.
Frame options
Use thumbnail frame Creates a frame around each thumbnail.
Margin Specifies the width of the frame.
Solid color Specifies the frame's color. Click the color picker to define acolor.
Tiled image Specifies an image to use as a frame. Click Browse to locatethe image you want to use.
Thumbnail options
Colored drop shadow Creates a drop shadow effect around each thumbnail. Clickthe color picker to define a color.
Colored edge fade Creates a fading frame effect around the image. Click thecolor picker to define a color.
Colored matte Uses a solid color as a background for the page. Click thecolor picker to define a color.
Beveled edges Creates a beveled edge effect on each thumbnail. This effectis not displayed in the Preview window.
Page background options
Solid color Uses a solid color as a background for the page. Click thecolor picker to define a color.
Tiled image Uses a tiled image as the background for the page. ClickBrowse to locate the picture you want to use.
Creating Archives of Your Files
You can use the Archive Creator plug-in to create archives of your images, documents, and media files.Archive Creator supports multiple archive formats, and helps you manage your files using

ACDSee Photo Studio Home 2022
Page 155 of 506
compression, encryption, and password protection tools.
To Create an Archive:
1. In Manage mode, in the File List pane, select a folder or group of files.
2. Click Tools | Create | Archive.
3. In the Create Archive dialog box, in the Options area, click the Archive Type drop-down list and selectthe archive format you want to create.
Some archive formats have additional settings that you can adjust by clicking the Settingsbutton.
4. Do any of the following:
To include the contents of any subfolders you selected, check the Include subfolders checkbox.
To include any hidden files in your archive, check the Include hidden files checkbox.
To remove the selected files and folders from your hard drive once they have been added tothe archive, check the Delete files after archiving checkbox.
To protect the contents of your archive with a password, check the Password Protect Archivecheckbox, and type a password into the field beside it. Note that not all archive types supportpasswords, and some formats require them.
5. Type a path and file name into the Output File field, or click Browse to locate a folder on your harddrive.
6. Select one of the following:
Add to existing archive: adds your files to an existing archive. This option is only available if thearchive specified in the Output File field already exists.
Overwrite existing archive: replaces any existing archive with the archive you are creating. Thisoption is only available if the archive specified in the Output File field already exists.
7. When you are satisfied with your choices, click Create to begin archiving your files.
Extracting Archives
You can extract archives very quickly and easily without leaving ACDSee. You can either extract the filesto a folder or simply double-click and view them.
To Extract an Archive to a Folder:
1. In Manage mode, navigate to the folder containing the archive, using the Folders pane.
2. Click the archive in the File List.
3. Click Edit | Extract to Folder.

ACDSee Photo Studio Home 2022
Page 156 of 506
4. In the Extract to Folder dialog, navigate to, and select the folder where you want to keep the files.
5. To create a new folder, click Create Folder, type in the name of the folder and then press Enter.
6. Use the Overwriting duplicate files drop-down list if you want to specify what do so with files in thefolder that have the same name as those you are extracting. You can select any of the following:
Ask: to be asked what to do about each individual file.
Rename: duplicates are given a new name.
Replace: duplicate files are overwritten.
Skip: no duplicates are extracted.
7. Click OK.
To View Files Inside an Archive:
1. In Manage mode, navigate to the folder containing the archive.
2. Double-click the archive.
Thumbnails of the contents of the archive open in the File List pane.
Printing Images
With the ACDSee Home print utility, you can print your files on any size of paper, in any orientation,and at any resolution your printer can support. You can also use the print utility to create and printcontact sheets, complete with headers, footers, and captions specific to each image.
As you change the options in the Print dialog box, you can view a dynamically updated preview of thefile and its position on the page. You can adjust the output size, print multiple copies of each file orimage, and change the orientation of images and documents on each page.
You can use the shortcut Ctrl + P to launch the print dialog.
To Print Your Images:
1. Select the images you want to print.
2. Do one of the following:
In Manage mode, click File | Print.
In View mode, click File | Print All Images. (If you want to print a single image in View mode,select Print Image.)

ACDSee Photo Studio Home 2022
Page 157 of 506
3. Under Print layout, do one of the following:
Select Full page and then choose a print size from the Format list.
Select Contact sheet and then set the Contact sheet format options to define the appearanceof your contact sheet.
Select Layout and then choose one of the available layout options.
4. On the Printer Options tab, specify the printer you want to use, the paper size, the orientation, thenumber of copies you want, the range of pages that you want to print, and image resolution.
5. On the Page Settings tab, specify the image position on the paper and the margin widths.
6. On the Adjustments tab, specify any adjustments you want to apply.
7. Specify the number of prints of each photo. If you are printing a Full page or a Contact sheet this optionis available on the Page Settings tab. If you are printing a Layout this option is available below the list oflayouts.
8. Add captions, headers, or footers. You can only add captions, headers, or footers if you are printing aFull page or a Contact sheet.
9. Click Print.
Setting Printer Options
When printing your images with ACDSee, you can specify which printer you want to use, and set theprinter options on the Printer Options tab in the Print dialog box.
Printer Options

ACDSee Photo Studio Home 2022
Page 158 of 506
Printer Specifies the printer you want to use. Select a printer from the drop-down list and click the Properties button to set its options. Refer tothe printer manufacturer's Help file or manual for more information.
Paper size Specifies the size of the paper, e.g. Letter, Legal, A4.
Orientation Specifies Portrait or Landscape page orientation.
Copies Specifies the number of copies you want to print.
Print range Select one of the following options:l All: prints all of the pages in the document.l Pages from: prints a range of pages. Specify the first and lastpages of the range in the fields.
Resolution Specifies a resolution in pixels-per-inch (PPI) for the image. Thehigher the value, the more dots per inch, and the higher theresolution of the printed image. For example, 600 PPI is 360,000(600 x 600) pixels per square inch.
Filter Specifies the resampling filter to use when printing images. Click thedrop-down list and select one of the following:
l Box: displays considerable tiling or jaggies when you resize animage.
l Triangle: produces good results for image reduction andenlargement, but displays sharp transition lines.
l Bicubic: produces good results with photo-realistic imagesand with images that are irregular or complex. Uses inter-polation to minimize the raggedness normally associated withimage expansion.
l Bell: smoothes the image.l B-Spline: produces smooth transitions, but may cause excess-ive blurring.
l Lanczos: produces the sharpest images, but may also intro-duce some ringing artifacts.
l Mitchell: produces smooth transitions when enlarging photo-realistic images. This filter is good compromise between theringing effect of Lanczos and the blurring effect of other filters.
Gamma Applies gamma correction to the printed images. Type a numberfrom 0.10 to 3.00 in the Gamma value field to adjust the gamma ofthe image. Higher values make the image appear brighter, whilelower values make the image appear darker.
Use EXIF 2.2 printing whenavailable
Your camera may capture EXIF information that, when shared withyour printer, will optimize printing results. Select this option if yourcamera and printer support EXIF 2.2 printing.
Creating Custom Print Layouts
You can create your own custom print layouts and store them as print options.

ACDSee Photo Studio Home 2022
Page 159 of 506
To Create a Custom Print Format:
1. In the Print dialog box, select Full page.
2. In the Print format area, click Add.
3. In the Add Custom Format dialog box, select a measurement unit from the Measurement units drop-down list.
4. Enter the dimensions for the new format in the Format width and Format height fields.
5. Click Add.
Setting Image Size and Positioning
You can use the Page Settings tab in the Print dialog box to adjust and control the size of the imagesyou are printing, and the positioning of images on each page.
Page Settings Options
Page position Specifies where to place the image on each page.
Margins Specifies the size of the margins. Type a value or clickthe arrows in the Top, Bottom, Left, and Right spinboxes.
Number of prints Specifies how many copies of each image to print.The print utility adds pages as required.
Automatically rotate picture based on printformat
Specifies whether you want the print utility todetermine automatically which orientation to use foreach image. If you check the checkbox, the printutility changes each page's orientation to best suit theimage you are printing.
Maintain aspect ratio Specifies whether you want the print utility tomaintain the original image's aspect ratio. Select oneof the following options to indicate how the printutility should handle the aspect ratio for oversizedimages:
l Crop image to fit print format: prints onlythe part of the image that fits within the printformat.
l Shrink image to fit print format: prints theentire image, reduced to fit inside the printformat.

ACDSee Photo Studio Home 2022
Page 160 of 506
Setting Print Adjustments
You can use the settings on the Adjustments tab of the Print dialog to compensate for quirks specificto your printer, such as the way your printer handles exposure.
It is recommended that you adjust these settings only after printing initially, when you knowwhat corrections your printer may require.
Please note that any adjustments made on the Adjustments tab will not be reflected in thePreviewwindow.
To Apply Adjustments to Images Prior to Printing:
1. Select the image or images you want to print.
2. Do one of the following:
In Manage mode, click File | Print.
In View mode, click File | Print Image or File | Print All Images.
3. In the Print dialog, on the Adjustments tab, adjust the Exposure, Contrast, or Sharpness sliders asdesired.
4. Click Print.
Adding Text to Pages
You can add headers and footers to pages, and captions beneath your images.
To Add Captions to Your Printed Images:
1. In the Print dialog box, click the Caption tab.
2. Select Use caption text.
3. Click Font to open the Font dialog box and set the font options.
4. In the text box, type the text you want the caption to display.
5. Click Insert Metadata to insert file-specific information into the caption for each image.
6. In the Text alignment drop-down list, select the caption positioning.
7. To set the maximum number of text lines for each caption to display, check the Number of linescheckbox, and then specify a number in the field.
To Add Headers and Footers to Your Printed Pages:

ACDSee Photo Studio Home 2022
Page 161 of 506
1. Do one of the following:
Click the Header tab and select Use header text.
Click the Footer tab and select Use footer text.
2. Click Font to open the Font dialog box and set the font options.
3. In the text box, type the text you want the header or footer to display.
4. To insert the current page number or the total number of pages into the text, click Insert Page Number,and then select an option from the menu.
5. In the Text alignment drop-down list, select the header or footer positioning.
6. To set a maximum number of text lines, check the Number of lines checkbox, and then specify anumber in the field.
Setting Contact Sheet Printing Options
The Contact sheet format area of the print utility contains settings you can adjust to control theappearance, layout, and size of your thumbnails. If you saved your format options as a preset you canselect the preset.
Contact Sheet Format Options

ACDSee Photo Studio Home 2022
Page 162 of 506
Thumbnail settings
Size Specifies the number of columns and rows to create oneach page.
Spacing Specifies the amount of space between rows or columns. Inthe Horizontal and Vertical spin boxes, type a number toindicate the amount of space to display.
Frame options
Use thumbnail frame Creates a frame around each thumbnail.
Margin Specifies the width of the frame.
Solid color Specifies the frame's color. Click the color picker to define acolor.
Tiled image Specifies an image to use as a frame. Click Browse to locatethe image you want to use.
Thumbnail options
Colored drop shadow Creates a drop shadow effect around each thumbnail. Clickthe color picker to define a color.
Colored edge fade Creates a fading frame effect around the image. Click thecolor picker to define a color.
Colored matte Creates a matte effect around each thumbnail. Click thecolor picker to define a color.
Beveled edges Creates a beveled edge effect on each thumbnail. Thiseffect is not displayed in the Preview window.
Page background options
Solid color Prints a solid color as a background for the page. Click thecolor picker to define a color.
Tiled image Prints a tiled image as the background for the page. ClickBrowse to locate the image you want to use.
About Batch Editing
In ACDSee you can make one type of edit to many images. For example, if you need to resize multipleimages you can use the Batch Resize tool. Or, if you need to rotate multiple photos by 90 degrees youcan use the Batch Rotate/Flip tool.

ACDSee Photo Studio Home 2022
Page 163 of 506
You can speed up the batch editing workflow by tagging your files. For example, you can quickly tagthe files you want to change, then click Tagged in the Catalog pane to display all the tagged files in theFile List pane. Then you can select the files and choose a batch tool.
Converting Multiple Images to Another File Format
You can convert multiple images to any supported file format. You can set the options for each formatindividually, specify how to handle multiple-page images, and apply the conversion defaultsautomatically.
To Convert Images to Another File Format:
1. Do one of the following:
In Manage mode, select one or more images, and click Tools | Batch | Convert File Format |Convert...
In View mode, click Tools |Modify | Convert File Format | Convert...
In Manage mode, select one or more images, and click Batch | Convert File Format | Convert...
In Manage or View mode, select one or more images and press Ctrl + Alt + F.
2. In the Convert File Format dialog, select a new format for your image or images from the Output FileFormat drop-down list. To configure format-specific options, select the file format and then press theSettings button.
3. In the Output Location section, identify where you want to place the converted images.
4. In the File Options section, specify how you want the tool to handle any file name conflicts by selectingone of the following options from the Overwrite existing files drop-down list:
Ask: prompts you when overwriting a file.
Skip: cancels the operation if there is a file with the same file name and extension.
Replace: overwrites the file without prompting for confirmation.
Rename: prompts you to rename the file.
5. To configure vector settings and how you want to handle any multi-page images, press the AdvancedSettings button. If you did not select any multi-page images to convert, and did not specify a multiple-page image format as your output file format, you can skip the options in the Multi-Page Source section.
6. Click Convert.
You can save your settings as a preset for future use. After configuring the Convert File Formatdialog settings, press the Save icon next to the Preset field. You will be prompted to enter aname for your preset. It is recommended that you give your preset an intuitive name. Savedpresets will be listed in the Convert File Format fly-out menu.
ACDSee Photo Studio Home 2022
Page 164 of 506
You can give your saved presets custom shortcuts for quick conversions. In the CustomizeShortcuts dialog, you can find your presets under the Preset - Convert File Format category.
Rotating or Flipping Multiple Images
You can rotate or flip multiple images at preset angles.
To Rotate or Flip an Image:
1. In Manage mode, select one or more images, and then click Tools | Batch | Rotate/Flip.
2. In the Batch Rotate/Flip Images dialog box, select the angle of rotation you want to apply. See below foran explanation of each angle.
3. If you select an image with multiple pages and want to apply the selected angle of rotation to all of thepages, check the Apply to all pages of the current image checkbox.
4. Do one of the following:
Click Next Image to move on to the next selected image. The Next Image button is notavailable if the Apply to all selected images box is checked.
If you select multiple images and you want to apply the same angle of rotation to all of them,check the Apply to all selected images checkbox.
Click Options to specify how you want to save and store the images.
5. When you are ready to apply the rotations to your images, click Start Rotate.
Rotate / Flip Angles

ACDSee Photo Studio Home 2022
Page 165 of 506
Rotates the image counter-clockwise 90 degrees.
Rotates the image 180 degrees.
Rotates the image clockwise 90 degrees.
Rotates the image according to any EXIF data contained within the image (based on what thecamera thinks the orientation should be).
Flips the image along the vertical axis.
Flips the image along the horizontal axis.
Flips the image along the vertical axis, and then rotates it counter-clockwise 90 degrees.
Flips the image along the vertical axis, and then rotates it clockwise 90 degrees.
You can also use the Rotate tool in Edit mode to rotate an image using a custom angle ofrotation.
Setting Rotated and Flipped File Options
You can change the settings in the Batch Image Rotate/Flip Options dialog box to control whereACDSee Home places modified images, how to handle file duplication conflicts, and specify whetheryou want to preserve the last-modified date of the file when you use the Batch Rotate/Flip Imagestool.
To Set the Rotate and Flip Options:

ACDSee Photo Studio Home 2022
Page 166 of 506
1. In Manage mode, select one or more images, and then click Tools | Batch | Rotate/Flip.
2. In the Batch Rotate/Flip Images dialog box, click the Options button.
3. Set the options as described below.
4. Click OK.
Rotate and Flip Options
Force lossless JPEG operations Rotates JPEG images without decompressing and re-compressing the JPEG information. As a result, the imagedoes not lose quality when rotated or flipped.
File options Specifies where to place the new images. Select one ofthe following options:
l Remove/replace original files: overwrites the ori-ginal file with the new image.
l Rename modified images and place in sourcefolder: adds identifying labels to the image namesand places them in the same folder as the originals.
l Place modified images in the following folder:places the converted image in a folder that you canspecify. Click the Browse button and select a folder.
Overwrite existing files Determines how ACDSee Home should handle overwritingfiles. Select one of the following options from the drop-down list:
l Ask: prompts you when overwriting a file.l Skip: cancels the operation if there is a file with thesame file name and extension.
l Replace: overwrites the file.l Rename: prompts you to rename the file.
Preserve last-modified dates Retains the date and time properties of the file.
Remember and apply the last rotationperformed
Automatically applies the same settings the next time yourotate an image.
Auto-close progress dialog if all operationssucceed
Automatically closes the dialog box after all images havebeen adjusted.
Save current settings as default Stores the current settings and applies them the next timeyou use the Rotate/Flip Images wizard.
Resizing Multiple Images
You can resize multiple images at once using the batch resize tool.
To Resize Multiple Images:

ACDSee Photo Studio Home 2022
Page 167 of 506
1. In Manage mode, select one or more images, and then click Tools | Batch | Resize | Resize...
2. In the Resize dialog box, you can choose from multiple ways to resize your images. Choose either Size inPixels, Percentage, Print Size, Long Edge, or Short Edge. Follow the directions in the table below.
3. Click Options to specify how you want to save and store the images.
4. Click Resize.
You can save your rename settings as a preset by clicking the save icon beside the preset drop-down. From there, enter a name and press OK. To delete a preset, press the trash icon.
You can assign shortcuts to speed up your process of resizing multiple images by following thedirections in the Customizing Keyboard Shortcuts topic.
Resize Options
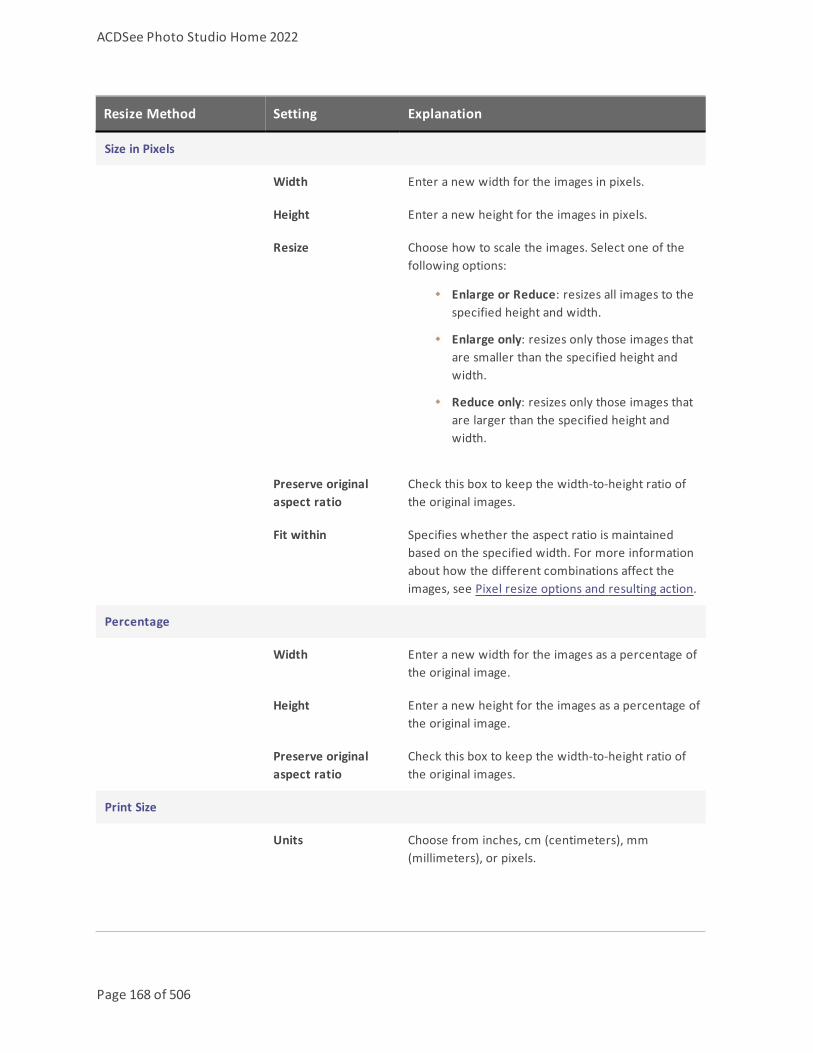
ACDSee Photo Studio Home 2022
Page 168 of 506
Resize Method Setting Explanation
Size in Pixels
Width Enter a new width for the images in pixels.
Height Enter a new height for the images in pixels.
Resize Choose how to scale the images. Select one of thefollowing options:
Enlarge or Reduce: resizes all images to thespecified height and width.
Enlarge only: resizes only those images thatare smaller than the specified height andwidth.
Reduce only: resizes only those images thatare larger than the specified height andwidth.
Preserve originalaspect ratio
Check this box to keep the width-to-height ratio ofthe original images.
Fit within Specifies whether the aspect ratio is maintainedbased on the specified width. For more informationabout how the different combinations affect theimages, see Pixel resize options and resulting action.
Percentage
Width Enter a new width for the images as a percentage ofthe original image.
Height Enter a new height for the images as a percentage ofthe original image.
Preserve originalaspect ratio
Check this box to keep the width-to-height ratio ofthe original images.
Print Size
Units Choose from inches, cm (centimeters), mm(millimeters), or pixels.

ACDSee Photo Studio Home 2022
Page 169 of 506
Resize Method Setting Explanation
Width Enter a new width for the images in pixels.
Height Enter a new height for the images in pixels.
Resolution Enter a resolution for the images in pixels per inch.
Resize Choose how to scale the images. Select one of thefollowing options:
Enlarge only: resizes only those images thatare smaller than the specified height andwidth.
Reduce only: resizes only those images thatare larger than the specified height andwidth.
Enlarge or reduce: resizes all images to thespecified height and width.
Preserve originalaspect ratio
Check this box to keep the width-to-height ratio ofthe original images.
Fit within Specifies whether the aspect ratio is maintainedbased on the specified width. For more informationabout how the different combinations affect theimages, see Pixel resize options and resulting action.
Long Edge
Size Enter a size in units, and choose the units from thedrop-down menu. There, you can choose frominches, cm (centimeters), mm (millimeters), orpixels.
Resolution Enter a resolution for the images in pixels per inch.
Resize Choose how to scale the images. Select one of thefollowing options:
Enlarge only: resizes only those images thatare smaller than the specified height andwidth.
Reduce only: resizes only those images thatare larger than the specified height and

ACDSee Photo Studio Home 2022
Page 170 of 506
Resize Method Setting Explanation
width.
Enlarge or reduce: resizes all images to thespecified height and width.
Short Edge
Size Enter a size in units, and choose the units from thedrop-down menu. There, you can choose frominches, cm (centimeters), mm (millimeters), orpixels.
Resolution Enter a resolution for the images in pixels per inch.
Resize Choose how to scale the images. Select one of thefollowing options:
Enlarge only: resizes only those images thatare smaller than the specified height andwidth.
Reduce only: resizes only those images thatare larger than the specified height andwidth.
Enlarge or reduce: resizes all images to thespecified height and width.
Options
Output Location Choose an output location from the options:
Remove/replace original files: this optionoverwrites your original files.
Same as source folder: pastes the resizedfiles in the folder they originated.
Specific folder: use the folder icon tonavigate to a specific folder for the outputfiles.
Create subfolder: with an output locationselected, check this checkbox to create asubfolder for your resized images. Enter aname in the box. This is useful if you aremaking multiple batch resizes to specific

ACDSee Photo Studio Home 2022
Page 171 of 506
Resize Method Setting Explanation
dimensions. You can save your resized files inseparate folders.
File options Choose your file options for overwriting existing files.
Choose whether to preserve certain file informationwhen resizing.
Choose your JPEG Compression options, find outmore in the JPEG Options topic.
Choose your resample type from the followingoptions:
Lanczos: produces the sharpest images, butmay also introduce some ringing artifacts.
Bell: smoothes the image.
Bicubic: produces good results with photo-realistic images and with images that areirregular or complex. Uses interpolation tominimize the raggedness normally associatedwith image expansion.
Box: displays considerable tiling or jaggies(jagged edges) when you resize an image.
B-spline: produces smooth transitions, but maycause excessive blurring.
ClearIQZ: slower than Bicubic and Lanczos,but produces the best results when enlargingphotos, especially those of people.
Mitchell: produces smooth transitions whenenlarging photo-realistic images. This filter isgood compromise between the ringing effectof Lanczos and the blurring effect of otherfilters.
Triangle: produces good results for imagereduction and enlargement, but displayssharp transition lines.

ACDSee Photo Studio Home 2022
Page 172 of 506
Setting File Options
You can change the settings in the Options dialog box to control where ACDSee Home places modifiedimages, how to handle file duplication conflicts, and specify whether you want to preserve the last-modified date of the file.
File Options
File options Specifies where to place the new images. Select one of thefollowing three options:
l Remove/replace original files: overwrites the original filewith the new image.
l Rename modified images and place in source folder:adds identifying labels to the image names and places themin the same folder as the originals.
l Place modified images in the following folder: placesthe converted image in a folder that you can specify. Click theBrowse button and select a folder.
Overwrite existing files Determines how ACDSee Home should handle overwriting files.Select one of the following options from the drop-down list:
l Ask: prompts you when overwriting a file.l Skip: cancels the operation if there is a file with the same filename and extension.
l Replace: overwrites the file.l Rename: prompts you to rename the file.
Preserve last-modified dates Retains the date and time properties of the file.
Auto-close progress dialog if alloperations succeed
Automatically closes the dialog box after all images have beenadjusted.
Save current settings as default Stores the current settings and applies them the next time you usethe Resize Images wizard.
JPEG Compression Options Opens the JPEG Options dialog where you can specify detailedcompression options to apply to the resized files.
Organizing and Managing Files in ACDSee
Adjusting Exposure For Multiple Images
In ACDSee, you can lighten or darken the colors of an image or a group of images with the BatchAdjust Exposure wizard. You can adjust each image individually and preview the changes beforeapplying, or make adjustments to an image and automatically apply the same changes to all of theimages you selected.
You can also save your settings as a preset for future use.

ACDSee Photo Studio Home 2022
Page 173 of 506
To Adjust Image Exposure:
1. In Manage mode, select one or more images, and then click Tools | Batch | Adjust Exposure.
2. In the Batch Adjust Exposure dialog box, do one or more of the following:
To adjust image exposure, contrast, and fill light level, select the Exposure tab and adjust theoptions.
To precisely adjust the contrast and light levels in your images, select the Levels tab and set theoptions.
To adjust image exposure automatically, select the Auto Levels tab and set the options.
To precisely adjust the RGB color channels in your image, select the Tone Curves tab and set theoptions.
3. Do one of the following:
Check the Apply settings to all selected images checkbox to apply the current settings to all ofthe images you selected.
Uncheck Apply settings to all selected images and click Next Image to move to the next image,and then repeat step 2 for each image you want to adjust.
4. Click Options to specify how you want to save and store the images.
5. Click Filter All Images.
You can also adjust image exposure and color levels in Edit mode.
Adjusting Batch Exposure Options
You can use the options in the Batch Adjust Exposure dialog to correct the exposure of your images.There are four tabs in the Exposure section: Exposure, Levels, Auto Levels, and Tone Curves.
To Use the Exposure Options:
In the Batch Adjust Exposure dialog box, use the following options:
Exposure Options

ACDSee Photo Studio Home 2022
Page 174 of 506
Exposure Specifies the amount of light to add to all areas of the image.
Auto Automatically corrects the exposure based upon the brightnessof the image.
Contrast Specifies the amount of difference between color andbrightness in an image. Moving the slider to the right darkensthe shadowed areas in an image, while moving the slider to theleft brightens them.
Fill Light Specifies the amount of light to add to the darkest areas of theimage.
Levels Options
Channel Specifies the brightness or color channel you want to adjust.
Shadows Specifies the black point of an image.
Move the slider or type a number from 0 to 255 into the spinbox to define the blackest area of an image. As the valueincreases, the dark colored areas of the image become darker.
Midtones Specifies the gamma correction in an image.
Move the slider or type a number from 0.00 to 2.00 into thespin box to set the amount of gamma correction. Higher valuesmake the image appear brighter, while lower values make theimage appear darker.
Highlights Specifies the white point of an image.
Move the slider or type a number from 0 to 255 into the spinbox to define the whitest area of an image. As the valueincreases, the light colored areas of the image become lighter.
Clipped % Indicates how much of the image detail is lost due to black pointand white point correction.
Black Point Eyedropper Click the button with the black eyedropper icon to adjust theblack point. Select the area in the Before image that you want toset as the black point for the After image.
Mid Point Eyedropper Click the button with the gray eyedropper icon to adjust thegamma correction value. Select the area in the Before imagethat you want to set as the gamma correction value.
White Point Eyedropper Click the button with the white eyedropper icon to adjust thewhite point. Select the area in the Before image that you wantto set as the white point for the After image.

ACDSee Photo Studio Home 2022
Page 175 of 506
Auto Levels Options
Strength Adjusts the amount of exposure applied to the image.
Auto Contrast and Color Adjusts color differences, brightness, and image color channels.
Auto Contrast Adjusts the color differences and brightness only.
Auto Color Balances color within the whole image.
Tone Curves Options
Channel Specifies the color channels to adjust.
Show Histogram Toggles the histogram display.
Histogram Displays a visual representation of the color information levelsin the image, based on the selected channel. Click and drag theline to manipulate the curve.
Renaming Multiple Files
You can use the Batch Rename tool to renamemultiple files. You can specify a template with anumerical or alphabetical sequence, save your template for future use, replace specific characters orphrases, change cases, and insert or remove text or spaces. This can be particularly useful if you dealwith large quantities of images, or you organize your images by file name.
To Rename Multiple Files:
1. In Manage mode, select one or more files, and then click Tools | Batch | Rename File| Rename... Ifselecting two or more files, you can alternatively press F2.
2. In the Rename dialog box, you will see a list of operations. You can use the checkboxes to select ordeselect which operations to run when batch renaming. The following operations enable you toperform the following actions:
Template - create a renaming template to apply to all selected files.
Search and Replace - search for and replace parts of your file name.
Case Change - change the case of text in your file name.
Insert Text - add text to your file name.
Remove Text- remove text from your file name.
Strip Spaces - remove spaces from your file name.

ACDSee Photo Studio Home 2022
Page 176 of 506
3. Review changes you have made to file names in the Preview field.
4. Click Rename.
You can save your rename settings as a preset by clicking the save icon beside the preset drop-down. From there, enter a name and press OK. You can also access your Last Used Settings inthe preset menu, if you wish to repeat an action. To delete a preset, press the trash icon.
You can assign shortcuts to speed up your process of renaming multiple files by following thedirections in the Customizing Keyboard Shortcuts topic.
Rename Settings

ACDSee Photo Studio Home 2022
Page 177 of 506
Template
Template: Type a file name format to set as a template. You can type any textinto this box, including hyphens and underscores.
Use the * symbol to insert the original file name, so renaming IMG-9359.jpg using the template "Summer Wedding*" will rename thefile "Summer WeddingIMG-9359.jpg".
Use the # symbol to begin a sequence, either numerical oralphabetical.
Insert Metadata... Choose one or more metadata properties to include in therenaming template by checking the relevant checkboxes. Press OK.
Clear Templates Select this option to clear the existing templates to create a newone, or change the existing template.
Use numbers to replace #'s Select this option to replace #s in the rename template withsequential numbers.
Use letters to replace #'s Select this option to replace #s in the rename template withsequential letters.
Start at: Select either Fixed value or Auto detect. If you select Fixed value,choose a number to start the sequence with. Select Auto detect toidentify an existing numerical system and continue it.
Search and Replace
Search for: Enter a term to search for.
Replace with: Enter a term to replace the searched term with.
Insert Metadata... Choose one or more metadata properties to include in therenaming template by checking the relevant checkboxes. Press OK.
Case sensitive Check this checkbox to search only for results that match the caseof your search term. You can use this to remove all capitals in yourfile names, or all lowercase terms.
Include extension Check this checkbox to include file extensions in your search andreplace.
Case Change
Name Choose from Lowercase, Uppercase, or Title case to make a changeto the case in your file name, or select No change to keep as is.
Extension Choose from Lowercase, Uppercase, or No change. This can be

ACDSee Photo Studio Home 2022
Page 178 of 506
useful to unify case differences in file names, for example .JPG and.jpg
Insert Text
Insert: Type the text you want to insert into the file name.
Insert Metadata... Choose one or more metadata properties to include in therenaming template by checking the relevant checkboxes. Press OK.
At location Choose from Prefix, Suffix, Position (meaning how many charactersinto the name), After text:, or Before text:. After and before textlets you enter text to prelude or follow.
Add from right to left Check this box to add the text from right to left, rather than fromleft to right.
Overwrite existing name Check this box to rename the file by overwriting the existing filename.
Include extension Check this checkbox to include file extensions in your renamingprocess.
Case sensitive Check this checkbox to search only for results that match the caseof your search term.
Remove Text
Start From Choose a Position or a Delimiter.
Enter a position, meaning how many characters into thename to start removing text.
Enter a Delimiter, which is where you start removing textfrom.
Remove Until Choose Count equals, Delimiter, or The end.
Enter a Count equals, this is how many characters of text toremove.
Type a Delimiter, which is where to stop removing textfrom.
When you choose The end, text is removed until the end ofthe file name.
Remove from right to left Check this box to remove text from right to left, rather than fromleft to right.

ACDSee Photo Studio Home 2022
Page 179 of 506
Remove delimiters Check this box to remove the delimiters when renaming, else theywill remain.
Include extension Check this box to include the file extension in the text you remove.
Case sensitive Check this box to make text in the delimiter fields case sensitive.
Strip Spaces
Type of space removal Choose Remove all, Remove trailing, Remove consecutive, orReplace with.
Remove all removes all spaces in the file name.
Remove trailing removes spaces following the file name.
Remove consecutive removes multiple spaces in the filename.
Replace with gives you the option to enter alternatives, suchas a letter, number, or dash.
Advanced...
Handle name conflicts Choose from the following options:
Ask: produce a prompt when a name conflict occurs.
Skip: skip names that include conflicts.
Rename: rename files with conflicts.
Handle extension changes Choose from the following options:
Ask: produce a prompt when a rename affects anextension.
Skip: skip changes that affect extensions.
Rename: rename extensions where required by therename.
As well as editing the options listed in the table, you can also reorder how these operationsrun. To reorder operations, use either the up or down arrows at the bottom of the list, or clickand drag the name of the operation to its new location.
You can add additional operations, up to 10 in total. To do this, press the plus button at thebottom of the list.

ACDSee Photo Studio Home 2022
Page 180 of 506
To remove an operation, press the trash icon.
About the ACDSee Database
The ACDSee Home database stores image, document, and media file information automatically whenyou browse your folders. This process is called cataloging. The database increases the speed withwhich you can browse your computer, and you can use the information stored in the database to sort,organize, search, and filter your images and media files. You can also backup, restore, and sharedatabase information.
You can store cached thumbnail previews, and add or edit the following information for each image ormedia file on your computer:
Categories
Notes
Keywords
Color Labels
Authors
Dates
Ratings
Captions
Face Data
Please note that Face Detection is only available for the 64-bit version of ACDSee PhotoStudio Home.
You can also choose to exclude folders from the database, and keep the contents of those foldersseparate from your other images and media files.
When you add ACDSeeMetadata to a file in ACDSee, the file is linked to the database. If youthen copy, move, or rename your files using programs other than ACDSee, such as WindowsExplorer, the link to the database is broken and this can cause the loss of ACDSeeMetadata.
Embedding ACDSee Metadata in Files
If you edit or add ACDSeeMetadata to your files, ACDSee Home automatically adds the new data to itsdatabase. If you have the Display embed ACDSee metadata reminder checkbox checked in theOptions dialog box, (click Tools | Options | Database), next time you close ACDSee, the EmbedACDSeeMetadata in Files dialog box opens and offers to embed the new data into the changed filesthemselves. You can also set how often you would like this reminder displayed. Embedding ACDSee

ACDSee Photo Studio Home 2022
Page 181 of 506
Metadata in the files as well, is a safe way to back up this data and make it easier to retrieve if youshould need to.
For example, once you have assigned ACDSeeMetadata to a file, the file is linked to the database. Ifthe file is moved using Windows Explorer, or any application other than ACDSee, the link will bebroken. However if you have embedded this data in the file and the link is broken, you can still retrievethe ACDSeeMetadata using the embedded data in the files.
You can use ACDSee Home to rename, move, or copy the file—even to another computer—and theembedded ACDSeeMetadata will transfer with the file.
To Embed ACDSee Metadata in a File When You Are Prompted:
1. In the Embed ACDSee Metadata dialog, in the Embed section, select the types of metadata you wouldlike to embed.
2. Do any of the following:
To embed data in files that are on a network, check the Include files on network drivescheckbox.
To write the information to a sidecar file if the file format does not support embedding insidethe file, select the Write sidecar files for formats that do not support embedded XMP.
To accept the current selection in the dialog and have these options happen automatically infuture, select Do not ask me this again.
3. Click Embed to embed the data in the files. A progress bar appears, followed by the Embed SummaryReport dialog that lists the following:
Items Selected: indicates the number of files that you selected.
Items Processed: indicates the number of files that were actually processed. (If you selectedfiles that did not need to have date embedded, this number may be different from the ItemsSelected.)
Succeeded: indicates the number of files that had data embedded.
Failed: indicates the number of files that, for a variety of reasons, could not have dataembedded. (To see the Error Log, click View Errors.)
4. Click Close.
To Embed ACDSee Metadata at Any Time:
You can embed data in files at any time.
1. Click Tools |Metadata | Embed ACDSee Metadata, and then select one of the following:
Embed in All Files: embeds data for all files.
Embed in Selected Files: embeds data for any files that you have selected.

ACDSee Photo Studio Home 2022
Page 182 of 506
2. In the Embed ACDSee Metadata dialog, in the Embed section, select the types of metadata you wouldlike to embed.
3. Do any of the following:
To embed data in files that are on a network, check the Include files on network drivescheckbox.
To write the information to a sidecar file if the file format does not support embedding insidethe file, select the Write sidecar files for formats that do not support embedded XMP.
4. Click Embed to embed the data in the files. A progress bar appears, followed by the Embed SummaryReport dialog that lists the following:
Items Selected: indicates the number of files that you selected.
Items Processed: indicates the number of files actually that were processed. (If you selectedfiles that did not need to have date embedded, this number may be different from the ItemsSelected.)
Succeeded: indicates the number of files that had data embedded.
Failed: indicates the number of files that, for a variety of reasons, could not have dataembedded. (To see the Error Log, click View Errors.)
5. Click Close.
ACDsee 2022 uses XMP to embed ACDSeeMetadata into each file. Only some file formats andfile extensions support XMP. These include GIF, JPEG, DNG, PNG, PSD, and TIF. In the case ofthese file formats, the ACDSeeMetadata is embedded inside the file and so you can rename ormove the file outside of ACDSee 2022 and still be able to retrieve the ACDSeeMetadata. Forformats that currently do not support XMP, including RAW and ABR, the ACDSeeMetadata iswritten to a sidecar file that is stored in the same folder as its file. Because a sidecar file isseparate from the file itself, you need to rename or move them together, or you could lose theACDSeeMetadata permanently.
The Embed Pending Icon
In Manage mode, in the File List pane, the following overlay icon appears on top of files that haveACDSeeMetadata and Face Data stored in the ACDSee Home database that has not yet been written
to the file:
Right-click and choose either:
Embed ACDSee Metadata: writes the metadata to the file.Clear Embed Pending Icon...: clears this overlay icon, but does not write the metadata to the file.
ACDSee Photo Studio Home 2022
Page 183 of 506
Viewing Files That Have Data to Embed
If you want to see the files that have data that needs to be embedded, there is a quick way to list themusing the Embed Pending option.
To View Files That Have Data to Embed:
In the Catalog pane, under Special Items, click Embed Pending.
All the files that have data to embed are displayed in the File List.
Retrieving ACDSee Metadata That is Embedded in Files
If you simply browse to the folder where the files are located, some of the ACDSeeMetadata isretrieved and written to the database. Categories and keywords, however, are not.
The safest way to retrieve all the ACDSeeMetadata, (including categories and keywords), is to clickTools | Database | Catalog Files. Then the following applies:
If the files are GIF, JPEG, DNG, PNG, and TIF formats, all the data will be retrieved and written to thedatabase.
If the files still have their sidecar files in the folder, and they still have the same file name, the databaseinformation is retrieved and written to the database.
If the files have become separated from their sidecar files or renamed, their ACDSee Metadata cannotbe retrieved and will be lost.
Excluding Folders From the Database
You can choose to exclude folders from the database, and keep the contents separate from your otherimages and media files. By default, the Program Files and Windows folders on your hard drive areautomatically excluded from the database.
To Manage Your Excluded Folders Settings:
1. In Manage mode, click Tools | Database | Excluded Folder Settings.
2. In the Excluded Folders dialog box, do one of the following:
To exclude a folder from the database, click Add. Browse to a folder on your hard drive, andthen click OK.
To remove a folder from the excluded folders list, select a folder in the list, and then clickRemove.
To reset your excluded folders list to the default settings, click Reset to Defaults.
3. When you are satisfied with your choices, click Close to return to ACDSee.

ACDSee Photo Studio Home 2022
Page 184 of 506
Cataloging Files in the Database
ACDSee Home automatically adds file information and thumbnails to the database as you browse.You can use the Catalog dialog box to add groups of files to the database without having to firstbrowse the folders. This can be particularly useful when using ACDSee Home for the first time, andwhen browsing or managing large collections of images, as it reduces the loading time required forthese folders.
The first time you run ACDSee, you are prompted to catalog your files.
To Catalog Your Files:
1. In Manage mode, click Tools | Database | Catalog Files...
2. In the Folders to Catalog section, check the checkbox next to the folders you want to catalog.
If you want to add folders that are not in the list, click Add folder..., select the folders you wantto include, and then click OK.
3. In the Import from Cataloged Files section, select the information to add to the database. If you chooseto import Face Data, select between ACDSee Face Data or Lightroom or Picasa Face Data.
4. In the File Formats section, select the type of files to catalog.
5. In the Options section, select any additional actions you wish to perform.
6. Click Start.
A progress bar shows your files as they are cataloged.
7. Click Finish.
If you are cataloging a large collection of files, do not disrupt the process, or use othersoftware while it is running. For large file collections, it is best to run cataloging overnight.
About the ACDSee Indexer
Cataloging and the Database.
The ACDSee database stores file information when you browse your folders. This process is calledcataloging. Cataloging and using the database can help you sort, organize, search, and filter your files,as well as speeding up browsing. The ACDSee Indexer is a tool that helps you catalog your imageswithout browsing through them.
You can use the Catalog dialog box to add files to the database without having to first browse thefolders. During this time, you will not be able to use ACDSee.
The ACDSee Indexer allows you to catalog files while your computer is idle and ACDSee is not running.This saves you from having to browse all folders or experience your computer slowing down while

ACDSee Photo Studio Home 2022
Page 185 of 506
processing. If you have edited any files in the selected folders, the ACDSee Indexer will update thedatabase.
You can set folders to be cataloged and how long you would like your computer to be idle before theACDSee Indexer begins to catalog your files. To configure these options, see Setting the ACDSeeIndexer Options.
Creating and Switching Between Multiple Databases
ACDSee allows you to create multiple databases and switch between them at any time, giving youcomplete organizational control over your file collections.
When you open ACDSee for the first time, (and up until you create additional databases), you will beusing the original database called Default.dbin. It is located in: C:\Users\<YourName>\AppData\Local\ACD Systems\Catalogs\<Version #>. All additional databases that you createwill be stored in this same location, unless you specify otherwise.
You can configure ACDSee to display the database it is currently running in the title bar of theapplication.
To Create a New Database:
1. In Manage mode, open File | Database | New...
2. In the New Database dialog box, enter a name for your new database.
3. Browse to choose the location where the database will be stored, or leave it set to the existing locationto store the new database with your existing database, Default.dbin.
The database file will be stored with a folder of the same name. The database file andfolder must always share exactly the same name, or ACDSee will not be able to connect tothe database.
4. If you would like to have the name of your database displayed in the title bar of the application, checkthe Show database filename in title bar checkbox.
5. Click OK.
6. A dialog will appear asking you if you would like to switch to your newly created database. Select Yes orNo. If you select Yes, ACDSee will restart and run with the new database.
To Switch from One Database to Another:
In Manage mode, do one of the following:

ACDSee Photo Studio Home 2022
Page 186 of 506
Open File | Database |Open...
In the Open Database dialog, browse to the database file (*.dbin) you want touse and click Open.
Open File | Database |Recent
Select one of your recently used databases.
To Quickly Launch ACDSee in a Specific Database Using Command Line Switch:
1. Create a shortcut to ACDSee. It is recommended that you name this shortcut something thatcorresponds to the name of the database you want to open.
2. In the shortcut properties, set the target to C:\Program Files\ACD Systems\ACDSee\<Version#>\ACDSee<Version #>.exe" /db "C:\Users\<Your Name>\AppData\Local\ACDSystems\Catalogs\<Version #>\<Name of Your Database>.dbin".
Converting an Older Database
You can use the ACD Database Convert wizard to take database information from previous versions ofACDSee Home and add it to your current database. This ensures that any information associated withyour files using a previous version of ACDSee Home is referenced properly in the current database.
If you have already added information to your current ACDSee Home database, it isrecommended that you create a backup of your database before converting an older ACDSeeHome database.
To Convert an Older Database:
1. In Manage mode, click Tools | Database | Convert Database.
2. On the Welcome page, click Next to select your conversion options.
3. On the Database Convert Options page, specify the version of the database files you want to convert, aswell as the folder where the database files are located on your hard drive. Click Next.
4. To automatically rebuild image thumbnails, IPTC and EXIF information after the conversion process iscomplete, check the Rebuild thumbnails, EXIF and IPTC data for local images checkbox.
5. To automatically update your database after converting, check the Optimize database files afterconvert checkbox.
6. Click Next.
7. On the Summary page, review your selections, and then click Next to convert your database.
Importing Database Information
You can use the ACD Database Import wizard to import archived database information, or to importdatabase information that was sent to you with images from another user. After you import the

ACDSee Photo Studio Home 2022
Page 187 of 506
information, ACDSee Home associates it with the appropriate images.
If you have already added information to your current ACDSee Home database, it isrecommended that you create a backup of your database before converting an older ACDSeeHome database.
To Use the ACD Database Import Wizard:
1. In Manage mode, click Tools | Database | Import, and then select Database.
2. Click Next to start the wizard.
3. On the Import Options page, select the type of exported database information you want to import.
You can import image information from a compressed database version, or information froman XML-based text file.
4. Click the Browse button to locate the database you want to import, and then click OK.
5. Check the Optimize database files after import checkbox to optimize the database after exiting thewizard, and then click Next.
6. On the Summary page, review your selections. Click Back to make changes, or click Next to beginimporting the database information.
7. Click Finish to close the ACD Database Import wizard.
If you are importing database information sent to you by another ACDSee Home user, ensurethat the images to which the information applies are in an identical location and folderstructure on your hard drive.
Importing File Information from Other Sources
You can import file information into your database from other sources, including ACDSee Photo Discsand files from previous versions of ACDSee.
Importing Photo Discs
Previous versions of ACDSee (versions 4.0 and 5.0) created separate database files with a .ddf fileextension for Photo Discs. You can import the Photo Disc database files into your ACDSee Homedatabase.
To Import a Photo Disc:
1. In Manage mode, click Tools | Database | Import, and then select Photo Disc.
2. In the Open dialog box, locate and select the photo disc file you want to import.
3. Click Open.

ACDSee Photo Studio Home 2022
Page 188 of 506
To import the information from Photo Discs created with ACDSee 6.0 or later, you mustconvert and import the entire database.
Importing Albums
In previous versions of ACDSee, you could create albums in an .ais file format that consisted oforganized shortcuts to your images. Now you can use categories to create albums of images that donot require a separate file extension. You can, however, import your albums from previous versions ofACDSee, and add the information from the albums to the database. ACDSee Home creates a newcategory for each album you import.
To Import Album Information into the Database:
1. In Manage mode, click Tools | Database | Import, and then select Album.
2. In the Open dialog box, locate and select the .ais file you want to import.
3. Click Open.
Working with Descript.ion Files
In previous versions of ACDSee, file descriptions were stored in a separate descript.ion file in eachfolder that contained images. ACDSee Home now stores file descriptions as captions in the database,along with other file information such as notes and keywords.
You can use the Descript.ion tools to import your old descript.ion files and add the information to thedatabase, or export your existing file captions to a descript.ion file.
To Import a Descript.ion File:
1. In Manage mode, click Tools | Database | Import, and then select Descript.ion File.
2. In the Open dialog box, locate and select the descript.ion file you want to import.
3. Click Open.
To Export Captions to a Descript.ion File:
1. In Manage mode, click Tools | Database | Export, and then select Descript.ion File.
2. In the Save As dialog box, type a name for the descript.ion file in the File name field.
3. Click Save.
Exporting Database Information
You can use the ACD Database Export wizard to save selected database information in a compressedformat, and then store it as a backup, or share it with other ACDSee Home users. You can also choose

ACDSee Photo Studio Home 2022
Page 189 of 506
to export your category and keyword definitions to a text file.
Exporting your database information differs from creating a backup in that you can choose to exportonly the parts of your database that you want to share or store with specific files, such as those on aCD. Other ACDSee Home users can import your information without affecting their existing database.
To create a backup of your entire database, including image or media files, use the ACD DatabaseBackup wizard.
To back up the contents of a local folder to a remote location, such as a network drive, use the ACDSync wizard.
To Use the ACD Database Export Wizard:
1. If you want to export your database information for a specific group of images or media files, select thefiles in the File List pane in Manage mode.
2. Click Tools | Database | Export | Database.
3. Click Next to begin using the wizard.
4. On the Content and Format Options page, specify how you want to export your database information byselecting one of the following options, and then clicking Next:
Export entire ACDSee database to a read-only, compressed version: exports the entirecontents of your ACDSee Home database to a compressed version that can be shared withother ACDSee Home users.
Export database information for selected items to a read-only, compressed version: exportsall of your database information for the images selected in the File List pane.
Export database information to a text file: exports the selected information to an XML-basedtext file. Check the checkboxes next to the information you want to include.
5. On the Location Options page, specify a location for the exported information, and a name for the textfile, if necessary, and then click Next.
6. On the Summary page, review your choices. You can click Back to make changes, or click Next to beginexporting your database information.
7. Click Finish to close the wizard and return to ACDSee.
Generating File Lists
You can generate a text file that lists all of the files in the folder currently displayed in the File List pane.The text file places the file name, size, image file format, modified date, image properties, caption, andrating for all of the files in the folder into a table, and creates a single text file.
To Generate a List of Your Files:
In Manage mode, click Tools | Database | Export, and then select Generate File Listing.

ACDSee Photo Studio Home 2022
Page 190 of 506
ACDSee Home automatically generates the file listing and opens it as a text file in your default texteditor. You can then edit or save the text file.
Backing Up Your Database
You can use the ACDSee Backup wizard to back up all of your database information, which you canthen restore in the case of a system failure or other event. You can also choose to back up your image,media, or archive files along with the relevant database information.
The ACDSee Backup wizard creates a series of files in a specified location that contain your entiredatabase. The backup is generated using your folder structure and is unique to your computer. Toback up portions of your database, or to share database information with another ACDSee Home user,use the ACDSee Database Export wizard.
For some suggestions about managing your database backups, see Database Backup Tips andStrategies.
To Back Up Your Database Information:
1. In Manage mode, click Tools | Database | Back Up Database.
2. On the Welcome page, select whether you would like to create a new backup, or update an existingbackup. Click Next.
If you choose to update an existing backup, please go to step #5.
3. On the New Backup page, select the information you would like to back up. Click Next.
4. On the Backup Location page, click Browse and specify a location for your backup, and type a name forthe backup file. Click Next.
5. On the Backup Summary page, review your settings. If you chose to update an existing backup, click theBackup to update drop-down list, and then select the existing backup. Click Next.
Backup Information Options

ACDSee Photo Studio Home 2022
Page 191 of 506
Do not includethumbnails
Excludes thumbnails from the backup, saving a substantial amount of storagespace on your hard drive.
Include thumbnails foroffline files
Includes only thumbnails for files that do not reside on your hard drive, such asPhotoDiscs.
Include thumbnails Includes all thumbnails in the database. This will require more space on yourhard drive to store the backup.
Backup files of type Backs up the specified file types with the database information. Select from thefollowing file types:
Image: includes image files in the backup.
Media: includes audio and video files in the backup.
Archive: includes archive files in the backup.
All files of specifiedtypes on your local harddrives
Backs up all specified files on your hard drive.
All files of specifiedtypes on local andnetwork hard drives
Backs up all specified files on your hard drive and network drives.
All files of specifiedtypes in a folder(including subfolders)
Backs up all specified files in a specified folder. Click the Browse button andselect the folder to back up.
Database Backup Tips and Strategies
The ACDSee Home database stores information about your files, including EXIF information, file nameand folder location, thumbnails, categories, ratings, and any other information you add using theProperties pane. The more information you store in the database, and the more time you spendentering that information, the more important it is to back up your database, and to have a goodstrategy for managing your backups. Losing hours of work to a system crash or other uncontrollableevent is something that should, and can, be avoided.
Backup Schedule
How often you need to back up depends on how often you add or change information in thedatabase. A good rule to use would be to back up your data as often as you want to avoid retyping it.You can use the backup reminder settings on the Database page of the Options dialog box to set aregular reminder for yourself to back up your data as often as you think appropriate. Businessenvironments and professional users should back up every day.

ACDSee Photo Studio Home 2022
Page 192 of 506
It is also recommended that you back up your database before performing any major adjustments toit, such as importing information from another ACDSee Home user, or converting a database from aprevious version of ACDSee.
Backup Location
It's a good idea to consider where you back up your data, as well as how often. If you're backing up toyour hard drive, ACDSee Home creates a new folder for each day. This helps to avoid overwriting yourbackup, and gives you several increments from which you can restore. Also helpful is a monthlybackup that is stored in a different physical location than your computer, such as a network drive.
Backup Size
To keep the size of the backup small, choose to back up database information only, and back up yourimages separately, also on a regular basis.
Restoring Database Information From a Backup
You can use the ACD Database Restore wizard to restore previously backed up database information.
To Restore Database Information:
1. In Manage mode, click Tools | Database | Restore Database.
2. On the Welcome page, click Next to select the backup.
3. On the Restore Options page, select the backup and date from which you want to restore, or browse tothe location of your backup and select a .bkup file.
4. Click Next when you are ready to restore your database.
When restoring a backup from a series of backup files, ACDSee Home will only restore theinformation included in and prior to the selected backup file. Therefore, unless required, it isrecommended that you select the last file in the backup sequence.
Maintaining the Database
It is recommended that you regularly perform database maintenance and optimization to increasehard drive space, remove redundant or extraneous information, and increase overall ACDSee Homeperformance.
You can use the tools in the Database Maintenance dialog box to update folders, or to identify folderswhose thumbnails and database information you would like to delete. The Database Maintenancedialog box displays a list of the folders on your system, and uses icons to indicate the status ofdatabase information within specific folders.

ACDSee Photo Studio Home 2022
Page 193 of 506
Database Content Icons
Folder contains files with cached thumbnails stored in the database.
Folder contains files that were changed without a database update. For example, a folder or file wasrenamed or moved outside of ACDSee.
To Perform Database Maintenance:
1. In Manage mode, click Tools | Database | Database Maintenance.
2. In the Database Maintenance dialog box, browse for folders marked with the database content icons. Ifthere are no marked folders, you do not need to perform database maintenance and can exit theDatabase Maintenance dialog box.
3. Select a folder and click one of the following buttons to identify the maintenance you want to performon that folder:
Remove Thumbnails: removes all thumbnail information for the selected folder.
Remove All DB Info: deletes all database and thumbnail information for the selected folder.
Remove Orphan Folders: deletes any out-of-date or broken references to missing files orinformation for the selected folder. It is only possible to check for orphans in folders located onyour computer. This option will not be visible if the folder is located on a network.
Change Binding: changes all location references for the selected orphaned folder to anotherfolder, and retains all database information. The default binding folder is My Pictures.
4. The Database Maintenance tool will delete records, creating unused space in your database. To reclaimthe unused space, click Optimize Database, and follow the instructions in the wizard.
5. Click Close.
Optimizing the Database
You can use the Optimize Database wizard to quickly remove redundant or outdated databaserecords. Optimizing your database, along with performing regular database maintenance, helps regainhard drive space and improves the overall performance of ACDSee.
If you are cataloging large numbers of files regularly, it is helpful to optimize weekly, or after anextended cataloging session. This is also a good time to backup the database.
To Optimize Your Database:
1. In Manage mode, click Tools | Database | Optimize Database.
2. In the Database Optimization wizard, click Next.

ACDSee Photo Studio Home 2022
Page 194 of 506
3. Select one or both of the following:
Optimize the database tables and fields: removes obsolete information from the database,reduces the space used by database fields, and re-indexes the tables.
Remove orphans from database: removes any orphan database entries, caused by files orfolders deleted by other programs.
4. Click Next.
5. When the wizard has finished, click Finish to return to ACDSee.
Mapping Drives for an Incoming Database
If you are upgrading to ACDSee Home or are importing or restoring your ACDSee Home database, theDatabase Drive Mapping dialog displays how drive mappings (in the incoming database) will be re-established in the ACDSee Home database. You can use this dialog to change how each drive will bemapped in the database.
To Select New Drive Mappings:
1. In the Database Drive Mapping dialog, select a drive and do one of the following:
To create a new drive map, select Create new database entry.
To map the drive to a local drive, select a drive from the Local Drive drop-down list.
2. Click Done.
Rebuilding Thumbnails and Metadata
Situations can develop in which your images will be out of sync with the thumbnail images displayed inthe File List pane and the embedded metadata. You can use the Rebuild Thumbnails and Metadatatool to immediately regenerate the thumbnails for selected images and rebuild the metadata.
To Rebuild Thumbnails:
1. In Manage mode, do one of the following:
Select one or more thumbnails in the File List pane.
Select a folder in the Folders pane.
2. Click Tools |Metadata | Rebuild Thumbnails and Metadata.
ACDSee Photo Studio Home 2022
Page 195 of 506
Quarantined Files
If ACDSee Home has trouble reading a corrupted or incomplete image or media file, or a file causes aplug-in to generate an error, ACDSee Home will quarantine that file. You can view a list of quarantinedfiles, and remove a file from the list.
To View Quarantined Files:
1. In Manage mode, click Tools | Database | Quarantine Files.
2. To remove a file, select it in the list, and then click Remove.
3. To disable the Quarantine feature, uncheck the Enable Quarantine checkbox.
4. Click OK to close the Quarantine Files dialog box and return to ACDSee.
Working with Plug-Ins
A plug-in is a software module that adds functionality to a larger program. ACDSee Home comes asstandard with many different plug-ins.
Types of Plug-Ins
Image Decode: converts a file from a binary format to the image displayed in ACDSee. Decode plug-insallow ACDSee Home to display images of many different file formats. The files that you can view withACDSee Home depend on which decoding plug-ins are installed on your computer.
Image Encode: converts the image displayed in ACDSee Home to a binary file format. Encode plug-insallow ACDSee Home to save (or convert) images to many different file formats. The files that you canedit and save with ACDSee Home depend on which encoding plug-ins are installed on your computer.
Archive: allows ACDSee Home to display and save archives of many different file formats. The archivesthat you can view and create with ACDSee Home depend on which archive plug-ins are installed on yourcomputer.
Camera: allows ACDSee Home to browse images on your digital camera and transfer them to a folderon your hard drive.
Command Extension: adds functionality to ACDSee. For example, there is a plug-in that you can use toshare your images over the Internet.
Pane Extension: adds a pane to ACDSee Home where you can perform tasks like order prints of yourdigital images.
We cannot ensure the quality of plug-ins that are not certified by ACD Systems. As with anyother piece of software, you are trusting that the plug-in is free of viruses and that thecompany that produced the plug-in is trustworthy.

ACDSee Photo Studio Home 2022
Page 196 of 506
Managing Plug-Ins
The Plug-in Settings dialog box displays a list of all the ACDSee plug-ins installed on your computer.You can also use the Plug-in Settings dialog box to control which plug-ins ACDSee Home uses.
To Access the Plug-In Settings Dialog Box:
In Manage mode, click Tools | Plug-in Settings.
Disabling a Plug-In
You can disable a plug-in in the Plug-in Settings dialog box so that ACDSee Home no longer uses it.
To Disable a Plug-In:
1. In the Plug-in Settings dialog box, select one of the Plug-in tabs.
2. Uncheck the checkbox beside the name of the plug-in that you do not want ACDSee Home to use.
3. Click OK.
Changing the Plug-In Order
Some file formats can be supported by more than one plug-in. However, when this happens, you cancontrol which plug-in is used to read or write a file format. The order that plug-ins appear in the Plug-inSettings dialog box is the order that ACDSee Home uses the plug-ins to read or write a file.
To Change the Plug-In Order:
1. In the Plug-in Settings dialog box, select one of the Plug-in tabs.
2. Select a plug-in in the Plug-ins list.
3. Do one of the following:
Click the Move up button to move the plug-in higher in the list.
Click the Move down button to move the plug-in lower in the list.
4. Click OK.
Viewing Plug-In Properties and Getting Help
You can view and set properties for certain plug-ins.
To View Plug-In Properties:

ACDSee Photo Studio Home 2022
Page 197 of 506
1. In the Plug-in Settings dialog box, select one of the Plug-in tabs.
2. Select a plug-in in the Plug-ins list.
3. Click the Properties button.
To View a Plug-In's Help File:
1. In the Plug-in Settings dialog box, select one of the Plug-in tabs.
2. Select a plug-in in the Plug-ins list.
3. Click the Plug-in Help button.
ACDSee SeeDrive™
The ACDSee SeeDrive™ pane provides direct access to your ACDSee 365 account. You can use theACDSee SeeDrive™ to manage your ACDSee 365 images, and monitor your uploads and downloads to365.acdsee.com, an image sharing and storage service. An ACDSee 365 account requires a membershipor the purchase of additional storage, which you can obtain at 365.acdsee.com.
ACDSee SeeDrive™ allows you to browse through your online images without having to launch anInternet browser. Alternatively, you can go to 365.acdsee.com with an Internet browser. To view theSeeDrive™ pane, go to Panes | SeeDrive.
To Use ACDSee SeeDrive™:
In the ACDSee SeeDrive™ pane, press Connect and enter your ACDSee 365 login credentials. If you donot have an ACDSee 365 account, select Create an account.
Alternatively, you can log in through 365mode.

ACDSee Photo Studio Home 2022
Page 198 of 506
Managing Your ACDSee 365 Files with SeeDrive™
You can create, rename, and delete ACDSee 365 folders directly from ACDSee SeeDrive™ in Managemode.
To Create a New Folder:
1. In the ACDSee SeeDrive™ pane in Manage mode, right-click your username and select New OnlineFolder...
2. In the New Online Folder dialog, enter a name for your folder and press OK.
To add a newly created folder to an existing folder hierarchy, drag the new folder to yourdesired location inside of it.
To Create a New Folder Inside an Existing Folder:
1. In the ACDSee SeeDrive™ pane in Manage mode, expose your folders by clicking the arrow next to yourusername.
2. Right-click your desired folder and select New Online Folder...
3. In the New Online Folder dialog, enter a name for your folder and press OK.
To Rename a Folder:
In the ACDSee SeeDrive™ pane in Manage mode, right-click the folder and select Rename.
To Delete a Folder:
In the ACDSee SeeDrive™ pane in Manage mode, right-click the folder and select Delete.
To Rename a File:
1. In the ACDSee SeeDrive™ pane in Manage mode, navigate to and open your desired folder.
2. In the File List pane, right-click the file and select Rename.
To Delete a File:
1. In the ACDSee SeeDrive™ pane in Manage mode, navigate to and open your desired folder.
2. In the File List pane, right-click the file and select Delete.
Uploading
Uploading Files to ACDSee 365 with SeeDrive™:

ACDSee Photo Studio Home 2022
Page 199 of 506
To upload a folder: select a folder from the Folders pane and drag it into your desired folder in ACDSeeSeeDrive™.
To upload individual files: select your desired files in the File List pane and drag them into your desiredfolder in ACDSee SeeDrive™.
Manage your uploads by right-clicking any folder in ACDSee SeeDrive™ and selecting TransferManager... Use the Transfer Manager controls as described in the table below.
Downloading
Downloading Files from ACDSee 365 with SeeDrive™:
1. Select your destination folder in the Folders pane.
2. Select the folder you would like to download in ACDSee SeeDrive™, right-click and choose Download.
Manage your downloads by right-clicking any folder in ACDSee SeeDrive™ and selecting TransferManager... Use the Transfer Manager controls as described in the table below.
Transfer Manager Options
Choose the Uploads or Downloads tab.
Restarts paused transfer
Pauses transfer
Cancels transfer
Retry transfer
Select all
Clear finished
Making Folders Private or Public
You can set folders to private or public in the ACDSee SeeDrive™ pane in Manage mode. When youmake a folder public, anyone can find and see the images in that folder when they browse or search365.acdsee.com.
New folders are set to private by default.
To Change an ACDSee 365 Folder to Public Using ACDSee SeeDrive™:

ACDSee Photo Studio Home 2022
Page 200 of 506
1. In the ACDSee SeeDrive™ pane, expose your folders by clicking the arrow next to your username.
2. Right-click the folder you want to make public, and selectMake Public.
To Change an ACDSee 365 Folder Back to Private Using ACDSee SeeDrive™:
1. In the ACDSee SeeDrive™ pane, expose your folders by clicking the arrow next to your username.
2. Right-click the folder you want to make private, and selectMake Private.
Sharing and Downloading with ACDSee SeeDrive™
You can perform sharing and downloading actions on your online content from right within ACDSeeSeeDrive™. You can also view and manage the progress of your uploads and downloads with theTransfer Manager.
Sharing a Folder with ACDSee SeeDrive™
You can share your ACDSee 365 folders with others right from your ACDSee SeeDrive™ pane. You canshare using Email, post to a social networking site, or create a widget.
To Share Your Folders Using ACDSee SeeDrive™:
1. In the ACDSee SeeDrive™ pane in Manage mode, expose your folders by clicking the arrow next to yourusername.
2. Right-click the folder you want to share and select Share Folder.
3. In the Share window, select your sharing method and enter your information, as described below.
Share Options

ACDSee Photo Studio Home 2022
Page 201 of 506
Scroll through your images at the bottom of the window and uncheck any photos you do not wish to include.After you have entered the information below, press OK.
Recipient Email Addresses Enter your recipients' email addresses. Separate multipleemail addresses with commas.
Your Message Enter a message for your recipients.
Allow download of largest availableJPG
Allow your recipients to download the largest availableversions of your images.
Email me too Check this checkbox to receive a copy of your email.
Optional private access password If you would like your album to be password protected, enterthe password here. The password will be available to yourrecipients in the body of your email, which they can then enterto gain access to your album.
Twitter™
Scroll through your images at the bottom of the window and uncheck any photos you do not wish to include.After you have completed the steps listed below, press Upload.
Twitter™ Press this button to launch Twitter™ in a browser and enteryour login credentials.
Shorten URL with bit.ly Shortens the length of your album's URL, allowing you morecharacters for your message.
Preview Displays a preview of your post.
Characters left Displays how many characters you have left of your message.
Allow download of largest availableJPG
Allows viewers to download the largest available versions ofyour images.
Widget
A photo widget is an image viewer or slideshow that can be placed on a website or blog. This optiongenerates a piece of html code that you can copy and paste onto your website or blog. Scroll through yourimages at the bottom of the window and uncheck any photos you do not wish to include.
Orientation Select the orientation of your photo widget from the drop-down menu.
Theme Select the color theme of your photo widget from the drop-down menu.
ACDSee Photo Studio Home 2022
Page 202 of 506
Size Select the size of your photo widget from the drop-downmenu.
Sharing Your Folders by Copying and Pasting its URL Using ACDSee SeeDrive™
You can copy the URL of a folder from ACDSee SeeDrive™ and paste it in a browser, email, or anywhereelse.
You can only copy a URL from a public folder.
Copying and Pasting a Folder's URL:
1. In the ACDSee SeeDrive™ pane in Manage mode, expose your folders by clicking the arrow next to yourusername.
2. Right-click the folder you want to share and select Copy URL.
3. Right-click and select Paste, or press Ctrl + V, wherever you would like to paste the URL.

ACDSee Photo Studio Home 2022
Page 203 of 506
Chapter 4: Media Mode
Using Media Mode
Mediamode offers a streamlined, database-driven approach to Digital Asset Management. Only thefolders browsed inManagemode and that have been cataloged into the ACDSee database will bedisplayed inMediamode, offering a clutter-free view of photographs and videos managed by ACDSee.
TheMediamode interface is divided into four separate functional areas:1. Header Button Bar,2. My Folders,3. Display Area, and4. Group By.

ACDSee Photo Studio Home 2022
Page 204 of 506
Header Button Bar
Located directly below the main menu, the Header Button Bar contains three buttons describedbelow:
l Refresh,l Catalog, andl Show Orphan Files.
Header Button Bar Options

ACDSee Photo Studio Home 2022
Page 205 of 506
Refresh
Refreshes the My Folder pane's folder tree and the Display Area pane.
Catalog
Produces the Catalog Files dialog which allows thumbnails and file inform-ation to be added to the database without having to first browse folders.
Folders to Catalog
Subfolders Enabledsubfolderswill also beadded tothe data-base.
Add folder... Click theAddFolder...button tobrowse forfolders tobe addedto the data-base.
Remove folder Select afolder inthe Foldersto Catalogtable andclick theRemovefolder but-ton toremovethe folderfrom thetable.
Import from Cataloged Files
EXIF and IPTC metadata Enable toimportEXIF andIPTCmetadata.

ACDSee Photo Studio Home 2022
Page 206 of 506
ACDSee Metadata, including categories, keywords, tagged,and collections
Enable toimportACDSeemetadata,includingcategories,keywords,tagged,and col-lections.
Face Data, including face outlines and names Enable toimportFace Data,includingface out-lines andnames.Enablingthe FaceDatacheckboxactivatestheACDSeeFace Dataradio but-ton andthe Light-room orPicasaFace Dataradio but-ton.
ACDSee Face Data Enable toimportACDSeeFace Data.TheACDSeeFace Dataradio but-ton is onlyactivated ifthe Face

ACDSee Photo Studio Home 2022
Page 207 of 506
Data,includingface out-lines andnamesckeckboxis enabled.EnablingtheACDSeeFace Dataradio but-ton dis-ables theLightroomor PicasaFace Dataradio but-ton.
Lightroom or Picasa Face Data Enable toimportLightroomor PicasaFace Data.The Light-room orPicasaFace Dataradio but-ton is onlyactivated ifthe FaceData,includingface out-lines andnamesckeckboxis enabled.Enablingthe Light-room orPicasaFace Dataradio but-ton dis-

ACDSee Photo Studio Home 2022
Page 208 of 506
ables theLightroomor PicasaFace Dataradio but-ton.
File Formats
Catalog images Only imagefile typeswill be cata-loged
Catalog images and videos Both imagefile typesand videofile typeswill beimported
Catalog all files All files inthe selec-ted folderwill beimported.
Options
Build and include thumbnails in database Enable tobuildthumbnailsof theimage orvideo filesandinclude thethumbnailsin the data-base.
Include contents of archive files Enable toinclude thecontents ofarchivedfiles.
Create preview files for RAW images Enable tocreate pre-view files

ACDSee Photo Studio Home 2022
Page 209 of 506
for RAWimages.
Help Opens the help file related to cataloging files inMedia mode.
Start Starts the process of adding thumbnails and file information to the data-base.
Cancel Stops the process of adding thumbnails and file information to the data-base.
Show Orphan Files
Displays missing files flagged as orphans. Orphans will be displayed insepia.
To use the Catalog Files tool:
1. Click the Catalog button in the Header Button Bar located directly below the main menu.2. In the Catalog Files dialog, complete the options described in the above table.3. Click the Start button to automatically add thumbnails and file information to the database.
My Folders
Located along the left side of the screen, theMy Folders pane is a simple folder tree populated with allfolders browsed while inManagemode. To add additional folders to theMy Folders pane withoutleavingMediamode, use the Catalog Files tool described above.
TheMy Folders pane is hidden by default. To display theMy Folders pane, click the Hide/Show icon
in the lower left of the Display Area.
Clicking a folder containing media in theMy Folder pane will filter the Display Area's contents todisplay the selected folder's media.
Display Area
The Display Area pane occupies the large central portion of the screen and is used primarily to displayimages and videos that can be filtered, sorted, or grouped.
Double-click any image or video to display them in full screen. Videos displayed in full screen can beplayed without leavingMediamode. Double click the full screen image or video to return to the gridview.
Right-click individual media assets to produce a context-sensitive help menu containing the followingoptions:
l View: opens media asset in View mode.
l Develop: opens media asset in Developmode.
l Edit: opens media asset in Edit mode.

ACDSee Photo Studio Home 2022
Page 210 of 506
l Rotate Left: press Ctrl + L to rotate left.
l Rotate Right: press Ctrl + R to rotate right.
l Show in File Explorer: opens to the media asset file's location in File Explorer.
Filter By
When enabled, the tools in the Filter By toolbar are very powerful for tailoring the results displayed inthe Display Area pane by filtering the results based on specific metadata.
To filter media assets in the Display Area pane, choose from a combination of any of the following:
l Enable the Tagged checkbox to display only those images with a tag.
l Make a selection from the ratings to display media with a specific rating. The button to the left of the rat-ings lets you choose whether the results will include media with a Rating less than or equal, greater thanor equal, or matching the chosen rating.
l Make a selection from the color labels to display media tagged with a specific label.
Changes made to the Filter By tools will affect the results displayed in the Group By pane.
Sort and Group
Located directly above the media asset and to the right-side of the Display Area pane, the Sort andGroup drop downs are used to alter how the contents of the Display Area pane are presented. Unlikethe Filter By field which refines the number of media assets displayed, the Sort and Group drop downsdo not change the number of media assets displayed. Both the Sort and Group drop down results canbe sorted forwards or backwards.
Selections made in the Group field will affect the results displayed in the Group By pane.
Group By
Located along the right side of the screen, the Group By pane lists groups of media assets based onthe selection made in the Filter By drop down and the Group drop down. To display the Group By
pane, click the Hide/Show icon in the lower right of the Display Area.
The Group By pane results can be grouped forward and backwards.
The blue bar within each group tab is representative of the number of media assets in the group.
Clicking a tab in the Group By pane changes the display in the Display Area pane to reflect the groupselected.

ACDSee Photo Studio Home 2022
Page 211 of 506
Chapter 5: View ModeViewmode is the main viewing component of the ACDSee user interface.
In Viewmode, you can:
Click + hold + drag to pan around large images.
Press the keyboard shortcut F to toggle in and out of full screen view.
Zoom in or out on your images.
View images in a slideshow.
Play video and audio files and add audio to your image files.
Add captions to your images.
Catalog files by tagging them, adding categories, keywords, and other metadata.
Automatically advance to the next image in the Filmstrip when you apply metadata.
Detect faces in images and assign them names.
Please note that Face Detection is only available for the 64-bit version of ACDSee PhotoStudio Home.
Previewing Your Images with Auto Lens
You can use Auto Lens to preview your images with a number of filters without actually applying themto the file.
To View Your Image with an Auto Lens:
1. Open an image in View mode.
2. On the Toolbar, press the Auto Lens button.
3. Select a filter to preview your image in.
4. Use the Filmstrip or Previous/Next button to preview more images with your selected filter.
The Lens will remain turned on in Viewmode until you turn it off.

ACDSee Photo Studio Home 2022
Page 212 of 506
To Turn Off Your Selected Auto Lens:
1. On the Toolbar, press the Auto Lens button.
2. Select None.
Light EQ™
You can view your image with an instant exposure adjustment in Viewmode with Light EQ™. You willneed to select Light EQ™ for each image you view.
To View Your Image with Light EQ™:
1. Open an image in View mode.
2. On the Toolbar, press the Light EQ™ button.
Rotating Images
You can rotate images in Manage and Viewmodes using the Rotate icons in the bottom toolbar.
When you rotate unedited JPEG images, ACDSee performs a lossless rotation, meaning noinformation is lost.
To Rotate Images:
1. In Manage mode or View mode, select one or more images.
2. Click the Rotate Left or Rotate Right icon in the bottom toolbar.
Rotate Icons
Rotate Left Rotates the image 90° to the left.
Rotate Right Rotates the image 90° to the right.

ACDSee Photo Studio Home 2022
Page 213 of 506
Using the Histogram
The Histogram is a graph that represents the distribution of color intensity for each color channel in animage.
To Display and Use the Histogram:
1. In View mode, click Panes | Histogram, or View | Histogram in Edit mode.
2. On the Histogram, check or uncheck the following checkboxes:
R: shows or hides the red color channel.
G: shows or hides the green color channel.
B: shows or hides the blue color channel.
L: shows or hides the lightness of the image.
Using Face Detection and Recognition in View Mode
Please note that Face Detection is only available for the 64-bit version of ACDSee Photo StudioHome.
You can use Face Detection to detect people in images you browse in Viewmode. You can also importface data from other programs in Viewmode.
This process will be expedited if you have allowed Face Detection to finish scanning in Managemode on the folder you are currently viewing.
You can assign names to the detected faces in Viewmode using the Face Detection pane or Face tool.Naming faces will assist ACDSee with recognizing individuals in future images. This is referred to asfacial recognition. The more often a person is named, the more likely they will be recognized, savingyou time in the future. You can also improve your results by correcting names mistakenly assigned tofaces by ACDSee. The sooner the correction is made, the less likely it will reoccur. Once you havenamed a face one or more times, ACDSee may suggest this name in future faces. See the Suggestionssection below.
Assigned names will allow you to search for images using the names of the people in them. You can dothis using the Search functions in Manage mode, as well as the People group in the Catalog pane. Youcan also manage the names assigned to faces using People mode.
Face Detection is enabled by default. Face Detection is only available on supported image file types.
You cannot run Face Detection on files in unsupported locations, such as archives, phones,and photo disks, or on files excluded from the database.
To Enable or Disable Face Detection:

ACDSee Photo Studio Home 2022
Page 214 of 506
Choose Tools | Options | Face Detection and check/uncheck the Automatically detect faces inimages checkbox.
When you browse images in Viewmode, Face Detection will scan each image for faces as you open it.
To Open the Face Detection Pane:
Choose Panes | Face Detection.
Detected faces will appear in the Face Detection pane.
To Show Face Outlines:
In the Bottom Toolbar, click the Show Face Outlines button or press Shift + B.
To Name Detected Faces:
1. In the Bottom Toolbar, click the Face Tool button or press Shift + F.
2. In the field below the face outline, enter the name of the detected face.
3. Press Enter.
You can use Tab to move your cursor between name fields on the image, as well as on the FaceDetection pane.
To Edit Face Outlines:
1. In the Bottom Toolbar, click the Face Tool button or press Shift + F.
2. Use your cursor to move, expand, or contract the outline.
To Draw Outlines Around and Name Undetected Faces:
1. In the Bottom Toolbar, click the Face Tool button or press Shift + F.
2. Click and drag to draw a face outline on the image.
3. In the field below the face outline, enter a name for the face.
Outlining and naming undetected faces will not improve ACDSee's recognition of theindividual.
To Import Embedded Face Data From Lightroom or Picasa:
1. In View Mode, select Tools | Face Detection | Import Lightroom or Picasa Face Data.
2. Your face data will import and the face data will be added to your database.
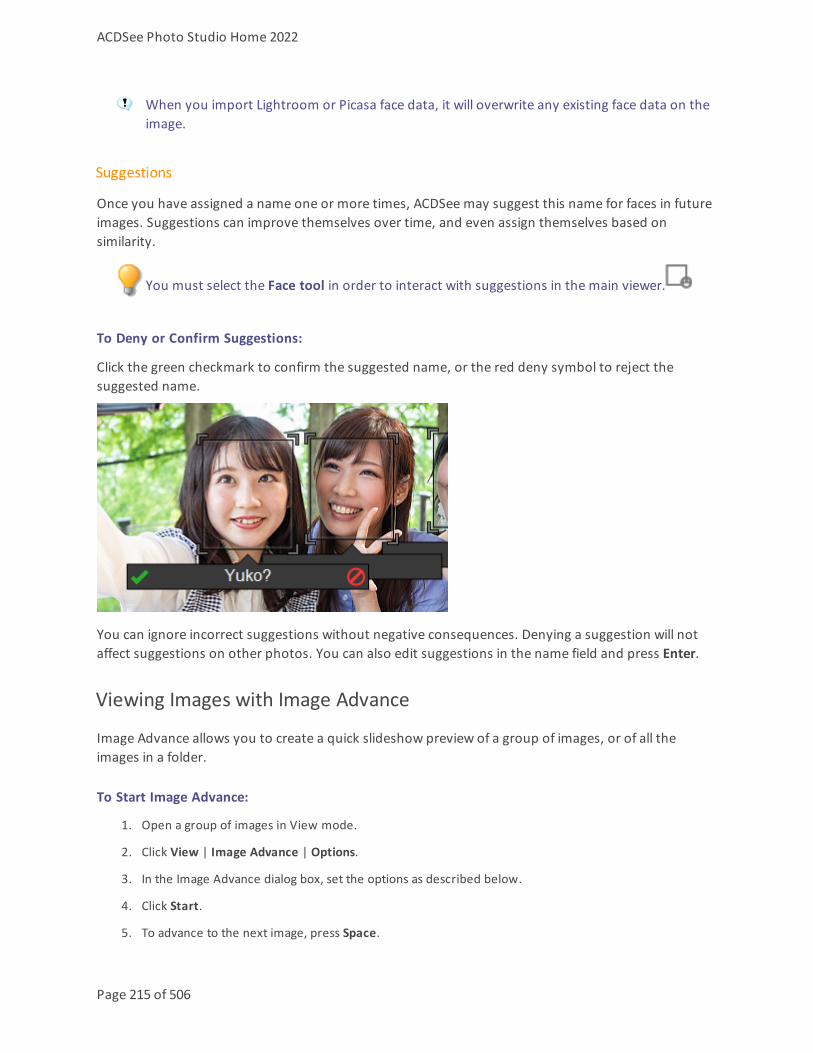
ACDSee Photo Studio Home 2022
Page 215 of 506
When you import Lightroom or Picasa face data, it will overwrite any existing face data on theimage.
Suggestions
Once you have assigned a name one or more times, ACDSee may suggest this name for faces in futureimages. Suggestions can improve themselves over time, and even assign themselves based onsimilarity.
You must select the Face tool in order to interact with suggestions in the main viewer.
To Deny or Confirm Suggestions:
Click the green checkmark to confirm the suggested name, or the red deny symbol to reject thesuggested name.
You can ignore incorrect suggestions without negative consequences. Denying a suggestion will notaffect suggestions on other photos. You can also edit suggestions in the name field and press Enter.
Viewing Images with Image Advance
Image Advance allows you to create a quick slideshow preview of a group of images, or of all theimages in a folder.
To Start Image Advance:
1. Open a group of images in View mode.
2. Click View | Image Advance | Options.
3. In the Image Advance dialog box, set the options as described below.
4. Click Start.
5. To advance to the next image, press Space.

ACDSee Photo Studio Home 2022
Page 216 of 506
6. To return to the previous image, press Backspace.
7. To stop or restart Image Advance, press Pause.
Image Advance Options
Sequence Determines the order that you want to display your images. Select one of the followingoptions:
l Forwardl Reversel Random
Repeat Automatically restarts the slideshow after the last image has been displayed.
Delay Specifies how long to display each image. Drag the slider or type a time in milliseconds.
Sound Check the Play audio clips checkbox to play any audio embedded in the selectedimages.
Displaying Text on Images in View Mode
You can use the Header/Footer tool to display text with your images in Viewmode. The text isdisplayed while you are viewing the image, but does not modify the original image. You can also hidethe headers and footers without changing the settings.
To add text directly to your photos and save it as part of the image, see Adding text to an image.
To Edit Image Headers and Footers:
1. In View mode, click View | Edit Header/Footer.
2. Do one or both of the following:
Check the Header checkbox to add text at the top of the image.
Check the Footer checkbox to add text at the bottom of the image.
3. Select or change the text options as described below.
4. Click OK.
Text Options

ACDSee Photo Studio Home 2022
Page 217 of 506
Alignment Specifies the justification of the captions.
Background Adds a background color to the text. Click Color to specify a color.
Description Displays the text you want to see on your images. Type the text you wantto appear, or click inside the field to set an insertion point for insertingmetadata.
Insert Metadata Inserts file-specific information into the text for each image.
Font Sets the font, size, and color of the caption text.
To Insert Metadata in Image Text:
1. Position the cursor in the Description text box where you want to display the file information and clickInsert Metadata.
2. In the Choose Properties dialog box, select the file information you want to include.
3. Click OK.
The information you added is inserted as a placeholder that will be replaced by the specific text foreach image.
Hiding Image Text
You can hide either the header or footer, or disable both at once without changing or deleting theinformation in the header and footer fields.
To Hide the Image Text:
1. In View mode, click View | Edit Header/Footer.
2. Do one or both of the following:
Uncheck the Header checkbox to remove text from the top of the image.
Uncheck the Footer checkbox to remove text from the bottom of the image.
3. Click OK.
To show or hide both headers and footers simultaneously, click View | Show Header/Footer.
Selecting Part of an Image
You can use the Select tool in Viewmode to select a rectangular area of an image. You can then zoomin on the selection, copy the selection, save the selection as a new image, print the selection, and usethe selection as the desktop wallpaper.
ACDSee Photo Studio Home 2022
Page 218 of 506
To Select Part of an Image:
1. Click the Select Tool icon.
2. Drag the cursor across the image to create a marquee.
3. Right-click inside the marquee and select one of the options described below.
4. To cancel the selection, click an area of the image outside of the marquee.
Selection Options
Zoom To Zooms in on the selected area.
Copy Copies the selected area to the Clipboard.
Save Crop As Saves the selected area as a new image.
Print Prints the selected area.
WallpaperCentered
Creates desktop wallpaper using the selected area and centers it on your desktop,shrinking it to fit if necessary.
Wallpaper Tiled Creates a tiled desktop wallpaper pattern using the selected area.
Viewing File Properties in View Mode
You can view an image’s properties in Viewmode and edit the information in the Properties pane.
To View an Image’s Properties:
In Viewmode, click Panes | Properties.
For more information about the Properties pane, and adding or editing ACDSee HomeMetadata, seeUsing the Properties Pane.
Viewing and Using Brush Files
You can view brush files in Manage mode just like fonts or other files. This means that you can assignratings or organize them just like any other file in ACDSee. Because many .abr files are actually groupsof images in one file, you need to open them in Viewmode to see the individual images.
This icon indicates an .abr brush file in ACDSee.
To View Brush Files:
ACDSee Photo Studio Home 2022
Page 219 of 506
In Manage mode, navigate to the folder containing your brush files.
To see just the top image in any .abr file, hover over the thumbnail to activate the pop-up, or click it tosee the image in the Preview pane.
To view the other images in the .abr file, double-click it to open it in View mode. The file opens in Viewmode showing the individual images in a pane on the left-hand side.
To see the number of images, and select them by number, click the down-arrow at the top of thesidebar, and then select the number of the image.
To scroll through the images, click the right and left arrows at the top of the sidebar, or on each image.
To Use Brush Files in Adobe Photoshop®:
With both Adobe Photoshop® and ACDSee Home open, drag the file from the File List (in Managemode) onto the Photoshop® window.
Even though nothing appears to happen, the brush is loaded into the Photoshop® brush library. Toview the new brushes, open the library and scroll to the bottom of the pane.
To make it even easier to use brushes in Photoshop®, you can configure it to be your defaulteditor. Then you can use Ctrl + Alt + X to open Photoshop® and use the brush right away.
Playing Video and Audio Files
You can play video or audio files in many formats in ACDSee. You can control playback volume, andcreate an image from a video frame.
To Play Video or Audio Files:
In Manage mode, in the File List pane, do one of the following:
Double-click a video or audio file.
Select one or more files and press Enter.
Select one or more files, right-click a selected file, and then select View.
Use the Media toolbar to adjust the volume, pause, loop, or extract frames from playback.
Automatically Playing Audio and Video Files
You can configure your settings to play audio and video files automatically, as soon as you open themin Viewmode, or as you view them in the Preview pane in Manage mode.
To Start Playing Media Files Automatically:

ACDSee Photo Studio Home 2022
Page 220 of 506
1. In Manage mode or View mode, click Tools | Options | Preview.
2. Check the Autoplay audio or video clips checkbox.
3. Click OK.
The Media Toolbar
You can use the Media toolbar to quickly access common media viewing and editing tools.
Media Toolbar Buttons
Play Plays the media file or selection. Changes into the Pause buttonwhen a media file or selection is playing.
Extract Frames Opens a menu you can use to copy, save, and extract videoframes.
Frames are extracted at the resolution you viewedthem at, (your screen resolution).
Loop Continuously plays the media file or selection.
Volume Mute Click to mute the playback volume, click again to play thevolume.
Saving Video Frames as Images
You can extract an individual frame from a video and save it as a still image.
To Extract and Save a Single Video Frame as an Image:
1. Do one of the following:
Find the frame you want to capture and press Pause.
Skip to step 2 as the exact frame you want to extract is playing.
2. On the Selection and media controls toolbar, click the Extract Current Frame button.
3. In the Extract Current Frame dialog box, select a folder in which to save your file.
4. In the File name field, type a filename.
5. Click the Save as type drop-down list and select a file format. You can click the Options button to selector change any options associated with the file format.
6. Click Save.

ACDSee Photo Studio Home 2022
Page 221 of 506
Adding or Editing Image Audio
ACDSee Home supports images with embedded audio and images with associated audio files.
Images with embedded audio are TIFF or JPEG images with audio saved inside the image file. You canembed audio inside an image file by adding audio to the image.
Images with associated audio are image files paired with separate WAV audio files. Image files and theirassociated audio files contain the same file name and are located in the same folder. You can associateany WAV file with an image file by giving them the same name and placing them in the same folder, orby adding audio to the image.
If you move or rename either an image file or the audio file associated with it, both files mustbe renamed and in the same folder or they will no longer be associated. This does not apply toimages with embedded audio.
To Add Audio to an Image:
1. Do one of the following:
Select an image in Manage mode.
Open an image in View mode.
2. Click Tools | Image Audio | Edit.
3. In the Edit Audio dialog box, click the Browse button.
4. Select a WAV file and click Save.
5. If you would like to truncate or clip the audio file, check the Use markers checkbox, and drag the Startmarker and End marker sliders. Do one of the following:
Click the Truncate button to remove the beginning and end of the audio file (the sectionsoutside of the start and end markers).
Click the Clip button to remove the section of the audio file inside the start and end markers.
6. To hear a preview of the file, click the Play button.
7. Click OK.
Recording Audio to an Image
You can record your own audio files and add them to your images. When you add audio to a JPEG orTIFF image, the audio is embedded in the image. With other file formats, the audio file is associatedwith the image; the audio file is saved in the same folder and is played when the image is viewed.
To Record and Add an Audio File to an Image:
ACDSee Photo Studio Home 2022
Page 222 of 506
1. Do one of the following:
Select an image in Manage mode.
Open an image in View mode.
2. Click Tools | Image Audio | Edit.
3. In the Edit Audio dialog box, select or change the Record sound settings options as described below.
4. Click Record and do one of the following:
Use a microphone and record a sound.
Play audio from an audio player on your computer.
5. Click Record to stop the recording.
6. Click Save As to save the audio file.
7. In the Save Sound File dialog box, type a name in the File name field, and then click Save.
8. Click OK.
Record Sound Settings Options
Capture device Specifies which of your computer's devices you wantto record the audio.
Input format Determines which sample rate and audio type are usedto record the sound. The formats displayed depend onthe sound card you have installed on your computer.
Overwrite Replaces the recorded audio from the Start markerslider location.
Mix Combines the recording with the existing audio file.
Insert using start marker Inserts the recording at the start marker location. Dragthe Start marker slider to select a position.
Append to sound file Adds the recording to the existing audio file.
Replace sound file Replaces the entire audio file with the new recording.
Printing Images in View Mode
With the ACDSee Home print utility, you can print your images and files on any size of paper, in anyorientation, and at any resolution your printer can support. You can also use the print utility to createand print contact sheets, complete with headers, footers, and captions specific to each image.

ACDSee Photo Studio Home 2022
Page 223 of 506
As you change the options in the Print dialog box, you can view a dynamically updated preview of theimage or file and its position on the page. You can adjust the output size, print multiple copies, andchange the orientation on each page.
To Print a Single Image:
1. In View mode, select the image you want to print.
2. Click File | Print....
3. Under Format, choose a print size.
4. On the Printer Options tab, specify the printer you want to use, the paper size, the number of copiesyou want, the range of pages that you want to print, and image resolution.
5. On the Page Settings tab, specify the image position on the paper and the margin widths, and specifythe number of prints of each photo.
6. On the Adjustments tab, adjust the settings to compensate for the way your printer handles exposure,contrast, and sharpness.
7. Add captions, headers, or footers.
8. Click Print.
To Print All Images:
1. In View mode, click File | Print All....
2. Under Print layout, do one of the following:
Select Full page and then choose a print size from the Format list.
Select Contact sheet and then set the Contact sheet format options to define the appearanceof your contact sheet.
Select Layout and then choose one of the available layout options.
3. On the Printer Options tab, specify the printer you want to use, the paper size, the number of copiesyou want, the range of pages that you want to print, and image resolution.
4. On the Page Settings tab, specify the image position on the paper and the margin widths.
5. On the Adjustments tab, adjust the settings to compensate for the way your printer handles exposure,contrast, and sharpness.
6. Specify the number of prints of each photo. If you are printing a Full page or a Contact sheet this optionis available on the Page Settings tab. If you are printing a Layout this option is available below the list oflayouts.
7. Add captions, headers, or footers. You can only add captions, headers, or footers if you are printing aFull page or a Contact sheet.
8. Click Print.

ACDSee Photo Studio Home 2022
Page 224 of 506
Setting an Image as the Desktop Wallpaper
You can select any image and set it as theWindows desktop wallpaper. You can also automaticallystretch a wallpapered image to fill the screen, or restore your previous wallpaper.
To Set an Image as the Desktop Wallpaper:
1. Do one of the following:
In Manage mode, select an image, and then click Tools | Set Wallpaper.
In View mode, click Tools | Set Wallpaper.
2. Select one of the following:
Centered: places the image in the center of the screen. If the image is larger than the screen, itis shrunk to fit.
Tiled: places the image in a tiled pattern that fills the entire desktop.
Stretched: stretches the image to fit the screen.
The selected image is saved as ACD Wallpaper.bmp in theWindows folder. ACDSee Homeautomatically changes the wallpaper settings in the Control Panel Display properties to display theimage.
To Automatically Stretch Wallpapered Images to Fit the Screen:
1. Click Tools | Options.
2. In the Options dialog box, click General.
3. On the General page, check the Automatically stretch wallpaper to fit screen checkbox.
4. Click OK.
To Display the Previous Wallpaper:
Click Tools | Set Wallpaper | Restore.
Synchronizing View Mode to a Folder
You can use the Sync to Folder option to change the images being displayed in Viewmode.
To Synchronize to a Folder:
1. In View mode, click File | Sync To Folder....
2. Type the path to the folder you want to synchronize, or click the Browse button to locate the folder.

ACDSee Photo Studio Home 2022
Page 225 of 506
3. Select or change the New Images options as described below.
4. Click OK.
New Images Options
Show new images immediately Displays images as soon as they appear in the folder. Ifthis option is cleared, new images are added to the endof the slideshow.
Ignore open files Delays adding a new file to the slideshow until thetransferring application has finished moving ordownloading the file.
Sort by name Sorts the images displayed in the slideshow by their filename.
To Stop Synchronizing to a Folder:
In Viewmode, click File | Sync To Folder....
Viewing Offline Images
ACDSee Home stores thumbnails and database information for images contained on CDs or otherremovable media as Photo Discs. You can then browse the thumbnails and view the information forthose images even when the disc is not in your CD-ROM drive.
To Add a Photo Disc:
1. Place a disc containing images into your CD-ROM drive.
2. In Manage mode, click File | New | Photo Disc.
3. In the New Disc dialog box, type a name for your disc in the Title field, and then click OK.
You can then browse the contents of the Photo Disc in the Offline Media section of the Folderspane.
If you add or remove images from a disc that you have already added to ACDSee Home as aPhoto Disc, you can update the information stored in the database. Insert the disc in your CD-ROM drive, and then right-click the name of the disc in the Folders pane and select UpdatePhoto Disc.
By default, ACDSee Home identifies Photo Discs by their serial numbers. This is the most reliablesetting to use when working with Photo Discs, particularly if you are importing or converting PhotoDiscs from previous versions of ACDSee.
ACDSee Photo Studio Home 2022
Page 226 of 506
However, if you are working with, or planning to work with, multi-session discs, the serial number maybe regenerated or changed each time you change the contents of a disc. Therefore, the volume label isthe required method of identification for multi-session Photo Discs.
Rebinding Photo Discs
Depending on the method used to identify Photo Discs, ACDSee Homemay encounter a Photo Discthat it does not recognize. This is most common when you are using the serial number method toidentify Photo Discs and you insert a multi-session disc. ACDSee Homemay not recognize the disc, asserial numbers are likely to change when updating a multi-session disc.
You can use the Rebind option to update the identification information, and associate the correctdatabase information with your disc.
To Rebind a Photo Disc to its ACDSee Home Database Information:
1. In the Rebind Photo Disc dialog box, carefully review the Current disc information to be sure that thecorrect disc is in the drive.
2. Select the Photo Disc record that you want to rebind to the current disc from the Photo Disc Name list.
3. Click Rebind.
Viewing Images in Another Application
You can open a file in another program from within ACDSee. For example, you can open documents inthe application used to create them.
To Use the Shell Open and Edit Commands:
1. In Manage mode, click File | Shell.
2. Select one of the following options:
Open: opens the file using the application that Windows associates with its file extension.
Edit: opens the file using the default system application, or opens a dialog box where you canselect an application.
Showing Originals
When you make changes to your images, the original image is saved so that you can restore the imageto its original settings.
To Show the Original Image:
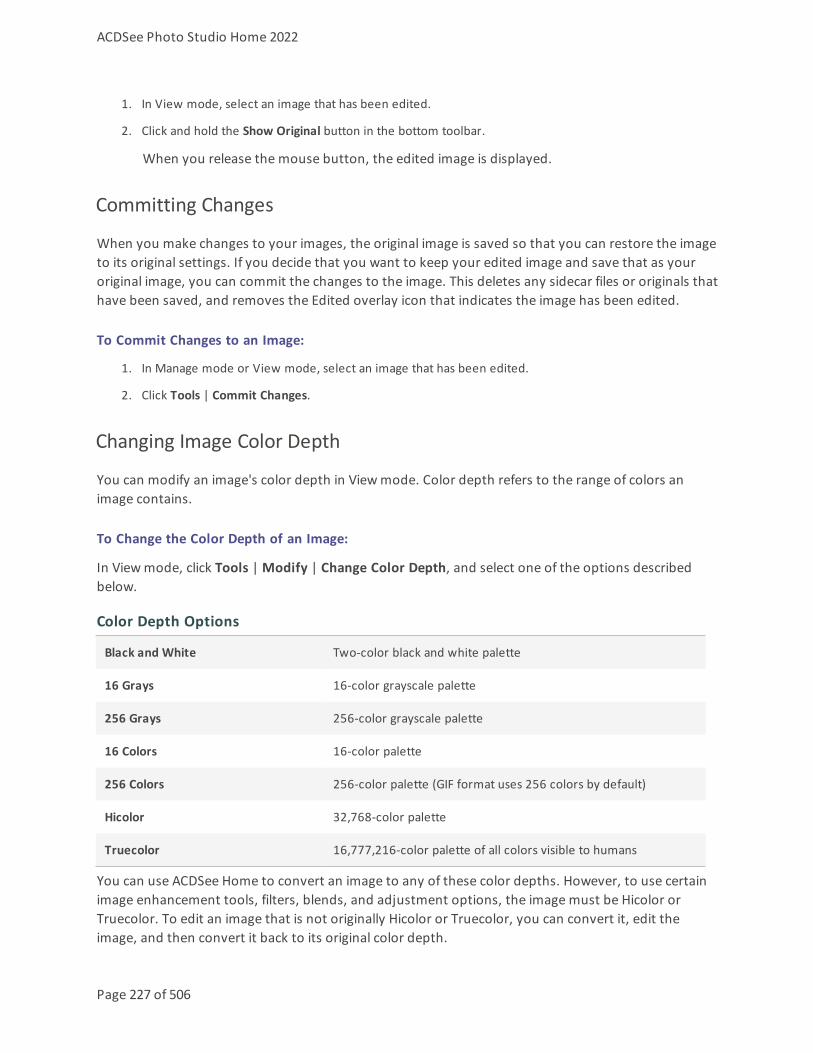
ACDSee Photo Studio Home 2022
Page 227 of 506
1. In View mode, select an image that has been edited.
2. Click and hold the Show Original button in the bottom toolbar.
When you release the mouse button, the edited image is displayed.
Committing Changes
When you make changes to your images, the original image is saved so that you can restore the imageto its original settings. If you decide that you want to keep your edited image and save that as youroriginal image, you can commit the changes to the image. This deletes any sidecar files or originals thathave been saved, and removes the Edited overlay icon that indicates the image has been edited.
To Commit Changes to an Image:
1. In Manage mode or View mode, select an image that has been edited.
2. Click Tools | Commit Changes.
Changing Image Color Depth
You can modify an image's color depth in Viewmode. Color depth refers to the range of colors animage contains.
To Change the Color Depth of an Image:
In Viewmode, click Tools |Modify | Change Color Depth, and select one of the options describedbelow.
Color Depth Options
Black and White Two-color black and white palette
16 Grays 16-color grayscale palette
256 Grays 256-color grayscale palette
16 Colors 16-color palette
256 Colors 256-color palette (GIF format uses 256 colors by default)
Hicolor 32,768-color palette
Truecolor 16,777,216-color palette of all colors visible to humans
You can use ACDSee Home to convert an image to any of these color depths. However, to use certainimage enhancement tools, filters, blends, and adjustment options, the image must be Hicolor orTruecolor. To edit an image that is not originally Hicolor or Truecolor, you can convert it, edit theimage, and then convert it back to its original color depth.

ACDSee Photo Studio Home 2022
Page 228 of 506
Zooming In and Out
In Viewmode you can use the Zoom tools to enlarge or reduce the size of the image you are viewing.When an image is zoomed to a larger size than the Viewmode window, you can use the Scroll tool(hand icon) to pan or scroll the image.
To Zoom an Image In or Out:
Click once on the image to toggle between your default view and Actual Size view.
Click Tools | Zoom, and then select one of the Zoom menu options.
Zoom Menu Options
Zoom In Increases the magnification of the image.
Zoom Out Decreases the magnification of the image.
Actual Size Displays the image at its original dimensions (100%).
Fit Image Displays the image at the largest magnification that fits in View mode window.
Fit Width Fits the image within the left and right sides of the View mode window.
Fit Height Fits the image within the top and bottom of the View mode window.
Zoom Lock Displays all images at the zoom option of the current image. If the zoom level isadjusted, the new zoom level is applied to all images that you view.
Zoom To Opens a dialog box where you can select a zoom level.
Pan Lock Locks the panned area of an image.
If you select Fit Image you can display the previous or next image by pressing the left and rightarrow keys on your keyboard.
To change your default image view, click Tools | Zoom and select Actual Size, Fit Image(standard), Fit Width, or Fit Height.
You can also quickly access the Zoom Lock on the Toolbar by toggling the Zoom Lock button.
Setting the Zoom Level
You can use the Set Zoom Level dialog box to set a specific zoom level in Viewmode.
ACDSee Photo Studio Home 2022
Page 229 of 506
To Set a Specific Zoom Level:
1. Click Tools | Zoom | Zoom To...
2. In the Set Zoom Level dialog, select one of the following:
Fit whole image: zooms the image to fit entirely within the window.
Fit width: zooms the image to fit the width of the window.
Fit height: zooms the image to fit the height of the window.
Specify: specifies a zoom percentage. Type a number in the field or click the drop-down list andselect a zoom level.
3. To use this setting as the default View mode zoom level, check the Lock at this zoom level checkbox.View mode displays all images based on the specified zoom level.
4. Click OK.
If you select Fit whole image you can display the previous or next image by pressing the leftand right arrow keys on your keyboard.
Automatically Shrinking or Enlarging Images
You can use the settings on the Display page of the Options dialog box to automatically enlarge orshrink images to fit the size of the ACDSee Home window. For information about how the combinationof the choices affects the display of images, see the Zoom mode and Resize results table below.
To Automatically Shrink or Enlarge Images:
1. In Manage mode or View mode, click Tools | Options.
2. In the Options dialog box, click View mode | Display.
3. In the Zoom options area, select one of the following options from the Default zoom mode drop-downlist:
Actual Size: keeps images at their original size.
Fit Width: resizes images to fit the width of the View mode window.
Fit Height: resizes images to fit the height of the View mode window.
Fit Image: resizes images to fit the size of the View mode window.
4. Select one of the following options from the Resize drop-down list:
Reduce Only: reduces large images to fit the size of the View mode window.
Enlarge Only: enlarges smaller images to fit the size of the View mode window.

ACDSee Photo Studio Home 2022
Page 230 of 506
Reduce or Enlarge: reduces large images, and enlarges smaller images to fit the size of theView mode window.
5. Click OK.
Zoom Mode and Resize Results
Fit Image Fit Width Fit Height
Reduce Only Reduces largeimages to fit thesize of the Viewmode window.
Images that aresmaller than theView modewindow aredisplayed at theiroriginal size.
Reduces large images tofit between the left andright sides of the Viewmode window.
Images that are smallerthan the View modewindow are displayed attheir original size.
Reduces large images tofit between the top andbottom of the Viewmode window.
Images that are smallerthan the View modewindow are displayed attheir original size.
Enlarge Only Enlarges smallimages to fit thesize of the Viewer.
Images that arelarger than theView modewindow aredisplayed at theiroriginal size.
Enlarges small images tofit between the left andright sides of the Viewmode window.
Images that are largerthan the View modewindow are displayed attheir original size.
Enlarges small images tofit between the top andbottom of the Viewmode window.
Images that are largerthan the View modewindow are displayed attheir original size.
Reduce andEnlarge
Reduces largeimages andenlarges smallimages to fit thesize of the Viewmode window.
Reduces large imagesand enlarges smallimages to fit betweenthe left and right sides ofthe View mode window.
Reduces large imagesand enlarges smallimages to fit betweenthe top and bottom ofthe View mode window.
If you select Fit Image you can display the previous or next image by pressing the left- andright-arrow keys on your keyboard.
Using the Navigator to View Select Areas of an Image
Use the Navigator pane to display a thumbnail overview of images that are larger than the Viewmodedisplay area. In the Navigator, a marquee indicates the area of the image that is visible.

ACDSee Photo Studio Home 2022
Page 231 of 506
To Display and Use the Navigator Pane:
1. In View mode, click Panes | Navigator.
2. Drag the slider to increase or decrease the magnification of the image in View mode.
3. Drag the marquee to the area of the image you would like to display in View mode.
To Use the Quick Navigator Pane:
1. In View mode, click and hold the Navigator button in the bottom toolbar.
2. Drag the marquee to the area of the image you would like to display in View mode.
Panning a Magnified Image
In Viewmode, you can pan large images by moving them vertically, horizontally, and diagonally acrossthe display area to view specific areas of the image. When an image is larger than the ACDSee Homewindow and you use the Scroll tool, the cursor changes to a hand.
To Pan an Image:
Do one of the following:
Drag the image to center the area you want to view.
Press an arrow key. You can hold the Ctrl key to pan quickly, or hold the Shift key to pan more slowly.
Using Pan Lock
You can use the Pan Lock setting to automatically center the same area of a series of larger images inViewmode.
To Use Pan Lock:
1. In View mode, pan over a large image to a specific area you want to view.
2. Using the Zoom menu, zoom in on the image until you reach the magnification you want to use for all ofyour images.
3. Click Tools | Zoom | Zoom Lock to keep the current zoom level.
4. Click Tools | Zoom | Pan Lock.
As you move through your images, each one will be automatically zoomed and panned to thesame area.
Magnifying Specific Areas of an Image
You can view specific areas of an image at a higher magnification in the Magnifying Glass pane.

ACDSee Photo Studio Home 2022
Page 232 of 506
To Use the Magnifying Glass Pane:
1. In View mode, click Panes |Magnifying Glass.
2. Move the cursor over an area of the image to view that area in the Magnifying Glass pane.
3. Change the Magnifying Glass pane settings by doing any of the following:
Move the slider at the bottom of the Magnifying Glass pane to increase or decrease themagnification.
Check the Fixed checkbox to apply the slider setting to the original size of the image. Uncheckthe Fixed checkbox to apply the slider setting to the magnification of the zoomed image in Viewmode.
Check the Smooth checkbox to apply anti-aliasing to the magnified portion of the image, oruncheck the Smooth checkbox to view the individual pixels. Anti-aliasing reduces jagged-lines,also known as 'jaggies'.

ACDSee Photo Studio Home 2022
Page 233 of 506
Chapter 6: Edit ModeMake your final edits in Edit mode, where you can apply fine-tuned adjustments on the morelimited RGB image data. Use the tools in Edit mode for any touch-ups to specific areas of your images.
In Edit Mode You Can:
Use the Selection tools to select and apply edits to a specific part of the image.
Use the Edit Brush
Remove flaws, or red eye.
Add text, watermark, borders, vignettes, a tilt-shift, special effects, and drawing tools.
Crop, flip, resize, and rotate.
Adjust lighting using the Exposure, Levels, Auto Levels, Tone Curves, and Light EQ™ filters.
Adjust color using the White Balance, Color EQ, Convert to Black & White, Split Tone, and Color LUTsfilters.
Add details to your image using Sharpen, Blur, Remove Noise, Add Noise or Clarity filters.
Using Edit Mode
In Edit mode, you can use the editing tools to fine tune your image, remove red eye, and apply specialeffects.
Editing an Image
To Edit an Image:
1. Select Edit mode.
2. Do any one or more of the following:
At the top of the panel, use the Selections or Drawing tools.
In the Repair group, click Red Eye Reduction or Repair Tool.
In the Add group, click Text, Watermark, Borders, Vignette, Drawing tools, Tilt-Shift, or click SpecialEffect and select an effect.
In the Geometry group, click Rotate, Flip, Crop, or Resize.
In the Exposure/Lighting group, click Exposure, Levels, Auto Levels, Tone Curves, or Light EQ™.

ACDSee Photo Studio Home 2022
Page 234 of 506
In the Color group, click White Balance, Color EQ, Convert to Black & White, and Color LUTs.
In the Detail group, click Sharpen, Blur, Clarity, or click Noise to remove or add noise.
3. You have several options in saving your images. See Saving images in Edit for more information.
Reverting to Original Settings
You can discard your Edit settings and revert to the original settings for your image. For steps to revertyour image, see Restoring originals.
Histogram and Image Viewing Controls
While editing an image, you can adjust the magnification with the zoom controls, located in thebottom right corner.
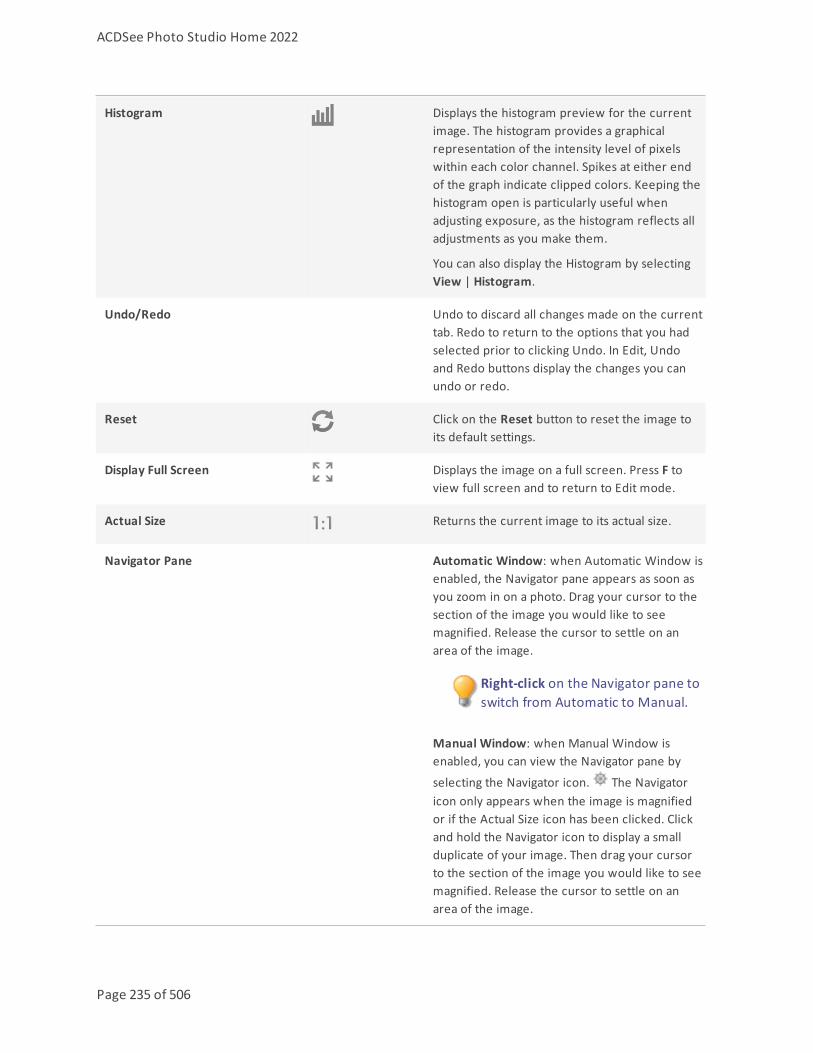
ACDSee Photo Studio Home 2022
Page 235 of 506
Histogram Displays the histogram preview for the currentimage. The histogram provides a graphicalrepresentation of the intensity level of pixelswithin each color channel. Spikes at either endof the graph indicate clipped colors. Keeping thehistogram open is particularly useful whenadjusting exposure, as the histogram reflects alladjustments as you make them.
You can also display the Histogram by selectingView | Histogram.
Undo/Redo Undo to discard all changes made on the currenttab. Redo to return to the options that you hadselected prior to clicking Undo. In Edit, Undoand Redo buttons display the changes you canundo or redo.
Reset Click on the Reset button to reset the image toits default settings.
Display Full Screen Displays the image on a full screen. Press F toview full screen and to return to Edit mode.
Actual Size Returns the current image to its actual size.
Navigator Pane Automatic Window: when Automatic Window isenabled, the Navigator pane appears as soon asyou zoom in on a photo. Drag your cursor to thesection of the image you would like to seemagnified. Release the cursor to settle on anarea of the image.
Right-click on the Navigator pane toswitch from Automatic to Manual.
Manual Window: when Manual Window isenabled, you can view the Navigator pane by
selecting the Navigator icon. The Navigatoricon only appears when the image is magnifiedor if the Actual Size icon has been clicked. Clickand hold the Navigator icon to display a smallduplicate of your image. Then drag your cursorto the section of the image you would like to seemagnified. Release the cursor to settle on anarea of the image.

ACDSee Photo Studio Home 2022
Page 236 of 506
Right-click on the Navigator icon toswitch from Manual to Automatic.
Fit Image Reduces the image to fit within the Edit modearea.
Show Previous Toggles the changes on or off, to compare thecurrent image to the last saved version.
Zoom slider Increases the size of the image if you drag it tothe right, decreases the size if you drag to theleft.
Zoom drop-down list Displays a list of zoom sizes to select.
Using Color Pickers in Edit Mode
When you use the color pickers in Edit mode, the RGB values beside the color picker relate to theimage before any new and unsaved edits. You can see the up-to-date RGB values for the image asedited in the status bar at the bottom of the page.
Using Presets in Edit Mode
Many ACDSee Home editing tools and special effects allow you to save your settings as presets. This isconvenient when you frequently use the same settings for a particular tool or effect.
For most tools, ACDSee Home automatically saves the last option settings you applied to an imagewhen you clicked Apply or Done. This preset is called Last Used.
The Save Preset and Delete buttons are located at the top of an editing tool's panel.
To Save a Preset:
1. In Edit mode, select a tool and specify its settings.
2. Click the Save Preset button.
3. In the New Preset dialog box, enter a name for your preset, and then click OK.
The new preset will appear in the tool's Presets drop-down list.
To Use a Previously Saved Preset:
1. In Edit mode, select the tool for which you created the preset.
2. Click the Presets drop-down list and select the preset you want to apply.

ACDSee Photo Studio Home 2022
Page 237 of 506
To Delete a Preset:
1. In Edit mode, select the tool for which you created the preset.
2. Click the Presets drop-down list and select the preset you want to delete.
3. Click the Delete button.
4. In the Confirm Delete dialog box, click Yes.
Using the Undo/Redo Button
You can undo and redo your changes when editing an image.
To Undo a Change:
In Edit mode, do one of the following:
Click the Undo button found at the bottom of the left pane.
Use the keyboard shortcut Ctrl + Z.
To Redo a Change:
In Edit mode, do one of the following:
Click the Redo button found at the bottom of the left pane.
Use the keyboard shortcut Ctrl + Y.
Restoring Originals
If you have committed changes to an image, you cannot restore the original.
You can discard all your changes and revert to the original image.
To Revert an Image Back to the Original in Edit:
In Edit mode, select File | Restore to Original.
To Revert an Image Back to the Original in Manage or View Mode:
1. Select the image.
2. Select Tools | Restore to Original.

ACDSee Photo Studio Home 2022
Page 238 of 506
Using the Edit Brush
While the tools in Edit mode allow you to make a variety of global adjustments, sometimes you mayonly want to adjust specific areas of your photos. For example, instead of blurring an entire photo,you may want to blur certain areas, such as the background. To do this, and other local adjustments,you can use the Edit Brush.
The Edit Brush allows you to selectively edit your photo by simply brushing on the effects. The EditBrush is essentially creating a mask that is used to determine which pixels will be affected by thecurrent settings of the chosen operation.
Edit Brush
The Edit Brush button displays at the center of the top editing panel toolbar for all applicable Editmode tools.
To Use the Edit Brush:
1. In Edit mode, select the tool you want to use.
2. Click the Edit Brush button to enter Brushing mode and open the Brush controls. Or, togglethe Brush panel open and closed with the B key.
3. Specify the brush settings in the panel or as you work as described in the table below.
4. Start painting the effects on your photo.
5. Adjust the sliders to get the effect you want.
6. Press Done to apply your brush strokes.
Edit Brush Controls

ACDSee Photo Studio Home 2022
Page 239 of 506
Add brush stroke Brush while holding the left mouse button down.
Erase brush stroke Brush while holding the right mouse button down.
Nib Width Adjusts the size of the brush. You can use the mouse wheel toadjust nib width or adjust the Nib Width slider.
Feathering Adjust the slider to control the softness of the transition betweenthe brush strokes and the image. Use Shift + mouse wheel toadjust the amount of feathering or adjust the Feathering slider.
Pressure Adjust the slider to control the strength of the brush.
Alternating between Brush mode andcursor-applied tools
For filters that involve drawing or clicking on the image, such asLight EQ™ and White Balance, hold down the Alt key to switchfrom Brush mode to using the tool.
Clear all brush strokesRemoves all brush strokes from the image.
Invert all brush strokesToggle this option to invert brushed strokes. This makes
brushed areas no longer brushed and untouched areas brushed.This is useful if you want the majority of the image brushed and asmall section untouched. Simply brush only the small area youdon't want affected and invert the brush strokes.
Load last applied brush strokesApplies effects to the area most recently brushed and
applied.
Show brush strokes
When this option is checked, your brush strokes will be displayedin the color shown. This is helpful when brushing a complex areawith a subtle effect, as it can be difficult to tell if you have misseda spot. Alternatively, hold down the S key to see your brushstrokes on the image.
When you click the Edit brush and enter Brushing mode, you need to apply brush strokes inorder to see any of your adjustments.
To exit Brushing mode, toggle the Edit brush button.
The Edit Brush is enabled in many of the editing tools and special effects filters. When it does not makesense to have this option, it is omitted. The Edit Brush is not available in the following tools: Crop,Resize, Rotate, Flip, Text, Red Eye Reduction, Repair Tool, and Selections.

ACDSee Photo Studio Home 2022
Page 240 of 506
Using the Gradient Tool
While the tools in Edit mode allow you to make solid, global adjustments, sometimes you want theseeffects to gradually progress over your photo. For example, instead of applying a blur across an entirephoto, you may want a blur that advances across the image, or advances over a section of the image.Use the Gradient tool to gradually progress an effect across an image.
Gradient Tool
The Gradient tool button displays at the center of the top Editing panel toolbar for all applicable Editmode tools.
To Use the Gradient Tool:
1. In Edit mode, select the tool you want to use.
2. Click the Gradient tool button to enter Gradient mode. Or, toggle the Gradient panel open andclosed with the G key.
3. Specify the gradient settings in the panel or as you work, as described in the table below.
4. Position the guides on your photo. Inside the guide boxes, the gradient is transitioning. On either side ofthe boxes, the effect being applied by the Gradient tool is at full strength or not applied at all. To makethis clearer, check the Show gradient mask checkbox. Move the boxes to define where the effect willbegin or end. Hold down the Shift key while positioning the effect to lock to the nearest 45° angle, forstraightness.
5. Adjust the sliders to get the effect you want.
6. Press Apply or Done.
Gradient Tool Options
Invert gradientToggle this option to invert the gradient. By pressing the
Invert button after applying a gradient beginning at the top of theimage, the gradient would now begin at the bottom, and viceversa.
Show gradient mask
When this option is checked, your gradient mask will be displayedin the color shown. Alternatively, hold down the S key to see themask on the image. Click the drop-down arrow to select anotherdisplay color.
Alternating between the Gradienttool and cursor-applied tools
For filters that involve drawing or clicking on the image, such asLight EQ™ and White Balance, hold down the Alt key to switchfrom Gradient mode to using the tool.
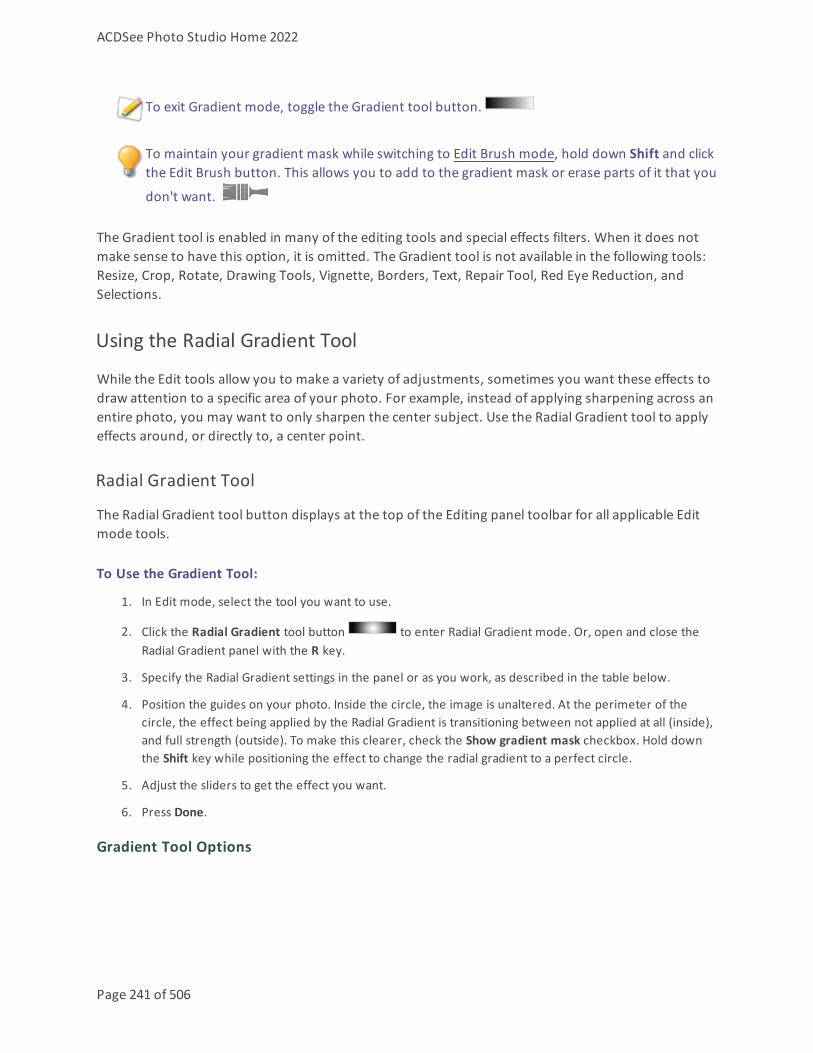
ACDSee Photo Studio Home 2022
Page 241 of 506
To exit Gradient mode, toggle the Gradient tool button.
To maintain your gradient mask while switching to Edit Brush mode, hold down Shift and clickthe Edit Brush button. This allows you to add to the gradient mask or erase parts of it that you
don't want.
The Gradient tool is enabled in many of the editing tools and special effects filters. When it does notmake sense to have this option, it is omitted. The Gradient tool is not available in the following tools:Resize, Crop, Rotate, Drawing Tools, Vignette, Borders, Text, Repair Tool, Red Eye Reduction, andSelections.
Using the Radial Gradient Tool
While the Edit tools allow you to make a variety of adjustments, sometimes you want these effects todraw attention to a specific area of your photo. For example, instead of applying sharpening across anentire photo, you may want to only sharpen the center subject. Use the Radial Gradient tool to applyeffects around, or directly to, a center point.
Radial Gradient Tool
The Radial Gradient tool button displays at the top of the Editing panel toolbar for all applicable Editmode tools.
To Use the Gradient Tool:
1. In Edit mode, select the tool you want to use.
2. Click the Radial Gradient tool button to enter Radial Gradient mode. Or, open and close theRadial Gradient panel with the R key.
3. Specify the Radial Gradient settings in the panel or as you work, as described in the table below.
4. Position the guides on your photo. Inside the circle, the image is unaltered. At the perimeter of thecircle, the effect being applied by the Radial Gradient is transitioning between not applied at all (inside),and full strength (outside). To make this clearer, check the Show gradient mask checkbox. Hold downthe Shift key while positioning the effect to change the radial gradient to a perfect circle.
5. Adjust the sliders to get the effect you want.
6. Press Done.
Gradient Tool Options

ACDSee Photo Studio Home 2022
Page 242 of 506
Invert gradientToggle this option to invert the radial gradient. By pressing the
Invert button, the effects will be applied to the center of the image(inside the circular guides), and outside of the radial gradient willbe unaltered.
Show gradient mask
When this option is checked, your radial gradient mask will bedisplayed in the color shown. Alternatively, hold down the S key tosee the mask on the image. Click the drop-down arrow to selectanother display color.
Alternating between the RadialGradient Tool and cursor-appliedtools
For filters that involve drawing or clicking on the image, such asLight EQ™ and White Balance, hold down the Alt key to switchfrom Radial Gradient mode to using the tool.
To exit Radial Gradient mode, toggle the Gradient tool button.
To maintain your radial gradient mask while switching to Edit Brush mode, hold down Shiftand click the Edit Brush button. This allows you to add to the gradient mask or erase parts of it
that you don't want.
The Radial Gradient tool is enabled in many of the editing tools and special effects filters. When it doesnot make sense to have this option, it is omitted. The Radial Gradient tool is not available in thefollowing tools: Resize, Crop, Rotate, Drawing Tools, Vignette, Borders, Text, Repair Tool, Red EyeReduction, and Selections.
Using Blend Modes and Opacity
When using a tool in Edit, there are blend mode and opacity tools. These tools give you creativecontrol and let you combine the two to create a new image. You can apply blend modes and opacity toan entire image or to a selected part of an image.
Opacity
The Opacity slider changes the opacity of the edited image. It gives you control of howmuch of theedit should be visible on the image.
Blend Modes
The ability to control how the edits and the image merge means that other blend modes besidesopacity can be used to affect the final image.

ACDSee Photo Studio Home 2022
Page 243 of 506
Normal Pixels in the edited image are combined with those in the original. Onlyopacity affects this blend.
Screen Combines the edited image color with the inverse of the original photo color,resulting in a color that is the same or lighter.
Multiply Combines the edited image color with the original photo to produce a darkercolor. Multiplying any color with black produces black; multiplying any colorwith white leaves the color unchanged.
Dodge Combines the edited image color with the original pixels in the photo toproduce a lighter color.
Burn Combines the edited image color with the original pixels in the photo toproduce a darker color.
Overlay Preserves the shadows and highlights of the lower layers while applying eitherMultiply or Screen blend mode based on the original image area's colorvalues.
Difference Subtracts the edited image color from the color of the original photo. Anywhite in the edited image produces a true negative of the color in the image,while black produces no effect.
Darken Applies pixels in the edited image that are darker than the original image.Pixels in the edited image that are lighter than the original image disappear(based on RGB values).
Lighten Applies pixels in the edited image that are lighter than the original image.Pixels in the edited image that are darker than the original image disappear(based on RGB values).
Hard Light Adds strong highlights or shadows by applying Multiply or Screen based on theoriginal image area's color values.
Soft Light Adds soft highlights or shadows by darkening or lightening based on theoriginal image area's color values.
Hue Applies the hue value of colors in the edited image to the color of the originalimage areas.
Saturation Applies the saturation value of colors in the edited image to the color of theoriginal image areas.
Color Applies the hue and saturation of the edited image to the image. This blenddoes not affect the luminance of the original image.
Luminosity Applies the lightness value of colors in the edited image to the color of theoriginal image areas.

ACDSee Photo Studio Home 2022
Page 244 of 506
Dissolve Applies some pixels from the edited image layer onto the original image,resulting in specks of color. The Opacity slider controls the amount ofspeckling.
Exclusion Like Difference, but with less contrast, Exclusion subtracts the blend colorfrom the color of the underlying photo. Any white in the blend color producesa true negative of the color in the image, while black produces no effect.
Vivid Light Combines the blend color with the underlying pixels in the photo byincreasing or decreasing contrast to produce a lighter or darker color, asdetermined by the blend color.
Pin Light When the light source is lighter than 50% gray, the pixels darker than the lightsource are replaced. Pixels lighter than the light source remain the same.When the light source is darker than 50% gray, the pixels lighter than the lightsource are replaced. Pixels darker than the light source remain the same.
Linear Light Dodges or burns by lightening or darkening the brightness value, dependingon the blend color.
Hard Mix Applies red, green, and blue channel values of the blend color to the RGBvalues of the image.
Subtract Subtracts the blend color from the image (base) color in each channel.
Divide Divides the blend color from the image (base) color.
Darker Color From the blend color and the image (base) color, the lower channel values arechosen.
Lighter Color From the blend color and the image (base) color, the higher channel valuesare chosen.
You can use the Edit Brush to paint an effect onto specific areas of your image, andthen set the blend mode and opacity slider to change the way the effect is applied.
The blend mode and opacity controls apply to many of the editing tools and special effects filters.When it does not make sense to have these controls, they are omitted. The blend mode and opacitycontrols are not on the following tools: Crop, Resize, Rotate, Flip, Text, Red Eye Reduction, RepairTool, Selections.

ACDSee Photo Studio Home 2022
Page 245 of 506
Saving Images in Edit Mode
Saving Images
When you have finished editing an image, you can choose from one of the many options for savingyour image, depending on what you want to do next.
To Save the Image and Return to the Mode You Were in Previously:
1. Click Done.
2. Select one of the following:
Save Save your changes.
Save as Save a copy of your edited image with a new name or format.
Depending on your file type, any of the following checkboxes appear in the bottom leftcorner of the Save as dialog box:
Preserve Metadata: retains metadata with the new image.
Preserve database information: maintains your catalog information, such asratings.
Embed Color Profile in Image: retains color profile selected in Color Managementwith your new image.
Discard Discard your changes.
Cancel Remain on the same image, with your changes intact, without saving the image.
AutoSave You can enable AutoSave in order to avoid selecting a saving option each time you finishwith an image. When AutoSave is enabled, pressing Done, or selecting another imagefrom the Filmstrip will prompt ACDSee to automatically save your changes in Edit mode.You will no longer see the Save Changes dialog. To disable AutoSave, choose Tools |Options... In the Options dialog, click Edit Mode. Then uncheck the AutoSave all changescheckbox.
AutoSave is not available for RAW images.
To Save the Image and Continue Processing Other Images:
ACDSee Photo Studio Home 2022
Page 246 of 506
1. Click Save.
2. Select one of the following:
Save: save your changes.
Save As: save a version of your edited image with a new name or format and switch to theupdated image.
Save a Copy: save a copy of your edited image with a new name or format, and continue towork on the original file.
Save a Copy is useful for making multiple versions of an image while continuing to work fromthe original file instead of a new processed copy. For example, if you take a RAW image andsave a copy of it as a JPG, instead of switching to this lossy JPG image, you remain on the RAWfile with the settings still intact.
Save is not available for RAW file formats because you cannot directly save changes to a RAWfile.
To Discard Changes to the Image and Return to the Mode You Were in Previously:
Click Cancel or use the keyboard shortcut Esc.
Using Selections
Use Selections to isolate an area of a photo in order to apply edits or filters to only that area, ratherthan the whole photo. There are four different selection tools and each selects an area of a photo in aunique way. The controls available change depending on which tool you select.
To Use a Selection Tool:
1. In Edit mode, at the top of the panel, select the button for one of the following selection tools:Rectangular selection tool, Elliptical selection tool, Lasso selection tool, Magic wand selection tool. Seebelow for more detailed steps for using these tools.
You can use Selections with the following Edit tools:
Add: Vignette, Special Effects, Tilt-Shift, Drawing tools
Exposure/Lighting: Exposure, Levels, Auto Levels, Tone Curves, Light EQ™
Color: White Balance, Color EQ
Detail: Sharpen, Blur, Noise, Clarity

ACDSee Photo Studio Home 2022
Page 247 of 506
The Selection Tools
Freehand Lasso: click the left mouse button and drag the cursor to draw around the area that youwish to select. As you draw, a line appears showing where you have drawn. When you release themouse, the end of the line joins to the start automatically to complete the selection. The wholeselection animates and looks like marching ants.
Magic Wand: click on any area of the image and all the pixels the same color are included in theselection. You can choose whether to select only the same color pixels that are actually touching theone you clicked, or all the pixels in the photo that are similar. You can increase the threshold to includemore pixels in the selection. The lower the threshold, the more similar a pixel has to be to the oneclicked in order to be included. The greater the threshold, the more different a pixel can be and still bein the selection.
Rectangular or Elliptical: click and drag either a rectangle or an ellipse that begins whereyou first click and ends when you release the mouse.
Using the Selection Tools
To Use the Lasso:
1. Select the Lasso button.
2. On the image, click and hold down the left mouse button as you draw around the area you want toselect.
3. Release the mouse button to complete the selection.
4. To clear the selection, click anywhere on the image (for the Lasso , Rectangular, or Elliptical selection).
5. To add to an existing selection, hold down Shift, or press the Add to selection button in the Context bar,
and draw a shape that includes any part of the original selection line.

ACDSee Photo Studio Home 2022
Page 248 of 506
When you release the mouse, the original selection expands to include the outer edge of youraddition.
6. To add multiple areas into your selection, hold down Shift, or press the Add to selection button in the
Context bar and draw around any part of the image.
As long as you do not touch the line of any other selection, you can add several separate areasto a selection.
7. To subtract from a selection, hold down Ctrl, or press the Subtract from selection button in the Context
bar, and draw a shape that includes part of the original selection, or encircles it completely.
8. If you wish to apply edits or effects to the outside areas of the image, you need to click Select | Inverseto reverse the selected area.
Now the selection includes all the outside areas of the image with the central area outside theselection.

ACDSee Photo Studio Home 2022
Page 249 of 506
You can preview the selection mask by holding down the Preview button:
You can select an editing tool or a special effect to apply to the selection.
To Use the Magic Wand:
1. Select the Magic Wand button.
2. Click any color in the image.
3. Do any of the following:
Slide the Threshold slider to adjust the number of pixels to be included or excluded. TheThreshold slider sets how similar a pixel needs to be to the one you clicked in order to beincluded in the selection.
Click the Connected checkbox if you want to include only pixels that are touching the one youclicked.
Hold down Shift and click around the selection to include more pixels.
Hold down Ctrl and click around the selection to remove pixels from the selection.
4. From the Wand type drop-down list, select one of the following:
Brightness: selects pixels similar in brightness to the area of the image you clicked.
Color: selects pixels similar in hue and brightness to the area of the image you clicked.
Color is generally your best option.
RGB: selects pixels with red, green, and blue combination similar to the area of the image youclicked.
You can preview the selection mask by holding down the Preview button:
You can select an editing tool or a special effect to apply to the selection.
To Use the Rectangular or Elliptical Selection Tool:

ACDSee Photo Studio Home 2022
Page 250 of 506
1. Select either the Rectangular or Elliptical button.
2. Click and drag to draw the selection on the image.
3. Do any of the following:
To add to an existing selection, hold down Shift, or use the Add to selection button , and draganother selection that includes any part of the original selection line. Release the mouse andthe selection now includes the additional area.
To add multiple areas to your selection, hold down Shift and drag as many as you want.
To subtract from an existing selection, hold down Ctrl, or use the Subtract from selection
button , and drag another selection that intersects with the one you want to reduce. Releasethe mouse and any part that was inside the new selection is removed.
You can preview the selection mask by holding down the Preview button:
You can select an editing tool or a special effect to apply to the selection.
Combining the Tools
You can use the Selection tools separately or in combination. For example, you can use the MagicWand to select most of a particular color, then switch to the Freehand Lasso to add to, or subtractfrom, the selection. Or you could use the Rectangular selection to select a large general area, thenrefine it using the Freehand Lasso.
To Combine Selection Tools:
1. Choose a tool and make a selection.
2. Switch to another tool.
3. Press the Add to selection button.
4. Make another selection.
Saving Selections as Presets:
You can save your settings as a preset for future use. After you have made a selection, click Select |Save Selection...
To use a previously saved selection, click Select | Load Selection...
To delete a saved selection, click Select |Manage Selections...
Applying Edits or Effects to Selections
You can use the Selections tools to isolate an area of an image. Once selected, you can apply many ofthe editing tools, such as color and exposure, or any of the special effects filters, to the selected area.

ACDSee Photo Studio Home 2022
Page 251 of 506
An active selection in an image looks like a line of marching ants.
To Apply an Edit or Effect to a Selection:
1. Use the Selections tools to create a selection.
2. Select a tool to use from any of the following groups:
Exposure/Lighting
Color
Detail
Add (Special Effects)
Ensure that the Use Selection button adjacent to the Feathering slider is toggled on.
3. Use the tool to edit the image.
Use Any of These Special Selections Options:
Use Selection Click to use the selection or apply the edit or effect to thewhole image. This control means you can edit just theselection, then deselect Use Selection and apply anotheredit to the whole image without clearing the selection.
Invert Selection Click to invert the selection.
Feathering Drag to increase or decrease the blurring between theedge of the selection and the edit or effect.
Feathering prevents an unnatural or sharp transitionbetween the selection and the rest of the image as itblends the edges. This control also makes it unnecessaryfor your selection to be perfectly on the edge of the areayou want to select.
Show/Hide Selection Click to show or hide the marching ants around theselection. Hiding the selection line makes it easier to judgethe effect of various effects. Press Ctrl + Alt + Z to enableor disable.
Reducing Red Eye
You can use the Red Eye Reduction tool in Edit mode to correct red eye in digital photographs.
To Correct Red Eye:

ACDSee Photo Studio Home 2022
Page 252 of 506
1. In Edit mode, in the Repair group, select Red Eye Reduction.
You can also access the Red Eye Reduction tool from the Filter drop-down menu or Filtertoolbar.
2. Use the Zoom tools in the bottom right corner to enlarge and center the eye you want to correct.
3. Click within the red portion of the eye.
4. In the Red Eye Reduction group, adjust the sliders as described below.
Red Eye Reduction Options
SizeDrag the slider to the right to increase the size of the area being darkened, or to theleft to decrease.
Darkening Drag the slider to the right to intensify the fill color, or to the left to lighten.
Click Reset to clear your changes and reset to default settings. If you saved your changes, youcannot reset your settings.
You can right-click a slider to reset to the default value.
Scroll with your mouse to adjust the size of the area you would like to darken at anytime.
You can show or hide the outline of the darkened area by checking or unchecking the ShowOutline checkbox.
Press Delete to remove the currently selected red eye adjustment.
Removing Flaws
You can use the Repair Tool to remove flaws, such as:
Skin blemishes
Telephone wires and other unwanted objects
Flash flares from snowflakes or windows
Lens scratches and water drops
There are two options available for the Repair Tool: the Healing Brush, and the Cloning Brush.
Heal: when you select the Healing Brush, the Repair Tool copies pixels from one area of a photo toanother, but it analyzes the pixels in the source area before copying them. It also analyzes thepixels in the target area, and then blends the pixels of both source and target, to match the

ACDSee Photo Studio Home 2022
Page 253 of 506
surrounding area. This ensures that the lighting and color of the replacement pixels integrate withthe surrounding area. The Healing Brush works particularly well with photos that involvecomplicated textures, like skin or fur.
Clone: when you select the Cloning Brush, the Repair Tool copies the exact pixels from one area of aphoto to another, creating an identical image area. The Cloning Brush is more effective for photosthat have strong, simple textures or uniform colors, as it is more difficult to identify the copiedpixels in the finished photo.
You can save your settings as a preset for future use.
To Remove Flaws from a Photo:
1. In Edit mode, in the Repair group, select Repair Tool.
You can also access the Repair Tool from the Filter drop-down menu or Filter toolbar.
2. Select one of the following:
Heal: copies the pixels from the source area to the target area, and blends pixels into thesurrounding image area.
Clone: copies the pixels from the source area to the target area.
3. Drag the Nib Width and Feathering sliders as described in the table below.
4. Right-click the image to set a source location. Pixels will be copied from this location and used in thetarget location.
5. Click and drag over the area that you want to cover. If you selected the healing brush, ACDSee Homeanalyzes and replaces the pixels when you release the mouse button.
6. Do one of the following:
Click Done to apply your changes and close the tool.
Click Cancel to discard all changes and close the tool.
Click Reset to reset the sliders. If you saved your changes, you cannot reset your settings.
Scroll with your mouse to adjust the brush sizeas you work, or press the Shift key while youscroll to adjust feathering.
Repair Tool Options

ACDSee Photo Studio Home 2022
Page 254 of 506
Nib Width Sets the width of the brush. The maximum brush width isrelative to the size of your image.
Feathering Sets the amount to feather on the edge of the brush to preventsharp transitions between the original and healed part of thephoto.
Feathering is set as a percentage of the nib width, not as aspecific number of pixels. This means that you do not have toadjust the feathering when you reset the Nib Width, as itautomatically adjusts to a percentage of the new nib width.
Pressure After setting a source point for the Clone tool, adjust the sliderto control the strength of the effect being applied.
Show preview in cursor Check this checkbox to display a preview of your selectedsource point in the cursor.
You can right-click a slider to reset to the default value.
Adding Drawings to Your Image
You can use the Drawing Tools in Edit mode to add lines and shapes, such as squares, circles, andarrows to your image. You can also adjust the width, feathering, and blending of your brush, which isuseful for creating subtle and dramatic drawings.
To Draw on Your Image:

ACDSee Photo Studio Home 2022
Page 255 of 506
1. In Edit mode, at the top of the panel, select from the following tools:
Hand
Use the Hand tool to exit out of any other drawing or selection tool. If you havea scrollable image, the Hand tool also allows you to pan it.
Rectangle
Drag over the image to create rectangle. Press Shift as you draw to create asquare. To fill your shape with color, ensure that the Fill checkbox is checked.
Ellipse
Drag over the image to create an ellipse. Press Shift as you draw to create acircle. To fill your shape with color, ensure that the Fill checkbox is checked.
Line
Drag over the image to draw a straight line. Press Shift as you draw to create avertical or horizontal line.
Arrow
Drag over the image to create an arrow. Press Shift as you draw to create avertical or horizontal arrow.
Polygon
Click to set the corner points of a polygon, then double-click to connect thestart and end points to complete the polygon. To fill your shape with color,ensure that the Fill checkbox is checked.
Curve
Drag over the image then release. Next, move your mouse to create the curveand click to set.
Brush
Drag over the image to draw a free-flowing line. Left-click with your mouse todraw with the foreground color, and right-click to draw with the backgroundcolor.
Use themouse wheel to adjust nib width or use the Nib Widthslider at the top of the panel, near the Opacity slider.

ACDSee Photo Studio Home 2022
Page 256 of 506
Use Shift + mouse wheel to adjust the amount of feathering oradjust the Feathering slider at the top of the panel, near theOpacity slider.
Fill
Select the Fill button, and click on a pixel to shade every pixel of that same colorvalue with your selected color. Your selected color is defined in the color box,as described below. Use the Threshold slider to adjust the number of pixels tobe included or excluded. The Threshold slider sets how similar a pixel needs tobe to the one you clicked in order to be included in the selection. Check theConnected checkbox in the Context Bar to fill all of the connected pixels of thesame color.
Gradient
Use the Gradient tool to draw gradients across your image, or use the radialoption to draw a gradient around an area. Select the Gradient tool, thenconfigure your color, opacity and blend mode using the Context bar. For a radialgradient, select the Radial Gradient button in the Context bar. Then draw yourgradient by dragging across the image. To discard your gradient, press theDiscard button in the Context bar. Rearrange your gradient as desired, thenpress the Commit button in the Context bar. You can undo your commit bypressing Ctrl + Z or selecting Edit | Undo.
Eye Dropper
Use the Eye Dropper tool to select colors from your images. Click a color in theimage, which will appear in the color boxes at the top right of the panel. Youcan then apply this color using the drawing tools, such as the Brush tool.
You can select the background color (bottom of the color boxes) by right-clicking on your image.
You can select a color from outside of the application by left-clicking on yourimage and dragging your cursor to the color outside of the application. Whenyou release your mouse button, the color will be selected and shown in thecolor boxes at the top right of the panel.
2. Select from one or more of the following options (Note: options vary depending on the toolselected):

ACDSee Photo Studio Home 2022
Page 257 of 506
Color
Select a color by clicking the color boxes at the top right of the panel to open theForeground or Background Color dialog, which displays a dialog of swatches tochoose from. If you are drawing a solid shape, such as a rectangle, the top(foreground) color box defines the color for the outline of the shape. Thebottom (background) color box defines the color that fills the center of theshape. If you want your shape to be a solid color, set both color boxes to match.
You can reset to black and white by pressing the reset buttondirectly next to the color boxes.
Nib Width
Drag the Nib Width slider to set the diameter of the brush measured in pixels.You can also adjust the nib width with the mouse wheel or by right-clicking onthe image to reveal the Nib Width sliders.
Feathering
Select the Nib Width button to reveal the Feathering slider. Drag the Featheringslider to set the blurring radius of the brush. You can also right-click on the imageto reveal the Nib Width and Feathering slider. Or, you can also hold down Shiftwhile using the mouse wheel to adjust the feather radius, represented by thedotted circle.
Spacing
Drag the Spacing slider to set how far apart each brush segment will be. Thisslider specifies the percentage of the size of the nib width, which determineshow smooth or choppy the strokes will appear.
Use Auto Spacing: check the Use Auto Spacing checkbox to allow ACDSee tochoose a spacing percentage based on the nib width and feathering settings,which will create a smooth-looking stroke.
Fill
Check the Fill checkbox to fill the shapes you draw with the selected color.
Opacity
Drag the Opacity slider to specify the transparency of the brush strokes.
Blending
Select an option from the Blending drop-down menu to affect how your brush

ACDSee Photo Studio Home 2022
Page 258 of 506
strokes blend with your image as you draw.
3. Drag over the image to draw.
You can right-click a slider to reset to the default value.
Adding Text to an Image
You can use the Add Text tool in Edit mode to add formatted text to a photo, or add talk and thoughtbubbles to create a comic-book effect. You can also adjust the opacity of the text to create awatermark effect, which is useful for putting copyright information onto your photos.
You can save your settings as a preset for future use.
To Add Text to an Image:
1. In Edit mode, in the Add group, select Text.
You can also access the Text tool from the Filter drop-down menu or Filter toolbar.
2. Type the text you want to add in the Text field.
3. In the Font area, specify the font you want to use, the formatting options, such as italics or justification,and the color of the text. Drag the Size slider to specify a point size, and then drag the Opacity slider tospecify the transparency of the text.
4. Click and drag the text marquee to reposition it anywhere on your image, or drag the marquee'shandles to resize it.
5. Select an option from the Blend Mode drop-down list to specify how you want the text to blend into theunderlying image.
6. Do one of the following:
Check the Bubble Text checkbox, and set the Bubble Text settings as explained in the tablebelow. Note that other text effects cannot be applied to bubble text.
Check one or more of the Effects, Drop Shadow, and Bevel checkboxes to customize your text.Click the Settings button to adjust the settings for each of these options as explained in the tablebelow.
7. Do one of the following:
Click Apply to add the text to your image, and keep the Text tool open so you can add moretext. The Text tool creates a new, empty marquee, and you can return to step 3 in the listabove.

ACDSee Photo Studio Home 2022
Page 259 of 506
Click Done to add the text to your image, and leave the tool. If you still have an empty marqueeopen, it will be discarded.
Click Cancel to discard your changes and leave the tool.
Add Text Options

ACDSee Photo Studio Home 2022
Page 260 of 506
Bubble Text Settings
Talk Encloses your text in a comic-book text bubble with a pointed stem.
Thought Encloses your text in a comic-book text bubble with a dotted stem.
Stem Angle Specifies the direction of the text bubble stem. Drag the arrow to adjustthe angle.
Thickness Specifies the thickness of the text bubble border.
Length Specifies the length of the text bubble stem.
Fill Specifies the background color of the text bubble. Click the arrow to selecta color.
Border Specifies the color of the text bubble border. Click the arrow to select acolor.
Effect Settings
Effect Specifies the effect you want to apply to your text. Each effect has differentoptions that control its appearance. Drag the sliders to adjust theappearance of the text.
Drop Shadow Settings
Distance Specifies the distance between the drop shadow and the text. The higherthe value, the farther the shadow and the higher the text appears.
If a drop shadow is cut off, or has a noticeably sharp edge, you may need toincrease the size of the text rectangle.
Blur Specifies the amount of blur applied to the drop shadow. Sharp shadowstend to seem less realistic than those with a slight blur.
Opacity Specifies the darkness of the drop shadow where it falls on the image.
Angle Specifies the direction of the imaginary light source that creates the dropshadow. Drag the arrow to adjust the angle — note that this also adjusts theshading of the text bevel.
Bevel Settings
Bevel Specifies how much of each letter's edge is bevelled. Higher values givethe text a more rounded, smoother look.
Strength Specifies the difference between the highest and lowest points on the text.Higher values heighten the difference between the flat portions of the textand the bevelled edges.

ACDSee Photo Studio Home 2022
Page 261 of 506
Elevation Specifies the height of the imaginary light source that creates the bevel'sshadowed effect. Lower values produce longer shadows on the text, whilea higher value produces a more direct lighting effect and shorter shadows.
Angle Specifies the direction of the imaginary light source that creates the beveleffect. Drag the arrow to adjust the angle — note that this also adjusts theangle of the drop shadow.
You can right-click a slider to reset to the default value.
Adding a Watermark to an Image
You can use theWatermark tool to add a watermark to a photo. You can move the watermark to anyposition on the photo. You can also change the opacity of the watermark and blend the watermarkinto the image. You can add newwatermarks and delete watermarks from the list that you no longeruse.
You can save your settings as a preset for future use.
You will need to create a watermark image before you can add the watermark to your photos.
To Add a Watermark to an Image:
1. In Edit mode, in the Add group, selectWatermark. A default watermark displays in the bottom right ofthe photo by default.
You can also access theWatermark tool from the Filter drop-down menu or Filter toolbar.
2. Choose a watermark from the drop-down list, or add a new watermark by using the + button.
3. Click and drag the watermark to reposition it anywhere on your image, or choose an Anchor Point fromthe Positioning settings. Ruler guidelines will appear as you move the watermark around the image toshow you pixel distances from the edge. You can also change this pixel distance in the Positioningsetting.
4. Drag the marquee handles to resize the watermark image.
5. SelectMaintain aspect ratio when resizing if you want to resize the watermark image withoutdistorting it.
6. Select Apply Alpha Channel to apply the alpha channel if it is present in the watermark.
(Only TIFF, PNG, and ICO watermark files can have an alpha channel.)
7. Select Apply Transparency to make a color in the watermark transparent.

ACDSee Photo Studio Home 2022
Page 262 of 506
The default color is black. You can choose a different color by clicking on the color box. In theStandard tab, you can choose a color, or select a color using the color picker. In the Customtab, you can enter HSB values (Hue, Saturation, and Brighness), Red Green Blue values, or ahex color code. The color selected will be made transparent in the watermark image itself.
8. Select an option from the Blending Mode drop-down list to specify how you want the watermark toblend into the underlying image.
9. Drag the Opacity slider to specify the transparency of the watermark.
10. Do one of the following:
Click Apply to add the watermark to your image, and keep the Watermark tool open.
Click Done to add the watermark to your image, and leave the tool.
Click Cancel to discard your changes and leave the tool.
You can right-click a slider to reset to the default value.
Click Reset to clear your changes and reset to default settings. If you saved your changes, youcannot reset your settings.
To Remove a Watermark From the List:
1. Choose the watermark in the drop-down list.
2. Press the minus symbol -.
3. Your watermark is removed.
Adding Borders
You can use the Borders tool to add one or more borders and edge effects to your images. You can setthe size of each side of the border, change the color and texture of the border or pick up a color fromwithin the image by clicking on that color in the image.
There are libraries of edges and textures to get you started, but you can save your own textures oredges to the ACDSee folder so that they appear in the library for you to use.
You can also use Edge blur to soften the edges or blend the image into the background texture. Youcan also add a third dimension to your images using the Drop Shadow and Raised edge effects.
Using combinations of multiple borders and edge effects can add to the mood and atmosphere of aphoto, emphasize contrast, and enhance color.
You can save your settings as a preset for future use.
To Add a Border to an Image:

ACDSee Photo Studio Home 2022
Page 263 of 506
1. In Edit mode, in the Add group, select Borders.
You can also access the Borders tool from the Filter drop-down menu or Filter toolbar.
2. Create the border by selecting its size, color, texture, edge, or edge effects as described in the Bordersoptions below.
3. Do one of the following:
Click Done to apply your changes and close the Border tool.
Click Cancel to discard all changes and close the tool.
4. To add another border, restart the border tool and repeat these steps.
Click Reset to clear your changes and reset to default settings. If you saved your changes, youcannot reset your settings.
Border Options

ACDSee Photo Studio Home 2022
Page 264 of 506
Eyedropper
Picks up the color beneath the cursor when you click onthe image. The border changes to the clicked color, whichalso appears in the Color box on the Borders pane so thatyou can adjust it if you open the Color dialog box.
The eyedropper is not available when you areusing a texture.
Border
Size Sets the size of all the sides of theborder simultaneously. Drag theslider left and right to adjust thewidth of the border. You can alsotype in a different number or usethe up and down arrows to changethe size of the border.
The text below the Size field showsthe final size of your image withthe border added. The final sizechanges dynamically as you adjustthe size of the border.
Advanced sizecontrols
Opens a fly-out menu of advancedsize controls. Use the sliders, upand down arrow keys, or type in anumber to set the size of each sideof the border individually. Forexample, you can set the bottomborder to be larger to include aspace for copyright information.Click on the arrow beside the Sizeslider to open the advanced sizecontrols menu.
Color box Activates when you select theColor radio button.
Do any of the following:
Click on a color in theimage to make the borderthat color. The clickedcolor appears in the Color

ACDSee Photo Studio Home 2022
Page 265 of 506
box.
Click on the color in themiddle of the Color box toopen the Colors dialog,where you can adjust thecolor in multiple ways.
Click the down-arrowbeside the box and hoverover the quick-color boxuntil you find a color youlike. When you click insidethe quick color box, thepicked color appears in theColor box and the borderchanges to the selectedcolor.
Texture box Activates when you select theTexture radio button.
Do any of the following:
Click the side arrow toopen the texture libraryand view thumbnails oftextures to select.
Click the forward and backarrows to browse throughthe textures one at a time,without opening thelibrary.
Edge
Straight Sets the edge of the border to be astraight line.
Irregular Activates when you select theIrregular radio button.
Do any of the following:
Click the side arrow besidethe edge box to open theedge library and viewthumbnails of edges to
ACDSee Photo Studio Home 2022
Page 266 of 506
select.
Click the forward and backarrows to browse throughthe edges one at a time,without opening thelibrary.
Edge blur Blurs the edges of the edge of theimage into the border. Drag theslider to the right to increase theblur, or to the left to decrease theblur.
Edge effects
Drop shadow Adds a drop shadow to the imagethat appears to lift it off the page.The drop shadow appears behindthe image, between it and theborder. You can adjust the depthof the blur on the edge of theshadow, and the transparency ofthe shadow, which affects howmuch of the border shows throughthe shadow. You can also changethe direction of the imaginarysource of light by dragging theglow on the Light Source ball.
Blur: adjusts the blur onthe edge of the shadowwhen you drag the slider.
Opacity: adjusts thetransparency of the dropshadow when you drag theslider.
Raised Adds a raised edge to the imagethat appears to raise it above theborder, giving it a 3D look. Theraised effect is applied to theimage, between it and the border.You can change the direction ofthe imaginary source of light of theraised edge by dragging the glow

ACDSee Photo Studio Home 2022
Page 267 of 506
on the Light Source ball. You canalso adjust the size, strength, andcolor of the raised edge in thefollowing ways:
Size: drag the slider to theright to increase the size ofthe raised edge so that itappears higher. Thegreater the size the morerounded the effect.
Strength: drag the slider tothe right to increase the 3Deffect of the raised edge.
Colored: select this optionto apply the border colorto the raised edge.
Light Source
Activates when you check either the Drop shadow orRaised checkboxes. Click and drag the glow on the ball toreposition the imaginary light source for the 3D effect ofthe Drop shadow or Raised edge effects.
You can right-click a slider to reset to the default value.
Adding Your Own Textures or Edges
It is possible to add custom textures and edges to the libraries in the Borders tool. If you make yourown edges or textures, or own a collection from the Internet, you can add them to the texture andedge libraries. You can also delete existing files from the libraries to make room for others.
The textures or edges have to be in the following file formats with these extensions:
BMP
EMF
GIF
JPG
GIF

ACDSee Photo Studio Home 2022
Page 268 of 506
PNG
TIF
Textures
As the textures are tiled, it is important to use an image that can be seamlessly repeated. The files areused at their full resolution, not scaled up or down. For example, if your texture image is 100 x 100pixels and you are creating a bordered image that is 1000 x 1000 pixels, then your texture file will betiled 10 times. If you use a texture file that is 1000 x 1000 pixels, then there would just be the onetexture tile for the whole border.
To Add Your Own Textures to the Texture Library:
1. In ACDSee, close the Borders tool if it is open.
2. Copy and paste your texture files into this folder:
C:\Program Files\Common Files\ACD Systems\borders\textures
3. In Manage mode, select the image you want to use and then click Tools | Edit.
4. In the Add group, click Borders.
5. Select the Texture radio button and then click the arrow on the right side of the texture box to open thetexture library.
Thumbnails of the textures display for you to select.
Edges
Edge files are grayscale images that are resized to fit the image. The image file shows through any areasin the edge file that are white, and does not show through any black areas. Pixels that are tones ofgray in the edge file show through with relative opacity depending on how close the pixels are to blackor white (in other words, the darker the gray pixel, the less it shows through).
To Add Your Own Edges to the Edges Library:
1. In ACDSee, close the Borders tool if it is open.
2. Copy and paste your edge files into this folder:
C:\Program Files\Common Files\ACD Systems\borders\edges
3. In Manage mode, select the image you want to use and then click Tools | Edit.
4. In the Add group, click Borders.
5. Select the Irregular radio button and then click the arrow on the right side of the edge box to open theedge library.
Thumbnails of the edges display for you to select.

ACDSee Photo Studio Home 2022
Page 269 of 506
If you open an image with borders already applied, another border will be applied to theimage.
Adding a Vignette
You can use the Vignette effect to add a frame around a subject, such as a person or a bouquet offlowers. You can change the focal point in the portrait. You can also control the appearance of theborder.
You can save your settings as a preset for future use.
To Apply a Vignette Effect:
1. In Edit mode, in the Add group, select Vignette.
You can also access the Vignette tool from the Filter drop-down menu or Filter toolbar.
2. Set the options as described below.
3. Do one of the following:
Click Done to apply your changes and close the tab.
Click Cancel to discard all changes and close the tab.
Click Reset to clear your changes and reset to default settings. If you saved your changes, youcannot reset your settings.
Vignette Options

ACDSee Photo Studio Home 2022
Page 270 of 506
Horizontal Specifies the focal point of the portrait on the horizontal axis. A value of 500places the center in the middle of the photo.
Vertical Specifies the focal point of the portrait on the vertical axis. A value of 500places the center in the middle of the photo.
Clear zone Specifies the size of the clear area around the focal point in the portrait. Dragthe slider to the left to reduce the size of the clear area. Drag the slider tothe right to increase the size of the clear area.
Transition zone Specifies the width of the transition area between the clear zone and theframe. Drag the slider to the left to narrow the transition area. Drag theslider to the right to widen the transition area.
Stretch Stretches the vignette horizontally to make the shape elliptical rather thanround.
Shape Specifies the shape of the frame:
Round: select Round if you want the frame to be round.
Rectangular: select Rectangular if you want the frame to be square.
Show outline Select Show outline if you want to display an outline that shows the outsideedge of the clear zone and the inside edge of the frame.
Frame Applies the following special effects to the vignette frame area around thefocal point:
Color: changes the color of the frame area to the color you select inthe color picker.
Saturation: removes color from the people or objects in the vignetteframe so they are gray scale.
Blur: blurs the vignette frame area.
Clouds: applies a Clouds effect to the frame area.
Edges: applies an Edges effect by tracing the lines and details ofpeople or objects with neon colors.
Radial Waves: creates the appearance of waves radiating from thefocal point into the frame area.
Radial Blur: creates a Radial Blur that rotates and stretches the framearea.
Zoom Blur: applies a Zoom Blur to the frame area.
Crayon Edges: applies the Crayon Edges effect by tracing the lines

ACDSee Photo Studio Home 2022
Page 271 of 506
and details around people or objects with crayon.
Dauber: creates the impression that the people or objects aroundthe focal point were painted with a brush.
Pixelate: applies a pixel effect to the frame.
Old: applies an aging effect to the frame to make it look like an oldphoto.
Glowing Edges: applies glowing edges to all the strong lines in theframe area.
Ripple: adds ripples to the frame so that it looks like liquid ripplesmoving outwards from the focal area.
Frame settings The settings that display below the Frame drop-down list change dependingon the frame you select. For example, if you select Color in the Frame drop-down list, a color picker displays so that you can select the color for thevignette. Similarly, if you select Blur in the Frame drop-down list, a sliderappears that you can use to change the amount of blur surrounding thephoto. For some choices, like Edges, there are no settings to apply.
You can right-click a slider to reset to the default value.
Adding a Tilt-Shift Effect
You can use the Tilt-Shift effect to create emphasis on specific subjects in your photos, or make yourphotos look like miniature landscapes.
To Use the Tilt-Shift Effect:
1. In Edit mode, in the Add group, select Tilt-Shift.
You can also access the Tilt-Shift tool from the Filter drop-down menu or Filter toolbar.
2. On the Tilt-Shift panel, set the options as described below.
3. Do one of the following:
Click Done to accept your changes and close the panel.
Click Cancel to discard your changes and close the panel.
Tilt-Shift Options
ACDSee Photo Studio Home 2022
Page 272 of 506
Use the guides on the image to place the effect. The inside boxes represent the points where the focus istransitioning to blur. Complete blur occurs at the outside boxes. Move the boxes to define where the effectwill begin or end. Hold down the Shift key while positioning the effect to lock to the nearest 45° angle, forstraightness.
Blurring
Select the type of blur you want from the Blur drop-down menu.
Lens BlurGaussian Blur
See Blur Types for more information.
Amount Specifies the amount of blur applied.
Bokeh Frequency Specifies how often the bokeh shapes occur.
Bokeh Brightness Specifies how bright the bokeh shapes appear.
Bokeh Sides Defines the number of sides the bokeh shape will have.
Saturation
Drag the slider to the right to intensify the effect.
You can use the Edit Brush to paint this effect onto specific areas of your image.
You can use the Gradient tool to transition this effect across specific areas of yourimage.
You can use the Radial Gradient tool to apply effects around, or directly to, a centerpoint.
About Special Effect Filters
You can use filters to add unique effects to your images. ACDSee Home includes more than 40 specialeffect filters, such as Crosshatch, Pencil Drawing, and Solarize.
To Access the Special Effects Filters:
In Edit mode, in the Add group, select Special Effect.
You can also access the Special Effects menu from the Filter drop-down menu or Filter toolbar.

ACDSee Photo Studio Home 2022
Page 273 of 506
For more information about each effect, click the Help button to view a Help file page specific to thateffect.
Applying a Bathroom Window Effect
The Bathroom Window effect divides your images into bars, transforming them so they resemble theview through privacy glass often found in bathrooms. You can select or change the Bathroom Windowoptions to apply this effect to your image.
You can save your settings as a preset for future use.
To Apply a Bathroom Window Effect:
1. In Edit mode, in the Add group, select Special Effect.
You can also access the Special Effects menu from the Filter drop-down menu or Filtertoolbar.
2. Click Bathroom Window.
3. Drag the Bar width slider to set the thickness of the bars. Thinner bars result in a more distorted image.
4. In the Bar direction area, select one of the following to specify the orientation of the bars in your image:
Vertical
Horizontal
5. Do one of the following:
Click Done to accept your changes and close the panel.
Click Cancel to discard your changes and close the panel.
You can right-click a slider to reset to the default value.
You can use the Edit Brush to paint this effect onto specific areas of your image.
You can use the Gradient tool to transition this effect across specific areas of yourimage.
You can use the Radial Gradient tool to apply effects around, or directly to, a centerpoint.
ACDSee Photo Studio Home 2022
Page 274 of 506
Applying a Blinds Effect
Use the Blinds effect to divide your image into bars that look like venetian or vertical window blinds.You can customize the characteristics of the blinds you would like added to your image.
You can save your settings as a preset for future use.
To Apply a Blinds Effect:
1. In Edit mode, in the Add group, select Special Effect.
You can also access the Special Effects menu from the Filter drop-down menu or Filtertoolbar.
2. Click Blinds.
3. On the Blinds panel, set the options as described below.
4. Do one of the following:
Click Done to accept your changes and close the panel.
Click Cancel to discard your changes and close the panel.
Blinds Options
Width Specifies the width of the blinds. Type a number from 1 to 1000 or drag the sliderto adjust the width of each blind. As the value increases, the width of the blind alsoincreases.
Opacity Specifies the opacity of the blinds. Type a number from 1 to 99 or drag the sliderto adjust the opacity of the blinds. The higher the opacity, the more the image isobscured.
Angle Specifies the angle of the blinds. Type a number from 1 to 360 or drag the arrowto adjust the angle.
Blind color Specifies the color of the blinds.
You can right-click a slider to reset to the default value.
You can use the Edit Brush to paint this effect onto specific areas of your image.
You can use the Gradient tool to transition this effect across specific areas of yourimage.

ACDSee Photo Studio Home 2022
Page 275 of 506
You can use the Radial Gradient tool to apply effects around, or directly to, a centerpoint.
Applying a Blue Steel Effect
You can use the Blue Steel effect to give your images a stylish blue tint.
To Apply the Blue Steel Effect:
1. In Edit mode, in the Add group, select Special Effect.
You can also access the Special Effects menu from the Filter drop-down menu or Filtertoolbar.
2. Click Blue Steel.
3. Do one of the following:
Click Done to accept your changes and close the panel.
Click Cancel to discard your changes and close the panel.
You can right-click a slider to reset to the default value.
You can use the Edit Brush to paint this effect onto specific areas of your image.
You can use the Gradient tool to transition this effect across specific areas of yourimage.
You can use the Radial Gradient tool to apply effects around, or directly to, a centerpoint.
Applying a Bob Ross Effect
You can use the Bob Ross effect to give your images a painted look.
You can save your settings as a preset for future use.
To Give Your Photos a Bob Ross Effect:

ACDSee Photo Studio Home 2022
Page 276 of 506
1. In Edit mode, in the Add group, select Special Effect.
You can also access the Special Effects menu from the Filter drop-down menu or Filtertoolbar.
2. Click Bob Ross.
3. On the Bob Ross panel, set the options as described in the table below.
4. Do one of the following:
Click Done to accept your changes and close the panel.
Click Cancel to discard your changes and close the panel.
Bob Ross Options
Brush size Drag the Brush size slider to specify the width of the brush strokes in theeffect. The higher value, the wider the brush stroke.
Coverage Drag the Coverage slider to specify the amount or density of paint on the"canvas" of your photo.
Paint thickness Drag the Paint thickness slider to specify how three dimensional the paintappears.
Colorfulness Drag the Colorfulness slider to specify the amount of color in your image.
Background color
Image Check the Image checkbox to use the color in the image as thebackground color behind the brush strokes added to the photo. To use adifferent color for the background, uncheck the Image checkbox andselect a new color from the color drop-down menu.
Randomize Indicates the random placement of the paint daubs. When you apply theBob Ross effect to an image, ACDSee places the daubs randomly. Thismakes the paint daubs different every time you apply the filter. Togenerate a new random placement of the paint daubs, click Randomize.
You can right-click a slider to reset to the default value.
You can use the Edit Brush to paint this effect onto specific areas of your image.
You can use the Gradient tool to transition this effect across specific areas of yourimage.

ACDSee Photo Studio Home 2022
Page 277 of 506
You can use the Radial Gradient tool to apply effects around, or directly to, a centerpoint.
Applying a Bulge Effect
Use the Bulge effect to stretch or shrink areas of your images horizontally and vertically. You cancustomize the strength, radius and position of the distortion.
You can save your settings as a preset for future use.
To Apply a Bulge Effect:
1. In Edit mode, in the Add group, select Special Effect.
You can also access the Special Effects menu from the Filter drop-down menu or Filtertoolbar.
2. Click Bulge.
3. On the Bulge panel, set the options as described below.
4. Do one of the following:
Click Done to accept your changes and close the panel.
Click Cancel to discard your changes and close the panel.
Bulge and Shrink Options

ACDSee Photo Studio Home 2022
Page 278 of 506
Horizontal position Specifies the center of the distortion along the horizontal axis. A lower valuemoves the distortion towards the left side of the image, while a higher valuemoves it towards the right side of the image.
Vertical position Specifies the center of the distortion along the vertical axis. A lower value movesthe distortion towards the bottom of the image, while a higher value moves ittowards the top of the image.
Radius Specifies the radius of the distorted area. A lower value decreases the radius ofthe distortion, while a higher value increases the radius of the distortion.
Strength Specifies the strength of the distortion. A negative value shrinks the center of thedistortion, while a higher value bulges the distortion.
Background color Specifies the background color for the filtered image.
Check the Image checkbox to use the original image color, or click the color pickerto select a different color.
Bulge direction Specifies the direction of the distortion. Select one or both of the followingoptions:
Horizontal: moves the distortion horizontally.
Vertical: moves the distortion vertically.
You can right-click a slider to reset to the default value.
You can use the Edit Brush to paint this effect onto specific areas of your image.
You can use the Gradient tool to transition this effect across specific areas of yourimage.
You can use the Radial Gradient tool to apply effects around, or directly to, a centerpoint.
Applying a Cartoon Effect
You can use the Cartoon Effect to give your images a sketched appearance.
You can save your settings as a preset for future use.
To Apply a Cartoon Effect:

ACDSee Photo Studio Home 2022
Page 279 of 506
1. In Edit mode, in the Add group, select Special Effect.
You can also access the Special Effects menu from the Filter drop-down menu or Filtertoolbar.
2. Click Cartoon.
3. On the Cartoon panel, set the options as described below.
4. Do one of the following:
Click Done to accept your changes and close the panel.
Click Cancel to discard your changes and close the panel.
Cartoon Options
Shading strength Specifies the strength of the shading in the image. The higher thesetting, the more intense the shading that is applied to the image.
Shading radius Specifies how spread out the shading is.
Shading threshold Specifies how sharp an edge must be in the image before shading isapplied. If you specify a higher value, more edges in the photo willbe shaded.
Smoothness Controls how smooth the transitions between similar colors are.
Outline detail Specifies how much the details are outlined in black.
Outline strength Specifies how strong the black outlines are applied.
Artifact Suppression Remove small details Prevents smalldetails frombeing outlinedin black,allowing theimage toappear morecartoon-like.
You can right-click a slider to reset to the default value.
You can use the Edit Brush to paint this effect onto specific areas of your image.
You can use the Gradient tool to transition this effect across specific areas of yourimage.

ACDSee Photo Studio Home 2022
Page 280 of 506
You can use the Radial Gradient tool to apply effects around, or directly to, a centerpoint.
Applying a Childhood Effect
You can use the Childhood effect to give your images a dreamy, nostalgic look.
To Apply the Childhood Effect:
1. In Edit mode, in the Add group, select Special Effect.
You can also access the Special Effects menu from the Filter drop-down menu or Filtertoolbar.
2. Click Childhood.
3. Do one of the following:
Click Done to accept your changes and close the panel.
Click Cancel to discard your changes and close the panel.
You can right-click a slider to reset to the default value.
You can use the Edit Brush to paint this effect onto specific areas of your image.
You can use the Gradient tool to transition this effect across specific areas of yourimage.
You can use the Radial Gradient tool to apply effects around, or directly to, a centerpoint.
Applying a Collage Effect
You can use the Collage effect to creatively break up a photo into a number of photos.
You can save your settings as a preset for future use.
To Use the Collage Effect:

ACDSee Photo Studio Home 2022
Page 281 of 506
1. In Edit mode, in the Add group, select Special Effect.
You can also access the Special Effects menu from the Filter drop-down menu or Filtertoolbar.
2. Click Collage.
3. Drag the sliders to set the Number and Size of the photos.
4. Select a background color by clicking the drop-down arrow to display gradients of colors, or click thecolor box to display a dialog of swatches to choose from.
5. If you would like to reshuffle the photos, click Randomize.
6. Do one of the following:
Click Done to accept your changes and close the panel.
Click Cancel to discard your changes and close the panel.
7. Click Exit to leave Special Effects, and return to the Filter menu.
You can right-click a slider to reset to the default value.
You can use the Edit Brush to paint this effect onto specific areas of your image.
You can use the Gradient tool to transition this effect across specific areas of yourimage.
You can use the Radial Gradient tool to apply effects around, or directly to, a centerpoint.
Applying a Colored Edges Effect
You can use the Colored Edges effect to trace the lines and details of people or objects in your images.
You can save your settings as a preset for future use.
To Apply a Colored Edges Effect:
1. In Edit mode, in the Add group, select Special Effect.
You can also access the Special Effects menu from the Filter drop-down menu or Filtertoolbar.
2. Click Colored Edges.

ACDSee Photo Studio Home 2022
Page 282 of 506
3. On the Colored Edges panel, set the options as described below.
4. Do one of the following:
Click Done to accept your changes and close the panel.
Click Cancel to discard your changes and close the panel.
Colored Edges Options
Intensity Specifies the amount of color added to the edges within the image. Thehigher the setting, the thicker the color that is applied to the image.
Edge color Specifies the color of the edges.
Edge detection Specifies the edge detection algorithm. The algorithm controls the formulaused to detect the edges and the direction of the edge indicators.
Blurring Blurs the edges in the image. Check the Use blurring checkbox, and thenchoose a blur setting to determine how much blur is applied.
You can right-click a slider to reset to the default value.
You can use the Edit Brush to paint this effect onto specific areas of your image.
You can use the Gradient tool to transition this effect across specific areas of yourimage.
You can use the Radial Gradient tool to apply effects around, or directly to, a centerpoint.
Applying a Contours Effect
You can use the Contours effect to draw contour lines on your image to create a cartoon effect. Selector change the rounding, line frequency, color and strength setting to apply to your image.
You can save your settings as a preset for future use.
To Apply a Contours Effect:
1. In Edit mode, in the Add group, select Special Effect.
You can also access the Special Effects menu from the Filter drop-down menu or Filtertoolbar.
ACDSee Photo Studio Home 2022
Page 283 of 506
2. Click Contours.
3. On the Contours panel, set the options as described below.
4. Do one of the following:
Click Done to accept your changes and close the panel.
Click Cancel to discard your changes and close the panel.
Contours Options
Rounding Specifies the amount of curve in the contour lines. The higher the value,the rounder the lines.
Line frequency Specifies the amount of space between the contour lines. The higher thevalue, the closer the lines move together.
Strength Specifies the strength of the line. The higher the value, the darker the line.
Line color Specifies the color of the contour lines.
You can right-click a slider to reset to the default value.
You can use the Edit Brush to paint this effect onto specific areas of your image.
You can use the Gradient tool to transition this effect across specific areas of yourimage.
You can use the Radial Gradient tool to apply effects around, or directly to, a centerpoint.
Applying a Crayon Drawing Effect
You can use the Crayon Drawing effect to give your photos the appearance of a crayon drawing.
To Use the Crayon Drawing Effect:
1. In Edit mode, in the Add group, select Special Effect.
You can also access the Special Effects menu from the Filter drop-down menu or Filtertoolbar.
2. Click Crayon Drawing.

ACDSee Photo Studio Home 2022
Page 284 of 506
3. Do one of the following:
Click Done to accept your changes and close the panel.
Click Cancel to discard your changes and close the panel.
You can use the Edit Brush to paint this effect onto specific areas of your image.
You can use the Gradient tool to transition this effect across specific areas of yourimage.
You can use the Radial Gradient tool to apply effects around, or directly to, a centerpoint.
Applying a Crosshatch Effect
You can use the Crosshatch effect to add crosshatching to an image.
To Use the Crosshatch Effect:
1. In Edit mode, in the Add group, select Special Effect.
You can also access the Special Effects menu from the Filter drop-down menu or Filtertoolbar.
2. Click Crosshatch.
3. Do one of the following:
Click Done to accept your changes and close the panel.
Click Cancel to discard your changes and close the panel.
You can use the Edit Brush to paint this effect onto specific areas of your image.
You can use the Gradient tool to transition this effect across specific areas of yourimage.
You can use the Radial Gradient tool to apply effects around, or directly to, a centerpoint.

ACDSee Photo Studio Home 2022
Page 285 of 506
Applying a Dauber Effect
You can use the Dauber effect to make your images look like they were painted with a paint dauber.Select or change the settings of the effect you want applied to your image, such as intensity, frequencyand more.
You can save your settings as a preset for future use.
To Use the Dauber Effect:
1. In Edit mode, in the Add group, select Special Effect.
You can also access the Special Effects menu from the Filter drop-down menu or Filtertoolbar.
2. Click Dauber.
3. On the Dauber panel, set the options as described below.
4. Do one of the following:
Click Done to accept your changes and close the panel.
Click Cancel to discard your changes and close the panel.
Dauber Options
Intensity Specifies the amount of color applied with each daub.
Frequency Specifies the number of daubs added to the image.
Background color Specifies the background color of the filtered image.
Check the Image checkbox to use the original image colors or click thecolor picker to select a different color.
Randomize Indicates the random placement of the paint daubs.
When you apply the Dauber effect to an image, ACDSee Home placesthe daubs randomly. This makes the paint daubs different every timeyou apply the filter. You can define a specific random seed to generateidentical daubs.
To generate a new random seed, click Randomize.
You can right-click a slider to reset to the default value.
You can use the Gradient tool to transition this effect across specific areas of yourimage.

ACDSee Photo Studio Home 2022
Page 286 of 506
You can use the Radial Gradient tool to apply effects around, or directly to, a centerpoint.
Applying a Dramatic Effect
You can use the Dramatic effect to make your images look dramatic and moody by drastically changingthe contrast in specific areas.
You can save your settings as a preset for future use.
To Apply a Dramatic Effect:
1. In Edit mode, in the Add group, select Special Effect.
You can also access the Special Effects menu from the Filter drop-down menu or Filtertoolbar.
2. Click Dramatic.
3. On the Dramatic panel, set the options as described below.
4. Do one of the following:
Click Done to accept your changes and close the panel.
Click Cancel to discard your changes and close the panel.
Dramatic Options
Strength Specifies the strength of the contrast being applied.
Spread Specifies how far the effect spreads over the details in the photo.
You can right-click a slider to reset to the default value.
You can use the Edit Brush to paint this effect onto specific areas of your image.
You can use the Gradient tool to transition this effect across specific areas of yourimage.
You can use the Radial Gradient tool to apply effects around, or directly to, a centerpoint.

ACDSee Photo Studio Home 2022
Page 287 of 506
Applying an Edge Detect Effect
You can use the Edge Detect effect to create a highlighted outline of your image. After creating a blackimage, the effect uses colored lines to outline the detail of an image where significant color differencesexist. Greater differences between colors in the original image produce brighter outline colors. (TheSobel effect is similar to the Edge Detect effect, but produces sharper and brighter outlines.)
To Use the Edge Detect Effect:
1. In Edit mode, in the Add group, select Special Effect.
You can also access the Special Effects menu from the Filter drop-down menu or Filtertoolbar.
2. Click Edge Detect.
3. Do one of the following:
Click Done to accept your changes and close the panel.
Click Cancel to discard your changes and close the panel.
You can use the Edit Brush to paint this effect onto specific areas of your image.
You can use the Gradient tool to transition this effect across specific areas of yourimage.
You can use the Radial Gradient tool to apply effects around, or directly to, a centerpoint.
Applying an Emboss Effect
You can use the Emboss effect to add a grayscale relief to an image.
You can save your settings as a preset for future use.
To Emboss an Image:
1. In Edit mode, in the Add group, select Special Effect.
You can also access the Special Effects menu from the Filter drop-down menu or Filtertoolbar.
2. Click Emboss.

ACDSee Photo Studio Home 2022
Page 288 of 506
3. On the Emboss panel, set the options as described below.
4. Do one of the following:
Click Done to accept your changes and close the panel.
Click Cancel to discard your changes and close the panel.
Emboss Options
Elevation Specifies the light source's elevation on the image. Lower values produce moreshadows and a darker image. Higher values produce fewer shadows and a lighterimage.
Weight Specifies the amount of relief added to the image. Higher values increase the reliefdepth.
Azimuth Specifies the angle of shadows that extend from the edges of image details. Avalue of 0 adds shadows to the left side, while a value of 180 adds shadows to theright side.
You can right-click a slider to reset to the default value.
You can use the Edit Brush to paint this effect onto specific areas of your image.
You can use the Gradient tool to transition this effect across specific areas of yourimage.
You can use the Radial Gradient tool to apply effects around, or directly to, a centerpoint.
Applying a Furry Edges Effect
You can use the Furry Edges effect to add fur and bristles to the lines and details of people or objectsin your image.
You can save your settings as a preset for future use.
To Use the Furry Edges Effect:
1. In Edit mode, in the Add group, select Special Effect.
You can also access the Special Effects menu from the Filter drop-down menu or Filtertoolbar.

ACDSee Photo Studio Home 2022
Page 289 of 506
2. Click Furry Edges.
3. On the Furry Edges panel, set the options as described below.
4. Do one of the following:
Click Done to accept your changes and close the panel.
Click Cancel to discard your changes and close the panel.
Furry Edges Options
Frequency Specifies how much fur is added to the image. The higher the setting, themore dense the fur that is applied to the image.
Threshold Specifies how sharp an edge must be before fur is applied to it. As thevalue decreases, the area of the image that fur is added to increases.
Fur length Specifies the length of each strand of fur. As the value increases, thelength of each fur strand also increases.
Variance Specifies how much of the fur grows in the direction indicated by theHair direction setting. The higher the value, the more random the furdirection will be.
Hair direction Specifies the general direction in which fur appears to grow.
Edge detection Specifies the edge detection algorithm. The algorithm controls theformula used to detect the edges and the direction of the edgeindicators.
Background color Specifies the background color of the filtered image. Check the Imagecheckbox to use the original image colors, or click the color picker toselect a different color.
Fur color Specifies the color of the fur. Check the Image checkbox to use theoriginal image colors, or click the color picker to select a different color.
Randomize Indicates the random placement of the fur strands.
When you apply the Furry Edges effect to an image, ACDSee Homeplaces the fur randomly. This makes the fur strands different every timeyou apply the filter. You can define a specific random seed to generateidentical fur patterns.
To generate a new random seed, click Randomize.
You can right-click a slider to reset to the default value.
You can use the Edit Brush to paint this effect onto specific areas of your image.

ACDSee Photo Studio Home 2022
Page 290 of 506
You can use the Gradient tool to transition this effect across specific areas of yourimage.
You can use the Radial Gradient tool to apply effects around, or directly to, a centerpoint.
Applying a Glowing Edges Effect
You can use the Glowing Edges effect to add color to the lines and details of people or objects in yourimages. The colored lines and details appear to glow.
You can save your settings as a preset for future use.
To Apply a Glowing Edges Effect:
1. In Edit mode, in the Add group, select Special Effect.
You can also access the Special Effects menu from the Filter drop-down menu or Filtertoolbar.
2. Click Glowing Edges.
3. On the Glowing Edges panel, set the options as described below.
4. Do one of the following:
Click Done to accept your changes and close the panel.
Click Cancel to discard your changes and close the panel.
Glowing Edges Options
Intensity Specifies the amount of color added to the edges within the image. The higher thesetting, the more intense the color that is applied to the image.
Color Specifies the color of the edges.
You can right-click a slider to reset to the default value.
You can use the Edit Brush to paint this effect onto specific areas of your image.
You can use the Gradient tool to transition this effect across specific areas of yourimage.
ACDSee Photo Studio Home 2022
Page 291 of 506
You can use the Radial Gradient tool to apply effects around, or directly to, a centerpoint.
Applying a Granite Effect
You can use the Granite effect to give your images the appearance of being painted on a rock wall.
You can save your settings as a preset for future use.
To Use the Granite Effect:
1. In Edit mode, in the Add group, select Special Effect.
You can also access the Special Effects menu from the Filter drop-down menu or Filtertoolbar.
2. Click Granite.
3. On the Granite panel, set the options as described below.
4. Do one of the following:
Click Done to accept your changes and close the panel.
Click Cancel to discard your changes and close the panel.
Granite Options
Light Angle Specifies the direction from which an imaginary light source is shining on theimage. Drag the arrow to adjust the angle. Different light angles will change thehighlights and shadows in the peaks and valleys on the rock.
You can use the Edit Brush to paint this effect onto specific areas of your image.
You can use the Gradient tool to transition this effect across specific areas of yourimage.
You can use the Radial Gradient tool to apply effects around, or directly to, a centerpoint.
Applying a Lomo Effect
Simulate the retro-effects of a lomo camera. Photos taken with a lomo camera are high contrast, witha golden hue and a noticeable vignette.

ACDSee Photo Studio Home 2022
Page 292 of 506
You can save your settings as a preset for future use.
To Use the Lomo Effect:
1. In Edit mode, in the Add group, select Special Effect.
You can also access the Special Effects menu from the Filter drop-down menu or Filtertoolbar.
2. Click Lomo.
3. Drag the Color Distortion slider to the right to increase the color distortion.
4. Drag the Vignette Strength slider to the right to increase the vignette strength.
5. Do one of the following:
Click Done to accept your changes and close the panel.
Click Cancel to discard your changes and close the panel.
6. Click Exit to leave Special Effects, and return to the Filter menu.
You can right-click a slider to reset to the default value.
You can use the Edit Brush to paint this effect onto specific areas of your image.
You can use the Gradient tool to transition this effect across specific areas of yourimage.
You can use the Radial Gradient tool to apply effects around, or directly to, a centerpoint.
Applying a Mirror Effect
You can use the Mirror effect to reflect an image along the horizontal or vertical axis. Select or changethe Mirror options to apply mirroring to your image, including mirror axis and direction.
You can save your settings as a preset for future use.
To Apply a Mirror Effect:

ACDSee Photo Studio Home 2022
Page 293 of 506
1. In Edit mode, in the Add group, select Special Effect.
You can also access the Special Effects menu from the Filter drop-down menu or Filtertoolbar.
2. ClickMirror.
3. On the Mirror panel, in the Mirror direction area, select one of the following options to indicate whichdirection you want to mirror the image:
Horizontal
Vertical
4. Drag the Mirror axis slider to adjust the position of the mirror. A value of 500 places the mirror in thecenter of the image.
5. Do one of the following:
Click Done to accept your changes and close the panel.
Click Cancel to discard your changes and close the panel.
You can right-click a slider to reset to the default value.
You can use the Edit Brush to paint this effect onto specific areas of your image.
You can use the Gradient tool to transition this effect across specific areas of yourimage.
You can use the Radial Gradient tool to apply effects around, or directly to, a centerpoint.
Applying a Negative Effect
You can use the Negative effect to create a negative of your image. You can also apply the Negativefilter to a negative scanned from a roll of film to produce a positive image.
To Create an Image Negative:
1. In Edit mode, in the Add group, select Special Effect.
You can also access the Special Effects menu from the Filter drop-down menu or Filtertoolbar.
2. Click Negative.

ACDSee Photo Studio Home 2022
Page 294 of 506
3. Do one of the following:
Click Done to accept your changes and close the panel.
Click Cancel to discard your changes and close the panel.
You can use the Edit Brush to paint this effect onto specific areas of your image.
You can use the Gradient tool to transition this effect across specific areas of yourimage.
You can use the Radial Gradient tool to apply effects around, or directly to, a centerpoint.
Applying an Oil Paint Effect
You can use the Oil Paint effect to give your images a painted appearance.
You can save your settings as a preset for future use.
To Create an Oil Painting from a Photo:
1. In Edit mode, in the Add group, select Special Effect.
You can also access the Special Effects menu from the Filter drop-down menu or Filtertoolbar.
2. Click Oil Paint.
3. On the Oil Paint panel, drag the Brush width slider to specify the width of the brush strokes in the effect.The higher the value, the wider the brush stroke.
4. Drag the Variance slider to specify the color variance in each brush stroke. Higher values increase thenumber of colors used in each stroke.
5. Drag the Vibrance slider to adjust the intensity of the colors in the image.
6. Do one of the following:
Click Done to accept your changes and close the panel.
Click Cancel to discard your changes and close the panel.
You can right-click a slider to reset to the default value.
You can use the Edit Brush to paint this effect onto specific areas of your image.

ACDSee Photo Studio Home 2022
Page 295 of 506
You can use the Gradient tool to transition this effect across specific areas of yourimage.
You can use the Radial Gradient tool to apply effects around, or directly to, a centerpoint.
Applying an Old Effect
You can use the Old effect to give your images an antique look. (The Old effect is similar to the Sepiaeffect, but produces a more realistic appearance of age.)
You can save your settings as a preset for future use.
To Apply the Old Effect:
1. In Edit mode, in the Add group, select Special Effect.
You can also access the Special Effects menu from the Filter drop-down menu or Filtertoolbar.
2. Click Old.
3. On the Old panel, set the options as described below.
4. Do one of the following:
Click Done to accept your changes and close the panel.
Click Cancel to discard your changes and close the panel.
Old Options
Age Specifies the intensity or degree of the effect. (The numbers do not correspond tohow old the photo should appear.)
You can right-click a slider to reset to the default value.
You can use the Edit Brush to paint this effect onto specific areas of your image.
You can use the Gradient tool to transition this effect across specific areas of yourimage.

ACDSee Photo Studio Home 2022
Page 296 of 506
You can use the Radial Gradient tool to apply effects around, or directly to, a centerpoint.
Applying an Orton Effect
Create beautiful impressionistic images with the Orton effect. The Orton effect mimics a darkroomtechnique created by sandwiching two images together, one of which is slightly out of focus, and bothof which are slightly overexposed.
You can save your settings as a preset for future use.
To Use the Orton Effect:
1. In Edit mode, in the Add group, select Special Effect.
You can also access the Special Effects menu from the Filter drop-down menu or Filtertoolbar.
2. Click Orton.
3. Drag the Blur, Contrast, and Brightness sliders to adjust each effect.
4. Do one of the following:
Click Done to accept your changes and close the panel.
Click Cancel to discard your changes and close the panel.
5. Click Exit to leave Special Effects, and return to the Filter menu.
You can right-click a slider to reset to the default value.
You can use the Edit Brush to paint this effect onto specific areas of your image.
You can use the Gradient tool to transition this effect across specific areas of yourimage.
You can use the Radial Gradient tool to apply effects around, or directly to, a centerpoint.
Applying an Outline Effect
The Outline effect is similar to the Edge Detect effect. You can use the Outline effect to create ahighlighted outline of your image. However, with the Outline effect you can control the thickness of

ACDSee Photo Studio Home 2022
Page 297 of 506
the outline, whether an edge is outlined or not, and the color that displays behind the outlined image.
You can save your settings as a preset for future use.
To Use the Outline Effect:
1. In Edit mode, in the Add group, select Special Effect.
You can also access the Special Effects menu from the Filter drop-down menu or Filtertoolbar.
2. Click Outline.
3. On the Outline panel, set the options as described below.
4. Do one of the following:
Click Done to accept your changes and close the panel.
Click Cancel to discard your changes and close the panel.
Outline Options
Line width Specifies the width of the outline in the effect. The higher the value, thewider the outline.
Threshold Specifies how sharp an edge must be in order to be outlined. If youspecify a higher value, more edges in the photo will be outlined.
Background color Specifies the background color of the filtered image. Click the colorpicker to select a different color.
You can right-click a slider to reset to the default value.
You can use the Edit Brush to paint this effect onto specific areas of your image.
You can use the Gradient tool to transition this effect across specific areas of yourimage.
You can use the Radial Gradient tool to apply effects around, or directly to, a centerpoint.

ACDSee Photo Studio Home 2022
Page 298 of 506
Applying a Pencil Drawing Effect
You can use the Pencil Drawing effect to create a pencil drawing from your images.
To Create a Pencil Drawing from an Image:
1. In Edit mode, in the Add group, select Special Effect.
You can also access the Special Effects menu from the Filter drop-down menu or Filtertoolbar.
2. Click Pencil Drawing.
3. Do one of the following:
Click Done to accept your changes and close the panel.
Click Cancel to discard your changes and close the panel.
You can use the Edit Brush to paint this effect onto specific areas of your image.
You can use the Gradient tool to transition this effect across specific areas of yourimage.
You can use the Radial Gradient tool to apply effects around, or directly to, a centerpoint.
Applying a Pixel Explosion Effect
You can use the Pixel Explosion effect to explode pixels from a center point in your images. Select orchange the Pixel Explosion settings, such as intensity and direction, to apply this effect to your image.
You can save your settings as a preset for future use.
To Use the Pixel Explosion Effect:
1. In Edit mode, in the Add group, select Special Effect.
You can also access the Special Effects menu from the Filter drop-down menu or Filtertoolbar.
2. Click Pixel Explosion.
3. On the Pixel Explosion panel, set the options as described below.

ACDSee Photo Studio Home 2022
Page 299 of 506
4. Do one of the following:
Click Done to accept your changes and close the panel.
Click Cancel to discard your changes and close the panel.
Pixel Explosion Options
Horizontal center Specifies the center point of the explosion on the horizontal axis. Avalue of 500 places the explosion at the middle of the image.
Vertical center Specifies the center point of the explosion on the vertical axis. Avalue of 500 places the explosion at the middle of the image.
Intensity Specifies the intensity of the explosion. A higher value creates alarger, more brilliant spread of the pixels in the image.
Explosion direction Specifies the direction of the explosion. Select one or both of thefollowing:
Explode horizontally: explodes the pixels towards the rightand left sides of the image.
Explode vertically: explodes the pixels towards the top andbottom of the image.
Randomize Indicates the random placement of the pixels.
When you apply the Pixel Explosion effect to an image, ACDSeeHome places the pixels randomly. This makes the pixels differentevery time you apply the filter. You can define a specific randomseed to generate identical pixel patterns.
To generate a new random seed, click Randomize.
You can right-click a slider to reset to the default value.
You can use the Edit Brush to paint this effect onto specific areas of your image.
You can use the Gradient tool to transition this effect across specific areas of yourimage.
You can use the Radial Gradient tool to apply effects around, or directly to, a centerpoint.
ACDSee Photo Studio Home 2022
Page 300 of 506
Applying a Pixelate Effect
A pixel is the smallest piece of a digital image, arranged in rows and columns. When you reduce theresolution of your image, the size of the pixel increases and produces blurring. You can use the Pixelateeffect to increase the size of the pixels in your image.
You can save your settings as a preset for future use.
To Apply a Pixelate Effect:
1. In Edit mode, in the Add group, select Special Effect.
You can also access the Special Effects menu from the Filter drop-down menu or Filtertoolbar.
2. Click Pixelate.
3. On the Pixelate panel, drag the Width and Height sliders to set the size of the pixels in your image.Check the Square checkbox to make the width and height equal.
4. Do one of the following:
Click Done to accept your changes and close the panel.
Click Cancel to discard your changes and close the panel.
You can right-click a slider to reset to the default value.
You can use the Edit Brush to paint this effect onto specific areas of your image.
You can use the Gradient tool to transition this effect across specific areas of yourimage.
You can use the Radial Gradient tool to apply effects around, or directly to, a centerpoint.
Applying a Posterize Effect
You can use the Posterize effect to reduce the number of brightness levels in your image. Select orchange the Posterize options to apply this effect to your image.
You can save your settings as a preset for future use.
To Apply a Posterize Effect:
ACDSee Photo Studio Home 2022
Page 301 of 506
1. In Edit mode, in the Add group, select Special Effect.
You can also access the Special Effects menu from the Filter drop-down menu or Filtertoolbar.
2. Click Posterize.
3. On the Posterize panel, drag the Brightness levels slider to adjust the variance of colors in the image.The lower the value, the fewer colors used in the image.
4. Do one of the following:
Click Done to accept your changes and close the panel.
Click Cancel to discard your changes and close the panel.
You can right-click a slider to reset to the default value.
You can use the Edit Brush to paint this effect onto specific areas of your image.
You can use the Gradient tool to transition this effect across specific areas of yourimage.
You can use the Radial Gradient tool to apply effects around, or directly to, a centerpoint.
Applying a Purple Haze Effect
You can use the Purple Haze effect to give your image a hyper-retro, purple tint.
To Apply the Purple Haze Effect:
1. In Edit mode, in the Add group, select Special Effect.
You can also access the Special Effects menu from the Filter drop-down menu or Filtertoolbar.
2. Click Purple Haze.
3. Do one of the following:
Click Done to accept your changes and close the panel.
Click Cancel to discard your changes and close the panel.
You can right-click a slider to reset to the default value.

ACDSee Photo Studio Home 2022
Page 302 of 506
You can use the Edit Brush to paint this effect onto specific areas of your image.
You can use the Gradient tool to transition this effect across specific areas of yourimage.
You can use the Radial Gradient tool to apply effects around, or directly to, a centerpoint.
Applying a Radial Waves Effect
You can use the Radial Waves effect to display waves radiating from a center point in the photo. Youcan change the center point in the photo and you can also control the appearance of the waves.
You can save your settings as a preset for future use.
To Apply a Radial Waves Effect:
1. In Edit mode, in the Add group, select Special Effect.
You can also access the Special Effects menu from the Filter drop-down menu or Filtertoolbar.
2. Click Radial Waves.
3. On the Radial waves panel, set the options as described below.
4. Do one of the following:
Click Done to accept your changes and close the panel.
Click Cancel to discard your changes and close the panel.
Radial Waves Options

ACDSee Photo Studio Home 2022
Page 303 of 506
Horizontal position Specifies the center of the waves on the horizontal axis. A value of 500places the waves in the middle of the image.
Vertical position Specifies the center of the waves on the vertical axis. A value of 500places the waves in the middle of the image.
Amplitude Specifies the depth and height of each wave.
Wavelength Specifies the amount of space between waves.
Light strength Specifies the amount of light contrast between the top and bottom ofeach wave.
Background color Specifies the background color of the filtered image. Check the Imagecheckbox to use the original image colors, or click the color picker toselect a different color.
Wave direction Specifies the direction of the waves. Select one, or both, of thefollowing:
l Wave horizontally: makes the waves move towards the rightand left sides of the image.
l Wave vertically: makes the waves move towards the top and bot-tom of the image.
You can right-click a slider to reset to the default value.
You can use the Edit Brush to paint this effect onto specific areas of your image.
You can use the Gradient tool to transition this effect across specific areas of yourimage.
You can use the Radial Gradient tool to apply effects around, or directly to, a centerpoint.
Applying a Rain Effect
You can use the Rain effect to make it look like it was raining when you took a photo. Control theamount, the angle, strength and other characteristics of the rain.
You can save your settings as a preset for future use.
To Apply Rain to a Photo:

ACDSee Photo Studio Home 2022
Page 304 of 506
1. In Edit mode, in the Add group, select Special Effect.
You can also access the Special Effects menu from the Filter drop-down menu or Filtertoolbar.
2. Click Rain.
3. On the Rain panel, set the options as described below.
4. Do one of the following:
Click Done to accept your changes and close the panel.
Click Cancel to discard your changes and close the panel.
Rain Options
Strength Specifies the length of the rain drops. Drag the slider to the right toincrease the length.
Opacity Specifies the opacity of the rain drops. Type a number from 0 to 100 ordrag the slider to adjust the opacity of the rain drops. The higher theopacity, the more the image is obscured.
Amount Specifies the number of rain drops.
Angle variance Specifies the angle of the rain drops. Type a number from 0 to 50 ordrag the arrow to adjust the angle.
Strength variance Specifies how much variety there should be in the length of the raindrops. Drag the slider to the left if you want rain drops to have a similarlength. Drag the slider to the right if you want to vary the length of raindrops. If you vary the length of rain drops they look natural.
Background blur Specifies the amount of blur in the photo. Heavy rain will block yourvision. Use this option to blur the photo so the rain effect looks natural.
Angle Specifies the angle at which the rain drops are falling.
Color Specifies the color of the rain drops.
You can right-click a slider to reset to the default value.
You can use the Edit Brush to paint this effect onto specific areas of your image.
You can use the Gradient tool to transition this effect across specific areas of yourimage.

ACDSee Photo Studio Home 2022
Page 305 of 506
You can use the Radial Gradient tool to apply effects around, or directly to, a centerpoint.
Applying a Ripple Effect
You can use the Ripple effect to divide your images into concentric circles that resembles what you seewhen you drop a pebble into water. Select or change the Ripple settings to apply to your image, suchas position, strength and more.
You can save your settings as a preset for future use.
To Apply a Ripple Effect:
1. In Edit mode, in the Add group, select Special Effect.
You can also access the Special Effects menu from the Filter drop-down menu or Filtertoolbar.
2. Click Ripple.
3. On the Ripple panel, set the options as described below.
4. Do one of the following:
Click Done to accept your changes and close the panel.
Click Cancel to discard your changes and close the panel.
Ripple Options

ACDSee Photo Studio Home 2022
Page 306 of 506
Horizontal position Specifies the center of the ripples on the horizontal axis. A value of500 places the ripples in the middle of the image.
Vertical position Specifies the center of the ripples on the vertical axis. A value of500 places the ripples in the middle of the image.
Amplitude Specifies the depth and height of each ripple.
Wavelength Specifies the amount of space between ripples.
Light strength Specifies the amount of light contrast between the top and bottomof each ripple.
Background color Specifies the background color of the filtered image. Check theImage checkbox to use the original image colors, or click the colorpicker to select a different color.
Ripple direction Specifies the direction of the ripples. Select one or both of thefollowing:
l Ripple vertically: makes the ripples move towards the topand bottom of the image.
l Ripple horizontally: makes the ripples move towards theright and left sides of the image.
You can right-click a slider to reset to the default value.
You can use the Edit Brush to paint this effect onto specific areas of your image.
You can use the Gradient tool to transition this effect across specific areas of yourimage.
You can use the Radial Gradient tool to apply effects around, or directly to, a centerpoint.
Applying a Scattered Tiles Effect
You can use the Scattered Tiles effect to divide your images into rectangular tiles, and scatter and stackthe tiles. Select or change the Scattered Tiles options to apply this effect to your image.
You can save your settings as a preset for future use.
To Apply a Scattered Tiles Effect:

ACDSee Photo Studio Home 2022
Page 307 of 506
1. In Edit mode, in the Add group, select Special Effect.
You can also access the Special Effects menu from the Filter drop-down menu or Filtertoolbar.
2. Click Scattered Tiles.
3. On the Scattered Tiles panel, set the options as described below.
4. Do one of the following:
Click Done to accept your changes and close the panel.
Click Cancel to discard your changes and close the panel.
Scattered Tiles Options
Tile size Specifies the size of the tiles.
Scatter amount Specifies how much the tiles will move from their original positions.
Background color Specifies the color of the background. Click the color picker to select adifferent color.
Randomize Indicates the random placement of the tiles.
When you apply the Scattered Tiles effect to an image, ACDSee Homeplaces the tiles randomly. This makes the effect different every time youapply the filter. You can define a specific random seed to generateidentical tile patterns.
To generate a new random seed, click Randomize.
You can right-click a slider to reset to the default value.
You can use the Edit Brush to paint this effect onto specific areas of your image.
You can use the Gradient tool to transition this effect across specific areas of yourimage.
You can use the Radial Gradient tool to apply effects around, or directly to, a centerpoint.
Applying a Sepia Effect
You can use the Sepia effect to give your images an antique look. (The Old effect is similar to the Sepiaeffect, but produces a more realistic appearance of age.)

ACDSee Photo Studio Home 2022
Page 308 of 506
You can save your settings as a preset for future use.
To Add a Sepia Tone to an Image:
1. In Edit mode, in the Add group, select Special Effect.
You can also access the Special Effects menu from the Filter drop-down menu or Filtertoolbar.
2. Click Sepia.
3. Do one of the following:
Click Done to accept your changes and close the panel.
Click Cancel to discard your changes and close the panel.
You can right-click a slider to reset to the default value.
You can use the Edit Brush to paint this effect onto specific areas of your image.
You can use the Gradient tool to transition this effect across specific areas of yourimage.
You can use the Radial Gradient tool to apply effects around, or directly to, a centerpoint.
Applying a Seventies Effect
You can use the Seventies effect to give your images a retro look.
To Apply the Seventies Effect:
1. In Edit mode, in the Add group, select Special Effect.
You can also access the Special Effects menu from the Filter drop-down menu or Filtertoolbar.
2. Click Seventies.
3. Do one of the following:
Click Done to accept your changes and close the panel.
Click Cancel to discard your changes and close the panel.

ACDSee Photo Studio Home 2022
Page 309 of 506
You can right-click a slider to reset to the default value.
You can use the Edit Brush to paint this effect onto specific areas of your image.
You can use the Gradient tool to transition this effect across specific areas of yourimage.
You can use the Radial Gradient tool to apply effects around, or directly to, a centerpoint.
Applying a Sheet Metal Effect
You can use the Sheet Metal effect to turn your images into sheet metal impressions.
You can save your settings as a preset for future use.
To Apply a Sheet Metal Effect:
1. In Edit mode, in the Add group, select Special Effect.
You can also access the Special Effects menu from the Filter drop-down menu or Filtertoolbar.
2. Click Sheet Metal.
3. On the Sheet Metal panel, set the options as described below.
4. Do one of the following:
Click Done to accept your changes and close the panel.
Click Cancel to discard your changes and close the panel.
Sheet Metal Options

ACDSee Photo Studio Home 2022
Page 310 of 506
Rounding Specifies the amount of curve in the edges of the impressions.
Detail Specifies the amount of detail in the impression.
Angle Specifies the angle of the grain in the sheet metal.
Metal color Specifies the color of the sheet metal.
Direction Specifies the direction in which the sheet metal was manipulated. Select one ofthe following:
l Indented: stamps the metal from the top side of the image.l Pushed out: stamps the metal from underneath the image.
You can right-click a slider to reset to the default value.
You can use the Edit Brush to paint this effect onto specific areas of your image.
You can use the Gradient tool to transition this effect across specific areas of yourimage.
You can use the Radial Gradient tool to apply effects around, or directly to, a centerpoint.
Applying a Shift Effect
You can use the Shift effect to divide your images into bars and shift them in random directions.
You can save your settings as a preset for future use.
To Apply a Shift Effect:
1. In Edit mode, in the Add group, select Special Effect.
You can also access the Special Effects menu from the Filter drop-down menu or Filtertoolbar.
2. Click Shift.
3. On the Shift panel, set the options as described below.

ACDSee Photo Studio Home 2022
Page 311 of 506
4. Do one of the following:
Click Done to accept your changes and close the panel.
Click Cancel to discard your changes and close the panel.
Shift Options
Strength Specifies the amount of shift between the bars.
Width Specifies the width of each bar.
Angle Specifies the angle of the bars.
Background color Specifies the background color of the filtered image. Check the Imagecheckbox to use the original image colors, or click the color picker toselect a different color.
You can right-click a slider to reset to the default value.
You can use the Gradient tool to transition this effect across specific areas of yourimage.
You can use the Radial Gradient tool to apply effects around, or directly to, a centerpoint.
Applying a Slant Effect
You can use the Slant effect to make a photo appear slanted. For example, you could use the Slanteffect to distort a photo by pushing the top of the photo to the left and the bottom of the photo tothe right. Similarly, you could use the slant effect to push the left side of the photo upwards and theright side of the photo downwards.
You can save your settings as a preset for future use.
To Apply a Slant Effect:
1. In Edit mode, in the Add group, select Special Effect.
You can also access the Special Effects menu from the Filter drop-down menu or Filtertoolbar.
2. Click Slant.
3. On the Slant panel, set the options as described below.

ACDSee Photo Studio Home 2022
Page 312 of 506
4. Do one of the following:
Click Done to accept your changes and close the panel.
Click Cancel to discard your changes and close the panel.
Slant Options
Amount Specifies the degree of the slant.
Fulcrum Specifies the center of the slant. Drag the slider to the left to place thecenter of the slant near the bottom of the photo. Drag the slider to theright to place the center of the slant near the top of the photo.
Background color Specifies the background color of the filtered image. Click the colorpicker to select a different color.
Slant Direction Specifies the angle of the slant:
Horizontal: select Horizontal to push the top or bottom of thephoto to the left or right.
Vertical: select Vertical to push the left or right side of the photoup or down.
You can right-click a slider to reset to the default value.
You can use the Edit Brush to paint this effect onto specific areas of your image.
You can use the Gradient tool to transition this effect across specific areas of yourimage.
You can use the Radial Gradient tool to apply effects around, or directly to, a centerpoint.
Applying a Sobel Effect
You can use the Sobel effect to create a highlighted outline of your image. After creating a black image,the effect uses colored lines to outline the detail of an image where significant color differences exist.Greater differences between colors in the original image produce brighter outline colors. (The Sobeleffect is similar to the Edge Detect effect, but produces sharper and brighter outlines.)
To Use the Sobel Effect:

ACDSee Photo Studio Home 2022
Page 313 of 506
1. In Edit mode, in the Add group, select Special Effect.
You can also access the Special Effects menu from the Filter drop-down menu or Filtertoolbar.
2. Click Sobel.
3. Do one of the following:
Click Done to accept your changes and close the panel.
Click Cancel to discard your changes and close the panel.
You can use the Edit Brush to paint this effect onto specific areas of your image.
You can use the Gradient tool to transition this effect across specific areas of yourimage.
You can use the Radial Gradient tool to apply effects around, or directly to, a centerpoint.
Applying a Solarize Effect
You can use the Solarize effect to simulate the effect of overexposing an image, as though the film wasexposed to light before developing. Select or change the Solarize options to apply this effect to yourimage.
You can save your settings as a preset for future use.
To Apply a Solarize Effect:
1. In Edit mode, in the Add group, select Special Effect.
You can also access the Special Effects menu from the Filter drop-down menu or Filtertoolbar.
2. Click Solarize.
3. On the Solarize panel, drag the Threshold slider to specify the brightness threshold of the image.
4. In the Effect area, specify which pixels you want to adjust by selecting one of the following options:
Solarize: adjusts pixels located above the specified threshold option. The effect takes any pixelsabove the threshold and replaces them with their negative value. When you solarize an image,a higher threshold value sets a brighter threshold, and colors need to be brighter to be

ACDSee Photo Studio Home 2022
Page 314 of 506
overexposed.
Lunarize: adjusts pixels located below the specified threshold option. The effect takes any pixelsbelow the threshold and replaces them with their negative value. When you lunarize an image,a higher threshold value sets a darker threshold, and colors do not have to be as bright to beoverexposed.
5. Do one of the following:
Click Done to accept your changes and close the panel.
Click Cancel to discard your changes and close the panel.
You can right-click a slider to reset to the default value.
You can use the Edit Brush to paint this effect onto specific areas of your image.
You can use the Gradient tool to transition this effect across specific areas of yourimage.
You can use the Radial Gradient tool to apply effects around, or directly to, a centerpoint.
Applying a Somber Effect
You can use the Somber effect to give your images an austere or sleek look.
To Apply the Somber Effect:
1. In Edit mode, in the Add group, select Special Effect.
You can also access the Special Effects menu from the Filter drop-down menu or Filtertoolbar.
2. Click Somber.
3. Do one of the following:
Click Done to accept your changes and close the panel.
Click Cancel to discard your changes and close the panel.
You can right-click a slider to reset to the default value.

ACDSee Photo Studio Home 2022
Page 315 of 506
You can use the Edit Brush to paint this effect onto specific areas of your image.
You can use the Gradient tool to transition this effect across specific areas of yourimage.
You can use the Radial Gradient tool to apply effects around, or directly to, a centerpoint.
Applying a Stained Glass Effect
You can use the Stained Glass effect to divide your image into fragments of a random size and shape,to give the photo the appearance of a stained glass window. Control the size and position of thefragments using the effect settings.
You can save your settings as a preset for future use.
To Apply a Stained Glass Effect:
1. In Edit mode, in the Add group, select Special Effect.
You can also access the Special Effects menu from the Filter drop-down menu or Filtertoolbar.
2. Click Stained Glass.
3. On the Stained Glass panel, set the options as described below.
4. Do one of the following:
Click Done to accept your changes and close the panel.
Click Cancel to discard your changes and close the panel.
Stained Glass Options
Fragment size Specifies the size of the fragments.
Randomize Indicates the random placement of the fragments.
When you apply the Stained Glass effect to an image, ACDSee Home places thefragments randomly. This makes the effect different every time you apply thefilter. You can define a specific random seed to generate identical fragmentpatterns.
To generate a new random seed, click Randomize.

ACDSee Photo Studio Home 2022
Page 316 of 506
You can right-click a slider to reset to the default value.
You can use the Edit Brush to paint this effect onto specific areas of your image.
You can use the Gradient tool to transition this effect across specific areas of yourimage.
You can use the Radial Gradient tool to apply effects around, or directly to, a centerpoint.
Applying a Sunspot Effect
You can use the Sunspot effect to add a bright spot in your images.
You can save your settings as a preset for future use.
To Apply a Sunspot Effect:
1. In Edit mode, in the Add group, select Special Effect.
You can also access the Special Effects menu from the Filter drop-down menu or Filtertoolbar.
2. Click Sunspot.
3. On the Sunspot panel, drag the Horizontal Position and Vertical Position sliders or click the image to setthe location of the sunspot.
4. Drag the Brightness slider to set the intensity of the sunspot.
5. Do one of the following:
Click Done to accept your changes and close the panel.
Click Cancel to discard your changes and close the panel.
You can right-click a slider to reset to the default value.
Applying a Swirl Effect
You can use the Swirl effect to rotate and stretch people and objects in your image.
You can save your settings as a preset for future use.

ACDSee Photo Studio Home 2022
Page 317 of 506
To Apply a Swirl Effect:
1. In Edit mode, in the Add group, select Special Effect.
You can also access the Special Effects menu from the Filter drop-down menu or Filtertoolbar.
2. Click Swirl.
3. On the Swirl panel, set the options as described below.
4. Do one of the following:
Click Done to accept your changes and close the panel.
Click Cancel to discard your changes and close the panel.
Swirl Options
Horizontal position Specifies the center of the swirl on the horizontal axis. A value of 500places the swirl in the middle of the image.
Vertical position Specifies the center of the swirl on the vertical axis. A value of 500places the swirl in the middle of the image.
Radius Specifies the size of the swirl effect.
Strength Specifies the strength and direction of the swirl. Higher values createa clockwise swirl, while negative values create a counter-clockwiseswirl.
Focus Specifies the concentration of the swirl. Higher values concentratethe effect on the center of the swirl, while lower values spread theswirl across the image.
Background color Specifies the background color of the filtered image. Check theImage checkbox to use the original image colors, or click the colorpicker to select a different color.
Swirl direction Specifies the direction of the swirl. Select one or both of thefollowing:
l Swirl horizontally: moves the swirl towards the top and bot-tom of the image.
l Swirl vertically: moves the swirl towards the right and leftsides of the image.
You can right-click a slider to reset to the default value.
You can use the Edit Brush to paint this effect onto specific areas of your image.

ACDSee Photo Studio Home 2022
Page 318 of 506
You can use the Gradient tool to transition this effect across specific areas of yourimage.
You can use the Radial Gradient tool to apply effects around, or directly to, a centerpoint.
Applying a Threshold Effect
You can use the Threshold effect to create a black and white image.
You can save your settings as a preset for future use.
To Apply the Threshold Effect:
1. In Edit mode, in the Add group, select Special Effect.
You can also access the Special Effects menu from the Filter drop-down menu or Filtertoolbar.
2. Click Threshold.
3. On the Threshold panel, set the options as described below.
4. Do one of the following:
Click Done to accept your changes and close the panel.
Click Cancel to discard your changes and close the panel.
Threshold Options
Threshold This slider determines which pixels become black and which ones become whitein the black and white image. Any pixels that are brighter than the selectedthreshold will become white and any pixels that are darker than the threshold willbecome black.
You can right-click a slider to reset to the default value.
You can use the Edit Brush to paint this effect onto specific areas of your image.
You can use the Gradient tool to transition this effect across specific areas of yourimage.

ACDSee Photo Studio Home 2022
Page 319 of 506
You can use the Radial Gradient tool to apply effects around, or directly to, a centerpoint.
Applying a Topography Effect
You can use the Topography effect to change the details of your images into contour lines.
You can save your settings as a preset for future use.
To Apply a Topography Effect:
1. In Edit mode, in the Add group, select Special Effect.
You can also access the Special Effects menu from the Filter drop-down menu or Filtertoolbar.
2. Click Topography.
3. On the Topographic Map panel, drag the Rounding slider to adjust the amount of curve in the contourlines.
4. Drag the Number of lines slider to specify how many contour lines you want to add.
5. Do one of the following:
Click Done to accept your changes and close the panel.
Click Cancel to discard your changes and close the panel.
You can right-click a slider to reset to the default value.
You can use the Edit Brush to paint this effect onto specific areas of your image.
You can use the Gradient tool to transition this effect across specific areas of yourimage.
You can use the Radial Gradient tool to apply effects around, or directly to, a centerpoint.
Applying a Water Effect
You can use theWater effect to insert an expanse of water below the subject of a photo and to displaya reflection of the subject in the water. You can control the position of the water below the subject.

ACDSee Photo Studio Home 2022
Page 320 of 506
For example, you can position the water below a person's chin, or below their waist. You can alsocontrol the appearance of ripples in the water and how dark or light the water appears.
You can save your settings as a preset for future use.
To Apply a Water Effect:
1. In Edit mode, in the Add group, select Special Effect.
You can also access the Special Effects menu from the Filter drop-down menu or Filtertoolbar.
2. ClickWater.
3. On the Water panel, set the options as described below.
4. Do one of the following:
Click Done to accept your changes and close the panel.
Click Cancel to discard your changes and close the panel.
Water Options
Position Specifies the position of the water below the subject of the photo.
Amplitude Specifies the height of the ripples in the water. Drag the slider to the left to reducethe height of the ripples and the distortion caused by the ripples. Drag the slider tothe right to increase the height of the ripples and the distortion caused by theripples.
Wavelength Specifies the distance between ripples. Drag the slider to the left to reduce thedistance between ripples and increase the distortion caused by the ripples. Dragthe slider to the right to increase the distance between ripples and reduce thedistortion caused by the ripples.
Perspective Changes the size of the waves as they get farther from the subject. Drag the sliderto the left to increase the size of the waves farthest from the subject and toincrease the illusion of distance.
Lighting Specifies the amount of light in the water.
You can right-click a slider to reset to the default value.
You can use the Edit Brush to paint this effect onto specific areas of your image.
ACDSee Photo Studio Home 2022
Page 321 of 506
You can use the Gradient tool to transition this effect across specific areas of yourimage.
You can use the Radial Gradient tool to apply effects around, or directly to, a centerpoint.
Applying a Water Drops Effect
You can use theWater Drops effect to display water drops on the surface of the photo. You cancontrol the number and size of water drops, and their position on the photo.
You can save your settings as a preset for future use.
To Apply Water Drops to a Photo:
1. In Edit mode, in the Add group, select Special Effect.
You can also access the Special Effects menu from the Filter drop-down menu or Filtertoolbar.
2. ClickWater Drops.
3. On the Water Drops panel, set the options as described below.
4. Do one of the following:
Click Done to accept your changes and close the panel.
Click Cancel to discard your changes and close the panel.
Water Drops Options
ACDSee Photo Studio Home 2022
Page 322 of 506
Density Specifies the number of water drops on the photo. Drag the slider to the left toremove water drops. Drag the slider to the right to add water drops.
Radius Specifies the size of the water drops. Drag the slider to the left to make the waterdrops smaller. Drag the slider to the right to make the water drops larger.
Height Specifies the height of the water drops above the photo surface. Drag the slider tothe left to reduce the height of the water drops and the distortion caused by thewater drops. Drag the slider to the right to increase the height of the water dropsand the distortion caused by the water drops.
Randomize Indicates the random placement of the water drops.
When you apply the Water Drops effect to an image, ACDSee Home places thewater drops randomly. This makes the effect different every time you apply thefilter. You can define a specific random seed to generate identical water droppatterns.
To generate a new random seed, click Randomize.
You can right-click a slider to reset to the default value.
You can use the Edit Brush to paint this effect onto specific areas of your image.
You can use the Gradient tool to transition this effect across specific areas of yourimage.
You can use the Radial Gradient tool to apply effects around, or directly to, a centerpoint.
Applying a Waves Effect
You can use theWaves effect to display waves across the photo. You can change the distance betweenwaves. This distance is called wavelength. You can also change the height of the waves, and the angleat which the waves cross the photo.
You can save your settings as a preset for future use.
To Apply a Waves Effect:

ACDSee Photo Studio Home 2022
Page 323 of 506
1. In Edit mode, in the Add group, select Special Effect.
You can also access the Special Effects menu from the Filter drop-down menu or Filtertoolbar.
2. ClickWaves.
3. On the Waves panel, select or change the options as described below.
4. Do one of the following:
Click Done to accept your changes and close the panel.
Click Cancel to discard your changes and close the panel.
Waves Options
Wavelength Specifies the distance between waves. Drag the slider to the left toreduce the distance between waves and increase the distortion causedby the waves. Drag the slider to the right to increase the distancebetween waves and reduce the distortion caused by the waves.
Amplitude Specifies the height of the waves. Drag the slider to the left to reducethe height of the waves and the distortion caused by the waves. Dragthe slider to the right to increase the height of the waves and thedistortion caused by the waves.
Angle Specifies the angle of the waves. Type a number from 1 to 360 or dragthe arrow to adjust the angle.
Background color Specifies the background color. Check the Image checkbox to use theoriginal image colors, or click the color picker to select a different color.
You can right-click a slider to reset to the default value.
You can use the Edit Brush to paint this effect onto specific areas of your image.
You can use the Gradient tool to transition this effect across specific areas of yourimage.
You can use the Radial Gradient tool to apply effects around, or directly to, a centerpoint.

ACDSee Photo Studio Home 2022
Page 324 of 506
Applying a Weave Effect
You can use theWeave effect to give a photo the appearance of being woven into a tapestry or basket.You can control the width of the vertical and horizontal strips, the width of the gap between the strips,and the background color that displays through the gap.
You can save your settings as a preset for future use.
To Apply a Weave Effect:
1. In Edit mode, in the Add group, select Special Effect.
You can also access the Special Effects menu from the Filter drop-down menu or Filtertoolbar.
2. ClickWeave.
3. On the Weave panel, set the options as described below.
4. Do one of the following:
Click Done to accept your changes and close the panel.
Click Cancel to discard your changes and close the panel.
Weave Options
Strip width Specifies the width of the vertical and horizontal strips.
Gap width Specifies the width of the gap between the strips.
Background color Specifies the color of the background. Click the color picker to select adifferent color.
You can right-click a slider to reset to the default value.
You can use the Edit Brush to paint this effect onto specific areas of your image.
You can use the Gradient tool to transition this effect across specific areas of yourimage.
You can use the Radial Gradient tool to apply effects around, or directly to, a centerpoint.
ACDSee Photo Studio Home 2022
Page 325 of 506
Applying a Wind Effect
You can use theWind effect to add wind lines that make stationary objects in your image look likethey are moving. Select or change the settings to control the effect of the wind added to your image.
You can save your settings as a preset for future use.
To Apply a Wind Effect:
1. In Edit mode, in the Add group, select Special Effect.
You can also access the Special Effects menu from the Filter drop-down menu or Filtertoolbar.
2. ClickWind.
3. On the Wind panel, select or change the options as described below.
4. Do one of the following:
Click Done to accept your changes and close the panel.
Click Cancel to discard your changes and close the panel.
Wind Options

ACDSee Photo Studio Home 2022
Page 326 of 506
Strength Determines how strong the wind lines are in the image. The higher thevalue, the stronger the wind lines.
Threshold Determines how sharp an edge must be before the filter will apply wind.The higher the value, the sharper the edge needs to be.
Chance of wind Determines the amount of wind lines to place in the image.
Edge detection Specifies the edge detection algorithm. The algorithm controls theformula used to detect the edges and the direction of the edgeindicators.
Background color Specifies the background color. Check the Image checkbox to use theoriginal image colors, or click the color picker to select a different color.
Wind color Specifies the color of the wind lines. Check the Image checkbox to usethe original image colors, or click the color picker to select a differentcolor.
Wind angle Specifies the angle of the wind lines.
Randomize Indicates the random placement of the wind lines.
When you apply the Wind effect to an image, ACDSee Home places thewind lines randomly. This makes the wind lines different every time youapply the filter. You can define a specific random seed to generateidentical wind lines.
To generate a new random seed, click Randomize.
You can right-click a slider to reset to the default value.
You can use the Edit Brush to paint this effect onto specific areas of your image.
You can use the Gradient tool to transition this effect across specific areas of yourimage.
You can use the Radial Gradient tool to apply effects around, or directly to, a centerpoint.
Creating a Custom Special Effect Filter (Convolution Effect)
You can use the Convolution filter to create your own special effects and apply them to your image.
You can save your settings as a preset for future use.

ACDSee Photo Studio Home 2022
Page 327 of 506
To Create a Custom Effect Filter:
1. In Edit mode, in the Add group, select Special Effect.
You can also access the Special Effects menu from the Filter drop-down menu or Filtertoolbar.
2. Click User Defined Convolution.
3. On the User Defined Convolution panel, set the options as described below.
4. Do one of the following:
Click Done to accept your changes and close the panel.
Click Cancel to discard your changes and close the panel.
User Defined Convolution Options
Convolution Matrix Specifies the formula to use when altering the image.
Type numbers in the matrix fields to change the pixels in the image.Using a mathematical formula, the color value of each pixel in animage is multiplied by the numbers in the matrix to produce an effect.
Division Specifies the fractional coefficient of the matrix.
Type a number into the Division field to use fractional coefficients inthe matrix. The product of the convolution matrix is divided by thedivision factor before being applied to a pixel.
Bias Specifies the brightness of the image.
Type a number into the Bias field to change the brightness of theimage. The bias number is added to the RGB values of each pixel. Apositive number brightens the image, while a negative numberdarkens the image.
Clear Matrix Resets the matrix.
Sample Filters Drop-Down Menu Loads a sample effect to use as a starting point for creating your owneffect.
You can use the Edit Brush to paint this effect onto specific areas of your image.
You can use the Gradient tool to transition this effect across specific areas of yourimage.

ACDSee Photo Studio Home 2022
Page 328 of 506
You can use the Radial Gradient tool to apply effects around, or directly to, a centerpoint.
Rotating an Image
You can rotate an image at preset or custom angles in Edit mode.
You can save your settings as a preset for future use.
To Rotate an Image at a Custom Angle:
1. In Edit mode, in the Geometry group, select Rotate.
You can also access the Rotate tool from the Filter drop-down menu or Filter toolbar.
2. Select one or more of the following:
Select one of the default orientation options.
Drag the Straightening slider to the left or right until the image appears straightened.
Click the Horizontal or Vertical button, and use the tools as described below.
Select Crop straightened image if you want to crop the image after it is straightened.
Select Preserve straightened image if you do not want to crop the straightened image. Selectthe color that you would like to display behind the straightened image from the Fill color drop-down.
Select Show grid overlay to display a grid over the image. You may find that the grid helps youstraighten the image and understand how the image will be cropped.
3. Do one of the following:
Click Done to apply your changes and close the tool.
Click Cancel to discard all changes and close the tool.
Click Reset to clear your changes and reset to default settings. If you saved your changes, youcannot reset your settings.
Rotate Icons

ACDSee Photo Studio Home 2022
Page 329 of 506
Horizontal Click on the horizontal icon, and then use the cursor to draw a line on the imagethat you want to set as the horizontal line.
Vertical Click on the vertical icon, and then use the cursor to draw a line on the image thatyou want to set as the vertical line.
You can right-click a slider to reset to the default value.
Flipping an Image
You can flip an image both vertically and horizontally in Edit mode.
You can save your settings as a preset for future use.
To Flip an Image:
1. In Edit mode, in the Geometry group, select Flip.
You can also access the Flip tool from the Filter drop-down menu or Filter toolbar.
2. Do one or both of the following:
Check the Horizontal Flip checkbox.
Check the Vertical Flip checkbox.
3. Do one of the following:
Click Done to apply your changes and close the tool.
Click Cancel to discard all changes and close the tool.
Click Reset to clear your changes and reset to default settings. If you saved your changes, youcannot reset your settings.
You can use the Edit Brush to paint this effect onto specific areas of your image.
You can use the Gradient tool to transition this effect across specific areas of yourimage.

ACDSee Photo Studio Home 2022
Page 330 of 506
Cropping an Image
You can use the Crop tool to remove unwanted parts of your images, or to reduce the image canvas toa particular size. You can also enable relative positioning which is useful for creating settings to batchcrop a selection of images.
You can save your settings as a preset for future use.
When zooming in, hold down the Spacebar to pan the image.
To Crop an Image:
1. In Edit mode, in the Geometry group, select Crop.
You can also access the Crop tool from the Filter drop-down menu or Filter toolbar.
2. Resize the crop window, and position it over the area of the image you want to keep.
3. To darken the parts of the image outside the crop window, drag the Darken outside crop area slider tothe left. Drag the slider to the right to lighten the area outside the crop window.
4. Click Estimate new file size to view how big your image file is after cropping.
5. Do one of the following:
Click Done to crop the image and close the tool.
Click Cancel to exit the tool without cropping the image.
You can right-click a slider to reset to the default value.
Resizing the Crop Window
You can resize the crop window in three ways:
Drag the edges of the crop window to the desired size.
Specify an exact size for the crop window in pixels, inches, centimeters, or millimeters.
Apply a ratio to constrain the crop window proportions.
To Resize the Crop Window by Dragging:
1. Position your cursor over the edge or corner of the crop window until it changes into a double-pointedarrow.
2. Drag the crop window's border to the desired size.
To Specify an Exact Size for the Crop Window:

ACDSee Photo Studio Home 2022
Page 331 of 506
1. Type the desired crop window proportions into the Width and Height spin boxes.
2. In the Units drop-down list, select a unit of measurement.
3. Use the Dots per inch spin box to specify a resolution.
To Constrain the Crop Window to a Ratio:
1. Check the Constrain cropping proportion checkbox.
2. Choose a ratio from the drop-down list.
3. Click on the Rotate button if you want to change the orientation of the crop window.
4. Do one of the following:
Position your cursor over the edge of the crop window until it changes into a double-pointedarrow, and then drag the edge of the crop window to the desired size.
Use the Width or Height spin box to specify a dimension for one side of the crop window.ACDSee Home automatically resizes the other dimension based on the ratio you selected.
To Resize the Crop Window by Using Relative Positioning:
You can enable relative positioning to specify how you want your image to crop. This can beparticularly useful for cropping in batches.
1. Check the Enable relative positioning checkbox.
2. Choose in the Horizontal settings whether you would like to position the crop from the left or rightedges, and the distance in pixels or as a percentage.
3. Choose in the Vertical settings whether you would like to position the crop from the left or right edges,and the distance in pixels or as a percentage.
Resizing an Image
You can resize an image by adjusting its dimensions in pixels, percentage, or actual/print size. Whileresizing, you can also choose an aspect ratio and a resampling filter to adjust the resized image'sappearance.
You can save your settings as a preset for future use.
To Resize an Image:
1. In Edit mode, in the Geometry group, select Resize.
You can also access the Resize tool from the Filter drop-down menu or Filter toolbar.

ACDSee Photo Studio Home 2022
Page 332 of 506
2. Select one of the following resize options:
Pixels: resizes the image to specific dimensions in pixels.
Percent: resizes the image to a percentage of the original.
Actual/Print size in: resizes the image to match a specific output size. Click the drop-down listto specify a unit of measurement.
3. If you want to maintain a specific width to height ratio, check the Preserve aspect ratio checkbox, andthen select one of the following options from the drop-down list:
Original: maintains the original image's width to height ratio.
1 x 1: forces the width and height to be equal.
2 x 3: forces a width to height ratio of 2:3.
3 x 2: forces a width to height ratio of 3:2.
3 x 5: forces a width to height ratio of 3:5.
5 x 3: forces a width to height ratio of 5:3.
Custom: applies a custom ratio. Enter a width to height ratio in the Custom Aspect Ratio dialogbox.
4. Select a resizing filter from the Resizing Filter drop-down list.
5. Under the resize option you selected in step #3, type the image's new dimensions into the Width andHeight spin boxes. If you selected Actual/Print size in, click the Resolution drop-down list, and thenselect a resolution (in dots per inch) for your output image.
6. To estimate the size of the output image, click Estimate new file size.
7. Do one of the following:
Click Done to apply your changes and close the Resize tool.
Click Cancel to discard all changes and close the tool.
Resizing Tips:
Maintain image quality by reducing images only by 33%, 50%, or 66%. Other percentagescan distort the aspect ratio.
Avoid resizing an image repeatedly. Each resizing places image pixels using a slightlydifferent orientation. As a result, multiple resizes can change the overall color andappearance of the image. If your first resize attempt does not produce the desired result,click the Undo button.
Avoid increasing the size of an image. Increasing image size makes the image's pixelsmore apparent, causing a grainy effect.

ACDSee Photo Studio Home 2022
Page 333 of 506
Pixel Resize Options and Resulting Action
You can reduce and enlarge the size of one or more images from Manage mode by entering a newdimension in pixels. For more information on how to resize an image using pixel dimensions, pleasesee Resizing an image or Resizing multiple images.
Enlarging an image tends to pixelate the image, reducing image quality. It is best to avoidenlarging images.

ACDSee Photo Studio Home 2022
Page 334 of 506
Resize Options Fit within Options Action
Enlarge only
Width only Resizes the image if the specifieddimensions are larger than theimage's original dimensions. Thewidth is increased to the specifiedvalue and the height is increased tomaintain the aspect ratio.
Height only Resizes the image if the specifieddimensions are larger than theimage's original dimensions. Theheight is increased to the specifiedvalue and the width is increased tomaintain the aspect ratio.
Width and height Resizes the image if the specifieddimensions are larger than theimage's original dimensions. Thewidth and height are increased asclose to the specified value aspossible, while maintaining theaspect ratio.
Width or height (largest image) Resizes the image if the specifieddimensions are larger than theimage's original dimensions. Thewidth or height is increased as closeto the specified value as possible tomaximize the size of the image, whilemaintaining the aspect ratio.
Reduce only
Width only Resizes the image if the specifieddimensions are smaller than theimage's original dimensions. Thewidth is decreased to the specifiedvalue and the height is decreased tomaintain the aspect ratio.
Height only Resizes the image if the specifieddimensions are smaller than theimage's original dimensions. Theheight is decreased to the specified

ACDSee Photo Studio Home 2022
Page 335 of 506
Resize Options Fit within Options Action
value and the width is decreased tomaintain the aspect ratio.
Width and height Resizes the image if the specifieddimensions are smaller than theimage's original dimensions. Thewidth and height are decreased asclose to the specified value aspossible, while maintaining theaspect ratio.
Width or height (largest image) Resizes the image if the specifieddimensions are smaller than theimage's original dimensions. Thewidth or height is decreased as closeto the specified value as possible tominimize the size of the image, whilemaintaining the aspect ratio.
Enlarge or reduce
Width only Resizes the width to the specifiedvalue and resizes the height towhatever value is necessary tomaintain the aspect ratio.
Height only Resizes the height to the specifiedvalue and resizes the width towhatever value is necessary tomaintain the aspect ratio.
Width and height Resizes the image within thespecified width and height. The widthand height are resized as close to thespecified value as possible whilemaintaining the aspect ratio.
Width or height (largest image) Resizes the image within thespecified width and height. The widthor height is resized as close to thespecified value as possible tomaximize (or minimize) the size ofthe image, while maintaining theaspect ratio.

ACDSee Photo Studio Home 2022
Page 336 of 506
Adjusting Image Exposure
You can use the Exposure tool to adjust an image's exposure, contrast, and fill light.
You can save your settings as a preset for future use.
To Adjust the Image Exposure:
1. In Edit mode, in the Exposure/Lighting group, select Exposure.
You can also access the Exposure tool from the Filter drop-down menu or Filter toolbar.
2. Set the options as described below.
3. Do one of the following:
Click Apply to apply your changes and set options on another tab.
Click Done to apply your changes and close the tool.
Click Cancel to discard all changes and close the tool.
Click Reset to clear your changes and reset to default settings. If you saved your changes, youcannot reset your settings.
Image Exposure Options
Exposure Drag the slider to the right to increase the exposure, or drag to the left todecrease exposure.
Auto Click the Auto button to automatically adjust the exposure level.
Contrast Drag the slider to the right to increase contrast, or drag to the left to decreasecontrast.
Fill Light Drag slider to the right to increase the amount of light in the darkest areas of theimage, or drag to the left to decrease fill light. Fill light brightens dark areas of theimage.
Exposure warning Highlights overexposed and underexposed areas of the image. Overexposedpixels turn red, underexposed pixels turn green. The icon is gray when disabled,and turns yellow if enabled.
You can right-click a slider to reset to the default value.
You can use the Edit Brush to paint this effect onto specific areas of your image.

ACDSee Photo Studio Home 2022
Page 337 of 506
You can use the Gradient tool to transition this effect across specific areas of yourimage.
You can use the Radial Gradient tool to apply effects around, or directly to, a centerpoint.
Adjusting Image Levels
You can use the Levels tool to precisely adjust the contrast and light levels in your images.
You can save your settings as a preset for future use.
To Adjust Image levels:
1. In Edit mode, in the Exposure/Lighting group, select Levels.
You can also access the Levels tool from the Filter drop-down menu or Filter toolbar.
2. Do one of the following:
Set the options as described below to adjust the contrast and light levels manually.
Click Auto and select a menu option to automatically adjust image properties.
3. Do one of the following:
Click Apply to apply your changes.
Click Done to apply your changes and close the Levels tool.
Click Cancel to discard all changes and close the tool.
Click Reset to clear your changes and reset to default settings. If you saved your changes, youcannot reset your settings.
Levels Options

ACDSee Photo Studio Home 2022
Page 338 of 506
Channel Specifies the brightness or color channel you want to adjust.
Shadows Specifies the black point of an image.
Move the slider or type a number from 0 to 255 into the spin box todefine the blackest area of an image. As the value increases, thedark colored areas of the image become darker. You can also clickon the arrow to automatically set it to where the black point start inthe image.
Midtones Specifies the midtones in an image.
Move the slider or type a number into the spin box to set themidtone. Higher values make the image appear brighter, whilelower values make the image appear darker. You can also click onthe arrow to automatically set it to the midtone of the image.
Highlights Specifies the white point of an image.
Move the slider or type a number from 0 to 255 into the spin box todefine the whitest area of an image. As the value increases, the lightcolored areas of the image become lighter. You can also click on thearrow to automatically set it to where the highlights start in theimage.
Auto Select one of the following options:l Adjust Contrast: automatically analyzes and adjusts imagecontrast.
l Adjust Color and Contrast: automatically analyzes andadjusts each color channel independently, and then adjuststhe contrast.
l Adjust Color and Brightness: automatically analyzes andadjusts image color and brightness.
l Tolerance: opens the Tolerance settings dialog box. Specifythe maximum clipping percentage for black and white levels,and click OK. ACDSee Home adjusts the image levels auto-matically.
Black Point picker Click the Black Point picker, and then click the image area you wantto set as the black point.
Mid Point picker Click the Mid Point picker, and then click the image area you wantto set as the mid point.
White Point picker Click the White Point picker, and then click the image area you wantto set as the white point.

ACDSee Photo Studio Home 2022
Page 339 of 506
When you click around the image with a selected eye dropper you will see the RGB numberschanging to reflect the RGB values of the pixel under the eye dropper. The RGB valuesrepresent the source pixel (unprocessed) and the current pixel as it appears on the screen.
You can use the Radial Gradient tool to apply effects around, or directly to, a centerpoint.
You can use the Edit Brush to paint this effect onto specific areas of your image.
You can use the Gradient tool to transition this effect across specific areas of yourimage.
Adjusting Levels Automatically
You can use the Auto Levels tool to automatically correct the exposure levels of your images. AutoLevels makes the darkest image pixels darker, and the brightest pixels brighter.
You can save your settings as a preset for future use.
To Automatically Correct an Image's Levels:
1. In Edit mode, in the Exposure/Lighting group, select Auto Levels.
You can also access the Auto Levels tool from the Filter drop-down menu or Filter toolbar.
2. Select one of the following options:
Auto Contrast and Color: adjusts color differences, brightness, and balances RGB channels.
Auto Contrast: adjusts the color differences and brightness only.
Auto Color: balances the RGB channels in the image, without changing the brightness orcontrast.
3. Use the Strength slider to fine tune the amount of exposure you want to apply.
4. Click Exposure Warning to make overexposed and underexposed pixels visible. Overexposed pixels turnred, underexposed pixels turn green.
5. Do one of the following:
Click Done to accept your changes and close the panel.
Click Cancel to discard your changes and close the panel.

ACDSee Photo Studio Home 2022
Page 340 of 506
Click Reset to clear your changes and reset to default settings. If you saved your changes, youcannot reset your settings.
You can right-click a slider to reset to the default value.
You can use the Edit Brush to paint this effect onto specific areas of your image.
You can use the Gradient tool to transition this effect across specific areas of yourimage.
You can use the Radial Gradient tool to apply effects around, or directly to, a centerpoint.
Adjusting Tone Curves in Edit Mode
In Editmode, the Tone Curves filter changes the tonal range of an image. Channel Filtering embeddedin the Tone Curves pane adjusts either the entire range of the image (RGB), or specific colors (Red,Green, and Blue).
Save adjusted settings as a preset for future use.
To adjust the Brightness Curves in an image:
1. In Edit mode, do one of the following:l In the Filter Menu pane, under the Exposure / Lighting group, select Tone Curves,l Select Filter | Exposure / Lighting | Tone Curves from the main menu, orl Press U.
2. Set the options as described below.
3. Do one of the following:
l Click Apply to accept any changes and remain in the tool,l Click Done to accept any changes and close the tool, orl Click Cancel to discard any changes and close the tool.
Click Reset to clear your changes and reset to default settings. If you saved your changes, youcannot reset your settings.
Tone Curves Options

ACDSee Photo Studio Home 2022
Page 341 of 506
Channel Specifies the color channels to adjust. Options include RGB, Red, Green,and Blue.
Show Histogram Toggles the histogram display on and off.
Histogram Displays a graphic of the color information levels in the image, based onthe selected channel. Click and drag the line to manipulate the curve. Notethat when a point on the curve is clicked, a Node Info Box appears in thetop left corner of the Histogram. The Node Info Box contains In and Outpixel values which are set in blocks of color to give a visual representation.The Node Info Box numbers convey that an In value pixel will be changedto the Out value. For example, if the In value is 40 and the Out value is 80,all pixels with a value of 40 will be changed to 80. Clicking the curve adds anew point to the curve. Drag the points up and down the curve. To deletea point, right-click the node and select Delete point.
Color Picker Drag the cursor onto the image to change the cursor to a color picker thatprovides the RGB value of the picker's current location. Click the image at adesired tone to add a corresponding point to the adjustment curse.
You can use the Radial Gradient tool to apply effects around, or directly to, a centerpoint.
You can use the Gradient tool to transition this effect across specific areas of yourimage.
You can use the Edit Brush to paint this effect onto specific areas of your image.
Adjusting Lighting
You can use the Light EQ™ tool to adjust areas in an image that are too dark or too light, withoutaffecting other areas of the photo. You can also simultaneously brighten dark areas that are too dark,and darken areas that are too bright. An example would be a portrait of someone in shadow but with alight background.
You can save your settings as a preset for future use.
The Light EQ™ tool lets you make quick and easy adjustments. ACDSee Home analyzes the photo andvaries the adjustment throughout the image automatically. For example, darker images arebrightened more. By opening the Light EQ™ tool, 1-Step applies an automatic exposure adjustment.For a more hands-on approach, the Basic tab allows you to click the Auto button and have ACDSeeHome fully analyze the photo and set the slider positions automatically. You can also click directly onan area of the image to generate automatic settings optimal for that area, (usually the subject of thephoto).

ACDSee Photo Studio Home 2022
Page 342 of 506
1-Step tab: for an instant, effortless exposure adjustment.
Basic tab: for very quick and easy adjustments using three sliders. ACDSee Home analyzes the photo andvaries the adjustment throughout the image automatically. For example, darker images are brightenedmore. By clicking the Auto button, you can have ACDSee Home fully analyze the photo and set the sliderpositions automatically. You can also click directly on an area of the image to generate automatic settingsoptimal for that area, (usually the subject of the photo).
To Open the Light EQ™ Tool:
In Edit mode, in the Exposure/Lighting group, select Light EQ™.
You can also access the Light EQ tool from the Filter drop-down menu or Filter toolbar.
Light EQ™ Controls
Right-click on a slider Right-click on a slider to reset it.
Exposure Warning Click the Exposure Warning to make any overexposed or underexposed areasvisible. Overexposed pixels turn red, underexposed pixels turn green. You can alsotoggle Exposure Warning on and off momentarily by holding down the E key.
Auto Click to allow the software to analyze the photo and apply optimal settings based onthe amount of light and dark pixels in the photo. Darker photos are brightened morethan photos that are already bright.
Done Click to apply your changes and close the tool.
Cancel Click to discard all changes and close the tool.
Click Reset to clear your changes and reset to default settings. If you saved your changes, youcannot reset your settings.
Using the 1-Step Tab
When you open an image in the Light EQ™ tool, 1-Step automatically adjusts your image's exposure.You can further adjust it using the Amount slider. To return to the 1-Step automatic adjustment, pressthe Reset button.
Using the Basic Tab
To Add Light to Dark Areas:
1. Drag the Shadows slider to the right to add light to the dark parts of the photo.
2. Adjust the settings using any of the controls in the table below.
ACDSee Photo Studio Home 2022
Page 343 of 506
To Darken Areas That Are Too Bright:
1. Drag the Highlights slider to the left to darken and return detail to areas that are too bright.
2. Adjust the settings using any of the controls in the table below.
To Adjust Midtones That Are Too Light or Dark:
1. Drag the Midtones slider to the right or left to brighten or darken the midtones.
2. Adjust the settings using any of the controls in the table below.
You can right-click a slider to reset to the default value.
You can use the Edit Brush to paint this effect onto specific areas of your image.
You can use the Gradient tool to transition this effect across specific areas of yourimage.
You can use the Radial Gradient tool to apply effects around, or directly to, a centerpoint.
Adjusting White Balance
You can use theWhite Balance tool to remove unwanted hue from an image. For example, if you takea photo at sunset and the resulting image has a reddish hue, also known as a red color cast, you canuse theWhite Balance tool to remove it.
You can save your settings as a preset for future use.
To Remove a Color Cast from an Image:
1. In Edit mode, in the Color group, selectWhite Balance.
You can also access theWhite Balance tool from the Filter drop-down menu or Filtertoolbar.
2. Click an image area that should be white or gray. The color square shows the color of the original pixelon the left, and the modified pixel on the right.
3. Drag the Temperature slider to the left (more blue) or right (more yellow) to select a specific colortemperature.
4. Drag the Tint slider to the left (more magenta) or right (more green) to match the white balance settingsthat you selected when you took the photo.

ACDSee Photo Studio Home 2022
Page 344 of 506
5. To specify the strength of the white balance adjustment, move the Strength slider. Higher settingsremove more of the unwanted color.
6. Click Done to save your changes, or click Cancel to discard your changes and leave the tool.
You can right-click a slider to reset to the default value.
You can use the Edit Brush to paint this effect onto specific areas of your image.
If you are having difficulties achieving the desired effect, try clicking an image area that is adifferent shade of white or gray.
Click Reset to clear your changes and reset to default settings. If you saved your changes, youcannot reset your settings.
You can use the Gradient tool to transition this effect across specific areas of yourimage.
You can use the Radial Gradient tool to apply effects around, or directly to, a centerpoint.
Adjusting Color with Color EQ
You can use the Color EQ tool in Edit mode to adjust overall colors in an image or each colorindividually. The advanced tools can subtly fine-tune and enhance colors, or completely changeindividual colors in an image.
Color EQ is useful for changing a single color in an image. If you have an image with a yellow car, youcan use the Saturation tab to saturate the yellow or use the Brightness tab to brighten the yellow. Inthe Hue tab, you can change the color of the car from yellow to pink. In the Contrast tab, you canadjust the contrast of the yellow and use the Balance slider to target the brightness range for thatcontrast adjustment.
You can then use the Global Adjustments to make changes to balance the colors in your image.Vibrance adjusts the vibrancy of colors, saturation affects the strength of colors, color shift adjusts thehue without affecting brightness, hue will change colors, and lightness will affect how light the wholeimage is. You can also adjust color using the Red, Green, and Blue sliders to increase or decrease thebalance of those colors.
You can save your settings as a preset for future use.

ACDSee Photo Studio Home 2022
Page 345 of 506
If you have an image of a yellow car with a yellow building in the background, you can changejust the car by using the Selections tool. Select the car using the Selections tool and then applyyour color adjustments.
To Adjust Color:
1. In Edit mode, in the Color group, select Color EQ.
You can also access the Color EQ tool from the Filter drop-down menu or Filter toolbar.
2. Select any of the tabs within the ColorEQ or any of the sliders in the Global Adjustments section, andadjust them according to the options described in the tables below.
3. Do one of the following:
Click Apply to apply your changes.
Click Done to apply your changes and close the tool.
Click Cancel to discard all changes and close the tool.
Click Reset to clear your changes and reset to default settings. If you saved your changes, youcannot reset your settings. If you want to discard only the Edit settings, select File | Restoreto Developed.
You can use the Edit Brush to paint this effect onto specific areas of your image.
You can use the Gradient tool to transition this effect across specific areas of yourimage.
You can use the Radial Gradient tool to apply effects around, or directly to, a centerpoint.
At the top of the Color EQ pane, choose either High Quality or Standard. Adjust image colorsindividually. High Quality uses the newer, more modern color models, allowing for a visuallyperceptive and higher quality adjustment. Standard supports previously developed images and allowsyou to adjust colors individually or make global adjustments.
Color EQ Options - High Quality.

ACDSee Photo Studio Home 2022
Page 346 of 506
Presets In the presets drop-down menu, you canchoose from existing presets, or save anyof your current edits as a preset, using
the save icon.
Color EQ Saturation,Brightnessand Huesliders
Adjust each colorindividually by draggingsliders right for moreintensity, or left for lessintensity. You can also entera number into the fields forprecise adjustments.
You can also select a precisecolor to adjust by placingyour cursor on the imagefor the double arrow icon toappear. Then click and dragup or down to adjust thecolors beneath the doublearrow icon. The affectedcolor sliders automaticallyadjust as you move yourcursor.
The sliders have thefollowing effects:
Saturation: slide leftto decreasesaturation and slideright to increasesaturation.
Brightness: adjuststhe imagebrightness.
Hue: adjusts the hueof the image.
Contrastsliders
Adjust each colorindividually by draggingsliders right for moreintensity, or left for lessintensity. You can also entera number into the fields forprecise adjustments.
You can also select a precise
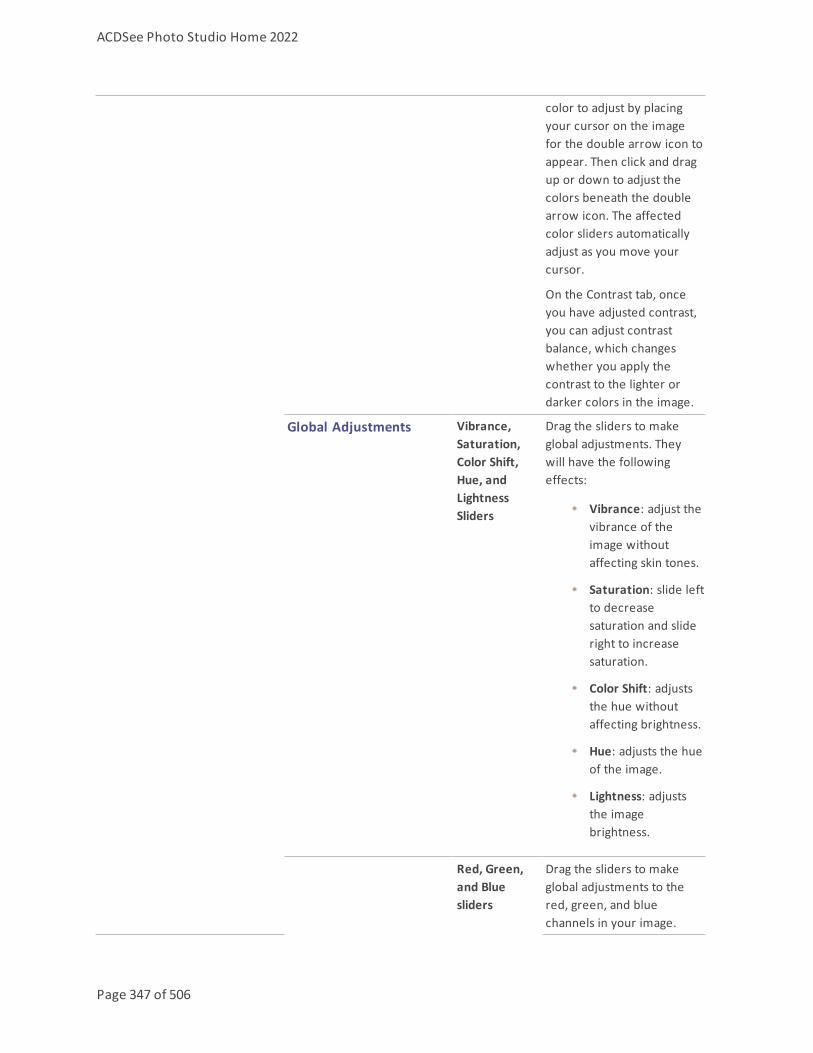
ACDSee Photo Studio Home 2022
Page 347 of 506
color to adjust by placingyour cursor on the imagefor the double arrow icon toappear. Then click and dragup or down to adjust thecolors beneath the doublearrow icon. The affectedcolor sliders automaticallyadjust as you move yourcursor.
On the Contrast tab, onceyou have adjusted contrast,you can adjust contrastbalance, which changeswhether you apply thecontrast to the lighter ordarker colors in the image.
Global Adjustments Vibrance,Saturation,Color Shift,Hue, andLightnessSliders
Drag the sliders to makeglobal adjustments. Theywill have the followingeffects:
Vibrance: adjust thevibrance of theimage withoutaffecting skin tones.
Saturation: slide leftto decreasesaturation and slideright to increasesaturation.
Color Shift: adjuststhe hue withoutaffecting brightness.
Hue: adjusts the hueof the image.
Lightness: adjuststhe imagebrightness.
Red, Green,and Bluesliders
Drag the sliders to makeglobal adjustments to thered, green, and bluechannels in your image.

ACDSee Photo Studio Home 2022
Page 348 of 506
Color EQ Options - Standard.
Presets In the presets drop-down menu, you canchoose from existing presets, or save anyof your current edits as a preset, using the
save icon.
Vibrance Drag the slider to adjust the vibrance of theimage without affecting skin tones.
Vertical slider The vertical slider applies adjustments to theentire image. It has the following effects onthe tabs:
Saturation: adjusts saturation fromgrayscale to highly saturated.
Brightness: adjusts the imagebrightness.
Hue: adjusts the hue of the image.
You can also enter a number into the field forprecise adjustments.
Direct image adjustments Place your cursor on the image for the doublearrow icon to appear. Then click and drag upor down to adjust the colors beneath thedouble arrow icon. The curve control and theaffected color sliders automatically adjust asyou move your cursor. The black down arrowon the graph indicates the color you areadjusting in the image.
The curve appears black in the graph, and youcannot directly adjust it. To apply furtheradjustments, you can alter the white curve.When you adjust the white curve, the blackcurve automatically changes with it. You canalso enter a number into the fields for preciseadjustments.
Individual color sliders Adjust each color with individual sliders.Select the color you want to adjust and clickand drag the sliders. You can also enter anumber into the fields for preciseadjustments.
You can right-click a slider to reset to the default value.
ACDSee Photo Studio Home 2022
Page 349 of 506
Creating a Grayscale Image
You can create rich grayscale images when you can control the brightness of the red, green, and bluechannels, as well as the overall brightness. Use the Convert to Black and White tool to emphasizedifferent areas or aspects of a photo, as well as alter its mood and tone.
If you hover your mouse over each slider and watch the effect on the small preview, it shows youwhich parts of the image will be affected by each channel. This helps to gauge the effect of each slideron the image.
You can also save your settings as a preset for future use.
To Create a Grayscale Image:
1. In Edit mode, in the Color group, select Convert to Black &White.
You can also access the Convert to Black & White tool from the Filter drop-down menu orFilter toolbar.
2. Adjust the settings as described in the table below.
3. Click Done to save your changes, or click Cancel to discard your changes and return to the Filter menu.
Grayscale Options

ACDSee Photo Studio Home 2022
Page 350 of 506
Brightness Tab
On the Brightness tab, do any of the following:
Drag individual color sliders, or left-click on the image (where a color previously occurred) and drag up ordown to alter the brightness of specific tones. For instance, drag your cursor on sky areas to alter thebrightness of the blue.Drag the Percent Red slider to the left or right.
The more red there is in a pixel, the more effect the red slider has on that pixel. The area ofred in the picture is brightened or darkened more than other areas.
Drag the Percent Green slider the left or right.
The more green there is in a pixel, the more effect the green slider has on that pixel. The areaof green in the picture is brightened or darkened more than other areas.
Drag the Percent Blue slider to the left or right.
The more blue there is in a pixel, the more effect the blue slider has on that pixel. The area ofblue in the picture is brightened or darkened more than other areas.
Drag the Percent Brightness slider to the right or left to brighten or darken the whole image.
You can right-click the slider to reset the value to zero.
Contrast Tab
You can increase or decrease the contrast of each individual color. In addition, you can specify the brightnessrange that the contrast adjustment will target for each color.
On the Contrast tab, do the following:
Strength: to adjust the contrast in specific color tones, drag individual color sliders, or left-click on the image(where a color previously occurred) and drag up or down.
Balance: to set the targeted brightness range for the contrast adjustment, adjust the slider to bring details outof highlights or shadows. To bring details out of the midtones, leave the Balance sliders set to 0.
Hold down Shift while clicking and dragging on the image to target the color's correspondingBalance slider.
You can right-click the slider to reset the value to zero.
At the bottom of the Convert to Black & White panel, you can use the Amount and Hue sliders to add colorback into the image. Choose the color using the Hue slider. The saturation of the color added back to any givenpixel is scaled based on both the amount of color/saturation that existed in the original image and the Amountslider.

ACDSee Photo Studio Home 2022
Page 351 of 506
You can use the Edit Brush to paint this effect onto specific areas of your image.
You can use the Gradient tool to transition this effect across specific areas of yourimage.
You can use the Radial Gradient tool to apply effects around, or directly to, a centerpoint.
Color Grading with LUTs
"Color LUT" stands for Color Lookup Table. Color LUTs are lists that instruct ACDSee or relatedprograms to map specific RGB values to other specific color values. You can import LUTs and use themas filters in ACDSee. You can apply a LUT in the same way you would use any other Edit mode filter.Color LUT supported file types are .3DL and .CUBE.
To Apply a Color LUT to Your Image:
1. In Edit mode, in the Color group, select Color LUTs.
2. On the Color LUTs panel, do one of the following:
Select a LUT from the list. The LUT is immediately applied.
Press the Import LUTs button. In the Open dialog, browse to the location of your LUT files, andpress Open. The LUT is immediately applied.
3. Do one of the following:
Click Done to accept your changes and close the panel.
Click Cancel to discard your changes and close the panel.
If an imported LUT file's location has changed, you will have to reload it in the Color LUTspanel.
You can use the Edit Brush to paint this effect onto specific areas of your image.
You can use the Radial Gradient tool to apply effects around, or directly to, a centerpoint.
You can use the Gradient tool to transition this effect across specific areas of yourimage.

ACDSee Photo Studio Home 2022
Page 352 of 506
To Refresh Your List of Color LUTs:
You can refresh your list of available LUTs to reveal moved or deleted files. Unavailable LUTs will beindicated in a darker font color.
On the Color LUTs panel, press the Refresh List button.
To Remove Color LUTs:
1. On the Color LUTs panel, press the Remove LUTs button.
2. In the Remove LUTs dialog, toggle the checkboxes next to the LUTs you want to delete.
3. Press Remove LUTs.
Using the Histogram
The Histogram is a graph that represents the distribution of color intensity for each color channel in animage.
To Display and Use the Histogram:
1. In View mode, click Panes | Histogram, or View | Histogram in Edit mode.
2. On the Histogram, check or uncheck the following checkboxes:
R: shows or hides the red color channel.
G: shows or hides the green color channel.
B: shows or hides the blue color channel.
L: shows or hides the lightness of the image.
Using the Color Dialog Box
The Colors dialog box appears in several places in Edit mode when you select or apply a color. You canuse the Color dialog box to select a color in multiple ways and to adjust a color using several differenttools.

ACDSee Photo Studio Home 2022
Page 353 of 506
The Standard Tab
On the first tab, there is a fixed honeycomb of Basic colors to choose from, including gray, black, andwhite at the bottom. Below it is a grid of Custom or Favorite colors that you can fill in by selecting acolor and then right-clicking a box in the grid. To create a custom color, click the Custom tab.
The Custom Tab
On the second tab, there is a color palette. On the far right is a color slider, which you can use tonavigate to a color group and gain access to any or all colors of the spectrum. Add colors to yourCustom colors by selecting the color in the palette and then right-clicking a box in the grid.
Selecting and Adjusting Colors
To select a color, click on a square in the grid of custom colors, or on the color palette. You can alsodrag over the color palette. When you click a color, that color appears in the New box and all of itsnumerical values, (Hue, Saturation, Luminosity, as well as Red, Green, and Blue), appear in the fieldson the Custom tab.
You can also adjust a color by changing the Hue, Saturation, and Luminosity values. To select a precisecolor, type in the values for that color. You can do the same using the Red, Green, and Blue values.

ACDSee Photo Studio Home 2022
Page 354 of 506
Sharpening an Image
You can use the Sharpen tool to sharpen an image by enhancing medium and high contrast edges.
You can save your settings as a preset for future use.
To Sharpen an Image Using Sharpen Tool:
1. In Edit mode, in the Detail group, select Sharpen.
You can also access the Sharpen tool from the Filter drop-down menu or Filter toolbar.
2. Drag the sliders to enhance or fix your image as described below.
3. Do one of the following:
Click Done to apply your changes and close the tool.
Click Cancel to discard all changes and close the tool.
Click Reset to clear your changes and reset to default settings. If you saved your changes, youcannot reset your settings.
Sharpen Options
Amount Specifies the amount of sharpening applied by increasing contrast around theedges.
Radius Controls the number of pixels to adjust around each edge. Higher values increasethe number of sharpened pixels and tend to bring out coarser detail, while lowervalues reduce the number of sharpened pixels and tend to bring out finer detail.
Detail Suppresses the halo, (the light border that forms around edges with extremesharpening), by reducing its intensity. The higher the value, the stronger thereduction.
Threshold Specifies how different the pixel lightness values within an edge must be beforethe pixels within the edge are sharpened. Higher values sharpen only strongeredges but minimize the appearance of noise. Lower values sharpen both strongand weaker edges, but can increase the appearance of noise. We recommend youset the threshold to enhance edges while keeping background noise to aminimum.
You can right-click a slider to reset to the default value.
You can use the Edit Brush to paint this effect onto specific areas of your image.

ACDSee Photo Studio Home 2022
Page 355 of 506
You can use the Gradient tool to transition this effect across specific areas of yourimage.
You can use the Radial Gradient tool to apply effects around, or directly to, a centerpoint.
Blurring an Image
You can use the Blur tool to apply different kinds of blur to an image.
You can save your settings as a preset for future use.
To Blur an Image:
1. In Edit mode, in the Detail group, select Blur.
You can also access the Blur tool from the Filter drop-down menu or Filter toolbar.
2. In the Blur type section, select the type of blur to apply.
3. Set the options as described below.
4. Do one of the following:
Click Done to apply your changes and close the Blur tool.
Click Cancel to discard all changes and close the tool.
Click Reset to clear your changes and reset to default settings. If you saved your changes, youcannot reset your settings.
Blur Types

ACDSee Photo Studio Home 2022
Page 356 of 506
Gaussian
Produces an even, smooth blur.
Amount Specifies the amount of blur. Move the slider tothe right to intensify the effect.
Linear
Produces a blurring effect that gives the illusion of movement.
Amount Specifies the amount of blur. Move the slider tothe right to intensify the effect.
Angle Specifies the direction of the blur effect.
Radial
Produces blur around a center point. Click the image to set the center point.
Amount Specifies the amount of blur. Move the slider tothe right to intensify the effect.
Clockwise Specifies clockwise blur.
Counter-clockwise Specifies counter-clockwise blur.
Horizontal position Specifies the blur's center point on the horizontalaxis.
Vertical position Specifies the blur's center point on the verticalaxis.
Spread
Produces a smeared or frosted blur.
Amount Specifies the amount of blur. Move the slider tothe right to intensify the effect.
Zoom

ACDSee Photo Studio Home 2022
Page 357 of 506
Produces inward or outward blur to or from a center point.
Amount Specifies the amount of blur. Move the slider tothe right to intensify the effect.
Zoom in Creates a blur that zooms in to the image's center.
Zoom out Creates a blur that zooms out from the image'scenter.
Horizontal position Specifies the blur's center point on the horizontalaxis.
Vertical position Specifies the blur's center point on the verticalaxis.
Smart Blur
Produces blur by detecting and avoiding edges, and preserves detail based on the thresholdsetting. This effect is usually used to smooth out skin.
Amount Specifies the amount of blur. Move the slider tothe right to intensify the effect.
Threshold Specifies how little detail an area must havebefore the blur will apply to it.
Lens
Produces a blur that mimics the blurring effect of a camera aperture.
Select a bokeh shape from the options on the Blur panel. These shapes concentrate inhighlights.
Amount Specifies the strength of the blur. Move the sliderto the right to intensify the effect.
Bokeh Frequency Specifies how often the bokeh shapes show up.
Bokeh Brightness Specifies how much the bokeh shapes stand out.
You can right-click a slider to reset to the default value.
You can use the Edit Brush to paint this effect onto specific areas of your image.
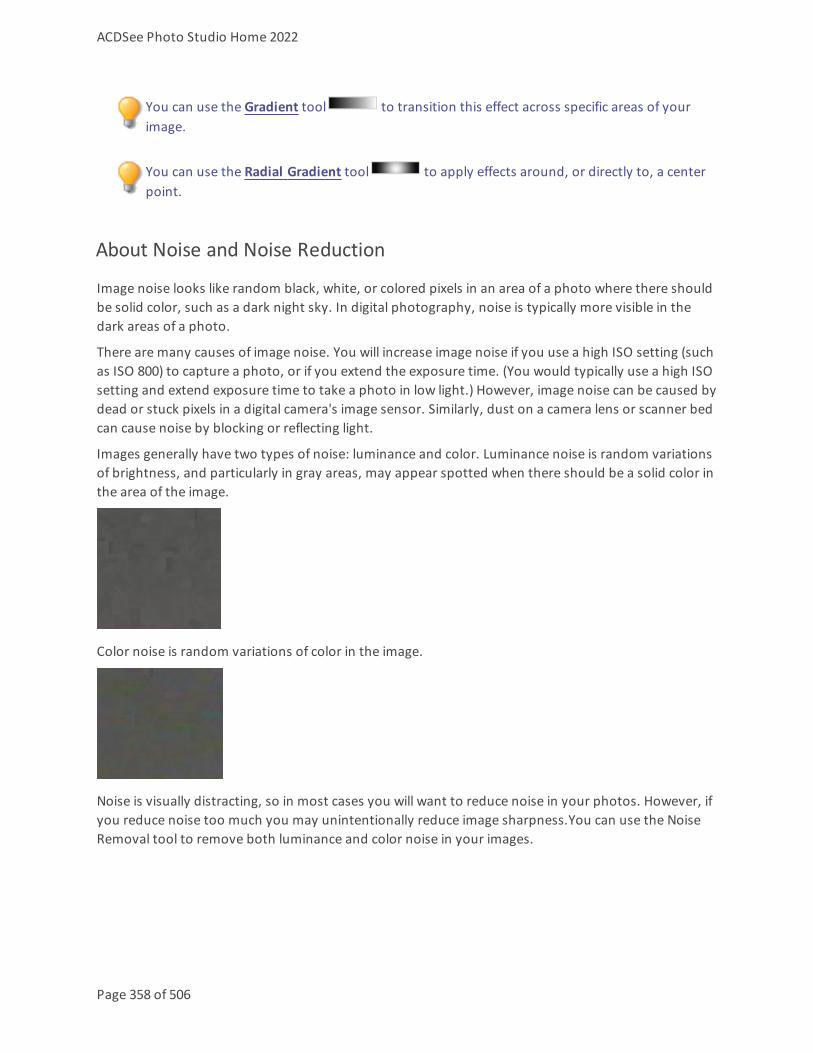
ACDSee Photo Studio Home 2022
Page 358 of 506
You can use the Gradient tool to transition this effect across specific areas of yourimage.
You can use the Radial Gradient tool to apply effects around, or directly to, a centerpoint.
About Noise and Noise Reduction
Image noise looks like random black, white, or colored pixels in an area of a photo where there shouldbe solid color, such as a dark night sky. In digital photography, noise is typically more visible in thedark areas of a photo.
There are many causes of image noise. You will increase image noise if you use a high ISO setting (suchas ISO 800) to capture a photo, or if you extend the exposure time. (You would typically use a high ISOsetting and extend exposure time to take a photo in low light.) However, image noise can be caused bydead or stuck pixels in a digital camera's image sensor. Similarly, dust on a camera lens or scanner bedcan cause noise by blocking or reflecting light.
Images generally have two types of noise: luminance and color. Luminance noise is random variationsof brightness, and particularly in gray areas, may appear spotted when there should be a solid color inthe area of the image.
Color noise is random variations of color in the image.
Noise is visually distracting, so in most cases you will want to reduce noise in your photos. However, ifyou reduce noise too much you may unintentionally reduce image sharpness.You can use the NoiseRemoval tool to remove both luminance and color noise in your images.

ACDSee Photo Studio Home 2022
Page 359 of 506
Loading Images in ACDSee Home with Noise Reduction from Legacy Versions
If ACDSee loads an acdc file made with a previous version, the denoise adjustment layer isadded using the legacy settings and runs the legacy algorithm. Loading does not change theimage. The ACDSee 2022 GUI is loaded, but only the legacy sliders are enabled (Luminance andColor) and the new sliders disabled. If a legacy slider is moved, the new algorithm is engagedand the new sliders enabled. The image can then be re-adjusted for better results using theadditional ACDSee 2022 sliders.
2022 acdc files that include denoise adjustment layers will not load in older versions ofACDSee.
Removing Noise
You can use the Remove Noise tool to remove noise from your images while preserving details thatyou want to retain.
You can use the Remove Noise tool to remove hot image pixels caused by digital cameras withmalfunctioning CCD array sensors, or the extra pixels caused by a dusty scanner or cameralens.
You can save your settings as a preset for future use.
To Remove Noise from an Image:
1. In Edit mode, in the Detail group, select Noise.
You can also access the Noise tool from the Filter drop-down menu or Filter toolbar.
2. Select the Remove Noise tab.
3. Select an option from the Noise Type section.
4. Set the options as described below.
Hold down the Alt key while adjusting a slider to view a preview of its effect on the image.
5. Do one of the following:
Click Done to apply your changes and close the Remove Noise tool.
Click Cancel to discard all changes and close the tool.
Click Reset to clear your changes and reset to default settings. If you saved your changes, youcannot reset your settings.
ACDSee Photo Studio Home 2022
Page 360 of 506
Noise Removal Options
Apply to channel
Modifies a targeted color channel by mixing the existing color channels in the image.
Noise Type
Camera NoiseRemoval
Removes digital camera noise. Adjust the following sliders tofurther remove noise:
Luminance Reduces the random variations of brightness in the noise.
Strength Controls the strength of the Luminance slider.
Color Reduces the random variations of color in the noise.
PreserveDetail
Restores details lost due to strong noise removal. Set the slider toadjust how much detail is restored.
PreserveDetailThreshold
Determines the level of detail necessary to be included in thePreserve Detail slider's adjustments.
Median NoiseRemoval
Reduces impulsive, or salt-and-pepper noise while preservingedges. Select from the following options to further removenoise:
Square Removes noise using a 3 x 3 pixel square.
X Removes noise using a 3 x 3 pixel X shape. Use this option whenyou want to preserve an image's thin and diagonal lines.
Plus Removes noise using a 3 x 3 pixel plus (+) shape. Use this optionwhen you want to preserve an image's thin, vertical, andhorizontal lines.
Despeckle Removes noise.
You can right-click a slider to reset to the default value.
You can use the Edit Brush to paint this effect onto specific areas of your image.

ACDSee Photo Studio Home 2022
Page 361 of 506
You can use the Gradient tool to transition this effect across specific areas of yourimage.
You can use the Radial Gradient tool to apply effects around, or directly to, a centerpoint.
Adding Noise
You can use the Add Noise tool to add a grainy texture to an image. Adding small amounts of noise canreduce the appearance of minor imperfections in the original image.
You can save your settings as a preset for future use.
To Add Noise to an Image:
1. In Edit mode, in the Detail group, select Noise.
You can also access the Noise tool from the Filter drop-down menu or Filter toolbar.
2. Select the Add Noise tab.
3. Set the options as described below.
4. Do one of the following:
Click Done to apply your changes and close the Add Noise tool.
Click Cancel to discard all changes and close the tool.
Click Reset to clear your changes and reset to default settings. If you saved your changes, youcannot reset your settings.
Add Noise Options

ACDSee Photo Studio Home 2022
Page 362 of 506
Intensity Specifies the amount of noise to add to the image. A higher intensityincreases the chance that a noise pixel will replace a pixel in the originalimage.
Color proximity Specifies the color of noise pixels to add to the image. A lower value giveseach noise pixel a color similar to the pixel it replaces. Higher valuesresult in a random selection of the noise pixel color.
Noise color Select one of the following options to specify noise pixel color:l Random: randomly selects the color.l Monochrome: produces black and white noise pixels.l Adjustable: randomly selects the color of each noise pixel, but morepixels match a defined color. To define a color, click the color pickerand select a color.
Noise placement Adds noise to image areas that closely match a defined color. Check theSet color checkbox to enable noise placement, and click the color pickerto specify a color.
Randomize Indicates the random placement of noise in an image.
When you use Add Noise tool, ACDSee Home places the noise pixelsbased on a random seed. This makes the image noise different each timeyou use the Add Noise tool. You can define a specific random seed togenerate identical image noise.
To generate a new random seed, click Randomize.
You can right-click a slider to reset to the default value.
You can use the Edit Brush to paint this effect onto specific areas of your image.
You can use the Gradient tool to transition this effect across specific areas of yourimage.
Adjusting Clarity
The Clarity tool adds subtle definition to the details in your image. Use the Clarity tool to enhance thecontrast of midtones in your images, without overpowering the shadows and highlights.
You can save your settings as a preset for future use.
To Adjust the Clarity of Your Image:

ACDSee Photo Studio Home 2022
Page 363 of 506
1. In Edit mode, in the Detail group, select Clarity.
You can also access the Clarity tool from the Filter drop-down menu or Filter toolbar.
2. Drag the Strength slider to the right for greater clarity, or to the left for reverse clarity.
3. Do one of the following:
Click Done to accept your changes and close the panel.
Click Cancel to discard your changes and close the panel.
You can also type a number into the number box and incrementally make preciseadjustments.
You can right-click a slider to reset to the default value.
You can use the Edit Brush to paint this effect onto specific areas of your image.
You can use the Gradient tool to transition this effect across specific areas of yourimage.
You can use the Radial Gradient tool to apply effects around, or directly to, a centerpoint.
Using People Mode
Please note that Peoplemode is only available for the 64-bit version of ACDSee Photo StudioHome.
Peoplemode is a dedicated space for managing all images of people.
Peoplemode can be accessed by selecting the Peoplemode icon in the mode bar, or by selectingTools | Manage People... from theManagemode main menu.
There are three views in Peoplemode:
l Named,
l Unnamed, and
l Person.

ACDSee Photo Studio Home 2022
Page 364 of 506
The Named and Unnamed views can be accessed from the Named and Unnamed buttons directlyabove the results grid in the button bar. To access the Person view, double-click a person's facial imagein Named view only.
In all views, select faces by clicking the face, or multi-select with Ctrl + click, Shift + click.
For both the Unnamed and Person views, toggle the Show Face Thumbnails icon and the
Source Image Thumbnails icon to view the face thumbnail or the entire source image.
Named View
The Named view in Peoplemode is populated with images of all the people that have been assigned aname in the ACDSee photo database. Images of identified people can be merged (for people withmany like-sounding names such as "Rob", "Robby", "Bobby"), renamed, or removed. Double-clickinga person opens that person's Person viewwhere all of the person's assigned faces reside and AI-prepared suggestions can be confirmed or denied.
Unnamed View
The Unnamed view in Peoplemode is populated with faces that haven't been assigned a name.
The Unnamed view can be filtered between Grouped and Ungrouped faces by toggling the drop downlist located at the far right of the button bar above the facial images.
In Grouped, the view is split between a top pane displaying groups, and a bottom pane which displaysthe faces associated with the selected group(s).Grouped faces are similar enough in structure that theAI in Peoplemode suggests that they should be grouped together.
In Ungrouped, the view displays a flat grid of all of the unnamed faces in the database. Ungroupedimages are all of the single facial images without AI-generated groups applied.
The Unnamed view is used to manage the unnamed faces by assigning them to a name, or deletingthe face.
Person View
In Peoplemode, the Person view is a display of all faces associated with one person.
The Person view is comprised of two separate areas:
l The Assigned Faces pane, a collection of facial images previously assigned with the person's name, and
l The Suggested Faces pane, a collection of faces that AI considers a possible match with the person.
Person view can only be accessed from the Named view.

ACDSee Photo Studio Home 2022
Page 365 of 506
Folders Pane
The Folders pane is used for filtering results by folder. Click to select a single folder, or multi-select with
Ctrl + click, Shift + click, or by clicking the Easy-Select arrows to the left of the folder names.
The Folders pane is located to the left of the results grid and has two views:
l Tree view, for an expanded view of folders visited in Manage mode that contain faces, and
l List view, for a flat list of folders containing faces.
Use the View button to the right of the Folders label to toggle between the Tree view and the List view.
Use the Folders Refresh icon below the Folders label to clear the current folder selection.
See also:
People Mode Named View
People Mode Unnamed View
People Mode Person View
Named View
The Named view in Peoplemode is populated with images of all the people that have been assigned aname in the ACDSee photo database. Images of identified people can be merged (for people withmany like-sounding names such as "Rob", "Robby", "Bobby"), renamed, or removed. Double-clickinga person opens that person's Person viewwhere all of the person's assigned faces reside and AI-prepared suggestions can be confirmed or denied.
To merge people:
1. In People mode, in the Named view, select more than one person.
2. Right-click one of the selected people.
3. From the context menu, select Merge People.
4. In theMerge People dialog, do one of the following two options:
l Enter a new name in the Enter or select a name field, or
l Select a name from the Enter or select a name drop down.
5. Click the OK button.
Merging can also be driven from the Edit menu.
To rename a person:
1. In People mode, in the Named view, select a person to rename.
2. Right-click the selected person.

ACDSee Photo Studio Home 2022
Page 366 of 506
3. From the context menu, select Rename Person.
4. Enter the person's new name in the highlighted bar beneath the person's image.
5. Press Enter.
Renaming can also be driven by clicking an associated name box beneath the image, or fromthe Edit menu.
To remove a person or persons:
1. In People mode, in the Named view, select a single person or people to remove.
2. Right-click the selected person(s).
3. From the context menu, select Remove Person(s).
4. In the prompted dialog, click the OK button.
Removing can also be driven from the Edit menu.
See also:
People Mode Unnamed View
People Mode Person View
Using People Mode
Unnamed View
The Unnamed view in Peoplemode is populated with faces that haven't been assigned a name.
The Unnamed view can be filtered between Grouped and Ungrouped faces by toggling the drop downlist located at the far right of the button bar above the facial images.
In Grouped, the view is split between a top pane displaying groups, and a bottom pane which displaysthe faces associated with the selected group(s).Grouped faces are similar enough in structure that theAI in Peoplemode suggests that they should be grouped together.
In Ungrouped, the view displays a flat grid of all of the unnamed faces in the database. Ungroupedimages are all of the single facial images without AI-generated groups applied.
The Unnamed view is used to manage the unnamed faces by assigning them to a name, or deletingthe face.
To delete the face from the Unnamed view,
1. Select the face to be deleted.
2. Do one of the following:
ACDSee Photo Studio Home 2022
Page 367 of 506
l Right-click the face and select Delete Face(s) from the context menu,
l Select Edit | Delete Face(s) from the main menu, or
l Press Delete.
To assign a name to an unnamed face using the name bar:
1. Click the bar beneath an unnamed face.2. Enter a name.3. Press Enter.
To assign a name to an unnamed face using the context menu:
1. Right-click an unnamed face.2. Select Name Face(s)... from the context menu, or press F2,3. Enter a name in the Name field.4. Click OK.
Faces supplied with names automatically disappear from the Unnamed view and arepopulated into the Named view.
In Grouped, deleting or naming a group in the top pane will affect all of the faces in the group.Deleting or naming faces in the bottom pane will affect only those faces.
See also:
People Mode Named View
People Mode Person View
Using People Mode
Person View
In Peoplemode, the Person view is a display of all faces associated with one person.
The Person view is comprised of two separate areas:
l The Assigned Faces pane, a collection of facial images previously assigned with the person's name, and
l The Suggested Faces pane, a collection of faces that AI considers a possible match with the person.
Person view can only be accessed from the Named view.

ACDSee Photo Studio Home 2022
Page 368 of 506
Assigned Faces Pane
The Assigned Faces pane is populated with facial images previously assigned with the person's name.Each image in the Assigned Faces pane has a right-click context sensitive help menu detailed in thefollowing table.
Assigned Faces Pane Context Menu Options
Menu Item Shortcut Description
Rename Face(s)... F2 Opens the Rename Face(s) dialog where anew name can be entered. The facialimage is automatically removed from thecurrent Person view and placed in theNamed view after a new name is applied.
Remove Face(s)... Delete Removes the name from the facial imageand returns the image to the Unnamedview.
Delete Face(s) Shift + Delete Removes the association with a person anddeletes the facial image from Peoplemode.
Set as Profile Sets the selected image as the profileimage for the person.
The Suggested Faces Pane
The Suggested Faces pane is populated with faces that AI considers a possible match with the person.
When the AI in Peoplemode considers unnamed facial images to be a possible match for a person, a
face icon will appear in the lower left corner of a named face in Named view.
Each image in the Suggested Faces pane has a right-click context sensitive help menu detailed in thefollowing table.
Suggested Faces Pane Context Menu Options

ACDSee Photo Studio Home 2022
Page 369 of 506
Menu Item Shortcut Description
Confirm Face(s)... Enter Confirms the AI-generated suggestion asbelonging to the person. The greencheck mark icon located in the name
bar beneath the facial image can also beused to confirm.
Deny Face(s)... Delete Removes the AI-generated suggestionfrom the facial image and returns theimage to the Unnamed view. The redcrossed out circle icon located in the
name bar beneath the facial image canalso be used to deny.
Rename Face(s) F2 Opens the Rename Face(s) dialog wherea new name can be entered. The facialimage is automatically removed from thecurrent Person view and placed in theNamed view after a new name isapplied.
Delete Face(s) Shift + Delete Removes the AI-generated suggestionfrom the facial image and deletes thefacial image from People mode.
To confirm or deny all faces in the pane, click the Confirm All Suggestions icon or the Deny
All Suggestions icon located at the far right of the Suggested Faces pane header bar.
See also:
People Mode Named View
People Mode Unnamed View
Using People Mode

ACDSee Photo Studio Home 2022
Page 370 of 506
Chapter 7: 365 ModeFor help with 365.acdsee.com, click theWeb tab, then click Support.
You can use 365mode to upload your images to 365.acdsee.com, an image sharing and storageservice available to ACDSee Home users. With 365mode and 365.acdsee.com, you can upload andbrowse through your online images without having to launch an Internet browser. You need to createa 365.acdsee.com account first, before uploading your photos.

ACDSee Photo Studio Home 2022
Page 371 of 506
With 365.acdsee.com, you can:
Create Your 365.acdsee.com Account
Upload Images
Set Privacy Settings for Your Image Folders
Working in 365 Mode
For help with 365.acdsee.com, click theWeb tab, then click Support.
You can use 365mode to upload your images to 365.acdsee.com, an image sharing and storageservice available to ACDSee Home users. With 365mode and 365.acdsee.com, you can upload andbrowse through your online images without having to launch an Internet browser. Or you can access365.acdsee.com at any time directly from an Internet browser.
365 Mode Has Two Parts: 365.acdsee.com and Transfer
To enable the 365.acdsee.com and Transfer tabs, you need to create a 365.acdsee.comaccount.
ACDSee Photo Studio Home 2022
Page 372 of 506
365.acdsee.com Clicking the 365.acdsee.com tab takes you to 365.acdsee.com, where you canbrowse through images you have uploaded to your online account, see otherusers' images, or upgrade your membership level. 365.acdsee.com has thefollowing menus:
l Manage: organize your images into folders.l Upload: click Upload to switch to Transfer for uploading images.l Profile: modify your profile and set specific information to public orprivate.
l Support: see the Help or FAQs for assistance with 365.acdsee.com.
Transfer Transfer allows you to upload images to your 365.acdsee.com account. InTransfer, the screen splits into two. The bottom of the screen displays theavailable images in your computer, and the top of the screen displays your365.acdsee.com account.
You cannot take an image from 365mode and open it in Edit mode for editing. To edit animage, select an image in Manage or Viewmode and open it in Edit mode for editing.
Creating an ACDSee 365 Account
Before you can upload your images to 365.acdsee.com, you need to create an account.
To Create an ACDSee 365 Account:
1. Click the 365 tab to enter ACDSee 365 mode.
2. Press the Sign Up button.
3. Enter your information into the fields and click Create your account.
If you already have an account, click the Sign In button.
Uploading Images to ACDSee 365
For help with 365.acdsee.com, click theWeb tab, then click Support.
ACDSee 365, or 365.acdsee.com, is an image sharing and storage service for ACDSee users. Before youupload photos, you need to create a 365.acdsee.com account. There is no size limit for uploadingimages to your 365.acdsee.com account.
Depending on your ACDSee 365 account level, you can also upload videos.
To Upload Your Images:

ACDSee Photo Studio Home 2022
Page 373 of 506
1. In 365 mode, click Sign In.
2. Log in to your account.
3. Click Upload to switch to Transfer.
Your screen splits in two, with the bottom part of the screen displaying images on yourcomputer, and the top part of the screen representing your images online.
4. Use the drop-down list in the top right corner to select one of the following:
Upload Original with associated data: upload image in current file format, including anyassociated files such as those containing metadata. This option is the best for images you want toarchive.
Upload Original (as JPG): uploads image as a JPG in its original size.
Upload 1920 x 1440 JPG: converts the image to JPG and sets the size to 1920 x 1440. Thisoption is the best for high quality JPGs.
Upload 1024 x 768 JPG: converts the image to JPG and sets the size to 1024 x 768. This optionresults in the fastest upload.
5. Do one of the following to select an image to upload:
Click and drag an image into the top part of the screen to upload it to your 365.acdsee.comaccount. To select multiple images, press the Shift or the Ctrl key and click on the images toselect them. You can also click and drag your cursor to select multiple images.
Drag a folder of your images to the top part of the screen.
Select images and click the up arrow icon beside Transfer Manager, or click Sync to Web toupload all the images in the Sync to Web folders.
When upload is complete, images are displayed in the order they were uploaded. Overlay iconsindicate the file type and if the image has been edited.
You can upload a folder with sub-folders. 365 mode respects folder hierarchy when uploadinga folder to your 365.acdsee.com account.
Setting Folders to Sync to Web
For help with 365.acdsee.com, click theWeb tab, then click Support.
You can set specific folders on your computer to upload all of their images to specific folders on365.acdsee.com. As you add new images to the folder on your computer, you can quickly sync thecorresponding folder on 365.acdsee.com by pressing the Sync to Web button. The sync works in onedirection; images from your computer are uploaded to your 365.acdsee.com account.
To Set a Folder to Sync to Web:

ACDSee Photo Studio Home 2022
Page 374 of 506
1. In 365 mode, click Sign in.
2. Click the Transfer tab.
3. In the Folders pane in the bottom half of the screen, right-click a folder and select Set as "Sync to Web"Folder or click Alt + A.
4. In the Setup "Sync to Web" Folder dialog box, set the options as described below.
5. Click OK.
You can also set Sync to Web folders by clicking File |Manage Sync to Web Folders.
To Run Sync to Web:
1. In Transfer, on the right side along the screen split, click Sync to Web.
2. Click OK.
To Edit a Folder's Sync to Web Settings:
1. In Transfer, in the Folders pane in the bottom half of the screen, right-click a Sync to Web folder, andselect Edit "Sync to Web" Folder.
2. In the Edit "Sync to Web" Folder dialog box, set the options as described below.
3. Click OK.
Sync to Web Folder Options
Upload Type Use the drop-down list to select one of the following:l Upload Original with associated data: uploads images in their currentfile format, including any associated files such as those containingmetadata. This option is the best for images you want to archive.
l Upload Original (as JPG): converts the image to JPEG in it's original size.l Upload 1920 x 1440 JPG: converts the image to JPEG and sets the res-olution to 1920 x 1440. This option is the best for high quality JPEGs.
l Upload 1024 x 768 JPG: converts the image to JPEG and sets the res-olution to 1024 x 768. This option is the best for images you want to view ona Netbook, and results in the fastest upload.
Local Folder Displays the path to the folder you selected. Click the browse button to select adifferent folder.
Online Folder Enter a name for the online folder. By default this is set to the same name as thefolder on your computer that you want to sync to Web.
Sync to Web rightaway
Check this box to upload the images in the selected folder immediately. If you donot check this checkbox, you can click Sync to Web to upload all the images in allthe folders you have chosen to sync.

ACDSee Photo Studio Home 2022
Page 375 of 506
Creating Folders and Setting Privacy
For help with 365.acdsee.com, click theWeb tab, then click Support.
In 365.acdsee.com and Transfer, you can create folders and make them private or public. When youmake a folder public, anyone can find and see the images in that folder. You can also copy the URL foryour public folders and share it with family and friends.
When you create a new folder, it is set to private by default.
To Create a Folder and Make it Private or Public in Transfer:
1. In 365 mode, click Transfer.
2. In the Folders pane on the top left, right-click your user name, and select New Online Folder...
3. In the New Online Folder dialog box, enter a name for the new folder.
4. Click OK.
By default the new folder is Private.
To change the folder to Public , right-click on the folder, and then click Make Public.
To Share the URL for a Public Folder:
1. In 365 mode, click Transfer.
2. In the Folders pane on the top left, right-click on a public folder.
3. Click Copy URL.
4. Paste the URL into an email, instant message, or other application to share it.
Right-click a public folder and select Share folder to share in an email, post on a socialnetworking site, or to create a widget.
Changing the Rating System
For help with 365.acdsee.com, click theWeb tab, then click Support.
Photos that you have rated in Manage mode are rated with a star rating system in 365mode. You canselect how to use stars to rate your photos.
To Change Your Rating System:
1. Click Tools and then select Options.
2. In the Options dialog box, select ACDSee 365.

ACDSee Photo Studio Home 2022
Page 376 of 506
3. In Ratings, select Convert 'Rating 1' to 5 stars or Convert 'Rating 1' to 1 star.
4. Click OK.
Downloading Images
For help with 365.acdsee.com, click theWeb tab, then click Support.
365.acdsee.com is also a storage service for ACDSee Home users. You can download your images fromyour 365.acdsee.com account to your computer at any time.
To Download Your Images:
1. In 365 mode, click Sign In.
2. Log in to your account.
3. Click the Transfer tab.
Your screen splits in two, with the bottom part of the screen displaying images on yourcomputer, and the top part of the screen representing your images online.
4. In the top part of the screen, in the Folders pane in the top left, navigate through your 365.acdsee.comfolders to the images you want to download.
5. In the bottom part of the screen, in the Local Computer pane, select a folder that you want to downloadyour image to.
6. Do one of the following to select an image to download:
Click and drag an image into the bottom part of the screen to download it to your computer. Toselect multiple images, press the Shift or the Ctrl key and click on the images to select them.You can also click and drag your cursor to select multiple images.
Drag a folder of your images to the bottom part of the screen.
Select images and click the down arrow icon beside Transfer Manager.
Using the Transfer Manager
For help with 365.acdsee.com, click theWeb tab, then click Support.
The Transfer Manager lets you monitor the progress of your uploads and downloads on your365.acdsee.com account, and also lets you cancel or pause image transfers. The Transfer Manager hastwo tabs: Uploads and Downloads. These two tabs list images that are being uploaded, downloaded,paused, or canceled.
To Open the Transfer Manager:
Click Tools | Transfer Manager.

ACDSee Photo Studio Home 2022
Page 377 of 506
You can do the following in Transfer Manager:
Cancel an upload or download.
Retry the image upload or download.
Pause an upload or a download.
Continue the image upload or download.
Selects all images in the list.
Clear uploaded, downloaded or canceled images from the list.

ACDSee Photo Studio Home 2022
Page 378 of 506
Chapter 8: Dashboard Mode
Using Dashboard Mode
Dashboard mode is a quick and convenient way to browse your file, camera, and database statistics.Camera statistics are read from your images' metadata, and file information is analyzed from yourACDSee database. Therefore, it is important to catalog your files to get the most out of Dashboardmode.
Cataloging Files
To catalog, do one of the following:
Go to Tools | Database | Catalog.
Browse your folders in Manage mode.
Dashboard Mode
Dashboard mode contains the following tabs:
Overview tab: the Overview tab summarizes the information found on the other tabs. It also displays agraph detailing your monthly or yearly photo counts. You can use the drop-down menu at the top of thetab to switch between viewing a range of months or a range of years. You can use the Prev and Nextbuttons to navigate backward or forward in time.
Database tab: the Database tab displays data relating to your database, such as its location, size, backupinformation, a breakdown of your assets, and more.
Cameras tab: the Cameras tab displays data relating to your camera usage, such as which cameras youuse the most, your favorite ISO setting, and more.
Files tab: the Files tab displays data relating to your image and video files, such as your most used bitdepths, image resolutions, and more.

ACDSee Photo Studio Home 2022
Page 379 of 506
Chapter 9: PicaView
About ACDSee PicaView
ACDSee PicaView is a quick and easy file viewer "add-on" for Windows/File Explorer™ that saves youtime by letting you preview files without having to open them in an application. If you right-click, youcan view your image EXIF information or view your image files in various sizes — including RAW files.You can also view a preview of any other image file format supported by ACDSee. You can access theACDSee PicaView preview by right-clicking a file in Windows/File Explorer™.
You can configure a variety of ACDSee PicaView's settings, including the size of the preview, whatinformation displays, and more. Access these settings by clicking ACDSee PicaView | Options..., orthrough ACDSee, by going to Tools | Options... and navigating to ACDSee PicaView in the Optionsdialog's menu.
To Adjust the ACDSee PicaView Options:
1. Right-click a file in Windows/File Explorer™ to access the ACDSee PicaView preview.
2. At the top of the preview, click ACDSee PicaView | Options...
3. On the ACDSee PicaView Options dialog, set or change the options as described below.
4. Click OK to apply your changes.
ACDSee PicaView Options
Display Image
Check the Display Image checkbox to display a preview of the right-clicked file on the context menu.
Location Add image to main menu: when you right-click,displays preview in the main menu.
Add image to sub-menu: when you right-click,displays preview in a sub-menu, available byclicking the arrow next to ACDSee PicaView.
Size Select the size of the preview that displays when youright-click.
Show Original Select Show Original to display the pre-edited versionof the image when you right-click.
Show EXIF Information
Check or uncheck the Show EXIF Information checkbox to display the right-clicked photo's EXIFinformation.

ACDSee Photo Studio Home 2022
Page 380 of 506
Using ACDSee Quick View
ACDSee Quick View is an image viewer that you can use to quickly view images without openingACDSee. For example, imagine that you want to view an image that someone sent to you in an email. Ifyou double-click the image it will open in Quick View, which is like a pared-down version of Viewmodein ACDSee.
With Quick View you can quickly scroll through your images, temporarily rotate images, and zoom inand out. If you are viewing a particularly appealing image in Quick View, you can also set the image asyour desktop wallpaper or print the image.
You can easily switch from Quick View to ACDSee. You also have the option to open an image inManage, View, or Edit mode.
If you are accustomed to using keyboard and mouse shortcuts in Viewmode you can use most ofthose shortcuts in Quick View as well.
To Open an Image in Quick View:
1. With ACDSee Home closed, double-click an image. For example, double-click the image in WindowsExplorer or in an email message.
2. Use the viewing options described below to view the image.
ACDSee Quick View Viewing Options
Previous View the previous image.
Next View the next image.
Rotate Left Rotate the image to the left.
Rotate Right Rotate the image to the right.
Zoom In View the image at a higher magnification.
Zoom Out View the image at a lower magnification.
Delete Move the image to the computer's Recycle Bin.

ACDSee Photo Studio Home 2022
Page 381 of 506
You can close ACDSee by pressing Esc.
To Open the Image in ACDSee:
Click Manage, Media, View, or Editmode.
To Set an Image as Your Desktop Wallpaper:
1. Click Previous or Next until the image that you want to make your desktop wallpaper displays in QuickView.
2. Click Tools | Set Wallpaper and select one of the following:
Centered: displays the image in the center of the desktop.
Tiled: displays the image in one or more tiles until the desktop is covered. If the image is small itmay appear in several tiles on the desktop. If the image is large it may appear in only one or twotiles.
Stretched: stretches the image proportionally to fill as much of the desktop as possible.
To Restore Your System to the Default Desktop Wallpaper:
Click Tools | Set Wallpaper | Restore.
To Print the Image:
1. Click File | Print.
2. Under Format, choose a print size.
3. On the Printer Options tab, specify the printer you want to use, the paper size, the number of copiesyou want, the range of pages that you want to print, and image resolution.
4. On the Page Settings tab, specify the image position on the paper and the margin widths, and specifythe number of prints of each photo.
5. Add captions, headers, or footers.
6. Click Print.
Using Windows Touch Gestures™ with Quick View
If you have a Windows Touch Gestures™-enabled device, you can use it with ACDSee Quick View forquick, easy viewing of photos.
To Use Windows Touch Gestures™ with Quick View:
Open an image in ACDSee Quick View.

ACDSee Photo Studio Home 2022
Page 382 of 506
Swipe on the image to scroll through images one at a time.
Hold and swipe slowly in one direction to go through all of the images in the folder.
Hold down on an image, and then let go to achieve the same results as right-clicking with a mouse.
Double-tap the image to launch it in ACDSee.
Move two fingers apart to zoom in, and toward each other to zoom out.
After zooming in, you can pan the image with your finger. To return, choose View | Zoom | Fit Image.

ACDSee Photo Studio Home 2022
Page 383 of 506
Chapter 10: Options and Configuration
Setting the General Options
You can adjust settings in the Options dialog box to display helpful tips, set the format for datedisplays, set automatic rotate options, and control the display of certain image types.
To Access the General Options:
1. In any mode, click Tools | Options...
2. In the Options dialog box, click General.
3. On the General page, set or change any of the options described below.
4. Click OK to apply your changes and return to ACDSee.
General Options
Enable gamma correction Applies the specified amount of gamma correction when viewing orpreviewing images.
Automatically stretch wallpaper tofit screen
Stretches small images to fit the entire desktop when you set themas your wallpaper.
Disable image animation Displays only the first frame of an animated image in Managemode's Preview pane and in View mode.
Automatically rotate JPEG and TIFFimages based on EXIF orientation
Automatically corrects the orientation of TIFF and JPEG images(based on their EXIF data) when displayed in ACDSee.
Status bar date Specifies the date to display in the status bar for a selected file.
Date/Time output format Select one of the following:
Default system format: uses the default system format whendisplaying the date and time in information overlays.Custom format: uses the specified format to display the dateand time in all information overlays. Select a format for bothDate and Time from the drop-down lists.
Show icon in Taskbar Notificationarea
Displays the ACDSee Home icon in the Taskbar Notification area.
Show the Mode Switching icons Displays the icons next to the names of each mode.

ACDSee Photo Studio Home 2022
Page 384 of 506
Setting the Auto Advance Options
You can control which applied metadata will trigger Auto Advance.
To Adjust the Auto Advance Options:
1. In any mode, click Tools | Options...
2. In the Options dialog box, click General | Auto Advance.
3. On the Auto Advance page, set or change the options as described below.
4. Click OK to apply your changes and return to ACDSee.
Auto Advance Options
Enable Auto Advance in l Manage Model View Mode
Deselect to turn off Auto Advance ineither Manage or View mode.
Auto Advance whenapplying/clearing
l Tagsl Ratingsl Labelsl Categoriesl Keywords
Specifies which applied or removedmetadata will trigger Auto Advance.
Keywords and Categories aredisabled by default.
Setting the Mode Configuration Options
You can control the appearance of the mode buttons to maximize viewing space.
To Set the Mode Button Options:
1. In any mode, click Tools | Options...
2. In the Options dialog box, clickMode Configuration.
3. On the Mode Configuration page, hide modes by unchecking their corresponding checkboxes.
You cannot hide Manage mode.
4. Use the modes' corresponding drop-down menus to set them to display icons and labels, labels only, oricons only.
5. Click Condense the appearance of the mode buttons to conserve space with smaller mode buttons.
6. Click OK.

ACDSee Photo Studio Home 2022
Page 385 of 506
Setting the Batch Operation Options
You can control which error logs appear for batch operations including batch rename, batch resize,and batch convert.
To Adjust the Batch Operation Options:
1. In any mode, click Tools | Options... or press Alt + O.
2. In the Options dialog box, click General | Batch Operations.
3. On the Batch Operations page, set or change the options as described below.
4. Click OK to apply your changes and return to ACDSee.
Batch Operations Options
Error logs Check the box of the relevant error log you wish to hide.
Setting the Manage Mode Options
You can use the Options dialog box to set various options for Manage mode, including the defaultstart folder.
To Set Manage Mode Options:
1. In any mode, click Tools | Options...
2. In the Options dialog box, clickManage Mode.
3. On the Manage mode page, set or change the options as described below.
4. Click OK to apply your changes and return to ACDSee.
Manage Mode Options
ACDSee Photo Studio Home 2022
Page 386 of 506
Default start folder
Remember from previoussession
Opens Manage mode in the same folder that was open the last timeyou used ACDSee, and automatically applies any browsing criteria youwere using.
Home folder Always opens Manage mode to the specified Home folder. Click theBrowse button to locate a starting folder on your hard drive.
Show warning if start folderdoes not exist
If you have enabled Remember from previous session, and thatfolder, or your Home folder, no longer exist, you will receive awarning.
Display theme
Specifies the color scheme to use in ACDSee.
Clear path history on exit
Clears the list of recently-accessed folders whenever you exit ACDSee.
Show full path in title bar
Displays the full path of an image in the ACDSee title bar.
Show database filename in title bar
Displays the name of the database that ACDSee is currently running in the title bar.
Folder Tree
Display Density Sets how condensed the Folder tree appears.
Use plus signs to expandfolder tree
Displays plus signs next to items on the Folder tree that can beexpanded.
Error Reporting
Select this option if you do not want to see a system error report if there is an error in ACDSee.
Scanning Destination
Click the Browse For Folder button to specify the destination for your scanned images.
Setting the Quick Search Options
You can use the Quick Search options to refine your search.

ACDSee Photo Studio Home 2022
Page 387 of 506
To Set Quick Search Options:
1. In Manage mode, click Tools | Options...
2. In the Options dialog box, clickManage Mode | Quick Search.
3. On the Quick Search page, set or change any of the Quick Search options described below.
4. Click OK to apply your changes and return to ACDSee.
Quick Search Options
Include file names Searches for file and folder names that begin with the search term.
Include categories Searches for categories that match the search term, and returns anyfiles assigned to those categories. Subcategories are not included.
Include contents of folders Searches for folder names that begin with the search term andreturns the contents of those folders. Subfolders are not included.
Include people Searches for people detected in images and named using FaceDetection in View mode. You can further refine these searchoptions on the Face Search page of the Options dialog.
Please note that Face Detection is only available forthe 64-bit version of ACDSee Photo Studio Home.
Setting the Face Detection and Recognition Options
Please note that Face Detection is only available for the 64-bit version of ACDSee Photo StudioHome.
You can toggle Face Detection on and off, trigger Face Detection to rerun, or allow the ACDSee Indexerto undertake Face Detection while your computer is idle.
To Set the Face Detection Options:
1. In any mode, click Tools | Options...
2. In the Options dialog box, click Face Detection.
3. On the Face Detection page, set or change the options as described below.
4. Click OK.
Face Detection Options
ACDSee Photo Studio Home 2022
Page 388 of 506
Face Detection
Automatically detect faces in images Toggle this option to turn on Face Detection. With this optionenabled, Face Detection will run on files encountered duringbrowsing in Manage mode. In View mode, Face Detectionwill run on the open image only.Once Face Detection has been run on an image, thatinformation is stored in the database. Therefore, with thisoption disabled, previously detected faces will still displayface outlines and names (if named) in View mode. You willalso be able to search using the names you have assigned tofaces.
Allow Face Detection to detect faceswhile your computer is idle using theACDSee Indexer.
You can enable Face Detection to be undertaken bythe ACDSee Indexer. The ACDSee Indexer will allow the FaceDetection process to be done when your computer is idleand ACDSee is not running. This allows you to avoid having tobrowse all of your folders.
Rerun Face Detection You can allow Face Detection to rerun if you suspect youhave files that have been changed since the last time FaceDetection was run on them. With this enabled, FaceDetection will rerun next time you browse the changed fileseither in Manage or View mode.
Facial Recognition
Enable Facial Recognition Toggle this option to turn on Facial Recognition. With thisoption enabled, ACDSee will attempt to recognize individualsbased on the faces you have named in previous images.
Use the slider to set how similar two faces need to be inorder for ACDSee to identify them as the same individual.
Moderate: the default setting is optimized to namemost faces without adding too many incorrect names.
Aggressive: faces need to be less similar in order to berecognized. This option is useful if your photo collectionconsists of just a few people in a wide variety of poses,lighting, and film quality. You may experience moreincorrect names.
Conservative: faces need to be more similar in order tobe recognized. This option is useful if your photocollection consists of a large number of different people,especially if those people are physically similar, such asclose family members. You will experience fewerincorrect names, but may have to manually name

ACDSee Photo Studio Home 2022
Page 389 of 506
people more frequently.
All three settings can result in incorrect names,especially when Facial Recognition encounters aperson for the first time. If you experience moreincorrect names than you can reasonablycorrect by hand, disable Facial Recognition andmanually name several faces for each person inyour photo collection. Then, re-enable FacialRecognition, and, if necessary, rerun FacialRecognition on a selection of files, or your entirelibrary.
Remove All Face Data
Removes all data related to Face Detection and Recognition from the database, including face outlines,names, and information relating to whether Face Detection has been run on files. This action will requireACDSee to restart.
Rerun Recognition
In order to correct names mistakenly assigned to faces by ACDSee, you can rerun facial recognition on facesyou have not manually named. This clears all names assigned by ACDSee's facial recognition, but leavesmanually entered names. ACDSee will then attempt to recognize unnamed faces based on names you haveentered manually.
Setting the Face Search Options
Please note that Face Detection is only available for the 64-bit version of ACDSee Photo StudioHome.
You can adjust settings to determine the results of searches using assigned or suggested names.
To Set the Face Search Options:
1. In any mode, click Tools | Options...
2. In the Options dialog box, click Face Detection | Face Search.
3. On the Face Search page, set or change the options as described below.
4. Click OK.
Face Search Options

ACDSee Photo Studio Home 2022
Page 390 of 506
Face Search Assigned names: when you search using the Quick Search bar, the Searchpane, or the People group in the Catalog pane, ACDSee will return photoswith names assigned using Face Detection.
Suggested names: when you search using the Quick Search bar, theSearch pane, or the People group in the Catalog pane, ACDSee will returnphotos with names suggested by ACDSee, (but not confirmed by you).
Both assigned and suggested names: when you search using the QuickSearch bar, the Search pane, or the People group in the Catalog pane,ACDSee will return photos with both assigned and suggested names.
Setting the File List Pane Options
You can use the Options dialog box to set options for the File List pane to suit your preferences, suchas grouping archive files with subfolders, or highlighting image types with different background colors.You can also customize your thumbnails, the file types ACDSee Home displays, and adjust howACDSee Home handles files and thumbnails in the File List pane.
To Adjust the File List Pane Options:
1. In any mode, click Tools | Options...
2. In the Options dialog box, click File List.
3. On the File List page, set or change the options as described below.
4. Click OK to apply your changes and return to ACDSee.
File List Options

ACDSee Photo Studio Home 2022
Page 391 of 506
File List
Automatically select new files Automatically selects new files when theyare added to the folder displayed in the FileList pane.
Group archives with folders Treats archive files as folders when sortingitems in the File List pane.
Use embedded thumbnails Displays the RAW files embedded thumbnailif the RAW file has them.
Generate high quality thumbnails Creates a high-quality thumbnail of the RAWfile in the background while the embeddedthumbnail is displayed, then replaces thepoorer quality thumbnail once it is ready.
Show thumbnails on folders Displays thumbnails of a folder's contents onthe folder icon in the File List pane.
Remember each folder's sort settings Select this option if you want ACDSee Hometo remember the sort settings that you usedin specific folders.
<Ctrl> key activates hot-tracking Activates hot-tracking when holding the Ctrlkey. Hot-tracking means that when you holddown Ctrl and hover over an image inManage mode, the contents of the Previewand Properties panes will update, withoutyou having to click on each individual image.
Use animations Activates or deactivates animation for somefeatures as they close or open. For example,group headers.
Configure Filters
Show all files Shows image files, folders, media files andarchive files in the File List.
Apply filtering criteria Shows any of the following that you select,and hides any that are not selected.
Show image files
Show folders
Show media files

ACDSee Photo Studio Home 2022
Page 392 of 506
Show archive files
Show hidden files and folders Shows system and other files and that arenormally hidden for safety.
Show THM files Shows Canon THM files in the File Fist.
Show XMP files Shows XMP sidecar files in the File List.
Highlight image files
Don't highlight image files Does not highlight image files in Details andThumbs+Details views.
Use a single color to highlight image files Uses a single color to highlight all image filetypes in Details and Thumbs+Details views.
Use multiple colors to highlight image files Uses a different color to highlight each imagetype in Details and Thumbs+Details views.
Pop-ups
Mouse cursor hover activates pop-ups Activates or deactivates the animated pop-uppreview that displays when you hover overthumbnails in the File List.
Settings below allow you to include textand/or an image in the pop-up, or if you turnthis option off, to activate the pop-up onlywhen you hold down the Shift key.
<Shift> key activates pop-ups Activates the pop-up only if you hold downthe Shift key while hovering over a thumbnailin the File List. You can turn this option off if itinterferes with Shift selection.
Auto hide pop-ups Hides pop-ups after 5 seconds, even if youare still hovering over the image.
Show thumbnail in pop-ups Shows a pop-up preview of images in the FileList when you hover over them with amouse.
Show information in pop-ups Includes text file information in the mouse-over pop-up. You can select the informationto display by clicking the Configure fileinformation...button and selecting yourdesired pop-up information.
ACDSee Photo Studio Home 2022
Page 393 of 506
Configure file information
Opens the Choose Pop-up Information dialog where you can select what information to display in the pop-up when you hover over a thumbnail in the File List. The default is file name, location, size, modified date,and image dimension, but you can select other ACDSee Metadata, EXIF, file, image, IPTC, or multimediaattributes.
Show the Windows Explorer shell context menu as the default right-click menu
Displays the default Windows Explorer context menu instead of the ACDSee Home context menu.
Setting the Thumbnail Info Options
You can use the Options dialog box to change the information that displays with thumbnails of imagesin the File List pane. These options are set under File List | Thumbnail Info.
To Adjust the Thumbnail Info Options:
1. In Manage mode, click Tools | Options...
2. In the Options dialog box, click File List | Thumbnail Info.
3. On the Thumbnail Info page, set or change the options as described below.
4. Click OK to apply your changes and return to ACDSee.
Thumbnail Info Options

ACDSee Photo Studio Home 2022
Page 394 of 506
Information
File name Displays the name of each file on the thumbnail in theFile List pane.
Choose Thumbnail Info Opens a dialog box where you can select the informationto display on each thumbnail in the File List pane.
Choose Tiles Info Opens a dialog box where you can select the informationto display on each tile in Tiles view mode.
Show unrated, untagged, and unlabeledoverlay icons on hover
Shows unrated, untagged, and unlabeled overlay iconswhen you hover over them.
Overlay icons
To view the overlay icons, go to Browsing Files in the File List Pane.
Rating Displays a rating overlay icon on thumbnails if the file hasbeen rated in the ACDSee Home database.
Embed Pending Displays a database overlay icon on the thumbnails offiles that have had metadata information added andstored in the ACDSee Home database, but have not yetbeen written to the files. This icon indicates that a fileand the database are out of sync.
Icon Displays a file format overlay icon on thumbnails in theFile List pane.
Category Displays a category overlay icon on thumbnails if the filehas been categorized.
Collection Displays a collection overlay icon on thumbnails if the filehas been added to a collection.
Shortcut Displays a shortcut overlay icon on thumbnails if the itemis a shortcut to another file.
Offline Displays an offline overlay icon on thumbnails if the file isstored on an offline device.
Excluded items Displays an excluded file icon on thumbnails if the file isexcluded from the ACDSee Home database.
Tagged items Displays a tagging overlay icon on thumbnails. If the file istagged, a checkmark displays in the icon.
Auto-rotate Displays an auto-rotate overlay icon on thumbnails if the

ACDSee Photo Studio Home 2022
Page 395 of 506
file was automatically rotated.
Edited Displays an Edit overlay icon on thumbnails if the file hasbeen edited.
Geotagged Displays a marker overlay icon on thumbnails if the filehas been pinned on the map.
Label Displays a color label overlay icon on thumbnails if thefile has been labeled.
Setting the Thumbnail Style Options
You can use the Options dialog box to change how the thumbnails of images display in the File Listpane. These options are set under File List | Thumbnail Style.
To Adjust the Thumbnail Style Options:
1. In Manage mode, click Tools | Options...
2. In the Options dialog box, click File List | Thumbnail Style.
3. On the Thumbnail Style page, set or change the options as described below.
4. Click OK to apply your changes and return to ACDSee.
Thumbnail Style Options

ACDSee Photo Studio Home 2022
Page 396 of 506
Thumbnail frame
Show drop shadow Shows thumbnails with a 3D drop shadow.
Show slide background Displays a shaded background behind the thumbnail andits information.
Folder style
XP style folder Displays folders as an XP-style image.
3D style folder Displays folders as a 3D folder with transparency.
Thumbnail ratio
Custom Specifies a custom height-to-width ratio for the shape ofthe thumbnails in the File List pane. Drag the slider underthe preview to set the ratio. The preview shows you theshape as you move the slider.
Portrait Specifies a standard 3:4 portrait ratio for the shape of thethumbnails in the File List pane.
Landscape Specifies a standard 4:3 landscape ratio for the shape ofthe thumbnails in the File List pane.
Thumbnail spacing
Slider Increases or decreases the space between eachthumbnail.
High-quality scaling
Uses high-quality thumbnail scaling in the File List pane.
Setting the Details View Options
You can use the Options dialog box to change how thumbnails display in the File List pane.
To Adjust the Details View Options:
1. In any mode, click Tools | Options...
2. In the Options dialog box, click File List | Details View.
3. On the Details View page, set or change the options as described below.
4. Click OK to apply your changes and return to ACDSee.

ACDSee Photo Studio Home 2022
Page 397 of 506
Details View Options
Show grid lines Separates each row and column in Details view mode with agrid line.
Full row select Selects the entire row when you click a column entry in thatrow.
Column auto-width Automatically resizes each column to fit its contents.
Highlight sort column Highlights the column used to sort files when you click onthe column's title.
Choose Details Specifies the columns you want to use to sort files in Detailsview mode.
Setting the Preview Pane Options
You can specify how ACDSee Home displays previews of your images, and configure settings to playaudio and video files automatically, as soon as you view them in the Preview pane.
To Set the Preview Options:
1. Do one of the following:
In Manage mode, click Tools | Options | Preview...
In Manage mode, right-click in the Preview pane and select Preview Options.
2. On the Preview options page, set or change the options as described below.
3. Click OK to apply your changes and return to ACDSee.
Preview Options

ACDSee Photo Studio Home 2022
Page 398 of 506
Delay Specifies how quickly the Preview pane displays an image afteryou select it in the File List pane.
Size Specifies the size of the previewed image in relation to theselected image.
Preview audio and video clips Previews media files as you select them in the File List pane.
Autoplay audio and video clips Automatically starts playing audio and video files in the Previewpane.
Instant image preview Displays an instant preview that improves in quality as theimage is decoded.
Image and Information Select one of the following:
Show image: displays a preview of the selected imagein the Preview pane.
Show information: displays information about theselected image in the Preview pane.
Choose Preview Info Specifies the type of information you want to display in thePreview pane. For more information, see Previewing Images.
Setting the Folders Pane Options
You can customize the Folders pane by showing or hiding the Easy-Select bar, displaying archives, andidentifying excluded folders.
To Customize the Folders Pane:
1. In any mode, click Tools | Options...
2. In the Options dialog box, click Folders.
3. On the Folders page, set or change the options as described below.
4. Click OK to apply your changes and return to ACDSee.
Folders Pane Options

ACDSee Photo Studio Home 2022
Page 399 of 506
Easy-Select
Show Easy-Select Displays the Easy-Select bar in the Folders pane, which you canuse to select multiple folders.
Enable Easy-Select tooltip Displays a tool-tip when you place your cursor over the Easy-Select bar.
Folder display
Show archives in Folder Pane Lists archive files in the Folders pane.
Confirm drag & drop movewithin folder views
Prompts you for confirmation of folder movements within theFolders pane.
Show overlay for excludedfolders
Displays an overlay icon on folders that are excluded from theACDSee Home database.
Setting the Catalog Pane Options
You can customize the Catalog pane to specify which confirmations you want to be prompted for whileworking with categories, and choose whether to show the Easy-Select bar.
To Set the Catalog Pane Options:
1. In any mode, click Tools | Options...
2. In the Options dialog box, click Catalog.
3. On the Catalog page, set or change the options as described below.
4. Click OK.
Catalog Options

ACDSee Photo Studio Home 2022
Page 400 of 506
Category deletion
Confirm if category has assigned files Prompts you for confirmation when deleting acategory with assigned files.
Confirm if category has sub-categories Prompts you for confirmation when deleting acategory containing sub-categories.
File removal
Confirm file removal from category Prompts you for confirmation when un-assigning files from a category.
Easy select
Show Easy-Select Displays an Easy-Select bar in the Catalog pane,which you can use to select multiple categories,special items, and ratings.
Enable Easy-Select tooltip Displays a tool-tip when you place your cursorover the Easy-Select bar.
Icons
Show icons for categories, ratings, color labels,and special items
Displays icons so you can easily identifycategories, ratings, color labels, and specialitems.
Enable setting categories, keywords, ratings, andcolor labels
Allows you to set categories, ratings, and colorlabels in the Catalog pane.
Setting the Calendar Pane Options
You can customize the ACDSee Home Calendar to start each week on a specific day, to use a 12 or 24-hour clock format, and to use one of four date types when sorting files.
To Set the Calendar Pane Options:
1. In any mode, click Tools | Options...
2. In the Options dialog box, click Calendar.
3. On the Calendar page, set or change any of the options described below.
4. Click OK to accept your changes and return to ACDSee.
Calendar Pane Options

ACDSee Photo Studio Home 2022
Page 401 of 506
Date types
Database date Sorts files in the Calendar pane based on the date stored in theACDSee Home database.
Date taken Sorts files in the Calendar pane based on the EXIF date of eachitem.
File modified date Sorts files in the Calendar pane based on the last-modified date ofeach item.
File created date Sorts files in the Calendar pane based on the date each file wascreated on your computer.
Filters
Apply Advanced File List Filters(excluding folders)
Filters the items displayed in the Calendar pane based on thecurrent File List pane filter settings.
Show image and media files only Displays only image, audio, and video files in the Calendar pane.
Start of week
Specifies the first day of each week in the Calendar pane.
Clock formats
12 hour Uses a 12-hour clock in the Calendar pane.
24 hour Uses a 24-hour clock in the Calendar pane.
Setting the CD/DVD Management Options
You can use the Options dialog box to set the preferred method for identifying Photo Discs.
To Change the Photo Disc Identification Options:
1. In any mode, click Tools | Options...
2. In the Options dialog box, click CD/DVDManagement.
3. On the CD/DVD Management page, set or change any of the options described below.
4. Click OK to apply your changes and return to ACDSee.
CD/DVD Management Options

ACDSee Photo Studio Home 2022
Page 402 of 506
Photo Disc Identification
Use disc volume label Attempts to identify a Photo Disc by its volume label. Thissetting is recommended if you are working with multi-session Photo Discs.
Use disc serial number Attempts to identify a Photo Disc by its serial number.This setting is preferred when working with single-session Photo Discs, or importing or converting PhotoDiscs from a previous version of ACDSee.
Setting the Properties Pane Options
You can use the Options dialog box to customize the information available on the Metadata tab in theProperties pane.
To Customize the Metadata Tab in the Properties Pane:
1. In Manage mode, click Tools | Options...
2. In the Options dialog box, click Properties Pane.
3. On the Properties Pane page, hide the Tagged, Rating, and Color Labels, by unchecking thecorresponding checkbox.
4. Hide the Categories by unchecking the checkbox.
5. ClickManage Metadata Views to open the Choose Metadata to Display dialog box.
6. Click the plus signs to expand the tree and select your preferences.
7. Click OK.
8. Click OK to apply your changes and return to ACDSee.
You can also click the Metadata View drop-down list in the Properties pane Metadata tab andselectManage Metadata Views.
Setting the File Management Options
You can specify how ACDSee Home handles renaming and deleting files and folders, and whetherACDSee Home sends deleted files to the desktop Recycle Bin by default.
To Set the File Management Options:
1. In any mode, click Tools | Options...
2. In the Options dialog box, click File Management.

ACDSee Photo Studio Home 2022
Page 403 of 506
3. On the File Management page, set or change any of the options as described below.
4. Click OK to accept your changes and return to ACDSee.
File Management Options
Confirmations
You can use the following options to display confirmation dialogs upon folder or file deletion.
If you are running Windows 8 or up, your Windows settings will overtake or affirm ACDSee's. Inorder for the settings in this dialog to take effect, you must enable them in your Recycle BinProperties settings.
Confirm folder deleteConfirm file delete
Overwriting duplicate files
Ask Prompts you for confirmation when overwriting duplicate files.
Rename Automatically resolves any naming conflicts when moving orcopying files by renaming the source files. In the Separatorcharacter field, type a character to use to separate file names inthe automatic renaming system.
Replace Automatically overwrites files in the target folder withoutprompting for confirmation.
Skip Does not move, copy, or overwrite any files that result in namingconflicts.
Save Originals
Saves a copy of the original file when it is edited using one of the batch editing tools. This makes it possibleto restore the original file later. Turning this option off means that originals are not saved during batchediting, and so cannot be restored.
In Edit mode, a copy of the original file is always saved, whether or not this option is selected.
Other
Click to edit file name Specifies that file names can be edited by clicking the file name inthe File List pane.
Use Recycle Bin Sends files to the Desktop Recycle Bin. If not selected, deleted filesare permanently removed from your hard drive.
Preserve database informationwhen files are copied
Copies database information with files when you copy them toanother location.
ACDSee Photo Studio Home 2022
Page 404 of 506
Control confirmations for folder delete, file delete, and read-only rename and delete actions inyour operating system settings.
Setting the Database Options
You can adjust settings in the Options dialog box to display reminders, control database information,and specify a location on your hard drive where you want to store your database files and cachedthumbnails.
To Set the Database Options:
1. In any mode, click Tools | Options...
2. In the Options dialog, click Database.
3. On the Database page, set or change the options as described below.
4. Click OK to apply your changes and return to ACDSee.
Database Options

ACDSee Photo Studio Home 2022
Page 405 of 506
Database file
Displays the location on your hard drive where the ACDSee Home database is stored.
Display backup reminder
Automatically reminds you to back up your ACDSee Home database. Click the Every drop-down list and selecthow often you would like to be reminded.
Manage excluded folders
Opens the Excluded Folders List dialog box, where you can specify which folders you want to exclude fromthe ACDSee Home database.
Display embed ACDSee Metadata reminder
Displays a reminder to embed ACDSee Metadata. Click the Every drop-down list and select how often youwould like to be reminded.
Set database date to EXIF date
Automatically adds the EXIF date to the ACDSee Home database when you catalog the contents of a folder.
Note: if the database date is changed, the Embed Pending icon does not show up.
Metadata
Import EXIFand IPTCmetadatafromcatalogedfiles
Automatically imports EXIF and IPTC information into the ACDSee Home databasewhenever you catalog the contents of a folder.
If this option is not selected, ACDSee Home does not import the EXIF and IPTCinformation, but does set aside space within the database records. To remove the emptyrecords, be sure to optimize your database frequently.
Set "EmbedPending"whentagging files
Displays a database overlay icon on thumbnails if the file has been tagged, but thismetadata has not yet been written to the file. This icon indicates that the file and thedatabase are out of sync. When this option is disabled, tagged images will not show upunder Embed Pending in the Special Items section of the Catalog pane.
IPTC conflicts
Showseparatorconflictdialog forIPTCkeywords
Displays the IPTC Keywords dialog box when a separator conflict occurs. You can specifya method of handling conflicts within the dialog and select not to display it again. Selectthis option to change or adjust those settings the next time a separator conflict occurs.

ACDSee Photo Studio Home 2022
Page 406 of 506
Showseparatorconflictdialog forIPTCsupplemental categories
Displays the IPTC Supplemental Categories dialog box when a separator conflict occurs.You can specify a method of handling conflicts within the dialog and elect not to display itagain. Select this option to change or adjust those settings the next time a separatorconflict occurs.
Setting the View Mode Options
You can use the Options dialog box to adjust the behavior of Viewmode to suit your preferences, andincrease the speed with which images are displayed.
To Set the View Mode Options:
1. In any mode, click Tools | Options...
2. In the Options dialog box, click View Mode.
3. On the View mode options page, set or change any of the View mode options described below.
4. Click OK to accept your changes and return to ACDSee.
View Mode Options
ACDSee Photo Studio Home 2022
Page 407 of 506
Decoding and caching
Decode next image in advance Automatically decodes the next image insequence in View mode, resulting in shorterload times.
Keep previous image in memory Keeps the previously decoded image inmemory for quick display in View mode.
Startup files
Replace images in list Does not open a new View mode window if animage is opened from another application.
Images in new window Opens a new View mode window to displayimages opened from another application.
Dropped files
Replace images in list Replaces the list of images open in View modewith images dropped into View mode fromanother application.
Add images to list Adds any images dropped into View mode byanother application to the list of imagesalready open.
Always on top
Keeps the ACDSee Home window as the top window in a stack of windows.
Full-screen
Opens images in View mode in full-screen mode. (Press F to exit full-screen mode.)
Hide mouse cursor in full-screen
Hides the cursor in full-screen mode.
Instant image preview
Displays an instant preview in View mode that improves in quality as the image is decoded.
Use ACDSee Home Quick View
If selected, ACDSee Home Quick View is set as the default viewer for images when ACDSee is closed.
Show pixels when zoomed past 100%

ACDSee Photo Studio Home 2022
Page 408 of 506
Resampling is not applied to images zoomed past 100%. When the box is unchecked, images zoomed past100% are resampled to produce smooth transitions, but this may result in excessive blurring.
Always open in selected Auto Lens
On startup, opens images in the Auto Lens last selected prior to closing ACDSee.
Exit after delete/move
Automatically returns to Manage mode after moving or deleting an image in View mode.
View all images in folder
Adds all images in a folder to the current image list when viewing any file from that folder.
Show full image file path
Displays the image's full file path in View mode title and status bars.
Sharpen subsampled images
Automatically sharpens the view for images zoomed in at less than 100%.
Setting The People Mode Options
Select Tools | Options... from the main menu to open theOptions dialog and select "People Mode"from the left-hand list.
The options in the People Mode pane include four field sets:
l Confirmation Prompts,l Thumbnail Style,l Folder Pane Style, andl Unnamed View Style.
Confirmation Prompts Options
Do not prompt when confirming all suggestionsEnable to turn off prompts whenconfirming all suggestions.
Do not prompt when denying all suggestionsEnable to turn off prompts whendenying all suggestions.
Do not prompt when deleting facesEnable to turn off prompts whendeleting faces.
Thumbnail Style Options
ACDSee Photo Studio Home 2022
Page 409 of 506
Face Thumbnail Enable to use thumbnails featuringthe person's face.
Asset Thumbnail Enable to use thumbnails featuringthe entirety of the asset's originaldimensions.
Folder Pane Style Options
ListEnable to use the List view as thedefault for the Folders pane.
TreeEnable to use the Tree view as thedefault for the Folders pane.
Unnamed Style Options
Ungrouped Enable to use the Ungrouped cat-egory as a default for sorting theUnnamed view results.
Grouped Enable to use the Grouped cat-egory as a default for sorting theUnnamed view results.
Setting the Display Options
You can use the Options dialog box to change the window background and specify how images arezoomed.
To Set the Display Options:
1. In any mode, click Tools | Options...
2. In the Options dialog box, click Display.
3. On the Display options page, set or change the options described below.
4. Click OK to accept your changes and return to ACDSee.
Display Options

ACDSee Photo Studio Home 2022
Page 410 of 506
Zoom options
Default zoom mode Specifies the default zoom level for images inView mode.
Reset zoom mode to default on every imagechange
Resets the zoom mode to the selected defaultwhen the displayed image changes.
Resize Resizes the image based on the selectedoption. For more information about how thesechoices affect the Viewer, see Automaticallyshrinking or enlarging images.
Pan tool
Enable click-zooming Deselect to turn off the one click image togglebetween Default view and Actual Size view.
Pan speed
Slow - Fast Specifies the speed when panning an image.
Background
Default color Uses the default ACDSee Home color for thebackground in View and Edit mode.
Custom color Specifies a color to use as the background inView and Edit mode.
Tiled image Uses a tiled image as the background for Viewand Edit mode. Click Browse to locate an imageon your hard drive.
The background color and tiled image options do not affect full screen mode.
To change the background color in ACDSee Quick View, open an image in Quick View, and thenclick Tools | Options.
Setting the Edit Mode Options
You can use the Options dialog box to show icons in Edit mode.
To Show Icons in the Edit Pane:

ACDSee Photo Studio Home 2022
Page 411 of 506
1. In any mode, click Tools | Options...
2. In the Options dialog box, click Edit Mode.
3. Set the options as described below.
4. Click OK to apply your changes and return to ACDSee.
Edit Show icons on filtermenu pane
Displays icons next to the tools in Edit.
AutoSave all changes Toggles AutoSave on and off. AutoSave saves your changes in Editmode automatically, without prompting the Save Changes dialog.
GPU selection In order to ensure optimum performance, parts of Edit moderun off of your GPU. ACDSee Home automatically chooses thebest GPU in your system. This option —Let ACDSee decide — isenabled by default. When Let ACDSee decide is enabled, GPUmodel text displays next to the option, specifying whether Editmode is running off of your primary GPU or another, moresuperior GPU that ACDSee Home has detected. In most cases, theGPU detected and identified as the best by ACDSee will be oneand the same: your primary GPU.
Use primary: you can enable this option if you prefer to useyour primary GPU over the GPU ACDSee Home has chosen.Let ACDSee decide: select this option to enable using thesuperior GPU found by ACDSee.
Setting the ACDSee 365 Options
You can use the Options dialog box to set options for ACDSee 365, such as the temporary folderlocation and what to do with uploads and downloads when you close ACDSee.
To Set the ACDSee 365 Options:
1. In any mode, click Tools | Options...
2. In the Options dialog box, click ACDSee 365.
3. On the ACDSee 365 page, set or change any of the options described below.
4. Click OK to accept your changes and return to ACDSee.
ACDSee 365 Options

ACDSee Photo Studio Home 2022
Page 412 of 506
Folder locations
Temporary folder Click the Browse button to change the folderwhere ACDSee Home temporarily keeps filesduring uploads and downloads.
Uploads/Downloads
On shutdown, always pause all transfers Pauses all transfers when you close ACDSee.
On startup, always automatically resume allpaused transfers
Resumes all transfers when you reopenACDSee.
Number of concurrent uploads (1-10) Select the number of files to be uploaded atthe same time.
Number of concurrent downloads (1-10) Select the number of files to be downloaded atthe same time.
Ratings
Convert 'Rating 1' to 5 stars Converts a numeric rating of 1 to five stars.
Convert 'Rating 1' to 1 star Converts a numeric rating of 1 to one star.
Setting the ACDSee Showroom Options
You can customize the ACDSee Showroom desktop slideshow in a number of ways, including changingthe slide duration, order, and transition or changing the frame opacity, size, and frame style.
To Customize the ACDSee Showroom Desktop Slideshow:
1. Start ACDSee Showroom by doing one of the following:
In any mode, click Tools | Create | ACDSee Showroom.
Click Start | Programs | ACD Systems | ACDSee Showroom.
2. Right-click anywhere in the ACDSee Showroom window and select Options.
3. Set or change the options as described below.
4. Click Set As Default to use the currently selected options as the default for new Showroom windows.
5. Click OK to apply your changes.
ACDSee Showroom Options

ACDSee Photo Studio Home 2022
Page 413 of 506
Picture Folder
Include subfolders Select this option if you want to include photos fromsubfolders in the slideshow.
Skip hidden folders Select this option to skip hidden folders such as the [Originals]folders that are created when you process images.
Slide
Duration Drag the slider to the left to decrease the display time foreach photo and to the right to increase the display time foreach photo.
Order From the Order drop-down list select Sequential to displayphotos in order or Random to display photos randomly.
Transition From the Transition drop-down list select None if you do notwant any special transition effects, Slide if you want photos toenter the window from the right and exit to the left, and Fadeif you want to reduce photo opacity during the transition fromone photo to another.
Apply to all Select Apply to all if you want to apply these changes to allslideshows.
Showroom Window
Opacity Drag the Opacity slider to the left to reduce the opacity of theShowroom window and to the right to increase opacity.
Size From the Size drop-down list select either a Small,Medium,or Large Showroom window frame.
Frame From the Frame drop-down list select a frame style.
Always on top Select Always on top if you want the Showroom window todisplay on top of all other application windows.
Apply to all Select Apply to all if you want to apply these changes to allShowroom windows.
Run at startup
Select Run at startup if you want to start ACDSee Showroom automatically when you start your computer.

ACDSee Photo Studio Home 2022
Page 414 of 506
Setting the ACDSee Quick View Options
You can customize ACDSee Quick View in a number of ways, including displaying Quick View on top ofany open windows, displaying Quick view at full screen, or even changing the background color in theQuick Viewwindow.
To Customize ACDSee Quick View:
1. Double-click on an image. For example, double-click on the image in Windows Explorer or in an emailmessage.
2. Click Tools | Options...
3. Set or change the options as described below.
4. Click OK to apply your changes.
ACDSee Quick View Options

ACDSee Photo Studio Home 2022
Page 415 of 506
Use ACDSee Quick View
If selected, ACDSee Quick View is set as the default viewer for images when ACDSee Home is closed.
Enable gamma correction
Applies the specified amount of gamma correction when viewing images.
Disable animation
Displays only the first frame of an animated image.
Always on top
Keeps the Quick View window as the top window in a stack of windows.
Full screen
Opens images in the Quick View window in full screen mode.
Hide mouse cursor in full screen
Hides the cursor in full screen mode.
Default zoom mode
Fit image Displays the image at the largest magnification that fits in the Quick Viewwindow. Images that are smaller than the Quick View window display attheir original size.
Actual size Displays the image at its actual size in the Quick View window.
Background
Default color Uses theACDSee Homebackground color in Quick View.
Custom color Specifies a color to use as the background in the Quick View window.Click the color swatch to select a different color.
Setting the Media Options
You can change what application handles your audio and video files when launched from ACDSee.
To Customize the Default Media Player for Files Launched from ACDSee:
1. In any mode, click Tools | Options...
2. In the Options dialog box, clickMedia.

ACDSee Photo Studio Home 2022
Page 416 of 506
3. To launch audio and video files in your system's default media player, check the Use default mediaplayer to open audio and video files checkbox.
4. Click OK to apply your changes.
Setting the ACDSee Indexer Options
You can use the Options dialog to customize the functionality of the ACDSee Indexer.
To Customize the ACDSee Indexer:
1. In any mode, click Tools | Options...
2. In the Options dialog box, click ACDSee Indexer.
3. On the ACDSee Indexer page, set or change the options as described below.
4. Click OK to apply your changes and return to ACDSee.
ACDSee Indexer Options
Auto index folders orimages when computer isidle for
Enables the indexing of folders or images while the computer is idle. Set theslider to indicate how long your computer should be idle before indexing begins.
Index image files only Deselect to index all file types supported by ACDSee.
Current database Displays which database will be indexed.
Folders to monitor Displays which folders will be indexed.
Add Folder... Click the Add Folder... button to add additional folders to be indexed.
Remove Folder Select a folder from the list and click the Remove Folder button to remove itfrom the folders to be indexed.
Include MicrosoftOneDrive
Enables the indexing of your OneDrive folder.
Setting the ACDSee PicaView Options
You can use the Options dialog box to change your ACDSee PicaView settings, as well as toggling it onand off.
To Adjust the ACDSee PicaView Options:
1. In Manage mode, click Tools | Options...
2. In the Options dialog box, click ACDSee PicaView.

ACDSee Photo Studio Home 2022
Page 417 of 506
3. On the ACDSee PicaView page, set or change the options as described below.
4. Click OK to apply your changes and return to ACDSee.
ACDSee Picaview Options
Enable ACDSee Picaview
This checkbox enables or disables ACDSee PicaView. When enabled, ACDSee PicaView appears when anACDSee-supported file is right-clicked anywhere on your hard drive. You have the option of displaying apreview of the file or image, and its EXIF information, or one or the other.
Display Image
Check the Display Image checkbox to display a preview of the right-clicked file.
Location: Add image to main menu: when you right-click,displays image in the main menu.
Add image to sub-menu: when you right-click, displaysimage in a sub-menu, available by clicking the arrownext to ACDSee PicaView.
Size: Select the size of the preview that displays when you right-click.
Show Original Select Show Original to display the pre-edited version of theimage when you right-click.
Show EXIF Information
Check or uncheck the Show EXIF Information checkbox to show or hide the right-clicked photo's EXIFinformation.
Setting the ACDSee Mobile Sync Options
You can use the Options dialog box to change your ACDSeeMobile Sync settings.
To Set the ACDSee Mobile Sync Options:
1. In any mode, click Tools | Options...
2. In the Options dialog, click ACDSee Mobile Sync.
3. On the ACDSee Mobile Sync page, set or change the options as described below.
4. Click OK to apply your changes and return to ACDSee.
ACDSee Mobile Sync Options

ACDSee Photo Studio Home 2022
Page 418 of 506
Root Folder Click the Browse For Folder button to specify the destination for your sent imagesand videos.
Server Name To customize the name of the target server (ACDSee on your PC), enter text inthe field. This name will appear in your list of targets in the ACDSee Mobile Syncapp.
Show ACDSee MobileSync Root Folder onFolder Tree
Displays the ACDSee Mobile Sync folder in the Folders pane.
Auto-hiding Panes and Panels
You can use the Auto Hide button to automatically hide some panes and panels in ACDSee. When apane is set to auto-hide, it rolls away when you click outside of it, leaving a tab displayed. You canaccess the pane by moving the cursor over the tab. When a pane or panel is floating, the auto-hidefeature is not available. You cannot move the pane to a new location if it is set to auto-hide.
The Auto Hide button's appearance on the pane’s title bar reflects its current setting:
A horizontal pushpin indicates that the pane is set to automatically hide when you clickoutside of it.
A vertical pushpin indicates that the pane is fixed and will remain visible even if you clickoutside of it.
To Set or Remove Auto-Hide:
Click the Auto Hide button on the title bar so that it displays a slanted or horizontal pushpin.
Using the Task Pane
The Task Pane displays groups of often-used tasks from the menus and toolbars based on yourcurrent location and selections in ACDSee. By default, the Task Pane opens on the right side of theManage mode window.
To Open or Close the Task Pane:
In Manage mode, click Panes | Task Pane.
The menus in the Task Pane change depending on what area of the Manage mode window you areworking in and what items you select. For example, if you select more than a folder in the File Listpane, the Task Pane displays different menus than it does if you select a photo or media file.

ACDSee Photo Studio Home 2022
Page 419 of 506
The options on the Task Pane menus also change dynamically. For example, if you select multipleimages in the File List, the options in the Fix and Enhance Photos menu change to list options that youcan use with multiple images.
Customizing Toolbars
You can customize the appearance and organization of toolbars in Manage mode and Viewmode byselecting which toolbars to display, and specifying each toolbar’s buttons or commands. You can alsodiscard your changes and reset the toolbars to their default layout at any time.
Displaying and Hiding Toolbars
You can choose to display or hide the specific toolbars in Manage mode and Viewmode.
To Display or Hide a Toolbar:
In Manage or View mode, click View | Toolbars, and then select the toolbar you want to display or hide.
Customizing Toolbar Contents
You can customize the following toolbars:
In Manage mode: the Main toolbar and the File List toolbar.
In View mode: the Bottom toolbar.
You can add, remove, and rearrange buttons on these toolbars. You can also display or hide textlabels and tool tips for the buttons on these toolbars. All toolbar customization options are in theCustomize dialog box.
To Display the Customize Dialog Box:
Do one of the following:
In Manage mode, click View | Toolbars and then select Customize.
In Manage mode, click the drop-down arrow, located to the right of the Main toolbar or File List toolbar,select Add or Remove Buttons, and then select Customize.
In View mode, click the drop-down arrow, located to the right of the Bottom toolbar, select Add orRemove Buttons, and then select Customize.
To Add or Remove Toolbar Buttons:
In Manage Mode:
Main toolbar:

ACDSee Photo Studio Home 2022
Page 420 of 506
1. Click the drop-down arrow located on the right side of the Main toolbar.
2. Select Add or Remove Buttons |Main Toolbar, then select the name of the button you want to add orremove.
File List toolbar:
With the Customize dialog box open, on the Commands tab, drag items from the Commands field to thetoolbar to add buttons.
To remove buttons, drag them from the toolbar to the Customize dialog box.
In View Mode:
Bottom toolbar:
1. Click the drop-down arrow, located to the right of the Bottom toolbar.
2. Select Add or Remove Buttons | Bottom Toolbar, then select the name of the button you want to addor remove.
To Rearrange Toolbar Buttons:
With the Customize dialog box open, drag buttons to your desired toolbar location.
To Display or Hide Text Labels Below Toolbar Buttons:
1. Display the Customize dialog box.
2. Click the Toolbars tab.
3. In Manage mode: select File List Toolbar or Main Toolbar.
In Viewmode: select Bottom Toolbar.
4. Check the Show text labels checkbox to display text labels, or clear the Show text labels checkbox tohide text labels.
5. Click Close.
To Display or Hide Tool Tips for Toolbar Buttons:
1. Display the Customize dialog box.
2. Click the Options tab.
3. Select Show ScreenTips on toolbars to display tool-tips, or clear Show ScreenTips on toolbars to hidetool-tips. If you select this option, you can also select Show shortcut keys in ScreenTips to showkeyboard shortcuts in the tool-tips.
4. Click Close.
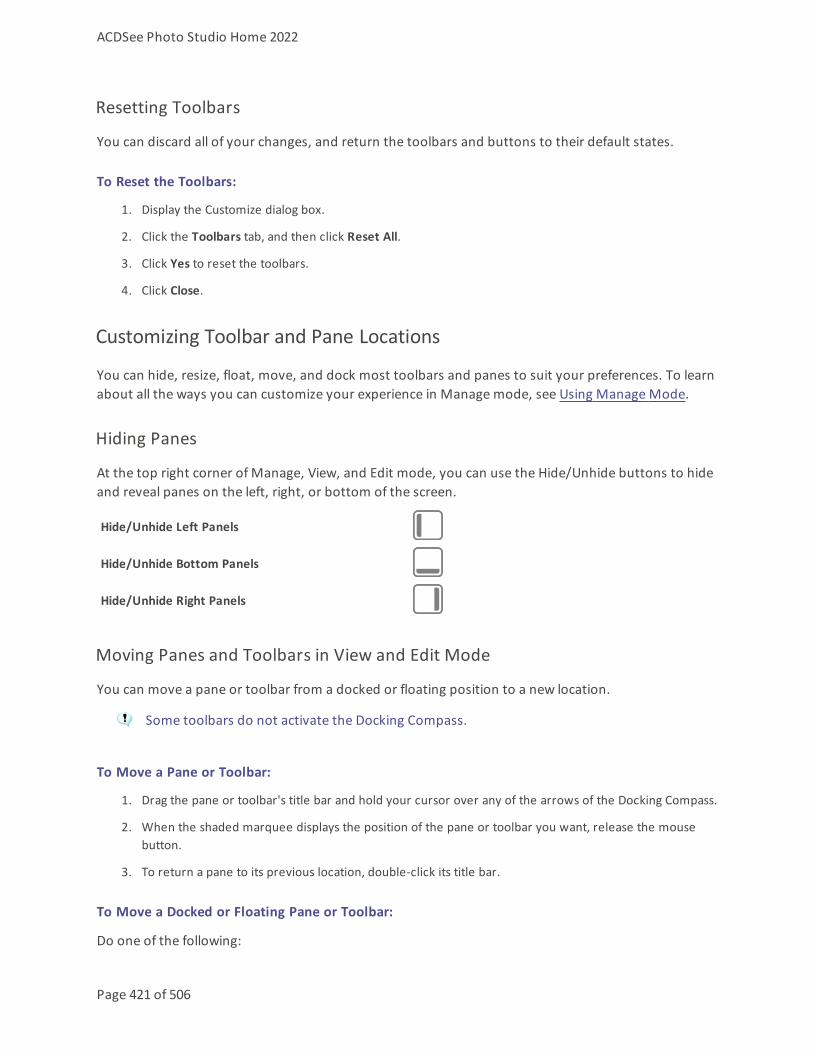
ACDSee Photo Studio Home 2022
Page 421 of 506
Resetting Toolbars
You can discard all of your changes, and return the toolbars and buttons to their default states.
To Reset the Toolbars:
1. Display the Customize dialog box.
2. Click the Toolbars tab, and then click Reset All.
3. Click Yes to reset the toolbars.
4. Click Close.
Customizing Toolbar and Pane Locations
You can hide, resize, float, move, and dock most toolbars and panes to suit your preferences. To learnabout all the ways you can customize your experience in Manage mode, see Using Manage Mode.
Hiding Panes
At the top right corner of Manage, View, and Edit mode, you can use the Hide/Unhide buttons to hideand reveal panes on the left, right, or bottom of the screen.
Hide/Unhide Left Panels
Hide/Unhide Bottom Panels
Hide/Unhide Right Panels
Moving Panes and Toolbars in View and Edit Mode
You can move a pane or toolbar from a docked or floating position to a new location.
Some toolbars do not activate the Docking Compass.
To Move a Pane or Toolbar:
1. Drag the pane or toolbar's title bar and hold your cursor over any of the arrows of the Docking Compass.
2. When the shaded marquee displays the position of the pane or toolbar you want, release the mousebutton.
3. To return a pane to its previous location, double-click its title bar.
To Move a Docked or Floating Pane or Toolbar:
Do one of the following:

ACDSee Photo Studio Home 2022
Page 422 of 506
Drag the pane or toolbar's tab to a new location.
Drag the pane or toolbar's title bar to a new location.
If you use dual monitors, you can move the panes and toolbars to your second monitor to free up spaceon your main monitor.
Docking Panes and Toolbars in View and Edit Mode
When you select a pane or toolbar, the Docking Compass activates to help you place the paneprecisely. The Docking Compass consists of an outer and inner ring of arrows. When you hold yourcursor over any of the arrows, a shaded marquee displays the potential position of the pane.
Some toolbars do not activate the Docking Compass.
To Dock a Pane or Toolbar:
Drag the pane or toolbar's title bar or tab to activate the Docking Compass. To dock a pane around theouter edge of the window, hold your cursor over any of the outer arrows of the Docking Compass, andthen release the mouse button.
Resizing Panes
You can resize all the panes and toolbars, whether they are docked or floating.
To Resize a Docked Pane:
1. Hold your cursor over the edge of the pane or toolbar until the cursor changes to arrows and lines.
2. Drag the edge of the pane or toolbar to the size you want.
To Resize a Floating Pane:
Hold your cursor over the edge or corner of the pane or toolbar and then drag the pane to the sizeyou want.
You can enlarge the Filmstrip in View and Edit mode to expedite browsing your folder. Toresize the Filmstrip, drag one of its edges.
You can move the Drawing and Selections Toolbar, as well as the ACDSee Actions bar.
Creating a Custom Menu
You can create a newmenu in Manage mode with custom commands for easy access. You can alsocustomize the name and location of your newmenu.

ACDSee Photo Studio Home 2022
Page 423 of 506
To Create a New Menu:
1. Do one of the following:
In Manage mode, click View | Toolbars and then select Customize.
In Manage mode, click the drop-down arrow located to the right of the Main toolbar or File Listtoolbar, select Add or Remove Buttons, and then select Customize.
2. In the Customize dialog, on the Commands tab, select New Menu from the Categories field.
3. In the Commands field, select New Menu and drag it to your desired toolbar location.
To Add Commands to a New Menu:
1. In the Customize dialog, on the Commands tab, select any option from the Categories field.
2. In the Commands field, select your command and drag it over to your new menu on the toolbar. Thenew menu will expand down. Drop the command on the menu.
To Delete a New Menu or Command:
The Customize dialog must be open to delete a newmenu or command.
Right-click the newmenu or command and choose Delete from the context menu.
To Name a New Menu:
The Customize dialog must be open to name a newmenu.
1. Right-click the new menu and choose Button Appearance... from the context menu.
2. In the Button Appearance dialog, with Text only selected, enter a name in the Button text field.
3. Press OK.
Configuring External Editors
To open images in external editing applications from within ACDSee, configure ACDSee Home to workwith a variety of image editors, such as ACDSee Luxea Video Editor, and specify which image editorACDSee Home uses by default.
An external editor must be configured before it can be assigned a shortcut key or used as abutton on the toolbar.
To configure an External Editor in ACDSee:
ACDSee Photo Studio Home 2022
Page 424 of 506
1. In Manage mode, select Tools | External Editors | Configure Editors from the main menu.
2. In the Configure Photo Editors dialog box, click the Add... button.
3. Browse to the hard drive folder containing an image editing application.
4. Select the executable file of the editing application. For example, ACDSee Luxea Video Editor.exe.
5. Click Open.
6. Enter an editor name in the Name field, then click OK.
To create a shortcut to the default External Editor:
1. Select Tools | Customize Shortcuts... from the main menu.
2. In the Customize Shortcuts dialog box, select "Tools" from the Category drop-down menu.
3. From the Commandsmenu, select Default External Editor.
4. Enter a shortcut key into the Enter new shortcut key field.
5. Click Assign and close the dialog box.
A new keyboard shortcut has been set for the default external editor.
To create a shortcut to an individual External Editor:
1. Select Tools | Customize Shortcuts... from the main menu.
2. In the Customize Shortcuts dialog box, select "External Editors" from the Category drop-down menu.
3. From the Commandsmenu, select the desired external editor.
4. Enter a shortcut key into the Enter new shortcut key field.
5. Click Assign and close the dialog box.
A new keyboard shortcut has been set for an individual external editor.
To add an External Editor to the FileList toolbar in Manage mode:
1. Click the Toolbar Options drop-down arrow, to the right of the Editors and Actionsmenu options, andselect Add or Remove Buttons | Customize.
2. In the Customize dialog box, in the Commands tab, select "Tools" from the Category list.
3. Click and drag an External Editor from the list onto the FileList toolbar.
4. Close the dialog box.
An External Editor is added to the FileList toolbar.
To add an External Editor button to the toolbar in View mode:
1. Click the Toolbar Options drop-down arrow, to the right of the tools, and select Add or Remove Buttons| Customize.

ACDSee Photo Studio Home 2022
Page 425 of 506
2. In the Customize dialog box, in the Commands tab, select "Tools" from the Category list.
3. In the Commands list, select Default External Editor, and click and drag it onto the toolbar.
4. Close the dialog box.
The default External Editor is added to the toolbar.
To manage image editors:
1. In Manage mode, select Tools | External Editors | Configure Editors from the main menu.
2. In the Configure Photo Editors dialog box, in the Editors list, select an application to change.
3. Do any of the following:
To change the location of the executable file or the name of the application displayed in theEditors list, click Edit. Set the location and name of the application, and then click OK.
To set the application as the default external editor for ACDSee, click Set As Default.
To specify whether the application can handle multiple images at the same time, check oruncheck the checkbox in the Supports Multiple Images column.
To remove the application from the list, click Remove.
4. Click OK to accept your changes and return to ACDSee.
To open an image in an external image editor:
1. In Manage or View mode, select an image to open in an external editor.
2. Do one of the following:
Select Tools | External Editors | Default External Editor or the name of an editor.
Press Ctrl + Alt + X to open the image in the default external editor.
Customizing Keyboard Shortcuts
There are pre-defined keyboard shortcuts for commands that you use frequently. You can change pre-defined shortcuts, or create keyboard shortcuts for commands that do not currently have shortcuts.The options available in the Customize Shortcut dialog will be mode-specific, depending on whichmode you opened the dialog from.
Keyboard shortcuts customized in one mode will not take effect in the other modes, even ifthe defined command name is the same.
If a shortcut is already assigned to a command, then assigning it to another command willunassign it from the original command.
To Customize Keyboard Shortcuts:

ACDSee Photo Studio Home 2022
Page 426 of 506
In Manage, View, and Edit mode:
1. Click Tools | Customize Shortcuts... or press Ctrl + Shift + Alt + S.
2. From the Category drop-down menu, select a category, such as File, Edit, or View. The commandsavailable from that menu display in the Commands list box.
3. Select a command in the Commands list box.
If a keyboard shortcut has been defined for that command, it displays in the Current Keys box.
If a keyboard shortcut has not been defined for that command, the Current Keys box will beempty.
To remove an existing keyboard shortcut, select the keyboard shortcut in the Current Keys box, andthen click Remove.
To Define a New Keyboard Shortcut:
1. Click in the Enter a new shortcut key text box.
2. Press the keys on your keyboard that you want to use for the keyboard shortcut.
The keys display in the Enter a new shortcut key text box. The Currently assigned to field willdisplay the function your entered shortcut is assigned to, if applicable.
3. Click Assign.
The new keyboard shortcut displays in the Current keys box.
4. Click Close.
To remove all custom keyboard shortcuts and restore the default keyboard shortcuts, click Reset All.
Changing the Display Theme
In ACDSee Home you can change the display theme to change the background color of the panes andtoolbars.
To Change the Display Theme:
1. In Manage mode, click Tools | Options.
2. In the Options dialog box, clickManage Mode.
3. In the Display theme drop-down list, select a theme.
4. Click OK to apply your changes and return to ACDSee.

ACDSee Photo Studio Home 2022
Page 427 of 506
Setting JPEG Options
You can change the settings in the Options dialog box to control the quality of the JPEG image,encoding method, color subsampling method, and whether to update or create embeddedthumbnails in the JPEG image.
JPEG Options
Image quality Drag the slider to determine the quality of the JPEG image.
Encoding l Progressive: select to enable progressive encoding.l Optimize Huffman codes: select to optimize Huffman codes to increasecompression.
Color componentsampling
l 2:1 Horizontal: select to subsample color channels on the horizontal axisby a factor of 2:1.
l 2:1 Vertical: select to subsample color channels on the vertical axis by afactor of 2:1.
Embedded thumbnails l Only update existing thumbnails: select to update any existing embed-ded thumbnails.
l Always add/update thumbnails: select to update any existing embed-ded thumbnails, or create embedded thumbnails.
l Never add/update thumbnails: select if you do not want to update anyexisting embedded thumbnails, or if you do not want to create embeddedthumbnails.
l Generate DCF compatible thumbnails: select to generate thumbnailsthat meet the Digital Camera Format (DCF) specification and are compatiblewith the thumbnail view on the LCD of a digital camera. This option forces afixed resolution of 160 x 120 and pads any extra space with black.
Save these settings asthe defaults
Select this option to use these JPEG settings by default for all JPEGs.

ACDSee Photo Studio Home 2022
Page 428 of 506
Chapter 11: Shortcuts
Manage Mode Keyboard Shortcuts
You can use the following keyboard shortcuts while working in Manage mode. There are also shortcutsthat can be used specifically in the Calendar pane.
To print this page for easy reference, right-click and select Print...

ACDSee Photo Studio Home 2022
Page 429 of 506
This Shortcut Has This Result
Alt + F4
Ctrl + W
Closes ACDSee.
Ctrl + Shift + Alt + S Opens the Customize Shortcuts dialog box,in which you can customize keyboardshortcuts.
Alt + O Opens the Options dialog box.
F1 Opens the Help file.
Enter Opens the selected item in View mode.
Delete Deletes the selected items.
Using Manage Mode

ACDSee Photo Studio Home 2022
Page 430 of 506
This Shortcut Has This Result
\ (backslash) Tags or untags the image.

ACDSee Photo Studio Home 2022
Page 431 of 506
This Shortcut Has This Result
` (grave accent) Toggles image audio on or off.

ACDSee Photo Studio Home 2022
Page 432 of 506
This Shortcut Has This Result
Alt + 0 to 5 Assigns a color label to the currentlyselected item. Press Alt + 0 to remove acolor label.
Alt + C Copies one or more selected files to afolder you specify.
Alt + Comma Opens the previous tab in the Propertiespane.
Alt + Period Opens the next tab in the Properties pane.
Alt + Enter Opens or closes the Properties pane.
Alt + G Opens the Import dialog box.
Alt + I Opens the Filters dialog box where you canspecify the types of files displayed in theFile List pane.
Alt + K Places the cursor in the Keyword section ofthe IPTC group in the Metadata tab of theProperties pane.
Alt + M Moves one or more selected files to afolder you specify.
Alt + Shift + F Maximizes the File List pane.
F2 Renames one or more selected files.
Alt + W Restores your desktop wallpaper to thesettings you were using before you appliedan ACDSee Home wallpaper.
Alt + X Removes currently displayed item fromthe active Image Basket.
Backspace Moves up one level in the current drive'sfolder structure.
Ctrl + 0 to 5 Assigns a rating to the currently selecteditem. Press Ctrl + 0 to remove a rating.
Ctrl + \ (backslash) Selects the tagged images.
Ctrl + A Selects the entire contents of the current

ACDSee Photo Studio Home 2022
Page 433 of 506
This Shortcut Has This Result
folder.

ACDSee Photo Studio Home 2022
Page 434 of 506
This Shortcut Has This Result
Ctrl + B Adds the selected items to the activeImage Basket.
Ctrl + E Opens the currently selected image in Editmode.
Ctrl + G Generates a file listing as a text document.
Ctrl + I Selects all images in the current folder.
Ctrl + Alt + D Opens the Edit Caption dialog box.
Ctrl + K Places the cursor in the Keywords field ofthe Organize tab in the Properties pane.
Ctrl + N Creates a new folder in the File List pane.
Ctrl + O Opens the Open Files dialog box, in whichyou can select one or more images to openin View mode.
Ctrl + P Opens the currently selected image orimages in the ACDSee Home Print utility.
Ctrl + Tab Moves the focus of the Manage modewindow between the currently displayedpanes.
Ctrl + X Cuts the currently selected items to theClipboard.
Ctrl + C
Ctrl + Insert
Copies the selected items to the Clipboard.
Ctrl + V
Shift + Insert
Pastes the contents of the Clipboard.
Ctrl + F Puts the focus in the Quick Search bar sothat you can begin typing your searchquery.
F5 Refreshes Manage mode.
F3 Opens the Search pane.
Ctrl + Alt + E Opens the Export dialog box.

ACDSee Photo Studio Home 2022
Page 435 of 506
This Shortcut Has This Result
F4 Displays the Contents bar drop-down list.

ACDSee Photo Studio Home 2022
Page 436 of 506
This Shortcut Has This Result
F6 Changes the File List to Thumbs+Detailsview.
F7 Changes the File List to Filmstrip view.
F8 Changes the File List to Thumbnails view.
F9 Changes the File List to Tiles view.
F10 Changes the File List to Icons view.
F11 Changes the File List to List view.
F12 Changes the File List to Details view.
Shift + Delete Removes the selected item from your harddrive.
Shift + F5 Refreshes the File List pane.
Shift + Tab Moves the focus of the Manage modewindow to the previous pane or tool insequence.
Tab Moves the focus of the Manage modewindow to the next pane or tool insequence.
Ctrl + Alt + R Opens the selected images in the CompareImages viewer.
Ctrl + Alt + W Sets the selected image as a stretcheddesktop wallpaper.
Ctrl + Alt + X Opens the current image in the defaultexternal editor.
Ctrl + Right-Click Opens Windows Explorer context menu.
Ctrl + Shift + 1 Opens or closes the Folders pane.
Ctrl + Shift + 2 Opens or closes the Catalog pane.
Ctrl + Shift + 3 Opens or closes the Search pane.
Ctrl + Shift + 4 Opens or closes the Calendar pane.

ACDSee Photo Studio Home 2022
Page 437 of 506
This Shortcut Has This Result
Ctrl + Shift + 5 Shows or hides all Image Baskets.
Ctrl + Shift + 9 Creates a new Image Basket.
Ctrl + Shift + - Deletes the active Image Basket.
Ctrl + Shift + A Selects all files in the current folder.
Ctrl + Shift + B Shows or hides the status bar.
Ctrl + Shift + C Copies the currently selected image to theClipboard.
Ctrl + Shift + D Clears your current selection.
Ctrl + Shift + E Opens the current file in the defaultsystem application or opens a dialog boxwhere you can select an application.
Ctrl + Shift + F Toggles the full-screen view for the File Listpane.
Ctrl + Shift + I Inverts your current selection.
Ctrl + Shift + L Opens or closes the Selective Browsingpanel.
Ctrl + Shift + M Opens or closes the Map pane.
Ctrl + Shift + N Opens a second instance of the ACDSeeprogram.
Ctrl + Shift + O Opens the file using the system applicationassociated with its file extension.
Ctrl + Shift + T Displays or hides the Manage mode Maintoolbar.
Ctrl + Shift + Tab Moves the focus of the Manage modewindow between the currently displayedpanes.
Ctrl + Shift + W Sets the selected image as a tiled desktopwallpaper.
Ctrl + Shift + Alt + W Sets the selected image as a centereddesktop wallpaper.

ACDSee Photo Studio Home 2022
Page 438 of 506
This Shortcut Has This Result
Viewing
Alt + Left Arrow Returns to the previous folder youbrowsed in the File List pane.
Alt + Right Arrow Returns to the folder you last moved backfrom in the File List pane.
Ctrl + S Creates a slideshow from the currentlyselected images.
Ctrl + Shift + P Opens or closes the Preview pane.
Batch Editing
Ctrl + R Opens the Batch Resize Images dialog box.
Ctrl + T Opens the Batch Adjust Time Stamp dialogbox.
Ctrl + Alt + F Opens the Batch Convert File Format dialogbox.
Ctrl + J Opens the Batch Rotate/Flip Images dialogbox.
Ctrl + L Opens the Batch Adjust Exposure dialogbox.
Mode Switching
Ctrl + F2 Switches to Media mode.
Ctrl + F3 Opens the image in View mode.
Ctrl + F5 Opens the image in Edit mode.
Ctrl + F6 Switches to People mode.
Ctrl + F7 Switches to 365 mode.
Ctrl + F8 Switches to Dashboard mode.
Manage Mode Mouse Shortcuts
You can use the following mouse shortcuts in Manage mode.

ACDSee Photo Studio Home 2022
Page 439 of 506
To print this page for easy reference, right-click and select Print...
Shortcut Resulting Action
Double-click Opens the selected image in View mode.
Right-click Opens the Manage mode context menu.
Shift + click Selects a group of images.
Click + drag Selects a group of images. Be sure to click on a blank area of thescreen, not on an image or folder, before you drag, so you can drawa selection box around the group of images.
Ctrl + click Selects images you click on.
Ctrl + right-click Opens the Windows Explorer context menu.
Ctrl + Wheel up Increases the magnification of the thumbnail (zooms in).
Ctrl + Wheel down Decreases the magnification of the thumbnail (zooms out).
Calendar Pane Shortcuts
Once you are familiar with the basic calendar pane options, consider using the following shortcuts:
Click the title bar on a year, month, or day table to display all available images for that year, month, orday.
Right-click the title bar on a year, month, or day table to scroll through and select from adjacent years,months, or days.
In Year view double-click any month to switch to Month view. Or, in Month view, double-click any dateto switch to Day view.
In Month view click the letter indicating a day of the week to display all available images for that day ofthe week. For example, click F to select all Fridays in that month.
In Day view click AM or PM to select the first or second half of a day.
In Event view press and hold the Ctrl key and click any month or day to display all available images forthose months or days.
Click on the title of any month calendar, to select all the photos in that month.
Click the name of the week, to select all the photos in those weeks of the month.
Drag and select any days in the calendar to select all the photos in those days.

ACDSee Photo Studio Home 2022
Page 440 of 506
Media Mode Keyboard Shortcuts
You can use the following keyboard shortcuts while working in Media mode.
To print this page for easy reference, right-click and select Print...
Shortcut Resulting Action
Alt + F4
Ctrl + W
Closes ACDSee.
Alt + O Opens the Options dialog.
Ctrl + P Prints the selected image.
Ctrl + L Rotates the selected image left.
Ctrl + R Rotates the selected image right.
F5 Refreshes.
Ctrl + F Show/Hide Folder pane.
Ctrl + G Show/Hide Group pane.
Mode Switching
Ctrl + F1 Switches to Manage mode.
Ctrl + F3 Opens the currently selected image inView mode.
Ctrl + F5 Opens the currently selected image in Editmode.
Ctrl + F6 Switches to People mode.
Ctrl + F7 Switches to 365 mode.
Ctrl + F8 Switches to Dashboard mode.
View Mode Keyboard Shortcuts
You can use the following keyboard shortcuts while working in Viewmode.
To print this page for easy reference, right-click and select Print...

ACDSee Photo Studio Home 2022
Page 441 of 506
If you would like to define your own keyboard shortcuts, see Customizing KeyboardShortcuts.

ACDSee Photo Studio Home 2022
Page 442 of 506
Shortcut Resulting Action
Alt + F4
Ctrl + W
Closes ACDSee.
` (grave accent) Toggles the display of the full file path in the Status bar.
Enter
Esc
Switches to the previous mode.
Shift + Esc Minimizes ACDSee in View and Edit mode.
Ctrl + Shift + Alt+ S
Opens the Customize Shortcuts dialog box, in which you can customizekeyboard shortcuts.
Alt + O Opens the Options dialog box.
F1 Opens the Help file.
File Menu
Ctrl + O
Insert
Opens the Open files dialog box.
Shift + F4 Closes the current item.
Ctrl + Shift + F4 Closes all images.
Ctrl + S Opens the Save Image As dialog box, in which you can save your imagewith a different name or file format.
Shift + L Opens the file using the system application associated with its fileextension.
Shift + E Opens the current file in the default system application or opens adialog box where you can select an application.
Ctrl + P Opens the current image in the ACDSee Home Print utility.
Ctrl + Shift + P Prints all currently selected images, or all images in the current folder.
Alt + L Opens the Flickr Uploader dialog box.
Alt + U Opens the SmugMug Uploader dialog box.
Alt + Z Opens the Zenfolio Uploader dialog box.
Customizing the Interface

ACDSee Photo Studio Home 2022
Page 443 of 506
Shortcut Resulting Action
Ctrl + Shift + H Toggles the Histogram open and closed.
Ctrl + Shift + M Toggles the Magnifying Glass pane open and closed.
Ctrl + + (plus) Zooms in on the Magnifying Glass pane.
Ctrl + - (minus) Zooms out on the Magnifying Glass pane.
Ctrl + Shift + S Toggles the Navigator open and closed.
Alt + Enter Toggles the Properties pane open and closed.
Alt + , Switches to the tab to the left on the Properties pane.
Alt + . Switches to the tab to the right on the Properties pane.
Ctrl + Shift + F Toggles the Filmstrip open and closed.
Ctrl + Shift + I Toggles the Info palette open and closed.
T
Ctrl + Shift + T
Toggles the Toolbar open and closed.
B
Ctrl + Shift + B
Toggles the Status bar open and closed.
Ctrl + Shift + V Toggles the Page View panel open and closed for multi-page images.
Managing

ACDSee Photo Studio Home 2022
Page 444 of 506
Shortcut Resulting Action
Ctrl + X Cuts the current item to the Clipboard.

ACDSee Photo Studio Home 2022
Page 445 of 506
Shortcut Resulting Action
Ctrl + C Copies the currently displayed file to the Clipboard.

ACDSee Photo Studio Home 2022
Page 446 of 506
Shortcut Resulting Action
Ctrl + V Pastes the contents of the Clipboard.

ACDSee Photo Studio Home 2022
Page 447 of 506
Shortcut Resulting Action
Alt + C Opens the Copy To Folder dialog box.

ACDSee Photo Studio Home 2022
Page 448 of 506
Shortcut Resulting Action
Alt + M Opens the Move To Folder dialog box.

ACDSee Photo Studio Home 2022
Page 449 of 506
Shortcut Resulting Action
Delete Deletes the selected image.
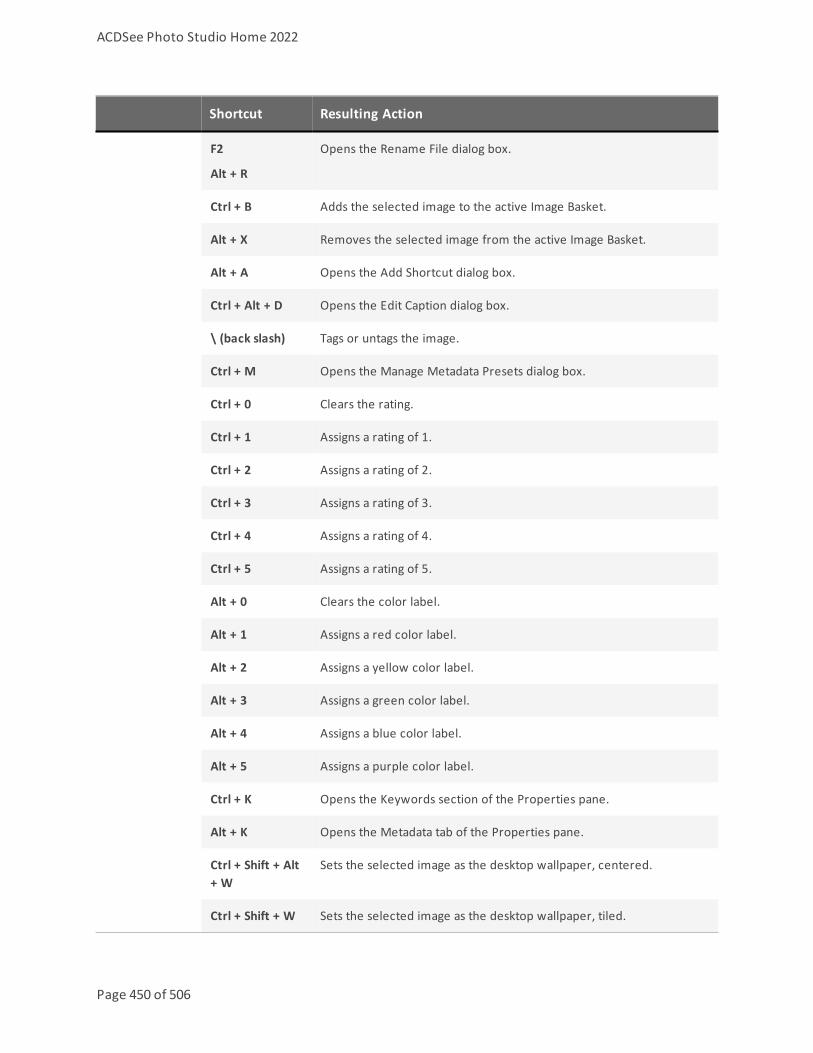
ACDSee Photo Studio Home 2022
Page 450 of 506
Shortcut Resulting Action
F2
Alt + R
Opens the Rename File dialog box.
Ctrl + B Adds the selected image to the active Image Basket.
Alt + X Removes the selected image from the active Image Basket.
Alt + A Opens the Add Shortcut dialog box.
Ctrl + Alt + D Opens the Edit Caption dialog box.
\ (back slash) Tags or untags the image.
Ctrl + M Opens the Manage Metadata Presets dialog box.
Ctrl + 0 Clears the rating.
Ctrl + 1 Assigns a rating of 1.
Ctrl + 2 Assigns a rating of 2.
Ctrl + 3 Assigns a rating of 3.
Ctrl + 4 Assigns a rating of 4.
Ctrl + 5 Assigns a rating of 5.
Alt + 0 Clears the color label.
Alt + 1 Assigns a red color label.
Alt + 2 Assigns a yellow color label.
Alt + 3 Assigns a green color label.
Alt + 4 Assigns a blue color label.
Alt + 5 Assigns a purple color label.
Ctrl + K Opens the Keywords section of the Properties pane.
Alt + K Opens the Metadata tab of the Properties pane.
Ctrl + Shift + Alt+ W
Sets the selected image as the desktop wallpaper, centered.
Ctrl + Shift + W Sets the selected image as the desktop wallpaper, tiled.

ACDSee Photo Studio Home 2022
Page 451 of 506
Shortcut Resulting Action
Ctrl + Alt + W Sets the selected image as the desktop wallpaper, stretched.
Alt + W Restores your desktop wallpaper to the settings you were using beforeyou applied an ACDSee Home wallpaper.
Viewing
Page ArrowRight
Page Down
3 (numerickeypad)
Spacebar
Displays the next image.
Page ArrowLeft
Page Up
9 (numerickeypad)
Backspace
Displays the previous image.
End Switches to the last image in the Filmstrip.
Home Switches to the first image in the Filmstrip.
Ctrl + Right-click
Opens the Windows Explorer context menu.
+ (plus) Zooms in.
- (minus) Zooms out.
Shift + Z Zooms in to the area you select.
/ (forwardslash)
Zooms the image to its actual size.
* (numerickeypadasterisk)
Shift + 8
Fits the image to the viewing area.
Alt + PageArrow Right
Fits image width to the display area.

ACDSee Photo Studio Home 2022
Page 452 of 506
Shortcut Resulting Action
Alt + PageDown
Fits image height to the display area.
Alt + \ Toggles the zoom lock on and off.
L Toggles the pan lock.
Z Opens the Set Zoom Level dialog box.
Page ArrowRight
Pans right when zoomed into the image.
Page ArrowLeft
Pans left when zoomed into the image.
Page Down Pans down when zoomed into the image.
Page Up Pans up when zoomed into the image.
F Toggles full screen mode.
Ctrl + PageArrow Right
Toggles the right pane open and closed.
Ctrl + PageArrow Down
Toggles the bottom pane open and closed.
O Displays saved version of the image.
E Toggles the exposure warning on and off.
R Toggles the RAW decode/embedded preview on and off.
Shift + F1 Activates the Hand tool after zooming in with the Zoom tool.
Shift + F2 Activates the Select tool.
Ctrl + Q Clears the current selection.
Shift + F3 Activates the Zoom tool.
Shift + F Activates the Face tool.
Please note that Face Detection is only available for the64-bit version of ACDSee Photo Studio Home.
Shift + B Toggles face outlines.

ACDSee Photo Studio Home 2022
Page 453 of 506
Shortcut Resulting Action
Please note that Face Detection is only available for the64-bit version of ACDSee Photo Studio Home.
Ctrl + N Opens the Face Detection pane and puts the cursor in the first namefield.
Please note that Face Detection is only available for the64-bit version of ACDSee Photo Studio Home.
TAB Moves the cursor between name fields on the image, as well as on theFace Detection pane.
Please note that Face Detection is only available for the64-bit version of ACDSee Photo Studio Home.
Ctrl + Shift + D Toggles the Face Detection pane.
Please note that Face Detection is only available for the64-bit version of ACDSee Photo Studio Home.
Ctrl + F Redetects faces.
Please note that Face Detection is only available for the64-bit version of ACDSee Photo Studio Home.
F5 Refreshes the View mode window and reloads the current image.
Ctrl + 6 Toggles the Light EQ button on and off.
Alt + S Automatically advances to the next image every 1 to 2 seconds.
Ctrl + Alt + S Launches the slideshow.
Ctrl + A Displays or hides headers and footers.
Ctrl + Shift + Q Opens the View Header/Footer dialog box, in which you can specifythe text to display on your images in View mode.
Alt + Ctrl + S Starts or stops the slideshow.
Shift + PageArrow Down
Advances to the next page of a multi-page image.
Shift + Page Switches to the previous page of a multi-page image.

ACDSee Photo Studio Home 2022
Page 454 of 506
Shortcut Resulting Action
Arrow Up
Shift + Home Switches to the first page of a multi-page image.
Shift + End Switches to the last page of a multi-page image.
Editing
Ctrl + Shift +Page ArrowLeft
Rotates the current image 90° counterclockwise.
Ctrl + Shift +Page ArrowRight
Rotates the current image 90° clockwise.
Alt + E Opens the image in the default editor.
Shift + O Restores an edited image to the original version.
Shift + S Commits the changes.
Ctrl + Alt + F Opens the Batch Convert File Format dialog box.
Ctrl + J Opens the Batch Rotate/Flip Images dialog box.
Ctrl + R Opens the Batch Resize Images dialog box.
Ctrl + L Opens the Batch Adjust Exposure dialog box.
Ctrl + T Opens the Batch Adjust Time Stamp dialog box.
Ctrl + Alt + R Opens the Batch Rename dialog box.
Ctrl + Shift + 1 Changes the image color depth to Black and White.
Ctrl + Shift + 2 Changes the image color depth to 16 grays.
Ctrl + Shift + 3 Changes the image color depth to 256 grays.
Ctrl + Shift + 4 Changes the image color depth to 16 colors.
Ctrl + Shift + 5 Changes the image color depth to 256 colors.
Ctrl + Shift + 6 Changes the image color depth to Hicolor.
Ctrl + Shift + 7 Changes the image color depth to Truecolor.

ACDSee Photo Studio Home 2022
Page 455 of 506
Shortcut Resulting Action
Ctrl + Shift + 8 Converts the image to a 16-bit grayscale palette.
Ctrl + Shift + 9 Converts the image to a 48-bit color palette.
Mode Switching
Ctrl + F1 Switches to Manage mode.
Ctrl + F2 Switches to Media mode.
Ctrl + F5 Opens the currently selected image in Edit mode.
Ctrl + F6 Switches to People mode.
Ctrl + F7 Switches to 365 mode.
Ctrl + F8 Switches to Dashboard mode.
View Mode Mouse Shortcuts
You can use the following mouse shortcuts while working in Viewmode.
To print this page for easy reference, right-click and select Print...

ACDSee Photo Studio Home 2022
Page 456 of 506
Shortcut Resulting Action
Double-click Closes View mode and returns to the previous mode.
Right-click Opens the View mode context menu.
Middle click Toggles full screen mode (on 3-button mouse).
Wheel click Toggles full screen mode.
Wheel up Displays the previous item.
Wheel down Displays the next item.
Ctrl + Right-click Opens the Windows Explorer context menu.
Ctrl + Wheel up Increases the magnification of the image (zooms in).
Ctrl + Wheel down Decreases the magnification of the image (zooms out).
Shift + Wheel up Displays the previous page of a multiple-page image.
Shift + Wheel down Displays the next page of a multiple-page image.
Edit Mode Keyboard Shortcuts
Use the following keyboard shortcuts in Edit mode.
To print this page for easy reference, right-click and select Print...
If you would like to define your own keyboard shortcuts, see Customizing KeyboardShortcuts.
Edit Mode Keyboard Shortcuts

ACDSee Photo Studio Home 2022
Page 457 of 506
Shortcut Resulting Action
Alt + F4 Closes ACDSee in all modes.
Shift + Esc Minimizes ACDSee in View and Edit mode.
Ctrl + Shift + Alt + S Opens the Customize Shortcuts dialog box,in which you can customize keyboardshortcuts.
Alt + O Opens the Options dialog box.
F1 Opens the Help file.
` (grave accent) Toggles the display of the full file path inthe Status bar.
File Menu
Page Arrow Right
Page Down
3 (numeric keypad)
Opens the next image.
Page Arrow Left
Page Up
9 (numeric keypad)
Opens the previous image.
Ctrl + S Saves the image.
Ctrl + Alt + S Saves a copy.
Ctrl + Alt + E Opens the Export dialog.
End Switches to the last image in the Filmstrip.
Home Switches to the first image in the Filmstrip.
Esc
Enter
Switches to the previous mode.
Edit Menu

ACDSee Photo Studio Home 2022
Page 458 of 506
Shortcut Resulting Action
Ctrl + Y Redo.
Ctrl + Z Undo.
Ctrl + Shift + Z Undo all.
Ctrl + C Copy.
Ctrl + V Paste.
Delete Delete.
Managing

ACDSee Photo Studio Home 2022
Page 459 of 506
Shortcut Resulting Action
Alt + 0 Clears the color label.
Alt + 1 Assigns a red color label.
Alt + 2 Assigns a yellow color label.
Alt + 3 Assigns a green color label.
Alt + 4 Assigns a blue color label.
Alt + 5 Assigns a purple color label.
Ctrl + 0 Clears the rating.
Ctrl + 1 Assigns a rating of 1.
Ctrl + 2 Assigns a rating of 2.
Ctrl + 3 Assigns a rating of 3.
Ctrl + 4 Assigns a rating of 4.
Ctrl + 5 Assigns a rating of 5.
Ctrl + K Opens the Keywords section of theProperties pane.
Alt + K Opens the Metadata tab of the Propertiespane.
\ (back slash) Tags the photo.
Ctrl + M Opens the Manage Metadata Presets dialogbox.
Ctrl + Alt + D Opens the Edit Caption dialog box.
Viewing

ACDSee Photo Studio Home 2022
Page 460 of 506
Shortcut Resulting Action
Ctrl + Page Arrow Right Toggles the right pane open and closed.
Ctrl + Page Arrow Left Toggles the left pane open and closed.
Ctrl + Page Arrow Down Toggles the bottom pane open and closed.
/ (forward slash) Zooms the image to its actual size.
Shift + 8
* (numeric keypad asterisk)
Fits the image to the viewing area.
+ (plus) Zooms in.
- (minus) Zoomed out.
F Displays the image full screen.
' Toggles Navigator open and closed whenzoomed into the image.
Z Displays saved version of the image.
Page Arrow Right Pans right when zoomed into the image.
Page Arrow Left Pans left when zoomed into the image.
Down Arrow Pans down when zoomed into the image.
Up Arrow Pans up when zoomed into the image.
Customizing the Interface

ACDSee Photo Studio Home 2022
Page 461 of 506
Shortcut Resulting Action
F2 Toggles the Filter Menu open and closed.
F4
Alt + Enter
Toggles the Properties pane open andclosed.
F5 Toggles the Filmstrip open and closed.
F6 Toggles the Info palette open and closed.
F7
Ctrl + Shift + H
Toggles the Histogram open and closed.
F10 Toggles the Colors pane open and closed.
Alt + F1 Toggles the Toolbar open and closed.
Alt + F2 Toggles the Filters toolbar open and closed.
Selecting
Alt + A Selects all.
Alt + D Deselects.
Alt + I Inverts selection.
Alt + Shift + S Saves the selection.
Alt + Shift + L Opens the Load Selection dialog box.
Alt + Shift + M Opens the Manage Selections dialog box
Filters

ACDSee Photo Studio Home 2022
Page 462 of 506
Shortcut Resulting Action
Y Opens the Red Eye Reduction tool.
Alt + P Opens the Repair tool.
X Opens the Text tool.
Alt + W Opens the Watermark tool.
Alt + B Opens the Border tool.
V Opens the Vignette tool.
Alt + S Opens the Special Effects panel.
T Opens the Tilt-Shift tool.
Alt + R Opens the Rotate tool.
Alt + F Opens the Flip tool.
C Opens the Crop tool.
J Opens the Resize tool.
Alt + X Opens the Exposure tool.
L Opens the Levels tool.
Alt + J Opens the Auto Levels tool.
U Opens the Tones Curves tool.
Q Opens the Light EQ™ tool.
A Opens the White Balance tool.
W Opens the Convert to Black & White tool.
Alt + M Opens the Color LUTs tool.
Alt + N Opens the Sharpen tool.
Alt + U Opens the Blur tool.
N Opens the Noise Reduction tool.
Alt + C Opens the Clarity tool.
Working Inside Filters
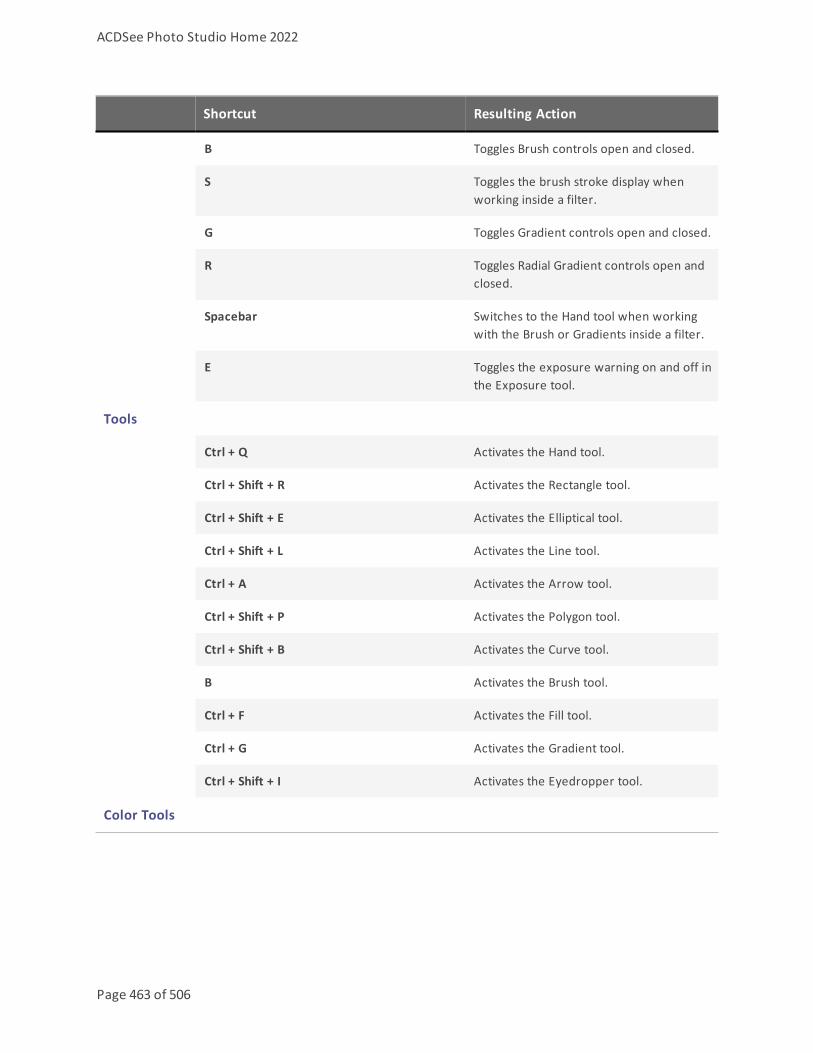
ACDSee Photo Studio Home 2022
Page 463 of 506
Shortcut Resulting Action
B Toggles Brush controls open and closed.
S Toggles the brush stroke display whenworking inside a filter.
G Toggles Gradient controls open and closed.
R Toggles Radial Gradient controls open andclosed.
Spacebar Switches to the Hand tool when workingwith the Brush or Gradients inside a filter.
E Toggles the exposure warning on and off inthe Exposure tool.
Tools
Ctrl + Q Activates the Hand tool.
Ctrl + Shift + R Activates the Rectangle tool.
Ctrl + Shift + E Activates the Elliptical tool.
Ctrl + Shift + L Activates the Line tool.
Ctrl + A Activates the Arrow tool.
Ctrl + Shift + P Activates the Polygon tool.
Ctrl + Shift + B Activates the Curve tool.
B Activates the Brush tool.
Ctrl + F Activates the Fill tool.
Ctrl + G Activates the Gradient tool.
Ctrl + Shift + I Activates the Eyedropper tool.
Color Tools

ACDSee Photo Studio Home 2022
Page 464 of 506
Shortcut Resulting Action
Ctrl + [ Opens the Foreground Color dialog box.
Ctrl + ] Opens the Background Color dialog box.
Ctrl + X Switches the foreground and backgroundcolor.
Selection Tools
Ctrl + R Activates the Rectangle Selection tool.
Ctrl + I Activates the Ellipse Selection tool.
Ctrl + L Activates the Lasso Selection tool.
Ctrl + W Activates the Magic Wand Selection tool.
Mode Switching
Ctrl + F1 Switches to Manage mode.
Ctrl + F2 Switches to Media mode.
Ctrl + F3 Opens the image in View mode.
Ctrl + F7 Switches to 365 mode.
Ctrl + F8 Switches to Dashboard mode.
Edit Mode Mouse Shortcuts
Use the following mouse shortcuts in Edit mode to make quick image adjustments.
To print this page for easy reference, right-click and select Print...

ACDSee Photo Studio Home 2022
Page 465 of 506
Shortcut Resulting Action
Shift + click Turns off the auto-collapse feature in the pane as you opengroups.
Shift + mouse wheel Makes large adjustments to the sliders.
Right-click Resets any slider to its default value.
Mouse wheel over slider Makes fine adjustments to a slider. Place your cursor overthe slider and scroll up or down.
Mouse wheel over image Adjusts brush size. Place your cursor over the image andscroll up or down to adjust nib width.
Shift + mouse wheel Adjusts feathering. Place your cursor over the image andscroll up or down to adjust feathering.
365 Mode Keyboard Shortcuts
Use the following keyboard shortcuts in the Transfer mode.
To print this page for easy reference, right-click and select Print...
If you would like to define your own keyboard shortcuts, see Customizing KeyboardShortcuts.

ACDSee Photo Studio Home 2022
Page 466 of 506
Shortcut Resulting Action
Alt + A Sets selected folder as an Upsync folder.
Alt + D Downloads selected files and folders.
Alt + Enter Displays Properties pane in the lower screen of Transfer mode.
Alt + Num + Group forward files and folders in the lower screen of Transfer mode.
Alt + Num - Group backward files and folders in the lower screen of Transfer mode.
Alt + O Displays Options dialog.
Alt + U Uploads selected files and folders.
Alt + Shift + U Upsyncs all files.
Ctrl + \ Selects tagged files.
Ctrl + A Selects all files and folders.
Ctrl + F8 Changes the view in the upper screen in Transfer mode to thumbnail viewof images in your account.
Ctrl + F12 Changes the view in the upper screen in Transfer mode to a detailed viewof images in your account.
Ctrl + Shift + D Clears image selection.
Ctrl + Shift + I Inverts image selection.
Ctrl + Shift + 1 Displays Folders pane in the lower screen of Transfer mode.
Ctrl + Shift + 2 Displays Catalog pane in the lower screen of Transfer mode.
Ctrl + Shift + 3 Displays Search pane in the lower screen of Transfer mode.
Ctrl + Shift + 4 Displays Calendar pane in the lower screen of Transfer mode.
Ctrl + Shift + 5 Shows or hides all Image Baskets.
Ctrl + W Closes ACDSee.
Delete Deletes files or folders.
Enter Opens the selected item in View mode.
F2 Renames files and folders.

ACDSee Photo Studio Home 2022
Page 467 of 506
Shortcut Resulting Action
F5 Refreshes the view.
F6 Displays thumbnails and details of folders and files in the lower screen ofTransfer mode.
F7 Displays filmstrip view of folders and files in the lower screen of Transfermode.
F8 Displays thumbnails of folders and files in the lower screen of Transfermode.
F9 Displays tile view of folders and files in the lower screen of Transfer mode.
F10 Displays icon view of folders and file types in the lower screen of Transfermode.
F11 Displays a list of folder and file types in the lower screen of Transfer mode.
F12 Displays a detailed view of folders and files in the lower screen of Transfermode.
Num + Sort forward files and folders in the lower screen of Transfer mode.
Num - Sort backward files and folders in the lower screen of Transfer mode.
Shift + Alt + A Displays 365.acdsee.com mode.
Shift + Alt + C Copies URL.
Shift + Alt + T Displays Transfer mode.
365 Mode Mouse Shortcuts
Use the following mouse shortcuts in Transfer mode.
To print this page for easy reference, right-click and select Print...
Shortcut Resulting Action
Click + drag Selects a group of images.
Ctrl + click Selects images you click on.
Shift + click Selects a group of images.

ACDSee Photo Studio Home 2022
Page 468 of 506
ACDSee PicaView Keyboard Shortcuts
You can use the following shortcut with ACDSee PicaView.
This Shortcut Has This Result
Shift + right-click animage
l If you have Display Image enabled: the image will not display in themain context menu.
l If you have Display Image disabled: the image will display in the maincontext menu.

ACDSee Photo Studio Home 2022
Page 469 of 506
Chapter 12: File Formats
Supported File Formats in ACDSee Home
Files that can be read by ACDSee:

ACDSee Photo Studio Home 2022
Page 470 of 506
ABR Adobe™ brush format
ACDC ACDSee Ultimate ACDC Image
AFPHOTO Affinity Thumbnails only
ANI Windows animated cursor Shows cursor animation
ARW Sony RAW
BMP Windows Bitmap Windows and OS/2;2/8/16/24/32 bpp; RLE anduncompressed
CNV Canvas Thumbnails only
CR2 Canon RAW CR2
CR3 Canon RAW CR3 To see applicable cameras, please refer to the supportedRAW format page on the ACDSee website.
cRAW Sony cRAW
CRW Canon RAW CRW
CUR Windows cursor
CVX Canvas Thumbnails only
DCR Kodak RAW DCR
DCX Multi-page PCX All sub-types and multiple pages supported
DNG Digital Negative An open-source archival format for RAW files
EMF Enhanced Metafile Format Win32 enhanced placeable metafiles
ERF Epson RAW
GIF Graphics Interchange Format Single page animated; 87a and 89a
GPR GoPro RAW
HDR Creo RAW
HEIF High Efficiency Image File Format Supports EXIF only. IPTC metadata is not supported forHEIC files
ICN AT&T ICN
ICO Windows icon Shows multiple resolutions as separate pages

ACDSee Photo Studio Home 2022
Page 471 of 506
JBR Corel brush format
JP2 JPEG2000 48-bit support
JPC JPEG2000 48-bit support
JPG JPEG JFIF JFIF and Adobe CMYK
MRW Konica Minolta RAW
NEF Nikon RAW
ORF Olympus RAW
PBR Corel PaintShop Pro brushformat
Up to 3072×2048 resolution (16BASE)
PCX ZSoft Publishers Paintbrush All sub-types supported
PEF Pentax RAW PEF, Samsung RAW
PCT Macintosh PICT
PNG Portable Network Graphics All sub-types supported
PSD Adobe PhotoShop Document RGB, grayscale, duotone, paletted and bi-level Lab colorinterpreted as grayscale only
RAF FujiFilm RAW
RAW Pentax RAW, Leica RAW, ContaxRAW, Casio RAW, Panasonic RAW
RWL Leica RAW
sRAW Canon sRAW
SRW Samsung SRW
SVG Scalable Vector Graphics Requires Windows 10 and the Creators' update.
TGA Targa TGA All sub-types supported
TIFF Tag Image File Format Bilevel / RGB / Paletted / CMYK / YCrCb / LOGL / LOGLUV;Uncompressed / PackBits / LZW / ThunderScan / SGILog /CCITT / ZIP / NEXT / New-JPEG (no v6.0 JPEG support)Support for multiple-page documents Kodak RAW TIFF,Canon RAW TIFF

ACDSee Photo Studio Home 2022
Page 472 of 506
WBMP Wireless Bitmap
WEBP Google WebP Format
WMF Windows Metafile Format Win 3.x placeable metafiles
Files that can be written by ACDSee:
ACDC ACDSee Ultimate ACDC Image Not supported on ACDSee Pro 9 and ACDSee 19
BMP Windows Bitmap Windows 1/8/24 bpp
GIF Graphics Interchange Format Non-interlaced GIF 89a only
GPR GoPro RAW
JP2 JPEG2000
JPEG JPEG JFIF
PCX ZSoft Publishers Paintbrush 8 and 24 bpp; RLE compressed
PNG Portable Network Graphics 1/4/8 bpp colormapped; 24 bpp RGB
PSD Adobe PhotoShop Document RGB, grayscale, duotone, paletted and bi-level Lab colorinterpreted as grayscale only
WBMP Wireless Bitmap
WEBP Google WebP Format
TGA Targa TGA 8 and 24 bpp. RLE and uncompressed top-down andbottom-up
TIFF Tag Image File Format 1/8/24 bits per pixel, single-page; uncompressed, CCITT3,CCITT4, LZW, Deflate (ZIP), and JPEG compression;Adjustable DPI tags
Archive read support formats:

ACDSee Photo Studio Home 2022
Page 473 of 506
ARJ ARJ archive ARJ format
CAB CAB archive Microsoft CAB file format
GZ GZ archive Unix GZIP (GnuZIP)
RAR RAR archive RAR format (RAR5 is not supported)
TAR TAR archive Unix TAR format
TGZ TGZ archive TAR format compressed with GZIP
ZIP ZIP archive Store and deflate
Archive write support formats:
ZIP ZIP archive Store and deflate
Video and audio read support formats:
AAC Audio Data Transport Format
ADST Audio Data Transport Stream
ASF Active Streaming File – HotMetaL Pro
AVI AVI movie format
M4A MPEG-4
M4V MPEG-4
MOV MPEG-4
MP3 MPEG Layer III compressed audio
MP4 MPEG-4
WAV Sound file
VMA Sound file
WMV Windows Metafile
ACDSee Photo Studio Home 2022
Page 474 of 506
About RAW Files
A RAW file is like a negative. RAW files contain all of the data that was collected by your digital camera'ssensor when you took a photo. If you tried to view a RAW file without processing, it would appearalmost completely black. It is therefore necessary to process your RAW files to produce a photo.
In ACDSee, you can view RAW files using the embedded thumbnail image created by your camera. Ifyou want to process RAW images, you must use a photo editing program such as ACDSee Professionalor ACDSee Ultimate, which includes tools for developing RAW images.
ACDSee will automatically apply geometry corrections to DNG files that include geometricdistortion correction tags. DNG files created from the Adobe DNG Converter© will oftengenerate geometric distortion tags for micro 4/3rds cameras.
Associating Files
ACDSee Home can work with a large number of file formats. ACDSee Home can be set as the defaultapplication for opening certain file types. This process is called associating files. When you associatefile types, you set ACDSee Home as the default program to open these kinds of files when you double-click them.
To Set File Association Options in ACDSee:
1. Click Tools | File Association Settings.
2. In the four format sections, check the checkboxes of the file formats you would like to associate withACDSee Home for image formats, RAW formats, media formats, and archive formats.
3. Click Save.
To Disassociate a File Type with ACDSee:
1. Click Tools | File Association Settings.
2. In the four format sections, uncheck the checkboxes of the file formats you would like to disassociatewith ACDSee Home for image formats, RAW formats, media formats, and archive formats.
3. Click Save.

Glossary

AActions, ACDSee Actions
You can record the steps you take when editing images in Edit mode. You can then save them as "ACDSee Actions". Oncesaved, you can apply the actions to other images. This is particularly useful for batch editing.
Album
Collection of images, often organized by theme or event. In ACDSee, albums contain shortcuts to where the images arestored on your hard drive.
Aliasing
Jagged edges caused by pixels. Occurs most often in low resolution images or images that have been enlarged. See jaggies.
Antialiasing, Anti-Aliasing
Software technique for reducing jagged lines, or ‘jaggies’. Uses shades of gray and color to smooth out the contrastbetween adjacent pixels.
Aspect Ratio
An image’s width-to-height ratio. For example, an image with an aspect ratio of 3:1 has a width 3 times larger than itsheight.
Azimuth
Angle of shadows that extend from the edges of image details. In ACDSee you can control azimuth when applying theEmboss effect to an image.
BBackground Processing
Tasks or programs that function without user interaction.
Barrel Distortion
In barrel distortion the photo appears to bulge outwards from the center.
Batch Editing
Any operation or tool, such as resizing, converting, or renaming, that can be used to adjust multiple images or filessimultaneously.
Bit
Bits are small units of computer memory. The color depth of your image is constrained by the number of bits available tostore color information. For example, it is possible to store 256 different color values per color channel in 8-bit RGB images.Similarly, it is possible to store 65,536 different color values per color channel in 18-bit images.
Blackpoint
An image’s darkest area. You can control the intensity of the black in an image by adjusting its blackpoint.
Blend Modes

Filters that change the effect of a tool or the appearance of a selected object.
Brightness
Light intensity of an image. You can make an image appear brighter or darker by adjusting its brightness.
Brush
A tool that you can use in Edit mode to isolate or indicate pixels you want to apply effects or adjustments to. The Brush inDrawing Tools can be used to draw in color on your image.
CCache
High-speed storage mechanism. The ACDSee Database is a cache.
Caption
Text associated with a file, or a comment or description added to a printed image.
Cataloging
Adding file information to the ACDSee database.
Category
Assign categories to photos to help sort and manage them more easily.
Chromatic Aberration
A lens artifact that can result in fringes in high contrast areas of some photos.
CMYK
Color model that uses cyan, magenta, yellow, and black (key) as its primary colors.
Color Cast
A color cast is a visible color tint that affects your image. For example, many digital cameras produce pictures with aslightly blue color cast. ACDSee includes a tool that removes an unwanted color cast.
Color Channel Value
Contains all pixel information for a single color. A grayscale image has one channel, while an RGB image has threechannels. You can adjust RGB values when editing a color.
Color Gamut
Range of colors that a device such as a printer or monitor can produce or display.
Color Management
Process of adjusting your computer settings so that the color output from your printer matches the colors you see onyour monitor.
Color Space

There are two types of color spaces: device-independent or device-dependent. A device-independent color space, such asRGB, describes all possible colors. A device-dependent color space describes the subset of colors (from the device-independent color space) that a particular device can reproduce. Device-dependent color spaces are used to map colorsbetween devices (for example, from a monitor to a printer) to ensure that colors are reproduced accurately.
Compression
Process that converts data to a storage format requiring less space than the original data.
Contact Sheet
Physical or digital page that contains a series of small images, usually in a grid format.
Context Menu
Menu that appears when you right-click within a program.
Contrast
Measure of an image’s color and brightness differences.
Convert
Change a file from one format to another. For example, you might convert a file from a bitmap (.bmp) to a JPEG (.jpg) toreduce the file size.
Cropping
Removing unwanted image areas.
DDatabase
Electronic filing system that provides fast access to stored data. The ACDSee Database contains two parts: a cachedthumbnail file and an information file. The cached thumbnail file contains small copies (thumbnails) of the images on yoursystem. The information file contains details about the files on your system, such as descriptions, dates, authors, notes,keywords, and categories.
Database Date
Date that you apply to the properties of a file and save in the ACDSee Database.
Descriptions
ACDSee stores descriptions in a hidden file named descript.ion. Descriptions such as file name and captions for an imagewill be included in the descript.ion files.
Dock
Attaching a toolbar, window, or pane to different screen areas.
DPI (dots per inch)

Measurement of an image’s resolution. For example, 92 DPI means 92 dots horizontally and 92 dots vertically, whichequals 8,464 dots per square inch. More dots per inch result in higher resolution and image quality.
Dynamic Range
The dynamic range of an image is directly related to the dynamic range of your digital camera's sensor. If your digitalcamera's sensor has a large dynamic range it can capture the darkest shadows and brightest highlights at the same time,without clipping the shadows or highlights. (RAW images preserve the dynamic range of your digital camera's sensor.)Adjusting the tonal range of the image changes how the dynamic range of the image is represented on a monitor or in aphoto.
EElevation
Height of an imaginary light source over an image. The elevation of the light source works in conjunction with azimuth togenerate a three-dimensional emboss effect.
Encode
Writing (or saving) a file format.
Encryption
Method of converting data into a secure format. You need a digital password or key to read an encrypted file.
EXIF (Exchangeable Image File)
Standard for storing information, primarily with images that use JPEG compression. Most digital cameras create EXIFinformation and embed it in the image file. For example, EXIF information can include details about shutter speed andwhether a flash was used.
Export
Moving data from one application to another. The exporting application places the data in a format that the otherapplication understands.
Exposure
Exposure is the amount of time that your digital camera's sensor is exposed to light.
FFace Detection, Facial Recognition
Face Detection will detect the faces of individuals in your images. You can assign names to the faces, and ACDSee willrecognize the individuals going forward. You can search for images using the names of the people in them.
Please note that Face Detection is only available for the 64-bit version of ACDSee Photo Studio Home.
Feather
Softening image edges to blend them into the background.
File Listing
In ACDSee, a report of the files currently displayed in Manage mode.
File Format
Medium for encoding information in a file. Each type of file has a different file format that specifies how it organizes theinformation it contains.
Filter
Program that can apply an effect to an image, such as an embossed appearance or a sepia tone.
Fisheye Distortion
In fisheye distortion, the photo appears to bulge outwards from the center, as if the photo were wrapped around asphere.
GGamma
Range of color values a monitor, scanner, or printer can display. Adjusting this value increases or decreases the intensityof the light spectrum.
Grayscale Image
Image composed of different shades of gray.
HHighlights
Highlights are the brightest or whitest parts of an image.
Histogram
A histogram is a graph that displays the dynamic range of shadows and highlights in an image.
Hue
Predominant color in an image.
IImage Editor
Program that you can use to create and edit images. ACDSee is an image editor.
Image Resolution
Quality of image details and colors. Also used to describe the quality of monitors and printer output.
Image Viewer
Program that displays images. ACDSee is an image viewer.
Import

Bringing data into an application from another using a format that the receiving application understands.
Interpolation
Process that uses nearby pixels to estimate the color of new pixels added to the larger image. For example, interpolationmight be used when enlarging a digital image.
IPTC
Standard method of encoding information within image files so that items such as descriptive comments and copyrightinformation can be transmitted with the image.
J-KJaggies
Individual pixels displayed in an image with low resolution. The appearance of pixels in an image causes lines and curves toappear jagged.
LLens Vignetting
Unusual darkness in the corners of images as a result of an inability of the lens to distribute light into the corners of theimage.
Lossless Compression
Form of compression that retains all image data and quality.
Lossless Rotation and Flipping
Rotation of a JPEG image without loss of image quality. This works best on images with dimensions that are a multiple of 8or 16.
Lossy Compression
Form of compression that attempts to remove unnecessary data. This data loss can affect image quality.
MMarquee
Dashed-line frame that identifies a selected portion of an image. Depending on the tool, you can resize or move a marqueewith or without changing the underlying image.
Metadata
Information about an image and how it was taken. This can be stored within the image itself or in a sidecar file. Forexample, the metadata of digital camera images can contain the date and time the picture was taken, the shutter speed,the exposure settings of the camera, and whether a flash was used.
Monochrome Image
Image containing a single color.

NNoise
Effect produced when a variety of pixel colors are used in the same color region. Noise often occurs in images with high ISOsetting or slow shutter speed.
OOpacity
Determines how visible an effect is when applied to an image or a selection. High opacity produces a more solid effect,while low opacity results in a nearly invisible effect.
Overexposed
Images that are overexposed have too many highlights, and tend to look faded. You typically overexpose images byexposing your digital camera's sensor to light for too long.
P-QPanning
Moving zoomed images vertically, horizontally, and diagonally across the display area to view specific areas of the image.
An acronym for Portable Document Format. You can view PDFs on any computer using the free Adobe Reader® software.
Perceptual
Rendering intent that scales all of the colors within one gamut to fit within another gamut. Best used for photographicimages, as it maintains the relationship between the colors more accurately than the colors themselves.
Photo Album
See album.
Photo Editor
See image editor.
Pincushion Distortion
In pincushion distortion the photo appears to shrink inwards toward the center.
Pixel (or Picture Element)
Smallest visible portion of a digital image, arranged in rows and columns.
Plug-in
Software module that adds functionality to a larger program.
PPI (pixels per inch)
Measurement of how an image is displayed. More pixels per inch result in higher image quality.

Presets
A preset contains image correction settings. You can create and use presets to ensure that settings you apply are the sameand consistent across all images.
Primary Colors
Colors that can produce other colors when blended. For example, in the RGB color model, red, green, and blue areprimary colors.
RRaster Image
Image composed of a rectangular grid of pixels. Each pixel contains a defined value about its color, size, and location in theimage. As a result, resizing the image can affect its quality.
Rasterize
To convert a vector layer to pixels, defining the resolution. To rasterize a layer can be seen as finalizing a layer, as it is nolonger editable.
Rating
Assign ratings (1, 2, 3, 4, 5) to photos to help sort and manage them more easily.
RAW
An image file format. RAW files contain all of the image data that was captured by your digital camera's sensor. RAW filesare not processed by your camera; instead, you must process RAW images using a photo editing program such as ACDSee.
Recursive
Program or task that can repeat itself indefinitely, such as a slideshow.
Red Eye
Red eye occurs when the light from your digital camera's flash reflects off the retinas in the subject's eyes. The subject'seyes look red instead of their normal color.
Relative Colorimetric
Rendering intent that maps the colors that fall exactly within the color gamuts of both the input and output devices. Bestused for single- or limited-color images as colors outside of both gamuts may be mapped to a single color.
Render
Drawing images to your screen.
Rendering Intent
Approach used to map colors from one color gamut to another. There are four rendering intents available: Perceptual,Relative Colorimetric, Saturation, and Absolute Colorimetric.
Resolution

Quality and clarity of an image, measured in pixels, dots per inch, or pixels per inch.
RGB
Color model that uses red, green, and blue as its primary colors.
Ringing Artifacts
Distortion around the edges of image subjects, caused by compressing or resizing an image.
SSaturation
Purity of a color. Higher color saturation results in more gray.
Saturation (rendering intent)
Rendering intent that maintains color saturation from one gamut to another. Best suited for images in which the actualcolor represented is less important than the color’s vividness.
Selection
Portion of an image that you define with a selection tool. A marquee surrounds a selection. ACDSee and ACD Photo Editorinclude selection tools.
Sepia
Sepia-toned images are composed of shades of brown. Many old photographs have a sepia tone.
Sharpen
The sharpen tool is for sharpening images. The original image is blurred slightly. This blurred version of the image issubtracted from the original image, revealing the edges in the original image. These edges can then be sharpened byincreasing contrast.
Sharpness
The sharpness in an image is determined, primarily, by your digital camera's lens and sensor. You can also create theillusion of sharpness by increasing the contrast between edges within an image.
Shortcut Menu
Menu that appears when you right-click within a program. Sometimes referred to as a context menu.
Slideshow
Automated sequential display of images. You can use slideshow software such as ACDSee to display slideshows of yourimages.
Soft Proofing
Using your computer's monitor as a proofing device. The monitor displays a simulation of how colors will appear whenrendered by the printer.
T

Tagging
Tagging, like categories and ratings, is a great way to organize and group your photos without moving the files intodifferent folders. You can tag a photo with one click. Similarly, you can display all tagged photos with one click.
Thumbnails
Small preview of a full-sized image.
Timestamp
Date and time associated with a file.
Transitions
Special effects used between images or video segments in slideshows, screensavers, and videos.
UUnderexposed
Images that are underexposed have too many shadows. Images typically become underexposed if you don't expose yourdigital camera's sensor to light long enough.
VVector Image
Image consisting of individual objects rather than pixels. Mathematical equations define the objects. You can adjust thesize of a vector image and the image will retain its clarity and quality.
WWatermark
Background text or graphics added to an image, usually to provide copyright protection.
White Balance
Removes color cast to create a photo that is correctly lit. You can use your camera settings to apply the correct whitebalance before taking an image, or correct the white balance in ACDSee.
Whitepoint
Lightest image area. You can control the intensity of the white in an image by adjusting its whitepoint.
X-ZXML (Extensible Markup Language)
Standard language for Web documents.
Zoom
In ACDSee, zoom refers to the process of increasing or decreasing the display scale for an image. Increase the display scaleto view a portion of an image or a specific image detail. Decrease the display scale to viewmore or all of the image.

Index

3
365mode 38
creating an account 372
creating folders 375
making folder public or private 375
privacy settings 375
rating system 375
uploading images 38
A
ACDSee
database 180
importing photos 42
user interface 18
ACDSeeMobile Sync 54
acquiring
importing 42
acquiring photos 42
Adjusting Clarity 362
Advanced Color 344
archiving files 154
assigning categories and color labels 92
assigning categories and ratings 89
associating files with ACDSee 474
audio
adding to images 221
recording to images 221
B
backing up
database 190
tips and strategies 191

batch editing
about 162
exposure 172
flipping 164
renaming 175
resizing 166
rotating 164
black and white 227
blurring 355
border 262
brightness 336
Brush 238
C
Calendar pane 63
Catalog pane
customizing 399
cataloging
assigning ratings 89
files 83
cataloging files 184
categories
assigning 89
finding unassigned images 135
managing 88
CD
getting photos 50
Photo discs 225
setting CD/DVD management options 401
clarity 362
color
changing color depth 227
color labels 92

color scheme 386, 426
committing changes 227
comparing images 78
contact sheets
creating 152
printing 161
converting
databases 186
descript.ion files 187
images to another file format 163
to grayscale 227
copying
files 111
images 112
Crayon Drawing effect 283
cropping 330
Crosshatch effect 284
customizing
Calendar pane 400
Catalog pane 399
Database 404
File List pane 390
File management 402
Folders pane 398
keyboard shortcuts 425
moving panes 22
Preview pane 397
toolbars 419
Viewmode 406
D
database
about 180

adding information to 117-118
backing up 190
cataloging files 184
converting 186
descript.ion files 187
excluding folders 183
exporting 188
importing 186
keywords 108
maintaining 192
mapping drives 194
optimizing 193
options 404
quarantining files 195
rebuilding thumbnails 194
restoring 192
tips and strategies 191
date
changing in multiple files 121
Dauber effect 285
descript.ion files 187
Details view 70
Details View options 396
digital camera
getting photos 44
plug-ins 44
display theme 386, 426
downloading
photos from a CD 50
photos from a digital camera 44
photos in ACDSee 42

dual monitors
moving the panes 23
Duplicate Finder 133
DVD
setting CD/DVD management options 401
E
E icon 61, 395
Edge Detect effect 287
Edit 233
Add Noise 361
Advanced Color 344
Auto Levels 339
Blur 355
Border 262
Clarity 362
Convert to Black & White 349
Crop 330
Flip 329
presets 236
Red Eye Reduction 251
Remove Noise 359
Repair tool 252
Resize 331
Rotate 328
Selections 246
Sharpen 354
Text 254, 258
Tone Curve 340
Vignette 269
Watermark 261
Edit Brush 238
Edit mode 37

Edited State
group by 72
editing
adding noise 361
adding text 254, 258
blurring 355
brightness 336
clarity 362
cloning 252
configuring editors 423
correcting shadows and highlights 341
cropping 330
exposure 339
flipping 329
HSL values 344
light levels 337
presets 236
removing noise 359
removing red eye 251
repairing 252
resizing 331
rotating 328
sharpen 354
special effects 272
tone curve 340
toolbars 419
effects
about 272
Bathroom Window 273
Blinds 274
Blur 296
Bulge 277

collage 280
Colored Edges 281
Contours 282
Crayon Drawing 283
Crosshatch 284
Dauber 285
Edge Detect 287
Emboss 287
Furry Edges 288
Glowing Edges 290
golden hue 291
Granite 291
Mirror 292
Negative 293
Oil Paint 294
Old 295
Outline 296
Pencil Drawing 298
Pixel Explosion 298
Pixelate 300
Posterize 300
Radial Waves 302
Rain 303
Ripple 305
Scattered Tiles 306
Sepia 307
Sheet Metal 309
Shift 310
Slant 311
Sobel 312
Solarize 313
Stained Glass 315

Sunspot 316
Swirl 316
Threshold 318
Topography 319
user defined 326
Vignette 269
Water 319
Water Drops 321
Waves 322
Weave 324
Wind 325
emailing images 138-139
Emboss effect 287
excluding folders from database 183
EXIF
adding EXIF information 117-118
viewing 101
exporting database information 188
Exporting Keywords 110
exposure
adjusting automatically 339
adjusting for multiple images 172
F
Face 213
Face Detection 68, 213
Face Recognition 68, 214
Facial Recognition 213-214
Favorites pane 66
File List pane
customizing 390
filtering files 71
full screen 62

setting Details View options 396
setting File List options 390
setting thumbnail display options 393
using 57
views 70
files
archiving 155
associating with ACDSee 474
cataloging 83
cataloging in the database 184
changing dates 121
copying and moving 111
details 70
finding duplicates 133
listing 189
management options 402
map coordinates 105
pasting 112
properties 100
quarantining 195
renaming 113
replacing 113
selecting 75
sorting 74
synchronizing between folders 122
filtering files 71
flipping
in Edit 329
multiple photos 164
folders
browsing 62
excluding from database 183

pasting 112
renaming 113
synchronizing files 122
synchronizing in Viewmode 224
Folders pane
options 398
using 62
footer
in Viewmode 216
printing on pages 160
fullscreen mode 33
Furry Edges effect 288
G
getting photos
renaming templates 51
glossary 475
Glowing Edges effect 290
Gradient 240
Granite effect 291
grayscale 227
Group by
Edited State 72
H
header
in Viewmode 216
printing on pages 160
Heal tool 252
hicolor 227
highlights 341
histogram 213, 352
home folder 386

HSL 344
HTML album 150
I
image advance 215
Image Basket 82
ImageWell 135
images
adding audio 221
comparing 78
converting to another format 163
copying 112
downloading 42
emailing 138-139
extracting from video files 220
finding quickly 135
import 44
importing 42
panning 231
uploading 373
viewing 33
import
photos 44
importing
images 42
importing database information 186
Importing Keywords 110
importing photos
from a CD 50
from a digital camera 44
from a disk 50
IPTC
adding IPTC information 117

removing IPTC keywords auto categories 120
viewing 101
J
JPEG options 427
K
keyboard shortcuts
customizing 425
Manage mode 428
Viewmode 440
keywords 108
L
labels
assigning 92
Light EQ™ 341
light levels 337
listing files 189
local contrast enhancement 341
M
magnifying glass 231
Manage mode
customizing toolbars 419
Favorites pane 66
File List pane 57
Folders pane 62
Image Basket 82
keyboard shortcuts 428
Map pane 105
options 385
Properties pane 100
Quick Search bar 124
Search pane 126

Selective Browsing pane 130
using 20
views 70
Map pane
using 105
Mirror effect 292
mobile sync 54
modes
switching 20
mouse shortcuts 455
moving
files 111
Manage mode panes 20
multiple images
adjusting exposure 172
renaming 175
resizing 166
N
navigator 230
Negative effect 293
noise
about 358
adding to an image 361
removing from an image 359
O
Oilpaint effect 294
Old effect 295
optimizing the database 193
options
ACDSee Quick View 380
Calendar pane 400

Catalog pane 399
contact sheet 161
database 404
file management 402
Folders 398
general 383
Manage mode 385
Preview pane 397
Viewmode 406
organizing
assigning categories 89
assigning color labels 92
finding images quickly 135
managing categories 88
originals
showing 226
Orton effect 296
Outline effect 296
overwriting files 113
P
panes
auto-hiding 418
moving 22
resetting to default layout 20
PDF 148
Pencil Drawing effect 298
photo discs 225
Photo Repair tool 252
photos 280
PicaView 379
Pixel Explosion effect 298
pixel resize options 333

Pixelate effect 300
plug-ins
about 195
managing 196
viewing properties 196
polaroid 280
Posterize effect 300
Preview pane
customizing 397
using 76
printing
contact sheet options 161
custom print formats 158
setting size and positioning 159
text on pages 160
Properties pane
options 402
using 100
Q
quarantining files 195
R
Radial Waves effect 302
Rain effect 303
ratings
assigning 89
recognition 213
recording image audio 221
red eye reduction 251
removeable devices 44
renaming
file or folder 113

multiple files 175
while getting photos 51
replacing files 113
resizing
multiple images 166
one image 331
restoring database information 192
restoring originals 237
retro effect 291
Ripple effect 305
rotating
in Edit 328
in Manage and Viewmode 77, 212
multiple photos 164
S
Scattered Tiles effect 306
screen capture 135
screensavers
creating 139
sharing 146
Search pane 126
searching
file name patterns 129
for duplicate files 133
ImageWell 135
Quick Search bar 124
setting Quick Search options 386
wildcards 129
with ACDSee 124
with the Search pane 126
second monitor
moving the panes 23

selecting
files 75
part of an image 217
Selections tool 246
Selective Browsing 130
Sepia effect 307
sharing
archives 154
contact sheets 152
emailing images 138-139
HTML albums 150
PDFs 148
screensavers 146
slideshows 146
with ACDSee 135
sharpen 354
Sheet Metal effect 309
Shift effect 310
shortcuts
Manage mode 428
mouse 455
Viewmode 440
Slant effect 311
slideshows
configuring 142
image advance 215
sharing 146
Sobel effect 312
Solarize effect 313
sorting files 74
sound
adding to images 221

recording 221
Stained Glass effect 315
start folder
default 386
Sunspot effect 316
Swirl effect 316
switching
modes 20
sync
uploading images 373
sync to web 373
synchronizing
files between folders 122
Viewmode to a folder 224
T
tagging images 116
text
adding to an image 254, 258
adding to pages (printing) 160
displaying on images in Viewmode 216
lists of files 189
theme
color 386, 426
Threshold effect 318
thumbnails
rebuilding 194
setting display options 393
setting ratio options 395
views 70
timestamp 121
timestamps 121
toolbars 419

Topography effect 319
truecolor 227
U
undo/redo 237
USB mass storage device
about 44
user interface 18
V
Vibrance 344
video files
extracting frames 220
Viewmode
automatic zooming 229
customizing 406
displaying text 216
fullscreen mode 33
histogram 213, 352
image advance 215
keyboard shortcuts 440
magnifying glass 231
mouse shortcuts 455
navigator 230
panning 231
setting display options 409
setting zoom level 228
synchronizing to a folder 225
using 32
zooming an image 228
viewing
file properties 218
file types in the File List 71

fullscreen 33
images 32
images in another application 226
text on images in Viewmode 216
Vignette effect 269
W
wallpaper 224
Water Drops effect 321
Water effect 319
watermarks 261
Waves effect 322
Weave effect 324
White Balance 343
wildcards 129
Wind effect 325
Z
zooming
automatically 229
setting level 228