
Upgrading Oracle Traffic Director
74
Oracle® Fusion Middleware Upgrading Oracle Traffic Director 12c (12.2.1.4.0) E95411-04 May 2021
-
Upload
khangminh22 -
Category
Documents
-
view
0 -
download
0
Transcript of Upgrading Oracle Traffic Director
Oracle® Fusion MiddlewareUpgrading Oracle Traffic Director
12c (12.2.1.4.0)E95411-04May 2021

Oracle Fusion Middleware Upgrading Oracle Traffic Director, 12c (12.2.1.4.0)
E95411-04
Copyright © 2018, 2021, Oracle and/or its affiliates.
Primary Author: Oracle Corporation
This software and related documentation are provided under a license agreement containing restrictions onuse and disclosure and are protected by intellectual property laws. Except as expressly permitted in yourlicense agreement or allowed by law, you may not use, copy, reproduce, translate, broadcast, modify, license,transmit, distribute, exhibit, perform, publish, or display any part, in any form, or by any means. Reverseengineering, disassembly, or decompilation of this software, unless required by law for interoperability, isprohibited.
The information contained herein is subject to change without notice and is not warranted to be error-free. Ifyou find any errors, please report them to us in writing.
If this is software or related documentation that is delivered to the U.S. Government or anyone licensing it onbehalf of the U.S. Government, then the following notice is applicable:
U.S. GOVERNMENT END USERS: Oracle programs (including any operating system, integrated software,any programs embedded, installed or activated on delivered hardware, and modifications of such programs)and Oracle computer documentation or other Oracle data delivered to or accessed by U.S. Governmentend users are "commercial computer software" or "commercial computer software documentation" pursuantto the applicable Federal Acquisition Regulation and agency-specific supplemental regulations. As such,the use, reproduction, duplication, release, display, disclosure, modification, preparation of derivative works,and/or adaptation of i) Oracle programs (including any operating system, integrated software, any programsembedded, installed or activated on delivered hardware, and modifications of such programs), ii) Oraclecomputer documentation and/or iii) other Oracle data, is subject to the rights and limitations specified in thelicense contained in the applicable contract. The terms governing the U.S. Government’s use of Oracle cloudservices are defined by the applicable contract for such services. No other rights are granted to the U.S.Government.
This software or hardware is developed for general use in a variety of information management applications.It is not developed or intended for use in any inherently dangerous applications, including applications thatmay create a risk of personal injury. If you use this software or hardware in dangerous applications, then youshall be responsible to take all appropriate fail-safe, backup, redundancy, and other measures to ensure itssafe use. Oracle Corporation and its affiliates disclaim any liability for any damages caused by use of thissoftware or hardware in dangerous applications.
Oracle and Java are registered trademarks of Oracle and/or its affiliates. Other names may be trademarks oftheir respective owners.
Intel and Intel Inside are trademarks or registered trademarks of Intel Corporation. All SPARC trademarks areused under license and are trademarks or registered trademarks of SPARC International, Inc. AMD, Epyc,and the AMD logo are trademarks or registered trademarks of Advanced Micro Devices. UNIX is a registeredtrademark of The Open Group.
This software or hardware and documentation may provide access to or information about content, products,and services from third parties. Oracle Corporation and its affiliates are not responsible for and expresslydisclaim all warranties of any kind with respect to third-party content, products, and services unless otherwiseset forth in an applicable agreement between you and Oracle. Oracle Corporation and its affiliates will notbe responsible for any loss, costs, or damages incurred due to your access to or use of third-party content,products, or services, except as set forth in an applicable agreement between you and Oracle.

Contents
Preface
Audience vi
Documentation Accessibility vi
Related Documents vi
Conventions vii
Part I Getting Started
1 Introduction to Upgrading Oracle Traffic Director to 12c (12.2.1.4.0)
About the Starting Points for Oracle Traffic Director Upgrade 1-1
About Oracle Traffic Director Standard Topologies 1-2
About Upgrade Restrictions 1-3
2 Pre-Upgrade Requirements
Pre-Upgrade Checklist 2-1
Creating a Complete Backup 2-3
Backing Up the Schema Version Registry Table 2-3
Maintaining Customized Domain and Environment Settings 2-3
Verifying Certification and System Requirements 2-4
Verify Your Environment Meets Certification Requirements 2-5
Verify System Requirements and Specifications 2-5
Verify That the Database Hosting Oracle Fusion Middleware is Supported 2-5
Verify That the JDK Is Certified for This Release of Oracle Fusion Middleware 2-6
Updating Policy Files when Using Enhanced Encryption (AES 256) 2-6
Purging Unused Data 2-7
Creating an Edition on the Server for Edition-Based Redefinition 2-7
Creating a Non-SYSDBA User to Run the Upgrade Assistant 2-8
Identifying Existing Schemas Available for Upgrade 2-10
iii

Part II Upgrading Oracle Traffic Director from 11g Release
3 Upgrading Oracle Traffic Director from 11g Release
About Oracle Traffic Director Upgrade Process from 11g Release 3-1
Preparing to Upgrade Oracle Traffic Director 11g to the Latest 12c (12.2.1.4.0)Version 3-3
Installing the Product Distributions 3-5
Performing Pre-Upgrade Tasks on Oracle Traffic Director 11g Environment to beUpgraded 3-7
Stopping Servers and Processes 3-8
Stopping Oracle Traffic Director Instances in 11g Environment 3-9
Stopping Oracle Traffic Director 11g Instances Using the AdministrationConsole 3-10
Stopping Oracle Traffic Director 11g Instances Using the CLI Mode 3-10
Starting the Upgrade Assistant for Oracle Traffic Director 11g Specific Upgrade 3-11
Upgrade Assistant Parameters Specific to Oracle Traffic Director 3-12
Upgrading Oracle Traffic Director 11g Component Configurations 3-14
Upgrading Oracle Traffic Director 11g in Graphical Mode 3-14
Upgrading Oracle Traffic Director 11g in Silent Mode 3-15
Verifying Oracle Traffic Director Component Configurations for a SuccessfulUpgrade 3-18
Post-Upgrade Tasks 3-18
Starting Servers and Processes After an Upgrade for Oracle Traffic Director 3-19
Starting Servers and Processes 3-19
Part III Upgrading Oracle Traffic Director from an Earlier or a Previous12c Release
4 Upgrading Oracle Traffic Director from a Previous 12c Release
About Oracle Traffic Director Upgrade Process from an Earlier or a Previous 12cRelease 4-1
Preparing to Upgrade Oracle Traffic Director from an Earlier or a Previous 12c to theLatest 12c 4-4
Installing the Product Distributions 4-5
Performing Pre-Upgrade Tasks on Oracle Traffic Director Domain to be Upgraded 4-7
Stopping Servers and Processes 4-8
Managing Oracle Traffic Director Instances in 12c Environment 4-9
Starting, Stopping, and Restarting 12c Oracle Traffic Director InstancesUsing Fusion Middleware Control 4-9
iv
Starting, Stopping, and Restarting Oracle Traffic Director 12c InstancesUsing Oracle WebLogic Scripting Tool (WLST) 4-10
Reconfiguring the Existing Domain in Oracle Traffic Director 4-10
Reconfiguring the Existing Oracle Traffic Director Domain in Graphical Mode 4-11
Reconfiguring the Existing Oracle Traffic Director Domain Using OracleWebLogic Scripting Tool 4-11
Starting the Upgrade Assistant for Oracle Traffic Director 12c Specific Upgrade 4-12
Upgrade Assistant Parameters Specific to Oracle Traffic Director 4-12
Upgrading a Collocated Domain 4-14
Upgrading Collocated Oracle Traffic Director in Graphical Mode 4-15
Upgrading Collocated Oracle Traffic Director in Silent Mode 4-16
Upgrading Remote Managed Domains 4-18
Installing Product Binaries 4-18
Packing the Upgraded Collocated Domain 4-18
Unpacking the Upgraded Collocated Domain on the Remote Nodes 4-19
Upgrading a Standalone Domain 4-19
Upgrading Standalone Oracle Traffic Director in Graphical Mode 4-20
Upgrading Standalone Oracle Traffic Director in Silent Mode 4-21
Verifying the Component Configurations for a Successful Upgrade 4-22
Post-Upgrade Tasks 4-23
Starting Servers and Processes 4-23
Starting Servers and Processes 4-24
Part IV Troubleshooting and Advanced Configurations
5 Troubleshooting the Upgrade
Troubleshooting Upgrade Performance Errors 5-1
A Upgrading the JDK After Installing and Configuring an OracleFusion Middleware Product
About Updating the JDK Location After Installing an Oracle Fusion MiddlewareProduct A-1
Updating the JDK Location in an Existing Oracle Home A-2
Updating the JDK Location in an Existing Domain Home A-2
v
Preface
This document describes how to upgrade an existing Oracle Traffic Directorenvironment to 12c (12.2.1.4.0).
AudienceIdentify the target audience for your book and learn more about this documentintended for.
This document is intended for system administrators who are responsible for installing,maintaining, and upgrading Oracle Traffic Director. It is assumed that readers haveknowledge of the following:
• Oracle Fusion Middleware system administration and configuration.
• Configuration parameters and expected behavior of the system being upgraded.
Documentation AccessibilityGet more information about Oracle's commitment to accessibility and support throughMy Oracle Support.
For information about Oracle's commitment to accessibility, see Oracle AccessibilityProgram website at http://www.oracle.com.
Access to Oracle Support
Oracle customers that have purchased support have access to electronic supportthrough My Oracle Support.
For details, see My Oracle Support. If you are hearing impaired, see http://www.oracle.com/pls/topic/lookup?ctx=acc&id=trs.
Related DocumentsLook for all the documents that you want to refer in Fusion Middleware from variousdocumentation libraries.
For more information, see the following documents, which are available on the homepage of Fusion Middleware Documentation:
• For Oracle Fusion Middleware getting started related information, see FusionMiddleware Getting Started.
• For Oracle Fusion Middleware installation related information, see FusionMiddleware Installation Documentation.
Preface
vi

• For Oracle Fusion Middleware upgrade related information, see FusionMiddleware Upgrade Documentation.
• For Oracle Fusion Middleware administration-related information, see FusionMiddleware Administration Documentation.
• For Oracle Fusion Middleware release-related information, see Fusion MiddlewareRelease Notes Documentation.
ConventionsLearn about the conventions used in this document.
This document uses the following text conventions:
Convention Meaning
boldface Boldface type indicates graphical user interface elementsassociated with an action, or terms defined in text or the glossary.
italic Italic type indicates book titles, emphasis, or placeholder variablesfor which you supply particular values.
monospace Monospace type indicates commands within a paragraph, URLs,code in examples, text that appears on the screen, or text that youenter.
Preface
vii
Part IGetting Started
This part of Upgrading Oracle Traffic Director introduces Oracle Traffic Director andprovides steps you must perform to prepare for upgrading to the latest version of 12c(12.2.1.4.0).
1Introduction to Upgrading Oracle TrafficDirector to 12c (12.2.1.4.0)
Before you begin an upgrade to Oracle Traffic Director 12c (12.2.1.4.0), make surethat you understand the standard upgrade topologies and upgrade paths for yourdomain.
Following the introductory information and preparation steps, the procedures in thisguide are divided into two sections. It is important that you refer to the correct set ofprocedures for your domain.
• Upgrades from 11g, described in Upgrading Oracle Traffic Director from 11gRelease
• Upgrades from a previous 12c release, described in Upgrading Oracle TrafficDirector from a Previous 12c Release
Note:
For general information about Fusion Middleware upgrade planning andother upgrade concepts and resources, see the following sections inPlanning an Upgrade of Oracle Fusion Middleware.
• Planning an Upgrade to Oracle Fusion Middleware 12c
• Understanding In-Place Versus Out-of-Place Upgrades
• Understanding the Basic 12c Upgrade Tasks
See the following documents for more information on Oracle Traffic Director:
• Fusion Middleware Release Notes for Oracle Traffic Director
• Fusion Middleware Administering Oracle Traffic Director
The following topics describe the concepts related to upgrading Oracle Traffic Director:
About the Starting Points for Oracle Traffic Director UpgradeYou can upgrade Oracle Traffic Director from 11g or from a previous 12c release.Thisguide provides information for upgrading from supported 11g and 12c releases.
1-1
Note:
As of 12.2.1.4.0, Oracle Traffic Director is deprecated.
In the future, use Oracle HTTP Server or Kubernetes Load Balancer forequivalent functionality.
The upgrade procedures in this guide explain how to upgrade an existing OracleTraffic Director 11g (11.1.1.9.0) or existing 12c (12.2.1.2 or 12.2.1.3) release versionto the latest Oracle Fusion Middleware 12c (12.2.1.4.0) release version. If yourdomain contains other components that also need to be upgraded, links to supportingdocumentation are provided.
Important:
To run your upgrade process, you must have an existing WebLogic Serverdomain. You cannot upgrade from your existing 11g to an Oracle TrafficDirector standalone domain, as upgrading Oracle Traffic Director from 11g to12c standalone is not supported.
About Oracle Traffic Director Standard TopologiesThe steps to upgrade Oracle Traffic Director to 12c (12.2.1.4.0) depend on the currentproduction topology (either 11g or a previous 12c release).
As a result, it is difficult to provide exact upgrade instructions for every possibleOracle Traffic Director installation. Therefore, this upgrade documentation providesinstructions for upgrading several typical Oracle Traffic Director topologies. Thesetypical topologies are referred to as standard upgrade topologies.
Your actual topology may vary, but the topologies described here provide an examplethat can be used as a guide to upgrade other similar Oracle Traffic Director topologies.
Note:
For your upgrade process and planning resources, see Preparing to Upgradein Planning an Upgrade of Oracle Fusion Middleware.
Tip:
For a list of Oracle Fusion Middleware documents available in HTML andPDF formats, see the documentation website: https://docs.oracle.com/en/middleware/.
Chapter 1About Oracle Traffic Director Standard Topologies
1-2
About Upgrade RestrictionsIf you are using two or more Oracle Fusion Middleware products of the same ordifferent versions in a single, supported, Oracle Fusion Middleware configuration,you must consider the interoperability and compatibility factors before planning theupgrade.
Interoperability
In the context of Oracle Fusion Middleware products, interoperability is defined asthe ability of two Oracle Fusion Middleware products or components of the sameversion (or release) to work together (interoperate) in a supported Oracle FusionMiddleware configuration. Specifically, interoperability applies when the first 4 digits ofthe release or version number are the same. For example, Oracle Fusion Middleware12c (12.2.1.0) components are generally interoperable with other 12c (12.2.1.4.0)components.
Compatibility
In the context of Oracle Fusion Middleware products, compatibility is defined as theability of two Oracle Fusion Middleware components of different versions (or releases)to interoperate.
For a list of products and features available in Oracle Fusion Middleware Release12.2.1.4.0, see Products and Features Available in Oracle Fusion Middleware inUnderstanding Interoperability and Compatibility.
When performing the upgrade of your hardware or software, verify that your OracleFusion Middleware software is certified to support the new operating system orcomputer hardware. For more information, refer to the following resources:
• Oracle Fusion Middleware Supported System Configurations
• Oracle® Fusion Middleware System Requirements and Specifications
Chapter 1About Upgrade Restrictions
1-3
2Pre-Upgrade Requirements
Before you begin to upgrade Oracle Traffic Director 12c (12.2.1.4.0), you must performpre-upgrade tasks such as backing up, cloning your current environment, and verifyingthat your system meets certified requirements.
Pre-Upgrade ChecklistThe Pre-Upgrade Checklist identifies tasks that can be performed before you beginyour upgrade to ensure that you have a successful upgrade and limited downtime.
Upgrades are performed while the servers are down. This checklist is meant to identifyimportant — and often time-consuming — pre-upgrade tasks that you can performbefore the upgrade to limit your downtime. The more preparation you can do beforeyou begin the upgrade process, the less time you spend offline.
Note:
The pre-upgrade procedures you perform depends on the configurationof your existing system, the components you are upgrading, and theenvironment that you want to create at the end of the upgrade andconfiguration process. Complete only those tasks that apply to yourconfigurations or use cases.
This table describes the Pre-Upgrade Checklist. It lists all the required componentsand describes them in detail.
Table 2-1 Tasks to Perform Before You Upgrade Oracle Fusion Middleware
Task Description
RequiredCreate a complete backup of your existingenvironment.
Back up all system-critical files and databases thatcontain any schemas that are to be upgraded. Ifthe upgrade fails, you must restore your pre-upgradeenvironment and begin the upgrade again.See Creating a Complete Backup.
• Make sure that your backup includes the schemaversion registry table. See Backing Up the SchemaVersion Registry Table.
• If you have modified or customized any of thestartup scripts or any of the configuration files inyour existing domain (for example, setting a valuefor the cookie-path property), you need to copythem to the temporary directory location (outsideof the existing domain) during the upgrade, andredeploy them after the upgrade.
2-1
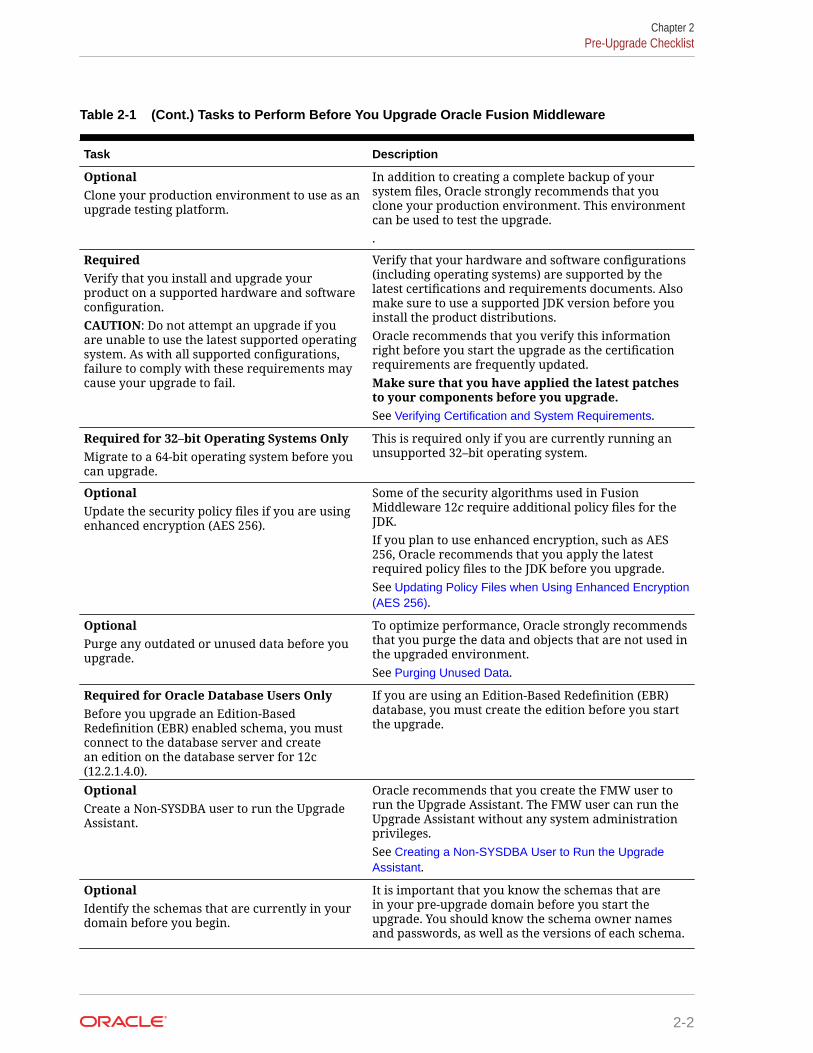
Table 2-1 (Cont.) Tasks to Perform Before You Upgrade Oracle Fusion Middleware
Task Description
OptionalClone your production environment to use as anupgrade testing platform.
In addition to creating a complete backup of yoursystem files, Oracle strongly recommends that youclone your production environment. This environmentcan be used to test the upgrade..
RequiredVerify that you install and upgrade yourproduct on a supported hardware and softwareconfiguration.CAUTION: Do not attempt an upgrade if youare unable to use the latest supported operatingsystem. As with all supported configurations,failure to comply with these requirements maycause your upgrade to fail.
Verify that your hardware and software configurations(including operating systems) are supported by thelatest certifications and requirements documents. Alsomake sure to use a supported JDK version before youinstall the product distributions.Oracle recommends that you verify this informationright before you start the upgrade as the certificationrequirements are frequently updated.Make sure that you have applied the latest patchesto your components before you upgrade.See Verifying Certification and System Requirements.
Required for 32–bit Operating Systems OnlyMigrate to a 64-bit operating system before youcan upgrade.
This is required only if you are currently running anunsupported 32–bit operating system.
OptionalUpdate the security policy files if you are usingenhanced encryption (AES 256).
Some of the security algorithms used in FusionMiddleware 12c require additional policy files for theJDK.If you plan to use enhanced encryption, such as AES256, Oracle recommends that you apply the latestrequired policy files to the JDK before you upgrade.See Updating Policy Files when Using Enhanced Encryption(AES 256).
OptionalPurge any outdated or unused data before youupgrade.
To optimize performance, Oracle strongly recommendsthat you purge the data and objects that are not used inthe upgraded environment.See Purging Unused Data.
Required for Oracle Database Users OnlyBefore you upgrade an Edition-BasedRedefinition (EBR) enabled schema, you mustconnect to the database server and createan edition on the database server for 12c(12.2.1.4.0).
If you are using an Edition-Based Redefinition (EBR)database, you must create the edition before you startthe upgrade.
OptionalCreate a Non-SYSDBA user to run the UpgradeAssistant.
Oracle recommends that you create the FMW user torun the Upgrade Assistant. The FMW user can run theUpgrade Assistant without any system administrationprivileges.See Creating a Non-SYSDBA User to Run the UpgradeAssistant.
OptionalIdentify the schemas that are currently in yourdomain before you begin.
It is important that you know the schemas that arein your pre-upgrade domain before you start theupgrade. You should know the schema owner namesand passwords, as well as the versions of each schema.
Chapter 2Pre-Upgrade Checklist
2-2
Creating a Complete BackupBefore you start an upgrade, back up all system-critical files, including the databasesthat host your Oracle Fusion Middleware schemas.
The backup must include the SYSTEM.SCHEMA_VERSION_REGISTRY$ table so that youcan restore the contents back to its pre-upgrade state if the upgrade fails.
The Upgrade Assistant Prerequisites screen prompts you to acknowledge thatbackups have been performed before you proceed with the actual upgrade. However,note that the Upgrade Assistant does not verify that a backup has been created.
See:
• Backing Up Your Environment in Administering Oracle Fusion Middleware
• Upgrading and Preparing Your Oracle Databases for 12c (12.2.1.4.0) in Planningan Upgrade of Oracle Fusion Middleware
Backing Up the Schema Version Registry TableYour system backup must include the SYSTEM.SCHEMA_VERSION_REGISTRY$ table or theFMWREGISTRY.SCHEMA_VERSION_REGISTRY$ table.
Each Fusion Middleware schema has a row in the SYSTEM.SCHEMA_VERSION_REGISTRY$table. If you run the Upgrade Assistant to update an existing schema and it does notsucceed, you must restore the original schema before you can try again. Before yourun the Upgrade Assistant, make sure you back up your existing database schemasand the schema version registry.
Note:
Before you upgrade a schema using the Upgrade Assistant, you mustperform a complete database backup. During the upgrade, you are requiredto acknowledge that backups have been performed.
Maintaining Customized Domain and Environment SettingsIf you have modified any domain-generated, server startup scripts, or configurationfiles in your pre-upgrade environment, it is important to note that these changes areoverwritten during the installation, domain upgrade, and reconfiguration operations.Save your customized files to a shared library location so that you can continue to usethem after the upgrade.
Every domain installation includes dynamically-generated domain and server startupscripts, such as setDomainEnv. These files are replaced by newer versions during theinstallation and upgrade process. To maintain your custom domain-level environmentsettings, Oracle recommends that you create a separate file to store the customdomain information before you upgrade, instead of modifying the scripts directly.
For example, if you want to customize server startup parameters that apply to allservers in a domain, you can create a file called setUserOverrides.cmd (Windows) orsetUserOverrides.sh (UNIX) and configure it to add custom libraries to the WebLogic
Chapter 2Creating a Complete Backup
2-3

Server classpath, specify additional command-line options for running the servers, orspecify additional environment variables. When using the pack and unpack commands,any custom settings that you add to this file are preserved during the domain upgradeoperation and are carried over to the remote servers.
The following example illustrates startup customizations in a setUserOverrides file:
# add custom libraries to the WebLogic Server system claspath if [ "${POST_CLASSPATH}" != "" ] ; then POST_CLASSPATH="${POST_CLASSPATH}${CLASSPATHSEP}${HOME}/foo/fooBar.jar" export POST_CLASSPATH else POST_CLASSPATH="${HOME}/foo/fooBar.jar" export POST_CLASSPATH fi # specify additional java command-line options for serversJAVA_OPTIONS="${JAVA_OPTIONS} -Dcustom.property.key=custom.value"
If the setUserOverrides file exists during a server startup, the file is included in thestartup sequence and any overrides contained within this file take effect. You muststore the setUserOverrides file in the EXISTING_DOMAIN_HOME/bin directory.
Note:
If you are unable to create the setUserOverrides script before an upgrade,you need to reapply your settings as described in Re-apply Customizationsto Startup Scripts in Upgrading Oracle WebLogic Server.
Verifying Certification and System RequirementsReview the certification matrix and system requirements documents to verify that yourenvironment meets the necessary requirements for installation.
Note:
When checking the certification, system requirements, and interoperabilityinformation, be sure to check specifically for any 32-bit or 64-bit systemrequirements. It is important for you to download software specificallydesigned for the 32-bit or 64-bit environment, explicitly.
WARNING:
Make sure that your current environment has been patched to the latestpatch set before you begin the upgrade. Certifications are based on fullypatched environments, unless stated otherwise.
Chapter 2Verifying Certification and System Requirements
2-4
Verify Your Environment Meets Certification RequirementsOracle has tested and verified the performance of your product on all certified systemsand environments. Make sure that you are installing your product on a supportedhardware or software configuration.
Whenever new certifications occur, they are added to the appropriate certificationdocument right away. New certifications can occur at any time, and for this reasonthe certification documents are kept outside of the documentation libraries andare available on Oracle Technology Network. See the Certification Matrix for 12c(12.2.1.4.0).
Verify System Requirements and SpecificationsIt is important to verify that the system requirements such as disk space, availablememory, specific platform packages and patches, and other operating system-specificitems are met.
Use the Oracle Fusion Middleware System Requirements and Specificationsdocument to verify that the requirements of the certification are met. For example,if the Certification Matrix for 12c (12.2.1.4.0) indicates that your product is certifiedfor installation on 64-Bit Oracle Linux 7, the System Requirements and Specificationsdocument should be used to verify that your Oracle Linux 7 system has met therequired minimum specifications such as disk space, available memory, specificplatform packages and patches, and other operating system-specific items. Thisdocument is updated as needed and resides outside of the documentation librarieson the Oracle Technology Network (OTN).
Note:
When you install the Oracle Fusion Middleware Release 12c softwarein preparation for upgrade, you should use the same user account thatyou used to install and configure the existing, pre-upgrade Oracle FusionMiddleware software. On UNIX operating systems, this ensures that theproper owner and group is applied to new Oracle Fusion Middleware 12cfiles and directories.
If you are running a 32–bit environment, you will need to perform an additional set ofsteps:
Verify That the Database Hosting Oracle Fusion Middleware isSupported
You must have a supported Oracle database configured with the required schemasbefore you run Oracle Fusion Middleware 12c.
Review the Fusion Middleware database requirements before starting the upgradeto ensure that the database hosting Oracle Fusion Middleware is supported andhas sufficient space to perform an upgrade. See the Certification Matrix for 12c(12.2.1.4.0).
Chapter 2Verifying Certification and System Requirements
2-5

Note:
If your database version is no longer supported, you must upgrade to asupported version before starting an upgrade. See Upgrading and PreparingYour Oracle Databases for 12c in Planning an Upgrade of Oracle FusionMiddleware.
Verify That the JDK Is Certified for This Release of Oracle FusionMiddleware
At the time this document was published, the certified JDK for 12c (12.2.1.4.0) was1.8.0_211.
Refer to the Oracle Fusion Middleware Supported System Configurations informationon the Oracle Technology Network (OTN) to verify that the JDK you are using issupported.
If your JDK is not supported, or you do not have a JDK installed, you must downloadthe required Java SE JDK, from the following website:
http://www.oracle.com/technetwork/java/javase/downloads/index.html
Make sure that the JDK is installed outside of the Oracle home. The Oracle UniversalInstaller validates that the designated Oracle home directory is empty, and the installdoes not progress until an empty directory is specified. If you install JDK underOracle home, you may experience issues in future operations. Therefore, Oraclerecommends that you use install the JDK in the following directory: /home/oracle/products/jdk.
For more information on the difference between generic and platform-specificinstallers, see Understanding the Difference Between Generic and Platform-Specific Distributions in the Oracle Fusion Middleware Download, Installation, andConfiguration Readme Files.
Updating Policy Files when Using Enhanced Encryption(AES 256)
If you plan to use enhanced encryption, such as Advanced Encryption Standard (AES)256, in your upgraded environment, Oracle recommends that you apply the latestrequired policy files to the JDK before you upgrade.
The Java platform defines a set of APIs spanning major security areas, includingcryptography, public key infrastructure, authentication, secure communication, andaccess control. These APIs allow developers to easily integrate security mechanismsinto their application code.
Some of the security algorithms used in Fusion Middleware 12c (12.2.1.4.0) requireadditional policy files for the JDK. See Java Cryptography Architecture OracleProviders Documentation.
Chapter 2Updating Policy Files when Using Enhanced Encryption (AES 256)
2-6
Note:
If you attempt to use enhanced encryption without applying these policy filesto the JDK before you begin the upgrade, the upgrade can fail and you mustrestore the entire pre-upgrade environment and start the upgrade from thebeginning.
Purging Unused DataPurging unused data and maintaining a purging methodology before an upgrade canoptimize the upgrade process.
Some components have automated purge scripts. If you are using purge scripts, waituntil the purge is complete before starting the upgrade process. The upgrade may failif the purge scripts are running while using the Upgrade Assistant to upgrade yourschemas.
Creating an Edition on the Server for Edition-BasedRedefinition
Before upgrading an Edition-Based Redefinition (EBR) enabled schema, you mustconnect to the database server and create an edition on the database server for 12c(12.2.1.4.0).
Edition-based redefinition enables you to upgrade an application's database objectswhile the application is in use, thus minimizing or eliminating downtime. This isaccomplished by changing (redefining) database objects in a private environmentknown as an edition. Only when all the changes have been made and tested, youmake the new version of the application available to users.
Note:
This task must be completed by an Oracle Database User with DBAprivileges.
Before upgrading an Edition-Based Redefinition (EBR) enabled schema, you mustconnect to the database server and create an edition on the database server for 12c(12.2.1.4.0). The new edition for 12c (12.2.1.3.0) must be a child of your existing 12cor 12c (12.2.1.4.0) edition.
To create an edition on the database server, sign in as an SYS user (or another Oracleuser that has DBA privileges) and enter the following command:
create edition Oracle_FMW_12_2_1_4_0 as child ofOracle_FMW_12_2_1_3_0;
where Oracle_FMW_12_2_1_3_0 is an example of the edition name you specified inRCU 12.2.1.3 when the 12.2.1.3 schemas were created. Be sure to provide the actualname used when creating the edition.
The following message notifies you that the edition is created successfully:
Chapter 2Purging Unused Data
2-7
Edition created.
During the upgrade, you are prompted to launch the Reconfiguration Wizard toreconfigure your existing domain. Before running the Reconfiguration Wizard, youmust specify the database default edition. Use the following SQL command tomanually set up the default edition name for the database, for example:
ALTER DATABASE DEFAULT EDITION = Oracle_FMW_12_2_1_4_0;
Creating a Non-SYSDBA User to Run the UpgradeAssistant
Oracle recommends that you create a non-SYSDBA user called FMW to run theUpgrade Assistant. This user has the privileges required to modify schemas, but doesnot have full administrator privileges.
SYSDBA is an administrative privilege that is required to perform high-leveladministrative operations such as creating, starting up, shutting down, backing up,or recovering the database. The SYSDBA system privilege is for a fully empowereddatabase administrator. When you connect with the SYSDBA privilege, you connectwith a default schema and not with the schema that is generally associated with youruser name. For SYSDBA, this schema is SYS. Access to a default schema can bea very powerful privilege. For example, when you connect as user SYS, you haveunlimited privileges on data dictionary tables. Therefore, Oracle recommends that youcreate a non-SYSDBA user to upgrade the schemas. The privileges listed below mustbe granted to user FMW before starting the Upgrade Assistant.
Notes:
The non-SYSDBA user FMW is created solely for the purpose of runningthe Upgrade Assistant. After this step is complete, drop the FMW user. Notethat privileges required for running the Upgrade Assistant may change fromrelease to release. By default, the v$xatrans$ table does not exist. You must runthe XAVIEW.SQL script to create this table before creating the user. Moreover,the grant select privilege on thev$xatrans$ table is required only by OracleIdentity Governance. If you do not require Oracle Identity Governance forconfiguration, or if you do not have the v$xatrans$ table, then remove thefollowing line from the script:
grant select on v$xatrans$ to FMW with grant option;
In the example below, password is the password that you set for the FMW user. Whengranting privileges, make sure that you specify your actual password.
create user FMW identified by password;grant dba to FMW;grant execute on DBMS_LOB to FMW with grant option;grant execute on DBMS_OUTPUT to FMW with grant option;grant execute on DBMS_STATS to FMW with grant option;
Chapter 2Creating a Non-SYSDBA User to Run the Upgrade Assistant
2-8

grant execute on sys.dbms_aqadm to FMW with grant option;grant execute on sys.dbms_aqin to FMW with grant option;grant execute on sys.dbms_aqjms to FMW with grant option;grant execute on sys.dbms_aq to FMW with grant option;grant execute on utl_file to FMW with grant option;grant execute on dbms_lock to FMW with grant option;grant select on sys.V_$INSTANCE to FMW with grant option;grant select on sys.GV_$INSTANCE to FMW with grant option;grant select on sys.V_$SESSION to FMW with grant option;grant select on sys.GV_$SESSION to FMW with grant option;grant select on dba_scheduler_jobs to FMW with grant option;grant select on dba_scheduler_job_run_details to FMW with grant option;grant select on dba_scheduler_running_jobs to FMW with grant option;grant select on dba_aq_agents to FMW with grant option;grant execute on sys.DBMS_SHARED_POOL to FMW with grant option;grant select on dba_2pc_pending to FMW with grant option;grant select on dba_pending_transactions to FMW with grant option;grant execute on DBMS_FLASHBACK to FMW with grant option;grant execute on dbms_crypto to FMW with grant option;grant execute on DBMS_REPUTIL to FMW with grant option;grant execute on dbms_job to FMW with grant option;grant select on pending_trans$ to FMW with grant option;grant select on dba_scheduler_job_classes to FMW with grant option;grant select on sys.DBA_TABLESPACE_USAGE_METRICS to FMW with grant option;grant select on SYS.DBA_DATA_FILES to FMW with grant option;grant select on SYS.V_$ASM_DISKGROUP to FMW with grant option;grant select on v$xatrans$ to FMW with grant option;grant execute on sys.dbms_system to FMW with grant option;grant execute on DBMS_SCHEDULER to FMW with grant option;grant select on dba_data_files to FMW with grant option;grant execute on UTL_RAW to FMW with grant option;grant execute on DBMS_XMLDOM to FMW with grant option;grant execute on DBMS_APPLICATION_INFO to FMW with grant option;grant execute on DBMS_UTILITY to FMW with grant option;grant execute on DBMS_SESSION to FMW with grant option;grant execute on DBMS_METADATA to FMW with grant option;grant execute on DBMS_XMLGEN to FMW with grant option;grant execute on DBMS_DATAPUMP to FMW with grant option;grant execute on DBMS_MVIEW to FMW with grant option;grant select on ALL_ENCRYPTED_COLUMNS to FMW with grant option;grant select on dba_queue_subscribers to FMW with grant option; grant execute on SYS.DBMS_ASSERT to FMW with grant option;grant select on dba_subscr_registrations to FMW with grant option;grant manage scheduler to FMW;
If you are upgrading Oracle Identity Manager (OIM) schema, ensure that the FMWuser has the following additional privileges:
grant execute on SYS.DBMS_FLASHBACK to fmw with grant option;grant execute on sys.DBMS_SHARED_POOL to fmw with grant option;grant execute on SYS.DBMS_XMLGEN to FMW with grant option;grant execute on SYS.DBMS_DB_VERSION to FMW with grant option;grant execute on SYS.DBMS_SCHEDULER to FMW with grant option;
Chapter 2Creating a Non-SYSDBA User to Run the Upgrade Assistant
2-9
grant execute on SYS.DBMS_SQL to FMW with grant option;grant execute on SYS.DBMS_UTILITY to FMW with grant option;grant ctxapp to FMW with admin option;grant execute on SYS.DBMS_FLASHBACK TO FMW with grant option;grant create MATERIALIZED VIEW to FMW with admin option;grant all on SCHEMA_VERSION_REGISTRY TO FMW with grant option;grant create SYNONYM to FMW with admin option;grant execute on CTXSYS.CTX_ADM to FMW with grant option;grant execute on CTXSYS.CTX_CLS TO FMW with grant option;grant execute on CTXSYS.CTX_DDL TO FMW with grant option;grant execute on CTXSYS.CTX_DOC TO FMW with grant option;grant execute on CTXSYS.CTX_OUTPUT TO FMW with grant option;grant execute on CTXSYS.CTX_QUERY TO FMW with grant option;grant execute on CTXSYS.CTX_REPORT TO FMW with grant option;grant execute on CTXSYS.CTX_THES TO FMW with grant option;grant execute on CTXSYS.CTX_ULEXER TO FMW with grant option;grant create JOB to FMW with admin option;
Identifying Existing Schemas Available for UpgradeThis optional task enables you to review the list of available schemas before you beginthe upgrade by querying the schema version registry. The registry contains schemainformation such as version number, component name and ID, date of creation andmodification, and custom prefix.
You can let the Upgrade Assistant upgrade all of the schemas in the domain, or youcan select individual schemas to upgrade. To help decide, follow these steps to view alist of all the schemas that are available for an upgrade:
1. If you are using an Oracle database, connect to the database by using an acountthat has Oracle DBA privileges, and run the following from SQL*Plus:
SET LINE 120COLUMN MRC_NAME FORMAT A14COLUMN COMP_ID FORMAT A20COLUMN VERSION FORMAT A12COLUMN STATUS FORMAT A9COLUMN UPGRADED FORMAT A8SELECT MRC_NAME, COMP_ID, OWNER, VERSION, STATUS, UPGRADED FROM SCHEMA_VERSION_REGISTRY ORDER BY MRC_NAME, COMP_ID;
2. Examine the report that is generated.
If an upgrade is not needed for a schema, the schema_version_registry tableretains the schema at its pre-upgrade version.
3. Note the schema prefix name that was used for your existing schemas. You willuse the same prefix when you create new 12c schemas.
Chapter 2Identifying Existing Schemas Available for Upgrade
2-10
Notes:
• If your existing schemas are not from a supported version, then you mustupgrade them to a supported version before using the 12c (12.2.1.4.0)upgrade procedures. Refer to your pre-upgrade version documentationfor more information.
• Some components, such as Oracle Enterprise Data Quality, OracleGoldenGate Monitor, and Oracle GoldenGate Veridata, support anupgrade from versions other than the standard Oracle FusionMiddleware supported versions.
• If you used an OID-based policy store in 11g, make sure to create a newOPSS schema before you perform the upgrade. After the upgrade, theOPSS schema remains an LDAP-based store.
• You can only upgrade schemas for products that are available forupgrade in Oracle Fusion Middleware release 12c (12.2.1.4.0). Do notattempt to upgrade a domain that includes components that are not yetavailable for upgrade to 12c (12.2.1.4.0).
Chapter 2Identifying Existing Schemas Available for Upgrade
2-11
Part IIUpgrading Oracle Traffic Director from 11gRelease
This part of Upgrading Oracle Traffic Director provides information about upgradingOracle Traffic Director from any of the 11g release version to the latest version of 12c(12.2.1.4.0).

3Upgrading Oracle Traffic Director from 11gRelease
You can upgrade Oracle Traffic Director from an earlier Oracle Fusion MiddlewareRelease 11g version to the latest 12c (12.2.1.4.0) release version.
Oracle Fusion Middleware Upgrade Assistant supports an out-of-place upgrade to12c (12.2.1.4.0) release from Oracle Traffic Director FMW 11g Release 1, Version:11.1.1.9.0. This is the only supported 11g release.
Note:
As of 12.2.1.4.0, Oracle Traffic Director is deprecated. In the future,use Oracle HTTP Server or Kubernetes Load Balancer for equivalentfunctionality.
The following topics describe how to upgrade Oracle Traffic Director to 12c(12.2.1.4.0) release:
About Oracle Traffic Director Upgrade Process from 11gRelease
Review the roadmap for an overview of the upgrade process for Oracle Traffic Directorfrom 11g release.
The steps you take to upgrade your existing domain will vary depending on how yourdomain is configured and which components are being upgraded. Follow only thosesteps that are applicable to your deployment.
Table 3-1 Tasks for Upgrading Oracle Traffic Director from 11g Release
Task Description
RequiredIf you have not done so already, review theintroductory topics in this guide and complete therequired pre-upgrade tasks.
See:• Introduction to Upgrading Oracle Traffic Director to
12c (12.2.1.4.0)• Pre-Upgrade Requirements• Pre-Upgrade Checklist
3-1
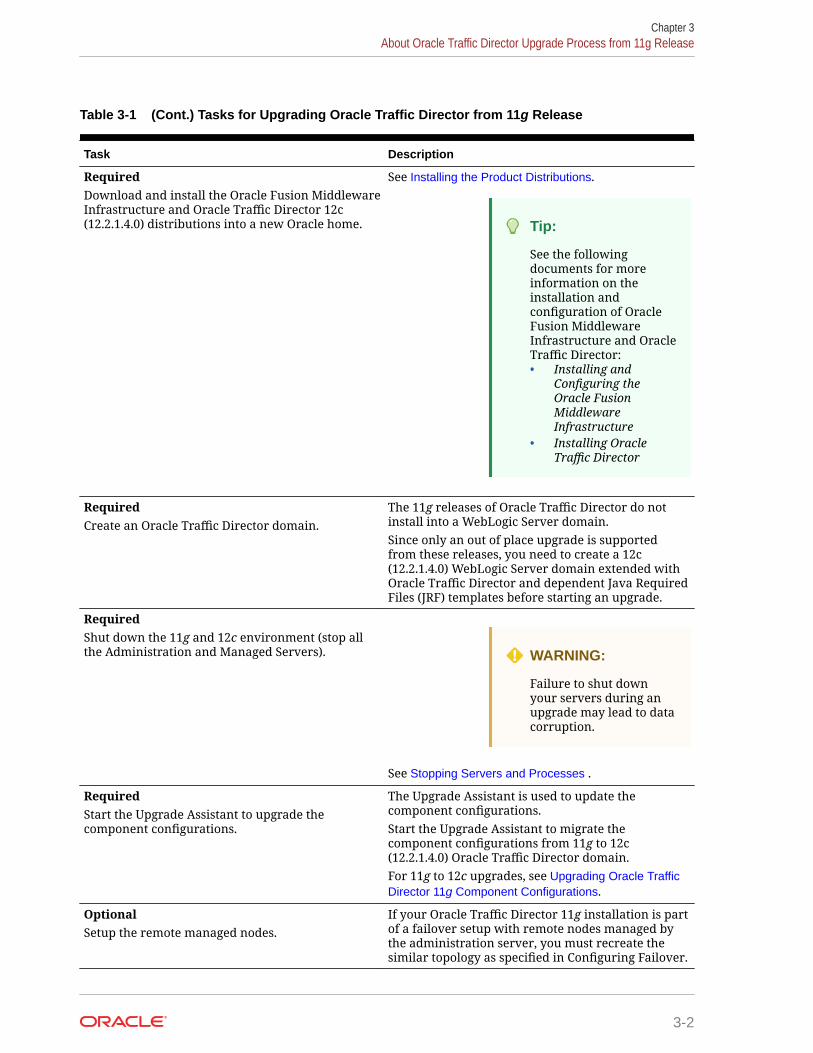
Table 3-1 (Cont.) Tasks for Upgrading Oracle Traffic Director from 11g Release
Task Description
RequiredDownload and install the Oracle Fusion MiddlewareInfrastructure and Oracle Traffic Director 12c(12.2.1.4.0) distributions into a new Oracle home.
See Installing the Product Distributions.
Tip:
See the followingdocuments for moreinformation on theinstallation andconfiguration of OracleFusion MiddlewareInfrastructure and OracleTraffic Director:• Installing and
Configuring theOracle FusionMiddlewareInfrastructure
• Installing OracleTraffic Director
RequiredCreate an Oracle Traffic Director domain.
The 11g releases of Oracle Traffic Director do notinstall into a WebLogic Server domain.Since only an out of place upgrade is supportedfrom these releases, you need to create a 12c(12.2.1.4.0) WebLogic Server domain extended withOracle Traffic Director and dependent Java RequiredFiles (JRF) templates before starting an upgrade.
RequiredShut down the 11g and 12c environment (stop allthe Administration and Managed Servers). WARNING:
Failure to shut downyour servers during anupgrade may lead to datacorruption.
See Stopping Servers and Processes .
RequiredStart the Upgrade Assistant to upgrade thecomponent configurations.
The Upgrade Assistant is used to update thecomponent configurations.Start the Upgrade Assistant to migrate thecomponent configurations from 11g to 12c(12.2.1.4.0) Oracle Traffic Director domain.For 11g to 12c upgrades, see Upgrading Oracle TrafficDirector 11g Component Configurations.
OptionalSetup the remote managed nodes.
If your Oracle Traffic Director 11g installation is partof a failover setup with remote nodes managed bythe administration server, you must recreate thesimilar topology as specified in Configuring Failover.
Chapter 3About Oracle Traffic Director Upgrade Process from 11g Release
3-2
Table 3-1 (Cont.) Tasks for Upgrading Oracle Traffic Director from 11g Release
Task Description
RequiredCreate Oracle Traffic Director instances.
The Upgrade Assistant does not create OracleTraffic Director instances. These instances must becreated post upgrade by targeting Oracle TrafficDirector configurations to machines, using FusionMiddleware Control UI or Oracle WebLogic ScriptingTool (WLST).See Post-Upgrade Tasks.
RequiredStart all process and servers.Restart the servers and Oracle Traffic Director 12c(12.2.1.4.0) instance.
Once the upgrade process is complete, start allprocesses and servers including the Admin Server,Managed Servers and Oracle Traffic Director 12c(12.2.1.4.0) instances.See Starting Servers and Processes.
RequiredComplete and verify the upgrade.
Perform the required post-upgrade configurationtasks (if needed), including starting the newAdministration and Managed Servers and nodemanager to ensure there are no issues.
Important:
Oracle recommends thatyou ensure all of theupgraded componentsare working as expectedbefore deleting yourbackups.
See Verifying The Component Configurations.
Preparing to Upgrade Oracle Traffic Director 11g to theLatest 12c (12.2.1.4.0) Version
This section describes the steps to prepare the upgrade for 11g versions of OracleTraffic Director to the latest 12c (12.2.1.4.0) version.
Before you upgrade to Oracle Traffic Director 12c (12.2.1.4.0), you must complete thefollowing steps:
1. Ensure that 12c (12.2.1.4.0) binaries are installed in a new FMW_HOME.
Tip:
See Installing Oracle Traffic Director in Installing Oracle Traffic Director
A valid WebLogic Server domain extended with Oracle Traffic Director anddependant JRF templates must also be created at the target location.
Chapter 3Preparing to Upgrade Oracle Traffic Director 11g to the Latest 12c (12.2.1.4.0) Version
3-3
Tip:
See Creating a Managed Domain in Administering Oracle TrafficDirector.
2. Shutdown the target 12c (12.2.1.4.0) environment, before you run the UpgradeAssistant to upgrade your schemas and configurations.
You must shut down all of the pre-upgrade processes and servers, including theAdministration Server and any Managed Servers and Node Manager.
Note:
For more information on starting, stopping, and restarting your OracleTraffic Director instances in:
• 11g environment, see Stopping Oracle Traffic Director Instances in11g Environment
• 12c (12.2.1.4.0) environment, see Managing Oracle Traffic DirectorInstances in 12c Environment.
Note:
The following are the restrictions for Oracle Traffic Director upgradeactivities:
• Upgrading across different platforms is not supported. For example,you cannot upgrade Oracle Traffic Director from a Linux to Solarisenvironment.
• Upgrading from an Oracle Traffic Director 11g to an Oracle TrafficDirector 12c (12.2.1.4.0) standalone domain is not supported.
For more information on installing 12c (12.2.1.4.0) binaries in a new FMW_HOME,stopping Administration and Managed Servers, and Node Manager, see the followingtopic with more details on the procedure, processes, and servers.
Chapter 3Preparing to Upgrade Oracle Traffic Director 11g to the Latest 12c (12.2.1.4.0) Version
3-4
Installing the Product DistributionsBefore beginning your upgrade, download Oracle Fusion Middleware Infrastructureand Oracle Traffic Director 12c (12.2.1.4.0) distributions on the target system andinstall them using Oracle Universal Installer.
Note:
When Infrastructure is required for the upgrade, you must install theOracle Fusion Middleware distribution first before you install other FusionMiddleware products.
The following install instructions are for the standard Oracle Fusion Middlewareinstallation topology. Refer to the Oracle Traffic Director Installation Guide for moreinformation about installing the other supported topologies.
To install 12c (12.2.1.4.0) distributions:
1. Sign in to the target system.
2. Download the following from Oracle Technology Network or Oracle SoftwareDelivery Cloud to your target system:
• Oracle Fusion Middleware Infrastructure(fmw_12.2.1.4.0_infrastructure_generic.jar)
• Oracle Traffic Director (UNIX:distribution_name_12.2.1.3.0_otd_linux64.bin), (Windows:distribution_name_12.2.1.3.0_otd_win64.exe)
3. Change to the directory where you downloaded the 12c (12.2.1.4.0) productdistribution.
4. Start the installation program for Oracle Fusion Middleware Infrastructure:
• (UNIX) JDK_HOME/bin/java -jar fmw_12.2.1.4.0_infrastructure.jar
• (Windows) JDK_HOME\bin\java -jar fmw_12.2.1.4.0_infrastructure.jar
5. On UNIX operating systems, the Installation Inventory Setup screen appears if thisis the first time you are installing an Oracle product on this host.
Specify the location where you want to create your central inventory. Makesure that the operating system group name selected on this screen has writepermissions to the central inventory location, and click Next.
Note:
The Installation Inventory Setup screen does not appear on Windowsoperating systems.
6. On the Welcome screen, review the information to make sure that you have metall the prerequisites. Click Next.
7. On the Auto Updates screen, select an option:
Chapter 3Preparing to Upgrade Oracle Traffic Director 11g to the Latest 12c (12.2.1.4.0) Version
3-5

• Skip Auto Updates: If you do not want your system to check for softwareupdates at this time.
• Select patches from directory: To navigate to a local directory if youdownloaded patch files.
• Search My Oracle Support for Updates: To automatically download softwareupdates if you have a My Oracle Support account. You must enter OracleSupport credentials then click Search. To configure a proxy server for theinstaller to access My Oracle Support, click Proxy Settings. Click TestConnection to test the connection.
Click Next.
8. On the Installation Location screen, specify the location for the Oracle homedirectory and click Next.
For more information about Oracle Fusion Middleware directory structure, seeUnderstanding Directories for Installation and Configuration in Oracle FusionMiddleware Planning an Installation of Oracle Fusion Middleware.
9. On the Installation Type screen, select the following:
a. For Infrastructure, select Fusion Middleware Infrastructure
b. For Oracle Traffic Director, select Oracle Traffic Director
Select the type of installation and consequently, the products and feature sets youwant to install.
• Select Standalone OTD (Managed independently of WebLogic server) if youare installing Oracle Traffic Director in a Standalone domain or installingOracle Traffic Director in a remote node of a collocated domain.
• Select Collocated OTD (Managed through WebLogic server) if you areinstalling Oracle Traffic Director in a WebLogic Server domain on theadministration server node.
Important:
You can only upgrade earlier versions of Oracle Traffic Director 12c inthe standalone OTD. Upgrading Oracle Traffic Director from 11g to 12cstandalone is not supported.
Click Next.See Installing Oracle Traffic Director for more information.
10. The Prerequisite Checks screen analyzes the host computer to ensure that thespecific operating system prerequisites have been met.
To view the list of tasks that are verified, select View Successful Tasks. To viewlog details, select View Log. If any prerequisite check fails, then an error messageappears at the bottom of the screen. Fix the error and click Rerun to try again. Toignore the error or the warning message and continue with the installation, clickSkip (not recommended).
11. On the Installation Summary screen, verify the installation options that youselected.
If you want to save these options to a response file, click Save Response File andenter the response file location and name. The response file collects and stores
Chapter 3Preparing to Upgrade Oracle Traffic Director 11g to the Latest 12c (12.2.1.4.0) Version
3-6

all the information that you have entered, and enables you to perform a silentinstallation (from the command line) at a later time.Click Install to begin the installation.
12. On the Installation Progress screen, when the progress bar displays 100%, clickFinish to dismiss the installer, or click Next to see a summary.
13. The Installation Complete screen displays the Installation Location and theFeature Sets that are installed. Review this information and click Finish to closethe installer.
14. After you have installed Oracle Fusion Middleware Infrastructure, enter thefollowing command to start the installer for your product distribution and repeatthe steps above to navigate through the installer screens:
(UNIX) ./distribution_name_12.2.1.3.0_otd_linux64.bin
(Windows) distribution_name_12.2.1.3.0_otd_win64.exe
Performing Pre-Upgrade Tasks on Oracle Traffic Director11g Environment to be Upgraded
You must perform the tasks as in this section, before you begin any upgrade fromOracle Traffic Director 11g specific environment to the latest 12c (12.2.1.4.0). Thesetasks ensure you have a successful upgrade and a limited amount of downtime.
Before you upgrade to the latest version of Oracle Traffic Director 12c (12.2.1.4.0), youmust follow these steps:
1. Shutdown your running 11g environment.
Note:
To stop Oracle Traffic Director instances in 11g environment, seeStopping Oracle Traffic Director Instances in 11g Environment.
2. Verify and ensure Oracle Traffic Director 11g INSTANCE_HOME has read permissionsfor the user, running the Upgrade Assistant to access the configurations within11g Administration Server config-store.
3. If Oracle Traffic Director 11g and Oracle Traffic Director 12c installations are ondifferent hosts or machines (for example: 11g on OEL5 and 12c on OEL6), thenthe user must perform one of the following:
a. In the Upgrade Assistant, once you select 11g source as the source versionfor the upgrade, then you must specify the remote directory path for OracleTraffic Director 11g instances.
Tip:
See Upgrading the Component Configurations in Installing OracleTraffic Director.
Chapter 3Performing Pre-Upgrade Tasks on Oracle Traffic Director 11g Environment to be Upgraded
3-7
b. Remotely copy ORACLE_HOME and INSTANCE_HOME directories from 11g host to12c preserving the same path as it was on 11g host.
For example, on 12c host:
# scp -r <11g host>:/otd/oracle_home /otd/oracle_home# scp -r <11g host>:/otd/oracle_home /otd/oracle_home
c. Mount 11g ORACLE_HOME and INSTANCE_HOME paths on 12c host preserving thesame path as it was on 11g host.
For example, on 12c host:
# mount <11g host>:/otd/oracle_home on /otd/oracle_home# mount <11g host>:/otd/instance_home on /otd/instance_home
4. If you have configured webgate plug-in on Oracle Traffic Director instance, thenyou must ensure that the related changes are pulled into the corresponding OracleTraffic Director configuration before you run the upgrade.
Tip:
See pull-config in Traffic Director Command-Line Reference 11g Release1 (11.1.1.7).
Stopping Servers and ProcessesBefore you run the Upgrade Assistant to upgrade your schemas and configurations,you must shut down all of the pre-upgrade processes and servers, including theAdministration Server and any managed servers.
An Oracle Fusion Middleware environment can consist of an Oracle WebLogic Serverdomain, an Administration Server, multiple managed servers, Java components,system components such as Identity Management components, and a database usedas a repository for metadata. The components may be dependent on each other, sothey must be stopped in the correct order.
Note:
The procedures in this section describe how to stop the existing, pre-upgrade servers and processes using the WLST command-line utility or ascript. You can also use the Oracle Fusion Middleware Control and theOracle WebLogic Server Administration Console. See Starting and StoppingAdministration and Managed Servers and Node Manager.
To stop your pre-upgrade Fusion Middleware environment, navigate to the pre-upgrade domain and follow the steps below:
Step 1: Stop System Components
To stop system components, such as Oracle HTTP Server, use the stopComponentscript:
Chapter 3Stopping Servers and Processes
3-8
• (UNIX) EXISTING_DOMAIN_HOME/bin/stopComponent.sh component_name
• (Windows) EXISTING_DOMAIN_HOME\bin\stopComponent.cmd component_name
You can stop system components in any order.
Step 2: Stop the Managed Servers
To stop a WebLogic Server Managed Server, use the stopManagedWebLogic script:
• (UNIX) EXISTING_DOMAIN_HOME/bin/stopManagedWebLogic.shmanaged_server_name admin_url
• (Windows) EXISTING_DOMAIN_HOME\bin\stopManagedWebLogic.cmdmanaged_server_name admin_url
When prompted, enter your user name and password.
Step 3: Stop Oracle Identity Management Components
Stop any Oracle Identity Management components, such as Oracle Internet Directory:
• (UNIX) EXISTING_DOMAIN_HOME/bin/stopComponent.sh component_name
• (Windows) EXISTING_DOMAIN_HOME\bin\stopComponent.cmd component_name
Step 4: Stop the Administration Server
When you stop the Administration Server, you also stop the processes running inthe Administration Server, including the WebLogic Server Administration Console andFusion Middleware Control.
To stop the Administration Server, use the stopWebLogic script:
• (UNIX) EXISTING_DOMAIN_HOME/bin/stopWebLogic.sh
• (Windows) EXISTING_DOMAIN_HOME\bin\stopWebLogic.cmd
When prompted, enter your user name, password, and the URL of the AdministrationServer.
Step 5: Stop Node Manager
To stop Node Manager, close the command shell in which it is running.
Alternatively, after setting the nodemanager.properties attribute QuitEnabled to true(the default is false), you can use WLST to connect to Node Manager and shut itdown. See stopNodeManager in WLST Command Reference for WebLogic Server.
Stopping Oracle Traffic Director Instances in 11g EnvironmentLearn more about how you can stop one or more Oracle Traffic Director 11g instancesin multiple modes.
To stop your Oracle Traffic Director instances in 11g environment, you can either usethe administration console or the CLI.
For more information on how you can stop one or more Oracle Traffic Director 11ginstances in multiple modes, see the following topics:
Chapter 3Stopping Servers and Processes
3-9
Stopping Oracle Traffic Director 11g Instances Using the AdministrationConsole
Learn more about stopping one or more Oracle Traffic Director 11g instances in thegraphical mode.
To stop Oracle Traffic Director 11g instances by using the Administration Console, youmust perform the following:
1. Sign in to the Administration Console for Oracle Traffic Director.
Tip:
For more details and procedures on the following topics, see OracleTraffic Director 11.1.1.9 Administrator's Guide:
• To access the Administration Console, see Accessing theAdministration Console.
• To stop Oracle Traffic Director 11g Administration Server, usingthe Administration Console, see Stopping and Restarting theAdministration Server.
2. Click Configurations button at the upper left corner of the page.
A list of the available configurations is displayed.
3. Select the configuration for which you want to start, stop, or restart instances.
4. In the navigation pane, select Instances.
5. Click Start/Restart or Stop as required, for the instance that you want to start,restart, or stop.
Note:
If you want to:
• Start or restart all instances of the selected configuration, Click Start/Restart Instances in the Common Tasks pane.
• Stop all instances of the configuration, Click Stop Instances.
A message is displayed in the Console Messages pane confirming that the instanceswere stopped.
Stopping Oracle Traffic Director 11g Instances Using the CLI ModeLearn more about stopping one or more Oracle Traffic Director 11g instances in thecommand line mode.
To stop one or more Oracle Traffic Director 11g instances, run the following command:
Chapter 3Stopping Servers and Processes
3-10
Table 3-2 Configuration Command for Oracle Traffic Director 11g Instances
Action Command
To Stop stop-instance
Tip:
For more details and procedures on the above topics, see Oracle TrafficDirector 11.1.1.9 Administrator's Guide:
• To invoke the CLI shell, see Accessing the Command-Line Interface.
• To stop Oracle Traffic Director 11g Administration Server, using theAdministration Console or CLI, see Stopping and Restarting theAdministration Server.
The following example is for your reference and requirement.
The command stop the instances of the configuration soa on the nodesapps1.example.com and apps2.example.com is as the following:
tadm> stop-instance --config=soa apps1.example.com apps2.example.com
Note:
Alternatively, you can use the following stop command from within theinstance directory to stop the instances.
> $INSTANCE_HOME/net-config_name/bin/stopserv
Starting the Upgrade Assistant for Oracle Traffic Director11g Specific Upgrade
Run the Upgrade Assistant to migrate Oracle Traffic Director componentconfigurations from 11g versions to 12c (12.2.1.4.0) domain.
Oracle recommends that you run the Upgrade Assistant as a non-SYSDBA user,completing the upgrade one domain at a time.
Chapter 3Starting the Upgrade Assistant for Oracle Traffic Director 11g Specific Upgrade
3-11
Note:
Before you start the Upgrade Assistant, make sure that the JVM characterencoding is set to UTF-8 for the platform on which the Upgrade Assistant isrunning.
If the character encoding is not set to UTF-8, then you will not be able todownload files containing Unicode characters in their names. This can causethe upgrade to fail.
To start the Upgrade Assistant
1. Go to the oracle_common/upgrade/bin directory:
• (UNIX) ORACLE_HOME/oracle_common/upgrade/bin
• (Windows) ORACLE_HOME\oracle_common\upgrade\bin
2. Start the Upgrade Assistant:
• (UNIX) ./ua
• (Windows) ua.bat
For information about other parameters that you can specify on the command line, seethe following topic.
Upgrade Assistant Parameters Specific to Oracle Traffic DirectorYou can start the Upgrade Assistant, using the specific command line parameters forOracle Traffic Director.
When you start the Upgrade Assistant from the command line, you can specifyadditional parameters. The Table 3-3 shows the specific Command-Line Parametersfor Oracle Traffic Director upgrade in Upgrade Assistant.
Table 3-3 Upgrade Assistant Command-Line Parameters
Parameter Required or Optional Description
-readiness Not applicable Performs the upgrade readinesscheck without performing anactual upgrade.This option is not applicable forupgrade from OTD 11g as OTDdoes not install into a WebLogicdomain in 11g.
-threads Optional Identifies the number of threadsavailable for concurrent schemaupgrades or readiness checks ofthe schemas.The value must be a positiveinteger in the range 1 to 8. Thedefault is 4.
Chapter 3Starting the Upgrade Assistant for Oracle Traffic Director 11g Specific Upgrade
3-12
Table 3-3 (Cont.) Upgrade Assistant Command-Line Parameters
Parameter Required or Optional Description
-response Required for silent upgrades orsilent readiness checks
Runs the Upgrade Assistant usinginputs saved to a response filegenerated from the data thatis entered when the UpgradeAssistant is run in GUI mode.Using this parameter runs theUpgrade Assistant in silent mode(without displaying UpgradeAssistant screens).
-examine Optional Performs the examine phasebut does not perform an actualupgrade.Do not specify this parameterif you have specified the -readiness parameter.
-logLevel attribute Optional Sets the logging level, specifyingone of the following attributes:• TRACE
• NOTIFICATION
• WARNING
• ERROR
• INCIDENT_ERROR
The default logging level isNOTIFICATION.
Consider setting the -logLevelTRACE attribute to so that moreinformation is logged. This isuseful when troubleshooting afailed upgrade. The UpgradeAssistant's log files can becomevery large if -logLevel TRACE isused.
Chapter 3Starting the Upgrade Assistant for Oracle Traffic Director 11g Specific Upgrade
3-13
Table 3-3 (Cont.) Upgrade Assistant Command-Line Parameters
Parameter Required or Optional Description
-logDir location Optional Sets the default location ofupgrade log files and temporaryfiles. You must specify an existing,writable directory where theUpgrade Assistant will create logfiles and temporary files.The default locations are:(UNIX)
NEW_ORACLE_HOME/
oracle_common/upgrade/
logs
NEW_ORACLE_HOME/
oracle_common/upgrade/
temp
(Windows)
NEW_ORACLE_HOME\oracle_c
ommon\upgrade\logs
NEW_ORACLE_HOME\oracle_c
ommon\upgrade\temp
-help Optional Displays all of the command-lineoptions.
Upgrading Oracle Traffic Director 11g ComponentConfigurations
When you run the Upgrade Assistant to upgrade the 11g versions of componentconfigurations, consider the following points based on the Oracle Traffic Directordomain.
The Upgrade Assistant must be run to migrate Oracle Traffic Director componentconfigurations from 11g to the 12c (12.2.1.4.0) collocated domain.
You can run the Upgrade Assistant in the following modes:
Upgrading Oracle Traffic Director 11g in Graphical ModeTo upgrade Oracle Traffic Director using the graphical mode, run the upgrade wizard.
Launch the upgrade assistance and follow the steps below:
1. The Welcome screen displays the pre-upgrade tasks that need to be performed.
Ensure you perform these tasks and Click Next to continue.
2. In the Upgrade Type screen, select All Configurations Used By a Domain andprovide the 12c (12.2.1.4.0) domain path in the Domain Directory field.
Chapter 3Upgrading Oracle Traffic Director 11g Component Configurations
3-14

Click Next to continue.
3. In the Component List screen, the list of components that needs to be upgradedare displayed.
Click Next to continue.
4. In the Prerequisites screen, ensure you have met all the prerequisites asmentioned in the screen.
Select all the check boxes, then Click Next to continue.
5. In Oracle Traffic Director Upgrade Path screen, select the source version for theupgrade as 11g source.
Select the check box Remote directory, if the directory containing the 11ginstances resides in a different node.
Specify the directory containing Oracle Traffic Director 11g instances.
Then Click Next to continue.
6. Optional: Oracle Traffic Director 11g SSL Token Pin screen is displayed onlyif any of Oracle Traffic Director configurations are SSL enabled and if the SSLtokens are protected with a token pin.
Enter the pin for the SSL token in the SSL Token Pin field and a Oracle WalletPassword to be set for Oracle Traffic Director configuration in 12c.
Then Click Next to continue.
7. The Examine screen shows the status of the examination process, where it ischecked if the components are ready to be upgraded.
Once the process is complete, then Click Next to continue.
8. The Upgrade Summary screen is displayed.
Click the Save Response File... button to create a response file.
A response file is a text file the Upgrade Assistant can write out that saves all ofyour inputs to the various screens.
This file can be used later as an input for Command Line upgrade bypassing theGUI.
Then Click Upgrade to continue.
9. The Upgrade Progress screen displays the upgrade progress.
Once the upgrade process is done, then Click Next to continue.
10. In the Upgrade Success screen, check the log file in case of any errors during theupgrade.
Then Click Close to complete the upgrade.
Upgrading Oracle Traffic Director 11g in Silent ModeYou can upgrade your collocated Oracle Traffic Director in silent mode (command linemode).
To upgrade Oracle Traffic Director using silent mode, run the Upgrade Assistantcommand with the response file generated using the upgrade wizard.
Chapter 3Upgrading Oracle Traffic Director 11g Component Configurations
3-15
Syntax
After a successful upgrade, a success message is displayed on the console. Log file isavailable under the following path:
<12.2.1.4.0 oracle home>/oracle_common/upgrade/logs
Command Line for Silent Upgrade (on UNIX)
<12.2.1.4.0 oracle home>/oracle_common/upgrade/bin/ua -response <response-file> -logLevel <Log-verbosity>
Note:
The SSL_TOKEN* fields are applicable only if the 11g instance has SSLenabled configuration.
Sample Response File
The following is a sample response file as an example for your requirement.
# This is a response file for the Fusion Middleware Upgrade Assistant.# Individual component upgrades are performed in the order they are described here.# Each upgrade is introduced by a section header containing the name of the component and name of the upgrade plugin.# The form of the section header is# [ComponentName.PluginName]
# These names can be found in the Upgrade Descriptor files for the components.# Individual input lines consist of a name, an equal sign, and a value.# The name is in two parts separated by a period. The first part is the "name" attribute from the Descriptor File XML tag by which the plugin refers to the value.# The second part of the name identifies a field within that value. Some input types have only one field, while other types can have half a dozen.# Do not intermix input lines that apply to different XML tags.[GENERAL] # This is the file format version number. Do not change the next line.fileFormatVersion = 3 # The next section contains information for accessing a WebLogic Server domain.[UAWLSINTERNAL.UAWLS] # The following number uniquely identifies this instance of an upgrade plugin.# Do not change it.pluginInstance = 1
Chapter 3Upgrading Oracle Traffic Director 11g Component Configurations
3-16

# Specifies the WebLogic Server domain directory:UASVR.path = /export/orahome/domains/otd_domain # The next section contains the information for performing a mid-tier upgrade on Oracle JRF, as described in the Upgrade Descriptor file located at# /export/orahome/oracle_common/plugins/upgrade/jrfua.xml# Do not change the next line.[JRF.JRF_CONFIG_PLUGIN] # The following number uniquely identifies this instance of an upgrade plugin. Do not change it.pluginInstance = 1 # The next section contains the information for performing a mid-tier upgrade on System Components Infrastructure, as described in the Upgrade Descriptor file located at# /export/orahome/oracle_common/plugins/upgrade/syscomp.xml# Do not change the next line.[CAM.SYSCOMP] # The next section contains the information for performing a mid-tier upgrade on Oracle Traffic Director, as described in the Upgrade Descriptor file located at# /export/orahome/otd/plugins/upgrade/otd-upgrade.xml# Do not change the next line.[OTD.CONFIG_UPGRADE] # The following number uniquely identifies this instance of an upgrade plugin. Do not change it.pluginInstance = 12 # Specifies a choice from a collection of values,# "Select the source version for the upgrade"UPGRADE_CHOICE.choose = 11-12 # Specifies the choice for a yes/no option:# "Remote directory"REMOTE_INSTANCE_HOME.option = no # Specifies a file or directory:# "Enter the directory that contains Oracle Traffic Director 11g instances (including admin-server)."OTD_11_INSTANCE_HOME.path = /export/otd_11g_home/instances # The SSL_TOKEN* fields below are applicable only if the 11g instance has SSL enabled config.# The table below lists the 11g Oracle Traffic Director configurations whose SSL tokens are protected with a token pin. If you want to upgrade these SSL certificates, then you must provide the SSL token pin as well as an Oracle wallet password# The below lines describe a Table input:# Each non-comment line represents a cell in the table in the form of
Chapter 3Upgrading Oracle Traffic Director 11g Component Configurations
3-17

# TABLE-NAME.COLUMN-NAME.ROW-NUMBER.DATATYPE-KEYWORD.# Simple strings have a "string" keyword suffix.# Boolean options have an "option" keyword suffix and yes/no values.# Encrypted passwords have an "encryptedPassword" keyword suffix.# To specify a different password in cleartext, use the "cleartextPassword" keyword instead.SSL_TOKEN_TABLE.CONFIG_NAME.0.string = testSSL_TOKEN_TABLE.SSL_TOKEN_PIN.0.encryptedPassword = 050C0F4F5030C0A319B1DE00BBC3AD79C7SSL_TOKEN_TABLE.WALLET_PSWD.0.encryptedPassword = 057033B2E49C479BDC52E21ABA8FF28263DF8EB1DCCA2C93C5
Verifying Oracle Traffic Director Component Configurationsfor a Successful Upgrade
After completing all the component configurations upgrade steps, verify whether it issuccessful by checking your upgraded configuration for Oracle Traffic Director domain.
This section describes the steps to verify the component configurations upgrade forOracle Traffic Director domain.
For Oracle Traffic Director 11g Configuration
• The version in server.xml of config-store is modified to 12c (12.2.1.4.0).
• The value of ORACLE_HOME in the scripts and in the obj.conf file are updated as thenew ORACLE_HOME for local Oracle Traffic Director instances.
Post-Upgrade TasksFollow the process to complete post-upgrade tasks for Oracle Traffic Director from 11gto the latest 12c (12.2.1.4.0) version.
Review the following list of post-upgrade tasks to be performed after using theUpgrade Assistant to upgrade to Oracle Traffic Director 12c (12.2.1.4.0):
• Oracle Traffic Director system component instances must be created post-upgrade, by targeting Oracle Traffic Director system component configurations tothe machines using Fusion Middleware Control or Oracle WebLogic Scripting Tool(WLST).
Tip:
See Managing Instances in Administering Oracle Traffic Director.
• Setting up failover is a deployment task.
These steps are best handled outside the upgrade as post-upgrade steps.
Chapter 3Verifying Oracle Traffic Director Component Configurations for a Successful Upgrade
3-18

Tip:
For more information on deployment topology and configuring failovergroups, see Configuring Oracle Traffic Director for High Availability inAdministering Oracle Traffic Director.
• Any references in Oracle Traffic Director configuration files to the paths outsideof INSTANCE_HOME and ORACLE_HOME may not be accessible post upgrade.
This must be configured manually.
Starting Servers and Processes After an Upgrade for OracleTraffic Director
After a successful Oracle Traffic Director upgrade from a 11g to the latest 12c(12.2.1.4.0) version, start all the processes and servers, including the AdministrationServer and any Managed Servers and system components.
The components may be dependent on each other and hence, they must be started inthe correct order.
To start Oracle Traffic Director instances in 12c environment, see Starting Servers andProcesses.
For more information on starting Administration and Managed Servers and NodeManager, see the following topic with more details on the procedure, processes, andservers.
Starting Servers and ProcessesAfter a successful upgrade, restart all processes and servers, including theAdministration Server and any Managed Servers.
The components may be dependent on each other so they must be started in thecorrect order.
Note:
The procedures in this section describe how to start servers and processusing the WLST command line or a script. You can also use the OracleFusion Middleware Control and the Oracle WebLogic Server AdministrationConsole. See Starting and Stopping Administration and Managed Serversand Node Manager in Administering Oracle Fusion Middleware.
To start your Fusion Middleware environment, follow the steps below:
Step 1: Start the Administration Server
When you start the Administration Server, you also start the processes running inthe Administration Server, including the WebLogic Server Administration Console andFusion Middleware Control.
Chapter 3Starting Servers and Processes After an Upgrade for Oracle Traffic Director
3-19
To start the Administration Server, use the startWebLogic script:
• (UNIX) NEW_DOMAIN_HOME/bin/startWebLogic.sh
• (Windows) NEW_DOMAIN_HOME\bin\startWebLogic.cmd
When prompted, enter your user name, password, and the URL of the AdministrationServer.
Step 2: Start Node Manager
To start Node Manager, use the startNodeManager script:
• (UNIX) NEW_DOMAIN_HOME/bin/startNodeManager.sh
• (Windows) NEW_DOMAIN_HOME\bin\startNodeManager.cmd
Step 3: Start Oracle Identity Management Components
Start any Oracle Identity Management components, such as Oracle Internet Directory,that form part of your environment:
• (UNIX) NEW_DOMAIN_HOME/bin/startComponent.sh component_name
• (Windows) NEW_DOMAIN_HOME\bin\startComponent.cmd component_name
Step 4: Start the Managed Servers
To start a WebLogic Server Managed Server, use the startManagedWebLogic script:
• (UNIX) NEW_DOMAIN_HOME/bin/startManagedWebLogic.sh managed_server_nameadmin_url
• (Windows) NEW_DOMAIN_HOME\bin\startManagedWebLogic.cmdmanaged_server_name admin_url
When prompted, enter your user name and password.
Note:
The startup of a Managed Server will typically start the applications thatare deployed to it. Therefore, it should not be necessary to manually startapplications after the Managed Server startup.
Step 5: Start System Components
To start system components, such as Oracle HTTP Server, use the startComponentscript:
• (UNIX) NEW_DOMAIN_HOME/bin/startComponent.sh component_name
• (Windows) NEW_DOMAIN_HOME\bin\startComponent.cmd component_name
You can start system components in any order.
Chapter 3Starting Servers and Processes After an Upgrade for Oracle Traffic Director
3-20
Part IIIUpgrading Oracle Traffic Director from anEarlier or a Previous 12c Release
This part of Upgrading Oracle Traffic Director introduces Oracle Traffic Director andprovides steps you must perform to prepare for upgrading to the latest version of 12c(12.2.1.4.0).
4Upgrading Oracle Traffic Director from aPrevious 12c Release
You can upgrade Oracle Traffic Director from an earlier 12c release version to thelatest 12c (12.2.1.4.0) release version.
Oracle Fusion Middleware Upgrade Assistant supports an in-place upgrade to 12c(12.2.1.4.0) for the following Oracle Traffic Director release versions:
• Oracle Traffic Director FMW 12c Release 2, Version: 12.2.1.2.0
• Oracle Traffic Director FMW 12c Release 2, Version: 12.2.1.3.0
Note:
As of 12.2.1.4.0, Oracle Traffic Director is deprecated. In the future,use Oracle HTTP Server or Kubernetes Load Balancer for equivalentfunctionality.
The following topics describe how to upgrade Oracle Traffic Director to 12c(12.2.1.4.0):
About Oracle Traffic Director Upgrade Process from anEarlier or a Previous 12c Release
Review the roadmap for an overview of the upgrade process for Oracle Traffic Directorfrom a previous 12c release.
The steps you take to upgrade your existing domain will vary depending on how yourdomain is configured and which components are being upgraded. Follow only thosesteps that are applicable to your deployment.
Table 4-1 Tasks for Upgrading Oracle Traffic Director from a Previous 12c Release
Task Description
RequiredIf you have not done so already, review theintroductory topics in this guide and complete therequired pre-upgrade tasks.
See:• Introduction to Upgrading Oracle Traffic Director to
12c (12.2.1.4.0)• Pre-Upgrade Requirements• Pre-Upgrade Checklist
4-1

Table 4-1 (Cont.) Tasks for Upgrading Oracle Traffic Director from a Previous 12c Release
Task Description
RequiredDownload and install the Oracle Fusion MiddlewareInfrastructure and Oracle Traffic Director 12c(12.2.1.4.0) distributions into a new Oracle home.
See Installing the Product Distributions.
Tip:
See the followingdocuments for moreinformation on theinstallation andconfiguration of OracleFusion MiddlewareInfrastructure and OracleTraffic Director:• Installing and
Configuring theOracle FusionMiddlewareInfrastructure
• Installing OracleTraffic Director
RequiredShut down the source and target environments(stop all the Administration and Managed Servers). WARNING:
Failure to shut downyour servers during anupgrade may lead to datacorruption.
See Stopping Servers and Processes .
RequiredReconfigure the existing domain.
Run the reconfiguration wizard targeting theexisting domain to update WebLogic Server coreinfrastructure and the domain to 12c (12.2.1.4.0)version.
RequiredStart the Upgrade Assistant to upgrade domaincomponent configurations.
The Upgrade Assistant is used to update the domain’scomponent configurations on the node that hoststhe Administration Server.See Starting the Upgrade Assistant for Oracle TrafficDirector 12c Specific Upgrade.
Chapter 4About Oracle Traffic Director Upgrade Process from an Earlier or a Previous 12c Release
4-2
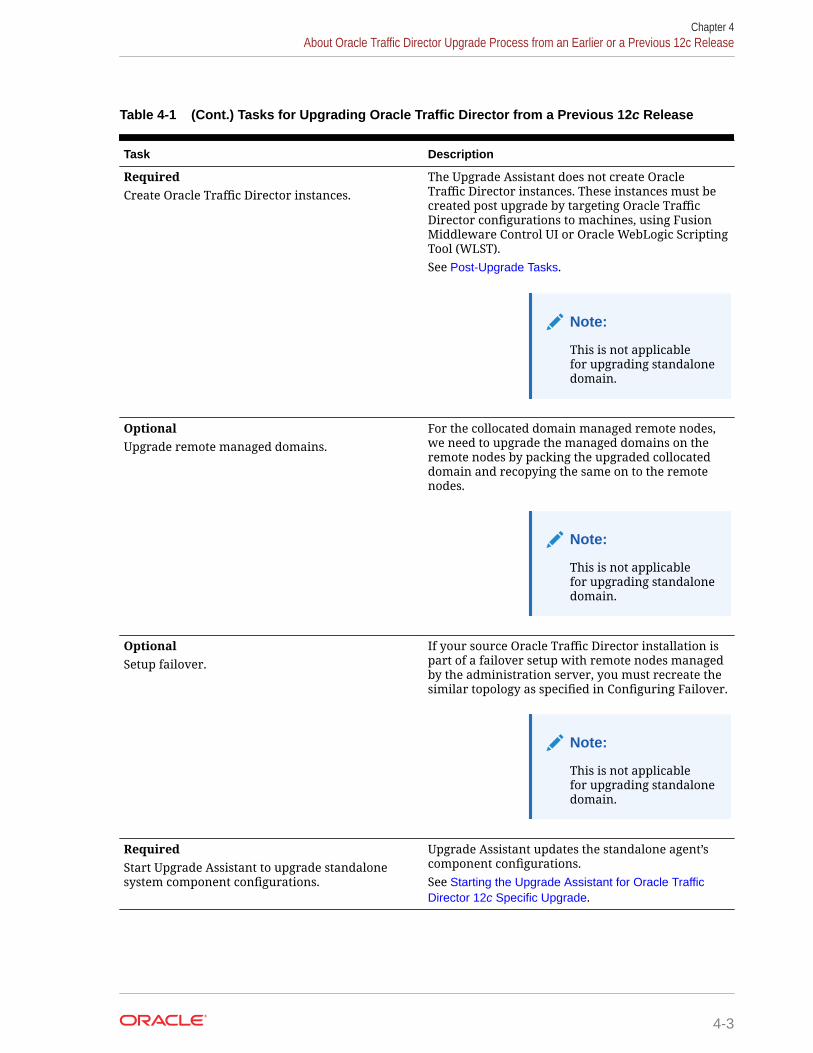
Table 4-1 (Cont.) Tasks for Upgrading Oracle Traffic Director from a Previous 12c Release
Task Description
RequiredCreate Oracle Traffic Director instances.
The Upgrade Assistant does not create OracleTraffic Director instances. These instances must becreated post upgrade by targeting Oracle TrafficDirector configurations to machines, using FusionMiddleware Control UI or Oracle WebLogic ScriptingTool (WLST).See Post-Upgrade Tasks.
Note:
This is not applicablefor upgrading standalonedomain.
OptionalUpgrade remote managed domains.
For the collocated domain managed remote nodes,we need to upgrade the managed domains on theremote nodes by packing the upgraded collocateddomain and recopying the same on to the remotenodes.
Note:
This is not applicablefor upgrading standalonedomain.
OptionalSetup failover.
If your source Oracle Traffic Director installation ispart of a failover setup with remote nodes managedby the administration server, you must recreate thesimilar topology as specified in Configuring Failover.
Note:
This is not applicablefor upgrading standalonedomain.
RequiredStart Upgrade Assistant to upgrade standalonesystem component configurations.
Upgrade Assistant updates the standalone agent’scomponent configurations.See Starting the Upgrade Assistant for Oracle TrafficDirector 12c Specific Upgrade.
Chapter 4About Oracle Traffic Director Upgrade Process from an Earlier or a Previous 12c Release
4-3

Table 4-1 (Cont.) Tasks for Upgrading Oracle Traffic Director from a Previous 12c Release
Task Description
RequiredStart all process and servers.Restart the servers and Oracle Traffic Director 12c(12.2.1.4.0) instance.
When the upgrade process is complete, restartOracle Traffic Director 12c (12.2.1.4.0) instance.Once the upgrade process is complete, start allprocesses and servers including the Admin Server,Managed Servers and Oracle Traffic Directorinstances.See Starting Servers and Processes.
RequiredComplete and verify the upgrade.
Perform the required post-upgrade configurationtasks (if needed), including starting the newAdministration and Managed Servers and nodemanager to ensure there are no issues.
Important:
Oracle recommends thatyou ensure all of theupgraded componentsare working as expectedbefore deleting yourbackups.
See Verifying the Component Configurations.
Preparing to Upgrade Oracle Traffic Director from an Earlieror a Previous 12c to the Latest 12c
This section describes preparing the upgrade Oracle Traffic Director from an earlier orprevious 12c version to the latest 12c (12.2.1.4.0) release version.
Important:
Before you upgrade to Oracle Traffic Director 12c (12.2.1.4.0), you mustensure that 12c (12.2.1.4.0) binaries are installed in a new FMW_HOME.
Note:
Upgrading across different platforms is not supported. For example, youcannot upgrade Oracle Traffic Director from a Linux to Solaris environment.
For more information on installing 12c (12.2.1.4.0) binaries in a new FMW_HOME, see thefollowing topic with more details on the procedure and processes.
Chapter 4Preparing to Upgrade Oracle Traffic Director from an Earlier or a Previous 12c to the Latest 12c
4-4

Installing the Product DistributionsBefore beginning your upgrade, download Oracle Fusion Middleware Infrastructureand Oracle Traffic Director 12c (12.2.1.4.0) distributions on the target system andinstall them using Oracle Universal Installer.
Note:
When Infrastructure is required for the upgrade, you must install theOracle Fusion Middleware distribution first before you install other FusionMiddleware products.
The following install instructions are for the standard Oracle Fusion Middlewareinstallation topology. Refer to the Oracle Traffic Director Installation Guide for moreinformation about installing the other supported topologies.
To install 12c (12.2.1.4.0) distributions:
1. Sign in to the target system.
2. Download the following from Oracle Technology Network or Oracle SoftwareDelivery Cloud to your target system:
• Oracle Fusion Middleware Infrastructure(fmw_12.2.1.4.0_infrastructure_generic.jar)
• Oracle Traffic Director (UNIX:distribution_name_12.2.1.3.0_otd_linux64.bin), (Windows:distribution_name_12.2.1.3.0_otd_win64.exe)
3. Change to the directory where you downloaded the 12c (12.2.1.4.0) productdistribution.
4. Start the installation program for Oracle Fusion Middleware Infrastructure:
• (UNIX) JDK_HOME/bin/java -jar fmw_12.2.1.4.0_infrastructure.jar
• (Windows) JDK_HOME\bin\java -jar fmw_12.2.1.4.0_infrastructure.jar
5. On UNIX operating systems, the Installation Inventory Setup screen appears if thisis the first time you are installing an Oracle product on this host.
Specify the location where you want to create your central inventory. Makesure that the operating system group name selected on this screen has writepermissions to the central inventory location, and click Next.
Note:
The Installation Inventory Setup screen does not appear on Windowsoperating systems.
6. On the Welcome screen, review the information to make sure that you have metall the prerequisites. Click Next.
7. On the Auto Updates screen, select an option:
Chapter 4Preparing to Upgrade Oracle Traffic Director from an Earlier or a Previous 12c to the Latest 12c
4-5
• Skip Auto Updates: If you do not want your system to check for softwareupdates at this time.
• Select patches from directory: To navigate to a local directory if youdownloaded patch files.
• Search My Oracle Support for Updates: To automatically download softwareupdates if you have a My Oracle Support account. You must enter OracleSupport credentials then click Search. To configure a proxy server for theinstaller to access My Oracle Support, click Proxy Settings. Click TestConnection to test the connection.
Click Next.
8. On the Installation Location screen, specify the location for the Oracle homedirectory and click Next.
For more information about Oracle Fusion Middleware directory structure, seeUnderstanding Directories for Installation and Configuration in Oracle FusionMiddleware Planning an Installation of Oracle Fusion Middleware.
9. On the Installation Type screen, select the following:
a. For Infrastructure, select Fusion Middleware Infrastructure
b. For Oracle Traffic Director, select Oracle Traffic Director
Select the type of installation and consequently, the products and feature sets youwant to install.
• Select Standalone OTD (Managed independently of WebLogic server) if youare installing Oracle Traffic Director in a Standalone domain or installingOracle Traffic Director in a remote node of a collocated domain.
• Select Collocated OTD (Managed through WebLogic server) if you areinstalling Oracle Traffic Director in a WebLogic Server domain on theadministration server node.
Important:
You can only upgrade earlier versions of Oracle Traffic Director 12c inthe standalone OTD. Upgrading Oracle Traffic Director from 11g to 12cstandalone is not supported.
Click Next.See Installing Oracle Traffic Director for more information.
10. The Prerequisite Checks screen analyzes the host computer to ensure that thespecific operating system prerequisites have been met.
To view the list of tasks that are verified, select View Successful Tasks. To viewlog details, select View Log. If any prerequisite check fails, then an error messageappears at the bottom of the screen. Fix the error and click Rerun to try again. Toignore the error or the warning message and continue with the installation, clickSkip (not recommended).
11. On the Installation Summary screen, verify the installation options that youselected.
If you want to save these options to a response file, click Save Response File andenter the response file location and name. The response file collects and stores
Chapter 4Preparing to Upgrade Oracle Traffic Director from an Earlier or a Previous 12c to the Latest 12c
4-6

all the information that you have entered, and enables you to perform a silentinstallation (from the command line) at a later time.Click Install to begin the installation.
12. On the Installation Progress screen, when the progress bar displays 100%, clickFinish to dismiss the installer, or click Next to see a summary.
13. The Installation Complete screen displays the Installation Location and theFeature Sets that are installed. Review this information and click Finish to closethe installer.
14. After you have installed Oracle Fusion Middleware Infrastructure, enter thefollowing command to start the installer for your product distribution and repeatthe steps above to navigate through the installer screens:
(UNIX) ./distribution_name_12.2.1.3.0_otd_linux64.bin
(Windows) distribution_name_12.2.1.3.0_otd_win64.exe
Performing Pre-Upgrade Tasks on Oracle Traffic DirectorDomain to be Upgraded
You must perform the tasks as in this section, before you begin any upgrade from anearlier or previous Oracle Traffic Director 12c domain to the latest 12c (12.2.1.4.0).These tasks ensure you have a successful upgrade and a limited amount of downtime.
Before you upgrade your earlier or previous Oracle Traffic Director 12c version tothe latest Oracle Traffic Director 12c (12.2.1.4.0) environment, you must follow thesesteps:
1. If you have configured webgate plug-in on Oracle Traffic Director instance, thenyou must ensure that the related changes are pulled into the corresponding OracleTraffic Director configuration before you run the upgrade.
Tip:
See pullComponentChanges in WebLogic Scripting Tool CommandReference for Oracle Traffic Director.
2. Shut down all of the pre-upgrade processes and servers, including theAdministration Server and any managed servers.
Tip:
To stop Oracle Traffic Director instances in 12c environment, seeManaging Oracle Traffic Director Instances in 12c Environment.
For more information on stopping Administration and Managed Servers and NodeManager, see the following topic with more details on the procedure, processes, andservers.
Chapter 4Performing Pre-Upgrade Tasks on Oracle Traffic Director Domain to be Upgraded
4-7

Stopping Servers and ProcessesBefore you run the Upgrade Assistant to upgrade your schemas and configurations,you must shut down all of the pre-upgrade processes and servers, including theAdministration Server and any managed servers.
An Oracle Fusion Middleware environment can consist of an Oracle WebLogic Serverdomain, an Administration Server, multiple managed servers, Java components,system components such as Identity Management components, and a database usedas a repository for metadata. The components may be dependent on each other, sothey must be stopped in the correct order.
Note:
The procedures in this section describe how to stop the existing, pre-upgrade servers and processes using the WLST command-line utility or ascript. You can also use the Oracle Fusion Middleware Control and theOracle WebLogic Server Administration Console. See Starting and StoppingAdministration and Managed Servers and Node Manager.
To stop your pre-upgrade Fusion Middleware environment, navigate to the pre-upgrade domain and follow the steps below:
Step 1: Stop System Components
To stop system components, such as Oracle HTTP Server, use the stopComponentscript:
• (UNIX) EXISTING_DOMAIN_HOME/bin/stopComponent.sh component_name
• (Windows) EXISTING_DOMAIN_HOME\bin\stopComponent.cmd component_name
You can stop system components in any order.
Step 2: Stop the Managed Servers
To stop a WebLogic Server Managed Server, use the stopManagedWebLogic script:
• (UNIX) EXISTING_DOMAIN_HOME/bin/stopManagedWebLogic.shmanaged_server_name admin_url
• (Windows) EXISTING_DOMAIN_HOME\bin\stopManagedWebLogic.cmdmanaged_server_name admin_url
When prompted, enter your user name and password.
Step 3: Stop Oracle Identity Management Components
Stop any Oracle Identity Management components, such as Oracle Internet Directory:
• (UNIX) EXISTING_DOMAIN_HOME/bin/stopComponent.sh component_name
• (Windows) EXISTING_DOMAIN_HOME\bin\stopComponent.cmd component_name
Chapter 4Stopping Servers and Processes
4-8
Step 4: Stop the Administration Server
When you stop the Administration Server, you also stop the processes running inthe Administration Server, including the WebLogic Server Administration Console andFusion Middleware Control.
To stop the Administration Server, use the stopWebLogic script:
• (UNIX) EXISTING_DOMAIN_HOME/bin/stopWebLogic.sh
• (Windows) EXISTING_DOMAIN_HOME\bin\stopWebLogic.cmd
When prompted, enter your user name, password, and the URL of the AdministrationServer.
Step 5: Stop Node Manager
To stop Node Manager, close the command shell in which it is running.
Alternatively, after setting the nodemanager.properties attribute QuitEnabled to true(the default is false), you can use WLST to connect to Node Manager and shut itdown. See stopNodeManager in WLST Command Reference for WebLogic Server.
Managing Oracle Traffic Director Instances in 12c EnvironmentBefore you start upgrading your domain, you must stop all the instances of OracleTraffic Director.
For more information on how you can configure in multiple modes, see the followingtopics:
Starting, Stopping, and Restarting 12c Oracle Traffic Director Instances UsingFusion Middleware Control
Learn more about starting, stopping, or restarting one or more 12c Oracle TrafficDirector instances in the graphical mode.
To start, stop, or restart 12c Oracle Traffic Director instances by using FusionMiddleware Control, you must perform the following:
1. Sign in to Fusion Middleware Control for Oracle Traffic Director.
Tip:
For more details, see Displaying Fusion Middleware Control inAdministering Oracle Traffic Director.
2. Click WebLogic Domain button at the upper left corner of the page.
3. Select Administration > OTD Configurations.
A list of the available configurations is displayed.
4. Select the configuration for which you want to start, stop, or restart instances.
5. Click Oracle Traffic Director Configuration, in the Common Tasks pane.
Chapter 4Stopping Servers and Processes
4-9
6. Select Administration > Instances.
The Instances page is displayed.
7. Select on the list of instances available.
Click Start Instances, or Stop Instances, or Restart Instances button, asrequired, for the instance that you want to start, stop, or restart.
Starting, Stopping, and Restarting Oracle Traffic Director 12c Instances UsingOracle WebLogic Scripting Tool (WLST)
Learn more about starting, stopping, or restarting one or more Oracle Traffic Director12c instances in the command line mode.
To start, stop, or restart one or more Oracle Traffic Director 12c instances, you mustrun the following commands:
Table 4-2 Configuration Commands for 12c Oracle Traffic Director Instances
Action Commands
To Start start
To Stop shutdown
To Restart softRestart
The following examples are for your reference and requirement.
The three commands start, shutdown, and softRestart the instance on the machineotd_foo_machine1.
start('otd_foo_machine1')
shutdown('otd_foo_machine1')
softRestart('otd_foo_machine1')
Tip:
For more information on Oracle WebLogic Scripting Tool (WLST) commandsmentioned in this section, see WebLogic Scripting Tool Command Referencefor Oracle Traffic Director.
Reconfiguring the Existing Domain in Oracle Traffic DirectorRun the Reconfiguration Wizard to reconfigure your Oracle Traffic Director domaincomponent configurations to 12c (12.2.1.4.0).
Follow the process to reconfigure the source Oracle Traffic Director domain on themachine that hosts the Administration Server or the Standalone Domain.
Chapter 4Reconfiguring the Existing Domain in Oracle Traffic Director
4-10
WARNING:
Before you start your reconfiguration process for an existing collocateddomain, you must ensure that the Administration Server is not running.
You can run the Reconfiguration Wizard in the following modes:
Reconfiguring the Existing Oracle Traffic Director Domain in GraphicalMode
To reconfigure your existing Oracle Traffic Director domain using the graphical mode,run the Reconfiguration Wizard.
Navigate through the screens in the Reconfiguration Wizard to reconfigure yourexisting domain.
1. Launch <12.2.1.4.0 oracle home>/oracle_common/common/bin/reconfig.shfrom 12.2.1.4.0 installation location.
While the steps described are for collocated domain, the screens are very similarfor standalone domain as well.
In the Select Domain screen, provide the domain path of the previous 12c releasein the Existing Domain Location field.
2. The setup progress screen is displayed.
Click Next to continue.
3. The Reconfig Summary screen is displayed.
Click Next to continue.
4. Click Next to continue in the Domain mode and the JDK screen.
5. The Advanced Configuration screen is displayed.
Click Next to continue.
6. Click Reconfig on the Configuration Summary screen to continue.
7. The Reconfiguration Progress screen is displayed.
Click Next to continue once the progress is completed and shows 100%.
8. Click Close in the End of Configuration screen to finish the Reconfiguration.
Reconfiguring the Existing Oracle Traffic Director Domain UsingOracle WebLogic Scripting Tool
Learn about how you can reconfigure your existing Oracle Traffic Director domain inthe command line mode.
You can also reconfigure the domain using Oracle WebLogic Scripting Tool in theoffline mode using the readDomainForUpgrade command.
Chapter 4Reconfiguring the Existing Domain in Oracle Traffic Director
4-11

Tip:
For more information, see Reconfiguring a WebLogic Domain UsingWebLogic Scripting Tool.
Starting the Upgrade Assistant for Oracle Traffic Director12c Specific Upgrade
Run the Upgrade Assistant to upgrade product schemas, domain componentconfigurations, or standalone system components to 12c (12.2.1.4.0). Oraclerecommends that you run the Upgrade Assistant as a non-SYSDBA user, completingthe upgrade for one domain at a time.
Note:
Before you start the Upgrade Assistant, make sure that the JVM characterencoding is set to UTF-8 for the platform on which the Upgrade Assistantis running. If the character encoding is not set to UTF-8, then you will notbe able to download files containing Unicode characters in their names. Thiscan cause the upgrade to fail.
To start the Upgrade Assistant
1. Go to the oracle_common/upgrade/bin directory:
• (UNIX) ORACLE_HOME/oracle_common/upgrade/bin
• (Windows) ORACLE_HOME\oracle_common\upgrade\bin
2. Start the Upgrade Assistant:
• (UNIX) ./ua
• (Windows) ua.bat
For information about other parameters that you can specify on the command line,such as logging parameters, see the following topic.
Upgrade Assistant Parameters Specific to Oracle Traffic DirectorYou can start the Upgrade Assistant, using the specific command line parameters forOracle Traffic Director.
When you start the Upgrade Assistant from the command line, you can specifyadditional parameters. The Table 3-3 shows the specific Command-Line Parametersfor Oracle Traffic Director upgrade in Upgrade Assistant.
Chapter 4Starting the Upgrade Assistant for Oracle Traffic Director 12c Specific Upgrade
4-12
Table 4-3 Upgrade Assistant Command-Line Parameters
Parameter Required or Optional Description
-readiness Required for readiness checksNote: Readiness checks cannotbe performed on standaloneinstallations (those not managedby the WebLogic Server).
Performs the upgrade readinesscheck without performing anactual upgrade.Schemas and configurations arechecked.Do not use this parameter ifyou have specified the -examineparameter.
-threads Optional Identifies the number of threadsavailable for concurrent schemaupgrades or readiness checks ofthe schemas.The value must be a positiveinteger in the range 1 to 8. Thedefault is 4.
-response Required for silent upgrades orsilent readiness checks
Runs the Upgrade Assistant usinginputs saved to a response filegenerated from the data thatis entered when the UpgradeAssistant is run in GUI mode.Using this parameter runs theUpgrade Assistant in silent mode(without displaying UpgradeAssistant screens).
-examine Optional Performs the examine phasebut does not perform an actualupgrade.Do not specify this parameterif you have specified the -readiness parameter.
-logLevel attribute Optional Sets the logging level, specifyingone of the following attributes:• TRACE
• NOTIFICATION
• WARNING
• ERROR
• INCIDENT_ERROR
The default logging level isNOTIFICATION.
Consider setting the -logLevelTRACE attribute to so that moreinformation is logged. This isuseful when troubleshooting afailed upgrade. The UpgradeAssistant's log files can becomevery large if -logLevel TRACE isused.
Chapter 4Starting the Upgrade Assistant for Oracle Traffic Director 12c Specific Upgrade
4-13
Table 4-3 (Cont.) Upgrade Assistant Command-Line Parameters
Parameter Required or Optional Description
-logDir location Optional Sets the default location ofupgrade log files and temporaryfiles. You must specify an existing,writable directory where theUpgrade Assistant will create logfiles and temporary files.The default locations are:(UNIX)
NEW_ORACLE_HOME/
oracle_common/upgrade/
logs
NEW_ORACLE_HOME/
oracle_common/upgrade/
temp
(Windows)
NEW_ORACLE_HOME\oracle_c
ommon\upgrade\logs
NEW_ORACLE_HOME\oracle_c
ommon\upgrade\temp
-help Optional Displays all of the command-lineoptions.
Upgrading a Collocated DomainRun the Upgrade Assistant to upgrade Oracle Traffic Director componentconfigurations on the collocated domain. You can upgrade a collocated Oracle TrafficDirector, from an earlier or a previous 12c domain to the latest 12c ( 12.2.1.3.0 )version.
You can run the Upgrade Assistant in the following modes:
• Upgrading Collocated Oracle Traffic Director in Graphical Mode
• Upgrading Collocated Oracle Traffic Director in Silent Mode
Note:
The Upgrade Assistant must only be running on the domain where OracleTraffic Director is collocated with WebLogic Administration Server within anOracle Fusion Middleware Infrastructure Oracle home.
For more information on upgrading remote nodes managed by the administrationserver, see Upgrading Remote Managed Domains.
Chapter 4Upgrading a Collocated Domain
4-14
You can run the Upgrade Assistant in the following modes to upgrade a collocateddomain:
Upgrading Collocated Oracle Traffic Director in Graphical ModeTo upgrade your collocated Oracle Traffic Director using the graphical mode, run theupgrade wizard.
Launch the Upgrade Assistant and follow the steps below:
1. The Welcome screen displays the pre-upgrade tasks that need to be performed.
Ensure you perform these tasks and Click Next to continue.
2. In the Upgrade Type screen, select All Configurations Used By a Domain andprovide the path of the reconfigured domain of an earlier or a previous 12c releasein the Domain Directory field.
Click Next to continue.
3. In the Component List screen, the list of components that will be upgraded aredisplayed.
Click Next to continue.
4. In the Prerequisites screen, make sure you have met all the prerequisitesmentioned in the screen.
Select all the check boxes.
Then click Next to continue.
5. In the Oracle Traffic Director Upgrade Path screen, select the source version forthe upgrade as 12c source.
6. The Examine screen shows the status of the examination process where it ischecked if the components are ready to be upgraded.
Once the process is complete, Click Next to continue.
7. The Upgrade Summary screen is displayed.
Click the Save Response File.. button to create a response file.
A response file is a text file the Upgrade Assistant can write out that saves all ofyour inputs to the various screens.
This file can be used later as an input for Command Line upgrade bypassing theGUI.
Click Upgrade to continue.
8. The Upgrade Progress screen displays the upgrade progress.
Once upgrade is done, Click Next to continue.
9. In the Upgrade Success screen, check the log file in case of any errors during theupgrade.
Click Close to complete the upgrade.
Chapter 4Upgrading a Collocated Domain
4-15

Upgrading Collocated Oracle Traffic Director in Silent ModeYou can upgrade your collocated Oracle Traffic Director in silent mode (command linemode).
To upgrade collocated Oracle Traffic Director using silent mode, run the upgradeassistant command with the response file generated using the upgrade wizard.
• After a successful upgrade, a success message is displayed on the console.
• Log file for the upgrade will be saved in the following path:
<12.2.1.4.0 oracle home>/oracle_common/upgrade/logs
• Command Line for silent upgrade (on UNIX):
<12.2.1.4.0 oracle home>/oracle_common/upgrade/bin/ua -response <response-file> -logLevel <Log-verbosity>
Syntax
After a successful upgrade, a success message is displayed on the console. Log file isavailable under the following path:
<12.2.1.4.0 oracle home>/oracle_common/upgrade/logs
Command Line for Silent Upgrade (on UNIX)
<12.2.1.4.0 oracle home>/oracle_common/upgrade/bin/ua -response <response-file> -logLevel <Log-verbosity>
Sample Response File
The following is a sample response file as an example for your requirement.
# This is a response file for the Fusion Middleware Upgrade Assistant.# Individual component upgrades are performed in the order they are described here.# Each upgrade is introduced by a section header containing the name of the# component and name of the upgrade plugin. The form of the section header is# [ComponentName.PluginName] # These names can be found in the Upgrade Descriptor files for the components.# Individual input lines consist of a name, an equal sign, and a value.# The name is in two parts separated by a period. The first part is the "name" attribute from the Descriptor File XML tag by which the plugin refers to the value.# The second part of the name identifies a field within that value. Some input types have only one field, while other types can have half a dozen.
Chapter 4Upgrading a Collocated Domain
4-16

# Do not intermix input lines that apply to different XML tags. [GENERAL]# This is the file format version number. Do not change the next line.fileFormatVersion = 3 # The next section contains information for accessing a WebLogic Server domain.[UAWLSINTERNAL.UAWLS] # The following number uniquely identifies this instance of an upgrade plugin. Do not change it.pluginInstance = 1 # Specifies the WebLogic Server domain directory:UASVR.path = /export/orahome/domains/otd_domain # The next section contains the information for performing a mid-tier upgrade on Oracle JRF, as described in the Upgrade Descriptor file located at# /export/orahome/oracle_common/plugins/upgrade/jrfua.xml# Do not change the next line.[JRF.JRF_CONFIG_PLUGIN] # The following number uniquely identifies this instance of an upgrade plugin. Do not change it.pluginInstance = 8 # The next section contains the information for performing a mid-tier upgrade on System Components Infrastructure, as described in the Upgrade Descriptor file located at# /export/orahome/oracle_common/plugins/upgrade/syscomp.xml# Do not change the next line.[CAM.SYSCOMP] # The following number uniquely identifies this instance of an upgrade plugin. Do not change it.pluginInstance = 4 # The next section contains the information for performing a mid-tier upgrade on Oracle Traffic Director, as described in the Upgrade Descriptor file located at# /export/orahome/otd/plugins/upgrade/otd-upgrade.xml# Do not change the next line.[OTD.CONFIG_UPGRADE] # The following number uniquely identifies this instance of an upgrade plugin. Do not change it.pluginInstance = 12 # Specifies a choice from a collection of values,# "Select the source version for the upgrade"UPGRADE_CHOICE.choose = 12-12 # Specifies the choice for a yes/no option:
Chapter 4Upgrading a Collocated Domain
4-17

# "Remote directory"REMOTE_INSTANCE_HOME.option = no
Upgrading Remote Managed DomainsFollow the process as in this topic to upgrade Oracle Traffic Director remotelymanaged domains.
If the Administration server in the upgraded domain manages multiple remotedomains, the following procedure must be followed to upgrade each of these.
Note:
Note that domains managed by a remote Administration Server arenot directly upgradable. Instead, the collocated domain on which theAdministration Server is running must be packed and unpacked on theremote node.
Learn more about processes and steps on how you can upgrade remotely manageddomains as in the following modes:
Installing Product BinariesYou must install the product binaries to begin your Oracle Traffic Director upgrade inremote managed domains.
Install Oracle Traffic Director in standalone mode on each node that hosts remotemanaged domain.
Tip:
For more information on installing Oracle Traffic Director in a standalonemode, see Installation Procedure in Installing Oracle Traffic Director.
Packing the Upgraded Collocated DomainFollow the steps to pack your upgraded collocated domain in Oracle Traffic Directorupgrade.
Pack the upgraded domain in the node that hosts the Administration Server using thepack command.
• This command creates a template jar file that contains a subset of the domain thatcan be used to create an Oracle Traffic Director managed domain on the remotemachine.
• Copy the template jar created by pack command to the node that needs to hostremote managed domain or keep the jar in a file system location which can beaccessed from that node.
Chapter 4Upgrading a Collocated Domain
4-18
Syntax
<12.2.1.4.0 Oracle Home>/oracle_common/common/bin/pack.sh -domain=<full path to the domain that needs to be packed> -template=<full path to a template jar file to be created> -template_name=<description> -managed=true
Sample Response File
The following is a sample response file as an example for your requirement.
<12.2.1.4.0 Oracle Home>/oracle_common/common/bin/pack.sh -domain=<domain home> -template=/share/files/upgraded_domain.jar -template_name=test_after_upgrade -managed=true
Unpacking the Upgraded Collocated Domain on the Remote NodesFollow the steps to unpack your upgraded collocated domain in Oracle Traffic Directorupgrade on the remote nodes.
To unpack your upgraded collocated domain, run the unpack command on thestandalone node that needs to host remote managed domain.
Syntax
<12.2.1.4.0 Oracle Home>/oracle_common/common/bin/unpack.sh -domain=<full path to the domain that needs to be created> -template=<full path to the template jar file created using pack>
Sample Response File
The following is a sample response file as an example for your requirement.
<12.2.1.4.0 Oracle Home>/oracle_common/common/bin/unpack.sh -domain=<domain home> -template=/share/files/upgraded_domain.jar
Upgrading a Standalone DomainRun the Upgrade Assistant to upgrade Oracle Traffic Director componentconfigurations on the standalone domain. You can upgrade a standalone Oracle TrafficDirector, from an earlier or a previous 12c domain to the latest 12c (12.2.1.4.0)version.
You can run the Upgrade Assistant in the following modes:
Chapter 4Upgrading a Standalone Domain
4-19

Upgrading Standalone Oracle Traffic Director in Graphical ModeTo upgrade your standalone Oracle Traffic Director using the graphical mode, run theupgrade wizard.
Launch the Upgrade Assistant and follow the steps below:
1. The Welcome screen displays the pre-upgrade tasks that need to be performed.
Ensure you perform these tasks and Click Next to continue.
2. In the Upgrade Type screen, Select Standalone System ComponentConfigurations.
In the Standalone Components screen, Select Update an Existing Domain andprovide the path of the reconfigured standalone domain of previous 12c release inthe Domain Directory field.
Click Next to continue.
Note:
The Create a new Domain option is not supported in Oracle TrafficDirector Standalone Domain.
3. In the Component List screen, the list of components that will be upgraded aredisplayed.
Click Next to continue.
4. In the Prerequisites screen, ensure you have met all the prerequisites mentionedin the screen.
Select all the check boxes, then Click Next to continue.
5. In Oracle Traffic Director Upgrade Path screen, Select the source version for theupgrade as 12c source.
6. The Examine screen shows the status of the examination process where it ischecked if the components are ready to be upgraded.
Once the process is complete, Click Next to continue.
7. The Upgrade Summary screen is displayed.
Click the Save Response File... button to create a response file.
This file can be used as an input for Command Line upgrade.
Click Upgrade to continue.
8. The Upgrade Progress screen displays the upgrade progress.
Once the upgrade is completed, Click Next to continue.
9. In the Upgrade Success screen, check the log file in case of any errors during theupgrade.
Click Close to complete this upgrade.
Chapter 4Upgrading a Standalone Domain
4-20

Upgrading Standalone Oracle Traffic Director in Silent ModeYou can upgrade your standalone Oracle Traffic Director in silent mode (command linemode).
To upgrade standalone Oracle Traffic Director using silent mode, run the UpgradeAssistant command with the response file generated using the upgrade wizard.
Syntax
After a successful upgrade, a success message is displayed on the console. Log file isavailable under the following path:
<12.2.1.4.0 oracle home>/oracle_common/upgrade/logs
Command Line for Silent Upgrade (on UNIX)
<12.2.1.4.0 oracle home>/oracle_common/upgrade/bin/ua -response <response-file> -logLevel <Log-verbosity>
Sample Response File
The following is a sample response file as an example for your requirement.
# This is a response file for the Fusion Middleware Upgrade Assistant.# Individual component upgrades are performed in the order they are described here.# Each upgrade is introduced by a section header containing the name of the component and name of the upgrade plugin. The form of the section header is# [ComponentName.PluginName] # These names can be found in the Upgrade Descriptor files for the components.# Individual input lines consist of a name, an equal sign, and a value.# The name is in two parts separated by a period. The first part is the "name" attribute from the Descriptor File XML tag by which the plugin refers to the value.# The second part of the name identifies a field within that value. Some input types have only one field, while other types can have half a dozen.# Do not intermix input lines that apply to different XML tags. [GENERAL] # This is the file format version number. Do not change the next line.fileFormatVersion = 3 # The next section contains information for accessing a WebLogic Server domain.[UAWLSINTERNAL.UAWLS]
Chapter 4Upgrading a Standalone Domain
4-21
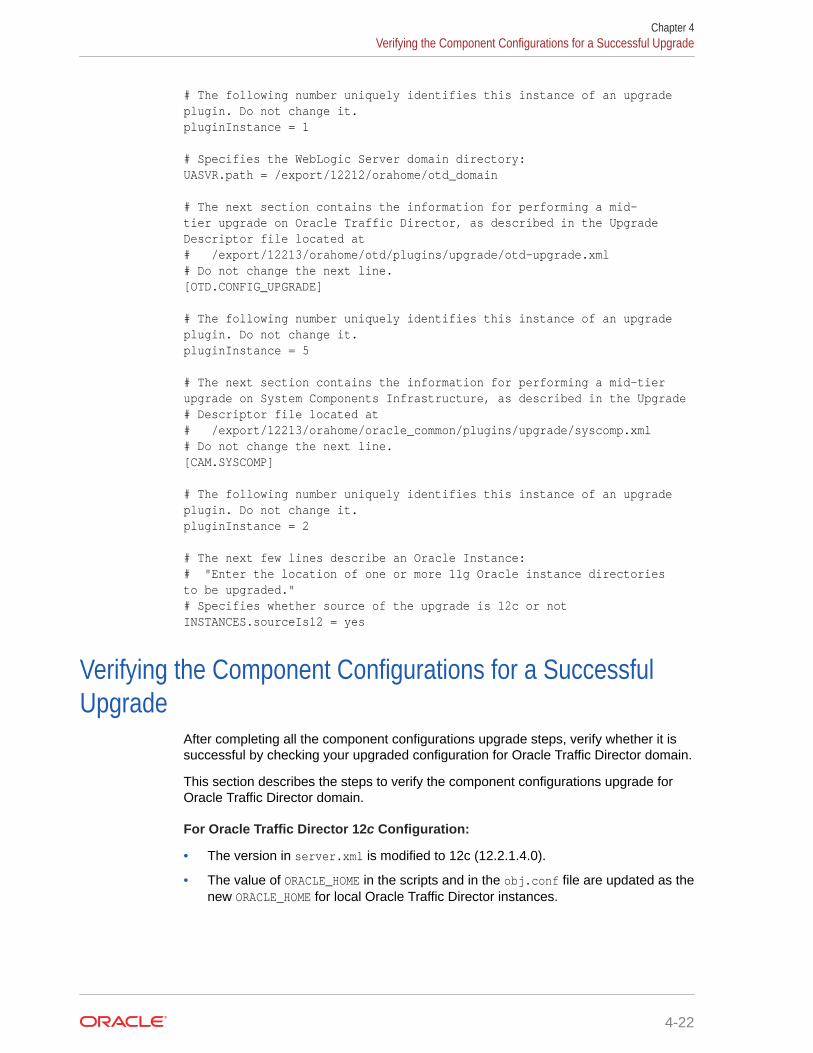
# The following number uniquely identifies this instance of an upgrade plugin. Do not change it.pluginInstance = 1 # Specifies the WebLogic Server domain directory:UASVR.path = /export/12212/orahome/otd_domain # The next section contains the information for performing a mid-tier upgrade on Oracle Traffic Director, as described in the Upgrade Descriptor file located at# /export/12213/orahome/otd/plugins/upgrade/otd-upgrade.xml# Do not change the next line.[OTD.CONFIG_UPGRADE] # The following number uniquely identifies this instance of an upgrade plugin. Do not change it.pluginInstance = 5 # The next section contains the information for performing a mid-tier upgrade on System Components Infrastructure, as described in the Upgrade# Descriptor file located at# /export/12213/orahome/oracle_common/plugins/upgrade/syscomp.xml# Do not change the next line.[CAM.SYSCOMP] # The following number uniquely identifies this instance of an upgrade plugin. Do not change it.pluginInstance = 2 # The next few lines describe an Oracle Instance:# "Enter the location of one or more 11g Oracle instance directories to be upgraded."# Specifies whether source of the upgrade is 12c or notINSTANCES.sourceIs12 = yes
Verifying the Component Configurations for a SuccessfulUpgrade
After completing all the component configurations upgrade steps, verify whether it issuccessful by checking your upgraded configuration for Oracle Traffic Director domain.
This section describes the steps to verify the component configurations upgrade forOracle Traffic Director domain.
For Oracle Traffic Director 12c Configuration:
• The version in server.xml is modified to 12c (12.2.1.4.0).
• The value of ORACLE_HOME in the scripts and in the obj.conf file are updated as thenew ORACLE_HOME for local Oracle Traffic Director instances.
Chapter 4Verifying the Component Configurations for a Successful Upgrade
4-22
Post-Upgrade TasksFollow the process to complete post-upgrade tasks for Oracle Traffic Director from anearlier/previous 12c to the latest 12c (12.2.1.4.0) version.
Review the following list of post-upgrade tasks to be performed after using theUpgrade Assistant to upgrade to Oracle Traffic Director 12c (12.2.1.4.0):
• Oracle Traffic Director instances must be created post-upgrade, by targetingOracle Traffic Director configurations to the machines using Fusion MiddlewareControl or Oracle WebLogic Scripting Tool (WLST).
Tip:
See Managing Instances in Administering Oracle Traffic Director.
• Setting up failover is a deployment task.
These steps are best handled outside the upgrade as post-upgrade steps.
Tip:
For more information on deployment topology and configuring failovergroups, see Configuring Oracle Traffic Director for High Availability inAdministering Oracle Traffic Director.
• Any references in Oracle Traffic Director configuration files to the paths outsideof INSTANCE_HOME and ORACLE_HOME may not be accessible post upgrade.
This must be configured manually.
Starting Servers and ProcessesAfter a successful upgrade from an earlier/previous 12c to the latest 12c (12.2.1.4.0)version, start all the processes and servers, including the Administration Server andany Managed Servers and system components.
The components may be dependent on each other and hence, they must be started inthe correct order.
Tip:
To start Oracle Traffic Director instances in 12c environment, see ManagingInstances.
For more information on starting and stopping Administration and Managed Serversand Node Manager, see the following topic with complete details on the procedure andhow to run all these processes and servers.
Chapter 4Post-Upgrade Tasks
4-23
Starting Servers and ProcessesAfter a successful upgrade, restart all processes and servers, including theAdministration Server and any Managed Servers.
The components may be dependent on each other so they must be started in thecorrect order.
Note:
The procedures in this section describe how to start servers and processusing the WLST command line or a script. You can also use the OracleFusion Middleware Control and the Oracle WebLogic Server AdministrationConsole. See Starting and Stopping Administration and Managed Serversand Node Manager in Administering Oracle Fusion Middleware.
To start your Fusion Middleware environment, follow the steps below:
Step 1: Start the Administration Server
When you start the Administration Server, you also start the processes running inthe Administration Server, including the WebLogic Server Administration Console andFusion Middleware Control.
To start the Administration Server, use the startWebLogic script:
• (UNIX) NEW_DOMAIN_HOME/bin/startWebLogic.sh
• (Windows) NEW_DOMAIN_HOME\bin\startWebLogic.cmd
When prompted, enter your user name, password, and the URL of the AdministrationServer.
Step 2: Start Node Manager
To start Node Manager, use the startNodeManager script:
• (UNIX) NEW_DOMAIN_HOME/bin/startNodeManager.sh
• (Windows) NEW_DOMAIN_HOME\bin\startNodeManager.cmd
Step 3: Start Oracle Identity Management Components
Start any Oracle Identity Management components, such as Oracle Internet Directory,that form part of your environment:
• (UNIX) NEW_DOMAIN_HOME/bin/startComponent.sh component_name
• (Windows) NEW_DOMAIN_HOME\bin\startComponent.cmd component_name
Step 4: Start the Managed Servers
To start a WebLogic Server Managed Server, use the startManagedWebLogic script:
• (UNIX) NEW_DOMAIN_HOME/bin/startManagedWebLogic.sh managed_server_nameadmin_url
Chapter 4Starting Servers and Processes
4-24
• (Windows) NEW_DOMAIN_HOME\bin\startManagedWebLogic.cmdmanaged_server_name admin_url
When prompted, enter your user name and password.
Note:
The startup of a Managed Server will typically start the applications thatare deployed to it. Therefore, it should not be necessary to manually startapplications after the Managed Server startup.
Step 5: Start System Components
To start system components, such as Oracle HTTP Server, use the startComponentscript:
• (UNIX) NEW_DOMAIN_HOME/bin/startComponent.sh component_name
• (Windows) NEW_DOMAIN_HOME\bin\startComponent.cmd component_name
You can start system components in any order.
Chapter 4Starting Servers and Processes
4-25
Part IVTroubleshooting and AdvancedConfigurations
This part of Upgrading Oracle Traffic Director provides information abouttroubleshooting upgrade issues and options for advanced upgrade configurations.

5Troubleshooting the Upgrade
If the upgrade process fails, you must close the Upgrade Assistant, correct the issue,and then restart the Upgrade Assistant.
If the upgrade process fails after the upgrade process has started, you must drop thecloned repository and start from a freshly cloned repository in addition to correcting theunderlying issue. There is no way to restart the failed upgrade process.
Tip:
For more information, see Troubleshooting Your Upgrade in Upgrading withthe Upgrade Assistant.
For more options in troubleshooting, see:
Troubleshooting Upgrade Performance ErrorsLearn more about upgrade related performance errors and how to troubleshoot them.
The number of sessions present in a repository affects upgrade performance. Oraclerecommends that you archive and purge your session logs to improve upgradeperformance.
Tip:
For more information, see the following:
• Purging the Log in Administering Oracle Data Integrator.
• Managing Logs in Administering Oracle Traffic Director.
5-1
AUpgrading the JDK After Installing andConfiguring an Oracle Fusion MiddlewareProduct
This appendix describes some common procedures for upgrading the JDK afterinstalling and configuring an Oracle Fusion Middleware product.
About Updating the JDK Location After Installing an OracleFusion Middleware Product
The binaries and other metadata and utility scripts in the Oracle home and Domainhome, such as RCU or Configuration Wizard, use a JDK version that was usedwhile installing the software and continue to refer to the same version of the JDK.The JDK path is stored in a variable called JAVA_HOME which is centrally locatedin .globalEnv.properties file inside the ORACLE_HOME/oui directory.
The utility scripts such as config.sh|cmd, launch.sh, or opatch reside in theORACLE_HOME, and when you invoke them, they refer to the JAVA_HOMEvariable located in .globalEnv.properties file. To point these scripts and utilities to thenewer version of JDK, you must update the value of the JAVA_HOME variable inthe .globalEnv.properties file by following the directions listed in Updating the JDKLocation in an Existing Oracle Home .
To make the scripts and files in your Domain home directory point to the newer versionof the JDK, you can follow one of the following approaches:
• Specify the path to the newer JDK on the Domain Mode and JDK screen whilerunning the Configuration Wizard.
For example, consider that you installed Oracle Fusion Middleware Infrastructurewith the JDK version 8u191. So while configuring the WebLogic domain with theConfiguration Assistant, you can select the path to the newer JDK on the DomainMode and JDK screen of the Configuration Wizard. Example: /scratch/jdk/jdk1.8.0_211.
• Manually locate the files that have references to the JDK using grep (UNIX) orfindstr (Windows) commands and update each reference. See Updating theJDK Location in an Existing Oracle Home .
Note:
If you install the newer version of the JDK in the same location as theexisting JDK by overwriting the files, then you don’t need to take any action.
A-1
Updating the JDK Location in an Existing Oracle HomeThe getProperty.sh|cmd script displays the value of a variable, such as JAVA_HOME,from the .globalEnv.properties file. The setProperty.sh|cmd script is used to setthe value of variables, such as OLD_JAVA_HOME or JAVA_HOME that contain thelocations of old and new JDKs in the .globalEnv.properties file.
The getProperty.sh|cmd and setProperty.sh|cmd scripts are located in the followinglocation:
(UNIX) ORACLE_HOME/oui/bin(Windows) ORACLE_HOME\oui\binWhere, ORACLE_HOME is the directory that contains the products using the currentversion of the JDK, such as 1.8.0_191.
To update the JDK location in the .globalEnv.properties file:
1. Use the getProperty.sh|cmd script to display the path of the current JDK from theJAVA_HOME variable. For example:
(UNIX) ORACLE_HOME/oui/bin/getProperty.sh JAVA_HOME(Windows) ORACLE_HOME\oui\bin\getProperty.cmd JAVA_HOMEecho JAVA_HOMEWhere JAVA_HOME is the variable in the .globalEnv.properties file that containsthe location of the JDK.
2. Back up the path of the current JDK to another variable such asOLD_JAVA_HOME in the .globalEnv.properties file by entering the followingcommands:
(UNIX) ORACLE_HOME/oui/bin/setProperty.sh -name OLD_JAVA_HOME-value specify_the_path_of_current_JDK(Windows) ORACLE_HOME\oui\bin\setProperty.cmd -nameOLD_JAVA_HOME -value specify_the_path_of_current_JDK
This command creates a new variable called OLD_JAVA_HOME inthe .globalEnv.properties file, with a value that you have specified.
3. Set the new location of the JDK in the JAVA_HOME variable ofthe .globalEnv.properties file, by entering the following commands:
(UNIX) ORACLE_HOME/oui/bin/setProperty.sh -name JAVA_HOME -value specify_the_location_of_new_JDK(Windows) ORACLE_HOME\oui\bin\setProperty.cmd -name JAVA_HOME-value specify_the_location_of_new_JDK
After you run this command, the JAVA_HOME variable in the .globalEnv.propertiesfile now contains the path to the new JDK, such as jdk1.8.0_211.
Updating the JDK Location in an Existing Domain HomeYou must search the references to the current JDK, for example 1.8.0_191 manually,and replace those instances with the location of the new JDK.
You can use the grep (UNIX) or findstr (Windows) commands to search for thejdk-related references.
Appendix AAbout Updating the JDK Location After Installing an Oracle Fusion Middleware Product
A-2
You’ll likely be required to update the location of JDK in the following three files:
(UNIX) DOMAIN_HOME/bin/setNMJavaHome.sh(Windows) DOMAIN_HOME\bin\setNMJavaHome.cmd
(UNIX) DOMAIN_HOME/nodemanager/nodemanager.properties(Windows) DOMAIN_HOME\nodemanager\nodemanager.properties
(UNIX) DOMAIN_HOME/bin/setDomainEnv.sh(Windows) DOMAIN_HOME\bin\setDomainEnv.cmd
Appendix AAbout Updating the JDK Location After Installing an Oracle Fusion Middleware Product
A-3