Upgrading FlexNet Manager Suite On-Premises - Flexera Product ...
122
Upgrading FlexNet Manager Suite On-Premises
-
Upload
khangminh22 -
Category
Documents
-
view
3 -
download
0
Transcript of Upgrading FlexNet Manager Suite On-Premises - Flexera Product ...

Upgrading FlexNet Manager Suite On-Premises

Legal Information
Document Name: FlexNet Manager Suite 2014 Rx (or later) to 2018 R2 Upgrade Guide (for on-premises delivery)
Part Number: FMS-13.1.0-UG04
Product Release Date: September 30, 2018
Copyright Notice
Copyright © 2018 Flexera. All Rights Reserved.
This publication contains proprietary and confidential technology, information and creative works owned byFlexera and its licensors, if any. Any use, copying, publication, distribution, display, modification, or transmission ofsuch publication in whole or in part in any form or by any means without the prior express written permission ofFlexera is strictly prohibited. Except where expressly provided by Flexera in writing, possession of this publicationshall not be construed to confer any license or rights under any Flexera intellectual property rights, whether byestoppel, implication, or otherwise.
All copies of the technology and related information, if allowed by Flexera, must display this notice of copyrightand ownership in full.
FlexNet Manager Suite incorporates software developed by others and redistributed according to licenseagreements. Copyright notices and licenses for this externally-developed software are provided in the link below.
Intellectual Property
For a list of trademarks and patents that are owned by Flexera, see http://www.flexera.com/intellectual-property.All other brand and product names mentioned in Flexera products, product documentation, and marketingmaterials are the trademarks and registered trademarks of their respective owners.
Restricted Rights Legend
The Software is commercial computer software. If the user or licensee of the Software is an agency, department, orother entity of the United States Government, the use, duplication, reproduction, release, modification, disclosure,or transfer of the Software, or any related documentation of any kind, including technical data and manuals, isrestricted by a license agreement or by the terms of this Agreement in accordance with Federal AcquisitionRegulation 12.212 for civilian purposes and Defense Federal Acquisition Regulation Supplement 227.7202 formilitary purposes. The Software was developed fully at private expense. All other use is prohibited.

Contents
1. Upgrading FlexNet Manager Suite to 2018 R2 On-Premises ........................................... 5
Process Overview .................................................................................................................................................. 5
Design the Final Topography .............................................................................................................................. 6
Considerations for Inventory Beacons ..................................................................................................................................... 10
Prerequisites and Preparations ......................................................................................................................... 13
Locate License Details (probably) .............................................................................................................................................. 13
Enable MTS and MSMQ................................................................................................................................................................. 14
Identify (or Set Up) Accounts ...................................................................................................................................................... 15
Isolate the System............................................................................................................................................................................ 21
Repair Database Constraint Violations .................................................................................................................................... 23
Check Database Collation Sequence ........................................................................................................................................ 26
Enable SQL Server CLR ................................................................................................................................................................... 27
Configure .NET and IIS ................................................................................................................................................................... 27
Configure Internet Explorer.......................................................................................................................................................... 30
Upgrade PowerShell on Inventory Beacons........................................................................................................................... 31
Configure Network Shares for Multi-Server .......................................................................................................................... 32
Drivers for Spreadsheet Imports ................................................................................................................................................ 32
Download the Materials ................................................................................................................................................................ 33
2. Upgrading FlexNet Manager Suite .................................................................................... 35
Remove Previous Language Packs.................................................................................................................... 35
Upgrade/Create Databases................................................................................................................................ 36
Re-Indexing a Database................................................................................................................................................................. 43
Database Validation ........................................................................................................................................................................ 44
Authorize the Service Account.......................................................................................................................... 45
Choosing the Upgrade Approach ..................................................................................................................... 46
Managing a Scripted Upgrade .......................................................................................................................... 46
Prepare Encrypted Credentials for Upgrade.......................................................................................................................... 47
Prepare Answer File ......................................................................................................................................................................... 50
Running a Scripted Installation................................................................................................................................................... 54
Managing Upgrades Interactively .................................................................................................................... 56
Upgrade the Web Interface.......................................................................................................................................................... 56
Contents
Upgrading FlexNet Manager Suite to 2018 R2 On Premises | Company Confidential 3

Update the Inventory Server........................................................................................................................................................ 58
Update the batch server ................................................................................................................................................................ 59
Configure the System ..................................................................................................................................................................... 60
Upgrading Flexera Analytics ............................................................................................................................. 65
Upgrading Recent Flexera Analytics ......................................................................................................................................... 65
Upgrading Flexera Analytics from FlexNet Report Designer .......................................................................................... 72
Configuring IIS to Use SSL/TLS Encryption ............................................................................................................................ 81
Reconfigure Cognos to Use Third-Party SSL Certificates ................................................................................................. 82
Importing an Updated Flexera License .................................................................................................................................... 84
Update the Sample Reporting Package .................................................................................................................................. 85
Installing a Free-Standing Studio ..................................................................................................................... 87
Populate the Downloadable Libraries .............................................................................................................. 89
Manual Updates of Library Data ................................................................................................................................................ 91
Link to Flexera Service Gateway ....................................................................................................................... 93
Update Access Rights ......................................................................................................................................... 94
Update and Deploy Additional Inventory Beacons ........................................................................................ 95
Upgrading 2014 or earlier, or installing new inventory beacons .................................................................................. 96
Managing self-upgrades from 2014 R2/R3 (or later) inventory beacons .................................................................. 98
Upgrade Connected-Mode Studios .................................................................................................................. 99
Configure Updates to Inventory Agents ........................................................................................................ 100
Optional: Perform a Full Import...................................................................................................................... 103
Activating and Using New Features ............................................................................................................... 105
Enhancement for Purchase Records ...................................................................................................................................... 106
Configure Updates to Inventory Agents .............................................................................................................................. 108
Updating the ADDM Adapter................................................................................................................................................... 110
Update the XenApp Adapter .................................................................................................................................................... 112
Update the XenDesktop Adapter............................................................................................................................................ 113
3. Notes on Issues .................................................................................................................. 116
Password Maintenance .................................................................................................................................... 116
Identifying IIS Application Pool Credential Issues........................................................................................ 119
Update Credentials in IIS Application Pools ...................................................................................................................... 120
IIS Roles/Services .............................................................................................................................................. 121
Contents
4 Upgrading FlexNet Manager Suite to 2018 R2 On Premises | Company Confidential

1Upgrading FlexNet Manager Suite to
2018 R2 On-Premises
This document covers upgrading from FlexNet Manager Suite release 2014 or later, to FlexNet Manager Suite2018 R2 in an on-premises implementation.
Note: Migrating from earlier versions such as 9.2 or earlier is not included in this document. For that process,please see the separate document Migrating to FlexNet Manager Suite 2018 R2 On-Premises. As well, managedservice providers (MSPs) should reference separate documentation covering multi-tenant environments.
This document is intended for use by:
• System engineers responsible for implementing and maintaining the system
• Network and security personnel with responsibility for infrastructure that the system relies on
• Flexera consultants implementing your system.
Assumptions: Readers have completed at least the appropriate training course in FlexNet Manager Suiteadministration, and understand basic product concepts. Readers have a technical background and are experiencedwith product installations and configuration.
Process OverviewUpgrading from the 2014 or later (web-based) releases to FlexNet Manager Suite 2018 R2 is conceptually verystraight-forward:
• For any 2014 release, if you had installed any language packs (localizing the user interface into, for example,German or Japanese), these should be uninstalled first. (The current release installs language support for allavailable languages.)
• Run the scripts provided to upgrade the underlying databases.
• Run the installer on (each of) your central application server(s) to update the product itself.
Upgrading FlexNet Manager Suite to 2018 R2 On-Premises
Upgrading FlexNet Manager Suite to 2018 R2 On Premises | Company Confidential 5

• If you had previously implemented any custom scheduled tasks on your application server (or, in a multi-serverimplementation, your batch server), consider upgrading these to use the shadow copy approach that helpsmeet high-availability goals by allowing live updates to Windows .NET assemblies (and dependent libraries)without interrupting normal operations of FlexNet Manager Suite.
• Manage your inventory beacon updates:
◦ If migrating from 2014, visit each inventory beacon and run the installer (available through your updatedweb interface of FlexNet Manager Suite) to update the beacon. While there, you may prefer to tweak thedefault schedules in the new, in-built beacon scheduler; and you need to update connection details foradapters previously run as Windows Scheduled Tasks.
◦ If migrating from 2014 R2 or later, your inventory beacons are self-updating. You can manage the upgradeprocess (including testing, pilot groups, and roll out) as described in FlexNet Manager Suite Help > What
Is an Inventory Beacon? > Upgrading Inventory Beacons.
At this point, your system is upgraded and functional. You may also choose, as part of the upgrade project, toextend your implementation with some of the newly supported features, as described in the release notes. Ingeneral, details about these enhanced features are not included in this document, which focuses on the upgradeprocess itself.
Design the Final TopographyYour existing implementation of FlexNet Manager Suite might be installed on a single central server, or on agroup of servers (such as a separate database server, and you may even have a separation between the webapplication server and the processing server). Going forward, you might consider scaling up your implementationas your estate grows. (In any case, please study the diagram below to understand terminology in this document.)
Determine whether to implement a single server or multi-server solution, based on projected scaling. Please referto the following diagram, where each blue box represents a potentially separate server, and where all are giventhe names referenced throughout this document.
Note: Both the inventory server (or in smaller implementations the processing server, or the application serverin a single-server implementation) and the inventory beacon(s) are expected to be members of Active Directorydomains. (For test environments, consultants may see article 000017145 How to run FlexNet Manager Suiteprocessing server on a workgroup computer.) If you implement a multi-server solution (separating the webapplication server, the batch server, or the inventory server), it is strongly recommended that all are members ofthe same Active Directory domain.
There are six different kinds of server functionality in FlexNet Manager Suite. Your implementation may merge allthis functionality onto a few servers; or for very large implementations, you may need six or more separate(virtual or physical) servers. In all cases, it is important to understand the functionality of these separatecomponents that make up a working system:
• At least one inventory beacon, and typically more for a complex infrastructure
Tip: An inventory beacon may be installed on the same server as the batch server (defined shortly). Thisallows for greater functionality in future custom business adapters, as on this inventory beacon alonebusiness adapters may operate in "connected mode".
Upgrading FlexNet Manager Suite to 2018 R2 On-Premises
6 Upgrading FlexNet Manager Suite to 2018 R2 On Premises | Company Confidential

• An inventory server, which can also be duplicated across multiple servers if you are gathering FlexNetinventory for many tens of thousands of devices (see below)
• One (and only one) batch server (also known as a reconciliation server) that imports third-party inventory,integrates FlexNet inventory, incorporates business-related information, and reconciles everything to calculateyour license position
Tip: Currently MSMQ limits the hostname of the batch server to 15 characters (excluding the domainqualifier).
• The database server (where the five underlying databases may also be split across separate database servers ifrequired)
• The web application server that handles presentation of the interface
• A server for the business reporting option (powered by Cognos), where applicable.
Tip: If the Cognos content store is installed on an SQL Server installation later than 2012, it should be run inSQL Server 2012 compatibility mode.
Tip: You can start with your FlexNet Manager Suite 2014 (or 2014 R2) server and upgrade it to the newsystem, where it can function as any of the servers described above (or indeed, for the combined servers asdescribed next, if yours is a smaller implementation). Similarly, if you had a separate database server in yourprevious implementation, that same database server may host the new databases shown in the diagram.
All system servers require a 64-bit operating system. The database server (alone) may have a 32-bit operatingsystem, but a 64-bit operating system is recommended.
In more moderately-sized implementations (the vast majority), a typical implementation might have a separatedatabase server and Cognos server, and combine the remaining three central functions as a single "applicationserver", as shown in the diagram. As scaling dictates, you can combine or separate the web application server, thebatch server, and the inventory server in any combination required. The logical separation of presentation fromprocessing need not drive hardware requirements. Scaling considerations may include the following:
• Typically the first candidate for replication is the inventory beacon. This is often driven by networkconsiderations as much as by simple scaling considerations.
• If your system manages more than 50,000 devices reporting FlexNet inventory alone (ignoring for the momentinventory through other third-party tools), the inventory server should be separated onto its own device. Youcan expect to duplicate a separate inventory server for (roughly) every 50,000 devices reporting FlexNetinventory.
• If you manage inventory from more than 100,000 devices, the batch server (or reconciliation server) may beseparated from the web application server and installed separately.
Upgrading FlexNet Manager Suite to 2018 R2 On-Premises
Upgrading FlexNet Manager Suite to 2018 R2 On Premises | Company Confidential 7

Tip: When you implement your web application server as a separate server, you must configure one or twonetwork shares that all servers can access to share uploaded data between them. The shared drives areidentified during the installation process. For details, see Configure Network Shares for Multi-Server.
The diagram shows that:
• FlexNet inventory (from the FlexNet inventory agent) is uploaded to the inventory database by the inventoryserver, and then separately imported to the compliance database
• Third-party inventory imported from other tools is loaded by the batch server and stored directly in thecompliance database
• Some time-based data is copied to the data warehouse database, and reports may combine trend data fromhere with current data from the compliance database
• Some data is copied to the snapshot database to improve presentation performance
• The web interface automatically displays a mixture of data from the snapshot database and the compliancedatabase, as appropriate; and data manually input through the web interface is written back to the compliancedatabase
• While Flexera Analytics can be installed on your application server, for performance reasons Flexera Analytics isbest installed on a separate server (it has high memory use requirements).
Note: All servers shown inside the data center should be within a single time zone. This is particularlyimportant if you are using Flexera Analytics, since the Flexera Analytics Operational Dashboard combinestime-based data from the database server(s) and the Cognos server.
Choose your web servers per device
Web protocols are used for data transfer within the FlexNet Manager Suite infrastructure. Two alternatives aresupported, and can be mixed and matched within the infrastructure of inventory beacons and servers:
Upgrading FlexNet Manager Suite to 2018 R2 On-Premises
8 Upgrading FlexNet Manager Suite to 2018 R2 On Premises | Company Confidential

• Microsoft IIS. Choose this alternative when any of the following apply:
◦ The host server is one of your central application servers (web application server, batch server, or inventoryserver, or combinations as applicable). No web server is required on a stand-alone database server. Whenyou install the recommended inventory beacon on the same device as the central batch server, that beaconalso uses IIS (whereas other free-standing beacons on separate devices still have a choice).
◦ When a particular inventory beacon is collecting inventory from (and passing back recommendations to)FlexNet Manager for SAP Applications, that inventory beacon must use IIS.
◦ When you require Windows Authentication to allow transfer of data (for example, a parent inventorybeacon might typically use Windows Authentication if it receives data from a child in your DMZ outside afirewall).
◦ When you require the use of the HTTPS protocol to encrypt data transfers.
• FlexNet self-hosted web server. Choose this alternative when none of the previous cases apply, and:
◦ You want simple administration of the web server.
◦ You want to minimize the installations on your inventory beacon, so that you do not need to installMicrosoft IIS.
◦ Anonymous access, and use of the HTTP protocol, are adequate (for example, within your secure LAN).
Note: After installation, more information about these web server options and how to configure them isavailable in the online help under Inventory Beacons > Local Web Server Page > Configuring DirectInventory Gathering.
Placement of inventory beacons
For more information about inventory beacons, see Considerations for Inventory Beacons.
Output
Prepare a block diagram of the actual servers for your implementation. Start with the central cluster of servers,depending on the scale of your implementation.
Don't forget the inventory beacons you intend to deploy. An inventory beacon on your batch server (orprocessing server, or application server, depending on your scaling decisions) is an option, but not mandatory ifyou are migrating only from the 2014 (or 2014 R2) release. Thereafter you may choose to deploy a hierarchy ofinventory beacons, ensuring that every targeted device will have access (preferably high-speed LAN access) to aninventory beacon.
Label each block in your diagram with:
• The server type, either 'inventory beacon' or as named in the diagram above (for ease of reference in followinginstructions)
• The actual server name and IP address
Upgrading FlexNet Manager Suite to 2018 R2 On-Premises
Upgrading FlexNet Manager Suite to 2018 R2 On Premises | Company Confidential 9

Tip: Keep in mind that an underscore character is not valid in a host name referenced by a DNS. If you havea host name that includes an underscore, you may need to set up a DNS alias for the server; or else use its IPaddress during the installation process.
• Which web server will be installed on each of these hosts.
Considerations for Inventory BeaconsThe inventory beacons in your network may be arranged in ways that meet your requirements. For example:
• You may use a flat arrangement where each inventory beacon communicates directly with the centralapplication server
• You may arrange them in a hierarchy, where the top-level inventory beacon(s) communicate with the centralapplication server, and further inventory beacons are arranged as 'children' that communicate with theinventory beacon(s) above them in the hierarchy.
There are no formal limits to the structure of this hierarchy. It may contain as many levels as you require.However, good network design typically means that your hierarchy has two or three (or rarely, four) levels.
The following considerations should assist in your network planning.
Fan-out
These are general guidelines. You should adjust expectations based on experience in your own environment:
• Provide one inventory beacon for every 20,000 (or so) devices with locally-installed FlexNet inventory agentsoftware. Keep in mind that you cannot specify particular allocations of devices to inventory beacons: theFlexNet inventory agent is a state-based tool that manages itself to match its downloaded policy, and as partof its self-management, it chooses which inventory beacon to use for data uploads and policy downloads.The default algorithm looks first for an inventory beacon in the same site as the inventory device, then for thebest ping response time, with a randomizing tie-breaker. Therefore this guideline is about the quantitativeplanning; and you should use other factors to determine the placement of inventory beacons.
• An inventory beacon may also gather inventory from other systems, such as importing inventory gathered byMicrosoft SCCM or IBM's ILMT ('third-party inventory'). Since you control the schedule for the collection ofthird-party inventory, you can stagger the times for different kinds of inventory; and a result, one inventorybeacon can easily handle multiple third-party inventory sources.
• Similar considerations apply to the collection of any business information through an inventory beacon.Arrange the schedules for business importer operations to spread the load on the relevant inventory beacon.
• If you are arranging a hierarchy of inventory beacons in a very large system, you should limit the fan-out froma parent inventory beacon to less than 100 child inventory beacons.
Minimum of one per subnet
It is best practice to deploy at least one inventory beacon into each separate subnet that contains target devicesfor which you may want an inventory beacon to execute discovery and inventory gathering. Being within thetarget subnet allows the inventory beacon to reliably use ARP or nbtstat requests to determine the MAC
Upgrading FlexNet Manager Suite to 2018 R2 On-Premises
10 Upgrading FlexNet Manager Suite to 2018 R2 On Premises | Company Confidential

address of a discovered device (reliability of these results is reduced across separate subnets). If you do notplace an inventory beacon in each subnet:
• It is possible that, across subnet boundaries, only an IP address can be found for a device (that is, the devicedata is missing both a MAC address and a device name).
• In this case, a central record is created for the discovered device, but because IP addresses may be dynamic(unreliable identifiers), this record is not matched (or merged) with more complete records (those which alsocontain either or both of the MAC address and a device name).
• As a consequence, on data import you may produce multiple discovered device records with duplicate IPaddresses:
◦ One record may be complete (for example, automatically created by FlexNet Manager Suite from inventorywhen it could not find an existing, matchable discovery device record to link to the inventory devicerecord)
◦ One or more others may be discovery records that are missing identifying data as discussed.
• Since these complete and incomplete records cannot be merged automatically, you are left with a manualtask to clean up the incomplete duplicates.
• What's worse, even after that manual clean-up, if the situation persists and an applicable discovery rule is re-run, the incomplete record is recreated.
You avoid all these risks by simply having a local inventory beacon in the same subnet as target devices. Beingin the same target subnet means that the inventory beacon can provide both the IP address and the MACaddress, which is sufficient for matching discovered device records. If you must do discovery across subnetboundaries without a local inventory beacon, ensure that there are full DNS entries visible to the inventorybeacon for all devices you intend to discover. This allows the inventory beacon to report both an IP address anda device name or fully-qualified domain name (FQDN), which combination is again sufficient for recordmatching.
Bridging to IPv6 subnets
All inventory beacons can operate within subnets configured to use either IPv4 or IPv6 addressing; and FlexNetinventory agent can also handle all data transfers within either environment. However, the link to the centralapplication server must use an IPv4 network protocol. The need to support the IPv4 protocol at the top level ofthe architecture, and the IPv6 protocol at the low level with the local FlexNet inventory agent, means that atleast one inventory beacon must be a dual-stack server that provides the bridge between the two protocols, asshown in the following architectural sketch:
Upgrading FlexNet Manager Suite to 2018 R2 On-Premises
Upgrading FlexNet Manager Suite to 2018 R2 On Premises | Company Confidential 11

Reading from top to bottom, this sketch shows:
• Your application server (or in larger implementations, multiple servers) continue(s) to support HTTP or HTTPScommunications over an IPv4 network layer.
• Within IPv4 zones of your network, you may deploy as many inventory beacons as required, either as a flatlayer where each communicates directly with the application server, or in a hierarchy, as dictated by yournetwork requirements. Of course, these inventory beacons provide full functionality, supporting all forms ofFlexNet inventory gathering from target inventory devices within the IPv4 network (for simplicity, thesedevices in the IPv4 zone are not shown in the sketch above).
• At least one inventory beacon must be a dual stack device that supports both IPv4 and IPv6 network layers. Itdoes not matter whether this is achieved using two Network Interface Cards (NICs) or a single configurableNIC. The IPv4 interface links upward to its parent (whether that be to another inventory beacon in thehierarchy or directly to the application server). The IPv6 interface links downward to those of its child devicesthat are in the IPv6 zone (of course, other devices in the IPv4 network could also communicate through thisinventory beacon, given its dual stack architecture). As shown, these IPv6 children may optionally include a
Upgrading FlexNet Manager Suite to 2018 R2 On-Premises
12 Upgrading FlexNet Manager Suite to 2018 R2 On Premises | Company Confidential

further hierarchy of inventory beacons (which child inventory beacons would then be operating entirelywithin the IPv6 network).
• Eventually, target inventory devices within the IPv6 zone that have locally installed FlexNet inventory agentscommunicate with at least one inventory beacon in the same zone; or where the lightweight FlexNetInventory Scanner has been run on a target device, this can also communicate with the inventory beacon.
There are further restrictions and requirements to add to these general sketches:
• All inventory beacons operating within an IPv6 network (whether as single-stack IPv6 devices or dual-stackIPv4 and IPv6 devices) must utilize Microsoft IIS as the web service. The simple alternative self-hosted webserver does not support the IPv6 protocol.
• Inside an IPv6 network, an inventory beacon cannot import Active Directory details. However, a dual-stackinventory beacon that can communicate with a domain name server (DNS) over IPv4 can still import ActiveDirectory data. Alternatively, an inventory beacon co-installed on your central application server (which bydefinition must have IPv4 available to it) can still access a DNS on IPv4 and import Active Directory data.
• Inside an IPv6 network, an inventory beacon cannot do any of the following:
◦ Import inventory from third-party sources
◦ Import business data from other systems (such as your purchasing or HR systems)
◦ Communicate with SAP systems in your IPv6 environment
◦ Perform any inventory beacon-based discovery or remote inventory collection across the IPv6 subnet,including VMware host scans (such as required for special 30-minute scans for IBM PVU licensemanagement)
◦ Adopt target inventory devices that can communicate only on an IPv6 subnet (instead, use third-partydeployment to install the FlexNet inventory agent on target devices within an IPv6-only subnet).
However, once again, a dual-stack inventory beacon that can communicate with a DNS over IPv4, and contactthe various sources also exclusively over IPv4, still supports all the above functionality on the IPv4 side. This isalso true of an inventory beacon co-installed on the application server.
Take these factors into account when planning the distribution of your inventory beacons around your network.Details about installing the individual inventory beacon are available in Configure Beacon Connections.
Prerequisites and PreparationsPlease ensure that you have worked through every one of the following topics.
Locate License Details (probably)There are three possibilities for your license documentation:
• You may not need to find it. This is the case if you are upgrading with the same hardware as for your 2014 Rximplementation, and not adding the specialized inventory functionality in FlexNet Manager for VMware. Thelicense installed on your server covers your upgrade (while you are under a maintenance agreement).
Upgrading FlexNet Manager Suite to 2018 R2 On-Premises
Upgrading FlexNet Manager Suite to 2018 R2 On Premises | Company Confidential 13

• You may need your existing license. If you are either upgrading to new hardware as part of this update, orscaling up your implementation with additional central servers (but not adding newly-licensed functionality),you need your original license file. A license file for your existing product(s) was sent to you with your originalorder confirmation. If you need and cannot locate the license file, please contact the Flexera order processingteam, and ask for a new copy of your license file.
Tip: One reason you might consider upgrading to new hardware is if you are still using 32-bit operatingsystems. FlexNet Manager Suite 2018 R2 requires 64-bit operating systems on all central applicationserver(s). You might consider upgrading the operating system, or replacing the old servers.
• You may need a new license. This is the case if you are upgrading from 2014 or 2014 R2, and plan to licensethe FlexNet Manager for VMware product for advanced inventory gathering in that context (2014 R3 alreadysupported this product). Please contact your Flexera (or partner) account manager to request a licenseincluding this additional term.
Enable MTS and MSMQMicrosoft Task Scheduler (MTS) must be enabled on your central application server. If you have a multi-serverimplementation, Microsoft Task Scheduler must be enabled on at least the batch server and the inventoryserver. If Microsoft Task Scheduler is disabled, the PowerShell configuration script fails when attempting tocreate a scheduled task folder, and of course the scheduled task required for server operation are not created.To correct this, enable Microsoft Task Scheduler, and re-run the Config.ps1 configuration script.
Microsoft Message Queuing (MSMQ) is a messaging service widely available as a component of variousMicrosoft operating systems. It allows applications running in separate processes, even on separate servers, toenjoy failsafe communications. MSMQ is used as foundational infrastructure for the batch scheduler and batchprocessor on the central application server (or, in larger systems, the batch server) of FlexNet Manager Suite. Itsoperation is mandatory on all central servers (whether a single server, or scaled up to separate web applicationserver, batch server, and inventory server) to allow the interactions necessary for batch processing tasks. Wherethe database server is separate, it is not required on the database server.
FlexNet Manager Suite makes use of the standard facilities of MSMQ, with no customization required. Forexample, MSMQ may make use of the following ports in operation:
• TCP: 1801, and 389 for version 3.0 and later
• RPC: 135, 2101*, 2103*, 2105* (Port 135 is queried to check availability of the remaining ports. The portnumbers marked * may be incremented by 11 if the initial choices are not available when MSMQ initializes.)
• UDP: 3527, 1801.
FlexNet Manager Suite makes no special demands on, nor adjustments to, the use of ports for MSMQ, and useswhatever ports are operational. Please check Microsoft documentation for more information about whenvarious ports are required (for example, https://support.microsoft.com/en-us/kb/178517).
The system requirements for integration with MSMQ are:
• In a multi-server implementation, each server must know the URL of all others (or, on a single-serverimplementation, localhost may be used). This is normally configured by the PowerShell configuration script,
described later.
Upgrading FlexNet Manager Suite to 2018 R2 On-Premises
14 Upgrading FlexNet Manager Suite to 2018 R2 On Premises | Company Confidential
• MSMQ imposes a 15-character limit on the batch server hostname (as noted in the section on design, andelsewhere).
• A single service account should be used in common across all central servers to facilitate the operations ofMSMQ. This is also noted in the following section on accounts.
Where MSMQ is already operational on your central servers, no customization is required. Where MSMQ hasbeen disabled or removed:
• When the feature is not installed or is not enabled, the PowerShell configuration script (described later) willattempt to install (if necessary) and enable the Windows feature. This requires that the installing user (seesection on accounts, below) has sufficient permissions to allow these actions if required. It also requires thatthe Windows CAB files are still available to the server.
Tip: After installing MSMQ, the PowerShell configuration script attempts to create the message queue. Ifthe installation process requires a reboot, this attempt fails, and the script reports Message Queueing hasnot been installed on this computer. If you see this message, reboot the server and re-run the samePowerShell configuration script.
• Alternatively, if the CAB files are still in place, an administrator can manually enable the Windows featurebefore running (or re-running) the PowerShell configuration script.
• Where CAB files have been removed as part of server hardening for security, MSMQ must be installedfollowing the instructions from Microsoft available through MSDN. The PowerShell scripts can be run (or re-run) thereafter.
FlexNet Manager Suite has been tested with multiple versions of MSMQ, up to and including version 6.3, whichis part of Windows Server 2012 R2.
Identify (or Set Up) AccountsYou may have accounts correctly configured from your previous implementation. If you need to adjust, here arethe details.
For installation and operation, FlexNet Manager Suite requires several different sets of account privileges. Whileit is possible to load a single account with all these privileges, this is typically unacceptable in secureenvironments, which require a separation of concerns between interactive login accounts for installation andmaintenance, and operational service accounts (usually with long-term and closely-guarded credentials).
The following tables list the various privilege levels, their purpose within FlexNet Manager Suite, and asuggested set of Active Directory accounts allowing for that separation of concerns. The three account typesdescribed are:
• A database administrator (typically this is an existing database administrator within your enterprise)
• An installing system administrator (account details must be made available to db-admin)
• A service account for normal operations (account details must be made available to db-admin).
Tip: Where privileges are controlled by Active Directory Group Policy Objects (GPOs), ensure that theaccounts and group(s) are added to the appropriate GPO settings prior to attempting installation. A suggested
Upgrading FlexNet Manager Suite to 2018 R2 On-Premises
Upgrading FlexNet Manager Suite to 2018 R2 On Premises | Company Confidential 15

practice when creating the databases is to assign the installing administrator account (fnms-admin) and theservice account (svc-flexnet) to an Active Directory group (suggested: FNMS Administrators) in order togrant them appropriate privileges; so you may choose to manage other rights through that group. Also notethat these accounts and their privileges must remain active for the lifetime of the FlexNet Manager Suiteenvironment.
Table 1: Database administration privileges — suggested AD account: db-admin
Privileges Required on Purpose
Database administrator, with db_owner rightson all operations databases related to FlexNetManager Suite (compliance data, warehousedata, snapshot data, and inventory data).
Database servers Provides the following accountswith database access rights asdescribed.
Member of the public database role in themodel database on the database server.
Database servers Required so that the account canrun scripts that check the databasecompatibility level.
SELECT rights to the following tables in themsdb database:
• dbo.sysjobs
• dbo.sysjobsteps
• sysjobs_view.
EXECUTE rights to the stored procedures fromthe msdb database used in the databasescripts, including:
• sp_add_job
• sp_add_jobserver
• sp_add_jobstep
• sp_add_jobschedule
• sp_delete_job.
Database servers Only required if an existinginstallation of FlexNet ManagerSuite 2015 or earlier is beingmigrated to a later release.
Tip: If you are installing Flexera Analytics (powered by Cognos) as part of your implementation, you alsoneed a SQL Server account with read/write access to the Content Store database required by Cognos. TheFlexera Analytics installer asks for the login name and password for this account (for details, includingcharacter set restrictions, see Upgrading Flexera Analytics from FlexNet Report Designer).
Upgrading FlexNet Manager Suite to 2018 R2 On-Premises
16 Upgrading FlexNet Manager Suite to 2018 R2 On Premises | Company Confidential
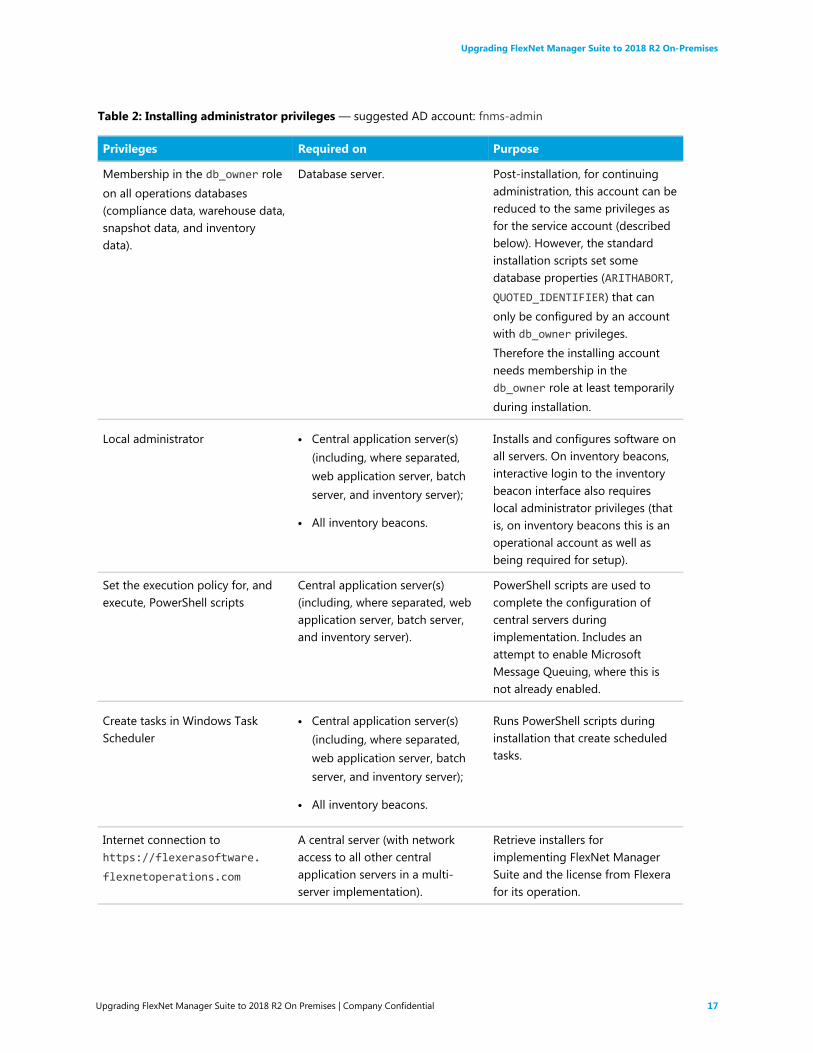
Table 2: Installing administrator privileges — suggested AD account: fnms-admin
Privileges Required on Purpose
Membership in the db_owner roleon all operations databases(compliance data, warehouse data,snapshot data, and inventorydata).
Database server. Post-installation, for continuingadministration, this account can bereduced to the same privileges asfor the service account (describedbelow). However, the standardinstallation scripts set somedatabase properties (ARITHABORT,QUOTED_IDENTIFIER) that canonly be configured by an accountwith db_owner privileges.Therefore the installing accountneeds membership in thedb_owner role at least temporarilyduring installation.
Local administrator • Central application server(s)(including, where separated,web application server, batchserver, and inventory server);
• All inventory beacons.
Installs and configures software onall servers. On inventory beacons,interactive login to the inventorybeacon interface also requireslocal administrator privileges (thatis, on inventory beacons this is anoperational account as well asbeing required for setup).
Set the execution policy for, andexecute, PowerShell scripts
Central application server(s)(including, where separated, webapplication server, batch server,and inventory server).
PowerShell scripts are used tocomplete the configuration ofcentral servers duringimplementation. Includes anattempt to enable MicrosoftMessage Queuing, where this isnot already enabled.
Create tasks in Windows TaskScheduler
• Central application server(s)(including, where separated,web application server, batchserver, and inventory server);
• All inventory beacons.
Runs PowerShell scripts duringinstallation that create scheduledtasks.
Internet connection tohttps://flexerasoftware.
flexnetoperations.com
A central server (with networkaccess to all other centralapplication servers in a multi-server implementation).
Retrieve installers forimplementing FlexNet ManagerSuite and the license from Flexerafor its operation.
Upgrading FlexNet Manager Suite to 2018 R2 On-Premises
Upgrading FlexNet Manager Suite to 2018 R2 On Premises | Company Confidential 17

Privileges Required on Purpose
Internet connection tohttp://www.managesoft.com
(Typically granted throughmembership in the FNMS
Administrators security group inActive Directory.)
The batch server (or, in smallerimplementations, the processingserver or application server).
Maintenance or unscheduledcollection of the ApplicationRecognition Library, the SKUlibraries, and the Product UseRight Libraries.
Table 3: Service account privileges — suggested AD account: svc-flexnet
Privileges Required on Purpose
Membership in the following fixeddatabase roles:
• db_ddladmin
• db_datawriter
• db_datareader.
In addition, the account requiresyou to GRANT EXECUTE
permissions on all operationsdatabases (compliance data,warehouse data, snapshot data,and inventory data).
Tip: In less stringentenvironments, it may beconvenient to give this accountmembership in the db_owner
role for the operationsdatabases, which supersedes allof the above.
Database server Normal operation (which includesexecution of SQL storedprocedures).
Upgrading FlexNet Manager Suite to 2018 R2 On-Premises
18 Upgrading FlexNet Manager Suite to 2018 R2 On Premises | Company Confidential

Privileges Required on Purpose
Logon as a Service, and run allFlexNet services
Tip: Admin access for thisaccount is convenient, andtypically granted throughmembership in the FNMS
Administrators securitygroup in Active Directory;otherwise read, write, andexecute permissions arerequired on all folderscontaining FlexNetinstallations, FlexNet data, andFlexNet log files.
• Central application server(s)(including, where separated,web application server, batchserver, and inventory server);
• All inventory beacons.
Runs all system operations,including batch services and webservices.
Important: In a multi-serverimplementation, the sameservice account must be usedon all central servers, and itmust be a Windows domainaccount. This is required forproper functioning of MicrosoftMessage Queueing betweenthe servers. (A distinct serviceaccount may be used forinventory beacons.)
Logon as a Batch Job • Central application server(s)(including, where separated,web application server, batchserver, and inventory server);
• All inventory beacons.
When the service account runs abatch job, this setting means thelogin is not an interactive user.
Tip: This is particularlyimportant on the batch server(for authorization details, seeAuthorize the Service Account).
Run scheduled tasks as a serviceaccount.
• Central application server(s)(including, where separated,web application server, batchserver, and inventory server);
• All inventory beacons.
Runs scheduled tasks withinnormal operations.
Run IIS application pools as aservice account
• Central application server(s)(including, where separated,web application server, batchserver, and inventory server);
• Those inventory beacons thatare running IIS
Normal operations
Upgrading FlexNet Manager Suite to 2018 R2 On-Premises
Upgrading FlexNet Manager Suite to 2018 R2 On Premises | Company Confidential 19

Privileges Required on Purpose
Internet connection tohttp://www.managesoft.com
(Typically granted throughmembership in the FNMS
Administrators security group inActive Directory.)
The batch server (or, in smallerimplementations, the processingserver or application server).
Scheduled collection of theApplication Recognition Library,the SKU libraries, and the ProductUse Right Libraries.
Tip: While the table above lists a single service account svc-flexnet on your application server(s) andinventory beacons, this may be adequate only in environments where security is not a significant concern. Forgreater security, consider a separate service account for each inventory beacon that has the permissions listedabove on the inventory beacon, but no permissions on your central application server(s).
Note: At implementation time, all services are configured with the correct password using the PowerShellscripts provided. If at any time the password on the service account is forced to change, the services will ceaseto operate. To ensure service continuity, you may either (a) allow the service account password to never expire(as normal for Windows service accounts), where permitted by your corporate policies; or (b) review theaccounts listed in Password Maintenance.
In addition to the three core accounts described in the tables, your implementation may require additionalaccounts for special circumstances.
For example, if you are using adapters to connect to other systems and import data, you need appropriateaccounts. For details, see documentation for the adapters you need, such as the FlexNet Manager Suite AdaptersReference, available through the title page of the online help after installation.
Tip: There may be several accounts needing to log in directly to the application server for tasks related toFlexNet Manager Suite, such as manipulating log files, scheduling tasks, and the like (this excludes accessthrough the web interface, which is not relevant to this discussion.) It is often convenient for these accounts tohave the same database permissions as the services account on all components of the operations databases:compliance data, warehouse data, snapshot data, and inventory data. A suggested method is to create either alocal or Active Directory security group (such as FNMS Administrators) and add all such accounts to thisgroup. Then you can, for example, set these permissions by opening each database in Microsoft SQL ServerManagement Studio, and granting the appropriate privileges to the security group. The procedures are detailedin the topics covering database creation. Accounts to list in the security group minimally include:
• The operational service account (suggested: svc-flexnet)
• The installing administrator account (suggested: fnms-admin) for post-installation on-going administration
(remembering that db_owner membership is required temporarily during installation, as described in
Identify (or Set Up) Accounts)
• Any operational account needing to log in to a central inventory beacon installed on your batch server(remember that, since the inventory beacon requires administrator privileges to run, this account is both alocal administrator on the batch server and a db_owner)
• Any future back-up administrator accounts needed for the application server.
Upgrading FlexNet Manager Suite to 2018 R2 On-Premises
20 Upgrading FlexNet Manager Suite to 2018 R2 On Premises | Company Confidential
Isolate the SystemYou need to protect your data from operational changes during the upgrade.
Since your FlexNet Manager Suite system receives inputs from operators, from uploads from inventory beacons,through scheduled tasks, and from its own processing of staged data, all of these should be turned off beforeyou upgrade.
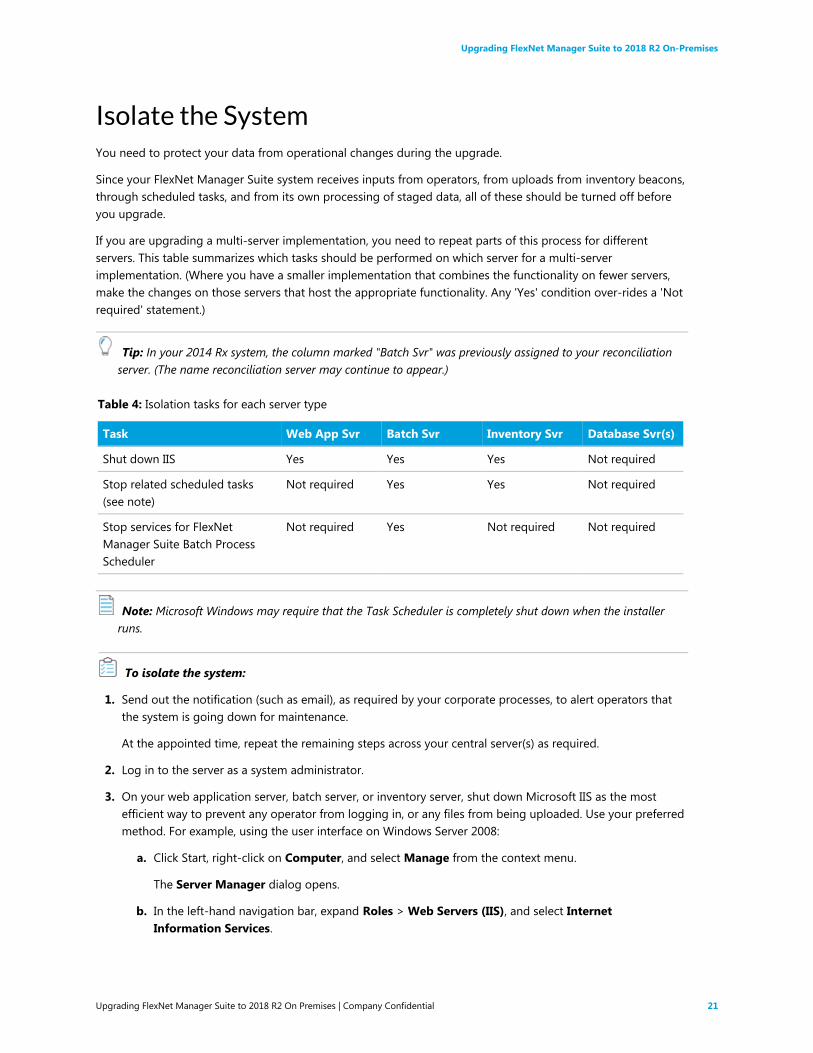
If you are upgrading a multi-server implementation, you need to repeat parts of this process for differentservers. This table summarizes which tasks should be performed on which server for a multi-serverimplementation. (Where you have a smaller implementation that combines the functionality on fewer servers,make the changes on those servers that host the appropriate functionality. Any 'Yes' condition over-rides a 'Notrequired' statement.)
Tip: In your 2014 Rx system, the column marked "Batch Svr" was previously assigned to your reconciliationserver. (The name reconciliation server may continue to appear.)
Table 4: Isolation tasks for each server type
Task Web App Svr Batch Svr Inventory Svr Database Svr(s)
Shut down IIS Yes Yes Yes Not required
Stop related scheduled tasks(see note)
Not required Yes Yes Not required
Stop services for FlexNetManager Suite Batch ProcessScheduler
Not required Yes Not required Not required
Note: Microsoft Windows may require that the Task Scheduler is completely shut down when the installerruns.
To isolate the system:
1. Send out the notification (such as email), as required by your corporate processes, to alert operators thatthe system is going down for maintenance.
At the appointed time, repeat the remaining steps across your central server(s) as required.
2. Log in to the server as a system administrator.
3. On your web application server, batch server, or inventory server, shut down Microsoft IIS as the mostefficient way to prevent any operator from logging in, or any files from being uploaded. Use your preferredmethod. For example, using the user interface on Windows Server 2008:
a. Click Start, right-click on Computer, and select Manage from the context menu.
The Server Manager dialog opens.
b. In the left-hand navigation bar, expand Roles > Web Servers (IIS), and select InternetInformation Services.
Upgrading FlexNet Manager Suite to 2018 R2 On-Premises
Upgrading FlexNet Manager Suite to 2018 R2 On Premises | Company Confidential 21

The IIS page is displayed.
c. In the Actions panel on the right, select Stop.
A message like Attempting to stop... appears. Note that it can take some time before theservice is stopped.
4. On your batch server or inventory server, disable all Windows scheduled tasks related to FlexNet ManagerSuite.
The scheduled tasks are different on the two different types of servers. On your batch server (also knownas reconciliation server), change all tasks in the FlexNet Manager Platform folder:
• Data warehouse export
• Export to ServiceNow
• FlexNet inventory data maintenance (only present if you are upgrading from release 2015 or later)
• Import SAP inventories
• Import SAP package license
• Inventory import and license reconcile
• Recognition data import
• Regenerate Business Import config
• Send contract notifications.
On your inventory server, change all tasks in the FlexNet Manager Platform folder:
• Import Active Directory
• Import application usage logs
• Import discovery information
• Import installation logs
• Import inventories
• Import Inventory Beacon activity status
• Import Inventory Beacon status
• Import remote task status information
• Import security event information
• Import system status information
• Import VDI access data.
An example process to change these tasks on Windows Server 2008:
a. Ensure that your Server Manager dialog is still open.
Upgrading FlexNet Manager Suite to 2018 R2 On-Premises
22 Upgrading FlexNet Manager Suite to 2018 R2 On Premises | Company Confidential

b. In the left-hand navigation bar, expand Configuration > Task Scheduler > Task ManagerPlatform, and select the FlexNet Manager Platform folder.
c. Select all of the relevant tasks in the list (click the first, shift+click the last), and in the Actions pane,in the Select Item section, click Disable (or right-click the selection, and click Disable).
d. Close the dialog.
5. On your batch server/reconciliation server, stop the services for FlexNet Manager Suite Batch ProcessScheduler:
a. Navigate to Start > Control Panel > Administrative Tools > View local services.
The Services dialog opens.
b. In the list of services, right-click on FlexNet Manager Suite Batch Process Scheduler, and fromthe context menu, select Stop.
Repair Database Constraint ViolationsAfter past upgrades, Flexera Support has identified cases where database constraints have been relaxed, andunexpected data inserted; and these changes have subsequently caused issues with license complianceoutcomes. For reasons like this, the database migration scripts have been made more rigorous, ensuring that alldatabase constraints are (re)activated, and stopping (failing the upgrade process) if unexpected data is found intables of the following FlexNet databases:
• Compliance database (suggested name FNMSCompliance)
• Inventory database (suggested name FNMSInventory)
• Data warehouse database (suggested name FNMSDataWarehouse).
You can avoid having your upgrade fail because of any such database issues by running the following processagainst each of those databases in turn, before you start the upgrade process. To run this process, you need tobe familiar with Microsoft SQL Server Management Studio, and your login must be mapped to users with (atleast) Select permissions on all of the above databases.
Note: This process does not make any changes to the data in your databases, because any such changes (ifrequired) need inspection and assessment. However, it does reactivate any database constraints that havebeen disabled. For this reason, it is strongly recommended that, now that your system is isolated (see Isolatethe System), you start with a full backup of all your FlexNet databases.
To identify issues with database constraint violations:
1. Log into Microsoft SQL Server Management Studio using an account with adequate mappings to databaseusers.
2. Make full backups of all your existing FlexNet databases:
• Compliance database (suggested name FNMSCompliance)
• Inventory database (suggested name FNMSInventory)
Upgrading FlexNet Manager Suite to 2018 R2 On-Premises
Upgrading FlexNet Manager Suite to 2018 R2 On Premises | Company Confidential 23

• Data warehouse database (suggested name FNMSDataWarehouse)
• Reporting snapshot database (suggested: FNMSSnapshot).
3. Select the first database to validate (such as FNMSCompliance), and copy the following script and paste itinto the execution window, select it, and run it.
Note: Long lines in this script have been wrapped for publication. You may choose to correct thewrapping before execution.
This script generates SQL statements to test data in tables that database migration will also check. A queryis output for each database constraint that appears as 'untrusted' to Microsoft SQL Server.
SELECT
N'IF EXISTS (SELECT * FROM ' + QUOTENAME(SCHEMA_NAME(c_o.schema_id))
+ N'.' + QUOTENAME(c_o.name) + N' AS a'
+ N' WHERE ' +
(
SELECT CASE WHEN fkc.constraint_column_id = 1
THEN N''
ELSE N' AND ' END + N'a.'
+ QUOTENAME(c.name) + N' IS NOT NULL'
FROM sys.foreign_key_columns AS fkc
INNER JOIN sys.columns AS c
ON c.object_id = fkc.parent_object_id
AND c.column_id = fkc.parent_column_id
WHERE fkc.constraint_object_id = fk.object_id
ORDER BY fkc.constraint_column_id
FOR XML PATH ('')
) +
N' AND NOT EXISTS (SELECT * FROM ' + QUOTENAME(SCHEMA_NAME(p_o.schema_id))
+ N'.' + QUOTENAME(p_o.name) + ' AS b WHERE ' +
(
SELECT CASE WHEN fkc.constraint_column_id = 1
THEN N''
ELSE N' AND ' END + N'a.' + QUOTENAME(c.name)
+ N' = b.' + QUOTENAME(cr.name)
FROM sys.foreign_key_columns AS fkc
INNER JOIN sys.columns AS c
ON c.object_id = fkc.parent_object_id
AND c.column_id = fkc.parent_column_id
INNER JOIN sys.columns AS cr
ON cr.object_id = fkc.referenced_object_id
AND cr.column_id = fkc.referenced_column_id
WHERE fkc.constraint_object_id = fk.object_id
ORDER BY fkc.constraint_column_id
FOR XML PATH ('')
) +
N')) RAISERROR (''' + REPLACE(N'Data exists in ' + SCHEMA_NAME(c_o.schema_id)
Upgrading FlexNet Manager Suite to 2018 R2 On-Premises
24 Upgrading FlexNet Manager Suite to 2018 R2 On Premises | Company Confidential

+ N'.' + c_o.name + N' which will break foreign
key '
+ fk.name, '''', '''''') + N''', 18, -1)' AS
TestQueries
FROM sys.foreign_keys AS fk
INNER JOIN sys.objects AS p_o
ON p_o.object_id = fk.referenced_object_id
INNER JOIN sys.objects AS c_o
ON c_o.object_id = fk.parent_object_id
WHERE fk.is_not_trusted = 1
ORDER BY p_o.name
If there are no SQL statements printed when you run this script, the database constraints are all trusted bySQL Server, and you may loop back and repeat this step for the remaining databases in turn. If nostatements are created for any of the three databases under test, this process is complete, and you mayskip forward to the next topic.
An untrusted database constraint produces an output SQL statement such as the following example (herewrapped for publication, and of course the table names and column names vary according to each case):
IF EXISTS (SELECT * FROM [dbo].[PaymentScheduleDetail_MT] AS a
WHERE a.[ActualAmountRateID] IS NOT NULL AND NOT EXISTS
(SELECT * FROM [dbo].[CurrencyRate_MT] AS b
WHERE a.[ActualAmountRateID] = b.[CurrencyRateID]))
RAISERROR ('Data exists in dbo.PaymentScheduleDetail_MT which will
break foreign key FK_PaymentScheduleDetail_ActualAmountRate', 18, -1)
4. Select any (or all) of the output SQL statements, and run them.
Each statement either:
• Produces no output, in which case the data is clean, and the previously untrusted constraint has nowbeen reactivated
• Produces a two-line output of this form:
Msg 50000, Level 18, State 1, Line nn
Data exists in dbo.tableName which will break foreign key FK_Name
You may choose to check details of the tableName and FK_Name in your pre-upgrade version of theFlexNet Manager Suite Schema Reference, available through the title page of online help. However,identifying and cleaning up the problematic data is likely to require specialized insight and expertise, sothat the steps below are recommended.
5. Copy all such output, and paste into a document for safekeeping. Identify this set with the database name.
6. Loop back to step 3, repeating the process for all three databases in turn until all are completed.
7. Ask your registered support contact (a designated person within your enterprise who has access rights andlogin details) to raise a support case at https://flexeracommunity.force.com/customer/SupportSFCaseInsert,including a clear description of the issue. Be sure to attach the document listing affected tables and foreignkeys.
Upgrading FlexNet Manager Suite to 2018 R2 On-Premises
Upgrading FlexNet Manager Suite to 2018 R2 On Premises | Company Confidential 25

A useful title might be something like "Upgrade stalled by DB constraint violations".
In due course, Flexera personnel will be in touch to assist with your data clean-up. Clearly, access to your datawill be required, so you may plan for that (for example, you may support a conference call with a systemallowing shared screens so that you can collaborate on the data clean-up).
Tip: Since you cannot proceed with the upgrade until these data issues are repaired, you may considerresuming normal operations with FlexNet Manager Suite until after the data cleanups are resolved.
Check Database Collation SequenceAll databases for this system require the correct collation sequence, both case insensitive and accent sensitive.
This is easiest if they are installed on one or more database instances that have this as the default collationsequence. If you are carrying forward the database instance that previously supported yourFlexNet ManagerSuite implementation, this already complies with the appropriate collations sequence. For any new DB instance,use this process to check the collation sequence.
To validate the server's default database collation sequence:
1. In SQL Server Management Studio, locate the SQL Server instance in the Object Explorer pane.
2. Right-click the server, and select Properties from the context menu.
3. On the server Properties dialog, select the General tab, and check the current collation sequence.
If the collation sequence includes the codes _CI_AS (for example, SQL_Latin1_General_CP1_CI_AS), youmay proceed with the installation.
Tip: Other suffixes like _KS or _WS are optional.
If the server's default collation does not include _CI_AS, you can set the collation sequence for eachdatabase, as you create it, by right-clicking the new database, selecting Properties from the context menu,and choosing the collation on the Options tab. Remember that the collation sequence must be identicalfor:
• The compliance database (suggested name: FNMSCompliance)
• The reporting snapshot database (suggested: FNMSSnapshot)
• The data warehouse database (suggested: FNMSDataWarehouse).
For example, if the first of these has the collation sequence called SQL_Latin1_General_CP1_CI_AS, thenall of them must have the exact same collation sequence. In contrast, the inventory database, whenseparate (suggested: FNMSInventory), and the Cognos content store may have different collationsequences, provided that these also include the same _CI_AS codes. The tempdb database (alone) mayhave any collation sequence, since FlexNet Manager Suite creates the required tables here with theappropriate collation sequence.
Upgrading FlexNet Manager Suite to 2018 R2 On-Premises
26 Upgrading FlexNet Manager Suite to 2018 R2 On Premises | Company Confidential

Enable SQL Server CLRFlexNet Manager Suite requires Microsoft's SQL Server Common Language Runtime (CLR) Integration to beenabled prior to upgrading for increased performance.
To enable SQL Server CLR:
1. In SQL Server Management Studio, locate the SQL Server instance to be used by FlexNet Manager Suite.
2. Enable Microsoft SQL Server Common Language Runtime (CLR) Integration by executing the followingstored proceedure:
sp_configure 'show advanced options', 1;
GO
RECONFIGURE;
GO
sp_configure 'clr enabled', 1;
GO
RECONFIGURE;
GO
Note: By default the CLR integration feature is disabled and must be enabled by the DB systemadministrator before database creation and installation.
Configure .NET and IISASP.NET needs patching, and IIS configuration must be modified for ASP.NET. As well, you must preventWebDAV from blocking functionality.
Detailed steps depend on the operating system and installed software. You must repeat this process in turn oneach of:
• web application server
• batch server
• inventory server
• Flexera Analytics (Cognos) server
• each free-standing inventory beacon (the inventory beacon installed on your central batch server is coveredby the configuration of the batch server).
Note: Inventory beacons have an additional requirement, that PowerShell is at least at version 3.0. Shouldyou wish to upgrade PowerShell to release 4.0, Microsoft also requires Microsoft .NET Framework 4.5 (orlater) on the same server. Take both these matters into account at the same time (see Upgrade PowerShellon Inventory Beacons for more details).
Upgrading FlexNet Manager Suite to 2018 R2 On-Premises
Upgrading FlexNet Manager Suite to 2018 R2 On Premises | Company Confidential 27

(If your implementation combines multiple servers into a processing server, or into an application server, thencomplete the task once per server.)
Tip: Mark off each server on your block diagram as this process is completed for that device.
To configure .NET and IIS on a server:
1. If the server is running Microsoft Windows Server 2012:
a. Open Windows Programs and Features.
b. Search the list of applications for Microsoft .NET Framework 4.5 (or later). If it is present, skip to step4 below.
c. Because Microsoft .NET Framework 4.5 (or later) is not present, follow steps under "To install IIS andASP.NET modules on Windows Server 2012 using the UI" in http://technet.microsoft.com/en-us/library/hh831475.aspx#InstallIIS. Thereafter, continue with step 4 below.
2. If your server is running Microsoft Windows Server 2008, the original installation was Microsoft .NETFramework 4, but it may have been upgraded already to 4.5. To check:
a. Open Windows Programs and Features.
b. Search the list of applications for Microsoft .NET Framework, and determine whether it is release 4or release 4.5 (or later).
• If it is 4.5 (or later), skip to step 4 below.
• If it is 4.0, continue here.
3. If the .NET version is less than 4.5, upgrade Microsoft .NET Framework to version 4.5 or later.
For more details, see https://msdn.microsoft.com/en-us/library/5a4x27ek(v=vs.110).aspx.
4. Open a Command Line window on the current server (for example, Start > search for cmd > run cmd.exe).
5. Change directory to the Microsoft .NET Framework installation folder.
6. Install ASP.NET (which also registers ASP.NET with IIS when present), for example with the platform-appropriate commands:
For operating systems up to Windows Server 2008 R2, use:
aspnet_regiis.exe -ir -enable
For Windows Server 2012, use:
dism /online /enable-feature /featurename:IIS-ApplicationDevelopment
dism /online /enable-feature /featurename:IIS-ISAPIFilter
dism /online /enable-feature /featurename:IIS-ISAPIExtensions
dism /online /enable-feature /featurename:IIS-NetFxExtensibility45
dism /online /enable-feature /featurename:IIS-ASPNET45
7. Exit to close the command line window.
If you are currently working on any of:
Upgrading FlexNet Manager Suite to 2018 R2 On-Premises
28 Upgrading FlexNet Manager Suite to 2018 R2 On Premises | Company Confidential

• Your web application server
• Your batch server
• A free-standing inventory beacon that uses the FlexNet self-hosted web server (and not IIS)
loop back now and restart this process for the next server on your list. For your inventory server and anyinventory beacon using IIS, continue and disable WebDAV on these devices.
Tip: Although from IIS 7.0, Microsoft offered a separate download for improved WebDAV functionality,the native WebDAV functionality must also be disabled. Otherwise WebDAV intercepts HTTP processingand blocks FlexNet inventory functionality.
8. You may first check that WebDAV is installed. For example, on Windows Server 2012:
a. Open Server Manager (for example, Start > Administrative Tools > Server Manager).
b. Select Dashboard, and in the dashboard select Add Roles and Features.
The Add Roles and Features Wizard opens.
c. In the left-hand navigation pane, select Installation Type, and in the main pane, ensure that theRole-based or feature-based installation is selected.
d. Click Next (or select Server Selection), and select the server you are currently configuring.
e. Click Next (or select Server Roles), and in the Roles panel, expand Web Server (IIS) > Web Server> Common HTTP Featured (Installed).
f. Observe whether the check box for WebDAV Publishing (Installed) is selected.
If this check box is clear, WebDAV is not installed, and you may click Cancel, then close all relevantdialogs. If this is not the last server on your list, loop back and restart this process on the nextserver. However, if the check box is selected, WebDAV is installed and must be disabled, asdescribed in the following steps.
9. Open the IIS settings page. For example:
• On Windows Server 2016, open Server Manager (Start > Administrative Tools > Server Manager).On the Server Manager dashboard, click IIS to reveal the server name in the right-hand pane. Right-click the server name, and select Internet Information Services (IIS) Manager.
• On Windows 7, navigate to Control Panel > System and Security > Administrative Tools, anddouble-click Internet Information Services (IIS) Manager.
10. In the work pane that opens, expand the server name node (if required), expand Sites, and select DefaultWeb Site.
11. In the Home pane for this site, in the IIS group, locate WebDAV Authoring Rules.
Tip: If it is not present, it is likely that WebDAV is not installed on this server, and your mission iscomplete.
12. Right-click the icon, and select Open Feature. A pane opens for WebDAV Authoring Rules.
13. On the right, in the Actions group, there is an option to enable or disable WebDAV.
Upgrading FlexNet Manager Suite to 2018 R2 On-Premises
Upgrading FlexNet Manager Suite to 2018 R2 On Premises | Company Confidential 29

• If the link currently says Enable WebDAV, do nothing, because your mission is complete.
• If the link current says Disable WebDAV, click the link.
14. Click OK to close all applicable dialogs.
If this is not the last server on your list, loop back and restart this process on the next server.
15. Flexera Analytics requires installation of URL Rewrite.
a. Open a web browser and open https://www.iis.net/downloads/microsoft/url-rewrite
b. Select the Install this extension box, which will download the urlrewrite2.exe file. A selection ofalternate language installers are also available on this page.
c. Run the file which will execute the installation of this extension.
d. Exit the installer.
16. Flexera Analytics also requires the installation of Application Request Routing.
a. Open a web browser and open https://www.iis.net/downloads/microsoft/application-request-routing
b. Select the Install this extension box, which will download the ARRv3_0.exe file.
c. Run the downloaded file which will execute the installation of this extension.
d. Exit the installer.
Tip: There is additional configuration of IIS handled by PowerShell configuration scripts described later.
Configure Internet ExplorerMicrosoft Internet Explorer requires configuration.
Compatibility mode must be turned off for FlexNet Manager Suite. In addition, when Internet Explorer is usedon a server-based operating system to access FlexNet Manager Suite after setup is complete (for example, if youare testing from your central application server, or an inventory beacon has a server operating system), itsenhanced security provisions must be turned off on that server, as follows. (Alternatively, use a differentbrowser.)
Tip: Check release notes for supported versions. For example, Microsoft Internet Explorer releases up to andincluding release 9 are deprecated for FlexNet Manager Suite from 2016 R1.
To configure Microsoft Internet Explorer:
1. Open Internet Explorer, and navigate to:
res://iesetup.dll/IESecHelp.htm#overview
2. Follow the instructions displayed there for disabling Enhanced Security Configuration.
Upgrading FlexNet Manager Suite to 2018 R2 On-Premises
30 Upgrading FlexNet Manager Suite to 2018 R2 On Premises | Company Confidential

3. FlexNet Manager Suite attempts to advise Internet Explorer that the website should not be run incompatibility mode. You need follow these steps only if you receive an alert asking you to turn offcompatibility mode:
a. In Internet Explorer, press the Alt key to display the Menu bar.
b. Click Tools, then Compatibility View Settings.
c. Make sure Display all websites in Compatibility View and Display intranet sites inCompatibility View are both clear.
d. Add websites that do require compatibility mode to the list of Websites you've added toCompatibility View.
There are a number of other configuration requirements for whichever web browser you choose to use:
• URLs to add to your trusted locations
• Recognition of your central server as an Intranet site, and allowing automatic logon
• Javascript must be enabled
• Cookies must be enabled
• Windows authentication must be enabled
• Font download should be enabled for optimum usability of the site
• Any company proxy servers must allow browsers to access to the web application server.
Details for each of these are included in the first topic in the online help, Configuring Your Web Browser,available after the product is upgraded.
Upgrade PowerShell on Inventory BeaconsPowerShell is used both as part of the installation, and for operation of inventory beacons after installation.
The minimum requirement on inventory beacons is PowerShell 3.0.
You may choose to upgrade PowerShell to version 4.0, but be aware that this release has a prerequisite of .NETFramework 4.5.
To check and optionally upgrade PowerShell on a candidate server:
1. Within Windows PowerShell, run $PSVersionTable.PSVersion.
This produces output similar to the following:
Major Minor Build Revision
----- ----- ----- --------
3 0 -1 -1
2. If the Major value is less than 3, download your chosen version and install it.
For example:
Upgrading FlexNet Manager Suite to 2018 R2 On-Premises
Upgrading FlexNet Manager Suite to 2018 R2 On Premises | Company Confidential 31

• For PowerShell 3.0, see http://www.microsoft.com/en-us/download/details.aspx?id=34595.
• For PowerShell 4.0, see https://www.microsoft.com/en-us/download/details.aspx?id=40855.
Configure Network Shares for Multi-ServerIf you have not already done so, use Windows Explorer to configure the network share drives used by yourcentral servers.
There are two such shares required when you install the web application server on a separate server:
• The data import directory used for handing off any content imported through the web interface of FlexNetManager Suite (such as one-off inventory spreadsheets) to the batch server for processing (default value:%ProgramData%\Flexera Software\FlexNet Manager Platform\DataImport\). It may be on any of
your central servers, as convenient in your implementation; and it may be on any drive and any file path. Youmust configure the share manually in Microsoft Windows.
• The parallel data export folder used to stage data for integration with other systems. This is typically locatedas a peer of the above (default value: %ProgramData%\Flexera Software\FlexNet Manager Platform\
DataExport\).
You may implement these shares as you see fit.
For added security, you may set up these shares so that they are available to the minimum number of accounts(rather than open to all). From the process of setting up accounts, you are already acquainted with the ActiveDirectory security group FNMS Administrators, which minimally contains the operational service account(suggested: svc-flexnet), the installing administrator account (suggested: fnms-admin), and any accounts withinteractive logins to any of your central servers. If you wish, you can restrict these network shares so that theyare open only to members of FNMS Administrators, with the group providing full control for both dailyoperations and any required maintenance/troubleshooting.
Drivers for Spreadsheet ImportsIt is quite likely that at some stage you will need to import data from spreadsheets or CSV files. For example,you may have purchase records in spreadsheets, or inventory exported from a hard-to-reach system, or you mayhave a record of entitlements from a reseller in a spreadsheet format. Documentation is available for thesedifferent uses, including the chapter Importing Inventory Spreadsheets and CSV files in the FlexNet Manager SuiteSystem Reference PDF file, available through the title page of online help after installation.
You need a driver update if all of the following conditions apply to your future use of FlexNet Manager Suite:
• You will import data from spreadsheets (the export of data to spreadsheets is not relevant, and the import ofdata from CSV [comma-separated values] file is also not relevant)
• The spreadsheets will be Excel spreadsheets in .xlsx format (the earlier .xls format does not require the
driver update; but be aware that this older format limits each spreadsheet to about 65,000 records/rows)
• The .xlsx files will be imported to the batch server (or processing server, or application server in a single
server implementation); or they will be imported to an inventory beacon — obviously, drivers are needed only
Upgrading FlexNet Manager Suite to 2018 R2 On-Premises
32 Upgrading FlexNet Manager Suite to 2018 R2 On Premises | Company Confidential

on servers (whether a central server or inventory beacon servers) where such imports actually occur, so thatthis prerequisite applies only to those relevant server(s).
In these conditions, you must install a 32-bit version of Microsoft Access Database Engine on the relevant server.The particular release is not important: for example, Microsoft Access Database Engine 2010-32 is adequate.Drivers are supplied within the Microsoft Access Database Engine.
Important: Only the 32-bit version is supported by the Business Importer mechanism, and this version isincompatible with the 64-bit version of Microsoft Office products installed on the same machine. This meansthat, when you need imports in .xslx format, 64-bit Office cannot be installed on the central batch server (orapplication server), or on applicable inventory beacons. Naturally, Office documents including spreadsheetsprepared on other machines running 64-bit Office can successfully be imported. The limitation is only on co-installation on the same computers.
Download the MaterialsPosition yourself on a computer that is accessible from all the central servers you will implement, and preferablyat least some of your inventory beacons.
To download required materials:
1. Use your browser to access the Flexera Customer Community.
a. On https://flexeracommunity.force.com/customer/CCLanding, use the account details emailed toyou with your order confirmation from Flexera to log in (using the Login link in the top right).
Tip: Access requires your Customer Community user name and password. If you do not haveone, use the Request Community Access link on the login page to request one. Yourcredentials are configured for access to content you have licensed.
b. Select the Downloads tab from the row across the top of the page.
A routing page appears to let you Access Product and License Center, displaying lists ofproducts from Flexera.
c. In the lists of products, identify FlexNet Manager Platform, and click the Access Above Productsbutton that is below that product name.
The Product and License Center site is displayed.
d. In the Your Downloads section of the Home page, click the link for FlexNet Manager Platform.
e. In the Download Packages page, click the link for FlexNet Manager Platform 2018 R2 to access thedownloads. (You may need to repeat this action on a second page to access the downloadablefiles.)
2. Download the following archives and save to a convenient (network-accessible) location on this computer(such as C:\temp\FNMSUpgrade\). You may unzip all these archives here.
• FlexNet Manager Suite 2018 R2 Installer.zip
Upgrading FlexNet Manager Suite to 2018 R2 On-Premises
Upgrading FlexNet Manager Suite to 2018 R2 On Premises | Company Confidential 33

• Database Migration to FNMS 2018 R2.zip
3. If you are collecting inventory from Citrix XenApp, also download:
• Adapter Tools.zip.
4. If your implementation design includes Flexera Analytics (powered by Cognos), also download:
• Report Designer for FlexNet Manager Suite.zip (this contains the default report structures
within FlexNetManagerPlatformReportsAndDashboard.zip)
5. If you will also install the Business Adapter Studio in connected mode (that is, on a central server withdirect access to your operations databases), also download Business Adapter Studio 2018 R2.zip tothe same location.
Tip: If you have a previously installed version of the Business Adapter Studio, it must be upgraded atthis release by removing the old installation and replacing it with the new version.
Upgrading FlexNet Manager Suite to 2018 R2 On-Premises
34 Upgrading FlexNet Manager Suite to 2018 R2 On Premises | Company Confidential

2Upgrading FlexNet Manager Suite
You have completed all the prerequisites in Prerequisites and Preparations (and its subsections). Only when allthese tasks are complete should you move forward to the upgrade of FlexNet Manager Suite to 2018 R2.
Remove Previous Language PacksFor easier and safer maintenance, remove previous localization packs before upgrading.
FlexNet Manager Suite 2018 R2 installs all available language packs as a standard part of the installation process,so that they no longer require separate installation. There is a risk, if you attempt to remove old language packsafter the upgrade is completed, that you will remove functionality you require in this release. For this reason, usethis opportunity to remove previous language packs before undertaking the upgrade. (If you have not previouslyinstalled language packs, ignore this section.)
To remove previous language packs:
1. Open the Windows Control Panel (for example, Windows Start menu > Control Panel).
2. Click Programs and Features.
The dialog displays the Uninstall or change a program page.
3. Select one of the available language packs.
When you make a selection the Uninstall button appears above the list of programs.
4. Click Uninstall, and if necessary click Yes in the confirmation dialog that may appear.
Wait while the removal process is completed.
5. If necessary, repeat the selection and uninstall process for the other language pack.
6. Close the Control Panel.
Upgrading FlexNet Manager Suite
Upgrading FlexNet Manager Suite to 2018 R2 On Premises | Company Confidential 35

Upgrade/Create DatabasesAny existing compliance databases must be upgraded, and if you are migrating from 2014 or earlier, 2018 R2uses an additional mandatory database.
Important: If you are using Microsoft SQL Server 2016, ensure that at least SP1 has been installed. This updateaddresses a defect in SQL Server that triggers a fatal error, as documented in https://support.microsoft.com/en-au/help/3173976/fix-fatal-error-when-you-run-a-query-against-the-sys-sysindexes-view-in-sql-server-2016.
You may wish only to update your existing database(s) for the new release. However, you may wish to take thisopportunity to scale up to multiple databases (potentially sharing the same server, of course) for inventory andcompliance. Separate databases are shown in the architectural diagram in Design the Final Topography.
Note: If your databases are to run on Microsoft SQL Server 2016 SP1 or later, set the database compatibility toa lower level for each database. If upgrading from an earlier version of a database, preserve its compatibilitylevel (100 or later, such as 110 for SQL Server 2012). For new database installations, set the compatibility levelfor each database to SQL Server 2014 (120).
Important: All database scripts use Unicode character sets to allow for necessary localization. This means that:
• Any FTP transfer of these files must be in binary mode (not ASCII mode)
• The files must be edited only in editors that support Unicode character sets.
Failure to observe these precautions may result in failures in script operations.
Important: If you have been using Flexera Analytics (powered by Cognos), be aware that Cognos may acquireschema locks on objects within the operations databases of FlexNet Manager Suite. For this reason it isimportant to stop the Cognos server before updating databases, and to restart it afterwards.
Take note of all the database names you create with the -d parameter in the following steps. You need thenames later (if database setup is done by a separate DBA, the database names must be handed off to theinstalling administrator). While it is possible to create your own database names, using the default names makesit easier to follow the rest of the documented processes.
Tip: There may be several accounts needing to log in directly to the application server for tasks related toFlexNet Manager Suite, such as manipulating log files, scheduling tasks, and the like (this excludes accessthrough the web interface, which is not relevant to this discussion.) It is often convenient for these accounts tohave the same database permissions as the services account on all components of the operations databases:compliance data, warehouse data, snapshot data, and inventory data. A suggested method is to create either alocal or Active Directory security group (such as FNMS Administrators) and add all such accounts to thisgroup. Then you can, for example, set these permissions by opening each database in Microsoft SQL ServerManagement Studio, and granting the appropriate privileges to the security group. The procedures are detailedin the topics covering database creation. Accounts to list in the security group minimally include:
• The operational service account (suggested: svc-flexnet)
Upgrading FlexNet Manager Suite
36 Upgrading FlexNet Manager Suite to 2018 R2 On Premises | Company Confidential

• The installing administrator account (suggested: fnms-admin) for post-installation on-going administration
(remembering that db_owner membership is required temporarily during installation, as described in Identify
(or Set Up) Accounts)
• Any operational account needing to log in to a central inventory beacon installed on your batch server(remember that, since the inventory beacon requires administrator privileges to run, this account is both alocal administrator on the batch server and a db_owner)
• Any future back-up administrator accounts needed for the application server.
To upgrade databases and extend where required:
1. If your previous implementation included Flexera Analytics (powered by Cognos), stop the Cognos server.
2. Create a security group (suggested: FNMS Administrators), and (optionally) add to it all accounts directlylogging into the central application server (or you can add accounts later).
3. In SQL Server Management Studio, ensure that the AD security group (suggested: FNMS Administrators)has a secure login:
a. Under Security > Logins, create a new login.
The Select User, Service Account or Group dialog appears.
b. Use the Object Types... button to ensure that User, Group, or Built-in security principalis selected as the object type.
c. Use the Locations... button to select your Active Directory domain.
d. As the object name, enter the name of your security group (suggested: FNMS Administrators), anduse Check Names to validate that the group name is found.
e. Click OK.
The newly added group is visible under the Security > Logins node. (You will use this group afterthe creation of each database.)
Upgrading FlexNet Manager Suite
Upgrading FlexNet Manager Suite to 2018 R2 On Premises | Company Confidential 37

4. Do a full backup your existing FlexNet Manager Suite database(s).
This is very important, especially as you may interrupt transaction logging in a few steps time.
5. Back up any customized files to a temporary location, (for example, C:\temp).
Customized files may include compliance importer procedures (XML files located by default ininstallation_dir\Compliance\ImportProcedures from 8.0 onwards, or for earlier releases, check insourceprocedures.xml).
6. Ensure that the target database instance is set for case-insensitive and accent-sensitive collations (asrequired by all databases in this system). To check the collation settings at the server level:
a. In SQL Server Management Studio, locate the SQL Server instance in the Object Explorer pane.
b. Right-click the server, and select Properties from the context menu.
c. On the server Properties dialog, select the General tab, and check the current collation sequence.
If the collation sequence includes the codes _CI_AS (for example, SQL_Latin1_General_CP1_CI_AS), youmay proceed with the installation.
Tip: Other suffixes like _KS or _WS are optional.
If the server's default collation does not include _CI_AS, you can set the collation sequence for eachdatabase, as you create it, by right-clicking the new database, selecting Properties from the context menu,and choosing the collation on the Options tab. Remember that the collation sequence must be identical for:
• The compliance database (suggested name: FNMSCompliance)
• The reporting snapshot database (suggested: FNMSSnapshot)
• The data warehouse database (suggested: FNMSDataWarehouse).
Upgrading FlexNet Manager Suite
38 Upgrading FlexNet Manager Suite to 2018 R2 On Premises | Company Confidential

For example, if the first of these has the collation sequence called SQL_Latin1_General_CP1_CI_AS, thenall of them must have the exact same collation sequence. In contrast, the inventory database, when separate(suggested: FNMSInventory), and the Cognos content store may have different collation sequences,provided that these also include the same _CI_AS codes. The tempdb database (alone) may have anycollation sequence, since FlexNet Manager Suite creates the required tables here with the appropriatecollation sequence.
7. Wherever possible, use SQL Server Management Studio to ensure that the database Recovery model is setto Simple (first recording its current value before changing it if necessary).
a. In SQL Server Management Studio, right-click the database, and select Properties from the contextmenu.
b. Select the Options tab.
c. Check that Recovery model is set to Simple (or note its current value, change it to Simple, and clickOK).
Especially for large databases, this prevents the transaction log from growing to excessive proportions.Because of this growth, for databases of all sizes, the migration process will truncate the transaction log atthe end of the process, and this truncation relies on the simple Recovery model. If the model is notcurrently Simple, note the existing value — there is a reminder below to restore this value after asuccessful database migration.
Note: In some cases it is not possible to set the Recovery model to Simple, such as when you are usingAvailability Groups. In these cases, it is critical to allow sufficient space for the transaction logs to expanddramatically — as a general guideline, to 2-3 times the disk space currently used by your FlexNetdatabases. It is also important to remain vigilant during database migration, monitoring both theremaining available space as well as the rate at which the logs are growing. Finally, after processing eachindividual database, consider truncating the transaction logs before proceeding to the next one; andtruncate again after the final database is processed.
8. If you have not already done so, login to the central application server with a privileged account (suggestion:db-admin) that has the privileges described in Identify (or Set Up) Accounts.
9. If you cannot access your downloaded and unzipped archives from your current login on this applicationserver, copy Database Migration to FNMS 2018 R2.zip to this server and unzip it to a convenientlocation, such as C:\temp\FNMSUpgrade.
10. In the Command Prompt window, navigate to your working copy of the migration folder (such as C:\Temp\
FNMSUpdate\Database Migration\FlexNet Manager Platform\Normal).
Tip: If your console window is in QuickEdit mode (visible in the Properties for the window), simplyclicking in the window when it already has focus puts it into Mark or Select mode. In such a mode, aprocess that is writing to the window is paused, awaiting your input. Beware of unintentionally pausingdatabase migration by extra clicking in this command prompt. A process that has been paused in thisway is resumed when the window already has focus and you press any key.
Upgrading FlexNet Manager Suite
Upgrading FlexNet Manager Suite to 2018 R2 On Premises | Company Confidential 39
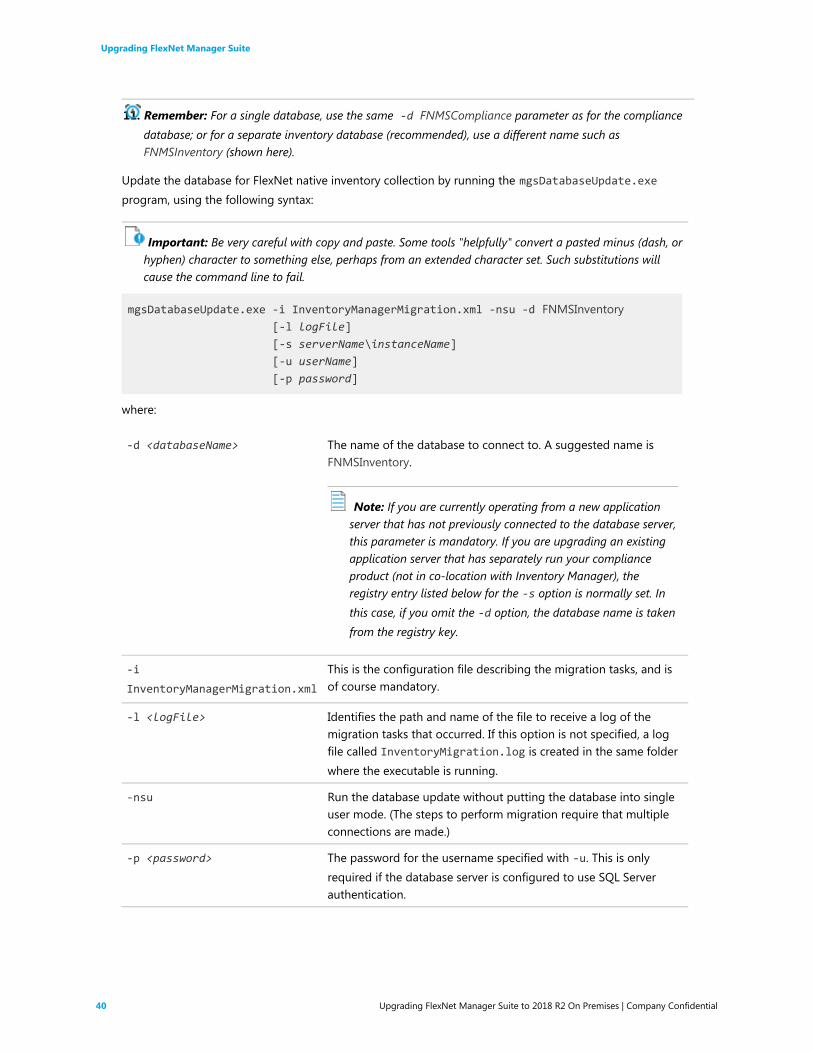
11. Remember: For a single database, use the same -d FNMSCompliance parameter as for the compliancedatabase; or for a separate inventory database (recommended), use a different name such asFNMSInventory (shown here).
Update the database for FlexNet native inventory collection by running the mgsDatabaseUpdate.exe
program, using the following syntax:
Important: Be very careful with copy and paste. Some tools "helpfully" convert a pasted minus (dash, orhyphen) character to something else, perhaps from an extended character set. Such substitutions willcause the command line to fail.
mgsDatabaseUpdate.exe -i InventoryManagerMigration.xml -nsu -d FNMSInventory[-l logFile]
[-s serverName\instanceName]
[-u userName]
[-p password]
where:
-d <databaseName> The name of the database to connect to. A suggested name isFNMSInventory.
Note: If you are currently operating from a new applicationserver that has not previously connected to the database server,this parameter is mandatory. If you are upgrading an existingapplication server that has separately run your complianceproduct (not in co-location with Inventory Manager), theregistry entry listed below for the -s option is normally set. Inthis case, if you omit the -d option, the database name is takenfrom the registry key.
-i
InventoryManagerMigration.xml
This is the configuration file describing the migration tasks, and isof course mandatory.
-l <logFile> Identifies the path and name of the file to receive a log of themigration tasks that occurred. If this option is not specified, a logfile called InventoryMigration.log is created in the same folderwhere the executable is running.
-nsu Run the database update without putting the database into singleuser mode. (The steps to perform migration require that multipleconnections are made.)
-p <password> The password for the username specified with -u. This is onlyrequired if the database server is configured to use SQL Serverauthentication.
Upgrading FlexNet Manager Suite
40 Upgrading FlexNet Manager Suite to 2018 R2 On Premises | Company Confidential

-s <serverName>
or-s
<serverName>\<instanceName>
The name of the database server to connect to. If -s is notspecified, the value at HKEY_LOCAL_MACHINE\SOFTWARE\Wow6432Node\ManageSoft Corp\ManageSoft \Reporter\
CurrentVersion\DatabaseConnectionString is used. Theregistry key is present on the compliance and inventory servers. (Ifyou have chosen to run this script on the database server itself, theregistry entry is not available, and you must therefore specify theserver name, or use the dot notation [.] to refer to the currentserver.)If the database is in a named instance (and not in the defaultdatabase on the server), the instance name must be specified aswell.
-u <userName> The username with which to connect to the database. This is onlyrequired if the database server is configured to use SQL Serverauthentication. If not specified, Windows Integrated Authenticationis used to connect to the database server using the current user’scredentials.
Example: The following command performs the migration using the standard configuration file. Instead ofrecording the log in the default log file, it will be written to the mig.log file specified in the command.Because the upgrade is running on a new server, the database server name (and, if required, instancename) and database name must be specified, and Windows Authentication is used to log in as the accountname running the executable.
mgsDatabaseUpdate.exe -i InventoryManagerMigration.xml -nsu -l mig.log -s
MyDBServer\thisInstance -d FNMSInventory
Check messages on the command line to confirm that the database migration was successful. If any errormessages occur, check the log file to troubleshoot the problem. Do not proceed to the next step until thedatabase migration is successful. For more information about database validation and remedies, seeDatabase Validation.
Tip: If, after migration is complete, the database size still seems much larger than before, ask yourdatabase administrator to check whether there is a significant amount of unused space in the databasefiles (using Microsoft SQL Server Management Studio). If so, a database shrink operation can reclaim thisunused space.
12. On this database, grant db_owner privileges to the security group (suggested: FNMS Administrators):
a. Open this database in Microsoft SQL Server Management Studio, expose the Security > Users
node, right-click and choose to create a new user.
b. In the Database User - New dialog, set the User type to SQL user with login, and enter a Username (for example, call it FNMS Administrators as well).
c. Next to the Login name field, click the ellipsis (...) button, and use the Select Login dialog to selectyour Active Directory security group (suggested: FNMS Administrators). Click OK to close bothdialogs.
Upgrading FlexNet Manager Suite
Upgrading FlexNet Manager Suite to 2018 R2 On Premises | Company Confidential 41

d. For your newly-added user, right-click and select the properties, and select the Membership page.Check the db_owner role, and click OK .
e. Strongly recommended for SQL Server 2016 SP1 or later: Set the compatibility level on this databaseto SQL Server 2012 (110) or SQL Server 2014 (120).
13. Optionally, re-index the inventory database.
For details, see Re-Indexing a Database.
14. Similarly, update the compliance database.
a. Still in the command window on the database server, using the administrative account (db-admin),and in the same folder of the unzipped archive, execute:
mgsDatabaseUpdate.exe -i ComplianceMigration.xml -nsu -d FNMSCompliance[-l logFile]
[-s serverName\instanceName]
[-u userName]
[-p password]
Upgrading FlexNet Manager Suite
42 Upgrading FlexNet Manager Suite to 2018 R2 On Premises | Company Confidential

b. Open this database in Microsoft SQL Server Management Studio, and grant db_owner privileges tothe security group (suggested: FNMS Administrators).
For more information about database validation and remedies, see Database Validation.
c. Strongly recommended for SQL Server 2016 SP1 or later: Set the compatibility level on this databaseto SQL Server 2012 (110) or SQL Server 2014 (120).
15. If you previously changed the setting for the database Recovery model, restore the original value now.
16. Optionally, re-index the compliance database.
For details, see Re-Indexing a Database.
17. Migrate your data warehouse database, running the mgsDatabaseUpdate.exe program again with differentparameters:
mgsDatabaseUpdate.exe -i DataWarehouseMigration.xml -nsu -d FNMSDataWarehouse[-l logFile]
[-s serverName\instanceName]
[-u userName]
[-p password]
Important: In this instance, the database name (-d parameter) is mandatory. (The suggested value isshown, which you should customize if your database name is different.)
Check messages on the command line to confirm that the warehouse migration was successful. If any errormessages occur, check the log file to troubleshoot the problem. Do not proceed to the next step until themigration is successful. For more information about database validation and remedies, see DatabaseValidation.
18. Strongly recommended for SQL Server 2016 SP1 or later: Set the compatibility level on this database to SQL
Server 2012 (110) or SQL Server 2014 (120).
19. If you began this process by stopping your Cognos server, you may restart it now.
Note: The snapshot database does not require migration.
Re-Indexing a DatabaseWhen updating the databases used by FlexNet Manager Suite, consider whether this is also the time to re-indexthe databases. Take into account the following factors:
• Re-indexing increases data access speed and recovers wasted disk space.
Tip: It is a good idea to re-index your database at least once a year. In SQL Server, tables that do not haveclustered indexes do not automatically reclaim space from deleted records. Re-indexing will reclaim thisspace.
Upgrading FlexNet Manager Suite
Upgrading FlexNet Manager Suite to 2018 R2 On Premises | Company Confidential 43

• Re-indexing is especially important if you have a lot of records in history tables. For example, in the inventorydatabase, check the Installation and InstallationHistory tables.
• Re-indexing is very demanding for SQL Server. You should only ever attempt a re-indexing of one databaseat a time. It is also good practice to schedule this out of production times, such as overnight or on aweekend.
• On large databases, this process can take more than 24 hours.
There is no requirement that you must re-index at this time: you may prefer to complete the current processesand schedule re-indexing at appropriate times soon. However, your current process is an excellent trigger forplanning a regular schedule for re-indexing, say one or twice a year.
FlexNet Manager Suite provides a re-indexing script that can be applied to the following databases:
• The compliance database (suggested name: FNMSCompliance)
• The inventory database (suggested name: FNMSInventory)
• The data warehouse database (suggested name: FNMSDataWarehouse).
(There is little benefit in re-indexing the snapshot database (suggested name: FNMSSnapshot), as this iseffectively cleaned up each time a snapshot is saved.)
Important: Do not apply the script to the Report Writer Content Store. This is a database designed by Cognosand not aligned with the reindexing script from Flexera.
To re-index one of the FlexNet Manager Suite operations databases (optional):
1. Start SQL Server Management Studio.
2. Open the appropriate copy of ReIndexAll.sql ( File > Open... and browse to the appropriate file listedbelow).
• For the inventory database, look in Database Migration\Inventory Manager
• For the compliance database, look in C:\temp\FNMSUpate\Database Migration\FlexNet Manager
Platform\Normal.
3. Click the Execute Query tool, or press F5 to run the script.
Keep in mind that the re-indexing may take a considerable time, depending on the size of your database.
Database ValidationDatabase migration includes a number of checks on the quality of the resulting database.
The first of these is a check of database constraints that may have been either enabled or disabled without datachecks. If constraint errors are detected, the migration process corrects them. Where a constraint is enabled, theprocess also attempts to ensure that the data it covers is appropriate for the constraint. Generally, this succeedswithout issue, and the change is simply noted in the migration log. However, if it fails, the migration processalso fails with an error similar to:
Upgrading FlexNet Manager Suite
44 Upgrading FlexNet Manager Suite to 2018 R2 On Premises | Company Confidential
ERROR: One or more constraints cannot be enabled (step number 99).
If this occurs, the names of the constraints that cannot be enabled are listed in the migration log. Restarting themigration at this time does not help this issue, and the database is unusable for production work. First, adatabase administrator or a Flexera support engineer must manually correct the issue with the underlying data.Once the data has been corrected, the migration process will be able to be restarted safely.
At the end of the migration process, there is a final schema check of the upgraded database to ensure that theupgrade has been successful. Messages from this database check may appear in your console towards the endof the process, after the migration itself is completed.
This check is included for the three main system databases: the compliance database, the inventory database,and the data warehouse database.
When these checks are run, the upgrade has already been completed without errors, and the database is likelyto be usable. These are additional checks to look for irregularities in the database that may cause futureoperational problems. These kinds of irregularities may occur because:
• The earlier database had previously been changed (either by database administrators or by a Flexeraconsultant) in ways that are not supported by the product
• A previous migration updated the database in ways that were not entirely correct, but not previouslydetected
• Something has occurred in the present migration that did not raise an error in the migration, but leaves thedatabase in a less than perfect condition.
Such causes can produce a range of possible issues, including:
• Missing tables, indexes, columns, or foreign keys
• Extra indexes, columns or foreign keys
• Incorrectly configured columns (the size differs, or their nullability)
• An index configured in unexpected ways, either in its uniqueness, its clustering status, or in the columns itcovers.
For the above cases, assistance from a database administrator or Flexera support engineer is also required tocorrect the schema. In many cases, the issues described in the log can be remedied in place, without requiringthat the database migration process is restarted.
Authorize the Service AccountThe account used to run processing services requires permission to run as a service. Prior to installing anything,perform this process on:
• Your batch server/reconciliation server (in a large-scale implementation with three servers)
• Your processing server (in a two server application implementation)
• Your application server (in a single server implementation).
Upgrading FlexNet Manager Suite
Upgrading FlexNet Manager Suite to 2018 R2 On Premises | Company Confidential 45

To authorize the service account:
1. On the appropriate server, log in as an administrator (suggested: fnms-admin).
2. Go to:
• On Windows Server 2012, Start > Administrative Tools > Local Security Policy
• On earlier releases of Windows Server, Start > All Programs > Administrative Tools > Local SecurityPolicy.
3. Select the Local Policies node, and choose User Rights Assignment.
4. Open the policy Log on as a service, and add the service account (example: svc-flexnet).
5. Open the policy Log on as a batch job, and add the service account (example: svc-flexnet).
6. Click OK.
Tip: A Microsoft error dialog Security Templates - An extended error has occurred. Failed
to save Local Policy Database. may appear. This error is described athttp://support.microsoft.com/kb/2411938, and may safely be ignored.
Choosing the Upgrade ApproachThe materials you have downloaded for your implementation (see Download the Materials) support two broadapproaches to upgrading the server(s) that form the core of your implementation:
• You may step through the upgrade processes manually, maximizing your control over each step (but perhapsincreasing the risk of manual error). For step-by-step instructions for each kind of server, start at ManagingUpgrades Interactively.
• You may prepare a detailed answer file for (each of) your server(s), and then use a provided script to completethe upgrade(s) for you. This is especially helpful if you want a repeatable process, such as upgrading first in atest environment and then again in a production environment; or even holding your answer file(s) for re-usewith future releases of FlexNet Manager Suite. Details for this approach start at Managing a Scripted Upgrade.
Managing a Scripted UpgradeYour downloaded materials include everything needed to prepare for, and then execute, scripted upgrades of thevarious server(s) needed in your implementation.
One script (and its support files) may either be used for a single-server implementation, or used repeatedly for amulti-server implementation with only a small configuration difference for each server.
A separate script can also implement Flexera Analytics as part of your implementation.
The instructions in this section assume that you have unzipped the downloaded installer and support files to afile share that is accessible from all the servers you want to configure (as described in Download the Materials). Ifthis is not the case, make a local copy of the entire unzipped archive on each server.
Upgrading FlexNet Manager Suite
46 Upgrading FlexNet Manager Suite to 2018 R2 On Premises | Company Confidential

Typical workflow for scripted upgrade
Remember: Databases must exist before you start scripted installation (see Upgrade/Create Databases fordetails).
Keep in mind the block diagram of servers you planned for your logical application server, as discussed in Designthe Final Topography. The summary workflow is:
1. Optionally, set up encryption for credentials to be referenced in the answer file(s) (see Prepare EncryptedCredentials for Upgrade). If you choose not to do this, the relevant account name and password appear inthe answer file(s) in plain text.
2. Create an answer file containing all configuration details, based on the sample FlexNet Manager Suiteanswer file provided (see Prepare Answer File).
3. Make a copy of the answer file for each server in your block diagram (such as the web application server, thebatch server, and the inventory server), and modify the FEATURES setting appropriately in the answer file foreach server. Of course, if you have designed a single-server implementation, you require only the oneanswer file.
4. On each of your servers:
a. Optionally, save the required command-line parameters as PowerShell variables (see Running aScripted Installation).
b. Provide the correct answer file for this server's functionality.
c. Run the supplied script with the appropriate command line (see Running a Scripted Installation).
The script completes both the installation and configuration required for each server.
5. For Flexera Analytics, use a similar process:
a. Customize the answer file, which in this case is an .xml file.
b. Run the specialized script on your Cognos server (see Upgrading Flexera Analytics from FlexNet ReportDesigner).
c. Configure the application server with the URL of your Flexera Analytics server.
d. Ensure that one or more roles have been created to permit access.
e. Add your Flexera Analytics server to your web browser's list of trusted websites.
Prepare Encrypted Credentials for UpgradeThis task is optional: if you do not wish to encrypt credentials used in the answer file during upgrade, you mayenter them in plain text in the answer file itself (see Prepare Answer File).
For encrypted credentials, you may use either of two approaches:
• You may use your own RSA or ECDH certificate. The RSA certificates used with this module must allow Key
Encipherment in their Key Usage extension. ECDH certificates must allow the Key Agreement Key Usage
extension. If you want to use your own certificate, follow the first steps in the process below to validate thatthe certificate is usable for both encryption and decryption before attempting any installation.
Upgrading FlexNet Manager Suite
Upgrading FlexNet Manager Suite to 2018 R2 On Premises | Company Confidential 47

• You can use the process here, along with a supplied PowerShell module, to create both a certificate and astore, along with all the identities required. Provided that you use the same identities on each of your coreapplication servers, you can simply copy the certificate and store to each server as appropriate, where theycan be accessed using your configured answer file.
Once credentials are saved in your store, you configure the answer file with store references that allow use ofthe credentials, without needing to include any password values in the answer file.
Important: The account that prepares these encryption details in this process must be the same account thatsubsequently runs the unattended installation script.
To prepare encrypted credentials for the upgrade process:
1. On the first of your target servers, with mapped share or local access to the downloaded and unzippedinstallation archive, log in using the account that will complete the installation (suggested: fnms-admin).
2. Launch an elevated PowerShell window (that is, in the Windows start menu, right-click PowerShell andselect Run as administrator).
3. In the PowerShell window, import the supplied Encryption.psm1 module to this PowerShell session:
cd path-to-resources\FlexNet Manager Suite\Support
Import-Module Modules\Encryption.psm1
4. If you are using your own RSA or ECDH certificate, verify that your certificate is usable for encryption anddecryption:
For example, the following command works for the certificate we will create in this process, and for yourown certificate the command should be similar.
Get-KeyEncryptionCertificate -RequirePrivateKey
To check on parameters for your own certificate, enter the following at your PowerShell prompt:
help Get-KeyEncryptionCertificate -full
5. If you are not using a certificate prepared earlier, create one now that can be used to encrypt and laterdecrypt the credentials. Use the following command (indented lines append to the first command, all onone line), which shows recommended values:
$thumbprint = New-CredentialCertificate
-Subject 'CN=FNMS Installation, OU=FNMS, O=Flexera'
-FriendlyName 'FNMS_Silent_Install'
$thumbprint
The first command saves the certificate thumbprint in a PowerShell variable called $thumbprint. The lastline displays the value of the variable. The newly-created certificate can now be used to generate acertificate store.
6. Use the newly-created certificate to create a new credential store for encrypted identities.
The command line is:
Upgrading FlexNet Manager Suite
48 Upgrading FlexNet Manager Suite to 2018 R2 On Premises | Company Confidential

New-CredentialStore -Certificate $thumbprint
where -Certificate identifies your new certificate by way of its thumbprint saved in the PowerShellvariable.
Tip: It is possible to specify an optional -PathToStore parameter (for example C:\Credential\
fnms.password.store.xml), but this is not recommended. The default behavior is to save a file namedfnms.password.store.xml in the secure profile directory of the logged-in user (running thePowerShell session). If you vary either of these, you must continue to specify your custom path/file namein all subsequent commands.
7. Create the credentials needed in the credential store.
For each identity in turn, use the following command (all on one line):
New-StoredCredential
-Name 'friendly-name'
-Username 'username'
-Password 'password'
Each use of this command echoes the Username and Name values, along with a StoreReference of theform flexera://friendly-name. Copy the value of each StoreReference, and save them for use in theanswer file (as described in Prepare Answer File). You might choose to create separate credentials for eachof the following identities; but more common practice is to create one identity for the service account youhave created (suggested: svc-flexnet, for which see Authorize the Service Account), and then referencethat same identity in each of the following set:
• SuiteAppPoolUser
• ExternalAPIAppPoolUser
• BeaconAppPoolUser
• BusinessReportingAuthUser
• ReconciliationScheduledTaskUser
• RLAppPoolUser
• DLAppPoolUser
• InventoryScheduledTaskUser.
8. If you are preparing a multi-server implementation, and you wish to use the same encrypted credentials oneach of your servers:
a. Export your certificate with the following command that references its thumbprint:
Export-CredentialCertificate $thumbprint -Path c:\path-on-disk\
SilentInstall.pfx
where the -Path parameter is optional to identify the file path and file name for saving thecertificate. If omitted, the path defaults to the working directory of the current PowerShell session.
Upgrading FlexNet Manager Suite
Upgrading FlexNet Manager Suite to 2018 R2 On Premises | Company Confidential 49

b. Copy both the exported certificate (suggested: SilentInstall.pfx) and credential store (default:fnms.password.store.xml) together to a temporary location on the other target servers.
c. On each server in turn, install the certificate into the Windows certificate store by providing the pathto the local copy:
Install-CredentialCertificate -Path
C:\temporary-path-on-disk\SilentInstall.pfx
d. Validate that you are able to retrieve credentials from the store using the following command:
Get-StoredCredential -PathToStore
C:\temporary-path-on-disk\fnms.password.store.xml
This command lists all the credentials in the store. The Username field is only populated if thecertificate is safely located on the same server.
e. Relocate the store in the correct working directory (the local application data store under the profiledirectory for the installing account).
In PowerShell, the shorthand way to do this is:
mv C:\temporary-path-on-disk\fnms.password.store.xml $env:LOCALAPPDATA
When the credential store and certificate are correctly installed, and identifying all credentials required on eachof your servers, you are ready to customize your answer file.
Prepare Answer FileAn answer file provides all the details required for upgrade of your server(s).
Tip: If you miss a setting from the answer file that is required for one of your servers, a dialog box appearsduring the upgrade process to request the missing value.
To customize your answer file:
1. From your downloaded and unzipped archive, and using a flat text editor, open the following file:
drive-and-path\FlexNet Manager Suite\Support\sample-fnms-answer.txt
2. Save a working copy on your local drive for editing.
It may be helpful in a multi-server implementation to use a file naming convention that identifies whichserver this answer file copy is intended for.
3. If you have set up encryption for credentials used in this answer file, uncomment (by removing the leadinghash or pound character) both the Security section header and the Store parameter, providing the pathand file name for your credential store on this server:
Example:
Upgrading FlexNet Manager Suite
50 Upgrading FlexNet Manager Suite to 2018 R2 On Premises | Company Confidential

[Security]
Store = drive:\path-to-file\fnms.password.store.xml
4. Adjust the FEATURES parameter to suit the type of server being installed and configured. (Come back andadjust this value for each server in a multi-server implementation, saving a separate answer file for eachserver type.)
Use one (or more) of the following values, depending on the server type:
Server type Value
Single-server implementation Use either of:
• ALL
• FleNetManagerPlatform
Alternatively, you may list all of the followingcomponent identifiers, separating each with acomma and space.
The web application server WebUI
The batch server BatchScheduler, BatchProcessor
(Use both labels on your batch server.)
The inventory server InventoryServer
Tip: Although these notes continue to provide guidance about which parameters apply to which servertype, the remaining values in the answer file may all be completed in a single editing pass. Thecontrolling script extracts only the parameters required for each server type, as declared by theFEATURES parameter that you have just customized. Therefore, other than configuring the FEATURES
parameter for each server type, the remainder of the answer file is portable across the various types ofserver that you may be installing.
5. The four settings for directories (in the middle of the [Installation] section) may be left commentedout if you are satisfied with the default values; or else you may uncomment the parameter and add a fullyqualified path.
The parameters, the server type applicable for each one, and the default values are as follows:
Parameter Applies to Default/Comments
INSTALLDIR All servertypes
C:\Program Files (x86)\Flexera Software\FlexNet
Manager Platform\
Upgrading FlexNet Manager Suite
Upgrading FlexNet Manager Suite to 2018 R2 On Premises | Company Confidential 51

Parameter Applies to Default/Comments
DATAIMPORTDIR The batchserver, andwebapplicationserver
C:\ProgramData\Flexera Software\FlexNet Manager
Platform\DataImport\
WAREHOUSEDIR Inventoryserver
C:\ProgramData\Flexera Software\Warehouse\
INCOMINGDIR Inventoryserver
C:\ProgramData\Flexera Software\Incoming\
6. When prepare the answer file is for your batch server, do one of the following:
• If you have implemented a credential store, uncomment the BatchProcessStoreReference
parameter and provide the store reference for this credential. (When you provide a store reference, anyvalues in the BATCHPROCESSUSERNAME and BATCHPROCESSPASSWORD are ignored.)
• Otherwise, complete the values for the BATCHPROCESSUSERNAME and BATCHPROCESSPASSWORD
parameters, identifying the service account (example: svc-flexnet) you already configured (see
Authorize the Service Account).
7. For the following set of identities, do one of the following for each separate [Identity]:
• If you have implemented a credential store, uncomment the StoreReference parameter and add the
store reference for the credential. (When you provide the store reference, any values for Username and
Password are ignored. Be certain not to modify the Name parameter that specifies the purpose for each
identity.)
• Otherwise, insert the account name and password for each identity. This is normally the service account(example: svc-flexnet) you already configured (see Authorize the Service Account). Recommended
format for the Username parameter is domain\username, such as:
Username = exampleDomain\svc-flexnet
All the identities for which the name includes "Pool" are used to configure Microsoft IIS on the respectiveserver. Two others are used to run scheduled tasks. The identities and the server type to which they applyare:
Identity names Apply to
SuiteAppPoolUser
ExternalAPIAppPoolUser
The web application server
Upgrading FlexNet Manager Suite
52 Upgrading FlexNet Manager Suite to 2018 R2 On Premises | Company Confidential
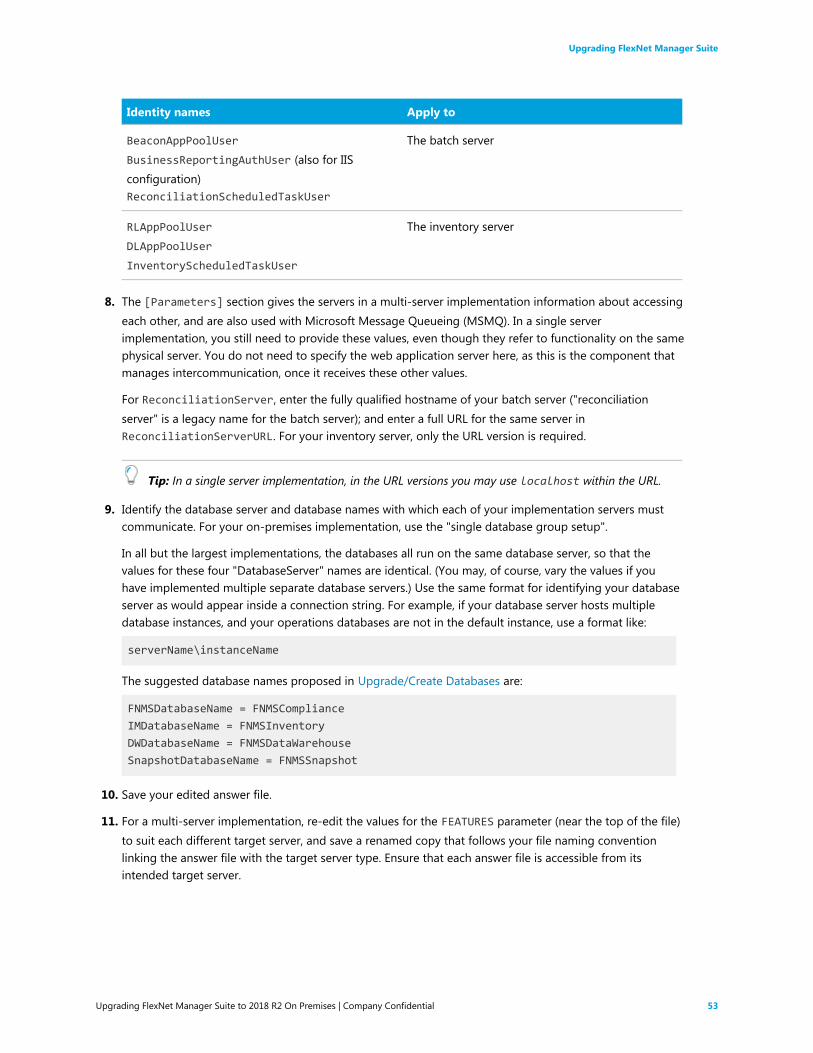
Identity names Apply to
BeaconAppPoolUser
BusinessReportingAuthUser (also for IISconfiguration)ReconciliationScheduledTaskUser
The batch server
RLAppPoolUser
DLAppPoolUser
InventoryScheduledTaskUser
The inventory server
8. The [Parameters] section gives the servers in a multi-server implementation information about accessingeach other, and are also used with Microsoft Message Queueing (MSMQ). In a single serverimplementation, you still need to provide these values, even though they refer to functionality on the samephysical server. You do not need to specify the web application server here, as this is the component thatmanages intercommunication, once it receives these other values.
For ReconciliationServer, enter the fully qualified hostname of your batch server ("reconciliationserver" is a legacy name for the batch server); and enter a full URL for the same server inReconciliationServerURL. For your inventory server, only the URL version is required.
Tip: In a single server implementation, in the URL versions you may use localhost within the URL.
9. Identify the database server and database names with which each of your implementation servers mustcommunicate. For your on-premises implementation, use the "single database group setup".
In all but the largest implementations, the databases all run on the same database server, so that thevalues for these four "DatabaseServer" names are identical. (You may, of course, vary the values if youhave implemented multiple separate database servers.) Use the same format for identifying your databaseserver as would appear inside a connection string. For example, if your database server hosts multipledatabase instances, and your operations databases are not in the default instance, use a format like:
serverName\instanceName
The suggested database names proposed in Upgrade/Create Databases are:
FNMSDatabaseName = FNMSCompliance
IMDatabaseName = FNMSInventory
DWDatabaseName = FNMSDataWarehouse
SnapshotDatabaseName = FNMSSnapshot
10. Save your edited answer file.
11. For a multi-server implementation, re-edit the values for the FEATURES parameter (near the top of the file)to suit each different target server, and save a renamed copy that follows your file naming conventionlinking the answer file with the target server type. Ensure that each answer file is accessible from itsintended target server.
Upgrading FlexNet Manager Suite
Upgrading FlexNet Manager Suite to 2018 R2 On Premises | Company Confidential 53
Important: The supplied sample answer file does not contain an ADDLOCAL parameter, because thisparameter is now deprecated. Do not re-insert this parameter into your answer file, since this forces legacybehavior which limits the flexibility of multi-server implementations.
Running a Scripted InstallationBefore running the scripted upgrade:
• All related database must exist (see Upgrade/Create Databases)
• If you are encrypting identities needed in the upgrade, you must have configured and distributed both thecertificate store and the certificate validating those identities (see Prepare Encrypted Credentials for Upgrade)
• You must have prepared the local copy of the answer file, correctly configured for the type of serverundergoing upgrade (see Prepare Answer File)
• From the current server, you must have access (either through a network share, or using a local copy) to thecomplete unzipped archive of the upgrade resources (do not attempt to extract portions, as many scripts andfiles interact in this process).
When all is ready, triggering a scripted upgrade is a simple matter of invoking the supplied PowerShell scriptwith the correct parameters. The command line can optionally be simplified by first declaring some PowerShellvariables to contain those parameters.
To configure variables and trigger scripted installation:
1. Ensure that you are running an elevated PowerShell session (that is, started with the Run as
administrator option).
2. Optionally, declare PowerShell variables to contain the various parameters.
This simplifies the final command line. Declaring PowerShell variables is as simple as identifying them(with a leading dollar sign) and their values at the command prompt. All parameters for this script defaultto the string type; but if you are cautious, you can also enforce the cast to the string type by prependingthe [string] literal before the variable name. Therefore both of the following forms of variabledeclaration are acceptable:
$greet = "Hello"
[string]$greet = "Hello"
The following parameters are mandatory for the command line you will use later, and may be declared asstring variables in the above manner. Of course, the suggested variable names can be modified to suityour preferences, as long as you reference them accurately in the command line. Remember to enclosethe path values in double quotation marks:
Upgrading FlexNet Manager Suite
54 Upgrading FlexNet Manager Suite to 2018 R2 On Premises | Company Confidential

Required Argument Description
$FnmpInstallerMsi Fully qualified path to the installation .msi for FlexNet Manager Suite. This istypically:
drive-and-path\FlexNet Manager Suite\Installers\FlexNet
Manager Suite\FlexNet Manager Suite Server.msi
$AnswerFile Fully qualified path to the answer file that you have customized and savedfor this server. Once again, check that this answer file has the correct settingfor the FEATURES parameter, as this entirely determines the kind of serverthat is installed on this device.
$FNMSConfigFile Fully qualified path to the Configuration file to be passed to Config.ps1.This is typically:
drive-and-path\FlexNet Manager Suite\Support\Config\FNMS
Windows Authentication Config.xml
In addition, the following parameter is optional, and is relevant only for second and subsequent attemptsat upgrade on this server:
Optional Parameter Description
$configMode If present, must have one of the following two string values:
• updateConfig (default) — Modifies the upgrade only with new settings
that have been changed in the answer file
• forceUpdateConfig — Overwrite all settings for this upgrade.
3. Enter the command line to trigger the upgrade script.
Caution: The order of parameters is critical. There are no keys or labels to indicate which parameter iswhich.
This example uses the three mandatory parameters as saved in the PowerShell variables suggested above:
cd drive-and-path\FlexNet Manager Suite\Support
.\InstallFNMS.ps1 $FnmpInstallerMsi $AnswerFile $FNMSConfigFile
This example shows the full text for the paths used in the correct order (normally all on the same line, buthere formatted for easier reading):
cd drive-and-path\FlexNet Manager Suite\Support
.\InstallFNMS.ps1
"drive-and-path\FlexNet Manager Suite\Installers\FlexNet Manager Suite\
FlexNet Manager Suite Server.msi"
"drive-and-path\FlexNet Manager Platform\Support\answerfile.txt"
Upgrading FlexNet Manager Suite
Upgrading FlexNet Manager Suite to 2018 R2 On Premises | Company Confidential 55

"drive-and-path\FlexNet Manager Suite\Support\Config\FNMS Windows
Authentication Config.xml"
The upgrade is triggered, and immediately followed by configuration appropriate to this server type.
Remember: If a required parameter is missing from the answer file, a dialog appears during the process torequest the missing value.
Managing Upgrades InteractivelyThe following topics provide step-by-step instructions for interactively managing the upgrade of server(s) in yourimplementation of FlexNet Manager Suite. (Obviously, if you have already completed the scripted upgrade ofyour servers, skip this entire section and all the topics it contains.)
Instructions for a single-server implementation are included in the first topic, Upgrade the Web Interface. Formulti-server implementations, continue through the following topics as appropriate.
Upgrade the Web InterfaceContinue this process as administrator (fnms-admin) on either your:
• application server (for a single server installation); or
• web application server (in a multi-server installation).
Note: Are you installing on the same server that was previously your application server for FlexNet ManagerSuite 2014 (the 10.0 release) (an in-place upgrade)? If so, you should now uninstall the previous version of theproduct so that you remove the MMC interface, deprecated from version 2014 R2. To do so:
1. On the application server, open Program and Features (Control Panel > Uninstall a Program).
2. Uninstall FlexNet Manager Platform (or your earlier compliance product, such as Compliance Manager),and then close Program and Features.
Tip: The web interface transfers high volumes of HTML data, which may have noticeable performanceimpacts for operators with slow links (such as across a WAN) between their web browsers and the webapplication server. To maximize performance, the web.config file installed on this web application serverturns on both static and dynamic content compression, with a setting of this form:
<urlCompression doStaticCompression="true" doDynamicCompression="true" />
These settings turn on compression settings for IIS, where these are available on the web application server:
• Static compression is installed by default for IIS.
• Dynamic compression requires a standard Microsoft installation to enable it. (Without this setup, thedynamic compression setting in the web.config file remains latent, having no possible effect.)
If you have operators on slow (WAN) links, check whether dynamic compression is already available on yourweb application server by examining the Server Manager, using the Add Roles and Features wizard. If it is
Upgrading FlexNet Manager Suite
56 Upgrading FlexNet Manager Suite to 2018 R2 On Premises | Company Confidential
not yet configured, see https://docs.microsoft.com/en-us/iis/configuration/system.webServer/urlCompression#setup for installation details.
To update the web interface for FlexNet Manager Suite 2018 R2, follow this standard installation process.
To install the web interface for FlexNet Manager Suite:
1. On the (web) application server, open Windows Explorer.
2. Copy the downloaded archive FlexNet Manager Suite 2018 R2 Installer.zip from your staginglocation to a convenient location on this server (such as C:\temp), and unzip it.
Tip: Unzipping the archive locally on each of your servers simplifies running the configuration scriptslater in the process. After running the installers, PowerShell scripts need to be Run as Administrator.Notice that the entire archive must be present, as scripts reference other elements from the archive.
3. Navigate in the unzipped archive to the FlexNet Manager Suite\Installers\FlexNet Manager
Suite folder.
4. Start (double-click) setup.exe.
Tip: You must start the installation by running setup.exe, rather than running the MSI by any othermeans. The setup file also installs Visual C++ 2010 Redistributable (if it is not already present), which isa prerequisite for integration with FlexNet Manager for SAP Applications.
5. Step through the installer until asked for the Setup Type, and do one of the following:
• For a small, single server installation combining the web application, the inventory collection, and thebatch processing functionality in one server, select the Complete option, and follow the instructions inthe installation wizard to complete the standard installation.
Tip: In the page where you are asked for the batch process credentials, for Server type, chooseeither Production for your main server installation, or Failover if this is a stand-by or testing server.On your Production server, the batch scheduler and batch processor are automatically started aspart of the installation process, while on a Failover server, both are disabled by default. If you need toswitch between your production and stand-by servers, you must manually:
◦ Disable the batch scheduler and processor on the product batch server
◦ Enable the batch scheduler and processor on the standby batch server.
These adjustments are made in the Microsoft Services control panel.
• For a multi-server installation, select the Custom installation path, and select the Web applicationserver for this installation. (If this is the only functionality on this server, also ensure that Inventoryserver, Batch scheduling server, and Batch server are all deselected; but in fact you can combinemost servers in the way that best suits your enterprise, so make the selection that matches your serverplan.)
Take note of the installation location for future reference.
Upgrading FlexNet Manager Suite
Upgrading FlexNet Manager Suite to 2018 R2 On Premises | Company Confidential 57

6. If this is a separate installation of the web application server in a multi-server implementation, ensure thatfrom this server you can access the network shares that you configured in Configure Network Shares forMulti-Server.
7. If this server includes the batch server functionality, you are prompted for the credentials used for batchprocesses. Be sure that the account you enter already has Logon as a service permission (see Authorizethe Service Account).
8. When successful, close the installation wizard.
Update the Inventory ServerThe inventory server processes all inventory collected (or augmented) by the FlexNet inventory agent.
In a single server implementation, this step is already completed and you should skip ahead to Configure theSystem.
For a multi-server implementation, continue this process as administrator (fnms-admin) on either your:
• processing server (in a two server application installation); or
• inventory server (in a three or more server application installation).
To install the inventory server software:
1. On the inventory (or processing) server, open Windows Explorer.
2. Copy the downloaded archive FlexNet Manager Suite 2018 R2 Installer.zip from your staginglocation to a convenient location on this server (such as C:\temp), and unzip it.
3. Navigate in the unzipped archive to the FlexNet Manager Suite\Installers\FlexNet Manager
Suite folder.
4. Start (double-click) setup.exe.
Tip: You must start the installation by running setup.exe, rather than running the MSI by any othermeans. The setup file also installs Visual C++ 2010 Redistributable (if it is not already present), which isa prerequisite for integration with FlexNet Manager for SAP Applications.
5. Select the Custom installation path, and do one of the following:
• For a two server installation, now installing your processing server, select all of the Inventory serverand the Batch scheduling server for this installation, and ensure that the Web application server isdeselected (displaying a cross).
• For an installation using three or more servers, now separately installing your inventory server, selectonly the Inventory server for this installation, ensuring that the other options are deselected.
Take note of the installation location for future reference.
Upgrading FlexNet Manager Suite
58 Upgrading FlexNet Manager Suite to 2018 R2 On Premises | Company Confidential

6. If this server includes the batch server functionality, you are prompted for the credentials used for batchprocesses. Be sure that the account you enter already has Logon as a service permission (see Authorizethe Service Account).
7. When successful, close the installation wizard.
Update the batch serverThe batch server is the integration point that correlates all your entitlement records and your consumptionrevealed in inventory to work out your reconciled license position.
You do not need this process if you have either of:
• A single-server implementation combining the web application server, the batch server, and the inventoryserver in one; or
• A two-server application implementation where you have combined the batch server and inventory serverfunctionality on one computer and kept the web application server as a second server.
In these two cases, this step is already completed and you should skip ahead to Installing a Free-StandingStudio.
For a three server implementation, continue this process as administrator (fnms-admin) on your batch server.
Tip: Currently MSMQ limits the hostname of the batch server to 15 characters (excluding the domainqualifier).
To install the batch server:
1. On the batch server, open Windows Explorer.
2. Copy the downloaded archive FlexNet Manager Suite 2018 R2 Installer.zip from your staginglocation to a convenient location on this server (such as C:\temp), and unzip it.
3. Navigate in the unzipped archive to the FlexNet Manager Suite\Installers\FlexNet Manager
Suite folder.
4. Start (double-click) setup.exe.
Tip: You must start the installation by running setup.exe, rather than running the MSI by any othermeans. The setup file also installs Visual C++ 2010 Redistributable (if it is not already present), which isa prerequisite for integration with FlexNet Manager for SAP Applications.
5. Select the Custom installation path, and select only the Batch scheduling server for this installation,ensuring that the other options are deselected (displaying a cross).
Take note of the installation location for future reference.
6. When asked to enter the credentials to be used for running batch processes, be sure that the account youenter already has Logon as a service permission (see Authorize the Service Account).
Upgrading FlexNet Manager Suite
Upgrading FlexNet Manager Suite to 2018 R2 On Premises | Company Confidential 59

7. On the same page of the wizard, for Server type, choose either Production for your main serverinstallation, or Failover if this is a stand-by or testing server.
Tip: On your Production server, the batch scheduler and batch processor are automatically started aspart of the installation process, while on a Failover server, both are disabled by default. If you need toswitch between your production and stand-by servers, you must manually:
• Disable the batch scheduler and processor on the product batch server
• Enable the batch scheduler and processor on the standby batch server.
These adjustments are made in the Microsoft Services control panel.
8. For the batch processor, you are asked to identify the folder where intermediate packages (uploaded frominventory beacons) are saved prior to processing. The default location is %ProgramData%\FlexeraSoftware\Beacon\IntermediateData. This default is formed by appending IntermediateData to thevalue of the base directory saved in HKEY_LOCAL_MACHINE\SOFTWARE\Wow6432Node\ManageSoft Corp\
ManageSoft\Beacon\CurrentVersion\BaseDirectory. This base location is also used by otherprocesses, and should be changed only with care.
Tip: A second folder, a network share, is used for handing off files uploaded through the web interface(such as inventory spreadsheet imports) for processing by the batch server. For this share, the defaultpath is %ProgramData%\FlexNet Manager Platform\DataImport, and the path is saved in theregistry at HKEY_LOCAL_MACHINE\SOFTWARE\Wow6432Node\ManageSoft Corp\ManageSoft\Compliance\CurrentVersion\DataImportDirectory. There is also a parallel folder for data export.For implementations that separate the web application server from the batch server, these shares mustalso be configured and accessible from both servers. For more information, see Configure NetworkShares for Multi-Server.
9. When successful, close the installation wizard.
Configure the SystemPowerShell scripts are provided to complete configuration of the central application server(s), including theconnections to the databases, and then store appropriate values in the database.
Important: For a single server implementation, run the PowerShell scripts on the application server (if youhave a separate database server, you do not run the PowerShell scripts on that.) If the logical applicationserver has been separated into multiple servers, the PowerShell scripts must be run on each of these servers,and must be run in the following order:
1. Your web application server
2. Your batch server (or processing server, for a two-server application implementation)
3. Your inventory server(s).
On each applicable server in turn, as administrator (fnms-admin), complete all the following steps (noticing thaton different servers, different dialogs may be presented). Before executing the PowerShell scripts, you shouldfirst ensure that:
Upgrading FlexNet Manager Suite
60 Upgrading FlexNet Manager Suite to 2018 R2 On Premises | Company Confidential

• Your administrator account is a member of the db_owner fixed database role (at least temporarily, as
described in Identify (or Set Up) Accounts)
• The scripts themselves have sufficient authorization to execute, as described in the following process.
Also notice that, to complete this configuration process, you restore IIS, the scheduled tasks, and the batchprocessing service to prepare your system for operations.
To configure the system using supplied PowerShell scripts:
1. On your web application server, batch server, or inventory server, ensure that Microsoft IIS is running again:
a. Ensure that your Server Manager dialog is still open.
b. In the left-hand navigation bar, expand Roles > Web Servers (IIS), and select InternetInformation Services.
The IIS page is displayed.
c. In the Actions panel on the right, select Start.
A message like Attempting to start... appears. Note that it can take some time before theservice is started. When the service is running, the PowerShell scripts can update the IISconfiguration as required.
2. If you require that the URLs for your central server(s) use the HTTPS protocol, confirm that site bindingshave been configured to allow this:
a. Open IIS Manager.
b. In the Connections pane, expand the Sites node in the tree, and then click to select the site forwhich you want to add a binding.
c. In the Actions pane, click Bindings.
d. In the Site Bindings dialog box, click Add.
e. In the Add Site Binding dialog box, add the binding information and then click OK.
For more information (including the set up of the required certificate), see http://www.iis.net/learn/manage/configuring-security/how-to-set-up-ssl-on-iis.
3. Run PowerShell as administrator (use the 64-bit version where available):
a. Locate PowerShell. For example:
• On Windows Server 2012, Start > Windows PowerShell.
• On earlier releases, in the Windows Start menu, find All Programs > Accessories > WindowsPowerShell > Windows PowerShell (this is the 64-bit version; the 32-bit version is Windows
PowerShell (x86). ).
b. Right-click, and choose Run as Administrator.
Important: It is critical that you run the PowerShell scripts with administrator privileges.Otherwise, scripts will fail.
Upgrading FlexNet Manager Suite
Upgrading FlexNet Manager Suite to 2018 R2 On Premises | Company Confidential 61

4. If you have not already done so, in the PowerShell command window, execute:
set-executionpolicy AllSigned
Respond to the warning text with the default Y.
5. In the PowerShell command window, navigate through the unzipped downloaded archive to the Supportfolder.
6. On each server, execute:
.\Config.ps1 "Config\FNMS Windows Authentication Config.xml" updateconfig
(This script determines the type of server installation, and applies appropriate configuration. See alsoserver-specific comments below.)
Tip: If your PowerShell window is in its default QuickEdit mode (visible in the Properties for thewindow), simply clicking in the window when it already has focus puts it into Mark or Select mode. Insuch a mode, a process that is writing to the window is paused, awaiting your input. Beware ofunintentionally pausing the configuration scripts by extra clicking in this PowerShell window. A processthat has been paused in this way is resumed when the window already has focus and you press any key.
On each server, on first run PowerShell asks whether to trust the publisher of this script. You may allow Runalways for a certificate signed by Flexera LLC.
7. In each case, allow the script to run once, completing the requested details.
Tip: Helpful notes:
• Use the service account details you created earlier (example: svc-flexnet).
• Separately on each dialog, the check box Use the same credentials for all identities copies theaccount details from the upper section to the lower section of the dialog.
• For externally visible URLs, you can specify either HTTP or HTTPS protocol, and either the flat servername or the fully qualified domain name is supported. Any port number is optional. Remember thatsite bindings may be required if you are using the HTTPS protocol (see above). Valid examples:
http://servername
https://www.servername.mydomain:8080
• If you have a single-server implementation, when asked for the hostname of the different serverfunctionality, use localhost.
• Remember that in a multi-server implementation, MSMQ limits the hostname of the batch server to14 characters. Of course, this limit applies to the hostname itself, and not to the fully-qualified domainname of the host. (If your batch server is already implemented with a longer hostname, consider usinga DNS alias that satisfies this limitation.)
Important: Remember to use the fully-qualified domain name (in the style ofserverName.example.com) when identifying servers in a multi-server implementation. Do notuse a URL.
Upgrading FlexNet Manager Suite
62 Upgrading FlexNet Manager Suite to 2018 R2 On Premises | Company Confidential

• The PowerShell script asks for appropriate database connection details, depending on theconfiguration of the current server (for example, if the current server includes inventory serverfunctionality, the script asks for the Inventory Management database). In each case, supply the hostserver name (and, if the database instance is not the default instance, the instance name, separatedby a backslash character); and the database name for each kind of database. In a small-to-mediumimplementation, all the operations databases may be on the same host and instance combination; butin larger implementations may be separated onto distinct servers. In either case, each database has adistinct database name, for which the suggested values are:
◦ The main compliance database: FNMSCompliance
◦ The database for inventory collected by the FlexNet inventory agent: FNMSInventory
◦ The data warehouse for trend reporting: FNMSDataWarehouse
◦ The snapshot database for performance improvement: FNMSSnapshot.
8. Close the PowerShell command window.
9. If this is your batch server (or the server hosting that functionality), ensure that the services for FlexNetManager Suite Batch Process Scheduler are running:
a. Navigate to Start > Control Panel > Administrative Tools > View local services.
The Services dialog opens.
b. In the list of services, ensure that both FlexNet Manager Suite Batch Process Scheduler andFlexNet Manager Suite Batch Processor are both running. If not, right-click each stopped servicein turn, and from the context menu, select Start.
Note: These services are critical to the operation of FlexNet Manager Suite. It is best practice toset up your service monitoring to alert you any time either of these services is stopped.
10. On your batch server or inventory server, enable all Windows scheduled tasks related to FlexNet ManagerSuite.
The scheduled tasks are different on the two different types of servers. On your batch server (also knownas reconciliation server), change all tasks in the FlexNet Manager Platform folder:
• Data warehouse export
• Export to ServiceNow
• FlexNet inventory data maintenance
• Import SAP inventories
• Import SAP package license
• Inventory import and license reconcile
• Recognition data import
• Regenerate Business Import config
Upgrading FlexNet Manager Suite
Upgrading FlexNet Manager Suite to 2018 R2 On Premises | Company Confidential 63

• Send contract notifications.
On your inventory server, change all tasks in the FlexNet Manager Platform folder:
• Import Active Directory
• Import application usage logs
• Import discovery information
• Import installation logs
• Import inventories
• Import Inventory Beacon activity status
• Import Inventory Beacon status
• Import remote task status information
• Import security event information
• Import system status information
• Import VDI access data.
An example process to change these tasks on Windows Server 2008:
a. Open your Computer Management dialog (for example, clickStart, right-click on Computer, andselect Manage from the context menu).
b. In the left-hand navigation bar, expand Configuration > Task Scheduler > Task ManagerPlatform, and select the FlexNet Manager Platform folder.
c. Select all of the relevant tasks in the list (click the first, shift+click the last), and in the Actions pane,in the Select Item section, click Enable (or right-click the selection, and click Enable).
d. Close the dialog.
Configuration by the PowerShell scripts is now complete. Although not needed now, at other times it is possibleto re-run the PowerShell scripts with the following flags for the use cases shown. You do not need to re-run thescripts unless, at some later stage, one of these use cases applies to you:
• Use without a flag to add a configuration file to a new installation; or on an existing implementation, toremove all customizations and replace the %ProgramFiles(x86)%\Flexera Software\FlexNet Manager
Platform\WebUI\web.config file with the default version:
.\Config.ps1 "Config\FNMS Windows Authentication Config.xml"
• Add the updateConfig flag to insert any new parameters added by Flexera, leaving all settings (including
customizations) unchanged for existing parameters:
.\Config.ps1 "Config\FNMS Window Authentication Config.xml" updateConfig
• Add the forceUpdateConfig flag to insert any new parameters added by Flexera, and restore the default
values for all factory-supplied settings, but leaving any custom parameters unchanged:
Upgrading FlexNet Manager Suite
64 Upgrading FlexNet Manager Suite to 2018 R2 On Premises | Company Confidential

.\Config.ps1 "Config\FNMS Windows Authentication Config.xml" forceUpdateConfig
• Add the removeConfig flag to remove the %ProgramFiles(x86)%\Flexera Software\FlexNet Manager
Platform\WebUI\web.config file before using Windows Programs and Features to uninstall FlexNet
Manager Suite:
.\Config.ps1 "Config\FNMS Windows Authentication Config.xml" removeConfig
Upgrading Flexera AnalyticsOnce you have upgraded FlexNet Manager Suite to 2018 R2, you can upgrade Flexera Analytics. Choose theappropriate topic based on the release of FlexNet Manager Suite you are upgrading:
• For FlexNet Manager Suite release 2017 R3 or later, use Upgrading Recent Flexera Analytics
• For FlexNet Manager Suite release 2017 R2 or earlier, use Upgrading Flexera Analytics from FlexNet ReportDesigner
• If you do not have Flexera Analytics or FlexNet Report Designer previously installed, but you are planning toadd them as part of this upgrade, please refer to Installing Flexera Analytics in the Installing FlexNet ManagerSuite On-Premises guide.
In any of the above cases, your new version of Flexera Analytics supports the use of the HTTPS protocol (withyour preferred certificates), as well as the Transport Layer Security (TLS) 1.2 protocol. To take advantage of eitherof these security features, see Configuring IIS to Use SSL/TLS Encryption and Reconfigure Cognos to Use Third-Party SSL Certificates below.
Upgrading Recent Flexera AnalyticsThis topic is for use when upgrading Flexera Analytics from FlexNet Manager Suite 2017 R3 or later. If you areupgrading from an earlier release using FlexNet Report Designer, please refer to Upgrading Flexera Analyticsfrom FlexNet Report Designer.
Upgrading Flexera Analytics replaces IBM Cognos version 11.0.06 with IBM Cognos 11.0.11. This is the onlyversion supported by FlexNet Manager Suite 2018 R2 and later.
Once you have confirmed that all pre-requisites have been met, an upgrade of Flexera Analytics can besummarized as follows:
1. Take a full backup of your Cognos content store database.
2. Upgrade Cognos.
3. Re-start the services.
4. Re-configure Flexera Analytics by populating an answer file with settings appropriate to your environment,and then implement the configuration, using PowerShell
5. Run the package import tool by following the instructions in the section Update the Sample ReportingPackage.
Upgrading FlexNet Manager Suite
Upgrading FlexNet Manager Suite to 2018 R2 On Premises | Company Confidential 65
6. Optionally, you may need to configure your Security Assertion Markup Language settings.
See the FlexNet Manager Suite 2018 R2 Release Notes for supported platforms and database versions.
Tip: It is not necessary to back up the configuration and data files on a Microsoft Windows operating system.These files are preserved during the uninstallation.
The IBM Cognos Analytics installer installs Flexera Analytics to the designated host as a service. Therefore, theaccount used to install this component must have administrator permissions.
Make sure of the following points:
• The installing account must have administrative privileges on the Cognos server (the server hosting FlexeraAnalytics).
• The Flexera Analytics server must be accessible by its host name, rather than just its IP address. Do not use IPaddresses anywhere in the Flexera Analytics settings.
• For performance reasons, Flexera Analytics is best installed on a separate server (it has high memory userequirements). (Refer back to Prerequisites and Preparations for server design details.) When Flexera Analyticsis installed on a server other than the database server running the content store database, Microsoft SQLServer Native Client must be installed on the server hosting Flexera Analytics. To download and install theMicrosoft SQL Server Native Client installer (subject to changes in the Microsoft website):
1. In your web browser, navigate to https://www.microsoft.com/en-us/download/details.aspx?id=29065.
2. Expand Install Instructions to display the available components of the Microsoft SQL Server® 2012Feature Pack.
3. Scroll approximately half-way down the page to the heading Microsoft® SQL Server® 2012 NativeClient and install the relevant package (X86 or X64) found there.
• The Flexera Analytics server must be in the same time zone as your database server(s).
• When you install Flexera Analytics, the required usernames and passwords can be encrypted, using acredential store. Refer to Prepare Encrypted Credentials for Upgrade for further information. Alternatively youmay choose to use clear text usernames and passwords in the answer file.
• Flexera Analytics can be configured to use https, however you will need to use http for installation andconfiguration.
• The password for the SQL Server login account used by Flexera Analytics must not contain any of the greater-than, less-than, or ampersand characters (< > &).
• Do not attempt to use Flexera Analytics (nor any related reports saved in FlexNet Manager Suite) beforeimporting the correct license file from Flexera (see Importing an Updated Flexera License).
Important: Do not allow consultants to use their 'normal' login when they develop reports on your behalf. Acommon user account should not be switched from one Flexera Analytics tenant to another. Otherwise, anyreports saved under My Folders for that account are automatically removed by Flexera Analytics as the useraccount switches between tenants (or customers). For details, see http://www-01.ibm.com/support/docview.wss?uid=swg21682369. "For safety, ensure that each consultant uses a login that is unique to yourcompany (such as johnEnterprise); or as a workaround, save their developed reports under Public Folder".
Upgrading FlexNet Manager Suite
66 Upgrading FlexNet Manager Suite to 2018 R2 On Premises | Company Confidential

To upgrade Flexera Analytics:
1. Best practice is to take a full backup of your existing Flexera Analytics content store database, and save itsecurely. If there are any database problems in your upgrade, you can restore this protective copy torecover.
2. Upgrade IBM Cognos as follows:
a. You will need to stop the Cognos Analytics Service and ensure that the IBM CognosConfiguration program is not running.
b. Stop your Microsoft IIS web server that is running your Flexera Analytics website
c. If you are upgrading FlexNet Manager Suite and Flexera Analytics on separate servers, first copy the<FNMS Media>\FlexNet Manager Suite\Support directory from the application server toC:\FNMSCognosAnalytics on the Flexera Analytics server. If you are performing a single serverinstallation, then the support folder should already be located on the application server.
d. From the support folder, copy the file ca_server_win64_11.0.11.exe to your Flexera Analyticsserver.
e. Double-click on this executable file to launch it, and work through the installation wizard panels asdescribed in the following table.
Tip: The executable automatically installs 32-bit software on 32-bit systems, and 64-bit software on64-bit operating systems.
Panel Details
Splash screen Select Installation language, then click Next.
Product Install Select the IBM Cognos Analytics radio button option, then click Next.
License Agreement • If you agree to be bound by its terms, select the I accept the terms of thelicense agreement check box.
• If you do not accept the terms of the license, you must stop the installationprocess. Do not proceed further in this case.
Location Specify the location of your existing Flexera Analytics instance. You can entera path manually in the Installation Folder field, or browse for a locationusing the Choose... button.
Once an installation folder has been specified, click Next.
Click Yes to confirm you are installing in the same location and areoverwriting a previous installation.
Note: Spaces in the installation path are acceptable in the commandline; but if you are scripting the installation, be sure to enclose the entirepath-with-spaces in double quotation marks.
Upgrading FlexNet Manager Suite
Upgrading FlexNet Manager Suite to 2018 R2 On Premises | Company Confidential 67

Panel Details
Summary Click Yes to install, and Done when complete
3. The services that were shut-down in the preceding step now need to be restarted.
a. Open the IBM Cognos Configuration program. You will be prompted that older versions ofConfiguration files were found and configuration files have been upgrade to the latestversion. Click OK and Save your configuration.
b. Re-start the Cognos Analytics Service.
c. Re-start your Microsoft IIS web server.
d. Navigate to the root of the Cognos Analytics installation directory and open the cmplst.txt file ina text editor and verify that the kit_version has changed to 11.0.11.18043017.
4. You will now configure Flexera Analytics by editing the file C:\FNMSCognosAnalytics\Support\
CognosConfigProperties.xml using Notepad (or an equivalent text editor). Fill out the values for theparameters listed in the following table, using the guidance from the description and examples provided.
Property/Example Description
CredentialStoreLocation
C:\user\customstore.xml
A custom credential store location.
If this parameter is omitted, the value defaults tofnms.password.store.xml under the logged inuser profile directory.
FNMSBatchServerLocation
http://BatchServer1.company.com
The URL of the FlexNet Manager Suite batchserver.
ContentStoreDatabaseLocation
DBServer1\Instance1
When using TCP, the format for this value ishostname:port. Alternatively, the hostname\
instancename format (without a port) can beused. Flexera Analytics does not allow the instancename to be Default or MSSQLServer. The SQLServer Browser service needs to be started if usingthe instance name format.
ContentStoreDatabaseName
ContentStore
This is the name of your Cognos content storedatabase.
Upgrading FlexNet Manager Suite
68 Upgrading FlexNet Manager Suite to 2018 R2 On Premises | Company Confidential

Property/Example Description
ContentStoreDatabaseUsername
Typically empty
Optional setting when providing credentials forSQL Server authentication. Leave this value blankto use Windows Authentication.
Note: If you have restored a backup of yourexisting content store to use with a newversion of Flexera Analytics, ensure that thisuser has the following permissions on thedatabase:
• Create and Drop table privileges.
• Member of the db_ddladmin,
db_datareader, and db_datawriter
roles.
• Must be the owner of the default schema onthis database.
Tip: This schema usually is namedFlexNetReportDesignerSchema.
ContentStoreDatabasePassword
Typically empty
Optional setting when providing credentials forSQL Server authentication. Leave this value blankto use Windows Authentication.
ContentStoreDatabaseStoreReference
flexera://storeUser
The credential store reference for ContentStoredatabase user identity.
If the ContentStoreDatabaseStoreReference
property is specified then theContentStoreUserName andContentStorePassword properties are notrequired in the answer file, any value provided forthese fields is overridden.
CognosInstallationPath
C:\Program Files\ibm\cognos\analytics
Flexera Analytics installation directory. Update thispath to change the default installation path.
CognosServerURI
http://$(ServerName):80
Note: The $(ServerName) text should not bealtered. It will be translated to the host name bythe installation code.
Upgrading FlexNet Manager Suite
Upgrading FlexNet Manager Suite to 2018 R2 On Premises | Company Confidential 69

Property/Example Description
CognosServerDispatcherURI
http://$(ServerName):9300
Note: The $(ServerName) text should not bealtered. It will be translated to the host name bythe installation code.
AppPoolUserName
Company\svc-fnms
The service user, used by IIS.
AppPoolPassword
(clear text)
A clear text password.
AppPoolStoreReference
flexera://serviceUser
The credential store reference for App Pool useridentity.
If AppPoolStoreReference property is specifiedthen the AppPoolUserName andAppPoolPassword properties are not required inthe answer file. Any value provided for these fieldsis overridden.
CognosServiceUserName
Company\svc-fnms
The service user for the IBM Cognos service. Thismust have read access to theFNMPDatawarehouse database, as well as being amember of the local Administrators group. Ensurethat the account you enter already has Logon asa service permission (see Authorize the ServiceAccount).
CognosServicePassword
(clear text)
A clear text password.
CognosServiceStoreReference
flexera://serviceUser
The credential store reference for Cognos serviceuser identity.
If CognosSerciceStoreReference property isspecified then the CognosServiceUserName andCognosServicePassword properties are notrequired in the answer file. Any value provided forthese fields is overridden.
Upgrading FlexNet Manager Suite
70 Upgrading FlexNet Manager Suite to 2018 R2 On Premises | Company Confidential

Property/Example Description
CognosServiceMaxMemory
4096
IBM recommends a minimum of 4GB (4096MB)for Cognos Analytics. This number is a startingpoint and should be adjusted upwards based onthe memory usage of your system.
Note: This value determines the amount ofmemory used by the Java Virtual Machine anddepends on how much memory is available. Ifthis value is too high, the process will fail tostart and no log information will be generated.
MachineKeyValidationKey
ABCDEFGHIJKLMNOPQRSTUVWXYZ0123456789
This is taken from the web.config file on theFlexNet Manager Suite presentation server. Forexample: C:\Program Files (x86)\FlexeraSoftware\FlexNet Manager Platform\WebUI\
web.config.
The required value is present in the<machineKey> element.
MachineKeyDecryptionKey
0123456789ABCDEFGHIJKLMNOPQRSTUVWXYZ
This is taken from the web.config file on theFlexNet Manager Suite presentation server. Forexample: C:\Program Files (x86)\FlexeraSoftware\FlexNet Manager Platform\WebUI\
web.config.
The required value is present in the<machineKey> element.
SmtpStoreReference
flexera:\\smpt
The credential store reference for SMTP useridentity.
If SmtpStoreReference property is specifiedthen the SmtpUserName and SmtpPassword
properties are not required in the answer file. Anyvalue provided for these fields is overridden.
FNMSConfigurationop
This value defines the FlexNet Manager Suiteenvironment configuration. This value is pre-populated based on the installation media anddoes not require the user to change it.
Modifying this value will cause the FlexeraAnalytics installation to fail.
Note: If the CognosConfigProperties.xml file contains passwords in clear text, after installation thisfile should be cleared of passwords; or kept in a file path that is only accessible to Administrators andcopied to a secure location off the host server. The file should be preserved for use in future upgrades.
Upgrading FlexNet Manager Suite
Upgrading FlexNet Manager Suite to 2018 R2 On Premises | Company Confidential 71

a. Open a PowerShell command-line window with Administrator privileges.
b. Navigate to the directory where you copied the support directory. For exampleC:\FNMSCognosAnalytics\Support
c. If you have not done so already, set the PowerShell permissions with the following command:
set-ExecutionPolicy AllSigned -Force
Respond to the warning text with the default Y.
d. Run the following command:
.\InstallCognos.ps1
Tip: This may take some time to complete.
5. To complete the upgrade, you will need to perform the instructions in the section Update the SampleReporting Package. This is required to apply any updated user permissions.
6. If you wish to configure Security Assertion Markup Language (SAML) authentication for Flexera Analytics,please refer to the Authentication chapter in the FlexNet Manager Suite Systems Reference guide. Here youwill find the instructions to run the Flexera Report Designer Package Import Utility to update your SAMLauthentication configuration.
Upgrading Flexera Analytics from FlexNet ReportDesignerThis chapter is for use when upgrading to Flexera Analytics from FlexNet Report Designer. If you areupgrading from FlexNet Manager Suite release 2017 R3 or later, with Flexera Analytics already installed, pleaserefer to Upgrading Recent Flexera Analytics.
When performing this upgrade, you will be replacing your earlier implementation with Flexera Analytics usingCognos 11.0.11. This is the only version supported by FlexNet Manager Suite 2018 R2 and later.
Once you have confirmed that all pre-requisites have been met, an upgrade from Report Designer to FlexeraAnalytics can be summarized as follows:
1. Take a full backup of your existing Cognos content store database.
2. Remove your previous installation of FlexNet Report Designer
3. Perform a new installation of Flexera Analytics
4. Configure Flexera Analytics by populating an answer file with settings appropriate to your environment,and then implement the configuration, using PowerShell
5. Configure your web application server to connect with Flexera Analytics
6. Update your Roles to enable access
7. Ensure that your web browser(s) include your web server in the list of trusted web sites
Upgrading FlexNet Manager Suite
72 Upgrading FlexNet Manager Suite to 2018 R2 On Premises | Company Confidential

8. Run the package import tool by following the instructions in the section Update the Sample ReportingPackage
9. Optionally, you may need to configure your Security Assertion Markup Language settings.
You may require an updated license for FlexNet Manager Suite that includes new terms for Flexera Analytics. Fordetails about applying your new license, see Importing an Updated Flexera License.
See the FlexNet Manager Suite 2018 R2 Release Notes for supported platforms and database versions.
Tip: It is not necessary to back up the configuration and data files on a Microsoft Windows operating system.These files are preserved during the uninstallation.
The IBM Cognos Analytics installer installs Flexera Analytics to the designated host as a service. Therefore, theaccount used to install this component must have administrator permissions.
Make sure of the following points:
• The installing account must have administrative privileges on the Cognos server (the server hosting FlexeraAnalytics).
• The Flexera Analytics server must be accessible by its host name, rather than just its IP address. Do not use IPaddresses anywhere in the Flexera Analytics settings.
• For performance reasons, Flexera Analytics is best installed on a separate server (it has high memory userequirements). (Refer back to Prerequisites and Preparations for server design details.) When Flexera Analyticsis installed on a server other than the database server running the content store database, Microsoft SQLServer Native Client must be installed on the server hosting Flexera Analytics. To download and install theMicrosoft SQL Server Native Client installer (subject to changes in the Microsoft website):
1. In your web browser, navigate to https://www.microsoft.com/en-us/download/details.aspx?id=29065.
2. Expand Install Instructions to display the available components of the Microsoft SQL Server® 2012Feature Pack.
3. Scroll approximately half-way down the page to the heading Microsoft® SQL Server® 2012 NativeClient and install the relevant package (X86 or X64) found there.
• The Flexera Analytics server must be in the same time zone as your database server(s).
• When you install Flexera Analytics, the required usernames and passwords can be encrypted, using acredential store. Refer to Prepare Encrypted Credentials for Upgrade for further information. Alternatively youmay choose to use clear text usernames and passwords in the answer file.
• Flexera Analytics can be configured to use https, however you will need to use http for installation andconfiguration.
• The password for the SQL Server login account used by Flexera Analytics must not contain any of the greater-than, less-than, or ampersand characters (< > &).
• Do not attempt to use Flexera Analytics (nor any related reports saved in FlexNet Manager Suite) beforeimporting the correct license file from Flexera (see Importing an Updated Flexera License).
Upgrading FlexNet Manager Suite
Upgrading FlexNet Manager Suite to 2018 R2 On Premises | Company Confidential 73

Important: Do not allow consultants to use their 'normal' login when they develop reports on your behalf. Acommon user account should not be switched from one Flexera Analytics tenant to another. Otherwise, anyreports saved under My Folders for that account are automatically removed by Flexera Analytics as the useraccount switches between tenants (or customers). For details, see http://www-01.ibm.com/support/docview.wss?uid=swg21682369. "For safety, ensure that each consultant uses a login that is unique to yourcompany (such as johnEnterprise); or as a workaround, save their developed reports under Public Folder".
Before you start, decide whether you want the benefit of content compression for your Flexera Analytics server.By default, the web.config file installed on this server turns on both static and dynamic content compression,with a setting of this form:
<urlCompression doStaticCompression="true" doDynamicCompression="true" />
Static compression is installed by default for IIS, but dynamic compression requires a standard Microsoftinstallation to enable it. (Without this setup, the dynamic compression setting in the web.config file remainslatent.) You can check whether dynamic compression is available in the Server Manager, using the Add Rolesand Features wizard. If it is not yet configured, see https://docs.microsoft.com/en-us/iis/configuration/system.webServer/urlCompression#setup for installation details.
To upgrade FlexNet Report Designer to Flexera Analytics:
1. Best practice is to take a full backup of your existing Cognos content store database, and save it securely. Ifthere are any database problems in your upgrade, you can restore this protective copy to recover.
2. Remove FlexNet Report Designer by removing the existing installation of IBM Cognos. Navigate to the Addor remove programs wizard and uninstall FlexNet Report Designer.
The existing content store database is not affected by this process.
Tip: Uninstallation of FlexNet Report Designer does not remove the IBM Cognos program groupfrom the Start Menu (remaining shortcuts are not functional). It is safe to remove the entire programgroup. Furthermore, the uninstallation process also generates a log file in the Report Designer'sinstallation directory (usually C:\Program Files\ReportDesigner), and this can be safely archivedfor removal of the entire directory.
3. Flexera Analytics Installation
a. If you are installing FlexNet Manager Suite and Flexera Analytics on separate servers, first copy the<FNMS Media>\FlexNet Manager Suite\Support directory from the application server toC:\FNMSCognosAnalytics on the Flexera Analytics server. If you are performing a single serverinstallation, then the support folder should already be located on the application server.
b. From the support folder, copy the file ca_server_win64_11.0.11.exe to your Flexera Analyticsserver.
c. Double-click on this executable file to launch it, and work through the installation wizard panels asdescribed in the following table.
Tip: The executable automatically installs 32-bit software on 32-bit systems, and 64-bit software on64-bit operating systems.
Upgrading FlexNet Manager Suite
74 Upgrading FlexNet Manager Suite to 2018 R2 On Premises | Company Confidential

Panel Details
Splash screen Select Installation language, then click Next.
Product Install Select the IBM Cognos Analytics radio button option, then click Next.
License Agreement • If you agree to be bound by its terms, select the I accept the terms of thelicense agreement check box.
• If you do not accept the terms of the license, you must stop the installationprocess. Do not proceed further in this case.
Location Specify the installation folder for the Flexera Analytics. You can enter a pathmanually in the Installation Folder field, or browse for a location using theChoose... button. If you make a mistake and wish to return the initial foldersuggested by the installer, click the Restore Default Folder button.
Once an installation folder has been specified, click Next. If the folder doesnot exist a popup dialog will appear asking if you want to create it duringthe installation.
Click Yes to process or No to specify a different installation location.
Note: Spaces in the installation path are acceptable in the commandline; but if you are scripting the installation, be sure to enclose the entirepath-with-spaces in double quotation marks.
Install type Select the Custom radio button, and click Next.
Note: The Custom option is required so that the Gateway component isinstalled.
Custom install Select First install, and click Next.
Choose components Select the following options:
• Content repository
• Application services
• Optional gateway
Credentials Create a Flexera Analytics administrator account, and keep a record of theuser ID and password that you create.
Note: The password must contain a minimum of 1 uppercase character,1 lowercase character, 1 digit, 1 special character among !@#$ and thelength is between 8 and 20 characters.
Upgrading FlexNet Manager Suite
Upgrading FlexNet Manager Suite to 2018 R2 On Premises | Company Confidential 75
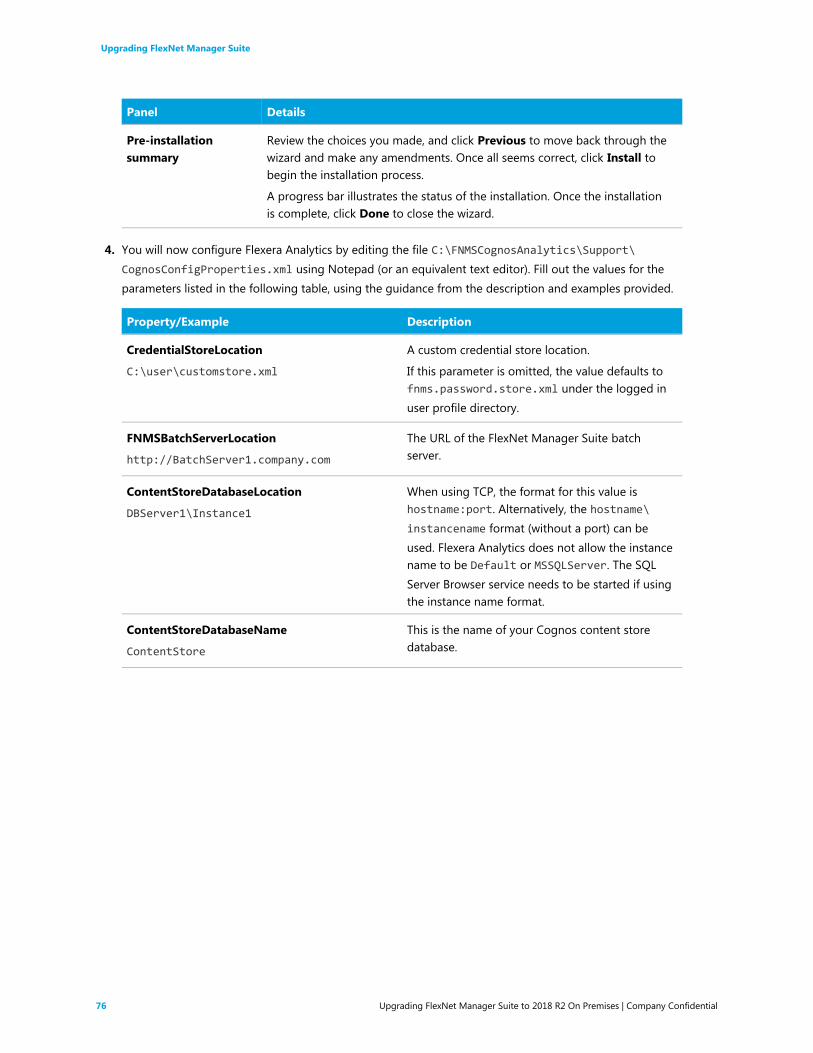
Panel Details
Pre-installationsummary
Review the choices you made, and click Previous to move back through thewizard and make any amendments. Once all seems correct, click Install tobegin the installation process.
A progress bar illustrates the status of the installation. Once the installationis complete, click Done to close the wizard.
4. You will now configure Flexera Analytics by editing the file C:\FNMSCognosAnalytics\Support\
CognosConfigProperties.xml using Notepad (or an equivalent text editor). Fill out the values for theparameters listed in the following table, using the guidance from the description and examples provided.
Property/Example Description
CredentialStoreLocation
C:\user\customstore.xml
A custom credential store location.
If this parameter is omitted, the value defaults tofnms.password.store.xml under the logged inuser profile directory.
FNMSBatchServerLocation
http://BatchServer1.company.com
The URL of the FlexNet Manager Suite batchserver.
ContentStoreDatabaseLocation
DBServer1\Instance1
When using TCP, the format for this value ishostname:port. Alternatively, the hostname\
instancename format (without a port) can beused. Flexera Analytics does not allow the instancename to be Default or MSSQLServer. The SQLServer Browser service needs to be started if usingthe instance name format.
ContentStoreDatabaseName
ContentStore
This is the name of your Cognos content storedatabase.
Upgrading FlexNet Manager Suite
76 Upgrading FlexNet Manager Suite to 2018 R2 On Premises | Company Confidential

Property/Example Description
ContentStoreDatabaseUsername
Typically empty
Optional setting when providing credentials forSQL Server authentication. Leave this value blankto use Windows Authentication.
Note: If you have restored a backup of yourexisting content store to use with a newversion of Flexera Analytics, ensure that thisuser has the following permissions on thedatabase:
• Create and Drop table privileges.
• Member of the db_ddladmin,
db_datareader, and db_datawriter
roles.
• Must be the owner of the default schema onthis database.
Tip: This schema usually is namedFlexNetReportDesignerSchema.
ContentStoreDatabasePassword
Typically empty
Optional setting when providing credentials forSQL Server authentication. Leave this value blankto use Windows Authentication.
ContentStoreDatabaseStoreReference
flexera://storeUser
The credential store reference for ContentStoredatabase user identity.
If the ContentStoreDatabaseStoreReference
property is specified then theContentStoreUserName andContentStorePassword properties are notrequired in the answer file, any value provided forthese fields is overridden.
CognosInstallationPath
C:\Program Files\ibm\cognos\analytics
Flexera Analytics installation directory. Update thispath to change the default installation path.
CognosServerURI
http://$(ServerName):80
Note: The $(ServerName) text should not bealtered. It will be translated to the host name bythe installation code.
Upgrading FlexNet Manager Suite
Upgrading FlexNet Manager Suite to 2018 R2 On Premises | Company Confidential 77

Property/Example Description
CognosServerDispatcherURI
http://$(ServerName):9300
Note: The $(ServerName) text should not bealtered. It will be translated to the host name bythe installation code.
AppPoolUserName
Company\svc-fnms
The service user, used by IIS.
AppPoolPassword
(clear text)
A clear text password.
AppPoolStoreReference
flexera://serviceUser
The credential store reference for App Pool useridentity.
If AppPoolStoreReference property is specifiedthen the AppPoolUserName andAppPoolPassword properties are not required inthe answer file. Any value provided for these fieldsis overridden.
CognosServiceUserName
Company\svc-fnms
The service user for the IBM Cognos service. Thismust have read access to theFNMPDatawarehouse database, as well as being amember of the local Administrators group. Ensurethat the account you enter already has Logon asa service permission (see Authorize the ServiceAccount).
CognosServicePassword
(clear text)
A clear text password.
CognosServiceStoreReference
flexera://serviceUser
The credential store reference for Cognos serviceuser identity.
If CognosSerciceStoreReference property isspecified then the CognosServiceUserName andCognosServicePassword properties are notrequired in the answer file. Any value provided forthese fields is overridden.
Upgrading FlexNet Manager Suite
78 Upgrading FlexNet Manager Suite to 2018 R2 On Premises | Company Confidential

Property/Example Description
CognosServiceMaxMemory
4096
IBM recommends a minimum of 4GB (4096MB)for Cognos Analytics. This number is a startingpoint and should be adjusted upwards based onthe memory usage of your system.
Note: This value determines the amount ofmemory used by the Java Virtual Machine anddepends on how much memory is available. Ifthis value is too high, the process will fail tostart and no log information will be generated.
MachineKeyValidationKey
ABCDEFGHIJKLMNOPQRSTUVWXYZ0123456789
This is taken from the web.config file on theFlexNet Manager Suite presentation server. Forexample: C:\Program Files (x86)\FlexeraSoftware\FlexNet Manager Platform\WebUI\
web.config.
The required value is present in the<machineKey> element.
MachineKeyDecryptionKey
0123456789ABCDEFGHIJKLMNOPQRSTUVWXYZ
This is taken from the web.config file on theFlexNet Manager Suite presentation server. Forexample: C:\Program Files (x86)\FlexeraSoftware\FlexNet Manager Platform\WebUI\
web.config.
The required value is present in the<machineKey> element.
SmtpStoreReference
flexera:\\smpt
The credential store reference for SMTP useridentity.
If SmtpStoreReference property is specifiedthen the SmtpUserName and SmtpPassword
properties are not required in the answer file. Anyvalue provided for these fields is overridden.
FNMSConfigurationop
This value defines the FlexNet Manager Suiteenvironment configuration. This value is pre-populated based on the installation media anddoes not require the user to change it.
Modifying this value will cause the FlexeraAnalytics installation to fail.
Note: If the CognosConfigProperties.xml file contains passwords in clear text, after installation thisfile should be cleared of passwords; or kept in a file path that is only accessible to Administrators andcopied to a secure location off the host server. The file should be preserved for use in future upgrades.
Upgrading FlexNet Manager Suite
Upgrading FlexNet Manager Suite to 2018 R2 On Premises | Company Confidential 79

a. Open a PowerShell command-line window with Administrator privileges.
b. Navigate to the directory where you copied the support directory. For exampleC:\FNMSCognosAnalytics\Support
c. If you have not done so already, set the PowerShell permissions with the following command:
set-ExecutionPolicy AllSigned -Force
Respond to the warning text with the default Y.
d. Run the following command:
.\InstallCognos.ps1
Tip: This may take some time to complete.
5. When upgrading from FlexNet Report Designer, your roles and operator accounts have been migrated tothe new version of Flexera Analytics. However, when upgrading from FlexNet Report Designer, a newlicense is required from Flexera to authorize use of the Flexera Analytics version. See Importing an UpdatedFlexera License for details. This must be completed before any operator can access any part of FlexeraAnalytics (and, as follows, operators must also be assigned to the appropriate roles).
6. Create a role to which you have assigned the Analytics User privilege, and a second role that has theAnalytics Administrator privilege, and assign operators as required:
a. In the web interface for FlexNet Manager Suite, navigate to the system menu ( in the top rightcorner), select Accounts, select the Roles tab, use the Business reporting portal section, and clickthe help button for further details).
b. Assign the appropriate operator(s) to these roles.
Important: By default, no more than 60 operators may be linked to the role that grants the Analytics
User privilege (or to all roles that grant this privilege). If you assign more than 60 operators to theseroles, all operators are locked out until you reduce the count of operators to the licensed limit. If youneed more than 60 operators with this privilege, contact your Flexera Consultant with your request toincrease the licensed count.
7. For security reasons, a browser will not provide a user's credentials to the Flexera Analytics server unlessthe site (or subdomain) is on a list of trusted websites. Extra steps are required to enable silent Windowsauthentication.
• Internet Explorer or Chrome on Windows
a. The Flexera Analytics server must be added under Local Intranet Zone in Internet Options. If not,the credentials will not be passed to the site and the user will be prompted to enter theircredentials every-time they navigate to Flexera Analytics from within FlexNet Manager Suite. Youcan either add the Flexera Analytics URL to trusted websites locally on the workstation or throughyour corporate group policy.
• Firefox on Windows
a. Launch FireFox.
Upgrading FlexNet Manager Suite
80 Upgrading FlexNet Manager Suite to 2018 R2 On Premises | Company Confidential

b. In the address bar type about:config and click Enter.
c. If prompted with the security warning choose "I'll be careful, I promise".
d. After the configuration page loads, in the filter box, type: network.automatic.
e. Modify network.automatic-ntlm-auth.trusted-uris by double-clicking the row and enterthe fully qualified URL of the Flexera Analytics server. For example http://cognos11.domain.
8. To complete the upgrade, you will need to perform the instructions in the section Update the SampleReporting Package. This is required to apply any updated user permissions.
9. If you wish to configure Security Assertion Markup Language (SAML) authentication for Flexera Analytics,please refer to the Authentication chapter in the FlexNet Manager Suite Systems Reference guide. Here youwill find the instructions to run the Flexera Report Designer Package Import Utility to update your SAMLauthentication configuration.
Configuring IIS to Use SSL/TLS EncryptionBefore completing the following process, you must have all your SSL certificates in place to create the chain oftrust on all servers.
Important: If you are using a Certificate Authority (CA) that is not one listed by default in Windowscertificate stores, the CA's root certificate need to be imported into all user's computers to ensure securecommunication between their web browsers and the Flexera Analytics server.
All servers in your FlexNet Manager Suite implementation must be configured to use Secure Sockets Layer forcommunication. This includes your Flexera Analytics host, and your application server for FlexNet Manager Suiteitself. If you have a larger, multi-server implementation, these changes must be configured on your webapplication server, your batch server, and your inventory server (or the servers on which you are hosting theseareas of functionality). Those FlexNet Manager Suite servers are assumed to be already configured followingyour installation or most recent upgrade.
To configure IIS on your Flexera Analytics server to use SSL:
1. Import all relevant certificates into the Windows Local Machine certificate stores.
Save the certificates as follows:
• If you have an unusual root certificate from a Certificate Authority (CA) not already known in theMicrosoft Windows Trusted Store, save it under Trusted Root Certification Authorities.
• Your SSL certificate (usually .pfx) is saved under Personal (this is your public key certificate issued by
the CA).
• Any intermediate certificates not already trusted in Windows are saved under Intermediate
Certification Authorities.
2. Launch IIS on your Flexera Analytics server and configure it as follows:
a. Select the web server for Flexera Analytics.
Upgrading FlexNet Manager Suite
Upgrading FlexNet Manager Suite to 2018 R2 On Premises | Company Confidential 81

b. Open the SSL Certificates feature and import your SSL certificate (usually .pfx).
c. Add the HTTPS binding for the Flexera Analytics website (usually, this is the default website), andselect the displayed SSL certificate to use for encryption.
d. Open SSL Settings for the default website, and turn on the Require SSL option.
e. Under the same website, navigate to ibmcognos/bi, and open its URL Rewrite feature.
f. Update the Reverse Proxy rule to use HTTPS as part of Rewrite URL.
g. Restart the web server.
With IIS suitably configured on your Flexera Analytics server, you must now reconfigure Cognos to use yourpreferred certificates in place of the default certificates installed with it. Continue on to Reconfigure Cognos toUse Third-Party SSL Certificates.
Reconfigure Cognos to Use Third-Party SSLCertificatesThis process switches Cognos over from using the default certificates provided by IBM to using the certificatesyou have saved for your servers. IBM refers to this process as "recrypting" Cognos. The process restores thechain of trust, enabling SSL communication between various Cognos components, as well as between Cognosand the others servers for FlexNet Manager Suite.
Commence this process while logged in to your Flexera Analytics server, using an account with administratorprivileges.
To recrypt Cognos to use third-party certificates:
1. Navigate to the Cognos installation directory (usually C:\Program Files\ibm\cognos\analytics).
2. Take a protective backup copy of the configuration folder.
3. Launch the IBM Cognos Configuration tool as administrator, and stop the Cognos service if it is running.
4. Navigate to File > Export As and export the decrypted content to cogstartup.xml on your Desktop.
5. Without restarting the Cognos service, close the IBM Cognos Configuration tool.
Important: Do not re-open the IBM Cognos Configuration tool until instructed to do so.
6. Open a command prompt as administrator, and run the following commands to delete existing content.
If you have a non-standard installation path, replace the default Cognos installation path shown here withthe one from your environment.
cd "C:\Program Files\ibm\cognos\analytics"
del .\configuration\cogstartup.xml
del .\configuration\caSerial
del .\configuration\certs\CAMCrypto.status
del .\configuration\certs\CAMKeystore
Upgrading FlexNet Manager Suite
82 Upgrading FlexNet Manager Suite to 2018 R2 On Premises | Company Confidential

del .\configuration\certs\CAMKeystore.lock
del .\temp\cam\freshness
rd .\configuration\csk /S /Q
7. Copy the exported cogstartup.xml file from your Desktop to theCognosInstallationPath\configuration directory.
8. Copy all certificate files to the CognosInstallationPath\bin64 directory.
9. Register all certificates individually to the Cognos trust store, using commands like the following, updatingyour Cognos installation path and the names of individual certificates as required for your context:
cd c:\Program Files\ibm\cognos\analytics\bin
ThirdPartyCertificateTool.bat -i -T -r anybase64.cer -p NoPassWordSet
ThirdPartyCertificateTool.bat -i -T -r mycabase64.cer -p NoPassWordSet
10. Import your certificates into the Cognos keystore as follows:
a. Navigate to CognosInstallationPath\jre\bin, and launch the IBM Key Management tool,ikeyman.exe.
b. Open the key database file CAMKeystore from CognosInstallationPath\configuration\certs
with password NoPassWordSet.
c. In the Key database content drop down, select Personal Certificates.
d. Import your wildcard certificate in PKCS12 format with correct password, and apply a new label to it:encryption.
e. In the Key database content drop down, select Signer Certificates.
f. Add the CA root certificate and label it as ca.
g. Add any other intermediate certificates that may be required to complete the chain of trust, givingeach one an arbitrary label.
h. Close the key management tool.
Best practice is to once again step through these import steps and validate that the certificates have beenimported with the correct labels.
11. In your preferred text editor, open CognosInstallationPath\configuration\FLEXnet.properties,and update the protocol in the URL to read HTTPS.
12. Launch the IBM Cognos Configuration tool as administrator.
13. Navigate to Cryptography, and:
a. Change Common symmetric key store password to NoPassWordSet.
b. If your enterprise policy does not allow versions of TLS prior to 1.2, edit SSL Protocols accordingly.
14. Navigate to Cryptography > Cognos, and:
a. Change Key store password to NoPassWordSet.
Upgrading FlexNet Manager Suite
Upgrading FlexNet Manager Suite to 2018 R2 On Premises | Company Confidential 83

b. Change Server common name to the fully-qualified domain name (FQDN) of your Analytics server.
c. Change Country or region code to match the country code of your saved certificates.
d. Set Use third party CA? to True.
e. Change Certificate Authority service common name to match the Common Name (CN) of the CAroot certificate.
f. Change Certificate Authority password to NoPassWordSet.
g. Change the Certificate lifetime in days figure to reflect time until the expiry date of the wildcardcertificate.
15. Navigate to Environment, and change all URIs to use the HTTPS protocol. In Gateway URI and ControllerURI for gateway, also replace port 80 with 443.
16. Save the updated configuration.
17. Start the Cognos service.
18. Close the configuration tool.
Flexera Analytics, powered by Cognos, is now using the certificates in your preferred chain to certify SSLcommunications.
Importing an Updated Flexera LicenseYou may require an updated license for FlexNet Manager Suite when:
• You are upgrading from an early release that supported FlexNet Report Designer to the current version,supporting Flexera Analytics
• You are upgrading from a release prior to 2016 R1 to the current version.
It is possible that details of your license were emailed to you as part of the order confirmation process for yourupgrade. If not, have your support liaison person raise a support ticket to request the license upgrade, and awaitits arrival in email.
Continue this process as administrator (fnms-admin), on the appropriate server (the one that includes the batchserver):
• The application server (in a single server implementation)
• The processing server (in a two server application implementation)
• The batch server (in a three server application implementation).
To activate FlexNet Manager Suite with the upgraded license:
1. On the appropriate server, save a copy of your updated license in a convenient folder (such as yourinstallation folder), where it is accessible for this activation process.
2. In Windows Explorer, navigate to the Installation-Dir\DotNet\bin folder.
Upgrading FlexNet Manager Suite
84 Upgrading FlexNet Manager Suite to 2018 R2 On Premises | Company Confidential

Replace Installation-Dir with your installation folder. The default location is C:\Program Files(x86)\Flexera Software\FlexNet Manager Platform\DotNet\bin.
3. Execute (double-click) ManageSoft.Activation.Wizard.exe.
4. Import your updated license to use FlexNet Manager Suite.
The terms of your updated license are now visible: navigate to the system menu ( in the top right corner) ofthe web interface, and select FlexNet Manager Suite License.
Update the Sample Reporting PackageThis section is only for those using Flexera Analytics (powered by Cognos).
To import the sample reporting package:
1. Log in to your Flexera Analytics (Cognos) server, and navigate to the following folder:
C:\Program Files\ibm\cognos\analytics\deployment
The folder should contain two zip files named Flexera Analytics.zip and FlexNet Manager
Platform Data Warehouse Reports and Dashboard.zip. These zip files should have been placed inthis directory as part of the Cognos Analytics installation and configuration process. If they are not there,you can copy them from your web application server from the installation media located in the directory<FNMS Media>\FlexNet Manager Suite\Support\Media
2. You may log out of the Flexera Analytics (Cognos) server now.
Shortly you will log into your batch server, but first there are permissions required to authorize theinstallation process.
3. In the web interface for FlexNet Manager Suite 2018 R2, add your service account (suggested: svc-flexnet)as an Analytics Administrator for the business reporting portal as follows:
Tip: You need to have administrator privileges within FlexNet Manager Suite to make these changes.
a. Navigate through the system menu ( in the top right corner) > Accounts.
The Accounts page opens.
b. Select the Roles tab, and check for the existence of the Business Reporting Portal Admin role.
If the role does not already exist, you can create it.
c. Click the edit (pencil) icon at the right-hand end of the card for this role.
The properties page for this role appears.
d. Expand the Business reporting portal tab of the accordion, and from the Privileges drop-downlist, ensure the Analytics Administrator feature has Allow permissions.
e. Switch to the All Accounts tab, locate your service account (suggested: svc-flexnet) in the list, andclick the account name hyperlink.
Upgrading FlexNet Manager Suite
Upgrading FlexNet Manager Suite to 2018 R2 On Premises | Company Confidential 85

The page switches to show Account Properties for your account.
f. Under the Permissions section, check whether your Business Reporting Portal Admin role isalready listed against the service account. If so, you are set for upload permissions, and shouldcontinue with the next step.
g. Click the + button to the right of the current Role to add this account to another role.
A duplicate line appears with another drop-down list of all the roles defines so far.
Tip: Each enterprise is licensed for only a single operator in the Analytics Administrator role. Ifone has already been assigned this privilege, you need to move that account out before you canadd the service account.
h. From the duplicate drop-down list, select your Business Reporting Portal Admin role.
The Business reporting portal tab of your resulting list of privileges is updated. If you expand thistab of the accordion, you see that Analytics Administrator now displays Allowed access.
i. Scroll to the bottom of this page, and click Save.
Your services account is now the (only) Analytics Administrator for use of the Flexera Analytics.
Tip: Flexera Analytics also requires that this account is valid in Active Directory.
This privilege level allows the account to complete the import of the sample reports package. Keepthis web page available for further use shortly.
4. Using the service account (suggested: svc-flexnet), log into your batch server directly.
Refer to your block diagram of servers to identify this machine. If you have combined servers, this may beyour processing server, or your application server.
Note: The following 6 steps can be completed using a package import utility as described here, or usinga command-line interface (for which see the note at the end of the process).
5. Navigate in Windows Explorer to installation-folder\Cognos\
BusinessReportingAuthenticationService\bin.
Example:
C:\Program Files (x86)\Flexera Software\FlexNet Manager Platform\Cognos
\BusinessReportingAuthenticationService\bin
6. Right-click CognosPackageImport.exe and click Run as Administrator.
A window appears for the Flexera Report Designer Package Import Utility.
7. Click Update....
An Update Value dialog appears.
8. In the Value field, enter the value for Report Designer's Dispatch URL.
In a typical installation, this value has the form:
Upgrading FlexNet Manager Suite
86 Upgrading FlexNet Manager Suite to 2018 R2 On Premises | Company Confidential

http://RD-Server:9300/p2pd/servlet/dispatch
where you should replace RD-Server with the name of your server hosting Report Designer (powered byCognos).
Tip: If your Flexera Analytics server is using encrypted communication over the HTTPS protocol, specifyhttps: as part of this value.
9. Click Update.
The value entered is written into the registry on this server, and the additional dialog disappears.
Tip: If you run this import utility on the same machine in future, it displays the value stored in theregistry in its read-only Dispatch URL field.
10. Click Install Reports Package.
Progress is logged in the text window of this dialog as the package is imported into the Cognos database.When successfully completed, the last line displays Finished publishing the Report Designerpackage.
Important: Do not close the utility until it has finished the import! This process may take severalminutes.
11. Restore the Analytics Administrator privilege to an appropriate interactive operator account.
a. Back in the web interface for FlexNet Manager Suite 2018 R2 (in the Accounts tab of the samepage), remove your service account (suggested: svc-flexnet) from the Business Reporting
Portal Admin role that includes the sole Analytics Administrator privilege (do this in the accountproperties, by deleting the appropriate line in the Roles group). Save the account properties thatyou have changed.
b. Switch to the appropriate administrator account (suggestion: fnms-admin), and for this account addthe Business Reporting Portal Admin role. Save the changed account properties.
Installing a Free-Standing StudioYou can install additional copies of the Business Adapter Studio.
There are two kinds of Studio. Adapters can be created or modified using either the Inventory Adapter Studio orthe Business Adapter Studio (each for its appropriate type of adapter). Each time that you install an inventorybeacon, copies of each of the Business Adapter Studio and the Inventory Adapter Studio are installed ready foruse on the inventory beacon. These versions are configured exclusively for disconnected mode, where theycannot directly access your central database.
However, sometimes you want to work in connected mode, with direct access to your central database (forexample, to write data into staging tables and manipulate it). For these cases:
• The Inventory Adapter Studio is also available on the web application server (or, in smaller implementations,the server providing that function). This works in connected mode.
Upgrading FlexNet Manager Suite
Upgrading FlexNet Manager Suite to 2018 R2 On Premises | Company Confidential 87

• You can co-install an inventory beacon on your web application server. As always, this also installs the BusinessAdapter Studio, giving it (and adapters built there) additional privileges to access your central database inconnected mode.
In addition, it is also possible to install a free-standing copy of the Business Adapter Studio (only) on your centralapplication server. (If you have scaled up to several central servers, such an installation can be on whicheverserver suits you. The default location is indicated below.) Business adapters installed directly on your centralserver(s) operate in connected mode, with full access to your central database. Obviously, attempt this only if youare very confident and well informed about details of the database schema.
Tip: It is not possible to install addition free-standing copies of the Inventory Adapter Studio.
Start this procedure using a web browser on the server where you will install the Business Adapter Studio, or acomputer that provides easy and fast network access from your central server.
To download and install an additional instance of the Business Adapter Studio:
1. Use your browser to access the Flexera Customer Community.
a. On https://flexeracommunity.force.com/customer/CCLanding, use the account details emailed to youwith your order confirmation from Flexera to log in (using the Login link in the top right).
Tip: Access requires your Customer Community user name and password. If you do not have one,use the Request Community Access link on the login page to request one. Your credentials areconfigured for access to content you have licensed.
b. Select the Downloads tab from the row across the top of the page.
A routing page appears to let you Access Product and License Center, displaying lists ofproducts from Flexera.
c. In the lists of products, identify FlexNet Manager Platform, and click the Access Above Productsbutton that is below that product name.
The Product and License Center site is displayed.
d. In the Your Downloads section of the Home page, click the link for FlexNet Manager Platform.
e. In the Download Packages page, click the link for FlexNet Manager Platform 2018 R2 to access thedownloads. (You may need to repeat this action on a second page to access the downloadable files.)
2. In the list of components to download, select Business Adapter Studio releaseNumber.zip, anddownload and save it to a convenient location (such as C:\Temp).
3. In Windows Explorer, navigate to the downloaded archive, right-click, and choose Extract All.
4. Navigate into the unzipped archive, and double-click setup.exe, following the instructions in theinstallation wizard.
The Business Adapter Studio may be installed on any of your central servers (in a multi-server implementation).The installer assesses the installation paths, and installs itself in the installation folder of FlexNet Manager Suite.The defaults are as follows:
Upgrading FlexNet Manager Suite
88 Upgrading FlexNet Manager Suite to 2018 R2 On Premises | Company Confidential

• The Business Adapter Studio executable: BusinessImporterUI.exe
• Default installation path (in connected mode on central server): C:\Program Files (x86)\Flexera
Software\FNMP Business Adapter Studio
• No template file storage is required for the Business Adapter Studio in connected mode, as it validates thedatabase schema directly. Your custom business adapters may be saved in the folder(s) of your choice.
When you have completed the remainder of your product installation, the Business Adapter Studio can be runfrom the Windows start menu on this server; and the Business Importer, which is also installed automatically withthe Business Adapter Studio, is also available for execution on the command line. For details about the BusinessAdapter Studio, see online help or the FlexNet Manager Suite System Reference PDF file; and for details about theBusiness Importer, see the Using the FlexNet Business Importer PDF file. Both PDF files are available through thetitle page of the online help.
Populate the Downloadable LibrariesFlexNet Manager Suite comes with an Application Recognition Library, and a SKU (Stock Keeping Unit) Library.You may also have the End of Service Life (EOSL) product and several Product Use Rights Libraries (depending onwhich products you have purchased for the suite). The various libraries are updated regularly by Flexera andnormally downloaded automatically.
Note: The automated updates, and the following process, both assume that your server has access to theInternet. Alternatively, if your server has Internet access controlled through a proxy server, the following URLsmust be accessible:
• For the ARL: https://www.managesoft.com/support/Compliance/RecognitionAfter82.cab
• For the EOSL library: https://www.managesoft.com/support/Compliance/EOSL.cab
• For the SKU library: https://www.managesoft.com/support/Compliance/PURL.cab
• For the PURLs: https://update.managesoft.com:443/ProductUseRights, including access to any sub-
directories of this that may be returned to your server in response to its initial request.
If neither direct access nor access through a proxy server can be provided, you can use an alternative process tomanage library updates manually, as described in Manual Updates of Library Data.
At installation time, you need to trigger download of the libraries to create a baseline ready for product use.Library downloads check the terms of your Flexera license. That is why this task cannot be attempted beforeProduct Activation, and must occur on the same server where your license was imported to activate the product.
Tip: Some product functionality updates are also delivered through the library downloads (for example, thelatest version of the InventorySettings.xml file).
In summary, the process downloads several different files to which you are entitled, saving them into staginglocations on your batch server (or the server hosting that functionality). When the downloads are all completedsuccessfully, the files are imported into the compliance database as required. The staging locations aresubdirectories of %PROGRAMDATA%\Flexera Software\FlexNet Manager Platform\DataImport\Content. Ifnecessary, you may customize this by saving your preferred path in the registry at HKEY_LOCAL_MACHINE\
Upgrading FlexNet Manager Suite
Upgrading FlexNet Manager Suite to 2018 R2 On Premises | Company Confidential 89

SOFTWARE\WOW6432Node\ManageSoft Corp\ManageSoft\Compliance\CurrentVersion\Recognition\
ContentImportDirectory. For log file details, see the end of the process below.
Complete this procedure as administrator (fnms-admin), having database rights as described in earlier sections.
To download the current libraries:
1. On the batch server (or application server for a single-server implementation), open the Microsoft TaskScheduler.
2. Manually trigger the Recognition data import scheduled task.
By default this task is run at 1am daily. The task places a request for download in the queue of the internalbatch scheduler. Given that no other processes are running at this stage of your implementation, itexecutes almost immediately. A utility downloads all libraries according to the terms of your license, and,when all downloads are successful, imports the contents into FlexNet Manager Suite. Depending on yournetwork speeds, a typical first download may take in the order of one-two hours, followed by the import.
Tip: Since all downloads must succeed before the import starts, a failure in any of the downloads meansthat the import is not attempted on this occasion. However, the process is resilient in that each downloadis automatically retried up to five times where necessary to work around transient network issues.
3. Thereafter, in the web interface for FlexNet Manager Suite, navigate to the system menu ( in the topright corner), select System Health > System Health Dashboard, and check the cards for:
• ARL
• SKU Library
• PURL.
Tip: The cards do not refresh automatically. Use F5 to refresh the display from time to time.
Each card shows the currently installed version of the relevant library, and the date of the last successfuldownload and import of these libraries. Errors display an additional alert icon with some explanatory text.In case of errors, check the following log files, located in %ProgramData%\Flexera Software\
Compliance\Logging\Content (where the asterisk in each file name is replaced with the appropriatedate):
• mgsImportRecognition*.log
• recognition*.log (for the Application Recognition Library)
• importPURL*.log.
Tip: Each log file is configured through a matching .config file saved in the same directory. Notethat by default, 30 dated copies of each log file are preserved, and thereafter the oldest file isautomatically removed to make room for the next log file (see maxSizeRollBackups in the .config
files). You cannot modify the file path for logging within the .config files, but you could if necessarycustomize the file name(s). If you really need a different file path for these logs, you can change thevalue used for %property{ComplianceLoggingPath} in the .config files by creating a REG_SZ
Upgrading FlexNet Manager Suite
90 Upgrading FlexNet Manager Suite to 2018 R2 On Premises | Company Confidential
registry key at SOFTWARE\WoW6432Node\ManageSoft Corp\ManageSoft\Compliance\CurrentVersion\LoggingBaseDirectory on your batch server (or in smaller implementations, theserver hosting this functionality), and setting the registry key to your preferred path. (Removing thiskey again restores the default value.)
Manual Updates of Library DataThe downloadable Application Recognition Library, Product Use Rights Library, and SKU Library are intended forautomated updates delivered directly to your application server (or, in a multi-server implementation, the serverhosting the batch server functionality). This automated process naturally relies on the server having directInternet access.
However, in some secure environments, the applicable server may not be permitted to have Internet access. Forsuch environments, the process of updating these critical libraries must be maintained manually. The manualprocess is outlined below; but first there are the following preparations.
• Subscribe to the Content Library Updates email list through the webpage http://learn.flexerasoftware.com/SLO-FMS-Software-Content-Library-Updates. List members receive email notifications when updates tolibrary data are published.
• On your applicable server, navigate to the Microsoft Task scheduler and disable the Recognition dataimport task (in the FlexNet Manager Platform group).This prevents the server from attempting to connect to the Internet to start downloads.
• Ensure that you have a user name and password for the Flexera Customer Community. If you do not yet havethese credentials, you can apply as noted in the process below. (There is a delay for account validation.)
When these preparations are completed, you can use the following process to manually update each of thedownloadable libraries for your new installation, and again as new editions are released (as advised in youremail notifications).
In summary, in this process you download several different files to which you are entitled, saving them intostaging locations on your batch server (or the server hosting that functionality). When the downloads are allcompleted successfully, you import the files into the compliance database as required. The staging locations aresubdirectories of %PROGRAMDATA%\Flexera Software\FlexNet Manager Platform\DataImport\Content.This default pathway is referenced throughout the description below. If necessary, you may customize thedefault path by saving your preferred path in the registry at HKEY_LOCAL_MACHINE\SOFTWARE\WOW6432Node\ManageSoft Corp\ManageSoft\Compliance\CurrentVersion\Recognition\ContentImportDirectory .For log file details, see the end of the process below.
To manually update downloadable libraries:
1. Log into a computer where you are permitted to access the Internet and download files.
2. Download the ARL from http://www.managesoft.com/support/Compliance/RecognitionAfter82.cab andsave it temporarily. Its eventual destination is %PROGRAMDATA%\Flexera Software\FlexNet ManagerPlatform\DataImport\Content\ARL on your batch server.
Upgrading FlexNet Manager Suite
Upgrading FlexNet Manager Suite to 2018 R2 On Premises | Company Confidential 91

3. If you have licensed the EOSL (End of Service Life) product, also download http://www.managesoft.com/support/Compliance/EOSL.cab for eventual saving in %PROGRAMDATA%\Flexera Software\FlexNet
Manager Platform\DataImport\Content\EOSL on your batch server.
4. Download the SKU library from https://update.managesoft.com/ProductUseRights/PURL.cab (despite thename, this is not a typographical error) for later saving in %PROGRAMDATA%\Flexera Software\FlexNet
Manager Platform\DataImport\Content\SKU on your batch server.
5. To collect your PURL entitlements, navigate to the appropriate download page in the Flexera CustomerCommunity website:
a. On https://flexeracommunity.force.com/customer/CCLanding, use the account details emailed toyou with your order confirmation from Flexera to log in (using the Login link in the top right).
Tip: Access requires your Customer Community user name and password. If you do not haveone, use the Request Community Access link on the login page to request one. Yourcredentials are configured for access to content you have licensed.
b. Select the Downloads tab from the row across the top of the page.
A routing page appears to let you Access Product and License Center, displaying lists ofproducts from Flexera.
c. In the lists of products, identify FlexNet Manager Platform, and immediately below it, clickAccess Above Products.
The Product and License Center site is displayed.
d. In the Your Downloads panel, select one of the additional products that you have licensed to openthe Download Packages page.
e. Click on the productName Content link to download the related PURL file.
f. Loop back and repeat the download for each of the products you have licensed for FlexNetManager Suite.
All these PURL files are to be saved in %PROGRAMDATA%\Flexera Software\FlexNet Manager
Platform\DataImport\Content\SKU (again, not a typo) on your batch server.
6. Log in to your batch server (or the server hosting that functionality, such as your application server in asingle-server implementation) as a user in the FNMS Administrators security group.
This is the security group recommended during installation. A suggested account to use is fnms-admin.
7. If this is not the first time you have downloaded the libraries manually, run the following command to cleanout the disk cache on your batch server (or equivalent):
cd InstallDir\DotNet\bin
ShadowHostWin.exe BatchProcessTask.exe run ARLCleanup
8. On your batch server (or equivalent), navigate to %PROGRAMDATA%\Flexera Software\FlexNet Manager
Platform\DataImport and create the Content directory and its subdirectories ARL, SKU, and EOSL.
Upgrading FlexNet Manager Suite
92 Upgrading FlexNet Manager Suite to 2018 R2 On Premises | Company Confidential

Use exactly these names to allow for subsequent automated tasks. (These folders are all removed eachcycle by the ARLCleanup task.)
9. Copy the downloaded files to your batch server, placing each one in the appropriate subdirectory underthe \Content path, as identified in the downloading steps described earlier.
10. Still on your batch server, navigate to the Microsoft Task scheduler, and in the FlexNet Manager Platformgroup:
a. Validate that the Recognition data import scheduled task has indeed been disabled.
b. Create a new import scheduled task with the following command line to execute in theInstallDir\DotNet\bin directory:
ShadowHostWin.exe BatchProcessTask.exe run ARLImport
It is appropriate to schedule this daily at 1am. This schedules an import from the disk cache whereyou have placed the files into the compliance database (and on the daily schedule, if there isnothing new in the cache, exits quickly). The import is scheduled as soon as possible, and run whenthere are no conflicting tasks. You can then trigger this scheduled task manually if need be.
All the downloaded libraries are loaded into the compliance database by the ARLImport task. When the processis complete, you can log into the web interface of FlexNet Manager Suite, and navigate to the system menu (
in the top right corner) and choose System Health > System Health Dashboard. The summary cardsthere display the versions and date/time of the last successful updates to the ARL, PURL, and SKU library. (Thecards do not update automatically once the page is open. Use F5 to refresh the display.) Errors display anadditional alert icon with some explanatory text. In case of errors, check the following log files, located in%ProgramData%\Flexera Software\Compliance\Logging\Content (where the asterisk in each file name isreplaced with the appropriate date):
• mgsImportRecognition*.log
• recognition*.log (for the Application Recognition Library)
• importPURL*.log.
Link to Flexera Service GatewayFlexera Service Gateway allows interaction between separate products from Flexera.
The ability to link FlexNet Manager Suite to the Flexera Service Gateway is subject to a separate license option. Ifyou have licensed this option (you can check using the process below), you need to configure the connection aspart of your configuration process.
To complete this process, you must know credentials that can log into your Flexera Service Gateway server withadministrator privileges.
To link to Flexera Service Gateway:
1. Log into the web interface for FlexNet Manager Suite.
Upgrading FlexNet Manager Suite
Upgrading FlexNet Manager Suite to 2018 R2 On Premises | Company Confidential 93

Tip: Either log in from a computer other than your web application server; or if running on that server,ensure that you access the full server name (and not localhost) in the URL. The URL in your webbrowser is taken into account in preparing the integration file, and should not include localhost if youwant to integrate with other products from Flexera.
2. Optionally, check that you have licensed the option to link to Flexera Service Gateway:
a. Navigate to the system menu ( in the top right corner) > FlexNet Manager Suite License.
The Your FlexNet Manager Suite License page appears.
b. Check the License details section.
If you have licensed this option, FNMP API integration enabled: Yes appears in the list. If it isnot visible, you cannot continue with this procedure.
3. Navigate to the system menu > System Settings, and select the Web API tab.
Note: This tab is available only if your enterprise has licensed the FNMP API integration option.
4. Click each of the links in turn to download the two files, and save them to a convenient location (such asC:\temp).
There must be network access to your Gateway server from the location where you save the files.
5. Either, in your web browser's list of recent downloads, click the registration tool to open it; or
a. Open a Command Window, and navigate to the location where you downloaded the files.
b. Run RegisterFlexeraServiceGateway.exe.
The Flexera Service Gateway Registration dialog appears.
6. Identify the Flexera Service Gateway host, the server in your enterprise where the Gateway is installed, andthe Port number.
You may use an IP address, a fully qualified domain name, or (if your DNS is correctly configured andaccessible) the server's host name. The default port number is 9443.
7. Provide the credentials for administrator access to the Gateway account.
In the absence of any better information, try the account admin with the password password.
8. Use the Import button to browse to the other downloaded file, webapi.config, and import it into theregistration tool.
9. Click OK.
Registration is complete. (You do not need to repeat this registration on others of your central servers.)
Update Access RightsThrough your processes of database migration, all the access rights that applied in your earlier complianceproduct are carried forward into FlexNet Manager Suite 2018 R2.
Upgrading FlexNet Manager Suite
94 Upgrading FlexNet Manager Suite to 2018 R2 On Premises | Company Confidential

In addition, if you created a new account for installation (suggested: fnms-admin), this account defaults to havingadministrator privileges in your new implementation, in addition to the migrated access rights. This account hasadequate rights to modify access rights for other operators.
To modify access rights:
1. Log in to the web interface to FlexNet Manager Suite 2018 R2.
2. Navigate to the system menu ( in the top right corner), choose Accounts, and select the Roles tab.
3. For each unique set of access rights that you need to assign to operators, ensure that there is (or create) adistinct role, and set its rights by expanding the various headings in the accordion and using the controlsinside. (For advanced combinations, start by selecting Custom from the drop-down list in each section.)Remember to scroll down and click Save (or Create) when you make any changes.
For more information, click the help button at the top left.
4. When appropriate roles are defined, switch to the All Accounts tab.
5. Find each account in the list in turn, and click the hyperlinked account name to open its properties.
6. Change the roles assigned, or add additional roles, to each account as required.
The net effect of all roles on permissions for this account is displayed in read-only mode in the accordionbelow as you make changes. (Remember that a 'deny' in one role over-rides an 'allow' in another role whenthe same account is assigned to both roles.)
7. Remember to Save each changed account.
Update and Deploy Additional InventoryBeaconsThe inventory beacon is enhanced in 2018 R2, and should be updated to take advantage of the most recentfunctionality.
Key points to note include the following:
Upgrading from Notes
Any version, where you used a customaccount to run the FlexNet BeaconEngine service.
The FlexNet Beacon Engine service normally runs as the localSYSTEM account on the inventory beacon (the default andrecommended configuration). If you provided alternative credentials(perhaps to manage access through a proxy server), be aware thatthese credentials are not known to FlexNet Manager Suite, so thatwhenever an inventory beacon is automatically updated with a newversion of the FlexNet Beacon software, the credentials for runningthe service are reset to SYSTEM. Hence, if you have manuallyconfigured custom credentials on an inventory beacon, you must re-configure those same credentials after each upgrade to FlexNetBeacon.
Upgrading FlexNet Manager Suite
Upgrading FlexNet Manager Suite to 2018 R2 On Premises | Company Confidential 95
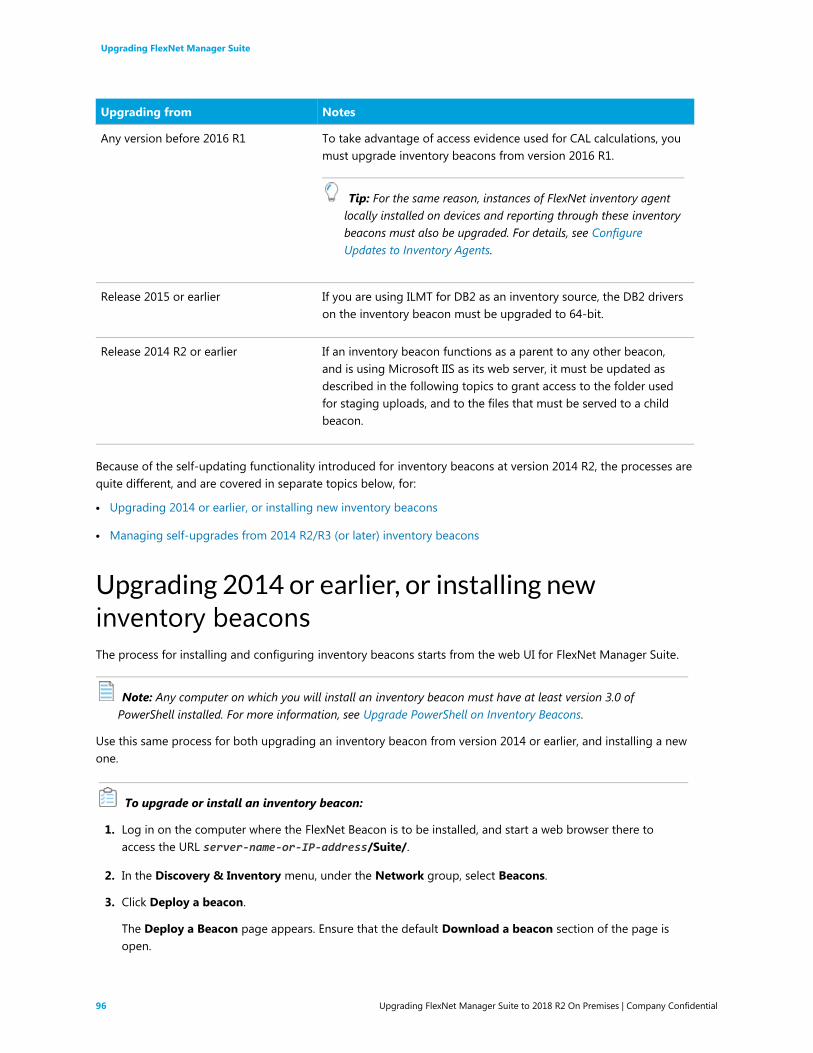
Upgrading from Notes
Any version before 2016 R1 To take advantage of access evidence used for CAL calculations, youmust upgrade inventory beacons from version 2016 R1.
Tip: For the same reason, instances of FlexNet inventory agentlocally installed on devices and reporting through these inventorybeacons must also be upgraded. For details, see ConfigureUpdates to Inventory Agents.
Release 2015 or earlier If you are using ILMT for DB2 as an inventory source, the DB2 driverson the inventory beacon must be upgraded to 64-bit.
Release 2014 R2 or earlier If an inventory beacon functions as a parent to any other beacon,and is using Microsoft IIS as its web server, it must be updated asdescribed in the following topics to grant access to the folder usedfor staging uploads, and to the files that must be served to a childbeacon.
Because of the self-updating functionality introduced for inventory beacons at version 2014 R2, the processes arequite different, and are covered in separate topics below, for:
• Upgrading 2014 or earlier, or installing new inventory beacons
• Managing self-upgrades from 2014 R2/R3 (or later) inventory beacons
Upgrading 2014 or earlier, or installing newinventory beaconsThe process for installing and configuring inventory beacons starts from the web UI for FlexNet Manager Suite.
Note: Any computer on which you will install an inventory beacon must have at least version 3.0 ofPowerShell installed. For more information, see Upgrade PowerShell on Inventory Beacons.
Use this same process for both upgrading an inventory beacon from version 2014 or earlier, and installing a newone.
To upgrade or install an inventory beacon:
1. Log in on the computer where the FlexNet Beacon is to be installed, and start a web browser there toaccess the URL server-name-or-IP-address/Suite/.
2. In the Discovery & Inventory menu, under the Network group, select Beacons.
3. Click Deploy a beacon.
The Deploy a Beacon page appears. Ensure that the default Download a beacon section of the page isopen.
Upgrading FlexNet Manager Suite
96 Upgrading FlexNet Manager Suite to 2018 R2 On Premises | Company Confidential

4. Click Download a beacon.
Tip: This button is displayed only to members of the Administrator role.
5. Use the web browser dialog to save the installer to a convenient directory (such as C:\temp).
Tip: If you have not downloaded directly to your intended inventory beacon, you should now move thedownloaded installer to that intended device.
6. In Windows Explorer, navigate to the saved file on your inventory beacon, and double-click it to run theinstaller.
7. Step through the installation wizard, using the summaries in the accordion section Beacon setup or themore detailed online help available through the web interface to assist as necessary.
8. Does this inventory beacon act as a parent to any other inventory beacons (lower in your hierarchy ofbeacons)? And if so, it is using Microsoft IIS as its local web server? If both of these are the case, you needto update parameters set for IIS as follows:
a. In the inventory beacon interface, in the Beacon configuration group in the navigation bar, clickLocal web server.
The Web Server Settings page opens.
b. Select No local web server (will not allow any incoming web requests).
This turns off the settings for IIS.
c. Select IIS web server.
The settings needed for child inventory beacons are now passed to IIS.
9. Is this an upgrade of an inventory beacon that previously collected third-party inventory (such as SCCM) inyour 2014 system? If not, continue to the next step.
In 2014 (or earlier), third-party inventory collection was triggered by Windows Scheduled Tasks, and theaccount used for data access was the account running the scheduled task (often the SYSTEM account). In2018 R2, all scheduling is managed by the inventory beacon engine (with settings controlled through theinventory beacon interface). This means that previously operating adapters will no longer work until youspecify credentials under which they should run under the new scheduling system. To do this:
a. In the inventory beacon interface, navigate to the Inventory systems page.
b. Select a connection to update from the list, and click Edit....
The Edit SQL Source Connection dialog appears (or a similar dialog according to your chosenconnection). All details of your previous connection should be preserved, but the authenticationdetails must be set up for the new architecture.
c. Typically, choose the Window (specific account) option, and provide the Username and Passwordthat allows access to the data source.
d. Click Save to close the dialog (which only writes the change to the inventory beacon interface).
e. Repeat this for all other connections in the list that need updating.
f. Finally, click Save again on the Inventory systems page to commit all your changes.
Upgrading FlexNet Manager Suite
Upgrading FlexNet Manager Suite to 2018 R2 On Premises | Company Confidential 97

10. When the configuration of this inventory beacon is complete, relocate to the next inventory beacon (orproposed beacon), and repeat this process.
When deployment and updating of inventory beacons is complete, remember to adjust your subnets andpossibly your inventory/discovery rules in the web interface of FlexNet Manager Suite to bring the new beaconsinto operation.
Managing self-upgrades from 2014 R2/R3 (or later)inventory beaconsThere are two settings, both controlled from the web interface for FlexNet Manager Suite, that manage the self-updating behavior of inventory beacons:
• Global settings for the overall update strategy
• Individual settings for each inventory beacon.
The combination allows you to silently upgrade all inventory beacons automatically; or to run a pilot program totest the behavior of one new inventory beacon before allowing all others to automatically update. The followingprocedure covers both strategies.
To manage self-upgrades of inventory beacons:
1. First check the global settings for inventory beacons:
a. In the compliance browser, navigate to Discovery & Inventory > Settings.
The Inventory Settings page appears.
Tip: Check the release details using the View Change History for FlexNet Beacon link in theBeacon settings section.
b. In the Beacon settings section, make a selection from the Beacon version approved for usecontrol.
• For fully automated updates of your inventory beacons, choose Always use the latest
version (currently release-number). With this setting operational for all your inventory
beacons, updates are silent and self-managing. (You need to check, as described below, thateach inventory beacon is permitted to accept this setting.)
• For a pilot program, choose the most recent version of self-updating FlexNet Beacon softwarethat is already installed in your enterprise. This must be earlier than the new release that younow want to test in a pilot program. (For example, suppose you previously installed version X.3of FlexNet Beacon, but now X.4 is available. In this example, setting the approved version to X.3prevents the later X.4 being installed until after you approve it with your pilot program.) Bylimiting the global automation to your previous approved version, you control when theupgrades flow through your estate.
2. Now check the settings for each individual inventory beacon:
a. In the compliance browser, navigate to Discovery & Inventory > Beacons (in the Network group).
Upgrading FlexNet Manager Suite
98 Upgrading FlexNet Manager Suite to 2018 R2 On Premises | Company Confidential

The list of your current inventory beacons displays. In the Actions column on the right-hand end ofeach entry, there is an edit icon (pen).
b. For the desired inventory beacon, click its edit icon.
The properties page for this inventory beacon displays. Ensure that the General tab is selected.
c. In the Overview section of the General tab, make a selection from the Upgrade mode drop-downlist.
• For all operational inventory beacons (but not for your pilot test one), choose Always use the
approved version (currently release-number) — This setting makes this inventory
beacon respond to the global settings for all your inventory beacons.
• For the pilot test inventory beacon, choose Choose a specific version — Another control
appears where you can choose the Specific version. Choose the latest version that you want totest.
3. After your testing period, when you are satisfied with the functionality of the upgraded pilot inventorybeacon, remember to return to the global settings (step 1) and authorize the latest version.
Tip: Remember that you cannot access the latest inventory collection functionality until all relevantinventory beacons have been upgraded (allow up to a day after you approve the latest version at yourcentral server for all inventory beacons to self-update).
Upgrade Connected-Mode StudiosIf you use the Inventory Adapter Studio or Business Adapter Studio in connected mode on your centralapplication server, you should update them separately.
Installations of the studios on inventory beacons are automatically updated as a part of the inventory beaconself-update procedure. These installations operate in disconnected mode, and need no intervention for updates.
Separate installations on one of your central servers may operate in connected mode. These are not installed orupgraded automatically, and if you have previously installed them, you should install the latest version tooverwrite your existing installation.
To upgrade studios running in connected mode:
1. For safety's sake, make a backup copy elsewhere of any custom adapters saved in the standard storagepaths used by the Inventory Adapter Studio or Business Adapter Studio.
2. Using the credentials supplied by Flexera with your order confirmation (or as renewed since), log intohttps://flexerasoftware.flexnetoperations.com.
3. On the first page, select FlexNet Manager Platform, and on the resulting second page, select the productagain.
4. In the list of versions, click the product name for the version you are using (typically the most recentversion).
Upgrading FlexNet Manager Suite
Upgrading FlexNet Manager Suite to 2018 R2 On Premises | Company Confidential 99

5. In the list of components to download, select Business Adapter Studio releaseNumber.zip, anddownload and save it to a convenient location (such as C:\Temp).
6. In Windows Explorer, navigate to the downloaded archive, right-click, and choose Extract All.
7. Navigate into the unzipped archive, and double-click setup.exe, following the instructions in theinstallation wizard.
The Business Adapter Studio may be installed on any of your central servers (in a multi-server implementation).The installer assesses the installation paths, and installs itself in the installation folder of FlexNet Manager Suite.The defaults are as follows:
• The Business Adapter Studio executable: BusinessImporterUI.exe
• Default installation path (in connected mode on central server): C:\Program Files (x86)\Flexera
Software\FNMP Business Adapter Studio
• No template file storage is required for the Business Adapter Studio in connected mode, as it validates thedatabase schema directly. Your custom business adapters may be saved in the folder(s) of your choice.
When you have completed the remainder of your product installation, the Business Adapter Studio can be runfrom the Windows start menu on this server; and the Business Importer, which is also installed automatically withthe Business Adapter Studio, is also available for execution on the command line. For details about the BusinessAdapter Studio, see online help or the FlexNet Manager Suite System Reference PDF file; and for details about theBusiness Importer, see the Using the FlexNet Business Importer PDF file. Both PDF files are available through thetitle page of the online help.
Configure Updates to Inventory AgentsAdjust the database settings that control automatic updates of deployed FlexNet inventory agents.
Note: Advanced inventory functionality often requires you to authorize the latest versions of FlexNet inventoryagent. For example:
• Collecting access evidence for calculating consumption of CALs requires the use of FlexNet inventory agentfor 2016 R1 (12.0.0) or later
• Improved application recognition for Tivoli Storage Manager™ version 7.x and IBM Spectrum Protect™version 8.x and later require the use of FlexNet inventory agent for 2018 R1 (12.4.2) or later.
By default, an upgrade to your central application server(s) and inventory beacon(s) does not trigger anyautomatic updates to the FlexNet inventory agents that you have deployed on target machines for localinventory collection. In fact, the upgrade mechanism for FlexNet inventory agent is turned off after an upgrade tothe central application servers. This gives you freedom to manage the upgrade of deployed FlexNet inventoryagents independently of the upgrade to the central application server.
Tip: This procedure applies only to FlexNet inventory agents installed locally on inventory targets (eitherthrough 'adoption' or third-party deployment) and collecting policy from an inventory beacon. Other scenariosare handled differently:
Upgrading FlexNet Manager Suite
100 Upgrading FlexNet Manager Suite to 2018 R2 On Premises | Company Confidential
• Copies of the FlexNet inventory core components installed on inventory beacons and used for zero-touchinventory collection are updated as part of the FlexNet Beacon self-update.
• If you are using copies of the lightweight FlexNet Inventory Scanner, you need to update those copies usingthe same techniques by which you deployed it in the first place.
• If you have used other techniques to deploy the FlexNet inventory core components to file shares or otherlocations of your choosing (where they are not automatically collecting policy), you need to use yourpreferred technique for deploying updated components.
The upgrade of deployed FlexNet inventory agents is controlled by settings stored in the central operationsdatabases. For that reason, this procedure takes place on your batch server/reconciliation server (or whicheverserver includes that functionality, such as your processing server, or application server in smallerimplementations).
Tip: The database setting grants permission (through policy) to the FlexNet inventory agents to perform self-upgrades (or even downgrades) to the specified version. The setting, therefore, can only be put into effect onthose platforms where the FlexNet inventory agent includes self-update functionality, and where new versionsof the FlexNet inventory agent are included in the operations databases after the upgrade. Currently, FlexNetinventory agents on Debian or Ubuntu Linux do not include self-update functionality. On these platforms, youcan do any of:
• Deploy new versions of FlexNet inventory agent manually
• Use your preferred third-party deployment tool to publish updates to FlexNet inventory agents
• Uninstall the old version(s) of FlexNet inventory agent, and once again target the devices for adoptionthrough FlexNet Manager Suite.
To authorize self-update of FlexNet inventory agent through policy:
1. Log in to your batch server using the installing user account (suggestion: fnms-admin).
Depending on the actions you want to take, the account requires either read or write access to thedatabase.
2. In a command window, navigate to installation-folder\DotNet\bin.
3. To review a list of the FlexNet inventory agent versions to which you may upgrade:
.\ConfigureSystem.exe list-agent-versions
Note: Managed Service Providers (MSPs) covering multiple tenants must use:
.\ConfigureSystem.exe list-agent-versions --tenantuid tenantIdentifier
This lists all versions of the FlexNet inventory agent that are stored in your database and available for useas upgrades to your currently deployed agents. The list is typically updated at each release of FlexNetManager Suite. Versions are shown by their internal major-minor-update numbering (such as 12.0.0).
4. To identify which version of the FlexNet inventory agent you have currently authorized as the target versionfor all upgrades:
Upgrading FlexNet Manager Suite
Upgrading FlexNet Manager Suite to 2018 R2 On Premises | Company Confidential 101

.\ConfigureSystem.exe current-agent-upgrade
Note: Managed Service Providers (MSPs) covering multiple tenants must use:
.\ConfigureSystem.exe current-agent-upgrade --tenantuid tenantIdentifier
5. To authorize a new version of the FlexNet inventory agent as the target version for all upgrades:
.\ConfigureSystem.exe select-agent-upgrade --version versionString
Note: Managed Service Providers (MSPs) covering multiple tenants must use (all on one line):
.\ConfigureSystem.exe select-agent-upgrade --version versionString
--tenantuid tenantIdentifier
Replace versionString with the same major-minor-update numbering as is displayed by the list-
agent-versions action. This value must be an exact match for one of the available versions listed bylist-agent-versions. If not, no action is taken. (Notice that there is no requirement for the new versionto be greater than versions previously installed: you can specify an earlier version from the available list,which causes any later FlexNet inventory agents to downgrade to the specified earlier version.)
Tip: The same version (number) of the FlexNet inventory agent is normally installed across all platforms.
6. To halt all upgrades and downgrades of the FlexNet inventory agents currently deployed in your enterprise:
.\ConfigureSystem.exe clear-agent-upgrades
Note: Managed Service Providers (MSPs) covering multiple tenants must use:
.\ConfigureSystem.exe clear-agent-upgrades --tenantuid tenantIdentifier
Tip: The result is the default state after the FlexNet Manager Suite application server(s) have beenupgraded.
When your new settings are saved to the central database, they are distributed to your inventory beacons at thenext update, along with the installer for the currently authorized target version of the FlexNet inventory agent foreach platform. The individual FlexNet inventory agents receive the setting and (if necessary) the installer whenthey next check in (by default, once a day), and subsequently they self-update to the specified version.
For more information about the actions available with this utility, use either of these commands:
.\ConfigureSystem.exe help
.\ConfigureSystem.exe help action-name
Upgrading FlexNet Manager Suite
102 Upgrading FlexNet Manager Suite to 2018 R2 On Premises | Company Confidential

Optional: Perform a Full ImportIt is important here to distinguish two separate cases, each of which uses the term "full":
• A full compliance calculation, which is typically associated with inventory updates from all inventory sources,and by default happens daily. After a product upgrade, full compliance calculations resume on their normalschedule.
Tip: If you are using high-frequency peak consumption calculations for IBM PVU sub-capacity licensing, andare upgrading from FlexNet Manager Suite version 2017 R1 or earlier to a later version, you must completeat least one full compliance calculation after the upgrade before high-frequency IBM PVU calculations canresume.
• A full (or non-differential) import of FlexNet inventory, discussed in this topic.
In most product upgrades, a full import of the FlexNet inventory held in your staging inventory database(suggested name: FNMSInventory) to your compliance database is unnecessary. This background helps youdecide whether you wish to run the full import.
Tip: If you are upgrading from any release of FlexNet Manager Suite between 2014 and 2018R1 inclusive, afull import of FlexNet inventory and a full compliance calculation are required to correctly show relationshipsbetween your installation(s) of Oracle Enterprise Manager and the database instances (and related Oracleoptions) that they manage.
Different parts of the inventory import processes behave in different ways appropriate to their context:
• All uploads from inventory beacons to the central application server are "full" inventory uploads, since theinventory beacon does not have access to your central databases nor the ability to distinguish changed fromunchanged records. Every record received by the inventory beacon is uploaded. (In the case of FlexNetinventory, collected by the FlexNet inventory agent in any of its forms, this full upload is staged in the FlexNetinventory database.)
• Next, imports from the FlexNet inventory database to the operational compliance database are, by default,differential updates, which means that only records that were updated in the inventory database after theprevious import into the compliance database are imported: for efficiency, unchanged records are notimported again. (The test is a simple comparison between the inventory date for the individual record and thedate of the last import into the compliance database.)
This rhythm is highly efficient and works well, but in rare instances may cause a slight data delay after a productupgrade. It occurs only in the following uncommon set of circumstances:
1. Imagine that data previously staged in the FlexNet inventory database included a column (let's call itcolumnX) that was not included in imports to the compliance database, as it had been considered legacydata surplus to compliance requirements.
2. Now, in our imaginary product upgrade, to meet changing requirements columnX has been also added tothe compliance database. (This is rare, in reality.)
3. At the next import of each inventory record from the staging inventory database to the compliancedatabase, the last-saved value in columnX in the inventory database is automatically imported into thecompliance database, just as you expect. This is the normal case and needs no intervention.
Upgrading FlexNet Manager Suite
Upgrading FlexNet Manager Suite to 2018 R2 On Premises | Company Confidential 103

4. However, using the default differential update from the inventory database to the compliance database, anyold and unchanged inventory record is not imported at this time, and therefore this unchanged compliancerecord does not receive a value in columnX. When you look at listings of inventory devices, the more recentimports do have a value in this column, and older imports do not.
You have options for dealing with this rare possibility:
• You can do nothing until you observe the symptoms described in 4 above, and then run a full import ofFlexNet inventory. (In most upgrades, this corner case never occurs, so doing nothing is not an impracticaloption.)
• You can simply wait until, eventually, every inventory record is updated. As each one is imported into thecompliance database, its value for columnXis automatically added, so that eventually (depending on the
frequency with which you collect data from your inventory devices) the data gap self-corrects.
• You can force a full import of FlexNet inventory from the staging data into the compliance database, just incase. Of course, the full import may take longer than the differential import; but you may consider this aworthwhile investment.
If you wish to force a full import of FlexNet inventory data from the staging inventory database into thecompliance database, please take careful note of the following:
• Identify the connection name for your FlexNet inventory database. The default connection name is FlexNet
Manager Suite, and the Source Type is ManageSoft.
• The full import is triggered from your batch server (or, in smaller implementations, the server hosting thatfunctionality).
• You must be logged in as a user with administrator privileges on that server.
• The following command must be entered at the Windows Command Prompt (and specifically, this is not foruse within a PowerShell window).
• Take careful note of the format of the command line shown below. The three dashes and the tripled double-quotation marks are not typographical errors, and are required. However, the command line has been brokenover multiple lines for publication, and you should enter it all on one line.
• When all conditions are met, use the following command line (all on one line), replacing the placeholderconnectionName with the name you gave the connection to your FlexNet inventory database:
BatchProcessTaskConsole.exe
run InventoryImportReaders ---f
-it Readers
-s """connectionName"""
The full import is run (and may take some time, depending on the number of additional aged inventory recordsthat are imported). Thereafter the additional data from the inventory database is present for all records in thecompliance database, and is visible in the web interface of FlexNet Manager Suite.
Upgrading FlexNet Manager Suite
104 Upgrading FlexNet Manager Suite to 2018 R2 On Premises | Company Confidential

Activating and Using New FeaturesSome new features in the 2018 R2 release are available now that you have:
• Updated the inventory server (see Update the Inventory Server)
• Updated the Application Recognition Library (see Populate the Downloadable Libraries)
• Updated your inventory beacons, including setting the global update settings to the latest release (see Updateand Deploy Additional Inventory Beacons and sub-sections).
Improved IBM PVU sub-capacity calculations (upgrading from 2017 R1 or earlier)
The improvements both to sub-capacity calculations for IBM PVU licenses and to the robustness of compliancecalculations introduced with the 2017 R2 release are based on significant changes to the database schema.Therefore, if you are upgrading from release 2017 R1 or earlier, the IBM PVU high-frequency mode is blockeduntil after your first, post-upgrade, full compliance calculation, which populates the required data in the updatedschema. As these calculations are typically scheduled to happen overnight, you can either wait for the normalschedule; or, as an operator in a role granting you administrator privileges, you can trigger a full compliancecalculation ahead of schedule by navigating to License Compliance > Reconcile, selecting Update inventoryfor reconciliation, and clicking Reconcile.
Improved purchase processing (upgrading from 2015 R2 SP5 or earlier)
An important area of enhancement is around purchase processing, especially the handling of licensesubscriptions or maintenance purchases. To support these changes, from release 2016 R1 the UnprocessedPurchases listing has improved logic that checks for any Available quantity on each purchase (that is, anyshortfall in total assignments to licenses compared with the purchased quantity). Depending on your past workpractices, this enhancement may cause some historical purchase records to reappear in the UnprocessedPurchases listing. For full details and a remediation process, see Enhancement for Purchase Records.
Improved inventory gathering (upgrading from 2015 R2 SP5 or earlier)
Some items of new or improved functionality requires updates to your deployed FlexNet inventory agents. Theseinclude:
• Gathering access evidence used for managing Microsoft User CALs and Device CALs
• Enhanced Oracle inventory gathering.
After an upgrade of your system, the deployed FlexNet inventory agents are not upgraded automatically, so thatyou can separately control the timing of this stage. Therefore, to take advantage of the new inventoryfunctionality, you must first allow self-updates of your installed FlexNet inventory agents. For details, seeConfigure Updates to Inventory Agents.
Increased reporting from inventory beacons (upgrading from any 2014 release)
If you are upgrading from a 2014 release (prior to 2015 R1), and you wish to take advantage of other newfeatures (including the increased reporting from inventory beacons), your next inventory import and licenseconsumption calculation must include a full (non-differential) import of FlexNet inventory. The command line toachieve this is shown below. Notice the particular use of the dash characters:
Upgrading FlexNet Manager Suite
Upgrading FlexNet Manager Suite to 2018 R2 On Premises | Company Confidential 105
BatchProcessTask.exe run InventoryImport ---f
For more explanation, see Optional: Perform a Full Import.
Adapter upgrades
Some adapters require special handling, or additional configuration or upgrade from earlier releases:
• BMC Discovery — If you are using this adapter and running it on your application server (rather than on a free-standing inventory beacon), you should ensure that all devices are updated for sociability with FlexNetinventory. You achieve this by making your next import and compliance calculation a full (non-differential)import, as described above.
• The ServiceNow integration package was entirely reworked in the 2016 R1 release. For details, see the relevantpart in FlexNet Manager Suite Adapters Reference PDF, available through the title page of online help.
• XenApp adapter (see Update the XenApp Adapter)
• XenDesktop adapter (see Update the XenDesktop Adapter).
These last two adapters require upgrading to match the new architecture that Citrix has released since version 7of those products.
Enhancement for Purchase RecordsEnhanced functionality in the Unprocessed Purchases page (if you are upgrading from a release prior to 2016R1) may require that you re-process some purchase records. The process is described below. These prior notesprovide background understanding of causes and impacts.
The enhancement is:
• In prior releases, a purchase (of an appropriate type) appeared in this Unprocessed Purchases listing onlywhen it was not linked to a license. The test did not take any account of quantities that were linked from thepurchase to one or more licenses — as long as there was at least one link between the purchase record and alicense, the purchase was counted as 'processed'.
• From release 2016 R1, FlexNet Manager Suite better supports splitting purchases of relevant types (includingmaintenance) across multiple licenses. As part of this improved functionality, it now examines each purchaseto compare the quantity purchased with the quantity assigned to one or more licenses. Any time that thequantity assigned is less than the quantity purchased, the purchase is included in the UnprocessedPurchases listing. This allows you to use this listing as a work center for purchase processing, especially whenyou are splitting purchases across multiple licenses. The purchase is automatically removed from the listing asyou assign the last of its purchased quantity to a license.
Depending on your previous work practices, this enhancement may cause some purchases previously processedto reappear in the Unprocessed Purchases listing after upgrade. This is more likely to occur for purchases oftype Software Maintenance, and will occur if your previous practice has been to manually set the purchasequantity for a maintenance purchase to zero as you linked it to a license.*
In those cases where you had manually set the assignment from a maintenance purchase to a license to zero,there is an ongoing mismatch between the quantity purchased and the quantity assigned to the relevantlicense(s). After your upgrade, this mismatch correctly causes the purchase to appear in the enhanced
Upgrading FlexNet Manager Suite
106 Upgrading FlexNet Manager Suite to 2018 R2 On Premises | Company Confidential

Unprocessed Purchases listing. (The same is true of any other cases of historical purchases where, for anyreason, the purchased quantity does not match the total assignments to licenses.) Since every purchase record ischecked for this listing (no matter how old), you may rely on it catching all historical cases where the mismatchbetween purchased quantity and assigned quantity exists.
To identify and reprocess purchases if required:
1. In the web interface for FlexNet Manager Suite, navigate to Procurement > Unprocessed Purchases (inthe Purchases group).
The listing includes all historical purchases for which there is an Available quantity (which is the differencebetween the purchased quantity and the total assigned to all linked licenses).
2. Select one or more rows from the listing.
3. Click Recalculate.
After a moment, unprocessed purchases may show updated values for Recommended licenses. In thecases described above, the recommendation is most often to link (once again) to the same license(s) youhad previously linked to each purchase. Review all recommendations.
4. Select only those purchases with recommendations that you find acceptable, and click Accept.
Tip: The Accept button is enabled only when you select purchases with recommended licenses. Youcannot include any rows where the Recommended licenses column displays No recommendationcalculated,
FlexNet Manager Suite creates the appropriate links to the recommended licenses (including correcting thelink types of those purchases that had been incorrectly linked before, so that their maintenance had beenwrongly counted towards entitlements).
5. If there are remaining historical purchases that still require processing, select one at a time and clickProcess.
A blue wizard area appears above the listing to assist with your processing choices. For details, click theonline help button in the top right of the Unprocessed Purchases page.
6. Repeat as required until all the historical purchase records have been reprocessed.
The necessary reprocessing is completed, and entitlement counts and maintenance coverage correctly reflectyour input data.
Tip: For Software Maintenance purchases, be sure to record the effective date and the expiry date on eachmaintenance purchase. This allows the system to automatically calculate coverage, alert you to forthcomingrenewals, and so on.
* One reason you may have used this approach is because of an early defect, since repaired, that incorrectlycounted maintenance purchases toward license entitlements. This error only occurred when:
• The purchase was manually linked to the license (it did not occur when purchase automation was used)
• The link was manually made from the purchase properties (it did not occur when the link was made from thelicense end of the relationship).
Upgrading FlexNet Manager Suite
Upgrading FlexNet Manager Suite to 2018 R2 On Premises | Company Confidential 107
(Historical purchase records affected by the old defect are visible in the Purchases tab of the license properties,where you can examine the Purchase type and License entitlements columns. Any linked purchase of typeSoftware maintenance should have no value shown for License entitlements. Cases where you had adjustedthe assigned quantity manually are detected and repaired as described here; and any cases where you did notnotice this old error are now likely to be flagged in license listings with an alert that there is a mismatchbetween the software entitlements and the maintenance coverage.)
Configure Updates to Inventory Agents
Adjust the database settings that control automatic updates of deployed FlexNet inventory agents.
Note: Advanced inventory functionality often requires you to authorize the latest versions of FlexNetinventory agent. For example:
• Collecting access evidence for calculating consumption of CALs requires the use of FlexNet inventory agentfor 2016 R1 (12.0.0) or later
• Improved application recognition for Tivoli Storage Manager™ version 7.x and IBM Spectrum Protect™version 8.x and later require the use of FlexNet inventory agent for 2018 R1 (12.4.2) or later.
By default, an upgrade to your central application server(s) and inventory beacon(s) does not trigger anyautomatic updates to the FlexNet inventory agents that you have deployed on target machines for localinventory collection. In fact, the upgrade mechanism for FlexNet inventory agent is turned off after an upgradeto the central application servers. This gives you freedom to manage the upgrade of deployed FlexNet inventoryagents independently of the upgrade to the central application server.
Tip: This procedure applies only to FlexNet inventory agents installed locally on inventory targets (eitherthrough 'adoption' or third-party deployment) and collecting policy from an inventory beacon. Other scenariosare handled differently:
• Copies of the FlexNet inventory core components installed on inventory beacons and used for zero-touchinventory collection are updated as part of the FlexNet Beacon self-update.
• If you are using copies of the lightweight FlexNet Inventory Scanner, you need to update those copies usingthe same techniques by which you deployed it in the first place.
• If you have used other techniques to deploy the FlexNet inventory core components to file shares or otherlocations of your choosing (where they are not automatically collecting policy), you need to use yourpreferred technique for deploying updated components.
The upgrade of deployed FlexNet inventory agents is controlled by settings stored in the central operationsdatabases. For that reason, this procedure takes place on your batch server/reconciliation server (or whicheverserver includes that functionality, such as your processing server, or application server in smallerimplementations).
Tip: The database setting grants permission (through policy) to the FlexNet inventory agents to perform self-upgrades (or even downgrades) to the specified version. The setting, therefore, can only be put into effect onthose platforms where the FlexNet inventory agent includes self-update functionality, and where new versionsof the FlexNet inventory agent are included in the operations databases after the upgrade. Currently, FlexNet
Upgrading FlexNet Manager Suite
108 Upgrading FlexNet Manager Suite to 2018 R2 On Premises | Company Confidential

inventory agents on Debian or Ubuntu Linux do not include self-update functionality. On these platforms, youcan do any of:
• Deploy new versions of FlexNet inventory agent manually
• Use your preferred third-party deployment tool to publish updates to FlexNet inventory agents
• Uninstall the old version(s) of FlexNet inventory agent, and once again target the devices for adoptionthrough FlexNet Manager Suite.
To authorize self-update of FlexNet inventory agent through policy:
1. Log in to your batch server using the installing user account (suggestion: fnms-admin).
Depending on the actions you want to take, the account requires either read or write access to thedatabase.
2. In a command window, navigate to installation-folder\DotNet\bin.
3. To review a list of the FlexNet inventory agent versions to which you may upgrade:
.\ConfigureSystem.exe list-agent-versions
Note: Managed Service Providers (MSPs) covering multiple tenants must use:
.\ConfigureSystem.exe list-agent-versions --tenantuid tenantIdentifier
This lists all versions of the FlexNet inventory agent that are stored in your database and available for useas upgrades to your currently deployed agents. The list is typically updated at each release of FlexNetManager Suite. Versions are shown by their internal major-minor-update numbering (such as 12.0.0).
4. To identify which version of the FlexNet inventory agent you have currently authorized as the target versionfor all upgrades:
.\ConfigureSystem.exe current-agent-upgrade
Note: Managed Service Providers (MSPs) covering multiple tenants must use:
.\ConfigureSystem.exe current-agent-upgrade --tenantuid tenantIdentifier
5. To authorize a new version of the FlexNet inventory agent as the target version for all upgrades:
.\ConfigureSystem.exe select-agent-upgrade --version versionString
Note: Managed Service Providers (MSPs) covering multiple tenants must use (all on one line):
.\ConfigureSystem.exe select-agent-upgrade --version versionString
--tenantuid tenantIdentifier
Replace versionString with the same major-minor-update numbering as is displayed by the list-
agent-versions action. This value must be an exact match for one of the available versions listed by
Upgrading FlexNet Manager Suite
Upgrading FlexNet Manager Suite to 2018 R2 On Premises | Company Confidential 109

list-agent-versions. If not, no action is taken. (Notice that there is no requirement for the new versionto be greater than versions previously installed: you can specify an earlier version from the available list,which causes any later FlexNet inventory agents to downgrade to the specified earlier version.)
Tip: The same version (number) of the FlexNet inventory agent is normally installed across allplatforms.
6. To halt all upgrades and downgrades of the FlexNet inventory agents currently deployed in your enterprise:
.\ConfigureSystem.exe clear-agent-upgrades
Note: Managed Service Providers (MSPs) covering multiple tenants must use:
.\ConfigureSystem.exe clear-agent-upgrades --tenantuid tenantIdentifier
Tip: The result is the default state after the FlexNet Manager Suite application server(s) have beenupgraded.
When your new settings are saved to the central database, they are distributed to your inventory beacons at thenext update, along with the installer for the currently authorized target version of the FlexNet inventory agentfor each platform. The individual FlexNet inventory agents receive the setting and (if necessary) the installerwhen they next check in (by default, once a day), and subsequently they self-update to the specified version.
For more information about the actions available with this utility, use either of these commands:
.\ConfigureSystem.exe help
.\ConfigureSystem.exe help action-name
Updating the ADDM AdapterThe ADDM adapter now offers increased support for BMC Atrium Discovery and Dependency Mapping.Additional features introduced with ADDM release 11 require that, if you have previously been using thisadapter, you need to update the staging database used for data import.
Note: If you are continuing to use ADDM release 10 or earlier, you do not need to update the stagingdatabase schema, and may skip this process. However, if you do apply this update to the staging databaseschema and continue to use ADDM release 10 or earlier, be sure to also use the latest version of theFnmpADDMStage.exe executable from the same Adapter Tools for FlexNet Manager Suite 2018 R2.ziparchive. This executable transfers to ADDM data (for any ADDM version) to the staging database, and isschema-aware for the upgraded staging database.
The update is a straight-forward task, once you have the latest copy of the appropriate script.
To update the ADDM adapter:
1. Download the Adapter Tools for FlexNet Manager Suite 2018 R2.zip archive from the FlexeraCustomer Community knowledge base:
Upgrading FlexNet Manager Suite
110 Upgrading FlexNet Manager Suite to 2018 R2 On Premises | Company Confidential

a. Access https://flexeracommunity.force.com/customer/articles/en_US/INFO/Adapter-Tools-for-FlexNet-Manager-Suite.
Tip: Access requires your Customer Community user name and password. If you do not haveone, use the link on the login page to request one.
b. Click the link Adapter Tools for FlexNet Manager Suite.
A new browser tab may appear temporarily, and the download of Adapter Tools for FlexNetManager Suite 2018 R2.zip commences.
c. In your browser dialog, choose to save the file, and if the browser allows it, direct the saved file to aconvenient working location (such as C:\Temp on a central, accessible server).
If your browser saves the file to a default location (such as your Downloads folder), move or copy itto the appropriate working location when the download is finished.
2. Right-click the downloaded zip archive, and choose Extract All....
3. Navigate through the unzipped archive to Adapter Tools for FlexNet Manager Suite 2018 R2.zip >BMC Atrium Discovery and Dependency Mapping Tools > SQL.
4. If necessary, copy the script ADDM_staging.sql from the SQL\ folder of your unzipped adapter archive toa temporary folder on your staging server.
5. Open a command prompt on the staging server.
6. In the command prompt window, execute the following command, as amended:
sqlcmd -S ServerName\InstanceName -i TemporaryPath\ADDM_staging.sql
where:
• The database ADDM_Staging is created with all necessary tables, indices, and so on.
• ServerName is the name of the database server hosting the staging database, or its IP address, or “.”
(dot) if you are running the staging script on the same server as the database instance
• InstanceName is the name of the instance to use for the database staging tables (this parameter may
be omitted if the instance is the default instance)
• TemporaryPath is the location where you saved the SQL procedure.
Example:
sqlcmd -S 192.100.0.20\Development -i C:\temp\ADDM_staging.sql
The schema of your staging database is updated. For more information about the latest ADDM adapter, see therelevant chapter in the FlexNet Manager Suite Adapters Reference, available through the title page of online help.
Upgrading FlexNet Manager Suite
Upgrading FlexNet Manager Suite to 2018 R2 On Premises | Company Confidential 111

Update the XenApp AdapterThe updated XenApp adapter requires updates to the XenApp server agent, the staging database, and themethod of collecting Active Directory data.
To update the XenApp server agent:
1. Check the inventory beacon update is complete (see Update and Deploy Additional Inventory Beacons andsub-sections).
2. Be sure that you have completed an import from Active Directory from all relevant domains.
For set-up details refer to FlexNet Manager Suite Help > Inventory Beacons > Active Directory Page.
3. If you did not already update your staging database for this adapter in your central database server (asdescribed in Upgrade/Create Databases):
a. Locate your downloaded archive Adapter Tools.zip (perhaps in C:\temp\FNMSUpgrade\), and inyour unzipped archive, navigate into the \Citrix XenApp Server Agent subdirectory.
b. Further navigate into the appropriate sub-folder for your version of XenApp:
• XenAppAgent6
• XenAppAgent65
• XenAppAgent75
• XenAppAgent76
• XenAppAgent78
• XenAppAgent79
• XenAppAgent711
• XenAppAgent712.
c. From your chosen folder, collect a copy of the database creation/update scriptSetupXenAppAgentStagingDatabase.sql.
d. Drop this SQL script on the database server hosting your staging database, and execute it in SQLServer Administration Studio against your chosen database instance.
Tip: If you have more than one of these staging databases, repeat this process until they are allupdated.
4. Ensure that the appropriate inventory beacon(s) has/have a connection configured for the stagingdatabase(s), and that the connection is scheduled for regular operation.
For details, check the Create Connections for Data Upload section of the XenApp Server Adapter chapter inFNMSAdaptersReferencePDF.pdf, available through the title page of online help.
Upgrading FlexNet Manager Suite
112 Upgrading FlexNet Manager Suite to 2018 R2 On Premises | Company Confidential
5. On each of your XenApp controlling servers where FNMPXenAppAgent.exe is installed, replace theexecutable with the correct version from the unzipped archive.
For details, check the Installing the XenApp Server Agent section in the above-mentioned chapter.
6. As required, create or update a scheduled task to execute the upgraded XenApp server agent.
See the adjacent topic Create a Scheduled Task in the same chapter.
Tip: Pay particular attention to the schedule for the agent, and the schedule of the inventory beaconimport from the staging table. These two activities must not overlap.
The XenApp adapter is now ready for operation. On schedule, the agent populates the staging database; on thelater schedule, the staged data is collected by the inventory beacon and uploaded to the central server; finally,when the next inventory import and compliance calculation is run, the XenApp applications and the users whocan access them are available, at least as installer evidence and file evidence, within FlexNet Manager Suite. Youmay additionally need to link the evidence to applications, and to ensure these applications are licensed. Formore information, see the other online help topics under FlexNet Manager Suite Help > Adapters Supplied byDefault > XenApp Server Adapter.
Update the XenDesktop AdapterThe best practice configuration for the XenDesktop adapter is to allow direct network access from theappropriate inventory beacon to the XenDesktop broker. (Where this is not permitted, you can copy theappropriate PowerShell script to the XenDesktop broker, execute it locally, and copy the generated .vdi and .ndifiles to the Incoming folder on the relevant inventory beacon.)
As this adapter relies on PowerShell scripts run from the inventory beacon and executing on the XenDesktopbroker, both these servers must allow at least RemoteSigned execution policy for PowerShell, as describedbelow.
If you are upgrading from an earlier version of the XenDesktop adapter, notice that you must run the ActiveDirectory import separately, and prior to exercising the adapter, as listed below. Failure to do this risks theremoval of previously-gathered inventory of VDI access to applications.
To update the XenDesktop adapter:
1. Check the inventory beacon update is complete (see Update and Deploy Additional Inventory Beacons andsub-sections).
2. Be sure that you have completed an import from Active Directory from all relevant domains.
For set-up details refer to FlexNet Manager Suite Help > Inventory Beacons > Active Directory Page.
3. On each of the inventory beacon and the XenDesktop broker, check the execution policy for PowerShellscripts:
a. On each machine in turn, open a PowerShell window.
b. At the prompt, enter Get-ExecutionPolicy.
Upgrading FlexNet Manager Suite
Upgrading FlexNet Manager Suite to 2018 R2 On Premises | Company Confidential 113

Usable settings include RemoteSigned, AllSigned, or Unrestricted (although the latter is notrecommended).
c. If the current policy setting is Restricted, run the following command to set it to RemoteSigned:
Set-ExecutionPolicy RemoteSigned
4. Create (or update) discovery and inventory gathering rules to target your XenDesktop brokers:
a. In the web interface for FlexNet Manager Suite, navigate to Discovery & Inventory > Discoveryand Inventory Rules (in the Discovery group).
b. Select the Targets tab, click Create a target, and complete the details to target your XenDesktopbroker(s). Click Save to add your new target to the list of available targets. (If necessary, repeat tocreate multiple targets.)
c. Select the Actions tab, click Create an action, and give your new action a useful name anddescription.
d. Expand the XenDesktop environments heading in the accordion list, and select both DiscoverXenDesktop environments and Also gather XenDesktop environment inventory. Then clickCreate to record your new action.
e. Select the Rules tab, click Create a rule, and in the rule builder that appears, click the View
Actions... hyperlink.
f. For the rule you just created, click Add to rule builder, and in the rule builder, click the View
Targets... hyperlink.
g. For the target(s) you defined, click Add to rule builder, and in the rule builder, click Schedule.
h. Complete the scheduling details, and click Save as.
i. Give your rule a meaningful name, and click Save.
Tip: After a little time (say, 30 minutes) to allow for the relevant inventory beacon to collectedits updated rules, you can inspect the rule on the applicable inventory beacon, in its Rules page.(If it hasn't updated yet, click Update now.)
5. After the XenDesktop adapter runs (according to the schedule you just created), and after the subsequentinventory import and compliance calculation, you can inspect the inventory from your XenDesktop broker:
a. In the web interface for FlexNet Manager Suite, navigate to Discovery & Inventory > AllDiscovered Devices (in the Discovery group).
b. Locate your XenDesktop broker in the list of devices.
Tip: Adding the VDI broker column from the column chooser, and then filtering on Yes, mayhelp you locate this server.
c. Click the device's name to open its properties, select the Status tab, and expand the XenDesktopenvironment inventory section of the accordion.
Upgrading FlexNet Manager Suite
114 Upgrading FlexNet Manager Suite to 2018 R2 On Premises | Company Confidential

This is also the location where any PowerShell script errors from the inventory beacon are reported.Should you need additional troubleshooting:
• Inspect the log file on the inventory beacon for errors relating to XenDesktop discovery. This fileis located at %PROGRAMDATA%\Flexera Software\Compliance\Logging\BeaconEngine.
• Should you need to prepare a trace file to submit to Flexera Support, turn on the Scheduling/
RemoteExecution tracing options by editing this file on your inventory beacon:
InstallationDirectory\Flexera Software\Inventory Beacon\etdp.trace
6. As required, you may need to link the file evidence imported from XenDesktop to application records, andensure that those application records are linked to license records. Wherever possible, link the licenserecords to purchase records to identify the number of your license entitlements.
Once all the links are in place, the next compliance calculation reflects your compliance position forapplications accessible through XenDesktop.
Upgrading FlexNet Manager Suite
Upgrading FlexNet Manager Suite to 2018 R2 On Premises | Company Confidential 115

3Notes on Issues
This chapter includes a few brief guidelines for dealing with common issues. If you discover additional issues notdescribed here, please contact Flexera Support for assistance.
For help on problems uploading inventory data, access the online help through the web interface for FlexNetManager Suite, and navigate to FlexNet Manager Suite Help > Inventory Beacons > Inventory BeaconReference > Troubleshooting: Inventory Not Uploading.
Password MaintenanceWhen a password on the service account expires, services cease to operate. At password refresh time, ensure thatthe password is updated for all of the following.
Note: For accuracy, the changes are listed for distinct servers. In smaller implementations:
• If you have only a web application server and a processing server, then combine the lists for the batch serverand inventory server for use on your processing server
• In a single server implementation, combine all three lists on your application server.
The configuration scripts used during product installation cannot be re-run simply to update passwords. Thefollowing passwords must all be maintained manually.
On the web application server
• The identity configured on the following IIS application pools:
◦ FlexNet Manager Platform
◦ ManageSoftWebServiceAppPool
◦ SAP Optimization
◦ SAPServiceAppPool
Notes on Issues
116 Upgrading FlexNet Manager Suite to 2018 R2 On Premises | Company Confidential

On the batch server
• The identity configured on the IIS application pool: Flexera Beacon
• In Services:
◦ FlexNet Manager Suite Batch Process Scheduler
◦ FlexNet Manager Suite Batch Processor
• In the FlexNet Manager Platform folder for Microsoft Scheduled Tasks:
◦ Data warehouse export
◦ Export to ServiceNow
◦ FlexNet inventory data maintenance
◦ FNMP database support task
◦ Import Active Directory
◦ Import application usage logs
◦ Import discovery information
◦ Import installation logs
◦ Import inventories
◦ Import Inventory Beacon activity status
◦ Import Inventory Beacon status
◦ Import remote task status information
◦ Import security event information
◦ Import SAP inventories
◦ Import SAP package license
◦ Import SAP user and activity information
◦ Import system status information
◦ Import VDI access data
◦ Inventory import and license reconcile
◦ Recognition data import
◦ Regenerate Business Import config
◦ Send contract notifications.
On the inventory server
• The identity configured on the following IIS application pools:
Notes on Issues
Upgrading FlexNet Manager Suite to 2018 R2 On Premises | Company Confidential 117

◦ Flexera Importers
◦ Flexera Package Repository
• In the FlexNet Manager Platform folder for Microsoft Scheduled Tasks:
◦ Import Active Directory
◦ Import application usage logs
◦ Import discovery information
◦ Import installation logs
◦ Import inventories
◦ Import Inventory Beacon activity status
◦ Import Inventory Beacon status
◦ Import remote task status information
◦ Import security event information
◦ Import system status information
◦ Import VDI access data.
On the Cognos server
The password on the IBM Cognos service also needs to be maintained.
On the inventory beaconBy default, the FlexNet Beacon Engine service and scheduled tasks run as the local SYSTEM account. If thesedefaults have been modified:
• The following service in the Services (local) folder of Component Services (this may have been modified torun as a service account with administrator privileges):
◦ FlexNet Beacon Engine.
Note: The following services are also present, but must be running as the local SYSTEM account:
◦ Flexera Inventory Manager installation agent
◦ Flexera Inventory Manager managed device vversionNumber
◦ Flexera Inventory Manager security service.
• In the FlexNet Inventory Beacon folder for Microsoft Scheduled Tasks (by default, these tasks run as the localSYSTEM account, but you may have modified the installation to run these as a named user account in order tomanage proxy access):
◦ Upload Flexera logs and inventories
◦ Upload third party inventory data.
Notes on Issues
118 Upgrading FlexNet Manager Suite to 2018 R2 On Premises | Company Confidential

Identifying IIS Application Pool CredentialIssuesA password change on (any of the) application server(s) may require an update of the IIS configuration.
Background
During installation of an on-premises implementation, PowerShell scripts run on the application server (or, in amulti-server implementation, on each of the component servers in turn) ask you to provide credentials for theapplication pools used within IIS for FlexNet Manager Suite. The scripts save these as part of the IIS configuration.
Note: If, as recommended, you have used a service account (suggested: svc-flexnet) for this purpose, it is veryunusual to require a password change for such an account. If you used a normal user account, you require thisadditional maintenance each time that the password on that account is changed.
If, at any time after installation, the password for this user account is updated, the IIS configuration is now out ofdate, and IIS will refuse to run the application pools for FlexNet Manager Suite.
Tip: In this case, as well as IIS configuration, you may also need to update passwords on scheduled tasks andon services. For a complete list, see Password Maintenance.
Diagnosis
First symptom: The web interface for FlexNet Manager Suite will not load, producing the following error:
HTTP Error 503 - Service unavailable
Investigation: If you examine the Microsoft IIS application pools, you will find that the application pool forFlexNet Manager Platform is disabled after any attempt to run the web interface. An examination of the IIS logfile shows entries like the following:
server-name 5057 Warning Microsoft-Windows-WAS System date time
Application pool FlexNet Manager Platform has been disabled. Windows Process Activation
Service (WAS)did not create a worker process to serve the application pool because the
application pool identity is invalid.
server-name 5059 Error Microsoft-Windows-WAS System date time
Application pool FlexNet Manager Platform has been disabled. Windows Process Activation
Service (WAS) encountered a failure when it started a worker process to serve the
application pool.
server-name 5021 Warning Microsoft-Windows-WAS System date time
The identity of application pool FlexNet Manager Platform is invalid. The user name or
password that is specified for the identity may be incorrect, or the user may not have
batch logon rights. If the identity is not corrected, the application pool will be
disabled when the application pool receives its first request. If batch logon rights
are causing the problem, the identity in the IIS configuration store must be changed
Notes on Issues
Upgrading FlexNet Manager Suite to 2018 R2 On Premises | Company Confidential 119

after rights have been granted before Windows Process Activation Service (WAS) can
retry the logon. If the identity remains invalid after the first request for the
application pool is processed, the application pool will be disabled. The data field
contains the error number.
Repair
Update the credentials for the applications pool on each of your application servers, using the process in UpdateCredentials in IIS Application Pools.
Update Credentials in IIS Application PoolsTo update the password for the FlexNet Manager Suite application pools within Microsoft IIS, complete thefollowing process on each of your servers in turn:
Tip: Servers are here named in a series from most specific (in large scale implementations) to most general(for small scale implementations). Use the first-listed server type that applies to you. For example, if the listitem says 'on the inventory server/processing server/application server', and you have a separate inventoryserver, make the change there. If you do not have a separate inventory server, but you have scaled to aseparate processing server (that combines your inventory server and your batch server), make the change onyour processing server. For a single-server implementation, you make this change on your application server.
To update credentials in IIS Application Pools:
1. Open IIS Manager (Start > Administrative Tools > Internet Information Service (IIS) Manager).
2. In the navigation area on the left, expand the SERVER-NAME (account-name) node, and select ApplicationPools.
Any application pool accessed since the user account password was changed displays a status of Stopped.On each server type, the relevant application pools are:
• Flexera Beacon on the batch server/processing server/application server
• Flexera Importers on the inventory server/processing server/application server
• Flexera Package Repository on the inventory server/processing server/application server
• FlexNet Manager Platform on the web application server/application server
• ManageSoftWebServiceAppPool on the web application server/application server
• SAP Optimization on the web application server/application server
• SAPServiceAppPool on the web application server/application server.
3. Select the appropriate application pool, and in the Actions list on the right, click Advanced Settings.
The Advanced Settings dialog appears.
4. In the Process Model section, select Identity, and click the ellipsis button next to the account name.
Notes on Issues
120 Upgrading FlexNet Manager Suite to 2018 R2 On Premises | Company Confidential

5. Next to Custom Account, click Set.
The Set Credentials dialog appears.
6. Enter the full User name for the account and enter the updated password in the two required fields.
7. Click OK to close all the open dialogs and save the new settings.
8. With the appropriate application pool still selected, in the Actions list on the right, click Start.
IIS Roles/ServicesBelow are the Microsoft Internet Information Services (IIS) roles and services utilized by FlexNet Manager Suite. Inthe event of misbehavior, it is often helpful to validate that all of the following are enabled on all your centralservers (depending on the scale of your implementation, the ones that you have implemented from theapplication server, the web application server, the processing server, the batch server, and the inventory server).The process for checking whether the services are enabled is summarized below the list.
• Web Server > Application Development > .NET Extensibility
• Web Server > Application Development > ASP.NET
• Web Server > Application Development > CGI
• Web Server > Application Development > ISAPI Extensions
• Web Server > Application Development > ISAPI Filters
• Web Server > Common HTTP Features > Default Document
• Web Server > Common HTTP Features > Directory Browsing
• Web Server > Common HTTP Features > HTTP Errors
• Web Server > Common HTTP Features > HTTP Redirection
• Web Server > Common HTTP Features > Static Content
• Web Server > Health and Diagnostics > HTTP Logging
• Web Server > Performance > Dynamic Content Compression
• Web Server > Performance > Static Content Compression
• Web Server > Security > Basic Authentication
• Web Server > Security > Request Filtering
• Web Server > Security > Windows Authentication
To check available services in the Windows Server operating system:
1. Starting from the Windows start menu, navigate to Control Panel > Administrative Tools > ServerManager.
Notes on Issues
Upgrading FlexNet Manager Suite to 2018 R2 On Premises | Company Confidential 121

2. In the navigation bar on the left, under the Server Manager node, select the Roles node.
3. Locate the Web Server (IIS) section, and within that, identify the Role Services section.
This section lists the status for each service. All of those in the list above should be both installed andenabled on all your central servers.
Notes on Issues
122 Upgrading FlexNet Manager Suite to 2018 R2 On Premises | Company Confidential