TWCAT Communication Driver
30
TWCAT – Driver Version 1.26 Doc. Revision AB –Feb 22nd, 2018 Page 1/30 TWCAT Communication Driver Driver for TCP/IP Communication with TWINCAT Runtime Using TwinCAT ADS Library Contents INTRODUCTION ........................................................................................................................................................2 GENERAL INFORMATION ........................................................................................................................................3 DEVICE CHARACTERISTICS .....................................................................................................................................3 LINK CHARACTERISTICS ..........................................................................................................................................3 DRIVER CHARACTERISTICS .....................................................................................................................................3 CONFORMANCE TESTING ........................................................................................................................................4 INSTALLING THE DRIVER .......................................................................................................................................5 CONFIGURING THE DRIVER ...................................................................................................................................6 SETTING THE COMMUNICATION PARAMETERS ..........................................................................................................6 CONFIGURING THE DRIVER WORKSHEETS ...............................................................................................................7 EXECUTING THE DRIVER ..................................................................................................................................... 22 TROUBLESHOOTING ............................................................................................................................................ 23 SAMPLE APPLICATION ........................................................................................................................................ 25 REVISION HISTORY............................................................................................................................................... 26 APPENDIX A : INSTALLING AND CONFIGURING THE TWINCAT ADS SOFTWARE ...................................... 28 DOWNLOAD AND INSTALL THE ADS SOFTWARE ON THE LOCAL COMPUTER SETTING THE COMMUNICATION PARAMETERS ...................................................................................................................................................... 28 ADD AN AMS ROUTE BETWEEN THE LOCAL COMPUTER AND THE TARGET ................................................................ 28 TO ADD THE AMS ROUTE ON THE LOCAL COMPUTER ............................................................................................. 29 TEST THE AMS ROUTE THAT YOU ADDED .............................................................................................................. 29
-
Upload
khangminh22 -
Category
Documents
-
view
1 -
download
0
Transcript of TWCAT Communication Driver
TWCAT – Driver Version 1.26
Doc. Revision AB –Feb 22nd, 2018
Page 1/30
TWCAT Communication Driver
Driver for TCP/IP Communication with TWINCAT Runtime Using TwinCAT ADS Library
Contents
INTRODUCTION ........................................................................................................................................................2
GENERAL INFORMATION ........................................................................................................................................3
DEVICE CHARACTERISTICS .....................................................................................................................................3 LINK CHARACTERISTICS ..........................................................................................................................................3 DRIVER CHARACTERISTICS .....................................................................................................................................3 CONFORMANCE TESTING ........................................................................................................................................4
INSTALLING THE DRIVER .......................................................................................................................................5
CONFIGURING THE DRIVER ...................................................................................................................................6
SETTING THE COMMUNICATION PARAMETERS ..........................................................................................................6 CONFIGURING THE DRIVER WORKSHEETS ...............................................................................................................7
EXECUTING THE DRIVER ..................................................................................................................................... 22
TROUBLESHOOTING ............................................................................................................................................ 23
SAMPLE APPLICATION ........................................................................................................................................ 25
REVISION HISTORY............................................................................................................................................... 26
APPENDIX A : INSTALLING AND CONFIGURING THE TWINCAT ADS SOFTWARE ...................................... 28
DOWNLOAD AND INSTALL THE ADS SOFTWARE ON THE LOCAL COMPUTER SETTING THE COMMUNICATION
PARAMETERS ...................................................................................................................................................... 28 ADD AN AMS ROUTE BETWEEN THE LOCAL COMPUTER AND THE TARGET ................................................................ 28 TO ADD THE AMS ROUTE ON THE LOCAL COMPUTER ............................................................................................. 29 TEST THE AMS ROUTE THAT YOU ADDED .............................................................................................................. 29
TWCAT – Driver Version 1.26
Doc. Revision AB –Feb 22nd, 2018
Page 2/30
Introduction
The TWCAT driver enables communication between the Studio system and TwinCAT PLC using the TwinCAT
ADS Interface PLC over TCP/IP, according to the specifications discussed in this document.
This document was designed to help you install, configure and execute the TWCAT driver to enable
communication with these devices. The information in this document is organized as follows:
Introduction: Provides an overview of the TWCAT driver documentation.
General Information: Provides information needed to identify all the required components (hardware and
software) used to implement communication between Studio and the TWCAT driver.
Installing the Driver: Explains how to install the TWCAT driver.
Configuring the Driver: Explains how to configure the TWCAT driver.
Executing the Driver: Explains how to execute the driver to verify that you installed and configured the
driver correctly.
Troubleshooting: Lists the most common error codes for this protocol and explains how to fix these errors.
Sample Application: Explains how to use a sample application to test the TWCAT driver configuration.
Revision History: Provides a log of all modifications made to the driver and the documentation.
Notes:
• This document assumes that you have read the “Development Environment” chapter in the Studio Technical Reference Manual.
• This document also assumes that you are familiar with the Windows XP/7/8 environment. If you are unfamiliar with Windows XP/7/8, we suggest using the Help feature (available from the Windows desktop Start menu) as you work through this guide.
TWCAT – Driver Version 1.26
Doc. Revision AB –Feb 22nd, 2018
Page 3/30
General Information
This chapter explains how to identify all the hardware and software components used to implement
communication between the Studio TWCAT driver and the TwinCAT PLC.
The information is organized into the following sections:
Device Characteristics Link Characteristics Driver Characteristics Conformance Testing
Device Characteristics
To establish communication, you must use devices with the following specifications:
Manufacturer: Beckhoff
Compatible Equipment: Beckhoff TwinCAT PLC/IO on Windows XP/7/8, CX1000 and CX1020 with Windows CE 5.0 and 6.0, PLC BC9000 and BX9000, and CP66xx with Windows CE 5.0 and ARMV4i processor
Programmer Software: Beckhoff TwinCAT (System Manager and PLC Control)
Link Characteristics
To establish communication, you must use links with the following specifications:
Device Communication Port: Runtime device (CX, CP, BC, BX, PC) Ethernet Port
Physical Protocol: Ethernet/TCP/IP
Logic Protocol: ADS
Device Runtime Software: TwinCAT Software
Third Party Library: TwinCAT ADS Interface PLC Software (tcAdsDll.dll or tcAdsDllCE.dll)
Specific PC Board: Any TCP/IP Adapter (Ethernet Board)
Driver Characteristics
The TWCAT driver is composed of the following files:
TWCAT.INI: Internal driver file. You must not modify this file.
TWCAT.MSG: Internal driver file containing error messages for each error code. You must not modify this file.
TWCAT.PDF: Document providing detailed information about the TWCAT driver.
TWCAT.DLL: Compiled driver.
Notes:
• All of the preceding files are installed in the /DRV subdirectory of the Studio installation directory.
• You must use Adobe Acrobat® Reader™ (provided on the Studio installation CD-ROM) to view the TWCAT.PDF document.
You can use the TWCAT driver on the following operating systems:
Windows XP/7/8
Windows CE
For a list of the operating systems used for conformance testing, see “Conformance Testing” on page 4.

TWCAT – Driver Version 1.26
Doc. Revision AB –Feb 22nd, 2018
Page 4/30
The TWCAT driver supports the following flair registers:
Register Type Write Read Bit Byte Integer Float DWord
%M
%Q
%I
NAME
ARRAY
Note:
• The TWCAT driver communicates only with Variable Names when communicating with a Windows based TwinCAT runtime system for (Windows Windows XP/7/8, CX1000, CX1020, Windows CE).
• When communicating with a Beckhoff BC9000/BX9000, it is possible only through the following registers: %Q, %I and %M.
Conformance Testing
The following hardware/software was used for conformance testing:
Driver Configuration: PLC Program Maschine.pro
Cable: Ethernet Cable
Driver
Version
Studio
Version
Operating System
(Development)
Operating System
(Target) Equipment
TwinCat System Versions
1.26
8.1
+
SP1
Windows 7/8.1
Windows XP +
Service Pack 3
Windows 7
Equipment:
Beckhoff TwinCAT
PLC
2.10.1318
2.11.2401
3.1.4014
3.1.4016
3.1.4018
3.1.4020

TWCAT – Driver Version 1.26
Doc. Revision AB –Feb 22nd, 2018
Page 5/30
Installing the Driver
When you install Studio version 6.1 or higher, all of the communication drivers are installed automatically.
You must select the driver that is appropriate for the application you are using.
Perform the following steps to select the driver from within the application:
1. Open Studio from the Start menu.
2. From the Studio main menu bar, select File Open Project to open your application.
3. Select Insert Driver from the main menu bar to open the Communication Drivers dialog.
4. Select the TWCAT driver from the Available Drivers list, and then click the Select button:
Communication Drivers Dialog
5. When the TWCAT driver displays in the Selected Drivers list, click the OK button to close the dialog.
Note:
It is necessary to install the TwinCAT ADS libraries on your computer to enable communication between the host and the device. This is installed automatically if you have TwinCAT on your PC. If you will run the runtime in a PC or WinCE device without TwinCAT, you will need to get the libraries directly from Beckhoff. Please check the appendix A for further information
Attention:
For safety reasons, you must use special precautions when installing the physical hardware. Consult the hardware manufacturer’s documentation for specific instructions in this area.

TWCAT – Driver Version 1.26
Doc. Revision AB –Feb 22nd, 2018
Page 6/30
Configuring the Driver
After opening Studio and selecting the TWCAT driver, you must configure the driver. Configuring the TWCAT
driver is done in two parts:
Specifying communication parameters
Defining tags and controls in the MAIN and STANDARD DRIVER SHEETs (or Communication tables)
Worksheets are divided into two sections, a Header and a Body. The fields contained in these two sections
are standard for all communications drivers — except the Station, Header and Address fields, which are driver-
specific. This document explains how to configure the Station, Header and Address fields only.
Note:
For a detailed description of the Studio MAIN and STANDARD DRIVER SHEETs, and information about configuring the standard fields, review the product’s Technical Reference Manual.
Setting the Communication Parameters
Use the following steps to configure the communication parameters, which are valid for all Driver worksheets configured in the system:
1. From the Studio development environment, select the Comm tab located below the Workspace pane.
2. Click on the Drivers folder in the Workspace pane to expand the folder.
3. Right-click on the TWCAT subfolder and when the pop-up menu displays, select the Settings option:
Select Settings from the Pop-Up Menu
The TWCAT: Communication Parameters dialog displays:

TWCAT – Driver Version 1.26
Doc. Revision AB –Feb 22nd, 2018
Page 7/30
Communication Parameters Dialog
Field Default Range Meaning
Timeout 1000 0 or greater The value in milliseconds of the internal timeout of the TwinCAT library. This timeout is valid only when trying to find a remote TwinCAT runtime. Note: If the TwinCAT runtime is found but the system is not running, this timeout will not apply
Max Block Size 512 0 - 512 The max amount of addresses that will be read in the same block using the Main Driver Sheet. If set to 0, it defaults to 512
Import Symbol Table
After (re)Connecting
After (re)Connecting OR On Startup only
This option determines when the symbols are imported from the TwinCAT PLC or runtime:. After (re)connecting : The symbol table is dynamically imported every time this driver communicates with the target device. This option is supported by all versions of TwinCAT On startup only : The symbol table is imported only once, when this driver communicates with the target device for the first time after startup. This option is more efficient, but it is supported only by TwinCAT 3.1 or later.
4. Click the Advanced button on the Communication Parameters dialog to open the Advanced Settings dialog and
configure the necessary settings.
Notes:
Do not change any of the other Advanced parameters at this time. You can consult the Studio Technical Reference Manual for information about configuring these parameters for future reference.
Configuring the Driver Worksheets
This section explains how to configure the MAIN and STANDARD DRIVER SHEETs (or Communication tables) to
associate application tags with the device addresses. You can configure multiple Driver worksheets — each of
which is divided into a Header section and Body section.
Configuring the MAIN DRIVER SHEET
When you add the TWCAT driver to your application, Studio automatically adds a MAIN DRIVER SHEET to the
driver folder, as shown in the following figure:
Main Driver Sheet

TWCAT – Driver Version 1.26
Doc. Revision AB –Feb 22nd, 2018
Page 8/30
You use this worksheet (similar to the following figure when communicating with TwinCat v2.x) to associate
Studio tags to addresses in the PLC:
Main Driver Sheet
Note:
Most of the MAIN DRIVER SHEET parameters are standard for all drivers, and are not discussed in this document. Instructions for configuring these standard parameters are provided in the Studio Technical Reference Manual.
Use the following information to configure the Station and Address parameters specific to this driver:
Station: Type the PLC AmsNetID Address (ID number) and the Runtime number or station port.
<AmsNetID>:<Runtime or Port Number> (for example: 192.168.1.72.1.1:1 or
192.168.1.72.1.1:301)
Where:
- <AmsNetID>: AmsNet ID of the PLC.
- <Runtime>: Runtime number of PLC program (1, 2, 3 or 4) for TwinCAT programs running
- <Port Number>: PLC/NC/IO port used to do the communication.
The following ports are implemented and tested in the current TWCAT driver version:

TWCAT – Driver Version 1.26
Doc. Revision AB –Feb 22nd, 2018
Page 9/30
o 801, 811, 821, 831 – TwinCAT PLC on WinXP/2000 or WinCE
o 301 – TwinCAT I/O (Custom port option if using tag integration/online symbol retrieval)
o 800 – BC9000 or BX9000 (Custom port option if using tag integration/online symbol retrieval)
o 851 – TwinCAT 3.1 PLC (Custom port option if using tag integration/online symbol retrieval)
I/O Address: You can communicate either with the variable name (Windows based runtime system) or a
specific I/O Address
Type the address of each register in the PLC using the following syntax
For Input, Outputs and Memory areas (on TwinCat 2.x):
%<AddressType><DataType><AddressNumber>.optBit:<VarType> (for example,
%QX0.0:BOOL, %IW0:INT)
For STRING type:
%<AddressType><DataType><AddressNumber>.optBit:STRING[Length] (for example,
%QB0:STRING[9], %IW0:STRING)
Where:
– <AddressType>: Register type (%M, %Q, %I)
– <Datatype>: Format of data – B (byte), X (byte for bit access), W (word), D (double word)
– <AddressNumber>: This value is the address number that you configured on your PLC
– <Bit> (optional): Indicates the bit number to be read from/written to the device.
Important: In order to access Bit addresses, you need to have the data type set for X (e.g. %IX0.0) – <VarType>: Type here the TwinCAT variable type that you configured for this address. The valid types
are: BOOL, BYTE, WORD, DWORD, SINT, USINT, INT, UINT, DINT, UDINT, REAL, LREAL, TIME,
TOD (TIME_OF_DAY), DATE and DT (DATE_AND_TIME)
– [optLength] (optional parameter): Indicates the string length. The default length is 80.
If you do not type the variable type, it will automatically fill this field with the default type according to the
configured Data Type: BOOL for X, BYTE for B, WORD for W and DWORD for D
Note:
- If the STRING length is not configured the default value going to be 80.
- The maximum STRING length on the address field is 1024.
- If configured a studio STRING length over than the device STRING length you can have a “string
overflow” error from device.
Attention:
The headers (%M, %Q, %I) are not supported by the driver when communicating with Twincat 3.1. To
communicate with these type of variables use the variables names as the I/O addresses. See section For Variable Names below.
For Variable Names (Windows based runtime systems only, e.g. CX1000, CX1020, WinCE, WinXP,
WinXPe in Twincat 2.8 or Windows 7/8 with Twincat 3.1):
You can access both Local and Global variables.

TWCAT – Driver Version 1.26
Doc. Revision AB –Feb 22nd, 2018
Page 10/30
For Twincat v2.10 or v2.11 Global variables, type a dot and then the variable name
Examples:
.Speed
.Counter
For Twincat v3.1 Gobal variables, <name of the Global Variable List>.<variable name>
Examples:
GLBL.Speed
GLobalList.Counter
For Local variables, type the POU name first where the variable is followed by the dot and then the
variable name
Example
Main.Param1
Both type of variables support a length property, using the syntax:
<Var Name>:optLength
The length property is used to predict the block size that will be necessary, and create virtual groups that
will not be bigger than allowed. If not set, no assumption about the length is made, and the parameter
Max Block Size of the driver settings will determine the number of tags on each block.
The length is especially useful when reading several string variables that may or may not have its size
determined on the TwinCAT program, and not setting its length on the address may lead to errors of
Invalid Block Size. Also, if using the length, the user must type the same length as used on the TwinCAT
program, as in the example:
On TwinCAT:
On Studio:
Note that even though the variable string1 on TwinCAT does not have a specific size, it has a default of
80, that the user can supply on the Main Driver Sheet address to ensure correct separation of virtual
groups.

TWCAT – Driver Version 1.26
Doc. Revision AB –Feb 22nd, 2018
Page 11/30
Note:
Using Variable Names, you can access arrays and structures created in TwinCAT. However, you need
to associate one tag for each array position or structure member, as you can see in the example below:
On TwinCAT:
On Studio:
Note:
The length field syntax is also valid for members of arrays and structures.

TWCAT – Driver Version 1.26
Doc. Revision AB –Feb 22nd, 2018
Page 12/30
Address suffixes for For Variable Names:
Reading Date and Time Variable types as Strings instead of numbers
The user can optionally use suffixes in the addresses configured as Variable names to convert values received for
variables of the type DATE (use suffix DATES), DT or Date and Time (use suffix DTS), TOD or Time of Day (use
suffix TODS) into a string. This is supported when communicating with Twincat 2 or Twincat 3.1.
For example: Main.dateVarArr[1]:DATES
Main.dateTimeVarArr[4]:DTS
Main.TimeOfDayVarArr[3]:TODS
On TwinCAT:
On Studio:

TWCAT – Driver Version 1.26
Doc. Revision AB –Feb 22nd, 2018
Page 13/30
Configuring the STANDARD DRIVER SHEET
Use the following steps to create a new STANDARD DRIVER SHEET:
1. From the Studio development environment, select the Comm tab, located below the Workspace pane.
2. In the Workspace pane, expand the Drivers folder and right-click the TWCAT subfolder.
3. When the pop-up menu displays, select the Insert option:
Inserting a New Worksheet
Note:
To optimize communication and ensure better system performance, you must tie the tags in different
Driver worksheets to the events that trigger communication between each tag group and the period in
which each tag group must be read or written. Also, we recommend configuring the communication
addresses in sequential blocks to improve performance.
The STANDARD DRIVER SHEET displays (similar to the following figure):

TWCAT – Driver Version 1.26
Doc. Revision AB –Feb 22nd, 2018
Page 14/30
Standard Driver Sheet
In general, all parameters on the Driver worksheet (except the Station, Header and Address fields) are standard
for all communication drivers, but they will not be discussed in this document. For detailed information about
configuring the standard parameters, consult the Studio Technical Reference Manual.
4. Use the following information to complete the Station, Header and Address fields on this worksheet.
– Station: Type the PLC AmsNetID Address (ID number) and the Runtime or Port number.
<AmsNetID>:<Runtime or Port Number> (for example: 192.168.1.72.1.1:1 or
192.168.1.72.1.1:301)
Where:
* <AmsNetID>: AmsNet ID of the PLC.
* <Runtime>: Runtime number of PLC program (1, 2, 3 or 4) for TwinCAT programs running
* <Port Number>: PLC/NC/IO port used to do the communication.
The following ports are implemented and tested in the current TWCAT driver version:
o 801, 811, 821, 831 – TwinCAT PLC on WinXP/2000 or WinCE
o 301 – TwinCAT I/O
o 800 – BC9000/BX9000
o 851 – TwinCAT 3.1 PLC (Custom port option if using tag integration/online symbol retrieval)
Note:
If both Studio and the TwinCAT runtime are on the same computer or CX10XX, you can leave the Station field blank and it will communicate with the Local Runtime Target system number 1 (Port 801) in case of Twincat v2.x. However this will have to be configured when using Twincat v3.1
– Header field: Use the information in the following table to define the type of variables that will be read from
or written to the device

TWCAT – Driver Version 1.26
Doc. Revision AB –Feb 22nd, 2018
Page 15/30
For Input, Outputs and Memory areas:
The header must comply with the following syntax:
%<AddressType>
Where:
– <AddressType> is the can be %M, %Q or %I
After you edit the Header field, Studio checks the syntax to determine if it is valid. If the syntax is incorrect,
Studio automatically inserts the default value %M in the Header field
Also, you can type a tag string in brackets {Tag} into the Header field, but you must be certain that the
tag’s value is correct and that you are using the correct syntax or you will get an invalid Header error.
Attention:
The headers (%M, %Q, %I) are not supported by the driver when communicating with Twincat 3.1. To
communicate with these type of variables use the variables names in the Address field and NAME as the header field. See section For Variable Names below.
For Variable Names (Windows based runtime systems only, e.g. CX1000, CX1020, WinCE, WinXP,
WinXPe, WIN7/8):
For a TwinCAT Windows based runtime system, you can only access the variables by their name in the
Address field. So, in the header field you simply type NAME on it, as shown in the example below:
o Writing into Array Variables (Only supported on TwinCat v2.x)
You can optimize writing into Array Variables creating a specific standard driver worksheet for it,
where all the array positions will be written in just one shot using the Write Trigger field.
In this case, the header that you need to configure is the Tag Name with the array configuration they
way to do it on TwinCAT.
Syntax: <VariableName>[initial..final]
For example:
On TwinCAT:
On Studio:

TWCAT – Driver Version 1.26
Doc. Revision AB –Feb 22nd, 2018
Page 16/30
The following table lists all of the data types that are valid for the TWCAT driver
Data Types
Supported on Twincat version
Sample Syntax Comments
%M 2.1x %M Memory: Read and write data value in the memory area
%Q 2.1x %Q Output: Read and write data value in the outputs area.
%I 2.1x %I Input: Read and write data value in the inputs area.
NAME 2.1x and 3.1 NAME Variable Name: up to 512 in the same driver sheet or 7Kb of Data.
Array Variable
Name
2.1x .VAR[0..10] Array Variable Name – the limit is the variable array size. (only 1 dimenstional arrays)

TWCAT – Driver Version 1.26
Doc. Revision AB –Feb 22nd, 2018
Page 17/30
– Address field: Use the information in the next table to associate each tag to its respective device address.
Type the tag from your application database into the Tag Name column. This tag will receive values from or send values to an address on the device. The address must comply with the following syntax:
For Input, Outputs and Memory areas:
<DataType><AddressNumber>.optBit:<VarType> (for example, X0.0:BOOL, W0:INT)
For STRING type:
<DataType><AddressNumber>.optBit:STRING[optLength] (for example, B0:STRING[9],
W0:STRING)
Where:
– <Datatype>: Format of data – B (byte), X (byte for bit access), W (word), D (double word)
– <AddressNumber>: This value is the address number that you configured on your PLC
– <Bit> (optional): Indicates the bit number to be read from/written to the device.
Important: In order to access Bit addresses, you need to have the data type set for X (e.g. %IX0.0) – <VarType>: Type here the TwinCAT variable type that you configured for this address. The valid types
are: BOOL, BYTE, WORD, DWORD, SINT, USINT, INT, UINT, DINT, UDINT, REAL, LREAL, TIME,
TOD (TIME_OF_DAY), DATE and DT (DATE_AND_TIME)
– [optLength] (optional): Indicates the string length. The default length is 80.
If you do not type the variable type, it will automatically fill this field with the default type according to the
configured Data Type: BOOL for X, BYTE for B, WORD for W and DWORD for D
Note:
- If the STRING length is not configured the default 80 will be used
- The maximum STRING length on the address field is 1024.
- If you configure a STRING length in the Address field larger than the STRING length configured at the
TwinCAT program, and try to write to it, you may get a “string overflow” error on TwinCAT
Attention:
The headers (%M, %Q, %I) are not supported by the driver when communicating with Twincat 3.1. To
communicate with these type of variables use the variables names in the Address field and NAME as the header field. See section For Variable Names below.
For Variable Names (Windows based runtime systems only, e.g. CX1000, CX1020, WinCE, WinXP,
WinXPe or Win7/8):
You can access both Local and Global variables.
For Twincat v2.10 or v2.11 Global variables, type a dot and then the variable name
Examples:
.Speed
.Counter
.Position[0,2,3]

TWCAT – Driver Version 1.26
Doc. Revision AB –Feb 22nd, 2018
Page 18/30
For Twincat v3.1 Global variables, type <name of the Global Variable List>.<variable name>
Examples:
GLBL.Speed
GLobalList.Counter
For Local variables, type the POU name first where the variable is followed by the dot and then the
variable name for both Twincat v2.10, v2.11 and TwinCaT v3.1
Example
Main.Param1
Address Configuration Sample v.2.1x
Device Address Header Field Address Field
%QX0.0 %Q X0.0:BOOL
%QX0.5 %Q X0.5:BOOL
%QX1.0 %Q X1.0:BOOL
%QX7.7 %Q X7.7:BOOL
%QB0 (8 bits) %Q B0:BYTE
%QW0 %Q W0:WORD
%MW0 (Word) %M W0:WORD
%MW5 (INT) %M W5:INT
%MB5 (BYTE) %M B5:BYTE
%MX5.0 %M X5.0:BOOL
%MD15 (REAL) %M D15:REAL
%IX10.7 %I X10.7:BOOL
%IW10 %I W10:WORD
%I10 and %I11 (16bits) %I W10
engine (Global Variable) NAME .engine
speed (Global Variable) NAME .speed
down (Global Variable) NAME .down
balance (main program) NAME MAIN.balance
timerUp.StartTime (Global) NAME .timerUp.StartTime
MyDINT[3] (Global) NAME .MyDINT[3]
MyArray[3,3,3] (Globa) NAME .MyArray[3,3,3]

TWCAT – Driver Version 1.26
Doc. Revision AB –Feb 22nd, 2018
Page 19/30
Address Configuration Sample v3.1
Device Address Header Field Address Field
engine (Global Variable List : GVL) NAME GVL.engine
speed (Global Variable List Glbl1) NAME Glbl1.speed
down (Global Variable List:Global) NAME Global.down
balance (main program) NAME MAIN.balance
MyDINT[3,3,3] (Main) NAME Main.MyDINT[3,3,3]
Attention:
- You must not configure a range of addresses or variable greater than the maximum block size (data buffer
length) supported by each PLC within the same worksheet. The maximum data buffer length for this driver is
configured on the drivers’ settings, with a maximum of 512 addresses / variable names, corresponding to 7Kb,
per Standard Driver worksheet.
- If there is any variable name configured in the Address field that does not match the PLC variable name, the
entire worksheet will be invalidated, and you will get communication error
o Writing into Array Variables
As mentioned before, you can optimize writing into Array Variables creating a specific standard driver
worksheet for it, where all the array positions will be written in just one shot using the Write Trigger
field.
Once you have configured the header with the variable name and the array settings, in the Address
field you only need to type the array position which you are connecting the tag to.
Important: this feature is supported only with one-dimensional arrays on Twincat v2.xx.
For example:
On TwinCAT v2.1x:

TWCAT – Driver Version 1.26
Doc. Revision AB –Feb 22nd, 2018
Page 20/30
On Studio:
So, what you get there is that when you change the value of the tag that is on the Write Trigger field you will
write the entire array in just one shot, optimizing the communication performance.
Note that in this case Enable Write on Tag Change trigger field will not work.
o Address suffixes for For Variable Names:
Reading Date and Time Variable types as Strings instead of numbers
You can optionally use suffixes in the addresses configured as Variable names to convert values received for
variables of the type DATE (use suffix DATES), DT or Date and Time (use suffix DTS), TOD or Time of Day
(use suffix TODS) into a string. This is supported when communicating with Twincat 2 or Twincat 3.1.
For example: Main.dateVar:DATES
Main.dateTimeVar:DTS
Main.TimeOfDayVar:TODS

TWCAT – Driver Version 1.26
Doc. Revision AB –Feb 22nd, 2018
Page 21/30
On TwinCAT:
On Studio:

TWCAT – Driver Version 1.26
Doc. Revision AB –Feb 22nd, 2018
Page 22/30
Executing the Driver
After adding the TWCAT driver to a project, Studio sets the project to execute the driver automatically when you
start the run-time environment.
To verify that the Driver Runtime task is enabled and will start correctly, perform the following steps:
1. Select Project → Status from the main menu bar.
The Project Status dialog displays:
Project Status Dialog
2. Verify that the Driver Runtime task is set to Automatic.
– If the setting is correct, click OK to close the dialog.
– If the Driver Runtime task is set to Manual, select the Driver Runtime line. When the Startup button becomes
active, click the button to toggle the Startup mode to Automatic.
3. Click OK to close the Project Status dialog.
4. Start the application to run the driver

TWCAT – Driver Version 1.26
Doc. Revision AB –Feb 22nd, 2018
Page 23/30
Troubleshooting
If the TWCAT driver fails to communicate with the device, the tag you configured for the Read Status or Write Status
fields will receive an error code. Use this error code and the following table to identify what kind of failure
occurred.
Error Code Description Possible Causes Procedure to Solve
0 OK Communication without problems None required
1 Invalid AmsNet ID Station Invalid AmsNet ID Station. The AmsNet ID must have 6 numbers.
Type a valid AmsNet ID.
30 Error loading third party library The third party library is not installed (tcAdsDll.dll or tcADsDllCE.dll).
Install the third party library TwinCAT ADS Interface PLC software.
40 Error loading extern function The extern function can not be loaded. Install the correct tcAdsDll.dll or tcAdsDllCE.dll library. The library exists, but the extern functions cannot be loaded.
50 Invalid command Header in the Driver Worksheet is invalid. Type a valid header.
60 Invalid datatype Specified address contains an invalid value Type a valid address.
70 Error in the GetLocalAddress function
The TwinCAT ADS Interface PLC is not working properly, or TwinCAT software is not running.
Contact your Studio technical support representative.
90 Error writing data The TwinCAT ADS Interface PLC is not working properly, or TwinCAT software is not running.
Note the error text in the LogWin, and contact your Studio technical support representative.
100 Error in the ADSIGRP_SYM_READWRITE (InfoByNameEx) service
Cannot load the TwinCAT PLC variables information. The TwinCAT ADS Interface PLC is not working properly, TwinCAT software is not running, or the configured variable name is not configured in the TwinCAT PLC software.
Using the Output or LogWin modules, enable the Serial Communication and check if it says the variable name that could not be found. Once it shows the variable name, go back to the driver sheet that has it and double check with the PLC program if this variable is correctly configured.
110 Error in the ADSIGRP_SYM_READWRITE service
Cannot read the TwinCAT PLC variables values. The TwinCAT ADS Interface PLC is not working properly, or TwinCAT software is not running.
Using the Output or LogWin modules, enable the Serial Communication and check if it says the variable name that could not be found. Once it shows the variable name, go back to the driver sheet that has it and double check with the PLC program if this variable is correctly configured.
120 Error processing value The configured variable name or address is not configured in the TwinCAT PLC software or is out of range.
Using the Output or LogWin modules, enable the
Serial Communication and check if it says the
variable name that could not be found. Once it
shows the variable name, go back to the driver
sheet that has it and double check with the PLC
program if this variable is correctly configured.
130 BlockSize Error Address or variable configured in Driver sheet is over the limit.
Only 512 addresses or variables can be configured
per Driver Sheet.
200 Too many connections AmsNetID is over the limit. Only 64 AmsNetID addresses can be configured.
211 Invalid Read Block Size Not enough data buffer. Configure up to 7Kb of data.
If using the Main Driver Sheet, specify the length of
the variables or block size
213 Invalid Header The configured Header is not valid. Check the documentation for a valid Header
configuration.
215 Invalid Block Size ARRAY Not enough data buffer ARRAY. Configure up to 7Kb of data.

TWCAT – Driver Version 1.26
Doc. Revision AB –Feb 22nd, 2018
Page 24/30
Error Code Description Possible Causes Procedure to Solve
216 Invalid Symbol Invalid NAME Correct the invalid NAME
217 Invalid Connection Invalid connection configuration. Check the connection configuration.
-15 Timeout Start Message Disconnected cables
PLC is turned off, in stop mode, or in error
mode
Wrong station number
Wrong RTS/CTS control settings
Check cable wiring.
Check the PLC state – it must be RUN.
Check the station number.
Check the configuration. See Studio Technical
Reference Manual for information about valid
RTS/CTS configurations.
-17 Timeout between rx char PLC in stop mode or in error mode
Wrong station number
Wrong parity
Wrong RTS/CTS configuration settings
Check cable wiring.
Check the PLC state – it must be RUN.
Check the station number.
Check the configuration. See Studio Technical
Reference Manual for information about valid
RTS/CTS configurations.
Tip:
You can verify communication status using the Studio development environment Output window (LogWin
module). To establish an event log for Field Read Commands and Field Write Commands, right-click in the Output
window. When the pop-up menu displays, select the option to set the log events. If you are testing a Windows
CE target, you can use the Remote LogWin of Studio (Tools Remote LogWin) to get the log events from the
target unit remotely.
If you are unable to establish communication with the PLC, try to establish communication between the PLC
Programming Tool (TwinCAT PLC Control) and the PLC (TwinCAT Runtime). Quite frequently, communication is
not possible because you have a hardware or cable problem, or a PLC configuration error. After successfully
establishing communication between the device’s Programming Tool and the PLC, you can retest the supervisory
driver.
To test communication with Studio, we recommend using the sample application provided rather than your new
application.
If you must contact us for technical support, please have the following information available:
Operating System (type and version): To find this information, select Tools → System Information.
Studio Version: To find this information, select Help → About.
Driver Version: To find this information, read the full description of the driver on the Communication Drivers
dialog.
Communication Log: Displays in the Studio Output window (or LogWin window) when the driver is running. Be
sure to enable the Field Read Commands and Field Write Commands for the LogWin window.
Device Model and Boards: Consult the hardware manufacturer’s documentation for this information.

TWCAT – Driver Version 1.26
Doc. Revision AB –Feb 22nd, 2018
Page 25/30
Sample Application
This driver does not have a sample application.

TWCAT – Driver Version 1.26
Doc. Revision AB –Feb 22nd, 2018
Page 26/30
Revision History
Doc.
Revision Driver Version Date Description of changes
A 1.00 Jan/28/2004 First driver version
B 1.01 Feb/04/2004 Modified the extern function to dynamic mode
C 1.02 Oct/27/2004 - Implemented remote access - Accessed all runtimes - Increased read performance
D 1.03 Jan/06/2005 Modified to accept any port number in the Station field.
E 1.04 Apr/25/2005 - Implemented String Type - Implemented Signed Type
F 1.05 Sep/6/2005 Fixed problems with GPF in ARMs processors
G 1.06 Sep/26/2005 Fixed problems with string writing
H 1.07 Feb/02/2006 Avoid GPF on variable writing.
I 1.08 Apr/18/2006 Changed TWCAT to communicate with BC9000
J 1.09 Oct/25/2006 Fixed problem with the bit reading Implemented the group writing
K 1.10 Nov/05/2007
-Fixed problem of the IO operands communicating with BX/BC PLC(TWCAT driver) - Implemented String Length - Driver reviewed - Fixed problem about String configuration - Increased Read performance - Implemented Write Trigger NAME
L 1.12 Dec/15/2008 - Increased the maximum Tag Name to 1023 characters. - Modified the algorithm to order the addresses.
M 1.13 Apr/6/2009 Modified driver to communicate with Strings more than 80 Characters long
N 1.14 Apr/21/2009 Fixed problem with REAL values when communicating with BC/BX 9000
O 1.14 Dec/9/2009 Changed the documentation only. No modifications in the driver
P 1.14 Mar/31/2010 Changed the documentation only. No modifications in the driver
Q 1.15 Jul/08/2010 -Included optional size of variable -Included option for max block size on drivers’ settings -Included new timeout parameter
R 1.16 Jul/1/2013 Modified error Message when beckhoff libraries fail to load
S 1.17 Jan/05/2016 -Fixed bug when the driver fails with the entire group in case one symbol is invalid -Updated driver quality as BAD for invalid symbol.
T 1.18 Feb/04/2016 Fixed problem in tags timestamp value
U 1.19 Apr/27/2016 -Fixed problem with writing TRUE to a Boolean tag. -Updated documentation for ADS configuration (Appendix A) and driver settings.
V 1.20 Jun/14/2016
-Fixed the issue of Reading/Writing symbols when they were dynamically added or changed in the PLC/Simulator while in runtime. -Improved loading of symbols when using After re-connect mode or On startup mode -Improved performance of the driver when loading symbols.
W 1.21 Sept/16/2016 -Improved memory usage and performance of the driver and fixed stability issues when working with large applications with deep structures and multiple simultaneous requests.
X 1.22 Feb/09/2017
-Improved memory consumption for the driver when using multiple simultaneous connections for large applications with deep structures. -Added support to string conversion for variables of the type Date, Date and Time (DT) and Time of Day (TOD)

TWCAT – Driver Version 1.26
Doc. Revision AB –Feb 22nd, 2018
Page 27/30
-Fixed issue of driver generating exceptions when using more than 16 simultaneous connections.
Y 1.23 June/26/2017 -Fixed issue of wrong quality and timestamp when using input, output and memory area addresses. - Improved memory allocation to prevent crashes.
Z 1.24 Aug/09/2017 -Fixed issue of no support for length entry for strings using %M, %Q or %I
AA 1.25 Feb/12/2018 -Fixed an issue with a memory leak when using invalid addresses
AB 1.26 Feb/22/2018 -Fixed a memory leak -Fixed an issue with connectivity while using multiple stations on WinCE
TWCAT – Driver Version 1.26
Doc. Revision AB –Feb 22nd, 2018
Page 28/30
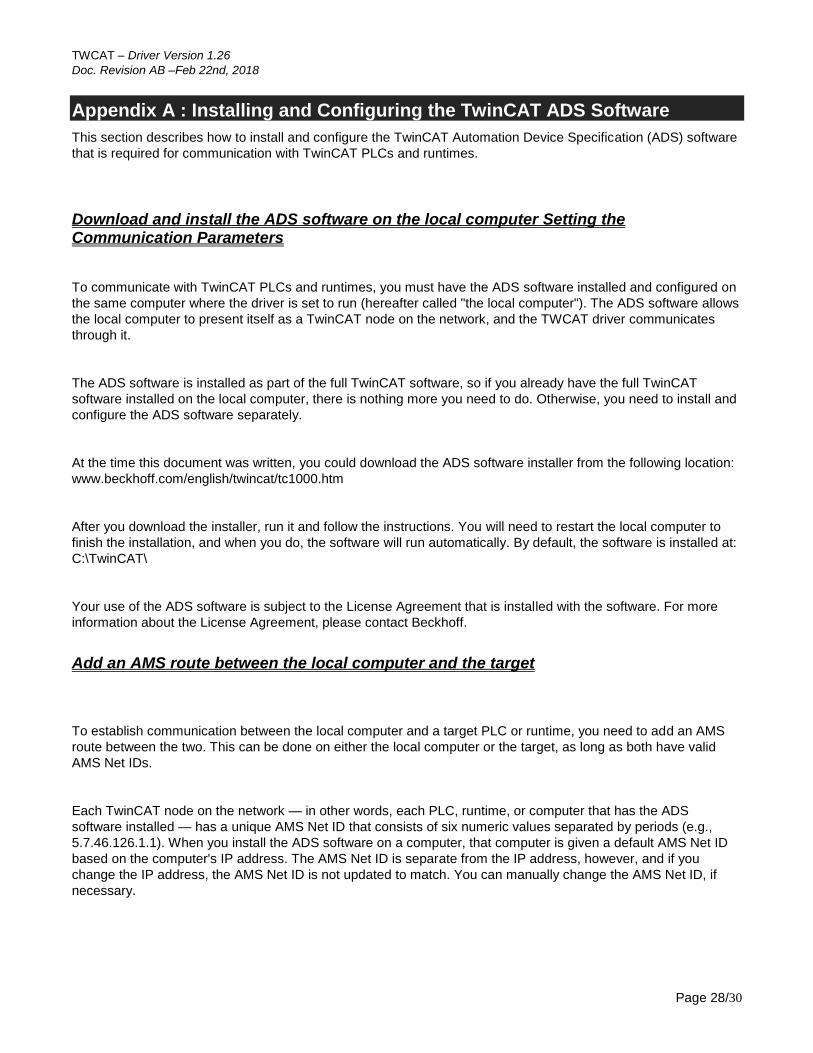
Appendix A : Installing and Configuring the TwinCAT ADS Software
This section describes how to install and configure the TwinCAT Automation Device Specification (ADS) software
that is required for communication with TwinCAT PLCs and runtimes.
Download and install the ADS software on the local computer Setting the Communication Parameters
To communicate with TwinCAT PLCs and runtimes, you must have the ADS software installed and configured on
the same computer where the driver is set to run (hereafter called "the local computer"). The ADS software allows
the local computer to present itself as a TwinCAT node on the network, and the TWCAT driver communicates
through it.
The ADS software is installed as part of the full TwinCAT software, so if you already have the full TwinCAT
software installed on the local computer, there is nothing more you need to do. Otherwise, you need to install and
configure the ADS software separately.
At the time this document was written, you could download the ADS software installer from the following location:
www.beckhoff.com/english/twincat/tc1000.htm
After you download the installer, run it and follow the instructions. You will need to restart the local computer to
finish the installation, and when you do, the software will run automatically. By default, the software is installed at:
C:\TwinCAT\
Your use of the ADS software is subject to the License Agreement that is installed with the software. For more
information about the License Agreement, please contact Beckhoff.
Add an AMS route between the local computer and the target
To establish communication between the local computer and a target PLC or runtime, you need to add an AMS
route between the two. This can be done on either the local computer or the target, as long as both have valid
AMS Net IDs.
Each TwinCAT node on the network — in other words, each PLC, runtime, or computer that has the ADS
software installed — has a unique AMS Net ID that consists of six numeric values separated by periods (e.g.,
5.7.46.126.1.1). When you install the ADS software on a computer, that computer is given a default AMS Net ID
based on the computer's IP address. The AMS Net ID is separate from the IP address, however, and if you
change the IP address, the AMS Net ID is not updated to match. You can manually change the AMS Net ID, if
necessary.

TWCAT – Driver Version 1.26
Doc. Revision AB –Feb 22nd, 2018
Page 29/30
To add the AMS route on the local computer
1. In the notification area of the Windows taskbar, right-click the TwinCAT icon, and then on the shortcut
menu, click Router > Edit Routes. (You might need to expand the notification area if the TwinCAT icon is
hidden.) The TwinCAT Static Routes dialog box is displayed.
2. In the TwinCAT Static Routes dialog box, click Add. The Add Route dialog box is displayed.
3. If the target is located on the same network as the local computer, you should be able to select it:
a. Click Broadcast Search to get a list of targets that broadcast their presence on the network.
b. Select your target in the list. The route settings are automatically configured for the selected target.
4. If the target is not located on the same network as the local computer, you need to manually configure the
route settings:
a. In the Route Name (Target) box, type a name for the target. This is the name that will be displayed in
the local computer's list of routes, after you finish adding the route.
b. In the Route Name (Remote) box, type a name for the local computer. This is the name that will be
displayed in the target's list of routes, after you finish adding the route. The default name is the local
computer's host name, but you can change it if necessary.
c. In the AmsNetID box, type the target's ID.
If you do not know the target's ID, either use the TwinCAT programming software to get it or use
Broadcast Search on another computer on the target's network.
d. In the Transport Type list, select the network's transport type or protocol. In most cases, you should
select TCP_IP (i.e., TCP/IP). For all other options, please contact Beckhoff.
e. In the Address Info box, type the host name or IP address of the target, and then below the box, make
sure the corresponding option — Host Name or IP Address — is selected.
Tip:
You can use the ping command, at the Windows command prompt, to confirm that the specified host name or
IP address is valid and accessible.
5. Click Add Route. The Add Route dialog box is closed, and the route is added to the local computer's list
of routes.
6. Close the TwinCAT Static Routes dialog box.
Alternatively, if you want to add the AMS route on the target, see the manufacturer's documentation for
that PLC or runtime.
Test the AMS route that you added
After you have added the AMS route between the local computer and the target, you should test the route itself to
make sure they can communicate with each other. To test the route:
1. On the local computer, locate and run the ADS test program (TcAdsTest.exe). The TcAdsTest window is
displayed.

TWCAT – Driver Version 1.26
Doc. Revision AB –Feb 22nd, 2018
Page 30/30
Note:
There are three copies of TcAdsTest.exe included in the ADS software. If the software was installed at its
default location, the three copies should be located at:
C:\TwinCAT\AdsApi\TcAdsDll\TcAdsTest.exe
C:\TwinCAT\AdsApi\TcAdsTest\TcAdsTest.exe
C:\TwinCAT\Common32\TcAdsTest.exe
All three copies function the same, so you can use any one of them
2. In the TcAdsTest window, click AdsPortOpen. An alert message is displayed to inform you that the
computer's ADS port has been opened for communication.
3. In the TcAdsTest window, click Test. The Test window is displayed.
4. In the Test window, in the AmsNetId box, type the ID of the target.
5. Click Start to start the test. The number of successful operations (e.g., n Successful) should be displayed
in the Output box, and the number should keep increasing as long as the test is running.
6. Click Stop to stop the test.
7. Close the Test window, and then close the TcAdsTest window.
If the test results confirm that the local computer and the target can communicate with each other, the
TWCAT driver should also be able to communicate with the target through the ADS software.