TV Adapter 3.0 - Instructions for use
27
Instructions for use TV Adapter 3.0
-
Upload
khangminh22 -
Category
Documents
-
view
0 -
download
0
Transcript of TV Adapter 3.0 - Instructions for use

Instructions for use TV Adapter 3.0

Introduction to this bookletThis booklet gives you guidance on how to use and maintain your new TV Adapter. Please read the booklet carefully, including the Warning section. This will help you get the most out of the TV Adapter.
If you have additional questions about the use of your TV Adapter, please contact your hearing care professional.
About Installation Daily use Warnings More info
For your convenience, this booklet contains a navigation bar to help you navigate easily through the different sections.
Intended use
Intended use The TV Adapter 3.0 is intended as a wireless transmitter of sound from a TV or from other electronic audio devices to hearing aids.
Indications for use No indications for use.
Intended user Adults and children older than 36 months.
Use environment Home setting.
Contraindications No contraindications.
Clinical benefits See clinical benefits of the hearing aid.

Table of contentsAbout
Package content 6TV Adapter overview 8
InstallationInstallation 10Placing the TV Adapter 11Connecting the TV Adapter to a power outlet 12Connecting the TV Adapter to the TV 14Connecting using TOSLINK 16Connecting using RCA 18Connecting using mini jack Adapter 20Connecting using SCART 22Pairing the TV Adapter with your hearing aids 24
Daily useStart TV sound using your hearing aids 26Turn off TV sound using your hearing aids 27
Volume control using your hearing aids 28Start TV sound using the hearing aid Remote Control 30Turn off TV sound using your Remote Control 31Volume control using your Remote Control 32Mute using your Remote Control 33Using the TV Adapter with the Oticon ON App 34More than one user 35More than one TV Adapter 36Removing a user/clear pairings 38Cleaning and maintenance 39
WarningsWarnings 40
More infoTechnical information 42International warranty 45

Instructions for use TV Adapter 3.0
Connectline
6 7 About Installation Daily use Warnings More info
Package contentThe TV Adapter packaging box consists of the following elements:
TV Adapter This booklet (Instructions for use)
About
Box 1
Box 3
Box 2
Power supply
TOSLINK
RCA cable Mini jack Adapter

OUTIN
RL
POWER
8 9 About Installation Daily use Warnings More info
TV Adapter overview
Mode Power indicator TV indicator
Power on, not paired to any hearing aids
Pairing complete (steady light 30 seconds)
Power on, not streaming
RCA inserted and streaming
No RCA/Audio input
TOSLINK inserted and streaming (digital)
TOSLINK inserted and streaming (invalid signal)*
Fault condition **
No light
* Try other input connection** Contact your hearing care professional
Blinking Fading Steady
Back
Power supply
Front
TV
TOSLINK in
Mode
TOSLINK outRCA left and right
Power
Setup
More information: www.oticon.global/connectivity

10 11 About Installation Daily use Warnings More info
InstallationUsing the TV Adapter for the first timeBefore you can use your hearing aids with your TV, the TV Adapter must be connected to a power outlet, connected to the TV and paired with your hearing aids.
This is a step-by-step guide on how to install the TV Adapter.
Place the TV AdapterPlace the TV adaptor close to the TV - horizontally, with free line of sight to the hearing aids.
Installation
TUOIN
POWER
RL
1 3
12 13 About Installation Daily use Warnings More info
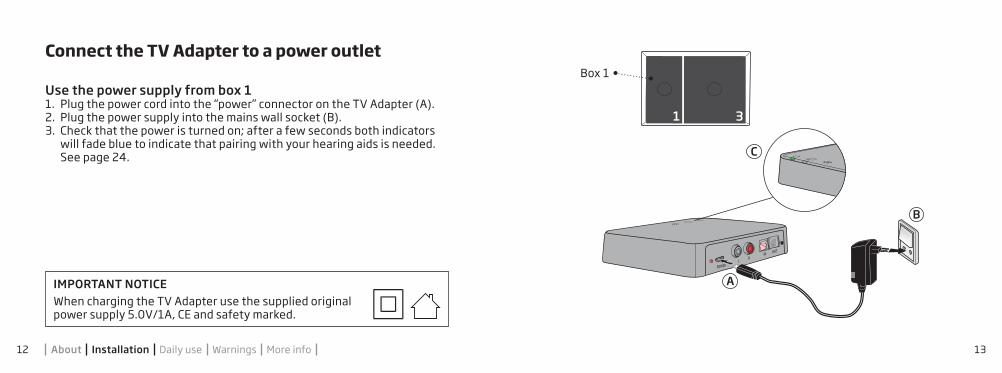
Connect the TV Adapter to a power outlet
Use the power supply from box 11. Plug the power cord into the “power” connector on the TV Adapter (A).2. Plug the power supply into the mains wall socket (B).3. Check that the power is turned on; after a few seconds both indicators
will fade blue to indicate that pairing with your hearing aids is needed. See page 24.
Box 1
B
C
AIMPORTANT NOTICEWhen charging the TV Adapter use the supplied original power supply 5.0V/1A, CE and safety marked.

L
TUOIN
R
1 3
2
1 3
L
TUOIN
R
L
R
AudioOut
L
TUOIN
R
1 3 L
R
AudioOut
L
TUOIN
R
1 3
14 15 About Installation Daily use Warnings More info
Connect the TV Adapter to the TVYou can connect the TV Adapter to the TV in four different ways.
Connection PageTOSLINK. Either digital stereo (PCM) or Dolby® Digital * 16RCA audio output L+R 18Mini jack audio output (typically headphone output) 20SCART audio output (L+R) 22
*Dolby is a registered trademark of Dolby Laboratories.
We recommend using TOSLINK.
Please see the following pages for a solution which fits your TV.
RCA (p. 18)
SCART (p. 22)
TOSLINK (p. 16)
Mini jack (p. 20)
More information: www.oticon.global/connectivity

L
TUOINR
1 3
2
L
TUOIN
R
1 3
2
16 17 About Installation Daily use Warnings More info
Connect using TOSLINK1. Use the TOSLINK cable from box no. 3 (A).2. Remove the plastic cap from the TOSLINK cable. (B)3. Connect the TOSLINK cable to the TOSLINK output on your TV/home
theatre system (C).4. Connect the TOSLINK cable to the pink TOSLINK input (D) on the
TV Adapter.5. The TOSLINK output (E) may be used to connect other TOSLINK devices
such as external Dolby® Decoders and surround sound systems.6. Refer to page 24 for pairing of the TV Adapter with your hearing aid.
Note It may be necessary to configure your TV, DVD player or home theatre system so that the correct audio output is available on the TOSLINK output.
Box 3
BC
C
A
D E

L
TUOINR
1 2L
R
AudioOut
L
TUOIN
R
1 3 L
R
AudioOut
18 19 About Installation Daily use Warnings More info
Connect using RCA1. Use the RCA cable from box no. 2 (A).2. Connect the RCA cable to the RCA output on your TV (B) or home theatre
system. (Typically marked “L – R AUDIO OUT” and found on the TV back or bottom panel.)
3. Connect the RCA cable to the RCA connectors (C) on the back of the TV Adapter.
4. Refer to page 24 for pairing of hearing aids with the TV Adapter.
Note It may be necessary to configure your TV so that the correct audio output is available on the RCA output.
B
C
C
ABox 2

L
TUOINR
1 2
L
TUOIN
R
1 3
20 21 About Installation Daily use Warnings More info
Connect using mini jack Adapter1. Use the mini jack Adapter from box no. 2 (A).2. Connect the RCA cable to the mini jack Adapter (B).3. Connect the mini jack to the TV, this is typically the headphone output
(B).4. Connect the RCA connectors to the TV Adapter RCA input (C).5. Refer to page 24 for pairing of the TV Adapter with your hearing aids.
Note The TV speakers may be muted when connecting to the headphone output, and sound only heard through the hearing aids/TV Adapter.
B
Box 2
A
C

L
TUOIN
R
L
R
AudioOut
L
TUOIN
R
L
R
AudioOut
22 23 About Installation Daily use Warnings More info
SCART Adapter(accessory)
Connect using SCART1. Use a SCART Adapter* (A).2. Connect the RCA cable to the red and white terminals on the SCART
Adapter (B).3. Connect the SCART Adapter to the SCART output on your TV (C).4. Connect the RCA connectors to the TV Adapter RCA input (D).5. Refer to page 24 for pairing of the TV Adapter with your hearing aids.
Note The audio output on the SCART connector can be dependent on the source selected on the TV. For example some TVs will only make TV sound availa-ble on the SCART output (i.e. sound from a connected DVD player).
B
C
A
D
* The SCART Adapter is an accessory which is not included in the package content. If you need a SCART Adapter, please contact your hearing care professional.

24 25 About Installation Daily use Warnings More info
Pair TV Adapter with hearing aidsBefore using the TV adapter, it must be paired with your hearing aids.
Pairing is only required once, and takes around 20-60 seconds.
Note This TV Adapter can be paired to as many hearing aids as you like. All users will be able to hear the same sound. Please see page 38 for more details.
IMPORTANT NOTICEPlease refer to your hearing aid‘s instructions for use for details on the functionality of your specific hearing aid.
Ensure the TV adapter is powered on.
Restart the hearing aids to activate pairing mode.
See your hearing aid‘s instructions for use, how to turn the hearing aids off and on again.
Place both hearing aids close to, or on top of the TV Adapter.
Pairing is completed when the power indicator and the TV indicator is blue for about 30 seconds.
TV Adapter Description
Pairing completed

P2 TVP1
Change programme
26 27 About Installation Daily use Warnings More info
Turn off TV sound using your hearing aidsTo stop the sound from the TV simply change to the desired programme in your hearing aids.
Start TV sound using your hearing aidsOnce a TV Adapter has been paired with your hearing aids, it will be available as a programme in your hearing aids. To listen to TV simply press and hold the programme switch on your hearing aids to change programme.
The programme cycle will depend on the programs already available in your hearing aids.
The TV programme indicator - which is different from hearing aid programme indicators - will be heard once the TV programme is selected.
IMPORTANT NOTICEPlease refer to your hearing aid‘s instructions for use for details on the functionality of your specific hearing aid.
Daily use

28 About Installation Daily use Warnings More info 29
Volume control using your hearing aidsUse the volume button on your hearing aid to adjust the TV volume level in both hearing aids. Adjust the volume by pressing up or down briefly. Press briefly repeatedly for further adjustments.
Note The TV volume in the hearing aids is normally not affected by volume adjustments from the TV Remote Control.
IMPORTANT NOTICEPlease refer to your hearing aid‘s instructions for use for details on the functionality of your specific hearing aid.
A short press on the RIGHT hearing aid increases the volume.
A short press on the LEFT hearing aid decreases the volume.

P2 TVP1
30 31 About Installation Daily use Warnings More info
Start TV sound using the hearing aid Remote ControlRemote Control is an optional accessory to your wireless hearing aids.
Once a TV Adapter has been paired to your hearing aids it will be available as a programme. To listen to TV simply press the programme selector and change programme (A).
The programme cycle will depend on the programmes already available in your hearing aids.
The TV programme indicator – which is different from programme indicators – will be heard once the TV programme is selected.
Turn off TV sound using Remote ControlTo stop the sound from the TV simply change to the desired programme in your hearing aids.
More information: www.oticon.global/connectivity
Change programme
A
32 33 About Installation Daily use Warnings More info
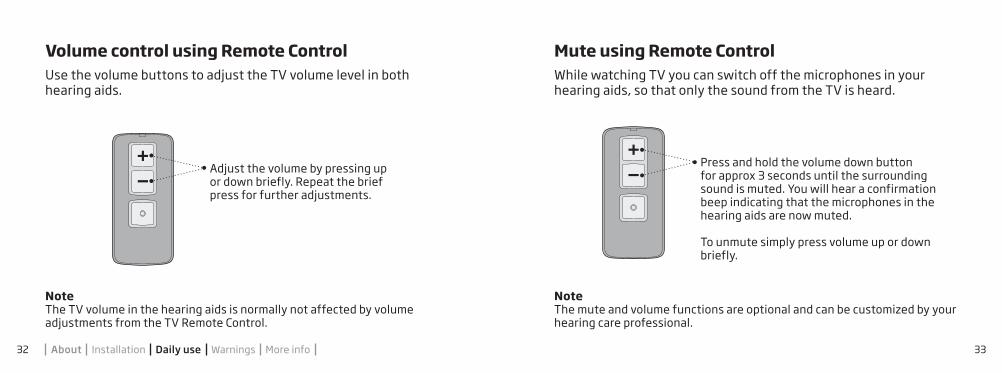
Volume control using Remote ControlUse the volume buttons to adjust the TV volume level in both hearing aids.
Note The TV volume in the hearing aids is normally not affected by volume adjustments from the TV Remote Control.
Adjust the volume by pressing up or down briefly. Repeat the brief press for further adjustments.
Mute using Remote ControlWhile watching TV you can switch off the microphones in your hearing aids, so that only the sound from the TV is heard.
Note The mute and volume functions are optional and can be customized by your hearing care professional.
Press and hold the volume down button for approx 3 seconds until the surrounding sound is muted. You will hear a confirmation beep indicating that the microphones in the hearing aids are now muted.
To unmute simply press volume up or down briefly.

34 35 About Installation Daily use Warnings More info
Use TV Adapter with Oticon On AppSound from the TV Adapter can also be controlled using the Oticon ON App.
Please refer to the instructions for use “Oticon ON App for Android and iOS” for further information.
Apple, the Apple logo, iPhone, iPad, and iPod touch are trademarks of Apple Inc., registered in the U.S. and other countries. App Store is a service mark of Apple Inc. Android, Google Play, and the Google Play logo are trademarks of Google LLC.
More than one userAn unlimited number of hearing aid users can listen to the sound from one TV Adapter.
Pair the hearing aids to the TV Adapter as described on page 24.

36 37 About Installation Daily use Warnings More info
More than one TV AdapterYour hearing aids can be paired with up to 4 TV Adapters. When you switch to ”TV Program” mode, your hearing aids will automatically connect to the last connected TV Adapter within range. I.e. the last TV you were watching with sound streamed directly to your hearing aids.
If you hear sound from another TV than the one you wish to, you may:
1a) Turn OFF the TV you do NOT want to hear sound from and wait 5 minutes, or
1b) Turn OFF the TV Adapter streaming sound by disconnecting the power cord
2) Exit ”TV Program” in your hearing aids3) Make sure you are within range of the TV and TV Adapter you wish to
connect to, and that these are (still) turned ON4) Enter ”TV Program” in you hearing aids5) Your hearing aids will now be connected to the right TV and TV Adapter
6) If another person wish to watch the TV that you turned OFF, it can be turned ON again after 5 minutes. If you do not wish to wait 5 minutes before turning this ON, you shall choose step 1b above, and the power cord can be reconnected immediately after step 5.

OUTIN
RL
POWER
38 39 About Installation Daily use Warnings More info
Cleaning and maintenanceUse a soft, dry cloth to clean the TV Adapter.
IMPORTANT NOTICEThe TV Adapter must never be washed or immersed in water or other liquids.
Remove a user/clear pairingsTo remove a user from your TV Adapter perform a system reset and re-pair the required hearing aids.
1. Reset system: Press and hold the setup button for more than 5 seconds2. Indicators fade blue to indicate no pairings3. Re-pair the required instruments (see page 24)
TV Adapter Description
No pairings
Fading
Setup

40 41 About Installation Daily use Warnings More info
For your personal safety and to ensure correct usage, you should familiarise yourself fully with the following general warnings before using your TV Adapter. Consult your hearing care professional if you experience unexpected operations or serious incidents with your TV Adapter during use or because of its use. Your hearing care professional will support you with issue handling and, if relevant, reporting to the manufacturer and/or the national authorities.
Fire hazardsThe power source in your TV Adapter has insufficient energy to cause fire in normal usage conditions.
InterferenceYour TV Adapter has been thoroughly tested for interference according to the most stringent international standards. However, interference with your TV adapter and other devices may occur. If this occurs, increase the distance between the TV adapter and the inter-fering device.
Connection to external equipmentThe safety of the use TV Adapter when connected to external equipment with an auxiliary input cable, is determined by the external signal source. When connected to external equipment plugged into a wall outlet, this equipment must comply with IEC-62368-1 or equivalent safety standards.
Incompatible non-supplied accessoriesOnly use accessories, transducers or cables supplied by the manufacturer. Incompatible accessories may result in reduced electromagnetic compatibility (EMC) of your device.
Warnings
Warnings

42 43 About Installation Daily use Warnings More info
More info
Conditions of Use
Operating conditions Temperature: +5°C to +40°CHumidity: 15% to 93% relative humidity, non-condensing Atmospheric pressure: 700 hPa to 1060 hPa
Storage and transportation conditions
Temperature and humidity shall not exceed the below limits for extended periods during transportation and storage:Temperature: -25 °C to +70 °CHumidity: 15% to 93% relative humidity, non-condensingAtmospheric pressure: 700 hPa to 1060 hPa
International warrantyYour TV adapter is covered by an international limited warranty issued by the manufacturer for a period of 12 months from the date of delivery. This limited warranty covers manufacturing and material defects in the device itself, but not in accessories such as e.g. batteries, cables, power supplies, etc. Problems arising from improper/incorrect handling or care, excessive use, accidents, repairs made by an unauthorised party, exposure to corrosive conditions, damage due to foreign objects entering the device or incorrect adjustments are NOT covered by the limited warranty and may void it. The above warranty does not affect any legal rights that
you might have under applicable national legislation governing sale of consumer goods. Your hearing care professional may have issued a warranty that goes beyond the clauses of this limited warranty. Please consult him/her for further information.
If you need service Take your TV adapter to your hearing care professional, who may be able to sort out minor problems and adjustments immediately.

44 45 About Installation Daily use Warnings More info
Technical informationModel name TVA3
The TV Adapter contains a radio transceiver using Bluetooth Low Energy (BLE) and a proprietary short range radio technology both working at ISM band 2.4 GHz.
The radio transmitter is weak and always below 50mW equal to 17 dBm in total radiated power. The TV Adapter complies with international standards concerning radio transmitters, electromagnetic compatibility and human expo-sure.
Due to the limited space available on the TV Adapter relevant approval markings can be found in this document.
Additional information can be found in theTechnical data sheets (TD) on www.oticon.global.
USA and CanadaThis device is certified under:
FCC ID: 2ACAHTVA3IC: 11936A-TVA3
The device complies with Part 15 of the FCC Rules and with Industry Canada’s licence-exempt RSSs.
Operation is subject to the following two conditions:1. This device may not cause harmful interference.
2. This device must accept any interference received, including interference that may cause undesired operation.
NoteChanges or modifications not expressly approved by the party responsible for compliance could void the user’s authority to operate the equipment.
46 47 About Installation Daily use Warnings More info
This Class B digital apparatus complies with Canadian ICES-003.
This equipment has been tested and found to comply with the limits for a Class B digital device, pursuant to part 15 of the FCC Rules. These limits are designed to provide reasonable protection against harmful interfer-ence in a residential installation. This equipment generates, uses and can radiate radio frequency energy and, if not installed and used in accord-ance with the instructions, may cause harmful interference to radio communications. However, there is no guarantee that interference will not occur in a particular installation. If this equipment does cause harmful interference to radio or television reception, which can be determined
by turning the equipment off and on, the user is encouraged to try to correct the interference by one or more of the following measures:
• Reorient or relocate the receiving antenna.
• Increase the separation between the equipment and receiver.
• Connect the equipment into an out-let on a circuit different from that to which the receiver is connected.
• Consult the manufacturer or an experienced radio/TV technician for help.
The manufacturer declares that this TV adapter is in compliance with the essential requirements and other relevant provisions of Directive 2014/53/EU.
Declaration of Conformity is available at the manufacturer.
SBO Hearing A/SKongebakken 9DK-2765 SmørumDenmarkwww.sbohearing.com
Waste from electronic equipment must be handled according to local regulations.

48 49 About Installation Daily use Warnings More info
Description of symbols used in this bookletWarningsText marked with a warning symbol must be read before using the device.ManufacturerThe device is produced by the manufacturer whose name and address are stated next to the symbol. Indicates the medical device manufacturer, as defined in EU Directives 90/385/EEC, 93/42/EEC and 98/79/EC.CE mark The device complies with Medical Device Directive 93/42/EEC. Electronic waste (WEEE) Recycle hearing aids, accessories or batteries according to local regulations.Hearing aid users can also return electronic waste to their hearing care professional for disposal. Electronic equipment covered by Directive 2012/19/EU on waste and electrical equipment (WEEE).Regulatory Compliance Mark (RCM) The device complies with electrical safety, EMC and radio spectrum requirements for devices supplied to the Australian or New Zealand market.Double insulation Indicates that product power supply is double insulated. This means a very low risk of single fault failures i.e. single fault failures cannot occur.
Description of symbols used in this booklet
Indoor use Indicates that the product is qualified for indoor use.
TwinLink 2.4 GHzThe device contains Bluetooth Low Energy (BLE) 2.4 GHz radio technology, which supports wireless streaming to Oticon hearing aids with a 2.4 GHz receiver.Medical DeviceThe device is a medical device.Singapore IMDA labelIndicates that the device complies with the standards and specification published by Info-Communications Media Development Authority (IMDA) and is compatible with the public telecommunication networks in Singapore and does not cause radio frequency interference to other authorized radio-communication networks.South Africa ICASA labelIndicates that the device has license to be sold in South Africa.Japan TELEC symbolIndicates mark for certified radio equipment.Brazil ANATEL labelIndicates that the device is certified and homologated in Brazil.

50 About Installation Daily use Warnings More info
1914
80UK
/ 20
19.1
0.11
Description of additional symbols used on labels
Keep dry Indicates a medical device that needs to be protected from moisture.
Caution symbol Consult instructions for use for warnings and cautions.
Serial number Indicates the manufacturer’s serial number so that a specific medical device can be identified.Catalogue number Indicates the manufacturer’s catalogue number so that the medical device can be identified.
5.0V 200mA Power supply outlet Indicates the rate at which power is sent from the outlet to your electrical device.
1914
80UK
/ 20
19.1
0.11

1914
80UK
/ 20
19.1
0.11
0000191480000001