Zentyal Server 3.0 guide
231
Zentyal 3.0 Official Documentation Introduction to Zentyal Presentation SMBs and ITC Zentyal: Linux server for SMBs Installation Zentyal installer Initial configuration Hardware requirements First steps with Zentyal Administrative web interface of Zentyal Network configuration with Zentyal Software updates Management of Zentyal components System Updates Automatic updates Zentyal Remote Client About Zentyal Remote Registering Zentyal server to Zentyal Remote Configuration backup in Zentyal Remote Other services along with your registration Zentyal Infrastructure Home Company Download Documentation Screenshots Forum Contribute Store
-
Upload
independent -
Category
Documents
-
view
0 -
download
0
Transcript of Zentyal Server 3.0 guide
Zentyal 3.0 OfficialDocumentation
Introduction to Zentyal
PresentationSMBs and ITCZentyal: Linux server for SMBs
InstallationZentyal installerInitial configurationHardware requirements
First steps with ZentyalAdministrative web interface of ZentyalNetwork configuration with Zentyal
Software updatesManagement of Zentyal componentsSystem UpdatesAutomatic updates
Zentyal Remote ClientAbout Zentyal RemoteRegistering Zentyal server to Zentyal RemoteConfiguration backup in Zentyal RemoteOther services along with your registration
Zentyal Infrastructure
HomeCompanyDownloadDocumentationScreenshotsForumContributeStore

Zentyal InfrastructureHigh-level Zentyal abstractions
Network objectsNetwork services
Domain Name System (DNS)DNS cache server configuration with ZentyalTransparent DNS ProxyDNS ForwardersConfiguration of an authoritative DNS server with Zentyal
Time synchronization service (NTP)Configuring an NTP server with Zentyal
Network configuration service (DHCP)DHCP server configuration with Zentyal
Thin client service (LTSP)Configuration of a thin client server with ZentyalDownload and run thin client
Certification authority (CA)Certification Authority configuration with Zentyal
Virtual private network (VPN) service with OpenVPNConfiguration of a OpenVPN server with Zentyal
Virtual private network (VPN) service with PPTPConfiguring a PPTP server in Zentyal
Virtual Private Network (VPN) Service with IPsecConfiguring an IPsec tunnel in Zentyal
Virtualization ManagerCreating virtual machines with ZentyalVirtual machine maintenance
Zentyal Gateway
Zentyal GatewayFirewall
Firewall configuration with ZentyalRouting
Configuring routing with ZentyalQuality of Service (QoS)
Quality of service configuration in Zentyal
Quality of service configuration in ZentyalNetwork authentication service (RADIUS)
Configuring a RADIUS server with ZentyalHTTP Proxy Service
HTTP Proxy configuration in ZentyalAccess RulesFilter profilesBandwidth Throttling
Captive PortalConfiguring a captive portal with ZentyalExceptionsList of UsersUsing the captive portal
Intrusion Detection System (IDS)Configuring an IDS with ZentyalIDS Alerts
Zentyal Office
Zentyal OfficeDirectory Service (LDAP)
Configuration of an LDAP server with ZentyalUser’s corner
File sharing and authentication serviceConfiguring a file server with ZentyalConfiguring a Domain Controller with Zentyal
File Transfer Protocol (FTP)FTP server configuration with Zentyal
Web publication service (HTTP)Introduction to HTTPHTTP server configuration with Zentyal
Printers sharing servicePrinter server configuration with Zentyal
BackupZentyal configuration Backup
Zentyal Unified Communications
Zentyal Unified Communications
Zentyal Unified CommunicationsElectronic Mail Service (SMTP/POP3-IMAP4)
SMTP/POP3-IMAP4 server configuration with ZentyalMail filter
Mail filter schema in ZentyalWebmail service
Configuring a webmail in ZentyalGroupware service
Configuration of a groupware server (Zarafa) with ZentyalZarafa basic use cases
Instant Messaging Service (Jabber/XMPP)Configuring a Jabber/XMPP server with Zentyal
Voice over IP serviceVoIP server configuration with ZentyalUsing Zentyal VoIP features
Zentyal Maintenance
Zentyal MaintenanceLogs
Zentyal log queriesConfiguration of Zentyal logsLog Audit for Zentyal administrators
Events and alertsEvents and alerts configuration in Zentyal
Uninterruptible power supplyUPS Configuration with Zentyal
MonitoringMonitoring in ZentyalMetricsBandwidth MonitoringAlerts
Automatic Maintenance with Zentyal RemoteZentyal RemoteTroubleshootingMaintenance
MaintenanceRemote management and inventoryFree trials
Advanced Zentyal Management
Importing configuration dataAdvanced Service CustomisationDevelopment environment of new modulesRelease policy
Zentyal Release CycleSupport policy
Bug management policyPatches and security updates
Technical supportCommunity supportCommercial support
Copyright 2004-2012 Zentyal S.L.
Presentation
SMBs and ITC
About 99% of companies in the world are small and mediumbusinesses (SMBs). They generate more than half of the global GPD.SMBs constantly look for ways to reduce costs and increaseproductivity, especially in times of crisis like the one we are currentlyfacing. However, they often operate under very limited budgets andlimited workforces. These circumstances make it extremelychallenging to offer suitable solutions that bring important benefits, atthe same time keeping investments and operational costs within budget.
Technology vendors have traditionally shown little interest indeveloping solutions that adapt to the needs of SMBs. In general,enterprise solutions available on the market have been developed forlarge corporations and therefore their implementation requiresconsiderable investments of time and resources, as well as a high levelof expertise.
In the server market, this has meant that until now SMBs have had fewsolutions to choose from and in addition, the available solutions haveusually been over-sized. Considering the real needs of SMBs - toocomplex to manage and with high licensing costs.
In this context it seems reasonable to consider Linux as a moreattractive SMB server alternative, since technically it has shown veryhigh quality and functionality, and the acquisition price is unbeatable.However, the presence of Linux in SMB environments is symbolic andthe growth is relatively small. How is this possible?
We believe that the reason why this happens is simple: to adapt anenterprise level server to an SMB environment, the components mustbe well integrated and easy to administer. Similarly, the ICT serviceproviders that work for SMBs also need server solutions, that requirelow deployment and maintenance time to stay competitive. TraditionalLinux server distributions don’t offer these characteristics.
Zentyal: Linux server for SMBs
Zentyal [1] was developed with the aim of bringing Linux closer toSMBs and to allow them to make the most of its potential as acorporate server. It is the open source alternative to Microsoft networkinfrastructure products aimed at SMBs (Windows Small BusinessServer, Windows Server, Microsoft Exchange, Microsoft Forefront...)
HomeCompanyDownloadDocumentationScreenshotsForumContributeStore
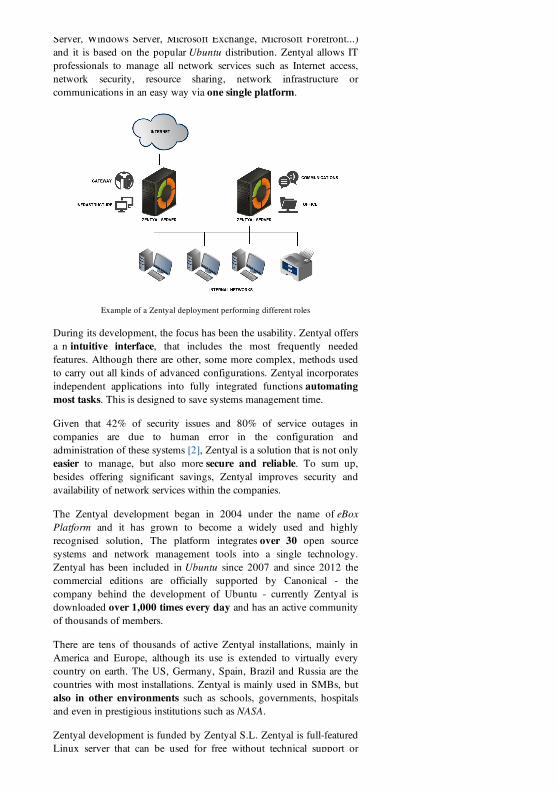
Server, Windows Server, Microsoft Exchange, Microsoft Forefront...)and it is based on the popular Ubuntu distribution. Zentyal allows ITprofessionals to manage all network services such as Internet access,network security, resource sharing, network infrastructure orcommunications in an easy way via one single platform.
Example of a Zentyal deployment performing different roles
During its development, the focus has been the usability. Zentyal offersa n intuitive interface, that includes the most frequently neededfeatures. Although there are other, some more complex, methods usedto carry out all kinds of advanced configurations. Zentyal incorporatesindependent applications into fully integrated functions automatingmost tasks. This is designed to save systems management time.
Given that 42% of security issues and 80% of service outages incompanies are due to human error in the configuration andadministration of these systems [2], Zentyal is a solution that is not onlyeasier to manage, but also more secure and reliable. To sum up,besides offering significant savings, Zentyal improves security andavailability of network services within the companies.
The Zentyal development began in 2004 under the name of eBoxPlatform and it has grown to become a widely used and highlyrecognised solution, The platform integrates over 30 open sourcesystems and network management tools into a single technology.Zentyal has been included in Ubuntu since 2007 and since 2012 thecommercial editions are officially supported by Canonical - thecompany behind the development of Ubuntu - currently Zentyal isdownloaded over 1,000 times every day and has an active communityof thousands of members.
There are tens of thousands of active Zentyal installations, mainly inAmerica and Europe, although its use is extended to virtually everycountry on earth. The US, Germany, Spain, Brazil and Russia are thecountries with most installations. Zentyal is mainly used in SMBs, butalso in other environments such as schools, governments, hospitalsand even in prestigious institutions such as NASA.
Zentyal development is funded by Zentyal S.L. Zentyal is full-featuredLinux server that can be used for free without technical support or
Linux server that can be used for free without technical support orupdates, or fully supported for a reasonable monthly fee. Thecommercial editions are aimed at two clearly different type ofcustomers. On one hand Small Business Edition is aimed at smallbusinesses with less than 25 users and with one single server or verysimple IT infrastructure. On the other hand, Enterprise Edition isaimed at small and medium businesses with more than 25 users andmore complex IT infrastructure.
The commercial editions come with the following services and tools:
Full technical support by Zentyal Support TeamOfficial support guaranteed by Ubuntu/CanonicalSoftware and security updatesRemote monitoring and management platform ofservers and desktopsDisaster recoveryProxy HTTPSMultiple server administrators
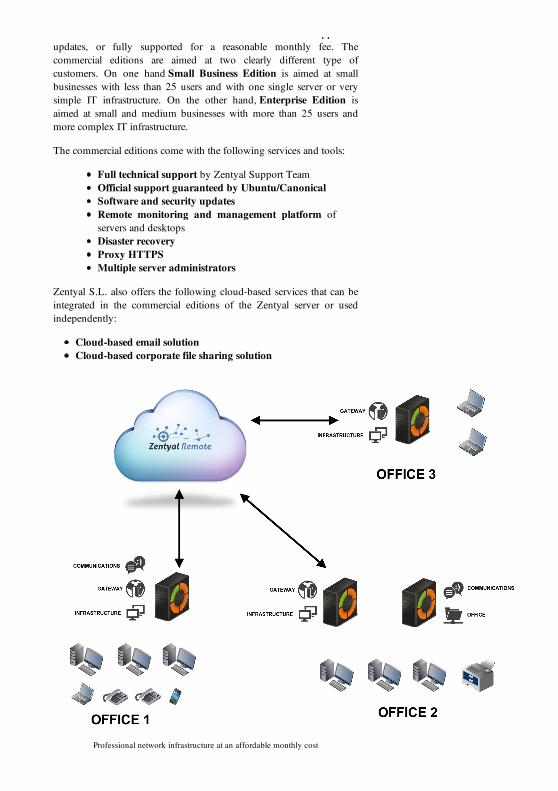
Zentyal S.L. also offers the following cloud-based services that can beintegrated in the commercial editions of the Zentyal server or usedindependently:
Cloud-based email solutionCloud-based corporate file sharing solution
Professional network infrastructure at an affordable monthly cost
In case that small and medium businesses want to count on supportfrom a local IT provider to deploy a Zentyal-based system, they cancontact Authorized Zentyal Partners. These partners are local IT supportand service providers, consultants or managed service providers thatoffer consultancy, deployment, support and/or outsourcing ofinfrastructure and network services of their customers. To find theclosest Zentyal Partner, or to learn how to become a partner, please visitthe Partner section at zentyal.com [3].
Zentyal S.L. offers to the Authorized Zentyal Partners a series of toolsand services that help at reducing the maintenance costs of ITinfrastructure of their customers and offering managed services withhigh added value:
Support platformRemote monitoring and management platform of servers anddesktopsTraining and certification of technical and sales staffManaged services portfolioSales materialsLead generation programDiscounts
[1] http://www.zentyal.com/[2] http://enise.inteco.es/enise2009/images/stories/Ponencias/T25/marcos%20polanco.pdf[3] http://www.zentyal.com/partners/
This documentation describes the main technical features of Zentyal,helping you to understand the way you can configure different networkservices with Zentyal and become productive when managing SMBICT infrastructure with Linux based systems.
The documentation is divided into six chapters plus some appendices.This first introductory chapters helps to understand the context ofZentyal as well as the installation process and walks you through thefirst steps required to use the system. The following four chaptersintroduce you to the four typical installation profiles: Zentyal as anetwork infrastructure server, as a server giving access to the Internet orGateway, as an office server or as a communications server. Thisdifferentiation into four functional groups is only made to facilitate themost typical Zentyal deployments. It is also possible to deploy anycombination of Zentyal server functionality.
Finally, the last chapter describes the tools and services available tocarry out and simplify the maintenance of a Zentyal server, ensuringits smooth running, optimising its deployment, resolving incidents andrecovering the system in case of a disaster.
Copyright 2004-2012 Zentyal S.L.
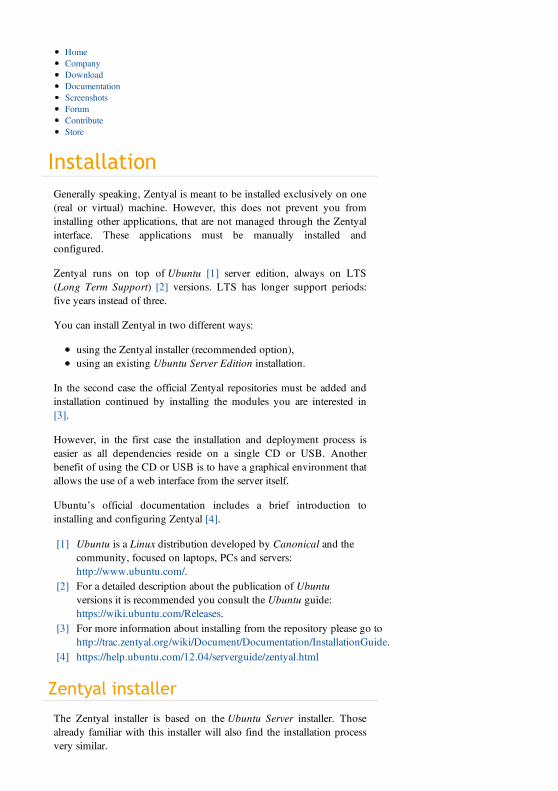
InstallationGenerally speaking, Zentyal is meant to be installed exclusively on one(real or virtual) machine. However, this does not prevent you frominstalling other applications, that are not managed through the Zentyalinterface. These applications must be manually installed andconfigured.
Zentyal runs on top of Ubuntu [1] server edition, always on LTS(Long Term Support) [2] versions. LTS has longer support periods:five years instead of three.
You can install Zentyal in two different ways:
using the Zentyal installer (recommended option),using an existing Ubuntu Server Edition installation.
In the second case the official Zentyal repositories must be added andinstallation continued by installing the modules you are interested in[3].
However, in the first case the installation and deployment process iseasier as all dependencies reside on a single CD or USB. Anotherbenefit of using the CD or USB is to have a graphical environment thatallows the use of a web interface from the server itself.
Ubuntu’s official documentation includes a brief introduction toinstalling and configuring Zentyal [4].
[1] Ubuntu is a Linux distribution developed by Canonical and thecommunity, focused on laptops, PCs and servers:http://www.ubuntu.com/.
[2] For a detailed description about the publication of Ubuntuversions it is recommended you consult the Ubuntu guide:https://wiki.ubuntu.com/Releases.
[3] For more information about installing from the repository please go tohttp://trac.zentyal.org/wiki/Document/Documentation/InstallationGuide.
[4] https://help.ubuntu.com/12.04/serverguide/zentyal.html
Zentyal installer
The Zentyal installer is based on the Ubuntu Server installer. Thosealready familiar with this installer will also find the installation processvery similar.
HomeCompanyDownloadDocumentationScreenshotsForumContributeStore
very similar.
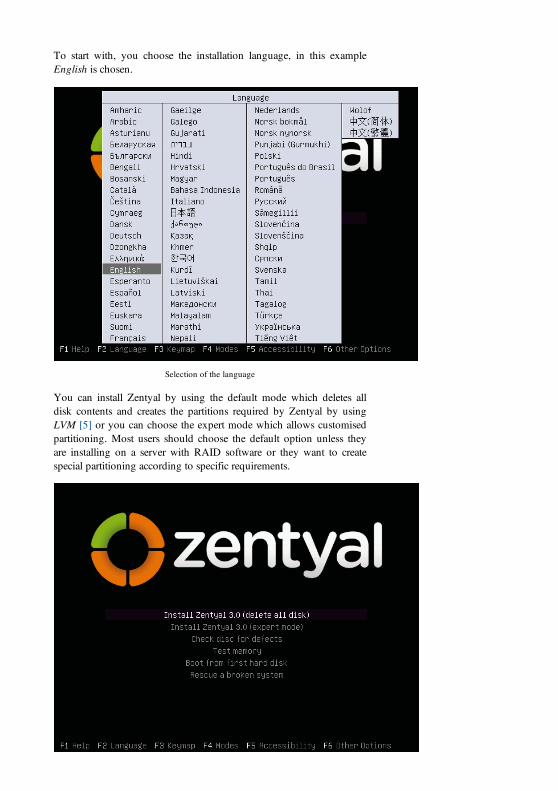
To start with, you choose the installation language, in this exampleEnglish is chosen.
Selection of the language
You can install Zentyal by using the default mode which deletes alldisk contents and creates the partitions required by Zentyal by usingLVM [5] or you can choose the expert mode which allows customisedpartitioning. Most users should choose the default option unless theyare installing on a server with RAID software or they want to createspecial partitioning according to specific requirements.
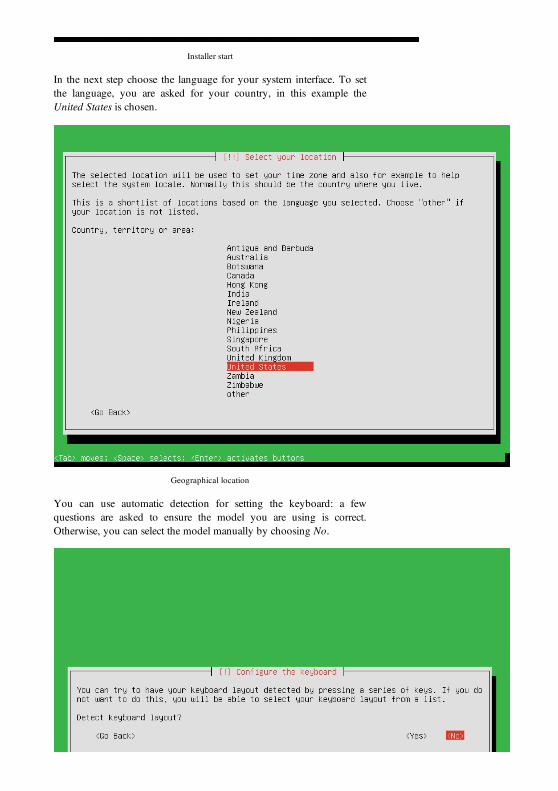
Installer start
In the next step choose the language for your system interface. To setthe language, you are asked for your country, in this example theUnited States is chosen.
Geographical location
You can use automatic detection for setting the keyboard: a fewquestions are asked to ensure the model you are using is correct.Otherwise, you can select the model manually by choosing No.
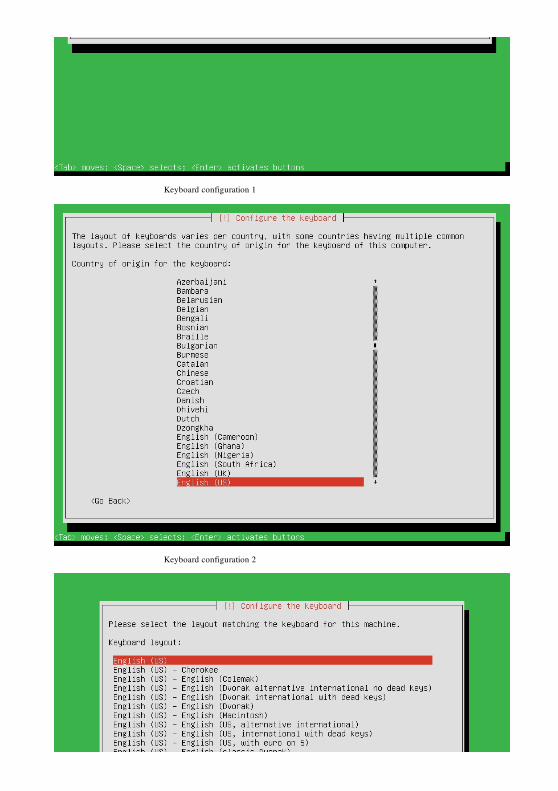
Keyboard configuration 1
Keyboard configuration 2
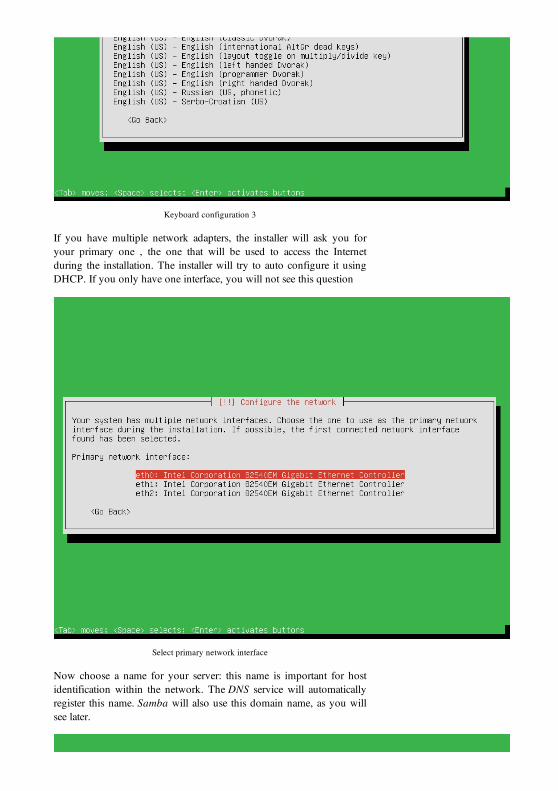
Keyboard configuration 3
If you have multiple network adapters, the installer will ask you foryour primary one , the one that will be used to access the Internetduring the installation. The installer will try to auto configure it usingDHCP. If you only have one interface, you will not see this question
Select primary network interface
Now choose a name for your server: this name is important for hostidentification within the network. The DNS service will automaticallyregister this name. Samba will also use this domain name, as you willsee later.
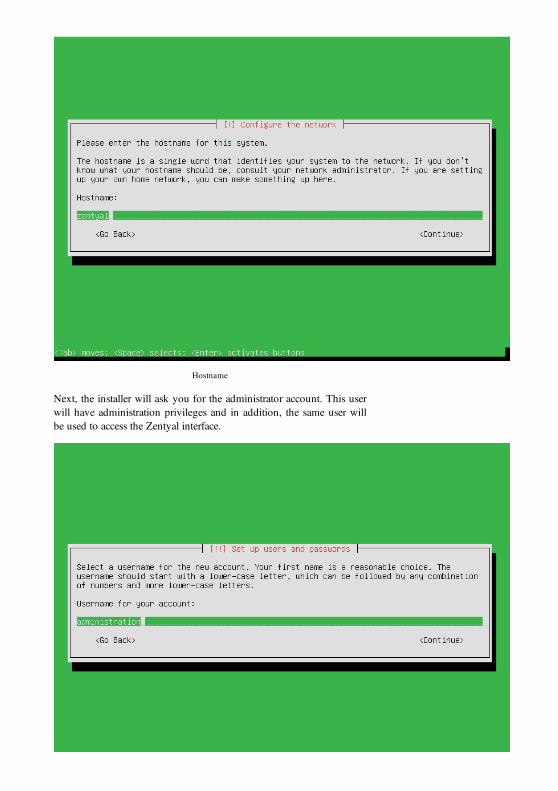
Hostname
Next, the installer will ask you for the administrator account. This userwill have administration privileges and in addition, the same user willbe used to access the Zentyal interface.
System username
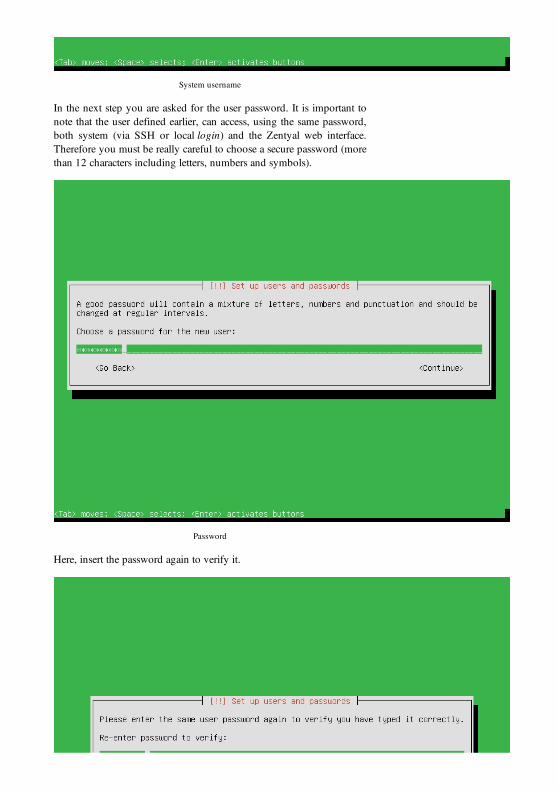
In the next step you are asked for the user password. It is important tonote that the user defined earlier, can access, using the same password,both system (via SSH or local login) and the Zentyal web interface.Therefore you must be really careful to choose a secure password (morethan 12 characters including letters, numbers and symbols).
Password
Here, insert the password again to verify it.
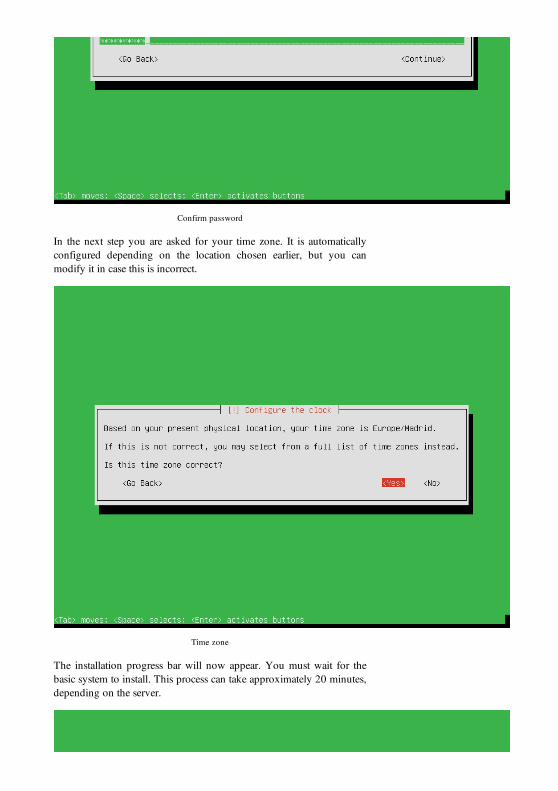
Confirm password
In the next step you are asked for your time zone. It is automaticallyconfigured depending on the location chosen earlier, but you canmodify it in case this is incorrect.
Time zone
The installation progress bar will now appear. You must wait for thebasic system to install. This process can take approximately 20 minutes,depending on the server.
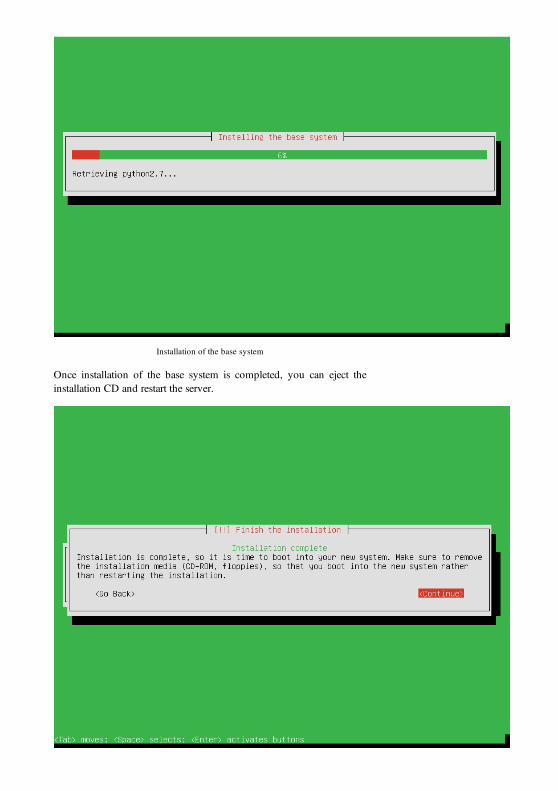
Installation of the base system
Once installation of the base system is completed, you can eject theinstallation CD and restart the server.
Restart
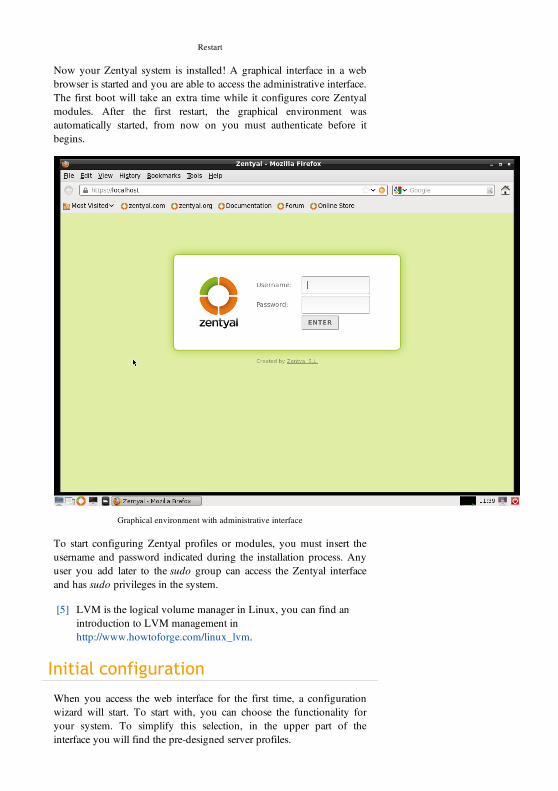
Now your Zentyal system is installed! A graphical interface in a webbrowser is started and you are able to access the administrative interface.The first boot will take an extra time while it configures core Zentyalmodules. After the first restart, the graphical environment wasautomatically started, from now on you must authenticate before itbegins.
Graphical environment with administrative interface
To start configuring Zentyal profiles or modules, you must insert theusername and password indicated during the installation process. Anyuser you add later to the sudo group can access the Zentyal interfaceand has sudo privileges in the system.
[5] LVM is the logical volume manager in Linux, you can find anintroduction to LVM management inhttp://www.howtoforge.com/linux_lvm.
Initial configuration
When you access the web interface for the first time, a configurationwizard will start. To start with, you can choose the functionality foryour system. To simplify this selection, in the upper part of theinterface you will find the pre-designed server profiles.
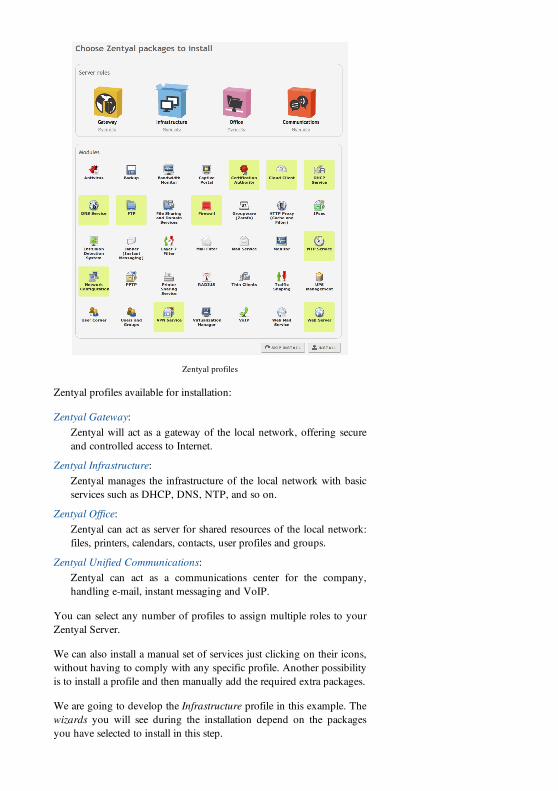
Zentyal profiles
Zentyal profiles available for installation:
Zentyal Gateway:Zentyal will act as a gateway of the local network, offering secureand controlled access to Internet.
Zentyal Infrastructure:Zentyal manages the infrastructure of the local network with basicservices such as DHCP, DNS, NTP, and so on.
Zentyal Office:Zentyal can act as server for shared resources of the local network:files, printers, calendars, contacts, user profiles and groups.
Zentyal Unified Communications:Zentyal can act as a communications center for the company,handling e-mail, instant messaging and VoIP.
You can select any number of profiles to assign multiple roles to yourZentyal Server.
We can also install a manual set of services just clicking on their icons,without having to comply with any specific profile. Another possibilityis to install a profile and then manually add the required extra packages.
We are going to develop the Infrastructure profile in this example. Thewizards you will see during the installation depend on the packagesyou have selected to install in this step.
Once you have finished the selection, only the necessary additional
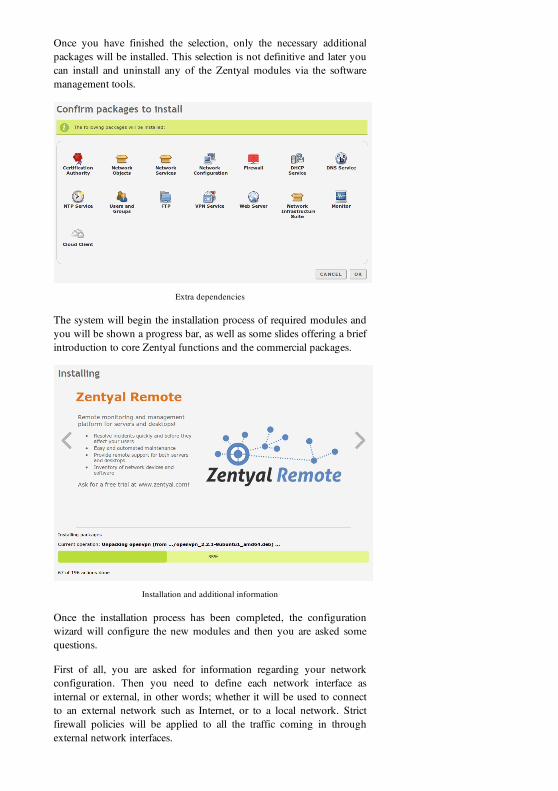
Once you have finished the selection, only the necessary additionalpackages will be installed. This selection is not definitive and later youcan install and uninstall any of the Zentyal modules via the softwaremanagement tools.
Extra dependencies
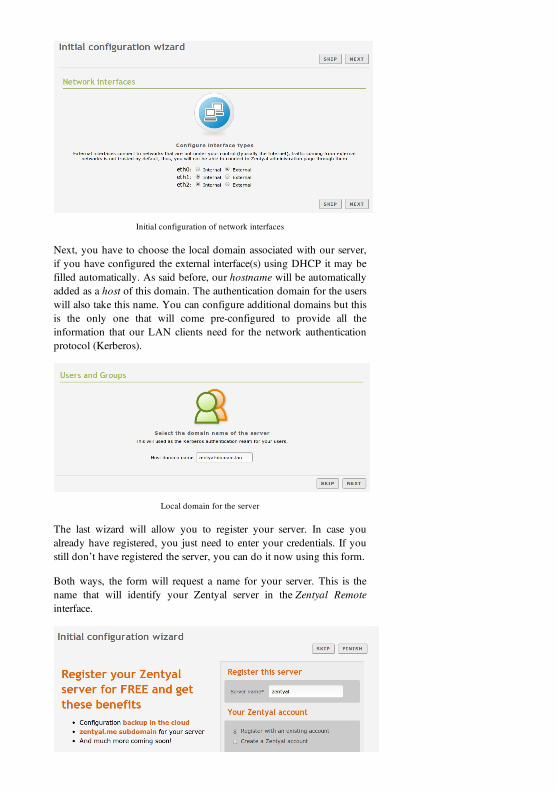
The system will begin the installation process of required modules andyou will be shown a progress bar, as well as some slides offering a briefintroduction to core Zentyal functions and the commercial packages.
Installation and additional information
Once the installation process has been completed, the configurationwizard will configure the new modules and then you are asked somequestions.
First of all, you are asked for information regarding your networkconfiguration. Then you need to define each network interface asinternal or external, in other words; whether it will be used to connectto an external network such as Internet, or to a local network. Strictfirewall policies will be applied to all the traffic coming in throughexternal network interfaces.
Initial configuration of network interfaces
Next, you have to choose the local domain associated with our server,if you have configured the external interface(s) using DHCP it may befilled automatically. As said before, our hostname will be automaticallyadded as a host of this domain. The authentication domain for the userswill also take this name. You can configure additional domains but thisis the only one that will come pre-configured to provide all theinformation that our LAN clients need for the network authenticationprotocol (Kerberos).
Local domain for the server
The last wizard will allow you to register your server. In case youalready have registered, you just need to enter your credentials. If youstill don’t have registered the server, you can do it now using this form.
Both ways, the form will request a name for your server. This is thename that will identify your Zentyal server in the Zentyal Remoteinterface.
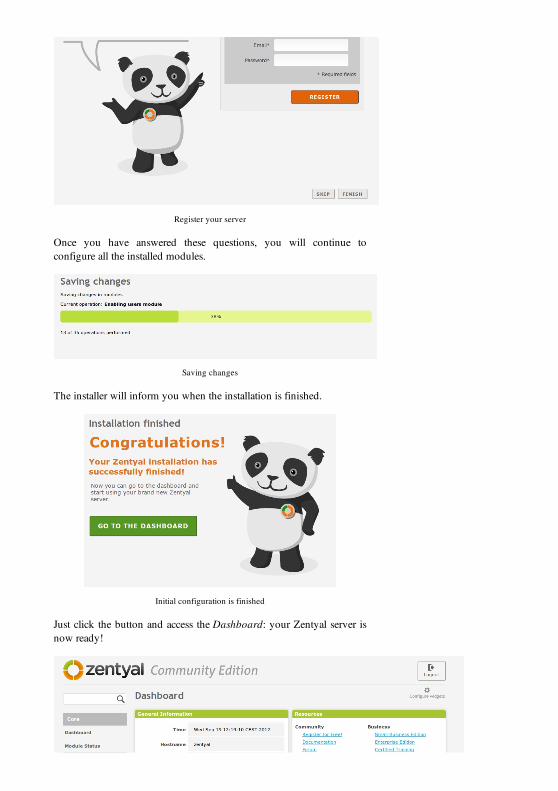
Register your server
Once you have answered these questions, you will continue toconfigure all the installed modules.
Saving changes
The installer will inform you when the installation is finished.
Initial configuration is finished
Just click the button and access the Dashboard: your Zentyal server isnow ready!

Dashboard
Hardware requirements
Zentyal runs on standard x86 or x86_64 (64-bit) hardware. However,you must ensure that Ubuntu Lucid 10.04 LTS (kernel 2.6.32)supports the hardware you are going to use. You should be able tocheck this information directly from the vendor. Otherwise you cancheck Ubuntu Linux Hardware Compatibility List [6], list of serverscertified for Ubuntu 10.04 LTS [7] or by searching in Google.
The Zentyal server hardware requirements depend on the modules youinstall. How many users will use the services and what their usagepatterns are.
Some modules have low resource requirements, like Firewall, DHCP orDNS. Others, like Mailfilter or Antivirus need more RAM memory andCPU. Proxy and File sharing modules benefit from faster disks duetheir intensive I/O usage.
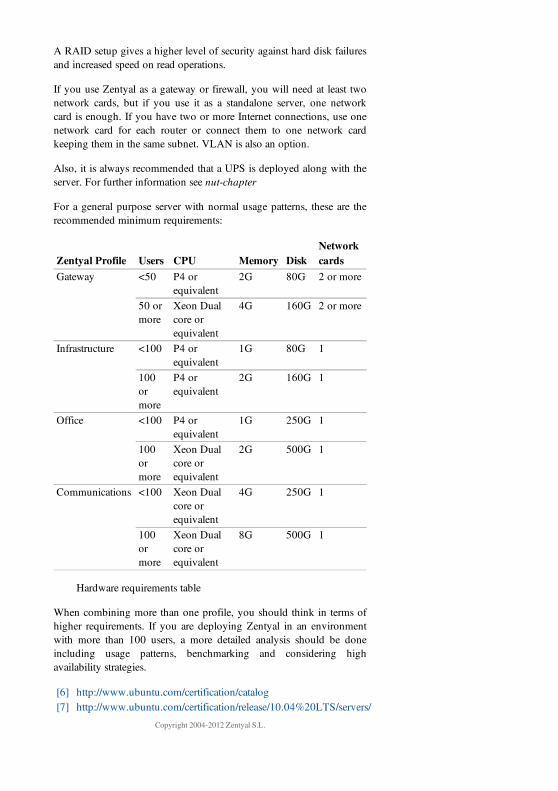
A RAID setup gives a higher level of security against hard disk failuresand increased speed on read operations.
If you use Zentyal as a gateway or firewall, you will need at least twonetwork cards, but if you use it as a standalone server, one networkcard is enough. If you have two or more Internet connections, use onenetwork card for each router or connect them to one network cardkeeping them in the same subnet. VLAN is also an option.
Also, it is always recommended that a UPS is deployed along with theserver. For further information see nut-chapter
For a general purpose server with normal usage patterns, these are therecommended minimum requirements:
Zentyal Profile Users CPU Memory DiskNetworkcards
Gateway <50 P4 orequivalent
2G 80G 2 or more
50 ormore
Xeon Dualcore orequivalent
4G 160G 2 or more
Infrastructure <100 P4 orequivalent
1G 80G 1
100ormore
P4 orequivalent
2G 160G 1
Office <100 P4 orequivalent
1G 250G 1
100ormore
Xeon Dualcore orequivalent
2G 500G 1
Communications <100 Xeon Dualcore orequivalent
4G 250G 1
100ormore
Xeon Dualcore orequivalent
8G 500G 1
Hardware requirements table
When combining more than one profile, you should think in terms ofhigher requirements. If you are deploying Zentyal in an environmentwith more than 100 users, a more detailed analysis should be doneincluding usage patterns, benchmarking and considering highavailability strategies.
[6] http://www.ubuntu.com/certification/catalog[7] http://www.ubuntu.com/certification/release/10.04%20LTS/servers/
Copyright 2004-2012 Zentyal S.L.
First steps with Zentyal
Administrative web interface of Zentyal
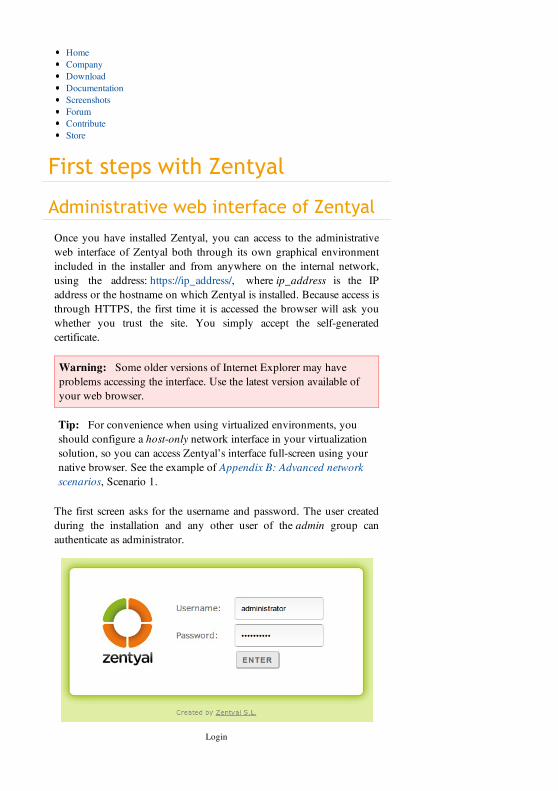
Once you have installed Zentyal, you can access to the administrativeweb interface of Zentyal both through its own graphical environmentincluded in the installer and from anywhere on the internal network,using the address: https://ip_address/, where ip_address is the IPaddress or the hostname on which Zentyal is installed. Because access isthrough HTTPS, the first time it is accessed the browser will ask youwhether you trust the site. You simply accept the self-generatedcertificate.
Warning: Some older versions of Internet Explorer may haveproblems accessing the interface. Use the latest version available ofyour web browser.
Tip: For convenience when using virtualized environments, youshould configure a host-only network interface in your virtualizationsolution, so you can access Zentyal’s interface full-screen using yournative browser. See the example of Appendix B: Advanced networkscenarios, Scenario 1.
The first screen asks for the username and password. The user createdduring the installation and any other user of the admin group canauthenticate as administrator.
Login
HomeCompanyDownloadDocumentationScreenshotsForumContributeStore
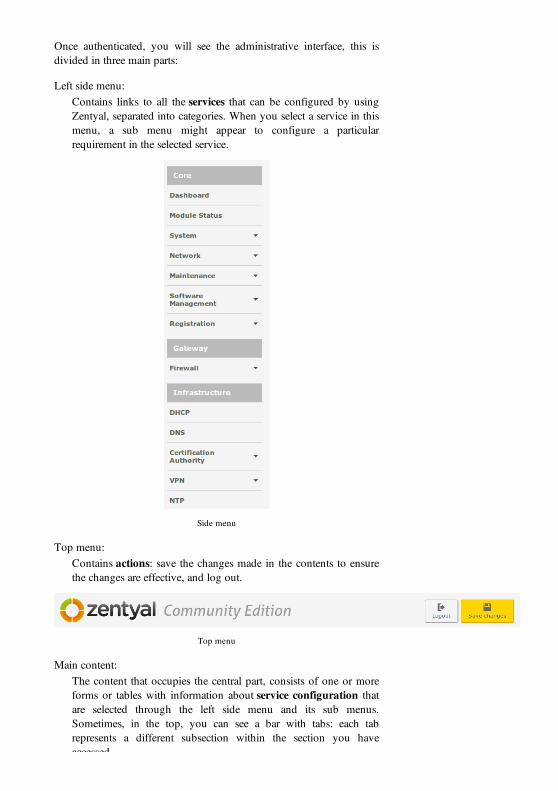
Once authenticated, you will see the administrative interface, this isdivided in three main parts:
Left side menu:Contains links to all the services that can be configured by usingZentyal, separated into categories. When you select a service in thismenu, a sub menu might appear to configure a particularrequirement in the selected service.
Side menu
Top menu:Contains actions: save the changes made in the contents to ensurethe changes are effective, and log out.
Top menu
Main content:The content that occupies the central part, consists of one or moreforms or tables with information about service configuration thatare selected through the left side menu and its sub menus.Sometimes, in the top, you can see a bar with tabs: each tabrepresents a different subsection within the section you haveaccessed.
accessed.
Contents of a form
Dashboard
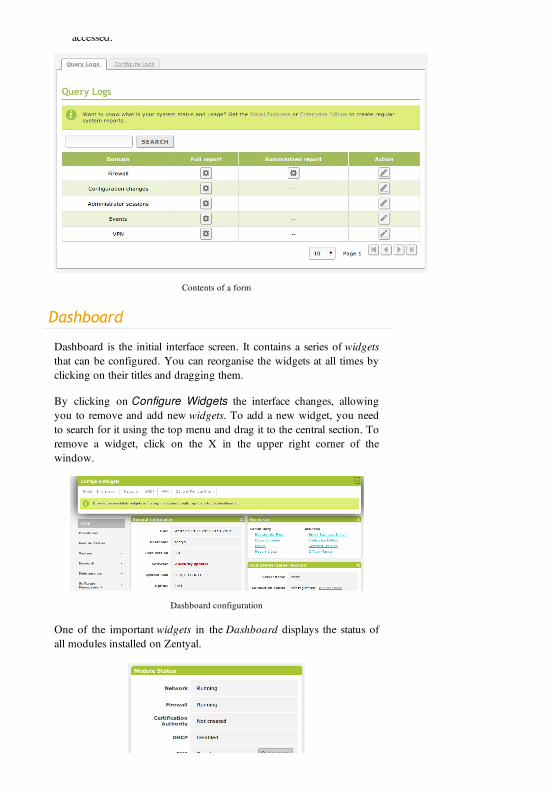
Dashboard is the initial interface screen. It contains a series of widgetsthat can be configured. You can reorganise the widgets at all times byclicking on their titles and dragging them.
By clicking on Configure Widgets the interface changes, allowingyou to remove and add new widgets. To add a new widget, you needto search for it using the top menu and drag it to the central section. Toremove a widget, click on the X in the upper right corner of thewindow.
Dashboard configuration
One of the important widgets in the Dashboard displays the status ofall modules installed on Zentyal.

Widget showing status of the modules
The image shows the status of a service and the action you can carryout for this service. The different statuses are:
Running:The service is running and listening to client connections. You canrestart a service using Restart.
Running unmanaged:If you haven’t enabled the module yet, it will be running with thedefault configuration set by the distribution.
Stopped:The service is stopped either because the administrator has stoppedit or because a problem has occurred. You can restart the service byclicking on Restart.
Disabled:The module has been explicitly disabled by the administrator.
Configuration of the module status
Zentyal uses a modular design in which each module manages adifferent service. To configure each of these services you must enablethe corresponding module from Module Status. All those functionsthat have been selected during the installation will be enabledautomatically.
Configuration of the status module
Each module may have dependencies on others modules in order to
Each module may have dependencies on others modules in order towork. For instance, DHCP module needs to have the network moduleenabled so that it can serve IP addresses through the configurednetwork interfaces. The dependencies are shown in the Dependscolumn and until these are enabled, you can’t enable the module.
Tip: It’s important to remember that a module will not work until itis activated. Similarly, you can do several changes in a moduleconfiguration and they will not apply until you click on SaveChanges. This behaviour is expected and allows you to carefullydouble check all the configurations before applying them.
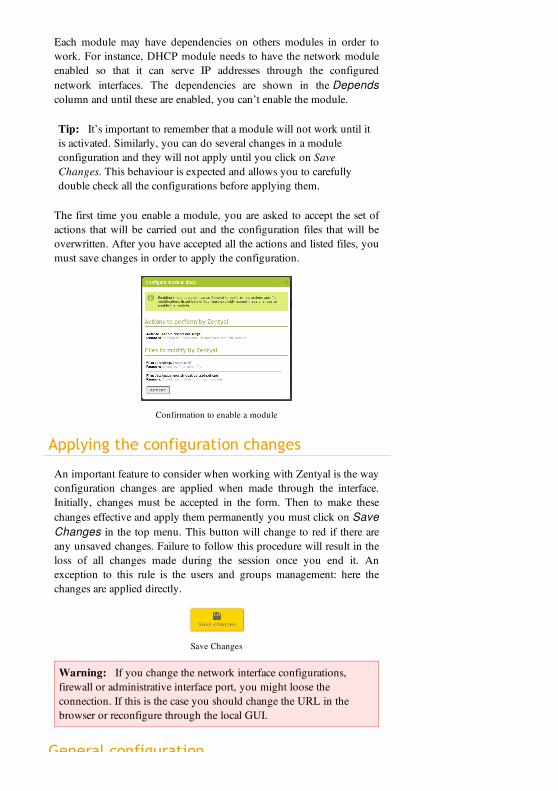
The first time you enable a module, you are asked to accept the set ofactions that will be carried out and the configuration files that will beoverwritten. After you have accepted all the actions and listed files, youmust save changes in order to apply the configuration.
Confirmation to enable a module
Applying the configuration changes
An important feature to consider when working with Zentyal is the wayconfiguration changes are applied when made through the interface.Initially, changes must be accepted in the form. Then to make thesechanges effective and apply them permanently you must click on SaveChanges in the top menu. This button will change to red if there areany unsaved changes. Failure to follow this procedure will result in theloss of all changes made during the session once you end it. Anexception to this rule is the users and groups management: here thechanges are applied directly.
Save Changes
Warning: If you change the network interface configurations,firewall or administrative interface port, you might loose theconnection. If this is the case you should change the URL in thebrowser or reconfigure through the local GUI.
General configuration
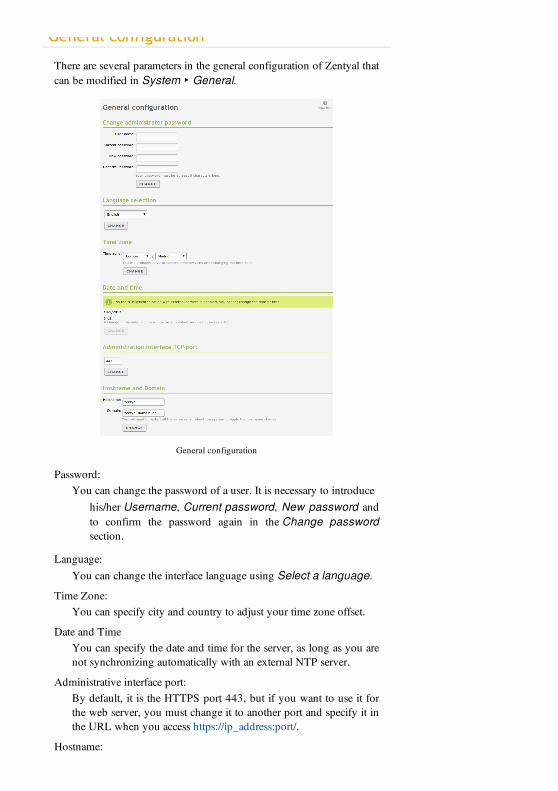
General configuration
There are several parameters in the general configuration of Zentyal thatcan be modified in System ‣ General.
General configuration
Password:You can change the password of a user. It is necessary to introduce
his/her Username, Current password, New password andto confirm the password again in the Change passwordsection.
Language:You can change the interface language using Select a language.
Time Zone:You can specify city and country to adjust your time zone offset.
Date and TimeYou can specify the date and time for the server, as long as you arenot synchronizing automatically with an external NTP server.
Administrative interface port:By default, it is the HTTPS port 443, but if you want to use it forthe web server, you must change it to another port and specify it inthe URL when you access https://ip_address:port/.
Hostname:
Hostname:It is possible to change the hostname or the hostname, for examplezentyal.home.lan. The hostname is helpful because the server canbe identified from other hosts in the same network.
Warning: You have to be careful if you intend to change themachine host name or local domain after the installation, because theauthentication configuration (Kerberos) that was automaticallyperformed will no longer be valid. In this case you will have to copythe relevant DNS registers manually.
Network configuration with Zentyal
Through Network ‣ Interfaces you can access the configuration ofeach network card detected by the system and you can select between astatic configuration (manually configured), dynamic (DHCPconfiguration), VLAN (802.1Q) trunk, PPoE or bridged.
In addition, you can define each interface to be External if it isconnected to an external network, such as the Internet. In order to applystricter firewall policies. If you don’t do this, the interface is consideredinternal, connected to a local network.
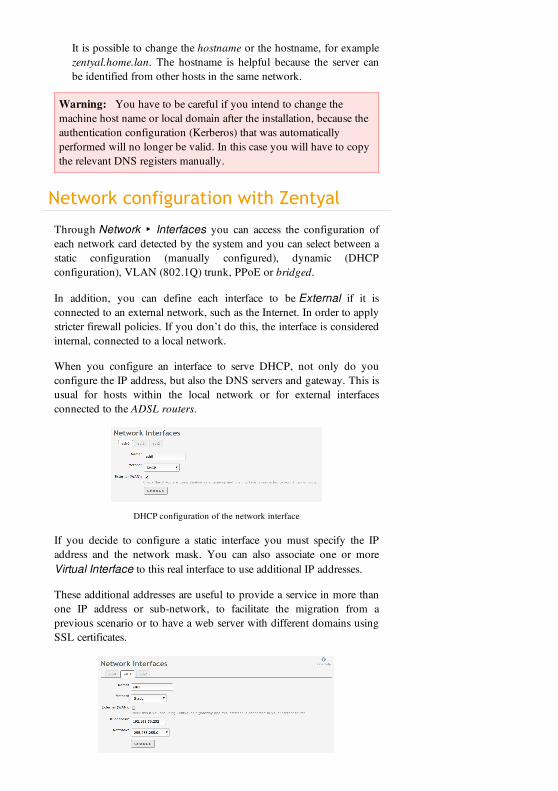
When you configure an interface to serve DHCP, not only do youconfigure the IP address, but also the DNS servers and gateway. This isusual for hosts within the local network or for external interfacesconnected to the ADSL routers.
DHCP configuration of the network interface
If you decide to configure a static interface you must specify the IPaddress and the network mask. You can also associate one or moreVirtual Interface to this real interface to use additional IP addresses.
These additional addresses are useful to provide a service in more thanone IP address or sub-network, to facilitate the migration from aprevious scenario or to have a web server with different domains usingSSL certificates.
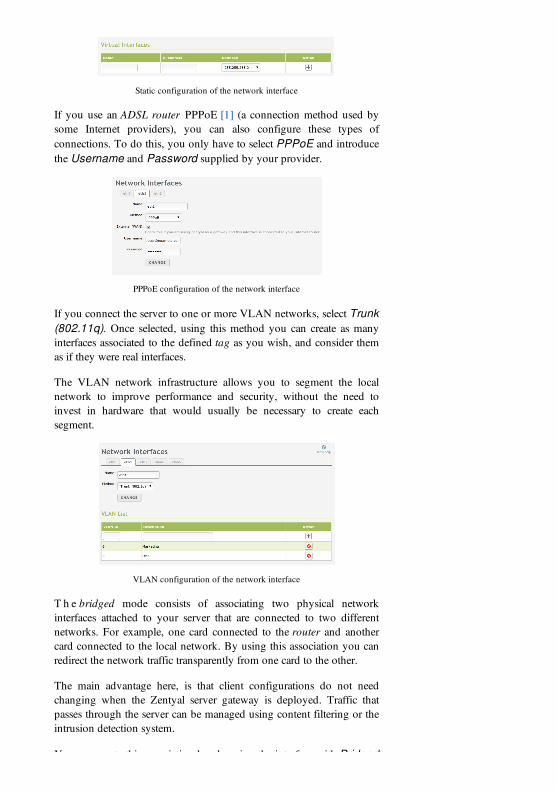
Static configuration of the network interface
If you use an ADSL router PPPoE [1] (a connection method used bysome Internet providers), you can also configure these types ofconnections. To do this, you only have to select PPPoE and introducethe Username and Password supplied by your provider.
PPPoE configuration of the network interface
If you connect the server to one or more VLAN networks, select Trunk(802.11q). Once selected, using this method you can create as manyinterfaces associated to the defined tag as you wish, and consider themas if they were real interfaces.
The VLAN network infrastructure allows you to segment the localnetwork to improve performance and security, without the need toinvest in hardware that would usually be necessary to create eachsegment.
VLAN configuration of the network interface
T h e bridged mode consists of associating two physical networkinterfaces attached to your server that are connected to two differentnetworks. For example, one card connected to the router and anothercard connected to the local network. By using this association you canredirect the network traffic transparently from one card to the other.
The main advantage here, is that client configurations do not needchanging when the Zentyal server gateway is deployed. Traffic thatpasses through the server can be managed using content filtering or theintrusion detection system.
You can create this association by changing the interface with Bridged
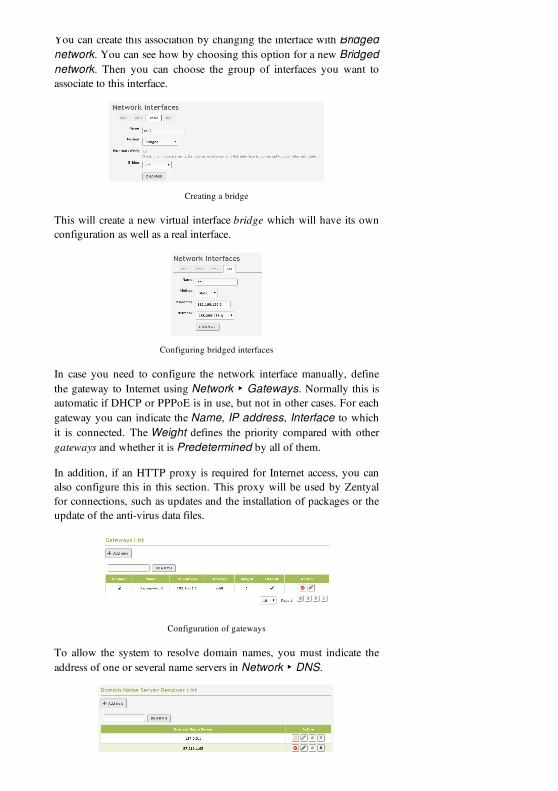
You can create this association by changing the interface with Bridgednetwork. You can see how by choosing this option for a new Bridgednetwork. Then you can choose the group of interfaces you want toassociate to this interface.
Creating a bridge
This will create a new virtual interface bridge which will have its ownconfiguration as well as a real interface.
Configuring bridged interfaces
In case you need to configure the network interface manually, definethe gateway to Internet using Network ‣ Gateways. Normally this isautomatic if DHCP or PPPoE is in use, but not in other cases. For eachgateway you can indicate the Name, IP address, Interface to whichit is connected. The Weight defines the priority compared with othergateways and whether it is Predetermined by all of them.
In addition, if an HTTP proxy is required for Internet access, you canalso configure this in this section. This proxy will be used by Zentyalfor connections, such as updates and the installation of packages or theupdate of the anti-virus data files.
Configuration of gateways
To allow the system to resolve domain names, you must indicate theaddress of one or several name servers in Network ‣ DNS.

Configuration of DNS servers
If the Internet connection assigns a dynamic IP address and you need adomain name to re-direct, you need a provider of dynamic DNS. Byusing Zentyal you can configure some of the most popular providers ofdynamic DNS.
To do this, you must select Network ‣ DynDNS where you canchoose the Service provider, Username, Password and Hostnamewhich needs updating when the public address changes. Finally selectEnable dynamic DNS.
Configuration of Dynamic DNS
Zentyal connects to a provider to obtain a public IP address avoidingany translation of the network address (NAT) between the server andInternet. If you are using this feature in the multirouter [2] scenario,you must not forget to create a rule to ensure the connections to theprovider always use the same gateway.
[1] http://en.wikipedia.org/wiki/PPPoE
Network diagnosis
To check that the network has been configured correctly, you can usethe tools available in Network ‣ Tools.
Ping is a tool that uses the ICMP network diagnosis protocol toobserve whether a particular remote host is reachable by means of asimple “echo request”.
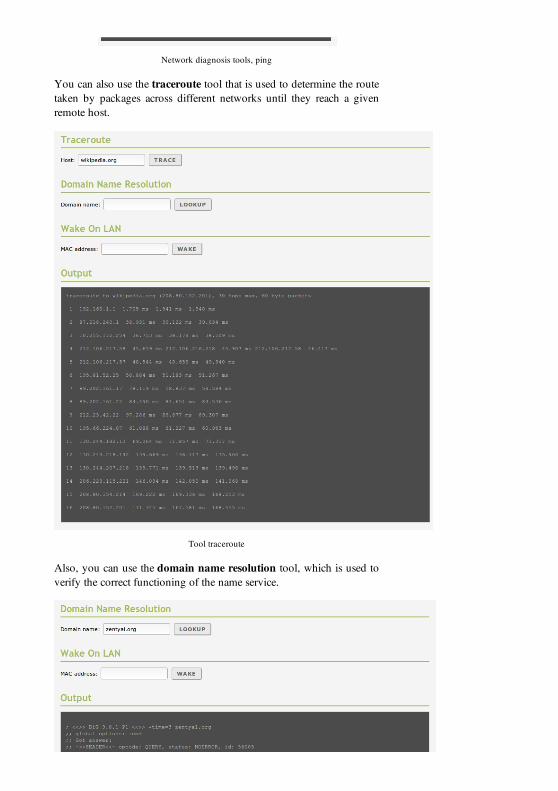
Network diagnosis tools, ping
You can also use the traceroute tool that is used to determine the routetaken by packages across different networks until they reach a givenremote host.
Tool traceroute
Also, you can use the domain name resolution tool, which is used toverify the correct functioning of the name service.
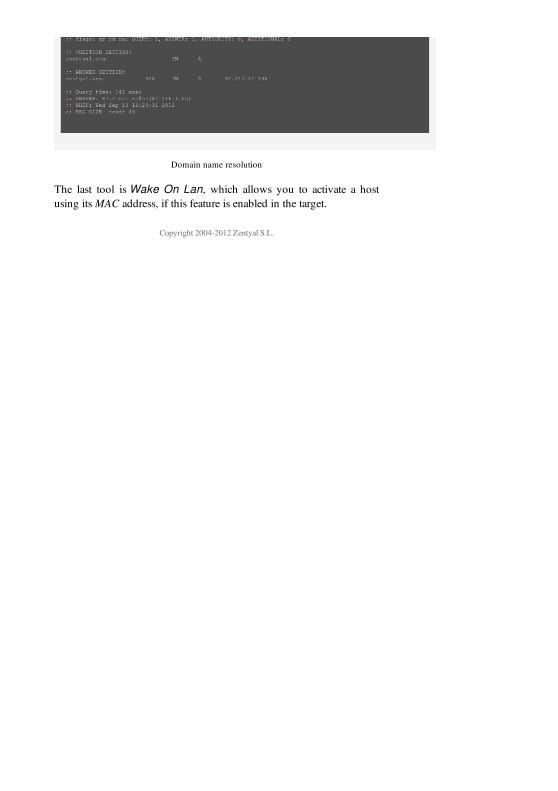
Domain name resolution
The last tool is Wake On Lan, which allows you to activate a hostusing its MAC address, if this feature is enabled in the target.
Copyright 2004-2012 Zentyal S.L.
Software updatesLike any other software system, Zentyal server requires periodicupdates, either to add new features or to fix defects or system failures.
Zentyal distributes its software as packages and it uses Ubuntu’sstandard tool, APT [1]. However, in order to ease this task, a webinterface is provided to simplify the process. [2]
[1] Advanced Packaging Tool (APT) is a system for themanagement of software packages created by the Debian Projectwhich greatly simplifies the installation and removal of programson Linux http://wiki.debian.org/Apt
[2] For a more extensive explanation on how to install softwarepackages in Ubuntu, please read the chapter on packagemanagement in Ubuntu’s official documentationhttps://help.ubuntu.com/12.04/serverguide/C/package-management.html
The web interface allows checking for new available versions ofZentyal components and installing them in a simple way. It also allowsyou to update the software supporting Zentyal, mainly to correctpotential security flaws.
Management of Zentyal components
T h e management of Zentyal components allows you to install,update and delete Zentyal modules.
To manage Zentyal components you must access SoftwareManagement -> Zentyal components.
HomeCompanyDownloadDocumentationScreenshotsForumContributeStore
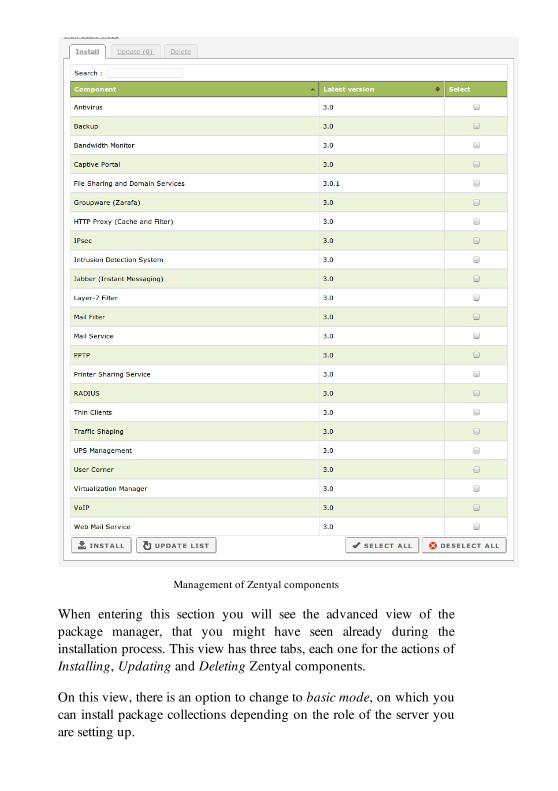
Management of Zentyal components
When entering this section you will see the advanced view of thepackage manager, that you might have seen already during theinstallation process. This view has three tabs, each one for the actions ofInstalling, Updating and Deleting Zentyal components.
On this view, there is an option to change to basic mode, on which youcan install package collections depending on the role of the server youare setting up.
Getting back to the advanced view, let’s see the available action indetail.
Component installation
Tab is visible when you enter in the component management section.There are three columns here, one for the component name, another forthe version currently available in the repositories and a third to selectthe component. In the lower part of the table you can view the buttonsto Install, Update list, Select all and Deselect all.
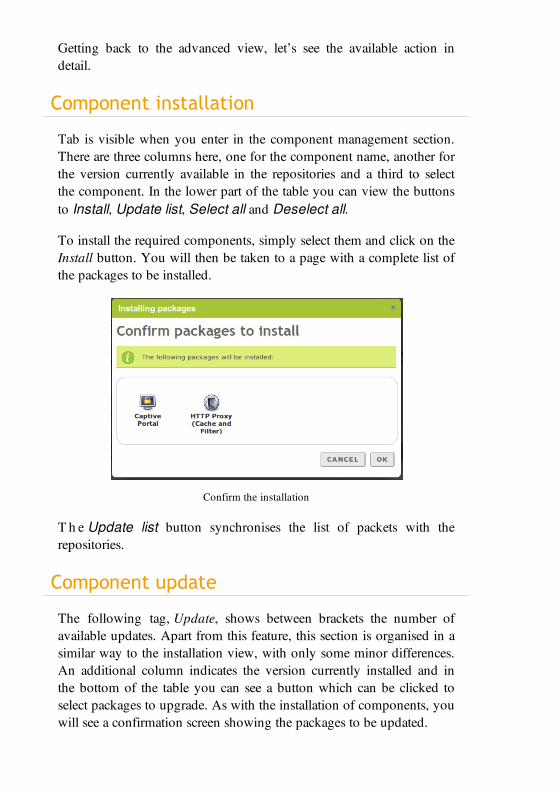
To install the required components, simply select them and click on theInstall button. You will then be taken to a page with a complete list ofthe packages to be installed.
Confirm the installation
T h e Update list button synchronises the list of packets with therepositories.
Component update
The following tag, Update, shows between brackets the number ofavailable updates. Apart from this feature, this section is organised in asimilar way to the installation view, with only some minor differences.An additional column indicates the version currently installed and inthe bottom of the table you can see a button which can be clicked toselect packages to upgrade. As with the installation of components, youwill see a confirmation screen showing the packages to be updated.
Component deletion
Component deletion
The last tag, Delete, shows a table with the installed packages and theirversions. In a similar way as with the previous view, you can selectpackages to uninstall and then, to complete the action click the Deletebutton in the lower left part of the table to complete the action.
Before performing the action, just like in previous examples, Zentyalwill ask for confirmation before deleting the selected packages and theirdependencies.
System Updates
T h e system updates section performs the updating of third partysoftware used by Zentyal. These programs are referenced asdependencies, ensuring that when installing Zentyal, or any of therequired modules, they are also installed. This guarantees the correctoperation of the server. Similarly, these programs may havedependencies too.
Usually the update of a dependency is not important enough to create anew Zentyal package with new dependencies, but it may be useful toinstall it in order to use its improvements or its patches to fix securityflaws.
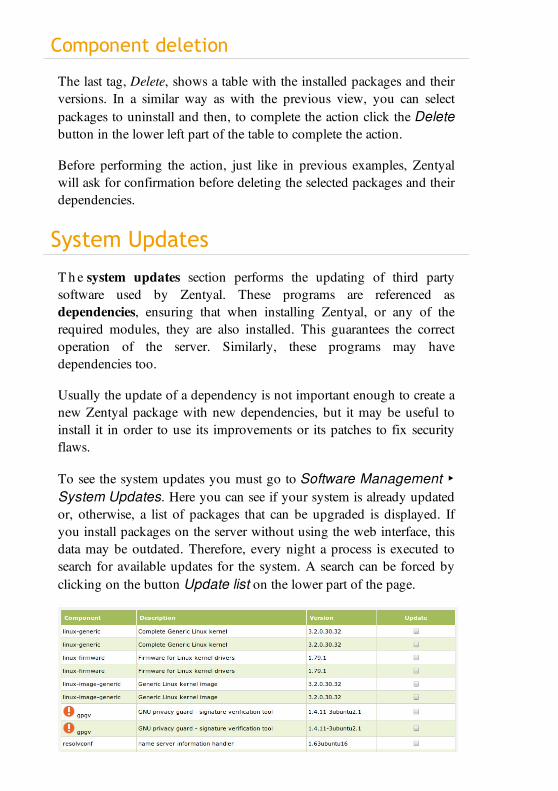
To see the system updates you must go to Software Management ‣System Updates. Here you can see if your system is already updatedor, otherwise, a list of packages that can be upgraded is displayed. Ifyou install packages on the server without using the web interface, thisdata may be outdated. Therefore, every night a process is executed tosearch for available updates for the system. A search can be forced byclicking on the button Update list on the lower part of the page.
System Updates
For each update, you can determine whether it is a security updateusing the information icon. If it is a security update the details about thesecurity flaw included in the package changelog will be displayed byclicking on the icon.
If you want to perform an update, select the packages on which toperform the action and press the appropriate button. As a shortcut, thebutton Update all packages can be used. Status messages will bedisplayed during the update operation.
Automatic updates
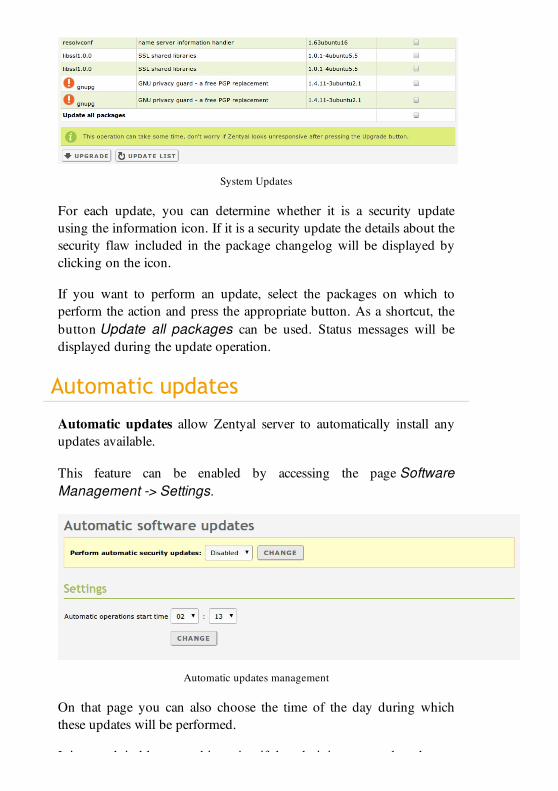
Automatic updates allow Zentyal server to automatically install anyupdates available.
This feature can be enabled by accessing the page SoftwareManagement -> Settings.
Automatic updates management
On that page you can also choose the time of the day during whichthese updates will be performed.
It is not advisable to use this option if the administrator needs to keep a

It is not advisable to use this option if the administrator needs to keep ahigher level of security and control for the management of updates.
Copyright 2004-2012 Zentyal S.L.
Zentyal Remote Client
About Zentyal Remote
Zentyal Remote is a solution that provides automatic maintenance ofservers, as well as real-time monitoring and centralised management ofmultiple Zentyal installations. It offers features such as; quality assuredsoftware updates, alerts and reports on server performance, networkinventory, security audits, disaster recovery, advanced security updates,network monitoring and remote, centralised and secure management ofgroups of servers, as well as the remote access and inventory fordesktop. [1]
If you don’t have a Zentyal server commercial edition, you can stillregister your community server. This entitles you to store one remoteconfiguration backup, create zentyal.me subdomain for your server andto see your Zentyal server name in the web browser tab.
In the following pages, you will learn how to register your server toZentyal Remote with a community server and you will see theadditional functionality that a registered server offers. Please rememberthat Zentyal servers in production environments should always havecommercial editions to guarantee maximum security and systemuptime. [2]
[1] http://www.zentyal.com/services/[2] http://www.zentyal.com/which-edition-is-for-me/
Registering Zentyal server to ZentyalRemote
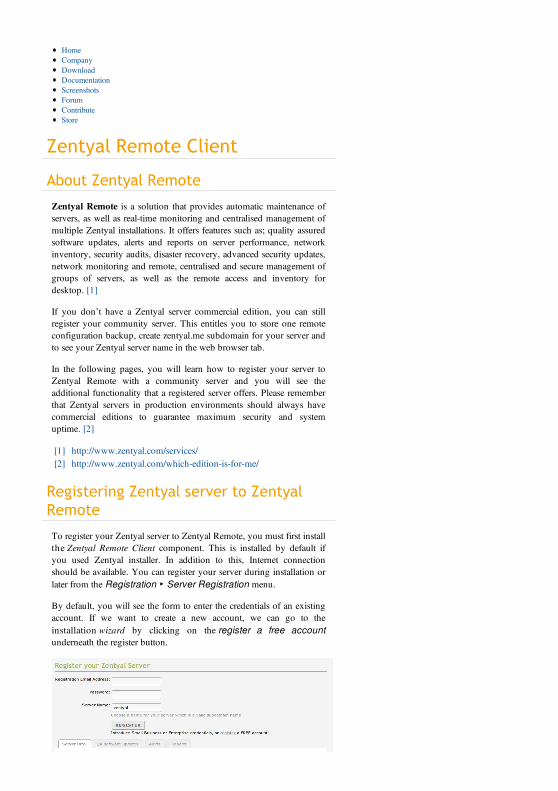
To register your Zentyal server to Zentyal Remote, you must first installthe Zentyal Remote Client component. This is installed by default ifyou used Zentyal installer. In addition to this, Internet connectionshould be available. You can register your server during installation orlater from the Registration ‣ Server Registration menu.
By default, you will see the form to enter the credentials of an existingaccount. If we want to create a new account, we can go to theinstallation wizard by clicking on the register a free accountunderneath the register button.
HomeCompanyDownloadDocumentationScreenshotsForumContributeStore
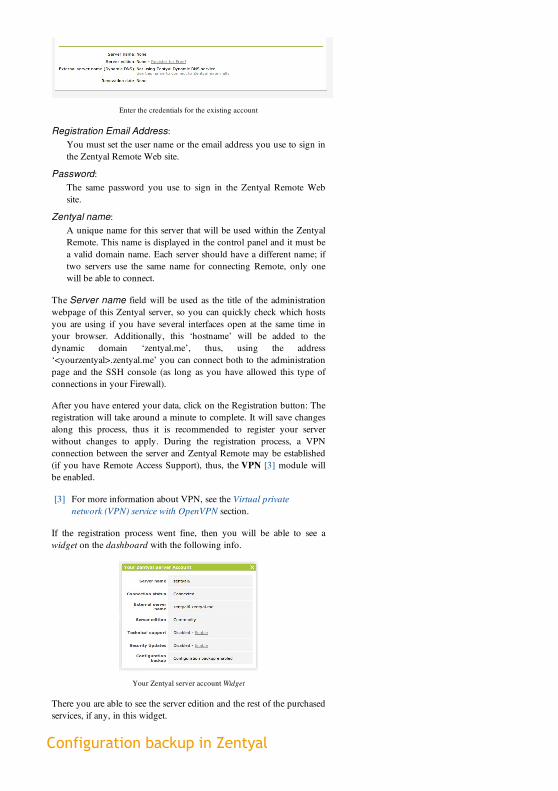
Enter the credentials for the existing account
Registration Email Address:You must set the user name or the email address you use to sign inthe Zentyal Remote Web site.
Password:The same password you use to sign in the Zentyal Remote Website.
Zentyal name:A unique name for this server that will be used within the ZentyalRemote. This name is displayed in the control panel and it must bea valid domain name. Each server should have a different name; iftwo servers use the same name for connecting Remote, only onewill be able to connect.
The Server name field will be used as the title of the administrationwebpage of this Zentyal server, so you can quickly check which hostsyou are using if you have several interfaces open at the same time inyour browser. Additionally, this ‘hostname’ will be added to thedynamic domain ‘zentyal.me’, thus, using the address‘<yourzentyal>.zentyal.me’ you can connect both to the administrationpage and the SSH console (as long as you have allowed this type ofconnections in your Firewall).
After you have entered your data, click on the Registration button: Theregistration will take around a minute to complete. It will save changesalong this process, thus it is recommended to register your serverwithout changes to apply. During the registration process, a VPNconnection between the server and Zentyal Remote may be established(if you have Remote Access Support), thus, the VPN [3] module willbe enabled.
[3] For more information about VPN, see the Virtual privatenetwork (VPN) service with OpenVPN section.
If the registration process went fine, then you will be able to see awidget on the dashboard with the following info.
Your Zentyal server account Widget
There you are able to see the server edition and the rest of the purchasedservices, if any, in this widget.
Configuration backup in ZentyalRemote
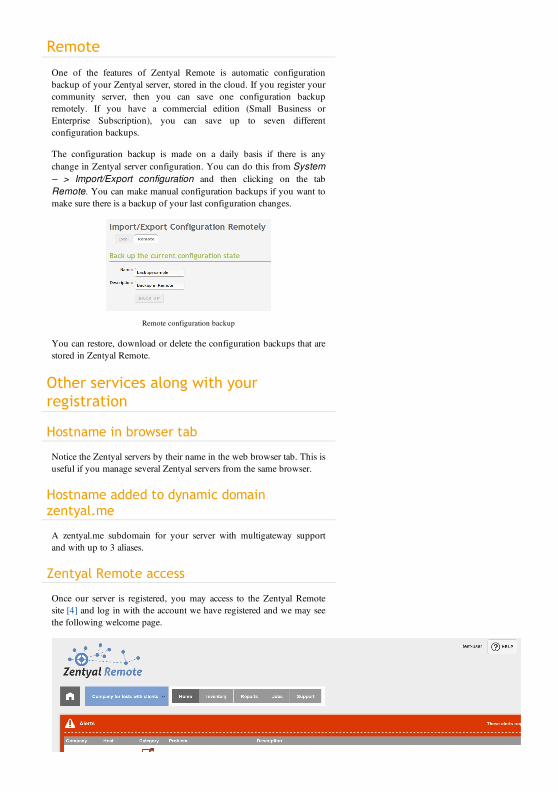
Remote
One of the features of Zentyal Remote is automatic configurationbackup of your Zentyal server, stored in the cloud. If you register yourcommunity server, then you can save one configuration backupremotely. If you have a commercial edition (Small Business orEnterprise Subscription), you can save up to seven differentconfiguration backups.
The configuration backup is made on a daily basis if there is anychange in Zentyal server configuration. You can do this from System– > Import/Export configuration and then clicking on the tabRemote. You can make manual configuration backups if you want tomake sure there is a backup of your last configuration changes.
Remote configuration backup
You can restore, download or delete the configuration backups that arestored in Zentyal Remote.
Other services along with yourregistration
Hostname in browser tab
Notice the Zentyal servers by their name in the web browser tab. This isuseful if you manage several Zentyal servers from the same browser.
Hostname added to dynamic domainzentyal.me
A zentyal.me subdomain for your server with multigateway supportand with up to 3 aliases.
Zentyal Remote access
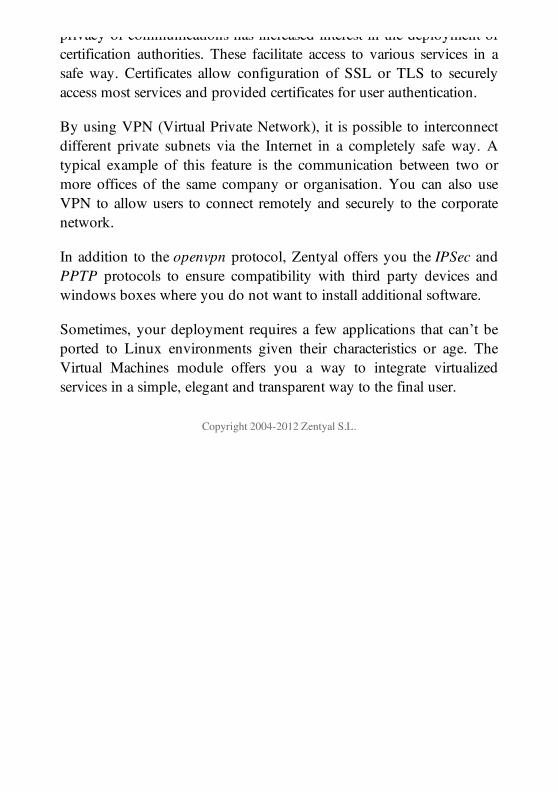
Once our server is registered, you may access to the Zentyal Remotesite [4] and log in with the account we have registered and we may seethe following welcome page.
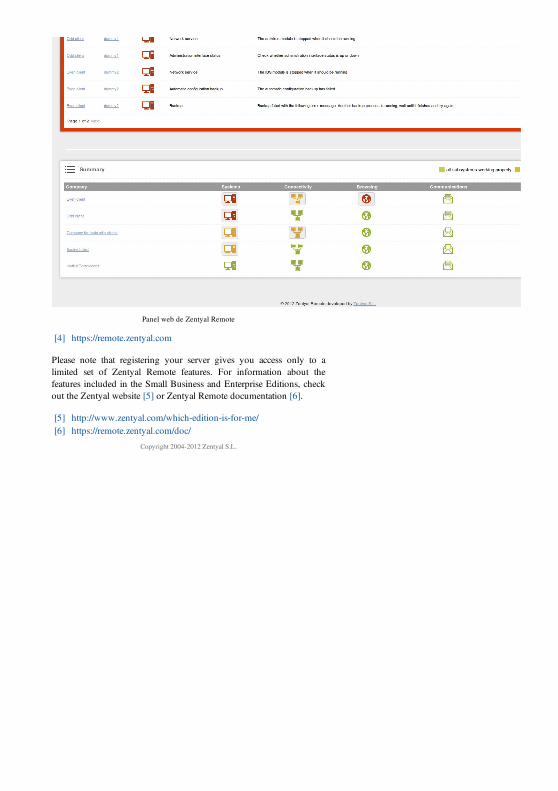
Panel web de Zentyal Remote
[4] https://remote.zentyal.com
Please note that registering your server gives you access only to alimited set of Zentyal Remote features. For information about thefeatures included in the Small Business and Enterprise Editions, checkout the Zentyal website [5] or Zentyal Remote documentation [6].
[5] http://www.zentyal.com/which-edition-is-for-me/[6] https://remote.zentyal.com/doc/
Copyright 2004-2012 Zentyal S.L.

Zentyal InfrastructureThis section explains several of the services used to manage theinfrastructure of your local network and to optimise internal traffic. Wewill study Zentyal’s high-level abstractions, the objects and services thatwill be used in most of the other modules, name domain management,time synchronisation, automatic network configuration, deployment ofthin clients, the management of a certification authority and thedifferent types of virtual private networks you can deploy and installingvirtual machines.
Defining abstractions will help you manage the entities that will be usedby the other modules, creating a coherent and robust context.
Domain Name System or DNS provides access to services and hostsusing names instead of IP addresses, these are easier to memorise.
The Network Time Protocol or NTP, keeps the system timesynchronised on the different computers within a network.
The DHCP service is widely used to automatically configure differentnetwork parameters on computers such as; IP address, DNS servers orthe gateway which is used to access to the Internet.
The Thin Client module (LTSP) allows you to reuse old hardware,creating a centralized management infrastructure where a lot of low-endterminals are powered by a few higher-end servers.
The growing importance of ensuring the authenticity, integrity andprivacy of communications has increased interest in the deployment of
HomeCompanyDownloadDocumentationScreenshotsForumContributeStore
privacy of communications has increased interest in the deployment ofcertification authorities. These facilitate access to various services in asafe way. Certificates allow configuration of SSL or TLS to securelyaccess most services and provided certificates for user authentication.
By using VPN (Virtual Private Network), it is possible to interconnectdifferent private subnets via the Internet in a completely safe way. Atypical example of this feature is the communication between two ormore offices of the same company or organisation. You can also useVPN to allow users to connect remotely and securely to the corporatenetwork.
In addition to the openvpn protocol, Zentyal offers you the IPSec andPPTP protocols to ensure compatibility with third party devices andwindows boxes where you do not want to install additional software.
Sometimes, your deployment requires a few applications that can’t beported to Linux environments given their characteristics or age. TheVirtual Machines module offers you a way to integrate virtualizedservices in a simple, elegant and transparent way to the final user.
Copyright 2004-2012 Zentyal S.L.
High-level Zentyal abstractions
Network objects
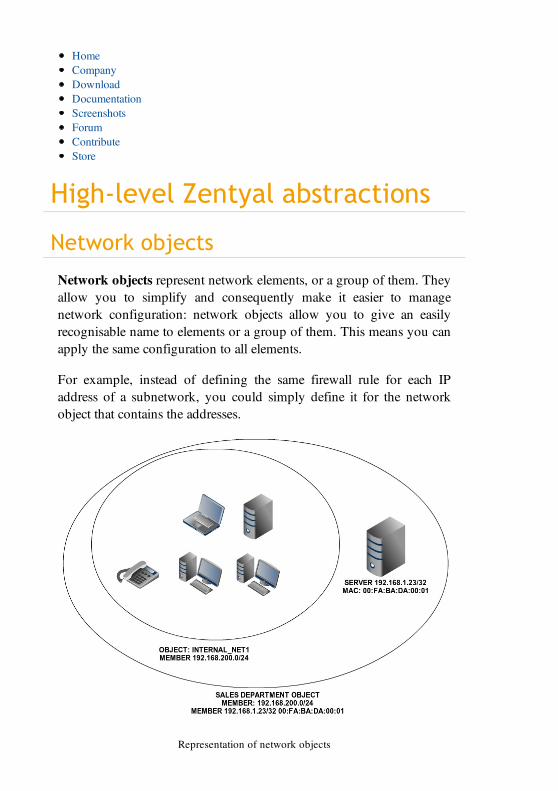
Network objects represent network elements, or a group of them. Theyallow you to simplify and consequently make it easier to managenetwork configuration: network objects allow you to give an easilyrecognisable name to elements or a group of them. This means you canapply the same configuration to all elements.
For example, instead of defining the same firewall rule for each IPaddress of a subnetwork, you could simply define it for the networkobject that contains the addresses.
Representation of network objects
HomeCompanyDownloadDocumentationScreenshotsForumContributeStore
An object consists of any number of members. Each member consistsof a network range or a specific host.
Management of Network objects with Zentyal
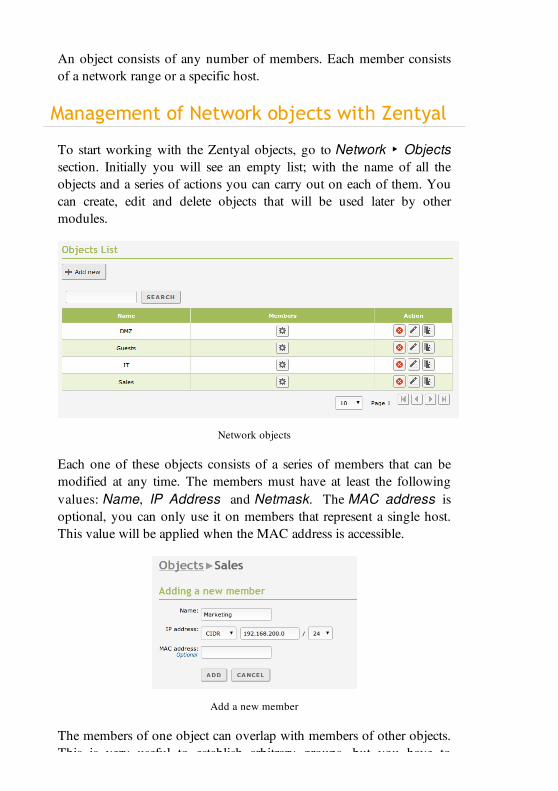
To start working with the Zentyal objects, go to Network ‣ Objectssection. Initially you will see an empty list; with the name of all theobjects and a series of actions you can carry out on each of them. Youcan create, edit and delete objects that will be used later by othermodules.
Network objects
Each one of these objects consists of a series of members that can bemodified at any time. The members must have at least the followingvalues: Name, IP Address and Netmask. The MAC address isoptional, you can only use it on members that represent a single host.This value will be applied when the MAC address is accessible.
Add a new member
The members of one object can overlap with members of other objects.This is very useful to establish arbitrary groups, but you have to
This is very useful to establish arbitrary groups, but you have toconsider them when using the rest of the modules to obtain the wantedconfiguration and to avoid conflicts.
In other configuration sections of Zentyal where you can use networkobjects ( like DHCP or Firewall), a quick embedded menu will beoffered, so you can create and configure the network objects withoutexplicitly accessing this menu section.
Network services
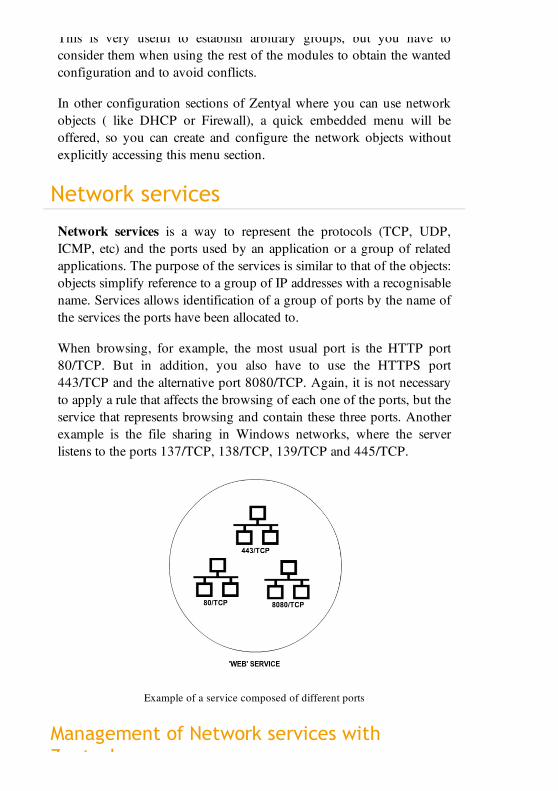
Network services is a way to represent the protocols (TCP, UDP,ICMP, etc) and the ports used by an application or a group of relatedapplications. The purpose of the services is similar to that of the objects:objects simplify reference to a group of IP addresses with a recognisablename. Services allows identification of a group of ports by the name ofthe services the ports have been allocated to.
When browsing, for example, the most usual port is the HTTP port80/TCP. But in addition, you also have to use the HTTPS port443/TCP and the alternative port 8080/TCP. Again, it is not necessaryto apply a rule that affects the browsing of each one of the ports, but theservice that represents browsing and contain these three ports. Anotherexample is the file sharing in Windows networks, where the serverlistens to the ports 137/TCP, 138/TCP, 139/TCP and 445/TCP.
Example of a service composed of different ports
Management of Network services withZentyal

Zentyal
To manage services with Zentyal, go to Network ‣ Services menu,where you will find a list of available services, created by all theinstalled modules and those that were added later. You can see theName, Description and access the Configuration. Furthermore, eachservice has a series of members; each one contains Protocol, Sourceport and Destination port values. You can introduce the value Any inall of the fields to specify, for example, the services for which thesource port is different to the destination port.
TCP, UDP, ESP, GRE or ICMP protocols are supported. You can alsouse a TCP/UDP value to avoid having to add the same port twice whenboth protocols are used by a service, for example DNS.
Network services
Copyright 2004-2012 Zentyal S.L.
Domain Name System (DNS)DNS configuration is vital to the functioning of the local networkauthentication (implemented with Kerberos since the Zentyal 3.0version), the network clients query the local domain, their SRV andTXT records to find servers with ticket authentication. As mentionedbefore, this domain is preconfigured to resolve Kerberos services sincethe installation. For additional information regarding directory services,check Directory Service (LDAP).
BIND [4] is the de facto DNS server on the Internet, originallydeveloped at the University of California, Berkeley and currentlymaintained by the Internet Systems Consortium. BIND version 9,rewritten from scratch to support the latest features of the DNS protocolis used by Zentyal’s DNS module.
[4] http://www.isc.org/software/bind
DNS cache server configuration withZentyal
Zentyal’s DNS module always works as a DNS cache server fornetworks marked as internal, so if you only want your server toperform cache DNS queries, simply enable the module.
Sometimes, this DNS cache server might need to be queried frominternal networks that are not directly configured in Zentyal. Althoughthis case is quite rare, it may occur in networks with routes to internalsegments or VPN networks.
Zentyal allows configuration of the DNS server to accept queries fromthese subnets by a configuration file. You can add these networks to thefile /etc/zentyal/80dns.conf with the option intnets=:
# Internal networks allowed to do recursive queries# to Zentyal DNS caching server. Localnetworks are already# allowed and this settings is intended to allow networks# reachable through static routes.# Example: intnets = 192.168.99.0/24,192.168.98.0/24intnets =
After restarting the DNS module the changes will be applied.
HomeCompanyDownloadDocumentationScreenshotsForumContributeStore

Zentyal’s DNS cache server will query root DNS servers directly tofind out which authoritative server will solve each DNS request. Then itwill store the data locally during the time period set in the TTL field.This feature reduces the time required to start every networkconnection, giving the users a sensation of speed and reducing theoverall Internet traffic.
The search domain is basically a string that is added to a search in case auser defined string is unresolvable. The search domain is set on theclients, but it can be provided automatically by DHCP, so that whenthe clients receive the initial network configuration, they can alsoreceive the search domain.
For example, your search domain could be foocorp.com. When a usertries to access the host example; as it is not present among its knownhosts, the name resolution will fail, then the user’s operating systemwill automatically provide example.foocorp.com, resulting in successfulname resolution.
In Network ‣ Tools you have a tool for Domain Name Resolution,which by using dig shows the details of a DNS query to the server youhave set in Network ‣ DNS.
Domain name resolution using the DNS local cache
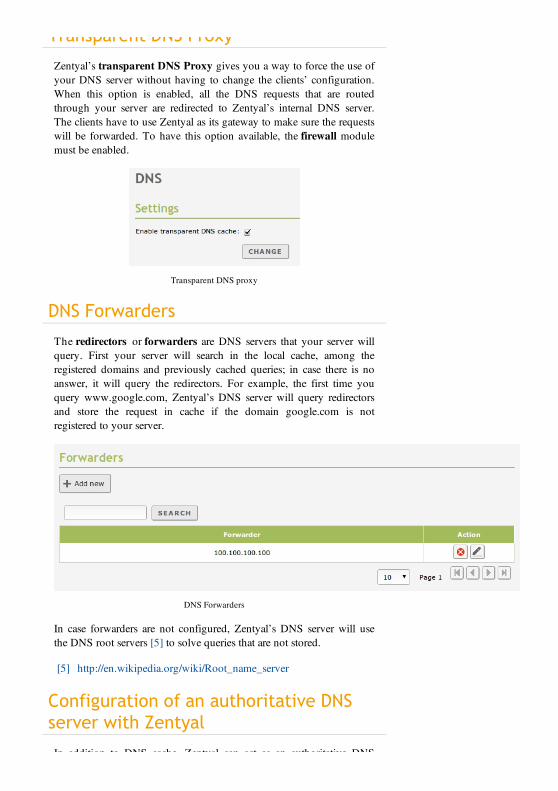
Transparent DNS Proxy
Transparent DNS Proxy
Zentyal’s transparent DNS Proxy gives you a way to force the use ofyour DNS server without having to change the clients’ configuration.When this option is enabled, all the DNS requests that are routedthrough your server are redirected to Zentyal’s internal DNS server.The clients have to use Zentyal as its gateway to make sure the requestswill be forwarded. To have this option available, the firewall modulemust be enabled.
Transparent DNS proxy
DNS Forwarders
The redirectors or forwarders are DNS servers that your server willquery. First your server will search in the local cache, among theregistered domains and previously cached queries; in case there is noanswer, it will query the redirectors. For example, the first time youquery www.google.com, Zentyal’s DNS server will query redirectorsand store the request in cache if the domain google.com is notregistered to your server.
DNS Forwarders
In case forwarders are not configured, Zentyal’s DNS server will usethe DNS root servers [5] to solve queries that are not stored.
[5] http://en.wikipedia.org/wiki/Root_name_server
Configuration of an authoritative DNSserver with Zentyal
In addition to DNS cache, Zentyal can act as an authoritative DNS

In addition to DNS cache, Zentyal can act as an authoritative DNSserver for a list of configured domains. As an authoritative server, it willrespond to queries about these domains coming both from internal andfrom external networks, so that not only local clients, but anyone canresolve these configured domains. Cache servers only respond toqueries from internal networks.
The configuration of this module is done through the DNS menu,where you can add as many domains and subdomains as required.
List of domains
See the “local” domain set during the installation or later through theDNS wizard. One of the TXT records of this domain contains aKerberos authentication realm (concept similar to that of domain). Inthe service records (SRV) you can find information about the hosts andports required for user authentication. Again, if you decide to removethis domain, it would be useful to replicate this information in the newdomain. You can have simultaneously all the domains you want: thiswill not cause any problem for the previously mentioned authorizationmethods.
To configure a new domain, display the form by clicking on Addnew. You can configure the Domain name from here.
Adding a new domain
You will see that within the domain you can configure different names:in the first place the IP Addresses of the domain. A typical case is toadd all Zentyal IP addresses to the local network interfaces as IPaddresses of the domain.
Once the domain has been created, you can define as many names(Type A) as required within the table Hostnames. For each one ofthese names Zentyal will automatically configure reverse resolution.Moreover, for each name you can define as many Alias as necessary.Again, you can associate more than one IP address to your hostname,that can help the clients to balance between different servers, for
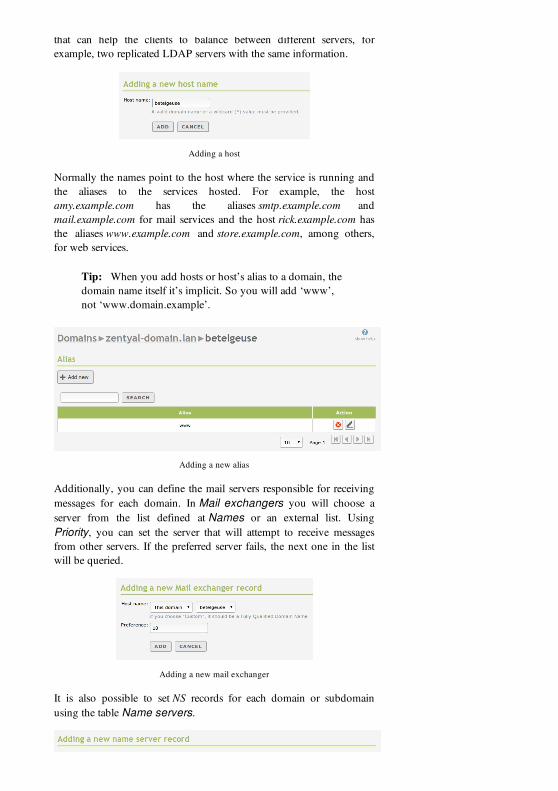
that can help the clients to balance between different servers, forexample, two replicated LDAP servers with the same information.
Adding a host
Normally the names point to the host where the service is running andthe aliases to the services hosted. For example, the hostamy.example.com has the aliases smtp.example.com andmail.example.com for mail services and the host rick.example.com hasthe aliases www.example.com and store.example.com, among others,for web services.
Tip: When you add hosts or host’s alias to a domain, thedomain name itself it’s implicit. So you will add ‘www’,not ‘www.domain.example’.
Adding a new alias
Additionally, you can define the mail servers responsible for receivingmessages for each domain. In Mail exchangers you will choose aserver from the list defined at Names or an external list. UsingPriority, you can set the server that will attempt to receive messagesfrom other servers. If the preferred server fails, the next one in the listwill be queried.
Adding a new mail exchanger
It is also possible to set NS records for each domain or subdomainusing the table Name servers.
Adding a new name server
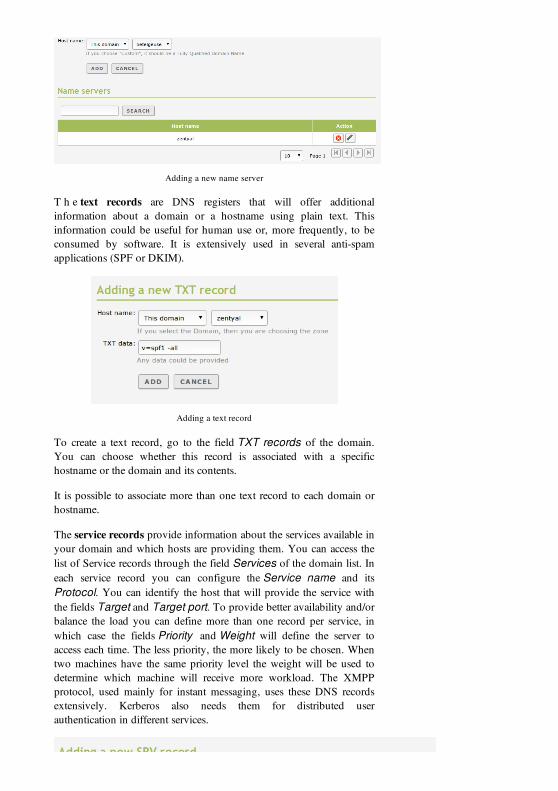
T h e text records are DNS registers that will offer additionalinformation about a domain or a hostname using plain text. Thisinformation could be useful for human use or, more frequently, to beconsumed by software. It is extensively used in several anti-spamapplications (SPF or DKIM).
Adding a text record
To create a text record, go to the field TXT records of the domain.You can choose whether this record is associated with a specifichostname or the domain and its contents.
It is possible to associate more than one text record to each domain orhostname.
The service records provide information about the services available inyour domain and which hosts are providing them. You can access thelist of Service records through the field Services of the domain list. Ineach service record you can configure the Service name and itsProtocol. You can identify the host that will provide the service withthe fields Target and Target port. To provide better availability and/orbalance the load you can define more than one record per service, inwhich case the fields Priority and Weight will define the server toaccess each time. The less priority, the more likely to be chosen. Whentwo machines have the same priority level the weight will be used todetermine which machine will receive more workload. The XMPPprotocol, used mainly for instant messaging, uses these DNS recordsextensively. Kerberos also needs them for distributed userauthentication in different services.
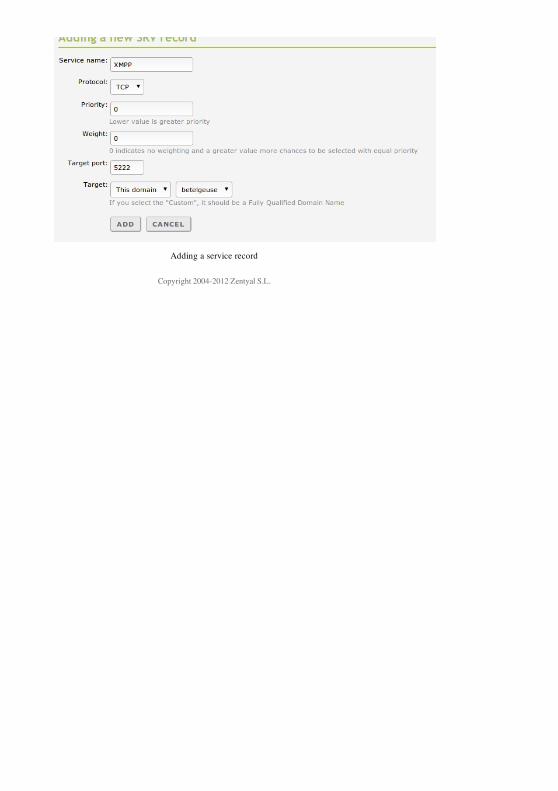
Adding a service record
Copyright 2004-2012 Zentyal S.L.
Time synchronization service(NTP)
Zentyal integrates ntpd [2] as its NTP server. NTP uses UDP port 123.
[2] http://www.eecis.udel.edu/~mills/ntp/html/ntpd.html
Configuring an NTP server with Zentyal
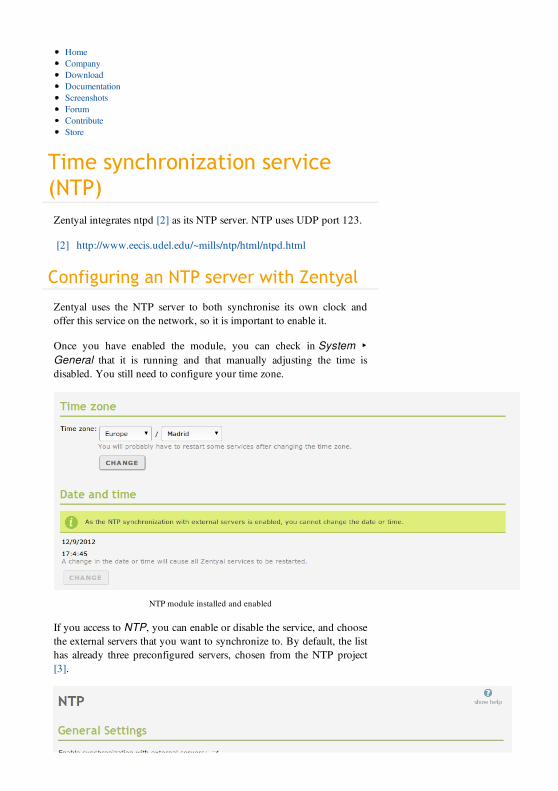
Zentyal uses the NTP server to both synchronise its own clock andoffer this service on the network, so it is important to enable it.
Once you have enabled the module, you can check in System ‣General that it is running and that manually adjusting the time isdisabled. You still need to configure your time zone.
NTP module installed and enabled
If you access to NTP, you can enable or disable the service, and choosethe external servers that you want to synchronize to. By default, the listhas already three preconfigured servers, chosen from the NTP project[3].
HomeCompanyDownloadDocumentationScreenshotsForumContributeStore
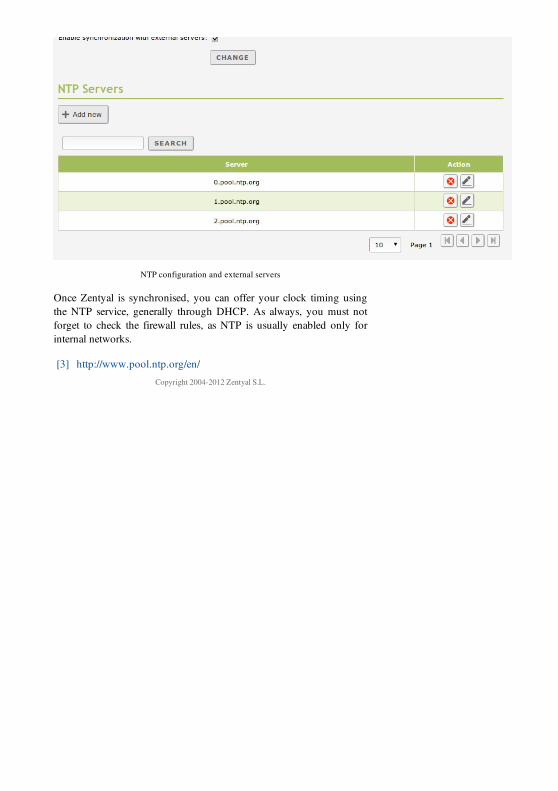
NTP configuration and external servers
Once Zentyal is synchronised, you can offer your clock timing usingthe NTP service, generally through DHCP. As always, you must notforget to check the firewall rules, as NTP is usually enabled only forinternal networks.
[3] http://www.pool.ntp.org/en/
Copyright 2004-2012 Zentyal S.L.
Network configuration service(DHCP)
Zentyal uses ISC DHCP Software [4] to configure the DHCP service,which is the de facto standard on Linux systems. This service uses theUDP transport protocol, port 68 on the client and port 67 on the server.
[4] https://www.isc.org/software/dhcp
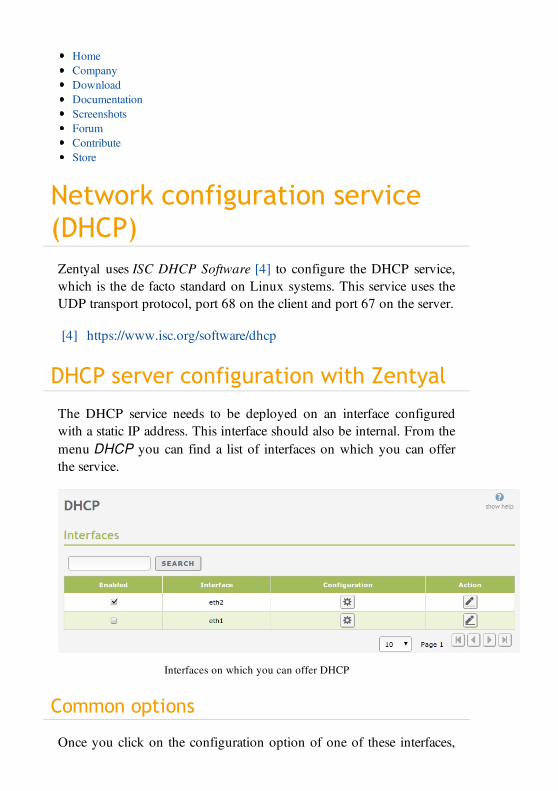
DHCP server configuration with Zentyal
The DHCP service needs to be deployed on an interface configuredwith a static IP address. This interface should also be internal. From themenu DHCP you can find a list of interfaces on which you can offerthe service.
Interfaces on which you can offer DHCP
Common options
Once you click on the configuration option of one of these interfaces,the following form will appear:
HomeCompanyDownloadDocumentationScreenshotsForumContributeStore
the following form will appear:
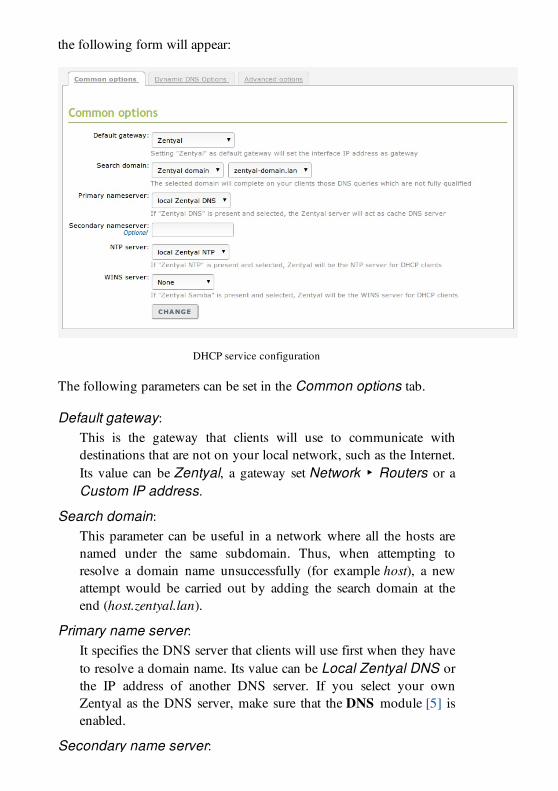
DHCP service configuration
The following parameters can be set in the Common options tab.
Default gateway:This is the gateway that clients will use to communicate withdestinations that are not on your local network, such as the Internet.Its value can be Zentyal, a gateway set Network ‣ Routers or aCustom IP address.
Search domain:This parameter can be useful in a network where all the hosts arenamed under the same subdomain. Thus, when attempting toresolve a domain name unsuccessfully (for example host), a newattempt would be carried out by adding the search domain at theend (host.zentyal.lan).
Primary name server:It specifies the DNS server that clients will use first when they haveto resolve a domain name. Its value can be Local Zentyal DNS orthe IP address of another DNS server. If you select your ownZentyal as the DNS server, make sure that the DNS module [5] isenabled.
Secondary name server:
Secondary name server:DNS server to be used by clients in case primary DNS server isunavailable. Its value must be an IP address of a DNS server.
NTP server:NTP server that clients will use to synchronise their system clock. Itcan be None, Local Zentyal NTP or the IP address of anotherNTP server. If you select your own Zentyal server as the NTPserver, make sure that the NTP module [6] is enabled.
WINS server:WINS server (Windows Internet Name Service) [7] that clients willuse to resolve names on a NetBIOS network. It can be None,Local Zentyal or another Custom. If you select your own Zentyalserver as the WINS server, make sure that the File Sharing module[8] is enabled.
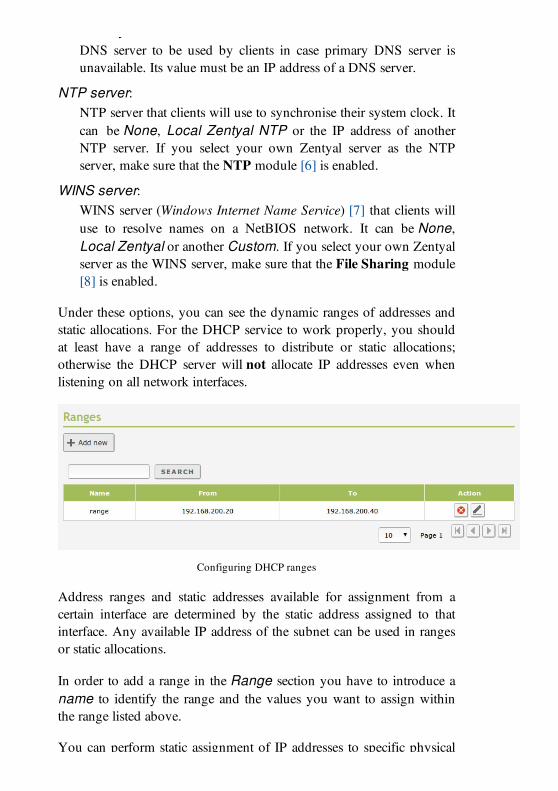
Under these options, you can see the dynamic ranges of addresses andstatic allocations. For the DHCP service to work properly, you shouldat least have a range of addresses to distribute or static allocations;otherwise the DHCP server will not allocate IP addresses even whenlistening on all network interfaces.
Configuring DHCP ranges
Address ranges and static addresses available for assignment from acertain interface are determined by the static address assigned to thatinterface. Any available IP address of the subnet can be used in rangesor static allocations.
In order to add a range in the Range section you have to introduce aname to identify the range and the values you want to assign withinthe range listed above.
You can perform static assignment of IP addresses to specific physical
You can perform static assignment of IP addresses to specific physicaladdresses in the Fixed addresses section. To fill this section youneed an object which members are pairs of host IP addresses (/32) andMAC addresses. You can create this object from Network ‣ Objectsor directly in the quick menu offered in the DHCP interface. Anaddress assigned in this way can not be part of any range. You can addan optional Description for the allocation as well.
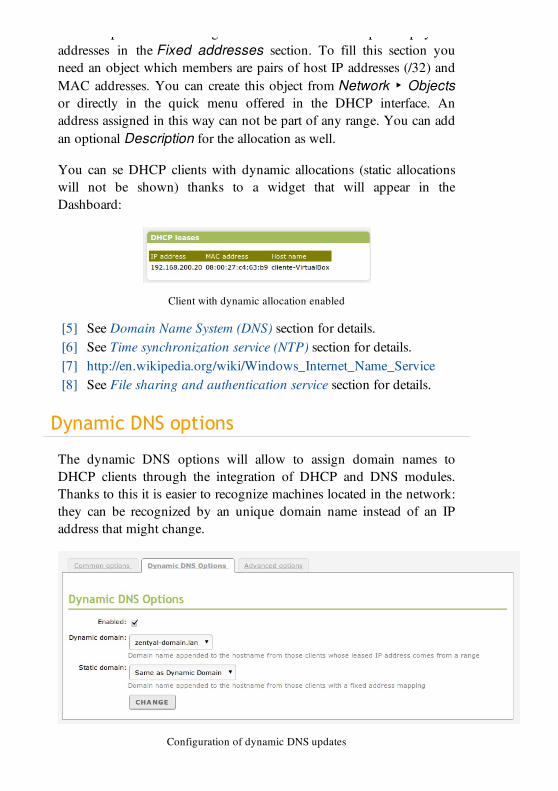
You can se DHCP clients with dynamic allocations (static allocationswill not be shown) thanks to a widget that will appear in theDashboard:
Client with dynamic allocation enabled
[5] See Domain Name System (DNS) section for details.[6] See Time synchronization service (NTP) section for details.[7] http://en.wikipedia.org/wiki/Windows_Internet_Name_Service[8] See File sharing and authentication service section for details.
Dynamic DNS options
The dynamic DNS options will allow to assign domain names toDHCP clients through the integration of DHCP and DNS modules.Thanks to this it is easier to recognize machines located in the network:they can be recognized by an unique domain name instead of an IPaddress that might change.
Configuration of dynamic DNS updates

To use this option, you must go to the tab “Dynamic DNS options”and to enable the feature, the DNS module must be enabled as well.You must have both Dynamic domain and Static domain: both will beadded automatically to the DNS configuration. The dynamic domainwill host the names of those machines which IP addresses belong to therange and the name associated is the one sent by the DHCP client,usually the host name. If none is sent, the pattern dhcp-<offered-IP-address>.<dynamic-domain> will be used. If there are any conflictswith a static allocation, the established static address will be overwrittenmanually. As to the static domain, the host name will follow thispattern: <name>.<static-domain>. The name will be the one registeredin the object used in the static allocation.
Advanced options
Advanced DHCP options
The dynamic address allocation has a time limit. After expiry of thattime a renewal must be requested (configurable in the Advancedoptions tab). This time varies from 1800 seconds to 7200. Thislimitation also applies to the static allocation.
Zentyal supports remote boot for thin clients through DHCP. In theAdvanced options tab you can configure a thin client that will bepublished through DHCP. If Zentyal is not used as a thin client server,in Host select the remote host and in File route select the route to findthe image within the server.
the image within the server.
In case Zentyal is used as a thin client server, choose imageArchitecture. You can also choose if you want to use thin or fat client[10]. To do this, you must have created the mentioned imagepreviously, as well as have carried out the rest of the configurations thatwill be explained in the Thin client service (LTSP).
[10] Detailed information regarding the differences between thin andfat clients:https://help.ubuntu.com/community/UbuntuLTSP/FatClients
Copyright 2004-2012 Zentyal S.L.
Thin client service (LTSP)
Configuration of a thin client server withZentyal
Creation of thin client images
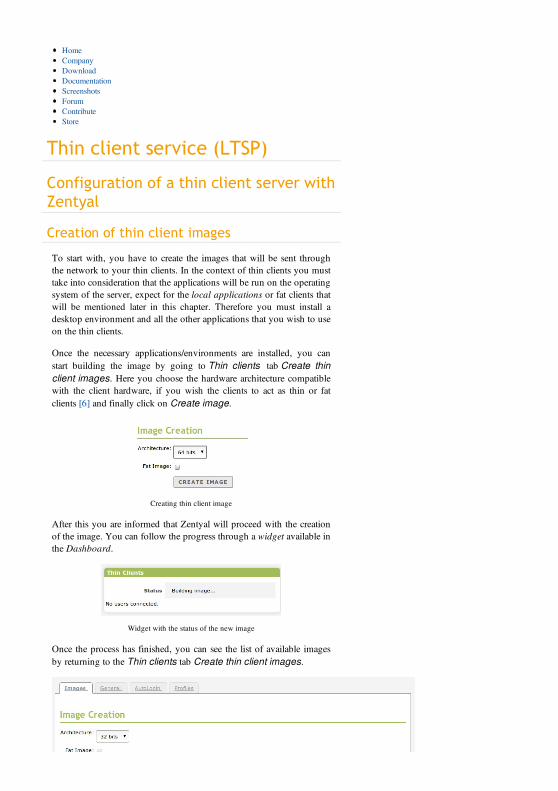
To start with, you have to create the images that will be sent throughthe network to your thin clients. In the context of thin clients you musttake into consideration that the applications will be run on the operatingsystem of the server, expect for the local applications or fat clients thatwill be mentioned later in this chapter. Therefore you must install adesktop environment and all the other applications that you wish to useon the thin clients.
Once the necessary applications/environments are installed, you canstart building the image by going to Thin clients tab Create thinclient images. Here you choose the hardware architecture compatiblewith the client hardware, if you wish the clients to act as thin or fatclients [6] and finally click on Create image.
Creating thin client image
After this you are informed that Zentyal will proceed with the creationof the image. You can follow the progress through a widget available inthe Dashboard.
Widget with the status of the new image
Once the process has finished, you can see the list of available imagesby returning to the Thin clients tab Create thin client images.
HomeCompanyDownloadDocumentationScreenshotsForumContributeStore
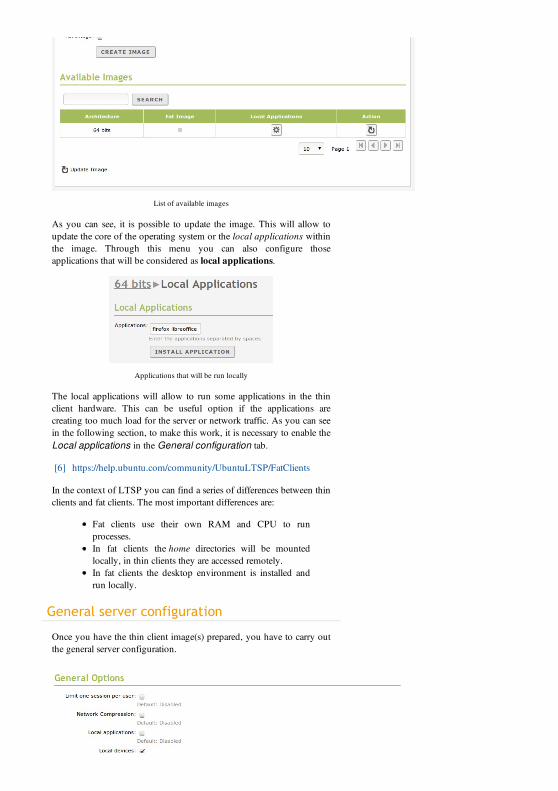
List of available images
As you can see, it is possible to update the image. This will allow toupdate the core of the operating system or the local applications withinthe image. Through this menu you can also configure thoseapplications that will be considered as local applications.
Applications that will be run locally
The local applications will allow to run some applications in the thinclient hardware. This can be useful option if the applications arecreating too much load for the server or network traffic. As you can seein the following section, to make this work, it is necessary to enable theLocal applications in the General configuration tab.
[6] https://help.ubuntu.com/community/UbuntuLTSP/FatClients
In the context of LTSP you can find a series of differences between thinclients and fat clients. The most important differences are:
Fat clients use their own RAM and CPU to runprocesses.In fat clients the home directories will be mountedlocally, in thin clients they are accessed remotely.In fat clients the desktop environment is installed andrun locally.
General server configuration
Once you have the thin client image(s) prepared, you have to carry outthe general server configuration.
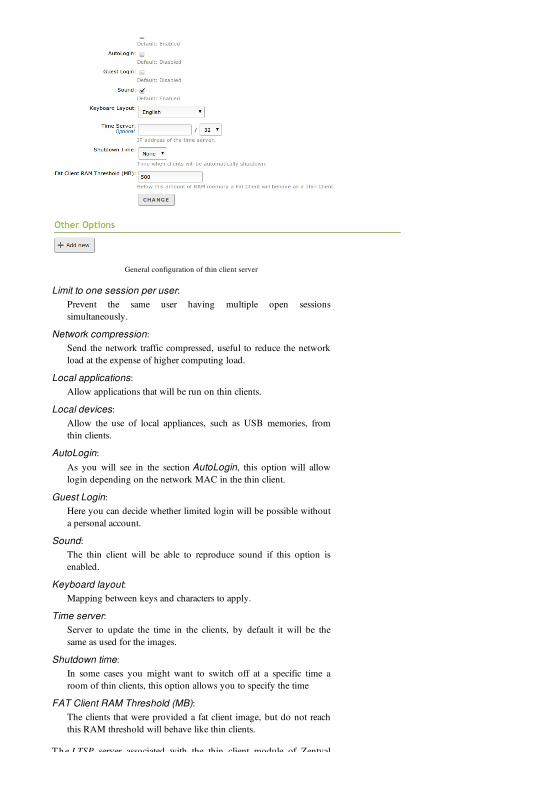
General configuration of thin client server
Limit to one session per user:Prevent the same user having multiple open sessionssimultaneously.
Network compression:Send the network traffic compressed, useful to reduce the networkload at the expense of higher computing load.
Local applications:Allow applications that will be run on thin clients.
Local devices:Allow the use of local appliances, such as USB memories, fromthin clients.
AutoLogin:As you will see in the section AutoLogin, this option will allowlogin depending on the network MAC in the thin client.
Guest Login:Here you can decide whether limited login will be possible withouta personal account.
Sound:The thin client will be able to reproduce sound if this option isenabled.
Keyboard layout:Mapping between keys and characters to apply.
Time server:Server to update the time in the clients, by default it will be thesame as used for the images.
Shutdown time:In some cases you might want to switch off at a specific time aroom of thin clients, this option allows you to specify the time
FAT Client RAM Threshold (MB):The clients that were provided a fat client image, but do not reachthis RAM threshold will behave like thin clients.
T h e LTSP server associated with the thin client module of Zentyal
T h e LTSP server associated with the thin client module of Zentyalcounts on many more advanced configuration options. In case youwant to use one of the options not mentioned here, the interface givesyou the option to add it as a name-value pair in the lower part of theform Other options [7].
[7] http://manpages.ubuntu.com/manpages/precise/man5/lts.conf.5.html
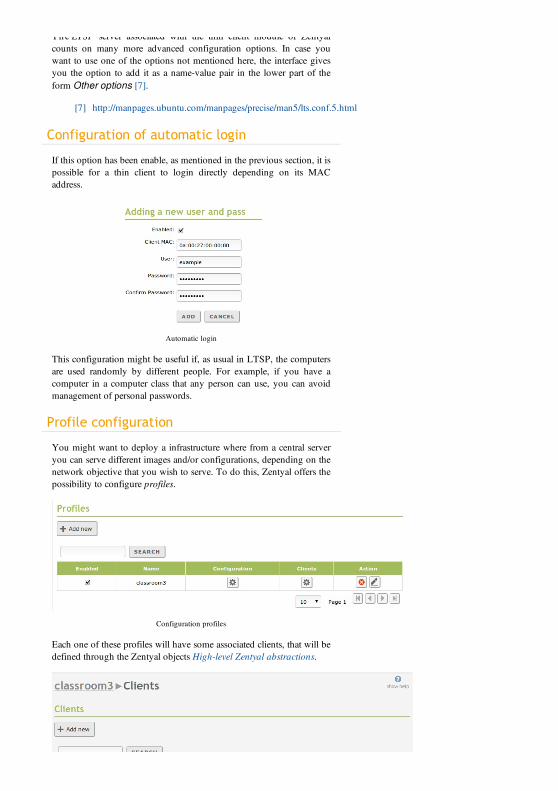
Configuration of automatic login
If this option has been enable, as mentioned in the previous section, it ispossible for a thin client to login directly depending on its MACaddress.
Automatic login
This configuration might be useful if, as usual in LTSP, the computersare used randomly by different people. For example, if you have acomputer in a computer class that any person can use, you can avoidmanagement of personal passwords.
Profile configuration
You might want to deploy a infrastructure where from a central serveryou can serve different images and/or configurations, depending on thenetwork objective that you wish to serve. To do this, Zentyal offers thepossibility to configure profiles.
Configuration profiles
Each one of these profiles will have some associated clients, that will bedefined through the Zentyal objects High-level Zentyal abstractions.
Profile will be applied on these clients
Through the configuration form associated with the profile (similar tothe general configuration), you can decide whether for each one of theparameters you want to apply the values defined in the generalconfiguration or other specific values.
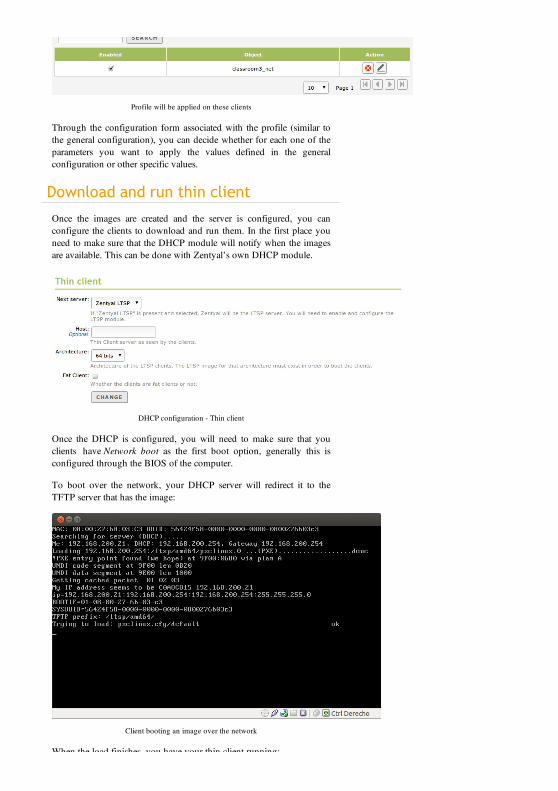
Download and run thin client
Once the images are created and the server is configured, you canconfigure the clients to download and run them. In the first place youneed to make sure that the DHCP module will notify when the imagesare available. This can be done with Zentyal’s own DHCP module.
DHCP configuration - Thin client
Once the DHCP is configured, you will need to make sure that youclients have Network boot as the first boot option, generally this isconfigured through the BIOS of the computer.
To boot over the network, your DHCP server will redirect it to theTFTP server that has the image:
Client booting an image over the network
When the load finishes, you have your thin client running:

When the load finishes, you have your thin client running:
Thin client running
Obviously the users that can login in the thin client will be configuredthrough Zentyal’s Directory Service (LDAP) module.
Copyright 2004-2012 Zentyal S.L.
Certification authority (CA)Zentyal uses OpenSSL [4] for the management of the CertificationAuthority and the life cycle of the issued certificates issued.
[4] http://www.openssl.org/
Certification Authority configuration withZentyal
In Zentyal, the Certification Authority module is self-managed, whichmeans that it does not need to be enabled in Module status. However,you have to initialize the CA to make the functionality of the moduleavailable.
Go to Certification Authority ‣ General and you will find the form tocreate the CA. You are required to fill in the Organization Name andDays to expire fields. Optionally, it is possible to specify the Countrycode (a two-letter acronym following the ISO-3166-1 standard [5]),City and State.
Create the CA certificate
When setting the expiration date you have to take into account that atthe moment of expiration all certificates issued by this CA will be
HomeCompanyDownloadDocumentationScreenshotsForumContributeStore
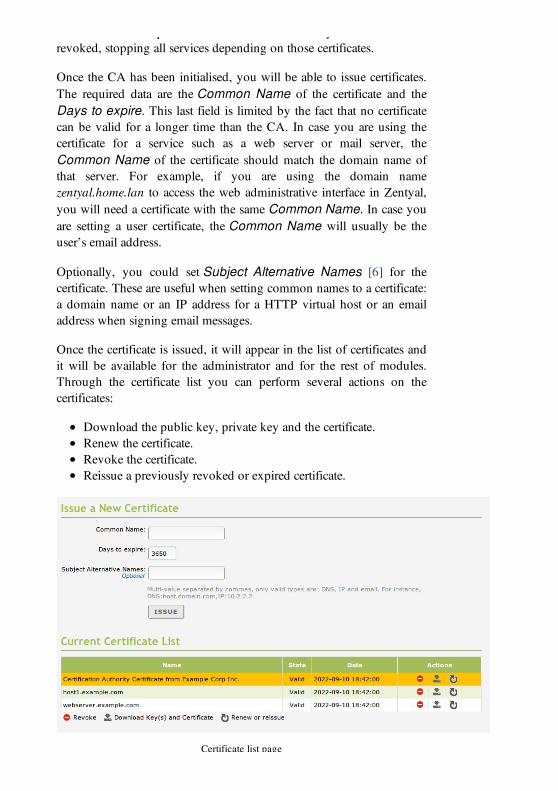
the moment of expiration all certificates issued by this CA will berevoked, stopping all services depending on those certificates.
Once the CA has been initialised, you will be able to issue certificates.The required data are the Common Name of the certificate and theDays to expire. This last field is limited by the fact that no certificatecan be valid for a longer time than the CA. In case you are using thecertificate for a service such as a web server or mail server, theCommon Name of the certificate should match the domain name ofthat server. For example, if you are using the domain namezentyal.home.lan to access the web administrative interface in Zentyal,you will need a certificate with the same Common Name. In case youare setting a user certificate, the Common Name will usually be theuser’s email address.
Optionally, you could set Subject Alternative Names [6] for thecertificate. These are useful when setting common names to a certificate:a domain name or an IP address for a HTTP virtual host or an emailaddress when signing email messages.
Once the certificate is issued, it will appear in the list of certificates andit will be available for the administrator and for the rest of modules.Through the certificate list you can perform several actions on thecertificates:
Download the public key, private key and the certificate.Renew the certificate.Revoke the certificate.Reissue a previously revoked or expired certificate.
Certificate list page
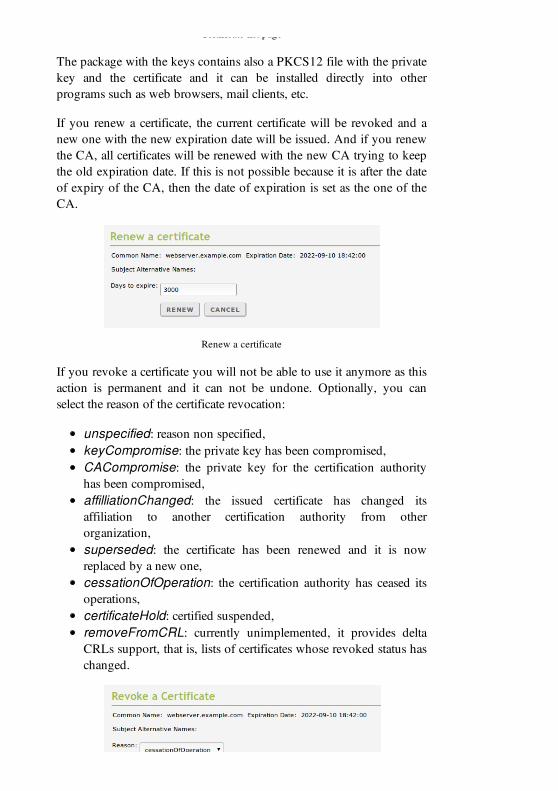
Certificate list page
The package with the keys contains also a PKCS12 file with the privatekey and the certificate and it can be installed directly into otherprograms such as web browsers, mail clients, etc.
If you renew a certificate, the current certificate will be revoked and anew one with the new expiration date will be issued. And if you renewthe CA, all certificates will be renewed with the new CA trying to keepthe old expiration date. If this is not possible because it is after the dateof expiry of the CA, then the date of expiration is set as the one of theCA.
Renew a certificate
If you revoke a certificate you will not be able to use it anymore as thisaction is permanent and it can not be undone. Optionally, you canselect the reason of the certificate revocation:
unspecified: reason non specified,keyCompromise: the private key has been compromised,CACompromise: the private key for the certification authorityhas been compromised,affilliationChanged: the issued certificate has changed itsaffiliation to another certification authority from otherorganization,superseded: the certificate has been renewed and it is nowreplaced by a new one,cessationOfOperation: the certification authority has ceased itsoperations,certificateHold: certified suspended,removeFromCRL: currently unimplemented, it provides deltaCRLs support, that is, lists of certificates whose revoked status haschanged.
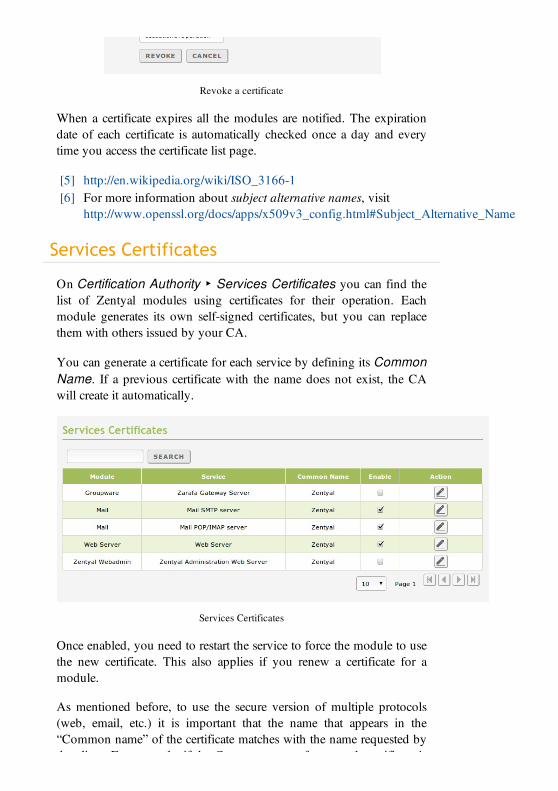
Revoke a certificate
When a certificate expires all the modules are notified. The expirationdate of each certificate is automatically checked once a day and everytime you access the certificate list page.
[5] http://en.wikipedia.org/wiki/ISO_3166-1[6] For more information about subject alternative names, visit
http://www.openssl.org/docs/apps/x509v3_config.html#Subject_Alternative_Name
Services Certificates
On Certification Authority ‣ Services Certificates you can find thelist of Zentyal modules using certificates for their operation. Eachmodule generates its own self-signed certificates, but you can replacethem with others issued by your CA.
You can generate a certificate for each service by defining its CommonName. If a previous certificate with the name does not exist, the CAwill create it automatically.
Services Certificates
Once enabled, you need to restart the service to force the module to usethe new certificate. This also applies if you renew a certificate for amodule.
As mentioned before, to use the secure version of multiple protocols(web, email, etc.) it is important that the name that appears in the“Common name” of the certificate matches with the name requested bythe client. For example, if the Common name of your web certificate is

the client. For example, if the Common name of your web certificate ishost1.example.com and the client types in https://www.example.com,the browser will show a security alert and the certificate is notconsidered valid.
Copyright 2004-2012 Zentyal S.L.
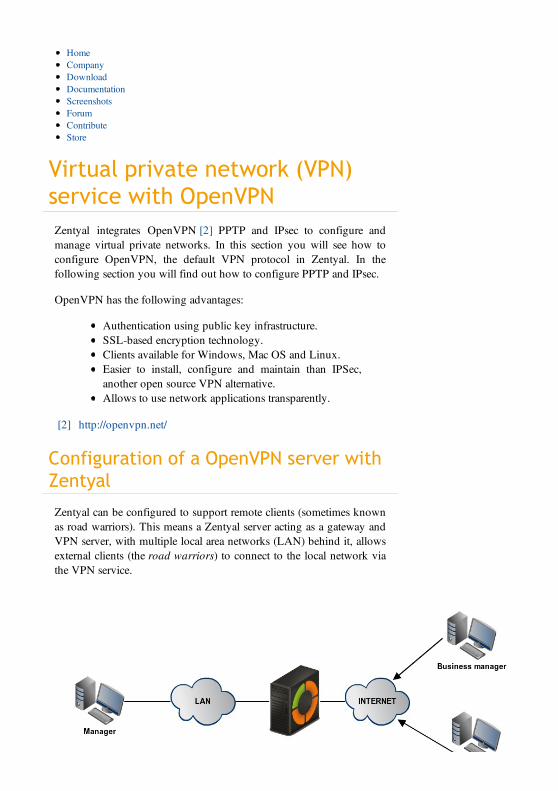
Virtual private network (VPN)service with OpenVPN
Zentyal integrates OpenVPN [2] PPTP and IPsec to configure andmanage virtual private networks. In this section you will see how toconfigure OpenVPN, the default VPN protocol in Zentyal. In thefollowing section you will find out how to configure PPTP and IPsec.
OpenVPN has the following advantages:
Authentication using public key infrastructure.SSL-based encryption technology.Clients available for Windows, Mac OS and Linux.Easier to install, configure and maintain than IPSec,another open source VPN alternative.Allows to use network applications transparently.
[2] http://openvpn.net/
Configuration of a OpenVPN server withZentyal
Zentyal can be configured to support remote clients (sometimes knownas road warriors). This means a Zentyal server acting as a gateway andVPN server, with multiple local area networks (LAN) behind it, allowsexternal clients (the road warriors) to connect to the local network viathe VPN service.
HomeCompanyDownloadDocumentationScreenshotsForumContributeStore
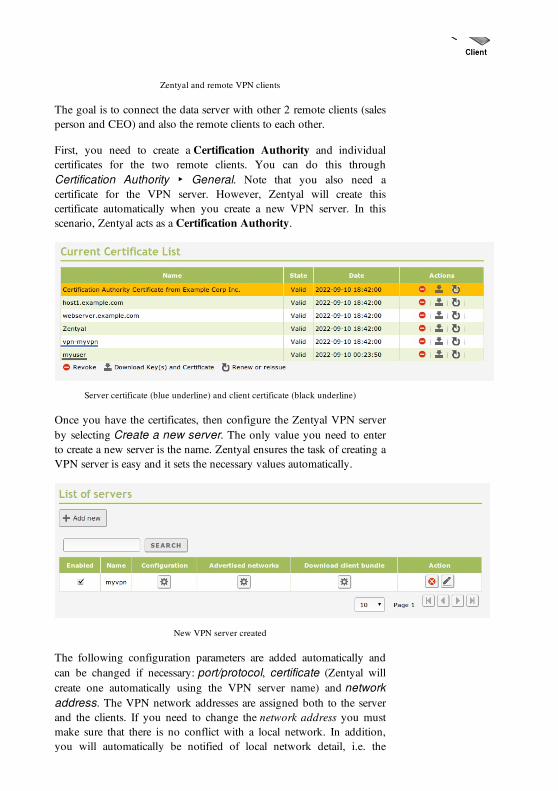
Zentyal and remote VPN clients
The goal is to connect the data server with other 2 remote clients (salesperson and CEO) and also the remote clients to each other.
First, you need to create a Certification Authority and individualcertificates for the two remote clients. You can do this throughCertification Authority ‣ General. Note that you also need acertificate for the VPN server. However, Zentyal will create thiscertificate automatically when you create a new VPN server. In thisscenario, Zentyal acts as a Certification Authority.
Server certificate (blue underline) and client certificate (black underline)
Once you have the certificates, then configure the Zentyal VPN serverby selecting Create a new server. The only value you need to enterto create a new server is the name. Zentyal ensures the task of creating aVPN server is easy and it sets the necessary values automatically.
New VPN server created
The following configuration parameters are added automatically andcan be changed if necessary: port/protocol, certificate (Zentyal willcreate one automatically using the VPN server name) and networkaddress. The VPN network addresses are assigned both to the serverand the clients. If you need to change the network address you mustmake sure that there is no conflict with a local network. In addition,you will automatically be notified of local network detail, i.e. the
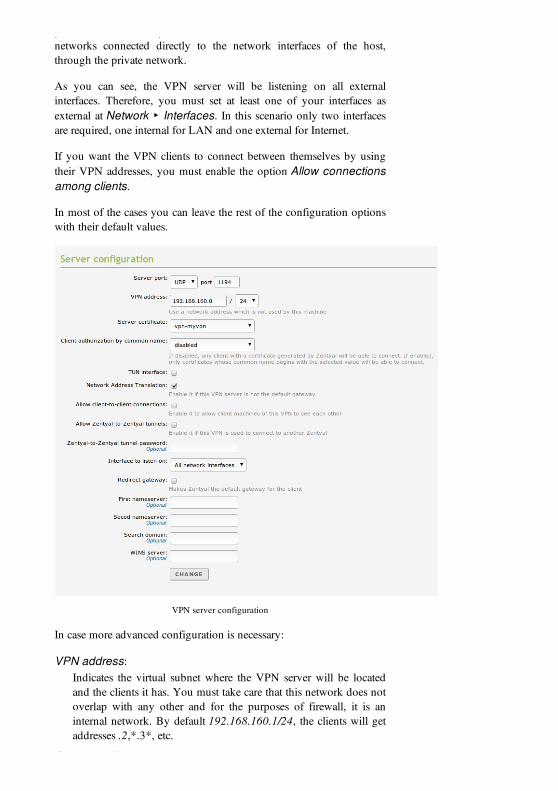
you will automatically be notified of local network detail, i.e. thenetworks connected directly to the network interfaces of the host,through the private network.
As you can see, the VPN server will be listening on all externalinterfaces. Therefore, you must set at least one of your interfaces asexternal at Network ‣ Interfaces. In this scenario only two interfacesare required, one internal for LAN and one external for Internet.
If you want the VPN clients to connect between themselves by usingtheir VPN addresses, you must enable the option Allow connectionsamong clients.
In most of the cases you can leave the rest of the configuration optionswith their default values.
VPN server configuration
In case more advanced configuration is necessary:
VPN address:Indicates the virtual subnet where the VPN server will be locatedand the clients it has. You must take care that this network does notoverlap with any other and for the purposes of firewall, it is aninternal network. By default 192.168.160.1/24, the clients will getaddresses .2,*.3*, etc.
Server certificate:

Server certificate:Certificate that will show the server to its clients. The Zentyal CAissues by default a certificate for the server, with the name vpn-<yourvpnname>. Unless you want to import an external certificate,usually you maintain this configuration.
Authorize the client by the common name:Requires that the common name of the client certificate will startwith the selected string of characters to authorize the connection.
TUN interface:By default a TAP type interface is used, more similar to a bridge ofLayer 2. You can also use a TUN type interface more similar to a IPnode of Layer 3.
Network Address Translation (NAT):It is recommended to enable this translation if the Zentyal serverthat accepts the VPN connections is not a default gateway of theinternal networks to which you can access from the VPN. Like thisthe clients of these internal networks respond to Zentyal’s VPNinstead of the gateway. If Zentyal server is both the VPN server andthe gateway (most common case), this option is indifferent.
Redirect gateway:If this option is not checked, the external client will access throughthe VPN to the established networks, but will use his/her localconnection to access to Internet and/or rest of the reachablenetworks. By checking this option you can achieve that all thetraffic of the client will go through the VPN.
The VPN can also indicate name servers, search domain and WINSservers to overwrite those of the client. This is specially useful in thecase you have redirected the gateway.
After having created the VPN server, you must enable the service andsave the changes. Later you must check in Dashboard that the VPNserver is running.
Widget of the VPN server
After this, you must advertise networks, i.e. routes between the VPN
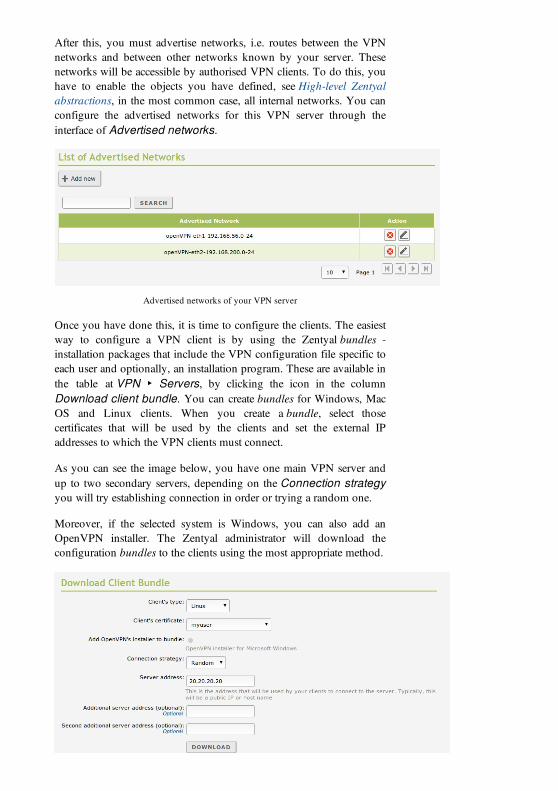
After this, you must advertise networks, i.e. routes between the VPNnetworks and between other networks known by your server. Thesenetworks will be accessible by authorised VPN clients. To do this, youhave to enable the objects you have defined, see High-level Zentyalabstractions, in the most common case, all internal networks. You canconfigure the advertised networks for this VPN server through theinterface of Advertised networks.
Advertised networks of your VPN server
Once you have done this, it is time to configure the clients. The easiestway to configure a VPN client is by using the Zentyal bundles -installation packages that include the VPN configuration file specific toeach user and optionally, an installation program. These are available inthe table at VPN ‣ Servers, by clicking the icon in the columnDownload client bundle. You can create bundles for Windows, MacOS and Linux clients. When you create a bundle, select thosecertificates that will be used by the clients and set the external IPaddresses to which the VPN clients must connect.
As you can see the image below, you have one main VPN server andup to two secondary servers, depending on the Connection strategyyou will try establishing connection in order or trying a random one.
Moreover, if the selected system is Windows, you can also add anOpenVPN installer. The Zentyal administrator will download theconfiguration bundles to the clients using the most appropriate method.
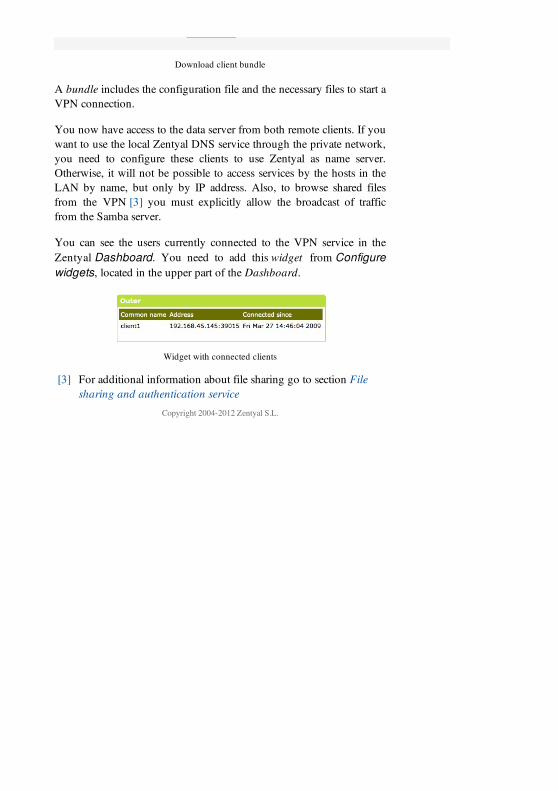
Download client bundle
A bundle includes the configuration file and the necessary files to start aVPN connection.
You now have access to the data server from both remote clients. If youwant to use the local Zentyal DNS service through the private network,you need to configure these clients to use Zentyal as name server.Otherwise, it will not be possible to access services by the hosts in theLAN by name, but only by IP address. Also, to browse shared filesfrom the VPN [3] you must explicitly allow the broadcast of trafficfrom the Samba server.
You can see the users currently connected to the VPN service in theZentyal Dashboard. You need to add this widget from Configurewidgets, located in the upper part of the Dashboard.
Widget with connected clients
[3] For additional information about file sharing go to section Filesharing and authentication service
Copyright 2004-2012 Zentyal S.L.
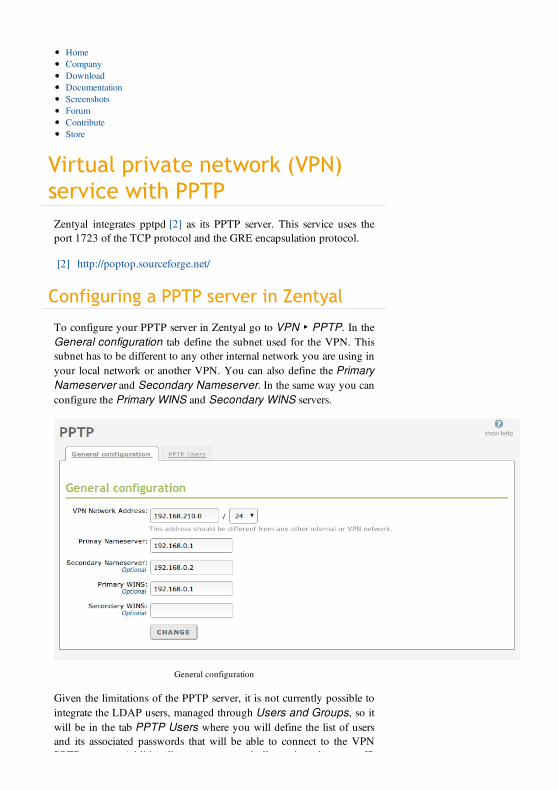
Virtual private network (VPN)service with PPTP
Zentyal integrates pptpd [2] as its PPTP server. This service uses theport 1723 of the TCP protocol and the GRE encapsulation protocol.
[2] http://poptop.sourceforge.net/
Configuring a PPTP server in Zentyal
To configure your PPTP server in Zentyal go to VPN ‣ PPTP. In theGeneral configuration tab define the subnet used for the VPN. Thissubnet has to be different to any other internal network you are using inyour local network or another VPN. You can also define the PrimaryNameserver and Secondary Nameserver. In the same way you canconfigure the Primary WINS and Secondary WINS servers.
General configuration
Given the limitations of the PPTP server, it is not currently possible tointegrate the LDAP users, managed through Users and Groups, so itwill be in the tab PPTP Users where you will define the list of usersand its associated passwords that will be able to connect to the VPNPPTP server. Additionally, you can statically assign the same IP
HomeCompanyDownloadDocumentationScreenshotsForumContributeStore

PPTP server. Additionally, you can statically assign the same IPaddress to a user inside the VPN subnet, using the configuration fieldIP Address.
PPTP Users
As usual, before being able to connect to your PPTP server, you haveto check that the current rules of the firewall allow the connection to thePPTP server, which includes the 1723/TCP port and the GRE protocol.
Copyright 2004-2012 Zentyal S.L.
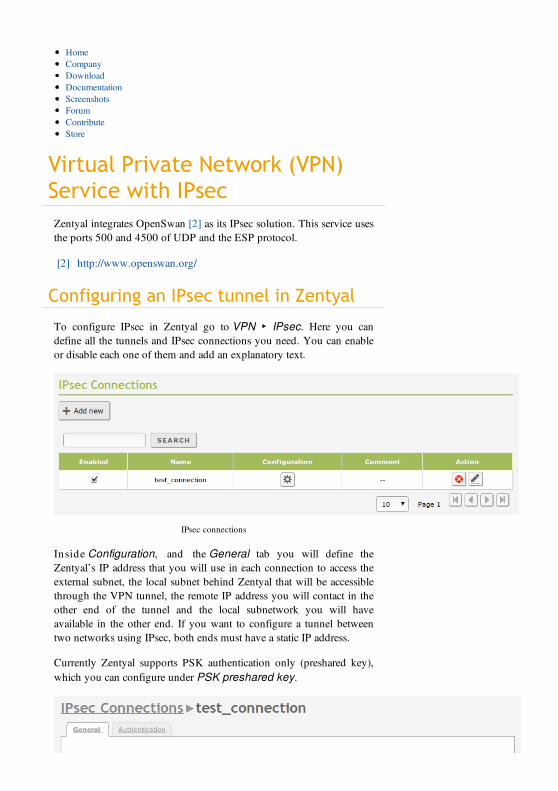
Virtual Private Network (VPN)Service with IPsec
Zentyal integrates OpenSwan [2] as its IPsec solution. This service usesthe ports 500 and 4500 of UDP and the ESP protocol.
[2] http://www.openswan.org/
Configuring an IPsec tunnel in Zentyal
To configure IPsec in Zentyal go to VPN ‣ IPsec. Here you candefine all the tunnels and IPsec connections you need. You can enableor disable each one of them and add an explanatory text.
IPsec connections
Inside Configuration, and the General tab you will define theZentyal’s IP address that you will use in each connection to access theexternal subnet, the local subnet behind Zentyal that will be accessiblethrough the VPN tunnel, the remote IP address you will contact in theother end of the tunnel and the local subnetwork you will haveavailable in the other end. If you want to configure a tunnel betweentwo networks using IPsec, both ends must have a static IP address.
Currently Zentyal supports PSK authentication only (preshared key),which you can configure under PSK preshared key.
HomeCompanyDownloadDocumentationScreenshotsForumContributeStore
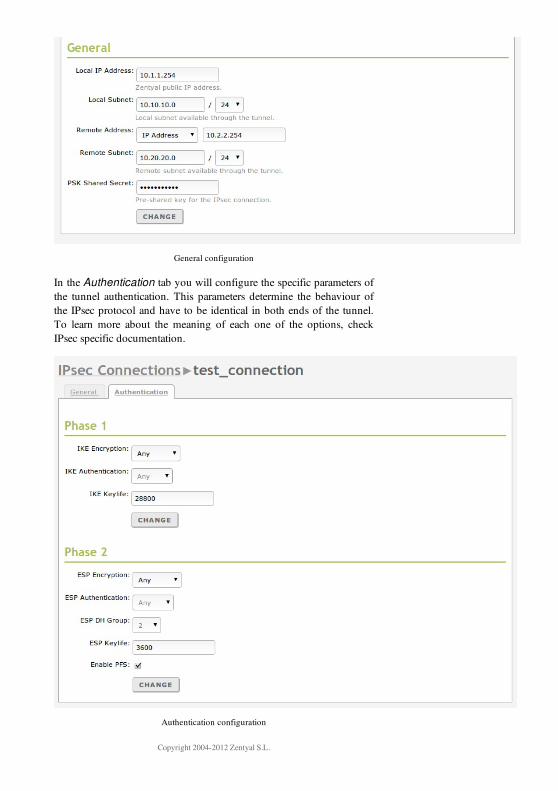
General configuration
In the Authentication tab you will configure the specific parameters ofthe tunnel authentication. This parameters determine the behaviour ofthe IPsec protocol and have to be identical in both ends of the tunnel.To learn more about the meaning of each one of the options, checkIPsec specific documentation.
Authentication configuration
Copyright 2004-2012 Zentyal S.L.


Virtualization ManagerZentyal offers easy management of virtual machines by integrating theKVM [1] solution.
[1] http://en.wikipedia.org/wiki/Kernel-based_Virtual_Machine
Creating virtual machines with Zentyal
Through the Virtual Machines menu you can access the list ofcurrently available machines, as well as add new ones or delete theexisting ones. You also have other maintenance options that will bedescribed in detail in the next section.
When you create a machine, you have to click in Add new and thenfill the following parameters:
Name
Just for identification purposes, it will also be used to pickthe file system path where you will store the data associatedwith this machine, but essentially, you can enter anyalphanumeric label.
and decide whether you want to:
Autostart
If this option is enabled, Zentyal will be in charge of startingor stopping the machine along with the rest of the services,otherwise Zentyal will just create the machine the first timeyou configure it and save changes. The system administratorwill be in charge of performing these actions manually whenhe/she considers necessary.
Creating a new virtual machine
HomeCompanyDownloadDocumentationScreenshotsForumContributeStore
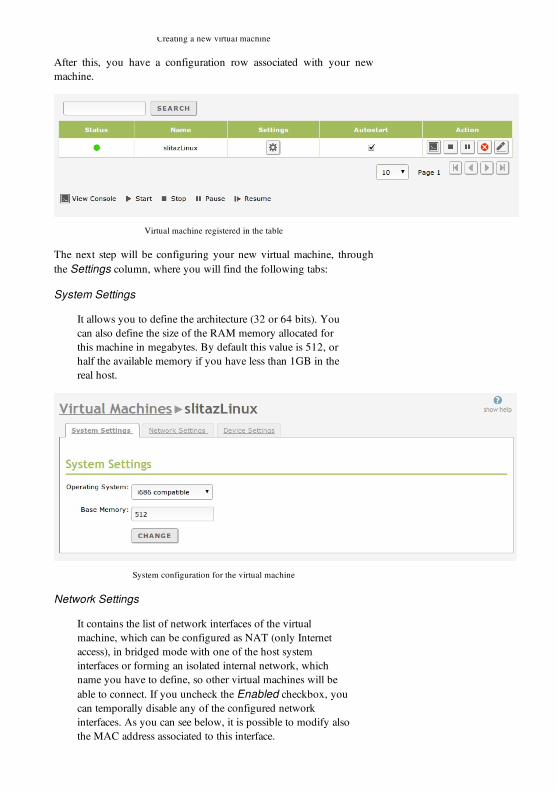
Creating a new virtual machine
After this, you have a configuration row associated with your newmachine.
Virtual machine registered in the table
The next step will be configuring your new virtual machine, throughthe Settings column, where you will find the following tabs:
System Settings
It allows you to define the architecture (32 or 64 bits). Youcan also define the size of the RAM memory allocated forthis machine in megabytes. By default this value is 512, orhalf the available memory if you have less than 1GB in thereal host.
System configuration for the virtual machine
Network Settings
It contains the list of network interfaces of the virtualmachine, which can be configured as NAT (only Internetaccess), in bridged mode with one of the host systeminterfaces or forming an isolated internal network, whichname you have to define, so other virtual machines will beable to connect. If you uncheck the Enabled checkbox, youcan temporally disable any of the configured networkinterfaces. As you can see below, it is possible to modify alsothe MAC address associated to this interface.
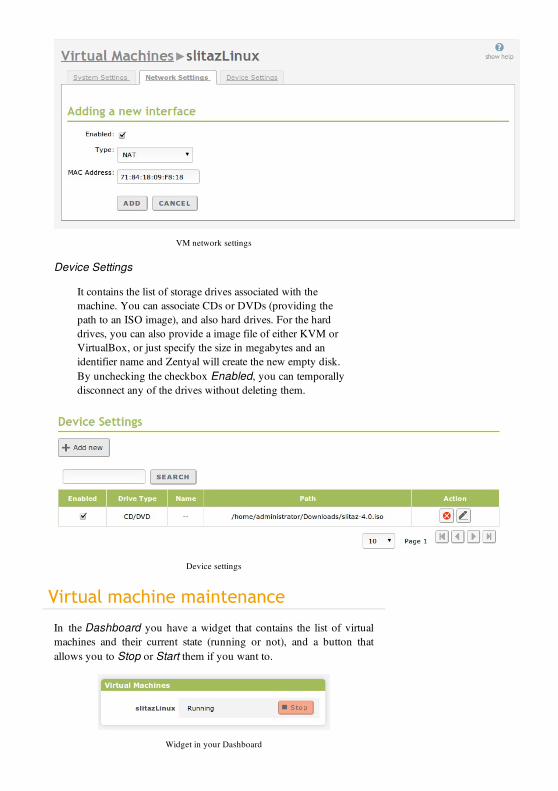
VM network settings
Device Settings
It contains the list of storage drives associated with themachine. You can associate CDs or DVDs (providing thepath to an ISO image), and also hard drives. For the harddrives, you can also provide a image file of either KVM orVirtualBox, or just specify the size in megabytes and anidentifier name and Zentyal will create the new empty disk.By unchecking the checkbox Enabled, you can temporallydisconnect any of the drives without deleting them.
Device settings
Virtual machine maintenance
In the Dashboard you have a widget that contains the list of virtualmachines and their current state (running or not), and a button thatallows you to Stop or Start them if you want to.
Widget in your Dashboard
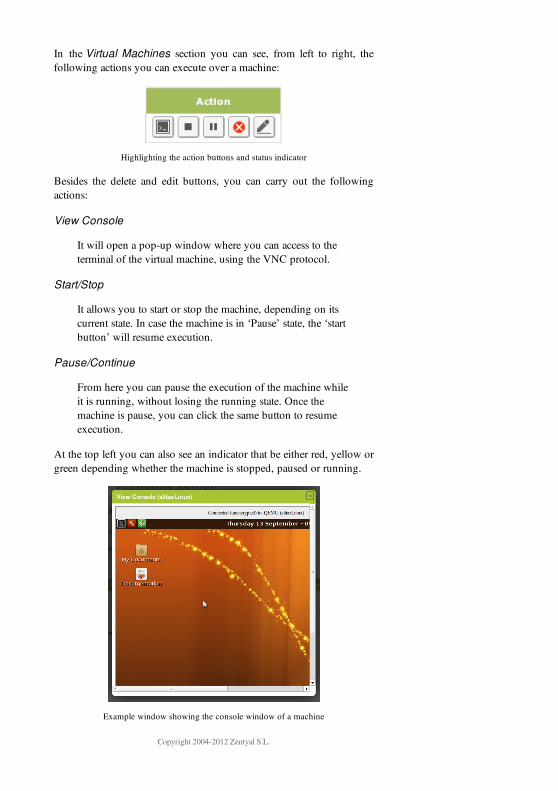
In the Virtual Machines section you can see, from left to right, thefollowing actions you can execute over a machine:
Highlighting the action buttons and status indicator
Besides the delete and edit buttons, you can carry out the followingactions:
View Console
It will open a pop-up window where you can access to theterminal of the virtual machine, using the VNC protocol.
Start/Stop
It allows you to start or stop the machine, depending on itscurrent state. In case the machine is in ‘Pause’ state, the ‘startbutton’ will resume execution.
Pause/Continue
From here you can pause the execution of the machine whileit is running, without losing the running state. Once themachine is pause, you can click the same button to resumeexecution.
At the top left you can also see an indicator that be either red, yellow orgreen depending whether the machine is stopped, paused or running.
Example window showing the console window of a machine
Copyright 2004-2012 Zentyal S.L.
Zentyal GatewayThis chapter focuses on the functionality of Zentyal as a gateway.Offering more reliable and secure networks, bandwidth managementand clear definition of connection and content policies.
One of the main chapters is dedicated to the firewall module, whichallows you to define connection management rules for both theincoming and outgoing traffic. To simplify the firewall configuration,you will categorize the types of traffic depending on their origin anddestination, and you will also use your defined objects and services.
You can define the traffic balancing of your gateways when accessingresources on the Internet, configuring the protocols associated with eachgateway, wan-failover safety politics and bandwidth restrictions forsome types of traffic, like P2P.
Using RADIUS, you can authenticate the users in your network, isspecially useful if you want to avoid the security problems associatedwith symmetric password on wireless networks.
Another needed service in most of the deployments is the HTTP Proxy.This service allows you to speed up your Internet connection, storing aweb cache and establishing advanced access politics.
The Captive Portal with bandwidth monitoring allows you to giveaccess to a set of users, redirecting all the web traffic to your registrationwebpage. It sports real-time reports of connected users and theirconsumed traffic.
HomeCompanyDownloadDocumentationScreenshotsForumContributeStore
Thanks to the IDS module you can stablish heuristics to automaticallydetect a diverse group of security threats, in both internal and externalnetworks.
Copyright 2004-2012 Zentyal S.L.

FirewallZentyal uses the Linux kernel subsystem called Netfilter [2] in thefirewall module. Functionality includes filtering, package marking andconnection redirection capabilities.
[2] http://www.netfilter.org/
Firewall configuration with Zentyal
Zentyal’s security model is based on delivering the maximum possiblesecurity with the default configuration, trying at the same time tominimise the effort when adding a new service.
When Zentyal is configured as a firewall, it is normally installedbetween the internal network and the router connected to the Internet.The network interface which connects the host with the router has to bemarked as External in Network -> Interfaces, therefore the firewallcan establish stricter policies for connections initiated outside yournetwork.
External interface
The default policy for external interfaces is to deny any newconnections. On the other hand, for internal interfaces, Zentyal deniesall the connection attempts, except the ones that are targeted to servicesdefined by the installed modules. The modules add rules to the firewallto allow these connections. These rules can be modified later by thesystem administrator. An exception to this are the connections to theLDAP server, which add a rule but it is configured to deny theconnection for security reasons. The default configuration forconnections to hosts outside the network and connections from the
HomeCompanyDownloadDocumentationScreenshotsForumContributeStore
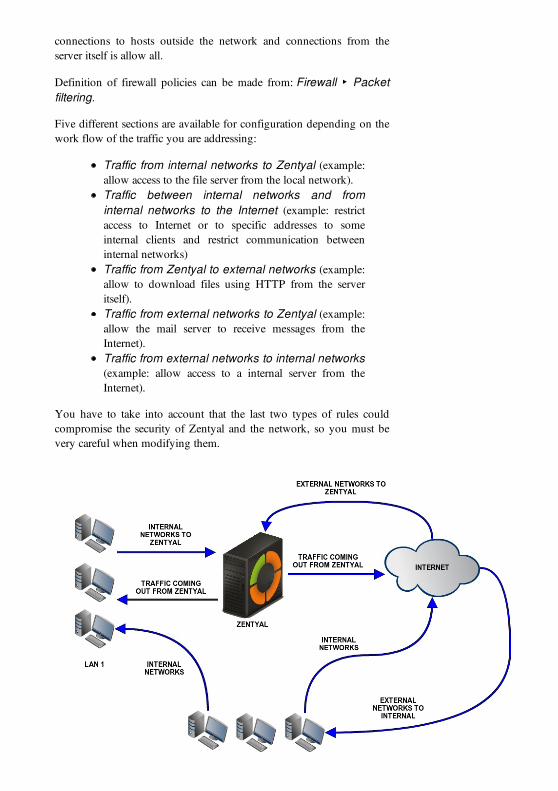
connections to hosts outside the network and connections from theserver itself is allow all.
Definition of firewall policies can be made from: Firewall ‣ Packetfiltering.
Five different sections are available for configuration depending on thework flow of the traffic you are addressing:
Traffic from internal networks to Zentyal (example:allow access to the file server from the local network).Traffic between internal networks and frominternal networks to the Internet (example: restrictaccess to Internet or to specific addresses to someinternal clients and restrict communication betweeninternal networks)Traffic from Zentyal to external networks (example:allow to download files using HTTP from the serveritself).Traffic from external networks to Zentyal (example:allow the mail server to receive messages from theInternet).Traffic from external networks to internal networks(example: allow access to a internal server from theInternet).
You have to take into account that the last two types of rules couldcompromise the security of Zentyal and the network, so you must bevery careful when modifying them.
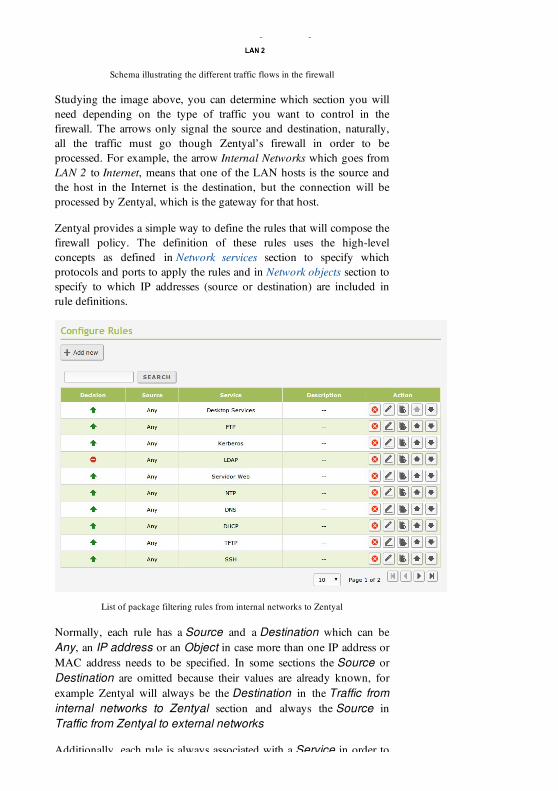
Schema illustrating the different traffic flows in the firewall
Studying the image above, you can determine which section you willneed depending on the type of traffic you want to control in thefirewall. The arrows only signal the source and destination, naturally,all the traffic must go though Zentyal’s firewall in order to beprocessed. For example, the arrow Internal Networks which goes fromLAN 2 to Internet, means that one of the LAN hosts is the source andthe host in the Internet is the destination, but the connection will beprocessed by Zentyal, which is the gateway for that host.
Zentyal provides a simple way to define the rules that will compose thefirewall policy. The definition of these rules uses the high-levelconcepts as defined in Network services section to specify whichprotocols and ports to apply the rules and in Network objects section tospecify to which IP addresses (source or destination) are included inrule definitions.
List of package filtering rules from internal networks to Zentyal
Normally, each rule has a Source and a Destination which can beAny, an IP address or an Object in case more than one IP address orMAC address needs to be specified. In some sections the Source orDestination are omitted because their values are already known, forexample Zentyal will always be the Destination in the Traffic frominternal networks to Zentyal section and always the Source inTraffic from Zentyal to external networks
Additionally, each rule is always associated with a Service in order to
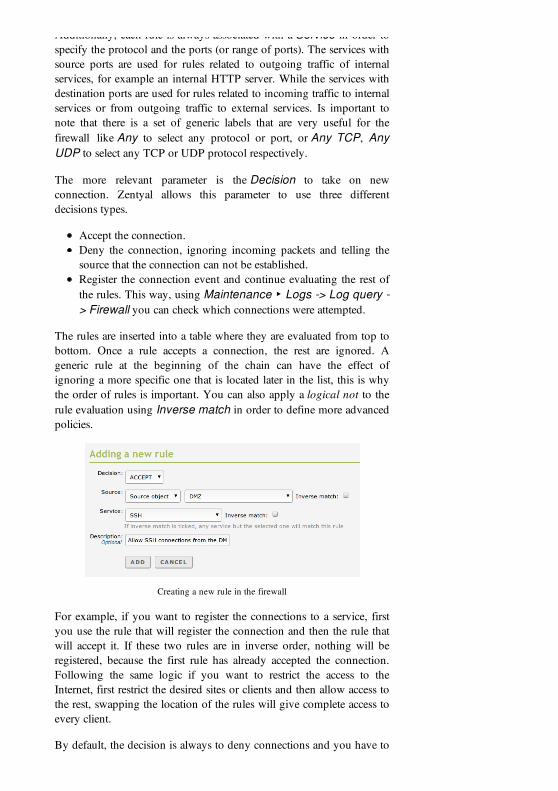
Additionally, each rule is always associated with a Service in order tospecify the protocol and the ports (or range of ports). The services withsource ports are used for rules related to outgoing traffic of internalservices, for example an internal HTTP server. While the services withdestination ports are used for rules related to incoming traffic to internalservices or from outgoing traffic to external services. Is important tonote that there is a set of generic labels that are very useful for thefirewall like Any to select any protocol or port, or Any TCP, AnyUDP to select any TCP or UDP protocol respectively.
The more relevant parameter is the Decision to take on newconnection. Zentyal allows this parameter to use three differentdecisions types.
Accept the connection.Deny the connection, ignoring incoming packets and telling thesource that the connection can not be established.Register the connection event and continue evaluating the rest ofthe rules. This way, using Maintenance ‣ Logs -> Log query -> Firewall you can check which connections were attempted.
The rules are inserted into a table where they are evaluated from top tobottom. Once a rule accepts a connection, the rest are ignored. Ageneric rule at the beginning of the chain can have the effect ofignoring a more specific one that is located later in the list, this is whythe order of rules is important. You can also apply a logical not to therule evaluation using Inverse match in order to define more advancedpolicies.
Creating a new rule in the firewall
For example, if you want to register the connections to a service, firstyou use the rule that will register the connection and then the rule thatwill accept it. If these two rules are in inverse order, nothing will beregistered, because the first rule has already accepted the connection.Following the same logic if you want to restrict the access to theInternet, first restrict the desired sites or clients and then allow access tothe rest, swapping the location of the rules will give complete access toevery client.
By default, the decision is always to deny connections and you have to

add explicit rules to allow them. There are a series of rules which areautomatically added during installation to define an initial version offirewall policies: allow all the outgoing connections to externalnetworks to the Internet, from the Zentyal server (in Traffic fromZentyal to external networks) and also allow all the connectionsfrom internal to external networks (in Traffic between internalnetworks and from internal networks to Internet). Additionally,each installed module adds a series of rules in sections Traffic frominternal networks to Zentyal and Traffic from external networks toZentyal, normally allowing traffic from internal networks and denyingfrom the external networks. This is made implicit, but it simplifies thefirewall management by allowing the service. Only the parameterDecision needs to be changed and you do not need to create a newrule. Note that these rules are added during the installation process of amodule only, and they are not automatically modified during futurechanges.
Finally, there is an additional field Description used to add adescriptive comment about the rule policy within the global policy ofthe firewall.
Copyright 2004-2012 Zentyal S.L.
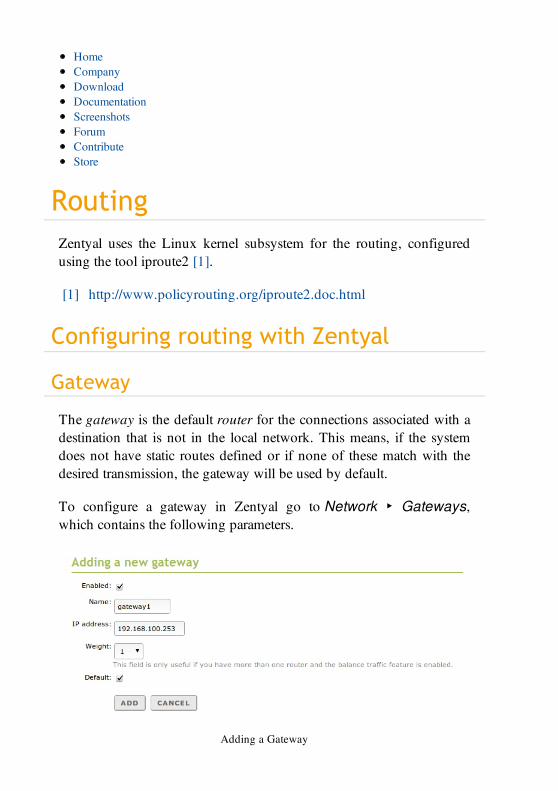
RoutingZentyal uses the Linux kernel subsystem for the routing, configuredusing the tool iproute2 [1].
[1] http://www.policyrouting.org/iproute2.doc.html
Configuring routing with Zentyal
Gateway
The gateway is the default router for the connections associated with adestination that is not in the local network. This means, if the systemdoes not have static routes defined or if none of these match with thedesired transmission, the gateway will be used by default.
To configure a gateway in Zentyal go to Network ‣ Gateways,which contains the following parameters.
Adding a Gateway
HomeCompanyDownloadDocumentationScreenshotsForumContributeStore
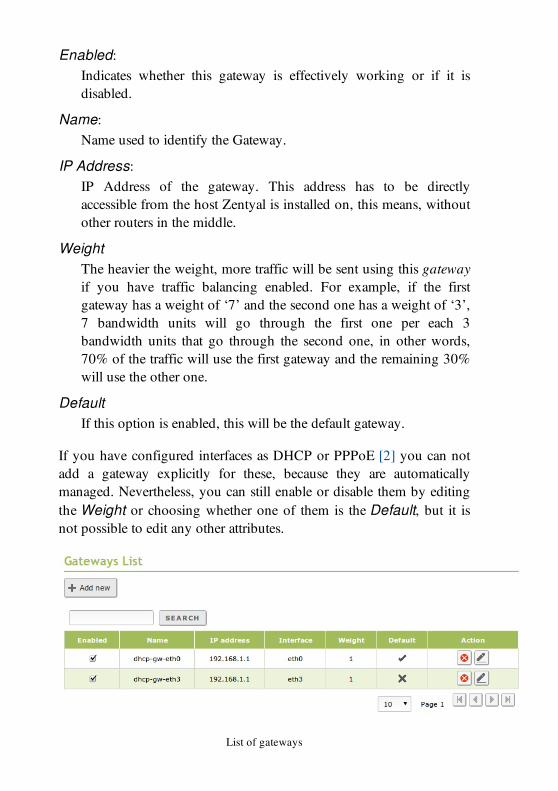
Enabled:Indicates whether this gateway is effectively working or if it isdisabled.
Name:Name used to identify the Gateway.
IP Address:IP Address of the gateway. This address has to be directlyaccessible from the host Zentyal is installed on, this means, withoutother routers in the middle.
WeightThe heavier the weight, more traffic will be sent using this gatewayif you have traffic balancing enabled. For example, if the firstgateway has a weight of ‘7’ and the second one has a weight of ‘3’,7 bandwidth units will go through the first one per each 3bandwidth units that go through the second one, in other words,70% of the traffic will use the first gateway and the remaining 30%will use the other one.
DefaultIf this option is enabled, this will be the default gateway.
If you have configured interfaces as DHCP or PPPoE [2] you can notadd a gateway explicitly for these, because they are automaticallymanaged. Nevertheless, you can still enable or disable them by editingthe Weight or choosing whether one of them is the Default, but it isnot possible to edit any other attributes.
List of gateways
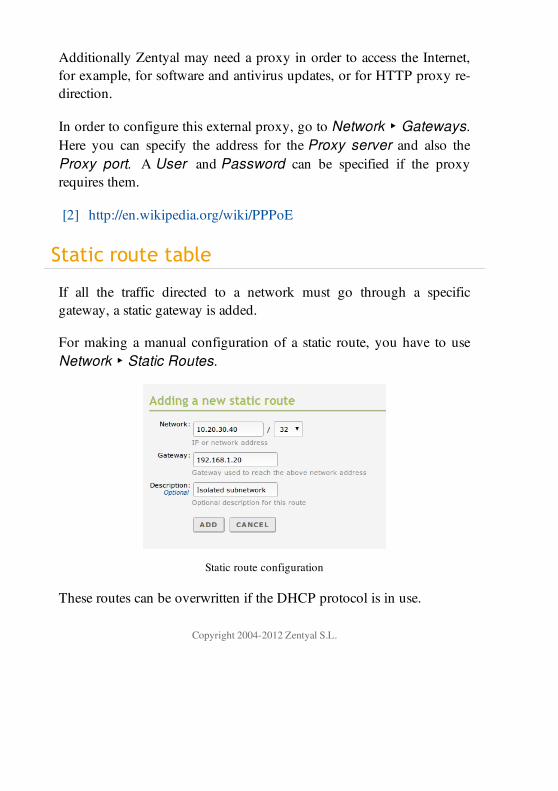
Additionally Zentyal may need a proxy in order to access the Internet,for example, for software and antivirus updates, or for HTTP proxy re-direction.
In order to configure this external proxy, go to Network ‣ Gateways.Here you can specify the address for the Proxy server and also theProxy port. A User and Password can be specified if the proxyrequires them.
[2] http://en.wikipedia.org/wiki/PPPoE
Static route table
If all the traffic directed to a network must go through a specificgateway, a static gateway is added.
For making a manual configuration of a static route, you have to useNetwork ‣ Static Routes.
Static route configuration
These routes can be overwritten if the DHCP protocol is in use.
Copyright 2004-2012 Zentyal S.L.
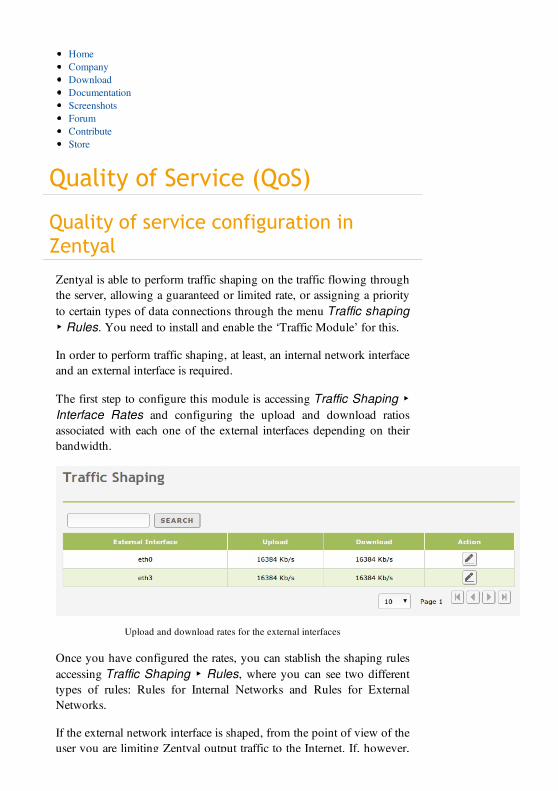
Quality of Service (QoS)
Quality of service configuration inZentyal
Zentyal is able to perform traffic shaping on the traffic flowing throughthe server, allowing a guaranteed or limited rate, or assigning a priorityto certain types of data connections through the menu Traffic shaping‣ Rules. You need to install and enable the ‘Traffic Module’ for this.
In order to perform traffic shaping, at least, an internal network interfaceand an external interface is required.
The first step to configure this module is accessing Traffic Shaping ‣Interface Rates and configuring the upload and download ratiosassociated with each one of the external interfaces depending on theirbandwidth.
Upload and download rates for the external interfaces
Once you have configured the rates, you can stablish the shaping rulesaccessing Traffic Shaping ‣ Rules, where you can see two differenttypes of rules: Rules for Internal Networks and Rules for ExternalNetworks.
If the external network interface is shaped, from the point of view of theuser you are limiting Zentyal output traffic to the Internet. If, however,
HomeCompanyDownloadDocumentationScreenshotsForumContributeStore
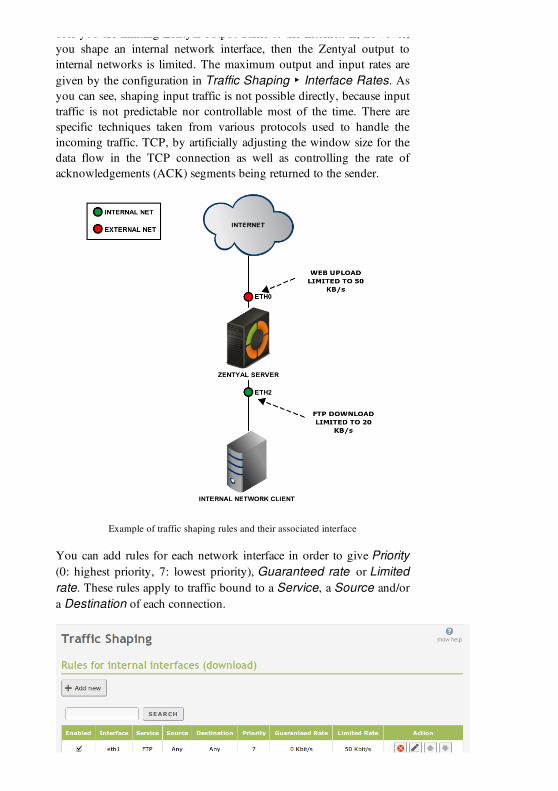
user you are limiting Zentyal output traffic to the Internet. If, however,you shape an internal network interface, then the Zentyal output tointernal networks is limited. The maximum output and input rates aregiven by the configuration in Traffic Shaping ‣ Interface Rates. Asyou can see, shaping input traffic is not possible directly, because inputtraffic is not predictable nor controllable most of the time. There arespecific techniques taken from various protocols used to handle theincoming traffic. TCP, by artificially adjusting the window size for thedata flow in the TCP connection as well as controlling the rate ofacknowledgements (ACK) segments being returned to the sender.
Example of traffic shaping rules and their associated interface
You can add rules for each network interface in order to give Priority(0: highest priority, 7: lowest priority), Guaranteed rate or Limitedrate. These rules apply to traffic bound to a Service, a Source and/ora Destination of each connection.
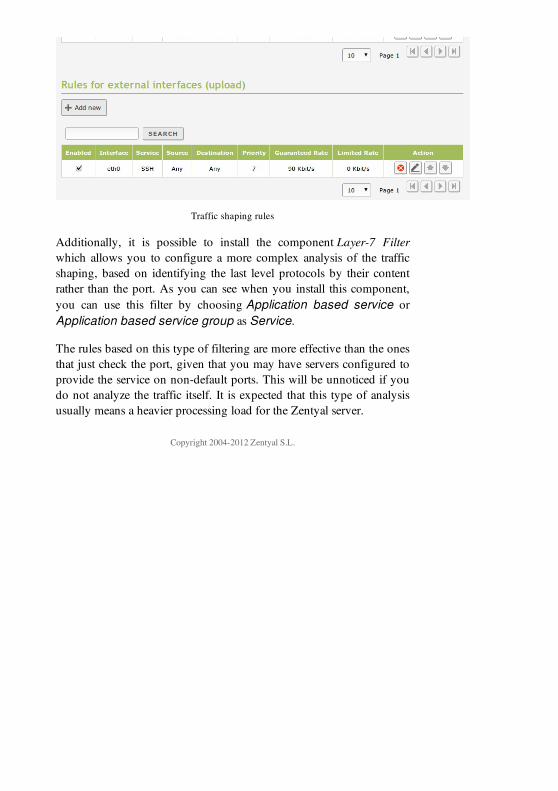
Traffic shaping rules
Additionally, it is possible to install the component Layer-7 Filterwhich allows you to configure a more complex analysis of the trafficshaping, based on identifying the last level protocols by their contentrather than the port. As you can see when you install this component,you can use this filter by choosing Application based service orApplication based service group as Service.
The rules based on this type of filtering are more effective than the onesthat just check the port, given that you may have servers configured toprovide the service on non-default ports. This will be unnoticed if youdo not analyze the traffic itself. It is expected that this type of analysisusually means a heavier processing load for the Zentyal server.
Copyright 2004-2012 Zentyal S.L.
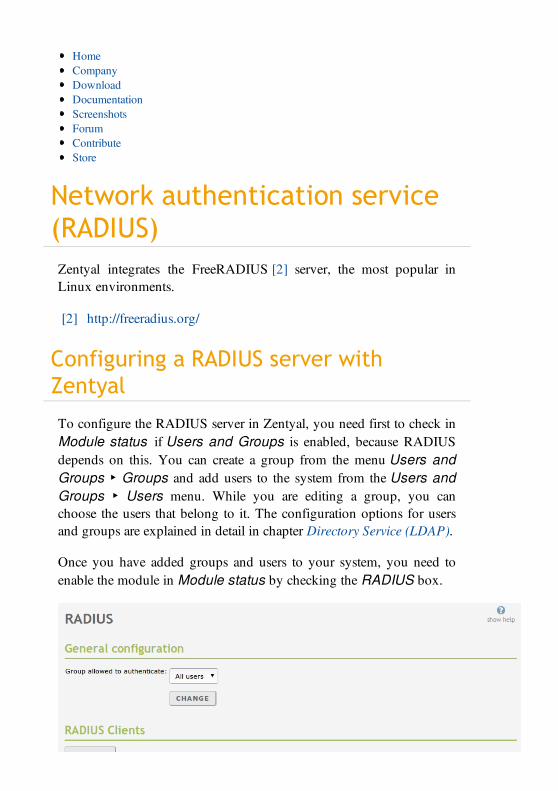
Network authentication service(RADIUS)
Zentyal integrates the FreeRADIUS [2] server, the most popular inLinux environments.
[2] http://freeradius.org/
Configuring a RADIUS server withZentyal
To configure the RADIUS server in Zentyal, you need first to check inModule status if Users and Groups is enabled, because RADIUSdepends on this. You can create a group from the menu Users andGroups ‣ Groups and add users to the system from the Users andGroups ‣ Users menu. While you are editing a group, you canchoose the users that belong to it. The configuration options for usersand groups are explained in detail in chapter Directory Service (LDAP).
Once you have added groups and users to your system, you need toenable the module in Module status by checking the RADIUS box.
HomeCompanyDownloadDocumentationScreenshotsForumContributeStore
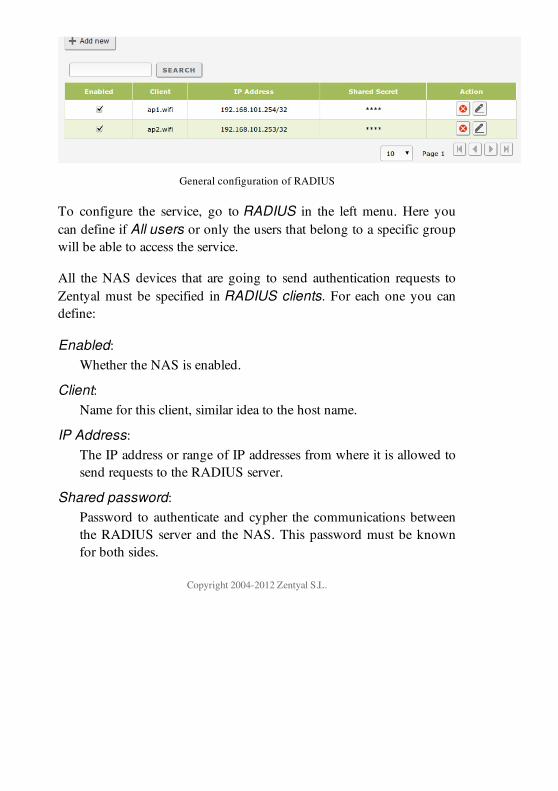
General configuration of RADIUS
To configure the service, go to RADIUS in the left menu. Here youcan define if All users or only the users that belong to a specific groupwill be able to access the service.
All the NAS devices that are going to send authentication requests toZentyal must be specified in RADIUS clients. For each one you candefine:
Enabled:Whether the NAS is enabled.
Client:Name for this client, similar idea to the host name.
IP Address:The IP address or range of IP addresses from where it is allowed tosend requests to the RADIUS server.
Shared password:Password to authenticate and cypher the communications betweenthe RADIUS server and the NAS. This password must be knownfor both sides.
Copyright 2004-2012 Zentyal S.L.
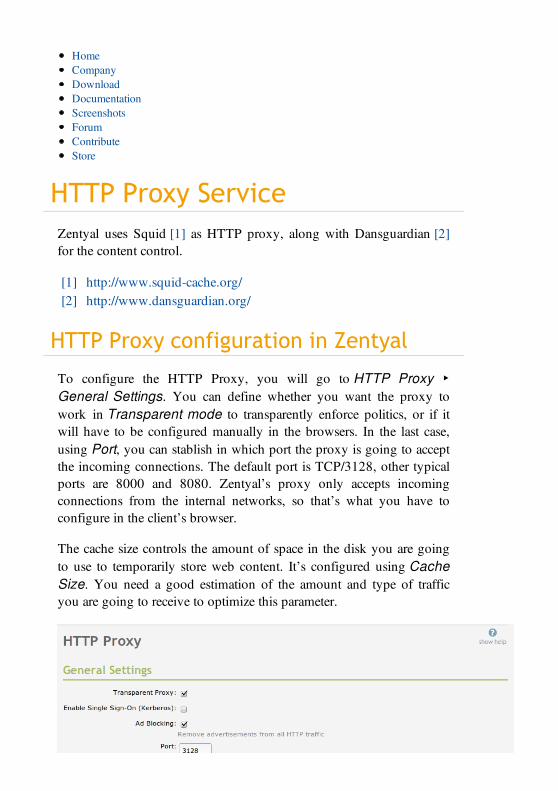
HTTP Proxy ServiceZentyal uses Squid [1] as HTTP proxy, along with Dansguardian [2]for the content control.
[1] http://www.squid-cache.org/[2] http://www.dansguardian.org/
HTTP Proxy configuration in Zentyal
To configure the HTTP Proxy, you will go to HTTP Proxy ‣General Settings. You can define whether you want the proxy towork in Transparent mode to transparently enforce politics, or if itwill have to be configured manually in the browsers. In the last case,using Port, you can stablish in which port the proxy is going to acceptthe incoming connections. The default port is TCP/3128, other typicalports are 8000 and 8080. Zentyal’s proxy only accepts incomingconnections from the internal networks, so that’s what you have toconfigure in the client’s browser.
The cache size controls the amount of space in the disk you are goingto use to temporarily store web content. It’s configured using CacheSize. You need a good estimation of the amount and type of trafficyou are going to receive to optimize this parameter.
HomeCompanyDownloadDocumentationScreenshotsForumContributeStore
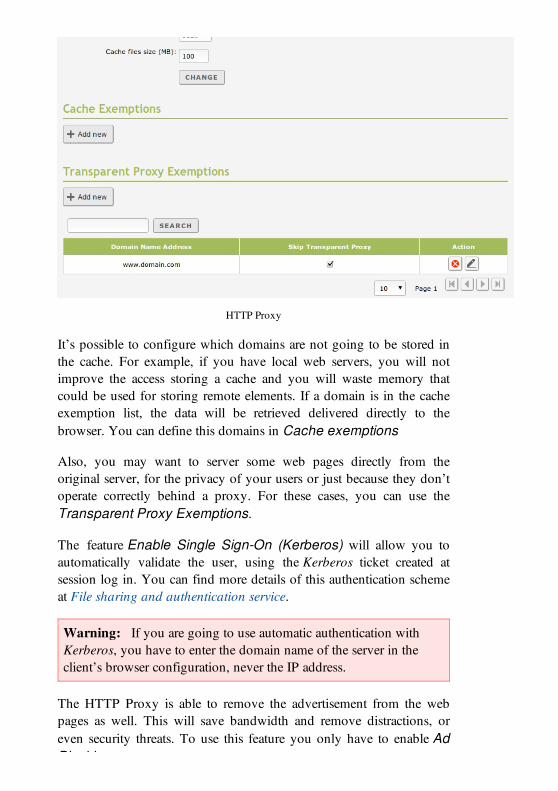
HTTP Proxy
It’s possible to configure which domains are not going to be stored inthe cache. For example, if you have local web servers, you will notimprove the access storing a cache and you will waste memory thatcould be used for storing remote elements. If a domain is in the cacheexemption list, the data will be retrieved delivered directly to thebrowser. You can define this domains in Cache exemptions
Also, you may want to server some web pages directly from theoriginal server, for the privacy of your users or just because they don’toperate correctly behind a proxy. For these cases, you can use theTransparent Proxy Exemptions.
The feature Enable Single Sign-On (Kerberos) will allow you toautomatically validate the user, using the Kerberos ticket created atsession log in. You can find more details of this authentication schemeat File sharing and authentication service.
Warning: If you are going to use automatic authentication withKerberos, you have to enter the domain name of the server in theclient’s browser configuration, never the IP address.
The HTTP Proxy is able to remove the advertisement from the webpages as well. This will save bandwidth and remove distractions, oreven security threats. To use this feature you only have to enable AdBlocking.
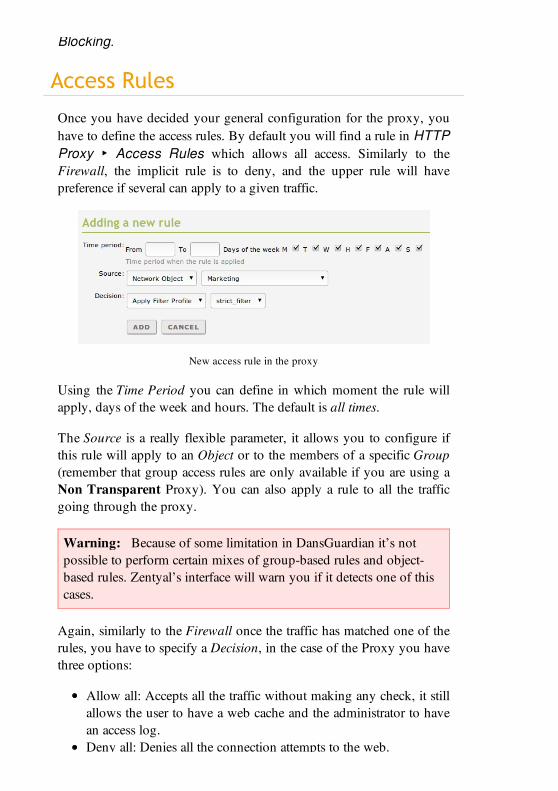
Blocking.
Access Rules
Once you have decided your general configuration for the proxy, youhave to define the access rules. By default you will find a rule in HTTPProxy ‣ Access Rules which allows all access. Similarly to theFirewall, the implicit rule is to deny, and the upper rule will havepreference if several can apply to a given traffic.
New access rule in the proxy
Using the Time Period you can define in which moment the rule willapply, days of the week and hours. The default is all times.
The Source is a really flexible parameter, it allows you to configure ifthis rule will apply to an Object or to the members of a specific Group(remember that group access rules are only available if you are using aNon Transparent Proxy). You can also apply a rule to all the trafficgoing through the proxy.
Warning: Because of some limitation in DansGuardian it’s notpossible to perform certain mixes of group-based rules and object-based rules. Zentyal’s interface will warn you if it detects one of thiscases.
Again, similarly to the Firewall once the traffic has matched one of therules, you have to specify a Decision, in the case of the Proxy you havethree options:
Allow all: Accepts all the traffic without making any check, it stillallows the user to have a web cache and the administrator to havean access log.Deny all: Denies all the connection attempts to the web.
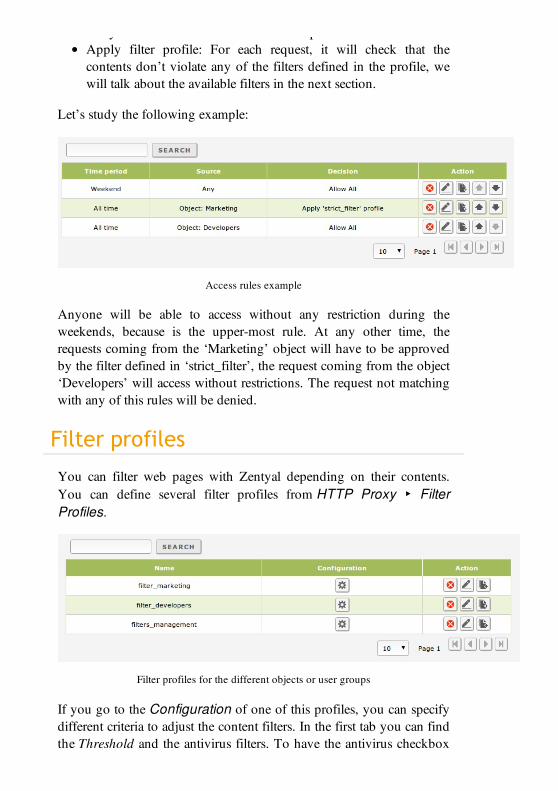
Deny all: Denies all the connection attempts to the web.Apply filter profile: For each request, it will check that thecontents don’t violate any of the filters defined in the profile, wewill talk about the available filters in the next section.
Let’s study the following example:
Access rules example
Anyone will be able to access without any restriction during theweekends, because is the upper-most rule. At any other time, therequests coming from the ‘Marketing’ object will have to be approvedby the filter defined in ‘strict_filter’, the request coming from the object‘Developers’ will access without restrictions. The request not matchingwith any of this rules will be denied.
Filter profiles
You can filter web pages with Zentyal depending on their contents.You can define several filter profiles from HTTP Proxy ‣ FilterProfiles.
Filter profiles for the different objects or user groups
If you go to the Configuration of one of this profiles, you can specifydifferent criteria to adjust the content filters. In the first tab you can findthe Threshold and the antivirus filters. To have the antivirus checkbox
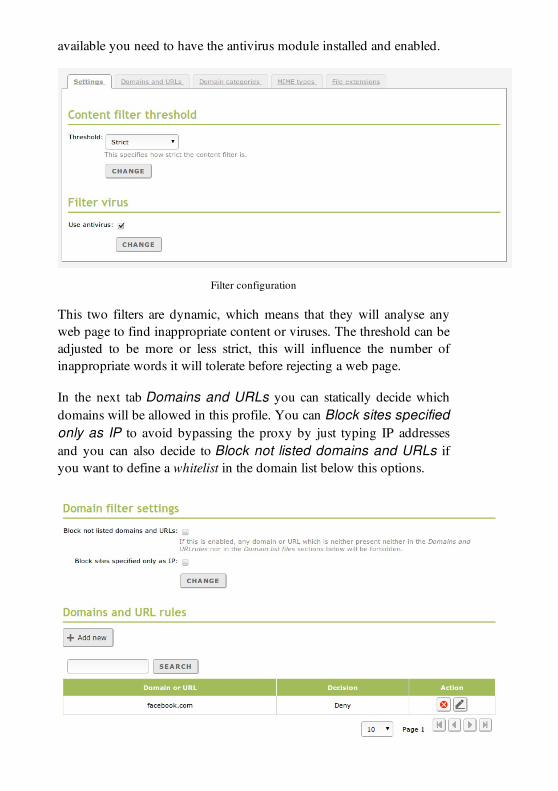
available you need to have the antivirus module installed and enabled.
Filter configuration
This two filters are dynamic, which means that they will analyse anyweb page to find inappropriate content or viruses. The threshold can beadjusted to be more or less strict, this will influence the number ofinappropriate words it will tolerate before rejecting a web page.
In the next tab Domains and URLs you can statically decide whichdomains will be allowed in this profile. You can Block sites specifiedonly as IP to avoid bypassing the proxy by just typing IP addressesand you can also decide to Block not listed domains and URLs ifyou want to define a whitelist in the domain list below this options.
Domains and URLs
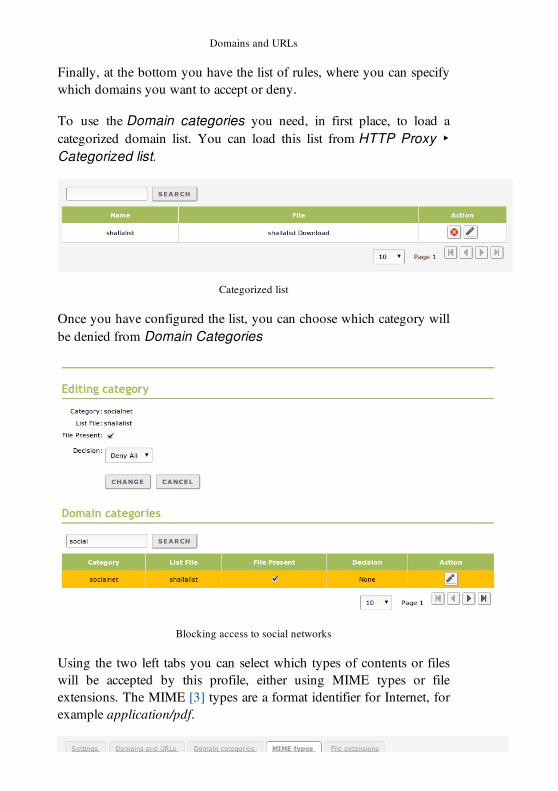
Domains and URLs
Finally, at the bottom you have the list of rules, where you can specifywhich domains you want to accept or deny.
To use the Domain categories you need, in first place, to load acategorized domain list. You can load this list from HTTP Proxy ‣Categorized list.
Categorized list
Once you have configured the list, you can choose which category willbe denied from Domain Categories
Blocking access to social networks
Using the two left tabs you can select which types of contents or fileswill be accepted by this profile, either using MIME types or fileextensions. The MIME [3] types are a format identifier for Internet, forexample application/pdf.
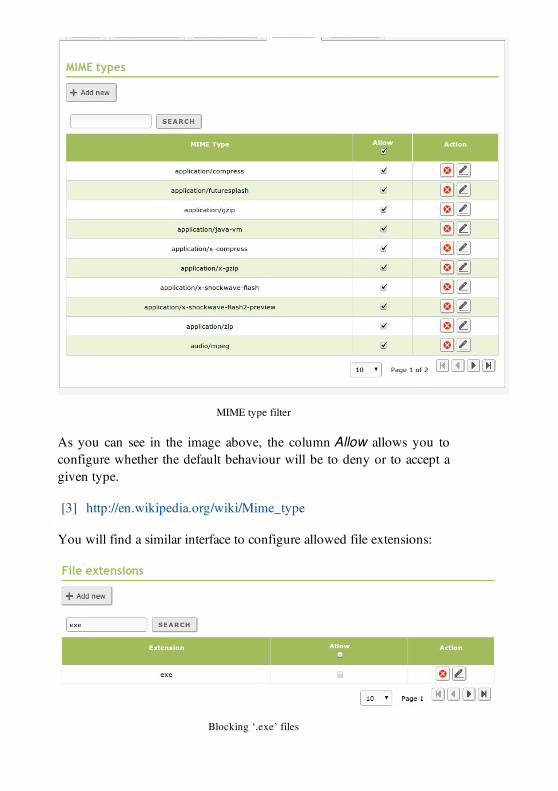
MIME type filter
As you can see in the image above, the column Allow allows you toconfigure whether the default behaviour will be to deny or to accept agiven type.
[3] http://en.wikipedia.org/wiki/Mime_type
You will find a similar interface to configure allowed file extensions:
Blocking ‘.exe’ files
Bandwidth Throttling
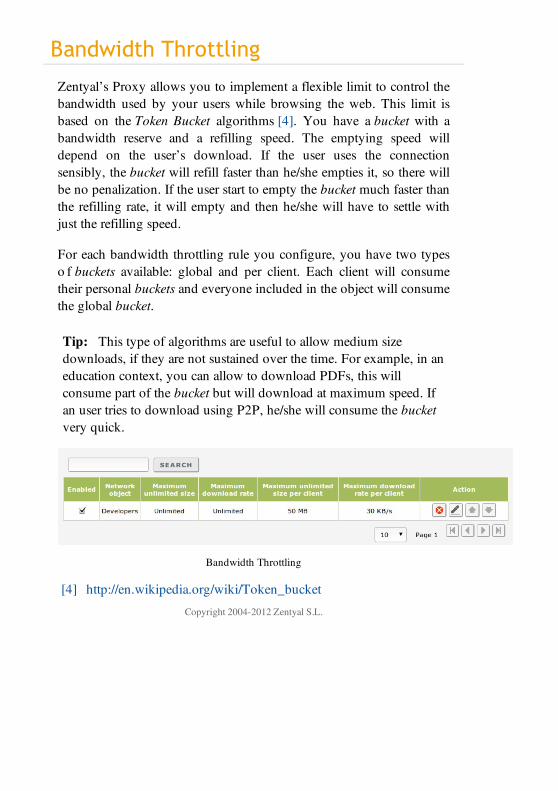
Bandwidth Throttling
Zentyal’s Proxy allows you to implement a flexible limit to control thebandwidth used by your users while browsing the web. This limit isbased on the Token Bucket algorithms [4]. You have a bucket with abandwidth reserve and a refilling speed. The emptying speed willdepend on the user’s download. If the user uses the connectionsensibly, the bucket will refill faster than he/she empties it, so there willbe no penalization. If the user start to empty the bucket much faster thanthe refilling rate, it will empty and then he/she will have to settle withjust the refilling speed.
For each bandwidth throttling rule you configure, you have two typeso f buckets available: global and per client. Each client will consumetheir personal buckets and everyone included in the object will consumethe global bucket.
Tip: This type of algorithms are useful to allow medium sizedownloads, if they are not sustained over the time. For example, in aneducation context, you can allow to download PDFs, this willconsume part of the bucket but will download at maximum speed. Ifan user tries to download using P2P, he/she will consume the bucketvery quick.
Bandwidth Throttling
[4] http://en.wikipedia.org/wiki/Token_bucket
Copyright 2004-2012 Zentyal S.L.
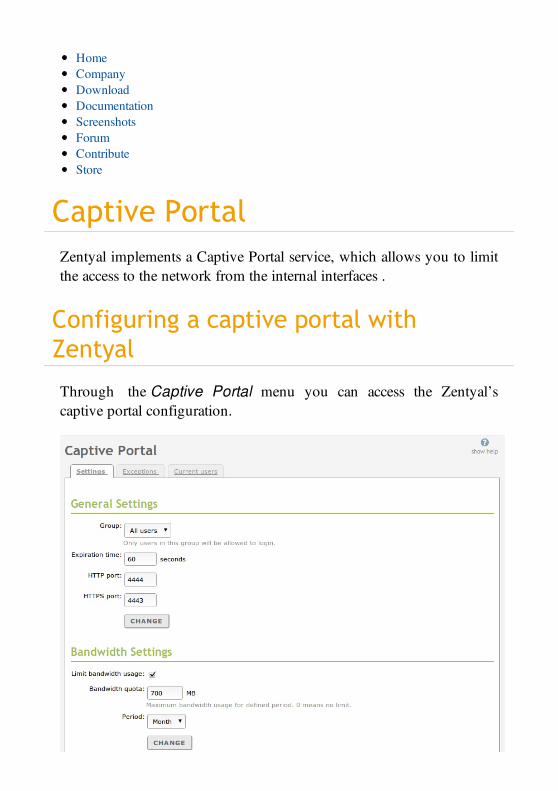
Captive PortalZentyal implements a Captive Portal service, which allows you to limitthe access to the network from the internal interfaces .
Configuring a captive portal withZentyal
Through the Captive Portal menu you can access the Zentyal’scaptive portal configuration.
HomeCompanyDownloadDocumentationScreenshotsForumContributeStore
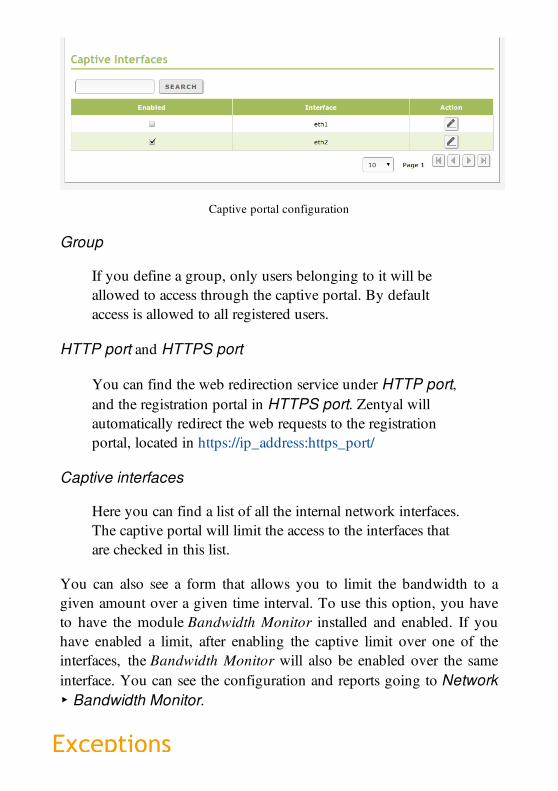
Captive portal configuration
Group
If you define a group, only users belonging to it will beallowed to access through the captive portal. By defaultaccess is allowed to all registered users.
HTTP port and HTTPS port
You can find the web redirection service under HTTP port,and the registration portal in HTTPS port. Zentyal willautomatically redirect the web requests to the registrationportal, located in https://ip_address:https_port/
Captive interfaces
Here you can find a list of all the internal network interfaces.The captive portal will limit the access to the interfaces thatare checked in this list.
You can also see a form that allows you to limit the bandwidth to agiven amount over a given time interval. To use this option, you haveto have the module Bandwidth Monitor installed and enabled. If youhave enabled a limit, after enabling the captive limit over one of theinterfaces, the Bandwidth Monitor will also be enabled over the sameinterface. You can see the configuration and reports going to Network‣ Bandwidth Monitor.
Exceptions
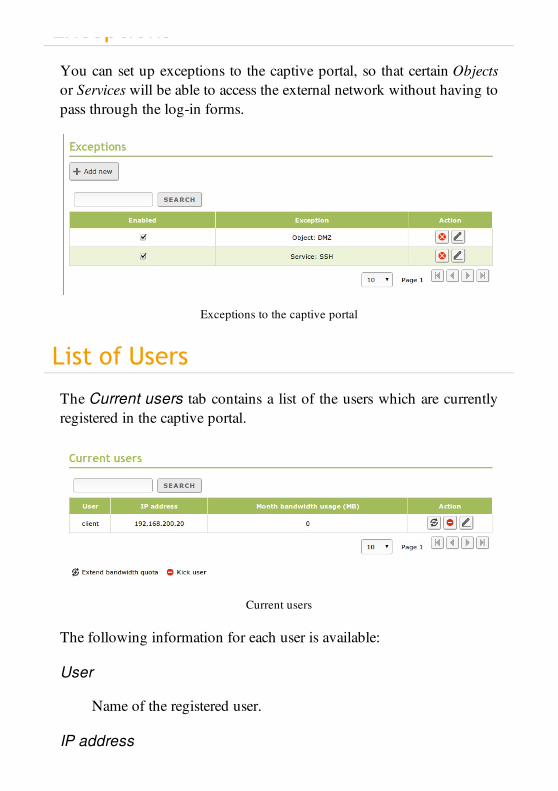
Exceptions
You can set up exceptions to the captive portal, so that certain Objectsor Services will be able to access the external network without having topass through the log-in forms.
Exceptions to the captive portal
List of Users
The Current users tab contains a list of the users which are currentlyregistered in the captive portal.
Current users
The following information for each user is available:
User
Name of the registered user.
IP address
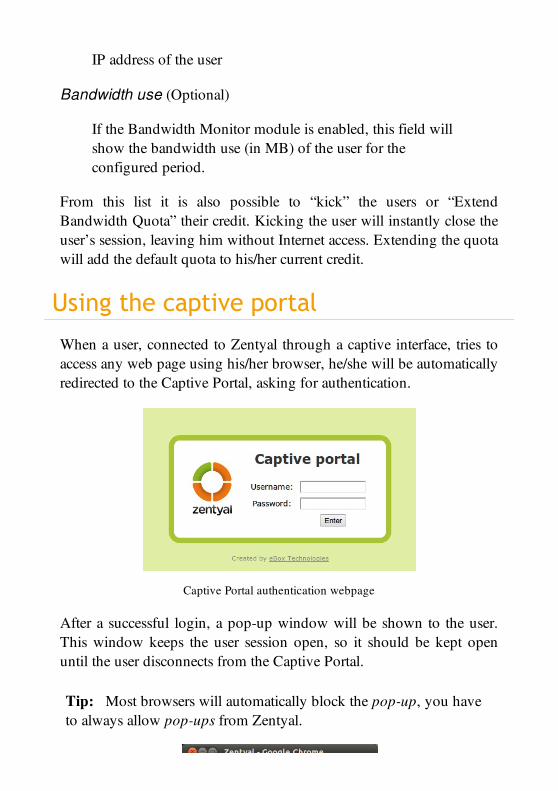
IP address of the user
Bandwidth use (Optional)
If the Bandwidth Monitor module is enabled, this field willshow the bandwidth use (in MB) of the user for theconfigured period.
From this list it is also possible to “kick” the users or “ExtendBandwidth Quota” their credit. Kicking the user will instantly close theuser’s session, leaving him without Internet access. Extending the quotawill add the default quota to his/her current credit.
Using the captive portal
When a user, connected to Zentyal through a captive interface, tries toaccess any web page using his/her browser, he/she will be automaticallyredirected to the Captive Portal, asking for authentication.
Captive Portal authentication webpage
After a successful login, a pop-up window will be shown to the user.This window keeps the user session open, so it should be kept openuntil the user disconnects from the Captive Portal.
Tip: Most browsers will automatically block the pop-up, you haveto always allow pop-ups from Zentyal.
Session window
Copyright 2004-2012 Zentyal S.L.
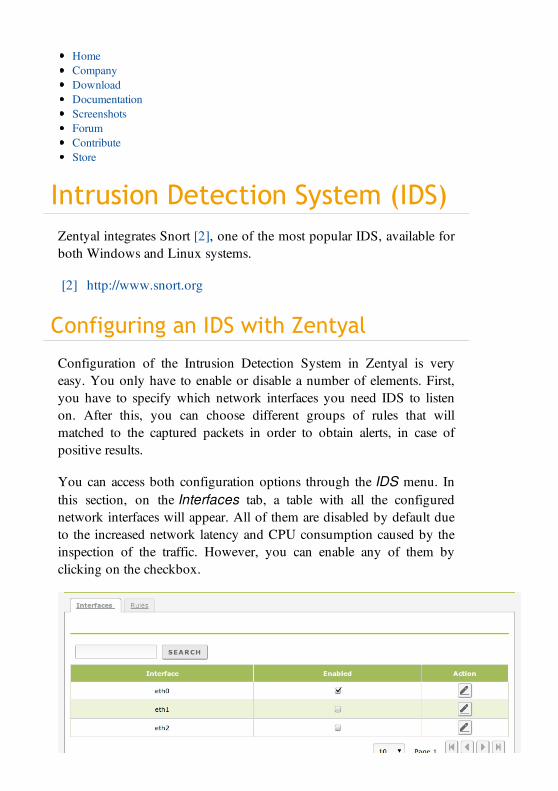
Intrusion Detection System (IDS)Zentyal integrates Snort [2], one of the most popular IDS, available forboth Windows and Linux systems.
[2] http://www.snort.org
Configuring an IDS with Zentyal
Configuration of the Intrusion Detection System in Zentyal is veryeasy. You only have to enable or disable a number of elements. First,you have to specify which network interfaces you need IDS to listenon. After this, you can choose different groups of rules that willmatched to the captured packets in order to obtain alerts, in case ofpositive results.
You can access both configuration options through the IDS menu. Inthis section, on the Interfaces tab, a table with all the configurednetwork interfaces will appear. All of them are disabled by default dueto the increased network latency and CPU consumption caused by theinspection of the traffic. However, you can enable any of them byclicking on the checkbox.
HomeCompanyDownloadDocumentationScreenshotsForumContributeStore
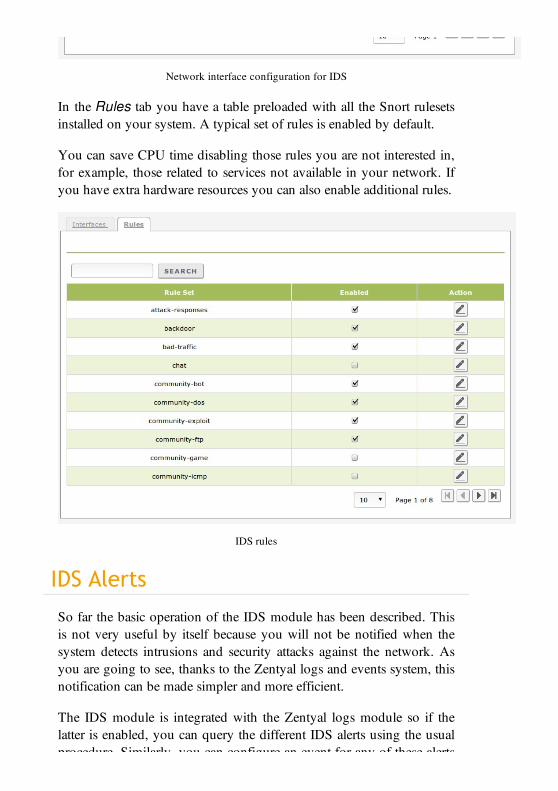
Network interface configuration for IDS
In the Rules tab you have a table preloaded with all the Snort rulesetsinstalled on your system. A typical set of rules is enabled by default.
You can save CPU time disabling those rules you are not interested in,for example, those related to services not available in your network. Ifyou have extra hardware resources you can also enable additional rules.
IDS rules
IDS Alerts
So far the basic operation of the IDS module has been described. Thisis not very useful by itself because you will not be notified when thesystem detects intrusions and security attacks against the network. Asyou are going to see, thanks to the Zentyal logs and events system, thisnotification can be made simpler and more efficient.
The IDS module is integrated with the Zentyal logs module so if thelatter is enabled, you can query the different IDS alerts using the usualprocedure. Similarly, you can configure an event for any of these alerts

procedure. Similarly, you can configure an event for any of these alertsto notify the systems administrator.
For additional information, see the Logs chapter.
Copyright 2004-2012 Zentyal S.L.
Zentyal OfficeThis section explains some of the services offered by Zentyal as anoffice server. In particular; its ability to manage network users in acentralised way, the sharing of files and printers, automatized sign-onon different services, web applications and backups for the user data.
Directory services allow you to manage user permissions within anorganisation in a centralised way. Meaning that users can authenticateinto the network securely. Also, you can define a hierarchical structurecontrolling the access to the organisation’s resources. Finally, thanks tothe master/slave architecture integrated within Zentyal, centralised usermanagement can be applied to large organisations with multiplenetwork locations.
File sharing and establishing access control for users and groups, is oneof the most important features of an office server and it greatly easesaccess to workgroup documents in an intuitive way. Security policyallows the protection of critical files within an organisation.
Moreover, many businesses use Web applications installed on an HTTPserver spanning different domain names allowing HTTPS connections.
Sharing printers, using user and group permissions is also a veryimportant service in any organisation, since this allows you to optimisethe resources usage and availability.
Finally, the backups tools for both Zentyal configuration and user’sdate is without any doubt a critical and indispensable tool in anyenterprise server to ensure the recovery process after a failure or mishap
HomeCompanyDownloadDocumentationScreenshotsForumContributeStore

enterprise server to ensure the recovery process after a failure or mishapof your systems, protecting you from data loss and downtime.
Copyright 2004-2012 Zentyal S.L.
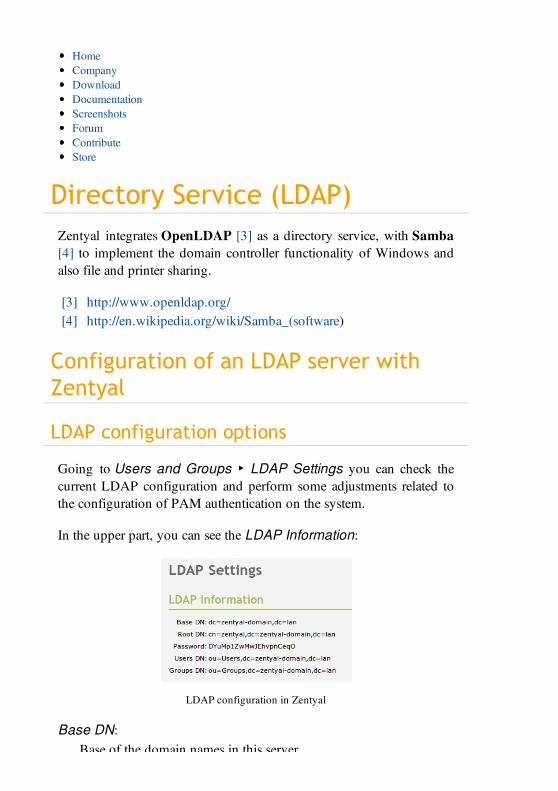
Directory Service (LDAP)Zentyal integrates OpenLDAP [3] as a directory service, with Samba[4] to implement the domain controller functionality of Windows andalso file and printer sharing.
[3] http://www.openldap.org/[4] http://en.wikipedia.org/wiki/Samba_(software)
Configuration of an LDAP server withZentyal
LDAP configuration options
Going to Users and Groups ‣ LDAP Settings you can check thecurrent LDAP configuration and perform some adjustments related tothe configuration of PAM authentication on the system.
In the upper part, you can see the LDAP Information:
LDAP configuration in Zentyal
Base DN:Base of the domain names in this server.
HomeCompanyDownloadDocumentationScreenshotsForumContributeStore
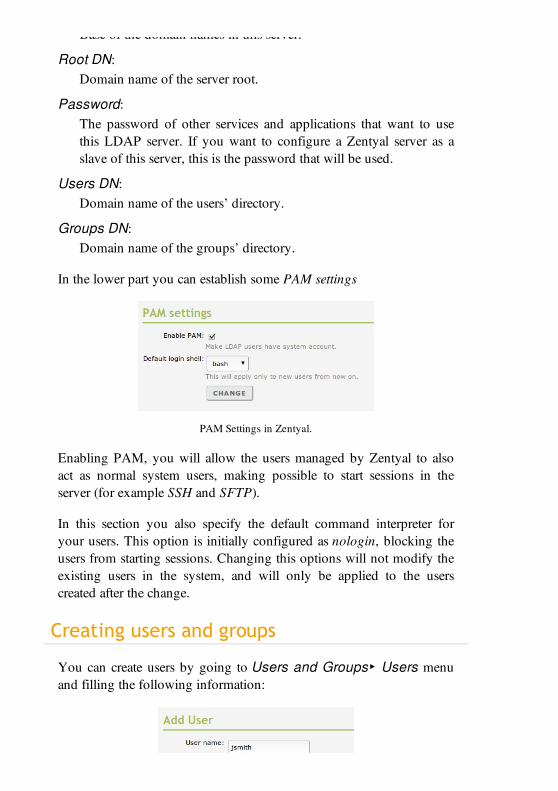
Base of the domain names in this server.
Root DN:Domain name of the server root.
Password:The password of other services and applications that want to usethis LDAP server. If you want to configure a Zentyal server as aslave of this server, this is the password that will be used.
Users DN:Domain name of the users’ directory.
Groups DN:Domain name of the groups’ directory.
In the lower part you can establish some PAM settings
PAM Settings in Zentyal.
Enabling PAM, you will allow the users managed by Zentyal to alsoact as normal system users, making possible to start sessions in theserver (for example SSH and SFTP).
In this section you also specify the default command interpreter foryour users. This option is initially configured as nologin, blocking theusers from starting sessions. Changing this options will not modify theexisting users in the system, and will only be applied to the userscreated after the change.
Creating users and groups
You can create users by going to Users and Groups‣ Users menuand filling the following information:
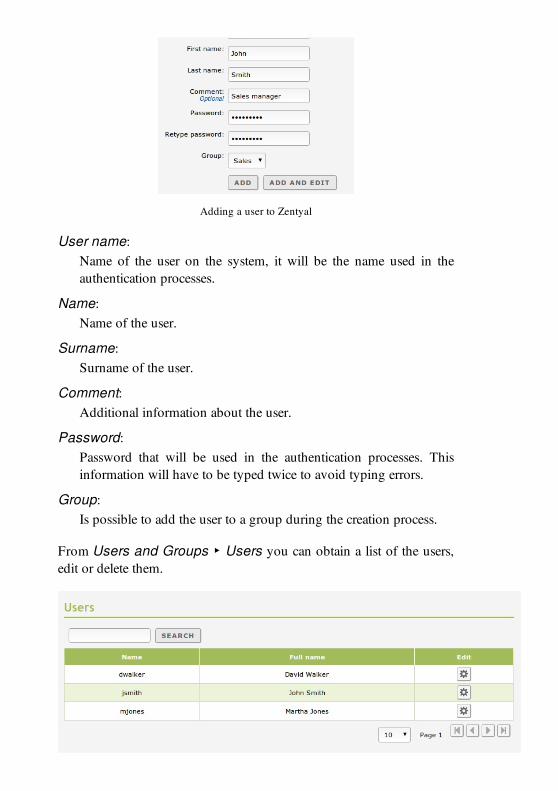
Adding a user to Zentyal
User name:Name of the user on the system, it will be the name used in theauthentication processes.
Name:Name of the user.
Surname:Surname of the user.
Comment:Additional information about the user.
Password:Password that will be used in the authentication processes. Thisinformation will have to be typed twice to avoid typing errors.
Group:Is possible to add the user to a group during the creation process.
From Users and Groups ‣ Users you can obtain a list of the users,edit or delete them.

List of users in Zentyal
While editing a user, you can change all the details, except the username and the information that is associated with the installed Zentyalmodules. These contain some specific configuration details assigned tousers. You can also modify the list of groups that contain this user.
Editing a user
Editing a user you can:
Create an account for the jabber server.Create an account for the filesharing or PDC with a personalisedquota.Create an e-mail account for the user and alias for it.Assign a telephone extension for the user.Enable or disable the user account for Zarafa and check if it hasadministrator rights.
You can create a group from the Users and groups ‣ Groups menu.A group will be identified by its name, and can also contain adescription.
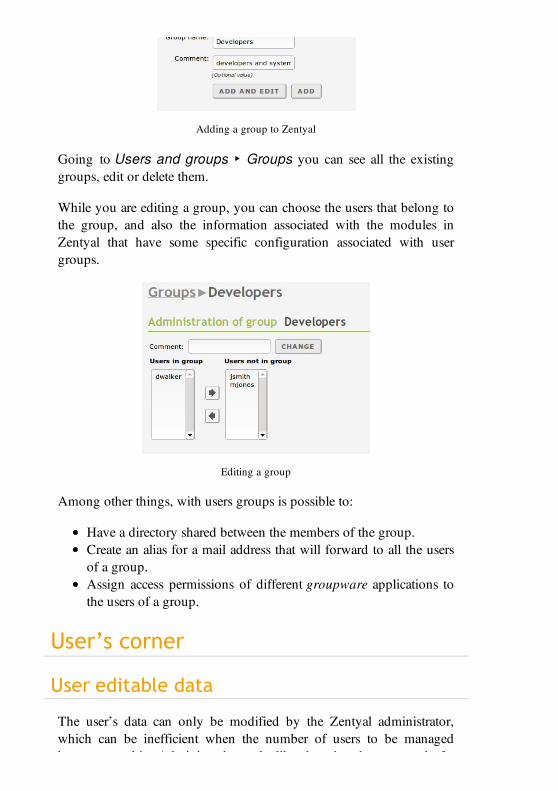
Adding a group to Zentyal
Going to Users and groups ‣ Groups you can see all the existinggroups, edit or delete them.
While you are editing a group, you can choose the users that belong tothe group, and also the information associated with the modules inZentyal that have some specific configuration associated with usergroups.
Editing a group
Among other things, with users groups is possible to:
Have a directory shared between the members of the group.Create an alias for a mail address that will forward to all the usersof a group.Assign access permissions of different groupware applications tothe users of a group.
User’s corner
User editable data
The user’s data can only be modified by the Zentyal administrator,which can be inefficient when the number of users to be managedbecomes too big. Administration tasks like changing the password of a
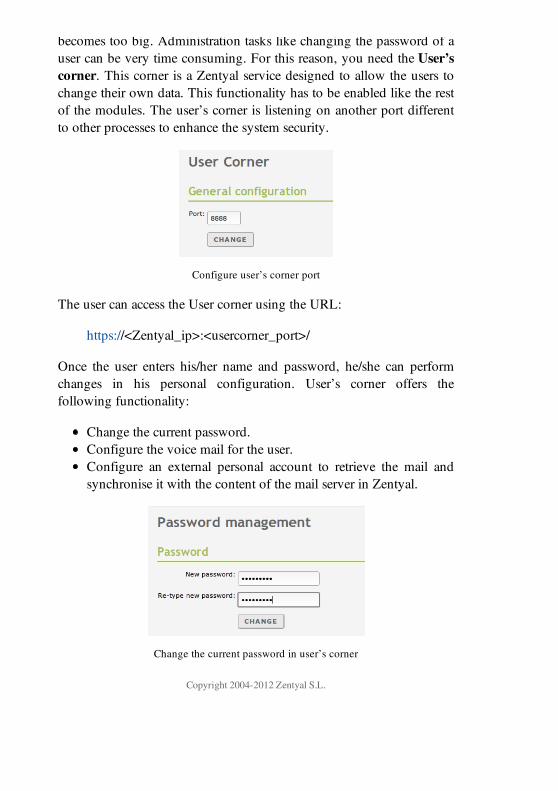
becomes too big. Administration tasks like changing the password of auser can be very time consuming. For this reason, you need the User’scorner. This corner is a Zentyal service designed to allow the users tochange their own data. This functionality has to be enabled like the restof the modules. The user’s corner is listening on another port differentto other processes to enhance the system security.
Configure user’s corner port
The user can access the User corner using the URL:
https://<Zentyal_ip>:<usercorner_port>/
Once the user enters his/her name and password, he/she can performchanges in his personal configuration. User’s corner offers thefollowing functionality:
Change the current password.Configure the voice mail for the user.Configure an external personal account to retrieve the mail andsynchronise it with the content of the mail server in Zentyal.
Change the current password in user’s corner
Copyright 2004-2012 Zentyal S.L.
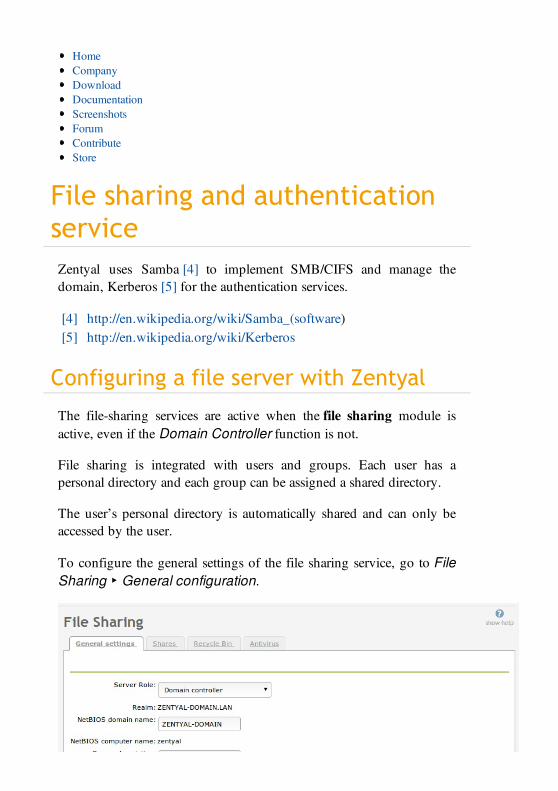
File sharing and authenticationservice
Zentyal uses Samba [4] to implement SMB/CIFS and manage thedomain, Kerberos [5] for the authentication services.
[4] http://en.wikipedia.org/wiki/Samba_(software)[5] http://en.wikipedia.org/wiki/Kerberos
Configuring a file server with Zentyal
The file-sharing services are active when the file sharing module isactive, even if the Domain Controller function is not.
File sharing is integrated with users and groups. Each user has apersonal directory and each group can be assigned a shared directory.
The user’s personal directory is automatically shared and can only beaccessed by the user.
To configure the general settings of the file sharing service, go to FileSharing ‣ General configuration.
HomeCompanyDownloadDocumentationScreenshotsForumContributeStore
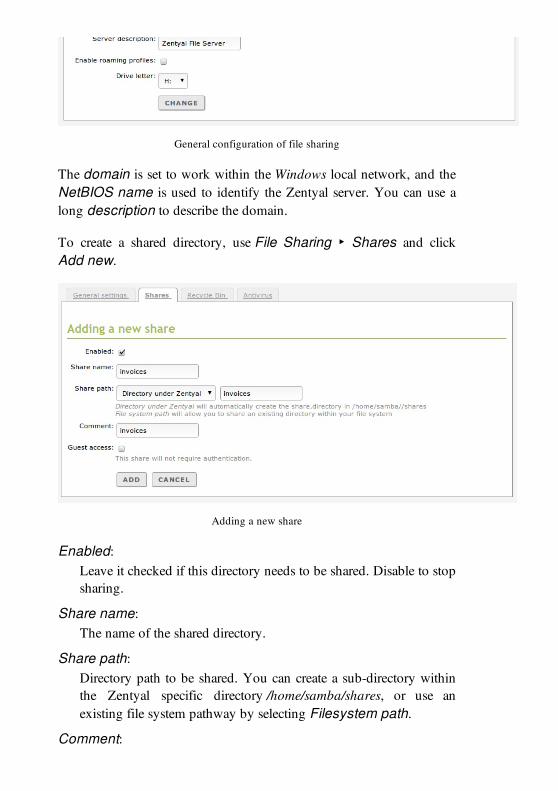
General configuration of file sharing
The domain is set to work within the Windows local network, and theNetBIOS name is used to identify the Zentyal server. You can use along description to describe the domain.
To create a shared directory, use File Sharing ‣ Shares and clickAdd new.
Adding a new share
Enabled:Leave it checked if this directory needs to be shared. Disable to stopsharing.
Share name:The name of the shared directory.
Share path:Directory path to be shared. You can create a sub-directory withinthe Zentyal specific directory /home/samba/shares, or use anexisting file system pathway by selecting Filesystem path.
Comment:A more detailed description of the shared directory simplifies
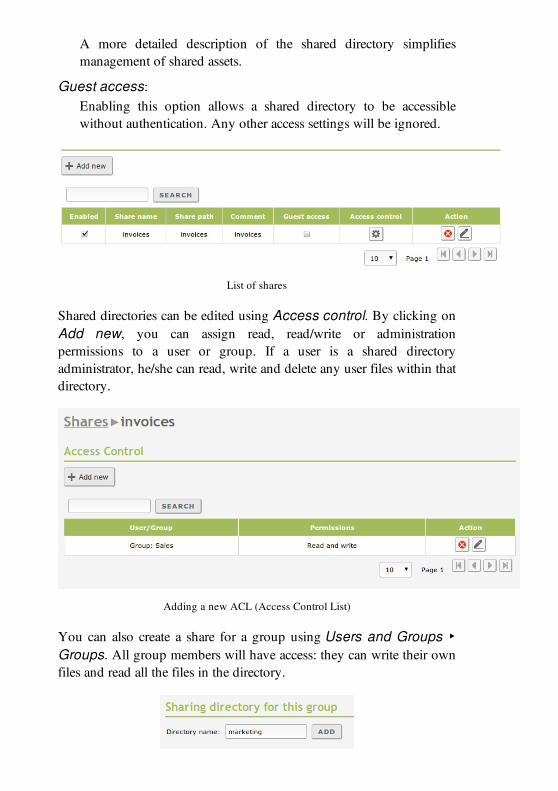
A more detailed description of the shared directory simplifiesmanagement of shared assets.
Guest access:Enabling this option allows a shared directory to be accessiblewithout authentication. Any other access settings will be ignored.
List of shares
Shared directories can be edited using Access control. By clicking onAdd new, you can assign read, read/write or administrationpermissions to a user or group. If a user is a shared directoryadministrator, he/she can read, write and delete any user files within thatdirectory.
Adding a new ACL (Access Control List)
You can also create a share for a group using Users and Groups ‣Groups. All group members will have access: they can write their ownfiles and read all the files in the directory.
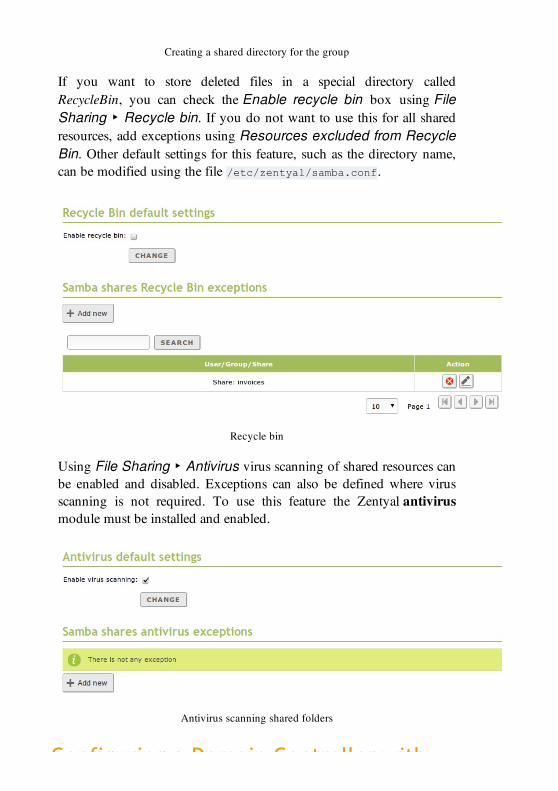
Creating a shared directory for the group
If you want to store deleted files in a special directory calledRecycleBin, you can check the Enable recycle bin box using FileSharing ‣ Recycle bin. If you do not want to use this for all sharedresources, add exceptions using Resources excluded from RecycleBin. Other default settings for this feature, such as the directory name,can be modified using the file /etc/zentyal/samba.conf.
Recycle bin
Using File Sharing ‣ Antivirus virus scanning of shared resources canbe enabled and disabled. Exceptions can also be defined where virusscanning is not required. To use this feature the Zentyal antivirusmodule must be installed and enabled.
Antivirus scanning shared folders
Configuring a Domain Controller with
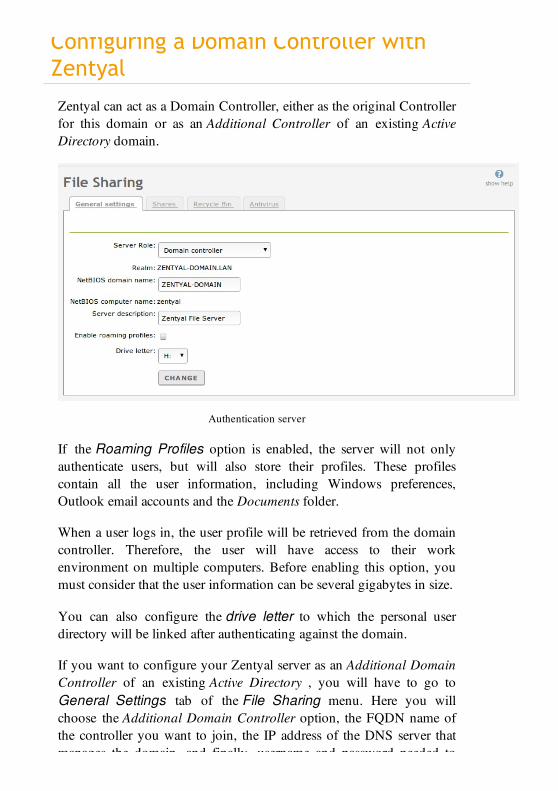
Configuring a Domain Controller withZentyal
Zentyal can act as a Domain Controller, either as the original Controllerfor this domain or as an Additional Controller of an existing ActiveDirectory domain.
Authentication server
If the Roaming Profiles option is enabled, the server will not onlyauthenticate users, but will also store their profiles. These profilescontain all the user information, including Windows preferences,Outlook email accounts and the Documents folder.
When a user logs in, the user profile will be retrieved from the domaincontroller. Therefore, the user will have access to their workenvironment on multiple computers. Before enabling this option, youmust consider that the user information can be several gigabytes in size.
You can also configure the drive letter to which the personal userdirectory will be linked after authenticating against the domain.
If you want to configure your Zentyal server as an Additional DomainController of an existing Active Directory , you will have to go toGeneral Settings tab of the File Sharing menu. Here you willchoose the Additional Domain Controller option, the FQDN name ofthe controller you want to join, the IP address of the DNS server thatmanages the domain, and finally, username and password needed to
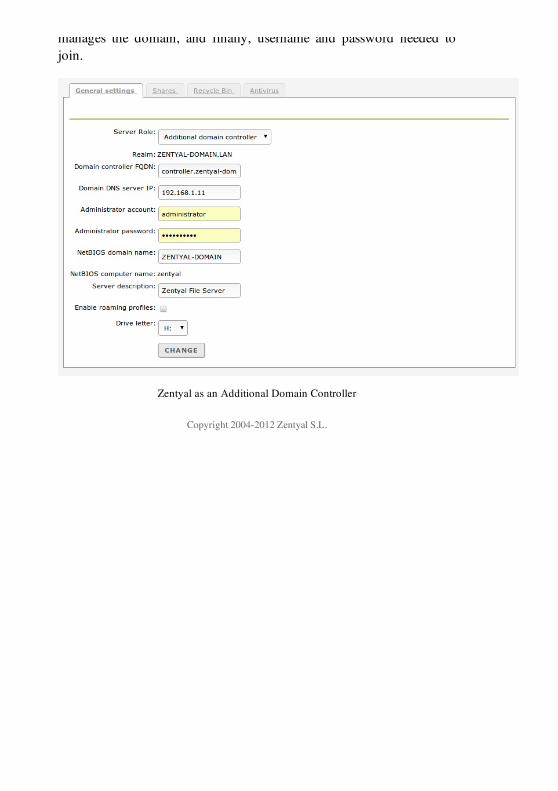
manages the domain, and finally, username and password needed tojoin.
Zentyal as an Additional Domain Controller
Copyright 2004-2012 Zentyal S.L.
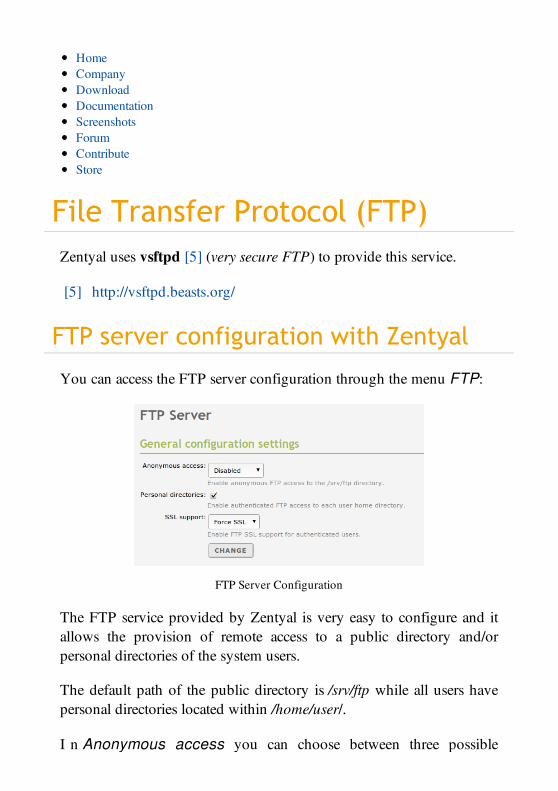
File Transfer Protocol (FTP)Zentyal uses vsftpd [5] (very secure FTP) to provide this service.
[5] http://vsftpd.beasts.org/
FTP server configuration with Zentyal
You can access the FTP server configuration through the menu FTP:
FTP Server Configuration
The FTP service provided by Zentyal is very easy to configure and itallows the provision of remote access to a public directory and/orpersonal directories of the system users.
The default path of the public directory is /srv/ftp while all users havepersonal directories located within /home/user/.
I n Anonymous access you can choose between three possible
HomeCompanyDownloadDocumentationScreenshotsForumContributeStore
I n Anonymous access you can choose between three possibleconfigurations for the public directory:
Disabled:No access is granted to anonymous users.
Read only:Users can access the directory with an FTP client, but users are onlyallowed to list the files and download them. This configuration isappropriate when making content globally available for download.
Read and write:Users can access the directory with a FTP client and anyone canadd, modify, download and delete files from this directory. Thisconfiguration is not recommended unless you are very confident ofwhat you are doing.
Another configuration parameter Personal directories allows eachZentyal user access to their personal directory. In this case, you can alsoactivate Restrict to Personal directories, which will prevent users tonavigate the entire file system, only accessing the files and directoriesunder /home/user.
Using the SSL Support option, you can force the secure connection,make it optional or disable it. If it is disabled you will not be able toaccess securely, if it is optional the decision will depend on the clientsupport and if it is forced, you will not accept clients that do notsupport it.
As usual, before enabling this service, you must check that theneccesary firewall ports are open.
Warning: You will need to enable PAM to allow your LDAP usersto access the FTP server.
Copyright 2004-2012 Zentyal S.L.
Web publication service (HTTP)
Introduction to HTTP
The Web [1] is one of the most common services on the Internet, to theextent that it has become the “public face” of the Internet for mostusers. This service is based on web page transfer using the HTTPprotocol.
HTTP (Hypertext Transfer Protocol) [2] is a request and responseprotocol. The client, also known as the User Agent, makes a request toaccess a resource on a HTTP server. The server with the requestedresource processes it and gives a response with the resource, this can bean HTML web page, image or any other file that is generateddynamically - based on a series of request parameters. These resourcesare identified by using URLs (Uniform Resource Locators) [3] ,identifiers usually know as web site addresses.
A client request follows this format:
Initial line with <method> <URL> <HTTP version>. Forexample, the GET /index.html HTTP/1.1 requests the resource/index.html using GET and by using the HTTP/1.1 protocol.A line, with headers, such as Host, Cookie, Referer or User-Agentamongst others. For example Host: zentyal.com informs that arequest is made to the domain zentyal.com.A blank line.A body with optional format, used, for example, to send data tothe server using the POST method.
HomeCompanyDownloadDocumentationScreenshotsForumContributeStore
the server using the POST method.
The Host header is used to specify which domain you need to send theHTTP request. This allows different domains with different web pagesto exist on the same server. The domains, therefore, will be resolved tothe same IP address of the server - after reading the Host header theserver can designate the virtual host or domain to which the request isaddressed.
There are several methods that clients can use to request data, althoughthe most common ones are GET and POST:
GET:Requests a resource. It is a harmless method as far as the server isconcerned and does not cause any changes to the hosted webapplications.
HEAD:Requests data from a resource, like GET, but the response will notinclude the the body, only the header. Hence, it allows you toobtain metadata from the resource without downloading it.
POST:Sends data to a resource that the server must process, through a webform, for instance. The data is included in the body of the request.
PUT:Sends an item to be stored on a specific resource. It is used, forexample, by WebDAV [4], a set of HTTP protocol methods whichallow collaboration between users when editing and managing files.
DELETE:Deletes the specified resource. Also used by WebDAV.
TRACE:Informs the server that it must return the header sent by the client.This is useful to see whether the request has been modified on itsway to the server, for example by an HTTP Proxy.
The server response has the same structure as the client request, exceptfor the first line. The first line contains <status code> <text reason>,
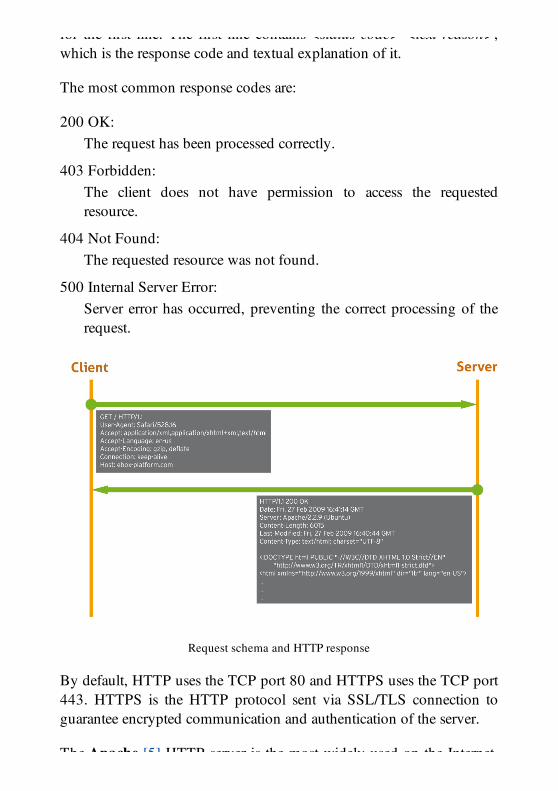
for the first line. The first line contains <status code> <text reason>,which is the response code and textual explanation of it.
The most common response codes are:
200 OK:The request has been processed correctly.
403 Forbidden:The client does not have permission to access the requestedresource.
404 Not Found:The requested resource was not found.
500 Internal Server Error:Server error has occurred, preventing the correct processing of therequest.
Request schema and HTTP response
By default, HTTP uses the TCP port 80 and HTTPS uses the TCP port443. HTTPS is the HTTP protocol sent via SSL/TLS connection toguarantee encrypted communication and authentication of the server.
The Apache [5] HTTP server is the most widely used on the Internet,
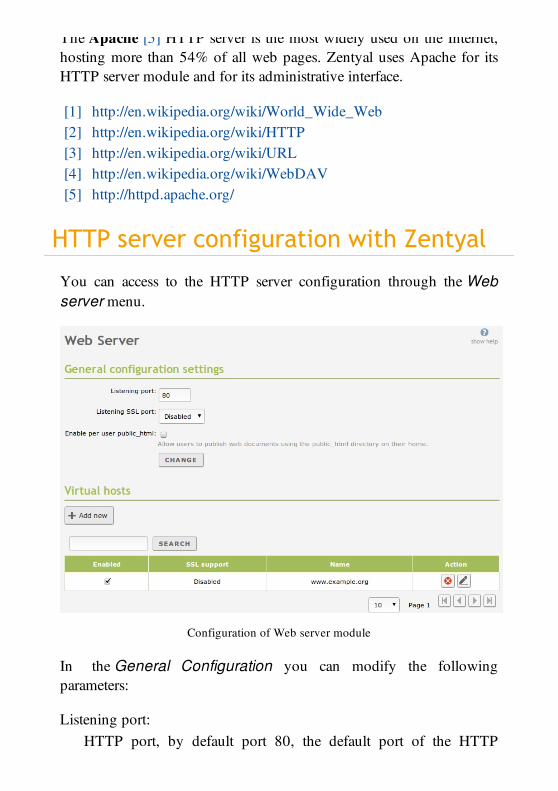
The Apache [5] HTTP server is the most widely used on the Internet,hosting more than 54% of all web pages. Zentyal uses Apache for itsHTTP server module and for its administrative interface.
[1] http://en.wikipedia.org/wiki/World_Wide_Web[2] http://en.wikipedia.org/wiki/HTTP[3] http://en.wikipedia.org/wiki/URL[4] http://en.wikipedia.org/wiki/WebDAV[5] http://httpd.apache.org/
HTTP server configuration with Zentyal
You can access to the HTTP server configuration through the Webserver menu.
Configuration of Web server module
In the General Configuration you can modify the followingparameters:
Listening port:HTTP port, by default port 80, the default port of the HTTPprotocol.
protocol.
SSL listening port:HTTPS port, by default port 443, the default port of the HTTPSprotocol. You must enable the certificate for this service and changethe Zentyal administrative interface port to another port if you wantto use the port 443.
Enable the public_html per user:If the users have a subdirectory called public_html in their personaldirectory, this option allows them to access it via the URLhttp://<zentyal>/~<user>/.
Virtual servers or Virtual hosts is where you can define differentdomains associated to certain web pages. When you use this option todefine a new domain, if the DNS module is installed, then the top leveldomain will be created. If a subdomain does not already exist, then itwill be added. This domain or subdomain creates a pointer to theaddress of the first internal interface configured with a static address -although you can modify the domain later if necessary.
Besides being able to enable and disable each domain of the HTTPserver, if SSL has already been configured, you can fix HTTPSconnections to a domain or even force all the connections to work overHTTPS.
T h e DocumentRoot or root directory for each page is in the/srv/www/<domain>/ directory. In addition, it is possible to apply acustomised Apache configuration to each Virtual host by adding a fileto the /etc/apache2/sites-available/user-ebox-<domain>/directory.
Copyright 2004-2012 Zentyal S.L.
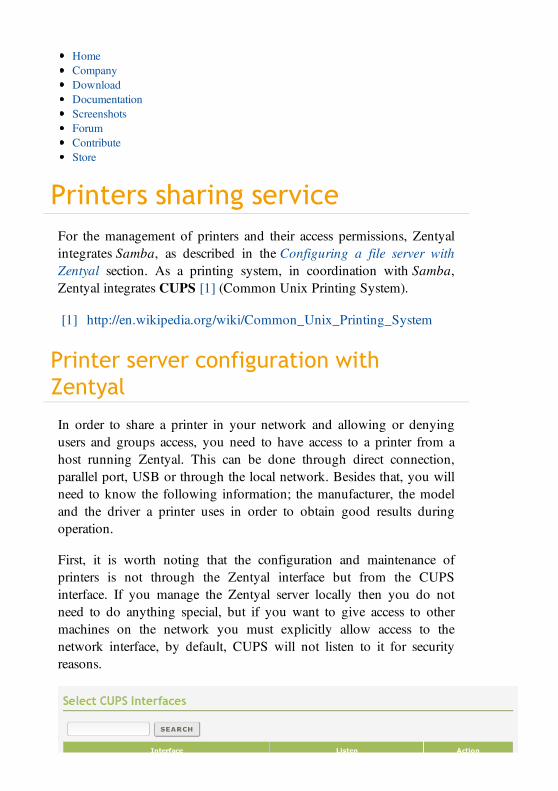
Printers sharing serviceFor the management of printers and their access permissions, Zentyalintegrates Samba, as described in the Configuring a file server withZentyal section. As a printing system, in coordination with Samba,Zentyal integrates CUPS [1] (Common Unix Printing System).
[1] http://en.wikipedia.org/wiki/Common_Unix_Printing_System
Printer server configuration withZentyal
In order to share a printer in your network and allowing or denyingusers and groups access, you need to have access to a printer from ahost running Zentyal. This can be done through direct connection,parallel port, USB or through the local network. Besides that, you willneed to know the following information; the manufacturer, the modeland the driver a printer uses in order to obtain good results duringoperation.
First, it is worth noting that the configuration and maintenance ofprinters is not through the Zentyal interface but from the CUPSinterface. If you manage the Zentyal server locally then you do notneed to do anything special, but if you want to give access to othermachines on the network you must explicitly allow access to thenetwork interface, by default, CUPS will not listen to it for securityreasons.
HomeCompanyDownloadDocumentationScreenshotsForumContributeStore
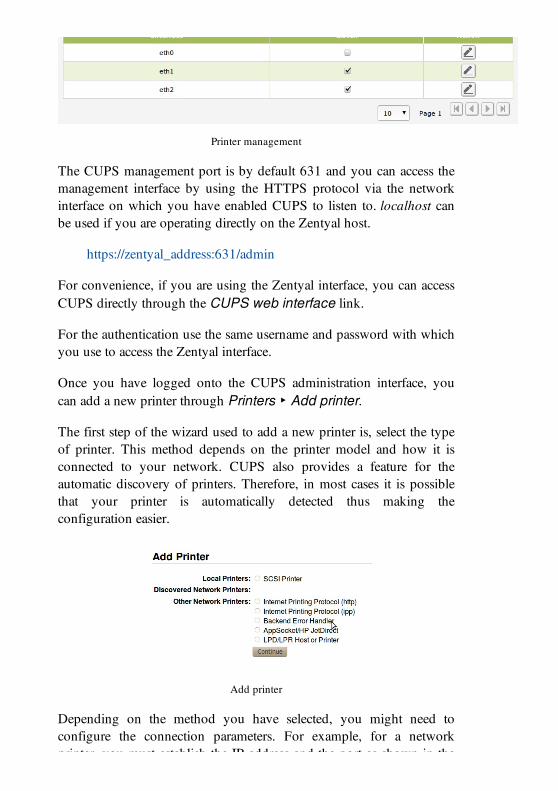
Printer management
The CUPS management port is by default 631 and you can access themanagement interface by using the HTTPS protocol via the networkinterface on which you have enabled CUPS to listen to. localhost canbe used if you are operating directly on the Zentyal host.
https://zentyal_address:631/admin
For convenience, if you are using the Zentyal interface, you can accessCUPS directly through the CUPS web interface link.
For the authentication use the same username and password with whichyou use to access the Zentyal interface.
Once you have logged onto the CUPS administration interface, youcan add a new printer through Printers ‣ Add printer.
The first step of the wizard used to add a new printer is, select the typeof printer. This method depends on the printer model and how it isconnected to your network. CUPS also provides a feature for theautomatic discovery of printers. Therefore, in most cases it is possiblethat your printer is automatically detected thus making theconfiguration easier.
Add printer
Depending on the method you have selected, you might need toconfigure the connection parameters. For example, for a networkprinter, you must establish the IP address and the port as shown in the
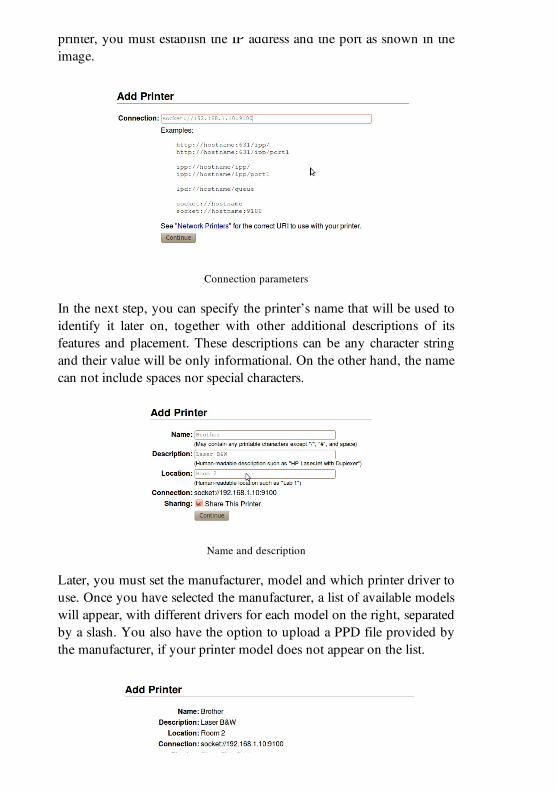
printer, you must establish the IP address and the port as shown in theimage.
Connection parameters
In the next step, you can specify the printer’s name that will be used toidentify it later on, together with other additional descriptions of itsfeatures and placement. These descriptions can be any character stringand their value will be only informational. On the other hand, the namecan not include spaces nor special characters.
Name and description
Later, you must set the manufacturer, model and which printer driver touse. Once you have selected the manufacturer, a list of available modelswill appear, with different drivers for each model on the right, separatedby a slash. You also have the option to upload a PPD file provided bythe manufacturer, if your printer model does not appear on the list.
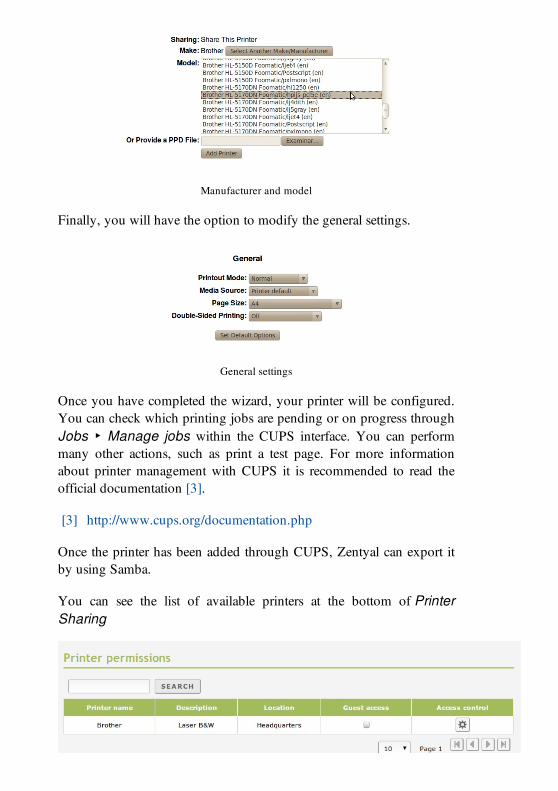
Manufacturer and model
Finally, you will have the option to modify the general settings.
General settings
Once you have completed the wizard, your printer will be configured.You can check which printing jobs are pending or on progress throughJobs ‣ Manage jobs within the CUPS interface. You can performmany other actions, such as print a test page. For more informationabout printer management with CUPS it is recommended to read theofficial documentation [3].
[3] http://www.cups.org/documentation.php
Once the printer has been added through CUPS, Zentyal can export itby using Samba.
You can see the list of available printers at the bottom of PrinterSharing
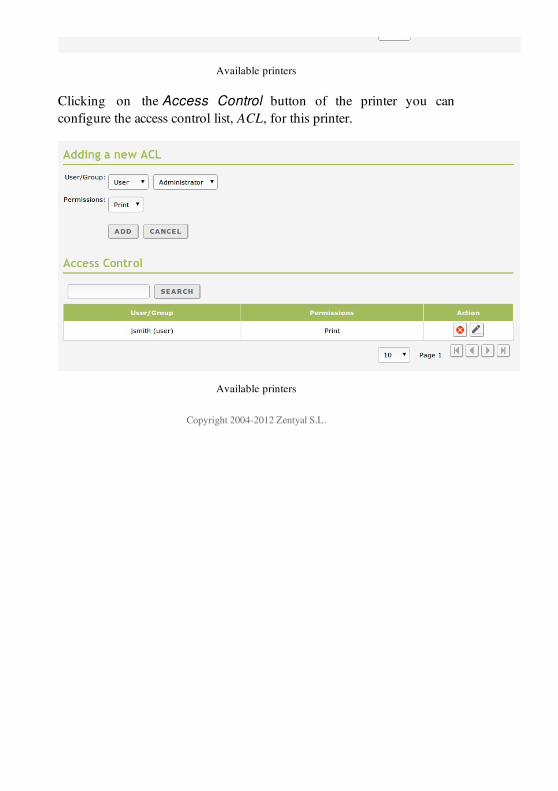
Available printers
Clicking on the Access Control button of the printer you canconfigure the access control list, ACL, for this printer.
Available printers
Copyright 2004-2012 Zentyal S.L.

Backup
Zentyal configuration Backup
Zentyal offers a configuration backup service, to ensure the recovery ofa server when a disaster occurs, for example a hard disk failure or ahuman error while managing configurations.
Backups can be made locally, saving them on the local hard drive ofthe Zentyal host. After this, it is recommended to save them to anexternal physical system, so if the machine suffers a failure, you stillhave access to this data.
It is also possible to automatically perform the backups using acommertial version of Zentyal. Both the Small Business and theEnterprise version include seven configuration backups in the cloudand the cloud Disaster Recovery service. Even if you register theZentyal server for free, you will have one cloud configuration backup.Using any of this options you will be able to quickly recover yourZentyal configuration from the remote servers in the event of a totalsystem failure.
To access the backup options, go to System ‣ Import/Exportconfiguration. You can not backup if there are unsaved changes in theconfiguration.
HomeCompanyDownloadDocumentationScreenshotsForumContributeStore
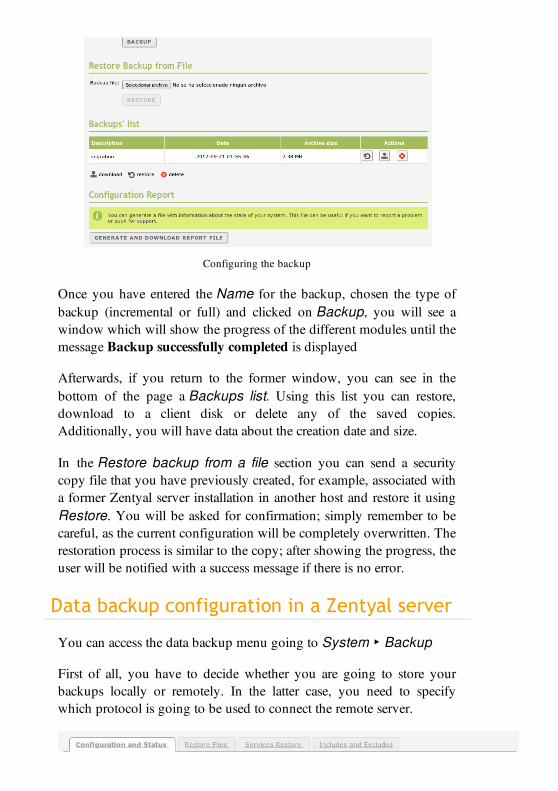
Configuring the backup
Once you have entered the Name for the backup, chosen the type ofbackup (incremental or full) and clicked on Backup, you will see awindow which will show the progress of the different modules until themessage Backup successfully completed is displayed
Afterwards, if you return to the former window, you can see in thebottom of the page a Backups list. Using this list you can restore,download to a client disk or delete any of the saved copies.Additionally, you will have data about the creation date and size.
In the Restore backup from a file section you can send a securitycopy file that you have previously created, for example, associated witha former Zentyal server installation in another host and restore it usingRestore. You will be asked for confirmation; simply remember to becareful, as the current configuration will be completely overwritten. Therestoration process is similar to the copy; after showing the progress, theuser will be notified with a success message if there is no error.
Data backup configuration in a Zentyal server
You can access the data backup menu going to System ‣ Backup
First of all, you have to decide whether you are going to store yourbackups locally or remotely. In the latter case, you need to specifywhich protocol is going to be used to connect the remote server.
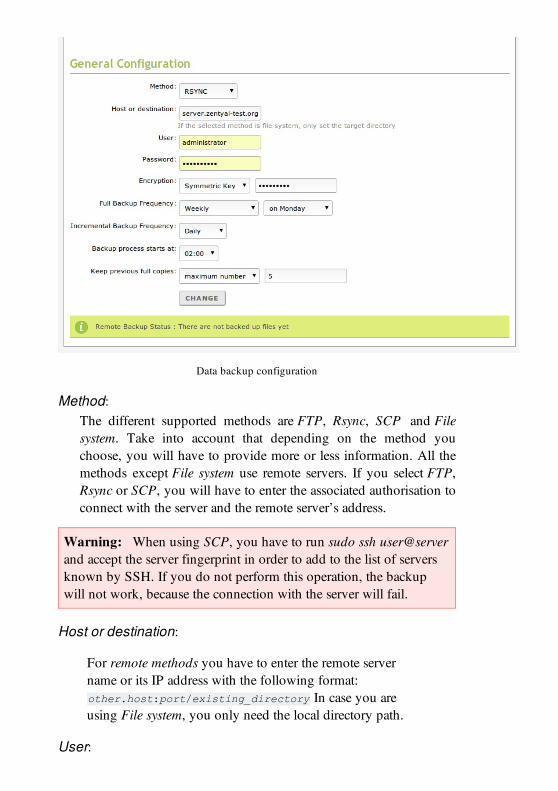
Data backup configuration
Method:The different supported methods are FTP, Rsync, SCP and Filesystem. Take into account that depending on the method youchoose, you will have to provide more or less information. All themethods except File system use remote servers. If you select FTP,Rsync or SCP, you will have to enter the associated authorisation toconnect with the server and the remote server’s address.
Warning: When using SCP, you have to run sudo ssh user@serverand accept the server fingerprint in order to add to the list of serversknown by SSH. If you do not perform this operation, the backupwill not work, because the connection with the server will fail.
Host or destination:
For remote methods you have to enter the remote servername or its IP address with the following format:other.host:port/existing_directory In case you areusing File system, you only need the local directory path.
User:
User:User name to authenticate in the remote host.
Password:Password to authenticate in the remote host.
Encryption:You can cypher the data in the backup using a symmetric key thatwill be entered in the form.
Full Backup FrequencyThis parameter is used to determine the frequency for completebackups to be performed. The values are: Only the first time, Daily,Weekly, Twice a month and Monthly. If Weekly, Twice a month orMonthly is selected, you will see a selection option to choose theexact day of the week or month to perform the backup.
I f Only the first time is selected, then it is mandatory to set afrequency for incremental backups.
Incremental Backup FrequencyThis value sets the frequency of the incremental copy or disables it.
If the incremental copy is enabled, you can choose a Daily orWeekly frequency. In the latter case, you have to decide the day ofthe week; either way you have to take into account the chosenfrequency which has to be greater than the full backup.
The days that you have scheduled a full backup, Zentyal will notperform any scheduled incremental copy.
Backup process starts atThis field is used to set the time a backup copy is started, for boththe full and the incremental backup. It is a good idea to set it to atime frame where no other activities are being performed in thenetwork, because it can consume a lot of upstream bandwidth.
Keep previous full copiesThis value is used to limit the total number of copies that can bestored. You can limit by number or by age.
If you limit by number, only the set number of copies, plus the lastcomplete copy will be stored. If you limit by age, you will onlysave full copies that are newer than the indicated period.
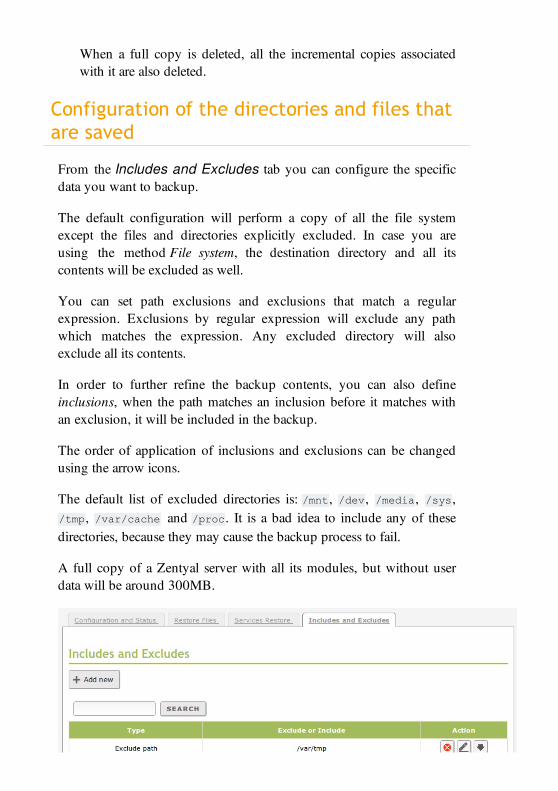
When a full copy is deleted, all the incremental copies associatedwith it are also deleted.
Configuration of the directories and files thatare saved
From the Includes and Excludes tab you can configure the specificdata you want to backup.
The default configuration will perform a copy of all the file systemexcept the files and directories explicitly excluded. In case you areusing the method File system, the destination directory and all itscontents will be excluded as well.
You can set path exclusions and exclusions that match a regularexpression. Exclusions by regular expression will exclude any pathwhich matches the expression. Any excluded directory will alsoexclude all its contents.
In order to further refine the backup contents, you can also defineinclusions, when the path matches an inclusion before it matches withan exclusion, it will be included in the backup.
The order of application of inclusions and exclusions can be changedusing the arrow icons.
The default list of excluded directories is: /mnt, /dev, /media, /sys,/tmp, /var/cache and /proc. It is a bad idea to include any of thesedirectories, because they may cause the backup process to fail.
A full copy of a Zentyal server with all its modules, but without userdata will be around 300MB.
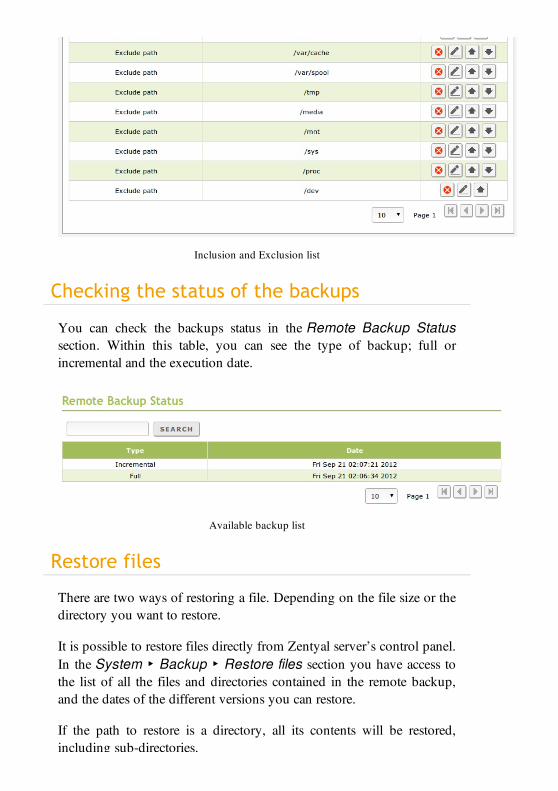
Inclusion and Exclusion list
Checking the status of the backups
You can check the backups status in the Remote Backup Statussection. Within this table, you can see the type of backup; full orincremental and the execution date.
Available backup list
Restore files
There are two ways of restoring a file. Depending on the file size or thedirectory you want to restore.
It is possible to restore files directly from Zentyal server’s control panel.In the System ‣ Backup ‣ Restore files section you have access tothe list of all the files and directories contained in the remote backup,and the dates of the different versions you can restore.
If the path to restore is a directory, all its contents will be restored,including sub-directories.
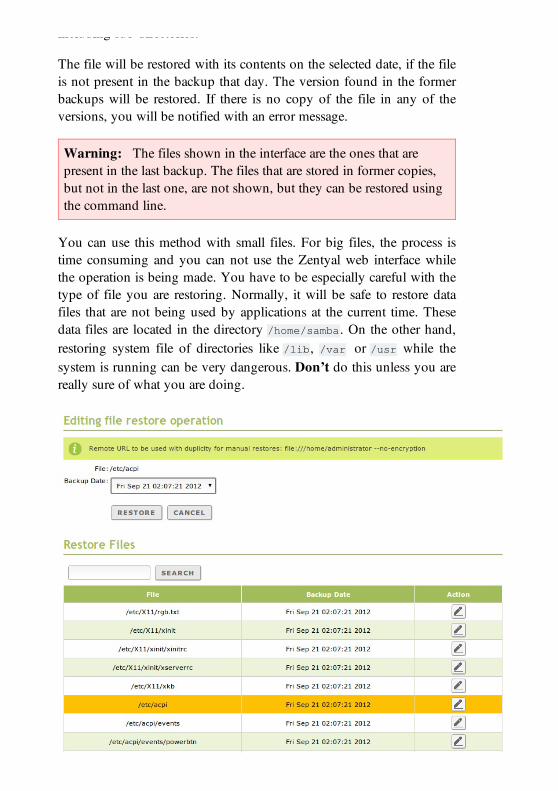
including sub-directories.
The file will be restored with its contents on the selected date, if the fileis not present in the backup that day. The version found in the formerbackups will be restored. If there is no copy of the file in any of theversions, you will be notified with an error message.
Warning: The files shown in the interface are the ones that arepresent in the last backup. The files that are stored in former copies,but not in the last one, are not shown, but they can be restored usingthe command line.
You can use this method with small files. For big files, the process istime consuming and you can not use the Zentyal web interface whilethe operation is being made. You have to be especially careful with thetype of file you are restoring. Normally, it will be safe to restore datafiles that are not being used by applications at the current time. Thesedata files are located in the directory /home/samba. On the other hand,restoring system file of directories like /lib, /var or /usr while thesystem is running can be very dangerous. Don’t do this unless you arereally sure of what you are doing.
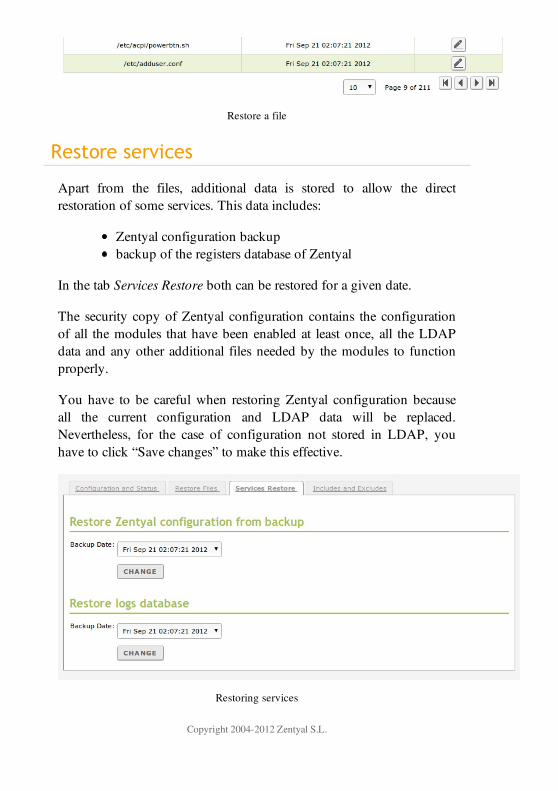
Restore a file
Restore services
Apart from the files, additional data is stored to allow the directrestoration of some services. This data includes:
Zentyal configuration backupbackup of the registers database of Zentyal
In the tab Services Restore both can be restored for a given date.
The security copy of Zentyal configuration contains the configurationof all the modules that have been enabled at least once, all the LDAPdata and any other additional files needed by the modules to functionproperly.
You have to be careful when restoring Zentyal configuration becauseall the current configuration and LDAP data will be replaced.Nevertheless, for the case of configuration not stored in LDAP, youhave to click “Save changes” to make this effective.
Restoring services
Copyright 2004-2012 Zentyal S.L.

Zentyal Unified CommunicationsIn this section you will see the different communication servicesintegrated in Zentyal, which enable centralised management of anorganisation’s communications, and allow users to work with all themusing the same password.
To start with, the e-mail service is described. It allows quick and easyintegration with the user’s e-mail clients, offering also spam and virusesprevention.
Since email became popular, it has suffered from unwanted mail, sentin bulk. This type of mail is often used to deceive the recipient in orderto obtain money fraudulently, or simply unwanted advertising. Youwill also see how to filter incoming and outgoing e-mail within yournetwork and to avoid both the reception of unwanted emails and blockoutgoing mail from any potentially compromised computer of yournetwork.
The corporate instant messaging service, based on Jabber/XMPP, isalso described. This module provides an internal IM service withouthaving to rely on external companies or an Internet connection andensures that conversations will be kept confidential, preventing databeing passed through third parties. This service provides conferencerooms. It allows, through the use of any of the many available clients,to have synchronous written communication in the organisation.
It is becoming increasingly important to use a system to help coordinatethe daily work of employees within an organisation. For this, Zentyalintegrates a groupware tool which allows users to share information
HomeCompanyDownloadDocumentationScreenshotsForumContributeStore
integrates a groupware tool which allows users to share informationsuch as calendars, tasks, addresses and so forth.
Finally, you will see an introduction to voice over IP (or VoIP), thisservice offers each user an extension to easily make calls or participatein conferences. Additionally, through an external provider, Zentyal canbe configured to connect to the traditional telephone network and makephone calls to any country in the world at significantly reduced rates.
Copyright 2004-2012 Zentyal S.L.
Electronic Mail Service(SMTP/POP3-IMAP4)
Zentyal uses Postfix [6] as a MTA. For the MDA (POP3, IMAP), ituses Dovecot [7]. Both come with support for secure communicationover SSL. To fetch mail from external accounts, Zentyal usesFetchmail [8] .
[6] Postfix The Postfix Home Page http://www.postfix.org .[7] Dovecot Secure IMAP and POP3 Server
http://www.dovecot.org .[8] http://fetchmail.berlios.de/
SMTP/POP3-IMAP4 server configurationwith Zentyal
Receiving and relaying mail
To understand the mail system configuration, the difference betweenreceiving mail and relaying mail must be clear.
Reception occurs when the server accepts a mail message whichrecipients contain an account that belongs to any of its virtual maildomains. Mail can be received from any client that is able to connect tothe server.
Relay occurs when the mail server receives a message which recipientsdo not belong to any of its managed virtual mail domains, thusrequiring forwarding of the message to other servers. Mail relay isrestricted, otherwise spammers could use the server to send spam all
HomeCompanyDownloadDocumentationScreenshotsForumContributeStore
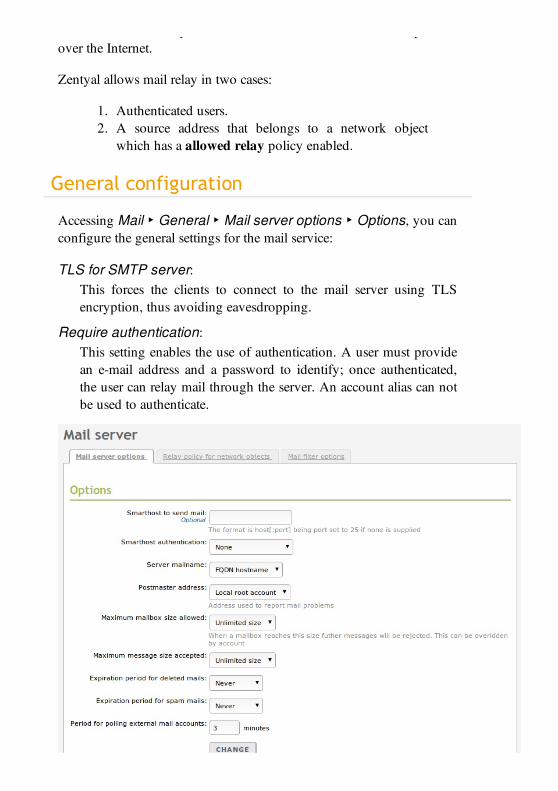
restricted, otherwise spammers could use the server to send spam allover the Internet.
Zentyal allows mail relay in two cases:
1. Authenticated users.2. A source address that belongs to a network object
which has a allowed relay policy enabled.
General configuration
Accessing Mail ‣ General ‣ Mail server options ‣ Options, you canconfigure the general settings for the mail service:
TLS for SMTP server:This forces the clients to connect to the mail server using TLSencryption, thus avoiding eavesdropping.
Require authentication:This setting enables the use of authentication. A user must providean e-mail address and a password to identify; once authenticated,the user can relay mail through the server. An account alias can notbe used to authenticate.
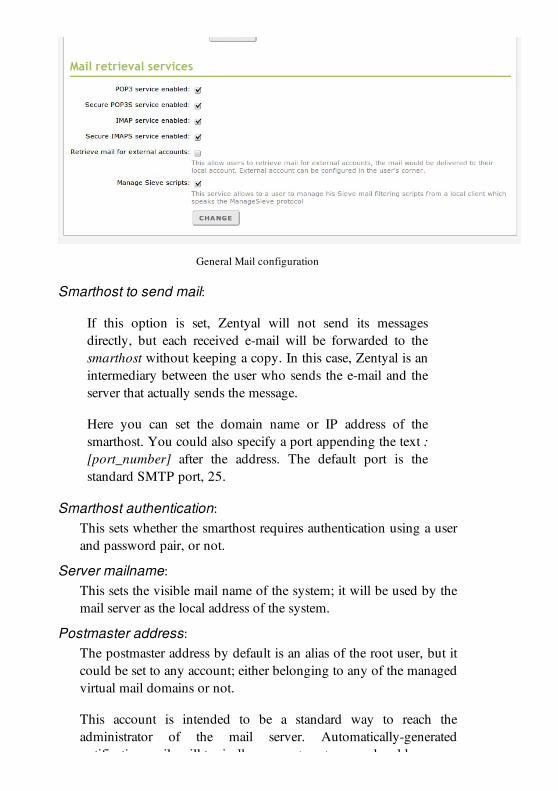
General Mail configuration
Smarthost to send mail:
If this option is set, Zentyal will not send its messagesdirectly, but each received e-mail will be forwarded to thesmarthost without keeping a copy. In this case, Zentyal is anintermediary between the user who sends the e-mail and theserver that actually sends the message.
Here you can set the domain name or IP address of thesmarthost. You could also specify a port appending the text :[port_number] after the address. The default port is thestandard SMTP port, 25.
Smarthost authentication:This sets whether the smarthost requires authentication using a userand password pair, or not.
Server mailname:This sets the visible mail name of the system; it will be used by themail server as the local address of the system.
Postmaster address:The postmaster address by default is an alias of the root user, but itcould be set to any account; either belonging to any of the managedvirtual mail domains or not.
This account is intended to be a standard way to reach theadministrator of the mail server. Automatically-generatednotification mails will typically use postmaster as reply address.

notification mails will typically use postmaster as reply address.
Maximum mailbox size allowed:Using this option you could indicate a maximum size in MB forany user’s mailboxes. All mail that exceeds the limit will be rejectedand the sender will receive a notification. This setting could beoverridden for any user in the Users and Groups ‣ Users page.
Maximum message size accepted:It indicates, if necessary, the maximum message size accepted bythe smarthost in MB. This is enforced regardless of any usermailbox size limit.
Expiration period for deleted mails:If you enable this option, those mail messages that are in the users’trash folder will be deleted when their dates exceeds the establishedlimit.
Expiration period for spam mails:This option applies, in the same way as the previous option, butrefers to the users’ spam folder.
In addition to this, Zentyal can be configured to relay mail withoutauthentication from some network addresses. To do this, you can addrelay policies for Zentyal network objects through Mail ‣ General ‣Relay policy for network objects. The policies are based on thesource mail client IP address. If relay is allowed by an object, then eachobject member can relay e-mails through Zentyal.
Relay policy for network objects
Warning: Be careful when using an Open Relay policy, i.e.forwarding e-mail from everywhere, your mail server will probablybecome a spam source.
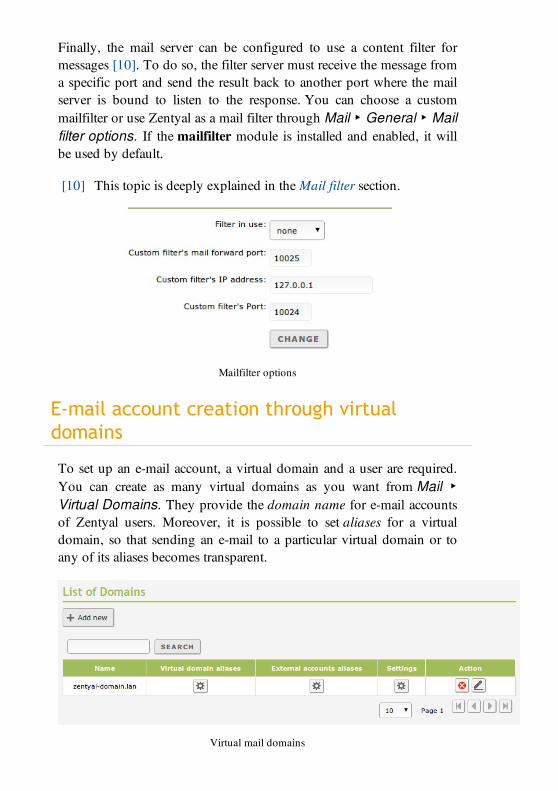
Finally, the mail server can be configured to use a content filter formessages [10]. To do so, the filter server must receive the message froma specific port and send the result back to another port where the mailserver is bound to listen to the response. You can choose a custommailfilter or use Zentyal as a mail filter through Mail ‣ General ‣ Mailfilter options. If the mailfilter module is installed and enabled, it willbe used by default.
[10] This topic is deeply explained in the Mail filter section.
Mailfilter options
E-mail account creation through virtualdomains
To set up an e-mail account, a virtual domain and a user are required.You can create as many virtual domains as you want from Mail ‣Virtual Domains. They provide the domain name for e-mail accountsof Zentyal users. Moreover, it is possible to set aliases for a virtualdomain, so that sending an e-mail to a particular virtual domain or toany of its aliases becomes transparent.
Virtual mail domains
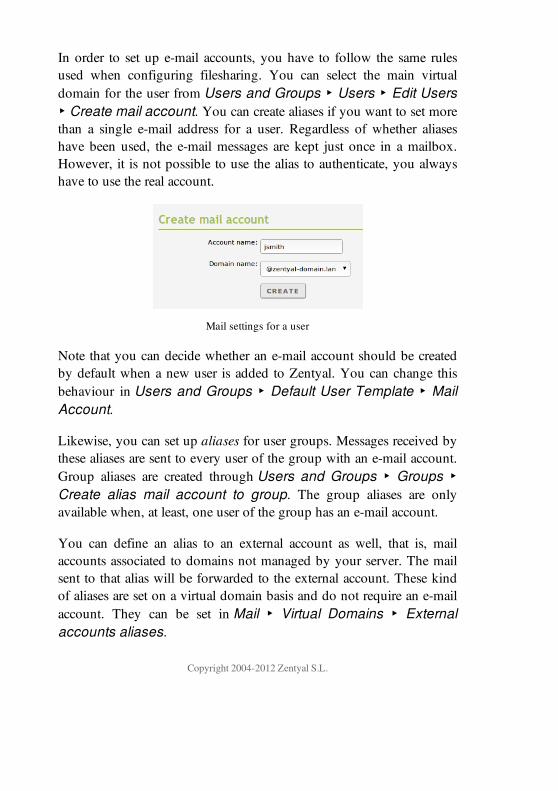
In order to set up e-mail accounts, you have to follow the same rulesused when configuring filesharing. You can select the main virtualdomain for the user from Users and Groups ‣ Users ‣ Edit Users‣ Create mail account. You can create aliases if you want to set morethan a single e-mail address for a user. Regardless of whether aliaseshave been used, the e-mail messages are kept just once in a mailbox.However, it is not possible to use the alias to authenticate, you alwayshave to use the real account.
Mail settings for a user
Note that you can decide whether an e-mail account should be createdby default when a new user is added to Zentyal. You can change thisbehaviour in Users and Groups ‣ Default User Template ‣ MailAccount.
Likewise, you can set up aliases for user groups. Messages received bythese aliases are sent to every user of the group with an e-mail account.Group aliases are created through Users and Groups ‣ Groups ‣Create alias mail account to group. The group aliases are onlyavailable when, at least, one user of the group has an e-mail account.
You can define an alias to an external account as well, that is, mailaccounts associated to domains not managed by your server. The mailsent to that alias will be forwarded to the external account. These kindof aliases are set on a virtual domain basis and do not require an e-mailaccount. They can be set in Mail ‣ Virtual Domains ‣ Externalaccounts aliases.
Copyright 2004-2012 Zentyal S.L.
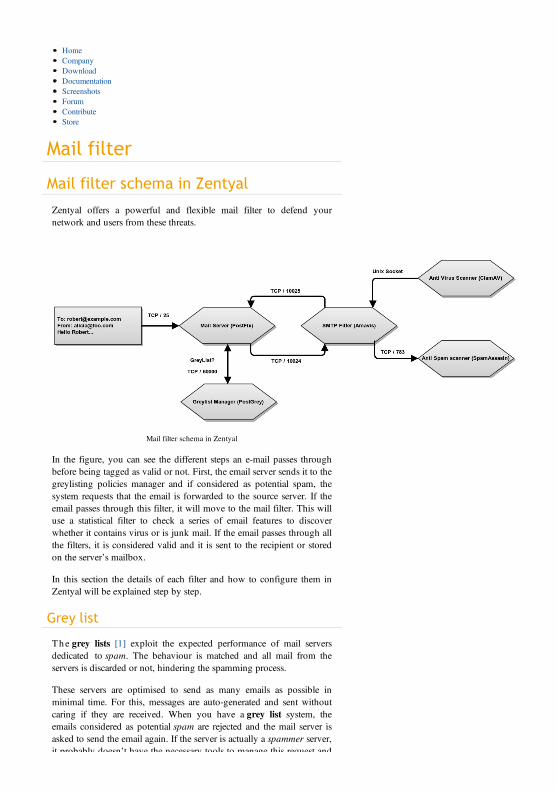
Mail filter
Mail filter schema in Zentyal
Zentyal offers a powerful and flexible mail filter to defend yournetwork and users from these threats.
Mail filter schema in Zentyal
In the figure, you can see the different steps an e-mail passes throughbefore being tagged as valid or not. First, the email server sends it to thegreylisting policies manager and if considered as potential spam, thesystem requests that the email is forwarded to the source server. If theemail passes through this filter, it will move to the mail filter. This willuse a statistical filter to check a series of email features to discoverwhether it contains virus or is junk mail. If the email passes through allthe filters, it is considered valid and it is sent to the recipient or storedon the server’s mailbox.
In this section the details of each filter and how to configure them inZentyal will be explained step by step.
Grey list
T h e grey lists [1] exploit the expected performance of mail serversdedicated to spam. The behaviour is matched and all mail from theservers is discarded or not, hindering the spamming process.
These servers are optimised to send as many emails as possible inminimal time. For this, messages are auto-generated and sent withoutcaring if they are received. When you have a grey list system, theemails considered as potential spam are rejected and the mail server isasked to send the email again. If the server is actually a spammer server,it probably doesn’t have the necessary tools to manage this request and
HomeCompanyDownloadDocumentationScreenshotsForumContributeStore
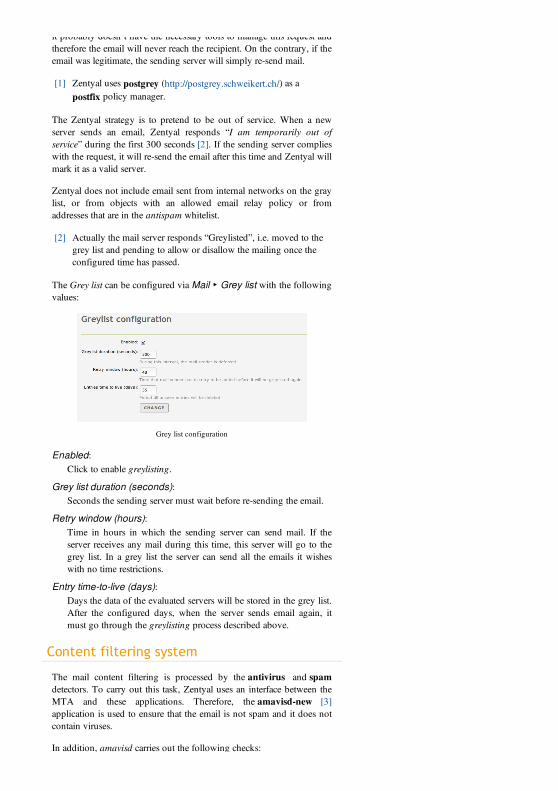
it probably doesn’t have the necessary tools to manage this request andtherefore the email will never reach the recipient. On the contrary, if theemail was legitimate, the sending server will simply re-send mail.
[1] Zentyal uses postgrey (http://postgrey.schweikert.ch/) as apostfix policy manager.
The Zentyal strategy is to pretend to be out of service. When a newserver sends an email, Zentyal responds “I am temporarily out ofservice” during the first 300 seconds [2]. If the sending server complieswith the request, it will re-send the email after this time and Zentyal willmark it as a valid server.
Zentyal does not include email sent from internal networks on the graylist, or from objects with an allowed email relay policy or fromaddresses that are in the antispam whitelist.
[2] Actually the mail server responds “Greylisted”, i.e. moved to thegrey list and pending to allow or disallow the mailing once theconfigured time has passed.
The Grey list can be configured via Mail ‣ Grey list with the followingvalues:
Grey list configuration
Enabled:Click to enable greylisting.
Grey list duration (seconds):Seconds the sending server must wait before re-sending the email.
Retry window (hours):Time in hours in which the sending server can send mail. If theserver receives any mail during this time, this server will go to thegrey list. In a grey list the server can send all the emails it wisheswith no time restrictions.
Entry time-to-live (days):Days the data of the evaluated servers will be stored in the grey list.After the configured days, when the server sends email again, itmust go through the greylisting process described above.
Content filtering system
The mail content filtering is processed by the antivirus and spamdetectors. To carry out this task, Zentyal uses an interface between theMTA and these applications. Therefore, the amavisd-new [3]application is used to ensure that the email is not spam and it does notcontain viruses.
In addition, amavisd carries out the following checks:
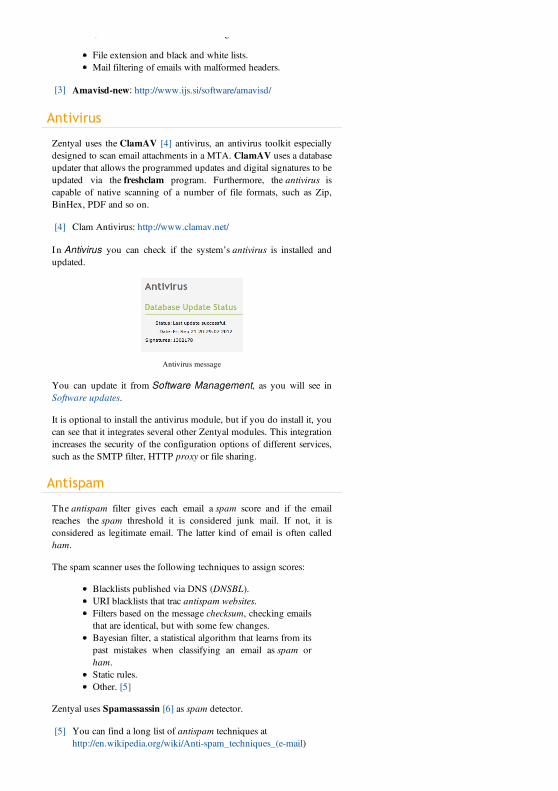
In addition, amavisd carries out the following checks:
File extension and black and white lists.Mail filtering of emails with malformed headers.
[3] Amavisd-new: http://www.ijs.si/software/amavisd/
Antivirus
Zentyal uses the ClamAV [4] antivirus, an antivirus toolkit especiallydesigned to scan email attachments in a MTA. ClamAV uses a databaseupdater that allows the programmed updates and digital signatures to beupdated via the freshclam program. Furthermore, the antivirus iscapable of native scanning of a number of file formats, such as Zip,BinHex, PDF and so on.
[4] Clam Antivirus: http://www.clamav.net/
I n Antivirus you can check if the system’s antivirus is installed andupdated.
Antivirus message
You can update it from Software Management, as you will see inSoftware updates.
It is optional to install the antivirus module, but if you do install it, youcan see that it integrates several other Zentyal modules. This integrationincreases the security of the configuration options of different services,such as the SMTP filter, HTTP proxy or file sharing.
Antispam
The antispam filter gives each email a spam score and if the emailreaches the spam threshold it is considered junk mail. If not, it isconsidered as legitimate email. The latter kind of email is often calledham.
The spam scanner uses the following techniques to assign scores:
Blacklists published via DNS (DNSBL).URI blacklists that trac antispam websites.Filters based on the message checksum, checking emailsthat are identical, but with some few changes.Bayesian filter, a statistical algorithm that learns from itspast mistakes when classifying an email as spam orham.Static rules.Other. [5]
Zentyal uses Spamassassin [6] as spam detector.
[5] You can find a long list of antispam techniques athttp://en.wikipedia.org/wiki/Anti-spam_techniques_(e-mail)
[6] The Powerful #1 Open-Source Spam Filter
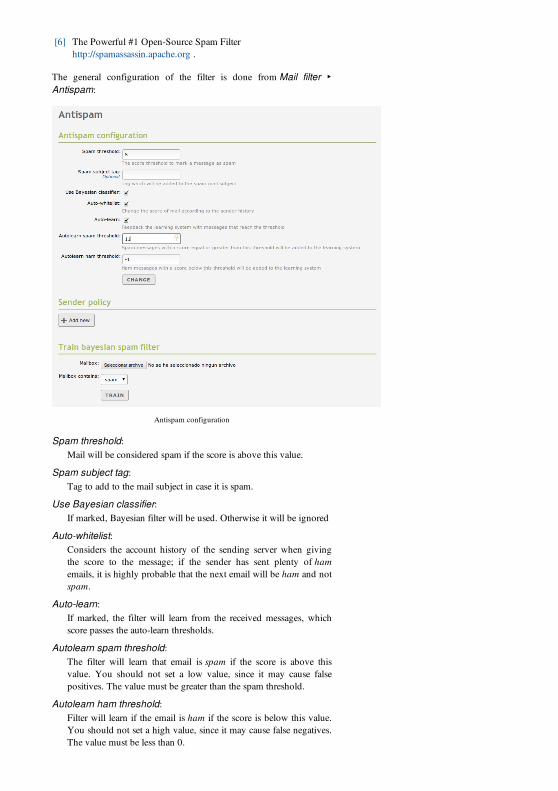
[6] The Powerful #1 Open-Source Spam Filterhttp://spamassassin.apache.org .
The general configuration of the filter is done from Mail filter ‣Antispam:
Antispam configuration
Spam threshold:Mail will be considered spam if the score is above this value.
Spam subject tag:Tag to add to the mail subject in case it is spam.
Use Bayesian classifier:If marked, Bayesian filter will be used. Otherwise it will be ignored
Auto-whitelist:Considers the account history of the sending server when givingthe score to the message; if the sender has sent plenty of hamemails, it is highly probable that the next email will be ham and notspam.
Auto-learn:If marked, the filter will learn from the received messages, whichscore passes the auto-learn thresholds.
Autolearn spam threshold:The filter will learn that email is spam if the score is above thisvalue. You should not set a low value, since it may cause falsepositives. The value must be greater than the spam threshold.
Autolearn ham threshold:Filter will learn if the email is ham if the score is below this value.You should not set a high value, since it may cause false negatives.The value must be less than 0.
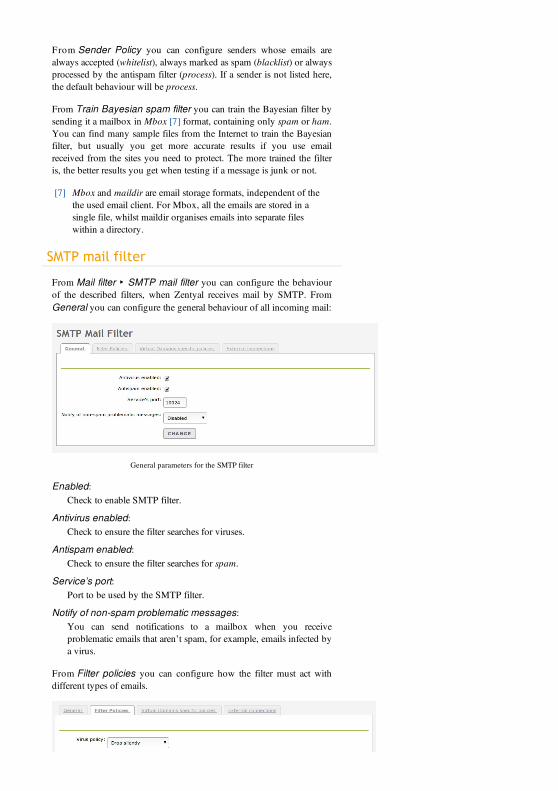
From Sender Policy you can configure senders whose emails arealways accepted (whitelist), always marked as spam (blacklist) or alwaysprocessed by the antispam filter (process). If a sender is not listed here,the default behaviour will be process.
From Train Bayesian spam filter you can train the Bayesian filter bysending it a mailbox in Mbox [7] format, containing only spam or ham.You can find many sample files from the Internet to train the Bayesianfilter, but usually you get more accurate results if you use emailreceived from the sites you need to protect. The more trained the filteris, the better results you get when testing if a message is junk or not.
[7] Mbox and maildir are email storage formats, independent of thethe used email client. For Mbox, all the emails are stored in asingle file, whilst maildir organises emails into separate fileswithin a directory.
SMTP mail filter
From Mail filter ‣ SMTP mail filter you can configure the behaviourof the described filters, when Zentyal receives mail by SMTP. FromGeneral you can configure the general behaviour of all incoming mail:
General parameters for the SMTP filter
Enabled:Check to enable SMTP filter.
Antivirus enabled:Check to ensure the filter searches for viruses.
Antispam enabled:Check to ensure the filter searches for spam.
Service’s port:Port to be used by the SMTP filter.
Notify of non-spam problematic messages:You can send notifications to a mailbox when you receiveproblematic emails that aren’t spam, for example, emails infected bya virus.
From Filter policies you can configure how the filter must act withdifferent types of emails.
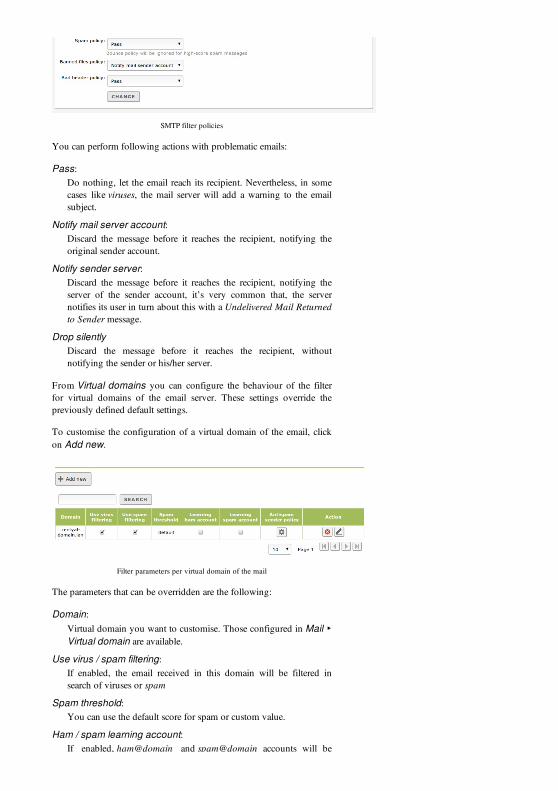
SMTP filter policies
You can perform following actions with problematic emails:
Pass:Do nothing, let the email reach its recipient. Nevertheless, in somecases like viruses, the mail server will add a warning to the emailsubject.
Notify mail server account:Discard the message before it reaches the recipient, notifying theoriginal sender account.
Notify sender server:Discard the message before it reaches the recipient, notifying theserver of the sender account, it’s very common that, the servernotifies its user in turn about this with a Undelivered Mail Returnedto Sender message.
Drop silentlyDiscard the message before it reaches the recipient, withoutnotifying the sender or his/her server.
From Virtual domains you can configure the behaviour of the filterfor virtual domains of the email server. These settings override thepreviously defined default settings.
To customise the configuration of a virtual domain of the email, clickon Add new.
Filter parameters per virtual domain of the mail
The parameters that can be overridden are the following:
Domain:Virtual domain you want to customise. Those configured in Mail ‣Virtual domain are available.
Use virus / spam filtering:If enabled, the email received in this domain will be filtered insearch of viruses or spam
Spam threshold:You can use the default score for spam or custom value.
Ham / spam learning account:If enabled, ham@domain and spam@domain accounts will be

If enabled, ham@domain and spam@domain accounts will becreated. The users can send emails to these accounts and train thefilter. All the email sent to ham@domain will be recorded as notspam the email sent to spam@domain will be recorded as spam.
Once you have added the domain, you can add addresses to yourwhitelist, blacklist or force the processing from Antispam policy forsenders.
Copyright 2004-2012 Zentyal S.L.
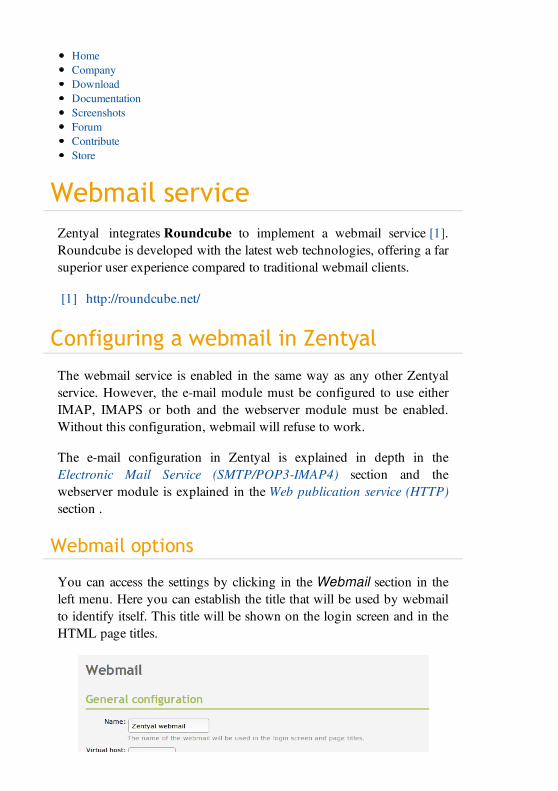
Webmail serviceZentyal integrates Roundcube to implement a webmail service [1].Roundcube is developed with the latest web technologies, offering a farsuperior user experience compared to traditional webmail clients.
[1] http://roundcube.net/
Configuring a webmail in Zentyal
The webmail service is enabled in the same way as any other Zentyalservice. However, the e-mail module must be configured to use eitherIMAP, IMAPS or both and the webserver module must be enabled.Without this configuration, webmail will refuse to work.
The e-mail configuration in Zentyal is explained in depth in theElectronic Mail Service (SMTP/POP3-IMAP4) section and thewebserver module is explained in the Web publication service (HTTP)section .
Webmail options
You can access the settings by clicking in the Webmail section in theleft menu. Here you can establish the title that will be used by webmailto identify itself. This title will be shown on the login screen and in theHTML page titles.
HomeCompanyDownloadDocumentationScreenshotsForumContributeStore
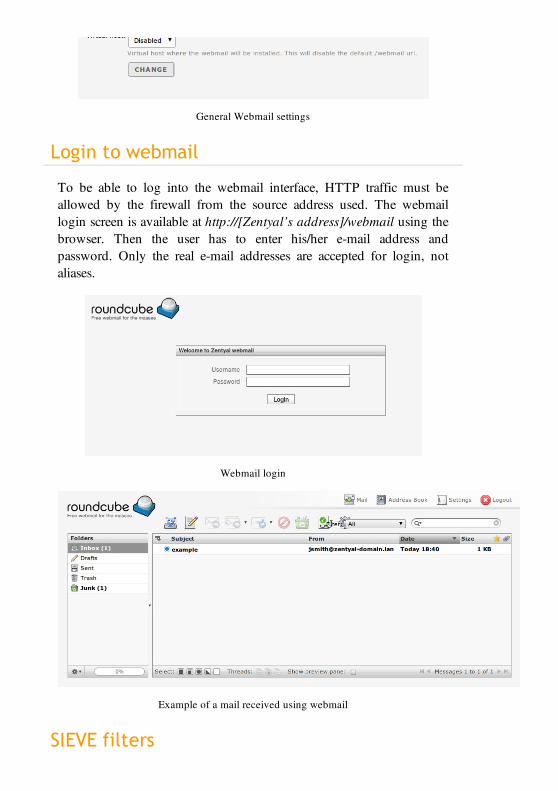
General Webmail settings
Login to webmail
To be able to log into the webmail interface, HTTP traffic must beallowed by the firewall from the source address used. The webmaillogin screen is available at http://[Zentyal’s address]/webmail using thebrowser. Then the user has to enter his/her e-mail address andpassword. Only the real e-mail addresses are accepted for login, notaliases.
Webmail login
Example of a mail received using webmail
SIEVE filters
The webmail software also includes an interface to manage SIEVEfilters. This feature is only available if the ManageSIEVE protocol isenabled in the e-mail service. Check out Sieve scripts and ManageSieveprotocol section for more information.
Copyright 2004-2012 Zentyal S.L.
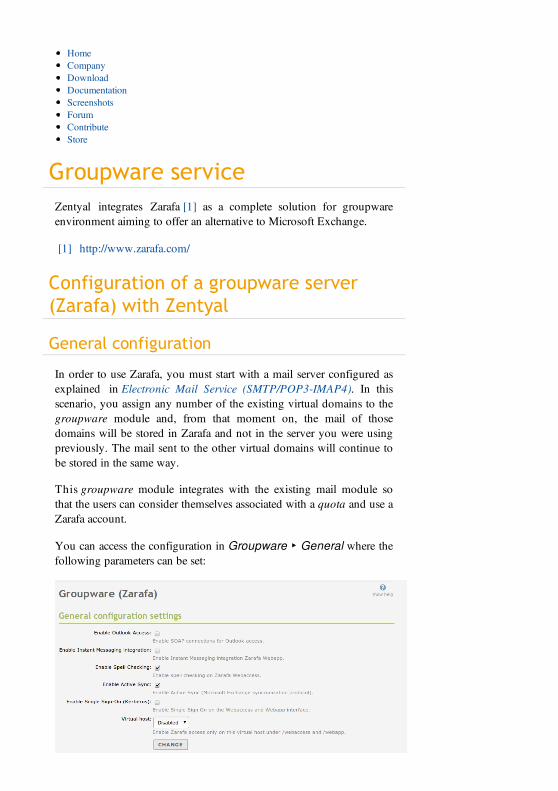
Groupware serviceZentyal integrates Zarafa [1] as a complete solution for groupwareenvironment aiming to offer an alternative to Microsoft Exchange.
[1] http://www.zarafa.com/
Configuration of a groupware server(Zarafa) with Zentyal
General configuration
In order to use Zarafa, you must start with a mail server configured asexplained in Electronic Mail Service (SMTP/POP3-IMAP4). In thisscenario, you assign any number of the existing virtual domains to thegroupware module and, from that moment on, the mail of thosedomains will be stored in Zarafa and not in the server you were usingpreviously. The mail sent to the other virtual domains will continue tobe stored in the same way.
This groupware module integrates with the existing mail module sothat the users can consider themselves associated with a quota and use aZarafa account.
You can access the configuration in Groupware ‣ General where thefollowing parameters can be set:
HomeCompanyDownloadDocumentationScreenshotsForumContributeStore
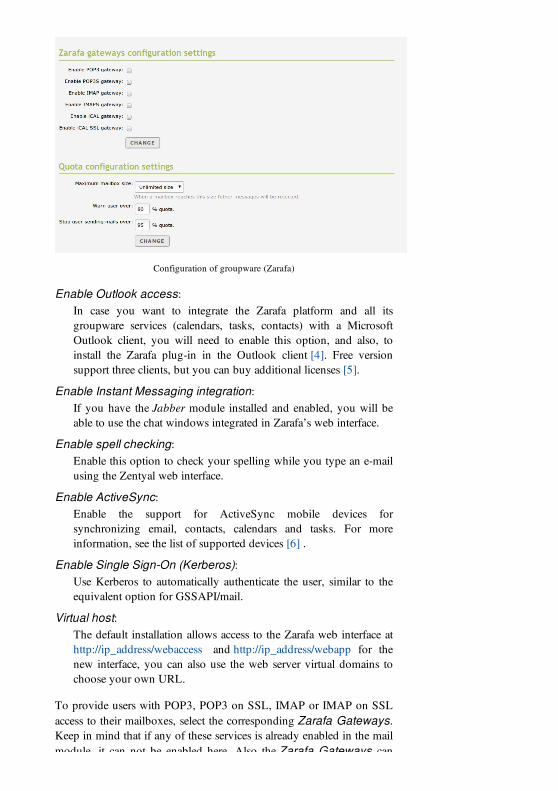
Configuration of groupware (Zarafa)
Enable Outlook access:In case you want to integrate the Zarafa platform and all itsgroupware services (calendars, tasks, contacts) with a MicrosoftOutlook client, you will need to enable this option, and also, toinstall the Zarafa plug-in in the Outlook client [4]. Free versionsupport three clients, but you can buy additional licenses [5].
Enable Instant Messaging integration:If you have the Jabber module installed and enabled, you will beable to use the chat windows integrated in Zarafa’s web interface.
Enable spell checking:Enable this option to check your spelling while you type an e-mailusing the Zentyal web interface.
Enable ActiveSync:Enable the support for ActiveSync mobile devices forsynchronizing email, contacts, calendars and tasks. For moreinformation, see the list of supported devices [6] .
Enable Single Sign-On (Kerberos):Use Kerberos to automatically authenticate the user, similar to theequivalent option for GSSAPI/mail.
Virtual host:The default installation allows access to the Zarafa web interface athttp://ip_address/webaccess and http://ip_address/webapp for thenew interface, you can also use the web server virtual domains tochoose your own URL.
To provide users with POP3, POP3 on SSL, IMAP or IMAP on SSLaccess to their mailboxes, select the corresponding Zarafa Gateways.Keep in mind that if any of these services is already enabled in the mailmodule, it can not be enabled here. Also the Zarafa Gateways can

module, it can not be enabled here. Also the Zarafa Gateways canonly authenticate users with a Zarafa account and not users with onlyan email account.
Finally, you can define the email quota, i.e. the maximum mailbox sizeeach user can have. The user will receive a notification email when thespecified percentage in the first limit is exceeded and if the second limitis exceeded, the user will not be allowed to continue sending emailsuntil they have freed up some space. When a user reaches the maximumquota, emails sent to this user will be rejected.
You can configure the mail domains that will be managed by Zarafagoing to Groupware ‣ Virtual Mail Domains
Configuration of a Zarafa account
As mentioned earlier, besides an email account, each user should have aZarafa account. Furthermore, the quota defined in the mail module foreach user will be applied to Zarafa, this can be unlimited globallydefined or specifically set per user.
[4] http://doc.zarafa.com/7.1/User_Manual/en-US/html/_configure_outlook.html#_installation_of_the_outlook_client
[5] https://store.zentyal.com
User configuration
Accessing the configuration of your users you can modify thefollowing Zarafa parameters:
Per-user Zarafa parameters
User accountWhether this user has Zarafa access enabled or not
Administration rights
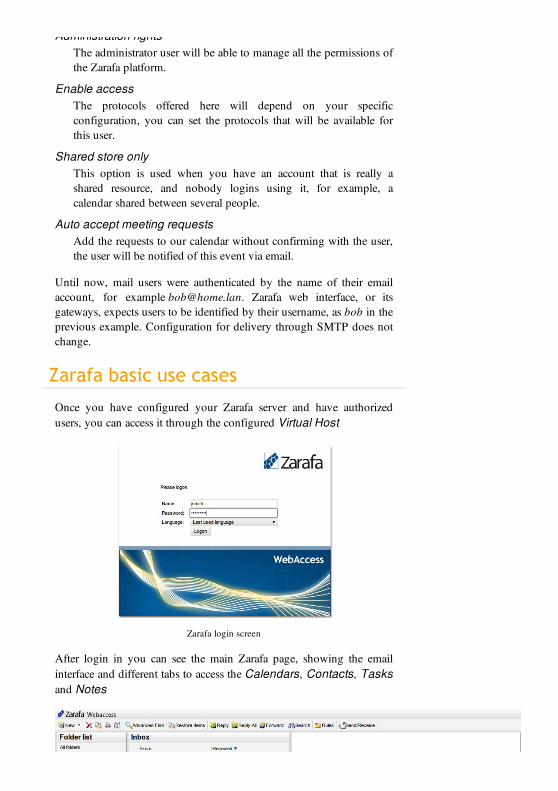
Administration rightsThe administrator user will be able to manage all the permissions ofthe Zarafa platform.
Enable accessThe protocols offered here will depend on your specificconfiguration, you can set the protocols that will be available forthis user.
Shared store onlyThis option is used when you have an account that is really ashared resource, and nobody logins using it, for example, acalendar shared between several people.
Auto accept meeting requestsAdd the requests to our calendar without confirming with the user,the user will be notified of this event via email.
Until now, mail users were authenticated by the name of their emailaccount, for example [email protected]. Zarafa web interface, or itsgateways, expects users to be identified by their username, as bob in theprevious example. Configuration for delivery through SMTP does notchange.
Zarafa basic use cases
Once you have configured your Zarafa server and have authorizedusers, you can access it through the configured Virtual Host
Zarafa login screen
After login in you can see the main Zarafa page, showing the emailinterface and different tabs to access the Calendars, Contacts, Tasksand Notes
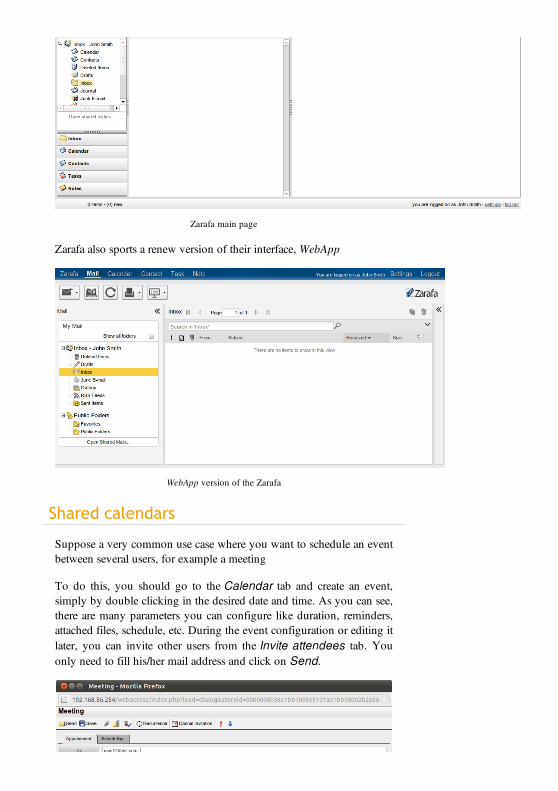
Zarafa main page
Zarafa also sports a renew version of their interface, WebApp
WebApp version of the Zarafa
Shared calendars
Suppose a very common use case where you want to schedule an eventbetween several users, for example a meeting
To do this, you should go to the Calendar tab and create an event,simply by double clicking in the desired date and time. As you can see,there are many parameters you can configure like duration, reminders,attached files, schedule, etc. During the event configuration or editing itlater, you can invite other users from the Invite attendees tab. Youonly need to fill his/her mail address and click on Send.

Sending an event invitation
The recipient will receive a custom mail with the event specification,including a submenu that allows him/her to accept or decline theinvitation, or even propose a new time.
Receiving a mail invitation
Whether you accept or decline the event invitation, you can notify thesender back and include an explanatory text. In case you accept theevent, it will be automatically added to your personal calendar.
Shared contacts
Another common use case is to share your business contact to have acentralized and organized point to retrieve this information.
First of all, you can create a contact through the New ‣ Contact menu.As you can see the form is quite complete: you can include severalphone numbers, email and addresses, portrait, attached files,department, role, etc.
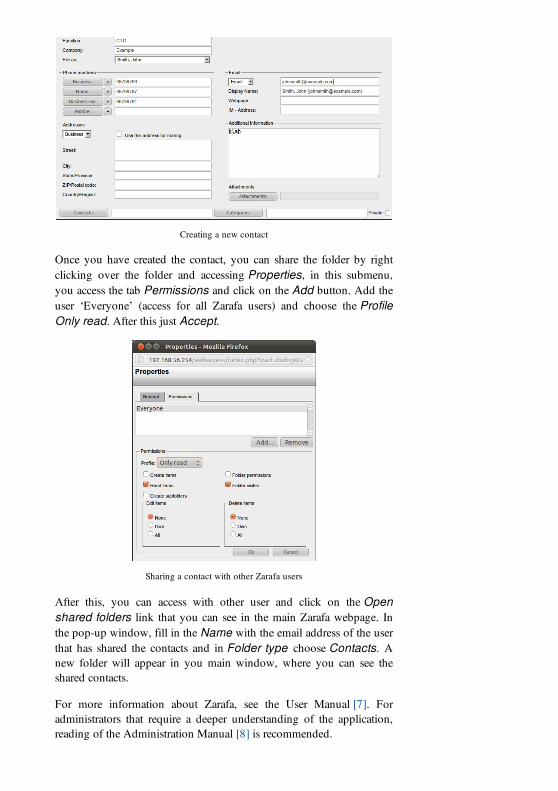
Creating a new contact
Once you have created the contact, you can share the folder by rightclicking over the folder and accessing Properties, in this submenu,you access the tab Permissions and click on the Add button. Add theuser ‘Everyone’ (access for all Zarafa users) and choose the ProfileOnly read. After this just Accept.
Sharing a contact with other Zarafa users
After this, you can access with other user and click on the Openshared folders link that you can see in the main Zarafa webpage. Inthe pop-up window, fill in the Name with the email address of the userthat has shared the contacts and in Folder type choose Contacts. Anew folder will appear in you main window, where you can see theshared contacts.
For more information about Zarafa, see the User Manual [7]. Foradministrators that require a deeper understanding of the application,reading of the Administration Manual [8] is recommended.

[6] http://www.zarafa.com/wiki/index.php/Z-Push_Mobile_Compatibility_List
[7] http://doc.zarafa.com/trunk/User_Manual/en-US/html/index.html[8] http://doc.zarafa.com/trunk/Administrator_Manual/en-
US/html/index.html
Copyright 2004-2012 Zentyal S.L.
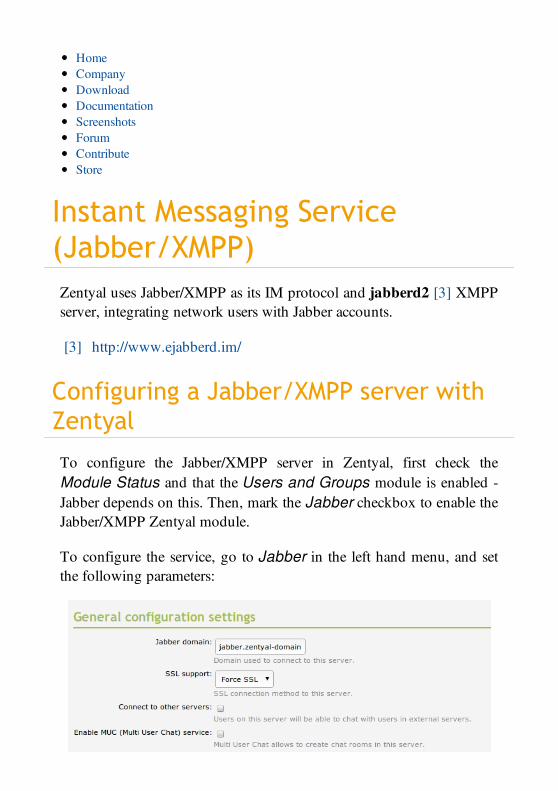
Instant Messaging Service(Jabber/XMPP)
Zentyal uses Jabber/XMPP as its IM protocol and jabberd2 [3] XMPPserver, integrating network users with Jabber accounts.
[3] http://www.ejabberd.im/
Configuring a Jabber/XMPP server withZentyal
To configure the Jabber/XMPP server in Zentyal, first check theModule Status and that the Users and Groups module is enabled -Jabber depends on this. Then, mark the Jabber checkbox to enable theJabber/XMPP Zentyal module.
To configure the service, go to Jabber in the left hand menu, and setthe following parameters:
HomeCompanyDownloadDocumentationScreenshotsForumContributeStore
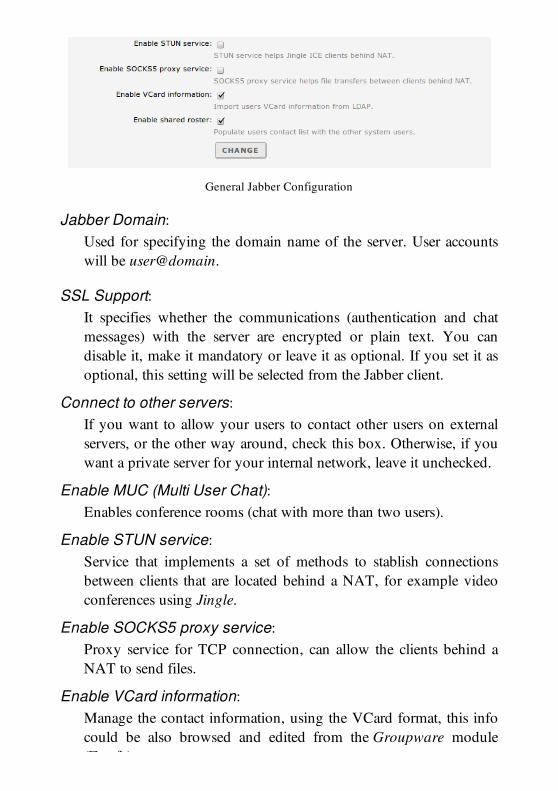
General Jabber Configuration
Jabber Domain:Used for specifying the domain name of the server. User accountswill be user@domain.
SSL Support:It specifies whether the communications (authentication and chatmessages) with the server are encrypted or plain text. You candisable it, make it mandatory or leave it as optional. If you set it asoptional, this setting will be selected from the Jabber client.
Connect to other servers:If you want to allow your users to contact other users on externalservers, or the other way around, check this box. Otherwise, if youwant a private server for your internal network, leave it unchecked.
Enable MUC (Multi User Chat):Enables conference rooms (chat with more than two users).
Enable STUN service:Service that implements a set of methods to stablish connectionsbetween clients that are located behind a NAT, for example videoconferences using Jingle.
Enable SOCKS5 proxy service:Proxy service for TCP connection, can allow the clients behind aNAT to send files.
Enable VCard information:Manage the contact information, using the VCard format, this infocould be also browsed and edited from the Groupware module(Zarafa).
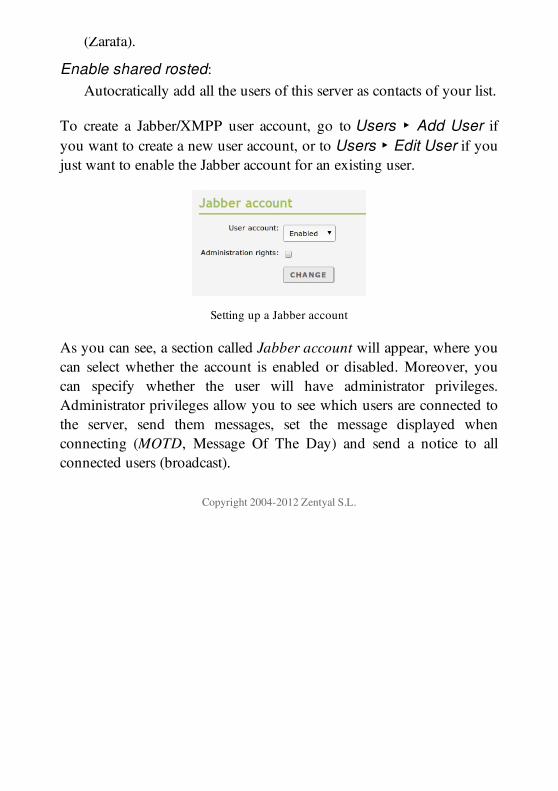
(Zarafa).
Enable shared rosted:Autocratically add all the users of this server as contacts of your list.
To create a Jabber/XMPP user account, go to Users ‣ Add User ifyou want to create a new user account, or to Users ‣ Edit User if youjust want to enable the Jabber account for an existing user.
Setting up a Jabber account
As you can see, a section called Jabber account will appear, where youcan select whether the account is enabled or disabled. Moreover, youcan specify whether the user will have administrator privileges.Administrator privileges allow you to see which users are connected tothe server, send them messages, set the message displayed whenconnecting (MOTD, Message Of The Day) and send a notice to allconnected users (broadcast).
Copyright 2004-2012 Zentyal S.L.
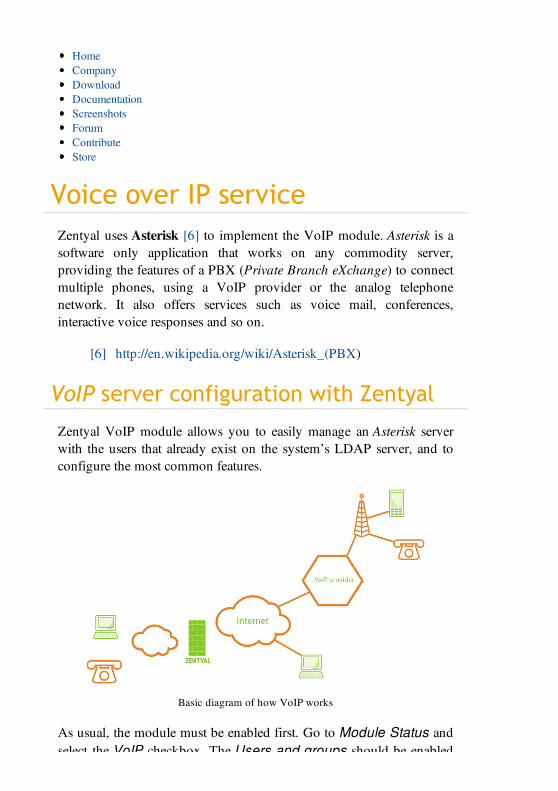
Voice over IP serviceZentyal uses Asterisk [6] to implement the VoIP module. Asterisk is asoftware only application that works on any commodity server,providing the features of a PBX (Private Branch eXchange) to connectmultiple phones, using a VoIP provider or the analog telephonenetwork. It also offers services such as voice mail, conferences,interactive voice responses and so on.
[6] http://en.wikipedia.org/wiki/Asterisk_(PBX)
VoIP server configuration with Zentyal
Zentyal VoIP module allows you to easily manage an Asterisk serverwith the users that already exist on the system’s LDAP server, and toconfigure the most common features.
Basic diagram of how VoIP works
As usual, the module must be enabled first. Go to Module Status andselect the VoIP checkbox. The Users and groups should be enabled
HomeCompanyDownloadDocumentationScreenshotsForumContributeStore
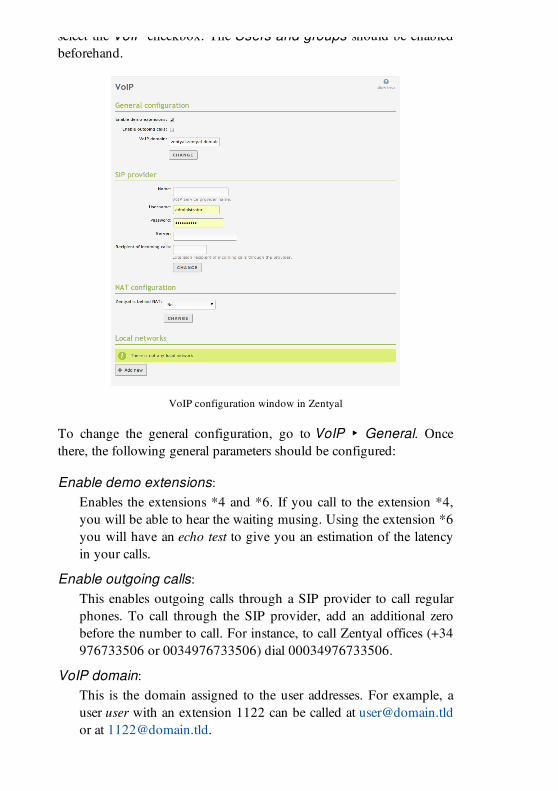
select the VoIP checkbox. The Users and groups should be enabledbeforehand.
VoIP configuration window in Zentyal
To change the general configuration, go to VoIP ‣ General. Oncethere, the following general parameters should be configured:
Enable demo extensions:Enables the extensions *4 and *6. If you call to the extension *4,you will be able to hear the waiting musing. Using the extension *6you will have an echo test to give you an estimation of the latencyin your calls.
Enable outgoing calls:This enables outgoing calls through a SIP provider to call regularphones. To call through the SIP provider, add an additional zerobefore the number to call. For instance, to call Zentyal offices (+34976733506 or 0034976733506) dial 00034976733506.
VoIP domain:This is the domain assigned to the user addresses. For example, auser user with an extension 1122 can be called at [email protected] at [email protected].
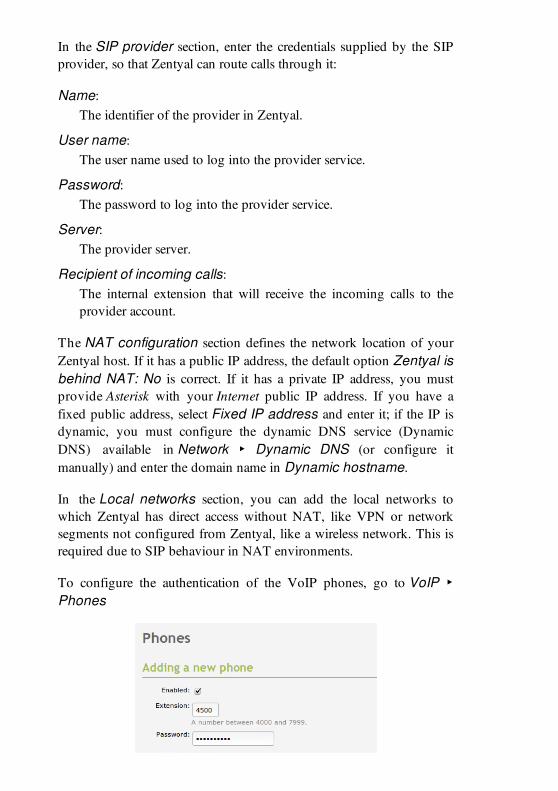
In the SIP provider section, enter the credentials supplied by the SIPprovider, so that Zentyal can route calls through it:
Name:The identifier of the provider in Zentyal.
User name:The user name used to log into the provider service.
Password:The password to log into the provider service.
Server:The provider server.
Recipient of incoming calls:The internal extension that will receive the incoming calls to theprovider account.
The NAT configuration section defines the network location of yourZentyal host. If it has a public IP address, the default option Zentyal isbehind NAT: No is correct. If it has a private IP address, you mustprovide Asterisk with your Internet public IP address. If you have afixed public address, select Fixed IP address and enter it; if the IP isdynamic, you must configure the dynamic DNS service (DynamicDNS) available in Network ‣ Dynamic DNS (or configure itmanually) and enter the domain name in Dynamic hostname.
In the Local networks section, you can add the local networks towhich Zentyal has direct access without NAT, like VPN or networksegments not configured from Zentyal, like a wireless network. This isrequired due to SIP behaviour in NAT environments.
To configure the authentication of the VoIP phones, go to VoIP ‣Phones

Adding a VoIP phone
Enabled:Whether this phone configuration is enabled.
Extension:Extension to dial to reach this phone.
Password:Needed to authenticate the phone against Zentyal, it will have to beconfigured in the phone itself as well.
Voicemail:The device available through this extension will store the voicemailfor this phone.
Email notified:This email address will receive the voicemail messages as anattachment.
Description:Description of the specific phone
You can access the conference configuration through VoIP ‣Meetings. Here you can configure multiple conference rooms. Theserooms extension should fit in the 8001-8999 range and optionallyhave an access password, an administration password and adescription. These extensions can be accessed from any server bydialling [email protected].
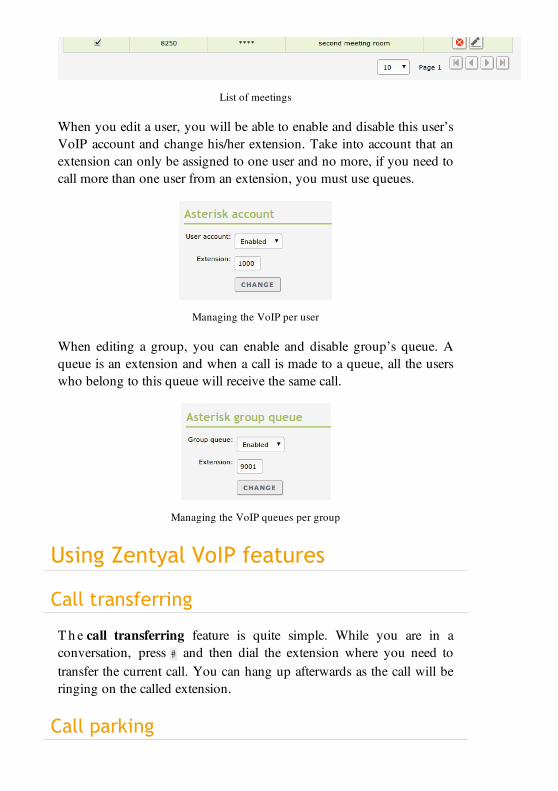
List of meetings
When you edit a user, you will be able to enable and disable this user’sVoIP account and change his/her extension. Take into account that anextension can only be assigned to one user and no more, if you need tocall more than one user from an extension, you must use queues.
Managing the VoIP per user
When editing a group, you can enable and disable group’s queue. Aqueue is an extension and when a call is made to a queue, all the userswho belong to this queue will receive the same call.
Managing the VoIP queues per group
Using Zentyal VoIP features
Call transferring
T h e call transferring feature is quite simple. While you are in aconversation, press # and then dial the extension where you need totransfer the current call. You can hang up afterwards as the call will beringing on the called extension.
Call parking
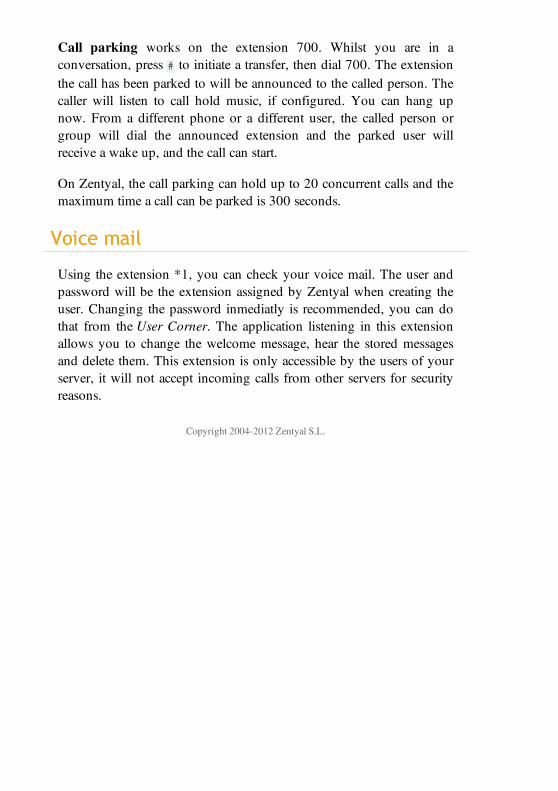
Call parking works on the extension 700. Whilst you are in aconversation, press # to initiate a transfer, then dial 700. The extensionthe call has been parked to will be announced to the called person. Thecaller will listen to call hold music, if configured. You can hang upnow. From a different phone or a different user, the called person orgroup will dial the announced extension and the parked user willreceive a wake up, and the call can start.
On Zentyal, the call parking can hold up to 20 concurrent calls and themaximum time a call can be parked is 300 seconds.
Voice mail
Using the extension *1, you can check your voice mail. The user andpassword will be the extension assigned by Zentyal when creating theuser. Changing the password inmediatly is recommended, you can dothat from the User Corner. The application listening in this extensionallows you to change the welcome message, hear the stored messagesand delete them. This extension is only accessible by the users of yourserver, it will not accept incoming calls from other servers for securityreasons.
Copyright 2004-2012 Zentyal S.L.

Zentyal MaintenanceZentyal server is not just meant to configure network services, but italso offers a number of features to ease general server management andmaintenance.
This section will explain the tools, such as service logs, included inZentyal server that help to find out what has happened in your networkand when, receive notifications for certain events or incidents, or carryout server monitoring. The available remote support tools are alsodescribed.
Besides these maintenance tools integrated in Zentyal server, thecommercial editions offer a series of services that help to automate theserver maintenance and management. These services are availablethrough the remote monitoring and management platform calledZentyal Remote.
HomeCompanyDownloadDocumentationScreenshotsForumContributeStore
Copyright 2004-2012 Zentyal S.L.
Logs
Zentyal log queries
Zentyal provides an infrastructure that allows its modules to log alltypes of events that may be useful for the administrator. These logs areavailable through the Zentyal interface. Logs are stored in a database somaking queries, reports and updates is easier and more efficient. Thedatabase manager used is MySQL.
You can also configure different dispatchers for the events so that theadministrator can be notified in different ways (Email, Jabber or RSS[1]).
[1] RSS Really Simple Syndication is an XML format used mainlyto publish frequently updated works http://www.rssboard.org/rss-specification/.
Zentyal offers logs for the following services:
OpenVPN Virtual private network (VPN) service with OpenVPNSMTP Filter Mail filterPrinters Printers sharing serviceFirewall FirewallDHCP Network configuration service (DHCP)Email Electronic Mail Service (SMTP/POP3-IMAP4)HTTP Proxy HTTP Proxy ServiceShared files File sharing and authentication serviceIDS Intrusion Detection System (IDS)
You can also receive notifications of the following events:
Specific values in the logs.Zentyal health status.Service status.
HomeCompanyDownloadDocumentationScreenshotsForumContributeStore
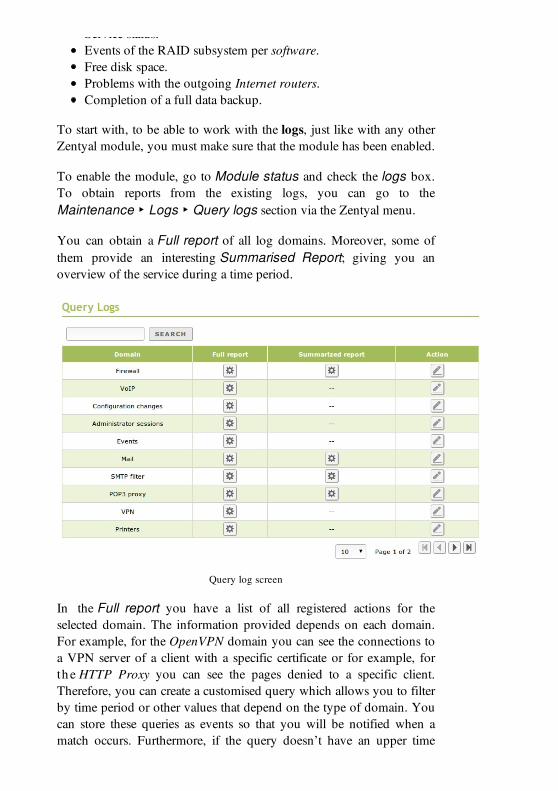
Service status.Events of the RAID subsystem per software.Free disk space.Problems with the outgoing Internet routers.Completion of a full data backup.
To start with, to be able to work with the logs, just like with any otherZentyal module, you must make sure that the module has been enabled.
To enable the module, go to Module status and check the logs box.To obtain reports from the existing logs, you can go to theMaintenance ‣ Logs ‣ Query logs section via the Zentyal menu.
You can obtain a Full report of all log domains. Moreover, some ofthem provide an interesting Summarised Report; giving you anoverview of the service during a time period.
Query log screen
In the Full report you have a list of all registered actions for theselected domain. The information provided depends on each domain.For example, for the OpenVPN domain you can see the connections toa VPN server of a client with a specific certificate or for example, forth e HTTP Proxy you can see the pages denied to a specific client.Therefore, you can create a customised query which allows you to filterby time period or other values that depend on the type of domain. Youcan store these queries as events so that you will be notified when amatch occurs. Furthermore, if the query doesn’t have an upper timelimit, the results will automatically refresh with new data.
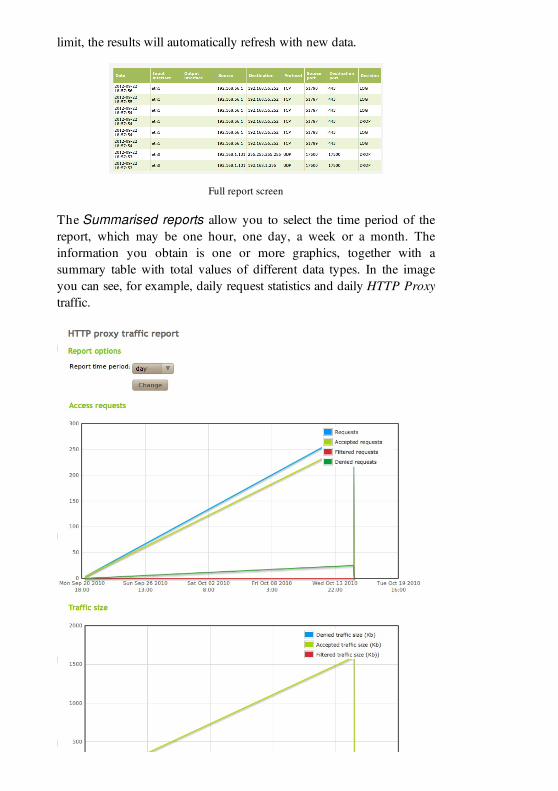
limit, the results will automatically refresh with new data.
Full report screen
The Summarised reports allow you to select the time period of thereport, which may be one hour, one day, a week or a month. Theinformation you obtain is one or more graphics, together with asummary table with total values of different data types. In the imageyou can see, for example, daily request statistics and daily HTTP Proxytraffic.
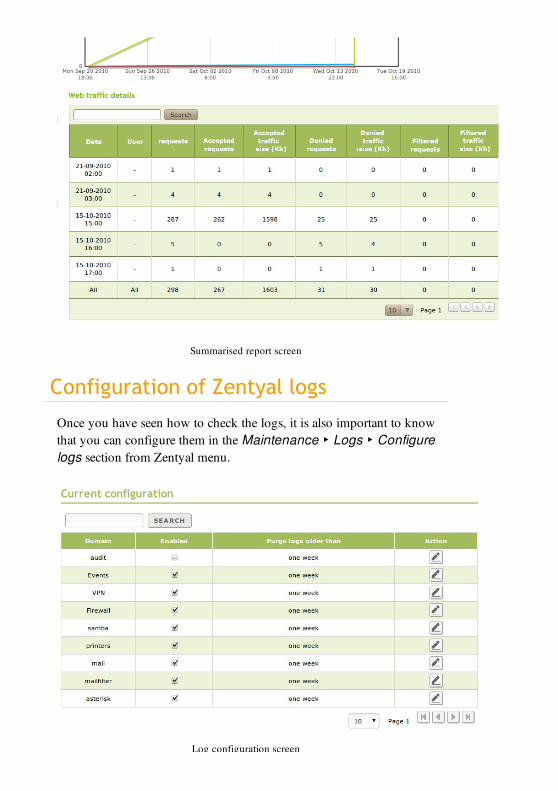
Summarised report screen
Configuration of Zentyal logs
Once you have seen how to check the logs, it is also important to knowthat you can configure them in the Maintenance ‣ Logs ‣ Configurelogs section from Zentyal menu.
Log configuration screen
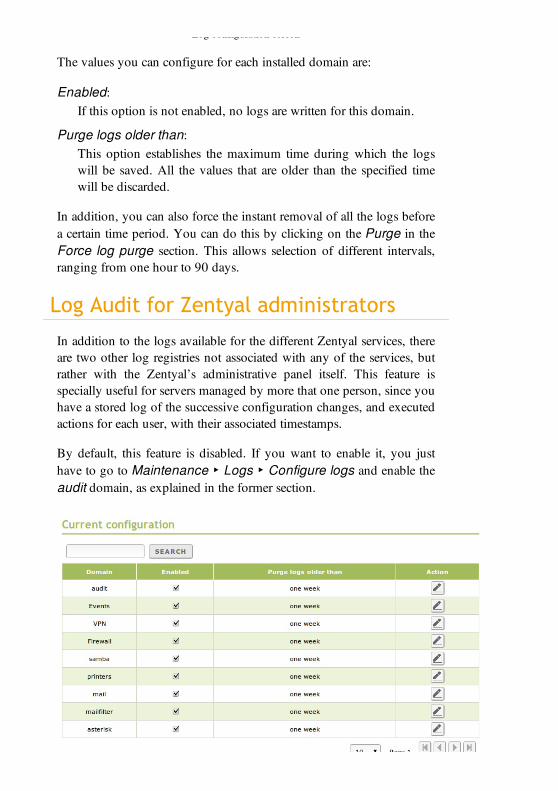
Log configuration screen
The values you can configure for each installed domain are:
Enabled:If this option is not enabled, no logs are written for this domain.
Purge logs older than:This option establishes the maximum time during which the logswill be saved. All the values that are older than the specified timewill be discarded.
In addition, you can also force the instant removal of all the logs beforea certain time period. You can do this by clicking on the Purge in theForce log purge section. This allows selection of different intervals,ranging from one hour to 90 days.
Log Audit for Zentyal administrators
In addition to the logs available for the different Zentyal services, thereare two other log registries not associated with any of the services, butrather with the Zentyal’s administrative panel itself. This feature isspecially useful for servers managed by more that one person, since youhave a stored log of the successive configuration changes, and executedactions for each user, with their associated timestamps.
By default, this feature is disabled. If you want to enable it, you justhave to go to Maintenance ‣ Logs ‣ Configure logs and enable theaudit domain, as explained in the former section.
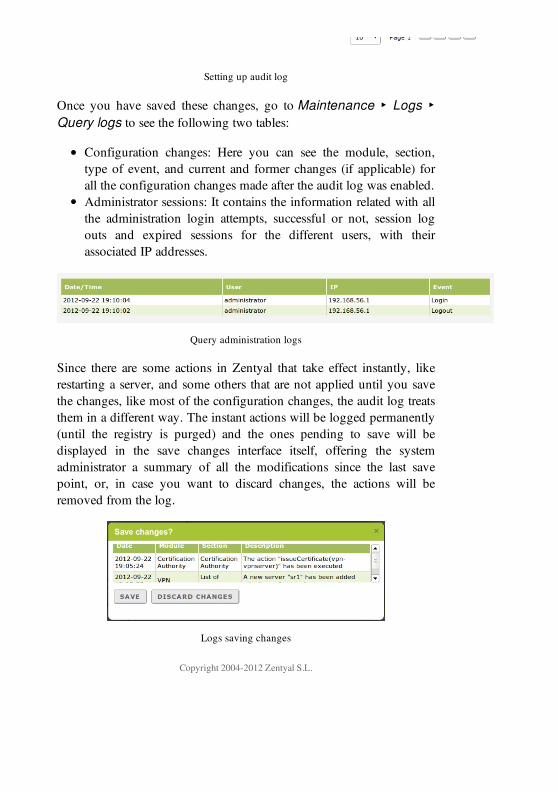
Setting up audit log
Once you have saved these changes, go to Maintenance ‣ Logs ‣Query logs to see the following two tables:
Configuration changes: Here you can see the module, section,type of event, and current and former changes (if applicable) forall the configuration changes made after the audit log was enabled.Administrator sessions: It contains the information related with allthe administration login attempts, successful or not, session logouts and expired sessions for the different users, with theirassociated IP addresses.
Query administration logs
Since there are some actions in Zentyal that take effect instantly, likerestarting a server, and some others that are not applied until you savethe changes, like most of the configuration changes, the audit log treatsthem in a different way. The instant actions will be logged permanently(until the registry is purged) and the ones pending to save will bedisplayed in the save changes interface itself, offering the systemadministrator a summary of all the modifications since the last savepoint, or, in case you want to discard changes, the actions will beremoved from the log.
Logs saving changes
Copyright 2004-2012 Zentyal S.L.
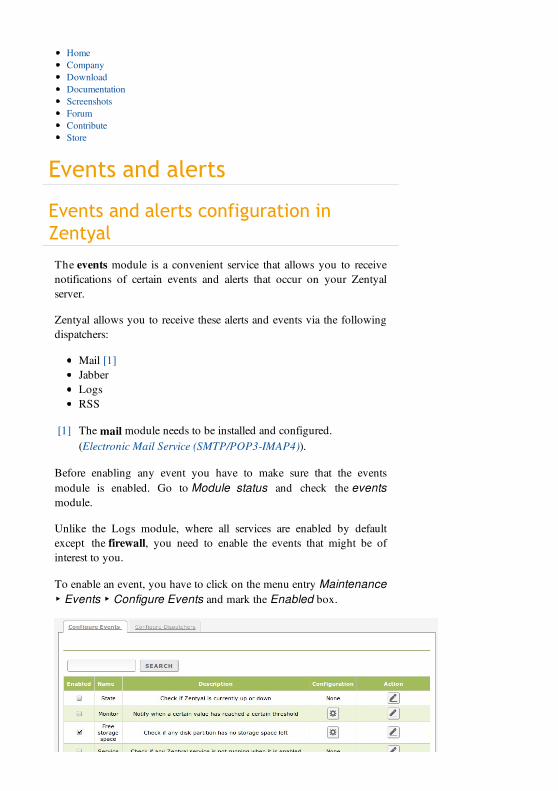
Events and alerts
Events and alerts configuration inZentyal
The events module is a convenient service that allows you to receivenotifications of certain events and alerts that occur on your Zentyalserver.
Zentyal allows you to receive these alerts and events via the followingdispatchers:
Mail [1]JabberLogsRSS
[1] The mail module needs to be installed and configured.(Electronic Mail Service (SMTP/POP3-IMAP4)).
Before enabling any event you have to make sure that the eventsmodule is enabled. Go to Module status and check the eventsmodule.
Unlike the Logs module, where all services are enabled by defaultexcept the firewall, you need to enable the events that might be ofinterest to you.
To enable an event, you have to click on the menu entry Maintenance‣ Events ‣ Configure Events and mark the Enabled box.
HomeCompanyDownloadDocumentationScreenshotsForumContributeStore
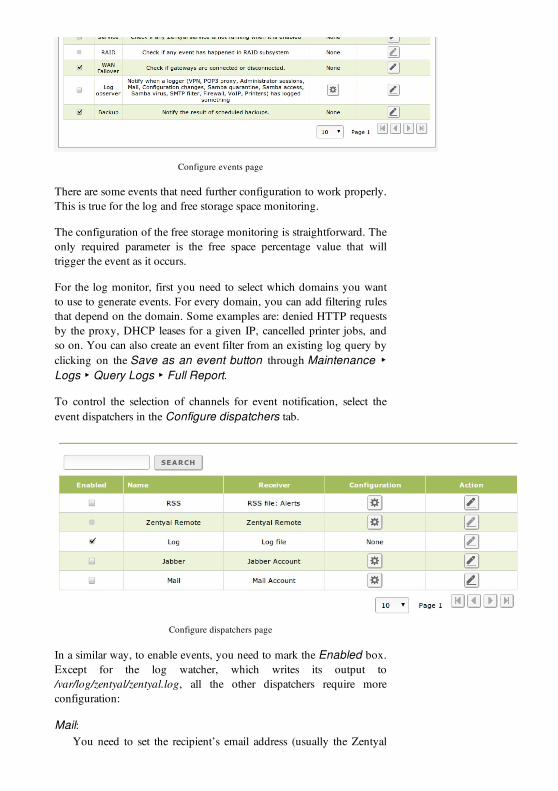
Configure events page
There are some events that need further configuration to work properly.This is true for the log and free storage space monitoring.
The configuration of the free storage monitoring is straightforward. Theonly required parameter is the free space percentage value that willtrigger the event as it occurs.
For the log monitor, first you need to select which domains you wantto use to generate events. For every domain, you can add filtering rulesthat depend on the domain. Some examples are: denied HTTP requestsby the proxy, DHCP leases for a given IP, cancelled printer jobs, andso on. You can also create an event filter from an existing log query byclicking on the Save as an event button through Maintenance ‣Logs ‣ Query Logs ‣ Full Report.
To control the selection of channels for event notification, select theevent dispatchers in the Configure dispatchers tab.
Configure dispatchers page
In a similar way, to enable events, you need to mark the Enabled box.Except for the log watcher, which writes its output to/var/log/zentyal/zentyal.log, all the other dispatchers require moreconfiguration:
Mail:You need to set the recipient’s email address (usually the Zentyaladministrator). You can also set the subject of the messages.
administrator). You can also set the subject of the messages.
Jabber:You need to set the Jabber server address and port that will be usedto send the messages. You also need to set the username andpassword of the user that will send the messages and the Jabberaddress of the administrator who will receive the notifications.From this page you can also create a new Jabber account with thesenew parameters in case they do not exist.
RSS:You can select the policy for authorised readers, as well as the feedlink. The public feed can be made private or authorised by sourceIP, address or object.
Copyright 2004-2012 Zentyal S.L.
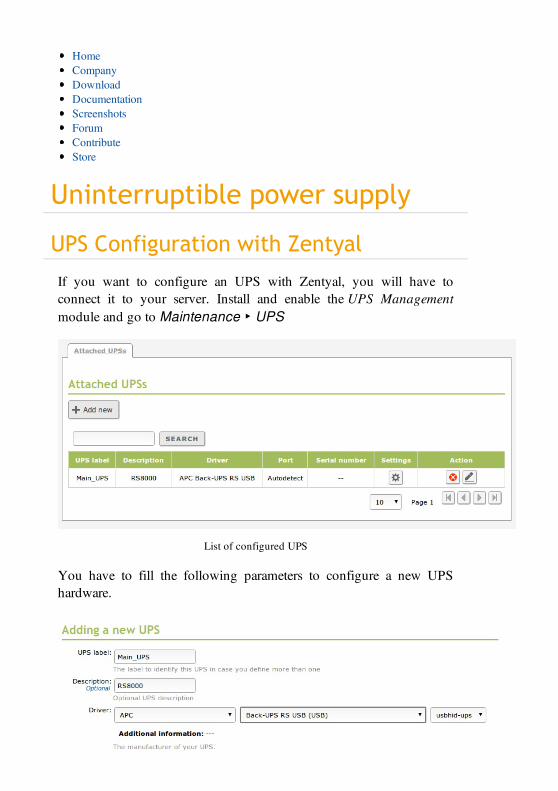
Uninterruptible power supply
UPS Configuration with Zentyal
If you want to configure an UPS with Zentyal, you will have toconnect it to your server. Install and enable the UPS Managementmodule and go to Maintenance ‣ UPS
List of configured UPS
You have to fill the following parameters to configure a new UPShardware.
HomeCompanyDownloadDocumentationScreenshotsForumContributeStore
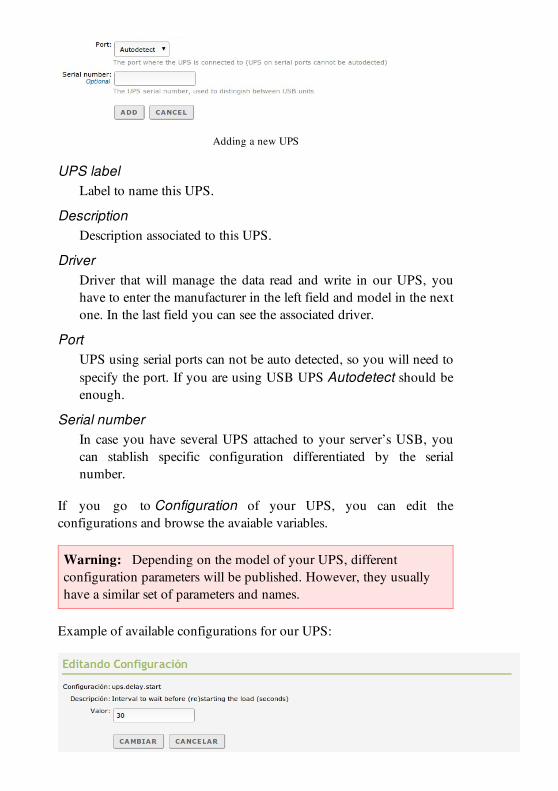
Adding a new UPS
UPS labelLabel to name this UPS.
DescriptionDescription associated to this UPS.
DriverDriver that will manage the data read and write in our UPS, youhave to enter the manufacturer in the left field and model in the nextone. In the last field you can see the associated driver.
PortUPS using serial ports can not be auto detected, so you will need tospecify the port. If you are using USB UPS Autodetect should beenough.
Serial numberIn case you have several UPS attached to your server’s USB, youcan stablish specific configuration differentiated by the serialnumber.
If you go to Configuration of your UPS, you can edit theconfigurations and browse the avaiable variables.
Warning: Depending on the model of your UPS, differentconfiguration parameters will be published. However, they usuallyhave a similar set of parameters and names.
Example of available configurations for our UPS:
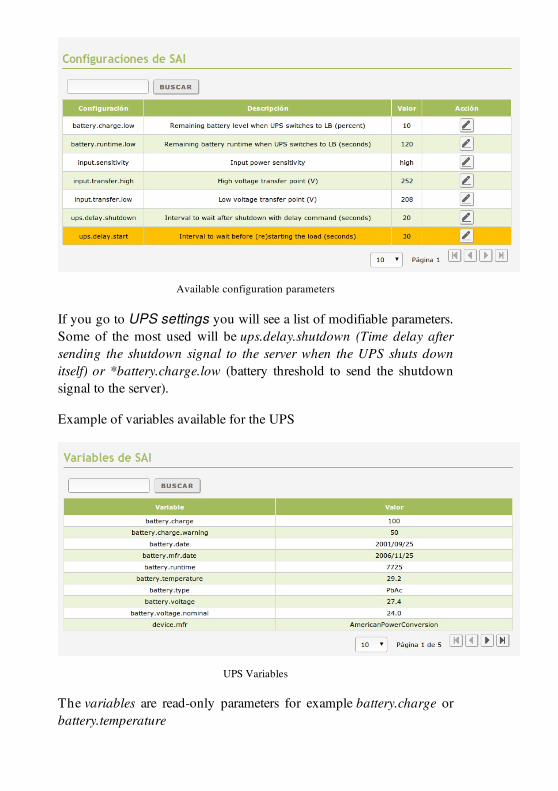
Available configuration parameters
If you go to UPS settings you will see a list of modifiable parameters.Some of the most used will be ups.delay.shutdown (Time delay aftersending the shutdown signal to the server when the UPS shuts downitself) or *battery.charge.low (battery threshold to send the shutdownsignal to the server).
Example of variables available for the UPS
UPS Variables
The variables are read-only parameters for example battery.charge orbattery.temperature
Copyright 2004-2012 Zentyal S.L.

Copyright 2004-2012 Zentyal S.L.
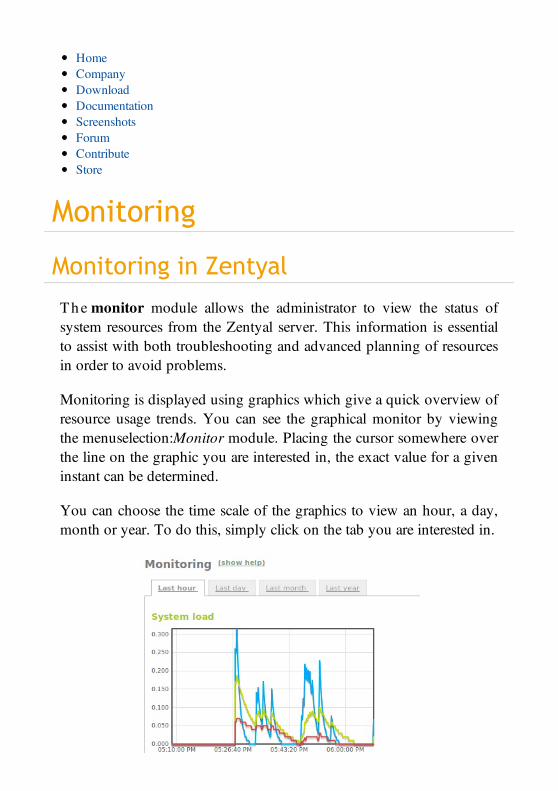
Monitoring
Monitoring in Zentyal
T h e monitor module allows the administrator to view the status ofsystem resources from the Zentyal server. This information is essentialto assist with both troubleshooting and advanced planning of resourcesin order to avoid problems.
Monitoring is displayed using graphics which give a quick overview ofresource usage trends. You can see the graphical monitor by viewingthe menuselection:Monitor module. Placing the cursor somewhere overthe line on the graphic you are interested in, the exact value for a giveninstant can be determined.
You can choose the time scale of the graphics to view an hour, a day,month or year. To do this, simply click on the tab you are interested in.
HomeCompanyDownloadDocumentationScreenshotsForumContributeStore
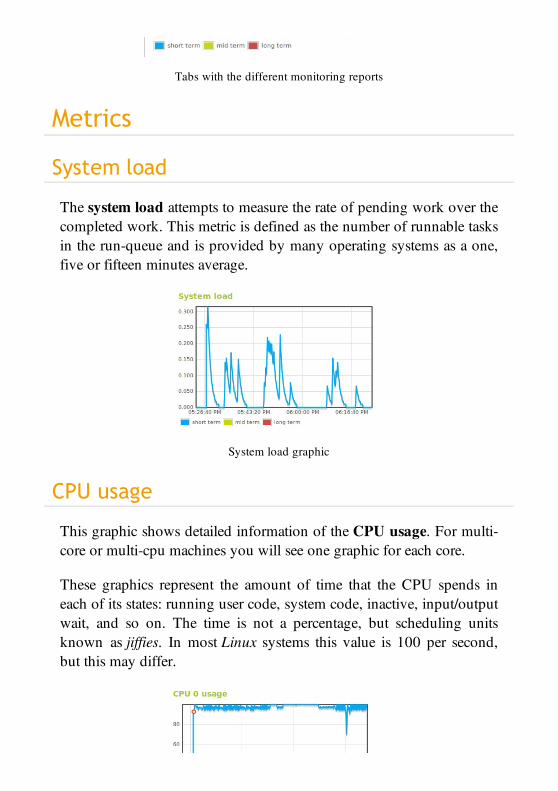
Tabs with the different monitoring reports
Metrics
System load
The system load attempts to measure the rate of pending work over thecompleted work. This metric is defined as the number of runnable tasksin the run-queue and is provided by many operating systems as a one,five or fifteen minutes average.
System load graphic
CPU usage
This graphic shows detailed information of the CPU usage. For multi-core or multi-cpu machines you will see one graphic for each core.
These graphics represent the amount of time that the CPU spends ineach of its states: running user code, system code, inactive, input/outputwait, and so on. The time is not a percentage, but scheduling unitsknown as jiffies. In most Linux systems this value is 100 per second,but this may differ.
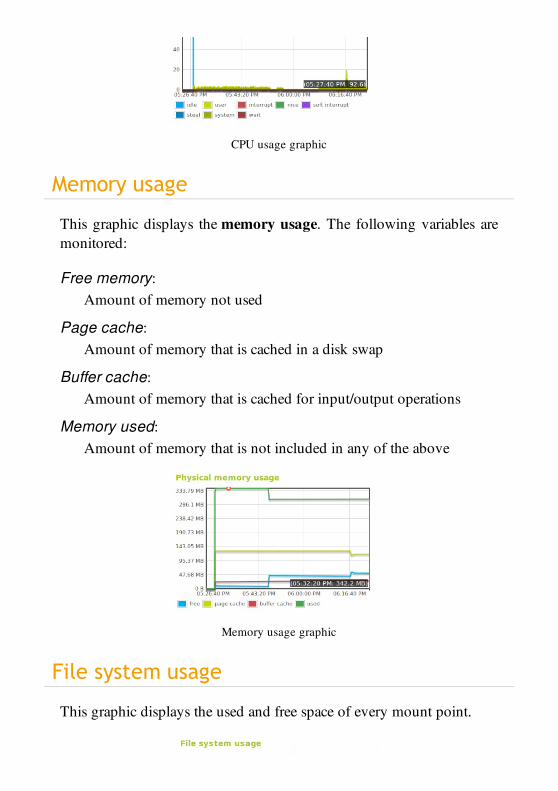
CPU usage graphic
Memory usage
This graphic displays the memory usage. The following variables aremonitored:
Free memory:Amount of memory not used
Page cache:Amount of memory that is cached in a disk swap
Buffer cache:Amount of memory that is cached for input/output operations
Memory used:Amount of memory that is not included in any of the above
Memory usage graphic
File system usage
This graphic displays the used and free space of every mount point.
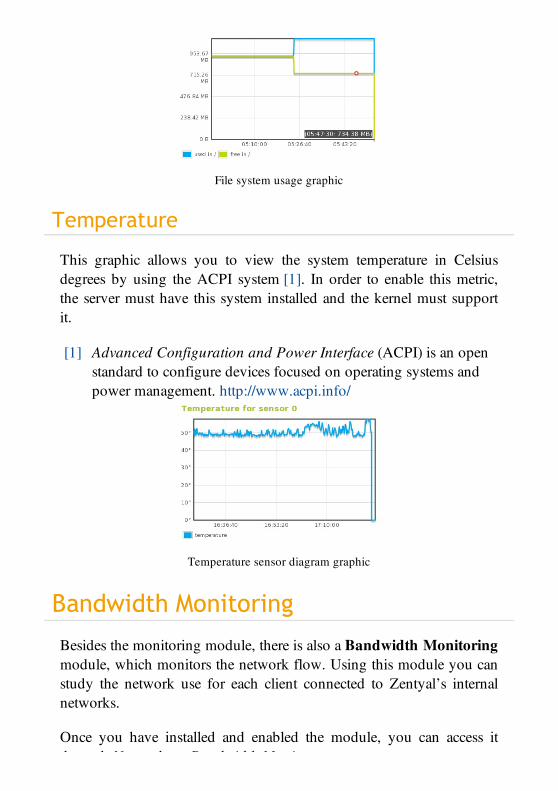
File system usage graphic
Temperature
This graphic allows you to view the system temperature in Celsiusdegrees by using the ACPI system [1]. In order to enable this metric,the server must have this system installed and the kernel must supportit.
[1] Advanced Configuration and Power Interface (ACPI) is an openstandard to configure devices focused on operating systems andpower management. http://www.acpi.info/
Temperature sensor diagram graphic
Bandwidth Monitoring
Besides the monitoring module, there is also a Bandwidth Monitoringmodule, which monitors the network flow. Using this module you canstudy the network use for each client connected to Zentyal’s internalnetworks.
Once you have installed and enabled the module, you can access itthrough Network –> Bandwidth Monitor.
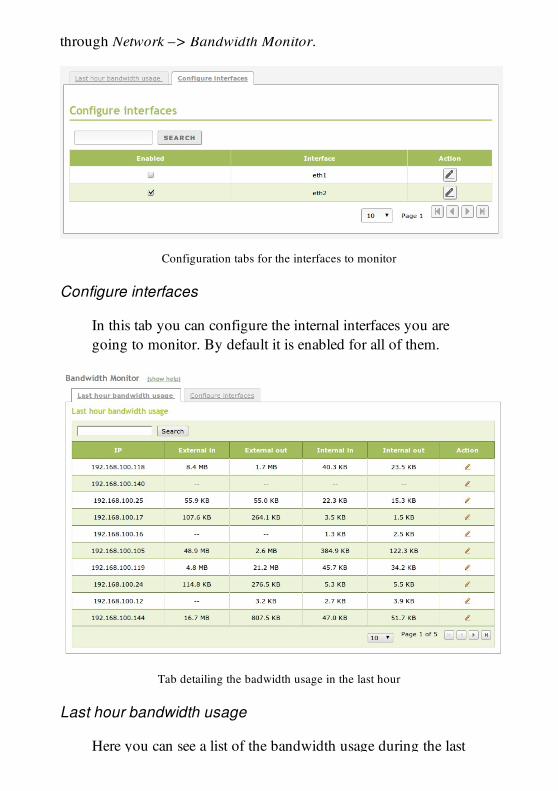
through Network –> Bandwidth Monitor.
Configuration tabs for the interfaces to monitor
Configure interfaces
In this tab you can configure the internal interfaces you aregoing to monitor. By default it is enabled for all of them.
Tab detailing the badwidth usage in the last hour
Last hour bandwidth usage
Here you can see a list of the bandwidth usage during the last
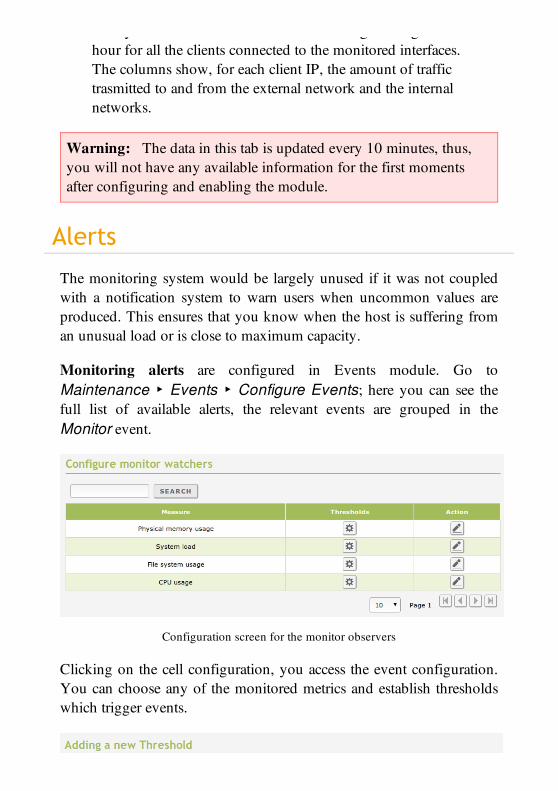
Here you can see a list of the bandwidth usage during the lasthour for all the clients connected to the monitored interfaces.The columns show, for each client IP, the amount of traffictrasmitted to and from the external network and the internalnetworks.
Warning: The data in this tab is updated every 10 minutes, thus,you will not have any available information for the first momentsafter configuring and enabling the module.
Alerts
The monitoring system would be largely unused if it was not coupledwith a notification system to warn users when uncommon values areproduced. This ensures that you know when the host is suffering froman unusual load or is close to maximum capacity.
Monitoring alerts are configured in Events module. Go toMaintenance ‣ Events ‣ Configure Events; here you can see thefull list of available alerts, the relevant events are grouped in theMonitor event.
Configuration screen for the monitor observers
Clicking on the cell configuration, you access the event configuration.You can choose any of the monitored metrics and establish thresholdswhich trigger events.
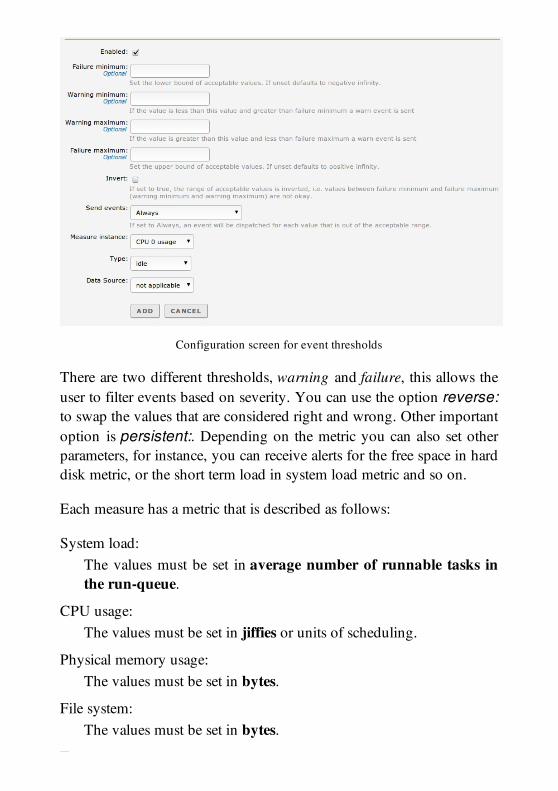
Configuration screen for event thresholds
There are two different thresholds, warning and failure, this allows theuser to filter events based on severity. You can use the option reverse:to swap the values that are considered right and wrong. Other importantoption is persistent:. Depending on the metric you can also set otherparameters, for instance, you can receive alerts for the free space in harddisk metric, or the short term load in system load metric and so on.
Each measure has a metric that is described as follows:
System load:The values must be set in average number of runnable tasks inthe run-queue.
CPU usage:The values must be set in jiffies or units of scheduling.
Physical memory usage:The values must be set in bytes.
File system:The values must be set in bytes.
Temperature:

Temperature:The values must be set in degrees.
Once you have configured and enabled the event at least one observermust also be configured. The observer configuration is the same as theconfiguration of any other event. Check the Events and alerts chapterfor more information.
Copyright 2004-2012 Zentyal S.L.
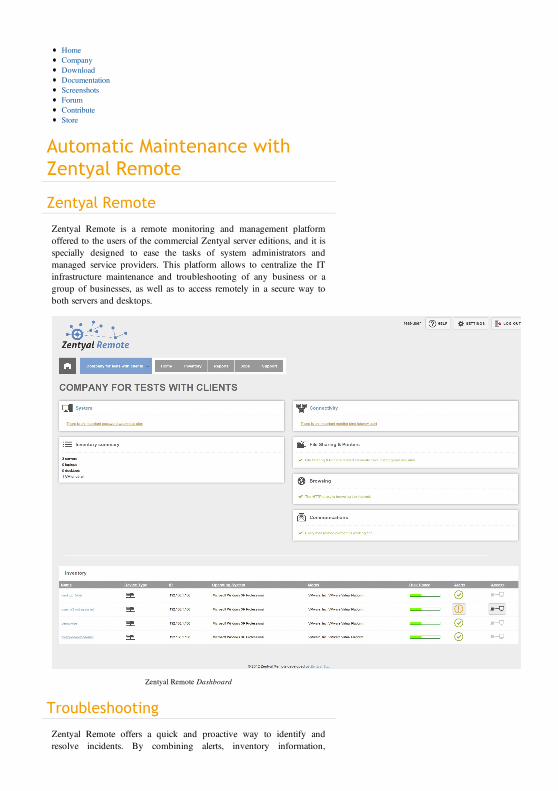
Automatic Maintenance withZentyal Remote
Zentyal Remote
Zentyal Remote is a remote monitoring and management platformoffered to the users of the commercial Zentyal server editions, and it isspecially designed to ease the tasks of system administrators andmanaged service providers. This platform allows to centralize the ITinfrastructure maintenance and troubleshooting of any business or agroup of businesses, as well as to access remotely in a secure way toboth servers and desktops.
Zentyal Remote Dashboard
Troubleshooting
Zentyal Remote offers a quick and proactive way to identify andresolve incidents. By combining alerts, inventory information,
HomeCompanyDownloadDocumentationScreenshotsForumContributeStore
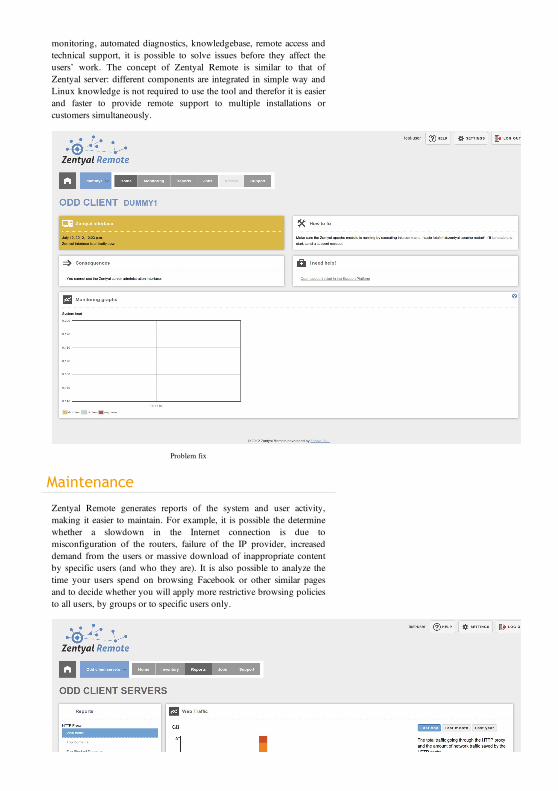
monitoring, automated diagnostics, knowledgebase, remote access andtechnical support, it is possible to solve issues before they affect theusers’ work. The concept of Zentyal Remote is similar to that ofZentyal server: different components are integrated in simple way andLinux knowledge is not required to use the tool and therefor it is easierand faster to provide remote support to multiple installations orcustomers simultaneously.
Problem fix
Maintenance
Zentyal Remote generates reports of the system and user activity,making it easier to maintain. For example, it is possible the determinewhether a slowdown in the Internet connection is due tomisconfiguration of the routers, failure of the IP provider, increaseddemand from the users or massive download of inappropriate contentby specific users (and who they are). It is also possible to analyze thetime your users spend on browsing Facebook or other similar pagesand to decide whether you will apply more restrictive browsing policiesto all users, by groups or to specific users only.
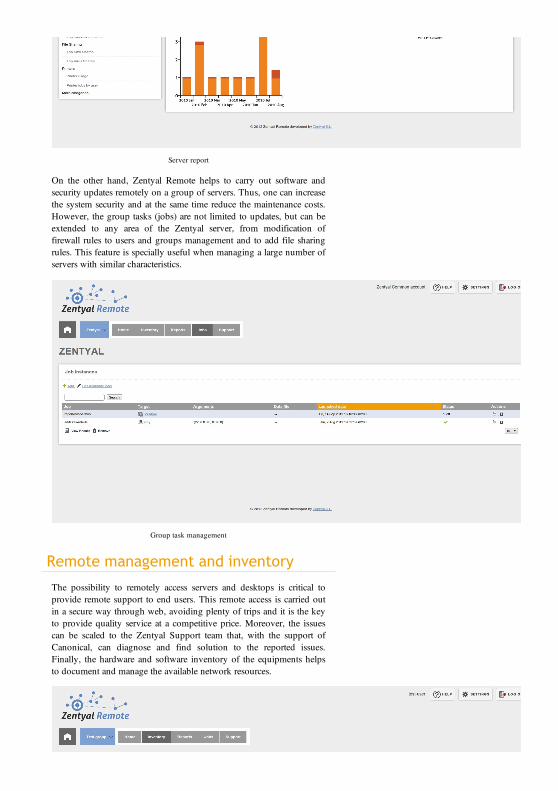
Server report
On the other hand, Zentyal Remote helps to carry out software andsecurity updates remotely on a group of servers. Thus, one can increasethe system security and at the same time reduce the maintenance costs.However, the group tasks (jobs) are not limited to updates, but can beextended to any area of the Zentyal server, from modification offirewall rules to users and groups management and to add file sharingrules. This feature is specially useful when managing a large number ofservers with similar characteristics.
Group task management
Remote management and inventory
The possibility to remotely access servers and desktops is critical toprovide remote support to end users. This remote access is carried outin a secure way through web, avoiding plenty of trips and it is the keyto provide quality service at a competitive price. Moreover, the issuescan be scaled to the Zentyal Support team that, with the support ofCanonical, can diagnose and find solution to the reported issues.Finally, the hardware and software inventory of the equipments helpsto document and manage the available network resources.
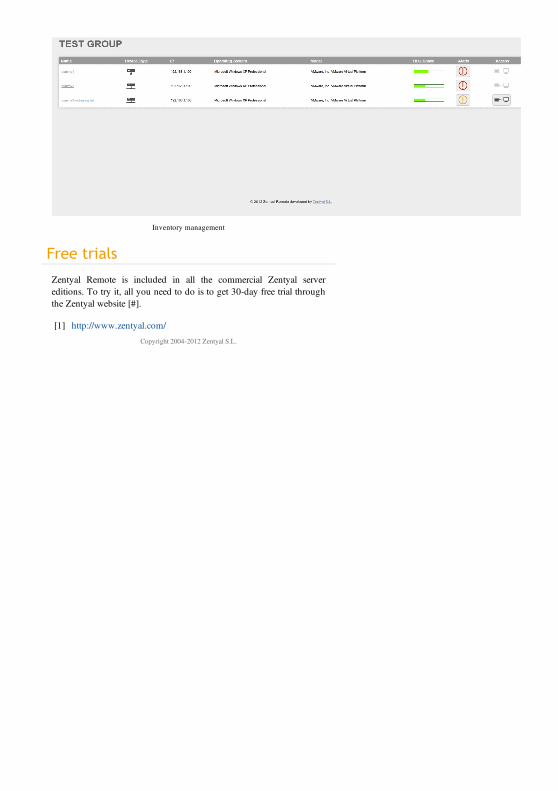
Inventory management
Free trials
Zentyal Remote is included in all the commercial Zentyal servereditions. To try it, all you need to do is to get 30-day free trial throughthe Zentyal website [#].
[1] http://www.zentyal.com/
Copyright 2004-2012 Zentyal S.L.
Importing configuration dataAlthough Zentyal UI interface greatly eases the system administratorwork, some configuration tasks through the interface can be tedious ifyou have to perform them repeatedly. For example, adding 100 newuser accounts or enabling an e-mail account for all 100 users.
These tasks can be automated easily through the ApplicationProgramming Interface (API) which is provided by Zentyal. You onlyneed a basic knowledge of Perl [1], and to know the public methodsexposed by the Zentyal modules you want to use. In fact, Zentyal webinterface uses the same programming interface.
[1] Perl is a high-level, general-purpose, interpreted, dynamicprogramming language. http://www.perl.org/
An example on how to create a small utility is shown below, using theZentyal API to automatically add an arbitrary number of users definedin a Comma Separated Values (CSV) file
#!/usr/bin/perl
use strict;use warnings;
use EBox;use EBox::UsersAndGroups::User;
EBox::init();
my @users;open (my $USERS, 'users');
HomeCompanyDownloadDocumentationScreenshotsForumContributeStore
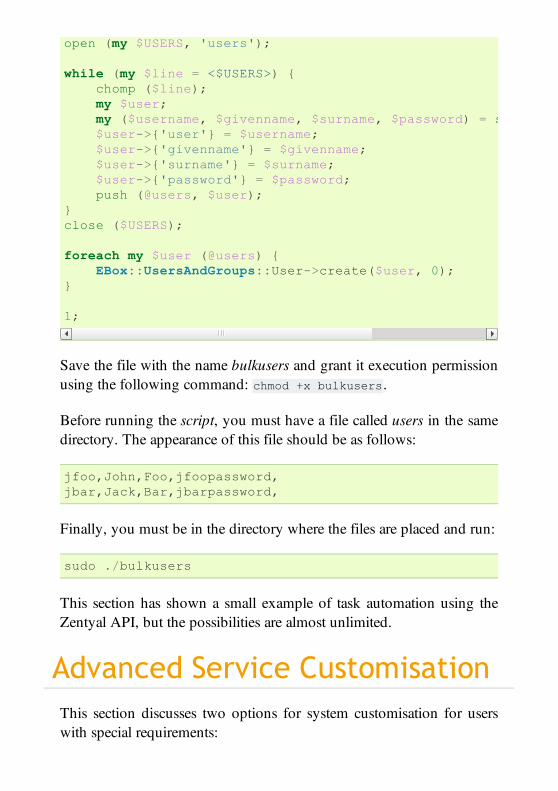
open (my $USERS, 'users');
while (my $line = <$USERS>) { chomp ($line); my $user; my ($username, $givenname, $surname, $password) = split $user->{'user'} = $username; $user->{'givenname'} = $givenname; $user->{'surname'} = $surname; $user->{'password'} = $password; push (@users, $user);}close ($USERS);
foreach my $user (@users) { EBox::UsersAndGroups::User->create($user, 0);}
1;
Save the file with the name bulkusers and grant it execution permissionusing the following command: chmod +x bulkusers.
Before running the script, you must have a file called users in the samedirectory. The appearance of this file should be as follows:
jfoo,John,Foo,jfoopassword,jbar,Jack,Bar,jbarpassword,
Finally, you must be in the directory where the files are placed and run:
sudo ./bulkusers
This section has shown a small example of task automation using theZentyal API, but the possibilities are almost unlimited.
Advanced Service CustomisationThis section discusses two options for system customisation for userswith special requirements:
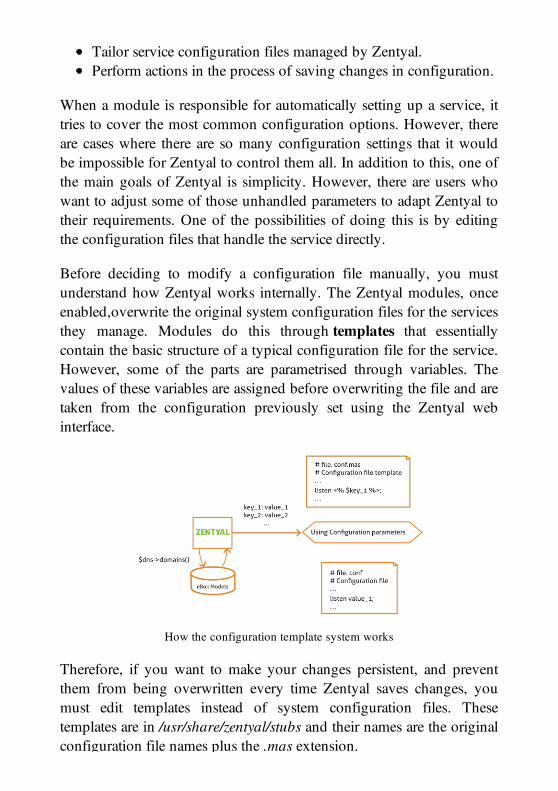
Tailor service configuration files managed by Zentyal.Perform actions in the process of saving changes in configuration.
When a module is responsible for automatically setting up a service, ittries to cover the most common configuration options. However, thereare cases where there are so many configuration settings that it wouldbe impossible for Zentyal to control them all. In addition to this, one ofthe main goals of Zentyal is simplicity. However, there are users whowant to adjust some of those unhandled parameters to adapt Zentyal totheir requirements. One of the possibilities of doing this is by editingthe configuration files that handle the service directly.
Before deciding to modify a configuration file manually, you mustunderstand how Zentyal works internally. The Zentyal modules, onceenabled,overwrite the original system configuration files for the servicesthey manage. Modules do this through templates that essentiallycontain the basic structure of a typical configuration file for the service.However, some of the parts are parametrised through variables. Thevalues of these variables are assigned before overwriting the file and aretaken from the configuration previously set using the Zentyal webinterface.
How the configuration template system works
Therefore, if you want to make your changes persistent, and preventthem from being overwritten every time Zentyal saves changes, youmust edit templates instead of system configuration files. Thesetemplates are in /usr/share/zentyal/stubs and their names are the originalconfiguration file names plus the .mas extension.
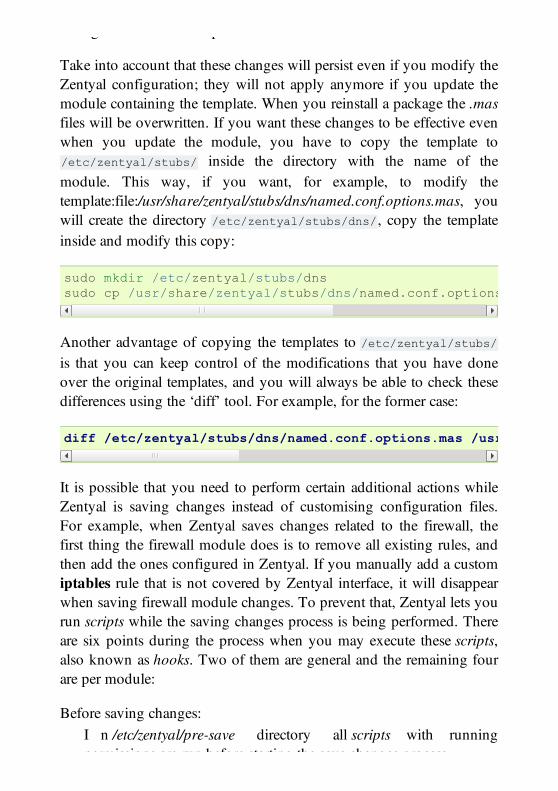
configuration file names plus the .mas extension.
Take into account that these changes will persist even if you modify theZentyal configuration; they will not apply anymore if you update themodule containing the template. When you reinstall a package the .masfiles will be overwritten. If you want these changes to be effective evenwhen you update the module, you have to copy the template to/etc/zentyal/stubs/ inside the directory with the name of themodule. This way, if you want, for example, to modify thetemplate:file:/usr/share/zentyal/stubs/dns/named.conf.options.mas, youwill create the directory /etc/zentyal/stubs/dns/, copy the templateinside and modify this copy:
sudo mkdir /etc/zentyal/stubs/dnssudo cp /usr/share/zentyal/stubs/dns/named.conf.options.mas
Another advantage of copying the templates to /etc/zentyal/stubs/is that you can keep control of the modifications that you have doneover the original templates, and you will always be able to check thesedifferences using the ‘diff’ tool. For example, for the former case:
diff /etc/zentyal/stubs/dns/named.conf.options.mas /usr/share/zentyal/stubs/dns/named.conf.options.mas /etc/zentyal/stubs/dns
It is possible that you need to perform certain additional actions whileZentyal is saving changes instead of customising configuration files.For example, when Zentyal saves changes related to the firewall, thefirst thing the firewall module does is to remove all existing rules, andthen add the ones configured in Zentyal. If you manually add a customiptables rule that is not covered by Zentyal interface, it will disappearwhen saving firewall module changes. To prevent that, Zentyal lets yourun scripts while the saving changes process is being performed. Thereare six points during the process when you may execute these scripts,also known as hooks. Two of them are general and the remaining fourare per module:
Before saving changes:I n /etc/zentyal/pre-save directory all scripts with runningpermissions are run before starting the save changes process.
permissions are run before starting the save changes process.
After saving changes:Scripts with running permissions in /etc/zentyal/post-save directoryare executed when the process is finished.
Before saving module configuration:W r i t i n g /etc/zentyal/hooks/<module>.presetconf file being<module> the module name you want to tailor, the hook isexecuted prior to overwriting the module configuration. It is theideal time to modify configuration templates from a module.
After saving module configuration:/etc/zentyal/hooks/<module>.postsetconf file is executed aftersaving <module> configuration.
Before restarting the service:/etc/zentyal/hooks/<module>.preservice is executed. This scriptcould be useful to load Apache modules, for instance.
After restarting the service:/etc/zentyal/hooks/<module>.postservice is executed. In the firewallcase, all the extra rules must be added here.
These options have great potential and allow highly customisableZentyal operations, offering better integration with the rest of thesystems.
Development environment of newmodules
Zentyal is designed with extensibility in mind and it is relatively simpleto create new Zentyal modules.
Anyone with Perl language knowledge may take advantage of theZentyal development framework to create web interfaces, and alsobenefit from the integration with the rest of the modules and thecommon features from the vast Zentyal library.
Zentyal design is completely object-oriented and it takes advantage of
Zentyal design is completely object-oriented and it takes advantage ofthe Model-View-Controller (MVC) design pattern [2], so the developeronly needs to define those features required by the data model. Theremaining parts are generated automatically by Zentyal. To simplify theprocess further, a development tool called zmoddev [3] is provided toease the development of new modules, auto-generating templatesdepending on the parameters provided by the user. This will save time,however, its explanation and development is beyond the scope of thiscourse.
[2] An explanation about Model-View-Controller design patternhttp://en.wikipedia.org/wiki/Model_View_Controller.
[3] zmoddev SVN repository accesssvn://svn.zentyal.org/zentyal/trunk/extra/zmoddev.
Zentyal is designed to be installed on a dedicated machine. Thisrecommendation is also extended to the developing scheme.Developing on the same host is highly discouraged. The recommendedoption is to deploy a virtual system to develop as Appendix A: Testenvironment with VirtualBox explains in depth.
Release policyZentyal server development follows time based release cycle: a stableZentyal release is published once a year, in September. The ZentyalDevelopment Team has opted for time based release cycle mostimportantly because it makes easier, for both users and for developers,to make long-term decisions regarding the development, deploymentand maintenance of the server and helps the Development Team todeliver well tested, high-quality software.
It is important to notice that all Zentyal releases are based on theUbuntu LTS versions. Each Zentyal release is based on the UbuntuLTS version that is available at the moment the release is launched.
Zentyal Release Cycle
There are three types of Zentyal server releases the ZentyalDevelopment Team will publish during the Zentyal Release Cycle: Betaversions, Release Candidates and Stable versions. The stable versionswill be supported for three years after which they reach their “end oflife” date and become unsupported.
Zentyal Beta versions
Zentyal Beta versions are unstable software releases that are publishedfrom September to June. These beta versions introduce new featuresthat are not yet fully tested for bugs. As the Zentyal Development Teamfollows the “Release early, release often” guideline, there might be animportant number of beta versions published during this time period.
Beta releases always have odd major numbers: 1.1, 1.3, 1.5, 2.1, 2.3...
As Beta versions will eventually become stable releases, this means that2.1 series followed this pattern: 2.1.1, 2.1.2, 2.1.3, .... 2.1.10, 2.1.11,2.1.x -> 2.2
The 2.3 series will follow this pattern: 2.3.1, 2.3.2, 2.3.3, .... 2.3.10,2.3.11, 2.3.x -> 3.0
Zentyal Release Candidates
Zentyal Release Candidates are published from July to September,during the three months stabilization period. There are as many releasecandidates as the Development Team deems necessary to stabilize thenew code and bug fixes introduced before publishing the next stableversion.
Release candidates always have the version number of the next stablerelease and the “rc” suffix to indicate that the version is a releasecandidate. A suffix of “rc1” would be used for the first releasecandidate, “rc2” for the second release candidate, “rc3” for the thirdrelease candidate, and so on: 3.0-rc1, 3.0-rc2...
Stable Zentyal versions
Stable Zentyal versions are published once a year, in September. Stablereleases always have even major numbers: 1.0, 1.2, 1.4, 2.0, 2.2, 3.0...The first version number changes every time the base system, UbuntuLTS version, is upgraded.
For example, the versions 1.0, 1.2 and 1.4 were based on Ubuntu 8.04LTS , 2.0 and 2.2 were based on Ubuntu 10.04 LTS and the 3.0 willbe based on Ubuntu 12.04 LTS.
Timetable
June: Zentyal development is frozen. Three months stabilizationperiod starts. The necessary release candidate versions arepublished during this period.September: Stable Zentyal version is published.October-June: Zentyal development continues. The necessary betaversions are published during this period.
Support policy
The Zentyal Development Team offers three years of support for thestable Zentyal versions. This means that since the publication of a stableZentyal version, support for all security issues as well as commercialsupport and subscription services will be granted for this version duringthe next three years. After this time period, the stable version reaches its“end of life” date and becomes unsupported.
Bug management policyEach open source software project has its own bug management policy.As mentioned previously, the stable Zentyal versions are supported forthree years during which support for all security issues is granted. Inaddition to security issues, other modifications might be added to fixseveral bugs at once. The latest Zentyal version always includes all thebug fixes.
The project management tool Trac [4] is used by the Zentyal
The project management tool Trac [4] is used by the ZentyalDevelopment Team to manage bugs and other tasks. It lets users opentickets to report problems and it is open to all users. Once the ticket iscreated by a user, its state can be tracked by the user through the web ore-mail. You may reach Zentyal Trac at http://trac.zentyal.org.
[4] Trac: is an enhanced Viki and issue tracking system for softwaredevelopment projects http://trac.edgewall.org.
It is highly recommendable to report a bug when you are fairly surethat your problem is really a bug and not just an expected result of theprogram under determined circumstances.
To report a bug, check first in the Trac if the bug was reported already.If not, report the bug via the Zentyal web interface (if the crash appearsthere) or manually via the Zentyal bug tracker. If the bug was reportedalready, you can still help by confirming that you have reproduced itand giving additional details about the issue.
It is absolutely necessary to include detailed steps to reproduce the issueso that the Zentyal Development Team can fix it. If you are reportingmanually, include at least the /var/log/zentyal/zentyal.log file or anyother useful information you think it’s related with your issue.Screenshots are also welcome if you think they will help to see theproblem.
Finally, it is even better if you can provide a solution to the issue. Thiscould be done by modifying the application itself through a patch orby following some steps to avoid the problem temporarily(workaround).
Patches and security updates
A patch is a modification in the source code used to fix a bug or add anew feature to that software. In open source projects, communitymembers are able to send patches to the project maintainers and if thepatches are considered suitable, then they will be merged into theapplication.
Developers themselves often publish official patches too, for example,fixing a known vulnerability. But, typically, projects like Zentyal,release a new version of the package - including the official patch.
You can check out the available community updates and install themusing the web interface through the software module [5]. If you have acommercial server subscription [6], quality assured software updateswill be automatically applied to your Zentyal server to guarantee yourinstallation with maximum security and uptime.
[5] Software updates section shows this module in depth.[6] http://www.zentyal.com/services/subscriptions/
Technical supportOpen source software projects usually provide technical support to theusers through different methods. Zentyal is not an exception.
You must distinguish between two kinds of support: the supportprovided to and by the community, which is free, and the commercialsupport, provided by companies that charge a fee for their services.
Community support
Community support is provided mainly on the Internet. There aremany occasions in which the community is able to support itself. Thatis, the users help each other.
The community members are an important, even fundamental,providers of information for the product development. Users contributeby discovering hidden bugs and help developers to improve theproduct so it becomes more attractive to more users.
This voluntary support, logically, does not offer any guarantees. If auser asks a question, it is possible that no reply is given depending onthe question format, timing or any other circumstances.
Zentyal community support channels is centered on the forum [7],
Zentyal community support channels is centered on the forum [7],although mailing lists [8] and IRC channels [9] are also available.
[7] http://forum.zentyal.org[8] http://lists.zentyal.org[9] irc.freenode.net server, #Zentyal (English) and #Zentyal-es
(Spanish) channels.
All this information is available, with further documentation, in thecommunity section of Zentyal web site (http://www.zentyal.org).
Commercial support
The commercial support allows the user access to obtain support as aprofessional service. Unlike community support, the commercialsupport offered by Zentyal Development Team or Authorized ZentyalPartners offers several guarantees:
Maximum response time: depending on the service package theresponse time will be different.Support from well-trained professionals backed by the ZentyalDevelopment Team.Additional features which add value to the product and are notavailable to the community.
In addition to this, commercial support ensures no time is wasted tryingto find out what hardware you should purchase, what modules youshould install, how to make the initial configuration, how to integrateZentyal with existing systems, etc. These advantages are pretty clear forcompanies whose business relies on this software.
Copyright 2004-2012 Zentyal S.L.