Oracle Application Server High Availability Guide
578
Oracle® Application Server High Availability Guide 10g Release 2 (10.1.2) B14003-05 February 2007
-
Upload
khangminh22 -
Category
Documents
-
view
4 -
download
0
Transcript of Oracle Application Server High Availability Guide

Oracle® Application ServerHigh Availability Guide
10g Release 2 (10.1.2)
B14003-05
February 2007

Oracle Application Server High Availability Guide, 10g Release 2 (10.1.2)
B14003-05
Copyright © 2005, 2007, Oracle. All rights reserved.
The Programs (which include both the software and documentation) contain proprietary information; they are provided under a license agreement containing restrictions on use and disclosure and are also protected by copyright, patent, and other intellectual and industrial property laws. Reverse engineering, disassembly, or decompilation of the Programs, except to the extent required to obtain interoperability with other independently created software or as specified by law, is prohibited.
The information contained in this document is subject to change without notice. If you find any problems in the documentation, please report them to us in writing. This document is not warranted to be error-free. Except as may be expressly permitted in your license agreement for these Programs, no part of these Programs may be reproduced or transmitted in any form or by any means, electronic or mechanical, for any purpose.
If the Programs are delivered to the United States Government or anyone licensing or using the Programs on behalf of the United States Government, the following notice is applicable:
U.S. GOVERNMENT RIGHTS Programs, software, databases, and related documentation and technical data delivered to U.S. Government customers are "commercial computer software" or "commercial technical data" pursuant to the applicable Federal Acquisition Regulation and agency-specific supplemental regulations. As such, use, duplication, disclosure, modification, and adaptation of the Programs, including documentation and technical data, shall be subject to the licensing restrictions set forth in the applicable Oracle license agreement, and, to the extent applicable, the additional rights set forth in FAR 52.227-19, Commercial Computer Software—Restricted Rights (June 1987). Oracle USA, Inc., 500 Oracle Parkway, Redwood City, CA 94065
The Programs are not intended for use in any nuclear, aviation, mass transit, medical, or other inherently dangerous applications. It shall be the licensee's responsibility to take all appropriate fail-safe, backup, redundancy and other measures to ensure the safe use of such applications if the Programs are used for such purposes, and we disclaim liability for any damages caused by such use of the Programs.
Oracle, JD Edwards, and PeopleSoft are registered trademarks of Oracle Corporation and/or its affiliates. Other names may be trademarks of their respective owners.
The Programs may provide links to Web sites and access to content, products, and services from third parties. Oracle is not responsible for the availability of, or any content provided on, third-party Web sites. You bear all risks associated with the use of such content. If you choose to purchase any products or services from a third party, the relationship is directly between you and the third party. Oracle is not responsible for: (a) the quality of third-party products or services; or (b) fulfilling any of the terms of the agreement with the third party, including delivery of products or services and warranty obligations related to purchased products or services. Oracle is not responsible for any loss or damage of any sort that you may incur from dealing with any third party.

iii
Contents
Preface ............................................................................................................................................................... xix
Intended Audience.................................................................................................................................... xixDocumentation Accessibility ................................................................................................................... xixRelated Documentation............................................................................................................................ xxConventions ............................................................................................................................................... xx
Part I Overview
1 Introduction to High Availability
1.1 What is High Availability .......................................................................................................... 1-11.1.1 High Availability Problems................................................................................................ 1-11.1.2 High Availability Solutions................................................................................................ 1-21.2 Oracle Application Server High Availability Concepts ....................................................... 1-41.2.1 Terminology ......................................................................................................................... 1-41.2.2 Oracle Application Server Base Architecture .................................................................. 1-71.2.3 Oracle Application Server High Availability Architectures ...................................... 1-101.2.4 Choosing the Best High Availability Architecture ...................................................... 1-101.3 High Availability Information in Other Documentation................................................... 1-12
2 Oracle Application Server High Availability Framework
2.1 Redundant Architectures........................................................................................................... 2-12.1.1 Oracle Application Server Active-Active Configurations: Oracle Application
Server Clusters .................................................................................................................... 2-12.1.2 Oracle Application Server Active-Passive Configurations: Oracle Application
Server Cold Failover Clusters ........................................................................................... 2-22.2 High Availability Services in Oracle Application Server...................................................... 2-42.2.1 Process Death Detection and Automatic Restart ............................................................ 2-42.2.1.1 Process Management with Oracle Process Manager and Notification Server .... 2-42.2.1.1.1 Automated Process Management with OPMN ................................................ 2-52.2.1.1.2 Distributed Process Control with OPMN.......................................................... 2-52.2.2 Configuration Management............................................................................................... 2-62.2.2.1 Configuration Management with Distributed Configuration Management ....... 2-62.2.2.1.1 Configuration Synchronization and Management with DCM....................... 2-62.2.2.1.2 Distributed Application Deployment with DCM............................................. 2-72.2.3 State Replication................................................................................................................... 2-7

iv
2.2.4 Server Load Balancing and Failover ................................................................................. 2-72.2.4.1 Internal Load Balancing Mechanism Provided in Oracle Application Server .... 2-72.2.4.2 External Load Balancers .............................................................................................. 2-82.2.5 Backup and recovery........................................................................................................ 2-122.2.5.1 Oracle Application Server Backup and Recovery Tool........................................ 2-122.2.6 Disaster Recovery ............................................................................................................. 2-122.2.6.1 Oracle Application Server Guard............................................................................ 2-13
Part II Middle-tier High Availability
3 Middle-tier High Availability
3.1 Redundancy................................................................................................................................. 3-13.1.1 Active-Active........................................................................................................................ 3-13.1.1.1 OracleAS Web Cache .................................................................................................. 3-33.1.1.2 Oracle HTTP Server ..................................................................................................... 3-43.1.1.2.1 Oracle HTTP Server High Availability Summary............................................ 3-43.1.1.2.2 OC4J Load Balancing Using mod_oc4j .............................................................. 3-53.1.1.2.3 Database Load Balancing with mod_plsql ........................................................ 3-73.1.1.3 OC4J................................................................................................................................ 3-73.1.1.3.1 OracleAS Cluster (OC4J) ...................................................................................... 3-73.1.1.3.2 OC4J Distributed Caching Using Java Object Cache .................................... 3-113.1.1.3.3 JMS High Availability........................................................................................ 3-123.1.2 Active-Passive ................................................................................................................... 3-153.1.2.1 OracleAS Cold Failover Cluster (Middle-Tier) ..................................................... 3-153.1.2.1.1 Managing Failover ............................................................................................. 3-163.1.2.1.2 OracleAS JMS in an OracleAS Cold Failover Cluster (Middle-Tier)
Environment ...................................................................................................... 3-173.2 Highly Available Middle-tier Configuration Management Concepts ............................. 3-173.2.1 OracleAS Clusters Managed Using DCM.................................................................... 3-173.2.1.1 What is a DCM-Managed OracleAS Cluster? ....................................................... 3-173.2.1.2 Oracle Application Server DCM Configuration Repository Types ................... 3-193.2.2 Manually Managed Oracle Application Server Clusters ............................................ 3-193.3 Middle-tier Backup and Recovery Considerations............................................................. 3-19
4 Managing and Operating Middle-tier High Availability
4.1 Middle-tier High Availability Configuration Overview....................................................... 4-14.1.1 DCM-Managed OracleAS Clusters ................................................................................... 4-14.2 Using DCM-Managed OracleAS Clusters............................................................................... 4-24.2.1 Creating DCM-Managed OracleAS Clusters................................................................... 4-24.2.1.1 Associating an Instance with an OracleAS Database-based Farm ........................ 4-34.2.1.2 Associating an Instance with an OracleAS File-based Farms ................................ 4-34.2.1.2.1 Creating an OracleAS File-based Farm Repository Host ................................ 4-34.2.1.2.2 Adding Instances to an OracleAS File-based Farm.......................................... 4-54.2.1.3 Using the Application Server Control Console Create Cluster Page.................... 4-54.2.2 Adding Instances to DCM-Managed OracleAS Clusters............................................... 4-64.2.3 Removing Instances from DCM-Managed OracleAS Clusters..................................... 4-84.2.4 Starting, Stopping, and Deleting DCM-Managed OracleAS Clusters ......................... 4-8

v
4.2.5 Rolling Upgrades for Stateful J2EE Applications ........................................................... 4-94.2.5.1 Configuration and HttpSession Replication.......................................................... 4-104.2.5.2 Scenario ....................................................................................................................... 4-104.2.5.3 Procedure.................................................................................................................... 4-114.2.5.4 Automation of the Procedure Using DCM Scripts ............................................... 4-154.2.5.5 Additional Considerations....................................................................................... 4-164.2.6 Configuring Oracle HTTP Server Options for DCM-Managed OracleAS Clusters 4-164.2.6.1 Using and Configuring mod_oc4j Load Balancing .............................................. 4-174.2.6.2 Configuring Oracle HTTP Server Instance-Specific Parameters ........................ 4-184.2.6.3 Configuring mod_plsql With Real Application Clusters .................................... 4-184.2.6.3.1 Configuring Detection and Cleanup of Dead Connections ......................... 4-184.2.6.3.2 Using Oracle Directory for Lookups ............................................................... 4-194.2.7 Understanding DCM-Managed OracleAS Cluster Membership .............................. 4-194.2.7.1 How the Common Configuration Is Established.................................................. 4-194.2.7.2 Parameters Excluded from the Common Configuration: Instance-Specific
Parameters ................................................................................................................. 4-204.2.7.3 Configuring Command-Line Options to be Instance-Specific............................ 4-224.3 Availability Considerations for the DCM Configuration Repository .............................. 4-234.3.1 Availability Considerations for DCM-Managed OracleAS Cluster (Database) ...... 4-234.3.2 Availability Considerations for DCM-Managed OracleAS Cluster (File-based) .... 4-234.3.2.1 Selecting the Instance to Use for a OracleAS File-based Farm Repository
Host ............................................................................................................................. 4-244.3.2.2 Protecting Against the Loss of a Repository Host ................................................ 4-254.3.2.3 Impact of Repository Host Unavailability ............................................................. 4-254.3.2.4 Impact of Non-Repository Host Unavailability .................................................... 4-254.3.2.5 Updating and Checking the State of Local Configuration .................................. 4-254.3.2.6 Performing Administration on a DCM-Managed OracleAS Cluster................. 4-264.3.2.7 Best Practices for Repository Backups.................................................................... 4-284.3.2.8 Best Practices for Managing Instances in OracleAS File-based Farms .............. 4-284.4 Using Oracle Application Server Clusters (OC4J) .............................................................. 4-294.4.1 Overview of OracleAS Cluster (OC4J) Configuration ................................................ 4-294.4.2 Cluster-Wide Configuration Changes and Modifying OC4J Instances ................... 4-304.4.2.1 Creating or Deleting OC4J Instances in an OracleAS Cluster (OC4J)................ 4-304.4.2.2 Deploying Applications on an OracleAS Cluster (OC4J) .................................... 4-314.4.2.3 Configuring Web Application State Replication with OracleAS
Cluster (OC4J) ........................................................................................................... 4-314.4.2.4 Configuring EJB Application State Replication with OracleAS
Cluster (OC4J-EJB) ................................................................................................... 4-334.4.2.5 Configuring Stateful Session Bean Replication for OracleAS
Cluster (OC4J-EJB)s .................................................................................................. 4-344.4.2.5.1 End of Call Replication...................................................................................... 4-344.4.2.5.2 JVM Termination Replication........................................................................... 4-354.4.3 Configuring OC4J Instance-Specific Parameters.......................................................... 4-354.4.3.1 Configuring OC4J Islands and OC4J Processes .................................................... 4-354.4.3.2 Configuring Port Numbers and Command Line Options .................................. 4-36
vi
4.5 Managing OracleAS Cold Failover Cluster (Middle-Tier)................................................. 4-374.5.1 Managing Configuration and Deployment for OracleAS Cold Failover
Cluster (Middle-Tier) ...................................................................................................... 4-384.5.1.1 Configuration and Deployment Changes for OracleAS Cold Failover
Cluster (Middle-Tier) ............................................................................................... 4-384.5.1.2 Backup and Recovery for OracleAS Cold Failover Cluster (Middle-Tier)........ 4-384.5.1.3 Using Application Server Control Console for OracleAS Cold Failover
Cluster (Middle-Tier) ............................................................................................... 4-394.5.2 Managing Failover for OracleAS Cold Failover Cluster (Middle-Tier).................... 4-394.5.2.1 Manual Failover for OracleAS Cold Failover Cluster (Middle-Tier) ................. 4-394.5.2.2 Manual Failover for the Virtual IP in OracleAS Cold Failover
Cluster (Middle-Tier) ............................................................................................... 4-404.5.2.3 Manual Failover of Components for OracleAS Cold Failover Cluster
(Middle-Tier) ............................................................................................................. 4-414.5.2.4 Manual Failover of OracleAS Cluster (OC4J-JMS) ............................................... 4-424.5.3 Moving Oracle Homes Between Local and Shared Storage....................................... 4-424.5.4 Deploying and Accessing Applications on OracleAS Cold Failover Cluster
(Middle-Tier) .................................................................................................................... 4-434.6 Managing Oracle Application Server Middle-tier Upgrades............................................ 4-434.6.1 Upgrading Oracle Application Server Instances ......................................................... 4-444.6.2 Upgrading DCM-Managed OracleAS Clusters............................................................ 4-444.6.3 Upgrading Stateful OC4J Applications ......................................................................... 4-444.7 Using OracleAS Single Sign-On with OracleAS Cluster (Middle-Tier)........................... 4-44
5 High Availability for Middle-tier Components
5.1 Middle-Tier Components in Active-Passive Topologies ...................................................... 5-15.2 OracleAS Portal ........................................................................................................................... 5-15.3 OracleAS Wireless....................................................................................................................... 5-25.4 OracleAS Reports Services......................................................................................................... 5-35.4.1 OracleAS Reports Services Architecture .......................................................................... 5-35.4.2 OracleAS Reports Services High Availability Features ................................................. 5-45.4.2.1 Process Management ................................................................................................... 5-45.4.2.2 Connection Retry .......................................................................................................... 5-45.4.2.2.1 OracleAS Portal Database Connection Retry .................................................... 5-45.4.2.2.2 Oracle Internet Directory Connection Retry ..................................................... 5-55.4.2.2.3 OracleAS Metadata Repository and Oracle Identity Management Outage . 5-55.4.2.3 Reports Server Timeout ............................................................................................... 5-55.4.3 OracleAS Reports Services in Active-Active Configurations........................................ 5-55.4.4 OracleAS Reports Services in Active-Passive Configurations ...................................... 5-75.5 OracleAS Forms Services ........................................................................................................... 5-75.6 OracleAS Integration B2B .......................................................................................................... 5-85.7 OracleAS Integration InterConnect....................................................................................... 5-115.8 Oracle BPEL Process Manager ............................................................................................... 5-175.8.1 Oracle BPEL Process Manager in an Active-Active Configuration........................... 5-175.8.2 Oracle BPEL Process Manager in an Active-Passive Configuration ......................... 5-195.8.3 Oracle BPEL Process Manager with Adapters ............................................................. 5-205.8.3.1 Overview of JCA-Based Adapters .......................................................................... 5-205.8.3.2 Concurrency Support................................................................................................ 5-20

vii
5.8.3.3 Active-Active Topology for Adapters .................................................................... 5-215.8.3.4 Modified Active-Active Topology for Adapters................................................... 5-215.8.3.5 Active-Passive Topology for Adapters .................................................................. 5-235.9 OracleBI Discoverer ................................................................................................................. 5-245.9.1 OracleBI Discoverer Preferences Server ........................................................................ 5-255.10 Oracle Content Management SDK ........................................................................................ 5-25
Part III OracleAS Infrastructure High Availability
6 High Availability for OracleAS Infrastructure: Overview
6.1 High Availability for OracleAS Infrastructure Services........................................................ 6-16.1.1 Process Management........................................................................................................... 6-26.1.2 Protection from Software and Hardware Failures.......................................................... 6-26.2 Intra-Site High Availability Topologies................................................................................... 6-36.2.1 Active-Active High Availability Topologies ................................................................... 6-46.2.2 Active-Passive High Availability Topologies.................................................................. 6-56.3 Backup and Recovery for OracleAS Infrastructure ............................................................... 6-66.3.1 OracleAS Cold Failover Cluster (Infrastructure) ............................................................ 6-76.3.2 Oracle Identity Management ............................................................................................. 6-7
7 OracleAS Infrastructure: High Availability for OracleAS Metadata Repository
7.1 Cold Failover Cluster Databases............................................................................................... 7-17.1.1 Installing a Cold Failover Cluster Database .................................................................... 7-37.1.2 Running a Cold Failover Cluster Database...................................................................... 7-37.1.3 Running Database Console against a Cold Failover Cluster Database ....................... 7-37.1.4 Backing Up a Cold Failover Cluster Database ................................................................ 7-37.1.5 Failing Over a Cold Failover Cluster Database............................................................... 7-47.2 Real Application Clusters Databases ....................................................................................... 7-47.2.1 Installing a Real Application Clusters Database ............................................................. 7-57.2.2 Running a Real Application Clusters Database .............................................................. 7-57.2.3 Backing up a Real Application Clusters Database.......................................................... 7-57.3 Other High Availability Solutions for the OracleAS Metadata Repository Database ...... 7-57.4 Checking the Status of OracleAS Metadata Repository........................................................ 7-5
8 OracleAS Infrastructure: High Availability for Oracle Identity Management
8.1 Overview: Running All the Oracle Identity Management Components Together........... 8-28.2 Overview: Distributing Oracle Identity Management Components................................... 8-28.3 Overview: Running Oracle Identity Management Components in Active-Active
Configurations ............................................................................................................................ 8-38.4 Overview: Running Oracle Identity Management Components in Active-Passive
Configurations............................................................................................................................ 8-48.5 All Oracle Identity Management Components in Active-Active Configurations............. 8-48.5.1 Handling Component and Node Failures ....................................................................... 8-58.5.2 Starting Oracle Identity Management Components....................................................... 8-58.5.3 Stopping Oracle Identity Management Components .................................................... 8-58.5.4 Using Application Server Control..................................................................................... 8-6

viii
8.5.5 Backing Up and Recovering Oracle Identity Management Components ................... 8-68.6 All Oracle Identity Management Components in Active-Passive Configurations ........... 8-68.6.1 Handling Component and Node Failures ....................................................................... 8-88.6.2 Manual Steps for Failover on Solaris Systems................................................................. 8-88.6.3 Manual Steps for Failover on Windows Systems ........................................................... 8-98.6.4 Manual Steps for Failover on Linux Systems ............................................................... 8-108.6.5 Starting Oracle Identity Management Components.................................................... 8-118.6.6 Stopping Oracle Identity Management Components.................................................. 8-128.6.7 Using Application Server Control.................................................................................. 8-128.6.8 Backing Up and Recovering Oracle Identity Management Components ................ 8-128.7 Oracle Internet Directory and Oracle Directory Integration and Provisioning in
Active-Active Configurations ............................................................................................... 8-128.7.1 Handling Component and Node Failures .................................................................... 8-138.7.2 Synchronizing Metadata in an OracleAS Cluster (Identity Management) .............. 8-138.7.3 OID Monitor in an OracleAS Cluster (Identity Management) Environment .......... 8-148.7.4 Managing an OracleAS Cluster (Identity Management) Environment.................... 8-168.7.5 Starting Oracle Internet Directory / Oracle Directory Integration and
Provisioning ...................................................................................................................... 8-178.7.6 Stopping Oracle Internet Directory / Oracle Directory Integration and
Provisioning ...................................................................................................................... 8-178.7.7 Using Application Server Control.................................................................................. 8-178.7.8 Backing Up and Recovering Oracle Internet Directory / Oracle Directory
Integration and Provisioning ......................................................................................... 8-188.8 Oracle Internet Directory and Oracle Directory Integration and Provisioning in
Active-Passive Configurations.............................................................................................. 8-188.8.1 Handling Component and Node Failures .................................................................... 8-198.8.2 Manual Steps for Failover on Solaris Systems.............................................................. 8-198.8.3 Manual Steps for Failover on Windows Systems ........................................................ 8-208.8.4 Manual Steps for Failover on Linux Systems ............................................................... 8-208.8.5 Using Oracle Internet Directory Replication with OracleAS Cold Failover
Cluster (Identity Management) ..................................................................................... 8-218.8.6 Starting Oracle Internet Directory / Oracle Directory Integration and
Provisioning ...................................................................................................................... 8-238.8.7 Stopping Oracle Internet Directory / Oracle Directory Integration and
Provisioning ...................................................................................................................... 8-248.8.8 Using Application Server Control.................................................................................. 8-248.8.9 Backing Up and Recovering Oracle Identity Management Components ................ 8-248.9 OracleAS Single Sign-On and Oracle Delegated Administration Services in
Active-Active Configurations ............................................................................................... 8-248.9.1 Changing Configuration for Components in an OracleAS Cluster .......................... 8-268.9.2 Failover for OracleAS Cluster (Identity Management) ............................................... 8-268.9.3 Handling Component and Node Failures .................................................................... 8-278.9.4 Starting OracleAS Single Sign-On / Oracle Delegated Administration Services ... 8-278.9.5 Stopping OracleAS Single Sign-On / Oracle Delegated Administration Services . 8-278.9.6 Using Application Server Control.................................................................................. 8-288.9.7 Backing Up and Recovering OracleAS Single Sign-On / Oracle Delegated
Administration Services Components .......................................................................... 8-28

ix
8.10 OracleAS Single Sign-On and Oracle Delegated Administration Services in Active-Passive Configurations.............................................................................................. 8-28
8.10.1 Handling Component and Node Failures .................................................................... 8-308.10.2 Manual Steps for Failover (for Solaris Systems) .......................................................... 8-308.10.3 Manual Steps for Failover (for Windows Systems) ..................................................... 8-318.10.4 Manual Steps for Failover (for Linux Systems)............................................................ 8-318.10.5 Starting OracleAS Single Sign-On / Oracle Delegated Administration Services ... 8-328.10.6 Stopping OracleAS Single Sign-On / Oracle Delegated Administration Services . 8-328.10.7 Using Application Server Control.................................................................................. 8-328.10.8 Backing Up and Recovering OracleAS Single Sign-On / Oracle Delegated
Administration Services.................................................................................................. 8-328.11 Checking the Status of Oracle Identity Management Components ................................. 8-33
9 OracleAS Infrastructure: High Availability Topologies
9.1 Summary of OracleAS Infrastructure High Availability Topologies.................................. 9-19.2 OracleAS Cold Failover Cluster (Infrastructure) Topology ................................................. 9-29.2.1 OracleAS Cold Failover Cluster (Infrastructure) on Microsoft Windows................... 9-39.2.2 Installation Highlights ........................................................................................................ 9-59.2.3 Runtime................................................................................................................................. 9-69.2.4 Failover.................................................................................................................................. 9-69.2.4.1 Failover on Solaris Systems......................................................................................... 9-79.2.4.2 Failover on Windows Systems ................................................................................... 9-89.2.4.3 Failover on Linux Systems .......................................................................................... 9-89.2.5 Startup Procedure ................................................................................................................ 9-99.2.6 Stop Procedure .................................................................................................................. 9-109.2.7 Use of Application Server Control Console.................................................................. 9-119.2.8 Changing Configuration.................................................................................................. 9-119.2.9 Configuring Virtual IPs.................................................................................................... 9-129.2.10 Backup and Recovery Procedure ................................................................................... 9-129.3 Distributed OracleAS Cold Failover Cluster (Infrastructure) Topology ......................... 9-129.3.1 Tiers in this Topology ...................................................................................................... 9-159.3.2 External Load Balancer Requirements........................................................................... 9-159.3.3 Installation Highlights ..................................................................................................... 9-159.3.4 Runtime for the OracleAS Metadata Repository / Oracle Internet Directory Tier 9-159.3.5 Failover for the OracleAS Metadata Repository / Oracle Internet Directory Tier . 9-169.3.6 Startup Procedure ............................................................................................................. 9-169.3.7 Stop Procedure .................................................................................................................. 9-169.3.8 Use of Application Server Control ................................................................................. 9-179.3.9 Monitoring Procedure...................................................................................................... 9-179.3.10 Backup and Recovery Procedure ................................................................................... 9-179.4 OracleAS Cold Failover Cluster (Identity Management) Topology................................. 9-179.4.1 Tiers in this Topology ...................................................................................................... 9-199.4.2 Installation Highlights ..................................................................................................... 9-209.4.3 Runtime for the Oracle Identity Management Components...................................... 9-209.4.4 Failover for the Oracle Identity Management Components ...................................... 9-209.4.5 Startup Procedure ............................................................................................................. 9-219.4.6 Stop Procedure .................................................................................................................. 9-21

x
9.4.7 Use of Application Server Control ................................................................................. 9-219.5 Distributed OracleAS Cold Failover Cluster (Identity Management) Topology ........... 9-219.5.1 Tiers in this Topology ...................................................................................................... 9-249.5.2 External Load Balancer Requirements........................................................................... 9-249.5.3 Installation Highlights ..................................................................................................... 9-249.5.4 Runtime and Failover for the OracleAS Single Sign-On and Oracle Delegated
Administration Services Tier ......................................................................................... 9-259.5.5 Runtime and Failover for the Oracle Internet Directory and Oracle Directory
Integration and Provisioning Tier ................................................................................. 9-259.5.6 Startup Procedure ............................................................................................................. 9-259.5.7 Stop Procedure .................................................................................................................. 9-259.5.8 Use of Application Server Control ................................................................................. 9-269.6 OracleAS Cluster (Identity Management) Topology.......................................................... 9-269.6.1 Additional Considerations .............................................................................................. 9-289.6.2 Tiers in this Topology ...................................................................................................... 9-289.6.3 External Load Balancer Requirements........................................................................... 9-299.6.4 Installation Highlights ..................................................................................................... 9-299.6.5 Runtime for the OracleAS Metadata Repository Nodes............................................. 9-299.6.6 Runtime for the OracleAS Cluster (Identity Management) Nodes ........................... 9-299.6.7 Failover on the OracleAS Cluster (Identity Management) Nodes ............................ 9-309.6.8 Failover on the OracleAS Metadata Repository Tier................................................... 9-309.6.9 Startup Procedure ............................................................................................................. 9-309.6.10 Stop Procedure .................................................................................................................. 9-319.6.11 Use of Application Server Control ................................................................................. 9-319.7 Distributed OracleAS Cluster (Identity Management) Topology .................................... 9-319.7.1 Tiers in this Topology ...................................................................................................... 9-349.7.2 External Load Balancer Requirements........................................................................... 9-349.7.3 Installation Highlights ..................................................................................................... 9-349.7.4 Runtime for the OracleAS Metadata Repository Nodes............................................. 9-359.7.5 Runtime for the Oracle Internet Directory and Oracle Directory Integration
and Provisioning Nodes ................................................................................................. 9-359.7.6 Runtime for the OracleAS Single Sign-On and Oracle Delegated Administration
Services Nodes ................................................................................................................. 9-359.7.7 Failover on the OracleAS Cluster (Identity Management) Nodes ............................ 9-359.7.8 Failover on the OracleAS Metadata Repository Tier................................................... 9-359.7.9 Startup Procedure ............................................................................................................. 9-369.7.10 Stop Procedure .................................................................................................................. 9-369.7.11 Use of Application Server Control ................................................................................. 9-369.8 OracleAS Cold Failover Cluster (Infrastructure) and OracleAS Cold Failover
Cluster (Middle-Tier) on the Same Nodes .......................................................................... 9-37
10 Oracle Internet Directory High Availability And Failover Considerations
10.1 About High Availability and Failover for Oracle Internet Directory .............................. 10-110.2 Oracle Internet Directory and the Oracle Technology Stack ............................................. 10-110.3 Failover Options on Clients.................................................................................................... 10-210.3.1 Alternate Server List from User Input ........................................................................... 10-210.3.2 Alternate Server List from the Oracle Internet Directory Server............................... 10-310.3.2.1 Setting the Alternate Server List by Using Oracle Directory Manager ............. 10-3

xi
10.4 Failover Options in the Public Network Infrastructure ..................................................... 10-310.4.1 Hardware-Based Load Balancing................................................................................... 10-410.4.2 Software-Based Load Balancing ..................................................................................... 10-410.5 High Availability and Failover Capabilities in Oracle Internet Directory ...................... 10-510.6 Failover Options in the Private Network Infrastructure.................................................... 10-510.6.1 IP Address Takeover (IPAT) ........................................................................................... 10-510.6.2 Redundant Links............................................................................................................... 10-510.7 High Availability Deployment Examples ............................................................................ 10-5
11 Oracle Internet Directory in Oracle Real Application Clusters Environment
11.1 Terminology.............................................................................................................................. 11-111.2 Installing Oracle Internet Directory against a Real Application Clusters Database ...... 11-211.3 Oracle Internet Directory in an Oracle Real Application Clusters Environment ........... 11-211.4 Oracle Directory Server Connection Modes to Real Application Clusters Database
Instances ................................................................................................................................... 11-411.4.1 Load_balance Parameter.................................................................................................. 11-411.4.2 Connect-Time Failover (CTF).......................................................................................... 11-411.4.3 Transparent Application Failover (TAF)....................................................................... 11-411.4.4 Configuring the tnsnames.ora File for the Failover..................................................... 11-411.5 Oracle Directory Replication Between Oracle Internet Directory Real Application
Clusters Nodes ........................................................................................................................ 11-611.6 About Changing the ODS Password on a Real Application Clusters Node................... 11-6
12 Deploying Identity Management with Multimaster Replication
12.1 Multimaster Identity Management Replication Configuration ........................................ 12-212.1.1 Master Node Installation ................................................................................................. 12-312.1.2 Replica Node Installation ................................................................................................ 12-312.1.3 Multimaster Replication Setup ....................................................................................... 12-312.1.4 Installing OracleAS Single Sign-On and Oracle Delegated Administration
Services on the Master Node .......................................................................................... 12-412.1.5 Synchronizing the OracleAS Single Sign-On Schema Password............................... 12-512.1.6 Installing OracleAS Single Sign-On and Oracle Delegated Administration
Services on the Replica Node ......................................................................................... 12-612.1.7 Oracle Directory Integration and Provisioning Event Propagation in a
Multimaster Scenario ...................................................................................................... 12-612.1.8 Load Balancer Configuration in a Multimaster Replication Scenario ...................... 12-712.2 Adding a Node to a Multimaster Replication Group......................................................... 12-712.3 Deleting a Node from a Multimaster Replication Group .................................................. 12-9
Part IV Disaster Recovery
13 OracleAS Disaster Recovery
13.1 Oracle Application Server 10g Disaster Recovery Solution............................................... 13-313.1.1 OracleAS Disaster Recovery Requirements.................................................................. 13-413.1.2 Supported Oracle Application Server Releases and Operating Systems ................. 13-513.1.3 Supported Topologies ...................................................................................................... 13-5

xii
13.1.3.1 Symmetrical Topologies - Strict Mirror of the Production Site with Collocated Oracle Identity Management and OracleAS Metadata Repository Infrastructure ........................................................................................ 13-5
13.1.3.2 Asymmetrical Topologies - Simple Asymmetric Standby Topology with Collocated Oracle Identity Management and OracleAS Metadata Repository Infrastructure ........................................................................................ 13-7
13.1.3.3 Separate OracleAS Metadata Repository for OracleAS Portal with Collocated Oracle Identity Management and OracleAS Metadata Repository Infrastructure (the Departmental Topology) ................................... 13-9
13.1.3.4 Distributed Application OracleAS Metadata Repositories with Non Collocated Oracle Identity Management and OracleAS Metadata Repository Infrastructure ...................................................................................... 13-10
13.2 Preparing the OracleAS Disaster Recovery Environment ............................................... 13-1113.2.1 Planning and Assigning Hostnames............................................................................ 13-1213.2.1.1 Physical Hostnames ................................................................................................ 13-1413.2.1.2 Network Hostnames ............................................................................................... 13-1513.2.1.3 Virtual Hostname .................................................................................................... 13-1513.2.2 Configuring Hostname Resolution .............................................................................. 13-1513.2.2.1 Using Local Hostnaming File Resolution ............................................................ 13-1613.2.2.2 Using DNS Resolution ............................................................................................ 13-1713.2.2.2.1 Additional DNS Server Entries for Oracle Data Guard.............................. 13-1913.3 Overview of Installing Oracle Application Server............................................................ 13-2013.4 Overview of OracleAS Guard and asgctl ........................................................................... 13-2113.4.1 Overview of asgctl .......................................................................................................... 13-2113.4.2 OracleAS Guard Client .................................................................................................. 13-2113.4.3 OracleAS Guard Server.................................................................................................. 13-2213.4.4 asgctl Operations ............................................................................................................ 13-2213.4.5 OracleAS Guard Integration with OPMN................................................................... 13-2413.4.6 Supported OracleAS Disaster Recovery Configurations .......................................... 13-2513.4.7 Configuring OracleAS Guard and Other Relevant Information ............................. 13-2513.5 Authentication of Databases ................................................................................................ 13-2613.6 Discovering, Dumping, and Verifying the Topology....................................................... 13-2713.7 Dumping Policy Files and Using Policy Files With Some asgctl Commands............... 13-2713.8 OracleAS Guard Operations -- Standby Site Cloning of One or More Production
Instances to a Standby System ............................................................................................ 13-2913.8.1 Cloning a Single Production Instance to a Standby System..................................... 13-3113.8.2 Cloning Multiple Production Instances to Standby Systems ................................... 13-3313.9 OracleAS Guard Operations -- Standby Instantiation and Standby Synchronization 13-3513.9.1 Standby Instantiation ..................................................................................................... 13-3613.9.2 Standby Synchronization............................................................................................... 13-3713.10 Runtime Operations -- OracleAS Guard Switchover and Failover Operations............ 13-3813.10.1 Outages............................................................................................................................. 13-3813.10.1.1 Scheduled Outages.................................................................................................. 13-3913.10.1.2 Unplanned Outages ................................................................................................ 13-4113.11 Monitoring OracleAS Guard Operations and Troubleshooting ..................................... 13-4213.11.1 Verifying the Topology.................................................................................................. 13-4213.11.2 Displaying the Current Operation ............................................................................... 13-4313.11.3 Displaying a List of Completed Operations ............................................................... 13-4413.11.4 Stopping an Operation................................................................................................... 13-44

xiii
13.11.5 Tracing Tasks................................................................................................................... 13-4413.11.6 Writing Information About the Topology to a File ................................................... 13-4513.11.7 Error Messages ................................................................................................................ 13-4513.12 Wide Area DNS Operations ................................................................................................. 13-4513.12.1 Using a Wide Area Load Balancer ............................................................................... 13-4513.12.2 Manually Changing DNS Names................................................................................. 13-4613.13 Using OracleAS Guard Command-Line Utility (asgctl) .................................................. 13-4613.13.1 Typical OracleAS Guard Session Using asgctl ........................................................... 13-4613.13.1.1 Getting Help ............................................................................................................. 13-4713.13.1.2 Specifying the Primary Database .......................................................................... 13-4713.13.1.3 Discovering the Topology ...................................................................................... 13-4813.13.1.4 Creating and Executing an asgctl Script .............................................................. 13-4813.13.2 Periodic Scheduling of OracleAS Guard asgctl Scripts............................................. 13-4913.13.3 Submitting OracleAS Guard Jobs to the Enterprise Manager Job System ............. 13-4913.14 Special Considerations for Some OracleAS Metadata Repository Configurations...... 13-4913.14.1 Special Considerations for Multiple OracleAS Metadata Repository
Configurations ................................................................................................................ 13-4913.14.1.1 Setting asgctl Credentials ....................................................................................... 13-5013.14.1.2 Specifying the Primary Database .......................................................................... 13-5013.14.1.3 Setting OracleAS Guard Port Numbers ............................................................... 13-5113.14.2 Special Considerations for OracleAS Metadata Repository Configurations
Created Using OracleAS Metadata Repository Creation Assistant ....................... 13-5113.15 Special Considerations for OracleAS Disaster Recovery Environments ....................... 13-5113.15.1 Some Special Considerations That Must Be Taken When Setting Up Some
OracleAS Disaster Recovery Sites ............................................................................... 13-5113.15.2 Handling ons.conf and dsa.conf Configuration Files for Asymmetric
Topologies....................................................................................................................... 13-5213.15.3 Other Special Considerations for OracleAS Disaster Recovery Environments..... 13-52
14 OracleAS Guard asgctl Command-line Reference
14.1 Information Common to OracleAS Guard asgctl Commands .......................................... 14-314.2 Information Specific to a Small Set of OracleAS Guard Commands ............................... 14-314.2.1 Special Considerations for OracleAS Disaster Recovery Configurations in
CFC Environments .......................................................................................................... 14-414.2.1.1 Special Considerations for Running Instantiate and Failover Operations
in CFC Environments ............................................................................................... 14-414.2.1.2 A Special Consideration and Workaround for Performing an Instantiate
Operation in CFC Environments ............................................................................ 14-514.2.1.3 Special Considerations for Running a Switchover Operations in CFC
Environments ............................................................................................................ 14-514.2.2 Other Special Considerations for OracleAS Disaster Recovery Environments....... 14-6
asgctl .......................................................................................................................................... 14-7
clone instance............................................................................................................................ 14-8
clone topology ........................................................................................................................ 14-11
connect asg .............................................................................................................................. 14-14
disconnect ............................................................................................................................... 14-15
discover topology................................................................................................................... 14-16

xiv
discover topology within farm............................................................................................. 14-18
dump policies ........................................................................................................................ 14-19
dump topology....................................................................................................................... 14-20
exit ............................................................................................................................................ 14-22
failover..................................................................................................................................... 14-23
help........................................................................................................................................... 14-25
instantiate topology ............................................................................................................... 14-26
quit ........................................................................................................................................... 14-28
set asg credentials .................................................................................................................. 14-29
set echo .................................................................................................................................... 14-31
set new primary database ..................................................................................................... 14-32
set noprompt........................................................................................................................... 14-33
set primary database.............................................................................................................. 14-34
set trace .................................................................................................................................... 14-36
show env ................................................................................................................................. 14-37
show operation....................................................................................................................... 14-38
shutdown ............................................................................................................................... 14-40
shutdown topology ............................................................................................................... 14-41
startup ..................................................................................................................................... 14-42
startup topology .................................................................................................................... 14-43
stop operation......................................................................................................................... 14-44
switchover topology ............................................................................................................. 14-45
sync topology ......................................................................................................................... 14-48
verify topology ...................................................................................................................... 14-50
dump farm (Deprecated) ..................................................................................................... 14-52
instantiate farm (Deprecated) .............................................................................................. 14-53
shutdown farm (Deprecated) .............................................................................................. 14-54
startup farm (Deprecated) ................................................................................................... 14-55
switchover farm (Deprecated) ............................................................................................ 14-56
sync farm (Deprecated) ........................................................................................................ 14-58
verify farm (Deprecated) ...................................................................................................... 14-59
15 Manual Sync Operations
15.1 Manually Synchronizing Baseline Installation with Standby Site Without Using OracleAS Guard asgctl Command-line Utility ....................................................... 15-1
15.1.1 Manually Backing Up the Production Site.................................................................... 15-215.1.1.1 Shipping OracleAS Infrastructure Database Archive Logs................................. 15-315.1.1.2 Backing Up Configuration Files (OracleAS Infrastructure and Middle Tier) .. 15-315.1.2 Manually Restoring to Standby Site............................................................................... 15-415.1.2.1 Restoring Configuration Files (OracleAS Infrastructure and Middle Tier) ...... 15-415.1.2.2 Restoring the OracleAS Infrastructure Database - Applying Log Files ............ 15-5

xv
16 OracleAS Disaster Recovery Site Upgrade Procedure
16.1 Prerequisites ............................................................................................................................. 16-116.2 Disaster Recovery Topology .................................................................................................. 16-116.3 High-Level OracleAS Disaster Recovery Upgrade Steps................................................... 16-216.4 Patching an Existing OracleAS Disaster Recovery Environment ..................................... 16-5
17 Setting Up a DNS Server
18 Secure Shell (SSH) Port Forwarding
18.1 SSH Port Forwarding .............................................................................................................. 18-1
Part V Transformation
19 Transforming Non-Highly Available Topologies to Highly Available
19.1 Source Configuration .............................................................................................................. 19-119.2 Target Configurations ............................................................................................................. 19-119.2.1 Transformation to OracleAS Cluster (Identity Management) ................................... 19-319.2.2 Transformation to Distributed OracleAS Cluster (Identity Management) .............. 19-419.2.3 Transformation to OracleAS Cold Failover Cluster (Identity Management) .......... 19-519.2.4 Transformation to Distributed OracleAS Cold Failover Cluster (Identity
Management) .................................................................................................................... 19-7
20 Transforming to OracleAS Cluster (Identity Management) Topologies
20.1 Overview of Transformation to OracleAS Cluster (Identity Management) ................... 20-120.2 Software, Hardware, and Documentation Requirements.................................................. 20-220.3 Overview of Steps .................................................................................................................... 20-420.4 Planning the Transformation ................................................................................................. 20-620.5 Steps in Detail ........................................................................................................................... 20-8
21 Transforming to OracleAS Cold Failover Cluster Topologies
21.1 Overview of Transformation to OracleAS Cold Failover Cluster (Identity Management) ........................................................................................................................... 21-1
21.2 Software, Hardware, and Documentation Requirements.................................................. 21-221.3 Transformation to OracleAS Cold Failover Cluster (Identity Management) on UNIX. 21-421.3.1 Overview of Steps............................................................................................................. 21-521.3.2 Steps in Detail.................................................................................................................... 21-621.4 Transformation to OracleAS Cold Failover Cluster (Identity Management) on
Windows ................................................................................................................................ 21-2221.4.1 Overview of Steps........................................................................................................... 21-2421.4.2 Steps in Detail.................................................................................................................. 21-2421.5 Transformation to Distributed OracleAS Cold Failover Cluster (Identity
Management) on UNIX and Windows.............................................................................. 21-5021.5.1 Overview of Steps........................................................................................................... 21-5321.5.2 Steps in Detail.................................................................................................................. 21-53

xvi
Part VI Appendices
A Troubleshooting High Availability
A.1 Troubleshooting OracleAS Cold Failover Cluster Configurations..................................... A-1A.1.1 OracleAS Web Cache Does Not Fail Over ...................................................................... A-1A.1.2 Unable to Perform Online Database Backup and Restore in OracleAS Cold
Failover Cluster Environment .......................................................................................... A-2A.1.3 Cannot Connect to Database for Restoration (Windows) ............................................ A-2A.2 Troubleshooting OracleAS Cluster (Identity Management) Configurations.................... A-3A.2.1 Logging into OracleAS Single Sign-On Takes a Long Time......................................... A-4A.2.2 Oracle Internet Directory Does Not Start Up on One of the Nodes............................ A-5A.2.3 Unable to Connect to Oracle Internet Directory, and Oracle Internet Directory
Cannot Be Restarted .......................................................................................................... A-5A.2.4 Cluster Configuration Assistant Fails During Installation .......................................... A-5A.2.5 Oracle Ultra Search Configuration Assistant is Unable to Connect to Oracle
Internet Directory During High Availability Infrastructure Installation ................. A-6A.2.6 odisrv Process Does Not Fail Over After "opmnctl stopall"......................................... A-6A.2.7 Unpredictable Behavior from OracleAS Cluster (Identity Management)
Configuration When System Time on All Nodes Is Not Synchronized .................... A-7A.2.8 Wrong Name Specified for Load Balancer ..................................................................... A-7A.3 Troubleshooting OracleAS Disaster Recovery Configurations........................................... A-8A.3.1 Standby Site Not Synchronized ....................................................................................... A-9A.3.2 Failure to Bring Up Standby Instances After Failover or Switchover......................... A-9A.3.3 Unable to Start Standalone OracleAS Web Cache Installations at the Standby Site A-9A.3.4 Standby Site Middle-tier Installation Uses Wrong Hostname................................... A-10A.3.5 Failure of Farm Verification Operation with Standby Farm ...................................... A-10A.3.6 Sync Farm Operation Returns Error Message .............................................................. A-11A.4 Troubleshooting Middle-Tier Components ......................................................................... A-12A.4.1 Using Multiple NICs with OracleAS Cluster (OC4J-EJB)........................................... A-12A.4.2 Performance Is Slow When Using the "opmn:" URL Prefix ....................................... A-13A.5 Troubleshooting Backup and Recovery................................................................................ A-14A.5.1 Unable to Restore OracleAS Metadata Repository to a Different Host ................... A-14A.6 Troubleshooting Real Application Clusters......................................................................... A-15A.6.1 Oracle Ultra Search Web Crawler Does Not Failover ................................................ A-15A.7 Need More Help?..................................................................................................................... A-16
B Manually Managed OracleAS Clusters
B.1 Overview of Manually Managed OracleAS Clusters ........................................................... B-1B.1.1 Oracle Application Server Manually Managed Clusters .............................................. B-1B.1.2 What Are Manually Managed OracleAS Clusters? ....................................................... B-2B.1.3 When Do I Need to Use a Manually Managed OracleAS Cluster? ............................. B-2B.1.3.1 No Database Requirement for Manually Managed OracleAS Cluster ............... B-3B.1.3.2 Tiered Deployment Requirement for Manually Managed OracleAS Cluster .... B-3B.1.3.3 Tiered Deployment with Security Requirement ..................................................... B-4B.2 Configuring Manually Managed OracleAS Clusters............................................................ B-4B.2.1 Associating Oracle Application Server Instances Together ......................................... B-4B.2.2 Configuring OC4J Instances for State Replication ......................................................... B-5

xvii
B.2.2.1 Configuring State Replication for Web Applications............................................. B-6B.2.2.2 Configuring State Replication for EJB Applications............................................... B-6B.2.3 Configuring the J2EE Application Properties................................................................. B-7B.2.4 Configuring Oracle HTTP Server for Failover and Load Balancing ........................... B-7B.2.4.1 Understanding mod_oc4j Request Routing............................................................. B-8B.2.4.2 Identifying the Instance Names................................................................................. B-8B.2.4.3 Configuring mod_oc4j Request Routing.................................................................. B-9
C OracleAS Guard Error Messages
C.1 DGA Error Messages................................................................................................................. C-1C.1.1 LRO Error Messages........................................................................................................... C-2C.1.2 Undo Error Messages......................................................................................................... C-3C.1.3 Create Template Error Messages...................................................................................... C-3C.1.4 Switchover Physical Standby Error Messages................................................................ C-3C.2 Duf Error Messages ................................................................................................................... C-4C.2.1 Database Error Messages................................................................................................. C-10C.2.2 Connection and Network Error Messages .................................................................... C-14C.2.3 SQL*Plus Error Messages ................................................................................................ C-16C.2.4 JDBC Error Messages ....................................................................................................... C-16C.2.5 OPMN Error Messages .................................................................................................... C-17C.2.6 Net Services Error Messages ........................................................................................... C-18C.2.7 LDAP or OID Error Messages......................................................................................... C-20C.2.8 System Error Messages .................................................................................................... C-20C.2.9 Warning Error Messages ................................................................................................. C-21C.2.10 OracleAS Database Error Messages ............................................................................... C-21C.2.11 OracleAS Topology Error Messages .............................................................................. C-22C.2.12 OracleAS Backup and Restore Error Messages............................................................ C-23C.2.13 OracleAS Guard Synchronize Error Messages............................................................. C-25C.2.14 OracleAS Guard Instantiate Error Messages ................................................................ C-26
Index

xviii

xix
Preface
This preface contains these sections:
■ Intended Audience
■ Documentation Accessibility
■ Related Documentation
■ Conventions
Intended AudienceThe Oracle Application Server High Availability Guide is intended for administrators, developers, and others whose role is to deploy and manage Oracle Application Server with high availability requirements.
Documentation AccessibilityOur goal is to make Oracle products, services, and supporting documentation accessible, with good usability, to the disabled community. To that end, our documentation includes features that make information available to users of assistive technology. This documentation is available in HTML format, and contains markup to facilitate access by the disabled community. Accessibility standards will continue to evolve over time, and Oracle is actively engaged with other market-leading technology vendors to address technical obstacles so that our documentation can be accessible to all of our customers. For more information, visit the Oracle Accessibility Program Web site at
http://www.oracle.com/accessibility/
Accessibility of Code Examples in DocumentationScreen readers may not always correctly read the code examples in this document. The conventions for writing code require that closing braces should appear on an otherwise empty line; however, some screen readers may not always read a line of text that consists solely of a bracket or brace.
Accessibility of Links to External Web Sites in DocumentationThis documentation may contain links to Web sites of other companies or organizations that Oracle does not own or control. Oracle neither evaluates nor makes any representations regarding the accessibility of these Web sites.

xx
TTY Access to Oracle Support ServicesOracle provides dedicated Text Telephone (TTY) access to Oracle Support Services within the United States of America 24 hours a day, seven days a week. For TTY support, call 800.446.2398.
Related DocumentationFor more information, see these Oracle resources:
■ Oracle Application Server Concepts
■ Oracle Application Server Installation Guide
■ Oracle Application Server Administrator’s Guide
ConventionsThe following text conventions are used in this document:
Convention Meaning
boldface Boldface type indicates graphical user interface elements associated with an action, or terms defined in text or the glossary.
italic Italic type indicates book titles, emphasis, or placeholder variables for which you supply particular values.
monospace Monospace type indicates commands within a paragraph, URLs, code in examples, text that appears on the screen, or text that you enter.

Part IOverview
The chapters in this part provide an introduction to Oracle Application Server high availability:
■ Chapter 1, "Introduction to High Availability"
■ Chapter 2, "Oracle Application Server High Availability Framework"


Introduction to High Availability 1-1
1Introduction to High Availability
This release of Oracle Application Server extends and improves upon the high availability solutions that were available in earlier releases. New flexible and automated high availability solutions for Oracle Application Server have been tested and are described in this guide. All of these solutions seek to ensure that applications that you deploy on Oracle Application Server meet the required availability to achieve your business goals. The solutions and procedures described in this book seek to eliminate single points of failure of any Oracle Application Server components with no or minimal outage in service.
This chapter explains high availability and its importance from the perspective of Oracle Application Server.
1.1 What is High AvailabilityThis section provides an overview of high availability from a problem-solution perspective. It has the sections:
■ Section 1.1.1, "High Availability Problems"
■ Section 1.1.2, "High Availability Solutions"
1.1.1 High Availability ProblemsMission critical computer systems need to be available 24 hours a day, 7 days a week, and 365 days a year. However, part or all of the system may be down during planned or unplanned downtime. A system's availability is measured by the percentage of time that it is providing service in the total time since it is deployed. Table 1–1 provides an example.
Table 1–2 depicts the various types of failures that are possible with a computer system.
Table 1–1 Availability percentages and corresponding downtime values
Availability Percentage Approximate Downtime Per Year
95% 18 days
99% 4 days
99.9% 9 hours
99.99% 1 hour
99.999% 5 minutes

What is High Availability
1-2 Oracle Application Server High Availability Guide
These two types of downtimes (planned and unplanned) are usually considered separately when designing a system’s availability requirements. A system’s needs may be very restrictive regarding its unplanned downtimes, but very flexible for planned downtimes. This is the typical case for applications with high peak loads during working hours, but that remain practically inactive at night and during weekends.
1.1.2 High Availability SolutionsHigh availability solutions can be categorized into local high availability solutions that provide high availability in a single data center deployment, and disaster recovery solutions, which are usually geographically distributed deployments that protect your applications from disasters such as floods or regional network outages.
Amongst possible types of failures, process, node, and media failures as well as human errors can be protected by local high availability solutions. Local physical disasters can be protected by geographically distributed disaster recovery solutions.
To solve the high availability problem, a number of technologies and best practices are needed. The most important mechanism is redundancy. High availability comes from redundant systems and components. Local high availability solutions can be categorized, by their level of redundancy, into active-active solutions and active-passive solutions (see Figure 1–1). Active-active solutions deploy two or more active system instances and can be used to improve scalability as well as provide high availability. All instances handle requests concurrently.
Active-passive solutions deploy an active instance that handles requests and a passive instance that is on standby. In addition, a heartbeat mechanism is set up between these two instances. This mechanism is provided and managed through operating system vendor-specific clusterware. Generally, vendor-specific cluster agents are also available to automatically monitor and failover between cluster nodes, so that when the active instance fails, an agent shuts down the active instance completely, brings up the passive instance, and application services can successfully resume processing. As a result, the active-passive roles are now switched. The same procedure can be done manually for planned or unplanned down time. Active-passive solutions are also generally referred to as cold failover clusters.
Table 1–2 System downtime and failure types
Downtime Type Failure Type
Unplanned downtime System failure
Data failure
Disasters
Human error
Planned downtime System maintenance1
1 Includes hardware and/or software changes (operating system, application server, configuration, application changes).
Data maintenance

What is High Availability
Introduction to High Availability 1-3
Figure 1–1 Active-active and active-passive high availability solutions
In addition to architectural redundancies, the following local high availability technologies are also necessary in a comprehensive high availability system:
■ Process death detection and automatic restart
Processes may die unexpectedly due to configuration or software problems. A proper process monitoring and restart system should monitor all system processes constantly and restart them should problems appear.
A system process should also maintain the number of restarts within a specified time interval. This is also important since continually restarting within short time periods may lead to additional faults or failures. Therefore a maximum number of restarts or retries within a specified time interval should also be designed as well.
■ Clustering
Clustering components of a system together allows the components to be viewed functionally as a single entity from the perspective of a client for runtime processing and manageability. A cluster is a set of processes running on single or multiple computers that share the same workload. There is a close correlation between clustering and redundancy. A cluster provides redundancy for a system.
■ Configuration management
A clustered group of similar components often need to share common configuration. Proper configuration management ensures that components provide the same reply to the same incoming request, allows these components to synchronize their configurations, and provides highly available configuration management for less administration downtime.
■ State replication and routing
For stateful applications, client state can be replicated to enable stateful failover of requests in the event that processes servicing these requests fail.
■ Server load balancing and failover
When multiple instances of identical server components are available, client requests to these components can be load balanced to ensure that the instances have roughly the same workload. With a load balancing mechanism in place, the instances are redundant. If any of the instances fail, requests to the failed instance can be sent to the surviving instances.
■ Backup and recovery
Active-Active System
Node 1(Active)
Node 2(Active)
ClientRequests
Active-Passive System
Node 1(Active)
Node 2(Passive)
ClientRequests On
Failover

Oracle Application Server High Availability Concepts
1-4 Oracle Application Server High Availability Guide
User errors may cause a system to malfunction. In certain circumstances, a component or system failure may not be repairable. A backup and recovery facility should be available to back up the system at certain intervals and restore a backup when an unrepairable failure occurs.
Disaster recovery solutions typically set up two homogeneous sites, one active and one passive. Each site is a self-contained system. The active site is generally called the production site, and the passive site is called the standby site. During normal operation, the production site services requests; in the event of a site failover or switchover, the standby site takes over the production role and all requests are routed to that site. To maintain the standby site for failover, not only must the standby site contain homogeneous installations and applications, data and configurations must also be synchronized constantly from the production site to the standby site.
Figure 1–2 Geographically distributed disaster recovery
1.2 Oracle Application Server High Availability Concepts An overview of high availability for Oracle Application Server is presented in the following sections:
■ Section 1.2.1, "Terminology"
■ Section 1.2.2, "Oracle Application Server Base Architecture"
■ Section 1.2.3, "Oracle Application Server High Availability Architectures"
■ Section 1.2.4, "Choosing the Best High Availability Architecture"
1.2.1 TerminologyThe definitions of terms below are useful in helping to understand the concepts presented in this book:
■ active-active: In a high availability system, the equivalent members of that system can be servicing requests concurrently. Under normal operation where non of the members have failed, all equivalent members are active and none are on standby. This is called an active-active system.
■ active-passive: In a high availability system, some members of the system can be actively servicing requests and performing work, while other members can be inactive. These inactive members are known to be passive. They are not activated until one or more of the active nodes have failed. Consumers of services provided by the system may or may not notice the failure. An active-active system generally provides more transparency and options for scalability to consumers than an active-passive system.
Oracle Application ServerProduction Site
(e.g. San Francisco)
Oracle Application ServerStandby Site(e.g. Atlanta)
Data andConfiguration
Synchronization
Oracle Application Server High Availability Concepts
Introduction to High Availability 1-5
■ failover: When a member of a highly available system fails unexpectedly (unplanned downtime), in order to continue offering services to its consumers, the system undergoes a failover operation. If the system is an active-passive system, the passive member is activated during the failover operation and consumers are directed to it instead of the failed member. The failover process can be performed manually, or it can be automated by setting up hardware cluster services to detect failures and move cluster resources from the failed node to the standby node. If the system is an active-active system, the failover is performed by the load balancer entity serving requests to the active members. If an active member fails, the load balancer detects the failure and automatically redirects requests for the failed member to the surviving active members.
■ failback: After a system undergoes a successful failover operation, the original failed member can be repaired over time and be re-introduced into the system as a standby member. If desired, a failback process can be initiated to activate this member and deactivate the other. This process reverts the system back to its pre-failure configuration.
■ hardware cluster: A hardware cluster is a collection of computers that provides a single view of network services (for example: an IP address) or application services (for example: databases, Web servers) to clients of these services. Each node in a hardware cluster is a standalone server that runs its own processes. These processes can communicate with one another to form what looks like a single system that cooperatively provides applications, system resources, and data to users.
A hardware cluster achieves high availability and scalability through the use of specialized hardware (cluster interconnect, shared storage) and software (health monitors, resource monitors). (The cluster interconnect is a private link used by the hardware cluster for heartbeat information to detect node death.) Due to the need for specialized hardware and software, hardware clusters are commonly provided by hardware vendors such as SUN, HP, IBM, and Dell. While the number of nodes that can be configured in a hardware cluster is vendor dependent, for the purpose of Oracle Application Server high availability, only two nodes are required. Hence, this document assumes a two-node hardware cluster for high availability solutions employing a hardware cluster.
■ cluster agent: The software that runs on a node member of a hardware cluster that coordinates availability and performance operations with other nodes. Clusterware provides resource grouping, monitoring, and the ability to move services. A cluster agent can automate the service failover.
■ clusterware: A software that manages the operations of the members of a cluster as a system. It allows one to define a set of resources and services to monitor via a heartbeat mechanism between cluster members and to move these resources and services to a different member in the cluster as efficiently and transparently as possible.
■ shared storage: Even though each hardware cluster node is a standalone server that runs its own set of processes, the storage subsystem required for any cluster-aware purpose is usually shared. Shared storage refers to the ability of the cluster to be able to access the same storage, usually disks, from both the nodes. While the nodes have equal access to the storage, only one node, the primary node, has active access to the storage at any given time. The hardware cluster’s software grants the secondary node access to this storage if the primary node fails. For the OracleAS Infrastructure in the OracleAS Cold Failover Cluster environment, its ORACLE_HOME is on such a shared storage file system. This file system is mounted by the primary node; if that node fails, the secondary node

Oracle Application Server High Availability Concepts
1-6 Oracle Application Server High Availability Guide
takes over and mounts the file system. In some cases, the primary node may relinquish control of the shared storage, such as when the hardware cluster’s software deems the Infrastructure as unusable from the primary node and decides to move it to the secondary.
■ primary node: The node that is actively executing one or more Infrastructure installations at any given time. If this node fails, the Infrastructure is failed over to the secondary node. Since the primary node runs the active Infrastructure installation(s), it is considered the "hot" node. See the definition for "secondary node" in this section.
■ secondary node: This is the node that takes over the execution of the Infrastructure if the primary node fails. Since the secondary node does not originally run the Infrastructure, it is considered the "cold" node. And, because the application fails from a hot node (primary) to a cold node (secondary), this type of failover is called cold failover. See the definition for "primary node" in this section.
■ network hostname: Network hostname is a name assigned to an IP address either through the /etc/hosts file (in UNIX), C:\WINDOWS\system32\drivers\etc\hosts file (in Windows), or through DNS resolution. This name is visible in the network that the machine to which it refers to is connected. Often, the network hostname and physical hostname are identical. However, each machine has only one physical hostname but may have multiple network hostnames. Thus, a machine’s network hostname may not always be its physical hostname.
■ physical hostname: This guide differentiates between the terms physical hostname and network hostname. This guide uses physical hostname to refer to the "internal name" of the current machine. In UNIX, this is the name returned by the hostname command.
Physical hostname is used by Oracle Application Server middle-tier installation types to reference the local host. During installation, the installer automatically retrieves the physical hostname from the current machine and stores it in the Oracle Application Server configuration metadata on disk.
■ switchover: During normal operation, active members of a system may require maintenance or upgrading. A switchover process can be initiated to allow a substitute member to take over the workload performed by the member that requires maintenance or upgrading, which undergoes planned downtime. The switchover operation ensures continued service to consumers of the system.
■ switchback: When a switchover operation is performed, a member of the system is deactivated for maintenance or upgrading. When the maintenance or upgrading is completed, the system can undergo a switchback operation to activate the upgraded member and bring the system back to the pre-switchover configuration.
■ virtual hostname: Virtual hostname is a network addressable hostname that maps to one or more physical machines via a load balancer or a hardware cluster. For load balancers, the name "virtual server name" is used interchangeably with virtual hostname in this book. A load balancer can hold a virtual hostname on behalf of a set of servers, and clients communicate indirectly with the machines using the virtual hostname. A virtual hostname in a hardware cluster is a network hostname assigned to a cluster virtual IP. Because the cluster virtual IP is not permanently attached to any particular node of a cluster, the virtual hostname is not permanently attached to any particular node either.
Oracle Application Server High Availability Concepts
Introduction to High Availability 1-7
■ virtual IP: Also, cluster virtual IP and load balancer virtual IP. Generally, a virtual IP can be assigned to a hardware cluster or load balancer. To present a single system view of a cluster to network clients, a virtual IP serves as an entry point IP address to the group of servers which are members of the cluster. A virtual IP can be assigned to a server load balancer or a hardware cluster.
A hardware cluster uses a cluster virtual IP to present to the outside world the entry point into the cluster (it can also be set up on a standalone machine). The hardware cluster’s software manages the movement of this IP address between the two physical nodes of the cluster while clients connect to this IP address without the need to know which physical node this IP address is currently active on. In a typical two-node hardware cluster configuration, each machine has its own physical IP address and physical hostname, while there could be several cluster IP addresses. These cluster IP addresses float or migrate between the two nodes. The node with current ownership of a cluster IP address is active for that address.
A load balancer also uses a virtual IP as the entry point to a set of servers. These servers tend to be active at the same time. This virtual IP address is not assigned to any individual server but to the load balancer which acts as a proxy between servers and their clients.
1.2.2 Oracle Application Server Base ArchitectureThe first thing to understand for high availability is the system's base architecture. Then, to make this system highly available, examine every component and connection path between components and make each one of them highly available. This produces a highly available architecture by essentially adding redundancy to the base architecture.
Figure 1–3 illustrates the base architecture of Oracle Application Server.
Note: Whenever the phrase "virtual hostname" is used in this document, it is assumed to be associated with a virtual IP address. In cases where just the IP address is needed or used, it will be explicitly stated.

Oracle Application Server High Availability Concepts
1-8 Oracle Application Server High Availability Guide
Figure 1–3 Oracle Application Server base architecture
At a high level, Oracle Application Server consists of the Oracle Application Server middle-tier business applications, Oracle Identity Management, and OracleAS Metadata Repository. The latter two are part of the OracleAS Infrastructure.
Oracle Identity Management software manages user authentication, authorization, and identity information. Functionally, its main components are:
■ OracleAS Single Sign-On
■ Oracle Delegated Administration Services
■ Oracle Internet Directory
■ Oracle Directory Integration and Provisioning
Architecturally, Oracle Identity Management can be broken down into a Web server tier of Oracle HTTP Server, an OracleAS Single Sign-On/Oracle Delegated Administration Services middle-tier composed of an Oracle Application Server Containers for J2EE (OC4J) instance for these security applications, and an Oracle Internet Directory/Oracle Directory Integration and Provisioning tier at the back end. The OracleAS Metadata Repository is an Oracle database that manages configuration, management, and product metadata for components throughout the OracleAS Infrastructure and OracleAS middle-tier.
The middle tier hosts most of Oracle Application Server business applications, such as:
■ Oracle Application Server Portal
■ Oracle Application Server Wireless
■ Oracle Application Server Integration
These applications rely on Oracle Identity Management and OracleAS Metadata Repository for security and metadata support. The middle tier also includes a Web caching sub-tier (Oracle Application Server Web Cache), a Web server sub-tier (Oracle HTTP Server), and OC4J instance(s). Behind the middle tier, the OracleAS Metadata Repository serves as the data tier. In actual deployments, other databases may also exist in the data tier (for example, a customer database for OC4J applications deployed on the middle tier).
OracleAS Infrastructure
Clients
Oracle IdentityManagement
OracleAS MetadataRepository
OracleAS Middle TierBusiness Applications

Oracle Application Server High Availability Concepts
Introduction to High Availability 1-9
Figure 1–4 shows the various sub-tiers that are traversed by client requests to the Oracle Application Server business applications and the Oracle Application Server Infrastructure services. An overall view of Infrastructure services is provided in Figure 1–5. These services include Oracle Identity Management, metadata repository, and LDAP services.
The base architecture supports many availability features, such as automatic process monitoring and restart, application server backup and recovery; however, it does not provide complete high availability. Several single points of failure exist. To eliminate them, redundancy has to be provided for each component. This can be achieved by extending the base architecture with additional high availability architectures.
Figure 1–4 Sub-tiers of the base architecture of Oracle Application Server
See Also: Oracle Application Server Concepts

Oracle Application Server High Availability Concepts
1-10 Oracle Application Server High Availability Guide
Figure 1–5 Overview of Infrastructure Services
1.2.3 Oracle Application Server High Availability ArchitecturesOracle Application Server provides both local high availability and disaster recovery solutions for maximum protection against any kind of failure with flexible installation, deployment, and security options. The redundancy of Oracle Application Server local high availability and disaster recovery originates from its redundant high availability architectures.
At a high level, Oracle Application Server local high availability architectures include several active-active and active-passive architectures for the OracleAS middle-tier and the OracleAS Infrastructure. Although both types of solutions provide high availability, active-active solutions generally offer higher scalability and faster failover, although, they tend to be more expensive as well. With either the active-active or the active-passive category, multiple solutions exist that differ in ease of installation, cost, scalability, and security.
Building on top of the local high availability solutions is the Oracle Application Server Disaster Recovery solution, Oracle Application Server Guard. This unique solution combines the proven Oracle Data Guard technology in the Oracle Database with advanced disaster recovery technologies in the application realm to create a comprehensive disaster recovery solution for the entire application system. This solution requires homogenous production and standby sites, but other Oracle Application Server instances can be installed in either site as long as they do not interfere with the instances in the disaster recovery setup. Configurations and data must be synchronized regularly between the two sites to maintain homogeneity.
1.2.4 Choosing the Best High Availability ArchitectureThere is no single best high availability solution for all systems in the world, but there may be a best solution for your system. Perhaps the most important decision in designing a highly available system is choosing the most appropriate high availability architecture or type of redundancy based on service level requirements as needed by a
IdentityManagementApplications
OC4J
Oracle HTTPServer
Oracle Identity Management
Infrastructure Services
Oracle Metadata Repositoryand
Oracle Internet Directory(LDAP)
PLSQL
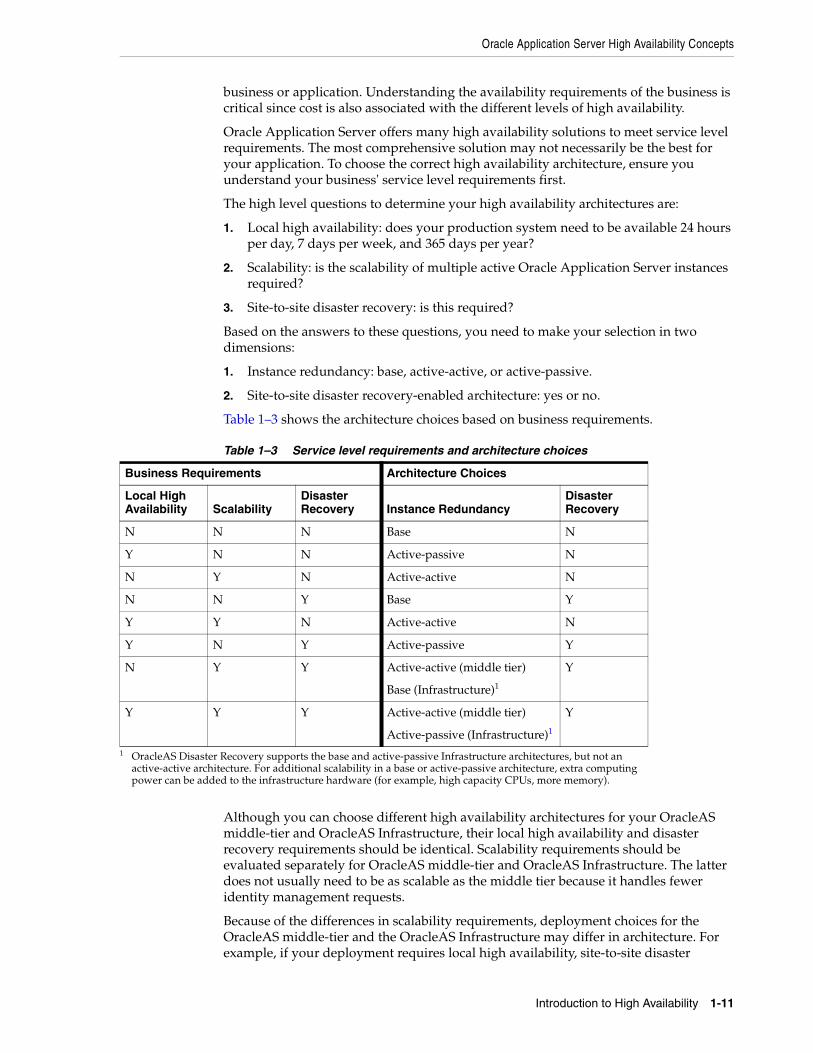
Oracle Application Server High Availability Concepts
Introduction to High Availability 1-11
business or application. Understanding the availability requirements of the business is critical since cost is also associated with the different levels of high availability.
Oracle Application Server offers many high availability solutions to meet service level requirements. The most comprehensive solution may not necessarily be the best for your application. To choose the correct high availability architecture, ensure you understand your business' service level requirements first.
The high level questions to determine your high availability architectures are:
1. Local high availability: does your production system need to be available 24 hours per day, 7 days per week, and 365 days per year?
2. Scalability: is the scalability of multiple active Oracle Application Server instances required?
3. Site-to-site disaster recovery: is this required?
Based on the answers to these questions, you need to make your selection in two dimensions:
1. Instance redundancy: base, active-active, or active-passive.
2. Site-to-site disaster recovery-enabled architecture: yes or no.
Table 1–3 shows the architecture choices based on business requirements.
Although you can choose different high availability architectures for your OracleAS middle-tier and OracleAS Infrastructure, their local high availability and disaster recovery requirements should be identical. Scalability requirements should be evaluated separately for OracleAS middle-tier and OracleAS Infrastructure. The latter does not usually need to be as scalable as the middle tier because it handles fewer identity management requests.
Because of the differences in scalability requirements, deployment choices for the OracleAS middle-tier and the OracleAS Infrastructure may differ in architecture. For example, if your deployment requires local high availability, site-to-site disaster
Table 1–3 Service level requirements and architecture choices
Business Requirements Architecture Choices
Local High Availability Scalability
Disaster Recovery Instance Redundancy
Disaster Recovery
N N N Base N
Y N N Active-passive N
N Y N Active-active N
N N Y Base Y
Y Y N Active-active N
Y N Y Active-passive Y
N Y Y Active-active (middle tier)
Base (Infrastructure)1
1 OracleAS Disaster Recovery supports the base and active-passive Infrastructure architectures, but not an active-active architecture. For additional scalability in a base or active-passive architecture, extra computing power can be added to the infrastructure hardware (for example, high capacity CPUs, more memory).
Y
Y Y Y Active-active (middle tier)
Active-passive (Infrastructure)1
Y

High Availability Information in Other Documentation
1-12 Oracle Application Server High Availability Guide
recovery, scalable middle tier but basic OracleAS Infrastructure scalability, you can choose an active-active middle tier, an active-passive OracleAS Infrastructure, and deploy a standby disaster recovery site that mirrors all middle-tier and OracleAS Infrastructure configuration in the production site.
1.3 High Availability Information in Other DocumentationThe following table provides a list of cross-references to high availability information in other documents in the Oracle library. This information mostly pertains to high availability of various Oracle Application Server components.
In addition, references to these and other documentation are noted in the text of this guide, where applicable.
Table 1–4 Cross-references to high availability information in Oracle documentation
Component Location of Information
Overall high availability concepts In the high availability chapter of Oracle Application Server Concepts.
Oracle installer In the chapter for installing in a high availability environment in Oracle Application Server Installation Guide.
Oracle Application Server Backup and Recovery Tool
In the backup and restore part of Oracle Application Server Administrator’s Guide.
Oracle Application Server Web Cache
Oracle Application Server Web Cache Administrator’s Guide
Identity Management service replication
In "Advanced Configurations" chapter of Oracle Application Server Single Sign-On Administrator’s Guide.
Identity Management high availability deployment
In "Oracle Identity Management Deployment Planning" chapter of Oracle Identity Management Concepts and Deployment Planning Guide.
Database high availability Oracle High Availability Architecture and Best Practices
Distributed Configuration Management commands
Distributed Configuration Management Administrator’s Guide
Oracle Process Manager and Notification Server commands
Oracle Process Manager and Notification Server Administrator’s Guide
OC4J high availability Oracle Application Server Containers for J2EE Services Guide
Oracle Application Server Containers for J2EE User’s Guide
Oracle Application Server Containers for J2EE Enterprise JavaBeans Developer’s Guide
Java Object Cache Oracle Application Server Web Services Developer’s Guide
Load balancing to OC4J processes Oracle HTTP Server Administrator’s Guide
Oracle Application Server Wireless high availability
Oracle Application Server Wireless Administrator’s Guide
Oracle Business Intelligence Discoverer high availability
Oracle Business Intelligence Discoverer Configuration Guide
OracleAS Forms Services Oracle Application Server Forms Services Deployment Guide
OracleAS Reports Services Oracle Application Server Reports Services Publishing Reports to the Web
Oracle Application Server Integration InterConnect ini file information
Oracle Application Server Integration InterConnect User’s Guide

Oracle Application Server High Availability Framework 2-1
2Oracle Application Server High Availability
Framework
Whereas Chapter 1 provided an overview of high availability in general, this chapter introduces you to the specific sets of features, services, and environments that Oracle Application Server provides to ensure high availability for all its components and services. It contains the following sections:
■ Section 2.1, "Redundant Architectures"
■ Section 2.2, "High Availability Services in Oracle Application Server"
2.1 Redundant ArchitecturesOracle Application Server provides redundancy by offering support for multiple instances supporting the same workload. These redundant configurations provide increased availability either through a distributed workload, through a failover setup, or both.
From the entry point to an Oracle Application Server system (content cache) to the back end layer (data sources), all the tiers that are crossed by a request can be configured in a redundant manner with Oracle Application Server. The configuration can be an active-active configuration using OracleAS Cluster or an active-passive configuration using OracleAS Cold Failover Cluster.
In the following sections, we describe the basics of these configurations:
■ Section 2.1.1, "Oracle Application Server Active-Active Configurations: Oracle Application Server Clusters"
■ Section 2.1.2, "Oracle Application Server Active-Passive Configurations: Oracle Application Server Cold Failover Clusters"
2.1.1 Oracle Application Server Active-Active Configurations: Oracle Application Server Clusters
Oracle Application Server provides an active-active redundant model for all its components with OracleAS Clusters. In an OracleAS Cluster, two or more Oracle Application Server instances are configured to serve the same application workload. These instances can reside on the same machine or on different machines.
The active instances may be front-ended by an external load balancer, which can redirect requests to any of the active instances, or by some other application-level configuration, such as address lists, to distribute the requests.

Redundant Architectures
2-2 Oracle Application Server High Availability Guide
The most common properties of an OracleAS Cluster configuration include:
■ Identical instance configuration
The instances are meant to serve the same workload or application. Their configuration guarantees that they deliver the same exact reply to the same request. Some configuration properties may be identical and others may be instance-specific, such as local host name information.
■ Managed collectively
Changes made to one system will usually need to be propagated to the other systems in an active-active configuration.
■ Operate independently
In order to provide maximum availability, the loss of one Oracle Application Server instance in an active-active configuration should not affect the ability of the other instances to continue to serve requests.
The advantages of an OracleAS Cluster configuration include:
■ Increased availability
An active-active configuration is a redundant configuration. Loss of one instance can be tolerated because other instance can continue to serve the same requests.
■ Increased scalability and performance
Multiple identically-configured instances provide the capability to have a distributed workload shared among different machines and processes. If configured correctly, new instances can also be added as the demand of the application grows.
In general, the term OracleAS Cluster describes clustering at the Oracle Application Server instance level. However, if it is necessary to call out the specific type of instances being clustered, this document will use OracleAS Cluster (type) to characterize the cluster solution. For example:
■ two or more J2EE instances are known as OracleAS Cluster (J2EE)
■ two or more OracleAS Portal instances are known as OracleAS Cluster (Portal)
■ two or more Oracle Identity Management instances are known as OracleAS Cluster (Identity Management)
2.1.2 Oracle Application Server Active-Passive Configurations: Oracle Application Server Cold Failover Clusters
Oracle Application Server provides an active-passive model for all its components using OracleAS Cold Failover Clusters. In an OracleAS Cold Failover Cluster configuration, two or more application server instances are configured to serve the same application workload but only one is active at any particular time. These instances can reside on the same machine or on different machines.
The most common properties of an OracleAS Cold Failover Cluster configuration include:
■ Shared storage
The passive Oracle Application Server instance in an active-passive configuration has access to the same Oracle binaries, configuration files, and data as the active instance.

Redundant Architectures
Oracle Application Server High Availability Framework 2-3
■ Virtual hostname
During OracleAS Infrastructure installation, you can specify a virtual hostname in the Specify Virtual Hostname screen. This OracleAS Infrastructure virtual hostname can be managed by a hardware cluster or a load balancer and is used by the middle-tier and OracleAS Infrastructure components to access the OracleAS Infrastructure. This is regardless of whether the OracleAS Infrastructure is in a single node installation, in the OracleAS Cold Failover Cluster solution, or in the OracleAS Cluster solution.
The virtual hostname is the hostname associated with the virtual IP. This is the name that is chosen to give the Oracle Application Server middle-tier a single system view of the OracleAS Infrastructure with the help of a hardware cluster or load balancer. This name-IP entry must be added to the DNS that the site uses, so that the middle-tier nodes can associate with the OracleAS Infrastructure without having to add this entry into their local /etc/hosts (or equivalent) file. For example, if the two physical hostnames of the hardware cluster are node1.mycompany.com and node2.mycompany.com, the single view of this cluster can be provided by the name selfservice.mycompany.com. In the DNS, selfservice maps to the virtual IP address of the OracleAS Infrastructure, which either floats between node1 and node2 via a hardware cluster or maps to node1 and node2 by a load balancer, all without the middle tier knowing which physical node is active and actually servicing a particular request.
You cannot specify a virtual hostname during Oracle Application Server middle-tier installation, but you can still use a virtual hostname via a hardware cluster or load balancer by following the post-installation configuration steps for cold failover cluster middle tiers. See the Oracle Application Server Installation Guide.
■ Failover procedure
An active-passive configuration also includes a set of scripts and procedures to detect failure of the Active instance and to failover to the Passive instance while minimizing downtime.
The advantages of an OracleAS Cold Failover Cluster configuration include:
■ Increased availability
If the active instance fails for any reason or must be taken offline, an identically configured passive instance is prepared to take over at any time.
■ Reduced operating costs
In an active-passive configuration only one set of processes is up and serving requests. Management of the active instance is generally less than managing an array of active instances.
■ Application independence
Some applications may not be suited to an active-active configuration. This may include applications which rely heavily on application state or on information stored locally. An active-passive configuration has only one instance serving requests at any particular time.
In general, the term OracleAS Cold Failover Cluster describes clustering at the Oracle Application Server instance level. However, if it is necessary to call out the specific
See Also: Section 1.2.2, "Oracle Application Server Base Architecture"

High Availability Services in Oracle Application Server
2-4 Oracle Application Server High Availability Guide
type of instances being clustered, this document will use OracleAS Cold Failover Cluster (type) to characterize the cluster solution. For example
■ OracleAS Cold Failover Cluster (Identity Management)
■ OracleAS Cold Failover Cluster (Middle-Tier)
From the entry point of an Oracle Application Server system (content cache) to the back end layer (data sources), all the tiers that are crossed by a client request can be configured in a redundant manner either in an active-active configuration using OracleAS Clusters or in an active-passive configuration using OracleAS Cold Failover Clusters.
2.2 High Availability Services in Oracle Application ServerOracle Application Server provides different features and topologies to support high availability across the its stack. This includes solutions that extend across both the OracleAS middle-tier and the OracleAS Infrastructure tier.
This section describes the following high availability services in Oracle Application Server:
■ Section 2.2.1, "Process Death Detection and Automatic Restart"
■ Section 2.2.2, "Configuration Management"
■ Section 2.2.3, "State Replication"
■ Section 2.2.4, "Server Load Balancing and Failover"
■ Section 2.2.5, "Backup and recovery"
■ Section 2.2.6, "Disaster Recovery"
2.2.1 Process Death Detection and Automatic RestartAn Oracle Application Server instance consists of many different running processes to serve client requests. Ensuring high availability means ensuring that all these processes run smoothly, fulfill requests, and do not experience any unexpected hangs or failures.
The interdependency of these processes must also be managed so that they are brought up in the proper sequence, with processes starting up only after the processes that they are dependent on have started successfully.
Oracle Application Server provides high availability and management services at the process level with Oracle Process Manager and Notification Server (OPMN)
2.2.1.1 Process Management with Oracle Process Manager and Notification ServerOPMN has the following capabilities:
■ Provides automatic death detection of Oracle Application Server processes.
■ Provides an integrated way to operate Oracle Application Server components.
■ Provides automatic restart of Oracle Application Server processes when they become unresponsive, terminate unexpectedly, or become unreachable as determined by ping and notification operations.
■ Channels all events from different Oracle Application Server component instances to all Oracle Application Server components that can utilize them.

High Availability Services in Oracle Application Server
Oracle Application Server High Availability Framework 2-5
■ Enables gathering of host and Oracle Application Server process statistics and tasks.
■ Does not depend on any other Oracle Application Server component being up and running before it can be started and used.
2.2.1.1.1 Automated Process Management with OPMN OPMN can be used to explicitly manage the following Oracle Application Server processes:
■ Oracle HTTP Server
■ Oracle Application Server Containers for J2EE
■ Distributed Configuration Management daemon
■ OracleAS Log Loader
■ OracleAS Guard (for disaster recovery)
■ Oracle Internet Directory
■ OracleAS Port Tunnel
■ OracleAS Web Cache
■ Oracle Business Intelligence Discoverer
■ OracleAS Wireless
In addition, OPMN implicitly manages any applications that rely on the above components. For example, any J2EE applications that run under OC4J are managed by OPMN.
OPMN is also extensible, providing the capability to add information about custom processes including load environment information, stopping procedures, and methods for death detection and restart.
2.2.1.1.2 Distributed Process Control with OPMN Although OPMN can manage processes on a local Oracle Application Server instance, OPMN daemons running on different instances can also work together to provide distributed process management and control.
For example, a command issued on one machine can be used to start all processes or a specific process type across all local and remote Oracle Application Server instances.
OPMN consists of two major components:
■ Oracle Notification Server (ONS)
The ONS is the transport mechanism for failure, recovery, startup, and other related notifications between components in Oracle Application Server. It operates according to a publish-subscribe model: an Oracle Application Server component receives a notification of a certain type per its subscription to ONS. When such a notification is published, ONS sends it to the appropriate subscribers.
■ Oracle Process Manager (PM)
The PM is the centralized process management mechanism in Oracle Application Server and is used to manage Oracle Application Server processes. It is responsible for starting, restarting, stopping, and monitoring every process it manages. The PM handles all requests sent to OPMN associated with controlling a process or obtaining status about a process. The PM is also responsible for performing
See Also: Oracle Process Manager and Notification Server Administrator’s Guide

High Availability Services in Oracle Application Server
2-6 Oracle Application Server High Availability Guide
death-detection and automatic restart of the processes it manages. The Oracle Application Server processes that the PM is configured to manage are specified in a file named opmn.xml. The PM waits for a user command to start specific or all processes. When a specific process or all processes are to be stopped, the PM receives a request as specified by the request parameters.
2.2.2 Configuration ManagementManaging and ensuring component high availability involves not only managing processes but also the configuration information for those processes both locally and across a set of Oracle Application Server instances.
2.2.2.1 Configuration Management with Distributed Configuration ManagementDistributed Configuration Management (DCM) is a management framework that enables you to create and manage multiple Oracle Application Server instances as one. Multiple instances enable Oracle Application Server to handle large volumes of traffic reliably since the workload is distributed among the instances.
DCM enables you to:
■ keep a configuration synchronized across multiple Oracle Application Server instances
■ archive and restore versions of configurations
■ export and import configurations between Oracle Application Server instances and clusters
DCM enables you to archive, import and export, and synchronize the configurations of multiple OracleAS instances as if they were a single Oracle Application Server instance. To provide this management functionality, DCM keeps information about an Oracle Application Server instance's configuration in either a file-based or an Oracle database-based repository known as the OracleAS Metadata Repository.
The OracleAS Metadata Repository contains:
■ configuration files for Oracle HTTP Server, OC4J, OPMN, and OracleAS JAAS Provider components
■ deployed J2EE applications
■ information about the OPMN instance or OracleAS Cluster
2.2.2.1.1 Configuration Synchronization and Management with DCM With DCM, you can manage configuration information for the following Oracle Application Server components and applications:
■ Oracle HTTP Server
■ Oracle Application Server Containers for J2EE
■ Oracle Process Manager and Notification Server
■ Oracle Application Server Java Authentication and Authorization Service (JAAS) Provider
■ J2EE applications
The configuration information for each of these components is stored in the metadata repository for each OracleAS instance. Once an OracleAS instance is managed by DCM, configuration information can then be:
■ archived for future use

High Availability Services in Oracle Application Server
Oracle Application Server High Availability Framework 2-7
■ restored locally from a previous archive
■ replicated to another OracleAS instance to provide configuration synchronization across a cluster of OracleAS instances
2.2.2.1.2 Distributed Application Deployment with DCM Oracle's Distributed Configuration Management tool, dcmctl, enables synchronization of configuration information across a cluster of OracleAS instances. This includes the ability to deploy new J2EE applications on one instance of the cluster and then have the same application automatically deployed by each member of the cluster.
Once an application has been deployed in this way, any instance in the cluster can then receive and serve requests for that application.
2.2.3 State ReplicationOne of the advantages of a distributed application is the ability to set up multiple redundant processes that can all serve the same requests. In the event that one of these application processes becomes unavailable, another application process can service the request.
Some applications may require Oracle Application Server to maintain stateful information across consecutive requests. In order to provide transparent failover of these requests, it is necessary to recreate this application state across multiple processes. Oracle Application Server enables the replication of state in J2EE applications through OracleAS Cluster (OC4J). In an OracleAS Cluster (OC4J), several processes work together to deliver the same J2EE application and replicate the state created by it. This enables the transparent failover of requests between the participants in the cluster. Two different types of state are typically maintained in a J2EE application: HTTP session state (updated by servlets and JSPs) and stateful session EJB state (updated by stateful session EJB instances). OracleAS Cluster (OC4J) enables the replication of both.
2.2.4 Server Load Balancing and FailoverLoad balancing involves the ability to distribute requests among two or more processes.
Features of a software or hardware external load balancer includes:
■ load balancing algorithm
A rule or set of rules for how to allocate requests across the different instances. The most common load balancing algorithms include simple round-robin or assignment based on some weighted property of the instance such as the response time or capacity of that instance relative to other instances.
■ death detection
The ability to recognize failed requests to one or more instances, and additionally, the ability to mark those instances as inactive so that no further requests will be forwarded to them.
2.2.4.1 Internal Load Balancing Mechanism Provided in Oracle Application ServerDifferent load balancing mechanisms are provided to communicate the components in an Oracle Application Server system. Load balancing takes place:
See Also: The OC4J Clustering chapter in the Oracle Application Server Containers for J2EE User’s Guide.

High Availability Services in Oracle Application Server
2-8 Oracle Application Server High Availability Guide
■ from Oracle Application Server Web Cache to Oracle HTTP Servers
■ from Oracle HTTP Servers to OC4J processes for J2EE applications
■ from Oracle HTTP Servers to the database for PLSQL applications
■ intra OC4J processes from the presentation layer components (servlets and JSPs) to the business layer components (EJBs)
■ from OC4J processes to databases
All sub-tiers in Oracle Application Server are enabled to manage failures in the connections that they establish with the next tier as follows:
■ Connections established from OracleAS Web Cache to Oracle HTTP Servers: OracleAS Web Cache detects failures in the replies returned by Oracle HTTP Servers and routes the new requests to the available Oracle HTTP Servers.
■ Connections established from Oracle HTTP Servers to OC4J processes: Oracle HTTP Server maintains a routing table of available OC4J processes and routes new requests only to those OC4J processes that are up an running.
■ Connections established from Oracle HTTP Servers to databases: mod_plsql detects failures in the database and routes requests to the available database nodes.
■ Connections established between OC4J processes: OC4J detects failures in the RMI invocations to the EJB tier and fails communication over to available EJB nodes.
■ Connections established between OC4J processes and databases: OC4J drivers are enabled to detect failures of database nodes and re-route requests to available nodes.
2.2.4.2 External Load BalancersTo load balance requests among many Oracle Application Server instances in an active-active configuration, Oracle recommends the use of an external load balancer.
When several Oracle Application Server instances are grouped to work together, they present themselves as a single virtual entry point to the system, which hides the multiple instance configuration. External load balancers can send requests to any application server instance in a cluster, as any instance can service any request. An administrator can raise the capacity of the system by introducing additional application server instances. These instances can be installed on separate nodes to allow for redundancy in case of node failure.
There are different types of external load balancers you can use with Oracle Application Server instances. Table 2–1 summarizes the different types.
Table 2–1 Types of External Load Balancers
Load Balancer Type Description
Hardware load balancer Hardware load balancing involves placing a hardware load balancer, such as Big-IP or Alteon, in front of a group of Oracle Application Server instances or OracleAS Web Cache. The hardware load balancer routes requests to the Oracle HTTP Server or OracleAS Web Cache instances in a client-transparent fashion.
Software load balancer Software load balancer involves using some process that intercepts the different calls to an application server and routes those requests to redundant components.
Lvs network load balancer for Linux
With some Linux operating systems, you can use the operating system to perform network load balancing.

High Availability Services in Oracle Application Server
Oracle Application Server High Availability Framework 2-9
External Load Balancer RequirementsOracle does not provide external load balancers. You can get external load balancers from other companies.
To ensure that your external load balancer can work with Oracle Application Server, check that your external load balancer meets the requirements listed in Table 2–2.
Note that you may not need all the requirements listed in the table. The requirements for an external load balancer depend on the topology being considered, and on the Oracle Application Server components that are being load balanced.
Windows Network Load Balancer (applicable to Windows version of Oracle Application Server)
With some Windows operating systems, you can use the operating system to perform network load balancing. For example, with Microsoft Advanced Server, the NLB functionality enables you to send requests to different machines that share the same virtual IP or MAC address. The servers themselves to do not need to be clustered at the operating system level.
Table 2–2 External Load Balancer Requirements
External Load Balancer Requirement Description
Virtual servers and port configuration
You need to be able to configure virtual server names and ports on your external load balancer, and the virtual server names and ports must meet the following requirements:
■ The load balancer should allow configuration of multiple virtual servers. For each virtual server, the load balancer should allow configuration of traffic management on more than one port. For example, for OracleAS Cluster (Identity Management), the load balancer needs to be configured with a virtual server and port for HTTP / HTTPS traffic, and separate virtual servers and ports for LDAP and LDAPS traffic.
■ The virtual server names must be associated with IP addresses and be part of your DNS. Clients must be able to access the external load balancer through the virtual server names.
Persistence / stickiness Some components of Oracle Application Server use persistence or stickiness in an external load balancer. Here are some examples:
■ For Oracle Delegated Administration Services, you need to configure cookie persistence on the external load balancer for HTTP traffic. Specifically, you need to set up cookie persistence for URIs starting with /oiddas/. This is the URI for Oracle Delegated Administration Services. Cookie-based persistence is highly recommended.
If your external load balancer does not allow you to set cookie persistence at the URI level, then set the cookie persistence for all HTTP traffic. In either case, set the cookie to expire when the browser session expires. Refer to your external load balancer documentation for details.
■ For Oracle Internet Directory, do not set a persistence setting for the external load balancer.
■ For OracleAS Single Sign-On, a persistence setting is not required. However, you may set a persistence or stickiness compatible with Oracle HTTP Server.
■ For OracleAS Portal, enable cookie-based persistence for OracleAS Web Cache.
Table 2–1 (Cont.) Types of External Load Balancers
Load Balancer Type Description

High Availability Services in Oracle Application Server
2-10 Oracle Application Server High Availability Guide
Figure 2–1 depicts an example deployment of a hardware load balancing router with Oracle Application Server.
Resource monitoring / port monitoring / process failure detection
You need to set up the external load balancer to detect service and node failures (through notification or some other means) and to stop directing non-Oracle Net traffic to the failed node. If your external load balancer has the ability to automatically detect failures, you should use it.
For example, for OracleAS Cluster (Identity Management), specific components that the external load balancer should monitor are Oracle Internet Directory, OracleAS Single Sign-On, and Oracle Delegated Administration Services. To monitor these components, set up monitors for the following protocols:
■ LDAP and LDAPS listen ports
■ HTTP and HTTPS listen ports (depending on the deployment type)
These monitors should use the respective protocols to monitor the services. That is, use LDAP for the LDAP port, LDAP over SSL for the LDAP SSL port, and HTTP/HTTPS for the Oracle HTTP Server port. If your external load balancer does not offer these monitors, consult your external load balancer documentation for the best method of setting up the external load balancer to automatically stop routing incoming requests to a service that is unavailable.
Network Address Translation (NAT)
The load balancer should have the capability to perform network address translation (NAT) for traffic being routed from clients to the Oracle Application Server nodes. This is specifically required for OracleAS Portal deployments, where the load balancer should allow enabling NAT for requests originating from within the OracleAS Portal node to the load balancer virtual server (for example, requests such as Parallel Page Engine (PPE) loopbacks and cache invalidation requests).
Fault tolerant mode It is highly recommended that you configure the load balancer to be in fault-tolerant mode.
Other It is highly recommended that you configure the load balancer virtual server to return immediately to the calling client when the backend services to which it forwards traffic are unavailable. This is preferred over the client disconnecting on its own after a timeout based on the TCP/IP settings on the client machine.
Table 2–2 (Cont.) External Load Balancer Requirements
External Load Balancer Requirement Description

High Availability Services in Oracle Application Server
Oracle Application Server High Availability Framework 2-11
Figure 2–1 Example load balancing router deployment with Oracle Application Server
Load balancing improves scalability by providing an access point through which requests are routed to one of many available instances. Instances can be added to the group that the external load balancer serves to accommodate additional users.
Load balancing improves availability by routing requests to the most available instances. If one instance goes down, or is particularly busy, the external load balancer can send requests to another active instance.
See Also:
■ Section 4.7, "Using OracleAS Single Sign-On with OracleAS Cluster (Middle-Tier)"
Database
Router
Browser
LAN
Internet
OracleWeb CacheCluster
OracleApplication ServerInstances

High Availability Services in Oracle Application Server
2-12 Oracle Application Server High Availability Guide
2.2.5 Backup and recoveryProtecting against the data loss of any system components is critical to maintaining a highly available environment. Regular, complete backups of all Oracle Application Server environment is recommended.
A complete Oracle Application Server environment backup includes:
■ A full backup of all files in the middle-tier Oracle homes (this includes Oracle software files and configuration files).
■ A full backup of all files in the OracleAS Infrastructure Oracle home (this includes Oracle software files and configuration files).
■ A complete cold backup of the OracleAS Metadata Repository.
■ A full backup of the Oracle system files on each host in your environment.
2.2.5.1 Oracle Application Server Backup and Recovery ToolThe most frequently changing critical files in an Oracle installation are configuration files and data files. Oracle provides the Oracle Application Server Backup and Recovery Tool (OracleAS Backup and Recovery Tool) to backup these configuration and data files.
The OracleAS Backup and Recovery Tool is a Perl script and associated configuration files. You can use this tool to backup and recover the following types of files:
■ configuration files in the middle-tier and OracleAS Infrastructure Oracle homes
■ OracleAS Metadata Repository files
The OracleAS Backup and Recovery Tool is installed by default whenever you install Oracle Application Server. The tool is installed in the $ORACLE_HOME/backup_restore directory.
The OracleAS Backup and Recovery Tool supports the following installation types:
■ J2EE and Web Cache
■ Portal and Wireless
■ OracleAS Infrastructure (Identity Management and Metadata Repository)
■ OracleAS Infrastructure (Identity Management only)
■ OracleAS Infrastructure (Metadata Repository only)
■ OracleAS TopLink (standalone or installed into a OracleAS middle-tier Oracle home)
■ Oracle Application Server Integration Business Activity Monitoring
■ Oracle Content Management Software Development Kit
2.2.6 Disaster RecoveryDisaster recovery refers to how a system can be recovered from catastrophic site failures caused by natural or unnatural disasters. Additionally, disaster recovery can also refer to how a system is managed for planned outages. For most disaster recovery situations, the solution involves replicating an entire site, not just pieces of hardware or subcomponents. This also applies to the Oracle Application Server Disaster Recovery (OracleAS Disaster Recovery) solution.
See Also: Oracle Application Server Administrator’s Guide

High Availability Services in Oracle Application Server
Oracle Application Server High Availability Framework 2-13
In the most common configuration, a standby site is created to mirror the production site. Under normal operation, the production site actively services client requests. The standby site is maintained to mirror the applications and content hosted by the production site.
2.2.6.1 Oracle Application Server GuardOracleAS Guard automates the restoration of a production site on its corresponding standby site. To protect a complete Oracle Application Server environment from disasters, OracleAS Guard performs the following operations:
■ Instantiates the standby site: instantiates an Oracle Application Server standby farm that mirrors a primary farm.
■ Verifies configuration: verifies that a farm meets the requirements to be used as a standby farm for the corresponding primary farm.
■ Site synchronization: synchronizes the production and the standby sites.
See Also: Section 13.4, "Overview of OracleAS Guard and asgctl"

High Availability Services in Oracle Application Server
2-14 Oracle Application Server High Availability Guide

Part IIMiddle-tier High Availability
This part contains chapters that discuss high availability for the middle tier. These chapters are:
■ Chapter 3, "Middle-tier High Availability"
■ Chapter 4, "Managing and Operating Middle-tier High Availability"
■ Chapter 5, "High Availability for Middle-tier Components"


Middle-tier High Availability 3-1
3Middle-tier High Availability
This chapter describes solutions that are available to protect the Oracle Application Server middle-tier from failures. It contains the following sections:
■ Section 3.1, "Redundancy"
■ Section 3.2, "Highly Available Middle-tier Configuration Management Concepts"
■ Section 3.3, "Middle-tier Backup and Recovery Considerations"
3.1 RedundancyOracle Application Server middle-tier can be configured to provide two types of redundancy:
■ Active-Active
■ Active-Passive
3.1.1 Active-ActiveAn Oracle Application Server middle-tier can be made redundant in an active-active configuration with OracleAS Cluster (Middle-Tier). An OracleAS Cluster (Middle-Tier) is a set of middle-tier instances configured to act in active-active configuration to deliver greater scalability and availability than a single instance. Using OracleAS Cluster (Middle-Tier) removes the single point of failure that a single instance poses. While a single Oracle Application Server instance leverages the resources of a single host, a cluster can span multiple hosts, distributing application execution over a greater number of CPUs. A single Oracle Application Server instance is vulnerable to the failure of its host and operating system, but a cluster continues to function despite the loss of an operating system or a host, hiding any such failure from clients
Figure 3–1 presents the various sub-tiers of the Oracle Application Server middle-tier in a redundant active-active configuration. Each sub-tier is configured with redundant processes so that the failure of any of these processes is handled by the sub-tier above the processes such that the failure does not affect incoming requests from clients.

Redundancy
3-2 Oracle Application Server High Availability Guide
Figure 3–1 Overall Active-Active Architecture for Oracle Application Server Middle Tier
The following sub-sections describe features that characterize each sub-tier’s active-active configuration:
■ Section 3.1.1.1, "OracleAS Web Cache"
■ Section 3.1.1.2, "Oracle HTTP Server"
■ Section 3.1.1.3, "OC4J"
Firewall
Clients
Load BalancerRouter
OracleASWeb Cache
Oracle HTTPServer
OC4J Security(runs SSOand DAS)
Oracle InternetDirectory
OracleASInfrastructure
OracleASWeb Cache
OracleASInfrastructure
Database
CustomerDatabase
OracleASWeb CacheTier
OracleHTTP Server Tier
Middle TierApplications
OC4J / Middle Tier ApplicationsOC4J Middle Tier
ApplicationsOC4J
Oracle HTTPServer
Oracle HTTPServer
mod_plsql

Redundancy
Middle-tier High Availability 3-3
3.1.1.1 OracleAS Web Cache You can configure multiple instances of OracleAS Web Cache to run as independent caches, with no interaction with one another. However, to increase the availability and scalability of your Web cache, you can configure multiple OracleAS Web Cache instances to run as members of a cache cluster, called OracleAS Cluster (Web Cache). A cache cluster is a loosely coupled collection of cooperating OracleAS Web Cache instances working together to provide a single logical cache.
Physically, the cache can be distributed over several nodes. If one node fails, a remaining node in the same cluster can fulfill the requests serviced by the failed node. The failure is detected by the remaining nodes in the cluster who take over ownership of the cacheable content of the failed member. The load balancing mechanism in front of the OracleAS Web Cache cluster (for example, a hardware load balancing appliance) redirects the requests to the live OracleAS Web Cache nodes.
OracleAS Web Cache clusters also add to the availability of Oracle Application Server instances. By caching static and dynamic content in front of the Oracle Application Server instances, requests can be serviced by OracleAS Web Cache reducing the need for the requests to be fulfilled by Oracle Application Server instances, particularly for Oracle HTTP Servers. The load and stress on Oracle Application Server instances is reduced, thereby increasing availability of the components in the instances.
OracleAS Web Cache can also perform a stateless or stateful load balancing role for Oracle HTTP Servers. Load balancing is done based on the percentage of the available capacity of each Oracle HTTP Server, or, in other words, the weighted available capacity of each Oracle HTTP Server. If the weighted available capacity is equal for several Oracle HTTP Servers, OracleAS Web Cache uses round robin to distribute the load. Refer to Oracle Application Server Web Cache Administrator’s Guide for the formula to calculate weighted available capacity.
Table 3–1 provides a summary of the high availability characteristics of OracleAS Web Cache.
In the case of failure of an Oracle HTTP Server instance, OracleAS Web Cache redistributes the load to the remaining Oracle HTTP Servers and polls the failed server
See Also: Oracle Application Server Web Cache Administrator’s Guide
Table 3–1 High Availability Characteristics for OracleAS Web Cache in Active-Active Configurations
Item Description
Protection from Node Failure
OracleAS Web Cache cluster protects from single point of failure. An external load balancer should be deployed in front of this cluster to route requests to live OracleAS Web Cache nodes.
Protection from Service Failure
In an OracleAS Web Cache cluster, pings are made to a specific URL in each cluster member to ensure that the URL is still serviceable.
Protection from Process Failure
OPMN monitors OracleAS Web Cache processes and restarts them upon process failure.
Automatic Re-routing OracleAS Web Cache members in a cluster ping each other to verify that peer members are alive or have failed. External load balancers provide failover capabilities for requests routed to OracleAS Web Cache components.
State Replication OracleAS Web Cache clustering manages cached contents that need to be transferred between OracleAS Web Cache nodes.
Configuration Cloning OracleAS Web Cache cluster maintains uniform configuration across cluster.

Redundancy
3-4 Oracle Application Server High Availability Guide
intermittently until it comes back online. Thereafter, OracleAS Web Cache recalculates the load distribution with the revived Oracle HTTP Server in scope.
3.1.1.2 Oracle HTTP ServerOracle HTTP Server and OracleAS Web Cache handle HTTP and HTTPS requests. Each HTTP request is met by a response from Oracle HTTP Server or OracleAS Web Cache, if the content requested is cached.
Oracle HTTP Server routes a request to different plug-in modules depending on the type of request received. These modules in turn delegate the request to different types of processes. The most common modules are mod_oc4j for J2EE applications and mod_plsql for PL/SQL applications. mod_oc4j delegates requests to OC4J processes. mod_plsql delegates requests to database processes. For all these types of requests, no state is required to be maintained in the Oracle HTTP Server processes.
This section covers the following topics:
■ Section 3.1.1.2.1, "Oracle HTTP Server High Availability Summary"
■ Section 3.1.1.2.2, "OC4J Load Balancing Using mod_oc4j"
■ Section 3.1.1.2.3, "Database Load Balancing with mod_plsql"
3.1.1.2.1 Oracle HTTP Server High Availability Summary Table 3–2 summarizes some of the Oracle Application Server high availability features for Oracle HTTP Server.
See Also:
■ Section 3.1.1.2, "Oracle HTTP Server" on page 3-4
■ Oracle Application Server Web Cache Administrator’s Guide
Table 3–2 High Availability Characteristics for Oracle HTTP Server
Item Description
Protection from Node Failure
OracleAS Cluster protects from single point of failure. A load balancer should be deployed in front of Oracle HTTP Server instances. This can be an external load balancer or OracleAS Web Cache.
Protection from Service Failure
Load balancer or OracleAS Web Cache in front of Oracle HTTP Server sends request to another Oracle HTTP Server if first one does not respond or is deemed failed through URL pings. Load balancer can be either OracleAS Web Cache or hardware appliance.
Protection from Process Failure
OPMN monitors Oracle HTTP Server processes and restarts them upon process failure. Each Oracle HTTP Server is also notified by OPMN when another Oracle HTTP Server process in the OracleAS Cluster fails.
Automatic Re-routing Load balancer or OracleAS Web Cache in front of Oracle HTTP Server auto re-routes to another Oracle HTTP Server if first does not respond.
State Replication None
Configuration Cloning OracleAS Cluster allows configuration to be replicated across to other Oracle HTTP Servers in the cluster through DCM.
See Also:
■ Section 3.1.1.1, "OracleAS Web Cache"
■ Section 2.2.1, "Process Death Detection and Automatic Restart"

Redundancy
Middle-tier High Availability 3-5
3.1.1.2.2 OC4J Load Balancing Using mod_oc4j The mod_oc4j Oracle HTTP Server module provides routing for HTTP requests that are handled by OC4J. Whenever a request is received for a URL that matches one of the mount points specified in mod_oc4j.conf, the request is routed to one of the available destinations specified for that URL. A destination can be a single OC4J process, or a set of OC4J instances. If an OC4J process fails, OPMN detects the failure and mod_oc4j does not send requests to the failed OC4J process until the OC4J process is restarted.
Using mod_oc4j configuration options, you can specify different load balancing routing algorithms depending on the type and complexity of routing you need. Stateless requests are routed to any destination available based on the algorithm specified in mod_oc4j.conf. Stateful HTTP requests are forwarded to the OC4J process that served the previous request using session identifiers, unless mod_oc4j determines through communication with OPMN that the process is not available. In this case, mod_oc4j forwards the request to an available OC4J process following the specified load balancing protocol.
Table 3–3 summarizes the routing styles that mod_oc4j provides. For each routing style, Table 3–3 lists the different algorithms that you can configure to modify the routing behavior. These mod_oc4j configuration options determine the OC4J process where mod_oc4j sends incoming HTTP requests to be handled.
OC4J Load Balancing Using Local Affinity and Weighted Routing OptionsUsing mod_oc4j options, you can select a routing method for routing OC4J requests. If you select either round robin or random routing, you can also use local affinity or
See Also:
■ Section 4.2.6.1, "Using and Configuring mod_oc4j Load Balancing" on page 4-17
■ Oracle HTTP Server Administrator’s Guide for information on using weighted routing and selecting local affinity with mod_oc4j load balancing options.
Table 3–3 mod_oc4j Routing Algorithms Summary
Routing Method Description
Round Robin Using the simple round robin configuration, all OC4J processes, remote and local to the application server instance running the Oracle HTTP Server, are placed in an ordered list. Oracle HTTP Server then chooses an OC4J process at random for the first request. For each subsequent request, Oracle HTTP Server forwards requests to another OC4J process in round robin style.
The round robin configuration supports local affinity and weighted routing options.
Random Using the simple random configuration, all OC4J processes, remote and local to the application server instance running the Oracle HTTP Server, are placed in an ordered list. For every request, Oracle HTTP Server chooses an OC4J process at random and forwards the request to that instance.
The random configuration supports local affinity and weighted routing options.
Metric-Based Using the metric-based configuration OC4J processes, remote and local to the application server instance running the Oracle HTTP Server, are placed into an ordered list. OC4J processes then regularly communicate to Oracle HTTP Server how busy they are and Oracle HTTP Server uses this information to send requests to the OC4J processes that are less busy. The overhead in each OC4J node is measured using the runtime performance metrics of OC4J processes. When there are no local OC4J processes available, mod_oc4j routes requests to each OC4J process on different hosts as per their performance metrics only.
The metric-based configuration supports a local affinity option.
Redundancy
3-6 Oracle Application Server High Availability Guide
weighted routing options. If you select metric-based routing, you can also use the local affinity option.
Using the weighted routing option, a weight is associated with OC4J processes on a node, as configured in mod_oc4j, on a node by node basis. During request routing, mod_oc4j then uses the routing weight to calculate which OC4J process to assign requests to. Thus, OC4J processes running on different nodes can be assigned different weights.
Using the local affinity option, mod_oc4j keeps two lists of available OC4J processes to handle requests, a local list and a remote list. If processes are available from the local list then requests are assigned locally using the random routing method or, for metric-based routing using metric-based routing. If no processes are available in the local list, then mod_oc4j selects processes randomly from the remote list when random method, using a round robin method for the round robin method, or using metric-based routing with the metric-based method.
Choosing a mod_oc4j Routing AlgorithmTable 3–3 summarizes the available routing options. To select a routing algorithm to configure with mod_oc4j, you need to consider the type of environment where Oracle HTTP Server runs. Use the following guidelines to help determine which configuration options to use with mod_oc4j:
■ For a Oracle Application Server cluster setup, with multiple identical machines running Oracle HTTP Server and OC4J in the same node, the round robin with local affinity algorithm is preferred. Using this configuration, an external router distributes requests to multiple machines running Oracle HTTP Server and OC4J. In this case Oracle HTTP Server gains little by using mod_oc4j to route requests to other machines, except in the extreme case that all OC4J processes on the same machine are not available.
■ For a tiered deployment, where one tier of machines contains Oracle HTTP Server and another contains OC4J instances that handle requests, the preferred algorithms are simple round robin and simple metric-based. To determine which of these two is best in a specific setup, you may need to experiment with each and compare the results. This is required because the results are dependent on system behavior and incoming request distribution.
■ For a heterogeneous deployment, where the different application server instances run on nodes that have different characteristics, the weighted round robin algorithm is preferred. Tune the number of OC4J processes running on each application server instance may allow you to achieve the maximum benefit. For example, a machine with a weight of 4 gets 4 times as many requests as a machine with a weight of 1, but if the system with a weight of 4 may not be running 4 times as many OC4J processes.
■ Metric-based load balancing is useful when there are only a few metrics that dominate the performance of an application. For example, CPU or number of database connections.
See Also:
■ Section 4.2.6.1, "Using and Configuring mod_oc4j Load Balancing" on page 4-17
■ Oracle HTTP Server Administrator’s Guide for information on using weighted routing and selecting local affinity with mod_oc4j load balancing options.

Redundancy
Middle-tier High Availability 3-7
3.1.1.2.3 Database Load Balancing with mod_plsql mod_plsql maintains a pool of connections to the database and reuses established database connections for subsequent requests. If there is no response from a database connection in a connection pool, mod_plsql detects this, discards the dead connection, and creates a fresh database connection for subsequent requests.
The dead database connection detection feature of mod_plsql eliminates the occurrence of errors when a database node or instance goes down. This feature is also extremely useful in high availability configurations like Real Application Clusters. If a node in a Real Application Clusters database fails, mod_plsql detects this and immediately starts servicing requests using the other Real Application Clusters nodes. mod_plsql provides different configuration options to satisfy maximum protection or maximum performance needs. By default, mod_plsql tests all pooled database connections which were created prior to the detection of a failure, but it also allows constant validation of all pooled database connections prior to issuing a request.
3.1.1.3 OC4JThe OC4J tier consists of the Oracle Application Server implementation of the J2EE container. This section discusses how the various OC4J components can be made highly available and consists of the following topics:
■ Section 3.1.1.3.1, "OracleAS Cluster (OC4J)"
■ Section 3.1.1.3.2, "OC4J Distributed Caching Using Java Object Cache"
■ Section 3.1.1.3.3, "JMS High Availability"
3.1.1.3.1 OracleAS Cluster (OC4J) Oracle Application Server provides several strategies for ensuring high availability with OC4J instances, both within an application server instance and across a cluster that includes multiple application server instances.
Besides the high availability features described in this section, other Oracle Application Server features enable OC4J processes to be highly available, including the load balancing feature in Oracle HTTP Server and the Oracle Process Manager and Notification Server system that automatically monitors and restarts processes.
The following sections explain the strategies for ensuring high availability for stateful applications in OC4J instances. Overall, there are two strategies:
■ Web Application Session State Replication with OracleAS Cluster (OC4J)
■ Stateful Session EJB State Replication with OracleAS Cluster (OC4J)
Web Application Session State Replication with OracleAS Cluster (OC4J) When a stateful Web application is deployed to OC4J, multiple HTTP requests from the same client may need to access the application. However, if the application running on the OC4J server experiences a problem where the OC4J process fails, the state associated with a client request may be lost. There are two ways to guard against such failures:
See Also: Oracle Application Server mod_plsql User’s Guide
See Also:
■ Section 3.1.1.2, "Oracle HTTP Server"
■ Section 2.2.1, "Process Death Detection and Automatic Restart"

Redundancy
3-8 Oracle Application Server High Availability Guide
■ State safe applications save their state in a database or other persistent storage system, avoiding the loss of state when the server goes down. Obviously, there is a performance cost for continually writing the application state to persistent storage.
■ Stateful applications can use OC4J session state replication, with OracleAS Cluster (OC4J), to automatically replicate the session state across multiple processes in an application server instance, and in a cluster, across multiple application instances which may run on different nodes.
An OC4J instance is the entity to which J2EE applications are deployed and configured. An OC4J instance is characterized by a specific set of binaries and configuration files. Several OC4J processes can be started for each OC4J instance. The OC4J process is what executes the J2EE applications for the OC4J instance. Within the application server instance, you can configure multiple OC4J instances, each with its own number of OC4J processes. The advantage of this is for configuration management and application deployment for separate OC4J processes in a cluster.
OC4J processes can be grouped into OracleAS Cluster (OC4J) to support session state replication for the high availability of Web applications. Using an OracleAS Cluster (OC4J) together with mod_oc4j request routing provides stateful failover in the event of a software or hardware problem. For example, if an OC4J process that is part of an OracleAS Cluster (OC4J) fails, mod_oc4j is notified of the failure by OPMN and routes requests to another OC4J process in the same cluster.
Each OC4J instance in a cluster has the following features:
■ The configuration of the OC4J instance is valid for one or more OC4J processes. This way, you can duplicate the configuration for multiple OC4J processes by managing these processes in the OC4J instance construct. When you modify the cluster-wide configuration within the OC4J instance, the modifications are valid for all OC4J processes.
■ Each OC4J instance can be configured with one or more OC4J processes.
■ When you deploy an application to an OC4J instance, all OC4J processes share the same application properties and configuration defined in the OC4J instance. The OC4J instance is also responsible for replicating the state of its applications.
■ The number of OC4J processes is specific to each OC4J instance. This must be configured for each application server instance in the cluster. The OC4J process configuration provides flexibility to tune according to the specific hardware capabilities of the host. By default, each OC4J instance is instantiated with a single OC4J process.
Web Application Session State Replication Protecting Against Software ProblemsTo guard against software problems, such as OC4J process failure or hang, you can configure an OC4J instance to run multiple OC4J processes in the same OracleAS Cluster (OC4J). The processes in the OracleAS Cluster (OC4J) communicate their session state between each other. Using this configuration provides failover and high availability by replicating state across multiple OC4J processes running on an application server instance.
In the event of a failure, Oracle HTTP Server forwards requests to active (alive) OC4J process within the OracleAS Cluster (OC4J). In this case, the Web application state for the client is preserved and the client does not notice any loss of service.
Note: Saving application state to persistent storage is the application developer’s responsibility.
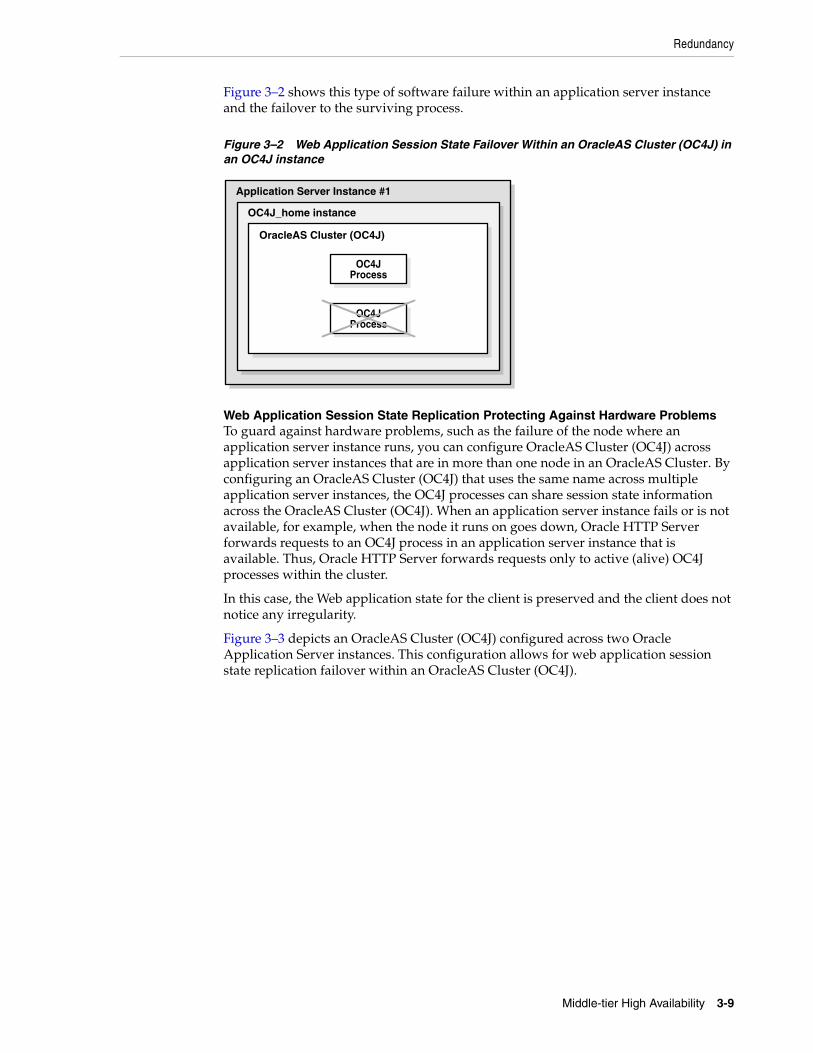
Redundancy
Middle-tier High Availability 3-9
Figure 3–2 shows this type of software failure within an application server instance and the failover to the surviving process.
Figure 3–2 Web Application Session State Failover Within an OracleAS Cluster (OC4J) in an OC4J instance
Web Application Session State Replication Protecting Against Hardware ProblemsTo guard against hardware problems, such as the failure of the node where an application server instance runs, you can configure OracleAS Cluster (OC4J) across application server instances that are in more than one node in an OracleAS Cluster. By configuring an OracleAS Cluster (OC4J) that uses the same name across multiple application server instances, the OC4J processes can share session state information across the OracleAS Cluster (OC4J). When an application server instance fails or is not available, for example, when the node it runs on goes down, Oracle HTTP Server forwards requests to an OC4J process in an application server instance that is available. Thus, Oracle HTTP Server forwards requests only to active (alive) OC4J processes within the cluster.
In this case, the Web application state for the client is preserved and the client does not notice any irregularity.
Figure 3–3 depicts an OracleAS Cluster (OC4J) configured across two Oracle Application Server instances. This configuration allows for web application session state replication failover within an OracleAS Cluster (OC4J).
OC4J_home instance
OracleAS Cluster (OC4J)
OC4JProcess
OC4JProcess
Application Server Instance #1

Redundancy
3-10 Oracle Application Server High Availability Guide
Figure 3–3 Web Application Session State Failover Within an OracleAS Cluster (OC4J)
Configuring OracleAS Cluster (OC4J) for Web Application Session State Replication To protect against software or hardware failure while maintaining state with the least number of OC4J processes, you need to configure at least two OC4J processes in the same cluster. For example, if you have two application server instances, instance 1 and instance 2, you can configure two OC4J processes in the default_island on each application server instance. With this configuration, stateful session applications are protected against hardware and software failures, and the client maintains state if either of the following types of failures occurs:
■ If one of the OC4J processes fails, then the client request is redirected to the other OC4J process in the default_island on the same application server instance. State is preserved and the client does not notice any irregularity.
■ If application server instance 1 terminates abnormally, then the client is redirected to the OC4J process in the default_island on application server instance 2. The state is preserved and the client does not notice any irregularity.
Stateful Session EJB State Replication with OracleAS Cluster (OC4J)Stateful session EJBs can be configured to provide state replication across OC4J processes associated to an application server instance or across an OracleAS Cluster. This EJB replication configuration provides high availability for stateful session EJBs by using multiple OC4J processes to run instances of the same stateful session EJB.
OracleAS Cluster (OC4J-EJB)s provide high availability for stateful session EJBs. They allow for failover of these EJBs across multiple OC4J processes that communicate over the same multicast address. Thus, when stateful session EJBs use replication, this can
See Also: Section 4.4.3.1, "Configuring OC4J Islands and OC4J Processes" on page 4-35
Note: Use of EJB replication OracleAS Cluster (OC4J-EJB) for high availability is independent of middle-tier OracleAS Clusters and can involve multiple application server instances installed across nodes that are or are not part of middle-tier OracleAS Clusters.
OC4J_home instance
Application Server Instance #1
OC4J_home instance
Application Server Instance #2
OracleAS Cluster (OC4J)
OC4JProcess
OC4JProcess
OC4JProcess
OC4JProcess
OC4JProcess

Redundancy
Middle-tier High Availability 3-11
protect against process and node failures and can provide for high availability of stateful session EJBs running on Oracle Application Server.
JNDI Namespace Replication When EJB clustering is enabled, JNDI namespace replication is also enabled between the OC4J instances in a middle-tier OracleAS Cluster. New bindings to the JNDI namespace in one OC4J instance are propagated to other OC4J instances in the middle-tier OracleAS Cluster. Re-bindings and unbindings are not replicated.
The replication is done outside the scope of each OracleAS Cluster (OC4J). In other words, multiple OracleAS Clusters (OC4J) in an OC4J instance have visibility into the same replicated JNDI namespace.
EJB Client Routing In EJB client routing, EJB classes take on the routing functionality that mod_oc4j provides between Oracle HTTP Server and servlets/JSPs. Clients invoke EJBs using the Remote Method Invocation (RMI) protocol. The RMI protocol listener is set up by in the RMI configuration file, rmi.xml, for each OC4J instance. It is separate from the Web site configuration. EJB clients and the OC4J tools access the OC4J server through a configured RMI port. OPMN designates a range of ports that the RMI listener could be using.
When you use the "opmn:ormi://" prefix string in the EJB look up, the client retrieves the assigned RMI port automatically. The load balancing and client request routing is provided by OPMN selecting the different OC4J processes available. The algorithm used for this load balancing is the random algorithm. Multiple OPMN URLs separated by commas can be used for higher availability.
3.1.1.3.2 OC4J Distributed Caching Using Java Object Cache Oracle Application Server Java Object Cache provides a distributed cache that can serve as a high availability solution for applications deployed to OC4J. The Java Object Cache is an in-process cache of Java objects that can be used on any Java platform by any Java application. It enables applications to share objects across requests and across users, and coordinates the life cycle of the objects across processes.
Java Object Cache enables data replication among OC4J processes even if they do not belong to the same OracleAS Cluster (OC4J), application server instance, or overall Oracle Application Server Cluster.
By using Java Object Cache, performance can be improved because shared Java objects are cached locally, regardless of which application produces the objects. This also improves availability; in the event that the source for an object becomes unavailable, the locally cached version is still available.
See Also:
■ Section 4.4.2.4, "Configuring EJB Application State Replication with OracleAS Cluster (OC4J-EJB)" on page 4-33
■ Oracle Application Server Containers for J2EE User’s Guide
■ Oracle Application Server Containers for J2EE Enterprise JavaBeans Developer’s Guide
See Also: Oracle Application Server Containers for J2EE Services Guide
See Also: The EJB primer section in Oracle Application Server Containers for J2EE User’s Guide.

Redundancy
3-12 Oracle Application Server High Availability Guide
3.1.1.3.3 JMS High Availability Two JMS providers are available with Oracle Application Server. Due to differing implementations, each provider achieves high availability in different ways. As such, they are discussed in two sections:
■ OracleAS JMS High Availability
■ Oracle JMS High Availability
Oracle Application Server JMS (OracleAS JMS) is implemented in OC4J. Hence, it utilizes OPMN for process monitoring and restart.
Oracle JMS (OJMS) is implemented through Oracle Streams Advanced Queuing (AQ). It requires the Oracle database and can have active-active availability through the Real Application Clusters database and Transparent Application Failover (TAF) features.
Table 3–4 provides an overview of high availability and configuration characteristics of the two JMS providers. The sections following the table discuss each provider in more detail.
The following sections provide details on how each JMS provider achieves high availability.
OracleAS JMS High AvailabilityHigh availability for OracleAS JMS can be achieved by grouping multiple instances of OC4J together in one cluster. This cluster is called OracleAS Cluster (OC4J-JMS). OPMN can be used to monitor and restart OC4J processes in the event of process failure.
See Also: The Java Object Cache chapter in the Oracle Application Server Web Services Developer’s Guide for complete information on using Java Object Cache
Table 3–4 Comparing High Availability Characteristics of OJMS and OracleAS JMS
Item OJMS OracleAS JMS
Process-level High Availability
OPMN (JMS application) OPMN
Node-level High Availability
Real Application Clusters (AQ, TAF) OracleAS Cold Failover Cluster (Middle-Tier)
Configuration Real Application Clusters configuration, resource provider configuration
dedicated JMS server, jmx.xml configuration, opmn.xml configuration
Message Store in Real Application Clusters database in dedicated JMS server/persistence files
Failover same or different machine (depending on Real Application Clusters setup)
same or different machine only in active-passive configuration with OracleAS Cold Failover Cluster (Middle-Tier)
(see Section 3.1.2.1, "OracleAS Cold Failover Cluster (Middle-Tier)" on page 3-15)
Note: The Oracle Application Server Containers for J2EE Services Guide provides detailed information and instructions on setting up OracleAS JMS and OJMS to be highly available. High availability for third-party JMS providers is not discussed as it is provider-specific.

Redundancy
Middle-tier High Availability 3-13
OracleAS Cluster (OC4J-JMS) provides an environment wherein JMS applications deployed in this environment can load balance JMS requests across multiple OC4J instances or processes. Redundancy is also achieved as the failure of an OC4J instance with a JMS server does not impact the availability of the JMS service because at least one other OC4J instance is available with a JMS server.
Both the JMS client and the JMS server contain state about each other, which includes information about connections, sessions, and durable subscriptions. Application developers can configure their environment and use a few simple techniques when writing their applications to make them cluster-friendly.
OracleAS Cluster (OC4J-JMS) allows for two configurations:
■ OracleAS JMS Server Distributed Destinations
This configuration requires multiple OC4J instances. Each instance contains a JMS server, queue destination, and application. There is no inter-process communication between JMS servers, queues, and applications in other OC4J instances. The sender and receiver of each application must be deployed together in an OC4J instance. A message enqueued to the JMS server in one OC4J process can be dequeued only from that OC4J process.
This configuration has the following advantages:
– High throughput is achieved because applications and JMS servers are executing within the same JVMs and no inter-process communication is required.
– There is no single point of failure. As long as one OC4J process is running, requests can be processed.
– Destination objects can be persistent or in-memory. Persistence is file-based.
The disadvantage of this configuration is that there is no failover from one JMS server to another.
■ Dedicated OracleAS JMS Server
This configuration defines that only one OC4J instance has the dedicated JMS server in an OracleAS Cluster (OC4J-JMS). The OC4J instance with the JMS server handles all messages. Message ordering is always maintained due to the single JMS server. All JMS applications use this dedicated server to host their connection factories and destination, and to service their enqueue and dequeue requests.
Only one OC4J JVM acts as the dedicated JMS server for all JMS applications within the OracleAS Cluster (OC4J-JMS). The single JVM ensures that other JVMs do not attempt to use the same set of persistent files. Other OC4J execute only applications. The single JMS server can be configured by limiting the JMS port range in the opmn.xml file to only one port for the dedicated OC4J instance. The single port value ensures that OPMN always assigns the same port value to the dedicated JMS server. This port value is used to define the connection factory in the jms.xml file that other OC4J instances in the OracleAS Cluster (OC4J-JMS) use to connect to the dedicated JMS server.
Refer to the JMS chapter in the Oracle Application Server Containers for J2EE Services Guide for more information on how to modify the opmn.xml file for this dedicated JMS server configuration.
See Also: The section "Abnormal Termination" in the Java Message Service chapter of the Oracle Application Server Containers for J2EE Services Guide. This section describes how to manage persistence files when an unexpected failure occurs.

Redundancy
3-14 Oracle Application Server High Availability Guide
Oracle JMS High AvailabilityHigh availability for Oracle JMS (OJMS) can be achieved using a Real Application Clusters database. AQ queues and topics should be available in the Real Application Clusters environment.
Each JMS application in Oracle Application Server uses OC4J resource providers to point to the backend Real Application Clusters database. JMS operations invoked on objects derived from these resources providers are directed to the database.
An OJMS application that uses a Real Application Clusters database must be able to handle database failover scenarios. Two failover scenarios are possible:
■ Real Application Clusters Network Failover
In the event of the failure of a database instance, a standalone OJMS application running against a Real Application Clusters database must have code to obtain the connection again and to determine if the connection object is invalid or not. The code must reestablish the connection if necessary. Use the API method com.evermind.sql.DbUtil.oracleFatalError() to determine if a connection object is invalid. If invalid, a good strategy is to aggressively roll back transactions and re-create the JMS state, such as connections, session, and messages, that were lost. Refer to the JMS chapter in Oracle Application Server Containers for J2EE Services Guide for a code example.
■ Transparent Application Failover
For most cases when Transparent Application Failover (TAF) is configured, an OJMS application will not be aware of a failed database instance that it is connected to. Hence, the application code need not perform any tasks to handle the failure.
However, in some cases, OC4J may throw an ORA error when a failure occurs. OJMS passes these errors to the application as a JMSException with a linked SQL exception. To handle these exceptions, the following can be done:
– As in the previous point, "Real Application Clusters Network Failover", provide code to use the method com.evermind.sql.DbUtil.oracleFatalError() to determine if the error is a fatal error. If it is, follow the approach outlined in the previous point. If not, the client can recover by sleeping for a short period of time and then wake up and retry the last operation.
– Failback and transient errors caused by incomplete failover can be recovered from by attempting to use the JMS connection after a short time. Pausing allows the database failover to recover from the failure and reinstate itself.
– In the case of transaction exceptions, such as "Transaction must roll back" (ORA-25402) or "Transaction status unknown" (ORA-25405), the current operation must be rolled back and all operations past the last commit must be retried. The connection is not usable until the cause of the exception is dealt with. If the retry fails, close and re-create all connections and retry all uncommitted operations.
Clustering Best PracticesThe following are best practice guidelines for working with clustered JMS servers:
■ Minimize JMS client-side state.
– Perform work in transacted sessions.

Redundancy
Middle-tier High Availability 3-15
– Save/checkpoint intermediate program state in JMS queues/topics for full recoverability.
– Do not depend on J2EE application state to be serializable or recoverable across JVM boundaries. Always use transient member variables for JMS objects, and write passivate/activate and serialize/deserialize functions that save and recover JMS state appropriately.
■ Do not use nondurable subscriptions on topics.
– Nondurable topic subscriptions duplicate messages per active subscriber. Clustering and load balancing creates multiple application instances. If the application creates a nondurable subscriber, it causes the duplication of each message published to the topic. This is either inefficient or semantically invalid.
– Use only durable subscriptions for topics. Use queues whenever possible.
■ Do not keep durable subscriptions alive for extended periods of time.
– Only one instance of a durable subscription can be active at any given time. Clustering and load-balancing creates multiple application instances. If the application creates a durable subscription, only one instance of the application in the cluster succeeds. All other instances fail with a JMSException.
– Create, use, and close a durable subscription in small time/code windows, minimizing the duration when the subscription is active.
– Write application code that accommodates failure to create durable subscription due to clustering (when some other instance of the application running in a cluster is currently in the same block of code) and program appropriate back-off strategies. Do not always treat the failure to create a durable subscription as a fatal error.
3.1.2 Active-PassiveActive-passive high availability for the middle tier is achieved using a cold failover cluster. This is discussed in the following section.
3.1.2.1 OracleAS Cold Failover Cluster (Middle-Tier)A two-node OracleAS Cold Failover Cluster (Middle-Tier) can be used to achieve active-passive availability for Oracle Application Server middle-tier components. In an OracleAS Cold Failover Cluster (Middle-Tier), one node is active while the other is passive, on standby. In the event that the active node fails, the standby node is activated, and the middle-tier components continue servicing clients from that node. All middle-tier components are failed over to the new active node. No middle-tier components run on the failed node after the failover.
In the OracleAS Cold Failover Cluster (Middle-Tier) solution, a virtual hostname and a virtual IP are shared between the two nodes (the virtual hostname maps to the virtual IP in their subnet). However, only one node, the active node, can use these virtual settings at any one time. When the active node fails and the standby node is made active, the virtual IP is moved to the new active node. All requests to the virtual IP are now serviced by the new active node.
The OracleAS Cold Failover Cluster (Middle-Tier) can use the same machines as the OracleAS Cold Failover Cluster (Infrastructure) solution. In this scenario, two pairs of virtual hostnames and virtual IPs are used, one pair for the middle-tier cold failover cluster and one pair for the OracleAS Cold Failover Cluster (Infrastructure) solution.

Redundancy
3-16 Oracle Application Server High Availability Guide
Figure 9–10 illustrates such a scenario. In this setup, the middle-tier components can fail over independently from the OracleAS Infrastructure.
You can install the Oracle home for the middle tier on a shared storage (which would give you a single Oracle home) or on the local storage of each node (which would give you two separate Oracle homes). Some guidelines:
■ OracleAS Wireless is not supported on single Oracle home installations. If you need to run OracleAS Wireless, then you need to install the Oracle home locally on each node.
■ For OracleAS JMS file-based persistence, you need to set up a shared disk to store the persistence files. The Oracle home for the middle tier can be on the local storage or on the shared storage.
No shared storage is required for the middle-tier cold failover cluster, unless you are using OracleAS JMS file-based persistence. However, for operational reasons, it is highly recommended to use a shared storage; otherwise, every administrative change needs to be applied twice, once for each Oracle home.
Each node must have an identical mount point for the middle-tier software. One installation for the middle-tier software must be done on each node, and both installations must have the same local Oracle home path.
3.1.2.1.1 Managing Failover The typical deployment expected for the solution is a two-node hardware cluster with one node running the OracleAS Infrastructure and the other running the Oracle Application Server middle-tier. If either node needs to be brought down for hardware or software maintenance or crashes, the surviving node can be brought online, and the OracleAS Infrastructure or Oracle Application Server middle-tier service can be started on this node.
However, because a typical middle-tier cold failover deployment does not require any shared storage (except for when OracleAS JMS file persistence is used), alternate deployments may include two standalone machines on a subnet, each with a local installation of the middle-tier software and a virtual IP which can failover between them.
The overall steps for failing over to the standby node are as follows:
1. Stop the middle-tier service on current primary node (if node is still available).
2. Fail over the virtual IP to the new primary node.
3. If OracleAS JMS file based persistence is using a shared disk for the messages, the shared disk is failed over to the new primary node.
4. Start the middle-tier service on the new primary node.
For failover management, two approaches can be employed:
■ Automated failover using a cluster manager facility
The cluster manager offers services, which allows development of packages to monitor the state of a service. If the service or the node is found to be down, it automatically fails over the service from one node to the other node. The package can be developed to try restarting the service on a given node before failing over.
Note: For instructions on installing the OracleAS Cold Failover Cluster (Middle-Tier), see the Oracle Application Server Installation Guide. For instructions on managing it, see Section 4.5, "Managing OracleAS Cold Failover Cluster (Middle-Tier)".

Highly Available Middle-tier Configuration Management Concepts
Middle-tier High Availability 3-17
■ Manual failover
For this approach, the failover steps outlined above are executed manually. Since both the detection of the failure and the failover itself is manual, this method may result in a longer period of service unavailability.
3.1.2.1.2 OracleAS JMS in an OracleAS Cold Failover Cluster (Middle-Tier) Environment OracleAS JMS can be deployed in an active-passive configuration by leveraging the two-node OracleAS Cold Failover Cluster (Middle-Tier) environment. In such an environment, the OC4J instances in the active node provide OracleAS JMS services, while OC4J instances in the passive node are inactive. OracleAS JMS file-based persistence data is stored in a shared disk.
Upon the failure of the active node, the entire middle-tier environment is failed over to the passive node, including the OracleAS JMS services and the shared disk used to persist messages. The OC4J instances in the passive node are started up together with other processes for the middle-tier environment to run. This node is now the new active node. OracleAS JMS requests are then serviced by this node from thereon.
3.2 Highly Available Middle-tier Configuration Management ConceptsThis section describes how configuration management can improve high availability for the middle tier. It covers the following:
■ Section 3.2.1, "OracleAS Clusters Managed Using DCM"
■ Section 3.2.2, "Manually Managed Oracle Application Server Clusters"
3.2.1 OracleAS Clusters Managed Using DCMDistributed Configuration Management (DCM) is a management framework that enables you to manage the configurations of multiple Oracle Application Server instances. To administer an OracleAS Cluster that is managed by DCM, you can use either Application Server Control Console or dcmctl commands to manage and configure common configuration information on one Oracle Application Server instance. DCM then replicates the common configuration information across all Oracle Application Server instances within the OracleAS Cluster. The common configuration information for the cluster is called the cluster-wide configuration.
This section covers the following:
■ Section 3.2.1.1, "What is a DCM-Managed OracleAS Cluster?"
■ Section 3.2.1.2, "Oracle Application Server DCM Configuration Repository Types"
3.2.1.1 What is a DCM-Managed OracleAS Cluster?A DCM-Managed OracleAS Cluster provides distributed configuration information and enables you to configure multiple Oracle Application Server instances together.
See Also: Section 3.1.2.1, "OracleAS Cold Failover Cluster (Middle-Tier)"
Note: There is configuration information that can be configured individually, per Oracle Application Server instance within a cluster (these configuration options are also called instance-specific parameters).

Highly Available Middle-tier Configuration Management Concepts
3-18 Oracle Application Server High Availability Guide
The features of a DCM-Managed OracleAS Cluster include:
■ Synchronization of configuration across instances in the DCM-Managed OracleAS Cluster.
■ OC4J distributed application deployment – deploying to one OC4J triggers deployment to all OC4Js.
■ Distributed diagnostic logging – all members of a DCM-Managed OracleAS Cluster log to same the same log file repository when the log loader is enabled.
■ A shared OC4J island is setup by default. Replication is not enabled automatically for the applications deployed in the cluster, each application needs to be marked as "distributable" in its web.xml file, and multicast replication needs to be enabled in the replication properties for the OC4J instance.
■ Load-balancing – Oracle HTTP Server is automatically configured to share load among all DCM-Managed OracleAS Cluster members.
■ Distributed process control – DCM-Managed OracleAS Cluster membership enables the opmnctl DCM-Managed OracleAS Cluster scope start, stop, and restart commands.
Each application server instance in an DCM-Managed OracleAS Cluster has the same base configuration. The base configuration contains the cluster-wide configuration and excludes instance-specific parameters.
For Oracle Application Server high availability, when a system in an Oracle Application Server cluster is down, there is no single point of failure for DCM. DCM remains available on all the available nodes in the cluster.
Using DCM helps reduce deployment and configuration errors in a cluster; these errors could, without using DCM, be a significant cause of system downtime.
Application Server Control Console uses DCM commands to perform configuration and deployment. You can also issue DCM commands using the dcmctl command.
DCM provides the following configuration commands:
■ Create or remove a cluster
■ Add or remove application server instances to or from a cluster
■ Synchronize configuration changes across application server instances
Note the following when making configuration changes to a cluster or deploying applications to a cluster:
■ If Application Server Control Console is up and managing the cluster, you can invoke the DCM command-line tool from any host where a clustered application server instance is running. The DCM daemon must be running on each node in the cluster.
■ If Application Server Control Console is not up and managing the cluster, if you want configuration changes to by applied dynamically across the cluster, the DCM daemon must be running on each node in the cluster. To start the DCM daemon,
See Also:
■ Section 4.2, "Using DCM-Managed OracleAS Clusters"
■ Section 4.2.7, "Understanding DCM-Managed OracleAS Cluster Membership"

Middle-tier Backup and Recovery Considerations
Middle-tier High Availability 3-19
run the DCM command-line tool, dcmctl, on each Oracle Application Server instance in the cluster.
3.2.1.2 Oracle Application Server DCM Configuration Repository TypesOracle Application Server supports two types of DCM configuration repositories: Database-based and File-based DCM configuration repositories. The DCM configuration repository stores configuration information and metadata related to the instances in an OracleAS Farm, and when the OracleAS Farm contains DCM-Managed OracleAS Clusters, stores both cluster-wide configuration information and instance-specific parameters for instances in DCM-Managed OracleAS Clusters.
■ An OracleAS Database-based Farm stores repository information and protects configuration information using an Oracle database.
■ An OracleAS File-based Farm stores repository information in the file system. When the farm contains a DCM-Managed OracleAS Cluster, the DCM configuration repository stores both cluster-wide configuration information and instance-specific parameters. Using an OracleAS File-based Farm, cluster-wide configuration information and related metadata is stored on the file system of an Oracle Application Server instance that is the repository host (host). Oracle Application Server instances that are part of an OracleAS File-based Farm depend on the repository host to store cluster-wide configuration information.
3.2.2 Manually Managed Oracle Application Server ClustersIn a Manually Managed OracleAS Cluster, it is your responsibility to synchronize the configuration of Oracle Application Server instances within the OracleAS Cluster. See Appendix B, "Manually Managed OracleAS Clusters" for details.
3.3 Middle-tier Backup and Recovery ConsiderationsIf a failure occurs in your system, it is important to recover from that failure as quickly as possible. Depending on the type of failure, recovery of a middle-tier installation involves one or both of the following tasks:
■ restart processes
■ restore middle-tier files, which include:
– Oracle system files
– Oracle software files
– configuration files
The restoration of middle-tier files can be done from backups made using procedures described in the "Backup Strategy and Procedures" chapter of the Oracle Application Server Administrator’s Guide. The backups encompass both the middle-tier and OracleAS Infrastructure installations and are performed Oracle home by Oracle home.
See Also: Distributed Configuration Management Administrator’s Guide
See Also: Distributed Configuration Management Administrator’s Guide
Note: The Oracle Application Server Administrator’s Guide contains all required backup and recovery strategies and procedures.

Middle-tier Backup and Recovery Considerations
3-20 Oracle Application Server High Availability Guide
Thus, the restoration of the middle tier is also performed Oracle home by Oracle home. Each restoration can be done on the same node that the backup was taken from or on a new node. The "Recovery Strategies and Procedures" chapter in the Oracle Application Server Administrator’s Guide provides details on using backups for recovery.
Restoration of a middle-tier installation on the same node restores the Oracle home, Oracle Application Server configuration files, and DCM repository. The backup of the Oracle home and configuration files is done when performing a complete Oracle Application Server environment backup, which is a backup of the entire Oracle Application Server system. Additionally, any time stamped backups of the configuration files should be restored, if required.
Restoration of a middle-tier installation on a new node requires the restoration of Oracle system files, the middle-tier Oracle home, and configuration files. Because the host is new, the DCM-managed and non DCM-managed components have to be updated with the host information.
See Also:
■ Distributed Configuration Management Administrator’s Guide
■ Section 4.3.2.7, "Best Practices for Repository Backups"

Managing and Operating Middle-tier High Availability 4-1
4Managing and Operating Middle-tier High
Availability
This chapter describes how to perform configuration changes and on-going maintenance for the Oracle Application Server middle-tier.
This chapter covers the following topics:
■ Section 4.1, "Middle-tier High Availability Configuration Overview"
■ Section 4.2, "Using DCM-Managed OracleAS Clusters"
■ Section 4.3, "Availability Considerations for the DCM Configuration Repository"
■ Section 4.4, "Using Oracle Application Server Clusters (OC4J)"
■ Section 4.5, "Managing OracleAS Cold Failover Cluster (Middle-Tier)"
■ Section 4.6, "Managing Oracle Application Server Middle-tier Upgrades"
■ Section 4.7, "Using OracleAS Single Sign-On with OracleAS Cluster (Middle-Tier)"
4.1 Middle-tier High Availability Configuration OverviewOracle Application Server provides different configuration options to support high availability for the Oracle Application Server middle-tier.
This section covers the following topics:
■ Section 4.1.1, "DCM-Managed OracleAS Clusters"
4.1.1 DCM-Managed OracleAS ClustersWhen administering a DCM-Managed OracleAS Cluster, you use either Application Server Control Console or dcmctl commands to manage and configure common configuration information on one Oracle Application Server instance. DCM then propagates and replicates the common configuration information across all Oracle Application Server instances within the DCM-Managed OracleAS Cluster. The common configuration information for the cluster is called the cluster-wide configuration.
Note: There is configuration information that can be configured individually, per Oracle Application Server instance within a cluster (these configuration options are also called instance-specific parameters).

Using DCM-Managed OracleAS Clusters
4-2 Oracle Application Server High Availability Guide
Each Oracle Application Server instance in a DCM-Managed OracleAS Cluster has the same base configuration. The base configuration contains the cluster-wide configuration and excludes instance-specific parameters.
4.2 Using DCM-Managed OracleAS ClustersThis section describes how to create and use a DCM-Managed OracleAS Cluster. This section covers the following topics:
■ Section 4.2.1, "Creating DCM-Managed OracleAS Clusters"
■ Section 4.2.2, "Adding Instances to DCM-Managed OracleAS Clusters"
■ Section 4.2.3, "Removing Instances from DCM-Managed OracleAS Clusters"
■ Section 4.2.4, "Starting, Stopping, and Deleting DCM-Managed OracleAS Clusters"
■ Section 4.2.5, "Rolling Upgrades for Stateful J2EE Applications"
■ Section 4.2.6, "Configuring Oracle HTTP Server Options for DCM-Managed OracleAS Clusters"
■ Section 4.2.7, "Understanding DCM-Managed OracleAS Cluster Membership"
4.2.1 Creating DCM-Managed OracleAS ClustersAn OracleAS Farm contains a collection of Oracle Application Server instances. In an OracleAS Farm, you can view a list of all application server instances when you start Application Server Control Console. The application server instances shown in the Standalone Instances area on the Application Server Control Console Farm Home Page are available to be added to DCM-Managed OracleAS Clusters.
Each Oracle Application Server Farm uses either a File-Based Repository or a Database-Based Repository. The steps for associating an application server instance with an OracleAS Farm depends on the type of the repository.
This section covers the following:
■ Section 4.2.1.1, "Associating an Instance with an OracleAS Database-based Farm"
■ Section 4.2.1.2, "Associating an Instance with an OracleAS File-based Farms"
■ Section 4.2.1.3, "Using the Application Server Control Console Create Cluster Page"
See Also:
■ Section 3.2.1, "OracleAS Clusters Managed Using DCM"
■ Section 4.2.7, "Understanding DCM-Managed OracleAS Cluster Membership"
See Also: Distributed Configuration Management Administrator’s Guide for information on dcmctl commands
Note: This section covers procedures for clusterable middle-tier instances that are part of an OracleAS Farm. For purposes of this section, a clusterable instance is a middle-tier instance, where the dcmctl isclusterable command returns the value true.

Using DCM-Managed OracleAS Clusters
Managing and Operating Middle-tier High Availability 4-3
4.2.1.1 Associating an Instance with an OracleAS Database-based FarmIf you have not already done so during the Oracle Application Server installation process, you can associate an application server instance with an OracleAS Database-based Farm:
For an OracleAS Database-based Farm, do the following to add an Oracle Application Server instance to the OracleAS Farm:
1. Navigate to the Application Server Control Console Instance Home Page.
2. In the Home area, select the Infrastructure link and follow the instructions for associating an application server instance with an Oracle Application Server Infrastructure.
4.2.1.2 Associating an Instance with an OracleAS File-based FarmsThis section covers the following topics:
■ Section 4.2.1.2.1, "Creating an OracleAS File-based Farm Repository Host"
■ Section 4.2.1.2.2, "Adding Instances to an OracleAS File-based Farm"
4.2.1.2.1 Creating an OracleAS File-based Farm Repository Host
You can instruct the Oracle Application Server installer to create an OracleAS File-based Farm when you install Oracle Application Server. If you did not create an OracleAS File-based Farm during installation, then you can create the OracleAS File-based Farm with the following steps.
1. Using the Application Server Control Console for the instance that you want to use as the repository host, select the Infrastructure link to navigate to the Infrastructure page. If a repository is not configured, then the Farm Repository field shows "Not Configured", as shown in Figure 4–1.
Figure 4–1 Application Server Control Console Farm Repository Management
2. On the Infrastructure page, in the OracleAS Farm Repository Management area, select the Configure button to start the Configure OracleAS Farm Repository wizard. The hostname appears under Configure Oracle Farm Repository Source.
3. Select the New file-based repository option and click Next, as shown in Figure 4–2.
See Also: Oracle Application Server Administrator’s Guide

Using DCM-Managed OracleAS Clusters
4-4 Oracle Application Server High Availability Guide
Figure 4–2 Application Server Control Console: Create Repository Wizard Step 1
4. The wizard jumps to Step 4 of 4, Validation, as shown in Figure 4–3.
Figure 4–3 Application Server Control Console Create Repository Wizard Step 4
5. Select Finish, and Oracle Application Server creates the OracleAS File-based Farm.
6. When the wizard completes, note the Repository ID shown in the OracleAS Farm Repository Management area on the Infrastructure page. You need to use the Repository ID to add instances to the OracleAS File-based Farm.
When you go to the Application Server Control Console Home page, notice that the home page shows the OC4J instance and the Oracle HTTP Server are stopped, and the page now includes a Farm link in the General area.

Using DCM-Managed OracleAS Clusters
Managing and Operating Middle-tier High Availability 4-5
4.2.1.2.2 Adding Instances to an OracleAS File-based Farm
To add standalone application server instances to an OracleAS File-based Farm, perform the following steps:
1. Obtain the Repository ID for the OracleAS File-based Farm that you want to join. To find the Repository ID, on any Oracle Application Server instance that uses the OracleAS File-based Farm, click the Infrastructure link, and check the value of the File-based Repository ID field in the OracleAS Farm Repository Management area.
2. Switch to the Application Server Control Console for the standalone instance that you want to add to the OracleAS File-based Farm and click the Infrastructure link. If a repository is not configured, then the Farm Repository field shows "Not Configured", as shown in Figure 4–1.
3. Click Configure to start the Configure OracleAS Farm Repository wizard. The repository creation wizard appears (Figure 4–2). The host name appears in the OracleAS Instance field under the Configure Oracle Farm Repository Source area.
4. Select the Existing file-based repository button and click Next. The repository creation wizard displays the Location page, Step 3 of 4 (Figure 4–4).
Figure 4–4 Application Server Control Console Add Instance to Farm
5. Enter the repository ID for the Repository Host and click Next.
6. In the step 4 of 4 page, Configure OracleAS Farm Repository Validation, click Finish. When the wizard completes, the standalone instance joins the OracleAS File-based Farm.
After the wizard completes, you return to the Application Server Control Console Infrastructure page.
4.2.1.3 Using the Application Server Control Console Create Cluster PageUsing the Application Server Control Console Farm Home Page, you can create a new DCM-Managed OracleAS Cluster.
From the Farm Home page, create a new DCM-Managed OracleAS Cluster as follows:
1. Click the Farm link to navigate to the Farm Home Page.
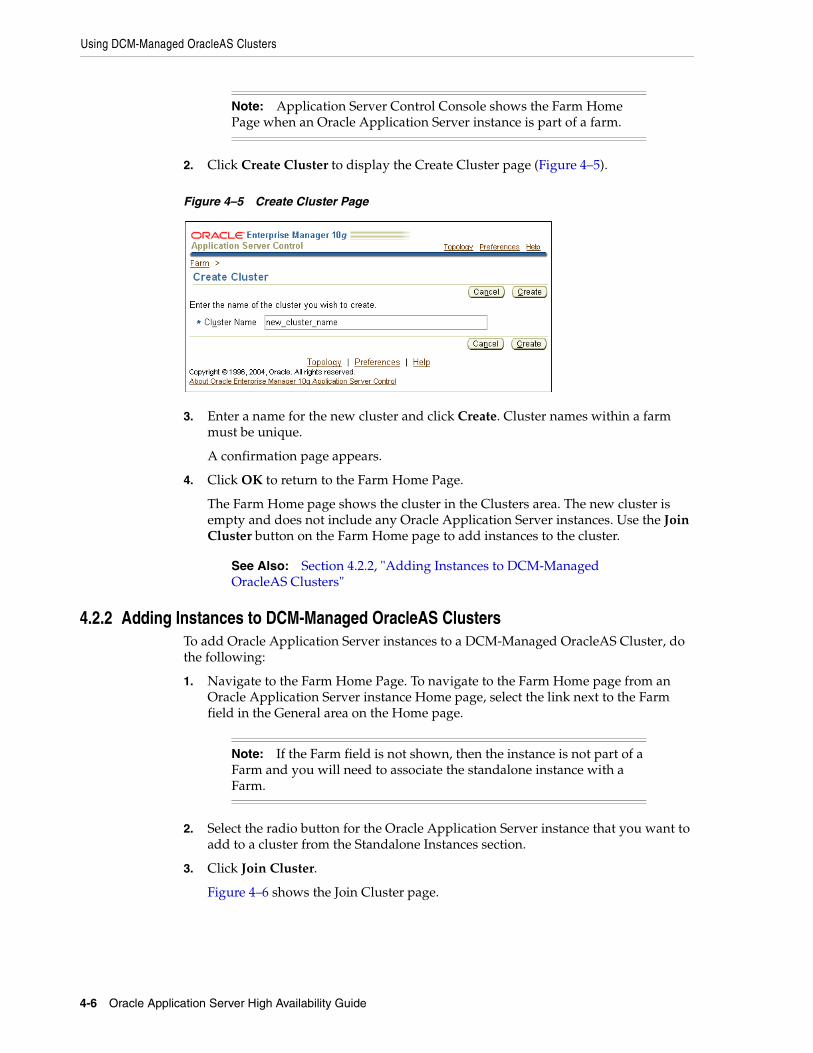
Using DCM-Managed OracleAS Clusters
4-6 Oracle Application Server High Availability Guide
2. Click Create Cluster to display the Create Cluster page (Figure 4–5).
Figure 4–5 Create Cluster Page
3. Enter a name for the new cluster and click Create. Cluster names within a farm must be unique.
A confirmation page appears.
4. Click OK to return to the Farm Home Page.
The Farm Home page shows the cluster in the Clusters area. The new cluster is empty and does not include any Oracle Application Server instances. Use the Join Cluster button on the Farm Home page to add instances to the cluster.
4.2.2 Adding Instances to DCM-Managed OracleAS ClustersTo add Oracle Application Server instances to a DCM-Managed OracleAS Cluster, do the following:
1. Navigate to the Farm Home Page. To navigate to the Farm Home page from an Oracle Application Server instance Home page, select the link next to the Farm field in the General area on the Home page.
2. Select the radio button for the Oracle Application Server instance that you want to add to a cluster from the Standalone Instances section.
3. Click Join Cluster.
Figure 4–6 shows the Join Cluster page.
Note: Application Server Control Console shows the Farm Home Page when an Oracle Application Server instance is part of a farm.
See Also: Section 4.2.2, "Adding Instances to DCM-Managed OracleAS Clusters"
Note: If the Farm field is not shown, then the instance is not part of a Farm and you will need to associate the standalone instance with a Farm.

Using DCM-Managed OracleAS Clusters
Managing and Operating Middle-tier High Availability 4-7
Figure 4–6 Join Cluster Page
4. Select the radio button of the cluster that you want the Oracle Application Server instance to join.
5. Click Join. Application Server Control Console adds the instance to the selected cluster and then displays a confirmation page.
6. Click OK to return to the Farm Home Page.
Repeat these steps for each additional standalone instance you want to add to the cluster.
Note the following when adding Oracle Application Server instances to a DCM-Managed OracleAS Cluster:
■ The order in which you add Oracle Application Server instances to a DCM-Managed OracleAS Cluster is significant. The first instance that joins the DCM-Managed OracleAS Cluster serves as the base configuration for all additional instances that join the cluster. The base configuration includes all cluster-wide configuration information. It does not include instance-specific parameters.
■ After the first Oracle Application Server instance joins the DCM-Managed OracleAS Cluster, the base configuration overwrites existing cluster-wide configuration information for subsequent Oracle Application Server instances that join the cluster. Each additional Oracle Application Server instance, after the first, that joins the cluster inherits the base configuration specified for the first Oracle Application Server instance that joined the cluster.
■ Before adding an Oracle Application Server instance to a DCM-Managed OracleAS Cluster, Application Server Control Console stops the instance. You can restart the Oracle Application Server instance by selecting the cluster link, selecting the appropriate instance from within the cluster, and then clicking the Start button.
■ Application Server Control Console removes an Oracle Application Server instance from the Standalone Instances area when the instance joins a DCM-Managed OracleAS Cluster.
■ To add multiple standalone Oracle Application Server instances to a DCM-Managed OracleAS Cluster in a single operation, use the dcmctl joinCluster command.
■ When an Oracle Application Server instance contains certain Oracle Application Server components, it is not clusterable. Use the dcmctl isClusterable command to test if an instance is clusterable. If the instance is not clusterable, then Application Server Control Console returns an error when you attempt to add the instance to a DCM-Managed OracleAS Cluster.

Using DCM-Managed OracleAS Clusters
4-8 Oracle Application Server High Availability Guide
■ All Oracle Application Server instances that are to be members of a DCM-Managed OracleAS Cluster must be installed on the same flavor operating system. For example, different variants of UNIX are clusterable together, but they are not clusterable with Windows systems.
4.2.3 Removing Instances from DCM-Managed OracleAS ClustersTo remove an Oracle Application Server instance from a cluster, do the following:
1. Select the cluster in which you are interested on the Farm Home Page. This displays the cluster page.
2. Select the radio button of the Oracle Application Server instance to remove from the cluster and click Remove.
Repeat these steps for each Oracle Application Server instance that you want to remove.
Note the following when removing Oracle Application Server instances from a DCM-Managed OracleAS Cluster:
■ Before Application Server Control Console removes an Oracle Application Server instance from a cluster, it stops the instance. After the operation completes, you can restart the Oracle Application Server instance from the Standalone Instances area of the Farm Home Page.
■ The dcmctl leaveCluster command removes one Oracle Application Server instance from the cluster at each invocation.
■ When the last Oracle Application Server instance leaves a cluster, cluster-wide configuration information associated with the cluster is removed. The cluster is now empty and the base configuration is not set. Subsequently, Oracle Application Server uses the first Oracle Application Server instance that joins the cluster as the base configuration for all additional Oracle Application Server instances that join the cluster.
■ You can remove any Oracle Application Server instance from a cluster at any time. The first instance to join a cluster does not have special properties. The base configuration is created from the first instance to join the cluster, but this instance can be removed from the cluster in the same manner as the other instances.
4.2.4 Starting, Stopping, and Deleting DCM-Managed OracleAS ClustersFigure 4–7 shows the Application Server Control Console Farm Home Page, including two clusters, cluster1 and cluster2.
Note: For adding instances to an OracleAS File-based Farm, where the instances will be added to an DCM-Managed OracleAS Cluster, there is no known fixed upper limit on the number of instances; a DCM-Managed OracleAS Cluster of 12 instances has been tested successfully.

Using DCM-Managed OracleAS Clusters
Managing and Operating Middle-tier High Availability 4-9
Figure 4–7 Oracle Application Server 10g Farm Page
Table 4–1 lists the cluster control options available on the Farm Home Page.
4.2.5 Rolling Upgrades for Stateful J2EE ApplicationsHttpSession replication has become a popular feature among Oracle Application Server users. OracleAS Cluster (OC4J) takes care of replicating the HttpSession information to the instances that participate in the cluster and enables the failover of requests between nodes in a manner transparent to the application user. However, this high availability feature is affected by the normal lifecycle of applications. Every time you redeploy an application, the deployment process triggers the reload of the application classes in the instances in the cluster and causes the HttpSession to be lost. The maintenance of session information across deployments may generate some inconsistencies depending on the logic included in the latest version of the application. It is up to the code in the application that the session information is treated in a different way from the previous deployment. However, in many cases, the changes in the code of an application do not affect the way the session information is processed inside the business logic. Additionally, and due to the possible criticality of the
Table 4–1 Oracle Application Server Farm Page Options
If you want to... Then...
Start all Oracle Application Server instances in a DCM-Managed OracleAS Cluster
Select the radio button next to the cluster and click Start.
Restart all Oracle Application Server instances in an DCM-Managed OracleAS Cluster
Select the radio button next to the cluster and click Restart.
Stop all Oracle Application Server instances in an DCM-Managed OracleAS Cluster
Select the radio button next to the cluster and click Stop.
Delete a DCM-Managed OracleAS Cluster
Oracle Application Server instances that are in the cluster are removed from the cluster and become standalone instances in the Farm.
Select the radio button next to the cluster and click Delete.

Using DCM-Managed OracleAS Clusters
4-10 Oracle Application Server High Availability Guide
information, it may be required to maintain the data added to the session by the users across deployments.
This section describes how to use OracleAS Clusters so that the deployments of new versions of an application do not imply the loss of HttpSession information. The procedure is based on the consecutive ("rolling") update of the application in the different instances that form the cluster.
4.2.5.1 Configuration and HttpSession ReplicationOne of the benefits of using OracleAS Clusters managed through file-based or database-based repositories (also known as DCM-managed clusters) is that the creation of a cluster through DCM automatically triggers the propagation of configuration across all the participants in the cluster. This enables the deployment of applications to all the Oracle Application Server instances in a cluster in a single step. DCM propagates the EAR or WAR file and replicates the configuration to all the nodes that are part of that cluster.
This configuration replication feature is commonly misunderstood and associated with the replication of "runtime state" in a cluster. Configuration replication is achieved with DCM. Replication of HttpSession state in a J2EE deployment is achieved through IP multicast and serialization mechanisms in OracleAS Cluster (OC4J).
The creation of OracleAS Cluster through Application Server Control triggers both mechanisms: configuration replication with DCM and HttpSession replication between the OC4J containers that "reside" in the Oracle Application Server instances that are part of the cluster. The session replication mechanism, however, is totally independent of the configuration replication. Only three configuration parameters are needed to enable the replication of the HttpSession object across OC4J instances:
■ the multicast address and port
■ the island definition
■ the "distributable" tag in the web.xml deployment descriptor for the application
Based on this, it is possible to participate in an "HttpSession replication group" without belonging to the same configuration group. The procedure described in this section (intended to maintain state across redeployments of application to an OracleAS Cluster) is based on the separation of these two concepts. The procedure does not apply to OracleAS Cluster (OC4J) that is manually configured. For this type of cluster, the deployment is done node by node. In these cases, the session will be maintained automatically as long as there is enough time (between the deployments to each instance in the cluster) for replication to take place.
4.2.5.2 ScenarioThe procedure described later in this section assumes the following scenario:
One OracleAS Farm containing two Oracle Application Server instances (I1 and I2) configured in one cluster (cluster1) sharing state (that is, configured inside the same OC4J island). This cluster can be managed either through a file-based or database-based repository.
One application ("app") is deployed on this cluster. The application is deployed on one OC4J instance (OC4J_Clustered). The application is already deployed and is at version 0. Some state is being stored in the HttpSession. The goal is to deploy a new version of the application (version 1) while maintaining the state. The two Oracle HTTP Servers in the Oracle Application Server instances are load-balanced by an external load balancer (typically OracleAS Web Cache or a third-party hardware load balancer).

Using DCM-Managed OracleAS Clusters
Managing and Operating Middle-tier High Availability 4-11
Figure 4–8 shows the initial scenario.
Figure 4–8 Initial Scenario
4.2.5.3 Procedure1. Using Application Server Control Console, stop OC4J and Oracle HTTP Server in
one of the instances (I2, for example) in the cluster. This ensures that all requests will get routed to the one single node that will maintain the state.
2. Using Application Server Control Console, remove the stopped instance (I2) from the cluster.
a. In Application Server Control Console, click "Cluster1".
b. Select the "I2" instance.
c. Click Remove.
At this point, although you have removed I2 from the cluster and stopped the OC4J_Clustered component in I2, the replication configuration still remains the same and the two instances are still sharing the same IP multicast group.
Figure 4–9 shows the configuration at this point.
Cluster1
Oracle Application Server Instance I1
OC4J_Clustered
App (version 0)
Oracle Application Server Instance I2
OC4J_Clustered
App (version 0)
Farm
Load Balancer
Oracle HTTP ServerOracle HTTP Server
Replication of HttpSession
Requests
(same IP multicast replication group)

Using DCM-Managed OracleAS Clusters
4-12 Oracle Application Server High Availability Guide
Figure 4–9 Instance I2 Stopped and Removed from Cluster1
3. Using Application Server Control Console, deploy a new version of the application to the I2 instance, which is no longer in the cluster. See Figure 4–10.
Figure 4–10 Instance I2 with New Version of the Application
4. Create a separate cluster (Cluster2) and add the standalone instance (I2) to it. See Figure 4–11.
Cluster1
Oracle Application Server Instance I1
OC4J_Clustered
App (version 0)
Oracle Application Server Instance I2(stopped)
OC4J_Clustered
App (version 0)
Farm
Load Balancer
Oracle HTTP ServerOracle HTTP Server
Requests
(same IP multicast replication group)
Cluster1
Oracle Application Server Instance I1
OC4J_Clustered
App (version 0)
Oracle Application Server Instance I2(stopped)
OC4J_Clustered
App (version 1)
Farm
Load Balancer
Oracle HTTP ServerOracle HTTP Server
Requests
(same IP multicast replication group)

Using DCM-Managed OracleAS Clusters
Managing and Operating Middle-tier High Availability 4-13
Figure 4–11 Instance I2 Added to a New Cluster, Cluster2
5. Start the I2 instance in the second cluster (Cluster2). At this time, because the instances are still using the same IP multicast group and same island definition for the OC4J instance, replication between the two separate clusters is still taking place. See Figure 4–12.
Figure 4–12 Instance I2 Started Up
6. Stop the I1 instance in the first cluster (Cluster1).
7. Remove the I1 instance from the first cluster (Cluster1).
Figure 4–13 shows the scenario at this point.
Cluster2Cluster1
Oracle Application Server Instance I1
OC4J_Clustered
App (version 0)
Oracle Application Server Instance I2(stopped)
OC4J_Clustered
App (version 1)
Farm
Load Balancer
Oracle HTTP ServerOracle HTTP Server
Requests
(same IP multicast replication group)
Cluster2Cluster1
Oracle Application Server Instance I1
OC4J_Clustered
App (version 0)
Oracle Application Server Instance I2
OC4J_Clustered
App (version 1)
Farm
Load Balancer
Oracle HTTP ServerOracle HTTP Server
Requests
(same IP multicast replication group)Replication of HttpSession

Using DCM-Managed OracleAS Clusters
4-14 Oracle Application Server High Availability Guide
Figure 4–13 Instance I1 Stopped and Removed from Cluster1
8. Join instance I1, which is stopped, to the second cluster (Cluster2). DCM will automatically deploy the new version of the application (version 1) in the joining instance (I1).
Figure 4–14 Instance I1 Added to Cluster2, App Is now Version 1
9. Start the first instance I1.
Cluster2Cluster1(empty) Oracle Application Server Instance I1
(stopped)
OC4J_Clustered
App (version 0)
Oracle Application Server Instance I2
OC4J_Clustered
App (version 1)
Farm
Load Balancer
Oracle HTTP ServerOracle HTTP Server
Requests
(same IP multicast replication group)
Cluster2Cluster1(empty) Oracle Application Server Instance I1
(stopped)
OC4J_Clustered
App (version 1)
Oracle Application Server Instance I2
OC4J_Clustered
App (version 1)
Farm
Load Balancer
Oracle HTTP ServerOracle HTTP Server
Requests
(same IP multicast replication group)

Using DCM-Managed OracleAS Clusters
Managing and Operating Middle-tier High Availability 4-15
Figure 4–15 Both Instances Running and Using the New Version of the Application
You now have two nodes with the new version of the application. The HttpSession information has been maintained across deployments. No state has been lost in the process.
4.2.5.4 Automation of the Procedure Using DCM ScriptsTo automate the procedure above, you can use DCM scripts in each of the involved instances. The following scripts provide a sample implementation and can be customized with the following parameters:
appname - the name of the application being deployed and updated
app.ear - the full path location to the new EAR file being deployed
instance_n - the name of the first Oracle Application Server instance that will be updated
last_instance - the name of the last Oracle Application Server instance that will be updated
cluster1 - the name of the cluster where the application is originally deployed
cluster2 - the name of the cluster used for session migration
dcmscript_instance_nstop -i instance_n -ct OC4Jstop -i instance_n -co HTTP_Server -ct HTTP_ServerleaveCluster -i instance_nundeployApplication -a appnamedeployApplication -f app.ear -a appnamejoinCluster -cl cluster2 -i instance_nstart -i instance_n
dcmscript_last_instancestop -i last_instanceleaveCluster -i last_instance
Cluster2Cluster1(empty)
Oracle Application Server Instance I1
OC4J_Clustered
App (version 1)
Oracle Application Server Instance I2
OC4J_Clustered
App (version 1)
Farm
Load Balancer
Oracle HTTP ServerOracle HTTP Server
Requests
(same IP multicast replication group)Replication of HttpSession

Using DCM-Managed OracleAS Clusters
4-16 Oracle Application Server High Availability Guide
joinCluster -cl cluster2 -i last_instancestart -i instance_1
The procedure involves running first dcmscript_instance_n in each of the instances that participate in the cluster and that will be updated before the last instance. After this is done in all the instances except the last one, run dcmscript_last_instance from the last instance. To run these scripts:
> cd ORACLE_HOME/dcm/bin> dcmctl shell -f filename
where filename is the name of the DCM script (dcmscript_instance_n or dcmscript_last_instance).
For future stateful deployments, the operations would require to switch roles between the original cluster and the session holder cluster. This can be achieved by creating a couple of additional scripts.
dcmscript_instance_n_odd_runstop -i instance_n -ct OC4Jstop -i instance_n -co HTTP_Server -ct HTTP_ServerleaveCluster -i instance_nundeployApplication -a appnamedeployApplication -f app.ear -a appnamejoinCluster -cl cluster1 -i instance_nstart -i instance_n
dcmscript_last_instance_odd_runstop -i last_instanceleaveCluster -i last_instancejoinCluster -cl cluster1 -i last_instancestart -i instance_1
The next deployment with state would require running the first set of scripts, the following deployment would use the odd_run scripts, and so on.
4.2.5.5 Additional ConsiderationsIf the cluster contains more than two instances, it is necessary to move the instances between the two clusters in the same way I1 was moved in the example above (you would have to apply steps 6 through 9 for each one of the instances in the cluster).
cluster1 and cluster2 switch roles in subsequent deployments. After you finish moving the last instance as described in the procedure, simply leave the empty cluster for future use.
If the new version of the application modifies the signature of the objects that are added to the session (for example, it added new attributes to these objects), the container will automatically trigger the load of the new version of the classes involved in the cluster. This means that the session will be lost whenever the signature is changed. Other modifications to the servlets, JSPs, and classes included in the redeployment will be assimilated by the instances without any loss in the HttpSession state.
4.2.6 Configuring Oracle HTTP Server Options for DCM-Managed OracleAS ClustersThis section describes Oracle HTTP Server options for DCM-Managed Oracle Application Server Clusters.

Using DCM-Managed OracleAS Clusters
Managing and Operating Middle-tier High Availability 4-17
This section covers the following:
■ Section 4.2.6.1, "Using and Configuring mod_oc4j Load Balancing"
■ Section 4.2.6.2, "Configuring Oracle HTTP Server Instance-Specific Parameters"
■ Section 4.2.6.3, "Configuring mod_plsql With Real Application Clusters"
4.2.6.1 Using and Configuring mod_oc4j Load BalancingUsing DCM-Managed OracleAS Clusters, the Oracle HTTP Server module mod_oc4j load balances requests to OC4J processes. The Oracle HTTP Server, using mod_oc4j configuration options, supports different load balancing policies. By specifying load balancing policies DCM-Managed OracleAS Clusters provide performance benefits along with failover and high availability, depending on the network topology and host machine capabilities.
By default, mod_oc4j uses weights to select a node to forward a request to. Each node uses a default weight of 1. A node’s weight is taken as a ratio compared to the weights of the other available nodes to define the number of requests the node should service compared to the other nodes in the DCM-Managed OracleAS Cluster. Once a node is selected to service a particular request, by default, mod_oc4j uses the roundrobin policy to select OC4J processes on the node. If an incoming request belongs to an established session, the request is forwarded to the same node and the same OC4J process that started the session.
The mod_oc4j load balancing policies do not take into account the number of OC4J processes running on a node when calculating which node to send a request to. Node selection is based on the configured weight for the node, and its availability.
To modify the mod_oc4j load balancing policy, use the Oc4jSelectMethod and Oc4jRoutingWeight configuration directives in the mod_oc4j.conf file.
Using Application Server Control Console, configure the mod_oc4j.conf file as follows:
1. Select the HTTP_Server component from the System Components area of an instance home page.
2. Click the Administration link on the HTTP_Server page.
3. Click the Advanced Server Properties link on the Administration page.
4. On the Advanced Server Properties page, select the mod_oc4j.conf link from the Configuration Files area.
5. On the Edit mod_oc4j.conf page, within the <IfModule mod_oc4j.c> section, add or edit the directives Oc4jSelectMethod and Oc4jRoutingWeight to select the desired load balancing option.

Using DCM-Managed OracleAS Clusters
4-18 Oracle Application Server High Availability Guide
4.2.6.2 Configuring Oracle HTTP Server Instance-Specific ParametersYou can modify the Oracle HTTP Server ports and listening addresses on the Server Properties Page, which can be accessed from the Oracle HTTP Server Home Page. You can modify the virtual host information by selecting a virtual host from the Virtual Hosts section on the Oracle HTTP Server Home Page.
Table 4–3 shows the Oracle HTTP Server instance-specific parameters.
4.2.6.3 Configuring mod_plsql With Real Application ClustersThis section covers the following:
■ Section 4.2.6.3.1, "Configuring Detection and Cleanup of Dead Connections"
■ Section 4.2.6.3.2, "Using Oracle Directory for Lookups"
4.2.6.3.1 Configuring Detection and Cleanup of Dead Connections
Using Oracle HTTP Server with the mod_plsql module, if a database becomes unavailable, the connections to the database need to be detected and cleaned up. This section explains how to configure mod_plsql to detect and cleanup dead connections.
The mod_plsql module maintains a pool of connections to the database and reuses established connections for subsequent requests. If there is no response from a database connection, mod_plsql detects this case, discards the dead connection, and creates a new database connection for subsequent requests.
By default, when a Real Application Clusters node or a database instance goes down and mod_plsql previously pooled connections to the node or instance, the first mod_plsql request that uses a dead connection in its pool results in a failure response of HTTP-503 that is sent to the end-user. The mod_plsql module processes this failure and uses it to trigger detection and removal of all dead connections in the connection pool. The mod_plsql module pings all connection pools that were created before the failure response. This ping operation is performed at the time of processing for the next request that uses a pooled connection. If the ping operation fails, the database connection is discarded, and a new connection is created and processed.
Note: If you do not use Application Server Control Console, you can edit mod_oc4j.conf and use the dcmctl updateConfig command to propagate changes to other mod_oc4j.conf files across a DCM-Managed OracleAS Cluster as follows:
> dcmctl updateconfig -ct ohs> opmnctl @cluster:<cluster_name> restartproc ias-component=HTTP_Server process-type=HTTP_Server
cluster_name is the name of the cluster.
The opmnctl restartproc command is required for the changes to take effect across all the instances in the cluster.
See Also:
■ Section 4.4.3, "Configuring OC4J Instance-Specific Parameters"
■ Oracle HTTP Server Administrator’s Guide for information on using mod_oc4j load balancing directives
■ Oracle Application Server Performance Guide

Using DCM-Managed OracleAS Clusters
Managing and Operating Middle-tier High Availability 4-19
Setting the PlsqlConnectionValidation parameter to Automatic causes the mod_plsql module to test all pooled database connections that were created before a failed request. This is the default configuration.
Setting the PlsqlConnectionValidation parameter to AlwaysValidate causes mod_plsql to test all pooled database connections before issuing any request. Although the AlwaysValidate configuration option ensures greater availability, it also introduces additional performance overhead.
You can specify the timeout period for mod_plsql to test a bad database connection in a connection pool. The PlsqlConnectionTimeout parameter, which specifies the maximum time mod_plsql should wait for the test request to complete before it assumes that a connection is not usable.
4.2.6.3.2 Using Oracle Directory for Lookups
Oracle Net clients can use a Directory Server to look up connect descriptors. At the beginning of a request, the client uses a connect identifier to the Directory Server where it is then resolved into a connect descriptor.
The advantage of using a Directory Server is that the connection information for a server can be centralized. If the connection information needs to be changed, either because of a port change or a host change, the new connection information only needs to be updated once, in the Directory Server, and all Oracle Net clients using this connection method will be able to connect to the new host.
4.2.7 Understanding DCM-Managed OracleAS Cluster MembershipAfter a DCM-Managed OracleAS Cluster is created, you can add Oracle Application Server instances to it. This section describes DCM-Managed OracleAS Cluster configuration and the characteristics of clusterable Oracle Application Server instances.
This section covers the following topics:
■ Section 4.2.7.1, "How the Common Configuration Is Established"
■ Section 4.2.7.2, "Parameters Excluded from the Common Configuration: Instance-Specific Parameters"
4.2.7.1 How the Common Configuration Is EstablishedThe order in which Oracle Application Server instances are added to the DCM-Managed OracleAS Cluster is significant. The common configuration that will be replicated across the DCM-Managed OracleAS Cluster is established by the first Oracle Application Server instance added to the cluster. The configuration of the first Oracle Application Server instance added is inherited by all Oracle Application Server instances that subsequently join the DCM-Managed OracleAS Cluster.
The common configuration includes all cluster-wide configuration information— namely, DCM-Managed OracleAS Cluster and Oracle Application Server instance attributes, such as components configured. For example, if the first Oracle Application Server instance to join the cluster has four OC4J instances, then the common configuration includes those four OC4J instances and the applications deployed on them. OC4J Instances that subsequently join the DCM-Managed OracleAS Cluster
See Also: Oracle Application Server mod_plsql User’s Guide
See Also: Oracle Database Net Services Administrator's Guide for instructions on configuring Directory Naming.

Using DCM-Managed OracleAS Clusters
4-20 Oracle Application Server High Availability Guide
replicate the OC4J instances and their deployed applications. (In addition, when the Oracle Application Server instance joins the DCM-Managed OracleAS Cluster, DCM removes any OC4J components that do not match the common configuration). Furthermore, changes to one Oracle Application Server instance in the DCM-Managed OracleAS Cluster, such as adding new OC4J instances or removing OC4J instances, are replicated across the DCM-Managed OracleAS Cluster; the components configured are part of the replicated cluster-wide, common configuration.
When the last Oracle Application Server instance leaves a DCM-Managed OracleAS Cluster, the DCM-Managed OracleAS Cluster becomes an empty DCM-Managed OracleAS Cluster, and the next Oracle Application Server instance to joins the DCM-Managed OracleAS Cluster provides a new common configuration for the DCM-Managed OracleAS Cluster.
4.2.7.2 Parameters Excluded from the Common Configuration: Instance-Specific ParametersSome parameters only apply to a given Oracle Application Server instance or computer; these parameters are instance-specific parameters. DCM does not propagate instance-specific parameters to the Oracle Application Server instances in a DCM-Managed OracleAS Cluster. When you change an instance-specific parameter, if you want the change to apply across the DCM-Managed OracleAS Cluster, you must apply the change individually to each appropriate Oracle Application Server instance.
Table 4–2 OC4J Instance-specific Parameters
Parameter Description
island definitions Specific to an Oracle Application Server instance. Stateful OC4J applications that need to replicate state require that all of the islands in each OC4J instance across the DCM-Managed OracleAS Cluster have the same name.
number of processes Specific to a computer. You may want to tune this parameter according to the computer’s capabilities.
command-line options.
Note: For command-line options to be instance-specific, you need to perform additional configuration. See Section 4.2.7.3, "Configuring Command-Line Options to be Instance-Specific" for details.
Specific to a computer.
port numbers for RMI, JMS and AJP communication
Specific to a computer.
Table 4–3 Oracle HTTP Server Instance-Specific Parameters
Parameter Description
ApacheVirtualHost Specific to a computer.
Listen Specific to a computer. This directive binds the server to specific addresses or ports.
OpmnHostPort Specific to a computer.
Port Specific to a computer. This directive specifies the port to which the standalone server listens.
User Specific to a computer.

Using DCM-Managed OracleAS Clusters
Managing and Operating Middle-tier High Availability 4-21
Group Specific to a computer.
NameVirtualHost Specific to a computer. This directive specifies the IP address on which the server receives requests for a name-based virtual host. This directive can also specify a port.
ServerName Specific to a computer. This directive specifies the host name that the server should return when creating redirection URLs. This directive is used if gethostbyname does not work on the local host. You can also use it if you want the server to return a DNS alias as a host name (for example, www.mydomain.com).
PerlBlob Specific to a computer.
Table 4–4 OPMN Instance-Specific Parameters
Parameter in opmn.xml file Description
All configuration for the notification server:
opmn/notification-server
Specific to a computer.
process-manager elements:
log-fileprocess-module
Specific to an Oracle Application Server instance.
ias_instance attributes:
idORACLE_HOMEORACLE_CONFIG_HOME
Specific to an Oracle Application Server instance.
The following elements and attributes of opmn/process-manager/ias-instance/ias-component/process-type
port.rangestartstoppingrestartprocess-set
Specific to an Oracle Application Server instance. Although instance-specific, these elements and attributes have default configurations (the configurations are not propagated, but retrieved from repository).
The MissingLocalValuePolicy flag indicates that element or attribute has a default value:
MissingLocalValuePolicy="UseRepositoryValue"
Table 4–3 (Cont.) Oracle HTTP Server Instance-Specific Parameters
Parameter Description

Using DCM-Managed OracleAS Clusters
4-22 Oracle Application Server High Availability Guide
4.2.7.3 Configuring Command-Line Options to be Instance-SpecificTo ensure that command-line options are instance-specific (that is, to ensure that the options are not propagated to other instances), you need to edit the ORACLE_HOME/opmn/conf/instspec.xml file as follows:
1. Remove (or comment out) the following line from the ORACLE_HOME/opmn/conf/instspec.xml file. You have to do this on all nodes in the cluster.
<!-- for HTTP_Server and OC4J, only this is instance specific --><InstanceScopeItem target="/opmn/process-manager/ias-instance/ias-component/
process-type/module-data/category/data[id='config-file']"/>
2. Add the following lines to the instspec.xml file. You have to do this on all nodes in the cluster.
<!-- for HTTP_Server and OC4J, only this is instance specific --> <InstanceScopeItem target="/opmn/process-manager/ias-instance/ias-component/
process-type/module-data/category/data"/>
<InstanceScopeItem target="/opmn/process-manager/ias-instance/ias-component/process-type/module-data/category/data[id='java-options']"/>
<InstanceScopeItem target="/opmn/process-manager/ias-instance/ias-component/process-type/module-data/category/data[id='oc4j-options']"/>
The following opmn/process-manager/ias-instance attributes and elements:
module-data/category/data[id='config-file']ias-component/module-data/category/data[id='config-file']ias-component/process-type/module-data/category/data[id='config-file']ias-component/process-type/process-set/module-data/category/data[id='config-file']
environment
ias-component/environment
ias-component/process-type/environment
ias-component/process-type/process-set/environment
All other components whose id is not HTTP_Server or OC4J in opmn/process-manager/ias-instance/ias-component:
[id='dcm-daemon'][id='WebCache'][id='OID'][id='IASPT'][id='wireless'][id='Discoverer'][id='LogLoader'][id='Custom']
Most of the HTTP_Server and OC4J parameters are cluster-wide; only those shown here are instance-specific.
In general:
■ Any data element whose id is config-file is instance-specific.
■ Any environment element is instance-specific.
See Also: Appendix B, "Troubleshooting DCM", in the Distributed Configuration Management Administrator’s Guide for a complete opmn.xml file that shows the hierarchy of these elements and attributes.
Table 4–4 (Cont.) OPMN Instance-Specific Parameters
Parameter in opmn.xml file Description

Availability Considerations for the DCM Configuration Repository
Managing and Operating Middle-tier High Availability 4-23
<InstanceScopeItem target="/opmn/process-manager/ias-instance/ias-component/process-type/module-data/category/data[id='java-bin']"/>
3. If the Oracle Application Server instances are in an Oracle Application Server Farm that uses a database-based repository, then run the following command so that the changes you made to instspec.xml are reflected in the database. You do not have to run the command if the Oracle Application Server instances are in a file-based repository.
You have to run the command on all nodes in the cluster.
java -jar ORACLE_HOME/dcm/lib/dcm.jar registerplugin-f ORACLE_HOME/opmn/conf/register.xml -o ORACLE_HOME
4. Reload OPMN.
ORACLE_HOME/opmn/bin/opmnctl reload
You have to run the command on all nodes in the cluster.
4.3 Availability Considerations for the DCM Configuration RepositoryThis section covers availability considerations for the DCM configuration repository, and covers the following topics:
■ Section 4.3.1, "Availability Considerations for DCM-Managed OracleAS Cluster (Database)"
■ Section 4.3.2, "Availability Considerations for DCM-Managed OracleAS Cluster (File-based)"
4.3.1 Availability Considerations for DCM-Managed OracleAS Cluster (Database)This section covers availability considerations for the DCM configuration repository when using DCM-Managed OracleAS Clusters with an OracleAS Database-based Farm.
Using an OracleAS Database-based Farm with a Real Application Clusters database or other database high availability solution protects the system by providing high availability, scalability, and redundancy during failures of DCM configuration repository database.
4.3.2 Availability Considerations for DCM-Managed OracleAS Cluster (File-based)Using an OracleAS File-based Farm, the DCM configuration repository resides on one Oracle Application Server instance at any time. A failure of the host that contains the
Note: The availability of the configuration repository only affects the Oracle Application Server configuration and administration services. It does not affect the availability of the system for handling requests, or availability of the applications running in a DCM-Managed OracleAS Cluster.
See Also: The Oracle Database High Availability Architecture and Best Practices guide for a description of Oracle Database high availability solutions.

Availability Considerations for the DCM Configuration Repository
4-24 Oracle Application Server High Availability Guide
DCM configuration repository requires manual failover (by migrating the repository host to another host).
This section covers availability considerations for the DCM configuration repository when using DCM-Managed OracleAS Clusters with an OracleAS File-based Farm.
■ Section 4.3.2.1, "Selecting the Instance to Use for a OracleAS File-based Farm Repository Host"
■ Section 4.3.2.2, "Protecting Against the Loss of a Repository Host"
■ Section 4.3.2.3, "Impact of Repository Host Unavailability"
■ Section 4.3.2.4, "Impact of Non-Repository Host Unavailability"
■ Section 4.3.2.5, "Updating and Checking the State of Local Configuration"
■ Section 4.3.2.6, "Performing Administration on a DCM-Managed OracleAS Cluster"
■ Section 4.3.2.7, "Best Practices for Repository Backups"
■ Section 4.3.2.8, "Best Practices for Managing Instances in OracleAS File-based Farms"
4.3.2.1 Selecting the Instance to Use for a OracleAS File-based Farm Repository HostAn important consideration for using DCM-Managed OracleAS Clusters with a OracleAS File-based Farm is determining which Oracle Application Server instance is the repository host.
Consider the following when selecting the repository host for an OracleAS File-based Farm:
■ When the repository host instance is temporarily unavailable, a DCM-Managed OracleAS Cluster that uses a OracleAS File-based Farm is still able to run normally, but it cannot update any configuration information.
■ Because the Oracle Application Server instance that is the repository host instance stores and manages the DCM-Managed OracleAS Cluster configuration information in its file system, the repository host instance should use mirrored or RAID disks. Disk mirroring improves the availability of the DCM-Managed OracleAS Cluster.
■ When the repository host instance is not available, read-only configuration operations are not affected on any Oracle Application Server instances that are running. The OracleAS Farm cluster-wide configuration information is distributed and managed through local Java Object Cache.
■ When the repository host instance is not available, operations that attempt to change configuration information in the file-based repository will generate an error. These operations must be delayed until the repository host instance is available, or until the repository host instance is relocated to another application server instance within the OracleAS File-based Farm.
Note: The information in this section does not apply to a DCM-Managed Oracle Application Server Cluster that uses a OracleAS Database-based Farm (with the repository type, database).

Availability Considerations for the DCM Configuration Repository
Managing and Operating Middle-tier High Availability 4-25
4.3.2.2 Protecting Against the Loss of a Repository HostUsing an OracleAS File-based Farm, one instance in the farm is designated as the repository host. The repository host holds configuration information for all instances in the OracleAS File-based Farm. Access to the repository host is required for all configuration changes, write operations, for instances in the OracleAS File-based Farm. However, instances have local configuration caches to perform read operations, where the configuration is not changing.
In the event of the loss of the repository host, any other instance in the OracleAS File-based Farm can take over as the new repository host if an exported copy of the old repository hosts is available. You should make regular backups of the repository host, and save the backups on a separate system.
4.3.2.3 Impact of Repository Host UnavailabilityWhen the repository host is unavailable, only read-only operations are allowed. No configuration changes are allowed. If an operation is attempted that requires updates to the repository host, such as use of the updateConfig command, dcmctl reports an error message. For example:
ADMN-100205Base Exception:The DCM repository is not currently available. The OracleAS 10g instance,"myserver.mydomain.com", is using a cached copy of the repository information.This operation will update the repository, therefore the repository must be available.
If the repository host is permanently down, or unavailable for the long-term, then the repository host should be relocated. If the restored repository is not recent, local instance archives can be applied to bring each instance up to a newer state.
4.3.2.4 Impact of Non-Repository Host UnavailabilityWhen the instances in a DCM-Managed OracleAS Cluster, other than the repository host instance, are down, all other instances can still function properly. If an instance is experiencing a short-term outage, the instance automatically updates its configuration information when it becomes available again.
If an instance is permanently lost, this will have no affect on other instances in the OracleAS File-based Farm. However, to maintain consistency, it will be necessary to delete all records pertaining to the lost instance.
To delete configuration information for a lost instance, use the following command:
> dcmctl destroyInstance
4.3.2.5 Updating and Checking the State of Local ConfigurationIt is important that all configuration changes complete successfully, and that all instances in a cluster are "In Sync". The local configuration information must match the information stored in the repository. DCM does not know about manual changes to configuration files, and such changes could make the instances in a cluster have an In Sync status of false.
See Also: Distributed Configuration Management Administrator’s Guide
See Also: Section 4.3.2.6, "Performing Administration on a DCM-Managed OracleAS Cluster"

Availability Considerations for the DCM Configuration Repository
4-26 Oracle Application Server High Availability Guide
Use the following dcmctl command to return a list of all managed components with their In Sync status:
> dcmctl getState -cl cluster_name
The In Sync status of true implies that the local configuration information for a component is the same as the information that is stored in the repository.
If you need to update the file-based repository with changed, local information, use the dcmctl command updateConfig, as follows,
> dcmctl updateconfig> dcmctl getstate -cl cluster_name
Use the resyncInstance command to update local information with information from the repository. For example:
> dcmctl resyncinstance
By default this command only updates configuration information for components whose In Sync status is false. Use the -force option to update all components, regardless of their In Sync status.
4.3.2.6 Performing Administration on a DCM-Managed OracleAS ClusterDuring planned administrative downtimes, with a DCM-Managed OracleAS Cluster using an OracleAS File-based Farm that runs on multiple hosts with sufficient resources, you can perform administrative tasks while continuing to handle requests. This section describes how to relocate the repository host in a DCM-Managed OracleAS Cluster, while continuing to handle requests.
These procedures are useful for performing administrative tasks on a DCM-Managed OracleAS Cluster, such as the following:
■ Relocating the repository for repository host node decommission.
■ Applying required patches to the DCM-Managed OracleAS Cluster.
■ Applying system upgrades, changes, or patches that require a system restart for a host in the DCM-Managed OracleAS Cluster.
Use the following steps to relocate the repository host in a DCM-Managed OracleAS Cluster.
1. Issue the following DCM command, on UNIX systems:
> cd $ORACLE_HOME/dcm/bin> dcmctl exportRepository -f file
On Windows systems:
> cd %ORACLE_HOME%\dcm\bin> dcmctl exportRepository -f file
Note: Using the procedures outlined in this section, only administration capabilities are lost during a planned downtime.

Availability Considerations for the DCM Configuration Repository
Managing and Operating Middle-tier High Availability 4-27
2. Stop the administrative system, including Enterprise Manager and the DCM daemon in each instance of the OracleAS File-based Farm, except for the instance that is going to be the new repository host.
On UNIX systems use the following commands on each instance in the cluster:
> $ORACLE_HOME/bin/emctl stop iasconsole> $ORACLE_HOME/opmn/bin/opmnctl stopproc ias-component=dcm-daemon
On Windows systems use the following commands on each instance in the cluster:
> %ORACLE_HOME%\bin\emctl stop iasconsole> %ORACLE_HOME%\opmn\bin\opmnctl stopproc ias-component=dcm-daemon
At this point, the DCM-Managed OracleAS Cluster can still handle requests.
3. Import the saved repository on the host that is to be the repository host instance.
On UNIX systems, use the following commands:
> cd $ORACLE_HOME/dcm/bin/> dcmctl importRepository -file filename
On Windows systems, use the following commands:
> cd %ORACLE_HOME%\dcm\bin\> dcmctl importRepository -file filename
filename is the name of the file you specified in the exportRepository command.
While importRepository is active, the DCM-Managed OracleAS Cluster can still handle requests.
4. Use the following command to start all components on the new repository host. Do not perform administrative functions at this time.
On UNIX systems:
> $ORACLE_HOME/opmn/bin/opmnctl startall
On Windows systems:
> %ORACLE_HOME%\opmn\bin\opmnctl startall
5. On the system that was the repository host, indicate that the instance is no longer the host by issuing the following command,
Note: After this step, do not perform configuration or administration commands that would change the configuration. Otherwise those changes will not be copied when the repository file is imported to the new repository host.
Note: The importRepository command issues a prompt that specifies that the system that is the currently hosting the repository must be shutdown. However, only the dcm-daemon on the system that is currently hosting the repository must be shutdown, and not the entire system.

Availability Considerations for the DCM Configuration Repository
4-28 Oracle Application Server High Availability Guide
> dcmctl repositoryRelocated
6. Start Application Server Control Console on the new repository host instance. The repository has now been relocated, and the new repository instance now handles requests.
On UNIX systems use the following commands on each instance in the cluster:
> $ORACLE_HOME/bin/emctl start iasconsole
On Windows systems use the following commands on each instance in the cluster:
> %ORACLE_HOME%\bin\emctl start iasconsole
7. Shut down the Oracle Application Server instance associated with the old repository host, using the following commands:
On UNIX systems:
> $ORACLE_HOME/opmn/bin/opmnctl stopall
On Windows systems:
> %ORACLE_HOME%\opmn\bin\opmnctl startall
You can now perform the required administrative tasks on the old repository host system, such as the following.
■ Applying required patches to the repository host system in the DCM-Managed OracleAS Cluster
■ Decommissioning the node
■ Applying system upgrades, changes, or patches that require a system restart for the DCM-Managed OracleAS Cluster
After completing the administrative tasks on the system that was the repository host, if you want to switchback the repository host, you need to perform these steps again.
4.3.2.7 Best Practices for Repository BackupsWhen you export repository files and archives, keep the files in known locations and back up the exports and archives regularly. It is also recommended that exported repositories be available to non-repository instances, not only as a backup means but also for availability. If the repository instance becomes unavailable, a new instance can become the new repository host but only if an exported repository file is available.
Oracle Application Server does not provide an automated repository backup procedure. However, to assure that you can recover from loss of configuration data, you need to put a repository backup plan in place. Perform repository backups regularly and frequently, and perform a repository backup after any configuration changes or topology changes where instances are added or removed.
Save repository backups to different nodes that are available to other nodes in the OracleAS File-based Farm.
4.3.2.8 Best Practices for Managing Instances in OracleAS File-based FarmsWhen you add or remove an instance from an OracleAS File-based Farm, all the managed processes on that instance are stopped. If you want the instance to be available, then after performing the leave or join farm operation, restart the instance.
See Also: Distributed Configuration Management Administrator’s Guide

Using Oracle Application Server Clusters (OC4J)
Managing and Operating Middle-tier High Availability 4-29
It is recommended that you back up the local configuration before leaving or joining an OracleAS File-based Farm. For example, use the following commands to create and export an archive:
> dcmctl createarchive -arch myarchive -comment "Archive before leaving farm"> dcmctl exportarchive -arch myarchive -f /archives/myarchive
Archives are portable across OracleAS File-based Farm. When an instance joins a new farm it can apply archives created on a previous farm.
4.4 Using Oracle Application Server Clusters (OC4J)This section describes OracleAS Cluster (OC4J) configuration and the use of OracleAS Cluster (OC4J) with DCM-Managed OracleAS Clusters.
OracleAS Cluster (OC4J) enables Web applications to replicate state and provides for high availability and failover for applications that run under OC4J. You can configure this feature without using a DCM-Managed OracleAS Cluster. However, when you use both of these Oracle Application Server features together, this simplifies and improves manageability and high availability. This section assumes that you are using both Oracle Application Server Cluster (OC4J) and DCM-Managed OracleAS Cluster.
This section covers the following:
■ Overview of OracleAS Cluster (OC4J) Configuration
■ Cluster-Wide Configuration Changes and Modifying OC4J Instances
■ Configuring OC4J Instance-Specific Parameters
4.4.1 Overview of OracleAS Cluster (OC4J) ConfigurationOracleAS Cluster (OC4J) enables Web applications to replicate state, and provides for high availability and failover for applications that run on OC4J. In a DCM-Managed OracleAS Cluster, Oracle Application Server instances and OC4J instances have the following properties:
■ Each Oracle Application Server instance has the same cluster-wide configuration. When you use Application Server Control Console or dcmctl to modify any cluster-wide OC4J parameters, the modifications are propagated to all Oracle Application Server instances in the cluster. To make cluster-wide OC4J configuration changes, you change the configuration parameters on a single Oracle Application Server instance. Oracle Application Server then propagates the modifications to all the other Oracle Application Server instances within the cluster.
■ When you modify any instance-specific parameters on an OC4J instance that is part of a DCM-Managed OracleAS Cluster, the change is not propagated across the DCM-Managed OracleAS Cluster. Changes to instance-specific parameters are only applicable to the specific Oracle Application Server instance where the change is made. Because different hosts running Oracle Application Server instances could each have different capabilities, such as total system memory, it may be appropriate for the OC4J processes within an OC4J instance to run with different configuration options.
See Also: Distributed Configuration Management Administrator’s Guide
See Also: Oracle Application Server Containers for J2EE User’s Guide for detailed information on configuring OC4J instances

Using Oracle Application Server Clusters (OC4J)
4-30 Oracle Application Server High Availability Guide
Table 4–5 provides a summary of OC4J instance-specific parameters. Other OC4J parameters are cluster-wide parameters and are replicated across DCM-Managed OracleAS Clusters.
4.4.2 Cluster-Wide Configuration Changes and Modifying OC4J Instances This section covers the following topics:
■ Section 4.4.2.1, "Creating or Deleting OC4J Instances in an OracleAS Cluster (OC4J)"
■ Section 4.4.2.2, "Deploying Applications on an OracleAS Cluster (OC4J)"
■ Section 4.4.2.3, "Configuring Web Application State Replication with OracleAS Cluster (OC4J)"
■ Section 4.4.2.4, "Configuring EJB Application State Replication with OracleAS Cluster (OC4J-EJB)"
■ Section 4.4.2.5, "Configuring Stateful Session Bean Replication for OracleAS Cluster (OC4J-EJB)s"
4.4.2.1 Creating or Deleting OC4J Instances in an OracleAS Cluster (OC4J)You can create a new OC4J instance on any Oracle Application Server instance within a DCM-Managed OracleAS Cluster, and the OC4J instance will be propagated to all Oracle Application Server instances across the cluster.
To create an OC4J instance, do the following:
1. Navigate to any application server instance within the DCM-Managed Oracle Application Server Cluster.
Table 4–5 OC4J Instance-Specific Parameters Summary for DCM-Managed OracleAS Cluster
OC4J Parameter Description
islands definitions While you want to keep the names of islands consistent across the application server instances, the definition of the islands and the number of OC4J processes associated with each island is configured on each instance, and the Oracle Application Server configuration management system does not replicate the configuration across the DCM-Managed OracleAS Cluster.
Note: state is replicated in OC4J islands with the same name across application boundaries and across the cluster. So to assure high availability, with stateful applications, the OC4J island names must be the same in each OC4J instance across the cluster.
number of OC4J processes While you want to keep the names of islands consistent across the application server instances, the definition of the islands and the number of OC4J processes associated with each island is configured on each instance, and DCM does not replicate the configuration across the DCM-Managed OracleAS Cluster.
On different hosts you can tune the number of OC4J processes specified to run per island to match the host capabilities.
port numbers The RMI, JMS, and AJP port numbers can be different for each host.
command line options The command line options you use can be different for each host.
See Also: Oracle Application Server Containers for J2EE User’s Guide for details on OC4J configuration and application deployment

Using Oracle Application Server Clusters (OC4J)
Managing and Operating Middle-tier High Availability 4-31
2. Select Create OC4J Instance under the System Components area. This displays the Create OC4J instance page.
3. Enter a name in the OC4J Instance name field.
4. Select Create.
Oracle Application Server creates the instances and then DCM propagates the new OC4J instance across the DCM-Managed OracleAS Cluster.
A new OC4J instance is created with the name you provided. This OC4J instance shows up on each application server instance across the cluster, in the System Components section.
To delete an OC4J instance, select the checkbox next to the OC4J instance you wish to delete, then select Delete OC4J Instance. DCM propagates the OC4J removal across the cluster.
4.4.2.2 Deploying Applications on an OracleAS Cluster (OC4J)In DCM-Managed OracleAS Cluster, when you deploy an application to one application server instance, the application is propagated to all application server instances across the cluster.
To deploy an application across a cluster, do the following:
1. Select the cluster you want to deploy the application to.
2. Select any application server instance from within the cluster.
3. Select an OC4J instance on the application server instance where you want to deploy the application.
4. Deploy the application to the OC4J instance using either Application Server Control Console or dcmctl commands.
DCM then propagates the application across the DCM-Managed Oracle Application Server Cluster.
4.4.2.3 Configuring Web Application State Replication with OracleAS Cluster (OC4J)To assure that Oracle Application Server maintains, across DCM-Managed OracleAS Cluster, the state of stateful Web applications you need to configure state replication for the Web applications.
To configure state replication for stateful Web applications, do the following:
1. Select the Administration link on the OC4J Home Page.
2. Select the Replication Properties link in the Instance Properties area.
3. Scroll down to the Web Applications section. Figure 4–16 shows this section.
See Also: Oracle Application Server Containers for J2EE User’s Guide for details on deploying applications to an OC4J instance

Using Oracle Application Server Clusters (OC4J)
4-32 Oracle Application Server High Availability Guide
Figure 4–16 Web State Replication Configuration
4. Select the Replicate session state checkbox.
Optionally, you can provide the multicast host IP address and port number. If you do not provide the host and port for the multicast address, it defaults to host IP address 230.0.0.1 and port number 9127. The host IP address must be between 224.0.0.2 through 239.255.255.255. Do not use the same multicast address for both HTTP and EJB multicast addresses.
5. Add the <distributable/> tag to all web.xml files in all Web applications. If the Web application is serializable, you must add this tag to the web.xml file.
The following shows an example of this tag added to web.xml:
<web-app><distributable/><servlet>
...</servlet>
</web-app>
Note: When choosing a multicast address, ensure that the address does not collide with the addresses listed in:
http://www.iana.org/assignments/multicast-addresses
Also, if the low order 23 bits of an address is the same as the local network control block, 224.0.0.0 – 224.0.0.255, then a collision may occur. To avoid this problem, provide an address that does not have the same bits in the lower 23 bits of the address as the addresses in this range.
Note: For sessions to be replicated to a just-started instance that joins a running cluster, for example, where sessions are already being replicated between instances, the web module in the application maintaining the session has to be configured with the load-on-startup flag set to true. This is a cluster-wide configuration parameter. See Figure 4–17 for details on setting this flag.

Using Oracle Application Server Clusters (OC4J)
Managing and Operating Middle-tier High Availability 4-33
Figure 4–17 Application Server Control Console Properties Page for Setting Load on Startup
4.4.2.4 Configuring EJB Application State Replication with OracleAS Cluster (OC4J-EJB) To create an EJB cluster, also known as OracleAS Cluster (OC4J-EJB), you specify the OC4J instances that are to be involved in the cluster, configure each of them with the same multicast address, username, and password, and deploy the EJB, which is to be clustered, to each of the nodes in the cluster.
EJBs involved in a OracleAS Cluster (OC4J-EJB) cannot be sub-grouped in an island. Instead, all EJBs within the cluster are in one group. Also, only session beans are clustered.
The state of all beans is replicated at the end of every method call to all nodes in the cluster using a multicast topic. Each node included in the OracleAS Cluster (OC4J-EJB) is configured to use the same multicast address.
The concepts for understanding how EJB object state is replicated within a cluster are described in the Oracle Application Server Containers for J2EE Enterprise JavaBeans Developer’s Guide.
To configure EJB replication, do the following:
1. Click the Administration link on the OC4J Home Page.
2. Click the Replication Properties link in the Instance Properties area.
3. In the EJB Applications section, select the Replicate State checkbox.
Figure 4–18 shows this section.
See Also: Oracle Application Server Containers for J2EE User’s Guide

Using Oracle Application Server Clusters (OC4J)
4-34 Oracle Application Server High Availability Guide
Figure 4–18 EJB State Replication Configuration
4. Provide the username and password, which is used to authenticate itself to other hosts in the OracleAS Cluster (OC4J-EJB). If the username and password are different for other hosts in the cluster, they will fail to communicate. You can have multiple username and password combinations within a multicast address. Those with the same username/password combinations are considered a unique cluster.
Optionally, you can provide the multicast host IP address and port number. If you do not provide the host and port for the multicast address, it defaults to host IP address 230.0.0.1 and port number 9127. The host IP address must be between 224.0.0.2 through 239.255.255.255. Do not use the same multicast address for both Web Application and EJB multicast addresses.
5. Configure the type of EJB replication in the orion-ejb-jar.xml file within the JAR file. See Section 4.4.2.5, "Configuring Stateful Session Bean Replication for OracleAS Cluster (OC4J-EJB)s" for details. You can configure these within the orion-ejb-jar.xml file before deployment or add this through the Application Server Control Console screens after deployment. To add this after deployment, drill down to the JAR file from the application page.
4.4.2.5 Configuring Stateful Session Bean Replication for OracleAS Cluster (OC4J-EJB)sFor stateful session beans, you may have to modify the orion-ejb-jar.xml file to add the state replication configuration. Because you configure the replication type for the stateful session bean within the bean deployment descriptor, each bean can use a different type of replication.
Stateful session beans require state to be replicated among nodes. In fact, stateful session beans must send all their state between the nodes, which can have a noticeable effect on performance. Thus, the following replication modes are available to you to decide on how to manage the performance cost of replication:
4.4.2.5.1 End of Call Replication The state of the stateful session bean is replicated to all nodes in the cluster, with the same multicast address, at the end of each EJB method call. If a node loses power, then the state has already been replicated.
Note: When choosing a multicast address, ensure that the address does not collide with the addresses listed in:
http://www.iana.org/assignments/multicast-addresses
Also, if the low order 23 bits of an address is the same as the local network control block, 224.0.0.0 – 224.0.0.255, then a collision may occur. To avoid this, provide an address that does not have the same bits in the lower 23 bits of the address as the addresses in this range.

Using Oracle Application Server Clusters (OC4J)
Managing and Operating Middle-tier High Availability 4-35
To use end of call replication, set the replication attribute of the <session-deployment> tag in the orion-ejb-jar.xml file to "endOfCall".
For example,
<session-deployment replication="EndOfCall" .../>
4.4.2.5.2 JVM Termination Replication The state of the stateful session bean is replicated to only one other node in the cluster, with the same multicast address, when the JVM is terminating. This is the most performant option, because the state is replicated only once. However, it is not very reliable for the following reasons:
■ The state is not replicated if the power is shut off unexpectedly. The JVM termination replication mode does not guarantee state replication in the case of lost power.
■ The state of the bean exists only on a single node at any time; the depth of failure is equal to one node.
To use JVM termination replication, set the replication attribute of the <session-deployment> tag in the orion-ejb-jar.xml file to "VMTermination".
For example,
<session-deployment replication="VMTermination" .../>
4.4.3 Configuring OC4J Instance-Specific ParametersThis section covers the instance-specific parameters that are not replicated across DCM-Managed OracleAS Clusters. This section covers the following:
■ Section 4.4.3.1, "Configuring OC4J Islands and OC4J Processes"
■ Section 4.4.3.2, "Configuring Port Numbers and Command Line Options"
4.4.3.1 Configuring OC4J Islands and OC4J ProcessesTo provide a redundant environment and to support high availability using DCM-Managed OracleAS Clusters, you need to configure multiple OC4J processes within each OC4J instance.
In DCM-Managed OracleAS Cluster, state is replicated in OC4J islands with the same name within OC4J instances and across instances in the DCM-Managed OracleAS Cluster. To assure high availability, with stateful applications, OC4J island names within an OC4J instance must be the same in corresponding OC4J instances across the DCM-Managed OracleAS Cluster. It is your responsibility to make sure that island names match where session state replication is needed in a DCM-Managed OracleAS Cluster.
The number of OC4J processes on an OC4J instance within a DCM-Managed OracleAS Cluster is an instance-specific parameter because different hosts running application server instances in the DCM-Managed OracleAS Cluster could each have different capabilities, such as total system memory. Thus, it could be appropriate for a DCM-Managed OracleAS Cluster to contain application server instances that each run different numbers of OC4J processes within an OC4J instance.
See Also: Oracle Application Server Containers for J2EE User’s Guide for details on OC4J configuration and application deployment

Using Oracle Application Server Clusters (OC4J)
4-36 Oracle Application Server High Availability Guide
To modify OC4J islands and the number of processes each OC4J island contains, do the following:
1. Click the Administration link on the OC4J Home Page of the application server instance of interest in the DCM-Managed OracleAS Cluster.
2. Click Server Properties in the Instance Properties area.
3. Scroll down to the Multiple VM Configuration section (Figure 4–19). This section defines the islands and the number of OC4J processes that should be started on this application server instance in each island.
Figure 4–19 OC4J instance Island and Number of Processes Configuration
4. Create any islands for this OC4J instance within the cluster by clicking Add Another Row. You enter a name for each island in the Cluster(OC4J) Name field. In the Number of Processes field, you designate how many OC4J processes should be started within each island.
4.4.3.2 Configuring Port Numbers and Command Line OptionsFigure 4–20 shows the section where you can modify OC4J ports and set command-line options.
To modify OC4J ports or command-line options, do the following:
1. Click the Administration link on the OC4J Home Page of the Oracle Application Server instance of interest in the cluster.
2. Click Server Properties in the Instance Properties area.
3. Scroll down to the Multiple VM Configuration section. This section defines the ports and the command line options for OC4J and for the JVM that runs OC4J processes.
Figure 4–20 shows the Ports and Command line options areas on the Server Properties page.

Managing OracleAS Cold Failover Cluster (Middle-Tier)
Managing and Operating Middle-tier High Availability 4-37
Figure 4–20 OC4J Ports and Command Line Options Configuration
4.5 Managing OracleAS Cold Failover Cluster (Middle-Tier)This section provides instructions for managing OracleAS Cold Failover Cluster (Middle-Tier). Using OracleAS Cold Failover Cluster (Middle-Tier) provides cost reductions for a highly available system, as compared to a fully available active-active middle-tier system. In addition, some applications may not function properly in an active-active OracleAS Cluster environment (for example, an applications that relies on queuing or other synchronous methods). In this case, using an OracleAS Cold Failover Cluster (Middle-Tier) provides for high availability using the existing applications without modifications.
This section covers the following topics:
■ Section 4.5.1, "Managing Configuration and Deployment for OracleAS Cold Failover Cluster (Middle-Tier)"
■ Section 4.5.2, "Managing Failover for OracleAS Cold Failover Cluster (Middle-Tier)"
■ Section 4.5.3, "Moving Oracle Homes Between Local and Shared Storage"
■ Section 4.5.4, "Deploying and Accessing Applications on OracleAS Cold Failover Cluster (Middle-Tier)"
Terminology NotesThis section uses the term "separate Oracle home installation" to mean OracleAS Cold Failover Cluster (Middle-Tier) installations where you place the Oracle home for the middle tier on the local storage of each node.
The term "single Oracle home installation" means OracleAS Cold Failover Cluster (Middle-Tier) installations where you place the Oracle home for the middle tier on the shared storage.

Managing OracleAS Cold Failover Cluster (Middle-Tier)
4-38 Oracle Application Server High Availability Guide
4.5.1 Managing Configuration and Deployment for OracleAS Cold Failover Cluster (Middle-Tier)
In separate Oracle home installations, any application deployment or configuration change needs to be applied to both nodes of the OracleAS Cold Failover Cluster (Middle-Tier). This is an administrator responsibility for the administrator managing the OracleAS Cold Failover Cluster (Middle-Tier) environment.
This section covers the following:
■ Section 4.5.1.1, "Configuration and Deployment Changes for OracleAS Cold Failover Cluster (Middle-Tier)"
■ Section 4.5.1.2, "Backup and Recovery for OracleAS Cold Failover Cluster (Middle-Tier)"
■ Section 4.5.1.3, "Using Application Server Control Console for OracleAS Cold Failover Cluster (Middle-Tier)"
4.5.1.1 Configuration and Deployment Changes for OracleAS Cold Failover Cluster (Middle-Tier)In separate Oracle home installations, any applications deployed or any configuration changes made to the middle-tier installation should be made on both nodes of the cold failover cluster. This needs to be ensured by the administrator managing the environment.
Application deployment is applied, as with any other middle-tier environment. To deploy applications on the passive node, bring up the node and then deploy the application. For the J2EE installation of OC4J and Oracle HTTP Server, the application deployment is like any other multiple middle-tier environment. The passive node can be brought up during the deployment phase and the application deployment can be done on this node. Similarly, applications can be deployed on the active node.
For single Oracle home installations, application deployments and configuration changes need to done only on the current node.
4.5.1.2 Backup and Recovery for OracleAS Cold Failover Cluster (Middle-Tier)For separate Oracle home installations, you should back up both nodes of the OracleAS Cold Failover Cluster (Middle-Tier). The procedure for this remains the same as for any other middle tier and is documented in the Oracle Application Server Administrator’s Guide. Each installation needs to be backed up. During restoration, each
Note: In OracleAS Cold Failover Cluster (Middle-Tier) with OracleBI Discoverer, the active instance of OracleBI Discoverer is also the preference server. User preferences that users create while logged on to the active instance need to be synced up to the values on the passive instance. This allows the values to be available when the passive instance becomes the active instance during a failover. Thus, you need to periodically copy or update the following files to the passive instance so that they are current during a failover.
ORACLE_HOME/discoverer/.reg_key.dcORACLE_HOME/discoverer/.reg_key.dc.bakORACLE_HOME/discoverer/util/pref.txt

Managing OracleAS Cold Failover Cluster (Middle-Tier)
Managing and Operating Middle-tier High Availability 4-39
backup can only be restored to the host it was backed up from. It should not be restored to the other node.
For single Oracle home installations, the middle tier backup and restore operations need to be done from just the current active node.
4.5.1.3 Using Application Server Control Console for OracleAS Cold Failover Cluster (Middle-Tier)For separate Oracle home installations, to monitor or manage a node using Application Server Control Console, log in to the console using the physical hostname of the current active node. The Application Server Control Console processes can be up and running on both nodes of the cluster simultaneously. When changes to the environment are made, including configuration changes or application deployments, perform the changes on both nodes of the OracleAS Cold Failover Cluster (Middle-Tier).
For single Oracle home installations, to monitor or manage a OracleAS Cold Failover Cluster (Middle-Tier) deployment using Application Server Control Console, log in to the console using the virtual hostname.
4.5.2 Managing Failover for OracleAS Cold Failover Cluster (Middle-Tier)In OracleAS Cold Failover Cluster (Middle-Tier), a failure in the active node, or a decision to stop the active node and fail over to the passive node, requires that you make the formerly passive node active (perform a failover operation).
The failover management itself can be performed using either of the following failover processes:
■ Automated using a cluster manager facility. The cluster manager offers services, which uses packages to monitor the state of a service. If the service or the node is found to be down, it automatically fails over the service from one node to the other node.
■ Manual failover. In this case, perform the manual failover steps as outlined in this section. Because both the detection of the failure and the failover itself is performed manually, the system may be unavailable for a longer period using manual failover.
This section covers the following topics:
■ Section 4.5.2.1, "Manual Failover for OracleAS Cold Failover Cluster (Middle-Tier)"
■ Section 4.5.2.2, "Manual Failover for the Virtual IP in OracleAS Cold Failover Cluster (Middle-Tier)"
■ Section 4.5.2.3, "Manual Failover of Components for OracleAS Cold Failover Cluster (Middle-Tier)"
■ Section 4.5.2.4, "Manual Failover of OracleAS Cluster (OC4J-JMS)"
4.5.2.1 Manual Failover for OracleAS Cold Failover Cluster (Middle-Tier)For single Oracle home installations, the failover process to make the formerly passive node the new active node includes the following steps:
1. Stop all middle-tier services on the currently active node, if the node is still available.
2. Fail over the virtual IP to the new active node.
Managing OracleAS Cold Failover Cluster (Middle-Tier)
4-40 Oracle Application Server High Availability Guide
3. Fail over the shared disk on which the shared Oracle home resides and fail over the components to the new active node.
4. Start the middle-tier services on the new active node.
For separate Oracle home installations, the failover process to make the formerly passive node the new active node includes the following steps:
1. Stop all middle-tier services on current active node, if the node is still available.
2. Fail over the virtual IP to the new active node.
3. Fail over the components to the new active node.
4. Start the middle-tier services on the new active node.
4.5.2.2 Manual Failover for the Virtual IP in OracleAS Cold Failover Cluster (Middle-Tier)Perform the following steps to fail over the virtual IP in OracleAS Cold Failover Cluster (Middle-Tier):
1. Stop all Oracle Application Server processes on the failed node, if possible.
On UNIX systems:
> $ORACLE_HOME/opmn/bin/opmnctl stopall
> On Windows systems,
%ORACLE_HOME%\opmn\bin\opmnctl stopall
2. Stop Oracle Application Server Administration processes on the failed node, if possible. On UNIX systems:
> $ORACLE_HOME/bin/emctl stop iasconsole> $ORACLE_HOME/bin/emctl stop agent
On Windows systems,
> %ORACLE_HOME%\bin\emctl stop iasconsole> %ORACLE_HOME%\bin\opmnctl stop agent
3. Fail over the virtual IP from the failed node to the new active node.
On Sun SPARC Solaris:
a. If the failed node is usable, login as root and execute the following command (on the failed node):
# ifconfig <interface_name> removeif <virtual_IP>
b. Login as root on the new active node and execute the command:
# ifconfig <interface_name> addif <virtual_IP> up
On Linux:
Note: The failover process requires that you previously performed the post-installation steps that set up and configure the OracleAS Cold Failover Cluster (Middle-Tier), as outlined in the Oracle Application Server Installation Guide for your platform.

Managing OracleAS Cold Failover Cluster (Middle-Tier)
Managing and Operating Middle-tier High Availability 4-41
a. If the failed node is usable, login as root on the failed node and execute the following command:
# /sbin/ifconfig <interface_name> down
b. Login as root on the new active node and execute the command:
# ifconfig <interface_name> netmask <netmask> <virtual_IP> up
On Windows:
On the failed node, move the group that was created using Oracle Fail Safe as follows:
a. Start up Oracle Fail Safe Manager.
b. Right-click the group that was created during the Oracle Application Server middle-tier installation and select "Move to different node".
4.5.2.3 Manual Failover of Components for OracleAS Cold Failover Cluster (Middle-Tier)After performing the failover steps for the virtual IP on the new active node, perform the following steps to fail over on the OracleAS Cold Failover Cluster (Middle-Tier) system. Perform the following steps to stop and start Oracle Application Server processes:
1. Stop Oracle Application Server processes on the new active node and start OPMN only.
Execute the following commands on UNIX systems:
> $ORACLE_HOME/opmn/bin/opmnctl stopall> $ORACLE_HOME/opmn/bin/opmnctl start
2. Stop Oracle Application Server Administration processes on the new active node, using the following commands
On UNIX systems:
> $ORACLE_HOME/bin/emctl stop iasconsole> $ORACLE_HOME/bin/emctl stop agent
On Windows systems,
> %ORACLE_HOME%\bin\emctl stop iasconsole> %ORACLE_HOME%\bin\opmnctl stop agent
3. On the current active node, execute the following commands.
On UNIX systems:
> $ORACLE_HOME/opmn/bin/opmnctl stopall> $ORACLE_HOME/opmn/bin/opmnctl startall
On Windows systems:
> %ORACLE_HOME%\opmn\bin\opmnctl stopall> %ORACLE_HOME%\opmn\bin\opmnctl startall
Note: If OracleAS JMS is using file-persistence, fail over the shared disk as well.
Managing OracleAS Cold Failover Cluster (Middle-Tier)
4-42 Oracle Application Server High Availability Guide
4. If you use Application Server Control Console, start Oracle Application Server Administration processes on the current active node using the following commands.
On UNIX systems:
> $ORACLE_HOME/bin/emctl start agent> $ORACLE_HOME/bin/emctl start iasconsole
On Windows systems,
> %ORACLE_HOME%\bin\emctl start agent> %ORACLE_HOME%\bin\opmnctl start iasconsole
4.5.2.4 Manual Failover of OracleAS Cluster (OC4J-JMS)If you are using OracleAS Cluster (OC4J-JMS), and the system fails abnormally, you may need to perform additional failover steps such as removing lock files for OracleAS JMS file-based persistence.
4.5.3 Moving Oracle Homes Between Local and Shared StorageIn OracleAS Cold Failover Cluster (Middle-Tier) topologies, you can install the Oracle home for the middle tier on a shared storage (called "single Oracle home installations"), or you can install separate Oracle homes for the middle tier on the local storage of each node (called "separate Oracle home installations"). This section describes how to move the Oracle home from one storage type to the other.
To move from a single Oracle home on the shared storage to separate Oracle homes on the local disks1. Create a new separate Oracle home-based OracleAS Cold Failover Cluster
(Middle-Tier) topology by following the steps in the Oracle Application Server Installation Guide. The middle-tier type can be the same as or different from the original single home OracleAS Cold Failover Cluster (Middle-Tier).
2. Redo any changes made to the configuration of the original single-home OracleAS Cold Failover Cluster (Middle-Tier) topology.
3. Redeploy any applications deployed in the original single-home OracleAS Cold Failover Cluster (Middle-Tier) topology.
4. Deinstall the single-home OracleAS Cold Failover Cluster (Middle-Tier) instance.
To move from separate Oracle homes on the local storage to a single Oracle home on the shared storageNote that OracleAS Wireless is not supported on single Oracle home configurations. This means that the source and destination Oracle homes should not have OracleAS Wireless configured.
If you want to retain one of the original Oracle homes:
See Also: Abnormal Termination in the Oracle Application Server Containers for J2EE Services Guide section, "Oracle Application Server JMS"

Managing Oracle Application Server Middle-tier Upgrades
Managing and Operating Middle-tier High Availability 4-43
1. Move the Oracle home you want to retain to a shared storage. Ensure that the Oracle home path remains the same. If this is not possible, then this migration option cannot be used.
2. Re-run the chgtocfmt conversion script on this instance to convert it to a single Oracle home installation. The -n option should not be specified in this run.
3. Deinstall the unused instance from the original separate Oracle home.
If you do not want to retain the original Oracle homes:
1. Create a new single Oracle home-based OracleAS Cold Failover Cluster (Middle-Tier) topology by following the steps in the Oracle Application Server Installation Guide. The middle-tier type installed here can be the same as or different from the original Oracle homes.
2. Redo any changes made in the configuration original OracleAS Cold Failover Cluster (Middle-Tier).
3. Redeploy any applications deployed in the original OracleAS Cold Failover Cluster (Middle-Tier).
4. Deinstall the original separate Oracle homes.
4.5.4 Deploying and Accessing Applications on OracleAS Cold Failover Cluster (Middle-Tier)
Applications deployed on OracleAS Cold Failover Cluster (Middle-Tier) should be accessed using the virtual hostname. For the applications to work, they should not be dependent in any way on the local physical host on which they are running. To ensure continuity after failover, any resources required by the application should be made available on the failover node.
All external access for the application (or any other Oracle product such as OracleAS Integration) should use the virtual hostname. The published URL for the application should use the virtual hostname.
4.6 Managing Oracle Application Server Middle-tier UpgradesWhen you upgrade systems in a high availability environment, your goal should be to upgrade all Oracle Application Server instances to the same version—in this case, Oracle Application Server 10g (10.1.2). Running all of the Oracle Application Server instances at the same version level is not mandatory; however, doing so makes it easier to manage, troubleshoot, and maintain J2EE applications and the Oracle Application Server components.
If you choose to maintain previous versions of Oracle Application Server, you must consider which combinations of versions are supported. See the Oracle Application Server Upgrade and Compatibility Guide for details.
This section covers the following topics:
■ Section 4.6.1, "Upgrading Oracle Application Server Instances"
■ Section 4.6.2, "Upgrading DCM-Managed OracleAS Clusters"
■ Section 4.6.3, "Upgrading Stateful OC4J Applications"

Using OracleAS Single Sign-On with OracleAS Cluster (Middle-Tier)
4-44 Oracle Application Server High Availability Guide
4.6.1 Upgrading Oracle Application Server InstancesWhen you perform an upgrade operation, you need to upgrade Oracle Application Server instances in a specific order to avoid unsupported or unstable configurations. See the Oracle Application Server Upgrade and Compatibility Guide for details.
4.6.2 Upgrading DCM-Managed OracleAS ClustersIn DCM-Managed OracleAS Clusters, each instance joined to the cluster must use the same Oracle Application Server version. Before you upgrade instances in a DCM-Managed OracleAS Cluster, you need to do the following:
1. Remove the Oracle Application Server instance from the DCM-Managed OracleAS Cluster using either Application Server Control Console, or the dcmctl leavecluster command.
2. Ensure that any old instance archives that need to be retained are exported to the file system using the DCM exportarchive command. The upgrade procedure does not upgrade archives. These archives can then be re-imported after the upgrade process.
3. After completing the upgrades for all the Oracle Application Server instances that are part of the DCM-Managed OracleAS Cluster, you can then join the instances into a new DCM-Managed OracleAS Cluster.
4.6.3 Upgrading Stateful OC4J ApplicationsYou can upgrade OC4J applications running in an OracleAS Cluster (OC4J) that use HTTPSession to store state with no session loss. See Section 4.2.5, "Rolling Upgrades for Stateful J2EE Applications" for details.
4.7 Using OracleAS Single Sign-On with OracleAS Cluster (Middle-Tier)To enable OracleAS Single Sign-On with OracleAS Cluster, the OracleAS Single Sign-On server needs to be aware of the entry point into the OracleAS Cluster, which is commonly the load balancer in front of the Oracle HTTP Servers. Usually, this is OracleAS Web Cache, a network load balancer appliance, or Oracle HTTP Server.
To register an OracleAS Cluster’s entry point with the OracleAS Single Sign-On server, use the ssoreg.sh script (ssoreg.bat on Windows).
In order to use OracleAS Single Sign-On functionality, all Oracle HTTP Server instances in an OracleAS Cluster must have an identical OracleAS Single Sign-On registration.
■ Each Oracle HTTP Server is registered with the same OracleAS Single Sign-On server.
■ Each Oracle HTTP Server redirects a success, logout, cancel, or home message to the network load balancer. In an OracleAS Cluster, each Oracle HTTP Server should redirect message URLs to the network load balancer. Because clients cannot access Oracle HTTP Server directly, they interact with the network load balancer.
See Also: Section 4.3.2.6, "Performing Administration on a DCM-Managed OracleAS Cluster" for information on how to minimize downtime while upgrading instances in a DCM-Managed OracleAS Cluster that uses an OracleAS File-based Farm.

Using OracleAS Single Sign-On with OracleAS Cluster (Middle-Tier)
Managing and Operating Middle-tier High Availability 4-45
If you do not use a network load balancer, then the OracleAS Single Sign-On configuration must originate with whatever you use as the incoming load balancer (OracleAS Web Cache, Oracle HTTP Server, and so on).
To configure a DCM-Managed OracleAS Cluster for single sign-on, execute the ssoreg.sh script (ssoreg.bat on Windows) against one of the Oracle Application Server instances in the DCM-Managed OracleAS Cluster. This tool registers the OracleAS Single Sign-On server and the redirect URLs with all Oracle HTTP Servers in the OracleAS Cluster, and establishes all information necessary to facilitate secure communication between the Oracle HTTP Servers in the OracleAS Cluster and the OracleAS Single Sign-On server.
On one of the Oracle Application Server instances, you define the configuration by running the ssoreg.sh (ssoreg.bat on Windows) script. DCM then propagates the configuration to all other Oracle HTTP Servers in the DCM-Managed OracleAS Cluster.
For syntax information, see the section "ssoreg syntax and parameters" in the Oracle Application Server Single Sign-On Administrator’s Guide.
Note: When using OracleAS Single Sign-On with Oracle HTTP Servers in the OracleAS Cluster, set the KeepAlive directive to OFF. When the Oracle HTTP Servers are behind a network load balancer, if the KeepAlive directive is set to ON, then the network load balancer maintains state with the Oracle HTTP Server for the same connection, which results in an HTTP 503 error. Modify the KeepAlive directive in the Oracle HTTP Server configuration in the httpd.conf file.
See Also: Oracle Application Server Single Sign-On Administrator’s Guide

Using OracleAS Single Sign-On with OracleAS Cluster (Middle-Tier)
4-46 Oracle Application Server High Availability Guide

High Availability for Middle-tier Components 5-1
5High Availability for Middle-tier Components
This chapter provides high availability information for the following middle-tier components:
■ Section 5.1, "Middle-Tier Components in Active-Passive Topologies"
■ Section 5.2, "OracleAS Portal"
■ Section 5.3, "OracleAS Wireless"
■ Section 5.4, "OracleAS Reports Services"
■ Section 5.5, "OracleAS Forms Services"
■ Section 5.6, "OracleAS Integration B2B"
■ Section 5.7, "OracleAS Integration InterConnect"
■ Section 5.8, "Oracle BPEL Process Manager"
■ Section 5.9, "OracleBI Discoverer"
■ Section 5.10, "Oracle Content Management SDK"
5.1 Middle-Tier Components in Active-Passive TopologiesGenerally, most middle-tier components are supported on OracleAS Cold Failover Cluster, or active-passive, topologies. However, some components have some conditions that you need to be aware of when running them in OracleAS Cold Failover Cluster topologies. These components include:
■ Section 5.3, "OracleAS Wireless"
■ Section 5.4, "OracleAS Reports Services"
See the section for the component for details.
5.2 OracleAS PortalYou can run OracleAS Portal in active-active topologies, where you have at least two middle-tier instances running OracleAS Portal. These middle-tier instances are fronted by a load balancer, which distributes requests to the middle tiers.
There are two versions of this topology:
■ For an enterprise version of this topology, which includes a high availability OracleAS Infrastructure and covers security concerns, see the "myPortalCompany.com" example in the Oracle Application Server Enterprise Deployment Guide.

OracleAS Wireless
5-2 Oracle Application Server High Availability Guide
■ For a simplified topology that is suitable for internal deployments, see the following guide:
Highlights of OracleAS Portal in Active-Active Topologies■ The load balancer provides a single published URL (example:
www.myportal.com) to the client tier. The Internet DNS maps the URL that clients use to the external IP of the load balancer.
■ The load balancer distributes requests to the instances. The Host: field of the HTTP requests still contain the original URL (www.myportal.com) used by the clients.
■ In the httpd.conf file in the middle tier homes, the ServerName directive is set to www.myportal.com (and not the physical names of the nodes running the middle tier instances).
■ Unless your load balancer does port mapping, you should configure the middle tier instances to use the same ports as the load balancer.
■ You can achieve better cache utilization if you mount a shared file system for the cached files. If you decide not to have the middle tiers share a cache directory, caching will still work, but with a lower hit ratio.
Session Binding for OracleAS Web Clipping PortletThe session binding feature in OracleAS Web Cache is used to bind user sessions to a given origin server to maintain state for a period of time. Although almost all components running in a default OracleAS Portal middle-tier are stateless, session binding is required for two reasons:
■ Web Clipping Studio, used by both the OracleAS Web Clipping Portlet and the Web Page Data Source of OmniPortlet, uses HTTP session to maintain state, for which session binding must be enabled.
■ Enabling session binding forces all the user requests to go to a given OracleAS Portal middle-tier, resulting in a better cache hit ratio for the OracleAS Portal cache.
For details, see "Step 7: Enable Session Binding on OracleAS Web Cache" in the Oracle Application Server Portal Configuration Guide.
5.3 OracleAS WirelessConfiguring OracleAS Wireless for high availability is documented in chapter 14, "Load Balancing and Failover", of the Oracle Application Server Wireless Administrator’s Guide.
Note that if you want to run OracleAS Wireless in an OracleAS Cold Failover Cluster (Middle-Tier) topology, you need to install the Oracle home for the middle tier on the local storage of each node. OracleAS Wireless is not supported on single Oracle home
Item Name
Book Oracle Application Server Portal Configuration Guide
This book is available in the Oracle Application Server documentation set.
Chapter 5, "Performing Advanced Configuration"
Section "Configuring Multiple Middle Tiers with a Load Balancing Router"

OracleAS Reports Services
High Availability for Middle-tier Components 5-3
installations (that is, it is not supported if you install the Oracle home for the middle tier on the shared storage).
5.4 OracleAS Reports ServicesOracleAS Reports Services is the reports publishing component of Oracle Application Server. It is an enterprise reporting service for producing high quality production reports that dynamically retrieve, format, and distribute any data, in any format, anywhere. You can use OracleAS Reports Services to publish in both Web-based and non-Web-based environments.
For details on OracleAS Reports Services, see Oracle Application Server Reports Services Publishing Reports to the Web.
Contents of this section:
■ Section 5.4.1, "OracleAS Reports Services Architecture"
■ Section 5.4.2, "OracleAS Reports Services High Availability Features"
■ Section 5.4.3, "OracleAS Reports Services in Active-Active Configurations"
■ Section 5.4.4, "OracleAS Reports Services in Active-Passive Configurations"
5.4.1 OracleAS Reports Services ArchitectureOracleAS Reports Services runs as a set of processes in an Oracle Application Server middle-tier instance. These processes handle requests from clients, prepare reports, submit requests to a database, and deliver the result back to the client. The primary OracleAS Reports Services processes are:
Figure 5–1 shows the interaction between these processes.
Table 5–1 Primary Processes for OracleAS Reports Services
Process Description
Reports client A Reports client connects to a Reports Server. The client can be a command-line client (rwclient) or Web-based (the Reports servlet).
Reports servlet The Reports servlet directs requests to a specific Reports Server. The servlet runs under OC4J.
Reports Server The Reports Server is responsible for interpreting the request and spawning one or more Reports Engine to fulfill the request. The Reports Server can run as a standalone process or within the OC4J process. If run within the OC4J process, it is called an "in-process Reports Server".
If run as a standalone process, it does not need to run on the Oracle Application Server middle-tier node where you installed the OracleAS Reports Services component.
Reports Engine The Reports Engine handles individual requests. It connects to the database as required. The Reports Engine fulfills the request and informs the Reports Server upon completion.

OracleAS Reports Services
5-4 Oracle Application Server High Availability Guide
Figure 5–1 Processes for OracleAS Reports Services
5.4.2 OracleAS Reports Services High Availability FeaturesOracleAS Reports Services has the following high availability features:
■ Section 5.4.2.1, "Process Management"
■ Section 5.4.2.2, "Connection Retry"
■ Section 5.4.2.3, "Reports Server Timeout"
5.4.2.1 Process ManagementThe in-process Reports Server is managed by OPMN via "urlping-parameters". If for some reason the oc4j_bi_forms instance is restarted, the Reports Server will also be restarted and become available once the oc4j_bi_forms instance is up.
The standalone Reports Server is managed by OPMN as a component. If the Reports Server fails or is stopped unexpectedly, OPMN restarts it automatically. Upon installation, the default Reports Server will be automatically configured to be managed by OPMN. If you add new Reports Servers, you must configure them manually so that OPMN can manage them. These configuration instructions are in the documentation.
If you use the Reports Bridge, you should also configure it so that OPMN can manage it. Instructions for configuring the Reports Bridge with OPMN are provided in the documentation.
5.4.2.2 Connection RetryIf components that OracleAS Reports Services is trying to connect to are unavailable, OracleAS Reports Services has the following features:
5.4.2.2.1 OracleAS Portal Database Connection Retry If the connection from the Reports Server to the OracleAS Portal database schema is dropped for some reason, then the Reports Server tries to reestablish the connection before generating an error. It
Database
Web client (through a URL) Command-line client (rwclient)
Oracle HTTP Server
mod_oc4j
Reports Server
OC4J
Reports servlet
Reports Engines

OracleAS Reports Services
High Availability for Middle-tier Components 5-5
retrieves the OracleAS Portal connection string from the OracleAS Metadata Repository and attempts to reconnect. If reconnection is successful, you do not need to restart the Reports Server.
5.4.2.2.2 Oracle Internet Directory Connection Retry If the Oracle Internet Directory connection becomes stale for some reason, the Reports servlet and the Reports Server try to reestablish the connection before generating errors. If reconnection is successful, you do not need to restart the Reports Server.
5.4.2.2.3 OracleAS Metadata Repository and Oracle Identity Management Outage The outage of the OracleAS Metadata Repository (which stores security metadata) will not bring down the Reports Server. If the OracleAS Metadata Repository is unavailable, the Reports Server rejects new requests due to one of the component being unavailable. When the OracleAS Metadata Repository is brought back on-line, the Reports Server recovers itself and can begin to receive and process new requests.
If Oracle Identity Management components become unavailable for some reason, the Reports Server will also reject new requests. It has similar characteristics as outage of the OracleAS Metadata Repository.
5.4.2.3 Reports Server TimeoutThe Reports Server has a configurable timeout for waiting for requests to be returned from the database. This has to be set to a high enough value to allow valid reports to run but not so high as to cause excessively long waits. You can configure this in the ORACLE_HOME/reports/conf/<server_name>.conf file, in the idleTimeOut attribute of the connection element.
5.4.3 OracleAS Reports Services in Active-Active ConfigurationsYou can run OracleAS Reports Services in an active-active configuration, as shown in Figure 5–2. In this case, you have two or more Oracle Application Server middle-tier instances, and each instance runs its own Reports servlet and Reports Server. A load balancer placed in front of Oracle HTTP Server distributes requests to the instances.
Each Reports servlet is bound to one default Reports Server. Although a specific Reports Server can be specified for an individual report request, there is no method of specifying an alternate Reports Server if the default Reports Server is not available.
If an instance fails, the load balancer detects the failure and routes all requests to the remaining active instances.
Command-line Client, rwclient, Not Supported in Active-Active ConfigurationsOnly Web clients are supported in active-active configurations. The command-line client, rwclient, is not supported. The reason is that rwclient connects to a specific Reports Server by name, and there can be only one named instance of a specific Reports Server. To run rwclient in a high availability environment, you can use the active-passive configuration. See Section 5.4.4, "OracleAS Reports Services in Active-Passive Configurations".
Multicast SubnetFor OracleAS Reports Services, all instances and components in an active-active configuration must run in the same subnet because the Reports servlet uses multicast to discover Reports Servers. If you need to run OracleAS Reports Services components across different subnets, then you need to use the Reports Bridge to provide access to Reports Servers on different subnets. In this case, the Reports Bridge becomes a vital

OracleAS Reports Services
5-6 Oracle Application Server High Availability Guide
component which you must secure using a high availability method such as OracleAS Cold Failover Cluster.
Figure 5–2 Running OracleAS Reports Services in an Active-Active Configuration
Steps for Creating an Active-Active ConfigurationTo create this active-active configuration, you perform these steps:
1. Install at least two middle-tier instances.
2. Configure your load balancer to distribute requests to the instances.
3. Ensure that the Reports Servers have different names.
4. If you set up additional Reports Servers, make sure you configure OPMN to manage them. See the following guide for details.
Item Name
Book Oracle Application Server Reports Services Publishing Reports to the Web
This book is available in the Oracle Application Server documentation set.
Chapter 3, "Configuring OracleAS Reports Services"
Section "Configuring Reports Server with the Oracle Process Manager and Notification Server and Oracle Enterprise Manager 10g"
Oracle HTTP Server
mod_oc4j
Reports Server
Database
Load Balancer
OC4J
Reports servlet
Reports Engine
Oracle HTTP Server
mod_oc4j
Reports Server
OC4J
Reports servlet
Reports Engine
Middle-TierInstance 1
Middle-TierInstance 2
Web client (through a URL)

OracleAS Forms Services
High Availability for Middle-tier Components 5-7
5. Ensure that configuration files are identical on all the middle-tier instances. If the files are different, requests may be interpreted differently on each instance. Configuration files include:
■ the key map file (by default, ORACLE_HOME/reports/conf/cgicmd.dat)
■ the Reports servlet properties file (ORACLE_HOME/reports/conf/rwservlet.properties)
■ the Reports Server persistent file (by default, ORACLE_HOME/reports/server/<server_name>.dat)
The persistent file contains a list of completed jobs as well as scheduled jobs. Each Reports Server has its own persistent file; different Reports Servers have different sets of completed job requests.
Because the persistent file also stores scheduled jobs, this means that loss of this file or of the instance means that all scheduled jobs are lost for that Reports Server, even in an active-active configuration. You must be able to restore this file in order to run the scheduled jobs.
6. Set up a backup plan to back up all configuration files regularly and frequently, especially the Reports Server batch file.
5.4.4 OracleAS Reports Services in Active-Passive ConfigurationsYou can use a provided script for installing and deploying OracleAS Reports Services in an active-passive configuration. However, note the following restrictions:
■ All components (Reports Servlet, Reports Server, and Reports Engines) must run from the same Oracle Application Server middle-tier instance.
■ Reports Bridge is not part of the solution.
5.5 OracleAS Forms ServicesAt runtime, OracleAS Forms Services consist of the components listed in Table 5–2.
OracleAS Forms Services does not exist as a dedicated server process on the middle tier, and therefore, all that is required to request and run a Forms application on the Web is the availability of a servlet container (OC4J) that is configured to run Forms Services.
Table 5–2 Runtime Forms Services components
Component Function
Forms Servlet The Forms Servlet handles the initial application request and dynamically generates the start HTML file for the Forms generic Java Applet. If using OracleAS Single Sign-On, the Forms Servlet is also used to verify users’ authentication.
Forms Listener Servlet The Forms Listener Servlet is a dispatcher servlet that handles the communication between the Forms Java client in the client browser and the Forms runtime process in the middle tier server. The Forms Listener Servlet starts a Forms runtime process for each application request and user.
Forms Runtime Engine The Forms Runtime Engine interprets the Forms application modules (fmx files) and executes the contained business logic. The Forms Runtime Engine also makes the database connection using SQLNet.
OracleAS Integration B2B
5-8 Oracle Application Server High Availability Guide
Because OracleAS Forms Services launches a dedicated Forms Runtime process for each user there is no transparent application failover. Once a user session is interrupted, the user has to restart the Forms Web application by issuing a new request to the Forms Servlet.
If a middle tier server crashes or a servlet session is interrupted, recover from either failure by restarting the application. To set up high availability for OracleAS Forms Services, the following components can be used:
mod_oc4j - Handling the failure of an OC4J instance, OracleAS Forms Services can be set up to load balance application requests between different OC4J instances. This ensures that an application request can be routed to the next available OC4J instance if the current OC4J instance fails.
OracleAS Web Cache - Using OracleAS Web Cache as a HTTP load balancer enables you to distribute Forms requests between many Oracle Application Server instances that may or may not share the same Infrastructure installation. If one instance fails, then the next Forms application request gets routed to the next available instance. Each instance can also use mod_oc4j to load balance Forms sessions between OC4J instances.
Hardware load balancers - A hardware load balancer can be deployed in front of OracleAS Web Cache, thereby adding one more layer of load balancing for Forms requests. Or, they can also replace OracleAS Web Cache and load balance requests directly to Oracle HTTP Servers.
For the OracleAS Infrastructure that is used by Forms Services installations, inclusive of Oracle Identity Management, use the OracleAS Cold Failover Cluster topology. This is described in Chapter 9, "OracleAS Infrastructure: High Availability Topologies".
For more information about Forms Services architecture and setup, refer to Oracle Application Server Forms Services Deployment Guide.
5.6 OracleAS Integration B2BOracleAS Integration B2B uses several components from the Oracle Application Server stack during runtime. These include Oracle HTTP Server, OC4J, and OracleAS Metadata Repository. Figure 5–3 shows the OracleAS Integration B2B high availability configuration.

OracleAS Integration B2B
High Availability for Middle-tier Components 5-9
Figure 5–3 High Availability Configuration of OracleAS Integration B2B
For OracleAS Integration B2B services to be highly available, the following components must be highly available:
■ Oracle HTTP Server
■ OC4J transport servlet
■ OracleAS Integration B2B server JVM
■ OracleAS Infrastructure
For discussion purposes, the runtime architecture can be segmented into the following tiers:
■ Web Server and OC4J Tier
■ OracleAS Integration B2B Tier
■ OracleAS Infrastructure Tier
Firewall
Load Balancer
OracleAS MetadataRepositoryHigh AvailabilityConfiguration
Node 1 Node 2
Node 3 Node 4
Firewall
AJP AJP
RMI
AJP AJP
Oracle HTTPServer
Oracle HTTPServer
RMI
Transport ServletOC4J_B2BInstance 1
(Oracle_Home_1)
OracleAS IntegrationB2B Server
JVM Process(Oracle_Home_1)
OracleAS IntegrationB2B Server
JVM Process(Oracle_Home_2)
Transport ServletOC4J_B2BInstance 2
(Oracle_Home_2)
Clients
OracleAS Integration B2B Server JVM processes are managed by OPMN
Multiple instances ofOracle HTTPServer, TransportServlets, and B2B Serversprovideredundancy

OracleAS Integration B2B
5-10 Oracle Application Server High Availability Guide
If each of these tiers has active-active availability, then OracleAS Integration B2B has active-active availability. Otherwise, if one of the tiers is active-passive, then OracleAS Integration B2B service is active-passive. For example, if the OracleAS Infrastructure tier uses the OracleAS Cold Failover Cluster (Infrastructure) configuration, then OracleAS Integration B2B service has active-passive availability.
Web Server and OC4J TierThis tier consists of Oracle HTTP Server and the OC4J transport servlet instances. The servlets are deployed in OC4J containers and can utilize the high availability properties of the containers. They can be grouped together into OracleAS Clusters (OC4J) and be synchronized by DCM for consistent configuration. The OC4J instances are load balanced by mod_oc4j.
For active-active availability, the web server and OC4J tier is front-ended by a load balancer router appliance and/or OracleAS Web Cache. If OracleAS Web Cache is used, it should be configured into an OracleAS Cluster (Web Cache). Monitoring and automatic restart of OracleAS Web Cache, Oracle HTTP Server, and OC4J processes are performed by OPMN.
The transport servlets perform the tasks of forwarding requests to and receiving responses from the OracleAS Integration B2B instances. The servlets do not maintain state for each request handled. They communicate with the OracleAS Integration B2B instances through Java RMI. Each instance of OracleAS Integration B2B is registered in the web.xml file of each of the OC4J containers hosting the transport servlets. The servlets forward requests to the OracleAS Integration B2B instances using the round-robin model. If any of the OracleAS Integration B2B instances fail, the servlets re-route requests to the next instance in the round-robin queue after a specified timeout period.
OracleAS Integration B2B TierThe OracleAS Integration B2B tier consists of the OracleAS Integration B2B server runtime. This is a Java application, but its instances do not run in OC4J containers. They run in their own standalone JVM processes.
The OracleAS Integration B2B server has the following characteristics:
■ Its runtime is stateless for each request it processes. If a runtime process fails and a request message is not completely processed, the client is expected to retry the request. If the failure occurs after the initial message has been completely processed, all subsequent incomplete processing results are stored in the database, and any other runtime instances can resume processing. Each processing step is atomic.
■ It uses JDBC to access the OracleAS Metadata Repository to make changes to the OracleAS Integration B2B metadata schemas. High availability for JDBC connections is achieved by Oracle Net.
■ Only one runtime instance exists for each Oracle Application Server instance.
To ensure that the server has active-active availability, multiple instances (on different nodes) of its runtime should be instantiated. Ideally, these instances should be deployed in more than one node to protect from node failure. For each instance, OPMN ensures that failure detection and automatic restart of each instance is managed.
Inbound communication to the OracleAS Integration B2B instances is received by the load balancer fronting the Oracle HTTP Servers. The load balancer distributes requests to the Oracle HTTP Server instances, which forwards the requests to the transport

OracleAS Integration InterConnect
High Availability for Middle-tier Components 5-11
servlets via mod_oc4j load balancing. The transport servlets communicate the requests to the OracleAS Integration B2B instances using the RMI protocol.
Outbound communication from the OracleAS Integration B2B instances occurs as follows. The instances send responses to the Oracle HTTP Servers, which are configured as proxy servers. This configuration can be accomplished by specifying the proxy host and port properties in the tip.properties file.
OracleAS Infrastructure TierHigh availability in the OracleAS Infrastructure tier can be enabled by any of the high availability configurations for the OracleAS Infrastructure explained in Chapter 9, "OracleAS Infrastructure: High Availability Topologies". These configurations ensure that the OracleAS Metadata Repository and Oracle Identity Management components are highly available for the web server and OC4J, and OracleAS Integration B2B tiers. For active-active availability, one of the configurations described in Section 6.2.1, "Active-Active High Availability Topologies", should be used. This allows the entire OracleAS Integration B2B service stack to have active-active availability.
5.7 OracleAS Integration InterConnectOracleAS Integration InterConnect has a hub and spoke architecture. Figure 5–4 shows OracleAS Integration InterConnect components with two spoke applications as an example.

OracleAS Integration InterConnect
5-12 Oracle Application Server High Availability Guide
Figure 5–4 OracleAS Integration InterConnect runtime components with two spoke application as an example
The OracleAS Integration InterConnect components are:
■ OracleAS Integration InterConnect Adapters
■ OracleAS Integration InterConnect Repository Server
■ OracleAS Integration InterConnect Hub database
For OracleAS Integration InterConnect to be highly available, all its components must be highly available. One additional requirement is for the data or message sources that provide information to the adapters to be highly available. These are the spoke applications. Because these applications are customer-dependent and not part of the Oracle Application Server product, their high availability discussion is outside the scope of this book.
SpokeApplication A
SpokeApplication B
Cold Failover Cluster
JVM Process(Active)
JVM Process(Active)
OracleASIntegration
InterConnectRepository
Server
OracleASIntegration
InterConnectRepository
Server
JVM Process(Standby)
JVM Process(Active)
RMI
Xref
JMS over JDBC
JMS over JDBC
The hub database can be a Real Application Clusters database or a cold failover database. It can also be the OracleAS Metadata Repository.
*
HubDatabase*
JDBC
JVM Process(Active)
RMI
JVM Process(Active)
OracleASIntegration
InterConnectAdapter
OracleASIntegration
InterConnectAdapter
Xref
OracleASIntegration
InterConnectAdapter
OracleASIntegration
InterConnectAdapter
OracleAS Integration InterConnect
High Availability for Middle-tier Components 5-13
For the purpose of high availability discussion, the OracleAS Integration InterConnect components can be segmented into the following tiers:
■ Adapter Tier
■ Repository Server Tier
■ Hub Database Tier
The following sections provide details on how high availability can be achieved for each tier.
Adapter TierExcept for the HTTP adapter, each adapter runs in a standalone JVM process (not OC4J) and is stateless. This JVM process can be configured as a custom OPMN application to achieve process failure detection and automatic restart. The custom application can be configured in the opmn.xml file. Refer to the Oracle Process Manager and Notification Server Administrator’s Guide for instructions on how to do this. After the configuration, the adapter processes should be started using OPMN (opmnctl command).
OPMN only monitors and restarts individual processes. In order for the adapter tier to be fully redundant, multiple adapter processes are required. The adapters can be set up using an active-active or active-passive approach:
■ Active-Active
Multiple active adapter processes can be deployed either on the same machine or separate machines. The adapter processes process incoming messages from the spoke application and deliver messages to the hub database concurrently. In the event that one adapter process fails, messages are delivered to the surviving processes. The adapters coordinate with each other to balance their workload from the spoke application.
■ Active-Passive
Two adapter processes can be deployed in a cold failover cluster configuration to achieve active-passive availability.
In a cold failover cluster, two machines can be clustered together using clusterware such as Sun Cluster or HP MC/Service Guard. This type of clustering is a commonly used solution for making adapters highly available. One node of the cluster is "cold", passively waiting to take over in the event of a failure, while the other is "hot", or actively running the adapter software. When the "hot" or "active" node fails, the clusterware restarts the software on the cold node to bring the adapter back online. Figure 5–4 shows a cold failover cluster for the adapters.
If the hub database is a Real Application Clusters database, the adapters are enabled to work with the multiple database instances in the Real Application Clusters. Real Application Clusters technology provides consistent and uninterrupted service without having to restart the adapters if a database instance fails. The adapters connect to the first of the listed available nodes in the adapter.ini or hub.ini files. If one of the Real Application Clusters nodes fails, the database connection is established with the next available node in the adapter.ini or hub.ini file recursively until a successful connection. Failover is transparent to the spoke application. Refer to the "Hub Database Tier" section below for more information on how the adapter process can be made aware of Real Application Clusters hub database instances.
See Also: OracleAS Integration InterConnect documentation for detailed information about OracleAS Integration InterConnect components

OracleAS Integration InterConnect
5-14 Oracle Application Server High Availability Guide
High availability specific to each adapter type can be achieved as follows:
■ Database Adapter
You can deploy multiple database adapter instances serving the same application (Figure 5–5 shows an example). Because the adapters are stateless, they share tasks coming from their spoke application, the customer database. Connection failure handling to a database is done by rolling back unfinished transactions and retrying other data sources. The same connection failure handling mechanism is also used for JMS communication (JMS over JDBC) to the Advanced Queue in the hub database.
Figure 5–5 Example of multiple database adapter instances (showing only single spoke)
See Also: OracleAS Integration InterConnect adapters installation documentation for details on adapter.ini and hub.ini files associated with specific adapters
Cold Failover Cluster
JVM Process(Active)
JVM Process(Active)
OracleASIntegration
InterConnectRepository
Server
OracleASIntegration
InterConnectRepository
Server
iStudio
JVM Process(Standby)
JVM Process(Active)
RMI
Xref
JMS over JDBC
JMS over JDBC
The hub database can be a Real Application Clusters database or a cold failover database. It can also be the OracleAS Metadata Repository.Note that the database adapter instances connect to only one hub database instance at any one time as specified in the adapter.ini file (similar behavior as the connections to the customer database).
*
HubDatabase*
JDBC
Real ApplicationClusters
DatabaseInstance 2
(Active)
DatabaseInstance 1
(Active)
CustomerDatabase
Xref
RMI(Design Time)
JDBC
OnFailover
OracleASIntegration
InterConnectAdapter
OracleASIntegration
InterConnectAdapter

OracleAS Integration InterConnect
High Availability for Middle-tier Components 5-15
After an application is designed, it can be deployed to the database adapters when the adapters are first started. Upon initial startup, the adapters fetch metadata from the hub database through the OracleAS Integration InterConnect Repository Server, similar to the way OracleAS Integration InterConnect iStudio accesses the data at design time. Once these metadata are retrieved by the adapters, they are cached locally on a file-based cache. Thus, subsequent adapter startup does not need to access the Repository Server.
At run time, the database adapters access the customer database through JDBC. There can be multiple JDBC data sources, which the adapters iterate through should a connection fail. Tasks from the customer database are processed by all database adapter instances in coordination so that a task is only processed once. In order to have readily available data from the customer database, the database should be Real Application Clusters-enabled or be in a cold failover configuration (applies to the hub database as well). The adapters communicate with the Repository Server at run time to implement the Xref feature.
■ HTTP adapter
The HTTP adapter consists of a standalone Java application, an OC4J transport servlet, and Oracle HTTP Server. The Java application implements the HTTP adapter logic and communicates with a servlet in OC4J using the RMI protocol. Each Java application process communicates with only one OC4J process. The Oracle HTTP Server is required to communicate with spoke applications over HTTP.
For high availability, more than one set of Oracle HTTP Server, OC4J, and Java application process should be deployed on redundant nodes. mod_oc4j load balancing can be used to distribute requests between Oracle HTTP Server and OC4J instances across nodes. But communication between OC4J instances and the Java application processes is one-to-one. A load balancer router can be deployed in front of the Oracle HTTP Server instances to distribute requests to these instances.
The HTTP adapter Java application also communicates with the hub database and Repository Server. The Java application works with these components the same way as the database adapter as described above. The hub database should be made highly available through using a Real Application Clusters database or cold failover cluster configuration. The Repository Server can be made highly available using a cold failover cluster configuration.
In the event a HTTP adapter process fails, an inbound message to the adapter process (servlet to adapter) can be lost if the message is still in the transport or RMI layer. But once the message arrives at the adapter agent layer, the message is persisted and can be picked up later when the adapter is restarted. Also, the transport servlet will not be able to enqueue any other messages to the adapter process as the RMI server fails with the adapter process. These messages in the OC4J process will not be processed as the transport servlet’s doPost() method will respond with an error message stating that the RMI server is unavailable.
■ FTP/SMTP adapter
To achieve high availability for the FTP/SMTP adapter, multiple adapter instances can be deployed on separate machines with a load balancer routing requests to them. Because adapters process messages atomically and are stateless, if any one of the adapter instances fail, the redundant deployment allows the failure to be transparent to senders and recipients of messages.
■ MQ/AQ adapter

OracleAS Integration InterConnect
5-16 Oracle Application Server High Availability Guide
High availability specifics of this adapter are similar to those of the database adapter. This is because access to the MQ/AQ database is also through JDBC (JMS). Refer to the database adapter description above.
■ File Adapter
For the file adapter to achieve high availability, multiple adapter instances are required to access a network file system. If one adapter instance fails, another instance can process the requests for the failed instance.
■ OEM Adapters
The OEM adapter model is similar to that of the HTTP adapter, that is, it has an OC4J transport servlet, Oracle HTTP Server, and a standalone Java application. The Java application implements the adapter logic and communicates with a servlet in OC4J using the RMI protocol. Each Java application process communicates with only one OC4J process. The Oracle HTTP Server is required to communicate with spoke applications over HTTP.
Repository Server TierThis tier consists of the Repository Server instance. Only a single instance can be actively running at any one time. Hence, the Repository Server can be deployed in a two-node cold failover cluster configuration with the nodes using shared storage. This configuration provides for node-level failover.
For Repository Server process high availability, the process can be configured as a custom application for OPMN in the opmn.xml file. This allows OPMN to monitor and automatically restart the Repository Server process if it fails. After the modification, the Repository Server process should be started using OPMN (opmnctl command).
The repository server is only used at run time for the Xref feature. Otherwise, it is only needed during design time and deployment time, when adapters are first started and fetch application metadata from the hub database.
Hub Database TierThe hub database can be any database, including the OracleAS Metadata Repository database. It stores OracleAS Integration InterConnect metadata such as application view and common view formats. iStudio accesses the hub database at design time through RMI via the Repository Server, which is a JVM process. The Repository Server can communicate with multiple hub database instances as multiple JDBC data sources. Internally, the Repository Server iteratively retries each data source with timeouts.
The OracleAS Integration InterConnect hub database can be made highly available by using Real Application Clusters. The following are some guidelines:
■ Enable the Repository Server process to be aware of the Real Application Clusters hub database instances.
The Repository Server process can be made aware of the Real Application Clusters database instances by specifying the list of available nodes hosting the database instances. Specifically, enter the host, port, and instance information of all the nodes in the repository.ini or hub.ini file. If a Real Application Clusters node connected to the Repository Server process fails, then the next node entry in the repository.ini and hub.ini file is used.
■ Enable the adapter processes to be aware of the Real Application Clusters hub database instances.

Oracle BPEL Process Manager
High Availability for Middle-tier Components 5-17
The adapter processes can be made aware of the Real Application Clusters database instances by specifying the list of available nodes hosting the database instances. Specifically, enter the host, port, and instance information of all the nodes in the adapter.ini file. If a node connected to an adapter process fails, the next node entry in the adapter.ini file is used.
The hub connections of all the OracleAS Integration InterConnect adapters and the spoke connections of the database and AQ adapters support Real Application Clusters.
5.8 Oracle BPEL Process ManagerBPEL (Business Process Execution Language) is an XML-based language that enables you to assemble discrete services into an end-to-end process flow. Oracle BPEL Process Manager provides a framework for designing, deploying, and managing BPEL business processes.
Oracle BPEL Process Manager is a J2EE application that you can run on different application servers. It is a stateless application, but it uses a database as its "dehydration store" to store process state information.
5.8.1 Oracle BPEL Process Manager in an Active-Active ConfigurationThe Oracle BPEL Process Manager architecture is also stateless, which makes it simple to make highly available. Figure 5–6 shows Oracle BPEL Process Manager in an active-active configuration, with a Real Application Clusters database as the dehydration store.
See Also: OracleAS Integration InterConnect adapters installation documentation for details on adapter.ini and hub.ini files associated with specific adapters.

Oracle BPEL Process Manager
5-18 Oracle Application Server High Availability Guide
Figure 5–6 Oracle BPEL Process Manager in an Active-Active Configuration
In an active-active configuration, all the components run at the same time. The load balancer distributes requests to the appropriate node. If the node is unavailable, it sends the request to the next available node.
To run Oracle BPEL Process Manager in an active-active configuration, you perform these steps:
■ Install Oracle BPEL Process Manager on multiple Oracle Application Server middle-tier instances (or on multiple standalone OC4J, WebLogic, JBoss, or WebSphere instances).
■ Place a load balancer in front of these Oracle Application Server instances. This can be a software load balancer such as OracleAS Web Cache, but for production purposes, a hardware load balancer such as f5 BIG-IP is recommended.
■ Configure all the BPEL servers to use the same database as their dehydration store.
■ Configure all the BPEL engines to use the load balancer as the server URL and callback address for the generated SOAP URLs. Specifically, use the Oracle BPEL Process Manager Administration Console to set the soapServerUrl and soapCallbackUrl properties to be the URL of the load balancer.
■ Change any JNDI lookups (for example, to retrieve services) to use a list of JNDI providers returned by OPMN. For example, instead of specifying JNDI providers like this:
jndiProviderURL = "ormi://localhost/CustomerService"
you should use this:
Load BalancerVirtual Server Name:bpel.mydomain.com
Oracle BPEL Process Manager
Application Server
Oracle BPEL Process Manager
Application Server
Cluster Node 2Cluster Node 1Dehydration Store in aReal Application Clustersdatabase
Data Files Shared
Storage

Oracle BPEL Process Manager
High Availability for Middle-tier Components 5-19
jndiProviderURL = "opmn:ormi://host1:port1:oc4j/app, opmn:ormi://host2:port2:oc4j/app"
This enables high availability at the JVM level. If you are running multiple JVM processes for a single OC4J instance, OPMN can route requests to independent JNDI objects based on the number of JVMs available.
To deploy BPEL processes on an active-active configuration:
■ In your design environment (for example, Oracle JDeveloper), compile and deploy your BPEL process on each node. You can also do this manually or through a script. See the Oracle BPEL Process Manager Developer’s Guide for details.
■ Ensure that all the servers in the cluster have the same domains (as above, this can also be done manually or through a script).
Invoking BPEL Processes in an Active-Active TopologyThis section describes the changes needed if you invoke BPEL processes through SOAP/WSDL or through the Oracle BPEL Process Manager Java API.
If you use SOAP/WSDL, then ensure that you use the load balancer virtual server name, instead of the hostnames of the nodes.
If you use the Oracle BPEL Process Manager Java API, then you list each hostname of the nodes in the active-active topology. See the jndiProviderURL example above.
Using a Real Application Clusters Database for the Dehydration StoreTo complete the high availability picture, you should run the dehydration store on a highly available database, such as a Real Application Clusters database. With a Real Application Clusters database, then all the components are highly available.
If you are using a Real Application Clusters database for the dehydration store, you need to make the following changes to your configuration:
■ Modify the OC4J data-sources.xml file so that the connect information to the Real Application Clusters database has the following format:
jdbc:oracle:thin:@(DESCRIPTION= (ADDRESS_LIST=(LOAD_BALANCE=on) (ADDRESS=(PROTOCOL=tcp)(HOST=hostname1)(PORT=1521)) (ADDRESS=(PROTOCOL=tcp)(HOST=hostname2)(PORT=1521)) ) (CONNECT_DATA=(SERVICE_NAME=orcl)))
hostname1 and hostname2 specify the names of the nodes running the Real Application Clusters database.
orcl specifies the service name of the database.
Note that both the address and the load balancer options are within the ADDRESS_LIST element.
5.8.2 Oracle BPEL Process Manager in an Active-Passive ConfigurationOracle BPEL Process Manager should work in an OracleAS Cold Failover Cluster, or active-passive, configuration. An active-passive configuration consists of two nodes in a hardware cluster, a shared storage, and a virtual hostname and IP. You install the files on the shared storage so that either node in the hardware cluster can access them. Clients use the virtual hostname to access the active in the hardware cluster. If the

Oracle BPEL Process Manager
5-20 Oracle Application Server High Availability Guide
active node becomes unavailable, a failover event occurs, and the passive node takes over and runs the processes.
5.8.3 Oracle BPEL Process Manager with AdaptersYou can use Oracle BPEL Process Manager with Oracle Application Server adapters to integrate your Oracle BPEL Process Manager processes with external resources. These adapters are based on J2EE Connector Architecture (JCA).
This section describes how to run Oracle BPEL Process Manager with adapters in a highly available manner. This section contains the following subsections:
■ Section 5.8.3.1, "Overview of JCA-Based Adapters"
■ Section 5.8.3.2, "Concurrency Support"
■ Section 5.8.3.3, "Active-Active Topology for Adapters"
■ Section 5.8.3.4, "Modified Active-Active Topology for Adapters"
■ Section 5.8.3.5, "Active-Passive Topology for Adapters"
5.8.3.1 Overview of JCA-Based AdaptersOracle Application Server JCA-based adapters integrate Oracle Application Server with various external resources, as shown in Table 5–3:
For detailed information on adapters, see Oracle Application Server Adapter Concepts.
5.8.3.2 Concurrency SupportConcurrency support means that multiple adapter services can access the same resource at the same time without causing any data corruption. You can think of concurrency support as transactional support. For example, multiple adapter services for the database adapter can access the same table in the database at the same time.
Adapters can be divided into those that support concurrency and those that do not:
■ Adapters that do not support concurrency include the file and FTP adapters. This is because the external resource, which is the file system, does not support concurrent access.
■ All other adapters support concurrency.
The concurrency/no-concurrency support affects high availability options for the adapters, as shown in Table 5–4.
Table 5–3 Types of Adapters
Adapter Type Examples
Technology Technology adapters integrate Oracle Application Server with transport protocols, data stores, and messaging middleware.
Examples of technology adapters include: FTP, Files, Database, JMS, and Advanced Queuing.
Packaged application Packaged application adapters integrate Oracle Application Server with applications such as Siebel and SAP.
Legacy and mainframe Legacy and mainframe adapters integrate Oracle Application Server with applications such as CICS and VSAM.

Oracle BPEL Process Manager
High Availability for Middle-tier Components 5-21
Note that for all high availability options, it is assumed that you have installed the adapters on all nodes. However, in some of the high availability options, you run Oracle BPEL Process Manager on only one node.
5.8.3.3 Active-Active Topology for AdaptersThis topology can be used only for adapters that support concurrency.
Figure 5–6 shows this active-active topology. In this topology, you have one or more nodes fronted by a load balancer. On each node, you deploy and run Oracle BPEL Process Manager and business processes. This is the desired model from a high availability point of view, because you have all the components available on all nodes.
If you deploy an adapter that does not support concurrency on an active-active topology, then you risk corrupting the data on the external data source (for example, reading and writing the same file at the same time).
5.8.3.4 Modified Active-Active Topology for AdaptersThis modified version of an active-active topology is similar to the full active-active topology except for these differences:
■ You still deploy and run Oracle BPEL Process Manager and business processes on all nodes, but on all nodes except the first node, you disable the Activation Agent for partner links that use adapters that do not support concurrency.
Only the adapter service on the first node gets "receive" requests.
This topology can be used for these adapters:
■ adapters that do not support concurrency
■ adapters that support concurrency. Although you can run this type of adapter in a full active-active topology, you choose not to do so because you want to coordinate resources (such as managing and ensuring the proper sequence of messages), and the only way of doing this is to have only one adapter service running at any given time.
Figure 5–7 shows this modified active-active topology.
Table 5–4 High Availability Options for Adapters
Adapter Type High Availability Options
Supports concurrency ■ Section 5.8.3.3, "Active-Active Topology for Adapters"
■ Section 5.8.3.4, "Modified Active-Active Topology for Adapters"
■ Section 5.8.3.5, "Active-Passive Topology for Adapters"
Does not support concurrency (file and FTP adapters)
■ Section 5.8.3.4, "Modified Active-Active Topology for Adapters"
■ Section 5.8.3.5, "Active-Passive Topology for Adapters"

Oracle BPEL Process Manager
5-22 Oracle Application Server High Availability Guide
Figure 5–7 Modified Active-Active Topology
If the node with the Activation Agent fails, then you have to perform these steps:
■ Disable the Activation Agent on the failed node, so that when the node becomes active again, it will not run the Activation Agent (because another node is already running the Activation Agent).
■ Enable the Activation Agent on another node.
To Disable an Activation AgentTo disable an Activation Agent, you comment out its activationAgent element in the bpel.xml file. In the following example, the comment lines surround the activation agent that you want to disable.
<activationAgents> <!-- start comment <activationAgent className="oracle.tip.adapter.fw.agent.jca.JCAActivationAgent" partnerLink="InboundPL"> <property name="InputFileDir">C:/ora_home/integration/bpm/samples/tutorials/
121.FileAdapter/ComplexStructure/InputDir/</property> <property name="portType">Read_ptt</property> </activationAgent> end comment --></activationAgents>
Load BalancerVirtual Server Name:bpel.mydomain.com
Oracle BPEL Process Manager
Application Server
Cluster Node 2Cluster Node 1
Dehydration Store in a RealApplication Clusters database
Data Files Shared
Storage
Oracle BPEL Process Manager
Application Server
Business Process
External Resource
ActivationAgent
Business ProcessActivationAgent disabled
(These resources do not support concurrentaccess.)
Examples: file systems and FTP servers

Oracle BPEL Process Manager
High Availability for Middle-tier Components 5-23
5.8.3.5 Active-Passive Topology for AdaptersThis topology can be used for all adapters. The active-passive topology is also called OracleAS Cold Failover Cluster topology.
In an active-passive topology (Figure 5–8), you have two nodes in a hardware cluster. One of the nodes is the active node, and the other node is the passive node. There is also a shared storage; you install the Oracle home directories on this shared storage. The shared storage is mounted only on the active node.
The active node in the hardware cluster is associated with a virtual hostname and IP. Clients use the virtual hostname to access the active node in the cluster.
During runtime, the active node runs the processes. The virtual hostname points to the active node. If the active node becomes unavailable, then a failover event occurs. The passive node becomes the new active node and runs the processes.
You install and manage Oracle BPEL Process Manager as you would for a single-node deployment, except for these differences:
■ You install the Oracle home directories on the shared storage.
■ Clients access the active node using the virtual hostname. They do not need to know which node is actually running Oracle BPEL Process Manager.

OracleBI Discoverer
5-24 Oracle Application Server High Availability Guide
Figure 5–8 Oracle BPEL Process Manager with Adapters in OracleAS Cold Failover Cluster Topology
5.9 OracleBI DiscovererWeb connections to OracleBI Discoverer Server are managed through the Discoverer servlet. The servlet is responsible for brokering between the client and a Discoverer session component that then manages the actual transactions. Discoverer session components are initiated and managed by the OAD (Object Activation Daemon). Each machine has an OAD that manages its own Discoverer sessions. The OAD and session component are both monitored and managed by OPMN.
OracleBI Discoverer can be configured for high availability in the following ways:
■ Process monitoring and restart
OPMN is configured to monitor and restart OracleBI Discoverer processes on each middle-tier node. See Chapter 4 of Oracle Business Intelligence Discoverer Configuration Guide.
■ Load balancing
Shared Storage
On Failover
Home directory for Application Server
Virtual Hostname: bpel.mydomain.comVirtual IP: 123.45.67.89
On Failover
Hardware Cluster
Cluster Node 2Cluster Node 1Dehydration Store in aReal Application Clustersdatabase
Data Files Shared
Storage
Cluster Node 1(active)
Oracle BPEL Process Manager
Application Server
Cluster Node 2(passive)
Oracle BPEL Process Manager
Application Server
On Failover

Oracle Content Management SDK
High Availability for Middle-tier Components 5-25
OracleAS Web Cache can be set up to perform as a load balancer for OracleBI Discoverer requests. See Chapter 5 of Oracle Business Intelligence Discoverer Configuration Guide.
5.9.1 OracleBI Discoverer Preferences ServerThe OracleBI Discoverer Preference Server stores individual user preferences across sessions. It is managed, like the session server, by the OAD. In a multiple machine environment, distributed session servers can be configured to access one centrally located OracleBI Discoverer Preferences Server. The latter is monitored and managed by OPMN.
The OracleBI Discoverer Preferences Server can be made highly available by deploying multiple instances that are fronted and serviced by a load balancer router and/or OracleAS Web Cache. Several considerations should be noted for managing session information for this scenario.
When deploying multiple OracleBI Discoverer middle-tiers behind a load balancer, you have two options for configuring the OracleBI Discoverer Preferences Server such that user preferences are consistent across a session:
■ Enable session binding either in the load balancer router or in the OracleAS Web Cache tier. This ensures that a particular user will always be directed to the machine where their local preferences are stored. For details on configuring session binding for your load balancer router, refer to instructions from your particular load balancer hardware vendor. For configuring OracleAS Web Cache session binding, see the Oracle Application Server Web Cache Administrator’s Guide.
■ Configure all the OracleBI Discoverer Servers to share a single preference server. This ensures that all user preferences are centralized, although, all preference information is now dependent on the availability of one machine.
Protecting the OracleBI Discoverer Preferences ServerLoss of either the machine which hosts the OracleBI Discoverer Preference Server or the information stored on that server does not impact availability of OracleBI Discoverer. However, it means that users lose their stored preferences information.
To limit the loss of preferences information, the data on the OracleBI Discoverer Preferences Server should be backed up regularly, in particular, the file <ORACLE_HOME>/discoverer/util/pref.txt. This file holds the preferences information.
5.10 Oracle Content Management SDKIn both active-active and active-passive environments, you need to ensure that the domain controller is running on an active node. If the node on which the domain controller is running becomes unavailable, you have to migrate the domain controller
See Also: The chapter on installing in a multi machine environment in the Oracle Business Intelligence Discoverer Configuration Guide for multi machine considerations and pre-requisites for providing load balancing for OracleBI Discoverer
Note: For instructions on how to configure a centralized OracleBI Discoverer Preferences Server, see the chapter on installing in a multiple machine environment in the Oracle Business Intelligence Discoverer Configuration Guide.

Oracle Content Management SDK
5-26 Oracle Application Server High Availability Guide
to another node. This is because the domain controller can run only on one node at any given time.
If you installed the Oracle Content Management SDK in an OracleAS Cold Failover Cluster (Middle-Tier), and a failover or failback event occurs, you need to migrate the domain controller to the new active node.
In an active-active environment, if the node on which the domain controller is running becomes unavailable, then you have to migrate it to another node.
For details on how to migrate the domain controller, see the section "Migrating the Domain Controller" in chapter 3, "Managing the Oracle CM SDK Domain", of the Oracle Content Management SDK Administrator’s Guide. You can find this guide on the "Oracle Content Management SDK" CD-ROM.

Part IIIOracleAS Infrastructure High Availability
The chapters in this part describe high availability for OracleAS Infrastructure.
■ Chapter 6, "High Availability for OracleAS Infrastructure: Overview"
■ Chapter 7, "OracleAS Infrastructure: High Availability for OracleAS Metadata Repository"
■ Chapter 8, "OracleAS Infrastructure: High Availability for Oracle Identity Management"
■ Chapter 9, "OracleAS Infrastructure: High Availability Topologies"


High Availability for OracleAS Infrastructure: Overview 6-1
6High Availability for OracleAS Infrastructure:
Overview
The OracleAS Infrastructure portion of Oracle Application Server consists of two parts: OracleAS Metadata Repository and Oracle Identity Management. Together, they provide centralized metadata, management, and security services for Oracle Application Server components.
To create a highly available OracleAS Infrastructure, you need to make both parts (Oracle Identity Management and OracleAS Metadata Repository) highly available. Each part can have its own high availability plan. For example, you can run Oracle Identity Management components in an active-active configuration against an OracleAS Metadata Repository database that is already configured for high availability (for example, a Real Application Clusters database). Chapter 9, "OracleAS Infrastructure: High Availability Topologies" describes high availability topologies for OracleAS Infrastructure.
This chapter describes high availability for the OracleAS Infrastructure from a high level. Subsequent chapters provide the details.
Contents of this chapter:
■ Section 6.1, "High Availability for OracleAS Infrastructure Services"
■ Section 6.2, "Intra-Site High Availability Topologies"
■ Section 6.3, "Backup and Recovery for OracleAS Infrastructure"
6.1 High Availability for OracleAS Infrastructure ServicesOracleAS Infrastructure provides the following services:
■ product metadata
■ security service
■ management service
These services execute on top of the following core components, which must all be available to guarantee high availability of the OracleAS Infrastructure:
■ OracleAS Metadata Repository
■ Oracle Net listener
■ Oracle HTTP Server
■ OC4J

High Availability for OracleAS Infrastructure Services
6-2 Oracle Application Server High Availability Guide
These core components are used by Oracle Identity Management and Oracle Management applications. The following table lists the Oracle Identity Management applications, and how they use the core components.
For management, Oracle Application Server provides Distributed Configuration Management (DCM). DCM also uses the OracleAS Metadata Repository.
For OracleAS Infrastructure to provide all essential services, all of the above components must be available. On UNIX platforms, this means that the processes associated with these components must be up and active. On Windows, some of these processes run as services.
6.1.1 Process ManagementOracleAS Infrastructure processes, except for the database, its listener, and Application Server Control Console, are started, managed, and restarted by Oracle Process Manager and Notification Server (OPMN). This means any failure of an OPMN-managed process is handled by OPMN. OPMN is automatically installed and configured during installation.
However, OPMN does not handle database process or database listener failures. Also, failure of any OPMN processes leaves OracleAS Infrastructure in a non-resilient mode if the failure is not detected and appropriate recovery steps are not taken. Section 2.2.1, "Process Death Detection and Automatic Restart" describes process management and monitoring.
6.1.2 Protection from Software and Hardware FailuresTo provide protection from local hardware and software failures (such as a system panic or node crash) that cannot be recovered by OPMN, you need to install and run OracleAS Infrastructure in a highly available topology.
Any high availability topology must be able to detect and recover from any type of software failures of any of the OracleAS Infrastructure components. It must also be able to detect and recover from any type of hardware failures on the hosts that are
Table 6–1 Oracle Identity Management Applications
Oracle Identity Management Application Description
Oracle Internet Directory Oracle Internet Directory uses the OracleAS Metadata Repository as its data store. Oracle Internet Directory includes a monitoring process (oidmon), which checks that the Oracle Internet Directory process is running.
For Oracle Internet Directory to be highly available, the OracleAS Metadata Repository has to be highly available as well.
Oracle Delegated Administration Services
OracleAS Single Sign-On
Oracle Delegated Administration Services and OracleAS Single Sign-On are OC4J applications. They run on an OC4J instance called "OC4J_SECURITY".
For Oracle Delegated Administration Services and OracleAS Single Sign-On to be highly available, the OC4J_SECURITY instance needs to be highly available.
Oracle Directory Integration and Provisioning
Oracle Directory Integration and Provisioning consists of a set of services and interfaces built into Oracle Internet Directory.
For Oracle Directory Integration and Provisioning to be highly available, Oracle Internet Directory needs to be highly available.

Intra-Site High Availability Topologies
High Availability for OracleAS Infrastructure: Overview 6-3
running the OracleAS Infrastructure. See Section 6.2, "Intra-Site High Availability Topologies".
These topologies, however, cannot protect the OracleAS Infrastructure from site failures, media failures, or regional disasters, which result in damage to or loss of data. For protection against these types of failures, Oracle Application Server provides OracleAS Disaster Recovery, which is a site-level active-passive disaster recovery topology. See Part IV, "Disaster Recovery" for details.
For media failures or if the metadata became corrupted, you can use the OracleAS Backup and Recovery Tool to back up and recover Oracle Application Server metadata, including data in the OracleAS Metadata Repository database and files in the file system. See Section 6.3, "Backup and Recovery for OracleAS Infrastructure".
6.2 Intra-Site High Availability TopologiesIntra-site high availability topologies for OracleAS Infrastructure can be categorized into these groups:
■ Section 6.2.1, "Active-Active High Availability Topologies"
■ Section 6.2.2, "Active-Passive High Availability Topologies"
Table 6–2 summarizes these topology types:
For each topology, you can choose to have collocated Oracle Identity Management components, or you can distribute the OracleAS Single Sign-On and Oracle Delegated
Table 6–2 Summary of Intra-Site High Availability Topologies
Topology Description
Active-Active In active-active topologies, you run multiple active instances of the OracleAS Infrastructure services on multiple nodes; all of the instances are servicing requests concurrently. If an instance or a node fails, the remaining active instances take over the workload of the failed instance.
Active-active topologies use an external load balancer to distribute requests to the active instances.
Active-active topologies are:
■ OracleAS Cluster (Identity Management) Topology
■ Distributed OracleAS Cluster (Identity Management) Topology
Active-Passive In active-passive topologies, you have two nodes, but only one of the nodes is active at any time. If the active node or instance fails, the passive node becomes active and takes over the entire workload of the failed instance.
The active and passive nodes share a storage device, on which you install Oracle Application Server. The nodes also use a virtual hostname, through which you access the active node. If the active node fails, the virtual hostname points to the other node, which becomes the active node.
Active-passive topologies are:
■ OracleAS Cold Failover Cluster (Infrastructure) Topology
■ Distributed OracleAS Cold Failover Cluster (Infrastructure) Topology
■ OracleAS Cold Failover Cluster (Identity Management) Topology
■ Distributed OracleAS Cold Failover Cluster (Identity Management) Topology

Intra-Site High Availability Topologies
6-4 Oracle Application Server High Availability Guide
Administration Services components onto their own nodes separate from Oracle Internet Directory node.
For the OracleAS Cluster (Identity Management) and OracleAS Cold Failover Cluster (Identity Management), which are focused on Oracle Identity Management, you install the OracleAS Metadata Repository on its own or in an existing cold failover cluster database or an existing Real Application Clusters database.
6.2.1 Active-Active High Availability TopologiesIn active-active topologies, all the nodes running Oracle Application Server instances are active and share the same workload. Active-active topologies for Oracle Identity Management are also known as OracleAS Cluster (Identity Management) topologies.
OracleAS Cluster (Identity Management) topologies come in two variations: non-distributed and distributed. For both, the Oracle Identity Management components need not be installed on machines that are part of a hardware cluster. Table 6–3 describes the non-distributed and distributed OracleAS Cluster (Identity Management) topologies:
High Availability Options for the OracleAS Metadata Repository in OracleAS Cluster (Identity Management) TopologiesFor both OracleAS Cluster (Identity Management) topologies, the Oracle Identity Management components on all nodes are connected to the same directory store database. High availability for this database, which is also used by the OracleAS Metadata Repository, is achieved by using OracleAS Metadata Repository Creation Assistant to install the directory store and metadata repository into an existing database. This database is already installed in one of the following high availability configurations:
■ Real Application Clusters database
■ two-node cold failover cluster database
For details on active-active topologies, see:
■ Section 9.6, "OracleAS Cluster (Identity Management) Topology"
■ Section 9.7, "Distributed OracleAS Cluster (Identity Management) Topology"
Table 6–3 OracleAS Cluster (Identity Management) Topologies (Active-Active)
Topology Description
OracleAS Cluster (Identity Management) Topology
In the non-distributed topology, all the Oracle Identity Management components are installed on each of two or more hosts. These hosts are deployed behind an external load balancer, which directs requests to them. If a host fails, the load balancer directs requests to the remaining host(s).
Distributed OracleAS Cluster (Identity Management) Topology
In the distributed topology, OracleAS Single Sign-On and Oracle Delegated Administration Services components are deployed on separate hosts from Oracle Internet Directory and Oracle Directory Integration and Provisioning. These hosts are fronted by a load balancer, which gives them active-active availability. Separating out OracleAS Single Sign-On and Oracle Delegated Administration Services components enables you to secure the other Oracle Identity Management components behind a firewall.

Intra-Site High Availability Topologies
High Availability for OracleAS Infrastructure: Overview 6-5
6.2.2 Active-Passive High Availability TopologiesActive-passive topologies use a cold failover cluster configuration on a hardware cluster. These topologies are described in Table 6–4. The variations in the topologies are based on the way OracleAS Infrastructure components are set up and distributed.
Table 6–4 OracleAS Cold Failover Cluster Topologies (Active-Passive)
Topology Description
OracleAS Cold Failover Cluster (Infrastructure) Topology
This a two-node, active-passive configuration on a hardware cluster. The two nodes are connected to shared storage.
OracleAS Metadata Repository and Oracle Identity Management are installed together in the same Oracle home on the shared storage. A new database is installed for the OracleAS Metadata Repository.
OracleAS Metadata Repository and Oracle Identity Management are active on one node and passive on the other node. This topology is the easiest to install and configure out-of-box.
Distributed OracleAS Cold Failover Cluster (Infrastructure) Topology
OracleAS Single Sign-On and Oracle Delegated Administration Services are installed on separate machines from Oracle Internet Directory and Oracle Directory Integration and Provisioning.
OracleAS Single Sign-On and Oracle Delegated Administration Services are installed on two or more hosts that are load balanced by an external load balancer. OracleAS Single Sign-On and Oracle Delegated Administration Services are active-active.
However, OracleAS Metadata Repository, Oracle Internet Directory and Oracle Directory Integration and Provisioning are installed in an OracleAS Cold Failover Cluster. A new database is installed for the OracleAS Metadata Repository. These components run in active-passive mode.
OracleAS Cold Failover Cluster (Identity Management) Topology
Oracle Identity Management components are installed in a hardware cluster, in active-passive mode.
OracleAS Metadata Repository is installed separately. You can install it in an existing high availability database using OracleAS Metadata Repository Creation Assistant.
Oracle Identity Management has a different Oracle home from OracleAS Metadata Repository. Failover of Oracle Identity Management can be performed independently of OracleAS Metadata Repository and vice versa.

Backup and Recovery for OracleAS Infrastructure
6-6 Oracle Application Server High Availability Guide
High Availability Options for the OracleAS Metadata Repository in OracleAS Cold Failover Cluster TopologiesFor the OracleAS Cold Failover Cluster topologies, you have the following high availability options for the OracleAS Metadata Repository.
For OracleAS Cold Failover Cluster (Infrastructure) and distributed OracleAS Cold Failover Cluster (Infrastructure), a new database is installed for the OracleAS Metadata Repository. The OracleAS Metadata Repository is in a cold failover cluster database.
For the OracleAS Cold Failover Cluster (Identity Management) and distributed OracleAS Cold Failover Cluster (Identity Management), you install the OracleAS Metadata Repository in an existing high availability database such as:
■ Real Application Clusters database
■ cold failover cluster database
6.3 Backup and Recovery for OracleAS InfrastructureThis section contains considerations for backup and recovery for OracleAS Infrastructure. It has the following sections:
■ Section 6.3.1, "OracleAS Cold Failover Cluster (Infrastructure)"
■ Section 6.3.2, "Oracle Identity Management"
Distributed OracleAS Cold Failover Cluster (Identity Management) Topology
OracleAS Metadata Repository is installed in an existing database using OracleAS Metadata Repository Creation Assistant. This database can use a cold failover cluster, Real Application Clusters, or other database-certified configurations to provide high availability.
OracleAS Single Sign-On and Oracle Delegated Administration Services are deployed on separate hosts from other Oracle Identity Management components. They can be installed on the OracleAS middle-tier hosts and can have active-active availability as they are fronted by a load balancer.
Oracle Internet Directory and Oracle Directory Integration and Provisioning are installed on a two node active-passive cold failover hardware cluster.
This configuration differs from the OracleAS Cold Failover Cluster (Identity Management) Topology in that OracleAS Single Sign-On and Oracle Delegated Administration Services are installed on separate hosts from Oracle Internet Directory and Oracle Directory Integration and Provisioning. This separation enables you to run Oracle Internet Directory and Oracle Directory Integration and Provisioning behind a firewall.
This topology is similar to the Distributed OracleAS Cold Failover Cluster (Infrastructure) Topology. The difference is that, in the hardware cluster where Oracle Internet Directory and OracleAS Metadata Repository are installed, each has a separate Oracle home from the other.
Note that OracleAS Single Sign-On and Oracle Delegated Administration Services are active-active, and Oracle Internet Directory is active-passive. OracleAS Metadata Repository availability is dependent on the high availability configuration used by the database.
Table 6–4 (Cont.) OracleAS Cold Failover Cluster Topologies (Active-Passive)
Topology Description

Backup and Recovery for OracleAS Infrastructure
High Availability for OracleAS Infrastructure: Overview 6-7
See the Oracle Application Server Administrator’s Guide for complete procedures for backup and recovery of the OracleAS Infrastructure.
6.3.1 OracleAS Cold Failover Cluster (Infrastructure)When performing backup and recovery operations for OracleAS Cold Failover Cluster (Infrastructure), note the following points:
■ backup considerations for OracleAS Cold Failover Cluster
– You should locate archive logs for the OracleAS Metadata Repository on the shared disk. This ensures that when you fail over from one cluster node to another in the case of media recovery, the archive logs are also failed over and available.
You can generate archive logs to a local file system. However, make this destination accessible to both nodes so that no matter which node is active, the database instance will always output archive logs to the same location. Otherwise, the backup operation will not be able to see all archive log files.
– Proper capacity planning is required in order to ensure adequate space is available to store the desired number of archive logs.
■ Recovery considerations for OracleAS Cold Failover Cluster
There are no special considerations for recovering OracleAS Cold Failover Cluster. As mentioned in the backup considerations above, if archive logs are stored on a local file system, in the case of media recovery, all archive logs must be made available to the application server instance performing the recovery. Recovery can be performed on either node of the cluster.
Before taking a cold backup or restoring the metadata repository database, the OracleAS Backup and Recovery Tool shuts down the database first. In the Windows OracleAS Cold Failover Cluster environment, the Oracle Fail Safe Manager performs database polling and restarts the database if it is down. This means that every time before you perform "backup_cold" or "restore_repos" with the OracleAS Backup and Recovery Tool on the primary (active) node, you must disable database polling in the Oracle Fail Safe Manager and re-enable it after the backup/restore operation.
6.3.2 Oracle Identity ManagementIn an OracleAS Cluster (Identity Management) or OracleAS Cold Failover Cluster (Identity Management) environment (or their distributed variants), you back up and restore each Oracle Identity Management installation individually. The backup performed on each Oracle Identity Management installation can be restored only on the respective instance in case of failure.
If the DCM repository is in the OracleAS Metadata Repository database, the OracleAS Backup and Recovery Tool requires at least one Oracle Internet Directory process to be running during backup and restore operations. So, in case of a failure on all the Oracle Identity Management nodes, you need to first perform the restore operation on one of the Oracle Identity Management nodes and start up the Oracle Internet Directory process on that node. Then you can restore the other Oracle Identity Management nodes.
If you lose an Oracle Identity Management node completely and need to restore it to a new node, see the "Restoring an Identity Management Instance to a New Host" procedure in the Oracle Application Server Administrator’s Guide.

Backup and Recovery for OracleAS Infrastructure
6-8 Oracle Application Server High Availability Guide
Note: To determine if the DCM repository is in a database, run the "dcmctl whichfarm" command and look for the "Repository Type: Database" or "Repository Type: Database (host)" line in the output.

OracleAS Infrastructure: High Availability for OracleAS Metadata Repository 7-1
7OracleAS Infrastructure: High Availability for
OracleAS Metadata Repository
This chapter describes high availability configurations for the OracleAS Metadata Repository. The next chapter, Chapter 8, "OracleAS Infrastructure: High Availability for Oracle Identity Management", describes high availability configurations for Oracle Identity Management.
To make OracleAS Metadata Repository highly available, you need to make the database highly available. Common configurations for a highly available database include:
■ Section 7.1, "Cold Failover Cluster Databases"
■ Section 7.2, "Real Application Clusters Databases"
■ Section 7.3, "Other High Availability Solutions for the OracleAS Metadata Repository Database"
The last section, Section 7.4, "Checking the Status of OracleAS Metadata Repository", describes how to check the status of the database and the listener.
7.1 Cold Failover Cluster DatabasesIn a cold failover cluster database, you install the database on storage shared by two nodes. These nodes are in a hardware cluster. One of these nodes (the active node) runs the database processes. If the active node fails for any reason, a failover event occurs and the other node (the passive node) takes over and runs the database processes.
In a cold failover cluster configuration, you set up a virtual hostname and virtual IP address, and associate them with the active node. Clients access the active node using the virtual hostname and virtual IP address. Using a virtual hostname or virtual IP address shields the clients from needing to know which node is servicing their requests. During a failover, the passive node becomes the active node, and the virtual hostname and virtual IP address are now associated with the new active node.
Figure 7–1 shows a diagram of a cold failover cluster database on UNIX; Figure 7–2 shows it on Windows. Note the following differences:
■ On Windows, you need to run Oracle Fail Safe and Microsoft Cluster Server. On UNIX, you run the vendor clusterware.
■ On Windows, you install the database ORACLE_HOME on the local storage of each node. On UNIX, you install it on the shared storage. For both UNIX and Windows, the data files for the database are located on the shared storage.

Cold Failover Cluster Databases
7-2 Oracle Application Server High Availability Guide
Figure 7–1 Cold Failover Cluster Database on UNIX
Figure 7–2 Cold Failover Cluster Database on Windows
Node1 (Active)
Physical Hostname: db1.mydomain.com Physical IP: 144.25.245.201
DatabaseProcesses
Hardware Cluster
Node2 (Standby)
Physical Hostname: db2.mydomain.com Physical IP: 144.25.245.202
DatabaseProcesses
Shared Storage
On Failover
Virtual Hostname: db.mydomain.comVirtual IP: 144.25.245.1
Clients, including Oracle Identity Management andMiddle Tier components
On Failover
ORACLE_HOME for the Database
Data files for the Database
Vendor Clusterware Vendor Clusterware
Node1 (Active)
Physical Hostname: db1.mydomain.com Physical IP: 144.25.245.201
DatabaseProcesses
Hardware Cluster
Node2 (Standby)
Physical Hostname: db2.mydomain.com Physical IP: 144.25.245.202
DatabaseProcesses
Shared Storage
On Failover
Virtual Hostname: db.mydomain.comVirtual IP: 144.25.245.1
Clients, including Oracle Identity Management andMiddle Tier components
On Failover
Data files for the Database
Microsoft Cluster Server
ORACLE_HOMEfor the Database
Oracle Fail Safe
Microsoft Cluster Server
ORACLE_HOMEfor the Database
Oracle Fail Safe

Cold Failover Cluster Databases
OracleAS Infrastructure: High Availability for OracleAS Metadata Repository 7-3
7.1.1 Installing a Cold Failover Cluster DatabaseYou can use the Oracle Application Server installer to install a cold failover cluster database that is already populated with the OracleAS Metadata Repository. See the Oracle Application Server Installation Guide for details.
If you already have a cold failover cluster database, you can load the OracleAS Metadata Repository into the existing database using the OracleAS Metadata Repository Creation Assistant. See the Oracle Application Server Metadata Repository Creation Assistant User’s Guide for details.
7.1.2 Running a Cold Failover Cluster DatabaseRunning and managing a cold failover cluster database is similar to running single-instance database. The only difference is using the virtual hostname instead of the physical hostname.
7.1.3 Running Database Console against a Cold Failover Cluster DatabaseBefore you can start, stop or check the status of Database Console against a cold failover cluster database, you need to set the ORACLE_HOSTNAME environment variable to the virtual hostname. This is required on UNIX platforms. For example, in Figure 7–1, the virtual hostname is db.mydomain.com. You would set ORACLE_HOSTNAME as follows:
C shell:
$ setenv ORACLE_HOSTNAME db.mydomain.com
Bourne or Korn shell:
% ORACLE_HOSTNAME=db.mydomain.com% export ORACLE_HOSTNAME
After setting the variable, you can then run the "emctl action dbconsole" commands, where action is start, stop, or status (for example, emctl start dbconsole).
On Windows, ORACLE_HOSTNAME is set in the Windows registry. You do not need to set it as an environment variable.
7.1.4 Backing Up a Cold Failover Cluster DatabaseBackup and recovery procedures are covered in detail in the Oracle Application Server Administrator’s Guide. This section describes backup and recovery details that are specific to cold failover cluster databases.
Backup Considerations■ Place archive logs for the OracleAS Metadata Repository on the shared disk. This
ensures that when failing over from one cluster node to another in the case of media recovery, the archive logs are also failed over and available.
You can generate archive logs to a local file system. However, make this destination accessible to both nodes so that no matter which node is active, the database instance writes archive logs to the same location. Otherwise, the backup operation will not be able to see all the archive log files.
■ Plan your capacity requirements carefully to ensure that you have adequate space to store the desired number of archive logs.

Real Application Clusters Databases
7-4 Oracle Application Server High Availability Guide
Recovery ConsiderationsThere are no special considerations for recovering a cold failover cluster database. If you store archive logs on a local file system, in the case of media recovery, you must make all archive logs be available to the Oracle Application Server instance performing the recovery. You can perform the recovery from either node of the cluster.
If You Are Running on Microsoft WindowsOne of the steps that you have to do to prepare your OracleAS Metadata Repository for backup using the OracleAS Backup and Recovery Tool is to run the "alter database archivelog" command to enable ARCHIVELOG mode. See the "Enabling ARCHIVELOG Mode" section in the Oracle Application Server Administrator’s Guide.
However, if Oracle Fail Safe has database polling enabled, the following error message will appear when you run the command:
ORA-01126: database must be mounted EXCLUSIVE and not open for this operation
To avoid this error message, you need to disable database polling in Oracle Fail Safe. To do this:
1. Start Oracle Fail Safe Manager.
2. Expand the following: Clusters > cluster_name > Cluster Resources, and select db_instance_name.
cluster_name is the name of the cold failover cluster, and db_instance_name is the name of the database instance.
3. Select the Database tab.
4. Disable Database Polling.
After completing the backup or restore operation, you can re-enable database polling.
You need to disable database polling because the OracleAS Backup and Recovery Tool shuts down the database. On Windows, Oracle Fail Safe performs database polling and restarts the database if it is down. This means that every time before you perform "backup_cold" or "restore_repos" with the OracleAS Backup and Recovery Tool on the active node, you must disable database polling in the Oracle Fail Safe Manager and re-enable it after the backup/restore operation.
Database polling opens the database and monitors or "pings" the database. For the "alter database archivelog" command to succeed, make sure database polling is disabled and the database is mounted EXCLUSIVE before executing the command.
7.1.5 Failing Over a Cold Failover Cluster DatabaseIn the failover operation, you need to fail over the virtual hostname and IP, and also the shared storage to the standby node. For details, refer to the instructions provided by your vendor clusterware.
7.2 Real Application Clusters DatabasesYou can also use a Real Application Clusters database for the OracleAS Metadata Repository database. In a Real Application Clusters database, you have multiple database instances running on different nodes and sharing access to an Oracle database. These database instances are linked by an interconnect.

Checking the Status of OracleAS Metadata Repository
OracleAS Infrastructure: High Availability for OracleAS Metadata Repository 7-5
The multiple database instances in a Real Application Clusters configuration provide high availability through redundancy. A Real Application Clusters configuration also provides scalability: you can simply add nodes to the cluster (for example, to handle increased traffic or to improve performance).
7.2.1 Installing a Real Application Clusters DatabaseYou need to use the Oracle database installer to install a Real Application Clusters database. Refer to the Real Application Clusters installation guide that is shipped with the database for details.
After you have installed a Real Application Clusters database, you can load the OracleAS Metadata Repository into the Real Application Clusters database using the OracleAS Metadata Repository Creation Assistant. See the Oracle Application Server Metadata Repository Creation Assistant User’s Guide for details.
7.2.2 Running a Real Application Clusters DatabaseFor details on administering Real Application Clusters databases, including performing procedures such as:
■ stopping and starting database instances
■ adding and deleting nodes and database instances
■ managing storage
■ managing backup and recovery
■ troubleshooting
see the Oracle Real Application Clusters Administrator’s Guide. You can find this guide in the Oracle Database documentation set.
7.2.3 Backing up a Real Application Clusters DatabaseYou back up a Real Application Clusters database using the normal backup procedures for any Real Application Clusters database. See the Oracle Real Application Clusters Administrator’s Guide for details.
7.3 Other High Availability Solutions for the OracleAS Metadata Repository Database
There are other types of solutions that provide high availability for the database. You can install the OracleAS Metadata Repository in such databases using the OracleAS Metadata Repository Creation Assistant. Examples of such solutions include storage snapshots, cloning, or local data guard. These solutions create a copy of the database from which you can perform a restore operation if the database fails. See the database documentation for details on these solutions.
7.4 Checking the Status of OracleAS Metadata RepositoryTo check the status of the OracleAS Metadata Repository database, run the following commands:
■ Connect to the database and check its state:
ORACLE_HOME/bin/sqlplus /nologSQL> connect SYS as SYSDBA

Checking the Status of OracleAS Metadata Repository
7-6 Oracle Application Server High Availability Guide
SQL> select status from v$instance;
■ Check the status of the database listener:
ORACLE_HOME/bin/lsnrctl status

OracleAS Infrastructure: High Availability for Oracle Identity Management 8-1
8OracleAS Infrastructure: High Availability for
Oracle Identity Management
Oracle Identity Management includes the following components:
■ Oracle Internet Directory
■ Oracle Directory Integration and Provisioning
■ Oracle Delegated Administration Services
■ OracleAS Single Sign-On
■ OracleAS Certificate Authority
Decisions to MakeTo run these components in a high availability configuration, you have to make these two decisions:
■ Do you want to run all the Oracle Identity Management components together from the same Oracle home, or install and run them over multiple nodes?
The following sections describe each option:
– Section 8.1, "Overview: Running All the Oracle Identity Management Components Together"
– Section 8.2, "Overview: Distributing Oracle Identity Management Components"
■ Do you want to run the components in active-active mode or active-passive mode?
The following sections describe each mode:
– Section 8.3, "Overview: Running Oracle Identity Management Components in Active-Active Configurations"
– Section 8.4, "Overview: Running Oracle Identity Management Components in Active-Passive Configurations"
Table 8–1 shows possible configurations that result from the two questions above. For example, you can run all Oracle Identity Management components in active-active mode.

Overview: Running All the Oracle Identity Management Components Together
8-2 Oracle Application Server High Availability Guide
8.1 Overview: Running All the Oracle Identity Management Components Together
In this model, you install and run all the Oracle Identity Management components on the same Oracle home.
In active-active configurations (also called OracleAS Cluster configurations), you install the components on the local storage of each node. You also need a load balancer in front of these nodes. Requests to these components go to the load balancer, which load balances the requests among the nodes.
In active-passive configurations (also called OracleAS Cold Failover Cluster configurations), you have two nodes in a hardware cluster, and a storage device shared by these nodes. You install the components on the shared storage device. Only one node is active at any time. The other node, called the passive or standby node, becomes active when the active node fails. The passive node then becomes the new active node: it mounts the shared storage device and runs the Oracle Identity Management components.
Installing and managing all the Oracle Identity Management components in the same Oracle home is easier than installing them in a distributed manner.
If you need to install and run some components on nodes that are more secure (located behind additional firewalls), then you need to distribute the Oracle Identity Management components.
8.2 Overview: Distributing Oracle Identity Management ComponentsYou can also install and run the Oracle Identity Management components on separate nodes. A common distribution model is:
■ OracleAS Single Sign-On and Oracle Delegated Administration Services on one set of computers
■ Oracle Internet Directory and Oracle Directory Integration and Provisioning on another set of computers
Table 8–1 High Availability Configurations for Oracle Identity Management Components
Active-active Configuration Active-Passive Configuration
Non-Distributed Model:
All Oracle Identity Management Components in the same Oracle home
Section 8.5, "All Oracle Identity Management Components in Active-Active Configurations"
Section 8.6, "All Oracle Identity Management Components in Active-Passive Configurations"
Distributed Model:
Oracle Internet Directory and Oracle Directory Integration and Provisioning
Section 8.7, "Oracle Internet Directory and Oracle Directory Integration and Provisioning in Active-Active Configurations"
Section 8.8, "Oracle Internet Directory and Oracle Directory Integration and Provisioning in Active-Passive Configurations"
OracleAS Single Sign-On and Oracle Delegated Administration Services
Section 8.9, "OracleAS Single Sign-On and Oracle Delegated Administration Services in Active-Active Configurations"
Section 8.10, "OracleAS Single Sign-On and Oracle Delegated Administration Services in Active-Passive Configurations"

Overview: Running Oracle Identity Management Components in Active-Active Configurations
OracleAS Infrastructure: High Availability for Oracle Identity Management 8-3
The components are separated in this manner because OracleAS Single Sign-On and Oracle Delegated Administration Services are typically the first components to be accessed directly by clients and other components. You can run these components on computers in the DMZ.
For the Oracle Internet Directory and your databases (including the OracleAS Metadata Repository), you typically run these components on computers located behind an additional firewall because they contain data that you want to secure.
Active-active and active-passive configurations for distributed Oracle Identity Management components are similar to active-active and active-passive configurations for the non-distributed model. The only difference is which components are running in the configuration. For example, instead of all Oracle Identity Management components, you might have only the Oracle Internet Directory component running in an active-active configuration.
Advantages of Distributing Oracle Identity Management ComponentsReasons for distributing the Oracle Identity Management components include:
■ Security: You might want to run some components, typically the Oracle Internet Directory, on computers that are located behind additional firewalls.
■ Performance: You may get better performance by running the components on multiple computers.
■ Choice of high availability configuration: You can configure different high availability models for each tier. For example, in the Distributed OracleAS Cold Failover Cluster (Identity Management) Topology, you run OracleAS Single Sign-On and Oracle Delegated Administration Services in an active-active configuration, but run Oracle Internet Directory in an active-passive configuration.
■ Performance isolation: You can scale each set of components independently of each other. For example, if the bottleneck is in OracleAS Single Sign-On, you can just increase the number of nodes that are running OracleAS Single Sign-On without changing the number of nodes that are running Oracle Internet Directory.
DisadvantagesMultiple installations are required: you need to perform the installations on each node.
You also need to manage, configure, and patch each node separately.
8.3 Overview: Running Oracle Identity Management Components in Active-Active Configurations
In active-active configurations, you install and run Oracle Identity Management components on multiple nodes. Each node runs the same components as the other nodes.
You need an external load balancer in front of the nodes. Requests to these nodes are directed to the load balancer, which then sends the requests to one of the nodes for processing. The load balancer uses its own algorithm to decide which node to send a request to. See Section 2.2.4.2, "External Load Balancers" for load balancer details.
You configure the load balancer with a virtual server name and port. When clients need to access an Oracle Identity Management component running on the nodes, they use this virtual server name and port.
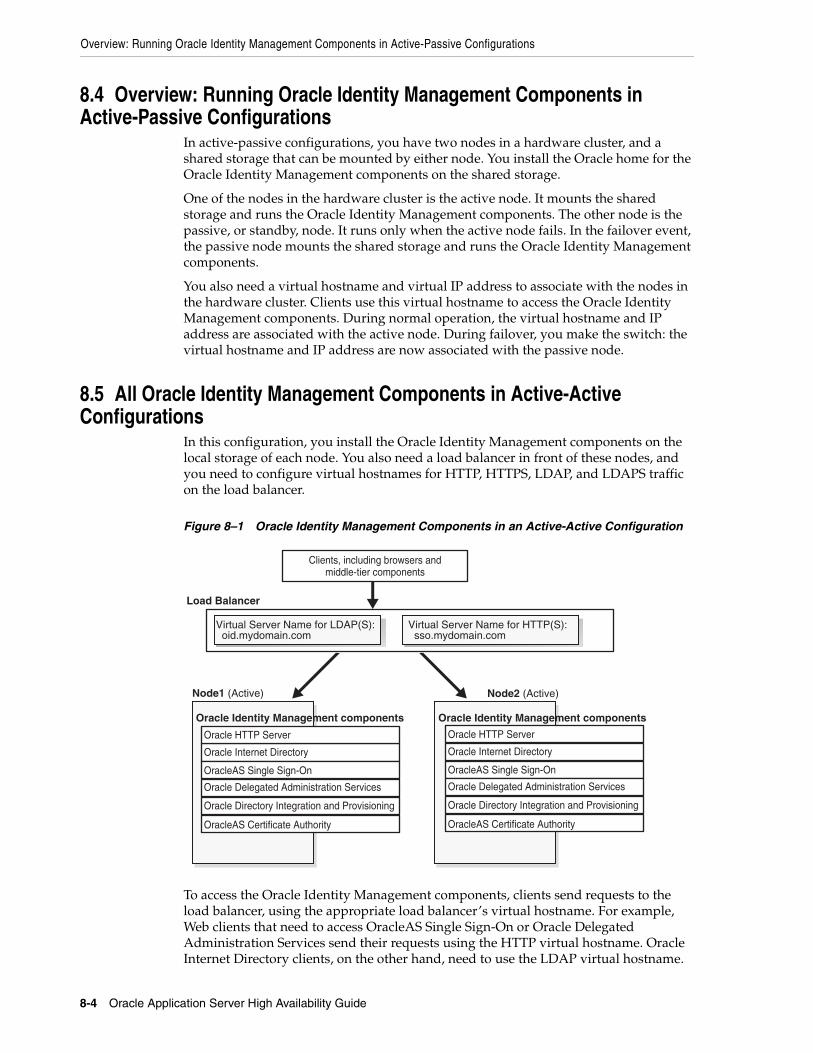
Overview: Running Oracle Identity Management Components in Active-Passive Configurations
8-4 Oracle Application Server High Availability Guide
8.4 Overview: Running Oracle Identity Management Components in Active-Passive Configurations
In active-passive configurations, you have two nodes in a hardware cluster, and a shared storage that can be mounted by either node. You install the Oracle home for the Oracle Identity Management components on the shared storage.
One of the nodes in the hardware cluster is the active node. It mounts the shared storage and runs the Oracle Identity Management components. The other node is the passive, or standby, node. It runs only when the active node fails. In the failover event, the passive node mounts the shared storage and runs the Oracle Identity Management components.
You also need a virtual hostname and virtual IP address to associate with the nodes in the hardware cluster. Clients use this virtual hostname to access the Oracle Identity Management components. During normal operation, the virtual hostname and IP address are associated with the active node. During failover, you make the switch: the virtual hostname and IP address are now associated with the passive node.
8.5 All Oracle Identity Management Components in Active-Active Configurations
In this configuration, you install the Oracle Identity Management components on the local storage of each node. You also need a load balancer in front of these nodes, and you need to configure virtual hostnames for HTTP, HTTPS, LDAP, and LDAPS traffic on the load balancer.
Figure 8–1 Oracle Identity Management Components in an Active-Active Configuration
To access the Oracle Identity Management components, clients send requests to the load balancer, using the appropriate load balancer’s virtual hostname. For example, Web clients that need to access OracleAS Single Sign-On or Oracle Delegated Administration Services send their requests using the HTTP virtual hostname. Oracle Internet Directory clients, on the other hand, need to use the LDAP virtual hostname.
Node1 (Active) Node2 (Active)
Clients, including browsers andmiddle-tier components
Oracle Directory Integration and Provisioning
Oracle Internet Directory
Oracle HTTP Server
OracleAS Single Sign-On
Oracle Delegated Administration Services
OracleAS Certificate Authority
Oracle Directory Integration and Provisioning
Oracle Internet Directory
Oracle HTTP Server
OracleAS Single Sign-On
Oracle Delegated Administration Services
OracleAS Certificate Authority
Load Balancer
Virtual Server Name for LDAP(S): oid.mydomain.com
Virtual Server Name for HTTP(S): sso.mydomain.com
Oracle Identity Management components Oracle Identity Management components
All Oracle Identity Management Components in Active-Active Configurations
OracleAS Infrastructure: High Availability for Oracle Identity Management 8-5
OPMN also runs on each node. If an OPMN-managed component fails, OPMN tries to restart it. See Section 2.2.1.1.1, "Automated Process Management with OPMN", which describes OPMN and the components that it manages.
OracleAS Certificate Authority Not SupportedNote that OracleAS Certificate Authority is not supported in an active-active configuration. You can install and run OracleAS Certificate Authority separately.
Topologies that Use This Configuration■ Section 9.6, "OracleAS Cluster (Identity Management) Topology"
8.5.1 Handling Component and Node FailuresOPMN runs on each node to provide process management, monitoring, and notification services for the OC4J_SECURITY instances, Oracle HTTP Server, and oidmon processes. (oidmon manages the Oracle Internet Directory processes.) If any of these processes fails, OPMN detects the failure and attempts to restart it. If the restart is unsuccessful, the load balancer detects the failure (usually through a non-response timeout) and directs requests to an active process running on a different node.
For the Oracle Internet Directory component, OPMN monitors oidmon, which in turn monitors the oidldapd, oidrepld, and odisrv Oracle Internet Directory processes. If oidldapd, oidrepld, or odisrv fails, oidmon attempts to restart it locally. Similarly, if oidmon fails, OPMN tries to restart it locally.
Only one odisrv process and one oidrepld process can be active at any time in an OracleAS Cluster (Identity Management) while multiple oidldapd processes can run in the same cluster. Refer to Oracle Internet Directory Administrator’s Guide for more details.
If a node fails, the load balancer detects the failure and redirects requests to an active node. Because each node provides identical services as the others, all requests can be fulfilled by the remaining nodes.
8.5.2 Starting Oracle Identity Management ComponentsYou start the Oracle Identity Management components in the following order:
1. Make sure the OracleAS Metadata Repository database is running.
2. On each node, perform these steps:
a. Set the ORACLE_HOME environment variable to the Oracle Identity Management’s Oracle home.
b. Run OPMN to start the Oracle Identity Management components.
ORACLE_HOME/opmn/bin/opmnctl startall
c. Start Application Server Control.
ORACLE_HOME/bin/emctl start iasconsole
8.5.3 Stopping Oracle Identity Management ComponentsTo stop the Oracle Identity Management components, run the following steps on each node:

All Oracle Identity Management Components in Active-Passive Configurations
8-6 Oracle Application Server High Availability Guide
1. Set the ORACLE_HOME environment variable to the Oracle Identity Management’s Oracle home.
2. Run OPMN to stop the Oracle Identity Management components.
ORACLE_HOME/opmn/bin/opmnctl stopall
3. Stop Application Server Control.
ORACLE_HOME/bin/emctl stop iasconsole
8.5.4 Using Application Server ControlYou can use Application Server Control to manage the Oracle Identity Management components on each node.
In the Application Server Control URL, you use the physical hostname. For example: http://im1.mydomain.com:1156 (assuming Application Server Control is running on port 1156).
8.5.5 Backing Up and Recovering Oracle Identity Management ComponentsYou back up files for the Oracle Identity Management components using the OracleAS Backup and Recovery Tool. This tool is described in the Oracle Application Server Administrator’s Guide.
8.6 All Oracle Identity Management Components in Active-Passive Configurations
In an active-passive (also called a cold failover cluster) configuration (see Figure 8–2), you have two nodes in a hardware cluster. You install the Oracle Identity Management components on the storage shared by these nodes.
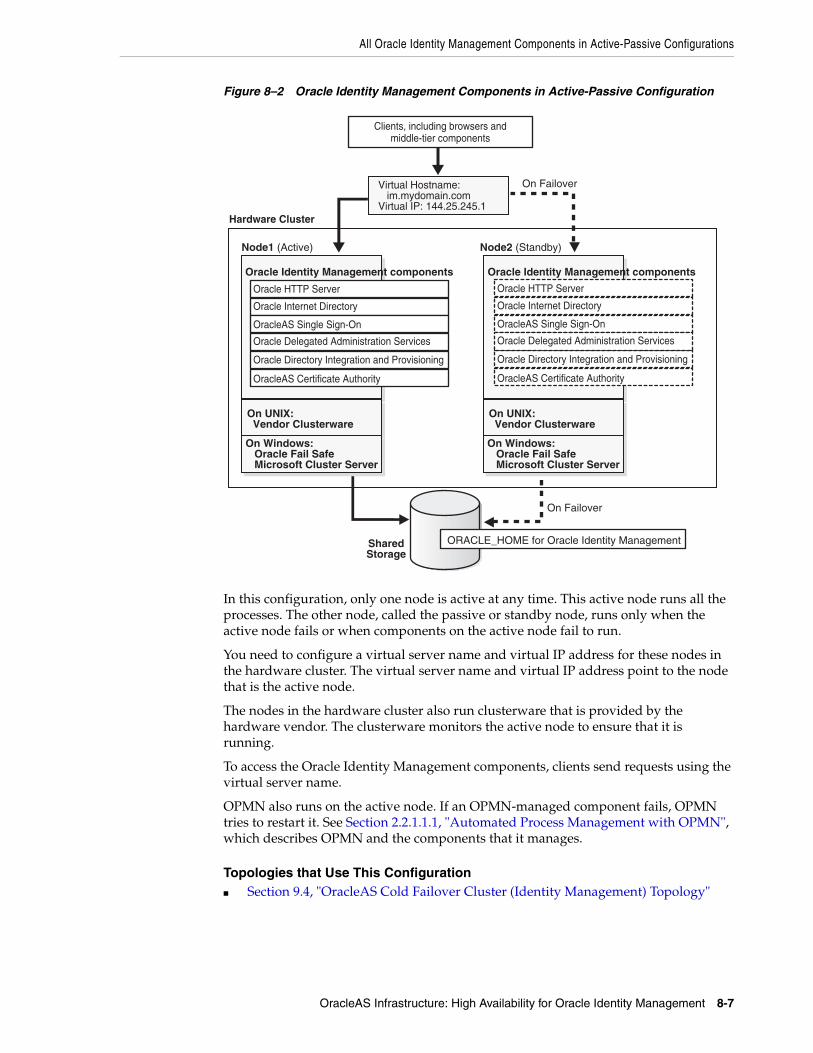
All Oracle Identity Management Components in Active-Passive Configurations
OracleAS Infrastructure: High Availability for Oracle Identity Management 8-7
Figure 8–2 Oracle Identity Management Components in Active-Passive Configuration
In this configuration, only one node is active at any time. This active node runs all the processes. The other node, called the passive or standby node, runs only when the active node fails or when components on the active node fail to run.
You need to configure a virtual server name and virtual IP address for these nodes in the hardware cluster. The virtual server name and virtual IP address point to the node that is the active node.
The nodes in the hardware cluster also run clusterware that is provided by the hardware vendor. The clusterware monitors the active node to ensure that it is running.
To access the Oracle Identity Management components, clients send requests using the virtual server name.
OPMN also runs on the active node. If an OPMN-managed component fails, OPMN tries to restart it. See Section 2.2.1.1.1, "Automated Process Management with OPMN", which describes OPMN and the components that it manages.
Topologies that Use This Configuration■ Section 9.4, "OracleAS Cold Failover Cluster (Identity Management) Topology"
Node1 (Active)
Clients, including browsers andmiddle-tier components
Oracle Directory Integration and Provisioning
Oracle Internet Directory
Oracle HTTP Server
OracleAS Single Sign-On
Oracle Delegated Administration Services
OracleAS Certificate Authority
Oracle Directory Integration and Provisioning
Oracle Internet Directory
Oracle HTTP Server
OracleAS Single Sign-On
Oracle Delegated Administration Services
OracleAS Certificate Authority
Oracle Identity Management components Oracle Identity Management components
Hardware Cluster
Node2 (Standby)
Virtual Hostname: im.mydomain.comVirtual IP: 144.25.245.1
On Failover
Shared Storage
On Failover
ORACLE_HOME for Oracle Identity Management
On UNIX: Vendor Clusterware
On Windows: Oracle Fail Safe Microsoft Cluster Server
On UNIX: Vendor Clusterware
On Windows: Oracle Fail Safe Microsoft Cluster Server
All Oracle Identity Management Components in Active-Passive Configurations
8-8 Oracle Application Server High Availability Guide
8.6.1 Handling Component and Node FailuresOPMN runs on the active node to provide process management, monitoring, and notification services for the OC4J_SECURITY instances, Oracle HTTP Server, and oidmon processes. (oidmon manages the Oracle Internet Directory processes.) If any of these processes fails, OPMN detects the failure and attempts to restart it. If the restart is unsuccessful, the clusterware detects the failure and fails over all the processes to the passive node.
For the Oracle Internet Directory component, OPMN monitors oidmon, which in turn monitors the oidldapd, oidrepld, and odisrv Oracle Internet Directory processes. If oidldapd, oidrepld, or odisrv fails, oidmon attempts to restart it locally. Similarly, if oidmon fails, OPMN tries to restart it locally.
Only one odisrv process and one oidrepld process can be active at any time in an OracleAS Cluster (Identity Management) while multiple oidldapd processes can run in the same cluster. Refer to Oracle Internet Directory Administrator’s Guide for more details.
If a node fails, the clusterware detects the failure and fails over all the processes to the passive node.
8.6.2 Manual Steps for Failover on Solaris SystemsPerform the following steps to fail over from the active node to the standby node for Solaris systems with a Veritas Volume Manager.
Steps to Perform on the Failed Node1. If necessary, stop or kill all Oracle Application Server processes on this node.
2. Ensure that the file system is not busy. If it is busy, check which processes are using the file system and stop them if required.
3. Unmount the file system using the following command:
# umount <mount_point>
4. As root, deport the disk group. For example, if you are using Sun Cluster with Veritas Volume Manager, deport the disk group using the following commands:
# vxdg deport <disk_group_name>
5. If the failed node is usable, execute this command to release the virtual IP address:
# ifconfig <interface_name> removeif <virtual_IP>
Steps to Perform on the New Active Node1. As root, execute the following command to assign the virtual IP to this node:
# ifconfig <interface_name> addif <virtual_IP> up
Note: While the hardware cluster framework can start, monitor, or fail over OracleAS Infrastructure processes, these actions are not automatic. You have to do them manually, create scripts to automate them, or use scripts provided by the cluster vendor for OracleAS Cold Failover Cluster.

All Oracle Identity Management Components in Active-Passive Configurations
OracleAS Infrastructure: High Availability for Oracle Identity Management 8-9
2. As root, import the disk group. For example, if you are using Sun Cluster with Veritas Volume Manager, use the following commands:
# vxdg import <disk_group_name># vxvol -g <disk_group_name> startall
3. As root, mount the file system using the following command:
# mount /dev/vx/dsk/<disk_group_name>/<volume_name> <mount_point>
4. Start all Oracle Application Server processes on this new active node. See Section 8.6.5, "Starting Oracle Identity Management Components".
8.6.3 Manual Steps for Failover on Windows SystemsFigure 8–3, Figure 8–4, and Figure 8–5 show the Oracle Fail Safe Manager screens for a failover operation from the active node to the standby node on Windows.
Figure 8–3 Screen 1 Performing Failover for Oracle Identity Management in an Active-Passive Configuration

All Oracle Identity Management Components in Active-Passive Configurations
8-10 Oracle Application Server High Availability Guide
Figure 8–4 Screen 2 Performing Failover for Oracle Identity Management in an Active-Passive Configuration
Figure 8–5 Screen 3 Performing Failover for Oracle Identity Management in an Active-Passive Configuration
8.6.4 Manual Steps for Failover on Linux SystemsPerform the following steps to fail over from the active node to the standby node on Linux systems.

All Oracle Identity Management Components in Active-Passive Configurations
OracleAS Infrastructure: High Availability for Oracle Identity Management 8-11
Steps to Perform on the Failed Node1. Make sure all the Oracle Identity Management processes are stopped on the failed
node.
2. Login as root.
3. Unmount the file system using the following command:
# umount <mount_point>
If the file system is busy, check which processes are using the file system with the following command:
# fuser -muv <Shared Storage Partition>
Stop the processes, if required, using the following command:
# fuser -k <Shared Storage Partition>
4. If the failed node is usable, execute the following command to release the virtual IP address:
# ifconfig <interface_name> down
For example,
# ifconfig eth1:1 down
Steps to Perform on the New Active Node1. Login as root.
2. Execute the following command to assign the virtual IP address to this node (the new active node):
# ifconfig <interface_name> netmask <subnet_mask> up
For example,
# ifconfig 144.88.27.125 netmask 255.255.252.0 up
3. Verify that the virtual IP is up and working using telnet from a different host (subnet/domain).
4. Mount the file system using the following command:
# mount <Shared Storage Partition> <mount_point>
For example:
# mount /dev/sdc1 /oracle
5. Start Oracle Application Server processes on this new active node. See Section 8.6.5, "Starting Oracle Identity Management Components".
8.6.5 Starting Oracle Identity Management ComponentsYou start the Oracle Identity Management components in the following order:
1. Make sure the OracleAS Metadata Repository database is running.
2. On the active node:

Oracle Internet Directory and Oracle Directory Integration and Provisioning in Active-Active Configurations
8-12 Oracle Application Server High Availability Guide
a. Set the ORACLE_HOME environment variable to the Oracle Identity Management’s Oracle home.
b. Run OPMN to start up the Oracle Identity Management components.
ORACLE_HOME/opmn/bin/opmnctl startall
c. Start up Application Server Control.
ORACLE_HOME/bin/emctl start iasconsole
8.6.6 Stopping Oracle Identity Management ComponentsTo stop the processes, run the following steps on the active node:
1. Set the ORACLE_HOME environment variable to the Oracle Identity Management’s Oracle home.
2. Run OPMN to stop the Oracle Identity Management components.
ORACLE_HOME/opmn/bin/opmnctl stopall
3. Stop Application Server Control.
ORACLE_HOME/bin/emctl stop iasconsole
8.6.7 Using Application Server ControlYou can use Application Server Control to manage the Oracle Identity Management components on the active node.
In the Application Server Control URL, you use the physical hostname of the active node. For example: http://im1.mydomain.com:1156 (assuming Application Server Control is running on port 1156).
8.6.8 Backing Up and Recovering Oracle Identity Management ComponentsYou back up files for the Oracle Identity Management components using the OracleAS Backup and Recovery Tool. This tool is described in the Oracle Application Server Administrator’s Guide.
8.7 Oracle Internet Directory and Oracle Directory Integration and Provisioning in Active-Active Configurations
In this configuration, you install Oracle Internet Directory and Oracle Directory Integration and Provisioning components on the local storage of each node. You also need a load balancer in front of these nodes, and you need to configure virtual hostnames for HTTP, HTTPS, LDAP, and LDAPS traffic on the load balancer.

Oracle Internet Directory and Oracle Directory Integration and Provisioning in Active-Active Configurations
OracleAS Infrastructure: High Availability for Oracle Identity Management 8-13
Figure 8–6 Oracle Internet Directory and Oracle Directory Integration and Provisioning in an Active-Active Configuration
To access Oracle Internet Directory, clients send requests to the load balancer, using the load balancer’s LDAP virtual hostname.
OPMN also runs on each node. If Oracle Internet Directory or Oracle Directory Integration and Provisioning fails, OPMN tries to restart it. See Section 2.2.1.1.1, "Automated Process Management with OPMN", which describes OPMN and the components that it manages.
Topologies that Use This Configuration■ Distributed OracleAS Cluster (Identity Management) Topology
8.7.1 Handling Component and Node FailuresOPMN runs on each node to provide process management, monitoring, and notification services for the oidmon process.
For the Oracle Internet Directory component, OPMN monitors oidmon, which in turn monitors the oidldapd, oidrepld, and odisrv Oracle Internet Directory processes. If oidldapd, oidrepld, or odisrv fails, oidmon attempts to restart it locally. Similarly, if oidmon fails, OPMN tries to restart it locally.
Only one odisrv process and one oidrepld process can be active at any time in an OracleAS Cluster (Identity Management) while multiple oidldapd processes can run in the same cluster. See the Oracle Internet Directory Administrator’s Guide for details.
If OPMN fails to restart oidmon, or if oidmon fails to restart the Oracle Internet Directory processes, the load balancer detects the failure (usually through a non-response timeout) and directs requests to an active process running on a different node.
If a node fails, the load balancer detects the failure and redirects requests to an active node. Because each node provides identical services as the others, all requests can be fulfilled by the remaining nodes.
8.7.2 Synchronizing Metadata in an OracleAS Cluster (Identity Management)In an OracleAS Cluster (Identity Management), it is necessary to synchronize Oracle Internet Directory metadata—for example, definitions of object classes, attributes,
Node1 (Active) Node2 (Active)
Clients, including browsers andmiddle-tier components
Oracle Directory Integration and Provisioning
Oracle Internet Directory
Oracle HTTP Server
Load BalancerVirtual Server Name for LDAP(S): oid.mydomain.com
Oracle Identity Management components
Oracle Directory Integration and Provisioning
Oracle Internet Directory
Oracle HTTP Server
Oracle Identity Management components

Oracle Internet Directory and Oracle Directory Integration and Provisioning in Active-Active Configurations
8-14 Oracle Application Server High Availability Guide
matching rules, ACPs, and password policies—on all the directory server nodes. Figure 8–7 and the accompanying text exemplify the process in which directory server metadata is synchronized between two directory server nodes, Host A and Host B, in an OracleAS Cluster (Identity Management) environment.
Figure 8–7 Metadata Synchronization Process in an OracleAS Cluster (Identity Management) Environment
In the example in Figure 8–7, directory server metadata in an OracleAS Cluster (Identity Management) environment is synchronized as follows:
1. On Host A, the directory server writes metadata changes to the shared memory on that same host.
2. OID Monitor on Host A polls the shared memory on that same host. When it discovers a change in the metadata, it retrieves the change.
3. OID Monitor sends the change to the Oracle Database, which is the repository for the directory server metadata in the OracleAS Cluster (Identity Management) environment.
4. OID Monitor on Host B polls the Oracle Database for changes in directory server metadata, and retrieves those changes.
5. OID Monitor on Host B sends the change to the shared memory on that same host.
6. The directory server on Host B polls the shared memory on that same host for metadata changes. It then retrieves and applies those changes.
8.7.3 OID Monitor in an OracleAS Cluster (Identity Management) EnvironmentIn an OracleAS Cluster (Identity Management) environment, the OID Monitor on each node reports to the other nodes that it is running by sending a message to the Oracle Database every 10 seconds. When it does this, it also polls the database server to verify that all other directory server nodes are also running. After 250 seconds, if an OID Monitor on one of the nodes has not reported that it is running, then the other directory server nodes regard it as having failed. At this point, the following occurs on one of the other nodes that are still running:
1. The OID Monitor on that node brings up the processes that were running on the failed node.
Shared Memory
Host A
OracleDatabase
Server
Oracle InternetDirectoryMonitor
3
4
1 2
Shared Memory
OracleDirectoryServer
Host B
6 5
OracleDirectoryServer
Oracle InternetDirectoryMonitor
OracleDirectoryServer

Oracle Internet Directory and Oracle Directory Integration and Provisioning in Active-Active Configurations
OracleAS Infrastructure: High Availability for Oracle Identity Management 8-15
2. The directory server on that node continues processing the operations that were previously underway on the failed node.
3. The OID Monitor on that node logs that it has brought up the processes that were previously running on the failed node.
Figure 8–8 and the accompanying text exemplify this process on two hypothetical nodes, Node A and Node B.
Figure 8–8 Example of Failover in an OracleAS Cluster (Identity Management) Environment
As the example in Figure 8–8 shows, the failover process in an OracleAS Cluster (Identity Management) environment follows this process:
1. Every 10 seconds, the OID Monitor on Node A reports that it is running by sending a message to the database.
2. The OID Monitor on Node B polls the database to learn which, if any, of the other nodes may have failed.
3. When OID Monitor on Node B learns that Node A has not responded for 250 seconds, it regards Node A as having failed. It then retrieves from the database the necessary information about the Oracle Internet Directory servers that were running on Node A. In this example, it learns that the directory replication server had been running on Node A.
4. Because a directory replication server was not already running on Node B, the OID Monitor on Node B starts a directory replication server that corresponds to the directory replication server previously running on Node A.
Node BNode A
OracleDatabase
Server
Oracle InternetDirectoryMonitor
1
4
32
OracleDirectoryServer
Oracle InternetDirectoryMonitor
OracleDirectoryServer
Oracle DirectoryReplication
Server
Oracle DirectoryReplication
Server

Oracle Internet Directory and Oracle Directory Integration and Provisioning in Active-Active Configurations
8-16 Oracle Application Server High Availability Guide
8.7.4 Managing an OracleAS Cluster (Identity Management) EnvironmentFollow the following rules when managing an OracleAS Cluster (Identity Management) environment:
■ The port numbers (non-SSL port and SSL port) used by the directory servers must be the same on all the nodes and on the external load balancer for Oracle Internet Directory.
■ Synchronize the time value on all nodes using Greenwich mean time so that there is a discrepancy of no more than 250 seconds between them.
■ If you change the password to the Oracle Application Server 10g-designated database, then you must update each of the other nodes in the OracleAS Cluster (Identity Management) environment. You change the ODS database user account password using the oidpasswd utility.
To change the ODS database user password, invoke the following command on one of the Oracle Internet Directory nodes:
oidpasswd connect=db-conn-str change_oiddb_pwd=true
On all other Oracle Internet Directory nodes, invoke the following command to synchronize the password wallet:
oidpasswd connect=db-conn-str create_wallet=true
Note: If Node A, running the directory replication server (oidrepld) and/or the Oracle Directory Integration and Provisioning (odisrv), fails, then the OID Monitor on Node B starts these processes on Node B after five minutes. When Node A is restarted, OIDMON on Node A starts the servers automatically and requests the OIDMON on Node B to stop the servers that were started for Node A.
If OIDMON detects a time discrepancy of more than 250 seconds between the two nodes, OIDMON on the node that is behind stops all servers. OIDMON on the node that is ahead automatically starts the servers. To correct this problem, synchronize the time and restart the servers on the node that was behind.
See Also:
"Oracle Internet DirectoryArchitecture" in the chapter "Directory Concepts and Architecture" in Oracle Internet Directory Administrator’s Guide for information about directory server nodes, directory server instances, and the kinds of directory metadata stored in the database
"Process Control" in the chapter "Directory Administration Tools" in the Oracle Internet Directory Administrator’s Guide.
Note: Normal shutdown is not treated as a failover, that is, after a normal shutdown of Node A, the OID Monitor on Node B does not start these processes on Node B after five minutes.

Oracle Internet Directory and Oracle Directory Integration and Provisioning in Active-Active Configurations
OracleAS Infrastructure: High Availability for Oracle Identity Management 8-17
8.7.5 Starting Oracle Internet Directory / Oracle Directory Integration and ProvisioningYou start Oracle Internet Directory and Oracle Directory Integration and Provisioning in the following order:
1. Make sure the OracleAS Metadata Repository database is running.
2. On each node:
a. Set the ORACLE_HOME environment variable to the directory where you installed Oracle Internet Directory.
b. Run OPMN to start up Oracle Internet Directory and Oracle Directory Integration and Provisioning.
ORACLE_HOME/opmn/bin/opmnctl startall
c. Start up Application Server Control.
ORACLE_HOME/bin/emctl start iasconsole
8.7.6 Stopping Oracle Internet Directory / Oracle Directory Integration and ProvisioningTo stop Oracle Internet Directory and Oracle Directory Integration and Provisioning, run the following steps on each node:
1. Set the ORACLE_HOME environment variable to the directory where you installed Oracle Internet Directory.
2. Run OPMN to stop Oracle Internet Directory and Oracle Directory Integration and Provisioning.
ORACLE_HOME/opmn/bin/opmnctl stopall
3. Stop Application Server Control.
ORACLE_HOME/bin/emctl stop iasconsole
8.7.7 Using Application Server ControlYou can use Application Server Control to manage Oracle Internet Directory and Oracle Directory Integration and Provisioning on each node.
In the Application Server Control URL, you use the physical hostname. For example: http://im1.mydomain.com:1156 (assuming Application Server Control is running on port 1156).
See Also:
■ "oidpasswd" in Oracle Identity Management User Reference Guide for instructions on how to change the password to the Oracle Application Server 10g-designated database
■ "Starting and Stopping Oracle Internet Directory, Replication, and Oracle Directory Integration and Provisioning Servers on a Virtual Host or Cluster Node" in Oracle Identity Management User Reference Guide

Oracle Internet Directory and Oracle Directory Integration and Provisioning in Active-Passive Configurations
8-18 Oracle Application Server High Availability Guide
8.7.8 Backing Up and Recovering Oracle Internet Directory / Oracle Directory Integration and Provisioning
You back up files for Oracle Internet Directory and Oracle Directory Integration and Provisioning using the OracleAS Backup and Recovery Tool. This tool is described in the Oracle Application Server Administrator’s Guide.
8.8 Oracle Internet Directory and Oracle Directory Integration and Provisioning in Active-Passive Configurations
In an active-passive (also called a cold failover cluster) configuration (see Figure 8–9), you have two nodes in a hardware cluster. You install Oracle Internet Directory and Oracle Directory Integration and Provisioning on the storage shared by these nodes.
Figure 8–9 Oracle Internet Directory and Oracle Directory Integration and Provisioning in an Active-Passive Configuration
In this configuration, only one node is active at any time. This active node runs all the processes. The other node, called the passive or standby node, runs only when the active node fails or when components on the active node fail to run.
You need to configure a virtual server name and virtual IP address for these nodes in the hardware cluster. The virtual server name and virtual IP address point to the node that is the active node.
Node1 (Active)
Clients, including browsers andmiddle-tier components
Oracle Identity Management components Oracle Identity Management components
Hardware Cluster
Node2 (Standby)
Virtual Hostname: oid.mydomain.comVirtual IP: 144.25.245.1
On Failover
Shared Storage
On Failover
ORACLE_HOME for Oracle Identity Management
Oracle Directory Integration and Provisioning
Oracle Internet Directory
Oracle HTTP Server
Oracle Directory Integration and Provisioning
Oracle Internet Directory
Oracle HTTP Server
On UNIX: Vendor Clusterware
On Windows: Oracle Fail Safe Microsoft Cluster Server
On UNIX: Vendor Clusterware
On Windows: Oracle Fail Safe Microsoft Cluster Server

Oracle Internet Directory and Oracle Directory Integration and Provisioning in Active-Passive Configurations
OracleAS Infrastructure: High Availability for Oracle Identity Management 8-19
The nodes in the hardware cluster also run clusterware that is provided by the hardware vendor. The clusterware monitors the active node to ensure that it is running.
To access Oracle Internet Directory or Oracle Directory Integration and Provisioning, clients send requests using the virtual server name.
OPMN also runs on the active node. If Oracle Internet Directory or Oracle Directory Integration and Provisioning fails, OPMN tries to restart it. See Section 2.2.1.1.1, "Automated Process Management with OPMN", which describes OPMN and the components that it manages.
Topologies that Use This Configuration■ Section 9.5, "Distributed OracleAS Cold Failover Cluster (Identity Management)
Topology"
8.8.1 Handling Component and Node FailuresOPMN runs on the active node to provide process management, monitoring, and notification services for the oidmon process.
For the Oracle Internet Directory component, OPMN monitors oidmon, which in turn monitors the oidldapd, oidrepld, and odisrv Oracle Internet Directory processes. If oidldapd, oidrepld, or odisrv fails, oidmon attempts to restart it locally. Similarly, if oidmon fails, OPMN tries to restart it locally.
Only one odisrv process and one oidrepld process can be active at any time in an OracleAS Cluster (Identity Management) while multiple oidldapd processes can run in the same cluster. Refer to Oracle Internet Directory Administrator’s Guide for more details.
If OPMN or oidmon fails to restart the processes they are monitoring, the clusterware detects the failure and fails over all the processes to the passive node.
If a node fails, the clusterware detects the failure and fails over all the processes to the passive node.
8.8.2 Manual Steps for Failover on Solaris SystemsPerform the following steps to fail over from the active node to the standby node for Solaris systems with a Veritas Volume Manager.
On the failed node:
1. If necessary, stop or kill all Oracle Internet Directory processes on this node.
2. Ensure that the file system is not busy. If it is busy, check which processes are using the file system and stop them if required.
3. Unmount the file system using the following command:
# umount <mount_point>
4. As root, deport the disk group. For example, if you are using Sun Cluster with Veritas Volume Manager, deport the disk group using the following commands:
Note: While the hardware cluster framework can start, monitor, or fail over the processes, these actions are not automatic. You have to do them manually, create scripts to automate them, or use scripts provided by the cluster vendor for OracleAS Cold Failover Cluster.

Oracle Internet Directory and Oracle Directory Integration and Provisioning in Active-Passive Configurations
8-20 Oracle Application Server High Availability Guide
# vxdg deport <disk_group_name>
5. If the failed node is usable, execute this command to release the virtual IP address:
# ifconfig <interface_name> removeif <virtual_IP>
On the new active node:
1. As root, execute the following command to assign the virtual IP to this node:
# ifconfig <interface_name> addif <virtual_IP> up
2. As root, import the disk group. For example, if you are using Sun Cluster with Veritas Volume Manager, use the following commands:
# vxdg import <disk_group_name># vxvol -g <disk_group_name> startall
3. As root, mount the file system using the following command:
# mount /dev/vx/dsk/<disk_group_name>/<volume_name> <mount_point>
4. Start Oracle Internet Directory processes on this new active node. See Section 8.8.6, "Starting Oracle Internet Directory / Oracle Directory Integration and Provisioning".
8.8.3 Manual Steps for Failover on Windows SystemsOn Windows, you use Oracle Fail Safe to perform the failover. See Section 8.6.3, "Manual Steps for Failover on Windows Systems" for details.
8.8.4 Manual Steps for Failover on Linux SystemsPerform the following steps to fail over from the active node to the standby node on Linux systems.
On the failed node:
1. Make sure all Oracle Internet Directory processes are stopped on the failed node.
2. Login as root.
3. Unmount the file system using the following command:
# umount <mount_point>
If the file system is busy, check which processes are using the file system with the following command:
# fuser -muv <Shared Storage Partition>
Stop the processes, if required, using the following command:
# fuser -k <Shared Storage Partition>
4. If the failed node is usable, execute the following command to release the virtual IP address:
# ifconfig <interface_name> down
For example,
# ifconfig eth1:1 down

Oracle Internet Directory and Oracle Directory Integration and Provisioning in Active-Passive Configurations
OracleAS Infrastructure: High Availability for Oracle Identity Management 8-21
On the new active node:
1. Login as root.
2. Execute the following command to assign the virtual IP address to this node (the new active node):
# ifconfig <interface_name> netmask <subnet_mask> up
For example,
# ifconfig 144.88.27.125 netmask 255.255.252.0 up
3. Verify that the virtual IP is up and working using telnet from a different host (subnet/domain).
4. Mount the file system using the following command:
# mount <Shared Storage Partition> <mount_point>
For example:
# mount /dev/sdc1 /oracle
5. Start Oracle Internet Directory processes on this new active node. See Section 8.8.6, "Starting Oracle Internet Directory / Oracle Directory Integration and Provisioning".
8.8.5 Using Oracle Internet Directory Replication with OracleAS Cold Failover Cluster (Identity Management)
To provide additional availability and scalability, you can use the cold failover technique in conjunction with Oracle Internet Directory Replication. Figure 8–10 illustrates this configuration.
Figure 8–10 Directory Replication in Conjunction with Cold Failover Configuration
As Figure 8–10 shows, on a two node cluster:
OracleDirectoryServerInstance
Oracle Internet Directory Node 1Physical Host A: Virtual Host VHA
OracleDirectoryReplicationServerInstance
OracleDirectoryReplicationServerInstance
Oracle Internet Directory Node 2Physical Host B: Virtual Host VHA
OracleDirectoryServerInstance
Shared Storage
ORACLE_HOME1Oracle Internet
DirectoryNode 1 Database
ORACLE_HOME2Oracle Internet
DirectoryNode 2 Database
LAN Redirector
LDAP Clients
. . .LDAP Clients
. . .LDAP Clients
. . .

Oracle Internet Directory and Oracle Directory Integration and Provisioning in Active-Passive Configurations
8-22 Oracle Application Server High Availability Guide
■ Virtual Host VHA is hosted by Physical Host A.
■ Virtual Host VHB is hosted by Physical Host B.
■ Oracle Internet Directory Node 1 is installed and configured on Virtual host VHA.
■ Oracle Internet Directory Node 2 is installed and configured on Virtual Host VHB.
■ Both Oracle Internet Directory nodes are configured for multimaster replication.
■ LDAP applications can do either of the following:
■ Communicate directly with either Oracle Internet Directory node by using the respective virtual host names for the LDAP host
■ Load-balance by means of a LAN re-director or another third-party solution that connects to the two hosts on which the Oracle Internet Directory nodes are configured
Using cold failover in this way represents an improvement over the simple cold failover configuration. There are two Oracle Internet Directory nodes and the two are in multimaster replication. Oracle Internet Directory is active on both cluster nodes and hence presents an active-active configuration. In contrast to the cold failover-only configuration, which is an active-passive configuration, the Oracle Internet Directory services are actively available on both cluster nodes at any given point in time.
Figure 8–11 shows the cold failover process in conjunction with Oracle directory replication.
See Also: "An Oracle Internet Directory Node" in the "Directory Concepts and Architecture" chapter in Oracle Internet Directory Administrator’s Guide

Oracle Internet Directory and Oracle Directory Integration and Provisioning in Active-Passive Configurations
OracleAS Infrastructure: High Availability for Oracle Identity Management 8-23
Figure 8–11 OracleAS Cold Failover Cluster (Identity Management) in Conjunction with Oracle Directory Replication
As Figure 8–11 shows, when Physical Host A fails or is unavailable because of maintenance downtime, the cluster software fails over virtual host VHA to Physical Host B. The Oracle Internet Directory processes that were previously running on Physical Host A are then restarted on Virtual Host VHA, and replication is resumed.
LDAP applications communicating directly with Oracle Internet Directory Node 1 by using host name VHA experience a momentary service outage. After the failover is complete, these applications must reconnect by using the same host name, namely, VHA. The momentary LDAP outage can be avoided completely if the two Oracle Internet Directory nodes are front-ended by a LAN redirector for load balancing.
8.8.6 Starting Oracle Internet Directory / Oracle Directory Integration and ProvisioningYou start Oracle Internet Directory and Oracle Directory Integration and Provisioning in the following order:
1. Make sure the OracleAS Metadata Repository database is running.
2. On the active node:
a. Set the ORACLE_HOME environment variable to the directory where you installed Oracle Internet Directory.
b. Run OPMN to start Oracle Internet Directory and Oracle Directory Integration and Provisioning.
ORACLE_HOME/opmn/bin/opmnctl startall
c. Start up Application Server Control.
Oracle Internet Directory Node 1Physical Host AVirtual Host VHA
Oracle Internet Directory Node 1Virtual Host VHA
Shared Storage
ORACLE_HOME1Oracle Internet
DirectoryNode 1 Database
ORACLE_HOME2Oracle Internet
DirectoryNode 2 Database
LDAP Clients
. . .LDAP Clients
. . .LDAP Clients
. . .
Oracle Internet Directory Node 2Virtual Host VHA
Physical Host BVirtual Host VHB
LAN Redirector
OracleDirectoryReplication
ServerInstance
OracleDirectoryServer
Instance
OracleDirectoryReplication
ServerInstance
OracleDirectoryServer
Instance

OracleAS Single Sign-On and Oracle Delegated Administration Services in Active-Active Configurations
8-24 Oracle Application Server High Availability Guide
ORACLE_HOME/bin/emctl start iasconsole
8.8.7 Stopping Oracle Internet Directory / Oracle Directory Integration and ProvisioningTo stop the processes, run the following steps on the active node:
1. Set the ORACLE_HOME environment variable to the directory where you installed Oracle Internet Directory.
2. Run OPMN to stop Oracle Internet Directory and Oracle Directory Integration and Provisioning.
ORACLE_HOME/opmn/bin/opmnctl stopall
3. Stop Application Server Control.
ORACLE_HOME/bin/emctl stop iasconsole
8.8.8 Using Application Server ControlYou can use Application Server Control to manage Oracle Internet Directory and Oracle Directory Integration and Provisioning components on the active node.
In the Application Server Control URL, you use the physical hostname of the active node. For example: http://im1.mydomain.com:1156 (assuming Application Server Control is running on port 1156).
8.8.9 Backing Up and Recovering Oracle Identity Management ComponentsYou back up files for the Oracle Identity Management components using the OracleAS Backup and Recovery Tool. This tool is described in the Oracle Application Server Administrator’s Guide.
8.9 OracleAS Single Sign-On and Oracle Delegated Administration Services in Active-Active Configurations
In this configuration, you run OracleAS Single Sign-On and Oracle Delegated Administration Services on two or more nodes in an OracleAS Cluster configuration. All the nodes in the OracleAS Cluster are active ("active-active" instead of "active-passive"), and these nodes are front-ended by a hardware load balancer to enable load balancing and failover between the nodes.
You install the Oracle home directory on the local storage of each node. These nodes do not need to be in a hardware cluster.
You also need to configure virtual hostnames for HTTP, HTTPS, LDAP, and LDAPS traffic on the load balancer.
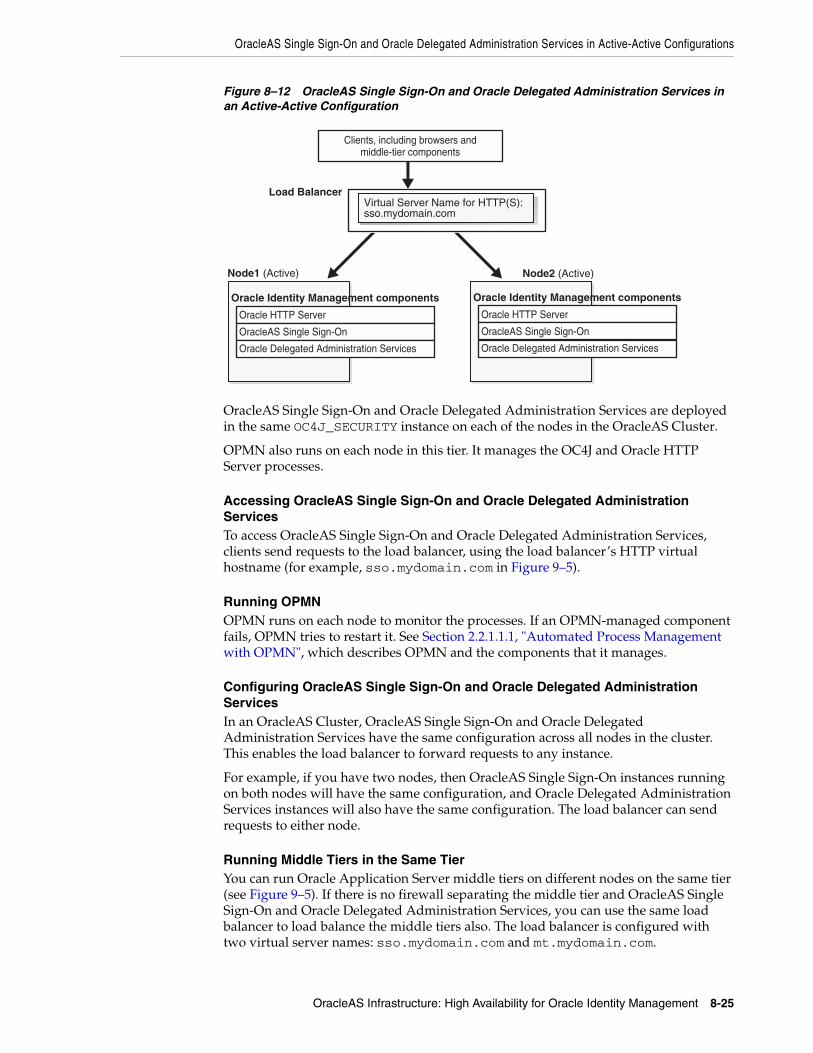
OracleAS Single Sign-On and Oracle Delegated Administration Services in Active-Active Configurations
OracleAS Infrastructure: High Availability for Oracle Identity Management 8-25
Figure 8–12 OracleAS Single Sign-On and Oracle Delegated Administration Services in an Active-Active Configuration
OracleAS Single Sign-On and Oracle Delegated Administration Services are deployed in the same OC4J_SECURITY instance on each of the nodes in the OracleAS Cluster.
OPMN also runs on each node in this tier. It manages the OC4J and Oracle HTTP Server processes.
Accessing OracleAS Single Sign-On and Oracle Delegated Administration ServicesTo access OracleAS Single Sign-On and Oracle Delegated Administration Services, clients send requests to the load balancer, using the load balancer’s HTTP virtual hostname (for example, sso.mydomain.com in Figure 9–5).
Running OPMNOPMN runs on each node to monitor the processes. If an OPMN-managed component fails, OPMN tries to restart it. See Section 2.2.1.1.1, "Automated Process Management with OPMN", which describes OPMN and the components that it manages.
Configuring OracleAS Single Sign-On and Oracle Delegated Administration ServicesIn an OracleAS Cluster, OracleAS Single Sign-On and Oracle Delegated Administration Services have the same configuration across all nodes in the cluster. This enables the load balancer to forward requests to any instance.
For example, if you have two nodes, then OracleAS Single Sign-On instances running on both nodes will have the same configuration, and Oracle Delegated Administration Services instances will also have the same configuration. The load balancer can send requests to either node.
Running Middle Tiers in the Same TierYou can run Oracle Application Server middle tiers on different nodes on the same tier (see Figure 9–5). If there is no firewall separating the middle tier and OracleAS Single Sign-On and Oracle Delegated Administration Services, you can use the same load balancer to load balance the middle tiers also. The load balancer is configured with two virtual server names: sso.mydomain.com and mt.mydomain.com.
Node1 (Active) Node2 (Active)
Clients, including browsers andmiddle-tier components
Oracle HTTP Server
OracleAS Single Sign-On
Oracle Delegated Administration Services
Load BalancerVirtual Server Name for HTTP(S):sso.mydomain.com
Oracle Identity Management components
Oracle HTTP Server
OracleAS Single Sign-On
Oracle Delegated Administration Services
Oracle Identity Management components

OracleAS Single Sign-On and Oracle Delegated Administration Services in Active-Active Configurations
8-26 Oracle Application Server High Availability Guide
Topologies that Use This Configuration■ Section 9.3, "Distributed OracleAS Cold Failover Cluster (Infrastructure)
Topology"
■ Section 9.7, "Distributed OracleAS Cluster (Identity Management) Topology"
■ Section 9.5, "Distributed OracleAS Cold Failover Cluster (Identity Management) Topology"
8.9.1 Changing Configuration for Components in an OracleAS ClusterThe OracleAS Single Sign-On and Oracle Delegated Administration Services instances need to contain common configuration files. If you need to change the configuration for one instance, you also need to update the configuration in other instances in the OracleAS Cluster.
To ensure that configuration files stay the same across the OracleAS Cluster:
■ Use the following command to save configuration changes related to OPMN, Oracle HTTP Server, or OC4J_SECURITY on one OracleAS Cluster node:
ORACLE_HOME/dcm/bin/dcmctl updateConfig
The "dcmctl updateConfig" command propagates configuration changes across the OracleAS Cluster nodes.
■ Configuration changes to Oracle Internet Directory are not automatically managed across the OracleAS Cluster. If you make changes to configuration files, primarily the wallet files, you need to make the same changes manually to all nodes in the OracleAS Cluster.
8.9.2 Failover for OracleAS Cluster (Identity Management)In an OracleAS Cluster (Identity Management) for OracleAS Single Sign-On and Oracle Delegated Administration Services, if a node within the cluster fails, the cluster has other nodes which can take over for the failed node, just like with other OracleAS Cluster (Identity Management). This failover requires a load balancer to detect failures and re-route the requests to the remaining nodes that are running.
OPMN manages Oracle Application Server processes and restarts crashed processes, when possible.
On Windows systems, if one of the cluster nodes goes down, Oracle Fail Safe detects the failure and initiates a failover of the managed Oracle services immediately.
If OC4J_SECURITY is down on a node, the active Oracle HTTP Servers direct traffic to a surviving OC4J_SECURITY instance (this is by virtue of the fact that they are clustered). If Oracle HTTP Server is down on a node, then the surviving Oracle HTTP Server on the other node services the request. When the Oracle HTTP Server services the request, Oracle Internet Directory monitor polls the Oracle Database server to verify that all other Oracle Internet Directory nodes are running. If, after five minutes an Oracle Internet Directory monitor on one of the nodes has not reported, then the other Oracle Internet Directory nodes regard it as having failed. At this point, the following occurs on one of the other nodes that are still running:
1. The Oracle Internet Directory monitor on that node brings up the processes that were running on the failed node.
2. The Oracle Internet Directory on that node continues processing the operations that were previously underway on the failed node.
OracleAS Single Sign-On and Oracle Delegated Administration Services in Active-Active Configurations
OracleAS Infrastructure: High Availability for Oracle Identity Management 8-27
3. The Oracle Internet Directory monitor on that node logs that it has brought up the processes that were previously running on the failed node.
8.9.3 Handling Component and Node FailuresOPMN runs on each node in the OracleAS Cluster to provide process management, monitoring, and notification services for the OC4J_SECURITY instances and Oracle HTTP Server processes. If any of these processes fails, OPMN detects the failure and attempts to restart it. If the restart is unsuccessful, the load balancer detects the failure (usually through a non-response timeout) and directs requests to an active process running on a different node.
If a node fails, the load balancer detects the failure and redirects requests to an active node in the OracleAS Cluster. Because each node provides identical services as the others, all requests can be fulfilled by the remaining nodes.
8.9.4 Starting OracleAS Single Sign-On / Oracle Delegated Administration ServicesYou start up OracleAS Single Sign-On and Oracle Delegated Administration Services in the following order:
1. Make sure the OracleAS Metadata Repository database is running.
2. Make sure Oracle Internet Directory is running.
3. On each node:
a. Set the ORACLE_HOME environment variable to the OracleAS Single Sign-On / Oracle Delegated Administration Services Oracle home.
b. Run OPMN to start up the components.
ORACLE_HOME/opmn/bin/opmnctl startall
c. Start up Application Server Control.
ORACLE_HOME/bin/emctl start iasconsole
8.9.5 Stopping OracleAS Single Sign-On / Oracle Delegated Administration ServicesTo stop OracleAS Single Sign-On and Oracle Delegated Administration Services, run the following steps on each node:
Note 1: When a node goes down or the processes on a node are brought down due to planned maintenance operations, the load balancer should be reconfigured to not send traffic to this node.
Note 2: If the primary node running either the directory replication server (oidrepld), or the Oracle Directory Integration and Provisioning server (odisrv), or both, fails, then the Oracle Internet Directory monitor on the secondary node starts these processes on the secondary node after five minutes.
Normal shutdown is not treated as a failover - that is, after a normal shutdown, the Oracle Internet Directory monitor on the secondary node does not start these processes on the secondary node after five minutes.

OracleAS Single Sign-On and Oracle Delegated Administration Services in Active-Passive Configurations
8-28 Oracle Application Server High Availability Guide
1. Set the ORACLE_HOME environment variable to the OracleAS Single Sign-On/Oracle Delegated Administration Services Oracle home.
2. Run OPMN to stop the components.
ORACLE_HOME/opmn/bin/opmnctl stopall
3. Stop Application Server Control.
ORACLE_HOME/bin/emctl stop iasconsole
8.9.6 Using Application Server ControlYou can use Application Server Control to manage the OracleAS Single Sign-On and Oracle Delegated Administration Services components on each node.
In the Application Server Control URL, you use the physical hostname. For example: http://im1.mydomain.com:1156 (assuming Application Server Control is running on port 1156).
8.9.7 Backing Up and Recovering OracleAS Single Sign-On / Oracle Delegated Administration Services Components
You back up files for the OracleAS Single Sign-On and Oracle Delegated Administration Services components using the OracleAS Backup and Recovery Tool. This tool is described in the Oracle Application Server Administrator’s Guide.
8.10 OracleAS Single Sign-On and Oracle Delegated Administration Services in Active-Passive Configurations
In an active-passive (also called a cold failover cluster) configuration, you have two nodes in a hardware cluster. You install the OracleAS Single Sign-On and Oracle Delegated Administration Services components on the storage shared by these nodes.

OracleAS Single Sign-On and Oracle Delegated Administration Services in Active-Passive Configurations
OracleAS Infrastructure: High Availability for Oracle Identity Management 8-29
Figure 8–13 OracleAS Single Sign-On and Oracle Delegated Administration Services in an Active-Passive Configuration
In this configuration, only one node is active at any time. This active node runs all the processes. The other node, called the passive or standby node, runs only when the active node fails or when components on the active node fail to run.
You need to configure a virtual server name and virtual IP address for these nodes in the hardware cluster. The virtual server name and virtual IP address point to the node that is the active node.
The nodes in the hardware cluster also run clusterware that is provided by the hardware vendor. The clusterware monitors the active node to ensure that it is running.
To access the OracleAS Single Sign-On and Oracle Delegated Administration Services components, clients send requests using the virtual server name.
OPMN also runs on each node. If an OPMN-managed component fails, OPMN tries to restart it. See Section 2.2.1.1.1, "Automated Process Management with OPMN", which describes OPMN and the components that it manages.
OracleAS Single Sign-On and Oracle Delegated Administration Services are applications deployed on the OC4J_SECURITY instance.
Topologies that Use This Configuration■ Section 9.4, "OracleAS Cold Failover Cluster (Identity Management) Topology"
Node1 (Active)
Clients, including browsers andmiddle-tier components
Oracle HTTP Server
OracleAS Single Sign-On
Oracle Delegated Administration Services
Oracle HTTP Server
OracleAS Single Sign-On
Oracle Delegated Administration Services
Oracle Identity Management components Oracle Identity Management components
Hardware Cluster
Node2 (Standby)
Virtual Hostname: im.mydomain.comVirtual IP: 144.25.245.1
On Failover
Shared Storage
On Failover
ORACLE_HOME for Oracle Identity Management
On UNIX: Vendor Clusterware
On Windows: Oracle Fail Safe Microsoft Cluster Server
On UNIX: Vendor Clusterware
On Windows: Oracle Fail Safe Microsoft Cluster Server

OracleAS Single Sign-On and Oracle Delegated Administration Services in Active-Passive Configurations
8-30 Oracle Application Server High Availability Guide
8.10.1 Handling Component and Node FailuresOPMN runs on the active node to provide process management, monitoring, and notification services for the OC4J_SECURITY and Oracle HTTP Server processes. If any of these processes fails, OPMN detects the failure and attempts to restart it. If the restart is unsuccessful, the clusterware detects the failure and fails over all the processes to the passive node.
If a node fails, the clusterware detects the failure and fails over all the processes to the passive node.
8.10.2 Manual Steps for Failover (for Solaris Systems)Perform the following steps to fail over from the active node to the standby node for Solaris systems with a Veritas Volume Manager.
On the failed node:
1. If necessary, stop or kill all OracleAS Single Sign-On and Oracle Delegated Administration Services processes on this node.
2. Ensure that the file system is not busy. If it is busy, check which processes are using the file system and stop them if required.
3. Unmount the file system using the following command:
# umount <mount_point>
4. As root, deport the disk group. For example, if you are using Sun Cluster with Veritas Volume Manager, deport the disk group using the following commands:
# vxdg deport <disk_group_name>
5. If the failed node is usable, execute this command to release the virtual IP address:
# ifconfig <interface_name> removeif <virtual_IP>
On the new active node:
1. As root, execute the following command to assign the virtual IP to this node:
# ifconfig <interface_name> addif <virtual_IP> up
2. As root, import the disk group. For example, if you are using Sun Cluster with Veritas Volume Manager, use the following commands:
# vxdg import <disk_group_name># vxvol -g <disk_group_name> startall
3. As root, mount the file system using the following command:
# mount /dev/vx/dsk/<disk_group_name>/<volume_name> <mount_point>
4. Start all OracleAS Single Sign-On and Oracle Delegated Administration Services processes on this new active node. See Section 8.10.5, "Starting OracleAS Single Sign-On / Oracle Delegated Administration Services".
Note: While the hardware cluster framework can start, monitor, or fail over OracleAS Infrastructure processes, the following actions are not automatic. You have to do them manually, or you can create some scripts to automate them.

OracleAS Single Sign-On and Oracle Delegated Administration Services in Active-Passive Configurations
OracleAS Infrastructure: High Availability for Oracle Identity Management 8-31
8.10.3 Manual Steps for Failover (for Windows Systems)On Windows, you use Oracle Fail Safe to perform the failover. See Section 8.6.3, "Manual Steps for Failover on Windows Systems" for details.
8.10.4 Manual Steps for Failover (for Linux Systems)Perform the following steps to fail over from the active node to the standby node on Linux systems.
On the failed node:
1. Make sure all the OracleAS Single Sign-On and Oracle Delegated Administration Services processes are stopped on the failed node.
2. Login as root.
3. Unmount the file system using the following command:
# umount <mount_point>
If the file system is busy, check which processes are using the file system with the following command:
# fuser -muv <Shared Storage Partition>
Stop the processes, if required, using the following command:
# fuser -k <Shared Storage Partition>
4. If the failed node is usable, execute the following command to release the virtual IP address:
# ifconfig <interface_name> down
For example,
# ifconfig eth1:1 down
On the new active node:
1. Login as root.
2. Execute the following command to assign the virtual IP address to this node (the new active node):
# ifconfig <interface_name> netmask <subnet_mask> up
For example,
# ifconfig 144.88.27.125 netmask 255.255.252.0 up
3. Verify that the virtual IP is up and working using telnet from a different host (subnet/domain).
4. Mount the file system using the following command:
# mount <Shared Storage Partition> <mount_point>
For example:
# mount /dev/sdc1 /oracle

OracleAS Single Sign-On and Oracle Delegated Administration Services in Active-Passive Configurations
8-32 Oracle Application Server High Availability Guide
5. Start OracleAS Single Sign-On and Oracle Delegated Administration Services on this new active node. See Section 8.10.5, "Starting OracleAS Single Sign-On / Oracle Delegated Administration Services".
8.10.5 Starting OracleAS Single Sign-On / Oracle Delegated Administration ServicesYou start up OracleAS Single Sign-On and Oracle Delegated Administration Services in the following order:
1. Make sure the OracleAS Metadata Repository database is running.
2. Make sure Oracle Internet Directory is running.
3. On the active node:
a. Set the ORACLE_HOME environment variable to the OracleAS Single Sign-On/Oracle Delegated Administration Services Oracle home.
b. Run OPMN to start up OracleAS Single Sign-On and Oracle Delegated Administration Services.
ORACLE_HOME/opmn/bin/opmnctl startall
c. Start up Application Server Control.
ORACLE_HOME/bin/emctl start iasconsole
8.10.6 Stopping OracleAS Single Sign-On / Oracle Delegated Administration ServicesTo stop OracleAS Single Sign-On and Oracle Delegated Administration Services, run the following steps on the active node:
1. Set the ORACLE_HOME environment variable to the OracleAS Single Sign-On/Oracle Delegated Administration Services Oracle home.
2. Run OPMN to stop OracleAS Single Sign-On and Oracle Delegated Administration Services.
ORACLE_HOME/opmn/bin/opmnctl stopall
3. Stop Application Server Control.
ORACLE_HOME/bin/emctl stop iasconsole
8.10.7 Using Application Server ControlYou can use Application Server Control to manage the components on the active node.
In the Application Server Control URL, you use the physical hostname of the active node. For example: http://im1.mydomain.com:1156 (assuming Application Server Control is running on port 1156).
8.10.8 Backing Up and Recovering OracleAS Single Sign-On / Oracle Delegated Administration Services
You back up files for OracleAS Single Sign-On and Oracle Delegated Administration Services using the OracleAS Backup and Recovery Tool. This tool is described in the Oracle Application Server Administrator’s Guide.

Checking the Status of Oracle Identity Management Components
OracleAS Infrastructure: High Availability for Oracle Identity Management 8-33
8.11 Checking the Status of Oracle Identity Management ComponentsUse the following steps to check the status of Oracle Identity Management components:
1. Check the status of OPMN and OPMN-managed processes:
ORACLE_HOME/opmn/bin/opmnctl status
2. Check the status of Application Server Control.
ORACLE_HOME/bin/emctl status iasconsole
3. Check the status of Oracle Internet Directory:
ORACLE_HOME/ldap/bin/ldapcheck
Verify that you can log in to Oracle Internet Directory:
ORACLE_HOME/bin/oidadmin
Use the following login and password:
Login: orcladmin
Password: <orcladmin_password>
After installation, the orcladmin_password is the same as the ias_admin password.
4. Verify you can log in to OracleAS Single Sign-On:
http://host:HTTP_port/pls/orasso
For host, you specify the virtual hostname.
Login: orcladmin
Password: orcladmin_password
5. Verify you can log in to Oracle Delegated Administration Services:
http://host:HTTP_port/oiddas
For host, you specify the virtual hostname.
Login: orcladmin
Password: orcladmin_password

Checking the Status of Oracle Identity Management Components
8-34 Oracle Application Server High Availability Guide

OracleAS Infrastructure: High Availability Topologies 9-1
9OracleAS Infrastructure: High Availability
Topologies
This chapter describes the high availability topologies for OracleAS Infrastructure. These topologies are composed of configurations described in previous chapters.
■ Section 9.1, "Summary of OracleAS Infrastructure High Availability Topologies"
■ Section 9.2, "OracleAS Cold Failover Cluster (Infrastructure) Topology"
■ Section 9.3, "Distributed OracleAS Cold Failover Cluster (Infrastructure) Topology"
■ Section 9.4, "OracleAS Cold Failover Cluster (Identity Management) Topology"
■ Section 9.5, "Distributed OracleAS Cold Failover Cluster (Identity Management) Topology"
■ Section 9.6, "OracleAS Cluster (Identity Management) Topology"
■ Section 9.7, "Distributed OracleAS Cluster (Identity Management) Topology"
■ Section 9.8, "OracleAS Cold Failover Cluster (Infrastructure) and OracleAS Cold Failover Cluster (Middle-Tier) on the Same Nodes"
9.1 Summary of OracleAS Infrastructure High Availability TopologiesTable 9–1 lists the OracleAS Infrastructure topologies, and the configurations that they use.

OracleAS Cold Failover Cluster (Infrastructure) Topology
9-2 Oracle Application Server High Availability Guide
9.2 OracleAS Cold Failover Cluster (Infrastructure) TopologyFigure 9–1 shows an OracleAS Cold Failover Cluster (Infrastructure). It consists of:
■ two nodes in a hardware cluster. One of the nodes is the active node, and the other node is the passive node. The active node runs all the components and responds to all requests. If the active node goes down for any reason, the passive node takes over: it runs the components and handles all the requests.
■ shared storage that can be mounted by both nodes. The shared storage contains the single Oracle home where you install the Oracle Identity Management and OracleAS Metadata Repository. Only one node, the active node, is mounted to the shared storage at any time.
■ virtual hostname and virtual IP address. The virtual hostname and virtual IP address point to the active node. Because clients use this virtual hostname, instead of the node’s physical hostname, to access the OracleAS Infrastructure, clients do not need to know which node in the cluster is running the OracleAS Infrastructure components.
The OracleAS Cold Failover Cluster (Infrastructure) topology provides the following capabilities:
Table 9–1 High Availability Topologies for OracleAS Infrastructure, and the Configurations Used by Each Topology
Topology OracleAS Metadata Repository Oracle Identity Management
OracleAS Cold Failover Cluster (Infrastructure) Topology
New database installed by installer (using "Identity Management and OracleAS Metadata Repository" installation type): active-passive configuration
n/a (Oracle Identity Management components are installed with the OracleAS Metadata Repository)
Distributed OracleAS Cold Failover Cluster (Infrastructure) Topology
New database installed by installer (using "Identity Management and OracleAS Metadata Repository" installation type): active-passive configuration
OracleAS Single Sign-On and Oracle Delegated Administration Services: active-active or active-passive configuration
Oracle Internet Directory and Oracle Directory Integration and Provisioning: installed with OracleAS Metadata Repository in active-passive configuration
OracleAS Cold Failover Cluster (Identity Management) Topology
Existing database Active-passive configuration
Distributed OracleAS Cold Failover Cluster (Identity Management) Topology
Existing database Oracle Internet Directory and Oracle Directory Integration and Provisioning: active-passive configuration
OracleAS Single Sign-On and Oracle Delegated Administration Services: active-active configuration
OracleAS Cluster (Identity Management) Topology
Existing database Active-active configuration
Distributed OracleAS Cluster (Identity Management) Topology
Existing database Oracle Internet Directory and Oracle Directory Integration and Provisioning: active-active configuration
OracleAS Single Sign-On and Oracle Delegated Administration Services: active-active configuration

OracleAS Cold Failover Cluster (Infrastructure) Topology
OracleAS Infrastructure: High Availability Topologies 9-3
■ Node failure protection - hardware cluster and the failover procedure protect the nodes from planned or unplanned node outage.
■ Process failure protection - OPMN and hardware cluster software detect and restart failed OracleAS Infrastructure processes.
Figure 9–1 OracleAS Cold Failover Cluster (Infrastructure): Normal Operation
9.2.1 OracleAS Cold Failover Cluster (Infrastructure) on Microsoft WindowsOn Microsoft Windows, the OracleAS Cold Failover Cluster (Infrastructure) topology has the characteristics described in the previous section, but it also has these unique features:
Firewall
Firewall
Load Balancer
SharedStorage
Single ORACLE_HOME forOracleAS Metadata Repositoryand Oracle Identity Management
SSO RequestsHTTP(S)
Clients
HTTP(S)
Node1 (Active)
Vendor Clusterware
Physical Hostname:infra1.mydomain.comPhysical IP: 144.25.245.100
Virtual Hostname: cfcinfra.mydomain.comVirtual IP: 144.25.245.1
OracleAS MetadataRepository
Database Instance
OHS
SSODAS
interconnect
OracleInternet
Directory
Vendor Clusterware
Physical Hostname:infra1.mydomain.comPhysical IP: 144.25.245.200
OracleAS MetadataRepository
Database Instance
OHS
SSODAS
Hardware Cluster
On Failover
OracleInternet
Directory
On Failover
LDAP
HTTP(S)
OracleNet
Node2 (Standby)
Virtual Server Name:mt.mydomain.com
OracleASMiddle Tier
OracleASMiddle Tier

OracleAS Cold Failover Cluster (Infrastructure) Topology
9-4 Oracle Application Server High Availability Guide
■ The nodes in the hardware cluster need to have Microsoft Cluster Server software for managing high availability for the cluster.
■ You need to install Oracle Fail Safe on the local storage of each node. Oracle Fail Safe works with Microsoft Cluster Server to manage the following:
■ virtual hostname and IP address
■ OracleAS Metadata Repository database
■ OPMN
■ Application Server Control Console
The integration of Oracle Fail Safe and Microsoft Cluster Server provides an easy-to-manage environment and automatic failover functionality in the OracleAS Cold Failover Cluster topology. The OracleAS Metadata Repository database, its TNS listener, and OPMN run as Windows services and are monitored by Oracle Fail Safe and Microsoft Cluster Server. If any of these services fails, Microsoft Cluster Server tries to restart the service three times (the default setting) before failing the group to the standby node. Additionally, OPMN monitors, starts, and restarts the Oracle Internet Directory, OC4J, and Oracle HTTP Server components.
Resource GroupsCentral to the Windows OracleAS Cold Failover Cluster topology is the concept of resource groups. A group is a collection of resources that you set up in Oracle Fail Safe. During failover from the active node to the standby node, the group and the resources in it fail over as a unit. When you install an OracleAS Cold Failover Cluster configuration, you create a group for the configuration. This group consists of the following:
■ virtual hostname and virtual IP address for the cluster
■ shared storage
■ OracleAS Metadata Repository database
■ TNS listener for the database
■ OPMN
■ Application Server Control Console
In Figure 9–2, the virtual hostname cfcinfra.mydomain.com and virtual IP 144.25.245.1 are used. When a failover occurs from node 1 to node 2, the virtual hostname and IP are moved to the standby node, which becomes the active node. The failure of the active node is transparent to the middle-tier components.
Note: Only static IP addresses can be used in the OracleAS Cold Failover Cluster (Infrastructure) topology for Windows.

OracleAS Cold Failover Cluster (Infrastructure) Topology
OracleAS Infrastructure: High Availability Topologies 9-5
Figure 9–2 OracleAS Cold Failover Cluster (Infrastructure) on Microsoft Windows
9.2.2 Installation HighlightsThe Oracle Application Server Installation Guide has details on installing this topology. Some highlights:
■ On Windows, you install Oracle Fail Safe on the local storage of each of the OracleAS Cold Failover Cluster (Infrastructure) nodes.
■ You run the installer on one of the nodes in the cluster and install the Oracle home on the shared storage. The Oracle home includes both OracleAS Metadata Repository and Oracle Identity Management.
Firewall
Firewall
Load Balancer
SharedStorage
Single ORACLE_HOME forOracleAS Metadata Repositoryand Oracle Identity Management
SSO RequestsHTTP(S)
Clients
HTTP(S)
HTTP(S)
Node1 (Active)
Oracle Fail Safe
Microsoft Cluster Server
Physical Hostname:infra1.mydomain.comPhysical IP: 144.25.245.100
Virtual Hostname: cfcinfra.mydomain.comVirtual IP: 144.25.245.1
OracleAS MetadataRepository
Database Instance
OHS
SSODAS
interconnect
OracleInternet
Directory
Oracle Fail Safe
Physical Hostname:infra1.mydomain.comPhysical IP: 144.25.245.200
OracleAS MetadataRepository
Database Instance
OHS
SSODAS
Hardware Cluster
On Failover
OracleInternet
Directory
On Failover
LDAP
OracleNet
Node2 (Standby)
Virtual Server Name:mt.mydomain.com
Microsoft Cluster Server
OracleASMiddle Tier
OracleASMiddle Tier

OracleAS Cold Failover Cluster (Infrastructure) Topology
9-6 Oracle Application Server High Availability Guide
■ During installation, you enter the virtual hostname for the hardware cluster. This virtual hostname is associated with the virtual IP of the hardware cluster. Clients use this virtual hostname to access the active node of the OracleAS Cold Failover Cluster.
9.2.3 RuntimeThis section uses the sample values shown in Figure 9–1:
The virtual hostname, cfcinfra.mydomain.com, is mapped to the virtual IP address, and the middle tier associates the OracleAS Infrastructure with cfcinfra.mydomain.com.
In normal operating mode, the hardware cluster’s software enables the virtual IP address on Node 1 and starts all OracleAS Infrastructure processes (database, database listener, Oracle Enterprise Manager 10g, and OPMN) on that node. OPMN then starts, monitors, and restarts, if necessary, the following OracleAS Infrastructure processes: Oracle Internet Directory, OC4J instances, and Oracle HTTP Server.
9.2.4 FailoverIf the primary node fails, the virtual IP address is manually enabled on the secondary node (Figure 9–3). All the OracleAS Infrastructure processes are then started on the secondary node. Middle tiers accessing the OracleAS Infrastructure will see a temporary loss of service as the virtual IP and the shared storage are moved over to Node2, and the database, database listener, and all other OracleAS Infrastructure processes are started. Once the processes are up, middle-tier processes that were retrying during this time are reconnected. New connections are not aware that a failover has occurred.
If you plan to use the Automatic Storage Management (ASM) feature of Oracle Database 10g for the OracleAS Metadata Repository, the Cluster Synchronization Services (CSS) daemon must be configured on the standby node. The CSS daemon synchronizes ASM instances with the database instances that use the ASM instances for database file storage. Specific instructions are provided in the OracleAS Cold Failover Cluster chapter in the Oracle Application Server Installation Guide.
Table 9–2 Sample Values for OracleAS Cold Failover Cluster (Infrastructure)
Item Sample Value
Physical nodes Node 1 and Node 2
Virtual hostname cfcinfra.mydomain.com
Virtual IP address 144.25.245.1

OracleAS Cold Failover Cluster (Infrastructure) Topology
OracleAS Infrastructure: High Availability Topologies 9-7
Figure 9–3 OracleAS Cold Failover Cluster (Infrastructure): After Failover
While the hardware cluster framework can start, monitor, detect, restart, or failover OracleAS Infrastructure processes, these actions are not automatic and involve some scripting or simple programming.
9.2.4.1 Failover on Solaris SystemsThe following shows the steps to fail over from the active node to the standby node for Solaris systems with a Veritas Volume Manager.
Steps to Perform on the Failed Node1. If necessary, stop or kill all processes belonging to the OracleAS Cold Failover
Cluster (Infrastructure) instance on this node.
Firewall
Firewall
Load Balancer
SharedStorage
Single ORACLE_HOME forOracleAS Metadata Repositoryand Oracle Identity Management
SSO RequestsHTTP(S)
Clients
HTTP(S)
Node1 (Failed)
Vendor Clusterware
Physical Hostname:infra1.mydomain.comPhysical IP: 144.25.245.100
OracleAS MetadataRepository
Database Instance
OHS
SSODAS
interconnect
OracleInternet
Directory
Vendor Clusterware
Physical Hostname:infra2.mydomain.comPhysical IP: 144.25.245.200
OracleAS MetadataRepository
Database Instance
OHS
SSODAS
Hardware Cluster
OracleInternet
Directory
Node2 (Active)
Virtual Server Name:mt.mydomain.com
Virtual Hostname: cfcinfra.mydomain.comVirtual IP: 144.25.245.1
LDAP
OracleNet
HTTP(S)
OracleASMiddle Tier
OracleASMiddle Tier
OracleAS Cold Failover Cluster (Infrastructure) Topology
9-8 Oracle Application Server High Availability Guide
2. As root, stop the Oracle Cluster Synchronization Services (CSS) daemon, ocssd, if it is running. Use the following command:
# /etc/init.d/init.cssd stop
3. Follow the steps in "Steps to Perform on the Failed Node" on page 8-8 (in Section 8.6.2, "Manual Steps for Failover on Solaris Systems").
Steps to Perform on the New Active Node1. Follow the steps in "Steps to Perform on the New Active Node" on page 8-8 (in
Section 8.6.2, "Manual Steps for Failover on Solaris Systems").
2. If the Oracle Cluster Synchronization Services (CSS) daemon, ocssd, is required, run the following command as the user which installed the Oracle home:
> /etc/init.d/init.cssd start
3. Start Oracle Application Server processes on this new active node. In this case, you need to start up the OracleAS Metadata Repository and the Oracle Identity Management processes:
a. Start the OracleAS Metadata Repository database:
> ORACLE_HOME/bin/sqlplus /nologSQL> connect SYS as SYSDBASQL> startup
b. Start the OracleAS Metadata Repository database listener.
> ORACLE_HOME/bin/lsnrctl start
c. Start Oracle Identity Management processes on this new active node.
> ORACLE_HOME/opmn/bin/opmnctl startall
9.2.4.2 Failover on Windows SystemsThe steps are described in Section 8.6.3, "Manual Steps for Failover on Windows Systems".
9.2.4.3 Failover on Linux SystemsThe following shows the steps to failover from the active node to the standby node on Linux systems.
Steps to Perform on the Failed Node1. Make sure all processes belonging to the OracleAS Cold Failover Cluster
(Infrastructure) instance on the failed node are down.
2. Login as root.
3. Use the following command to stop the Oracle Cluster Synchronization Services (CSS) daemon, ocssd, if it is running:
# /etc/init.d/init.cssd stop
4. Follow the steps in "Steps to Perform on the Failed Node" on page 8-11 (in Section 8.6.4, "Manual Steps for Failover on Linux Systems").

OracleAS Cold Failover Cluster (Infrastructure) Topology
OracleAS Infrastructure: High Availability Topologies 9-9
On the new active node:
Steps to Perform on the New Active Node1. Follow the steps in "Steps to Perform on the New Active Node" on page 8-11 (in
Section 8.6.4, "Manual Steps for Failover on Linux Systems").
2. If the Oracle Cluster Synchronization Services (CSS) daemon, ocssd, is required, run the following command as the user that installed the Oracle home:
> /etc/init.d/init.cssd start
3. Start all OracleAS Infrastructure processes on this new active node with the following commands:
a. Set the ORACLE_HOME environment variable to the OracleAS Infrastructure’s Oracle home.
b. Set the ORACLE_SID environment variable to the OracleAS Metadata Repository’s system identifier.
c. Start the OracleAS Metadata Repository database:
> ORACLE_HOME/bin/sqlplus /nologSQL> connect SYS as SYSDBASQL> startup
d. Start the OracleAS Infrastructure database listener.
> ORACLE_HOME/bin/lsnrctl start
e. Start OPMN and all OPMN-managed processes using the following command:
> ORACLE_HOME/opmn/bin/opmnctl startall
f. Start the Application Server Control Console:
> ORACLE_HOME/bin/emctl start iasconsole
9.2.5 Startup ProcedureUse the following steps to start up the OracleAS Infrastructure components in an OracleAS Cold Failover Cluster (Infrastructure):
1. As root, enable volume management software and mount the file system if necessary.
2. Enable the virtual IP address on the current node.
3. Set the ORACLE_HOME environment variable to the OracleAS Infrastructure’s Oracle home.
4. Set the ORACLE_SID environment variable to the OracleAS Metadata Repository database’s system identifier.
5. Set the PATH environment variable to include the OracleAS Infrastructure’s ORACLE_HOME/bin directory.
On Windows, you can use the following command to set the PATH:
set PATH=%ORACLE_HOME%\bin;%PATH%

OracleAS Cold Failover Cluster (Infrastructure) Topology
9-10 Oracle Application Server High Availability Guide
6. Start the OracleAS Metadata Repository database listener.
> ORACLE_HOME/bin/lsnrctl start
7. Start the OracleAS Metadata Repository database:
On UNIX systems:
> $ORACLE_HOME/bin/sqlplus /nologSQL> connect SYS as SYSDBASQL> startup
On Windows systems:
> %ORACLE_HOME%\bin\sqlplus /nologSQL> connect SYS as SYSDBASQL> startup
8. Start OPMN and all OPMN-managed processes.
> ORACLE_HOME/opmn/bin/opmnctl startall
9. Start the Application Server Control Console:
> ORACLE_HOME/bin/emctl start iasconsole
9.2.6 Stop ProcedureUse the following steps to stop the OracleAS Infrastructure in an OracleAS Cold Failover Cluster:
1. Set the ORACLE_HOME environment variable to the Infrastructure’s Oracle home.
2. Set the ORACLE_SID environment variable to the metadata repository’s system identifier.
3. Stop the Application Server Control Console.
> ORACLE_HOME/bin/emctl stop iasconsole
4. Stop OPMN and all OPMN-managed processes for each OracleAS instance locally.
To shut down the OPMN daemon and all OPMN-managed processes:
> ORACLE_HOME/opmn/bin/opmnctl stopall
5. Stop the OracleAS Metadata Repository database:
On UNIX systems:
> $ORACLE_HOME/bin/sqlplus /nologSQL> connect SYS as SYSDBASQL> shutdown
On Windows systems:
> %ORACLE_HOME%\bin\sqlplus /nologSQL> connect SYS as SYSDBA
Note: Specify the path of the Oracle home as the first entry in the PATH environment variable if you have several Oracle homes installed on the computer. Also, ensure that the full paths of the executables you use are specified.

OracleAS Cold Failover Cluster (Infrastructure) Topology
OracleAS Infrastructure: High Availability Topologies 9-11
SQL> shutdown
6. Stop the OracleAS Infrastructure database listener.
> ORACLE_HOME/bin/lsnrctl stop
The next two steps are required only if you are stopping on the current node to fail over to the other node. Otherwise it is not a mandatory part of the stop process.
1. As root, disable volume management software and unmount the file system (if necessary).
2. Disable the virtual IP address from the current node.
9.2.7 Use of Application Server Control ConsoleYou can use the Application Server Control Console to manage OracleAS Cold Failover Cluster (Infrastructure). Figure 9–4 shows a sample screen.
In the URL for the Application Server Control Console, you use the virtual hostname instead of the physical hostname.
Figure 9–4 Application Server Control Console with OracleAS Cold Failover Cluster (Infrastructure)
9.2.8 Changing ConfigurationIn an OracleAS Cold Failover Cluster (Infrastructure), OracleAS Metadata Repository and Oracle Identity Management are installed together in the same Oracle home on the shared storage. To change the configuration for OracleAS Cold Failover Cluster

Distributed OracleAS Cold Failover Cluster (Infrastructure) Topology
9-12 Oracle Application Server High Availability Guide
(Infrastructure), you use the standard OracleAS Infrastructure administration techniques described in the Oracle Application Server Administrator’s Guide.
9.2.9 Configuring Virtual IPsThe Oracle Application Server Installation Guide for your platform cover the instructions for configuring the virtual IPs for a OracleAS Cold Failover Cluster (Infrastructure):
■ If you are running UNIX platforms, see section 11.2.2, "Map the Virtual Hostname and Virtual IP Address" in the Oracle Application Server Installation Guide for your platform
■ If you are running on Microsoft Windows, see section 11.2.2, "Get a Virtual Address for the Cluster" in the Oracle Application Server Installation Guide for Microsoft Windows
9.2.10 Backup and Recovery ProcedureFor backing up OracleAS Cold Failover Cluster environments and recovering these backups during failures, use the backup and recovery procedures provided in the Oracle Application Server Administrator’s Guide.
Additionally, the following considerations should be noted:
Backup considerations:
■ Oracle recommends that you place archive logs for the OracleAS Metadata Repository on the shared disk. This ensures that, when failing over from one cluster node to another in the case of media recovery, the archive logs are also failed over and available.
■ You can generate archive logs to a local file system; however, the same path must be available during runtime on whichever node is hosting the OracleAS Infrastructure instance.
■ Proper capacity planning is required in order to ensure adequate space is available to store the desired number of archive logs.
Recovery considerations:
■ If archive logs are stored on a local file system, in the case of media recovery, all archive logs must be made available to the application server instance performing the recovery. Recovery can be performed on either node of the cluster.
9.3 Distributed OracleAS Cold Failover Cluster (Infrastructure) TopologyIn a distributed OracleAS Cold Failover Cluster (Infrastructure) (see Figure 9–5), you distribute the Oracle Identity Management components to create a more secure environment. You deploy OracleAS Single Sign-On and Oracle Delegated Administration Services separately from the other OracleAS Infrastructure components.
Typically, you run OracleAS Single Sign-On and Oracle Delegated Administration Services between two firewalls (in a DMZ), and Oracle Internet Directory and OracleAS Metadata Repository behind the inner firewall, as shown in Figure 9–5. The figure also shows Oracle Application Server middle tiers running on the same nodes as OracleAS Single Sign-On and Oracle Delegated Administration Services.
See Also:
■ Section 9.2.7, "Use of Application Server Control Console"

Distributed OracleAS Cold Failover Cluster (Infrastructure) Topology
OracleAS Infrastructure: High Availability Topologies 9-13
Clients from outside the first firewall can access OracleAS Single Sign-On and Oracle Delegated Administration Services. The second firewall prevents clients from accessing the OracleAS Metadata Repository and Oracle Internet Directory directly.
To access Oracle Internet Directory in the other tier, OracleAS Single Sign-On and Oracle Delegated Administration Services use the virtual hostname (oidmr.mydomain.com in Figure 9–5).

Distributed OracleAS Cold Failover Cluster (Infrastructure) Topology
9-14 Oracle Application Server High Availability Guide
Figure 9–5 Distributed OracleAS Cold Failover Cluster (Infrastructure)
Firewall
Single ORACLE_HOME forOracleAS Metadata Repositoryand Oracle Internet Directory
OracleNet
SharedStorage
Node1 (Active)
Oracle InternetDirectory
Node2 (Standby)
Oracle InternetDirectory
Node3 (Active)Physical Hostname:sso1.mydomain.com
Node4 (Active)Physical Hostname:sso2.mydomain.com
OHS OHS
OracleAS MetadataRepository
Database Instance
OracleAS MetadataRepository
Database Instance
Hardware Cluster
Virtual Hostname: oidmr.mydomain.comVirtual IP: 144.25.245.1
LDAP
LDAP
FirewallHTTP(S)
HTTP(S)
HTTP(S)
OracleNet
SSO RequestsHTTP(S)
Load Balancer
Virtual Server Name:mt.mydomain.com
Virtual Server Name:sso.mydomain.com
Clients
OracleASMiddle Tier 2
OracleASMiddle Tier 1
SSODAS
SSODAS
OracleNet

Distributed OracleAS Cold Failover Cluster (Infrastructure) Topology
OracleAS Infrastructure: High Availability Topologies 9-15
9.3.1 Tiers in this TopologyTable 9–3 lists the tiers in this topology:
9.3.2 External Load Balancer RequirementsIn this topology, you can run OracleAS Single Sign-On and Oracle Delegated Administration Services in an active-active configuration or active-passive configuration. If you run them in an active-active configuration, you need an external load balancer with the following features:
■ virtual server name and port configuration
■ death detection
■ persistence configuration for HTTP URLs
See Section 2.2.4.2, "External Load Balancers" for details on these features.
9.3.3 Installation HighlightsThe Oracle Application Server Installation Guide contains details on how to install this topology. Some highlights:
■ You need to configure the virtual server name on the load balancer before you run the installer.
■ On Windows, you have to install Oracle Fail Safe on the local storage of each of the OracleAS Cold Failover Cluster (Infrastructure) nodes, that is, the nodes that are running OracleAS Metadata Repository and Oracle Internet Directory.
■ You install the components in the following order:
1. Install OracleAS Metadata Repository, Oracle Internet Directory, and Oracle Directory Integration and Provisioning on the shared disk. During installation, you need to enter the virtual hostname configured for the hardware cluster.
2. Install OracleAS Single Sign-On and Oracle Delegated Administration Services. You can install and run these components in an active-active or active-passive configuration. The installation procedure depends on the configuration that you want.
9.3.4 Runtime for the OracleAS Metadata Repository / Oracle Internet Directory TierYou deploy the following OracleAS Infrastructure components in an OracleAS Cold Failover Cluster:
Table 9–3 Tiers in a Distributed OracleAS Cold Failover Cluster (Infrastructure)
Tier Configuration For Information on Managing This Tier, See:
OracleAS Metadata Repository + all Oracle Identity Management components except OracleAS Single Sign-On and Oracle Delegated Administration Services
Active-Passive Section 9.3.4, "Runtime for the OracleAS Metadata Repository / Oracle Internet Directory Tier"
OracleAS Single Sign-On and Oracle Delegated Administration Services
Active-active or active-passive
Section 8.9, "OracleAS Single Sign-On and Oracle Delegated Administration Services in Active-Active Configurations"
- or -
Section 8.10, "OracleAS Single Sign-On and Oracle Delegated Administration Services in Active-Passive Configurations"

Distributed OracleAS Cold Failover Cluster (Infrastructure) Topology
9-16 Oracle Application Server High Availability Guide
■ OracleAS Metadata Repository
■ Oracle Internet Directory
■ Oracle Directory Integration and Provisioning
In an OracleAS Cold Failover Cluster, you have one active node and one passive node ("active-passive" configuration), and a virtual hostname and virtual IP address for the cluster.
Only one node of the hardware cluster is active at any time. The virtual hostname (oidmr.mydomain.com) points to the active node. The shared storage is mounted only on the active node.
To access the components running in this tier, clients use the virtual hostname. For example, to access the OracleAS Metadata Repository or Oracle Internet Directory, you use the virtual hostname (oidmr.mydomain.com).
OPMN runs on this tier to manage the Oracle Internet Directory processes.
9.3.5 Failover for the OracleAS Metadata Repository / Oracle Internet Directory TierIf the active tier fails, the clusterware fails over the OracleAS Metadata Repository, Oracle Internet Directory, Application Server Control, and OPMN processes to the standby node.
The clusterware also mounts the shared storage on the new active node and associates the virtual hostname and virtual IP address with the new active node.
Failover from the active node to the passive node occurs at the node level. All the components running on the active node (Oracle Internet Directory, Oracle Directory Integration and Provisioning, and OracleAS Metadata Repository) fail over together to the passive node.
On Windows, Oracle Fail Safe performs the failover.
9.3.6 Startup ProcedureTo start up the processes on the different tiers, you have to start them up in the following order:
1. On the active node in the OracleAS Metadata Repository and Oracle Internet Directory tier:
a. Start up the OracleAS Metadata Repository.
b. Start up the Oracle Internet Directory and other processes.
c. Start up Application Server Control.
2. Start up the OracleAS Single Sign-On and Oracle Delegated Administration Services components on each node in the OracleAS Single Sign-On and Oracle Delegated Administration Services tier. Section 8.9.4, "Starting OracleAS Single Sign-On / Oracle Delegated Administration Services" lists the start commands.
9.3.7 Stop ProcedureTo stop the processes on the different tiers, you stop them in the following order:
1. Stop the processes on each node in the OracleAS Single Sign-On and Oracle Delegated Administration Services tier. Section 8.9.5, "Stopping OracleAS Single Sign-On / Oracle Delegated Administration Services" lists the stop commands.

OracleAS Cold Failover Cluster (Identity Management) Topology
OracleAS Infrastructure: High Availability Topologies 9-17
2. On the active node in the OracleAS Metadata Repository and Oracle Internet Directory tier:
a. Stop Oracle Internet Directory and other processes.
b. Stop the OracleAS Metadata Repository.
c. Stop Application Server Control.
9.3.8 Use of Application Server ControlYou can use Application Server Control to manage the components in a distributed OracleAS Cold Failover Cluster (Infrastructure).
For the OracleAS Metadata Repository and Oracle Internet Directory nodes, you use the virtual hostname in the Application Server Control URL, for example: http://oidmr.mydomain.com:1156 (assuming Application Server Control is running on port 1156).
For the OracleAS Single Sign-On and Oracle Delegated Administration Services nodes, you use the physical hostname of either node in the Application Server Control URL, for example, http://sso1.mydomain.com:1156 or http://sso2.mydomain.com:1156.
9.3.9 Monitoring ProcedureTypically, OPMN monitors Oracle Application Server processes for you, so you do not have to monitor them yourself. However, if you want to monitor them manually, you can use Application Server Control or commands to monitor the status of OracleAS Infrastructure components running on all the nodes.
See Section 7.4, "Checking the Status of OracleAS Metadata Repository" and Section 8.11, "Checking the Status of Oracle Identity Management Components" for a list of commands that you can run. Make sure you run the commands on the appropriate node. For example, to check on Oracle Internet Directory, run the command on the OracleAS Metadata Repository and Oracle Internet Directory node.
9.3.10 Backup and Recovery ProcedureSee Section 9.2.10, "Backup and Recovery Procedure" for some backup and recovery guidelines.
9.4 OracleAS Cold Failover Cluster (Identity Management) TopologyIn an OracleAS Cold Failover Cluster (Identity Management) (see Figure 9–6), you install and run the Oracle Identity Management components in an OracleAS Cold Failover Cluster. For the OracleAS Metadata Repository, you install it in an existing database using the OracleAS Metadata Repository Creation Assistant. This database should be a high availability database, such as a Real Application Clusters database or a cold failover cluster database. Figure 9–6 shows a cold failover cluster database in the topology.
You need a virtual hostname and virtual IP address for the nodes running the Oracle Identity Management components. Clients, including middle tiers, use the virtual hostname to access the Oracle Identity Management components.

OracleAS Cold Failover Cluster (Identity Management) Topology
9-18 Oracle Application Server High Availability Guide
If You Are Using a Cold Failover Cluster DatabaseIf you are using a cold failover cluster database, you can install and run Oracle Identity Management on the same nodes as the database. You can also make each node an active node: one node can be the active node for the Oracle Identity Management components, and the other node can be the active node for the database. For example, in Figure 9–6, Node 1 is the active node for Oracle Identity Management, but Node 2 is the active node for the database containing the OracleAS Metadata Repository. This enables you to use both nodes at the same time. If one node fails, then processes running on that node are failed over to the other node, and that node runs all the processes (database and Oracle Identity Management).
To do this, you need to set up separate virtual hostnames and virtual IP addresses for Oracle Identity Management and the database because they point to different active nodes. In Figure 9–6, the virtual hostname for Oracle Identity Management, im.mydomain.com, points to Node 1, but the virtual hostname for the database, mr.mydomain.com, points to Node 2.

OracleAS Cold Failover Cluster (Identity Management) Topology
OracleAS Infrastructure: High Availability Topologies 9-19
Figure 9–6 OracleAS Cold Failover Cluster (Identity Management)
9.4.1 Tiers in this TopologyTable 9–4 lists the tiers in this topology:
Vendor Clusterware
Node1
(Active)
Virtual Hostname: im.mydomain.comVirtual IP: 144.25.245.2
OHS
OracleAS MetadataRepository
Database Instance
(Standby)
Vendor Clusterware
Node2
(Standby)
Virtual Hostname: mr.mydomain.comVirtual IP: 144.25.245.3
OHS
SSODAS
OracleInternet
Directory
OracleAS MetadataRepository
Database Instance
(Active)
Firewall
Firewall
Load Balancer
SharedStorage
* Oracle Homes above have separate paths** Shared storage can be the same disk but
must have two mount points, one for each node in the hardware cluster
SSO RequestsHTTP(S)
Clients
HTTP(S)
HTTP(S)
interconnect
Hardware Cluster
LDAP
Virtual Server Name:mt.mydomain.com
ORACLE_HOME for OracleAS Metadata Repository
ORACLE_HOME for Oracle Identity Management
OracleNet
OracleNet
SSODAS
LDAP
OracleASMiddle Tier
OracleASMiddle Tier
OracleInternet
Directory

OracleAS Cold Failover Cluster (Identity Management) Topology
9-20 Oracle Application Server High Availability Guide
9.4.2 Installation HighlightsThe Oracle Application Server Installation Guide contains details on how to install this topology. Some highlights:
■ On Windows, you have to install Oracle Fail Safe on the local storage of each node running Oracle Identity Management.
■ You install the components in the following order:
1. Install OracleAS Metadata Repository in your existing high availability database using OracleAS Metadata Repository Creation Assistant.
2. Install Oracle Identity Management on the shared disk. During installation, you enter the virtual hostname configured for the Oracle Identity Management components.
9.4.3 Runtime for the Oracle Identity Management ComponentsMiddle-tier components and applications access Oracle Identity Management services by making LDAP requests to Oracle Internet Directory, and HTTP/HTTPS requests to OracleAS Single Sign-On or Oracle Delegated Administration Services.
Clients can perform single sign-on by making direct HTTP/HTTPS requests to OracleAS Single Sign-On server using the single sign-on URL. This URL uses the virtual hostname configured for Oracle Identity Management.
OracleAS Single Sign-On establishes connection pools to access the OracleAS Metadata Repository database. A connection in the pool uses Oracle Net to communicate with the active database instance(s). Oracle Net is also used by middle-tier components and Oracle Internet Directory to connect to the database.
9.4.4 Failover for the Oracle Identity Management ComponentsIf the node on which the Oracle Identity Management components are running fails, the components fail over to the other node. The virtual hostname and IP also switch to point to the new active node.
If You Are Running a Cold Failover Cluster DatabaseIf you are running a cold failover cluster database and are using one node as the active node for the database and the other node as the active node for Oracle Identity Management (for example, Node 1 is the active node for Oracle Identity Management, and Node 2 is the active node for the database), then the newly active node now runs all the processes. Both virtual hostnames now point to the new active node.
Table 9–4 Tiers in an OracleAS Cold Failover Cluster (Identity Management)
Tier Configuration For Information on Managing This Tier, See:
OracleAS Metadata Repository Installed in an existing database
Chapter 7, "OracleAS Infrastructure: High Availability for OracleAS Metadata Repository"
Oracle Identity Management components Active-Passive Section 8.6, "All Oracle Identity Management Components in Active-Passive Configurations"
Distributed OracleAS Cold Failover Cluster (Identity Management) Topology
OracleAS Infrastructure: High Availability Topologies 9-21
9.4.5 Startup ProcedureTo start up the processes, you have to start them up in the following order:
1. Start up the OracleAS Metadata Repository database.
2. Start up the Oracle Identity Management components.
3. Start up Application Server Control.
9.4.6 Stop ProcedureTo stop the processes, you stop them in the following order:
1. Stop the Oracle Identity Management components.
2. Stop Application Server Control.
3. Stop the OracleAS Metadata Repository database.
9.4.7 Use of Application Server ControlYou can use Application Server Control to manage the Oracle Identity Management components in an OracleAS Cold Failover Cluster (Identity Management).
For the Application Server Control URL, you use the virtual hostname, for example: http://im.mydomain.com:1156 (assuming Application Server Control is running on port 1156).
9.5 Distributed OracleAS Cold Failover Cluster (Identity Management) Topology
This topology is similar to the one described in Section 9.4, "OracleAS Cold Failover Cluster (Identity Management) Topology" except that you install and run OracleAS Single Sign-On and Oracle Delegated Administration Services on one set of nodes, and Oracle Internet Directory on another set of nodes.
You run the OracleAS Single Sign-On and Oracle Delegated Administration Services nodes in an active-active configuration, which means that you place a load balancer in front of these nodes. The load balancer directs requests to these nodes.
For the Oracle Internet Directory nodes, you run them in an active-passive configuration. If you have an existing cold failover cluster database, you can install Oracle Internet Directory on the same nodes as the database.
For the OracleAS Metadata Repository, you can install it, using OracleAS Metadata Repository Creation Assistant, in an existing Real Application Clusters database for active-active availability or in a cold failover cluster database for active-passive availability.
You might choose this topology to create a more secure configuration. This topology enables you to run OracleAS Single Sign-On and Oracle Delegated Administration Services in the DMZ, and Oracle Internet Directory and the OracleAS Metadata Repository database in your intranet behind the DMZ.
Figure 9–7 shows a distributed OracleAS Cold Failover Cluster (Identity Management). The OracleAS Metadata Repository is installed in an existing cold failover cluster database. Oracle Internet Directory is installed on the same nodes as the cold failover cluster database.

Distributed OracleAS Cold Failover Cluster (Identity Management) Topology
9-22 Oracle Application Server High Availability Guide
If you install Oracle Internet Directory on the same cluster as the cold failover database, you need separate virtual hostnames and virtual IP addresses for the database and for Oracle Internet Directory.

Distributed OracleAS Cold Failover Cluster (Identity Management) Topology
OracleAS Infrastructure: High Availability Topologies 9-23
Figure 9–7 Distributed OracleAS Cold Failover Cluster (Identity Management)
Firewall
Node3 (Active)Physical Hostname:sso1.mydomain.com
Node4 (Active)Physical Hostname:sso2.mydomain.com
OHS OHS
LDAP
LDAP
Vendor Clusterware
Node1
(Active)
Virtual Hostname: oid.mydomain.comVirtual IP: 144.25.245.2
OracleAS MetadataRepository
Database Instance
(Standby)
Node2
(Standby)
Virtual Hostname: mr.mydomain.comVirtual IP: 144.25.245.1
OracleAS MetadataRepository
Database Instance
OracleInternet
Directory
(Active)
SharedStorage
InterConnect
Hardware Cluster
Vendor Clusterware
OracleNet
* Oracle Homes belowhave separate paths
** Shared storage can be the same disk but must have two mount points, one for each node in the hardware cluster
ORACLE_HOME for OracleAS Metadata Repository
ORACLE_HOME for Oracle Identity Management
OracleInternet
Directory
SSODAS
FirewallHTTP(S)
HTTP(S)
HTTP(S)
OracleNet
SSO RequestsHTTP(S)
Load Balancer
Virtual Server Name:mt.mydomain.com
Virtual Server Name:sso.mydomain.com
Clients
OracleASMiddle Tier 2
OracleASMiddle Tier 1
SSODAS

Distributed OracleAS Cold Failover Cluster (Identity Management) Topology
9-24 Oracle Application Server High Availability Guide
9.5.1 Tiers in this TopologyTable 9–5 lists the tiers in this topology:
9.5.2 External Load Balancer RequirementsThe OracleAS Single Sign-On and Oracle Delegated Administration Services tier uses an external load balancer. This external load balancer should have the following features:
■ virtual server name and port configuration
■ death detection
■ persistence configuration for HTTP URLs
If you are using the same external load balancer for middle tiers, you may need additional features depending on which middle tier components you are running.
See Section 2.2.4.2, "External Load Balancers" for details on these features.
9.5.3 Installation HighlightsThe Oracle Application Server Installation Guide contains details on how to install this topology. Some highlights:
■ On Windows, you also have to install Oracle Fail Safe on the local storage of each node running Oracle Internet Directory.
■ You install the components in the following order:
1. Install OracleAS Metadata Repository in your existing database using OracleAS Metadata Repository Creation Assistant.
2. Install Oracle Internet Directory on the shared disk. During installation, you need to enter the virtual hostname configured for Oracle Internet Directory.
3. Install OracleAS Single Sign-On and Oracle Delegated Administration Services on the local disk of each node. During installation, you need to enter the virtual server name configured on the load balancer for HTTP traffic.
Table 9–5 Tiers in a Distributed OracleAS Cold Failover Cluster (Identity Management)
Tier Configuration For Information on Managing This Tier, See:
OracleAS Metadata Repository Installed in an existing database
Chapter 7, "OracleAS Infrastructure: High Availability for OracleAS Metadata Repository"
Oracle Internet Directory and Oracle Directory Integration and Provisioning components
Active-Passive Section 8.8, "Oracle Internet Directory and Oracle Directory Integration and Provisioning in Active-Passive Configurations"
OracleAS Single Sign-On and Oracle Delegated Administration Services components
Active-Active Section 8.9, "OracleAS Single Sign-On and Oracle Delegated Administration Services in Active-Active Configurations"

Distributed OracleAS Cold Failover Cluster (Identity Management) Topology
OracleAS Infrastructure: High Availability Topologies 9-25
9.5.4 Runtime and Failover for the OracleAS Single Sign-On and Oracle Delegated Administration Services Tier
See Section 8.9, "OracleAS Single Sign-On and Oracle Delegated Administration Services in Active-Active Configurations".
9.5.5 Runtime and Failover for the Oracle Internet Directory and Oracle Directory Integration and Provisioning Tier
See Section 8.8, "Oracle Internet Directory and Oracle Directory Integration and Provisioning in Active-Passive Configurations".
If You Are Running a Cold Failover Cluster DatabaseIf you are running a cold failover cluster database and are using one node as the active node for the database and the other node as the active node for Oracle Internet Directory (for example, Node 1 is the active node for Oracle Internet Directory, and Node 1 is the active node for the database), then the newly active node now runs all the processes. Both virtual hostnames now point to the new active node.
9.5.6 Startup ProcedureYou start the processes in the following order:
1. Start up the OracleAS Metadata Repository database.
2. On the active node for Oracle Internet Directory:
a. Start up Oracle Internet Directory.
b. Start up Application Server Control.
3. On each node running OracleAS Single Sign-On and Oracle Delegated Administration Services:
a. Start up OracleAS Single Sign-On, Oracle Delegated Administration Services, and Oracle HTTP Server.
b. Start up Application Server Control.
9.5.7 Stop ProcedureYou stop the processes in the following order:
1. On each node running OracleAS Single Sign-On and Oracle Delegated Administration Services:
a. Stop OracleAS Single Sign-On, Oracle Delegated Administration Services, and Oracle HTTP Server.
b. Stop Application Server Control.
2. On the active node for Oracle Internet Directory:
a. Stop Oracle Internet Directory.
b. Stop Application Server Control.
3. Stop the OracleAS Metadata Repository database.

OracleAS Cluster (Identity Management) Topology
9-26 Oracle Application Server High Availability Guide
9.5.8 Use of Application Server ControlFor Oracle Internet Directory, you can use Application Server Control to manage it. For the Application Server Control URL, you use the virtual hostname, for example: http://oid.mydomain.com:1156 (assuming Application Server Control is running on port 1156).
You can also use Application Server Control to manage OracleAS Single Sign-On and Oracle Delegated Administration Services. In this case, use the physical hostname for the Application Server Control URL.
9.6 OracleAS Cluster (Identity Management) TopologyIn an OracleAS Cluster (Identity Management) (see Figure 9–8), you run Oracle Identity Management components (Oracle Internet Directory, OracleAS Single Sign-On, Oracle Delegated Administration Services, and Oracle Directory Integration and Provisioning) on two or more nodes. Each node runs all of the Oracle Identity Management components mentioned above. A load balancer manages traffic to these nodes.
OracleAS Certificate Authority Not SupportedOracleAS Certificate Authority is not supported in an OracleAS Cluster (Identity Management). You can install and run OracleAS Certificate Authority separately.

OracleAS Cluster (Identity Management) Topology
OracleAS Infrastructure: High Availability Topologies 9-27
Figure 9–8 OracleAS Cluster (Identity Management)
The nodes running the Oracle Identity Management components should be functionally equivalent.
These nodes provide active-active availability for Oracle Identity Management services. OracleAS Single Sign-On and Oracle Delegated Administration Services run
Node4 (Active)Node3 (Active)im1.mydomain.com im2.mydomain.com
OHS
LDAP
LDAPLDAP
InterConnect
OracleAS MetadataRepository
OracleNET
DatabaseInstance
Node2 (Active)
mr2.mydomain.com
DataFiles
SharedStorage
DatabaseInstance
Node1 (Active)
Real Application Clusters
mr1.mydomain.com
OHS
OracleNET
OracleNET
OracleInternet
Directory
OracleInternet
Directory
FirewallHTTP(S)
HTTP(S)
LDAP
OracleNet
HTTP(S)
HTTP(S) HTTP(S)
SSO Requests HTTP(S)
Load Balancer
Virtual Server Name:mt.mydomain.com
Clients
Virtual Server Name:oid.mydomain.com
SSODAS
SSODAS
OracleASMiddle Tier 2
OracleASMiddle Tier 1
Virtual Server Name:sso.mydomain.com

OracleAS Cluster (Identity Management) Topology
9-28 Oracle Application Server High Availability Guide
on a single OC4J_SECURITY instance in each Oracle home. Oracle Internet Directory also runs on each node.
You configure the load balancer with three virtual server names, as shown in Figure 9–8:
■ one for OracleAS Single Sign-On. Clients use this virtual server name to access OracleAS Single Sign-On.
■ one for Oracle Internet Directory. LDAP and JNDI requests from middle tiers and OracleAS Single Sign-On use this virtual server name to access Oracle Internet Directory.
■ one for the middle tiers. Clients use this virtual server name to access the middle tiers.
OracleAS Single Sign-On, Oracle Delegated Administration Services, and Oracle Internet Directory access the OracleAS Metadata Repository database instances through Oracle Net load balancing. Note that OracleAS Single Sign-On establishes connection pools to access the database. A connection in the pool can be to any of the database instances in the Real Application Clusters.
9.6.1 Additional ConsiderationsThe following list includes important guidelines for managing an OracleAS Cluster (Identity Management) environment:
■ The port number used by the directory servers must be the same on all the nodes. Use of staticports feature to enforce this is strongly recommended. Even the LDAP ports configured in the LDAP virtual server on the load balancer should be the same as the LDAP ports configured on all the physical Oracle Internet Directory nodes.
■ The time value on all nodes should be synchronized using Greenwich Mean Time so that there is a discrepancy of no more than 250 seconds between them.
■ If you change the password to the Oracle Internet Directory-designated database, then you must update each of the other nodes in the OracleAS Cluster (Identity Management) environment.
■ In a Windows environment, make sure that Microsoft Cluster service is running.
■ For information on Oracle Internet Directory in OracleAS Cluster (Identity Management) environment, see these sections:
– Section 8.7.2, "Synchronizing Metadata in an OracleAS Cluster (Identity Management)"
– Section 8.7.3, "OID Monitor in an OracleAS Cluster (Identity Management) Environment"
– Section 8.7.4, "Managing an OracleAS Cluster (Identity Management) Environment"
9.6.2 Tiers in this TopologyTable 9–6 lists the tiers in this topology:

OracleAS Cluster (Identity Management) Topology
OracleAS Infrastructure: High Availability Topologies 9-29
9.6.3 External Load Balancer RequirementsThe Oracle Identity Management tier uses an external load balancer. This external load balancer should have the following features:
■ virtual server name and port configuration
■ death detection
■ persistence configuration for HTTP URLs
If you are using the same external load balancer for middle tiers, you may need additional features depending on which middle tier components you are running.
See Section 2.2.4.2, "External Load Balancers" for details on these features.
9.6.4 Installation HighlightsThe Oracle Application Server Installation Guide contains details on how to install this topology. Some highlights:
■ You need to configure the virtual server name on the load balancer before you run the installer.
■ You install the components in the following order:
1. Install OracleAS Metadata Repository on an existing database. This database should be a high availability database, such as a Real Application Clusters database or a cold failover cluster database.
2. Install Oracle Internet Directory, Oracle Directory Integration and Provisioning, OracleAS Single Sign-On, and Oracle Delegated Administration Services on each node. During installation, you enter the virtual server name configured on the external load balancer.
9.6.5 Runtime for the OracleAS Metadata Repository NodesThe nodes on this tier run an Oracle database configured for high availability (such as a Real Application Clusters database or a cold failover cluster database). You manage this database as you would any other Oracle database.
9.6.6 Runtime for the OracleAS Cluster (Identity Management) NodesAll the nodes on this tier are active. An external load balancer directs requests to these nodes. To access the components running on these nodes, clients use the appropriate virtual server name configured on the load balancer. For example, clients trying to access OracleAS Single Sign-On or Oracle Delegated Administration Services use the
Table 9–6 Tiers in an OracleAS Cluster (Identity Management)
Tier Configuration For Information on Managing This Tier, See:
OracleAS Metadata Repository Installed in an existing database
Chapter 7, "OracleAS Infrastructure: High Availability for OracleAS Metadata Repository"
Oracle Identity Management components Active-Active Section 8.5, "All Oracle Identity Management Components in Active-Active Configurations"

OracleAS Cluster (Identity Management) Topology
9-30 Oracle Application Server High Availability Guide
virtual server name for the HTTP protocol, while clients trying to access Oracle Internet Directory use the virtual server name for the LDAP protocol.
OPMN also runs on each node in this tier. If an OPMN-managed component fails, OPMN tries to restart it.
9.6.7 Failover on the OracleAS Cluster (Identity Management) NodesOPMN runs on each node to provide process management, monitoring, and notification services for the OC4J_SECURITY instances, Oracle HTTP Server, and oidmon processes. If any of these processes fails, OPMN detects the failure and attempts to restart it. If the restart is unsuccessful, the load balancer detects the failure (usually through a non-response timeout) and directs requests to an active process running on another node in the OracleAS Cluster (Identity Management).
oidmon monitors the oidldapd, oidrepld, and odisrv Oracle Internet Directory processes, while OPMN monitors oidmon. If oidldapd, oidrepld, or odisrv fails, oidmon attempts to restart it locally. Similarly, if oidmon fails, OPMN tries to restart it locally. Only one odisrv process and one oidrepld process can be active at any time in an OracleAS Cluster (Identity Management) while multiple oidldapd processes can run in the same cluster. See the Oracle Internet Directory Administrator’s Guide for details.
If a node fails, the load balancer detects the failure and redirects requests to a remaining active node. Because each node provides identical services as the others, all requests can be fulfilled by the remaining nodes.
For information on Oracle Internet Directory in OracleAS Cluster (Identity Management) and how directory replication can provide high availability, see Chapter 12, "Deploying Identity Management with Multimaster Replication".
9.6.8 Failover on the OracleAS Metadata Repository TierIf you installed the OracleAS Metadata Repository in an existing Real Application Clusters database, node failures are managed by Oracle Net and Real Application Clusters. Oracle Net redirects requests to remaining active database instances if any of the other database instances fail.
If you installed the OracleAS Metadata Repository in a cold failover cluster database, node failure is performed by switching the virtual hostname and IP to the standby node and starting the database processes on that node. Section 7.1.5, "Failing Over a Cold Failover Cluster Database" provides instructions on how to accomplish these tasks.
9.6.9 Startup ProcedureTo start up the processes on the different tiers, you have to start them up in the following order:
1. Start up the OracleAS Metadata Repository database.
2. On each node in the OracleAS Cluster (Identity Management), start up the Oracle Identity Management components.
3. Start up Application Server Control.
Distributed OracleAS Cluster (Identity Management) Topology
OracleAS Infrastructure: High Availability Topologies 9-31
9.6.10 Stop ProcedureTo stop the processes on the different tiers, you have to stop them in the following order:
1. On each node in the OracleAS Cluster (Identity Management), stop the Oracle Identity Management components.
2. Stop the OracleAS Metadata Repository database.
3. Stop Application Server Control.
9.6.11 Use of Application Server ControlYou can use Application Server Control to manage the Oracle Identity Management components in an OracleAS Cluster (Identity Management). For the OracleAS Metadata Repository, you manage the database using database management tools, such as Enterprise Manager.
For the OracleAS Cluster (Identity Management) nodes, you use the physical hostname in the Application Server Control URL, for example: http://im1.mydomain.com:1156 (assuming Application Server Control is running on port 1156).
9.7 Distributed OracleAS Cluster (Identity Management) TopologyThis is a variation of the OracleAS Cluster (Identity Management) Topology. Instead of running all the Oracle Identity Management components on each of the OracleAS Cluster (Identity Management) nodes, you separate out OracleAS Single Sign-On and Oracle Delegated Administration Services to run on another set of OracleAS Cluster (Identity Management) nodes. See Figure 9–9.
The advantage of this topology is that you can deploy the nodes running OracleAS Single Sign-On and Oracle Delegated Administration Services in the DMZ, and deploy Oracle Internet Directory inside your intranet, protected by the firewalls (as shown in Figure 9–9).
This topology provides flexibility in placing your components. In this topology:
■ You install the OracleAS Metadata Repository in an existing database.
■ Oracle Internet Directory runs on active-active nodes. Typically these nodes are in the same tier as the database.
■ OracleAS Single Sign-On and Oracle Delegated Administration Services are in an OracleAS Cluster (Identity Management). This means that they are configured identically on all nodes. For example, if you have two nodes, all OracleAS Single Sign-On instances running on both nodes have the same configuration, and all Oracle Delegated Administration Services instances have the same configuration.
The nodes running OracleAS Single Sign-On and Oracle Delegated Administration Services are active-active nodes. These nodes are placed in the DMZ.
These nodes are fronted by a load balancer that directs requests to them. Oracle Application Server middle tier and clients access OracleAS Single Sign-On and Oracle Delegated Administration Services using the virtual server name configured on this load balancer.

Distributed OracleAS Cluster (Identity Management) Topology
9-32 Oracle Application Server High Availability Guide
You can also install Oracle Application Server middle tiers on the OracleAS Single Sign-On and Oracle Delegated Administration Services nodes, if you like.
OracleAS Certificate Authority Not SupportedOracleAS Certificate Authority is not supported in an OracleAS Cluster (Identity Management). You can install and run OracleAS Certificate Authority separately.

Distributed OracleAS Cluster (Identity Management) Topology
OracleAS Infrastructure: High Availability Topologies 9-33
Figure 9–9 Distributed OracleAS Cluster (Identity Management)
OracleASMetadata
Repository
Firewall
Firewall
HTTP(S)
HTTP(S)
HTTP(S)
LDAP
OracleNet
The database can be a Real Application Clusters database
HTTPS
LDAP
LDAP
OracleNet
SSO RequestsHTTP(S)
Database
Node1 (Active)Physical Hostname:oid1.mydomain.com
Oracle InternetDirectory
Node2 (Active)Physical Hostname:oid2.mydomain.com
Oracle InternetDirectory
Node3 (Active)Physical Hostname:sso1.mydomain.com
Node4 (Active)Physical Hostname:sso2.mydomain.com
OHS OHS
Load Balancer
Virtual Server Name:mt.mydomain.com
Virtual Server Name:sso.mydomain.com
Clients
OracleASMiddle Tier 2
OracleASMiddle Tier 1
Load BalancerVirtual Server Name:oid.mydomain.com
SSODAS
SSODAS

Distributed OracleAS Cluster (Identity Management) Topology
9-34 Oracle Application Server High Availability Guide
9.7.1 Tiers in this TopologyTable 9–7 lists the tiers in this topology:
9.7.2 External Load Balancer RequirementsThe Oracle Identity Management tier uses an external load balancer. This external load balancer should have the following features:
■ virtual server name and port configuration
■ death detection
■ persistence configuration for HTTP URLs
If you are using the same external load balancer for middle tiers, you may need additional features depending on which middle tier components you are running.
See Section 2.2.4.2, "External Load Balancers" for details on these features.
9.7.3 Installation HighlightsThe Oracle Application Server Installation Guide contains details on how to install this topology. Some highlights:
■ You need to configure the virtual server name on the load balancer before you run the installer.
■ You install the components in the following order:
1. Install OracleAS Metadata Repository on an existing database. This database should be a high availability database, such as a Real Application Clusters database or a cold failover cluster database.
2. Install Oracle Internet Directory and Oracle Directory Integration and Provisioning on each node separately. During installation, you enter the virtual server name configured on the load balancer.
3. Install OracleAS Single Sign-On and Oracle Delegated Administration Services on each node separately. During installation, you enter the virtual server name configured on the load balancer.
Table 9–7 Tiers in an OracleAS Cluster (Identity Management)
Tier Configuration For Information on Managing This Tier, See:
OracleAS Metadata Repository Installed in an existing database
Chapter 7, "OracleAS Infrastructure: High Availability for OracleAS Metadata Repository"
Oracle Internet Directory and Oracle Directory Integration and Provisioning
Active-Active Section 8.7, "Oracle Internet Directory and Oracle Directory Integration and Provisioning in Active-Active Configurations"
OracleAS Single Sign-On and Oracle Delegated Administration Services
Active-Active Section 8.9, "OracleAS Single Sign-On and Oracle Delegated Administration Services in Active-Active Configurations"

Distributed OracleAS Cluster (Identity Management) Topology
OracleAS Infrastructure: High Availability Topologies 9-35
9.7.4 Runtime for the OracleAS Metadata Repository NodesThe nodes on this tier run an Oracle database configured for high availability (such as a Real Application Clusters database or a cold failover cluster database). You manage this database as you would any other Oracle database.
9.7.5 Runtime for the Oracle Internet Directory and Oracle Directory Integration and Provisioning Nodes
All the nodes on this tier are active. A load balancer directs requests to these nodes. To access Oracle Internet Directory, clients use the virtual server name for the LDAP protocol.
OPMN also runs on each node in this tier to monitor the oidmon process, which in turn monitors the Oracle Internet Directory processes. If oidmon fails, OPMN tries to restart it. If an Oracle Internet Directory process fails, oidmon tries to start it up.
9.7.6 Runtime for the OracleAS Single Sign-On and Oracle Delegated Administration Services Nodes
All the nodes on this tier are active. A load balancer directs traffic to these nodes. Clients send requests to OracleAS Single Sign-On and Oracle Delegated Administration Services using the load balancer’s HTTP virtual server name (sso.mydomain.com in Figure 9–9).
OracleAS Single Sign-On and Oracle Delegated Administration Services run in the OC4J_SECURITY instance on each node.
OPMN runs on each nodes to monitor Oracle HTTP Server and OC4J processes, including OC4J_SECURITY. If these processes go down, OPMN tries to restart them. If restart fails, the load balancer detects that the instance is not running on a node and directs requests to instances running on other nodes.
9.7.7 Failover on the OracleAS Cluster (Identity Management) NodesOPMN runs on each node to provide process management, monitoring, and notification services for the OC4J_SECURITY instances, Oracle HTTP Server, and oidmon processes. If any of these processes fails, OPMN detects the failure and attempts to restart it. If the restart is unsuccessful, the load balancer detects the failure (usually through a non-response timeout) and directs requests to an active process running on another node in the OracleAS Cluster (Identity Management).
If a node fails, the load balancer detects the failure and redirects requests to a remaining active node. Because each node provides identical services as the others, all requests can be fulfilled by the remaining nodes.
For information on Oracle Internet Directory in OracleAS Cluster (Identity Management) and how directory replication can provide high availability, see Chapter 12, "Deploying Identity Management with Multimaster Replication".
9.7.8 Failover on the OracleAS Metadata Repository TierIf you installed the OracleAS Metadata Repository in an existing Real Application Clusters database, node failures are managed by Oracle Net and Real Application Clusters. Oracle Net redirects requests to remaining active database instances if any of the other database instances fail.

Distributed OracleAS Cluster (Identity Management) Topology
9-36 Oracle Application Server High Availability Guide
If you installed the OracleAS Metadata Repository in a cold failover cluster database, node failure is performed by switching the virtual hostname and IP to the standby node and starting the database processes on that node. Section 7.1.5, "Failing Over a Cold Failover Cluster Database" provides instructions on how to accomplish these tasks.
9.7.9 Startup ProcedureStart up the processes on the different tiers in the following order:
1. Start up the OracleAS Metadata Repository database.
2. On each node in the Oracle Internet Directory tier:
a. Start up Oracle Internet Directory.
b. Start up Application Server Control.
3. On each node in the OracleAS Single Sign-On and Oracle Delegated Administration Services tier:
a. Start up OracleAS Single Sign-On, Oracle Delegated Administration Services, and Oracle HTTP Server.
b. Start up Application Server Control.
9.7.10 Stop ProcedureStop the processes on the different tiers in the following order:
1. On each node in the OracleAS Single Sign-On and Oracle Delegated Administration Services tier:
a. Stop OracleAS Single Sign-On, Oracle Delegated Administration Services, and Oracle HTTP Server.
b. Stop Application Server Control.
2. On each node in the Oracle Internet Directory tier:
a. Stop Oracle Internet Directory.
b. Stop Application Server Control.
3. Stop the OracleAS Metadata Repository database.
9.7.11 Use of Application Server ControlYou can use Application Server Control to manage the Oracle Identity Management components in a distributed OracleAS Cluster (Identity Management). For the OracleAS Metadata Repository, you manage the database using database management tools, such as Enterprise Manager.
For the OracleAS Single Sign-On/Oracle Delegated Administration Services nodes, you use the physical hostname in the Application Server Control URL, for example: http://sso1.mydomain.com:1156 (assuming Application Server Control is running on port 1156).

OracleAS Cold Failover Cluster (Infrastructure) and OracleAS Cold Failover Cluster (Middle-Tier) on the Same Nodes
OracleAS Infrastructure: High Availability Topologies 9-37
9.8 OracleAS Cold Failover Cluster (Infrastructure) and OracleAS Cold Failover Cluster (Middle-Tier) on the Same Nodes
In this topology, a middle tier runs in a cold failover configuration on the same nodes as the OracleAS Cold Failover Cluster (Infrastructure). The middle tier is in an OracleAS Cold Failover Cluster (Middle-Tier) configuration.
The OracleAS Cold Failover Cluster (Infrastructure) and OracleAS Cold Failover Cluster (Middle-Tier) have separate virtual hostnames mapping to separate virtual IPs. This enables the OracleAS Infrastructure and middle tier to fail over independently of each other.
In Figure 9–10, the OracleAS Infrastructure is active on Node 1, while the middle tier is active on Node 2. If Node 2 fails, the middle tier fails over to Node 1. If Node 1 fails, the OracleAS Infrastructure fails over to Node 2. By having the OracleAS Infrastructure active on one node and the middle tier active on the other node during normal operation, you are using resources efficiently as both nodes are performing work and no node is idle. This topology also provides high performance isolation because the middle tier and the OracleAS Infrastructure services run on separate environments.
See the Oracle Application Server Installation Guide for instructions on installing such a topology.
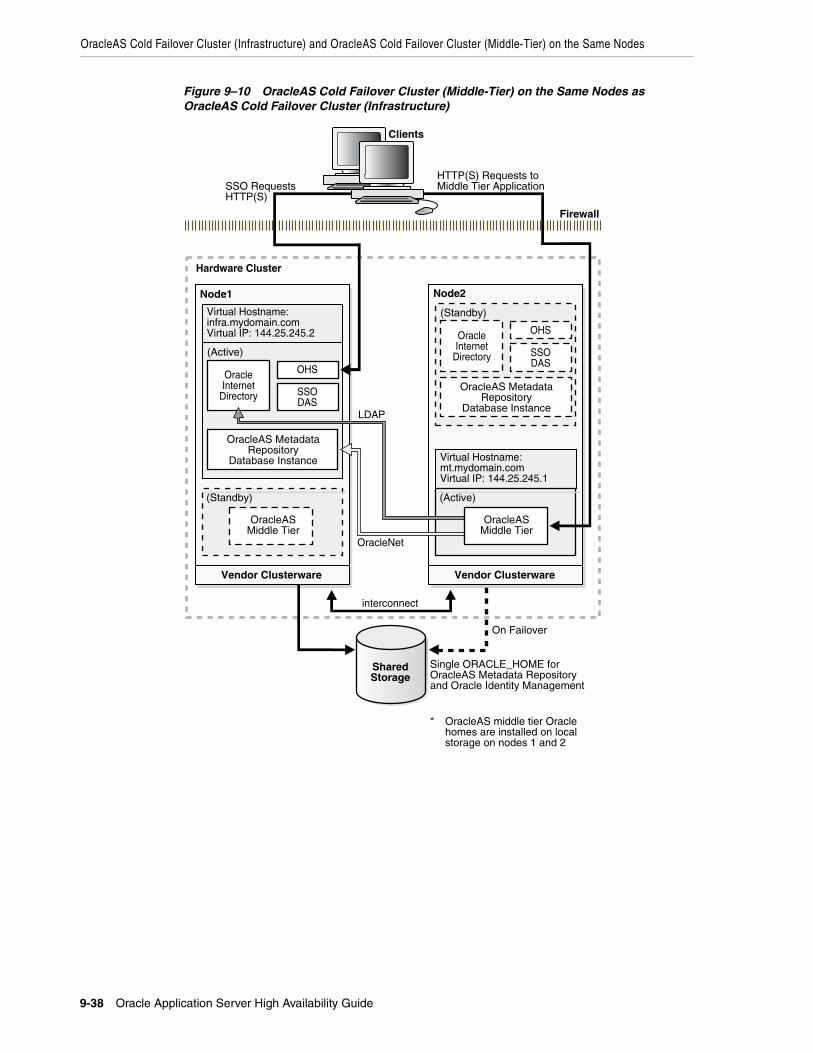
OracleAS Cold Failover Cluster (Infrastructure) and OracleAS Cold Failover Cluster (Middle-Tier) on the Same Nodes
9-38 Oracle Application Server High Availability Guide
Figure 9–10 OracleAS Cold Failover Cluster (Middle-Tier) on the Same Nodes as OracleAS Cold Failover Cluster (Infrastructure)
Vendor Clusterware
Node1
(Active)
Virtual Hostname: infra.mydomain.comVirtual IP: 144.25.245.2
OracleAS MetadataRepository
Database Instance
OHS
OracleASMiddle Tier
(Standby)
Node2
(Standby)
Virtual Hostname: mt.mydomain.comVirtual IP: 144.25.245.1
OracleAS MetadataRepository
Database Instance
OHS
SSODAS
OracleInternet
Directory
(Active)
Firewall
SharedStorage
SSO RequestsHTTP(S)
interconnect
Hardware Cluster
OracleInternet
Directory SSODAS
Single ORACLE_HOME forOracleAS Metadata Repositoryand Oracle Identity Management
* OracleAS middle tier Oracle homes are installed on local storage on nodes 1 and 2
On Failover
Vendor Clusterware
OracleASMiddle Tier
HTTP(S) Requests to Middle Tier Application
Clients
LDAP
OracleNet

Oracle Internet Directory High Availability And Failover Considerations 10-1
10Oracle Internet Directory High Availability
And Failover Considerations
While many Oracle customers deploy multiple identity management components, others choose to deploy only Oracle Internet Directory as a highly available identity repository. This chapter describes the availability and failover features of Oracle Internet Directory, and provides guidelines for exploiting these features in a typical directory deployment. It contains these topics:
■ Section 10.1, "About High Availability and Failover for Oracle Internet Directory"
■ Section 10.2, "Oracle Internet Directory and the Oracle Technology Stack"
■ Section 10.3, "Failover Options on Clients"
■ Section 10.4, "Failover Options in the Public Network Infrastructure"
■ Section 10.5, "High Availability and Failover Capabilities in Oracle Internet Directory"
■ Section 10.6, "Failover Options in the Private Network Infrastructure"
■ Section 10.7, "High Availability Deployment Examples"
10.1 About High Availability and Failover for Oracle Internet DirectoryOracle Internet Directory provides the high degree of system availability that mission-critical applications require. It does this by enabling:
■ All components in the system to facilitate redundancy
■ All interfaces to facilitate failure recognition and recovery, called failover
■ Integration of application-independent network failover capabilities in the overall deployment
Oracle products are commonly targeted for high availability environments and hence necessary capabilities are built into all layers of the Oracle technology stack. Typically, it is not necessary to employ every failover capability in every component.
10.2 Oracle Internet Directory and the Oracle Technology StackFigure 10–1 gives an overview of the various components of the Oracle Internet Directory stack. Stack communication between separate computers occurs by passing information from one node to the other through several layers of code. Information descends through layers on the client side. It is then packaged for transport across a network medium. The information then proceeds up the stack on the server side where it is translated and understood by the corresponding layers.

Failover Options on Clients
10-2 Oracle Application Server High Availability Guide
Figure 10–1 Oracle Internet Directory/Oracle Technology Stack
You can build sufficient fault tolerance mechanisms into each layer to ensure maximum availability of the product. The following sections describe some of the high availability options in each of these layers.
10.3 Failover Options on ClientsIncorporating enough intelligence in the clients so that they can failover to alternate Oracle directory servers in case the primary Oracle directory server fails is a good option in some cases. This requires the clients to cache alternate server information and use it upon recognizing connectivity loss. This method of guaranteeing availability is viable only for deployments in which one has full control over the type of clients accessing the directory.
This section contains these topics:
■ Section 10.3.1, "Alternate Server List from User Input"
■ Section 10.3.2, "Alternate Server List from the Oracle Internet Directory Server"
10.3.1 Alternate Server List from User InputThe clients can be designed to obtain the list of alternate Oracle directory servers from user input so that the clients can automatically failover in the event of a failure of the primary server. However, as the number of clients increases, this option does not scale very well in terms of administration of client installations.
LDAP clients(using C, Java
or PLSQL)
Public networkinfrastructure
(intelligent switches)
LDAP server(Oracle Directory
Server andOracle Directory
Replication Server)
Private networkinfrastructure
(Redundant NICs etc)
LDAP data storage(Oracle Application
Server Database andOracle Net Listener)

Failover Options in the Public Network Infrastructure
Oracle Internet Directory High Availability And Failover Considerations 10-3
10.3.2 Alternate Server List from the Oracle Internet Directory ServerOracle Internet Directory supports a DSE root attribute called AltServer. This is an LDAP Version 3 standard attribute and is to be maintained by the directory administrator. It points to other Oracle directory servers in the system with the same set of naming contexts as that of the local server. When connectivity to the local server is lost, clients have the option of accessing one of the servers listed in this attribute. This option requires explicit administrative action to maintain this attribute.
Clients should cache the information in the alternate server list for use in the event that the primary server becomes unavailable.
10.3.2.1 Setting the Alternate Server List by Using Oracle Directory ManagerTo set the alternate server list:
1. In the navigator pane, expand Oracle Internet Directory Servers, then select a server instance. System operational attributes appear in the right pane.
2. In the Alternate Server field, enter the name or names of alternate servers.
3. Choose OK.
10.4 Failover Options in the Public Network InfrastructureThe network used to access Oracle Internet Directory services is called the Public Network Infrastructure. Providing network level load balancing and failover measures (connection re-direction) in the Public Network Infrastructure are highly recommended because these measures provide a high degree of flexibility and transparency to application clients.
If the Oracle Internet Directory services are accessed from the Internet, this would include a couple of high speed links (T1 to T3) and an intelligent TCP/IP level load balancer. If the Oracle Internet Directory services are accessed from an Intranet, this would include high speed LAN connections to the server computers running the Oracle directory server and an intelligent TCP/IP level load balancer. In both cases, there would be more than one computer serving LDAP requests so that failure of one Oracle directory server computer would not affect availability.
Figure 10–2 illustrates a typical Internet deployment of Oracle Internet Directory with network-level failover enabled.
See Also:
■ RFC 2251 at http://www.ietf.org for details about the usage of altServer attribute
■ "Managing Attributes by Using Command-Line Tools" in the "Directory Schema Administration" chapter in Oracle Internet Directory Administrator’s Guide for instructions about setting the AltServer attribute

Failover Options in the Public Network Infrastructure
10-4 Oracle Application Server High Availability Guide
Figure 10–2 Network-Level Failover
In Figure 10–2, the Oracle directory servers (LDAP servers) can be connected to either the same back-end database or different back-end databases. In this deployment, network-level load balancing can be accomplished by both hardware and software solutions.
This section contains these topics:
■ Section 10.4.1, "Hardware-Based Load Balancing"
■ Section 10.4.2, "Software-Based Load Balancing"
10.4.1 Hardware-Based Load BalancingHardware-based load balancing technology is available from several vendors. These redirection devices connect directly to the Internet and can route requests among several server computers. They can also detect computer failures and stop routing requests to the failed computer. This feature guarantees that new connections from clients will not be routed to a failed computer. When a computer comes back, the device detects it and starts routing new requests to it. These devices also perform some load balancing, which makes sure that client requests are uniformly distributed.
Some of the vendors providing hardware based re-direction technologies are:
■ Accelar Server Switches from Nortel Networks
■ Local Director from Cisco
■ BIG/ip from F5 Labs Inc.
■ Hydra from HydraWEB Technologies
■ Equalizer from Coyote Point Systems
10.4.2 Software-Based Load BalancingThe software-based solutions essentially work in the same manner as their hardware counterparts. Some of the currently available solutions include Dispatch from Resonate and Network Dispatcher from IBM.
Host B
LDAP Client
Internet
LDAP Client
Firewall
Host A
Load Balancer
OracleDirectoryServer
OracleDirectoryServer

High Availability Deployment Examples
Oracle Internet Directory High Availability And Failover Considerations 10-5
10.5 High Availability and Failover Capabilities in Oracle Internet Directory
Multimaster replication makes it possible for the directory system to be available for both access and updates at all times, as long as at least one of the nodes in the system is available. When a node comes back online after a period of unavailability, replication from the existing nodes will resume automatically and cause its contents to be synchronized transparently.
Any directory system with high availability requirements should always employ a network of replicated nodes in multimaster configuration. A replica node is recommended for each region that is separated from others by a relatively low speed or low bandwidth network segment. Such a configuration, while allowing speedy directory access to the clients in the same region, also serves as a failover arrangement during regional failures elsewhere.
10.6 Failover Options in the Private Network InfrastructureThe Private Network Infrastructure is the network used by Oracle Internet Directory and its back-end components to communicate with each other. In cases where Oracle Internet Directory is deployed on the Internet, Oracle Corporation recommends that this network be physically different from the network used to serve client requests. In cases where Oracle Internet Directory is deployed over an Intranet, the same LAN may be used, but Oracle Internet Directory components should have dedicated bandwidth with the help of a network switch. Because Oracle Internet Directory depends on the Private Network Infrastructure for its communications, you must take adequate precautions to guarantee availability in the event of failures in the Private Network. Some of the options available in this area are:
■ Section 10.6.1, "IP Address Takeover (IPAT)"
■ Section 10.6.2, "Redundant Links"
10.6.1 IP Address Takeover (IPAT)IP address takeover feature is available on many commercial clusters. This feature protects an installation against failures of the Network Interface Cards (NICs). To make this mechanism work, installations must have two NICs for each IP address assigned to a server. Both the NICs must be connected to the same physical network. One NIC is always active while the other is in a standby mode. The moment the system detects a problem with the main adapter, it immediately fails over to the standby NIC. Ongoing TCP/IP connections are not disturbed and as a result clients do not notice any downtime on the server.
10.6.2 Redundant LinksSince all networks (with the exception of wireless networks) are comprised of wires going from one location to the other, there is a distinct possibility that someone might unintentionally disconnect a wire that is used to link a client computer to a server computer. If you want to take such precautions, use NICs and hubs/switches that come with the capability to use redundant links in case of a link level failure.
10.7 High Availability Deployment ExamplesIn Figure 10–3, both the database and Oracle directory server (LDAP server) reside on the same computer. Changes on one directory server instance are reflected on the

High Availability Deployment Examples
10-6 Oracle Application Server High Availability Guide
second directory server instance through multimaster replication. When a failure of the directory server or database server on a particular node occurs, it is elevated to a computer failure so that the load balancer will stop handing off connections to the computer on which there was a failure.
Figure 10–3 Deployment Example (Two Oracle Internet Directory Nodes in Replication)
As Figure 10–4 illustrates, each region can be set up with two Oracle Internet Directory nodes replicating between each other. This configuration is typical of global directory networks deployed by large enterprises where each of the regions could potentially represent a continent or a country.
LDAP Client
Internet
LDAP Client
Firewall
Oracle DirectoryServer
Host A
Oracle DirectoryServer
Host B
OIDMulti-masterReplication
Oracle Application Server data files
Oracle Application Server data files
OracleDatabase
Server
OracleDatabase
Server
Load Balancer
OracleDirectoryServer
OracleDirectoryServer

High Availability Deployment Examples
Oracle Internet Directory High Availability And Failover Considerations 10-7
Figure 10–4 Deployment Example 2
Oracle InternetDirectoryServer #4
Region B
LDAP Clients
Oracle InternetDirectoryServer #3
Oracle InternetDirectoryServer #2
Region A
LDAP Clients
OIDMulti-masterReplication
WANLink
Oracle InternetDirectoryServer #1
Load Balancer
Load Balancer

High Availability Deployment Examples
10-8 Oracle Application Server High Availability Guide

Oracle Internet Directory in Oracle Real Application Clusters Environment 11-1
11Oracle Internet Directory in Oracle Real
Application Clusters Environment
Oracle Real Application Clusters is a computing environment that harnesses the processing power of multiple, interconnected computers. Along with a collection of hardware, called a cluster, it unites the processing power of each component to become a single, robust computing environment. A cluster comprises two or more computers, also called nodes.
This chapter discusses the ways you can run Oracle Internet Directory in an Oracle Real Application Clusters system. It contains these topics:
■ Section 11.1, "Terminology"
■ Section 11.2, "Installing Oracle Internet Directory against a Real Application Clusters Database"
■ Section 11.3, "Oracle Internet Directory in an Oracle Real Application Clusters Environment"
■ Section 11.4, "Oracle Directory Server Connection Modes to Real Application Clusters Database Instances"
■ Section 11.5, "Oracle Directory Replication Between Oracle Internet Directory Real Application Clusters Nodes"
■ Section 11.6, "About Changing the ODS Password on a Real Application Clusters Node"
11.1 Terminology■ Node
A computer where an instance resides. It can be part of a Massively Parallel Computing Infrastructure in which it shares disk storage with other nodes. In most cases, a node has its own copy of the operating system.
■ Cluster
A set of instances, each typically running on a different node, that coordinate with each other when accessing the shared database on the disk
■ Cluster Manager
An operating system-dependent component that discovers and tracks the membership state of nodes by providing a common view of cluster membership across the cluster
■ Transparent Application Failover (TAF)

Installing Oracle Internet Directory against a Real Application Clusters Database
11-2 Oracle Application Server High Availability Guide
A runtime failover for high-availability environments, such as Oracle Real Application Clusters and Oracle Fail Safe, that refers to the failover and re-establishment of application-to-service connections. It allows client applications to automatically reconnect to the database if the connection fails, and optionally resume a SELECT statement that was in progress. This reconnect happens automatically from within the Oracle Call Interface (OCI).
The client notices no connection loss as long as there is one instance left serving the application.
■ Connect-time failover
Failover method in which a client connect request is forwarded to another listener if the first listener is not responding. It is enabled by service registration, because the listener knows whether an instance is running before attempting a connection.
11.2 Installing Oracle Internet Directory against a Real Application Clusters Database
For information on installing Oracle Internet Directory against a Real Application Clusters database, see the chapter entitled "Installing in High Availability Environments: OracleAS Cluster (Identity Management)" in the Oracle Application Server Installation Guide.
11.3 Oracle Internet Directory in an Oracle Real Application Clusters Environment
To achieve a very comprehensive high availability configuration, you can configure Oracle Internet Directory to run in the Real Application Clusters active-active mode. This involves running Oracle Internet Directory processes and the Oracle Internet Directory-designated database on all the Real Application Clusters nodes.
Figure 11–1 shows a two-node cluster on which an Oracle Real Application Clusters database is configured.

Oracle Internet Directory in an Oracle Real Application Clusters Environment
Oracle Internet Directory in Oracle Real Application Clusters Environment 11-3
Figure 11–1 Oracle Internet Directory with Basic High Availability Configuration
As Figure 11–1 shows:
■ Oracle directory server instance 1 is active on Real Application Clusters Node 1 and Oracle directory server instance 2 is active on Real Application Clusters Node 2. Note that multiple Oracle directory server instances can be started on each node.
■ Oracle directory integration and provisioning server instances are active on both nodes.
■ The Oracle directory replication server instance is active on one node only. If the node fails, then the OID Monitor on the surviving node pulls the Oracle directory replication server instance from the failed node and starts it on the surviving node.
■ The LDAP client applications can be configured to communicate with Oracle Internet Directory on different Real Application Clusters nodes directly. Alternatively, the Oracle Internet Directory server instances can be front-ended by a LAN redirector to get a single system image of the Real Application Clusters nodes.
■ When one Real Application Clusters node is unavailable because of failure or maintenance purposes, Oracle Internet Directory on the other Real Applications Clusters node is available. The LDAP clients connected to Oracle Internet Directory on the failed Real Applications Clusters node must reconnect.
Real Application Clusters Node 1
Shared Disk Subsystem
OracleDatabase
ServerInstance 1
OracleDirectoryReplication
Server
OracleDirectoryServer
Instance 1
OracleDirectoryIntegration
Server
OracleDatabase
ServerInstance 2
Real Application Clusters Node 2
LAN Redirector
LDAP Clients
OracleDirectoryServer
Instance 2

Oracle Directory Server Connection Modes to Real Application Clusters Database Instances
11-4 Oracle Application Server High Availability Guide
11.4 Oracle Directory Server Connection Modes to Real Application Clusters Database Instances
This section discusses the various connection modes possible for Oracle directory server instances communicating with Oracle Real Application Clusters database instances. These connection modes are transparent to the Oracle Internet Directory clients, and do not affect the way in which Oracle Internet Directory communicates with its clients.
This section contains these topics:
■ Section 11.4.1, "Load_balance Parameter"
■ Section 11.4.2, "Connect-Time Failover (CTF)"
■ Section 11.4.3, "Transparent Application Failover (TAF)"
■ Section 11.4.4, "Configuring the tnsnames.ora File for the Failover"
11.4.1 Load_balance ParameterIf the load_balance parameter in the tnsnames.ora file is set to ON, then Oracle Internet Directory connections to the Oracle Database are distributed to each Oracle Database node. During failover of any node, only connections to the failed node are redirected to the available Oracle Database nodes.
If the load_balance parameter is set to off, then all the Oracle Internet Directory connections to the Oracle Database are to one Oracle Database node only.
During failover, all the connections are redirected to the available Oracle Database nodes.
11.4.2 Connect-Time Failover (CTF)At the time of connection to the Oracle Database by the Oracle directory servers, if the primary Oracle Database node is not available, then Oracle Internet Directory servers connect to the backup—that is, secondary—database.
11.4.3 Transparent Application Failover (TAF)To configure TAF, in the tnsnames.ora file, add type=select and method=preconnect.
During any LDAP search operation, if the primary Oracle Database node fails, then the Oracle directory server transparently connects to the backup—that is, the secondary—Oracle Databasee node, and the current LDAP search operation continues.
11.4.4 Configuring the tnsnames.ora File for the FailoverThis section shows configurations of the tnsnames.ora files on two nodes.
Node 1db.us.acme.com= (description= (load_balance=off/on) /* only connect time load balancing & connection load balancing */ (failover=on) /* only connect time failover */ (address= (protocol=tcp)
Oracle Directory Server Connection Modes to Real Application Clusters Database Instances
Oracle Internet Directory in Oracle Real Application Clusters Environment 11-5
(host=db1) (port=1521)) (address= (protocol=tcp) (host=db2) (port=1521)) (connect_data= (service_name=db.us.acme.com) (failover_mode= (backup=db2.acme.com) (type=select) (method=preconnect))))
db2.acme.com= (description= (address= (protocol=tcp) (host=db2) (port=1521)) (connect_data= (service_name=db.us.acme.com) (instance_name=db2) (failover_mode= (backup=db2.acme.com) (type=select) (method=preconnect)) ))
Node 2db.us.acme.com= (description= (load_balance=off/on) /* only connect time load balancing & connection load balancing */ (failover=on) /* only connect time failover */ (address= (protocol=tcp) (host=db2) (port=1521)) (address= (protocol=tcp) (host=db1) (port=1521)) (connect_data= (service_name=db.us.acme.com) (failover_mode= (backup=db1.acme.com) (type=select) (method=preconnect))))
db1.acme.com= (description= (address= (protocol=tcp) (host=db1) (port=1521)) (connect_data= (service_name=db.us.acme.com) (instance_name=db2) (failover_mode= (backup=db2.acme.com)

Oracle Directory Replication Between Oracle Internet Directory Real Application Clusters Nodes
11-6 Oracle Application Server High Availability Guide
(type=select) (method=preconnect))))
11.5 Oracle Directory Replication Between Oracle Internet Directory Real Application Clusters Nodes
Directory replication can be configured between two or more Oracle Internet Directory Real Application Clusters nodes.
■ Each node in the directory replication group (DRG) is an Oracle Internet Directory Real Application Clusters node
■ Directory replication brings in geographic availability, and the Oracle Internet Directory Real Application Clusters nodes in the DRG ensure local availability, manageability, and scalability
11.6 About Changing the ODS Password on a Real Application Clusters Node
If you change the ODS password on one Real Application Clusters node by using the OID Database Password Utility, then you must update the wallet $ORACLE_HOME/ldap/admin/oidpwdlldap1 on the other Real Application Clusters nodes. Do this either by copying the changed wallet to all the nodes, or by invoking the OID Database Password Utility on all other nodes to update the wallet file only. This applies to the replication password changes also. Here the Replication Environment Management Tool is used instead of the OID Database Password Utility.
Note: If the primary node running either the directory replication server (oidrepld), or the Oracle directory integration and provisioning server (odisrv), or both fails, then the OID Monitor on the secondary node starts these processes on the secondary node after five minutes. However, when the primary node is restarted, these servers are not automatically restarted on the primary node.
Normal shutdown is not treated as a failover—that is, after a normal shutdown, the OID Monitor on the secondary node does not start these processes on the secondary node after five minutes. However, as in the case of a failure, when the primary node is restarted, these servers are not automatically restarted on the primary node.

Deploying Identity Management with Multimaster Replication 12-1
12Deploying Identity Management with
Multimaster Replication
This chapter provides high-level instructions for installing Oracle Identity Management components with Oracle Internet Directory multimaster replication. This chapter assumes that you are familiar with Oracle Application Server components, including: Oracle Internet Directory, OracleAS Single Sign-On, Oracle Delegated Administration Services, and Oracle Directory Integration and Provisioning. You should also be familiar with Oracle Internet Directory replication concepts.
You might find the following documentation pointers useful:
Keep the following points in mind when using the command-line tools mentioned in this chapter:
■ The ORACLE_HOME, MASTER_HOME, and REPLICA_HOME variables designate absolute Oracle home paths.
■ Use the appropriate path separator while running the commands. The notation in this chapter is based on the UNIX path variable notation. For example, the ldapadd tool is located in the $ORACLE_HOME/bin directory in the UNIX environment. In the Windows environment, this tool is located in the ORACLE_HOME\bin directory.
■ The PATH environment variable should include ORACLE_HOME\bin, ORACLE_HOME\ldap\bin and ORACLE_HOME\opmn\bin directories.
■ Include $ORACLE_HOME/lib in the appropriate library environment variable. For example, in the Solaris environment, include $ORACLE_HOME/lib in the LD_LIBRARY_PATH environment variable.
This chapter contains the following sections:
■ Section 12.1, "Multimaster Identity Management Replication Configuration"
For information on See:
Running a replicated Oracle Internet Directory "Oracle Internet Directory Replication Administration" chapter in the Oracle Internet Directory Administrator’s Guide
Deploying Oracle Identity Management with fan-out replication
Oracle Identity Management Concepts and Deployment Planning Guide
Using Oracle Directory Integration and Provisioning with Oracle Internet Directory
Oracle Identity Management Integration Guide
Using Oracle Delegated Administration Services with Oracle Internet Directory
Oracle Identity Management Guide to Delegated Administration

Multimaster Identity Management Replication Configuration
12-2 Oracle Application Server High Availability Guide
■ Section 12.2, "Adding a Node to a Multimaster Replication Group"
■ Section 12.3, "Deleting a Node from a Multimaster Replication Group"
12.1 Multimaster Identity Management Replication ConfigurationIn Figure 12–1, the Oracle Identity Management master node includes Host 1 and Host 2. OracleAS Metadata Repository, Oracle Internet Directory, and Oracle Directory Integration and Provisioning are installed on Host 1. OracleAS Single Sign-On and Oracle Delegated Administration Services are installed on Host 2.
Similarly, the Oracle Identity Management replica node includes Host 3 and Host 4. OracleAS Metadata Repository, Oracle Internet Directory, and Oracle Directory Integration and Provisioning are installed on Host 3. OracleAS Single Sign-On and Oracle Delegated Administration Services are installed on Host 4.
Figure 12–1 Multimaster Replication Configuration with Two Hosts Per Node
MetadataRepository
MetadataRepository
HOST 2 HOST 4
MasterNode
ReplicaNode
HTTPLoad Balancer
HOST 1 HOST 3
MasterHome
ReplicaHome
LDAPLoad Balancer
DistributedConfigurationManagement
Multi-Master OID/SSO Replication
OracleInternet
Directory
DistributedConfigurationManagement
OracleASSingle
Sign-On
OracleDelegated
AdministrationServices
DistributedConfigurationManagement
OracleASSingle
Sign-On
OracleDelegated
AdministrationServices
DistributedConfigurationManagement
OracleDirectory
Integration Platform
OracleInternet
Directory
OracleDirectory
Integration Platform

Multimaster Identity Management Replication Configuration
Deploying Identity Management with Multimaster Replication 12-3
12.1.1 Master Node InstallationInstall Oracle Internet Directory and Oracle Directory Integration and Provisioning on the master node as follows:
■ In the Oracle Application Server installer on Host 1: select Identity Management and Metadata Repository in the Select Installation Type screen, and select Oracle Internet Directory and Oracle Directory Integration and Provisioning in the Select Configuration Options screen. This chapter refers to this Oracle home on Host 1 as the MASTER_HOME.
■ Do not install any other Identity Management components such as OracleAS Single Sign-On or Oracle Delegated Administration Services on Host 1.
12.1.2 Replica Node InstallationInstall Oracle Internet Directory with OracleAS Metadata Repository on the replica node as follows:
■ In the Oracle Application Server installer on Host 3:
Select Identity Management and Metadata Repository in the Select Installation Type screen.
Select Oracle Internet Directory, Oracle Directory Integration and Provisioning, High Availability and Replication in the Select Configuration Options screen.
This chapter refers to this Oracle home on Host 3 as the REPLICA_HOME. This Oracle home will have only Oracle Internet Directory with OracleAS Metadata Repository and Oracle Directory Integration and Provisioning. The OracleAS Metadata Repository database should have a unique global database name.
■ Do not install any other Oracle Identity Management components, such as OracleAS Single Sign-On and Oracle Delegated Administration Services on Host 3.
12.1.3 Multimaster Replication SetupUse the following procedure to set up replication between the master node and the replica node.
1. Perform the following tasks in the Oracle Internet Directory Administrator’s Guide to set up the master and the replica nodes for replication:
Note: When installing the replica, be sure to select High Availability and Replication in the Select Configuration Options screen so that the installer will prompt you for the replication type. It will ask you to select ASR Replica or LDAP Replica. Select ASR Replica.
Item Name
Book Oracle Internet Directory Administrator’s Guide
This book is available in the Oracle Application Server documentation set.
Chapter 25, "Oracle Internet Directory Replication Administration"
Section "Installing and Configuring a Multimaster Replication Group"
Multimaster Identity Management Replication Configuration
12-4 Oracle Application Server High Availability Guide
2. A workaround is required for release 10g (10.1.2).
On the master node (node 2), run this command:
@ sqlplus REPADMIN/password exec DBMS_REPCAT.DROP_MASTER_REPOBJECT ( sname =>'ORASSO', oname => 'WWSEC_PERSON$', type => 'TABLE', drop_objects => false );
On each node in the replication group, run this command:
sqlplus "/ as sysdba"delete from orasso.wwsec_person$ where user_name not like '%PUBLIC';commit;
12.1.4 Installing OracleAS Single Sign-On and Oracle Delegated Administration Services on the Master Node
Install OracleAS Single Sign-On and Oracle Delegated Administration Services as follows:
1. On Host 2, install OracleAS Single Sign-On and Oracle Delegated Administration Services so that those components use the OracleAS Metadata Repository and Oracle Internet Directory on Host 1. To do that, make the following selections in the installation screens:
a. Specify File Locations - enter the destination directory where you want to install OracleAS Single Sign-On and Oracle Delegated Administration Services.
b. Select a Product to Install - select Oracle Application Server Infrastructure.
c. Select Installation Type - select Identity Management.
d. Confirm Pre-Installation Requirements - verify that you meet the requirements and select all the checkboxes.
e. Select Configuration Options - select OracleAS Single Sign-On, Oracle Delegated Administration Services, and High Availability and Replication.
f. Specify Port Configuration Options - select Automatic.
g. Select High Availability Option - select OracleAS Cluster (Identity Management).
Task Task 3: Set Up Oracle Database Advanced Replication for a Directory Replication Group
Task 5: Ensure that Oracle Directory Server Instances Are Started on All the Nodes
Task 6: Start the Replication Servers on All Nodes in the DRG
Task 7: Test Directory Replication
See Also: Replication information in the Oracle Internet Directory Administrator’s Guide
Item Name

Multimaster Identity Management Replication Configuration
Deploying Identity Management with Multimaster Replication 12-5
h. Create or Join an Oracle Application Server Cluster (Identity Management) - select Create a New Oracle Application Server Cluster.
i. Specify New Oracle Application Server Cluster Name - enter a name for the new cluster.
j. Specify LDAP Virtual Host and Ports - enter the physical hostname of Host 1 (not the virtual name configured on the load balancer), and the necessary ports for Oracle Internet Directory.
k. Specify Oracle Internet Directory Login - enter the login and password for Oracle Internet Directory.
l. Specify HTTP Listen Port, Load Balancer Host and Port - enter the port number that you want to use for Oracle HTTP Server in HTTP Listener Port. In HTTP Load Balancer Hostname and Port, enter the HTTP virtual hostname configured on the load balancer and the port number configured for the virtual hostname.
m. Specify Instance Name and ias_admin Password - enter a name for this Oracle Application Server instance, and the password for the ias_admin user.
2. Repeat this procedure to install additional OracleAS Single Sign-On and Oracle Delegated Administration Services instances, as needed.
12.1.5 Synchronizing the OracleAS Single Sign-On Schema PasswordTo synchronize the OracleAS Single Sign-On schema password between the master Metadata Repository database (MDS) and the replica Metadata Repository database (RMS), follow the steps in the following section:
Whenever you add a new Oracle Application Server Single Sign-On and Oracle Delegated Administration Services replica, you must first perform this step from the master Oracle home on the replica to synchronize the Oracle Application Server Single Sign-On schema password with the OracleAS Metadata Repository.
Note: You can place OracleAS Single Sign-On and Oracle Delegated Administration Services instances in the same cluster only if all the instances in the cluster use the same OracleAS Metadata Repository. For example, in Figure 12–1, you cannot place the instances on Host 2 and Host 4 in the same cluster because they use different OracleAS Metadata Repositories. But if you install another OracleAS Single Sign-On and Oracle Delegated Administration Services instance, and set it to use the OracleAS Metadata Repository on Host 1, you can cluster it with the instance on Host 2.
Item Name
Book Oracle Application Server Single Sign-On Administrator’s Guide
This book is available in the Oracle Application Server documentation set.
Chapter 9, "Advanced Deployment Options"
Section "Configuring the Identity Management Database for Replication"
Step Perform step 2.

Multimaster Identity Management Replication Configuration
12-6 Oracle Application Server High Availability Guide
12.1.6 Installing OracleAS Single Sign-On and Oracle Delegated Administration Services on the Replica Node
Install OracleAS Single Sign-On and Oracle Delegated Administration Services on the replica node as follows:
1. On Host 4, install OracleAS Single Sign-On and Oracle Delegated Administration Services so that those components use the Metadata Repository and Oracle Internet Directory on the replica node (Host 3). To do this, follow the screen sequence shown in step 1 on page 12-4, with the following differences:
■ In step h on page 12-5, you also create a new cluster. You cannot join this instance (on Host 4) with the instance on Host 2 in the same cluster because the instances use different OracleAS Metadata Repositories.
■ In step j on page 12-5, enter the physical hostname for Host 3 instead of Host 1, because you want OracleAS Single Sign-On and Oracle Delegated Administration Services to use the Oracle Internet Directory running on Host 3.
2. Synchronize the mod_osso configuration from the master middle tier, as described in the following section:
3. Repeat this procedure to install additional OracleAS Single Sign-On and Oracle Delegated Administration Services instances, as needed.
12.1.7 Oracle Directory Integration and Provisioning Event Propagation in a Multimaster Scenario
Oracle Directory Integration and Provisioning supports high availability in an Oracle Internet Directory multimaster replicated scenario, with certain drawbacks. In this high availability scenario, when changes are applied to Oracle Internet Directory on one node, the changes get propagated to the other consumer nodes. The Oracle Directory Integration and Provisioning server running on each node is responsible for event propagation to the configured applications on that node. That is, the applications that have provisioning profiles on that Oracle Internet Directory node will be informed of the changes happening on that Oracle Internet Directory node.
Note: If you encounter errors, the OracleAS Metadata Repository might be misconfigured. Either the MDS or RMS might not have the correct database information, as used by OracleAS Single Sign-On.
Item Name
Book Oracle Application Server Single Sign-On Administrator’s Guide
This book is available in the Oracle Application Server documentation set.
Chapter 9, "Advanced Deployment Options"
Section "Configuration Steps"
Step Reregister mod_osso on the single sign-on middle tiers
See Also: Oracle Identity Management Integration Guide

Adding a Node to a Multimaster Replication Group
Deploying Identity Management with Multimaster Replication 12-7
12.1.8 Load Balancer Configuration in a Multimaster Replication ScenarioFigure 12–1 shows two load balancers: one for HTTP requests and one for LDAP requests. Note the following points when you configure these load balancers:
■ The LDAP load balancer does not accept requests from OracleAS Single Sign-On and Oracle Delegated Administration Services.
OracleAS Single Sign-On and Oracle Delegated Administration Services should not use the LDAP load balancer because they need to send requests only to the Oracle Internet Directory in the same "stack", where a stack consists of OracleAS Single Sign-On and its corresponding Oracle Internet Directory. You associated this OracleAS Single Sign-On with its Oracle Internet Directory during installation (see step 1(j) on page 12-5).
For example, in Figure 12–1, OracleAS Single Sign-On and Oracle Delegated Administration Services on Host 2 and the Oracle Internet Directory on Host 1 make up one stack, and OracleAS Single Sign-On and Oracle Delegated Administration Services on Host 4 and the Oracle Internet Directory on Host 3 make up another stack.
■ All other LDAP requests (other than the ones from OracleAS Single Sign-On / Oracle Delegated Administration Services) should go through the LDAP load balancer. For example, requests from OracleAS Portal should go through the LDAP load balancer.
■ The HTTP load balancer should monitor both the OracleAS Single Sign-On servers and the Oracle Internet Directory servers on all nodes. It needs to do this so that it can ensure that the HTTP and LDAP requests are routed to the same "stack". For example, if the Oracle Internet Directory on Host 1 is down, then the HTTP load balancer should route HTTP requests only to the OracleAS Single Sign-On server on Host 4 because its Oracle Internet Directory server on Host 3 is up.
■ The HTTP load balancer should be configured for persistent routing of HTTP requests.
For details on deploying applications in a replicated environment, see section 3.3.2.7, "Application Deployments in Replicated Directory Environments", in the Oracle Identity Management Concepts and Deployment Planning Guide.
12.2 Adding a Node to a Multimaster Replication GroupTo add a replication node to a functioning directory replication group (DRG), follow these steps.
1. First, install the new node.
Install Identity Management and Metadata Repository. This installation will have only the Metadata Repository, Oracle Internet Directory and Oracle Directory Integration and Provisioning. The replica node Metadata Repository should have a unique global database name.
Do not install other Identity Management components such as OracleAS Single Sign-On or Oracle Delegated Administration Services.
2. Prepare the environment for adding a node.
a. Configure the Oracle Net Services environment as described in Task 3, Installing and Configuring a Multimaster Replication Group, in the "Oracle Internet Directory Replication Administration" chapter of Oracle Internet Directory Administrator’s Guide.

Adding a Node to a Multimaster Replication Group
12-8 Oracle Application Server High Availability Guide
b. Stop the directory replication server on all nodes
c. Identify a sponsor node and switch the sponsor node to read-only mode
Note: While the sponsor node is in read-only mode, do not make any updates to it. You may, however, update any of the other nodes, but those updates are not replicated immediately. Also, the sponsor node and the MDS can be the same node.
d. Back up the sponsor node by using ldifwrite. Enter the following command:
$ORACLE_HOME/bin/ldifwrite -c connect_string \ -b "orclagreementid=000001,cn=replication configuration" \ -f output_ldif_file
3. Add the node into the replication group.
a. Perform the Advanced Replication add node setup on the sponsor node by typing:
$ORACLE_HOME/bin/remtool -addnode
The Replication Environment Management Tool adds the node to the DRG.
b. Switch the sponsor node to updatable mode.
c. Start the directory replication server on all nodes except the new node.
d. Stop oidmon
e. Load data into the new node, as follows:
First do a check and generate by typing:
$ORACLE_HOME/ldap/bin/bulkload.sh \ -connect <db_connect_string_of_new_node> \ -check -generate -restore \ absolute_path_to_the_ldif_file_generated_by_ldifwrite
Now load the data on the target node by typing:
$ORACLE_HOME/ldap/bin/bulkload.sh \ -connect db_connect_string_of_new_node \ -load -restore \ absolute_path_to_the_ldif_file_generated_by_ldifwrite
4. Start the directory server on the new node by typing the following command:
Note: Note: If you encounter errors, then use remtool -asrverify. If it reports errors, then rectify them by using remtool -asrrectify. Both of those options list all the nodes in the DRG. If the node to be deleted is in the list, then delete it by running remtool -delnode again.
Note: Verify that the $ORACLE_HOME/ldap/log/bulkload.log does not report any errors. It is possible that you might see Duplicate entry errors in the log for some of the entries. You can safely ignore this error and proceed with the load.

Deleting a Node from a Multimaster Replication Group
Deploying Identity Management with Multimaster Replication 12-9
$ORACLE_HOME/opmn/bin/opmnctl startproc ias-component=OID
5. Start the directory replication server on the new node by typing:
$ORACLE_HOME/bin/oidctl connect=db_connect_string_of_new_node \ server=oidrepld instance=1 \ flags='-h host_name_of_new_node -p port' start
6. A workaround is required for release 10g (10.1.2).
On the new node run this command:
sqlplus "/ as sysdba"delete from orasso.wwsec_person$ where user_name not like '%PUBLIC';commit;
7. Install a new middle tier, based on the new replica node.
a. Synchronize the OracleAS Single Sign-On schema passwords from MDS to the new node as described in Section 12.1.5, "Synchronizing the OracleAS Single Sign-On Schema Password".
b. Install OracleAS Single Sign-On and Oracle Delegated Administration Services as described in Section 12.1.6, "Installing OracleAS Single Sign-On and Oracle Delegated Administration Services on the Replica Node".
c. Configure the HTTP load balancer to distribute incoming traffic to this newly installed node.
12.3 Deleting a Node from a Multimaster Replication GroupYou can delete a node from a DRG, provided the DRG contains more than two nodes. You might need to do so if the addition of a new node did not fully succeed as a result of system errors. To delete a replication node, perform these steps:
1. Stop the directory replication server on all nodes. To do that, run the following command on each node in the DRG:
$ORACLE_HOME/bin/oidctl connect=connect_string server=oidrepld instance=1 stop
2. Stop all processes on the node to be deleted.
a. Stop all processes in the associated middle tier Oracle homes.
$ORACLE_HOME/opmn/bin/opmnctl stopall
b. On the node to be deleted, stop all Oracle Application Server processes including Oracle Internet Directory Monitor and all directory server instances.
$ORACLE_HOME/opmn/bin/opmnctl stopall
3. Delete the node from the master definition site. From the MDS, run the following command:
$ORACLE_HOME/bin/remtool -delnode
Note: The instance number may vary.

Deleting a Node from a Multimaster Replication Group
12-10 Oracle Application Server High Availability Guide
4. Start the directory replication server on all nodes by typing the following command:
$ORACLE_HOME/bin/oidctl connect=connect_string server=oidrepld \ instance=1 flags='-h host -p port' start
5. Decommission the removed node and its associated middle tier. You can optionally decommission the removed replicated node and associated middle tier by deinstalling the corresponding Oracle homes.
Note: If you encounter errors, then use remtool -asrverify. If it reports errors, then rectify them by using remtool -asrrectify. Both of those options list all nodes in the DRG. If the new node is not in the list, then add it by running remtool -addnode again.

Part IVDisaster Recovery
The chapter in this part describes the Oracle Application Server Disaster Recovery solution.
This part contains the following chapter:
■ Chapter 13, "OracleAS Disaster Recovery"
■ Chapter 14, "OracleAS Guard asgctl Command-line Reference"
■ Chapter 15, "Manual Sync Operations"
■ Chapter 16, "OracleAS Disaster Recovery Site Upgrade Procedure"
■ Chapter 17, "Setting Up a DNS Server"
■ Chapter 18, "Secure Shell (SSH) Port Forwarding"


OracleAS Disaster Recovery 13-1
13OracleAS Disaster Recovery
Disaster recovery refers to how a system recovers from catastrophic site failures caused by natural or unnatural disasters. Examples of catastrophic failures include earthquakes, tornadoes, floods, or fire. Additionally, disaster recovery can also refer to how a system is managed for planned outages. For most disaster recovery situations, the solution involves replicating an entire site, not just pieces of hardware or subcomponents. This also applies to the Oracle Application Server Disaster Recovery (OracleAS Disaster Recovery) solution.
This chapter describes the OracleAS Disaster Recovery solution, how to configure and set up its environment, and how to manage the solution for high availability. The discussion involves both OracleAS middle tiers and OracleAS Infrastructure tiers in two sites: production and standby. The standby site is configured either identically and symmetrically or asymmetrically to the production site. Under normal operation, the production site actively services requests. The standby site is maintained to mirror or closely mirror the applications and content hosted by the production site.
The sites are managed using Oracle Application Server Guard, which contains a command-line utility (asgctl) that encapsulates administrative tasks (see Chapter 14, "OracleAS Guard asgctl Command-line Reference" for reference information about these administrative commands). The OracleAS Disaster Recovery solution leverages the following services among other system services that are available across the entire site. Behind the scenes OracleAS Guard automates the use of Backup and Recovery Tool (for managing configuration files in the file system) and Oracle Data Guard (for managing the OracleAS Infrastructure database) in a distributed fashion across the topology. Table 13–1 provides a summary of the OracleAS Disaster Recovery strategy and how this Oracle software is used behind the scenes:
Table 13–1 Overview of OracleAS Disaster Recovery strategy
Coverage Procedure Purpose
Middle-tier Configuration Files
OracleAS Backup and Recovery Tool
To back up OracleAS configuration files in the production site middle-tier nodes and restore the files to the standby site middle-tier nodes.
OracleAS Infrastructure Configuration Files
OracleAS Backup and Recovery Tool
To back up OracleAS configuration files in the production site OracleAS Infrastructure node and restore them to the standby site OracleAS Infrastructure node.
OracleAS Infrastructure Database
Oracle Data Guard To ship archive logs from production site OracleAS Infrastructure database to standby site OracleAS Infrastructure database. Logs are not applied immediately.

13-2 Oracle Application Server High Availability Guide
Beginning with OracleAS release 10.1.2.0.2, to simplify the concepts presented to describe the OracleAS Disaster Recovery solution, the term topology is introduced to mean all farms on either the production or standby site. The term topology replaces the previous concept of a farm as described in the OracleAS Disaster Recovery solution documentation for OracleAS release 10.1.2.0.0. The term topology refers to all instances that share the same Oracle Internet Directory for a production site. The discover topology command queries Oracle Internet Directory to determine the list of instances and then generates a topology XML file that describes the production topology. The discover topology within farm command is used in cases where Oracle Internet Directory is not available and then OracleAS Guard uses OPMN to discover the topology within the farm.
In addition to the recovery strategies, configuration and installation of both sites are discussed. For these tasks, two different ways of naming the middle-tier nodes are covered as well as two ways of resolving hostnames intra-site and inter-site.
With OracleAS Disaster Recovery, planned outages of the production site can be performed without interruption of service by switching over to the standby site using the OracleAS Guard switchover operation. Unplanned outages are managed by failing over to the standby site using the OracleAS Guard failover operation. Procedures for switchover and failover are covered in this chapter in Section 13.10, "Runtime Operations -- OracleAS Guard Switchover and Failover Operations".
This chapter is organized into the following sections:
■ Section 13.1, "Oracle Application Server 10g Disaster Recovery Solution"
■ Section 13.2, "Preparing the OracleAS Disaster Recovery Environment"
■ Section 13.3, "Overview of Installing Oracle Application Server"
■ Section 13.4, "Overview of OracleAS Guard and asgctl"
■ Section 13.5, "Authentication of Databases"
■ Section 13.6, "Discovering, Dumping, and Verifying the Topology"
■ Section 13.7, "Dumping Policy Files and Using Policy Files With Some asgctl Commands"
■ Section 13.8, "OracleAS Guard Operations -- Standby Site Cloning of One or More Production Instances to a Standby System"
■ Section 13.9, "OracleAS Guard Operations -- Standby Instantiation and Standby Synchronization"
■ Section 13.10, "Runtime Operations -- OracleAS Guard Switchover and Failover Operations"
■ Section 13.11, "Monitoring OracleAS Guard Operations and Troubleshooting"
■ Section 13.12, "Wide Area DNS Operations"
■ Section 13.13, "Using OracleAS Guard Command-Line Utility (asgctl)"
■ Section 13.14, "Special Considerations for Some OracleAS Metadata Repository Configurations"
Note: Your other databases must be covered in the overall disaster recovery strategy, and you must use Oracle Data Guard as the solution.

Oracle Application Server 10g Disaster Recovery Solution
OracleAS Disaster Recovery 13-3
■ Section 13.15, "Special Considerations for OracleAS Disaster Recovery Environments"
Geographically distributed Identity Management (IM) Infrastructure deployment replication, though an example of an active-active configuration, shares some features similar to an OracleAS Disaster Recovery solution in that Oracle Internet Directory (OID), OracleAS Metadata Repository (MR), and OracleAS Single Sign-On (SSO) are set up in replication and distributed across different geographic regions. Each OracleAS Single Sign-On site uses its own Oracle Internet Directory and OracleAS Metadata Repository located at the local site, thus resulting in the active-active configuration. The shared similarities serve two purposes. First, in case a database failure is detected at one site, Oracle Internet Directory and OracleAS Single Sign-On servers are reconfigured to route user requests to the closest geographic area. Second, in case a OracleAS Single Sign-On middle-tier failure is detected, the network is reconfigured to route traffic to a remote middle tier. However, this solution does not provide synchronization for OracleAS Portal, OracleAS Wireless, and Distributed Configuration Management (DCM) schemas in the Infrastructure database because neither supports the replica model used for Oracle Internet Directory and OracleAS Single Sign-On information. See Oracle Identity Management Concepts and Deployment Planning Guide for more information about a geographically distributed Identity Management Infrastructure deployment.
13.1 Oracle Application Server 10g Disaster Recovery SolutionThe Oracle Application Server Disaster Recovery solution consists of two configured sites - one primary (production/active) and one secondary (standby). Both sites may or may not have the following: same number of middle tiers and the same number of OracleAS Infrastructure nodes, and the same number and types of components installed. In other words, the installations on both sites, middle tier and OracleAS Infrastructure could be identical (symmetrical topology) or not identical (asymmetrical topology). Both sites are usually dispersed geographically, and if so, they are connected through a wide area network.
Some important points to emphasize for the Oracle Application Server Disaster Recovery solution are the following:
■ The number of instances required on the standby site to run your site can be identical to (symmetric) or fewer (asymmetric) than the production site.
■ The set of instances needed must be created and installed on the standby site in case of failover.
■ The standby site needs the minimum set of instances required to run your site.
This section describes the overall layout of the solution, the major components involved, and the configuration of these components. It has the following sections:
■ Section 13.1.1, "OracleAS Disaster Recovery Requirements"
■ Section 13.1.2, "Supported Oracle Application Server Releases and Operating Systems"
■ Section 13.1.3, "Supported Topologies"
See Also: Oracle Application Server Installation Guide for instructions about how to install the OracleAS Disaster Recovery solution.

Oracle Application Server 10g Disaster Recovery Solution
13-4 Oracle Application Server High Availability Guide
13.1.1 OracleAS Disaster Recovery RequirementsTo ensure that your implementation of the OracleAS Disaster Recovery solution performs as designed, the following requirements must be adhered to:
■ On each host in the standby site, make sure the following is identical to its equivalent peer in the production site:
– For the middle-tier hosts, physical hostnames.
– Virtual hostname for the OracleAS Infrastructure. The virtual hostname can be specified in the Specify Virtual Hostname screen presented by the installer.
– Hardware platform
– Operating system release and patch levels
■ All installations conform to the requirements listed in the Oracle Application Server Installation Guide to install Oracle Application Server.
■ Oracle Application Server software is installed in identical directory paths between each host in the production site and its equivalent peer in the standby site.
■ The following details must be the same between a host in the production site and a peer in the standby site:
– User name and password of the user who installed Oracle Application Server must be the same between a host in the production site and its peer in the standby site.
– Numerical user ID of the user who installed Oracle Application Server on that particular node
– Group name of the user who installed Oracle Application Server on that particular node
– Numerical group ID of the group for the user who installed Oracle Application Server on that particular node
– Environment profile
– Shell (command-line environment)
– Directory structure, Oracle home names, and path of the Oracle home directory for each OracleAS installation on a node. Do not use symbolic links anywhere in the path.
– Oracle Application Server installation types (Any instance installed on the standby system must be identical to that installed on the production system):
* Middle Tier: J2EE and Web Cache, and Portal and Wireless
* OracleAS Infrastructure: Metadata Repository (MR) and Identity Management (IM)
Note: If you already have installed systems, you only need to modify the physical names for the middle-tier systems at the standby site and then create a virtual hostname for the physical hostname of the OracleAS Infrastructure (see the next bullet). See Section 13.2.1, "Planning and Assigning Hostnames" for information about how to change these physical hostnames and the virtual hostname.

Oracle Application Server 10g Disaster Recovery Solution
OracleAS Disaster Recovery 13-5
13.1.2 Supported Oracle Application Server Releases and Operating SystemsOracleAS Guard supports Oracle Application Server releases 10g (9.0.4) and 10g (10.1.2.0.0 and 10.1.2.0.2). The OracleAS Guard kit located on the 10g (10.1.2.0.2) Utility media #2 must be installed on all systems with Oracle homes or Oracle Application Server instances in the topology. See the OracleAS Disaster Recovery installation information in Oracle Application Server Installation Guide for more information.
OracleAS Guard supports a mixed OracleAS 10g (9.0.4) and OracleAS 10g (10.1.2) or higher release environment, such as may occur during an upgrade scenario. In this case, you may have upgraded the standby site to OracleAS 10g (10.1.2) Oracle homes in the middle tier but the Infrastructure is still an OracleAS 10g (9.0.4) Infrastructure. This mixed release environment will work as long as the OracleAS Disaster Recovery peer home for the given production middle tier Oracle homes are also upgraded to the same release OracleAS 10g (10.1.2) and as long as its Infrastructure is still an OracleAS 10g (9.0.4) Infrastructure. So the rule of thumb is that all Oracle home peer middle tiers within the topology must match exactly in release number on both the standby and production sites. Also the Infrastructures must match exactly in release number on both the standby and production sites and Oracle AS Guard must be the same version on both sites. However, as an upgrade based requirement, the Infrastructure can be at a lower release than the middle tiers because this happens during an upgrade scenario.
13.1.3 Supported TopologiesOracleAS Disaster Recovery supports a number of basic topologies for the configuration of the Infrastructure and middle tier on production and standby sites. OracleAS Disaster Recovery supports these basic topologies:
■ Symmetrical Topologies - Strict Mirror of the Production Site with Collocated Oracle Identity Management and OracleAS Metadata Repository Infrastructure
■ Asymmetrical Topologies - Simple Asymmetric Standby Topology with Collocated Oracle Identity Management and OracleAS Metadata Repository Infrastructure
■ Separate OracleAS Metadata Repository for OracleAS Portal with Collocated Oracle Identity Management and OracleAS Metadata Repository Infrastructure (the Departmental Topology)
■ Distributed Application OracleAS Metadata Repositories with Non Collocated Oracle Identity Management and OracleAS Metadata Repository Infrastructure
13.1.3.1 Symmetrical Topologies - Strict Mirror of the Production Site with Collocated Oracle Identity Management and OracleAS Metadata Repository InfrastructureFor OracleAS Disaster Recovery Release 10.1.2.0.1, only the OracleAS Disaster Recovery symmetrical topology environment was supported. This OracleAS Disaster Recovery environment has two major requirements:
■ The deployment must use a single default Infrastructure install that contains a collocated OracleAS Metadata Repository and Oracle Identity Management.
■ The standby site has to be a strict mirror of the production site with the same number of instances (symmetrical topology).
Figure 13–1 depicts an example OracleAS Disaster Recovery solution having a symmetrical topology with a Cold Failover Cluster on the primary site. This is considered a symmetrical topology because from an Oracle Application Server perspective both sites contain two OracleAS middle tiers and one Infrastructure.

Oracle Application Server 10g Disaster Recovery Solution
13-6 Oracle Application Server High Availability Guide
Figure 13–1 Example Oracle Application Server Site-to-Site Disaster Recovery Solution (Load Balancer Appliance Is Optional If Only One Middle-Tier Node Is Present)
The procedures and steps for configuring and operating the OracleAS Disaster Recovery solution support 1 to n number of middle-tier installations in the production site. The same number of middle-tier installations must exist in the standby site. The middle tiers must mirror each other in the production and standby sites.
For the OracleAS Infrastructure, a uniform number of installations is not required (names or instances must be equal) between the production and standby sites. For example, the OracleAS Cold Failover Cluster (Infrastructure) solution can be deployed in the production site, and a single node installation of the OracleAS Infrastructure can be deployed in the standby site as shown in Figure 13–1. This way, the production site's OracleAS Infrastructure has protection from host failure using an OracleAS Cold Failover Cluster. This solution provides hardware redundancy by utilizing a virtual hostname. Refer to the section Section 6.2.2, "Active-Passive High Availability Topologies" on page 6-5 for more information on OracleAS Cold Failover Clusters.
The OracleAS Disaster Recovery solution is an extension to various single-site Oracle Application Server architectures. Examples of such single-site architectures include the combination of OracleAS Cold Failover Cluster (Infrastructure) and active-active Oracle Application Server middle-tier architecture. For the latest information on what single-site architectures are supported, check the Oracle Technology Network (OTN) Web site for the latest certification matrix.
http://www.oracle.com/technology/products/ias/hi_av/index.html
The following are important characteristics of the OracleAS Disaster Recovery solution:
Load Balancer
OracleASMiddle Tier
OracleASMiddle Tier
OracleAS Cold Failover Cluster(Infrastructure)
(Standby)(Active)
SharedStorage
Node 1
Primary / Active Site
Node 2
Load Balancer
OracleASMiddle Tier
OracleASMiddle Tier
OracleASInfrastructure
Node 1
Secondary / Standby Site
Node 2

Oracle Application Server 10g Disaster Recovery Solution
OracleAS Disaster Recovery 13-7
■ Middle-tier installations are identical between the production and standby sites. In other words, each middle-tier installation in the production site has an identical installation in the standby site. More than one middle-tier node is recommended because this enables each set of middle-tier installations on each site to be redundant. Because they are on multiple machines, problems and outages within a site of middle-tier installations are transparent to clients.
■ The OracleAS Disaster Recovery solution is restricted to identical site configuration to ensure that processes and procedures are kept the same between sites, making operational tasks easier to maintain and execute. Identical site configuration also allows for a higher success rate for manually maintaining the synchronization of Oracle Application Server component configuration files between sites.
■ When the production site becomes unavailable due to a disaster, the standby site can become operational within a reasonable time. Client requests are always routed to the site that is operating in the production role. After a failover or switchover operation occurs due to an outage, client requests are routed to another site that assumes the production role. For a symmetric topology, the quality of service offered by the new production site should be the same as that offered by the original production site before the outage.
■ The sites are set up in active-passive configuration. An active-passive setup has one primary site used for production and one secondary site that is initially passive (on standby). The secondary site is made active only after a failover or switchover operation is performed. Since the sites are symmetrical, after failover or switchover, the original standby site can be kept active as the new production site. After repairing or upgrading the original production site, it can be made into the new standby site as long as the OracleAS Disaster Recovery site requirements are maintained. Either site should offer the same level of service to clients as the other.
■ The site playing the standby role contains a physical standby of the Oracle Application Server Infrastructure coordinated by Oracle Data Guard, OracleAS Guard automates the configuration and use of Oracle Data Guard together with procedures for backing up and restoring OracleAS Infrastructure configuration files and provides configuration synchronization between the production and standby sites. Switchover and failover operations allow the roles to be traded between the OracleAS Infrastructures in the two sites. Refer to Section 13.8, "OracleAS Guard Operations -- Standby Site Cloning of One or More Production Instances to a Standby System", Section 13.9, "OracleAS Guard Operations -- Standby Instantiation and Standby Synchronization", Section 13.10, "Runtime Operations -- OracleAS Guard Switchover and Failover Operations", and Section 13.13, "Using OracleAS Guard Command-Line Utility (asgctl)" for information about using the asgctl command-line interface to perform OracleAS Guard administrative tasks of cloning, instantiation, synchronization, switchover, and failover in the OracleAS Disaster Recovery solution.
13.1.3.2 Asymmetrical Topologies - Simple Asymmetric Standby Topology with Collocated Oracle Identity Management and OracleAS Metadata Repository InfrastructureBeginning with OracleAS Disaster Recovery Release 10.1.2.0.2, support for asymmetric topologies includes support for the following simple asymmetric standby topologies:
■ A standby site having reduced resources (fewer middle tiers); this means support for all production services except the scaling. This approach guarantees all services

Oracle Application Server 10g Disaster Recovery Solution
13-8 Oracle Application Server High Availability Guide
are maintained, but not scaled (see Figure 13–2 for an example of this OracleAS Disaster Recovery solution).
Figure 13–2 Simple Asymmetric Standby with Reduced Resources
Figure 13–2 shows a production site of four middle tier instances and one Infrastructure (collocated Oracle Identity Management and OracleAS Metadata Repository). In this example, the services and applications deployed to middle tier 1 are scaled to include middle tier 2. In addition, the services and applications deployed to middle tier 3 are scaled to include middle tier 4. To satisfy the requirements for reduced resources for disaster recovery, the scaling is not necessary at the standby site. Therefore, the services deployed at production middle tiers 1 and 2 are satisfied by a disaster recovery peer middle tier 1 at the standby site, which will be synchronized with the production middle tier 1. Likewise, the services deployed at production middle tiers 3 and 4 are satisfied by a disaster recovery peer middle tier 3 at the standby site, which will be synchronized with the production middle tier 3.
■ A standby site that maintains OracleAS Disaster Recovery support for the Infrastructure services only, while the middle-tier instances are supported only through production site management. This approach guarantees that only the Infrastructure services are maintained (see Figure 13–3 for an example of this OracleAS Disaster Recovery solution).
Node 1 Node 2 Node 1 Node 3
OracleASPortal &Wireless
Middle Tier
OracleASJ2EE &
Web CacheMiddle Tier
Production Standby
Node 3 Node 4
OracleASPortal &Wireless
Middle Tier
OracleASPortal &Wireless
Middle Tier
OracleASJ2EE &
Web CacheMiddle Tier
OracleASJ2EE &
Web CacheMiddle Tier
OracleAS InfrastructureIM + MR
OracleAS InfrastructureIM + MR

Oracle Application Server 10g Disaster Recovery Solution
OracleAS Disaster Recovery 13-9
Figure 13–3 Simple Asymmetric Standby with Guaranteed Infrastructure
Figure 13–3 shows a production site consisting of four middle tiers instances, with two middle tiers (1 and 2) collocated with the production Infrastructure services and two middle tiers (3 and 4) remotely located at the standby site. The standby site is used to provide disaster recovery capability for only the Infrastructure services. In this configuration, middle tier resources are configured in an active/active model and technically as a single production topology.
Under normal conditions, application requests can be serviced from middle tiers 1 through 4. This model assumes that the services and applications deployed to middle tiers 3 and 4 can tolerate the latency, firewall, and network issues associated with this topology. For disaster recovery operations, only the Infrastructure services must be maintained, while the deployment and maintenance of the middle tier instances is done through routine production site management.
In general, support for asymmetrical topologies means that the OracleAS Disaster Recovery standby site has or potentially has reduced resources, maintains a reduction of Oracle homes, and also guarantees a certain minimum level of service capability.
13.1.3.3 Separate OracleAS Metadata Repository for OracleAS Portal with Collocated Oracle Identity Management and OracleAS Metadata Repository Infrastructure (the Departmental Topology)This topology (Figure 13–4), consists of an OracleAS Infrastructure with two OracleAS Metadata Repositories and multiple middle tiers. One OracleAS Metadata Repository is used by Oracle Identity Management components, such as Oracle Internet Directory and OracleAS Single Sign-On. All middle tiers use this OracleAS Metadata Repository for Oracle Identity Management services, as well as any additional middle tiers that might be added to this topology as it expands. The other OracleAS Metadata Repository is used for product metadata by the OracleAS Portal and OracleAS Wireless middle tier components. With two metadata repositories, this deployment can best be described as two DCM production farms.
An OracleAS Disaster Recovery standby configuration could be set up as either a symmetrical topology as described in Section 13.1.3.1, "Symmetrical Topologies - Strict Mirror of the Production Site with Collocated Oracle Identity Management and OracleAS Metadata Repository Infrastructure", thereby requiring two DCM standby farms be configured or as a simple asymmetric topology as described in Section 13.1.3.2, "Asymmetrical Topologies - Simple Asymmetric Standby Topology with Collocated Oracle Identity Management and OracleAS Metadata Repository
Node 1 Node 2 Node 3 Node 4
Production Standby
OracleAS InfrastructureIM + MR
OracleAS InfrastructureIM + MR
OracleASPortal &Wireless
Middle Tier
OracleASPortal &Wireless
Middle Tier
OracleASPortal &Wireless
Middle Tier
OracleASPortal &Wireless
Middle Tier

Oracle Application Server 10g Disaster Recovery Solution
13-10 Oracle Application Server High Availability Guide
Infrastructure", with service guaranteed requiring minimally that a single DCM standby farm be configured.
Figure 13–4 Collocated Oracle Identity Management and OracleAS Metadata Repository with a Separate OracleAS Metadata Repository
13.1.3.4 Distributed Application OracleAS Metadata Repositories with Non Collocated Oracle Identity Management and OracleAS Metadata Repository InfrastructureThe topologies in Section 13.1.3.1, "Symmetrical Topologies - Strict Mirror of the Production Site with Collocated Oracle Identity Management and OracleAS Metadata Repository Infrastructure", Section 13.1.3.2, "Asymmetrical Topologies - Simple Asymmetric Standby Topology with Collocated Oracle Identity Management and OracleAS Metadata Repository Infrastructure", and Section 13.1.3.3, "Separate OracleAS Metadata Repository for OracleAS Portal with Collocated Oracle Identity Management and OracleAS Metadata Repository Infrastructure (the Departmental Topology)" describe a deployment for a default database repository collocated for both the Oracle Identity Management and OracleAS Metadata Repository Infrastructure, while Section 13.1.3.3, "Separate OracleAS Metadata Repository for OracleAS Portal with Collocated Oracle Identity Management and OracleAS Metadata Repository Infrastructure (the Departmental Topology)" also describes a topology with a separate OracleAS Metadata Repository.
In a topology with distributed application OracleAS Metadata Repositories and non collocated Oracle Identity Management and OracleAS Metadata Repository Infrastructure, the Oracle Identity Management Infrastructure and one OracleAS Metadata Repository Infrastructure are installed on separate hosts, and other OracleAS Metadata Repositories are installed to reside with respective applications on different hosts. Thus, one OracleAS Metadata Repository can be the result of a deployment using a single default Infrastructure install, while one or more OracleAS Metadata Repositories can be the result of an OracleAS user using a tool, such as the OracleAS Metadata Repository Creation Assistant, to install one or more application OracleAS Metadata Repositories on one or more systems with the application data, for management or policy reasons, or both.
Node 3 Node 2 Node 3
OracleASInfrastructure
MR
Node 2
Production Standby
Node 4 Node 1 Node 4
OracleASInfrastructure
IM + MR
Node 1
OracleASJ2EE &
Web CacheMiddle Tier
OracleASInfrastructure
MR
OracleASInfrastructure
IM + MR
OracleASJ2EE &
Web CacheMiddle Tier
OracleASPortal &Wireless
Middle Tier
OracleASPortal &Wireless
Middle Tier

Preparing the OracleAS Disaster Recovery Environment
OracleAS Disaster Recovery 13-11
Figure 13–5 shows an example OracleAS Disaster Recovery solution having non collocated Oracle Identity Management and OracleAS Metadata Repository Infrastructure and distributed OracleAS Metadata Repositories.
Figure 13–5 Non-Collocated Oracle Identity Management (IM) and OracleAS Metadata Repository (MR) Infrastructure Topology with Distributed OracleAS Metadata Repositories
13.2 Preparing the OracleAS Disaster Recovery EnvironmentPrior to the installation of OracleAS software for the OracleAS Disaster Recovery solution, a number of system level configurations are required or optional as specified. The tasks that accomplish these configurations are:
■ Section 13.2.1, "Planning and Assigning Hostnames"
■ Section 13.2.2, "Configuring Hostname Resolution"
■ Chapter 18, "Secure Shell (SSH) Port Forwarding" (optional)
This section covers the steps needed to perform these tasks for the symmetrical topology. These same steps are also applicable to simple asymmetrical standby sites as
Node 1 Node 2 Node 1
OracleASInfrastructure
MR
Node 2
OracleASPortal &Wireless
Middle Tier
Production Standby
Node 3 Node 4 Node 3
OracleASInfrastructure
MR
Node 4
OracleASJ2EE &
Web CacheMiddle Tier
Node 5 Node 5
OracleASInfrastructure
IM
OracleASMiddle
Tier
OracleASMiddle
Tier
OracleASInfrastructure
IM
OracleASInfrastructure
MR
OracleASInfrastructure
MR
OracleASInfrastructure
MR
OracleASPortal &Wireless
Middle Tier
OracleASInfrastructure
MR
OracleASJ2EE &
Web CacheMiddle Tier

Preparing the OracleAS Disaster Recovery Environment
13-12 Oracle Application Server High Availability Guide
well as to topologies for non collocated Oracle Identity Management and OracleAS Metadata Repository with or without distributed OracleAS Metadata Repositories.
13.2.1 Planning and Assigning HostnamesBefore performing the steps to set up the physical and network hostnames, plan the physical and network hostnames you wish to use with respect to the entire OracleAS Disaster Recovery solution. The overall approach to planning and assigning hostnames must meet the following goals:
■ OracleAS components in the middle tier and OracleAS Infrastructure must use the same physical hostnames in their configuration settings regardless of whether the components are in the production or standby site. In addition, you must also create a virtual hostname for the physical hostname of the OracleAS Infrastructure.
For example, if a middle-tier component in the production site uses the name "asmid1" to reach a host in the same site, the same component in the standby site must use the same name to reach asmid1's equivalent peer in the standby site. Likewise, if the virtual hostname of the OracleAS Infrastructure on the production site uses the name "infra", the virtual hostname for the physical hostname of the OracleAS Infrastructure on the standby site must be named "infra".
■ No changes to hostnames (physical, network, or virtual) are required when the standby site takes over the production role. However, a DNS switchover must be performed, see Section 13.12, "Wide Area DNS Operations" for more information.
Figure 13–6 illustrates the process of planning and assigning hostnames.
Note: Although the physical hostnames in the production and standby sites must remain uniform between the two sites, the resolution of these physical hostnames to the correct hosts can be different. Section 13.2.2, "Configuring Hostname Resolution" explains hostname resolution.

Preparing the OracleAS Disaster Recovery Environment
OracleAS Disaster Recovery 13-13
Figure 13–6 Name Assignment Example in the Production and Standby Sites
In Figure 13–6, two middle-tier nodes exist in the production site. The OracleAS Infrastructure can be a single node or an OracleAS Cold Failover Cluster solution (represented by a single virtual hostname and a virtual IP, as for a single node OracleAS Infrastructure). The common names in the two sites are the physical hostnames of the middle-tier nodes and the virtual hostname of the OracleAS Infrastructure. Table 13–2 details what the physical, network, and virtual hostnames are in the example:
Table 13–2 Physical, network, and virtual hostnames in Figure 13–6
Physical Hostnames Virtual Hostname Network Hostnames
asmid1 - prodmid1, standbymid1
asmid2 - prodmid2, standbymid2
- 1
1 In this example, the physical hostname is the network hostname. Therefore, the network host name is used in the appropriate asgctl commands for the respective <host>, <host-name>, or <standby_topology_host> parameter arguments.
infra prodinfra, standbyinfra
OracleAS Middle Tier Node 1prodmid1 = 123.1.2.333
physical hostname = asmid1asmid1 = 123.1.2.333asmid2 = 123.1.2.334infra = 123.1.2.111remoteinfra = 213.2.2.210
OracleAS Cold Failover Clusterprodinfra = 123.1.2.111
asmid1 = 123.1.2.333asmid2 = 123.1.2.334remoteinfra = 213.2.2.210virtual hostname = infravirtual IP = 123.1.2.111
OracleAS Middle Tier Node 2prodmid2 = 123.1.2.334
physical hostname = asmid2asmid1 = 123.1.2.333asmid2 = 123.1.2.334infra = 123.1.2.111remoteinfra = 213.2.2.210
Production / Active Site
OracleAS Middle Tier Node 1standbymid1 = 213.2.2.443
physical hostname = asmid1asmid1 = 213.2.2.443asmid2 = 213.2.2.444infra = 213.2.2.210remoteinfra = 123.1.2.111
OracleAS Infrastructure Nodestandbyinfra = 213.2.2.210
asmid1 = 213.2.2.443asmid2 = 213.2.2.444remoteinfra = 123.1.2.111virtual hostname = infravirtual IP = 213.2.2.210
OracleAS Middle Tier Node 2standbymid2 = 213.2.2.444
physical hostname = asmid2asmid1 = 213.2.2.443asmid2 = 213.2.2.444infra = 213.2.2.210remoteinfra = 123.1.2.111
Standby / Passive Site

Preparing the OracleAS Disaster Recovery Environment
13-14 Oracle Application Server High Availability Guide
■ Cohosting non OracleAS applications
If the hosts in the production site are running non OracleAS applications, and you wish to cohost OracleAS on the same hosts, changing the physical hostnames of these hosts may break these applications. In such a case, you can keep these hostnames in the production site and modify the physical hostnames in the standby site to match those in the production site. The non OracleAS applications can then also be installed on the standby hosts so that they can act in a standby role for these applications.
As explained in Section 1.2.1, "Terminology", physical, network, and virtual hostnames have different purposes in the OracleAS Disaster Recovery solution. They are also set up differently. The following sections provide information about how the three types of hostnames are set up.
13.2.1.1 Physical HostnamesThe naming of middle-tier hosts in both the production and standby sites requires changing the physical hostname in each host.
In Solaris, to change the physical hostname of a host:
1. Check the setting for the existing hostname as follows:
prompt> hostname
2. Use a text editor, such as vi, to edit the name in /etc/nodename to your planned physical hostname.
3. For each middle-tier host, reboot it for the change to take effect.
4. Repeat Step 1 to verify the correct hostname has been set.
5. Repeat the previous steps for each host in the production and standby sites.
In Windows, to change the physical hostname of a host, follow these steps:
1. In the Start menu, select Control Panel.
2. Double-click the System icon.
3. Select the Advance tab.
4. Select Environment variables.
5. Under the User Environment variables for the installer account, select New to create a new variable.
6. Enter the name of the variable as "_CLUSTER_NETWORK_NAME_".
7. For the value of this variable, enter the planned physical hostname.
Note: For other UNIX variants, consult your system administrator for equivalent commands in each step.
Note: The user interface elements in your version of Windows may vary from those described in the following steps.

Preparing the OracleAS Disaster Recovery Environment
OracleAS Disaster Recovery 13-15
13.2.1.2 Network HostnamesThe network hostnames used in the OracleAS Disaster Recovery solution are defined in domain name system (DNS). These hostnames are visible in the network that the solution uses and are resolved through DNS to the appropriate hosts by the assigned IP address in the DNS system. You need to add these network hostnames and their corresponding IP addresses to the DNS system.
Using the example in Figure 13–6, the following additions should be made to the DNS system serving the entire network that encompasses the production and standby sites:
prodmid1.oracle.com IN A 123.1.2.333prodmid2.oracle.com IN A 123.1.2.334prodinfra.oracle.com IN A 123.1.2.111standbymid1.oracle.com IN A 213.2.2.443standbymid2.oracle.com IN A 213.2.2.444standbyinfra.oracle.com IN A 213.2.2.210
13.2.1.3 Virtual HostnameAs defined in Section 1.2.1, "Terminology", virtual hostname applies to the OracleAS Infrastructure only. It is specified during installation of the OracleAS Infrastructure. When you run the OracleAS Infrastructure installation type, a screen called "Specify High Availability" appears to provide a text box to enter the virtual hostname of the OracleAS Infrastructure that is being installed. Refer to the Oracle Application Server Installation Guide for more details.
For the example in Figure 13–6, when you install the production site's OracleAS Infrastructure, enter its virtual hostname, "infra", when you see the Specify Virtual Hostname screen. Enter the same virtual hostname when you install the standby site's OracleAS Infrastructure.
13.2.2 Configuring Hostname ResolutionIn the OracleAS Disaster Recovery solution, you can configure hostname resolution in one of two ways to resolve the hostnames you planned and assigned in Section 13.2.1, "Planning and Assigning Hostnames". These are:
■ Section 13.2.2.1, "Using Local Hostnaming File Resolution"
■ Section 13.2.2.2, "Using DNS Resolution"
In UNIX, the order of the method of name resolution can be specified using the "hosts" parameter in the file /etc/nsswitch.conf. The following is an example of the hosts entry:
hosts: files dns nis
In the previous statement, local hostnaming file resolution is preferred over DNS and NIS (Network Information Service) resolutions. When a hostname is required to be resolved to an IP address, the /etc/hosts file (UNIX) or C:\WINDOWS\system32\drivers\etc\hosts file is consulted first. In the event that a hostname cannot be resolved using local hostnaming resolution, DNS is used. (NIS resolution is not used for the OracleAS Disaster Recovery solution.) Refer to your
Note: If the OracleAS Infrastructure is installed in an OracleAS Cold Failover Cluster solution, the virtual hostname is the name that is associated with the virtual IP of the OracleAS Cold Failover Cluster.

Preparing the OracleAS Disaster Recovery Environment
13-16 Oracle Application Server High Availability Guide
UNIX system documentation to find out more about name resolution using the file /etc/nsswitch.conf.
13.2.2.1 Using Local Hostnaming File ResolutionThis method of hostname resolution relies on a local hostnaming file to contain the requisite hostname-to-IP address mappings. In UNIX, this file is /etc/hosts. In Windows, this file is C:\WINDOWS\system32\drivers\etc\hosts.
To use the local hostnaming file to resolve hostnames for the OracleAS Disaster Recovery solution in UNIX for each middle tier and OracleAS Infrastructure host in both the production and standby sites, perform the following steps:
1. Use a text editor, such as vi, to edit the /etc/nsswitch.conf file. With the "hosts:" parameter, specify "files" as the first choice for hostname resolution.
2. Edit the /etc/hosts file to include the following:
■ The physical hostnames and the correct IP addresses for all middle-tier nodes in the current site. The first entry must be the hostname and IP address of the current node.
For example, if you are editing the /etc/hosts file of a middle-tier node in the production site, enter all the middle-tier physical hostnames and their IP addresses in the production site beginning the list with the current host. (You should also include fully qualified hostnames in addition to the abbreviated hostnames. See Table 13–3.)
■ The virtual hostname of the OracleAS Infrastructure in the current site.
For example, if you are editing the /etc/hosts of a middle-tier node in the standby site, enter the virtual hostname, fully qualified and abbreviated, and the IP address of the OracleAS Infrastructure host in the standby site.
3. Reboot each host after editing the files mentioned in the previous steps.
4. From each host, use the ping command for each physical hostname that is valid in its particular site to ensure that the IP addresses have been assigned correctly.
For the example in Figure 13–6, on the asmid1 host, use the following commands in succession:
ping asmid1
The returned IP address should be 123.1.2.333.
ping asmid2
The returned IP address should be 123.1.2.334.
ping infra
The returned IP address should be 123.1.2.111.
Note: When making entries in the hosts file, make sure the intended hostname is positioned in the second column of the hosts file; otherwise, an asgctl verify topology with <host> operation will fail indicating that the production topology is not symmetrical with the standby topology. See Appendix A, "Troubleshooting High Availability" for more information about troubleshooting and resolving this type of problem.

Preparing the OracleAS Disaster Recovery Environment
OracleAS Disaster Recovery 13-17
In Windows, the method of ordering hostname resolution varies depending on the Windows version. Refer to the documentation for your version of Windows for the appropriate steps.
Using the example in Figure 13–6, Table 13–3 shows that the /etc/hosts file entries on each production node contains the required entries in the of each UNIX host. The entries in the Windows C:\WINDOWS\system32\drivers\etc\hosts file should be similar.
13.2.2.2 Using DNS ResolutionTo set up the OracleAS Disaster Recovery solution to use DNS hostname resolution, you must set up site-specific DNS servers in the production and standby sites in addition to the overall corporate DNS servers (usually more than one DNS server exists in a corporate network for redundancy). Figure 13–7 provides an overview of this setup.
Note: Some UNIX variants, such as Solaris, require the -s option to return an IP address.
Table 13–3 Network and Virtual Hostname Entries in Each /etc/hosts File of Example in Figure 13–6
Host Entries in /etc/hosts
asmid1 in production site 123.1.2.333 asmid1.oracle.com asmid1123.1.2.334 asmid2.oracle.com asmid2123.1.2.111 infra.oracle.com infra213.2.2.210 remoteinfra.oracle.com remoteinfra
asmid2 in production site 123.1.2.334 asmid2.oracle.com asmid2123.1.2.333 asmid1.oracle.com asmid1123.1.2.111 infra.oracle.com infra213.2.2.210 remoteinfra.oracle.com remoteinfra
infra in production site 123.1.2.111 infra.oracle.com infra123.1.2.333 asmid1.oracle.com asmid1123.1.2.334 asmid2.oracle.com asmid2213.2.2.210 remoteinfra.oracle.com remoteinfra
asmid1 in standby site 213.2.2.443 asmid1.oracle.com asmid1213.2.2.444 asmid2.oracle.com asmid2213.2.2.210 infra.oracle.com infra123.1.2.111 remoteinfra.oracle.com remoteinfra
asmid2 in standby site 213.2.2.444 asmid2.oracle.com asmid2213.2.2.443 asmid1.oracle.com asmid1213.2.2.210 infra.oracle.com infra123.1.2.111 remoteinfra.oracle.com remoteinfra
infra in standby site 213.2.2.210 infra.oracle.com infra213.2.2.443 asmid1.oracle.com asmid1213.2.2.444 asmid2.oracle.com asmid2123.1.2.111 remoteinfra.oracle.com remoteinfra
See Also: Chapter 17, "Setting Up a DNS Server" for instructions on how to set up a DNS server in a UNIX environment.

Preparing the OracleAS Disaster Recovery Environment
13-18 Oracle Application Server High Availability Guide
Figure 13–7 DNS Resolution Topology Overview
For the topology in Figure 13–7 to work, the following requirements and assumptions must be made:
■ The DNS servers for the production and standby sites must not be aware of each other. They make non authoritative lookup requests to the overall corporate DNS servers if they fail to resolve any hostnames within their specific sites.
■ The production site and standby site DNS servers must contain entries for middle-tier physical hostnames and OracleAS Infrastructure virtual hostnames. Each DNS server contains entries of only the hostnames within its own site. The sites have a common domain name that is different from that of the overall corporate domain name.
■ The overall corporate DNS servers contain network hostname entries for the middle-tier hosts and OracleAS Infrastructure hosts of both production and standby sites.
■ In UNIX, the /etc/hosts file in each host does not contain entries for the physical, network, or virtual hostnames of any host in either the production or standby site. In Windows, this applies to the file C:\WINDOWS\system32\drivers\etc\hosts.
To set up the OracleAS Disaster Recovery solution for DNS resolution, follow these steps:
1. Configure each of the overall corporate DNS servers with the network hostnames of all the hosts in the production and standby sites. Using the example presented in Figure 13–6, the following entries are made:
Corportate Network
asmid1 = 123.1.2.333
infra = 123.1.2.111
Production Site DNS Zone Entries:asmid1.oracleas IN A 123.1.2.333asmid2.oracleas IN A 123.1.2.334infra.oracleas IN A 123.1.2.111remoteinfra.oracleas IN A 213.2.2.210
asmid2 = 123.1.2.334
Production / Active Site
asmid1 = 213.2.2.443
infra = 213.2.2.210
Standby Site DNS Zone Entries:asmid1.oracleas IN A 213.2.2.443asmid2.oracleas IN A 213.2.2.444infra.oracleas IN A 213.2.2.210remoteinfra.oracleas IN A 123.1.2.111
oracle.com DNS server entries:prodmid1.oracle.com IN A 123.1.2.333prodmid2.oracle.com IN A 123.1.2.334prodinfra.oracle.com IN A 123.1.2.111standbymid1.oracle.com IN A 213.2.2.443standbymid2.oracle.com IN A 213.2.2.444standbyinfra.oracle.com IN A 213.2.2.210
asmid2 = 213.2.2.444
Standby / Passive Site

Preparing the OracleAS Disaster Recovery Environment
OracleAS Disaster Recovery 13-19
prodmid1.oracle.com IN A 123.1.2.333prodmid2.oracle.com IN A 123.1.2.334prodinfra.oracle.com IN A 123.1.2.111standbymid1.oracle.com IN A 213.2.2.443standbymid2.oracle.com IN A 213.2.2.444standbyinfra.oracle.com IN A 213.2.2.210
2. For each site, production and standby, create a unique DNS zone by configuring a DNS server as follows:
a. Select a unique domain name to use for the two sites that is different from the corporate domain name. As an example, use the name "oracleas" for the domain name for the two sites in Figure 13–6. The high level corporate domain name is oracle.com.
b. Configure the DNS server in each site to point to the overall corporate DNS servers for unresolved requests.
c. Populate the DNS servers in each site with the physical hostnames of each middle-tier host and the virtual hostname of each OracleAS Infrastructure host. Include the domain name selected in the previous step.
For the example in Figure 13–6, the entries are as follows:
For the DNS server on the production site:
asmid1.oracleas IN A 123.1.2.333asmid2.oracleas IN A 123.1.2.334infra.oracleas IN A 123.1.2.111
For the DNS server on the standby site:
asmid1.oracleas IN A 213.2.2.443asmid2.oracleas IN A 213.2.2.444infra.oracleas IN A 213.2.2.210
13.2.2.2.1 Additional DNS Server Entries for Oracle Data Guard
Because OracleAS Guard automates the use of Oracle Data Guard technology, which is used to synchronize the production and standby OracleAS Infrastructure databases, the production OracleAS Infrastructure must be able to reference the standby OracleAS Infrastructure and conversely.
For this to work, the IP address of the standby OracleAS Infrastructure host must be entered in the production site's DNS server with a hostname that is unique to the production site. Similarly, the IP address of the production OracleAS Infrastructure host must be entered in the standby site's DNS server with the same hostname. These DNS entries are required because Oracle Data Guard uses TNS Names to direct requests to the production and standby OracleAS Infrastructures. Hence, the appropriate entries must also be made to the tnsnames.ora file. Additionally,
Note: If you are using the OracleAS Cold Failover Cluster solution for the OracleAS Infrastructure in either site, enter the cluster's virtual hostname and virtual IP address. For example, in the previous step, infra is the virtual hostname and 123.1.2.111 is the virtual IP of the cluster in the production site. For more information on the OracleAS Cold Failover Cluster solution, see Section 6.2.2, "Active-Passive High Availability Topologies" on page 6-5.
Overview of Installing Oracle Application Server
13-20 Oracle Application Server High Availability Guide
OracleAS Guard asgctl command-line commands must reference the network hostnames.
Using the example in Figure 13–6 and assuming that the selected name for the remote OracleAS Infrastructure is "remoteinfra," the entries for the DNS server in the production site are:
asmid1.oracleas IN A 123.1.2.333asmid2.oracleas IN A 123.1.2.334infra.oracleas IN A 123.1.2.111remoteinfra.oracleas IN A 213.2.2.210
And, in the standby site, the DNS server entries should be as follows:
asmid1.oracleas IN A 213.2.2.443asmid2.oracleas IN A 213.2.2.444infra.oracleas IN A 213.2.2.210remoteinfra.oracleas IN A 123.1.2.111
13.3 Overview of Installing Oracle Application ServerThis section provides an overview of the steps for installing the OracleAS Disaster Recovery solution. These steps are applicable to the topologies described in Section 13.1.3, "Supported Topologies". After following the instructions in Section 13.2, "Preparing the OracleAS Disaster Recovery Environment" to set up the environment for the solution, read this section for an overview of the installation process. Then, follow the detailed instructions in the Oracle Application Server Installation Guide to install the solution.
The following steps represent the overall sequence for installing the OracleAS Disaster Recovery solution:
1. Install OracleAS Infrastructure in the production site (see Oracle Application Server Installation Guide).
2. Install OracleAS Infrastructure in the standby site (see Oracle Application Server Installation Guide).
3. Start the OracleAS Infrastructure in each site before installing the middle tiers for that site.
4. Install the middle tiers in the production site (see Oracle Application Server Installation Guide).
5. Install the middle tiers in the standby site (see Oracle Application Server Installation Guide).
The following points are important when you perform the installation:
Note: To assign identical ports for use by symmetrical hosts in the production and standby sites, you can use static port definitions. These definitions are defined in a file, (for example, named staticports.ini). Then, specify the staticports.ini file in the Specify Ports Configuration Options screen in the installer. (Detailed information on the static ports file is found in the Oracle Application Server Installation Guide.)

Overview of OracleAS Guard and asgctl
OracleAS Disaster Recovery 13-21
■ Ensure that the same ports are used by equivalent peer hosts in both sites. For example, the asmid1 host in the standby site must use the same ports as the asmid1 host in the production site. Use a static ports definition file. (see the previous note in this section and the following point).
■ Specify the full path to the staticports.ini file in the installer's Specify Ports Configuration Options screen.
■ Ensure that you select the High Availability and Replication option in the installer's Select Configuration Options screen.
■ Specify the virtual address assigned to the OracleAS Infrastructure in the Specify Virtual Hostname screen during OracleAS Infrastructure installation.
■ Install for the middle-tier hosts, any of the available middle-tier installation types. (Ensure that the OracleAS Infrastructure services have been started for a site before installing any middle tiers in that site.)
■ Specify the OracleAS Infrastructure's virtual hostname as the OracleAS Infrastructure database during each middle-tier installation.
■ Start the OracleAS services on the hosts in each site starting with the OracleAS Infrastructure.
13.4 Overview of OracleAS Guard and asgctlThis section provides an overview of OracleAS Guard and its command-line interface asgctl. If you are already familiar with this overview information, go to Section 13.5, "Authentication of Databases". This section contains the following subsections:
■ Section 13.4.1, "Overview of asgctl"
■ Section 13.4.2, "OracleAS Guard Client"
■ Section 13.4.3, "OracleAS Guard Server"
■ Section 13.4.4, "asgctl Operations"
■ Section 13.4.5, "OracleAS Guard Integration with OPMN"
■ Section 13.4.6, "Supported OracleAS Disaster Recovery Configurations"
■ Section 13.4.7, "Configuring OracleAS Guard and Other Relevant Information"
13.4.1 Overview of asgctlThe asgctl command-line utility greatly simplifies the complexity and magnitude of the steps involved in setting up and managing OracleAS Disaster Recovery. This utility provides a distributed solution that consists of a client component and a server component. The client component (OracleAS Guard client) can be installed on a system on the topology. The server component (OracleAS Guard server) is installed by default on the systems hosting the primary and standby Oracle homes that comprise the OracleAS Disaster Recovery environment.
13.4.2 OracleAS Guard ClientThe OracleAS Guard client is installed on every OracleAS install type. The OracleAS Guard client attempts to open and maintain a connection to the OracleAS Guard server.
The OracleAS Guard client provides an asgctl command-line interface (CLI) (see Chapter 14, "OracleAS Guard asgctl Command-line Reference") consisting of a set of

Overview of OracleAS Guard and asgctl
13-22 Oracle Application Server High Availability Guide
commands to perform administrative tasks described in Section 13.4.4, "asgctl Operations".
13.4.3 OracleAS Guard ServerThe OracleAS Guard server is a distributed server (installed by default) that runs on all the systems in an OracleAS Disaster Recovery configuration. The OracleAS Guard client maintains an active connection to the OracleAS Guard server on one system that has network connectivity in the OracleAS Disaster Recovery configuration. This coordinating server communicates to the OracleAS Guard servers on the other systems in the OracleAS Disaster Recovery configuration as necessary to complete processing during standby site cloning, instantiation, synchronization, verification, switchover, and failover operations. The OracleAS Guard server carries out asgctl commands issued directly by the OracleAS Guard client or issued on behalf of the OracleAS Guard client by another OracleAS Guard server in the network for the client session. The steps to complete an operation will execute throughout all systems in both the production and standby topologies. Most operational steps will be executed either in parallel or sequentially (as required) on these systems throughout the OracleAS Disaster Recovery configuration by the OracleAS Guard server.
13.4.4 asgctl OperationsMajor asgctl operations using the asgctl commands belong in the following categories of operations:
■ Authentication -- Identify the OracleAS Infrastructure database on the primary topology (set primary database command). If there are topologies with multiple Infrastructures, each must be identified using this command prior to performing an operation involving both production and standby topologies.
Identify the new OracleAS Infrastructure database on the standby topology (set new primary database command) prior to a failover operation.
Set the credentials (set asg credentials command) used to authenticate the OracleAS Guard client connections to OracleAS Guard servers and the connections between OracleAS Guard servers to a specific host. See the set asg credentials command for an example, and see Section 13.14.1.1, "Setting asgctl Credentials" for more information.
When OracleAS Guard discovers the topology (discover topology command), it requires you provide Oracle Internet Directory authentication credentials (Oracle Internet Directory password) in order to query Oracle Internet Directory to obtain instance information for the production site.
■ Discover the topology -- Discover (discover topology command) by querying Oracle Internet Directory all instances within the topology that share the same Oracle Internet Directory for a production site and generate a topology XML file that describes the topology and replicates this file to all instances in the topology. See Section 13.6, "Discovering, Dumping, and Verifying the Topology" for more information.
The command discover topology within farm discovers the topology using OPMN at a production site for special cases where Oracle Internet Directory is not available.
■ Standby site cloning -- Clone a single production instance to a standby system (clone instance command) or clone two or more production instances to standby systems (clone topology command). See Section 13.8, "OracleAS Guard Operations -- Standby Site Cloning of One or More Production Instances to a Standby System"

Overview of OracleAS Guard and asgctl
OracleAS Disaster Recovery 13-23
for more information. The standby site cloning operation eliminates the task of having to install these Oracle instances on the standby middle tier systems and perform an instantiate operation.
■ Standby site instantiation -- Creates the disaster recovery environment. It establishes the relationship between standby and production instances, mirrors the configuration, create the standby Infrastructure, then synchronize the standby site with the primary site (instantiate topology command). See Section 13.9.1, "Standby Instantiation" for more information.
■ Standby site synchronization -- Applies database redo logs for OracleAS Infrastructures to the standby site in conjunction with synchronizing external configuration files across the topology (sync topology command). See Section 13.9.2, "Standby Synchronization" for more information.
■ Switchover -- Switch from the production site to the standby site after the standby site is synchronized with the production site with the application of the database redo logs (switchover topology command). See Section 13.10.1.1, "Scheduled Outages" for more information.
■ Failover -- Make the standby site the production site after restoring configuration files and restoring the OracleAS server environment to the point of the last successful sync operation (failover command). See Section 13.10.1.2, "Unplanned Outages" for more information.
■ Verification -- Validate that the primary topology is running and the configuration is valid (verify topology command) or if a standby topology is specified, compare the primary topology to which the local host system is a member with the standby topology to validate that they are consistent with one another and conform to the requirements for OracleAS Disaster Recovery. See Section 13.11.1, "Verifying the Topology" for more information.
■ Using a policy file -- Used as a filter to filter out unnecessary instances for supporting asymmetric topologies. The dump policies command writes detailed, default policy information to respective XML formatted files for a select set of asgctl commands. You can then edit each respective XML policy file and use it in the using policy <file> parameter with any one of these select set of asgctl commands: dump topology, verify topology, clone topology, failover, instantiate topology, switchover topology, and sync topology to define by instance the domain of execution operations that are permitted for each of these asgctl commands. Each instance list entry in an XML policy file logically tags a production-standby peer combination with a particular attribute that defines the success requirement for its successful operation. For example, you may want to omit a node in a symmetric topology while performing one of the operations previously mentioned. Use the policy file to specify the node to be ignored. See Section 13.7, "Dumping Policy Files and Using Policy Files With Some asgctl Commands" for more information.
■ Instance management -- Enables you to shut down (shutdown topology command) and start up the topology (startup topology command).
■ Troubleshooting -- Uses the dump topology command to write detailed information about the topology to the screen or to a file. Lets you determine the current operations that are running (show operation command) and stop any operations that need to be halted (stop operation command).
Table 13–4 describes the OracleAS Disaster Recovery production and standby site environment before and after performing an asgctl clone, instantiate, sync, failover, and switchover operation.

Overview of OracleAS Guard and asgctl
13-24 Oracle Application Server High Availability Guide
13.4.5 OracleAS Guard Integration with OPMNA typical Oracle Application Server site has multiple farms. OracleAS Guard server and its ias-component DSA process is not started by default by OPMN because it is only necessary in the context of disaster recovery sites. You must start this ias-component DSA process in all Oracle homes as described later in this section. To check the status of this component and determine if the component is running, run the following opmnctl command on each system in your topology:
On UNIX systems> <ORACLE HOME>/opmn/bin/opmnctl status
On windows systems> <ORACLE HOME>\opmn\bin\opmnctl status
Because there is no way an OracleAS Guard client nor OPMN on the production site can start OracleAS Guard services on the standby site, OracleAS Guard must be started directly using opmnctl on the Infrastructure node in the standby topology. Connect to a node and run the following OPMN command on UNIX systems:
> <ORACLE HOME>/opmn/bin/opmnctl startproc ias-component=DSA
Table 13–4 Description of Disaster Recovery Production and Standby Environments Before and After Performing These OracleAS Guard Operations
OracleAS Guard Operation DR Site Environment Before Operation DR Site Environment After Operation
clone The production site has one or more instances that need to be installed on the standby site and instantiated. The cloning operations perform this task.
The standby site has one or more new standby instances that are a logical mirror of the production site instances.
instantiate The standby site with its Oracle homes exists, but the OracleAS Disaster Recovery relationship across sites does not exist yet for an OracleAS Disaster Recovery operation to be performed.
A logical mirror of the production site is set up and maintained at the standby site.
sync The standby site is not consistent with the production site. OracleAS Disaster Recovery is not possible to a consistent point in time without some manual intervention.
Database redo logs are applied to OracleAS Infrastructures in combination with synchronizing external configuration files across the topology. The sync operation is performed in the event that a failover or switchover operation is necessary, then the standby site can be restored to a consistent point in time. No manual intervention is necessary to synchronize the sites after the asgctl sync operation is performed.
switchover A planned outage at the production site will make the standby site the production site for a period of time; that is the roles of each site will be switched.
The standby site has become the production site. All OPMN services are started. The production site may become available again after the planned outage, at which time, another switchover operation could be performed to return activity back to the original production site from the standby site.
failover An unscheduled outage at the production site has left the production site down or unavailable for an unknown period of time. The production site is lost due to some unforeseen circumstance.
The standby site has permanently become the production site. Configuration and Infrastructure data are restored to a consistent point in time on the standby site. Site services are brought up in a consistent fashion to the point of the last sync operation. All OPMN services are started.

Overview of OracleAS Guard and asgctl
OracleAS Disaster Recovery 13-25
On Windows systems, issue the following OPMN command to start OracleAS Guard if your Oracle home is located on drive C:.
C:\<ORACLE HOME>\opmn\bin\opmnctl startproc ias-component=DSA
After the OracleAS Guard server is started it is non transient, while the remaining OracleAS Guard servers in the standby topology are transient servers. This configuration allows cross-topology communication.
13.4.6 Supported OracleAS Disaster Recovery ConfigurationsFor OracleAS 10g release (10.1.2), OracleAS Guard supports not only the default OracleAS Infrastructure configuration supported on Oracle Application Server Cold Failover Cluster and single instance, but also the topologies described in Section 13.1.3, "Supported Topologies".
13.4.7 Configuring OracleAS Guard and Other Relevant InformationBy default, OracleAS Guard and asgctl, the command-line utility for OracleAS Guard, are installed for all install types with the following default configuration information, which includes:
■ See the OracleAS Guard readme.txt file in the <ORACLE_HOME>\dsa\doc directory for more information about OracleAS Guard parameters that are configurable.
■ OracleAS Guard command-line utility asgctl is installed in the <ORACLE_HOME>/dsa/bin directory on UNIX systems and <ORACLE_HOME>\dsa\bin directory on Windows systems on all nodes in the topology production and standby topologies.
■ OracleAS Guard uses a default port (port) number of 7890; for example, port=7890. If there is a second Oracle home installed on a system, this second Oracle home must have a different OracleAS Guard port number, usually incremented by one, for example, port=7891, and so on.
■ OracleAS Guard has a default timeout value (exec_timeout_secs) for executing operating system commands of 60 seconds, for example, exec_timeout_secs=60.
Note: When you perform an opmnctl status command on a system on which OracleAS Guard is running, you will see an ias-component and process-type named DSA. This is the OracleAS component name and server process name for the OracleAS Guard server.
Note: If the port number must be changed for some reason (it must be unique for each OracleAS Guard server in each Oracle home on a machine, which is automatically handled during installation), you can change its value in the <ORACLE_HOME>/dsa/dsa.conf file. Then, stop the OracleAS Guard server(<ORACLE_HOME>/opmn/bin/opmnctl stopproc ias-component=DSA) and start the OracleAS Guard server (<ORACLE_HOME>/opmn/bin/opmnctl startproc ias-component=DSA) to activate the change. See Section 13.4.5, "OracleAS Guard Integration with OPMN") for more information.

Authentication of Databases
13-26 Oracle Application Server High Availability Guide
■ OracleAS Guard starts up the OracleAS component services across the production topology.
■ The OracleAS Guard operation status information for a topology (from either an asgctl show operation full or show operation history command) remains available for the life of the current OracleAS Guard client asgctl connect session only. When the OracleAS Guard client disconnects from the OracleAS Guard server, this topology's operation history information becomes unavailable.
■ After you start an asgctl operation, you cannot run another asgctl command on the same OracleAS Guard server until the previous command that is running completes or is forced to stop (see the asgctl stop operation command for more information.) In addition, you cannot run an asgctl operation in background and then quit or exit the asgctl utility.
13.5 Authentication of DatabasesSeveral levels of authentication are required when an OracleAS Guard client connects to an OracleAS guard server and begins a session to perform administrative operations within the production topology or across both production and standby topologies:
■ Infrastructure authentication
■ OracleAS Guard client authentication to OracleAS Guard servers
■ Oracle Internet Directory authentication
Infrastructure AuthenticationWhen initiating an OracleAS Guard administrative session, after establishing the connection between the OracleAS Guard client and OracleAS Guard server, you must identify all the OracleAS Infrastructure databases on the primary topology using the set primary database command. Infrastructure authentication must be performed before you initiate any operation that involves either the production topology or both the production and standby topologies.
Another form of Infrastructure authentication occurs as part of a failover operation. In this scenario, the production site is down and you must failover to the standby site and make this site the new production site. First, identify the new OracleAS Infrastructure database on the standby topology using the set new primary database command before performing the failover operation. See Section 13.10.1.2, "Unplanned Outages" for more information.
OracleAs Guard Client Authentication to OracleAS Guard ServersBy default, these are the same authentication credentials used for instance level authentication with the Oracle Application Server account (ias_admin/password) that was created during the Oracle Application Server installation and used in the connect asg command. These same credentials are used when the OracleAS Guard client connects to any OracleAS Guard server in the production and standby topology when executing administrative operations.
There may be cases where you want to use different credentials for a specific OracleAS Guard server or set a common set of credentials in the standby topology that differs from the credentials used in the primary topology. To set credentials for an OracleAS Guard server, use the set asg credentials command and one or more of its parameter options by either specifying the host name to which the credentials apply or the topology along with the new set of credentials (username/password).

Dumping Policy Files and Using Policy Files With Some asgctl Commands
OracleAS Disaster Recovery 13-27
If you set the credentials for a topology, these credentials are inherited for the entire topology. If you set the credentials for an individual host on the topology, the credentials for this host override the default credentials set for the topology. After you set the credentials so that they are different from the default connection credentials for a host system or an entire topology, whenever you initiate an OracleAS Guard administrative session, you must specify all credentials that are different from the default connection credentials for any host system or topology before you perform an operation involving all the OracleAS Guard servers within a production topology or across both production and standby topologies. Otherwise, the operation will fail with an authentication error. See the connect asg command for an example.
Oracle Internet Directory AuthenticationThe discover topology command requires you provide Oracle Internet Directory authentication credentials (Oracle Internet Directory password) in order to query Oracle Internet Directory to obtain instance information for the production site. See the section that follows for more information and the discover topology command.
13.6 Discovering, Dumping, and Verifying the TopologyThe discover topology command discovers by querying Oracle Internet Directory all instances within the topology that share the same Oracle Internet Directory for a production site. A topology XML file is created and distributed to all Oracle homes within the topology that describes all instances for the topology. This topology file is used by all OracleAS Guard operations.
You must perform a discover topology command when you first set up your OracleAS Disaster Recovery environment in order to initially create the topology XML file. Thereafter, you should perform a discover topology operation whenever you procure another Oracle home in a production site or change roles from a production to a standby site through a switchover or failover operation. See the discover topology command for more information.
You should perform a dump topology command to inspect the information that describes your topology. See the dump topology command for more information.
You should perform a verify topology command to validate that the primary topology is running and that the configuration is valid. In addition, if you specify the with host parameter, the verify operation compares the primary topology of which the local host system is a member with the standby topology to validate that they are consistent with one another and conform to the requirements for OracleAS Disaster Recovery. See Section 13.11.1, "Verifying the Topology" and the verify topology command for more information.
With both the dump topology and verify topology commands, if you want to use a policy file, edit and use the respective dump and verify policy files (dump_policy.xml and verify_policy.xml). Specify this file in the using policy <file> parameter of each command to dump or verify only those instances specified accordingly. See Section 13.7, "Dumping Policy Files and Using Policy Files With Some asgctl Commands" for more information.
13.7 Dumping Policy Files and Using Policy Files With Some asgctl Commands
OracleAS Disaster Recovery provides support for a variety of application server topologies as described in Section 13.1.3, "Supported Topologies". As part of this support, a set of XML formatted policy files are maintained, local to the OracleAS

Dumping Policy Files and Using Policy Files With Some asgctl Commands
13-28 Oracle Application Server High Availability Guide
Guard client that performs the dump policies command, to record by instance the domain of execution operations that are permitted for each of the following asgctl commands: dump topology, verify topology, clone topology, failover, instantiate topology, switchover topology, and sync topology.
To understand the default policies in use for any these asgctl commands, enter the following command at the asgctl prompt:
ASGCTL> dump policiesGenerating default policy for this operationCreating policy files on local host in directory "/private1/OraHome2/asr1012/dsa/conf/"ASGCTL>
Each instance list entry in each of the XML policy files logically tags by default a production-standby peer combination with a particular attribute that defines the success requirement for the successful operation of each command. This approach provides greater flexibility in regulating how each of these OracleAS Guard operations are to be successfully used among the supported topologies, see Section 13.1.3, "Supported Topologies" for more information.
After inspecting each of the XML formatted policy files, you can subsequently edit the respective policy file and use it with the particular asgctl command using the parameter syntax using policy <file> and indicate the name of the policy file to be used. In this way, you can employ a particular disaster recovery policy that defines the success requirement attribute value by instance for each of these OracleAS Guard operations mentioned earlier in this chapter.
The success requirement attribute value can be one of the following: [optional | mandatory | ignore | group <MinSucceeded=<number>>], where:
■ Optional -- means if there is a failure for that instance continue processing other instances.
■ Mandatory -- means if an error occurs for this instance, the entire operation fails.
■ Ignore -- means the instance is not part of the operation.
■ Group <MinSucceeded=<number> -- means to combine groups of Oracle instances, and if the specified number of group members is successful, then the operation is successful; otherwise, if less than the number of group members that is specified is successful, the operation fails.
Each attribute value determines the success requirement for that peer group and will be referenced during failure cases of asgctl operations to determine whether or not to continue with the OracleAS Guard operation. For example, when the success requirement is specified as mandatory, the particular OracleAS Guard operation must be successful for the specified instance for that production-standby peer combination; otherwise, the OracleAS Guard operation ceases, execution is rolled back to its starting point of execution, and an error message is returned.
For example, the following XML policy file in use for an asymmetric topology for the failover operation specifies that this asgctl operation is mandatory for the infra
Note: If you want to maintain a set of custom policy files, you must copy, edit, and maintain them in a location other than the default location; otherwise, your custom set of policy files will be overwritten whenever you perform a discover topology command followed subsequently by a dump policies command.

OracleAS Guard Operations -- Standby Site Cloning of One or More Production Instances to a Standby System
OracleAS Disaster Recovery 13-29
instance, optional for the portal_1 and portal_2 instances, can be ignored for the portal_3 instance, and must be successful for a minimum of any two of the group of three instances, BI_1, BI_2, and BI_3.
<policy> <instanceList successRequirement="Mandatory"> <instance>infra</instance> </instanceList > <instanceList successRequirement="Optional"> <instance>portal_1</instance> <instance>portal_2</instance> </instanceList > <instanceList successRequirement="Ignore"> <instance>portal_3</instance> </instanceList > <instanceList successRequirement="Group" minSucceed="2"> <instance>BI_1</instance> <instance>BI_2</instance> <instance>BI_3</instance> </instanceList ></policy>
13.8 OracleAS Guard Operations -- Standby Site Cloning of One or More Production Instances to a Standby System
Standby site cloning is the process of cloning a single production instance to a standby system (using the clone instance command) or cloning two or more production instances to standby systems (using the clone topology command).
Clone InstanceThe clone instance command is used to create a new standby instance target from an existing production instance source.
One of the underlying technologies used by OracleAS Guard to perform this operation is the OracleAS Backup and Restore loss of host capability. See the section on recovering a loss of host automatically in Oracle Application Server Administrator’s Guide for more information including a list of prerequisites. This capability assumes that the target machine is a newly procured Oracle environment because it overwrites the Oracle software registry. Additionally, some of the underlying operations require elevated privileges, root for the UNIX environments and Administrator for Windows. On Windows, the user must ensure that the client and OracleAS Guard server are started with Administrator privileges.
There are two phases of clone. The first phase is to create the Oracle home and register it within the system environment. The second phase is to perform the OracleAS Guard instantiate operation to link it into the OracleAS Disaster Recovery environment and logically match the Oracle home with it's corresponding production home.
A series of clone instance operations on different instances are equivalent to a clone topology operation.
Clone TopologyThe clone topology command performs a clone instance operation across a group of systems. The clone operation is performed on every OracleAS home that does not contain a database or it can be filtered using a policy file. For OracleAS homes that contain a database, a clone topology operation will perform the instantiate phase of

OracleAS Guard Operations -- Standby Site Cloning of One or More Production Instances to a Standby System
13-30 Oracle Application Server High Availability Guide
the operation, skipping the creation of the Oracle home at the standby site. The operation can be performed on a subset of a topology by utilizing a policy file.
There are three methodologies that you must be aware of when planning for an OracleAS Disaster Recovery site setup:
■ Creating a pure OracleAS Disaster Recovery site
■ Adding OracleAS homes to an existing site with OracleAS Disaster Recovery enabled
■ Integrating OracleAS Metadata Repositories within an existing database
Each operation requires a different methodology to integrate the newly installed Oracle homes into the existing site or combine them into a standby site for a production site.
Creating a Pure OracleAS Disaster Recovery Site Prior to OracleAS 10g release 10.1.2.0.2, this was the only type of site OracleAS Guard could support. An OracleAS Disaster Recovery configuration was supported only for the default Infrastructure and OracleAS middle-tier install types. With this type of configuration, all the OracleAS homes were created using the Oracle installer. The OracleAS Guard instantiate command creates the relationships between the production and standby Oracle homes and the underlying standby Oracle database repositories.
Adding OracleAS Homes to an Existing Site with OracleAS Disaster Recovery EnabledAfter an OracleAS site is OracleAS Disaster Recovery enabled, the relationship between the production and standby Oracle homes has been created. For releases previous to OracleAS 10g release 10.1.2.0.2, the only way to add new instances to the site was to break the standby relationship, add the new instance at the production site using Oracle Installer, add the new instance to the standby site using Oracle Installer, and re-create the standby site. With OracleAS 10g release 10.1.2.0.2, you can use the clone instance command to add instances to a standby site.
For example, if you need a new middle tier to scale out the services in the middle tier the new instance is installed at the production site. This operation creates the OracleAS home for the instance and establishes the necessary relationships within the OracleAS repositories.
With OracleAS 10g release 10.1.2.0.2, OracleAS Guard asymmetrical topology support, this Oracle home can optionally be ignored in regard to the site's OracleAS Disaster Recovery solution. If you want to add this instance to the standby site, the clone topology command will create the OracleAS Oracle home at the standby target host and establish the production-standby relationship for this instance. Before issuing this command, the standalone OracleAS Guard kit must be installed and started at the target host (see the OracleAS Disaster Recovery installation information in Oracle Application Server Installation Guide for more information) and a site discovery topology operation should be performed to discover the new instance in the production topology.
Integrating OracleAS Metadata Repositories within an Existing DatabaseOracleAS supports the ability to create Metadata Repository schemas in an existing database. Although OracleAS Guard recognizes and manages these databases to synchronize the Metadata Repository configuration data with the rest of the site's distributed configuration data, OracleAS Guard does not create the standby repository
OracleAS Guard Operations -- Standby Site Cloning of One or More Production Instances to a Standby System
OracleAS Disaster Recovery 13-31
nor the production to standby relationship. This environment is supported using the clone topology operation.
To utilize the clone topology command, first install and start the standalone OracleAS Guard server on each standby host. Additionally, the OracleAS Backup/Restore utility is installed in the Oracle home created by the standalone OracleAS Guard install. See the section on recovering a loss of host automatically in Oracle Application Server Administrator’s Guide for more information including a list of prerequisites. The clone topology command creates the middle-tier instance Oracle homes and configuration information at the standby site. For Infrastructure instances, an implicit instantiate operation is performed to initialize the OracleAS Disaster Recovery environment. It is assumed that a separate OracleAS install has already been performed on the standby host. The clone topology operation can use a profile file to filter out instances for an asymmetric topology.
Some situations in which cloning operations are useful are:
■ When you want to add one or more production instances to a standby host site.
■ When you want to add a single production instance to a standby host system.
The steps to perform these cloning operations are described in the following sections.
13.8.1 Cloning a Single Production Instance to a Standby SystemAs an example, you want to add a production instance to a standby system. The clone instance operation eliminates the task of having to install the Oracle instance on the standby middle-tier system and then perform an instantiate operation.
The production instance to be cloned cannot exist on the standby system.
The following are prerequisites for performing the clone instance operation to the standby site system:
■ The OracleAS Guard standalone kit must be installed on the standby system.
■ Backup and Restore must be installed in the OracleAS Guard home on the standby system.
■ A Java development kit with its jar utility must be installed on the standby system.
■ For Windows systems, the services kit (sc.exe) must be installed on the standby system.
The basic procedure consists of the following pre-clone, clone, and post-clone steps.
Pre-Clone StepsFor each instance on the production and standby sites, perform the following steps:
1. Log in as su - root on UNIX systems or as Administrator on Windows systems.
2. CD to the instance home.
3. Shut down any OracleAS Guard servers.
On UNIX systems:
Warning: Do not perform a clone operation to a standby system that contains an existing Oracle home because it will get overwritten. Perform a clone operation only to a standby system where no Oracle home is installed.

OracleAS Guard Operations -- Standby Site Cloning of One or More Production Instances to a Standby System
13-32 Oracle Application Server High Availability Guide
> <ORACLE HOME>/opmn/bin/opmnctl stopproc ias-component=DSA
On Windows systems:C:\<ORACLE HOME>\opmn\bin\opmnctl stopproc ias-component=DSA
4. On UNIX systems only: make sure dsaServer.sh in <ORACLE_HOME>/dsa/bin is executable by everyone. If it is not, record the permission, then change the executable permission by issuing the following command:
chmod +x dsaServer.shchmod u+x asgexec
5. Invoke asgctl and issue the startup command.
>On UNIX systems from the <ORACLE_HOME>/dsa/bin directory> asgctl.sh startup
On Windows systems fom the <ORACLE_HOME>\dsa\bin directoryC:\> asgctl startup
6. Log out as root on UNIX systems.
Clone StepsFrom any instance on the production site, perform the following steps:
1. Log in as user (non root user on UNIX systems).
2. CD to the production instance home.
3. Invoke asgctl and run the clone instance command to clone the instance to the standby topology host system.
> asgctl.shApplication Server Guard: Release 10.1.2.0.2(c) Copyright 2004, 2005 Oracle Corporation. All rights reservedASGCTL> connect asg prodinfra ias_admin/adminpwdSuccessfully connected to prodinfra:7890ASGCTL> set primary database sys/testpwd@asdbChecking connection to database asdbASGCTL> clone instance portal_2 to asmid2Generating default policy for this operation...ASGCTL> disconnectASGCTL> exit>
4. Log out of the system.
Post-Clone StepsFor the instance on the production and standby sites, perform the following steps:
1. Log in as su - root on UNIX systems or as Administrator on Windows systems.
2. CD to the instance home.
■ On the production site systems, CD to the instance home.
■ On the standby site systems, CD to the OracleAS Guard standalone home.
3. Perform an asgctl shutdown command.

OracleAS Guard Operations -- Standby Site Cloning of One or More Production Instances to a Standby System
OracleAS Disaster Recovery 13-33
>On UNIX systems from the <ORACLE_HOME>/dsa/bin directory> asgctl.sh shutdown
On Windows systems fom the <ORACLE_HOME>\dsa\bin directoryC:\> asgctl shutdown
4. Log out as root on UNIX systems.
5. On UNIX systems only: Restore the permission for dsaServer.sh to what you recorded it as in Pre-Clone Step 4.
6. On the standby site only, CD to the newly cloned home.
7. Start up OracleAS Guard using the following opmnctl command:
On Unix systems:> <ORACLE HOME>/opmn/bin/opmnctl startproc ias-component=DSA
On Windows systems:C:\<ORACLE HOME>\opmn\bin\opmnctl startproc ias-component=DSA
The last step completes the cloning instance operation and brings the systems back to where they were before you started the operation. At this point, you could invoke asgctl, connect to a production system, discover the topology, and then perform a verify operation to determine if the production and standby topologies were valid and consistent with one another as you would expect them to be.
13.8.2 Cloning Multiple Production Instances to Standby SystemsAs an example, you want to add two or more production instances to a standby middle-tier host system. The clone topology operation eliminates the task of having to install these Oracle instances on the standby middle-tier systems and then perform an instantiate operation.
As part of the clone topology operation, the production instances are cloned and the OracleAS Metadata Repository is instantiated. However, for a OracleAS Metadata Repository configuration created using OracleAS Metadata Repository Creation Assistant, no instantiate operation is performed.
The production instances to be cloned cannot exist on the standby systems.
If you want to use a policy file, edit and use the clone policy file (clone_policy.xml). Specify this file in the using policy <file> parameter of the clone topology command to clone a standby topology for only those instances specified accordingly. See Section 13.7, "Dumping Policy Files and Using Policy Files With Some asgctl Commands" for more information.
The following are prerequisites for performing the clone topology operation to standby site systems:
■ The OracleAS Guard standalone kit must be installed on each standby system.
■ Backup and Restore must be installed on each OracleAS Guard home on each standby system.
Note: If OracleAS Guard does not run as root on UNIX systems, the user will be prompted by the OracleAS Guard client to run the underlying operations at each of the instance homes as root (manually) in order to continue with the operation.

OracleAS Guard Operations -- Standby Site Cloning of One or More Production Instances to a Standby System
13-34 Oracle Application Server High Availability Guide
■ A Java development kit with its jar utility must be installed on each standby system.
■ For Windows systems only, the services kit (sc.exe) must be installed on each standby system.
The basic procedure consists of the following pre-clone, clone, and post-clone steps.
Pre-Clone StepsFor each instance on the production and standby sites, perform the following steps:
1. Log in as su - root on UNIX systems or as Administrator on Windows systems.
2. CD to the instance home.
3. Shut down any OracleAS Guard servers.
On UNIX systems:> <ORACLE HOME>/opmn/bin/opmnctl stopproc ias-component=DSA
On Windows systems:C:\<ORACLE HOME>\opmn\bin\opmnctl stopproc ias-component=DSA
4. On UNIX systems only: make sure dsaServer.sh in <ORACLE_HOME>/dsa/bin is executable by everyone. If it is not, record the permission, then change the executable permission by issuing the following command:
chmod +x dsaServer.shchmod u+x asgexec
5. Invoke asgctl and issue the startup command.
>On UNIX systems from the <ORACLE_HOME>/dsa/bin directory> asgctl.sh startup
On Windows systems fom the <ORACLE_HOME>\dsa\bin directoryC:\> asgctl startup
6. Log out as root on UNIX systems.
Clone StepsFrom any instance on the production site, perform the following steps:
1. Log in as user (non root user on UNIX systems).
2. CD to any production instance home.
3. Invoke asgctl and run the clone topology command to clone the topology to the standby topology host system.
> asgctl.shApplication Server Guard: Release 10.1.2.0.2(c) Copyright 2004, 2005 Oracle Corporation. All rights reservedASGCTL> connect asg prodinfra ias_admin/adminpwdSuccessfully connected to prodinfra:7890ASGCTL> set primary database sys/testpwd@asdbChecking connection to database asdbASGCTL> # Command to use if you are using a policy file where <file># is the full path and file spec of the clone policy file.ASGCTL> clone topology to standbyinfra using policy <file>Generating default policy for this operation.

OracleAS Guard Operations -- Standby Instantiation and Standby Synchronization
OracleAS Disaster Recovery 13-35
.
.ASGCTL> disconnectASGCTL> exit>
4. Log out from the system.
Post-Clone StepsFor each instance on the production and standby sites, perform the following steps:
1. Log in as su - root on UNIX systems or as Administrator on Windows systems.
2. CD to the instance home.
■ On the production site systems, CD to the instance home.
■ On the standby site systems, CD to the OracleAS Guard standalone home.
3. Perform an asgctl shutdown command.
>On UNIX systems from the <ORACLE_HOME>/dsa/bin directory> asgctl.sh shutdown
On Windows systems fom the <ORACLE_HOME>\dsa\bin directoryC:\> asgctl shutdown
4. Log out as root on UNIX systems.
5. On UNIX systems only: Restore the permission for dsaServer.sh to what you recorded it as in Pre-Clone Step 4.
6. On the standby site only, CD to the newly cloned homes.
7. Start up OracleAS Guard using the following opmnctl command:
On Unix systems:> <ORACLE HOME>/opmn/bin/opmnctl startproc ias-component=DSA
On Windows systems:C:\<ORACLE HOME>\opmn\bin\opmnctl startproc ias-component=DSA
The last step completes the cloning topology operation and brings the systems back to where they were before you started the operation. At this point, you could invoke asgctl, connect to a production system, discover the topology, and then perform a verify operation to determine if the production and standby topologies were valid and consistent with one another, as you would expect them to be.
13.9 OracleAS Guard Operations -- Standby Instantiation and Standby Synchronization
After adhering to the following conditions, you are ready to use the Oracle Application Server Guard for standby instantiation and standby synchronization.
Note: If OracleAS Guard does not run as root on UNIX systems, the user will be prompted by the OracleAS Guard client to run the underlying operations at each of the instance homes as root (manually) in order to continue with the operation.

OracleAS Guard Operations -- Standby Instantiation and Standby Synchronization
13-36 Oracle Application Server High Availability Guide
■ Meet the requirements for the implementation of the OracleAS Disaster Recovery solution as described in Section 13.1.1, "OracleAS Disaster Recovery Requirements", Section 13.1.3, "Supported Topologies", and Section 13.2, "Preparing the OracleAS Disaster Recovery Environment".
■ Install the OracleAS Disaster Recovery (DR) solution as described in Section 13.3, "Overview of Installing Oracle Application Server".
The following subsections describe standby instantiation and standby synchronization.
See Chapter 14, "OracleAS Guard asgctl Command-line Reference" for OracleAS Guard command-line asgctl utility reference information.
13.9.1 Standby InstantiationThe standby instantiation operation performs a number of operations to set up and maintain a logical mirror of the production site at the standby site. OracleAS Guard is used to coordinate the distributed operations across the production and standby sites to ensure the disaster recovery functionality is enabled. The setup operations are:
■ Uses a previous topology file created by performing a discovery topology operation.
■ Verifies the topology definitions to ensure they comply with the rules of the OracleAS Disaster Recovery environment.
■ Configures Oracle Data Guard to maintain the OracleAS Disaster Recovery environment for the database repository.
■ Mirrors the configuration information of all the Oracle homes in the OracleAS topology to the corresponding Oracle home at the standby site.
■ If you want to use a policy file, edit and use the instantiate policy file (instantiate_policy.xml). Specify this file in the using policy <file> parameter of the instantiate topology command to instantiate a standby topology for only those instances specified accordingly. See Section 13.7, "Dumping Policy Files and Using Policy Files With Some asgctl Commands" for more information.
■ Reports any errors found for correction.
The procedure to perform a standby instantiation operation uses the following example, which assumes that you have invoked the OracleAS Guard client and performed a discover topology command to create a topology file.
See Section 14.2.1.1, "Special Considerations for Running Instantiate and Failover Operations in CFC Environments" if you have an OracleAS Disaster Recovery configuration in a CFC environment and are about to perform an instantiate operation.
1. Connect to the OracleAS Guard server.
ASGCTL > connect asg prodinfra ias_admin/<adminpwd>Successfully connected to prodinfra:7890 ASGCTL>
2. Specify the primary OracleAS Metadata Repository database. See Section 13.13.1.2, "Specifying the Primary Database" for more information. If you have multiple OracleAS Metadata Repositories in your topology, you must authenticate each one using the set primary database command.
ASGCTL> set primary database sys/testpwd@asdb

OracleAS Guard Operations -- Standby Instantiation and Standby Synchronization
OracleAS Disaster Recovery 13-37
3. Dump the policies (dump policies command), then edit and use the verify policy file (verify_policy.xml) and the instantiate policy file (instantiate_policy.xml) to specify the success requirement attribute for each instance in the file. See Section 13.7, "Dumping Policy Files and Using Policy Files With Some asgctl Commands" for more information.
ASGCTL> dump policiesGenerating default policy for this operationCreating policy files on local host in directory "/private1/OraHome2/asr1012/dsa/conf/"
4. Verify the topology. The network hostname standbyinfra is used.
ASGCTL> verify topology with standbyinfra
5. Instantiate the topology at the secondary site. The network hostname standbyinfra is used. This command assumes that all Oracle homes have been installed using Oracle installer software. Specify the using policy <file> parameter where <file> represents the path and file specification for the instantiate_policy.xml file.
ASGCTL> instantiate topology to standbyinfra using policy <file>
Whenever a standby instantiation is performed using the asgctl instantiate topology command a synchronization operation is also performed. Thus, you do not need to perform another synchronization operation immediately following the instantiation operation. If a period of time had passed following an instantiate operation, ensure that both the primary and standby sites are consistent. Then, perform a sync topology operation to ensure any changes that occurred on the primary site are applied to the secondary site.
13.9.2 Standby SynchronizationThe OracleAS Guard synchronization operation synchronizes the standby site with the primary site to ensure that the two sites are logically consistent. This operation is necessary whenever any of the following circumstances exist:
■ Deploy a new application or redeploy an existing application - Both the deployment of a new application and the redeployment of an existing application require changes to schema-based information in the metadata repository as well as component configuration information distributed among the Oracle homes in an OracleAS topology. This information has to be uniformly deployed at the standby site.
■ Configuration changes - Specific changes, small to large, to a configuration, must be reflected at the standby site.
■ User Provisioning - The default Infrastructure installation maintains the database for Oracle Internet Directory. As new users are added to the database, they should be synchronized to the standby site on a schedule that fulfills the business availability requirements.
■ Periodic full synchronization - By default, the synchronization operations synchronizes only the pieces of configuration that have changed since the last synchronization operation. During test cycles or occasional complex configuration changes, administrators may want to fully refresh of their configuration information to the standby site to ensure mirroring of these changes.
Runtime Operations -- OracleAS Guard Switchover and Failover Operations
13-38 Oracle Application Server High Availability Guide
You can specify a full or incremental synchronization. By default, an incremental synchronization is performed, which offers the best performance. However, in the following three circumstances a full synchronization should be specified:
■ When you want to force a full synchronization to happen for some reason, such as synchronizing the standby site completely with the primary site.
■ When you know there are many transactional changes over a short period of time on the primary site that must be synchronized with the secondary site.
■ When you know that there is a large accumulation of transactional changes over a long period of time on the primary site that must be synchronized with the secondary site.
As part of the synchronization operation, a verify operation is performed to ensure the required OracleAS Disaster Recovery environment is maintained. Additionally, if new OracleAS instances are installed into the OracleAS topology, OracleAS Guard will discover these installations.
If you want to use a policy file, edit and use the synchronization policy file (sync_policy.xml). Specify this file in the using policy <file> parameter of the sync topology command for synchronizing a standby topology for only those instances specified accordingly. See Section 13.7, "Dumping Policy Files and Using Policy Files With Some asgctl Commands" for more information.
The following example assumes that you have invoked the OracleAS Guard client and performed a discover topology command to create a topology file.
The procedure to perform standby synchronization is as follows:
1. Connect to the OracleAS Guard server.
ASGCTL > connect asg prodinfra ias_admin/<adminpwd>Successfully connected to prodinfra:7890 ASGCTL>
2. Specify the primary database. See Section 13.13.1.2, "Specifying the Primary Database" for more information.
ASGCTL> set primary database sys/testpwd@asdb
3. Synchronize the secondary site with the primary site.
ASGCTL> sync topology to standbyinfra
13.10 Runtime Operations -- OracleAS Guard Switchover and Failover Operations
Runtime operations include dealing with outages, whether they are scheduled or unscheduled (see Section 13.10.1, "Outages"), and monitoring ongoing OracleAS Guard operations using the asgctl command-line utility and troubleshooting (see Section 13.11, "Monitoring OracleAS Guard Operations and Troubleshooting").
13.10.1 OutagesOutages fall into two categories scheduled and unplanned.
The following subsections describe these outages.

Runtime Operations -- OracleAS Guard Switchover and Failover Operations
OracleAS Disaster Recovery 13-39
13.10.1.1 Scheduled OutagesScheduled outages are planned outages. They are required for regular maintenance of the technology infrastructure supporting the business applications and include tasks such as hardware maintenance, repair and upgrades, software upgrades and patching, application changes and patching, and changes to improve the performance and manageability of systems. Scheduled outages can occur either for the production or standby site. Descriptions of scheduled outages that impact the production or standby site are:
■ Site-wide maintenance
The entire site where the current production resides is unavailable. Examples of site-wide maintenance are scheduled power outages, site maintenance, and regularly planned switchover operations.
■ OracleAS Cold Failover Cluster cluster-wide maintenance
This is scheduled downtime of the OracleAS Cold Failover Cluster for hardware maintenance. The scope of this downtime is the whole hardware cluster. Examples of cluster-wide maintenance are repair of the cluster interconnect and upgrade of the cluster management software.
■ Testing and validating the standby site as a means to test OracleAS Disaster Recovery readiness.
For scheduled outages, a site switchover operation has to be performed, which is explained in the section that follows.
Site Switchover OperationsA site switchover is performed for planned outages of the production site. Both the production and standby sites have to be available during the switchover. The application of the database redo logs is synchronized to match the backup and restoration of the configuration files for the middle tier and OracleAS Infrastructure installations.
During site switchover, considerations must be made to avoid long periods of cached DNS information. Modifications to the site's DNS information, specifically time-to-live (TTL), must be performed. See Section 13.12.2, "Manually Changing DNS Names" for instructions.
If you want to use a policy file, edit and use the switchover policy file (switchover_policy.xml). Specify this file in the using policy <file> parameter of the switchover topology command for switching over to the standby topology only those instances specified accordingly. See Section 13.7, "Dumping Policy Files and Using Policy Files With Some asgctl Commands" for more information. This example does not show the use of a policy file.
See Section 14.2.1.3, "Special Considerations for Running a Switchover Operations in CFC Environments" if you have an OracleAS Disaster Recovery configuration in a CFC environment and are planning a switchover operation.
To switchover from the production site to the standby site, perform the following steps:
1. Reduce the wide area DNS TTL value for the site. See Section 13.12.2, "Manually Changing DNS Names" for more information.
2. On the primary Infrastructure system, make sure the emagent process is stopped. Otherwise, the following error may occur when doing a switchover operation because the emagent has a connection to the database:

Runtime Operations -- OracleAS Guard Switchover and Failover Operations
13-40 Oracle Application Server High Availability Guide
prodinfra: -->ASG_DGA-13051: Error performing a physical standby switchover.prodinfra: -->ASG_DGA-13052: The primary database is not in the proper state to perform a switchover. State is "SESSIONS ACTIVE"
On UNIX systems, stop the Application Server Control (iasconsole) and stop the emagent process, as follows:
> <ORACLE_HOME>/bin/emctl stop iasconsole
On UNIX systems, to check to see if there is an emagent process running, enter the following command:
> ps -ef | grep emagent
On UNIX systems, if after performing the stop iasconsole operation, the emagent process is still running, obtain the process ID (PID) as shown in the previous ps command, and stop the emagent process as follows:
> kill -9 <emagent-pid>
On Windows systems, open the Services control panel. Locate the OracleAS10gASControl service and stop this service.
3. Invoke the OracleAS Guard client command-line utility asgctl (on UNIX systems, asgctl.sh is located in <ORACLE_HOME>/dsa/bin and on Windows systems, asgctl.bat is located in <ORACLE_HOME>\dsa\bin.) and connect to the OracleAS Guard server.
> asgctl.shApplication Server Guard: Release 10.1.2.0.2(c) Copyright 2004, 2005 Oracle Corporation. All rights reservedASGCTL> connect asg prodinfra ias_admin/<adminpwd>
4. Switchover the topology to the secondary site. If you want to use a policy file, specify the using policy <file> parameter where <file> represents the path and file specification for the switchover_policy.xml file.
ASGCTL> switchover topology to standbyinfra
5. Disconnect from the old primary site OracleAS Guard server.
ASGCTL> disconnectASGCTL>
6. Perform a wide area DNS switchover to direct requests to the new production site based on one of the options presented in Section 13.12, "Wide Area DNS Operations".
7. Adjust the wide area DNS TTL to an appropriate value.
Special Switchover Operation ConsiderationsThis section describes the following special considerations relating to the switchover operation.
Note: As part of the OracleAS Guard switchover operation, an implicit sync topology operation is performed to make sure the topologies are identical. In addition, all OPMN services are stopped and then restarted on the production site.

Runtime Operations -- OracleAS Guard Switchover and Failover Operations
OracleAS Disaster Recovery 13-41
■ When performing a switchover operation from a primary site with two Oracle Identity Management instances running to a standby site representing an asymmetric topology with only one Oracle Identity Management instance running, which means that the other node is to be ignored on the switchover site, the system administrator must not only edit the switchover_policy.xml policy file to indicate that this other node is to be set to Ignore, but must also shutdown all processes running on that node in order for the switchover operation to be successful. For example, if the two Oracle Identity Management instances running on the primary site are im.machineA.us.oracle.com and im.machineB.us.oracle.com, and the other node (im.machineB.us.oracle.com) is to be ignored on the switchover site, the system administrator must also shutdown all processes running on that node (im.machineB.us.oracle.com) in order for the switchover operation to succeed.
■ When the discover topology command is issued following a switchover operation and the asymmetric standby site topology originally had one or more fewer middle tiers (for example, instA and instB) than there were in the original production site topology (instA, instB, and instC), a warning error message displays for each missing instance of a middle tier (instC, in this case). This warning error message is expected and can be ignored. When a discover topology command is issued following a switchover operation, OracleAS Server Guard reads the Oracle Internet Directory information, which is an exact copy of the original primary site Oracle Internet Directory information on this new primary site (former standby site). Because this Oracle Internet Directory information is identical to the original primary site Oracle Internet Directory information, when OracleAS Server Guard visits the host or home of each instance of these middle tiers to verify their existence, it discovers that some of the middle tiers do not exist, and issues warnings.
13.10.1.2 Unplanned OutagesAn unplanned outage that impacts a production site occurs when it becomes unavailable and there is no possibility of restoring the production site to service within a reasonable period of time. This includes site-wide outages at the production site such as fire, flood, earthquake, or power outages.
Unplanned outages warrant performing a failover operation of the production site to the standby site.
Site Failover OperationsA site failover operation is performed for unplanned outages for the production site. Failover operations require the restoration of the configuration and Infrastructure data to a consistent point in time. OracleAS Guard ensures that the site services are brought up in a consistent fashion to the point of the last sync operation. A failover operation restores to the last synchronization point.
If you want to use a policy file, edit and use the failover policy file (failover_policy.xml). Specify this file in the using policy <file> parameter of the failover command for failing over to the standby topology only those instances specified accordingly. See Section 13.7, "Dumping Policy Files and Using Policy Files With Some asgctl Commands" for more information.
See Section 14.2.1.1, "Special Considerations for Running Instantiate and Failover Operations in CFC Environments" if you have an OracleAS Disaster Recovery configuration in a CFC environment and are about to perform a failover operation.
To fail over the production site to the standby site, follow these steps:

Monitoring OracleAS Guard Operations and Troubleshooting
13-42 Oracle Application Server High Availability Guide
1. Connect to the OracleAS Guard server on the standby site. The network name is standbyinfra.
ASGCTL> connect asg standbyinfra ias_admin/<adminpwd>Successfully connected to stanfbyinfra:7890
2. Specify that the primary OracleAS Metadata Repository database on the standby site is now identified as the new primary database on this new production site. The keyword new is shown as bold text in the following example to indicate its importance as a key word. If you have multiple OracleAS Metadata Repositories in your topology, you must authenticate each one using the set new primary database command.
ASGCTL> set new primary database sys/testpwd@asdb
3. Perform an asgctl failover operation.
ASGCTL> failover
4. Discover the topology. You must perform this operation to create a new topology file for this production site.
ASGCTL> discover topology oidpassword=oidpwd
13.11 Monitoring OracleAS Guard Operations and TroubleshootingAfter setting up your OracleAS Disaster Recovery solution, and instantiating the standby topology, and synchronizing the standby topology, you can use the OracleAS Guard client command-line utility asgctl to issue commands through the coordinating OracleAS Guard server to monitor asgctl operations and perform troubleshooting tasks. A typical OracleAS Guard monitoring or troubleshooting session may involve the following tasks:
1. Section 13.11.1, "Verifying the Topology"
2. Section 13.11.2, "Displaying the Current Operation"
3. Section 13.11.3, "Displaying a List of Completed Operations"
4. Section 13.11.4, "Stopping an Operation"
5. Section 13.11.5, "Tracing Tasks"
6. Section 13.11.6, "Writing Information About the Topology to a File"
As asgctl commands are issued through the OracleAS Guard client and requests are then made to the coordinating OracleAS Guard server, the coordinating OracleAS Guard server communicates these requests to the other OracleAS Guard servers in the production and standby topologies, and status messages are returned to the OracleAS Guard client as well as any error messages should a particular task encounter a problem. Section 13.11.7, "Error Messages" describes where you can obtain more information about these error messages.
13.11.1 Verifying the TopologyTo validate that the primary topology is running and the configuration is valid, enter the following asgctl command at the asgctl prompt.
ASGCTL> connect asg ias_admin/iastest2Successfully connected to prodinfra:7890ASGCTL> discover topology oidpassword=oidpwd

Monitoring OracleAS Guard Operations and Troubleshooting
OracleAS Disaster Recovery 13-43
ASGCTL> verify topologyGenerating default policy for this operationprodinfra:7890 HA directory exists for instance asr1012.infra.us.oracle.comasmid2:7890 HA directory exists for instance asmid2.asmid2.us.oracle.comasmid1:7890 HA directory exists for instance asmid1.asmid1.us.oracle.comASGCTL>
If you want to use a policy file, edit and use the verify policy file (verify_policy.xml) to specify the success requirement attribute for each instance in the file. Then specify the using policy <file> parameter in the verify command where <file> represents the path and file specification for the verify_policy.xml file. See Section 13.7, "Dumping Policy Files and Using Policy Files With Some asgctl Commands" for more information.
To compare a primary topology to which the local host is a member with a standby topology and ensure that they are consistent with one another and that both topologies conform to OracleAS Disaster Recovery requirements, enter the following asgctl command at the asgctl prompt and specify the name of the standby host system.
ASGCTL> dump policiesGenerating default policy for this operationCreating policy files on local host in directory "/private1/OraHome2/asr1012/dsa/conf/"
ASGCTL> verify topology with standbyinfraGenerating default policy for this operationprodinfra:7890 HA directory exists for instance asr1012.infra.us.oracle.comasmid2:7890 HA directory exists for instance asmid2.asmid2.us.oracle.comasmid1:7890 HA directory exists for instance asmid1.asmid1.us.oracle.comstandbyinfra:7890 HA directory exists for instance asr1012.infra.us.oracle.comasmid2:7890 HA directory exists for instance asmid2.asmid2.us.oracle.comasmid1:7890 HA directory exists for instance asmid1.asmid1.us.oracle.comprodinfra:7890 Verifying that the topology is symmetrical in both primary and standby configurationASGCTL>
# Command to use if you want to use a policy file# verify topology with standbyinfra using policy <file>
13.11.2 Displaying the Current OperationTo display the status of all the current operations running on all nodes of the topology to which the OracleAS Guard client is connected, enter the following asgctl command at the asgctl prompt:
ASGCTL> show operation*************************************OPERATION: 19 Status: running Elapsed Time: 0 days, 0 hours, 0 minutes, 28 secs TASK: syncFarm TASK: backupFarm TASK: fileCopyRemote
Monitoring OracleAS Guard Operations and Troubleshooting
13-44 Oracle Application Server High Availability Guide
TASK: fileCopyRemote TASK: restoreFarm TASK: fileCopyLocal
13.11.3 Displaying a List of Completed OperationsTo display only operations that have completed (are not running on any nodes of the topology to which the OracleAS Guard client is connected for the current session), enter the following asgctl command at the asgctl prompt:
ASGCTL> show operation history*************************************OPERATION: 7 Status: success Elapsed Time: 0 days, 0 hours, 0 minutes, 0 secs TASK: getTopology TASK: getInstance*************************************OPERATION: 16 Status: success Elapsed Time: 0 days, 0 hours, 0 minutes, 0 secs TASK: getTopology TASK: getInstance*************************************OPERATION: 19 Status: success Elapsed Time: 0 days, 0 hours, 1 minutes, 55 secs TASK: syncFarm TASK: backupFarm TASK: fileCopyRemote TASK: fileCopyRemote TASK: restoreFarm TASK: fileCopyLocall
13.11.4 Stopping an OperationTo stop a specific operation that is running on the server, enter the following asgctl command at the asgctl prompt and specify the operation number you want to stop. You can obtain the operation number you want to stop by entering a asgctl show operation full command.
ASGCTL> show operation full*************************************OPERATION: 19 Status: running Elapsed Time: 0 days, 0 hours, 0 minutes, 28 secs Status: running...ASGCTL> stop operation 19
13.11.5 Tracing TasksTo set a trace flag for a specific event and to log the output to the asgctl log files, enter the following asgctl command at the asgctl prompt and specify the on keyword and enter the trace flags to be enabled. In this case, the trace flag DB indicates that trace

Wide Area DNS Operations
OracleAS Disaster Recovery 13-45
information regarding processing in the Oracle Database environment will be displayed. See the set trace command for more information about other trace flags that can be enabled. See the set trace command for a complete list of the trace flags that can be set.
ASGCTL> set trace on db
13.11.6 Writing Information About the Topology to a FileTo write detailed information about the topology to which the local host is connected, enter the following asgctl command at the asgctl prompt and specify the path name and file name where the detailed output is to be written. The output is the same as the display shown in the dump topology command, except it is written to a file that you can save for future reference.
ASGCTL> dump topology to c:\dump_mid_1.txt
13.11.7 Error MessagesAppendix C, "OracleAS Guard Error Messages" categorizes and describes the error messages that may appear while using the OracleAS Disaster Recovery solution.
13.12 Wide Area DNS OperationsTo direct client requests to the entry point of a production site, use DNS resolution. When a site switchover or failover is performed, client requests have to be redirected transparently to the new site that is playing the production role. To accomplish this redirection, the wide area DNS that resolves requests to the production site has to be switched over to the standby site. The DNS switchover can be accomplished by either using a wide area load balancer or manually changing DNS names.
The following subsections describe the DNS switchover operation.
13.12.1 Using a Wide Area Load BalancerWhen a wide area load balancer (global traffic manager) is deployed in front of the production and standby sites, it provides fault detection services and performance-based routing redirection for the two sites. Additionally, the load balancer can provide authoritative DNS name server equivalent capabilities.
During normal operations, the wide area load balancer can be configured with the production site's load balancer name-to-IP mapping. When a DNS switchover is required, this mapping in the wide area load balancer is changed to map to the standby site's load balancer IP. This allows requests to be directed to the standby site, which now has the production role.
This method of DNS switchover works for both site switchover and failover. One advantage of using a wide area load balancer is that the time for a new name-to-IP mapping to take effect can be almost immediate. The downside is that an additional investment needs to be made for the wide area load balancer.
Note: A hardware load balancer is assumed to be front-ending each site. Check http://metalink.oracle.com for supported load balancers.

Using OracleAS Guard Command-Line Utility (asgctl)
13-46 Oracle Application Server High Availability Guide
13.12.2 Manually Changing DNS NamesThis method of DNS switchover involves the manual change of the name-to-IP mapping that is originally mapped to the IP address of the production site's load balancer. The mapping is changed to map to the IP address of the standby site's load balancer. Follow these instructions to perform the switchover:
1. Make a note the current time-to-live (TTL) value of the production site's load balancer mapping. This mapping is in the DNS cache and it will remain there until the TTL expires. As an example, let's assume that the TTL is 3600 seconds.
2. Modify the TTL value to a short interval (for example, 60 seconds).
3. Wait one interval of the original TTL. This is the original TTL of 3600 seconds from Step 1.
4. Ensure that the standby site is switched over to receive requests.
5. Modify the DNS mapping to resolve to the standby site's load balancer giving it the appropriate TTL value for normal operation (for example, 3600 seconds).
This method of DNS switchover works for planned site switchover operations only. The TTL value set in Step 2 should be a reasonable time period where client requests cannot be fulfilled. The modification of the TTL is effectively modifying the caching semantics of the address resolution from a long period of time to a short period. Due to the shortened caching period, an increase in DNS requests can be observed.
13.13 Using OracleAS Guard Command-Line Utility (asgctl)This section includes the following subsections:
■ Section 13.13.1, "Typical OracleAS Guard Session Using asgctl"
■ Section 13.13.2, "Periodic Scheduling of OracleAS Guard asgctl Scripts"
■ Section 13.13.3, "Submitting OracleAS Guard Jobs to the Enterprise Manager Job System"
■ Section 13.14.1, "Special Considerations for Multiple OracleAS Metadata Repository Configurations"
■ Chapter 14, "OracleAS Guard asgctl Command-line Reference"
13.13.1 Typical OracleAS Guard Session Using asgctlA typical OracleAS Guard session using asgctl involves the following tasks, which are described in the following subsections:
■ Section 13.13.1.1, "Getting Help"
■ Section 13.13.1.2, "Specifying the Primary Database"
■ Section 13.13.1.3, "Discovering the Topology"
One of the advantages of supporting an asgctl command-line interface is that you can place these asgctl commands in a proper sequence in a script as described in Section 13.13.1.4, "Creating and Executing an asgctl Script" and then execute the script as described in Section 13.13.2, "Periodic Scheduling of OracleAS Guard asgctl Scripts" and Section 13.13.3, "Submitting OracleAS Guard Jobs to the Enterprise Manager Job System".

Using OracleAS Guard Command-Line Utility (asgctl)
OracleAS Disaster Recovery 13-47
13.13.1.1 Getting HelpTo get help on a particular command, enter the asgctl command at the asgctl prompt and specify the command name you for which you want help information. Otherwise, to get help on all commands, enter the following asgctl command at the asgctl prompt:
ASGCTL> help connect asg [<host>] [ias_admin/<password>] disconnect exit quit clone topology to <standby_topology_host> [using policy <file>] clone instance <instance> to <standby_topology_host> discover topology [oidhost=<host>] [oidsslport=<sslport>] [oiduser=<user>] oidpassword=<pass> discover topology within farm dump farm [to <file>] (Deprecated) dump topology [to <file>] [using policy <file>] dump policies failover [using policy <file>] help [<command>] instantiate farm to <standby_farm_host> (Deprecated) instantiate topology to <standby_topology_host> [using policy <file>] set asg credentials <host> ias_admin/<password> [for topology] set asg credentials <host> ias_admin/<password> [for farm] (Deprecated) set primary database <username>/<password>@<servicename> [pfile <filename> | spfile <filename>] set new primary database <username>/<password>@<servicename> [pfile <filename> | spfile <filename>] set noprompt set trace on|off <traceflags> sync farm to <standby_farm_host> [full | incr[emental]] (Deprecated) sync topology to <standby_topology_host> [full | incr[emental]] [using policy <file>] startup startup farm (Deprecated) startup topology shutdown [local] shutdown farm (Deprecated) shutdown topology show op[eration] [full] [[his]tory] show env stop op[eration] <op#> switchover farm to <standby_farm_host> (Deprecated) switchover topology to <standby_topology_host> [using policy <file>] verify farm [with <host>](Deprecated) verify topology [with <host>] [using policy <file>]
ASGCTL>
13.13.1.2 Specifying the Primary DatabaseTo identify the OracleAS Infrastructure database on the primary topology, enter the following asgctl command at the asgctl prompt and specify the user name and password for the database account with sysdba privileges to access the OracleAS Infrastructure database and the TNS service name of the OracleAS Infrastructure database:
ASGCTL> set primary database sys/testpwd@asdb Checking connection to database asdbASGCTL>
The standby site uses the same values as specified for the primary database because the service name and password for both the primary and standby OracleAS

Using OracleAS Guard Command-Line Utility (asgctl)
13-48 Oracle Application Server High Availability Guide
Infrastructure Databases must be the same. You must always set the primary database before performing an instantiate, sync, switchover, or failover operation.
If you have multiple OracleAS Metadata Repositories in your topology, you must authenticate each one using the set primary database command.
13.13.1.3 Discovering the TopologyYou must perform a discover topology command when you first set up your OracleAS Disaster Recovery environment in order to initially create the topology XML file. There after, you should perform a discover topology operation whenever you procure another Oracle home in a production site or change roles from a production to a standby site through a switchover or failover operation. The discover topology command queries Oracle Internet Directory for all instances within the topology that share the same Oracle Internet Directory for the production site. Enter the following asgctl command at the asgctl prompt to discover the topology:
ASGCTL> discover topology oidpassword=oidpwdDiscovering topology on host "infra" with IP address "123.1.2.111" prodinfra:7890 Connecting to the OID server on host "infra.us.oracle.com" using SSL port "636" and username "orcladmin" Getting the list of databases from OID Gathering database information for SID "asdb" from host "infra.us.oracle.com" Getting the list of instances from OID Gathering instance information for "asr1012.infra.us.oracle.com" from host "infra.us.oracle.com" Gathering instance information for "asmid1.asmid1.us.oracle.com" from host "asmid1.us.oracle.com" Gathering instance information for "asmid2.asmid2.us.oracle.com" from host "asmid2.us.oracle.com"The topology has been discovered. A topology.xml file has been written to each home in the topology.
ASGCTL>
After the production topology is known by OracleAS Guard for a production site, you can execute any one of the subsequent commands to perform a subsequent asgctl operation that involves the standby site. See discover topology for more information.
13.13.1.4 Creating and Executing an asgctl ScriptTo create a script containing a sequence of asgctl command names and their arguments, open an edit session with your favorite editor, enter the asgctl commands in the proper sequence according to the operations you want to perform, save the script file, then execute the script when you invoke asgctl as shown in the following command:
> ASGCTL @myasgctlscript.txt
See the set echo command for an example of a script containing a series of asgctl commands.
You can also set the noprompt state for use in executing commands in an asgctl script in which all interactive prompts are later ignored. See the asgctl set noprompt command for more information.

Special Considerations for Some OracleAS Metadata Repository Configurations
OracleAS Disaster Recovery 13-49
13.13.2 Periodic Scheduling of OracleAS Guard asgctl ScriptsFor OracleAS Guard operations that you want to run periodically, such as a periodic sync topology operation to keep the standby topology synchronized with the primary topology, you can automate the periodic running of an OracleAS Guard asgctl script.
On UNIX systems, you can set up a cron job to run the asgctl script. Copy your asgctl script into the appropriate /etc subdirectory cron.hourly, cron.daily, cron.weekly, or cron.monthly. It will run either hourly, daily, weekly, or monthly, depending on the name of the subdirectory in which you choose to place your script. Or you can edit a crontab and create an entry that will be specific for the time on which you want to run the asgctl script. See the one or two manpages on cron and crontab for more information.
On Windows systems, you can use the task scheduler or scheduled tasks from the Control Panel to choose the time to run the asgctl script, daily, weekly, monthly, or at specific times. You can also purchase additional scheduler software with more options from a third party and then set the time and frequency to run the asgctl script. See the Windows operating system help for more information.
13.13.3 Submitting OracleAS Guard Jobs to the Enterprise Manager Job SystemYou can use the Enterprise Manager Job System to automate the execution of any asgctl script to be run at a specified time interval or at a specified time and date, or both, in addition to setting other custom settings. To do this, access the EM Job Activity page and create your own host command job to execute your asgctl script, which is called a job task. Your job task (script) will invoke asgctl to run the asgctl commands in the order in which they are listed. After you create your OracleAS Guard job, save it to the EM Job Library, which is a repository for frequently used jobs, where it can be executed based on the custom settings and time specifications you selected. See the Enterprise Manager online help and Oracle Enterprise Manager Concepts for more information.
13.14 Special Considerations for Some OracleAS Metadata Repository Configurations
This section describes special considerations for multiple OracleAS Metadata Repositories and OracleAS Metadata Repositories created using the OracleAS Metadata Repository Creation Assistant.
13.14.1 Special Considerations for Multiple OracleAS Metadata Repository Configurations
By default, the credentials you specified in the asgctl connect command are used whenever one OracleAS Guard server connects to another OracleAS Guard server. However, there may be cases where you want to do either of the following:
■ Use different credentials for each system on a given site, see Section 13.14.1.1, "Setting asgctl Credentials".
■ Use a common set of credentials in the standby topology that are the same as the credentials used in the primary topology, see Section 13.14.1.2, "Specifying the Primary Database".
If the credentials for any host system are not the same as those used in the asgctl connect command, you must set the OracleAS Guard credentials so that the OracleAS Guard server can connect to each host system in the configuration.

Special Considerations for Some OracleAS Metadata Repository Configurations
13-50 Oracle Application Server High Availability Guide
13.14.1.1 Setting asgctl CredentialsTo set different credentials for all the host systems belonging to the same topology, enter the following asgctl command at the asgctl prompt. Specify the node name of the host system to which the credentials apply and the ias_admin account name and password for the ias_admin account created during the Oracle Application Server installation, and the key words for topology. These settings are good for the current session.
ASGCTL> set asg credentials standbyinfra ias_admin/<iasadminpwd> for topology
When you specify the key words, for topology, you set the credentials for all the host systems that belong to the same topology as the specified system; otherwise, the credentials will apply only for the specified host system.
The set asg credentials command is also useful when you want to use different credentials for a specific server on the topology. In the previous example, the same credentials were set for all nodes on the standby topology, so that these credentials differ from the credentials used in the primary topology. The following command sets the credentials for a specific node, the standbyinfra node, on the standby topology.
ASGCTL> set asg credentials standbyinfra ias_admin/<iasadminpwd>
To summarize, if you set the credentials for a topology, these credentials are inherited for the entire topology. If you set the credentials for an individual host on the topology, the credentials (for this host) override the default credentials set for the topology.
In addition, for topologies that have more than one Infrastructure, such as a collocated Oracle Internet Directory+OracleAS Metadata Repository and a separate Portal OracleAS Metadata Repository, OracleAS Guard requires that you set the credentials for each system on which an Infrastructure resides before performing any important OracleAS Guard operations, such as instantiate, sync, switchover, and failover. See set asg credentials for an example.
13.14.1.2 Specifying the Primary DatabaseTo identify the OracleAS Infrastructure database on the primary topology, enter the following asgctl command at the asgctl prompt. Specify the user name and password for the database account with sysdba privileges to access the OracleAS Infrastructure Database on the primary topology and the TNS service name of the OracleAS Infrastructure database:
ASGCTL> set primary database sys/testpwd@asdbChecking connection to database asdbASGCTL>
The standby site uses the same values as specified for the primary database because the service name and password for both the primary and standby OracleAS Infrastructure databases must be the same.
If a production or standby site has multiple OracleAS Metadata Repository instances installed and you are performing an instantiate, sync, switchover, or failover operation, you must identify all of the OracleAS Metadata Repository instances by performing a set primary database command for each OracleAS Metadata Repository instance before performing either an instantiate, sync, switchover, or failover operation. See set asg credentials for an example.

Special Considerations for OracleAS Disaster Recovery Environments
OracleAS Disaster Recovery 13-51
13.14.1.3 Setting OracleAS Guard Port NumbersOracleAS Guard uses a default port (port) number of 7890; for example, port=7890. If there are any additional Oracle homes installed on a system, each additional Oracle home must have a unique OracleAS Guard port number, that is usually incremented by the value one, for example, port=7891, and so forth. See Section 13.4.6, "Supported OracleAS Disaster Recovery Configurations" for more information.
13.14.2 Special Considerations for OracleAS Metadata Repository Configurations Created Using OracleAS Metadata Repository Creation Assistant
The following items are special considerations for an OracleAS Metadata Repository configuration created using OracleAS Metadata Repository Creation Assistant. These Metadata Repository databases are installed in Oracle homes with schemas containing user data. For this reason, there are some special considerations regarding OracleAS Disaster Recovery.
■ On the standby site, no Metadata Repository is created by OracleAS Disaster Recovery. The System Administrator must use the OracleAS Metadata Repository Creation Assistant on the standby site and create this Metadata Repository.
■ During a clone topology operation to the standby site no instantiate operation is performed on the Metadata Repository.
■ Warning: Do not perform a clone operation to a standby system containing an existing Oracle home because it will get overwritten. Only perform a clone operation to a standby system where there is no Oracle home installed.
■ The OracleAS Disaster Recovery solution assumes that user schemas are already configured for Oracle Data Guard.
■ The OracleAS Disaster Recovery solution assumes that when using Oracle Data Guard, that the Metadata Repository is not in managed recovery mode.
■ OracleAS Disaster Recovery will not change the recovery mode of Oracle Data Guard for the Metadata Repository if it is found to be in managed recovery mode; instead, OracleAS Guard will issue a warning indicating that the database is in managed recovery mode and this feature must be set differently.
■ OracleAS Guard must be installed in every Oracle home on every system that is part of your production and standby topology configured for the OracleAS Disaster Recovery solution. OracleAS Guard can be installed as a standalone install a kit located on OracleAS Utility media #2. See the OracleAS Disaster Recovery installation information in Oracle Application Server Installation Guide for more information.
13.15 Special Considerations for OracleAS Disaster Recovery Environments
The following sections describe some additional special considerations for OracleAS Disaster Recovery environments.
13.15.1 Some Special Considerations That Must Be Taken When Setting Up Some OracleAS Disaster Recovery Sites
Some special considerations must be taken when setting up OracleAS Disaster Recovery for sites that include:
■ Middle-tier CFC configurations

Special Considerations for OracleAS Disaster Recovery Environments
13-52 Oracle Application Server High Availability Guide
■ OracleAS Guard release 10g (9.0.4) cloning
In both cases, the instance name stored in Oracle Internet Directory is comprised of the original host name on which the production site installation was performed. In the case of an OracleAS Disaster Recovery site having a symmetric topology, the standby OracleAS Disaster Recovery peer must be installed identically to the production site and for an OracleAS Guard Release 10.1.2.0.2 clone instance or clone topology operation, the operation must be performed to mirror the configuration.
In an asymmetric standby topology, where the production site physical host does not exist at the standby site, the instance name should be filtered out of the topology using the policy file capabilities (see Section 13.7, "Dumping Policy Files and Using Policy Files With Some asgctl Commands" for more information). The hosts file of the host on which a discover topology operation is performed must map the original host name to the corresponding IP of the new host system on which it was cloned.
13.15.2 Handling ons.conf and dsa.conf Configuration Files for Asymmetric TopologiesThe OracleAS Guard operation synchronizes the configuration files of the standby site with those of the production site through a backup operation on the primary site and restores them to the standby site.
For asymmetric topologies the standby site has fewer nodes, thus node name list in the ons.conf configuration file is different from the one on the production site. Therefore, the ons.conf configuration file should be excluded from the backup list of files so it is not restored on the standby site. If not excluded, the nodes listed in the ons.conf configuration file will reflect the node list of the production site and not the actual node list of the standby site. This will cause inefficiencies as OPMN will continue to ping non existing nodes.
Additionally, for asymmetric topologies the dsa.conf configuration file for an Oracle home may contain special settings on the production site that are different from the standby site. For example, the inventory_location parameter setting may be different on the standby site than it is on the primary site. In this case, you should also exclude the dsa.conf configuration file from the backup list of files so it is not restored on the standby site. Otherwise, in this example, the location of the OraInventory will not be correct on the standby site following a switchover or failover operation.
In both these cases, you should modify the Backup and Restore exclusion file as follows to exclude both of these configuration files from the backup list of files so neither is then restored to the standby site:
# Exclude Files# - Add additional files to this list that you want to be ignored# - during the configuration file backup/restorec:\oracle\ias1012\opmn\conf\ons.confc:\oracle\ias1012\dsa\dsa.conf
If the directives set in the dsa.conf file are necessary at the site that currently functions as the production site, it may be desirable to include the dsa.conf file for synchronization and add a post switchover or failover step to edit physical site specific directives.
13.15.3 Other Special Considerations for OracleAS Disaster Recovery EnvironmentsSee Section 14.2, "Information Specific to a Small Set of OracleAS Guard Commands" for information describing some additional special considerations.
OracleAS Guard asgctl Command-line Reference 14-1
14OracleAS Guard asgctl Command-line
Reference
This chapter contains reference information describing the asgctl commands. Table 14–1 summarizes all the asgctl commands. Table 14–2 summarizes all the asgctl commands that were deprecated beginning with OracleAS release 10.1.2.0.2. Subsequent sections provide detailed reference information common to many commands and about each command.
Table 14–1 Summary of asgctl Commands
Command Description
asgctl Invokes the OracleAS Guard client command-line utility asgctl. On UNIX systems, asgctl.sh is located in <ORACLE_HOME>/dsa/bin and on Windows systems, asgctl.bat is located in <ORACLE_HOME>\dsa\bin.
clone instance Clones a single production instance to a standby system.
clone topology Clones two or more production middle tier instances to standby middle tier systems.
connect asg Connects the OracleAS Guard client to the OracleAS Guard server.
disconnect Disconnects the OracleAS Guard client from the OracleAS Guard server.
discover topology Discovers by querying Oracle Internet Directory all instances within the topology that share the same Oracle Internet Directory for a production site and generates a topology XML file that describes the topology.
discover topology within farm
Discovers the topology within the farm for a site when Oracle Internet Directory is not available; in this case, OracleAS Guard server uses OPMN to discover the topology within the farm.
dump policies Directs OracleAS Guard server to write detailed, default policy information to respective XML formatted files for a set of asgctl commands. Each policy file can then be edited and later specified to define the topology's disaster recovery policy to be used with the respective administrative command.
dump topology Directs the OracleAS Guard server to write detailed information about the topology to the screen or if specified, to a file.
exit Disconnects the OracleAS Guard client from any existing connections and exits the OracleAS Guard client. This has the same effect as the quit command.
failover During an unscheduled outage of the production site, the standby site becomes the production site.

14-2 Oracle Application Server High Availability Guide
help Displays help information at the command line.
instantiate topology Creates a topology at the standby site (after verifying that the primary and standby sites are valid for OracleAS Disaster Recovery); also synchronizes the standby site with the primary site so that the primary and standby sites are consistent.
quit Disconnects the OracleAS Guard client from any existing connections and exits the OracleAS Guard client. This has the same effect as the exit command.
set asg credentials Sets the credentials used to authenticate the OracleAS Guard client connections to OracleAS Guard servers and connections between OracleAS Guard servers to a specific host.
set echo Sets command-echoing on or off in an asgctl script.
set new primary database Identifies the OracleAS Infrastructure database on the standby topology as the new primary OracleAS Infrastructure database.
set noprompt Sets the noprompt state in an asgctl script in which all interactive prompts are thereafter ignored.
set primary database Identifies the OracleAS Infrastructure database on the primary topology.
set trace Enables or disables tracing for the specified trace flag. When tracing for a flag is set to on, the output of the trace is written to the OracleAS Guard log files.
show env Shows the current environment of the OracleAS Guard server to which the OracleAS Guard clients is connected.
show operation Shows the current operation.
shutdown Shuts down the OracleAS Guard server at the operating system command-line prompt on a system on which OPMN is not running. This command is only used with cloning an instance or cloning a topology.
shutdown topology Shuts down a running topology.
startup Starts up the OracleAS Guard server at the operating system command-line prompt on a system on which OPMN is not running. This command is only used with cloning an instance or cloning a topology.
startup topology Starts up a shutdown topology.
stop operation Stops the specified operation.
switchover topology During a scheduled outage of the production site, switches the roles of the production site with the standby site so that the standby site now becomes the production site.
sync topology Synchronizes the standby site with the primary site so that the primary and standby sites are consistent.
verify topology Verifies that the topology is running and the configuration is valid. If a standby topology is specified, this command compares the primary and standby topologies to verify that they conform to the requirements for OracleAS Disaster Recovery.
Table 14–1 (Cont.) Summary of asgctl Commands
Command Description

Information Specific to a Small Set of OracleAS Guard Commands
OracleAS Guard asgctl Command-line Reference 14-3
14.1 Information Common to OracleAS Guard asgctl CommandsThis section describes information that is common to OracleAS Guard asgctl commands.
General InformationThe OracleAS Guard client must be connected to an OracleAS Guard server when you issue any asgctl command with the exception of startup and shutdown commands.
The OracleAS Guard server will act as the coordinating server for all operations performed on the systems being configured. By default, this is the local system where the connect asg command is being executed. This system must be a member of the production site topology.
OracleAS Guard Server InformationThe OracleAS Guard server must be started on the standby host system (<standby_topology_host>. The OracleAS Guard server can be stopped and started using the opmnctl command-line Utility as follows:
On UNIX systems:<ORACLE_HOME>/opmn/bin/opmnctl startproc ias-component=DSA
On Windows systems:<ORACLE_HOME>\opmn\bin\opmnctl stopproc ias-component=DSA
14.2 Information Specific to a Small Set of OracleAS Guard CommandsThis section describes information that is specific to a small set of OracleAS Guard operations, such as instantiate, sync, failover, switchover, dump topology, discover topology, clone topology, verify topology, setting the primary database, and setting asg credentials.
Table 14–2 Summary of Deprecated asgctl Commands
Command Description
dump farm (Deprecated) Directs the OracleAS Guard server to write detailed information about the farm to the screen or if specified, to a file.
instantiate farm (Deprecated)
Creates a farm at the standby site (after verifying that the primary and standby sites are valid for OracleAS Disaster Recovery; also synchronizes the standby site with the primary site so that the primary and standby sites are consistent.
shutdown farm (Deprecated)
Shuts down a running farm.
startup farm (Deprecated) Starts up a shutdown farm.
switchover farm (Deprecated)
During a scheduled outage of the production site, switches the roles of the production site with the standby site so that the standby site now becomes the production site.
sync farm (Deprecated) Synchronizes the standby site with the primary site so that the primary and standby sites are consistent.
verify farm (Deprecated) Verifies that the farm is running and the configuration is valid. If a standby farm is specified, this command compares the primary and standby farms to verify that they conform to the requirements for OracleAS Disaster Recovery.

Information Specific to a Small Set of OracleAS Guard Commands
14-4 Oracle Application Server High Availability Guide
If a production or standby site has multiple OracleAS Metadata Repository instances installed and you are performing an instantiate, sync, switchover, or failover operation, you must identify all of the OracleAS Metadata Repository instances by performing a set primary database command for each and every OracleAS Metadata Repository instance prior to performing either an instantiate, sync, switchover, or failover operation.
OracleAS Guard requires that you set the credentials for any OracleAS Guard server system in the topology that has different credentials from the OracleAS Guard server to which you are connected before performing any important OracleAS Guard operations, such as instantiate, sync, switchover, and failover. See set asg credentials for an example.
You must perform a discover topology command when you first set up your OracleAS Disaster Recovery environment in order to initially create the topology XML file; there after, you should perform a discover topology operation whenever you procure another Oracle home in a production site or change roles from a production to a standby site through a switchover or failover operation.
If you want to use a policy file, edit the contents of the XML policy file to define by instance the domain of execution operations that are permitted for any one of these asgctl commands (clone topology, dump topology, failover, instantiate topology, switchover topology, sync topology, and verify topology). Each instance list entry in this XML policy file (clone_policy.xml, dump_policy.xml, failover_policy.xml, instantiate_policy.xml, switchover_policy.xml, sync_policy.xml, and verify_policy.xml) logically tags a production-standby peer combination with a particular attribute that defines the success requirement for the commands successful operation. See Section 13.7, "Dumping Policy Files and Using Policy Files With Some asgctl Commands" for more information and an example of an XML policy file.
14.2.1 Special Considerations for OracleAS Disaster Recovery Configurations in CFC Environments
In an OracleAS Disaster Recovery configuration that uses CFC on the primary topology or standby topology, or both, the following information must be considered before performing an asgctl clone, instantiate topology, switchover topology, or failover command. Before taking a cold backup or restoring the metadata repository database, the Oracle Backup and Recovery Tool shuts down the database first.
For example, in the Windows CFC environment, Oracle Fail Safe performs database polling and restarts the database if it is down. Hence, every time before the administrator performs a clone, instantiate, switchover, or failover operation, the administrator must disable database polling in Oracle Fail Safe and re-enable it after the backup/restore operation (after the clone, instantiate, switchover, or failover operation completes). The steps to perform this sequence of operations are described in a note in Section 14.2.1.1, "Special Considerations for Running Instantiate and Failover Operations in CFC Environments" and Section 14.2.1.3, "Special Considerations for Running a Switchover Operations in CFC Environments".
14.2.1.1 Special Considerations for Running Instantiate and Failover Operations in CFC EnvironmentsIn an OracleAS Disaster Recovery configuration that uses CFC on the primary topology or standby topology, or both, the following information must be considered before performing an asgctl clone, instantiate, switchover, or failover operation.

Information Specific to a Small Set of OracleAS Guard Commands
OracleAS Guard asgctl Command-line Reference 14-5
Before taking a cold backup or restoring the metadata repository database, the Oracle Backup and Recovery Tool shuts down the database first.
For example, in the Windows CFC environment, Oracle Fail Safe performs database polling and restarts the database if it is down. Hence, every time before the administrator performs an instantiate, switchover, or failover operation, the administrator must disable database polling in Oracle Fail Safe and re-enable it after the backup/restore operation (after the clone, instantiate, switchover, or failover operation completes).
The steps to perform this sequence of operations are as follows:
1. Using Microsoft Cluster Administrator, open the cluster group that contains the Application Server resources. Take the following resources offline in this order: Oracle Process Manager, then Oracle Database, then Oracle Listener.
2. Using Windows Service Control Manager, start the following services in this order: Fail Safe Listener, then the Oracle Database service.
3. From a Windows command prompt, use the sqlplus command-line Utility to startup the database.
4. Using Windows Service Control Manager, start the Oracle Process Manager.
5. Perform the asgctl commands, including the clone, instantiate, switchover, or failover operation.
6. Using Microsoft Cluster Administrator, open up the cluster group that contains the Application Server resources and bring up the following resources online in this order: Oracle Listener, then Oracle Database, then Oracle Process Manager.
14.2.1.2 A Special Consideration and Workaround for Performing an Instantiate Operation in CFC EnvironmentsWhen performing an instantiate operation, OracleAS Guard puts an entry for the remote database in the tnsnames.ora file on both the production and standby site. The service name of this entry is constructed by concatenating _REMOTE1 to the database service name (for example, ORCL_REMOTE1). The entry contains the IP address of the target host where the database is running. On the production site, the IP will refer to the standby system and on the standby site, the IP refers to the production system.
In a CFC environment, the database is accessed using a virtual IP rather than a physical IP. When OracleAS Guard creates the tnsnames.ora entry it should use the virtual IP, but it uses the physical IP instead. This problem will be fixed in a future release of OracleAS Guard. As a workaround, when performing an instantiate operation in this environment, edit the tnsnames.ora file after an instantiation operation and replace the physical IP in the entry with the virtual IP used to access the database.
14.2.1.3 Special Considerations for Running a Switchover Operations in CFC EnvironmentsIn an OracleAS Disaster Recovery configuration that uses CFC on the primary topology or standby topology or both, the following information must be considered before performing an asgctl instantiate topology, switchover topology, or failover command.
Before taking a cold backup or restoring the metadata repository database, the Oracle Backup and Recovery Tool shuts down the database first.

Information Specific to a Small Set of OracleAS Guard Commands
14-6 Oracle Application Server High Availability Guide
For example, in the Windows CFC environment, Oracle Fail Safe performs database polling and restarts the database if it is down. Hence, every time before the administrator performs an instantiate, switchover, or failover operation, the administrator must disable database polling in Oracle Fail Safe and re-enable it after the backup/restore operation (after the instantiate, switchover, or failover operation completes).
The steps to perform this sequence of operations are as follows:
1. Using Microsoft Cluster Administrator, open the cluster group that contains the Application Server resources. Take the following resources offline in this order: Oracle Process Manager, then Oracle Database, then Oracle Listener.
2. Using Windows Service Control Manager, start the following services in this order: Fail Safe Listener, then the Oracle Database service.
3. From a Windows command prompt, use sqlplus to start up the database.
4. Perform the asgctl commands, including the instantiate topology, switchover topology, or failover command.
5. Using Microsoft Cluster Administrator, open up the cluster group that contains the Application Server resources and bring up the following resources online in this order: Oracle Listener, then Oracle Database, then Oracle Process Manager.
14.2.2 Other Special Considerations for OracleAS Disaster Recovery EnvironmentsSee Section 13.14, "Special Considerations for Some OracleAS Metadata Repository Configurations" and Section 13.15, "Special Considerations for OracleAS Disaster Recovery Environments" for information describing some additional special considerations for OracleAS Disaster Recovery environments.

asgctl
OracleAS Guard asgctl Command-line Reference 14-7
asgctl
Invokes the OracleAS Guard client from the operating system command-line prompt or runs a script, if the path name to the script is provided.
Formatasgctl@[filename]
Parameters
filename = <file-path>The path to a file that contains asgctl commands that you want to run as a script.
Usage NotesOn UNIX systems, asgctl.sh is located in <ORACLE_HOME>/dsa/bin and on Windows systems, asgctl.bat is located in <ORACLE_HOME>\dsa\bin.
Example> asgctl.shApplication Server Guard: Release 10.1.2.0.2
(c) Copyright 2004, 2005 Oracle Corporation. All rights reservedASGCTL>

clone instance
14-8 Oracle Application Server High Availability Guide
clone instance
Clones a single production instance to a standby system.
Formatclone instance <instance> to <standby_topology_host>
Parameters
instanceThe name of the instance.
standby_topology_hostThe name of the standby topology host to which the instance is to be cloned.
Usage NotesThis command is useful for cloning a production instance on a middle tier to a standby middle tier host system. The clone instance operation eliminates the task of having to install the Oracle instance on the standby middle tier system and perform an instantiate operation.
The production instance to be cloned cannot exist on the standby system.
The following are prerequisites for performing the clone instance operation to the standby site system
■ The OracleAS Guard standalone kit must be installed on the standby system.
■ Backup and Restore must be installed in the OracleAS Guard home on the standby system
■ A Java development kit with its jar utility must be installed on the standby system
■ For Windows systems, the services kit (sc.exe) must be installed on the standby system
See Section 13.8, "OracleAS Guard Operations -- Standby Site Cloning of One or More Production Instances to a Standby System" for more information.
The basic procedure consists of the following pre-clone, clone, and post-clone steps.
Pre-Clone StepsFor each instance on the production and standby sites, perform the following steps:
1. Log in as su - root on UNIX systems or as Administrator on Windows systems.
2. CD to the instance home.
3. Shut down any OracleAS Guard servers.
On UNIX systems:> <ORACLE HOME>/opmn/bin/opmnctl stopproc ias-component=DSA
On Windows systems:C:\<ORACLE HOME>\opmn\bin\opmnctl stopproc ias-component=DSA

clone instance
OracleAS Guard asgctl Command-line Reference 14-9
4. On UNIX systems only: make sure dsaServer.sh in <ORACLE_HOME>/dsa/bin is executable by everyone. If it is not, record the permission, then change the executable permission by issuing the following command:
chmod +x dsaServer.shchmod u+x asgexec
5. Invoke asgctl and issue the startup command.
>On UNIX systems from the <ORACLE_HOME>/dsa/bin directory> asgctl.sh startup
On Windows systems fom the <ORACLE_HOME>\dsa\bin directoryC:\> asgctl startup
6. Log out as root on UNIX systems.
Clone StepsFrom any instance on the production site, perform the following steps:
1. Log in as user (non root user on UNIX systems).
2. CD to the production instance home.
3. Invoke asgctl and run the clone instance command to clone the instance to the standby topology host system.
4. Log out of the system.
Post-Clone StepsFor the instance on the production and standby sites, perform the following steps:
1. Log in as su - root on UNIX systems or as Administrator on Windows systems.
2. CD to the instance home.
■ On the production site systems, CD to the instance home.
■ On the standby site systems, CD to the OracleAS Guard standalone home.
3. Perform an asgctl shutdown command.
>On UNIX systems from the <ORACLE_HOME>/dsa/bin directory> asgctl.sh shutdown
On Windows systems fom the <ORACLE_HOME>\dsa\bin directoryC:\> asgctl shutdown
4. Log out as root on UNIX systems.
5. On UNIX systems only: Restore the permission for dsaServer.sh to what you recorded it as in Pre-Clone Step 4.
6. On the standby site only, CD to the newly cloned home.
7. Start up OracleAS Guard using the following opmnctl command:
On Unix systems:> <ORACLE HOME>/opmn/bin/opmnctl startproc ias-component=DSA
On Windows systems:C:\<ORACLE HOME>\opmn\bin\opmnctl startproc ias-component=DSA

clone instance
14-10 Oracle Application Server High Availability Guide
This last step completes the cloning instance operation and brings the systems back to where they were before you started the clone instance operation. At this point you could invoke asgctl, connect to a production system, discover the topology, and then perform a verify operation to determine whether the production and standby topologies were valid and consistent with one another as you would expect them to be.
ExampleThe following command in the example clones an instance named portal_2 to the standby topology host system named asmid2.
1. Check the prerequisites as described in the Usage Notes.2. Perform the Pre-Clone steps as described in the Usage Notes.3. Perform the Clone steps as described in the Usage Notes. a. Log in as user to any production system. b. CD to any production instance home. c. Invoke asgctl and perform the clone instance command.> asgctl.shApplication Server Guard: Release 10.1.2.0.2
(c) Copyright 2004, 2005 Oracle Corporation. All rights reservedASGCTL> connect asg prodinfra ias_admin/adminpwdSuccessfully connected to prodinfra:7890ASGCTL> set primary database sys/testpwd@asdbChecking connection to database asdbASGCTL> clone instance portal_2 to asmid2Generating default policy for this operation...ASGCTL> disconnectASGCTL> exit> d. Log off the system4. Perform Post-Clone steps as described in the Usage Notes.
Note: If OracleAS Guard does not run as root on UNIX systems, the user will be prompted by the OracleAS Guard client to run the underlying operations at each of the instance homes as root (manually) in order to continue with the operation.

clone topology
OracleAS Guard asgctl Command-line Reference 14-11
clone topology
Clones two or more production middle tier instances to standby middle tier systems.
Formatclone topology to <standby_topology_host> [using policy <file>]
Parameters
standby_topology_hostThe name of the standby topology host system.
using policy <file>Full path and file specification for the XML policy file.
Usage NotesThis command is useful for cloning two or more production instances on middle tier systems to a standby middle tier host system. The clone topology operation eliminates the task of having to install these Oracle instances on the standby middle tier systems and perform an instantiate operation.
As part of the clone topology operation, the middle tiers are cloned and the OracleAS Metadata Repository is instantiated; however for a OracleAS Metadata Repository configuration created using OracleAS Metadata Repository Creation Assistant, no instantiate operation is performed.
The production instances to be cloned cannot exist on the standby systems.
The following are prerequisites for performing the clone topology operation to standby site systems.
■ The OracleAS Guard standalone kit must be installed on each standby system
■ Backup and Restore must be installed on each OracleAS Guard home on each standby system
■ A Java development kit with its jar utility must be installed on each standby system
■ For Windows systems only, the services kit (sc.exe) must be installed on each standby system
See Section 13.8, "OracleAS Guard Operations -- Standby Site Cloning of One or More Production Instances to a Standby System" for more information.
The basic procedure consists of the following pre-clone, clone, and post-clone steps.
Pre-Clone StepsFor each instance on the production and standby sites, perform the following steps:
1. Log in as su - root on UNIX systems or as Administrator on Windows systems.
2. CD to the instance home.
3. Shut down any OracleAS Guard servers.
On UNIX systems:> <ORACLE HOME>/opmn/bin/opmnctl stopproc ias-component=DSA

clone topology
14-12 Oracle Application Server High Availability Guide
On Windows systems:C:\<ORACLE HOME>\opmn\bin\opmnctl stopproc ias-component=DSA
4. On UNIX systems only: make sure dsaServer.sh in <ORACLE_HOME>/dsa/bin is executable by everyone. If it is not, record the permission, then change the executable permission by issuing the following command:
chmod +x dsaServer.shchmod u+x asgexec
5. Invoke asgctl and issue the startup command.
>On UNIX systems from the <ORACLE_HOME>/dsa/bin directory> asgctl.sh startup
On Windows systems fom the <ORACLE_HOME>\dsa\bin directoryC:\> asgctl startup
6. Log out as root on UNIX systems.
Clone StepsFrom any instance on the production site, perform the following steps:
1. Log in as user (non root user on UNIX systems).
2. CD to any production instance home.
3. Invoke asgctl and run the clone topology command to clone the topology to the standby topology host system.
4. Log out of the system.
Post-Clone StepsFor each instance on the production and standby sites, perform the following steps:
1. Log in as su - root on UNIX systems or as Administrator on Windows systems.
2. CD to the instance home.
■ On the production site systems, CD to the instance home.
■ On the standby site systems, CD to the OracleAS Guard standalone home.
3. Perform an asgctl shutdown command.
>On UNIX systems from the <ORACLE_HOME>/dsa/bin directory> asgctl.sh shutdown
On Windows systems fom the <ORACLE_HOME>\dsa\bin directoryC:\> asgctl shutdown
4. Log out as root on UNIX systems.
5. On UNIX systems only: Restore the permission for dsaServer.sh to what you recorded it as in Pre-Clone Step 4.
6. On the standby site only, CD to the newly cloned homes.
7. Start up OracleAS Guard using the following opmnctl command:
On Unix systems:> <ORACLE HOME>/opmn/bin/opmnctl startproc ias-component=DSA
On Windows systems:

clone topology
OracleAS Guard asgctl Command-line Reference 14-13
C:\<ORACLE HOME>\opmn\bin\opmnctl startproc ias-component=DSA
This last step completes the cloning topology operation and brings the systems back to where they were before you started the clone topology operation. At this point you could invoke asgctl, connect to a production system, discover the topology, and then perform a verify operation to determine whether the production and standby topologies were valid and consistent with one another as you would expect them to be.
See Section 14.1, "Information Common to OracleAS Guard asgctl Commands" and Section 14.2, "Information Specific to a Small Set of OracleAS Guard Commands" for more information.
ExampleThe command in the following example results in the OracleAS Guard client cloning the topology to the standby topology host system standbyinfra.
1. Check the prerequisites as described in the Usage Notes.2. Perform the Pre-Clone steps as described in the Usage Notes.3. Perform the Clone steps as described in the Usage Notes. a. Log in as user to any production system. b. CD to any production instance Oracle home. c. Invoke asgctl and perform the clone instance command.> asgctl.shApplication Server Guard: Release 10.1.2.0.2
(c) Copyright 2004, 2005 Oracle Corporation. All rights reservedASGCTL> connect asg prodinfra ias_admin/adminpwdSuccessfully connected to prodinfra:7890ASGCTL> set primary database sys/testpwd@asdbChecking connection to database asdbASGCTL> clone topology to standbyinfraGenerating default policy for this operation...
# Command to use if you are using a policy file# clone topology to standbyinfra using policy <file>...ASGCTL> disconnectASGCTL> exit> d. Log off the system4. Perform Post-Clone steps as described in the Usage Notes.
Note: If OracleAS Guard does not run as root on UNIX systems, the user will be prompted by the OracleAS Guard client to run the underlying operations at each of the instance homes as root (manually) in order to continue with the operation.

connect asg
14-14 Oracle Application Server High Availability Guide
connect asg
Connects the OracleAS Guard client to the OracleAS Guard server on a system on which Oracle Application Server services are running.
Formatconnect asg [<host-name>[:<port>]] ias_admin/<password>
Parameters
host-name = <host-name>Name of the host system for the OracleAS Guard server to which you want the OracleAS Guard client to connect. This OracleAS Guard server will be the coordinating server for all operations performed on the systems being configured. The host name is optional if the OracleAS Guard client and OracleAS Guard server are on the same node.
portThe port number of the OracleAS Guard server in its Oracle home.
ias_admin/passwordThe user name must be the ias_admin account name and the password for the ias_admin account created during the Oracle Application Server installation.
Usage Notes■ The OracleAS Guard client system must have network access to the OracleAS
Guard host system specified with the host-name parameter.
■ The OracleAS Guard host system must have network access to all systems in the OracleAS Disaster Recovery configuration.
■ The specified ias_admin account name must be configured with the necessary rights and privileges to permit OracleAS Disaster Recovery site operations (read and write access to all required files and directories, and so forth)
■ An IP address can be used in place of a host name.
■ If a password for the ias_admin account is not specified in the connect command, you will be prompted to enter a password.
ExampleThe command in the following example results in the OracleAS Guard client connecting to the OracleAS Guard server running on a host named prodinfra using the user name and password ias_admin and adminpwd, respectively.
ASGCTL> connect asg prodinfra ias_admin/adminpwdSuccessfully connected to prodinfra:7890

disconnect
OracleAS Guard asgctl Command-line Reference 14-15
disconnect
Disconnects the OracleAS Guard client from the OracleAS Guard server to which it is currently connected.
Formatdisconnect
Usage NotesThe OracleAS Guard client must be connected to a OracleAS Guard server when you issue this command.
ExampleThe command in the following example disconnects the OracleAS Guard client from the OracleAS Guard server to which it is currently connected.
ASGCTL> disconnectASGCTL>

discover topology
14-16 Oracle Application Server High Availability Guide
discover topology
Directs asgctl to query Oracle Internet Directory and determine all instances within the topology that share the same Oracle Internet Directory for a production site and generates a topology XML file that describes the topology.
Formatdiscover topology [oidhost=<host>] [oidsslport=<sslport>] [oiduser=<user>] oidpassword=<pass>
Parameters
hostName of the host system where Oracle Internet Directory is installed.
sslportThe port number of the host system where Oracle Internet Directory and Secure Sockets Layer (SSL) is installed.
userThe Oracle Internet Directory user name.
passThe password for the specified Oracle Internet Directory user name.
Usage NotesYou should perform a discover topology operation whenever you procure another Oracle home in a production site or change roles from a production to a standby site through a switchover or failover operation.
Discover topology creates the topology (stored in topology.xml) on which to perform all OracleAS Guard operations. This command utilizes the information in Oracle Internet Directory to define the instances included in the topology. Additionally, it gathers local information about each instance. For this reason, it requires all production site instances to have OPMN running. For instances not managed using a DCM farm, the OracleAS Guard service on the Oracle home has to be started. If the services are not started locally, a warning will be produced and the topology.xml file will contain only the instances discovered.
See Section 14.1, "Information Common to OracleAS Guard asgctl Commands" and Section 14.2, "Information Specific to a Small Set of OracleAS Guard Commands" for more information.
ExampleThe command in the following example discovers all the instances within the topology that share the same Oracle Internet Directory for a production site, and generates a topology XML file that describes the topology.
ASGCTL> connect asg prodinfra ias_admin/adminpwdSuccessfully connected to prodinfra:7890ASGCTL> discover topology oidpassword=oidpwdDiscovering topology on host "infra" with IP address "123.1.2.111" prodinfra:7890 Connecting to the OID server on host "infra.us.oracle.com" using SSL port "636" and username "orcladmin" Getting the list of databases from OID

discover topology
OracleAS Guard asgctl Command-line Reference 14-17
Gathering database information for SID "asdb" from host "infra.us.oracle.com" Getting the list of instances from OID Gathering instance information for "asr1012.infra.us.oracle.com" from host "infra.us.oracle.com" Gathering instance information for "asmid1.asmid1.us.oracle.com" from host "asmid1.us.oracle.com" Gathering instance information for "asmid2.asmid2.us.oracle.com" from host "asmid2.us.oracle.com"The topology has been discovered. A topology.xml file has been written to each home in the topology.ASGCTL>

discover topology within farm
14-18 Oracle Application Server High Availability Guide
discover topology within farm
Directs asgctl to discover the topology within a farm at a production site for those special cases where a farm does not have Oracle Internet Directory available.
Formatdiscover topology within farm
ParametersNone.
Usage NotesThe OracleAS Guard client must be connected to a OracleAS Guard server when you issue this command.
ExampleThe command in the following example for a special case in which Oracle Internet Directory is not available, uses OPMN to discover the application server topology within a farm of the OracleAS Guard server to which the OracleAS Guard client is currently connected.
ASGCTL> connect asg prodinfra ias_admin/adminpwdSuccessfully connected to prodinfra:7890ASGCTL> set primary database sys/testpwd@asdbChecking connection to database asdbASGCTL> discover topology within farmWarning: If OID is part of your environment, you should use it for discoveryDiscovering topology on host "infra" with IP address "123.1.2.111"prodinfra:7890 Discovering instances within the topology using OPMN Gathering instance information for "asr1012.infra.us.oracle.com" from host "infra.us.oracle.com"The topology has been discovered. A topology.xml file has been written to each home in the topology.ASGCTL>
Note: You should always use the discover topology command for discovering the topology for a site because this command uses Oracle Internet Directory to discover all instances in the topology. The discover topology within farm command is useful only in those special cases where Oracle Internet Directory is not available; in this special case OracleAS Guard uses OPMN to discover the topology within a farm.

dump policies
OracleAS Guard asgctl Command-line Reference 14-19
dump policies
Directs OracleAS Guard Server to write detailed, default policy information in XML formatted output for the different asgctl commands to a set of policy files located on the local host at the <ORACLE_HOME>/dsa/conf directory on UNIX systems or <ORACLE_HOME>\dsa\conf directory on Windows systems.
Formatdump policies
ParametersNone.
Usage NotesA set of XML formatted policy files are written for each of the following asgctl commands: clone topology, dump topology, failover, instantiate topology, sync topology, switchover topology, and verify topology. You can edit the respective command's policy file, then specify it in the using policy <file> clause for the appropriate command. This parameter lets you define the topology's disaster recovery policy for each of these OracleAS Guard operations.
For the dump policy file, by default the success requirement attribute is set to optional for all instances (middle tier and OracleAS Metadata Repository).
For the failover policy file, by default the success requirement attribute is set to optional for all instances (middle tier and OracleAS Metadata Repository) and mandatory for the Oracle Internet Directory home.
For the instantiate policy file, by default the success requirement attribute is set to mandatory for all instances.
For the switchover policy file, by default the success requirement attribute is set to optional for all instances (middle tier and OracleAS Metadata Repository) and mandatory for the Oracle Internet Directory home.
For the sync policy file, by default the success requirement attribute is set to mandatory for all instances.
For the verify policy file, by default the success requirement attribute is set to optional for all instances (middle tier and OracleAS Metadata Repository) and mandatory for the Oracle Internet Directory home.
ExampleThe following example writes detailed, default policy information in XML formatted output for the different asgctl commands to a set of respective policy files located on the local host.
ASGCTL> dump policiesGenerating default policy for this operationCreating policy files on local host in directory "/private1/OraHome2/asr1012/dsa/conf/"ASGCTL>

dump topology
14-20 Oracle Application Server High Availability Guide
dump topology
Directs asgctl to write detailed information about the topology to the specified file.
Formatdump topology [to <file>] [using policy <file>]
Parameters
to <file>Name of file on the OracleAS Guard client node where the detailed output is to be written.
using policy <file>Full path and file specification for the XML policy file.
Usage NotesFor the dump policy file, by default the success requirement attribute is set to optional for all OracleAS homes (middle tier and OracleAS Metadata Repository).
ExampleThe following example writes detailed information about the topology to a local file.
ASGCTL> connect asg prodinfra ias_admin/adminpwdSuccessfully connected to prodinfra:7890ASGCTL> set primary database sys/testpwd@asdbChecking connection to database asdbASGCTL> dump topology to c:\dump_mid_1.txt
Contents of file c:\dump_mid_1.txt are:
Generating default policy for this operation Instance: asr1012.infra.us.oracle.com Type: Infrastructure Oracle Home Name: asr1012 Oracle Home Path: /private1/OraHome Version: 10.1.2.0.2 OidHost: infra.us.oracle.com OidPort: 389 VirtualHost: infra.us.oracle.com Host: prodinfra Ip: 123.1.2.111 Operation System Arch: sparc Operation System Version: 5.8 Operation System Name: SunOS
Instance: asmid2.asmid2.us.oracle.com Type: Core Oracle Home Name: asmid2 Oracle Home Path: /private1/OraHome2 Version: 10.1.2.0.2 OidHost: infra.us.oracle.com OidPort: 389 VirtualHost: asmid2.us.oracle.com

dump topology
OracleAS Guard asgctl Command-line Reference 14-21
Host: asmid2 Ip: 123.1.2.333 Operation System Arch: sparc Operation System Version: 5.8 Operation System Name: SunOS Instance: asmid1.asmid1.us.oracle.com Type: Core Oracle Home Name: asmid1 Oracle Home Path: /private1/OraHome Version: 10.1.2.0.2 OidHost: infra.us.oracle.com OidPort: 389 VirtualHost: asmid1.us.oracle.com Host: asmid1 Ip: 123.1.2.334 Operation System Arch: sparc Operation System Version: 5.8 Operation System Name: SunOSASGCTL>
The following example writes detailed information about the topology to a local file. Any instances that you want left out of the output can be specified in the policy file.
# Command to use if you are using a policy fileASGCTL> dump topology to c:\dump_mid_1.txt using policy <file>

exit
14-22 Oracle Application Server High Availability Guide
exit
Disconnects from any existing connections to OracleAS Guard servers and exits from the OracleAS Guard client.
Formatexit
Parameters
None
Usage NotesNone.
ExampleASGCTL> exit>

failover
OracleAS Guard asgctl Command-line Reference 14-23
failover
During an unscheduled outage of the production site, performs the failover operation on the standby site to make it the primary site.
Formatfailover [using policy <file>]
Parameters
using policy fileFull path and file specification for the XML policy file.
Usage NotesMake sure OracleAS Infrastructure database is running on the standby topology before performing a failover operation. Also, the OracleAS Infrastructure database information must be set by using the set new primary database asgctl command.
The global DNS names are used to direct the failover. This will be different than the HA naming utilized in the OracleAS Disaster Recovery environment. The discovery mechanism automatically maps the topology to the corresponding peer, based off local name resolution.
For the failover policy file, by default the success requirement attribute is set to optional for all OracleAS homes (middle tier and OracleAS Metadata Repository) and mandatory for the Oracle Internet Directory home.
See Section 14.1, "Information Common to OracleAS Guard asgctl Commands" and Section 14.2, "Information Specific to a Small Set of OracleAS Guard Commands" for more information.
ExampleThe following example performs a failover operation to a standby site.
ASGCTL> connect asg standbyinfra ias_admin/adminpwdSuccessfully connected to standbyinfra:7890ASGCTL> set new primary database sys/testpwd@asdbASGCTL> failoverGenerating default policy for this operationstandbyinfra:7890 Failover each instance in the topology from standby to primary topologystandbyinfra:7890 (home /private1/OraHome2/asr1012) Shutting down each instance in the topology... Executing opmnctl startall commandstandbyinfra:7890 HA directory exists for instance asr1012.infra.us.oracle.comasmid2:7890 HA directory exists for instance asmid2.asmid2.us.oracle.comasmid1:7890 HA directory exists for instance asmid1.asmid1.us.oracle.comASGCTL>

failover
14-24 Oracle Application Server High Availability Guide
# Command to use if you are using a policy file# failover using policy <file>

help
OracleAS Guard asgctl Command-line Reference 14-25
help
Displays help information.
Formathelp [<command>]
Parameters
commandName of the command for which you want help.
Usage NotesNone.
ExampleThe following example displays help about all commands.
ASGCTL> help connect asg [<host>] [ias_admin/<password>] disconnect exit quit clone topology to <standby_topology_host> [using policy <file>] clone instance <instance> to <standby_topology_host> discover topology [oidhost=<host>] [oidsslport=<sslport>] [oiduser=<user>] oidpassword=<pass> discover topology within farm dump farm [to <file>] (Deprecated) dump topology [to <file>] [using policy <file>] dump policies failover [using policy <file>] help [<command>] instantiate farm to <standby_farm_host> (Deprecated) instantiate topology to <standby_topology_host> [using policy <file>] set asg credentials <host> ias_admin/<password> [for topology] set asg credentials <host> ias_admin/<password> [for farm] (Deprecated) set primary database <username>/<password>@<servicename> [pfile <filename> | spfile <filename>] set new primary database <username>/<password>@<servicename> [pfile <filename> | spfile <filename>] set noprompt set trace on|off <traceflags> sync farm to <standby_farm_host> [full | incr[emental]] (Deprecated) sync topology to <standby_topology_host> [full | incr[emental]] [using policy <file>] startup startup farm (Deprecated) startup topology shutdown [local] shutdown farm (Deprecated) shutdown topology show op[eration] [full] [[his]tory] show env stop op[eration] <op#> switchover farm to <standby_farm_host> (Deprecated) switchover topology to <standby_topology_host> [using policy <file>] verify farm [with <host>](Deprecated) verify topology [with <host>] [using policy <file>]
ASGCTL>

instantiate topology
14-26 Oracle Application Server High Availability Guide
instantiate topology
Instantiates a topology to a standby site by establishing the relationship between standby and production instances, mirroring the configuration, creating the standby Infrastructure, and then synchronizing the standby site with the primary site.
Formatinstantiate topology to <standby_topology_host>[:<port>] [with cloning] [using policy <file>]
Parameters
standby_topology_hostName of the standby host system. This parameter is required because it directs the coordinating OracleAS Guard server instance to discover the instances that make up the standby site. This host system must be a member of the standby topology.
portThe port number of the OracleAS Guard server in its Oracle home.
with cloningA directive to perform an instantiation operation using cloning.
using policy <file>Full path and file specification for the XML policy file.
Usage NotesMake sure OracleAS Infrastructure database is running on the primary topology before performing an instantiate topology operation. Also, the OracleAS Infrastructure database information must be set by using the set primary database asgctl command.
The global DNS names are used to direct the instantiation. This will be different than the HA naming utilized in the OracleAS Disaster Recovery environment. The discovery mechanism automatically maps the topology to the corresponding peer, based off local name resolution.
The instantiate operation performs an implicit verify operation.
For the instantiate policy file, by default the success requirement attribute is set to mandatory for all instances.
See Section 14.1, "Information Common to OracleAS Guard asgctl Commands" and Section 14.2, "Information Specific to a Small Set of OracleAS Guard Commands" for more information.
ExampleThe following example instantiates a standby topology by attaching the coordinating OracleAS Guard server and discovering the topology of the production and standby sites, performing site verification, and establishing a OracleAS Disaster Recovery environment with the topology containing the standby topology host known by DNS as standbyinfra. Note that part way through the operation you will be prompted to answer a question regarding whether you want to shut down the database. Reply by entering y or yes.
ASGCTL> connect asg prodinfra ias_admin/adminpwdSuccessfully connected to prodinfra:7890

instantiate topology
OracleAS Guard asgctl Command-line Reference 14-27
ASGCTL> set primary database sys/testpwd@asdbChecking connection to database asdbASGCTL> instantiate topology to standbyinfraGenerating default policy for this operationprodinfra:7890 Instantiating each instance in the topology to standby topology HA directory exists for instance asr1012.infra.us.oracle.comasmid2:7890 HA directory exists for instance asmid2.asmid2.us.oracle.comasmid1:7890 HA directory exists for instance asmid1.asmid1.us.oracle.comstandbyinfra:7890 HA directory exists for instance asr1012.infra.us.oracle.comasmid2:7890 HA directory exists for instance asmid2.asmid2.us.oracle.comasmid1:7890 HA directory exists for instance asmid1.asmid1.us.oracle.comasmid2:7890 Verifying that the topology is symmetrical in both primary and standby configuration...This operation requires the database to be shutdown. Do you want to continue? Yes or Noy...asmid2:7890 (home /private1/oracle/asr1012) Starting backup/synchronization of database "orcl.us.oracle.com" Starting restore/synchronization of database "orcl.us.oracle.com" Synchronizing topology completed successfullyasmid2:7890 Synchronizing topology completed successfully
ASGCTL>
# Command to use if you are using a policy file# instantiate topology to standbyinfra using policy <file>

quit
14-28 Oracle Application Server High Availability Guide
quit
Instructs the OracleAS Guard client to disconnect from any existing connections and exit from asgctl.
Formatquit
Parameters
None
Usage NotesNone.
ExampleThe following example exits from asgctl.
ASGCTL> quit>

set asg credentials
OracleAS Guard asgctl Command-line Reference 14-29
set asg credentials
Sets the credentials used to authenticate the OracleAS Guard connections to OracleAS Guard servers.
Formatset asg credentials <host>[:<port>] ias_admin/<password> [for farm] [for topology]
Parameters
hostName of the host system to which the credentials apply. When OracleAS Guard connects to that host, it will use these credentials.
portThe port number of the OracleAS Guard server in its Oracle home.
ias_admin/passwordThe user name must be the ias_admin account name and the password for the ias_admin account created during the Oracle Application Server installation. This account name must be the same as the account name on at least one of the Oracle Application Server homes.
for farm (deprecated)A keyword, that if present in the command line, directs OracleAS Guard to set the credentials for all of the host systems that belong to the same farm as the local host system.
for topologyA keyword, that if present in the command line, directs OracleAS Guard to set the credentials for all of the host systems that belong to the same topology as the local host system.
Usage NotesBy default, the credentials used in the asgctl connect command are used whenever a OracleAS Guard server needs to connect to another OracleAS Guard server. However, there may be cases where you want to use different credentials for a specific server. This command allows you to use the same credentials for all nodes in a topology. For example, you may want to use a common set of credentials in the standby topology that is different from the credentials used in the primary topology.
If you set the credentials for a topology, these credentials are inherited for the entire topology. If you set the credentials for an individual host on the topology, the credentials (for this host) override the default credentials set for the topology.
For topologies that have more than one Infrastructure, such as a collocated Oracle Internet Directory+OracleAS Metadata Repository and a separate Portal OracleAS Metadata Repository, OracleAS Guard requires that you set the credentials for each system on which an Infrastructure resides before performing any important OracleAS Guard operations, such as instantiate, sync, switchover, and failover. This is actually a two step process in which you must first identify all OracleAS Infrastructure databases on the topology using the set the primary database command for each Infrastructure, then you must set the credentials used to authenticate the OracleAS Guard connections to OracleAS Guard servers on which these Infrastructures reside. The

set asg credentials
14-30 Oracle Application Server High Availability Guide
following example illustrates this concept. Assume your production topology and standby topology consists of the following systems with installed Infrastructure and middle tier software applications.
Production topology:
host01 (Identity Management+OracleAS Metadata Repository), host04 (OracleAS Metadata Repository only), host06 (J2EE), host06 (Portal & Wireless)
Standby Topology:
host02 (Identity Management+OracleAS Metadata Repository), host05 (OracleAS Metadata Repository only), host07 (J2EE), host07 (Portal & Wireless)
The following OracleAS Guard set primary database and set asg credentials commands would be required to properly identify the Infrastructures and authenticate OracleAS Guard connections to OracleAS Guard servers prior to performing an instantiate, sync, switchover, or failover operation. Assuming that the Oracle Identity Management+OracleAS Metadata Repository Infrastructure has a service name of orcl and the separate Portal OracleAS Metadata Repository has a service name of asdb.
ASGCTL> set primary database sys/<password>@orcl.us.oracle.comASGCTL> set primary database sys/<password>@asdb.us.oracle.comASGCTL> set asg credentials host01.us.oracle.com ias_admin/<password>ASGCTL> set asg credentials host04.us.oracle.com ias_admin/<password>
Note that for a failover operation, these steps would be carried out on the standby topology and are as follows with a change in the host system names:
ASGCTL> set primary database sys/<password>@orcl.us.oracle.comASGCTL> set primary database sys/<password>@asdb.us.oracle.comASGCTL> set asg credentials host02.us.oracle.com ias_admin/<password>ASGCTL> set asg credentials host05.us.oracle.com ias_admin/<password>
The OracleAS Guard client must be connected to a OracleAS Guard server before using this command.
An IP address can be used in place of a host name.
See Section 14.1, "Information Common to OracleAS Guard asgctl Commands" and Section 14.2, "Information Specific to a Small Set of OracleAS Guard Commands" for more information.
ExampleThe following example sets the OracleAS Guard credentials of host system standbyinfra to all host systems that belong to this topology.
ASGCTL> set asg credentials standbyinfra ias_admin/<password> for topology

set echo
OracleAS Guard asgctl Command-line Reference 14-31
set echo
Sets command-echoing on or off in a asgctl script.
Formatset echo on | off
Parameters
on | offSpecifying "on" turns on command-echoing in a asgctl script. Specifying "off" turns off command-echoing in a asgctl script.
Usage NotesThis command is useful when running large asgctl scripts. For example, if the asgctl script has error test cases with comments entered before each test case or before each asgctl command, setting echo on displays the comment before each test case or before each asgctl command that is run to give you an explanation of what the test case is or what asgctl command is about to be run.
This command also works with nested scripts.
ExampleThe following example is a asgctl script that turns on command-echoing, runs a test case, connects to a OracleAS Guard server, displays detailed information about the topology, then turns echo off, disconnects from the OracleAS Guard server, and exits from the OracleAS Guard client.
> ASGCTL @myasgctltestscript.txt
# myasgctltestscript.txt# turn on echoset echo on
# make sure you are not connecteddisconnect
# not connected, should get an error messagedump topology
# connect to a DSA serverconnect asg prodinfra ias_admin/adminpwd
#display detailed info about the topologydump topology
#disconnectdisconnect
# turn off echoecho offexit

set new primary database
14-32 Oracle Application Server High Availability Guide
set new primary database
Identifies the OracleAS Infrastructure database on the standby topology as the new primary database preceding a failover operation. This command is only used as part of a failover operation.
Formatset new primary database <username>/<password>@<servicename> [pfile <filename> | spfile <filename>]
Parameters
username/passwordUser name and password for the database account with sysdba privileges.
servicenameThe TNS service name of the OracleAS Infrastructure database. The name must be defined on the OracleAS Infrastructure host system; it does not need to be defined on the OracleAS Guard client host system.
pfile filenameThe filename of the primary (OracleAS Infrastructure) database initialization file that will be used when the primary database is started.
spfile filenameThe filename of the server (OracleAS Infrastructure) initialization file that will be used when the database is started.
Usage NotesBefore performing a failover operation, you are required to connect to the Infrastructure node of the standby topology and define the new primary database. Once the Oracle Infrastructure database on the standby site is identified as the new primary database, then you can proceed to begin the failover operation.
ExampleThe following example sets the OracleAS Infrastructure database information for the standby topology as the new primary/production topology preceding a failover operation.
ASGCTL> connect asg standbyinfra ias_admin/adminpwdSuccessfully connected to standbyinfra:7890ASGCTL> set new primary database sys/testpwd@asdbASGCTL> failover...ASGCTL>

set noprompt
OracleAS Guard asgctl Command-line Reference 14-33
set noprompt
Sets the noprompt state for user interaction for use in executing commands in an asgctl script.
Formatset noprompt
Parameters
None
Usage NotesThe default value, if supplied, is taken for all interactive prompts. A prompt for a user name and password returns an error message in the noprompt state.
ExampleThe following example is an asgctl script containing an asgctl set noprompt command part way through the script that thereafter ignores all subsequent interactive prompting.
> ASGCTL @myasgctltestscript.txt
# myasgctltestscript.txt
# connect to a DSA serverconnect asg prodinfra ias_admin/adminpwd
# set the primary databaseset primary database sys/testpwd@asdb
# discover the production topologydiscover topology oidpassword=oidpwd
# set the noprompt stateset noprompt
#display detailed info about the topologydump topology
#disconnectdisconnect
exit

set primary database
14-34 Oracle Application Server High Availability Guide
set primary database
Identifies the OracleAS Infrastructure database on the primary topology.
Formatset primary database <username>/<password>@<servicename> [pfile <filename> | spfile <filename>]
Parameters
username/passwordUser name and password for the database account with sysdba privileges.
servicenameThe TNS service name of the OracleAS Infrastructure database. The name must be defined on the OracleAS Infrastructure host system; it does not need to be defined on the OracleAS Guard client host system.
pfile filenameThe filename of the primary (OracleAS Infrastructure) database initialization file that will be used when the primary database is started.
spfile filenameThe filename of the server (OracleAS Infrastructure) initialization file that will be used when the database is started.
Usage NotesYou must always set the primary database before performing an instantiate, sync, or switchover operation.
When you set the primary database, OracleAS Guard server logs into and validates the connection to the database.
If a production or standby site has multiple OracleAS Metadata Repository instances installed and you are performing an instantiate, sync, switchover, or failover operation, you must identify all of the OracleAS Metadata Repository instances by performing a set primary database command for each and every OracleAS Metadata Repository instance prior to performing either an instantiate, sync, switchover, or failover operation. In addition, for topologies that have more than one Infrastructure, such as a collocated Oracle Internet Directory+OracleAS Metadata Repository and a separate Portal OracleAS Metadata Repository, OracleAS Guard requires that you set the credentials for each system on which an Infrastructure resides before performing any important OracleAS Guard operations, such as instantiate, sync, switchover, and failover. See set asg credentials for an example.
OracleAS Guard requires the database to have password file authentication. If the database does not have a password file, you must use the orapwd utility to create a password file. Also, set the REMOTE_LOGIN_PASSWORDFILE initialization parameter to EXCLUSIVE.
See Section 14.1, "Information Common to OracleAS Guard asgctl Commands" and Section 14.2, "Information Specific to a Small Set of OracleAS Guard Commands" for more information.

set primary database
OracleAS Guard asgctl Command-line Reference 14-35
ExampleThe following example sets the OracleAS Infrastructure database information for the primary or production topology.
ASGCTL> connect asg prodinfra ias_admin/adminpwdSuccessfully connected to prodinfra:7890ASGCTL> set primary database sys/testpwd@asdbChecking connection to database asdbASGCTL>
The following example sets OracleAS Infrastructure database information for each OracleAS Metadata Repository installed for the primary/production topology prior to a switchover operation.
ASGCTL> connect asg prodinfra ias_admin/adminpwdSuccessfully connected to prodinfra:7890ASGCTL> set primary database sys/testpwd@portal_1Checking connection to database portal_1ASGCTL> set primary database sys/testpwd@portal_2Checking connection to database portal_2ASGCTL> set primary database sys/testpwd@asdbChecking connection to database asdbASGCTL> discover topology oidpassword=oidpwdASGCTL> switchover topology to standbyinfra...

set trace
14-36 Oracle Application Server High Availability Guide
set trace
Sets a trace flag on or off to log output to the OracleAS Guard log files.
Formatset trace on | off <traceflags>
Parameters
on | offSpecifying "on" enables tracing. Specifying "off" disables tracing.
traceflagsThe traceflags to be enabled. Two or more specified traceflags entries must be separated by a comma (,). The traceflags are as follows:
■ DB -- trace information regarding processing in the Oracle Database environment
■ HOME -- trace information with regard to Oracle homes
■ IAS -- trace information regarding processing in Oracle Application Server
■ OPMN -- trace information regarding access to OracleAS OPMN calls
■ IP -- trace information regarding network access and address translation
■ CLIPBOARD -- trace information regarding clipboard processing
■ COPY -- trace information regarding file copy processing
■ FLOW -- trace information regarding work flow processing
■ NET -- trace information regarding network processing
■ RUNCMD -- trace information regarding the running of external commands
■ SESSION -- trace information regarding session management
■ TOPOLOGY -- trace information regarding processing of topology information
Usage NotesThis command applies to all hosts that might be involved in a asgctl command during the lifetime of the connection.
The OracleAS Guard client must be connected to a OracleAS Guard server before using this command.
ExampleThe following example turns on trace for database operations.
ASGCTL> set trace on db

show env
OracleAS Guard asgctl Command-line Reference 14-37
show env
Shows the current environment for the OracleAS Guard server to which the OracleAS Guard client is connected.
Formatshow env
ParametersNone.
Usage NotesNone.
ExampleThe following examples show the environment of the OracleAS Guard server to which the OracleAS Guard client is connected. In the first example, the primary database and new primary database are not yet set on host prodinfra and in the second example, the primary database has already been set on host standbyinfra.
Example 1.
ASGCTL> show env
ASG Server Connection: Host: prodinfra Port: 7890
Primary database: <not set> New primary database: <not set>
Example 2.
ASGCTL> ASGCTL> show env
ASG Server Connection: Host: standbyinfra Port: 7890
Gathering information from the database orcl
Primary database: : User: sys Service: orcl Role: The database role is PHYSICAL STANDBY
New primary database: <not set>

show operation
14-38 Oracle Application Server High Availability Guide
show operation
Shows all operations on all nodes of the topology to which the OracleAS Guard client is connected for the current session.
Formatshow op[eration] [full] [[his]tory]
Parameters
fullFor all operations, shows the operation number, the job name, the job owner's user name, the job ID, the time the operation began, the time the operation ended, the elapsed time for the operation, and all tasks belonging to this job.
historyFor only operations that are not running, shows the operation number and the job name.
Usage NotesNone.
ExampleThe following examples show the status of the current operation.
ASGCTL> show operation*************************************OPERATION: 19 Status: running Elapsed Time: 0 days, 0 hours, 0 minutes, 28 secs TASK: syncFarm TASK: backupFarm TASK: fileCopyRemote TASK: fileCopyRemote TASK: restoreFarm TASK: fileCopyLocal
The following example shows the history of all operations.
ASGCTL> show op his*************************************OPERATION: 7 Status: success Elapsed Time: 0 days, 0 hours, 0 minutes, 0 secs TASK: getTopology TASK: getInstance*************************************OPERATION: 16 Status: success Elapsed Time: 0 days, 0 hours, 0 minutes, 0 secs TASK: getTopology TASK: getInstance*************************************OPERATION: 19

show operation
OracleAS Guard asgctl Command-line Reference 14-39
Status: success Elapsed Time: 0 days, 0 hours, 1 minutes, 55 secs TASK: syncFarm TASK: backupFarm TASK: fileCopyRemote TASK: fileCopyRemote TASK: restoreFarm TASK: fileCopyLocall
shutdown
14-40 Oracle Application Server High Availability Guide
shutdown
Shuts down a running OracleAS Guard server to which the OracleAS Guard client is connected. Use this command only on a host system where OPMN is not running and you are following the procedure to clone an instance or clone a topology.
Formatshutdown [local]
Parameters
localWhen specified shuts down the OracleAS Guard server of the local Oracle home of asgctl.
Usage NotesThe OracleAS Guard server must have been started using the asgctl startup command and not the OPMN opmnctl command startproc.
ExampleThe following example shuts down the OracleAS Guard server on a host system in which OPMN is not running.
> asgctl.sh shutdown

shutdown topology
OracleAS Guard asgctl Command-line Reference 14-41
shutdown topology
Shuts down the OracleAS component services across the topology, while OracleAS Guard server and OPMN will continue to run.
Formatshutdown topology
ParametersNone.
Usage NotesThis is a convenient command for shutting down the entire topology. Use the startup topology command to start it up again.
This command will shutdown OracleAS services such as OID, OC4J, WebCache, and so forth.
ExampleThe following example shuts down the prodinfra production topology.
ASGCTL> shutdown topologyGenerating default policy for this operation
prodinfra:7890 Shutting down each instance in the topology
asmid2:7890 (home /private1/OraHome2/asmid2) Shutting down component HTTP_Server Shutting down component OC4J Shutting down component dcm-daemon Shutting down component LogLoader
asmid1:7890 (home /private1/OraHome/asmid1) Shutting down component HTTP_Server Shutting down component OC4J Shutting down component dcm-daemon Shutting down component LogLoader
prodinfra:7890 (home /private1/OraHome2/asr1012) Shutting down component OID Shutting down component HTTP_Server Shutting down component OC4J Shutting down component dcm-daemon Shutting down component LogLoaderASGCTL>

startup
14-42 Oracle Application Server High Availability Guide
startup
Starts up an OracleAS Guard server from the asgctl prompt. Use this command only on a host system where OPMN is not running and you are following the procedure to clone an instance or clone a topology.
Formatstartup
ParametersNone.
Usage NotesNone.
ExampleThe following example shuts down the OracleAS Guard server on a host system in which OPMN is not running.
> asgctl.sh startup

startup topology
OracleAS Guard asgctl Command-line Reference 14-43
startup topology
Starts up a shutdown topology by starting up the OracleAS component services across the topology.
Formatstartup topology
Parameters
none
Usage NotesThis is a convenient command for starting up the entire topology after it was shut down using the shutdown topology command.
This command will start up OracleAS services such as OID, OC4J, WebCache, and so forth. The startup topology command will perform the equivalent of an opmnctl startup command across each instance of the topology.
ExampleThe following example starts up the production topology.
ASGCTL> startup topologyGenerating default policy for this operation
profinfra:7890 Starting each instance in the topology
prodinfra:7890 (home /private1/OraHome2/asr1012) Executing opmnctl startall command
asmid1:7890 (home /private1/OraHome/asmid1) Executing opmnctl startall command
asmid2:7890 (home /private1/OraHome2/asmid2) Executing opmnctl startall commandASGCTL>

stop operation
14-44 Oracle Application Server High Availability Guide
stop operation
Stops a specific operation that is running on the server.
Formatstop op[eration] <op #>
Parameters
op #The number of the operation.
Usage NotesThe number of the operation that is running on the server can be determined from a show operation command.
ExampleThe following example first shows the running operation (15) on the server and then the stop operation command stops this operation.
ASGCTL> show operation*************************************OPERATION: 15 Status: running Elapsed Time: 0 days, 0 hours, 1 minutes, 35 secs TASK: instantiateFarm TASK: verifyFarm
ASGCTL> stop operation 15

switchover topology
OracleAS Guard asgctl Command-line Reference 14-45
switchover topology
During a scheduled outage of the production site, performs the switchover operation from the production site to the standby site.
Formatswitchover topology to <standby_topology_host>[:<port>] [using policy <file>]
Parameters
standby_topology_hostName of the standby host system. This parameter is required because it directs the coordinating OracleAS Guard server instance to discover the instances that make up the standby site. This host system must be a member of the standby topology.
portThe port number of the standby host system for the OracleAS Guard server in its Oracle home.
using policy <file>Full path and file specification for the XML policy file.
Usage NotesOn the primary infrastructure system, make sure the emagent process is stopped. Otherwise, you may run into the following error when doing a switchover operation because the emagent process has a connection to the database:
prodinfra: -->ASG_DGA-13051: Error performing a physical standby switchover.prodinfra: -->ASG_DGA-13052: The primary database is not in the proper state to perform a switchover. State is "SESSIONS ACTIVE"
On UNIX systems, to stop the emagent process, stop the Application Server Control, which is called iasconsole, as follows:
> <ORACLE_HOME>/bin/emctl stop iasconsole
On UNIX systems, to check to see if there is an emagent process running, do the following:
> ps -ef | grep emagent
On UNIX systems, if after performing the stop iasconsole operation, the emagent process is still running, get its process ID (PID) as determined from the previous ps command and stop it as follows:
> kill -9 <emagent-pid>
On Windows systems, open the Services control panel. Locate the OracleAS10gASControl service and stop this service.
Make sure OracleAS Infrastructure database is running on the primary topology before performing a switchover operation. Also, the OracleAS Infrastructure database information must be set by using the set primary database asgctl command.
The global DNS names are used to direct the switchover. This will be different than the HA naming utilized in the OracleAS Disaster Recovery environment. The discovery

switchover topology
14-46 Oracle Application Server High Availability Guide
mechanism automatically maps the topology to the corresponding peer, based off local name resolution.
As part of the OracleAS Guard switchover operation, an implicit sync topology operation is performed to make sure the topologies are identical. In addition OPMN automatically starts the OracleAS Guard server on the "new" standby Infrastructure node and this server will run indefinitely, and in turn, starts the OracleAS Guard server on the other nodes in the "new" standby topology and each of these is a transient server.
For the switchover policy file, by default the success requirement attribute is set to optional for all instances (middle tier and OracleAS Metadata Repository) and mandatory for the Oracle Internet Directory home.
When performing a switchover operation from a primary site with two Oracle Identity Management instances running (im.machineA.us.oracle.com and im.machineB.us.oracle.com) to a standby site representing an asymmetric topology with only one Oracle Identity Management instance running (im.machineA.us.oracle.com), meaning that the other node (im.machineB.us.oracle.com) is to be ignored on the switchover site, the system administrator must not only edit the switchover_policy.xml policy file to indicate that this other node is to be set to Ignore, but the system administrator must also shut down all processes running on that node (im.machineB.us.oracle.com) in order for the switchover operation to be successful.
When performing a switchover operation from a primary site with two middle tiers, for example core1 and core2 instances registered in the Oracle Internet Directory, to a standby site representing an asymmetric topology with only one middle tier core1, the standby site actually has both core1 and core1 middle tiers registered in the Oracle Internet Directory. The switchover_policy.xml policy file is edited to ignore the core2 middle tier that does not exist on the standby site during the switchover operation. However, it should be noted that the Oracle Internet Directory, which is stored in an Oracle database, is identical for both the production site topology and the standby site topology and therefore a core2 middle tier is also shown to be registered in the Oracle Internet Directory on the standby site topology. For this reason, you cannot install to that standby site topology the same core2 middle tier with the hope of making this into a symmetric topology again. This is a strict limitation for switchover operations using asymmetric standby topologies.
When the discover topology command is issued following a switchover operation and the asymmetric standby site topology originally had one or more fewer middle tiers (for example, instA and instB) than there were in the original production site topology (instA, instB, and instC), a warning error message displays for each missing instance of a middle tier (instC, in this case). This warning error message is expected and can be ignored. When a discover topology to command is issued following a switchover operation, OracleAS Server Guard reads the Oracle Internet Directory information, which is an exact copy of the original primary site Oracle Internet Directory information on this new primary site (former standby site). Because this Oracle Internet Directory information is identical to the original primary site Oracle Internet Directory information, when OracleAS Server Guard visits the host/home of each instance of these middle tiers to verify their existence, it finds that some do not exist, and issues the warning.
See Section 14.1, "Information Common to OracleAS Guard asgctl Commands" and Section 14.2, "Information Specific to a Small Set of OracleAS Guard Commands" for more information.

switchover topology
OracleAS Guard asgctl Command-line Reference 14-47
ExampleThe following example performs a switchover operation to a standby site known by DNS as standbyinfra.
ASGCTL> connect asg prodinfra ias_admin/adminpwdSuccessfully connected to prodinfra:7890ASGCTL> set primary database sys/testpwd@asdbASGCTL> switchover topology to standbyinfraGenerating default policy for this operationprodinfra:7890 Switchover each instance in the topology to standby topologyprodinfra:7890 (home /private1/OraHome2/asr1012) Connecting to the primary database asdb.us.oracle.com Gathering information from the primary database asdb.us.oracle.com Shutting down each instance in the topology...prodinfra:7890 HA directory exists for instance asr1012.infra.us.oracle.comasmid2:7890 HA directory exists for instance asmid2.asmid2.us.oracle.comasmid1:7890 HA directory exists for instance asmid1.asmid1.us.oracle.comstandbyinfra:7890 HA directory exists for instance asr1012.infra.us.oracle.comasmid2:7890 HA directory exists for instance asmid2.asmid2.us.oracle.comasmid1:7890 HA directory exists for instance asmid1.asmid1.us.oracle.comprodinfra:7890 Verifying that the topology is symmetrical in both primary and standby configurationASGCTL>
# Command to use if you are using a policy file# switchover topology to standbyinfra using policy <file>

sync topology
14-48 Oracle Application Server High Availability Guide
sync topology
Synchronizes the standby site with the primary site to ensure that the two sites are consistent. The sync topology operation applies database redo logs for OracleAS Infrastructures to the standby site in conjunction with synchronizing external configuration files across the topology.
Formatsync topology to <standby_topology_host>[:<port>] [full | incr[emental]] [using policy <file>]
Parameters
standby_topology_hostName of the standby site host system. This parameter is required because it directs the coordinating OracleAS Guard server instance to discover the instances that make up the standby site. This host system must be a member of the standby topology.
portThe port number of the standby host system for the OracleAS Guard server in its Oracle home.
full | incremental The synchronization of the standby site with the primary site to make the standby site consistent can be either "full" or "incremental". The default is "incremental". By default, if a full backup has not been performed, an incremental backup operation will not be performed. Instead, a full backup operation will be performed.
using policy fileFull path and file specification for the XML policy file.
Usage NotesBy default an incremental synchronization is performed to make the standby site consistent with the primary site, which offers the best performance. However, there may be three circumstances when specifying a full synchronization should be used.
■ When you want to force a full synchronization to happen, such as synchronizing the standby site completely at a specific point in time (currently) with the primary site.
■ When you know there are many transactional changes over a short period of time on the primary site that must be synchronized with the secondary site.
■ When you know that there are a large accumulation of transactional changes over a long period of time on the primary site that must be synchronized with the secondary site.
The sync operation performs an implicit verify operation.
For the sync policy file, by default the success requirement attribute is set to mandatory for all instances.
See Section 14.1, "Information Common to OracleAS Guard asgctl Commands" and Section 14.2, "Information Specific to a Small Set of OracleAS Guard Commands" for more information.

sync topology
OracleAS Guard asgctl Command-line Reference 14-49
ExampleThe following example synchronizes the specified standby site with the coordinating OracleAS Guard server (the primary site). By default the sync mode is incremental.
ASGCTL> connect asg prodinfra ias_admin/adminpwdSuccessfully connected to prodinfra:7890ASGCTL> set primary database sys/testpwd@asdbChecking connection to database asdbASGCTL> sync topology to standbyinfraGenerating default policy for this operationprodinfra:7890 Synchronizing each instance in the topology to standby topologyprodinfra:7890 (home /private1/OraHome2/asr1012) Starting backup of topology "" Backing up and copying data to the standby topology Backing up each instance in the topology Starting backup of instance "asr1012.infra.us.oracle.com" Configuring the backup scriptasmid1:7890 (home /private1/OraHome/asmid1) Starting backup of instance "asmid1.asmid1.us.oracle.com"asmid2:7891 (home /private1/OraHome/asmid2) Starting backup of instance "asmid2.asmid2.us.oracle.com"...asmid2:7890 (home /private1/OraHome2/asr1012) Starting backup/synchronization of database "asdb.us.oracle.com" Starting restore/synchronization of database "asdb.us.oracle.com" Synchronizing topology completed successfullyASGCTL>
# Command to use if you are using a policy file# sync topology to standbyinfra using policy <file>

verify topology
14-50 Oracle Application Server High Availability Guide
verify topology
Validates that the primary topology is running and the configuration is valid. If a standby topology is specified, compares the primary topology to which the local host system is a member with the standby topology to validate that they are consistent with one another and conform to the requirements for OracleAS Disaster Recovery.
Formatverify topology [with <host>[:<port>]] [using policy <file>]
Parameters
hostName of the standby host system. This host system must be a member of the standby topology.
portThe port number of the host system for the OracleAS Guard server in its Oracle home.
using policy <file>Full path and file specification for the XML policy file.
Usage NotesIf the host system name is not specified, the topology in which the local host system participates will be verified for local OracleAS Disaster Recovery rules.
If the standby host system name is specified, the topology at the standby site will be verified along with the production topology for both local rules and distributed OracleAS Disaster Recovery rules, and the symmetry between the primary and standby sites is also checked.
For the verify policy file, by default the success requirement attribute is set to optional for all OracleAS homes (middle tier and OracleAS Metadata Repository) and mandatory for the Oracle Internet Directory home.
See Section 14.1, "Information Common to OracleAS Guard asgctl Commands" and Section 14.2, "Information Specific to a Small Set of OracleAS Guard Commands" for more information.
ExampleThe following example validates that the primary topology is running and the configuration is valid.
ASGCTL> connect asg ias_admin/iastest2Successfully connected to prodinfra:7890ASGCTL> verify topologyGenerating default policy for this operationprodinfra:7890 HA directory exists for instance asr1012.infra.us.oracle.comasmid2:7890 HA directory exists for instance asmid2.asmid2.us.oracle.comasmid1:7890 HA directory exists for instance asmid1.asmid1.us.oracle.comASGCTL>

verify topology
OracleAS Guard asgctl Command-line Reference 14-51
The following example validates that the topology to which the local host system is a member is consistent with the standby topology to which the host system standbyinfra is a member.
ASGCTL> connect asg prodinfra ias_admin/adminpwdSuccessfully connected to prodinfra:7890ASGCTL> set primary database sys/testpwd@asdbChecking connection to database asdbASGCTL> verify topology with standbyinfraGenerating default policy for this operationprodinfra:7890 HA directory exists for instance asr1012.infra.us.oracle.comasmid2:7890 HA directory exists for instance asmid2.asmid2.us.oracle.comasmid1:7890 HA directory exists for instance asmid1.asmid1.us.oracle.comstandbyinfra:7890 HA directory exists for instance asr1012.infra.us.oracle.comasmid2:7890 HA directory exists for instance asmid2.asmid2.us.oracle.comasmid1:7890 HA directory exists for instance asmid1.asmid1.us.oracle.comprodinfra:7890 Verifying that the topology is symmetrical in both primary and standby configurationASGCTL>
# Command to use if you are using a policy file# verify topology using policy <file>

dump farm (Deprecated)
14-52 Oracle Application Server High Availability Guide
dump farm (Deprecated)
Directs asgctl to write detailed information about the farm to the specified file.
Formatdump farm [to <file>]
Parameters
to <file>Name of file on the OracleAS Guard client node where the detailed output is to be written.
Usage NotesNone.
ExampleSee the dump topology command for an example.
Note: The dump farm command is deprecated beginning with OracleAS release 10.1.2.0.2. Use the dump topology command, which supports the OracleAS Disaster Recovery topology concept in current and future OracleAS releases.

instantiate farm (Deprecated)
OracleAS Guard asgctl Command-line Reference 14-53
instantiate farm (Deprecated)
Instantiates a farm to a standby site by discovering the current farm definition at the production and standby sites, verifying that each complies with the OracleAS Disaster Recovery rules and restrictions of the current OracleAS software deployed on these systems prior to creation. Also synchronizes the standby site with the primary site so that the primary and standby sites are consistent.
Formatinstantiate farm to <standby_farm_host>[:<port>]
Parameters
standby_farm_hostName of the standby host system. This parameter is required because it directs the coordinating OracleAS Guard server instance to discover the instances that make up the standby site. This host system must be a member of the standby farm.
portThe port number of the OracleAS Guard server in its Oracle home.
Usage NotesThe production local system must be part of an Oracle Notification Server (ONS) farm for the site.
The standby host must be part of an ONS farm for the standby site and must be symmetrical to the farm of the production farm.
Make sure OracleAS Infrastructure database is running on the primary farm before performing an instantiating farm operation. Also, the OracleAS Infrastructure database information must be set by using the set primary database asgctl command.
The global DNS names are used to direct the instantiation. This will be different than the HA naming utilized in the OracleAS Disaster Recovery environment. The discovery mechanism automatically maps the farm to the corresponding peer, based off local name resolution.
ExampleSee the instantiate topology command for an example.
Note: The instantiate farm to command is deprecated beginning with OracleAS release 10.1.2.0.2. Use the instantiate topology command, which supports the OracleAS Disaster Recovery topology concept in current and future OracleAS releases.

shutdown farm (Deprecated)
14-54 Oracle Application Server High Availability Guide
shutdown farm (Deprecated)
Shuts down a running farm.
Formatshutdown farm
ParametersNone.
Usage NotesThis is a convenient command for shutting down the entire farm. Use the startup farm command to start it up again.
ExampleSee the shutdown topology command for an example.
Note: The shutdown farm command is deprecated beginning with OracleAS release 10.1.2.0.2. Use the shutdown topology command, which supports the OracleAS Disaster Recovery topology concept in current and future OracleAS releases.

startup farm (Deprecated)
OracleAS Guard asgctl Command-line Reference 14-55
startup farm (Deprecated)
Starts up a shutdown farm.
Formatstartup farm
ParametersNone
Usage NotesThis is a convenient command for starting up the entire farm after it was shut down using the shutdown farm command.
ExampleSee the startup topology command for an example.
Note: The startup farm command is deprecated beginning with OracleAS release 10.1.2.0.2. Use the startup topology command, which supports the OracleAS Disaster Recovery topology concept in current and future OracleAS releases.

switchover farm (Deprecated)
14-56 Oracle Application Server High Availability Guide
switchover farm (Deprecated)
During a scheduled outage of the production site, performs the switchover operation from the production site to the standby site.
Formatswitchover farm to <standby_farm_host>[:<port>]
Parameters
standby_farm_hostName of the farm host system. This parameter is required because it directs the coordinating OracleAS Guard server instance to discover the instances that make up the standby site. This host system must be a member of the standby farm.
portThe port number of the standby host system for the OracleAS Guard server in its Oracle home.
Usage NotesOn the primary Infrastructure system, make sure the emagent process is stopped. Otherwise, you may run into the following error when doing a switchover operation because the emagent process has a connection to the database:
prodinfra: -->ASG_DGA-13051: Error performing a physical standby switchover.prodinfra: -->ASG_DGA-13052: The primary database is not in the proper state to perform a switchover. State is "SESSIONS ACTIVE"
On UNIX systems, to stop the emagent process, stop the Application Server Control, which is called iasconsole, as follows:
> <ORACLE_HOME>/bin/emctl stop iasconsole
On UNIX systems, to check to see if there is an emagent process running, do the following:
> ps -ef | grep emagent
On UNIX systems, if after performing the stop iasconsole operation, the emagent process is still running, get its process ID (PID) as determined from the previous ps command and stop it as follows:
> kill -9 <emagent-pid>
On Windows systems, open the Services control panel. Locate the OracleAS10gASControl service and stop this service.
The production local system must be part of an Oracle Notification Server (ONS) farm for the site.
Note: The switchover farm to command is deprecated beginning with OracleAS release 10.1.2.0.2. Use the switchover topology command, which supports the OracleAS Disaster Recovery topology concept in current and future OracleAS releases.

switchover farm (Deprecated)
OracleAS Guard asgctl Command-line Reference 14-57
The standby host must be part of an ONS farm for the standby site and must be symmetrical to the farm of the production farm.
Make sure OracleAS Infrastructure database is running on the primary farm before performing a switchover operation. Also, the OracleAS Infrastructure database information must be set by using the set primary database asgctl command.
The global DNS names are used to direct the switchover. This will be different than the HA naming utilized in the OracleAS Disaster Recovery environment. The discovery mechanism automatically maps the farm to the corresponding peer, based off local name resolution.
As part of the OracleAS Guard switchover operation, an implicit sync farm operation is performed to make sure the farms are identical. In addition, OPMN automatically starts the OracleAS Guard server on the "new" standby Infrastructure node and this server will run indefinitely. In turn, it starts the OracleAS Guard server on the other nodes in the "new" standby farm and each of these is a transient server.
ExampleSee the switchover topology command for an example.

sync farm (Deprecated)
14-58 Oracle Application Server High Availability Guide
sync farm (Deprecated)
Synchronizes the standby site with the primary site to ensure that the two sites are consistent. The sync topology operation applies database redo logs for OracleAS Infrastructures to the standby site in conjunction with synchronizing external configuration files across the topology.
Formatsync farm to <standby_farm_host>[:<port>] [full | incr[emental]]
Parameters
standby_farm_hostName of the standby site host system. This parameter is required because it directs the coordinating OracleAS Guard server instance to discover the instances that make up the standby site. This host system must be a member of the standby farm.
portThe port number of the standby host system for the OracleAS Guard server in its Oracle home.
full | incremental The synchronization of the standby site with the primary site to make the standby site consistent can be either "full" or "incremental". The default is "incremental". By default, if a full backup has not been performed, an incremental backup operation will not be performed. Instead, a full backup operation will be performed.
Usage NotesBy default sync_mode is incremental and offers the best performance. However, there may be three circumstances when specifying a sync_mode of full should be used.
■ When you want to force a full synchronization to happen, such as synchronizing the standby site completely at a specific point in time (currently) with the primary site.
■ When you know there are many transactional changes over a short period of time on the primary site that must be synchronized with the secondary site.
■ When you know that there is a large accumulation of transactional changes over a long period of time on the primary site that must be synchronized with the secondary site.
ExampleSee the sync topology command for an example.
Note: The sync farm to command is deprecated beginning with OracleAS release 10.1.2.0.2. Use the sync topology command, which supports the OracleAS Disaster Recovery topology concept in current and future OracleAS releases.
verify farm (Deprecated)
OracleAS Guard asgctl Command-line Reference 14-59
verify farm (Deprecated)
Validates that the primary farm is running and the configuration is valid. If a standby farm is specified, compares the primary farm to which the local host system is a member with the standby farm to validate that they are consistent with one another and conform to the requirements for OracleAS Disaster Recovery.
Formatverify farm [with <host>[:<port>]]
Parameters
hostName of the standby host system. This host system must be a member of the standby farm.
portThe port number of the OracleAS Guard server in its Oracle home.
Usage NotesIf the host system name is not specified, the farm in which the local host system participates will be verified for local OracleAS Disaster Recovery rules.
If the standby host system name is specified, the farm at the standby site will be verified along with the production farm for both local rules and distributed OracleAS Disaster Recovery rules, and the symmetry between the primary and standby sites is also checked.
ExampleSee the verify topology command for an examples.
Note: The verify farm command is deprecated beginning with OracleAS release 10.1.2.0.2. Use the verify topology command, which supports the OracleAS Disaster Recovery topology concept in current and future OracleAS releases.

verify farm (Deprecated)
14-60 Oracle Application Server High Availability Guide

Manual Sync Operations 15-1
15Manual Sync Operations
The following manual sync operations must be performed if for some reason the secondary (standby) site is not synchronized with the primary site and you are performing regular backup operations of the primary site middle tier and OracleAS Infrastructure configuration files as described in Section 15.1.1, "Manually Backing Up the Production Site". Then you will need to restore the backup configuration files as described in Section 15.1.2, "Manually Restoring to Standby Site". After restoring the configuration files (OracleAS Infrastructure and Middle Tier) on the standby site, then proceed to Step 2 as described in "Site Failover Operations" on page 13-41.
15.1 Manually Synchronizing Baseline Installation with Standby Site Without Using OracleAS Guard asgctl Command-line Utility
Once Oracle Data Guard has been set up between the production and standby sites, the procedure for synchronizing the two sites can be carried out. An initial synchronization should be done, before the production site is used, in order to obtain a baseline snapshot of the post-installation production site onto the standby site. This baseline can then be used to recover the production site configuration on the standby site if needed later.
In order to obtain a consistent point-in-time snapshot of the production site, the information stored in the OracleAS Infrastructure database and the Oracle Application Server-related configuration files in the middle-tier and OracleAS Infrastructure hosts must be synchronized at the same time. Synchronization of the configuration files can be done by backing up the files and restoring them on the standby hosts using the Oracle Application Server Backup and Recovery Tool. For the OracleAS Infrastructure database, synchronization is done using Oracle Data Guard by shipping the archive
Note: This section and Section 15.1.1, "Manually Backing Up the Production Site" and Section 15.1.2, "Manually Restoring to Standby Site" are retained here for the special case as described in Step 1b in "Site Failover Operations" on page 13-41 where the standby site is not synchronized with the primary site. In this case, on the standby site, you must restore the most recently backed up configuration files as described in Section 15.1.2, "Manually Restoring to Standby Site".
If you are using asgctl to continually synchronize the secondary (standby) site with the primary site, then both sites should already be synchronized and you do not need to manually perform a restore operation and you can begin with Step 2 in "Site Failover Operations" on page 13-41 to recover from an unplanned outage.

Manually Synchronizing Baseline Installation with Standby Site Without Using OracleAS Guard asgctl Command-line Utility
15-2 Oracle Application Server High Availability Guide
logs to the standby OracleAS Infrastructure and applying these logs in coordination with the restoration of the configuration files.
The sequence of steps for the baseline synchronization (which can also be used for future synchronizations) are:
■ Shipping OracleAS Infrastructure Database Archive Logs
■ Backing Up Configuration Files (OracleAS Infrastructure and Middle Tier)
■ Restoring Configuration Files (OracleAS Infrastructure and Middle Tier)
■ Restoring the OracleAS Infrastructure Database - Applying Log Files
These steps are detailed in the following two main sections.
15.1.1 Manually Backing Up the Production SiteThe main strategy and approach to synchronizing configuration information between the production and standby sites is to synchronize the backup of OracleAS Infrastructure and middle-tier configuration files with the application of log information on the standby OracleAS Infrastructure database.
For Oracle Application Server, not all the configuration information is in the OracleAS Infrastructure database. The backup of the database files needs to be kept synchronized with the backup of the middle-tier and OracleAS Infrastructure configuration files. Due to this, log-apply services should not be enabled on the standby database. The log files from the production OracleAS Infrastructure are shipped to the standby OracleAS Infrastructure but are not applied.
The backup process of the production site involves backing up the configuration files in the middle-tier and OracleAS Infrastructure nodes. Additionally, the archive logs for the OracleAS Infrastructure database are shipped to the standby site.
The procedures to perform the backups and the log ship are discussed in the following sections:
■ Shipping OracleAS Infrastructure Database Archive Logs
■ Backing Up Configuration Files (OracleAS Infrastructure and Middle Tier)
IMPORTANT: Ensure that no configuration changes are going to be made to the Oracle Application Server system (underlying configuration files and OracleAS Infrastructure database) as you perform the steps in this section.
Note: At the minimum, the backup and restoration steps discussed in this section and the "Manually Restoring to Standby Site" section should be performed whenever there is any administration change in the production site (inclusive of changes to the OracleAS Infrastructure database and configuration files on the middle-tier and OracleAS Infrastructure nodes). On top of that, scheduled regular backups and restorations should also be done (for example, on a daily or twice weekly basis). See the Oracle Application Server Administrator’s Guide for more backup and restore procedures.

Manually Synchronizing Baseline Installation with Standby Site Without Using OracleAS Guard asgctl Command-line Utility
Manual Sync Operations 15-3
15.1.1.1 Shipping OracleAS Infrastructure Database Archive LogsAfter installing the OracleAS Disaster Recovery solution, Oracle Data Guard should have been installed in both the production and standby databases. The steps for shipping the archive logs from the production OracleAS Infrastructure database to the standby OracleAS Infrastructure database involve configuring Oracle Data Guard and executing several commands for both the production and standby databases. Execute the following steps to ship the logs for the OracleAS Infrastructure database:
1. If not disabled already, disable log-apply services by running the following SQLPLUS statement on the standby host:
SQL> alter database recover managed standby database cancel;
2. Run the following command to perform a log switch on the production OracleAS Infrastructure database. This ensures that the latest log file is shipped to the standby OracleAS Infrastructure database
SQL> alter system switch logfile;
3. In normal operation of the production site, the production database frequently ships log files to the standby database but are not applied. At the standby site, you want to apply the logs that are consistent up to the same time that the production site's configuration files are backed up. The following SQL statement encapsulates all OracleAS Infrastructure database changes into the latest log and allows the Oracle Data Guard transport services to transport this log to the OracleAS Infrastructure in the standby site:
SQL> select first_change# from v$log where status='CURRENT';
A SCN or sequence number is returned, which essentially represents the timestamp of the transported log.
4. Note down the SCN number as you will need this for the restoration of the production database changes on the standby site.
Continue to the next section to back up the configuration files on the middle-tier host(s) and OracleAS Infrastructure host.
15.1.1.2 Backing Up Configuration Files (OracleAS Infrastructure and Middle Tier)Use the instructions in this section to back up the configuration files. The instructions require the use of the OracleAS Backup and Recovery Tool. They assume you have installed and configured the tool on each OracleAS installation (middle tier and OracleAS Infrastructure) as it needs to be customized for each installation. Refer to Oracle Application Server Administrator’s Guide for more details about that tool, including installation and configuration instructions.
For each middle-tier and OracleAS Infrastructure installation, perform the following steps (the same instructions can be used for the middle-tier and OracleAS Infrastructure configuration files):
1. After performing the installation and configuration steps detailed in the Oracle Application Server Administrator’s Guide, for the Oracle Application Server Backup and Recovery Tool, the variables oracle_home, log_path, and config_backup_path in the tool's configuration file, config.inp, should have the appropriate values. Also, the following command for the tool should have been run to complete the configuration:
perl bkp_restore.pl -m configure_nodb

Manually Synchronizing Baseline Installation with Standby Site Without Using OracleAS Guard asgctl Command-line Utility
15-4 Oracle Application Server High Availability Guide
In Windows, the Perl executable can be found in <ORACLE_HOME>\perl\<perl_version>\bin\MSWin32-x86.
If you have not completed these tasks, do so before continuing with the ensuing steps.
2. Execute the following command to back up the configuration files from the current installation:
perl bkp_restore.pl -v -m backup_config
This command creates a directory in the location specified by the config_backup_path variable specified in the config.inp file. The directory name includes the time of the backup. For example: config_bkp_2003-09-10_13-21.
3. A log of the backup is also generated in the location specified by the log_path variable in the config.inp file. Check the log files for any errors that may have occurred during the backup process.
4. Copy the OracleAS Backup and Recovery Tool's directory structure and contents from the current node to its equivalent in the standby site. Ensure that the path structure on the standby node is identical to that on the current node.
5. Copy the backup directory (as defined by config_backup_path) from the current node to its equivalent in the standby site. Ensure that the path structure on the standby node is identical to that on the current node.
6. Repeat the steps above for each Oracle Application Server installation in the production site (middle tier and OracleAS Infrastructure).
15.1.2 Manually Restoring to Standby SiteAfter backing up the configuration files from the middle-tier Oracle Application Server instances and OracleAS Infrastructure together with the OracleAS Infrastructure database, restore the files and database in the standby site using the instructions in this section, which consists of the following sub-sections:
■ Restoring Configuration Files (OracleAS Infrastructure and Middle Tier)
■ Restoring the OracleAS Infrastructure Database - Applying Log Files
15.1.2.1 Restoring Configuration Files (OracleAS Infrastructure and Middle Tier)Restoring the backed up files from the production site requires the OracleAS Backup and Recovery Tool that was used for the backup. The instructions in this section assume you have installed and configured the tool on each OracleAS installation in the standby site, both in the middle-tier and OracleAS Infrastructure nodes. Refer to Oracle Application Server Administrator’s Guide for instructions on how to install the tool.
For each middle-tier and OracleAS Infrastructure installation in the standby site, perform the following steps (the same instructions can be used for the middle-tier and OracleAS Infrastructure configuration files):
Note: There are two important items that should be maintained consistently between the production and standby sites. The directory names should be the same and the correlation of SCN to a given backup directory should be noted at both sites in administration procedures.

Manually Synchronizing Baseline Installation with Standby Site Without Using OracleAS Guard asgctl Command-line Utility
Manual Sync Operations 15-5
1. Check that the OracleAS Backup and Recovery Tool's directory structure and the backup directory from the equivalent installation in the production site are present in the current node.
2. Stop the Oracle Application Server instances and their processes so that no modification of configuration files can occur during the restoration process. Use the following OPMN command:
In UNIX:
<ORACLE_HOME>/opmn/bin/opmnctl stopall
In Windows:
<ORACLE_HOME>\opmn\bin\opmnctl stopall
Check that all relevant processes are no longer running. In UNIX, use the following command:
ps -ef | grep <ORACLE_HOME>
In Windows, press <ctrl><alt><del> to bring up the Task Manager and verify that the processes have stopped.
3. Configure the backup utility for the Oracle home.
This can be accomplished either by configuring the OracleAS Backup and Recovery Tool for the Oracle home or copying the backup configuration file, config.inp, from the production site peer. Below is an example of running the OracleAS Backup and Recovery Tool configuration option:
perl bkp_restore.pl -v -m configure_nodb
In Windows, the Perl executable can be found in <ORACLE_HOME>\perl\<perl_version>\bin\MSWin32-x86.
4. Execute the following command to view a listing of the valid configuration backup locations:
perl bkp_restore.pl -v -m restore_config
5. Restore the configuration files using the following command:
perl bkp_restore.pl -v -m restore_config -t <backup_directory>
where <backup_directory> is the name of the directory with the backup files that was copied from the production site. For example, this could be config_bkp_2003-09-10_13-21.
6. Check the log file specified in config.inp for any errors that may have occurred during the restoration process.
7. Repeat the steps above for each Oracle Application Server installation in the production site (middle tier and OracleAS Infrastructure).
15.1.2.2 Restoring the OracleAS Infrastructure Database - Applying Log FilesDuring the backup phase, you executed several instructions to ship the database log files from the production site to the standby site up to the SCN number that you recorded as per instructed. To restore the standby database to that SCN number, apply the log files to the standby OracleAS Infrastructure database using the following SQLPLUS statement:
SQL> alter database recover automatic from '/private/oracle/oracleas/standby/' standby

Manually Synchronizing Baseline Installation with Standby Site Without Using OracleAS Guard asgctl Command-line Utility
15-6 Oracle Application Server High Availability Guide
database until change <SCN>;
(In Windows, substitute the path shown above appropriately.)
With this command executed and the instructions to restore the configuration files completed on each middle-tier and OracleAS Infrastructure installation, the standby site is now synchronized with the production site. However, there are two common problems that can occur during the application of the log files: errors caused by the incorrect specification of the path and gaps in the log files that have been transported to the standby site.
The following are methods of resolving these problems:
1. Find the correct log path.
On the standby OracleAS Infrastructure database, try to determine location and number of received archive logs using the following SQLPLUS statement:
SQL> show parameter standby_archive_dest
NAME TYPE VALUE------------------------------------ ----------- ------------------------------standby_archive_dest string /private/oracle/oracleas/standby/
(The previous example shows the UNIX path. The Windows equivalent path is shown in Windows systems.)
2. Use the log path obtained from the previous step to ensure that all log files have been transported.
At the standby OracleAS Infrastructure database, perform the following:
standby> cd /private/oracle/oracleas/standby standby> ls 1_13.dbf 1_14.dbf 1_15.dbf 1_16.dbf 1_17.dbf 1_18.dbf 1_19.dbf
(In Windows, use the command cd to change to the appropriate directory and dir to view the directory contents.)
At the production OracleAS Infrastructure database, execute the following SQLPLUS statement:
SQL> show parameter log_archive_dest_1
NAME TYPE VALUE ------------------------------------ ----------- ------------------------------ log_archive_dest1 string LOCATION=/private/oracle/oracleas/oradata
MANDATORY log_archive_dest_10 string
(The previous example shows the UNIX path. The Windows equivalent path is shown in Windows systems.)
3. Using the path specified in step 1, note the number and sequence of the log files. For example:
production> cd /private/oracle/oracleas/oradata production> ls 1_10.dbf 1_12.dbf 1_14.dbf 1_16.dbf 1_18.dbf asdb 1_11.dbf 1_13.dbf 1_15.dbf 1_17.dbf 1_19.dbf

Manually Synchronizing Baseline Installation with Standby Site Without Using OracleAS Guard asgctl Command-line Utility
Manual Sync Operations 15-7
(In Windows, use the command cd to change to the appropriate directory and dir to view the directory contents.)
In the previous example, note the discrepancy where the standby OracleAS Infrastructure is missing files 1_10.dbf through 1_12.dbf. Since this gap in the log files happened in the past, it could be due to a problem with the historic setup involving the network used for the log transport. This problem has obviously been corrected and subsequent logs have been shipped. To correct the problem, copy (FTP) the log files to the corresponding directory on the standby OracleAS Infrastructure database host and re-attempt the SQLPLUS recovery statement shown earlier in this section.

Manually Synchronizing Baseline Installation with Standby Site Without Using OracleAS Guard asgctl Command-line Utility
15-8 Oracle Application Server High Availability Guide

OracleAS Disaster Recovery Site Upgrade Procedure 16-1
16OracleAS Disaster Recovery Site Upgrade
Procedure
This chapter describes how to complete a full site Oracle Application Server Disaster Recovery (OracleAS Disaster Recovery) upgrade from OracleAS 10g (9.0.4) to OracleAS 10g (10.1.2.0.2). This procedure assumes that a successful release 9.0.4 to release 10.1.2 upgrade is possible for all the Oracle home types within the topology that define the site and extends these procedures in the OracleAS Disaster Recovery (DR) solution.
This site upgrades an existing supported DR implementation as documented in the Oracle Application Server Disaster Recovery chapter in Oracle Application Server 10g High Availability Guide for OracleAS 10g (9.0.4). This process will not upgrade a non-supported DR environment into an upgraded DR environment. Additionally, this procedure will utilize the standalone OracleAS Guard install within the existing release 9.0.4 Oracle homes and is worded using OracleAS Guard operational steps. If this environment is not possible, the equivalent manual steps can be performed, that is, the OracleAS Guard sync topology command equates to the site synchronization steps documented in the Oracle Application Server Disaster Recovery chapter in Oracle Application Server 10g High Availability Guide for OracleAS 10g (9.0.4).
16.1 PrerequisitesThe following are prerequisites for performing a full DR site upgrade from OracleAS 10g (9.0.4) to OracleAS 10g (10.1.2.0.2):
■ You must have a DR site configured according to the guidelines in Chapter 13, "OracleAS Disaster Recovery".
■ The OracleAS Backup/Restore utility is installed in all Oracle homes of the both the production and standby sites. The Backup/Restore utility version to be used is the version that supports that release.
■ The OracleAS 10g (10.1.2.0.2) standalone install of OracleAS Guard, located on Utilities Disk 2, is installed in all OracleAS 10g (9.0.4) Oracle homes. See the OracleAS Disaster Recovery installation information in Oracle Application Server Installation Guide for more information.
16.2 Disaster Recovery TopologyThe systems involved in this DR environment are contained in two sites, site A and site B. The initial roles of each are:
■ Site A is the production site.

High-Level OracleAS Disaster Recovery Upgrade Steps
16-2 Oracle Application Server High Availability Guide
■ Site B is the standby site.
Due to geographical separation of the sites, it is assumed that the current roles of each of these sites will be the final roles of these same sites at the end of this procedure. However, during the course of the procedure these roles do change. Thus, all references will be to the sites named A and B. Some of the terminology used may be confusing, depending on the role the site is maintaining at a particular point in time.
16.3 High-Level OracleAS Disaster Recovery Upgrade StepsThe following steps describe the OracleAS 10g (9.0.4) to OracleAS 10g (10.1.2.0.2) Disaster Recovery upgrade scenario. These steps refer to Infrastructure systems infra1 and infra2 on site A and site B, respectively.
1. Install the OracleAS 10g (10.1.2.0.2) standalone install of OracleAS Guard into each Oracle home on the production and standby sites.
If multiple Oracle homes exist on the same system, ensure that different ports are configured for each of the OracleAS Guard servers in this configuration file. The default port number is 7890.
<ORACLE_HOME>/dsa/dsa.conf
2. At the standby site [site B], start the OracleAS Guard server:
<ORACLE_HOME>/opmn/bin/opmnctl startproc ias-component=DSA
3. At the production site [site A], connect to OracleAS Guard Infrastructure system infra1 and perform a sync operation.
This operation is used to ensure that the Oracle homes across the topology are logically synchronized.
a. Invoke the asgctl client.
On Unix systems<ORACLE_HOME>/dsa/bin/asgctl.sh
On Windows systems<ORACLE_HOME>\dsa\bin\asgctl
b. Perform a connect operation to site A Infrastructure system infra1.
ASGCTL> connect asg infra1 ias_admin/<password>
c. Set the primary database to the OracleAS Metadata Repository at site A.
ASGCTL> set primary database sys/<password>@<site A's servicename>
d. Discover the topology.
ASGCTL> discover topology oidpassword=<oidpwd>
e. Synchronize the standby site B Infrastructure system infra2 with the production site.
ASGCTL> sync topology to infra2
f. Ensure there are no changes to the environment through the duration of the upgrade procedure. Note that this does not mean changes to customer data, as this will be in a different database than the Identity Management

High-Level OracleAS Disaster Recovery Upgrade Steps
OracleAS Disaster Recovery Site Upgrade Procedure 16-3
(IM)/Metadata Repository (MR) data. However, in this model, the IM/MR data will not be able to be synchronized again during the upgrade procedure.
4. Connect to OracleAS Guard at the standby [site B] Infrastructure and failover.
The purpose of this step is to break the DR environment into two independent sites. This allows site B to be upgraded first. Once site B is upgraded, application level tests can be performed to ensure that the update was completed and that this site is operational. If you use this approach, then site A, production, is not really DR tolerant for the time period of the upgrade. Theoretically, another standby site could be established at this time as site B was upgraded.
The steps to follow to perform the OracleAS Guard failover operation are:
a. Perform a connect operation to site B Infrastructure system infra2.
ASGCTL> connect asg infra2 ias_admin/<password>
b. Set the new primary database to the OracleAS Metadata Repository at site B.
ASGCTL> set new primary database sys/<password>@<site B's servicename>
c. Perform the failover operation to this standby site, site B. The failover operation will start all the OPMN managed services across the topology equivalent of an opmnctl startall command.
ASGCTL> failover
5. Start the other services for the site at site B.
Any additional services needed for testing must be handled manually, such as applications, database jobs, Enterprise Manager, and so forth.
6. Perform an OracleAS upgrade to the site B systems [see Oracle Application Server Upgrade and Compatibility Guide for more information].
7. Test applications or note problems for resolution for the production site. Perform tests until you are satisfied the upgrade has been properly completed.
8. Redirect site access to site B, if desirable.
a. During the next operation, site A will be upgraded, and Site B can provide some level of service during this upgrade procedure. Theoretically, all access can be given at this time. Once site B is upgraded, requests are serviced there, making this the production role of the DR environment. Once site A is upgraded, the software versions at both sites will be the same and a DR instantiate/sync operation will be possible (as performed in Step 12). If this approach is utilized, any updates made at the original production site [site A] will be lost.
b. If Step 8a is implemented and site B becomes the production site, then ignore the restrictions in Step 3f because site A is about to be upgraded.
9. Perform an OracleAS upgrade to the site A systems [see Oracle Application Server Upgrade and Compatibility Guide for more information].
10. Test applications or note problems for resolution. Perform tests until you are satisfied the upgrade has been properly completed.
At the end of this step, the two site upgrades are functionally equivalent and have been upgraded to OracleAS Disaster Recovery 10.1.2.0.2 Full site functionality has been enabled at site B and it is time to reestablish the production/standby relationship.

High-Level OracleAS Disaster Recovery Upgrade Steps
16-4 Oracle Application Server High Availability Guide
11. Stop the OracleAS Guard server in all the old OracleAS 9.0.4 Oracle homes, remove the dsa.conf file in the <ORACLE_HOME>/dsa directory on Unix systems or <ORACLE_HOME>\dsa directory on Windows systems, then restart the DSA process as well as the OPMN server on all the systems in the new OracleAS 10.1.2 Oracle homes.
On UNIX systems:
<ORACLE_HOME>/opmn/bin/opmnctl stopall<ORACLE_HOME>/opmn/bin/opmnctl startall<ORACLE_HOME>/opmn/bin/opmnctl startproc ias-component=DSA
On Windows systems:
<ORACLE_HOME>\opmn\bin\opmnctl stopall<ORACLE_HOME>\opmn\bin\opmnctl startall<ORACLE_HOME>\opmn\bin\opmnctl startproc ias-component=DSA
12. Use OracleAS Guard and perform a site instantiation from site B to site A if Step 8a is utilized.
This step reestablishes the OracleAS Disaster Recovery environment between site B and Site A. In this sequence, site B is the production site, and site A is updated to mirror site B.
Perform the following asgctl steps to complete this operation:
a. Invoke the asgctl client.
On Unix systems<ORACLE_HOME>/dsa/bin/asgctl.sh
On Windows systems<ORACLE_HOME>\dsa\bin\asgctl
b. Perform a connect operation to site B’s Infrastructure system infra2.
ASGCTL> connect asg infra2 ias_admin/<password>
c. Set the primary database to the OracleAS Metadata Repository at site B.
ASGCTL> set primary database sys/<password>@<site B's servicename>
d. Discover the topology.
ASGCTL> discover topology oidpassword=<oidpwd>
e. Instantiate the topology to site A’s standby Infrastructure system infra1.
ASGCTL> instantiate topology to infra1
13. Perform a domain name system (DNS) switchover operation.
You would probably perform this step here to absorb the DNS timeout during the time period of the switchover operation. There will be end user access errors (service unavailable) until DNS, the site services, and the application have all been switched over and are running.
14. Use OracleAS Guard to perform a switchover operation from site B to site A.
The end goal is to have the same access at the end of upgrade as at the start of the process. Thus the roles have to be switched between the sites. Connect to the Infrastructure for site B, set the primary database, perform a discover topology, then perform a switchover to site A Infrastructure system infra1.

Patching an Existing OracleAS Disaster Recovery Environment
OracleAS Disaster Recovery Site Upgrade Procedure 16-5
ASGCTL> connect asg infra2 ias_admin/<password>ASGCTL> set primary database sys/<password>@<site B's servicename>ASGCTL> switchover topology to infra1
15. Note that an alternative to Steps 9 through 14 would be as follows:
a. Take down the production site [site A].
b. Perform an OracleAS upgrade to the site A systems [see Oracle Application Server Upgrade and Compatibility Guide for more information].
c. Perform site A to site B instantiation using OracleAS Guard.
16. Start or open up services at production site A for the application.
This completes the steps required for the OracleAS Disaster Recovery site upgrade procedure from OracleAS 10g (9.0.4) to OracleAS 10g (10.1.2.0.2).
16.4 Patching an Existing OracleAS Disaster Recovery EnvironmentFor information about how to patch your OracleAS Disaster Recovery environment (patching OracleAS Guard 10.1.2.0.0 with Release 10.1.2.0.2) to take advantage of the features in this latest release of OracleAS Guard, see the platform specific Oracle Application Server Installation Guide and specifically the chapter entitled "Installing in High Availability Environments: OracleAS Disaster Recovery." This chapter contains a section entitled "Patching OracleAS Guard Release 10.1.2.0.0 with Release 10.1.2.0.2" that describes this patching process.

Patching an Existing OracleAS Disaster Recovery Environment
16-6 Oracle Application Server High Availability Guide

Setting Up a DNS Server 17-1
17Setting Up a DNS Server
This chapter provides instructions on setting up a DNS server in UNIX. These instructions are applicable for setting up the site-specific DNS zones used for hostname resolution in the example in Figure 13–7, "DNS Resolution Topology Overview".
For the discussion in this chapter, the DNS server that is set up creates and services a new DNS zone with the unique domain oracleas. Within the zone, this DNS server resolves all requests for the oracleas domain and forwards other requests to the overall wide area company DNS server(s).
On the UNIX host that will act as the DNS zone server, perform the following steps:
1. Create the name server configuration file /var/named.conf. Assuming the wide area company DNS server IP address is 123.1.15.245, the contents of this file should be as follows:
options {directory "/var/named";forwarders {123.1.15.245;
};};
zone "." in {type hint;file "named.ca";
};
zone "oracleas" {type master;file "oracleas.zone";
};
zone "0.0.127.IN-ADDR.ARPA {type master;file "127.zone";
};
Note: The DNS setup information provided in this appendix is an example to aid in the understanding of OracleAS Disaster Recovery operations. It is generic to DNS, and other appropriate DNS documentation should be consulted for comprehensive DNS information.

17-2 Oracle Application Server High Availability Guide
2. Create the root hint file /var/named/named.ca, which has the following contents (123.1.2.117 is the IP of the zone DNS server):
. 999999 IN NS ourroot.private.ourroot.private. IN A 123.1.2.117
3. Create the loopback address file /var/named/127.zone, which has the following contents (assume the zone DNS server's hostname is aszone1):
$ORIGIN 0.0.127.IN-ADDR.ARPA.0.0.127.IN-ADDR.ARPA. IN SOA aszone1.oracleas. root.aszone1.oracleas.(
25 ; serial number900 ; refresh600 ; retry86400 ; expire3600 ) ; minimum TTL
0.0.127.IN-ADDR.ARPA. IN NS aszone1.oracleas.1 IN PTR localhost.oracleas.
4. Create the zone data file /var/named/oracleas.dns, which has the following contents (values shown are applicable to the example of the production site in Figure 13–7):
;; Database file oracleas.dns for oracleas zone.; Zone version: 25;$ORIGIN oracleas.oracleas. IN SOA aszone1.oracleas. root.aszone1.oracleas (
25 ; serial number900 ; refresh600 ; retry86400 ; expire3600 ) ; minimum TTL
;; Zone NS records;oracleas. IN NS aszone1.oracleas.
;; Zone records;localhost IN A 127.0.0.1
asmid1 IN A 123.1.2.333asmid2 IN A 123.1.2.334infra IN A 123.1.2.111remoteinfra IN A 213.2.2.210
5. Run the following command to start the name server:
/sbin/in.named
6. On all the hosts in the domain that is serviced by this DNS server, edit the domain and nameserver settings in the file /etc/resolv.conf as follows (all previous nameserver settings should be removed; 123.1.2.117 is assumed to the zone DNS server's IP address):

Setting Up a DNS Server 17-3
domain oracleasnameserver 123.1.2.117

17-4 Oracle Application Server High Availability Guide

Secure Shell (SSH) Port Forwarding 18-1
18Secure Shell (SSH) Port Forwarding
This chapter describes how secure shell (SSH) port forwarding may be used with Oracle Data Guard.
18.1 SSH Port ForwardingOracleAS Guard automates the use of Oracle Data Guard, which sends redo data across the network to the standby system using Oracle Net-. SSH tunneling may be used with Oracle Data Guard as an integrated way to encrypt and compress the redo data before it is transmitted by the production system and subsequently decrypt and uncompress the redo data when it is received by the standby system.
See Also:
■ Implementing SSH port forwarding with Data Guard: http://metalink.oracle.com/metalink/plsql/showdoc?db=NOT&id=225633.1
■ Troubleshooting Data Guard network issues: http://metalink.oracle.com/metalink/plsql/showdoc?db=NOT&id=241925.1

SSH Port Forwarding
18-2 Oracle Application Server High Availability Guide

Part VTransformation
The chapters in this part describe how to transform non-high availability OracleAS Infrastructure configurations to high availability configurations:
■ Chapter 19, "Transforming Non-Highly Available Topologies to Highly Available"
■ Chapter 20, "Transforming to OracleAS Cluster (Identity Management) Topologies"
■ Chapter 21, "Transforming to OracleAS Cold Failover Cluster Topologies"


Transforming Non-Highly Available Topologies to Highly Available 19-1
19Transforming Non-Highly Available
Topologies to Highly Available
This chapter provides an overview of transforming non-highly available OracleAS Infrastructure topologies to highly available topologies.
The chapters in this section describe transformation for OracleAS Infrastructure only. Typically, you configure OracleAS Infrastructure for high availability during installation. If you installed OracleAS Infrastructure without high availability configuration, you can use the transformation procedures to transform the non-highly available OracleAS Infrastructure to highly available after installation.
Transformation does not apply to middle tiers because, unlike OracleAS Infrastructure, you do not configure high availability for middle tiers during installation. To make middle tiers highly available, you configure them after installation. See the chapters in Part II, "Middle-tier High Availability", for details.
Sections in this chapter:
■ Section 19.1, "Source Configuration"
■ Section 19.2, "Target Configurations"
19.1 Source ConfigurationAlthough Oracle Application Server supports many different configurations, the transformation procedures are designed for a non-highly available configuration (the source configuration) that consists of:
■ OracleAS Metadata Repository installed through OracleAS Metadata Repository Creation Assistant in an existing single-instance database. The version of the database is either Oracle9i Release 2 (9.2.0.6) or Oracle Database 10g Release 1 (10.1.0.4).
■ Oracle Identity Management is installed in its own Oracle home.
The source configuration is always the same, regardless of which target configuration you select.
19.2 Target ConfigurationsYou can transform the source configuration into any of the high availability configurations shown in Table 19–1.
During the transformation process, you transform the OracleAS Metadata Repository and the Oracle Identity Management components. Table 19–1 shows what these

Target Configurations
19-2 Oracle Application Server High Availability Guide
components are transformed to. The database and Oracle Application Server versions are not changed.
Note that you may need additional hardware (such as additional nodes or load balancers) and software (such as vendor clusterware) to create the high availability configuration.
Table 19–1 Transformation Targets
Target Configuration OracleAS Metadata Repository Oracle Identity Management
OracleAS Cluster (Identity Management)
Transformed to a Real Application Clusters database.
You need a hardware cluster with at least two nodes for the Real Application Clusters database.
Transformed to OracleAS Cluster (Identity Management).
You need to install one additional instance of Oracle Identity Management on a new node. You also need a load balancer in front of the nodes running Oracle Identity Management instances.
Distributed OracleAS Cluster (Identity Management)
Transformed to a Real Application Clusters database.
You need a hardware cluster with at least two nodes for the Real Application Clusters database.
Transformed to a distributed OracleAS Cluster (Identity Management).
In this environment, you run OracleAS Single Sign-On / Oracle Delegated Administration Services on one set of nodes, and Oracle Internet Directory / Oracle Directory Integration and Provisioning on another set of nodes.
You need additional nodes to run the additional instances of OracleAS Single Sign-On / Oracle Delegated Administration Services and Oracle Internet Directory / Oracle Directory Integration and Provisioning.
OracleAS Cold Failover Cluster (Identity Management)
Transformed to a cold failover cluster database.
To create a cold failover cluster database, you need nodes that are in a hardware cluster and a virtual hostname and IP for the hardware cluster.
Transformed to OracleAS Cold Failover Cluster (Identity Management).
To create OracleAS Cold Failover Cluster (Identity Management), you need nodes in a hardware cluster and a virtual hostname and IP for the hardware cluster.
Distributed OracleAS Cold Failover Cluster (Identity Management)
Transformed to a cold failover cluster database.
To create a cold failover cluster database, you need nodes that are in a hardware cluster and a virtual hostname and IP for the hardware cluster.
Transformed to a distributed OracleAS Cold Failover Cluster (Identity Management).
In this environment, you run Oracle Internet Directory / Oracle Directory Integration and Provisioning on nodes in a hardware cluster. This results in an active-passive configuration. You need a virtual hostname and IP for the hardware cluster.
For OracleAS Single Sign-On / Oracle Delegated Administration Services, you run them on a different set of nodes in an OracleAS Cluster (Identity Management) topology. The results in an active-active configuration, and you need a load balancer in front of these nodes.

Target Configurations
Transforming Non-Highly Available Topologies to Highly Available 19-3
19.2.1 Transformation to OracleAS Cluster (Identity Management)Figure 19–1 shows the transformation to OracleAS Cluster (Identity Management). For this transformation, you transform the single-instance OracleAS Metadata Repository database to a Real Application Clusters database, and the Oracle Identity Management to OracleAS Cluster (Identity Management).
This results in an active-active topology. For details on this topology, see Section 9.6, "OracleAS Cluster (Identity Management) Topology".
You need a hardware cluster with two or more nodes for the Real Application Clusters database, and additional nodes for the OracleAS Cluster (Identity Management). You also need a load balancer in front of the nodes for the OracleAS Cluster (Identity Management).
For details on this transformation, see Chapter 20, "Transforming to OracleAS Cluster (Identity Management) Topologies".

Target Configurations
19-4 Oracle Application Server High Availability Guide
Figure 19–1 Transforming to OracleAS Cluster (Identity Management)
19.2.2 Transformation to Distributed OracleAS Cluster (Identity Management)This is similar to transforming to OracleAS Cluster (Identity Management), except that you run OracleAS Single Sign-On and Oracle Delegated Administration Services on one set of nodes, and Oracle Internet Directory and Oracle Directory Integration and Provisioning on another set of nodes. Figure 19–2 shows this transformation.
For details on a distributed OracleAS Cluster (Identity Management) topology, see Section 9.7, "Distributed OracleAS Cluster (Identity Management) Topology".
For details on this transformation, see Chapter 20, "Transforming to OracleAS Cluster (Identity Management) Topologies".
New Node (Active)Node 2 (Active)im1.mydomain.com im2.mydomain.com
OHS
InterConnect
OracleAS Metadata Repository inReal Application Clusters database
DatabaseInstance
Cluster Node 2 (Active)
mr2.mydomain.com
DataFiles Shared
Storage
DatabaseInstance
Cluster Node 1 (Active)
mr1.mydomain.com
OHS
SSODAS
SSODAS
ORACLE_HOME forOracleAS Metadata Repository
ORACLE_HOME forOracleAS Metadata Repository
ORACLE_HOME forOracle Identity Management
ORACLE_HOME forOracle Identity Management
Node 2
OracleAS MetadataRepository Database
Instance
Node 3
OHS
OracleInternet
DirectorySSODAS
ORACLE_HOME forOracleAS Metadata Repository(single-instance database)
ORACLE_HOME forOracle Identity Management
MiddleTier
Node 1
Non-High AvailabilityConfiguration
OracleAS Cluster (Identity Management)High Availability Configuration
DIP
OracleInternet
Directory
DIP
OracleInternet
Directory
DIP
MiddleTier
Node 1
Load Balancer
HTTP Virtual Server Name: sso.mydomain.com
LDAP Virtual Server Name: oid.mydomain.com
KEY:
Association in non-high availability configuration
Association in high availability configuration

Target Configurations
Transforming Non-Highly Available Topologies to Highly Available 19-5
Figure 19–2 Transforming to Distributed OracleAS Cluster (Identity Management)
19.2.3 Transformation to OracleAS Cold Failover Cluster (Identity Management)In this transformation (Figure 19–3), you transform the database to a cold failover cluster database, and the Oracle Identity Management to OracleAS Cold Failover Cluster (Identity Management).
This results in an active-passive topology. In this topology, you have two nodes in a hardware cluster, where only one node is active at any given time. The passive node becomes active when the currently active node fails. For details on this topology, see
New Node (Active)Node 2 (Active)im1.mydomain.com im2.mydomain.com
DIP
InterConnectDatabaseInstance
Cluster Node 2 (Active)
mr2.mydomain.com
DataFiles Shared
Storage
DatabaseInstance
Cluster Node 1 (Active)
mr1.mydomain.com
DIPOracleInternet
Directory
OracleInternet
Directory
ORACLE_HOME forOracleAS Metadata Repository
ORACLE_HOME forOracleAS Metadata Repository
ORACLE_HOME forOracle Identity Management
ORACLE_HOME forOracle Identity Management
ORACLE_HOME for Oracle IdentityManagement
MiddleTier
Node 1 New Node (Active)
Non-High AvailabilityConfiguration
Distributed OracleAS Cluster (Identity Management)High Availability Configuration
OHSSSODAS
ORACLE_HOME forOracle Identity Management
Node 2
OracleAS MetadataRepository Database
Instance
Node 3
OHS
SSODAS
ORACLE_HOME forOracleAS Metadata Repository(single-instance database)
ORACLE_HOME forOracle Identity Management
MiddleTier
Node 1
OracleInternet
Directory
DIP
Load Balancer HTTP Virtual Server Name: sso.mydomain.com
Load Balancer
LDAP Virtual Server Name: oid.mydomain.com
New Node (Active)
OHSSSODAS
KEY:
Association in non-high availability configuration
Association in high availability configuration
OracleAS Metadata Repository inReal Application Clusters database
HTTP Virtual Server Name: mt.mydomain.com

Target Configurations
19-6 Oracle Application Server High Availability Guide
Section 9.4, "OracleAS Cold Failover Cluster (Identity Management) Topology". For details on cold failover databases, see Section 7.1, "Cold Failover Cluster Databases".
The nodes in the hardware cluster have access to a shared storage.
If you are running on UNIX platforms, on the shared storage, you install the Oracle homes for the database and for Oracle Identity Management (see Figure 19–3).
If you are running on Windows, you install the Oracle home for the database on the local storage of each node, not on the shared storage, but you place the data files on the shared storage (see Figure 21–7).
For details on this transformation, see Chapter 21, "Transforming to OracleAS Cold Failover Cluster Topologies".
Figure 19–3 Transforming to OracleAS Cold Failover Cluster (Identity Management) on UNIX
Node 1
(Active)
(Active)
Cluster Node 2
OracleAS MetadataRepository
Database Instance
SharedStorage
MiddleTier
Node 2
On Failover
OracleAS MetadataRepository Database
Instance
OHS
SSODAS
ORACLE_HOME forOracleAS Metadata Repository(single-instance database)
MiddleTier
Node 2
Non-High AvailabilityConfiguration
ORACLE_HOME for OracleAS Metadata Repository Database
ORACLE_HOME for Oracle Identity Management
(Standby)
InterConnect
Vendor Clusterware
Virtual Hostname:infra.mydomain.comVirtual IP: 123.45.67.89
ORACLE_HOME forOracle Identity Management
OracleInternet
Directory
DIP
On Failover
OracleAS Cold Failover Cluster (Identity Management)High Availability Configuration
KEY:
Association in non-high availability configuration
Association in high availability configuration
Hardware Cluster
Vendor Clusterware
(Active)
Cluster Node 1
OracleAS MetadataRepository
Database Instance
(Active)
OHS
SSODAS
OracleInternet
Directory
DIP OHS
SSODAS
OracleInternet
Directory
DIP
(Standby)

Target Configurations
Transforming Non-Highly Available Topologies to Highly Available 19-7
19.2.4 Transformation to Distributed OracleAS Cold Failover Cluster (Identity Management)
This transformation (see Figure 19–4) is similar to transforming to OracleAS Cold Failover Cluster (Identity Management), except that the OracleAS Single Sign-On and Oracle Delegated Administration Services components run in an active-active configuration.
■ You transform the OracleAS Metadata Repository to a cold failover cluster database. This is an active-passive configuration. To run a cold failover cluster database, you need two nodes in a hardware cluster, where only one node is active at any time. If the active node fails, the other node becomes the active node.
You need a virtual hostname and IP for this hardware cluster.
On UNIX, you install the Oracle home for the database and the data files on the shared storage. Figure 19–4 shows the UNIX version of the transformation.
On Windows, you install the Oracle home for the database on the local storage of each node, but you place the data files on the shared storage.
■ For the Oracle Identity Management components:
– You transform Oracle Internet Directory and Oracle Directory Integration and Provisioning to a distributed OracleAS Cold Failover Cluster (Identity Management). This is an active-passive configuration.
You also need a two-node hardware cluster for this active-passive configuration, and a virtual hostname and IP for the hardware cluster. You can use the same hardware cluster that you are using for the cold failover cluster database, or you can use a different hardware cluster.
– You install new instances of OracleAS Single Sign-On and Oracle Delegated Administration Services on their own set of nodes. You configure these components in an OracleAS Cluster (Identity Management). This results in an active-active configuration. You need a load balancer in front of these nodes.
For details on the Distributed OracleAS Cold Failover Cluster (Identity Management) topology, see Section 9.5, "Distributed OracleAS Cold Failover Cluster (Identity Management) Topology".
For details on this transformation, see Chapter 21, "Transforming to OracleAS Cold Failover Cluster Topologies".

Target Configurations
19-8 Oracle Application Server High Availability Guide
Figure 19–4 Transforming to Distributed OracleAS Cold Failover Cluster (Identity Management) on UNIX
Node 1
(Active)
(Active)
Cluster Node 2
OracleAS MetadataRepository
Database Instance
SharedStorage
MiddleTier
Node 2
OracleAS MetadataRepository Database
Instance
OHS
SSODAS
New Node
(Active)
OHS
SSODAS
New Node
(Active)
OHS
SSODAS
ORACLE_HOME forOracleAS Metadata Repository(single-instance database)
Non-High AvailabilityConfiguration
Distributed OracleAS Cold Failover Cluster (Identity Management)High Availability Configuration
ORACLE_HOME for OracleAS Metadata Repository Database
ORACLE_HOME for Oracle Identity Management
(Standby)
InterConnect
Vendor ClusterwareVendor Clusterware
Virtual Hostname:infra.mydomain.comVirtual IP: 123.45.67.89
ORACLE_HOME forOracle Identity Management
On Failover
Hardware Cluster
ORACLE_HOMEfor SSO and DAS
OracleInternet
Directory
DIP
On Failover
Load Balancer
KEY:
Association in non-high availability configuration
Association in high availability configuration
(Active)
OHS OracleInternet
DirectoryDIP
Cluster Node 1
OracleAS MetadataRepository
Database Instance
(Active)
MiddleTier
Node 2
ORACLE_HOMEfor SSO and DAS
HTTP Virtual Server Name: sso.mydomain.com
HTTP Virtual Server Name: mt.mydomain.com
(Standby)
OHS OracleInternet
DirectoryDIP

Transforming to OracleAS Cluster (Identity Management) Topologies 20-1
20Transforming to OracleAS Cluster (Identity
Management) Topologies
This chapter describes how to transform non-highly available installations to OracleAS Cluster (Identity Management) topologies.
This chapter assumes that you have read Chapter 19, "Transforming Non-Highly Available Topologies to Highly Available".
■ Section 20.1, "Overview of Transformation to OracleAS Cluster (Identity Management)"
■ Section 20.2, "Software, Hardware, and Documentation Requirements"
■ Section 20.3, "Overview of Steps"
■ Section 20.4, "Planning the Transformation"
■ Section 20.5, "Steps in Detail"
20.1 Overview of Transformation to OracleAS Cluster (Identity Management)
You can transform your source topology to an OracleAS Cluster (Identity Management) topology or to a distributed OracleAS Cluster (Identity Management) topology. In both versions, you transform the source OracleAS Metadata Repository to a Real Application Clusters database, and the Oracle Identity Management components to an OracleAS Cluster (Identity Management).
■ In an OracleAS Cluster (Identity Management) topology, the Oracle Identity Management components run from the same Oracle home. See Figure 19–1.
■ In a distributed OracleAS Cluster (Identity Management) topology, Oracle Internet Directory and Oracle Directory Integration and Provisioning run from one Oracle home on one set of nodes, and OracleAS Single Sign-On and Oracle Delegated Administration Services run from a different Oracle home on a different set of nodes. See Figure 19–2.
The starting, or source, configuration is the same for both transformations. The source configuration is described in Section 19.1, "Source Configuration".
In general, you perform the following steps to transform a non-highly available installation to an OracleAS Cluster (Identity Management) topology:
■ Transform the OracleAS Metadata Repository from a single-instance database to a Real Application Clusters database.

Software, Hardware, and Documentation Requirements
20-2 Oracle Application Server High Availability Guide
■ Transform the Oracle Identity Management components to run in an OracleAS Cluster (Identity Management). This includes configuring the components to use the virtual server names on load balancers, and installing additional instances.
■ Configure the middle tiers to use the virtual server names and Real Application Clusters database.
20.2 Software, Hardware, and Documentation RequirementsBefore starting the transformation, check that you have the required software and hardware:
■ Additional nodes to run the Oracle Identity Management components
■ Additional nodes and clusterware to run the database as a Real Application Clusters database
■ External load balancers to distribute requests to the Oracle Identity Management and middle-tier nodes
For the OracleAS Cluster (Identity Management) topology, you need one load balancer.
For the distributed OracleAS Cluster (Identity Management) topology, you typically need two load balancers to send requests to two different sets of nodes located on opposite sides of a firewall. However, if your network topology allows it, you might be able to use one load balancer for both sets of nodes.
■ Oracle Database distribution CD-ROMs for installing the Real Application Clusters database
■ Oracle Application Server distribution CD-ROMs for installing additional instances of Oracle Application Server
■ Patches listed in Table 20–1. You can download the patches from OracleMetaLink (http://metalink.oracle.com).
Table 20–1 Required Downloads
If you are running this database You need these patches
Oracle9i Release 2 (9.2) Database on UNIX ■ 3948480: this is the 9.2.0.6 patch set
■ 4015165: REGRN:SCALAR VARCHAR2 IN BINDS WITH DIFFERENT SIZE RANDOMLY FAILS WITH ORA-06502
Oracle9i Release 2 (9.2) Database on Windows
■ 3948480: this is the 9.2.0.6 patch set
■ 3973928: this is the Windows CFS and Clusterware Patch for 9.2.0.6
■ 2878462: this is the 2.2.0.18.0 Oracle Universal Installer
Oracle Database 10g Release 1 (10.1) ■ 4163362: this is the 10.1.0.4 patch set
■ If you are running on Linux and intend to use the Oracle Cluster File System, download these two items from http://oss.oracle.com/projects/ocfs:
- Oracle Cluster File System (OCFS)
- OCFS kernel type ("smp" or "enterprise")

Software, Hardware, and Documentation Requirements
Transforming to OracleAS Cluster (Identity Management) Topologies 20-3
The detailed steps below specify when you apply the patches.
Documents Referenced by the Transformation ProcedureSome steps in the transformation procedure refer to the Oracle documentation listed in Table 20–2. To perform the transformation procedure, you must have these documents.
You can access these documents on Oracle Technology Network (http://www.oracle.com/technology/documentation), or on your Oracle distribution CD-ROMs.
Table 20–2 Documents Needed
Product Guides Needed
Oracle Database If you are running Oracle9i Release 2 (9.2) Database, you need these guides:
■ Oracle9i Installation Guide for your platform
■ Oracle9i Real Application Clusters Setup and Configuration
You can find these guides on Oracle Technology Network: http://www.oracle.com/technology/documentation/oracle9i.html.
If you are running Oracle9i Release 2 (9.2) Database on Windows, you also need these notes from OracleMetaLink:
■ Note 186130.1: "Clustercheck.exe Fails with Windows Error 183"
■ Note 230290.1: "WIN RAC: How to Remove a Failed OCFS Install"
■ Note 211685.1: "Oracle 9.2 Install on Windows Halts With Error: "file not found CRLOGDR.EXE""
■ Note 270048.1: "Node Selection Screen Does Not Show The Nodenames Installing 9205 (OUI 10g)"
■ Note 213416.1: "RAC: Troubleshooting Windows NT/2000 Service Hangs"
■ Note 255481.1: "Changing Priority of CMSRVR (OracleCMService9i) on Windows"
■ Note 232239.1: "DBCA Tips and Pitfalls in a Windows RAC Environment"
If you are running Oracle Database 10g Release 1 (10.1), you need these guides:
■ Oracle Real Application Clusters Installation and Configuration Guide for your platform
■ [Required only if you are running on Linux] OCFS Userguide. You can access this guide here: http://oss.oracle.com/projects/ocfs/documentation
■ Oracle Database 10g Quick Installation Guide for your platform
■ Oracle Database 10g Companion CD Installation Guide for your platform
You can find these guides on Oracle Technology Network: http://www.oracle.com/technology/documentation/database10g.html.
Oracle Application Server
■ Oracle Application Server Metadata Repository Creation Assistant User’s Guide for your platform
■ Oracle Application Server Administrator’s Guide
■ Oracle Application Server Installation Guide for your platform

Overview of Steps
20-4 Oracle Application Server High Availability Guide
20.3 Overview of StepsTo perform the transformation, follow these steps:
Step 1: Check Requirements for High Availability
Step 2: Back Up Your Environment
Step 3: Convert the Database to a Real Application Clusters Database
Step 4: Change the Source Oracle Identity Management to Use the OracleAS Metadata Repository in the Real Application Clusters Database
Step 5: Transform the Source Oracle Identity Management to Use the Virtual Server Names Configured on the Load Balancer
Step 6: (Distributed OracleAS Cluster (Identity Management) Case Only) Install OracleAS Single Sign-On and Oracle Delegated Administration Services
Step 7: Change the Middle Tier to Use the Virtual Server Names on the Load Balancer
Step 8: Install Additional Oracle Identity Management Instances
Step 9: Verify That All the Components Are Working
Step 10: Decommission the Oracle Homes That Are No Longer Used
Figure 20–1 shows these steps graphically for transformation to OracleAS Cluster (Identity Management). Figure 20–2 shows the steps for transformation to distributed OracleAS Cluster (Identity Management). Steps 1 and 2 are omitted from the figures.
Tip: It is possible to perform the transformation steps in two stages, instead of performing all the steps in one session. See Section 20.4, "Planning the Transformation" for details.

Overview of Steps
Transforming to OracleAS Cluster (Identity Management) Topologies 20-5
Figure 20–1 Transforming to OracleAS Cluster (Identity Management)
OracleAS MetadataRepository Database
Instance
Node 3
Node 2
OHSOracle Internet
Directory SSO DAS
Middle Tier
Node 1
Back up your environment.
1 Check high availability requirements.
2
InterConnect
OracleAS Metadata Repository in Real Application Clusters database
Data Files Shared
Storage
DatabaseInstance
Cluster Node 1 (Active)
mr1.mydomain.com
ORACLE_HOME for OracleAS Metadata Repository
ORACLE_HOME for OracleAS Metadata Repository
Transform database to Real Application Clustersdatabase.3
3
4 Change source Identity Management to usethe Real Application Clusters database.
5 Transform source Identity Management to usevirtual server names on the load balancer.
DatabaseInstance
mr2.mydomain.com
5
7
8 Install additional instances.
Non-high availability configuration
SSO and DAS in an OracleASCluster (Identity Management)
7 Change middle tier to use the virtual servernames on the load balancer.
OHS Oracle Internet
DirectorySSO DAS
New Node
4
6 n/a (This step applies only when transforming todistributed OracleAS Cluster.)
Non-high availability configuration
DIP DIP
8
KEY:
Cluster Node 2 (Active)
Association in non-high availability configurationData transfer
Association in high availability configuration
Load Balancer
HTTP Virtual Server Name: sso.mydomain.com
LDAP Virtual Server Name: oid.mydomain.com
7

Planning the Transformation
20-6 Oracle Application Server High Availability Guide
Figure 20–2 Transforming to Distributed OracleAS Cluster (Identity Management)
20.4 Planning the TransformationWhen you are performing the transformation steps, the system is not available. If you are concerned about downtime, you can perform the transformation steps over two
OracleAS MetadataRepository Database
Instance
Node 3
Node 2
OHS Oracle Internet
DirectorySSO DAS
Middle Tier
Node 1
InterConnect
OracleAS Metadata Repository in Real Application Clusters database
Data Files Shared
Storage
DatabaseInstance
mr1.mydomain.com
ORACLE_HOME for OracleAS Metadata Repository
ORACLE_HOME for OracleAS Metadata Repository
Transform database to RealApplication Clusters database.3
3
4 Change source Identity Management touse the Real Application Clusters database.
New Node
OHS SSO DAS
6 Install an Oracle home for SSO and DAS usingvirtual server names on the load balancers.
DatabaseInstance
mr2.mydomain.com
5
6
7
8
New Node
OHS SSO DAS
New Node
Oracle Internet
Directory
OHS
DIP
Non-high availability configuration
Non-high availability configuration
SSO and DAS in an OracleASCluster (Identity Management)
7
4
5 Transform source Identity Management to usevirtual server names on the load balancers.
8 Install additional instances.
DIP
KEY:
Association in non-high availability configurationData transfer
Association in high availability configuration
Cluster Node 1 (Active) Cluster Node 2 (Active)
Load Balancer
HTTP Virtual Server Name: sso.mydomain.com
8
Load Balancer
LDAP Virtual Server Name: oid.mydomain.com
7 Change middle tier to use the virtual server nameon the load balancer.
Back up your environment.
1 Check high availability requirements.
2
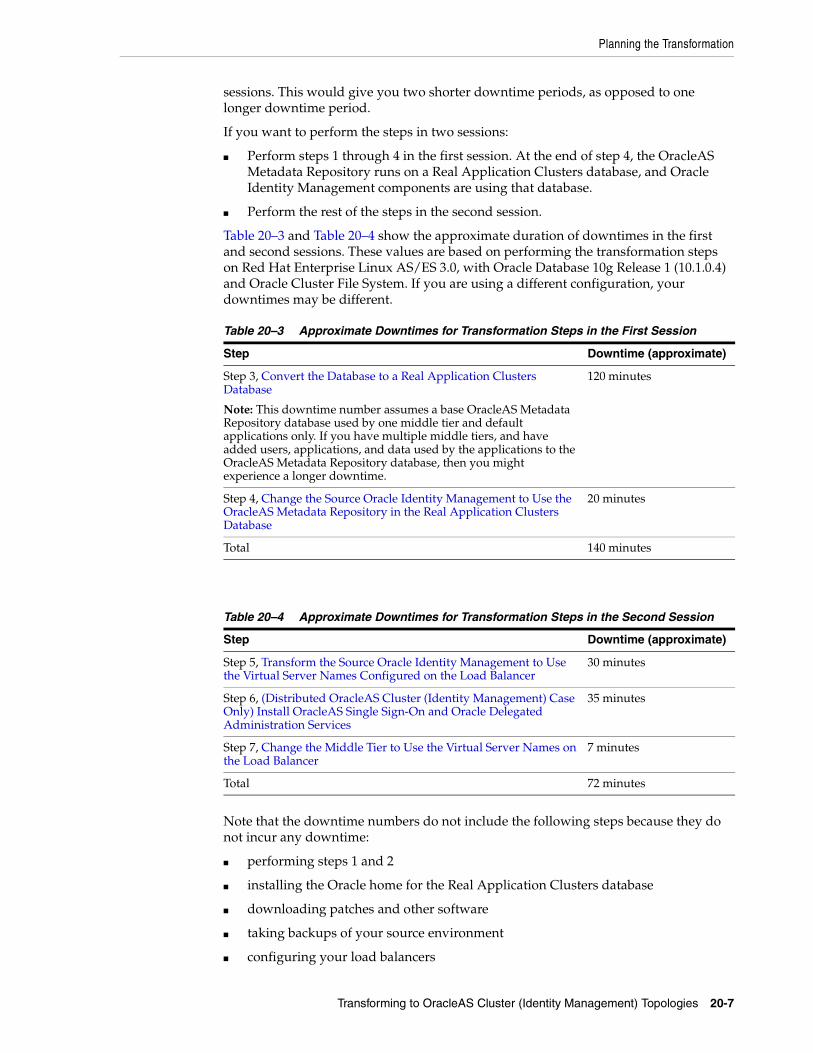
Planning the Transformation
Transforming to OracleAS Cluster (Identity Management) Topologies 20-7
sessions. This would give you two shorter downtime periods, as opposed to one longer downtime period.
If you want to perform the steps in two sessions:
■ Perform steps 1 through 4 in the first session. At the end of step 4, the OracleAS Metadata Repository runs on a Real Application Clusters database, and Oracle Identity Management components are using that database.
■ Perform the rest of the steps in the second session.
Table 20–3 and Table 20–4 show the approximate duration of downtimes in the first and second sessions. These values are based on performing the transformation steps on Red Hat Enterprise Linux AS/ES 3.0, with Oracle Database 10g Release 1 (10.1.0.4) and Oracle Cluster File System. If you are using a different configuration, your downtimes may be different.
Note that the downtime numbers do not include the following steps because they do not incur any downtime:
■ performing steps 1 and 2
■ installing the Oracle home for the Real Application Clusters database
■ downloading patches and other software
■ taking backups of your source environment
■ configuring your load balancers
Table 20–3 Approximate Downtimes for Transformation Steps in the First Session
Step Downtime (approximate)
Step 3, Convert the Database to a Real Application Clusters Database
Note: This downtime number assumes a base OracleAS Metadata Repository database used by one middle tier and default applications only. If you have multiple middle tiers, and have added users, applications, and data used by the applications to the OracleAS Metadata Repository database, then you might experience a longer downtime.
120 minutes
Step 4, Change the Source Oracle Identity Management to Use the OracleAS Metadata Repository in the Real Application Clusters Database
20 minutes
Total 140 minutes
Table 20–4 Approximate Downtimes for Transformation Steps in the Second Session
Step Downtime (approximate)
Step 5, Transform the Source Oracle Identity Management to Use the Virtual Server Names Configured on the Load Balancer
30 minutes
Step 6, (Distributed OracleAS Cluster (Identity Management) Case Only) Install OracleAS Single Sign-On and Oracle Delegated Administration Services
35 minutes
Step 7, Change the Middle Tier to Use the Virtual Server Names on the Load Balancer
7 minutes
Total 72 minutes

Steps in Detail
20-8 Oracle Application Server High Availability Guide
20.5 Steps in DetailThis section provides details on the transformation steps. Most of the steps include a figure showing what the topology looks like at the end of the step.
Step 1 Check Requirements for High AvailabilityEnsure that your system meets the requirements for creating a highly available topology. The requirements are listed in these guides:
■ Oracle Application Server Installation Guide, available on Disk 1 of the Oracle Application Server distribution. In particular, be sure to read the "Installing in High Availability Environments: OracleAS Cluster (Identity Management)" chapter.
■ For Oracle9i Real Application Clusters database requirements, see the Oracle9i Installation Guide.
For Oracle Database 10g Real Application Clusters requirements, see the Oracle Real Application Clusters Installation and Configuration Guide.
■ In addition, check the latest certification information for Real Application Clusters on OracleMetaLink (http://metalink.oracle.com):
Step 2 Back Up Your EnvironmentBefore starting the transformation process, back up your environment so that you can restore the original environment in case of errors during the transformation process.
You should back up these installations:
■ OracleAS Metadata Repository database, including data files
■ Oracle Identity Management
■ Oracle Application Server middle tiers
You should also test your backups (by performing a restore operation) to ensure that these backups are valid. This exercise gives you the following benefits: you get practice in restoring from backup files, and a faster recovery means a shorter downtime.
The following steps show how to stop the Oracle Application Server processes and how to perform a simple backup using the tar command.
1. Stop all middle tier processes. MT_ORACLE_HOME indicates the Oracle home for your middle tier. You need to stop all middle tiers in your environment.
> MT_ORACLE_HOME/opmn/bin/opmnctl stopall> MT_ORACLE_HOME/bin/emctl stop iasconsole
2. Stop Oracle Identity Management processes. IM_ORACLE_HOME indicates the Oracle home for the Oracle Identity Management.
> IM_ORACLE_HOME/opmn/bin/opmnctl stopall> IM_ORACLE_HOME/bin/emctl stop iasconsole
3. Stop the OracleAS Metadata Repository database. SRC_MR_ORACLE_HOME indicates the Oracle home for the source OracleAS Metadata Repository.
> SRC_MR_ORACLE_HOME/bin/sqlplus /nolog
Downtime 1 Starts: The next step starts the first downtime.

Steps in Detail
Transforming to OracleAS Cluster (Identity Management) Topologies 20-9
SQL> connect / as sysdbaSQL> shutdownSQL> exit
Stop the database console:
> SRC_MR_ORACLE_HOME/bin/emctl stop dbconsole> SRC_MR_ORACLE_HOME/bin/emctl stop agent
Stop the listener:
> SRC_MR_ORACLE_HOME/bin/lsnrctl stop
Windows: in the Services panel, stop the database service.
4. Back up your environment. You can use any backup tools.
The following example shows how to use the tar command to back up the OracleAS Metadata Repository and Oracle Identity Management homes. If you are using tar, you need to become the root user.
> suPassword: root_password# tar -cvfp SRC_MR_ORACLE_HOME mr.tar# tar -cvfp IM_ORACLE_HOME im.tar
You can use other backup and recovery mechanisms. For example, you can use the OracleAS Backup and Recovery Tool to perform the backup and restore operations. See the Oracle Application Server Administrator’s Guide for details on using this tool.
Step 3 Convert the Database to a Real Application Clusters DatabaseAfter this step, your environment should look like this (Figure 20–3):

Steps in Detail
20-10 Oracle Application Server High Availability Guide
Figure 20–3 Step 3: Converting the Single-Instance Database to a Real Application Clusters Database
This step is divided into three sections based on the database platform and database version. Follow only the section appropriate for your database:
■ "Step 3A: Converting an Oracle9i Database on UNIX Platforms" on page 20-10
■ "Step 3B: Converting an Oracle Database 10g on UNIX Platforms" on page 20-14
■ "Step 3C: Converting an Oracle 10g Database on Windows" on page 20-18
■ "Step 3D: Converting an Oracle9i Database on Windows" on page 20-23
Step 3A: Converting an Oracle9i Database on UNIX Platforms
This section describes how to convert a single-instance Oracle9i Database to a Real Application Clusters database that uses raw devices as its storage type.
1. Perform pre-installation steps listed in the following sections:
Item Name
Book Oracle9i Real Application Clusters Setup and Configuration
This book is available in the Oracle9i Database documentation set.
Chapter 10, "Converting to Real Application Clusters from Single-Instance Oracle Databases"
OracleAS MetadataRepository Database
Instance
Node 3
Node 2
OHS Oracle Internet
DirectorySSO DAS
Middle Tier
Node 1
InterConnect
OracleAS Metadata Repository in Real Application Clusters database
Data Files Shared
Storage
DatabaseInstance
mr1.mydomain.com
ORACLE_HOME for OracleAS Metadata Repository
ORACLE_HOME for OracleAS Metadata Repository
3DatabaseInstance
mr2.mydomain.com
Non-high availability configuration
Non-high availability configuration
DIP
KEY:
Association in non-high availability configurationData transfer
Association in high availability configuration
Cluster Node 1 (Active) Cluster Node 2 (Active)
Transform database to Real Application Clusters database.3

Steps in Detail
Transforming to OracleAS Cluster (Identity Management) Topologies 20-11
2. Create a file to associate OracleAS Metadata Repository tablespaces with raw devices, and set the DBCA_RAW_CONFIG environment variable to point to this file. Details:
a. Create the file. In the file, each line specifies a tablespace and corresponding raw device in the following format:
tablespace = raw_device
For a list of tablespaces required by the OracleAS Metadata Repository, see:
Example: The following lines show the contents of a file that you can use for the DBCA_RAW_CONFIG environment variable. In the example, "asdb" is the database SID, and "imha-dg" is the name of the disk group.
system=/dev/vx/rdsk/imha-dg/asdb_system_raw_1024msysaux=dev/vx/rdsk/imha-dg/asdb_sysaux_raw_1024mundotbs1=/dev/vx/rdsk/imha-dg/asdb_undotbs1_raw_500mundotbs2=/dev/vx/rdsk/imha-dg/asdb_undotbs2_raw_500mtemp=/dev/vx/rdsk/imha-dg/asdb_temp_raw_250mexample=/dev/vx/rdsk/imha-dg/asdb_example_raw_160musers=/dev/vx/rdsk/imha-dg/asdb_users_raw_120mredo1_1=/dev/vx/rdsk/imha-dg/asdb_redo1_1_raw_120mredo1_2=/dev/vx/rdsk/imha-dg/asdb_redo1_2_raw_120mredo1_3=/dev/vx/rdsk/imha-dg/asdb_redo1_3_raw_120mredo2_1=/dev/vx/rdsk/imha-dg/asdb_redo2_1_raw_120mredo2_2=/dev/vx/rdsk/imha-dg/asdb_redo2_2_raw_120mredo2_3=/dev/vx/rdsk/imha-dg/asdb_redo2_3_raw_120mcontrol1=/dev/vx/rdsk/imha-dg/asdb_control1_raw_110m
Section In the section "Single Instance on a Cluster Running from non-Cluster Installed Oracle Home", perform the steps in these subsections:
■ "Set up Cluster". Note: Do not perform the steps in "Back up the Original Single-Instance Database". You will do this later to minimize downtime.
■ "Set up Shared Storage"
■ "Pre-Installation Steps"
Note: Do not run the "Install Oracle Software" step at this time. You will run it later.
Item Name
Book Oracle Application Server Metadata Repository Creation Assistant User’s Guide
This guide is available on Disk 1 of the Oracle Application Server distribution.
Chapter 1, "OracleAS Metadata Repository Creation Assistant Overview and Requirements"
Section "Tablespace Sizes"
Note: Make sure that the DCM and the Oracle Internet Directory tablespaces (OLTS_ATTRSTORE, OLTS_BATTRSTORE, OLTS_CT_STORE, OLTS_DEFAULT, OLTS_SVRMGSTORE) have at least 200 MB of free space.
Item Name

Steps in Detail
20-12 Oracle Application Server High Availability Guide
control2=/dev/vx/rdsk/imha-dg/asdb_control2_raw_110mcontrol3=/dev/vx/rdsk/imha-dg/asdb_control3_raw_110mspfile=/dev/vx/rdsk/imha-dg/asdb_spfile_raw_5mpwdfile=/dev/vx/rdsk/imha-dg/asdb_pwdfile_raw_5mcwmlite=/dev/vx/rdsk/imha-dg/asdb_cwmlite_raw_100mxdb=/dev/vx/rdsk/imha-dg/asdb_xdb_raw_50modm=/dev/vx/rdsk/imha-dg/asdb_odm_raw_280mindx=/dev/vx/rdsk/imha-dg/asdb_indx_raw_70mtools=/dev/vx/rdsk/imha-dg/asdb_tools_raw_12mdrsys=/dev/vx/rdsk/imha-dg/asdb_drsys_raw_250mPORTAL=/dev/vx/rdsk/imha-dg/asdb_portal_raw_128mPORTAL_DOC=/dev/vx/rdsk/imha-dg/asdb_portaldoc_raw_64mPORTAL_IDX=/dev/vx/rdsk/imha-dg/asdb_portalidx_raw_64mPORTAL_LOG=/dev/vx/rdsk/imha-dg/asdb_portallog_raw_64mDCM=/dev/vx/rdsk/imha-dg/asdb_dcm_raw_500mOCATS=/dev/vx/rdsk/imha-dg/asdb_ocats_raw_300mDISCO_PTM5_CACHE=/dev/vx/rdsk/imha-dg/asdb_discoptm5cache_raw_64mDISCO_PTM5_META=/dev/vx/rdsk/imha-dg/asdb_discoptm5meta_raw_64mWCRSYS_TS=/dev/vx/rdsk/imha-dg/asdb_wcrsysts_raw_64mUDDISYS_TS=/dev/vx/rdsk/imha-dg/asdb_uddisysts_raw_64mOLTS_ATTRSTORE=/dev/vx/rdsk/imha-dg/asdb_oltsattrstore_raw_500mOLTS_BATTRSTORE=/dev/vx/rdsk/imha-dg/asdb_oltsbttrstore_raw_500mOLTS_CT_STORE=/dev/vx/rdsk/imha-dg/asdb_oltsctstore_raw_500mOLTS_DEFAULT=/dev/vx/rdsk/imha-dg/asdb_oltsdefault_raw_500mOLTS_SVRMGSTORE=/dev/vx/rdsk/imha-dg/asdb_oltssvrmgstore_raw_256mIAS_META=/dev/vx/rdsk/imha-dg/asdb_iasmeta1_raw_500mDSGATEWAY_TAB=/dev/vx/rdsk/imha-dg/asdb_dsgatewaytab_raw_64mb2b_dt=/dev/vx/rdsk/imha-dg/asdb_b2bdt_raw_256mb2b_rt=/dev/vx/rdsk/imha-dg/asdb_b2brt_raw_256mb2b_idx=/dev/vx/rdsk/imha-dg/asdb_b2bidx_raw_128mb2b_lob=/dev/vx/rdsk/imha-dg/asdb_b2blob_raw_128mosssys=/dev/vx/rdsk/imha-dg/asdb_osssys_raw_800m
b. Set the DBCA_RAW_CONFIG environment variable to point to the file that you created. For example:
Bourne or Korn shell:
> DBCA_RAW_CONFIG=/fullpath/to/rawconfig/file> export DBCA_RAW_CONFIG
C shell:
> setenv DBCA_RAW_CONFIG /fullpath/to/rawconfig/file
3. Install the Oracle9i Release 2 (9.2.0.1) software on local disks. In the installer:
■ Specify a different Oracle home from the one running the single-instance database.
■ Select "Database Configuration: Software Only" because you are not creating the database yet.
4. Apply the Oracle9i Release 2 (9.2.0.6) patch set (patch number 3948480). Perform these steps:
a. In the README file for the patch set, perform the steps in the section "Before You Install This Patch Set" if they apply to you.
b. If you are running the Real Application Clusters database in a Sun Clusterware environment, apply the Oracle UNIX Distributed Lock Manager

Steps in Detail
Transforming to OracleAS Cluster (Identity Management) Topologies 20-13
(UDLM) 3.3.4.8 patch. This patch is included in the patch set. The installation instructions are in the Disk1/racpatch/README.udlm file.
c. Install the 9.2.0.6 patch set.
d. Perform the steps in the section "Required Post-Installation Tasks" in the README, up to, but not including, the section "Upgrade the Database". You have not created the database yet. You will do this later.
5. Back up your original single-instance database using DBCA to create a database template from the original database. To perform this step, see:
Select the OFA (Oracle Flexible Architecture) option, because the target machines may not have the same file structure.
DBCA generates two files, template_name.dbc and template_name.dfb, in the SRC_ORACLE_HOME/assistants/dbca/templates directory.
6. Copy the files generated in the previous step to the RAC_ORACLE_HOME/assistants/dbca/templates directory. RAC_ORACLE_HOME refers to the directory where you installed the database software in step 3 on page 20-12.
7. On the Real Application Clusters node where you installed the database Oracle home (step 3 on page 20-12), run Net configuration assistant and perform a typical installation.
> cd RAC_ORACLE_HOME/bin> netca
Select the "Typical Installation" option, and accept the default values in all the screens.
8. Start the Global Services Daemon (GSD) on both nodes in the Real Application Clusters database.
> cd RAC_ORACLE_HOME/bin> gsdctl start
9. On the Real Application Clusters node where you installed the database Oracle home (step 3 on page 20-12), run DBCA on the target node to create a database using the template you created in step 5 on page 20-13.
> cd RAC_ORACLE_HOME/bin> dbca
Notes:
■ When DBCA displays a list of templates from which you can create a new database, select the template that you created earlier.
■ Enter a global database name and the SID that are the same as the ones on the single-instance database.
Item Name
Book Oracle9i Real Application Clusters Setup and Configuration
This book is available in the Oracle9i Database documentation set.
Chapter 10, "Converting to Real Application Clusters from Single-Instance Oracle Databases"
Section "Back up the Original Single-Instance Database"

Steps in Detail
20-14 Oracle Application Server High Availability Guide
■ Make sure raw devices and filenames are correct. Check that the paths are full paths and there are no trailing spaces. Make any corrections as necessary.
■ If you get error "PLS-00302: component ’VALIDATE_COMPONENTS’ must be declared", you can ignore this error because you will run rdbms/admin/catpatch.sql later to upgrade the newly created database to 9.2.0.6.
■ If you get PRKR-1005 or PRKC-1018 errors, you need to stop and restart the GSD daemon on both nodes.
> cd RAC_ORACLE_HOME/bin> gsdctl stop> gsdctl start
10. Upgrade the database to 9.2.0.6 using the downloaded 9.2.0.6 patch set by performing the steps in the section "Upgrade the Database" in the README for the patch set. One of the steps in this section is to run the rdbms/admin/catpatch.sql script.
11. Apply patch 4015165 to the newly upgraded database.
12. Unlock all the database accounts listed in IM_ORACLE_HOME/config/unlock.sql. Note that this file is in the Oracle home for the Oracle Identity Management, not in the database Oracle home.
To unlock the accounts without changing the passwords, perform these steps:
a. Log into the database as the SYS user.
> sqlplus SYS/password as sysdba
b. Run the following commands for each user listed in the IM_ORACLE_HOME/config/unlock.sql file:
– Determine the password for the user.
SQL> select password from dba_users where username = ’username’;
Replace username with the name of the account.
– Run the "alter user" command.
SQL> alter user username identified by values ’password’ account unlock;
Replace username with the name of the account.
Replace password with the password determined from the previous step.
Step 3B: Converting an Oracle Database 10g on UNIX Platforms
This section describes how to convert a single-instance Oracle Database 10g to a Real Application Clusters database that uses OCFS as its storage type.
1. Perform pre-installation tasks for your platform.
Note: Do not change the passwords for these accounts.

Steps in Detail
Transforming to OracleAS Cluster (Identity Management) Topologies 20-15
For example, on Linux, you would perform the steps in the following sections in the "Pre-Installation Tasks for RAC on Linux" chapter in the Oracle Real Application Clusters Installation and Configuration Guide.
■ "Check Hardware Requirements"
■ "Check Network Requirements"
■ "Check Software Requirements"
■ "Create Required UNIX Group and Users"
■ "Configure Kernel Parameters and Shell Limits"
■ "Identify Required Software Directories"
■ "Identity or Create an Oracle Base Directory"
■ "Create the CRS Home Directory"
■ "Create Directories for Oracle CRS, Database, or Recovery Files"
■ "Verify that the Required Software is Running"
2. This step is required only if you are running on Linux and you intend to use the Oracle Cluster File System. If you are running on other platforms, or if you are using other file management systems (such as raw devices or ASM), you may skip this step.
Install Oracle Cluster File System (OCFS) using the instructions in:
Overview of installing OCFS:
a. Install the OCFS software which you downloaded earlier.
b. Generate the /etc/ocfs.conf file on both nodes of the cluster using ocfstool.
c. As root user, run load_ocfs to load the OCFS module. You do not need to reboot the nodes if you run this command.
d. Create partitions and format OCFS mount points.
3. Install Cluster Ready Services (CRS) using the instructions in:
4. Patch CRS to version 10.1.0.4.
a. Shut down all the database processes from the database Oracle home.
b. Shut down all crs and ocssd processes.
Item Name
Book OCFS Userguide
This guide is available here: http://oss.oracle.com/projects/ocfs/documentation
Section "Storage with Oracle Cluster File System"
Item Name
Book Oracle Real Application Clusters Installation and Configuration Guide
This book is available in the Oracle Database 10g documentation set.
Chapter 9, "Installing Cluster Ready Services on UNIX"

Steps in Detail
20-16 Oracle Application Server High Availability Guide
On UNIX, you have to run the commands as the root user.
> suPassword: root_password# /etc/init.d/init.crsd stop To stop the crs process# /etc/init.d/init.cssd stop To stop the css process
On Windows, these are services that you can stop using the Services panel. In the Services panel, you want to stop the OracleCRService and OracleCSService services.
c. Apply the 10.1.0.4 patch set (patch number 4163362) to the CRS home. See the README file in the patch set for details.
5. Install the Real Application Clusters database software following the steps in the guide listed below:
6. Create listeners on the Real Application Clusters nodes.
a. Make sure all crs and ocssd processes are running.
b. Start the Net configuration assistant.
> cd RAC_ORACLE_HOME/bin> netca
c. In the Net configuration assistant, enter the virtual IPs of the nodes in the cluster.
d. In the Net configuration assistant, create a listener for each of the two database instances.
7. Install products from the Companion CD for the Oracle Database 10g. The Companion CD contains two sets of products:
■ Oracle Database 10g Products
■ Oracle Database 10g Companion Products
You need to install the first set of products. This includes the Oracle Database examples, natively compiled Java libraries for Oracle JVM and Oracle interMedia, Oracle Text supplied knowledge bases, and Legato Single Server Version.
For installation steps, see:
8. Create the database from template. To perform this step, refer to:
Item Name
Book Oracle Database 10g Quick Installation Guide for your platform
This book is available in the Oracle Database 10g documentation set.
Section "Install Oracle Database 10g"
Note: In the Select Database Configuration screen, do not create a starter database. You will create the database later.
Item Name
Book Oracle Database Companion CD Installation Guide for your platform
This book is available in the Oracle Database 10g documentation set.

Steps in Detail
Transforming to OracleAS Cluster (Identity Management) Topologies 20-17
Note that the global database name and SID for the Real Application Clusters database must be the same as those of the single-instance database.
Follow the steps in these sections:
a. "Back up the Original Single-Instance Database"
b. "Perform the Pre-Installation Steps"
c. "Copy the Preconfigured Database Image"
d. "Install Oracle Database 10g Software with Real Application Clusters"
At this time, you would get an error while creating the database because the installer expects catpatch.sql to be run. You can ignore the error and proceed to complete the database creation. You will run catpatch.sql when you apply the patch in the next step.
9. Patch the Real Application Clusters database software to version 10.1.0.4. This is the same patch set that you downloaded in step 4 on page 20-15.
a. Ensure that the database processes are shut down.
b. Ensure that the CRS processes (crs and ocssd) are running.
c. Apply the patch. Follow the steps in the README file for the patch set.
d. Perform the post-installation steps listed in patchnote.htm.
Typically, you do not have to run the steps for "Resetting the DBMS_SCHEDULER Time Zone". If your system is set to a time zone other than UTC, you would not be able to start dbconsole. It would show you this message:
Timezone mismatch: The agentTZRegion value (UTC) in/scratch/oracleas/radb/host1.mydomain.com_radb/sysman/config/emd.propertiesdoes not match the current environment TZ setting(PST8PDT).The dbconsole cannot run with this mismatch.
If UTC is the correct timezone, set your timezone environment variable toUTC and repeat the 'emctl start dbconsole' operation.
If UTC is not the correct timezone, make sure that the timezone in yourenvironment is correct, and then run the following command in your localOracle Home: 'emctl resetTZ agent'
The output of this command will include detailed instructions to follow, tocorrect the mismatch.
Follow the steps mentioned and you should be able to start your dbconsole after that.
10. Unlock all the database accounts listed in IM_ORACLE_HOME/config/unlock.sql. Note that this file is in the Oracle home for the Oracle Identity Management, not in the database Oracle home.
To unlock the accounts without changing the passwords, perform these steps:
Item Name
Book Oracle Real Application Clusters Installation and Configuration Guide
This book is available in the Oracle Database 10g documentation set.
Appendix D, "Converting to Real Application Clusters from Single-Instance Databases"

Steps in Detail
20-18 Oracle Application Server High Availability Guide
a. Log into the database as the SYS user.
> sqlplus SYS/password as sysdba
b. Run the following commands for each user listed in the IM_ORACLE_HOME/config/unlock.sql file:
– Determine the password for the user.
SQL> select password from dba_users where username = ’username’;
Replace username with the name of the account.
– Run the "alter user" command.
SQL> alter user username identified by values ’password’ account unlock;
Replace username with the name of the account.
Replace password with the password determined from the previous step.
Step 3C: Converting an Oracle 10g Database on Windows
This section describes how to convert a single-instance Oracle 10g Database on Windows to a Real Application Clusters database that uses OCFS as its storage type.
1. Perform pre-installation tasks for your platform. The tasks are listed in the following guide:
Note: Do not change the passwords for these accounts.
Item Name
Book Oracle Real Application Clusters Installation and Configuration Guide
This book is available in the Oracle Database 10g documentation set.
Chapter 8, "Pre-Installation Tasks for RAC on Windows"
Section "Oracle Database System Requirements"
Additional things to check:
In subsection "Oracle Cluster File System Pre-Installation Steps":
■ In step 1, where it mentions to "Run Windows Disk Management", be sure to create an extended partition so that you can configure it as a logical drive. Make sure also that the partition style is "Master Boot Record (MBR)".
■ In step 2, where it mentions to create two partitions, make sure that the partitions are large enough to hold the Oracle database home and the Oracle database files.
■ In step 6, make sure you restart all nodes after you have created the logical drives.
■ In step 7, although you selected "Do not assign a drive letter or path" in step 4, the other node in the cluster may have assigned a drive letter to the logical drive. In this case, follow step 7 to remove the drive letter.
Section "Hardware and Software Certification"

Steps in Detail
Transforming to OracleAS Cluster (Identity Management) Topologies 20-19
2. Install Cluster Ready Services (CRS) using the instructions in:
3. Install the Real Application Clusters database software. You can follow the steps in the guide listed below:
Section "Network Requirements"
Additional things to check:
■ In the subsection "Checking the Network Requirements", your configuration could vary slightly from the described configuration in that you could have more than one interface (for example, a public interface and a virtual IP interface) residing on the same NIC. In this case, you need to configure the ipconfig list so that the interfaces on the NIC associated with the public interface are listed first.
■ The %SystemRoot%\system32\drivers\etc\hosts file should contain only the private network addresses. The public IP and the virtual IP should be registered in the DNS.
■ The public IP and the virtual IP should be accessible from outside the subnet. You can check this by pinging the IPs from a machine outside the subnet.
■ The private IP on each node of the Real Application Clusters should be accessible from the other node.
Section "Individual Component Requirements"
Item Name
Book Oracle Real Application Clusters Installation and Configuration Guide
This book is available in the Oracle Database 10g documentation set.
Chapter 10, "Installing Cluster Ready Services on Windows"
Additional things to check:
■ In subsection "Verify Cluster Privileges", if the command "net use \\node_name\C$" is not successful for both nodes, check that you are logged in as the same user and that you have the same user privileges on both nodes. Log out and log in as a user with exactly the same privileges on both nodes and try the command again.
■ In subsection "Stop GSD Services from Earlier Releases", verify that there are no GSD services running on either node. You can check this using the Services window.
■ If you are using Oracle Cluster File System, make sure that you review the points listed under the heading "In subsection "Oracle Cluster File System Pre-Installation Steps":" on page 20-18.
Item Name
Book Oracle Real Application Clusters Installation and Configuration Guide
This book is available in the Oracle Database 10g documentation set.
Item Name

Steps in Detail
20-20 Oracle Application Server High Availability Guide
4. Install products from the Companion CD for the Oracle Database 10g. The Companion CD contains two sets of products:
■ Oracle Database 10g Products
■ Oracle Database 10g Companion Products
You need to install the first set of products. This includes the Oracle Database examples, natively compiled Java libraries for Oracle JVM and Oracle interMedia, Oracle Text supplied knowledge bases, and Legato Single Server Version.
For installation steps, see:
5. Configure virtual IP for the Real Application Clusters database.
a. Start up the Virtual IP configuration assistant:
RAC_ORACLE_HOME\bin\vipca.bat
b. In the Network Interfaces screen, which enables you to select network interfaces from a list, select both private and public interfaces.
c. On the IP Address screen, enter the virtual IP alias name and press Tab. The Virtual IP configuration assistant should automatically fill in the value for virtual IP address. Verify that the value is correct.
d. The subnet masks should also be automatically filled in. Change them if they are not correct.
e. Complete the rest of the screens in the Virtual IP configuration assistant. It should create and start the VIP, GSD, and Oracle Notification Service (ONS) services.
6. Create listeners on the Real Application Clusters nodes.
a. Start the Net configuration assistant.
RAC_ORACLE_HOME\bin\netca
b. Select Cluster Configuration.
c. Select to configure Both Nodes of the Cluster.
d. Select Listener Configuration.
e. Select Add a Listener.
Chapter 11, "Installing Oracle Database 10g with Real Application Clusters"
Notes:
■ In the Specify Hardware Cluster Installation Mode page of the installer, select Cluster Installation mode and select both nodes in the cluster.
■ In the Select Installation Type page, select Enterprise Edition.
■ In the Select Database Configuration page, select Do not create a starter database.
Item Name
Book Oracle Database Companion CD Installation Guide for your platform
This book is available in the Oracle Database 10g documentation set.
Item Name

Steps in Detail
Transforming to OracleAS Cluster (Identity Management) Topologies 20-21
f. Enter a name for the listener.
g. Select TCP as the protocol.
h. Select 1521 as the standard port (unless it is already in use).
i. Select No when asked to configure another listener.
j. Create a listener for both nodes in the cluster.
7. Add "LDAP," to the NAMES.DIRECTORY_PATH line in the RAC_ORACLE_HOME\network\admin\sqlnet.ora file. Do this for both nodes in the cluster. The line should look like the following:
NAMES.DIRECTORY_PATH=(LDAP,TNSNAMES,ONAMES,HOSTNAME)
8. Patch CRS to version 10.1.0.4.
a. Make sure that the ORACLE_HOME and ORACLE_SID environment variables are set.
b. Shut down all the database processes from the database Oracle home.
c. Shut down all crs and ocssd processes.
On UNIX, you have to run the commands as the root user.
> suPassword: root_password# /etc/init.d/init.crsd stop To stop the crs process# /etc/init.d/init.cssd stop To stop the css process
On Windows, these are services that you can stop using the Services panel. In the Services panel, you want to stop the OracleCRService and OracleCSService services.
d. Apply the 10.1.0.4 patch set (patch number 4163362) to the CRS home. See the README file in the patch set for details.
e. Check the message window at the end of the installer to see if there are any extra steps that you have to run.
9. Patch the Real Application Clusters database software to version 10.1.0.4. This is the same patch set that you downloaded in step 8 on page 20-21.
a. Make sure that the ORACLE_HOME and ORACLE_SID environment variables are set.
b. Ensure that the database processes are shut down.
c. Ensure that the CRS processes (crs and ocssd) are running.
d. Apply the patch. Follow the steps in the README file for the patch set.
e. Check the message window at the end of the installer to see if there are any extra steps that you have to run.
You need not perform the post-installation steps listed in patchnote.htm yet, because you have not created the database yet. You perform these steps after creating the database.
10. Create the database from template.
Note that the global database name and SID for the Real Application Clusters database must be the same as those of the single-instance database.
a. Shut down the Oracle Application Server environment:

Steps in Detail
20-22 Oracle Application Server High Availability Guide
– Shut down the middle tiers.
– Shut down the Oracle Identity Management components.
– Shut down the OracleAS Metadata Repository database.
b. Perform the steps in these subsections:
c. Create the database using DBCA:
– Check that CRS, the database listener, and all other services related to the cluster are running.
– Start up DBCA on one of the nodes in the cluster:
RAC_ORACLE_HOME\bin\dbca
– Welcome screen: select Oracle Real Application Clusters Database.
– Operations screen: select Create a Database.
– Node Selection screen: select both nodes in the cluster.
– Database Templates screen: select the templates that you created from the single-instance database.
– Database Identification screen: enter the same global database name and SID as for the single-instance database.
– Management Options screen: select Configure the Database with Enterprise Manager, and select Use Database Control for Database Management.
– Database Credentials screen: create passwords for the administration accounts.
– Storage Options screen: select the storage system that you are using.
– Database File Locations screen: select Use Common Location for All Database Files, and enter a directory on the shared storage for the data files.
– Recovery Configuration screen: select Specify Flash Recovery Area, and enter a directory on the shared storage for the flash recovery files.
– Database Content screen: select No Scripts to Run.
– Database Services screen: click Next.
Item Name
Book Oracle Real Application Clusters Installation and Configuration Guide
This book is available in the Oracle Database 10g documentation set.
Appendix D, "Converting to Real Application Clusters from Single-Instance Databases"
Section "Back up the Original Single-Instance Database"
This section creates template files in the SRC_MR_ORACLE_HOME\assistants\dbca\templates directory. Remember to create the templates that include both structure and data.
Section "Copy the Preconfigured Database Image"
Copy the template files generated in the backup section to the RAC_ORACLE_HOME\assistants\dbca\templates directory on any node in the cluster.

Steps in Detail
Transforming to OracleAS Cluster (Identity Management) Topologies 20-23
– Initialization Parameters screen: click the All Initialization Parameters button, and ensure that the cluster_database parameter is set to true.
– Database Storage screen: review and set up any database storage parameters that you want for the Real Application Clusters database.
– Creation Option screen: select Create Database and click Finish to create the database.
– Click OK at the end to start the two instances on both nodes of the cluster.
11. Perform the post-installation steps listed in patchnote.htm of the 10.1.0.4 patch set. Be sure you run catpatch.sql and utlrp.sql.
Typically, you do not have to run the steps for "Resetting the DBMS_SCHEDULER Time Zone". See step 9 on page 20-17 for details.
12. Unlock all the database accounts listed in IM_ORACLE_HOME\config\unlock.sql. Note that this file is in the Oracle home for the Oracle Identity Management, not in the database Oracle home.
To unlock the accounts without changing the passwords, perform these steps:
a. Log into the database as the SYS user.
> sqlplus SYS/password as sysdba
b. Run the following commands for each user listed in the IM_ORACLE_HOME\config\unlock.sql file:
– Determine the password for the user.
SQL> select password from dba_users where username = ’username’;
Replace username with the name of the account.
– Run the "alter user" command.
SQL> alter user username identified by values ’password’ account unlock;
Replace username with the name of the account.
Replace password with the password determined from the previous step.
Step 3D: Converting an Oracle9i Database on Windows
This procedure describes how to convert a single-instance Oracle9i database to a Real Application Clusters database that uses raw devices as its storage type.
This configuration installs the Oracle home on a local NTFS drive of each node in the Real Application Clusters and the Oracle raw data files on shared logical partitions.
Note: Do not change the passwords for these accounts.

Steps in Detail
20-24 Oracle Application Server High Availability Guide
1. Ensure that you have a certified combination of operating system, Oracle software version, and storage option. You can find the latest certification information on OracleMetaLink (http://metalink.oracle.com).
Note that Microsoft Cluster Software (MSCS) is not required for Real Application Clusters databases because the Oracle Clusterware provides the clustering. However, the Oracle Clusterware can coexist with MSCS as long as the quorum and shared disks are physically separated and mutually exclusive.
2. Unzip the patches into staging directories. You can then apply the patches from the staging directories. The steps in this procedure assume the following staging directories:
Subsequent steps in the procedure incorporate the application of these patches with the installation for a new cluster. Review all README instructions before proceeding.
3. Ensure that the external (public) hostnames are defined in your DNS (directory network services) and that the correct IP addresses resolve for all nodes in the cluster.
4. Ensure that all external and internal (private) hostnames are defined in the WIN_HOME\System32\drivers\etc\hosts file on all nodes of the cluster. For example, the hosts file for a two-node cluster may look like this:
If you are installing on a cluster with three or more nodes: Due to known Oracle Universal Installer issues when installing on clusters with three or more nodes, it is recommended that you install the 2.2.0.18 version of the OUI so that you can perform a cluster installation of the database software.
The alternative is to perform individual installations on each node, which would put an installation inventory on each node. If you choose to perform individual installations, you should be aware of the following:
■ The cluster setup wizard (step 10 on page 20-27) would still be run only off one node, because it does not use OUI.
■ All instructions below using the OUI would need to be done individually on each node.
■ All future patch installations would also have to be done individually on each node.
In addition, you may encounter patch issues with some non-Oracle services that may be running on the cluster nodes. Typically the Microsoft Service Distributed Transaction Coordinator (MSDTC) can interact with Oracle software during installation. It is recommended that you stop this service and set it to manual start on all nodes in the cluster (using the Services dialog). After the installation, if you require the MSDTC service, you can restart it and set it to auto start.
Table 20–5 Staging Directories Used in this Procedure
Patch Staging Directory
Oracle9i 9.2.0.6 patch set E:\installs\9206\disk1
Windows CFS and Clusterware patch E:\installs\osd9206

Steps in Detail
Transforming to OracleAS Cluster (Identity Management) Topologies 20-25
135.1.136.52 racnode1135.1.136.53 racnode210.10.10.11 racnode1.san10.10.10.12 racnode2.san
The ".san" depends on whether you are using the default name for the private interconnect or if you modified it.
Note that some vendors also require the setup of the LMHOSTS file. Check your vendor documentation for details.
5. Test your cluster configuration by pinging all hostnames from each node. Ensure that the hostnames are correctly resolved.
6. Check that the temporary directories are defined in Windows. Oracle Universal Installer uses the temporary directories.
The TEMP and TMP directories should be the same across all nodes in the cluster. By default, these settings are defined as %USERPROFILE%\Local Settings\Temp and %USERPROFILE%\Local Settings\Tmp in the Environment Settings of My Computer. It is recommended that you redefine these as DRIVE_LETTER:\temp and DRIVE_LETTER:\tmp. For example: C:\temp and C:\tmp for all nodes.
7. Check access to other nodes in the cluster.
To perform installation and administrative tasks, you should use either the same local administrative username and password on every node in a cluster, or use a domain username with local administrative privileges on all nodes. All nodes must be in the same domain.
Ensure that each node has administrative access to the WIN_HOME, ORACLE_HOME, and temp directories within the Windows environment by running the following command at the command prompt:
> NET USE \\host_name\C$
where host_name is the public network name for the other nodes. If you plan to install the ORACLE_HOME onto another drive location than C, change the administrative share to the appropriate value as well (for example, D$ instead of C$).
For example, if your WIN_HOME is on the C drive and you plan to install the ORACLE_HOME onto the E drive of all nodes, you would run the following from a command prompt on node 1 of a four-node cluster:
> NET USE \\node2\C$> NET USE \\node3\C$> NET USE \\node4\C$> NET USE \\node2\E$> NET USE \\node3\E$> NET USE \\node4\E$
Repeat these commands on each node within the cluster. If the privileges are set up correctly, the commands should return with a success message:
The command completed successfully
If you receive errors, resolve them before proceeding.
8. Run clustercheck.exe to perform a final cluster check.

Steps in Detail
20-26 Oracle Application Server High Availability Guide
From a command prompt window, run the clustercheck.exe program located in the staging directory of the unzipped patch 3973928 (that is, under the 3973928\Disk1\preinstall_rac\clustercheck directory). This program performs the following tasks:
■ It prompts you for the public and private hostnames and requires you to verify the IP address resolution.
■ It checks the shared disk array, environment variables, and permissions necessary for proper cluster installation and operation.
■ It creates a subdirectory called opsm in the temporary directory specified by your environment settings (DRIVE_LETTER:\temp if you changed it as specified in step 6 on page 20-25).
■ It creates a log file called OraInfoCoord.log. This log will contain any errors encountered in the check. You should see the following at the end of the log file and within the command prompt window where you ran clustercheck.exe:
ORACLE CLUSTER CHECK WAS SUCCESSFUL
You must correct any errors before proceeding. If you have any issues with clustercheck, see OracleMetaLink Note 186130.1: "Clustercheck.exe Fails with Windows Error 183".
9. Prepare the logical drives.
Oracle instances in Real Application Clusters write data onto the raw devices to update the control file, server parameter file, each datafile, and each redo log file. All instances in the cluster share these files. In addition, Oracle Application Server components also use the raw devices.
Database Configuration Assistant (DBCA) expects the raw devices to be configured in a specific way. Table 20–6 lists the tablespaces and the expected symbolic link names for the OracleAS Metadata Repository database.
Table 20–6 Filenames Expected by DBCA for Tablespaces
Tablespace Filename Expected by DBCA
SYSTEM tablespace db_name_system
USERS tablespace db_name_users
TEMP tablespace db_name_temp
UNDOTBS tablespace Thread 1 db_name_undotbs1
UNDOTBS tablespace Thread 2 db_name_undotbs2
CWMLITE tablespace db_name_cwmlite
EXAMPLE tablespace db_name_example
INDX tablespace db_name_indx
TOOLS tablespace db_name_tools
DRSYS tablespace db_name_drsys
XML tablespace db_name_xml
ODM tablespace db_name_odm
First control file db_name_control1
Second control file db_name_control2

Steps in Detail
Transforming to OracleAS Cluster (Identity Management) Topologies 20-27
Notes:
■ For the number of redo log files, check the .dbc file created as a part of the template from the source database. If it shows three redo log files, it means that the Real Application Clusters database should have three redo log groups, each with at least two threads.
■ For the minimum datafile size for each tablespace (for both database and Oracle Application Server tablespaces), check the .dbc file created as a part of the template from the source database.
For the rest of the Oracle Application Server-specific tablespaces, create corresponding raw partitions. You would be prompted to name them once you run the Cluster setup wizard. There is no fixed naming convention for them.
10. Run the Oracle Cluster setup wizard. You have to run this only on one node and the software will be correctly transferred to the other nodes in the cluster.
a. Expand the Windows CFS and Clusterware patch (3973928) into a staging directory, such as E:\installs\osd9206. This creates another subdirectory such as E:\installs\osd9206\3973928. This patch contains a full clustersetup release.
b. Launch the Oracle Cluster Setup Wizard. Within a command prompt window, navigate to the E:\installs\osd9206\3973928\preinstall_rac\clustersetup directory and run clustersetup.
c. In the Welcome page, click Next.
d. The first time the Wizard is run, the only option is to create a cluster. Click Next.
e. Select Use private network for interconnect and click Next.
f. In the Network Configuration screen, enter the cluster name and the public hostnames for all nodes. The private hostnames will be automatically entered as public_name.san. If you want to provide a different name to the private hostnames, you can modify it. Also make sure that the hosts file has the exact same private hostnames as those mentioned in this Network Configuration screen. If not, you would not be able to start the cluster services. Click Next.
g. In the Cluster File System Options screen, select No CFS. Click Next.
h. In the Disk Configuration screen, click the Create Oracle Symbolic Links button.
Redo Thread 1 Log 1 db_name_redo1_1
Redo Thread 1 Log 2 db_name_redo1_2
Redo Thread 2 Log 1 db_name_redo2_1
Redo Thread 2 Log 2 db_name_redo2_2
spfile db_name_spfile
srvcfg srvcfg
Table 20–6 (Cont.) Filenames Expected by DBCA for Tablespaces
Tablespace Filename Expected by DBCA

Steps in Detail
20-28 Oracle Application Server High Availability Guide
i. In the Oracle Object Link Manager window, select an empty row from the Symbolic Link column, and type in the desired datafile link name. Press Enter to save.
Repeat to assign all symbolic link names required (as listed in Table 20–6).
j. Click the Apply button to commit the changes. When the progress bar at the bottom of the screen stops moving, choose Close.
k. In the Disk Configuration screen, assign the Voting disk to the logical drive you labeled as srvcfg in the previous step by highlighting the corresponding partition. Click Next.
l. In the VIA Detection screen, select Yes or No, depending on your Virtual Interface Architecture (VIA) hardware configuration. Contact your cluster hardware vendor if you are unsure. Click Next.
m. The Install Location screen appears. It defaults to the WIN_HOME\system32\osd9i directory. Accept the default and click Finish.
The Cluster Setup window appears. It shows the progress on installing the cluster files and creating the cluster services on all nodes. If no errors occur, the Oracle Cluster Setup Wizard completes and closes automatically.
If the cluster setup does not run properly, check for errors in the log files under WIN_HOME\system32\osd9i. If any hardware or operating system configuration changes are made, it is recommended that you remove and reinstall the cluster software (deinstallation is not supported). See OracleMetaLink Note 230290.1: "WIN RAC: How to Remove a Failed OCFS Install" for more information on this procedure. It would be the same for raw devices except you will not have an ocfs.sys file for a "No CFS" installation.
n. Check the clusterware setup. The following services should be running on all nodes in the cluster:
– Oracle Object Service
– OracleCMService9i
11. Install the 2.2.0.18 OUI.
a. Unzip the Oracle Universal Installer 2.2.0.18 (patch number 2878462) into a staging directory such as E:\oui22018.
b. Within a command prompt window, navigate to E:\oui22018\Disk1\install\win32. Run setup.exe.
c. In the OUI Welcome screen, click Next.
d. In the Cluster Node Selection screen, highlight all nodes and click Next. If you are performing individual installations for each node, select the local node only.
Note: If at any time in the installation of the software you do not see all nodes in the cluster within the Cluster Node Selection screen, there is something wrong with your cluster configuration and you have to go back and troubleshoot your cluster setup. You can perform clusterware diagnostics by executing:
ORACLE_HOME\bin\lsnodes -v
Analyze its output, resolve the problem, and then rerun the checks.

Steps in Detail
Transforming to OracleAS Cluster (Identity Management) Topologies 20-29
e. In the File Location screen, ensure the correct source path is being used. In the Destination field, enter the Oracle home for the desired Oracle home for the database, such as C:\oracle\ora92.
f. In the Installation Types screen, select Minimum installation (2.2.0.18 OUI only) and click Next. (This screen enables you to install both the Software Packager and the OUI 2.2.0.18 or a subset.)
g. In the Summary screen, check that all nodes are listed and click Next.
The progress screen appears. When the 2.2.0.18 Oracle Universal Installer is installed, click Exit.
h. If you are performing individual installations, repeat on all nodes.
12. Install Oracle 9.2.0.1 Database software.
a. Launch Oracle Universal Installer.
b. In the Welcome screen, click Next.
c. In the Node Selection screen, highlight all nodes where the Oracle database software will be installed. Click Next. If you are performing individual installations, select only the local node.
d. In the File Location screen, in the Destination section, enter the same directory where you installed Oracle Universal Installer 2.2.0.18 in the previous step (step 11(e) on page 20-29). Click Next.
e. In the Available Products screen, select Oracle9i Database and click Next.
f. In the Installation Type screen, select Enterprise Edition. The selection on this screen refers to the installation operation, not the database configuration. Click Next.
g. In the Database Configuration screen, select Software Only. Click Next.
h. In the Oracle Services for Microsoft Transaction Server screen, enter a port number for this service or leave at default value if you are unsure. Click Next.
i. In the Summary screen, review the information. Double-check the temporary space available on the drive from which you are installing and then click Install.
j. If you are performing individual installations, repeat the previous steps for all other nodes in the cluster.
Oracle Universal Installer installs the Oracle9i software on the local node, copies this information to the other selected nodes, and makes the required registry changes on all selected nodes. This can take some time, an hour or more depending on your computers and network environment. During the installation process, the installer does not display all the messages indicating components are being installed on other nodes, so the installation may appear to be hung. In this case, I/O activity may be the only indication that the process is continuing. If necessary, check each node's activity using Task Manager. You can also check the progress by periodically reviewing the Properties on the Oracle home directory in Windows Explorer to see if the size is growing.
Note: There is a known bug with the installer where it fails to find crlogdr.exe or other files when installing from Disk 3. These files are located in Disk 1 under the preinstall_rac subdirectory. See OracleMetaLink Note 211685.1: "Oracle 9.2 Install on Windows Halts With Error: "file not found CRLOGDR.EXE"" for more information.

Steps in Detail
20-30 Oracle Application Server High Availability Guide
13. Patch the database to 9.2.0.6.
The 9.2.0.6 patchset uses the 10g version of Oracle Universal Installer. Therefore you will be installing the 10g Oracle Universal Installer along with the 9.2.0.6 patch.
a. Navigate to E:\installs\9206\disk1 directory (where you unzipped the 9.2.0.6 patchset) and run setup.exe.
b. In the Welcome screen, click Next.
c. In the File Location screen, ensure the correct source path is being used. In the Destination field, enter the desired Oracle home for the database, such as C:\oracle\ora92. Click Next.
d. In the Cluster Node Selection screen, you should see a list of all the cluster nodes. Click Next. If you previously performed an installation on an individual node, you should see only the local node.
Note: If the Cluster Node Selection screen does not appear, see OracleMetaLink Note 270048.1: "Node Selection Screen Does Not Show The Nodenames Installing 9205 (OUI 10g)" for the workaround.
e. In the Available Products screen, check all products you want to upgrade to 9.2.0.6 or just accept the default (all already installed products with a lower version than 9.2.0.6 are checked for you). Click Next.
f. In the Summary screen, click Install.
g. The progress screen appears. At the end of the installation, click Exit to complete patch installation.
h. Reboot all nodes in the cluster before proceeding. Ensure all services start on all nodes.
14. Patch the remaining clusterware.
You will copy all files from the staging clusterware patch directory (E:\installs\osd9206\3973928 in our example). You may want to rename the extension of the files to keep the original version (for example, rename the original copy of the file as filename.orig).
a. To patch the GSD from E:\installs\osd9206\3973928\srvm\gsd, copy these files into the following directories:
%ORACLE_HOME%\bin\orasrvm.dll%ORACLE_HOME%\bin\gsd.exe%ORACLE_HOME%\bin\gsdservice.exe%ORACLE_HOME%\jlib\srvm.jar
b. Install the GSD service by running the following command on all nodes:
> ORACLE_HOME\bin\gsdservice -install
To change the service startup, select Start > Settings > Control Panel > Administrative Tools > Services. If OracleGSDService service startup fails, then select OracleGSDService and select Properties from the Action menu and a tabbed Properties page appears. Select the "Log On" tab and select "Log On As" > "This Account". Enter the username and password for an operating system user in the Local Administrators and ORA_DBA groups. Perform this step on each node. See OracleMetaLink Note 213416.1: "RAC: Troubleshooting Windows NT/2000 Service Hangs" for detailed information.

Steps in Detail
Transforming to OracleAS Cluster (Identity Management) Topologies 20-31
c. To patch the DBCA utilities from E:\installs\osd9206\3973928\srvm\dbca, copy these files into the following directories:
%ORACLE_HOME%\assistants\jlib\assistantsCommon.jar%ORACLE_HOME%\assistants\dbca\jlib\dbca.jar
d. To patch the OLM files from E:\installs\osd9206\3973928\Disk1\preinstall_rac\olm, copy the files listed below into both of these directories: %ORACLE_HOME%\bin and %ORACLE_HOME%\olm.
crlogdr.exeDeleteDisk.exeExportSYMLinks.exeGUIOracleOBJManager.exeImportSYMLinks.exeLetterDelete.exeLogPartFormat.exeOracleObjManager.exeOracleObjService.exeoraoobjlib.dllreadme.txt
e. Reinstall the Oracle Object Service by running the following commands on all nodes in the cluster:
> OracleOBJService.exe /remove> OracleOBJService.exe /install
Use the Services control panel to start the service, or reboot the nodes.
15. Increase the priority of the CM Service.
This is an optional step that you can do now or at any time after the installation and configuration are complete. This will not affect the installation process if you choose to configure this at a later date. It is, however, recommended for all production clusters and any Real Application Clusters systems that will be highly loaded.
The CM Service requires a small addition to the registry on all nodes to give the service a higher priority within the Windows. See OracleMetaLink Note 255481.1: "Changing Priority of CMSRVR (OracleCMService9i) on Windows" for the procedure.
After making this registry change, it is important that you restart the CM Service on all nodes to enable this change.
16. Create cluster listener on each node.
To create listeners on the Real Application Clusters nodes:
a. Start the Net configuration assistant.
> RAC_ORACLE_HOME\bin\netca
b. Select Cluster Configuration.
c. Select to configure Both Nodes of the Cluster.
d. Select Listener Configuration.
e. Select Add a Listener.
f. Enter a name for the listener.
g. Select TCP as the protocol.

Steps in Detail
20-32 Oracle Application Server High Availability Guide
h. Select 1521 as the standard port (unless it is already in use).
i. Select No when asked to configure another listener.
j. Create a listener for both nodes in the cluster.
17. Back up your original single-instance database using DBCA to create a database template from the original database. To perform this step, see:
Select the OFA (Oracle Flexible Architecture) option, because the target machines may not have the same file structure.
DBCA generates two files, template_name.dbc and template_name.dfb, in the SRC_ORACLE_HOME/assistants/dbca/templates directory.
18. Copy the files generated in the previous step to the RAC_ORACLE_HOME\assistants\dbca\templates directory. RAC_ORACLE_HOME refers to the directory where you installed the database software in step 12 on page 20-29.
19. Create the Real Application Clusters database using DBCA.
a. Edit the dbca.bat file as described in OracleMetaLink Note 232239.1: "DBCA Tips and Pitfalls in a Windows RAC Environment" so that it generates a log file. See the section titled "Trace DBCA During Database Creation". This log file provides more complete error information if problems arise.
b. Run the global services daemon (GSD) in the foreground as described in the same OracleMetaLink note referenced in the previous step (Note 232239.1). See the section "Run the global services daemon (GSD) in the Foreground".
c. Open a new command prompt window and run DBCA as follows:
> cd %ORACLE_HOME\bin> dbca > C:\dbca_trace.txt
d. In the Welcome screen, select Cluster Database Option.
e. In the Operations screen, select Create a Database.
f. In the Node Selection screen, select both nodes in the cluster.
g. In the Database Templates screen, select the templates that you created from the single-instance database.
h. In the Database Identification screen, enter the same global database name and SID as for the single-instance database.
i. In the Connections option screen, select Dedicated Server.
j. In the Initialization Parameters screen, click the All Initialization Parameters button, and ensure that the cluster_database parameter is set to true.
k. The Database storage screen enables you to enter a file name for each tablespace in your database. The screen displays a table with two columns: File Name and File directories. The filenames correspond to the symbolic
Item Name
Book Oracle9i Real Application Clusters Setup and Configuration
This book is available in the Oracle9i Database documentation set.
Chapter 10, "Converting to Real Application Clusters from Single-Instance Oracle Databases"
Section "Back up the Original Single-Instance Database"

Steps in Detail
Transforming to OracleAS Cluster (Identity Management) Topologies 20-33
links created by the Cluster Setup Wizard (step 10i on page 20-28). You may have to modify the filenames to match the Oracle Application Server-specific symbolic names and their directories. Table 20–7 shows an example of how the table should look.
Table 20–7 Example of Filenames and Directories for Tablespaces
Filename File Directory
iasdb_raw_olts_attr_128m \\.\
iasdb_raw_b2b_dt_256m \\.\
iasdb_raw_orabpel_80m \\.\
iasdb_raw_portal_128m \\.\
iasdb_raw_portal_doc_64m \\.\
iasdb_raw_olts_battr_64m \\.\
IASDB_CWMLITE \\.\
iasdb_raw_dcm_256m \\.\
iasdb_raw_disco_meta_64m \\.\
iasdb_raw_disco_cache_64m \\.\
IASDB_DRSYS \\.\
IASDB_EXAMPLE \\.\
iasdb_raw_b2b_idx_256m \\.\
iasdb_raw_olts_default_128m \\.\
iasdb_raw_ias_meta_256m \\.\
IASDB_INDX \\.\
iasdb_raw_oca_64m \\.\
IASDB_ODM \\.\
iasdb_raw_olts_ct_store_256m \\.\
iasdb_raw_portal_idx_64m \\.\
iasdb_raw_portal_log_64m \\.\
iasdb_raw_synd_64m \\.\
iasdb_raw_b2b_lob_256m \\.\
iasdb_raw_olts_svrmgstore_64m \\.\
IASDB_SYSTEM \\.\
IASDB_TOOLS \\.\
iasdb_raw_uddi_64m \\.\
IASDB_UNDOTBS1 \\.\
IASDB_USERS \\.\
iasdb_raw_clip_64m \\.\
iasdb_raw_xdb_25m \\.\
IASDB_TEMP \\.\
IASDB_UNDOTBS2 \\.\

Steps in Detail
20-34 Oracle Application Server High Availability Guide
Note that this is just an example. The names and the sizes may be different depending on the names of the Oracle symbolic links (created previously) and the actual sizes of the raw partitions.
Also, on this screen, ensure that you have the correct number of Redo Log groups and corresponding raw partitions.
l. In the Creation Options screen, select Create database.
m. In the DBCA summary screen, review the information and click OK.
Notes on creating a database using DBCA:
■ The database creation can take some time, and the progress may seem slow or hung, especially during the creation of the Java server components and at the end when the database service is created on the remote nodes and the other threads of redo are created. You can check the progress by checking Task Manager and seeing the CPU activity, or by checking the alert log for redo log switching.
■ DBCA may hang at 95-99%. This is usually due to a problem with creating and enabling the second thread of redo and then bringing the database up in cluster mode. Check the alert logs on both nodes for any errors. If you do not see any errors, open a SQL*Plus session on node 1 and connect as a sysdba user. Select on the v$thread view to see how many threads are open. If there is only one, check the redo logs (v$log, v$logfile) to see if the second thread of redo logs is physically present. If not, run the appropriate scripts manually. Currently, this is the ORACLE_HOME\admin\db_name\scripts\postDBCreation.sql script. You can also check the progress of the run by reviewing the logs in the ORACLE_HOME\admin\db_name\create directory.
■ If you have issues with any service hangs, see OracleMetaLink Note 213416.1: "RAC: Troubleshooting Windows NT/2000 Service Hangs".
■ During the database creation process, you may see the following error:
ORA-29807 specified operator does not exist
This is a known issue (bug 2925665). You can click the Ignore button to continue. Once DBCA has completed database creation, run the %ORACLE_HOME%\rdbms\admin\prvtxml.plb script as the SYS user. You should also run the utlrp.sql script to ensure that there are no invalid objects in the database.
20. Unlock all the database accounts listed in IM_ORACLE_HOME/config/unlock.sql. Note that this file is in the Oracle home for the Oracle Identity Management, not in the database Oracle home.
To unlock the accounts without changing the passwords, perform these steps:
a. Log into the database as the SYS user.
> sqlplus SYS/password as sysdba
IASDB_XML \\.\
IASDB_ODM \\.\
Table 20–7 (Cont.) Example of Filenames and Directories for Tablespaces
Filename File Directory

Steps in Detail
Transforming to OracleAS Cluster (Identity Management) Topologies 20-35
b. Run the following commands for each user listed in the IM_ORACLE_HOME/config/unlock.sql file:
– Determine the password for the user.
SQL> select password from dba_users where username = ’username’;
Replace username with the name of the account.
– Run the "alter user" command.
SQL> alter user username identified by values ’password’ account unlock;
Replace username with the name of the account.
Replace password with the password determined from the previous step.
Step 4 Change the Source Oracle Identity Management to Use the OracleAS Metadata Repository in the Real Application Clusters DatabaseIn this step, you configure the Oracle Identity Management to use the OracleAS Metadata Repository running in the new Real Application Clusters database.
Note: Do not change the passwords for these accounts.

Steps in Detail
20-36 Oracle Application Server High Availability Guide
Figure 20–4 Step 4: Change Oracle Identity Management to Use the Real Application Clusters Database
1. If you installed the Real Application Clusters database on the same nodes as the single-instance database, skip this step and go to step 2 on page 20-37.
If you installed the Real Application Clusters database on different nodes from the single-instance database, perform the steps in these sections.
Item Name
Book Oracle Application Server Administrator’s Guide
This book is available in the Oracle Application Server documentation set.
Chapter 9, "Changing Infrastructure Services"
OracleAS MetadataRepository Database
Instance
Node 3
Node 2
OHS Oracle Internet
DirectorySSO DAS
Middle Tier
Node 1
InterConnect
OracleAS Metadata Repository in Real Application Clusters database
Data Files Shared
Storage
DatabaseInstance
mr1.mydomain.com
ORACLE_HOME for OracleAS Metadata Repository
ORACLE_HOME for OracleAS Metadata Repository
4 Change source Identity Management to use the Real Application Clusters database.
DatabaseInstance
mr2.mydomain.com
Non-high availability configuration
Non-high availability configuration
4
DIP
KEY:
Association in non-high availability configurationData transfer
Association in high availability configuration
Cluster Node 1 (Active) Cluster Node 2 (Active)

Steps in Detail
Transforming to OracleAS Cluster (Identity Management) Topologies 20-37
2. Restart Oracle Identity Management and check that you can access Oracle Identity Management components.
a. Shut down Oracle Identity Management.
> IM_ORACLE_HOME/bin/emctl stop iasconsole> IM_ORACLE_HOME/opmn/bin/opmnctl stopall
b. Start Oracle Identity Management.
> IM_ORACLE_HOME/opmn/bin/opmnctl startall> IM_ORACLE_HOME/bin/emctl start iasconsole
c. Some components, such as Log Loader, are not started when you run the "opmnctl startall" command. To check for components that are not started, you can run the following command:
> IM_ORACLE_HOME/opmn/bin/opmnctl status
For the components that are not started, you can start them with the following command:
Section In the section "Changing the Metadata Repository Used by Identity Management", perform the steps in these tasks:
■ "Update Oracle Internet Directory"
Because the new database with which the Oracle Internet Directory is getting registered is a Real Application Clusters database, it has two database instances, one on each node of the Real Application Clusters. This means that the tnsnames.ora file would contain two hostnames instead of one. The following example shows a sample listing for a Real Application Clusters database where the two nodes are node1 and node2:
RADB= (DESCRIPTION= (ADDRESS_LIST= (ADDRESS=(PROTOCOL=TCP)(HOST=node1.mydomain.com)(PORT=1521)) (ADDRESS=(PROTOCOL=TCP)(HOST=node2.mydomain.com)(PORT=1521)))(CONNECT_DATA=(SERVICE_NAME=radb.us.oracle.com)))
■ "Shut Down the Original Metadata Repository"
■ "Start Oracle Internet Directory Using Special Commands"
■ "Update the Oracle Internet Directory Database Registration".
Because the new database with which the Oracle Internet Directory is getting registered is a Real Application Clusters database, it has two database instances, one on each node of the Real Application Clusters. This means that the HOST parameter in the orclnetdescstring field mentioned in Chapter 9 would contain two hostnames instead of one. The following example shows a sample orclnetdescstring field for a Real Application Clusters database registration where the two nodes are node1 and node2:
(DESCRIPTION=(ADDRESS_LIST= (ADDRESS=(PROTOCOL=TCP)(HOST=node1.mydomain.com)(PORT=1521)) (ADDRESS=(PROTOCOL=TCP)(HOST=node2.mydomain.com)(PORT=1521)))(CONNECT_DATA=(SERVICE_NAME=radb.us.oracle.com)))
■ "Stop Oracle Internet Directory Using Special Commands"
Go to step 2(b) on page 20-37.
Item Name

Steps in Detail
20-38 Oracle Application Server High Availability Guide
> IM_ORACLE_HOME/opmn/bin/opmnctl startproc ias-component=component
where component specifies the component that you want to start. For example, to start Log Loader, run this command:
> IM_ORACLE_HOME/opmn/bin/opmnctl startproc ias-component=LogLoader
If a component failed to start because of user error (for example, invalid password), check that the user passwords in Oracle Internet Directory and the database are the same. If they are different, use SQL*Plus to change the password in the database to match the password in Oracle Internet Directory. See these sections in the Oracle Application Server Administrator’s Guide for details:
– Viewing OracleAS Metadata Repository Schema Passwords
– Changing OracleAS Metadata Repository Schema Passwords
Example: to determine the password for DCM in Oracle Internet Directory, perform these steps:
– Start Oracle Directory Manager.
UNIX: run IM_ORACLE_HOME/bin/oidadmin.
Windows: select Start > Programs > Oracle - OracleHomeName > Inte-grated Management Tools > Oracle Directory Manager.
– Connect to Oracle Internet Directory through the load balancer’s LDAP virtual server name, and log in as the superuser ("cn=orcladmin").
– In Oracle Directory Manager, expand the following:
Entry Management > cn=OracleContext > cn=Products > cn=IAS > cn=Infrastructure Databases > DatabaseName (ASDB) > orclResource-Name=DCM
– Select orclResourceName=DCM in the left frame, and select the Properties tab in the right frame. Note the password in the orclpasswordattribute field.
3. If you installed the Real Application Clusters database on different nodes from the single-instance database, you can skip this step and go to step 4 on page 20-39. You can skip this step because you have already done it in step 1 on page 20-36.
If you installed the Real Application Clusters database on the same nodes as the single-instance database, you need to perform this step.
Make Oracle Identity Management Real Application Clusters-aware.
a. Shut down Oracle Identity Management.
> IM_ORACLE_HOME/bin/emctl stop iasconsole> IM_ORACLE_HOME/opmn/bin/opmnctl stopall
b. Update IM_ORACLE_HOME/network/admin/tnsnames.ora to add all the nodes in the Real Application Clusters in the file.
For example, if your original tnsnames.ora file looks like this:
ASDB = (DESCRIPTION = (ADDRESS_LIST = (ADDRESS = (PROTOCOL=TCP)(HOST=clusternode1.mydomain.com)(PORT=1521)) )

Steps in Detail
Transforming to OracleAS Cluster (Identity Management) Topologies 20-39
(CONNECT_DATA = (SERVICE_NAME = asdb.mydomain.com) ) )
You would add the "clusternode2" line to the file:
ASDB = (DESCRIPTION = (ADDRESS_LIST = (ADDRESS = (PROTOCOL=TCP)(HOST=clusternode1.mydomain.com)(PORT=1521)) (ADDRESS = (PROTOCOL=TCP)(HOST=clusternode2.mydomain.com)(PORT=1521)) ) (CONNECT_DATA = (SERVICE_NAME = asdb.mydomain.com) ) )
c. Start Oracle Identity Management.
> IM_ORACLE_HOME/opmn/bin/opmnctl startall> IM_ORACLE_HOME/bin/emctl start iasconsole
4. Test the Oracle Identity Management components.
a. Test OracleAS Single Sign-On by accessing its URL: http://node2.mydomain.com:7777/pls/orasso.
node2.mydomain.com:7777 refers to the physical hostname of the machine running OracleAS Single Sign-On. In Figure 20–4, this is Node 2.
Validate that everything is working.
b. Test Oracle Delegated Administration Services by accessing its URL: http://node2.mydomain.com:7777/oiddas.
node2.mydomain.com:7777 refers to the physical hostname of the machine running Oracle Delegated Administration Services. In Figure 20–4, this is Node 2.
Validate that everything is working.
Step 5 Transform the Source Oracle Identity Management to Use the Virtual Server Names Configured on the Load BalancerIn this step, you transform the source Oracle Identity Management to use the virtual server names configured on the load balancer.
This step has two subsections. Follow the steps according to the transformation you want to perform:
■ If you are transforming to an OracleAS Cluster (Identity Management), perform the steps in "Step 5A: OracleAS Cluster (Identity Management) Case" on page 20-40.
Downtime 1 Ends: This ends the first downtime. At this point, the OracleAS Metadata Repository now runs on a Real Application Clusters database, and Oracle Identity Management components are using that database.

Steps in Detail
20-40 Oracle Application Server High Availability Guide
■ If you are transforming to a distributed OracleAS Cluster (Identity Management), where Oracle Internet Directory / Oracle Directory Integration and Provisioning run on one Oracle home, and OracleAS Single Sign-On / Oracle Delegated Administration Services run on another Oracle home, perform the steps in "Step 5B: Distributed OracleAS Cluster (Identity Management) Case" on page 20-44.
Step 5A: OracleAS Cluster (Identity Management) Case
Perform these steps if you are transforming to an OracleAS Cluster (Identity Management). After this step, your environment should look like this:
Figure 20–5 Step 5 (OracleAS Cluster (Identity Management) Case): Configuring the Source Oracle Identity Management to Use the Virtual Server Name on the Load Balancer
1. Set up the load balancer.
a. Perform the steps in the following section:
Downtime 2 Starts: The next step starts the second downtime.
OracleAS MetadataRepository Database
Instance
Node 3
Node 2
OHSOracle Internet
Directory SSO DAS
Middle Tier
Node 1
InterConnect
OracleAS Metadata Repository in Real Application Clusters database
Data Files Shared
Storage
DatabaseInstance
Cluster Node 1 (Active)
mr1.mydomain.com
ORACLE_HOME for OracleAS Metadata Repository
ORACLE_HOME for OracleAS Metadata Repository
5 Transform source Identity Management to use virtual server names on the load balancer.
DatabaseInstance
mr2.mydomain.com
Non-high availability configuration
Non-high availability configuration
DIP
KEY:
Cluster Node 2 (Active)
Association in non-high availability configurationData transfer
Association in high availability configuration
Load Balancer
HTTP Virtual Server Name: sso.mydomain.com
LDAP Virtual Server Name: oid.mydomain.com
5

Steps in Detail
Transforming to OracleAS Cluster (Identity Management) Topologies 20-41
b. Configure a virtual server name on the load balancer for LDAP connections. For this virtual server, you need to configure two ports: one for SSL and one for non-SSL connections.
c. Configure a virtual server name on the load balancer for HTTP connections. For this virtual server, you need to configure two ports: one for SSL and one for non-SSL.
d. Configure the virtual server to direct requests only to the original node initially. After you install Oracle Identity Management on the second node, then you can add that node to the virtual server.
2. Make the following changes to Oracle Internet Directory.
a. Reload OPMN configuration.
> IM_ORACLE_HOME/opmn/bin/opmnctl reload
b. Start Oracle Internet Directory.
> IM_ORACLE_HOME/opmn/bin/opmnctl startproc ias-component=OID
c. Check that Oracle Internet Directory is up and running.
> IM_ORACLE_HOME/bin/ldapbind -p oid_nonssl_port> IM_ORACLE_HOME/bin/ldapbind -p oid_ssl_port -U 1
These command should return a "bind successful" message.
d. Configure Oracle Internet Directory to use the load balancer’s virtual server name.
– Shut down Oracle Identity Management components.
> IM_ORACLE_HOME/opmn/bin/opmnctl stopall
– Update the following lines in the IM_ORACLE_HOME/config/ias.properties file to use the virtual server name and port.
OIDhost=virtual_server_nameOIDport=virtual_server_port
Item Name
Book Oracle Application Server Installation Guide
This book is available on Disk 1 of the Oracle Application Server distribution.
Chapter "Installing in High Availability Environments: OracleAS Cluster (Identity Management)"
Section "Pre-Installation Steps for OracleAS Cluster (Identity Management)"
Note: These are the same ports that Oracle Internet Directory is using on the original node. Ensure that these ports are available on the nodes on which you will be installing additional instances of Oracle Internet Directory (you perform the additional installations in step 8: "Install Additional Oracle Identity Management Instances" on page 20-51).

Steps in Detail
20-42 Oracle Application Server High Availability Guide
– Start Oracle Identity Management components.
> IM_ORACLE_HOME/opmn/bin/opmnctl startall
– Check that Oracle Internet Directory is up and running.
> IM_ORACLE_HOME/bin/ldapbind -p oid_nonssl_port> IM_ORACLE_HOME/bin/ldapbind -p oid_ssl_port -U 1
These commands should return a "bind successful" message.
e. Configure OracleAS Single Sign-On to use the virtual server name for Oracle Internet Directory.
– Check that the LD_LIBRARY_PATH (or equivalent) environment variable includes the IM_ORACLE_HOME/lib directory. The environment variable that you need to set depends on your platform. See the following section for details:
– Update OracleAS Single Sign-On (enter the following command on one line).
> IM_ORACLE_HOME/jdk/bin/java -jar IM_ORACLE_HOME/sso/lib/ossoca.jar reassoc -repos IM_ORACLE_HOME
3. Make the following changes for OracleAS Single Sign-On.
a. Update the following lines in the IM_ORACLE_HOME/Apache/Apache/conf/httpd.conf file to use the virtual server name and port.
ServerName virtual_server_namePort virtual_server_port
For example:
ServerName sso.mydomain.comPort 7777
b. Run the following command to update the information in DCM.
> IM_ORACLE_HOME/dcm/bin/dcmctl updateConfig -v -d
c. Configure OracleAS Single Sign-On to accept authentication from the externally published address of the OracleAS Single Sign-On server. This configuration updates the information in the OracleAS Metadata Repository.
> IM_ORACLE_HOME/sso/bin/ssocfg.sh protocol virtual_server_name virtual_server_port
For example:
> IM_ORACLE_HOME/sso/bin/ssocfg.sh http sso.mydomain.com 7777
Item Name
Book Oracle Application Server Administrator’s Guide
This guide is available in the Oracle Application Server documentation set.
Chapter 1, "Getting Started After Installing Oracle Application Server"
Section 1.1, "Task 1: Set Up Environment Variables"

Steps in Detail
Transforming to OracleAS Cluster (Identity Management) Topologies 20-43
d. Re-register mod_osso to use the virtual server name and port (enter the following command on one line).
> IM_ORACLE_HOME/sso/bin/ssoreg.sh -oracle_home_path im_oracle_home_path -site_name virtual_server_name -config_mod_osso TRUE -mod_osso_url http://virtual_server_name:port
For example:
> IM_ORACLE_HOME/sso/bin/ssoreg.sh -oracle_home_path im_oracle_home_path -site_name sso.mydomain.com -config_mod_osso TRUE -mod_osso_url http://sso.mydomain.com:7777
4. For Oracle Delegated Administration Services, change the URL for Oracle Delegated Administration Services to use the virtual server name and port.
a. Start Oracle Directory Manager.
b. Connect to Oracle Internet Directory using the virtual server name and port. Log in as the superuser: cn=orcladmin.
c. Expand the following entries: Entry Management > cn=OracleContext > cn=Products > cn=DAS > cn=OperationalURLs.
d. Change the orcldasurlbase attribute to http://virtual_server_name:port. For example: http://sso.mydomain.com:7777.
5. Stop and restart the Oracle Identity Management and middle-tier components, and test that the components are working.
a. Stop Oracle Identity Management.
> IM_ORACLE_HOME/opmn/bin/opmnctl stopall> IM_ORACLE_HOME/bin/emctl stop iasconsole
b. Start Oracle Identity Management.
> IM_ORACLE_HOME/opmn/bin/opmnctl startall> IM_ORACLE_HOME/bin/emctl start iasconsole
c. Test Oracle Identity Management components.
– Test Oracle Delegated Administration Services by accessing its URL, http://virtual_server_name:port/oiddas, and try to perform some operations. Example: http://sso.mydomain.com:7777/oiddas.
– Test OracleAS Single Sign-On by accessing its URL, http://virtual_server_name:port/pls/orasso, and try to perform some operations. Example: http://sso.mydomain.com:7777/pls/orasso.
d. Test middle-tier components. For example, to test OracleAS Portal, access its URL, http://portalhost.mydomain.com:7777/pls/portal, and try to perform some operations.
6. Create a Distributed Configuration Management cluster and make the Oracle Identity Management instance a member of the cluster.
> IM_ORACLE_HOME/dcm/bin/dcmctl createcluster clustername> IM_ORACLE_HOME/dcm/bin/dcmctl joincluster clustername> IM_ORACLE_HOME/dcm/bin/dcmctl listcomponents

Steps in Detail
20-44 Oracle Application Server High Availability Guide
7. Stop and restart the Oracle Identity Management components, and test that the components are working. Make sure that the OC4J_SECURITY component is restarted. See step 5 on page 20-43 for details.
Step 5B: Distributed OracleAS Cluster (Identity Management) Case
After this step, your environment should look like this:
Figure 20–6 Step 5 (Distributed OracleAS Cluster (Identity Management) Case): Configuring the Source Oracle Identity Management to Use the Virtual Server Name on the Load Balancer
1. Set up the load balancer.
a. Perform the pre-installation steps in the following section:
Item Name
Book Oracle Application Server Installation Guide
This book is available on Disk 1 of the Oracle Application Server distribution.
Chapter "Installing in High Availability Environments: OracleAS Cluster (Identity Management)"
OracleAS MetadataRepository Database
Instance
Node 3
Node 2
OHS Oracle Internet
DirectorySSO DAS
Middle Tier
Node 1
InterConnect
OracleAS Metadata Repository in Real Application Clusters database
Data Files Shared
Storage
DatabaseInstance
mr1.mydomain.com
ORACLE_HOME for OracleAS Metadata Repository
ORACLE_HOME for OracleAS Metadata Repository
DatabaseInstance
mr2.mydomain.com
5
Non-high availability configuration
Non-high availability configuration
5 Transform source Identity Management to use virtual server name on the load balancer.
DIP
KEY:
Association in non-high availability configurationData transfer
Association in high availability configuration
Cluster Node 1 (Active) Cluster Node 2 (Active)
Load Balancer
LDAP Virtual Server Name: oid.mydomain.com

Steps in Detail
Transforming to OracleAS Cluster (Identity Management) Topologies 20-45
b. Configure a virtual server name on the load balancer for LDAP connections. For this virtual server, you need to configure two ports: one for SSL and one for non-SSL connections.
c. Configure a virtual server name on the load balancer for HTTP connections. For this virtual server, you need to configure two ports: one for SSL and one for non-SSL.
d. Configure the virtual server to direct requests only to the original node initially. After you install Oracle Identity Management on the second node, then you can add that node to the virtual server.
2. Disable OracleAS Single Sign-On and Oracle Delegated Administration Services on the first Oracle Identity Management node.
a. Start up Application Server Control Console.
b. Display the home page for the Oracle Identity Management instance.
c. Select the checkbox for OC4J_SECURITY and click Enable/Disable Components. This displays the Enable/Disable Components page.
d. On the Enable/Disable Components page, select both OC4J_SECURITY and HTTP_Server, Single Sign-On:orasso in the Enabled Components box and click Move All to move them to the Disabled Components box. There should be three items in the Disabled Components box:
– home
– OC4J_SECURITY
– HTTP_Server, Single Sign-On:orasso
e. Click OK.
f. On the Warning page, which warns you that the components to be disabled will be stopped, click Yes. This stops the components and disables them as well.
g. When you return to the instance home page, you should see only two components: Internet Directory and Management.
3. Stop all the Oracle Identity Management components except for Oracle Internet Directory. One way of doing this is to stop all components, then start up Oracle Internet Directory.
Section "Pre-Installation Steps for OracleAS Cluster (Identity Management)"
Note: These are the same ports that Oracle Internet Directory is using on the original node. Ensure that these ports are available on the nodes on which you will be installing additional instances of Oracle Internet Directory (you perform the additional installations in step 8: "Install Additional Oracle Identity Management Instances" on page 20-51).
Downtime 2 Starts: The next step starts the second downtime.
Item Name

Steps in Detail
20-46 Oracle Application Server High Availability Guide
a. Stop Oracle Identity Management components.
> IM_ORACLE_HOME/opmn/bin/opmnctl stopall
b. Start the OPMN daemon.
> IM_ORACLE_HOME/opmn/bin/opmnctl start
c. Start Oracle Internet Directory.
> IM_ORACLE_HOME/opmn/bin/opmnctl startproc ias-component=OID
d. Check that Oracle Internet Directory is up and running.
> IM_ORACLE_HOME/bin/ldapbind -p oid_nonssl_port> IM_ORACLE_HOME/bin/ldapbind -p oid_ssl_port -U 1
These commands should return a "bind successful" message.
4. Make the following changes to Oracle Internet Directory.
a. Reload the OPMN configuration.
> IM_ORACLE_HOME/opmn/bin/opmnctl reload
IM_ORACLE_HOME refers to the original Oracle home for Oracle Identity Management.
b. Configure Oracle Internet Directory to use the load balancer’s virtual server name.
– Shut down Oracle Identity Management components.
> IM_ORACLE_HOME/opmn/bin/opmnctl stopall
– Update the following lines in the IM_ORACLE_HOME/config/ias.properties file to use the virtual server name and port.
OIDhost=virtual_server_nameOIDport=virtual_server_port
– Start Oracle Identity Management components.
> IM_ORACLE_HOME/opmn/bin/opmnctl startall
– Check that Oracle Internet Directory is up and running.
> IM_ORACLE_HOME/bin/ldapbind -p oid_nonssl_port> IM_ORACLE_HOME/bin/ldapbind -p oid_ssl_port -U 1
These commands should return a "bind successful" message.
5. Create a Distributed Configuration Management cluster and make the Oracle Identity Management instance a member of the cluster.
> IM_ORACLE_HOME/dcm/bin/dcmctl createcluster clustername> IM_ORACLE_HOME/dcm/bin/dcmctl joincluster clustername> IM_ORACLE_HOME/dcm/bin/dcmctl listcomponents

Steps in Detail
Transforming to OracleAS Cluster (Identity Management) Topologies 20-47
Step 6 (Distributed OracleAS Cluster (Identity Management) Case Only) Install OracleAS Single Sign-On and Oracle Delegated Administration ServicesThis step applies only if you are transforming to a distributed OracleAS Cluster (Identity Management). If you are transforming to an OracleAS Cluster (Identity Management), skip this step.
After this step, your configuration should look like this (Figure 20–7):
Figure 20–7 Step 6: Installing New Instance for OracleAS Single Sign-On and Oracle Delegated Administration Services
For distributed OracleAS Cluster (Identity Management), you need to install OracleAS Single Sign-On and Oracle Delegated Administration Services in a new Oracle home.
Make the following selections in the installer:
6 Install an Oracle home for SSO and DAS usingvirtual server names on the load balancers.
OracleAS MetadataRepository Database
Instance
Node 3
Node 2
OHS Oracle Internet
DirectorySSO DAS
Middle Tier
Node 1
InterConnect
OracleAS Metadata Repository in Real Application Clusters database
Data Files Shared
Storage
DatabaseInstance
mr1.mydomain.com
ORACLE_HOME for OracleAS Metadata Repository
ORACLE_HOME for OracleAS Metadata Repository
New Node
OHS SSO DAS
DatabaseInstance
mr2.mydomain.com
6
Non-high availability configuration
Non-high availability configuration
DIP
KEY:
Association in non-high availability configurationData transfer
Association in high availability configuration
Cluster Node 1 (Active) Cluster Node 2 (Active)
Load Balancer
HTTP Virtual Server Name: sso.mydomain.com
Load Balancer
LDAP Virtual Server Name: oid.mydomain.com

Steps in Detail
20-48 Oracle Application Server High Availability Guide
■ In the Select a Product to Install screen, select Oracle Application Server Infrastructure.
■ In the Select Installation Type screen, select Identity Management.
■ In the Select Configuration Options screen, select OracleAS Single Sign-On, Oracle Delegated Administration Services, and High Availability and Replication.
■ In the Select High Availability Option screen, select OracleAS Cluster (Identity Management).
■ In the Create or Join an Oracle Application Server Cluster (Identity Management) screen, select Create a New Oracle Application Server Cluster.
■ In the Specify New Oracle Application Server Cluster Name screen, enter a new name for the cluster.
■ In the Specify LDAP Virtual Host and Ports screen, enter the virtual hostname configured on the load balancer for LDAP traffic (that is, for Oracle Internet Directory). For the port number, enter the port number associated with the virtual hostname.
■ In the Specify HTTP Listen Port, Load Balancer Host and Port screen:
– In the HTTP Listener Port field, enter the port number that you want to use for Oracle HTTP Server.
– In the HTTP Load Balancer Hostname and Port fields, enter the HTTP virtual hostname configured on the load balancer and the port number configured for the virtual hostname.
Step 7 Change the Middle Tier to Use the Virtual Server Names on the Load BalancerYou need to reconfigure the middle tiers to use the load balancer’s virtual server names when accessing Oracle Identity Management components.
After this step, your environment should look like either Figure 20–8 or Figure 20–9 (for the distributed case).

Steps in Detail
Transforming to OracleAS Cluster (Identity Management) Topologies 20-49
Figure 20–8 Step 7 (OracleAS Cluster (Identity Management) Case): Configure the Middle Tiers to Use Virtual Server Names Configured on the Load Balancer
OracleAS MetadataRepository Database
Instance
Node 3
Node 2
OHSOracle Internet
Directory SSO DAS
Middle Tier
Node 1
InterConnect
OracleAS Metadata Repository in Real Application Clusters database
Data Files Shared
Storage
DatabaseInstance
Cluster Node 1 (Active)
mr1.mydomain.com
ORACLE_HOME for OracleAS Metadata Repository
ORACLE_HOME for OracleAS Metadata Repository
DatabaseInstance
mr2.mydomain.com
7
Non-high availability configuration
7 Change middle tier to use virtual server names on the load balancer.
Non-high availability configuration
DIP
KEY:
Cluster Node 2 (Active)
Association in non-high availability configurationData transfer
Association in high availability configuration
Load Balancer
HTTP Virtual Server Name: sso.mydomain.com
LDAP Virtual Server Name: oid.mydomain.com
7

Steps in Detail
20-50 Oracle Application Server High Availability Guide
Figure 20–9 Step 7 (Distributed Case): Configure the Middle Tiers to Use Virtual Server Names Configured on the Load Balancer
1. Shut down the middle tiers. If your middle tiers use their own OracleAS Metadata Repository, shut it down too.
> MT_ORACLE_HOME/opmn/bin/opmnctl stopall> MT_ORACLE_HOME/bin/emctl stop iasconsole
2. Change the Oracle Internet Directory configuration in the middle tier’s Oracle home to use the virtual server name and port. You can do this by updating these lines in the MT_ORACLE_HOME/config/ias.properties file.
OIDhost=virtual_server_nameOIDport=virtual_server_port
If your middle tier uses a different OracleAS Metadata Repository, make the same updates in the OracleAS Metadata Repository’s Oracle home.
7 Change middle tier to use the virtual server name on the load balancer.
OracleAS MetadataRepository Database
Instance
Node 3
Node 2
OHS Oracle Internet
DirectorySSO DAS
Middle Tier
Node 1
InterConnect
OracleAS Metadata Repository in Real Application Clusters database
Data Files Shared
Storage
DatabaseInstance
mr1.mydomain.com
ORACLE_HOME for OracleAS Metadata Repository
ORACLE_HOME for OracleAS Metadata Repository
New Node
OHS SSO DAS
DatabaseInstance
mr2.mydomain.com
7
Non-high availability configuration
Non-high availability configuration
7
DIP
KEY:
Association in non-high availability configurationData transfer
Association in high availability configuration
Cluster Node 1 (Active) Cluster Node 2 (Active)
Load Balancer
HTTP Virtual Server Name: sso.mydomain.com
Load Balancer
LDAP Virtual Server Name: oid.mydomain.com

Steps in Detail
Transforming to OracleAS Cluster (Identity Management) Topologies 20-51
3. Start the middle tier.
a. If the middle tier uses a different OracleAS Metadata Repository from Oracle Identity Management, start this OracleAS Metadata Repository.
b. Start the middle tier instance.
> MT_ORACLE_HOME/opmn/bin/opmnctl startall> MT_ORACLE_HOME/bin/emctl start iasconsole
4. Configure the middle tier to use the reconfigured Oracle Identity Management. You can do this by following the steps in this section:
5. Repeat this procedure for each middle tier.
Step 8 Install Additional Oracle Identity Management InstancesYou need additional instances to create multiple active instances in the OracleAS Cluster (Identity Management). After this step, you should have a highly available environment shown in either Figure 20–10 or Figure 20–11 (distributed case).
Item Name
Book Oracle Application Server Administrator’s Guide
This book is available in the Oracle Application Server documentation set.
Chapter 9, "Changing Infrastructure Services"
Section "Moving Identity Management to a New Host"
Task Task 3: "Change Middle-Tier Instances to the New Identity Management"
Downtime 2 Ends: This ends the second downtime.

Steps in Detail
20-52 Oracle Application Server High Availability Guide
Figure 20–10 Step 8 (OracleAS Cluster (Identity Management) Case): Install Additional Instances
OracleAS MetadataRepository Database
Instance
Node 3
Node 2
OHSOracle Internet
Directory SSO DAS
Middle Tier
Node 1
InterConnect
OracleAS Metadata Repository in Real Application Clusters database
Data Files Shared
Storage
DatabaseInstance
Cluster Node 1 (Active)
mr1.mydomain.com
ORACLE_HOME for OracleAS Metadata Repository
ORACLE_HOME for OracleAS Metadata Repository
DatabaseInstance
mr2.mydomain.com
8 Install additional instances.
Non-high availability configuration
SSO and DAS in an OracleASCluster (Identity Management) OHS Oracle
InternetDirectorySSO
DAS
New Node
Non-high availability configuration
DIP DIP
8
KEY:
Cluster Node 2 (Active)
Association in non-high availability configurationData transfer
Association in high availability configuration
Load Balancer
HTTP Virtual Server Name: sso.mydomain.com
LDAP Virtual Server Name: oid.mydomain.com
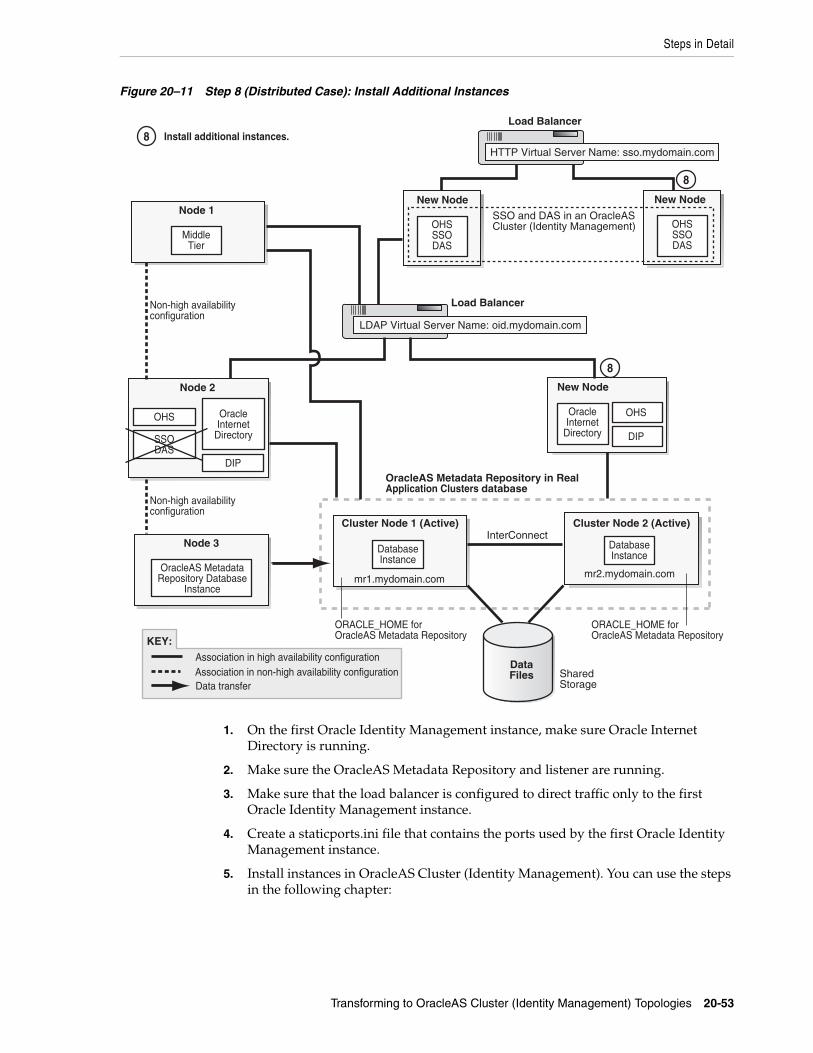
Steps in Detail
Transforming to OracleAS Cluster (Identity Management) Topologies 20-53
Figure 20–11 Step 8 (Distributed Case): Install Additional Instances
1. On the first Oracle Identity Management instance, make sure Oracle Internet Directory is running.
2. Make sure the OracleAS Metadata Repository and listener are running.
3. Make sure that the load balancer is configured to direct traffic only to the first Oracle Identity Management instance.
4. Create a staticports.ini file that contains the ports used by the first Oracle Identity Management instance.
5. Install instances in OracleAS Cluster (Identity Management). You can use the steps in the following chapter:
OracleAS MetadataRepository Database
Instance
Node 3
Node 2
OHS Oracle Internet
DirectorySSO DAS
Middle Tier
Node 1
InterConnect
OracleAS Metadata Repository in Real Application Clusters database
Data Files Shared
Storage
DatabaseInstance
mr1.mydomain.com
ORACLE_HOME for OracleAS Metadata Repository
ORACLE_HOME for OracleAS Metadata Repository
New Node
OHS SSO DAS
DatabaseInstance
mr2.mydomain.com
8
New Node
OHS SSO DAS
New Node
Oracle Internet
Directory
OHS
DIP
Non-high availability configuration
Non-high availability configuration
SSO and DAS in an OracleASCluster (Identity Management)
8 Install additional instances.
DIP
KEY:
Association in non-high availability configurationData transfer
Association in high availability configuration
Cluster Node 1 (Active) Cluster Node 2 (Active)
Load Balancer
HTTP Virtual Server Name: sso.mydomain.com
8
Load Balancer
LDAP Virtual Server Name: oid.mydomain.com

Steps in Detail
20-54 Oracle Application Server High Availability Guide
6. Reconfigure the load balancer to route requests to the new instance.
If you install additional instances, you configure the load balancer to point to the instance after installing the instance.
Step 9 Verify That All the Components Are WorkingVerify that the Oracle Identity Management and middle-tier components are working.
1. Test Oracle Identity Management components.
– Test Oracle Delegated Administration Services by accessing its URL, http://virtual_server_name:port/oiddas, and try to perform some operations. Example: http://sso.mydomain.com:7777/oiddas.
– Test OracleAS Single Sign-On by accessing its URL, http://virtual_server_name:port/pls/orasso, and try to perform some operations. Example: http://sso.mydomain.com:7777/pls/orasso.
2. Test middle-tier components. For example, to test OracleAS Portal, access its URL, http://portalhost.mydomain.com:7777/pls/portal, and try to perform some operations.
Step 10 Decommission the Oracle Homes That Are No Longer UsedAt the end of the transformation procedure, you no longer need the source Oracle home for the OracleAS Metadata Repository database. If you are not using this Oracle home for other purposes (that is, if you were using this Oracle home only for the OracleAS Metadata Repository database), then you can deinstall it. See the "Removing Oracle Software" chapter in the Oracle Database Installation Guide for details.
Item Name
Book Oracle Application Server Installation Guide
This book is available on Disk 1 of the Oracle Application Server distribution.
Chapter "Installing in High Availability Environments: OracleAS Cluster (Identity Management)"
Section "Installing OracleAS Cluster (Identity Management) on Subsequent Nodes"
Notes:
■ Be sure that you join the new instance to the existing DCM cluster that you created in step 6 on page 20-43. If you are transforming to distributed OracleAS Cluster (Identity Management), you created the cluster in step 5 on page 20-46.
■ If you are transforming to a distributed OracleAS Cluster (Identity Management), you need to install additional instances of Oracle Internet Directory / Oracle Directory Integration and Provisioning, and also additional instances of OracleAS Single Sign-On / Oracle Delegated Administration Services.
■ If the Cluster Configuration Assistant failed, you can cluster the instance after installation. In this case, to cluster the instance, you must use the "dcmctl joincluster" command instead of Application Server Control Console. You cannot use Application Server Control Console in this case because Application Server Control Console cannot cluster instances that contain disabled components. In this case, the "home" OC4J instance is disabled.

Transforming to OracleAS Cold Failover Cluster Topologies 21-1
21Transforming to OracleAS Cold Failover
Cluster Topologies
This chapter describes how to transform non-highly available topologies to OracleAS Cold Failover Cluster highly available topologies.
■ Section 21.1, "Overview of Transformation to OracleAS Cold Failover Cluster (Identity Management)"
■ Section 21.2, "Software, Hardware, and Documentation Requirements"
■ Section 21.3, "Transformation to OracleAS Cold Failover Cluster (Identity Management) on UNIX"
■ Section 21.4, "Transformation to OracleAS Cold Failover Cluster (Identity Management) on Windows"
■ Section 21.5, "Transformation to Distributed OracleAS Cold Failover Cluster (Identity Management) on UNIX and Windows"
21.1 Overview of Transformation to OracleAS Cold Failover Cluster (Identity Management)
For transformation to OracleAS Cold Failover Cluster (Identity Management), you can transform to OracleAS Cold Failover Cluster (Identity Management) or to distributed OracleAS Cold Failover Cluster (Identity Management). In both versions, you transform the source OracleAS Metadata Repository to a cold failover cluster database, and the Oracle Identity Management components to an OracleAS Cold Failover Cluster (Identity Management) configuration:
■ In an OracleAS Cold Failover Cluster (Identity Management), Oracle Identity Management components run from the same Oracle home.
■ In a distributed OracleAS Cold Failover Cluster (Identity Management), you install and run the Oracle Identity Management components on different nodes:
– You configure Oracle Internet Directory and Oracle Directory Integration and Provisioning in an OracleAS Cold Failover Cluster (Identity Management). This means that the nodes are in a hardware cluster, and the Oracle home is located on a shared storage. You can use the same hardware cluster as for the OracleAS Metadata Repository database. See Figure 21–1.
– You configure OracleAS Single Sign-On and Oracle Delegated Administration Services in an OracleAS Cluster (Identity Management). This means that you install the Oracle home locally on each node, and each node is active. You also need a load balancer to direct requests to these nodes. See Figure 21–19.

Software, Hardware, and Documentation Requirements
21-2 Oracle Application Server High Availability Guide
In general, you perform the following steps to transform a non-highly available installation to an OracleAS Cold Failover Cluster (Identity Management) topology:
■ Transform the OracleAS Metadata Repository from a single-instance database to a cold failover cluster database.
■ Transform the Oracle Identity Management components to run in an OracleAS Cold Failover Cluster (Identity Management). This includes configuring the components to use the virtual hostname associated with the hardware cluster.
■ Configure the middle-tier components to use the virtual hostname associated with the hardware cluster.
Notes on the transformation:
■ The transformation procedure works only on version 10.1.2.0.2 of Oracle Application Server: you are transforming a 10.1.2.0.2 non-highly available installation to a 10.1.2.0.2 highly available topology. If you are running an older version, you have to upgrade first.
■ The OracleAS Metadata Repository must be installed in an existing database using OracleAS Metadata Repository Creation Assistant.
■ The operating system must be the same on all nodes.
On Windows, the operating systems on the source and target nodes may be different editions within the same Windows family. For example, your source nodes can be running Windows 2000 Professional, but your target nodes can be running Windows 2000 Advanced Server.
Downtime InformationFor certain portions of the transformation procedure, Oracle Application Server components needs to be stopped, and during these times (called downtimes), clients will not be able to access the Oracle Application Server topology. The "Steps in Detail" sections for the transformation procedure indicate when the downtimes occur.
You can use the downtime information to plan your transformation. For example, if you want to perform the transformation procedure in chunks, you can begin the transformation procedure and stop at the end of a downtime (that is, when components are up and running again). Clients can access Oracle Application Server at this time.
When you are ready to continue, you can pick up where you left off and continue with the procedure. You will not achieve a highly available topology until you complete all the steps in the transformation procedure.
21.2 Software, Hardware, and Documentation RequirementsTo perform the transformation, check that you meet the following requirements:
■ two nodes in a hardware cluster, and virtual hostname and IP address for the hardware cluster
You can also run the cold failover cluster database on one hardware cluster, and the Oracle Identity Management components on another hardware cluster. In this case, each hardware cluster contains two nodes, and each hardware cluster has its own virtual hostname and IP address.
■ Oracle Database distribution CD-ROMs for installing the database on the shared storage

Software, Hardware, and Documentation Requirements
Transforming to OracleAS Cold Failover Cluster Topologies 21-3
■ Oracle Application Server distribution CD-ROMs for installing additional instances of Oracle Application Server
■ Patches listed in Table 21–1. You can download the patches from OracleMetaLink (http://metalink.oracle.com).
Additional Requirements for WindowsIf you are running on Windows, check that you have the following items:
■ Microsoft Cluster Server installed on all the nodes in the hardware cluster(s)
■ Oracle Fail Safe Release 3.3.3 distribution CD-ROMs for installing Oracle Fail Safe
Additional Requirements for Distributed OracleAS Cold Failover Cluster (Identity Management)If you are transforming to a distributed OracleAS Cold Failover Cluster (Identity Management) topology, check that you have the following items:
■ two nodes fronted by a load balancer (this is for running OracleAS Single Sign-On and Oracle Delegated Administration Services in an active-active configuration)
■ virtual server name and IP configured for HTTP traffic on the load balancer ("sso.mydomain.com" in Figure 21–19)
Documents Referenced by the Transformation ProcedureSome steps in the transformation procedure refer to the Oracle documentation listed in Table 21–2. To perform the transformation procedure, you must have these documents.
You can access these documents on Oracle Technology Network (http://www.oracle.com/technology/documentation), or on your Oracle distribution CD-ROMs.
Table 21–1 Required Downloads
If you are running this database You need these patches
Oracle9i Release 2 (9.2) Database 3948480: this is the 9.2.0.6 patch set
Oracle Database 10g Release 1 (10.1) 4163362: this is the 10.1.0.4 patch set
Table 21–2 Documents Needed
Product Guides Needed
Oracle Database If you are running Oracle9i Release 2 (9.2) Database, you need this guide:
■ Oracle9i Installation Guide for your platform
You can find it on Oracle Technology Network: http://www.oracle.com/technology/documentation/oracle9i.html.
If you are running Oracle Database 10g Release 1 (10.1), you need these guides:
■ Oracle Database 10g Quick Installation Guide for your platform
■ Oracle Database 10g Companion CD Installation Guide for your platform
You can find these guides on Oracle Technology Network: http://www.oracle.com/technology/documentation/database10g.html.

Transformation to OracleAS Cold Failover Cluster (Identity Management) on UNIX
21-4 Oracle Application Server High Availability Guide
21.3 Transformation to OracleAS Cold Failover Cluster (Identity Management) on UNIX
This section describes how to transform a non-highly available configuration to an OracleAS Cold Failover Cluster configuration on UNIX. If your platform is Windows, see Section 21.4, "Transformation to OracleAS Cold Failover Cluster (Identity Management) on Windows".
In the non-highly available, or "source", configuration, the OracleAS Metadata Repository and Oracle Identity Management run from different Oracle homes. They can run on the same computer, or on different computers. Figure 21–1 shows them on the same computer, but the procedure described in this section can be used for either case.
To transform this to an OracleAS Cold Failover Cluster configuration, you make the following transformations:
■ Install a new database Oracle home on the shared storage.
■ Transform the OracleAS Metadata Repository to a cold failover cluster database.
■ Install Oracle Identity Management on the shared storage.
■ Configure Oracle Identity Management and middle tiers to use the cluster’s virtual hostname.
Figure 21–1 shows the steps in the transformation.
Oracle Application Server
■ Oracle Application Server Administrator’s Guide
■ Oracle Application Server Installation Guide for your platform
Table 21–2 (Cont.) Documents Needed
Product Guides Needed

Transformation to OracleAS Cold Failover Cluster (Identity Management) on UNIX
Transforming to OracleAS Cold Failover Cluster Topologies 21-5
Figure 21–1 Transforming to OracleAS Cold Failover Cluster Configuration
21.3.1 Overview of StepsTransformation steps, at a high level, are:
Step 1: Convert the Single-Instance Database to a Cold Failover Cluster Database
Step 2: Update the Source Oracle Identity Management to Use the New OracleAS Metadata Repository
Node 1 Cluster Node 2
OracleAS Metadata Repository
Database Instance
Shared Storage
OHSOracle Internet
DirectorySSO DAS
On Failover
OracleAS MetadataRepository Database
Instance
OHSOracle Internet
DirectorySSO DAS
ORACLE_HOME for OracleAS Metadata Repository (single-instance database)
Middle Tier
Node 2
ORACLE_HOME for OracleASMetadata Repository Database
ORACLE_HOME for OracleIdentity Management
(Standby)
InterConnect
Vendor Clusterware
Cluster Node 1 (Active)
OracleAS Metadata Repository
Database Instance
OHS
SSO DAS
Vendor Clusterware
Virtual Hostname: infra.mydomain.comVirtual IP: 144.25.245.2
ORACLE_HOME for Oracle Identity Management
Non-high availability configuration
Non-high availability configuration
4
1
1
Install Identity Management on the shared storage.3
3
Update the source Identity Management topoint to the cold failover cluster database.2
2
4 Configure the new Identity Management and middle tier touse the virtual hostname.
5 Deregister the source Identity Management.
5
1
On Failover
3
4
3
DIP DIP
Oracle Internet
Directory
DIP
Non-High Availability Configuration High Availability Configuration
KEY:
Association in non-high availability configuration
Data transfer
Association in high availability configuration
Temporary association
Convert the single-instance database to acold failover cluster database.

Transformation to OracleAS Cold Failover Cluster (Identity Management) on UNIX
21-6 Oracle Application Server High Availability Guide
Step 3: Install New Oracle Identity Management Instance on the Shared Storage
Step 4: Configure Oracle Identity Management and Middle Tiers to Use the Virtual Hostname
Step 5: Deregister the Source Oracle Identity Management
Step 6: (optional) Create Failover Scripts
Step 7: Start the OracleAS Metadata Repository, Oracle Identity Management, and Middle Tiers
Step 8: Verify That All the Components Are Working
Step 9: Decommission the Oracle Homes That Are No Longer Used
21.3.2 Steps in DetailThe following steps use the following names to refer to the different nodes (the names match the ones used in Figure 21–1):
■ Node 1 and node 2 are nodes in the source configuration.
■ Cluster node 1 and cluster node 2 are nodes in the hardware cluster. At any given time, only one of these nodes has access to the shared storage on which you will install the Oracle Identity Management instance and the Oracle database.
Step 1 Convert the Single-Instance Database to a Cold Failover Cluster DatabaseAfter this step, your environment should look like the following (Figure 21–2):

Transformation to OracleAS Cold Failover Cluster (Identity Management) on UNIX
Transforming to OracleAS Cold Failover Cluster Topologies 21-7
Figure 21–2 Step 1: Convert the Single-Instance Database to a Cold Failover Cluster Database
1. Run the Oracle database installer on cluster node 1 to install only the Oracle database software on the shared storage (do not create a database). The database version that you install must be the same version as the source OracleAS Metadata Repository database.
The database Oracle home created in this step will be referred to as CFC_MR_ORACLE_HOME in subsequent steps.
If you are using Oracle Database 10g:
a. Follow the steps in the guide listed below, but note this difference: In the Select Database Configuration screen, do not create a starter database.
Node 1
OracleAS Metadata Repository
Database Instance
Shared Storage
OracleAS MetadataRepository Database
Instance
OHSOracle Internet
DirectorySSO DAS
ORACLE_HOME for OracleAS Metadata Repository (single-instance database)
Middle Tier
Node 2
ORACLE_HOME for OracleASMetadata Repository Database
InterConnect
Vendor Clusterware
OracleAS Metadata Repository
Database Instance
Vendor Clusterware
ORACLE_HOME for Oracle Identity Management
Non-high availability configuration
Non-high availability configuration
1
1
On Failover
DIP
Non-High Availability Configuration High Availability Configuration
KEY:
Association in non-high availability configuration
Data transfer
Association in high availability configuration
Temporary association
1
On Failover
Virtual Hostname: infra.mydomain.comVirtual IP: 144.25.245.2
Cluster Node 2 (Standby)Cluster Node 1 (Active)
Convert the single-instance database to a cold failover cluster database.

Transformation to OracleAS Cold Failover Cluster (Identity Management) on UNIX
21-8 Oracle Application Server High Availability Guide
b. Apply the 10.1.0.4 patch set to the database software that you just installed by following the instructions in the README that comes with the patch set. Note: Perform the steps in the section "Required Post-Installation Tasks" in the README, up to, but not including, the section "Upgrade the Database". You have not created the database yet. You will do this later
If you are using Oracle9i Database:
a. Install the Oracle9i Release 2 (9.2.0.1) software. In the installer, select "Database Configuration: Software Only" because you are not creating the database yet.
b. Apply the Oracle9i Release 2 (9.2.0.6) patch set. Perform these steps:
– In the README file for the patch set, perform the steps in the section "Before You Install This Patch Set" if they apply to you.
– Install the 9.2.0.6 patch set.
– Perform the steps in the section "Required Post-Installation Tasks" in the README, up to, but not including, the section "Upgrade the Database". You have not created the database yet. You will do this later.
2. Stop the middle tier and the Oracle Identity Management instances so that they are not modifying the OracleAS Metadata Repository database while you are backing it up.
To stop the middle tier:
> MT_ORACLE_HOME/bin/emctl stop iasconsole> MT_ORACLE_HOME/opmn/bin/opmnctl stopall
To stop the Oracle Identity Management:
> SRC_IM_ORACLE_HOME/bin/emctl stop iasconsole> SRC_IM_ORACLE_HOME/opmn/bin/opmnctl stopall
3. Back up the source Oracle Identity Management and middle tiers. You can use any backup tools. For example, you can use the OracleAS Backup and Recovery Tool, described in the Oracle Application Server Administrator’s Guide.
4. Perform a cold backup of the OracleAS Metadata Repository datafiles and the oraInventory directory.
5. Back up the source OracleAS Metadata Repository by using DBCA to create a database template from the OracleAS Metadata Repository database.
a. On node 1, start up DBCA.
> SRC_MR_ORACLE_HOME/bin/dbca
b. Select Manage Templates.
Item Name
Book Oracle Database 10g Quick Installation Guide for your platform
This book is available in the Oracle Database 10g documentation set.
Section "Install Oracle Database 10g"
Downtime 1 Starts: The next step starts the first downtime.

Transformation to OracleAS Cold Failover Cluster (Identity Management) on UNIX
Transforming to OracleAS Cold Failover Cluster Topologies 21-9
c. Select Create a Database Template and select From an existing database (structure as well as data).
d. Select the name of your database instance.
e. Enter a name for the template.
DBCA generates two files, template_name.dbc and template_name.dfb, in the SRC_MR_ORACLE_HOME/assistants/dbca/templates directory.
f. Select Convert the file locations to use OFA structure.
6. Copy (or ftp in binary mode) the two files generated in the previous step to the shared storage and place them in the CFC_MR_ORACLE_HOME/assistants/dbca/templates directory on the shared storage.
7. Create a database listener.
a. Start up Network configuration assistant.
> CFC_MR_ORACLE_HOME/bin/netca
b. Select Listener Configuration.
c. Select the protocol and port.
d. Exit the Network configuration assistant.
e. In the CFC_MR_ORACLE_HOME/network/admin/listener.ora file, update the hostname in the listening address from the local host (cluster node 1) to the virtual hostname.
f. Stop and restart the listener for the changes in the previous step to take effect.
> CFC_MR_ORACLE_HOME/bin/lsnrctl stop> CFC_MR_ORACLE_HOME/bin/lsnrctl start
8. Restore the templates to the database that you installed in step 1 on page 21-7.
a. On cluster node 1, run DBCA to create a database using the templates you created in step 5 on page 21-8.
> CFC_MR_ORACLE_HOME/bin/dbca
b. Select Create Database.
c. Select the template name for the files that you copied to the shared storage.
d. When prompted for the global database name and SID, enter the same names as your source OracleAS Metadata Repository.
e. Accept the default values for the remaining screens.
9. On cluster node 2, create or edit the oratab file so that it includes a line for the Oracle database. The location of the file is platform-dependent:
■ Solaris: /var/opt/oracle/oratab
■ Other UNIX operating systems: /etc/oratab
See the Oracle Database Installation Guide for the format of this file.
Step 2 Update the Source Oracle Identity Management to Use the New OracleAS Metadata RepositoryIn this step, you update the source Oracle Identity Management so that it uses the OracleAS Metadata Repository that you just installed in the hardware cluster. At the

Transformation to OracleAS Cold Failover Cluster (Identity Management) on UNIX
21-10 Oracle Application Server High Availability Guide
end of this step, your environment should be functional and look like the following (Figure 21–3):
Figure 21–3 Step 2: Update Source Identity Management to Use the New OracleAS Metadata Repository
1. Unlock the accounts in the new OracleAS Metadata Repository without changing the passwords. These accounts are listed in the SRC_IM_ORACLE_HOME/config/unlock.sql file, where SRC_IM_ORACLE_HOME is the home directory for the source Oracle Identity Management.
To unlock the accounts without changing the passwords, perform these steps:
a. Log into the database as the SYS user.
> sqlplus SYS/password as sysdba
Update the source Identity Management to point to the cold failover cluster database.
Node 1
OracleAS Metadata Repository
Database Instance
Shared Storage
On Failover
OracleAS MetadataRepository Database
Instance
OHSOracle Internet
DirectorySSO DAS
ORACLE_HOME for OracleAS Metadata Repository (single-instance database)
Middle Tier
Node 2
ORACLE_HOME for OracleASMetadata Repository Database
InterConnect
Vendor Clusterware
OracleAS Metadata Repository
Database Instance
Vendor Clusterware
Virtual Hostname: infra.mydomain.comVirtual IP: 144.25.245.2
ORACLE_HOME for Oracle Identity Management
Non-high availability configuration
Non-high availability configuration
2
On Failover
DIP
Non-High Availability Configuration High Availability Configuration
KEY:
Association in non-high availability configuration
Data transfer
Association in high availability configuration
Temporary association
2
Cluster Node 2 (Standby)Cluster Node 1 (Active)

Transformation to OracleAS Cold Failover Cluster (Identity Management) on UNIX
Transforming to OracleAS Cold Failover Cluster Topologies 21-11
b. Run the following commands for each user listed in the SRC_IM_ORACLE_HOME/config/unlock.sql file:
– Determine the password for the user.
SQL> select password from dba_users where username = ’username’;
Replace username with the name of the account.
– Run the "alter user" command.
SQL> alter user username identified by values ’password’ account unlock;
Replace username with the name of the account.
Replace password with the password determined from the previous step.
2. In the SRC_IM_ORACLE_HOME/network/admin/tnsnames.ora file, update the HOST parameter in the OracleAS Metadata Repository connect string to use the fully qualified virtual hostname.
3. Update the OracleAS Metadata Repository connect string in Oracle Internet Directory.
a. Start the OPMN daemon (note that you run "opmnctl start", not "opmnctl startall").
> SRC_IM_ORACLE_HOME/opmn/bin/opmnctl start
b. Start Oracle Internet Directory.
> SRC_IM_ORACLE_HOME/opmn/bin/opmnctl startproc ias-component=OID
c. Start Oracle Directory Manager.
> SRC_IM_ORACLE_HOME/bin/oidadmin
d. Log in as cn=orcladmin.
e. Expand the following: Entry Management > cn=OracleContext.
f. Select cn=dbName on the left side.
g. In the Properties tab on the right side, update the HOST parameter in orclnetdescstring with the fully qualified virtual hostname.
4. Verify that the following items have the same connect string:
■ orclnetdescstring value in Oracle Internet Directory (see previous step)
■ the tnsnames.ora file in SRC_IM_ORACLE_HOME/network/admin
■ the tnsnames.ora file in CFC_MR_ORACLE_HOME/network/admin
5. Stop and restart Oracle Identity Management and middle tier.
> MT_ORACLE_HOME/opmn/bin/opmnctl stopall> SRC_IM_ORACLE_HOME/opmn/bin/opmnctl stopall> SRC_IM_ORACLE_HOME/opmn/bin/opmnctl startall> MT_ORACLE_HOME/opmn/bin/opmnctl startall
Note: Do not change the passwords for these accounts.

Transformation to OracleAS Cold Failover Cluster (Identity Management) on UNIX
21-12 Oracle Application Server High Availability Guide
6. Test OracleAS Infrastructure and middle-tier components. They should be working normally.
Step 3 Install New Oracle Identity Management Instance on the Shared StorageFigure 21–4 shows the environment at the completion of this step.
Figure 21–4 Step 3: Install a New Oracle Identity Management Instance on the Shared Storage
1. Create an OracleAS Cluster (Identity Management) on the source Oracle Identity Management instance.
Downtime 1 Ends: This ends the first downtime.
Node 1
OracleAS Metadata Repository
Database Instance
Shared Storage
OHSOracle Internet
DirectorySSO DAS
On Failover
OracleAS MetadataRepository Database
Instance
OHSOracle Internet
DirectorySSO DAS
ORACLE_HOME for OracleAS Metadata Repository (single-instance database)
Middle Tier
Node 2
ORACLE_HOME for OracleASMetadata Repository Database
ORACLE_HOME for OracleIdentity Management
InterConnect
Vendor Clusterware
OracleAS Metadata Repository
Database Instance
OHS
SSO DAS
Vendor Clusterware
Virtual Hostname: infra.mydomain.comVirtual IP: 144.25.245.2
ORACLE_HOME for Oracle Identity Management
Non-high availability configuration
Non-high availability configuration
Install Identity Management on the shared storage.3
3
On Failover
3
3
DIP DIP
Oracle Internet
Directory
DIP
Non-High Availability Configuration High Availability Configuration
KEY:
Association in non-high availability configuration
Data transfer
Association in high availability configuration
Temporary association
Cluster Node 2 (Standby)Cluster Node 1 (Active)

Transformation to OracleAS Cold Failover Cluster (Identity Management) on UNIX
Transforming to OracleAS Cold Failover Cluster Topologies 21-13
> SRC_IM_ORACLE_HOME/dcm/bin/dcmctl createcluster -cluster cluster_name
You create this OracleAS Cluster (Identity Management) as a means to copy configuration information from the source Oracle Identity Management to the new Oracle Identity Management.
2. Make the Oracle Identity Management instance the first member of the OracleAS Cluster (Identity Management).
> SRC_IM_ORACLE_HOME/dcm/bin/dcmctl joincluster -cluster cluster_name
3. Create a staticports.ini file to specify the ports that you are using on node 1 for Oracle Identity Management. You will specify this file in the installer.
You only need to specify the ports for Oracle Internet Directory in this file. The port numbers must match those for Oracle Internet Directory on node 1. You can copy the lines from the SRC_IM_ORACLE_HOME/install/portlist.ini file in the source Oracle Identity Management. For example:
Oracle Internet Directory port = 389Oracle Internet Directory (SSL) port = 636
4. On cluster node 1, run the Oracle Application Server installer to install an Oracle Identity Management instance on the shared storage, and during installation, set this instance to belong to the OracleAS Cluster (Identity Management) that you created in the previous step. Essentially, you are installing a second instance in an OracleAS Cluster (Identity Management).
Important details:
■ Install the Oracle Identity Management instance on the shared storage.
■ In the Select Configuration Options screen, select Oracle Internet Directory, OracleAS Single Sign-On, Oracle Delegated Administration Services, Oracle Directory Integration and Provisioning, and High Availability and Replication.
■ In the Specify Port Configuration Options screen, select Manual and enter the fullpath to the staticports.ini file that you created in step 3 on page 21-13.
■ In the Specify Repository screen, connect to the database on cluster node 1 using the virtual hostname.
■ In the Specify Existing Oracle Application Server Cluster Name screen, enter the name of the cluster that you created in step 1 on page 21-12.
■ In the Specify ODS Password screen, enter the password for the ODS account.
■ In the Specify LDAP Virtual Host and Ports screen, specify node 1’s hostname and the Oracle Internet Directory port.
■ In the Specify HTTP Listen Port, Load Balancer Host and Port screen, enter the fully qualified virtual hostname in the HTTP Load Balancer: Hostname field. Enter the HTTP port in HTTP Load Balancer: Port field.
5. Remove the source Oracle Identity Management instance (on node 1) from the cluster. You added it to the cluster in step 2 on page 21-13.
> SRC_IM_ORACLE_HOME/dcm/bin/dcmctl leaveCluster -c clustername> SRC_IM_ORACLE_HOME/dcm/bin/dcmctl removeCluster -c clustername
6. (optional) You can take a backup of your environment at this time, if desired.
a. Stop all processes.

Transformation to OracleAS Cold Failover Cluster (Identity Management) on UNIX
21-14 Oracle Application Server High Availability Guide
To stop the middle tier:
> MT_ORACLE_HOME/opmn/bin/opmnctl stopall
To stop the source Oracle Identity Management instance:
> SRC_IM_ORACLE_HOME/opmn/bin/opmnctl stopall
To stop the new Oracle Identity Management instance:
> CFC_IM_ORACLE_HOME/opmn/bin/opmnctl stopall
To stop the OracleAS Metadata Repository database:
> CFC_MR_ORACLE_HOME/bin/sqlplus /nologSQL> connect / as sysdbaSQL> shutdown
To stop the listener:
> CFC_MR_ORACLE_HOME/bin/lsnrctl stop
b. Back up the Oracle Identity Management instance that you just installed.
c. Back up the OracleAS Metadata Repository data files.
d. Start up all the components (listener, OracleAS Metadata Repository, Oracle Identity Management, middle tier).
Step 4 Configure Oracle Identity Management and Middle Tiers to Use the Virtual HostnameAfter installation, configure the Oracle Identity Management and middle-tier components for OracleAS Cold Failover Cluster. After this step, your environment should be functional and look like this (Figure 21–5):

Transformation to OracleAS Cold Failover Cluster (Identity Management) on UNIX
Transforming to OracleAS Cold Failover Cluster Topologies 21-15
Figure 21–5 Step 4: Configure Oracle Identity Management and Middle-Tier Components to Use the Virtual Hostname
1. On cluster node 1, configure the Oracle Internet Directory in the new Oracle Identity Management instance to use the virtual hostname.
a. Stop all Oracle Identity Management components.
> CFC_IM_ORACLE_HOME/bin/emctl stop iasconsole> CFC_IM_ORACLE_HOME/opmn/bin/opmnctl stopall
b. Make these edits in the CFC_IM_ORACLE_HOME/opmn/conf/opmn.xml file.
In these categories:
Downtime 2 Starts: The next step starts the second downtime.
Node 1
OracleAS Metadata Repository
Database Instance
Shared Storage
OHSOracle Internet
DirectorySSO DAS
On Failover
OracleAS MetadataRepository Database
Instance
OHSOracle Internet
DirectorySSO DAS
ORACLE_HOME for OracleAS Metadata Repository (single-instance database)
Middle Tier
Node 2
ORACLE_HOME for OracleASMetadata Repository Database
ORACLE_HOME for OracleIdentity Management
InterConnect
Vendor Clusterware
OracleAS Metadata Repository
Database Instance
OHS
SSO DAS
Vendor Clusterware
Virtual Hostname: infra.mydomain.comVirtual IP: 144.25.245.2
ORACLE_HOME for Oracle Identity Management
Non-high availability configuration
Non-high availability configuration
4
4 Configure the new Identity Management and middle tier to use the virtual hostname.
On Failover
4
DIP DIP
Oracle Internet
Directory
DIP
Non-High Availability Configuration High Availability Configuration
KEY:
Association in non-high availability configuration
Data transfer
Association in high availability configuration
Temporary association
Cluster Node 2 (Standby)Cluster Node 1 (Active)

Transformation to OracleAS Cold Failover Cluster (Identity Management) on UNIX
21-16 Oracle Application Server High Availability Guide
category id="oidctl-parameters"
and
category id="oidmon-parameters"
add the following line (including the < and > characters):
<data id="host" value="fully_qualified_virtual_hostname"/>
Replace fully_qualified_virtual_hostname with your fully qualified virtual hostname.
2. On cluster node 1, edit the CFC_IM_ORACLE_HOME/config/ias.properties file as follows:
■ Edit the OIDhost entry to use the virtual hostname.
3. Update the DIRECTORY_SERVERS parameter in the CFC_IM_ORACLE_HOME/ldap/admin/ldap.ora file to use the virtual hostname.
4. On cluster node 1, check that the ORACLE_HOME environment variable is set correctly before running the chgiphost.sh script:
> echo $ORACLE_HOME> CFC_IM_ORACLE_HOME/chgip/scripts/chgiphost.sh -idm -noconfig
When prompted, provide the following information:
5. Configure OracleAS Single Sign-On to use the virtual hostname.
a. Start Oracle Internet Directory (note that the first command is "opmnctl start", not "opmnctl startall").
> CFC_IM_ORACLE_HOME/opmn/bin/opmnctl start> CFC_IM_ORACLE_HOME/opmn/bin/opmnctl startproc ias-component=OID
b. Start Oracle Directory Manager:
> CFC_IM_ORACLE_HOME/bin/oidadmin
c. Connect using virtual hostname. Log in as cn=orcladmin.
d. Get the password for the orasso schema.
– In Oracle Directory Manager, expand Entry Management > cn=OracleContext > cn=Products > cn=IAS > cn=IAS Infrastructure
Table 21–3 Prompts from chgiphost
Prompt from chgiphost Response
Enter fully qualified hostname (hostname.domainname) of destination
Enter the fully qualified virtual hostname.
Enter fully qualified hostname (hostname.domainname) of source
Enter the fully qualified cluster node 1’s hostname.
Enter valid IP address of destination
Enter the IP associated with the virtual hostname.
Enter valid IP address of source Enter the IP for cluster node 1.
OID Admin Password Enter the password for the cn=orcladmin user.

Transformation to OracleAS Cold Failover Cluster (Identity Management) on UNIX
Transforming to OracleAS Cold Failover Cluster Topologies 21-17
Databases > orclReferenceName=DBServiceName > orclResourceName=ORASSO.
– Note the password in the orclpasswordattribute field. You will use it in the next step.
e. On cluster node 1, log in to the OracleAS Metadata Repository database as ORASSO and run the ssooconf.sql script.
> cd CFC_IM_ORACLE_HOME/sso/admin/plsql/sso> CFC_IM_ORACLE_HOME/bin/sqlplus orasso/password@mrdbInstanceNameSQL> @ssooconf.sql
For password, enter the password for the orasso schema.
For mrdbInstanceName, enter the instance name of the database as defined in the CFC_IM_ORACLE_HOME/network/admin/tnsnames.ora file
ssooconf.sql prompts you for the following information:
6. On cluster node 1, run:
> CFC_IM_ORACLE_HOME/dcm/bin/dcmctl resetHostInformation
7. Update the Oracle Directory Integration and Provisioning registration to use the virtual hostname.
a. Run one of the following commands to update Oracle Directory Integration and Provisioning:
Non-SSL:
> CFC_IM_ORACLE_HOME/bin/odisrvreg -D cn=orcladmin -w adminPasswd -lhost FQvirtualHostname -p oidPort -h FQvirtualHostname
SSL:
> CFC_IM_ORACLE_HOME/bin/odisrvreg -D cn=orcladmin -w adminPasswd -lhost FQvirtualHostname -p oidSSLPort -h FQvirtualHostname -U sslMode -W walletLocation -P walletPassword
b. Start the Oracle Directory Integration and Provisioning server.
> oidctl connect=connectString server=odisrv inst=1 host=FQvirtualHostname flags="port=port host=FQvirtualHostname" start
Table 21–4 ssooconf.sql Prompts
Prompt from ssooconf.sql Your Response
Enter value for new_oid_host: Enter the fully qualified virtual hostname and press Return.
Enter value for new_oid_port: Enter the Oracle Internet Directory port number and press Return. You can enter an SSL port or a non-SSL port. In the last prompt (see below), you indicate whether this port is an SSL port or a non-SSL port.
Enter value for new_ssoserver_password:
Press Return so that the password is not changed.
Enter value for new_ldapusessl: Enter n if the port you entered above is not an SSL port.
Enter y if the port you entered above is an SSL port.

Transformation to OracleAS Cold Failover Cluster (Identity Management) on UNIX
21-18 Oracle Application Server High Availability Guide
Replace connectString with the connect string to the Oracle Internet Directory database.
Replace FQvirtualHostname with the fully qualified virtual hostname for the OracleAS Cold Failover Cluster.
Replace port with the Oracle Internet Directory port.
8. Update the OracleAS Metadata Repository.
Check that the ORACLE_HOME environment variable is set correctly:
> echo $ORACLE_HOME
Non-SSL:
> CFC_IM_ORACLE_HOME/sso/bin/ssocfg.sh http FQvirtualHostname port
SSL:
> CFC_IM_ORACLE_HOME/sso/bin/ssocfg.sh https FQvirtualHostname port
Replace FQvirtualHostname with the virtual hostname (fully qualified).
Replace port with either the SSL or the non-SSL port used by Oracle HTTP Server.
9. Skip this step if you are transforming to a distributed OracleAS Cold Failover Cluster (Identity Management) topology.
Change the URL for OracleAS Single Sign-On and Oracle Delegated Administration Services.
a. Start Oracle Directory Manager:
> CFC_IM_ORACLE_HOME/bin/oidadmin
b. Connect using cluster node 1’s hostname. Log in as cn=orcladmin.
c. In Oracle Directory Manager, expand Entry Management > cn=OracleContext > cn=Products > cn=DAS > cn=OperationURLs.
d. Update the value of the orcldasurlbase attribute to the virtual hostname.
10. Skip this step if you are transforming to a distributed OracleAS Cold Failover Cluster (Identity Management) topology.
Update mod_osso registration by running the following command (all on one line).
> CFC_IM_ORACLE_HOME/sso/bin/ssoreg.sh -oracle_home_path im_oracle_home -site_name virtual_hostname:http_port -config_mod_osso TRUE -mod_osso_url http://virtual_hostname:port -u root
Replace im_oracle_home with the full path of the Oracle Identity Management Oracle home.
Replace virtual_hostname with the fully qualified virtual hostname.
Replace port with the Oracle HTTP Server port. Note that if you are using port 80, you must not specify the port number because port 80 is the default value.
11. Restart Oracle Identity Management components.

Transformation to OracleAS Cold Failover Cluster (Identity Management) on UNIX
Transforming to OracleAS Cold Failover Cluster Topologies 21-19
> CFC_IM_ORACLE_HOME/opmn/bin/opmnctl stopall> CFC_IM_ORACLE_HOME/opmn/bin/opmnctl startall
12. Configure the middle tiers to use the new Oracle Identity Management.
a. Stop all the middle-tier instances.
> MT_ORACLE_HOME/bin/emctl stop iasconsole> MT_ORACLE_HOME/opmn/bin/opmnctl stopall
b. In each middle-tier instance, in the MT_ORACLE_HOME/config/ias.properties file, update the OIDhost parameter to use the fully qualified virtual hostname.
c. In each middle-tier instance, update the DIRECTORY_SERVERS parameter in the MT_ORACLE_HOME/ldap/admin/ldap.ora file to use the virtual hostname.
d. Start OPMN and Application Server Control Console on all the middle-tier instances.
Note that the first command is "opmnctl start", not "opmnctl startall", because at this time you want to start up only OPMN and the Application Server Control Console. The middle tiers cannot be started yet.
> MT_ORACLE_HOME/opmn/bin/opmnctl start> MT_ORACLE_HOME/bin/emctl start iasconsole
e. For each middle tier:
– Use the Application Server Control Console and navigate to the home page for the middle tier.
– Click the Infrastructure link.
– In the Identity Management section, click Change.
– Follow the wizard for entering a new hostname. You enter the virtual hostname here.
– When the wizard completes, it asks you to restart the components. You can do this by running the following commands:
> MT_ORACLE_HOME/opmn/bin/opmnctl stopall> MT_ORACLE_HOME/opmn/bin/opmnctl startall
Step 5 Deregister the Source Oracle Identity ManagementIn this step, you deregister the source Oracle Identity Management from the OracleAS Metadata Repository. Figure 21–6 shows the environment at the completion of this step.
Downtime 2 Ends: This ends the second downtime.

Transformation to OracleAS Cold Failover Cluster (Identity Management) on UNIX
21-20 Oracle Application Server High Availability Guide
Figure 21–6 Step 5: Deregister the Source Identity Management
1. If you are running Oracle Directory Integration and Provisioning, you need to stop it:
> ORACLE_HOME/bin/oidctl connect=dbConnect flags="host=OIDhost port=OIDport" server=odisrv instance=1 stop
2. Make the following edits to the SRC_IM_ORACLE_HOME/deconfig/DeconfigWrapper.properties file, where SRC_IM_ORACLE_HOME refers to the source Oracle Identity Management home on node 1.
■ Comment out the line that begins with "SSO=". For example, the line might look like this:
SSO=/scratch/iastrans/im/jdk/bin/java -jar /scratch/iastrans/im/sso/lib/ossoca.jar deinstall /scratch/iastrans/im "%OID_USER%" %OID_PASSWORD%
Node 1
OracleAS Metadata Repository
Database Instance
Shared Storage
OHSOracle Internet
DirectorySSO DAS
On Failover
OracleAS MetadataRepository Database
Instance
OHSOracle Internet
DirectorySSO DAS
ORACLE_HOME for OracleAS Metadata Repository (single-instance database)
Middle Tier
Node 2
ORACLE_HOME for OracleASMetadata Repository Database
ORACLE_HOME for OracleIdentity Management
InterConnect
Vendor Clusterware
OracleAS Metadata Repository
Database Instance
OHS
SSO DAS
Vendor Clusterware
Virtual Hostname: infra.mydomain.comVirtual IP: 144.25.245.2
ORACLE_HOME for Oracle Identity Management
Non-high availability configuration
Non-high availability configuration
5 Deregister the source Identity Management.
5
On Failover
DIP DIP
Oracle Internet
Directory
DIP
Non-High Availability Configuration High Availability Configuration
KEY:
Association in non-high availability configuration
Data transfer
Association in high availability configuration
Temporary association
Cluster Node 2 (Standby)Cluster Node 1 (Active)

Transformation to OracleAS Cold Failover Cluster (Identity Management) on UNIX
Transforming to OracleAS Cold Failover Cluster Topologies 21-21
Comment out the line by adding a # character at the beginning of the line:
#SSO=/scratch/iastrans/im/jdk/bin/java -jar /scratch/iastrans/im/sso/lib/ossoca.jar deinstall /scratch/iastrans/im "%OID_USER%" %OID_PASSWORD%
■ Comment out the line that begins with "MOD_OSSO=". For example, the line might look like this:
MOD_OSSO=/scratch/iastrans/im/jdk/bin/java -jar /scratch/iastrans/im/jlib/infratool.jar de -f /scratch/iastrans/im/deconfig/deconfig_modosso.properties -o /scratch/iastrans/im -u "%OID_USER%" -obf %OID_PASSWORD%
Comment out the line by adding a # character at the beginning of the line:
#MOD_OSSO=/scratch/iastrans/im/jdk/bin/java -jar /scratch/iastrans/im/jlib/infratool.jar de -f /scratch/iastrans/im/deconfig/deconfig_modosso.properties -o /scratch/iastrans/im -u "%OID_USER%" -obf %OID_PASSWORD%
3. On node 1, run deconfig.pl to deregister the source Oracle Identity Management from the OracleAS Metadata Repository.
> cd SRC_IM_ORACLE_HOME/bin> SRC_IM_ORACLE_HOME/perl/bin/perl deconfig.pl -u oidUser -w passwd -dbp sysPasswd [-r realm]
The -u option specifies the name of the Oracle Internet Directory user. This user must have privileges for deinstalling the Oracle Identity Management components. To run as the Oracle Internet Directory superuser, specify the user as cn=orcladmin.
The -w option specifies the password of the user.
The -dbp option specifies the password of the SYS user in the OracleAS Metadata Repository database.
The -r option is required only if your Oracle Internet Directory contains multiple realms. Use it to specify the realm in Oracle Internet Directory against which the user should be validated.
See the "Deinstallation and Reinstallation" appendix in the Oracle Application Server Installation Guide for details about deconfig.pl.
Step 6 (optional) Create Failover ScriptsCreate scripts to perform failover and start up Oracle Application Server components on the standby node. The scripts are dependent on the clusterware that you are running. If you do not create the failover scripts, you will have to perform the failover steps manually.
Step 7 Start the OracleAS Metadata Repository, Oracle Identity Management, and Middle TiersStart the OracleAS Metadata Repository and the Oracle Identity Management on cluster node 1, and start also the middle tiers. The components and applications should be functioning properly. To test failover, fail cluster node 1. The failover scripts created in step 6 on page 21-21 should failover the processes to cluster node 2.

Transformation to OracleAS Cold Failover Cluster (Identity Management) on Windows
21-22 Oracle Application Server High Availability Guide
Step 8 Verify That All the Components Are WorkingVerify that the Oracle Identity Management and middle-tier components are working.
1. Test Oracle Identity Management components.
– Test Oracle Delegated Administration Services by accessing its URL, http://virtual_host_name:port/oiddas, and try to perform some operations. Example: http://infra.mydomain.com:7777/oiddas.
– Test OracleAS Single Sign-On by accessing its URL, http://virtual_host_name:port/pls/orasso, and try to perform some operations. Example: http://infra.mydomain.com:7777/pls/orasso.
2. Test middle-tier components. For example, to test OracleAS Portal, access its URL, http://portalhost.mydomain.com:7777/pls/portal, and try to perform some operations.
Step 9 Decommission the Oracle Homes That Are No Longer UsedAt the end of the transformation procedure, you no longer need these Oracle homes:
■ Oracle home for the source OracleAS Metadata Repository database
If you are not using this Oracle home for other purposes (that is, if you were using this Oracle home only for the OracleAS Metadata Repository database), then you can deinstall it. See the "Removing Oracle Software" chapter in the Oracle Database Installation Guide for details.
■ Oracle home for the source Oracle Identity Management
You can deinstall it by following the procedures in the "Deinstallation and Reinstallation" appendix in the Oracle Application Server Installation Guide.
21.4 Transformation to OracleAS Cold Failover Cluster (Identity Management) on Windows
This section describes how to transform a non-highly available configuration to an OracleAS Cold Failover Cluster configuration on Windows. If your platform is UNIX, see Section 21.3, "Transformation to OracleAS Cold Failover Cluster (Identity Management) on UNIX".
In the non-highly available, or "source", configuration, the OracleAS Metadata Repository and Oracle Identity Management run from different Oracle homes. They can run on the same computer, or on different computers. Figure 21–7 shows them on the same computer, but the procedure described in this section can be used for either case.
To transform this to an OracleAS Cold Failover Cluster configuration, you make the following transformations:
■ Install Oracle Fail Safe on the local storage of each node in the hardware cluster.
■ Install the a new database Oracle home on the local storage of each node in the hardware cluster.
■ Transform the OracleAS Metadata Repository to a cold failover cluster database.
■ Install Oracle Identity Management on the shared storage.
■ Configure Oracle Identity Management for cold failover.
■ Configure Oracle Identity Management and middle tiers to use the cluster’s virtual hostname.

Transformation to OracleAS Cold Failover Cluster (Identity Management) on Windows
Transforming to OracleAS Cold Failover Cluster Topologies 21-23
Figure 21–7 shows the steps in the transformation.
Figure 21–7 Transforming to OracleAS Cold Failover Cluster Configuration on Windows
Node 1
OracleAS Metadata Repository
Database Instance
Shared Storage
OHSOracle Internet
DirectorySSO DAS
On Failover
OracleAS MetadataRepository Database
Instance
OHSOracle Internet
DirectorySSO DAS
ORACLE_HOME for OracleAS Metadata Repository (single-instance database)
ORACLE_HOME for OracleIdentity Management
InterConnect
OracleAS Metadata Repository
Database Instance
OHS Oracle Internet
DirectorySSO DAS
Virtual Hostname: infra.mydomain.comVirtual IP: 144.25.245.2
ORACLE_HOME for Oracle Identity Management
Non-high availability configuration
Non-high availability configuration
6
Install Identity Management on the shared storage.5
Change the source Identity Management topoint to the cold failover cluster database.4
7
Configure the new Identity Management to use thevirtual hostname.
Deregister the source Identity Management.
5
Oracle Fail Safe
Microsoft Cluster Server
Oracle Fail Safe
Microsoft Cluster Server
Convert the single-instance database to acold failover cluster database.2
Install Oracle Fail Safe and create a failover group.1
Set up the new database for high availability.3
Make the Identity Management highly available.
8 Configure the middle tiers to use the new Identity Management.
9
1 1
2
2
3
4
9
On FailoverORACLE_HOME forOracleAS Metadata Repository (cold failover cluster database)
ORACLE_HOME forOracleAS MetadataRepository (cold failovercluster database) 2
Data Files for the Cold Failover ClusterDatabase 2
8
5 6
5
DIP
7
DIP DIP
Non-High Availability Configuration High Availability Configuration
Middle Tier
Node 2
KEY:
Association in non-high availability configuration
Data transfer
Association in high availability configuration
Temporary association
Cluster Node 2 (Standby)Cluster Node 1 (Active)

Transformation to OracleAS Cold Failover Cluster (Identity Management) on Windows
21-24 Oracle Application Server High Availability Guide
21.4.1 Overview of StepsTransformation steps, at a high level, are:
Step 1: Install Oracle Fail Safe and Create a Failover Group on the Nodes in the Hardware Cluster
Step 2: Convert the Single-Instance Database to a Cold Failover Cluster Database
Step 3: Set up the New Database for High Availability
Step 4: Change the Source Oracle Identity Management to Use the New OracleAS Metadata Repository
Step 5: Install a New Oracle Identity Management Instance on the Shared Storage
Step 6: Configure Oracle Identity Management to Use the Virtual Hostname
Step 7: Make the Oracle Identity Management Highly Available
Step 8: Configure the Middle Tiers to Use the New Oracle Identity Management
Step 9: Deregister the Source Oracle Identity Management
Step 10: Start the OracleAS Metadata Repository, Oracle Identity Management, and Middle Tiers
Step 11: Verify That All the Components Are Working
Step 12: Decommission the Oracle Homes That Are No Longer Used
21.4.2 Steps in DetailThe following steps use the following names to refer to the different nodes (the names match the ones used in Figure 21–7):
■ Node 1 and node 2 are nodes in the source configuration.
■ Cluster node 1 and cluster node 2 are nodes in the hardware cluster. At any given time, only one of these nodes has access to the shared storage, which will contain the Oracle Identity Management home and the data files for the OracleAS Metadata Repository database.
Step 1 Install Oracle Fail Safe and Create a Failover Group on the Nodes in the Hardware ClusterAfter this step, your environment should look like the following (Figure 21–8):

Transformation to OracleAS Cold Failover Cluster (Identity Management) on Windows
Transforming to OracleAS Cold Failover Cluster Topologies 21-25
Figure 21–8 Step 1: Install Oracle Fail Safe and Create a Failover Group
1. Verify that Microsoft Cluster Server (MSCS) is installed on cluster node 1 and cluster node 2. You can do this by launching the Cluster Administrator from the Start menu:
Windows 2000: Start > Programs > Administrative Tools > Cluster Administrator
Windows 2003: Start > Administrative Tools > Cluster Administrator
2. Get the name of the cluster by invoking the Cluster Administrator on either cluster node 1 or cluster node 2. The cluster name appears at the top of the left frame.
3. Install Oracle Fail Safe on both cluster nodes, and verify the cluster.
You install it on the local storage (not the shared storage) of each node. For instructions on installing Oracle Fail Safe, see the following guide:
Node 1
Shared Storage
On Failover
OracleAS MetadataRepository Database
Instance
OHSOracle Internet
DirectorySSO DAS
ORACLE_HOME for OracleAS Metadata Repository (single-instance database) InterConnect
Virtual Hostname: infra.mydomain.comVirtual IP: 144.25.245.2
ORACLE_HOME for Oracle Identity Management
Non-high availability configuration
Non-high availability configuration
Oracle Fail Safe
Microsoft Cluster Server
Oracle Fail Safe
Microsoft Cluster Server
Install Oracle Fail Safe and create a failover group.1
1 1
On Failover
DIP
Non-High Availability Configuration High Availability Configuration
Middle Tier
Node 2
KEY:
Association in non-high availability configuration
Data transfer
Association in high availability configuration
Temporary association
Cluster Node 2 (Standby)Cluster Node 1 (Active)

Transformation to OracleAS Cold Failover Cluster (Identity Management) on Windows
21-26 Oracle Application Server High Availability Guide
4. Create a failover group in Oracle Fail Safe. For steps, see the following guide:
Step 2 Convert the Single-Instance Database to a Cold Failover Cluster DatabaseAfter this step, your environment should be functional and look like the following (Figure 21–9):
Item Name
Book Oracle Application Server Installation Guide for Microsoft Windows
This guide is available on Disk 1 of the Oracle Application Server distribution.
Chapter 11, "Installing in High Availability Environments: OracleAS Cold Failover Cluster"
Sections 11.2.5, "Determine a Domain User to Administer Oracle Fail Safe"
11.2.6, "Install Oracle Fail Safe on the Local Storage of Each Node" (this section includes steps on verifying the cluster)
Item Name
Book Oracle Application Server Installation Guide for Microsoft Windows
This guide is available on Disk 1 of the Oracle Application Server distribution.
Chapter 11, "Installing in High Availability Environments: OracleAS Cold Failover Cluster"
Section 11.2.7, "Create a Group in Oracle Fail Safe"

Transformation to OracleAS Cold Failover Cluster (Identity Management) on Windows
Transforming to OracleAS Cold Failover Cluster Topologies 21-27
Figure 21–9 Step 2: Convert the Single-Instance Database to a Cold Failover Cluster Database
1. Run the Oracle database installer on cluster node 1 to install only the Oracle database software on the local storage (do not create a database). The database version that you install must be the same version as the source OracleAS Metadata Repository database.
The database Oracle home created in this step will be referred to as CFC_MR_ORACLE_HOME in subsequent steps.
If you are using Oracle Database 10g:
a. Follow the steps in the guide listed below, but note this difference: In the Select Database Configuration screen, do not create a starter database.
Node 1
OracleAS Metadata Repository
Database Instance
Shared Storage
On Failover
OracleAS MetadataRepository Database
Instance
OHSOracle Internet
DirectorySSO DAS
ORACLE_HOME for OracleAS Metadata Repository (single-instance database) InterConnect
OracleAS Metadata Repository
Database Instance
Virtual Hostname: infra.mydomain.comVirtual IP: 144.25.245.2
ORACLE_HOME for Oracle Identity Management
Non-high availability configuration
Non-high availability configuration
Oracle Fail Safe
Microsoft Cluster Server
Oracle Fail Safe
Microsoft Cluster Server
Convert the single-instance database to a cold failover cluster database.2
2
2
On FailoverORACLE_HOME forOracleAS Metadata Repository (cold failover cluster database)
ORACLE_HOME forOracleAS MetadataRepository (cold failovercluster database) 2
Data Files for the Cold Failover ClusterDatabase 2
DIP
Non-High Availability Configuration High Availability Configuration
Middle Tier
Node 2
KEY:
Association in non-high availability configuration
Data transfer
Association in high availability configuration
Temporary association
Cluster Node 2 (Standby)Cluster Node 1 (Active)

Transformation to OracleAS Cold Failover Cluster (Identity Management) on Windows
21-28 Oracle Application Server High Availability Guide
b. Apply the 10.1.0.4 patch set to the database software that you just installed by following the instructions in the README that comes with the patch set. Note: Perform the steps in the section "Required Post-Installation Tasks" in the README, up to, but not including, the section "Upgrade the Database". You have not created the database yet. You will do this later.
If you are using Oracle9i Database:
a. Install the Oracle9i Release 2 (9.2.0.1) software. In the installer, select "Database Configuration: Software Only" because you are not creating the database yet.
b. Apply the Oracle9i Release 2 (9.2.0.6) patch set. Perform these steps:
– In the README file for the patch set, perform the steps in the section "Before You Install This Patch Set" if they apply to you.
– Install the 9.2.0.6 patch set.
– Perform the steps in the section "Required Post-Installation Tasks" in the README, up to, but not including, the section "Upgrade the Database". You have not created the database yet. You will do this later.
2. Install and patch the database Oracle home on the local storage of cluster node 2 by repeating step 1 on page 21-27 for cluster node 2.
3. Stop the middle tier and the Oracle Identity Management instances so that they are not modifying the OracleAS Metadata Repository database while you are backing it up.
To stop the middle tier:
> MT_ORACLE_HOME\bin\emctl stop iasconsole> MT_ORACLE_HOME\opmn\bin\opmnctl stopall
To stop the Oracle Identity Management:
> SRC_IM_ORACLE_HOME\bin\emctl stop iasconsole> SRC_IM_ORACLE_HOME\opmn\bin\opmnctl stopall
4. Back up the source Oracle Identity Management and middle tiers. You can use any backup tools. For example, you can use the OracleAS Backup and Recovery Tool, described in the Oracle Application Server Administrator’s Guide.
5. Perform a cold backup of the OracleAS Metadata Repository datafiles and the oraInventory directory.
6. Back up the source OracleAS Metadata Repository by using DBCA to create a database template from the OracleAS Metadata Repository database.
a. On node 1, start up DBCA from the Start menu:
Item Name
Book Oracle Database 10g Quick Installation Guide for your platform
This book is available in the Oracle Database 10g documentation set.
Section "Install Oracle Database 10g"
Downtime 1 Starts: The next step starts the first downtime.

Transformation to OracleAS Cold Failover Cluster (Identity Management) on Windows
Transforming to OracleAS Cold Failover Cluster Topologies 21-29
Start > Programs > Oracle - SRC_MR_ORACLE_HOME_NAME > Database Administration > Database Configuration Assistant
b. Select Manage Templates.
c. Select Create a Database Template and select From an existing database (structure as well as data).
d. Select the name of your database instance.
e. Enter a name for the template.
DBCA generates two files, template_name.dbc and template_name.dfb, in the SRC_MR_ORACLE_HOME\assistants\dbca\templates directory.
f. Add a user-defined variable called TARGET_DB_LOCATION:
– On the page where you entered the name of the template, click the File Location Variable button.
– In the File Location Variable dialog, enter TARGET_DB_LOCATION in the first non-grey row of the Variable column.
– Enter the fully qualified directory path on the shared disk where you want the database data files on the target system to reside. For example, if S: is the shared disk, you can enter a directory path such as S:\oracle.
g. Select Convert the file locations to use OFA structure.
7. Copy the template_name.dbc and template_name.dfb files generated in the previous step to the CFC_MR_ORACLE_HOME\assistants\dbca\templates directory on the local storage of cluster node 1.
8. On cluster node 1, edit the template_name.dbc file as follows:
■ Replace all instances of {ORACLE_BASE} with {TARGET_DB_LOCATION}. For example, this:
{ORACLE_BASE}\admin
would be changed to:
{TARGET_DB_LOCATION}\admin
■ For the SPfile line, replace {ORACLE_HOME} with {TARGET_DB_LOCATION}. For example, change it from this:
<SPfile useSPFile="true">{ORACLE_HOME}\database\spfile{SID}.ora</SPfile>
To this:
<SPfile useSPFile="true">{TARGET_DB_LOCATION}\database\spfile{SID}.ora</SPfile>
Do not replace other occurrences of {ORACLE_HOME}.
9. Create a database listener.
a. On cluster node 1, start up Network configuration assistant. You can do this from the Start menu:
Start > Programs > Oracle - CFC_MR_ORACLE_HOME_NAME > Network Administration > Oracle Net Configuration Assistant
b. Select Listener Configuration and follow the prompts accepting all defaults with the exception that if you would like to use a port number for the listener other than port 1521 you may choose to do so.

Transformation to OracleAS Cold Failover Cluster (Identity Management) on Windows
21-30 Oracle Application Server High Availability Guide
c. Exit Network configuration assistant.
10. Restore the database on the target system.
a. Verify that the shared storage is mounted on cluster node 1.
b. On cluster node 1, run DBCA to create a database using the templates you created. You can start up DBCA from the Start menu:
Start > Programs > Oracle - CFC_MR_ORACLE_HOME_NAME > Database Administration > Database Configuration Assistant
c. Select Create Database.
d. Select the template name that you copied to the local storage and edited.
e. When prompted for the global database name and SID, enter the same names as your source OracleAS Metadata Repository.
f. Accept the default values for the remaining screens. Be sure to verify the paths on the following screens:
- On screen 11, Initialization Parameters, verify that the paths to the control files point to correct locations on the shared disk. Note: If you see an extra line in the control file section, update the extra line so that its path also points to the shared disk.
- On screen 12, Database Storage, verify that the paths to the data files point to correct locations on the shared disk.
g. After DBCA creates the database, it displays a summary of information about the database including the fully qualified path of the server parameter file (spfile). Make a note of this fully qualified path. You will need this path in a later step (step h on page 21-30).
h. On cluster node 1, verify that a pfile named init<SID>.ora exists in the CFC_MR_ORACLE_HOME\database directory (<SID> refers to the SID of the database you restored in step 10 on page 21-30), and that the file contains a line that looks like:
spfile=<fullpath_to_spfile>
where <fullpath_to_spfile> is the fully qualified path for the spfile that you noted in the previous step.
11. Unlock the accounts in the new OracleAS Metadata Repository without changing the passwords. These accounts are listed in SRC_IM_ORACLE_HOME\config\unlock.sql, where SRC_IM_ORACLE_HOME is the home directory for the source Oracle Identity Management.
To unlock the accounts without changing the passwords, perform these steps:
a. Log into the database as the SYS user.
> sqlplus SYS/password as sysdba
b. Run the following commands for each user listed in the SRC_IM_ORACLE_HOME\config\unlock.sql file:
– Determine the password for the user.
SQL> select password from dba_users where username = ’username’;
Replace username with the name of the account.
– Run the "alter user" command.

Transformation to OracleAS Cold Failover Cluster (Identity Management) on Windows
Transforming to OracleAS Cold Failover Cluster Topologies 21-31
SQL> alter user username identified by values ’password’ account unlock;
Replace username with the name of the account.
Replace password with the password determined from the previous step.
12. You can now perform the remaining steps in the "Required Post-Installation Tasks" section of the README for the database patch set. Specifically, perform the steps in the "Upgrade the Database" section.
13. Copy CFC_MR_ORACLE_HOME\database\init<SID>.ora to TARGET_DB_LOCATION\database\init<SID>.ora.
The pfile, TARGET_DB_LOCATION\database\init<SID>.ora, is needed by Oracle Fail Safe.
14. Verify the standalone database resource using Oracle Fail Safe Manager by providing the path to the TARGET_DB_LOCATION\database\init<SID>.ora file.
a. Verify that the PATH environment variable contains CFC_MR_ORACLE_HOME\bin.
b. Start Oracle Fail Safe Manager.
c. On the left side, expand the following items (Figure 21–10 shows a sample screen shot):
Cluster_Name > Nodes > Cluster_node_1 > Standalone Resources > SID
Figure 21–10 Oracle Fail Safe Manager: Right-click the SID and Select "Verify Standalone Resources"
d. Right-click the database SID, and select Verify Standalone Database. This displays the Verify Standalone Database dialog.
Note: Do not change the passwords for these accounts.

Transformation to OracleAS Cold Failover Cluster (Identity Management) on Windows
21-32 Oracle Application Server High Availability Guide
Figure 21–11 Oracle Fail Safe Manager: Verify Standalone Database dialog
e. In the Verify Standalone Database dialog, enter the database name (example: MRDB) and the full path to the parameter file (example: S:\oracle\database\initMRDB.ora). Ensure that Use operating system authentication is selected. Then click OK.
Step 3 Set up the New Database for High AvailabilityFigure 21–12 shows the environment at the completion of this step.

Transformation to OracleAS Cold Failover Cluster (Identity Management) on Windows
Transforming to OracleAS Cold Failover Cluster Topologies 21-33
Figure 21–12 Step 3: Set up the New Database for High Availability
1. Add the OracleAS Metadata Repository to the failover group that you created in Oracle Fail Safe. For steps, see the following guide:
2. Add the shared storage as a dependency for the listener. For steps, see the following guide:
Item Name
Book Oracle Application Server Installation Guide for Microsoft Windows
This guide is available on Disk 1 of the Oracle Application Server distribution.
Chapter 11, "Installing in High Availability Environments: OracleAS Cold Failover Cluster"
Section 11.12.2, "Make OracleAS Metadata Repository Highly Available"
Node 1
OracleAS Metadata Repository
Database Instance
Shared Storage
On Failover
OracleAS MetadataRepository Database
Instance
OHSOracle Internet
DirectorySSO DAS
ORACLE_HOME for OracleAS Metadata Repository (single-instance database) InterConnect
OracleAS Metadata Repository
Database Instance
Virtual Hostname: infra.mydomain.comVirtual IP: 144.25.245.2
ORACLE_HOME for Oracle Identity Management
Non-high availability configuration
Non-high availability configuration
Oracle Fail Safe
Microsoft Cluster Server
Oracle Fail Safe
Microsoft Cluster Server
Set up the new database for high availability.3
3
On FailoverORACLE_HOME forOracleAS Metadata Repository (cold failover cluster database)
ORACLE_HOME forOracleAS MetadataRepository (cold failovercluster database)
Data Files for the Cold Failover ClusterDatabase
DIP
Non-High Availability Configuration High Availability Configuration
Middle Tier
Node 2
KEY:
Association in non-high availability configuration
Data transfer
Association in high availability configuration
Temporary association
Cluster Node 2 (Standby)Cluster Node 1 (Active)
Transformation to OracleAS Cold Failover Cluster (Identity Management) on Windows
21-34 Oracle Application Server High Availability Guide
3. Disable the old listener service.
a. Display the Services dialog.
b. Select the old listener. The name of the old listener is Oracle<CFC_MR_OracleHomeName>TNSListener.
c. Stop the old listener, if it is running.
d. Right-click the old listener and select Properties.
e. Set its startup type to Disabled, and click OK.
There should be another listener service with the name Oracle<CFC_MR_OracleHomeName>TNSListenerFsl<virtualHostName>. This listener was created when you added the OracleAS Metadata Repository to the failover group (in step 1 on page 21-33). This is the listener you will be using.
Step 4 Change the Source Oracle Identity Management to Use the New OracleAS Metadata RepositoryIn this step, you update the source Oracle Identity Management so that it uses the OracleAS Metadata Repository that you just installed in the hardware cluster. After performing this step, your environment should look like the following (Figure 21–13):
Item Name
Book Oracle Application Server Installation Guide for Microsoft Windows
This guide is available on Disk 1 of the Oracle Application Server distribution.
Chapter 11, "Installing in High Availability Environments: OracleAS Cold Failover Cluster"
Section 11.12.3, "Add the Shared Disk as a Dependency for the Listener"

Transformation to OracleAS Cold Failover Cluster (Identity Management) on Windows
Transforming to OracleAS Cold Failover Cluster Topologies 21-35
Figure 21–13 Step 4: Change the Source Identity Management to Use the New OracleAS Metadata Repository
1. Shut down Oracle Identity Management on node 1.
> SRC_IM_ORACLE_HOME\opmn\bin\opmnctl stopall
2. In the SRC_IM_ORACLE_HOME\network\admin\tnsnames.ora file, update the HOST parameter in the OracleAS Metadata Repository connect string to use the fully qualified virtual hostname.
3. Update the OracleAS Metadata Repository connect string in Oracle Internet Directory.
a. Start the OPMN daemon (note that you run "opmnctl start", not "opmnctl startall").
> SRC_IM_ORACLE_HOME\opmn\bin\opmnctl start
Change the source Identity Management to point to the cold failover cluster database.4
OracleAS Metadata Repository
Database Instance
Shared Storage
On Failover
OracleAS MetadataRepository Database
Instance
OHSOracle Internet
DirectorySSO DAS
ORACLE_HOME for OracleAS Metadata Repository (single-instance database) InterConnect
OracleAS Metadata Repository
Database Instance
Virtual Hostname: infra.mydomain.comVirtual IP: 144.25.245.2
ORACLE_HOME for Oracle Identity Management
Non-high availability configuration
Non-high availability configuration
Oracle Fail Safe
Microsoft Cluster Server
Oracle Fail Safe
Microsoft Cluster Server
4
On FailoverORACLE_HOME forOracleAS Metadata Repository (cold failover cluster database)
ORACLE_HOME forOracleAS MetadataRepository (cold failovercluster database)
Data Files for the Cold Failover ClusterDatabase
DIP
Non-High Availability Configuration High Availability Configuration
Middle Tier
KEY:
Association in non-high availability configuration
Data transfer
Association in high availability configuration
Temporary association
Node 1
Node 2
Cluster Node 2 (Standby)Cluster Node 1 (Active)

Transformation to OracleAS Cold Failover Cluster (Identity Management) on Windows
21-36 Oracle Application Server High Availability Guide
b. Start Oracle Internet Directory.
> SRC_IM_ORACLE_HOME\opmn\bin\opmnctl startproc ias-component=OID
c. Start Oracle Directory Manager from the Start menu:
Start > Programs > Oracle - IM_OracleHomeName > Integrated Management Tools > Oracle Directory Manager
d. Log in as cn=orcladmin.
e. Expand the following: Entry Management > cn=OracleContext.
f. Select cn=dbName on the left side.
g. In the Properties tab on the right side, update the HOST parameter in orclnetdescstring with the fully qualified virtual hostname.
4. Verify that the following items have the same connect string:
■ orclnetdescstring value in Oracle Internet Directory (see previous step)
■ the tnsnames.ora file in SRC_IM_ORACLE_HOME\network\admin
■ the tnsnames.ora file in CFC_MR_ORACLE_HOME\network\admin
5. Stop and restart Oracle Identity Management and middle tier.
> MT_ORACLE_HOME\opmn\bin\opmnctl stopall> SRC_IM_ORACLE_HOME\opmn\bin\opmnctl stopall> SRC_IM_ORACLE_HOME\opmn\bin\opmnctl startall> MT_ORACLE_HOME\opmn\bin\opmnctl startall
6. Test OracleAS Infrastructure and middle-tier components. They should be working normally.
Step 5 Install a New Oracle Identity Management Instance on the Shared StorageFigure 21–14 shows the environment at the completion of this step.
Downtime 1 Ends: This ends the first downtime.

Transformation to OracleAS Cold Failover Cluster (Identity Management) on Windows
Transforming to OracleAS Cold Failover Cluster Topologies 21-37
Figure 21–14 Step 5: Install a New Oracle Identity Management Instance on the Shared Storage
1. Create an OracleAS Cluster (Identity Management) on the source Oracle Identity Management instance.
> SRC_IM_ORACLE_HOME\dcm\bin\dcmctl createcluster -cluster cluster_name
You create this OracleAS Cluster (Identity Management) as a means to copy configuration information from the source Oracle Identity Management to the new Oracle Identity Management.
2. Make the Oracle Identity Management instance the first member of the OracleAS Cluster (Identity Management).
> SRC_IM_ORACLE_HOME\dcm\bin\dcmctl joincluster -cluster cluster_name
3. Make sure that the shared storage on which you will be installing Oracle Identity Management is mounted on cluster node 1.
OracleAS Metadata Repository
Database Instance
Shared Storage
OHSOracle Internet
DirectorySSO DAS
On Failover
OracleAS MetadataRepository Database
Instance
OHSOracle Internet
DirectorySSO DAS
ORACLE_HOME for OracleAS Metadata Repository (single-instance database)
ORACLE_HOME for OracleIdentity Management
InterConnect
OracleAS Metadata Repository
Database Instance
OHS Oracle Internet
DirectorySSO DAS
Virtual Hostname: infra.mydomain.comVirtual IP: 144.25.245.2
ORACLE_HOME for Oracle Identity Management
Non-high availability configuration
Non-high availability configuration
Install Identity Management on the shared storage.5
5
Oracle Fail Safe
Microsoft Cluster Server
Oracle Fail Safe
Microsoft Cluster Server
On FailoverORACLE_HOME forOracleAS Metadata Repository (cold failover cluster database)
ORACLE_HOME forOracleAS MetadataRepository (cold failovercluster database)
Data Files for the Cold Failover ClusterDatabase
5
5
DIP DIP DIP
Non-High Availability Configuration High Availability Configuration
Middle Tier
KEY:
Association in non-high availability configuration
Data transfer
Association in high availability configuration
Temporary association
Node 1
Node 2
Cluster Node 2 (Standby)Cluster Node 1 (Active)

Transformation to OracleAS Cold Failover Cluster (Identity Management) on Windows
21-38 Oracle Application Server High Availability Guide
4. On the shared storage, create a staticports.ini file to specify the ports that you are using on node 1 for Oracle Identity Management. You will specify this file in the installer.
You only need to specify the ports for Oracle Internet Directory in this file. The port numbers must match those for Oracle Internet Directory on node 1. You can copy the lines from the SRC_IM_ORACLE_HOME\install\portlist.ini file in the source Oracle Identity Management. For example:
Oracle Internet Directory port = 389Oracle Internet Directory (SSL) port = 636
5. On cluster node 1, run the Oracle Application Server installer to install an Oracle Identity Management instance on the shared storage, and during installation, set this instance to belong to the OracleAS Cluster (Identity Management) that you created in the previous step. Essentially, you are installing a second instance in an OracleAS Cluster (Identity Management).
Important details:
■ Install the Oracle Identity Management instance on the shared storage.
■ In the Select Configuration Options screen, select Oracle Internet Directory, OracleAS Single Sign-On, Oracle Delegated Administration Services, Oracle Directory Integration and Provisioning, and High Availability and Replication.
■ In the Specify Port Configuration Options screen, select Manual and enter the fullpath to the staticports.ini file that you created in step 4 on page 21-38.
■ In the Specify Repository screen, connect to the database on cluster node 1 using the virtual hostname as the hostname. Connect as the system user if you did not create a password file in Oracle Fail Safe (see step 1 on page 21-33). If you created a password file in Oracle Fail Safe, you can connect as the sys user.
■ In the Specify Existing Oracle Application Server Cluster Name screen, enter the name of the cluster that you created in step 1 on page 21-37.
■ In the Specify LDAP Virtual Host and Ports screen, specify node 1’s hostname and the Oracle Internet Directory port.
■ In the Specify HTTP Listen Port, Load Balancer Host and Port screen, enter the virtual hostname in the HTTP Load Balancer: Hostname field. Enter the HTTP port in HTTP Load Balancer: Port field.
6. On cluster node 1, remove the new Oracle Identity Management instance from the cluster and farm. You need to do this so that you can install this instance from cluster node 2.
> CFC_IM_ORACLE_HOME\dcm\bin\dcmctl leaveCluster> CFC_IM_ORACLE_HOME\dcm\bin\dcmctl leaveFarm
7. Reboot cluster node 1. The resources defined in the failover group fail over to cluster node 2.
8. Delete the Oracle home for the Oracle Identity Management instance that you just installed on the shared storage. You need to do this because you need to perform the same installation, but this time from cluster node 2 (next step).
9. From cluster node 2, install the Oracle Identity Management instance in the same Oracle home directory on the shared storage. Follow the same instructions as for cluster node 1.

Transformation to OracleAS Cold Failover Cluster (Identity Management) on Windows
Transforming to OracleAS Cold Failover Cluster Topologies 21-39
10. On cluster node 2, remove the new Oracle Identity Management instance from the cluster.
> CFC_IM_ORACLE_HOME\dcm\bin\dcmctl leaveCluster
11. Change the source Oracle Identity Management instance (on node 1) to its original configuration.
> SRC_IM_ORACLE_HOME\dcm\bin\dcmctl leaveCluster> SRC_IM_ORACLE_HOME\dcm\bin\dcmctl removeCluster -cluster cluster_name
cluster_name is the name of the cluster you created in step 1 on page 21-37.
12. (optional) You can take a backup of your environment at this time, if desired.
a. Stop all processes.
To stop the middle tier:
> MT_ORACLE_HOME\opmn\bin\opmnctl stopall
To stop the source Oracle Identity Management instance:
> SRC_IM_ORACLE_HOME\opmn\bin\opmnctl stopall
To stop the new Oracle Identity Management instance:
> CFC_IM_ORACLE_HOME\opmn\bin\opmnctl stopall
To stop the OracleAS Metadata Repository database:
> CFC_MR_ORACLE_HOME\bin\sqlplus /nologSQL> connect / as sysdbaSQL> shutdown
To stop the listener:
> CFC_MR_ORACLE_HOME\bin\lsnrctl stop
b. Back up the Oracle Identity Management instance that you just installed.
c. Back up the OracleAS Metadata Repository data files.
d. Start up all the components (listener, OracleAS Metadata Repository, Oracle Identity Management, middle tier).
Step 6 Configure Oracle Identity Management to Use the Virtual HostnameAfter installation, configure the Oracle Identity Management components for OracleAS Cold Failover Cluster. After this step, your environment should look like this (Figure 21–15):

Transformation to OracleAS Cold Failover Cluster (Identity Management) on Windows
21-40 Oracle Application Server High Availability Guide
Figure 21–15 Step 6: Configure Oracle Identity Management to Use the Virtual Hostname
1. Check that cluster node 1 is the active node and that the shared storage is mounted on that node.
2. On cluster node 1, configure Oracle Internet Directory in the new Oracle Identity Management instance to use the virtual hostname.
a. Stop all Oracle Identity Management components.
> CFC_IM_ORACLE_HOME\bin\emctl stop iasconsole> CFC_IM_ORACLE_HOME\opmn\bin\opmnctl stopall
b. Make these edits in the CFC_IM_ORACLE_HOME\opmn\conf\opmn.xml file.
Downtime 2 Starts: The next step starts the second downtime.
Configure the new Identity Management to use the virtual hostname.6
OracleAS Metadata Repository
Database Instance
Shared Storage
OHSOracle Internet
DirectorySSO DAS
On Failover
OracleAS MetadataRepository Database
Instance
OHSOracle Internet
DirectorySSO DAS
ORACLE_HOME for OracleAS Metadata Repository (single-instance database)
ORACLE_HOME for OracleIdentity Management
InterConnect
OracleAS Metadata Repository
Database Instance
OHS Oracle Internet
DirectorySSO DAS
Virtual Hostname: infra.mydomain.comVirtual IP: 144.25.245.2
ORACLE_HOME for Oracle Identity Management
Non-high availability configuration
Non-high availability configuration
Oracle Fail Safe
Microsoft Cluster Server
Oracle Fail Safe
Microsoft Cluster Server
On FailoverORACLE_HOME forOracleAS Metadata Repository (cold failover cluster database)
ORACLE_HOME forOracleAS MetadataRepository (cold failovercluster database)
Data Files for the Cold Failover ClusterDatabase
6
DIP DIP DIP
Non-High Availability Configuration High Availability Configuration
Middle Tier
KEY:
Association in non-high availability configuration
Data transfer
Association in high availability configuration
Temporary association
Node 1
Node 2
Cluster Node 2 (Standby)Cluster Node 1 (Active)
Transformation to OracleAS Cold Failover Cluster (Identity Management) on Windows
Transforming to OracleAS Cold Failover Cluster Topologies 21-41
In these categories:
category id="oidctl-parameters"
and
category id="oidmon-parameters"
add the following line (including the < and > characters):
<data id="host" value="fully_qualified_virtual_hostname"/>
Replace fully_qualified_virtual_hostname with your fully qualified virtual hostname.
3. On cluster node 1, edit the CFC_IM_ORACLE_HOME\config\ias.properties file as follows:
■ Edit OIDhost to use the virtual hostname.
4. Update the DIRECTORY_SERVERS parameter in the CFC_IM_ORACLE_HOME\ldap\admin\ldap.ora file to use the virtual hostname.
5. On cluster node 1, set the ORACLE_HOME environment variable to the fully qualified path for CFC_IM_ORACLE_HOME, then run the chgiphost.bat script.
> set ORACLE_HOME=CFC_IM_ORACLE_HOME> cd CFC_IM_ORACLE_HOME\chgip\scripts> cmd /c chgiphost.bat -idm -noconfig
(You need to enter the "cmd /c" in the last command so that the DOS window in which you enter the command does not go away when the command completes.)
When prompted, provide the following information:
6. Configure OracleAS Single Sign-On to use the virtual hostname.
a. Start Oracle Internet Directory (note that the first command is "opmnctl start", not "opmnctl startall").
> CFC_IM_ORACLE_HOME\opmn\bin\opmnctl start> CFC_IM_ORACLE_HOME\opmn\bin\opmnctl startproc ias-component=OID
b. On cluster node 1, start Oracle Directory Manager from the Start menu:
Start > Programs > Oracle - IM_OracleHomeName > Integrated Management Tools > Oracle Directory Manager
Table 21–5 Prompts from chgiphost
Prompt from chgiphost Response
Enter fully qualified hostname (hostname.domainname) of destination
Enter the fully qualified virtual hostname.
Enter fully qualified hostname (hostname.domainname) of source
Enter the fully qualified cluster node 2’s hostname.
Enter valid IP address of destination
Enter the IP associated with the virtual hostname.
Enter valid IP address of source Enter the IP for cluster node 2.
OID Admin Password Enter the password for the cn=orcladmin user.

Transformation to OracleAS Cold Failover Cluster (Identity Management) on Windows
21-42 Oracle Application Server High Availability Guide
c. Connect using the virtual hostname. Log in as cn=orcladmin.
d. Get the password for the orasso schema.
– In Oracle Directory Manager, expand Entry Management > cn=OracleContext > cn=Products > cn=IAS > cn=IAS Infrastructure Databases > orclReferenceName=DBServiceName > orclResourceName=ORASSO.
– Note the password in the orclpasswordattribute field.
e. On cluster node 1, log in to the OracleAS Metadata Repository database as ORASSO and run the ssooconf.sql script.
> cd CFC_IM_ORACLE_HOME\sso\admin\plsql\sso> CFC_IM_ORACLE_HOME\bin\sqlplus orasso/password@mrdbInstanceNameSQL> @ssooconf.sql
For password, enter the password for the orasso schema.
For mrdbInstanceName, enter the instance name of the database as defined in the CFC_IM_ORACLE_HOME\network\admin\tnsnames.ora file
ssooconf.sql prompts you for the following information:
7. On cluster node 1, run:
> CFC_IM_ORACLE_HOME\dcm\bin\dcmctl resetHostInformation
8. Update the Oracle Directory Integration and Provisioning registration to use the virtual hostname.
a. Run one of the following commands to update Oracle Directory Integration and Provisioning:
Non-SSL:
> CFC_IM_ORACLE_HOME\bin\odisrvreg -D cn=orcladmin -w adminPasswd-lhost FQvirtualHostname -p oidPort -h FQvirtualHostname
SSL:
> CFC_IM_ORACLE_HOME\bin\odisrvreg -D cn=orcladmin -w adminPasswd -lhost FQvirtualHostname -p oidSSLPort -h FQvirtualHostname -U sslMode -W walletLocation -P walletPassword
Table 21–6 ssooconf.sql Prompts
Prompt from ssooconf.sql Response
Enter value for new_oid_host: Enter the virtual hostname and press Return.
Enter value for new_oid_port: Enter the Oracle Internet Directory port number and press Return. You can enter an SSL port or a non-SSL port. In the last prompt (see below), you indicate whether this port is an SSL port or a non-SSL port.
Enter value for new_ssoserver_password:
Press Return so that the password is not changed.
Enter value for new_ldapusessl: Enter n if the port you entered above is not an SSL port.
Enter y if the port you entered above is an SSL port.

Transformation to OracleAS Cold Failover Cluster (Identity Management) on Windows
Transforming to OracleAS Cold Failover Cluster Topologies 21-43
b. Start the Oracle Directory Integration and Provisioning server.
> oidctl connect=connectString server=odisrv inst=1 host=FQvirtualHostname flags="port=port host=FQvirtualHostname" start
Replace connectString with the connect string to the Oracle Internet Directory database.
Replace FQvirtualHostname with the fully qualified virtual hostname for the OracleAS Cold Failover Cluster.
Replace port with the Oracle Internet Directory port.
9. Update the OracleAS Metadata Repository.
Check that the ORACLE_HOME environment variable is set correctly.
> echo %ORACLE_HOME%
Non-SSL:
> CFC_IM_ORACLE_HOME\sso\bin\ssocfg.bat http FQvirtualHostname port
SSL:
> CFC_IM_ORACLE_HOME\sso\bin\ssocfg.bat https FQvirtualHostname port
Replace FQvirtualHostname with the virtual hostname (fully qualified).
Replace port with either the SSL or the non-SSL port used by Oracle HTTP Server.
10. Skip this step if you are transforming to a distributed OracleAS Cold Failover Cluster (Identity Management) topology.
Change the URL for OracleAS Single Sign-On and Oracle Delegated Administration Services.
a. Start Oracle Directory Manager from the Start menu:
Start > Programs > Oracle - IM_OracleHomeName > Integrated Management Tools > Oracle Directory Manager
b. Connect using the virtual hostname. Log in as cn=orcladmin.
c. In Oracle Directory Manager, expand Entry Management > cn=OracleContext > cn=Products > cn=DAS > cn=OperationURLs.
d. Update the value of the orcldasurlbase attribute to the virtual hostname.
11. Skip this step if you are transforming to a distributed OracleAS Cold Failover Cluster (Identity Management) topology.
Update mod_osso registration by running the following command (all on one line).
> CFC_IM_ORACLE_HOME\sso\bin\ssoreg.bat -oracle_home_path im_oracle_home -site_name virtual_hostname:http_port -config_mod_osso TRUE -mod_osso_url http://virtual_hostname:port -u system
Replace im_oracle_home with the full path of the Oracle Identity Management Oracle home.
Replace virtual_hostname with the fully qualified virtual hostname.

Transformation to OracleAS Cold Failover Cluster (Identity Management) on Windows
21-44 Oracle Application Server High Availability Guide
Replace port with the Oracle HTTP Server port. Note that if you are using port 80, then you must not specify the port number because port 80 is the default.
12. Restart Oracle Identity Management components.
> CFC_IM_ORACLE_HOME\opmn\bin\opmnctl stopall> CFC_IM_ORACLE_HOME\opmn\bin\opmnctl startall
Step 7 Make the Oracle Identity Management Highly AvailableFigure 21–16 shows the environment at the completion of this step.
Figure 21–16 Step 7: Make the Oracle Identity Management Highly Available
1. Add OPMN to the failover group that you created in Oracle Fail Safe.
a. On cluster node 1, start Oracle Fail Safe Manager from the Start menu:
OracleAS Metadata Repository
Database Instance
Shared Storage
OHSOracle Internet
DirectorySSO DAS
On Failover
OracleAS MetadataRepository Database
Instance
OHSOracle Internet
DirectorySSO DAS
ORACLE_HOME for OracleAS Metadata Repository (single-instance database)
ORACLE_HOME for OracleIdentity Management
InterConnect
OracleAS Metadata Repository
Database Instance
OHS Oracle Internet
DirectorySSO DAS
Virtual Hostname: infra.mydomain.comVirtual IP: 144.25.245.2
ORACLE_HOME for Oracle Identity Management
Non-high availability configuration
Non-high availability configuration
7
Oracle Fail Safe
Microsoft Cluster Server
Oracle Fail Safe
Microsoft Cluster Server
Make the Identity Management highly available.
On FailoverORACLE_HOME forOracleAS Metadata Repository (cold failover cluster database)
ORACLE_HOME forOracleAS MetadataRepository (cold failovercluster database)
Data Files for the Cold Failover ClusterDatabase
DIP
7
DIP DIP
Non-High Availability Configuration High Availability Configuration
Middle Tier
KEY:
Association in non-high availability configuration
Data transfer
Association in high availability configuration
Temporary association
Node 1
Node 2
Cluster Node 2 (Standby)Cluster Node 1 (Active)

Transformation to OracleAS Cold Failover Cluster (Identity Management) on Windows
Transforming to OracleAS Cold Failover Cluster Topologies 21-45
Start > Programs > Oracle - OracleHomeName > Oracle Fail Safe Manager
b. Right-click the OracleAS group and select Add Resource to Group.
c. In Resource, Step 1, select Generic Service and click Next.
d. In Generic Service Identity, Step 2, select the Oracle<OracleHomeName>ProcessManager service from Display Name and click Next.
e. In Generic Service Account, Step 3, click Next.
f. In Generic Service Disks, Step 4, click Next.
g. In Generic Service Dependencies, Step 5, click Next.
h. In Generic Service Registry, Step 6, click Next.
i. In Finish Adding the Service to the Group, verify the information and click OK.
2. Add the shared storage as a dependency for OPMN. For steps, see the following guide:
3. Add Application Server Control Console to the failover group.
a. On cluster node 1, start Oracle Fail Safe Manager from the Start menu:
Start > Programs > Oracle - OracleHomeName > Oracle Fail Safe Manager
b. Right-click the OracleAS group and select Add Resource to Group.
c. In Resource, Step 1, select Generic Service and click Next.
d. In Generic Service Identity, Step 2, select Oracle<OracleHomeName>ASControl from Display Name and click Next.
e. In Generic Service Account, Step 3, click Next.
f. In Generic Service Disks, Step 4, click Next.
g. In Generic Service Dependencies, Step 5, move the Oracle<OracleHomeName>ProcessManager service to the Resource Dependencies column. Click Next.
h. In Generic Service Registry, Step 6, click Next.
i. In Finish Adding the Service to the Group, verify the information and click OK.
Step 8 Configure the Middle Tiers to Use the New Oracle Identity ManagementFigure 21–17 shows the environment at the completion of this step.
Item Name
Book Oracle Application Server Installation Guide for Microsoft Windows
This guide is available on Disk 1 of the Oracle Application Server distribution.
Chapter 11, "Installing in High Availability Environments: OracleAS Cold Failover Cluster"
Section 11.12.5, "Add the Shared Disk as a Dependency for OPMN"

Transformation to OracleAS Cold Failover Cluster (Identity Management) on Windows
21-46 Oracle Application Server High Availability Guide
Figure 21–17 Step 8: Configure the Middle Tiers to Use the New Oracle Identity Management
1. Stop all the middle-tier instances.
> MT_ORACLE_HOME\bin\emctl stop iasconsole> MT_ORACLE_HOME\opmn\bin\opmnctl stopall
2. In each middle-tier instance, in the MT_ORACLE_HOME\config\ias.properties file, update the OIDhost parameter to use the fully qualified virtual hostname.
3. In each middle-tier instance, in the MT_ORACLE_HOME\ldap\admin\ldap.ora file, update the DIRECTORY_SERVERS parameter to use the fully qualified virtual hostname.
4. Start OPMN and Application Server Control Console on all the middle-tier instances.
OracleAS Metadata Repository
Database Instance
Shared Storage
OHSOracle Internet
DirectorySSO DAS
On Failover
OracleAS MetadataRepository Database
Instance
OHSOracle Internet
DirectorySSO DAS
ORACLE_HOME for OracleAS Metadata Repository (single-instance database)
ORACLE_HOME for OracleIdentity Management
InterConnect
OracleAS Metadata Repository
Database Instance
OHS Oracle Internet
DirectorySSO DAS
Virtual Hostname: infra.mydomain.comVirtual IP: 144.25.245.2
ORACLE_HOME for Oracle Identity Management
Non-high availability configuration
Non-high availability configuration
Oracle Fail Safe
Microsoft Cluster Server
Oracle Fail Safe
Microsoft Cluster Server
8 Configure the middle tiers to use the new Identity Management.
On FailoverORACLE_HOME forOracleAS Metadata Repository (cold failover cluster database)
ORACLE_HOME forOracleAS MetadataRepository (cold failovercluster database)
Data Files for the Cold Failover ClusterDatabase
8
DIP DIP DIP
Non-High Availability Configuration High Availability Configuration
Middle Tier
KEY:
Association in non-high availability configuration
Data transfer
Association in high availability configuration
Temporary association
Node 1
Node 2
Cluster Node 2 (Standby)Cluster Node 1 (Active)

Transformation to OracleAS Cold Failover Cluster (Identity Management) on Windows
Transforming to OracleAS Cold Failover Cluster Topologies 21-47
Note that the first command is "opmnctl start", not "opmnctl startall", because at this time you want to start up only OPMN and the Application Server Control Console. The middle tiers cannot be started yet.
> MT_ORACLE_HOME\opmn\bin\opmnctl start> MT_ORACLE_HOME\bin\emctl start iasconsole
5. For each middle tier:
– Use the Application Server Control Console and navigate to the home page for the middle tier.
– Click the Infrastructure link. Note that although you may see the virtual hostname on the page, you still have to perform this step. Application Server Control Console displays the virtual hostname only because it read it from the updated ias.properties file.
– In the Identity Management section, click Change.
– Follow the wizard for entering a new hostname. You enter the virtual hostname here.
– When the wizard completes, it asks you to restart the components. You can do this by running the following commands:
> MT_ORACLE_HOME\opmn\bin\opmnctl stopall> MT_ORACLE_HOME\opmn\bin\opmnctl startall
Step 9 Deregister the Source Oracle Identity ManagementIn this step, you deregister the source Oracle Identity Management from the OracleAS Metadata Repository. Figure 21–18 shows the environment at the end of this step.
Downtime 2 Ends: This ends the second downtime.
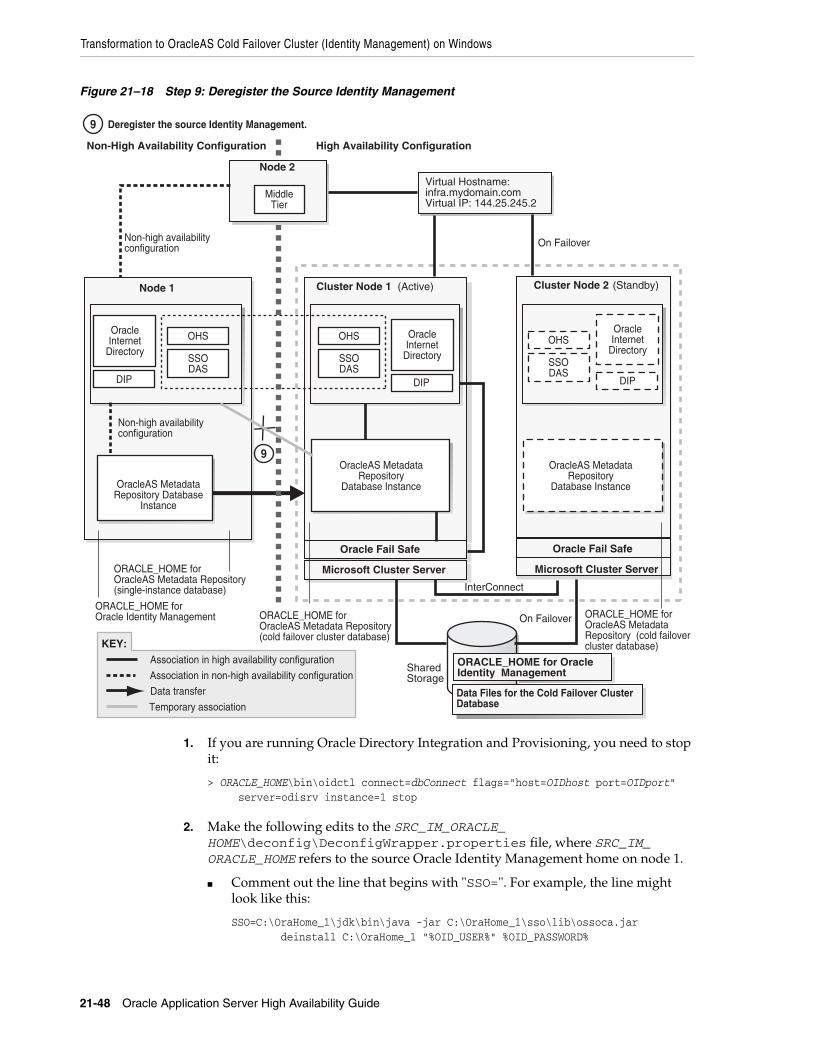
Transformation to OracleAS Cold Failover Cluster (Identity Management) on Windows
21-48 Oracle Application Server High Availability Guide
Figure 21–18 Step 9: Deregister the Source Identity Management
1. If you are running Oracle Directory Integration and Provisioning, you need to stop it:
> ORACLE_HOME\bin\oidctl connect=dbConnect flags="host=OIDhost port=OIDport" server=odisrv instance=1 stop
2. Make the following edits to the SRC_IM_ORACLE_HOME\deconfig\DeconfigWrapper.properties file, where SRC_IM_ORACLE_HOME refers to the source Oracle Identity Management home on node 1.
■ Comment out the line that begins with "SSO=". For example, the line might look like this:
SSO=C:\OraHome_1\jdk\bin\java -jar C:\OraHome_1\sso\lib\ossoca.jar deinstall C:\OraHome_1 "%OID_USER%" %OID_PASSWORD%
OracleAS Metadata Repository
Database Instance
Shared Storage
OHSOracle Internet
DirectorySSO DAS
On Failover
OracleAS MetadataRepository Database
Instance
OHSOracle Internet
DirectorySSO DAS
ORACLE_HOME for OracleAS Metadata Repository (single-instance database)
ORACLE_HOME for OracleIdentity Management
InterConnect
OracleAS Metadata Repository
Database Instance
OHS Oracle Internet
DirectorySSO DAS
Virtual Hostname: infra.mydomain.comVirtual IP: 144.25.245.2
ORACLE_HOME for Oracle Identity Management
Non-high availability configuration
Non-high availability configuration
Deregister the source Identity Management.
Oracle Fail Safe
Microsoft Cluster Server
Oracle Fail Safe
Microsoft Cluster Server
9
9
On FailoverORACLE_HOME forOracleAS Metadata Repository (cold failover cluster database)
ORACLE_HOME forOracleAS MetadataRepository (cold failovercluster database)
Data Files for the Cold Failover ClusterDatabase
DIP DIP DIP
Non-High Availability Configuration High Availability Configuration
Middle Tier
KEY:
Association in non-high availability configuration
Data transfer
Association in high availability configuration
Temporary association
Node 1
Node 2
Cluster Node 2 (Standby)Cluster Node 1 (Active)

Transformation to OracleAS Cold Failover Cluster (Identity Management) on Windows
Transforming to OracleAS Cold Failover Cluster Topologies 21-49
Comment out the line by adding a # character at the beginning of the line:
#SSO=C:\OraHome_1\jdk\bin\java -jar C:\OraHome_1\sso\lib\ossoca.jar deinstall C:\OraHome_1 "%OID_USER%" %OID_PASSWORD%
■ Comment out the line that begins with "MOD_OSSO=". For example, the line might look like this:
MOD_OSSO=C:\OraHome_1\jdk\bin\java -jar C:\OraHome_1\jlib\infratool.jar de -f C:\OraHome_1\deconfig\deconfig_modosso.properties -o C:\OraHome_1 -u "%OID_USER%" -obf %OID_PASSWORD%
Comment out the line by adding a # character at the beginning of the line:
#MOD_OSSO=C:\OraHome_1\jdk\bin\java -jar C:\OraHome_1\jlib\infratool.jar de -f C:\OraHome_1\deconfig\deconfig_modosso.properties -o C:\OraHome_1 -u "%OID_USER%" -obf %OID_PASSWORD%
3. On node 1, run deconfig.pl to deregister the source Oracle Identity Management from the OracleAS Metadata Repository.
> cd SRC_IM_ORACLE_HOME\bin> SRC_IM_ORACLE_HOME\perl\5.6.1\bin\MSWin-x86\perl.exe deconfig.pl -u oidUser -w passwd -dbp sysPasswd [-r realm]
The -u option specifies the name of the Oracle Internet Directory user. This user must have privileges for deinstalling the Oracle Identity Management components. To run as the Oracle Internet Directory superuser, specify the user as cn=orcladmin.
The -w option specifies the password of the user.
The -dbp option specifies the password of the SYS user in the OracleAS Metadata Repository database.
The -r option is required only if your Oracle Internet Directory contains multiple realms. Use it to specify the realm in Oracle Internet Directory against which the user should be validated.
See the "Deinstallation and Reinstallation" appendix in the Oracle Application Server Installation Guide for details about deconfig.pl.
Step 10 Start the OracleAS Metadata Repository, Oracle Identity Management, and Middle TiersStart the OracleAS Metadata Repository and the Oracle Identity Management on cluster node 1, and start also the middle tiers. The components and applications should be functioning properly. To test failover, fail cluster node 1. The processes should fail over to cluster node 2.
Step 11 Verify That All the Components Are WorkingVerify that the Oracle Identity Management and middle-tier components are working.
1. Test Oracle Identity Management components.
– Test Oracle Delegated Administration Services by accessing its URL, http://virtual_host_name:port/oiddas, and try to perform some operations. Example: http://infra.mydomain.com/oiddas.

Transformation to Distributed OracleAS Cold Failover Cluster (Identity Management) on UNIX and Windows
21-50 Oracle Application Server High Availability Guide
– Test OracleAS Single Sign-On by accessing its URL, http://virtual_host_name:port/pls/orasso, and try to perform some operations. Example: http://infra.mydomain.com/pls/orasso.
2. Test middle-tier components. For example, to test OracleAS Portal, access its URL, http://portalhost.mydomain.com/pls/portal, and try to perform some operations.
Step 12 Decommission the Oracle Homes That Are No Longer UsedAt the end of the transformation procedure, you no longer need these Oracle homes:
■ Oracle home for the source OracleAS Metadata Repository database
If you are not using this Oracle home for other purposes (that is, if you were using this Oracle home only for the OracleAS Metadata Repository database), then you can deinstall it. See the "Removing Oracle Software" chapter in the Oracle Database Installation Guide for details.
■ Oracle home for the source Oracle Identity Management
You can deinstall it by following the procedures in the "Deinstallation and Reinstallation" appendix in the Oracle Application Server Installation Guide.
21.5 Transformation to Distributed OracleAS Cold Failover Cluster (Identity Management) on UNIX and Windows
This section describes how to transform a non-highly available configuration to a distributed OracleAS Cold Failover Cluster configuration.
In the non-highly available, or "source", configuration, the OracleAS Metadata Repository and Oracle Identity Management run from different Oracle homes. They can run on the same computer, or on different computers. Figure 21–19 and Figure 21–20 show them on the same computer, but the procedure described in this section can be used for either case.
To transform this to a distributed OracleAS Cold Failover Cluster configuration, you make the following transformations:
■ Install a new database Oracle home for the cold failover cluster database, and copy the contents of the OracleAS Metadata Repository to a new database instance based on the new Oracle home.
■ Install an Oracle home on the shared drive for Oracle Internet Directory and Oracle Directory Integration and Provisioning.
■ Install Oracle homes for OracleAS Single Sign-On and Oracle Delegated Administration Services on nodes fronted by a load balancer. These nodes will run these components in an active-active configuration.
Figure 21–19 shows the transformation scenario on UNIX. Figure 21–20 shows the transformation on Windows.

Transformation to Distributed OracleAS Cold Failover Cluster (Identity Management) on UNIX and Windows
Transforming to OracleAS Cold Failover Cluster Topologies 21-51
Figure 21–19 Transforming to a Distributed OracleAS Cold Failover Cluster Configuration on UNIX
OracleAS Metadata Repository
Database Instance
Shared Storage
OHS
SSO DAS
On Failover
OracleAS MetadataRepository Database
Instance
OHS
SSO DAS
ORACLE_HOME for OracleAS Metadata Repository (single-instance database)
Middle Tier
ORACLE_HOME for OracleAS Metadata Repository Database
ORACLE_HOME for Oracle Identity Management
InterConnect
Vendor Clusterware
OracleAS Metadata Repository
Database Instance
OHS
SSO DAS
Vendor Clusterware
Virtual Hostname: infra.mydomain.comVirtual IP: 144.25.245.2
ORACLE_HOME for Oracle Identity Management
Non-high availability configuration
Non-high availability configuration
4 Install DAS and SSO on active nodes.
Follow the steps for transforming to OracleASCold Failover Cluster.1
3
3
Disable SSO and DAS.2
2
5 Configure SSO and DAS for SSL, if you are using SSL.
6Configure virtual server name and IP addresson the load balancer.
New Node (Active)
OHS
SSO DAS
New Node (Active)
OHS
SSO DAS
ORACLE_HOME for Oracle Identity Management
ORACLE_HOME for Oracle Identity Management
Update SSO and DAS information in OracleASMetadata Repository.
7 Update mod_osso registration.
On Failover
Oracle Internet
Directory
Oracle Internet
Directory
Oracle Internet
Directory
DIP DIPDIP
Non-High Availability Configuration High Availability Configuration
Load Balancer
HTTP Virtual Server Name: sso.mydomain.com
KEY:
Association in non-high availability configuration
Data transfer
Association in high availability configuration
Temporary association
4 4
5
6
7 7
Node 1
Node 2
Cluster Node 2 (Standby)Cluster Node 1 (Active)
5

Transformation to Distributed OracleAS Cold Failover Cluster (Identity Management) on UNIX and Windows
21-52 Oracle Application Server High Availability Guide
Figure 21–20 Transforming to a Distributed OracleAS Cold Failover Cluster Configuration on Windows
OracleAS Metadata Repository
Database Instance
Shared Storage
OHS
SSO DAS
On Failover
OracleAS MetadataRepository Database
Instance
OHS
SSO DAS
ORACLE_HOME for OracleAS Metadata Repository (single-instance database)
Middle Tier
InterConnect
OracleAS Metadata Repository
Database Instance
OHS
SSO DAS
Virtual Hostname: infra.mydomain.comVirtual IP: 144.25.245.2
ORACLE_HOME for Oracle Identity Management
Non-high availability configuration
Non-high availability configuration
4 Install DAS and SSO on active nodes.
Follow the steps for transforming to OracleASCold Failover Cluster.1
3
3
Disable SSO and DAS.2
2
5 Configure SSO and DAS for SSL, if you are using SSL.
6Configure virtual server name and IP addresson the load balancer.
OHS
SSO DAS
OHS
SSO DAS
ORACLE_HOME for Oracle Identity Management
ORACLE_HOME for Oracle Identity Management
Update SSO and DAS information in OracleASMetadata Repository.
7 Update mod_osso registration.
On Failover
Oracle Internet
Directory
Oracle Internet
Directory
Oracle Internet
Directory
DIP DIPDIP
Non-High Availability Configuration High Availability ConfigurationLoad Balancer
HTTP Virtual Server Name: sso.mydomain.com
KEY:
Association in non-high availability configuration
Data transfer
Association in high availability configuration
Temporary association
4 4
5
6
7 7
ORACLE_HOME for OracleIdentity Management
Data Files for the Cold Failover Cluster Database
ORACLE_HOME forOracleAS Metadata Repository (cold failover cluster database)
ORACLE_HOME forOracleAS MetadataRepository (cold failovercluster database)
Oracle Fail Safe
Microsoft Cluster Server
Oracle Fail Safe
Microsoft Cluster Server
New Node (Active) New Node (Active)
Node 1
Node 2
Cluster Node 2 (Standby)Cluster Node 1 (Active)
5

Transformation to Distributed OracleAS Cold Failover Cluster (Identity Management) on UNIX and Windows
Transforming to OracleAS Cold Failover Cluster Topologies 21-53
21.5.1 Overview of StepsTransformation steps, at a high level, are:
Step 1: Perform Same Steps as for Transforming to OracleAS Cold Failover Cluster
Step 2: Disable OracleAS Single Sign-On and Oracle Delegated Administration Services
Step 3: Configure Virtual Server Name and IP on the Load Balancer
Step 4: Install OracleAS Single Sign-On and Oracle Delegated Administration Services on Active-Active Nodes
Step 5: Configure SSL (If You Want to Use SSL)
Step 6: Update OracleAS Single Sign-On and Oracle Delegated Administration Services Information in the OracleAS Metadata Repository
Step 7: Update mod_osso Registration
Step 8: Verify That All the Components Are Working
Step 9: Decommission the Oracle Homes That Are No Longer Used
21.5.2 Steps in DetailThe following steps use the following names to refer to the different nodes (the names match the ones used in Figure 21–19):
■ Node 1 and node 2 are nodes in the source configuration.
■ Cluster node 1 and cluster node 2 are nodes in the hardware cluster. These nodes have access to the shared storage on which you will install Oracle Identity Management instance.
■ New nodes for OracleAS Single Sign-On and Oracle Delegated Administration Services are fronted by a load balancer. These nodes are not in a hardware cluster.
Step 1 Perform Same Steps as for Transforming to OracleAS Cold Failover ClusterPerform most of the steps for transforming to OracleAS Cold Failover Cluster. Table 21–7 lists the sections for the steps.
Table 21–7 Step 1 for Transforming to a Distributed OracleAS Cold Failover Cluster
Platform Section
UNIX Perform the steps in Section 21.3, "Transformation to OracleAS Cold Failover Cluster (Identity Management) on UNIX", but skip these steps:
■ Step 9 on page 21-18
■ Step 10 on page 21-18
Windows Perform the steps in Section 21.4, "Transformation to OracleAS Cold Failover Cluster (Identity Management) on Windows", but skip these steps:
■ Step 10 on page 21-43
■ Step 11 on page 21-43

Transformation to Distributed OracleAS Cold Failover Cluster (Identity Management) on UNIX and Windows
21-54 Oracle Application Server High Availability Guide
Step 2 Disable OracleAS Single Sign-On and Oracle Delegated Administration ServicesDisable OracleAS Single Sign-On and Oracle Delegated Administration Services on the hardware cluster so that you can install them on other nodes. This enables you to create a distributed model. After running this step, you should have an environment that looks like Figure 21–21.
Figure 21–21 Step 2 (UNIX): Disable OracleAS Single Sign-On and Oracle Delegated Administration Services
OracleAS Metadata Repository
Database Instance
Shared Storage
OHS
SSO DAS
On Failover
OracleAS MetadataRepository Database
Instance
OHS
SSO DAS
ORACLE_HOME for OracleAS Metadata Repository (single-instance database)
Middle Tier
ORACLE_HOME for OracleAS Metadata Repository Database
ORACLE_HOME for Oracle Identity Management
InterConnect
Vendor Clusterware
OracleAS Metadata Repository
Database Instance
OHS
SSO DAS
Vendor Clusterware
Virtual Hostname: infra.mydomain.comVirtual IP: 144.25.245.2
ORACLE_HOME for Oracle Identity Management
Non-high availability configuration
Non-high availability configuration
Disable SSO and DAS.2
2
On Failover
Oracle Internet
Directory
Oracle Internet
Directory
Oracle Internet
Directory
DIP DIPDIP
Non-High Availability Configuration High Availability Configuration
KEY:
Association in non-high availability configuration
Data transfer
Association in high availability configuration
Temporary association
Node 1
Node 2
Cluster Node 2 (Standby)Cluster Node 1 (Active)

Transformation to Distributed OracleAS Cold Failover Cluster (Identity Management) on UNIX and Windows
Transforming to OracleAS Cold Failover Cluster Topologies 21-55
Figure 21–22 Step 2 (Windows): Disable OracleAS Single Sign-On and Oracle Delegated Administration Services
1. On either cluster node 1 or cluster node 2, from the CFC_IM_ORACLE_HOME, start up Application Server Control Console.
2. Display the home page for the Oracle Identity Management instance.
3. Select the checkbox for OC4J_SECURITY and click Enable/Disable Components. This displays the Enable/Disable Components page.
4. On the Enable/Disable Components page, select both OC4J_SECURITY and HTTP_Server, Single Sign-On:orasso in the Enabled Components box and click Move All to move them to the Disabled Components box. There should be three items in the Disabled Components box:
Downtime 1 Starts: The next step starts the first downtime.
OracleAS Metadata Repository
Database Instance
Shared Storage
OHS
SSO DAS
On Failover
OracleAS MetadataRepository Database
Instance
OHS
SSO DAS
ORACLE_HOME for OracleAS Metadata Repository (single-instance database)
Middle Tier
InterConnect
OracleAS Metadata Repository
Database Instance
OHS
SSO DAS
Virtual Hostname: infra.mydomain.comVirtual IP: 144.25.245.2
ORACLE_HOME for Oracle Identity Management
Non-high availability configuration
Non-high availability configuration
On Failover
Oracle Internet
Directory
Oracle Internet
Directory
Oracle Internet
Directory
DIP DIPDIP
Non-High Availability Configuration High Availability Configuration
KEY:
Association in non-high availability configuration
Data transfer
Association in high availability configuration
Temporary association
ORACLE_HOME for OracleIdentity Management
Data Files for the Cold Failover Cluster Database
ORACLE_HOME forOracleAS Metadata Repository (cold failover cluster database)
ORACLE_HOME forOracleAS MetadataRepository (cold failovercluster database)
Oracle Fail Safe
Microsoft Cluster Server
Oracle Fail Safe
Microsoft Cluster Server
2
Disable SSO and DAS.2
Node 1
Node 2
Cluster Node 2 (Standby)Cluster Node 1 (Active)

Transformation to Distributed OracleAS Cold Failover Cluster (Identity Management) on UNIX and Windows
21-56 Oracle Application Server High Availability Guide
– home
– OC4J_SECURITY
– HTTP_Server, Single Sign-On:orasso
5. Click OK.
6. On the Warning page, which warns you that the components to be disabled will be stopped, click Yes. This stops the components and disables them as well.
7. When you return to the instance home page, you should see only two components: Internet Directory and Management.
Step 3 Configure Virtual Server Name and IP on the Load BalancerConfigure a virtual server name and IP on the load balancer for HTTP traffic. Clients will use this virtual server name to access OracleAS Single Sign-On and Oracle Delegated Administration Services.
Step 4 Install OracleAS Single Sign-On and Oracle Delegated Administration Services on Active-Active NodesIn this step, you install OracleAS Single Sign-On and Oracle Delegated Administration Services on the nodes fronted by the load balancer. You install the Oracle home on the local storage of each node; this means you have to perform the installation once for each node.

Transformation to Distributed OracleAS Cold Failover Cluster (Identity Management) on UNIX and Windows
Transforming to OracleAS Cold Failover Cluster Topologies 21-57
Figure 21–23 Step 4 (UNIX): Install OracleAS Single Sign-On and Oracle Delegated Administration Services on Active-Active Nodes
OracleAS Metadata Repository
Database Instance
Shared Storage
OHS
SSO DAS
On Failover
OracleAS MetadataRepository Database
Instance
OHS
SSO DAS
ORACLE_HOME for OracleAS Metadata Repository (single-instance database)
Middle Tier
ORACLE_HOME for OracleAS Metadata Repository Database
ORACLE_HOME for Oracle Identity Management
InterConnect
Vendor Clusterware
OracleAS Metadata Repository
Database Instance
OHS
SSO DAS
Vendor Clusterware
Virtual Hostname: infra.mydomain.comVirtual IP: 144.25.245.2
ORACLE_HOME for Oracle Identity Management
Non-high availability configuration
Non-high availability configuration
Install DAS and SSO on active nodes.
New Node (Active)
OHS
SSO DAS
New Node (Active)
OHS
SSO DAS
ORACLE_HOME for Oracle Identity Management
ORACLE_HOME for Oracle Identity Management
On Failover
Oracle Internet
Directory
Oracle Internet
Directory
Oracle Internet
Directory
DIP DIPDIP
Non-High Availability Configuration High Availability Configuration
Load Balancer
HTTP Virtual Server Name: sso.mydomain.com
KEY:
Association in non-high availability configuration
Data transfer
Association in high availability configuration
Temporary association
Node 1
Node 2
Cluster Node 2 (Standby)Cluster Node 1 (Active)
4
4 4

Transformation to Distributed OracleAS Cold Failover Cluster (Identity Management) on UNIX and Windows
21-58 Oracle Application Server High Availability Guide
Figure 21–24 Step 4 (Windows): Install OracleAS Single Sign-On and Oracle Delegated Administration Services on Active-Active Nodes
1. Stop all the Oracle Identity Management components except Oracle Internet Directory. One way of doing this is to stop all components, then start up Oracle Internet Directory. (In the commands below, use the appropriate slash for your operating system.)
OracleAS Metadata Repository
Database Instance
Shared Storage
OHS
SSO DAS
On Failover
OracleAS MetadataRepository Database
Instance
OHS
SSO DAS
ORACLE_HOME for OracleAS Metadata Repository (single-instance database)
Middle Tier
InterConnect
OracleAS Metadata Repository
Database Instance
OHS
SSO DAS
Virtual Hostname: infra.mydomain.comVirtual IP: 144.25.245.2
ORACLE_HOME for Oracle Identity Management
Non-high availability configuration
Non-high availability configuration
Install DAS and SSO on active nodes.
New Node (Active)
OHS
SSO DAS
New Node (Active)
OHS
SSO DAS
ORACLE_HOME for Oracle Identity Management
ORACLE_HOME for Oracle Identity Management
On Failover
Oracle Internet
Directory
Oracle Internet
Directory
Oracle Internet
Directory
DIP DIPDIP
Non-High Availability Configuration High Availability ConfigurationLoad Balancer
HTTP Virtual Server Name: sso.mydomain.com
KEY:
Association in non-high availability configuration
Data transfer
Association in high availability configuration
Temporary association
ORACLE_HOME for OracleIdentity Management
Data Files for the Cold Failover Cluster Database
ORACLE_HOME forOracleAS Metadata Repository (cold failover cluster database)
ORACLE_HOME forOracleAS MetadataRepository (cold failovercluster database)
Oracle Fail Safe
Microsoft Cluster Server
Oracle Fail Safe
Microsoft Cluster Server
Node 1
Node 2
Cluster Node 2 (Standby)Cluster Node 1 (Active)
4 4
4

Transformation to Distributed OracleAS Cold Failover Cluster (Identity Management) on UNIX and Windows
Transforming to OracleAS Cold Failover Cluster Topologies 21-59
> CFC_IM_ORACLE_HOME/opmn/bin/opmnctl stopall> CFC_IM_ORACLE_HOME/opmn/bin/opmnctl startproc ias-component=OID
2. Run the installer on each node to install OracleAS Single Sign-On and Oracle Delegated Administration Services. Some important screens:
■ In the Select Installation Type screen, select Identity Management.
■ In the Select Configuration Options screen, select only OracleAS Single Sign-On, Oracle Delegated Administration Services, and High Availability.
■ In the Select High Availability Option screen, select OracleAS Cluster (Identity Management).
■ In the Create or Join an OracleAS Cluster (Identity Management) screen, for the first instance of OracleAS Single Sign-On / Oracle Delegated Administration Services that you are installing, select Create a New OracleAS Cluster. For subsequent instances, select Join an Existing Cluster.
■ In the Specify HTTP Load Balancer Host and Ports screen, enter the virtual server name configured on the load balancer and port.
■ In Specify LDAP Virtual Host and Ports screen, enter the virtual hostname and port for Oracle Internet Directory.
Step 5 Configure SSL (If You Want to Use SSL)Configure OracleAS Single Sign-On and Oracle Delegated Administration Services for SSL, if you need these components to use SSL in your installation.
Step 6 Update OracleAS Single Sign-On and Oracle Delegated Administration Services Information in the OracleAS Metadata Repository1. From one of OracleAS Single Sign-On nodes, run one of these commands:
■ Non-SSL on UNIX:
> SSO_ORACLE_HOME/sso/bin/ssocfg.sh http FQ_virtual_hostname port
■ SSL on UNIX:
> SSO_ORACLE_HOME/sso/bin/ssocfg.sh https FQ_virtual_hostname port
■ Non-SSL on Windows:
> SSO_ORACLE_HOME\sso\bin\ssocfg.bat http FQ_virtual_hostname port
■ SSL on Windows:
> SSO_ORACLE_HOME\sso\bin\ssocfg.bat https FQ_virtual_hostname port
Replace FQ_virtual_hostname with the HTTP virtual server name configured on the load balancer. Enter the fully qualified name.
Replace port with either the SSL or the non-SSL port used by Oracle HTTP Server.
2. Change the URL for OracleAS Single Sign-On and Oracle Delegated Administration Services.
a. On cluster node 1, start Oracle Directory Manager.
If you are running on UNIX, run the following command to start it:
> SSO_ORACLE_HOME/bin/oidadmin

Transformation to Distributed OracleAS Cold Failover Cluster (Identity Management) on UNIX and Windows
21-60 Oracle Application Server High Availability Guide
If you are running on Windows, you can start it from the Start menu:
Start > Programs > Oracle - IM_OracleHomeName > Integrated Management Tools > Oracle Directory Manager
b. Connect using cluster node 1’s hostname. Log in as cn=orcladmin.
c. Expand Entry Management > cn=OracleContext > cn=Products > cn=DAS > cn=OperationURLs.
d. Update the value of the orcldasurlbase attribute to the virtual server name.
Step 7 Update mod_osso Registration1. Run ssoreg as follows:
On UNIX:
> CFC_IM_ORACLE_HOME/sso/bin/ssoreg.sh -oracle_home_path im_oracle_home -site_name virtual_hostname:http_port -config_mod_osso TRUE -mod_osso_url http://virtual_hostname:port -u root
On Windows:
> CFC_IM_ORACLE_HOME\sso\bin\ssoreg.bat -oracle_home_path im_oracle_home -site_name virtual_hostname:http_port -config_mod_osso TRUE -mod_osso_url http://virtual_hostname:port -u system
Replace im_oracle_home with the full path of the Oracle Identity Management Oracle home.
Replace virtual_hostname with the fully qualified virtual hostname.
Replace port with the Oracle HTTP Server port. Note that if you are using port 80, you must not specify the port number because port 80 is the default value.
2. Update the configuration in the DCM repository.
> SSO_ORACLE_HOME/dcm/bin/dcmctl updateConfig
3. Restart the second OracleAS Single Sign-On.
> opmnctl restartproc process-type=HTTP_Server> opmnctl restartproc process-type=OC4J_SECURITY
Step 8 Verify That All the Components Are WorkingVerify that the Oracle Identity Management and middle-tier components are working.
1. Test Oracle Identity Management components.
– Test Oracle Delegated Administration Services by accessing its URL, http://virtual_server_name:port/oiddas, and try to perform some operations. Example: http://sso.mydomain.com/oiddas.

Transformation to Distributed OracleAS Cold Failover Cluster (Identity Management) on UNIX and Windows
Transforming to OracleAS Cold Failover Cluster Topologies 21-61
– Test OracleAS Single Sign-On by accessing its URL, http://virtual_server_name:port/pls/orasso, and try to perform some operations. Example: http://sso.mydomain.com/pls/orasso.
2. Test middle-tier components. For example, to test OracleAS Portal, access its URL, http://portalhost.mydomain.com/pls/portal, and try to perform some operations.
Step 9 Decommission the Oracle Homes That Are No Longer UsedAt the end of the transformation procedure, you no longer need these Oracle homes:
■ Oracle home for the source OracleAS Metadata Repository database
If you are not using this Oracle home for other purposes (that is, if you were using this Oracle home only for the OracleAS Metadata Repository database), then you can deinstall it. See the "Removing Oracle Software" chapter in the Oracle Database Installation Guide for details.
■ Oracle home for the source Oracle Identity Management
You can deinstall it by following the procedures in the "Deinstallation and Reinstallation" appendix in the Oracle Application Server Installation Guide.
Downtime 1 Ends: This ends the first downtime.

Transformation to Distributed OracleAS Cold Failover Cluster (Identity Management) on UNIX and Windows
21-62 Oracle Application Server High Availability Guide

Part VIAppendices
The information in this part is supplementary to the previous chapters of the book and is organized into the following appendixes:
■ Appendix A, "Troubleshooting High Availability"
■ Appendix B, "Manually Managed OracleAS Clusters"
■ Appendix C, "OracleAS Guard Error Messages"


Troubleshooting High Availability A-1
ATroubleshooting High Availability
This appendix describes common problems that you might encounter when deploying and managing Oracle Application Server in high availability configurations, and explains how to solve them. It contains the following topics:
■ Section A.1, "Troubleshooting OracleAS Cold Failover Cluster Configurations"
■ Section A.2, "Troubleshooting OracleAS Cluster (Identity Management) Configurations"
■ Section A.3, "Troubleshooting OracleAS Disaster Recovery Configurations"
■ Section A.4, "Troubleshooting Middle-Tier Components"
■ Section A.5, "Troubleshooting Backup and Recovery"
■ Section A.6, "Troubleshooting Real Application Clusters"
■ Section A.7, "Need More Help?"
A.1 Troubleshooting OracleAS Cold Failover Cluster ConfigurationsThis section describes common problems and solutions in OracleAS Cold Failover Cluster configurations. It contains the following topics:
■ Section A.1.1, "OracleAS Web Cache Does Not Fail Over"
■ Section A.1.2, "Unable to Perform Online Database Backup and Restore in OracleAS Cold Failover Cluster Environment"
■ Section A.1.3, "Cannot Connect to Database for Restoration (Windows)"
A.1.1 OracleAS Web Cache Does Not Fail Over
ProblemOracleAS Web Cache does not fail over in an OracleAS Cold Failover Cluster environment (that is, it does not start up on the standby node). It writes the following error in the log file:
[26/Apr/2005:14:36:08 -0700] [error 13079] [ecid: -] No matching CACHEelement found in webcache.xml for current hostname (hostname) andORACLE_HOME (/path/to/oracle/home)
SolutionYou need to perform these steps for OracleAS Web Cache to fail over in an OracleAS Cold Failover Cluster environment:

Troubleshooting OracleAS Cold Failover Cluster Configurations
A-2 Oracle Application Server High Availability Guide
■ Create a two-node OracleAS Web Cache cluster using Application Server Control Console. For the host name, use the physical hostnames of the nodes in the OracleAS Cold Failover Cluster.
■ Keep both of these cache entries (the CACHE element in webcache.xml) in sync, except for the host name.
For details on OracleAS Web Cache clusters, see chapter 10, "Configuring Cache Clusters", in the Oracle Application Server Web Cache Administrator’s Guide.
A.1.2 Unable to Perform Online Database Backup and Restore in OracleAS Cold Failover Cluster Environment
Issues with online database backup and restore are noted here. This information pertains to the OracleAS Cold Failover Cluster environment.
ProblemUnable to perform online recovery of Infrastructure database due to dependencies and cluster administrator trying to bring the database down and then up during the recovery phase by the Backup and Recovery Tool.
Solution 1To perform a clean recovery, use the following steps:
1. Bring all resources offline using the cluster administrator (for Windows, use Oracle Fail Safe).
2. Perform a normal shutdown of the Infrastructure database.
3. Start only the database service using the following command:
net start OracleService<SID>
4. Run the Backup and Recovery Tool to perform the recovery of the database.
Solution 2For Windows, the following steps can be used to perform a recovery:
1. In Oracle Fail Safe, under "Cluster Resources", select "ASDB(DB Resource)" in the "Database" tab.
2. For "Database Polling", select "Disabled" from the drop down list.
3. Using the Backup and Recovery Tool, perform an online restore of the Infrastructure database.
The database is not accessible for a brief period while the Backup and Recovery Tool stops and starts the database. Once the database starts up, it can be accessed by middle-tier and Infrastructure components.
A.1.3 Cannot Connect to Database for Restoration (Windows) Unable to connect to idle OracleAS Metadata Repository database to restore it after it is shutdown using Microsoft Cluster Administrator.
ProblemWhen you stop the OracleAS Metadata Repository database using Microsoft Cluster Administrator, Microsoft Cluster Administrator performs the strictest and fastest abort

Troubleshooting High Availability A-3
to shut down the database service. After the shutdown, you are unable to connect to the database.
The following steps illustrate the problem:
1. Access an OracleAS Metadata Repository that is used for testing.
2. Corrupt a database file (note: do not modify the ts$ table).
3. Issue a SQL query to ensure that the database is corrupted.
4. Using Microsoft Cluster Administrator, verify that the database is online.
5. Using Oracle Fail Safe Manager, disable database polling.
6. Using Microsoft Cluster Administrator, take the database offline. This also takes OPMN and Application Server Control Console offline as they are dependencies of the database.
7. Try connecting as sysdba. The connection should fail.
SolutionUse the Oracle Fail Safe Manager to shut down the database. To do so:
1. In the Oracle Fail Safe Manager, right-click the "ASDB" resource (default if not changed), and select "Immediate".
2. Start the database service using Windows Service Manager.
3. Connect to the database as sysdba. The connection should be successful.
A.2 Troubleshooting OracleAS Cluster (Identity Management) Configurations
This section describes common problems and solutions in OracleAS Cluster (Identity Management) configurations. It contains the following topics:
■ Section A.2.1, "Logging into OracleAS Single Sign-On Takes a Long Time"
■ Section A.2.2, "Oracle Internet Directory Does Not Start Up on One of the Nodes"
■ Section A.2.3, "Unable to Connect to Oracle Internet Directory, and Oracle Internet Directory Cannot Be Restarted"
■ Section A.2.4, "Cluster Configuration Assistant Fails During Installation"
■ Section A.2.5, "Oracle Ultra Search Configuration Assistant is Unable to Connect to Oracle Internet Directory During High Availability Infrastructure Installation"
■ Section A.2.6, "odisrv Process Does Not Fail Over After "opmnctl stopall""
■ Section A.2.7, "Unpredictable Behavior from OracleAS Cluster (Identity Management) Configuration When System Time on All Nodes Is Not Synchronized"
■ Section A.2.8, "Wrong Name Specified for Load Balancer"
Problems and solutions related to multimaster replication and other Oracle Internet Directory features are documented in the troubleshooting section of Oracle Internet Directory Administrator’s Guide.

Troubleshooting OracleAS Cluster (Identity Management) Configurations
A-4 Oracle Application Server High Availability Guide
A.2.1 Logging into OracleAS Single Sign-On Takes a Long Time
ProblemLogging into OracleAS Single Sign-On might take a long time if you are running OracleAS Single Sign-On and Oracle Internet Directory on opposite sides of a firewall (OracleAS Single Sign-On is running outside the firewall and Oracle Internet Directory inside the firewall) and if the firewall is configured to drop idle connections or recycle connections after the configured timeout period has elapsed.
Solution1. Set the timeout on OracleAS Single Sign-On connections to a value smaller than
the firewall and load balancer timeout values. The OracleAS Single Sign-On server will remove connections that are idle for longer than the specified value.
You specify this value (in minutes) using the connectionIdleTimeout parameter in the ORACLE_HOME/sso/conf/policy.properties file. For example, the following line sets the timeout value for 20 minutes. The OracleAS Single Sign-On server will remove connections that are idle for longer than 20 minutes.
connectionIdleTimeout = 20
Restart the OC4J server (OC4J_SECURITY) that is running the OracleAS Single Sign-On server for the new value to take effect.
2. Set the timeout for database connections in the SQLNET.EXPIRE_TIME parameter in the ORACLE_HOME/network/admin/sqlnet.ora file. You also set this value to a value smaller than the firewall and load balancer timeout values.
This parameter specifies how often the database server sends a probe packet to the client (which is the OracleAS Single Sign-On server). This periodic activity by the probe packet enables the OracleAS Single Sign-On server-to-database connections to stay active.
The value is specified in minutes. In the following example, the database server sends the probe packet every 20 minutes to the client.
SQLNET.EXPIRE_TIME = 20
Restart the database for the new value to take effect.
Explanation: The firewall or load balancer might drop connections to Oracle Internet Directory and the database if the connections are idle for a certain time. When the firewall or load balancer drops a connection, it might not send a tcp close notification to the OracleAS Single Sign-On server. The OracleAS Single Sign-On server then is unaware that the connection is no longer valid and tries to use it to perform Oracle Internet Directory or database operations. When the OracleAS Single Sign-On server does not get a response, it tries the next connection. Eventually it tries all the connections in the pool before making fresh connections to Oracle Internet Directory or to the database.
By setting the timeout on the OracleAS Single Sign-On server and on the database to a value smaller than the timeout on the firewall or load balancer, you ensure that the connections are valid.
Troubleshooting High Availability A-5
A.2.2 Oracle Internet Directory Does Not Start Up on One of the Nodes
ProblemIf the time difference between the nodes in the OracleAS Cluster (Identity Management) is greater than 250 seconds, the Oracle Internet Directory Monitor (oidmon) will stop Oracle Internet Directory on the node that is behind. For example, if the time on node A is ahead of node B’s by more than 250 seconds, then oidmon will stop Oracle Internet Directory processes on node B. This is because the oidmon processes on all the nodes update the database every 10 seconds to tell the other nodes it is running. If a node does not respond for 250 seconds, then the other nodes treat that node as a failed node.
SolutionSynchronize the time on all nodes to within 250 seconds of each other.
A.2.3 Unable to Connect to Oracle Internet Directory, and Oracle Internet Directory Cannot Be Restarted
ProblemThis issue applies only to Windows 2000 platforms. This issue has two symptoms:
Symptom #1: If you have configured your load balancer to monitor the Oracle Internet Directory ports using TCP port monitoring, you might see the "maximum number of connections reached" error in the Oracle Internet Directory log file. This means that clients are unable to connect to Oracle Internet Directory.
Symptom #2: If Oracle Internet Directory terminates, you are not able to restart it. When you try to restart it, you get a message that Oracle Internet Directory is unable to access its ports because the System Idle Process is already using them. Oracle Internet Directory needs exclusive access to its ports.
SolutionThis problem is caused by an application (in this case, the load balancer) that performs TCP port monitoring on the Oracle Internet Directory ports. In TCP port monitoring, the application opens and closes connections to the Oracle Internet Directory ports. In Windows 2000, the connection is not closed properly; this is why you reach the maximum number of connections.
The workaround is not to use TCP port monitoring for the Oracle Internet Directory ports. Instead, use LDAP or HTTP port monitoring.
A.2.4 Cluster Configuration Assistant Fails During Installation Problems encountered during the clustering of components using the Cluster Configuration Assistant are addressed here.
ProblemDuring the installation of distributed Oracle Identity Management configurations, the OracleAS Single Sign-On and Oracle Delegated Administration Services components are installed in two of their own nodes separate from the other Oracle Identity Management components. The Cluster Configuration Assistant may attempt to cluster the two resulting OracleAS Single Sign-On/Oracle Delegated Administration Services instances together. However, the error message "Instances containing disabled

Troubleshooting OracleAS Cluster (Identity Management) Configurations
A-6 Oracle Application Server High Availability Guide
components cannot be added to a cluster" may appear. This message appears because Enterprise Manager cannot cluster instances with disabled components.
SolutionIf the Cluster Configuration Assistant fails, you can cluster the instance after installation. In this case, to cluster the instance, you must use the "dcmctl joincluster" command instead of Application Server Control Console. You cannot use Application Server Control Console in this case because it cannot cluster instances that contain disabled components. In this case, the "home" OC4J instance is disabled.
A.2.5 Oracle Ultra Search Configuration Assistant is Unable to Connect to Oracle Internet Directory During High Availability Infrastructure Installation
During high availability Infrastructure installation, the Oracle Ultra Search Configuration Assistant cannot connect to an Oracle Internet Directory instance at port 3060 of the virtual hostname provided in the virtual hostname addressing screen.
ProblemA common mistake can be made when virtual hostname addressing is used during Infrastructure installation. The load balancer virtual server name is entered, and the load balancer is set up correctly to assume this name. However, the Infrastructure node is not set up correctly to resolve this name. Thus, when the Oracle Ultra Search Configuration Assistant on the Infrastructure node tries to connect to the load balancer virtual server name, the Configuration Assistant cannot find the load balancer.
SolutionThe solution is to set up name resolution correctly on the Infrastructure machine for the load balancer virtual server name. This procedure is platform dependent. Check your operating system manual for an accurate procedure. In Unix, this usually involves editing the /etc/hosts file and making sure this file is used for name resolution by editing the /etc/nsswitch.conf file. In Windows, this usually involves editing the C:\WINDOWS\system32\drivers\etc\hosts file.
A.2.6 odisrv Process Does Not Fail Over After "opmnctl stopall"Issues with odisrv process failover between nodes are documented here.
ProblemIn any OracleAS Cluster (Identity Management) solution, when opmnctl stopall is executed to stop all OPMN-managed processes on that node, odisrv is not started automatically on the second node because opmnctl stopall is a normal administrative shutdown, not an actual node failure. In a true node failure, odisrv is started on the remaining node upon death detection of the original odisrv process.
SolutionIf planned maintenance is required for an OracleAS Cluster (Identity Management), use the oidctl command to explicitly stop and start odisrv.
On the node where odisrv is running, use the following command to stop it:
ORACLE_HOME/bin/oidctl connect=<dbConnect> server=odisrv inst=1 stop
On the remaining active node, start odisrv using the following command:

Troubleshooting High Availability A-7
ORACLE_HOME/bin/oidctl connect=<dbConnect> server=odisrv instance=1 flags="host=OIDhost port=OIDport" start
A.2.7 Unpredictable Behavior from OracleAS Cluster (Identity Management) Configuration When System Time on All Nodes Is Not Synchronized
Unpredictable behavior from OracleAS Cluster (Identity Management) nodes if system time on all nodes is not synchronized.
ProblemIn a OracleAS Cluster (Identity Management) configuration, the Oracle Internet Directory Monitor (OIDMON) on each node updates the directory database every 10 seconds with metadata. At the same time, it queries the database to verify that all other directory servers are running.
If an OIDMON does not update the database for 250 seconds, the other nodes assume that that node has failed. This delay can be manifested erroneously by nodes with their system clocks set with a difference of more than 250 seconds from the other nodes. When this happens, OIDMON on one of the other nodes will initiate failover operations, which include locally bringing up processes that were running on the failed node. The node where these processes are started continue processing the operations that were underway in the failed node.
As an example, assume a OracleAS Cluster (Identity Management) configuration with nodes A and B. The system clock in node B is 300 seconds behind node A’s clock. Node B updates its metadata in the directory database, which includes the system clock value. Node A queries the database for active Oracle Internet Directory servers and determines that node B has failed because its time value is 300 seconds. Node A then initiates failover operations by locally starting all Oracle Internet Directory server processes that were running on node B.
SolutionThe system clock value on all nodes in the OracleAS Cluster (Identity Management) configuration should be synchronized using Greenwich mean time so that there is a discrepancy of no more than 250 seconds between them.
Refer to the chapters on Rack-Mounted directory server configurations in the Oracle Internet Directory Administrator’s Guide.
A.2.8 Wrong Name Specified for Load Balancer If a load balancer is deployed in front of Oracle Application Server instances that are clustered together, configuration files of the instances may not have the correct load balancer virtual server name specified.
ProblemFor a cluster of Oracle Application Server instances front-ended by a load balancer, a redirect back to the cluster may not contain the load balancer virtual server name. Dynamic pages created by a servlet or JSP may also not use the correct load balancer virtual server name. In both cases, the local hostname is most likely used instead.
To correctly specify the load balancer virtual server name to be used, modifications have to be made to the httpd.conf and default-web-site.xml file for each instance.

Troubleshooting OracleAS Disaster Recovery Configurations
A-8 Oracle Application Server High Availability Guide
SolutionFor each Oracle Application Server instance, perform the following steps:
1. Perform the following steps for Oracle HTTP Server:
a. Stop the Oracle HTTP Server using the following command:
opmnctl stopproc ias_component=HTTP_Server
b. In Oracle HTTP Server’s httpd.conf file, change the value for the directive ServerName to the virtual server name of your load balancer. For example, if you use "localhost", change it to the virtual server name of your load balancer.
c. In the same httpd.conf file, change the value of the Port directive to the port number your load balancer is configured with for incoming requests. For example, if the port number specified is 7777, change it to port 80 if that is configured on your load balancer.
d. Execute the following command to update the DCM repository with the above changes:
dcmctl updateConfig -ct ohs
e. Start the Oracle HTTP Server using the following command:
opmnctl startproc ias_component=HTTP_Server
2. Perform the following steps for OC4J:
a. Stop the OC4J processes for each OracleAS instance using the following command:
opmnctl stopproc ias_component=OC4J
b. Edit the file default-web-site.xml to include the following line:
<frontend host="load_balancer_name" port="port_number" />
Replace "load_balancer_name" with the virtual server name of your load balancer and "port_number" with the port number that is configured for incoming requests in your load balancer (these values are similar to those you entered for httpd.conf above).
c. Execute the following command to update the DCM repository with the changes you made in the default-web-site.xml file:
dcmctl updateconfig -ct oc4j
d. Start the OC4J instances using the following command:
opmnctl startproc ias_component=OC4J
A.3 Troubleshooting OracleAS Disaster Recovery ConfigurationsThis section describes common problems and solutions in OracleAS Disaster Recovery configurations. It contains the following topics:
■ Section A.3.1, "Standby Site Not Synchronized"
■ Section A.3.2, "Failure to Bring Up Standby Instances After Failover or Switchover"
■ Section A.3.3, "Unable to Start Standalone OracleAS Web Cache Installations at the Standby Site"

Troubleshooting High Availability A-9
■ Section A.3.4, "Standby Site Middle-tier Installation Uses Wrong Hostname"
■ Section A.3.5, "Failure of Farm Verification Operation with Standby Farm"
■ Section A.3.6, "Sync Farm Operation Returns Error Message"
A.3.1 Standby Site Not Synchronized In the OracleAS Disaster Recovery standby site, you may find that the site’s OracleAS Metadata Repository is not synchronized with the OracleAS Metadata Repository in the primary site.
ProblemThe OracleAS Disaster Recovery solution requires manual configuration and shipping of data files from the primary site to the standby site. Also, the data files (archived database log files) are not applied automatically in the standby site, that is, OracleAS Disaster Recovery does not use managed recovery in Oracle Data Guard.
SolutionThe archive log files have to be applied manually. The steps to perform this task is found in Chapter 13, "OracleAS Disaster Recovery".
A.3.2 Failure to Bring Up Standby Instances After Failover or SwitchoverStandby instances are not started after a failover or switchover operation.
ProblemIP addresses are used in instance configuration. OracleAS Disaster Recovery setup does not require identical IP addresses in peer instances between the production and standby site. OracleAS Disaster Recovery synchronization does not reconcile IP address differences between the production and standby sites. Thus, if you use explicit IP address xxx.xx.xxx.xx in your configuration, the standby configuration after synchronization will not work.
SolutionAvoid using explicit IP addresses. For example, in OracleAS Web Cache and Oracle HTTP Server configurations, use ANY or host names instead of IP addresses as listening addresses
A.3.3 Unable to Start Standalone OracleAS Web Cache Installations at the Standby Site OracleAS Web Cache cannot be started at the standby site possibly due to misconfigured standalone OracleAS Web Cache after failover or switchover.
ProblemOracleAS Disaster Recovery synchronization does not synchronize standalone OracleAS Web Cache installations.
SolutionUse the standard Oracle Application Server full CD image to install the OracleAS Web Cache component

Troubleshooting OracleAS Disaster Recovery Configurations
A-10 Oracle Application Server High Availability Guide
A.3.4 Standby Site Middle-tier Installation Uses Wrong HostnameA middle-tier installation in the standby site uses the wrong hostname even after the machine’s physical hostname is changed.
ProblemBesides modifying the physical hostname, you also need to put it as the first entry in /etc/hosts file. Failure to do the latter will cause the installer to use the wrong hostname.
SolutionPut the physical hostname as the first entry in the /etc/hosts file. See Section 13.2.2, "Configuring Hostname Resolution" on page 13-15 for more information.
A.3.5 Failure of Farm Verification Operation with Standby FarmWhen performing a verify farm with standby farm operation, the operation fails with an error message indicating that the middle-tier machine instance cannot be found and that the standby farm is not symmetrical with the production farm.
ProblemThe verify farm with standby farm operation is trying to verify that the production and standby farms are symmetrical to one another, that they are consistent, and conform to the requirements for disaster recovery.
The verify operation is failing because it sees the middle-tier instance as mid_tier.<hostname> and not as mid_tier.<physical_hostname>. You might suspect that this is a problem with the environmental variable _CLUSTER_NETWORK_NAME_, which is set during installation. However, in this case, it is not because a check of the _CLUSTER_NETWORK_NAME_ environmental variable setting finds this entry to be correct. However, a check of the contents of the /etc/hosts file, indicates that the entries for the middle tier in question are incorrect. That is, all middle-tier installations take the hostname from the second column of the /etc/hosts file.
For example, assume the following scenario:
■ Two environments are used: examp1 and examp2
■ OracleAS Infrastructure (Oracle Identity Management and OracleAS Metadata Repository) is first installed on examp1 and examp2 as host infra
■ OracleAS middle-tier (OracleAS Portal and OracleAS Wireless) is then installed on examp1 and examp2 as host node1
■ Basically, these are two installations (OracleAS Infrastructure and OracleAS middle-tier) on a single node
■ Updated the latest duf.jar and backup_restore files on all four Oracle homes
■ Started OracleAS Guard (asgctl) on all four Oracle homes (OracleAS Infrastructure and OracleAS middle-tier on two nodes)
■ Performed asgctl operations: connect asg, set primary, dump farm
■ Performed asgctl verify farm with standby farm operation, but it fails because it sees the instance as mid-tier.examp1 and not as mid_tier.node1.us.oracle.com
A check of the /etc/hosts file shows the following entry:
123.45.67.890 examp1 node1.us.oracle.com node1 infra
Troubleshooting High Availability A-11
Then ias.properties and farms shows the following and the verify operation is failing:
IASname=midtier_inst.examp1
However, the /etc/hosts file should actually be the following:
123.45.67.890 node1.us.oracle.com node1 infra
Then ias.properties and farms shows the following and the verify operation succeeds:
IASname=midtier_inst.node1.us.oracle.com
SolutionCheck and change the second column entry in your /etc/hosts file to match the hostname of the middle-tier node in question as described in the previous explanation.
A.3.6 Sync Farm Operation Returns Error MessageA sync farm to operation returns the error message: "Cannot Connect to asdb"
ProblemOccasionally, an administrator may forget to set the primary database using the asgctl command line utility in performing an operation that requires that the asdb database connection be established prior to an operation. The following example shows this scenario for a sync farm to operation:
ASGCTL> connect asg hsunnab13 ias_admin/iastest2Successfully connected to hsunnab13:7890ASGCTL> ...<Other asgctl operations may follow, such as verify farm, dump farm, <and show operation history, and so forth that do not require the connection<to the asdb database to be established or a time span may elapse of no activity<and the administrator may miss performing this vital command....ASGCTL> sync farm to usunnaa11prodinfra(asr1012): Syncronizing each instance in the farm to standby farmprodinfra: -->ASG_ORACLE-300: ORA-01031: insufficient privilegesprodinfra: -->ASG_DUF-3700: Failed in SQL*Plus executing SQL statement: connect null/******@asdb.us.oracle.com as sysdba;.prodinfra: -->ASG_DUF-3502: Failed to connect to database asdb.us.oracle.com.prodinfra: -->ASG_DUF-3504: Failed to start database asdb.us.oracle.com.prodinfra: -->ASG_DUF-3027: Error while executing Syncronizing each instance in the farm to standby farm at step - init step.
SolutionPerform the asgctl set primary database command. This command sets the connection parameters required to open the asdb database in order to perform the sync farm to operation. Note that the set primary database command must also precede the instantiate farm to command and switchover farm to

Troubleshooting Middle-Tier Components
A-12 Oracle Application Server High Availability Guide
command if the primary database has not been specified in the current connection session.
A.4 Troubleshooting Middle-Tier ComponentsThis section describes common problems and solutions for middle-tier components in high availability configurations. It contains the following topics:
■ Section A.4.1, "Using Multiple NICs with OracleAS Cluster (OC4J-EJB)"
■ Section A.4.2, "Performance Is Slow When Using the "opmn:" URL Prefix"
A.4.1 Using Multiple NICs with OracleAS Cluster (OC4J-EJB)
ProblemIf you are running OracleAS Cluster (OC4J-EJB) on computers with two NICs (network interface cards) and you are using one NIC for connecting to the network and the second NIC for connecting to the other node in the cluster, multicast messages may not be sent or received correctly. This means that session information does not get replicated between the nodes in the cluster.
Figure A–1 OracleAS Cluster (OC4J-EJB) Running on Computers with Two NICs
SolutionYou need to start up the OC4J instances by setting the oc4j.multicast.bindInterface parameter to the name or IP address of the other NIC on the node.
For example, using the values shown in Figure A–1, you would start up the OC4J instances with these parameters:
On node 1, configure the OC4J instance to start with up with this parameter:
-Doc4j.multicast.bindInterface=123.45.67.21
On node 2, configure the OC4J instance to start with up with this parameter:
-Doc4j.multicast.bindInterface=123.45.67.22
You specify this parameter and its value in the "Java Options" field in the "Command Line Options" section in the Server Properties page in the Application Server Control Console (Figure A–2).
Node 1
NIC 1: 123.45.67.11
NIC 2: 123.45.67.21
LAN
OC4J
Node 2
NIC 1: 123.45.67.12
NIC 2: 123.45.67.22
OC4J
Private interconnect

Troubleshooting High Availability A-13
Figure A–2 Server Properties Page in Application Server Control Console
A.4.2 Performance Is Slow When Using the "opmn:" URL Prefix
ProblemIf you have applications that use the "opmn:" prefix in their Context.PROVIDER_URL property, you may experience slow performance in the InitialContext method.
The following sample code sets the PROVIDER_URL to a URL with an opmn: prefix.
Hashtable env = new Hashtable();env.put(Context.PROVIDER_URL, "opmn:ormi://hostname:port/cmpapp");// ... set other properties ...Context context = new InitialContext(env);
If the host specified in PROVIDER_URL is down, the application has to make a network connection to OPMN to locate another host. Going through the network to OPMN takes time.
SolutionTo avoid making another network connection to OPMN to get another host, set the oracle.j2ee.naming.cache.timeout property so that the values returned from OPMN the first time are cached, and the application can use the values in the cache.
The following sample code sets the oracle.j2ee.naming.cache.timeout property.
Hashtable env = new Hashtable();env.put(Context.PROVIDER_URL, "opmn:ormi://hostname:port/cmpapp");
// set the cache valueenv.put("oracle.j2ee.naming.cache.timeout", "30");

Troubleshooting Backup and Recovery
A-14 Oracle Application Server High Availability Guide
// ... set other properties ...
Context context = new InitialContext(env);
Table A–1 shows valid values for the oracle.j2ee.naming.cache.timeout property:
With the property set, you will still see some delay on the first "new InitialContext()" call, but subsequent calls should be faster because they are retrieving data from the cache instead of making a network connection to OPMN.
Note that for optimal performance, you should also set Dedicated.Connection to either YES or DEFAULT, and set Dedicated.RMIcontext to FALSE.
A.5 Troubleshooting Backup and Recovery■ Section A.5.1, "Unable to Restore OracleAS Metadata Repository to a Different
Host"
A.5.1 Unable to Restore OracleAS Metadata Repository to a Different Host The backing up and restoration of an OracleAS Metadata Repository using the Backup and Recovery Tool from one host to another fails if the ORACLE SID in the new host is different from that of the old host.
ProblemThe Backup and Recovery Tool does not work with different ORACLE SID values.
The following is an example of the error message that appears when the restoration fails due to an inconsistent ORACLE SID:
Assume two nodes: A and B. The OracleAS Metadata Repository in machine A is backed up using the Backup and Recovery Tool. When attempting to restore it on machine B using the same tool, the following message appears:
Oracle instance startedRMAN-00571: ===========================================================RMAN-00569: =============== ERROR MESSAGE STACK FOLLOWS ===============RMAN-00571: ===========================================================RMAN-00579: the following error occurred at 09/08/2003 16:29:15RMAN-06003: ORACLE error from target database: ORA-01103: database name 'M16REP1' in controlfile is not 'M16MR2'RMAN-06097: text of failing SQL statement: alter database mountRMAN-06099: error occurred in source file: krmk.pc, line: 4124
Note that "M16REP1" is the ORACLE SID of the database that was backed up.
Table A–1 Values for the oracle.j2ee.naming.cache.timeout Property
Value Meaning
-1 No caching.
0 Cache only once, without any refreshing.
Greater than 0 Number of seconds after which the cache can be refreshed. Note that this is not automatic; the refresh occurs only when you invoke "new InitialContext()" again.
If the property is not set, the default value is 60.

Troubleshooting High Availability A-15
SolutionNone at this time. Restoring the OracleAS Metadata Repository to a database with a different ORACLE SID is currently not supported.
A.6 Troubleshooting Real Application Clusters■ Section A.6.1, "Oracle Ultra Search Web Crawler Does Not Failover"
A.6.1 Oracle Ultra Search Web Crawler Does Not Failover For Real Application Clusters that do not use a cluster file system, the Oracle Ultra Search web crawler does not failover to an available node.
ProblemCurrently, the Oracle Ultra Search web crawler is configured so that it can be run only from one node in a Real Application Cluster. If that node (or the database) goes down, the web crawler will not startup on an available node. This situation occurs for non Cluster File System Real Application Clusters.
SolutionWhen Real Application Clusters use a Cluster File System, Oracle Ultra Search crawler can be launched from any of the Real Application Clusters nodes. At least one node has to be running.
When a Cluster File System is not used, the Oracle Ultra Search crawler always runs on a specified node. If this node stops operating, you must run the wk0reconfig.sql script to move Oracle Ultra Search to another Real Application Clusters node. This script can be run as follows:
> sqlplus wksys/wksys_passwd SQL> ORACLE_HOME/ultrasearch/admin/wk0reconfig.sql <instance_name> <connect_url>
<instance_name> is the name of the Real Application Clusters instance that Oracle Ultra Search uses for crawling. This name can be obtained by using the following SQL statement after connecting to the database:
SELECT instance_name FROM v$instance
<connect_url> is the JDBC connection string that guarantees a connection only to the specified instance, such as:
(DESCRIPTION=(ADDRESS_LIST=(ADDRESS=(PROTOCOL=TCP)
(HOST=<nodename>)(PORT=<listener_port>)))
(CONNECT_DATA=(SERVICE_NAME=<service_name>)))
Note that when Oracle Ultra Search is switched from one Real Application Clusters node to another, the contents of the cache will be lost. After switching instances, force a re-crawl of the documents to re-populate the cache.

Need More Help?
A-16 Oracle Application Server High Availability Guide
A.7 Need More Help?In case the information in the previous section is not sufficient, you can find more solutions on Oracle MetaLink, http://metalink.oracle.com. If you do not find a solution for your problem, log a service request.
See Also:
■ Oracle Application Server Release Notes, available on the Oracle Technology Network: http://www.oracle.com/technology/documentation/index.html

Manually Managed OracleAS Clusters B-1
BManually Managed OracleAS Clusters
Clustering components of a system allows the components to be viewed, functionally, as a single entity from the perspective of a client. This appendix describes the procedures you use to create and configure Manually Managed OracleAS Clusters in the Oracle Application Server middle-tier.
This appendix covers the following topics:
■ Section B.1, "Overview of Manually Managed OracleAS Clusters"
■ Section B.2, "Configuring Manually Managed OracleAS Clusters"
B.1 Overview of Manually Managed OracleAS ClustersOracle Application Server consists of many components that can be deployed in distributed topologies. Clustering, which unites various Oracle Application Server components to provide scalable and unified functionality with redundancy should any individual components fail, enables high availability for Oracle Application Server.
Review the following terms from Section 1.2.1, "Terminology" before reading this appendix:
■ Oracle Application Server Instance
■ Oracle Application Server Farm
■ Oracle Application Server Cluster
■ Oracle Application Server Cluster (OC4J)
In addition, we use the following term in this appendix:
Component Instance: Component instances include a single Oracle HTTP Server process or multiple Oracle Application Server Containers for J2EE (OC4J) instances.
B.1.1 Oracle Application Server Manually Managed ClustersThe Oracle Application Server components that constitute an OracleAS Cluster include:
Note: This appendix only covers information on Manually Managed Oracle Application Server Clusters. Read this appendix when using a DCM-Managed OracleAS Cluster is either not desirable or not feasible.

Overview of Manually Managed OracleAS Clusters
B-2 Oracle Application Server High Availability Guide
■ Oracle Process Manager and Notification Server (OPMN) which provides process death detection and process restarting in the event that problems are detected for monitored processes, and channels notifications between the different processes.
■ Distributed Configuration Management (DCM) distributes the configuration information across the components in the OracleAS Cluster, and also saves the configuration to the repository.
■ DCM Repository is a vital part of the whole OracleAS Infrastructure that provides the Management Services. The DCM Repository stores the configuration information for the Oracle Application Server Instances, OracleAS Cluster and the whole OracleAS Farm.
■ mod_oc4j plugs into Oracle HTTP Server, provides configurable and intelligent routing for incoming requests to all OC4J instances using AJP. Requests are routed only to processes and components that mod_oc4J determines to be alive, through communication with OPMN.
B.1.2 What Are Manually Managed OracleAS Clusters?Manually Managed Oracle Application Server Clusters rely on the administrators to manually configure each instance within the OracleAS Cluster. With a Manually Managed Oracle Application Server Cluster, it is the administrator's job to make a group of application server instances function as an OracleAS Cluster.
Manually Managed OracleAS Clusters provide the following load balancing and high-availability services:
■ Load-balance requests across all instances of the application server in the Manually Managed OracleAS Cluster.
■ Replicate session state across all clustered instances in the Manually Managed OracleAS Cluster.
■ In the event of a node or container failure, transparently fail over requests to a surviving node or container in the Manually Managed OracleAS Cluster.
Using Manually Managed OracleAS Clusters, each Oracle Application Server Instance must be managed independently. The administrator needs to make configuration changes manually to each instance and the changes need to be identical for each instance. Applications deployed to one instance must be individually deployed to all other instances in the Manually Managed OracleAS Cluster.
In essence, a Manually Managed Oracle Application Server Cluster provides scalability and availability, but not manageability. The administrator has the responsibility to synchronize the configuration of the Oracle Application Server Instances across the Manually Managed OracleAS Cluster.
B.1.3 When Do I Need to Use a Manually Managed OracleAS Cluster?In environments where using a DCM-Managed OracleAS Cluster is either not desirable or not feasible, you have the option to use a Manually Managed OracleAS Cluster.
This section covers the following:
■ Section B.1.3.1, "No Database Requirement for Manually Managed OracleAS Cluster"
■ Section B.1.3.2, "Tiered Deployment Requirement for Manually Managed OracleAS Cluster"
Overview of Manually Managed OracleAS Clusters
Manually Managed OracleAS Clusters B-3
■ Section B.1.3.3, "Tiered Deployment with Security Requirement"
B.1.3.1 No Database Requirement for Manually Managed OracleAS Cluster Starting with Oracle Application Server 10g, you have the option of using an OracleAS File-based Farm, which in many cases enables you to avoid using a Manually Managed OracleAS Cluster. In releases prior to Oracle Application Server 10g, a primary reason why people used a Manually Managed OracleAS Cluster was to avoid using a database for storing the DCM Repository. In Oracle Application Server 10g, using an OracleAS File-based Farm, you can configure a DCM-Managed OracleAS Cluster without storing the DCM Repository in a database. To avoid using a database to store DCM configuration repository information, you should use a DCM-Managed OracleAS Cluster with a OracleAS File-based Farm. In this case, a Manually Managed OracleAS Cluster is not required.
B.1.3.2 Tiered Deployment Requirement for Manually Managed OracleAS ClusterUsing a DCM-Managed OracleAS Cluster you can also deploy components in a tiered deployment, where the OracleAS Web Cache, Oracle HTTP Server, OC4J and database are running on different tiers. In this case, depending on how you configure each tier, it is possible to use a DCM-Managed OracleAS Cluster instead of a Manually Managed OracleAS Cluster. However, in some cases a tiered deployment does require the use of a Manually Managed OracleAS Cluster.
While you cannot selectively install the Oracle Application Server components that you want to use on a particular tier, you can either stop or disable non-required components on a particular tier. For example, a J2EE & Web Cache type install installs Oracle HTTP Server and OC4J, but if you do not want to run OC4J on that tier, you can either stop or disable the OC4J component in that Oracle Application Server Instance.
If you decide to stop the non-required components on a tier, as compared to disabling the components, then you can use a DCM-Managed OracleAS Cluster.
■ Stopping Non-Required Components
If you don't have the requirement to disable the tiered deployment non-required Oracle Application Server components on a particular tier, then you can simply stop them and put all your tiers in one OracleAS Farm. Using this configuration option, for a tiered deployment, you can create a DCM-Managed OracleAS Cluster and avoid using a Manually Managed OracleAS Cluster.
■ Disabling Non-Required Components
In cases where it is a business requirement to disable the non-required tiered deployment components on a particular tier, you need to use a Manually Managed OracleAS Cluster.
Using a DCM-Managed OracleAS Cluster, you cannot selectively disable components in an Oracle Application Server Instance. In this configuration, disabling a component in one Oracle Application Server Instance would also disabled the component in all the Oracle Application Server Instances in the
Note: We recommend using a DCM-Managed OracleAS Cluster wherever possible. A DCM-Managed OracleAS Cluster provides manageability along with scalability and availability and takes care of synchronization of application server instance configuration across the OracleAS Cluster.

Configuring Manually Managed OracleAS Clusters
B-4 Oracle Application Server High Availability Guide
DCM-Managed OracleAS Cluster. For example, if you disable Oracle HTTP Server in one Oracle Application Server Instance, DCM disables Oracle HTTP Servers in all Oracle Application Server Instances that are in the DCM-Managed OracleAS Cluster.
Thus, if it is required to disable the components in a particular tier, then you cannot use a DCM-Managed OracleAS Cluster.
However, using this type of configuration you can put all of the tiers in an OracleAS Farm, as standalone instances that are not part of a DCM-Managed OracleAS Cluster (this can simplify Manually Managed OracleAS Cluster configuration by eliminating the step of associating application server instances that is required to configure a Manually Managed OracleAS Cluster.)
B.1.3.3 Tiered Deployment with Security RequirementIn cases where a tiered deployment includes special security requirements, the configuration could prevent the use of a DCM-Managed OracleAS Cluster. In this case, you may need to configure and use a Manually Managed OracleAS Cluster to support a highly available system.
B.2 Configuring Manually Managed OracleAS ClustersThis section covers the steps you need to follow to configure a Manually Managed OracleAS Cluster.
For this section, we assume the following use case:
■ A Manually Managed OracleAS Cluster is required for the purpose of a J2EE application, myapp.
■ The Manually Managed OracleAS Cluster will have two standalone instances, not part of an OracleAS Farm. The instances are named inst1 and inst2.
■ The two Oracle Application Server Instances (inst1 and inst2) are installed on either two different nodes or on one node but in two separate ORACLE_HOME directories.
■ J2EE application, myapp is deployed on an OC4J instance named home, that is not used by any of the components internally.
This section covers the following:
■ Section B.2.1, "Associating Oracle Application Server Instances Together"
■ Section B.2.2, "Configuring OC4J Instances for State Replication"
■ Section B.2.3, "Configuring the J2EE Application Properties"
■ Section B.2.4, "Configuring Oracle HTTP Server for Failover and Load Balancing"
B.2.1 Associating Oracle Application Server Instances TogetherFor this use case we assume that the Oracle Application Server Instances are standalone instances, meaning they are not associated with an OracleAS Farm. But if in your case the Oracle Application Server Instances are associated with an OracleAS Farm then you can skip this section.
1. On both inst1 and inst2, run following command, on UNIX systems:
See Also: Section B.2.1, "Associating Oracle Application Server Instances Together" on page B-4

Configuring Manually Managed OracleAS Clusters
Manually Managed OracleAS Clusters B-5
$ORACLE_HOME/dcm/bin/dcmctl getOPMNPort
On Windows systems:
%ORACLE_HOME%\dcm\bin\dcmctl getOPMNPort
This returns the hostname and the ONS remote port for the local application server instance (from the local ons.conf file). The output will be of the form:
IPaddress:PortNumber,
For example:
127.2.141.148:6200
We will refer the output from inst1 as <IP of inst1:Port of inst1> and output from inst2 as <IP of inst2:Port of inst2>.
2. On inst1, run following command on UNIX systems:
$ORACLE_HOME/dcm/bin/dcmctl addOPMNLink <IP of inst2:Port of inst2>
On Windows systems:
%ORACLE_HOME%\dcm\bin\dcmctl addOPMNLink <IP of inst2:Port of inst2>
3. On inst2, run following command on UNIX systems:
$ORACLE_HOME/dcm/bin/dcmctl addOPMNLink <IP of inst1:Port of inst1>
On Windows systems:
%ORACLE_HOME%\dcm\bin\dcmctl addOPMNLink <IP of inst1:Port of inst1>
Running these three steps configures the OPMN processes to communicate with each other, allowing OPMN to monitor Oracle Application Server components across the instances.
When you associate Oracle Application Server instances, note the following:
■ To run addOPMNLink, all instances must be J2EE and Web Cache instances and the instances must not be part of an OracleAS Farm (associated with a repository); otherwise, the command will fail.
■ If you would like to change the ONS remote port for an instance in a Manually Managed OracleAS Cluster, you must remove the instance from the cluster using removeOPMNLink, change the remote port, and add the instance to the cluster again using addOPMNLink. You must repeat the command in every Oracle home that is part of the Manually Managed OracleAS Cluster.
■ If you create a cluster and then want to add another instance to the cluster, you must run the command again in all Oracle homes that are part of the Manually Managed Oracle Application Server Cluster.
B.2.2 Configuring OC4J Instances for State ReplicationTo assure that Oracle Application Server maintains, across the Manually Managed OracleAS Cluster, the state of stateful applications you need to configure state replication for Web and EJB applications. Replication properties are at an OC4J instance level and not at the J2EE application level, meaning that once enabled these are enabled for all the J2EE applications deployed on the OC4J Instance.

Configuring Manually Managed OracleAS Clusters
B-6 Oracle Application Server High Availability Guide
Session state for Web applications is replicated in OC4J islands with the same name across application boundaries and across the OracleAS Cluster. To assure high availability with stateful applications, the OC4J island names must be the same in each OC4J instance across the cluster.
This section covers the following topics:
■ Section B.2.2.1, "Configuring State Replication for Web Applications"
■ Section B.2.2.2, "Configuring State Replication for EJB Applications"
B.2.2.1 Configuring State Replication for Web ApplicationsTo configure state replication for stateful Web applications, do the following on both instances inst1 and inst2:
1. Invoke Application Server Control Console and navigate to the Home Page of the "home" OC4J instance.
2. Select the Administration link.
3. Select Replication Properties in the Instance Properties column.
4. Scroll down to the Web Applications section.
5. Select the Replicate session state checkbox.
Optionally, you can provide the multicast host IP address and port number. If you do not provide the host and port for the multicast address, it defaults to host IP address 230.0.0.1 and port number 9127. The host IP address must be between 224.0.0.2 through 239.255.255.255. Do not use the same multicast address for both HTTP and EJB multicast addresses.
B.2.2.2 Configuring State Replication for EJB ApplicationsTo configure state replication for EJB applications, do the following on both instances inst1 and inst2:
1. Invoke Application Server Control Console and navigate to the Home Page of the "home" OC4J instance.
2. Select the Administration link.
3. Select Replication Properties in the Instance Properties column.
4. In the EJB Applications section, select the Replicate State checkbox.
Optionally, you can provide the multicast host IP address and port number. If you do not provide the host and port for the multicast address, it defaults to host IP address 230.0.0.1 and port number 23791. The host IP address must be between 224.0.0.2 through 239.255.255.255. Do not use the same multicast address for both HTTP and EJB multicast addresses.
5. Provide the username and password, which is used to authenticate itself to other hosts in the cluster. If the username and password are different for other hosts in the cluster, they will fail to communicate. You can have multiple username and
Note: If you do not require session state replication or if your J2EE application is stateless, you can skip this section.
See Also: "Configuring Web Application State Replication with OracleAS Cluster (OC4J)" on page 4-31 for more details.

Configuring Manually Managed OracleAS Clusters
Manually Managed OracleAS Clusters B-7
password combinations within a multicast address. Those with the same username/password combinations will be considered a unique cluster.
6. Provide RMI Server Host name; this is usually the name of the machine where the OC4J instance is running.
7. Click Apply and then OK to confirm.
B.2.3 Configuring the J2EE Application PropertiesFor J2EE applications to be cluster aware, you need to make the following changes in each of the J2EE applications on instances inst1 and inst2.
1. Add <distributable/> tag in web.xml.
If the Web application is serializable, you must add this tag to the web.xml file.
The following shows an example of this tag added to web.xml:
<web-app> <distributable/> <servlet> ... </servlet></web-app>
2. Add <cluster-config> Tag in orion-web.xml.
The following shows an example of this tag added to orion-web.xml:
<orion-web-app ...> ... <cluster-config/></orion-web-app>
3. Add replication attribute in orion-ejb-jar.xml.
Modify the orion-ejb-jar.xml file to add the state replication configuration for stateful session beans. Since you configure the replication type for the stateful session bean within the bean deployment descriptor, each bean can use a different type of replication (either VMTermination or EndOfCall).
The following shows an example of this attributed added to orion-ejb-jar.xml:
<session-deployment ... replication="EndOfCall" />
B.2.4 Configuring Oracle HTTP Server for Failover and Load BalancingThe module mod_oc4j in the Oracle HTTP Server identifies the requests it needs to act on, determines which OC4J to route those requests to, and communicates with a particular process. Every J2EE (web) application when deployed needs to be associated with a root context. This root context, that is the URL prefix, acts as the identifier of requests that need to be handled by mod_oc4j. Requests are routed only to OC4J instances and processes that mod_oc4J determines to be alive, through communication with the OPMN.
See Also: "Configuring EJB Application State Replication with OracleAS Cluster (OC4J-EJB)" on page 4-33 for more details.

Configuring Manually Managed OracleAS Clusters
B-8 Oracle Application Server High Availability Guide
All mod_oc4j related configuration information is kept in the mod_oc4j.conf file. Oracle HTTP Server uses an Oc4jMount directive to map the root context to the OC4J instance where application was deployed.
Oracle HTTP Server keeps a table of available OC4J instances and load balancing information. To configure a Manually Managed OracleAS Cluster, you need to update the mod_oc4j.conf configuration to make mod_oc4j aware of the other instances so that Oracle HTTP Servers in the Manually Managed OracleAS Cluster can send requests to the OC4J instances in other Oracle Application Server Instances across the Manually Managed OracleAS Cluster (incase the local OC4J instance goes down).
This section covers the following:
■ Section B.2.4.1, "Understanding mod_oc4j Request Routing"
■ Section B.2.4.2, "Identifying the Instance Names"
■ Section B.2.4.3, "Configuring mod_oc4j Request Routing"
B.2.4.1 Understanding mod_oc4j Request RoutingOracle HTTP Server uses the Oc4jMount directives defined in mod_oc4j.conf file to route requests containing a particular path to a destination. A destination can be a single OC4J process or a set of OC4J instances.
The syntax for the Oc4jMount directive is as follows:
Oc4jMount path [destination]
Where path is the context root, it must be the same as the application context root specified during application deployment and where destination is one of these types:
ajp13_dest
cluster_dest
instance_dest
A portion of the Oc4jMount section of a default mod_oc4j.conf file is shown:
Oc4jMount /j2ee/*Oc4jMount /webapp homeOc4jMount /webapp/* home
B.2.4.2 Identifying the Instance NamesIdentify the fully qualified names of each Oracle Application Server Instances that will be participating in the Manually Managed OracleAS Cluster.
On both inst1 and inst2, run following command, on UNIX systems:
$ORACLE_HOME/dcm/bin/dcmctl whichInstance
On Windows systems:
%ORACLE_HOME%\dcm\bin\dcmctl whichInstance
This command returns the name of the local application server instance that you should use in the following section (the output from inst1 is <inst1_name> and output from inst2 as <inst2_name>).
See Also: Oracle HTTP Server Administrator’s Guide
See Also: Oracle HTTP Server Administrator’s Guide

Configuring Manually Managed OracleAS Clusters
Manually Managed OracleAS Clusters B-9
B.2.4.3 Configuring mod_oc4j Request RoutingThe default mount points only indicate the local OC4J instance. For this configuration it is necessary to edit the Oc4jMount directives to point to each Oracle Application Server Instance and OC4J instance in the Manually Managed OracleAS Cluster.
The following edits should be done after an application is deployed, not before, since part of the deployment process an Oc4jMount directive is written to the mod_oc4j.conf file. Do the following on both Oracle Application Server Instances inst1 and inst2 (or do it only on one instance, for example inst1, if you wish to use Oracle HTTP Server of inst1 and would never use Oracle HTTP Server of inst2):
1. Invoke Application Server Control Console and navigate to the Home Page of the "home" OC4J and navigate to Home Page of "HTTP_Server".
2. Select the Administration link and then select Advance Server Properties.
3. Select mod_oc4j.conf in the File Name column.
4. In the editor, scroll down and find the Oc4jMount directives for the application you deployed and change these as follows:
Oc4jMount /myapp instance://<inst1_name>:home, <inst2_name>:homeOc4jMount /myapp/* instance://<inst1_name>:home, <inst2_name>:home
This configuration automatically makes these instances (inst1 and inst2) failover candidates for each other.
5. Click Apply and then OK to confirm.
This step requires restarting, or stopping and then starting the Oracle HTTP Server component.

Configuring Manually Managed OracleAS Clusters
B-10 Oracle Application Server High Availability Guide

OracleAS Guard Error Messages C-1
COracleAS Guard Error Messages
The following sections describe the OracleAS Guard error messages. Though not shown, OracleAS Guard error messages are preceded by an ASG prefix. Error messages are categorized into the following groups and subgroups:
■ DGA Error Messages
– LRO Error Messages
– Undo Error Messages
– Create Template Error Messages
– Switchover Physical Standby Error Messages
■ Duf Error Messages
– Database Error Messages
– Connection and Network Error Messages
– SQL*Plus Error Messages
– JDBC Error Messages
– OPMN Error Messages
– Net Services Error Messages
– System Error Messages
– Warning Error Messages
– OracleAS Database Error Messages
– OracleAS Topology Error Messages
– OracleAS Backup and Restore Error Messages
– OracleAS Guard Synchronize Error Messages
– OracleAS Guard Instantiate Error Messages
C.1 DGA Error MessagesThe following are DGA error messages.
Note: The symbols {0}, {1}, and {2} are variables that will be replaced by the name of the object.

DGA Error Messages
C-2 Oracle Application Server High Availability Guide
12001, Error while creating a DGA template.Cause: An error occurred while creating a template file.
Action: See secondary error.
12500, Standby database instance {0} already exists on host {1}.Cause: The standby database instance specified already exists on target host.
Action: Either select a new instance or remove the current instance.
C.1.1 LRO Error MessagesThe following are LRO error messages.
13000, Error during Create Physical Standby: Prepare-init.Cause: Error occurred during specified step.
Action: See secondary error.
13001, Error during Create Physical Standby: Prepare-check standby.Cause: Error occurred during specified step.
Action: See secondary error.
13002, Error during Create Physical Standby: Prepare-primary processing.Cause: Error occurred during specified step.
Action: See secondary error.
13003, Error during Create Physical Standby: Prepare-standby processing.Cause: Error occurred during specified step.
Action: See secondary error.
13004, Error during Create Physical Standby: Prepare-sqlnet configuration.Cause: Error occurred during specified step.
Action: See secondary error.
13005, Error during Create Physical Standby: Copy-init.Cause: Error occurred during specified step.
Action: See secondary error.
13006, Error during Create Physical Standby: Copy-validate standby.Cause: Error occurred during specified step.
Action: See secondary error.
13007, Error during Create Physical Standby: Copy-file copy.Cause: Error occurred during specified step.
Action: See secondary error.
13008, Error during Create Physical Standby: Finish-init.Cause: Error occurred during specified step.
Action: See secondary error.
13009, Error during Create Physical Standby: Finish-prepare primary.Cause: Error occurred during specified step.
Action: See secondary error.

DGA Error Messages
OracleAS Guard Error Messages C-3
13010, Error during Create Physical Standby: Finish-configure primary.Cause: Error occurred during specified step.
Action: See secondary error.
13011, Error during Create Physical Standby: Finish-configure standby.Cause: Error occurred during specified step.
Action: See secondary error.
C.1.2 Undo Error MessagesThe following are undo error messages.
13015, Error trying to Undo Create Physical Standby: Prepare.Cause: Error occurred during undo of the prepare task.
Action: See secondary error.
13016, Error trying to Undo Create Physical Standby: Copy.Cause: Error occurred during undo of the copy task.
Action: See secondary error.
13017, Error trying to Undo Create Physical Standby: Finish.Cause: Error occurred during undo of the finish task.
Action: See secondary error.
C.1.3 Create Template Error MessagesThe following are create template error messages.
13020, Error during Create Template: init.Cause: Error occurred during specified step.
Action: See secondary error.
13021, Error during Create Template: primary processing.Cause: Error occurred during specified step.
Action: See secondary error.
13022, Error during Create Template: standby processing.Cause: Error occurred during specified step.
Action: See secondary error.
13023, Error during Create Template: finish.Cause: Error occurred during specified step.
Action: See secondary error.
C.1.4 Switchover Physical Standby Error MessagesThe following are switchover physical standby error messages.
13051, Error performing a physical standby switchover.Cause: Error occurred in performing a switchover.
Action: See secondary error.

Duf Error Messages
C-4 Oracle Application Server High Availability Guide
13052, The primary database is not in the proper state to perform a switchover.Cause: The switchover status of the primary database must be either "TO STANDBY" or "SESSIONS ACTIVE".
Action: Make sure the SWITCHOVER_STATUS of the V$DATABASE table is either "TO STANDBY" or "SESSIONS ACTIVE".
13053, The standby database is not in the proper state to perform a switchover.Cause: The switchover status of the standby database must be either "TO PRIMARY" or "SWITCHOVER PENDING".
Action: Make sure the SWITCHOVER_STATUS of the V$DATABASE table is either "TO PRIMARY" or "SWITCHOVER PENDING".
13504, Error switching the database role from primary to standby.Cause: Failed to switchover database role from primary to standby.
Action: See secondary error.
13505, Error switching the database role from standby to primary.Cause: Failed to switchover database role from standby to primary.
Action: See secondary error.
13061, Error failing over physical standby database.Cause: Error occurred in performing a failover of a standby database.
Action: See secondary error.
C.2 Duf Error MessagesThe following are Duf error messages.
3000, Server error {0}.Cause: Invalid argument was supplied.
Action: Pass in a valid argument.
3001, Invalid argument {0}.Cause: Invalid argument was supplied.
Action: Pass in a valid argument.
3002, Invalid log path {0}.Cause: Invalid log path specification.
Action: Specify a valid log path.
3003, Invalid command line value {0} specified.Cause: Invalid command line specification.
Action: Correct the command line option and retry.
3004, Invalid command action {0} specified.Cause: Invalid command action specification.
Action: Correct the command line action and retry.
3005, Invalid command argument {0} specified, commands must begin with a hyphen.Cause: Command argument did not start with a hyphen.

Duf Error Messages
OracleAS Guard Error Messages C-5
Action: Enter a correct command line argument.
3006, Command line argument {0} missing a required value.Cause: Command argument missing a required value.
Action: Enter a correct command line argument value.
3007, Command line argument {0} given an incorrect value {1}.Cause: Command argument value is incorrect.
Action: Enter a correct command line argument value.
3008, Command line argument {0} is required but missing.Cause: Command argument value is missing.
Action: Enter a correct command line argument value.
3009, Invalid session ID.Cause: The client passed an invalid session ID.
Action: Enter a correct command line argument value.
3010, Duplicate session ID.Cause: The session ID is already in use.
Action: Enter a correct command line argument value.
3011, Unsatisfied link error for {0} in library DufNatives.Cause: An attempt to make a call using the DufNatives library failed.
Action: Make sure the DufNatives library is correctly installed.
3012, Checksum error in password.Cause: The login password has a checksum error.
Action: Try to reconnect.
3013, Operation failed.Cause: The specified operation failed.
Action: See secondary error.
3014, Invalid command line specified.Cause: Invalid command line specification.
Action: Correct command line option and retry.
3015, Error getting local host name.Cause: Error trying to get local host name.
Action: See secondary error.
3016, No encrypt key.Cause: No encrypt key supplied. Encryption requires an encrypt key.
Action: This is an internal programming error.
3017, Error encrypting data.Cause: Failed to encrypt the given data.
Action: See secondary error.
3018, Error missing plan for specified request {0}, cannot process.

Duf Error Messages
C-6 Oracle Application Server High Availability Guide
Cause: Could not find plan for specified request.
Action: Either specify a valid request or supply valid plan.
3019, Server does not recognize application ID.Cause: Client specified an application ID that the server does not support.
Action: Contact Oracle support.
3020, Failed to authenticate user {0}. Please enter the correct user name and password.Cause: Client supplied incorrect OS user name or password or both.
Action: Make sure the correct OS user name and password are used.
3021, No user name and/or password are supplied for authentication.Cause: Client did not supply a user name or password or both through the "connect duf" command.
Action: Make sure user issue a "connect duf" command before any other commands.
3022, Failed to authorize user {0}. User must have administrator privilege on the server system.Cause: The user name provided by the client to connect to DUF server must have administrator privilege on the server system. This error is applicable on Windows system only.
Action: Make sure the user account belongs to the administrator group on the server system.
3023, Error: There is no connection to a DUF server.Cause: You must connect to DUF server before issues other commands.
Action: Connect to the DUF server.
3024, Failed to authorize user {0}. The owner account of the Oracle Home must be used.Cause: The user name provided by the client to connect to DUF server must be the same user from which the Oracle home is installed. This error is applicable on UNIX system only.
Action: Make sure the user account is the same as that of the Oracle home.
3025, The operation has been cancelled.Cause: The operation has been cancelled by either the user or the DUF internal software.
Action: None.
3026, The {0} task must complete successfully before running the {1} task.Cause: An attempt was made to run the specified task before the required previous task has successfully completed.
Action: Rerun the required previous task.
3027, Error while executing {0} at step - {1}.Cause: Error during specified step of specified operation.
Action: Check secondary error.
3028, Failed to start DUF server on host {0}.

Duf Error Messages
OracleAS Guard Error Messages C-7
Cause: Error during specified step of specified operation.
Action: Check DUF log file for more information.
3029, Failed to start {0} server with exception.Cause: Error trying to start the server.
Action: See secondary error.
3030, Error, cannot resolve host name {0}.Cause: Error trying to resolve specified host name.
Action: Check that the host name is correctly specified.
3031, Error, Invalid user name {0}. Only {1} account can connect to a DSA server.Cause: Only ias_admin can connect to a DSA server.
Action: Please use ias_admin to connect to a DSA server.
3032, Failed to start {0} server on host {1}. Start server on specified host and reconnect.Cause: Error trying to start the server on the specified host while trying to connect.
Action: Start the server manually and retry the connect.
3033, Error, the server is shutting down.Cause: Error communicating with the server.
Action: Retry the operation.
3034, Invalid command line specified: - {0}.Cause: Invalid command line specification.
Action: Correct the command line option and retry.
3035, Failed to kill the OracleAS Guard (DSA) server process {0} with error {1}.Cause: OracleAS Guard client is unable to kill the OracleAS Guard (DSA) server process.
Action: Use "kill -9 <pid>" command to kill the process from the command line prompt.
3100, Error reading file {0}.Cause: Error trying to read from file.
Action: See secondary error.
3101, Error writing file {0}.Cause: Error trying to write file.
Action: See secondary error.
3102, Error creating file {0}.Cause: Error trying to create specified file.
Action: See secondary error.
3103, Error deleting file {0}.Cause: Error trying to delete a file.
Action: See secondary error.

Duf Error Messages
C-8 Oracle Application Server High Availability Guide
3104, Error opening file {0}.Cause: Error trying to open file.
Action: See secondary error.
3105, File {0} not found.Cause: Error trying to open file.
Action: See secondary error.
3106, No read access to file {0}.Cause: Error trying to open file.
Action: See secondary error.
3107, No write access to file {0}.Cause: Error trying to open file.
Action: See secondary error.
3108, File specification {0} must be absolute.Cause: Error trying to open file.
Action: See secondary error.
3109, Error closing file {0}.Cause: Error trying to close the file.
Action: See secondary error.
3110, Error creating dir {0}.Cause: Error trying to create specified directory.
Action: See secondary error.
3111, Error deleting dir {0}.Cause: Error trying to delete specified directory.
Action: See secondary error.
3112, Error expanding file wildcard specification {0}.Cause: Error trying to process file wildcard specification.
Action: See secondary error.
3120, Error opening configuration file {0}.Cause: Error trying to open configuration file.
Action: Make sure configuration file exists or specified correctly.
3121, Error creating zip file {0}.Cause: Error trying to create a zip file.
Action: See secondary error.
3122, There are no files to be zipped.Cause: The directory to be zipped has no files in it.
Action: Make sure the directory to be zipped has files in it.
3123, Error adding files in directory {0} to zip file.Cause: Error adding files in the given directory to zip file.

Duf Error Messages
OracleAS Guard Error Messages C-9
Action: See secondary error.
3124, No zip file is specified.Cause: No zip file is specified.
Action: Internal error.
3125, Error extracting files from zip file {0}.Cause: Error extracting files from a zip file.
Action: See secondary error.
3400, Error processing XML document.Cause: Error processing XML document.
Action: See secondary error.
3401, Error processing XML node.Cause: Error processing XML node.
Action: See secondary error.
3402, Error parsing XML request message.Cause: There was an error parsing the XML request message.
Action: Contact Oracle support.
3403, Error parsing XML response message.Cause: There was an error parsing the XML request message.
Action: Contact Oracle support.
3404, Error parsing XML body string.Cause: There was an error parsing the XML body string.
Action: Contact Oracle support.
3405, Error writing the body to an XML DOM.Cause: There was an error writing the XML body string.
Action: Contact Oracle support.
3406, Error reading the body from an XML DOM.Cause: There was an error reading the XML body string.
Action: Contact Oracle support.
3407, Error writing a work item to an XML DOM.Cause: There was an error reading the XML body string.
Action: Contact Oracle support.
3408, Error reading a work item from an XML DOM.Cause: There was an error reading the XML body string.
Action: Contact Oracle support.
3409, Error parsing an XML string.Cause: There was an error parsing the XML string.
Action: Contact Oracle support.
3410, Error converting XML DOM to string.

Duf Error Messages
C-10 Oracle Application Server High Availability Guide
Cause: There was an error converting the DOM tree to a XML string.
Action: Contact Oracle support.
3411, Error reading XML DOM tree.Cause: There was an error reading the XML DOM tree.
Action: Contact Oracle support.
C.2.1 Database Error MessagesThe following are database error messages.
3501, Failed to initialize DufDb class.Cause: There was an error creating the DufDb class.
Action: See secondary error.
3502, Failed to connect to database {0}.Cause: There was an error connecting to the database.
Action: See secondary error.
3503, Failed to verify database {0}.Cause: There was an error verifying the database.
Action: See secondary error.
3504, Failed to start database {0}.Cause: There was an error starting the database.
Action: See secondary error.
3505, Failed to create pfile to include spfile.Cause: There was an error creating the given pfile.
Action: See secondary error.
3506, Failed to turn on archivelog mode for the database.Cause: There was an error turning on archivelog mode.
Action: See secondary error.
3507, Failed to create the standby database control file.Cause: There was an error creating the standby database control file.
Action: See secondary error.
3508, Failed to create the pfile.Cause: There was an error creating the database init parameter file.
Action: See secondary error.
3509, Failed to create the spfile.Cause: There was an error creating the database spfile.
Action: See secondary error.
3510, Output reader thread for {0} terminated.Cause: The output reader thread is terminated.
Action: Contact Oracle support.
3511, Error creating local worker on node {0}.

Duf Error Messages
OracleAS Guard Error Messages C-11
Cause: This is an internal error.
Action: Contact Oracle support.
3512, Error creating remote worker on node {0}.Cause: There is a problem communicating with the remote server.
Action: Make sure that the remote server is accessible.
3513, Database is not started {0}.Cause: The specified database has not been started.
Action: Start the specified database.
3514, Failed to stop database {0}.Cause: There was an error stopping the database.
Action: See secondary error.
3515, Failed querying database to determine current archivelog mode.Cause: There was an error querying the database to determine current archive mode.
Action: See secondary error.
3516, Failed to query redo log information for database.Cause: There was an error querying the database redo log information.
Action: See secondary error.
3517, Failed to drop standby redo log for database.Cause: There was an error dropping the standby redo log.
Action: See secondary error.
3518, Failed to start managed recovery for standby database.Cause: There was an error starting managed recovery for the standby database.
Action: See secondary error.
3519, Failed to cancel managed recovery for standby database.Cause: There was an error cancelling managed recovery for the standby database.
Action: See secondary error.
3520, Failed to determine the existence of database instance.Cause: There was an error determining the existence of the given database instance.
Action: See secondary error.
3521, Invalid database instance {0} specified in the template file; DUF found instance {1}.Cause: The standby database instance specified in the template file is different from the one DUF found on the system.
Action: Please either rerun the prepare and copy phases with the new standby instance or specify the correct standby database instance found on the system.
3522, The pfile {0} needed to generate an spfile is missing.Cause: A pfile needed to create the spfile used by the standby database is missing.

Duf Error Messages
C-12 Oracle Application Server High Availability Guide
Action: Please either rerun the prepare and copy phases to generate the pfile or manually create one with the correct values.
3523, The standby database cannot have the same service name as the primary database.Cause: The standby service name is the same as the primary.
Action: Change the standby service name.
3524, Error: The primary database is not set.Cause: The primary database is not defined.
Action: Set the primary database first.
3525, Error: The standby database is not set.Cause: The standby database is not defined.
Action: Set the standby database first.
3526, Set the primary database before setting the standby database.Cause: The standby service name is the same as the primary on the same host.
Action: Change the standby service name.
3527, The database tablespace map is NULL.Cause: This is an internal error.
Action: Contact Oracle support.
3528, Error initializing init parameter file {0}.Cause: An error occurred trying to initialize the parameter file.
Action: See secondary error.
3529, Error writing init parameter file {0}.Cause: An error occurred trying to write the parameter file.
Action: See secondary error.
3530, Error in setting the protection mode for database {0}.Cause: An error occurred trying to set the protection mode.
Action: See secondary error.
3531, Error opening database in read only mode for database {0}.Cause: An error occurred trying to open the database in read only mode.
Action: See secondary error.
3532, Failed to get init parameter value from {0}.Cause: Error trying to get the parameter value from the init parameter file.
Action: See secondary error.
3533, No user name and/or password is specified for database {0}.Cause: Error trying to get the parameter value from the init parameter file.
Action: User must specify the user name and password to be used to connect to the database using "set primary database" or "set standby database" command.
3534, The standby database cannnot have the same host as the primary database.Cause: The standby host is the same as the primary.

Duf Error Messages
OracleAS Guard Error Messages C-13
Action: Change the standby or primary database host name.
3535, Failed to create standby redo log.Cause: An error occurred trying to create a standby redo log.
Action: See secondary error.
3536, Failed to get a list of standby database(s) from log archive destination.Cause: An error occurred trying to get a list of standby databases from the log archive destination parameters.
Action: See secondary error.
3537, Failed to add standby database as a log archive destination.Cause: An error occurred trying to add a standby database as a log archive destination.
Action: See secondary error.
3538, Failed to remove standby database as a log archive destination.Cause: An error occurred trying to remove a standby database as a log archive destination.
Action: See secondary error.
3539, Error: The new primary database is not set. Cause: The new primary database is not defined.
Action: Set the new primary database first.
3540, Error processing template file {0}.Cause: Error trying to process template file.
Action: Correct protection and retry operation.
3541, Invalid database protection specified in template file {0}.Cause: Error trying to process protection value in template file.
Action: Correct protection and retry operation.
3542, Failed to query database role.Cause: Error trying to query the database role.
Action: See secondary error.
3543, Error processing command, must be connected to a OracleAS Guard server in the primary topology.Cause: User is connected to server on a topology that is not the primary topology.
Action: Connect to primary topology node.
3544, Error processing command, must be connected to a OracleAS Guard server in the standby topology.Cause: User is connected to server on a topology that is not the standby topology.
Action: Connect to primary topology node.
3545, Error trying to remove old passwd file %1 while creating new db.Cause: Could not delete the old password file as part of a delete database operation. This is a problem when trying to create a new database.
Action: Delete the stale password file.

Duf Error Messages
C-14 Oracle Application Server High Availability Guide
3546, Error, database SID was expected to have value but it is empty.Cause: The database SID was suppose to have a value but it is empty.
Action: This is an internal error.
3547, Error storing DB Credentials in the clipboard of the server.Cause: Failed to store DB credentials in the clipboard on the specified server.
Action: Internal error.
3548, Error storing DB info in the clipboard of the server.Cause: Failed to store DB information in the clipboard on the specified server.
Action: Internal error.
3549, Error cleaning up the database on the standby host.Cause: Failed to clean up the database on the standby host.
Action: See secondary error.
3550, Failed to find a valid Oracle Home.Cause: A valid Oracle home was not found for this operation.
Action: Create a valid Oracle home.
3551, Oracle Data Guard Home must have the same owner as the database server home.Cause: The Oracle Data Guard Home is owned by a different user than the database server home.
Action: Reinstall Oracle Data Guard user from the owner of Oracle database server.
3552, Specified Oracle Home {0} could not be found.Cause: The specified Oracle home could not be found.
Action: Please specify a valid Oracle home.
3553, An error occurred getting the list of Oracle Homes on the system.Cause: The list of Oracle homes could not be read.
Action: Make sure the Oracle inventory is valid.
3554, The Oracle home that contains SID {0} cannot be found.Cause: The Oracle home that contains a specific SID cannot be found.
Action: Make sure the Oracle home inventory is valid.
3555, Error accessing the Oracle home inventory. Make sure the inventory file exists.Cause: The Oracle home inventory cannot be accessed.
Action: Make sure the Oracle home inventory exists
3556, Error: Unable to find the Oracle home within path {0}.Cause: The Oracle home within the given path cannot be found.
Action: Make sure the Oracle home inventory exists.
C.2.2 Connection and Network Error MessagesThe following are connection and network error messages.

Duf Error Messages
OracleAS Guard Error Messages C-15
3600, Error connecting to server: Unknown node {0}.Cause: The server host is unknown to the client.
Action: Contact Oracle support.
3601, Error connecting to server node {0}.Cause: The client cannot connect to the server.
Action: Contact Oracle support.
3602, File Copy protocol error.Cause: There was an internal protocol error while copying files.
Action: Contact Oracle support
3603, Error sending data across network.Cause: There was a network error.
Action: Retry operation.
3604, Error receiving data across network.Cause: There was a network error.
Action: Retry operation.
3605, The file copy operation has been terminated.Cause: The copy aborted due to an error.
Action: Retry operation.
3606, Error connecting to file copy server {0} on port {0}.Cause: The copy server is not running.
Action: Contact Oracle support.
3607, Error opening file copy server socket on {0} with port {0}.Cause: The copy aborted due to an error.
Action: Retry operation.
3608, Error connecting to clipboard.Cause: There is no connection to the clipboard server.
Action: Retry operation.
3609, Error while copying {0} to {1}.Cause: Error occurred during a file copy.
Action: See secondary error.
3610, Error starting online backup.Cause: Error occurred while putting tablespace in online backup mode.
Action: See secondary error.
3611, Error ending online backup.Cause: Error occurred while restore tablespace from online backup mode.
Action: See secondary error.
3612, Error listening on server port {0}.Cause: Error occurred while listening on port.
Action: Check if server is already running.

Duf Error Messages
C-16 Oracle Application Server High Availability Guide
3613, Network Buffer Overflow Detected.Cause: The network protocol detected a buffer overflow due to a bug or attack.
Action: Call Oracle Support.
C.2.3 SQL*Plus Error MessagesThe following are SQL*Plus error messages.
3700, Failed in SQL*Plus executing SQL statement: {0}.Cause: Failed to execute the specified SQL statement.
Action: See secondary error.
3701, Failed starting SQL*Plus : {0}.Cause: Failed to execute the specified SQL statement.
Action: See secondary error.
C.2.4 JDBC Error MessagesThe following are JDBC error messages.
3751, Failed to register Oracle JDBC driver: oracle.jdbc.OracleDriver.Cause: Failed to register the Oracle JDBC driver.
Action: Make sure that Oracle JDBC driver is installed on the local system.
3752, There is no JDBC connection to the database.Cause: There is no connection to the database server.
Action: Connect to a database server first, then try the operation again.
3753, Failed to connect to the database.Cause: Unable to connect to the database server.
Action: See secondary error.
3754, Failed to disconnect from the database.Cause: Unable to disconnect from the database server.
Action: See secondary error.
3755, Failed to execute the SQL statement.Cause: Failed to execute the SQL statement.
Action: See secondary error.
3756, Failed to run the SQL query.Cause: Failed to run the SQL query statement.
Action: See secondary error.
3757, Failed to close the Oracle result set or the Statement object.Cause: Failed to close the Oracle result set or the Statement object.
Action: See secondary error.
3758, This method can not be used to verify the physical standby database.Cause: This is a programming error.
Action: Contact Oracle support.

Duf Error Messages
OracleAS Guard Error Messages C-17
3759, Verify DB query returned no data.Cause: Verify database query returned no data.
Action: See secondary error.
3760, Failed to query the archive log destination information.Cause: Failed to query the archive log destination information.
Action: See secondary error.
3761, Failed to query the redo log information.Cause: Failed to query the redo log information.
Action: See secondary error.
3762, Failed to process the results from SQL statement.Cause: Failed to process the results from the SQL statement.
Action: See secondary error.
3763, Failed to query the data files of the database.Cause: Failed to query the data files from the database.
Action: See secondary error.
3764, Failed to query the log files used by the database.Cause: Failed to query the log files used by the database.
Action: See secondary error.
3765, Failed to query table space information.Cause: Failed to query tablespace information from the database.
Action: See secondary error.
C.2.5 OPMN Error MessagesThe following are OPMN error messages.
3800, Failed trying to connect to OPMN Manager.Cause: Error trying to connect to OPMN manager.
Action: Make sure OPMN manager is started.
3801, Failed trying to get topology information from OPMN Manager on {0}.Cause: Error trying to get topology information from OPMN manager.
Action: Make sure OPMN manager is started and working correctly.
3802, Failed trying to stop OPMN Component {0}.Cause: Failed trying to stop the specified OPMN component.
Action: See secondary error.
3803, Failed trying to start OPMN Component {0}.Cause: Failed trying to start the specified OPMN component.
Action: See secondary error.

Duf Error Messages
C-18 Oracle Application Server High Availability Guide
3900, Error creating Oracle database service because the service has already been marked for deletion. Please exit the Windows Service Control Manager on node {0}. Would you like to retry? Cause: The user has the SCM open causing a service operation to fail.
Action: User must exit SCM GUI.
C.2.6 Net Services Error MessagesThe following are Net Services error messages.
4000, Failed trying to get Net Services default domain for {0}.Cause: Failed trying to get the Net Services default domain.
Action: See secondary error.
4001, Error trying to add net service name entry for {0}.Cause: Failed trying to add the specified service name.
Action: See secondary error.
4002, Error trying to get net service name entry for {0}.Cause: Failed trying to get the specified service name.
Action: See secondary error.
4003, Error trying to get host name from net service entry for {0}.Cause: Failed trying to get the host name from the net service entry.
Action: See secondary error.
4004, Error trying to get host name from net service description.Cause: Failed trying to get the host name from the net service description.
Action: See secondary error.
4005, Error trying to get net service listener information.Cause: Failed trying to get the net service listener information.
Action: See secondary error.
4006, Error trying to create a net service default listener.Cause: Failed trying to create a default listener.
Action: See secondary error.
4007, Error trying to add SID entry {0} to net service listener {1}.Cause: Failed trying to add a SID entry to the listener.
Action: See secondary error.
4008, Error generating a command a script for the net service listener command: {0}.Cause: Failed generating a command script for the listener.
Action: See secondary error.
4009, Error running the command script for the net service listener command: {0}.Cause: Failed running the command script for the listener.
Action: See secondary error.
4010, Error adding the net service TNS entry for {0}.Cause: Failed adding a TNS entry.

Duf Error Messages
OracleAS Guard Error Messages C-19
Action: See secondary error.
4011, Error trying to delete SID entry {0} to the net service listener {1}.Cause: Failed trying to delete the SID entry to the listener.
Action: See secondary error.
4012, Error trying to save the listener configuration.Cause: Listener information was modified and an attempt to save information failed.
Action: See secondary error.
4013, Error deleting net service TNS entry for {0}.Cause: Failed deleting a TNS entry.
Action: See secondary error.
4014, Error starting the TNS listener using the lsnrctl command.Cause: Failed to start the TNS listener.
Action: See secondary error.
4030, The command \"{0}\" failed due to timeout.Cause: Command timed out.
Action: Increase timeout values in configuration file.
4031, Error getting environment variables using the env command.Cause: The env command does not work.
Action: Make sure the /bin or /usr/bin directory contains the env executable.
4040, Error executing the external program or script.Cause: The execution of the specified command failed.
Action: See secondary error.
4041, Failed to get the value of {0} from the TNS name descriptor {1}.Cause: Failed to get the value for the given parameter from the TNS name descriptor.
Action: See secondary error.
4042, Failed to update the value of {0} for the TNS name descriptor {1}.Cause: Failed to update the value of a given parameter in the TNS name descriptor.
Action: See secondary error.
4043, Failed to compare the TNS descriptor entry {0} with entry {1}.Cause: Failed to compare the two TNS entries.
Action: See secondary error.
4044, Failed to generate a remote TNS name descriptor for the service name.Cause: Failed to generate a remote TNS name descriptor for the given local database.
Action: See secondary error.
4045, Failed to get the remote TNS service name for the service name.Cause: Failed to get the remote TNS service name for the given local database.

Duf Error Messages
C-20 Oracle Application Server High Availability Guide
Action: See secondary error.
C.2.7 LDAP or OID Error MessagesThe following are LDAP or OID error messages.
4101, Failed to connect to OID server on host {0}, port {1}.Cause: Failed to the OID server on a given host and port.
Action: See secondary error.
4102, Failed to connect to OID server via SSL on host {0}, port {1}.Cause: Failed to the OID server via SSL on a given host and port.
Action: See secondary error.
4103, User must specify host, port, user name, and password for the OID server.Cause: User did not specify all the above parameters.
Action: User must specify all the above parameters in order to access the OID server.
4104, Failed to get the value of attribute {0} from OID server.Cause: Failed to get the value of the given attribute.
Action: See secondary error.
4105, Failed to get the attributes for DN {0} from OID serverCause: Failed to get the attributes of the given DN.
Action: See secondary error.
4106, Failed to get Oracle Application Server instances from OID serverCause: Failed to get Oracle Application Server instances from the OID server.
Action: See secondary error.
4107, Failed to get infrastructure databases from OID server.Cause: Failed to get infrastructure databases from the OID server.
Action: See secondary error.
4110, Cannot set current topology to file {0} because the file does not exist.Cause: The topology file does not exist.
Action: Specify a filename of a file that exists.
4111, The current topology file \"{0}\" does not exist. Use the "set topology" command to specify a valid topology file.Cause: The topology file does not exist.
Action: Specify a filename of a file that exists in dsa.conf.
C.2.8 System Error MessagesThe following are system error messages.
4900, An exception occurred on the server.Cause: A server exception occurred.
Action: See secondary error.
4901, A null pointer exception occurred on the server.

Duf Error Messages
OracleAS Guard Error Messages C-21
Cause: Software error.
Action: See secondary error.
4902, Object not found in clipboard for key {0}.Cause: Software error.
Action: See secondary error.
4903, The minimum succeed value of {0} was not met for the workers in group {1}. Cause: A group of workers belonging to the same group requires that a minimum number of them succeed. That minimum succeed value was not met.
Action: See secondary error.
4950, An error occurred on host {0} with IP {1} and port {2}.Cause: An error occurred on the server.
Action: See secondary error.
C.2.9 Warning Error MessagesThe following are warning error messages.
15305, Warning: Problem gathering summary information for backup.Cause: Error during the gatherInfo step of the backup topology operation.
Action: Check secondary error.
15306, Warning during undo processing.Cause: Error occurred during undo processing.
Action: Check secondary error.
C.2.10 OracleAS Database Error MessagesThe following are OracleAS database error messages.
15604, Error finishing up creating the physical standby database.Cause: Failed to finish creating the standby database.
Action: See secondary error.
15605, Error creating the physical standby database.Cause: Failed to the create the standby database.
Action: See secondary error.
15606, Failed to perform a sync database operation on the primary topology.Cause: Failed to perform a sync database operation on the primary topology.
Action: See secondary error.
15607, Failed to perform a sync database operation on the standby topology.Cause: Failed to perform a sync database operation on the standby topology.
Action: See secondary error and log file for more information.
15608, Invalid backup mode specified in the template file {0}.Cause: Error trying to process a backup mode value in the template file.
Action: Correct backup mode and retry the operation.
15609, Failed to get database backup files.

Duf Error Messages
C-22 Oracle Application Server High Availability Guide
Cause: Error trying to get the database backup files.
Action: See secondary error.
C.2.11 OracleAS Topology Error MessagesThe following are OracleAS topology error messages.
15620, An Invalid Topology was specified.Cause: Error trying to process a topology object.
Action: Retrieve a valid topology object.
15621, Error trying to verify topology {0}.Cause: The specified topology had an error during the verify operation.
Action: See secondary error for more information.
15622, Error trying to verify instance {0}.Cause: The specified instance had an error during the verify operation.
Action: See secondary error for more information.
15623, Topology {0} is not symmetrical with topology {1}.Cause: The specified topologies are not symmetrical.
Action: See secondary error for more information.
15624, An Invalid Topology was specified. Topology {0} does not contain any valid instances.Cause: Error trying to process a topology object. Topology object did not contain a valid instance.
Action: Retrieve a valid topology object with at least one instance.
15625, Could not find matching instance {0} in Topology {1}.Cause: Could not get matching instances. Topologies do not appear to be symmetrical.
Action: Make the topologies symmetrical.
15626, Topologies are not symmetrical because topology name {0} is not the same as topology name {1}.Cause: Topology names are not the same and therefore topologies are not symmetrical.
Action: Make the topologies symmetrical.
15627, Instance {0} is not symmetrical because of different Oracle Home names {1}.Cause: Instance Home names are not symmetrical in the specified topologies.
Action: Make the topologies symmetrical.
15628, Instance {0} is not symmetrical because of different Oracle Home paths {1}.Cause: Instance Home paths are not symmetrical in the specified topologies.
Action: Make the topologies symmetrical.
15629, Instance {0} is not symmetrical, because of different host names {1}, {2}.Cause: Instance host names are not symmetrical in the specified topologies.
Action: Make the topologies symmetrical.

Duf Error Messages
OracleAS Guard Error Messages C-23
15630, The specified instance {0} could not be found.Cause: The specified instance information could not be found on this node.
Action: Either the wrong instance name or host name was specified on the request to the server.
15631, The primary and standby topologies appear to be identical because both have instance {0} on host {1}.Cause: An instance can only be in a member of one topology, it appears that the primary and standby topologies are the same.
Action: Specify a primary and separate standby topology.
15632, The Home that contains instance {0} could not be found.Cause: The specified instance could not be found in any Home on this node.
Action: The Oracle home information on the system is incorrect.
15633, An Invalid Topology was specified. Topology contains a duplicate instance named {0}.Cause: Topology information obtained from OPMN contains a duplicate instance.
Action: Check OPMN to ensure that the topology information listed is correct.
C.2.12 OracleAS Backup and Restore Error MessagesThe following are OracleAS backup and restore error messages.
15681, Must specify a backup directory.Cause: A backup directory must be specified for the operation to complete successfully.
Action: Check secondary error.
15682, Failed to initialize configure file: {0}.Cause: Failed to initialize the configure file for backup script.
Action: Check secondary error.
15683, The ha directory does not exist in Oracle Home {0}.Cause: The ha directory does not exist in the OracleAS Oracle home.
Action: Make sure the ha directory which contains the backup and restore scripts is copied to the OracleAS Oracle home.
15684, Failed to generate the configuration file for the backup and restore script.Cause: Failed to generate the configure file for the backup and restore script.
Action: Check secondary error.
15685, Failed to backup configuration data for instance {0}.Cause: Failed to backup configuration data for the specified instance.
Action: Check secondary error.
15686, Failed to restore configuration data for instance {0}.Cause: Failed to restore configuration data for the specified instance.
Action: Check secondary error.
15687, Failed to get the database backup files.Cause: Failed to get the database backup file names from the log.

Duf Error Messages
C-24 Oracle Application Server High Availability Guide
Action: Check secondary error.
15688, Error running the config script.Cause: Failed to run the config script.
Action: Check the log file generated by the config script.
15689, Error running the backup script.Cause: Failed to run the backup script.
Action: Check the log file generated by the backup script.
15690, Error running the restore script.Cause: Failed to run the restore script.
Action: Check the log file generated by the restore script.
15691, No zip file was found.Cause: No zip file was found.
Action: Make sure a successful backup has been performed.
15692, The config file {0} is empty.Cause: The specified configure file is empty.
Action: Copy the original configure file from the "ha" directory where backup restore scripts are located.
15693, No zip file was specified.Cause: User did not specify a zip file for the unzip operation.
Action: Internal error.
15694, Error executing step - {0} of Backup topology.Cause: Backup topology failed at the specified step.
Action: Check secondary error.
15695, Error executing step - {0} of Restore topology.Cause: Restore topology failed at the specified step.
Action: Check secondary error.
15696, Error initializing backup topology operation.Cause: Error initializing backup topology operation.
Action: Check secondary error.
15697, Error during backup topology operation - backup step.Cause: Error during backup step processing of backup topology.
Action: Check secondary error.
15698, Error during backup topology operation - copy step.Cause: Error during copy step processing of backup topology.
Action: Check secondary error.
15699, Error initializing restore topology operation.Cause: Error initializing restore topology operation.
Action: Check secondary error.

Duf Error Messages
OracleAS Guard Error Messages C-25
15700, No backup file was found.Cause: No backup file was found.
Action: Make sure a successful backup has been performed.
15701, Failed to restore configuration with the DCM-resyncforce option for instance {0}. Cause: Failed to restore configuration with the DCM-resyncforce option.
Action: Check secondary error.
15702, Error initializing the clone instance operation.Cause: Error initializing the clone instance operation.
Action: Check the secondary error.
15703, Error initializing the clone topology operation.Cause: Error initializing the clone home operation.
Action: Check the secondary error.
15704, Error: Oracle home of the instance to be cloned {0} already exists.Cause: Error cloning instance, the Oracle home already exists
Action: Clean up the Oracle home and retry.
15705, cloning instance {0}. Cloning requires OPMN to be stopped, therefore the OracleAS Guard server must be started using asgctl .Cause: Cloning requires that OPMN be stopped, which will cause the OracleAS Guard server (DSA server process) to be stopped. This will cause the clone to fail.
Action: Use opmnctl to stop the OracleAS Guard server (DSA server process). Then use the asgctl startup topology command to restart OracleAS Guard server for this instance.
15706, Stop the backup home image operation in response to the user's request.Cause: Stop the backup home operation because the user entered NO.
Action: None.
15707, Stop the restore home image operation in response to the user's request.Cause: Stop the restore home operation because the user entered NO.
Action: None.
C.2.13 OracleAS Guard Synchronize Error MessagesThe following are OracleAS Guard synchronize error messages.
15721, Failed to initialize a DUF database object.Cause: Failed to initialize a DufDb object.
Action: Check secondary error.
15722, No topology information is available to perform the topology operation.Cause: No topology information is available to perform the topology operation.
Action: Check secondary error.
15723, No instances are found in the topology's backup list.Cause: The topology's backup list is empty.
Action: Check secondary error.

Duf Error Messages
C-26 Oracle Application Server High Availability Guide
15724, Failed to get the standby host list.Cause: Failed to get the standby host list.
Action: Check secondary error.
15725, Failed to backup OracleAS configuration data for topology {0}.Cause: Failed to backup OracleAS topology configuration data.
Action: Check secondary error.
15726, Failed to restore OracleAS configuration data for topology.Cause: Failed to restore OracleAS topology configuration data.
Action: Check secondary error.
15727, Failed to backup OracleAS infrastructure database {0}.Cause: Failed to backup OracleAS topology infrastructure database.
Action: Check secondary error.
15728, Failed to restore OracleAS infrastructure database {0}.Cause: Failed to restore OracleAS topology infrastructure database.
Action: Check secondary error.
15729, Failed to perform the sync topology operation.Cause: Failed to perform the sync topology operation.
Action: Check secondary error.
C.2.14 OracleAS Guard Instantiate Error MessagesThe following are OracleAS Guard instantiate error messages.
15751, Error executing step {0} of instantiate topology operation.Cause: The instantiate topology operation failed at the specified step.
Action: Check secondary error.
15752, Failed to load remote topology information.Cause: Failed to load remote topology information.
Action: Make sure the user specified the correct host name for the topology and that the OPMN processes are running on the topologies.
15753, Error preparing to instantiate topology on host {0}.Cause: Error preparing to instantiate topology.
Action: Check secondary error.
15754, Error instantiating database {0}.Cause: Error instantiating the database.
Action: Check secondary error.
15755, Error finishing up instantiating database {0}.Cause: Error finishing up instantiating the database.
Action: Check secondary error.
15756, Error initializing instantiate topology operation.Cause: Error initializing the instantiate topology operation.

Duf Error Messages
OracleAS Guard Error Messages C-27
Action: Check secondary error.
15757, Error initializing switchover topology operation.Cause: Error initializing the switchover topology operation.
Action: Check secondary error.
15770, The instance {0} specified in the topology file does not match the instance {1} in home {2}.Cause: The topology file is incorrect.
Action: Run the "discover topology command" from asgctl.
15771, The topology file {0} is the wrong version Please delete the file and rediscover the topology.Cause: The topology file is incorrect.
Action: Run the "discover topology command" from asgctl.
15772, The topology file {0} does not contain an entry for the discovery host {1}.Cause: The topology file is incorrect.
Action: Run the "discover topology command" from asgctl.
15773, The standby topology does not contain a entry for the mandatory primary instance {0}.Cause: The topology file is incorrect.
Action: Run the "discover topology command" from asgctl.
15774, The host name {0} in the standby topology net descriptor for database {1} resolves to a primary host address {2}.Cause: The topology file is incorrect.
Action: Run the "discover topology command" from asgctl.
15775, The standby topology host name {0} for the instance {1} resolves to a primary host address.Cause: The topology file is incorrect.
Action: Run the "discover topology command" from asgctl.
15776, Error accessing the OID server.Cause: Unable to access the OID server.
Action: Specify the correct OID information and make sure the OID server is running.
15777, Error: OID information needed to access the server was not specified.Cause: Unable to access the OID server.
Action: Specify the correct OID information.
15778, Error getting database information for SID {0} from host {1}. This instance will be excluded from the topology.xml file.Cause: Unable to get database information for the topology database.
Action: None.
15779, Error getting instance information for instance {0} from host {1}. This instance will be excluded from the topology.xml file.Cause: Unable to get information for an instance.

Duf Error Messages
C-28 Oracle Application Server High Availability Guide
Action: None.
15780, Instance {0} cannot be found in the topology.Cause: The instance name does not exist in the topology file.
Action: Perform the asgctl discover topology command.

Index-1
Index
Aactive-active topologies, 1-4
OracleAS Cluster, 2-1OracleAS Cluster (Middle-Tier), 3-1OracleAS Infrastructure, 6-3
active-passive topologies, 1-4OracleAS Cold Failover Cluster, 2-2OracleAS Infrastructure, 6-3site-level (OracleAS Disaster Recovery), 6-3with Real Application Clusters database, 6-6
adapters (Oracle BPEL Process Manager), 5-20adapters (OracleAS Integration InterConnect), 5-13adding instance to OracleAS Database-based
Farm, 4-3adding instance to OracleAS File-based Farm, 4-3AJP port, 4-20, 4-30alternate server list
from Oracle Internet Directory, 10-3from user input, 10-2
AlternateServers attribute (in failover), 10-3Application Server Control Console
Configure OracleAS Farm Repository wizard, 4-3, 4-5
configuring mod_oc4j.conf file, 4-17Create Cluster page, 4-5Farm home page, 4-5in OracleAS Cluster(OC4J) environment, 4-29in OracleAS Cold Failover Cluster (Middle-Tier)
environment, 4-39archive logs, 13-1
shipping manually, 15-3asgctl commands
asgctl, 14-7clone instance, 13-22, 13-29, 14-8clone topology, 13-22, 13-29, 14-11common information, 14-3connect asg, 14-14disconnect, 14-15discover topology, 13-22, 13-27, 13-48, 14-16discover topology within farm, 13-22, 14-18dump farm (deprecated), 14-52dump policies, 13-23, 14-19dump topology, 13-23, 13-27, 14-20exit, 14-22failover, 13-23, 13-41, 14-23
help, 13-47, 14-25instantiate farm (deprecated), 14-53instantiate topology, 13-23, 14-26quit, 14-28set asg credentials, 13-22, 13-26, 13-50, 14-29set echo, 14-31set new primary database, 13-22, 13-26, 14-32set noprompt, 14-33set primary database, 13-22, 13-26, 13-47, 13-50,
14-34set trace, 14-36show env, 14-37show operation, 13-23, 14-38shutdown, 13-23, 14-40shutdown farm (deprecated), 14-54shutdown topology, 14-41specific information for some, 14-3startup, 14-42startup farm (deprecated), 14-55startup topology, 13-23, 14-43stop operation, 13-23, 14-44switchover farm (deprecated), 14-56switchover topology, 13-23, 13-39, 14-45sync farm, 14-58sync topology, 13-23, 14-48verify farm (deprecated), 14-59verify topology, 13-23, 13-27, 14-50
asgctl scriptscreating and executing, 13-48
attributesAlternateServers (for failover), 10-3
authenticating Infrastructure databasesfailover to new production site, 13-22, 13-26production site, 13-22, 13-26
authenticating OracleAS Guard servers to OracleAS Guard client, 13-22, 13-26
Bbackup and recovery
cold failover cluster database, 7-3middle tier, 3-19OracleAS Cold Failover Cluster
(Middle-Tier), 4-38OracleAS Infrastructure, 6-6

Index-2
Backup and Recovery Tool, 6-7, 7-4, 13-1, 15-1, 15-3, 15-4
CCFC environment
special considerations forinstantiate and failover operations, 14-4switchover operation, 14-5
special considerations for disaster recovery configurations, 14-4
chgtocfmt script, 4-43clone instance command, 13-29, 13-31, 14-8clone topology command, 13-22, 13-29, 13-33, 14-11clone topology policy file, 13-33cloning an instance at secondary site, 13-31cloning topology at secondary site, 13-33cluster agent, 1-5Cluster configuration assistant fails, A-5cluster file system and Oracle Ultra Search, A-15cluster manager, 11-1clusters
definition, 11-1clusterware, 1-5cold failover cluster database, 7-1
backup and recovery, 7-3converting from single-instance database (on
UNIX), 21-6converting from single-instance database (on
Windows), 21-26database polling, 6-7for OracleAS Metadata Repository, 6-4
common configuration, establishing, 4-19common information for asgctl commands, 14-3config.inp, 15-3configuration cloning, 3-4configuration files
backed up by OracleAS Disaster Recovery, 13-1backed up for OracleAS Disaster Recovery, 15-3in OracleAS Disaster Recovery, 13-7
configuration, establishing common, 4-19Configure OracleAS Farm Repository wizard, 4-3,
4-5connect asg command, 14-14connect-time failover, 11-2Create Cluster page, 4-5creating and executing asgctl scripts, 13-48creating DCM-Managed OracleAS Clusters, 4-2
Ddatabase connect problem (on Windows), A-2database console, 7-3database polling, 7-4database polling (cold failover cluster database), 6-7DCM, 2-6
starting DCM daemon, 3-18dcmctl commands, 3-18, 4-29, 4-31
createArchive, 4-29exportArchive, 4-29
exportRepository, 4-26getState, 4-26importRepository, 4-27leaveCluster, 4-8repositoryRelocated, 4-27resyncInstance, 4-26updateConfig, 4-18, 4-26
DCM-Managed OracleAS Clusters, 3-17, 4-1, 4-2, 4-19
adding instances to, 4-6common configuration, 4-19configuring mod_oc4j.conf, 4-17configuring Oracle HTTP Server, 4-16creating, 4-2deleting, 4-8deploying applications, 4-31instance-specific parameters, 4-20relocating repository host, 4-26removing instances, 4-8starting, 4-8stopping, 4-8upgrading, 4-44using with OracleAS Single Sign-On, 4-44
dehydration store, 5-19disaster recovery, 13-1disconnect command (OracleAS Disaster
Recovery), 14-15discover topology (OracleAS Disaster
Recovery), 13-22, 13-27, 13-48command, 14-16
discover topology within farm (OracleAS Disaster Recovery), 13-22
command, 14-18displaying current operation, 13-43displaying detailed topology information, 13-45displaying operation history on all nodes, 13-44<distributable/> tag, 4-32distributed OracleAS Cluster (Identity
Management), 9-31transformation to, 19-4, 20-1with Real Application Clusters database, 9-35
distributed OracleAS Cold Failover Cluster (Identity Management), 9-21, 9-23
transformation to, 19-7, 21-1distributed OracleAS Cold Failover Cluster
(Infrastructure), 9-12DNS, 13-15, 13-18
DNS resolution (for OracleAS Disaster Recovery), 13-17
DNS servers on production and standby sites (for OracleAS Disaster Recovery), 13-18
mapping (for OracleAS Disaster Recovery), 13-46switchover (for OracleAS Disaster
Recovery), 13-40used in OracleAS Disaster Recovery, 13-15
dump farm command (deprecated), 14-52dump policies command, 13-23, 13-27, 14-19dump topology command, 13-23, 13-27, 13-45, 14-20dump topology policy file, 13-27dumping policy files, 13-27

Index-3
Eediting a policy file, 13-28EJB
application state replication, 4-33client routing, 3-11replication, 3-10session state replication, 3-10
EJB state replication, 3-10error messages (OracleAS Disaster Recovery), 13-45exit command (OracleAS Disaster Recovery), 14-22
Ffailback, 1-5failover, 1-5
AlternateServers attribute, 10-3during connect-time, 11-2
failover command (OracleAS Disaster Recovery), 13-7, 13-23, 13-41, 14-23
failover policy file, 13-41Farm home page, 4-5fault tolerant mode, 2-10file-based repository, 3-19Forms Listener Servlet, 5-7Forms Runtime Engine, 5-7Forms Servlet, 5-7
Ggetting help (OracleAS Disaster Recovery), 13-47
Hhardware cluster, 1-5hardware load balancers, 2-8help command (OracleAS Disaster Recovery), 14-25hostname
network, 1-6, 13-15physical, 1-6, 13-13, 13-14, 13-16virtual, 1-6, 13-13virtual (in OracleAS Disaster Recovery), 13-15,
13-16hostname resolution, 13-15hub database (OracleAS Integration
InterConnect), 5-16
Iidentifying Infrastructure database on primary
topology, 13-50information common to asgctl commands, 14-3information specific to some asgctl commands, 14-3instance management (OracleAS Disaster
Recovery), 13-23instance-specific parameters, 4-20instantiate farm command (deprecated), 14-53instantiate topology (OracleAS Disaster
Recovery), 13-23, 13-36at secondary site, 13-36policy file, 13-36, 13-37
instantiate topology command, 14-26IP address takeover (IPAT), 10-5
JJ2EE and Web Cache installation type, 13-4J2EE applications
rolling upgrades of, 4-9Java Object Cache, 3-11, 4-24JMS port, 4-20, 4-30JNDI namespace replication, 3-11
Lload balancers, 2-8
fault tolerant mode, 2-10hardware load balancers, 2-8in OracleAS Disaster Recovery, 13-6lvs, 2-8network address translation (NAT), 2-10network load balancers, 2-8persistence, 2-9port configuration, 2-9port monitoring, 2-10process failure detection, 2-10requirements, 2-9resource monitoring, 2-10software load balancers, 2-8stickiness, 2-9types, 2-8virtual server configuration, 2-9Windows network load balancers, 2-9with Oracle Internet Directory, 10-6with OracleAS Forms Services, 5-8wrong virtual server name in configuration
files, A-7load balancing
local affinity (for OC4J), 3-5mod_oc4j, 3-5, 4-17network level, 10-3Oracle Internet Directory, 10-4OracleBI Discoverer, 5-24software, 10-4weighted routing (for OC4J), 3-5
load-on-startup, 4-32local affinity (OC4J load balancing), 3-5log apply services, 15-2lvs load balancer, 2-8
Mmetric-based mod_oc4j routing algorithm, 3-5Microsoft Cluster Server, 9-4middle tier
backup and recovery, 3-19upgrades, 4-43
MissingLocalValuePolicy flag, 4-21mod_oc4j, 3-6
load balancing, 3-5, 4-17load balancing algorithms, 3-5metric-based routing algorithm, 3-5

Index-4
mod_oc4j.conf, 4-18configuring, 4-17
mod_plsql, 4-18monitoring asgctl operations, 13-42multicast address, 3-10, 4-32, 4-34multimaster replication, 10-5
Nnetwork address translation (NAT), 2-10network hostname, 1-6, 13-15Network Interface Cards (NICs)
failures of, 10-5using multiple with OracleAS Cluster
(OC4J-EJB), A-12network load balancers, 2-8network load balancing, 10-3NIS, 13-15
OOC4J, 6-1
cluster-wide parameters, 4-29configuring OC4J-specific parameters, 4-35creating OC4J instances in OracleAS Cluster
(OC4J), 4-30deleting OC4J instances in OracleAS Cluster
(OC4J), 4-30distributed caching, 3-11instance-specific parameters, 4-20, 4-29, 4-35islands, 4-20, 4-30, 4-35, 4-36Java Object Cache, 3-11JNDI namespace replication, 3-11load balancing, 3-5mod_oc4j, 3-5number of processes, 4-30ports, 4-30, 4-36process, 3-6, 3-7, 3-8, 4-17, 4-30, 4-35, 4-36
OC4J_SECURITY, 8-25Oc4jRoutingWeight directive, 4-17Oc4jSelectMethod directive, 4-17odisrv, failover problems, A-6OPMN, 6-2opmn: prefix, A-13opmnctl restartproc command, 4-18opmn.xml, 4-21, 4-22Oracle BPEL Process Manager, 5-17
adapters, 5-20Oracle Content Management SDK, 5-25Oracle Data Guard, 13-1, 13-7, 13-19, 15-3, 18-1Oracle Delegated Administration Services, 6-2, 6-3,
9-13load balancer persistence setting, 2-9
Oracle Directory Integration and Provisioning, 6-2, 9-16
Oracle Fail Safe, 7-4, 9-3, 9-4database polling, 6-7
Oracle HTTP Server, 3-4, 3-6, 3-8, 3-9, 4-16, 6-1stateful load balancing, 3-3stateless load balancing, 3-3
Oracle Identity Management, 6-2, 6-3Oracle Internet Directory, 6-2, 9-16, 9-21
alternate server list, 10-3cannot start, A-5deployment examples, 10-5failover, 10-1failover at network level, 10-3failover capabilities, 10-5failover in Real Application Clusters database
environment, 11-1failover options for clients, 10-2failover options in private network
infrastructure, 10-5failover options in public network
infrastructure, 10-3fails to start on one node, A-5fault tolerance mechanisms, 10-2hardware-based load balancing, 10-4high availability capabilities, 10-5load balancer persistence setting, 2-9multimaster replication, 10-5OID Monitor in OracleAS Cluster (Identity
Management) environment, 8-14software load balancing, 10-4stack, 10-1synchronizing metadata in OracleAS Cluster
(Identity Management) environment, 8-13unable to connect to, A-5with Real Application Clusters database, 11-1
Oracle Management Services, 6-2Oracle Net listener, 6-1Oracle Ultra Search
cluster file system and, A-15Real Application Clusters database, A-15
ORACLE_HOSTNAME environment variable, 7-3OracleAS Cluster (Identity Management), 2-2, 6-3,
6-4, 9-26configuring system time, A-7distributed, 6-3, 6-4, 9-31failover, 8-26OID Monitor in, 8-14Oracle Internet Directory metadata
synchronization, 8-13transformation to, 19-3, 20-1with Real Application Clusters database, 9-30
OracleAS Cluster (J2EE), 2-2OracleAS Cluster (Middle-Tier), 3-1, 4-44OracleAS Cluster (OC4J), 2-7, 3-7, 3-8, 3-9, 3-11
Application Server Control Console and, 4-29configuring, 4-29configuring OC4J instances, 4-35configuring Web application state
replication, 4-31creating OC4J instances, 4-30deleting OC4J instances, 4-30deploying applications, 4-31EJB state replication, 3-10session state replication, 3-7, 3-8, 3-9state replication, 2-7using, 4-29

Index-5
Web application session state replication, 3-10OracleAS Cluster (OC4J-EJB), 3-10
configuring EJB application state replication, 4-33EJB replication, 3-10state replication, 4-33with multiple NICs, A-12
OracleAS Cluster (OC4J-JMS), 3-12, 3-13manual failover, 4-42
OracleAS Cluster (Portal), 2-2OracleAS Cluster (Web Cache), 3-3OracleAS Clusters, 2-1
advantages, 2-2manually managed, 3-19, B-1with OracleAS Cluster (OC4J), 3-9
OracleAS Cold Failover Cluster, 2-2, 5-8, 13-6, 13-15, 13-19
advantages, 2-3backup and recovery, 6-7cluster-wide maintenance, 13-39environment, 1-5online database backup and restore, A-2solutions for Metadata Repository and Identity
Management, 6-5OracleAS Cold Failover Cluster (Identity
Management), 6-3, 6-6, 9-17, 9-19distributed, 6-3, 9-21transformation to, 19-5, 21-1
OracleAS Cold Failover Cluster (Infrastructure), 3-15, 5-10, 6-3, 6-5, 9-2
backup and recovery, 9-12configuring, 9-11distributed, 6-3, 6-5, 9-12, 9-14failover, 9-6managing, 9-11node failure protection, 9-3process failure protection, 9-3starting, 9-9stopping, 9-10using Application Server Control Console, 9-11Windows solution, 9-3with OracleAS Cold Failover Cluster
(Middle-Tier), 9-37OracleAS Cold Failover Cluster (Middle-Tier), 3-12,
3-15, 3-16, 3-17, 4-40accessing applications, 4-43backup and recovery, 4-38configuration and deployment, 4-38deploying applications, 4-43managing, 4-37managing failover, 4-39manual failover, 4-39moving Oracle homes between local and shared
storage, 4-42using Application Server Control Console, 4-39using with OracleBI Discoverer, 4-38with OracleAS Cold Failover Cluster
(Infrastructure), 9-37OracleAS Database-based Farm
adding instance to, 4-3
OracleAS Disaster Recovery, 13-1asymmetrical standby configuration, 13-7asymmetrical standby with fewer middle
tiers, 13-7asymmetrical standby with Infrastructure
only, 13-8collocated OID and MR with a separate MR, 13-9full site upgrade prerequisites, 16-1full site upgrade procedure, 16-2non-collocated OID and MR with distributed
application MRs, 13-10standby site not started after failover, A-9standby site not synchronized, A-9supported topologies, 13-5symmetrical production and standby
configuration, 13-5sync farm operation fails, A-11verify farm operation fails, A-10
OracleAS Farm, 4-2OracleAS File-based Farm
adding instance to, 4-3, 4-5creating repository host, 4-3
OracleAS Forms Services, 5-7OracleAS Guard, 13-25, 13-35
asgctl commands description summary, 14-1client, 13-21cloning instance at secondary site, 13-31cloning topology at secondary site, 13-33creating and executing asgctl scripts, 13-48deprecated asgctl commands description
summary, 14-1displaying current operation, 13-43displaying detailed topology information, 13-45displaying operation history, 13-44error messages, 13-45failing over to standby topology, 13-41getting help, 13-47identifying Infrastructure database on primary
topology, 13-50instantiating topology at secondary site, 13-36invoking asgctl, 14-7monitoring asgctl operations, 13-42operations, 13-22server, 13-22setting asg credentials, 13-50specifying primary database, 13-47stopping operations, 13-44supported disaster recovery configurations, 13-25supported OracleAS releases, 13-5switching over to standby topology, 13-39synchronizing secondary site with primary
site, 13-37tracing tasks, 13-44typical asgctl session, 13-46validating primary topology, 13-42validating primary topology configuration, 13-42
OracleAS Infrastructurebackup and recovery, 6-6monitoring, 8-33stopping, 9-10

Index-6
OracleAS Integration B2B, 5-8, 5-10OracleAS Integration InterConnect, 5-11
hub database, 5-16repository server, 5-16with Real Application Clusters database, 5-15
OracleAS Integration InterConnect adapters, 5-13Database adapter, 5-14File adapter, 5-16FTP/SMTP adapter, 5-15HTTP adapter, 5-15MQ/AQ adapter, 5-15OEM adapter, 5-16
OracleAS JMS, 3-17, 4-42distributed destinations, 3-13
OracleAS Metadata Repository, 5-10, 6-1, 6-6, 9-21high availability options, 6-6unable to restore to different host, A-14using Real Application Clusters database, 6-4
OracleAS Metadata Repository Creation Assistant, 9-17
OracleAS Portal, 5-1load balancer persistence setting, 2-9parallel page engine, 2-10
OracleAS Reports Services, 5-3OracleAS Single Sign-On, 4-44, 6-2, 6-3
configuring, 4-44load balancer persistence setting, 2-9long connection time, A-4
OracleAS Web Cache, 3-4failover problems, A-1not started on standby site, A-9OracleAS Cluster (Web Cache), 3-3with OracleAS Forms Services, 5-8
OracleAS Wireless, 5-2OracleBI Discoverer, 4-38, 5-24
load balancing, 5-24process monitoring and restart, 5-24
OracleBI Discoverer Preferences Server, 5-25oracle.j2ee.naming.cache.timeout property, A-13orion-ejb-jar.xml, 4-34
Pparallel page engine, 2-10persistence on load balancers, 2-9physical hostname, 1-6, 13-13, 13-14, 13-16PlsqlConnectionValidation parameter, 4-19policy file, 13-27
clone topology, 13-33dump topology, 13-27editing, 13-28failover, 13-41instantiate topology, 13-36, 13-37success requirement attributes, 13-28switchover topology, 13-39sync topology, 13-38verify topology, 13-27, 13-37, 13-43writing, 13-23
port configuration on load balancers, 2-9port monitoring on load balancers, 2-10
port numbers, 4-30, 4-36Portal and Wireless installation type, 13-4prerequisites for OracleAS Disaster Recovery full site
upgrade, 16-1primary node, 1-6process failure detection on load balancers, 2-10production site, 13-3, 13-18
backup, 15-2PROVIDER_URL property, A-13
Qquit command (OracleAS Disaster Recovery), 14-28
RRAID disks, 4-24random mod_oc4j routing algorithm, 3-5Real Application Clusters database, 7-4
and JMS, 3-12, 3-14and mod_plsql, 3-7, 4-18and Oracle Internet Directory, 11-1and Oracle Ultra Search, A-15and OracleAS Integration InterConnect, 5-13,
5-15, 5-16as Oracle BPEL Process Manager dehydration
store, 5-19for OracleAS Metadata Repository, 6-4in active-passive topologies, 6-6in distributed OracleAS Cluster (Identity
Management), 9-35in OracleAS Cluster (Identity Management)
topology, 9-30Oracle Internet Directory failover in, 11-1transforming to, 20-9
redundancy, 2-1redundant links, 10-5removing instances from DCM-Managed OracleAS
Clusters, 4-8repository host, 3-19
choosing, 4-24creating, 4-3relocating, 4-26unavailability of, 4-25
repository server (OracleAS Integration InterConnect), 5-16
requirements for load balancers, 2-9resource monitoring on load balancers, 2-10RMI port, 4-20, 4-30rolling upgrade for J2EE applications, 4-9round robin mod_oc4j routing algorithm, 3-5
Sscheduled outages, 13-39SCN, 15-3, 15-5secondary node, 1-6secure shell port forwarding, 18-1separate Oracle home installations (OracleAS Cold
Failover Cluster (Middle-Tier)), 4-42sequence number, 15-3, 15-5

Index-7
serializable, 4-32session state replication, 3-7, 3-8, 3-9set asg credentials command, 13-22, 13-26, 13-50,
14-29set echo command, 14-31set new primary database command, 13-22, 13-26,
14-32set noprompt command, 14-33set primary database command, 13-22, 13-26, 13-47,
13-50, 14-34set trace command, 14-36set trace off command, 13-44set trace on command, 13-44shared storage, 1-5, 2-2, 9-4, 9-16show env command, 14-37show operation command, 13-23, 14-38show operation full command, 13-43show operation history command, 13-44shutdown command, 14-40shutdown farm command (deprecated), 14-54shutdown topology command, 13-23, 14-41single Oracle home installations (OracleAS Cold
Failover Cluster (Middle-Tier)), 4-42single point of failure, 3-18site upgrade procedure
OracleAS Disaster Recovery, 16-1software load balancers, 2-8special considerations
disaster recovery configurations in CFC environment, 14-4
instantiate and failover operations, 14-4switchover operation, 14-5
for switchover operation, 13-40specific information for some asgctl commands, 14-3specifying primary database, 13-47SSH tunneling, 18-1ssoreg.sh script, 4-44standby site, 13-3, 13-4, 13-18
clone instance command, 13-22instantiation, 13-23not started after failover, A-9not synchronized, A-9OracleAS Web Cache not started, A-9restoration, 15-4synchronization, 13-23wrong hostname on middle tier, A-10
startup command, 14-42startup farm command (deprecated), 14-55startup topology command, 13-23, 14-43state information in J2EE applications
preserving when upgrading, 4-9state replication
configuring for EJB applications, 4-33configuring for Web applications, 4-31JVM termination, 4-35
state safe applications, 3-8stateful applications, 3-8stateful OC4J applications, clustering and, 4-20stateful session EJB, 4-34, 4-35staticports.ini file, 13-20
stickiness on load balancers, 2-9stop operation command, 13-23, 13-44, 14-44stopping asgctl operations, 13-44supported topologies
OracleAS Disaster Recovery, 13-5switchback, 1-6switchover, 1-6switchover farm command (deprecated), 14-56switchover operation, 13-23switchover topology command, 13-23, 13-39, 14-45switchover topology policy file, 13-39switchover topology to command, 13-7sync farm command, 14-58sync farm operation fails, A-11sync topology command, 13-23, 14-48sync topology policy file, 13-38synchronize topology command, 13-37synchronizing secondary site with primary
site, 13-37system time synchronized, A-7
TTCP/IP connections, 10-3, 10-5time-to-live, 13-46TNS listener, 9-4TNS Names, 13-19tracing asgctl tasks, 13-44transformation
to distributed OracleAS Cluster (Identity Management), 19-4, 20-1
to distributed OracleAS Cold Failover Cluster (Identity Management), 19-7, 21-1
to OracleAS Cluster (Identity Management), 19-3, 20-1
to OracleAS Cold Failover Cluster (Identity Management), 19-5, 21-1
transformation to highly available topologies, 19-1source configuration, 19-1target configurations, 19-1
Transparent Application Failover, 3-12Transparent Application Failover (TAF), 3-12, 11-1troubleshooting
dumping the topology to a file, 13-23, 13-27show operations, 13-23stop an operation, 13-23
typical asgctl session, 13-46
Uunplanned outages, 13-41upgrade prerequisites
OracleAS Disaster Recovery, 16-1upgrade procedure for OracleAS Disaster
Recovery, 16-2upgrading stateful J2EE applications, 4-9
Vvalidating primary topology, 13-42verify farm command (deprecated), 14-59

Index-8
verify farm operation fails, A-10verify operation, 13-23, 13-27verify topology command, 13-23, 13-27, 13-42, 14-50verify topology policy file, 13-27, 13-37, 13-43virtual hostname, 1-6, 9-4, 13-13, 13-18
distributed OracleAS Cold Failover Cluster (Identity Management), 9-22
distributed OracleAS Cold Failover Cluster (Infrastructure), 9-16
OracleAS Cold Failover Cluster (Identity Management), 9-17
OracleAS Cold Failover Cluster (Infrastructure), 9-4, 9-6
OracleAS Cold Failover Cluster (Middle-Tier), 3-15
OracleAS Disaster Recovery, 13-6, 13-12, 13-15, 13-16, 13-17, 13-18, 13-21
OracleAS Disaster Recovery requirement, 13-4unable to connect to Oracle Internet Directory
during installation, A-6virtual IP, 1-6, 1-7, 2-3, 2-9
collocated OracleAS Cold Failover Cluster (Infrastructure) and OracleAS Cold Failover Cluster (Middle-Tier), 9-37
distributed OracleAS Cold Failover Cluster (Identity Management), 9-22
failover, 4-40failover for OracleAS Cold Failover Cluster
(Middle-Tier), 3-16, 4-41failover on Solaris, 8-8, 8-20, 8-30OracleAS Cold Failover Cluster (Identity
Management), 9-17OracleAS Cold Failover Cluster
(Infrastructure), 9-4, 9-6, 9-9, 9-11, 9-12OracleAS Cold Failover Cluster
(Middle-Tier), 3-15OracleAS Disaster Recovery, 13-15, 13-19
virtual server configuration on load balancers, 2-9volume management software, 9-9, 9-11
WWeb application session state replication, 3-7, 3-9,
3-10Web Clipping Studio, 5-2web.xml, 4-32weighted routing (OC4J load balancing), 3-5wide area network, 13-3Windows network load balancers, 2-9