Tools2Talk+ User Guide - Scope Australia
20
Tools2Talk+ User Guide
-
Upload
khangminh22 -
Category
Documents
-
view
4 -
download
0
Transcript of Tools2Talk+ User Guide - Scope Australia

Tools2Talk+
User Guide
Contents
User Guide ................................................................................................................................ 4
Homepage .............................................................................................................................................................4
Chat........................................................................................................................................................................ 4
Edit ......................................................................................................................................................................... 5
Add New Grid .....................................................................................................................................................5
My Grids ...............................................................................................................................................................5
Add/Edit ................................................................................................................................................................5
Page Options ...................................................................................................................................................6
Text Options ...................................................................................................................................................6
Image Options .................................................................................................................................................6
Style Options ...................................................................................................................................................7
Undo/Redo ...........................................................................................................................................................7
Export ....................................................................................................................................................................7
Settings ..................................................................................................................................................................8
Default Font .....................................................................................................................................................8
Voice Options .................................................................................................................................................8
Set a Home Grid ............................................................................................................................................8
Questions to think about when designing a communication aid ........................................ 9
Designing a communication aid ........................................................................................... 10
What do you need to consider? ..................................................................................................................10
The person ....................................................................................................................................................10
Vision .............................................................................................................................................................10
Cognition ......................................................................................................................................................10
Language/literacy skills ...............................................................................................................................11
Hearing ..........................................................................................................................................................11
Physical skills, which includes hand skills and mobility. .........................................................................11
User Guide
Does the person need a communication assessment? ............................................................................12
The purpose .................................................................................................................................................12
Support - how & who ................................................................................................................................13
Template descriptions ......................................................................................................................................13
Sample pages built with Tools2Talk+ .................................................................................... 15
ABC/QWERTY Board .....................................................................................................................................15
Communication board (built with standardised grid layout) ..................................................................16
Communication Book (Page 1) ......................................................................................................................16
Communication Book (Page 2) ......................................................................................................................17
Daily Timetable ..................................................................................................................................................17
First-Then ...........................................................................................................................................................18
Personal Communication Dictionary ...........................................................................................................18
Shopping List ......................................................................................................................................................19
Templates ................................................................................................................................ 19
Acknowledgements ................................................................................................................ 20
Permissions ............................................................................................................................. 20
User Guide

4
User Guide
The Tools2Talk+ App from Scope Australia is designed to allow you to make and print communication boards from your iPad. Packed with 81 different grid layouts, as well as a number of templates ready to be customised. All of your communication needs are covered in one, easy to use app. Build communication aids with PCS symbols, Compic symbols, use your own photos, or a mix of all. Not only can you have printed communication resources, you can also use these boards with speech output. There are also some sample communication resources within the app that can be used to get some ideas on how you can create your own customised communication aids.
HomepageFrom the homepage you have two options:
• Edit
• Chat
The edit pages allow you to add new communication aids, as well as change the grids you already have in your library.
The chat page, takes you straight to the chat function of the app, where you can use iOS voices to play messages programmed into each individual cell.
In the tool bar at the top of the page you also have two buttons:
An information symbol which brings up the user guide, and a cog button which brings takes you to the settings.
ChatOpen Chat and tap on a grid cell. A text to speech voice will read out any text programmed into the cell.
Navigate to another page on the same grid by tapping on the left/right arrow buttons, or by swiping from left to right.
Navigate to an entirely new grid by tapping on the drawer button in the top bar, on the left hand side and selecting a new page from the drop down menu.
You can navigate between pages in Chat mode by swiping left and right. Turn navigate buttons on if you would prefer to see a backwards and forwards arrow as a visual support for navigation.
User Guide
5
Edit
Add New GridIn the right hand viewport you can give your grid a name, and choose the size of the grid you want to build by selecting the number of rows and columns. You may also start making a grid without naming it. When you do this, it will be saved with a default name “Untitled xxx”. You may rename whenever you like by accessing it in ‘my grids’ and pressing ‘rename’.
Alternatively, select a pre-designed template from the drop down list of options. You may also access some sample communication aids from the drop down box.
My GridsIn the left hand viewport you can select from the list of grids that you have previously designed. When you tap on a title of these you can choose to:
• Edit Grid - where you can make changes to the grids
• Delete - to delete the selected grid
• Copy - to copy the selected grid for further editing
• Chat - to take you straight to chat mode
• Rename - give your grid a different name
Add/EditWith your new template or grid open, you have four options on the right hand side of the screen.
• Page - change the background colour of the page by selecting “page colour”; add columns or rowstoagridbyselecting“gridsize”(pleasenote,youcanonlychangetheconfiguration on grids that you have designed from scratch, not on pre-designed templates).
• Text - alter the text as it appears on a cell, in addition to changing the font type, size, colour and where a text label is positioned in the cell, choose to underline and also change the text that is spoken aloud whilst in chat mode.
• Images - when a cell is selected, you can add or alter images appearing in a cell. Choose by getting images from your camera, camera roll (gallery), COMPIC library; PCS library or delete.
• Style - change the look of a cell by changing its background colour, border colour, border width, border style, corner style or adding a strikethrough and changing its colour.
You can edit page options without selecting a cell, otherwise you need to choose which cell on the page you wouldliketoalter.Tappingononecellselectsit.Onceyouhavefinishededitingthatcell,taponthenextcell you would like to edit. If you would like to select all the cells for edit at once, tap on ‘select page’ on the options screen. You can also deselect cells from ‘select page’ as needed.
You can add a second page to your grid by pressing on the right arrow. You can navigate between the pages by pressing the left and right arrows or by swiping to the left and right.
User Guide
6
Page Options
Page Colour
Choose the colour that you wish to use as the grid’s background. Multiple pages on the same grid must all have the same background colour.
Grid Size
Tap Grid Size, then set the number of columns and the number of rows you wish to have on each page (please note that you cannot resize a pre-designed template).
Text Options
Text
Label text is the text that appears in a selected grid cell.
Spoken text is the text that is spoken when you tap on a grid cell in Chat Mode. As a default, it automatically matches the text shown in label text, but you have the option to change this, by typing an alternative message to be spoken aloud.
Font
Choose the font style that you wish to use for the cell label, choose the colour that you wish to use on the cell label. You can change the size of the font as it appears in the cell (note: this may reduce the size of the cell image if you increase the font size too much).
Tap on the underline option once to underline the cell label. Tap on it again to remove the underlining.
Position in Cell
Tap on the arrows to choose where in the cell you want the label to appear (top, center, bottom, left justified,rightjustified,centered).
Grid Default
If you want to reuse the same font, colour, size and positioning in other cells on the same page, you may want to make these settings the grid default to avoid having to change. Simply slide “Grid Default” to turn on.
Image Options
Symbols
ChoosefromPCSorCompicsymbols.Youcanusethesearchboxtolookforspecificitemswithineachsymbol library.
User Generated Images (camera & gallery)
Tap camera to take a photo. Once you tap “Use Photo” a crop box will appear asking you to make the image square. If you already have an image saved in your iPad, then simply tap on the Gallery option.
Delete
Ifyouwanttoremoveanimagefromacellwithoutreplacingit,simplytapondeleteandconfirm.
User Guide

7
Style Options
Background Colour
Tap on background and choose the colour that you want in the background of the cell. If you make a customised colour, you can add it to favourites by tapping on the heart with the plus button (just below the ‘Done’ button).
Borders
Change the colour of your border; use the slider to make the border thicker, thinner, or to remove it entirely. Tap corner style and use the slider to make the corners of the cell more rounded, and choose border style if you want a dashed border, or no border at all.
Strikethrough
If you want to add a strikethrough or cross on top of your cell, tap on strikethrough then tap on the style you want from the options that appear. Tap on strikethrough colour to change it.
Grid Default
If you want to reuse the same background colour and border style in other cells on the same page, you may want to make these settings the grid default to avoid having to change them every time. Simply slide “Grid Default” to turn on.
Undo/RedoThere are buttons to undo and redo the changes you make whilst adding or editing. If you do something in error, simply tap the undo button.
Once you leave add/edit mode, or if you change the grid size, the changes you have made will be saved and you will not be able to undo any changes previously made, so you will have to make the changes manually.
ExportThe cloud icon in the top bar allows you to share the board in a variety of ways, or to print the grid using apple Air Print.
You may share your board in a variety of forms; including text message, Airdrop, email and Dropbox.
Tap on Print or Email to choose how you would like to export, the option you choose will be highlighted in orange.
Print with or without colour, and with or without a title.
Tap on “export” to proceed.
User Guide
8
Settings
Default FontYou can change the font that appears by default on all cell labels across all new grids. Change the font type, as well as it’s colour and size.
Voice OptionsChange the accent or the language of the voice that is used in Chat Mode, by choosing from the drop down list.
Set a Home GridThe home grid is the grid that automatically opens when you launch Chat mode from the home screen.
OtherYou may also access Scope Australia’s website, the user guide (for export) and the acknowledgements for the development of the app.
User Guide

9
Questions to think about when designing a communication aid
Communication aids provide a method of communication for people who cannot talk or whose speech is difficulttounderstand.Whendesigningacommunicationaidtherearemanyoptionstoconsider.Thepersondesigning the aid needs to fully understand the communication skills of the person who will be using it, and their reason for using it.
Tools2Talk+ has been designed with the intention that the app will be used to create:
• Communication boards (e.g.: Aided language displays, topic boards)
• Communication books
• Alphabet boards
• Personal Communication Dictionaries
• Personal Histories
• Visual supports including:
- Chores charts - First and then aids - Shopping lists - Timetables - Who’s here today boards
See‘TemplateDescriptors’belowwhichprovidesadefinitionofeachtypeofcommunicationresourcethatTools2Talk+ has been designed for.
It is recommended that Tools2Talk+ is used to supplement a person’s comprehensive communication system through allowing the creation of additional aids and visual supports a person may require to enhancetheirreceptiveunderstanding,toexpressthemselvesinaspecificsituation(i.e.creatingtopicboards) or to assist communication partners with regards to how that person communicates (i.e. Personal Communication Dictionary, Personal History).
While it is intended that anybody can purchase and use this app for a multitude of ways, it is recommended people consult with a speech pathologist to ensure resources are created in an effective manner for the person and for its intended purpose.
Below are some general things that you need to think about when designing a communication aid.
This advice does not substitute the advice gained through consulting a speech pathologist.
Designing a communication aid

10
What do you need to consider?
The person
• How does the person communicate?
For example, - how does the person indicate yes/no? - express wants & needs? - comment? - protest? - chat? - make choices? - understand routines and instructions?
What exposure to symbols has the person had in the past? Photos? Boardmaker PCS? COMPIC? Something else? Build upon what the person knows and is familiar with already. Tools2Talk+ has some of the biggest picture-based libraries built into it, and you can include your own photos - so the options are right there for you to choose from.
• What are the person’s skills and abilities?
Vision
Consider:• Has the person had a vision assessment before creating this aid?
• Cell sizing - are the cells too small to see?
• Are there too many cells on the page which is causing visual crowding?
• Can the person visually differentiate?
• Text size: is it too small to see either for the person or the communication partner?
• Consider using a contrastive background that may aid the person to differentiate
• If the board is to be printed out as a paper-based tool, consider using matte laminate to reduce visual glare.
• Consider A4 versus A3 sizing, and portability.
Cognition Consider:
• Has the person had a cognitive assessment prior to creating this aid?
• How does the person need information represented? i.e. Photos, symbols.
Designing a communication aid

11
Language/literacy skills Consider:
• Has the person had a language assessment?
• Has the person had their literacy level assessed?
• Does the person require images to support written text?
• If so, what symbols has the person had exposure to/experience with already?
• What is their receptive language (understanding) like?
• What is their expressive language (talking) like?
• How do they communicate currently?
• What communication system/s has the person used in the past? Were they successful? Why? Why not?
• Have visual supports worked in the past?
Hearing Consider:
• Has the person had a hearing assessment?
• What is their audible hearing range?
• Can the person hear the voices in this app?
Physical skills, which includes hand skills and mobility.Consider:
• What is the person’s diagnosis?
• What is the prognosis of their diagnosis? Is their physical function likely to stay the same? Get better? Get worse over time?
• Whatistheperson’sfinemotorskill(i.e.Handuse)like?Cantheyisolateafingertopressacellona board?
• If not, do they need alternative access?
• How will the person use this app/paper-based board?
• How will they indicate they want to use this app/board, if they can’t speak or get it for themselves?
• If the person has another communication system in place in addition to the boards created with Tools2Talk+, how will they request they want to change between the two systems, if they can’t talk or go get the other tool themselves?
Designing a communication aid
12
Does the person need a communication assessment?
An assessment by a Speech pathologist may help you determine if the person is communicating at a non-symbolic level, intentional/emerging level, or symbolic level. Understanding the person’s communication skills will help guide the choice of communication aid.
The purpose
• What is the communication aid for?
• Will it be used best as an iPad app (possibly with voice output), or will a print out paper-based board work better, or should you have both options?
• If a paper-based board, think about sizing, portability and durability (does it need to be laminated).
• How will the person request the communication tool? Do you need to teach the person how to request that they have something to say?
• Carefully consider all vocabulary on the communication aid – it should enable a person to communicate something that they could not otherwise.
- Core words make up 75-80% of the words we use everyday. Generally, any communication board that is presenting single words should have a focus on core vocabulary.
- Fringe words make up approximately 20% of the words we use each day like “ball”, “drink” and “biscuit”. While fringe vocabulary is important, these words should not make up the majority of the words on a communication board.
- Keep core words in predictable, logical places - even across boards. Long-term planning is important to understand where you will position the top 100 core vocabulary words, even if you’re starting with 12 on a page. The predictable placement of these core words will help the person to learn where these words are over time, as they develop automatic motor patterns.
- Arrange fringe words in logical categories, so the person (and communication partners) know wheretofindvocabularyquickly.Remember,itmaymakesensetoyoubecauseyou’vecreatedit - but is it logical to everyone else?
- Get feedback from an outside person on how you’ve arranged vocabulary, before you give it a test run with the person you’ve created it for.
• Why does the person want to use the communication aid?
- To help with their expressive language, for example, give the person with little or no speech a way to request things, inform others, ask questions, give opinions, help them ‘speak’ for themselves.
- To help with their receptive language, for example, provide visual supports to help the person understand what’s happening in their day, or what to do in a certain task, and be more independent.
- To assist communication partners, for example provide information for others to get to know the person, and learn how to interact with the person.
Designing a communication aid

13
Support - how & who
• Who are the communication partners?
• Who will support the person to learn to use the communication aid? For example, parent, friend or support worker.
- Make sure you, the person and their team or network, have time to learn the new system, before you decide whether it’s working or not. Learning to communicate with a communication aid takes time, practice, modelling and support, before anyone can judge how successful it has been.
• What are the opportunities to use the aid? When, where, and who with?
• How can you create opportunities to use the communication tool?
• Have you involved the person in the design of the aid and the content in the aid? Does this include choices about what the person wants and doesn’t want?
Template descriptions
Alphabet board
Analphabetboardmaybesuitableforpeoplewhohaveliteracy/spellingskills.Itcanbedesignedspecificallyto suit the person’s needs e.g. using either an ABC or QWERTY format – with direct access or partner-assisted scanning.
Chores chart
A chores chart may be suitable for a person who understands photos, pictures or words. It may be useful for a person to have visual support or cue to remind them of what jobs need to be done at home or work.
A chores chart has been designed with photos or pictures to show the daily or weekly tasks within the home or work environment.
A photo of the person responsible for the individual tasks is displayed next to the job.
Communication boards
Communication boards are for people who can use a visual display of photos, pictures and/or written words for communication. The purpose of a communication display is to provide a method of communication for peoplewhocannottalkorwhosespeechisdifficulttounderstand.
Theseaidsaredetailedandmadespecificallytosuittheperson’sindividualneedsandspecificsituations.Thechoice of communication display and design features depends on the communication skills of the person who will be using it and their reason for using it.
Designing a communication aid
14
Communication book
Multi-level Communication books are for people who can use photos, pictures and/or written words for communication. This communication aid allows access to a large vocabulary, and provides a method ofcommunicationforpeoplewhocannottalkorwhosespeechisdifficulttounderstand.Thechoiceofcommunication book design features depends on the communication skills of the person who will be using itandtheirreasonforusingit.Onestyleofmulti-levelcommunicationbookhasanindexonthefirstpage,which enables the user to go to a range of topics. Pages can have tabs to make it easier to navigate through the book. Each page contains an option that allows the person to return to the index and change the topic.
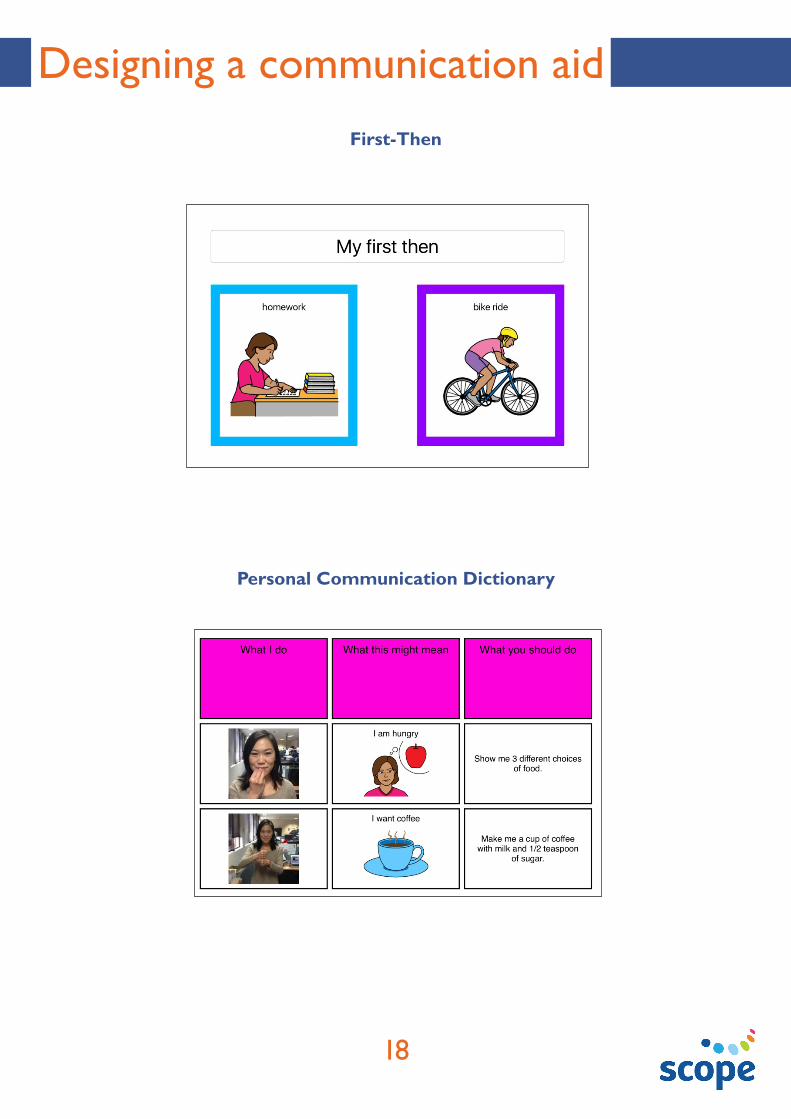
First and then
AFirstThenBoardisavisualsupportusedtohelpcompletespecifictasks.Ithelpswithbothreceptiveandexpressivecommunication.The“first”isapictureofanon-preferredactivityandthe“then”isapictureofapreferredactivity.Thepersonmustdothefirstbeforebeingabletodothesecondactivity.
Personal Communication Dictionary
A Personal Communication Dictionary (PCD) is useful for communication partners who do not know the person well, and are unfamiliar with the way a person communicates.
A PCD is a sheet that records what a person does (person’s individual gestures, body language, facial expressions, vocalisations and/or signs); what this means; and what the role the communication partner can play (It may also record when and where the behaviours may be seen).
A gesture dictionary is similar and outlines all the manual signs and gestures that the person understands or uses to communicate.
Personal history
A personal history provides communication partners with information and photos about a person’s life and family history.
A personal history includes information about a person’s past and present skills and interests, likes and dislikes, and future aspirations and dreams. It can be used as a conversation starter or to gain information abouttheperson,especiallywhentheyfinditdifficulttoexpressthemselvesandtellyoutheirownstory.
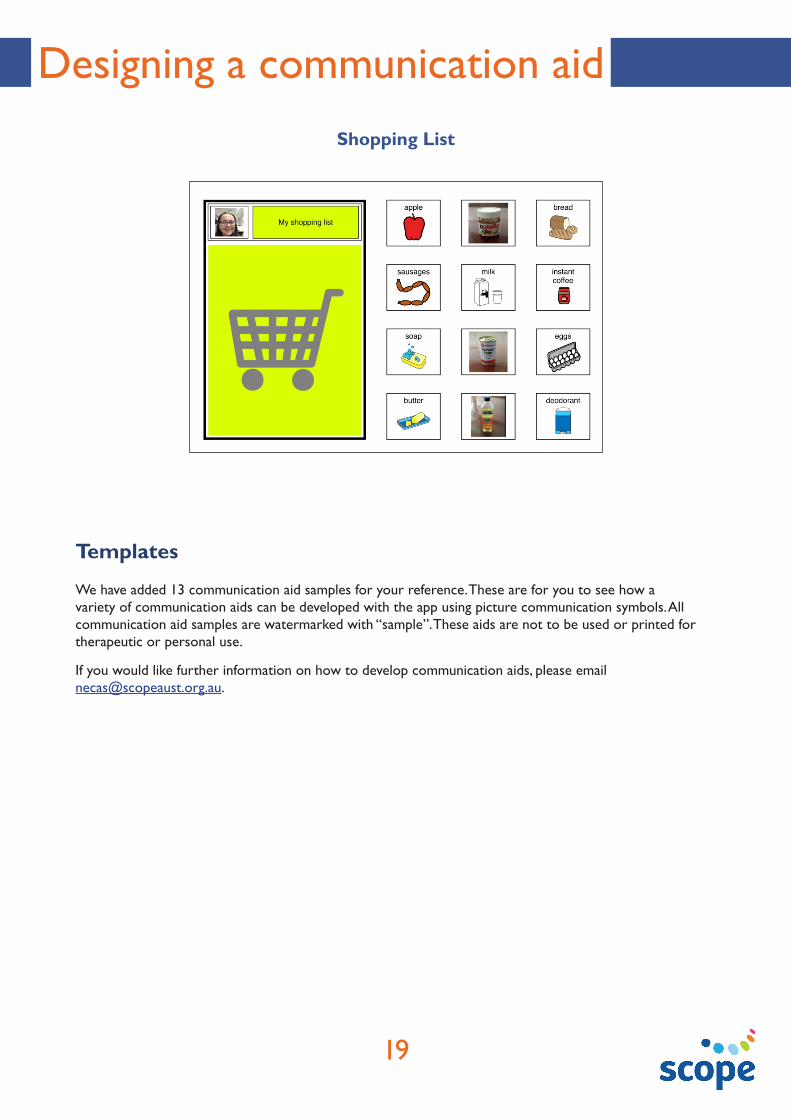
Shopping list
A shopping book or list allows a person to pre-plan what to buy, or indicate if they want something extra or different. Shopping lists need to be customised to contain grocery and personal items for each person.
Timetable
A timetable provides a person with visual cues about the daily routine, and helps people to recognise and anticipate activities that will happen during the day or week. A timetable can also be used to encourage choice making, for example, a person might decide the order that they want to do some things.
Decideifthetimetableisforonepersonorgroupofpeople.Thismayinfluencethesizeofthetimetableand portability.
Designing a communication aid

15
Who’s here today
A Who’s here today chart displays the whereabouts of different people. It prepares a person for who they should expect to see, any changes that occur unexpectedly, and reasons why staff or others are away.
Sample pages built with Tools2Talk+
ABC/QWERTY Board
1 2 3 4 5 6 7 8 9 0Q W E R T Y U I O P
A S D F G H J K LZ X C V B N M ?
1 2 3 4 5 6 7 8 9 0A B C D E F G H I JK L M N O P Q R S
T U V W X Y Z ?
Designing a communication aid

16
Communication board (built with standardised grid layout)
Communication Book (Page 1)
Designing a communication aid

17
Communication Book (Page 2)
Daily Timetable
Designing a communication aid
18
First-Then
Personal Communication Dictionary
Designing a communication aid
19
Shopping List
Templates
We have added 13 communication aid samples for your reference. These are for you to see how a variety of communication aids can be developed with the app using picture communication symbols. All communication aid samples are watermarked with “sample”. These aids are not to be used or printed for therapeutic or personal use.
If you would like further information on how to develop communication aids, please email [email protected].
Designing a communication aid

20
Acknowledgements
Scope would like to thank everyone who made the development of this app possible, including support from theVictoriangovernment,peoplewithcommunicationdifficulties,familiesandtherapistswhokindlytestedthe app, the staff from Scope’s Communication and Inclusion Resource Centre, and the project staff from DreamWalk.
Additional thanks to Tobii Dynavox for the use of their Picture Communication Symbols.
Permissions
The Picture Communication Symbols (“PCS”) accessed with this software may not be used to create materials in print or electronic form, whether for communication or instruction, except by a single user in conjunction with the user’s own use of this Software. Users of this software may not rent, lease, or lend PCS symbols, or provide them to any online service or commercial hosting services. Users may not sublicense, assign or transfer any rights to the PCS, or authorize all or any portion of the PCS symbols to which the user has access to be copied onto any computer or other device.
Acknowledgements