Scheduler for the Stream Processing Frameworks on Hadoop ...
Upload
khangminh22Category
view
1download
0
IBM Tivoli Workload Scheduler
Planning and InstallationVersion 8 Release 6 Fix Pack 2
SC32-1273-12
���


IBM Tivoli Workload Scheduler
Planning and InstallationVersion 8 Release 6 Fix Pack 2
SC32-1273-12
���

NoteBefore using this information and the product it supports, read the information in “Notices” on page 379.
This edition applies to version 8, release 6, modification level 0 Fix Pack 2 of Tivoli Workload Scheduler (programnumber 5698-WSH) and to all subsequent releases and modifications until otherwise indicated in new editions.
© Copyright IBM Corporation 1999, 2012.US Government Users Restricted Rights – Use, duplication or disclosure restricted by GSA ADP Schedule Contractwith IBM Corp.

Contents
Figures . . . . . . . . . . . . . . vii
Tables . . . . . . . . . . . . . . . ix
About this publication . . . . . . . . xiWhat is new in this release . . . . . . . . . xiWho should read this publication . . . . . . . xiPublications . . . . . . . . . . . . . . xiAccessibility . . . . . . . . . . . . . . xiTivoli technical training . . . . . . . . . . xiiSupport information . . . . . . . . . . . xii
Part 1. Planning . . . . . . . . . . 1
Chapter 1. Network planning . . . . . . 3Tivoli Workload Scheduler environment . . . . . 3
Tivoli Workload Scheduler interfaces . . . . . 8Planning the environment . . . . . . . . . . 9
Distributed workload environment with staticscheduling capabilities . . . . . . . . . . 9Distributed workload environment with dynamicscheduling capabilities . . . . . . . . . . 11Distributed workload environment with staticand dynamic scheduling capabilities . . . . . 13End-to-end workload environment . . . . . 14Workload environment integrated with externalsystems. . . . . . . . . . . . . . . 15Distributed-driven workload environment forz/OS . . . . . . . . . . . . . . . 16
Planning domains . . . . . . . . . . . . 17Localized processing in your domain . . . . . 18Considerations in planning domains . . . . . 18Single domain network . . . . . . . . . 20Multiple domain network . . . . . . . . 21
Workstation classes . . . . . . . . . . . . 23Time zone considerations . . . . . . . . . . 23
Part 2. Tivoli Workload Scheduler 25
Chapter 2. Preparing for installation . . 27Installation overview . . . . . . . . . . . 27Checking prerequisites (UNIX and Linux) . . . . 28Installation considerations . . . . . . . . . 29Installation media . . . . . . . . . . . . 31Instances of Tivoli Workload Automation . . . . 31Relational database management systems . . . . 33Selecting your installation method . . . . . . . 34
Launchpad . . . . . . . . . . . . . 34Installation wizard . . . . . . . . . . . 35Silent mode . . . . . . . . . . . . . 36The twsinst script for agents. . . . . . . . 36Software Distribution software package blocks(SPBs) . . . . . . . . . . . . . . . 36
Installation log files. . . . . . . . . . . . 36InstallShield wizard and silent installation anduninstallation log files . . . . . . . . . . 37The twsinst log files . . . . . . . . . . 37Software package block log files . . . . . . 38WebSphere Application Server installation logfiles . . . . . . . . . . . . . . . . 38DB2 installation log files . . . . . . . . . 38
Tivoli Workload Scheduler user. . . . . . . . 39Windows users domain rights and structure . . 39Considerations for Windows domain controllersrunning Microsoft Active Directory . . . . . 40Checking environment settings for WindowsVista users. . . . . . . . . . . . . . 41
Windows services . . . . . . . . . . . . 41
Chapter 3. Creating or upgrading theTivoli Workload Scheduler databasetables before installing or upgrading . . 43Creating or upgrading the database tables if you areusing DB2 . . . . . . . . . . . . . . . 43
Customizing the properties file for DB2 . . . . 43Generating the SQL files for DB2 . . . . . . 46Running the SQL files to create or upgrade theSQL tables for DB2 . . . . . . . . . . . 47
Creating or upgrading the database tables if you areusing Oracle . . . . . . . . . . . . . . 53
Customizing the properties file for Oracle . . . 54Generating the SQL files for Oracle . . . . . 55Running the SQL files to create or upgrade theSQL tables for Oracle . . . . . . . . . . 55
Chapter 4. Installing . . . . . . . . . 67User authorization requirements . . . . . . . 67Installing DB2 . . . . . . . . . . . . . 67Using the installation wizard . . . . . . . . 68
Installing a master domain manager or backupmaster . . . . . . . . . . . . . . . 68Installing a dynamic domain manager or backupdynamic domain manager . . . . . . . . 80Installing an agent . . . . . . . . . . . 87Installing a command line client . . . . . . 90Adding a feature . . . . . . . . . . . 92
Performing a silent installation . . . . . . . . 92Silent installation using response file templates 96Silent installation using an automaticallygenerated response file . . . . . . . . . 96
Installing agents using twsinst . . . . . . . . 97Installing the agents . . . . . . . . . . 98Agent installation parameters . . . . . . . 99Example installations . . . . . . . . . . 102
Installing agents using Software Distribution . . . 104Software packages and parameters . . . . . 104Installation procedure . . . . . . . . . 107Installing language packs . . . . . . . . 111
© Copyright IBM Corp. 1999, 2012 iii

Installing the Job Brokering Definition Console . . 113Installing the Job Brokering Definition Consoleusing the installation wizard . . . . . . . 113Performing a silent installation of the JobBrokering Definition Console . . . . . . . 113
Installing the additional plug-ins by using theTivoli Workload Scheduler for Additional Plug-ins . 114
Before installing . . . . . . . . . . . 114The additional plug-in structure . . . . . . 114Selecting your installation method . . . . . 115Installing by using the installation wizard . . . 115Installing by using the silent installation . . . 116Installation actions and log files . . . . . . 118
Chapter 5. Upgrading . . . . . . . . 121Engine coexistence and upgrade notes . . . . . 121
Coexistence with previous versions . . . . . 121Upgrading existing versions . . . . . . . 121Files and folders changed during the upgrade 122
User authorization requirements . . . . . . . 122Checking prerequisites (UNIX and Linux) . . . . 123Upgrading a master domain manager or backupmaster domain manager instance . . . . . . . 123
Upgrading overview . . . . . . . . . . 124Preparing to upgrade. . . . . . . . . . 134New directory structure . . . . . . . . . 135Performing a direct upgrade . . . . . . . 138Performing a parallel upgrade. . . . . . . 149
Upgrading agents and domain managers . . . . 153New directory structure . . . . . . . . . 154Unlinking and stopping Tivoli WorkloadScheduler when upgrading agent workstations . 154Upgrading agents and domain manager usingthe installation wizard . . . . . . . . . 155Upgrading agents and domain manager using asilent installation . . . . . . . . . . . 158Upgrading agents and domain manager usingtwsinst . . . . . . . . . . . . . . 158Upgrading agents using Software Distribution 164Upgrading agents using Tivoli EndpointManager . . . . . . . . . . . . . . 169
Upgrading a command line client . . . . . . 188Upgrading when there are corrupt registry files 189
Re-creating the registry files using theinstallation wizard. . . . . . . . . . . 189Re-creating registry files using the silentupgrade . . . . . . . . . . . . . . 190Re-creating registry files using twsinst . . . . 190
Adding a feature . . . . . . . . . . . . 191
Chapter 6. Configuring . . . . . . . 193Setting the environment variables . . . . . . 193Configuring a master domain manager . . . . . 194Configuring a backup master domain manager . . 195Configuring a domain manager . . . . . . . 196Configuring a backup domain manager . . . . 196Configuring a dynamic domain manager . . . . 197Configuring a backup dynamic domain manager 197Configuring a fault-tolerant agent . . . . . . 198Configuring a dynamic agent . . . . . . . . 199
Configuring a command line client . . . . . . 200Configuring WebSphere Application Server . . . 200Adding a feature . . . . . . . . . . . . 200
Adding a connector . . . . . . . . . . 200Adding language packs to a command lineclient . . . . . . . . . . . . . . . 202Adding the Java runtime to run job types withadvanced options . . . . . . . . . . . 202
Enabling dynamic scheduling after installation . . 202
Chapter 7. Uninstalling . . . . . . . 205User authorization requirements . . . . . . . 205Uninstalling a dynamic domain manager and all itsdomain . . . . . . . . . . . . . . . 206Uninstalling using the wizard . . . . . . . . 206Uninstalling using a silent uninstallation . . . . 207Uninstalling agents using the twsinst script . . . 208Uninstalling using the Software Distribution CLI 209Uninstalling a command line client . . . . . . 210Uninstalling the additional plug-ins using theTivoli Workload Scheduler for Additional Plug-ins . 210
Uninstalling by using the wizard . . . . . . 210Uninstalling by using the silent uninstallation 212
Chapter 8. Troubleshootinginstallation, migration, anduninstallation . . . . . . . . . . . 215Log files of installation processes . . . . . . . 215
Packaging log files for support . . . . . . 215Recovering a failed interactive InstallShield wizardinstallation . . . . . . . . . . . . . . 216
The Step List window . . . . . . . . . 217The Step window . . . . . . . . . . . 218Correcting a failed step and continuing theinstallation . . . . . . . . . . . . . 222Deciding whether to resume the wizard orrerun it . . . . . . . . . . . . . . 223Deciding whether to resume immediately or exitand resume later . . . . . . . . . . . 224Stopping and resuming an interactiveinstallation . . . . . . . . . . . . . 225Example procedure for resolving a problem . . 226
Recovering a failed silent InstallShield wizardinstallation . . . . . . . . . . . . . . 226Recovering a failed upgrade . . . . . . . . 227Analyzing return codes for Tivoli WorkloadScheduler for Additional Plug-ins silent installation 227Problem scenarios: install, reinstall, upgrade,migrate, and uninstall . . . . . . . . . . 230
Problems installing on Windows operatingsystem . . . . . . . . . . . . . . 230Problems installing on AIX . . . . . . . . 235Problems installing on UNIX . . . . . . . 236Problems installing on HP-UX. . . . . . . 237Problems installing on Oracle Solaris . . . . 238Problems installing on Linux . . . . . . . 239Problems with the silent installation . . . . . 241Problems with installations using the twsinstscript . . . . . . . . . . . . . . . 241Problems installing the application server . . . 242
iv Tivoli Workload Scheduler: Planning and Installation: Planning and Installation
|||

Other installation problems. . . . . . . . 243Upgrade problems. . . . . . . . . . . 255Uninstallation problems . . . . . . . . . 258Fix pack installation problems . . . . . . . 260
Security implications of the installation . . . . . 261Verifying the installation . . . . . . . . . 262Uninstalling Tivoli Workload Scheduler manually 263
Uninstalling manually on Windows operatingsystem . . . . . . . . . . . . . . 263Uninstalling manually on UNIX . . . . . . 265Problems during manual uninstallation. . . . 267
Uninstalling Tivoli Workload Scheduler connectorsmanually . . . . . . . . . . . . . . . 267
Uninstalling the connector manually on UNIX 267Uninstalling the connector manually onWindows operating system . . . . . . . . 268
Removing Windows registry keys . . . . . . 269
Part 3. Tivoli Workload Scheduleron IBM i systems . . . . . . . . . 273
Chapter 9. Prerequisites . . . . . . . 275
Chapter 10. Installing agents on IBM isystems. . . . . . . . . . . . . . 277Agent installation parameters on IBM i systems 279Example installation of an agent on IBM i systems 281The twsinst script log files on IBM i systems. . . 281
Chapter 11. Configuring a dynamicagent . . . . . . . . . . . . . . . 283
Chapter 12. Uninstalling agents onIBM i systems . . . . . . . . . . . 285
Part 4. Installing the DynamicWorkload Console . . . . . . . . 287
Chapter 13. Preparing . . . . . . . . 289Overview of the Dynamic Workload Console . . . 289Installation overview . . . . . . . . . . . 289Installation considerations . . . . . . . . . 290
Selecting your installation method . . . . . 290Instances of Tivoli Workload Automation . . . 291Installation media . . . . . . . . . . . 292Installation log files . . . . . . . . . . 292
Chapter 14. Installing . . . . . . . . 295Installing the Dynamic Workload Console . . . . 295
Using the launchpad . . . . . . . . . . 295Using the installation wizard . . . . . . . 295Performing a silent installation . . . . . . 299Installing the Tivoli Integrated Portal on anexternal WebSphere Application Server from theimages . . . . . . . . . . . . . . 301
Post-installation steps to connect to TivoliWorkload Scheduler Version 8.3 Fix Pack 3 . . . 301
Post-installation steps to configure the use ofLightweight Third-Party Authentication (LDAP). . 302Accessing the Dynamic Workload Console . . . 303
Quick steps to define a Tivoli WorkloadScheduler engine connection . . . . . . . 304Quick steps to define a Dynamic WorkloadBroker connection . . . . . . . . . . . 305
Starting and stopping the Dynamic WorkloadConsole . . . . . . . . . . . . . . . 306
Chapter 15. Configuring . . . . . . . 309
Chapter 16. Getting started . . . . . 311Tivoli Workload Scheduler portfolio . . . . . . 311Dynamic workload broker portfolio . . . . . . 313First actions . . . . . . . . . . . . . . 314
Chapter 17. Upgrading . . . . . . . 315Updating authentication . . . . . . . . . . 315Upgrading the console installed on an embeddedWebSphere Application Server. . . . . . . . 316
Directory structure . . . . . . . . . . 316Performing the upgrade . . . . . . . . . . 317
Chapter 18. Uninstalling . . . . . . . 319Uninstalling using the wizard . . . . . . . . 319Uninstalling in silent mode . . . . . . . . . 319
Chapter 19. Troubleshooting theinstallation, upgrade, anduninstallation . . . . . . . . . . . 321Installation and uninstallation log and trace files 321Recovering a failed InstallShield wizard installation 321Recovering a failed upgrade . . . . . . . . 321Manually uninstall an integrated DynamicWorkload Console . . . . . . . . . . . . 322Manually uninstall a stand-alone DynamicWorkload Console version 8.6.0 instance . . . . 323Troubleshooting scenarios . . . . . . . . . 325
Problems with the launchpad . . . . . . . 325Problems with the interactive wizard . . . . 325Problems with the silent installation . . . . . 329Problems with the upgrade. . . . . . . . 330Problems with the uninstallation . . . . . . 331
Part 5. Tutorials . . . . . . . . . 333
Chapter 20. Using the Tivoli WorkloadScheduler tutorial utility . . . . . . . 335Populating your Tivoli Workload Schedulerdatabase . . . . . . . . . . . . . . . 335
Objects used by the Tivoli Workload Schedulertutorial scenarios . . . . . . . . . . . 336
Overview of the scheduling scenarios . . . . . 337Creating and working with the production plan 337
Scenario 1: Creating the production plan andviewing its contents . . . . . . . . . . 338
Running the scheduling scenarios . . . . . . 338
Contents v
||

Scenario 2: Starting and stopping TivoliWorkload Scheduler processes . . . . . . . 338Scenario 3: Scheduling basics, how jobs arescheduled, and run order of jobs . . . . . . 339Scenario 4: Advanced scheduling, dependenciesfrom prompts, files, and resources . . . . . 339Scenario 5: Time dependencies and run cycles 340Scenario 6: Manual submission of jobs, jobstreams, and commands . . . . . . . . . 340Scenario 7: Recovery options and recovery jobs 340Scenario 8: Event-driven scheduling . . . . . 341Scenario 9: Using variable tables . . . . . . 341
Removing tutorial objects from the database . . . 342
Part 6. Appendixes . . . . . . . . 343
Appendix A. Registry file . . . . . . 345
Appendix B. Using response files . . 347
Appendix C. The Tivoli WorkloadScheduler response file properties . . 349
Appendix D. The Dynamic WorkloadConsole response file properties . . . 361
Appendix E. The Job BrokeringDefinition Console response fileproperties . . . . . . . . . . . . . 367
Appendix F. Installing and upgradingTivoli Workload Scheduler IntegrationWorkbench . . . . . . . . . . . . 369Installing Tivoli Workload Scheduler IntegrationWorkbench with the bundled version of Eclipse . . 369
Installing Tivoli Workload Scheduler IntegrationWorkbench with an existing instance of Eclipseusing the Eclipse Site . . . . . . . . . . . 369Installing Tivoli Workload Scheduler IntegrationWorkbench with an existing instance of Eclipseusing the remote Eclipse Site . . . . . . . . 370Upgrading Tivoli Workload Scheduler IntegrationWorkbench installed with the bundled version ofEclipse . . . . . . . . . . . . . . . 370Upgrading Tivoli Workload Scheduler IntegrationWorkbench installed as a plug-in . . . . . . . 371
Appendix G. Discovering installedproducts . . . . . . . . . . . . . 373
Appendix H. Files backed up duringupgrade of Tivoli Workload Scheduler. 375
Appendix I. DB2 tablespace relativepaths . . . . . . . . . . . . . . . 377
Notices . . . . . . . . . . . . . . 379Trademarks . . . . . . . . . . . . . . 380
Index . . . . . . . . . . . . . . . 383
vi Tivoli Workload Scheduler: Planning and Installation: Planning and Installation

Figures
1. Graphical overview of Tivoli WorkloadScheduler environment to run static workload . 4
2. Graphical overview of Tivoli WorkloadScheduler dynamic environment . . . . . . 6
3. Distributed workload environment with staticscheduling capabilities . . . . . . . . . 10
4. Distributed workload environment withdynamic scheduling capabilities. . . . . . 12
5. Distributed workload environment with staticand dynamic scheduling capabilities . . . . 14
6. Workload environment integrated withexternal systems . . . . . . . . . . . 16
7. Distributed-driven workload environment forz/OS. . . . . . . . . . . . . . . 17
8. Single domain topology . . . . . . . . 209. Single domain topology on multiple sites 21
10. Multiple domain topology . . . . . . . 2211. Parallel upgrade procedure flowchart 12612. Direct upgrade procedure flowchart . . . . 12713. Wizard panel after an installation failure 21614. Step List window showing a failed step 21715. Step status tab . . . . . . . . . . . 21916. Step properties tab . . . . . . . . . . 21917. Step output tab . . . . . . . . . . . 221
© Copyright IBM Corp. 1999, 2012 vii

viii Tivoli Workload Scheduler: Planning and Installation: Planning and Installation

Tables
1. Features partially or not supported fordynamic scheduling. . . . . . . . . . 13
2. Symbolic link options . . . . . . . . . 313. Installing into an existing instance of Tivoli
Workload Automation . . . . . . . . . 334. Installation log files . . . . . . . . . . 375. DB2 Setup files . . . . . . . . . . . 686. Response files . . . . . . . . . . . . 937. List of parameters to install language packs 1128. Options to perform a silent installation 1179. Installation log files . . . . . . . . . 119
10. Upgrade availability for Tivoli WorkloadScheduler components . . . . . . . . 122
11. Direct upgrade scenario . . . . . . . . 12812. Parallel upgrade scenario . . . . . . . 12913. Tivoli Workload Scheduler Fault Tolerant
Agent 8.6 . . . . . . . . . . . . . 17214. Tivoli Workload Scheduler for z/OS Agent
V8.6. . . . . . . . . . . . . . . 173
15. Uninstallation log files . . . . . . . . 21116. Options to perform a silent uninstallation 21317. Default InstallAnywhere error messages 22818. InstallAnywhere error messages for
additional plug-ins. . . . . . . . . . 22919. Installing into an existing instance of Tivoli
Workload Automation . . . . . . . . 29120. Installation log files . . . . . . . . . 29321. Dynamic Workload Console response files 30022. Objects downloaded by the tutorial utility 33623. List of scheduling scenarios . . . . . . . 33724. Registry file attributes . . . . . . . . 34525. Tivoli Workload Scheduler response file
properties . . . . . . . . . . . . . 34926. Dynamic Workload Console response file
properties . . . . . . . . . . . . . 36127. Job Brokering Definition Console response file
properties . . . . . . . . . . . . . 367
© Copyright IBM Corp. 1999, 2012 ix
||||||

x Tivoli Workload Scheduler: Planning and Installation: Planning and Installation

About this publication
About this task
This IBM® Tivoli® Workload Scheduler Planning and Installation provides informationfor planning, installing, migrating, and configuring an IBM Tivoli WorkloadScheduler network.
What is new in this releaseFor information about the new or changed functions in this release, see TivoliWorkload Automation: Overview.
For information about the APARs that this release addresses, see the TivoliWorkload Scheduler Release Notes at http://www.ibm.com/support/docview.wss?rs=672&uid=swg27020781, and Dynamic Workload Console ReleaseNotes at http://www.ibm.com/support/docview.wss?rs=672&uid=swg27020873.
Who should read this publicationAbout this task
This guide is intended for the following audience:v Tivoli Workload Scheduler IT administrators who plan for and install the
networkv Dynamic Workload Console IT administrators who plan for and install the
productv Specialists who plan the network topologyv IT administrators who install the networkv System architects
PublicationsFull details of Tivoli Workload Scheduler publications can be found in TivoliWorkload Automation: Publications. This document also contains information aboutthe conventions used in the publications.
A glossary of terms used in the product can be found in Tivoli Workload Automation:Glossary.
Both of these are in the Information Center as separate publications.
AccessibilityAccessibility features help users with a physical disability, such as restrictedmobility or limited vision, to use software products successfully. With this product,you can use assistive technologies to hear and navigate the interface. You can alsouse the keyboard instead of the mouse to operate all features of the graphical userinterface.
© Copyright IBM Corp. 1999, 2012 xi

For full information with respect to the Dynamic Workload Console, see theAccessibility Appendix in the IBM Tivoli Workload Scheduler User’s Guide andReference.
Tivoli technical trainingFor Tivoli technical training information, refer to the following IBM TivoliEducation website:
http://www.ibm.com/software/tivoli/education
Support informationIf you have a problem with your IBM software, you want to resolve it quickly. IBMprovides the following ways for you to obtain the support you need:v Searching knowledge bases: You can search across a large collection of known
problems and workarounds, Technotes, and other information.v Obtaining fixes: You can locate the latest fixes that are already available for your
product.v Contacting IBM Software Support: If you still cannot solve your problem, and
you need to work with someone from IBM, you can use a variety of ways tocontact IBM Software Support.
For more information about these three ways of resolving problems, see theappendix on support information in Tivoli Workload Scheduler: Troubleshooting Guide.
xii Tivoli Workload Scheduler: Planning and Installation: Planning and Installation

Part 1. Planning
This part provides an overview of the IBM Tivoli Workload Automationenvironment and describes how to plan for the installation.
© Copyright IBM Corp. 1999, 2012 1

2 Tivoli Workload Scheduler: Planning and Installation: Planning and Installation

Chapter 1. Network planning
About this task
This section provides information to help you plan your Tivoli Workload Schedulernetwork.
Tivoli Workload Scheduler environmentAbout this task
A Tivoli Workload Scheduler network consists of a set of linked workstations onwhich you perform job processing. A network is composed of one or moredomains, each having a domain manager workstation acting as a management hub,and one or more agent workstations.
Using Tivoli Workload Scheduler you can run your workload in one of thefollowing ways:
StaticallyTo run existing job types, for example docommand and scripts on specificworkstations of fault-tolerant agents or standard agent type.
DynamicallyTo run existing job types and job types with advanced options, allowingthe product to assign it to the workstation that best meets both thehardware and software requirements needed to run it.
Job types with advanced options are both those supplied with the productand the additional types implemented through the custom plug-ins. Forexample, those supplied with the product are DB2®, file transfer, and webservices. Those implemented through the custom plug-ins are the ones youdeveloped using the Integration Workbench of the Software DevelopmentKit (SDK).
Depending on how you want to run your workload you have to install andconfigure different components in your network.
Figure 1 on page 4 gives a graphical overview of a typical Tivoli WorkloadScheduler environment to run static workload:
© Copyright IBM Corp. 1999, 2012 3

In Figure 1 the master domain is shown with the principle components to runworkload statically, and two levels of subdomain. The available user interfaces arealso indicated. An example is provided of the basic domain hierarchical structure,where each domain is named "D1", "D2, and so on. All of these concepts areexplained in the following section:
To run your workload statically install the following components:
Master domain managerThe master domain manager is the highest level workstation of a TivoliWorkload Scheduler network. It contains or connects to the relationaldatabase that stores scheduling object definitions. It creates or updates aproduction file when the plan is created or extended and then distributesthe file to the network. It performs all logging and reporting for thenetwork. It can perform the role of event processing server for theevent-driven workload automation feature.
Backup master domain manager
Child domain(Dn) - and so on
MD
D1 D2
D3 D4 D5
User Interfaces
Master Domain(MD)
Example domain hierarchyFault-toleant
Agents
Database
Master domainmanager
Tivoli Dynamic
Workload Console
Command-line
client (remote)
Backup masterdomain manager
(agent)Fault-toleant
Agents
Child domainmanager(agent)
Child domainmanager(agent)
Command
line
Web browser
D6
Backup domainmanager (agent)
Figure 1. Graphical overview of Tivoli Workload Scheduler environment to run static workload
4 Tivoli Workload Scheduler: Planning and Installation: Planning and Installation

Define a backup master domain manager at installation to point to eitherthe database being used by the master domain manager or to a mirror ofthat database. In this way the backup master domain manager has thelatest data available to it at all times.
Domain managerInstall this component if you need a multi-domain network and you wantto manage workload by assigning it to a predefined workstation that is torun your workload statically. In a multi-domain network all domainsbelow the master domain have fault-tolerant agents configured to be adomain manager to manage the workstations in its domain. A domainmanager can manage fault-tolerant, standard, and extended agents. Eachdomain manager is a fault-tolerant agent in the domain of the next higherlevel. To define a domain manager, install a fault-tolerant agent on yourworkstation and then define it as manager in the workstation definition.
Backup domain managerInstall this component if you want a backup to your domain manager. Ifyour domain manager experiences problems, you can configure anyfault-tolerant agent as the domain manager and switch to it with a simpleprocedure.
Agent An agent is a workstation in the network that runs the jobs which arecontrolled by the Tivoli Workload Scheduler master domain manager.Install agents by choosing the agent installation from the DVD or bydownloading the eImage using the Passport Advantage® Online website.After installing the agent, you define its type by using the workstationdefinition.
Fault-tolerant agentAn fault-tolerant agent can resolve local dependencies and launchjobs in the absence of a domain manager. It has a copy of theproduction control file. This allows fault-tolerant agents to continueprocessing even if the dynamic domain manager or the networkconnection is down. With a simple reconfiguration, they can serveas subordinate domain managers. To define a fault-tolerant agent,install a fault-tolerant agent on your workstation and then define itas fault-tolerant in the workstation definition.
Standard agentAn agent that launches jobs only under the direction of its domainmanager. It is not fault-tolerant. To define a standard agent, installa fault-tolerant agent on your workstation and then define it as astandard agent in the workstation definition.
Extended agentExtended agents are logical definitions (hosted by a physical workstation)used to extend job processing to selected applications (SAP R/3, OracleE-Business Suite, PeopleSoft, and z/OS®). For information about installingan extended agent, see Tivoli Workload Scheduler for Applications: User'sGuide.
Note: All agents with special roles (master domain manager, backup masterdomain manager, domain manager, backup domain manager) can also work asfault-tolerant agents with jobs scheduled on them.
Figure 2 on page 6 gives a graphical overview of a typical Tivoli WorkloadScheduler environment to run dynamic workload:
Chapter 1. Network planning 5

In Figure 2 the master domain is shown with the principle components to runworkload dynamically, and two levels of dynamic subdomain. The available userinterfaces are also indicated. An example is provided of the basic domainhierarchical structure, where each domain is named "D1", "D2, and so on. All ofthese concepts are explained in the following section.
If you want to run your workload dynamically install the following components:
Master domain managerThe master domain manager is the highest level workstation of a TivoliWorkload Scheduler network. It contains or connects to the relationaldatabase that stores scheduling object definitions. It creates or updates aproduction file when the plan is created or extended and then distributesthe file to the network. It performs all logging and reporting for thenetwork. It can perform the role of event processing server for theevent-driven workload automation feature.
Backup master domain manager
Child domain(Dn) - and so on
MD
D1 D2
D3 D4 D5
User Interfaces
Master Domain(MD)
Example domain hierarchy
Database
Master domainmanager
Tivoli Dynamic
Workload Console
Command-line
client (remote)
Backup masterdomain manager
(agent)Dynamic
agents
Child dynamicdomain
manager
Child dynamicdomain
manager
Command
line
Web browser
D6
Backup dynamicdomain
manager
Dynamic
agents
Figure 2. Graphical overview of Tivoli Workload Scheduler dynamic environment
6 Tivoli Workload Scheduler: Planning and Installation: Planning and Installation

Define a backup master domain manager at installation to point to eitherthe database being used by the master domain manager or to a mirror ofthat database. In this way the backup master domain manager has thelatest data available to it at all times.
Dynamic Domain managerInstall this component if you need a multi-domain network and you wantto manage your workload both statically that dynamically. All domainsbelow the master domain have dynamic domain managers to manage theworkstations in its domain. Each dynamic domain manager is an agent inthe domain of the next higher level. To define a dynamic domain manager,install a dynamic domain manager and then perform the “Configuring adynamic domain manager” on page 197 procedure.
Backup dynamic domain managerInstall this component if you want a backup to your dynamic domainmanager. If your dynamic domain manager experiences problems, you canswitch to it with a simple procedure.
Agent An agent is a workstation in the network that runs the jobs which arecontrolled by the Tivoli Workload Scheduler master domain manager.Install agents by choosing the agent installation from the DVD or bydownloading the eImage using the Passport Advantage Online website.
Dynamic agentAn agent that has the following capabilities:
Run workload dynamicallyIt communicates with the server the status of its resources.In this way the product is able to dynamically run yourworkload to the best available resources by:v Automatically discovering scheduling environment
resources.v Automatically following resource changesv Requesting additional resources when neededv Matching job requirements to available resourcesv Controlling and optimizing use of resources
The characteristics listed above provides high availabilityand load balancing potentialities to your environment andwell suite virtualized environments.
When a job is submitted, either as part of a job stream inthe plan or through ad hoc submission, Tivoli WorkloadScheduler checks the job requirements, the availableresources and the related characteristics and submits thejob to the resource that best meets the requirements to runit.
Run both existing job types and job types with advancedoptions
It can run:v Existing job types. For example docommand and scripts.v Job types with advanced options, both those supplied
with the product and the additional types implementedthrough the custom plug-ins. For example, thosesupplied with the product are DB2, file transfer, and webservices. Those implemented through the customplug-ins are the ones you developed using the
Chapter 1. Network planning 7

Integration Workbench of the Software Development Kit(SDK). To run these job types you must also install theJava™ runtime.
Manage dynamic workload broker logical resourceIt can remotely run, from the agent, the dynamic workloadbroker resource command on the server. To manage theresource command you must also install the Java runtime.
After installing the agent, you define its type by using“Configuring a dynamic agent” on page 199.
Note: Dynamic agents must be directly connected to the masterdomain manager or to the dynamic domain manager.
Extended agentExtended agents are logical definitions (hosted by a physicalworkstation) used to extend job processing to selected applications(SAP R/3, Oracle E-Business Suite, PeopleSoft, and z/OS). Forinformation about installing an extended agent, see TivoliWorkload Scheduler for Applications Tivoli Workload Scheduler forApplications: User's Guide.
Tivoli Workload Scheduler interfacesAbout this task
Tivoli Workload Scheduler includes the following user interfaces from which youmanage your production environment:
Master domain manager command lineThe master domain manager command line is installed automatically whenyou install the master domain manager. This command line interface is runonly from the workstation serving as the master domain manager. Fromthe command line, you can administer the master specific binaries andoptions. A backup master domain manager command line also exists onthe backup master domain manager.
Dynamic Workload ConsoleThe web-based interface for creating, modifying, monitoring, controlling,and deleting Tivoli Workload Scheduler objects. You can interface with theconsole from any system in the network where a supported web browser isinstalled.
Command line clientA component of Tivoli Workload Scheduler that allows you to implementthe following commands on the master domain manager from anotherworkstation: The commands you can use are the following:v Composerv Optmanv Planman showinfo and unlock (the other planman commands must be
run locally on the master domain manager)
Tivoli dynamic workload broker command lineInstalled and configured automatically when you select to enable thedynamic scheduling capability at master installation time. It includescommands to directly submit and manage jobs for dynamic scheduling,manage job JSDL definitions and resources, and more. See Tivoli WorkloadScheduler: Scheduling Workload Dynamically for reference.
8 Tivoli Workload Scheduler: Planning and Installation: Planning and Installation

Job Brokering Definition ConsoleA structured editing tool that you use to create and modify Job SubmissionDescription Language (JSDL) files. These files are saved in the JobRepository as job definitions and become available for submission. TheJSDL files adhere to the XML syntax and semantics as defined in the JSDLschema. For more information, see the Tivoli Workload Scheduler: User'sGuide and Reference, SC32-1274.
Additionally, Tivoli Workload Automation contains the z/OS Connector, which is acomponent that connects IBM Tivoli Workload Scheduler for z/OS and theDynamic Workload Console. For more information, see Tivoli Workload Scheduler forz/OS: Planning and Installation Guide.
For a more detailed description of the Tivoli Workload Scheduler components, seeTivoli Workload Automation: Overview.
Planning the environmentThis section describes some of the typical installation scenarios for Tivoli WorkloadAutomation products and components. These typical scenarios show how todeploy specific solutions on the minimum possible system resources.
Distributed workload environment with static schedulingcapabilities
Use this configuration to run workload statically across your distributed network.Figure 3 on page 10 shows the system resources needed to install a fully-workingTivoli Workload Scheduler environment for managing your distributed workload.
Chapter 1. Network planning 9

TWSMasterDomainManager
DBserver
ServerSystem
Components share infrastructure
TDWCserver
TWA instance
TWS agentnetwork
TWSFTA
TWSFTA
Figure 3. Distributed workload environment with static scheduling capabilities
10 Tivoli Workload Scheduler: Planning and Installation: Planning and Installation

Distributed workload environment with dynamic schedulingcapabilities
Use this configuration to run workload dynamically across your distributednetwork. In this configuration, you can choose whether or not to add the runtimeenvironment for Java jobs to the agent. The runtime environment is used to:v Run on the agent job types with advanced options, both those supplied with the
product and the additional types implemented through the custom plug-ins.v Enable the capability to remotely run, from the agent, the dynamic workload
broker resource command on the server.
For information about dynamic scheduling, how to run application job plug-insand the dynamic workload broker resource command on the server, see TivoliWorkload Scheduler: Scheduling Workload Dynamically.
Figure 4 on page 12 shows the system resources required to install a fully workingTivoli Workload Scheduler environment for running your distributed workloaddynamically.
Note: A dynamic agent can be directly connected to its master domain manager, asshown in Figure 4 on page 12 or through a dynamic domain manager as shown inFigure 5 on page 14.
Chapter 1. Network planning 11

Dynamic scheduling supports most of the Tivoli Workload Scheduler features forstatic scheduling. The Table 1 on page 13 lists some features or properties that arepartially or not supported.
TWSMasterDomainManager
DBserver
ServerSystem
Components share infrastructure
TDWCserver
TWA instance
TWS agentnetwork
TWSDynamic
Agent
JavaRuntime
TWSDynamic
Agent
TDWCserver
Figure 4. Distributed workload environment with dynamic scheduling capabilities
12 Tivoli Workload Scheduler: Planning and Installation: Planning and Installation

Table 1. Features partially or not supported for dynamic scheduling
Featuredynamic agent and Tivoli WorkloadScheduler for z/OS agent
Event-driven workload automation.Note: For more details about the eventstype, see Tivoli Workload Scheduler User'sGuide and Reference: Appendixes - Event-drivenworkload automation event and action definitions
TWSObjectMonitor events supported
FileMonitor events not supported
TWSApplicationMonitor events notsupported
File dependency Not supported
Utility commands (datecalc, jobinfo etc). Not supported
Distributed workload environment with static and dynamicscheduling capabilities
Use this configuration to run workload both statically and dynamically across yourdistributed network. In this configuration, you can choose whether or not to addthe runtime environment for Java jobs to the agent. The runtime environment isused to:v Run on the agent job types with advanced options, both those supplied with the
product and the additional types implemented through the custom plug-ins.v Enable the capability to remotely run, from the agent, the dynamic workload
broker resource command on the server.
For information about dynamic scheduling, how to run application job plug-insand the dynamic workload broker resource command on the server, see TivoliWorkload Scheduler: Scheduling Workload Dynamically.
Figure 5 on page 14 shows the system resources required to install a fully workingTivoli Workload Scheduler environment for running your distributed workloadboth statically and dynamically. Tivoli Workload Scheduler requires a fault-tolerantagent and a dynamic agent to be installed on every system where jobs are toscheduled statically or dynamically.
Note: A dynamic agent can be directly connected to its master domain manager orthrough a dynamic domain manager as shown in Figure 5 on page 14.
Chapter 1. Network planning 13

For a list of features partially or not supported in a mixed environment, see Table 1on page 13.
End-to-end workload environmentIn an end-to-end environment (agent connected to the z/OS system), you candefine the following types of configurations:
TWSMasterDomainManager
DBserver
ServerSystem
Components share infrastructure
TDWCserver
TWA instance
TWS agentnetwork
TWSDomainManager
TWSDynamicDomainManager
TWSFTA
TWSFTA
TWSFTA
TWSDynamic
Agent
TWSDynamic
Agent
DynamicAgent
DBserver
JavaRuntime
Figure 5. Distributed workload environment with static and dynamic scheduling capabilities
14 Tivoli Workload Scheduler: Planning and Installation: Planning and Installation

To run your workload statically:
Using fault-tolerant agentsUse the fault-tolerant end-to-end scheduling environment toschedule and control static workload from the mainframe todistributed systems. On the distributed system, you installfault-tolerant agents and connect them to the z/OS server. SeeTivoli Workload Scheduler for z/OS: Scheduling End-to-end with FaultTolerance Capabilities for more details.
Using Tivoli Workload Scheduler for z/OS agents (z-centric)Use the z-centric end-to-end scheduling environment to scheduleand control static workload from the mainframe to distributedsystems with a low cost of ownership. On the distributed system,you install Tivoli Workload Scheduler for z/OS agents and connectthem to the z/OS controller. For information about how to install itsee Tivoli Workload Scheduler for z/OS: Planning and Installation Guidefor information about how to use it see Tivoli Workload Scheduler forz/OS: Scheduling End-to-end with z-centric Capabilities for moredetails.
To run your workload dynamically:
Using Tivoli Workload Scheduler for z/OS agents (z-centric) withdynamic capabilities
Use the z-centric end-to-end scheduling environment to scheduleand control dynamic workload from the mainframe to distributedsystems with a low cost of ownership. On the distributed system,you install Tivoli Workload Scheduler for z/OS agents, adddynamic scheduling capabilities and connect them to a dynamicdomain manager that must be connected to the z/OS controller.For information about how to:v Install a dynamic domain manager see “Installing a dynamic
domain manager or backup dynamic domain manager” on page80
v Install Tivoli Workload Scheduler for z/OS agents seeTivoliWorkload Scheduler for z/OS: Planning and Installation Guide
v Use Tivoli Workload Scheduler for z/OS agents seeTivoliWorkload Scheduler for z/OS: Scheduling End-to-end with z-centricCapabilities for more details.
Workload environment integrated with external systemsUse this configuration to extend Tivoli Workload Scheduler capabilities forscheduling on external applications, such as SAP R/3 and PeopleSoft using TivoliWorkload Scheduler.
Figure 6 on page 16 shows a sample environment including the agents needed toextend Tivoli Workload Scheduler scheduling capabilities on one or more externalapplications using Tivoli Workload Scheduler for Applications. You can installTivoli Workload Scheduler for Applications on the master domain manager, on afault-tolerant agents, on dynamic agents, and on Tivoli Workload Scheduler forz/OS agents.
For information about Tivoli Workload Scheduler for Applications, see the TivoliWorkload Scheduler for Applications: User's Guide documentation.
Chapter 1. Network planning 15

Note: Installing Tivoli Workload Scheduler for Applications on an agent (masterdomain manager, domain manager, fault-tolerant agent, standard agent, dynamicagent, Tivoli Workload Scheduler for z/OS agent) is the correct deploymentscenario in an end-to-end environment.
Distributed-driven workload environment for z/OSUse this configuration to submit from the Tivoli Workload Scheduler (using thedynamic workload broker component installed with the master domain manageror the dynamic domain manager) workload to be processed by JES2, withouthaving to define the workload on the z/OS system.
Figure 6 shows the minimum system resources needed to install adistributed-driven environment, where the Tivoli Workload Schedulerdistributed-Agent for z/OS represents a lightweight end-to-end schedulingsolution where you define and manage on the distributed side the workload that isto be processed by JES2.
TWS agentnetwork
TWSFTA
z/OS
Oracle
PeopleSoft
SAP R/3
TWSfor
Applications
Applications
TWSfor
Applications
TWSfor
Applications
TWS Server system
TWSDynamic
Agent
TWSfor Z/OS
Agent
JavaRuntime
Figure 6. Workload environment integrated with external systems
16 Tivoli Workload Scheduler: Planning and Installation: Planning and Installation

For information about Tivoli Workload Scheduler distributed-Agent for z/OS, seethe Tivoli Workload Scheduler: Scheduling with the Agent for z/OS documentation.
Planning domainsA Tivoli Workload Scheduler network contains at least one master domainmanager that acts as a management hub for the product. Additional domains canbe used to divide a widely-distributed network into locally-managed groups ofworkstations.
DBserver
ServerSystem
TDWCserver
TWA instance
Components share infrastructure
TWSMDM
z/OSSystem
TWSDistributed-Agent
for z/OS
Figure 7. Distributed-driven workload environment for z/OS
Chapter 1. Network planning 17

In a single domain configuration, the master domain manager maintainscommunications with all of the workstations in the network.
In a multiple domain configuration, the master domain manager communicateswith the workstations in its domain and all immediately subordinate domainmanagers. The subordinate domain managers communicate with the workstationsin their domains and their immediately subordinate domain managers, and so on.Domain managers report all of the activities of the domain to the master. Usingmultiple domains reduces network traffic and the load on the master by reducingthe number of direct communications between the master domain manager andworkstations. Multiple domains also provide fault-tolerance by limiting the outagecaused by losing a domain manager in a single domain. To limit the effects further,you can designate backup domain managers to take over if domain managers fail.
When you define a new domain, you must identify the parent domain and thedomain manager. The parent domain is the domain directly above the new domainin the domain hierarchy. All communications to and from a domain are routedthrough the parent domain manager.
Localized processing in your domainLocalized processing is separating your scheduling needs based on a common setof characteristics, such as geographical locations, business functions, andapplication groupings. Group related processing can limit the amount ofinterdependency information that needs to be communicated between domains.The benefits of localized domains are:
Decreased network trafficKeeping processing localized to domains eliminates the need for frequentinter-domain communication.
Tighter security and simplified administrationSecurity and administration can be defined at and limited to the domainlevel. Instead of network-wide or workstation-specific administration, youcan have domain administration.
Optimized network and workstation fault-toleranceIn a multiple domain network, you can define backups for each domainmanager so that problems in one domain do not disrupt operations inother domains.
Considerations in planning domainsIn planning your Tivoli Workload Scheduler network, consider the following:
Number of workstations, applications, and jobsConsider the number of workstations that comprise the network and thenumber of applications and jobs that the network runs. If you have a smallnumber of workstations, or a small number of applications to control, youdo not need multiple domains.
Number of geographic locationsConsider the number of geographic locations covered by your network andthe reliability and efficiency of communication between the locations.Multiple geographic locations is one of the primary reasons for choosing amultiple domain architecture. One domain for each geographical location isa common configuration. A single domain architecture relies on thenetwork maintaining continuous processing.
18 Tivoli Workload Scheduler: Planning and Installation: Planning and Installation

Time zonesWhen your network is spread across multiple geographic locations indifferent time zones, decide whether to activate the time zone feature. See“Time zone considerations” on page 23.
Centralized or decentralized managementYou can manage single or multiple domain networks from a single masterdomain manager. If you want to manage multiple locations separately, youcan consider the installation of a separate Tivoli Workload Schedulernetwork at each location. Some decentralized management is possible in astand-alone Tivoli Workload Scheduler network by mounting or sharingfile systems.
Types of applicationsConsider the types of applications that are run by Tivoli WorkloadScheduler. If you have multiple applications that are distinctly separatefrom each other, you might choose to put them in separate domains.
Windows networkWhen you have a Windows network, you might want your TivoliWorkload Scheduler domains to mirror your Windows domains.
System performance and other criteriaYou can define multiple domains to localize systems based on performanceor operating system type.
Amount of network trafficIf your network traffic is manageable, having multiple domains is lessimportant.
Dependencies between jobsConsider if you need to plan for job dependencies that cross systemboundaries, geographical boundaries, or application boundaries. Forexample, does the start of Job1 on workstation1 depend on the completionof Job2 running on workstation2. The degree of interdependence betweenjobs is an important consideration when planning your network. If you usemultiple domains, try to keep interdependent objects in the same domain,thereby decreasing network traffic and improving use of the domainarchitecture. See the Tivoli Workload Scheduler: User's Guide and Reference,SC32-1274.
Level of fault-tolerance requiredA disadvantage of the single domain configuration is the reliance on asingle domain manager. In a multi-domain network, the loss of a singledomain manager affects only the agents in its domain.
FirewallsWhen your network contains firewalls, plan the structure of your domainsaround the firewalls. See the Tivoli Workload Scheduler: Administration Guide.
Secure Sockets Layer (SSL) or IBM Global Security Kit (GSKit) encryptionIf you want to use SSL or GSKit encryption in your network, plan yourdomains in accordance with the protocol.
Note: If you want to be compliant with Federal Information ProcessingStandards (FIPS), you must use GSKit. See the Tivoli Workload Scheduler:Administration Guide.
Chapter 1. Network planning 19

Single domain networkA single domain network consists of a master domain manager and any number ofagents. Figure 8 shows an example of a single domain network. A single domainnetwork is well-suited to companies that have few locations and businessfunctions. All communication in the network is routed through the master domainmanager. With a single location, you are concerned only with the reliability of yourlocal network and the amount of traffic it can handle.
Single domain networks can be combined with other networks, single or multipledomain, to meet multiple site requirements. Tivoli Workload Scheduler supportsinternetwork dependencies between jobs running on different networks.
MasterDomainManager
Agents
Figure 8. Single domain topology
20 Tivoli Workload Scheduler: Planning and Installation: Planning and Installation

Example 1 shows a single domain network. The master domain manager is locatedin Atlanta, along with several agents. There are also agents located in Denver. Theagents in Denver depend on the master domain manager in Atlanta to resolve allinteragent dependencies, even though the dependencies might be on jobs that runin Denver. An alternative would be to create separate single domain networks inAtlanta and Denver, as shown in example 2.
Multiple domain networkMultiple domain networks are especially suited to companies that span multiplelocations, departments, or business functions. A multiple domain network consistsof a master domain manager, any number of lower tier domain managers, and anynumber of agents in each domain. Agents communicate only with their domain
Tivoli DynamicWorkload Console
MasterDomainManager
Atlanta
Denver
Atlanta Denver
Agent
Backup MasterDomain Manager
Or:
MasterDomainManager
MasterDomainManager
Agent Agent
Agent
Agent Agent Agent
Example 1
Example 2
BackupMasterDomainManager
Agent
Figure 9. Single domain topology on multiple sites
Chapter 1. Network planning 21

managers, and domain managers communicate with their parent domainmanagers. The hierarchy of domains can go down to any number of levels.
As Figure 10 illustrates, the master domain manager is located in Atlanta. Themaster domain manager contains the database files used to document thescheduling objects, and distributes the Symphony file to its agents and the domainmanagers in Denver and Los Angeles. The Denver and Los Angeles domainmanagers then distribute the Symphony file to their agents and subordinatedomain managers in New York, Aurora, and Burbank. The master domainmanager in Atlanta is responsible for broadcasting inter-domain informationthroughout the network.
Tivoli DynamicWorkload Console
MasterDomainManager
Master domain
Denver
Backup MasterDomain Manager
Agent
DomainManager
Agent Agent Agent
Second-leveldomains
LosAngeles
DomainManager
AgentAgent
NewYork
DomainManager
Agent Agent
AuroraDomainManager
Agent Agent
Burbank
DomainManager
Agent Agent
Third-leveldomains
Atlanta
Figure 10. Multiple domain topology
22 Tivoli Workload Scheduler: Planning and Installation: Planning and Installation

All communication to and from the New York domain manager is routed throughits parent domain manager in Denver. If there are schedules or jobs in the NewYork domain that are dependent on schedules or jobs in the Aurora domain, thosedependencies are resolved by the Denver domain manager. Most inter-agentdependencies are handled locally by the lower tier domain managers, greatlyreducing traffic on the network.
Workstation classesWorkstations are organized into domains to make your network managementeasier and more efficient. However, the domain name is not one of the selectioncriteria when choosing where to run a job or job stream. If you want to groupworkstations together because they have similar job scheduling characteristics, usea workstation class. Any number of workstations can be grouped in a class, and aworkstation can be in many classes. Jobs and job streams can be assigned to run ona specific workstation class.
For example, you could set up workstation classes to group workstations accordingto:v Your internal departmental structure, so that you could define a job that would
be run on all the workstations in a departmentv The software installed on them, so that you could define a job that would be run
on all the workstations that had a particular application installedv The role of the user, so that you could define a job that would be run on all the
workstations belonging to, for example, managers
In this example, an individual workstation could be in one workstation class for itsdepartment, another for its user, and several others for the software installed on it.
Time zone considerationsTime zone support is an optional feature that is enabled by default. It allows youto manage workloads at a global level. For information about how to set the timezone, see Tivoli Workload Scheduler: Administration Guide.
Time zone implementation also enables easy scheduling across multiple timezones. For a description of how the time zone works, see the Tivoli WorkloadScheduler: User's Guide and Reference.
Chapter 1. Network planning 23

24 Tivoli Workload Scheduler: Planning and Installation: Planning and Installation

Part 2. Tivoli Workload Scheduler
This part describes how to create or upgrade the Tivoli Workload Schedulerdatabase tables before installing or upgrading Tivoli Workload Scheduler, install,upgrade, configure, and uninstall Tivoli Workload Scheduler. It also containssections on troubleshooting.
© Copyright IBM Corp. 1999, 2012 25

26 Tivoli Workload Scheduler: Planning and Installation: Planning and Installation

Chapter 2. Preparing for installation
About this task
This chapter provides a brief overview of an installation and some specificenvironment considerations. It contains the following sections:v “Installation overview”v “Checking prerequisites (UNIX and Linux)” on page 28v “Installation considerations” on page 29v “Installation media” on page 31v “Instances of Tivoli Workload Automation” on page 31v “Relational database management systems” on page 33v “Selecting your installation method” on page 34v “Installation log files” on page 36v “Tivoli Workload Scheduler user” on page 39v “Windows services” on page 41
Installation overviewAbout this task
Perform the following steps to prepare to install and configure Tivoli WorkloadScheduler:1. Confirm the configuration of your network to determine what type of
workstation to install. See Chapter 1, “Network planning,” on page 3.2. Check the installation prerequisites at http://www.ibm.com/support/
docview.wss?rs=672&uid=swg27019747 to verify that your system is compliant.3. Decide if you want to use a DB2 database, or an Oracle database4. Run the procedure described in Chapter 3, “Creating or upgrading the Tivoli
Workload Scheduler database tables before installing or upgrading,” on page 43only when the database administrator manages all the confidential informationrelated to the database, such as the database administrator user ID andpassword and the IT administrator who installs the product does not knowthem.
5. Decide if you want to install into an existing instance of Tivoli WorkloadAutomation or are installing a new instance of Tivoli Workload Automation.
6. Collect the information necessary to fill in the required fields during theinstallation.
7. Optional, create or upgrade the Tivoli Workload Scheduler database tablesbefore installing or upgrading. The database administrator runs this procedureonly if the IT administrator who installs the product does not know all theconfidential information related to the database. If the IT administrator canprovide the database administrator user ID and password during theinstallation, the database administrator does not need to run these proceduresbecause the installation automatically creates and upgrades the database tables.
8. Install Tivoli Workload Scheduler following the instructions provided inChapter 4, “Installing,” on page 67.
© Copyright IBM Corp. 1999, 2012 27
|||||||

9. Perform any configuration required for the workstation type you installed. SeeChapter 6, “Configuring,” on page 193.
Checking prerequisites (UNIX and Linux)About this task
If you are preparing to install on UNIX and Linux operating systems, TivoliWorkload Scheduler automatically runs a prerequisite check on your system.Having an environment that meets the Tivoli Workload Scheduler systemrequirements ensures that an installation succeeds without any delays orcomplications.
Note: The prerequisite check is not available if you are using the SoftwareDistribution installation method and is only available on UNIX and Linuxoperating systems.
The prerequisite check verifies that:v The operating system is supported for the product.v The necessary engine software patch levels are installed.v There is enough permanent and temporary disk space.v There is enough memory and virtual memory swap space.v The necessary kernel parameters are correctly configured.
Note: The prerequisite check only verifies that the environment meets therequirements of the Tivoli Workload Scheduler. It does not check the installationrequirements for other components, such as DB2.
If any of these checks fails Tivoli Workload Scheduler displays a notification of therequirement that was not met, and you can pause the installation to resolve theproblem. Without this check, the software might install but then fail to work.
If you are installing Tivoli Workload Scheduler using the installation wizard, silentinstallation, or twsinst script, you can control whether the prerequisite check stopsthe installation only when it encounters blocking errors or when it encounters anytype of error or warning. If you want the installation to stop for any error orwarning, perform the following actions when you launch the installation:
Installation wizardEnter SETUP.bin -W checkPrerequisites.stopOnCheckPrereq=true .
Silent installationSpecify the parameter -W checkPrerequisites.stopOnCheckPrereq=true inthe response files you use for silent installations.
twsinstSpecify the parameter -stoponcheckprereq.
Details of the prerequisite check results are available in the installation log (see“Installation log files” on page 292). In the installation log you find details of theblocking and non-blocking errors, as well as any warnings.
For a detailed list of supported operating systems and product prerequisites, seehttp://www.ibm.com/support/docview.wss?rs=672&uid=swg27019747.
28 Tivoli Workload Scheduler: Planning and Installation: Planning and Installation

Installation considerationsAbout this task
Before you begin the installation using the installation wizard, consider thefollowing items that might apply to your specific environment.
Installing on Windows operating systems
If you are installing on Windows, consider the following items.v If you are using Windows Terminal Services, set the install user with the
command: change user /install
v If <TWS_user> is a domain user, Microsoft Computer Browser Servicemust be active. This is required for IBM WebSphere Application Serverauthentication.
v If <TWS_user> is a domain user, the user performing the installationmust be a domain administrator.
Installing on UNIX and Linux operating systems
If you are installing on HP-UX operation systems, check that theMAXDSIZ parameter is set to a minimum of 128 MB.
If you get an error message indicating insufficient space for the installationwizard temporary data in the default /tmp directory, you can launch theinstallation wizard with the -is flag and set an alternative temporarydirectory. For example:SETUP.sh [-is:tempdir <temporary_directory>]
For additional information about disk and space requirements for theinstallation, see “Checking prerequisites (UNIX and Linux)” on page 28.
Resource limits on UNIX and Linux operating systems (ulimit parameter)
The submission of a significant number of Java jobs requires a largeamount of memory. Change the value for data, stack, and memory limitsaccording to the number of jobs you want to submit. The submission of asignificant number of native jobs requires a high number of file descriptorsand processes. Change the values for nofiles and processes according to thenumber of jobs you want to submit. The following example gives possiblesetting values to submit 100 jobs concurrently:time(seconds) unlimitedfile(blocks) 2097151data(kbytes) 131072stack(kbytes) 32768memory(kbytes) 32768coredump(blocks) 2097151nofiles(descriptors) 4000threads(per process) unlimitedprocesses(per user) unlimited
Installing with DB2 or installing several computers from a mounted shareddirectory
The installation DVDs include two types of installation scripts:v <operating_system>/SETUP.binv SETUP.sh
SETUP.sh makes a local copy of the installation media in /tmp/_twscd. Ifyou use this method, ensure that there is adequate space in /tmp. For
Chapter 2. Preparing for installation 29

more information, see the Tivoli Workload Scheduler System RequirementsDocument at http://www.ibm.com/support/docview.wss?rs=672&uid=swg27019747 .
Choosing language settings and national charactersIf you want to use characters of a specific language locale, the languageyou choose for the installation wizard must match the language localesettings of the workstation on which you are installing. You cannot usenational characters in the installation path of a master domain manager orbackup master domain manager. Additionally, you cannot add adistributed connector to an agent that has national characters in itsinstallation path.
Installation errorsIf the installation ends with errors, do not use the Close icon on the topright to exit the session because this prevents the creation of installationsummary log file. Complete the installation even if it contains errors byclicking Next until you reach the last panel and then Finish.
Performing silent installationsWhen you install the latest version of Tivoli Workload Scheduler, you cancreate a response file based on the parameters of the initial installation.You can then use this customized response file to run silent installationsusing the same parameters. Before running the initial installation, youmight want to consider this feature. For more information, see “Performinga silent installation” on page 92.
Mapped drivesWhen you copy the image of a specific operating system onto theworkstation for installation using the wizard, you must copy the completecontents of the DVD to the drive from where you run your installation.When the drive is a UNC mapped drive, the remote path must be mappedto a drive on the installation workstation. For a complete list of thesupported operating systems and their prerequisites, see the TivoliWorkload Scheduler System Requirements Document http://www.ibm.com/support/docview.wss?rs=672&uid=swg27019747.
Remote installationYou cannot install Tivoli Workload Scheduler on a Windows workstationfrom a remote Samba-mounted file system.
Installing for end-to-end scheduling
If you are installing Tivoli Workload Scheduler on a workstation used as adistributed agent (that is either a standard agent, fault-tolerant agent, ordomain manager) for end-to-end scheduling, specify OPCMASTER as thename of the master domain manager during the installation process. Forfurther information about installing for end-to-end scheduling, seeTivoliWorkload Scheduler Scheduling End-to-end.
Create symbolic linksUNIX and Linux. The installation wizard installs all executable files in itsown .bin directory. Before running any Tivoli Workload Schedulercommands, you run a script that sets the command-line environment toaccess these files. To avoid having to set the environment each time youwant to run any of the commands from within a script, you can select aninstallation option to create symbolic links to those commands or utilitiesmost frequently used from within scripts. Table 2 on page 31 shows thebinary paths and the symbolic links.
30 Tivoli Workload Scheduler: Planning and Installation: Planning and Installation

Table 2. Symbolic link options
TWS binary path Symbolic link
<TWS_home>/bin/at usr/bin/mat
<TWS_home>/bin/batch usr/bin/mbatch
<TWS_home>/bin/datecalc usr/bin/datecalc
<TWS_home>/bin/jobstdl usr/bin/jobstdl
<TWS_home>/bin/maestro usr/bin/maestro
<TWS_home>/bin/mdemon usr/bin/mdemon
<TWS_home>/bin/morestdl usr/bin/morestdl
<TWS_home>/bin/muser usr/bin/muser
<TWS_home>/bin/parms usr/bin/parms
Installation mediaAbout this task
Depending on the operating system, the installation DVD contains some or all thefollowing directories:
TWS Contains the files necessary to install Tivoli Workload Scheduler
TDWCContains the files necessary to install the Dynamic Workload Console
DB2 Contains the files necessary to install DB2
DB2_activationContains the files necessary for DB2 activation
IntegrationsContains the files necessary to integrate Tivoli Workload Scheduler withother Tivoli products
LaunchpadContains the launch pad code
Integration WorkbenchContains the files necessary to install Tivoli Workload SchedulerIntegration Workbench
JBDC Contains the files necessary on a Windows or Linux system for the JobBrokering Definition Console
For a complete list of the supported operating systems, see the Tivoli WorkloadScheduler downloadable documentation at http://www.ibm.com/support/docview.wss?rs=672&uid=swg24027501.
Instances of Tivoli Workload AutomationAbout this task
Tivoli Workload Scheduler installs files for the TWS_user in the directory selectedpath\TWS\ and selected path\eWAS\, where selected path is the installation location.
Chapter 2. Preparing for installation 31

On Windows operating systems, the default installation location for a newinstallation is c:\Program Files\IBM\TWA\.
On UNIX operating systems, the default installation location is /opt/IBM/TWA/.
On Linux operating systems, the product is installed into the directory chosenduring installation. The default installation location is /opt/ibm/TWA/.
Each instance of a Tivoli Workload Scheduler component can exist only once in aTivoli Workload Automation directory. Multiple instances of the product can beinstalled on a single workstation only if a unique TWS_user and installation pathare used to create a separate instance.
Each instance of Tivoli Workload Automation can contain the following:v One instance of the embedded IBM WebSphere Application Server on which can
run:– One instance of a master domain manager, backup master domain manager,
dynamic domain manager, backup dynamic domain manager, domainmanager with distributed connector, or fault-tolerant agent with distributedconnector
– One instance of the Dynamic Workload Console– One instance of the Tivoli Workload Scheduler for z/OS Connector
v If no other Tivoli Workload Scheduler component (master domain manager,backup master domain manager, dynamic domain manager, backup dynamicdomain manager, domain manager with distributed connector, or fault-tolerantagent with distributed connector) is installed, one instance of a domain manageror fault-tolerant agent without a distributed connector.
Only one Dynamic Workload Console can be installed on a workstation and can beinstalled as follows:v In an existing Tivoli Workload Automation instancev In a new Tivoli Workload Automation instancev Outside any Tivoli Workload Automation instance, using an existing external
instance of Tivoli Integrated Portal.
If you install a new Tivoli Workload Scheduler instance onto a computer that hasan existing TWA directory, a new default installation directory is created as TWA1,TWA2, and so on.
Note: In this and other manuals, the Tivoli Workload Automation instancedirectory is referred to as TWA_home.
For example, if you have already installed Tivoli Workload Scheduler in the/opt/ibm/TWA directory, the next attempt to install Tivoli Workload Scheduler onthis workstation results in an installation directory of /opt/ibm/TWA1. However,if you originally installed the Dynamic Workload Console into the /TWA/TDWCdirectory, you can install a new instance of Tivoli Workload Scheduler in the/opt/ibm/TWA/TWS directory. The same situation applies to Tivoli WorkloadScheduler, and the Dynamic Workload Console. Only one instance of each productor component can exist in any instance of a Tivoli Workload Automation directory.
Note: Instances of Tivoli Workload Scheduler are recorded only in the registry file.Former versions of Tivoli Workload Scheduler were registered both in the registryfile and in the components file.
32 Tivoli Workload Scheduler: Planning and Installation: Planning and Installation

During the installation of Tivoli Workload Scheduler, decide if you want to installinto an existing instance of Tivoli Workload Automation or create a new instance.
If you are installing into an existing instance of Tivoli Workload Automation, youcan install certain products or components, depending on the products orcomponents that currently exist in that instance. The advantage of installing aproduct or component into an existing instance of Tivoli Workload Automation isthat all of the data that is required to configure the component is already presentand displayed in the wizard. In some cases, data from the existing instance isreused automatically. In other cases, data is retrieved as default values that youcan choose to use or edit.
Table 3 describes the actions that you can perform in each different scenario if youare installing the full set of Tivoli Workload Scheduler components.
Table 3. Installing into an existing instance of Tivoli Workload Automation
If the existing Tivoli Workload Automationinstance contains: You can perform the following:
A previous version of a Tivoli WorkloadScheduler component
Upgrade that component.
A previous version of a Tivoli WorkloadScheduler agent installed using twsinst
Upgrade that component using twsinst.
A Tivoli Workload Scheduler version 8.6master domain manager or backup masterdomain manager
Take no action. It is not possible to installTivoli Workload Scheduler in this scenario.
A Tivoli Workload Scheduler version 8.6dynamic domain manager or backupdynamic domain manager
Take no action. It is not possible to installTivoli Workload Scheduler in this scenario.
A Tivoli Workload Scheduler version 8.6fault-tolerant agent (with no connector)
Add the connector feature.
A Tivoli Workload Scheduler version 8.6fault-tolerant agent with connector
Take no action. It is not possible to installTivoli Workload Scheduler in this scenario.
A Tivoli Workload Scheduler version 8.6dynamic agent
Take no action. It is not possible to installTivoli Workload Scheduler in this scenario.
A Dynamic Workload Console version 8.6 Install Tivoli Workload Scheduler.
A Dynamic Workload Console version 8.6 onan existing external WebSphere ApplicationServer
Take no action. It is not possible to installTivoli Workload Scheduler in this scenario.
A Tivoli Workload Scheduler for z/OSAgent version 8.6
Take no action. It is not possible to installanother agent in this instance.
A Tivoli Workload Scheduler for z/OSconnector
Install Tivoli Workload Scheduler.
A current version of the command line client Add a language pack feature only.
Relational database management systemsAbout this task
A relational database management system (RDBMS) is a prerequisite of the masterdomain manager and backup master. The RDBMS can be one of the following:
DB2 Enterprise Server Edition
Chapter 2. Preparing for installation 33

A version of DB2 is bundled with the installation DVD. For informationabout the launchpad, see “Selecting your installation method.” You caninstall DB2 in the following ways:
Server Install DB2 Server and the master domain manager on the sameworkstation.
Client Install DB2 Server on one workstation. DB2 client and the masterdomain manager on a different workstation. The advantage of thisconfiguration is that you can easily switch between your masterdomain manager and your backup master, if necessary.
Oracle
Install Oracle and the master domain manager on the same computer. Youcan install Oracle in the following ways:
Oracle Enterprise EditionThe advantage of choosing Oracle Enterprise Edition is that youcan implement the Oracle Partitioning feature to improve theperformance of event-driven workload automation. This willimprove rule management performance, in particular the followingqueries: event_rule_instance, action_run and operator_messages.For information about event-driven workload automation, seeOverview.
Oracle Standard EditionOracle Standard Edition does not include the Oracle Partitioningfeature. Installing this edition does not improve the performance ofevent-driven workload automation.
For supported versions, see the Tivoli Workload Scheduler System RequirementsDocument at http://www.ibm.com/support/docview.wss?rs=672&uid=swg27019747.
You must install the RDBMS prior to installing Tivoli Workload Scheduler. Duringthe installation of Tivoli Workload Scheduler, identify the instance of the RDBMSyou want to use.
Note: If you already have an RDBMS and want to upgrade it, you must upgrade itafter you upgrade Tivoli Workload Scheduler. For information about upgrading theRDBMS, see the data maintenance chapter in the Tivoli Workload Scheduler:Administration Guide.
Selecting your installation methodAbout this task
You can install Tivoli Workload Scheduler using one of the methods described inthis section.
LaunchpadAbout this task
The launchpad is the starting point for installing products that are part of TivoliWorkload Automation. You can also install DB2 from the launchpad. Thelaunchpad is included in your installation media. Using the launchpad, you can:v Install or upgrade on or all Tivoli Workload Scheduler components
34 Tivoli Workload Scheduler: Planning and Installation: Planning and Installation
v Install or upgrade the Dynamic Workload Consolev Install or upgrade Tivoli Workload Scheduler for Applicationsv Install the Tivoli Workload Scheduler for z/OS Connectorv Install DB2v Install the Job Brokering Definition Consolev Access product informationv Keep you constantly and quickly informed about product news, updates,
technotes, APARs, and fixes using the "News and Updates" feature. To use thisfeature you must be connected to the Internet.
The launchpad automatically accesses and runs the related installation setup file ininteractive mode. Note that the installation from the launchpad can be driven andsimplified according to the deployment model you chose.
The launchpad requires some additional installation prerequisites. For moreinformation, see the Tivoli Workload Scheduler System Requirements Document athttp://www.ibm.com/support/docview.wss?rs=672&uid=swg27019747.
If you have autorun enabled, the launchpad starts automatically. If you want tostart the launchpad from a mounted file system, ensure that you have writepermission on it before starting the launchpad.
To start the launchpad installation program, perform the following steps:1. From the DVD that contains the component you want to install, run the
launchpad as follows:
Windows operating systems:From the root directory of the DVD, run launchpad.exe.
UNIX operating systems:
a. Export the browser location to the BROWSER environment variable.b. From the root directory of the DVD, run launchpad.sh.
The launchpad opens.2. In the launchpad, click to install the configuration of Tivoli Workload Scheduler
that you want. The related installation program starts. To proceed with theinstallation of the selected Tivoli Workload Scheduler component, follow theinstructions described in the following sections.
To access information about product installation prerequisites, click the differentoptions in the left frame of the launchpad.
Installation wizardAbout this task
Install Tivoli Workload Scheduler master domain managers, backup masters,agents, connectors, and the Dynamic Workload Console by launching theindividual setup files for each supported platform.
You can use the installation wizard in interactive or silent mode. In interactivemode, the wizard guides you through the installation steps. In silent mode, aresponse file provides the relevant information to the installation process, which isrun in background.
Chapter 2. Preparing for installation 35
|||

This method of installation uses a Java Virtual Machine, and therefore has specificsystem requirements. See “Checking prerequisites (UNIX and Linux)” on page 28for details about installation requirements.
Silent modeAbout this task
Customize a response file by adding all the configuration settings to be used duringinstallation. Then, from the command line, run the setup command. Using thismethod you can run the installation unattended and in the background. For moreinformation, see “Performing a silent installation” on page 92.
The twsinst script for agentsAbout this task
Only use twsinst to install Tivoli Workload Scheduler agents if you are notrunning a Java Virtual Machine (JVM) on the workstation. Otherwise, perform asilent installation instead. See “Performing a silent installation” on page 92.
After you use the twsinst script to upgrade an instance of Tivoli WorkloadScheduler to version 8.6, whose previous version was installed using theinstallation wizard, you can only use the twsinst method to upgrade that instanceof Tivoli Workload Scheduler again. However, you can uninstall that TivoliWorkload Scheduler instance using the wizard.
For information about twsinst, see “Installing agents using twsinst” on page 97.
Software Distribution software package blocks (SPBs)About this task
Install agents using the Software Distribution component of IBM TivoliConfiguration Manager, versions 4.1, 4.2, 4.2.1, 4.2.2, or 4.2.3 by distributingsoftware package blocks. See “Installing agents using Software Distribution” onpage 104.
Use Software Distribution to install Tivoli Workload Scheduler agents only if youdo not run a JVM on the workstation. If this is not your situation, you mightchoose to perform a silent installation instead. See “Performing a silentinstallation” on page 92.
Installation log filesAbout this task
The type of log files you find on your system depends on the type of installationyou performed. This section describes the logs associated with the differentinstallations.
For more information about log files, see the Administration Guide.
36 Tivoli Workload Scheduler: Planning and Installation: Planning and Installation

InstallShield wizard and silent installation and uninstallationlog files
About this task
You can check the following log files for information about the installation wizardand silent. Details of the installation process are kept in log files on the localworkstation in the following directories:
Tivoli Workload Scheduler
Windows operating systems:%Temp%\TWA\tws86
where
%Temp% is the windows system environment variable.
UNIX and Linux operating systems:/tmp/TWA/tws86
Table 4 lists the InstallShield wizard log files.
Table 4. Installation log files
Log file name Content
twsstatus.log Tivoli Workload Scheduler installation status log file. Itreports if the installation completed successfully or witherrors. In case of errors it indicates if the error is due to anincorrect field value or to a failed step.
twsismp.log Tivoli Workload Scheduler installation trace file
summary.log Tivoli Workload Scheduler installation log file
For multiple installations on the same workstation, the log header and footerindicate the user ID (<TWS_user>) for which the installation was performed. Mostlog files are overwritten if there are multiple installations on the same workstation.The exceptions are the following files, which are not overwritten but appended:v twsismp.logv summary.log
Note: If you are running a silent installation and the response file you are usingdoes not have the correct syntax, the installation fails without producing a log file.
The twsinst log filesAbout this task
The twsinst log file is as follows:
<tempDir>/twsinst_<operating_system>_<TWS_user>^8.6.0.00.log, where:
<tempDir>The user temporary directory:
UNIX /tmp/TWA/tws86
Windows operating system%Temp%\TWA\tws86
<operating_system>The operating system.
Chapter 2. Preparing for installation 37

<TWS_user>The name of the user for which Tivoli Workload Scheduler was installed(the name you supplied during installation)
Software package block log filesAbout this task
The IBM Tivoli Configuration Manager software package block log files are asfollows:v <tempDir>/TWA/tws86/FP_TWS_<operating_system>_<TWS_user>^8.6.0.00.log
(agent SPB log file)v <tempDir>/TWA/tws86/TWS_LP_<TWS_user>^8.6.0.00.log (agent NLS SPB log file)
where:
<tempDir>The user temporary directory:
Windows operating systemsThe default value is: %Temp%\TWA\tws86
UNIX and Linux operating systems/tmp/TWA/tws86
<operating_system>The operating system.
<TWS_user>The name of the user for which Tivoli Workload Scheduler was installed(the name you supplied during installation)
WebSphere Application Server installation log filesAbout this task
The application server installation has no log. However, if you update theapplication server, for example during the application of a Tivoli WorkloadScheduler fix pack, a log is created which gives information about the update. Thelog can be found in the directory <TWS_home>/eWAS/logs/update, where you canfind a directory that identifies the fix pack that has been installed, for example:7.0.0-WS-WASEmbeded-AixPPC64-FP000027.install, which contains a log file called/updatelog.txt.
The log for the startup of the application server can be found at:<TWS_home>/eWAS/profiles/TIPProfile/logs/<SERVERNAME>/startServer.log
where <SERVERNAME> is:v server1 in the first instance of Tivoli Workload Automationv server2, server3... for subsequent instances of Tivoli Workload Automation
Note: In the case of an upgrade, <SERVERNAME> is the name of the previousserver, for example server1.
DB2 installation log filesAbout this task
For information about DB2 installation log files, see the DB2 documentation.
38 Tivoli Workload Scheduler: Planning and Installation: Planning and Installation

Tivoli Workload Scheduler userAbout this task
On UNIX and Linux operating systems, regardless of the method of installationyou choose, the Tivoli Workload Scheduler user must be created manually beforerunning the installation. Use the appropriate UNIX and Linux operating systemcommands to create the user.
Note: Some operating systems require that for users with a password, thepassword must be changed at the first login. If this is your situation, for asuccessful installation, you will need to log in as the user and change the passwordfor the first time.
Windows users domain rights and structureAbout this task
If you install on Windows operating systems, consider the following information.
For the installation:
v You cannot have a local user and a domain user with the same name.For example, you cannot have user1 as local user and at the same timeuser1@domain1 and domain\user1.
v The Windows user performing the installation must:– For a local TWS user, be a member of the local administrative group– For a domain TWS user, be a member of the domain "Administrator"
group in the domain controller
For Windows Tivoli Workload Scheduler users:All Windows Tivoli Workload Scheduler users must have the followinguser permissions. They can be granted locally. Domain level policiesalways override local policies, so you might be required to grant thepermissions from the domain:v Act as part of the operating systemv Allow log on locallyv Impersonate a client after authenticationv Log on:
– As a batch job– As a service
v Replace process level tokenv Adjust memory quotas for a process (available on some configurations
only)
Note: These rights are granted during the installation, but you can confirmthem manually.
To run Tivoli Workload Scheduler command lines:
On Windows operating systems with UAC disabled:In addition to standard Windows permissions, to log on to themachine, the user must have the "Impersonate a client afterauthentication" permission granted. By default, this is granted justto the "Administrators" group members. This permission isrequired to impersonate the TWS user and access the TivoliWorkload Scheduler Symphony and Mailbox.
Chapter 2. Preparing for installation 39

On Windows operating systems with UAC enabled:This is the default value. The "Impersonate a client afterauthentication" is not available to the user, unless the cmd shell isstarted with "start as administrator" permission. To run TivoliWorkload Scheduler command lines, the user must have"Impersonate a client after authentication" permission defined andthen start the shell with the "start as administrator" permissionauthenticating with its own user ID.
For the Streamlogon user:The user must have the "logon as batch" permission to allow TivoliWorkload Scheduler to create the job process. In addition, you must assignto the user "Read" and "Read & Execute" permission to cmd.exe. You canassign "Read" and "Read & Execute" permission to cmd.exe also to theBATCH built-in group instead of to a single user.
To manage Tivoli Workload Scheduler agents:The user must be in the Administrators group or must be able to perform"Run as" as twsuser to reset the Tivoli Workload Scheduler files if arecovery is needed.
Considerations for Windows domain controllers runningMicrosoft Active Directory
About this task
If you want to install Tivoli Workload Scheduler fault-tolerant agents onworkstations where users who run jobs are domain users and the domaincontroller is the running Microsoft Active Directory, decide how to install theagents and configure the domain so that the jobmon process can obtain the correctinformation to let the users run jobs.
Before running a job, jobmon must retrieve information about the user running thejob. If the user is a domain user and the domain controller is running MicrosoftActive Directory, whether the user information can be retrieved depends on theinformation in the access control list (ACL) of that user. The main jobmon processthat runs the job is started as the local system account (AUTHORITY\SYSTEM),but it immediately impersonates the <TWS_user> that owns the fault-tolerantagent. This means that for jobmon to successfully launch the job, the <TWS_user>must have an access control entry (ACE) in the ACL of the user for which it istrying to retrieve information.
To resolve this issue, perform one of the following actions:
Enable the <TWS_user> to access a set of users that run jobsOn the domain server, edit the ACL of all users that run jobs on theworkstation and add an ACE for the <TWS_user> for each. In this case,only the specified users can run the jobs submitted by jobmon.
Allow all users to run jobs submitted by jobmon by using theTWS_BYPASS_DC=TRUE system variable
Create the TWS_BYPASS_DC=TRUE system variable, with a value not null,and reboot the workstation. In this case, jobmon obtains the userinformation without performing the security check for the ACE in the ACLof the user. All the local and the domain users can run the jobs submittedby jobmon.
40 Tivoli Workload Scheduler: Planning and Installation: Planning and Installation

Allow all users to run jobs submitted by jobmon setting the <TWS_user> as adomain user
Set up the <TWS_user> as a Windows domain user and install the instanceof Tivoli Workload Scheduler using the <TWS_user>. In this case, allauthenticated users on the domain controller can access the default ACLfor a domain user. Jobs can then be launched by the local or the domainusers. All the local and the domain users can run the jobs submitted byjobmon.
Exclude the workstation from the security check on users ACLOn the domain server, add the host name of the workstation where thefault-tolerant agent is installed to the Pre-Windows 2000-Compatible AccessGroup. In this way from a security point of view, the domain controllerinteracts with this workstation as if it was in a Windows domain whichdoes not support Active Directory. In this case, all the local and the domainusers can run the jobs submitted by jobmon. In addition, the domaincontroller does not prevent any local or domain user from running otherprocesses that are not controlled by Tivoli Workload Scheduler.
Checking environment settings for Windows Vista usersAbout this task
Before you install Tivoli Workload Scheduler on a Windows Vista workstation thatdoes not belong to a Windows domain, make sure that the workstation name andthe domain name are both registered in uppercase in the Windows environmentsettings. When the workstation is not in a Windows domain, theCOMPUTERNAME and USERDOMAIN values are identical, but on Vista theUSERDOMAIN value is sometimes in lowercase even if the COMPUTERNAME isin uppercase.
To resolve this issue, perform the following actions:1. Open a DOS command prompt shell.2. Run the set command to display the Windows environment settings.3. Check that the USERDOMAIN value is in uppercase. If this is not the case,
follow this workaround to correct it:4. Run the set command to change the value of COMPUTERNAME to a
temporary host name of your choice:set /p COMPUTERNAME=MYTEMPHOST
5. Restart the system.6. Run the set command again as in step 4 replacing the temporary host name
with the original one.7. Restart the system.8. Check that the USERDOMAIN value is now in uppercase.
Windows servicesAbout this task
An installation on Windows operating systems registers the following services withthe Windows Service Control Manager:v Tivoli Workload Scheduler (for <TWS_user>)v Tivoli Netman (for <TWS_user>)
Chapter 2. Preparing for installation 41

v Tivoli Token Service (for <TWS_user>) - includes the In-Flight Tracing facilityservice
v Tivoli Workload Scheduler SSM Agent (for <TWS_user>)v WebSphere Application Server (for <TWS_user>)v IBM Common Platform Agent: tws_cpa_agent_ (for <TWS_user>)
Note: An existing service that has the same name as the new service will beoverwritten during installation.
The Service Control Manager maintains its own user password database. If the<TWS_user> password is changed following installation, you must use the Servicesapplet in the Control Panel to assign the new password for the Tivoli TokenService and Tivoli Workload Scheduler (for <TWS_user>). For more information,see the section on changing the password of the TWS_User in Administration Guide.
42 Tivoli Workload Scheduler: Planning and Installation: Planning and Installation

Chapter 3. Creating or upgrading the Tivoli WorkloadScheduler database tables before installing or upgrading
This procedure is not mandatory for the installation of the product. The databaseadministrator must run the procedure to create or upgrade the product databasetables before the installation of the product only when the IT administrator whoinstalls the product does not know the database administrator user ID andpassword. Otherwise, the IT administrator provides the database administratoruser ID and password during the installation and the tables are automaticallycreated and upgraded during the installation or the upgrade of the product.
Using this procedure, the database administrator creates or upgrades the databasetables before the IT administrator installs or upgrades the product with a userdifferent from the database administrator user. The procedure ensures that only thedatabase administrator manages all the confidential information related to thedatabase, such as the administrator user ID and password, and the ITadministrator can install or upgrade the product without knowing any confidentialdatabase information.
This chapter describes the procedure to follow if you want to:v Create and upgrade the Tivoli Workload Scheduler and the dynamic workload
broker database tables before installing or upgrading the product if you areusing DB2. See “Creating or upgrading the database tables if you are usingDB2.”
v Create and upgrade the Tivoli Workload Scheduler and the dynamic workloadbroker database tables before installing or upgrading the product if you areusing Oracle. See “Creating or upgrading the database tables if you are usingOracle” on page 53.
The IT administrator can perform:v The installation, specifying as database administrator user name the user to be
granted access, by the administrator of the DB2 server, to the Tivoli WorkloadScheduler database.
v The upgrade, by using another user that has the same permissions as the userthat installed the product.
Creating or upgrading the database tables if you are using DB2To create or upgrade the Tivoli Workload Scheduler and the dynamic workloadbroker database tables if you are using DB2, run the following procedures:1. Customize the properties file. See “Customizing the properties file for DB2.”2. Generate the SQL files. See “Generating the SQL files for DB2” on page 46.3. Run the SQL files to create the SQL tables. See “Running the SQL files to create
or upgrade the SQL tables for DB2” on page 47.
Customizing the properties file for DB2To customize the properties files, perform the following steps:1. From the installation DVD or from the eImage containing the master domain
manager or the dynamic domain manager, open the following properties file:
© Copyright IBM Corp. 1999, 2012 43

On Windows operating systems:<images_dir>\RESPONSEFILES\customizeDB2SQL.properties
On UNIX and Linux systems:<images_dir>/RESPONSEFILES/customizeDB2SQL.properties
where: images_dir specifies the directory where you extract the product image.2. Customize the SQL properties with the values appropriate for your needs:
TWSTEMPDIRThe directory where you want to store the SQL scripts to create thedatabase tables. The default value is:
On Windows operating system:C:\DOCUME~1\ADMINI~1\LOCALS~1\Temp\TWA\tws86
On UNIX and Linux systems:/tmp/TWA/tws86
DB_USER
If you are creating the database tables before installing the product:Specify the user to be granted access by the administrator ofthe DB2 server to access the Tivoli Workload Schedulerdatabase.
When the IT administrator installs the product, he must specifythis value in the DB2 server administrator user field.
On Windows operating systemThe default value is db2admin.
On UNIX and Linux operating systemsThe default value is db2inst1.
On UNIX, verify that you can switch to this user and that it canload the DB2 environment.
If you are upgrading the database tables before upgrading theproduct:
Specify the user that you used when you installed the versionof the product you are upgrading. When you later upgrade theproduct, you can specify a user different from the one youspecified in the DB_USER field, but it must have databaseaccess permissions.
TWS_USERSpecify the Tivoli Workload Scheduler user name.
It can contain alphanumeric, dash (-), and underscore (_) characters; itcannot contain national characters. The first character of the user namemust be a letter.
When the IT administrator installs the product, he must specify thisvalue in the User_name field.
TWS_DBThe name of the DB2 database. The maximum length is five characters.The default value is TWS. If you are creating the SQL tables for a:
Master domain managerProvide the name of a database that is not used by a dynamicdomain manager.
44 Tivoli Workload Scheduler: Planning and Installation: Planning and Installation

Dynamic domain managerProvide the name of a database that is not used by a masterdomain manager.
When the IT administrator installs the product, he must specify thisvalue in the Database name field.
TWS_TS_NAMEThe name of the DB2 instance table space. This table space is used tostore scheduling objects and event rules. For information about DB2table spaces, see the DB2 documentation. The default table space nameis TWS_DATA.
When the IT administrator installs the product, he must specify thisvalue in the Tablespace name field.
TWS_DATA_TS_PATHThe relative path of the DB2 table space. The path can be a relative or afully qualified path. When the table space path is a fully qualified path,the DB2 administrator user must have complete access rights to thedirectory where the table space is installed. The default table space pathname is TWS_DATA. For UNIX and Linux operating systems, makesure that the DB2 administrator has write access to the directory abovethe table space directory. For more information, see Appendix I, “DB2tablespace relative paths,” on page 377.
When the IT administrator installs the product, he must specify thisvalue in the Tablespace path field.
TWS_LOG_TS_NAMESpecify the name of the DB2 table space where Tivoli WorkloadScheduler event logs are to be stored. These logs include data aboutevent rule instances, triggered actions, and operator messages that aredisplayed by the Dynamic Workload Console. Data from the logs canbe used to create reports. You can view report data by using theDynamic Workload Console. The default name is TWS_LOG.
When the IT administrator installs the product, he must specify thisvalue in the Report tablespace name field.
TWS_LOG_TS_PATHSpecify the path of the DB2 table space where Tivoli WorkloadScheduler event logs are to be stored. The default path is TWS_LOG.The path can be a relative or a fully qualified path. When the tablespace path is a fully qualified path the DB2 administrator user musthave complete access rights to the directory where the table space isinstalled. For more information, see Appendix I, “DB2 tablespacerelative paths,” on page 377.
Note: The report table space path cannot be the same as the table spacepath.
When the IT administrator installs the product, he must specify thisvalue in the Report tablespace path field.
COMPANY_NAMEThe name of the company. You can use spaces and the maximum fieldlength is 40 characters. The default is MYCOMPANY.
When the IT administrator installs the product, he must specify thisvalue in the Company field.
Chapter 3. Creating or upgrading the Tivoli Workload Scheduler database tables before installing or upgrading 45

EIF_PORTThe port used by the event management processor to receive events.The default value is 31131. The valid range is from 1 to 65535.
When the IT administrator installs the product, he must specify thisvalue in the Event Processor field.
HOST_NAMEThe fully qualified host name or IP address on which the dynamicdomain manager is contacted by the dynamic agent.
When the IT administrator installs the product, he must specify thisvalue in the dynamic agent configuration information Host name or IPaddress field.
WAS_SEC_PORTThe HTTPS port of the dynamic workload broker. The dynamic agentuses it to connect to the dynamic workload broker. The default value is31116. If you leave the field blank, it defaults to 0. The valid range isfrom 1 to 65535.
When the IT administrator installs the product, he must specify thisvalue in the Dynamic workload broker HTTPS port number field.
Generating the SQL files for DB2To generate the SQL files you use the customizeSQL script. It is located:
On Windows operating system<images_dir>\TWS\<operating_system>\tws_tools\customizeSQL.bat
On UNIX and Linux operating systems<images_dir>/TWS/<operating_system>/tws_tools/customizeSQL.sh
where:
images_dirThe directory where you stored the product images. If you want to use theeImage, download the one containing the master domain manager.
operating_systemThe operating system you are working on.
To show command usage, run:customizeSQL -usage
The script has the following syntax:
On Windows operating systemcustomizeSQL -javaHome <javahome_dir> -propertyFile <property_file_path>
On UNIX and Linux operating systemscustomizeSQL -imagesDir <images_dir> -javaHome <javahome_dir>-propertyFile <property_file_path>
where:
images_dirUNIX only. The directory where the Tivoli Workload Scheduler setup.bincommand is located.
javahome_dirThe directory where the Java runtime environment is located.
46 Tivoli Workload Scheduler: Planning and Installation: Planning and Installation

property_file_pathThe directory where the property file is located.
The following example shows the command for UNIX if you stored the images inthe /opt/TWSImages/TWS/AIX directory and the properties file in the /tmp/ directory:customizeSQL -imagesDir /opt/TWSImages/TWS/AIX -javaHome /usr -propertyFile/tmp/customizeDB2SQL.properties
The SQL files are created in the directory you specified in the TWSTEMPDIRproperty.
The following example shows the command for Windows if you stored the Javaruntime in the C:\Program Files\Java\jre6 and the properties file in the C:\Temp\directory:customizeSQL -javaHome "C:\Program Files\Java\jre6"-propertyFile "C:\Temp\customizeDb2Sql.properties"
The SQL files are created in the directory you specified in the TWSTEMPDIRproperty.
Running the SQL files to create or upgrade the SQL tables forDB2
This section describes the command you must run to create or upgrade the SQLtables. The commands you must run depends if you are:
Creating the SQL tables before installing:
v A master domain manager. See “Before installing a master domainmanager.”
v A dynamic domain manager. See “Before installing a dynamic domainmanager” on page 49.
Upgrading the SQL tables before upgrading the product
v From version 8.3 up to version 8.5. See “Before upgrading TivoliWorkload Scheduler from V8.3 and later to V8.5” on page 50.
v From version 8.5.1 up to version 8.5.1.1. See “Before upgrading TivoliWorkload Scheduler from V8.5.1 to V8.5.1.1” on page 52.
These scripts must be run by the database administrator by using the db2inst1administrator user or the user that the database administrator granted access to theTivoli Workload Scheduler database.
Before installing a master domain managerIf you are creating the SQL tables before installing a master domain manager,perform the following steps:1. Create the Tivoli Workload Scheduler database, by running the following
command:db2 -v -t -f <sql_directory>/sql/create_database.sql
where:sql_directory is the directory where you stored the SQL you created in“Generating the SQL files for DB2” on page 46.
2. Connect the user to the Tivoli Workload Scheduler database, by running thefollowing command:db2 connect to TWS_DB user ADMIN_USER \"ADMIN_PW\"
Chapter 3. Creating or upgrading the Tivoli Workload Scheduler database tables before installing or upgrading 47

where:
TWS_DBIs the value you specified in the TWS_DB property.
ADMIN_USERIs the DB2 database administrator.
ADMIN_PWIs the password of the DB2 database administrator.
3. Create the Tivoli Workload Scheduler table spaces, by running the followingcommand:db2 -v -t -f <sql_directory>/sql/create_tablespaces.sql
4. Create the Tivoli Workload Scheduler event rule tables, by running thefollowing command:db2 -v -t -f <sql_directory>/sql/create_rule_tables.sql
5. Create the Tivoli Workload Scheduler log tables, by running the followingcommand:db2 -v -t -f <sql_directory>/sql/create_log_tables.sql
6. Create the Tivoli Workload Scheduler tables, by running the followingcommand:db2 -v -t -f <sql_directory>/sql/create_tables.sql
7. Set the Tivoli Workload Scheduler event rule constraints, by running thefollowing command:db2 -v -t -f <sql_directory>/sql/create_rule_constraints.sql
8. Set the Tivoli Workload Scheduler log constraints, by running the followingcommand:db2 -v -t -f <sql_directory>/sql/create_log_constraints.sql
9. Set the Tivoli Workload Scheduler constraints, by running the followingcommand:db2 -v -t -f <sql_directory>/sql/create_constraints.sql
10. Populate the Tivoli Workload Scheduler tables, by running the followingcommand:db2 -v -t -f <sql_directory>/sql/populate_tables.sql
11. Create the Tivoli Workload Scheduler event rule indexes, by running thefollowing command:db2 -v -t -f <sql_directory>/sql/create_rule_indexes.sql
12. Create the Tivoli Workload Scheduler log indexes, by running the followingcommand:db2 -v -t -f <sql_directory>/sql/create_log_indexes.sql
13. Create the Tivoli Workload Scheduler indexes, by running the followingcommand:db2 -v -t -f <sql_directory>/sql/create_indexes.sql
14. Create the Tivoli Workload Scheduler event rule views, by running thefollowing command:db2 -v -t -f <sql_directory>/sql/create_rule_views.sql
15. Create the Tivoli Workload Scheduler log views, by running the followingcommand:db2 -v -t -f <sql_directory>/sql/create_log_views.sql
16. Create the Tivoli Workload Scheduler views, by running the followingcommand:db2 -v -t -f <sql_directory>/sql/create_views.sql
48 Tivoli Workload Scheduler: Planning and Installation: Planning and Installation

17. Assign permissions to the Tivoli Workload Scheduler user to access TivoliWorkload Scheduler tables and views, by running the following command:db2 -v -t -f <sql_directory>/sql/grant_twsuser.sql
18. Grant permissions to the database user, by running the following command:db2 grant DBADM on database to user DB_USER
19. Create the job repository, by running the following command:db2 -v -t -f <sql_directory>/DWB/sql/create_job_repository.sql
20. Create the allocation repository, by running the following command:db2 -v -t -f <sql_directory>/DWB/sql/create_allocation_repository.sql
21. Create the resource repository, by running the following command:db2 -v -t -f <sql_directory>/DWB/sql/create_resource_repository.sql
22. Create the server table, by running the following command:db2 -v -t -f <sql_directory>/DWB/sql/create_server.sql
23. Catalog the Tivoli Workload Scheduler node, by running the followingcommand:db2 catalog local node TWS_DB_ND instance DB2_instance_name
24. Catalog the local node, by running the following command:db2 catalog tcpip node LBNODE remote 127.0.0.1 serverDB2_instance_port
25. Catalog the alias of the Tivoli Workload Scheduler database, by running thefollowing command:db2 catalog db TWS_DB as TWS_DB_DBat node LBNODE
Before installing a dynamic domain managerIf you are creating the SQL tables before installing a dynamic domain manager,perform the following steps:1. Create the Tivoli Workload Scheduler database, by running the following
command:db2 -v -t -f <sql_directory>/sql/create_database.sql
where:sql_directory is the directory where you stored the SQL you created in“Generating the SQL files for DB2” on page 46
2. Connect the user to the Tivoli Workload Scheduler database, by running thefollowing command:db2 connect to TWS_DB user ADMIN_USER \"ADMIN_PW\"
where:
TWS_DBIs the value you specified in the TWS_DB property.
ADMIN_USERIs the DB2 database administrator.
ADMIN_PWIs the password of the DB2 database administrator.
3. Create the Tivoli Workload Scheduler table spaces, by running the followingcommand:db2 -v -t -f <sql_directory>/sql/create_tablespaces.sql
4. Create the job repository, by running the following command:
Chapter 3. Creating or upgrading the Tivoli Workload Scheduler database tables before installing or upgrading 49
|
|

db2 -v -t -f <sql_directory>/DWB/sql/create_job_repository.sql
5. Create the allocation repository, by running the following command:db2 -v -t -f <sql_directory>/DWB/sql/create_allocation_repository.sql
6. Create the resource repository, by running the following command:db2 -v -t -f <sql_directory>/DWB/sql/create_resource_repository.sql
7. Create the server table, by running the following command:db2 -v -t -f <sql_directory>/DWB/sql/create_server.sql
8. Grant permissions to the database user, by running the following command:db2 grant DBADM on database to user DB_USER
9. Catalog the alias of the Tivoli Workload Scheduler database, by running thefollowing command:db2 catalog db TWS_DB as TWS_DB_DBat node LBNODE
10. Catalog the local node, by running the following command:db2 catalog tcpip node LBNODE remote 127.0.0.1 server DB2_instance_port
Before upgrading Tivoli Workload Scheduler from V8.3 and laterto V8.5If you want to upgrade the SQL tables before upgrading Tivoli WorkloadScheduler from V8.3 and later to V8.5, perform the following steps:1. Connect the user to the Tivoli Workload Scheduler database, by running the
following command:db2 connect to TWS_DB user ADMIN_USERusing \"ADMIN_PW\"
where:
TWS_DBIs the value you specified in the TWS_DB property.
ADMIN_USERIs the DB2 database administrator.
ADMIN_PWIs the password of the DB2 database administrator.
2.
3. Grant permissions to the database user, by running the following command:db2 grant DBADM on database to user DB_UPGRADE_USER
where DB_UPGRADE_USER is the name of the user that the IT administratorspecifies in the DB2 Server administrator user field later when upgrading theproduct. You must assign SYSMON authority to the DB_UPGRADE_USER.
4. Verify the version of your database, by running the select command.The command must be run by a user that has DBADM authority or at leastDATAACCESS authority.Run the command by using the following syntax:select MPR_DESCRIPTION, MPR_VALUE from MDL.MPR_MODEL_PROPERTIESwhere MPR_NAME=’DATABASE_VERSION’
If DATABASE_VERSION returns one of the following values:8.3.0.00
You have installed version 8.3.8.3.0.01
You have installed version 8.3.0.1.
50 Tivoli Workload Scheduler: Planning and Installation: Planning and Installation
|
|
|||

8.4.0.00You have installed version 8.4.
8.4.0.01You have installed version 8.4.0.1.
8.5.0.00You have installed version 8.5.
run the procedure described in Step 5.If DATABASE_VERSION returns one of the following values:
8.5.1.00You have installed version 8.5.1.
8.5.1.01You have installed version 8.5.1.1.
run the procedure described in “Before upgrading Tivoli Workload Schedulerfrom V8.5.1 to V8.5.1.1” on page 52.
5. Run the following commands in sequence starting with the command for yourspecific DATABASE_VERSION value.For example, if DATABASE_VERSION is equal to:
8.3.0.00Run all the commands listed in To upgrade the Tivoli WorkloadScheduler database tables.
8.4.0.00Run the following commands:a. 4cb. 4dc. 4ed. 4f on page 52e. 4g on page 52f. 4h on page 52
8.5.0.00To upgrade the Tivoli Workload Scheduler database tables, run thefollowing commands:a. 4eb. 4f on page 52c. 4g on page 52d. 4h on page 52
To upgrade the dynamic workload broker database tables, run thecommands listed in To upgrade the dynamic workload broker databasetables.
To upgrade the Tivoli Workload Scheduler database tables:
a.db2 -v -t -f <sql_directory>/sql/upgrade_83000_83001.sql
b.db2 -v -t -f <sql_directory>/sql/upgrade_83001_84000.sql
c.db2 -v -t -f <sql_directory>/sql/upgrade_84000_84001.sql
d.db2 -v -t -f <sql_directory>/sql/upgrade_84001_85000.sql
e.
Chapter 3. Creating or upgrading the Tivoli Workload Scheduler database tables before installing or upgrading 51

db2 -v -t -f <sql_directory>/sql/upgrade_85000_85100.sql
f.db2 -v -t -f <sql_directory>/sql/upgrade_85100_85101.sql
g.db2 -v -t -f <sql_directory>/sql/upgrade_85101_86000.sql
h.db2 -x ’SELECT COUNT (*) FROM MDL.JSF_JS_INST_FORECAST’
v If the command returns the following error message:SQL0204N "MDL.JSF_JS_INST_FORECAST"name is an undefined name. SQLSTATE=42704
run the following command:db2 -v -t -f <sql_directory>/sql/upgrade_84001_84005.sql
To upgrade the dynamic workload broker database tables:
a. Create the job repository, by running the following command:db2 -v -t -f <sql_directory>/DWB/sql/create_job_repository.sql
b. Create the allocation repository, by running the following command:db2 -v -t -f <sql_directory>/DWB/sql/create_allocation_repository.sql
c. Create the resource repository, by running the following command:db2 -v -t -f <sql_directory>/DWB/sql/create_resource_repository.sql
d. Create the server table, by running the following command:db2 -v -t -f <sql_directory>/DWB/sql/create_server.sql
Before upgrading Tivoli Workload Scheduler from V8.5.1 toV8.5.1.1If you want to upgrade the SQL tables before upgrading Tivoli WorkloadScheduler from version 8.5.1 to version 8.51.1, perform the following steps:1. Connect the user to the Tivoli Workload Scheduler database, by running the
following command:db2 connect to TWS_DB user ADMIN_USERusing \"ADMIN_PW\"
where:
TWS_DBIs the value you specified in the TWS_DB property.
ADMIN_USERIs the DB2 database administrator.
ADMIN_PWIs the password of the DB2 database administrator.
2. Grant permissions to the database user, by running the following command:db2 grant DBADM on database to user DB_UPGRADE_USER
where DB_UPGRADE_USER is the name of the user that the IT administratorspecifies in the DB2 Server administrator user field when later upgrading theproduct. You must assign SYSMON authority to the DB_UPGRADE_USER.
3. Verify the version of your database, by running the select command.The command must be run by a user that has DBADM authority or at leastDATAACCESS authority. Run the command by using the following syntax:select MPR_DESCRIPTION, MPR_VALUE from MDL.MPR_MODEL_PROPERTIESwhere MPR_NAME=’DATABASE_VERSION’
52 Tivoli Workload Scheduler: Planning and Installation: Planning and Installation
|
|
|||

If DATABASE_VERSION returns one of the following values:8.3.0.00
You have installed version 8.3.8.3.0.01
You have installed version 8.3.0.1.8.4.0.00
You have installed version 8.4.8.4.0.01
You have installed version 8.4.0.1.8.5.0.00
You have installed version 8.5.
run the procedure described in “Before upgrading Tivoli Workload Schedulerfrom V8.3 and later to V8.5” on page 50.If DATABASE_VERSION returns one of the following values:
8.5.1.00You have installed version 8.5.1.
8.5.1.01You have installed version 8.5.1.1.
run the procedure described in Step 4.4. If DATABASE_VERSION returns a value from 8.5.1.00 to 8.5.1.01, run the
following commands in sequence:
To upgrade the Tivoli Workload Scheduler database tables:
a.db2 -v -t -f <sql_directory>/sql/upgrade_85100_85101.sql
b.db2 -v -t -f <sql_directory>/sql/upgrade_85101_86000.sql
c.db2 -x ’SELECT COUNT (*) FROM MDL.JSF_JS_INST_FORECAST’
v If the command returns the following error message:SQL0204N "MDL.JSF_JS_INST_FORECAST"name is an undefined name. SQLSTATE=42704
run the following command:db2 -v -t -f <sql_directory>/sql/upgrade_84001_84005.sql
To upgrade the dynamic workload broker database tables:db2 -v -t -f <sql_directory>/DWB/sql/upgrade_85100_86000.sql
Creating or upgrading the database tables if you are using OracleTo create or upgrade the Tivoli Workload Scheduler and the dynamic workloadbroker database tables if you are using Oracle, run the following procedures:1. Customize the properties file. See “Customizing the properties file for Oracle”
on page 54.2. Generate the SQL files. See “Generating the SQL files for Oracle” on page 55.3. Run the SQL files to create the SQL tables. See “Running the SQL files to create
or upgrade the SQL tables for Oracle” on page 55.
Chapter 3. Creating or upgrading the Tivoli Workload Scheduler database tables before installing or upgrading 53

Customizing the properties file for OracleTo customize the properties files, perform the following steps:1. From the installation DVD or from the eImage containing the master domain
manager or the dynamic domain manager, open the following properties file:
On Windows operating systems:<images_dir>\RESPONSEFILES\customizeORACLESQL.properties
On UNIX and Linux systems:<images_dir>/RESPONSEFILES/customizeORACLESQL.properties
where: <images_dir> specifies the directory where you extract the productimage.
2. Customize the SQL properties with the values appropriate for your needs:
TWSTEMPDIRThe directory where you want to store the SQL scripts to create thedatabase tables. The default value is:
On Windows operating systems:C:\DOCUME~1\ADMINI~1\LOCALS~1\Temp\TWA\tws86
On UNIX and Linux systems:/tmp/TWA/tws86
MDL_USERThe database administrator user name (such as SYSTEM) that access theTivoli Workload Scheduler and the dynamic workload broker database.It is a user that must be created on Oracle; it is not an operating systemuser.
When the IT administrator installs the product, he must specify thisvalue in the Oracle administrator user field.
TWS_PASSWORDThe password of the MDL_USER.
When the IT administrator installs the product, he must specify thisvalue in the Oracle administrator user password field.
TWS_USERSpecify the Tivoli Workload Scheduler user name.
It can contain alphanumeric, dash (-), and underscore (_) characters; itcannot contain national characters. The first character of the user namemust be a letter.
When the IT administrator installs the product, he must specify thisvalue in the User_name field.
TWS_TS_NAMEThe name that identifies the Tivoli Workload Scheduler data tablespace. The default for this field is USERS.
When the IT administrator installs the product, he must specify thisvalue in the Tivoli Workload Scheduler data tablespace field.
TWS_LOG_TS_NAMEThe name that identifies the Tivoli Workload Scheduler table spacewhere report data is to be stored. You can view the report data byusing the Dynamic Workload Console. The default value for this field isUSERS.
54 Tivoli Workload Scheduler: Planning and Installation: Planning and Installation

When the IT administrator installs the product, he must specify thisvalue in the Tivoli Workload Scheduler reports tablespace field.
TWS_TS_TEMP_NAMEThe name that identifies the Tivoli Workload Scheduler temporary tablespace. The default value for this field is TEMP.
When the IT administrator installs the product, he must specify thisvalue in the Tivoli Workload Scheduler temporary tablespace field.
COMPANY_NAMEThe name of the company. You can use spaces and the maximum fieldlength is 40 characters. The default is MYCOMPANY
When the IT administrator installs the product, he must specify thisvalue in the Company field.
EIF_PORTThe port used by the event management processor to receive events.The valid range is from 1 to 65535. The default value is 31131.
When the IT administrator installs the product, he must specify thisvalue in the Event Processor field.
HOST_NAMEThe fully qualified host name or IP address on which the dynamicdomain manager is contacted by the dynamic agent.
When the IT administrator installs the product, he must specify thisvalue in the dynamic agent configuration information Host name or IPaddress field.
WAS_SEC_PORTThe HTTPS port of the dynamic workload broker. The dynamic agentuses it to connect to the dynamic workload broker. The valid range isfrom 1 to 65535. The default value is 31116. If you leave the field blank,it defaults to 0.
When the IT administrator installs the product, he must specify thisvalue in the Dynamic workload broker HTTPS port number field.
Generating the SQL files for OracleTo generate the SQL tables, run the customizeSQL script as described in“Generating the SQL files for DB2” on page 46.
Running the SQL files to create or upgrade the SQL tables forOracle
This section describes the commands you must run to create or upgrade the SQLtables. The commands you must run depends if you are:
Creating the SQL tables before installing:
v A master domain manager. See “Before installing a master domainmanager” on page 56.
v A dynamic domain manager. See “Before installing a dynamic domainmanager” on page 58.
Upgrading the SQL tables before upgrading the product
v From version 8.3 and later to version 8.5. See “Before upgrading TivoliWorkload Scheduler from V8.3 and later to V8.5” on page 59.
Chapter 3. Creating or upgrading the Tivoli Workload Scheduler database tables before installing or upgrading 55

v From version 8.5.1 up to version 8.5.1.1. See “Before upgrading fromV8.5.1 to V8.5.1.1” on page 63
These scripts must be run by the database administrator by using the value youspecified in MDL_USER or the user that the database administrator granted toaccess the Tivoli Workload Scheduler database.
Before installing a master domain managerIf you are creating the SQL tables before installing a master domain manager,perform the following steps:1. Create the Tivoli Workload Scheduler users, by running the following
command:sqlplus -L -S <ORACLE_ADMIN>/<ORACLE_ADMIN_PW>@<ORACLE_NET_SERVICE_NAME>@<sql_directory>/sql/create_users.sql
where:
ORACLE_ADMINIs the Oracle database administrator.
ORACLE_ADMIN_PWIs the password of the ORACLE_ADMIN.
Net service name
The name used by clients to identify an Oracle Net server and thespecific system identifier or database for the Oracle Net connection. Anet service name is mapped to a port number and protocol. It is alsoknown as a connect string, database alias, host string, or service name.
If your Oracle database is:v Installed on the same system where you are installing your master
domain manager or a backup master, the net service name is thename of your Oracle database.
v Installed on the same system where you are installing your dynamicdomain manager or a backup dynamic domain manager, the netservice name is the name of your Oracle database.
v Not installed on the system where you are installing your masterdomain manager or a backup master, the net service name is thealias configured for the connection to the remote database.
v Not installed on the system where you are installing your dynamicdomain manager or a backup dynamic domain manager, the netservice name is the alias configured for the connection to the remotedatabase.
When the IT administrator installs the product he must specify thisvalue in the Net service name field.
sql_directoryThe directory where you stored the SQL you created in “Generatingthe SQL files for DB2” on page 46.
2. Create the Tivoli Workload Scheduler event rule tables, by running thefollowing command:sqlplus -L -S <TWS_MDL_USER>/<TWS_MDL_PW>@<ORACLE_NET_SERVICE_NAME>@<sql_directory>/sql/create_rule_tables.sql
56 Tivoli Workload Scheduler: Planning and Installation: Planning and Installation

where:
TWS_MDL_USERIs the user you specified in the MDL_USER field of the property file.
TWS_MDL_PWIs the password of the MDL_USER.
3. Create the Tivoli Workload Scheduler log tables, by running the followingcommand:
If you did not use the ORACLE partitioning featuresqlplus -L -S <TWS_MDL_USER>/<TWS_MDL_PW>@<ORACLE_NET_SERVICE_NAME>@<sql_directory>/sql/stded/create_log_tables.sql
If you used the ORACLE partitioning featuresqlplus -L -S <TWS_MDL_USER>/<TWS_MDL_PW>@<ORACLE_NET_SERVICE_NAME>@<sql_directory>/sql/create_log_tables.sql
4. Create the Tivoli Workload Scheduler tables, by running the followingcommand:sqlplus -L -S <TWS_MDL_USER>/<TWS_MDL_PW>@<ORACLE_NET_SERVICE_NAME>@<sql_directory>/sql/create_tables.sql
5. Set the Tivoli Workload Scheduler event rule constraints, by running thefollowing command:sqlplus -L -S <TWS_MDL_USER>/<TWS_MDL_PW>@<ORACLE_NET_SERVICE_NAME>@<sql_directory>/sql/create_rule_constraints.sql
6. Set the Tivoli Workload Scheduler log constraints, by running the followingcommand:sqlplus -L -S <TWS_MDL_USER>/<TWS_MDL_PW>@<ORACLE_NET_SERVICE_NAME>@<sql_directory>/sql/create_log_constraints.sql
7. Set the Tivoli Workload Scheduler constraints, by running the followingcommand:sqlplus -L -S <TWS_MDL_USER>/<TWS_MDL_PW>@<ORACLE_NET_SERVICE_NAME><sql_directory>/sql/create_constraints.sql
8. Populate the Tivoli Workload Scheduler tables, by running the followingcommand:sqlplus -L -S <TWS_MDL_USER>/<TWS_MDL_PW>@<ORACLE_NET_SERVICE_NAME>@<sql_directory>/sql/populate_tables.sql
9. Create the Tivoli Workload Scheduler event rule indexes, by running thefollowing command:sqlplus -L -S <TWS_MDL_USER>/<TWS_MDL_PW>@<ORACLE_NET_SERVICE_NAME>@<sql_directory>/sql/create_rule_indexes.sql
10. Create the Tivoli Workload Scheduler log indexes, by running the followingcommand:
If you did not use the ORACLE partitioning featuresqlplus -L -S <TWS_MDL_USER>/<TWS_MDL_PW>@<ORACLE_NET_SERVICE_NAME>@<sql_directory>/sql/stded/create_log_indexes.sql
Chapter 3. Creating or upgrading the Tivoli Workload Scheduler database tables before installing or upgrading 57

If you used the ORACLE partitioning featuresqlplus -L -S <TWS_MDL_USER>/<TWS_MDL_PW>@<ORACLE_NET_SERVICE_NAME>@<sql_directory>/sql/create_log_indexes.sql
11. Create the Tivoli Workload Scheduler indexes, by running the followingcommand:sqlplus -L -S <TWS_MDL_USER>/<TWS_MDL_PW>@<ORACLE_NET_SERVICE_NAME>@<sql_directory>/sql/create_indexes.sql
12. Create the Tivoli Workload Scheduler event rule views, by running thefollowing command:sqlplus -L -S <TWS_MDL_USER>/<TWS_MDL_PW>@<ORACLE_NET_SERVICE_NAME>@<sql_directory>/sql/create_rule_views.sql
13. Create the Tivoli Workload Scheduler log views, by running the followingcommand:sqlplus -L -S <TWS_MDL_USER>/<TWS_MDL_PW>@<ORACLE_NET_SERVICE_NAME>@<sql_directory>/sql/create_log_views.sql
14. Create the Tivoli Workload Scheduler views, by running the followingcommand:sqlplus -L -S <TWS_MDL_USER>/<TWS_MDL_PW>@<ORACLE_NET_SERVICE_NAME>@<sql_directory>/sql/create_views.sql
15. Create the job repository, by running the following command:sqlplus -L -S <TWS_MDL_USER>/<TWS_MDL_PW>@<ORACLE_NET_SERVICE_NAME>@<sql_directory>/DWB/sql/create_job_repository.sql
16. Create the allocation repository, by running the following command:sqlplus -L -S <TWS_MDL_USER>/<TWS_MDL_PW>@<ORACLE_NET_SERVICE_NAME>@<sql_directory>/DWB/sql/create_allocation_repository.sql
17. Create the resource repository, by running the following command:sqlplus -L -S <TWS_MDL_USER/<TWS_MDL_PW@<ORACLE_NET_SERVICE_NAME>@<sql_directory>/DWB/sql/create_resource_repository.sql
18. Create the server table, by running the following command:sqlplus -L -S <TWS_MDL_USER>/<TWS_MDL_PW>@<ORACLE_NET_SERVICE_NAME>@<sql_directory>/DWB/sql/create_server.sql
Before installing a dynamic domain managerIf you are creating the SQL tables before installing a dynamic domain manager,perform the following steps:1. Create the Tivoli Workload Scheduler users, by running the following
command:sqlplus -L -S <ORACLE_ADMIN>/<ORACLE_ADMIN_PW>@<ORACLE_NET_SERVICE_NAME>@<sql_directory>/DWB/sql/create_users.sql
where:
ORACLE_NET_SERVICE_NAME
The name used by clients to identify an Oracle Net server and thespecific system identifier or database for the Oracle Net connection. A
58 Tivoli Workload Scheduler: Planning and Installation: Planning and Installation
net service name is mapped to a port number and protocol. It is alsoknown as a connect string, database alias, host string, or service name.
When you install the IT administrator must specify this value in theNet service name field.
If your Oracle database will be:v Installed on the same system where you are installing your master
domain manager or a backup master, the net service name is thename of your Oracle database.
v Installed on the same system where you are installing your dynamicdomain manager or a backup dynamic domain manager, the netservice name is the name of your Oracle database.
v Not installed on the system where you are installing your masterdomain manager or a backup master, the net service name is thealias configured for the connection to the remote database.
v Not installed on the system where you are installing your dynamicdomain manager or a backup dynamic domain manager, the netservice name is the alias configured for the connection to the remotedatabase.
sql_directoryThe directory where you stored the SQL you created in “Generating theSQL files for DB2” on page 46.
2. Create the job repository, by running the following command:sqlplus -L -S <TWS_MDL_USER>/<TWS_MDL_PW>@<ORACLE_NET_SERVICE_NAME>@<sql_directory>/DWB/sql/create_job_repository.sql
3. Create the allocation repository, by running the following command:sqlplus -L -S <TWS_MDL_USER>/<TWS_MDL_PW>@<ORACLE_NET_SERVICE_NAME>@<sql_directory>/DWB/sql/create_allocation_repository.sql
4. Create the resource repository, by running the following command:sqlplus -L -S <TWS_MDL_USER>/<TWS_MDL_PW>@<ORACLE_NET_SERVICE_NAME>@<sql_directory>/DWB/sql/create_resource_repository.sql
5. Create the server table, by running the following command:sqlplus -L -S <TWS_MDL_USER>/<TWS_MDL_PW>@<ORACLE_NET_SERVICE_NAME>@<sql_directory>/DWB/sql/create_server.sql
Before upgrading Tivoli Workload Scheduler from V8.3 and laterto V8.5If you are upgrading the SQL tables before upgrading Tivoli Workload Schedulerfrom V8.3 and later to V8.5, perform the following steps:1. Log on to the ORACLE database with the user you specified in the
MDL_USER property.2. Verify the version of your database, by running the following command:
select * FROM <MDL_USER>.MPR_MODEL_PROPERTIESwhere MPR_NAME=’DATABASE_VERSION’
If DATABASE_VERSION returns one of the following values:8.3.0.00
You have installed version 8.3.8.3.0.01
You have installed version 8.3.0.1.
Chapter 3. Creating or upgrading the Tivoli Workload Scheduler database tables before installing or upgrading 59

8.4.0.00You have installed version 8.4.
8.4.0.01You have installed version 8.4.0.1.
8.5.0.00You have installed version 8.5.
run the commands listed in Step 3.If DATABASE_VERSION returns one of the following values:
8.5.1.00You have installed version 8.5.1.
8.5.1.01You have installed version 8.5.1.1.
run the procedure described in “Before upgrading from V8.5.1 to V8.5.1.1” onpage 63.
3. Run the following commands in sequence starting with the command for yourspecific database version considering if you used or not the ORACLEpartitioning feature.For example, if DATABASE_VERSION is equal to 8.5.0.00 and you:
Did not use the ORACLE partitioning feature:Run the following commands:a. 4d on page 61b. 4e on page 61c. 4f on page 61d. 4g on page 61
Used the ORACLE partitioning feature:Run the following commands:a. 7d on page 62b. 7e on page 62c. 7f on page 62d. 7g on page 62
To upgrade the Tivoli Workload Scheduler database tables, if you did not usethe ORACLE partitioning feature:
Run the following commands:a. sqlplus -L -S <TWS_MDL_USER>/<TWS_MDL_PW>
@<ORACLE_NET_SERVICE_NAME>@<sql_directory>/sql/stded/upgrade_83001_84000.sql
ORACLE_NET_SERVICE_NAME
The name used by clients to identify an Oracle Net serverand the specific system identifier or database for the OracleNet connection. A net service name is mapped to a portnumber and protocol. It is also known as a connect string,database alias, host string, or service name. When youinstall the IT administrator must specify this value in theNet service name field.
If your Oracle database will be:
60 Tivoli Workload Scheduler: Planning and Installation: Planning and Installation

v Installed on the same system where you are installingyour master domain manager or a backup master, the netservice name is the name of your Oracle database.
v Installed on the same system where you are installingyour dynamic domain manager or a backup dynamicdomain manager, the net service name is the name ofyour Oracle database.
v Not installed on the system where you are installing yourmaster domain manager or a backup master, the netservice name is the alias configured for the connection tothe remote database.
v Not installed on the system where you are installing yourdynamic domain manager or a backup dynamic domainmanager, the net service name is the alias configured forthe connection to the remote database.
sql_directoryThe directory where you stored the SQL you created in“Generating the SQL files for DB2” on page 46.
b. sqlplus -L -S <TWS_MDL_USER>/<TWS_MDL_PW>@<ORACLE_NET_SERVICE_NAME>@<sql_directory>/sql/upgrade_84001_84001.sql
c. sqlplus -L -S <TWS_MDL_USER>/<TWS_MDL_PW>@<ORACLE_NET_SERVICE_NAME>@<sql_directory>/sql/stded/upgrade_84001_85000.sql
d. sqlplus -L -S <TWS_MDL_USER>/<TWS_MDL_PW>@<ORACLE_NET_SERVICE_NAME>@<sql_directory>/sql/upgrade_85000_85100.sql
e. sqlplus -L -S <TWS_MDL_USER>/<TWS_MDL_PW>@<ORACLE_NET_SERVICE_NAME>@<sql_directory>/sql/upgrade_85100_85101.sql
f. sqlplus -L -S <TWS_MDL_USER>/<TWS_MDL_PW>@<ORACLE_NET_SERVICE_NAME>@<sql_directory>/sql/stded/upgrade_85101_86000.sql
g. sqlplus -L -S <TWS_MDL_USER>/<TWS_USER_PW>@<ORACLE_NET_SERVICE_NAME>@<sql_directory>/sql/check_forecast.sql
v If the command returns a value different from 0 run the followingcommand:sqlplus -L -S <TWS_MDL_USER>/<TWS_USER_PW>@<ORACLE_NET_SERVICE_NAME>@<sql_directory>/sql/upgreade_84001_84005.sql
To upgrade the Tivoli Workload Scheduler database tables, if you used theORACLE partitioning feature:
Run the following commands:a. sqlplus -L -S <TWS_MDL_USER>/<TWS_MDL_PW>
@<ORACLE_NET_SERVICE_NAME>@<sql_directory>/sql/upgrade_83001_84000.sql
ORACLE_NET_SERVICE_NAME
The name used by clients to identify an Oracle Net serverand the specific system identifier or database for the OracleNet connection. A net service name is mapped to a portnumber and protocol. It is also known as a connect string,database alias, host string, or service name.
When you install the IT administrator must specify thisvalue in the Net service name field.
Chapter 3. Creating or upgrading the Tivoli Workload Scheduler database tables before installing or upgrading 61

If your Oracle database will be:v Installed on the same system where you are installing
your master domain manager or a backup master, the netservice name is the name of your Oracle database.
v Installed on the same system where you are installingyour dynamic domain manager or a backup dynamicdomain manager, the net service name is the name ofyour Oracle database.
v Not installed on the system where you are installing yourmaster domain manager or a backup master, the netservice name is the alias configured for the connection tothe remote database.
v Not installed on the system where you are installing yourdynamic domain manager or a backup dynamic domainmanager, the net service name is the alias configured forthe connection to the remote database.
sql_directoryThe directory where you stored the SQL you created in“Generating the SQL files for DB2” on page 46.
b. sqlplus -L -S <TWS_MDL_USER>/<TWS_MDL_PW>@<ORACLE_NET_SERVICE_NAME>@<sql_directory>/sql/upgrade_84001_84001.sql
c. sqlplus -L -S <TWS_MDL_USER>/<TWS_MDL_PW>@<ORACLE_NET_SERVICE_NAME>@<sql_directory>/sql/upgrade_84001_85000.sql
d. sqlplus -L -S <TWS_MDL_USER>/<TWS_MDL_PW>@<ORACLE_NET_SERVICE_NAME>@<sql_directory>/sql/upgrade_85000_85100.sql
e. sqlplus -L -S <TWS_MDL_USER>/<TWS_MDL_PW>@<ORACLE_NET_SERVICE_NAME>@<sql_directory>/sql/upgrade_85100_85101.sql
f. sqlplus -L -S <TWS_MDL_USER>/<TWS_MDL_PW>@<ORACLE_NET_SERVICE_NAME>@<sql_directory>/sql/upgrade_85101_86000.sql
g. sqlplus -L -S <TWS_MDL_USER>/<TWS_MDL_PW>@<ORACLE_NET_SERVICE_NAME>@<sql_directory>/sql/check_forecast.sql
v If the command returns a value different from 0 run the followingcommand:sqlplus -L -S <TWS_MDL_USER>/<TWS_USER_PW>@<ORACLE_NET_SERVICE_NAME>@<sql_directory>/sql/upgrade_84001_84001.sql
To upgrade the dynamic workload broker database tables:
a. Create the job repository, by running the following command:sqlplus -L -S <TWS_MDL_USER>/<TWS_MDL_PW>@<ORACLE_NET_SERVICE_NAME>@<sql_directory>/DWB/sql/create_job_repository.sql
ORACLE_NET_SERVICE_NAME
The name used by clients to identify an Oracle Net serverand the specific system identifier or database for the OracleNet connection. A net service name is mapped to a portnumber and protocol. It is also known as a connect string,database alias, host string, or service name.
62 Tivoli Workload Scheduler: Planning and Installation: Planning and Installation

When you install the IT administrator must specify thisvalue in the Net service name field.
If your Oracle database will be:v Installed on the same system where you are installing
your master domain manager or a backup master, the netservice name is the name of your Oracle database.
v Installed on the same system where you are installingyour dynamic domain manager or a backup dynamicdomain manager, the net service name is the name ofyour Oracle database.
v Not installed on the system where you are installing yourmaster domain manager or a backup master, the netservice name is the alias configured for the connection tothe remote database.
v Not installed on the system where you are installing yourdynamic domain manager or a backup dynamic domainmanager, the net service name is the alias configured forthe connection to the remote database.
sql_directoryThe directory where you stored the SQL you created in“Generating the SQL files for DB2” on page 46.
b. Create the allocation repository, by running the following command:sqlplus -L -S <TWS_MDL_USER>/<TWS_MDL_PW>@<ORACLE_NET_SERVICE_NAME>@<sql_directory>/DWB/sql/create_allocation_repository.sql
c. Create the resource repository, by running the following command:sqlplus -L -S <TWS_MDL_USER>/<TWS_MDL_PW>@<ORACLE_NET_SERVICE_NAME>@<sql_directory>/DWB/sql/create_resource_repository.sql
d. Create the server table, by running the following command:sqlplus -L -S <TWS_MDL_USER>/<TWS_MDL_PW>@<ORACLE_NET_SERVICE_NAME>@<sql_directory>/DWB/sql/create_server.sql
e. Log on to the ORACLE database as SYSTEM and run the followingcommand:grant create procedure to <MDL_USER>
Before upgrading from V8.5.1 to V8.5.1.1If you are upgrading the SQL tables before upgrading Tivoli Workload Schedulerfrom version 8.5.1 to version 8.5.1.1, perform the following steps:1. Log on to the ORACLE database with the user you specified in the
MDL_USER property.2. Verify the version of your database, by running the following command:
select * FROM <MDL_USER>.MPR_MODEL_PROPERTIESwhere MPR_NAME=’DATABASE_VERSION’
If DATABASE_VERSION returns one of the following values:8.3.0.00
You have installed version 8.3.8.3.0.01
You have installed version 8.3.0.1.8.4.0.00
You have installed version 8.4.
Chapter 3. Creating or upgrading the Tivoli Workload Scheduler database tables before installing or upgrading 63
8.4.0.01You have installed version 8.4.0.1.
8.5.0.00You have installed version 8.5.
run the procedure described in “Before upgrading Tivoli Workload Schedulerfrom V8.3 and later to V8.5” on page 59.If DATABASE_VERSION returns one of the following values:
8.5.1.00You have installed version 8.5.1.
8.5.1.01You have installed version 8.5.1.1.
run the procedure described in Step 3.3. Run the following commands in sequence starting with the command for your
specific database version, depending on whether or not you used the ORACLEpartitioning feature:
To upgrade the Tivoli Workload Scheduler database tables, if you did not usethe ORACLE partitioning feature:
a. sqlplus -L -S <TWS_MDL_USER>/<TWS_MDL_PW>@<ORACLE_NET_SERVICE_NAME>@<sql_directory>/sql/upgrade_85100_85101.sql
ORACLE_NET_SERVICE_NAME
The name used by clients to identify an Oracle Net serverand the specific system identifier or database for the OracleNet connection. A net service name is mapped to a portnumber and protocol. It is also known as a connect string,database alias, host string, or service name.
When you install the IT administrator must specify thisvalue in the Net service name field.
If your Oracle database will be:v Installed on the same system where you are installing
your master domain manager or a backup master, the netservice name is the name of your Oracle database.
v Installed on the same system where you are installingyour dynamic domain manager or a backup dynamicdomain manager, the net service name is the name ofyour Oracle database.
v Not installed on the system where you are installing yourmaster domain manager or a backup master, the netservice name is the alias configured for the connection tothe remote database.
v Not installed on the system where you are installing yourdynamic domain manager or a backup dynamic domainmanager, the net service name is the alias configured forthe connection to the remote database.
sql_directoryThe directory where you stored the SQL you created in“Generating the SQL files for DB2” on page 46.
64 Tivoli Workload Scheduler: Planning and Installation: Planning and Installation

b. sqlplus -L -S <TWS_MDL_USER>/<TWS_MDL_PW>@<ORACLE_NET_SERVICE_NAME>@<sql_directory>/sql/stded/upgrade_85101_86000.sql
To upgrade the Tivoli Workload Scheduler database tables, if you used theORACLE partitioning feature:
a. sqlplus -L -S <TWS_MDL_USER>/<TWS_MDL_PW>@<ORACLE_NET_SERVICE_NAME>@<sql_directory>/sql/upgrade_85100_85101.sql
ORACLE_NET_SERVICE_NAME
The name used by clients to identify an Oracle Net serverand the specific system identifier or database for the OracleNet connection. A net service name is mapped to a portnumber and protocol. It is also known as a connect string,database alias, host string, or service name.
When you install the IT administrator must specify thisvalue in the Net service name field.
If your Oracle database will be:v Installed on the same system where you are installing
your master domain manager or a backup master, the netservice name is the name of your Oracle database.
v Installed on the same system where you are installingyour dynamic domain manager or a backup dynamicdomain manager, the net service name is the name ofyour Oracle database.
v Not installed on the system where you are installing yourmaster domain manager or a backup master, the netservice name is the alias configured for the connection tothe remote database.
v Not installed on the system where you are installing yourdynamic domain manager or a backup dynamic domainmanager, the net service name is the alias configured forthe connection to the remote database.
sql_directoryThe directory where you stored the SQL you createdin“Generating the SQL files for DB2” on page 46.
b. sqlplus -L -S <TWS_MDL_USER>/<TWS_MDL_PW>@<ORACLE_NET_SERVICE_NAME>@<sql_directory>/sql/upgrade_85101_86000.sql
To upgrade the dynamic workload broker database tables:sqlplus -L -S <TWS_MDL_USER>/<TWS_MDL_PW>@<ORACLE_NET_SERVICE_NAME>@<sql_directory>/DWB/sql/upgrade_85100_86000.sql
Chapter 3. Creating or upgrading the Tivoli Workload Scheduler database tables before installing or upgrading 65

66 Tivoli Workload Scheduler: Planning and Installation: Planning and Installation

Chapter 4. Installing
About this task
This chapter describes how to perform a first-time installation of the currentversion of Tivoli Workload Scheduler. It contains the following sections:v “User authorization requirements”v “Installing DB2”v “Using the installation wizard” on page 68v “Performing a silent installation” on page 92v “Installing agents using twsinst” on page 97v “Installing agents using Software Distribution” on page 104v “Installing the Job Brokering Definition Console” on page 113v “Installing the additional plug-ins by using the Tivoli Workload Scheduler for
Additional Plug-ins” on page 114
User authorization requirementsAbout this task
Check the authorization roles before beginning the procedure.
Authorization requirements for running any of the installation, upgrade, oruninstallation wizards or commands are the same:
UNIX and Linux operating systemsroot access
Windows operating systemYour login account must be a member of the Windows Administratorsgroup or domain administrators with Act as Part of the Operating System.
If you set the Windows User Account Control (UAC) on the workstationyou must run the installation as administrator. To do this, before runningthe installation, perform the following steps:1. Right-click the icon that you use to run the program:
If you are using the wizard:SETUP.exe
If you are using the silent installation or twsinst:Command Prompt
2. Select Run as administrator.
In addition, to use Software Distribution, the user must have the SoftwareDistribution roles admin, senior, or super.
Installing DB2About this task
For detailed information about DB2, see the DB2 documentation athttp://pic.dhe.ibm.com/infocenter/db2luw/v9r7/index.jsp.
© Copyright IBM Corp. 1999, 2012 67
|||
|||
|
||
||
|

To install DB2, choose one of the following options:v Use the launchpad. See “Launchpad” on page 34.v Manually launch the DB2 server installation on the product DVD. The setup files
for DB2 are on the product DVDs as follows:
Table 5. DB2 Setup files
Operating System Setup file
AIX®, HP-UX/IA64, SunOS/SPARC,SunOS/SPARC64, all Linux operatingsystems
DB2/server/db2setup
SunOS/AMD64 DB2/wse/db2setup
Windows/x86 and Windows/AMD64 DB2\SERVER\setup.exe
Using the installation wizardAbout this task
This section describes how to install Tivoli Workload Scheduler components usingthe installation wizard. The installation wizard runs on all supported operatingsystems. For a complete list of supported operating systems, seehttp://www.ibm.com/support/docview.wss?rs=672&uid=swg27012175.
Installing a master domain manager or backup masterAbout this task
For a graphical installation, from the installation DVD or from the appropriateeImage, start the launchpad as described in “Launchpad” on page 34 and select theTivoli Workload Scheduler installation, or run the setup for the operating systemon which you are installing:
On Windows operating systemsTWS\operating_system\SETUP.exe or TWS\SETUP.cmd
On UNIX and Linux operating systemsTWS/operating_system/SETUP.bin or TWS/SETUP.sh
Note: Your RDBMS must be running when you begin the installation.
If you are installing on UNIX or Linux and you want the installation to stop if theTivoli Workload Scheduler prerequisite check encounters an error or warning,specify the parameter -W checkPrerequisites.stopOnCheckPrereq=true after thesetup command. See “Checking prerequisites (UNIX and Linux)” on page 28 formore information about the prerequisite check.
When you install a master domain manager and a backup master domain managerthe following workstation types are created in the database:
masterFor the master domain manager
brokerFor the broker server
agent For the dynamic agent
68 Tivoli Workload Scheduler: Planning and Installation: Planning and Installation
If you are installing a backup master domain manager, you must configure itmanually after you perform the installation, See “Configuring a backup masterdomain manager” on page 195.
The installation steps for the master domain manager or the backup masterdomain manager installation process are described in the following sections:1. “Tivoli Workload Scheduler installation options”2. “WebSphere Application Server installation options” on page 723. “RDBMS installation options” on page 73
This section is divided into the following subsections:v “Installing for a DB2 database server” on page 73v “Installing for a DB2 database client” on page 75v “Installing for an Oracle database” on page 78
4. “Dynamic workload broker configuration information” on page 80
After a successful installation, perform one of the following configuration tasks,depending on the type of component you installed:v “Configuring a master domain manager” on page 194v “Configuring a backup master domain manager” on page 195.
Tivoli Workload Scheduler installation optionsAbout this task
Complete the following Tivoli Workload Scheduler data fields.
User nameSpecify the Tivoli Workload Scheduler user name. User name can containalphanumeric, dash (-), and underscore (_) characters; it cannot containnational characters. The first character of the user name must be a letter.
On Windows operating systems
v If this user account does not already exist, it is automaticallycreated by the installation wizard.
v If installing on a Windows server in a domain, do not define adomain and local ID with the same user name.
v If you specify a domain user, define the name asdomain_name\user_name.
v If you specify a local user, define the name assystem_name\user_name. Type and confirm the password.
On UNIX and Linux operating systemsThis user account must be created manually before running theinstallation. Create a user with a home directory and group. Bydefault, Tivoli Workload Scheduler is installed in TWA_home
Note: If you are installing into a new instance of Tivoli WorkloadAutomation, the Tivoli Workload Scheduler user name and password arealso used as the WebSphere Application Server administrator user nameand password.
PasswordSpecify the Tivoli Workload Scheduler password. The password mustcomply with the password policy in your Local Security Settings. Spacesare not permitted.
Chapter 4. Installing 69

On Windows operating systemsPassword for users can include any alphanumeric, dash (-),underscore (_) characters, and ()!?=*~+..
On UNIX and LINUX systemsPassword for users can include any alphanumeric, dash (-),underscore (_) characters, and ()!?=*~+..
Master domain manager and backup master domain manager configurationinformation
CompanyThe name of the company. Spaces are allowed and the maximumfield length is 40 characters.
This workstation nameThe name of the workstation where you are installing the instance.The default is the host name of the workstation.
When installing a master domain manager, the name you specifyhere is the name of the Tivoli Workload Scheduler workstationknown in the database as master.
When installing a backup master domain manager, the name youspecify here is the name of the Tivoli Workload Schedulerworkstation known in the database as fta. Spaces are not allowedand the maximum field length is 16 characters. If the host name islonger than 16 characters, an alternative name must be providedfor a successful installation. It can contain alphanumeric, dash (-),and underscore (_) characters. The first character must be a letter.
Master domain manager nameThe name of the master domain manager workstation. This field isrequired if you are installing a backup manager. If you are notinstalling a backup manager, this field is grayed out. Spaces are notallowed and the maximum field length is 16 characters. The firstcharacter cannot be numeric.
Tivoli Workload Scheduler Netman portThe port used by the Netman process to run distributedscheduling. Netman is the network process that controls theproduction environment. The default value is 31111. The validrange is from 1 to 65535.
Note: If you change this value, all default port number values inthe application server port information panel are changed to reflectthe new range. For example, if you specify 42111 as TCP/IP portnumber, the default for HTTP transport becomes 42125, the defaultfor HTTPS becomes 42126, and so on.
Dynamic agent configuration information
Host name or IP addressThe fully qualified host name or IP address of the dynamic agent.The dynamic workload broker and the Tivoli Workload Schedulerfor z/OS controller use this address to connect to the dynamicagent.
Agent display nameThe name of the dynamic agent workstation definition.
70 Tivoli Workload Scheduler: Planning and Installation: Planning and Installation

JobManager port numberThe dynamic agent secure port number (SECUREADDR). TheTivoli Workload Scheduler for z/OS controller and the dynamicworkload broker use this port to contact the Tivoli WorkloadScheduler dynamic agent. The default value is 31114. The validrange is from 1 to 65535. .
Dynamic workload broker host nameApplies only to backup master domain manager. The fullyqualified hostname the dynamic workload broker. The TivoliWorkload Scheduler for z/OS controller and the dynamic agentuse this address to contact the dynamic workload broker.
Dynamic workload broker HTTPS port numberApplies only to backup master domain manager. The HTTPStransport port of the dynamic workload broker. The dynamic agentuses this port to connect to the dynamic workload broker. Thedefault value is 31116 although if you leave the field blank, itdefaults to 0. The valid range is from 1 to 65535.
Add the "FINAL" job stream to the database to automate the production cycleThis option is available only if you are installing a master domainmanager. To add the final job stream to the database. This option allowsautomatic production plan extension at the end of each current productionplan processing. By default, this box remains unchecked.
Note: During the installation, if you identified an existing Tivoli WorkloadScheduler database that has a final job stream, the installation does notoverwrite it.
Automatically generate all the other Tivoli Workload Scheduler portsBy default, this box is checked. If you leave this box selected, all the portsneeded by WebSphere Application Server are automatically generatedusing the default values and the application server port information panelis not displayed. The installation procedure checks for the availability ofthe ports in the specified port range. If one or more ports are in use byother applications, you are prompted to enter a new port number. If youhave not requested to generate ports automatically, specify the values forthe ports used by the application server embedded in the Tivoli WorkloadScheduler instance. Accept the default values unless you know that theyare already in use by other applications.
Installation directoryEnter the name of the directory where the Tivoli Workload Schedulerinstance is installed for the specified user. The maximum field length is 46characters and the name must not contain numbers. Parentheses () are notallowed. You cannot use national characters.
Spaces are allowed. However, you cannot install Tivoli Workload Schedulerfor Applications version 8.2.1 or earlier on the current version of TivoliWorkload Scheduler if the directory path contains spaces.
On Windows operating systems:
v The name must be longer than three characters, the secondcharacter must be :, and the third character must be \.
v The default directory is %ProgramFiles%\IBM\TWA.
On UNIX and Linux systems:
Chapter 4. Installing 71

v The name must be longer than one character and the firstcharacter must be /.
v The default directory is the /opt/IBM/TWA directory.v Optionally check Create symbolic links to create links in the
/usr/bin directory. Any existing Tivoli Workload Schedulersymbolic links are overwritten.
WebSphere Application Server installation optionsAbout this task
The following fields are provided for WebSphere Application Server data. Thefields you complete depend upon whether you are installing into a new instance ofTivoli Workload Automation or into an existing instance. The installationprocedure checks for the availability of the ports in the specified port range. If oneor more ports are in use by other applications, you are prompted to enter a newport number.
New instanceIf you are installing into a new instance of Tivoli Workload Automation,provide the following information.
HTTP transportThe port for the HTTP transport. It is used by the composercommand line interface when this protocol is selected. The defaultvalue is 31115. The valid range is from 1 to 65535.
HTTPS transportThe port for the secure HTTP transport. It is used by the composercommand line interface when this protocol is selected. The defaultvalue is 31116. The valid range is from 1 to 65535.
BootstrapThe port for the bootstrap or RMI. It is used by the graphical userinterfaces. The default value is 31117. The valid range is from 1 to65535.
SOAP connectorThe port for the application server protocol SOAP connector. Thedefault value is 31118. The valid range is from 1 to 65535.
SAS Server Authentication ListenerThe port used by the Secure Association Services (SAS) to listen forinbound authentication requests. The default value is 31119. Thevalid range is from 1 to 65535.
CSIv2 Server Authentication ListenerThe port on which the Common Secure Interoperability Version 2(CSIv2) service listens for inbound server authentication requests.The default value is 31120. The valid range is from 1 to 65535.
CSIv2 Client Authentication ListenerThe port on which the Common Secure Interoperability Version 2(CSIv2) service listens for inbound client authentication requests.The default value is 31121. The valid range is from 1 to 65535.
ORB ListenerThe port used for RMI over IIOP communication. The defaultvalue is 31122. The valid range is from 1 to 65535.
72 Tivoli Workload Scheduler: Planning and Installation: Planning and Installation

Administration HTTP transportThe administrative console port. The default value is 31123. Thevalid range is from 1 to 65535
Administration HTTPS transportThe administrative console secure port. The default value is 31124.The valid range is from 1 to 65535.
Event ProcessorThe port used by the event management processor to receiveevents. The default value is 31131. The valid range is from 1 to65535. This parameter is not requested if you are installing abackup master domain manager.
Existing instanceIf you are installing into an existing instance of Tivoli WorkloadAutomation, you are only required to provide the WebSphere ApplicationServer administrator user name and password. The port data isautomatically retrieved from the existing WebSphere Application Serverinstance. If you do not know the user name, you can click Retrieve on theappropriate panel to populate this field, although you must still providethe password. If you click Retrieve, you might have to wait for the field topopulate.
RDBMS installation optionsAbout this task
This section is divided into subsections. See the section that corresponds to theRDBMS you are using.v “Installing for a DB2 database server”v “Installing for a DB2 database client” on page 75v “Installing for an Oracle database” on page 78
Installing for a DB2 database server:About this task
When you are installing for an existing database, perform the steps described in“Tivoli Workload Scheduler installation options” on page 69. The following listdescribes the fields that you might need to complete during the installation.
DB2 search pathType or Browse for the directory where the existing DB2 instance isinstalled. On Windows, the default is %ProgramFiles%\IBM\sqllib. If youhave more than one DB2 instance installed, make sure you provide thefully qualified path to the DB2 instance you want. This path must identifya tree in the DB2 structure that includes the db2level.exe file.
Instance nameThe name of the DB2 server instance.
Instance portThe TCP/IP port number used to communicate with the DB2 instance. Thedefault is 50000.
DB2 server administrator userThe user name of the administrator of the DB2 server instance. This usercan also be any user having SYSADM or SYSCTRL authority on the DB2server. On UNIX, verify that you can switch to this user and that it canload the DB2 environment.
Chapter 4. Installing 73

If the DB2 administrator already created the database tables usingthe“Creating or upgrading the database tables if you are using DB2” onpage 43 procedure, the user name is the one that the DB2 administratorspecified in the DB_USER property in the customizeDB2SQL.propertiesfile.
On Windows operating systemsThe default value is db2admin.
On UNIX and Linux operating systemsThe default value is db2inst1.
DB2 server administrator passwordThe password of the DB2 server administrator user, or of the user withSYSADM or SYSCTRL authority. You are asked to confirm the password.
Database nameThe name of the DB2 database. The maximum length is five characters.You can use an existing DB2 database instance if its name does not exceedfive characters. When you are installing:
Master domain managerProvide the name of a database that is not used by a dynamicdomain manager.
Backup master domain managerProvide the name of the master domain manager database.
Dynamic domain managerProvide the name of a database that is not used by a masterdomain manager.
Backup dynamic domain managerProvide the name of the dynamic domain manager database.
For information about DB2 database names, see the DB2 documentation.
Specify advanced configuration parameters for the Tivoli Workload Schedulerdatabase
Select this option if you want to specify the following advancedparameters:
Tablespace nameThe name of the DB2 instance tablespace. This tablespace is usedto store scheduling objects and event rules. For information aboutDB2 table spaces, see the DB2 documentation.
Tablespace pathThe relative path of the DB2 table space. The path can be a relativeor a fully qualified path. When the table space path is a fullyqualified path, the DB2 administrator user must have completeaccess rights to the directory where the table space is installed. Formore information see Appendix I, “DB2 tablespace relative paths,”on page 377.
The default table space path name is TWS_DATA. The default table spacetemporary directory is TWS_TEMP. For UNIX and Linux operatingsystems, make sure that the DB2 Administrator has write access to thedirectory above the table space directory.
Tablespace used to store event logsSpecify the name and path of the DB2 table space where Tivoli Workload
74 Tivoli Workload Scheduler: Planning and Installation: Planning and Installation

Scheduler event logs are to be stored. These logs include data about eventrule instances, triggered actions, and operator messages displayed by theDynamic Workload Console. Data from the logs can be used to createreports. You can view report data using the Dynamic Workload Console.
Report tablespace nameThe name of the table space for storing report data. The defaultname is TWS_LOG.
Report tablespace pathThe path of the table space for storing report data. The defaultpath is TWS_LOG. The path can be a relative or a fully qualifiedpath. When the table space path is a fully qualified path the DB2administrator user must have complete access rights to thedirectory where the table space is installed. For more information,see Appendix I, “DB2 tablespace relative paths,” on page 377. Notethat the report tablespace path cannot be the same as thetablespace path.
Installing for a DB2 database client:About this task
During the installation of the backup master domain manager, you install a DB2client to connect to the DB2 server that contains the Tivoli Workload Schedulerdatabase. This database was created by the master domain manager installation. Ifit is a DB2 database server, the database is on the workstation of the masterdomain manager. If it is a DB2 database client, the database is on anotherworkstation.
During the installation of the backup dynamic domain manager, you install a DB2client to connect to the DB2 server that contains the Tivoli Workload Schedulerdatabase. This database was created by the dynamic domain manager installation.If it is a DB2 database server, the database is on the workstation of the dynamicdomain manager. If it is a DB2 database client, the database is on anotherworkstation.
When you are installing with an existing database, perform the steps described in“Tivoli Workload Scheduler installation options” on page 69. The following listdescribes the fields that you might need to complete during the installation.
DB2 search pathType or Browse for the directory where the existing DB2 instance isinstalled. If you have more than one DB2 instance installed, make sure youprovide the fully qualified path to the DB2 instance you want. This pathmust identify a tree in the DB2 structure that includes the db2level.exefile.
Remote database serverThe IP address or host name of the workstation where the DB2 server isinstalled.
Remote database portThe TCP/IP port number that the remote DB2 server instance uses tocommunicate.
Identify the user on the remote DB2 server to be used by the installation forDB2 administration tasks
Provide the following data:
Chapter 4. Installing 75

DB2 server administrator userThe user name of the administrator of the DB2 server instance.This user can also be any user having SYSADM or SYSCTRLauthority on the DB2 server. On UNIX, verify that you can switchto this user and that it can load the DB2 environment.
If the DB2 administrator already created the database tables usingthe“Creating or upgrading the database tables if you are usingDB2” on page 43 procedure, the user name is the one that the DB2administrator specified in the DB_USER property in thecustomizeDB2SQL.properties file.
On Windows operating systemsThe default value is db2admin.
On UNIX and Linux operating systemsThe default value is db2inst1.
DB2 server administrator passwordThe password of the DB2 server administrator user, or of the userwith SYSADM or SYSCTRL authority. You are asked to confirm thepassword.
Identify the user on the DB2 client to be used by the installation forDB2 administration tasks
Specify the user on the DB2 client to be used by the installation forDB2 administration tasks. Provide the following data:
DB2 client administrator userThe user name of the DB2 administrator of the DB2 clientinstance. The user ID must contain the following loginproperties:-login=’true’
-rlogin=’true’
DB2 client administrator passwordThe password of the DB2 administrator of the DB2 clientinstance.
Note: The password must comply with the passwordpolicy in your Local Security Settings, otherwise theinstallation fails.
Identify the user on the DB2 server to be used by TivoliWorkload Scheduler to access the database, if different from theDB2 Server Administration User
Select this option when the DB2 server user used to accessTivoli Workload Scheduler is different from the DB2 ServerAdministration User. Provide the following data:
Tivoli Workload Scheduler DB2 userThe user name of the Tivoli Workload SchedulerDB2 user.
Tivoli Workload Scheduler DB2 passwordThe password of the Tivoli Workload SchedulerDB2 user.
Database nameThe name of the DB2 database. The maximum length is five
76 Tivoli Workload Scheduler: Planning and Installation: Planning and Installation

characters. You can use an existing DB2 database instance if itsname does not exceed five characters. When you are installing a:
Master domain managerProvide the name of a database that is not used by adynamic domain manager.
Backup masterProvide the name of the master domain manager database.
Dynamic domain managerProvide the name of a database that is not used by amaster domain manager.
Backup dynamic domain managerProvide the name of the dynamic domain managerdatabase.
For information about DB2 database names, see the DB2documentation.
Specify advanced configuration parameters for the Tivoli WorkloadScheduler database
Select this option if you want to specify the following advancedparameters:
Tablespace nameThe name of the DB2 instance table space. For informationabout DB2 table spaces, see the DB2 documentation.
Tablespace pathThe relative path of the DB2 table space. The path can be arelative or a fully qualified path. When the table spacepath is a fully qualified path, the DB2 administrator usermust have complete access rights to the directory wherethe table space is installed. For more information, seeAppendix I, “DB2 tablespace relative paths,” on page 377.
The default table space path name is TWS_DATA. The defaulttable space temporary directory is TWS_TEMP. For UNIX andLinux operating systems, make sure that the DB2 Administratorhas write access to the directory above the table space directory.
Tablespace used to store event logsSpecify the name and path of the DB2 table space where TivoliWorkload Scheduler event logs are to be stored. These logs areused to create reports. You can view report data using the DynamicWorkload Console.
Report tablespace nameThe name of the table space for storing report data. Thedefault name is TWS_LOG.
Report tablespace pathThe path of the table space for storing report data. Thedefault path is TWS_LOG. The path can be a relative or afully qualified path. When the table space path is a fullyqualified path, the DB2 administrator user must havecomplete access rights to the directory where the tablespace is installed. For more information, see Appendix I,“DB2 tablespace relative paths,” on page 377.
Chapter 4. Installing 77

Installing for an Oracle database:About this task
When you are installing for an Oracle database both for server and client, followthe installation wizard prompts. The following list describes the fields that youmight need to complete during the installation.
Oracle Database search pathSpecify the path of an Oracle installation that satisfies the Tivoli WorkloadScheduler prerequisites. The fully qualified path must identify a tree in theOracle structure that includes the sqlplus executable.
Net service name
The name used by clients to identify an Oracle Net server and the specificsystem identifier or database for the Oracle Net connection. A net servicename is mapped to a port number and protocol. It is also known as aconnect string, database alias, host string, or service name.
If your Oracle database is:v Installed on the same system where you are installing your master
domain manager or a backup master, the net service name is the nameof your Oracle database.
v Installed on the same system where you are installing your dynamicdomain manager or a backup dynamic domain manager, the net servicename is the name of your Oracle database.
v Not installed on the system where you are installing your masterdomain manager or a backup master, the net service name is the aliasconfigured for the connection to the remote database.
v Not installed on the system where you are installing your dynamicdomain manager or a backup dynamic domain manager, the net servicename is the alias configured for the connection to the remote database.
Contact your database administrator to obtain the correct net service name.
Oracle administrator userThe database administrator user name (such as SYSTEM) required toauthenticate to the Oracle database. This account must already exist.
If the ORACLE administrator already created the database tables usingthe“Creating or upgrading the database tables if you are using Oracle” onpage 53, the user name is the one that the ORACLE administrator specifiedin the MDL_USER property of the customizeORACLESQL.properties file.
Oracle administrator user passwordThe database administrator user password required to authenticate to theOracle database.
Tivoli Workload Scheduler Oracle userThe owner of the Tivoli Workload Scheduler schema.
If the ORACLE administrator already created the database tables usingthe“Creating or upgrading the database tables if you are using Oracle” onpage 53, the user name is the one that the ORACLE administrator specifiedin the MDL_USER property of the customizeORACLESQL.propertiesfile.The name must comply with the Oracle naming rules.
If you are installing a:
Master domain managerIf you leave this field blank, this name is defaulted to <TWS_user>.
78 Tivoli Workload Scheduler: Planning and Installation: Planning and Installation
Backup masterEnter the same name that you used in the master domain manager.
Dynamic domain managerIf you leave this field blank, this name is defaulted to <TWS_user>.Provide a name different from the one that you used wheninstalling the master domain manager.
Backup dynamic domain managerEnter the same name that you used in the dynamic domainmanager.
On a fresh installation of a:
Master domain managerThis user does not exist in the database. If this is not the case, itmeans that there already is a master domain manager or a backupmaster instance pointing to the same database with this user name.If your existing Tivoli Workload Scheduler instance is version 8.3or later, the installation process upgrades the current databaseschema to the new schema.
Dynamic domain managerThis user does not exist in the database. If this is not the case, itmeans that there already is a dynamic domain manager or abackup dynamic domain manager pointing to the same databasewith this user name. If your existing Tivoli Workload Schedulerinstance is version 8.3 or later, the installation process upgrades thecurrent database schema to the new schema.
If your existing instance is the current version, the installation processassumes that the schema is at the correct level and does not create thedatabase objects (tables, views, clusters, procedures, indexes, and so on) forTivoli Workload Scheduler.
If you identify an existing Oracle user as the Tivoli Workload SchedulerOracle user, the installation process assumes that the configuration iscomplete and does not create the database objects for Tivoli WorkloadScheduler. In this case, the installation completes successfully but youcannot use the database.
Tivoli Workload Scheduler Oracle user passwordThe password for the Tivoli Workload Scheduler Oracle user. It mustcomply with the Oracle naming rules.
Create the Tivoli Workload Scheduler schema using the Oracle Partitioningoption If you are installing on Oracle Enterprise Edition, you can choose to
implement the Oracle Partitioning option to improve the performance ofevent-driven workload automation. For information about event-drivenworkload automation, see Overview.
Tivoli Workload Scheduler data tablespaceThe name that identifies the Tivoli Workload Scheduler data table space.This table space must have been previously created by the databaseadministrator. The default for this field is USERS.
Tivoli Workload Scheduler reports tablespaceThe name that identifies the Tivoli Workload Scheduler table space wherereport data is to be stored. You can view the report data using theDynamic Workload Console.
Chapter 4. Installing 79

This table space must have been previously created by the databaseadministrator. The default value for this field is USERS.
Tivoli Workload Scheduler temporary tablespaceThe name that identifies the Tivoli Workload Scheduler temporary tablespace. This table space must have been previously created by the databaseadministrator. The default value for this field is TEMP.
Dynamic workload broker configuration informationAbout this task
Applies only to master domain manager installation.
Dynamic workload broker workstation nameThe definition of the dynamic workload broker workstation created in theTivoli Workload Scheduler database. Its type is broker. Spaces are notallowed and the maximum field length is 16 characters. It can containalphanumeric, dash (-), and underscore (_) characters. The first charactermust be a letter.
Dynamic workload broker Netman portThe port on the workload broker workstation. The Tivoli WorkloadScheduler master or backup master use this port to communicate withdynamic workload broker. The default value is 41114. The valid range isfrom 1 to 65535.
Installing a dynamic domain manager or backup dynamicdomain manager
About this task
Install this component if you want to schedule and control your static anddynamic workload both in distributed and end-to-end environments. For exampleyou have different branch offices and you want to run your dynamic scheduleindependently at each branch office to improve agent scalability. Moreoverinstalling these components you run your dynamic schedule even if the masterdomain manager or the backup master domain manager is unavailable.
By installing a dynamic domain manager you can:v Improve fault-tolerant and dynamic agents scalability because the workload of
the agents in the domain is directly controlled by the dynamic domain managerto which they are directly connected.
v Allow static and dynamic processing to continue even if the agents connectionto their master domain manager is unavailable.
If you want to ensure that your workload runs even if the connection to thedynamic domain manager is unavailable, install a backup dynamic domainmanager.
A dynamic domain manager or a backup dynamic domain manager is composedof a:v Fault-tolerant agentv Broker serverv Dynamic agentv Plan Connector
When you install a dynamic domain manager the following workstation types arecreated in the database:
80 Tivoli Workload Scheduler: Planning and Installation: Planning and Installation

BrokerFor the broker server
Agent For the dynamic agent
ManagerFor the fault-tolerant agent
DomainFor the domain. The domain is a child of the master domain managerdomain.
These workstations are created under the default master domain manager domain.If you want you can change it after the installation.
The fault-tolerant agent must be configured manually after you perform theinstallation:
If you are installing a dynamic domain manager:Configure it as manager. See “Configuring a dynamic domain manager”on page 197.
If you are installing a backup dynamic domain manager:Configure it as fta. See “Configuring a backup dynamic domain manager”on page 197.
For a graphical installation, from the installation DVD or from the appropriateeImage, start the launchpad as described in “Launchpad” on page 34 and select theTivoli Workload Scheduler installation, or run the setup for the operating systemon which you are installing:
On Windows operating systemsTWS\operating_system\SETUP.exe or TWS\SETUP.cmd
On UNIX and Linux operating systemsTWS/operating_system/SETUP.bin or TWS/SETUP.sh
Note: Your RDBMS must be running when you begin the installation.
If you are installing on UNIX or Linux and you want the installation to stop if theTivoli Workload Scheduler prerequisite check encounters an error or warning,specify the parameter -W checkPrerequisites.stopOnCheckPrereq=true after thesetup command. See “Checking prerequisites (UNIX and Linux)” on page 28 formore information about the prerequisite check.
The installation steps for the dynamic domain manager or the backup dynamicdomain manager installation process are described in the following sections:1. “Tivoli Workload Scheduler installation options” on page 822. “WebSphere Application Server installation options” on page 723. “RDBMS installation options” on page 73
This section is divided into the following subsections:v “Installing for a DB2 database server” on page 73v “Installing for a DB2 database client” on page 75v “Installing for an Oracle database” on page 78
4. “Dynamic workload broker configuration information” on page 86
After a successful installation, perform one of the following configuration tasks,depending on the type of component you installed:
Chapter 4. Installing 81

v “Configuring a dynamic domain manager” on page 197v “Configuring a backup dynamic domain manager” on page 197.
Tivoli Workload Scheduler installation optionsAbout this task
Complete the following Tivoli Workload Scheduler installation options:
User nameSpecify the Tivoli Workload Scheduler user name. User name can containalphanumeric, dash (-), and underscore (_) characters. Cannot containnational characters. The first character of the user name must be a letter.
On Windows operating systemsIf this user account does not already exist, it is automaticallycreated by the installation wizard. If installing on a Windowsserver in a domain, do not define a domain and local ID with thesame user name. If you specify a domain user, define the name asdomain_name\user_name. If you specify a local user, define thename as system_name\user_name. Type and confirm the password.
On UNIX and Linux operating systemsThis user account must be created manually before running theinstallation. Create a user with a home directory and group. Bydefault, Tivoli Workload Scheduler is installed in TWA_home.
Note: If you are installing into a new instance of Tivoli WorkloadAutomation, the Tivoli Workload Scheduler user name and password arealso used as the WebSphere Application Server administrator user nameand password.
PasswordSpecify the Tivoli Workload Scheduler password. The password mustcomply with the password policy in your Local Security Settings. Spacesare not permitted.
On Windows operating systemsPassword for users can include any alphanumeric, dash (-),underscore (_) characters, and ()!?=*~+..
On other platformsPassword for users can include any alphanumeric, dash (-),underscore (_) characters, and ()!?=*~+..
Dynamic domain manager and backup dynamic domain manager configurationinformation
Domain nameApplies only to dynamic domain manager. Specify the TivoliWorkload Scheduler domain name managed by the dynamicdomain manager. The default value is DYNAMICDM.
This workstation nameThe name of the workstation where you are installing the instance.The default is the host name of the workstation. When you install:v A dynamic domain manager, the name you specify here is the
name of the Tivoli Workload Scheduler workstation known inthe database as fta. Configure it as manager by performing theprocedure described in “Configuring a dynamic domainmanager” on page 197.
82 Tivoli Workload Scheduler: Planning and Installation: Planning and Installation

v A backup dynamic domain manager, the name you specify hereis the name of the Tivoli Workload Scheduler workstationknown in the database as fta. Configure it as fta by performingthe procedure described in “Configuring a backup dynamicdomain manager” on page 197.
Spaces are not allowed and the maximum field length is 16characters. If the host name is longer than 16 characters, analternative name must be provided for a successful installation. Itcan contain alphanumeric, dash (-), and underscore (_) characters.The first character must be a letter. The workstation name andmaster domain manager name cannot be the same.
Master domain manager nameThe name of the master domain manager workstation. Spaces arenot allowed and the maximum field length is 16 characters. Thefirst character cannot be numeric. The workstation name andmaster domain manager name cannot be the same.
In case you are installing the dynamic domain manager to connectit only to the Tivoli Workload Scheduler for z/OS controller, thevalue you must specify in this field is not used because in a z/OSlightweight end-to-end configuration the fault-tolerant agent is notneeded.
Tivoli Workload Scheduler Netman portThe port used by the Netman process to run distributedscheduling. Netman is the network process that controls theproduction environment. The default value is 31111. The validrange is from 1 to 65535.
In case you are installing the dynamic domain manager to connectit only to the Tivoli Workload Scheduler for z/OS controller, thevalue you must specify in this field is not used because in a z/OSlightweight end-to-end configuration the fault-tolerant agent is notneeded.
Note: If you change this value, all default port number values inthe application server port information panel are changed to reflectthe new range. For example, if you specify 42111 as TCP/IP portNumber, the default for HTTP transport becomes 42125, the defaultfor HTTPS becomes 42126, and so on.
Dynamic agent configuration information
Host name or IP addressThe local fully qualified host or IP address of the dynamic agent.The dynamic workload broker and the Tivoli Workload Schedulerfor z/OS controller use this address to connect to the dynamicagent.
Agent display nameThe name of the dynamic agent workstation definition.
JobManager port numberThe dynamic agent secure port number (SECUREADDR). TheTivoli Workload Scheduler for z/OS controller and the dynamicworkload broker use this port to connect to the Tivoli WorkloadScheduler dynamic agent. The default value is 31114. The validrange is from 1 to 65535.
Chapter 4. Installing 83
Enable HTTPS communication for the JobManager portThis option enables HTTPS communication between the localdynamic workload broker and the dynamic agent. For secureconnections, it is recommended that you use HTTPS. To use HTTPcommunication, clear this checkbox.
Dynamic workload broker host nameApplies only to backup dynamic domain manager. The fullyqualified host name of the dynamic workload broker. TivoliWorkload Scheduler for z/OS controller and the dynamic agentuse this address to contact the dynamic workload broker.
Dynamic workload broker HTTPS port numberApplies only to backup dynamic domain manager. The HTTPSport of the dynamic workload broker. You specified it wheninstalling the dynamic domain manager. The dynamic agent uses itto connect to the dynamic workload broker. The default value is31116. If you leave the field blank, it defaults to 0. The valid rangeis from 1 to 65535.
Automatically generate all the other Tivoli Workload Scheduler portsIf you check this box, all the ports needed by WebSphere ApplicationServer are automatically generated using the default values and theapplication server port information panel is not displayed. The installationprocedure checks for the availability of the ports in the specified portrange. If one or more ports are in use by other applications, you areprompted to enter a new port number. By default, this box is checked. Ifyou have not requested to generate ports automatically, specify the valuesfor the ports used by the application server embedded in the TivoliWorkload Scheduler instance. Accept the default values unless you knowthat they are already in use by other applications.
Installation directoryEnter the name of the directory where the dynamic domain manager orbackup dynamic domain manager instance is installed for the specifieduser. The maximum field length is 46 characters and the name must notcontain numbers. Parentheses () are not allowed. You cannot use nationalcharacters.
Spaces are allowed. However, you cannot install Tivoli Workload Schedulerfor Applications version 8.2.1 or earlier on the current version of TivoliWorkload Scheduler if the directory path contains spaces.
On Windows operating systems
v The name must be longer than three characters, the secondcharacter must be :, and the third character must be \.
v The default directory is the default directory is%ProgramFiles%\IBM\TWA.
On UNIX and Linux operating systems
v The name must be longer than one character and the firstcharacter must be /.
v The default directory is the /opt/IBM/TWA directory.v Optionally check Create symbolic links to create links in the
/usr/bin directory. Any existing Tivoli Workload Schedulersymbolic links are overwritten.
84 Tivoli Workload Scheduler: Planning and Installation: Planning and Installation

WebSphere Application Server installation optionsAbout this task
The following installation options are provided for WebSphere Application Serverdata. The installation options you complete depend upon whether you areinstalling into a new instance of Tivoli Workload Automation or into an existinginstance.
The installation procedure checks for the availability of the ports in the specifiedport range. If one or more ports are in use by other applications, you are promptedto enter a new port number.
New instanceIf you are installing into a new instance of Tivoli Workload Automation,provide the following information:
HTTP transportThe port for the HTTP transport. It is used by the composercommand line interface when this protocol is selected. The defaultvalue is 31115. The valid range is from 1 to 65535.
HTTPS transportThe port for the secure HTTP transport. It is used by the composercommand line interface when this protocol is selected. The defaultvalue is 31116. The valid range is from 1 to 65535.
BootstrapThe port for the bootstrap or RMI. It is used by the graphical userinterfaces. The default value is 31117. The valid range is from 1 to65535.
SOAP connectorThe port for the application server protocol SOAP connector. Thedefault value is 31118. The valid range is from 1 to 65535.
SAS Server Authentication ListenerThe port used by the Secure Association Services (SAS) to listen forinbound authentication requests. The default value is 31119. Thevalid range is from 1 to 65535.
CSIv2 Server Authentication ListenerThe port on which the Common Secure Interoperability Version 2(CSIv2) service listens for inbound server authentication requests.The default value is 31120. The valid range is from 1 to 65535.
CSIv2 Client Authentication ListenerThe port on which the Common Secure Interoperability Version 2(CSIv2) service listens for inbound client authentication requests.The default value is 31121. The valid range is from 1 to 65535.
ORB ListenerThe port used for RMI over IIOP communication. The defaultvalue is 31122. The valid range is from 1 to 65535.
Administration HTTP transportThe administrative console port. The default value is 31123. Thevalid range is from 1 to 65535
Administration HTTPS transportThe administrative console secure port. The default value is 31124.The valid range is from 1 to 65535.
Chapter 4. Installing 85

Existing instanceIf you are installing into an existing instance of Tivoli WorkloadAutomation, you are only required to provide the WebSphere ApplicationServer administrator user name and password. The port data is retrievedautomatically from the existing WebSphere Application Server instance. Ifyou do not know the user name, click Retrieve on the appropriate panel topopulate this field, although you must still provide the password. If youclick Retrieve, you might have to wait for the field to populate.
RDBMS stepsAbout this task
This section is divided into subsections. See the section that corresponds to theRDBMS you are using.v “Installing for a DB2 database server” on page 73v “Installing for a DB2 database client” on page 75v “Installing for an Oracle database” on page 78
Note: When providing the database name ensure to provide the name of adatabase that is not used by a master domain manager.
Dynamic workload broker configuration informationAbout this task
Applies only to dynamic domain manager installation.
Dynamic workload broker workstation nameThe definition of the dynamic workload broker workstation created in theTivoli Workload Scheduler database. Spaces are not allowed and themaximum field length is 16 characters. It can contain alphanumeric, dash(-), and underscore (_) characters. The first character must be a letter.
The dynamic workload broker workstation acts as the communicationbridge between the master domain manager and the dynamic workloadbroker component. In your job or job stream definitions, it is theworkstation where the jobs run. In this way, you submit your workloadthrough this workstation to the dynamic workload broker component.
Dynamic workload broker Netman portThe port on the workload broker workstation used by the Tivoli WorkloadScheduler dynamic domain manager or backup dynamic domain managerto communicate with dynamic workload broker. The default value is 41114.The valid range is from 1 to 65535.
Do you want to connect the Dynamic Domain Manager only to the z/OScontroller?
Select this check box if you want to connect the dynamic domain manageronly to the z/OS controller. Leave the check box clear to connect thedynamic domain manager to:v A master domain managerv Both a master domain manager and a z/z/OS controller
When you connect the Dynamic Domain Manager only to a z/OScontroller, is because you want to create a lightweight end-to-endscheduling environment in which to schedule and control workload fromthe Tivoli Workload Scheduler for z/OS on distributed systems. Tocomplete this environment you must install a Tivoli Workload Scheduler
86 Tivoli Workload Scheduler: Planning and Installation: Planning and Installation

for z/OS agent. See the Tivoli Workload Scheduler for z/OS: Planning andInstallation Guide for a detailed explanation on how to install the TivoliWorkload Scheduler for z/OS agent. When you select the check box theMaster domain manager host name and the Master domain managerhttps port field are disabled.
Master domain manager host nameThe fully qualified host name on which the dynamic domain managercontacts the master domain manager.
Master domain manager https portThe port for the secure HTTP transport. It is used by the dynamic domainmanager to contact the master domain manager. The default value is 31116.The valid range is from 1 to 65535.
Installing an agentAbout this task
This section describes how to install the Tivoli Workload Scheduler fault-tolerantand dynamic agents in your distributed or end-to-end network. During theinstallation of the dynamic agent, you can add the Java runtime environment torun job types with advanced options, both the job types supplied with the productand the additional types implemented through the custom plug-ins. To install theTivoli Workload Scheduler for z/OS connector, see Tivoli Workload Scheduler forz/OS: Planning and Installation Guide.
To install from the DVD or eImages, run the setup for the operating system onwhich you are installing as follows:
On Windows operating systems:TWS\operating_system\SETUP.exe or TWS\SETUP.cmd
On UNIX and Linux operating systems:TWS/operating_system/SETUP.bin or TWS/SETUP.sh
Note: SETUP.sh copies the entire image to a temporary directory. Ensure that thereis enough space available.
If you are installing on UNIX or Linux and you want the installation to stop if theTivoli Workload Scheduler prerequisite check encounters an error or warning,specify the parameter -W checkPrerequisites.stopOnCheckPrereq=true after thesetup command. See “Checking prerequisites (UNIX and Linux)” on page 28 formore information about the prerequisite check.
For a graphical installation, from the installation DVD or from the appropriateeImage, start the launchpad as described in “Launchpad” on page 34 and select theTivoli Workload Scheduler installation.
Windows operating systems
v To install for a local user, you must be an administrator on the computer.v To install for a domain user, you must be a domain administrator.
UNIX or Linux operating systemsTo install on UNIX or Linux, you must be logged in as root.
You can install agents during the full installation of Tivoli Workload Scheduler orin a stand-alone installation of only the agent. You can optionally simultaneouslyinstall a fault-tolerant agent, a dynamic agent, and the Java runtime environment.
Chapter 4. Installing 87

Installing a fault-tolerant agentTo install only a fault-tolerant agent, during the installation wizard youselect agent as the component you want to install, and then selectfault-tolerant as the type of agent. Ensure you deselect dynamic agent ifyou do not want to install that type of agent at the same time. After youperformed the installation configure it manually. See “Configuring afault-tolerant agent” on page 198.
Installing a dynamic agent and adding Java runtimeTo install only a dynamic agent, during the installation wizard you selectagent as the component you want to install. The check box for dynamicagent is already selected by default. Select Java runtime if you want toinstall the runtime environment to run job types with advanced options,both those types supplied with the product and the additional typesimplemented through the custom plug-ins. After you performed theinstallation, perform the steps outlined in “Configuring a dynamic agent”on page 199.
Simultaneously installing both a fault-tolerant and a dynamic agentTo install both a fault-tolerant agent and a dynamic agent, during theinstallation wizard you select agent as the component you want to install,and then select both fault-tolerant and dynamic agents (the check box fordynamic is already selected by default). Select Java runtime if you want toinstall the runtime environment to run job types with advanced options,both those types supplied with the product and the additional typesimplemented through the custom plug-ins. Perform the steps outlined in“Configuring a dynamic agent” on page 199 and “Configuring afault-tolerant agent” on page 198.
See “Installation options” for descriptions of the installation parameters andoptions.
Installation optionsAbout this task
This section describes the installation configuration parameters and options.
User nameSpecify the Tivoli Workload Scheduler user name. Spaces are notpermitted.
On Windows operating systems
v If this user account does not already exist, it is automaticallycreated by the installation wizard.
v If you specify a domain user specify the name asdomain_name\user_name.
v If you are installing in a domain controller the user name mustalways be domain_name\user_name.
v If you specify a local user with the same name as a domain user,the local user must first be created manually by an administratorand then specified as system_name\user_name.
On UNIX and Linux operating systemsThis user account must be created manually before running theinstallation. Create a user with a home directory. By default, TivoliWorkload Scheduler is installed under the HOME directory of theselected user.
88 Tivoli Workload Scheduler: Planning and Installation: Planning and Installation

Note: If you are installing an agent in an instance of Tivoli WorkloadAutomation where the Dynamic Workload Console is already installed,and you intend later to add the Connector feature to the agent, you arestrongly advised to use, as the TWS_user of the agent, the same user thatyou used as the WebSphere Application Server administration user whenyou installed the Dynamic Workload Console. The WebSphere ApplicationServer administration is simplified if the names are the same (this is thedefault if you install a Tivoli Workload Scheduler component that usesWebSphere Application Server before the Dynamic Workload Console).
PasswordSpecify the Tivoli Workload Scheduler password. The password mustcomply with the password policy in your Local Security Settings. Spacesare not permitted.
On Windows operating systemsPassword for users can include alphanumeric, dash (-), underscore(_) characters, and ()!?=^*/~ [] $`+;:.,@.
On other platformsPassword for users can include any alphanumeric, dash (-),underscore (_) characters, and ()!?=*~+..
Fault-tolerant agent configuration information
CompanyThe name of the company. Spaces are allowed and the maximumfield length is 40 characters.
This workstation nameThe name of the workstation where you are installing the instance.The default is the host name of the workstation. The name youspecify here is the name of the Tivoli Workload Schedulerworkstation as it is known in the database. The name must startwith a letter, and can contain alphanumeric characters, dashes, andunderscores. It can contain up to 16 characters. If the hostname islonger than 16 characters, an alternative name must be provided.
Master domain manager nameThe name of the master domain manager to which the workstationbelongs.
Tivoli Workload Scheduler Netman portThe port used by the Netman process to listen for communicationfrom the master. The default value is 31111. The valid range isfrom 1 to 65535.
Dynamic agent configuration information
Host name or IP addressThe fully qualified host name or IP address of the dynamic agent.The dynamic workload broker uses this address to connect to thedynamic agent.
Agent display nameThe name of the dynamic agent workstation definition
JobManager port numberThe dynamic agent port (SECUREADDR or TCPADDR) of thedynamic agent. Dynamic workload broker uses this port to connectto the dynamic workload broker. It is used by JobManager to rundynamic workload and to run workload coming from a z/OS
Chapter 4. Installing 89

environment in a distributed environment. JobManager is thenetwork process that controls the dynamic scheduling environmentand the z-centric environment. The installation default value is31114. The valid range is from 1 to 65535.
Enable HTTPS communication for the JobManager portThis option enables HTTPS communication between the TivoliWorkload Scheduler master domain manager or Tivoli WorkloadScheduler for z/OS controller and the agent. If you accept thisdefault, ensure that you also configure HTTPS communication onthe z/OS controller. For secure connections, it is recommended thatyou use HTTPS. To use HTTP communication, clear this checkbox.However, to improved performance of communication between theTivoli Workload Scheduler for z/OS controller and the agent,choose to use HTTP.
Dynamic workload broker host nameThe fully qualified host name of the dynamic workload broker. TheTivoli Workload Scheduler dynamic agent uses it to connect to thedynamic workload broker.
Dynamic workload broker HTTPS port numberThe HTTPS transport port of the dynamic workload broker. Youspecified it when installing the master or backup master. Thedynamic agent uses this port to connect to the dynamic workloadbroker. The installation default value is 31116 although if you leavethe field blank, it defaults to 0. The valid range is from 1 to 65535.
Installation directoryEnter the name of the directory where the Tivoli Workload Schedulerinstance will be installed for the specified user. The maximum field lengthis 46 characters and the name must not contain numbers, parentheses () ornational characters.
Spaces are allowed however, Tivoli Workload Scheduler for Applicationsversion 8.2.1 or earlier cannot be installed on the current version of TivoliWorkload Scheduler if the directory path contains spaces.
On Windows operating systems
v The name must be longer than three characters, the secondcharacter must be :, and the third character must be \.
v The default directory is %ProgramFiles%\IBM\TWA.
On UNIX and Linux systems
v The name must be longer than one character and the firstcharacter must be /.
v The default directory is the /opt/IBM/TWA directory.v Optionally check Create symbolic links to create links in the
/usr/bin directory. Any existing Tivoli Workload Schedulersymbolic links are overwritten.
Installing a command line clientAbout this task
The command line client is a component of Tivoli Workload Scheduler thatimplements many of the commands used on the master domain manager. It can beinstalled on any workstation that satisfies its prerequisites, including workstationswhere no other Tivoli Workload Scheduler components are installed. It
90 Tivoli Workload Scheduler: Planning and Installation: Planning and Installation

communicates by TCP/IP with the command line server, which is part of themaster domain manager. Install the command line client using the installationwizard or in silent mode. Do not install the command-line client in the same paththat you used to install any other Tivoli Workload Scheduler component.
The information required to make the connection with the master domain managermust be defined either in the local options file or supplied as parameters to thecommand.
The commands you can use are the following:v Composerv Optmanv Planman showinfo and unlock (the other planman commands must be run
locally on the master domain manager)v sendevent
Note: The command line client is different from and independent from the abilityto use conman locally on an agent to manage the local Symphony® file and localjobs. Configuring a connection with the master does allow the local conman tosubmit objects from the database into the plan.
Running the installation wizardAbout this task
To install a command line client on an existing installation, perform the followingsteps:1. For a graphical installation, from the installation DVD or from the appropriate
eImage, start the launchpad as described in “Launchpad” on page 34 and selectthe Tivoli Workload Scheduler installation, or run the setup for the operatingsystem on which you are installing.From the TWS directory on the DVD, perform the following:v On Windows: WINDOWS\SETUP.exe or SETUP.cmd
v On UNIX and Linux: SETUP.sh or operating_system/SETUP.bin.
Note: SETUP.sh copies the entire image to a temporary directory. Ensure thereis enough space available.
2. Follow the installation wizard screens to complete the installation. Thefollowing list describes the fields that you might need to complete during theinstallation.
Remote HostThe TCP/IP address or host name of the workstation where the TivoliWorkload Scheduler engine is installed.
Remote PortThe HTTP or HTTPS port number used to connect to the workstationwhere the master domain manager is installed. This port number mustmatch the values defined for the master domain manager.
Note: The default protocol used by the command line client toestablish a connection with the master is https. If the http port isspecified in the Remote Port field, before running any commands, youmust modify the PROTOCOL property in the localopts file byinserting http instead of https.
Chapter 4. Installing 91

User NameThe user name used to connect to the workstation where the masterdomain manager is installed. This user should be a valid user listed inthe security file on the master domain manager.
PasswordThe password used to connect to the workstation where the masterdomain manager is installed.
Adding a featureAbout this task
To some of the components of the product you can add a feature:
Add a connector to an agentIf you want to access the plan which is available on an agent or domainmanager workstation, add the connector feature which enables thecommunication between it and the Dynamic Workload Console. See“Adding a connector” on page 200.
Add a language pack to the command-line clientIf you want to use the command-line client in a supported language otherthan English or the language of the locale of the computer where youinstalled it, add the language pack. See “Adding language packs to acommand line client” on page 202.
Add the Java runtime to an agentDuring the installation of the agent you might have chosen not to add theJava runtime that supports the running of job types with advancedoptions. If you later decide that you require this function, you can just addthe Java runtime separately. See “Adding the Java runtime” on page 109.
If you already set up your environment and want to enable dynamic schedulingcapabilities, see “Enabling dynamic scheduling after installation” on page 202.
Performing a silent installationAbout this task
A silent installation runs according to parameters set in a response file. Theresponse file includes all the installation information required to run theinstallation without user intervention.
There are two ways to customize a response file to satisfy your installationrequirements:v Edit an existing response file template provided on the installation DVDs. See
“Silent installation using response file templates” on page 96.v Automatically create a customized response file by running the installation
wizard. See “Silent installation using an automatically generated response file”on page 96.
Table 6 on page 93 lists the response files and the types of installation eachperforms by platform:
92 Tivoli Workload Scheduler: Planning and Installation: Planning and Installation

Table 6. Response files
Type of installation Response file to use
Installing on UNIX
Command line client withlanguage packs
TWS86_CLI_LP_UNIX.txt
Command line client (no languagepacks installed)
TWS86_CLI_UNIX.txt
Fresh fault-tolerant agent or bothfault-tolerant agent and dynamicagent on existing Tivoli WorkloadAutomation instance
TWS86_FRESH_Agent_existTWA_UNIX.txt
Fresh fault-tolerant agent or bothfault-tolerant agent and dynamicagent on new Tivoli WorkloadAutomation instance
TWS86_FRESH_Agent_newTWA_UNIX.txt
Fresh backup dynamic domainmanager on existing TivoliWorkload Automation instance
TWS86_FRESH_BACKUP_DDM_existTWA_UNIX.txt
Fresh backup dynamic domainmanager on new Tivoli WorkloadAutomation instance
TWS86_FRESH_BACKUP_DDM_newTWA_UNIX.txt
Fresh backup master domainmanager on existing TivoliWorkload Automation instance
TWS86_FRESH_BACKUP_MDM_existTWA_UNIX.txt
Fresh backup master domainmanager on new Tivoli WorkloadAutomation instance
TWS86_FRESH_BACKUP_MDM_newTWA_UNIX.txt
Fresh connector with no DynamicWorkload Console installed
TWS86_FRESH_Conn_NEITHER_TDWC_NOR_ZCONN_UNIX.txt
Fresh connector on the DynamicWorkload Console
TWS86_FRESH_Conn_ON_TDWC_OR_ZCONN_UNIX.txt
Fresh dynamic agent TWS86_FRESH_DYNAMIC_Agent_UNIX.txt
Fresh dynamic domain manager onexisting Tivoli WorkloadAutomation instance for TivoliWorkload Scheduler for z/OSlightweight end-to-end schedulingenvironment
TWS86_FRESH_DDM_for_ZOS_existTWA_UNIX.txt
Fresh dynamic domain manager onexisting Tivoli WorkloadAutomation instance
TWS86_FRESH_DDM_existTWA_UNIX.txt
Fresh dynamic agent TWS86_FRESH_DYNAMIC_Agent_UNIX.txt
Fresh dynamic domain manager onnew Tivoli Workload Automationinstance for Tivoli WorkloadScheduler for z/OS lightweightend-to-end schedulingenvironment
TWS86_FRESH_DDM_for_ZOS_newTWA_UNIX.txt
Fresh dynamic domain manager onnew Tivoli Workload Automationinstance
TWS86_FRESH_DDM_newTWA_UNIX.txt
Chapter 4. Installing 93

Table 6. Response files (continued)
Type of installation Response file to use
Fresh master domain manager onexisting Tivoli WorkloadAutomation instance
TWS86_FRESH_MDM_existTWA_UNIX.txt
Fresh master domain manager onnew Tivoli Workload Automationinstance
TWS86_FRESH_MDM_newTWA_UNIX.txt
Uninstall an agent TWS86_UNINSTALL_Agent.txt
Upgrade an agent TWS86_UPGRADE_Agent_UNIX.txt
Upgrade a backup master domainmanager from version 8.3 or later
TWS86_UPGRADE_BACKUP_MDM_83plus_UNIX.txt
Upgrade a command line client TWS86_UPGRADE_CLI_UNIX.txt
Upgrade a connector on anend-to-end fault-tolerant agent
TWS86_UPGRADE_Connector_and_FTA_UNIX.txt
Upgrade a master domainmanager from version 8.3 or later
TWS86_UPGRADE_MDM_83plus_UNIX.txt
Installing on Windows
Command line client withlanguage packs
TWS86_CLI_LP_WIN.txt
Command line client (no languagepacks installed)
TWS86_CLI_WIN.txt
Fresh fault-tolerant agent or bothfault-tolerant agent and dynamicagent on existing Tivoli WorkloadAutomation instance
TWS86_FRESH_Agent_existTWA_WIN.txt
Fresh fault-tolerant agent or bothfault-tolerant agent and dynamicagent on new Tivoli WorkloadAutomation instance
TWS86_FRESH_Agent_newTWA_WIN.txt
Fresh backup master domainmanager on existing TivoliWorkload Automation instance
TWS86_FRESH_BACKUP_MDM_existTWA_WIN.txt
Fresh backup dynamic domainmanager on new Tivoli WorkloadAutomation instance
TWS86_FRESH_BACKUP_DDM_newTWA_WIN.txt
Fresh backup dynamic domainmanager on existing TivoliWorkload Automation instance
TWS86_FRESH_BACKUP_DDM_existTWA_WIN.txt
Fresh connector with no DynamicWorkload Console installed
TWS86_FRESH_Conn_NEITHER_TDWC_NOR_ZCONN_WIN.txt
Fresh connector on the DynamicWorkload Console
TWS86_FRESH_Conn_ON_TDWC_OR_ZCONN_WIN.txt
Fresh dynamic agent TWS86_FRESH_DYNAMIC_Agent_WIN.txt
Fresh dynamic domain manager onexisting Tivoli WorkloadAutomation instance for TivoliWorkload Scheduler for z/OSlightweight end-to-end schedulingenvironment
TWS86_FRESH_DDM_existTWA_WIN.txt
94 Tivoli Workload Scheduler: Planning and Installation: Planning and Installation

Table 6. Response files (continued)
Type of installation Response file to use
Fresh dynamic domain manager onexisting Tivoli WorkloadAutomation instance
TWS86_FRESH_DDM_for_ZOS_existTWA_WIN.txt
Fresh dynamic domain manager onnew Tivoli Workload Automationinstance for Tivoli WorkloadScheduler for z/OS lightweightend-to-end schedulingenvironment
TWS86_FRESH_DDM_for_ZOS_newTWA_WIN.txt
Fresh dynamic domain manager onnew Tivoli Workload Automationinstance
TWS86_FRESH_DDM_newTWA_WIN.txt
Fresh master domain manager onexisting Tivoli WorkloadAutomation instance
TWS86_FRESH_MDM_existTWA_WIN.txt
Fresh master domain manager onnew Tivoli Workload Automationinstance
TWS86_FRESH_MDM_newTWA_WIN.txt
Uninstall an agent TWS86_UNINSTALL_Agent.txt
Upgrade an agent TWS86_UPGRADE_Agent_WIN.txt
Upgrade a command line client TWS86_UPGRADE_CLI_WIN.txt
Upgrade a backup master domainmanager from version 8.3 or later
TWS86_UPGRADE_BACKUP_MDM_83plus_WIN.txt
Upgrade a command line client TWS86_UPGRADE_CLI_WIN.txt
Upgrade a connector TWS86_UPGRADE_Connector_WIN.txt
Upgrade a connector on anend-to-end fault-tolerant agent
TWS86_UPGRADE_Connector_and_FTA_WIN.txt
Upgrade a master domainmanager from version 8.3 or later
TWS86_UPGRADE_MDM_83plus_WIN.txt
Note: When you are performing a silent installation on UNIX zSeries® systems,you must first save the response file in UTF 8 format.
To perform a silent installation using a response file template, perform thefollowing steps:1. Copy the relevant response file to a local directory and edit it to meet the needs
of your environment.
Note: Be sure to review the license agreement information included in theinstallation media. To accept the terms of the license agreement, set thelicenseAccepted parameter to true in the response file you are using. Thisvalue is required to complete the silent installation successfully.
2. Save the file with your changes.3. Enter the following command:
Windows operating systemsSETUP.exe -options <local_dir>\response_file.txt -silent
Chapter 4. Installing 95

Where response_file.txt is the name of the response file to be used forinstallation. The SETUP.exe file is located in the WINDOWS directory.See “Installation media” on page 31.
UNIX and Linux operating systems./SETUP.bin -options <local_dir>/response_file.txt -silent
Where response_file.txt is the name of the response file to be used forinstallation. The SETUP.sh file is located in the root directory of therelevant installation DVD. See “Installation media” on page 31.
4. Review the installation messages in the summary.log file to check thatinstallation was successful.
5. At the end of a successful installation, perform one of the followingconfiguration tasks, depending on the type of agent you installed:v “Configuring a master domain manager” on page 194.v “Configuring a fault-tolerant agent” on page 198.v “Configuring a dynamic agent” on page 199.
Note: If you are installing an agent in an instance of Tivoli Workload Automationwhere the Dynamic Workload Console is already installed, and you intend later toadd the Connector feature to the agent, you are strongly advised to use, as the<TWS_user> of the agent, the same user as you used as the WebSphere ApplicationServer administration user when you installed the Dynamic Workload Console. Itwill make the WebSphere Application Server administration easier to perform ifthe names are the same (this is the default case if you install a Tivoli WorkloadScheduler component that uses WebSphere Application Server before the DynamicWorkload Console).
Silent installation using response file templatesAbout this task
Edit the response file templates provided on the installation DVDs in the\TWS\RESPONSEFILES\ directory. Instructions for customizing the files are includedin the files as commented text. For details about response file properties, seeAppendix C, “The Tivoli Workload Scheduler response file properties,” on page349.
Silent installation using an automatically generated responsefile
About this task
During the initial installation of the current version of Tivoli Workload Scheduler,you can create a response file based on the parameters of the initial installation.You use this response file to run subsequent installations with the sameparameters. Creating an automatically generated response file is recommendedbecause all input is automatically validated by the program.
To perform a silent installation using an automatically generated response file,perform the following steps:
Procedure1. Perform the initial installation using the following command:
Windows operating systems
96 Tivoli Workload Scheduler: Planning and Installation: Planning and Installation
SETUP.exe -options-record <local_dir>\response_file.txt
Where response_file.txt is the name of the response file to be created.The SETUP.exe file is located in the WINDOWS directory. See“Installation media” on page 31.
UNIX and Linux operating systems./SETUP.bin -options-record <local_dir>/response_file.txt
Where response_file.txt is the name of the response file to be created.The SETUP.sh file is located in the root directory of the relevantinstallation DVD. See “Installation media” on page 31.
2. For all subsequent installations, enter the following command:
Windows SETUP.exe -options <local_dir>\response_file.txt -silent
UNIX andLinux
./SETUP.bin -options <local_dir>/response_file.txt -silent
3. After each silent installation, review the installation messages in thesummary.log file to check that installation was successful.
4. At the end of a successful installation, perform one of the followingconfiguration tasks, depending on the type of agent you installed:v “Configuring a master domain manager” on page 194v “Configuring a fault-tolerant agent” on page 198.v “Configuring a dynamic agent” on page 199.
Installing agents using twsinstAbout this task
This section describes how to use the twsinst script to install the Tivoli WorkloadScheduler fault-tolerant or dynamic agent in your distributed or end-to-endnetwork. The twsinst script is an alternative to the silent installation wizard (see“Performing a silent installation” on page 92). In addition, if you are installing thedynamic agent, you can use the twsinst script to add to the agent the Java runtimenecessary to run job types with advanced options. Agents installed using twsinstcan only be uninstalled using twsinst.
Note:
1. You cannot use the twsinst script to install Tivoli Workload Scheduler agents ifyou are running a Java Virtual Machine (JVM).
During the installation process, twsinst creates a file in the following directoriesfor each of the installation steps:
On UNIX operating systems/user's_home/TWS
On Windows operating systems%ProgramFiles%\IBM\TWA\TWS
Chapter 4. Installing 97

Installing the agentsAbout this task
You can install the fault-tolerant or dynamic agent during the full installation ofTivoli Workload Scheduler or in a stand-alone installation of just the agent.
See “Agent installation parameters” on page 99 for descriptions of the installationparameters and options.
To install a Tivoli Workload Scheduler agent, perform the following steps:
On UNIX and Linux operating systems:
1. Insert the DVD for your operating system or download the agenteImage (see “Installation media” on page 31 or the DownloadDocument at http://www.ibm.com/support/docview.wss?rs=672&uid=swg24027501 for more information).
2. Create the Tivoli Workload Scheduler user. The software is installed bydefault in the user's home directory, referred to as /installation_dir/TWS
User: TWS_user
Home: /installation_dir/TWS (for example: /home/user1/TWS where user1is the name of Tivoli Workload Scheduler user.)
3. Log in as root on the workstation where you want to install theproduct.
4. From the DVD_root/TWS/operating_system directory, run twsinst usingthe syntax described below. See “Agent installation parameters” onpage 99 for descriptions of the syntax parameters.
On Windows operating systems:
1. Insert the DVD for your operating system or download the agenteImage (see “Installation media” on page 31 or the DownloadDocument at http://www.ibm.com/support/docview.wss?rs=672&uid=swg24027501 for more information).
2. Log in as administrator on the workstation where you want to installthe product.
3. From the DVD_root/TWS/operating_system directory, run twsinst usingthe syntax described below. See “Agent installation parameters” onpage 99 for descriptions of the syntax parameters.
Note: twsinst for Windows is a Visual Basic Script (VBS) that you canrun in CScript and WScript mode.The Tivoli Workload Scheduler user is automatically created. Thesoftware is installed by default in the Tivoli Workload Schedulerinstallation directory. The default value is %ProgramFiles%\IBM\TWA.
A failed installation issues the return code RC = 1. In the case of a failedinstallation, see to the Tivoli Workload Automation: Messages and Codes.
At the end of a successful installation, perform one of the following configurationtasks, depending on the type of agent you installed:v “Configuring a fault-tolerant agent” on page 198.v “Configuring a dynamic agent” on page 199.
On UNIX and Linux operating systems:
98 Tivoli Workload Scheduler: Planning and Installation: Planning and Installation

Show command usage and versiontwsinst -u | -v
Install a new instancetwsinst -new -uname username
[-addjruntime true|false][-agent dynamic|fta|both][-company company_name][-create_link][-displayname agentname][-hostname hostname][-inst_dir install_dir][-jmport port_number][-jmportssl true|false][-lang lang_id][-master master_cpu_name][-port port_number][-reset_perm][-skip_usercheck][-stoponcheckprereq][-tdwbport tdwbport_number][-tdwbhostname host_name][-thiscpu workstation]
On Windows operating systems:
Show command usage and versiontwsinst -u | -v
Install a new instancetwsinst -new -uname username
-password user_password[-addjruntime true|false][-agent dynamic|fta|both][-company company_name][-displayname agentname][-domain user_domain][-hostname host_name][-inst_dir install_dir][-jmport port_number][-jmportssl true|false][-lang lang_id][-master master_cpu_name][-port port_number][-skip_usercheck][-tdwbport tdwbport_number][-tdwbhostname host_name][-thiscpu workstation]
Agent installation parametersAbout this task
This section lists and describes the parameters used when using the twsinst scriptto install the fault-tolerant or dynamic agent.
-addjruntime true|falseAdds the Java runtime to run job types with advanced options, both thosetypes supplied with the product and the additional types implementedthrough the custom plug-ins. Valid values are true and false. The defaultfor a fresh installation is true.
-agent dynamic|fta|bothThe type of agent you want to install. Valid values are:
Chapter 4. Installing 99

dynamicTo install the Tivoli Workload Scheduler dynamic agent. Use thisvalue with the -tdwbhostname host_name and the -tdwbporttdwbport_number parameters.
fta To install the Tivoli Workload Scheduler fault-tolerant agent,
both To install the dynamic agent used with the -tdwbhostnamehost_name and the -tdwbport tdwbport_number parameters, and thefault-tolerant agent.
The default is dynamic.
-company company_nameThe name of the company. The company name cannot contain blankcharacters. The name appears in program headers and reports. If notspecified, the default name is COMPANY.
-create_linkUNIX only. Create the symlink between /usr/bin/at and<install_dir>/TWS/bin/at. See Table 2 on page 31 for more information.
-displaynameThe name to assign to the dynamic agent. The default is the host name ofthis computer.
-domain user_domainWindows only. The domain name of the Tivoli Workload Scheduler user.The default is the name of the workstation on which you are installing theproduct.
-hostname host_nameThe fully qualified host name or IP address on which the agent iscontacted by the dynamic workload broker. The default is the host name ofthis computer.
-inst_dir installation_dirThe directory of the Tivoli Workload Scheduler installation.
On UNIX and Linux operating systems:The path cannot contain blanks. If you do not manually specify apath, the path is set to the default home directory that is%ProgramFiles%\IBM\TWA.
On Windows operating systems:If you specify a path that contains blanks, enclose it in doublequotes. If you do not manually specify a path, the path is set to thedefault home directory that is the user_name home directory.
-jmport port_number
The JobManager port number used by the dynamic workload broker toconnect to the Tivoli Workload Scheduler dynamic agent. The default valueis 31114. The valid range is from 1 to 65535.
-jmportssl true|falseThe JobManager port used by the dynamic workload broker to connect tothe Tivoli Workload Scheduler dynamic agent. This number is registered inthe ita.ini file located in ITA\cpa\ita on Windows and ITA/cpa/ita onUNIX, Linux, and IBM i.
For communication using SSL or HTTPSSet jmportssl = true. To communicate with the dynamic workload
100 Tivoli Workload Scheduler: Planning and Installation: Planning and Installation

broker, it is recommended that you set the value to true. In thiscase, the port specified in jmport communicates in HTTPS.
For communication without using SSL, or through HTTPSet jmportssl = false. In this case the port specified in jmportcommunicates in HTTP.
-lang lang_idThe language in which the twsinst messages are displayed. If notspecified, the system LANG is used. If the related catalog is missing, thedefault C language catalog is used.
Note: This is the language in which the installation log is recorded, andnot the language of the installed engine instance. twsinst installs alllanguages as default.
-master workstationThe workstation name of the master domain manager. This name cannotexceed 16 characters, cannot contain spaces and cannot be the same as theworkstation name you entered in the thiscpu parameter. If not specified,the default value is MASTER.
-new A fresh installation of the agent. Installs an agent and all supportedlanguage packs.
-password user_passwordWindows only. The password of the user for which you are installingTivoli Workload Scheduler.
-port port_numberThe TCP/IP port number used by the Netman process to listen forcommunication from the master. The default value is 31111. The validrange is from 1 to 65535. This port number is registered in the localoptsfile.
-reset_permUNIX and IBM i only. Reset the permission of the libraries in the/usr/Tivoli directory.
-skip_usercheckEnable this option if the authentication process within your organization isnot standard, thereby disabling the default authentication option. OnUNIX, skip the check of the user in the /etc/password file or using the sucommand. On Windows, does not create the user you specified in the-uname username parameter. If you specify this parameter you must createthe user manually before running the script.
-stoponcheckprereqStop the installation whenever a problem occurs during the prerequisitecheck. See “Checking prerequisites (UNIX and Linux)” on page 28 formore information on the prerequisite check.
-tdwbhostname host_nameThe fully qualified host name of the dynamic workload broker. It is usedtogether with the -agent dynamic|both and the -tdwbport tdwbport_numberparameters. It is necessary to install the dynamic agent. If not specified,you cannot run your workload dynamically and this parameter assumesthe localhost default value. This value is registered in theResourceAdvisorUrl property in the JobManager.ini file.
Chapter 4. Installing 101

-tdwbport tdwbport_numberThe dynamic workload broker HTTP or HTTPS transport port number. It isused together with the -agent dynamic|both and the -tdwbhostnamehost_name parameters. It is necessary to install the dynamic agent. Thisnumber is registered in the ResourceAdvisorUrl property in theJobManager.ini file. The default value is 31116. The valid range is from 0to 65535. If you specify 0 or do not specify this parameter, you cannot runworkload dynamically. Do not specify 0 if the -agent value is dynamic orboth.
-thiscpu workstationThe name of the Tivoli Workload Scheduler workstation of this installation.The name cannot exceed 16 characters, cannot contain spaces and cannotbe the same as the workstation name of the master domain manager. Thisname is registered in the localopts file. If not specified, the default valueis the host name of the workstation.
-u Displays command usage information and exits.
-uname usernameThe name of the user for which Tivoli Workload Scheduler is installed.This user name is not to be confused with the user performing theinstallation logged on as root on UNIX and Linux and as administrator onWindows. The user name cannot contain periods (.).
On UNIX and Linux, for a new installation, this user account must becreated manually before running the installation. Create a user with ahome directory. Tivoli Workload Scheduler is installed by default under thehome directory of the specified user.
-v Displays the command version and exits.
Example installationsAbout this task
The following example shows the syntax used when using the twsinst script toinstall a new instance of the fault-tolerant agent.
On UNIX and Linux:./twsinst -new-uname TWS_user-addjruntime true-agent both-company IBM-create_link-hostname thishostname.mycompany.com-inst_dir "c:\Program Files\IBM\TWA"-jmport 31114-master TWSmdm-port 37124-reset_perm-stoponcheckprereq-thiscpu mainworkstation
On Windows operating systems:twsinst -new
-uname TWS_user-password user_password-agent fta-company IBM-displayname thishostcomputername
102 Tivoli Workload Scheduler: Planning and Installation: Planning and Installation

-hostname thishostname.mycompany.com-inst_dir "c:\Program Files\IBM\TWA"-jmport 31114-master TWSmdm-port 37124-thiscpu mainworkstation
The following example shows the syntax used when using the twsinst script toinstall a new instance of the dynamic agent and adding the Java runtime forrunning job types with advanced options.
On Unix and Linux operating systems:./twsinst -new-uname TWS_user-addjruntime true-agent dynamic-company IBM-create_link-hostname thishostname.mycompany.com-inst_dir "c:\Program Files\IBM\TWA"-jmport 31114-master TWSmdm-port 37124-reset_perm-stoponcheckprereq-tdwbport 31116-tdwbhostname mainbroker.mycompany.com-thiscpu mainworkstation
On Windows operating systems:-twsinst -new-uname TWS_user-password user_password-addjruntime true-agent dynamic-company IBM-displayname thishostcomputername-hostname thishostname.mycompany.com-inst_dir "c:\Program Files\IBM\TWA"-jmport 31114-master TWSmdm-port 37124-tdwbport 31116-tdwbhostname mainbroker.mycompany.com-thiscpu mainworkstation
The following example shows the syntax used when using the twsinst script toinstall a new instance of both the fault-tolerant and the dynamic agent, and addingthe Java runtime for running job types with advanced options.
On UNIX and Linux:./twsinst -new-uname TWS_user-addjruntime true-agent both-company IBM-create_link-hostname thishostname.mycompany.com-inst_dir "c:\Program Files\IBM\TWA"-jmport 31114-master TWSmdm-port 37124-reset_perm
Chapter 4. Installing 103

-stoponcheckprereq-tdwbport 31116-tdwbhostname mainbroker.mycompany.com-thiscpu mainworkstation
On Windows operating systems:-twsinst -new-uname TWS_user-password user_password-addjruntime true-agent both-company IBM-displayname thishostcomputername-hostname thishostname.mycompany.com-inst_dir "c:\Program Files\IBM\TWA"-jmport 31114-master TWSmdm-port 37124-tdwbport 31116-tdwbhostname mainbroker.mycompany.com-thiscpu mainworkstation
Installing agents using Software DistributionAbout this task
This section describes how to install Tivoli Workload Scheduler agents usingSoftware Distribution software package blocks. During the installation, you canadd the following:v Standard agent, fault-tolerant agent, or domain manager capabilityv Dynamic agentv The Java runtime for running job types with advanced options, both the job
types supplied with the product and the additional types implemented throughthe custom plug-ins.
The agent installed using the Software Distribution software package blocks hasthe following characteristics:v It is installed in its own path, independent of any other Tivoli Workload
Automation products or components installed on the same system.v It cannot share components of the Tivoli Workload Automation network.v It cannot have a connector added to it and therefore cannot be directly
connected to the Dynamic Workload Console.
Use Software Distribution software package blocks to install Tivoli WorkloadScheduler agents only if you do not run a Java Virtual Machine on theworkstation. If this is not your case, you might choose to perform a silentinstallation instead. See “Performing a silent installation” on page 92.
Note: Agents installed using Software Distribution software package blocks canonly be uninstalled using Software Distribution.
Software packages and parametersAbout this task
Tivoli Workload Scheduler agents can be installed distributing a software packageblock (SPB), using the Software Distribution component of Tivoli Configuration
104 Tivoli Workload Scheduler: Planning and Installation: Planning and Installation

Manager, Versions 4.1, 4.2, 4.2.1, 4.2.2, or 4.2.3. You can distribute the SPB, usingeither the command line interface or from the Tivoli desktop.
Note: Do not modify the SPB supplied with the product.
An SPB exists for each supported operating system located on the installation disksunder the directory of the operating system. The SPBs are named according to theoperating system: Tivoli_TWS_<operating_system>.SPB. For the packages to bedistributed, they must be imported in software package profiles. The softwarepackage profiles must be named according to the operating system and user:FP_TWS_<operating_system>_<TWS_user>.8.6.00. Possible values for operatingsystem are:v AIXv HPv SOLARISv WINDOWSv LINUX_I386v LINUX_PPCv LINUX_S390v SOLARIS_I386v HPIA64v LINUX_X86_64v WINDOWS_X86_64
An SPB also exists to install language packs: Tivoli_TWS_LP.SPB. The softwarepackage profiles must be named according to the user:Tivoli_TWS_LP_<TWS_user>.8.6.00. The language pack software package block islocated in the root directory of the installation DVD.
Tivoli Workload Scheduler installation parameters are defined as default variablesin the software package. The following is a list of installation parameters.
backup Optional. Indicates a backup. For a fresh installation, specify false.Thedefault value is false.
companyOptional. The company name. This name appears in program headers andreports. The default value is COMPANY.
display_nameRequired. The name to assign to the dynamic agent. The default is the hostname of this computer.
domain Optional unless the user is a domain user. Windows operating systemsonly. The domain name of the user. The default value is <computer_name>.
fresh_installRequired. Indicates if this is a first time install. To perform a freshinstallation, specify false. To perform an upgrade, specify true. Thedefault value is true.
from_releaseRequired if you specified upgrade. When you specify upgrade=”true”, youmust also specify from_release indicating the release of the existing instance.The format is 8.x.
group Optional. The name of the group of operating system users.
Chapter 4. Installing 105

host_nameOptional. The fully qualified host name or IP address on which the agentis contacted by the Tivoli Dynamic Workload Broker.
installerOptional. Windows operating systems only. The user ID of the installer ofTivoli Workload Scheduler. The default value is Administrator.
install_dirRequired. The fully qualified path to the directory of the Tivoli WorkloadScheduler installation. This path must be a fully qualified path and cannotcontain blanks. On Windows workstations, the path is created if it does notalready exist. On UNIX and Linux operating systems, the path is the sameas the user's home directory. The default values are:v Windows: $(system_drive)\win32app1TWS\<TWS_user>v UNIX and Linux: user_home
jm_portSpecify the value of the HTTP port that is used for communicationbetween the Tivoli Workload Scheduler server and the Tivoli WorkloadScheduler dynamic agent
To communicate in HTTP you must also set the following parameters: -Djm_port=nnnn where nnnn is the port number and -D jm_sec_port=0. Thedefault number of jm_port is 31114.
jm_sec_portSpecify the value of the HTTPS port that is used for communicationbetween the Tivoli Workload Scheduler server and the Tivoli WorkloadScheduler dynamic agent.
To communicate in HTTPS, you must also set the following parameters: -Djm_port=0 -D jm_sec_port=nnnn where nnnn is the port number. Thedefault number of jm_sec_port is 31114.
master_cpuOptional. The name of the master domain manager. The name cannotexceed 16 characters and cannot contain spaces. The default is MASTER.
pwd (for Windows only)Required for Windows operating systems when installing for the first time.The password associated with the <TWS_user> user name. The SPBpassword variable is passed to the pwd variable.
tcp_portRequired. The Netman port used to run distributed scheduling. Netman isthe network process that controls the production environment. Wheninstalling more than one instance on the same workstation, use differentport numbers for each instance. It must be an unassigned 16-bit value inthe range from 1 to 65535. The default value is 31111.
tdwb_hostnameOptional. The dynamic workload broker fully qualified host name. Usedtogether with the -tdwbport <tdwbport_number> parameter. Adds to TivoliWorkload Scheduler the capability to run workload dynamically. If notspecified, you cannot run your workload dynamically and this parameterassumes the localhost default value. This value is registered in theResourceAdvisorUrl property in the JobManager.ini file.
tdwb_portOptional. The dynamic workload broker HTTP or HTTPS port number.
106 Tivoli Workload Scheduler: Planning and Installation: Planning and Installation

Used together with the -tdwbhostname host_name parameter. Adds toTivoli Workload Scheduler the capability to run workload dynamically.This number is registered in the ResourceAdvisorUrl property in theJobManager.ini file. The default value is 31116. The valid range is from 1to 65535.
this_cpuRequired. The name of the workstation on which you are performing theinstallation. The name cannot exceed 16 characters and cannot containspaces. The default value is THIS_CPU.
tws_userRequired. The user name for which Tivoli Workload Scheduler instance isbeing installed. On Windows systems, if this user account does not alreadyexist, it is automatically created. If you specify a domain user or domaincontroller, you must specify the domain in the domain variable. If youspecify a local user with the same name as a domain user, the local usermust first be created manually by an administrator and then identified as<system_name>\<user_name>.
On UNIX and Linux operating systems, this user account must be createdmanually before running the installation.
upgradeRequired. Indicates if the installation is an upgrade. To perform anupgrade, specify true. To perform a fresh installation, specify false. Thedefault value is false.
Note:
1. fresh_install and upgrade are mutually exclusive.2. The variables that are not documented here are for debugging purposes only.
See Administration Guide.
Installation procedureAbout this task
The installation procedure checks that there is sufficient space for the TivoliWorkload Scheduler engine to be installed. It does not, however, check that there issufficient space for the Configuration Manager backup directory specified in theswdis.ini file. See the Tivoli Configuration Manager documentation for thesespace requirements.
To perform the installation, complete the following steps:1. Create a software package profile:
FP_TWS_<operating_system>_<TWS_user>.8.6.00 where operating_system is theoperating system where you are installing and <TWS_user> is the user of theinstallation.
2. Import the software package blocks using the wimpspo command. When youimport the software package blocks, you must pass the name of the profile towimpspo so that the Configuration Manager endpoint catalogs the namecorrectly.
3. Install the software package blocks using the wdinstsp command.
Note: The supplied software packages must be installed as COMMITTED. Thepackages cannot be installed as UNDOABLE because the UNDO action does notrollback the product registry entries.
Chapter 4. Installing 107
4. Depending on the type of agent you are installing, perform the steps in“Configuring a fault-tolerant agent” on page 198 and “Configuring a dynamicagent” on page 199.
Note: For complete instructions on performing these tasks, see wimpspo andwdinstsp in the IBM Tivoli Configuration Manager, Reference Manual for SoftwareDistribution, and the IBM Tivoli Configuration Manager, User's Guide for SoftwareDistribution.
Prerequisite: Installing the Common Inventory Technology (CIT)About this task
You must install CIT before installing the agent and adding the followingcapabilities:v Standard agent, fault-tolerant agent, or domain manager capabilityv Dynamic scheduling capabilityv The option to add the runtime for Java environment jobs
The following are examples of the commands you run to install CIT on Windowsand UNIX workstations. See “Software packages and parameters” on page 104 fora description of the parameters.
Windows operating systems:1. wdinstsp -D CIT_ExploiterID=TWA D:\TWS_86\WINDOWS\CIT_Preinstall.spb2. wdinstsp D:\TWS_86\WINDOWS\CIT.spb
UNIX and Linux operating systems:1. wdinstsp -D CIT_ExploiterID=TWA /TWS_86/UNIX/CIT_Preinstall.spb2. wdinstsp /TWS_86/UNIX/CIT.spb
Installing the Tivoli Workload Scheduler dynamic agentAbout this task
This section describes how to install the Tivoli Workload Scheduler dynamic agentby using the wdinstsp command. In addition, you can add the Java runtime to theagent to run job types with advanced options, both those types supplied with theproduct and the additional types implemented through the custom plug-ins See“Adding the Java runtime” on page 109.
To install the Tivoli Workload Scheduler dynamic agent, perform the followingsteps:1. Verify the authorizations required to run the procedure in the “User
authorization requirements” on page 67 section.2. Locate the .spb as described in the “Software packages and parameters” on
page 104 section.3. Set the Software Distribution environment launching the following command
located in the TWA/TWS/_uninstall/CLI directory:
Windows operating systems:swd_env.bat
UNIX and Linux operating systems:swd_env.sh
4. Run the wdinstsp command located in the TWA/TWS/_uninstall/CLI as shownin the following examples:
Windows operating systemsThe following Windows example describes an installation with the user
108 Tivoli Workload Scheduler: Planning and Installation: Planning and Installation

<TWS_user> and the endpoint Tivoli_TWS_WINDOWS. In this example, youare installing on a domain controller or in a Windows node agentbecause the -D domain="domain_name" was specified.wdinstsp
-f-uy-D install_dir="C:\ibm\TWS\twsuser\TWS"-D tws_user="twsuser"-D password="twspasswd"-D domain="domain_name"-D group="group_name"-D installer="Administrator"-D jm_port="0"-D jm_sec_port="31114"-D host_name="IT041924-T61.rot.ibm.com"-D display_name="IT041924-T61_1"-D tdwb_port="31116"-D "tdwb_hostname=slt.romelab.it.ibm.com"-D fresh_install="true"-D upgrade="false"-D execActionTools="true"-D startAgent="true"-n "TWS_LWA_twsuser.8.6.0.00"
"C:\Output\TWS_VLAST\WINDOWS\Tivoli_LWA_WINDOWS.SPB"
UNIX and Linux operating systemsThe following UNIX example describes an installation with the user<TWS_user> and the endpoint Tivoli_TWS_LINUX_I386.wdinstsp
-f-uy-D install_dir="/home/twsuser/TWS"-D tws_user="twsuser"-D domain="null"-D group="group_name"-D installer="root"-D jm_port="0"-D jm_sec_port="31114"-D host_name="IT041924-T61.rot.ibm.com"-D display_name="IT041924-T61_1"-D tdwb_port="31116"-D "tdwb_hostname=slt.romelab.it.ibm.com"-D fresh_install="true"-D upgrade="false"-D execActionTools="true"-D startAgent="true"-n "TWS_LWA_twsuser.8.6.0.00"
/mnt/gsa/home/s/l/user1/web/public/SPB_INSTALL/LINUX_I386/Tivoli_LWA_LINUX_I386.SPB
The following are examples of the settings required to perform a fresh installationof an agent on Windows and UNIX workstations. See “Software packages andparameters” on page 104 for a description of the parameters.
Adding the Java runtimeAbout this task
Add the Java runtime to add the following functions to your agent:v Run job types with advanced options, both those types supplied with the
product and the additional types implemented through the custom plug-ins.v Enable the capability to remotely run, from the agent, the dynamic workload
broker resource command on the server.
Chapter 4. Installing 109

To add the Java runtime, perform the following steps:1. Verify the authorizations required to run the procedure in the “User
authorization requirements” on page 67 section.2. Locate the .spb as described in the “Software packages and parameters” on
page 104 section.3. Set the Software Distribution environment launching the following command
located in the TWA/TWS/_uninstall/CLI directory:
Windows operating systems:swd_env.bat
UNIX and Linux operating systems:swd_env.sh
4. If you are not at General Availability level, commit the current fix pack beforeproceeding with the next step.
5. Run the wdinstsp command located in the TWA/TWS/_uninstall/CLI as shownin the following examples:See “Software packages and parameters” on page 104 for a description of theparameters.
Windows operating systems:wdinstsp
-f-uy-D install_dir="C:\ibm\TWS\twsuser\TWS"-D tws_user="twsuser"-D group="group_name"-D installer="Administrator"-n "TWS_Eclipse_twsuser.8.6.0.0x"
"C:\Output\TWS_VLAST\WINDOWS\<level_name>_Eclipse_WINDOWS.SPB"
UNIX and Linux operating systems:The following UNIX example describes an installation with the user<TWS_user>:wdinstsp
-f-uy-D install_dir="/home/twsuser/TWS"-D tws_user="twsuser"-D group="group_name"-D installer="root"-n "TWS_Eclipse_twsuser.8.6.0.0x"
/mnt/gsa/home/s/l/user1/web/public/SPB_INSTALL/LINUX_I386/<level_name>_Eclipse_LINUX_I386.SPB
where x is the fix pack number (0 for General Availability level) and<level_name> is Tivoli if you are at General Availability level or FP if youapplied any fix pack.
Adding standard agent, fault-tolerant agent, or domain managercapabilityAbout this task
To add standard agent, fault-tolerant agent, or domain manager capability to theTivoli Workload Scheduler agent on Windows and UNIX workstations, perform thefollowing steps.1. Verify the authorizations required to run the procedure in the “User
authorization requirements” on page 67 section.
110 Tivoli Workload Scheduler: Planning and Installation: Planning and Installation

2. Locate the .spb as described in the “Software packages and parameters” onpage 104 section.
3. Set the Software Distribution environment launching the following commandlocated in the TWA/TWS/_uninstall/CLI directory:
Windows operating systems:swd_env.bat
UNIX and Linux operating systems:swd_env.sh
4. Run the wdinstsp command located in the TWA/TWS/_uninstall/CLI as shownin the following examples:See “Software packages and parameters” on page 104 for a description of theparameters.
Windows operating systems:In the following example, you are installing on a domain controller orin a Windows node agent because the -D domain="domain_name"parameter was specified. The installation is performed with the user<TWS_user> and the endpoint Tivoli_TWS_WINDOWS.wdinstsp
-n "FP_TWS_WINDOWS_twsuser.8.6.0.00"-D install_dir="C:\ibm\TWS\twsuser\TWS"-D tws_user="twsuser"-D password="twspasswd"-f-uy-D company="company_name"-D this_cpu="IT041924-T61"-D master_cpu="MTMDM"-D tcp_port="33311" jm_port=0-D jm_sec_port=31114-D domain="domain_name"
"C:\Output\TWS_VLAST\WINDOWS\Tivoli_TWS_WINDOWS.SPB"
UNIX and Linux operating systemsThe following UNIX example describes an installation with the user<TWS_user> and the endpoint Tivoli_TWS_LINUX_I386.wdinstsp
-n FP_TWS_WINDOWS_twsuser.8.6.0.00-f-uy-D install_dir="/home/twsuser/TWS"-D tws_user="twsuser"-D company="company_name"-D this_cpu="IT041924-T61"-D master_cpu="MTMDM" jm_port=0-D jm_sec_port=31114-D tcp_port="33311"-D serverName="server1"
/mnt/gsa/home/s/l/user1/web/public/SPB_INSTALL/LINUX_I386/Tivoli_TWS_LINUX_I386.SPB
Installing language packsAbout this task
You can install language packs using Software Distribution. Locate theTivoli_TWS_LP.SPB software package block in the root directory of the DVD, andthen customize the following parameters before you install.
Chapter 4. Installing 111

Table 7. List of parameters to install language packs
Default variable Description Required Default value
zh_CN
it
ko
es
zh_TW
ja
pt_BR
de
fr
ALL_LANG
Chinese, Simplified
Italian
Korean
Spanish
Chinese, Traditional
Japanese
Brazilian Portuguese
German
French
All of the abovelanguages.
Specify true for thelanguages to install.The default value forall other languages isfalse.
false
tws_user The user name forwhich the specifiedlanguage pack isbeing installed.
Yes $(user_name)
install_dir The fully qualifiedpath to which thespecified languagepacks are installed.
Yes $(program_files)
1. Verify the authorizations required to run the procedure in the “Userauthorization requirements” on page 67 section.
2. Locate the .spb as described in the “Software packages and parameters” onpage 104 section.
3. Set the Software Distribution environment launching the following commandlocated in the TWA/TWS/_uninstall/CLI directory:
Windows operating systems:swd_env.bat
UNIX and Linux operating systems:swd_env.sh
4. Run the wdinstsp command located in the TWA/TWS/_uninstall/CLI as shownin the following examples: The following is the syntax required to install alllanguages:wdinstsp
-D install_dir="Installation Path"-D tws_user="UserName"[-D zh_C =true ...-D de=true | ALL_LANG=true]Tivoli_TWS_LP.SPB [subscribers...]
The following is the syntax required to install Italian and German languagepacks:wdinstsp
-D install_dir="Installation Path"-D tws_user="UserName"[-D it =true | -D de=true]Tivoli_TWS_LP.SPB [subscribers...]
112 Tivoli Workload Scheduler: Planning and Installation: Planning and Installation

Installing the Job Brokering Definition ConsoleAbout this task
This section describes how to install the Job Brokering Definition Console. It isdivided into the following topics:v “Installing the Job Brokering Definition Console using the installation wizard”v “Performing a silent installation of the Job Brokering Definition Console”
The Job Brokering Definition Console is a structured editing tool that you use tocreate and modify Job Submission Description Language (JSDL) files. These filesare saved in the Job Repository as job definitions and become available forsubmission. The JSDL files adhere to the XML syntax and semantics as defined inthe JSDL schema. For more information about the Job Brokering DefinitionConsole, see the Tivoli Workload Scheduler: User's Guide and Reference, SC32-1274.
The Job Brokering Definition Console is supported only on Windows 32-bit andLinux 32-bit. You can install one instance of the Job Brokering Definition Consolefor a single user on each workstation. This is because two instances installed bythe same user share the same workspace. If you need to install two instances of theJob Brokering Definition Console on the same workstation, install each instanceusing a different user and ensure that each instance accesses its own workspace.
Installing the Job Brokering Definition Console using theinstallation wizard
About this task
For a graphical installation, from the installation DVD, start the launchpad asdescribed in “Launchpad” on page 34 and select the Job Brokering DefinitionConsole installation, or run the setup for the operating system on which you areinstalling.
From the root directory of the DVD, run the following:v On Windows operating systems: JBDC\WORKBENCH\setupwin32.exe
v On Linux operating systems: JBDC/WORKBENCH/setuplinux.bin
Follow the installation wizard, providing the installation directory name, tocomplete the installation.
Performing a silent installation of the Job Brokering DefinitionConsole
About this task
For a silent installation, copy the following file to a local directory:<images_path>/JBDC/WORKBENCH/ResponseFiles/TDWB_Workbench_installation.rsp
In this file, edit the following parameters:-V licenseAccepted=true-P installLocation="<installation_path>"
To perform a silent installation using a response file template, enter the followingcommand:-options "<path-to-ResponseFile>/TDWB_Workbench_installation.rsp" -silent
Chapter 4. Installing 113

For information about response files and silent installation, see “Performing asilent installation” on page 92.
Installing the additional plug-ins by using the Tivoli WorkloadScheduler for Additional Plug-ins
About this task
This section describes how to install one or more additional plug-ins by using theTivoli Workload Scheduler for Additional Plug-ins. It is divided into the followingtopics:v “Before installing”v “Selecting your installation method” on page 115v “Installing by using the installation wizard” on page 115v “Installing by using the silent installation” on page 116
The Tivoli Workload Scheduler for Additional Plug-ins is an installation processthat you can use to install the additional plug-ins that you have developed toresolve your particular needs. This installer is contained in the Tivoli WorkloadScheduler Fix Pack 1 DVD or eImages.
Before installingBefore you install the additional plug-in, ensure that the following conditions aresatisfied:v You must have the following structure for the plug-in file<plug-
in_namespace>.<plug-in id>_<plug-in_version>.zip as described in thefollowing section: “The additional plug-in structure.”
v You have the following permissions to run the installation:Windows operating systems:
AdministratorUNIX and Linux operating systems:
rootv The installation process is not already running on the workstation. You can
verify it by checking that the setup process is not running.
The additional plug-in structureThis section describes the plug-in structure.v The plug-in zip name must be the following:
<plug-in_namespace>.<plug-in_id>_<plug-in_version>.zip
v You must have the following structure for the plug-in file<plug-in_namespace>.<plug-in id>_<plug-in_version>.zip:/files/license/files/plugin.xml/files/<plug-in_name>.properties/files/<plug-in_name>_<plugin_version>.jar
where,– The/files/license directory contains the License agreement files. This
directory is optional.– The optional file <plug-in_name>.properties contains the properties of the
plug-in.– The mandatory file/files/plugin.xml must have the following structure:
114 Tivoli Workload Scheduler: Planning and Installation: Planning and Installation

<plugin><pluginInfo version="<plugin_version>" name="<plug-in_name>"
id="<plug-in_ID>" /><vendor name="<company_name>" id="<company_id>" /><pluginIstaller minVersionSupported="<plugin_min_version>" />
<twsInstances><twsInstance version="8.6.0.00" /></twsInstances>
<licenses dir="files/license" />
<deploy><jarFiles><file name="files/com.ibm.scheduling.agent.<plug-in_name>_
<plug-in_version>.jar"overWriteIfExists="yes" mod="755" uninstall="yes" />
</jarFiles><propertiesFiles><file name="files/<plug-in_name>.properties" /></propertiesFiles></deploy>
</plugin>
Selecting your installation methodYou can install the additional plug-ins by using one of the methods described inthis section. To install a additionalplug-in, use any of the following procedures. Ifyou want to install another one, start the installation procedure again.
Installation wizardInstall additional plug-in on an existing installation by running theindividual setup files for each supported operating system. For details, see“Installing by using the installation wizard.”
Silent installationCustomize a response file by adding all the configuration settings to be usedduring installation. Then, from the command line, run the setup command.With this procedure, you can run the installation unattended and in thebackground. For details, see “Installing by using the silent installation” onpage 116.
Before starting the installation process, ensure that the file <plug-in_namespace>.<plug-in id>_<plug-in_version>.zip is built as described in“Before installing” on page 114.
Note: To successfully use the installed plug-ins, you must first restart WebSphereApplication Server, Tivoli Workload Scheduler agent or both.
Installing by using the installation wizard
To install additionalplug-in, perform the following steps:1. From the Tivoli Workload Scheduler Fix Pack 1 DVD or eImages, for the
operating system where you are installing, run the setup installationcommand. It is located in the /PLUGIN_INSTALLER directory. The installationstarts.
2. Select the language in which you want the wizard to be displayed, and clickOK. The Welcome panel is displayed.
3. Read the welcome information and click Next. The operations panel isdisplayed.
Chapter 4. Installing 115

4. Select the Install radio button. Click Next. The zip file location panel isdisplayed.
5. Select the path on your workstation where the zip file <plug-in_namespace>.<plug-in id>_<plug-in_version>.zipis located.If the installation program does not detect any zip file in the path youspecified, you cannot perform any actions.
6. Click Next. The plug-in details panel is displayed.7. Review the plug-in details, and click Next. The plug-in Software License
Agreement panel is displayed.8. Read the plug-in Software License Agreement information and select the radio
button to accept the license agreement. Click Next. A summary informationpanel is displayed.
9. Select the Tivoli Workload Scheduleron your workstation where the zip file<plug-in_namespace>.<plug-in id>_<plug-in_version>.zip is installed.If the installation program does not detect any instance of Tivoli WorkloadScheduler, you cannot perform any actions.
10. Review the summary details and click Install. The installation process begins;the progress panel is displayed showing the status.
If you received error messages, analyze the installation log files shown in the tableTable 9 on page 119.
Installing by using the silent installationAbout this task
A silent installation runs according to the parameters set in a response file. Theresponse file includes all the installation information required to run theinstallation without user intervention.
To install additionalplug-in with the silent installation, you are provided with thefollowing response file located under PLUGIN_INSTALLER/RESPONSE_FILE on theproduct DVD:TWS_Plug-ins_RespFile_<operatingsystem>.txt
where <operatingsystem> can be unix or windows.
It is a template file that you can customize to reflect the additional plug_in youwant to install.
Note: Using the silent installation you can install one plug-in at time.
When running the installation in silent mode, no messages are displayed. Themessages are written in the silent installation log files listed in “Installation actionsand log files” on page 118. If the silent installation fails, you can verify themessages written in the log files , by checking them in the section “Analyzingreturn codes for Tivoli Workload Scheduler for Additional Plug-ins silentinstallation” on page 227.
To run the silent installation, perform the following steps:1. Create your response file or customize the response file to include the options
required to complete the installation.TWS_Plug-ins_RespFile_<operatingsystem>.txt
116 Tivoli Workload Scheduler: Planning and Installation: Planning and Installation

For a list of these options, see Table 8.The response file must be accessible from the workstation where you want toperform the installation. Entries in the response file are in the formatoption=value. Each entry must be written on a separate line.
2. Insert the product DVD for your operating system and run the setupcommand, located in the PLUGIN_INSTALLER/ directory:
On UNIX and Linux operating systems:./setup.sh -i silent -f response_file
On Windows operating systems:setup.bat -i silent -f response_file
Where:
-i silentSpecifies that the installation is run unattended, driven by a responsefile.
-f response_fileIndicates the fully qualified path to the response file that contains theinstallation options. response_file can be any text file with the name andextension you choose.
The actions performed by installation is described in the section “Installationactions and log files” on page 118.
Table 8 lists the options you can specify to drive the installation.
Table 8. Options to perform a silent installation
Option Required Description Value
USER_INSTALL_DIR=<path> Yes Specify the TivoliWorkload Schedulerinstallation pathwhere you want toinstall an additionalplug-in.
A fully qualified path. Forexample, to install theproduct under c:\programFiles\IBM\TWA86, specify:
USER_INSTALL_DIR="c:\program Files\IBM\TWA86"
The product files are installedin:
c:\program Files\IBM\TWA86\methods
On Windows operatingsystems:
The default path is"c:\\ProgramFiles\\IBM\\TWA"
On UNIX and Linuxoperating systems:
The default pathis/opt/IBM/TWA
Chapter 4. Installing 117

Table 8. Options to perform a silent installation (continued)
Option Required Description Value
TWSAPPS_PLUGIN_FILE_NAME=<zip-filename> Yes Specify the fullyqualified path to thezip file that containsthe addition plug-inthat you want toinstall.
A fully qualified path. Forexample, to install theadditional plug-in<test_plug-in>.zip located inC:\Documents andSettings\Administrator\Desktop\PLUGINS\, specify:
TWSAPPS_PLUGIN_FILE_NAME=C:\Documents and Settings\Administrator\Desktop\PLUGINS\<test_plug-in>.zip
LICENSE_ACCEPTED=<value> Yes Specify the boolenvalue to acceptlicense agreement ofadditional plug-in.
The value can be true orfalse. But the plug-ininstallation proceed even ifthe value is set to true
ACTION_TYPE=<value> Yes Specify the actionthat installationprocess performs onplug-in. In this casethe value must beset to DEPLOY.
The value must be set toDEPLOY.
The following is an example of the command you run to perform a silentinstallation on a UNIX workstation, by using the response fileTWSPlug-ins_RespFile_UNIX.txt:./setup.sh -i silent -f /tmp/TWSPlug-ins_RespFile_unix.txt
The following example shows a response file that installs the additional plug-incontained in the zip file <plug-in>.zip on a Windows workstation:USER_INSTALL_DIR="c:\\Program Files\\IBM\\TWA"TWSAPPS_PLUGIN_FILE_NAME=C:\Documents and Settings\Administrator\Desktop\PLUGINS\<plug-in>.zip
Installation actions and log filesThis section describes the additional plug-in installation process actions andinstallation logs files.
The additional plug-in installation is possible on Tivoli Workload Schedulerinstance of:v Master domain managerv Backup master domain managerv Dynamic Domain managerv Backup Dynamic Domain managerv Agentv Fault-tolerant agent with Java extension installed.
The structure of the zip file is described in the section “The additional plug-instructure” on page 114.
118 Tivoli Workload Scheduler: Planning and Installation: Planning and Installation

The installation performs the following actions on the content of the zipfile<plug-in_namespace>.<plug-in id>_<plug-in_version>.zip for all TivoliWorkload Schedulerworkstation types:v Copy the file plugin.xml asplugin_<plugin_name>.xml in the directory
<TWA_HOME>/installDataPlugins of the selected Tivoli Workload Schedulerinstance.
v Copy the file/files/<plug-in_name>.properties in the directory<TWA_HOME>/TWS/JavaExt/eclipse/configuration of the selected Tivoli WorkloadScheduler instance.
v Copy the file/files/<plugin_namespace>.<plug-in_id>_<plugin_version>.jar inthe directory <TWA_HOME>/TWS/JavaExt/eclipse/configurationof the selectedTivoli Workload Scheduler instance.
v Copy all the files in the /files/licenses directory in the directory<TWA_HOME>/license/<plug-in_id> of the selected Tivoli Workload Schedulerinstance.
The installation also performs the following actions on the content of the zipfile<plug-in_namespace>.<plug-in id>_<plug-in_version>.zip for specificworkstation types:v For master domain manager,backup master domain manager, Dynamic
Domain manager , and Backup Dynamic Domain manager , also copy thefilefiles/<plugin_namespace>.<plug-in_id>_<plugin_version>.jar in thedirectory <TWA_HOME>/TWS/applicationJobPlugins of the selected Tivoli WorkloadScheduler instance.
v For Tivoli Workload Scheduler for z/OS connector, also copy the filefiles/<plugin_namespace>.<plug-in_id>_<plugin_version>.jar in the directory<TWA_HOME>/TWSZOS/applicationJobPluginsof the selected Tivoli WorkloadScheduler instance.
If you received error messages, analyze the installation log files shown in Table 9.
Table 9. Installation log files
Log file name Content Directory
tws4plugins_ia_install.log additional plug-in log file forInstallAnywhere errors.
Tivoli WorkloadScheduler_installation_dir\logs
tws4plugins_install.log The additional plug-in installation log file. At the begin of the installationprocess this log file is created in thefollowing directory:
On Windows operating systems:%TEMP%\twa\tws4apps
On UNIX and Linux operatingsystems:
$tmp\twa\tws4appsand copied to directory TivoliWorkload Scheduler_installation_dir\logs at the end of the installationprocess.
Chapter 4. Installing 119

Table 9. Installation log files (continued)
Log file name Content Directory
tws4plugins_status.log The additional plug-in installation status logfile is created only for silent installation. Itreports if the installation completedsuccessfully or with errors. In case of errors itindicates if the error is due to an incorrectfield value or to a failed step.
At the begin of the installationprocess this log file is created in thefollowing directory:
On Windows operating systems:%TEMP%\twa\tws4apps
On UNIX and Linux operatingsystems:
$tmp\twa\tws4appsand copied to the directory TivoliWorkload Scheduler_installation_dir\logs at the end of the installationprocess.
Note: If you are installing in silent mode and you need to see the logs files, checkbefore the tws4plugins_status.log file to verify the installation process status andthen check thetws4plugins_install.logfile for details.
120 Tivoli Workload Scheduler: Planning and Installation: Planning and Installation

Chapter 5. Upgrading
This chapter describes how to upgrade Tivoli Workload Scheduler from version 8.3and higher to the current version. It is divided into the following sections:v “Engine coexistence and upgrade notes”v “User authorization requirements” on page 67v “Checking prerequisites (UNIX and Linux)” on page 123v “Upgrading a master domain manager or backup master domain manager
instance” on page 123v “Upgrading agents and domain managers” on page 153v “Upgrading a command line client” on page 188v “Upgrading when there are corrupt registry files” on page 189v “Adding a feature” on page 191
Important:
v Only when the database administrator manages all the confidential informationrelated to the database, such as the database administrator user ID andpassword and the IT administrator who upgrades the product does not knowthem, run the procedure described in Chapter 3, “Creating or upgrading theTivoli Workload Scheduler database tables before installing or upgrading,” onpage 43.
v After upgrading, to grant permissions to users on the updated database views,you must run the script <TWA_home>\TWS\dbtools\DB2\scripts\dbgrant.bat (forWindows operating systems) or <TWA_home>/TWS/dbtools/DB2/scripts/dbgrant.sh (for AIX operating systems) using the following syntax:<TWA_home>/TWS/dbtools/DB2/scripts/dbgrant.sh<user_ID_to_be_granted> <database_name>[<database_admin_user> <password>]
Engine coexistence and upgrade notesAbout this task
This section contains information about coexistence with older versions andupgrade possibilities.
Coexistence with previous versionsThe current version of the Tivoli Workload Scheduler distributed engine can beinstalled on any workstation containing a prior version, provided that both the<TWS_user>, the nm port, and the installation path are different from those of theprevious versions.
Upgrading existing versionsAbout this task
The upgrade of a Tivoli Workload Scheduler network can be performed top-downor bottom-up. The advantages and disadvantages of these approaches arediscussed in “Choosing how to migrate your network” on page 124.
© Copyright IBM Corp. 1999, 2012 121

Table 10 shows the versions of Tivoli Workload Scheduler components that can beupgraded to the current version.
Table 10. Upgrade availability for Tivoli Workload Scheduler components
Component VersionMinimum recommended fix packlevel
Master domain managerBackup master domain managerFault-tolerant agent
8.3 7 and higher
8.4 GA and higher
8.5 GA and higher
8.5.1 GA and higher
Command-line client 8.5.1 GA and higher
Connector Upgrade available from version 8.3
v If you are using Tivoli Workload Scheduler components at a lower fix pack level,install the fix pack at the indicated level, or higher.
v If you are using Tivoli Workload Scheduler components from a previous versionnot supported in Table 10, consider replacing them with a fresh installation ofthe latest components, or upgrading them as follows:1. Upgrade them to one of the supported upgrade platforms, using the upgrade
programs and procedures documented for that platform.2. Apply the necessary fix packs, as shown in Table 10.3. Upgrade them to the current version.
Files and folders changed during the upgradeThe upgrade process changes the following folders and files:
On UNIX and Linux operating systems:/etc/TWS/etc/TWA/.swdis (This is the default Software Distribution directory.
The product changes the directory specified inthe product_dir property inthe /etc/Tivoli/swdis.ini file.)
/usr/Tivoli/TWStws_home
On Windows operating systems:%windir%\TWA%windir%\system32\TWS*Registry.datC:\swdis (This is the default Software Distribution directory.
The product changes the directory specified inthe product_dir property inthe %windir%\swdis.ini file.)
tws_home
User authorization requirementsAbout this task
Check the authorization roles before beginning the procedure.
Authorization requirements for running any of the installation, upgrade, oruninstallation wizards or commands are the same:
UNIX and Linux operating systemsroot access
122 Tivoli Workload Scheduler: Planning and Installation: Planning and Installation

Windows operating systemYour login account must be a member of the Windows Administratorsgroup or domain administrators with Act as Part of the Operating System.
If you set the Windows User Account Control (UAC) on the workstationyou must run the installation as administrator. To do this, before runningthe installation, perform the following steps:1. Right-click the icon that you use to run the program:
If you are using the wizard:SETUP.exe
If you are using the silent installation or twsinst:Command Prompt
2. Select Run as administrator.
In addition, to use Software Distribution, the user must have the SoftwareDistribution roles admin, senior, or super.
Checking prerequisites (UNIX and Linux)About this task
If you are preparing to upgrade on UNIX and Linux operating systems, TivoliWorkload Scheduler automatically runs a prerequisite check on your system.Having an environment that meets the Tivoli Workload Scheduler systemrequirements ensures that an upgrade succeeds without any delays orcomplications.
Note: The prerequisite check is not available if you are using the SoftwareDistribution installation method and is only available on UNIX and Linuxoperating systems.
The prerequisite check verifies that:v The operating system is supported for the product.v The necessary engine software patch levels are installed.v The necessary kernel parameters are correctly configured.
Note: The prerequisite check only verifies that the environment meets therequirements of the Tivoli Workload Scheduler. It does not check the installationrequirements for other components, such as DB2.
For a detailed description on how the check works, see“Checking prerequisites(UNIX and Linux)” on page 28.
Upgrading a master domain manager or backup master domainmanager instance
About this task
This section describes how to upgrade master domain managers and backupmaster domain managers.
This section is divided into the following topics:v “Upgrading overview” on page 124
Chapter 5. Upgrading 123
|||
|||
|
||
||
|

v “Preparing to upgrade” on page 134v “New directory structure” on page 135v “Performing a direct upgrade” on page 138v “Performing a parallel upgrade” on page 149
Upgrading overviewAbout this task
This section provides an overview of the upgrade of an existing version of TivoliWorkload Scheduler V8.3 and higher instance. It is divided into the followingsections:v “Choosing how to migrate your network”v “Component upgrade procedures”v “Parallel or direct upgrading” on page 128v “Updating authentication” on page 130v “Performing a safe upgrade” on page 133
Note: When you upgrade from version 8.5, you must upgrade the entire instanceof Tivoli Workload Automation. For information about Tivoli WorkloadAutomation instances, see “Instances of Tivoli Workload Automation” on page 31.
To upgrade an instance of Tivoli Workload Automation, you must upgrade allcomponents that are part of that instance, starting with the components of TivoliWorkload Scheduler first. For example, if your instance includes one masterdomain manager and also the Dynamic Workload Console, you must upgrade bothof these components but you must upgrade the master domain manager first andthen the Dynamic Workload Console next.
Choosing how to migrate your networkAbout this task
Tivoli Workload Scheduler supports backwards compatibility so you can decide toupgrade your network in either of the following ways:
Top-downUpgrade the master domain manager and backup master domain manager,and then progressively upgrade the agents. Many of the new functionsintroduced in the current version become available for each agent as it isupgraded. The disadvantage is that the same functions are not available toall agents at the same time. Even if you distribute the new security file toan agent prior to V8.5, it does not function until you upgrade it. You mustupgrade any agents that are older than V8.5.
Bottom-upUpgrade the agents first, and then upgrade the master domain managerand backup master domain manager. The new functions introduced in thecurrent version are not available until the whole network has beenupgraded.
Component upgrade proceduresAbout this task
The following flowcharts show the steps you can perform to upgrade TivoliWorkload Scheduler to the current version. Note the different flowcharts for directand parallel upgrades. These options are discussed in detail following the charts.
124 Tivoli Workload Scheduler: Planning and Installation: Planning and Installation

The following acronyms are used in the flowcharts:
MDM Master domain manager
BKM Backup master domain manager
Chapter 5. Upgrading 125

YES
?
NO
1.BKM exists?
Stop scheduling processon the BKM
Install newBKM
2. UpgradeBKM
Rebuild Plan in theMDM to send
Symphony to BKM
Can upgradebe completedin plan cycle ?
3. Run Switch managerfrom MDM to BKM
Starting with runningMDM
Migrate authenticationconfiguration to
BKM
Define newBKM in old database and
optionally stop Broker
YES
NO
Make Switch managerpermanent (*)
2. UpgradeBKM
4. Upgrade old MDM(now BKM)
Run Switch managerto switch back toupgraded MDM
Was first switch manager (*)made permanent
YES
NO
Make the second Switch managerpermanent
v8.5 and higher
Which versionbeing upgraded ?
Upgrade Security filefor new featuresin v8.4 and v 8.5
New MDM and BKM upgradedto ... version
v8.3 or v8.4
Figure 11. Parallel upgrade procedure flowchart
126 Tivoli Workload Scheduler: Planning and Installation: Planning and Installation

YES
?
NO
v8.5 and higher
0. BKM exists?
Stop scheduling processon the BKM
Install newBKM
UpgradeBKM
1. Stop scheduling processon theMDM
2. UpgradeMDM
Which versionbeing upgraded ?
3. Upgrade Security filefor new featuresin v8.4 and v 8.5
4. Restart schedulingprocesses on MDM
Starting with runningMDM
Copy authenticationconfiguration to
BKM
v8.3 or v8.4
Figure 12. Direct upgrade procedure flowchart
Chapter 5. Upgrading 127
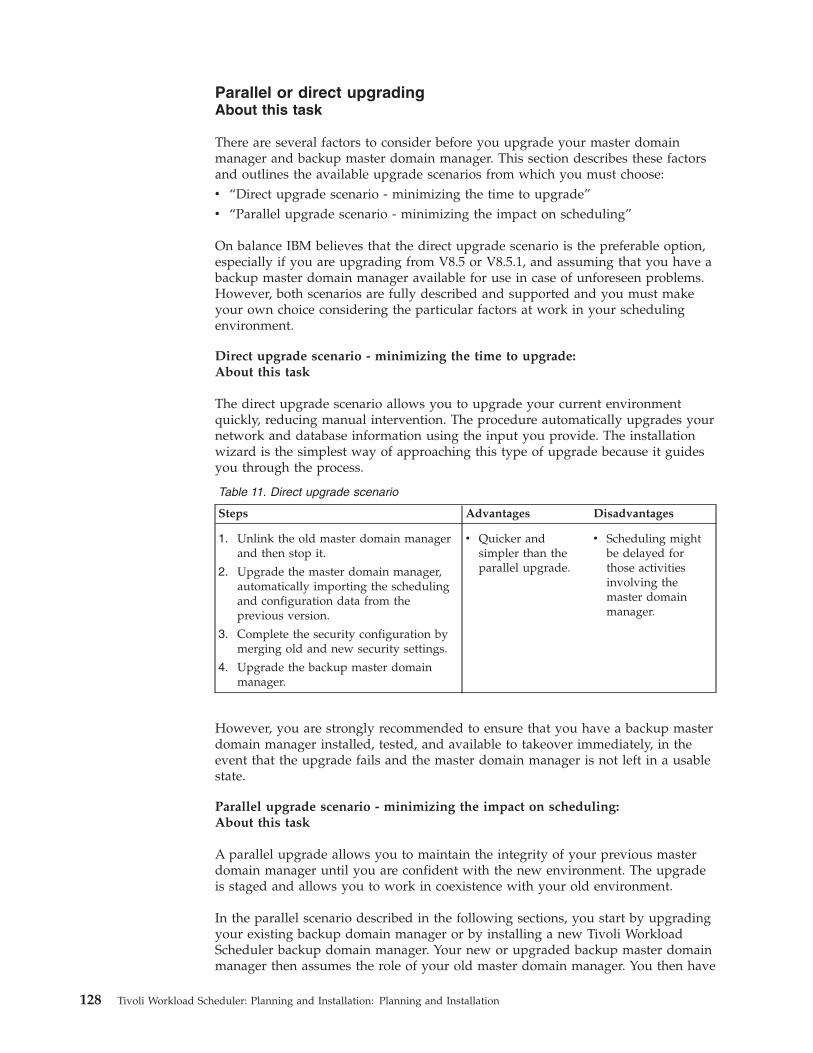
Parallel or direct upgradingAbout this task
There are several factors to consider before you upgrade your master domainmanager and backup master domain manager. This section describes these factorsand outlines the available upgrade scenarios from which you must choose:v “Direct upgrade scenario - minimizing the time to upgrade”v “Parallel upgrade scenario - minimizing the impact on scheduling”
On balance IBM believes that the direct upgrade scenario is the preferable option,especially if you are upgrading from V8.5 or V8.5.1, and assuming that you have abackup master domain manager available for use in case of unforeseen problems.However, both scenarios are fully described and supported and you must makeyour own choice considering the particular factors at work in your schedulingenvironment.
Direct upgrade scenario - minimizing the time to upgrade:About this task
The direct upgrade scenario allows you to upgrade your current environmentquickly, reducing manual intervention. The procedure automatically upgrades yournetwork and database information using the input you provide. The installationwizard is the simplest way of approaching this type of upgrade because it guidesyou through the process.
Table 11. Direct upgrade scenario
Steps Advantages Disadvantages
1. Unlink the old master domain managerand then stop it.
2. Upgrade the master domain manager,automatically importing the schedulingand configuration data from theprevious version.
3. Complete the security configuration bymerging old and new security settings.
4. Upgrade the backup master domainmanager.
v Quicker andsimpler than theparallel upgrade.
v Scheduling mightbe delayed forthose activitiesinvolving themaster domainmanager.
However, you are strongly recommended to ensure that you have a backup masterdomain manager installed, tested, and available to takeover immediately, in theevent that the upgrade fails and the master domain manager is not left in a usablestate.
Parallel upgrade scenario - minimizing the impact on scheduling:About this task
A parallel upgrade allows you to maintain the integrity of your previous masterdomain manager until you are confident with the new environment. The upgradeis staged and allows you to work in coexistence with your old environment.
In the parallel scenario described in the following sections, you start by upgradingyour existing backup domain manager or by installing a new Tivoli WorkloadScheduler backup domain manager. Your new or upgraded backup master domainmanager then assumes the role of your old master domain manager. You then have
128 Tivoli Workload Scheduler: Planning and Installation: Planning and Installation

the choice of making this new environment permanent. Alternatively, you canupgrade and restore the old master domain manager to its original role.
This sequence of operations is designed to minimize your out-of-service time andto ensure data integrity. The parallel upgrade involves a limited number of manualsteps but has the advantage of maintaining the integrity of your currentenvironment.
Table 12. Parallel upgrade scenario
Steps Advantages Disadvantages
1. Perform one of the following dependingon whether or not you already have abackup master domain manager:
v Upgrade your current backup masterdomain manager referencing theexisting database.
v Install a fresh backup master domainmanager, that points to the existingdatabase. You also need to migrateyour user authentication configurationto the new backup master domainmanager.
2. Switch your manager to the new backupmaster domain manager.
3. Make the switch manager permanent.
4. Your backup master domain managerhas now become the master domainmanager of the new environment.Before you proceed to the next step,decide what to do with your old masterdomain manager. You have threealternatives:
v Keep the new manager as the masterdomain manager of your newenvironment and your old masterdomain manager as a full statusagent, upgrading it later to the newversion. Install a new backup masterdomain manager and configure it.
v Keep the new manager as the masterdomain manager of your newenvironment and upgrade the oldmaster to become the new backupmaster domain manager.
v Upgrade your old master domainmanager and restore the originalconfiguration in the new environment(this is the procedure indicated inFigure 12 on page 127)
5. If you switch back, and your originalswitch was made permanent, you mustmake the switch back permanent as well
6. Complete your security configuration bymerging old and new security settings.
v Allows thecoexistence of theold master with thenew environment.
v Allows you tochoose a new andbetter performingplatform for yournew masterdomain manager.
v It is a reversibleprocess.
v Automaticallyupdates thedatabase schemawhich is fullycompatible for oldand new versions.
v Allows a greatdegree of flexibility.You can choose tonot upgrade theold master domainmanager.
v You can easilyupgrade hardwareat the same timeyou perform theparallel upgrade.
v Involves somemanualconfiguration steps.
Chapter 5. Upgrading 129

Updating authenticationAbout this task
This section describes how your configured authentication mechanism is upgraded.
In versions of Tivoli Workload Scheduler before V8.6, authentication wasconfigured to use stand-alone user registries, managed by the embeddedWebSphere Application Server. The available options were:v Local operating systemv Custom (through PAM - Pluggable Authentication Module)v LDAPv File Registry
If you enabled LDAP, you could use one of the following servers:v IBM Tivoli Directory Serverv Sun ONEv Microsoft Windows Active Directoryv RACF® configured on IBM Tivoli Directory Server
Versions of Tivoli Workload Scheduler from V8.6 onwards are configured forauthentication (through the embedded WebSphere Application Server) in VMM(Virtual Member Manager) mode. This creates a Federated User Registry, whichsupports the simultaneous use of more than one user registry. The user registrychoices and LDAP server options are similar to those in versions before V8.6.
The implementation of the Federated User Registry, however, requires a differentconfiguration than the stand-alone configuration you are currently using.
During the upgrade, your existing configuration is migrated, so that when theupgrade is complete the product is configured to use the same authenticationmechanism as before, but within a Federated User Registry. The procedure isslightly different, depending on how you perform the upgrade. If you seeFigure 12on page 127 you will see that there are three possibilities:
Direct upgrade of existing master domain managerIn this scenario the upgrade wizard or command attempts to reconfigureyour authentication mechanism for the Federated User Registry. In theevent that it fails to do this, but in all other respects the upgrade issuccessful, your upgraded master domain manager is configured with astand-alone user registry. However, this is a temporary measure to allowyou access to the master domain manager, and the problem must beresolved and the configuration migrated into the Federated User Registrybefore any further components are upgraded or installed.
Parallel upgrade by installing a new backup master domain managerIn this scenario, after you have installed the new backup master domainmanager you must manually migrate your authentication mechanism fromyour old master domain manager to the new backup master domainmanager. When the new backup master domain manager is switched tobecome the new master domain manager it is thus already configured foryour current chosen authentication mechanism. The migration requires youto export the authentication configuration on the master domain managerto a text file and import it into the backup master domain manager. This isdone using the WebSphere Application Server tools.
130 Tivoli Workload Scheduler: Planning and Installation: Planning and Installation

Parallel upgrade by upgrading your existing backup master domain managerIn this scenario your existing backup master domain manager will alreadybe configured with the same user authentication as your master domainmanager. The upgrade wizard or command attempts to reconfigure yourauthentication mechanism for the Federated User Registry. In the eventthat it fails to do this, but in all other respects the upgrade is successful,your upgraded backup master domain manager is configured with astand-alone user registry. However, this is a temporary measure to allowyou access to the backup master domain manager, and the problem mustbe resolved and the configuration migrated into the Federated UserRegistry before any further components are upgraded or installed.
RACF considerations:About this task
In versions of Tivoli Workload Scheduler before V8.6, RACF authentication wasconfigured using the IBM Tivoli Directory Server, and instructions about how to dothis were given in the documentation. When you upgrade to V8.6 thisconfiguration is also upgraded, and you can continue to use it. However, theFederated User Registry supports the z/OS Integrated Security Services LDAPServer, which you can configure after the upgrade is complete.
Mapping between stand-alone and federated repository keywords:About this task
When you upgrade your stand-alone user registry, either by upgrading an existingcomponent that uses WebSphere Application Server, or by exporting yourconfiguration from the stand-alone to the federated environment, the product mapsyour existing configuration keywords to the new structure. It does so followingthese rules:v If only old keywords are present, these keywords are used to configure the new
keywordsv If both old and new keywords are present, the old keywords are discarded and
only the new keywords are used.v If the showSecurityProperties WebSphere Application Server tool is used to
extract the security configuration based on the stand-alone repositories, awarning is issued to alert the user that, when re-imported, the data in the file isused to enable VMM security and the stand-alone repositories are disabled
v The LDAPreuseConnection property is not supported in federated repositories,and is discarded if present.
v The old LDAP user search filters, if specified, are converted to the new usersearch filters as follows. For more details about the individual propertiesdiscussed here see the Tivoli Workload Scheduler: Administration Guide.
LDAPUserFilter=(&(|(mail=%v)(cn=%v))(objectclass=ePerson))All the parameters (like "mail=%" and "cn=%v") are removed from thesearch filter and added to "LDAPloginProperties" (if not already present)separated by semi-colons";" because these variables are not supported inthe federated LDAP search filters. In this new configuration, VMM doesnot support replacement parameters such as "%v". In VMM, the filter tosubstitute mail with the specified value is applied by the VMM runtimeduring login to the application server, according to the login propertiesspecified for an LDAP registry configured in the federated repository.The remaining values are added to the LDAPUserSearchFilter. All values
Chapter 5. Upgrading 131

like objectclass=ePerson, objectclass=...... are added to theLDAPUserObjectClasses separated with semi-colons ";" and without thekeyword "objectclass ".
LDAPGroupFilter=(&(cn=%v)(ou=memberlist)(ou=ibmgroups)(o=ibm.com)(objectclass=groupOfUniqueNames))
All the parameters (like "cn=%v") are removed from the search filter andadded to "LDAPloginProperties" (if not already present) separated withsemi-colons ";". Because the variables are not supported in the federatedLDAP search filters. In this new configuration, VMM does not supportreplacement parameters such as "%v". In VMM, the filter to substitutemail with the specified value is applied by the VMM runtime duringlogin to the application server, according to the login properties specifiedfor an LDAP registry configured in the federated repository. Theremaining values are added to the LDAPGroupSearchFilter. All valueslike (objectclass=groupOfUniqueNames , objectclass=......) are addedto the LDAPGroupObjectClasses separated with semi-colons ";" andwithout the keyword "objectclass ".
LDAPUserIdMap=*:cnIf the first part of the mapping is not "*" and this value is present in the"LDAPloginProperties", then it is replaced in "LDAPloginProperties"using the second part of the mapping, in this case "cn".
LDAPGroupIdMap=*:cnIf the first part of the mapping is not "*" and this value is present in the"LDAPloginProperties", then it is replaced in "LDAPloginProperties "using the second part of the mapping, in this case "cn".
LDAPGroupMemberIdMap=groupOfNames:member;groupOfUniqueNames:uniqueMember
This sequence of semi-colon ";" separated values is parsed and the firstelement of every pair of values is added to"LDAPGroupConfigMemberClasses", while the second element is added to"LDAPGroupConfigMemberNames".– If the server type is IDS, then the "LDAPGroupConfigMemberScopes" is
set to "all" and "LDAPGroupConfigName" is set to "ibm-allGroups"– If the server type is AD, then the "LDAPGroupConfigMemberScopes" is
set to "direct" and "LDAPGroupConfigName" is set to "memberOf"
EXAMPLE:About this task
Stand-alone Configuration:LDAPServerType=IBM_DIRECTORY_SERVERLDAPUserFilter=(&(|(mail=%v)(cn=%v))(objectclass=ePerson))LDAPGroupFilter=(&(cn=%v)
(ou=memberlist)(ou=ibmgroups)(o=ibm.com)(objectclass=groupOfUniqueNames))
LDAPUserIdMap=*:cnLDAPGroupIdMap=*:cnLDAPGroupMemberIdMap=groupOfNames:member;groupOfUniqueNames:uniqueMember
Federated ConfigurationLDAPServerType=IDSLDAPloginProperties=mail;cnLDAPUserEntityType=PersonAccountLDAPUserObjectClasses=ePersonLDAPUserSearchFilter=(objectclass=ePerson)
132 Tivoli Workload Scheduler: Planning and Installation: Planning and Installation

LDAPGroupEntityType=GroupLDAPGroupObjectClasses=groupOfUniqueNamesLDAPGroupSearchFilter=(&(ou=memberlist)
(ou=ibmgroups)(o=ibm.com)(objectclass=groupOfUniqueNames))
LDAPGroupConfigName=ibm-allGroupsLDAPGroupConfigScope=allLDAPGroupConfigMemberNames=member;uniqueMemberLDAPGroupConfigMemberClasses=groupOfNames;groupOfUniqueNamesLDAPGroupConfigMemberScopes=all;allLDAPGroupConfigMemberDummies=uid=dummy;
changeSecurityProperties output:About this task
The output from the changeSecurityProperties script, whether run by the upgradewizard as part of the upgrade or run by you manually, gives a lot of information,warning, and error messages described in the section "changeSecurityPropertiesoutput" of the Tivoli Workload Scheduler: Administration Guide.
Performing a safe upgradeAbout this task
If you are upgrading in parallel mode you do not interrupt any running processes.However, if you are upgrading in direct mode you will interrupt running processesfor the time it takes to perform the upgrade. To ensure that this interruption doesnot risk the integrity of these running processes, it is performed in safe mode. Safemode ensures this by doing the following before starting the upgrade:v Checks if there are command lines currently running.v Prevents other jobs from starting by setting the job fence on the workstation to
the go (101) value.v Checks if there are jobs running. If there are, it waits 60 minutes and checks
again. If all the jobs do not complete during this interval, the upgrade does notproceed and an error message is displayed. If you want to change this value,specify the number of minutes when you run the setup or perform a silentinstallation.
v Check if there are processes running. If any, it stops them, and waits for thecompletion of the stop action.
If all these checks are passed Tivoli Workload Scheduler starts the upgrade:v If the upgrade complete successfully after the Batchman process restarts, the job
fence is set to the original value, because there is a synchronization between theBatchman message queues and the Symphony file for the job fence value. Theinstallation process does not start the Batchman process and to set the originaljob fence on your workstation, run:conman "start"
v If the upgrade does not complete successfully either because the checks are notpassed or an error occurs, the job fence is not set to the original value. You must:– Set the job fence manually to its original value.– Perform the steps to complete the actions or correct the errors and resume the
upgrade.
Note: The safe upgrade is available with all the upgrade methods except usingSoftware Distribution.
Chapter 5. Upgrading 133
|||||
|

Preparing to upgradeAbout this task
Before you begin the upgrade process, complete the following tasks as appropriate:
Configuring the security file for new functionsDuring the upgrade procedure you will need to configure the security filefor new functions. Configuring the security file requires the following:
Setting the default variable table when upgrading from version 8.3 and8.4
Setting variable tables applies to version 8.3 and higher. When youupgrade from version 8.3 and 8.4, the upgraded security fileincludes the new default statement for variable tables. A variabletable is an object that groups together multiple variables. Known asglobal parameters in previous versions, these objects are nowcalled variables in version 8.5 and higher. Local parameters aremanaged as before, and the old parameters statement from theprevious security file continues to manage their security aspects.Any global parameters that were defined in your previousdatabase have become elements of the default variable table, and asecurity statement for the table has been added to the security file.You can choose to customize the user permissions to this table (bydefault, all users have full permission).
Configuring for event-driven workload automation
Configuring for event-driven workload automation applies only toversion 8.3. You must modify the security file to include newsecurity statements for the event management and reportingfeatures. If you have specific security settings in your V8.3environment, these settings must be manually merged with thenew settings before you build the final security file for yourcurrent environment. The statements you add manually might varydepending on your security settings and on whether you havechosen the parallel or direct upgrade scenario, as explained in thefollowing sections.
Perform a backup of your databaseBefore you begin the upgrade process, perform a backup of your currentTivoli Workload Scheduler database, referring to the Oracle or DB2documentation.
Upgrade your database to 64-bitIf you are performing a direct upgrade on any UNIX or Linux platform,except for Linux Intel 32 and HP RISC, you must upgrade your local DB2or Oracle instances to 64-bit versions.
Linux kernelIf you are upgrading in a Linux environment that uses theLD_ASSUME_KERNEL=2.4.1 environment variable, upgrade to the currentversion of Tivoli Workload Scheduler in a shell that also uses theLD_ASSUME_KERNEL=2.4.1 environment variable.
Ensure your current Tivoli Workload Scheduler installations are in the correctstate When you are upgrading your current environment, make sure the
software package is in the COMMIT state. If it is in the UNDOABLE state, youmust accept it to change its state to COMMIT before you upgrade to thecurrent version. To check the state, perform the following:
134 Tivoli Workload Scheduler: Planning and Installation: Planning and Installation

1. From <TWA_dir>/TWS/_uninstall/CLI, run the command: swd_env.bator . . /swd_env.sh as appropriate.
2. Run the command: wdlssp3. Search for the following lines:
DISSE0164I Name : TWS_LP_twsuserDISSE0165I Version : 8.4.0.00DISSE0166I State : IC---
----------------------------------------
DISSE0164I Name : FP_TWS_WINDOWS_twsuserDISSE0165I Version : 8.4.0.00DISSE0166I State : IC---
4. Ensure that the state of the package is IC.
Ensure your backup master domain manager is installed and workingIf you do not use a backup master domain manager you are stronglyrecommended to install and use one during the upgrade process. Followthe instructions in the Tivoli Workload Scheduler: Administration Guide,SC23-9113 to configure the backup master domain manager and ensurethat key files are regularly mirrored to it. Test that it is working correctlyby running switchmgr to switch to it and back again.
Check for absolute installation pathsUse composer to check if the workstation has jobs or file dependencies thatuse the absolute installation path. If there are, modify the path using avariable.
New directory structureAbout this task
This section applies if you are upgrading from version 8.3 or 8.4. If you areupgrading from version 8.5, this directory structure already exists. This sectiondescribes the new product directory structure and the new directory structure forSSL files that was implemented in version 8.5.
Product directoryAbout this task
The new directory structure to all upgrades with the exception of upgradesperformed using Software Distribution.
When you upgrade to the current version from version 8.3 or 8.4, a new productdirectory structure is created. During the upgrade process, Tivoli WorkloadScheduler is moved from the old directory structure and then updated into thenew directory structure. The new structure changes the existing TWShome toTWAhome which becomes the parent directory for the new TWShome.
UNIX and Linux operating systemsThe product is installed in the user's home directory. The default locationfor the upgrade is:v on Linux: /opt/ibm/TWA/TWS/v on UNIX: /opt/IBM/TWA/TWS/
Windows operating systemsThe default location for the upgrade is %ProgramFiles%\IBM\TWA\TWS\.
Chapter 5. Upgrading 135

Note: The WebSphere Application Server located inside the installation directory isrenamed from appserver to eWAS
Note:
1. If you have a FINAL schedule, during the upgrade, it is downloaded duringthe installation. The default FINAL is reused. A backup copy of the schedule iscreated with the name SFinal.extract in the new installation directory
2. If you have any custom configurations (for example, custom scripts or backupprocesses) existing in your Tivoli Workload Scheduler structure, you mustupdate them so that they work in the new directory structure.
3. On UNIX operating systems, you can create symbolic links to the new directorystructure until the scheduling environment is updated by performing the ln -scommand from the old installation directory. For example:ln -s bin TWS/binln -s config TWS/config
For more information about installation paths, see “Instances of Tivoli WorkloadAutomation” on page 31.
Examples:About this task
UNIX and Linux operating systems
If you originally installed Tivoli Workload Scheduler in/export/home/twsuser, you have a directory structure as follows:/export/home/twsuser/bin/export/home/twsuser/config/export/home/twsuser/_uninstall/export/home/twsuser/appserver/export/home/twsuser/wastools
When you upgrade Tivoli Workload Scheduler, the new directory structureis:/export/home/twsuser/TWA/TWS/bin/export/home/twsuser/TWA/TWS/config/export/home/twsuser/TWA/TWS/_uninstall/export/home/twsuser/TWA/eWAS/export/home/twsuser/TWA/wastools/export/home/twsuser/TWA/TDWB
Windows operating systemsIf you originally installed Tivoli Workload Scheduler into the directoryc:\Program Files\IBM\TWS, you have a directory structure as follows:c:\Program Files\IBM\TWS\binc:\Program Files\IBM\TWS\configc:\Program Files\IBM\TWS\uninstallc:\Program Files\IBM\TWS\appserverc:\Program Files\IBM\TWS\wastools
When you upgrade Tivoli Workload Scheduler, the new directory structureis:c:\Program Files\IBM\TWA\TWS\binc:\Program Files\IBM\TWA\TWS\configc:\Program Files\IBM\TWA\TWS\uninstallc:\Program Files\IBM\TWA\eWASc:\Program Files\IBM\TWA\wastoolsc:\Program Files\IBM\TWA\TDWB
136 Tivoli Workload Scheduler: Planning and Installation: Planning and Installation

File system structureAbout this task
When performing the upgrade the file system directory structure changes asfollows:
On UNIX and Linux operating systems:
From Version 8.3 and 8.4<TWS_home_directory>/appserver/profiles/twsprofile/config/cells/DefaultNode/nodes/DefaultNode/servers/server1/
From Version 8.5.1<TWS_home_directory>/eWAS/profiles/twaprofile/config/cells/DefaultNode/nodes/DefaultNode/servers/twaserver
To Version 8.6<TWS_home_directory>/eWAS/profiles/TIPProfile/config/cells/TIPCell/nodes/TIPNode/servers/server1
On Windows operating systems:
From Version 8.3 and 8.4<TWS_home_directory>\appserver\profiles\twsprofile\config\cells\DefaultNode\nodes\DefaultNode\servers\server1
From Version 8.5.1<TWS_home_directory>\eWAS\profiles\twaprofile\config\cells\DefaultNode\nodes\DefaultNode\servers\twaserver
To Version 8.6<TWS_home_directory>\eWAS\profiles\TIPProfile\config\cells\TIPCell\nodes\TIPNode\servers\server1
Where <TWS_home_directory> is the directory where you originally installed theproduct.
Directory for SSL filesAbout this task
When you upgrade to the current version from version 8.3 or 8.4, a new directoryfor SSL files is created. The following describes the old and new directorystructures depending on whether you have chosen the default installation path orhave customized the installation path.
If you are using the default installation path, the TWSServerTrustFile.jks andTWSServerKeyFile.jks files are located as follows. Note that in these cases, thevalues of keyFileName and trustFileName in the security properties are already setto default.
Previous directory structure
v TWSInstallationPath\AppServer\profiles\twsprofile\etc\TWSServerTrustFile.jks
v TWSInstallationPath\AppServer\profiles\twsprofile\etc\TWSServerKeyFile.jks
New directory structure
v TWSInstallationPath\eWAS\profiles\TIPProfile\etc\TWSServerTrustFile.jks
v TWSInstallationPath\eWAS\profiles\TIPProfile\etc\TWSServerKeyFile.jks
Chapter 5. Upgrading 137

If you are using a customized installation path, the TWSServerTrustFile.jks andTWSServerKeyFile.jks files are located as follows. The old keys are left in theiroriginal directories but are also copied to the new directory. The locationparameters of WebSphere Application Server will be set to the default path whichis ${USER_INSTALL_ROOT}/etc/KEYNAME. Note that the values of keyFileNameand trustFileName in the security properties are set to the default paths which are${USER_INSTALL_ROOT}/etc/TWSServerKeyFile.jks and ${USER_INSTALL_ROOT}/etc/TWSServerTrustFile.jks.
Previous directory structure
v CustomzedInstallationPath\TWSServerTrustFile.jks
v CustomizedInstallationPath\TWSServerKeyFile.jks
New directory structure
v TWSInstallationPath\eWAS\profiles\TIPProfile\etc\TWSServerTrustFile.jks
v TWSnstallationPath\eWAS\profiles\TIPProfile\etc\TWSServerKeyFile.jks
Performing a direct upgradeAbout this task
This section describes how to upgrade your environment using a direct scenario.See “Direct upgrade scenario - minimizing the time to upgrade” on page 128 foran overview. It is divided into the following procedures:v “Direct 1: Unlink the master domain manager from the network and stop it”v “Direct 2: Upgrade the master domain manager or backup master” on page 139v “Direct 3: Reconfigure the DB2 properties on the backup master domain
manager” on page 144v “Direct 4: Check the authentication upgrade was successful” on page 144v “Direct 5: Customize and submit the optional final job stream” on page 145v “Direct 7: Complete the security configuration for the new environment” on
page 147v “Direct 6: Upgrade your backup master domain manager” on page 146v “Direct 8: Restart scheduling processes” on page 147
The upgrade process changes some files and folders, see “Files and folderschanged during the upgrade” on page 122 for the complete list.
Direct 1: Unlink the master domain manager from the networkand stop itAbout this task
Before commencing the upgrade, you must unlink all workstations from the masterdomain manager and stop it.
Follow these steps:
Procedure1. Log in as the <TWS_user>.2. Unlink all workstations in the domain:
From the Dynamic Workload ConsoleIn the navigation tree, click Scheduling Environment > Monitor >
138 Tivoli Workload Scheduler: Planning and Installation: Planning and Installation
Monitor Workstations, run a task and, in the table of results, select allthe workstations of the master domain manager and click . Unlink.
From the command line of the master domain managerIssue the following command:conman "unlink @;noask"
3. Stop the master domain manager:
From the Dynamic Workload ConsoleIn the navigation tree, click Scheduling Environment > Monitor >Monitor Workstations, run a task and, in the table of results, select allthe workstations of the master domain manager and click . Stop.
From the command line of the master domain managerIssue the following command:conman “stop;wait”
4. From the command line of the master domain manager, stop the netmanprocess as follows:
UNIX and Linux operating systemsRun:conman “shut" ; wait
Windows operating systemsRun the shutdown.cmd command from the Tivoli Workload Schedulerhome directory.
5. If you are upgrading from version 8.4 or higher, stop the SSM Agent byrunning conman stopmon .
6. Verify that all services and processes are not running, as follows:
UNIX and Linux operating systemsRunps -u <TWS_user>
Verify that the following processes are not running: netman, mailman,batchman, writer, jobman, JOBMAN, stageman, appserverman. Allprocesses must be stopped with the exception of the embeddedWebSphere Application Server which must remain running.
Windows operating systemsRun:<drive>\unsupported\listproc.exe
where <drive> is the Tivoli Workload Scheduler home directory. Verifythat the following processes are not running: netman, mailman,batchman, writer, jobman, stageman, JOBMON, tokensrv, batchup.
Also, ensure that no system programs are accessing the directory orsubdirectories, including the command prompt, and that in WindowsExplorer the Administrative Tools>Services panel is not open.
Direct 2: Upgrade the master domain manager or backup masterAbout this task
This section describes how to upgrade a master domain manager or backup masterdomain manager
Chapter 5. Upgrading 139

You can upgrade a master domain manager or backup master domain managerusing the following installation methods:v “Upgrading using the installation wizard”v “Upgrading using the silent installation” on page 144
Upgrading using the installation wizard:About this task
To upgrade a Tivoli Workload Scheduler master domain manager or backup masterdomain manager perform the following steps.
Procedure
1. Choose one of the following:v Insert the installation DVD and run the setup for your operating system:
On UNIX and Linux operating systemsTWS/operating_system/SETUP.bin or TWS/SETUP.sh
On Windows operating systemsTWS\operating_system\SETUP.exe or TWS\SETUP.cmd
v Alternatively, start the launchpad as follows and select the Tivoli WorkloadScheduler installation:
On UNIX and Linux operating systemsFrom the root directory of the DVD, run launchpad.sh.
On Windows operating systemsFrom the root directory of the DVD, run launchpad.exe.
If you have autorun enabled, the launchpad starts automatically. If you wantto start the launchpad from a mounted file system, ensure that you havewrite permission on it before starting the launchpad.
2. Follow the installation wizard screens to complete the installation. Thefollowing list describes the fields that you might need to complete during theinstallation. Some fields might not apply to your upgrade depending onwhether your old version is 8.3 or higher.
Back up the previous Tivoli Workload Scheduler instanceSelect whether to back up the previous instance.
Backup Destination DirectoryWhen you select to back up the previous instance, specify the directorywhere the backup is to be located.
Backup profile destination directoryThe upgrade procedure performs a backup of your WebSphere®
Application Server (WAS) profile. Your current settings are transferredto the new WebSphere Application Server automatically. A defaultbackup path is provided for you. If you want to save the profile to adifferent path, specify it in this field. Click Next.
Tivoli Workload Scheduler user passwordType the password of the Tivoli Workload Scheduler user for whichyou are upgrading the instance.
Embedded WebSphere Application Server (WAS) administrator user nameand password
If you have changed the WebSphere Application Server (WAS)administrator user name and password from your previous installation,
140 Tivoli Workload Scheduler: Planning and Installation: Planning and Installation
|||

enter the new user name and password. If you have not changed theseWebSphere Application Server values in your current installation, leavethese fields blank.
SAS Server Authentication ListenerApplies only to version 8.3. The port used by the Secure AssociationServices (SAS) to listen for inbound authentication requests. The defaultvalue is 31119.
CSIv2 Server Authentication ListenerApplies only to version 8.3. The port on which the Common SecureInteroperability Version 2 (CSIv2) service listens for inbound serverauthentication requests. The default value is 31120.
CSIv2 Client Authentication ListenerApplies only to version 8.3. The port on which the Common SecureInteroperability Version 2 (CSIv2) service listens for inbound clientauthentication requests. The default value is 31121.
ORB ListenerApplies only to version 8.3. The port used for RMI over IIOPcommunication. The default value is 31122.
Administration HTTP transportApplies only to version 8.3. The administrative console port. Thedefault value is 31123.
Administration HTTPS transportApplies only to version 8.3. The administrative console secure port. Thedefault value is 31124.
Event ProcessorApplies only to version 8.3. This port is used by the event managementfeature. The default value is 31131. This port is not requested forbackup master domain managers.
JobManager port numberThe port used by the Tivoli Workload Scheduler for z/OS server or thedynamic workload broker component to connect to the Tivoli WorkloadScheduler agent. It is used by JobManager to run dynamic workloadand to run workload coming from a z/OS environment in a distributedenvironment. JobManager is the network process that controls thedynamic scheduling environment and the z-centric environment. Thedefault value is 31114. The valid range is from 1 to 65535. This portnumber is required only if you are upgrading the master domainmanager.
Host name or IP addressThe fully qualified hostname on which the agent will be contacted bythe dynamic workload broker.
Enable the dynamic scheduling capabilitySelecting this option enables the dynamic workload broker for thedynamic scheduling capability of the master domain manager. If youare upgrading a master domain manager, the Dynamic WorkloadBroker workstation definition is created. For the dynamic schedulingcapability to be enabled, all the backup master domain managers inyour network must have installed Tivoli Workload Scheduler, version8.3 Fix Pack 8 or later, or Tivoli Workload Scheduler, version 8.4 FixPack 4 or later.
Chapter 5. Upgrading 141

Although dynamic workload broker is not installed on the backupmaster domain manager, dynamic scheduling is enabled and the relatedWebSphere Application Server configuration tools are installed duringboth the installation or upgrade.If you decide to enable dynamicscheduling capability later see the procedure described in “Enablingdynamic scheduling after installation” on page 202.
Dynamic workload broker workstation nameThe definition of the dynamic workload broker workstation created inthe Tivoli Workload Scheduler database. Spaces are not allowed and themaximum field length is 16 characters. It can contain alphanumeric,dash (-), and underscore (_) characters. The first character must be aletter.
The dynamic workload broker workstation acts as the communicationbridge between the master domain manager and the dynamic workloadbroker component. In your job or job stream definitions it is theworkstation where the jobs run. In this way, you submit your workloadthrough this workstation to the dynamic workload broker component.
Dynamic workload broker host nameApplies to backup master domain manager. The dynamic workloadbroker fully qualified host name. Adds the capabilities to run dynamicworkload to the Tivoli Workload Scheduler agent. If not specified, thedefault value is localhost. This value is registered in theResourceAdvisorUrl property in the JobManager.ini file.
Dynamic workload broker Netman portApplies to backup master domain manager. The dynamic workloadbroker Netman port number used to add dynamic schedulingcapabilities to your distributed or end-to-end environment. Thisnumber is registered in the ResourceAdvisorUrl property in theJobManager.ini file. The default value is 31116. The valid range is from0 to 65535. If you specify 0, you do not add the capability to rundynamic workload to the agent.
RDBMS installation pathDepending on the type of RDBMS you are using, specify the followinginformation:
For DB2:
DB2 Server administrator userThe user name of the administrator of the DB2 server instance.This user can also be any user having SYSADM or SYSCTRLauthority on the DB2 server. On UNIX, verify that you are ableto switch to this user and that it can load the DB2 environment.
If the DB2 administrator already created the database tablesusing the“Creating or upgrading the database tables if you areusing DB2” on page 43 procedure, the user name is the onethat the DB2 administrator specified in the DB_USER propertyin the customizeDB2SQL.properties file.
DB2 Server administrator passwordThe password of the DB2 server administrator user, or of theuser with SYSADM or SYSCTRL authority. You are asked toconfirm the password.
142 Tivoli Workload Scheduler: Planning and Installation: Planning and Installation

Note: The DB2 installation path will be discovered automatically by theupgrade procedure.If you have a DB2 Enterprise client installed on a UNIX platform,specify also the DB2 local client user name.
For Oracle:
Installation pathSpecify the path of an Oracle installation that satisfies the TivoliWorkload Scheduler prerequisites. The fully qualified path mustidentify a tree in the Oracle structure that includes the sqlplusexecutable.
Oracle Administrator UserThe name of the Oracle Administrator user.
If the ORACLE administrator already created the databasetables using the“Creating or upgrading the database tables ifyou are using Oracle” on page 53, the user name is the one thatthe ORACLE administrator specified in the MDL_USERproperty of the customizeORACLESQL.properties file.
Oracle Administrator user passwordThe password of the Oracle Administrator user. You are askedto confirm the password.
Tivoli Workload Scheduler database informationApplies only when upgrading from version 8.3. Specify the followinginformation needed to update the Tivoli Workload Scheduler database:
For DB2:
Report tablespace nameThe name of the tablespace used to store event logs
Report tablespace pathThe path of the tablespace used to store event logs.
Note: If you are upgrading from Tivoli Workload Scheduler version 8.3fix pack 1 or higher, the DB2 installation path will be discoveredautomatically by the upgrade procedure.
For Oracle:
Installation pathSpecify the path of an Oracle installation that satisfies the TivoliWorkload Scheduler prerequisites. The fully qualified path mustidentify a tree in the Oracle structure that includes the sqlplusexecutable.
Tivoli Workload Scheduler Oracle user passwordThe password of the Tivoli Workload Scheduler Oracle user
Create the Tivoli Workload Scheduler schema using the OraclePartitioning option
If you are upgrading version 8.3 on Oracle Enterprise Editionand have not implemented the Oracle Partitioning feature, youcan do so at this point. Implementing this feature improves theperformance of event-driven workload automation. Note thatthe partitioning option must already be installed into the Oracleinstance. For information about event-driven workloadautomation, see Overview.
Chapter 5. Upgrading 143
If you are upgrading version 8.4 and higher, this option is notavailable because the database schema of the event-drivenworkload automation already exists. To implement the OraclePartitioning feature, see Administration Guide.
Tivoli Workload Scheduler report tablespaceThe path of the Oracle tablespace for Tivoli Workload Schedulerreports.
Upgrading using the silent installation:About this task
To upgrade your Tivoli Workload Scheduler master domain manager or backupmaster domain manager instance, use one of the following response files:v TWS86_UPGRADE_MDM_83plus_UNIX.txt
v TWS86_UPGRADE_BACKUP_MDM_83plus_UNIX.txt
v TWS86_UPGRADE_MDM_83plus_WIN.txt
v TWS86_UPGRADE_BACKUP_MDM_83plus_WIN.txt
and follow the procedure described in “Performing a silent installation” on page92.
Direct 3: Reconfigure the DB2 properties on the backup masterdomain managerAbout this task
If you are upgrading a backup master domain manager and using either a DB2client or server, you must perform the following step after completing the upgradeprocedure.
Open the TWA_HOME\TDWB\config\CLIConfig.properties file. In this file, editthe following property:com.ibm.tdwb.dao.rdbms.jdbcPath=jdbc\:db2\://DB2_server_hostname\:
DB2_server_port/DB_name
where:v DB2_server_hostname is the hostname of the DB2 server.v DB2_server_port is the port number of the DB2 server.v DB_name is the name of the database. This field will be already customized
during the upgrade.
Direct 4: Check the authentication upgrade was successfulAbout this task
The upgrade attempts to migrate your authentication configuration (for example,Local OS, LDAP, or File Registry) to the new format inside a Federated UserRegistry (see “Updating authentication” on page 130 for an overview of the newauthentication features and how the upgrade is performed). It is possible that thismigration might fail, in which case the following happens:
Upgrade statusIf there are no other upgrading problems the upgrade will finish as"successful", even though this aspect of it has failed.
Authentication configurationYour existing authentication configuration will be implemented as
144 Tivoli Workload Scheduler: Planning and Installation: Planning and Installation

"stand-alone". This is a temporary state which must be corrected beforeattempting to install or upgrade other components that need tocommunicate with the master domain manager. To do this, follow theinstructions in the Tivoli Workload Scheduler: Administration Guide about howto configure authentication in a Federated User Registry, using either theIntegrated Solutions Console or the WebSphere Application Server tools.
Installing the Dynamic Workload ConsoleIf you attempt to install the Dynamic Workload Console in the sameinstance of Tivoli Workload Automation as the master domain manager itwill fail because the user registry is not federated. If you need to install theDynamic Workload Console temporarily, install it in a new instance ofDynamic Workload Console. However, you should note that this is not themost efficient way to use the Dynamic Workload Console and you shouldplan to remove it and reinstall it in the same Tivoli Workload Automationinstance as the master domain manager as soon as the Federated UserRegistry is configured and working.
To determine if the migration of the authentication configuration has failed youmust consult the upgrade log (see “Installation log files” on page 36 forinformation about where to find the log.
Direct 5: Customize and submit the optional final job streamAbout this task
If your old final job stream is called FINAL, a backup copy has been made of it inSfinal.extract and it has been upgraded to V8.5.1. If it was customized, you mustmake the corresponding customizations to the new FINAL job stream. If it is notcalled FINAL, you must merge the functions of your old final job stream with thesyntax of your new FINAL job stream. Depending on your situation, perform thefollowing steps:1. Customize the final job stream as required:
If you had a customized job stream called FINAL in your database:
a. Edit the new FINAL job stream with composer or the DynamicWorkload Console.
b. Edit the file Sfinal.extract with a text editor.c. Make the corresponding customizations to the new FINAL job
stream.d. Save your new FINAL job stream.
If you had a customized final job stream called something other than FINALin your database:
a. Edit the new FINAL job stream with composer or the DynamicWorkload Console.
b. Edit your old final job stream with composer or the DynamicWorkload Console.
c. Merge the two job streams so that your new final job stream has thesame name and customizations as before (if you want to preservethe naming), plus the new required attributes from the new FINALjob stream.
d. Save your new final job stream.e. Delete the old final job stream.
If you had a final job stream called something other than FINAL in yourdatabase, but it is not customized:
Chapter 5. Upgrading 145

a. Delete your old final job stream with composer or the DynamicWorkload Console.
b. Rename the new FINAL job stream with the name of your old finaljob stream with composer or the Dynamic Workload Console.
If you had a final job stream called FINAL in your database, but it is notcustomized:
Take no action because the FINAL job stream has already been editedby the installation or upgrade procedure.
2. Use conman to delete your old final job stream instances and submit newinstances to replace them.
During the upgrade, JnextPlan is overwritten even if you customized it. Theexisting JnextPlan is backed up and renamed to:
On Windows operating systems:JnextPlan.cmd.bk
On UNIX and Linux operating systems:JnextPlan.bk
Note: You run JnextPlan in “Direct 7: Complete the security configuration for thenew environment” on page 147.
Direct 6: Upgrade your backup master domain managerAbout this task
If you use a backup master domain manager you must now upgrade it to the sameversion as the master domain manager, otherwise the new functions are notsupported. Much of what you have to do is the same as for the master domainmanager. Follow these instructions:v “Direct 2: Upgrade the master domain manager or backup master” on page 139v “Direct 3: Reconfigure the DB2 properties on the backup master domain
manager” on page 144v “Direct 4: Check the authentication upgrade was successful” on page 144. You
should have implemented the same authentication for your backup masterdomain manager as your master domain manager, so you should expect to getthe same results from the authentication upgrade, but even if the master domainmanager authentication upgrade completed successfully, you must still check theupgrade log for the backup master domain manager.
v There is no need to make any changes to the FINAL job stream because theFINAL job stream on the master domain manager is used whenever you run theswitch manager process.
v Neither do you need to change the security file configuration on the backupmaster domain manager, because the procedure for maintaining yourenvironment in readiness for the use of switch manager require you to mirrorthe Security file to the backup master domain manager whenever you change it.
If you do not use a backup master domain manager, you are stronglyrecommended to install and use one, to ensure the high availability of yourscheduling environment.
146 Tivoli Workload Scheduler: Planning and Installation: Planning and Installation
Direct 7: Complete the security configuration for the newenvironmentAbout this task
Versions 8.5 and higher include new security statements for the event managementand variable tables. If you have specific security settings in your V8.3 or V8.4environment, these settings must be manually merged with the new settings beforeyou build the final security file to be used in your new environment. Thestatements you might have to add manually vary depending on your specificsecurity settings.
Perform the following:1. Log in as <TWS_user> on your upgraded master domain manager and set the
Tivoli Workload Scheduler environment.2. If you have centralized security enabled, extract the new security file on the
new master using the following V8.5 and higher command:dumpsec > sec_file
where sec_file is the text file created by the dumpsec command.3. Edit the sec_file, and insert the following statements:
If you are upgrading from V8.3, add the following statements:REPORT NAME=@ ACCESS=DISPLAYEVENTRULE NAME=@ ACCESS=ADD,DELETE,DISPLAY,MODIFY,LIST,UNLOCKACTION PROVIDER=@ ACCESS=DISPLAY,SUBMIT,USE,LISTEVENT PROVIDER=@ ACCESS=USE
If you are upgrading from a V8.3 or V8.4 environment, add the followingstatement:VARTABLE NAME=@ ACCESS=ADD,DELETE,DISPLAY,MODIFY,USE,LIST,UNLOCK
4. Check that the user permissions of the new statements are correct.5. Save your changes to the sec_file.6. Build your final security file for your new master domain manager using the
V8.5 and higher makesec command:makesec sec_file
7. If you are using FIPS, you must manually enable it again in the WebSphereApplication Server java.security file. See the Tivoli Workload Scheduler:Administration Guide for the FIPS compliance information.
8. If you have centralized security, distribute the security file.9. Run JnextPlan -for 0000 to distribute the Symphony file to the agents.
Note: Ensure that the optman cf option is set to all or only the unfinishedjobstreams will be carried forward.
10. Restore the previous setting of the optman cf option, if necessary.11. If you want to use EDWA, enable it using optman.
Direct 8: Restart scheduling processesAbout this task
Restart the scheduling processes after the upgrade is complete, as follows:1. Log in as the <TWS_user>.2. Start the master domain manager:
Chapter 5. Upgrading 147
From the Dynamic Workload ConsoleIn the navigation tree, click Scheduling Environment > Monitor >Monitor Workstations, run a task and, in the table of results, select allthe workstations of the master domain manager and click . Start.
From the command line of the master domain managerIssue the following commands:conman "startappserver";waitconman “start”
3. From the command line of the master domain manager, start the netmanprocess as follows:
UNIX and Linux operating systemsRun:StartUp.sh
Windows operating systemsRun:StartUp
4. Runconman start
5. Link all workstations in the domain:
From the Dynamic Workload ConsoleIn the navigation tree, click Scheduling Environment > Monitor >Monitor Workstations, run a task and, in the table of results, select allthe workstations of the master domain manager and click . Link.
From the command line of the master domain managerIssue the following commands:conman "link @;noask"
6. If you want your upgraded environment to perform event processing, firstly,run:conman startevtp
Then do the following:
From the Dynamic Workload Console
a. Click Tivoli Workload Scheduler>SchedulingEnvironment>Monitor>Monitor Workstations
b. Select All Workstations in plan or another predefined task namec. Choose an engine name, or specify connection properties, and click
OK
d. Select a workstation and click More Actions>Start EventMonitoring.
From the command line of the master domain manager
UNIX and Linux operating systemsRunconman startmon
Windows operating systemsStart the Windows service: Tivoli Workload Scheduler SSMAgent (for <TWS_user>).
7. Verify that all services and processes are running, as follows:
148 Tivoli Workload Scheduler: Planning and Installation: Planning and Installation

UNIX and Linux operating systemsRunps -u <TWS_user>
Verify that the following processes are running: netman, mailman,batchman, writer, jobman, JOBMAN, stageman, appserverman.
Windows operating systemsRun:<drive>\unsupported\listproc.exe
where <drive> is the Tivoli Workload Scheduler home directory. Verifythat the following processes are running: netman, mailman, batchman,writer, jobman, stageman, JOBMON, tokensrv, batchup.
Note: Even if the autotrace mechanism is no longer supported, the upgradeprocess does not remove the TWA_home\TWS\trace directory after the upgradebecause it is possible that you use it with other Tivoli products. If you are sure thatyou do not use it, you can remove the TWA_home\TWS\trace directory.
Performing a parallel upgradeAbout this task
This section describes how to upgrade your environment using a parallel upgradescenario. See “Parallel upgrade scenario - minimizing the impact on scheduling”on page 128 for an overview.
The scenario consists of the following procedures:v “Parallel 1: Upgrade your existing backup master domain manager, or install a
new one”– “Parallel 1a: Install a new backup master domain manager” on page 150
or– “Parallel 1b: Upgrade your current backup master domain manager” on page
151v “Parallel 2: Switch the master domain manager to the new or upgraded backup
master” on page 151v “Parallel 3: Make the switch manager permanent” on page 151v “Parallel 5: Install a new master domain manager or upgrade your old master
domain manager” on page 152v “Parallel 6: Switching back to the old master domain manager (optional)” on
page 153v “Parallel 7: Complete the security configuration for the new environment” on
page 153
The upgrade process changes some files and folders, see “Files and folderschanged during the upgrade” on page 122 for the complete list.
Parallel 1: Upgrade your existing backup master domainmanager, or install a new oneAbout this task
This step is divided into two alternative substeps, depending on whether youalready have a backup master domain manager in your environment:
Chapter 5. Upgrading 149

Parallel 1a: Install a new backup master domain manager:About this task
The purpose of this step is to install a fresh backup master domain manager andattach it to your current network.
This backup master domain manager will point to your existing Tivoli WorkloadScheduler database and become your new master domain manager.
Parallel 1a-1: Install the fresh backup master domain managerTo install a new backup master domain manager see the proceduresdescribed in Chapter 4, “Installing,” on page 67. Specifically, see theprocedure described in “Tivoli Workload Scheduler installation options” onpage 69 and subsequent sections depending on whether you are using aDB2 or an Oracle database. Ensure that your new backup master domainmanager points to your current Tivoli Workload Scheduler databaseinstance.
Parallel 1a-2: Migrate your authentication configurationDo the following to migrate your authentication mechanism to the newlyinstalled backup master domain manager:1. On your existing master domain manager, use the
showSecurityProperties tool to export your authenticationconfiguration to a text file.
2. Copy this file to your new backup master domain manager.3. During the export all the password in the file have been replaced with
asterisks. Locate them and remove the asterisks entering yourpasswords again.
4. Run the changeSecurityProperties tool on the new backup masterdomain manager to import the configuration. The tool recognizes thatthe input file is in the old format and attempts to migrate theconfiguration to the new format.If your authentication mechanism is customized in ways that themigration cannot handle, an error or errors will be given and youshould configure the authentication mechanism manually.
5. Test that the migrated authentication mechanism allows you to log onand use composer with more than one user ID.
Parallel 1a-3: Define a new backup master domain manager in the databaseDefine your new backup master domain manager as a full status agent inthe domain of your master domain manager, using the composer commandinterface.
Parallel 1a-4: Optionally enable dynamic scheduling capabilitiesThe upgrade installs a disabled dynamic workload broker on the backupmaster domain manager. If you do not want dynamic schedulingcapabilities in your network, you do not have to take action here. You canenable dynamic scheduling capability later following the proceduredescribed in “Enabling dynamic scheduling after installation” on page 202.
Parallel 1a-5: Prepare the old security file for switching the manager
For Tivoli Workload Scheduler to switch correctly, you must add the newTWS_user into the old security file. The new TWS_user is the one that youused when you installed the new backup master domain manager.
Perform the following steps:
150 Tivoli Workload Scheduler: Planning and Installation: Planning and Installation

1. On the old master domain manager, log in as the old TWS_user and setthe Tivoli Workload Scheduler environment. Add the TWS_user of thenew master domain manager to the old security file.
2. If you have centralized security, distribute the security file to all agents.If you do not have centralized security, copy the compiled security fileto the installed or upgraded backup master domain manager,overwriting the version that is there.
You now need to make these changes effective, as follows:1. Ensure that the optman cf option is set to all
2. Run JnextPlan -for 0000 or wait until the end of the production plan.This distributes the Symphony file to the new backup master domainmanager.
3. Restore the previous setting of the optman cf option, if necessary.
Parallel 1b: Upgrade your current backup master domain manager:About this task
To upgrade your current backup master domain manager, follow the proceduredescribed in “Direct 2: Upgrade the master domain manager or backup master” onpage 139 using your preferred installation method.
Parallel 2: Switch the master domain manager to the new orupgraded backup masterAbout this task
Switch to your new backup master domain manager, which now becomes yourmaster domain manager, by issuing the following command on your old masterdomain manager:conmanswitchmgr masterdm;new_mgr_cpu
where new_mgr_cpu is the name of the workstation of your new or upgradedbackup master domain manager.
If you are upgrading from V8.4 or higher and the event processor is being hostedon the old master domain manager or backup master domain manager, you mustrun switchevtprocessor to switch the event processor in the same way.
If using the back up master domain manager V8.6 you define agent, pool, ordynamic pool workstations and than you open their database definitions from themaster domain manager V8.4 database, their workstation types are blank.
Parallel 3: Make the switch manager permanentAbout this task
In the preceding step you have promoted your upgraded backup master domainmanager to the role of master domain manager.
To make this configuration fully operational and persistent through JnextPlan, youmust perform the following steps:
On the new master domain manager, referred to as new_mgr_cpu:1. Edit the localopts file and modify the following entry as shown:
DEFAULTWS=new_mgr_cpu
Chapter 5. Upgrading 151

where new_mgr_cpu is the workstation name of the new master. See the TivoliWorkload Scheduler: Administration Guide.
2. Change the workstation definition of the old master using composer:modify cpu=old_mgr_cpu
and substitute type=manager with type=fta
3. Repeat the preceding step, this time to modify the workstation definition of thenew master and substitute type=fta with type=manager.
4. Ensure that the optman cf option is set to all
5. Rebuild the plan to activate the changes to the database:JnextPlan -for 0000
6. Restore the previous setting of the optman cf option, if necessary.7. Edit the \TWS\mozart\globalopts file and modify the master=old_mgr_cpu entry
as shown:master=new_mgr_cpu
where new_mgr_cpu is the workstation name of the new master. See the TivoliWorkload Scheduler: Administration Guide.In this way the reports (reptr - pre and reptr -post) can run when you runJnextPlan.
Note: Ensure that the global option carryforward is set to all or only theunfinished jobstreams will be carried forward.
Parallel 4: Customize the optional final job streamAbout this task
Perform the procedure described in “Direct 5: Customize and submit the optionalfinal job stream” on page 145.
Parallel 5: Install a new master domain manager or upgrade yourold master domain managerAbout this task
You can now choose to install a new master domain manager, following theinstructions in “Installing a master domain manager or backup master” on page68.
Alternatively, you might decide to upgrade rather than install a new masterdomain manager.
During the upgrade you will be prompted to activate the dynamic schedulingcapabilities on that computer. If you want to activate dynamic schedulingcapabilities, you must be sure that ALL backup domain managers on the networkare at the minimum supported version level. See the Tivoli Workload SchedulerSystem Requirements Document at http://www.ibm.com/support/docview.wss?rs=672&uid=swg27019747. You can then choose to activate dynamicscheduling capabilities.
If you do not know if all backup master domain managers are at the minimumsupported level, do not select the option to activate dynamic schedulingcapabilities. You can add this capability at a later time using the “Enablingdynamic scheduling after installation” on page 202 procedure.
152 Tivoli Workload Scheduler: Planning and Installation: Planning and Installation
|
|

Before performing this step, if you created agent, pool, or dynamic poolworkstations in Step “Parallel 2: Switch the master domain manager to the new orupgraded backup master” on page 151 set them to ignore. If you do not set themto ignore, when the master domain manager adds the workstation definition to theplan it does not find them and sends a lot of messages in the IBM\TWA\TWS\pobox files. The size of these files increases exponentially.
To upgrade your master domain manager (which is now your backup masterdomain manager), perform the following steps:1. From the new master domain manager, unlink the old master workstation
conman "unlink old_mdm_cpu"
2. Upgrade your old master domain manager to the current version using theprocedure described in “Direct 6: Upgrade your backup master domainmanager” on page 146.
3. Link the upgraded master domain manager to the networkconman "link old_mdm_cpu"
Parallel 6: Switching back to the old master domain manager(optional)About this task
This step is optional. You can switch back to your old master domain manager thathas now been upgraded. To do this, perform the following steps:1. From the upgraded master domain manager switch the master domain
manager:conmanswitchmgr masterdm;old_mdm_cpu
2. To restore your upgraded master domain manager to its role permanently,perform the steps outlined in “Parallel 3: Make the switch manager permanent”on page 151, this time for the master workstation.
Parallel 7: Complete the security configuration for the newenvironmentAbout this task
Perform the procedure described in “Direct 7: Complete the security configurationfor the new environment” on page 147.
Upgrading agents and domain managersAbout this task
This section describes how to upgrade Tivoli Workload Scheduler agents anddomain managers in your distributed, z/OS, or end-to-end network. During theupgrade, you can add dynamic scheduling capabilities or the Java runtime to runjob types with advanced options to the agent. The runtime environment is used to:v Run job types with advanced options, both those supplied with the product and
the additional types implemented through the custom plug-ins on the agent.v Enable the capability to remotely run, from the agent, the dynamic workload
broker resource command on the server.
See “Software packages and parameters” on page 104 for a description of theparameters.
Chapter 5. Upgrading 153

If you are upgrading from a version prior to 8.5.1 you can add new featuresduring the upgrade process.
If you are upgrading from version 8.5.1 and during the installation you did notinstall some features like the dynamic capabilities or the Java runtime to run jobtypes with advanced options, you cannot add them during the upgrade process. Toadd them perform the procedure described in the following sections:v “Adding a feature” on page 200v “Enabling dynamic scheduling after installation” on page 202
The product performs the upgrade in safe mode by performing all the checksdetailed in “Performing a safe upgrade” on page 133 before starting. To ensure thatthe upgrade can run without stopping, perform manually the steps described in“Unlinking and stopping Tivoli Workload Scheduler when upgrading agentworkstations” before starting the upgrade.
The upgrade process changes some files and folders, see “Files and folderschanged during the upgrade” on page 122 for the complete list.
When the upgrade procedure is successful, it is not possible to roll back to theprevious version. The following describes the new directory structure and how toupgrade agents using the various installation methods:v “New directory structure”v “Unlinking and stopping Tivoli Workload Scheduler when upgrading agent
workstations”v “Upgrading agents and domain manager using the installation wizard” on page
155v “Upgrading agents and domain manager using a silent installation” on page 158v “Upgrading agents and domain manager using twsinst” on page 158v “Upgrading agents using Software Distribution” on page 164v “Upgrading agents using Tivoli Endpoint Manager” on page 169
New directory structureAbout this task
For the new product directory structure and the new directory structure for SSLfiles see “New directory structure” on page 135.
Unlinking and stopping Tivoli Workload Scheduler whenupgrading agent workstations
About this task
The product performs the upgrade in safe mode by performing all the checksdetailed in “Performing a safe upgrade” on page 133 before starting. To ensure thatthe upgrade can run without stopping, perform manually the steps indicated in theprocedure before starting the upgrade.
Before you perform an upgrade on an agent workstation ensure that all TivoliWorkload Scheduler processes and services are stopped. If you have jobs that arecurrently running, the related processes must be stopped manually or you mustwait until the jobs are complete.
154 Tivoli Workload Scheduler: Planning and Installation: Planning and Installation

Note: Do not use the UNIX kill command to stop Tivoli Workload Schedulerprocesses.To stop Tivoli Workload Scheduler processes and services, follow these steps:1. Unlink the target workstation from the other workstations in the network. Or,
from the command line of the master domain manager, enter the followingcommand:conman "unlink workstationname;noask"
2. Stop the target workstation. Or, from the command line of the master domainmanager, log in as TWS_user and enter the following command:conman “stop workstationname;wait”
3. If you are upgrading from version 8.4 or higher, stop the SSM Agent as follows:v On Windows, stop the Windows service: Tivoli Workload Scheduler SSM
Agent (for TWS_user).v On UNIX, run stopmon to stop the agent.
4. Stop the netman process as follows:v On Windows, from the Tivoli Workload Scheduler home directory, run the
shutdown.cmd.v On UNIX, run:
conman “shut;wait workstationname"
5. If you are updating an agent, remove (unmount) any NTFS mounted directoriesfrom the master domain manager.
To verify if any services and processes are still running, perform the followingsteps:v On Windows operating systems, enter the command:
<drive>unsupported\listproc.exe
Verify that the following processes are not running: netman, mailman, batchman,writer, jobman, stageman, JOBMON, tokensrv, batchup.Also, ensure that there are no system programs accessing the directory orsubdirectories, including the command prompt. In Windows Explorer, theAdministrative Tools→Services panel must be closed.
Note:
1. If you are upgrading in a Windows environment, the Tivoli Token Servermust be running.
2. Before you upgrade, make sure that the conman command line is not runningv On UNIX, enter the command:
ps -u TWS_user
Upgrading agents and domain manager using the installationwizard
About this task
Use the installation wizard if you want to upgrade agents and satisfy the followingobjectives:
Perform the upgrade in a safe wayIt checks all the processes that are running before starting. It does notperform the upgrade if there are command lines currently running andadvises you if there are jobs running. In this case you can decide to wait
Chapter 5. Upgrading 155

before performing the upgrade or quit the upgrade. See “Performing a safeupgrade” on page 133 for detailed information.
Upgrade the master, the backup master, and the agents using the same upgrademethod
It can be run on all the workstations of your network.
Use a graphical interface that guides the user through the upgradeIn interactive mode, the wizard guides you through the upgrade steps.
Manage both UNIX and Windows operating system workstationsIt runs both on UNIX and Windows agents.
To upgrade an agent using the installation wizard, run the setup for the operatingsystem on which you are upgrading:
Windows operating systemFrom the WINDOWS directory, run:SETUP.exe
UNIX and LinuxFrom the operating_system directory, run:SETUP.bin
Note: The number of minutes that the product waits for jobs that are running tocomplete before starting the upgrade is 60. If the jobs do not complete during thisinterval the upgrade does not proceed and an error message is displayed. If youwant to change this value run the following command before starting the upgrade:
Windows operating systemFrom the WINDOWS directory, run:SETUP.exe -W checkJobsLoop.wait=value
UNIX and Linux operating systemsFrom the operating_system directory, run:SETUP.bin -W checkJobsLoop.wait=value
where value is an integer or -1 for the product to wait indefinitely.
Alternatively, start the launchpad as follows and select the Tivoli WorkloadScheduler installation:
Windows operating systemFrom the root directory of the DVD, run launchpad.exe.
UNIX and Linux operating systemsFrom the root directory of the DVD, run launchpad.sh.
When the installation wizard is launched, select the agent you want to upgradeand follow the prompts to complete the upgrade.
For a description of the options requested during the upgrade, see “Installationoptions” on page 88
Upgrading an agent with connector using the installation wizardAbout this task
To upgrade a Tivoli Workload Scheduler agent version 8.3 or higher with aconnector using the installation wizard, run the setup for the operating system onwhich you are upgrading:
156 Tivoli Workload Scheduler: Planning and Installation: Planning and Installation

On Windows operating systemTWS\operating_system\SETUP.exe or TWS\SETUP.cmd
On UNIX and Linux operating systemsTWS/operating_system/SETUP.bin or TWS/SETUP.sh
Alternatively, start the launchpad as follows and select the Tivoli WorkloadScheduler installation:
Windows operating systemFrom the root directory of the DVD, run launchpad.exe.
UNIX and Linux operating systemsFrom the root directory of the DVD, run launchpad.sh.
If you have autorun enabled, the launchpad starts automatically. If you want tostart the launchpad from a mounted file system, ensure that you have writepermission on it before starting the launchpad.
Note: During the upgrade, you are prompted for the WebSphere ApplicationServer administration user name and password.
Follow the installation wizard panels to complete the upgrade. For a description ofthe agent options requested during the upgrade, see “Installation options” on page88
The following list describes the fields to complete for the connector:
Backup profile destination directoryThis information is needed to perform a backup of your WebSphereApplication Server (WAS) profile. Your current settings are transferred toWebSphere Application Server automatically.
Tivoli Workload Scheduler user passwordEnter the password of the Tivoli Workload Scheduler user for which youare upgrading the agent and connector instance. If you changed theWebSphere Application Server administrator user name and passwordfrom your previous installation, you must supply them here. If you did notchange these values in your installation, leave these fields blank.
SAS Server Authentication ListenerApplies only to version 8.3. The port used by the Secure AssociationServices (SAS) to listen for inbound authentication requests. The defaultvalue is 31119.
CSIv2 Server Authentication ListenerApplies only to version 8.3. The port on which the Common SecureInteroperability Version 2 (CSIv2) service listens for inbound serverauthentication requests. The default value is 31120.
CSIv2 Client Authentication ListenerApplies only to version 8.3. The port on which the Common SecureInteroperability Version 2 (CSIv2) service listens for inbound clientauthentication requests. The default value is 31121.
ORB ListenerApplies only to version 8.3. The port used for RMI over IIOPcommunication. The default value is 31122.
Chapter 5. Upgrading 157

Administration HTTP transportApplies only to version 8.3. The administrative console port. The defaultvalue is 31123.
Administration HTTPS transportApplies only to version 8.3. The administrative console secure port. Thedefault value is 31124.
Upgrading agents and domain manager using a silentinstallation
About this task
Use a silent installation if you want to upgrade agents and satisfy the followingobjectives:
Perform the upgrade in a safe wayIt checks all the processes that are running before starting. It does notperform the upgrade if there are command lines currently running andadvises you if there are jobs running. In this case you can decide to waitbefore performing the upgrade or quit the upgrade. See “Performing a safeupgrade” on page 133 for detailed information.
Upgrade the master, the backup master, and the agents using the sameinstallation method
It can be run on all the workstations of your network.
Use a method that runs unattended and in backgroundIt uses a response file that you customize by adding all the configurationsettings to be used during installation. Then, from a command line,running the setup command. Using this method the you can run theinstallation unattended and in the background.
Manage both UNIX and Windows operating system workstationsIt runs both on UNIX and Windows agents.
To upgrade an agent from version 8.3 and higher using a silent installation, followthe procedure described in “Performing a silent installation” on page 92 with theappropriate response files:
AgentTWS86_UPGRADE_Agent_WIN.txtTWS86_UPGRADE_Agent_UNIX.txt
Agent with connectorTWS86_UPGRADE_Connector_and_FTA_WIN.txtTWS86_UPGRADE_Connector_and_FTA_UNIX.txt
Note: The number of minutes that the product waits for jobs that are running tocomplete before starting the upgrade is 60. If the jobs do not complete during thisinterval the upgrade does not proceed and an error message is displayed. If youwant to change this value customize the -w checkJobsLoop.wait=60 parameter asindicated in the response file. For details about response file properties, seeAppendix C, “The Tivoli Workload Scheduler response file properties,” on page349.
Upgrading agents and domain manager using twsinstAbout this task
Use twsinst if you want to upgrade agents and satisfy the following objectives:
158 Tivoli Workload Scheduler: Planning and Installation: Planning and Installation

Perform the upgrade in a safe wayIt checks all the processes that are running before starting. It does notperform the upgrade if there are command lines currently running andadvises you if there are jobs running. In this case you can decide to waitbefore performing the upgrade or quit the upgrade. See “Performing a safeupgrade” on page 133 for detailed information.
Save time, disk space, and RAM when upgrading the productIt performs the agent upgrade in 30% less time than the upgrade wizard. Itsaves disk space and RAM because it is not Java-based.
Use a very simple commandIt consists of a single line command.
Manage both UNIX and Windows operating system workstationsIt runs both on UNIX and Windows agents.
Use twsinst to upgrade the Tivoli Workload Scheduler agent in your distributed orend-to-end network and add dynamic scheduling capabilities or the Java runtimeto run job types with advanced options to the agent. The runtime environment:v Runs on the agent job types with advanced options, both those supplied with
the product and the additional types implemented through the custom plug-ins.v Enables the capability to remotely run, from the agent, the dynamic workload
broker resource command on the server.
See “Software packages and parameters” on page 104 for a description of theparameters. To add dynamic scheduling capabilities, specify the -tdwbport and-tdwbhostname parameters as described in the corresponding description. To addthe Java runtime to run job types with advanced options to the agent, specify the-addjruntime parameter as described in the corresponding description.
For information about agents installed using twsinst, see “Installing agents usingtwsinst” on page 97. See http://www.ibm.com/support/docview.wss?rs=672&uid=swg27012175 for a list of supported operating systems and requirements.
Note: After you use the twsinst script to upgrade an instance of Tivoli WorkloadScheduler to version 8.6, whose previous version was installed using theinstallation wizard, you can only use the twsinst method to upgrade that instanceof Tivoli Workload Scheduler again. However, you can uninstall that TivoliWorkload Scheduler instance using the wizard
Running the upgradeAbout this task
During the upgrade process, twsinst creates a file in the following directories foreach of the installation steps:
On UNIX and Linux operating systems/user's_home/TWS
On Windows operating systemsC:\%Program Files%\IBM\TWA
If you stop and restart the installation, the installation process starts from theinstallation step where it was stopped.
To upgrade agents using the twsinst script, perform the following steps:
On UNIX and Linux operating systems
Chapter 5. Upgrading 159

1. Insert the installation DVD according to the operating system. See“Installation media” on page 31
2. From the DVD_root/TWS/operating_system directory, run the twsinstscript using the synopsis described below.
On Windows operating systems
1. Insert the DVD for your operating system. See “Installation media” onpage 31.
2. Log in as administrator on the workstation where you want to upgradethe product.
3. From the DVD_root/TWS/operating_system directory of the DVD, runtwsinst using the synopsis described below.
Note: twsinst for Windows is a Visual Basic Script (VBS) that you canrun in CScript and WScript mode.
A successful upgrade using the twsinst issues the return code RC = 0. A failedupgrade issues the return code RC = 1. In the case of a failed installation, seetheTivoli Workload Automation: Messages and Codes.
Synopsis:
On UNIX and Linux operating systems
Show command usage and version./twsinst -u | -v
Upgrade an instance./twsinst -update -uname user_name[-addjruntime boolean][-backup_dir backup_dir][-displayname agentname][-hostname host_name][-inst_dir install_dir][-jmport port_number][-jmportssl boolean][-lang lang-id][-nobackup][-reset_perm][-skip_usercheck][-tdwbhostname host_name][-tdwbport port_number][-wait minutes]
On Windows operating systems:
Show command usage and versiontwsinst -u | -v
Upgrade an instancetwsinst -update -uname user_name-password user_password[-addjruntime boolean][-backup_dir backup_dir][-displayname agentname][-domain user_domain][-hostname host_name][-inst_dir install_dir][-jmport port_number][-jmportssl boolean][-lang lang_id][-nobackup]
160 Tivoli Workload Scheduler: Planning and Installation: Planning and Installation

[-skip_usercheck][-tdwbhostname host_name][-tdwbport port_number][-wait minutes]
-addjruntimeAdds the Java runtime to run job types with advanced options to the agent.The runtime environment is used to run application job plug-ins on the agentand to enable the capability to remotely run, from the agent, the dynamicworkload broker resource command on the server. See “Software packages andparameters” on page 104 for a description of the parameters. Valid values aretrue and false. The default is false.
-backup_dir backup_dirThe directory, which must be created manually, where to store the backup copyof a previous version. If the upgrade fails, you cannot restore your previousversion using the files stored here; you must call IBM Software Support andprovide this path.
If you do not specify this option when running an upgrade, the followingdefault value is used:$BACKUP_DIR = $INST_DIR_backup_$TWS_USER
where:v $INST_DIR is the installation path (the user home directory on UNIX and
Linux).v $TWS_USER is the user name.
For example:$INST_DIR=/opt/TWS/TWS84$TWS_USER=user84$BACKUP_DIR=/opt/TWS/TWS83_backup_user83$BACKUP_SUBDIR=/opt/TWS/TWS83_backup_user83/TWS84
-displaynameThe name to assign to the dynamic agent. The default is the host name of thiscomputer.
-domain user_domainWindows only. The domain name of the Tivoli Workload Scheduler user. Thedefault is the name of the workstation on which you are upgrading theproduct.
-hostnameThe fully qualified hostname on which the agent is contacted by the dynamicworkload broker.
-inst_dir install_dirThe directory where you installed Tivoli Workload Scheduler. When upgradinginst_dir is used:v If the upgrade process cannot retrieve the product install location from the
registries.v If you need to create the Tivoli Workload Scheduler registries again before
upgrading. See “Re-creating registry files using twsinst” on page 190 fordetails.
If you do not provide the inst_dir and Tivoli Workload Scheduler cannotretrieve it from the installation registries, the product is installed in the userhome directory.
Chapter 5. Upgrading 161

On UNIX and Linux operating systems:The path cannot contain blanks. If not specified, the path is set to theuser_name home directory,
On Windows operating systems:If you specify a path that contains blanks, enclose it in double quotes.If not specified, the path is set to %ProgramFiles%\IBM\TWA.
-jmport
The port used by the Tivoli Workload Scheduler for z/OS server or thedynamic workload broker to connect to the Tivoli Workload Scheduler agent.The default value is 31114. The valid range is from 1 to 65535.
-jmportsslThe port used by the Tivoli Workload Scheduler for z/OS controller, or by thedynamic workload broker to connect to the Tivoli Workload Scheduler agent.This number is registered in the ita.ini file located in ITA\cpa\ita onWindows andITA/cpa/ita on UNIX. For communication using SSL, set jmportssl= true. To communicate with the dynamic workload broker, it is recommendedthat you set the value to true. In this case, the port specified in jmportcommunicates in HTTPS. If you specify true, ensure that you also configurethe HTTPS communication on the z/OS controller. Specify false for HTTPcommunication. In this case the port specified in jmport communicates inHTTP. The default value is true. For communication without using SSL, setjmportssl = false. To increase the performance of the Tivoli Workload Schedulerfor z/OS server, it is recommended that you set this value to false.
-langThe language in which the twsinst messages are displayed. If not specified,the system LANG is used. If the related catalog is missing, the default Clanguage catalog is used.
Note: The -lang option does not relate to the supported language packs. Bydefault, all supported language packs are installed when you install using thetwsinst script.
-nobackupThe upgrade process does not back up the instance you are upgrading.
-password user_passwordWindows only. The password of the user for which you are upgrading TivoliWorkload Scheduler.
-reset_permUNIX only. Reset the permissions of the libatrc library.
-skip_usercheckEnable this option if the authentication process within your organization is notstandard, thereby disabling the default authentication option. On UNIX, skipthe check of the user in the /etc/password file or using the su command. OnWindows, does not create the user you specified in the -uname usernameparameter. If you specify this parameter you must create the user manuallybefore running the script.
-tdwbhostnameThe dynamic workload broker fully qualified host name. It is used togetherwith the -tdwbport tdwbport_number parameter. It adds and starts thecapabilities to run workload dynamically to Tivoli Workload Scheduler. If notspecified you cannot run your workload dynamically and this parameter
162 Tivoli Workload Scheduler: Planning and Installation: Planning and Installation

assumes the localhost default value. This value is registered in theResourceAdvisorUrl property in the JobManager.ini file.
-tdwbportThe dynamic workload broker HTTP or HTTPS port number used to adddynamic scheduling capabilities to your distributed or end-to-endenvironment. It is used together with the -tdwbhostname host_name parameter.This number is registered in the ResourceAdvisorUrl property in theJobManager.ini file. The default value is 0, however, if you leave the value as0, you cannot run your workload dynamically. Specify a nonzero value to adddynamic capability. The valid range is 0 to 65535.
-uname usernameThe name of the user for which Tivoli Workload Scheduler is being updated.The software is updated in this user’s home directory. This user name is not tobe confused with the user performing the upgrade.
-updateUpgrades an existing agent that was installed using twsinst.
-wait minutesThe number of minutes that the product waits for jobs that are running tocomplete before starting the upgrade. If the jobs do not complete during thisinterval the upgrade does not proceed and an error message is displayed. Validvalues are integers or -1 for the product to wait indefinitely. The default is 60.
ExamplesAbout this task
This section contains examples of twsinst scripts that you can use to upgrade anagent.
To upgrade an agent installed in the user home directory that does not have thedynamic scheduling capabilities and the Java runtime to run job types withadvanced options:
./twsinst -update -uname twsuser
To upgrade a version 8.5 agent installed in the path /opt/IBM/TWA and give itdynamic scheduling capabilities, but not the Java runtime to run job types withadvanced options:
On UNIX and Linux operating systems:./twsinst -update -uname twsuser -tdwbhostname mybroker.mycompany.com
-tdwbport 31116 -inst_dir /opt/IBM/TWA
On Windows operating system:twsinst -update -uname TWS_user -password qaz12qaz-tdwbhostname mybroker.mycompany.com -tdwbport 31116-inst_dir "c:\Program Files\IBM\TWA"
To upgrade a version 8.5 agent and give it dynamic scheduling capabilities, andthe Java runtime to run job types with advanced options. The runtime environmentis used to run application job plug-ins on the agent and to enable the capability toremotely run, from the agent, the dynamic workload broker resource command onthe server:
On UNIX and Linux operating systems:./twsinst -update -uname twsuser -tdwbhostname mybroker.mycompany.com
-tdwbport 31116 -addjruntime true
Chapter 5. Upgrading 163

On Windows operating system:twsinst -update -uname TWS_user -password qaz12qaz-tdwbhostname mybroker.mycompany.com -tdwbport 31116 -addjruntime true-inst_dir "c:\Program Files\IBM\TWA"
Upgrading agents using Software DistributionAbout this task
This section describes how to upgrade Tivoli Workload Scheduler agents usingSoftware Distribution software package blocks. The upgrade process usingSoftware Distribution software package blocks does not verify if there arecommand lines, processes or job running before starting the upgrade you have tostop them manually by following the procedure described in “Unlinking andstopping Tivoli Workload Scheduler when upgrading agent workstations” on page154.
During the upgrade, you can add the following capabilities:v Standard agent, fault-tolerant agent, or domain manager capabilitiesv Dynamic scheduling capabilitiesv The option to add the Java runtime to run job types with advanced options to
the agent. The runtime environment is used to run job types with advancedoptions on the agent and to enable the capability to remotely run, from theagent, the dynamic workload broker resource command on the server.
Creating and installing the software package blockAbout this task
To create, import, and install the software package block (SPB), complete thefollowing steps:1. Create a software package profile that has the following name:
FP_TWS_operating_system_<TWS_user>.8.6.00
where: operating_system is the operating system where you are installing and<TWS_user> is the user of the installation.When you import the software package block, you must pass the name of theprofile to wimpspo so that the Configuration Manager endpoint catalogs thename correctly.
2. Import the software package block using the wimpspo command.3. Install the software package block using the wdinstsp command.
Note: When upgrading using the wdinstsp command, make sure that youspecify the install_dir variable. If you installed the previous version in adirectory other than the default and you do not specify install_dir, TivoliWorkload Scheduler is installed as a fresh installation.
For complete instructions about performing these tasks, seethe IBM TivoliConfiguration Manager, Reference Manual for Software Distribution and the IBM TivoliConfiguration Manager, User's Guide for Software Distribution.
Upgrading procedure overviewAbout this task
To upgrade, after installing the software package block, perform the followingprocedure:
164 Tivoli Workload Scheduler: Planning and Installation: Planning and Installation

1. Upgrade the Common Inventory Technology (CIT). See “Upgrading theCommon Inventory Technology.”
2. Upgrade the dynamic capabilities of your agent if you installed the version8.5.1 fault-tolerant agent with dynamic capabilities. See “Upgrading the TivoliWorkload Scheduler dynamic agent” on page 166.
3. Upgrade the fault-tolerant agent. Perform this step to include standard agent,fault-tolerant agent, or domain manager capabilities. See “Upgrading thestandard agent, fault-tolerant agent, or domain manager” on page 167
4. Optional. If you want to add the Java runtime to run job types with advancedoptions to the agent, see “Upgrading the Java runtime to run job types withadvanced options” on page 168.
Some Tivoli Workload Scheduler parameters are used by the software packageblock to perform the upgrade. You can assign values to each variable to reflect theinstallation that is being upgraded, otherwise the default value is assigned.
When you upgrade agents using Software Distribution, the following variables arerequired:v install_dir
v tws_user
v pwd (This parameter is not required in a UNIX upgrade.)v fresh_install
v upgrade
v from_release
For a list of Software Distribution parameters, see “Software packages andparameters” on page 104.
Upgrading the Common Inventory TechnologyAbout this task
You must upgrade the Common Inventory Technology (CIT) before upgrading theagent and adding the following capabilities:v Standard agent, fault-tolerant agent, or domain manager capabilitiesv Dynamic scheduling capabilitiesv The option to add the Java runtime to run job types with advanced options to
the agent. The runtime environment is used to:– Add the Java runtime to run job types with advanced options, both those
supplied with the product and the additional types implemented through thecustom plug-ins.
– Enable the capability to remotely run, from the agent, the dynamic workloadbroker resource command on the server.
The following are examples of the commands that you run to install CIT onWindows and UNIX workstations. See “Software packages and parameters” onpage 104 for a description of the parameters.
Windows operating systems:1. wdinstsp -D CIT_ExploiterID=TWA D:\TWS_86\WINDOWS\CIT_Preinstall.spb2. wdinstsp D:\TWS_86\WINDOWS\CIT.spb
UNIX and Linux operating systems:1. wdinstsp -D CIT_ExploiterID=TWA /TWS_86/UNIX/CIT_Preinstall.spb2. wdinstsp /TWS_86/UNIX/CIT.spb
Chapter 5. Upgrading 165

Upgrading the Tivoli Workload Scheduler dynamic agentThe Tivoli Workload Scheduler dynamic agent has replaced the fault-tolerant agentwith dynamic capabilities available in V8.5.1. To upgrade the latter with twsinstyou need to install the new dynamic agent.1. Verify the authorizations required to run the procedure in the “User
authorization requirements” on page 67 section.2. Locate the .spb as described in the “Software packages and parameters” on
page 104 section.3. Set the Software Distribution environment launching the following command
located in the TWA/TWS/_uninstall/CLI directory:
Windows operating systems:swd_env.bat
UNIX and Linux operating systems:swd_env.sh
4. Run the wdinstsp command located in the TWA/TWS/_uninstall/CLI as shownin the following examples:
Windows operating systems:The following Windows example describes an installation with the user<TWS_user> and the endpoint Tivoli_TWS_WINDOWS. In this example,you are installing on a domain controller or in a Windows node agentbecause the -D domain="domain_name" was specified.wdinstsp
-D ita_port="31112"-D host_name=IT041924-T61.rot.ibm.com-f-uy-D install_dir="C:\ibm\TWS\twsuser\TWS"-D tws_user="twsuser"-D password="twspasswd"-D startAgent="true"-D company="company_name"-D this_cpu="CPU_name"-D master_cpu="MTMDM"-D tcp_port="33311"-D domain="domain_name"-n "FP_TWS_LWA_WINDOWS_twsuser.8.6.0.00"
"C:\Output\TWS_VLAST\WINDOWS\Tivoli_LWA_WINDOWS.SPB"
UNIX and Linux operating systems:The following UNIX example describes an installation with the user<TWS_user> and the endpoint Tivoli_TWS_LINUX_I386.wdinstsp
-D ita_port="31112"-D host_name="IT041924-T61.rot.ibm.com"-f-uy-D install_dir="/home/twsuser/TWS"-D tws_user="twsuser"-D company="company_name"-D this_cpu="cpu_name"-D master_cpu="MTMDM"-D tcp_port="33311"-D serverName="server1"-n "FP_TWS_LWA_LINUX_I386_twsuser.8.6.0.00"
/mnt/gsa/home/s/l/user1/web/public/SPB_INSTALL/LINUX_I386/Tivoli_LWA_LINUX_I386.SPB
166 Tivoli Workload Scheduler: Planning and Installation: Planning and Installation

Upgrading the standard agent, fault-tolerant agent, or domainmanagerThe following are examples of the settings required to upgrade a Tivoli WorkloadScheduler agent on Windows and UNIX workstations giving it standard agent,fault-tolerant agent, or domain manager capabilities. You can also add the Javaruntime to run job types with advanced options to the agent. The runtimeenvironment is used to run application job plug-ins on the agent and to enable thecapability to remotely run, from the agent, the dynamic workload broker resourcecommand on the server. See “Upgrading the Java runtime to run job types withadvanced options” on page 168 for details.1. Verify the authorizations required to run the procedure in the “User
authorization requirements” on page 67 section.2. Locate the .spb as described in the “Software packages and parameters” on
page 104 section.3. Set the Software Distribution environment launching the following command
located in the TWA/TWS/_uninstall/CLI directory:
Windows operating systems:swd_env.bat
UNIX and Linux operating systems:swd_env.sh
4. Run the wdinstsp command located in the TWA/TWS/_uninstall/CLI as shownin the following examples:
Windows operating systems:In this example, you are upgrading on a domain controller or in aWindows node agent because the -D domain="domain_name" isspecified. The following Windows example describes an upgrade fromversion 8.4 with the user <TWS_user> and the endpointTivoli_TWS_WINDOWS.wdinstsp
-n "FP_TWS_WINDOWS_twsuser.8.6.0.00"-D install_dir="C:\ibm\TWS\twsuser\TWS"-D tws_user="twsuser"-D password="twspasswd"-f-uy-D company="company_name"-D this_cpu="IT041924-T61"-D master_cpu="MTMDM"-D fresh_install="false"-D upgrade="true"-D tcp_port="33311"-D domain="domain_name"-D from_release="8.4"
"C:\Output\TWS_VLAST\WINDOWS\Tivoli_TWS_WINDOWS.SPB"
UNIX and Linux operating systemsThe following UNIX example describes an upgrade from version 8.4with the user <TWS_user> and the endpoint Tivoli_TWS_LINUX_I386.wdinstsp
-n FP_TWS_WINDOWS_twsuser.8.6.0.00-f-uy-D install_dir="/home/twsuser/TWS"-D tws_user="twsuser"-D company="company_name"-D this_cpu="IT041924-T61"-D master_cpu="MTMDM"-D fresh_install=false
Chapter 5. Upgrading 167

-D upgrade=true-D tcp_port="33311"-D serverName="server1"-D from_release=8.4
/mnt/gsa/home/s/l/user1/web/public/SPB_INSTALL/LINUX_I386/Tivoli_TWS_LINUX_I386.SPB
Upgrading the Java runtime to run job types with advancedoptionsThe following are examples of the settings required to upgrade the Java runtime torun job types with advanced options to the agent if you installed it with theversion 8.5.1 of the fault-tolerant agent with dynamic capabilities. The runtimeenvironment:v Runs on the agent, job types with advanced options, both those types supplied
with the product and the additional types implemented through the customplug-ins.
v Enables the capability to remotely run, from the agent, the dynamic workloadbroker resource command on the server.
See “Software packages and parameters” on page 104 for a description of theparameters.1. Verify the authorizations required to run the procedure in the “User
authorization requirements” on page 67 section.2. Locate the .spb as described in the “Software packages and parameters” on
page 104 section.3. Set the Software Distribution environment launching the following command
located in the TWA/TWS/_uninstall/CLI directory:
Windows operating systems:swd_env.bat
UNIX and Linux operating systems:swd_env.sh
4. Run the wdinstsp command located in the TWA/TWS/_uninstall/CLI as shownin the following examples:
Windows operating systems:The following Windows example describes an upgrade with the user<TWS_user>:wdinstsp
-n "TWS_Eclipse_twsuser.8.6.0.00"-D tws_user="twsuser"-D from_release="8.4"-D install_dir="D:\IBM\TWA\TWS"
D:\output\TWS_851\WINDOWS\Tivoli_Eclipse_WINDOWS.SPB
UNIX and Linux operating systems:The following UNIX example describes an upgrade with the user<TWS_user>:
wdinstsp-n "TWS_Eclipse_twsuser.8.6.0.00"-D tws_user="twsuser"-D from_release=8.4-D install_dir="D:\IBM\TWA\TWS"
/mnt/gsa/home/s/l/user1/web/Tivoli_Eclipse_LINUX_I386.SPB
168 Tivoli Workload Scheduler: Planning and Installation: Planning and Installation

Upgrading agents using Tivoli Endpoint Manager
Use the IBM Tivoli Endpoint Manager Analyses and Fixlets for IBM TivoliWorkload Scheduler agents upgrade management to take advantage of:v The Tivoli Endpoint Manager functions to view and analyze Tivoli Workload
Scheduler information about all the agents installed on Tivoli Endpoint Managerendpoints.
v The Fixlets to automatically find all the Tivoli Workload Scheduler agents whereto install Tivoli Workload Scheduler V8.6 upgrade. When the Fixlets becomerelevant, you can choose to schedule or run immediately a Tivoli WorkloadScheduler upgrade installation.
Tivoli Endpoint Manager provides unified, real-time visibility and enforcement todeploy and manage upgrades to all endpoints from a single console.
Software requirements
You can use Tivoli Endpoint Manager Analyses and Fixlets for Tivoli WorkloadScheduler agents upgrade management in a distributed environment, installing:v Tivoli Workload Scheduler V8.6 agents (fault-tolerant, dynamic, z/OS agent).v Tivoli Endpoint Manager for Lifecycle Management V8.2.
Upgrading remarks
Before you begin to upgrade agents using Tivoli Endpoint Manager, consider thefollowing items:v Make sure to have at least 2 GB of free space under the root directory or
filesystem (depending on your operating system).v If on an agent there are more than one Tivoli Workload Scheduler instance, more
than one baseline or fixlet could be relevant for that agent. Make sure to applythem in the right order and to wait for an action to complete before taking anew one, because only one single action can be taken on the same agent at thesame time.
v On an agent can be installed more than one Tivoli Workload Scheduler instance;when you run a fixlet to upgrade to an upper level, it upgrades all the instanceslisted in the Tivoli Workload Scheduler registry starting by the first one. You cannot select a particular agent.
v Ask the Tivoli Endpoint Manager license team to add Tivoli Workload Schedulermanagement to your Tivoli Endpoint Manager environment, by performing thefollowing actions:1. Locate the Tivoli Endpoint Manager serial number for your license on the
License Overview dashboard in the Tivoli Endpoint Manager console.2. Send an email to the Tivoli Endpoint Manager license team at the following
address [email protected] providing your Tivoli Endpoint Manager serialnumber, company name, and the request to add Tivoli Workload Schedulerto your Tivoli Endpoint Manager license.
3. After you receive the confirmation that Tivoli Workload Scheduler has beenadded to your license, click the Check for license update button in thedashboard to retrieve your new license.
4. When Tivoli Workload Scheduler is listed in the dashboard, click Enable andassign the content to groups of computers in the same way as for any otherTivoli Endpoint Manager content site. For more information, see the TivoliEndpoint Manager Administrator's Guide.
Chapter 5. Upgrading 169
|
||
|||
||||
||
|
||
|
|
|
||
||
|||||
||||
|||
||
||||
|||
||||

Customizing IBM Endpoint Manager to manage Tivoli WorkloadScheduler agents upgrading
To customize IBM Endpoint Manager to manage Tivoli Workload Scheduler agentsupgrading, perform the following steps:1. Open IBM Endpoint Manager Console,2. Login to IBM Endpoint Manager server by using the administrative credentials
and perform the following steps to configure and customize the IBM EndpointManager environment to automate the Tivoli Workload Scheduler upgradeinstallation.
Note: The screen shots used are to be intended as a reference only, and do notreflect the current version of the product.
Enabling and subscribing to the Software Distribution external site:
To enable and subscribe all the computers with the Software Distribution Site byusing the Tivoli Endpoint Manager Console, perform the following steps:1. Open the BigFix Management domain and scroll to the top to view the
associated dashboards.2. From the Licensing Dashboard, enable the Software Distribution Site if not
already enabled, by selecting the site and clicking on the Software DistributionSite from the list of Enabled Site.
170 Tivoli Workload Scheduler: Planning and Installation: Planning and Installation
||
||
|
||||
||
|
||
||
|||
|
|

1. In the properties panel of the site, select the Computer Subscriptions tab, andclick on All Computers to subscribe all computers in the Tivoli EndpointManager environment to the Software Distribution Site.
2. Click Save Changes to save the site subscription settings.
Installing and registering the Download Plug-in for Software Distribution:
To install and register the Download Plug-in for Software Distribution by using theTivoli Endpoint Manager Console, perform the following steps:1. From the navigation tree in the All Content domain Panel, click Sites
->External Sites ->Software Distribution ->Fixlets and Tasks
2. From the resulting List Panel on the right, click the Tivoli Endpoint ManagerServer: Install Tivoli Endpoint Manager Upload Maintenance Service forSoftware Distribution fixlet (if relevant) to open it. Ensure that the Descriptiontab is selected.
3. From the Description tab, click the link or button corresponding to the FixletAction. The Take Action dialog box is displayed.
4. If you want, you can fine-tune the settings of the Action browsing usingappropriate tabs.
5. Click OK at the bottom of the Take Action dialog box. The action is propagatedto all the computers targeted in the Take Action dialog.
Chapter 5. Upgrading 171
|||
|
|
|
|
||
||
||||
||
||
||

6. Repeat the procedure for the relevant fixlet: Tivoli Endpoint Manager Server:Register Download Plug-in for Software Distribution.
Uploading the Tivoli Workload Scheduler V8.6 eImages and tools on the TivoliEndpoint Manager server:
To upload the Tivoli Workload Scheduler V8.6 product eImages and the tools tounpack and deploy the product on the Tivoli Endpoint Manager server by usingthe Tivoli Endpoint Manager Console, perform the following steps:1. Download the Tivoli Workload Scheduler V8.6 product eImages from Passport
Advantage, depending on your platform and agent, as per the following tables:
Table 13. Tivoli Workload Scheduler Fault Tolerant Agent 8.6
Platform Elmage name Part number
AIX Tivoli Workload Scheduler FaultTolerant Agent 8.6 for AIX,Multilingual
CI94MML
HP-UX onPA-RISC
Tivoli Workload Scheduler FaultTolerant Agent 8.6 for HP-UX onPA-RISC, Multilingual
CI94QML
HP-UX onItanium
Tivoli Workload Scheduler FaultTolerant Agent 8.6 for HP-UX onItanium, Multilingual
CI956ML
Linux onx86
Tivoli Workload Scheduler FaultTolerant Agent 8.6 for Linux on x86,Multilingual
CI94XML
172 Tivoli Workload Scheduler: Planning and Installation: Planning and Installation
||
|
|
||
|||
||
||
|||
||||
|
|||||
|
|||||
|
|||||
|

Table 13. Tivoli Workload Scheduler Fault Tolerant Agent 8.6 (continued)
Platform Elmage name Part number
Linux x86-64 Tivoli Workload Scheduler FaultTolerant Agent 8.6 for Linux on x86,Multilingual
CI95BML
Linux onSystem z
Tivoli Workload Scheduler FaultTolerant Agent 8.6 for Linux onSystem z9 and System z, Multilingual
CI953ML
Linux onPOWER
Tivoli Workload Scheduler FaultTolerant Agent 8.6 for Linux onPOWER, Multilingual
CI950ML
SolarisSPARC
Tivoli Workload Scheduler FaultTolerant Agent 8.6 For SolarisSPARC, Multilingual
CI94SML
Solaris x64 Tivoli Workload Scheduler FaultTolerant Agent 8.6 for Solaris x64,Multilingual
CI959ML
Windows(32-bit)
Tivoli Workload Scheduler FaultTolerant Agent 8.6 for Windows,Multilingual
CI94VML
Windowsx64
Tivoli Workload Scheduler FaultTolerant Agent 8.6 for Windows x64,Multilingual
CI95EML
Table 14. Tivoli Workload Scheduler for z/OS Agent V8.6
Platform Elmage name Part number
AIX Tivoli Workload Scheduler for z/OSAgent V8.6 for AIX, Multilingual
CI95QML
HP-UX onPA-RISC
Tivoli Workload Scheduler for z/OSAgent V8.6 for HP-UX on PA-RISC,Multilingual
CI95RML
HP-UX onItanium
Tivoli Workload Scheduler for z/OSAgent V8.6 for HP-UX on Itanium,Multilingual
CI95XML
IBM i Tivoli Workload Scheduler for z/OSAgent V8.6 for IBM i, Multilingual
CI95PML
Linux onx86
Tivoli Workload Scheduler for z/OSAgent V8.6 for Linux on x86,Multilingual
CI95UML
Linuxx86-64
Tivoli Workload Scheduler for z/OSAgent V8.6 for Linux on x86-64,Multilingual
CI95ZML
Linux onSystem z
Tivoli Workload Scheduler for z/OSAgent V8.6 for Linux on System z9and System z, Multilingual
CI95WML
Linux onPOWER
Tivoli Workload Scheduler for z/OSAgent V8.6 for Linux on POWER,Multilingual
CI95VML
SolarisSPARC
Tivoli Workload Scheduler for z/OSAgent V8.6 for Solaris SPARC,Multilingual
CI95SML
Chapter 5. Upgrading 173
|
|||
||||
|
|||||
|
|||||
|
|||||
|
||||
|
|||||
|
|||||
|
|
||
|||
||||
|||||
|
|||||
|
||||
|||||
|
|||||
|
|||||
|
|||||
|
|||||
|

Table 14. Tivoli Workload Scheduler for z/OS Agent V8.6 (continued)
Platform Elmage name Part number
Solaris x64 Tivoli Workload Scheduler for z/OSAgent V8.6 for Solaris x64,Multilingual
CI95YML
Windows(32-bit)
Tivoli Workload Scheduler for z/OSAgent V8.6 for Windows,Multilingual
CI95TML
Windowsx64
Tivoli Workload Scheduler for z/OSAgent V8.6 for Windows x64,Multilingual
CI960ML
2. In the navigation tree of the System Lifecycle domain Panel, click the iconslabeled Software Distribution ->Manage Software Distribution Packages.
3. From the resulting Package Library List Panel on the right, double click NewPackage to create the package for the Tivoli Workload Scheduler V8.6 GAeImages and the package for the tools. Using the same panel you cancustomize all the properties for the created packages.
4. Select the Tivoli Workload Scheduler V8.6 GA package from the PackageLibrary List Panel. The Manage Files tab is displayed at the bottom.
5. Click Add Files to upload one file at time of the Tivoli Workload SchedulerV8.6 GA eImages on the Tivoli Endpoint Manager server.
174 Tivoli Workload Scheduler: Planning and Installation: Planning and Installation
|
|||
||||
|
|||||
|
|||||
|
|
||
||||
||
||

1. Select the Tivoli Workload Scheduler V8.6 tools package from the PackageLibrary List Panel. The Manage Files tab is displayed at the bottom.
2. Click Add Files to upload one file at time of the Tivoli Workload SchedulerV8.6 tools on the Tivoli Endpoint Manager server.a. You must add the twsinst.vbs file (for Windows systems) or the file
SWRequirements.sh (for AIX systems) from the GAFixes folder of the TivoliWorkload Scheduler Fixlets, Actions, Baselines, and Analysis that youdownloaded from Fix Central (8.6.0-TIV-TWS-TEM-FP000n.zip, where n isthe fix pack number you want to apply).
b. Then you must add the sleep.exe tool provided into the Windows Server2003 Resource Kit Tools (http://www.microsoft.com/en-us/download/details.aspx?id=17657).
c. Finally, you must add the unzip tool for every platform that you need. Theunzip tools are located in the tws_tools folder of the Tivoli WorkloadScheduler Fixlets, Actions, Baselines, and Analysis that you downloadedfrom Fix Central (8.6.0-TIV-TWS-TEM-FP000n.zip, where n is the fix packnumber you want to apply). The following naming convention, specific foreach operating system, has been used:
v unzip-aixv unzip-hpuxv unzip-hpux_ia64
Chapter 5. Upgrading 175
|
|
||
||
|||||
|||
||||||
|
|
|

v unzip-linux_s390v unzip-linux_x86v unzip-solarisv unzip-solaris_i386v unzip-windows.exe.
Creating and subscribing to the Tivoli Workload Scheduler Custom Site:
The site hosts the Tivoli Workload Scheduler Fixlet messages, Actions, Baselinesand Analysis that are pertinent to your network. To create and subscribe all thecomputers to the Tivoli Workload Scheduler Custom Site by using the TivoliEndpoint Manager Console, perform the following procedure:1. Select Tools >Create Custom Site.2. You are prompted for a name for your custom site. Enter a name, for example,
Tivoli Workload Scheduler, and click OK.3. From the All Content Domain panel, click the Tivoli Workload Scheduler site
under Sites ->Custom to create the site.
176 Tivoli Workload Scheduler: Planning and Installation: Planning and Installation
|
|
|
|
|
|
|
|
||||
|
||
||

4. From the Details tab, enter a description of the site. From the Domainpull-down menu, select a Domain to house your site.
5. From the Computer Subscriptions tab, indicate which subset of your TivoliEndpoint Manager Client computers you want to subscribe to this site. Forexample All Computers.
6. From the Operator Permissions tab, you grant specific access permissions tospecific operators.
7. Click Save Changes on the work area to complete the description of the site.You must enter your password to propagate your new custom site.
Importing Tivoli Workload Scheduler Fixlets, Actions, Baselines, and Analysison the Tivoli Workload Scheduler Custom Site:
To import the Tivoli Workload Scheduler Fixlets, Actions, Baselines, and Analysison the Tivoli Workload Scheduler Custom Site you created, use the Tivoli EndpointManager Console by performing the following procedure.1. Select File > Import. Using the Import dialog you import the .bes files
containing all the Tivoli Workload Scheduler Fixlets, Actions, Baselines andAnalysis that you downloaded from Fix Central (8.6.0-TIV-TWS-TEM-FP000n.zip, where n is the fix pack number you want to apply).
2. After you click on Import, the Import Content dialog is displayed. Using it youreview each Tivoli Endpoint Manager object to import (contained in .bse files)and to choose the site where to create those object. Choose the Tivoli WorkloadScheduler Customer site as the site where to create the objects.
3. Click OK at the bottom of the Import Content dialog box to import the objectson the site.
Chapter 5. Upgrading 177
||
|||
||
||
|
|
||
|||
||||
||||
||

4. From the navigation tree in the All Content domain Panel, click the iconslabeled Sites > Custom Sites > Tivoli Workload Scheduler to review theimported Fixlets, Actions, Baselines, and Analysis.
Using Tivoli Endpoint Manager Analysis to receive informationon the Tivoli Workload Scheduler agents installed
An Analysis is a collection of property expressions that allow an Operator to viewand summarize various properties of Tivoli Endpoint Manager Client computersacross a network. The collection is grouped together to be labeled, edited, andactivated against groups of computers for the results to be displayed together. Forexample, suppose you have a custom application deployed in your network, andyou want to create an analysis to have important information about the state of theworkstations relative to that custom application. You might build an analysis withseveral properties, such as:v Is the custom application installed?v What is the version of the custom application?v Is the application currently running?
Tivoli Workload Scheduler analyses are grouped for supported platform. Using theTivoli Workload Scheduler custom site you can browse and analyze the TivoliWorkload Scheduler instance information installed on each computer connected toTivoli Endpoint Manager server.
To display a Tivoli Workload Scheduler Analysis by using the Tivoli EndpointManager Console, perform the following steps:1. Click the Analyses icon in the Domain Panel navigation tree.
178 Tivoli Workload Scheduler: Planning and Installation: Planning and Installation
|||
|
|
||
||||||||
|
|
|
||||
||
|

2. Click any Tivoli Workload Scheduler agent (platform) entry in the resultingAnalysis List Panel. The body of the Analysis is displayed in the Work Areabelow the list. Click the Description tab if it is not already selected.
3. The Analysis display region has the following tabs:a. Description: This is an HTML page providing a description of the analysis.b. Details: This panel provides a property-by-property listing of the chosen
analysis, as well as the Relevance statement that is being used to target thechosen computers. At the bottom is a text box for entering a comment thatto be attached to this analysis.
c. Results: A filter/list Lists the actual results of the analysis, which can befiltered and sorted by the pre-assigned properties. This tab is only availableif the Analysis is activated. For the Tivoli Workload Scheduler Agentanalysis the following information is provided for each instance installed:Computer Name, Tivoli Workload Scheduler Version (Major, Minor,Maintenance, Fixpack), Tivoli Workload Scheduler Agent Type, TivoliWorkload Scheduler User Owner, Tivoli Workload Scheduler InstallationPath.
4. Applicable Computers: This is a filter/list of all the computers where theselected analysis is applicable. You can filter the list by selecting items from thefolders on the left, and sort the list by clicking the column headers.
Using Tivoli Endpoint Manager relevant Fixlets to upgrade TivoliWorkload Scheduler agents
Fixlets and Tasks are central to Tivoli Endpoint Manager. Using Relevancestatements, they target specific computers, remediating only those Tivoli EndpointManager Clients affected by an issue. They are both packaged with an Actionscript that can resolve the issue with a simple mouse-click.
The Tivoli Workload Scheduler Fixlets for instance find, if relevant, only the TivoliWorkload Scheduler agents that have installed a version prior to V8.6. Then therelative Actions prepare the instance to install the upgrade and then upgrades theagent.
Fixlets and Tasks differ mainly on how they get resolved.
Chapter 5. Upgrading 179
|||
|
|
||||
||||
||||
||||
|
||
||||
||||
|

A Fixlet is triggered by a Relevance clause that detects a “vulnerability”. For TivoliWorkload Scheduler vulnerability means, for example, that an older version thanV8.6 is applied to the agents. When an Action is invoked to remediate thevulnerability, the Fixlet automatically loses relevance and is for this reason it is nolonger applicable on that specific Tivoli Endpoint Manager Client. As a FixletAction propagates through your network, you can track its progress with theConsole, the Web Reports, and the Visualization Tool. When you remediate everyTivoli Endpoint Manager Client in your network, the Fixlet is no longer relevantand it is removed from the list. If the vulnerability returns, the Fixlet is shownagain in the list, ready to address the vulnerability again.
A Task comes with one or more Action scripts that help you adjust settings or runmaintenance tasks.
At any time, you can open a Fixlet to inspect the underlying Relevance expressionsthat are used to target the Clients, as well as the Action scripts that are designed toaddress the issue. The language is human-readable to give you a high degree ofconfidence in both the applicability of the trigger and efficacy of the remedialAction. You can also see exactly which computers in your network are affected byeach Fixlet. When propagated, you can then view the progress and ultimate historyof each Action taken on a Client-by-Client basis.
Tivoli Workload Scheduler provides the following fixlets for each operating systemto upgrade agents to V8.6:1. Prepare the upgrade of the Tivoli Workload Scheduler type_of_agent agent to
version 8.6 for platform
2. Upgrade Tivoli Workload Scheduler type_of_agent agent to version 8.6 forplatform
Where platform is one of the supported operating systems, and type_of_agent can befault-tolerant or for z/OS.
If the first fixlet is relevant and you Take the Action, Tivoli Endpoint Managerprepares the Tivoli Workload Scheduler agent for the upgrade by performing thefollowing steps:v Downloads the images from the Tivoli Endpoint Manager server or relay.v Extracts the images.v Checks if the Tivoli Workload Scheduler command line tools are running
(conman, composer, fileaid). If they are running, the action fails.v Sets the fence of the workstation to GO.v Waits for jobs to complete. If there are still jobs running after
"WaitForJobCompletion" seconds, the action fails.v Stops the agent. If the agent cannot be stopped, the action fails.v Checks if all Tivoli Workload Scheduler binaries and files are unlocked.
180 Tivoli Workload Scheduler: Planning and Installation: Planning and Installation
||||||||||
||
|||||||
||
||
||
||
|||
|
|
||
|
||
|
|

If one of the Actions fails, the fixlet remains relevant and the Action fails. You cancheck the failed Action by using the Status tab of the Action. Then you canperform the necessary steps to solve the problems on the agents, and rerun theAction.
If all the Actions succeed, the fixlet is no longer relevant and the second fixletbecomes relevant. If you take the Action for the second one, it upgrades thepreviously prepared agent instance to V8.6, performing the following steps:v Downloads the images from the Tivoli Endpoint Manager server or relay.v Extracts the images.v Upgrades the instance.v Resets the fence to the original value.v Links back to the domain manager.
Also in this case you can check the status of the Action through the relative tab,and in case correct any errors and rerun the Action again until it succeed.
Chapter 5. Upgrading 181
|
|
||||
|||
|
|
|
|
|
||

Displaying relevant Tivoli Workload Scheduler Fixlets:
To display a Tivoli Workload Scheduler Fixlets by using the Tivoli EndpointManager Console, perform the following procedure:1. From the navigation tree in the Domain Panel, click the icon labeled Fixlets
and Tasks. The List Panel is displayed on the right.2. From the List Panel, click any Tivoli Workload Scheduler fixlet to open it. The
body of the Fixlet message is displayed in the Work Area.3. Click the Description tab if not already selected. When selected, each Fixlet has
its own window. Each Fixlet contains a Work Area with the following four tabs:a. Description: This is a page providing a descriptive explanation of the
problem and one or more Actions to fix it. The Actions are represented bylinks at the bottom of the description page. Click an Action to open theTake Action dialog, which allows you to further target or schedule theAction. If you accidentally click an Action hyperlink, before the actualdeployment, you always get a chance to modify (or cancel) the Action.
b. Details: This dialog contains the Fixlet/Task properties such as category,security ID, download size, source, severity, and date. It also lists the codebehind the Relevance expressions and the Actions. At the bottom of thisdialog there is a text box for you to enter a comment that remains attachedto this item.
c. Applicable Computers: This is a filter/list of all the computers targeted bythe selected Fixlet or Task. You can filter the list by selecting items from thefolders on the left, and sort the list by clicking the column headers.
d. Action History: This is a filter/list of any Actions that have been deployedfrom this Fixlet or Task. If the item is new, there are no Actions in the list.Like the other filter/lists in the Console, you can filter the Actions using theleft panel, and sort them by clicking the column headers above theright-hand list.
182 Tivoli Workload Scheduler: Planning and Installation: Planning and Installation
|
|
|
||
||
||
||
||||||
|||||
|||
|||||

Deploying Tivoli Workload Scheduler Actions:
To deploy a Tivoli Workload Scheduler Action by using the Tivoli EndpointManager Console, perform the following procedure:1. Click the List Panel to open a relevant Fixlet or Task. Make sure the
Description tab is selected.2. Read the description carefully. Scroll down to see the suggested Actions.3. Click the Details tab and research the Action. Examine the Relevance section
and the Action script itself.
Chapter 5. Upgrading 183
|
|
|
||
||
|
||

1. From the Description tab, click the link or button corresponding to the FixletAction. The Take Action dialog box is displayed, after you provide thenecessary Action parameters. It lists the name of the Action at the top. Click theExecution tab to view the scheduling constraints on the Action execution.
2. In the Preset pull-down, you can accept the default setting or select Policy toestablish an open-ended Action with no expiration date. For more informationabout presets, see the section on Custom Actions.
3. If you want, you can fine-tune the list of targeted computers using the Targettab. Use the computer tree in the left panel to filter the list in the right panel.
4. Create an optional message that is shown on the Tivoli Endpoint ManagerClient computers by using the Messages tab.
5. Set the various scheduling constraints and behaviors with the Execution tab.Use the other tabs in this interface to further modify the Action settings.
6. Any Operator with Custom Authoring permissions can modify the ActionScript as well.
7. Click OK.
Note: If you are taking an action that applies to different computers, when you areprompted to insert values for the Action parameters, you must leave the defaultvalues. You must not specify other values.
184 Tivoli Workload Scheduler: Planning and Installation: Planning and Installation
|
|
||||
|||
||
||
||
||
|
|||

The Action is propagated to all the computers targeted in the Take Action dialog.When the Action runs and the targeted computers are fixed, those computers nolonger report this Fixlet as relevant.
Monitoring Tivoli Workload Scheduler Actions:
When you decide to take a proposed Action you have several deployment options.For example, you might schedule the Action to take place unattended aftermidnight or to take place explicitly with user involvement during the day.
After you schedule the Actions, the Tivoli Endpoint Manager Server attempts toindicate the computers that wait for the Actions. Ideally, the Tivoli EndpointManager Client gathers the Action information from the Action site and performsit immediately. More typically however, some computers are powered off andothers are mobile and undocked at the time of the deployment. As soon as thesecomputers are powered on or docked to the network, the remedial Actions isapplied to them.
To monitor a deployed Action, by using the Tivoli Endpoint Manager Console,perform the following steps:1. Click the Actions icon in the Domain Panel navigation tree.
If you have not yet deployed an Action or all the Actions completed, this list isempty. Otherwise, click any action to view its status, whether it is evaluating,waiting, running, fixed, or failed. You can add comments to the Action, either foryourself or other operators.
Chapter 5. Upgrading 185
|
|
|||
|
|||
|||||||
||
|
||||

The Actions might go through several states as they are collected, evaluated, andrun by the clients.
Note: If an Action has failed for any reason and its state is Open, before running itagain, make sure to Stop it and that is not listed in the Actions list.
Using Tivoli Endpoint Manager relevant Baselines to upgradeTivoli Workload Scheduler agents
Baselines are collections of Fixlet messages and tasks. They provide a powerfulway to deploy a group of Actions across an entire network with a singlecommand, a click.
Baselines provide a way to maintain a common operating environment, makingsure that all users in any given domain have the same software, patches, anddrivers. Baselines are easy to set up, by selecting the Fixlet messages, Tasks, andother Baselines that you want to be a part of the group. To limit the scope of aBaseline, a Relevance expression can be used to target any subset of your network,using IP addresses, computer names, operating systems, and many other qualifiers.
186 Tivoli Workload Scheduler: Planning and Installation: Planning and Installation
||
||
|
|
||
|||
||||||

For example, you might make a Baseline named "All critical hotfixes," andpopulate it with all the current critical hotfixes available in the Fixlet list. Or youmight create one named "Finance department baseline," to keep that particulargroup of computers updated with the latest financial programs, financial tables,updates, and patches.
Tivoli Workload Scheduler provides a Baseline for every platform supported. Thebaselines provided group together the Tivoli Workload Scheduler Fixlets describedin Using Tivoli Endpoint Manager relevant Fixlets to upgrade Tivoli WorkloadScheduler agents that prepare the agent instance for the upgrade and then upgradethe agent. In this way you can manage in a single click the upgrade of the agent.
The Tivoli Workload Scheduler Baseline provided is named: Upgrade TivoliWorkload Scheduler type_of_agent agent to version 8.6 for platform, whereplatform is the operating system of the agent to upgrade and type_of_agent can befault-tolerant or for z/OS.
Viewing Tivoli Workload Scheduler Baselines:
Baselines allow you to group Fixlet messages and tasks into a group for simple,one-click deployment. To display an existing Baseline perform the following steps:1. Click the Baselines icon in the Domain Panel navigation tree. The List Panel is
displayed.2. Click an item. The body of the Baseline is shown in the Work Area below.
The Baseline display region contains the following tabs:v Description: This is typically an HTML page providing a descriptive explanation
of the problem and an Action to fix it.v Details: This tab lists the Baseline Properties, a section detailing the code behind
the Relevance expressions and the Baseline actions, along with other Baselineproperties. Scroll to the bottom to enter a comment as a note for yourself orother Console operators.
v Components: This tab lists the components, namely the Fixlet messages, Tasks,and other Baselines that are grouped into this Baseline. Because Baselines makea copy of the components, it is possible for one of these copies to get out of syncwith the underlying Fixlet or Task that spawned it. If this happens, a message isdisplayed saying that the source differs from the copy and allowing you tosynchronize with the current source.
v Applicable Computers: A filter/list of all the computers targeted by the selectedBaseline. You can filter the list by selecting items from the folders on the left,and sort the list by clicking the column headers.
v Component Applicability: A filter/list of the various components of theBaseline. It displays the number of computers where the Baseline is currentlyapplicable and, after a slash, the number where it is not. Double-click an item inthe list to display it for inspection.
v Action History: A filter/list of any actions that have been deployed from thisBaseline. If the Baseline is new, there are no actions in the list. Like the otherfilter/lists in the Console, you can filter the actions using the left panel, and sortthem by clicking the column headers.
Chapter 5. Upgrading 187
|||||
|||||
||||
|
||
||
|
|
||
||||
||||||
|||
||||
||||

Monitoring Relevant Tivoli Workload Scheduler Baselines:
When Baselines become relevant somewhere in your network, the Tivoli EndpointManager Console adds them to the list of Baselines to be displayed under theBaselines icon in the Domain Panel navigation tree. You can filter this list byopening the icon and selecting one of the subsets. In the resulting List Panel on theright, you can sort the Baselines by clicking one of the column headings, whichmight include the following fields:v Name: The name assigned to the Baseline by the author.v ID: A numerical ID assigned to the Baseline by the author.v Site: The name of the site that is generating the relevant Baseline.v Applicable Computer Count: The number of Tivoli Endpoint Manager Clients in
the network currently targeted by the Baseline.v Open Action Count: The number of actions open for the given Baseline.
If you do not see one of the columns listed above, right-click in the Baseline headerand select it from the pop-up menu.
Deploying and Monitoring Tivoli Workload Scheduler Actions related toBaselines:
See “Deploying Tivoli Workload Scheduler Actions” on page 183 and “MonitoringTivoli Workload Scheduler Actions” on page 185 sections for further information.
Upgrading a command line clientThis section describes how to upgrade a command line client.
188 Tivoli Workload Scheduler: Planning and Installation: Planning and Installation
|
|
|
||||||
|
|
|
||
|
||
||
||

To upgrade a Tivoli Workload Scheduler version 8.3 and later command line clientusing the installation wizard, run the setup for the operating system on which youare upgrading:
On Windows operating systems:TWS\operating_system\SETUP.exe or TWS\SETUP.cmd
On UNIX and Linux operating systems:TWS/operating_system/SETUP.bin or TWS/SETUP.sh
Alternatively, start the launchpad as follows and select the Tivoli WorkloadScheduler installation:
Windows operating systemFrom the root directory of the DVD, run launchpad.exe.
UNIX and Linux operating systemsFrom the root directory of the DVD, run launchpad.sh.
If you have autorun enabled, the launchpad starts automatically. If you want tostart the launchpad from a mounted file system, ensure that you have writepermission on it before starting the launchpad.
When the installation wizard is launched, follow the prompts to complete theupgrade.
To upgrade a command line client using the silent installation, follow theprocedure described in “Performing a silent installation” on page 92 using theTWS86_UPGRADE_CLI.txt response file.
Upgrading when there are corrupt registry filesIf you have tried to upgrade a stand-alone, fault-tolerant agent (an agent that isnot shared with other components or does not have the connector feature) andreceived an error message that states that an instance of Tivoli Workload Schedulercannot be found, this can caused by a corrupt registry file. It is possible to upgradea stand-alone, fault-tolerant agent that has a corrupt registry files without havingto reinstall the product. Tivoli Workload Scheduler has a recovery option you canrun to recreate the necessary files. You can also use this option when upgradingnodes in clusters, where the node on which you want to perform the upgrade isnot available or is in an inconsistent state. The recovery option re-creates theregistry files and the Software Distribution information without having to reinstallthe complete product.
You can run the recovery option when using any of the following upgrademethods:v Upgrading using the installation wizardv Performing a silent upgrade of the agentv Upgrading the agent using the twsinst script
Re-creating the registry files using the installation wizardIf you want to re-create the registry files while performing an upgrade using theinstallation wizard, perform the following steps:1. Insert the installation DVD for your operating system.2. Run one of the following commands:
Chapter 5. Upgrading 189

Windows operating systemChoose one of the following:v TWS\operating_system\SETUP.exe -W
InstallationActions.TWA_INSTANCE_PATH=TWA_home -WrecovInstReg.run=true
v TWS\SETUP.cmd -W InstallationActions.TWA_INSTANCE_PATH=TWA_home-W recovInstReg.run=true
where operating_system is the operating system where you want toupgrade Tivoli Workload Scheduler and TWA_home is the directorywhere Tivoli Workload Scheduler is installed.
UNIX and LinuxChoose one of the following:v TWS/operating_system/SETUP.bin -W
InstallationActions.TWA_INSTANCE_PATH=TWA_home -WrecovInstReg.run=true
v TWS/SETUP.sh -WInstallationActions.TWA_INSTANCE_PATH=TWA_home -WrecovInstReg.run=true
where operating_system is the operating system where you want toupgrade Tivoli Workload Scheduler and TWA_home is the directorywhere Tivoli Workload Scheduler is installed.
Re-creating registry files using the silent upgradeTo re-create the registry files while upgrading an agent using the silent upgrademethod, perform the following steps:1. Copy one of the following response files to a local directory, according to your
operating system:v TWS86_UPGRADE_Agent_UNIX.txt
v TWS86_UPGRADE_Agent_WIN.txt
2. Edit the response file by specifying the parameter: -W recovInstReg.run=true
3. Save the file with your changes.4. Enter the following command:
Windows operating systemSETUP.exe -options local_dir\response_file.txt -silent
where response_file.txt is the name of the response file to use for theupgrade. The SETUP.exe file is located in TWS\operating_system.
UNIX and Linux operating systems./SETUP.bin -options local_dir/response_file.txt -silent
where response_file.txt is the name of the response file to use for theupgrade. The SETUP.bin file is located in TWS/operating_system.
5. Review the installation messages in the summary.log file to check that upgradewas successful.
Re-creating registry files using twsinstTo re-create the registry files while upgrading an agent using the twsinst script,perform the following steps:
On UNIX and Linux
190 Tivoli Workload Scheduler: Planning and Installation: Planning and Installation

1. Insert the installation DVD according to the operating system.2. From the TWS/operating_system directory, where operating_system is the
operating system where you want to upgrade Tivoli WorkloadScheduler, run the twsinst script using the synopsis described below.
On Windows operating system
1. Insert the DVD for your operating system.2. Log in as administrator on the workstation where you want to upgrade
the product.3. From the TWS/operating_system directory of the DVD, where
operating_system is the operating system where you want to upgradeTivoli Workload Scheduler, run twsinst using the synopsis describedbelow.
Synopsis:
On UNIX and Linux
Show command usage and version./twsinst -u | -v
Upgrade an instance./twsinst -update -uname user_name[-inst_dir install_dir[-recovInstReg true]]
Example./twsinst -update -uname twsuser -inst_dir /opt/IBM/TWA-recovInstReg true
On Windows operating systems:
Show command usage and versiontwsinst -u | -v
Upgrade an instancetwsinst -update -uname user_name
-password user_password[-domain user_domain][-recovInstReg true][-inst_dir install_dir]
Exampletwsinst -update -uname twsuser -password qaz12qaz-inst_dir "C:\Program Files\IBM\TWA" -recovInstReg true
For information about the twsinst parameters, see “Running the upgrade” on page159.
Adding a featureTo some of the components of the product you have upgraded you can add afeature:
Add a connector to an agentIf you want to access the plan which is available on an agent or domainmanager workstation, add the connector feature which enables thecommunication between it and the Dynamic Workload Console. See“Adding a connector” on page 200.
Add a language pack to the command-line clientIf you want to use the command-line client in a supported language other
Chapter 5. Upgrading 191

than English or the language of the locale of the computer where youinstalled it, add the language pack. See “Adding language packs to acommand line client” on page 202.
Add the Java runtime to an agentDuring the installation of the agent you might have chosen not to add theJava runtime that supports the running of job types with advancedoptions. If you later decide that you require this function, you can just addthe Java runtime separately. See “Adding the Java runtime” on page 109.
If you already installed your environment and want to enable dynamic schedulingcapabilities, see “Enabling dynamic scheduling after installation” on page 202.
192 Tivoli Workload Scheduler: Planning and Installation: Planning and Installation

Chapter 6. Configuring
About this task
This chapter describes configuring after the installation is complete. It is dividedinto the following sections:v “Setting the environment variables”v “Configuring a master domain manager” on page 194v “Configuring a backup master domain manager” on page 195v “Configuring a domain manager” on page 196v “Configuring a backup domain manager” on page 196v “Configuring a dynamic domain manager” on page 197v “Configuring a backup dynamic domain manager” on page 197v “Configuring a fault-tolerant agent” on page 198v “Configuring a dynamic agent” on page 199v “Configuring a command line client” on page 200v “Configuring WebSphere Application Server” on page 200v “Adding a feature” on page 200v “Enabling dynamic scheduling after installation” on page 202
Setting the environment variablesAbout this task
Before you configure your Tivoli Workload Scheduler components, you must setthe environment variables.
On Windows operating systems, run the tws_env.cmd shell script to set up both thePATH and TWS_TISDIR variables. For example, if Tivoli Workload Scheduler isinstalled in the %ProgramFiles%\IBM\TWA\TWS directory, the PATH variable is set asfollows:c:\Program Files\IBM\TWA\TWS;c:\Program Files\IBM\TWA\TWS\bin
Note: If you have more than one version of Tivoli Workload Scheduler installed onyour computer, make sure TWS_TISDIR points to the latest one. This ensures thatthe most recent character set conversion tables are used.
On UNIX and Linux operating systems, source the tws_env shell script to set upboth the PATH and TWS_TISDIR variables. For example, if Tivoli WorkloadScheduler is installed in the default directory /opt/IBM/TWA/TWS directory,tws_env.sh sets the variables as follows:PATH=/opt/IBM/TWA/TWS:/opt/IBM/TWA/TWS/bin:$PATH
export PATH
TWS_TISDIR=/opt//opt/IBM/TWA/TWSexport TWS_TISDIR
The tws_env script has two versions:v tws_env.sh for Bourne and Korn shell environments
© Copyright IBM Corp. 1999, 2012 193

v tws_env.csh for C Shell environments
Configuring a master domain managerAbout this task
After you have installed a master domain manager, if you did not select toautomatically add the final job stream during installation and want to do so,follow the steps in this section to add the final job stream to the database and runJnextPlan. This job stream is placed in production every day and runs JnextPlanprior to the start of a new day. The installation creates the FINAL file in the/TWA/TWS directory on your workstation containing the final job stream definition.You can use FINAL or create and customize a new file. See Tivoli Workload Scheduler:User's Guide and Reference for details about customizing the final job stream.
The following is an example of how to configure a master domain manager afterinstallation:1. Log in as <TWS_user>.2. Set the environment variables. See “Setting the environment variables” on page
193.3. Run the composer command.4. Add the final job stream definition to the database by running the following
command:add FINAL
where FINAL is the name of the file containing the definition of the Final jobstream.
5. Exit the composer command line.6. Run the JnextPlan job:
JnextPlan
You can automate this step after installation. See Tivoli Workload Scheduler:User's Guide and Reference.
7. When JnextPlan completes, check the status of Tivoli Workload Scheduler:conman status
If Tivoli Workload Scheduler started correctly the status returned by thecommand is Batchman=LIVES.
8. Raise the workstation limit value to allow jobs to run. The default job limitafter installation is 0, so no jobs are permitted to run at a time. Raise the joblimit to allow jobs to run, for example to 10 jobs:conman "limit ;10"
If no workstation name is specified for the limit command, the default value isthe current login workstation.
Note: If priority of jobs is equal to HI (100) or GO (101), they will disregard thelimit and run despite a limit=0, unless fence>=priority.
Additionally, the following configuration procedures might be necessary. Forinformation about these procedures, see Tivoli Workload Scheduler: AdministrationGuide.v Customizing and configuring global, local, and user options.
194 Tivoli Workload Scheduler: Planning and Installation: Planning and Installation

v Customizing and configuring user authentication to allow users authorization onactions and objects, and to configure LDAP.
v Setting connection security to enable SSL or GSKit for inter-componentcommunications.
Configuring a backup master domain managerAbout this task
After you have installed a backup master domain manager, perform the followingconfiguration steps:1. Log in as <TWS_user> on your master domain manager2. Add the backup master username and password to the useropts file. See Tivoli
Workload Scheduler: User's Guide and Reference.3. Set the environment variables by running tws_env
4. Define the backup master as a full status autolink fault-tolerant agent in theTivoli Workload Scheduler database, using the composer command interface orthe Dynamic Workload Console. In this example using composer:composernew
5. Type the workstation definition in the text editor, for example:CPUNAME BDM1DESCRIPTION "Backup master domain mananger"OS UNIXNODE lab777TCPADDR 31111FOR MAESTRO
TYPE FTAAUTOLINK ONBEHINDFIREWALL OFFFULLSTATUS ON
end
For more information about workstation definitions, see the Tivoli WorkloadScheduler: User's Guide and Reference for information.
6. Run JnextPlan -for 0000 to include the backup master workstation in the planand to send the Symphony file to it.
Note: Ensure that the global option carryforward is set to all or only theunfinished jobstreams will be carried forward.
7. Change the workstation limit to allow jobs to run on the workstation. Forexample, set the number of jobs to run concurrently on the workstation to 10:conman "limit DM1;10"
Note: If you are logged into the backup master, DM1 is not required.
Additionally, the following configuration procedures might be necessary. Forinformation about these procedures, see Tivoli Workload Scheduler: AdministrationGuide.v Customizing and configuring global, local, and user options.v Customizing and configuring user authentication to allow users authorization on
actions and objects, and to configure LDAP.v Setting connection security to enable SSL or GSKit for inter-component
communications.
Chapter 6. Configuring 195

Configuring a domain managerAbout this task
After you have installed a domain manager, perform the following configurationsteps:1. Log in as <TWS_user> on your master domain manager.2. Set the environment variables by running tws_env.3. Define the domain manager as a full status autolink fault-tolerant agent in the
Tivoli Workload Scheduler database, using the composer command interface orthe Dynamic Workload Console. In this example using composer, type:composernew
4. Type the workstation definition in the text editor, for example:CPUNAME DDM1
DESCRIPTION "domain mananger"OS UNIXNODE lab0777TCPADDR 31111DOMAIN MDMFOR MAESTRO
TYPE MANAGERAUTOLINK ONBEHINDFIREWALL OFFFULLSTATUS ON
END
For more information about workstation definitions, see the Tivoli WorkloadScheduler: User's Guide and Reference for information.
5. Run JnextPlan -for 0000 to include the domain manager workstation in theplan and to send the Symphony file to it.
Note: Ensure that the global option carryforward is set to all or only theunfinished jobstreams will be carried forward.
6. Change the workstation limit to allow jobs to run on the workstation. Forexample, set the number of jobs to run concurrently on the workstation to 10:conman "limit;10"
Configuring a backup domain managerAbout this task
After you have installed a backup domain manager, perform the followingconfiguration steps:1. Log in as <TWS_user> on your master domain manager.2. Set the environment variables by running tws_env.3. Define the backup domain manager as a full status autolink fault-tolerant agent
in the Tivoli Workload Scheduler database, using the composer commandinterface or the Dynamic Workload Console. In this example using composer,type:composernew
4. Type the workstation definition in the text editor, for example:
196 Tivoli Workload Scheduler: Planning and Installation: Planning and Installation

CPUNAME DDM1DESCRIPTION "backup domain mananger"OS UNIXNODE lab0777TCPADDR 31111DOMAIN MDMFOR MAESTRO
TYPE FTAAUTOLINK ONBEHINDFIREWALL OFFFULLSTATUS ON
END
For more information about workstation definitions, see the Tivoli WorkloadScheduler: User's Guide and Reference for information.
5. Run JnextPlan -for 0000 to include the backup domain manager workstation inthe plan and to send the Symphony file to it.
Note: Ensure that the global option carryforward is set to all or only theunfinished jobstreams will be carried forward.
6. Change the workstation limit to allow jobs to run on the workstation. Forexample, set the number of jobs to run concurrently on the workstation to 10:conman "limit;10"
Configuring a dynamic domain managerAbout this task
After you have installed a dynamic domain manager, perform the followingconfiguration steps:1. Log in as <TWS_user> on your master domain manager.2. Set the environment variables by running tws_env.3. Run JnextPlan -for 0000 to include the dynamic domain manager workstation
in the plan and to send the Symphony file to it.
Note: Ensure that the global option carryforward is set to all or only theunfinished jobstreams will be carried forward.
4. Change the workstation limit to allow jobs to run on the workstation. Forexample, set the number of jobs to run concurrently on the workstation to 10:conman "limit;10"
Configuring a backup dynamic domain managerAbout this task
After you have installed a backup dynamic domain manager, perform thefollowing configuration steps:1. Log in as <TWS_user> on your master domain manager2. Set the environment variables by running tws_env
3. Define the backup dynamic domain manager as a full status autolinkfault-tolerant agent in the Tivoli Workload Scheduler database, using thecomposer command interface or the Dynamic Workload Console. In thisexample using composer, type:composernew
Chapter 6. Configuring 197

4. Type the workstation definition in the text editor, for example:CPUNAME BDDM1
DESCRIPTION "backup dynamic domain mananger"OS UNIXNODE lab00777TCPADDR 31111DOMAIN DYNAMICDMFOR MAESTRO
TYPE FTAAUTOLINK ONBEHINDFIREWALL OFFFULLSTATUS ON
END
For more information about workstation definitions, see the Tivoli WorkloadScheduler: User's Guide and Reference for information.
5. Run JnextPlan -for 0000 to include the backup dynamic domain managerworkstation in the plan and to send the Symphony file to it.
Note: Ensure that the global option carryforward is set to all or only theunfinished jobstreams will be carried forward.
6. Change the workstation limit to allow jobs to run on the workstation. Forexample, set the number of jobs to run concurrently on the workstation to 10:conman "limit;10"
Configuring a fault-tolerant agentAbout this task
After installing a fault-tolerant agent, define the workstation in the database andlink the workstation from the master. You can perform this task by using theDynamic Workload Console or the command line interface. See the Tivoli WorkloadScheduler: User's Guide and Reference for information. The following is an exampleof how to configure a fault-tolerant agent after installation using the command lineinterface:1. Log in to the master domain manager as <TWS_user>.2. Set the environment variables by running tws_env.sh.3. Create the workstation definition in the Tivoli Workload Scheduler database.
Open a command line window and enter the following commands:composernew
4. Type the workstation definition in the text editor. For example:CPUNAME F235007_00
DESCRIPTION "fault-tolerant agent"OS UNIXNODE lab235007TCPADDR 31111DOMAIN MASTERDMFOR MAESTRO
TYPE FTAAUTOLINK ONBEHINDFIREWALL OFFFULLSTATUS OFF
END
198 Tivoli Workload Scheduler: Planning and Installation: Planning and Installation

Run JnextPlan with the option -for 0000 to add the agent workstationdefinition to the plan and to send the Symphony file to it. For moreinformation about workstation definitions, see the Tivoli Workload SchedulerReference Guide.
Note: Ensure that the global option carryforward is set to all or only theunfinished jobstreams will be carried forward.
5. If you set the autolink parameter to OFF, issue the link command from themaster domain manager to link the agent and to download the Symphony fileto it:conman “link workstation”
6. Change the workstation limit to allow jobs to run on the workstation. Forexample, set the number of jobs to run concurrently on the workstation to 10:conman "limit F235007_00;10"
Additionally, the following configuration procedures might be necessary. Forinformation about these procedures, see Tivoli Workload Scheduler: AdministrationGuide.v Customizing and configuring global, local, and user options.v Customizing and configuring user authentication to allow users authorization on
actions and objects, and to configure LDAP.v Setting connection security to enable SSL or GSKit for inter-component
communications.
Configuring a dynamic agentAbout this task
After installing a dynamic agent, perform the following steps:1. Run JnextPlan with the option -for 0000 to add the dynamic agent workstation
definition to the plan and to send the Symphony file to it. For moreinformation about workstation definitions, see User's Guide and Reference.
Note: Ensure that the global option carryforward is set to all otherwise onlythe unfinished jobstreams are carried forward.
2. Change the workstation limit to allow jobs to run on the workstation. Forexample, set the number of jobs that can run concurrently on the workstationto 10:conman "limit F235007_00;10"
Additionally, the following configuration procedures might be necessary. Forinformation about these procedures, see Administration Guide.v Customizing and configuring jobmanager.ini and user options.v Customizing and configuring user authentication to allow users authorization
for actions and objects, and to configure LDAP.v Setting connection security to enable GSKit for inter-component communications.
Chapter 6. Configuring 199

Configuring a command line clientAbout this task
The following configuration procedures might be necessary for a command lineclient. For information about these procedures, see Tivoli Workload Scheduler:Administration Guide.v Customizing and configuring global and local optionsv Customizing and configuring user authentication to allow users authorization on
actions and objects, and to configure LDAPv Setting connection security to enable SSL or GSKit for inter-component
communications
Configuring WebSphere Application ServerAbout this task
If, after installing, you have more than one instance of WebSphere ApplicationServer managing any Tivoli Workload Automation products, you must ensure thatthey have the same LTPA token_keys. See the Tivoli Workload Scheduler:Administration Guide.
Adding a featureAbout this task
This section explains how to add one of the following features to yourenvironment after you installed or upgraded your network:
Add a connector to an agentIf you want to access the plan which is available on an agent or domainmanager workstation, add the connector feature which enables thecommunication between it and the Dynamic Workload Console. See“Adding a connector.”
Add a language pack to the command-line clientIf you want to use the command-line client in a supported language otherthan English or the language of the locale of the computer where youinstalled it, add the language pack. See “Adding language packs to acommand line client” on page 202.
Add the Java runtime to an agentDuring the installation of the agent you might have chosen not to add theJava runtime that supports the running of job types with advancedoptions. If you later decide that you require this function, you can just addthe Java runtime separately. See “Adding the Java runtime” on page 109.
Adding a connectorTo add a connector instance to an existing installation, perform the following steps:1. For a graphical installation, from the installation DVD, start the launchpad as
described in “Launchpad” on page 34 and select the Tivoli Workload Schedulerinstallation, or run the setup for the operating system on which you areinstalling.From the DVD, perform the following:
200 Tivoli Workload Scheduler: Planning and Installation: Planning and Installation

On Windows operating system:TWS\operating_system\SETUP.exe or TWS\SETUP.cmd
On UNIX and Linux operating systems:TWS/SETUP.sh or TWS/operating_system/SETUP.bin
Note: SETUP.sh copies the entire image to a temporary directory. Ensure thereis enough space available.
2. Follow the installation wizard screens to complete the installation. Thefollowing list describes the fields that you might need to complete during theinstallation.
Add a New FeatureSelect the agent on which you want to add the connector. Addconnector is displayed.
TWSuser passwordThe password of the <TWS_user>.
Note: If the <TWS_user> of the agent on which you are adding theConnector is different from the WebSphere Application Serveradministration user you used when you installed the DynamicWorkload Console, you should make a note to pay especial attentionwhen performing administration activities on WebSphere ApplicationServer to always use the WebSphere Application Server administrationuser's credentials, not the credentials of the <TWS_user>. You shouldalso note that in these circumstances you might experience a smallproblem during the uninstallation of the Connector (see “Theuninstallation of the Connector fails in the "Start the embeddedWebSphere Application server" step” on page 259).
HTTP transportThe port for the HTTP transport. The default value is 31115. The validrange is from 1 to 65535.
HTTPS transportThe port for the secure HTTPS transport. The default value is 31116.The valid range is from 1 to 65535.
BootstrapThe port for the bootstrap or RMI. The default value is 31117. The validrange is from 1 to 65535.
SOAP connectorThe port for the application server protocol SOAP connector. Thedefault value is 31118. The valid range is from 1 to 65535.
SAS Server Authentication ListenerThe port used by the Secure Association Services (SAS) to listen forinbound authentication requests. The default value is 31119. The validrange is from 1 to 65535.
CSIv2 Server Authentication ListenerThe port on which the Common Secure Interoperability Version 2(CSIv2) service listens for inbound server authentication requests. Thedefault value is 31120. The valid range is from 1 to 65535.
CSIv2 Client Authentication ListenerThe port on which the Common Secure Interoperability Version 2(CSIv2) service listens for inbound client authentication requests. Thedefault value is 31121. The valid range is from 1 to 65535.
Chapter 6. Configuring 201

ORB ListenerThe port used for RMI over IIOP communication. The default value is31122. The valid range is from 1 to 65535.
Administration HTTP transportThe administrative console port. The default value is 31123. The validrange is from 1 to 65535.
Administration HTTPS transportThe administrative console secure port. The default value is 31124. Thevalid range is from 1 to 65535.
Note: The installation procedure checks for the availability of the ports in thespecified port range. If one or more ports are in use by other applications, you areprompted to enter a new port number.
Adding language packs to a command line clientTo add language packs to a command line client, perform the following steps:1. From the installation DVD, run the setup for the operating system on which
you are installing:
On Windows operating system:TWS\operating_system\SETUP.exe or TWS\SETUP.cmd
On UNIX and Linux operating systems:TWS/SETUP.sh or TWS/operating_system/SETUP.bin
2. Select the installation wizard language. Click OK.3. Read the welcome information. Click Next.4. Read and accept the license agreement. Click Next.5. From the drop-down list, select an existing command line client. Existing
installations are identified by the installation path. Note that the option AddlangPack is automatically selected.
6. Select the additional languages to install. Click Next.7. Review the installation settings. Click Next.8. When the installation completes, a panel displays a successful installation or
indicates the directory of the log file if the installation was unsuccessful. ClickFinish.
Adding the Java runtime to run job types with advancedoptions
Java runtime allows you to run job types with advanced options, both thosesupplied with the product and the additional types implemented through thecustom plug-ins.
If you did not install the Java runtime when you installed the other TivoliWorkload Scheduler components, you can add it at any time by installing the JavaRuntime Environment software package block using the wdinstsp command. See“Adding the Java runtime” on page 109 for more information.
Enabling dynamic scheduling after installationThis section describes the procedure that you must follow to enable dynamicscheduling if upgraded the product, both the master and the agent, withoutenabling the dynamic scheduling capabilities. For example, you upgraded theproduct in the following ways:
202 Tivoli Workload Scheduler: Planning and Installation: Planning and Installation

Using the installation wizardYou did not select one or both of the following options:v Enable the dynamic scheduling capabilities, when upgrading the
masterv Dynamic agent, when upgrading the agent.
Using twsinst, when upgrading the agentYou did not specify the -tdwbport tdwbport_number and -tdwbhostnamehost_name.
To enable dynamic scheduling, perform the following steps:1. In the tws_home/TDWB/config/BrokerWorkstation.properties file, modify the
values of the following properties according to the values that you specified atupgrade time:Broker.Workstation.Name= master_name_DWBBroker.Workstation.Port= port_numberMasterDomainManager.Name= host_nameBroker.AuthorizedCNs=server1; ... ;servern
where:
Broker.Workstation.Name=master_name_DWBIt is the master domain manager name followed by _DWB. You canmodify this value including the _DWB suffix.
Broker.Workstation.Port=port_numberIt is the port on the workload broker workstation used by the TivoliWorkload Scheduler master domain manager to communicate withdynamic workload broker. You can specify any value. The default valueis 41114 if the Netman port number is 31111. The valid range is from 1to 65535. If you changed the Netman port number, theBroker.Workstation.Port port_number is calculated as:netman_port_number+10003
MasterDomainManager.Name=host_nameIt is the fully qualified host name on which the master domainmanager will be contacted by the agents.
Broker.AuthorizedCNs=server1; ... ;servernIt is the list of prefixes of common names master domain managercertificates authorized to communicate with the broker server. For moreinformation about authorizing the connection to the server seetheCustomizing the SSL connection to the master domain manager anddynamic domain manager section in the Tivoli Workload Scheduler:Administration Guide.
2. On the master domain manager, verify the current value of the httpsPort byrunning the showHostProperties wastool. The default value is 31116. Thefollowing is an example output:################################################################# Ports Configuration Panel################################################################bootPort=38317bootHost=nynewhost.romelab.ibm.it.comsoapPort=38318soapHost=mynewhost.romelab.it.ibm.comhttpEnabled=truehttpPort=21115
Chapter 6. Configuring 203

httpHost=*httpsEnabled=truehttpsPort=31116............
3. On the master domain manager and on every agent that is connected to theworkload broker server, update the JobManager.ini configuration file locatedunder:v On Windows operating system:
tws_home\TWS\ITA\cpa\config\JobManager.ini
v On UNIX and Linux operating systems:tws_home/TWS/ITA/cpa/config/JobManager.ini
by assigning to the tdwb_hostname and tdwb_httpsport variables contained in theResourceAdvisorUrl property, the following values:
tdwb_hostnameSpecify the fully qualified host name of the workload broker server
tdwb_httpsportSpecify the value that the httpsPort has on the master domain manageras shown by the showHostPorperties wastool. The default is 31116,which is the dynamic workload broker port number. The port iscurrently set to zero because at installation time you specified that youwould not use the dynamic workload broker.
The ResourceAdvisorUrl property has the following syntax:ResourceAdvisorUrl = https://<tdwb_hostname>:<tdwb_httpsport>/JobManagerRESTWeb/JobScheduler/resource
4. Start the dynamic workload broker component by running thestartBrokerApplication.sh wastool as follows:/<TWS_home>/wastools/startBrokerApplication.sh -user user_name-password password
where:
user_nameSpecifies the name of the WebSphere Application Server.
passwordSpecifies the password of the WebSphere Application Server.
5. On the master domain manager and on every agent of your network that youwant to connect to the workload broker server, start the Tivoli WorkloadScheduler agent by running the following command from the TWS_homedirectory:v On Windows operating system:
StartUpLwa.cmdv On UNIX and Linux operating systems:
StartUpLwa
204 Tivoli Workload Scheduler: Planning and Installation: Planning and Installation

Chapter 7. Uninstalling
This chapter describes how you uninstall Tivoli Workload Scheduler. It is dividedinto the following sections:v “User authorization requirements” on page 67v “Uninstalling a dynamic domain manager and all its domain” on page 206v “Uninstalling using the wizard” on page 206v “Uninstalling using a silent uninstallation” on page 207v “Uninstalling agents using the twsinst script” on page 208v “Uninstalling using the Software Distribution CLI” on page 209v “Uninstalling a command line client” on page 210
The uninstaller program is created during the installation procedure. Whereverpossible, use the same method you chose to install the product when uninstallingthe product. For example, if you installed the product using the installationwizard, use the uninstaller program to subsequently remove the product.
Uninstalling the product does not remove files created after Tivoli WorkloadScheduler was installed, nor files that are open at the time of uninstallation. If youdo not need these files, you must remove them manually. If you intend to reinstalland therefore need to use the files, make a backup before starting the installationprocess. The uninstallation does not remove your DB2 or Oracle database.
Note:
1. The Tivoli Workload Scheduler engine is a prerequisite for other products andfeatures you can install, such as Tivoli Workload Scheduler for Applicationsand the connector. Before you uninstall the engine, uninstall all the additionalfeatures.
2. See the Tivoli Workload Scheduler: Administration Guide for information aboutremoving Tivoli Workload Scheduler manually.
User authorization requirementsAbout this task
Check the authorization roles before beginning the procedure.
Authorization requirements for running any of the installation, upgrade, oruninstallation wizards or commands are the same:
UNIX and Linux operating systemsroot access
Windows operating systemYour login account must be a member of the Windows Administratorsgroup or domain administrators with Act as Part of the Operating System.
If you set the Windows User Account Control (UAC) on the workstationyou must run the installation as administrator. To do this, before runningthe installation, perform the following steps:1. Right-click the icon that you use to run the program:
© Copyright IBM Corp. 1999, 2012 205
|||
|||
|

If you are using the wizard:SETUP.exe
If you are using the silent installation or twsinst:Command Prompt
2. Select Run as administrator.
In addition, to use Software Distribution, the user must have the SoftwareDistribution roles admin, senior, or super.
Uninstalling a dynamic domain manager and all its domainTo correctly uninstall a dynamic domain manager and all the dynamic agents in itsdomain, perform the following steps:1. Uninstall the dynamic agents connected to the dynamic domain manager you
want to uninstall by using the one of the procedure described in this chapter.2. In the database, delete the definition of the workstations of type AGENT that
are connected to the dynamic domain manager to uninstall. You can use eitherthe Dynamic Workload Console workload designer or run the followingcommand:composer del ws agent_workstation_name
3. Delete the definition of the workstations of type REM-ENG connected to thedynamic domain manager to uninstall. You can use either the DynamicWorkload Console workload designer or run the following command:composer del ws rem_eng_workstation_name
4. Delete the definition of the workstations of type POOL connected to thedynamic domain manager to uninstall. You can use either the DynamicWorkload Console workload designer or run the following command:composer del ws pool_workstation_name
5. Delete the definition of the workstations of type D-POOL connected to thedynamic domain manager to uninstall. You can use either the DynamicWorkload Console workload designer or run the following command:composer del ws dpool_workstation_name
6. Uninstall the dynamic domain manager by using the “Uninstalling using thewizard” or the “Uninstalling using a silent uninstallation” on page 207procedure.
7. Delete the definition of the workstation of type X-AGENT hosted by thedynamic domain manager to uninstall. You can use either the DynamicWorkload Console workload designer, or run the following command:composer del ws x-agent_workstation_name
8. Delete the definition of the workstations of type BROKER of the dynamicdomain manager to uninstall. You can use either the Dynamic WorkloadConsole workload designer or run the following command:composer del ws broker_workstation_name
Uninstalling using the wizardThe uninstaller program removes product files, registry keys, and services. It alsoremoves the binaries related to the Tivoli Workload Scheduler agent installed, thedistributed connector, and the language packs.
To uninstall Tivoli Workload Scheduler, perform the following steps:
206 Tivoli Workload Scheduler: Planning and Installation: Planning and Installation
||
||
|

1. Ensure that all Tivoli Workload Scheduler processes and services are stopped,and that there are no active or pending jobs. For information about stoppingthe processes and services see Administration Guide.
2. Navigate to the twshome path.3. Run the uninstall script:
v On Windows operating systems:uninstaller.exe
v On UNIX and Linux operating systems:./uninstall.bin
4. Select the Tivoli Workload Scheduler instance you want to uninstall:v If you are uninstalling a master domain manager, the wizard removes the
selected instance and any additional feature installed for that instance. If youare uninstalling from an integrated Tivoli Workload Automation, theembedded WebSphere Application Server is not removed. Only TivoliWorkload Scheduler applications are removed.
v If you are uninstalling an agent, you can choose if you want to uninstall theconnector only, or both the agent and connector simultaneously.
If your uninstallation does not complete successfully, you can manually remove aninstance of Tivoli Workload Scheduler using the procedure described in“Uninstalling Tivoli Workload Scheduler manually” on page 263.
Uninstalling using a silent uninstallationFor a silent uninstallation of a master domain manager, a backup master domainmanager, a dynamic domain manager, or a backup dynamic domain manager,perform the following steps:1. Ensure that all Tivoli Workload Scheduler processes and services are stopped,
and that there are no active or pending jobs. For information about stoppingthe processes and services see Administration Guide.
2. Navigate to the /TWA/TWS/_uninstall path.3. Enter the following command:
v On Windows operating systems:uninstaller.exe -silent
v On UNIX and Linux operating systems:./uninstall.bin -silent
For a silent uninstallation of an agent, a connector, or both, perform the followingsteps:1. Ensure that all Tivoli Workload Scheduler processes and services are stopped,
and that there are no active or pending jobs.2. Copy the TWS86_UNINSTALL_Agent.txt response file from the installation DVD
in the \TWS\RESPONSEFILES\ directory to a local directory and edit it asappropriate.
3. Save the file with your changes.4. Navigate to the /TWA/TWS/_uninstall path.5. Enter the following command:
v On Windows operating systems:uninstaller.exe -options <local_dir>\TWS86_UNINSTALL_Agent.txt -silent
v On UNIX and Linux operating systems:
Chapter 7. Uninstalling 207

./uninstall.bin -options <local_dir>/TWS86_UNINSTALL_Agent.txt -silent
Note: If you want to reinstall after performing a silent uninstallation, you mustfirst close and reopen the shell to correctly reset the environment variables.
If your uninstallation does not complete successfully, you can manually remove aninstance of Tivoli Workload Scheduler using the procedure described in“Uninstalling Tivoli Workload Scheduler manually” on page 263.
Uninstalling agents using the twsinst scriptFollow these steps to uninstall Tivoli Workload Scheduler agents using the twsinstscript. Only agents installed using twsinst can be uninstalled using twsinst.Depending on the operating system, proceed as follows:v On UNIX and Linux operating systems:
1. Ensure that all Tivoli Workload Scheduler processes and services are stopped,and that there are no active or pending jobs. For information about stoppingthe processes and services, see Administration Guide.
2. Log on as root and change your directory to /installation_dir/TWS (forexample: /home/user1/TWS where user1 is the name of Tivoli WorkloadScheduler user.)
3. From the TWS directory, run the twsinst script as follows:twsinst -uninst -uname username [-wait minutes][-lang lang_id]
The uninstallation is performed in the language of the locale and not thelanguage set during the installation phase. If you want to uninstall agents in alanguage other than the locale of the computer, run the twsinst script from the/installation_dir/TWS (for example, /home/user1/TWS) as follows:./twsinst -uninst -uname user_name -lang language
where language is the language set during the uninstallation.v On Windows operating systems::
1. Ensure that all Tivoli Workload Scheduler processes and services are stopped,and that there are no active or pending jobs. For information about stoppingthe processes and services see Administration Guide.
2. Log on as administrator on the workstation where you want to uninstall theproduct.
3. From the installation_dir\TWS (for example, c:\Program Files\IBM\TWA),run the twsinst script as follows:twsinst -uninst -uname username [-wait minutes][-domain domain_name] [-lang lang_id]
Note: twsinst for Windows is a Visual Basic Script (VBS) that you can run inCScript and WScript mode.
The uninstallation is performed in the language of the locale and not thelanguage set during the installation phase. If you want to uninstall agents in alanguage other than the locale of the computer, run the twsinst script from the/installation_dir/TWS (for example, /home/user1/TWS) as follows:twsinst -uninst -uname user_name -lang language
where language is the language set during the uninstallation.
-uninstUninstalls Tivoli Workload Scheduler.
208 Tivoli Workload Scheduler: Planning and Installation: Planning and Installation

-uname usernameThe name of the user for which Tivoli Workload Scheduler is uninstalled. Thisuser name is not to be confused with the user performing the installationlogged on as root on UNIX and Linux and as administrator on Windows.
-wait minutesThe number of minutes that the product waits for jobs that are running tocomplete before starting the uninstallation. If the jobs do not complete duringthis interval the uninstallation stops and an error message is displayed. Validvalues are integers or -1 for the product to wait indefinitely. The default is 60.
-domain domain_nameWindows only. The domain name of the Tivoli Workload Scheduler user. Thedefault is the name of the workstation on which you are uninstalling theproduct.
-lang lang_idThe language in which the twsinst messages are displayed. If not specified,the system LANG is used. If the related catalog is missing, the default Clanguage catalog is used.
Note: The -lang option is not to be confused with the Tivoli WorkloadScheduler supported language packs.
The following is an example of a twsinst script that uninstalls the Tivoli WorkloadScheduler agent, originally installed for user named twsuser:
On UNIX and Linux operating systems:./twsinst -uninst -uname TWS_user
On Windows operating systems:twsinst -uninst -uname TWS_user
Uninstalling using the Software Distribution CLIYou can uninstall Tivoli Workload Scheduler using a SoftwareDistribution/Configuration Manager command. To uninstall a software packagefrom a disconnected target, use the command wdrmvsp. Tivoli Workload Scheduleruses the disconnected catalog.
Ensure that all Tivoli Workload Scheduler processes and services are stopped, andthat there are no active or pending jobs. For information about stopping theprocesses and services see Administration Guide.
For example, to uninstall on UNIX, perform the following:conman "stop;wait"conman "shut;wait"
Ensure all processes are down.
As root:cd <twshome>/_uninstall/CLI. ./swd_env
To display package names and versions: wdlssp
wdrmvsp -f packagename.version
Chapter 7. Uninstalling 209

Using the same procedure, you can also remove the software package block thatinstalls language packs, the Java runtime to run job types with advanced options,the dynamic agent. See “Uninstalling Tivoli Workload Scheduler manually” onpage 263 for information about removing Tivoli Workload Scheduler manually.
Uninstalling a command line clientYou can uninstall a command line client using the uninstallation wizard or byperforming a silent uninstallation. To uninstall a command line client perform thefollowing steps:1. Navigate to the CLI_home/_uninstall path, where CLI_home is the installation
path of your command line client .2. To uninstall using the wizard, run the uninstaller command:
On Windows operating system:uninstaller.exe
On UNIX and Linux operating systems:./uninstall.bin
Note: For a silent installation, use the -silent flag.
Uninstalling the additional plug-ins using the Tivoli WorkloadScheduler for Additional Plug-ins
Uninstalling the additional plug-ins either using the wizard or the silent method.
About this task
When you uninstall the additional plug-ins, you can uninstall one or more plug-inssimultaneously.
If you installed an additional plug-in by using the silent installation, uninstall itusing the same procedure.
To uninstall an additional plug-in, you can use any of the following procedures:
WizardFor details, see “Uninstalling by using the wizard.”
Silent For details, see “Uninstalling by using the silent uninstallation” on page212.
Note: You can uninstall only additional plug-ins installed by using TivoliWorkload Scheduler for Additional Plug-ins.
Uninstalling by using the wizardUninstalling the additional plug-ins by using the wizard.
Using the wizard, you can uninstall one or more plug-ins at a time.
If you installed the product using the installation wizard, you can uninstall iteither using the uninstallation wizard or the silent uninstallation. If you installedthe product using the silent installation you must use the silent uninstallation touninstall it.
To uninstall one or more plug-ins, perform the following steps:
210 Tivoli Workload Scheduler: Planning and Installation: Planning and Installation

1. Insert the Tivoli Workload Scheduler for Applications DVD or eImages, for theoperating system where you are installing, run the setup installation command:On Windows operating systems:
From the \PLUGIN_INSTALLER directory,setup.bat
On UNIX and Linux operating systems:From the /PLUGIN_INSTALLER directory,./setup.sh
The uninstall program starts.2. Select the language for the wizard, and click OK. The Welcome panel is
displayed.3. Read the welcome information and click Next. The Operations panel is
displayed4. Select the Uninstall radio button. Click Next. The Plug-in list panel is displayed.5. Select the additional plug-ins you want to uninstall and click Next. The
summary of the plug-ins that you selected for uninstall is displayed6. The uninstall process starts. When the uninstallation completes, a panel
showing the results, is displayed.7. Click Finish to exit the wizard.
If you received the error messages, analyze the uninstallation log files listed inTable 15.
Table 15. Uninstallation log files
Log file name Content Directory
tws4plugins_status.log The additional plug-in uninstallationstatus log file is created only for silentuninstallation. It reports if theuninstallation completed successfully orwith errors. In case of errors it indicatesif the error is due to an incorrect fieldvalue or to a failed step.
At the begin of the uninstallationprocess this log file is created in thefollowing directory:
On Windows operating systems:%TEMP%\twa\tws4apps
On UNIX and Linux operatingsystems:
$tmp\twa\tws4appsand copied to directory Tivoli WorkloadScheduler_installation_dir\logs at theend of the uninstallation process.
tws4plugins_ia_uninstall.log additional plug-in log file forInstallAnywhere errors.
Tivoli WorkloadScheduler_installation_dir\logs
tws4plugins_uninstall.log The additional plug-in uninstallation logfile.
At the begin of the uninstallationprocess this log file is created in thefollowing directory:
On Windows operating systems:%TEMP%\twa\tws4apps
On UNIX and Linux operatingsystems:
$tmp\twa\tws4appsand copied to directory Tivoli WorkloadScheduler_installation_dir\logs at theend of the uninstallation process.
Chapter 7. Uninstalling 211

Note: If you are uninstalling in silent mode and you need to see the logs files,check before the tws4plugins_status.log file to verify the installation processstatus and then check thetws4plugins_install.logfile for details.
Uninstalling by using the silent uninstallationAbout this task
Use the silent uninstallation process to uninstall the additional plug-ins, withoutthe user intervention. Using the silent method you can uninstall all the installedplug-ins simultaneously or one plug-in at a time.
If you installed the plug-in using the installation wizard, you can uninstall it eitherusing the uninstallation wizard or the silent uninstallation. If you installed theplug-ins by using the silent installation you must use the silent method to uninstallit.
When running the uninstallation in silent mode, no messages are displayed. Themessages are written in the silent installation log files listed in Table 15 on page211. If the silent uninstallation fails, you can verify the messages written in the logfiles.
To uninstall one or more plug-ins at a time, run the following command :
On Windows operating systems:From the /PLUGIN_INSTALLER directory of the DVD or eImages product,setup.bat -i silent -f <response file>
Where response file is a template file that you can customize to indicate thelist of the plug-ins you want to uninstall. The default response file isTWSPlug-ins_RespFile_Uninst_windows.txt. It is located under theRESPONSE_FILE directory.
On UNIX and Linux operating systems:From the /PLUGIN_INSTALLER directory of the DVD or eImages product,./setup.sh -i silent -f <response file>
Where response file is a template file that you can customize to indicate thelist of the plug-ins you want to uninstall. The default response file isTWSPlug-ins_RespFile_Uninst_unix.txt. It is located under theRESPONSE_FILE directory
Table 16 on page 213 lists the options you can specify when uninstalling.
212 Tivoli Workload Scheduler: Planning and Installation: Planning and Installation

Table 16. Options to perform a silent uninstallation
Option Required Description Value
USER_INSTALL_DIR="<path>" Yes Specify the IBM TivoliWorkload Schedulerinstallation path fromwhere you want touninstall one or moreadditional plug-ins.
A fully qualified path. For example, touninstall the additional plug-ins underC:\Program Files\IBM\TWA86, specify:
USER_INSTALL_DIR="C:\Program Files\IBM\TWA86"
On Windows operating systems:The default uninstallationpath is "c:\\ProgramFiles\\IBM\\TWA"
On UNIX and Linux operatingsystems:
The default uninstallationpath is/opt/IBM/TWA
PLUGINS_TO_UNDEPLOY=<plug-in_1>,...., <plug-in_n>
Yes Specify the plug-insID that correspondsto the plug-ins youwant to uninstall,separated by comma.
To find the plug-in ID, perform thefollowing actions:
1. Open the <TWA_HOME>\InstallDataPlugins\plugin_<plug-in_name>.xml file
2. Identify the value of the idattribute of the plug-in:
<pluginInfo version="<plug-in_version>" name="<plug-in_name>"id="<plug-in_id>" />
For example, to uninstall the followingplug-in:
<pluginInfo version="1.0.0.01"name="plug-in_test_diskspace"id="plug-in_test_ds" />
specify the value:
PLUGINS_TO_UNDEPLOY=
plug-in_test_ds
ACTION_TYPE=<value> Yes Specify the action thatuninstallation processperforms on plug-in.In this case the valuemust be set toUNDEPLOY.
The value must be set to UNDEPLOY.
The following is an example of the command you run from the directory/PLUGIN_INSTALLER, to perform a silent installation on a UNIX workstation, byusing the response file TWSPlug-ins_RespFile_uninst_UNIX.txt:./setup.sh -i silent -f TWSPlug-ins_RespFile_uninst_UNIX.txt
The following example shows a response file that uninstalls the plug-in_test_ds on aWindows workstation:USER_INSTALL_DIR=c:\\Program Files\\IBM\\TWA86FEATURE_UNINSTALL_LIST=plug-in_test_ds
Chapter 7. Uninstalling 213

214 Tivoli Workload Scheduler: Planning and Installation: Planning and Installation
Chapter 8. Troubleshooting installation, migration, anduninstallation
This chapter describes issues dealing with the installation, removal, andconfiguration of Tivoli Workload Scheduler and its prerequisites. It is divided intothe following topics:v “Log files of installation processes”v “Recovering a failed interactive InstallShield wizard installation” on page 216v “Recovering a failed silent InstallShield wizard installation” on page 226v “Recovering a failed upgrade” on page 227v “Problem scenarios: install, reinstall, upgrade, migrate, and uninstall” on page
230v “Security implications of the installation” on page 261v “Verifying the installation” on page 262v “Uninstalling Tivoli Workload Scheduler manually” on page 263v “Uninstalling Tivoli Workload Scheduler connectors manually” on page 267v “Removing Windows registry keys” on page 269
For information about issues on the DB2 installation, see the DB2 productdocumentation.
Log files of installation processesLog files of the installation processes have a different naming convention,depending on the installation method. For information about the different log filesassociated with the different installations, see “Installation log files” on page 36.
Packaging log files for supportIf a problem occurs with an installation that you cannot resolve, IBM SoftwareSupport might ask you to send them all of the installation log files. Include thefollowing:v For Tivoli Workload Scheduler, all of the files and subdirectories in the
<tempDir>/TWA/tws86 directory.v For the Dynamic Workload Console, all of the files and subdirectories in the or
the <tempDir>/TWA/tdwc86 directory.v The software package block log files.v The DB2 installation log.v The installation log of the embedded WebSphere Application Server.v For Software Developers Kit, all files and subdirectories in the /tmp/TWA/sdk86
directory.v For the Job Brokering Definition Console, all files and subdirectories in the
/tmp/TWA/jbdc86 directory.
Note: Do not remove, add, or modify files in the <tempDir>/TWA/tws86 directorybecause this might cause an installation to fail, or prevent the recovery of a failedinstallation.
© Copyright IBM Corp. 1999, 2012 215

Recovering a failed interactive InstallShield wizard installationThis section describes how to recover a failed interactive installation.
If an operation fails during the installation, the wizard opens the following panel:
TVT Instructions
To capture this and the following windows in this section, follow this procedure:1. Chose a computer where DB2 is installed2. Run the install wizard and select to install a new master domain manager3. When asked about DB2 select to use the existing instance4. STOP WHEN YOU GET TO THE SUMMARY PANEL5. Stop DB2, as follows:
a. Open a DB2 windowb. Type "db2 force application all"c. Type "db2stop"
DB2 stops.6. Click "Next" to let the installation start. When it fails, follow the procedures
written in the guide to navigate from screen to screen to make the screencaptures - you might need to adjust the size of the screen to get the best results.
Note: If you are using the interactive wizard, do not close the wizard panel by
clicking on the Close icon: . If you do, the wizard is unable to save thetroubleshooting information that you need for a resume. Instead, if you are sureyou want to quit the installation, click Quit installation.
You can use the debug mode of the wizard to see which steps of the installationhave failed. You can correct errors that have occurred and resume those installationsteps that have not completed successfully, without leaving the wizard.
You can choose to do this immediately the failure occurs, or close the window andrecover the situation later.
Figure 13. Wizard panel after an installation failure
216 Tivoli Workload Scheduler: Planning and Installation: Planning and Installation

The procedure is described in the following sections:v “The Step List window”v “The Step window” on page 218v “Correcting a failed step and continuing the installation” on page 222v “Deciding whether to resume the wizard or rerun it” on page 223v “Deciding whether to resume immediately or exit and resume later” on page 224v “Stopping and resuming an interactive installation” on page 225v “Example procedure for resolving a problem” on page 226
The Step List windowThe Step List window opens either when an installation fails, or when you areresuming an installation that had previously been stopped (see “Stopping andresuming an interactive installation” on page 225). Figure 14 shows an example ofthe Step List window when an installation step has failed:
The Step List window is organized as follows:
Step # The installation sequence.
DescriptionThe description of the installation step. The steps of the Tivoli WorkloadScheduler installation are described in Chapter 4, “Installing,” on page 67.
Target The workstation where the installation is being run.
Status The step status. It can be one of the following:
Ready The step is ready to be installed.
SuccessThe step has successfully completed.
Error The step completed, but errors were detected.
Figure 14. Step List window showing a failed step
Chapter 8. Troubleshooting installation, migration, and uninstallation 217

Held A step that prerequisites another step has failed. Do not set thisstate.
Run nextStart the next step in the list that has a status set to Ready.
Run allStart, in sequence, all the steps in the list that have a status set to Ready.
Stop Use this to stop the step processing while a step is being processed. Thestep returns to the Ready status.
Stop on errorIf selected, stops the processing of any step or steps that you run in theevent of an error.
Search by statusSelect the status you want to view, then click Search. The step list displaysthe first step in the step list with the selected status.
Status
The status of the installation processing engine. It can be one of thefollowing:
WaitingUser action is required.
RunningInstallation of a step is in progress.
StoppingAfter the current step, the engine stops.
SearchingThe engine is searching for product images.
DetailsFor each status, shows the number of steps in that status. Also displays thetotal number of steps.
For information about each individual step, double-click the step to open the Stepwindow.
The Step windowIf you double-click a step in the Step List window, The Step window opens. It hasthree tabs:
Status tabThe Status tab shows the status of the installation step (Ready, Success, Error, orHeld). You can change the status from Error to Ready if the condition that causeda step to fail has been removed. This is an example of the tab:
218 Tivoli Workload Scheduler: Planning and Installation: Planning and Installation

Properties tabThe Properties tab gives the user parameters required by the step. These might bethe parameters you have input in the installation wizard, or values that the wizardhas determined according to the logic of its operations. This is an example of thetab:
For example, in this tab the property DB2 Client Flag is an internal propertydetermined by the wizard.
The properties are of three types:
A commandSome of the steps have properties that include a command string. Thismust never be edited. The command string has positional parameters andgenerated parameters. If you change even one character the commandmight fail.
Figure 15. Step status tab
Figure 16. Step properties tab
Chapter 8. Troubleshooting installation, migration, and uninstallation 219

Editable parametersThese are parameters that are used by the step, but can be edited by you.The name of the parameter is the same as the name used on the wizardpanel when you input the data.
Internal parametersThese are parameters generated by the wizard. They are recognizablebecause you did not input them in the wizard panels. For example, the DB2Client Flag in the above example screen is an internal flag which tells thestep whether it is to install the DB2 Server or DB2 Client. These must neverbe edited. They might be linked to other parameters in a way that is notobvious to you.
Output tabThe Output tab shows the output and any errors that occurred for the installationstep, and also the commands that were performed by the installation. This is anexample of the tab:
220 Tivoli Workload Scheduler: Planning and Installation: Planning and Installation

The Output tab has the following entries:
Time StampThe time that the command was run.
Return codeThe return code for the operation:
0 OK
1 - 9 Error
Figure 17. Step output tab
Chapter 8. Troubleshooting installation, migration, and uninstallation 221

DiagRecordA unique point of failure identification. This can be quoted to IBMSoftware Support if you need to request assistance.
CommandThe command that failed.
Command outputAny output from the command (such as a return code or an error messagenumber)
Error logShows a list of errors that occurred during the installation of the step.
Correcting a failed step and continuing the installationTo correct a failed step and continue the installation, use the following procedure:1. Use the Output tab to determine what problem occurred.2. Consult the sections in this guide that describe how to resolve problems found
with the installation or the help for the error message that has been displayed.3. If the solution to the problem requires you to change one of the values that you
entered in the installation wizard, consult “Deciding whether to resume thewizard or rerun it” on page 223 and determine from the guidelines there, if youshould rerun the wizard from scratch, or if it is appropriate to correct the valueand resume the wizard. If the latter, follow this procedure:a. Select the Properties tab and make the required changes. Click Apply.
The error description might make reference to a property that is notavailable for editing in the step that failed. In this case you must do thefollowing:1) Close the Step window.2) Double-click the preceding step and check if the Properties tab contains
the property you require. If it does not, then close the Step window andtry the next preceding step; continuing until you locate the property tochange.When you find the property, change its value and then continue withthe rest of the steps in this procedure, from the step that you have modified,not from the step that failed.
b. Double-click each of the other steps in the installation in turn and click theProperties tab for the step. If the step includes the property whose valueyou changed above, change the value of the property accordingly and clickApply. This is necessary because the step properties are not interlinked.
c. For each modified step, lick the Status tab, change the Status to Ready, thenclick Apply. The Step list is redisplayed.
4. If instead, the solution to the problem does not require you to change any ofthe values that you entered in the installation wizard, resolve the problemoutside the wizard, then change the Status to Ready and click Apply. The Steplist is redisplayed.
5. Determine which is the earliest step in Ready status.6. If you want to run just the first step in Ready status, to ensure, for example,
that the change you made has worked, click Run next. This runs the first stepin the step list (in step number order) with a status of Ready. When the stepfinishes successfully you run the other steps in the installation in the same way,in sequence, or use Run all.
222 Tivoli Workload Scheduler: Planning and Installation: Planning and Installation

7. To resume the installation in one go, click Run all. The wizard attempts tocomplete all outstanding steps, starting with the first step in Ready status.
Deciding whether to resume the wizard or rerun itThe fact that the wizard has a facility that allows you to diagnose the problem,correct it, and resume it, does not mean that you must do so. There are a numberof scenarios when it is quicker to rerun the wizard, or you are more sure of successby doing so. This section helps you to decide which is the best action to take.
Note: Diagnosing and resuming a failed installation is a process that must beguided, either by following the instructions in the sections that follow in thismanual, or by following instructions from IBM Software Support.
The facility to diagnose, correct, and resume a failed installation can be very usefulfor you, but if it is not done correctly can require more work than rerunning it.
The following sections detail different installation scenarios and suggest the bestway to proceed.
Installing an agent or the command line clientIf you are installing an agent or the command line client, it is always easier torerun, rather than resume, a failed installation. This is because the steps are few,and can all be rerun.
Installing a master domain manager, a backup master domainmanager, or the connectorIf you are installing a master domain manager, a backup master domain manager,or the connector, you must follow these guidelines:
Reason for failure:Consider the reason for failure and what is needed to fix the problem:
External reasonIf the wizard has failed for an external reason, that you can correct, youcan always resume from the failed step.
For example, in an installation of the master domain manager, the databasesupport that you chose in the wizard must be running during theinstallation. When you supply the information to identify the RDBMSinstance, the wizard checks that it is running and gives an error if not.However, if the RDBMS support stops running for any reason, after thewizard has checked it is running, but before the wizard starts to install theTivoli Workload Scheduler database, the wizard stops. To resolve theproblem, restart the RDBMS support and resume the installation from thefailed step.
Non-valid installation dataIf the wizard fails because data supplied to the wizard is not valid, youmust consider which data is not valid:
<TWS_user> ID or passwordIf there are any problems with the <TWS_user> ID or password,you must quit the installation and rerun it. Many of the steps havethe <TWS_user> as a property, and because many crucial factors inthe installation are linked to the <TWS_user>, you must not try tochange the ID and then resume.
Chapter 8. Troubleshooting installation, migration, and uninstallation 223

Installation directoryLike the <TWS_user> ID, this is important to the installation. If thesupplied value has some problem you must quit the installationand rerun it.
Ports The ports used by the embedded WebSphere Application Serverare checked at the moment you input them, but if one of thembecomes busy by the time the wizard starts to configure theembedded WebSphere Application Server, the installation stops. Inthis case, you can proceed to change the value of the port beingused in the step and resume the installation, because the ports areonly used in one step.
Database dataThe data relating to the configuration of the RDBMS support andthe installation of the Tivoli Workload Scheduler database might beused in any or all of the database-related steps. Look at the namesof the steps to determine which they are. If you change a value inone, open them all and check if the value is used in others.
Other dataFor all other installation data, check every step to determine wherethe data item is being used.
If in doubt, rerun the installation.
Where is the problem:Follow these guidelines depending on where, in the installation, the problemoccurs:
Early stepsGenerally, if the problem occurs in one of the early steps, it is almost asquick, and generally more reliable, to rerun the installation, than correctthe data and resume it.
After the database has successfully been installedIf the problem occurs after the database has been successfully installed, butyou want to rerun the installation, or resume from some point before thedatabase configuration steps, there is no need to drop or uncatalog thedatabase because the wizard finds the existing database and continues.
Cleaning up before a rerun:If you decide to rerun, there should be no need to clean up anything. All the datastructures that are installed can be overwritten.
Deciding whether to resume immediately or exit and resumelater
If you decide to diagnose, correct, and resume the wizard, you can choose to do itimmediately, or to quit the installation and resolve the problem later:
Diagnose failureIf you choose to diagnose the failure immediately, the Step List window isopened. See “The Step List window” on page 217 for more details.
Quit installationIf you select to quit the installation, a summary of the progress of theinstallation is displayed, and the InstallShield wizard is closed.
224 Tivoli Workload Scheduler: Planning and Installation: Planning and Installation

You can discover the reason for the failure by looking in the installationlog files, correct the problem, and later perform a restart of the installationusing the resume option, see “Stopping and resuming an interactiveinstallation.”
Note these considerations:
v Do not close the panel by clicking on the Close icon: . If you do, the wizardis unable to save the troubleshooting information that you need for the resume.Instead, if you are sure you want to quit the installation, click Quit installation.
v You can only resume the last installation of each SETUP attempt regardless ofthe component it was installing. Every time you click Next on the Summarypanel when running an installation of any component, any previoustroubleshooting information about a previous installation of any component isoverwritten. If you want to be able to resume multiple installations on the samecomputer, back up the entire <tempDir>/TWA/tws86 directory after eachinstallation attempt has stopped, and then, for each installation you need toresume, restore this data from the backup and resume the installation.
Stopping and resuming an interactive installationYou can stop and resume an installation at any time. For example:v The installation is running successfully but you want to pause it and resume it
laterv The installation has failed and you want to reboot the computer to correct a
problem
To stop an interactive installation that is running click Stop. The wizard asks you ifyou want to quit the installation after the current step is completed. If you replyYes, the installation completes the step being performed and then displays asummary panel of the completed activities. Click Finish to exit.
To stop an installation that has just failed, select Quit installation, click Next, andconfirm your decision.
To stop an installation that is on the Step List window, click Cancel, and confirmyour decision.
To resume the installation, enter the following command:
<setup_file_name> -resume
where <setup_file_name> is one of the following:
Windows operating systemsetup.exe
UNIX and Linux operating systemsSETUP.bin
The InstallShield wizard recognizes that a previous installation has not completed,and the Step List window opens. From here you can continue the previousinstallation at the point where it stopped. If the steps in the Step List window haveno errors, you can resume the installation; otherwise you must correct the errorthat caused the installation steps to fail, before resuming those steps. See “The StepList window” on page 217 for details.
Chapter 8. Troubleshooting installation, migration, and uninstallation 225

Example procedure for resolving a problemThis section describes an example procedure for resolving a problem and finishingthe installation.
Assume that you are upgrading an existing instance of Tivoli Workload Schedulerversion 8.3, using DB2, and the "Configure the Tivoli Workload Scheduler instance"step has failed. This could be for a number of reasons. The procedure for resolvingthe problem starts when the installation stops and the Diagnose Failure windowopens (see Figure 13 on page 216).1. On the Diagnose Failure window, select Diagnose failure and click Next. The
Step List window opens (see Figure 14 on page 217).2. Double-click the step that failed, in this case the "Configure the Tivoli Workload
Scheduler instance" step.3. Click the Output tab (see Figure 17 on page 221) and determine the cause of
the problem.4. Fix the problem. For this scenario it is assumed that the workstation name that
you originally supplied to the installation wizard is not valid. Click theProperties tab and change the workstation name to a valid value. Click Apply.
5. Change the Status on the Status tab (see Figure 15 on page 219) to Ready, andclick Apply. The Step List window opens again. This time the status of all thesteps yet to be performed is set to Ready.
6. Double-click the other steps in turn and click their Properties tab. If you findthe workstation name field, change the value as you did for the failed "Configurethe Tivoli Workload Scheduler instance" step. Click Apply.
7. In this case, the steps that you changed have not yet been run, so the earlieststep you changed is also the step that failed. The status of this step is alreadyset to "Ready", so there is nothing further to do.
8. When you have checked the properties for the affected steps, click Run all. Theinstallation wizard resumes and completes the installation.
Recovering a failed silent InstallShield wizard installationIf the silent wizard stops, follow this procedure:1. Open the installation log and establish at what point the installation failed. The
location of the installation log files is described in “Installation log files” onpage 36.The installation is performed in two distinct phases:
Validation phaseThe input parameters are validated, but no installation action is taken.In the log file the validation of the input parameters is indicated by theaction: validateFields.
Step execution phaseThe installation is performed in a series of steps. In the log, each stepstarts with a message that begins "Running step:".
2. When you have discovered what the problem is, and in what phase it started,determine how to resolve it. You might have to correct a parameter or changesomething in the installation environment (for example, create more diskspace).
226 Tivoli Workload Scheduler: Planning and Installation: Planning and Installation

3. When you have resolved the problem, you can rerun or resume the wizard. Todetermine which you should do, see “Deciding whether to resume the wizardor rerun it” on page 223. Follow these instructions for how to proceed aftermaking the decision:
Rerun the wizardYou must rerun the wizard if the error was found in the Validation phase.
If the wizard was in the Step execution phase you can always rerun it,but you must consider that the wizard attempts to redo each step.Thus, you might need to clean up the installation environment after thefailed installation before rerunning it.
If you need to change an input parameter, edit the response file. Thenrerun the wizard, just reissuing the silent wizard command as youissued it originally.
Resume the wizardYou can only resume the wizard if the error was found in the Stepexecution phase. The resume option uses the interactive wizard. Youcannot resume the wizard silently, because an interaction is required toresume the failed step.
To resume the wizard, reissue the silent wizard command as you issuedit originally, with these changes:v Add the parameter -resume
v Remove the parameter -silent when you ran it originally. If you donot remove this parameter, the installation cannot resume.
The Step list window of the interactive wizard is displayed, where youcan optionally change the values of the data input parameters, andresume the installation at the failed step. See “The Step List window”on page 217, and follow the instructions in that section.
Recovering a failed upgradeIn the case of a failed upgrade, collect any logs or error messages and contact IBMSoftware Support.
Analyzing return codes for Tivoli Workload Scheduler for AdditionalPlug-ins silent installation
Check the error and warning messages issued by Tivoli Workload Scheduler forAdditional Plug-ins, during the silent installation process.
This section lists the errors and the warnings messages returned byInstallAnywhere during the silent installation process.
The errors and warnings are organized into two tables:v Default InstallAnywhere error messages, Table 17 on page 228v Additional plug-in installation error messages, Table 18 on page 229
When running the installation in silent mode, no messages are displayed. Themessages are written in the silent installation log files listed in Table 9 on page 119.
Chapter 8. Troubleshooting installation, migration, and uninstallation 227

If the response file you specify in the command line does not exist or the file nameis incorrect, the silent installation process does not write the log files. To have thecorrect return code for the silent installation process, issue:start /w <silent command>
where:<silent command> is the command you launch to perform silent installation.
You can check the error codes found in the installation log files during the silentinstallation process, with the codes in the following tables to obtain the specificdescription of the error message. Table 17 shows the default InstallAnywhere errormessages written in the log files during the silent installation execution.
Table 17. Default InstallAnywhere error messages
Error Code Description
0 Success: The installation completed successfully without any warnings orerrors.
1 The installation completed successfully, but one or more of the actionsfrom the installation sequence caused a warning or a non-fatal error.
8 The silent installation failed because there is an error in one or moreinstallation steps.
-1 One or more of the actions from the installation sequence caused a fatalerror.
1000 The installation was canceled by the user.
1001 The installation includes an invalid command-line option.
2000 Unhandled error.
2001 The installation failed the authorization check. It might indicate an expiredversion.
2002 The installation failed a rules check. A rule placed on the installer itselffailed.
2003 An unresolved dependency in silent mode caused the installer to exit.
2004 The installation failed because not enough disk space was detected whilerunning the Install action.
2005 The installation failed while trying to install on a Windows 64-bit system,because the installation does not include support for Windows 64-bitsystems.
2006 The installation failed because it was launched in a UI mode that is notsupported by this installer.
3000 Unhandled error specific to a launcher.
3001 The installation failed due to an error specific to the lax.main.classproperty.
3002 The installation failed due to an error specific to the lax.main.methodproperty.
3003 The installation was unable to access the method specified in thelax.main.method property.
3004 The installation failed due to an exception error caused by thelax.main.method property.
3005 The installation failed because no value was assigned to thelax.application.name property.
3006 The installation was unable to access the value assigned to thelax.nl.java.launcher.main.class property.
228 Tivoli Workload Scheduler: Planning and Installation: Planning and Installation

Table 17. Default InstallAnywhere error messages (continued)
Error Code Description
3007 The installation failed due to an error specific to thelax.nl.java.launcher.main.class property.
3008 The installation failed due to an error specific to thelax.nl.java.launcher.main.method property.
3009 The installation was unable to access the method specified in thelax.nl.launcher.java.main.method property.
4000 A Java executable could not be found at the directory specified by thejava.home system property.
4001 An incorrect path to the installer jar caused the relauncher to launchincorrectly.
Table 18 shows the error messages issued during Tivoli Workload Scheduler forAdditional Plug-ins silent installation of the plug-ins.
Table 18. InstallAnywhere error messages for additional plug-ins
Error Code Description
11 The required parameter does not contain a value.
12 The file specified in response file does not exist.
13 The plug-in file specified is not a zip file.
14 The plug-in you specified does not contain the plugin.xml file.
15 The installation process does not find a Tivoli Workload Automationinstance on this system.
16 You cannot perform the action you specified on the selected instance.
17 You are performing the installation on a workstation that does not haveenough disk space.
18 The path you specified does not contain a valid installation of TivoliWorkload Scheduler.
19 The operating system, where you are performing installation, is notsupported.
20 The plug-in you specified contains a plugin.xml file with syntax errors.
21 The plugin.xml file you specified, lists some files that are not contained inthe plug-in.
22 You do not specify a plug-in in the response file.
23 An higher version of the selected plug-in is already installed on thisinstance.
24 The plug-in (zip file) you are installing does not contain the required jarfile or the jar file is not located in the correct path.
25 You cannot install the selected plug-in using the current plug-in installerversion.
26 The plug-in (zip file) you are installing does not contain the requiredlicences or the licences are not located in the correct path.
27 The ACTION_TYPE parameter value specified in the response file, mustbe DEPLOY or UNDEPLOY.
28 You cannot accepted the license agreement in the response file.
29 The installation process cannot save the updates for TWARegistry.dat file.
Chapter 8. Troubleshooting installation, migration, and uninstallation 229

Table 18. InstallAnywhere error messages for additional plug-ins (continued)
Error Code Description
30 The installation process is unable to update the config.ini file.
31 The installation process is unable to copy plug-in files on the targetsystem.
32 Cannot install the selected plug-in on the Tivoli Workload Schedulerinstance because the Java extension is not installed
Problem scenarios: install, reinstall, upgrade, migrate, and uninstallThis section contains known problem scenarios that could occur with the install,reinstall, upgrade, migrate, and uninstall of Tivoli Workload Schedulercomponents. It is divided into these topics:v “Problems installing on Windows operating system”v “Problems installing on UNIX” on page 236v “Problems installing on HP-UX” on page 237v “Problems installing on Oracle Solaris” on page 238v “Problems installing on Linux” on page 239v “Problems with the silent installation” on page 241v “Problems with installations using the twsinst script” on page 241v “Problems installing the application server” on page 242v “Other installation problems” on page 243v “Upgrade problems” on page 255v “Uninstallation problems” on page 258v “Fix pack installation problems” on page 260v
Problems installing on Windows operating systemThe following sections describe problems that could occur when installing onWindows, and their workarounds:v “An installation on Windows fails” on page 231.v “Installation fails because the host name is truncated” on page 231v “An InstallShield wizard installation fails with the message "CMW3202E
Command failed."” on page 231.v “The InstallShield wizard commit step fails on Windows with AWSDEQ024E
error” on page 232.v “The installation on Windows receives the warning AWSGAB005W” on page
232.v “On a Windows 2003 domain, the application server installation fails with an
apparent credentials problem but the credentials are correct” on page 233v “The user account is not created on Windows 2000 with system error 56b” on
page 233v “The user account is not created on Windows - create it manually” on page 233.v “The Windows services fail to start after installation” on page 234v “The Tivoli Workload Scheduler services fail to start after installation” on page
234
230 Tivoli Workload Scheduler: Planning and Installation: Planning and Installation

v “Installation fails with error “SQL1219N - The request failed because privatevirtual memory could not be allocated.”” on page 235
An installation on Windows failsYou have tried to install the product using the InstallShield wizard on a Windowsworkstation, but the installation has failed.
Cause and solution
A possible cause of a failure of an InstallShield wizard installation on Windows isthat the Services window of the Administrative Tools in the Control Panel is open.This is because, with the window open, the Services registry cannot be updated.
Close the Services window and do one of the following:v If you have selected the wizard option to recover a failed installation by
rerunning the step that failed, you can now set the status of that step to "Ready"and resume the step (see “Recovering a failed interactive InstallShield wizardinstallation” on page 216)
v If you have completely stopped the installation, you can resume it (see“Stopping and resuming an interactive installation” on page 225).
Installation fails because the host name is truncatedYou are installing a Tivoli Workload Scheduler component with the InstallShieldwizard on a system where you have defined a host name longer than 15characters. The installation fails because of a host name mismatch.
Cause and solution
This problem is caused by Windows. When you define a host name Windowsplaces no limit on the length of the host name. However, if you supply a hostname longer than 15 characters, when you reboot the Windows system to make thehost name active, Windows truncates the host name to 15 characters, and logs amessage in the system log. If you do not notice that message, you will not knowthat the name has been truncated, and will supply the full version of the hostname on the installation panel.
Unfortunately, the Windows Java classes that use that supplied long host name donot truncate the name, so report a mismatch.
To resolve the problem, do one of the following:v Specifically rename the host name to 15 characters or less, reboot the computer
and restart the installationv If the truncated name is acceptable, use the step restart facility (see “Recovering
a failed interactive InstallShield wizard installation” on page 216 or “Recoveringa failed silent InstallShield wizard installation” on page 226) to modify thesupplied host name to its truncated form, and continue the installation.
An InstallShield wizard installation fails with the message"CMW3202E Command failed."You are running an InstallShield wizard installation on Windows and the wizardfails in the step "Configure the Tivoli Workload Scheduler instance", with errormessages like the following:"atinstall.exe"CMW3202E Command failed.
Chapter 8. Troubleshooting installation, migration, and uninstallation 231

Cause and solution
A possible cause for this problem is that a file (not a directory) exists on theinstallation drive with the name <drive_letter>\program (for example,D:\program. Delete or rename this file and resume the installation at the failedstep.
The InstallShield wizard commit step fails on Windows withAWSDEQ024E errorYou are installing Tivoli Workload Scheduler on Windows with the InstallShieldwizard, interactive or silent. The commit step fails, and the error log includes amessage similar to the following :AWSDEQ024E Error owner is not of type user in :."makesec failed with error code: 1"
Cause and solution
The problem is probably caused by a non-valid setting of the TMP environmentvariable. For example, the above version of message AWSDEQ024E is produced if thevalue of the TMP variable is set to C.\tmp instead of C:\tmp.
To resolve the problem, quit the installation wizard, uninstall Tivoli WorkloadScheduler and rerun the installation wizard. You cannot just correct the TMPvariable and resume the installation. If you have problems running theuninstallation, see “Uninstalling Tivoli Workload Scheduler manually” on page 263.
The installation on Windows receives the warning AWSGAB005WAn installation on Windows receives the following error:
AWSGAB005E The account cannot be verified automatically. >Check that the supplied login and password are valid and >satisfy the local security policy.
Cause and solution
This is a known Windows limitation, dependent upon the security settings of yourWindows workstations. The password you supplied for the <TWS_user> might beperfectly valid, but the installation wizard is unable to validate it.
The problem does not block the installation. If you are using the interactivewizard, the installation displays this message; giving you the option to click Nextto continue. If you are using the silent option, the installation goes ahead.
To resolve the problem, take the following steps:1. After the installation has completed, check whether the supplied password was
correct. If it was, you need do no more.2. If the password was incorrect, when the product tries to start the Windows
services it has created, the services fail. Use the Windows facilities to modifythe password used by these services so that it matches the password of the<TWS_user>. To do this perform these steps for each service:a. In the Windows Services panel, locate the Tivoli Workload Scheduler service
with the incorrect password.b. Access the properties of this service, for example by right-clicking the
service and selecting Properties.c. Click the Log On tab.
232 Tivoli Workload Scheduler: Planning and Installation: Planning and Installation
d. Enter and confirm the correct values for the password.e. Start the service.
On a Windows 2003 domain, the application server installationfails with an apparent credentials problem but the credentials arecorrectYou are installing on a Windows 2003 domain any Tivoli Workload Schedulercomponent that also installs the application server, but the installation fails at thestep where the application server is being installed. The error message given is:com.ibm.websphere.security.auth.WSLoginFailedException:Authentication failed for user mdm84 with the following error messageLogon failure: unknown user name or bad password.
When you check the credentials you find that the User ID and password arecorrect.
Cause and solution
A possible cause for this problem is that you have not installed SP2 on Windows2003. Without SP2, Windows has a known bug that when it sets the "impersonate aclient after authentication" right, it also deletes the network connection icon, so thatthe installation cannot communicate with the application server. SP2 is aprerequisite of the installation.
Do the following:1. Install Windows 2003 SP22. Make sure that the "impersonate a client after authentication" right is applied
not only to the <TWS_user> but also the Administrators group, and the Servicesystem account.
3. Rerun the installation.
The user account is not created on Windows 2000 with systemerror 56bOn Windows 2000 operating systems, you are running an InstallShield wizardinstallation specifying a domain user (domain\user) as the <TWS_user>. Theinstallation fails at the user account creation stage giving the following message:WARNING: USER DOES NOT EXIST #System error <56b>
Cause and solution
The problem is actually caused by a synchronization error between the Windows2000 domain server and client. The account creation process and the process thatadds the account to the appropriate user group are not synchronized, giving theimpression that the account creation has failed.
Normally, by the time you have noted the error, the account creation has beencompleted. So, to resolve this problem, just set the user account creation step of theinstallation to "ready" and continue the installation.
However, if the process fails for a second time, you must create the user manually,and then resume the failed step.
The user account is not created on Windows - create it manuallyOn Windows operating systems, the installation automatically creates the TivoliWorkload Scheduler user with the appropriate rights, if the user does not already
Chapter 8. Troubleshooting installation, migration, and uninstallation 233

exist. However, if the installation encountered problems with the creation of theuser, you can perform the following steps.1. Back out of the installation.2. Create a local user account with a name of your choice on the workstation
where you want to install Tivoli Workload Scheduler.
Note: You can also use an existing user account. Ensure, however, that thisuser is a member of the Windows Administrators group.
3. Grant this <TWS_user> the following advanced user rights:
Act as part of the operating systemAdjust memory quotasLog on as batch jobLog on as a serviceLog on locallyReplace a process level token
4. Rerun the installation, citing the name of the account you created whenrequested.
The Windows services fail to start after installationIf the Tivoli Token service and the Tivoli Workload Scheduler for <TWS_user>services fail to start after installation, there was probably a problem with the<TWS_user> password. This scenario is described in “The Tivoli WorkloadScheduler services fail to start after installation.”
The Tivoli Workload Scheduler services fail to start afterinstallationOn Windows, both the Tivoli Token service and the Tivoli Workload Schedulerfor <TWS_user> service (batchup) fail to start for the first time (after a successfulinstallation).
Cause and solution
During the installation you selected the option to create the <TWS_user>, but anerror was found with the password you supplied (for example, the suppliedpassword might not have satisfied the security policy on the workstation). Youused the restart facility (see “Recovering a failed interactive InstallShield wizardinstallation” on page 216) to recover the situation. On the recovery panel youentered a different value for the password than the value entered originally. Thisvalue was valid, so the program went ahead and completed the installation.
However, during the completion of the installation, the <TWS_user> was createdusing the new password that you entered on the recovery panel, while the serviceswere created using the original password value.
The reason for this is that when the installation wizard starts the installation steps,after having accepted the input of all of the installation variables, it creates each ofthe steps complete with the properties (variables) required to perform the step. If astep fails, and the Step List window opens (see “The Step List window” on page217), the properties that are displayed for one step are quite separate from theproperties of another step. Thus, if you changed the password for one step (forexample, the "Create the <TWS_user> (Windows only)" step), you must have alsochanged it for all the other steps where it is used (for example, the "Configure theTivoli Workload Scheduler instance" step (see “Correcting a failed step andcontinuing the installation” on page 222).
234 Tivoli Workload Scheduler: Planning and Installation: Planning and Installation

To resolve this problem after the installation has completed, you must change thepassword for the services to the value that you entered on the recovery panel,following the procedure described in Tivoli Workload Scheduler: Administration Guide.
If you become aware of this problem before the installation is complete, you canchoose either to let the installation go ahead and change the password afterwards,as described in the previous paragraph, or to exit from the installation, uninstallwhatever you have installed, following the procedures described in the TivoliWorkload Scheduler: Planning and Installation Guide, and rerun the installation.
Installation fails with error “SQL1219N - The request failedbecause private virtual memory could not be allocated.”During the master domain manager installation of DB2 on Windows, theinstallation fails with the error “SQL1219N - The request failed because privatevirtual memory could not be allocated.”
Cause and solution
The request failed because private virtual memory could not be allocated. This canoccur because the DB2 administrator is not part of the Administrators group. Youmust add the DB2 administrator to the Administrators group by performing thefollowing steps:1. Cancel the installation wizard.2. Add the DB2 administrator, for example db2admin, to the Administrators
group.3. Restart the workstation.4. Resume the installation.
Problems installing on AIXThe following problems could occur while installing on AIX:v “ISMP installation on AIX hangs”v “ISMP installation on AIX 6100-05 hangs”
ISMP installation on AIX hangsThe installation hangs while using the ISMP wizard in interactive mode.
Cause and solution
If this happens, do the following:1. Cancel the interactive installation.2. Follow the instructions provided in “Recovering a failed interactive
InstallShield wizard installation” on page 216 to back out any installationactions that have already been performed.
3. Perform the installation in silent mode.Instructions for performing a silent ISMP installation are provided in Chapter 3of Tivoli Workload Scheduler: Planning and Installation Guide.
ISMP installation on AIX 6100-05 hangsYou are installing on AIX 6100-05, and receive a message indicating that there is aproblem validating the authentication information (userid and password).
Cause and solution
Chapter 8. Troubleshooting installation, migration, and uninstallation 235

You receive the following error:<2011.05.04 14:14:32 - Configure the Tivoli Workload Scheduler database (nc118226)>Installation completed with errors <<<---/tmp/TWA/tws86/scripts/createdb_root.shTWS86 TRUE TWS86_ND nc118227.romelab.it.ibm.com 50000 db2inst1******** DUMMY FALSE FALSE FALSE<OUT [AWSJIS038E An internal error has occurred.An unspecified internal error has occurred during the installation process.Checking nodeChecking for database existenceError in attaching to the node TWS86_ND.Check out the node TWS86_ND in the DB2 node catalogand the supplied authentication data (username/password)
CMW3202E Command failed. RC: 3]ERR [AWSJIS031E An internal error has occurred. An internal program has failed.]
The authentication information (userid and password) are correct. To solve theproblem perform the following steps:1. In the /tmp/TWA/tws86/scripts/createdb_root.sh script, modify the following
line:su - $DB2_ADMINISTRATOR -c "cd $TWS_TEMPDIR/scripts &&./dbsetup.sh $TWSDBNAME $TWSCLIENTFLAG $1 $2 $3 $4 ’$5’ $6 $7 $8 $9"
as follows:su - $DB2_ADMINISTRATOR -c "source .profile && cd $TWS_TEMPDIR/scripts &&./dbsetup.sh $TWSDBNAME $TWSCLIENTFLAG $1 $2 $3 $4 ’$5’ $6 $7 $8 $9"
2. In the /tmp/TWA/tws86/DWB/scripts/createdb_root.sh script, modify thefollowing line:su - $LOCAL_DB2_USER -c "cd $SCRIPT_DIR &&./dbmigrate.sh $1 $2 ’$3’ $4 $5"
as follows:su - $LOCAL_DB2_USER -c "source .profile && cd $SCRIPT_DIR &&./dbsetup.sh $1 $2 ’$3’ $4 $5"
3. Run the failed step again.
Problems installing on UNIXThe following problems could occur:v “The installation fails on UNIX with a problem validating the Java Virtual
Machine”v “An incorrect password is supplied for the TWS_user on UNIX” on page 237
The installation fails on UNIX with a problem validating the JavaVirtual MachineYou are installing on UNIX, and receive a message indicating that there is aproblem validating the Java Virtual Machine (JVM).
Cause and solution
This might be caused by a timeout problem. The InstallShield wizard uses adefault timeout of five seconds during its operations to validate the version of JVMthat you have installed. For a variety of reasons this might be insufficient.
Relaunch the installation wizard (interactive or silent) adding the followingparameter:
236 Tivoli Workload Scheduler: Planning and Installation: Planning and Installation

-is:jvmtimer 10
This extends the timeout to 10 seconds, and if this does not work, you can tryextending it to 20 seconds. If the JVM still does not validate correctly, contact IBMSoftware Support for assistance.
An incorrect password is supplied for the TWS_user on UNIXYou have supplied an incorrect password for the TWS_user on UNIX. Anappropriate error message is displayed, but it is displayed during the steppedinstallation rather than when you input the password. You need to determine howto recover.
Cause and solution
The TWS_user password cannot be checked on UNIX at time of input, for technicalreasons. If an incorrect password is provided, the error is not discovered until thewizard tries to install the product, after it has already successfully installed theTivoli Workload Scheduler database, and the embedded WebSphere ApplicationServer.
To recover from this situation, do the following:1. Quit the wizard2. Delete the application server directory: $WAS_HOME/eWAS/, where $WAS_HOME is
the environment variable that contains the installation path of the embeddedWebSphere Application Server
3. Rerun the wizard4. Supply the correct password for the TWS_user, when requested
Problems installing on HP-UXThe following problems could occur:v “An InstallShield wizard installation cannot start on HP-UX”v “An InstallShield wizard installation fails on HP-UX with an error installing the
bundled JRE” on page 238v “An InstallShield wizard installation fails on HP-UX with a "run error"” on page
238
An InstallShield wizard installation cannot start on HP-UXYou are trying to install Tivoli Workload Scheduler on HP-UX using theInstallShield wizard. The wizard does not start.
Cause and solution
This is probably due to insufficient threads being available to the installationprogram.
Set the max_thread_proc kernel parameter to a minimum of 128 so that theinstallation can start.
See http://www.ibm.com/support/docview.wss?rs=672&uid=swg27012175 fordetails of the typical kernel parameters to use to run Tivoli Workload Scheduler onHP-UX.
Chapter 8. Troubleshooting installation, migration, and uninstallation 237

An InstallShield wizard installation fails on HP-UX with an errorinstalling the bundled JREYou are installing on HP-UX where the required level of JRE is not installed. Theinstallation wizard tries to install the bundled JRE but fails. The following messageis received:Bundled JRE is not binary compatible with host OS/Arch or it is corrupt.Testing bundled JRE failed.
Cause and solution
This problem is probably caused by the HP-UX configuration parameter MAXDSIZhaving been set to a value that is too low. Set the MAXDSIZ configuration parameterto a minimum of 128 MB, and retry the installation.
An InstallShield wizard installation fails on HP-UX with a "runerror"You are trying to install Tivoli Workload Scheduler using the InstallShield wizardon an AIX or HP-UX operating system. The installation fails giving the followingexception in thread "main":
java.lang.NoClassDefFoundError: run error
This problem is described in “An InstallShield wizard installation fails on AIX orHP-UX with a "run error"” on page 247.
Problems installing on Oracle SolarisThe following problem could occur:
An installation fails on Oracle Solaris with the error "Thecommand line parameter, -installRoot, is invalid"The installation of a component on Oracle Solaris fails. The following errormessages are given:AWSJIS038E: An unspecified internal error has occurred
during the installation process.ERROR: The command line parameter, -installRoot, is invalidUse -usage to see the available command line optionsERROR installing WAS Express, check system stderr/stdout
Cause and solution
The problem is possibly caused by an incorrect PATH environment variable, whichhas the search path relating to an X/Open specification, for example XPG4, in theincorrect order.
Consult the Oracle Solaris documentation and support website and ensure that thePATH variable is correctly expressed. Correct any error you find and retry theinstallation.
An installation fails on Oracle Solaris with the error "SQL0101NThe statement is too long or too complex. SQLSTATE=54001"The installation of a component on Oracle Solaris fails. The following errormessage is given in the DB2 /export/home/db2admin/sqllib/db2dump/db2diag.log:SQL0101N The statement is too long or too complex. SQLSTATE=54001
Cause and solution
238 Tivoli Workload Scheduler: Planning and Installation: Planning and Installation

The problem is possibly caused by an incorrect kernel parameter on Solaris.
To solve the problem perform the following steps:1. Save in another directory for example home_dir the content of the
/tmp/TWA/tws86 directory.2. Run db2osconf to see the kernel parameter settings and set the value suggested
by the command. Consult the IBM DB2 documentation which describes how tomodify kernel parameters on Oracle Solaris.
3. Restore the content of the /tmp/TWA/tws86 directory in the /tmp/TWA/ directory.4. Perform the setup -resume command to recover the installation.
An installation fails on Oracle Solaris with the error "SQL1084CShared memory segments cannot be allocated. SQLSTATE=5701"The installation of a component on Oracle Solaris fails. The following errormessage is given in the DB2 /export/home/db2admin/sqllib/db2dump/db2diag.log:SQL1084C Shared memory segments cannot be allocated. SQLSTATE=5701
Cause and solution
The problem is possibly caused by an incorrect kernel parameter on Solaris.
To solve the problem perform the following steps:1. Save in another directory for example home_dir the content of the
/tmp/TWA/tws86 directory.2. Run db2osconf to see the kernel parameter settings and set the value suggested
by the command. Consult the IBM DB2 documentation which describes how tomodify kernel parameters on Oracle Solaris.
3. Restore the content of the /tmp/TWA/tws86 directory in the /tmp/TWA/ directory.4. Perform the setup -resume command to recover the installation.
Problems installing on LinuxThe following problems could occur:v “An InstallShield wizard installation fails on Linux with an error installing the
bundled JRE”v “A non-English installation on Linux finishes correctly, but the start of Tivoli
Workload Scheduler gives one or more errors” on page 240v “Java Virtual Machine (JVM) failure when installing on a Red Hat Enterprise
Linux (RHEL) Version 5 or a Suse Linux system Version 11” on page 240v “On Linux installation fails with message AWSJIS138E” on page 241.
An InstallShield wizard installation fails on Linux with an errorinstalling the bundled JREYou are installing on Linux where the required level of JRE is not installed. Theinstallation wizard tries to install the bundled JRE but fails. The following messageis received:This application requires a Java Run Time Environment (JRE)to run. Searching for one on your computer was not successful.Please use the command line switch -is:javahome to specifya valid JRE. For more help use the option -is:help.
Note: The solution indicated in this InstallShield wizard message probably doesnot work.
Chapter 8. Troubleshooting installation, migration, and uninstallation 239
Cause and solution
The probable cause is that the bc utility is a prerequisite of the InstallShieldwizard, but is not installed by default on all Linux platforms (on Red Hat Linux,version 2.1, for example, it is included only in Service Pack 2).
To check for the existence of the utility run this query on the rpm registry: rpm -qbc
If the utility is missing, consult your operating system's support resources todetermine how to obtain it. When it is successfully installed, rerun the installation.
A non-English installation on Linux finishes correctly, but thestart of Tivoli Workload Scheduler gives one or more errorsYou installed a non-English version of Tivoli Workload Scheduler on Linux, butwhen the product starts errors are given.
Cause and solution
The problem might be the code page of the workstation. To support languagesother than English, Tivoli Workload Scheduler requires the code page to be UTF8.Reset the code page and restart the product and you should have no reoccurrenceof this problem.
Java Virtual Machine (JVM) failure when installing on a Red HatEnterprise Linux (RHEL) Version 5 or a Suse Linux systemVersion 11About this task
Problem description:
When working with Tivoli Workload Scheduler on a Red Hat Enterprise LinuxVersion 5 or a Suse Linux system Version 11, you might receive the error "Failed tofind VM - aborting".
Cause and solution
Linux systems have a new security feature named 'Security Enhanced Linux', orSELinux for short. A weaker version of SELinux was included in Red HatEnterprise Linux Version 4, and was disabled by default. On these versions of RedHat Enterprise Linux and Suse Linux, this security feature is enabled by default.SELinux helps to keep the host secure from certain types of malicious attacks.However, the default settings have been known in many cases to prevent Javafrom running properly.
To fix this issue, choose one of the following options:v Configure SELinux so that it knows that the Tivoli Workload Scheduler Java
related processes are acceptable to run.v Change the mode of SELinux to Permissive by entering setenforce 0 on the
command line. SELinux will be fully enabled again the next time the system isrebooted or if setenforce 1 is entered on the command line. For the DynamicWorkload Console to function, you must set setenforce 0. For more informationabout setenforce, see the documentation for your operating system.
240 Tivoli Workload Scheduler: Planning and Installation: Planning and Installation

On Linux installation fails with message AWSJIS138EAbout this task
On Linux, you start the installation, but it fails with the following error messagewritten in the twsismp.log file:AWSJIS138E The specified instance name "instance_name"does not exist on the DB2 server.
Cause and solution
The problem occurs because the db2idefs file cannot be found by the installationprogram.
To solve the problem, perform the following steps:1. Add to the PATH environment variable the path where the db2idefs file is
located, for example /opt/ibm/db2/V9.7/instance.2. Start the installation again.
Problems with the silent installationAbout this task
The following problem could occur with the silent installation:v “Silent installation fails without writing a log”
Silent installation fails without writing a logAbout this task
You have launched the silent installation but it fails without writing a log.
Cause and solution
The response file is corrupt, or not syntactically correct.
To check the problem, run the setup adding the parameter-is:javaconsole. Correctthe syntax of the response file, comparing your version with the suppliedtemplates, or recreate it from the template if it is not readable.
Problems with installations using the twsinst scriptAbout this task
The following problems could occur:v “An installation with twsinst fails with a return code that does not indicate the
reason for failure”v “An incorrect password is supplied for the TWS_user on UNIX” on page 237
An installation with twsinst fails with a return code that does notindicate the reason for failureAbout this task
If an error occurs during an unattended installation process that makes use of thetwsinst script, it can display a return code that is not documented.
Cause and solution
Chapter 8. Troubleshooting installation, migration, and uninstallation 241
||
||
||
|
||
|
||
|
|

Several twsinst error situations give the same return code that is used in the errormessage that gives the failure. The various error situations have not beendocumented, because other error messages in the log explain the precise error.
Follow the sequence of installation messages in the log and determine from theircontext the reason for the problem. Correct the problem and rerun the installation.
Problems installing the application serverThe following problems might occur:v “The application server profile creation fails”v “The application server installation fails on a Windows 2003 domain with an
apparent credentials problem but the credentials are correct” on page 243
The application server profile creation failsThe installation stops in the step "Install with rollback the Tivoli WorkloadScheduler modelling and planning server, version 8.5" because it cannot create theapplication server profile.
When you check the application server trace file
you find the following line (it is shown here split into three lines):
The variable $WAS_HOME is the directory where the application server is installed.
Cause and solution
This error indicates that the folder repository is missing in the installation of theembedded WebSphere Application Server. This means that the following folder ismissing or damaged in the path where you placed the installation images:
The variable $PLATFORM_IMAGES_ROOT is the location of images for the selectedplatform, for example, Solaris.
Compare the corresponding files on the distribution media and the location whereyou copied the installation images.v If the files are different, the copy of the installation images from the distribution
media to the location from which you are using them did not complete correctly.Ensure there is sufficient disk space. Ensure you are using the binary option ifusing ftp. Recopy the files and rerun the Tivoli Workload Scheduler componentinstallation, or rerun the installation directly from the distribution media.
v If the files are in the same correct path (as indicated above) and are the same,there might be an internal error; contact IBM Software Support for assistance.
$WAS_HOME/profiles/TIPProfile.deleted/logs/wsadmin.traceout
[1/17/06 17:16:46:886 CST] 0000000a WorkSpaceMast EWKSP0020E: Error getting meta data repository root$WAS_HOME/eWAS/profiles/TIPProfile/config/.repository
$PLATFORM_IMAGES_ROOT/EmbeddedExpress/profileTemplates/default/documents/config/.repository
242 Tivoli Workload Scheduler: Planning and Installation: Planning and Installation

The application server installation fails on a Windows 2003domain with an apparent credentials problem but the credentialsare correctYou are installing on a Windows 2003 domain any Tivoli Workload Schedulercomponent that also installs the application server, but the installation fails at thestep where the application server is being installed. The error message given is:com.ibm.websphere.security.auth.WSLoginFailedException:Authentication failed for user mdm84 with the following error messageLogon failure: unknown user name or bad password.
When you check the credentials you find that the User ID and password arecorrect.
Cause and solution
See “On a Windows 2003 domain, the application server installation fails with anapparent credentials problem but the credentials are correct” on page 233 for thecause and solution.
Other installation problemsThe following miscellaneous problems might occur:v “An installation fails on a UNC mapped drive” on page 244v “Message "Error writing file = " received” on page 244v “Message "Error writing file = 28" received” on page 244v “Message AWSFAB037E is received on UNIX” on page 245v “A master domain manager installation fails with message AWSJIS038E” on page
245v “A dynamic domain manager installation fails with message AWSJIS038E” on
page 246v “A dynamic domain manager or backup dynamic domain manager installation
fails after the database configuration” on page 246v “An installation fails with a problem with the installation images on an NFS
mount” on page 247v “An InstallShield wizard installation fails on AIX or HP-UX with a "run error"”
on page 247v “An InstallShield wizard "Add feature" installation fails” on page 248v “A software package block installation fails with the message: DISSE0324E” on
page 248v “A software package block installation fails to complete successfully” on page
250v “The installation fails with the error AWSFAB035E” on page 251v “An agent installation fails if you launch it from a shell where you set the
environment variables using the swd_env script” on page 252v “The installation fails with the error AWSGAB566E” on page 252v “The commit step fails” on page 252v “Uninstalling and reinstalling a dynamic agent with the same name on the same
workstation” on page 252v “Miscellaneous failures” on page 253
Chapter 8. Troubleshooting installation, migration, and uninstallation 243

An installation fails on a UNC mapped driveYou are running an installation with the installation images on a drive mappedusing the Universal Naming Convention (UNC). The wizard fails at the first step.
Cause and solution
The Tivoli Workload Scheduler installation wizard methodology does not supportUNC mapped drives. Rerun the installation from a drive that is not UNC mapped.
Message "Error writing file = " receivedWhen performing any type of installation on any operating system, you mightreceive the following error:
Error writing file = There may not be enough temporary disk space.Try using -is:tempdir to use a temporary directory on a partitionwith more disk space.
Note in particular the absence of an error code, which differentiates this messagefrom a very similar message, with error code 28, that indicates that you are notlogged on as root (see “Message "Error writing file = 28" received”).
Cause and solution
Normally this error means what it says; the solution is as follows.
First, try to redirect the installation to use a different temporary directory, byadding the -is:tempdir .<temp_dir_path> variable to the installation command.
If this oes not work, you must use one of these two methods to give more space tothe swdis directory:v Either:
Create a new version in a different file system. The procedure is as follows:1. Delete or rename both the work and the backup subdirectories and recreate
the directories in a file system with more space in it.2. Link the new directories to the .swdis directory using the ln -s command.
v Or:Create a new backup directory in a file system with more space in it, andmodify the /etc/Tivoli/swdis.ini file to point to it.Ensure to modify the correct section of the swdis.ini file, as follows:– If you are making a local silent InstallShield wizard installation that uses the
disconnected command line (wdinstsp), modify the value of the backup_dirkey in the [#MOBILE] section.
– If you are making a remote installation using Tivoli Configuration Manager,you must identify the section relative to the endpoint chosen as the target (forexample, [lab133080_aix]), and modify the backup_dir key in that section.
Message "Error writing file = 28" receivedWhen performing any type of installation on any operating system, you mightreceive the following error:
Error writing file = 28 There may not be enough temporary disk space.Try using -is:tempdir to use a temporary directory on a partitionwith more disk space.
244 Tivoli Workload Scheduler: Planning and Installation: Planning and Installation

Note in particular the error code 28, which differentiates this message from a verysimilar message, without error code 28, that does indicate disk space problems (see“Message "Error writing file = " received” on page 244).
Cause and solution
This error does not mean exactly what it says. When performing a silentinstallation of a fix pack on UNIX, and possibly in certain other circumstances, thiserror message might mean that you are not logged on as root.
Make sure that you are logged onto the workstation as root before running thesilent installation:/SETUP.bin -options <path_to_patchInstall.txt> -silent
Message AWSFAB037E is received on UNIXAbout this task
The twsinst script installation fails on UNIX with the following error message:
AWSFAB037E The twsinst script is being run from the wrong directory.AWSFAB038I Mount the TWS installation CD and run the twsinst utilityplaced there.
Cause and solution
These error messages are received when attempting to install Tivoli WorkloadScheduler on a UNIX operating system using the twsinst utility copied from theinstallation DVD to the home directory of the user that is nominated as theTWS_user during the installation. The installation fails and no log files aregenerated.
You can run twsinst from the following places:v The Tivoli Workload Scheduler DVDv A disk image of the DVDv A copy of the twsinst utility and its associated files placed in any local directory
other than the home directory of the user that is going to be nominated as theTWS_user during the installation.
A master domain manager installation fails with messageAWSJIS038EAbout this task
You are installing a domain manger and the installation fails with the followingerror message:AWSJIS038E An internal error has occurred.An unspecified internal error has occurred during the installation process.
moreover, the output of the installation step list if you are performing aninteractive installation, or the \inst_logfile_dir\ItemConfigure_TWS_DBOut.xmlfiles if you are performing a silent installation, reports the following information:Database DDMSM already presentChecking if DDMSM is a TWS databaseDDMSM is not a TWS database.
Where inst_logfile_dir is the directory where all the installation log files are saved.
Chapter 8. Troubleshooting installation, migration, and uninstallation 245

Cause and solution
You are installing a master domain manager and the installation fails because youspecified in the Database name field the name of a database already used by adynamic domain manager. Run the installation again providing a different namefor the database.
A dynamic domain manager installation fails with messageAWSJIS038EAbout this task
You are installing a dynamic domain manager and the installation fails with thefollowing error message:AWSJIS038E An internal error has occurred.An unspecified internal error has occurred during the installation process.
moreover, the output of the installation step list if you are performing aninteractive installation, or the \inst_logfile_dir\ItemConfigure_TWS_DBOut.xml fileif you are performing a silent installation, reports the following information:Database TWSBM already presentChecking if TWSBM is not a TWS databaseTWSBM is a TWS database. It must be a TDWB database.One or more errors has occurred during the database setup.
Where inst_logfile_dir is the directory where all the installation log files are saved.
Cause and solution
You are installing a dynamic domain manager, the installation fails because youspecified in the Database name field the name of a database already used by amaster domain manager. Run the installation again providing a different name forthe database.
A dynamic domain manager or backup dynamic domain managerinstallation fails after the database configurationAbout this task
You are installing a dynamic domain manager or a backup dynamic domainmanager and the installation fails after the database configuration step.
Solution
In this case you have to uninstall the dynamic domain manager or backupdynamic domain manager manually performing the following steps:1. From the TWS_home_directory/TDWB/bin directory, run the following command:
exportserverdata -dbUsr <username> -dbPwd <password> [exportFile <export_file>]
where:
usernameSpecify the name of the user required to access the Tivoli WorkloadScheduler database server.
passwordSpecify the password of the user required to access the Tivoli WorkloadScheduler database server
246 Tivoli Workload Scheduler: Planning and Installation: Planning and Installation
export_fileSpecify the name of the text file that is created. The default isserver.properties.
2. Open the file you created and edit it by removing the entry related to the failedinstallation. For example:http://9.168.117.211:31115/JobManagerRESTWeb/JobScheduler
3. Update the database definition by running the following command:importserverdata -dbUsr <username> -dbPwd <password> [importFile <import_file>]
where <import_file> is the name of the file you created using theexportserverdata command. The default is server.properties.
An installation fails with a problem with the installation imageson an NFS mountAbout this task
The installation images are on an NFS mount. The installation fails and the logshows messages similar to the following:cannot start <file_name>No such file or directory <file_name>"
where <file_name> is a file in the directory structure of the installation images.
Cause and solution
The NFS mount is corrupt. Refresh the NFS mount by issuing unmount and thenmount commands. Retry the failed step (or the entire installation, depending onwhat went wrong and at what point in the installation).
An InstallShield wizard installation fails on AIX or HP-UX with a"run error"About this task
You are trying to install Tivoli Workload Scheduler using the InstallShield wizardon an AIX or HP-UX operating system. The installation fails giving the followingexception in thread "main":
java.lang.NoClassDefFoundError: run error
Cause and solution
This caused by a combination of display, Java, and binary issues.
To resolve this problem, perform the following steps:1. Ensure Quality Pack 10 or higher is installed.2. Run xhost + and re-export the display.3. Retry the installation using the SETUP.bin binary located at the root of the
DVD.This copies the appropriate media to /tmp and runs the installation from there.
Note: If you have insufficient space in /tmp, run the SETUP.bin command withthe -is:tempdir .<temp_dir_path> variable.
Chapter 8. Troubleshooting installation, migration, and uninstallation 247

An InstallShield wizard installation does not start and displaysthe message "A supported JVM is missing"About this task
You are installing on UNIX or Linux and the interactive or silent installation doesnot start. The message "A supported Java Virtual Machine is missing" displays.
Cause and solution
On very slow environments you could experience this installation problem anderror message. However, this InstallShield message is incorrect. The problem is thatthe InstallShield Java Virtual Machine verification routine times out due to theslow environment on which you are running.
InstallShield has the following parameter in the installation launcher:-is:jvmtime timeout in seconds
where timeout in seconds is the amount of time InstallShield waits before timingout the installation. If you have a slow environment, set this parameter to a highvalue to enable the Java Virtual Machine recognition routine enough time to obtainthe value before timeout. Initially, set the timeout in seconds parameter to 60, andincrement it by 60 until the installation successfully launches.
An InstallShield wizard "Add feature" installation failsYou are trying to add a feature to an existing Tivoli Workload Schedulerinstallation, using the Add feature option in the wizard. You have started thewizard from the Tivoli Workload Scheduler DVD, but have previously copied theDVD image of the feature to your hard disk. When the wizard asks you to supplythe path to the feature installation, you eject the product DVD before supplying thehard disk path information. The installation fails.
Cause and solution
This is a known problem with the InstallShield wizard. If an installation startsfrom a DVD, the InstallShield wizard expects to find a DVD in the DVD drive.
To correct this problem, put the product DVD, or any other DVD, back in the DVDdrive (the InstallShield wizard requires a DVD, but it can be any DVD).
A software package block installation fails with the message:DISSE0324EYou launched an installation of either the full product, a component, or a fix-pack,that uses the software package blocks of the software distribution component ofIBM Tivoli Configuration Manager. The installation fails, giving the followingmessages:
DISSE0282E Error compressing file <file_name> in the software Package block.DISSE0324E Cannot create backup packageDISSE0005E Operation unsuccessful
Cause and solution
The installation using a software package block is unable to check that there issufficient space for the backup it performs. The backup requires at least 80 MB of
248 Tivoli Workload Scheduler: Planning and Installation: Planning and Installation

disk space. The directory used for the backup is determined by the parameterbackup_dir in the [#MOBILE] section of the swdis.ini file. The following is anexample of this section of the file:
[#MOBILE]product_dir=/root/.swdisworking_dir=/root/.swdis/workbackup_dir=/root/.swdis/backuptrace_level=0trace_size=1000000send_timeout=300autopack_dir=/root/.swdis/autopackstaging_dir=root/.swdis/serviceuser_file_variables=/root/.swdis/swdis.varimport_libraries=spd,libecimp
If there is insufficient space in this directory, the error messages shown above aredisplayed.
Because the Tivoli Configuration Manager installation was unable to start, therestore script twsRestore cannot be used. The recovery procedure is as follows:1. If you are performing a full-product installation, manually delete the following
files and directories:v twsRestore.sh or twsRestore.cmd (as appropriate)v twsRemove.sh or twsRemove.cmd (as appropriate)v _uninstall directory
2. Resolve the file space problem, as follows.First, try to redirect the installation to use a different temporary directory, byadding the -is:tempdir .<temp_dir_path> variable to the installationcommand.If this oes not work, you must use one of these two methods to give morespace to the swdis directory:v Either:
Create a new version in a different file system. The procedure is as follows:a. Delete or rename both the work and the backup subdirectories and
recreate the directories in a file system with more space in it.b. Link the new directories to the .swdis directory using the ln -s
command.v Or:
Create a new backup directory in a file system with more space in it, andmodify the /etc/Tivoli/swdis.ini file to point to it.Ensure to modify the correct section of the swdis.ini file, as follows:– If you are making a local silent InstallShield wizard installation that uses
the disconnected command line (wdinstsp), modify the value of thebackup_dir key in the [#MOBILE] section.
– If you are making a remote installation using Tivoli ConfigurationManager, you must identify the section relative to the endpoint chosen asthe target (for example, [lab133080_aix]), and modify the backup_dir key inthat section.
3. Run the installation again.
Chapter 8. Troubleshooting installation, migration, and uninstallation 249

A software package block installation fails to completesuccessfullyYou launched an installation that uses the software package blocks of the softwaredistribution component of IBM Tivoli Configuration Manager. The installation fails.
Cause and solution
Problems when installing remotely with a software package block can often bedifficult to solve, because it might be more difficult to set the remote environmentcorrectly so that the installation runs successfully. For this reason, the softwarepackage block is supplied with a series of keys that switch on or off its installationactivities. These action keys are set by default to true, so that the installationcompletes normally. If it fails for a reason that you know you can resolveafterwards, you can retry it, setting one or more of these keys to false, so that theinstallation process does not attempt to perform that or those steps.
For example, if the installation fails when trying to back up the previousinstallation, and you know that you can proceed without making a backup, youcan eliminate this action from the installation by setting its action key to false. Youre-launch the installation, which does not perform the backup step, but otherwisecompletes successfully.
A description of the processing carried out in each step is given in the TivoliWorkload Scheduler: Planning and Installation Guide.
Note: The installation steps are always the same, whatever installation method youuse.
The details of the action keys are as follows (set any of them to false to not performthat action):
execActionTools = "true"This controls all of the other keys. If you set it to false, none of the otheractions take place (their settings are ignored).
execTwsStopAction = "true"This controls whether or not the installation stops existing Tivoli WorkloadScheduler processes on the target workstation.
execTwsCleanAction = "true"This controls whether or not the installation cleans up an existinginstallation before upgrading it.
execTwsUndoAction = "true"This controls whether or not the undoable installation script is run.
execTwsBackupAction = "$(backup)"This controls whether or not the installation takes a backup of an existinginstallation before commencing the installation. By default this value is setto "false".
execTwsUserAction = "true"This controls whether or not the installation creates or modifies the<TWS_user> details.
execTwsConfigAction = "true"This controls whether or not the installation configures Tivoli WorkloadScheduler after the installation.
250 Tivoli Workload Scheduler: Planning and Installation: Planning and Installation

execTwsStartUpAction = "true"This controls whether or not the installation starts up Tivoli WorkloadScheduler after the installation.
execTwsCommitAction = "true"This controls whether or not the installation issues a software distributioncommit action to complete the installation (see the Tivoli ConfigurationManager publications for more details).
When you have resolved the problem, reset these keys to true for any otherinstallation using the software package block.
See the Tivoli Configuration Manager publications for details of how to change thevalues of a parameter in a software package block.
The installation fails with the error AWSFAB035EYou are trying to install Tivoli Workload Scheduler or one of its fix packs. Theinstallation fails with the following error:
AWSFAB035E The installation has failed. For more details seethe log file: /tmp/tws84/summary.log.
The installation log contains the Software Distribution error message DISSE0006E:
DIS:SENG:0006 Operation unsuccessful: Fatal failure.Explanation: The operation cannot be completed because ofan internal error (for example, a memory allocation failure)System Action: Operation failed.
The log also contains details of the last internal command it ran:
+ wdinstsp -f -D promote=false -D upgrade=false -D fresh_install=true
Cause and solution
This is a problem related to incompatibility between the Tivoli Workload Schedulerinstaller and the current version of IBM Tivoli Configuration Manager. Followthese steps:1. Check the version of Tivoli Configuration Manager that is installed, using the
command wlsinst -ah. Check if any patches are installed.2. If you are using Tivoli Configuration Manager version 4.2, with fix pack
4.2-SWDGW-F1P1 (or later for the same component), there is a compatibilityproblem because the installation of Tivoli Workload Scheduler version 8.4 andits fix packs are only compatible with the GA version of the TivoliConfiguration Manager SWDGW component.In this case you must either choose a different installation method that does notuse Tivoli Configuration Manager or uninstall the Tivoli ConfigurationManager 4.2-SWDGW fix pack or packs until the installation is complete.
3. The Tivoli Workload Scheduler GA and fix pack installation uses the TivoliConfiguration Manager version 4.2 disconnected command line. A problem hasbeen discovered with this component which requires you to do the following:a. Install Tivoli Configuration Manager fix pack 4.2-TCM-FP02 on the
workstation.b. Run the wconvcat command (described in the 4.2-TCM-FP02.README file)
to restore the functionality of the disconnected command line.c. Retry the failed installation.
Chapter 8. Troubleshooting installation, migration, and uninstallation 251

An agent installation fails if you launch it from a shell where youset the environment variables using the swd_env scriptThe following error occurs when you install an agent:AWSFAB035E The installation has failed.
Cause and solution
You can receive this error if you are running the installation form a shell scriptwhere you previously set up the Software Distribution environment variables usingthe swd_env.cmd or the . . /swd_env.sh.
Resume the installation from a shell script where you did not set the environmentvariables and complete the installation.
The installation fails with the error AWSGAB566EYou are trying to install Tivoli Workload Scheduler, and the installation fails withthe following error:
AWSGAB566E There is not enough disk space available in the followingsupplied directory to complete the installation: <directory_name>.The installation requires <required_space> megabytes,but only <available_space> megabytes are available.
Cause and solution
The probable cause of this error is that either the file set where the product is to beinstalled, or the file set where the temporary installation files are being written, isnot large enough. Information about the disk space requirements is given in theTivoli Workload Scheduler System Requirements Document athttp://www.ibm.com/support/docview.wss?rs=672&uid=swg27019747
However, this error is also given if the virtual memory file (sometimes called pagefile or swap space) on your hard disk is not large enough.
Thus, if there seems to be sufficient disk space, check also the virtual memory thatyou have allocated to the hard disks. The installation requires at least 256 MB ofvirtual memory on any operating system.
The commit step failsYou are trying to install Tivoli Workload Scheduler, and the commit step fails
Cause and solution
If the mapped attribute, LDAPUSERIdMap is different from the login attribute,LDAPUserFilter, the commit step fails. You must dump the security file and insertthe mapped value (see error message). Then, manually perform the failedcomposer command (see error message). Finally, set the failed step as successfuland resume the installation.
Uninstalling and reinstalling a dynamic agent with the samename on the same workstationIf you have to uninstall a dynamic agent from a workstation and want to reinstallit with same name on the same workstation, perform the following steps tooverride the existing agent definition:
252 Tivoli Workload Scheduler: Planning and Installation: Planning and Installation

1. Obtain the ID of the dynamic agent running the following command: conmancpuinfo dynamic agent_name on the workstation in the plan.
2. Add the ID of the dynamic agent in the jobmanager.ini file using the AgentIDkeyword, as shown in the following example:[ResourceAdvisorAgent]FullyQualifiedHostname = geneva12.paralab.it.fsx.comResourceAdvisorUrl = https://localhost.localdomain:31116/JobManagerRESTWeb/JobScheduler/resourceCPUScannerPeriodSeconds = 10ScannerPeriodSeconds = 120NotifyToResourceAdvisorPeriodSeconds = 180ComputerSystemDisplayName = geneva12_1BackupResourceAdvisorUrls = "https://localhost.localdomain:31116/JobManagerRESTWeb/JobScheduler/resource","https://geneva12.paralab.it.fsx.com:31116/JobManagerRESTWeb/JobScheduler/resource"AgentID = 4A0B274AC61E11DF995053784667819B
Miscellaneous failuresThe installation fails and the cause is not immediately obvious from the logmessages.
Cause and solution
The cause of the failure could be any of the following:
The FTP transfer of the files to the node was not done in binary modeYou copied the install directory from the DVD to the local hard disk usingFTP, but did not specify the binary option. Make sure the entire directoryis transferred by FTP in binary mode.
Note: The directory on the local hard disk can have any name, but it isimportant to have a parent directory available for the twsinst installation,because some temporary files need to be located there.
For example:/temp/HP-UX
or/temp/TWS84/HP-UX
There is not enough disk space available for the installationCheck that there is enough disk space for the installation on your chosenfileset.
See the Tivoli Workload Scheduler System Requirements Document athttp://www.ibm.com/support/docview.wss?rs=672&uid=swg27019747 formore information about the amount of space necessary for installation.
File names did not retain their original caseOn UNIX, check that file names retain their case. For example, the file"TWS_size.txt" cannot be "tws_size.txt".
One or more required files were not copied from the root of the installationDVD Check that the number of files copied from the DVD is the same as that on
the DVD. If not, copy the files again.
You launched a second installation before the first one had successfullyfinished.
If you launch an installation (of an additional component, for example)while another installation is still running, both installations might fail, or
Chapter 8. Troubleshooting installation, migration, and uninstallation 253

the second installation might try and resume the first, as if you hadterminated the first installation part way through and now want tocontinue.
Depending on the stage that the first installation reached, you might justbe able to close the second installation and let the first one finish.However, if one or both have failed, you might need to uninstall and thenstart the installation again.
The InstallShield wizard installation on Oracle fails with the errorAWSJIS145EAbout this task
You are installing on Oracle using the InstallShield wizard. The wizard displaysthe error message:AWSJIS145E "The supplied credentials for user Tivoli Workload SchedulerOracle Database user are not correct"
Cause and solution
If you open the installation log file twsismp.log, you can see the error:DBCfgInfo, dbg, validate_twsDBUserAuthInfo: result of the queryfor the existence of the TWS Oracle User is:ERROR:ORA-28002: the password will expire within 7 days 0
ORA-01017: invalid username/password; logon denied
The problem is that the password of the Oracle system account, used during theinstallation, is about to expire. Change the password of the Oracle system accountand restart the wizard installation.
The InstallShield wizard installation of backup master domainmanager does not correctly manage the localopts fileAbout this task
You installed a backup master domain manager using the InstallShield wizard. Theinstallation completes successfully, but the localopts file does not contain thefollowing sections:#----------------------------------------------------------------------------# Attributes for CLI connections## Master hostname used when attempting a connection.HOST = 127.0.0.1# Protocol used to establish a connection with the Master.PROTOCOL = httpsPORT = 31116 # Protocol port#PROXY = proxy.userlocal#PROXYPORT = 3333TIMEOUT = 3600 # Timeout in seconds to wait a server response#CLISSLSERVERAUTH = yes#CLISSLCIPHER = MD5#CLISSLSERVERCERTIFICATE =#CLISSLTRUSTEDDIR =DEFAULTWS = NC112015USEROPTS = useropts_mdm86
#----------------------------------------------------------------------------# Event Management parameters#CAN BE EVENT PROCESSOR = yes # yes for MDM and BKM, no otherwise
254 Tivoli Workload Scheduler: Planning and Installation: Planning and Installation
|||
||
||
|
|
|||
|
|||
|||
|||
||||||||||||||||||||||

Cause and solution
If you perform some next and back actions in the wizard panels, the installationprocess cannot create the CLI connections and Event Management parameters sectionsof the localopts file. After installation, manually add the sections to the file.
The installation of additional plug-in by does not have enoughtemporary spaceAbout this task
The installation of an additional plug-in using the Tivoli Workload Scheduler forAdditional Plug-ins fails with the message:WARNING:/tmp does not have enough disk space!
Attempting to use / for install base and tmp dir
Cause and solution
If the temporary directory does not have enough space, redirect the installationprocess to another temporary directory, set the InstallAnywhere variableIATEMPDIR:
Windows operating systems
1. set IATEMPDIR=<new_temp_dir>2. Start the installation.
UNIX operating systems
1. export IATEMPDIR=<new_temp_dir>2. Start the installation.
Upgrade problemsThe following problems could be encountered.v “Tivoli Workload Scheduler instance refers to a wrong ITA agent certificate after
upgrade from V8.5.1 to V8.6.”v “Variables not resolved after upgrade” on page 256v “Default variable table not accessible after upgrade” on page 257v “Registry file information not found during upgrade” on page 257v
Tivoli Workload Scheduler instance refers to a wrong ITA agentcertificate after upgrade from V8.5.1 to V8.6After a master domain manager V8.5.1, a backup master domain manager V8.5.1, adynamic agent V8.5.1 upgrade to version 8.6, Tivoli Workload Scheduler refers toan incorrect ITA agent certificate.
Cause and solution
The Tivoli Workload Scheduler installation or upgrade process V8.5.1 for masterdomain manager, backup master domain manager, and dynamic agent creates thefollowing ITA agent certificate:
On Windows operating systems:<INSTALL_DIR>\TWS\ITA\TWSClientKeyStore.kdb
On UNIX and Linux operating systems:<INSTALL_DIR>/TWS/ITA/bin/TWSClientKeyStore.kdb
Chapter 8. Troubleshooting installation, migration, and uninstallation 255
|
|||
|||
||
||
|
|||
|
|
|
|
|
|
|

Where <INSTALL_DIR> is the directory where you installed the Tivoli WorkloadScheduler instance.
The Tivoli Workload Scheduler installation or upgrade process V8.6 for the masterdomain manager, the backup master domain manager, and the dynamic agentcreates the same certificate in the following different directories:
On Windows operating systems:<INSTALL_DIR>\TWS\ITA\cpa\ita\cert\TWSClientKeyStore.kdb
On UNIX and Linux operating systems:<INSTALL_DIR>/TWS/ITA/cpa/ita/cert/TWSClientKeyStore.kdb
Where <INSTALL_DIR> is the directory where you installed the Tivoli WorkloadScheduler instance.
If you uses the default certificates or you have your own certificate saved in thedefault directory and you upgrade your Tivoli Workload Scheduler instance toV8.6, the ITA processes V8.6 use the incorrect certificate installed in the newdirectory.
To manage the incorrect ITA certificate, after the master domain manager, backupmaster domain manager, and dynamic agent upgrade process to V8.6, perform thefollowing procedure:1. Stop the ITA agent processes that use the incorrect certificate by running:
On Windows operating systems:ShutdownLwa.bat
On UNIX and Linux operating systems:ShutdownLwa
For more information about the command syntax, see User's Guide andReference.
2. Modify the ITA certificate, by copying the TWSClientKeyStore.kdb file:
On Windows operating systems:From the directory <INSTALL_DIR>\TWS\ITA\bin to the directory<INSTALL_DIR>\TWS\ITA\cpa\ita\cert.
On UNIX and Linux operating systems:From the directory <INSTALL_DIR>/TWS/ITA to the directory<INSTALL_DIR>\TWS\ITA\cpa\ita\cert.
Where <INSTALL_DIR> is the directory where you installed the Tivoli WorkloadScheduler instance.
3. Start the ITA agent processes that use the modified certificate by running:
On Windows operating systems:StartUpLwa.bat
On UNIX and Linux operating systems:StartUpLwa
For more information about the command syntax, see User's Guide andReference.
Variables not resolved after upgradeAfter upgrading to version 8.5 (and also to V8.5.1 or V8.6 if upgrading from V8.3or V.8.4), global variables are not resolved.
256 Tivoli Workload Scheduler: Planning and Installation: Planning and Installation
Cause and solution
During the upgrade to version 8.5 (and also to V8.5.1 or V8.6 if upgrading fromV8.3 or V.8.4), all the security file statements relating to your global variables werecopied by the install wizard into a default variable table in the new security file.Global variables are disabled in version 8.5 (and also in V8.5.1 or V8.6 if upgradingfrom V8.3 or V.8.4), and can only be used through the variable tables. If yousubsequently rebuilt the security file using the output from your previous dumpsecas input to the new makesec, you will have overwritten the security statementsrelating to your default variable table, so no user has access to the default variabletable.
If you have a backup of your security file from prior to when you ran makesec, rundumpsec from that, and merge your old dumpsec output file with your new one, asdescribed in the upgrade procedure in the Tivoli Workload Scheduler: Planning andInstallation Guide.
If you do not have a backup, create the default variable table security statement,following the instructions about configuring the security file in the Tivoli WorkloadScheduler: Administration Guide.
Default variable table not accessible after upgradeAfter upgrading to version 8.5 (and also to V8.5.1 or V8.6 if upgrading from V8.3or V.8.4), your default variable table is not accessible by any user.
Cause and solution
This problem has exactly the same cause and solution as the preceding - see“Variables not resolved after upgrade” on page 256.
Registry file information not found during upgradeYou have tried to upgrade a stand-alone, fault-tolerant agent (an agent that is notshared with other components and does not have the connector feature) but theupgrade fails. If you were upgrading using the twsinst script, you may have seenthe following error message:
AWSFAB025E You are performing an update or uninstall operation, but theinstallation script has failed to find a previous instance of TivoliWorkload Scheduler in the Tivoli Workload Scheduler registry file. Thescript expected to find an entry belonging to the following user:user_name.and in the following registry file: registry_file_name.
If you were performing a silent installation, you may have seen the following errormessage:
AWSJIS165E No valid instance of Tivoli Workload Automation has been specified.Specify a valid instance or install the component in a new instance.
Cause and solution
This problem has occurred because of the following possible reasons:v You have defined specified an incorrect installation path and the registry file
cannot be found.v You have used a user name that is not associated with the specific instance of
Tivoli Workload Scheduler agent that you are upgrading.
Chapter 8. Troubleshooting installation, migration, and uninstallation 257

v You are upgrading a stand-alone, fault-tolerant agent that has a corrupt registryfile.
If you are sure you are using the correct installation path and user name, you canupgrade this agent without having to reinstall the product by using the TivoliWorkload Scheduler registry file recovery option, which re-creates the necessaryfiles. See “Upgrading when there are corrupt registry files” on page 189 for theprocedures on how to use the recovery option according to your upgrade method.
The pobox files increase in size after you performed a parallelmigrationAfter you migrate your environment, the pobox files increase in size.
Cause and solution
This problem occurs when performing a parallel migration for the followingreasons:v In Step “Parallel 2: Switch the master domain manager to the new or upgraded
backup master” on page 151 using the backup master domain manager V8.6 youdefine agent, pool, or dynamic pool workstations.
v In Step “Parallel 5: Install a new master domain manager or upgrade your oldmaster domain manager” on page 152 you did not set them to ignore, the agent,pool, or dynamic pool workstations you defined in Step “Parallel 2: Switch themaster domain manager to the new or upgraded backup master” on page 151
To solve the problem, perform the following steps:1. From the backup master domain manager V8.6, set the workstation to ignore.2. From the previous version master domain manager, run:
JnextPlan -for 0000
Uninstallation problemsThe following problems can occur when uninstalling:v “An uninstallation on Windows fails”v “An uninstallation fails during the restore profiles step, because the embedded
WebSphere Application Server was not stopped” on page 259v “The uninstallation of the Connector fails in the "Start the embedded WebSphere
Application server" step” on page 259
An uninstallation on Windows failsYou have tried to uninstall the product using the InstallShield wizard on aWindows workstation, but the uninstallation has failed.
Cause and solution
A possible cause of a failure of an InstallShield wizard uninstallation on Windows,is that the Services window of the Administrative Tools in the Control Panel isopen.
Close the Services window. Rerun the uninstallation. If you have any problems,uninstall the services manually.
258 Tivoli Workload Scheduler: Planning and Installation: Planning and Installation

An uninstallation fails during the restore profiles step, becausethe embedded WebSphere Application Server was not stoppedYou have tried to uninstall the product but the uninstallation has failed at therestore profiles step. The error indicates that the embedded WebSphere ApplicationServer has not stopped (if this fact is not reported by the log, check whether theapplication server has stopped, and if it has not, proceed in the same way).
Cause and solution
The problem is that the profiles cannot be restored while the application server isrunning, and the stop of the application server has failed. There are two possiblecauses:v The Windows Service Control Manager was unable to stop the embedded
WebSphere Application Server service before the timeout expired.v The Windows Service Control Manager has given an error while trying to stop
the service
Check the Windows system log files to see if an error is reported by the WindowsService Manager. If it has, you need to resolve the problem before continuing.
If no error is reported from the Windows Service Control Manager, it must be atimeout problem.
To solve the problem, do as follows:1. Open the Windows Services panel2. Stop the service that runs the embedded WebSphere Application Server from
the panel3. Close the Windows Services panel4. Resume the installation from the restore profiles step.
The uninstallation of the Connector fails in the "Start theembedded WebSphere Application server" stepYou are uninstalling the Connector, but the uninstallation fails in the step: "Start theembedded WebSphere Application server", with the message:
AWSJIS038E An internal error has occurred. An unspecified internal errorhas occurred during the installation process.
----------- Error log ------------
Could not open service ’IBMWAS70Service - <TWS_user>’
Reason: The specified service does not exist as an installed service.
ADMU0116I: Tool information is being logged in file C:\ProgramFiles\IBM\TWA\eWAS\profiles\TIPProfile\logs\server1\startServer.log
ADMU0128I: Starting tool with the TIPProfile profile
ADMU3100I: Reading configuration for server: server1
ADMU3028I: Conflict detected on port 28880. Likely causes: a) An instanceof the server server1 is already running b) some other process is usingport 28880
Chapter 8. Troubleshooting installation, migration, and uninstallation 259

ADMU3027E: An instance of the server may already be running: server1
ADMU0111E: Program exiting with error:com.ibm.websphere.management.exception.AdminException: ADMU3027E: Aninstance of the server may already be running: server1
ADMU1211I: To obtain a full trace of the failure, use the -trace option.
ADMU0211I: Error details may be seen in the file: C:\ProgramFiles\IBM\TWA\eWAS\profiles\TIPProfile\logs\server1\startServer.logTWA_EXCEPTION
CMW3202E Command failed.
Cause and solution
This problem occurs when the WebSphere Application Server administration userID and the TWS_user of the agent on which the Connector was installed aredifferent. This can be caused by having installed the Dynamic Workload Consolebefore the agent, and by not having installed the agent using the WebSphereApplication Server administration user ID as the TWS_user ID.
To resolve the problem, do the following:1. If you are using the interactive wizard, select the option to use the step restart
facility. If the step failed in the silent installation, rerun the silent installationusing the –resume option and omitting the –silent option so that theinteractive wizard's step restart facility can be used.
2. In the step restart facility, select the step that failed and put it into the Successfulstate.
3. Click Run next or Run all and let the wizard finish.4. Follow the instructions in the Tivoli Workload Scheduler: Administration Guide for
stopping and restarting the application server using the stopWas and startWascommands, ensuring to use the credentials of the WebSphere ApplicationServer administration user.
Fix pack installation problemsThis section describes problems and solutions for problems that might occurduring the installation of a fix pack.
The following problem could be encountered:
The update of the embedded WebSphere Application Server failsduring the fix pack installationYou have tried to apply a fix pack, but the installation fails at the step "Update ofthe embedded WebSphere Application Server". A message similar to the followingis given in the summary.log:Updating bobcatERROR: The script ended abnormally. The reason is:possible error, 65, launching updateinstaller.The script exit code is 65
CMW3202E Command failed.
Cause and solution
260 Tivoli Workload Scheduler: Planning and Installation: Planning and Installation

More information can be found in the fix pack installation log. See “WebSphereApplication Server installation log files” on page 38 for details.
One potential cause of the problem is disk space. Look for the following messagein the fix pack installation log file:(Aug 30, 2006 12:01:00 PM), UpdateInstaller,com.ibm.ws.install.ni.ismp.actions.MaintenancePrereqCheckAction, err,CWUPI0025E: There is insufficient free disk space on the system:
/<TWS_home>/eWAS:
Required: 400 MBAvailable: 146 MB
/tmp/:
Required: 250 MBAvailable: 311 MB
Ensure there is enough free disk space on all required file systems and retry theoperation.
Security implications of the installationThere are security implications involved in the installation of Tivoli WorkloadScheduler, because some of the files used by the installation contain unencryptedpasswords. The security exposure scenarios are as follows:
Successful installationDuring a successful installation, some temporary files are written withunencrypted passwords. At the final step they are deleted. The exposure isthe duration, or less, of the installation.
A failed installation which is resumed and finishes successfully.This is like the successful installation, except that the period of theexposure is lengthened by the time it takes you to fix whatever is theproblem.
A failed installation which cannot be finished, and from which you have torecover manually
In this case, the final step to delete the temporary files is not performed, sothe files remain.
A silent installationYou edit a response file, adding unencrypted passwords. The response fileis not deleted, even after a successful installation. The exposure ispermanent unless you delete the file.
The files where you can find unencrypted passwords are the following. Theymight not all be present, but you should check for all of them:
Windows operating system<TWS_home>\userdef_wnt<TEMP_DIR>\TWA/tws86\DB2Response.rsp<TEMP_DIR>\TWA/tws86\checkdb_root.sh<TEMP_DIR>\TWA/tws86\checkdbclient.sh
UNIX and Linux loperating systems<TEMP_DIR>/TWA/tws86/DB2Response.rsp<TEMP_DIR>/TWA/tws86/checkdb_root.sh<TEMP_DIR>/TWA/tws86/checkdbclient.sh
Chapter 8. Troubleshooting installation, migration, and uninstallation 261

In addition, on all platforms, the Tivoli Workload Scheduler response file if youused a silent installation (see the Tivoli Workload Scheduler: Planning and InstallationGuide for details of the template response file names).
Verifying the installationAfter installing the product, the installation process proceeds to complete, amongstother operations, the following configuration tasks:v Create the main local and global default settings.v Configure security access.
A default operational Security file is created in the <TWS_home> directory. Bydefault, it authorizes <TWS_user> and the administrator or root user. It is alsoupdated when a full InstallShield wizard installation of the connector isperformed.
v Set workstation and user definitions each time you install or promote a TivoliWorkload Scheduler master domain manager.
To make sure that no errors occurred during installation, check the install log file(see “Installation log files” on page 36 for information about the log files andwhere to find them).
The following are examples of checks you can perform to verify the installation,and the corresponding recovery actions:
Check the main local and global default settings.If you promoted a workstation from the role of standard agent orfault-tolerant agents to the role of master domain manager, check that themaster global option is set to the correct workstation name.
If it is wrong, you must manually edit the files to replace the currentvalues with the correct ones.
Check for the Security fileCheck that the default operational security file named Security wascreated in the <TWA_home>\tws directory. If this did not happen, createthe file as follows:1. Set the Tivoli Workload Scheduler environment by running the script
tws_env.2. Customize the Security file, as follows:
a. Open the file <TWS_home>/config/Security.conf
b. Edit the contents to reflect your environment and requirementsc. Save the file as <TWS_home>/Security.conf
3. Run one of the following commands:
Windows operating systemmakesec Security.conf
UNIX and Linux operating systemsmakesec -l Security.conf
Check for workstation and user definitionsCheck that your required workstation and user definitions are in place inthe database of the master domain manager. To add missing definitions inthe database, follow the instructions in the Tivoli Workload Scheduler: User'sGuide and Reference or the online help for the Dynamic Workload Console.
262 Tivoli Workload Scheduler: Planning and Installation: Planning and Installation
Uninstalling Tivoli Workload Scheduler manuallyThis section describes how to manually remove an instance of Tivoli WorkloadAutomation that did not completely uninstall.
The following are possible scenarios from which you might need to recover:v You removed a previous installation of the product, but the uninstall procedure
did not work properly and records of the previous installation were left on yoursystem.
v For some reason the uninstallation as described in the Tivoli Workload Scheduler:Planning and Installation Guide does not work.
v Your installation fails and you cannot recover and finish the installation. In thisevent, you must determine which steps completed successfully, and start at theappropriate point in the uninstallation procedure. See “Correcting a failed stepand continuing the installation” on page 222 for a detailed description of thesteps.
The following provides details for uninstalling manually for the followingoperating systems:v “Uninstalling manually on Windows operating system”v “Uninstalling manually on UNIX” on page 265v “Problems during manual uninstallation” on page 267
To remove an instance of Tivoli Workload Automation that contains an integratedinstallation of Tivoli Workload Scheduler and the Dynamic Workload Console, firstperform the uninstallation of Tivoli Workload Scheduler as described in “Manuallyuninstall an integrated Dynamic Workload Console” on page 322. Then, to removethe Dynamic Workload Console, perform the following steps:v On Windows operating system, perform steps 6 on page 322 and 7 on page 322.v On UNIX and Linux operating systems, perform step 5 on page 323.
If you want to remove Tivoli Workload Scheduler from an instance of TivoliWorkload Automation without removing the Tivoli Workload Automation instance,contact IBM Software Support.
Uninstalling manually on Windows operating systemIf Add or Remove Programs from the Windows Control Panel fails to uninstall TivoliWorkload Scheduler, perform the following steps:1. If you have jobs that are currently running on the workstation, wait for them
to finish. To determine which are not finished, check for jobs that are in theexec state. When there are no jobs in this state, and you have allowedsufficient time for all events to be distributed in your network, you cancontinue with the rest of the procedure.
2. Log on to the computer where Tivoli Workload Scheduler is installed as a userin the Administrators group.
3. From the TWS_home/bin directory run the following commands:conman "unlink workstation;noask"conman "stop;wait"conman "stopmon;wait"conman "shut;wait"
4. Stop the processes that are still active as follows:
Chapter 8. Troubleshooting installation, migration, and uninstallation 263

a. Open Services from the Windows Control Panel and stop the followingTivoli Workload Scheduler services:
Tivoli Netman for TWS_userTivoli Token Service for TWS_userTivoli Workload Scheduler for TWS_userTivoli Workload Scheduler SSM Agent for TWS_userIBM Common Platform Agent for tws_cpa_agent_TWS_user
b. Run Windows Task Manager from the Windows Task Bar to end all theprocesses that are already running after stopping the Tivoli WorkloadScheduler services.If the End Process action does not work, run the following steps from theTWS_home/unsupported directory:1) Run listproc.exe
2) Read the PID number associated to the process that you want to end3) Run killproc.exe <PID>
5. Stop the WebSphere Application Server using the conman stopappservercommand (see Tivoli Workload Scheduler: User's Guide and Reference)
6.
Use wdrmvsp to remove only the entries related to Tivoli Workload Scheduler.For information, see “Uninstalling using the Software Distribution CLI” onpage 209.Open the %WINDIR%\system32\TWSRegistry.dat (for Windows 32 bit)or %WINDIR%\TWSRegistry.dat (for Windows 64 bit) file. Delete all the rowsthat contain the name of the TWS_user. For example, if the user ID is twsuser,delete the rows containing twsuser, as shown in the following example:
/Tivoli/Workload_Scheduler/twsuser_DN_objectClass=OU/Tivoli/Workload_Scheduler/twsuser_DN_PackageName=TWS_WINDOWS_twsuser.8.5.0.00/Tivoli/Workload_Scheduler/twsuser_DN_MajorVersion=8/Tivoli/Workload_Scheduler/twsuser_DN_MinorVersion=5/Tivoli/Workload_Scheduler/twsuser_DN_PatchVersion=/Tivoli/Workload_Scheduler/twsuser_DN_ProductID=TWS_ENGINE/Tivoli/Workload_Scheduler/twsuser_DN_ou=twsuser/Tivoli/Workload_Scheduler/twsuser_DN_InstallationPath=C:\TWS\twsuser/Tivoli/Workload_Scheduler/twsuser_DN_UserOwner=twsuser/Tivoli/Workload_Scheduler/twsuser_DN_MaintenanceVersion=0/Tivoli/Workload_Scheduler/twsuser_DN_Agent=MDM/Tivoli/Workload_Scheduler/twsuser_DN_LPName=TWS_LP_twsuser.8.5.0.00/Tivoli/Workload_Scheduler/twsuser_DN_LPList=ALL_LANG
For a full description of the TWSRegistry.dat file, see Appendix A, “Registryfile,” on page 345.
7. Stop and remove the Tivoli Workload Scheduler services by issuing thefollowing commands:TWA_home\eWAS\bin\WASService.exe -stop TWS_userTWA_home\eWAS\bin\WASService.exe -remove TWS_user
Ensure that the Windows Services panel is closed when you do this.8. Navigate to the install_dir and take note of the name of the .id file
twainstancexxx.id. You need this information later in the procedure.9. Delete the file teb_tws_cpa_agent_tws_user.ini, which is located in the
%windir%\teb directory.10. Delete the installation directory and all its contents.
264 Tivoli Workload Scheduler: Planning and Installation: Planning and Installation

Note: If the manual deletion of these files is slow, see “File deletion onWindows too slow” on page 267.
11. Depending on what point the installation or uninstallation process reachedbefore it failed, you might need to remove the Windows services. See theinstructions for running regedit to do this in “Removing Windows registrykeys” on page 269.
12. Remove the files:%WINDIR%\TWA\twainstancexxx.propertiestwainstancexxxx.properties.ext
where xxx is the name of the file you noted in step 8 on page 264.13. If you are performing this procedure because you are cleaning up a failed
installation which could not be completed, you should also delete any fileswhich contain unencrypted passwords.The files where you can find unencrypted passwords are the following. Theymight not all be present, but you should check for all of them:
TEMP_DIR/tws86/checkdb_root.batTEMP_DIR/tws86/checkdbclient.bat
In addition, on all platforms, delete the Tivoli Workload Scheduler responsefile if you used a silent installation.
14.
Depending on what point the installation or uninstallation process reachedbefore it failed, you might need to remove the Add or Remove Programs keys.To do, this, use the system's facilities:a. Open the Add or Remove Programs option window from the Windows
Control Panelb. If Tivoli Workload Scheduler is available on the menu, click Remove on it.c. As you have, in the previous step, removed the uninstaller, a message is
displayed, asking if you want to remove the Add or Remove Programs keys.Click "Yes" and the keys are removed.
15. Reboot the workstation to remove the services, any DLLs, any daemons, orany other executable programs from memory.
Uninstalling manually on UNIXTo uninstall manually, perform the following steps:1. If you have jobs that are currently running on the workstation, wait for them
to finish. To determine which are not finished, check for jobs that are in theexec state. When there are no jobs in this state, and you have allowedsufficient time for all events to be distributed in your network, you cancontinue with the rest of the procedure.
2. Log on to the computer where Tivoli Workload Scheduler is installed as root.3. From the <TWS_home>/bin directory run the following commands:
conman "unlink workstation;noask"conman "stop;wait"conman "stopmon;wait"conman "shut;wait"
4. From a shell script run the following command:ps -ef grep <TWS_install_dir>/bin/jobman
This checks that the following processes are not active:
Chapter 8. Troubleshooting installation, migration, and uninstallation 265
agentJobManagertaskLauncherbatchmanjobmanJOBMANmailmanmonmannetmanssmagentstagemanwriter
5. Stop the processes that are still active as follows:kill -9 <pid>
6. Stop the WebSphere Application Server using the conman stopappservercommand (see Tivoli Workload Scheduler: User's Guide and Reference
7.
Use wdrmvsp to remove only the entries related to Tivoli Workload Scheduler.For information, see “Uninstalling using the Software Distribution CLI” onpage 209.Open /etc/TWS/TWSRegistry.dat and delete all the rows containingthe TWS_user user ID. For example, if the user ID is twsuser, delete the rowscontaining twsuser, as shown in the following example:
/Tivoli/Workload_Scheduler/twsuser_DN_objectClass=OU/Tivoli/Workload_Scheduler/twsuser_DN_PackageName=TWS_LINUX_twsuser.8.5.0.00/Tivoli/Workload_Scheduler/twsuser_DN_MajorVersion=8/Tivoli/Workload_Scheduler/twsuser_DN_MinorVersion=5/Tivoli/Workload_Scheduler/twsuser_DN_PatchVersion=/Tivoli/Workload_Scheduler/twsuser_DN_ProductID=TWS_ENGINE/Tivoli/Workload_Scheduler/twsuser_DN_ou=twsuser/Tivoli/Workload_Scheduler/twsuser_DN_InstallationPath=/home/twsuser/Tivoli/Workload_Scheduler/twsuser_DN_UserOwner=twsuser/Tivoli/Workload_Scheduler/twsuser_DN_MaintenanceVersion=0/Tivoli/Workload_Scheduler/twsuser_DN_Agent=MDM/Tivoli/Workload_Scheduler/twsuser_DN_LPName=TWS_LP_twsuser.8.5.0.00/Tivoli/Workload_Scheduler/twsuser_DN_LPList=ALL_LANG
For a full description of the TWSRegistry.dat file, see Appendix A, “Registryfile,” on page 345.
8. Navigate to the install_dir and take note of the name of the .id filetwainstancexxx.id. You will need this information later in the procedure.
9. Delete the installation directory as follows:rm -R <TWS_home>
10. Delete the file /etc/teb/teb_tws_cpa_agent_tws_user.ini.11. Delete the file:
etc/TWA/twainstancexxx.properties
where xxx is the name of the file you noted in step 8.12. If you are performing this procedure because you are cleaning up a failed
installation which could not be completed, you should also delete any fileswhich contain unencrypted passwords.The files where you can find unencrypted passwords are the following. Theymight not all be present, but you should check for all of them:
266 Tivoli Workload Scheduler: Planning and Installation: Planning and Installation

TEMP_DIR/tws86/checkdb_root.shTEMP_DIR/tws86/checkdbclient.sh
In addition, on all platforms, delete the Tivoli Workload Scheduler responsefile if you used a silent installation.
13. Reboot the workstation to remove the services, any DLLs, any daemons, orany other executable programs from memory.
Problems during manual uninstallationThe following problem might occur during a manual uninstallation:v “File deletion on Windows too slow”
File deletion on Windows too slowWhen manually deleting files during a manual uninstallation, the deletion of thefiles in the path $TWA_DIR\TWS\stdlist\yyyy.mm.dd\Onnnn.hhmm is unacceptablyslow.
Cause and solution:
This problem is caused by a known Microsoft issue on Windows operatingsystems. It occurs when you try to delete the indicated files on the Windowssystem after having uninstalled the master domain manager. To prevent theproblem from occurring use Shift-Canc to remove these files instead of using theDelete menu option, moving them to the recycle bin, or using the Canc key on thekeyboard.
Uninstalling Tivoli Workload Scheduler connectors manuallyThis section describes how to manually remove an instance of a Tivoli WorkloadScheduler connector that did not completely uninstall.
The following are possible scenarios from which you might need to recover:v You might have removed a previous installation of the connector, but the
uninstall procedure did not work properly and records of the previousinstallation were left on your system.
v For some reason the uninstallation as described in Chapter 4, “Installing,” onpage 67 does not work.
v Your installation fails and you cannot recover and finish the installation. In thisevent, you must determine which steps completed successfully, and start at theappropriate point in the uninstallation procedure. See “Correcting a failed stepand continuing the installation” on page 222 for a detailed description of thesteps.
The following provides details for uninstalling manually for the followingoperating systems:v “Uninstalling the connector manually on UNIX”v “Uninstalling the connector manually on Windows operating system” on page
268
Uninstalling the connector manually on UNIXAbout this task
If you need to uninstall a connector manually, perform the following steps:
Chapter 8. Troubleshooting installation, migration, and uninstallation 267

Procedure1. Log on to the computer where Tivoli Workload Scheduler is installed as root.2. Access the directory: <TWS_home>/wastools3. Stop the WebSphere Application Server using the conman stopappserver
command (see Tivoli Workload Scheduler: User's Guide and Reference)4. Delete the installation directory as follows:
rm -R <TWS_home>
This step is not obligatory, but is just to save space on the file system. If youare in any doubt about risking deleting other Tivoli Workload Scheduler files,omit this step.
5. Open the /etc/TWS/TWSZConnRegistry.dat and delete all the rows containingthe <TWS_user> user ID.
6. If you are performing this procedure because you are cleaning up a failedinstallation which could not be completed, you should also delete any fileswhich contain unencrypted passwords.The files where you can find unencrypted passwords are the following. Theymight not all be present, but you should check for all of them:
<TEMP_DIR>/tws86/checkdb_root.sh<TEMP_DIR>/tws86/checkdbclient.sh
In addition, on all platforms, delete the Tivoli Workload Scheduler response fileif you used a silent installation (see Table 6 on page 93 for a details aboutresponse file names).
7. Remove the files:<WINDOR>\TWA\twainstancexxx.propertiestwainstancexxxx.properties.ext
Uninstalling the connector manually on Windows operatingsystem
About this task
If you cannot run the add/remove program from the Windows Control Panel,perform the following steps:1. Log on to the computer where Tivoli Workload Scheduler is installed as a user
in the Administrators group.2. Access the directory: <TWS_home>/wastools3. Stop the WebSphere Application Server using the conman stopappserver
command (see Tivoli Workload Scheduler: User's Guide and Reference)4. Stop and remove the Tivoli Workload Scheduler services by issuing the
following commands:<TWS_home>\eWAS\bin\WASService.exe -remove(<TWS_user>)<TWS_home>\eWAS\bin\WASService.exe -remove TWSZCONNECTOR(<TWS_user>)
Ensure that the Windows Services panel is closed when you do this.5. Open the %WINDIR%\System32\TWSConnRegistry.dat or %WINDIR%\System32\
TWSZConnRegistry.dat file, depending on whether the connector is distributedor z/OS, and delete all the rows that contain the name of the <TWS_user>.
268 Tivoli Workload Scheduler: Planning and Installation: Planning and Installation

6. Delete the installation directory and all its contents. This step is not obligatory,but it saves space on the file system. If you are in doubt about deleting otherTivoli Workload Scheduler files, omit this step.
7. Depending on what point the installation or uninstallation process reachedbefore it failed, you might need to remove the Add or Remove Programs keys. Todo, this, use the system's facilities:a. Open the Add or Remove Programs option window from the Windows
Control Panelb. If the Tivoli Workload Scheduler Connector or the Tivoli Workload
Scheduler for z/OS Connector is available on the menu, select it and clickRemove.
c. As you have, in the previous step, removed the uninstaller, a message isdisplayed, asking if you want to remove the Add or Remove Programs keys.Click "Yes" and the keys are removed.
8. If you are performing this procedure because you are cleaning up a failedinstallation which could not be completed, you should also delete any fileswhich contain unencrypted passwords.The files where you can find unencrypted passwords are the following. Theymight not all be present, but you should check for all of them:
<TWS_home>\userdef_wnt<TEMP_DIR>\tws86/checkdb_root.sh<TEMP_DIR>\tws86\checkdbclient.sh
In addition, on all platforms, delete the Tivoli Workload Scheduler response fileif you used a silent installation (see “Performing a silent installation” on page92 for a details of the template response file names).
9. Reboot the workstation to remove the services, any DLLs, any daemons, or anyother executable programs from memory.
Removing Windows registry keysAbout this task
During the life of this product it has undergone name changes and has been issuedin a number of versions. There is more than one way to install and uninstall theproduct. All this leads to the risk that in upgrading from one version to another,one or more registry keys have been inadvertently left in the Windows Registry.This procedure is designed to help you remove these unwanted keys.
Note: If you make changes to the Windows Registry, you risk making the operatingsystem unusable. You are strongly advised to back up the registry before you start.
A similar procedure is described in “Uninstalling manually on Windows operatingsystem” on page 263; the same objective is achieved using different techniques.
This procedure is designed to identify and remove the keys for the following:v Maestro versions 6.0 and 6.1v Tivoli Workload Scheduler, versions 7.0, 8.1, 8.2.n, 8.3, and 8.4
Depending upon the version of Maestro or Tivoli Workload Scheduler, and theversion of the operating system, some of the keys in this procedure might havealready been removed by the InstallShield wizard uninstall program. If this is thecase, skip that step and proceed to the next step in the procedure. Some of the
Chapter 8. Troubleshooting installation, migration, and uninstallation 269

names of the keys vary depending upon the choices made during the installationof Maestro or Tivoli Workload Scheduler, so make certain that you are aware ofthese original choices when locating the keys.
The procedure is as follows:1. Stop Tivoli Workload Scheduler completely. The easiest way to do this is as
follows:a. Change to the <TWS_home>\unsupported directory. In this directory are two
files, listproc.exe and killproc.exe.b. Copy both of these files into the <TWS_home>\bin directory and set a path to
<TWS_home> and <TWS_home>\bin, using the Windows path command.c. Type the following command:
listproc | more
A page that looks similar to this is displayed:
PID Command # Handles # Threads567 agent 87 4687 JobManager 65 8443 taskLauncher 34 8624 netman 86 5332 tokensrv 62 81088 writer 60 25688 monman 89 35364 ssmagent 210 191052 mailman 85 2936 batchup 57 41020 batchman 92 21036 JOBMAN 91 21312 JOBMON 105 3
This table shows the entire Tivoli Workload Scheduler process tree of arunning fault-tolerant agents.
Note: There are other processes belonging to the operating system andother applications interspersed between these processes.
d. Write down the process ID (pid) of any TWS processes.e. Stop the processes by issuing the following command for each running
process: killproc <pid>. Killproc is a more reliable tool than thecorresponding Microsoft tool, which does not always stop runawayprocesses.
2. Remove Tivoli Workload Scheduler using the InstallShield wizarduninstallation.
3. Reboot the workstation.4. Select Start > Run, type regedit and press the enter key.5. Select HKEY_LOCAL_MACHINE > Software.6. Remove the keys from versions of Tivoli Workload Scheduler prior to version
8.3:a. Delete the Unison Software, Inc key.b. Close Software.c. Open System > CurrentControlSet > Services.d. Delete the maestro_<workstation>_<user_ID> key.e. Delete any key called netman_<system_name>_<user_ID>. DO NOT delete
any other key called Netman. This Netman is part of Windows.
270 Tivoli Workload Scheduler: Planning and Installation: Planning and Installation
f. Delete any key called tokensrv_<system_name>_<user_ID>. If you cannotlocate a key of this type, look for keys called <process_name>_<user_ID>and delete them.
7. Remove the keys from Tivoli Workload Scheduler versions 8.3 and 8.4:a. Open System > CurrentControlSet > Services.b. Delete the tws_maestro_<user_ID> key.c. Delete the tws_netman_<user_ID> key. DO NOT delete any other key called
Netman. This Netman is part of Windows.d. Delete the tws_tokensrv_<user_ID> key.e. Delete the tws_cpa_agent_<user_ID> key.f. Delete the tws_ssm_agent_<user_ID> key.
8. Close regedit.9. Reboot the workstation.
Chapter 8. Troubleshooting installation, migration, and uninstallation 271

272 Tivoli Workload Scheduler: Planning and Installation: Planning and Installation

Part 3. Tivoli Workload Scheduler on IBM i systems
This part describes how to plan, install, configure, and uninstall Tivoli WorkloadScheduler on IBM i systems.
© Copyright IBM Corp. 1999, 2012 273

274 Tivoli Workload Scheduler: Planning and Installation: Planning and Installation

Chapter 9. Prerequisites
About this task
To install and use the IBM i agent you must have a supported version of the IBM ioperating system. For a detailed list of supported operating systems, seehttp://www.ibm.com/support/docview.wss?rs=672&uid=swg27019747.
© Copyright IBM Corp. 1999, 2012 275
|
|
|
|||

276 Tivoli Workload Scheduler: Planning and Installation: Planning and Installation

Chapter 10. Installing agents on IBM i systems
About this task
You can install the agent on an IBM i system by using the twsinst installationscript.
To install a Tivoli Workload Scheduler agent, perform the following steps:1. Sign on as QSECOFR user.2. Create an IBM i user profile for which the Tivoli Workload Scheduler agent is
installed.
Note: The user profile is not the same as that for the user performing theinstallation logged on as QSECOFR, but instead is for the user that you specifyin the -uname username parameter when running the twsinst script. Fordescriptions of the syntax parameters, see “Agent installation parameters onIBM i systems” on page 279. You cannot use an existing IBM i system userprofile, an application supplied user profile, or any of the following reservedIBM i user profiles:v QDBSHRv QDFTOWNv QDOCv QLPAUTOv QLPINSTALLv QRJEv QSECOFRv QSPLv QSYSv QTSTRQS
Attention:
Be aware of the following consideration:v If the user profile is a member of a group, the installation fails. Set the group
profile associated with the user profile to *NONE.v If the username is longer than 8 characters, after installation the agent (and
the JobManager component) run under the QSECOFR user instead of underthe authority of the installation user. To prevent this problem, set thePASE_USRGRP_LIMITED environment variable to N.
3. On the IBM i system, verify that no library exists with the same name as theuser profile supplied for the agent user.
4. Insert the DVD for the IBM i system or download the agent eImage from thePassport Advantage Online website. For more information about theinstallation media, see “Installation media” on page 31 or the DownloadDocument at http://www.ibm.com/support/docview.wss?rs=672&uid=swg24027501.
5. If you downloaded the eImages, to untar the package, use the PASE shell or theAIXterm command.
© Copyright IBM Corp. 1999, 2012 277

Using PASE shell:
a. Open the PASE shell.b. Run the command "CALL QP2TERM".c. Locate the folder where you downloaded the eImages and run the
command:"tar xvf TWS86_IBM_I.tar"
d. Exit from the PASE shell.
Using AIXterm command:
a. Start the Xserver on your desktop.b. On the iSeries machine, open a QSH shell and export the display.c. In QSH shell, go to the directory /QopenSys and run the command
"aixterm -sb".d. A pop-up window is displayed on your desktop. By Using this
pop-up window, untar the file TWS86_IBM_I.tar.6. Open a QSH shell and run the twsinst script. During the installation process the
product creates an IBM i library and a job description with the same name asthe user profile created in Step 2 on page 277.The installation procedure adds this library to the user profile library list of thedynamic agent user profile and sets this job description as the job descriptionof the dynamic agent user profile. By default, the software is installed in theuser's home directory.
Note: If you do not run the twsinst script from a QSH shell the installationfails.
A failed installation issues the return code RC = 1. If the installation fails, see TivoliWorkload Automation: Messages and Codes.
After a successful installation, perform the following configuration task:v “Configuring a dynamic agent” on page 199.
command usage and version
Show command usage and versiontwsinst -u | -v
Install a new instancetwsinst -new -uname username
[-agent dynamic][-company company_name][-displayname agentname][-hostname hostname][-inst_dir install_dir][-jmport port_number][-jmportssl true|false][-lang lang_id][-tdwbport tdwbport_number][-tdwbhostname host_name]
For a description of the installation parameters and options related to agent on thisplatform, see “Agent installation parameters on IBM i systems” on page 279.
278 Tivoli Workload Scheduler: Planning and Installation: Planning and Installation

Agent installation parameters on IBM i systemsAbout this task
The parameters set when using the twsinst script to install the dynamic agent onIBM i systems.
-agent dynamicThe value on aIBM i system is:
dynamicTo install the Tivoli Workload Scheduler agent. Use this value withthe -tdwbhostname host_name and the -tdwbport tdwbport_numberparameters.
-company company_nameThe name of the company. The company name cannot contain blankcharacters. The name is shown in program headers and reports. If notspecified, the default name is COMPANY.
-displaynameThe name to assign to the agent. The default is the host name of thiscomputer.
-hostname host_nameThe fully qualified host name or IP address on which the agent iscontacted by the dynamic workload broker. The default is the host name ofthis computer.
-inst_dir installation_dirThe directory of the Tivoli Workload Scheduler installation.
Note: The path cannot contain blanks. If you do not manually specify apath, the path is set to the default home directory, that is, the user_home\user_name directory.
-jmport port_number
The JobManager port number used by the dynamic workload broker toconnect to the Tivoli Workload Scheduler dynamic agent. The default valueis 31114. The valid range is from 1 to 65535.
-jmportssl true|falseThe JobManager port used by the dynamic workload broker to connect tothe Tivoli Workload Scheduler dynamic agent. This number is registered inthe ita.ini file located in the ITA/cpa/ita directory.
For communication using SSL or HTTPSSet jmportssl = true. To communicate with the dynamic workloadbroker, it is recommended that you set the value to true. If thevalue is set to true, the port specified in jmport communicates inHTTPS.
For communication without using SSL, or through HTTPSet jmportssl = false. If the value is set to false, the port specifiedin jmport communicates in HTTP.
-lang lang_idThe language in which the twsinst messages are displayed. If notspecified, the system LANG is used. If the related catalog is missing, thedefault C language catalog is used.
Chapter 10. Installing agents on IBM i systems 279

Note: This is the language in which the installation log is recorded, andnot the language of the installed engine instance. The twsinst scriptinstalls all languages by default.
-new A fresh installation of the agent. Installs an agent and all supportedlanguage packs.
-skip_usercheckEnable this option if the authentication process within your organization isnot standard, thereby disabling the default authentication option. If youspecify this parameter, you must create the user manually before runningthe script.
-stoponcheckprereqStop the installation whenever a problem occurs during the prerequisitecheck.
For a detailed list of supported operating systems and productprerequisites, see http://www.ibm.com/support/docview.wss?rs=672&uid=swg27019747.
-tdwbhostname host_nameThe fully qualified host name of the dynamic workload broker. It is usedtogether with the -agent dynamic and the -tdwbport tdwbport_numberparameters. If not specified, you cannot run your workload dynamicallyand this parameter uses the localhost default value. This value isregistered in the ResourceAdvisorUrl property in the JobManager.ini file.
-tdwbport tdwbport_numberThe dynamic workload broker HTTP or HTTPS transport port number. It isused together with the -agent dynamic|both and the -tdwbhostnamehost_name parameters. It is necessary to install the dynamic agent. Thisnumber is registered in the ResourceAdvisorUrl property in theJobManager.ini file. The default value is 31116. The valid range is from 0to 65535. If you specify 0 or do not specify this parameter, you cannot runworkload dynamically. Do not specify 0 if the -agent value is dynamic orboth.
-thiscpu workstationThe name of the Tivoli Workload Scheduler workstation of this installation.The name cannot exceed 16 characters, cannot contain spaces and cannotbe the same as the workstation name of the master domain manager. Thisname is registered in the localopts file. If not specified, the default valueis the host name of the workstation.
-u Displays command usage information and exits.
-uname usernameThe name of the user for which Tivoli Workload Scheduler is installed.
Note: This user name is not the same as the user performing theinstallation logged on as QSECOFR.
If username is longer than 8 characters, after installation the agent (and theJobManager component) erroneously run under the QSECOFR user,instead of under the authority of the installation user. To prevent this, setthe PASE_USRGRP_LIMITED environment variable to N.
-v Displays the command version and exits.
280 Tivoli Workload Scheduler: Planning and Installation: Planning and Installation
||||

Example installation of an agent on IBM i systemsAbout this task
The following example shows the syntax used when using the twsinst script toinstall a new instance of the agent on IBM i system.
./twsinst -new-uname TWS_user-agent dynamic-hostname thishostname.mycompany.com-jmport 31114-tdwbport 31116-tdwbhostname mainbroker.mycompany.com
The twsinst script log files on IBM i systemsAbout this task
The twsinst log file is created in the following directory:
<tempDir>/twsinst_IBM_i_<TWS_user>^8.6.0.00.log, where:
<tempDir>The user temporary directory:
IBM i /tmp and /tmp/TWA/tws86.
<TWS_user>The name of the user for which Tivoli Workload Scheduler was installed(the name you supplied during installation).
Chapter 10. Installing agents on IBM i systems 281

282 Tivoli Workload Scheduler: Planning and Installation: Planning and Installation

Chapter 11. Configuring a dynamic agent
About this task
After installing a dynamic agent, perform the following steps:1. Run JnextPlan with the option -for 0000 to add the dynamic agent workstation
definition to the plan and to send the Symphony file to it. For moreinformation about workstation definitions, see User's Guide and Reference.
Note: Ensure that the global option carryforward is set to all otherwise onlythe unfinished jobstreams are carried forward.
2. Change the workstation limit to allow jobs to run on the workstation. Forexample, set the number of jobs that can run concurrently on the workstationto 10:conman "limit F235007_00;10"
Additionally, the following configuration procedures might be necessary. Forinformation about these procedures, see Administration Guide.v Customizing and configuring jobmanager.ini and user options.v Customizing and configuring user authentication to allow users authorization
for actions and objects, and to configure LDAP.v Setting connection security to enable GSKit for inter-component communications.
© Copyright IBM Corp. 1999, 2012 283

284 Tivoli Workload Scheduler: Planning and Installation: Planning and Installation

Chapter 12. Uninstalling agents on IBM i systems
To uninstall Tivoli Workload Scheduler agents on an IBM i system using thetwsinst script, follow these steps:1. Ensure that all Tivoli Workload Scheduler processes and services are stopped,
and that there are no active or pending jobs. For information about stoppingthe processes and services, see Administration Guide.
2. Log on as QSECOFR and change your directory to /installation_dir/TWS. Forexample: /home/user1/TWS where user1 is the name of Tivoli WorkloadScheduler user.
3. From the Installation directory\TWS directory, run the twsinst script asfollows:twsinst -uninst -uname username [-wait minutes][-lang lang_id]
-uninstUninstalls Tivoli Workload Scheduler.
-uname usernameThe name of the user for which Tivoli Workload Scheduler is uninstalled. Thisuser name is not the same as the user performing the installation logged on asQSECOFR.
-wait minutesThe number of minutes that the product waits for jobs that are running tocomplete before starting the uninstallation. If the jobs do not complete duringthis intervals the uninstallation stops and an error message is displayed. Validvalues are integers or -1 for the product to wait indefinitely. The default is 60.
-lang lang_idThe language in which the twsinst messages are displayed. If not specified,the system LANG is used. If the related catalog is missing, the default Clanguage catalog is used.
The following example shows a twsinst script that uninstalls the Tivoli WorkloadScheduler agent, originally installed for twsuser user:
On IBM i systems:./twsinst -uninst -uname TWS_user
© Copyright IBM Corp. 1999, 2012 285

286 Tivoli Workload Scheduler: Planning and Installation: Planning and Installation

Part 4. Installing the Dynamic Workload Console
Installing the Dynamic Workload Console
© Copyright IBM Corp. 1999, 2012 287

288 Tivoli Workload Scheduler: Planning and Installation: Planning and Installation

Chapter 13. Preparing
This chapter gives you an overview of what you need to know to prepare forinstallation of the Dynamic Workload Console. It consists of the following sections:v “Overview of the Dynamic Workload Console”v “Installation overview”v “Installation considerations” on page 290
Overview of the Dynamic Workload ConsoleThe Dynamic Workload Console is a web-based user interface that is used with thefollowing set of products:v Tivoli Workload Schedulerv Tivoli Workload Scheduler for z/OSv Tivoli Workload Scheduler for Applicationsv Dynamic workload broker
You can access Tivoli Workload Scheduler and Dynamic Workload Brokerenvironments from any location in your network using one of the supportedbrowsers connected to the Dynamic Workload Console. The Dynamic WorkloadConsole must be installed on a system that can reach either the Tivoli WorkloadScheduler or the Dynamic Workload Broker nodes using network connections.
Installation overviewPerform the following steps to prepare, install, and configure the DynamicWorkload Console:1. Check the installation prerequisites at http://www.ibm.com/support/
docview.wss?rs=672&uid=swg27020800 to verify that your system is compliant.2. Collect the information necessary to fill in the required fields during the
installation. See Chapter 14, “Installing,” on page 295.3. Choose the installation method that best suits your needs as described in
Installing.4. Install the Dynamic Workload Console by following the instructions provided
in “Installing the Dynamic Workload Console” on page 295.5. If you plan to communicate with the Tivoli Workload Scheduler or Tivoli
Workload Scheduler for z/OS Connector Version 8.3 Fix Pack 3, perform thepost-installation steps as described in “Post-installation steps to connect toTivoli Workload Scheduler Version 8.3 Fix Pack 3” on page 301.
6. Log in to the Dynamic Workload Console as described in “Accessing theDynamic Workload Console” on page 303.
7. In the navigation tree on the left, click one of the following:
Tivoli Workload SchedulerTo access the Tivoli Workload Scheduler available functions
Dynamic workload brokerTo access the Dynamic Workload Broker available functions
8. To effectively manage the functions available in the Dynamic WorkloadConsole, create engine connections to the Tivoli Workload Scheduler and
© Copyright IBM Corp. 1999, 2012 289
Dynamic Workload Broker environments that you want to manage. Withoutdefining engine connections, you can use only a limited set of DynamicWorkload Console functions. For more information, see“Quick steps to define aTivoli Workload Scheduler engine connection” on page 304 and “Quick steps todefine a Dynamic Workload Broker connection” on page 305.
Installation considerationsBefore you begin an installation or upgrade, consider the following items thatmight apply to your specific environment.v Only one Dynamic Workload Console can be installed on a computer and can be
installed as follows:– In a new Tivoli Workload Automation instance– In an existing Tivoli Workload Automation instance where the embedded
WebSphere Application Server is already installed, but the Dynamic WorkloadConsole is not installed
– Outside any Tivoli Workload Automation instance, using an existing externalinstance of Tivoli Integrated Portal.
For more information about Tivoli Workload Automation instances, see Instancesof Tivoli Workload Automation
v You cannot install more than one instance of the current version of the DynamicWorkload Console on the same workstation. If you attempt to install anotherinstance of the Dynamic Workload Console onto a workstation that already hasan upgradeable version on it, you will only be able to upgrade it.
v When you upgrade the Dynamic Workload Console, it is automaticallyupgraded into a new instance of Tivoli Workload Automation.
v If you plan to install the Dynamic Workload Console on already-installed TivoliIntegrated Portal, ensure that the server associated to the profile where you planto install is active before starting the installation. Only profiles that are createdas described and without customization are supported.
v You must restart the Dynamic Workload Console immediately after theinstallation if you plan to connect to Internet Protocol version 6 (IPv6) enabledengines.
v Before installing Dynamic Workload Console on Windows and Windows 64, youmust start the workstation service of Windows. This applies to Windows 2003and Windows 2008.
Selecting your installation methodYou can install the Dynamic Workload Console using one of the followingmethods:
LaunchpadUse the launchpad to guide you through the installation of the DynamicWorkload Console, and the Tivoli Workload Scheduler components, from asingle interface. For more information about how to install using thelaunchpad, see Installing from the launchpad.
Installation wizardAccess the installation wizard by running the appropriate setup commandand entering the configuration settings to install and configure yourinstallation. Using this method, you can synchronously monitor theinstallation processing and results. For more information, see “Using theinstallation wizard” on page 295.
290 Tivoli Workload Scheduler: Planning and Installation: Planning and Installation

This method of installation uses a Java Virtual Machine, and therefore hasspecific system requirements. See the Dynamic Workload Console SystemRequirements Document at http://www.ibm.com/support/docview.wss?rs=672&uid=swg27020800 for details on installationrequirements.
Silent modeCustomize a response file by adding all configuration settings to be usedduring installation, and then invoke from the command line the setupcommand using the -silent keyword. Using this method, you can run theinstallation unattended and in the background. For more information, see“Performing a silent installation” on page 299.
Instances of Tivoli Workload AutomationDuring the installation of the Dynamic Workload Console you must decidewhether to install into an existing instance of Tivoli Workload Automation orwhether to create a new instance. For information, see Instances of Tivoli WorkloadAutomation.
If you are installing into an existing instance of Tivoli Workload Automation, youcan install certain components, depending on the components or products thatcurrently exist in that instance. Table 19 describes the actions that you can performin each different scenario.
Table 19. Installing into an existing instance of Tivoli Workload Automation
If the existing Tivoli Workload Automationinstance contains: You can perform the following:
A Dynamic Workload Console version 8.4,8.5, or 8.5.1
Upgrade
A Dynamic Workload Console version 8.4,8.5, or 8.5.1 installed on external WebSphereApplication Server
Uninstall and reinstall the DynamicWorkload Console. It is not possible toupgrade the Dynamic Workload Console inthis case.
A Dynamic Workload Console version 8.6 Take no action. It is not possible to installthe Dynamic Workload Console in this case.
Tivoli Workload Scheduler version 8.5 or8.5.1 master domain manager or backupdomain manager
Take no action. It is not possible to installthe Dynamic Workload Console in this case.
A Tivoli Workload Scheduler version 8.6master domain manager or backup domainmanager
Install the Dynamic Workload Console onthe common embedded WebSphereApplication Server.
A Tivoli Workload Scheduler version 8.5 or8.5.1 agent with connector
Take no action. It is not possible to install asecond instance of the Dynamic WorkloadConsole on the same computer.
A Tivoli Workload Scheduler version 8.6agent with connector
Install the Dynamic Workload Console onthe common embedded WebSphereApplication Server.
A Tivoli Workload Scheduler for z/OSconnector version 8.5 or 8.5.1
Take no action. It is not possible to install asecond instance of the Dynamic WorkloadConsole on the same computer.
A Tivoli Workload Scheduler for z/OSconnector version 8.6
Install the Dynamic Workload Console onthe common embedded WebSphereApplication Server.
Chapter 13. Preparing 291

Table 19. Installing into an existing instance of Tivoli Workload Automation (continued)
If the existing Tivoli Workload Automationinstance contains: You can perform the following:
A Tivoli Workload Scheduler version 8.6dynamic domain manager or backupdynamic domain manager.
Install the Dynamic Workload Console onthe common embedded WebSphereApplication Server.
Any components that are not mentioned in this table, such as the agent withoutconnector, the domain manager or the command-line client, are not installed inTivoli Workload Automation instances, and so do not impact the DynamicWorkload Console installation.
Installation mediaThe Dynamic Workload Console is packaged into multiple DVDs, one for each ofthe supported operating systems. Each DVD contains:v The installable imagev The setup filev The sample response filesv The launchpad
For a complete list of DVDs and supported operating systems, see the DynamicWorkload Console downloadable documentation at http://www.ibm.com/support/docview.wss?rs=672&uid=swg24029125.
Note:
1. If you copy or mount the DVD to a system directory, make sure that the pathname to that directory does not contain the following unsupported characters: {} [ ] < > $ | ? ! # * + " / % ' or non US-ASCII characters.
2. If you plan to install on a Windows system from a mapped remote drive, makesure you map the remote folder locally on the system where you want toinstall, and then run the installation using the local path.
3. If you plan to install on Linux, make sure that the files contained in themounted image have executable permission, and that the SETUP.bin file is notlocated in a path with blanks.
Installation log filesThe type of log files you find on your system depends on the type of installationyou performed. This section describes the logs associated with the differentinstallations.
For more information about log files, see the Administration Guide.
Interactive wizard installation and uninstallation log filesYou can check the following log files for information about the installation. Detailsof the installation process are recorded in log files on the local computer in thefollowing directories:
Note: The following values are valid only if you have not changed the defaultvalue of the TEMP system variable.
Windows operating system
%Temp%\TWA\tdwc86
UNIX and Linux operating systems
292 Tivoli Workload Scheduler: Planning and Installation: Planning and Installation

/tmp/TWA/tdwc86
Table 20 lists the InstallShield wizard log files.
Table 20. Installation log files
Log file name Content
tdwcstatus.log Dynamic Workload Console installation status log file. Itreports if the installation completed successfully or witherrors. In case of errors it indicates if the error is due to anincorrect field value or to a failed step.
tdwcinstall.log Dynamic Workload Console installation log file
tdwcuninstall.log Dynamic Workload Console uninstallation log file
securityConfignnnn.log Dynamic Workload Console log file containing details aboutthe Tivoli Integrated Portal security configuration performedduring installation. The numeric value nnnn is automaticallyassigned. Access the tdwcinstall.log file to see the filenameof the securityConfignnnn.log file.
wsadmin.log Dynamic Workload Console log file containing details aboutthe interaction of the installation with WebSphereApplication Server.
TIPInstaller-00.log Tivoli Integrated Portal installation log file.
For multiple installations on the same workstation, the log header and footerindicate the user ID (TWS_user) for which the installation was performed.
Note: If you are running a silent installation and the response file you are usingdoes not have the correct syntax, the installation fails without producing a log.
Installation log files for the embedded WebSphere ApplicationServerThe application server installation has no log. However, if you update theapplication server, for example during the application of a Tivoli WorkloadScheduler fix pack, a log is created which gives information about the update. Thelog can be found in the directory TWS_home/eWAS/logs/update, where you will finda directory that identifies the fix pack that has been installed, for example:7.0.0-WS-WASEmbeded-AixPPC64-FP0000027.install, which contains a log file called/updatelog.txt.
The log for the startup of the application server can be found at:TWS_home/eWAS/profiles/TIPProfile/logs/server1/startServer.log
Chapter 13. Preparing 293

294 Tivoli Workload Scheduler: Planning and Installation: Planning and Installation

Chapter 14. Installing
This chapter describes how to install the Dynamic Workload Console. It is dividedinto the following sections:v “Installing the Dynamic Workload Console”v “Post-installation steps to connect to Tivoli Workload Scheduler Version 8.3 Fix
Pack 3” on page 301v “Post-installation steps to configure the use of Lightweight Third-Party
Authentication (LDAP)” on page 302v “Accessing the Dynamic Workload Console” on page 303v “Starting and stopping the Dynamic Workload Console” on page 306
Installing the Dynamic Workload ConsoleThis section explains how to install the Dynamic Workload Console using theavailable installation methods. It is divided into the following topics:v “Using the launchpad”v “Using the installation wizard”v “Performing a silent installation” on page 299v “Installing the Tivoli Integrated Portal on an external WebSphere Application
Server from the images” on page 301
Using the launchpadYou can install the Dynamic Workload Console using the launchpad. Use theinstructions for launching and running the launchpad at Installing from thelaunchpad, and choose the Dynamic Workload Console installation option in thelaunchpad. Follow the on-screen instructions. The launchpad runs the installationwizard with some of the options pre-filled. Follow the instructions for “Using theinstallation wizard,” to complete the process.
Using the installation wizardFollow these steps to install the Dynamic Workload Console using the installationwizard:1. Browse to the setup directory and start the installation by running the setup
file. The installation wizard first checks if there is enough free space availablein the Java temporary directory. If not, the installation exits, and you mustincrease the size of the Java temporary directory, as described in the TivoliWorkload Scheduler System Requirements Document at http://www.ibm.com/support/docview.wss?rs=672&uid=swg27019747, before rerunning theinstallation wizard.
2. Select the language to use while installing the Dynamic Workload Console, andclick OK.
3. In the welcome panel, click Next to continue with the installation.4. Read and accept the license agreement. Click Next.5. Select the Tivoli Integrated Portal instance. Choose among the following:
v If you choose to install a new instance of the Tivoli Integrated Portal or ifyou choose to install on an existing instance of Tivoli Workload Automationthat does not contain the embedded WebSphere Application Server, perform
© Copyright IBM Corp. 1999, 2012 295

the steps in “Installing a new instance of the Tivoli Integrated Portal.”Perform this installation if you do not have the Tivoli Integrated Portalalready installed or if you have installed a Tivoli Workload Schedulercomponent that does not install the embedded WebSphere Application Serverfor example a fault-tolerant agent.
v If you choose to install on an existing Tivoli Workload Automation instancethat contains the embedded WebSphere Application Server, perform the stepsin “Installing on an existing instance of the embedded WebSphereApplication Server” on page 298. Perform this installation if you havealready installed a Tivoli Workload Automation component that installs theembedded WebSphere Application Server also, for example the masterdomain manager.
v If you choose to install on top of your existing instance of Tivoli IntegratedPortal, perform the steps in “Installing on your existing instance of TivoliIntegrated Portal” on page 299. You perform this installation if you havealready installed a Tivoli Integrated Portal with another Tivoli product. For alist of supported Tivoli Integrated Portals, seethe Tivoli Workload SchedulerSystem Requirements Document at http://www.ibm.com/support/docview.wss?rs=672&uid=swg27019747.
v Starting from V8.6 we do not support anymore the Dynamic WorkloadConsole installed on external WebSphere Application Server. If you do nothave the Tivoli Integrated Portal installed, you can install it using theinstallation DVD or the appropriate eImages as described in the “Installingthe Tivoli Integrated Portal on an external WebSphere Application Serverfrom the images” on page 301.
6. Select an installation location. Click Next.7. Specify the user name and password of the Tivoli Integrated Portal user that
you want to use as the Dynamic Workload Console administrator.
Note: The user name and password must be operating systems credentials. OnWindows operating systems, if the user name you specify does not exist, a newoperating system user is createdThe user name must be unique, 3 to 60 characters in length, and contain onlythe characters a-z, A-Z, 0-9, period (.), hyphen (-), underscore (_), anddouble-byte character set (DBCS) characters.The password must be 5 to 16 characters in length and contain only thecharacters a-z, A-Z, 0-9, period (.), hyphen (-), and underscore (_).The user must be created as described in Rules for using a Federated UserRegistry with Tivoli Workload Scheduler.Confirm the password and click Next.
8. Choose a new path to install into or choose the path of the existing TivoliWorkload Automation instance. Choose the path where you want to install,from now on referred to as twa_install_dir, or accept the default path, and clickNext.Make sure that the installation path is 32 characters or less in length and that itdoes not contain special characters.
Installing a new instance of the Tivoli Integrated PortalThe following applies if you are installing a new Tivoli Workload Automationinstance or if you are installing over an existing Tivoli Workload Automationinstance where the embedded WebSphere Application Server has not yet beeninstalled. You are in this case if you do not have the Tivoli Integrated Portalalready installed or if you have installed a Tivoli Workload Scheduler component
296 Tivoli Workload Scheduler: Planning and Installation: Planning and Installation

that does not install the embedded WebSphere Application Server for example afault-tolerant agent. In this case Tivoli Workload Scheduler installs the embeddedWebSphere Application Server and the Tivoli Integrated Portal.
Follow these steps if you selected to install the Tivoli Integrated Portal and theDynamic Workload Console:
In the installation choice window, select one of the following installation types.
Default InstallationIf you want to use the default Tivoli Integrated Portal settings, proceedwith the installation as described in “Default installation.”
Advanced InstallationIf you want to customize the Tivoli Integrated Portal settings, proceed withthe installation as described in “Advanced installation.”
Default installation:Follow these steps to proceed with a default installation:1. To start the installation, check that the values displayed in the installation
summary window are correct and click Install.2. When the installation completes successfully, a window opens showing links to
the user interface on the Tivoli Integrated Portal. For more information,see“Accessing the Dynamic Workload Console” on page 303. If the installationfails, the window contains the list of the items that were not installed and thelocation of the log file. Click Finish.
Advanced installation:Perform the following steps to proceed with an advanced installation:1. Specify the following port numbers for the Tivoli Integrated Portal or accept
the default values. These are embedded WebSphere Application Server portsused by Tivoli Integrated Portal.
HTTP transportThe number of the port that the portal uses for HTTP transport. Thedefault value is 29080.
HTTPS transportThe number of the port that the portal uses for secure HTTP transport(HTTPS). The default value is 29443.
BootstrapThe port number for the bootstrap function. The default value is 22809.
SOAP connectorThe port number for the Simple Object Access Protocol (SOAP)connector on the portal. The default value is 28880.
SAS server authentication listenerThe SAS SSL server authentication listener port number on the portal.The default value is 29401.
CSIv2 server authentication listenerThe CSIv2 SSL ServerAuth Listener port number on the portal. Thedefault value is 29403.
CSIv2 Client Authentication ListenerThe CSIv2 SSL ClientAuth Listener port number on the portal. Thedefault value is 29402.
Chapter 14. Installing 297

ORB listenerThe ORB listener port number on the portal. The default value is 29100.
Administrative consoleThe HTTP administrative console port on the portal. The default valueis 29060.
Administrative console secureThe HTTP administrative console secure port on the portal. The defaultvalue is 29043.
IPC connectorThe IPC connector on the portal. The default value is 29314.
REST notificationThe REST notification port on the portal. The default value is 29324.
DCS Unicast portThe DCS Unicast port on the portal. The default value is 29353.
Click Next.2. Complete the installation by following the steps described in “Default
installation” on page 297.
Installing on an existing instance of the embedded WebSphereApplication ServerYou perform this installation if you have already installed a Tivoli WorkloadAutomation component that installs the embedded WebSphere Application Serveralso, for example the master domain manager. Follow these steps to install theDynamic Workload Console on an existing instance of the embedded WebSphereApplication Server:1. Select the existing Tivoli Workload Automation directory.2. Supply the username and password of the existing instance of the embedded
WebSphere Application Server.
Note: If you have already installed WebSphere Application Server into yourexisting Tivoli Workload Automation instance but do not know the username,click Retrieve. The username is retrieved but you still must provide thepassword. This operation may take a few minutes. If you are performing asilent installation, to find these credentials, run showSecurityProperties beforerunning the installation.
3. Select if you want the administrator to access the Tivoli Workload Schedulerconsole, the Dynamic Workload Broker console, or both. Click Next.
Note: If you select one of the two available user interfaces, after installing youcan authorize the user to access the other user interface by assigning him oneof the predefined roles created by the installation process. For moreinformation, seethe information about configuring the Dynamic WorkloadConsole in the Tivoli Workload Scheduler: Administration Guide.
4. To start the installation, check that the values displayed in the installationsummary window are correct and click Install.Specify the following port numbers for the Tivoli Integrated Portal or acceptthe default values. These are embedded WebSphere Application Server portsused by Tivoli Integrated Portal
IPC connectorThe IPC connector on the portal. The default value is 29314.
298 Tivoli Workload Scheduler: Planning and Installation: Planning and Installation

REST notificationThe REST notification port on the portal. The default value is 29324.
DCS Unicast portThe DCS Unicast port on the portal. The default value is 29353.
5. When the installation completes successfully, a window opens showing links tothe user interface on the Tivoli Integrated Portal. For more information,see“Accessing the Dynamic Workload Console” on page 303. If the installationfails, the window contains a list of the items that were not installed and thelocation of the log file. Click Finish.
Installing on your existing instance of Tivoli Integrated PortalYou perform this installation if you have already installed a Tivoli Integrated Portalwith another Tivoli product. Follow these steps to install the Dynamic WorkloadConsole on top of an existing Tivoli Integrated Portal instance:1. Select the existing Tivoli Integrated Portal instance over which you want to
install the Dynamic Workload Console by specifying the installation path.2. Specify the user ID and password of an existing Tivoli Integrated Portal user
that you want to set as the Dynamic Workload Console administrator.
Note: If you select one of the two available user interfaces, after installing youcan authorize the user to access the other user interface by assigning him oneof the predefined roles created by the installation process. For moreinformation, seethe information about configuring the Dynamic WorkloadConsole in the Tivoli Workload Scheduler: Administration Guide.
3. To start the installation, check that the values displayed in the installationsummary window are correct and click Install.
4. When the installation completes successfully, a window opens showing links tothe user interface on the Tivoli Integrated Portal. For more information,see“Accessing the Dynamic Workload Console” on page 303. If the installationfails, the window contains a list of the items that were not installed and thelocation of the log file. Click Finish.
Performing a silent installationYou can run the installation in unattended mode from the command line byadding the -silent parameter when running the setup installation file. Perform thefollowing steps:v Run the installation as root on UNIX operating systems, or as Administrator on
Windows operating systems.v Specify all the settings that are prompted when installing using the installation
wizard.
The installation settings are provided using a response file.
Edit the response file templates provided on the installation DVDs in the\tdwc\responsefiles\ directory. Instructions for customizing the files are includedin the files as commented text. For details about response file properties, seeAppendix D, “The Dynamic Workload Console response file properties,” on page361.
Table 21 on page 300 lists the response files and the types of installation eachperforms by operating system:
Chapter 14. Installing 299

Table 21. Dynamic Workload Console response files
Type of installation Response file to use on Unix Response file to use on Windows
Fresh Dynamic WorkloadConsole on existing TWAinstance
TDWC86_FRESH_existTWA_UNIX.txt TDWC86_FRESH_existTWA_WIN.txt
Fresh Dynamic WorkloadConsole on an external TivoliIntegrated Portal
TDWC86_FRESH_extTIP_UNIX.txt TDWC86_FRESH_extTIP_WIN.txt
Fresh Dynamic WorkloadConsole on a new TWAinstance
TDWC86_FRESH_newTWA_UNIX.txt TDWC86_FRESH_newTWA_WIN.txt
Uninstall the DynamicWorkload Console
TDWC86_UNINSTALL.txt TDWC86_UNINSTALL.txt
Upgrade the DynamicWorkload Console on existingTivoli Workload Automationinstance (embeddedWebSphere ApplicationServer)
TDWC86_UPGRADE_embeddedWAS_UNIX.txt TDWC86_UPGRADE_embeddedWAS_WIN.txt
Note: In the upgrade scenarios, choose the embedded version of IBM WebsphereApplication Server that you originally chose when you installed the DynamicWorkload Console version 8.4 or higher.
To install in silent mode, perform these steps on the computer on which you wantto install the Dynamic Workload Console:1. Copy the sample response file for that operating system to a local temporary
directory.2. Customize the options contained in the response file to suit your requirements
and environment. For information about the available options, seeAppendix D,“The Dynamic Workload Console response file properties,” on page 361.
3. Run the following command:
Windows operating system:SETUP.exe -options response_file.txt -silent
UNIX and Linux operating systems:./SETUP.bin -options response_file.txt -silent
where response_file is the full path name.4. Check the result of the silent installation as follows:
Windows operating system:The installation command is asynchronous, meaning that when it isissued it starts an installation procedure and then ends withoutreturning any value or message. To know whether or not the silentinstallation ran successfully, seethe installation result reported in thetdwcinstall.log installation log file stored in the temporary directory.
UNIX and Linux operating systems:The installation command is synchronous and it returns 0 if theinstallation ran successfully, or a nonzero value if the installation failed.
Note: For information about the installation result, see the tdwcinstall.loginstallation log file stored in the temporary directory.
300 Tivoli Workload Scheduler: Planning and Installation: Planning and Installation

Installing the Tivoli Integrated Portal on an externalWebSphere Application Server from the images
The following procedure applies if you do not have the Tivoli Integrated Portalinstalled but you have the WebSphere Application Server installed. To install theTivoli Integrated Portal, perform the following steps:1. From the installation DVD or from the downloaded eImages, go to the
TDWC_<operating_system>\TDWC\WEBUI\<operating_system>\TIP\ directorywhere the sample_response.txt file is located.
2. Follow the instructions provided in the sample_response.txt file to customizethe properties necessary to perform the installation.
3. Run the following command:install.sh/bat <java_jre_16_home> sample_response.txt
where java_jre_16_home is the path where the Java V16 is installed.The Tivoli Integrated Portal installation creates the TIPProfile profile into yourexisting instance of the WebSphere Application Server. After you installed theTivoli Integrated Portal, you can install the Dynamic Workload Console on thisnew Tivoli Integrated Portal instance by following the instructions provided in“Installing the Dynamic Workload Console” on page 295.
Post-installation steps to connect to Tivoli Workload SchedulerVersion 8.3 Fix Pack 3
To access a Tivoli Workload Scheduler Version 8.3 Fix Pack 3 environment, youmust enable Tivoli Workload Scheduler to work with the Dynamic WorkloadConsole.
Note:
1. These steps are not necessary to connect to a Tivoli Workload Schedulerenvironment for any version higher than V8.3 Fix Pack 3. Any upgradesperformed after version 8.3 Fix Pack 3 will maintain any changes made duringthis procedure.
2. If you plan to communicate from the Dynamic Workload Console version 8.4 orhigher to Tivoli Workload Scheduler, Version 8.3 Fix Pack 3, make sure that theAPAR PK47309 is installed on top of the Tivoli Workload Scheduler engine. Formore information, contact IBM Software Support.
3. Before proceeding, it is recommended that you run the backupConfig.sh orbackupConfig.cmd script to backup the Tivoli Workload Scheduler configuration.For information about how to run these scripts, see the Tivoli WorkloadScheduler: Administration Guide.
This task must be run on the system where the Tivoli Workload Scheduler enginethat you want to connect to is installed:
Tivoli Workload Scheduler distributed environment
v On the master domain manager.v On a full status fault-tolerant agents (FTA) workstation where the Tivoli
Workload Scheduler connector is installed.
Tivoli Workload Scheduler z/OS environmentOn the distributed system where the Tivoli Workload Scheduler z/OSConnector is installed.
Chapter 14. Installing 301

Perform the following steps:1. Make sure that the embedded or external version of WebSphere Application
Server, as appropriate, is started on the Tivoli Workload Scheduler workstationand then run the following script:
On Windows operating system:As Administrator, from the directory TWS_home\wastools:webui -operation enable -user TWS_user -password TWS_user_pw
-port TWS_port [-server TWS_server]
On UNIX and Linux systemsAs root, from the directory TWS_home/wastools:./webui.sh -operation enable -user TWS_user -password TWS_user_pw
-port TWS_port [-server TWS_server]
where:
TWS_userThe Tivoli Workload Scheduler administrator user ID.
TWS_user_pwThe Tivoli Workload Scheduler administrator password.
TWS_portThe SOAP port of the WebSphere Application Server where the TivoliWorkload Scheduler is installed. This is a mandatory setting whenusing the enable flag. Its default values are 31118 for distributedenvironments, and 31128 for z/OS environments.
TWS_serverThe name of the server specified in the WebSphere Application Serverprofile used by Tivoli Workload Scheduler. By default the valueassigned to this field is server1.
2. Stop and start the external or embedded WebSphere Application Server on theTivoli Workload Scheduler system where you run the script.
When you have completed these steps, you are ready to create engine connectionsfor the Tivoli Workload Scheduler workstation and to manage your TivoliWorkload Scheduler production environment. For information about how toaccomplish these tasks, access the Dynamic Workload Console online general help.
Post-installation steps to configure the use of Lightweight Third-PartyAuthentication (LDAP)
If the Dynamic Workload Console and the Tivoli Workload Scheduler engine or theTivoli Workload Scheduler z/OS Connector have been configured with the sameLDAP user registry, or are installed on the same computer, you might receive aconnection failure. If this happens, use the same Lightweight Third-PartyAuthentication (LTPA) keys on all servers: the Dynamic Workload Console, theTivoli Workload Scheduler engine server, and the Tivoli Workload Scheduler z/OSConnector server.
To align the LTPA keys, see the section on configuring the use of LightweightThird-Party Authentication in the Administration Guide.
302 Tivoli Workload Scheduler: Planning and Installation: Planning and Installation

Accessing the Dynamic Workload ConsoleWhen the installation of the Dynamic Workload Console completes successfully, amessage with links to the Integrated Solutions Console portal is displayed. If youused the silent installation, this information is stored in the tdwcinstall.loginstallation log file. For more details about where to find the installation logs, see“Interactive wizard installation and uninstallation log files” on page 292.
From a supported browser, access one of the following links provided by theinstallation program:
http://dynamic_workload_console_system:http_port/ibm/console
https://dynamic_workload_console_system:https_port/ibm/console
where:
dynamic_workload_console_systemThe hostname or IP address of the system where you installed theDynamic Workload Console.
http_portThe port number used to access the Dynamic Workload Console using anunsecure connection over HTTP. The default value for this port number is29080 if you installed the Dynamic Workload Console in a new TivoliWorkload Automation instance. If you installed the Dynamic WorkloadConsole into an existing Tivoli Workload Automation instance, the valuefor this port is inherited. If the existing Tivoli Workload Automationinstance contains the current version of Tivoli Workload Scheduler usingdefault ports, the value is 31123.
https_portThe port number used to access the Dynamic Workload Console using asecure connection over HTTPS. The default value for this port number is29443 if you installed the Dynamic Workload Console as a new TivoliWorkload Automation instance. If you installed the Dynamic WorkloadConsole into an existing Tivoli Workload Automation instance, the valuefor this port is inherited. If the existing Tivoli Workload Automationinstance contains the current version of Tivoli Workload Scheduler usingdefault ports, the value is 31124.
When connecting to the Tivoli Integrated Portal using an HTTPSconnection, if you receive a security alert, proceed with the DynamicWorkload Console working session. If you receive security informationwindows while navigating through the Tivoli Integrated Portal, choose todisplay nonsecure items to proceed. If you are using Internet Explorer, youcan prevent these windows from opening by setting Display mixedcontent to Enable in the Security settings.
In the Tivoli Integrated Portal login portlet, enter the user ID and password youspecified during the installation, and click Log in.
On the navigation bar on the left, expand the Tivoli Workload Scheduler entry toaccess the Dynamic Workload Console and then the Tivoli Workload Schedulercomponents. Expand the Dynamic Workload Broker entry to access DynamicWorkload Broker environments.
Chapter 14. Installing 303

To effectively use the functions of these two products, you must define connectionsto the Tivoli Workload Scheduler engines and the Dynamic Workload Brokerservers.
Without defining engine connections, you can perform only this limited set ofoperations:
On Tivoli Workload Schedulerv Create browse tasksv Create report tasksv Create event management tasksv Define user preferences
On Dynamic Workload BrokerDefine user preferences
If the user ID you used to connect to the Dynamic Workload Console has beenassigned a role different from TWSWEBUIAdministrator andTDWBAdministrator, you will see a subset of the available panels. This subsetdepends on the authorizations assigned to the role associated to your user ID. Formore information about roles, seethe information about configuring the DynamicWorkload Console in the Tivoli Workload Scheduler: Administration Guide.
If the user ID you used to connect to the Dynamic Workload Console has no roleassigned, you do not see the entries for Tivoli Workload Scheduler and DynamicWorkload Broker in the Tivoli Integrated Portal portal navigation tree.
Quick steps to define a Tivoli Workload Scheduler engineconnection
After logging in to the Dynamic Workload Console using the administrator useridor another userid with assigned TWSWEBUIAdministrator orTWSWEBUIConfigurator roles, use the following steps to create an engineconnection to one of your supported Tivoli Workload Scheduler engines.
Note: If you installed the Dynamic Workload Console into a Tivoli WorkloadAutomation instance that had the embedded WebSphere Application Serveralready installed, the connection to the Tivoli Workload Scheduler component (forexample, master domain manager, backup master domain manager, or connector)is automatically defined with blank credentials. The connection is shared with allthe Dynamic Workload Console users and no further credentials are neededbecause Single Sign On is automatically implemented for the component. The samesituation applies if you install a Tivoli Workload Scheduler component into a TivoliWorkload Automation instance where the Dynamic Workload Console and theembedded WebSphere Application Server are already installed.1. To expand the tree, click the Dynamic Workload Console and Tivoli Workload
Scheduler.2. Select Quick start
3. Click New Engine.4. In the Engine Connection Properties window, assign a name to the engine
connection and specify:
Engine TypeEither z/OS or Distributed. This is the type of the Tivoli WorkloadScheduler engine to connect to.
304 Tivoli Workload Scheduler: Planning and Installation: Planning and Installation

HostnameThe hostname or IP address of system where the distributed engine orthe z/OS connector, for z/OS engine types, runs.
PortNumberThe bootstrap port number for the Tivoli Workload Scheduler engine.Default values are 31117 for distributed engine, and 31217 for z/OSconnector.
Remote Server NameThis setting is valid and mandatory only for z/OS engines. It is thevalue specified when the engine was created in the z/OS connector. Itmust exactly match the z/OS connector engine name and is casesensitive. If the engine was defined using the WASTOOLS"createZosEngine" COMMAND, this is the value specified in the -nameparameter. This is the name of the remote server of the engine as it isspecified in the z/OS connector.
Userid and PasswordThe user ID and password that are used to connect to the engine. Thissetting allows access to Tivoli Workload Scheduler from the DynamicWorkload Console. The authorization assigned to the user in the TivoliWorkload Scheduler security file determines the operations allowed.
If you want to test the connection to the Tivoli Workload Scheduler database(mandatory for managing reporting and event management functions), youmust select Enable reporting and specify the user credentials.
5. Click Test Connection to check that the configuration was successful and thatthe Dynamic Workload Console is communicating with the selected engine. Ifthe test connection fails, see Tivoli Workload Scheduler: Troubleshooting Guide,SC32-1275.
Note: Make sure you run “Post-installation steps to connect to Tivoli WorkloadScheduler Version 8.3 Fix Pack 3” on page 301 before testing the engineconnection if you are connecting to a Tivoli Workload Scheduler version 8.3 FixPack 3 engine or z/OS Connectors.
Quick steps to define a Dynamic Workload Broker connectionThe Dynamic Workload Console supports a single connection to one DynamicWorkload Broker engine at any given time for each authorized user. A differentconnection is supported for each authorized user.
After having logged in to the Dynamic Workload Console using the administratoruser ID, or another user ID with assigned TDWBAdministrator orTDWBConfigurator roles, follow these steps to create an engine connection to asupported Dynamic Workload Broker engine:1. In the Dynamic Workload Console, click Dynamic Workload Broker to expand
the tree.2. Select Configuration.3. Click Server connection.4. In the Server Connection specify:
HostnameThe host name of the Dynamic Workload Broker you want to connectto.
Chapter 14. Installing 305

Non secure portThe non-secure port to be used for connection.
Secure portThe secure port to be used for connection.
Use Secure ConnectionSpecify whether a secure connection must be used. For moreinformation about security, see theTivoli Workload Scheduler:Administration Guide, SC23-9113.
UsernameOptionally specify a different user for the server connection. Theconnection to the new server is enabled using the credentials of theuser you specified. Each user has access to only one server connection.
PasswordSpecify the password for the authenticated user the connection appliesto.
5. Click OK to save your changes. The server connection you specified is enabledand is immediately effective.
Starting and stopping the Dynamic Workload ConsoleTo start and stop the Dynamic Workload Console or an engine, you must start andstop the application server instance it is installed on.
Embedded WebSphere Application Server on a Tivoli Integrated Portal in aTivoli Workload Automation instance
If you installed the Dynamic Workload Console on the embeddedWebSphere Application Server, you can start and stop the server asfollows:
Windows operating system:To stop: install_dir\wastools\stopWas.bat
To start: install_dir\wastools\startWas.bat
UNIX and Linux operating systems:To stop: install_dir/wastools/stopWas.sh
To start: install_dir/wastools/startWas.sh
WebSphere Application Server on a Tivoli Integrated Portal outside a TivoliWorkload Automation instance
If you are using an external instance of WebSphere Application Server, usethe following WebSphere Application Server scripts to start and stop anapplication server instance.
Note: These scripts can also be used to start and stop embeddedWebSphere Application Server, although it is suggested that you use themethod described above.
Windows operating system:ewas_install_dir\bin\stopServer.bat app_server-user user_id -password user_id_pw
ewas_install_dir\bin\startServer.bat app_server
306 Tivoli Workload Scheduler: Planning and Installation: Planning and Installation

UNIX and Linux operating systems:ewas_install_dir/bin/stopServer.sh app_server-user user_id -password user_id_pw
/ewas_install_dir/bin/startServer.sh app_server
where:
ewas_install_dirIs the directory where the WebSphere Application Server isinstalled.
app_serverIs the server name specified in the Tivoli Integrated Portal profilerelated to the Dynamic Workload Console or to the engine. Thedefault is server1.
user_idIs the administrator user ID specified when installing the DynamicWorkload Console or the engine.
user_id_pwIs the administrator user ID password specified when installing theDynamic Workload Console or the engine.
Chapter 14. Installing 307

308 Tivoli Workload Scheduler: Planning and Installation: Planning and Installation

Chapter 15. Configuring
This chapter describes how to configure the Dynamic Workload Console. You canperform the following optional configuration steps at any time after theinstallation.v Configuring new users to access the Dynamic Workload Consolev Configuring the Dynamic Workload Console to use a user registry
– Configuring the Dynamic Workload Console with LDAP - RACF (for moreinformation, see WebSphere documentation at: Configuring to secureLightweight Directory Access Protocol user registry using Resource AccessControl Facility based on z/OS
v Configuring roles to access the Dynamic Workload Consolev Configuring the Dynamic Workload Console to use Single Sign-Onv Securing your communication using Secure Socket Layer protocolv Configure the Dynamic Workload Console to launch in context
Note: If, after installing, you have more than one instance of WebSphereApplication Server managing any Tivoli Workload Automation products, you mustensure that they have the same LTPA token_keys.
For information about configuration, see "Configuring the Dynamic WorkloadConsole" in the Tivoli Workload Scheduler: Administration Guide, SC23-9113 at thefollowing link: http://pic.dhe.ibm.com/infocenter/tivihelp/v47r1/index.jsp?topic=/com.ibm.tivoli.itws.doc_8.6.0.2/distr/src_ad/awsadconfigtdwc.htm.
For more information about configuring authentication using, amongst othermethods, the popular LDAP (Lightweight Directory Access Protocol), see:http://pic.dhe.ibm.com/infocenter/tivihelp/v47r1/index.jsp?topic=/com.ibm.tivoli.itws.doc_8.6.0.2/distr/src_ad/awsadldapconfig.htm
© Copyright IBM Corp. 1999, 2012 309

310 Tivoli Workload Scheduler: Planning and Installation: Planning and Installation

Chapter 16. Getting started
This chapter explains how to get started with using the Dynamic WorkloadConsole.
When you connect to the Dynamic Workload Console, you see a portfolio on theleft with an entry for each Tivoli product installed inside the Tivoli IntegratedPortal, such as, Tivoli Workload Scheduler.
You can access the Dynamic Workload Console from any computer in yourenvironment using a web browser through both the secure HTTPS or HTTPprotocol.
For an interactive overview of the product and its features, you can view severaldemo scenarios, available (in English only) on the product information center atthe following link: https://www.ibm.com/developerworks/wikis/display/tivolimediagallery/Tivoli+Workload+Scheduler
The Dynamic Workload Console interface consists of the following sections:
PortfolioLocated on the left, it has a tree structure and contains all the entries tolaunch the Dynamic Workload Console functions. Use the portfolio tonavigate to the panels.
Note: The upgrade does not report the customization you have performedon the portfolio. The defaults settings are installed.
Portlet areaYour working area. It displays the panels corresponding to your selectionin the portfolio. From each panel you can access the online help by clickingon the "?" symbol at the top right corner of the portlet.
Task barContains a tab to open each active function you called from the portfolio.Each time you click an entry of the portfolio, the corresponding panel isopened in the portlet area. When you open a new panel, the precedingones are minimized to tabs on the task bar and you can switch betweenthe panels by clicking on these tabs. The browser task bar contains up tofive open tabs. If you open more than five tabs, a new browser windowopens and you can move from one page to another by opening the SelectAction menu.
The portfolio has separate sections for Tivoli Workload Scheduler and DynamicWorkload Broker.
Tivoli Workload Scheduler portfolioThe Tivoli Workload Scheduler portfolio contains the following entries:
Quick StartOpen this entry to run some basic operations. Click here to create andmanage queries of objects on the plan and to create and modifyconnections to the Dynamic Workload Console engines.
© Copyright IBM Corp. 1999, 2012 311

All Configured TasksOpen this entry to view a list of all your saved tasks to monitor objects inthe plan. A set of predefined tasks is provided to help you start using theapplication for the first time. These tasks cover the most common queriesyou might want to launch to find information about scheduling objectsrunning on distributed, z/OS, or both platforms.
All Configured ReportsOpen this entry to view a list of all your saved reports. From this view youcan create new reports and customize existing ones.
DashboardOpen this entry to have a graphical view that shows the progress of thecurrent plan on the engines for which you configured a connection andspecified its inclusion in the dashboard.
WorkloadManage your workload to design objects in the database, to handle plans,to submit jobs or job streams to monitor objects in the plan, or to generatereports.
DesignOpen this entry to create, list, and edit object and object definitionsin the database. Click here, for example, to create and modify jobs,job streams, and event rules.
ForecastOpen this entry to work with plans, creating and viewing trial andforecast plans and listing archived plans.
SubmitOpen this entry to submit jobs and job streams on request
MonitorOpen this entry to create, list, and edit tasks to monitor objects inthe plan. Click here, for example, to create and modify queries forjobs or job streams in the plan. Also, click here to handle queriesabout workload dependencies and events.
Scheduling EnvironmentDesign and control the topology of your scheduling environment: theworkstations and domains.
DesignOpen this entry to create, list, and edit workstations and domainsin your environment.
MonitorOpen this entry to create, list, and edit tasks to monitorworkstations and domains in the plan.
ReportingDefine and run reports.
Generate Historical ReportsOpen this entry to create reports that gather historical data.
Generate Plan ReportsOpen this entry to create reports with details about your plans.
Generate Custom SQL ReportsOpen this entry to generate and run customized SQL reports.
312 Tivoli Workload Scheduler: Planning and Installation: Planning and Installation

SettingsConfigure and modify general settings about Tivoli Workload Scheduler
Manage EnginesOpen this entry to create, list, and edit your connections to theTivoli Workload Scheduler engine.
Manage User PreferencesOpen this entry to configure and modify settings about tablelayout, time zone, and dashboard layout for Tivoli WorkloadScheduler.
Manage SettingsOpen this entry to import and export user preferences, configured tasks,and engine connections and to configure your settings repository.
Dynamic workload broker portfolioThe Dynamic Workload Broker portfolio contains the following entries:
Scheduling EnvironmentDefine and control logical resources and resource groups in your dynamicscheduling environment
Define New Logical ResourceOpen this entry to define a new logical resource required to runjobs dynamically.
Define New Resource GroupOpen this entry to create a new group definition to aggregatedifferent logical resources in a group.
Logical ResourcesOpen this entry to list and edit defined logical resources.
Resource GroupsOpen this entry to list and edit defined resource groups
ConfigurationDefine a connection to the dynamic workload broker component.
Server ConnectionsOpen this entry to create or edit a connection to the dynamicworkload broker component.
DefinitionsManage dynamic workload to create list and submit jobs.
Define a New JobOpen this entry to create new dynamic job definitions.
Jobs Open this entry to list, edit and submit dynamic workload objects.
TrackingMonitor your dynamic workflow and the environment status.
Job InstancesOpen this entry to monitor submitted dynamic job instances, seejob output, and cancel jobs.
ComputersOpen this entry to monitor and edit status and details of dynamicworkstations.
Chapter 16. Getting started 313

PreferencesCustomize display settings for Dynamic Workload Broker.
User PreferencesOpen this entry to customize number of rows in each table pageand set the displayed time zone.
First actionsThe following sections describe the first and main actions you perform when youconnect to the Dynamic Workload Console.
Creating a connection to a Tivoli Workload Scheduler engineYou type the details (such as IP address, user name, and password) toaccess a Tivoli Workload Scheduler engine, and, optionally, a database tooperate with objects defined in plans or stored in the database. From theDynamic Workload Console you can access the current plan, a trial plan, aforecast plan, or an archived plan for the distributed environment or thecurrent plan for the z/OS® environment. You might want to access thedatabase to perform actions against objects stored in it or generate reportsshowing historical or statistical data. In addition, working both on thedatabase and on plans, you can create and run event rules to define andtrigger actions that you want to run in response to events occurring onTivoli Workload Scheduler nodes.
Defining a scheduling environmentYou define your Tivoli Workload Scheduler network. You createworkstation definitions on the database representing the physical machinesor computer systems on which your workload is scheduled to run. TivoliWorkload Scheduler network is made up of the workstations where joband job stream processing occurs. When you design your network, youassign roles to these workstations to suit your specific businessrequirements. You can design your network with multiple domains, todivide control of a large network into smaller manageable groups. Atypical Tivoli Workload Scheduler network consists of a workstation actingas master domain manager and at least one domain.
Defining scheduling objects in the databaseYou define your workload, which consists of jobs that are concatenated injob streams. Then, you specify the calendars and run cycles according towhich job streams must run. Moreover, you define possible dependenciesto condition the workload processing. All these definitions can be donewithin the Workload Designer.
Creating tasks to manage Tivoli Workload Scheduler objects in the planYou specify some filtering criteria to query a list of scheduling objectswhose attributes satisfy the criteria you specified. Starting from this list,you can navigate and modify the content of the plan, switching betweenobjects, opening more lists, and accessing other plans or other TivoliWorkload Scheduler environments.
Creating a connection to a Tivoli dynamic workload broker schedulingenvironment
You type the details (such as IP address, user name, password, and port) toaccess a dynamic workload broker workstation. Specify if you want towork in secure HTTPS or HTTP protocol. After creating the connection,opening the tracking computer you can view status and details of brokerworkstations, and define resources and dynamic jobs. For more detailsabout dynamic scheduling, see: Scheduling Workload Dynamically.
314 Tivoli Workload Scheduler: Planning and Installation: Planning and Installation

Chapter 17. Upgrading
This chapter describes how to upgrade the Dynamic Workload Console to thecurrent version.
Note: The upgrade on a external WebSphere Application Server is not supported.If you have already installed the WebSphere Application Server with anotherproduct you must uninstall the Dynamic Workload Console and install it again.
To upgrade an instance of Tivoli Workload Automation:v You must upgrade all components that are part of the instance. For example, if
your instance includes one master domain manager and also the DynamicWorkload Console, you must upgrade both of these components.
v You must upgrade all the components part of that instance before you canupgrade the Dynamic Workload Console.
If you installed the Dynamic Workload Console sharing the WebSphere ApplicationServer with other Tivoli Workload Automation components, when you upgradethose components, the existing Dynamic Workload Console will not work until youupgrade it to the new version.
When you upgrade the Dynamic Workload Console on the embedded WebSphereApplication Server, changes are made to the directory structure of the console.Thus, the section contains the following topics:v “Updating authentication”v “Upgrading the console installed on an embedded WebSphere Application
Server” on page 316v “Performing the upgrade” on page 317
Updating authenticationThis section describes how your configured authentication mechanism is upgraded.
In versions of Tivoli Workload Scheduler before V8.6, authentication wasconfigured to use stand-alone user registries, managed by the embeddedWebSphere Application Server. The available options were:v Local operating systemv Custom (through PAM - Pluggable Authentication Module)v LDAPv File Registry
If you enabled LDAP, you could use one of the following servers:v IBM Tivoli Directory Serverv Sun ONEv Microsoft Windows Active Directoryv RACF configured on IBM Tivoli Directory Server
Versions of Tivoli Workload Scheduler from V8.6 onwards are configured forauthentication (through the embedded WebSphere Application Server) in VMM
© Copyright IBM Corp. 1999, 2012 315

(Virtual Member Manager) mode. This creates a Federated User Registry, whichsupports the simultaneous use of more than one user registry. The user registrychoices and LDAP server options are similar to those in versions before V8.6.
During the upgrade, your existing configuration are migrated, so that when theupgrade is complete the product is configured to use the same authenticationmechanism as before, but within a Federated User Registry.
For detailed information, see Tivoli Workload Scheduler: Administration Guide.
Upgrading the console installed on an embedded WebSphereApplication Server
This section provides information about the upgrade of the Dynamic WorkloadConsole on an embedded WebSphere Application Server.
Directory structureThis section describes the program directory structure and the directory structurefor SSL files that was implemented in version 8.5.1. This section applies if you areupgrading from version 8.3 or 8.4. If you are upgrading from version 8.5 or 8.5.1,this directory structure already exists.
Program directoryWhen you upgrade the Dynamic Workload Console to the current version, a newprogram directory structure is created. During the upgrade process, components ofthe Dynamic Workload Console are moved from the old directory structure andthen updated into the new directory structure. The Dynamic Workload Consoleprogram files remain in the original installation directory.
If you have any custom configurations (for example, custom scripts or backupprocesses) existing in your Dynamic Workload Console structure, you must updatethem so that they work in the new directory structure.
For example, if you originally installed the Dynamic Workload Console into thedefault directory c:\Program Files\IBM\webui\, you have a directory structure asfollows:c:\Program Files\IBM\TWA\webui\appserverc:\Program Files\IBM\TWA\webui\wastoolsc:\Program Files\IBM\TWA\webui\_webuiutilsc:\Program Files\IBM\TWA\webui\_webuiuninstc:\Program Files\IBM\TWA\webui\_jvm
When you upgrade the Dynamic Workload Console, the new directory structure is:c:\Program Files\IBM\TWA\eWASc:\Program Files\IBM\TWA\wastoolsc:\Program Files\IBM\TWA\TDWCc:\Program Files\IBM\TWA\TDWC\_tdwcscriptsc:\Program Files\IBM\TWA\TDWC\_tdwcuninstc:\Program Files\IBM\TWA\TDWC\_tdwcutilsc:\Program Files\IBM\TWA\TDWC\_jvm
The new directory structure includes new embedded WebSphere ApplicationServer tools that are common to Tivoli Workload Scheduler.
316 Tivoli Workload Scheduler: Planning and Installation: Planning and Installation

Directory for SSL filesWhen you upgrade to the current version, a new directory for SSL files is created.The following describes the old and new directory structures.
Note: Before upgrading you must backup any customized SSL keys and copythem to the default installation path.
After upgrading, the old SSL files stored in PCKS12 format are imported into newSSL files in JKS format.
The old PCKS12 files are also copied to the new directory as a backup. The key.p12file becomes TWSServerKeyFile.jks. The trust.p12 files becomesTWSServerTrustFile.jks.
Previous directory structure
v TWSInstallationPath\appServer\profiles\webuiprofile\config\cells\CellName\nodes\NodeName\key.p12
v TWSInstallationPath\appServer\profiles\webuiprofile\config\cells\CellName\nodes\NodeName\trust.p12
New directory structure
v TWSInstallationPath\eWAS\profiles\TIPProfile\config\cells\TIPNode\nodes\TIPCell\key.p12
v TWSInstallationPath\eWAS\profiles\TIPProfile\config\cells\TIPNode\nodes\TIPCell\trust.p12
v TWSInstallationPath\eWAS\profiles\TIPProfile\etc\TWSServerKeyFile.jks
v TWSInstallationPath\eWAS\profiles\TIPProfile\etc\TWSServerTrustFile.jks
Note: The files key.p12 and trust.p12 are not used by the DynamicWorkload Console, but are backed up.
Performing the upgradeYou can upgrade the Dynamic Workload Console using the following methods:
Interactive wizard
To upgrade using the interactive wizard, run the setup for the operatingsystem on which you are installing:
On Windows operating system:WINDOWS\SETUP.exe
Before beginning, stop the appserverman process by running thefollowing commands:Shutdown.cmd -appsrvStartWas.bat -direct
After running these commands, verify that all Tivoli WorkloadScheduler processes are stopped with the exception of theembedded WebSphere Application Server. The embeddedWebSphere Application Server must remain running.
On UNIX and Linux operating systems:SETUP.sh or operating_system/SETUP.bin.
Chapter 17. Upgrading 317

Note: SETUP.sh copies the entire image to a temporary directory.Ensure there is enough space available.
LaunchpadStart the launchpad and select the Dynamic Workload Console upgrade.The installation wizard is launched with some options pre-selected toupgrade the console.
Silent You can run the upgrade silently and in background by creating a responsefile from the template provided and running the installation wizard withthe -silent option. See “Performing a silent installation” on page 299 formore details on how to run a silent installation or upgrade. See thefollowing section for the upgrade information that you must supply in theresponse file.
Follow the installation panels to complete the upgrade. The following list describesthe fields you must provide during the upgrade.
Use an existing instance of the Dynamic Workload ConsoleWhen you are prompted that a previous version of the Dynamic WorkloadConsole has been found, select Use an existing instance. From thedrop-down list, choose the instance that you are upgrading.
Administrative credentials of application serverEnter the external or embedded WebSphere Application Server user nameand password.
Backup directoryChoose a backup directory. This directory contains only configurationinformation and other program-related objects and not the external orembedded WebSphere Application Server files. Note that this directoryremains on your computer even after the upgrade is complete.
IPC connectorThe IPC connector on the portal. The default value is 29314.
REST notificationThe REST notification port on the portal. The default value is 29324.
DCS Unicast portThe DCS Unicast port on the portal. The default value is 29353.
Note:
1. For information about Tivoli Workload Automation instances, see “Instances ofTivoli Workload Automation” on page 291.
2. During an upgrade on Windows, the embedded WebSphere Application ServerWindows Service account name in the local OS user registry is changed to theadministrator user name of the Tivoli Integrated Portal. If you use a customregistry or LDAP registry, the service is upgraded to the installation user.
3. It is not necessary to manually stop the embedded WebSphere ApplicationServer prior to upgrading, as it is stopped automatically during the upgradeprocedure.
318 Tivoli Workload Scheduler: Planning and Installation: Planning and Installation

Chapter 18. Uninstalling
This chapter describes how to uninstall the Dynamic Workload Console. It isdivided into the following sections:v “Uninstalling using the wizard”v “Uninstalling in silent mode”
Uninstalling using the wizardTo uninstall the Dynamic Workload Console using the wizard, perform thefollowing steps:1. Start the Tivoli Integrated Portal.2. Start the uninstall as follows:
On Windows operating system:Perform one of the following:v From the TWA_home\TDWC directory, run the command:
uninstall.bat
v From the Control Panel, click Add/Remove Programs. Scroll downthe list of software, and select the Dynamic Workload Console. ClickChange/Remove.
On UNIX operating systems:From the TWA_home/TDWC directory, run the command:uninstall.sh
3. Select the language.4. Click Next in the Dynamic Workload Console uninstall welcome window.5. Provide the external or embedded WebSphere Application Server administrator
user name and password, and click Next.6. In the uninstall summary window, check that the directory from where the
product is to be removed and the features to be removed are correct, and thenclick Uninstall. If you installed the Dynamic Workload Console and the TivoliIntegrated Portal, they are both uninstalled. If you installed the DynamicWorkload Console on a existing Tivoli Integrated Portal only the DynamicWorkload Console is uninstalled.
7. When the uninstall completes, a window showing a message about the successof the operation is displayed. Click Finish to exit the InstallShield Wizard.
Uninstalling in silent modeYou can perform a silent uninstall of the Dynamic Workload Console.
Before starting to uninstall ensure that the Tivoli Integrated Portal is active, andmove to a directory different from the tdwc_install_dir.
Run the uninstall command as follows:
On Windows operating system:twa_home\tdwc\uninstall.bat -optionsresponse_file.txt -silent
© Copyright IBM Corp. 1999, 2012 319

On UNIX or Linux operating systems:twa_home/tdwc/uninstall.bin -optionsresponse_file.txt -silent
where response_file is the full path name.
320 Tivoli Workload Scheduler: Planning and Installation: Planning and Installation

Chapter 19. Troubleshooting the installation, upgrade, anduninstallation
This chapter describes how to troubleshoot the installation, upgrade, anduninstallation of the Dynamic Workload Console. It is divided into the followingsections:v “Installation and uninstallation log and trace files”v “Recovering a failed InstallShield wizard installation”v “Recovering a failed upgrade”v “Manually uninstall an integrated Dynamic Workload Console” on page 322v “Troubleshooting scenarios” on page 325
Note: See the section “Manually uninstall an integrated Dynamic WorkloadConsole” on page 322 to manually uninstall or recover from a failed installation.
Installation and uninstallation log and trace filesFor information about installation log files, see “Installation log files” on page 292.
Recovering a failed InstallShield wizard installationThe recovery of a failed installation of the Dynamic Workload Console isstructurally very similar to that described in Tivoli Workload Scheduler: Planning andInstallation Guide and for Tivoli Workload Scheduler. However, there are somesignificant differences, which are described in this section.
The recovery of a failed installation is fully described in the Tivoli WorkloadScheduler: Planning and Installation Guide.
Follow the instructions in Tivoli Workload Scheduler: Planning and Installation GuideFollow the instructions in the Tivoli Workload Scheduler: Planning and InstallationGuide up to the point where you want to modify the values of a step, and thenfollow these instructions:1. The values used in each step for the Dynamic Workload Console are all stored
in one place - Step 0. So if you discover, for example, that the step thatconfigures the embedded Tivoli Integrated Portal has failed because a port is inuse, you must go to Step 0 and modify the value for the port in that step.
2. Set the status of Step 0, plus the status of the step that failed, to Ready.3. In all cases, run Step 0 in the Step List, using the Run next option. Step 0 uses
the original data, as modified by you, to regenerate all of the scripts that runthe steps.
4. Resume the wizard from the failed step, either running Run all to complete theinstallation without stopping at each step, or Run next, to complete theinstallation step by step.
Note: You cannot rerun any step that has completed successfully, other than Step 0.
Recovering a failed upgradeIn the case of a failed upgrade, contact IBM Software Support.
© Copyright IBM Corp. 1999, 2012 321

Manually uninstall an integrated Dynamic Workload ConsolePerform the following steps to manually remove an instance of Tivoli WorkloadAutomation that contains the Dynamic Workload Console and uses the embeddedTivoli Integrated Portal. In the case of a failed installation, you may find some ofthe steps are unnecessary, depending on when the installation failed.
To remove an instance of Tivoli Workload Automation that contains an integratedinstallation of Tivoli Workload Scheduler and the Dynamic Workload Console, dothe following actions:1. Uninstall Tivoli Workload Scheduler as described in the Tivoli Workload
Scheduler: Planning and Installation Guide.2. Remove the Dynamic Workload Console by performing the steps described in
the procedure below.
If you want to remove the Dynamic Workload Console from an instance of TivoliWorkload Automation without removing the Tivoli Workload Automation instance,contact IBM Software Support.
Note: Only perform these manual steps on systems where the Dynamic WorkloadConsole is installed, otherwise you delete the Composite Offering Installer registry.
On Windows operating system:
1. If you have already removed the Dynamic Workload Console, using theinstallation DVD or the downloaded eImages, run the followingcommand from the \TDWC\WEBUI\<operating_system>\scripts\directory:# ./cleanDE.bat -installRoot <TWA_INSTALL_DIR>\eWas -force true
If, instead, the Dynamic Workload Console is still installed but notworking, run the following command from the <TWA_INSTALL_DIR>\TDWC\_tdwcutils\scripts\ directory:# ./cleanDE.bat -installRoot <TWA_INSTALL_DIR>\eWas -force true
2. Stop the service:<TWA_INSTALL_DIR>\bin\WASService -stop TIPProfile_Port_defaulthost_port
3. Remove the service:<TWA_INSTALL_DIR>\bin\WASService -remove
4. Navigate to the <TWA_INSTALL_DIR> and note the name of the IDfile twainstancexxx.id. You will need this information later in theprocedure.
5. Remove the directory:<TWA_INSTALL_DIR>
6. Remove the directory:C:\Program Files\Common Files\InstallShield\Universal\TDWC
7. Delete the following registry key:HKEY_LOCAL_MACHINE\SOFTWARE\Microsoft\Windows\CurrentVersion\Uninstall\
e625666383dedb70850864e2a6feaa2e1371705039
8. Remove the file:%windir%\TWA\twainstancexxx.properties
9. Restart the system.
On UNIX and Linux operating systems:
322 Tivoli Workload Scheduler: Planning and Installation: Planning and Installation

1. If you have already removed the Dynamic Workload Console, using theinstallation DVD or the downloaded eImages, run the followingcommand from the \TDWC\WEBUI\<operating_system>\scripts\directory:# ./cleanDE.sh -installRoot <TWA_INSTALL_DIR>\eWas -force true
If, instead, the Dynamic Workload Console is still installed but notworking, run the following command from the<TWA_INSTALL_DIR>\TDWC\_tdwcutils\scripts\ directory:# ./cleanDE.sh -installRoot <TWA_INSTALL_DIR>\eWas -force true
2. Stop the server by running the command:<TWA_INSTALL_DIR>/wastools/stopWas.sh
3. Navigate to the <TWA_INSTALL_DIR> and note the name of the ID filetwainstancexxx.id. You will need this information later in the procedure.
4. Remove the directory:<TWA_INSTALL_DIR>
5. Remove the directory:
On AIX/usr/lib/objrepos/InstallShield/Universal/TDWC
On all UNIX systems, except AIXROOT_USER_HOME/InstallShield/Universal/TDWC
6. Remove the file:etc/TWA/twainstancexxx.properties
Manually uninstall a stand-alone Dynamic Workload Console version8.6.0 instance
The correct procedure to uninstall a stand-alone Dynamic Workload Consoleinstance is to run its uninstaller program. If this is not possible, for example for afailed installation or uninstallation, a manual procedure is required.
Perform the following steps to manually remove a stand-alone instance ofDynamic Workload Console that uses the embedded Tivoli Integrated Portal. In thecase of a failed installation, you may find some of the steps are unnecessary,depending on when the installation failed.
To remove an instance of Dynamic Workload Console, perform the followingactions.
Note: Only perform these manual steps on systems where the Dynamic WorkloadConsole is installed, otherwise you delete the Composite Offering Installer registry.
On Windows operating system:
1. If you have already removed the Dynamic Workload Console, using theinstallation DVD or the downloaded eImages, run the followingcommand from the \TDWC\WEBUI\<operating_system>\scripts\directory:# ./cleanDE.bat -installRoot <TWA_INSTALL_DIR>\eWas -force true
If, instead, the Dynamic Workload Console is still installed but notworking, run the following command from the <TWA_INSTALL_DIR>\TDWC\_tdwcutils\scripts\ directory:
Chapter 19. Troubleshooting the installation, upgrade, and uninstallation 323

# ./cleanDE.bat -installRoot <TWA_INSTALL_DIR>\eWas -force true
2. Stop the service:<TWA_INSTALL_DIR>\bin\WASService -stop TIPProfile_Port_defaulthost_port
3. Remove the service:<TWA_INSTALL_DIR>\eWAS\bin\wasservice.exe –remove TDWC_admin_username
4. Remove the ISMP installation registry directory:%CommonProgramFiles%\InstallShield\Universal\TDWC
5. Remove the Tivoli Workload Automation registry file. In the file<TWA_INSTALL_DIR>\ twainstancexxx.id, take note of the number n,which indicates the Tivoli Workload Automation instance number, andremove the following files:%WINDIR%\TWA\twainstance<n>.TWA.properties
%WINDIR%\TWA\twainstance<n>.TWA.properties.ext
6. Delete the following registry key:HKEY_LOCAL_MACHINE\SOFTWARE\Microsoft\Windows\CurrentVersion\Uninstall\
e625666383dedb70850864e2a6feaa2e1371705039
7. Remove the directory:<TWA_INSTALL_DIR>
On UNIX and Linux operating systems:
1. If you have already removed the Dynamic Workload Console, using theinstallation DVD or the downloaded eImages, run the followingcommand from the \TDWC\WEBUI\<operating_system>\scripts\directory:# ./cleanDE.sh -installRoot <TWA_INSTALL_DIR>\eWas -force true
If, instead, the Dynamic Workload Console is still installed but notworking, run the following command from the<TWA_INSTALL_DIR>\TDWC\_tdwcutils\scripts\ directory:# ./cleanDE.sh -installRoot <TWA_INSTALL_DIR>\eWas -force true
2. Stop the Embedded WebSphere Application Server by running thecommand:<TWA_INSTALL_DIR>/wastools/stopWas.sh
3. Remove the directory:
On AIX/usr/lib/objrepos/InstallShield/Universal/TDWC
On all UNIX systems, except AIXROOT_USER_HOME/InstallShield/Universal/TDWC
4. Remove the Tivoli Workload Automation registry file. In the file<TWA_INSTALL_DIR>\ twainstancexxx.id, take note of the number n,which indicates the Tivoli Workload Automation instance number, andremove the following files:/etc/TWA/twainstance<n>.TWA.properties
/etc/TWA/twainstance<n>.TWA.properties.ext
5. Remove the directory:<TWA_INSTALL_DIR>
6. Remove the following directories:/var/ibm/common/acsi
/usr/ibm/common/acsi
324 Tivoli Workload Scheduler: Planning and Installation: Planning and Installation

Troubleshooting scenariosThe troubleshooting scenarios are listed in the following categories:v “Problems with the launchpad”v “Problems with the interactive wizard”v “Problems with the silent installation” on page 329v “Problems with the upgrade” on page 330v “Problems with the uninstallation” on page 331
Problems with the launchpadThe following problems might be encountered while using the launchpad to installthe Dynamic Workload Console:v “Warning messages displayed when using the launchpad on Linux”v “Undefined error when using launchpad on Windows operating system”
Warning messages displayed when using the launchpad onLinuxProblem description:
Warning messages might be displayed on the standard output when using thelaunchpad on Linux.
Cause and solution
You can ignore these messages because they do not indicate a malfunction of thelaunchpad.
Undefined error when using launchpad on Windows operatingsystemProblem description:
You try to install the Dynamic Workload Console on a Windows operating systemusing the launchpad and you get an "Undefined" error message. The launchpaddoes not start.
Cause and solution
Make sure that the path from where you launched the installation does not containfolder names longer than eight characters. If it does, then map the path to thelaunchpad.exe, and run the launchpad from that new path.
Problems with the interactive wizardThe following problems might be encountered while running the DynamicWorkload Console interactive installation:v “The Dynamic Workload Console installation hangs” on page 326v “Installation hangs during stopWas command” on page 326v “Tivoli Integrated Portal installation fails even if into the logs you find
successfully installed” on page 326v “Installation from a remote shared folder fails on Windows operating system” on
page 327v “Installation fails on a Linux 390 system with a hostname which is not a Fully
Qualified Domain Name” on page 328
Chapter 19. Troubleshooting the installation, upgrade, and uninstallation 325

v “Java Virtual Machine (JVM) failure when installing the Dynamic WorkloadConsole on a Red Hat Enterprise Linux (RHEL) Version 5 or a Suse Linuxsystem Version 11” on page 328
v “The Dynamic Workload Console graphical installation and uninstallation fail tostart on Red Hat Enterprise Linux (RHEL) Version 5 on x86-64” on page 329
v “On Windows, the Dynamic Workload Console installation fails if you try toreinstall on a different profile of an external WebSphere Application Server” onpage 329
The Dynamic Workload Console installation hangsProblem description:
The installation of the Dynamic Workload Console does not proceed. This occursregardless of the method you used to install.
Cause and solution
Make sure an active personal firewall is not preventing the installation processfrom connecting to the network. If it is, allow the connection and then continuewith the installation.
Installation hangs during stopWas commandProblem description:
The installation of the Dynamic Workload Console does not proceed.
Cause and solution
The installation of the Dynamic Workload Console does not proceed because thestopWas command is hanging.
To continue the installation, open the Task Manager and locate the Java process ofthe embedded WebSphere Application Server. This process is the java.exe processwith the associated installation username. Stop this process.
Then, find the associated WASService process. This process is the WASService.exeprocess with the associated the installation username. Stop this process.
Continue with the installation.
Tivoli Integrated Portal installation fails even if into the logs youfind successfully installedProblem description:
You are installing the Tivoli Integrated Portal, either using the wizard or the silentinstallation, and the installation fails with the following error:Start installing TIP - Tivoli Integrated Portal 2.2For log details, please seeC:\Documents and Settings\Administrator\TIPInstaller-00.logand {install location}\logs.zipPreparing SILENT Mode Installation...
===========================================================================GenericInstaller (created with InstallAnywhere by Macrovision)---------------------------------------------------------------------------===========================================================================Installing...
326 Tivoli Workload Scheduler: Planning and Installation: Planning and Installation

=============|==================|==================|==================]
Installation Complete.SUCCESS: The overall installation is successful.Current OS is Windows XPExecuting’C:\IBM\TWS\TDWC\eWAS\profiles\TIPProfile\bin\tipcli.bat’ with arguments:’Version’
The ’ characters around the executable and arguments arenot part of the command.Execute:Java13CommandLauncher:Executing’C:\IBM\TWS\TDWC\eWAS\profiles\TIPProfile\bin\tipcli.bat’ with arguments:’Version’
The ’ characters around the executable and arguments arenot part of the command.The following error occurred while executing this line:C:\temp\TDWC\WEBUI\WINDOWS\xml\commonTargets.xml:1735:Execute failed: java.io.IOException:Cannot run program "C:\IBM\TWS\TDWC\eWAS\profiles\TIPProfile\bin\tipcli.bat"in directory "C:\IBM\TWS\TDWC\eWAS\profiles\TIPProfile\bin"):CreateProcess error=2, The system cannot find the file specified.****************************************************************************Installation Complete.SUCCESS: The overall installation is successful.Current OS is Windows XPExecuting’C:\IBM\TWS\TDWC\eWAS\profiles\TIPProfile\bin\tipcli.bat’ with arguments:’Version’
The ’ characters around the executable and arguments arenot part of the command.Execute:Java13CommandLauncher:Executing’C:\IBM\TWS\TDWC\eWAS\profiles\TIPProfile\bin\tipcli.bat’ with arguments:’Version’
Cause and solution
This error occurs if you remove an instance of the Dynamic Workload Console,and the Tivoli Integrated Portal is also installed in the same path, without runningthe uninstaller (for example, removing manually only the content of the TWAdirectory). In this case, the Tivoli Integrated Portal instance remains registered inthe Deployment Engine installation registries and when you perform anotherinstallation of the Tivoli Integrated Portal the installer reports the error indicatedpreviously.
Run the procedure described in “Manually uninstall an integrated DynamicWorkload Console” on page 322 to clean your environment. Restart the installationfrom the failed step.
Installation from a remote shared folder fails on Windowsoperating systemProblem description:
You try to install the Dynamic Workload Console on a Windows operating systemfrom a shared network folder that uses Universal Naming Convention (UNC). Theinstallation fails.
Cause and solution
Chapter 19. Troubleshooting the installation, upgrade, and uninstallation 327

You must map the remote folder locally on the Windows system where you wantto install the Dynamic Workload Console and then run the installation using thelocal path.
Installation fails on a Linux 390 system with a hostname which isnot a Fully Qualified Domain NameProblem description:
You install the Dynamic Workload Console with the embedded WebSphereApplication Server on a server with a hostname is not a Fully Qualified DomainName. The installation fails and the following error is stored in the twainstall.logfile:
ADMU3011E: Server launched but failed initialization. startServer.log,SystemOut.log(or job log in zOS) and other log files under/oracle/ibm/TDWC/eWAS/profiles/TIPProfile/logs/tdwcservershould contain failure information.
WASX7023E: Error creating "SOAP" connection to host "localhost";exception information:com.ibm.websphere.management.exception.ConnectorNotAvailableException:com.ibm.websphere.management.exception.ConnectorNotAvailableException:ADMC0016E: The system cannot create a SOAP connector to connect to host
localhost at port 28880.
Cause and solution
Run the following command from the system prompt on the Linux 390 systemwhere you tried to install the Dynamic Workload Console:hostname --fqdn
If the command returns:hostname: Unknown host
the host name is not resolved. You must specify a hostname with a fully qualifieddomain name to install the embedded WebSphere Application Server. Update thehostname notation, as explained in the embedded WebSphere Application Serverdocumentation, and then rerun the installation.
Java Virtual Machine (JVM) failure when installing the DynamicWorkload Console on a Red Hat Enterprise Linux (RHEL) Version5 or a Suse Linux system Version 11Problem description:
When installing the Dynamic Workload Console on a Red Hat Enterprise LinuxVersion 5 or a Suse Linux Version 11 system, you might receive the error "Failed tofind VM - aborting".
Cause and solution
Linux systems have a security feature named 'Security Enhanced Linux', orSELinux for short. A weaker version of SELinux was included in Red HatEnterprise Linux Version 4, and was disabled by default. On these versions of RedHat Enterprise Linux and Suse Linux, this security feature is enabled by default.SELinux helps to keep the host secure from certain types of malicious attacks.However, the default settings have been known in many cases to prevent Javafrom running properly.
328 Tivoli Workload Scheduler: Planning and Installation: Planning and Installation

To fix this issue, choose one of the following options:v Configure SELinux so that it knows that the Dynamic Workload Console Java
related processes are acceptable to run.v Change the mode of SELinux to Permissive by entering setenforce 0 on the
command line. SELinux will be fully enabled again the next time the system isrebooted or if setenforce 1 is entered on the command line. For the DynamicWorkload Console to function, you must set setenforce 0. For more informationabout setenforce, see the documentation for your operating system.
The Dynamic Workload Console graphical installation anduninstallation fail to start on Red Hat Enterprise Linux (RHEL)Version 5 on x86-64Problem description:
When launching the Dynamic Workload Console installation or uninstallationwizard in interactive mode on Red Hat Enterprise Linux (RHEL) Version 5 x86-64,you might receive the following error:
For the installation:The installer is unable to run in graphical mode.Try running the installer with the -console or -silent flag.
For the uninstallation:The uninstaller is unable to run in graphical mode.Try running the uninstaller with the -console or -silent flag.
Cause and solution
If you run into this problem, launch the installation or the uninstallation in silentmode. For more information, see “Performing a silent installation” on page 299and “Uninstalling in silent mode” on page 319.
On Windows, the Dynamic Workload Console installation fails ifyou try to reinstall on a different profile of an externalWebSphere Application ServerProblem description:
This situation applies to a Windows operating system. You install the DynamicWorkload Console on a profile, for example, ProfileA, of an existing WebSphereApplication Server installation. You remove the Dynamic Workload Consolesuccessfully and then try to install it on a different profile of the same WebSphereApplication Server. The installation fails.
Cause and solution
A possible cause is that when you removed the Dynamic Workload Console, somefiles belonging to ProfileA were not removed. To solve this problem, stop ProfileAand then install the Dynamic Workload Console again on the other profile.
Problems with the silent installationThe following problems might be encountered while running the DynamicWorkload Console silent installation:v “The silent uninstallation does not work and an error code is returned” on page
330
Chapter 19. Troubleshooting the installation, upgrade, and uninstallation 329
v “Tivoli Integrated Portal installation fails even if into the logs you findsuccessfully installed” on page 326
The silent uninstallation does not work and an error code isreturnedProblem description:
If you try to perform a silent uninstall with a response file that does not exist,either because the file name is incorrect or because you specified the wrongdirectory, an error code is returned and the uninstallation does not run. Nothing islogged in the temporary directory and no messages are issued.
Cause and solution
Ensure that you specify a valid response file name.
Problems with the upgradeThe following problem might be encountered while running the DynamicWorkload Console upgrade:v “Upgrade fails with message AWSUI0085E”
Upgrade fails with message AWSUI0085EProblem description:
You are running the upgrade of the Dynamic Workload Console and the followingerror occurs:The instance of the Dynamic Workload Console that you want to upgradeuses an LDAP user registry.The LDAP server type you are using is not supported.The supported LDAP server types are:IBM Tivoli Directory Server, Microsoft Active Directory, Sun ONE DS,and RACF configured on IBM Tivoli Directory Server.Use a supported LDAP server type or install a fresh instanceof the Dynamic Workload Console
Cause and solution
The upgrade fails because you are using an LDAP server type that is notsupported. The supported LDAP server types are:v IBM Tivoli Directory Serverv Microsoft Active Directoryv Sun ONE DSv RACF configured on IBM Tivoli Directory Server
Configure the Dynamic Workload Console to use:v One of the supported LDAP server types.v The local operating system - the default authentication system at installation on
Windows operating systems.v The custom (through PAM - Pluggable Authentication Module) - the default
authentication system at installation on UNIX and Linux operating systems.
or install a fresh instance of the Dynamic Workload Console and then configure itto use one of the supported LDAP server types.
330 Tivoli Workload Scheduler: Planning and Installation: Planning and Installation

Problems with the uninstallationThe following problems might be encountered while running the DynamicWorkload Console uninstallation:v “Uninstall fails on Windows if the installation directory contains the @
character”v “The Dynamic Workload Console interactive uninstallation wizard fails to start
on Red Hat Enterprise Linux (RHEL) Version 5 on x86-64”v “Installation fails when reinstalling the Dynamic Workload Console after having
uninstalled it”
Uninstall fails on Windows if the installation directory containsthe @ characterProblem description:
When running uninstaller.exe to remove the Dynamic Workload Console installedin a directory that contains the @ character, for example C:\ProgramFiles\ibm\TDWC\a-.@_~a, the uninstall fails and the following error message isdisplayed:CreateProcess failed ==> The system cannot find the file specified.
Cause and solution
The uninstall fails because '@' is a special character for ISMP. ISMP is not able tomanage an installation directory containing this character.
You can bypass the problem by running the uninstall as follows:"C:\Program Files\ibm\TDWC\a-.@_~a\_jvm\jre\bin\java.exe"
-cp "C:\Pr Fi\ibm\TDWC\a-.@_~a\_tdwcuninst\uninstall.jar" run
Run this command outside the installation directory, otherwise the installationdirectory is not removed.
The Dynamic Workload Console interactive uninstallation wizardfails to start on Red Hat Enterprise Linux (RHEL) Version 5 onx86-64Problem description:
When launching the Dynamic Workload Console interactive uninstallation wizardon Red Hat Enterprise Linux (RHEL) Version 5 x86-64, the following error isdisplayed:The uninstaller is unable to run in graphical mode.Try running the uninstaller with the -console or -silent flag.
See “The Dynamic Workload Console graphical installation and uninstallation failto start on Red Hat Enterprise Linux (RHEL) Version 5 on x86-64” on page 329 forthe solution.
Installation fails when reinstalling the Dynamic WorkloadConsole after having uninstalled itProblem description:
Installation fails when trying to reinstall the Dynamic Workload Console on aWindows system where the Dynamic Workload Console has been uninstalled.
Cause and solution
Chapter 19. Troubleshooting the installation, upgrade, and uninstallation 331

This problem can be due to the fact that eWAS directory was not correctly deletedduring uninstallation. If during the Dynamic Workload Console uninstallation eWASdirectory cannot be deleted because it is locked by another process, theuninstallation wizard does not fail but completes successfully without removingthe directory. The solution for this problem is to force the uninstallation to failwhen eWAS directory cannot be deleted. In this way you can kill all the processesrelated to the eWAS directory. Alternatively, you can manually delete it and finallyrerun the installation step.
332 Tivoli Workload Scheduler: Planning and Installation: Planning and Installation

Part 5. Tutorials
Installation tutorials
© Copyright IBM Corp. 1999, 2012 333

334 Tivoli Workload Scheduler: Planning and Installation: Planning and Installation

Chapter 20. Using the Tivoli Workload Scheduler tutorialutility
About this task
This section describes the Tivoli Workload Scheduler tutorial utility and guides youthrough a set of steps to populate and use a stand-alone test environment. Thetutorial utility is intended for first-time users of Tivoli Workload Scheduler whowant an overview of the features and capabilities of the product in a realenvironment. The tutorial utility includes a sample database with predefinedscheduling objects and a set of scenarios that use these objects.
The sampledbsetup.sh or the SAMPLEDBSETUP.CMD script (depending on whether youare in a UNIX or Windows environment) populates your Tivoli WorkloadScheduler with a set of scheduling objects. The scenario scripts use these objects inbasic scheduling activities. Each scenario is self-contained and can be run in anyorder, with the exception of the first scenario which is a prerequisite to all others.
The Tivoli Workload Scheduler tutorial utility runs only on a master domainmanager. It does not affect any other workstation defined in your Tivoli WorkloadScheduler environment. Each scenario is launched as a separate script file whichuses the conman and composer command interfaces. The syntax and usage of eachcommand used in the scenarios is explained in detail in the Tivoli WorkloadScheduler: User's Guide and Reference. Before you begin using the utility, read anoverview of Tivoli Workload Scheduler concepts and tasks in Tivoli WorkloadAutomation: Overview.
This chapter is divided into the following sections:v “Populating your Tivoli Workload Scheduler database”v “Overview of the scheduling scenarios” on page 337v “Creating and working with the production plan” on page 337v “Running the scheduling scenarios” on page 338v “Removing tutorial objects from the database” on page 342
Populating your Tivoli Workload Scheduler databaseAbout this task
This section describes how you use the utility to populate your Tivoli WorkloadScheduler database.
After you have installed Tivoli Workload Scheduler on the master domain managerin your test environment you are ready to populate the database.
Follow these steps:1. Go to the TWS_home/TWS/TWSTutorial directory, where TWS_home is the home
directory of the user for which you installed Tivoli Workload Scheduler.2. Launch the tutorial utility installation script:
v In a Windows operating system:SAMPLEDBSETUP.CMD
© Copyright IBM Corp. 1999, 2012 335

v In a UNIX and Linux operating systems:sampledbsetup.sh
The script adds a set of scheduling objects with names starting with the stringSMPL, followed by the object type and scenario number so that all objects used ineach scenario are easily identifiable. Some objects are different depending onwhether you are using a UNIX or a Windows environment.
The script performs a check on the database. If any objects with the same name arefound, you are prompted to specify if these objects can be overwritten.
When processing of the script ends successfully, your Tivoli Workload Schedulerdatabase contains the objects needed to run the scheduling scenarios.
Objects used by the Tivoli Workload Scheduler tutorialscenarios
About this task
After you have successfully installed the Tivoli Workload Scheduler tutorial utilityin your test environment, your database is populated with the followingscheduling objects:
Table 22. Objects downloaded by the tutorial utility
Object type Object Names (Total objects)
Calendar SMPCAL6 (1)
Variable SMPLHOME, SMPLUSER, SMPLWIN1 toSMPLWIN4 or SMPLUNX1 to SMPLUNX4,SMPLSLEEP, SMPLTMP, SMPLPATH (6)
Resource SMPLRES1, SMPLRES2 (2)
Prompt SMPLPRM4, SMPLPRM5, SMPLPRM6,SMPLPRM7 (4)
Job SMPL_JOB_3_0_1, SMPL_JOB_3_0_2,SMPL_JOB_3_0_3, SMPL_JOB_4_0_1,SMPL_JOB_4_0_2, SMPL_JOB_4_0_3,SMPL_JOB_5_0_1, SMPL_JOB_5_0_2,SMPL_JOB_7_0_1, SMPL_JOB_7_0_2,SMPL_JOB_7_0_3, SMPL_JOB_9_0_1,SMPL_JOB_9_1_1, SMPL_JOB_EVN,SMPL_JOB_ODD, SMPL_JOB_PAIR,SMPL_JOB_SBJ, SMPL_JOB_7_0_LAST,SMPL_JOB_7_0_RECV (19)
Job Stream SMPL_SCHED_3_0_1, SMPL_SCHED_3_0_2,SMPL_SCHED_4_0_1, SMPL_SCHED_4_0_2,SMPL_SCHED_4_0_3, SMPL_SCHED_4_0_S,SMPL_SCHED_5_0_1, SMPL_SCHED_5_0_2,SMPL_SCHED_7_0_1 SMPL_SCHED_7_0_2,SMPL_SCHED_7_0_3, SMPL_SCHED_9_0_1,SMPL_SCHED_9_0_2, SMPL_SCHED_9_1_1,SMPL_SCHED_5–ODD, SMPL_SCHED_5_EVN,SMPL_SCHED_SBS (17)
Event Rule SMPL_FILTER_RULE (1)
Variable table SMPL_VAR_TABLE_9_0_1,SMPL_VAR_TABLE_9_0_2 (2)
336 Tivoli Workload Scheduler: Planning and Installation: Planning and Installation

You can display each object by running the composer command interface. Forspecific information about the syntax of the composer interface, see the TivoliWorkload Scheduler: User's Guide and Reference.
Overview of the scheduling scenariosAbout this task
The following table describes the topics covered in each scenario. Each scenario isa separate script file.
You must run Scenario 1 first, but you can choose to run the other scenarios in anyorder.
Table 23. List of scheduling scenarios
Scenario name Script name Topics
Scenario 1 scenario1.0.bat(Windows)scenario1.0.sh(UNIX)
Creating the production planand viewing its contentsNote: This scenario is aprerequisite for all the otherscenarios in your sequence.
Scenario 2 scenario2.0.bat(Windows)scenario2.0.sh(UNIX)
Administrative commands:starting and stopping TivoliWorkload Schedulerprocesses
Scenario 3 scenario3.0.bat(Windows)scenario3.0.sh(UNIX)
Scheduling basics: how jobsare scheduled, run order ofjobs
Scenario 4 scenario4.0.bat(Windows)scenario4.0.sh(UNIX)
Advanced Scheduling:prompt, file, and resourcedependencies
Scenario 5 scenario5.0.bat(Windows)scenario5.0.sh(UNIX)
Time dependencies and runcycles
Scenario 6 scenario6.0.bat(Windows)scenario6.0.sh(UNIX)
Job submission (jobs, jobstreams, ad-hoc jobs)
Scenario 7 scenario7.0.bat(Windows)scenario7.0.sh(UNIX)
Recovery options andrecovery jobs
Scenario 8 scenario8.0.bat(Windows)scenario8.0.sh(UNIX)
Event-driven scheduling
Scenario 9 scenario9.0.bat(Windows)scenario9.0.sh(UNIX)
Using variable tables
Creating and working with the production planAbout this task
After you have successfully populated the database, you are ready to run theScenario 1, which creates the production plan. The production plan contains thedatabase objects (jobs and job streams) that are eligible for scheduling.
Chapter 20. Using the Tivoli Workload Scheduler tutorial utility 337

Scenario 1 is a prerequisite to all other scenarios so you must run it first. The otherscenarios can then be run in any order.
Most commands in the scenarios are given in their short form. Where this is thecase, the full name of the command is shown in parentheses in each scenariodescription.
Scenario 1: Creating the production plan and viewing itscontents
The scenario shows you how to:v Create and extend a production planv Understand if a plan was created successfullyv View the contents of a plan
The scenario performs the following actions:v Creates a production plan with a duration of 24 hoursv Inserts into the plan all the jobs and job streams that the tutorial already added
in the database with their dependenciesv Views the contents of the plan
Commands used in the scenario in their run sequence:1. JnextPlan2. conman sc (showcpus)3. planman showinfo4. conman ss @#SMPL@ (showschedules)
Running the scheduling scenariosAfter creating the plan in Scenario 1, the other scenarios use the tutorial objects inthe database by scheduling them in the plan. Each scenario explains differentscheduling concepts. For each command used in the scenarios, the output isdisplayed on the screen.
Note: You can run the scenarios in any order because each scenario uses differentobjects. However, if you want to run the same scenario more than once in yoursequence, you must reset the plan and run Scenario 1 again before you rerun theindividual scenario. Perform these steps:1. Run the following command:
ResetPlan -scratch
2. Run the scenario1.0.bat in Windows or the scenario1.0.sh script in UNIX.
Scenario 2: Starting and stopping Tivoli Workload Schedulerprocesses
This scenario performs some basic administrative tasks. After each stop or startcommand, the status is displayed on the screen.
Scenario tasks and concepts:v Stopping and starting the Tivoli Workload Scheduler enginev Stopping and starting the event processorv Stopping and starting the monitoring agentv Viewing process status
Commands used in the scenario in their run sequence:1. "conman stop"
338 Tivoli Workload Scheduler: Planning and Installation: Planning and Installation

2. "conman status"3. "conman start"4. "conman status"5. "conman stopevtproc" (stopeventprocessor)6. "conman startevtproc" (starteventprocessor)7. "conman sc" (showcpus)8. "conman stopmon;wait"9. "conman startmon"
10. "conman sc" (showcpus)
For a detailed description of Tivoli Workload Scheduler processes and relatedcommands, see the Tivoli Workload Scheduler: User's Guide and Reference.
Scenario 3: Scheduling basics, how jobs are scheduled, andrun order of jobs
This scenario performs basic scheduling tasks by showing how you schedule jobsand how you manage the scheduling sequence.
Scenario tasks and concepts:v Running a job and a job stream on a workstationv Viewing job statusv Viewing and changing the workstation limitv Understanding the concept and purpose of dependent job streams and run order
(FOLLOWS)v Viewing dependency resolution during job runs
Commands used in the scenario in their run sequence:1. "conman ss @#SMPL_SCHED_3@" (showschedules)2. "composer disp sched=@SMPL_SCHED_3_0_2"3. "conman lc; 10;noask" (limit)4. "conman sc" (showcpus)5. "conman sj @#[email protected]_JOB_3_0_@" (showjobs)6. "conman sj @#[email protected]_JOB_3_0_@" (showjobs
Scenario 4: Advanced scheduling, dependencies fromprompts, files, and resources
This scenario performs advanced scheduling tasks by showing different types ofdependencies in action.
Scenario tasks and concepts:v Viewing and managing prompt dependenciesv Viewing and managing resource dependenciesv Viewing and managing file dependenciesv Understanding resource contention between jobs
Commands used in the scenario in their run sequence:1. "composer disp sched= @#SMPL_SCHED_4@"
2. "conman ss @SMPL_SCHED_4@" (showschedules)3. "conman sp @#SMPLPRM4" (showprompts)4. "conman reply SMLPRM4;y" (reply)5. "conman sp @#SMLPRM4" (showprompts)6. "conman sj @SMPL_SCHED_4_0_@.@" (showjobs)7. "conman sj @SMPL_SCHED_4_0_@.@" (showjobs)
Chapter 20. Using the Tivoli Workload Scheduler tutorial utility 339

8. "conman sj @SMPL_SCHED_4_0_S.@" (showjobs)
Scenario 5: Time dependencies and run cyclesThis scenario performs advanced scheduling using time dependencies and runcycles.
Scenario tasks and concepts:v Managing time limits such as AT time and UNTIL timev Releasing a time dependencyv Using run cycles to plan scheduling activities
Commands used in the scenario in their run sequence:1. "conman sj @#[email protected]_JOB_5_0_@" (showjobs)2. "conman ddj @#SMPL_SCHED_5_0_1.SMPL_JOB_5_0_1;at;noask" (deldep)3. "conman sj @#SMPL_SCHED_5_0_1.SMPL_JOB_5_0_1" (showjobs)4. "conman rj @#SMPL_SCHED_5_0_1.SMPL_JOB_5_0_2" (release)5. "conman sj @#SMPL_SCHED_5_0_1.SMPL_JOB_5_0_2" (showjobs)6. "conman ss @#SMPL_SCHED_5-@" (showschedules)
Scenario 6: Manual submission of jobs, job streams, andcommands
This scenario uses the submit command to insert jobs, job streams, and ad-hoc jobsin the plan.
Scenario tasks and concepts:v Submitting a job in the current production planv Submitting a job stream in the current production planv Submitting a command in the current production planv Displaying the job, job stream, and command status in the plan
Commands used in the scenario in their run sequence:1. "conman sbj @#SMPL_JOB_SBJ;alias=SMPL_SBJ_ALIAS" (submit)2. "conman sj @#JOBS.SMPL_ALIAS" (showjobs)3. "conman sbs @#SMPL_SCHED_SBS;alias=SMPL_SBS_ALIAS" (submit)4. "conman sj @#SMPL_SBS_ALIAS" (showjobs)5. "conman sbd "ver"; logon=^SMPLUSER^;alias=SMPL_SBD_ALIAS" (submit)6. "conman sj @#JOBS.SMPL_SBD_ALIAS" (showjobs)
Note: The value of the logon attribute in step 5 is specified by using a parameterobject. For more information about parameters see the Tivoli Workload Scheduler:User's Guide and Reference.
Scenario 7: Recovery options and recovery jobsThis scenario shows some examples of recovery options and recovery jobs.
Scenario tasks and concepts:v Defining and using the STOP, CONTINUE, and RERUN recovery optionsv Understanding the use of recovery jobs to solve scheduling malfunctions
340 Tivoli Workload Scheduler: Planning and Installation: Planning and Installation

Commands used in the scenario in their run sequence:1. "conman reply SMPLPRM7;y" (reply)2. "conman sp SMPLPRM7" (showprompts)3. "conman sj @#SMPL_SCHED_7_0_1.@" (showjobs)4. "conman sj @#SMPL_SCHED_7_0_2.@" (showjobs)5. "conman sj @#SMPL_SCHED_7_0_3.@" (showjobs)
Scenario 8: Event-driven schedulingThis scenario shows some examples of event-driven scheduling.
Scenario tasks and concepts:v Creating a rule and associating an action to the rulev Understanding the different rule types: Filter, Sequence, and Collection rulesv Processing an action associated to a rule
Commands used in the scenario in their run sequence:1. "composer disp erule=SMPL_FILTER_RULE" (display)2. "planman deploy -scratch"
3. "conman sj @#JOBS.SMPL_SBJ_ALIAS2" (showjobs)
Scenario 9: Using variable tablesThis scenario shows how you use variable tables to:v Change the behavior of jobs and job streams based on why they are scheduled
to run. For example, you can create a job that runs different commands fordifferent operating systems.
v Change the behavior of jobs and job streams based on when they are scheduledto run, that is, on which days they run.
Commands used in the scenario in their run sequence:1. "composer disp vartable=SMPL_VAR_TABLE_9_0_?" (display)2. "composer disp vartable=MAIN_TABLE" (display)3. "composer disp job=SMPL_JOB_9_1_1" (display)4. "composer disp sched=SMPL_SCHED_9_1_1" (display)5. "conman sj SMPL_SCHED_9_1_1(1000).SMPL_JOB_9_1_1;info (showjobs)6. "conman sj SMPL_SCHED_9_1_1(1200).SMPL_JOB_9_1_1;info (showjobs)
Because the production plan has already been generated, you can see the followingresults:v The job stream added for the run cycle associated to the
SMPL_VAR_TABLE_9_0_2 variable table contains the SMPL_JOB_9_1_1 job thatlaunches the default command.
v The job stream added for the run cycle associated to theSMPL_VAR_TABLE_9_0_1 variable table contains the SMPL_JOB_9_1_1 job thatlaunches the command specified within the variable table.
Scenario 9 part 1: Using variable tables to run differentcommands using the same job definitionThis part shows how you use variable tables to create two job streams containingthe same job definition to launch two different commands. The scenario performsthe following steps:
Chapter 20. Using the Tivoli Workload Scheduler tutorial utility 341

v Creates two variable tables and defines variables inside them.v Uses variables inside jobs.v Defines two job streamsv Associates a different variable table to each job stream.
Commands used in the scenario in their run sequences:1. "composer disp vartable=SMPL_VAR_TABLE_9_0_?" (display)2. "composer disp job=SMPL_JOB_9_0_1" (display)3. "composer disp sched=SMPL_SCHED_9_0_?" (display)4. "conman sj SMPL_SCHED_9_0_1.SMPL_JOB_9_0_1;info" (showjobs)5. "conman sj SMPL_SCHED_9_0_2.SMPL_JOB_9_0_1;info" (showjobs)
Because the production plan has already been generated, you can see the followingresults:v The job added with the SMPL_SCHED_9_0_1 job stream contains the command
to list the content of the TWSTutorial directory.v The job added with the SMPL_SCHED_9_0_2 job stream contains the command
to list the content of the TWS directory.
Scenario 9 part 2: Using variable tables to run differentcommands on different daysThis part shows how you use variable tables to have the same job streamcontaining two run cycles to launch two commands based on variable substitution.It create a job stream containing a job definition and two different run cycles thataddress two different variable tables. The scenario performs the following steps:v Creates two variable tables and defines variables inside them.v Uses variables inside jobs.v Defines a job stream.v Associates a different variable table to each run cycle.
Removing tutorial objects from the databaseYou can choose to keep the database objects in your environment to use them astemplates for new objects. If, instead, you want to completely remove all tutorialobjects from the database, perform the following steps:1. Go to the TWS_home/TWS/TWSTutorial directory, where TWS_home is the home
directory of the user for which you installed Tivoli Workload Scheduler.2. Launch the tutorial utility installation script as follows:
v In a Windows operating system:SAMPLEDBSETUP.CMD -uninstall
v In a UNIX and Linux operating systems:sampledbsetup.sh -uninstall
342 Tivoli Workload Scheduler: Planning and Installation: Planning and Installation

Part 6. Appendixes
© Copyright IBM Corp. 1999, 2012 343

344 Tivoli Workload Scheduler: Planning and Installation: Planning and Installation

Appendix A. Registry file
On UNIX operating systems, when you install Tivoli Workload Scheduler using theInstallShield wizard or the twsinst script, a check is performed to determinewhether there are other Tivoli Workload Scheduler instances already installed. TheTWSRegistry.dat file stores the history of all instances installed. On Windowsoperating systems, this file is stored under the system drive directory, for example,c:\winnt\system32. On UNIX operating systems, this file is stored in the /etc/TWSpath. The file contains the values of the following attributes that define a TivoliWorkload Scheduler installation:
Table 24. Registry file attributes
Attribute Value
ProductID TWS_ENGINE
PackageName The name of the software package used toperform the installation.
InstallationPath The absolute path of the Tivoli WorkloadScheduler instance.
UserOwner The owner of the installation.
MajorVersion Tivoli Workload Scheduler version number.
MinorVersion Tivoli Workload Scheduler release number.
MaintenanceVersion Tivoli Workload Scheduler maintenanceversion number.
PatchVersion The latest product patch number installed.
Agent Any one of the following: standard agent,fault-tolerant agent, master domain manager.
FeatureList The list of optional features installed.
LPName The name of the software package block thatinstalls the language pack.
LPList A list of all languages installed for theinstance installed.
The following is an example of a TWSRegistry.dat file on a master domainmanager:/Tivoli/Workload_Scheduler/tws_nord_DN_objectClass=OU/Tivoli/Workload_Scheduler/tws_nord_DN_PackageName=FP_Windows_tws_nord.8.3.00/Tivoli/Workload_Scheduler/tws_nord_DN_MajorVersion=8/Tivoli/Workload_Scheduler/tws_nord_DN_MinorVersion=2/Tivoli/Workload_Scheduler/tws_nord_DN_PatchVersion=/Tivoli/Workload_Scheduler/tws_nord_DN_FeatureList=TBSM/Tivoli/Workload_Scheduler/tws_nord_DN_ProductID=TWS_ENGINE/Tivoli/Workload_Scheduler/tws_nord_DN_ou=tws_nord/Tivoli/Workload_Scheduler/tws_nord_DN_InstallationPath=c:\TWS\tws_nord/Tivoli/Workload_Scheduler/tws_nord_DN_UserOwner=tws_nord/Tivoli/Workload_Scheduler/tws_nord_DN_MaintenanceVersion=1/Tivoli/Workload_Scheduler/tws_nord_DN_Agent=MDM
© Copyright IBM Corp. 1999, 2012 345

346 Tivoli Workload Scheduler: Planning and Installation: Planning and Installation

Appendix B. Using response files
All components of Tivoli Workload Scheduler and the Dynamic Workload Consolethat can be installed by the InstallShield wizard can also be installed silently, usinga response file. A response file is a flat text list of property-value pairs each ofwhich corresponding to a data item that the wizard needs to determine what is tobe installed, where, and with what configuration. Silent installations can be used toinstall, upgrade or uninstall components locally, or remotely.
Tivoli Workload Scheduler and the Dynamic Workload Console components areprovided with template response files, containing the appropriate properties toperform one installation, upgrade, or uninstallation action.
To perform a silent installation, provide the following command line argumentswhen running the wizard:-options "<response_file_name> -silent
The provided files are template files, so you are recommended to edit theproperties appropriately, and then save a copy of the file with a file name whichidentifies the component to be installed and the system on which it is to beinstalled.
The properties have unique names and uses, and are described in the followingsections. Many of them will contain default values that you can use. The defaultsare not listed here as they may change, depending on which template file they areused in.
Note: Where the same template file is provided for Windows and UNIX platforms,default paths are supplied for both environments, with the keys duplicated andone commented out. Note that if you uncomment one and omit to comment theother, the wizard utilizes the last of the duplicated keys.
© Copyright IBM Corp. 1999, 2012 347

348 Tivoli Workload Scheduler: Planning and Installation: Planning and Installation

Appendix C. The Tivoli Workload Scheduler response fileproperties
This section describes the properties used in the Tivoli Workload Schedulerresponse files, in alphabetical order:
Note:
1. All values must be written between double quotation marks ("), for example:cpuCfgPanel.addFINAL="true"
2. Properties are written in mixed case for ease of reading, but are notcase-sensitive
3. Keywords (for example, "true") used in values, are not case-sensitive.
Table 25. Tivoli Workload Scheduler response file properties
Name Description Permitted values
checkJobsLoop.wait Specify the number of minutes that theproduct waits for jobs that are running tocomplete before starting the upgrade. If thejobs do not complete during this interval theupgrade does not proceed and an errormessage is displayed.
Integers or -1 for the product towait indefinitely. The default is 60.
checkPrerequisites.stopOnCheckPrereq
Stop the installation whenever any type oferror or warning occurs during theprerequisite check. See “Checkingprerequisites (UNIX and Linux)” on page 28for more information on the prerequisitecheck.
true Stop the installationwhenever any type oferror or warning occursduring the prerequisitecheck.
false Stop the installationwhenever blocking errorsoccur during theprerequisite check.
The default is false.
cpuCfgPanel.addFINAL
Add the final job stream to the database.This option allows to perform automaticproduction plan extension at the end of eachcurrent production plan processing. Bydefault, this box remains unchecked. Thisoption is available only if you are installinga master domain manager.
true Add the final job stream
false Do not add the final jobstream
cpuCfgPanel.company
Company name. See “Tivoli Workload Schedulerinstallation options” on page 69.
cpuCfgPanel.masterCPU
The name of the master domain managerworkstation. When you are installing amaster domain manager, this value musthave the same value ascpuCfgPanel.thisCPU.
See “Tivoli Workload Schedulerinstallation options” on page 69.
© Copyright IBM Corp. 1999, 2012 349
Table 25. Tivoli Workload Scheduler response file properties (continued)
Name Description Permitted values
cpuCfgPanel.jmPortNumberHttps
Specify if HTTPS is used for communicationbetween the Tivoli Workload Scheduleragent and the Tivoli Workload Schedulerserver, Tivoli Workload Scheduler for z/OSserver, or the dynamic workload broker.Specify true for HTTPS and false for HTTP.
See “Installing an agent” on page87.
cpuCfgPanel.tdwbHostName The fully qualified host name used by theTivoli Workload Scheduler agent to connectto the dynamic workload broker.
See “Tivoli Workload Schedulerinstallation options” on page 69.
cpuCfgPanel.tcpPortNumber
The port used by netman on the system onwhich the component is installed.
See “Tivoli Workload Schedulerinstallation options” on page 69.
cpuCfgPanel.thisCPU
The name of the workstation where you areinstalling the component. When you areinstalling a master domain manager, thisvalue must have the same value ascpuCfgPanel.masterCPU.
See “Tivoli Workload Schedulerinstallation options” on page 69.
cpuCfgPanel.jmPortNumber The port used by the Workload Schedulerfor z/OS server, or the dynamic workloadbroker to connect to the Tivoli WorkloadScheduler dynamic agent.
See “Tivoli Workload Schedulerinstallation options” on page 69
db2CheckPrereqs.db2Directory
The installation directory of the DB2Enterprise Server or the DB2 AdministrationClient.
See “RDBMS installation options”on page 73.
db2ClientCfg.remoteNode
The remote node of the DB2 AdministrationClient.
See “RDBMS installation options”on page 73.
db2ClientCfg.remotePort
The TCP/IP port number that the remoteDB2 server instance uses to communicate.
See “RDBMS installation options”on page 73.
350 Tivoli Workload Scheduler: Planning and Installation: Planning and Installation

Table 25. Tivoli Workload Scheduler response file properties (continued)
Name Description Permitted values
db2ClientCfg.db2AdminUser
The user name of the administrator of theDB2 server instance.
If the DB2 administrator already created thedatabase tables using the “Creating orupgrading the database tables if you areusing DB2” on page 43 procedure, the username is the one that the DB2 administratorspecified in the DB_USER property in thecustomizeDB2SQL.properties file. Thedefault value is:On Windows operating systems
db2admin.On UNIX and Linux operating systems
db2inst1.
If the DB2 administrator already upgradedthe database tables using the “Creating orupgrading the database tables if you areusing DB2” on page 43 procedure, the username is the one that the DB2 administratorspecified in the DB_UPGRADE_USER field.You must assign SYSMON authority to theuser you specified in theDB_UPGRADE_USER field.
See “RDBMS installation options”on page 73.
db2ClientCfg.db2AdminPwd
The password of the DB2 serveradministrator user, or of the user withSYSADM or SYSCTRL authority.
See “RDBMS installation options”on page 73.
db2ClientCfg.db2LocalAdminUser
The user name of the DB2 administrator ofthe DB2 client instance.
See “RDBMS installation options”on page 73.
db2ClientCfg.db2LocalAdminPwd
The password of the DB2 administrator ofthe DB2 client instance.
See “RDBMS installation options”on page 73.
db2ClientCfg.twsDBUser
The user name of the DB2 user. See “RDBMS installation options”on page 73.
db2ClientCfg.twsDBPwd The password of the DB2 user. See “RDBMS installation options”on page 73.
db2ServerCfg.instanceName
The name of the DB2 server instance. See “RDBMS installation options”on page 73.
db2ServerCfg.instancePort
The TCP/IP port number used tocommunicate with the DB2 instance.
See “RDBMS installation options”on page 73.
Appendix C. The Tivoli Workload Scheduler response file properties 351

Table 25. Tivoli Workload Scheduler response file properties (continued)
Name Description Permitted values
db2ServerCfg.db2AdminUser
The user name of the administrator of theDB2 Server.
If the DB2 administrator already created thedatabase tables using the “Creating orupgrading the database tables if you areusing DB2” on page 43 procedure, the username is the one that the DB2 administratorspecified in the DB_USER property in thecustomizeDB2SQL.properties file. Thedefault value is:On Windows operating system
db2admin.On UNIX and Linux operating systems
db2inst1.
If the DB2 administrator already upgradedthe database tables using the “Creating orupgrading the database tables if you areusing DB2” on page 43 procedure, the username is the one that the DB2 administratorspecified in the DB_UPGRADE_USER field.You must assign SYSMON authority to theuser you specified in theDB_UPGRADE_USER field.
See “RDBMS installation options”on page 73.
db2ServerCfg.db2AdminPwd
The password of the DB2 serveradministrator user, or of the user withSYSADM or SYSCTRL authority.
See “RDBMS installation options”on page 73.
InstallationActions.Install_Method
Tivoli Workload Automation instance choice
Many of the Tivoli Workload Schedulercomponents, including the DynamicWorkload Console, must be installed in aninstance of Tivoli Workload Automation (see“Instances of Tivoli Workload Automation”on page 31 for an explanation). Thisproperty lets you choose whether you wantto install the component in a new instance(installing also the embedded WebSphereApplication Server and other infrastructuresupport), or to install the component in anexisting instance.
In the former case, the path you want to usefor the new instance must be defined in theproperty twsLocationPanel.directory. Inthe latter case you must also identify thepath of the existing instance, using theproperty:
InstallationActions.TWA_INSTANCE_PATH
new Install the Tivoli WorkloadScheduler component in anew instance of TivoliWorkload Automation(and install theinfrastructure support)
ONTWAInstall the Tivoli WorkloadScheduler component inan existing instance ofTivoli WorkloadAutomation
Note: These values arecase-sensitive.
InstallationActions.instanceID
The command-line client is registered byTivoli Workload Scheduler with an ID.When you upgrade an instance you mustsupply this ID.
It has the following format:<remoteHost>:<remoteUser>
352 Tivoli Workload Scheduler: Planning and Installation: Planning and Installation

Table 25. Tivoli Workload Scheduler response file properties (continued)
Name Description Permitted values
InstallationActions.TWA_INSTANCE_PATH
Tivoli Workload Automation instance path.
Identifies the path where an instance ofTivoli Workload Automation has alreadybeen installed.
See “Tivoli Workload Schedulerinstallation options” on page 69.
InstallationActions.twsUser
The existing TWSUser.
Identifies the TWSUser of an existingcomponent you are upgrading.
installationAgentComponents.addEclipse
Adds the Java runtime to run job types withadvanced options to the dynamic agent. Theruntime environment is used to:
v Run on the agent job types with advancedoptions, both those supplied with theproduct and the additional typesimplemented through the customplug-ins.
v Enable the capability to remotely run,from the agent, the dynamic workloadbroker resource command on the server.
true Adds the Java runtime torun job types withadvanced options.
false To not the Java runtime torun job types withadvanced options
installationAgentComponents.addTdwb
Adds to the Tivoli Workload Scheduleragent the capability to run dynamicworkload.
true To add the capability torun dynamic workload.
false To not add the capabilityto run dynamic workload.
installationAgentComponents.instanceType
The type of agent to install.LWA Agent to run workload
from a z/OS environmentin a distributedenvironment.
FTA Fault-tolerant and domainmanager agents
installationComponents.instanceType
Tivoli Workload Automation instance type.
The type of component to install.
MDM master domain managerBKM backup master domain
managerDDM dynamic domain managerBDM backup dynamic domain
managerAGENT
Fault-tolerant agent,dynamic agent, or domainmanager
CLI command-line client
installLocation Installation path for the IntegrationWorkbench.
Any fully qualified path outside aninstance of Tivoli WorkloadAutomation.
IsOnlyFTAConnectorToUninstall.IsOnlyFTAConnector
Specify which component is to beuninstalled. Yes Uninstall just the
distributed connector.
No Uninstall the fault-tolerantagent, the dynamic agent,and the distributedconnector.
Appendix C. The Tivoli Workload Scheduler response file properties 353

Table 25. Tivoli Workload Scheduler response file properties (continued)
Name Description Permitted values
licenseAccepted Accept license agreement.
To install a component using a response fileyou must explicitly accept the licenseagreement, a copy of which is in the Licensedirectory of the product install media (DVDor downloaded image).
true To accept the licenseagreement.
false To not accept the licenseagreement. In this eventthe component is notinstalled.
TdwbConfig.tdwbCpuName
The dynamic workload broker workstationthat you will create in the Tivoli WorkloadScheduler database
See “Tivoli Workload Schedulerinstallation options” on page 69.
TdwbConfig.tdwbCpuPort
The port of the dynamic workload brokerworkstation that you will create in the TivoliWorkload Scheduler database. The TivoliWorkload Scheduler engine and the dynamicworkload broker component communicateusing this port.
See “Tivoli Workload Schedulerinstallation options” on page 69.
oracleCheckPrereqs.oracleDirectory
The installation directory of the Oracledatabase.
See “Installing for an Oracledatabase” on page 78.
oracleServerCommunicationInfo.netServiceName
The name used by clients to identify anOracle Net server and the specific systemidentifier or database for the Oracle Netconnection.
See “Installing for an Oracledatabase” on page 78.
oracleServerCommunicationInfo.oracleAdminUser
The database administrator user name (suchas SYSTEM) required to authenticate to theOracle database.
If the ORACLE administrator alreadycreated the database tables usingthe“Creating or upgrading the databasetables if you are using Oracle” on page 53,the user name is the one that the ORACLEadministrator specified in the MDL_USERproperty of thecustomizeORACLESQL.properties file.
See “Installing for an Oracledatabase” on page 78.
oracleServerCommunicationInfo.oracleAdminPwd
The database administrator user passwordrequired to authenticate to the Oracledatabase.
See “Installing for an Oracledatabase” on page 78.
354 Tivoli Workload Scheduler: Planning and Installation: Planning and Installation

Table 25. Tivoli Workload Scheduler response file properties (continued)
Name Description Permitted values
recovInstReg.run Specify to upgrade workstations withcorrupted registry files without having toreinstall the product. Use this option also toupgrade a cluster environment from anynode of the cluster, not only from the onewhere you installed Tivoli WorkloadScheduler. This option is particularly usefulwhen the cluster node where the product isinstalled is unavailable or in an inconsistentstate. If you specify this option, TivoliWorkload Scheduler re-creates theinstallation registries and the SoftwareDistribution information.
true To upgrade workstationswith corrupted registryfiles without having toreinstall the product.
false To do not use this option.The default is false.
SDK_ECLIPSE_BUNDLED Integration Workbench is to be installedwith the bundled version of Eclipse.
Whichever setting you choose, the propertySDK_UPDATESITE must have the oppositesetting.
true To install IntegrationWorkbench with thebundled version of Eclipse
false To not install IntegrationWorkbench with thebundled version of Eclipse.
SDK_UPDATESITE Integration Workbench is to be installed asan Eclipse site, without the bundled versionof Eclipse.
Whichever setting you choose, the propertySDK_ECLIPSE_BUNDLED must have theopposite setting.
true To install IntegrationWorkbench as an Eclipsesite, without the bundledversion of Eclipse
false To not install IntegrationWorkbench as an Eclipsesite
selectRDBMSPanel.rdbmsSelected
Choose which type of RDBMS support youwant to use, DB2 or Oracle.
"DB2" or "Oracle", notcase-sensitive.
TdwbConfig.tdwbCpuName
The dynamic workload broker workstationthat you will create in the Tivoli WorkloadScheduler database
See “Tivoli Workload Schedulerinstallation options” on page 69.
TdwbConfig.tdwbCpuPort
The port of the dynamic workload brokerworkstation that you will create in the TivoliWorkload Scheduler database. The TivoliWorkload Scheduler engine and the dynamicworkload broker component communicateusing this port.
See “Tivoli Workload Schedulerinstallation options” on page 69.
twsCliCfgPanel.password
Password of the user identified intwsCliCfgPanel.user.
twsCliCfgPanel.remoteHost
The host name or IP address of theworkstation where the master domainmanager is installed.
twsCliCfgPanel.remotePort
The listening port of the workstation wherethe master domain manager is installed.
Appendix C. The Tivoli Workload Scheduler response file properties 355

Table 25. Tivoli Workload Scheduler response file properties (continued)
Name Description Permitted values
twsCliCfgPanel.user
The user ID used to access the masterdomain manager. Usually the <TWS_user>.
TWSCLILanguagesPanel.all
Choose command-line client languages: alllanguages
When installing the language pack on thecommand-line client, you can select to installall languages, using this property, or selectthe specific languages you require (seefollowing property)
true All languages are installed.
false You want to install specificlanguages using the
TWSCLILanguagesPanel.<language>
properties.
TWSCLILanguagesPanel.chineseSimplifiedchineseTraditionalgermanfrenchitalianjapanesekoreanportuguesespanish
Choose command-line client languages:specific languages
When installing the language pack on thecommand-line client, you can select to installall languages, using theTWSCLILanguagesPanel.all property, orselect the specific languages you require,using one or more of these properties.
For each property:
true The selected language isinstalled.
false The selected language isnot installed.
twsCLILocationPanel.directory
The path where you want to install thecommand-line client.
Any valid, fully qualified pathoutside any instance of TivoliWorkload Automation.
twsDBCfg.dbName The name of the DB2 database. See “RDBMS installation options”on page 73.
twsDBCfg.tablespaceName The name of the DB2 instance tablespace. See “RDBMS installation options”on page 73.
twsDBCfg.tablespacePath The relative path of the DB2 table space. See “RDBMS installation options”on page 73.
twsDBCfg.reportTablespaceName
The name of the table space for storingreport data.
See “RDBMS installation options”on page 73.
twsDBCfg.reportTablespacePath
The path of the table space for storing reportdata.
See “RDBMS installation options”on page 73.
twsLocationPanel.directory
The path where you want to install the freshTivoli Workload Scheduler component.
Any valid, fully qualified TivoliWorkload Automation instancepath.
twsLocationPanel.symLinkOption
Choose whether to create symbolic links (seeTable 2 on page 31 for more details). true Symbolic links are created.
false Symbolic links are notcreated.
356 Tivoli Workload Scheduler: Planning and Installation: Planning and Installation

Table 25. Tivoli Workload Scheduler response file properties (continued)
Name Description Permitted values
twsOracleDbCfg.twsDBUser
The owner of the Tivoli Workload Schedulerschema.
See “Installing for an Oracledatabase” on page 78.
twsOracleDbCfg.twsDBPwd
The database administrator user passwordrequired to authenticate to the Oracledatabase.
See “Installing for an Oracledatabase” on page 78.
twsOracleDbCfg.twsDataTablespace
The name that identifies the Tivoli WorkloadScheduler data table space.
See “Installing for an Oracledatabase” on page 78.
twsOracleDbCfg.twsReportTablespace
The name that identifies the Tivoli WorkloadScheduler table space where report data is tobe stored.
See “Installing for an Oracledatabase” on page 78.
twsOracleDbCfg.twsTempTablespace
The name that identifies the Tivoli WorkloadScheduler temporary table space.
See “Installing for an Oracledatabase” on page 78.
twsOracleDbCfg.isPartitioned
Specify whether the event-driven workloadautomation database schema is to be createdusing the Oracle Partitioning feature.
true The Oracle Partitioningfeature is used whencreating the event-drivenworkload automationdatabase schema.
false The Oracle Partitioningfeature is NOT used whencreating the event-drivenworkload automationdatabase schema.
twsPortsPanel.portAdmin
Administration HTTP transport port. See “WebSphere Application Serverinstallation options” on page 72 formore details.
twsPortsPanel.portAdminSec
Administration HTTPS transport port. See “WebSphere Application Serverinstallation options” on page 72 formore details.
twsPortsPanel.portEif
Event processor port See “WebSphere Application Serverinstallation options” on page 72 formore details.
twsPortsPanel.portHTTP
HTTP transport port See “WebSphere Application Serverinstallation options” on page 72 formore details.
twsPortsPanel.portHTTPS
HTTPS transport port See “WebSphere Application Serverinstallation options” on page 72 formore details.
Appendix C. The Tivoli Workload Scheduler response file properties 357

Table 25. Tivoli Workload Scheduler response file properties (continued)
Name Description Permitted values
twsPortsPanel.portMtlAuth
CSIv2 Client Authentication Listener port See “WebSphere Application Serverinstallation options” on page 72 formore details.
twsPortsPanel.portORB
ORB Listener port See “WebSphere Application Serverinstallation options” on page 72 formore details.
twsPortsPanel.portRMI
Bootstrap port See “WebSphere Application Serverinstallation options” on page 72 formore details.
twsPortsPanel.portSAS
SAS Server Authentication Listener port See “WebSphere Application Serverinstallation options” on page 72 formore details.
twsPortsPanel.portSOAP
SOAP connector port See “WebSphere Application Serverinstallation options” on page 72 formore details.
twsPortsPanel.portSrvAuth
CSIv2 Server Authentication Listener port See “WebSphere Application Serverinstallation options” on page 72 formore details.
twsUpgradePanel.backupOldInstance
Determines if the existing instance of acomponent is to be backed up during anupgrade.
true The existing instance isbacked up.
false The existing instance is notbacked up.
twsUpgradePanel.bckpDirectory
The backup directory used if the existinginstance of a component is to be backed upduring an upgrade.
Any valid fully qualified pathoutside the path of any existingTivoli Workload Schedulercomponent.
twsUpgradePanel.bckpProfileDirectory
The backup directory for the applicationserver profile (used when upgrading themaster domain manager or backup masterdomain manager from version 8.3 or 8.4).
Any valid fully qualified pathoutside the path of any existingTivoli Workload Schedulercomponent.
twsUpgradePanel.dumpDirectory
The migration directory used whenupgrading a master domain manager fromversion 8.2.x. The database is exported tothis directory as flat text files, and thenimported into the new RDBMS support.
Any valid fully qualified pathoutside the path of any existingTivoli Workload Schedulercomponent.
userUnixCfgPanel.inputUserName
The user ID of the <TWS_user> (on UNIX). The ID must already exist on thesystem where the silent wizard willbe run.
userUnixCfgPanel.twsPassword
The password of the <TWS_user> (onUNIX).
358 Tivoli Workload Scheduler: Planning and Installation: Planning and Installation

Table 25. Tivoli Workload Scheduler response file properties (continued)
Name Description Permitted values
userUnixCfgPanel.wasPassword
If the Dynamic Workload Console hasalready been installed on an existinginstance of Tivoli Workload Automation,supply the password of the WebSphereApplication Server user ID of the embeddedWebSphere Application Server that youconfigured when you installed the DynamicWorkload Console (on UNIX).
This will normally be the passwordof the <TWS_user>, unless youhave changed it in the embeddedWebSphere Application Server.
userUnixCfgPanel.wasUserName
If the Dynamic Workload Console hasalready been installed on an existinginstance of Tivoli Workload Automation,supply the WebSphere Application Serveruser ID of the embedded WebSphereApplication Server that you configuredwhen you installed the Dynamic WorkloadConsole (on UNIX).
This will normally be the<TWS_user>, unless you havechanged it in the embeddedWebSphere Application Server.
userWinCfgPanel.inputUserName
The ID of the <TWS_user> - the user thatwill "own" the agent on the agentworkstation (on Windows).
If this user does not already exist, itwill be created. In this case, theformat of the ID must follow therules for User IDs on the computerwhere it is to be created.
userWinCfgPanel.twsPassword
The password of the <TWS_user> (onWindows).
If the user is to be created, theformat of the password must followthe rules for passwords on thecomputer where it is to be created.
userWinCfgPanel.wasPassword
If the Dynamic Workload Console hasalready been installed on an existinginstance of Tivoli Workload Automation,supply the password of the WebSphereApplication Server user ID of the embeddedWebSphere Application Server that youconfigured when you installed the DynamicWorkload Console (on Windows).
This will normally be the passwordof the <TWS_user>, unless youhave changed it in the embeddedWebSphere Application Server.
userWinCfgPanel.wasUserName
If the Dynamic Workload Console hasalready been installed on an existinginstance of Tivoli Workload Automation,supply the WebSphere Application Serveruser ID of the embedded WebSphereApplication Server that you configuredwhen you installed the Dynamic WorkloadConsole (on Windows).
This will normally be the<TWS_user>, unless you havechanged it in the embeddedWebSphere Application Server.
Appendix C. The Tivoli Workload Scheduler response file properties 359

360 Tivoli Workload Scheduler: Planning and Installation: Planning and Installation

Appendix D. The Dynamic Workload Console response fileproperties
This section describes the properties used in the Dynamic Workload Consoleresponse files, in alphabetical order:
Note:
1. All values must be written between double quotation marks ("), for example:InstallationActions.INSTALL_METHOD="new"
2. Property names are written in mixed case for ease of reading, but are notcase-sensitive
3. Keywords used in values are not case-sensitive.
Table 26. Dynamic Workload Console response file properties
Name Description Permitted values
BOOTSTRAP_ADDRESS The bootstrap port. See “Advanced installation” on page297 for more details.
CREATE_WAS_SERVICE On Windows, the embedded WebSphereApplication Server can be defined to startautomatically at system startup. To do this, setthis property, which creates a Windows servicethat starts up the embedded WebSphereApplication Server.
true A Windows service iscreated to automatically startthe embedded WebSphereApplication Server
false The Windows service is notcreated
CSIV2_SSL_MUTUALAUTH_LISTENER_ADDRESS
CSIv2 Client Authentication Listener port. See “Advanced installation” on page297 for more details.
CSIV2_SSL_SERVERAUTH_LISTENER_ADDRESS
CSIv2 Server Authentication Listener port See “Advanced installation” on page297 for more details.
DCS_UNICAST_ADDRESS The DCS Unicast port. See “Advanced installation” on page297 for more details.
ENABLE_TDWB Enable Dynamic Workload Broker
The Dynamic Workload Console can be usedto access either of the following:
v Tivoli Workload Scheduler (includes TivoliWorkload Scheduler for z/OS)
v Dynamic workload broker
All users must be given specific access to oneor both of these products.
It is useful to give these access rights to theWebSphere Application Server administratorfrom the outset, so that the administrator canimmediately perform any tasks that might berequired:
true Gives the administratoraccess to Dynamic WorkloadBroker
false Denies the administratoraccess to Dynamic WorkloadBroker
© Copyright IBM Corp. 1999, 2012 361

Table 26. Dynamic Workload Console response file properties (continued)
Name Description Permitted values
ENABLE_TWS Enable Tivoli Workload Scheduler
See the description of "ENABLE_TDWB"
true Gives the administratoraccess to Tivoli WorkloadScheduler
false Denies the administratoraccess to Tivoli WorkloadScheduler
INSTALL_METHOD Installation instance choice
The Dynamic Workload Console must beinstalled in an instance of Tivoli WorkloadAutomation (see Instances of Tivoli WorkloadAutomation for an explanation). This propertylets you choose whether you want to installthe component in a new instance (installingalso the embedded WebSphere ApplicationServer and other infrastructure support), or anexisting instance.
In the former case, the path you want to usefor the new instance must be defined in theproperty IS_DESTINATION. In the latter case youmust also identify the path of the existinginstance, using the property:TWA_INSTANCE_PATH
This property also lets you install the DynamicWorkload Console outside the Tivoli WorkloadAutomation structure, on your own externalsupported version of WebSphere ApplicationServer. In this case, the path must be suppliedusing the property ISC_APPSERVER_DIR
new Install the DynamicWorkload Console in a newinstance of Tivoli WorkloadAutomation (and install theinfrastructure support). Usethis value also whenupgrading an existinginstance of the DynamicWorkload Console.
ONTWAInstall the DynamicWorkload Console in anexisting instance of TivoliWorkload Automation
onwas Install the DynamicWorkload Console on yourown external supportedversion of WebSphereApplication Server
IPC_CONNECTOR_ADDRESS The IPC connector. See “Advanced installation” on page297for more details.
IS_BACKUP_DIR Backup directory for upgrade
When upgrading the Dynamic WorkloadConsole, the wizard needs to back up theapplication server configuration while it isupgrading embedded WebSphere ApplicationServer (part of the Dynamic Workload Consoleupgrade process).
Any valid, fully qualified pathoutside: any existing instance ofTivoli Workload Automation, and theinstallation path of the EmbeddedVersion of WebSphere ApplicationServer
362 Tivoli Workload Scheduler: Planning and Installation: Planning and Installation

Table 26. Dynamic Workload Console response file properties (continued)
Name Description Permitted values
IS_DESTINATION Console installation path
On a new instance of Tivoli WorkloadAutomation: the path of a new instance ofTivoli Workload Automation where theDynamic Workload Console is to be installed.
On your existing external instance ofWebSphere Application Server: wheninstalling the Dynamic Workload Console onyour own external version of WebSphereApplication Server, supply the consoleinstallation path.
This does not have to be a path related to theinstance of the WebSphere Application Serveron which you are going to install it. The pathmust not be within an instance of TivoliWorkload Automation:
Any valid, fully qualified pathoutside any existing instance of TivoliWorkload Automation.
IS_UPGRADE Boolean property that determines whether thewizard is being run to upgrade an existinginstance.
true The wizard will use thesupplied properties toupgrade an existing instanceof the Dynamic WorkloadConsole
false The wizard will use thesupplied properties to installan instance of the DynamicWorkload Console
ISC_ADMIN_FULL_USER Your WebSphere Application Serveradministrator user ID
On a new instance of Tivoli WorkloadAutomation: supply the user ID to be used forthe Integrated Solutions Consoleadministration user
On your existing external instance ofWebSphere Application Server: wheninstalling, upgrading, or uninstalling theDynamic Workload Console on your ownexternal version of WebSphere ApplicationServer, supply the existing user ID of theIntegrated Solutions Console administrationuser.
The user ID must exist.
Appendix D. The Dynamic Workload Console response file properties 363

Table 26. Dynamic Workload Console response file properties (continued)
Name Description Permitted values
ISC_ADMIN_PASSWORD Your WebSphere Application Serveradministrator user password
On a new instance of Tivoli WorkloadAutomation: supply the password to be usedfor the Integrated Solutions Consoleadministration user
On your existing external instance ofWebSphere Application Server: wheninstalling, upgrading, or uninstalling theDynamic Workload Console on your ownexternal version of WebSphere ApplicationServer, supply the password of the user ID ofthe existing Integrated Solutions Consoleadministration user.
ISC_APPSERVER_DIR Existing instance installation directory
The installation directory of the externalIntegrated Solutions Console on which theDynamic Workload Console must be installedor upgraded.
See “Installing on your existinginstance of Tivoli Integrated Portal”on page 299 for more details.
licenseAccepted Accept license agreement
To install the Dynamic Workload Consoleusing a response file, you must explicitlyaccept the license agreement, a copy of whichis in the License directory of the productinstall media (DVD or downloaded image).
true To accept the licenseagreement.
false To not accept the licenseagreement. In this event, theDynamic Workload Consoleis not installed.
ORB_LISTENER_ADDRESS ORB Listener port See “Advanced installation” on page297 for more details.
REST_NOTIFICATION_ADDRESS The REST notification port. See“Advanced installation” on page297 for more details.
SAS_SSL_SERVERAUTH_LISTENER_ADDRESS
SAS SSL Port See “Advanced installation” on page297 for more details.
SOAP_CONNECTOR_ADDRESS SOAP connector port See “Advanced installation” on page297 for more details.
TWA_INSTANCE_PATH Existing Tivoli Workload Automation instancepath
The path of an existing instance of TivoliWorkload Automation where the DynamicWorkload Console is to be installed.
Any valid, fully qualified TivoliWorkload Automation instance path.
UPDATE_INSTALLER_DIR The WebSphere Application Server updateinstaller path
The directory of the external WebSphereApplication Server update installer.
See “Installing on your existinginstance of Tivoli Integrated Portal”on page 299 for more details.
364 Tivoli Workload Scheduler: Planning and Installation: Planning and Installation

Table 26. Dynamic Workload Console response file properties (continued)
Name Description Permitted values
WAS_CELL_NAME The WebSphere Application Server cell name
The external WebSphere Application Servercell name.
See “Installing on your existinginstance of Tivoli Integrated Portal”on page 299 for more details.
WAS_NODE_NAME The WebSphere Application Server node name
The external WebSphere Application Servernode name.
See “Installing on your existinginstance of Tivoli Integrated Portal”on page 299 for more details.
WAS_PROFILE_NAME The WebSphere Application Server profilename
The external WebSphere Application Serverprofile name.
See “Installing on your existinginstance of Tivoli Integrated Portal”on page 299 for more details.
WAS_SERVER_NAME The WebSphere Application Server servername
The external WebSphere Application Serverserver name.
See “Installing on your existinginstance of Tivoli Integrated Portal”on page 299 for more details.
WC_adminhost Administrative console See “Advanced installation” on page297 for more details.
WC_adminhost_secure Administrative Console Secure See “Advanced installation” on page297 for more details.
WC_defaulthost HTTP transport See “Advanced installation” on page297 for more details.
WC_defaulthost_secure HTTPS transport See “Advanced installation” on page297 for more details.
Appendix D. The Dynamic Workload Console response file properties 365

366 Tivoli Workload Scheduler: Planning and Installation: Planning and Installation

Appendix E. The Job Brokering Definition Console responsefile properties
This section describes the properties used in the Job Brokering Definition Consoleresponse files:
Note:
1. All values must be written between double quotation marks (").2. Property names are written in mixed case for ease of reading, but are not
case-sensitive3. Keywords used in values are not case-sensitive.
Table 27. Job Brokering Definition Console response file properties
Name Description Permitted values
licenseAccepted Accept license agreement
To install the Job Brokering Definition Consoleusing a response file, you must explicitlyaccept the license agreement, a copy of whichis in the License directory of the productinstall media (DVD or downloaded image).Thelicense must be accepted before installation.This value must equal true for the installationto be successful.
true To accept the licenseagreement.
false To not accept the licenseagreement. In this event, theJob Brokering DefinitionConsole is not installed.
installLocation Installation path for the Job BrokeringDefinition Console.
Any fully qualified path.
© Copyright IBM Corp. 1999, 2012 367

368 Tivoli Workload Scheduler: Planning and Installation: Planning and Installation
Appendix F. Installing and upgrading Tivoli WorkloadScheduler Integration Workbench
About this task
Use Tivoli Workload Scheduler Integration Workbench to develop event and actionplug-ins that extend the capabilities of Tivoli Workload Scheduler event-drivenworkload automation. You can also create Java applications that use the TivoliWorkload Scheduler Java API.
You can install Tivoli Workload Scheduler Integration Workbench with the bundledversion of Eclipse or with an existing instance of Eclipse. The minimum supportedversion is Eclipse HELIOS 3.6 with the Plug-in Development Environment (PDE)installed.
Note: If you are working with an exported display, to access the Tivoli WorkloadScheduler Integration Workbench readme file you must have a browser open andrunning.
Installing Tivoli Workload Scheduler Integration Workbench with thebundled version of Eclipse
About this task
If you do not have the required version of Eclipse on your computer, you caninstall Tivoli Workload Scheduler Integration Workbench bundled with Eclipse forlocal use.
To install Tivoli Workload Scheduler Integration Workbench with the bundledversion of Eclipse, perform the following actions:1. Either, from the installation DVD, navigate to the IntegrationWorkbench
directory and run the setup file appropriate to your operating system.Or, start the launchpad as described in “Launchpad” on page 34 and select theTivoli Workload Scheduler Integration Workbench installation.
2. Follow the installation wizard and when prompted, select Install IntegrationWorkbench.
Installing Tivoli Workload Scheduler Integration Workbench with anexisting instance of Eclipse using the Eclipse Site
About this task
If you have the required version of Eclipse, you can install Tivoli WorkloadScheduler Integration Workbench as a plug-in on the existing instance. Users acrossthe network can access Tivoli Workload Scheduler Integration Workbench as anEclipse site.
To install the current version of Tivoli Workload Scheduler Integration Workbenchinto your existing instance of Eclipse, perform the following actions:
© Copyright IBM Corp. 1999, 2012 369

1. Either, from the installation DVD, navigate to the IntegrationWorkbenchdirectory and run the setup file appropriate to your operating system.Or, start the launchpad as described in “Launchpad” on page 34 and select theTivoli Workload Scheduler Integration Workbench installation.
2. Follow the installation wizard and when prompted, select Install Eclipse site.
Note: For information about using the plug-in, see the readme document inEclipse.
Installing Tivoli Workload Scheduler Integration Workbench with anexisting instance of Eclipse using the remote Eclipse Site
About this task
If you already have Eclipse on your computer, you can install Tivoli WorkloadScheduler Integration Workbench as a plug-in for an existing instance of Eclipse,using the IBM remote Eclipse Site for Tivoli Workload Scheduler IntegrationWorkbench.
To install the current version of Tivoli Workload Scheduler Integration Workbenchinto your existing instance of Eclipse, use the Eclipse Software Update featurespecifying in the Site field, the following link:ftp://public.dhe.ibm.com/software/tivoli_support/misc/TWS/SDK/
Note: For information about using the plug-in, see the readme document inEclipse.
Upgrading Tivoli Workload Scheduler Integration Workbench installedwith the bundled version of Eclipse
About this task
If you installed Tivoli Workload Scheduler Integration Workbench version 8.5.0 or8.5.1 using the bundle version of Eclipse, you can upgrade it using the EclipseSoftware Updates feature. To upgrade Tivoli Workload Scheduler IntegrationWorkbench version 8.5.0 or 8.5.1, perform the following actions:1. Close Tivoli Workload Scheduler Workbench version 8.5.0 or 8.5.1.2. Move to TivoliWorkloadSchedulerIntegrationWorkbenchversion_installation_directory/
eclipse/plugins.3. In this directory, remove the org.eclipse.ecf.identity.jar_<version> file.4. In the TivoliWorkloadSchedulerIntegrationWorkbenchversion_installation_directory/
eclipse/features/com.ibm.tws.sdk_<version>/feature.xml file, change the URLalready present in the update tag, with the following URL:<url>
update label="%updatesite"url="ftp://public.dhe.ibm.com/software/tivoli_support/misc/TWS/SDK/
</url>
5. Save and close the file.6. Start Tivoli Workload Scheduler Integration Workbench.7. Upgrade your old version of Tivoli Workload Scheduler Integration Workbench
using the Eclipse Software Updates feature.
370 Tivoli Workload Scheduler: Planning and Installation: Planning and Installation

Note: For information about using the plug-in, see the readme document inEclipse.
Upgrading Tivoli Workload Scheduler Integration Workbench installedas a plug-in
About this task
If you installed Tivoli Workload Scheduler Integration Workbench version 8.5.0 or8.5.1 on an existing version of Eclipse as a plug-in, you can upgrade it using theEclipse Software Updates feature, by performing the following actions:1. Close the Eclipse where you installed Tivoli Workload Scheduler Integration
Workbench version 8.5.0 or 8.5.1.2. Move to the eclipse_installation _directory/eclipse/features directory.3. Update the com.ibm.tws.sdk_<version>/feature.xml with the following
address:ftp://public.dhe.ibm.com/software/tivoli_support/misc/TWS/SDK/
4. Upgrade the old version of Tivoli Workload Scheduler Integration Workbenchusing the Eclipse Software Updates feature.
Note: For information about using the plug-in, see the readme document inEclipse.
Appendix F. Installing and upgrading Tivoli Workload Scheduler Integration Workbench 371

372 Tivoli Workload Scheduler: Planning and Installation: Planning and Installation

Appendix G. Discovering installed products
About this task
If you do not know what products are installed in an instance of Tivoli WorkloadAutomation, perform the following procedure to discover what products areinstalled:
Open a command prompt and change to the following directory on the TivoliWorkload Scheduler DVD for the operating system of the computer (if you havecopied it to hard disk, go to that location): drive/operating_system/CLI
Run the following to initialize the Tivoli Configuration Manager environment:swd_env.bat/.sh
Run the following software distribution command to verify which softwarepackages have been installed:wdlssp
A list of the software packages is displayed, similar to the following:----------------------------------------
DISSE0164I Name : FP_TWS_WINDOWS_TWS_userDISSE0165I Version : 8.5.0.00DISSE0166I State : ICU--
----------------------------------------
DISSE0164I Name : TWS_LP_TWS_userDISSE0165I Version : 8.5.0.00DISSE0166I State : ICU--
----------------------------------------
The details of the packages in the list will depend on which packages have beeninstalled on this computer. In this case, on a Windows computer, an installation fora <TWS_user> called <TWS_user> has been made of the software package blocksfor the Tivoli Workload Scheduler scheduling engine and the scheduling engineNational Language Support (LP = Language Pack). The value of State depends onwhether the package has yet been "committed".
Run the following to remove a software package:wdrmvsp -f <package_name>.<package_version>
This command does not remove the log files and configuration files used by TivoliConfiguration Manager. These remain either within the Tivoli Workload Schedulerinstallation directory, or the system temporary directory.
Note: If you experience any problem running these commands, or to understandmore about Tivoli Configuration Manager, consult its documentation, which can befound online at http://publib.boulder.ibm.com/tividd/td/ConfigurationManager4.2.3.html.
© Copyright IBM Corp. 1999, 2012 373

374 Tivoli Workload Scheduler: Planning and Installation: Planning and Installation

Appendix H. Files backed up during upgrade of TivoliWorkload Scheduler
During an upgrade from V8.3 and V8.4, some files will be backed up into a .bkfile. Files upgraded from V8.5 and higher are not backed up into a .bk fileAdditionally, any customized files are not backed up. For example, the filetws_env.cmd will be backed up into the file tws_env.cmd.bk. These backed up fileare replaced with new files. The following is a list of files backed up during theupgrade.
Windows operating system:
v tws_env.cmdv jobmanrc.cmdv TWSCCLog.properties (this file is not replaced)v Startup.cmdv JnextPlan.cmdv MakePlan.cmdv SwitchPlan.cmdv CreatePostReports.cmv UpdateStats.cmdv ResetPlan.cmdv Sfinal
UNIX
v tws_env.shv tws_env.cshv jobmanrcv TWSCCLog.properties (this file is not replaced)v StartUpv JnextPlanv MakePlanv SwitchPlanv CreatePostReportsv UpdateStatsv ResetPlanv Sfinal
© Copyright IBM Corp. 1999, 2012 375

376 Tivoli Workload Scheduler: Planning and Installation: Planning and Installation

Appendix I. DB2 tablespace relative paths
When you create a DB2 tablespace with a relative path, the path is constructed inthe following way:DFTDBPATH\DB2_instance\NODE0000\SQLnnnnn\TABLESPACE_REL_PATH
where:
DFTDBPATHFor Windows operating system, this is the drive where the DB2 instance isinstalled. For UNIX and Linux operating systems, this is the home instanceof the DB2 installation.
DB2_instanceIs the name of the DB2 instance.
NODE0000Is the directory where DB2 database instances are located.
SQLnnnnIs an incremental directory path that depends on the number of databaseinstances.
TABLESPACE_REL_PATHIs the relative path you specified for the tablespace.
For more information about tablespace relative paths, seethe DB2 documentationset.
© Copyright IBM Corp. 1999, 2012 377

378 Tivoli Workload Scheduler: Planning and Installation: Planning and Installation

Notices
This information was developed for products and services offered in the U.S.A.IBM may not offer the products, services, or features discussed in this document inother countries. Consult your local IBM representative for information on theproducts and services currently available in your area. Any reference to an IBMproduct, program, or service is not intended to state or imply that only that IBMproduct, program, or service may be used. Any functionally equivalent product,program, or service that does not infringe any IBM intellectual property right maybe used instead. However, it is the user's responsibility to evaluate and verify theoperation of any non-IBM product, program, or service.
IBM may have patents or pending patent applications covering subject matterdescribed in this document. The furnishing of this document does not give youany license to these patents. You can send license inquiries, in writing, to:
IBM Director of LicensingIBM CorporationNorth Castle DriveArmonk, NY 10504-1785 U.S.A.
For license inquiries regarding double-byte (DBCS) information, contact the IBMIntellectual Property Department in your country or send inquiries, in writing, to:
Intellectual Property LicensingLegal and Intellectual Property LawIBM Japan, Ltd.19-21, Nihonbashi-Hakozakicho, Chuo-kuTokyo 103-8510, Japan
The following paragraph does not apply to the United Kingdom or any othercountry where such provisions are inconsistent with local law:
INTERNATIONAL BUSINESS MACHINES CORPORATION PROVIDES THISPUBLICATION "AS IS" WITHOUT WARRANTY OF ANY KIND, EITHEREXPRESS OR IMPLIED, INCLUDING, BUT NOT LIMITED TO, THE IMPLIEDWARRANTIES OF NON-INFRINGEMENT, MERCHANTABILITY OR FITNESSFOR A PARTICULAR PURPOSE.
Some states do not allow disclaimer of express or implied warranties in certaintransactions, therefore, this statement might not apply to you.
This information could include technical inaccuracies or typographical errors.Changes are periodically made to the information herein; these changes will beincorporated in new editions of the publication. IBM may make improvementsand/or changes in the product(s) and/or the program(s) described in thispublication at any time without notice.
Any references in this information to non-IBM websites are provided forconvenience only and do not in any manner serve as an endorsement of thosewebsites. The materials at those websites are not part of the materials for this IBMproduct and use of those websites is at your own risk.
© Copyright IBM Corp. 1999, 2012 379

IBM may use or distribute any of the information you supply in any way itbelieves appropriate without incurring any obligation to you.
Licensees of this program who wish to have information about it for the purposeof enabling: (i) the exchange of information between independently createdprograms and other programs (including this one) and (ii) the mutual use of theinformation which has been exchanged, should contact:
IBM Corporation2Z4A/10111400 Burnet RoadAustin, TX 78758 U.S.A.
Such information may be available, subject to appropriate terms and conditions,including in some cases payment of a fee.
The licensed program described in this document and all licensed materialavailable for it are provided by IBM under terms of the IBM Customer Agreement,IBM International Program License Agreement or any equivalent agreementbetween us.
This information contains examples of data and reports used in daily businessoperations. To illustrate them as completely as possible, the examples include thenames of individuals, companies, brands, and products. All of these names arefictitious and any similarity to the names and addresses used by an actual businessenterprise is entirely coincidental.
TrademarksIBM, the IBM logo, and ibm.com® are trademarks or registered trademarks ofInternational Business Machines Corporation in the United States, other countries,or both. If these and other IBM trademarked terms are marked on their firstoccurrence in this information with a trademark symbol (® or ™), these symbolsindicate U.S. registered or common law trademarks owned by IBM at the time thisinformation was published. Such trademarks may also be registered or commonlaw trademarks in other countries. A current list of IBM trademarks is available onthe Web at "Copyright and trademark information" at http://www.ibm.com/legal/copytrade.shtml.
Adobe, the Adobe logo, PostScript, and the PostScript logo are either registeredtrademarks or trademarks of Adobe Systems Incorporated in the United States,and/or other countries.
Intel, Intel logo, Intel Inside, Intel Inside logo, Intel Centrino, Intel Centrino logo,Celeron, Intel Xeon, Intel SpeedStep, Itanium, and Pentium are trademarks orregistered trademarks of Intel Corporation or its subsidiaries in the United Statesand other countries.
Java and all Java-based trademarks and logos are trademarks or registeredtrademarks of Oracle and/or its affiliates.
380 Tivoli Workload Scheduler: Planning and Installation: Planning and Installation

Linux is a registered trademark of Linus Torvalds in the United States, othercountries, or both.
Microsoft, Windows, Windows NT, and the Windows logo are trademarks ofMicrosoft Corporation in the United States, other countries, or both.
UNIX is a registered trademark of The Open Group in the United States and othercountries.
Notices 381

382 Tivoli Workload Scheduler: Planning and Installation: Planning and Installation

Index
Special characters@ character in install directory name,
causing the Dynamic Workload Consoleuninstallation to fail 331
agent dynamic 98prerequisites 275
Numerics4.2-SWDGW-F1P1 fix pack, compatibility
problem 2514.2-TCM-FP02 fix pack, to solve
compatibility problem 25156b - system error given during
installation 233
Aaccess method
silent installation 116accessibility xiaccount creation
Windows 233Windows 2000 233
addlanguage packs
command line client 202new feature
administration HTTP transportfield 202
administration HTTPS transportfield 202
bootstrap field 201CSIv2 Client Authentication
Listener field 201CSIv2 Server Authentication
Listener field 201HTTP transport field 201HTTPS transport field 201ORB Listener field 202RMI field 201SAS Server Authentication Listener
field 201SOAP connector field 201TWSuser password field 201
option to add the dynamic workloadbroker resource command withwdinstsp 109
option to add the Java runtime to runjob types with advanced optionsusing wdinstsp 109
standard agent, fault-tolerant agent, ordomain manager capability withwdinstsp 110
the Java runtime to run job types withadvanced options usingwdinstsp 168
add feature installation fails 248
addingconnector 92language packs 92plug-ins by using the wizard 115
additional plug-insuninstallation procedures 210uninstalling
log files 210modified files 210with wizard 210
administration HTTP transport fieldnew feature
add 202administration HTTPS transport field
new featureadd 202
agent 98, 277for distributed environment 88, 98for end-to-end environment 88, 98how to uninstall manually 263install 87installation
agent display name 89dynamic workload broker host
name 90dynamic workload broker HTTPS
port number 90host name or IP address 89installation directory 90JobManager port 89, 90user name 88
on IBM i 277static environment 5upgrading dynamic agent 166upgrading standard or fault-tolerant
agent 167upgrading using a silent
installation 158upgrading using Software
Distribution 164upgrading using the installation
wizard 155upgrading using twsinst 158
agent display nameinstallation
agent 89dynamic domain manager 83master domain manager or backup
master 70agent dynamic
on 98on IBM i 277
agent fault-tolerantstatic environment 5
agent installationunattended, troubleshooting 252
agent uninstallingsilent 207twsinst 208, 285wizard 206
Agent, registry attribute 345
AIXinstallation problems 235InstallShield wizard installation
fails 247APARs 234
IY50574 262IZ79105 309
application job plug-insoption to add runtime for Java
runtime to run job types withadvanced options 161
option to add the Java runtime to runjob types with advancedoptions 167
option to add the Java runtime to runjob types with advanced optionsusing wdinstsp 109, 168
application servercredentials problem when installing
on Windows 233installation fails on Windows 2003
domain with credentialsproblem 243
installation log files 38, 293installation problem 242profile creation fails 242
applicationsworkload environment integrated
with 15attributes, registry file 345authentication
upgrading 130authentication mechanism
Tivoli Dynamic Workload Consoleupdating 315
automatically generate portsinstallation
dynamic domain manager 84available functions
for Dynamic Workload Broker 304for Tivoli Workload Scheduler 304
AWSDEQ024E received in commitstep 232
AWSFAB035E received 251AWSFAB037E received 245AWSGAB005W received 232AWSGAB566E received 252
Bbackup
directory 248backup domain manager
configuring 196static environment 5
backup dynamic domain managerconfiguring 197environment 7installing 80
© Copyright IBM Corp. 1999, 2012 383

backup masterinstallation
dynamic workload broker HTTPSport number 71
backup master domain managerconfiguring 195environment 7installation
name 70installing 68static environment 5
backup master or master domainmanager
installationagent display name 70company 70Dynamic workload broker host
name 71host name or IP address 70JobManager port 71Netman port 70password 69this workstation name 70user name 69
backup package creation failed 248batchman
checking if active 265bc, utility required by InstallShield
wizard on Linux 239before installing
creating database tables 43before upgrading
upgrading database tables 43bootstrap field
new featureadd 201
BOOTSTRAP_ADDRESS response fileproperty 361
Ccapability
domain manager 5dynamic agent 7dynamic domain manager 7extended agent 5, 8fault-tolerant agent 5
CDsDynamic Workload Console
installation 292checking
prerequisites 28, 123checkJobsLoop.wait response file
property 349checkPrerequisites.stopOnCheckPrereq
response file property 349CLI
parameter, -installRoot, is invalid,error given on Oracle Solaris 238
wdinstsp 107wimpspo 107
CMW3202E received 231command
setup.bin 115uninstaller.bin 210, 212
command line clientadd
language packs 202installation 90
password 92remote host 91remote port 91user name 92
upgrading 188commands
wdinstsp 107wdinstsp agent installation 108wdinstsp CIT installation 108, 165wdinstsp to add standard agent,
fault-tolerant agent, or domainmanager capability 110
wdinstsp to add standard agent,fault-tolerant or domain managercapabilities 167
wdinstsp to add the Java runtime torun job types with advancedoptions 109, 168
wimpspo 107commands and scripts
lnto link directories to the .swdis
directory 244, 249makesec
create Security file 262ps, used before manual
uninstallation 265shut, used before manual
uninstallation 265stop
used before manualuninstallation 265
twsinst, files not being correctlycopied before running 245, 253
unlinkused before manual
uninstallation 265wconvcat 251wdlssp, used before manual
uninstallation 265wdrmvsp, used before manual
uninstallation 265wlsinst 251
commit step fails 252company
installationfault-tolerant agent 89master domain manager or backup
master 70COMPANY_NAME property
customizeDB2 45ORACLE 55
configuringbackup domain manager 196backup dynamic domain
manager 197backup master domain manager 195domain manager 196dynamic agent 199, 283dynamic domain manager 197dynamic scheduling after
installation 202
configuring (continued)dynamic scheduling after
upgrade 202fault-tolerant agent 198master domain manager 194
connectionto Tivoli Workload Scheduler 304
connectoradding 92, 200uninstalling manually on
Windows 268connectors
uninstall manually 267console
portfolio 311start 311
conventions used in publications xicpuCfgPanel.addFINAL response file
property 349cpuCfgPanel.company response file
property 349cpuCfgPanel.jmPort NumberHttps
response file property 350cpuCfgPanel.masterCPU response file
property 349cpuCfgPanel.tcp PortNumber response
file property 350cpuCfgPanel.tdwbHostName response
file property 350cpuCfgPanel.thisCPU response file
property 350cpuCfgPanel.tws PortNumber response
file property 350create
SQL files before installing a dynamicdomain manager
Oracle 58SQL files before installing a master
domain managerOracle 49, 56
CREATE_WAS_SERVICE response fileproperty 361
creating database tablesbefore installing 43before upgrading 43
creating database tables DB2property file
COMPANY_NAME property 45DB_USER property 44EIF_PORT property 46HOST_NAME property 46TWS_DATA_TS_PATH
property 45TWS_DB property 44TWS_LOG_TS_NAME
property 45TWS_LOG_TS_PATH property 45TWS_TS_NAME property 45TWS_USER property 44WAS_SEC_PORT property 46
credentials problem causing installationof application server on Windows 2003domain to fail 243
credentials problem for application serverwhen installing on Windows 233
384 Tivoli Workload Scheduler: Planning and Installation: Planning and Installation

CSIv2 Client Authentication Listener fieldnew feature
add 201CSIv2 Server Authentication Listener
fieldnew feature
add 201CSIV2_SSL_MUTUALAUTH_
LISTENER_ADDRESS response fileproperty 361
CSIV2_SSL_SERVERAUTH_LISTENER_ADDRESS response fileproperty 361
customizeDB2
properties file 43Oracle
properties file 54customizeDB2SQL.properties file
customizeDB2 44
customizeORACLESQL.properties filecustomize
ORACLE 54customizeSQL
generating SQL filesDB2 46
Ddatabase tables
creatingbefore installing 43before upgrading 43
DB_USER propertycustomize
DB2 44DB2
creating database tablesbefore installing 43
customizeCOMPANY_NAME property 45DB_USER property 44EIF_PORT property 46HOST_NAME property 46properties file 43TWS_DATA_TS_PATH
property 45TWS_DB property 44TWS_LOG_TS_NAME
property 45TWS_LOG_TS_PATH property 45TWS_TS_NAME property 45TWS_USER property 44TWSTEMPDIR property 44WAS_SEC_PORT property 46
generatingSQL files 46
generating SQL filescustomizeSQL 46images_dir 46javahome_dir 46operating_system 46property_file_path 47
installation log files 38
DB2 (continued)run before installing a master domain
managerSQL files 47
run before installing dynamic domainmanager
SQL files 49run before upgrading Tivoli Workload
SchedulerSQL files 50, 52
upgrading database tablesbefore upgrading 43
db2CheckPrereqs. db2Directory. responsefile property 350
db2ClientCfg. remoteNode. response fileproperty 350
db2ClientCfg. remotePort. response fileproperty 350
db2ClientCfg. twsDBPwd. response fileproperty 351
db2ClientCfg. twsDBUser. response fileproperty 351
db2ClientCfg.db2 AdminPwd. responsefile property 351
db2ClientCfg.db2 AdminUser. responsefile property 351
db2ClientCfg.db2 LocalAdminPwd.response file property 351
db2ClientCfg.db2 LocalAdminUser.response file property 351
db2ServerCfg. instanceName response fileproperty 351
db2ServerCfg.db2 Admin User responsefile property 352
db2ServerCfg.db2AdminPwd responsefile property 352
db2ServerCfg.instancePort response fileproperty 351
DCS_UNICAST_ADDRESS response fileproperty 361
deleting filestoo slow after manual uninstall 267
directoriesbackup 248swdis 248work 248
directory for SSL filesupgrade master domain
manager 137disconnected command line, of Tivoli
Configuration Manager 251disk space
not enough for installation 253display name
agentmaster domain manager or backup
master 70installation
agent 89dynamic domain manager 83
DISSE0005E received 248DISSE0006E received 251DISSE0282E received 248DISSE0324E received 248distributed workload
environment 9
distributed workload (continued)environment with dynamic scheduling
capabilities 11environment with static and dynamic
scheduling capabilities 13distributed-driven
workload environment for z/OS 16domain
amount of network traffic 19dependencies between jobs 19firewalls 19internetwork dependencies 20level of fault-tolerance required 19localized processing 18number of geographic locations 18number of workstations, applications,
and jobs 18planning 17, 18SSL or GSKit 19system performance and other
criteria 19time zones 19topology
multiple 21single 20
types of applications 19Windows network 19
domain managerconfiguring 196static environment 5upgrading 167upgrading using the installation
wizard 155domain name
installationdynamic domain manager 82
domain removing adynamic domain manager 206
DVDsinstallation 31
dynamic agentcapability 7configuring 199, 283environment 7installation
user name 88installing 88maintaining ID 252maintaining name 252multiple installations 252on 98reinstalling 252repeated installations 252retrieving ID 252several installations 252
dynamic and static schedulingcapabilities
environment with 13dynamic domain manager
configuring 197environment 7installation
agent display name 83automatically generate ports 84domain name 82dynamic workload broker host
name 84
Index 385

dynamic domain manager (continued)installation (continued)
dynamic workload broker netmanport 86
dynamic workload brokerworkstation name 86
host name or IP address 83JobManager port 84master domain manager name 83master domain manager netman
port 80Netman port 83password 82this workstation name 82user name 82
installation fails 246installation fails after database
configuration 246installing 80run SQL files before installing
DB2 49Oracle 58
uninstalling 206dynamic scheduling
enabling 92, 191enabling after installation 202enabling after upgrade 202
dynamic scheduling capabilitiesenvironment with 11
dynamic workload brokerinstallation
dynamic workload broker HTTPSport number 84
Dynamic Workload Brokeravailable functions 304server connection 305
dynamic workload broker host nameinstallation
agent 90dynamic domain manager 84
Dynamic workload broker host nameinstallation
master domain manager or backupmaster 71
dynamic workload broker HTTPS portnumber
installationagent 90dynamic domain manager 84master domain manager or backup
master 71dynamic workload broker workstation
nameinstallation
dynamic domain manager 86master domain manager 80
Dynamic Workload Consoleaccessibility xiconfiguration 309
for Tivoli Workload SchedulerVersion 8.3 Fix Pack 3 301
connectionto Dynamic Workload Broker
components 305getting started 311installation
advanced 297
Dynamic Workload Console (continued)installation (continued)
CDs 292default 297images 292log files 292methods 290on embedded WebSphere
Application Server 296on existing external WebSphere
Application Server 299on existing instance of the
embedded WebSphereApplication Server 298
sample scenarios 290setup file 292silent 299types 297using launchpad 295using response file 299using wizard 295
installation and uninstallation logfiles 321
log files 292overview 289remove
manually 322, 323starting and stopping 306troubleshooting 321uninstall 319
clean-up 322, 323in silent mode 319manually 322, 323using wizard 319
updatingauthentication mechanism 315
upgradefailed, recovering 321
upgradingoverview 315silently 317upgrading on embedded
WebSphere ApplicationServer 316
using launchpad 317using wizard 317
user interface 303Dynamic Workload Console problems
withuninstallation 331upgrade 330
Eeducation xiiEIF_PORT property
customizeDB2 46ORACLE 55
ENABLE_TDWB response fileproperty 361
ENABLE_TWS response fileproperty 362
enablingdynamic scheduling 92, 191dynamic scheduling after
installation 202
enabling (continued)dynamic scheduling after
upgrade 202end-to-end scheduling 30end-to-end workload environment
planning 14environment
backup dynamic domain manager 7backup master domain manager 7description 3distributed workload environment 9distributed workload environment
with dynamic schedulingcapabilities 11, 13
distributed-driven workloadenvironment for z/OS 16
domain 17dynamic agent 7dynamic domain manager 7end-to-end workload
environment 14extended agent 5, 8localized processing 18master domain manager 6workload environment integrated
with external systems 15environment static
agent 5backup domain manager 5backup master domain manager 5domain manager 5fault-tolerant agent 5master domain manager 4standard agent 5
error writing file = , error message 244error writing file = 28, error
message 244examples
language installation with SoftwareDistribution 112
registry file 345existing versions
upgrade 121extended agent
capability 5, 8environment 5, 8
external systemsworkload environment integrated
with 15
Ffault-tolerant agent
configuring 198installation
company 89master domain manager name 89Netman port 89user name 88workstation name 89
installing 88static capability 5
featureinstallation 92, 200upgrading 191
FeatureList, registry attribute 345
386 Tivoli Workload Scheduler: Planning and Installation: Planning and Installation
filetws4apps_ia_uninstall.log silent
uninstallation 212tws4apps_ia_uninstall.log
uninstallation 210tws4apps_status.log
uninstallation 210tws4apps_uninstall.log silent
uninstallation 212tws4apps_uninstall.log
uninstallation 210TWSAPPS_RespFile_UNIX.txt silent
installation 116TWSAPPS_RespFile_windows.txt
silent installation 116file names, case changed during
copy 253file system structure
upgrade master domainmanager 137
files/etc/password 162case changed during copy 253FINAL 194logs
installation 215uninstallation 215
names, case changed duringcopy 253
not correctly copied before runningtwsinst 245, 253
Securitychecking existence of 262
swdis.ini 108Symphony 22twsinst, before running not being
correctly copied 245, 253TWSRegistry.dat 265, 345
files changedupgrade 122
FINALadding 194
final job streamadding 194
firewall stopping installation of theDynamic Workload Console 326
fix packs4.2-SWDGW-F1P1, compatibility
problem 2514.2-TCM-FP02, to solve compatibility
problem 251installing using Tivoli Configuration
Managerincompatibility problem 251insufficient disk space 248
silent installation fails 244folders changed
upgrade 122
Ggateway component of software
distribution, incompatibility 251generating
SQL filesDB2 46Oracle 55
generating SQL filesDB2
customizeSQL 46images_dir 46javahome_dir 46operating_system 46property_file_path 47
global options, checking defaultsettings 262
glossary xi
Hhost name
dynamic workload brokerJobManager 84
installationagent 89
not FQDN causing installation to failon Linux 328
host name Dynamic workload brokerinstallation
master domain manager or backupmaster 71
host name or IP addressinstallation
dynamic domain manager 83master domain manager or backup
master 70host name truncated causing installation
to fail, Windows 231HOST_NAME property
customizeDB2 46ORACLE 55
HP-UXinstallation problems 237InstallShield wizard installation
cannot install JRE 238does not start 237fails 247fails with a "run error" 238
HTTP transport fieldnew feature
add 201HTTPS port number
dynamic workload broker 84HTTPS port number dynamic workload
brokerinstallation
master domain manager or backupmaster 71
HTTPS transport fieldnew feature
add 201hung installation on AIX 235hung installation on AIX 6100-05 235
IIBM i
agent dynamic 277images
Dynamic Workload Consoleinstallation 292
images_dirgenerating SQL files
DB2 46install
agent 87INSTALL_METHOD response file
property 362InstallAnywhere error messages
messages 227installation
adding connector 200adding features 92, 200additional method 115agent
agent display name 89dynamic workload broker host
name 90dynamic workload broker HTTPS
port number 90host name or IP address 89installation directory 90JobManager port 89, 90user name 88
AIX, problems 235application server installation
problems 242backup master domain manager
workstation name 70checking prerequisites 28checking prerequisites IBM i 275command line client 90
password 92remote host 91remote port 91user name 92
correcting a failed step andcontinuing 222
DVDs 31dynamic domain manager
agent display name 83automatically generate ports 84domain name 82dynamic workload broker host
name 84dynamic workload broker HTTPS
port number 84dynamic workload broker netman
port 86dynamic workload broker
workstation name 86host name or IP address 83JobManager port 84master domain manager name 83Netman port 83password 82this workstation name 82user name 82
Dynamic Workload ConsoleCDs 292images 292in silent mode 291methods 290on embedded WebSphere
Application Server 296on existing external WebSphere
Application Server 299
Index 387
installation (continued)Dynamic Workload Console
(continued)on existing instance of the
embedded WebSphereApplication Server 298
sample scenarios 290setup file 292types 297using launchpad 290using wizard 290
Dynamic Workload Console logfiles 321
example procedure for problemresolving 226
fails"Error writing file = "
received 244"Error writing file = 28"
received 244application server profile creation
fails 242AWSDEQ024E error received 232AWSFAB037E error received 245CMW3202E error received 231dynamic domain manager 246host name truncated 231InstallShield wizard on
Windows 231master domain manager 245miscellaneous 253NoClassDefFoundError error 247Oracle Solaris with error
"command line parameter,-installRoot, is invalid" 238
recovery using wizard 216software package block 248, 250UNIX with JVM validation
error 236with error AWSFAB035E 251with error AWSGAB566E 252with error DISSE0324E 248with installation image problem on
NFS mount 247fails on Linux 241fault-tolerant agent
company 89master domain manager name 89Netman port 89workstation name 89
from shared folder fails onWindows 327
hangs (Dynamic WorkloadConsole) 326
hangs on AIX 235hangs on AIX 6100-05 235HP-UX, problems 237InstallShield wizard
"Add feature" installationfails 248
does not start on HP-UX 237fails on HP-UX with a "run
error" 238JRE does not install on
HP-UX 238JRE does not install on Linux 239
installation (continued)Linux
start of Tivoli Workload Schedulergives errors 240
Linux, problems 239log files 36, 215log files, DB2 38log files, embedded WebSphere
Application Server 38, 293master domain manager
dynamic workload broker netmanport 80
dynamic workload brokerworkstation name 80
master domain manager or backupmaster
agent display name 70company 70Dynamic workload broker host
name 71dynamic workload broker HTTPS
port number 71host name or IP address 70JobManager port 71Netman port 70password 69this workstation name 70user name 69
miscellaneous problems 243of application server fails on Windows
2003 domain with credentialsproblem 243
of the Dynamic Workload Consolefails when installing on differentexternal WebSphere ApplicationServer profile 329
of the Dynamic Workload Console,fails to start on Linux RHEL 5(x86–64) 329
Oracle Solaris, problems 238overview 27preparing 27problem scenarios 230problems installing on Windows 230procedure for problem resolving 226resuming 225security implications 261silent 92
fails with "Error writing file =" 244
fails with "Error writing file =28" 244
of the Dynamic Workload Console,problems with 329
response file template 96troubleshooting 241
silent,recovering 226
software package blocks 104step list 217step window 218step, failed, correcting and
continuing 222Tivoli Configuration Manager,
fails 248, 250Tivoli Integrated Portal
from the DVD or eImages 301
installation (continued)Tivoli Integrated Portal installation
fails 326troubleshooting 215troubleshooting scenarios
Dynamic Workload Console 325twsinst
fails 245fails with error AWSFAB035E 251fails with error
AWSGAB566E 252troubleshooting 241
UNIX, problems 236using launchpad 34Using the installation wizard 68verifying 262Windows receives warning
AWSGAB005W 232wizard, rerunning or resuming 223wizard, resuming now or later 224
installation agentunattended, troubleshooting 252wizard, troubleshooting 252
installation and uninstallation log filestwsinst 37wizard and silent 37
installation directoryinstallation
agent 90installation log file
tws4apps_install.log 115tws4plugins_install.log 115
installation methodISMP 35
launchpad 34ISMP silent mode 36twsinst 36, 97
installation methodsSoftware Distribution 36
installation response fileTWSAPPS_RespFile_UNIX.txt silent
installation 116TWSAPPS_RespFile_windows.txt
silent installation 116installation silent log file
tws4apps_install.log 116InstallationActions .instanceID response
file property 352InstallationActions. Install_Method
response file property 352InstallationActions. TWA_ 353InstallationActions. twsUser response file
property 353installationAgent Components.
addEclipse response file property 353installationAgent Components. addTdwb
response file property 353installationAgentComponents.
instanceType response fileproperty 353
installationComponents.instance Typeresponse file property 353
InstallationPath, registry attribute 345installing
additional plug-in with silentinstallation 116
backup dynamic domain manager 80
388 Tivoli Workload Scheduler: Planning and Installation: Planning and Installation

installing (continued)backup master domain manager 68by using the wizard 115dynamic agent 88dynamic domain manager 80fault-tolerant agent 88Integration Workbench 369Integration Workbench using the
remote Eclipse Site 370Java runtime 88language packs with Software
Distribution 111master domain manager 68software package block 164syntax CIT installation using
wdinstsp 165installing additionalplug-ins
before 114installLocation response file
property 353, 367installRoot not valid on Oracle
Solaris 238InstallShield wizard
"Add feature" installation fails 248cannot install JRE on HP-UX 238cannot install JRE on Linux 239does not start on HP-UX 237fails on AIX or HP-UX with a "run
error" 247fails with "run error" 247fails with a "run error" on
HP-UX 238installation and uninstallation log
files 292problem using with the Dynamic
Workload Console 325recovering installation with 216uninstallation fails on Windows 258
InstallShield wizard backup masterdomain manager installation
localopts 254InstallShield wizard installation
backup master domain managerlocalopts 254
failsAWSJIS145E 254
InstallShield wizard Oracle installationfails
AWSJIS145E 254InstallShield wizard silent
installation and uninstallation logfiles 37
INSTANCE_PATH response fileproperty 353
Integration Workbenchinstalling 369installing using the remote Eclipse
Site 370upgrading 370upgrading installed as a plug-in 371
interactive wizardproblem using with the Dynamic
Workload Console 325interface
command line client 8dynamic workload broker command
line 8
interface (continued)Dynamic Workload Console 8Job Brokering Definition Console 8master domain manager command
line 8internetwork dependencies
domain 20IP address
installationagent 89
IP address or host nameinstallation
dynamic domain manager 83master domain manager or backup
master 70IPC_CONNECTOR_ADDRESS response
file property 362IS_BACKUP_DIR response file
property 362IS_DESTINATION response file
property 363IS_UPGRADE response file
property 363ISC_ADMIN_FULL_USER response file
property 363ISC_ADMIN_PASSWORD response file
property 364ISC_APPSERVER_DIR response file
property 364ISMP
installation method 35ISMP silent mode
installation method 36IsOnlyFTAConnectorToUninstall.
IsOnlyFTAConnector response fileproperty 353
IY50574, APAR 262IY52481, APAR 234
JJava runtime
installing 88Java Runtime Environment
cannot be installed on HP-UX 238cannot be installed on Linux 239validation problem on UNIX 236
javahome_dirgenerating SQL files
DB2 46jobman and JOBMAN
checking if active 265JobManager port
installationagent 89, 90dynamic domain manager 84master domain manager or backup
master 71JVM
causing installation to fail on LinuxRHEL V5 328
causing installation to fail on SuseLinux 328
causing product installation to fail onLinux RHEL 5 240
causing product installation to fail onSuse Linux 240
jvmtimer, need to use for UNIXinstallation 236
Kkernel parameters, max_thread_proc 237keys, registry, Windows, removing 269
Llanguage packs
addcommand line client 202
adding 92installing 101, 162, 280installing with Software
Distribution 111removing 206uninstalling 210
launchpadinstallation 34problems using with the Dynamic
Workload Console 325LDAP
upgrading 130Tivoli Dynamic Workload
Console 315license Accepted response file
property 367licenseAccepted response file property,
TDWC 364licenseAccepted response file property,
TWS 354Linux
erroneous warning messagesdisplayed from launchpad 325
installation fails if host name notFQDN 328
installation problems 239InstallShield wizard installation
cannot install JRE 239RHEL 5 (x86–64) install or uninstall of
the Dynamic Workload Console failsto start 329
RHEL 5 and Suse 11 productinstallation fails (JVM) 240
RHEL V5 and Suse V11 installationfails (JVM) 328
start of Tivoli Workload Schedulergives errors after installation 240
Linux failed installation 241Linux user accounts 39ln, command
to link directories to the .swdisdirectory 244, 249
localized processingdomain 18
localoptschecking default settings 262
Log Analyzerdescription 369
log filetws4apps_ia_uninstall.log silent
uninstallation 212tws4apps_status.log
uninstallation 210
Index 389

log file (continued)tws4apps_uninstall.log silent
uninstallation 212tws4apps_uninstall.log
uninstallation 210tws4plugins_install.log 115
log file for uninstallingtws4apps_ia_uninstall.log 210
log file not written by failed silentinstallation 241
log file silent installationtws4apps_ia_install.log 116
log files 36DB2 installation 38Dynamic Workload Console 321embedded WebSphere Application
Server installation 38, 293installation 215packaging for support 215uninstallation 215uninstalling additional plug-ins 210
log successfullybut Tivoli Integrated Portal
installation fails 326LPList, registry attribute 345LPName, registry attribute 345
Mmailman
checking if active 265MaintenanceVersion, registry
attribute 345MajorVersion, registry attribute 345makesec
create Security file 262manual uninstallation
agents 263connector 267master domain manager 263
manuallyDynamic Workload Console
uninstall 322, 323master domain manager
configuring 194environment 6installation
dynamic workload broker HTTPSport number 71
dynamic workload brokerworkstation name 80
installation fails 245installing 68run SQL files before installing
DB2 47Oracle 56
static environment 4uninstall manually 263
master domain manager nameinstallation
dynamic domain manager 83fault-tolerant agent 89
master domain manager or backupmaster
installationagent display name 70company 70
master domain manager or backupmaster (continued)
installation (continued)Dynamic workload broker host
name 71host name or IP address 70JobManager port 71Netman port 70password 69this workstation name 70user name 69
master domain manager upgradedirectory for SSL files 137file system structure 137product directory 135
master, global option 262max_thread_proc kernel parameter 237MAXDSIZ, configuration parameter
needed for HP-UX 238MDL_USER property
customizeORACLE 54
memoryvirtual, out of 252
messageInstallAnywhere return code 227
methodfor installing 115
methodsfor uninstalling 210
MinorVersion, registry attribute 345modified files
uninstalling additional plug-ins 210
Nname
companymaster domain manager or backup
master 70domain name 82master domain manager name 83password
master domain manager or backupmaster 69
this workstation namemaster domain manager or backup
master 70user name 82
master domain manager or backupmaster 69
workstation namebackup master domain
manager 70netman
checking if active 265Netman port
fault-tolerant agentinstallation 89
installationdynamic domain manager 83master domain manager or backup
master 70netman port dynamic workload broker
installationdynamic domain manager 86master domain manager 80
network 3backup dynamic domain manager 7backup master domain manager 7dynamic agent 7dynamic domain manager 7extended agent 5, 8master domain manager 6
network staticagent 5agent fault-tolerant 5backup domain manager 5backup master domain manager 5domain manager 5master domain manager 4standard agent 5
new featureadd
administration HTTP transportfield 202
administration HTTPS transportfield 202
bootstrap field 201CSIv2 Client Authentication
Listener field 201CSIv2 Server Authentication
Listener field 201HTTP transport field 201HTTPS transport field 201ORB Listener field 202RMI field 201SAS Server Authentication Listener
field 201SOAP connector field 201TWSuser password field 201
NFS mounted installation image,installation fails 247
NoClassDefFoundError error 247
Ooperating_system
generating SQL filesDB2 46
optionsproduct response file 117, 212product silent installation 117product silent uninstallation 212
Oraclecreating database tables
before installing 43, 53customize
properties file 54generating
SQL files 55run before installing a dynamic
domain managerSQL files 58
run before installing a master domainmanager
SQL files 56run before upgrading
SQL files 63run before upgrading Tivoli Workload
SchedulerSQL files 59
upgrading database tablesbefore upgrading 43, 53
390 Tivoli Workload Scheduler: Planning and Installation: Planning and Installation

ORACLEcustomize
COMPANY_NAME property 55EIF_PORT property 55HOST_NAME property 55MDL_USER property 54TWS_LOG_TS_NAME
property 54TWS_PASSWORD property 54TWS_TS_NAME property 54TWS_TS_TEMP_NAME
property 55TWS_USER property 54TWSTEMPDIR property 54WAS_SEC_PORT property 55
Oracle E-Business Suite applicationsworkload environment integrated
with 15oracleCheckPrereqs. oracleDirectory
response file property 354oracleServerCommunication
Info.netServiceName response fileproperty 354
oracleServerCommunicationInfo.oracleAdminPwd response fileproperty 354
oracleServerCommunicationInfo.oracleAdminUser response fileproperty 354
ORB Listener fieldnew feature
add 202ORB_LISTENER_ADDRESS response file
property 364output tab, in step window 220overview
installation 27upgrading
Dynamic Workload Console 315
PPackageName, registry attribute 345page file, too small 252parameter twsinst update
-addjruntime 161-backup_dir 161-displayname 161-domain 161-hostname 161-inst_dir 161-jmport 162-jmportssl 162-lang 162-nobackup_dir 162-password 162-reset_perm 162-skip_usercheck 162-tdwbhostname 162-tdwbport 163-uname 163-update 163-wait 163
passwordinstallation
command line client 92dynamic domain manager 82
password (continued)installation (continued)
master domain manager or backupmaster 69
password incorrect for TWS_user onUNIX 237
PatchVersion, registry attribute 345pausing an installation 225Peoplesoft applications
workload environment integratedwith 15
planningdistributed workload environment 9distributed workload environment
with dynamic schedulingcapabilities 11
distributed workload environmentwith static and dynamic schedulingcapabilities 13
distributed-driven workloadenvironment for z/OS 16
domain 17, 18end-to-end workload
environment 14environment 9, 11, 13localized processing in your
domain 18workload environment integrated
with external systems 15plug-ins
adding with the wizard 115PLUGINS_TO_UNDEPLOY
response file option 213port
dynamic workload broker HTTPSnumber 84
JobManager 84, 89, 90master domain manager or backup
master 71Netman
fault-tolerant agent 89master domain manager or backup
master 70port number HTTPS dynamic workload
brokerinstallation
master domain manager or backupmaster 71
portfolioconsole 311
portsWebSphere Application Server 297
ports automatically generateinstallation
dynamic domain manager 84post installation
configuring a backup domainmanager 196
configuring backup dynamic domainmanager 197
configuring backup master domainmanager 195
configuring domain manager 196configuring dynamic agent 199, 283configuring dynamic domain
manager 197configuring fault-tolerant agent 198
post installation (continued)configuring master domain
manager 194post-installation actions 250pre-installation actions 250preparing
installation 27prerequisites
checking 28, 123IBM i 275
problem scenarios, installation 230procedure
for uninstalling 210procedure for resolving installation
problems 226product
before installing additionalplug-ins 114
silent installation 116silent uninstallation 212uninstalling with wizard 210
product directoryupgrade master domain
manager 135ProductID, registry attribute 345profile, WebSphere Application Server,
different, causing the DynamicWorkload Console installation tofail 329
properties fileDB2
customize 43Oracle
customize 54properties tab, in step window 219property file DB2
creating database tablesCOMPANY_NAME property 45DB_USER property 44EIF_PORT property 46HOST_NAME property 46TWS_DATA_TS_PATH
property 45TWS_DB property 44TWS_LOG_TS_NAME
property 45TWS_LOG_TS_PATH property 45TWS_TS_NAME property 45TWS_USER property 44WAS_SEC_PORT property 46
property_file_pathgenerating SQL files
DB2 47ps, command used before manual
uninstallation 265publications xi
RrecovInstReg.run response file
property 355Red Hat Enterprise Linux V5
product installation failing on(JVM) 240
Red Hat Enterprise Linux V5, (x86–64),install or uninstall of the DynamicWorkload Console failing on 329
Index 391

Red Hat Enterprise Linux V5, installationfailing on (JVM) 328
registry attribute 345registry entries, deleting manually
UNIX 265Windows 263, 269
registry fileattributes 345example 345recreating 189upgrading with corrupt files 189
Relational database management systemsinstallation 33
remote hostcommand line client
installation 91remote port
installationcommand line client 91
removeDynamic Workload Console
manually 322, 323removing the product 205
dynamic domain manager 206silent 207twsinst 208, 285wizard 206
rerun installation wizard, or resume 223response file
product install options 117product uninstall options 212TWSAPPS_RespFile_windows.txt
silent installation 116response file install option
TWSAPPS_PLUGIN_FILE_NAME 118USER_INSTALL_DIR 117
response file missing, causing silentinstallation to fail 330
response file optionPLUGINS_TO_UNDEPLOY 213
response file uninstall optionUSER_INSTALL_DIR 213
response filessilent installation 92template 96
REST_NOTIFICATION_ADDRESSresponse file property 364
resume installation wizard immediately,or exit and resume later 224
resume installation wizard, or rerun 223resuming a stopped installation 225RHEL 5
product installation failing on(JVM) 240
RHEL 5 (x86–64), install or uninstall ofthe Dynamic Workload Console failingon 329
RHEL V5 and Suse V11, installationfailing on (JVM) 328
RMI fieldnew feature
add 201run
SQL files before installing a dynamicdomain manager
DB2 49
run (continued)SQL files before installing a master
domain managerDB2 47Oracle 56
SQL files before installing dynamicdomain manager
Oracle 58SQL files before upgrading
Oracle 63SQL files before upgrading Tivoli
Workload SchedulerDB2 50, 52Oracle 59
run error on installation 247run error, failure of installation on
HP-UX 238
Ssafe
upgrade 133SAP R/3 applications
workload environment integratedwith 15
SAS Server Authentication Listener fieldnew feature
add 201SAS_SSL_SERVERAUTH_
LISTENER_ADDRESS response fileproperty 364
scheduling dynamicallyenabling after installation 202enabling after upgrade 202
scriptwebui 302
SDK_ECLIPSE_BUNDLED response fileproperty 355
SDK_UPDATESITE response fileproperty 355
security implications of installation 261Security, file
checking existence of 262selectRDBMSPanel.rdbmsSelected
response file property 355service
stopping 154services (Windows)
closing panel before usingInstallShield wizard 231, 258
deleting 263fail to start after installation 234Service Control Manager error 259
setup fileDynamic Workload Console
installation 292setup.bin
command for installation 115shared Windows folder, installation fails
from 327shut, command, used before manual
uninstallation 265silent
installation and uninstallation logfiles 37
uninstalling 207silent installation 92
silent installation (continued)Dynamic Workload Console 299fails without writing a log 241of the Dynamic Workload
Console 291response file template 96Tivoli Workload Scheduler for
Additional Plug-ins installoptions 117
troubleshooting 241silent installation log file
tws4apps_ia_install.log 116tws4apps_install.log 116
silent installation of the DynamicWorkload Console problems with 329
silent installation wizardfails with "Error writing file = " 244fails with "Error writing file =
28" 244recovering 226
silent mode ISMPinstallation method 36
silent uninstallof the Dynamic Workload
Console 319silent uninstallation
additional plug-ins uninstalloptions 212
Tivoli Workload Scheduler forAdditional Plug-ins 212
SOAP connector fieldnew feature
add 201SOAP_CONNECTOR_ADDRESS
response file property 364Software Distribution
installing language packs 111software package block
creating and installing 164software package block installation and
uninstallation log files 38Solaris
installation fails with error "commandline parameter, -installRoot, isinvalid" 238
installation problems 238SQL files
generatingDB2 46Oracle 55
run before installing a dynamicdomain manager
Oracle 58run before installing a master domain
managerDB2 47Oracle 56
run before installing dynamic domainmanager
DB2 49run before upgrading
Oracle 63run before upgrading Tivoli Workload
SchedulerDB2 50, 52Oracle 59
392 Tivoli Workload Scheduler: Planning and Installation: Planning and Installation

SSL files directoryupgrade master domain
manager 137stageman
checking if active 265standard agent
capability static 5environment static 5
startingconsole 311Dynamic Workload Console 306server 306
static and dynamic schedulingcapabilities
environment with 13static capability
fault-tolerant agent 5standard agent 5
static networkbackup master domain manager 5domain manager 5master domain manager 4
status tab, in step window 218step
configuring a backup domainmanager 196
configuring backup dynamic domainmanager 197
configuring backup master domainmanager 195
configuring domain manager 196configuring dynamic agent 199, 283configuring dynamic domain
manager 197configuring fault-tolerant agent 198configuring master domain
manager 194step list
status 218using 217
step windowusing 218
step, installation, failed, correcting andcontinuing 222
stepped installation wizard 216stop, command
used before manualuninstallation 265
stoppingan installation 225Dynamic Workload Console 306server 306services 154
stopWas command hangs during installof the Dynamic Workload Console 326
structureinstallation DVD structures 31
summary.log, file 215support
packaging log files for 215Suse Linux 11
product installation failing on(JVM) 240
Suse Linux V11, installation failing on(JVM) 328
swap space, out of 252
swd_envwizard, troubleshooting 252
SWDGW component of TivoliConfiguration Manager,incompatibility 251
swdis, directoryinsufficient space 248
Symphony file 22syntax
wdinstsp to add the Java runtime torun job types with advancedoptions 109, 168
syntax agent installationwdinstsp 108
syntax CIT installationwdinstsp 108, 165
syntax to add standard agent,fault-tolerant agent, or domain managercapability
wdinstsp 110system error 56b given during
installation 233systems external
workload environment integratedwith 15
TTdwb Config. tdwbCpuName 354, 355TdwbConfig. tdwbCpuPort 354, 355technical training xiithis workstation name
installationdynamic domain manager 82master domain manager or backup
master 70time zone
overview 23Tivoli Configuration Manager
incompatibility problem with fixpacks 251
installation fails 248, 250insufficient disk space 248
Tivoli Dynamic Workload Consoleconfiguration 309getting started 311overview 289starting and stopping 306troubleshooting 321uninstall 319updating
authentication mechanism 315upgrading
overview 315Tivoli Integrated Portal
installationfrom the DVD or eImages 301
Tivoli Netman for TWS_user, deletingservice 263
Tivoli technical training xiiTivoli Token Service
fails to start after installation 234for TWS_user, deleting service 263
Tivoli Workload Scheduler 289available functions 304engine connection 304
Tivoli Workload Scheduler agents 97
Tivoli Workload Scheduler agents IBM iuninstalling
twsinst 285Tivoli Workload Scheduler agents
uninstallingsilent 207twsinst 208wizard 206
Tivoli Workload Scheduler for AdditionalPlug-ins
before installing 114installation
additional plug-in 115uninstalling
with silent uninstallation 212Tivoli Workload Scheduler for Additional
Plug-ins installationfails
AWSJIS145E 255Tivoli Workload Scheduler for Additional
Plug-ins temp installationfails
does not have enough space 255Tivoli Workload Scheduler for
Applications 289Tivoli Workload Scheduler for z/OS 289Tivoli Workload Scheduler service for
TWS_userdeleting 263fails to start after installation 234
Tivoli Workload Scheduler Version 8.3 FixPack 3
configurationfor Dynamic Workload
Console 301tools
Integration Workbench 369training
technical xiitroubleshooting
application server installationproblems 242
fix pack installation 260installation 215, 231
AIX 235HP-UX 237Oracle Solaris 238UNIX 236
installation scenariosDynamic Workload Console 325
installationsLinux 239
miscellaneous installationproblems 243
uninstallation 258, 259upgrading 255
truncated host name on Windows:installation fails 231
TWA_INSTANCE_PATH response fileproperty 364
TWS_DATA_TS_PATH propertycustomize
DB2 45TWS_DB property
customizeDB2 44
Index 393
TWS_LOG_TS_NAME propertycustomize
DB2 45ORACLE 54
TWS_LOG_TS_PATH propertycustomize
DB2 45TWS_PASSWORD property
customizeORACLE 54
TWS_TS_NAME propertycustomize
DB2 45ORACLE 54
TWS_TS_TEMP_NAME propertycustomize
ORACLE 55TWS_user password incorrect on
UNIX 237TWS_USER property
customizeDB2 44ORACLE 54
tws4apps_ia_install.loglog file silent installation 116
tws4apps_ia_uninstall.loglog file for silent uninstallation 212log file for uninstalling 210
tws4apps_install.loglog file for silent installation 116
tws4apps_uninstall.loglog file for silent uninstallation 212log file for uninstallation 210
tws4plugins_install.loglog file installation 115
TWSAPPS_PLUGIN_FILE_NAMEzip file 118
TWSAPPS_RespFile_UNIX.txt 116TWSAPPS_RespFile_Windows
installation response file forproduct 116
twsCliCfgPanel.password response fileproperty 355
twsCliCfgPanel.remoteHost response fileproperty 355
twsCliCfgPanel.remotePort response fileproperty 355
twsCliCfgPanel.user response fileproperty 356
TWSCLILanguagesPanel.* response fileproperties 356
twsCLILocationPanel.directory responsefile property 356
TWSConnRegistry.dat 267twsDBCfg.dbName response file
property 356twsDBCfg.report TablespaceName
response file property 356twsDBCfg.report TablespacePath response
file property 356twsDBCfg.tablespaceName response file
property 356twsDBCfg.tablespacePath response file
property 356twsinst 97, 98, 277
twsinst (continued)fails
"The twsinst script is being runfrom the wrong directory." 245
miscellaneous 253with error AWSFAB035E 251with error AWSGAB566E 252
files not being correctly copied beforerunning 245, 253
installation and uninstallation logfiles 37, 281
installation method 36, 97unattended, troubleshooting 241uninstalling 208, 285UNIX usage 160Windows usage 160
twsinst installation agentswd_env 252
twsismp.log, file 215twsLocationPanel.directory response file
property 356twsLocationPanel.symLinkOption
response file property 356twsOracleDbCfg. isPartitioned response
file property 357twsOracleDbCfg. twsDBPwd response file
property 357twsOracleDbCfg. twsDBUser response file
property 357twsOracleDbCfg.tws DataTablespace
response file property 357twsOracleDbCfg.tws ReportTablespace
response file property 357twsOracleDbCfg.tws TempTablespace
response file property 357twsPortsPanel.portAdmin response file
property 357twsPortsPanel.portAdminSec response
file property 357twsPortsPanel.portEif response file
property 357twsPortsPanel.portHTTP response file
property 357twsPortsPanel.portHTTPS response file
property 357twsPortsPanel.portMtlAuth response file
property 358twsPortsPanel.portORB response file
property 358twsPortsPanel.portRMI response file
property 358twsPortsPanel.portSAS response file
property 358twsPortsPanel.portSOAP response file
property 358twsPortsPanel.portSrvAuth response file
property 358TWSRegistry.dat, file 265, 345TWSTEMPDIR property
customizeDB2 44ORACLE 54
twsUpgradePanel.backupOldInstanceresponse file property 358
twsUpgradePanel.bckpDirectory responsefile property 358
twsUpgradePanel.bckpProfileDirectoryresponse file property 358
twsUpgradePanel.dumpDirectoryresponse file property 358
TWSUseraccount creation
Windows 233Windows 2000 233
deleting from registryUNIX 265Windows 263
TWSuser password fieldnew feature
add 201TWSZConnRegistry.dat 267
Uulimit parameter 29unattended installation agent
swd_env 252unattended installation using
twsinst 241UNC mapped drive, unable to install
from 244uninstall
Dynamic Workload Console 319manually 322, 323
of the Dynamic Workload Consolein silent mode 319
using response file 319uninstallation
Dynamic Workload Console logfiles 321
fails because the embeddedWebSphere Application Server notstopped 259
fails in restore profiles step 259fails using InstallShield wizard on
Windows 258manual
file deletion too slow 267manually
agents 263connector 267master domain manager 263
of the Dynamic Workload Console,fails to start on Linux RHEL 5(x86–64) 329
of the Dynamic Workload Console,problems with 331
the connector manually onWindows 268
troubleshooting 215uninstallation log file
tws4apps_ia_uninstall.log 210tws4apps_ia_uninstall.log silent
uninstallation 212tws4apps_status.log installation 210tws4apps_uninstall.log
installation 210tws4apps_uninstall.log silent
uninstallation 212uninstallation procedures 210uninstaller.bin
command for uninstallation 210, 212uninstalling 205
394 Tivoli Workload Scheduler: Planning and Installation: Planning and Installation

uninstalling (continued)additional plug-ins 210additional plug-ins log files 210additional plug-ins modified
files 210additional plug-ins with the
wizard 210dynamic domain manager 206procedures 210Tivoli Workload Scheduler for
Additional Plug-ins silently 212uninstalling agent
silent 207twsinst 208, 285wizard 206
UNIXinstallation fails with JVM validation
error 236installation problems 236password incorrect for
TWS_user 237silent fix pack installation fails 244uninstalling manually 265
UNIX user accounts 39unlink workstation 154unlink, command
used before manualuninstallation 265
update of the embedded WebSphereApplication Server fails during the fixpack installation 260
UPDATE_INSTALLER_DIR response fileproperty 364
updatingTivoli Dynamic Workload Console
authentication mechanism 315upgrade
checking prerequisites 123existing software versions 121files and folders changed 122of the Dynamic Workload Console,
problems with 330problems 255, 260recovering 227safe 133troubleshooting 215
upgrade master domain managerdirectory for SSL files 137file system structure 137product directory 135
upgradingadding features 191agent 153agent using a silent installation 158agent using Software
Distribution 164agent using the installation
wizard 155agent using twsinst 158authentication 130
Tivoli Dynamic WorkloadConsole 315
command line client 188domain manager 167domain manager using the installation
wizard 155domain managers 153
upgrading (continued)dynamic agent 166Dynamic Workload Console
on embedded WebSphereApplication Server 316
overview 315fault-tolerant agent 189Integration Workbench 370Integration Workbench installed as a
plug-in 371LDAP 130standard or fault-tolerant agent 167syntax CIT installation using
wdinstsp 165with corrupt registry files 189
user namecreating 107installation
command line client 92dynamic domain manager 82master domain manager or backup
master 69USER_INSTALL_DIR
install response file option 117uninstall response file option 213
UserOwner, registry attribute 345users
account creationWindows 233Windows 2000 233
rightsassignment for TWS_user 233
TWS_userdeleting from registry on
UNIX 265deleting from registry on
Windows 263rights assignment 233
userUnixCfgPanel.inputUserNameresponse file property 358
userUnixCfgPanel.twsPassword responsefile property 358
userUnixCfgPanel.wasPassword responsefile property 359
userUnixCfgPanel.wasUserNameresponse file property 359
userWinCfgPanel.inputUserNameresponse file property 359
userWinCfgPanel.twsPassword responsefile property 359
userWinCfgPanel.wasPassword responsefile property 359
userWinCfgPanel.wasUserName responsefile property 359
Vvariables
languageBrazilian Portuguese 112Chinese, Simplified 112Chinese, Traditional 112French 112German 112install_dir 112Italian 112Japanese 112
variables (continued)language (continued)
Korean 112Spanish 112tws_user 112
Software Package Blockbackup 105company 105domain 105fresh_install 105from_release 105install_dir 106jm_port 106jm_sec_port 106master_cpu 106pwd 106tcp_port 106tdwb_hostname 106tdwb_port 106this_cpu 107tws_user 107upgrade 107
symlinkTWA/TWS/bin/at 31TWA/TWS/bin/batch 31TWA/TWS/bin/datecalc 31TWA/TWS/bin/jobstdl 31TWA/TWS/bin/maestro 31TWA/TWS/bin/mdemon 31TWA/TWS/bin/morestdl 31TWA/TWS/bin/muser 31TWA/TWS/bin/parms 31
verifying Tivoli Workload Schedulerinstallation 262
version 8.3run SQL files before upgrading Tivoli
Workload SchedulerDB2 50Oracle 59
version 8.4run SQL files before upgrading Tivoli
Workload SchedulerDB2 50Oracle 59
version 8.5run SQL files before upgrading Tivoli
Workload SchedulerDB2 50Oracle 59
version 8.5.1run SQL files before upgrading Tivoli
Workload SchedulerDB2 52Oracle 63
version 8.5.1.1run SQL files before upgrading Tivoli
Workload SchedulerDB2 52Oracle 63
virtual memory, out of 252
WWAS_CELL_NAME response file
property 365WAS_NODE_NAME response file
property 365
Index 395

WAS_PROFILE_NAME response fileproperty 365
WAS_SEC_PORT propertycustomize
DB2 46ORACLE 55
WAS_SERVER_NAME response fileproperty 365
WC_adminhost response fileproperty 365
WC_adminhost_secure response fileproperty 365
WC_defaulthost response fileproperty 365
WC_defaulthost_secure response fileproperty 365
wconvcat, command 251wdinstsp
syntax agent installation 108syntax CIT installation 108, 165syntax to add standard agent,
fault-tolerant agent, or domainmanager capability 110
syntax to add standard agent,fault-tolerant or domain managercapabilities 167
syntax to add the Java runtime to runjob types with advancedoptions 109, 168
wdlssp, comman used before manualuninstallation 265
wdrmvsp, command used before manualuninstallation 265
WebSphere Application Serverchoosing instance 295ports 297
WebSphere Application Server,installation of the Dynamic WorkloadConsole fails when installing ondifferent profile 329
webuiscript 302
Windows2003 domain, application server
installation fails with credentialsproblem 243
credentials problem for installing onapplication server 233
file deletion to slow after manualuninstallation 267
installationreceives warning
AWSGAB005W 232with InstallShield wizard,
fails 231installation fails
host name truncated 231installation of the Dynamic Workload
Console fails on different externalWebSphere Application Serverprofile 329
installation problems 230registry keys, removing 269shared folder, installation fails
from 327undefined error message displayed
from launchpad 325
Windows (continued)uninstallation fails because the
embedded WebSphere ApplicationServer not stopped 259
uninstallation fails in restore profilesstep 259
uninstallation with InstallShieldwizard fails 258
uninstalling manually 263uninstalling the connector manually
on 268wirard installation agent
swd_env 252wizard
additionalplug-in 115installation and uninstallation log
files 37installing 115uninstalling 206uninstalling additional plug-ins 210
wlsinst, command 251work, directory 248workstation
unlinking 154workstation class
definition 23workstation name
installationbackup master domain
manager 70fault-tolerant agent 89
workstation name dynamic workloadbroker
installationdynamic domain manager 86master domain manager 80
writerchecking if active 265
Zz/OS applications
workload environment integratedwith 15
396 Tivoli Workload Scheduler: Planning and Installation: Planning and Installation


����
Product Number: 5698-WSH
Printed in USA
SC32-1273-12
Copyright © 2022 FDOKUMEN