CA Workload Automation User Guide
156
-
Upload
khangminh22 -
Category
Documents
-
view
2 -
download
0
Transcript of CA Workload Automation User Guide


This Documentation, which includes embedded help systems and electronically distributed
materials, (hereinafter referred to as the “Documentation”) is for your informational purposes
only and is subject to change or withdrawal by CA at any time. This Documentation is
proprietary information of CA and may not be copied, transferred, reproduced, disclosed,
modified or duplicated, in whole or in part, without the prior written consent of CA.
If you are a licensed user of the software product(s) addressed in the Documentation, you may
print or otherwise make available a reasonable number of copies of the Documentation for
internal use by you and your employees in connection with that software, provided that all CA
copyright notices and legends are affixed to each reproduced copy.
The right to print or otherwise make available copies of the Documentation is limited to the
period during which the applicable license for such software remains in full force and effect.
Should the license terminate for any reason, it is your responsibility to certify in writing to CA
that all copies and partial copies of the Documentation have been returned to CA or destroyed.
TO THE EXTENT PERMITTED BY APPLICABLE LAW, CA PROVIDES THIS
DOCUMENTATION “AS IS” WITHOUT WARRANTY OF ANY KIND, INCLUDING
WITHOUT LIMITATION, ANY IMPLIED WARRANTIES OF MERCHANTABILITY, FITNESS
FOR A PARTICULAR PURPOSE, OR NONINFRINGEMENT. IN NO EVENT WILL CA BE
LIABLE TO YOU OR ANY THIRD PARTY FOR ANY LOSS OR DAMAGE, DIRECT OR
INDIRECT, FROM THE USE OF THIS DOCUMENTATION, INCLUDING WITHOUT
LIMITATION, LOST PROFITS, LOST INVESTMENT, BUSINESS INTERRUPTION, GOODWILL,
OR LOST DATA, EVEN IF CA IS EXPRESSLY ADVISED IN ADVANCE OF THE POSSIBILITY
OF SUCH LOSS OR DAMAGE.
The use of any software product referenced in the Documentation is governed by the applicable
license agreement and such license agreement is not modified in any way by the terms of this
notice.
The manufacturer of this Documentation is CA.
Provided with “Restricted Rights.” Use, duplication or disclosure by the United States
Government is subject to the restrictions set forth in FAR Sections 12.212, 52.227-14, and 52.227-
19(c)(1) - (2) and DFARS Section 252.227-7014(b)(3), as applicable, or their successors.
Copyright © 2014 CA. All rights reserved. All trademarks, trade names, service marks, and logos
referenced herein belong to their respective companies.

Contact CA Support For your convenience, CA Technologies provides one site where you can access the information that you need for your Home Office, Small Business, and Enterprise CA Technologies products. At http://ca.com/support, you can access the following resources:
Online and telephone contact information for technical assistance and customer services
Information about user communities and forums
Product and documentation downloads
CA Support policies and guidelines
Other helpful resources appropriate for your product
Providing Feedback About Product Documentation If you have comments or questions about CA Technologies product documentation, you can send a message to [email protected]. To provide feedback about CA Technologies product documentation, complete our short customer survey which is available on the CA Support website at http://ca.com/docs.

TABLE OF CONTENTS4
TABLE OF CONTENTS
1 INTRODUCTION .................................................................................................. 9 2 ARCHITECTURE ................................................................................................ 10
2.1 Processing Example ........................................................................................... 12 2.1.1 Data Refresh Cycle ..................................................................................... 12
2.1.2 On-Demand Activity Example .................................................................... 12 2.1.3 Log File Retrieval ....................................................................................... 12
2.2 Security .............................................................................................................. 13 3 VIEWING JOBS ................................................................................................... 14
3.1 Customizing the GUI ......................................................................................... 14 3.2 Graphical Views................................................................................................. 15
3.2.1 The Console View ....................................................................................... 15
3.2.1.1 Sort Order in Console View ........................................................................ 18 3.2.2 Time View ................................................................................................... 19
3.2.2.1 Setting Chart Duration ................................................................................ 20 3.2.2.2 Retrieve Run Data ....................................................................................... 20
3.2.3 Job Flow View ............................................................................................ 22 3.2.3.1 Zoom ........................................................................................................... 23 3.2.3.2 Job Flow View Order .................................................................................. 24
3.2.3.3 Names in Job Flow View ............................................................................ 25 3.2.3.4 Global Variable Symbol .............................................................................. 26
3.2.4 The Job Detail View .................................................................................... 28 3.2.5 The Tree View ............................................................................................. 32
3.3 Selecting Multiple Jobs ..................................................................................... 34 4 iXp MENU BAR................................................................................................... 35
4.1 File Menu:.......................................................................................................... 35 4.1.1 File►User Command ................................................................................. 35
4.1.1.1 File►UserCommand►Job ......................................................................... 37
4.1.1.2 File►UserCommand►Alarm .................................................................... 38
4.1.1.3 File►UserCommand►Context Free ......................................................... 38 4.1.2 File►CLI .................................................................................................... 39 4.1.3 File►Print ................................................................................................... 41
4.1.3.1 Print Tiling .................................................................................................. 42
4.1.4 File►Save Session Settings ....................................................................... 42 4.1.5 File►Save View as JIL ............................................................................... 42 4.1.6 File►Set Time Zone ................................................................................... 42
4.1.7 File►Go Offline ......................................................................................... 43 4.1.8 File►Change Password .............................................................................. 43 4.1.9 File►Sendevent .......................................................................................... 44
4.1.9.1 Sendevent►Standard .................................................................................. 44 4.1.9.2 Sendevent►Multi-Select ............................................................................ 46
4.1.9.3 Sendevent►CHANGE_STATUS ............................................................... 47 4.1.9.4 Sendevent►ALARM ................................................................................. 48 4.1.9.5 Sendevent►COMMENT ........................................................................... 49
TABLE OF CONTENTS5
4.1.9.6 Sendevent►SET_GLOBAL ....................................................................... 50 4.1.9.7 Sendevent►CHANGE_PRIORITY ........................................................... 51 4.1.9.8 Sendevent►SEND_SIGNAL ..................................................................... 52 4.1.9.9 Sendevent►MACHINE ............................................................................. 53
4.1.10 File►Retrieve Run Data ............................................................................. 53 4.1.11 File►Retrieve Alarm Data ......................................................................... 53
4.2 Edit Menu .......................................................................................................... 54 4.2.1 Edit►Undo: ................................................................................................ 54 4.2.2 Edit►Edit Filters ........................................................................................ 54
4.2.3 Edit►Edit Preferences ................................................................................ 54 4.2.3.1 Color Editor ................................................................................................ 58 4.2.3.2 Filter Editor ................................................................................................. 58
4.3 View Menu ........................................................................................................ 60 4.3.1 View►Find Job By Name .......................................................................... 60 4.3.2 View►Find Job By… ................................................................................. 61
4.3.3 View►Find Admin Filter ........................................................................... 62 4.3.4 View►Find Personal Filter ........................................................................ 63
4.3.5 View►Find Group Filter ............................................................................ 63 4.3.6 View►Hide Selected Jobs .......................................................................... 63 4.3.7 View►Global Variables ............................................................................. 63
4.3.8 View►Job Overrides .................................................................................. 66 4.3.9 View►Expand ............................................................................................ 66
4.3.10 View►Expand All ...................................................................................... 67
4.3.11 View►Transitive Closure ........................................................................... 67
4.3.12 View►Display Alarm Button ..................................................................... 67 4.3.13 View►Alarm Manager on Top ................................................................... 67
4.3.14 View►Lock Job Name Column ................................................................. 67 4.4 View►Flow View ............................................................................................. 67
4.4.1 View►FlowView►Display Flow View .................................................... 67
4.4.2 View►FlowView►Show Print Grid ......................................................... 68 4.4.3 View►FlowView►Stream Jobs ................................................................ 68
4.4.4 View►FlowView►Show Job Names ........................................................ 68 4.4.5 View►FlowView►Truncate Job Names ................................................... 69
4.4.6 View►FlowView►Keep First 8 Letters .................................................... 69 4.4.7 View►FlowView►Hide Job Names ......................................................... 69
4.4.8 View►FlowView►Show Arrows .............................................................. 69 4.4.9 View►FlowView►Hide Out of Box Arrows ............................................ 69 4.4.10 View►FlowView►Hide All Arrows ......................................................... 70 4.4.11 View►FlowView►Hide Icons .................................................................. 70 4.4.12 View►FlowView►Enable Arrow Routing ............................................... 70
4.5 Migrate............................................................................................................... 72 4.6 Report Menu ...................................................................................................... 72
4.6.1 Report Editor ............................................................................................... 72 4.6.1.1 Report Management .................................................................................... 72
4.7 Definition Menu ................................................................................................ 76 4.7.1 Edit Calendars ............................................................................................. 76
4.7.1.1 Menu options .............................................................................................. 77

TABLE OF CONTENTS6
4.7.1.2 Manage Standard Calendars ....................................................................... 78 4.7.1.3 Manage Cycles ............................................................................................ 79 4.7.1.4 Managing Extended Calendars ................................................................... 81
4.7.2 Edit Jobs ...................................................................................................... 82
4.7.2.1 Menu icons .................................................................................................. 83 4.7.2.2 Basic page ................................................................................................... 83 4.7.2.3 Date/Time page ........................................................................................... 84 4.7.2.4 Alarm page .................................................................................................. 84 4.7.2.5 Execution page ............................................................................................ 84
4.7.2.6 Runtime page .............................................................................................. 84 4.7.2.7 Resource page ............................................................................................. 84 4.7.2.8 Permission page .......................................................................................... 85
4.7.2.9 Box page ..................................................................................................... 85 4.7.2.10 File Watcher page .................................................................................. 85
4.8 Help Menu ......................................................................................................... 85
4.8.1 Graphics Help ............................................................................................. 85 4.9 Quick Find ......................................................................................................... 85
5 iXp TOOL BAR .................................................................................................... 87 5.1 Instance Monitor ................................................................................................ 87 5.2 Alarm Manager .................................................................................................. 88
5.2.1 Job Control Pop-up menu in Alarm Manager ............................................. 90 5.2.2 Sort Order in Alarm Manager ..................................................................... 91
5.3 Current Filter ..................................................................................................... 92
5.4 Flow View Buttons ............................................................................................ 93
6 JOB FILTERS ....................................................................................................... 94 6.1 Filters Defined ................................................................................................... 94
6.1.1 Attribute Filters ........................................................................................... 94 6.1.2 Job Dependency Filters ............................................................................... 95
6.2 How Filters Work .............................................................................................. 95
6.2.1 Filter Logic Sequence ................................................................................. 96 6.2.2 Example Filtration Sequence ...................................................................... 96
6.3 Filter Editor........................................................................................................ 97 6.3.1 Filter Editor File Menu ............................................................................. 102
7 JOB TOOLS POP-UP ......................................................................................... 103 7.1 Expand, Collapse, and Hide ............................................................................ 103
7.2 Job Control ...................................................................................................... 104 7.2.1 Update Job ................................................................................................ 105 7.2.2 Override Job .............................................................................................. 105 7.2.3 Change Status............................................................................................ 105
7.3 New Filter and Update Filter ........................................................................... 107
7.3.1 Job Dependency Filters Definitions .......................................................... 107 7.4 User Command ................................................................................................ 108 7.5 Job Information................................................................................................ 109
7.5.1 Job Definition.............................................................................................110 7.5.2 Detailed Report ..........................................................................................110 7.5.3 Run Data ....................................................................................................110
7.5.3.1 View Detail ................................................................................................ 111
TABLE OF CONTENTS7
7.5.3.2 Create Report ............................................................................................. 111 7.5.4 Log Files ....................................................................................................113
7.5.4.1 STDOUT, STDERR, STDIN .....................................................................113 7.5.4.2 Job Profile ..................................................................................................114
7.5.4.3 Remote Agent Log .....................................................................................115 7.5.5 Calendars....................................................................................................116
7.6 View Statistics ..................................................................................................117 8 iXp CLIENT CLI ................................................................................................ 120
8.1 Installation ....................................................................................................... 120
8.2 Commands ....................................................................................................... 122 8.2.1 ixautorep ................................................................................................... 122 8.2.2 ixsendevent ............................................................................................... 123
8.2.3 ixjil ............................................................................................................ 124 8.2.4 ixautostatus ............................................................................................... 126 8.2.5 ixjob_depends ........................................................................................... 126
8.2.6 ixautocal_asc ............................................................................................. 127 8.2.7 ixflags ........................................................................................................ 128
8.2.8 ixuserjobcmd ............................................................................................. 128 9 INTERACTIVE FORECASTING...................................................................... 130
9.1 Go Offline ........................................................................................................ 130
9.1.1 Rewind, Play, Pause .................................................................................. 131 9.2 Forecast Configuration .................................................................................... 131
9.2.1 Time Settings ............................................................................................ 132
9.2.2 EP Latencies .............................................................................................. 133
9.2.3 Log Files ................................................................................................... 134 9.2.4 Run Times ................................................................................................. 134
9.2.5 End Statuses .............................................................................................. 136 9.2.6 Sendevents ................................................................................................ 137 9.2.7 Return iXp to Online Mode ...................................................................... 138
9.3 View Forecast Run Data .................................................................................. 139 9.4 Errors and Warnings ........................................................................................ 139
9.4.1 Warning for old data ................................................................................. 139 9.4.2 No Activity Warning ................................................................................. 140
9.4.3 iXp Client is “Out Of Memory” ................................................................ 140 9.4.4 iXp Client gets “EOF” Exceptions ........................................................... 141
10 MIGRATING WORKLOAD OBJECTS ............................................................ 142 10.1 Scenario: How to Migrate Workload Objects in CA Workload Automation iXp
......................................................................................................................... 142 10.1.1 Prerequisites .............................................................................................. 144 10.1.2 Preparing the Migration Package .............................................................. 144
10.1.2.1 Create a Migration Package ................................................................ 145 10.1.2.2 Select an Existing Package ................................................................. 147
10.1.3 Verify that the Appropriate Workload Objects are Included in the Package
148 10.1.4 Validate the Integrity of the Workload Objects in the Package ................ 149 10.1.5 Migrate the Package .................................................................................. 151
11 GLOSSARY ........................................................................................................ 153

TABLE OF CONTENTS8
11.1 CA Workload Automation iXp Related Terms ................................................ 153 11.2 CA Workload Automation AE Terms .............................................................. 154 11.3 Symbols in this Guide...................................................................................... 155 11.4 Related Documents .......................................................................................... 156

INTRODUCTION9
1 INTRODUCTION
CA Workload Automation iXp is a JavaTM-based graphical interface that can be opened from Java Web Start. With CA Workload Automation iXp users can monitor, control, update, forecast, simulate, report on, and print CA Workload Automation AE job streams across multiple instances. The iXp Admin Tool lets you manage privileges for users by defining authorization roles. The iXp Command Line Interface lets users view, report, control, create, update, and delete CA Workload Automation AE jobs. The commands interface with the CA Workload Automation iXp security model and do not require a local installation of the CA Workload Automation AE software. The wizard-style migration assistant enables users to migrate jobs and other related objects from a Unicenter AutoSys JM 4.5.1 instance to a CA Workload Automation AE r11.3 or higher instance. Users can visualize, build, validate, and upload packages containing the appropriate set of jobs and their related global variables and calendars. This guide assumes familiarity with CA Workload Automation AE. Companion to this CA Workload Automation iXp User Guide is the CA Workload Automation iXp Administration Guide.

User Guide10
2 ARCHITECTURE
iXp Server Machine
iXp Clients
CA Workload
Automation
AE Instances
PRD
Web Server Process/iXp Daemon
ACE
DEV
iXp Cache
CA Workload
Automation AE
Remote Agents /
iXp Agents

ARCHITECTURE11
ARCHITECTURE ELEMENT
DESCRIPTION
iXp Daemon This process runs on the iXp Server machine and is the only process that runs constantly. The iXp Daemon is a multi-threaded Java process that performs the following functions:
Collects all the relevant job data from the CA Workload Automation AE instances
Maintains the iXp Cache Supplies the data to all the iXp clients
The iXp Daemon runs as a servlet within a Web Application Server (for example, Tomcat).
iXp Cache These highly compressed data files in proprietary binary format include all the CA Workload Automation AE data required by the iXp Daemon and the iXp clients.
iXp Client The iXp Client is the JavaTM-based GUI that can be opened on any Java-supported system, and the CLI that can be opened on supported systems. The GUI provides the capability to monitor, report, forecast, control and update job processing across the CA Workload Automation AE instances. Because the GUI is a Java application, there is no software installation required on the machine that will open the client. The CLI provides the capability to run CA Workload Automation AE commands, such as sendevent, autorep, jil, and job_depends, from any machine without installing the CA Workload Automation AE client software.
iXp Agent
The iXp Agent is a Java program that runs on a CA Workload Automation AE Remote Agent. The iXp Agent lets iXp Clients retrieve the output files that CA Workload Automation AE jobs create. iXp also provides a PERL-based agent that has been deprecated. The iXp Daemon can start this program automatically when needed, or it can be started as a job from CA Workload Automation AE. The iXp Server can install this program automatically, or the iXp administrator can install it manually. NOTE: The iXp Agent is not required with CA Workload Automation AE r11.3 and higher.
User Guide12
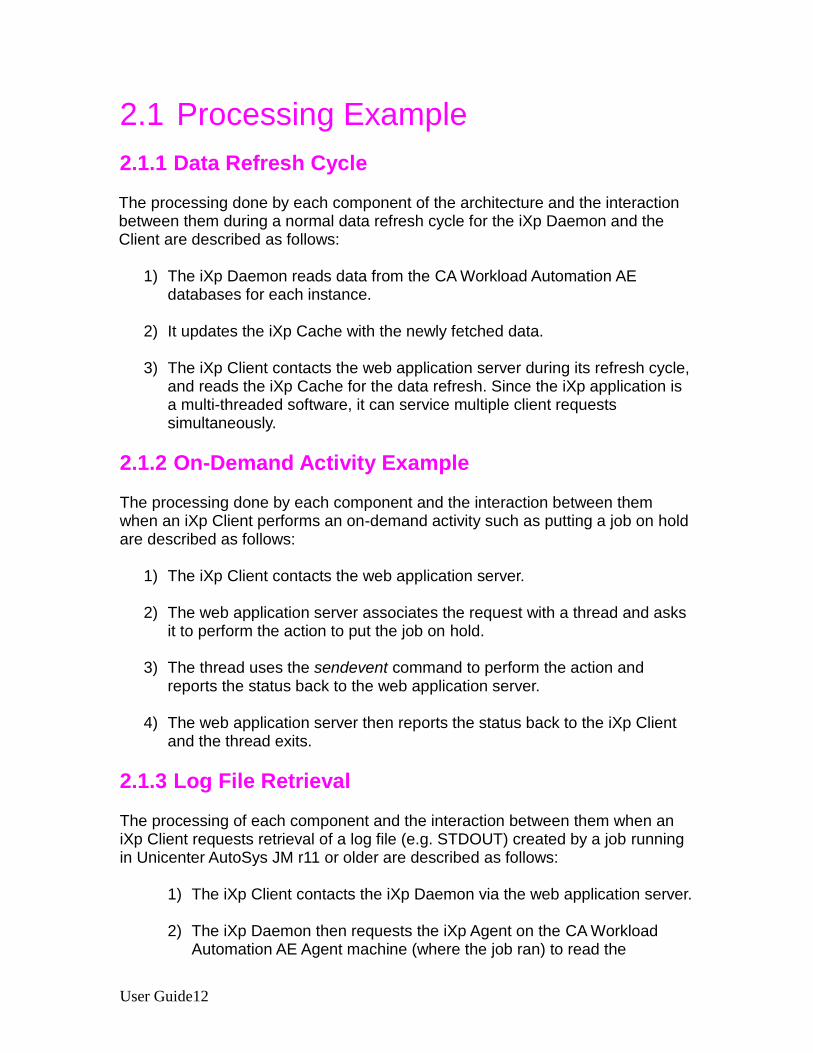
2.1 Processing Example
2.1.1 Data Refresh Cycle
The processing done by each component of the architecture and the interaction between them during a normal data refresh cycle for the iXp Daemon and the Client are described as follows:
1) The iXp Daemon reads data from the CA Workload Automation AE
databases for each instance.
2) It updates the iXp Cache with the newly fetched data.
3) The iXp Client contacts the web application server during its refresh cycle, and reads the iXp Cache for the data refresh. Since the iXp application is a multi-threaded software, it can service multiple client requests simultaneously.
2.1.2 On-Demand Activity Example
The processing done by each component and the interaction between them when an iXp Client performs an on-demand activity such as putting a job on hold are described as follows:
1) The iXp Client contacts the web application server.
2) The web application server associates the request with a thread and asks
it to perform the action to put the job on hold.
3) The thread uses the sendevent command to perform the action and reports the status back to the web application server.
4) The web application server then reports the status back to the iXp Client and the thread exits.
2.1.3 Log File Retrieval
The processing of each component and the interaction between them when an iXp Client requests retrieval of a log file (e.g. STDOUT) created by a job running in Unicenter AutoSys JM r11 or older are described as follows:
1) The iXp Client contacts the iXp Daemon via the web application server.
2) The iXp Daemon then requests the iXp Agent on the CA Workload
Automation AE Agent machine (where the job ran) to read the

Security
ARCHITECTURE13
appropriate log file and send the contents back to the iXp Server. If the iXp Agent is not running, then the iXp Daemon sends a message back to the Client indicating that the Agent is not running.
3) Once it receives the contents, the iXp Server sends the contents back to the requesting iXp Client. The iXp Client displays the contents in a browser window.
2.2 Security
There are two security methods available for controlling access to iXp.
1) Native iXp security 2) Single Sign-On (SSO)
iXp provides a native multi-layered security model that encompasses data encryption, user authorization, and optional user authentication. The same security model is applied to both the iXp GUI and the iXp CLI. In the first model, user access to iXp requires validation of the user identity and password. All user identities and passwords are managed within iXp and have no relation to system/domain IDs and passwords.
In the second model, iXp leverages the user ID already authenticated to the Active Directory Domain or the local machine. This requires no user/password maintenance in iXp.
In either case, iXp security includes the following features:
Data transmission between the server and client machines can be
secured and encrypted through current secure HTTP technology. Also, the sensitive data stored by iXp is encrypted.
Roles can be assigned to the iXp user identities to provide read, update,
and control privileges for the CA Workload Automation AE objects. The security model is very dynamic and user policies can be changed on
the fly. Changes immediately take effect and a user logout is not necessary.
The iXp administrator can easily manage the security role policies
through the iXp Admin Tool.

User Guide14
3 VIEWING JOBS
3.1 Customizing the GUI
Contact your iXp administrator for the URL of the iXp server and login information. After logging in, you should see iXp application as shown below. You can verify the version of iXp by selecting the Help►About menu option. On the main GUI, shown below, drag the window size adjusters with your mouse to view all four iXp windows. A left-click on the arrow indentation on any size adjuster will move the panel all the way to the edge of the GUI window, collapsing any views in that direction. For example, a left-click on the down arrow indentation on the size adjuster between the Console View and the Job Flow View will completely hide the Job Flow View and enlarge the Console View.
Window Size Adjusters

Graphical Views
VIEWING JOBS15
3.2 Graphical Views
There are five graphical views in iXp. Each view shares context with all the other views. All the views show the same data. The five views are as follows:
1. Tree View 2. Job Detail View 3. Console View 4. Time View 5. Job Flow View
3.2.1 The Console View
The Console View provides an ordered list of jobs and their vital details. COLUMN NAME
DESCRIPTION
Job Type The job type: CMD, BOX, FW, or new job type
Icon The type of job or its state represented pictorially.
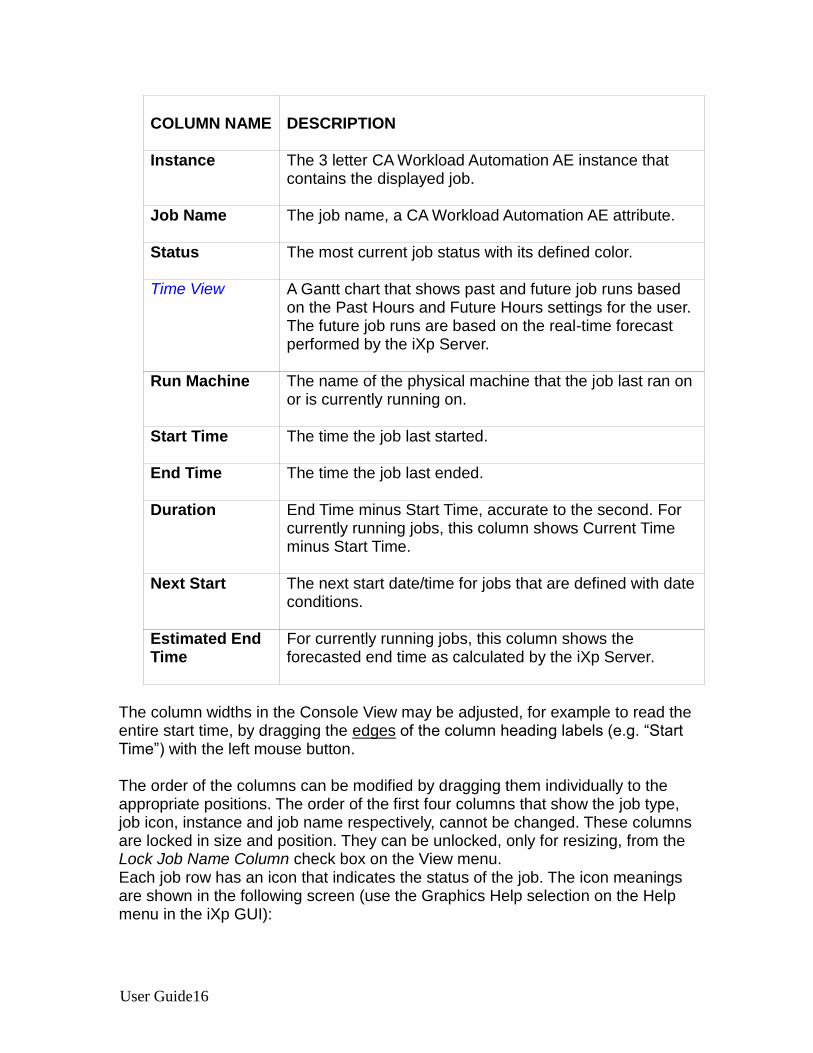
User Guide16
COLUMN NAME
DESCRIPTION
Instance The 3 letter CA Workload Automation AE instance that contains the displayed job.
Job Name The job name, a CA Workload Automation AE attribute.
Status The most current job status with its defined color.
Time View A Gantt chart that shows past and future job runs based on the Past Hours and Future Hours settings for the user. The future job runs are based on the real-time forecast performed by the iXp Server.
Run Machine The name of the physical machine that the job last ran on or is currently running on.
Start Time The time the job last started.
End Time The time the job last ended.
Duration End Time minus Start Time, accurate to the second. For currently running jobs, this column shows Current Time minus Start Time.
Next Start The next start date/time for jobs that are defined with date conditions.
Estimated End Time
For currently running jobs, this column shows the forecasted end time as calculated by the iXp Server.
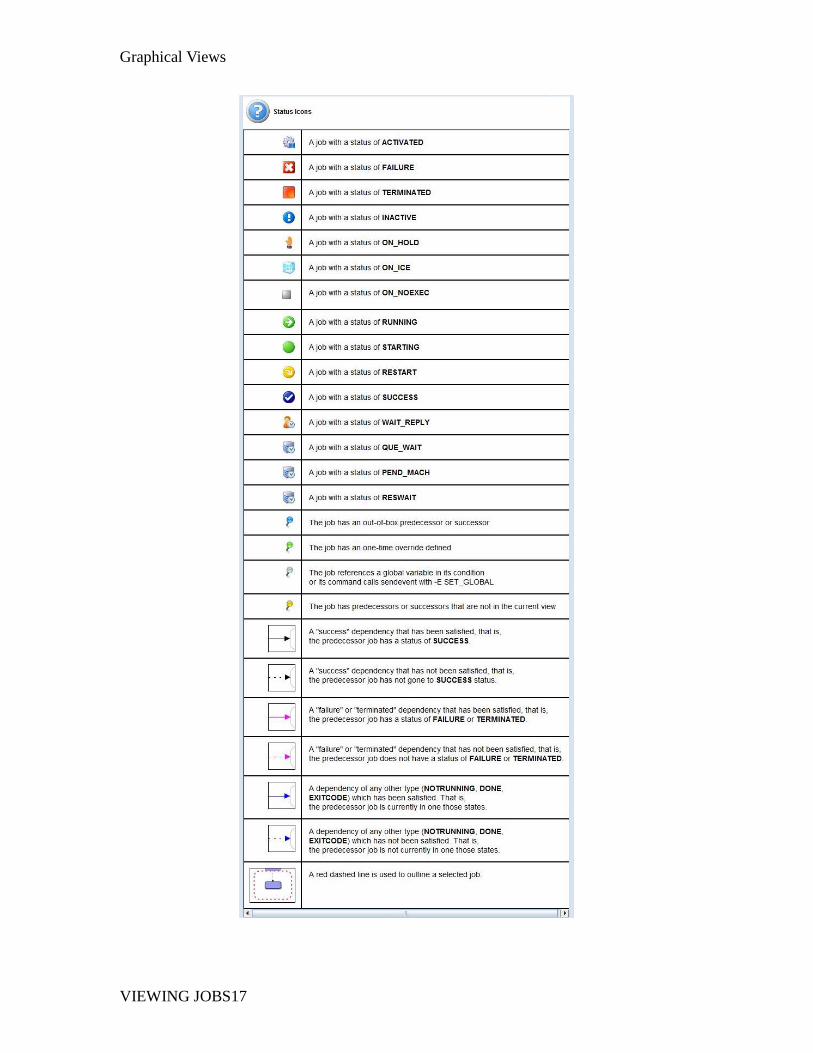
The column widths in the Console View may be adjusted, for example to read the entire start time, by dragging the edges of the column heading labels (e.g. “Start Time”) with the left mouse button. The order of the columns can be modified by dragging them individually to the appropriate positions. The order of the first four columns that show the job type, job icon, instance and job name respectively, cannot be changed. These columns are locked in size and position. They can be unlocked, only for resizing, from the Lock Job Name Column check box on the View menu. Each job row has an icon that indicates the status of the job. The icon meanings are shown in the following screen (use the Graphics Help selection on the Help menu in the iXp GUI):
Graphical Views
VIEWING JOBS17
User Guide18
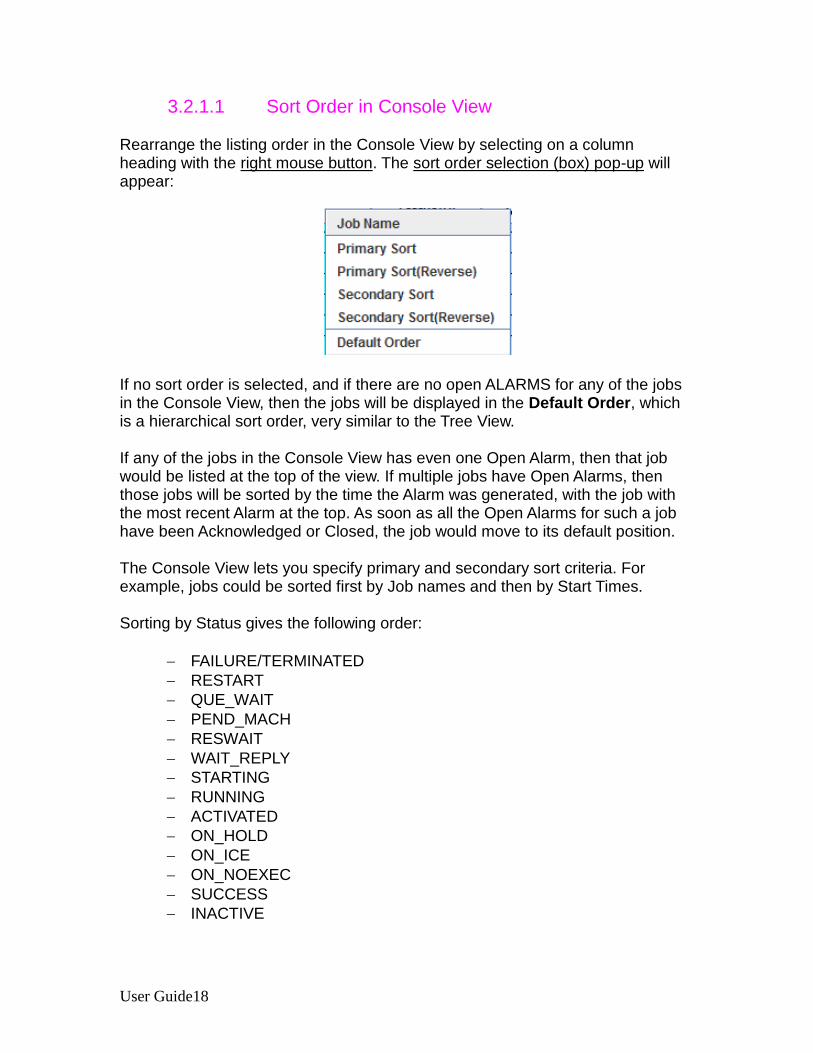
3.2.1.1 Sort Order in Console View
Rearrange the listing order in the Console View by selecting on a column heading with the right mouse button. The sort order selection (box) pop-up will appear:
If no sort order is selected, and if there are no open ALARMS for any of the jobs in the Console View, then the jobs will be displayed in the Default Order, which is a hierarchical sort order, very similar to the Tree View. If any of the jobs in the Console View has even one Open Alarm, then that job would be listed at the top of the view. If multiple jobs have Open Alarms, then those jobs will be sorted by the time the Alarm was generated, with the job with the most recent Alarm at the top. As soon as all the Open Alarms for such a job have been Acknowledged or Closed, the job would move to its default position. The Console View lets you specify primary and secondary sort criteria. For example, jobs could be sorted first by Job names and then by Start Times. Sorting by Status gives the following order:
FAILURE/TERMINATED
RESTART
QUE_WAIT
PEND_MACH
RESWAIT
WAIT_REPLY
STARTING
RUNNING
ACTIVATED
ON_HOLD
ON_ICE
ON_NOEXEC
SUCCESS
INACTIVE
Graphical Views
VIEWING JOBS19
3.2.2 Time View
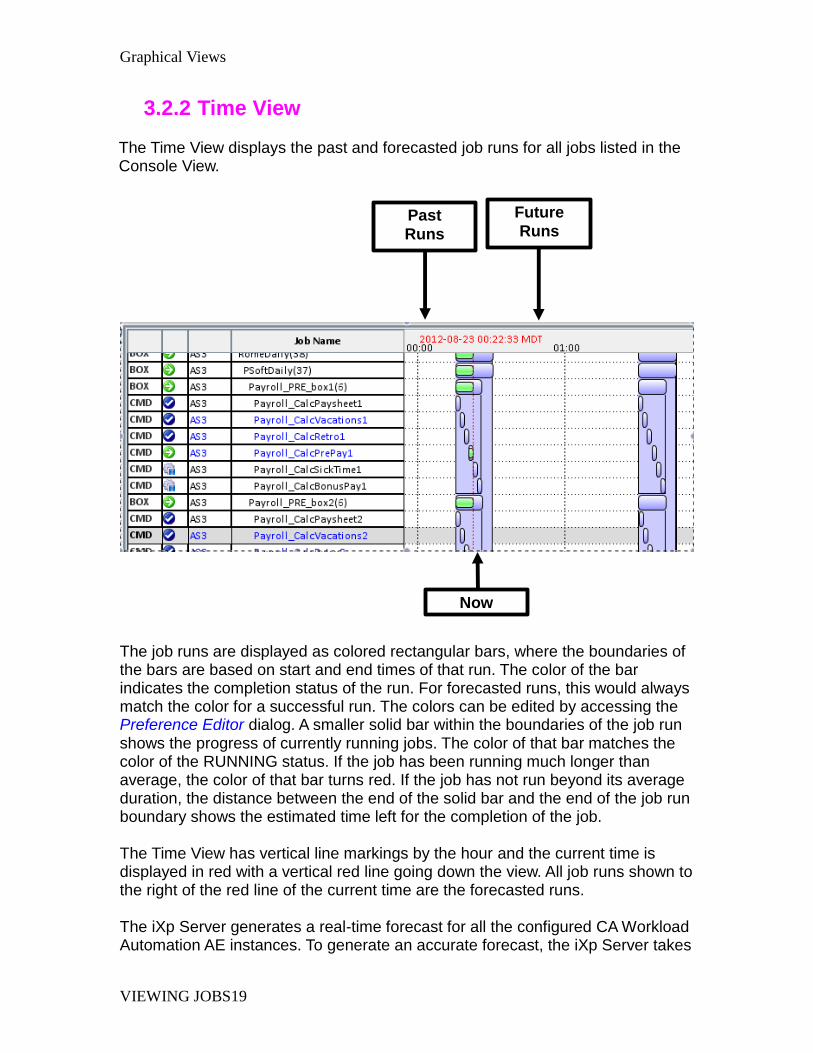
The Time View displays the past and forecasted job runs for all jobs listed in the Console View.
The job runs are displayed as colored rectangular bars, where the boundaries of the bars are based on start and end times of that run. The color of the bar indicates the completion status of the run. For forecasted runs, this would always match the color for a successful run. The colors can be edited by accessing the Preference Editor dialog. A smaller solid bar within the boundaries of the job run shows the progress of currently running jobs. The color of that bar matches the color of the RUNNING status. If the job has been running much longer than average, the color of that bar turns red. If the job has not run beyond its average duration, the distance between the end of the solid bar and the end of the job run boundary shows the estimated time left for the completion of the job.
The Time View has vertical line markings by the hour and the current time is displayed in red with a vertical red line going down the view. All job runs shown to the right of the red line of the current time are the forecasted runs. The iXp Server generates a real-time forecast for all the configured CA Workload Automation AE instances. To generate an accurate forecast, the iXp Server takes
Past
Runs
Future
Runs
Now

User Guide20
into account the current statuses of all jobs, job dependencies, date/time conditions, and average job durations as stored in the CA Workload Automation AE database. The iXp Server performs a forecast of each CA Workload Automation AE instance as per their forecasting properties listed in the iXp Admin Tool. The iXp Server also accounts for all the major CA Workload Automation AE latencies and hence the duration for forecasted runs may be greater than the average job duration, which does not account for any latencies. If a past job run lasted much longer than the average duration for that job, the job run is marked with a red ‘X’ in the Time View. This provides a visual alert on all job runs that lasted longer than average. Jobs that run much longer than scheduled, or are predicted to run much longer than scheduled, are also marked with a red X.
3.2.2.1 Setting Chart Duration
Use the “Past Hours” and “Future Hours” settings in the Preference Editor to set the duration of the Time View chart. For example, by setting the Past Hours and Future Hours to 2 Hours, the Time View would depict any runs within the last two hours for the jobs in the Console View and also show all forecasted runs for the next two hours for the same jobs.
Use the “Time Window” tab on the Filter Editor window to select jobs to be displayed according to their past and future run times. For example, adjusting “Past Hours” to 2 and “Future Hours” to 10, in the Filter Editor, and then applying the resulting filter, will contain jobs that have run in the past 2 hours, are currently running, or are forecasted to run in the next 10 hours. Adjusting the Time Window in the Filter Editor does not affect the Time View Chart duration set in the Preference Editor.
3.2.2.2 Retrieve Run Data

Graphical Views
VIEWING JOBS21
If the “Retrieve Run Data” check box is not selected, no job run data will be displayed and hence the Time View would not show any runs. In order for the client to display past and forecasted job runs, the “Retrieve Run Data” check box MUST be selected.

User Guide22
3.2.3 Job Flow View
The Job Flow View shows the predecessor and successor job relationships for each job and the box hierarchy.
Left-click a job in the Job Flow View to show the selected job with a red border, and highlight its predecessor and successor relationship arrows. All other jobs and arrows will be grayed out. Once a job is selected, any right-click actions will affect that job.

Graphical Views
VIEWING JOBS23
3.2.3.1 Zoom
Use the Zoom buttons on the iXp toolbar to adjust the size of the Job Flow View.
The Fit icon sizes the Job Flow View to show the entire structure. You can
select the zoom value from the drop-down list or by clicking the icon. The zoom value of 100% gives a font size for the Job Flow View about equal to the other view fonts.
The default sizing layout in the Job Flow View (Zoom 100%) is derived from the job name font, horizontal spacing, and vertical spacing as set in the preferences (see the Section 4.2.3 Edit►Edit Preferences of this document).
Other sizing options are the and icons on the Flow View Toolbar, and the “rubber-band” function—use the mouse to select an area that you want to view in more detail (this works best when refresh is paused). Finally, it is possible to simply type numbers in the zoom drop-down list.

User Guide24
3.2.3.2 Job Flow View Order
In the Job Flow View, the jobs are arranged in the following ways:
1. Largest job streams (set of related jobs—jobs in boxes and jobs that depend on each other) at top left.
2. Smaller job streams are spaced across the top (or side if streaming top to bottom). Additional job streams are centered under each job stream in the top row.
3. All jobs with no dependencies are grouped together 4. All other things being equal (size, number and position of predecessors,
number and position of successors, how many joids occur between the two compared joids), jobs with a higher JOID (i.e. jobs that were defined later) will be below or to the right of jobs with lower JOIDs.
Jobs that are contained in the same box or Level-0 jobs, once they have been grouped, are positioned using the following criteria: size of job or box number and position of predecessors number and position of successors the presence of out-of-box predecessors or successors the presence of circular dependency logic

Graphical Views
VIEWING JOBS25
If all the listed criteria are equivalent for two jobs in the same box, a job with a higher JOID (i.e. jobs that were defined later) will be below or to the right of a job with a lower JOID. The Stream Jobs option on the View menu can be used to toggle between a left to right job flow and a top to bottom job flow.
3.2.3.3 Names in Job Flow View
In the Job Flow View, job names can be abbreviated in several ways. This preserves View space in the event of commonly used naming practices. The abbreviation functions are as follows:
1) Truncate Job Names, based on shared prefixes of sibling jobs existing on the iXp Client. Example: jobs named abc101 and abc102 are abbreviated to *1 and *2. The three special characters (., _ and –) are special delimiter characters, and are kept in the abbreviated job names. Example: abc.101 and abc.102 are abbreviated as *.101 and *.102.
2) Keep First 8 letters, which is a simple numerical cut of everything from character 9 on.
3) Hide Job Names, which reduces each job to an icon. 4) Show Job Names displays the entire job name for each job.
User Guide26
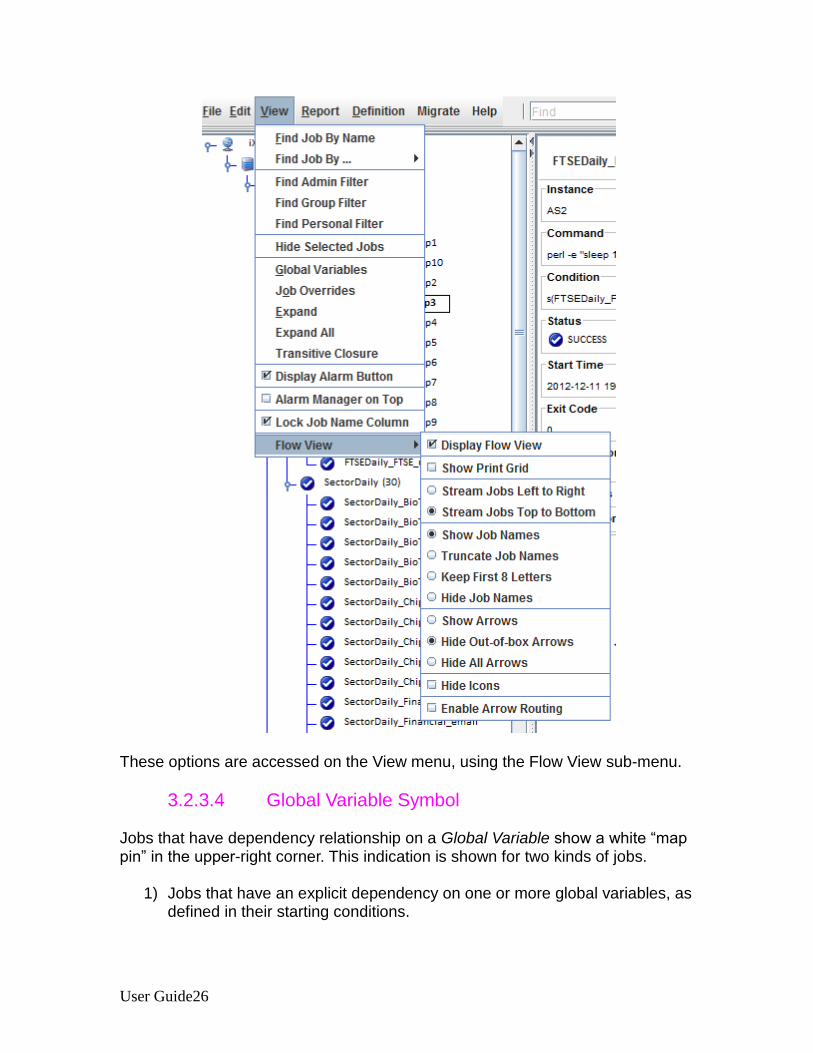
These options are accessed on the View menu, using the Flow View sub-menu.
3.2.3.4 Global Variable Symbol
Jobs that have dependency relationship on a Global Variable show a white “map pin” in the upper-right corner. This indication is shown for two kinds of jobs.
1) Jobs that have an explicit dependency on one or more global variables, as
defined in their starting conditions.

Graphical Views
VIEWING JOBS27
2) Jobs that set the value of one or more global variables. The appropriate
sendevent syntax for setting global variables must be defined in the
command field.

User Guide28
3.2.4 The Job Detail View
The Job Detail View shows details of the selected job.
Note. Clicking on the Status, Box name, Run machine, Application, or Group attributes automatically creates a temporary job filter that shows all jobs with the same attributes. Detail View Item Description
Selected Jobs Lists the jobs that have been selected in the Console
View, the Job Flow View, or the Tree View. If more than one job is selected, only the selected job names will appear; the remaining fields in the Detail View will be blank.
Instance/icons The name of the CA Workload Automation AE Instance where this job is defined, and icons that provide detail about the job. In the example above, the icons show that this is a Command (rather than Box or File Watcher) job, that it has date/time conditions, that it has a dependency, and that it uses a Global Variable.
Box Name The name of the Box Job that contains the selected job. Jobs that are not in boxes will show N/A.
Description The contents of the CA Workload Automation AE JIL
description attribute.
Command / Watch File
The contents of the CA Workload Automation AE JIL
command attribute to be executed for command jobs,
and may be the name of any command, executable, UNIX shell script or batch file, and its arguments. If the job is a Box Job, this field is not shown. If the job is a File Watcher, then the contents of the CA
Workload Automation AE JIL watch_file attribute
is shown.
Condition The contents of the CA Workload Automation AE JIL
condition attribute specifies when the job can or
cannot run relative to other jobs. If this attribute is blank, then this field is not shown.
Group Displays the group that the job is associated to. Application Displays the application that the job is associated to.
Graphical Views
VIEWING JOBS29
Detail View Item Description
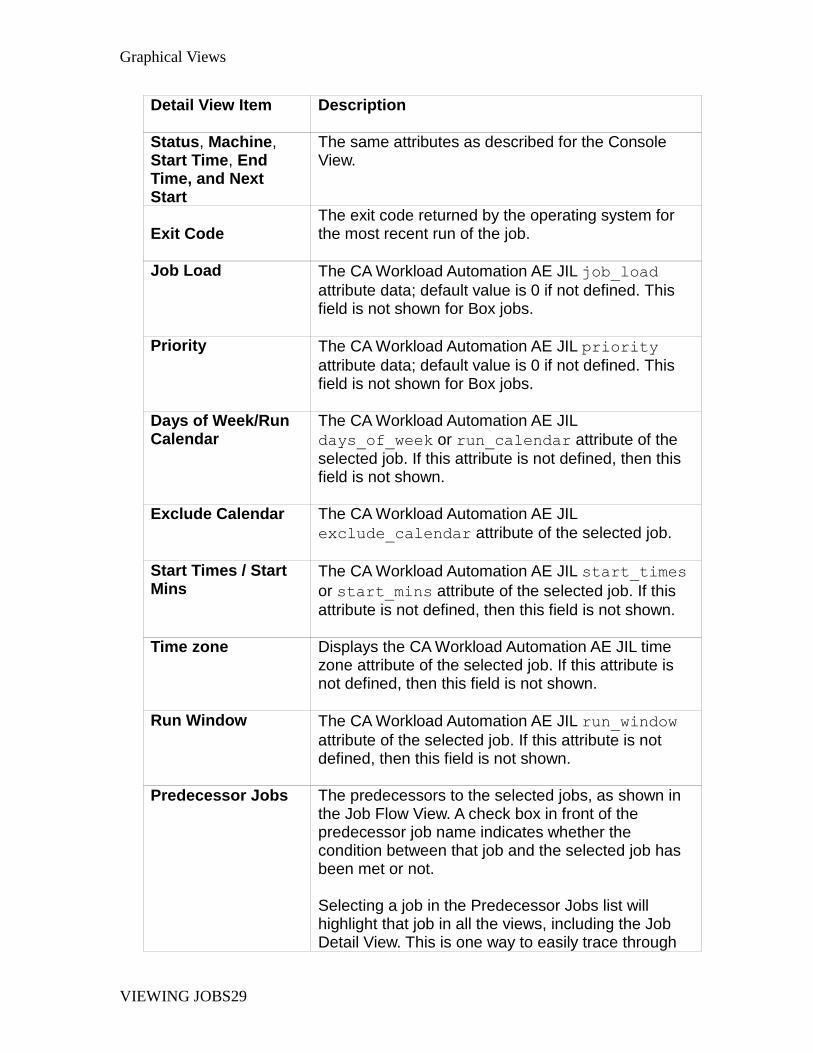
Status, Machine, Start Time, End Time, and Next Start
The same attributes as described for the Console View.
Exit Code
The exit code returned by the operating system for the most recent run of the job.
Job Load The CA Workload Automation AE JIL job_load
attribute data; default value is 0 if not defined. This field is not shown for Box jobs.
Priority The CA Workload Automation AE JIL priority
attribute data; default value is 0 if not defined. This field is not shown for Box jobs.
Days of Week/Run Calendar
The CA Workload Automation AE JIL
days_of_week or run_calendar attribute of the
selected job. If this attribute is not defined, then this field is not shown.
Exclude Calendar The CA Workload Automation AE JIL
exclude_calendar attribute of the selected job.
Start Times / Start Mins
The CA Workload Automation AE JIL start_times
or start_mins attribute of the selected job. If this
attribute is not defined, then this field is not shown.
Time zone Displays the CA Workload Automation AE JIL time zone attribute of the selected job. If this attribute is not defined, then this field is not shown.
Run Window The CA Workload Automation AE JIL run_window
attribute of the selected job. If this attribute is not defined, then this field is not shown.
Predecessor Jobs The predecessors to the selected jobs, as shown in the Job Flow View. A check box in front of the predecessor job name indicates whether the condition between that job and the selected job has been met or not. Selecting a job in the Predecessor Jobs list will highlight that job in all the views, including the Job Detail View. This is one way to easily trace through

User Guide30
Detail View Item Description job dependency relationships.
Successor Jobs The successors to the selected job, as shown in the Job Flow View. Each successor job is listed with an icon that shows its current status. Selecting a job in the Successor Jobs list will highlight that job in all the views, including the Job Detail View. This is one way to easily trace through job dependency relationships.
Global Variables If the selected job is dependent on GlobalVariables, or is setting the value for any, then the current value of the global variables will be displayed here.
If any of the following attributes are displayed, you can click the values shown to perform the associated actions:
Attribute Associated Action
Run Calendar View the calendar dates in the graphical Calendar dialog.
Exclude Calendar View the calendar dates in the graphical Calendar dialog.
Predecessor Job Change the selection to the job that was clicked.
Successor Job Change the selection to the job that was clicked.
Global Variable Open the Global Variable dialog to view the list of jobs associated with the clicked Global variable, set the value or delete the Global variable.
The following screen shows the atomic conditions being displayed in the Detail View. If a dependency has been met, then the Predecessor jobs field shows a checkmark for that job.

Graphical Views
VIEWING JOBS31
The condition attribute of the selected job.
The indicator whether the above conditions have been met or not.

User Guide32
3.2.5 The Tree View The Tree View depicts the hierarchical box structure of the jobs. Box Job icons look like a box and open when the Tree View displays the jobs contained in the Box Job. Left-click the knob next to a Box Job or double-click the box to expand one level and show the contents of the Box Job in the Tree View.
Use the right mouse button to select Expand to expand the view one level, or Expand All to view the entire Tree View. The Expand or Expand All option can be applied to a Box Job, an Instance or the whole Site. Expanding a Box job shows all the jobs at the next level within the selected Box job. Expanding an instance shows all Level Zero jobs (i.e. all jobs that are NOT within a Box job), including top-level Box jobs. When an Expand All is performed, all jobs within the selected Instance or Box or Site are shown. This could result in quite a large number of jobs.
Box Job (contains12 jobs)
Job ON_HOLD
Job ON_ICE
Graphical Views
VIEWING JOBS33
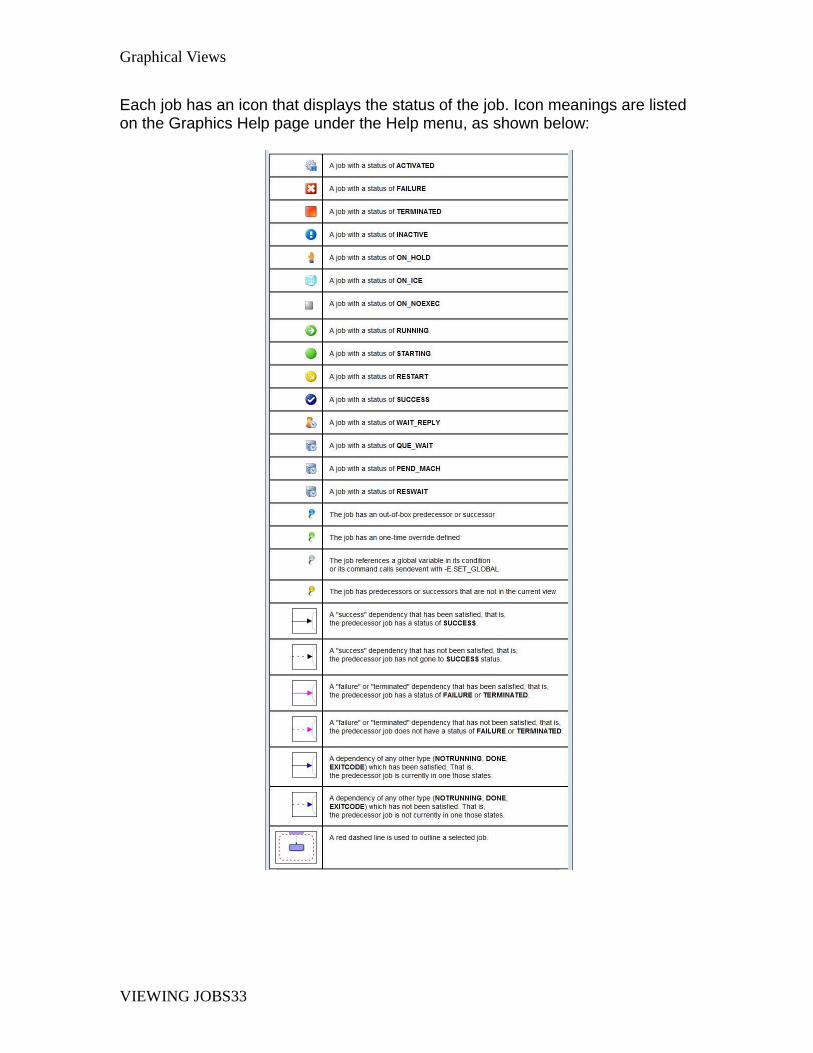
Each job has an icon that displays the status of the job. Icon meanings are listed on the Graphics Help page under the Help menu, as shown below:
User Guide34
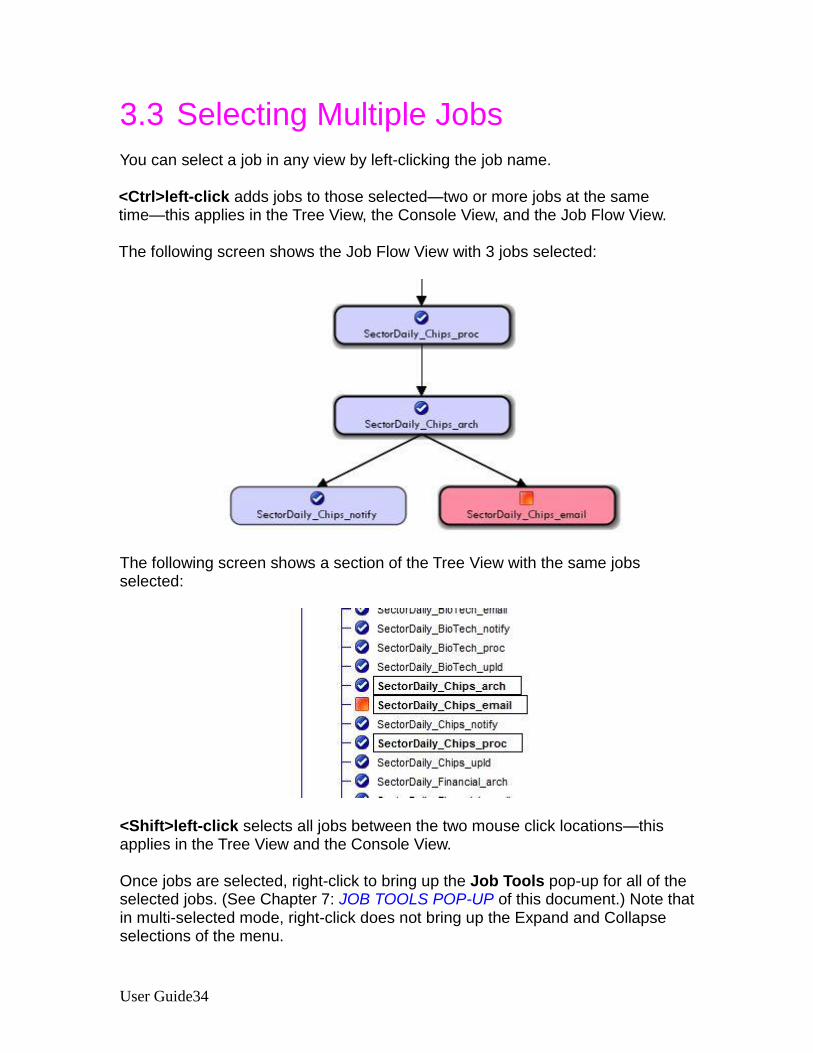
3.3 Selecting Multiple Jobs
You can select a job in any view by left-clicking the job name. <Ctrl>left-click adds jobs to those selected—two or more jobs at the same time—this applies in the Tree View, the Console View, and the Job Flow View. The following screen shows the Job Flow View with 3 jobs selected:
The following screen shows a section of the Tree View with the same jobs selected:
<Shift>left-click selects all jobs between the two mouse click locations—this applies in the Tree View and the Console View. Once jobs are selected, right-click to bring up the Job Tools pop-up for all of the selected jobs. (See Chapter 7: JOB TOOLS POP-UP of this document.) Note that in multi-selected mode, right-click does not bring up the Expand and Collapse selections of the menu.
File Menu:
iXp MENU BAR35
4 iXp MENU BAR
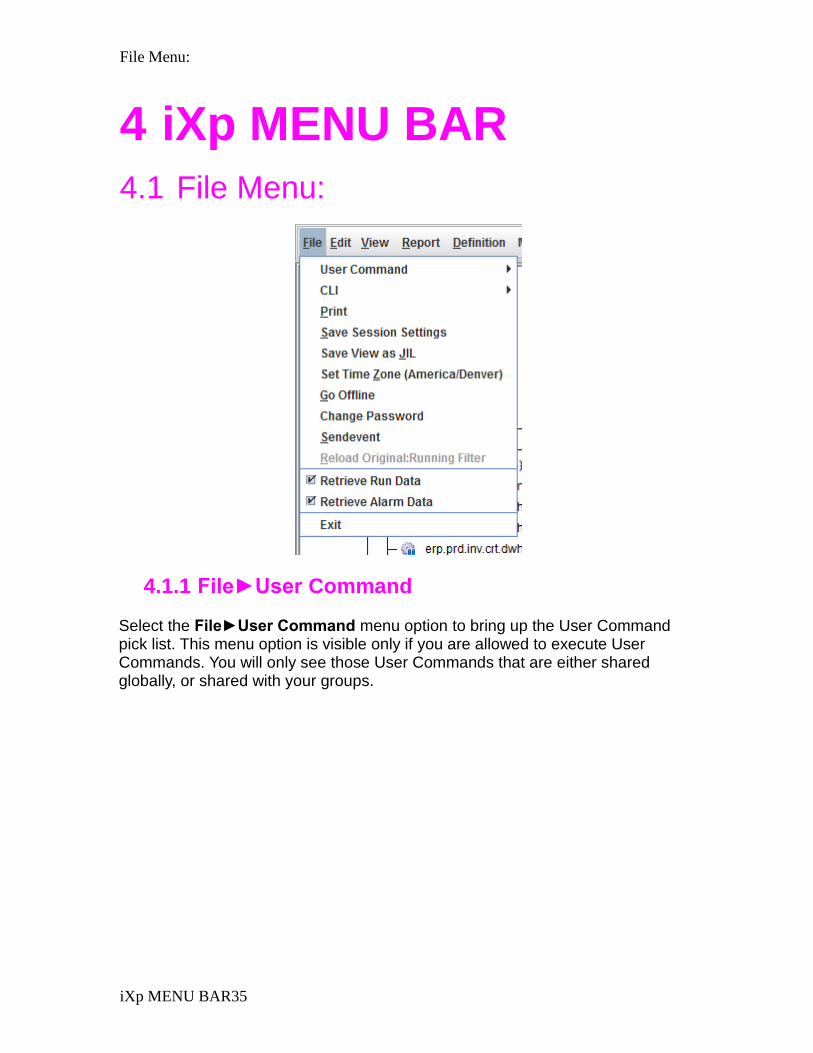
4.1 File Menu:
4.1.1 File►User Command
Select the File►User Command menu option to bring up the User Command pick list. This menu option is visible only if you are allowed to execute User Commands. You will only see those User Commands that are either shared globally, or shared with your groups.
User Guide36
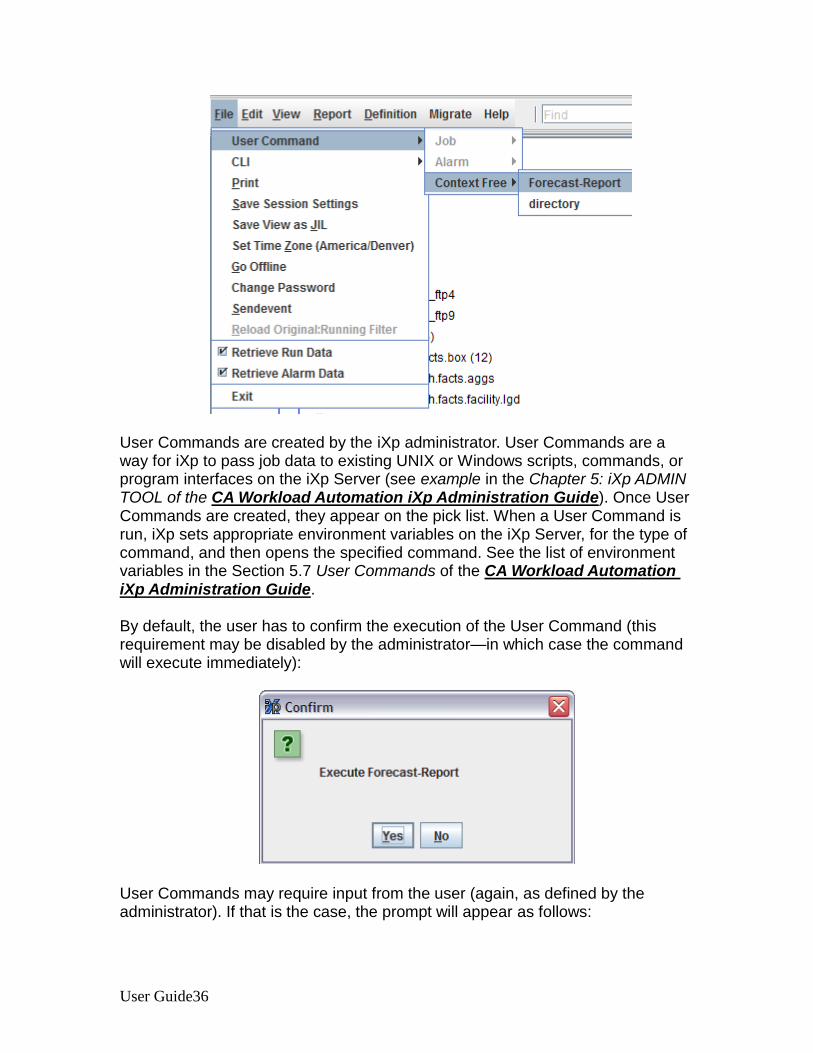
User Commands are created by the iXp administrator. User Commands are a way for iXp to pass job data to existing UNIX or Windows scripts, commands, or program interfaces on the iXp Server (see example in the Chapter 5: iXp ADMIN TOOL of the CA Workload Automation iXp Administration Guide). Once User Commands are created, they appear on the pick list. When a User Command is run, iXp sets appropriate environment variables on the iXp Server, for the type of command, and then opens the specified command. See the list of environment variables in the Section 5.7 User Commands of the CA Workload Automation iXp Administration Guide. By default, the user has to confirm the execution of the User Command (this requirement may be disabled by the administrator—in which case the command will execute immediately):
User Commands may require input from the user (again, as defined by the administrator). If that is the case, the prompt will appear as follows:

File Menu:
iXp MENU BAR37
4.1.1.1 File►UserCommand►Job
User Commands of type Job may be run when a job is selected in the iXp views. Select “Job” to run a User Command of type Job after selecting a chosen job in the iXp views. Job User Commands can ONLY be run when a job has been selected. If no job is selected, the Job User Command menu item will be grayed out. User commands can be set up such that you can select multiple jobs and then execute the same command on each of the selected jobs. If a User Command is executed on multiple jobs, iXp will run the user command on each job consecutively, and then show the concatenated output.
When a user command is executed, some relevant information about the selected job is set in the environment. The following example lists some of the environment variables that are set and their values:
IXP_HOME=opt/CA/ixp IXP_USERCOMMAND_INPUT_PROMPT=
IXP_USERCOMMAND_INPUT=
IXP_USERCOMMAND_JOB_JOID=757
IXP_USERCOMMAND_JOB_LAST_END=5/7/07 11:31 AM
IXP_USERCOMMAND_JOB_LAST_RUN_MACHINE=aragorn

User Guide38
IXP_USERCOMMAND_JOB_LAST_START=5/7/07 11:11 AM
IXP_USERCOMMAND_JOB_NAME=FTSEDaily_FTSE_process
IXP_USERCOMMAND_JOB_STATUS=INACTIVE
IXP_USERCOMMAND_USER_NAME=ixpAdmin
ixp.home=opt/CA/ixp
The results of any user command are shown in a web browser. This enables the user to leverage the functionality of the browser to save, print, email, or search the output.
4.1.1.2 File►UserCommand►Alarm
User Commands of type Alarm are available when an Alarm Job is selected in the Section 5.2 Alarm Manager. The procedure to execute Alarm User commands is the same as that for Job User commands. If a Job Alarm is selected in the Alarm manager, right-clicking it will bring up the Alarm Pop-up menu, which includes Alarm User Commands. The Pop-up is not supported for other types of alarms (Rollover, and so on).
4.1.1.3 File►UserCommand►Context Free
For User Commands of type Context Free, the iXp Request Server executes the command without setting any job or alarm specific information. To run context free commands, it is not required to click and select a job or an alarm. Two default context free user commands supplied with iXp are as follows:
Forecast_Next_48hrs
Forecast_Next_24hrs.
The Forecast_Next_24Hrs and the Forecast_Next_48Hrs commands provide a text report of all the forecasted runs in the next 24 and 48 hours respectively.

File Menu:
iXp MENU BAR39
4.1.2 File►CLI

User Guide40
Select the File►CLI menu option to execute Command Line utilities from the GUI. For example, to run an autorep command, select the File►CLI►autorep menu option as shown below:
For specifics regarding the command line options, click the Usage button.
Supported commands are autorep, autostatus, job_depends, sendevent, jil. The user’s security privilege setting will control what jobs and what actions are allowed. The “jil” option is slightly different:
File Menu:
iXp MENU BAR41
Options include the “quiet” (-Q) and verification (-V) check boxes, and the Import File button.
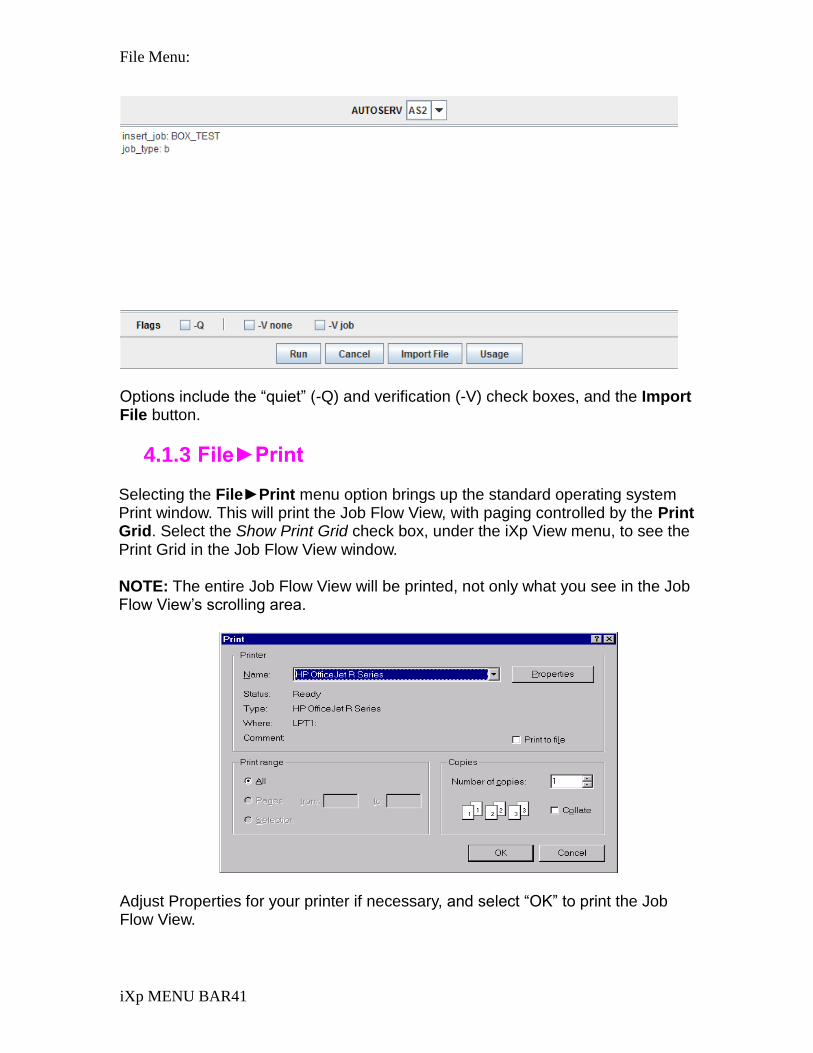
4.1.3 File►Print
Selecting the File►Print menu option brings up the standard operating system Print window. This will print the Job Flow View, with paging controlled by the Print Grid. Select the Show Print Grid check box, under the iXp View menu, to see the Print Grid in the Job Flow View window. NOTE: The entire Job Flow View will be printed, not only what you see in the Job Flow View’s scrolling area.
Adjust Properties for your printer if necessary, and select “OK” to print the Job Flow View.

User Guide42
NOTE: The Print Dialog is provided by your underlying operating system and differs across platforms. The above graphic is a Windows NT® dialog. Currently, the print size and print orientation is not configurable. Hence, the print size is always 8.5 x 11 inches, and in portrait orientation. If the print layout exceeds one page, iXp will print out the job flow across multiple pages.
4.1.3.1 Print Tiling
Multi-page prints are tiled, with tile row and column numbers printed in the lower left of the pages.
4.1.4 File►Save Session Settings This saves the user preferences to the iXp Server. Save Session Settings results in saving of the user preferences, as listed in the preference dialog, and the start-up filter setting, as dictated by the Current Filter. Also the current iXp windows layout, the size, position and sort order of columns in the Console View and the Alarm Manager will be saved. Some other options under the View menu item will be saved too. The next time that user opens iXp, the saved settings will determine the display format and the data shown.
4.1.5 File►Save View as JIL
This lets you generate a text file with JIL definition of all the jobs that are currently in view. This feature will generate the file as long as every job in view passes the user’s JOB_DETAIL privilege. By default, the file will be shown in a web-browser.
4.1.6 File►Set Time Zone
By default, the job run information displayed throughout the iXp Application is shown based on the time zone of the iXp client machine. For example, users opening the iXp client in Malaysia for CA Workload Automation AE jobs running in Chicago will see all the job run times in the corresponding Malaysian time zone. Using this menu option, you can set your time zone preference, and the job run data will be displayed based on the selected time zone. NOTE: iXp administrators can use the iXp Admin Tool to assign a timezone for each CA Workload Automation AE instance. In that case, iXp will always show the information in that timezone, irrespective of the value here.

File Menu:
iXp MENU BAR43
4.1.7 File►Go Offline
Offline mode enables the Interactive Forecasting tool. Selecting the File►Go Offline menu option will bring up the Confirmation dialog box.
In Offline mode, all filtration and navigation actions derive results from the in-memory snapshot, not from the server. Offline mode provides a means to perform filter and view customization without the cost of roundtrip server invocations. After customizing the iXp setup, you can save your preferences and filters, and then go back Online with those preferences and filters. In the Offline mode, Job Control actions such as job definition updates or sendevents are not possible. To take the iXp session back online, select the File►Go Online menu option.
4.1.8 File►Change Password
Selecting the File►Change Password menu option brings up the Password dialog box to change the iXp password for the current user

User Guide44
4.1.9 File►Sendevent
The File►Sendevent menu option opens the sendevent dialog for creation of
custom sendevents. This menu option is visible only if you are allowed to control
jobs.
Select the tabs in the Sendevent Dialog to create a custom sendevent. Select the
Issue Sendevent button to issue the event to CA Workload Automation AE. Select the Close button to close the Sendevent Dialog. Future Sendevent: The option Time (-T) provides a mechanism to issue events for a later date and time in advance, rather than doing it in person at that time. For example, a job may have been put ON_HOLD a few minutes ago and you want the job to be taken OFF_HOLD later that night. It would be easier to issue a future OFF_HOLD event on that job for that night, rather than to open iXp to issue the command exactly at the appropriate time. Clear the Now check box to enter a time when the sendevent will occur.
4.1.9.1 Sendevent►Standard
The Sendevent►Standard tab creates default sendevents as does the Job Tools Pop-up►Job Control, with the option to alter the Sendevent time.

File Menu:
iXp MENU BAR45
Standard Tab Item Description
Example: Sendevent Pick from the standard Sendevent listing: FORCE_STARTJOB, JOB_ON_HOLD, JOB_OFF_HOLD, JOB_ON_ICE, JOB_OFF_ICE, JOB_ON_NOEXEC, JOB_OFF_NOEXEC, KILLJOB, STARTJOB. These are as in Job Control►STARTJOB.
Comment (-C) Type a comment to be associated with the Sendevent.
Time (-T) Select a time for the Sendevent, or select Now (the default time).
Current Sendevent Lists the Sendevents that have been selected. Select Issue Sendevent to issue to CA Workload Automation AE, or select Close to close the window without issuing any events.
User Guide46
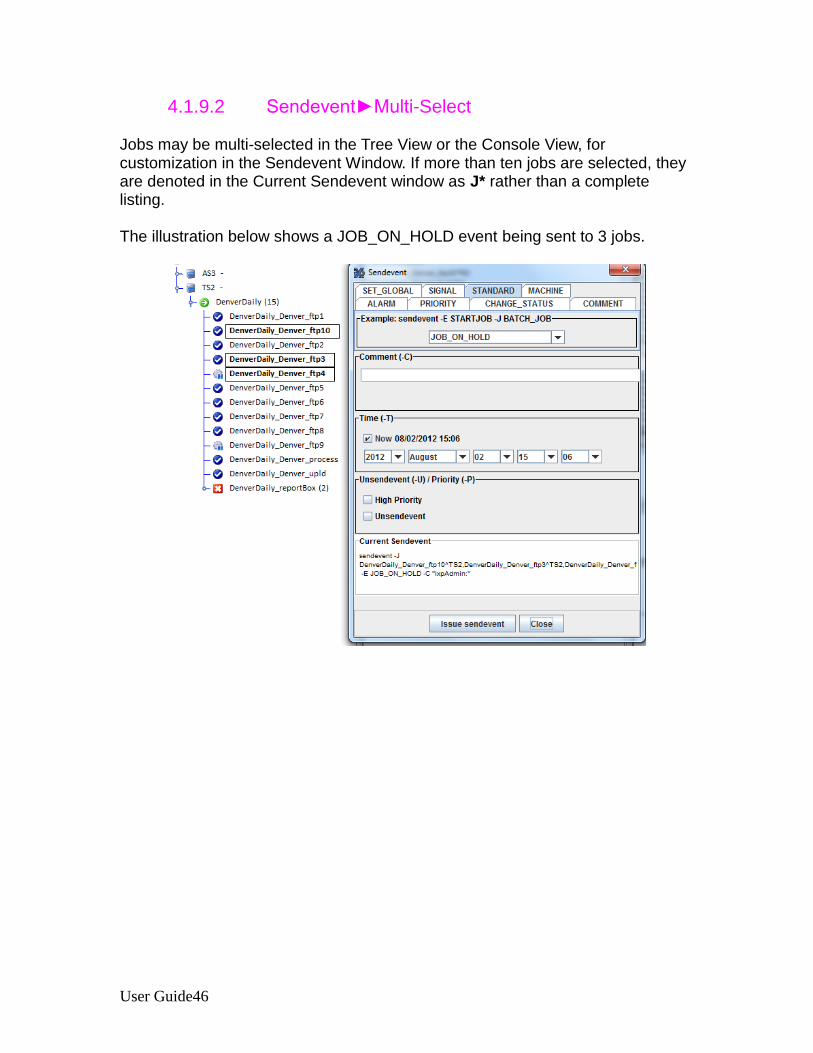
4.1.9.2 Sendevent►Multi-Select
Jobs may be multi-selected in the Tree View or the Console View, for customization in the Sendevent Window. If more than ten jobs are selected, they are denoted in the Current Sendevent window as J* rather than a complete listing. The illustration below shows a JOB_ON_HOLD event being sent to 3 jobs.

File Menu:
iXp MENU BAR47
4.1.9.3 Sendevent►CHANGE_STATUS
CHANGE_STATUS Tab Item
Description
Example: sendevent Pick from the CHANGE_STATUS types: FAILURE, INACTIVE, RUNNING, SUCCESS, TERMINATED, as are in the Job Control Pop-up.
User Guide48
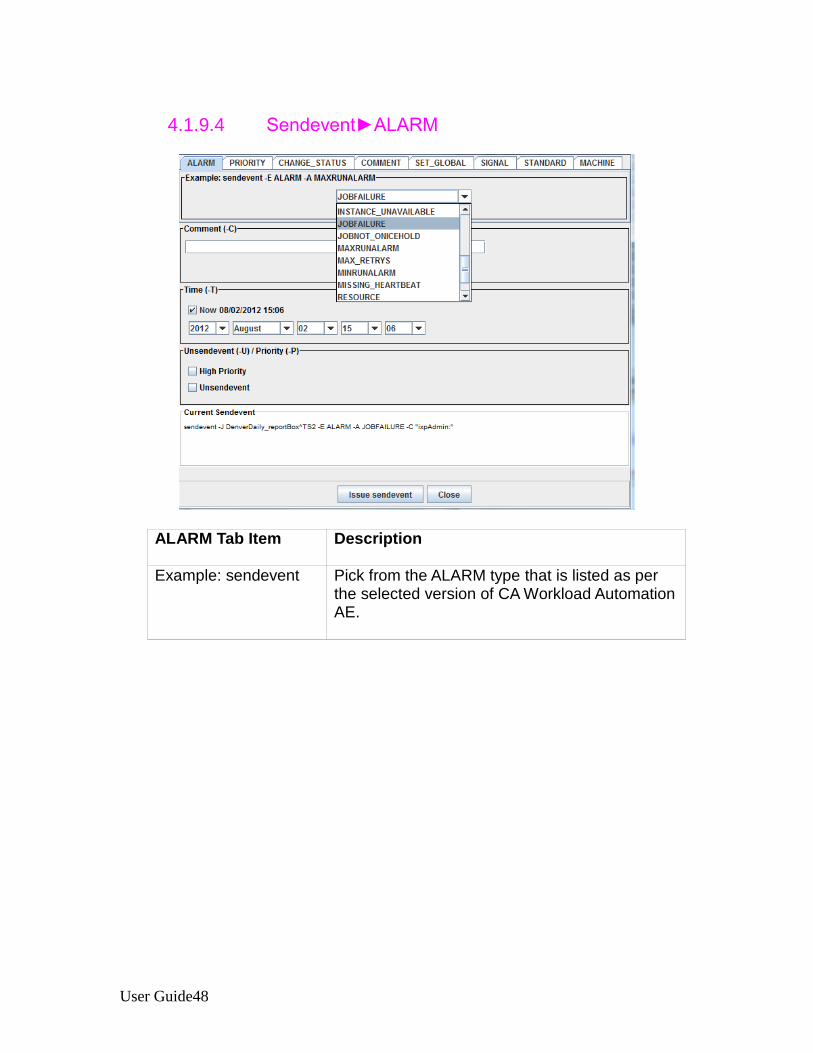
4.1.9.4 Sendevent►ALARM
ALARM Tab Item
Description
Example: sendevent Pick from the ALARM type that is listed as per the selected version of CA Workload Automation AE.

File Menu:
iXp MENU BAR49
4.1.9.5 Sendevent►COMMENT
COMMENT Tab Item
Description
Comment (-C) Type a comment -- for standalone COMMENT if no job is selected, or to go with selected jobs.

User Guide50
4.1.9.6 Sendevent►SET_GLOBAL
Set_Global Tab Item Description
Global Variables Select Global Variables that must be created or updated. All existing variables are provided in the drop-down list.
Values Select Values for the Global Variables. All the values for the existing global variables are provided in the drop-down list.

File Menu:
iXp MENU BAR51
4.1.9.7 Sendevent►CHANGE_PRIORITY
CHANGE_PRIORITY Tab Item
Description
Priority Select the priority value to be assigned to the chosen job. You can pick a value from the drop-down menu or type it in.
User Guide52
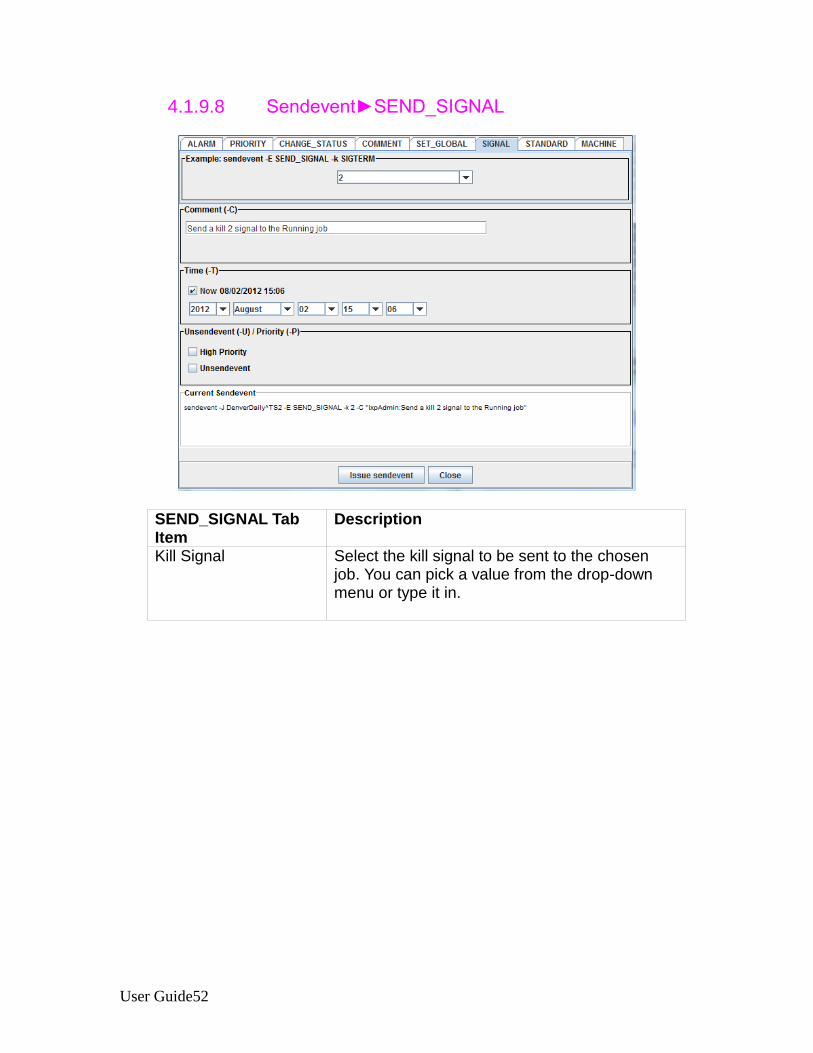
4.1.9.8 Sendevent►SEND_SIGNAL
SEND_SIGNAL Tab Item
Description
Kill Signal Select the kill signal to be sent to the chosen job. You can pick a value from the drop-down menu or type it in.

File Menu:
iXp MENU BAR53
4.1.9.9 Sendevent►MACHINE
MACHINE Tab Items Description
Event Name Select the event that you want to send to the machine.
Machine Name Select the name of the machine that you want to send the event to.
4.1.10 File►Retrieve Run Data
If the Retrieve Run Data check box is not selected, the historical and forecasted job runs would not be retrieved by the client. If it is selected, then the run data will be retrieved by the client and appear in the Time View Chart. Turning off Retrieve Run Data can improve the application speed especially for dial-up use.
4.1.11 File►Retrieve Alarm Data
If this check box is selected, the user will receive the alarm data for all the jobs allowed. By clearing this check box, you can speed-up the client, especially over slower networks. This menu item is available only if the user has been assigned with the privilege to see CA Workload Automation AE Alarms.
User Guide54
4.2 Edit Menu
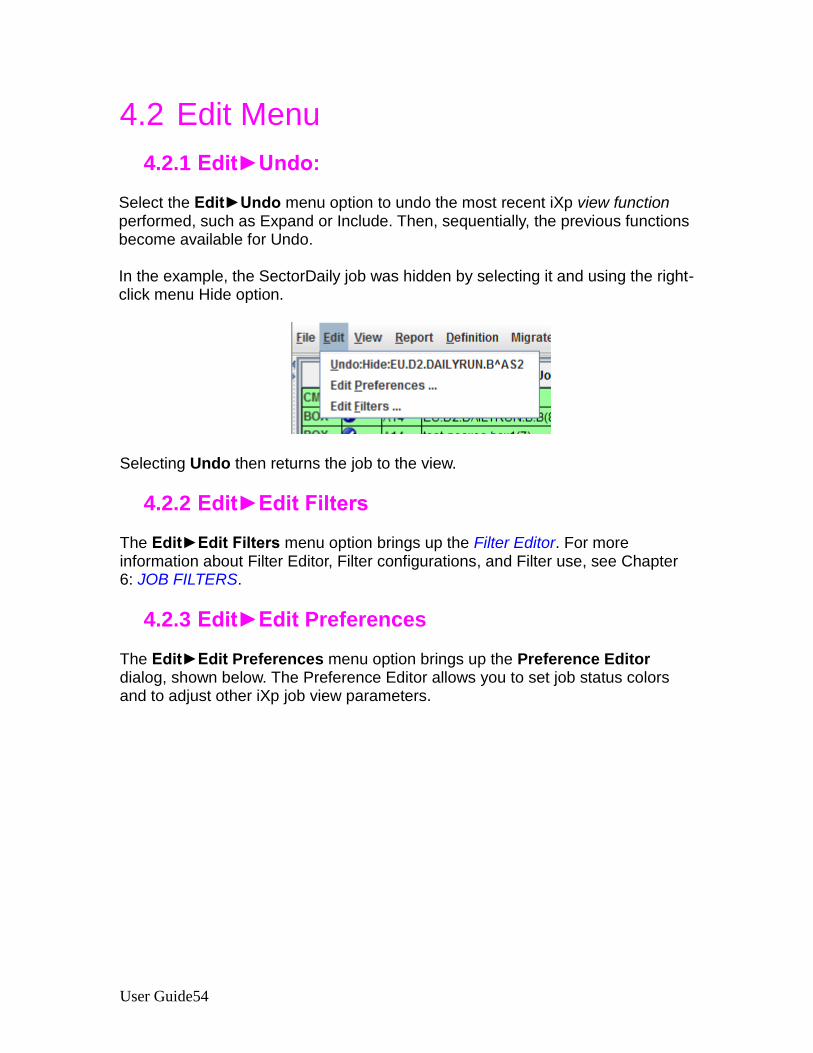
4.2.1 Edit►Undo:
Select the Edit►Undo menu option to undo the most recent iXp view function performed, such as Expand or Include. Then, sequentially, the previous functions become available for Undo. In the example, the SectorDaily job was hidden by selecting it and using the right-click menu Hide option.
Selecting Undo then returns the job to the view.
4.2.2 Edit►Edit Filters
The Edit►Edit Filters menu option brings up the Filter Editor. For more information about Filter Editor, Filter configurations, and Filter use, see Chapter 6: JOB FILTERS.
4.2.3 Edit►Edit Preferences
The Edit►Edit Preferences menu option brings up the Preference Editor dialog, shown below. The Preference Editor allows you to set job status colors and to adjust other iXp job view parameters.

Edit Menu
iXp MENU BAR55
Preference Name Description
ACTIVATED Color Color for the job icon in all Views when the job is
in ACTIVATED status.
Application Background
Background color for iXp. Lets you visually differentiate between multiple iXp windows.
FAILURE Color Color for the job icon in all Views when the job is in FAILURE status.
INACTIVE Color Color for the job icon in all Views when the job is in INACTIVE status.
ON_HOLD Color Color for the job icon in all Views when the job is in ON_HOLD status.

User Guide56
Preference Name Description
ON_ICE Color Color for the job icon in all Views when the job is in ON_ICE status.
ON_NOEXEC Color Color for the job icon in all Views when the job is in ON_NOEXEC status.
PEND_MACH Color Color for the job icon in all Views when the job is in PEND_MACH status.
QUEUE_WAIT Color Color for the job icon in all Views when the job is in QUEUE_WAIT status.
RESWAIT Color Color for the job icon in all Views when the job is in RESWAIT status.
RESTART Color Color for the job icon in all Views when the job is in RESTART status.
RUNNING Color Color for the job icon in all Views when the job is in RUNNING status.
STARTING Color Color for the job icon in all Views when the job is in STARTING status.
SUCCESS Color Color for the job icon in all Views when the job is in SUCCESS status.
TERMINATED Color Color for the job icon in all Views when the job is in TERMINATED status.
WAIT_REPLY Color Color for the job icon in all Views when the job is in WAIT_REPLY status.
Aside from colors, the following Preferences can be specified:

Edit Menu
iXp MENU BAR57
Preference Name Description
Filter The Filter specifies to the iXp Daemon about the kind of data the user wants to view. See the Chapter 6: JOB FILTERS of this document.
Job Name Font Sets the font type for the job names in the Job Flow View. Click Job Name Font to bring up the font chooser window.
Table Font Sets the font type for iXp table views.
Tree Font Sets the font type for iXp tree views.
Future Hours Sets the number of hours of forecast data visible in the Time View chart window.
Horizontal Spacing Sets the horizontal spacing between jobs in the Job Flow View window.
Past Hours Sets the number of hours of historical data visible in the Time View chart window.
Refresh Interval Sets the number of seconds between iXp client refreshes.
Vertical Spacing Sets the vertical spacing between jobs in the Job Flow View window.
User Guide58
After setting new preferences, click the Save icon to save the new preferences. Once preferences are saved, you can change them by saving new ones.
4.2.3.1 Color Editor
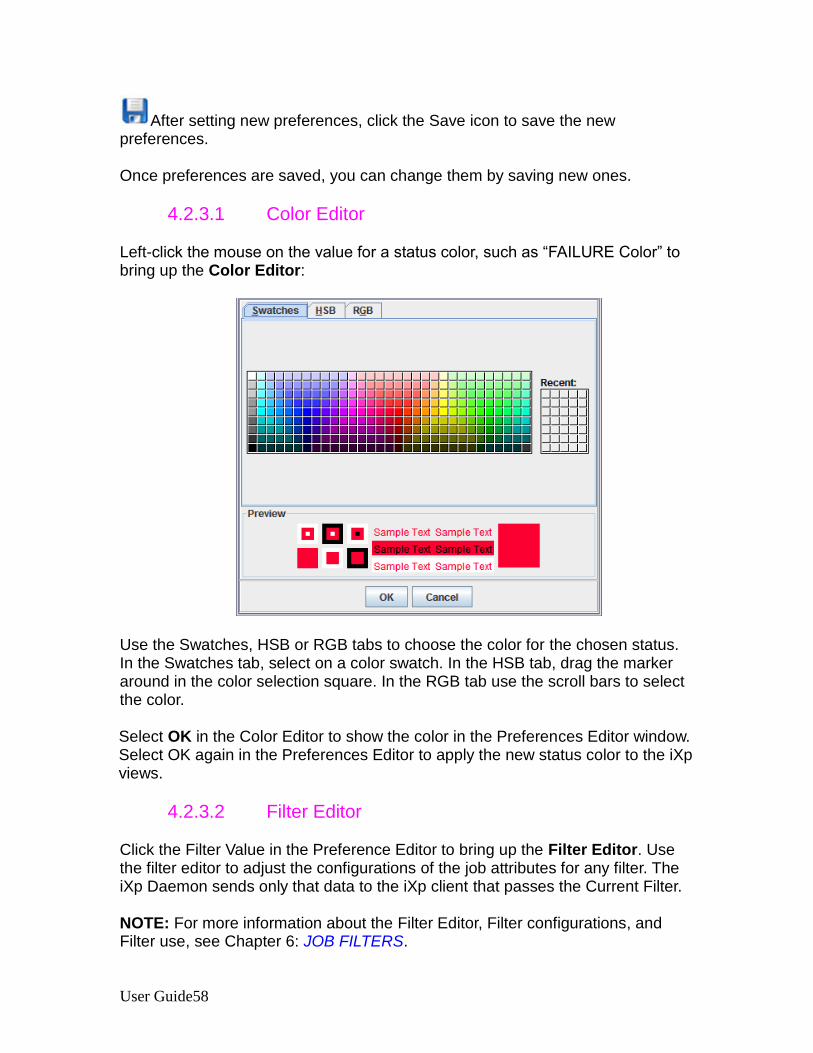
Left-click the mouse on the value for a status color, such as “FAILURE Color” to bring up the Color Editor:
Use the Swatches, HSB or RGB tabs to choose the color for the chosen status. In the Swatches tab, select on a color swatch. In the HSB tab, drag the marker around in the color selection square. In the RGB tab use the scroll bars to select the color. Select OK in the Color Editor to show the color in the Preferences Editor window. Select OK again in the Preferences Editor to apply the new status color to the iXp views.
4.2.3.2 Filter Editor
Click the Filter Value in the Preference Editor to bring up the Filter Editor. Use the filter editor to adjust the configurations of the job attributes for any filter. The iXp Daemon sends only that data to the iXp client that passes the Current Filter. NOTE: For more information about the Filter Editor, Filter configurations, and Filter use, see Chapter 6: JOB FILTERS.
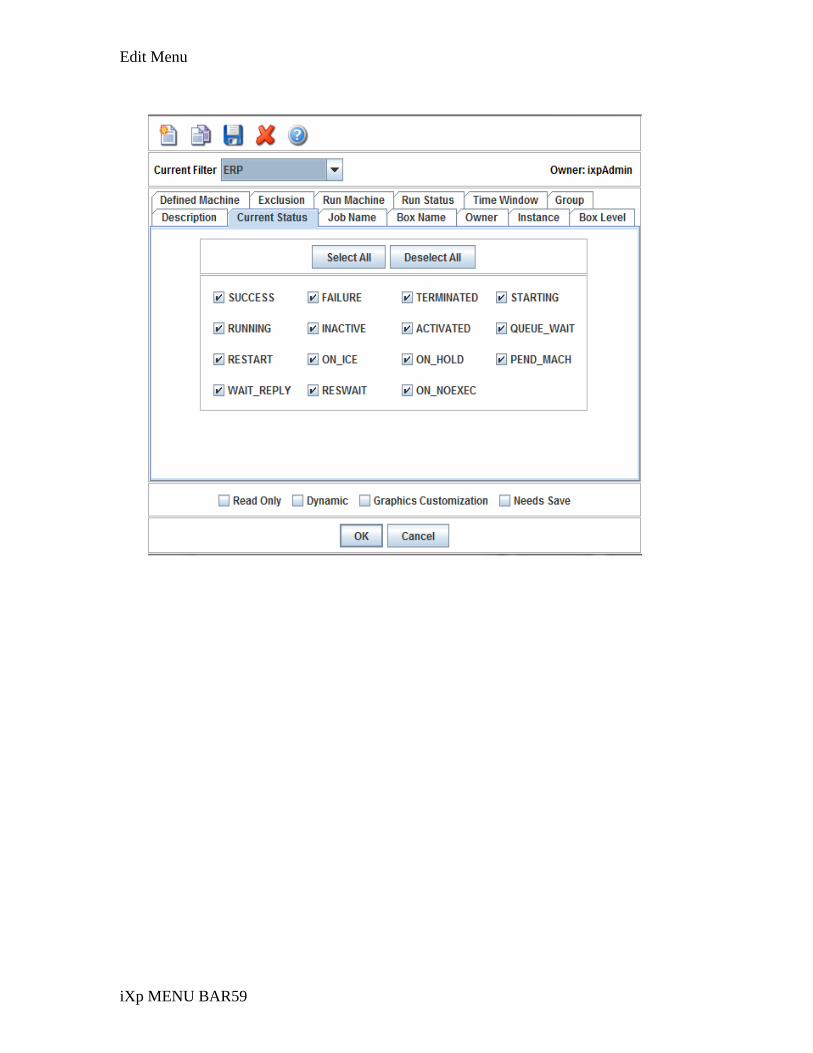
Edit Menu
iXp MENU BAR59
User Guide60
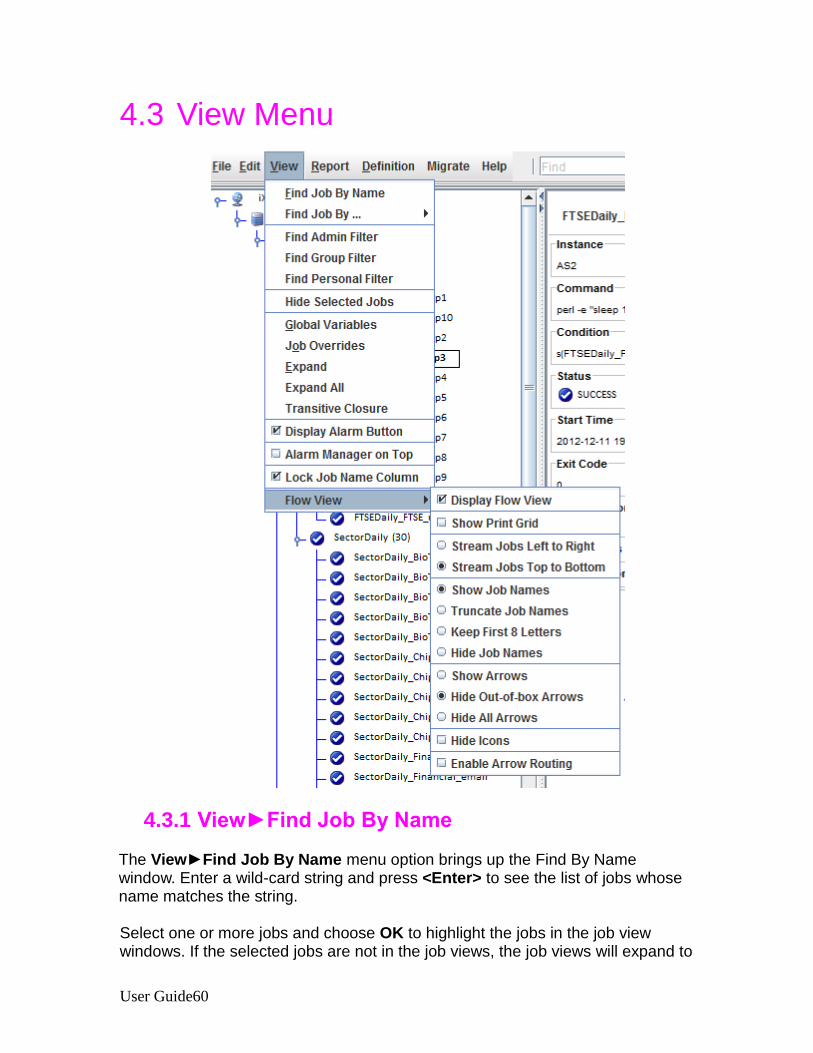
4.3 View Menu
4.3.1 View►Find Job By Name
The View►Find Job By Name menu option brings up the Find By Name window. Enter a wild-card string and press <Enter> to see the list of jobs whose name matches the string. Select one or more jobs and choose OK to highlight the jobs in the job view windows. If the selected jobs are not in the job views, the job views will expand to
View Menu
iXp MENU BAR61
include the selected job. Also, double-clicking a job selects that job in the Views. Select the Refresh button on the Find By Name window to refresh the list of job names. Select Cancel to exit the Find By Name window without selecting any jobs. Narrow the names on the Find By Name list by typing a wildcard name string in the “Job Name” field and then pressing the Enter key on the keyboard. iXp assumes you are searching for job names rather than instances. A ^ denotes the instance name following each job name. The job name matching is not case-sensitive.
Typing one or more characters after a * finds the job names ending in that character, not the instance name (E*2 finds job names ending in 2, regardless of
whether on instance JU2 or JU3). That is, *xyz expands to *xyz^*.
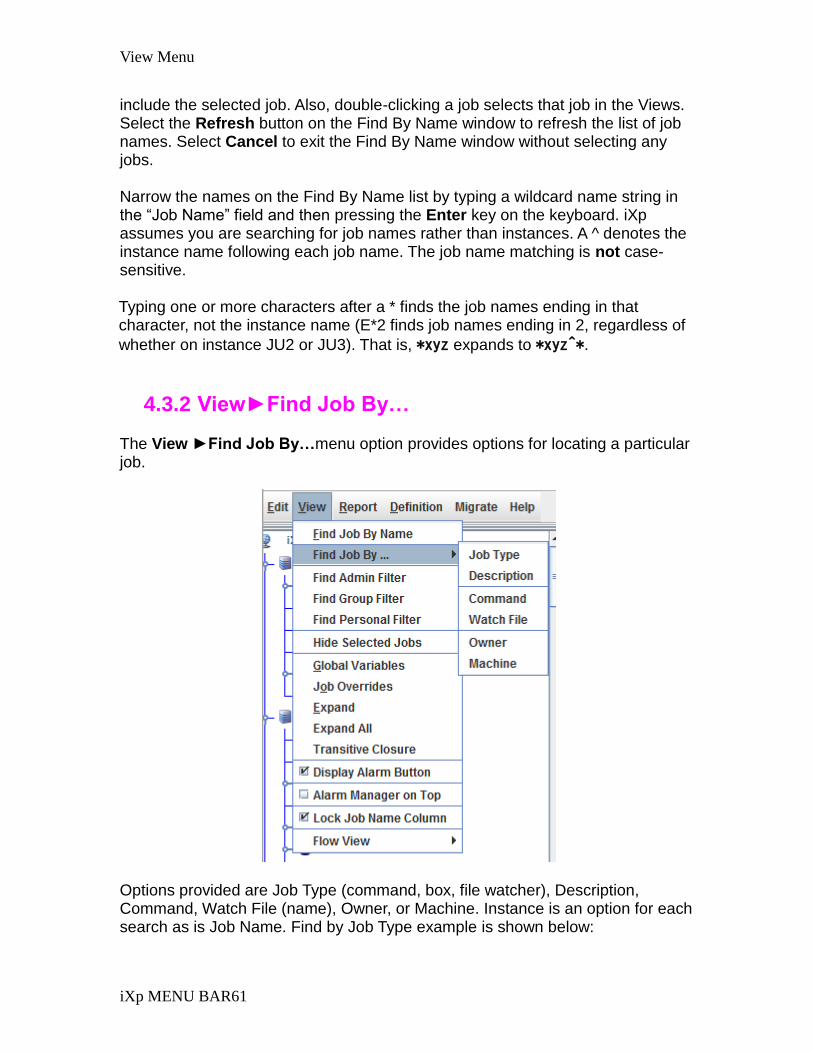
4.3.2 View►Find Job By…
The View ►Find Job By…menu option provides options for locating a particular job.
Options provided are Job Type (command, box, file watcher), Description, Command, Watch File (name), Owner, or Machine. Instance is an option for each search as is Job Name. Find by Job Type example is shown below:

User Guide62
After entering the search conditions (in this case Job Type is “command” and Job
Name is “test*”) click the search icon to find matching jobs, then select one and click OK. The specified job will become the highlighted/selected job in all iXp views.
4.3.3 View►Find Admin Filter
The View►Shared Filter menu option shows a dialog where you can find all or any of the Shared Filters that have been created and shared by the administrators. These filters can be modified only by the administrators. You can search for a filter by providing a name with wild cards. You will see only those filters that have been either shared globally, or have been assigned to one or more of your groups. Some filters may not provide any data for some users, as their security settings may not allow them to view the jobs specified in the filters. To import newly created shared filters, iXp clients must be re-opened.

View Menu
iXp MENU BAR63
4.3.4 View►Find Personal Filter
The View►Personal Filter menu option shows a dialog with all the filters created by the user, and the standard filters provided by iXp. If the user is an administrator, then this dialog will show those filters that have been created by the user and not shared with other users. This dialog is similar to the Shared Filters dialog.
4.3.5 View►Find Group Filter The View►Find Group Filter menu option shows a dialog with all the filters for the group, and the standard filters provided by iXp.
4.3.6 View►Hide Selected Jobs The View►Hide Selected Jobs menu option enables users to create or select rule sets that define criteria to hide jobs from the current view or to apply when performing migrations. When the rule set is applied to the current view, jobs matching the rule will be hidden, until the user changes the filter or restarts the UI. For more information about these rule sets, see Chapter 7: MANAGING WORKLOAD MIGRATION in the CA Workload Automation iXp Administration Guide.
4.3.7 View►Global Variables
The View►Global Variables menu option brings up the Global Variables information window.

User Guide64
By default, all Global Variables that a user is allowed to view are displayed, along with their current values. To search for a specific variable, type a string in the box (* wildcard is supported) and click the search icon. The search is not case-sensitive. Select a Global Variable in the top section of the window to view Related Jobs in the lower section of the window. Related Jobs are jobs that depend on the Global Variable, or jobs that set the Global Variable (using a sendevent in the job definition command line). Global
Variables are set using the CA Workload Automation AE sendeventSET_GLOBAL
command. Select a job in the lower section to select that job in the iXp job view windows.

View Menu
iXp MENU BAR65

User Guide66
4.3.8 View►Job Overrides
Select the View►Job Overrides menu option to bring up the Job Overrides view window, populated with job names of jobs that have current Overrides. Select a job name and then select View Override to see the Overrides for that job.
To delete an override, click the Delete button. You will be required to confirm that you want to delete the override.
The Close button lets you close the dialog without affecting any of the jobs and overrides listed.
4.3.9 View►Expand
Select the View►Expand menu option to expand all the box jobs in the current view by one more level. This is an easy way to drill down in all the displayed box jobs one level at a time. See also Section 7.1 Expand, Collapse, and Hide.
View►Flow View
iXp MENU BAR67
4.3.10 View►Expand All
Select the View►Expand All menu option to expand all the box jobs in the view to show all the jobs contained in the box. This is an easy way to drill all the way down in all the displayed box jobs. See also Section 7.1 Expand, Collapse, and Hide.
4.3.11 View►Transitive Closure
Select the View►Transitive Closure menu option to show the transitive closure of all the jobs in the view. This could result in jobs being imported in to the view to display the complete closed set of jobs for all the jobs in the view. For more information about Transitive Closure, see Section 7.3.1 Job Dependency
Filters Definitions.
4.3.12 View►Display Alarm Button
Deselect the View►Display Alarm Button menu option to hide the Alarm Button from the bottom section of the GUI.
4.3.13 View►Alarm Manager on Top
If you are viewing the Alarm Manager (which can be opened by clicking the Alarm button) and you click the main GUI screen, then the Alarm Manager will be sent to the background. You will have to click the icon for “iXp” on the taskbar to bring it to the foreground. If you enable this menu option, then the Alarm Manager will never be sent to background, even if you are working in the main GUI.
4.3.14 View►Lock Job Name Column
The View►Lock Job Name Column menu option controls the sizing of the first three columns in the Console View. When this option is deselected, you can resize the first three columns. To lock in the selected size, just select this option.
4.4 View►Flow View
4.4.1 View►FlowView►Display Flow View Deselect the View►FlowView►Display Flow View menu option. This option is useful when you are looking at thousands of jobs, as showing them in the Flow View will increase the consumption of system resources on your client machine.
User Guide68
4.4.2 View►FlowView►Show Print Grid
Select the View►FlowView►Show Print Grid menu option to display the Print Grid in the Job Flow View. The Print Grid shows the resulting layout of print pages for the File►Print functionality.
The advantage of Show Print Grid is that after seeing the print layout, you can customize the print by zooming in or out. The print grid can be turned off by deselecting the option.
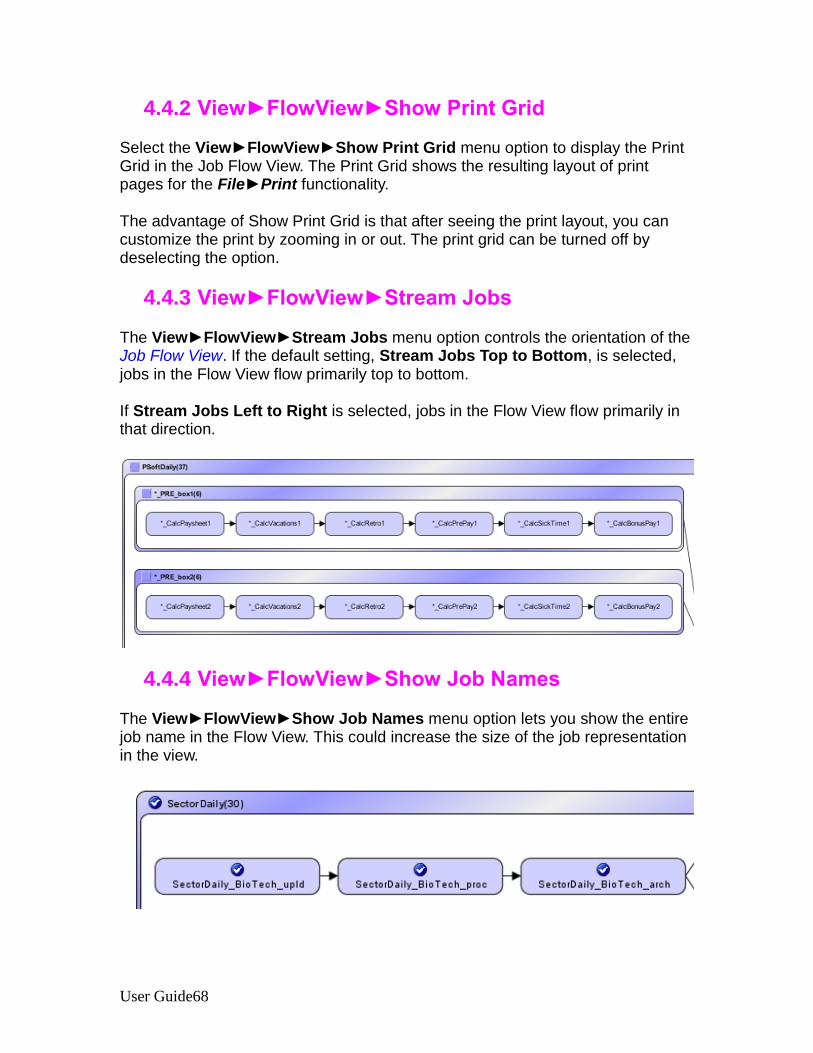
4.4.3 View►FlowView►Stream Jobs
The View►FlowView►Stream Jobs menu option controls the orientation of the Job Flow View. If the default setting, Stream Jobs Top to Bottom, is selected, jobs in the Flow View flow primarily top to bottom.
If Stream Jobs Left to Right is selected, jobs in the Flow View flow primarily in that direction.
4.4.4 View►FlowView►Show Job Names
The View►FlowView►Show Job Names menu option lets you show the entire job name in the Flow View. This could increase the size of the job representation in the view.

View►Flow View
iXp MENU BAR69
4.4.5 View►FlowView►Truncate Job Names
The View►FlowView►Truncate Job Names menu option controls the abbreviation of job names as they appear in iXp. If the “Truncate Job Names” check box is selected, job names are abbreviated in the Flow View based on the shared prefixes of sibling jobs. The following screen shows the same jobs as in the previous option, but with this setting turned on:
Notice how the letters “Invent” are replaced with an “*”.
4.4.6 View►FlowView►Keep First 8 Letters
The View►Flow View►Keep First 8 Letters is another menu option to control the abbreviation of job names as they appear in iXp. After truncating the job name (see the Truncate Job Names option, above) only the next 8 characters are shown. The rest of the job name is also truncated.
4.4.7 View►FlowView►Hide Job Names
The View►FlowView►Hide Job Names menu option does away with job names in Flow View leaving just the icons. This is useful for getting a “big picture” view of a job stream.
4.4.8 View►FlowView►Show Arrows
The View►FlowView►Show Arrows menu option controls the drawing of arrows in the Job Flow View. If it is selected, the view displays all job relationship arrows. This is the default option.
4.4.9 View►FlowView►Hide Out of Box Arrows
The View►FlowView►HideOut of Box Arrows menu option controls the drawing of arrows for out-of-box dependencies. If this option is selected, then the Flow View will not display arrows for such dependencies.

User Guide70
4.4.10 View►FlowView►Hide All Arrows
The View►FlowView►Hide All Arrows menu option controls the drawing of all arrows in the Flow View. If this option is selected, then the Flow View will not display any arrows between jobs. If you select a job, then the arrows to the immediate predecessors and successors of that job will be shown.
4.4.11 View►FlowView►Hide Icons
The View►FlowView►Hide Icons menu option shows the job representations in the Flow View without any status icons or pins. This option reduces the size of the job representations so you can fit more jobs in the Flow View window.
4.4.12 View►FlowView►Enable Arrow Routing
The View►FlowView►Enable Arrow Routing menu option applies an “arrow-routing” algorithm to the Flow View. When this option is selected, the arrows will go around jobs, rather than over or behind them. This option can be selected only when jobs are being streamed from Top to Bottom.
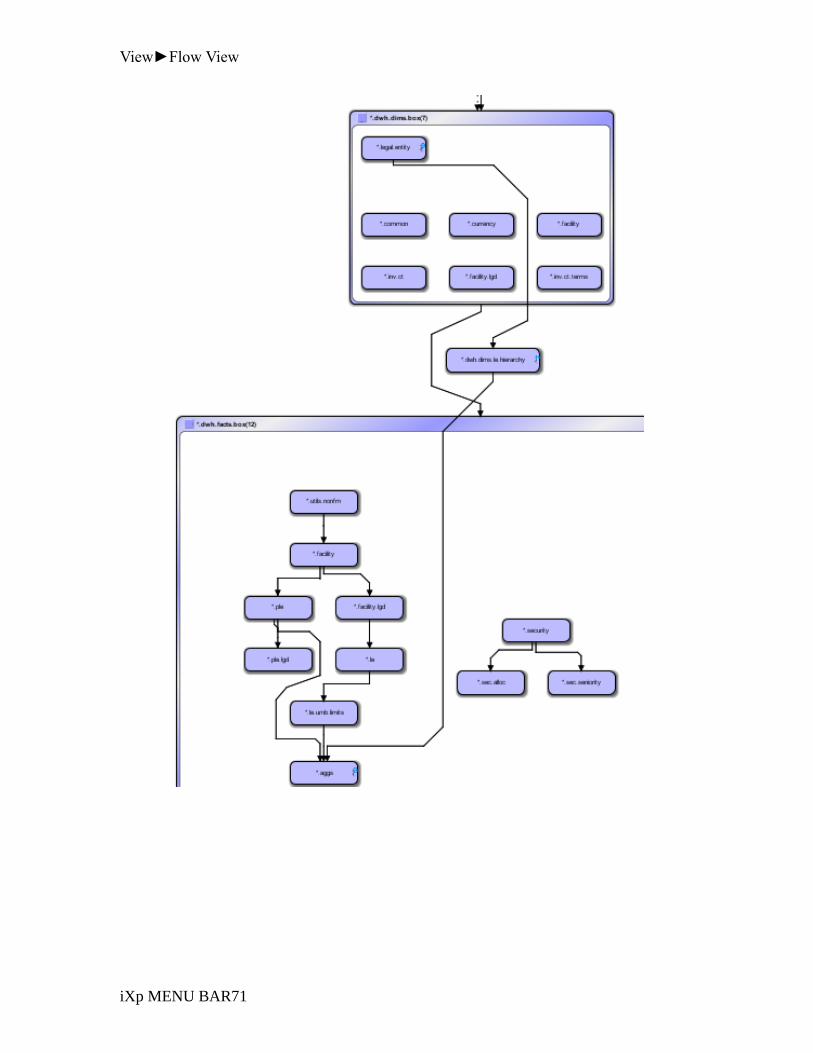
View►Flow View
iXp MENU BAR71
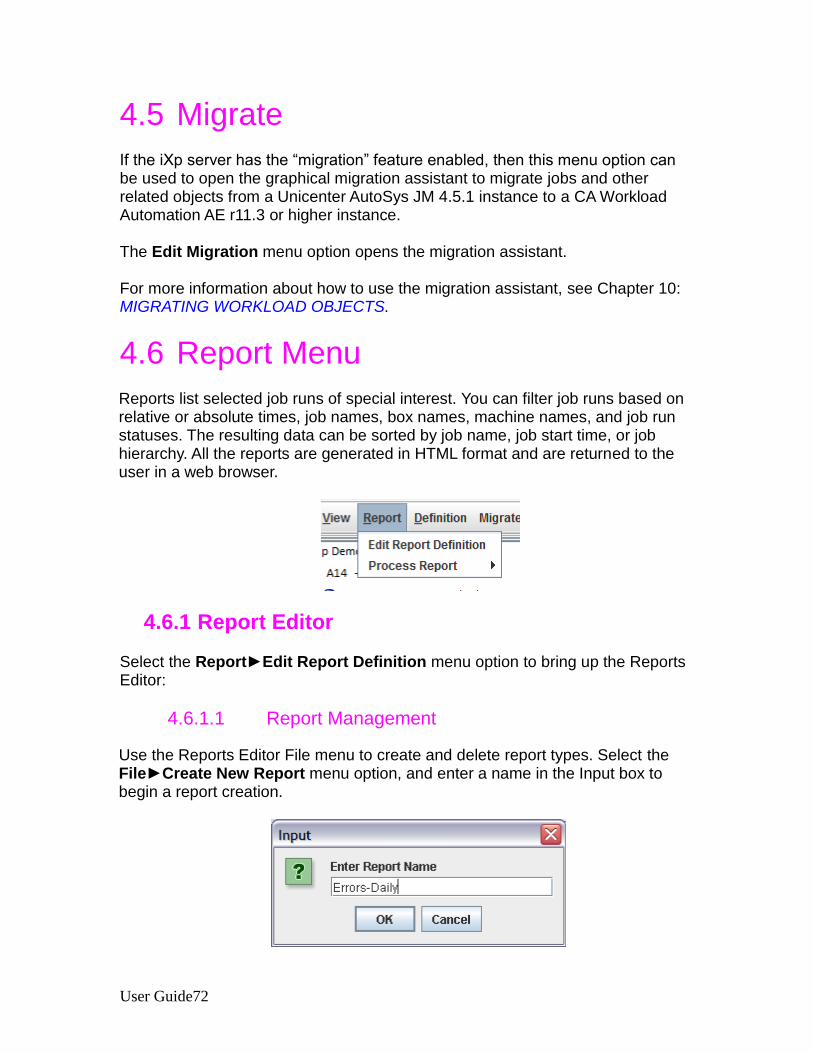
User Guide72
4.5 Migrate If the iXp server has the “migration” feature enabled, then this menu option can be used to open the graphical migration assistant to migrate jobs and other related objects from a Unicenter AutoSys JM 4.5.1 instance to a CA Workload Automation AE r11.3 or higher instance. The Edit Migration menu option opens the migration assistant. For more information about how to use the migration assistant, see Chapter 10: MIGRATING WORKLOAD OBJECTS.
4.6 Report Menu
Reports list selected job runs of special interest. You can filter job runs based on relative or absolute times, job names, box names, machine names, and job run statuses. The resulting data can be sorted by job name, job start time, or job hierarchy. All the reports are generated in HTML format and are returned to the user in a web browser.
4.6.1 Report Editor
Select the Report►Edit Report Definition menu option to bring up the Reports Editor:
4.6.1.1 Report Management
Use the Reports Editor File menu to create and delete report types. Select the File►Create New Report menu option, and enter a name in the Input box to begin a report creation.

Report Menu
iXp MENU BAR73
Then use the different tabs on the Report Editor to define the Report.
Reports Tab Usage
Instance Select CA Workload Automation AE instance of jobs to be reported.
Time Identify the times of jobs to be reported. Select Absolute to specify an absolute start time to end time window. Select Relative to choose a time window in the past from the present time.
Status Select the run status(es) of jobs to be reported: SUCCESS, FAILURE, TERMINATED, ON_NOEXEC, RUNNING.
Row Count Select number of rows to be reported, to limit the report length, or select “No Limit”.
Machines Insert and delete expressions for machine names of job runs to be reported.
User Guide74
Reports Tab Usage
Jobs Insert and delete expressions for job names to be reported.
Boxes Insert and delete expressions for box names of job runs to be reported. If a box name is specified here, the report will be generated on the box job and all of the jobs within that box job. This is an easier and intuitive way to generate reports for sets of box jobs.
Order Select order of jobs in the report: autorep (the default order), alphabetical, by start time, or “Last Run Only” for only the most recent.
Group Select Groups to be included in the Report.
Select the File►Save menu option to save the report creation. Select the File►Delete menu option to delete the report name shown in the Report window. Select the File►Copy menu option to create a copy of the report name populated in the Report window. Select the File►Process menu option to process the report name populated in the Report window. The result will appear in a new browser window.

Report Menu
iXp MENU BAR75
From the main menu, select the Report►Process Report menu option to choose a report for processing from the picklist.
Three “out of the box” reports are delivered with iXp: DailyErrors, DailyReport and WeeklyErrors. These cannot be edited, and ixp Admin-created reports cannot be edited by any user other than ixp administrator. The DailyErrors report shows all job runs that resulted in FAILURE and TERMINATED in the last 24 hours. The DailyReport report shows all job runs that occurred over the last 24 hours. The WeeklyErrors report shows all job runs that resulted in FAILURE and TERMINATED in the last 7 days.
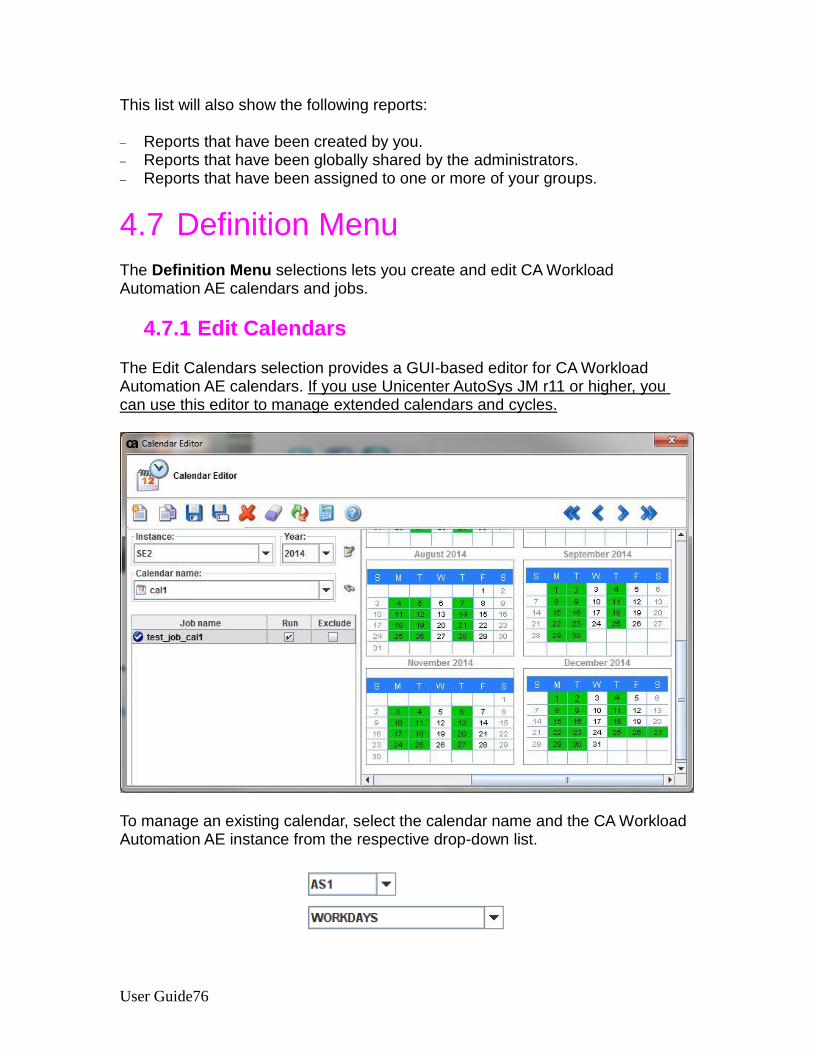
User Guide76
This list will also show the following reports: Reports that have been created by you. Reports that have been globally shared by the administrators. Reports that have been assigned to one or more of your groups.
4.7 Definition Menu
The Definition Menu selections lets you create and edit CA Workload Automation AE calendars and jobs.
4.7.1 Edit Calendars
The Edit Calendars selection provides a GUI-based editor for CA Workload Automation AE calendars. If you use Unicenter AutoSys JM r11 or higher, you can use this editor to manage extended calendars and cycles.
To manage an existing calendar, select the calendar name and the CA Workload Automation AE instance from the respective drop-down list.

Definition Menu
iXp MENU BAR77
The panel below the calendar name displays the job and box jobs that the selected calendar is applied to. Note. Right click the job name in the and click ‘Select in Console’ to open the job in the main iXp window. The default view shows all 12 months of the current calendar year. You can change the view by selecting the year from the drop-down list.
In addition, the forward/reverse buttons can move through the calendar:
The forward and reverse buttons move by 3 months at a time, the fast forward/fast reverse move by 1 year at a time. When you are managing a standard calendar, clicking a date toggles the inclusion of that date in the calendar. When the date is included, it is displayed in green by default. If the date is excluded, there is no background color. In the example below, November 10, 2009 and November 20, 2009 are included in the displayed calendar.
4.7.1.1 Menu options
Menu Icon
Functionality
Create new calendar
Copy current calendar to new name (requires save)
Save current calendar

User Guide78
Menu Icon
Functionality
Save On Alternate Instance—copy this calendar to a different CA Workload Automation AE instance
Delete current calendar
Clear all dates in current calendar
Reload calendar from the CA Workload Automation AE database—all unsaved changes will be lost.
Generate standard calendar dates by rule (see “Calendar Generator Dialog” in the next section).
Display Help.
4.7.1.2 Manage Standard Calendars Clicking the calculator icon brings up the Date Generator Dialog. You can use this tool to create standard calendars with dates that follow a pattern. For example, you can create a calendar that includes the 10th, 20th, and 30th of every month with the following settings:

Definition Menu
iXp MENU BAR79
4.7.1.3 Manage Cycles
If you use Unicenter AutoSys JM r11 or higher, you can create cycles that extended calendars can leverage. To create a cycle, set the appropriate Instance and select the New►Cycle menu option. Enter the name of the cycle. The date generator dialog shows the parameters to manage a cycle.
You can specify the date ranges for the cycle by entering the Start and End dates for each period. You can type in the dates manually, or you can select them visually by clicking the date icon next to the date field. If you want to set the cycle to repeat every year, omit the year or select the year “1972” when entering the dates. You can move the periods up and down. You can also delete them by using the up/down arrows and the delete icon.

User Guide80
You can view the cycle definition in the format the “autocalasc” command
supports by clicking the icon.
To save the cycle, click the “Save” icon. You can also copy the cycle to another instance by clicking the “Save As” icon. You can copy the cycle to a new name within the same instance by clicking the “Copy” icon. Once the Cycle has been saved and the date generator dialog has been dismissed, the Calendar Editor shows the days that the cycle covers.

Definition Menu
iXp MENU BAR81
4.7.1.4 Managing Extended Calendars
If you use Unicenter AutoSys JM r11 or higher, you can create extended calendars that one or more jobs can use. To create a new extended calendar, set the appropriate Instance and select the New►Extended calendar menu option. Enter the name of the calendar. The date generator dialog shows the parameters to manage an extended calendar.
NOTE: For more information about each attribute, see CA Workload Automation AE Reference Guide. Once you have the appropriate values for the calendar, you can click the
Preview icon to see the dates that are set when the calendar is saved. The dates are shown for the next 12 months from the current day.
Once the calendar has been saved, you can click the Generate icon to regenerate the dates for the next 12 months from the current day.

User Guide82
To save the extended calendar, click the “Save” icon. You can also copy the calendar to another instance by clicking the “Save As” icon. You can copy the calendar to a new name within the same instance by clicking the “Copy” icon. Once the calendar has been saved and the date generator dialog has been dismissed, the Calendar Editor shows the days the calendar covers.
4.7.2 Edit Jobs The Edit Jobs selection provides a form editor for CA Workload Automation AE Jobs.

Definition Menu
iXp MENU BAR83
The Menu icons provide access to creating, saving, deleting jobs, and so on. The pages of the editor are: Basic, Date/Time, Alarm, Execution, Runtime, Resource, Permission, Box, and File Watcher. These pages are described in detail below. The area at the bottom of the screen shows the JIL (Job Information Language) that will be used to define the job to CA Workload Automation AE.
4.7.2.1 Menu icons
Menu Icon
Functionality
Create new job.
Copy current job to new name (requires save).
Save current job.
Save On Alternate Instance—copy this job to a different CA Workload Automation AE instance.
Delete current job—if the job is a box, jobs in the box are not deleted.
Delete a box—also deletes all jobs inside the box.
Create a one-time override for the current job.
Delete a one-time override for the current job.
Reload job definition from the CA Workload Automation AE database—all unsaved changes will be lost.
Clear all fields.
Find a job by command, description, machine, name, or owner (also show a list of recently selected jobs).
Display Help.
4.7.2.2 Basic page
Basic information for a job includes the following items: Job Name The Box the job is in (if any) Job Owner (ID to be used when running the job) Job Type (cannot be changed) Description

User Guide84
Condition (starting conditions of the job) Machine Group Application
4.7.2.3 Date/Time page The Date/Time page includes the following details:
Date Conditions check box—must be selected to schedule by date & time Date sub-page
Run Calendar Run Days Exclude Calendar
Time sub-page Times of Day Minutes After Each Hour Run Window Time Zone
4.7.2.4 Alarm page The Alarm page includes: Maximum and Minimum Run Time alarms, and the Alarm on Failure check box.
4.7.2.5 Execution page The Execution page includes the following options:
Box terminator (for jobs in boxes)
Job terminator (for jobs in boxes)
Terminate job minutes
Delete job hours
Restart number of times parameter
Average run time minutes
AutoHold for jobs in boxes check box
4.7.2.6 Runtime page On the Runtime page, the standard output file, standard error file, standard input file, and profile to be used when running a job are defined.
4.7.2.7 Resource page Resources include the Maximum Exit Code parameter, the Heartbeat Interval, the Job Load and Job Priority settings (for use with queuing), and the Disk Space parameters.
Help Menu
iXp MENU BAR85
4.7.2.8 Permission page On this page the permissions for access to the job are defined. Edit and Execute permissions for Group, World, and All Hosts are available.
4.7.2.9 Box page This page contains parameters that are unique to Box jobs: Box Success and Box Failure conditions.
4.7.2.10 File Watcher page This page provides parameters that are unique to File Watcher jobs. Minimum File Size and Steady State Interval are the parameters supported here.
4.8 Help Menu
The Help Menu enables users to view information about the version of iXp, see the CA Workload Automation iXp User Guide and CA Workload Automation iXp Administration Guide, and view description of all the icons being used for job statuses in the Tree and Console View.
4.8.1 Graphics Help
Select the Graphics Help menu item to view a description of the icons and arrows used in the Views.
4.9 Quick Find
The box to the right of “Help” on the iXp Menu Bar allow entry of a search string
to find jobs. The “next” and “previous” icons move the selection to the next job that matches the string in the box. The order in which jobs are found is controlled by the Tree View order, that is: jobs near the top of the Tree will be found first. Any job name containing the string entered will be matched (wildcards are not supported because all matching strings will be found). If no jobs have a matching string, the icons are grayed out as shown below:

User Guide86

Instance Monitor
iXp TOOL BAR87
5 iXp TOOL BAR
5.1 Instance Monitor
The Instance Monitor button at the bottom-left corner of the iXp window brings up a dialog box that shows the current state of all the CA Workload Automation AE Instances. If one or more CA Workload Automation AE Instances are experiencing a
database issue, then the icon will change to . If one or more CA Workload Automation AE Instances have been disabled in iXp,
then the icon will change to .

User Guide88
5.2 Alarm Manager
The Open Alarms button on the bottom of the iXp window brings up the Alarm Manager dialog. This button is visible only if the user has been assigned the privilege to view CA Workload Automation AE Alarms.
CA Workload Automation AE alarms are in one of three states: Open, Acknowledged and Closed. From the Alarm Manager, Open alarms may be Acknowledged or Closed. All Open Alarms have a red font and a red highlight when selected. Acknowledged alarms may be Closed or Acknowledged again. Closed Alarms may be Closed again, if needed. The Alarm Manager Buttons on the bottom of the Alarm Manager change the state of selected alarms, and prompt for a Response.
The iXp administrator can restrict the total length of each response (including the date/time and user name information in the response header). If you enter a response that exceeds this value, an error dialog shows the maximum allowed characters and the total length of the current response. When closing multiple alarms at the same time, a confirmation dialog—shown below—will be shown before the alarms are closed.
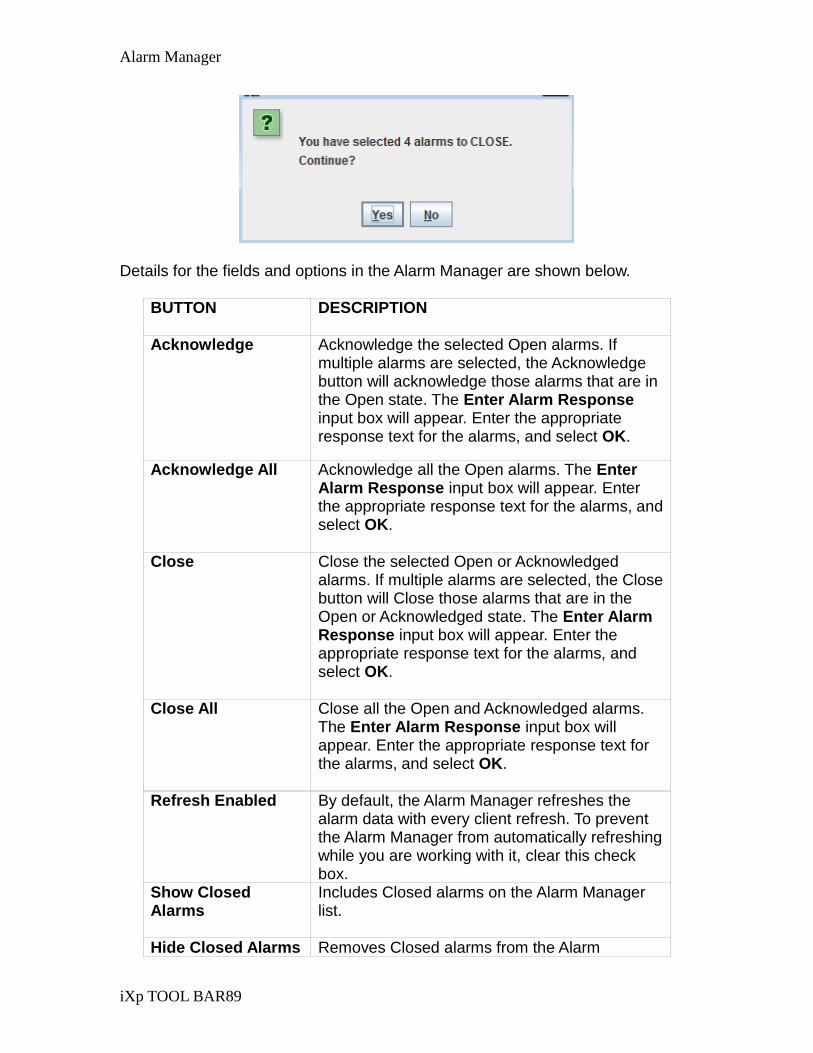
Alarm Manager
iXp TOOL BAR89
Details for the fields and options in the Alarm Manager are shown below.
BUTTON
DESCRIPTION
Acknowledge Acknowledge the selected Open alarms. If multiple alarms are selected, the Acknowledge button will acknowledge those alarms that are in the Open state. The Enter Alarm Response input box will appear. Enter the appropriate response text for the alarms, and select OK.
Acknowledge All Acknowledge all the Open alarms. The Enter Alarm Response input box will appear. Enter the appropriate response text for the alarms, and select OK.
Close Close the selected Open or Acknowledged alarms. If multiple alarms are selected, the Close button will Close those alarms that are in the Open or Acknowledged state. The Enter Alarm Response input box will appear. Enter the appropriate response text for the alarms, and select OK.
Close All Close all the Open and Acknowledged alarms. The Enter Alarm Response input box will appear. Enter the appropriate response text for the alarms, and select OK.
Refresh Enabled By default, the Alarm Manager refreshes the alarm data with every client refresh. To prevent the Alarm Manager from automatically refreshing while you are working with it, clear this check box.
Show Closed Alarms
Includes Closed alarms on the Alarm Manager list.
Hide Closed Alarms Removes Closed alarms from the Alarm

User Guide90
BUTTON
DESCRIPTION
Manager list.
Close Window Closes the Alarm Manager dialog.
The information boxes in the Alarm Manager window display the following alarm management information:
INFORMATION BOX
DESCRIPTION
User The user who Acknowledged or Closed the alarm.
Comment An attribute of alarm, provided by the CA Workload Automation AE scheduler.
State Time The time of the most recent state transition of the alarm (to state Open, Acknowledged or Closed).
Response The response input when the alarm was transitioned from Open to Acknowledged, or to Closed. If the alarm has been Acknowledged or Closed multiple times, all the responses entered will be shown.
5.2.1 Job Control Pop-up menu in Alarm Manager
Select an alarm, and right-click the alarm to bring up the Job Control pop-up menu for the job that generated the alarm. The Job Control menu functionality is described in the Section 7.2 Job Control of this document.

Alarm Manager
iXp TOOL BAR91
Choose “Select in Console” to highlight the job in all the iXp views. If the selected Alarm Manager job is not in the current iXp job set, a refresh will be executed to bring in the job. If the Alarm selected is not related to a job, a more limited pop-up menu is displayed:
5.2.2 Sort Order in Alarm Manager
Rearrange the listing order in the Alarm Manager by selecting on a column heading with the right mouse button. The sort order selection (box) pop-up, similar to the one in the Console View, will appear. The columns in this dialog may be moved and resized by clicking and dragging the column headers. The column positioning, sizing and the sort order can be saved by selecting the Save Session Settings option under the File menu item on the main screen.

User Guide92
5.3 Current Filter
The Current Filter button at the bottom of the iXp window may be used to change the current filter for the iXp views.
Select a filter from the pull down list to apply the filter to your current iXp session. iXp will refresh the job views on the client, from the iXp Daemon, using the selected filter.
In the Current Filter drop-down list, the list of filters is ASCII sorted (alphabetically with capitals first). Also, iXp creates temporary filters when a user action related to the view is performed (e.g. Critical Path analysis). These temporary filters are
named username_number, where username is the name of the logged-on user and
number is an incremental number, starting with 0. To save any of these temporary
filters, just select the filter and click the Save icon.

Flow View Buttons
iXp TOOL BAR93
Remember to save such filters or else they will not be available to the user after logging out or closing the browser. These temporary filters are very useful as users can save the results of any Impact Analysis actions, job selections, and so on.
5.4 Flow View Buttons
The bottom-right part of the Tool Bar provides buttons for the Job Flow View. These buttons provide the same functionality as the View►Flow View menu option.

User Guide94
6 JOB FILTERS
6.1 Filters Defined
There are two kinds of filters in iXp. Attribute Filters limit the job data that is sent back, according to specified job attributes. Job Dependency Filters limit the iXp views according to specified job dependencies. Users have access to two types of filters, from the Current Filter Selection list.
1) “Out of the box” filters provided by iXp. These include several Job
Attribute Filters.
2) “User-defined” filters are owned by the user who defined them, and are configurable by him/her. These include temporary filters created when jobs are added to the view.
The Current Filter appears on the Current Filter button at the bottom of the iXp window, and on the Filter Editor. All filters are applied after the user security filters have been applied. Thus, applying the “No Filter” as current filter will show all jobs that the user is allowed to see.
6.1.1 Attribute Filters
Job Attribute Filter configurations may be edited, or created, with the Filter Editor. Attribute Filters can use CA Workload Automation AE job attributes to further define or limit the views in iXp. The following table shows the “Out of the box” Attribute Filters:
iXp Job Attribute Filter Name
Description
Level Zero Filter Includes all instances in the site and jobs that are not in boxes and box jobs at level zero i.e. jobs within a box are not shown.
Running Filter Includes jobs that have a current status of STARTING, RUNNING or ACTIVATED.
Exception Filter Includes jobs that have a current status of FAILURE

How Filters Work
JOB FILTERS95
iXp Job Attribute Filter Name
Description
or TERMINATED.
Instance Filter Only the Site and Instance icon are shown. No jobs are shown.
Site Filter Only the Site icon is shown. No instance icons or jobs are shown.
No Filter Shows all instances and all jobs within all instances.
6.1.2 Job Dependency Filters
Job Dependency Filters are selected from the Job Tools Pop-up menu. Job Dependency filters can be applied in two ways, Update Filter and New Filter. Update Filter will apply the selected filter to the existing view. This may result in an addition of new jobs to match the filter but will not result in a removal of any jobs from the existing view. New Filter will clear the existing view, create a temporary filter based on the username and show the jobs that match the selected filter. See Section 7.3.1 Job Dependency Filters Definitions.
6.2 How Filters Work
When the iXp Daemon receives a request for a read operation, such as refresh, job filters are applied to the iXp Data before returning jobs data to the Client, as follows.
1) The iXp Daemon first applies the appropriate security read filter to the site data, returning a security-filtered site. (The request from the iXp Client always comes identified with the specific user, for individualized response from the iXp Daemon.)
2) Then the user-specified filter is applied to the security-filtered site data,
and the data are sent to the client.

User Guide96
6.2.1 Filter Logic Sequence
The filter saved to the iXp Daemon, for the specific iXp Client, is applied to the security-filtered site, according to the following filter logic:
1) The Job Attribute Filter or Job Dependency Filter reduces the view
according to the specified attributes. Then any Exclusion Post-Process attributes result in special eliminations.
2) User-modifications to the views are applied, including Expand, Collapse, Expand All, Hide, Update Filter, Find Job by Name, Predecessor and Successor (as chosen from the Job Detail View).
3) Inclusion of the complete Box Ancestry for all jobs returning to the iXp
Client is always the final filtration step on the iXp Daemon.
4) New jobs, arriving to the Client after graphics customization, are positioned logically by iXp, post-process.
6.2.2 Example Filtration Sequence
1) Suppose one applies the Level Zero Filter: only the first level Box Jobs appear in the view.
2) Then, through the Update Filter function on the job tools pop-up menu,
apply a Critical Path Filter on one of those jobs. This will create a new filter that belongs to you, and will return all the dependency-related jobs for that selected job, also leaving the other first level box jobs.
3) Then use the Find Job By Name function on another, third level Box
Job. This returns that job and its parent, in addition to the other jobs.]
4) The iXp Client will expand the box graphics in the Job Flow View and insert the newly returned jobs.
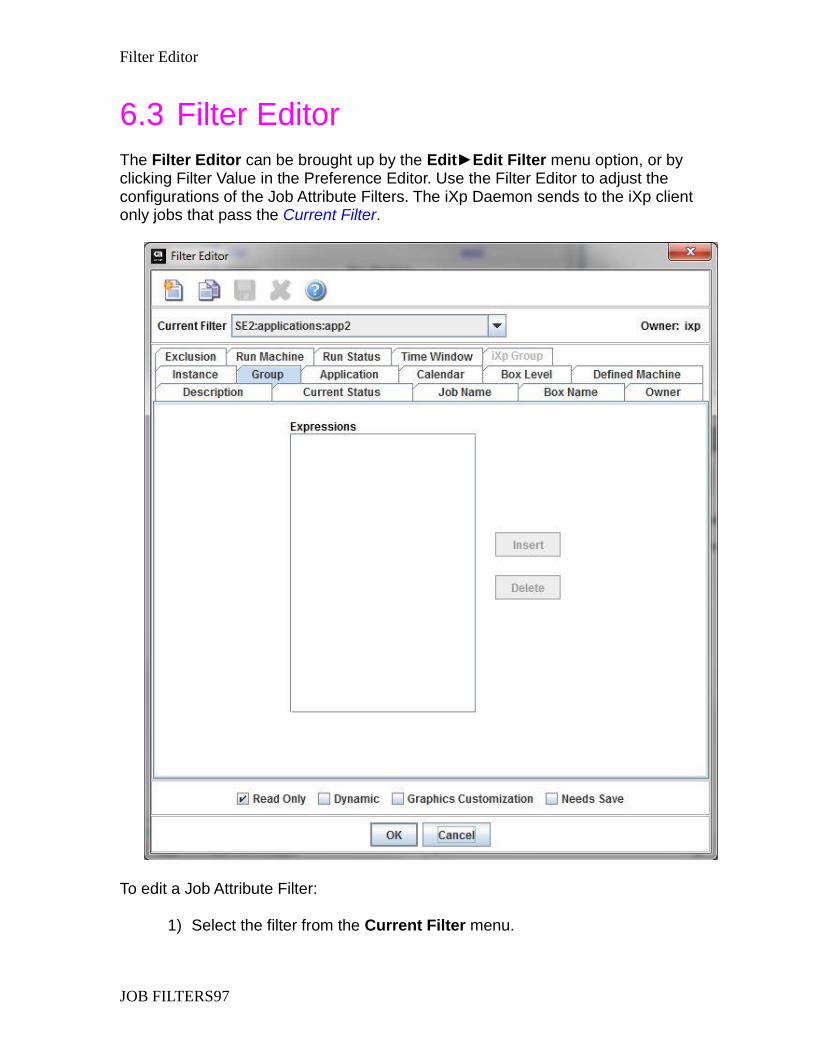
Filter Editor
JOB FILTERS97
6.3 Filter Editor
The Filter Editor can be brought up by the Edit►Edit Filter menu option, or by clicking Filter Value in the Preference Editor. Use the Filter Editor to adjust the configurations of the Job Attribute Filters. The iXp Daemon sends to the iXp client only jobs that pass the Current Filter.
To edit a Job Attribute Filter:
1) Select the filter from the Current Filter menu.

User Guide98
2) Select the filter attribute that you want to edit from among the twelve tabs: Description, Current Status, Job Name, Box Name, Owner, Instance, Box Level, Defined Machine, Exclusion, Run Machine, Run Status, and Time Window.
3) Edit the properties of that tab on the dialog. For Instance, Run
Machine, Defined Machine, Exclusion, Job Name, Box Name and Owner, use the Insert and Delete buttons to edit the Expressions. In Box Level and Time Window, slide the level pointer. In Current Status and Run Status, check or uncheck Statuses to filter. In Description, type your description directly in.
NOTE. You can use the asterix figure ‘*’ as a wild card for your search terms. For example entering Pay*, pay* or PAY* returns all jobs having
Job Name that starts with Pay or pay.
NOTE: For JOB NAMES, ^ is a special character that defines a CA
Workload Automation AE Instance, as inJob_A*^ACE...
4) Select OK to save your edits and close the Filter Editor window.
5) Click the Save icon on the Filter Editor, or on the Preference Editor, to save your filter edits.
Filter Editor Tabs:
Filter Attribute
Description
Instance CA Workload Automation AE Instance names, such as
“ACE”, or wildcard expressions, such as “A*”.The absence
of any entries means no jobs will be excluded based on instance.
Box Level Box Level is the maximum number of box levels that will satisfy the filter. All jobs of a higher box level will be excluded.
Run Machine Run Machine entries pass only jobs having one or more run records in the specified list of statuses. Entries may
be a string, such as “pluto”, or a wildcard expression,
such as “pl*”.The absence of any entries means no jobs
will be excluded based on run machine. Only jobs having one or more historical run records on a run machine (or virtual machine) will pass the filter. If a job satisfies a filter, its box ancestry will also be included.
Run Status See screen below. The filter includes all ancestors of

Filter Editor
JOB FILTERS99
Filter Attribute
Description
jobs satisfying this filter, regardless of the ancestors’ Run Statuses. The absence of any Run Status selections means no jobs will satisfy the filter. If no Run Status filtration is needed, select all statuses.
Time Window “Future Hours” and “Past Hours” set bounds on the Run Status and Run Machine filter tabs. Choosing “Ignore” for Past Hours means no recent run history is required to pass the filter. Choosing “Ignore” for Future Hours means no future execution is required to pass the filter.
Defined Machine
Each list entry can be a string, such as “pluto”, or a
wildcard expression, such as “jup*”. The absence of any
entries implies that no jobs will be excluded based on the
JIL "machine:" specification. A job satisfies the filter if it
has at least one machine in its JIL "machine:" definition
that matches any of the filter's wildcard expressions. Note that if a job satisfies a filter, its box ancestry will also be included.
Exclusion Exclusion expressions are performed after all other filter
expressions. If a job_name satisfies an exclusion
expression that job, and if a box all of its descendants, will be discarded. Expressions may be a string, such as
“job_ABC”, or a wildcard expression, such as
“job_A*”.The absence of any entries means that no jobs
will be filtered based on Exclusion expressions.
Description Use the Description field to document the filter.
Current Status Only jobs with Statuses that are selected by a check mark will satisfy the filter. If no statuses are selected, no jobs will pass the filter. If all Statuses are selected, no jobs will be excluded based on status.
Job Name Each list entry can be a job_name, such as “Job_A” or a
wildcard expression, such as “Job_A*”. The absence of
any entries implies that no jobs will be excluded based
on job_name. Note that "^" is a special character for
delimiting instances. “Job_A” is equivalent to “Job_A^*”.
Box Name Each list entry can be the name of a Box Job. The name supports wildcard expressions. The filter will return all

User Guide100
Filter Attribute
Description
Box Jobs that match the name expressions and all the jobs within them.
Owner Only jobs with an owner that match these expressions
passes the filter. Entries can be a string, such as
“root@pluto”, or a wildcard expression, such as
“root@*”.The absence of any entries means that no jobs
are excluded based on the owner.
iXp Group The filter is shared with members of the iXp groups specified in this filter attribute.
Calendar Filters jobs by calendar.
Group Filters jobs by group.
Application Filters jobs by application.
Filter Editor Check Boxes:
Check Box Description
Read Only Indicates this filter is not owned by the current user and
cannot be modified.
Dynamic Indicates this filter is modified by job run data.
Graphics Configuration
Indicates additional drill-down or drag-n-drop actions are associated with this filter. This is a deprecated setting that may be enabled again in a future release.
Needs Save Indicates that filter configuration changes have not yet been saved to the iXp Daemon.

Filter Editor
JOB FILTERS101
Filter Editor, showing Run Status selection:
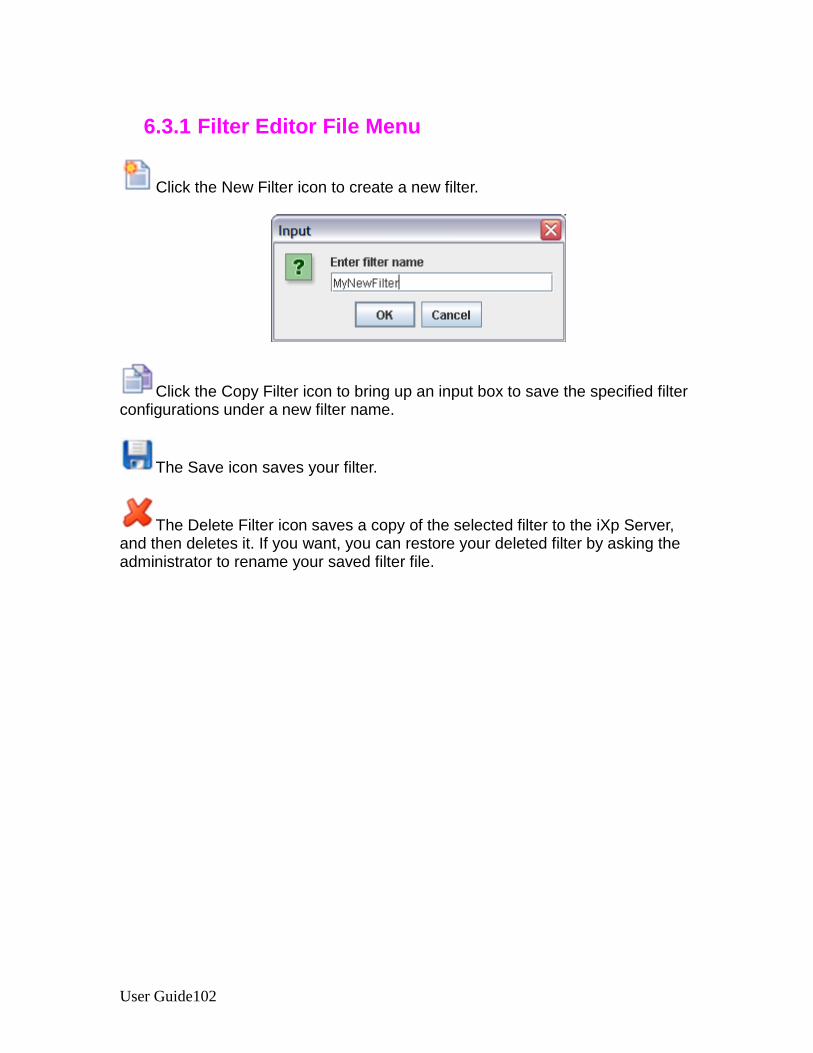
User Guide102
6.3.1 Filter Editor File Menu
Click the New Filter icon to create a new filter.
Click the Copy Filter icon to bring up an input box to save the specified filter configurations under a new filter name.
The Save icon saves your filter.
The Delete Filter icon saves a copy of the selected filter to the iXp Server, and then deletes it. If you want, you can restore your deleted filter by asking the administrator to rename your saved filter file.

Expand, Collapse, and Hide
JOB TOOLS POP-UP103
7 JOB TOOLS POP-UP A pop-up menu for job tools can be activated by right-clicking a job in any of the views. The same menu can also be activated by right-clicking an Instance icon on the Tree or Job Flow View. This menu offers tools for navigating the job streams, issuing events on jobs, updating job definitions, generating job dependency filters, running user commands and viewing job information.
7.1 Expand, Collapse, and Hide
The Expand, Expand All and Collapse menu items are shown when either a Box job or an Instance is selected. These three options provide an easy way to traverse the job streams. Box jobs or Instances would either be expanded by just one additional level (Expand) or expanded to show all the jobs within them (Expand All). A Box Job or an Instance could also be collapsed to show just that Box job or Instance but not any of the jobs within them (Collapse). The Hide menu option could be applied to any job or Instance. Activating this item removes the selected job/Instance and also all of the jobs within them, from all of the Views.
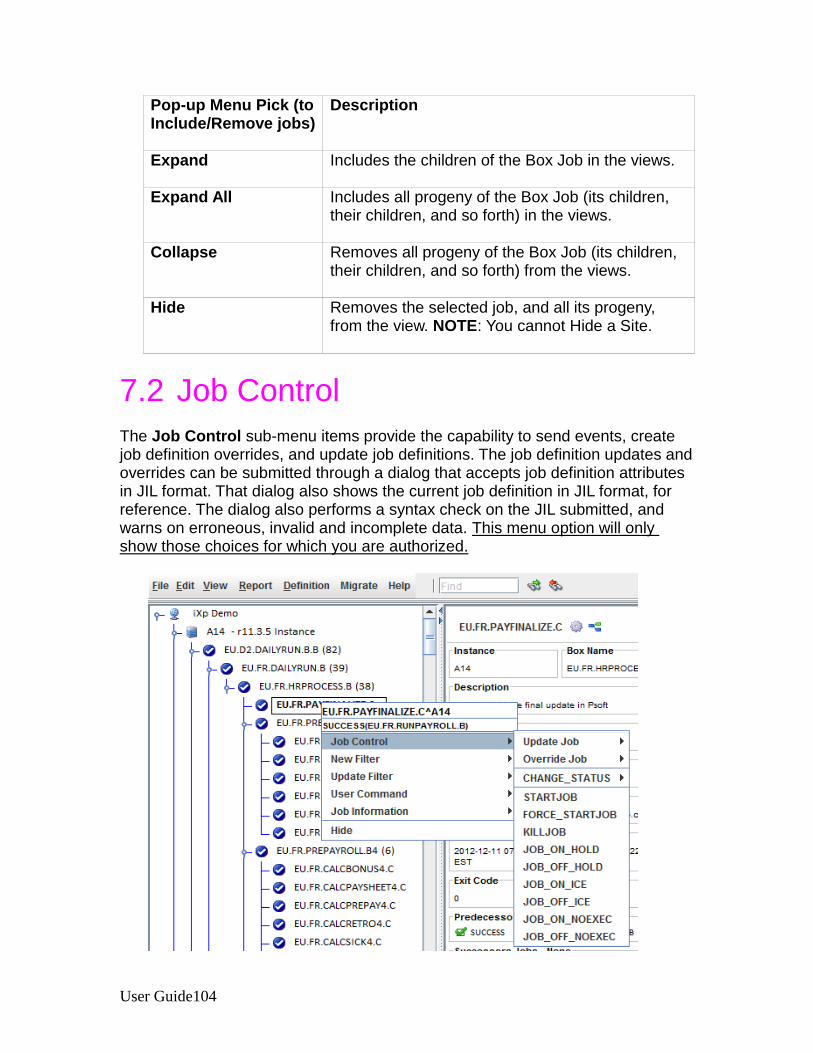
User Guide104
Pop-up Menu Pick (to Include/Remove jobs)
Description
Expand Includes the children of the Box Job in the views.
Expand All Includes all progeny of the Box Job (its children, their children, and so forth) in the views.
Collapse Removes all progeny of the Box Job (its children, their children, and so forth) from the views.
Hide Removes the selected job, and all its progeny, from the view. NOTE: You cannot Hide a Site.
7.2 Job Control
The Job Control sub-menu items provide the capability to send events, create job definition overrides, and update job definitions. The job definition updates and overrides can be submitted through a dialog that accepts job definition attributes in JIL format. That dialog also shows the current job definition in JIL format, for reference. The dialog also performs a syntax check on the JIL submitted, and warns on erroneous, invalid and incomplete data. This menu option will only show those choices for which you are authorized.

Job Control
JOB TOOLS POP-UP105
7.2.1 Update Job
The Update Job menu item opens a dialog from which a user can update the job definition. The dialog allows users to update any attribute of the job, except the owner field.
7.2.2 Override Job
The Override Job menu item provides a dialog from which a user can submit a one-time job override to CA Workload Automation AE. For one-time overrides, CA Workload Automation AE only allows a selected job attributes to be modified. Hence, the iXp dialog may generate error messages if the one-time override is issued for invalid job attributes.
7.2.3 Change Status
The rest of the Job Control menu options allow users to send events to CA Workload Automation AE for the selected jobs. The CHANGE_STATUS option has a sub-menu that provides a selection of job statuses.

User Guide106
When an event is selected, users can also provide a comment that could be used for audit purposes. The comment is not mandatory and hence the text area for the comment could be left blank. Every time iXp issues an event to the CA Workload Automation AE database, the iXp username is inserted as a part of the comment, even if the comment is left blank. This provides an audit trail of all events performed via iXp. When a particular sendevent is selected, the confirmation dialog also allows users to type in the comment to be associated with that job and event.

New Filter and Update Filter
JOB TOOLS POP-UP107
7.3 New Filter and Update Filter
The New Filter and Update Filter options allow the creation of Job Dependency Filters. New Filter always creates a new temporary filter with the selected Job Dependency criteria. Update Filter always updates the existing filter with the selected Job Dependency criteria. Once the filter is set the preferred way, it can be saved with a new name from the Filter Editor. Select New Filter to create a new filter that will appear on the Set Filter list.
Choosing a New Filter will apply a Job Dependency Filter to the selected job (named Payroll_CalcBonusPay1 in this example). Select Update Filter to return the union set of jobs for a Job Dependency Filter on the selected job, together with the existing filter. The Update Filter item has the same choices as the New Filter option. For example, choosing an Update Filter of Job Focus will add the child and parent dependency relations of the selected job to the view and will not remove the other jobs.
7.3.1 Job Dependency Filters Definitions
Job Dependency filters can be applied via Update Filter and New Filter. Update Filter will apply the selected filter to the existing view and may result in an addition of new jobs to match the filter but will not result in a removal of any jobs from the existing view. New Filter will clear the existing view, create a temporary filter based on the username and show the jobs that match the selected filter.
Dependency Filter Name
Description
Job Focus Filter Filters the iXp views to show a job and its immediate predecessors and successors.
User Guide108
Dependency Filter Name
Description
Critical Path Focuses on a job and then follows predecessor
and successor relationships (dependency relationships) from that job, as far as the dependency relationships can be traced in the job stream.
Recursive Critical Path
Performs a critical path filter on the job, and on all its ancestors and all its progeny. This yields all the extended ancestor and progeny relationships (Box relationships) to the selected job, and all the extended predecessor and successor relationships (dependency relationships) to each of those jobs.
Transitive Closure Follows all Box and dependency relationships in both directions, throughout the CA Workload Automation AE Job structure. First a Recursive Critical Path filter is applied to the selected job, then a Recursive Critical Path filter is applied to the resulting jobs, and so forth through the job stream. Transitive Closure on any job in the set of jobs returned by the Transitive Closure filter has the useful property that the filter applied to any one selected job returns the same set of jobs as for any other job in the set. The Transitive Closure filter can be useful for understanding where the partitions are in your job stream, hence for designing more modular job streams, for rapid failure recovery.
7.4 User Command
The User Command menu option provides quick access to all user commands of type job. When expanded, this menu item shows all the job user commands that are available for execution. The list of commands would be same as that found under the File►UserCommand►Job menu option.

Job Information
JOB TOOLS POP-UP109
7.5 Job Information
The Job Information menu option has five submenu options that let you perform the following actions:
Retrieve the job definition
Report on the last job run
View all the historical and forecasted runs of the selected job
Retrieve the log files the job and CA Workload Automation AE created when the job ran on the Remote Agent machine (if the iXp Agent is installed on that machine)
View the calendars associated with the job
Select Job Definition, Detailed Report, View Run Data to view the Job Information for the selected job. Select the Log Files sub-menu item to see a list of files that you can retrieve for the last job run. Select the Calendars sub-menu to see the Run or Exclude Calendar for a job.
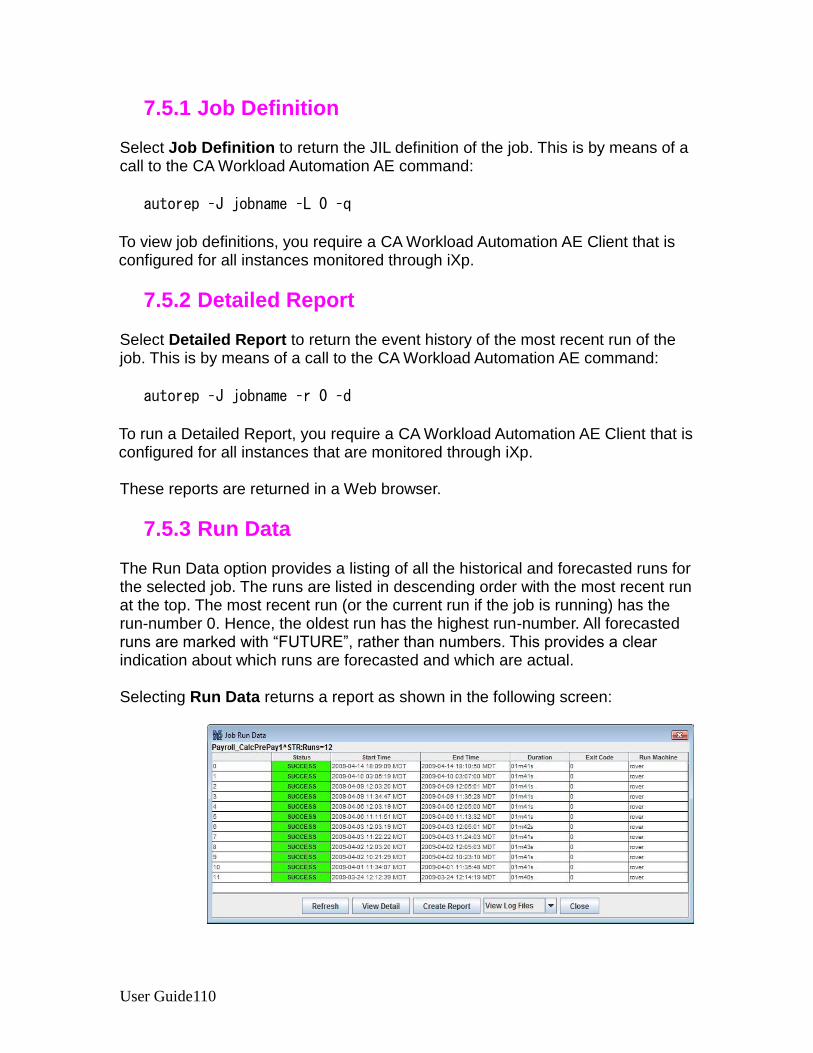
User Guide110
7.5.1 Job Definition
Select Job Definition to return the JIL definition of the job. This is by means of a call to the CA Workload Automation AE command:
autorep –J jobname –L 0 –q
To view job definitions, you require a CA Workload Automation AE Client that is configured for all instances monitored through iXp.
7.5.2 Detailed Report
Select Detailed Report to return the event history of the most recent run of the job. This is by means of a call to the CA Workload Automation AE command:
autorep –J jobname –r 0 –d
To run a Detailed Report, you require a CA Workload Automation AE Client that is configured for all instances that are monitored through iXp. These reports are returned in a Web browser.
7.5.3 Run Data
The Run Data option provides a listing of all the historical and forecasted runs for the selected job. The runs are listed in descending order with the most recent run at the top. The most recent run (or the current run if the job is running) has the run-number 0. Hence, the oldest run has the highest run-number. All forecasted runs are marked with “FUTURE”, rather than numbers. This provides a clear indication about which runs are forecasted and which are actual. Selecting Run Data returns a report as shown in the following screen:

Job Information
JOB TOOLS POP-UP111
RUN DATA COLUMN
DESCRIPTION
First column Job run identifier number, as used in the CA Workload
Automation AE command autorep –j job_name –r run_number.
Status Status of the job for the specific run of the job.
Start Time Time the run of the job started.
End Time Time the run ended.
Duration End Time – Start Time.
Exit Code Exit Code returned for the execution of the job run.
7.5.3.1 View Detail
If you want to see the detailed report (autorep -d) on any run, select that run on this dialog and click this button.
7.5.3.2 Create Report
Once the appropriate runs have been imported in the Run Data dialog, an HTML report that lists those runs can be created by selecting this option. The report will be shown in a web browser. This feature enables users to print, email and save the run report for any job.

User Guide112

Job Information
JOB TOOLS POP-UP113
7.5.4 Log Files
The Log Files sub-menu displays a list of files that you can retrieve for the last job run of the selected job. This menu option is visible only if the privilege to view Job Log files or Job Script files has been assigned to you.
You can retrieve the STDOUT, STDERR, STDIN, Job Profile, and Remote Agent log for the last job run. If any of these files are not present on the Remote Agent machine, the iXp Client will notify you. Since all of these files reside on the Remote Agent machine, the iXp Agent has to be up and running on that machine in order for the iXp Client to show the files for jobs running in Unicenter AutoSys JM r11 or older versions. The iXp Client will display the contents of the requested files in a web browser window. This way you can search for text, email, or print the contents of the file. Tip: If the iXp Agent is not running, then the iXp Client will display an error indicating this condition. If the iXp Client displays a Process Timeout error, you can try to retrieve the log again.
7.5.4.1 STDOUT, STDERR, STDIN
Select the Standard Out, Standard Error, or Standard In option to view these files. The iXp Daemon will extract the file name as defined to the job and resolve any Substitution, Global, or Environment variables in the file name before retrieving the file. If the file name is based on variables that can have dynamic values (e.g. the RUN_NUM, NTRY of a job, the date when the job ran, and so

User Guide114
on), then the iXp Daemon will use information from the last run of the job to determine the value of such variables.
The output of the STDOUT file above shows that the job is defined to create the
STDOUT file based on a Global Variable called “LOGDIR” and the standard CA
Workload Automation AE Environment variables called “AUTO_JOB_NAME” and
“AUTORUN”. The output from iXp Client shows the resolved name of the file after
the appropriate values were plugged in for the variables used.
7.5.4.2 Job Profile
Select the Profile menu option to view the file that has been assigned to the job profile field in the job definition. NOTE: This functionality is available for UNIX jobs only.

Job Information
JOB TOOLS POP-UP115
7.5.4.3 Remote Agent Log Select the Autoremote Log option to view the Remote Agent Log file. In most cases, CA Workload Automation AE is set up to purge the Remote Agent Log
when the job ends in a SUCCESS. Hence, this functionality may work only with
jobs in a FAILURE or TERMINATED status.
For Unicenter AutoSys JM r11 or older, if the iXp Agent is unable to find a file, the web browser window will show that message. The window will also show the fully qualified name of the file that the iXp Agent attempted to retrieve.

User Guide116
7.5.5 Calendars
This menu item is shown only for those jobs that use a “run_calendar” or “exclude_calendar”. You can view the name and the dates assigned to that each calendar by selecting the menu item. The calendar shown is “Read only” and no changes are permitted.
You can view one calendar year at a time by selecting the year from the drop-down list. For each year, the dates set inside the calendar definition are shown in “green” color. The name of the calendar is shown in the title bar of the window.

View Statistics
JOB TOOLS POP-UP117
7.6 View Statistics
Server statistics provide a comprehensive report on the capacity, usage and performance of a CA Workload Automation AE instance. Non-admin users can see this option only if the privilege has been granted by the administrator. Select a CA Workload Automation AE Instance icon on the Tree View, and right mouse click to see the Instance Options menu.

User Guide118
Select View Statistics to bring up the Server Statistics charts. From top to bottom, the charts show the number of jobs started per minute, the number of jobs completed per minute, the events processed per minute, and the average scheduling latency time in seconds, each plotted as a function of time. The gray area of each chart is set to contain eighty percent or more of the charted data.
Chart Duration Button
Mouse Flyover Detail

View Statistics
JOB TOOLS POP-UP119
Use the chart duration button to select the time duration shown. Move the mouse over a chart to view the exact data value, and time, in the mouse flyover banner. Using Server Statistics: These statistics provide guidance to the CA Workload Automation AE administrator for capacity planning and fulfilling service level agreements. Ideally, the scheduling latency should not be more than a few seconds and the number of jobs submitted should be as high as possible without affecting the latency. The gray area is set to show the average figures for every chart.
User Guide120
8 iXp CLIENT CLI iXp provides a set of command line tools that enable users to execute the CA Workload Automation AE commands sendevent, autorep, and jil from their client machine without installing the CA Workload Automation AE software. These commands interface with the iXp Server and the actual execution of CA Workload Automation AE commands occurs on the iXp Server. The results of execution are passed back to the client. All the parameters supported by the actual CA Workload Automation AE commands can be passed to the iXp commands, including input files.
8.1 Installation
The iXp Client CLI is a self-contained set of files that has to be copied to each machine from where the commands will be executed. The total disk space required for these files is less than 3Mb. Once the files have been copied, you have to set two environment variables and create a configuration file. Environment Variables
IXP_HOME=<Directory where software resides> AUTOSERV=<CA Workload Automation AE Instance name> where IXP_HOME = The Base directory where the iXp Client CLI has been installed. AUTOSERV = The 3-letter name of the CA Workload Automation AE instance for
which the command is being executed. This variable can be set before each execution, if the commands are being used for multiple instances.
For example, IXP_HOME=C:\ixphome
AUTOSERV=ACE Optional variables
IXP_SERVER_URL=<http://IXP_SERVER:PORT> IXP_SERVER_URL_2=<http://IXP_SERVER:PORT>

Installation
iXp CLIENT CLI121
If these variables are defined, the Configuration File (see below) is ignored. Configuration File
You must create a configuration file under the IXP_HOME/etc directory if the IXP_SERVER_URL variable is not defined in the environment. This file called ixp.conf contains a single line that provides the URL of the iXp Server to the Client CLI. The following command will create this file: echo “IXP_SERVER_URL=http://IXP_SERVER:PORT” > $IXP_HOME/etc/ixp.conf (UNIX/Linux) echo IXP_SERVER_URL=http://IXP_SERVER:PORT > %IXP_HOME%\etc\ixp.conf (Windows) where IXP_SERVER = The machine/IP address of the iXp Server PORT = The HTTP port number of the iXp Server. For example, echo IXP_SERVER_URL=http://venus:8080 > C:\ixphome\etc\ixp.conf If the IXP_SERVER_URL variable is defined in the environment, the configuration file is ignored. Once the configuration file has been created or the variable defined, you can run the client CLI. If there is an alternate iXp server running for high availability, then an additional line can be added in the file to provide its connection information to the CLI.
echo “IXP_SERVER_URL_2=http://IXP_SERVER_2:PORT” >> $IXP_HOME/etc/ixp.conf where
IXP_SERVER_2 = Machine/IP address of the alternate iXp Server PORT = The HTTP port of the alternate iXp Web Server Similarly, the above can be set as an environment variable.

User Guide122
8.2 Commands
The iXp Client CLI provides six commands in the $IXP_HOME/bin directory. All except one are counterparts to CA Workload Automation AE commands. Each command has the same syntax as its CA Workload Automation AE counterpart, and accepts the same input and parameters. When you execute any command, the parameters and input file, along with your authentication information, are passed to the iXp Server defined in your configuration file. If you have been assigned the authorization to execute the command for all the parameters and input provided, the iXp Server will run the original CA Workload Automation AE counterpart, capture the results, and send them back to you.
8.2.1 ixautorep
The ixautorep command is the iXp counterpart of the CA Workload Automation AE “autorep” command. It accepts the same list of parameters that you can pass to the “autorep” command. The following shows the syntax for the ixautorep command. Notice how it is actually the syntax of the CA Workload Automation AE “autorep” command. C:\ixphome\bin>ixautorep
Usage: [-J Jobname] <-d | -s | -q | -t | -o [Override #] | -w>
[-R run_num] [-L Print Level] [-N Retry] [-x]
[-G GlobalName] [-M MachineName] [-D TNS_alias_name]
IF OverRide# = 0, it will display OverRide Currently in
Effect.
Error in command line for autorep.
JobName OR GlobalName OR MachineName is required.
When you run the ixautorep command with the “-J” option, it will provide the Summary, Detail, or Definition output, depending on the parameters. Only those jobs for which you are authorized will be displayed.
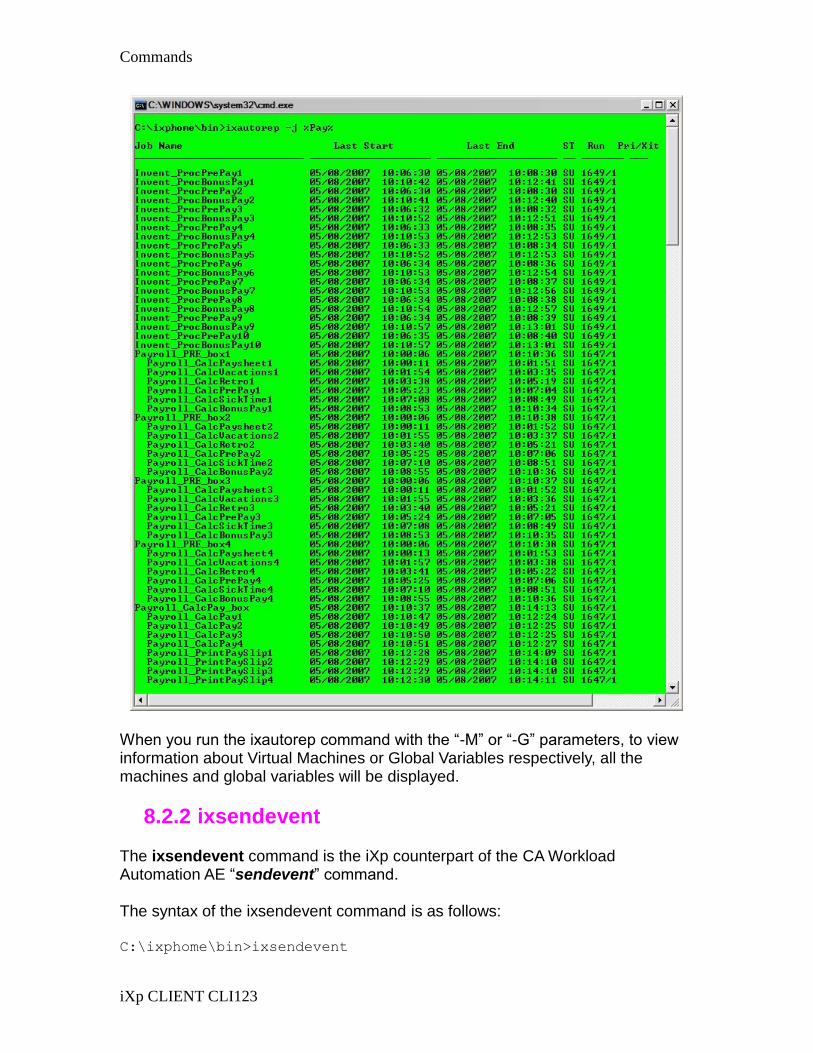
Commands
iXp CLIENT CLI123
When you run the ixautorep command with the “-M” or “-G” parameters, to view information about Virtual Machines or Global Variables respectively, all the machines and global variables will be displayed.
8.2.2 ixsendevent
The ixsendevent command is the iXp counterpart of the CA Workload Automation AE “sendevent” command. The syntax of the ixsendevent command is as follows: C:\ixphome\bin>ixsendevent

User Guide124
Usage: sendevent -E EVENT [-S AUTOSERV] [-A Alarm] [-J JobName]
[-s Status] [-P Event Priority] [-M Max Send
Trys ]
[-q Job Que Priority] [-G Global=Value] [-C
Comment]
[-U (Un-SENDEVENT)] [-T Time of Event] [-K
Signal(s)]
Error in command line for sendevent.
Event [-E] is required.
When you run the ixsendevent command with the “-J” option, it will issue the sendevent to the job only if you are authorized to do so. Otherwise, the iXp Server will return a security exception. You can pass any valid parameter supported by the CA Workload Automation AE “sendevent” command. NOTE: ixsendevent does not allow “-E STOP_DEMON” events. These events have to be issued from your normal commands or interfaces.
8.2.3 ixjil
The ixjil command is the iXp counterpart for the CA Workload Automation AE “jil” command. This command enables you to create, update, or delete CA Workload Automation AE job and machine definitions using valid JIL statements. You can run the ixjil command only in the batch mode. You have to either pass a filename or valid JIL statements as standard input. In the screen below, you can see how the ixjil command is executed with JIL statements and filename as standard input.
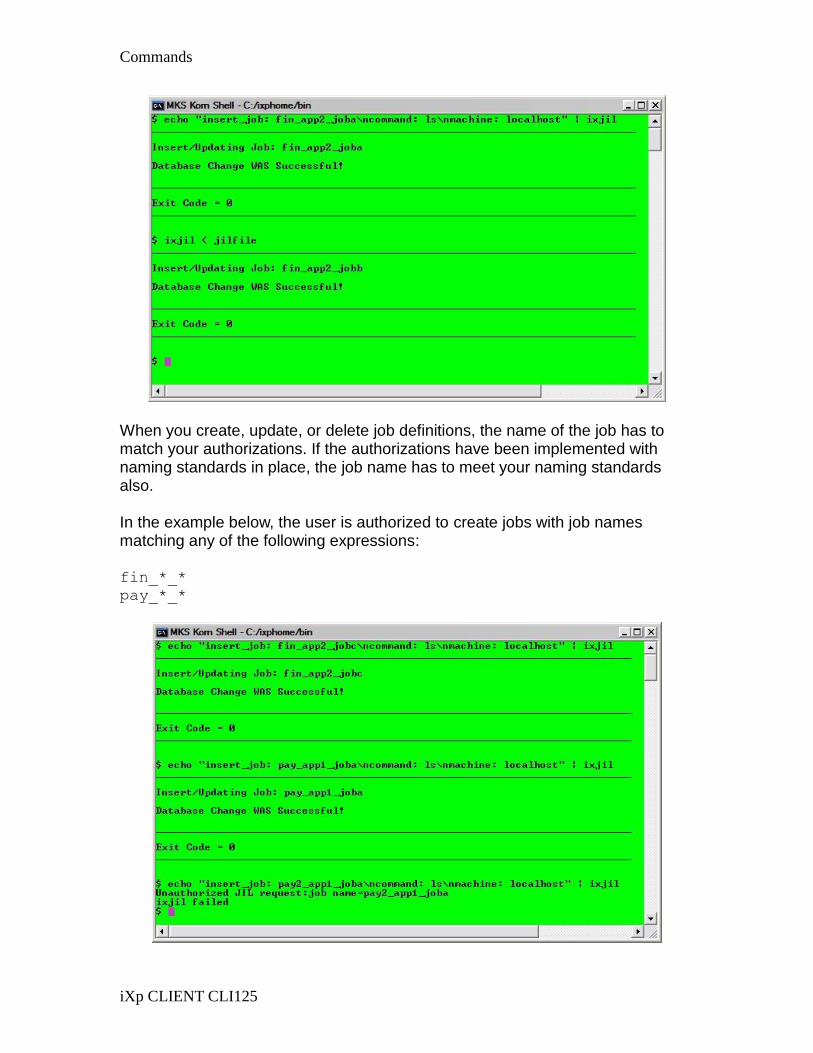
Commands
iXp CLIENT CLI125
When you create, update, or delete job definitions, the name of the job has to match your authorizations. If the authorizations have been implemented with naming standards in place, the job name has to meet your naming standards also. In the example below, the user is authorized to create jobs with job names matching any of the following expressions: fin_*_*
pay_*_*
User Guide126
As shown above, the JIL insert statement for job pay2_app1_joba failed as it
did not meet the authorization. NOTE: If the standard input to ixjil is a filename, the entire file should contain JIL statements that meet your authorizations. If it contains even one JIL statement that does not meet your authorization, the entire file will be rejected.
8.2.4 ixautostatus
The ixautostatus command is the iXp counterpart for the CA Workload Automation AE “autostatus” command. This command enables you to view the current status or value of a single CA Workload Automation AE job or global variable respectively. The syntax of the ixautostatus command is as follows:
C:\ixphome\bin>ixautostatus
Usage: <-J JobName> OR <-G GlobalName> [-S AUTOSERV]
Error in command line for autostatus.
For example,
C:\ixphome\bin>ixautostatus -J EuropeDailyBox
SUCCESS
8.2.5 ixjob_depends
The ixjob_depends command is the iXp counterpart for the CA Workload Automation AE “job_depends” command. This command enables you to view the list of job dependencies, the current status of predecessor and successor jobs of a single job, or a forecast report of all jobs scheduled to run within a specific time frame and their successors. The syntax of the ixjob_depends command is as follows:
C:\ixphome\bin>ixjob_depends
JobName is required.
Must specify Mode:
c Current Condition Status
d Dependencies Only (from Job Definition)
t Time Dependencies (Forecasts)
Usage: job_depends< -c | -d | -t | -t -s | -t -e | -t -e -s
><-J JobName>| -w

Commands
iXp CLIENT CLI127
[-F From Date/Time (MM/DD/YYYY HH:MM)]
[-T To Date/Time]
[-L Print Level] [-D TNS_alias_name]
*** Error in command line for job_depends.***
The sample output of ixjob_depends command is as follows:
8.2.6 ixautocal_asc
The ixautocal_asc command enables you to view, create, modify, and delete standard CA Workload Automation AE calendars. The functionality is similar to the CA Workload Automation AE autocal_asc command. You can use all command line arguments of standard autocal_asc with benefit of ixp security and audit. The following example shows the command being executed with a filename that contains lines to add dates to a calendar:
#>cat infile
TESTCAL
A
08/05/2011
09/05/2011
10/05/2011
#>ixautocal_asc<infile
Utility to Add/Delete or Print entries in Calendar.
Calendar Name: Add (A) or Delete (D) or Print (P) ?
Date (MM/DD/YYYY [HH:MM]): ...Successful.
Date (MM/DD/YYYY [HH:MM]): ...Successful.

User Guide128
Date (MM/DD/YYYY [HH:MM]): ...Successful.
Date (MM/DD/YYYY [HH:MM]):
The following example shows the command being executed with standard input that prints out the dates in a calendar:
#>echo "TESTCAL\nP" |ixautocal_asc
Utility to Add/Delete or Print entries in Calendar.
Calendar Name: Add (A) or Delete (D) or Print (P) ?
Days in the Calendar: TESTCAL
--------------------------------
08/05/2011 00:00
09/05/2011 00:00
10/05/2011 00:00
8.2.7 ixflags
The ixflags command is a command to view the current version of iXp Client. $ ixflags
iXp-11.3.5.X
NOTE: This command is not a counterpart to the CA Workload Automation AE “autoflags” command. The “X” character in the preceding response shows the build number.
8.2.8 ixuserjobcmd
The ixuserjobcmd command allows you run a user command previously defined in AdminTool. Specify the command and job names that this command will operate upon. The command return results in a standard output. NOTE you must have rights to run user job commands.
usage: ixuserjobcmd v11.3.5.5097
-c,--command <arg> REQUIRED. User job-command name.
-j,--job <arg> REQUIRED. Job name or comma
separated list of job names
that are passed to a user job-
command. If fullname is not

Commands
iXp CLIENT CLI129
used, current instance is added to
job name. Job name will be set to
env. variable
IXP_USERCOMMAND_JOB_NAME and
IXP_USERCOMMAND_JOB_FULL_NAME.
-i,--input <arg> Custom user input. Input will be
set into env. variable
IXP_USERCOMMAND_INPUT
-s,--autoserv <arg> CA WAAE (Autosys) instance to be
used. If not specified the one from
env. variable AUTOSERV is used.
-x,--version Shows client version.
-h,--help Shows this help.

User Guide130
9 INTERACTIVE FORECASTING
A key function of iXp is the ability to perform interactive forecasting and simulations. Forecast reports can be generated and simulations played back. All job run simulations are done by iXp and not actually run on CA Workload Automation AE. Simulation is based on historical averages and resolution of job dependencies as defined within CA Workload Automation AE. The results of a simulation can be viewed as steps-through-time and also can be saved in a report. Simulation also provides the ability to perform “what-if” scenarios that could help during decision-making.
9.1 Go Offline iXp has two modes, Online and Offline. Interactive forecasting can be performed only during Offline mode. When Offline mode is started all job dependencies and relevant attributes are loaded on the client, and during Offline mode job runs and current statuses are not loaded or shown. As a result, in Offline mode all jobs are initially marked as INACTIVE. Although the job data is highly compressed during Offline mode, it could impact the client machine performance because all that data is stored in memory on the client machine when a user decides to enter Offline mode. Therefore, iXp allows users to enter Offline mode with data for a single CA Workload Automation AE instance only. If iXp is monitoring more than one CA Workload Automation AE instance, the user is presented with a selection of CA Workload Automation AE instances when entering Offline mode.
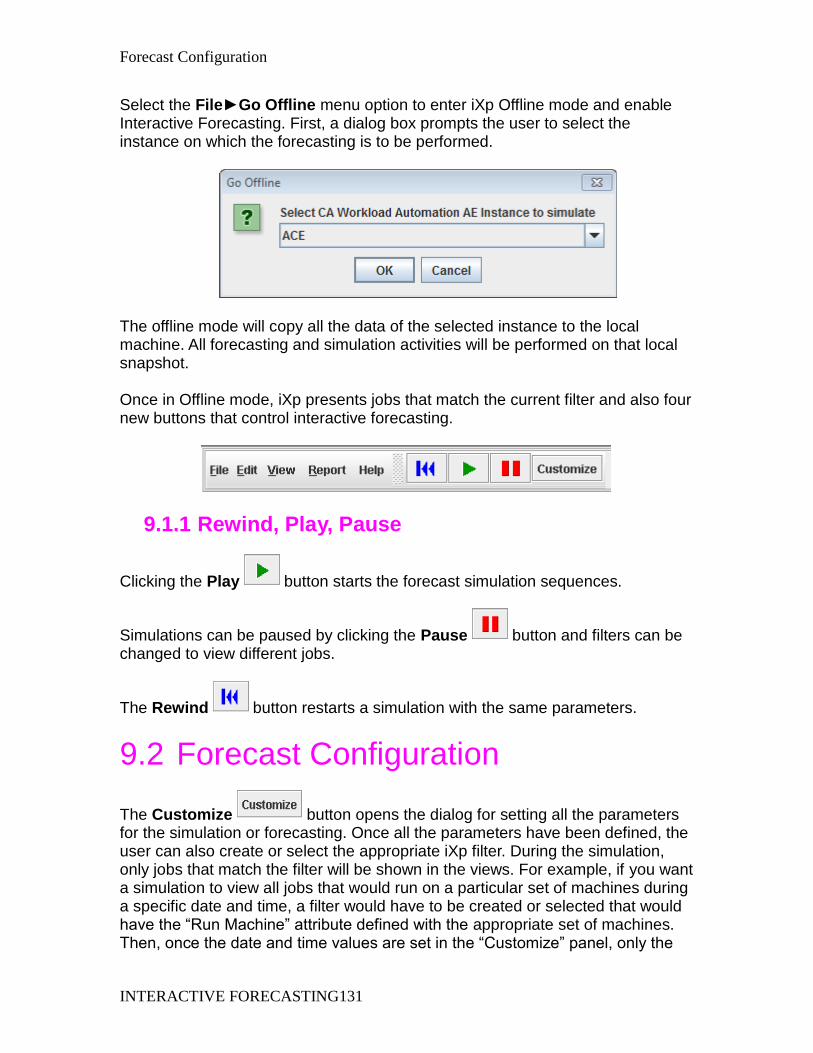
Forecast Configuration
INTERACTIVE FORECASTING131
Select the File►Go Offline menu option to enter iXp Offline mode and enable Interactive Forecasting. First, a dialog box prompts the user to select the instance on which the forecasting is to be performed.
The offline mode will copy all the data of the selected instance to the local machine. All forecasting and simulation activities will be performed on that local snapshot. Once in Offline mode, iXp presents jobs that match the current filter and also four new buttons that control interactive forecasting.
9.1.1 Rewind, Play, Pause
Clicking the Play button starts the forecast simulation sequences.
Simulations can be paused by clicking the Pause button and filters can be changed to view different jobs.
The Rewind button restarts a simulation with the same parameters.
9.2 Forecast Configuration
The Customize button opens the dialog for setting all the parameters for the simulation or forecasting. Once all the parameters have been defined, the user can also create or select the appropriate iXp filter. During the simulation, only jobs that match the filter will be shown in the views. For example, if you want a simulation to view all jobs that would run on a particular set of machines during a specific date and time, a filter would have to be created or selected that would have the “Run Machine” attribute defined with the appropriate set of machines. Then, once the date and time values are set in the “Customize” panel, only the
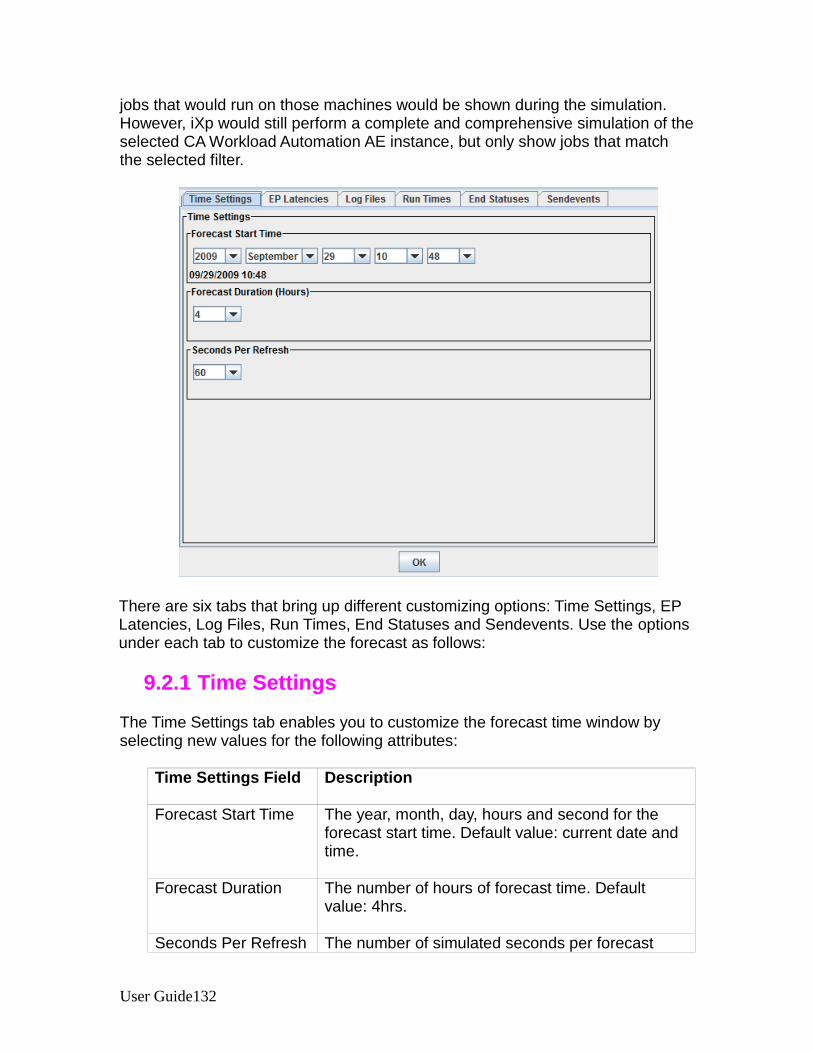
User Guide132
jobs that would run on those machines would be shown during the simulation. However, iXp would still perform a complete and comprehensive simulation of the selected CA Workload Automation AE instance, but only show jobs that match the selected filter.
There are six tabs that bring up different customizing options: Time Settings, EP Latencies, Log Files, Run Times, End Statuses and Sendevents. Use the options under each tab to customize the forecast as follows:
9.2.1 Time Settings
The Time Settings tab enables you to customize the forecast time window by selecting new values for the following attributes:
Time Settings Field Description
Forecast Start Time The year, month, day, hours and second for the
forecast start time. Default value: current date and time.
Forecast Duration The number of hours of forecast time. Default value: 4hrs.
Seconds Per Refresh The number of simulated seconds per forecast

Forecast Configuration
INTERACTIVE FORECASTING133
Time Settings Field Description window refresh (the “speed” of the forecast). Default value: 60 seconds.
Select OK to apply the changes and close the Forecast Configuration window.
9.2.2 EP Latencies
This dialog lets you set the forecast scheduling latencies, in milliseconds. These EP Latencies variables are described in the Section 5.8 Forecast of the CA Workload Automation iXp Administration Guide, corresponding as follows:
EP Latencies Field Forecast Property Variable
Job Completion setDoneStatusTimeMillis
VM Stat vmstatTimeMillis
Remote Agent Connect StartJobTimeMillis
Set DB Status setStatusTimeMillis
X-Instance sendevent xinstanceSendeventTimeMillis

User Guide134
EP Latencies Field Forecast Property Variable
Set DB Starting Status setStartingTimeMillis
Read DB Event readEventTimeMillis
Set DB Running Status setRunningTimeMillis
9.2.3 Log Files
Interactive Forecasting can create log files for textual reports of the jobs forecast. These files are stored on the local machine where the simulation was performed.
Log Files Field Description
Event Log Where to place the event log file (path and file name).
Run Log Where to place the run log file (path and file name).
Log Filter Filter for data content of the log files. The Log Filter selections are described in the Chapter 6: JOB FILTERS of this document.
9.2.4 Run Times

Forecast Configuration
INTERACTIVE FORECASTING135
Customize run times for specific jobs. Assigning new run times for a job overrides the average run time values for the next forecasted run of the job.
Run Times Field Description
Job Name Name of job to which new run time is to be
assigned.
Current Average Run Time The average run time currently used by the forecaster.
Assigned Run Time The hours, minutes and seconds for a new run time may be built with the h, m, spicklists. The resulting run time is combined with the Job Name in the Run Time field.
Run Time This field combines the Assigned Run Time with the Job Name fields. This may also be edited directly. Select Add to add the newly assigned time to the update list.
Simulated Run Times This is a running list of all the run times one is preparing to add to the simulation. Run times on the list may be deleted by highlighting them and selecting Delete. (The same selecting

User Guide136
Run Times Field Description multiple jobs method may be used as in other windows.) Once you select OK, the job names and times listed here will be assigned.
9.2.5 End Statuses
Customize End Status for specific jobs. Assigning a new End Status for a job overrides the current End Status, in the job forecast processing logic, for the next forecasted runs of the job. If a job runs multiple times within your forecast window, each run will end in the status specified.
End Statuses Field Description
Job Name Job name to which a new End Status is to be
assigned in the simulation.
Assigned End Status Pick list for End Status currently to be assigned by the forecaster.
End Status This field combines the Job Name and Assigned End Status fields, select Add to add the newly
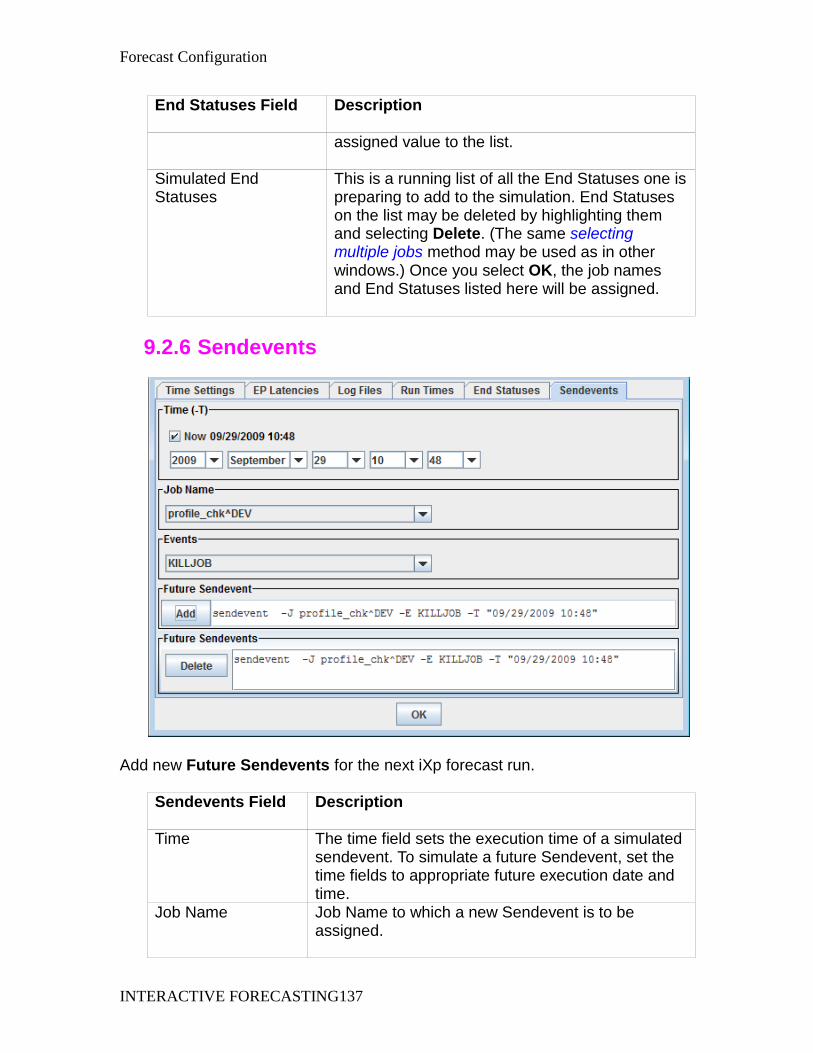
Forecast Configuration
INTERACTIVE FORECASTING137
End Statuses Field Description assigned value to the list.
Simulated End Statuses
This is a running list of all the End Statuses one is preparing to add to the simulation. End Statuses on the list may be deleted by highlighting them and selecting Delete. (The same selecting multiple jobs method may be used as in other windows.) Once you select OK, the job names and End Statuses listed here will be assigned.
9.2.6 Sendevents
Add new Future Sendevents for the next iXp forecast run.
Sendevents Field Description
Time The time field sets the execution time of a simulated sendevent. To simulate a future Sendevent, set the time fields to appropriate future execution date and time.
Job Name Job Name to which a new Sendevent is to be assigned.

User Guide138
Sendevents Field Description
Events Event portion of the Sendevent JIL.
Future Sendevent This field combines the Time, Job Name, and Events fields to define a Future Sendevent. Select Add to add this one to the Future Sendevents list. The JIL populated here is essentially the same as used in CA Workload Automation AE (except for the use of ^InstanceName in the iXp syntax).
Future Sendevents This is a running list of all the Future Sendevents one is preparing to add to the simulation. Future Sendevents on the list may be deleted by highlighting them and selecting Delete. (The same jobs method may be used as in other windows.) Once you select OK, the job names and End Statuses listed here will be assigned.
9.2.7 Return iXp to Online Mode
Select the File►Go Online menu option to return iXp to online mode as shown below:
When you return to online mode, Interactive Forecasting in iXp is disabled, and job runs and current statuses from the CA Workload Automation AE instances are again loaded and shown in iXp. The next time you select the File►Go Offline menu option, the Interactive Forecasting properties will be reset to the current job properties and defaults, all job dependencies and relevant attributes will be loaded on the client, and job runs and current statuses will not be loaded or shown.

View Forecast Run Data
INTERACTIVE FORECASTING139
Thus if one does not want to lose the information gained from a simulation in Offline Mode, the log files should be kept in saved file names.
9.3 View Forecast Run Data Forecast jobs (jobs generated by the iXp Daemon rather than by CA Workload Automation AE) appear in the Run Data table (on the Job Tools Pop-up, Job Information menu) with job index number listed as SIMULATED, for example:
9.4 Errors and Warnings The iXp client provides various indications to the user about problems that iXp may be experiencing. These indications are provided via the means of messages, warnings or certain behavior.
9.4.1 Warning for old data
The iXp Daemon continuously reads data from the CA Workload Automation AE databases. The daemon also incorporates the acquired data in the iXp cache that is read by the iXp clients. If the iXp Daemon is unable to read data from a CA Workload Automation AE instance, then it will not update the cache. To alert the user of such a condition, the iXp client will update the Instance monitor to indicate that the Instance is not refreshing. The Instance monitor is shown in the lower left corner of the client. Also, if the cache has not been updated in five minutes, the iXp client will get an error dialog message indicating the condition.
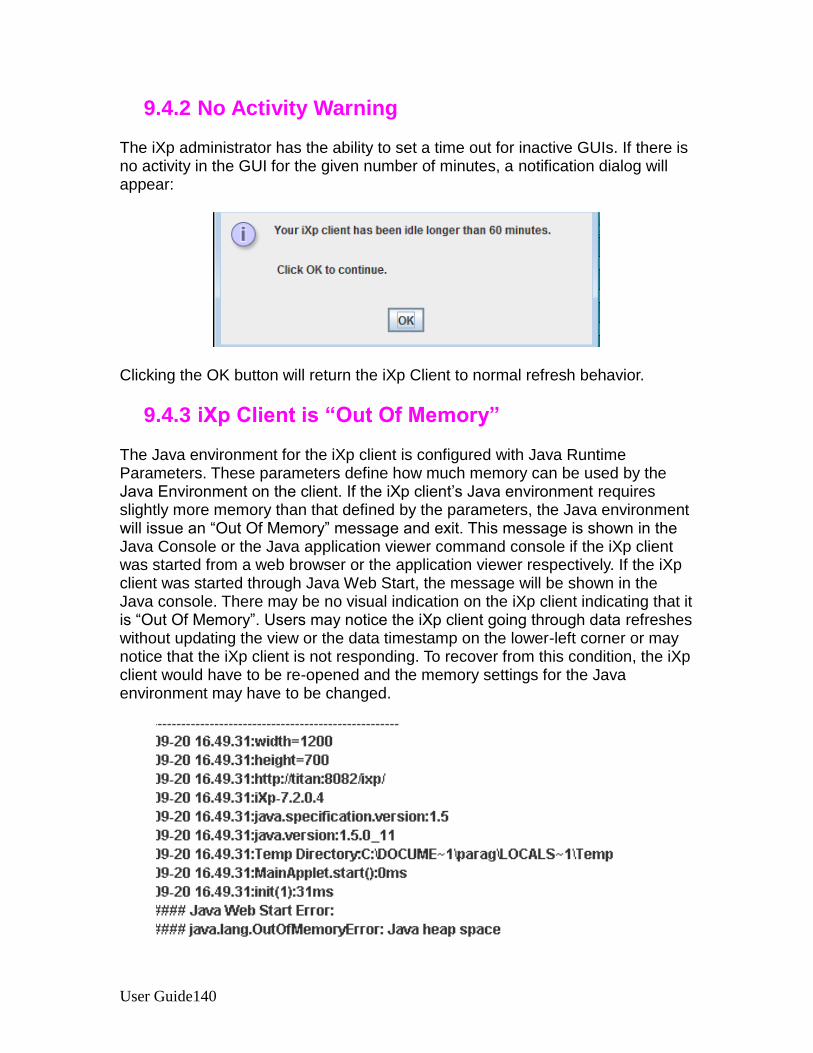
User Guide140
9.4.2 No Activity Warning The iXp administrator has the ability to set a time out for inactive GUIs. If there is no activity in the GUI for the given number of minutes, a notification dialog will appear:
Clicking the OK button will return the iXp Client to normal refresh behavior.
9.4.3 iXp Client is “Out Of Memory” The Java environment for the iXp client is configured with Java Runtime Parameters. These parameters define how much memory can be used by the Java Environment on the client. If the iXp client’s Java environment requires slightly more memory than that defined by the parameters, the Java environment will issue an “Out Of Memory” message and exit. This message is shown in the Java Console or the Java application viewer command console if the iXp client was started from a web browser or the application viewer respectively. If the iXp client was started through Java Web Start, the message will be shown in the Java console. There may be no visual indication on the iXp client indicating that it is “Out Of Memory”. Users may notice the iXp client going through data refreshes without updating the view or the data timestamp on the lower-left corner or may notice that the iXp client is not responding. To recover from this condition, the iXp client would have to be re-opened and the memory settings for the Java environment may have to be changed.

Errors and Warnings
INTERACTIVE FORECASTING141
9.4.4 iXp Client gets “EOF” Exceptions Users may notice “EOF” exception errors when performing certain operations that require the iXp client to contact the iXp server. Actions such as processing iXp reports, getting job definitions, issuing sendevents, responding to CA Workload Automation AE Alarms, and so on. may result in this exception. Typically, this occurs due to a timeout parameter setting between the iXp client and the server. The default value for this parameter is 60 (sixty) seconds. If the iXp client has not received the results of its request within this time, it will throw this exception message to the user. The iXp client will not stop functioning due to this exception. Also, this exception does not indicate the result of the action requested. For example, the user clicks a few alarms and tries to Acknowledge them. After the timeout interval, the iXp client throws the exception and continues with its refresh cycle. Meanwhile, the iXp Requestor finally updates the alarms in the CA Workload Automation AE database, but it cannot tell the user that requested the update about the completion of its work. However, the iXp client would receive the new data as a part of its refresh.
If the iXp Daemon has crashed, the iXp client will timeout for every refresh and throw the EOF exception message in the Java Console or the application viewer command window. For users that open iXp from a web browser, the Java Console is an extremely important window, as the majority of error messages would go in there. We recommend that you configure the Java environment, so that this console is opened every time.

User Guide142
10 MIGRATING WORKLOAD OBJECTS
10.1 Scenario: How to Migrate Workload Objects in CA Workload Automation iXp
As a CA Workload Automation AE scheduler, you want to migrate workload objects from an older Unicenter AutoSys JM release instance to a newer release instance. For example, you set up an instance of CA Workload Automation AE r11.3 or higher and you want to move your workload objects from the existing Unicenter AutoSys JM 4.5.1 instance over to it. While traditional Unicenter AutoSys JM 4.5.1 migration utilities such as datamover let you migrate workload objects, the migration assistant offers you the following capabilities that other utilities do not:
If authorized, you can migrate the workload objects yourself instead of relying on an administrator to do it for you.
You can define, visualize, and migrate subsets of workload objects easily to ensure that you migrate only the data you want.
You can create a migration package for future migration. NOTE: To migrate workload objects from an older Unicenter AutoSys JM release instance to a newer release instance, you can also use CA Workload Automation AutoSys Upgrade Assistant (AUA). This scenario shows the full process of workload object migration by stepping you through creating and migrating a package. Skip any steps of the process that do not apply to you. The following diagram illustrates how to migrate workload objects from a Unicenter AutoSys JM 4.5.1 instance to a CA Workload Automation AE r11.3 or higher instance:
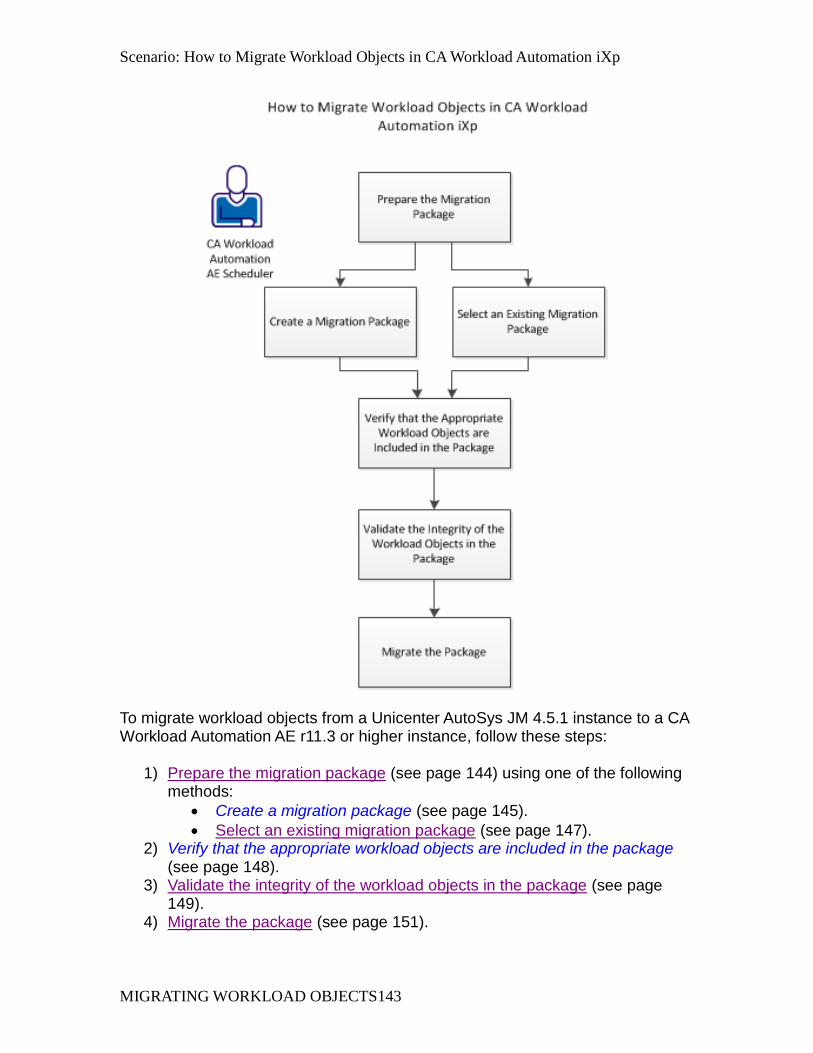
Scenario: How to Migrate Workload Objects in CA Workload Automation iXp
MIGRATING WORKLOAD OBJECTS143
To migrate workload objects from a Unicenter AutoSys JM 4.5.1 instance to a CA Workload Automation AE r11.3 or higher instance, follow these steps:
1) Prepare the migration package (see page 144) using one of the following methods:
Create a migration package (see page 145).
Select an existing migration package (see page 147). 2) Verify that the appropriate workload objects are included in the package
(see page 148). 3) Validate the integrity of the workload objects in the package (see page
149). 4) Migrate the package (see page 151).

User Guide144
10.1.1 Prerequisites
Verify that the following prerequisites are met before you migrate a set of workload objects in CA Workload Automation iXp:
You are authorized to access the iXp user interface client and logged in.
You have the security privileges to create migration packages, migrate the package, or both. NOTE: The Migrate tab is displayed on the iXp menu bar only when you have security privileges to create or migrate packages.
You are familiar with transitive closures, exclusions, and conversion scripts. NOTE: For more information about transitive closure, see Section 7.3.1 Job Dependency Filters Definitions.
You are familiar with iXp filters, and you know how to create a filter to view the desired set of jobs.
10.1.2 Preparing the Migration Package A migration package contains the set of workload objects that include jobs and their related global variables and calendars. If you are authorized, you can prepare a package for migration using either of the following methods:
Create a migration package (see page 145).
Select an existing migration package (see page 147). Both methods are described in subsequent procedures. After this step, if authorized, you can migrate the package to move workload objects from Unicenter AutoSys 4.5.1 to CA Workload Automation AE r11.3 or higher.
Scenario: How to Migrate Workload Objects in CA Workload Automation iXp
MIGRATING WORKLOAD OBJECTS145
10.1.2.1 Create a Migration Package
To migrate a package with a set of workload objects, create a migration package based on filters. The filter can only include jobs from a single Unicenter AutoSys JM 4.5.1 instance. Note: You must be authorized to view the details of the jobs that are shown in the filter and any dependent jobs included by transitive closure. You must have authorization to read the calendars and global variables that are associated with the jobs included in the migration package. Follow these steps:
1) Log in to the iXp user interface client.
2) Select an existing filter from the Filter drop-down list.
Notes:
You can also select an existing filter by clicking View, Personal filter, or Group filter. The Personal filter option shows only the filters that you have created. The Group filter option shows only the filters that are created and shared only by your group.
If the existing filters do not include the jobs that you want to
migrate, create a new filter to show only the jobs that you want.
A list of filtered jobs is displayed.
3) Click Migrate, Edit Migrations.
4) Click Create.
The Create Job Stream Migration dialog opens with the selected job filter in the Job Stream Name field.
NOTE: The job stream name, or package name, must not match any previously created package names. If you select an existing name, an error message is displayed.
5) Select the CA Workload Automation AE instance to which you plan to migrate the package from the Target AUTOSERV drop-down list.
6) (Optional) Enter a description for the package.
7) (Optional) Clear one or more of the following check boxes if you do not
want to apply them to this migration package:

User Guide146
Apply Transitive Closure
Applies the transitive closure to the package. The transitive closure lets the migration assistant build a closed set of jobs that run together without breaking job flows. Note: The transitive closure lets migration assistant amend your jobs in the package and include the dependent jobs that are not included in the active filter. Thus, a closed set of jobs is built.
Apply Exclusions
Applies the exclusion rule set to the package. The exclusion rule set excludes jobs from the migration package based on job status, machines, and other attributes that your administrator has specified. Note: By default, the migration assistant automatically applies the rule set every time a package is created or opened.
Apply Conversion Scripts
Applies predefined conversion scripts to the package. The conversion scripts parse and modify the workload object files to meet the syntax requirements of the target instance and the internal corporate standards. Note: For more information about exclusions and conversion scripts, see Chapter 7: MANAGING WORKLOAD MIGRATION in the CA Workload Automation iXp Administration Guide.
8) Click OK to retrieve and include the filtered set of workload objects in the
package. 9) Click Next.
The Migrate Job Stream dialog displays the list of jobs that are included in the package. Jobs that meet the exclusion rule set are marked as excluded.
The package is loaded with workload objects and the internal list of workload objects is built. Next, you should verify that all of the workload objects you want to migrate are included in the package.

Scenario: How to Migrate Workload Objects in CA Workload Automation iXp
MIGRATING WORKLOAD OBJECTS147
10.1.2.2 Select an Existing Package An existing package can be migrated if you want to do either of the following:
Migrate workload objects you packaged previously.
Rebuild an existing package with JIL definitions that have been modified since you created the package.
You can edit the package before migration.
Follow these steps:
1) Log in to the iXp user interface client.
2) Click Migrate, Edit Migrations. The Migrate Job Stream dialog is displayed.
3) Click Edit.
The Select Migration dialog displays with a list of migration packages. NOTE: A checkmark in the list indicates that the migration package has been loaded into the target instance.
4) Select the migration package, and click OK.
The migration assistant automatically checks the added, deleted, or modified jobs or job dependencies that affect the closed set of jobs. The package is loaded with workload objects and the internal list of workload objects is built. The Migrate Job Stream dialog displays the set of workload objects included in the package. NOTE: If the list of jobs or their dependencies have changed, the migration assistant suggests that you rebuild the package by clicking Rebuild. When you rebuild the package, the migration assistant deletes and creates a set of files. This process rebuilds the references to related global variables, calendars, machines, and owners and updates the dependent object files with current definitions.
The package is loaded with workload objects and the internal list of workload objects is built. Next, you should verify that all of the workload objects you want to migrate are included in the package.

User Guide148
10.1.3 Verify that the Appropriate Workload Objects are Included in the Package
The migration assistant applies the default exclusion rule to exclude particular jobs from the package that you have created or selected. The migration assistant also applies transitive closure, if enabled, to find all the dependent jobs. You can manually include or exclude jobs from the list of jobs that are shown in the Migrate Job Stream dialog. Before the migration starts, verify that all the workload objects you want to migrate have been included in the package. NOTE: If you have selected a predefined package to migrate, you cannot change the list of excluded jobs. If you add new jobs to the predefined package, you can manually exclude only those additional jobs. Follow these steps:
1) Click the Search icon on the Migrate Job Stream dialog. The Hide Selected Jobs dialog is displayed with the default exclusion rule set. You can view the rules to exclude jobs based on status, machine, and so on, by clicking the Status, Machines, Owner, and Miscellaneous tabs respectively.
2) (Optional) Do one of the following actions after you close the Hide Selected Jobs dialog:
Clear the Included check box against the Level-Zero job that you want to exclude from the package.
Select the Included checkbox against the Level-Zero job that you want to include in the package.
3) Click Next. The migration assistant processes the included jobs, and prepares the list of workload objects to be included in the package. NOTE: The transitive closure, if enabled, lets migration assistant amend your jobs in the package and include the dependent jobs that are not included in the active filter. Thus, a closed set of jobs is built.
4) Verify the list of workload objects by performing the following actions in the Migrate Job Stream dialog:
Scenario: How to Migrate Workload Objects in CA Workload Automation iXp
MIGRATING WORKLOAD OBJECTS149
a) Click the Jobs tab to verify the set of jobs to be loaded in the package.
b) Click the Calendars tab to verify the set of calendars to be loaded in the package.
c) Click the Globals tab to verify the global variables to be loaded in the package.
d) (Optional) Click the relevant Edit File icon next to the object count in the Pre-conversion Summary section to view the JIL file, the calendar definition file, and the global variable script. NOTE: The JIL file, calendar definition file, and the global variable script are used to create jobs, calendars, and global variables. The migration assistant parses the JIL file and builds a list of calendars and global variables that are referenced by the job attributes in that file.
e) Click the Machines tab to verify the list of machines that are referenced by jobs defined in the JIL file.
f) Click the Owners tab to see the list of job owners for the jobs included in the migration package.
g) Click the Profiles tab to see the list of profile names that are referenced by any Windows-based jobs included in the migration package.
NOTES: If the jobs use credentials that are stored in the Unicenter AutoSys JM
4.5.1 database, they are displayed in the Owners tab.
The machine, owner, and profile lists are only for a reference. The migration assistant does not create them in the target instance.
You are now ready to run the conversion scripts against the object files to validate their syntax and finalize them for the migration.
10.1.4 Validate the Integrity of the Workload Objects in the Package
You can automatically run the predefined conversion scripts and syntax checker on the workload objects after you verify the contents of the package to migrate. This validation ensures that the workload objects are migrated more easily and with fewer errors.

User Guide150
The conversion scripts can be set up to change the definitions of the workload objects before migration. The syntax checker verifies that the object files meet the syntax requirements of the target instance. You can view the list of objects after the conversion scripts have processed their respective definition files. Follow these steps: 1) Click Next from the workload object verification page of the Migrate Job
Stream dialog after you verify that the package contents are correct. The migration assistant loads the workload objects in the package, runs the conversion scripts against the object files, and prepares them for the migration. The Migrate Job Stream dialog displays the converted files.
2) Re-verify the converted files of workload objects that are loaded in the package after the scripts ran, as changes to these objects may have taken place. To do so, use the following available methods:
The Pre-conversion Summary section displays the number of jobs, calendars, global variables, machines, owners, and profiles by parsing the definition files. The definition files are created after the conversion scripts ran.
The Jobs, Calendars, and Global variables tabs show the objects that exist on the target instance and the objects that are ready for migration.
The Machines and Owners tabs list the required objects and the objects that have not yet been defined on the target instance.
IMPORTANT! If any machines have not been defined on the target instance, you cannot proceed with migration. Contact the CA Workload Automation AE administrator to resolve these errors.
3) Click Next. The migration assistant performs a syntax check on the JIL file and displays the job stream migration panel.
4) (Optional) Perform the following actions as appropriate if your syntax check
fails: a) Click View Details to view the errors.
b) Click Previous to go back to the previous panel and click the Edit File icon
next to the job count.

Scenario: How to Migrate Workload Objects in CA Workload Automation iXp
MIGRATING WORKLOAD OBJECTS151
c) Verify the JIL files again and modify them, if required. NOTES:
You can run the syntax checker multiple times to make the required modifications until you have no syntax errors remaining.
You can close the migration assistant at any time. Before you close the migration assistant, ensure that you have saved all the modifications.
d) Click Next to go to the panel to migrate the package.
NOTE: Alternatively, click the Edit File icon next to the job count in the conversion summary section to run the syntax check manually, as follows:
a) Click the Check Syntax toolbar icon to run the syntax checker. The JIL file includes the results of the syntax check and the messages that are generated by the syntax checker as comments.
b) Click View Results of syntax check to view the entire output in a separate dialog.
c) Type a string in the Find option to find the syntax errors and warnings. You can type the search strings CAUAJM_W for warnings and CAUAJM_E for errors.
You are now ready to migrate the package.
10.1.5 Migrate the Package You can migrate a package after the migration assistant validates that the workload object files meet the syntax requirements of the target instance. To complete the package migration, click Migrate Now. If the migration is successful, the migration assistant prompts you to bring the migrated jobs into the tree view in the main iXp client window. NOTES:
If you decide to migrate the package at a future time, click Exit and your package is saved.
User Guide152
If the migration panel displays only Exit, you do not have authorization to migrate the package. Click Exit, and your package is saved. Contact your CA Workload Automation AE administrator to migrate the package for you.
If an error is encountered during the migration, the migration assistant deletes the workload objects that were created prior to the step where the error is encountered. The migration is then stopped and rolled back automatically to let you resolve errors and missing objects before proceeding. IMPORTANT! If an error is encountered during the migration and the migration is not automatically rolled back due to network and system issues, the migration assistant indicates that the rollback is not working. Contact your CA Workload Automation AE administrator to perform the rollback manually by using the relevant files in the following directory on the iXp server: $IXP_HOME/dat/migrate/<package_name>/rollback You have successfully migrated the workload objects that you want from the source Unicenter AutoSys JM instance to the target CA Workload Automation AE instance.
CA Workload Automation iXp Related Terms
GLOSSARY153
11 GLOSSARY
11.1 CA Workload Automation iXp Related Terms
Console View: Tabular listing of jobs and their vital data in the upper right portion of the iXp window. Critical Path Filter: Focuses on a job and then follows predecessor and successor relationships (dependency relationships) from that job. Exception Filter: A Job Attribute Filter that Displays only jobs that have failed or been terminated. HTTPD: Hypertext Transfer Protocol Daemon. Instance Filter: A Job Attribute Filter that displays only the Site and its Instances. Job Attribute Filters: Filters that use each CA Workload Automation AE job attribute to further define or limit the views in iXp. Job Dependency Filters: Filters that limit the iXp views according to specified job dependencies. Job Detail View: View in the upper center of the iXp window that shows details of the selected job. Job Flow View: View in the lower right portion of the iXp window that shows the predecessor and successor job relationships for each job. Level Zero Filter: A Job Attribute Filter that displays the Site, the Instances, and Level 0 boxes. Recursive Critical Path Filter: Applies an ancestor-progeny filter that passes all the parents and children of the selected job, all their parents and children, and so forth through the job stream. Then a Critical Path filter is applied to each of those jobs. Running Filter: A Job Attribute Filter that displays only running jobs. Server Invocation: A call from a client (web browser) to the server, which in turn makes a call to refresh or request data from a CA Workload Automation AE Instance.

User Guide154
SHTTP: Secure Hypertext Transfer Protocol Site: A group of one or more CA Workload Automation AE instances. Site Filter: A Job Attribute Filter that displays only the Site icon. Transitive Closure Filter: Follows all Box and dependency relationships in both directions, throughout the CA Workload Automation AE Job structure. First a Recursive Critical Path filter is applied to the selected job, and then a Recursive Critical Path filter is applied to the resulting jobs, and so forth through the job stream. Tree View: View on the left of the iXp window that depicts the hierarchical box structure of the jobs.
11.2 CA Workload Automation AE Terms
See also CA Workload Automation AE User Guide. Alarm: Alarms are special events that notify operations personnel of situations requiring attention. BoxJob: A CA Workload Automation AE job that spawns other jobs that are “contained” in the Box Job.
Global Variable: Set by the sendeventSET_GLOBAL commands, Global Variables
are used to create dependency relationships. JIL: Job Information Language. Refer to the CA Workload Automation AE User Guide. Job: A job is the basic building block on which an operations cycle is built. A CA Workload Automation AE job is any single command or executable, UNIX shell script, or Windows batch file. Each CA Workload Automation AE job definition contains qualifying attributes, including conditions for when and where a job should be run. Command Jobs execute commands, BoxJobs are containers, which hold other jobs, and File Watcher Jobs watch for the arrival of a specified file. Job Name: The job name is used to identify the job to CA Workload Automation AE, and must be unique within CA Workload Automation AE. It can be from 1- to 30 alphanumeric characters long, and is terminated with white space. Embedded blanks and tabs are illegal.
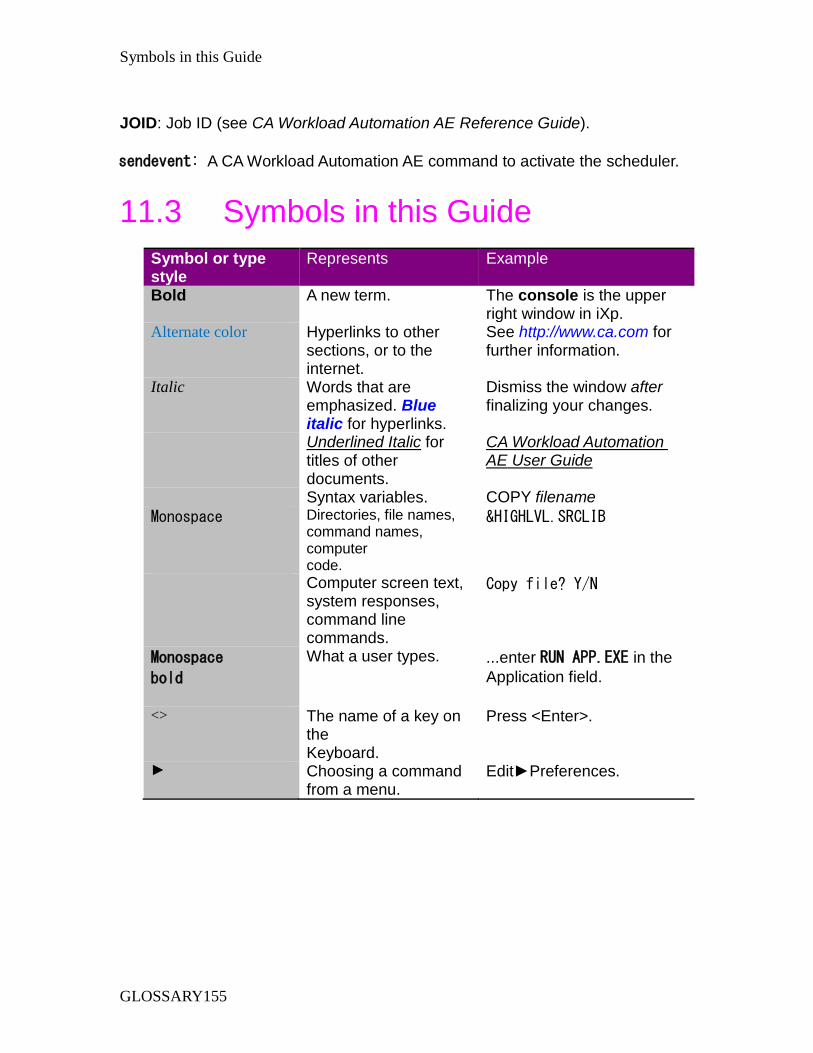
Symbols in this Guide
GLOSSARY155
JOID: Job ID (see CA Workload Automation AE Reference Guide).
sendevent: A CA Workload Automation AE command to activate the scheduler.
11.3 Symbols in this Guide
Symbol or type style
Represents Example
Bold A new term. The console is the upper right window in iXp.
Alternate color Hyperlinks to other sections, or to the internet.
See http://www.ca.com for further information.
Italic Words that are emphasized. Blue italic for hyperlinks.
Dismiss the window after finalizing your changes.
Underlined Italic for titles of other documents.
CA Workload Automation AE User Guide
Syntax variables. COPY filename
Monospace Directories, file names, command names, computer code.
&HIGHLVL.SRCLIB
Computer screen text, system responses, command line commands.
Copy file? Y/N
Monospace
bold
What a user types. ...enter RUN APP.EXE in the
Application field.
<> The name of a key on the Keyboard.
Press <Enter>.
► Choosing a command from a menu.
Edit►Preferences.

User Guide156
11.4 Related Documents
CA Workload Automation AE Windows Implementation Guide
CA Workload Automation AE UNIX Implementation Guide
CA Workload Automation AE Reference Guide
CA Workload Automation AE User Guide CA Workload Automation iXp Release Notes CA Workload Automation iXp Administration Guide