The RPS Website:
43
1 The RPS Website: a guide for Chapter, Group and Region Web Editors Emily Mathisen Web Content Manager
-
Upload
khangminh22 -
Category
Documents
-
view
1 -
download
0
Transcript of The RPS Website:

1
The RPS Website:
a guide for Chapter, Group
and Region Web Editors
Emily Mathisen
Web Content Manager

2
Contents Data Protection:.............................................................................................................................................................. 4
Important notes .............................................................................................................................................................. 4
Your contacts .................................................................................................................................................................. 4
The basics ....................................................................................................................................................................... 4
Registering and gaining Admin privileges ................................................................................................................... 4
Changing your password ............................................................................................................................................ 4
Content and Media ..................................................................................................................................................... 5
Folders ........................................................................................................................................................................ 5
Previewing your pages ................................................................................................................................................ 6
What are ‘Cards’? ....................................................................................................................................................... 6
Publishing and Scheduling .......................................................................................................................................... 7
Landing Pages and Content Pages .............................................................................................................................. 7
SEO – ‘Search Engine Optimisation’ ........................................................................................................................... 8
News ............................................................................................................................................................................... 8
Creating a News Page ................................................................................................................................................. 9
Setting up a News Card............................................................................................................................................. 12
Events ........................................................................................................................................................................... 12
Setting up an event venue ........................................................................................................................................ 12
Setting up an Event ................................................................................................................................................... 15
Creating Tickets ........................................................................................................................................................ 18
Creating Main Tickets ........................................................................................................................................... 18
Creating Add on Tickets ........................................................................................................................................ 19
Setting up an Event Card .......................................................................................................................................... 21
Adding event cards to event pages .......................................................................................................................... 21
Cards ............................................................................................................................................................................. 22
Benefits List .............................................................................................................................................................. 23
Content Cards ........................................................................................................................................................... 24
Journal Cards ............................................................................................................................................................ 26
Promo Card ............................................................................................................................................................... 27
Spotlight Cards .......................................................................................................................................................... 30
Text card ................................................................................................................................................................... 31
Tool Cards ................................................................................................................................................................. 32
Adding cards to pages............................................................................................................................................... 33
Linking to other pages, external pages and documents ............................................................................................... 33
About Us Page/Homepage ........................................................................................................................................... 34
Adding a hyperlink/PDF to text .................................................................................................................................... 37

3
Adding Images .............................................................................................................................................................. 38
Adding images to a page .......................................................................................................................................... 40
Including credit information on images ................................................................................................................... 41
Image sizing .................................................................................................................................................................. 41
Adding video to a page ................................................................................................................................................. 41
Landing Page Example .................................................................................................................................................. 43

4
Data Protection: All data must be kept securely on your computer and must not be shared. Please see the GDPR Guidance for
Volunteers document for more information. This document can be found in: http://www.rps.org/volunteer-
area/volunteer-documents when you are logged into the website.
Important notes This manual is intended for Chapter/Group/Region (CGR) Web Editors to upload content to the website. It is not
intended to be a user guide to the website.
• When you create Events which require a ‘Book Online’ button, a code has to be added at RPS HQ by Alan
Hitch ([email protected]), this is to link it with the database to ensure you get paid. This can take a day or two
so please be patient (more information can be found in the Events section of this guide).
• Other content may need to synchronise with our database (which happens a few times a day) before it will
show, again please be patient, but do contact us if you can’t see it a few hours later.
• The website really doesn’t like special characters in titles of things such as _-,”* this applies to jpeg, PDF or
Blog/page/Event titles – please avoid them at all costs!
Your contacts Anti-clash calendar and volunteer area – [email protected]
Events (to be made live and issues with – see Events section) and official email addresses – [email protected]
Everything else – [email protected] and [email protected]
The basics
Registering and gaining Admin privileges Before you can start administrating your designated area of the website you need to have registered with an
‘official’ email address such as [email protected].
To obtain your official address and admin login, please send an email to both [email protected] and [email protected] (one
email copying both in) and this will be set up for you. Once this is done, Admin privileges will be assigned to your
account which will allow you to administer the area of the website for which you will be responsible (you can also
contact Kate and Alan if you already have an official account but would like admin privileges applied to it).
The software used to edit the website is called Umbraco, and is used via your web browser. You can find it here:
http://prelive-cms.rps.org/umbraco/. Use your admin login to log in.
Changing your password Your Umbraco login has generated an automatic password but you can change this whenever you like.
When logged into Umbraco, click
your initials in the top right corner,
then click ‘Change Password’

5
• Input your old password, your new password and then confirm the new password
• Click ‘Change password’ to save it
Content and Media Umbraco is divided into ‘Content’ and ‘Media’. Content is where all your pages and cards will be stored. This is also
where you will do all your editing.
Media is essentially a library of folders that will house all of your images and documents.
These can be accessed in the main menu, top left of the screen.
Folders Your content tree will look something like this:
Blue is your Cards folder
Orange is your News folder
Brown is your Events folder (and within this is your Event Venue folder)
The easel, pin or book page is your group, region or chapter homepage
Event Types are used for tagging on an event page
Anything above ‘Home’ is editable by you. Everyone will have different folders, obviously only those that are
applicable to their chapter/group or region. If you think you don’t have access to something that you should, please
contact Emily ([email protected]).

6
News and Events folders should be filed by year/month like this:
Your cards folder doesn’t need to be filed by year/month, but it may help you find relevant cards if you employ a
filing system. You could add folders for News cards, Event cards, Homepage cards etc, to help you find them when
needed.
When navigating through your folders, click the arrow next to the folder to open the contents of that folder, click
the actual item to select that item. This is the similar in your Media library folders. Click the name of the folder to
open it and see what items are inside it, click the whole box to select that image (a pink box will appear around it to
show it’s highlighted).
IMPORTANT: How you file your news and events affects how the web address (URL) will appear on the website. So
in the above example, the URL would be www.rps.org/Bristol/2019/October/WelcometothenewRPS... . We need to
keep the URLs as short and succinct as possible so they are easy for people to follow. They will also help others
work out where something is saved (Alan for example, may need to assist with your event bookings).
Previewing your pages On each page (landing pages, content pages, events and news) there is a Preview button in the bottom right of the
screen near the Publish button. The preview button allows you to view the page and see any changes, but won’t let
you click any of the links or use it as an actual webpage. To view the actual webpage, ensure you have clicked
Publish, then click on ‘Info’ in the top right of the screen and then click the web link:
To return to the content so you can edit again, click Content (top right, next to ‘Info’).
Please Note: Cards are not viewable this way. Cards can only be viewed once they’ve been added to a page. Add
your card to a page (remember, content pages won’t allow cards), and then view the page as detailed above. You
can use the Cards section of this guide to view how the cards should look before you start to help you decide which
card to make.
What are ‘Cards’? The new website is essentially made up of pages on which you can place cards to promote/show information or link
to other pages. There are several different types of card, each suitable for different types of information. You can
find out more about each type of card and how/why to set them up in the ‘Cards’ section.

7
Publishing and Scheduling When you’ve finished setting up a page you can click ‘Save and Publish’ in the bottom right corner of Umbraco.
However, if you have set something up in advance like a News item or Event and would like it to publish at a date in
the future, you can click the arrow to the right of the ‘Save and Publish’ button and open a menu of more options.
• Click the arrow and then click schedule
• Select a publish date and time and/or an unpublish date and time
• Click Schedule
Landing Pages and Content Pages There are two types of pages available: Landing pages and Content pages. Any pages you add that aren’t News or
Events (which should be set up in the appropriate folder), should be set up under your Group/Region/Chapter
Homepage. Your homepage can be found in your content tree as either a pin (Regions), an easel (Groups) or a book
(Chapters).
Landing pages are the main pages you should be adding as they allow the greatest flexibility in design and layout.
Landing pages allow for adding cards, so you could have text cards for information, or the other image led cards
linking to other pages, news items, events etc. You can also section these pages to make navigation easier. You
can’t add text straight to a landing page, you will need to make cards and add them.
Content pages are more for a longer piece of writing that doesn’t require any links to anything else. You can add
hyperlinks to the text and images in amongst the text, but you won’t be able to add cards to the page.
PLEASE NOTE: Work is ongoing with the layout of content pages and the guide will be updated further once this is
clarified. Please avoid using this page until then.
It is worth planning out how you want a page to look before you start so you can work out what information/cards
you will need.
Please add pages under your Group/Region/Chapter homepage. Do this by right clicking on your homepage,
clicking create and then selecting ‘Landing Page’:
For Subgroups: As in the screenshot above, please set up your ‘homepage’ as a landing page underneath the main
group. Any other pages you set up should then be set up under that.

8
SEO – ‘Search Engine Optimisation’ On each page there is an SEO (Search Engine Optimisation) section. This is where you can add in information to
help social media display your page if it’s shared, or help Google understand what your page is about and display it
appropriately.
You can input a title and description, keywords, add an image specifically sized for social media and choose
whether you want the ‘Share Widget’ displayed on the page. The Share Widget is this bit on the left:
You can also set a ‘Friendly URL’. We called these ‘Aliases’ or ‘Short URLs’ on the old site. This is
where you can choose a shorter way of naming your page. So, if you have a page for example, that is
www.rps.org/special-interest-groups/digital-imaging/DIG-thames-valley/Committee, you could use
the Friendly URL section to put in ‘DIGTVCommittee’ and your page would then be reachable at
www.rps.org/DIGTVcommittee. You may find this particularly useful when putting links into
publications or newsletters, to use less space and make it easier for anyone who is typing it into their
browser manually.
We currently haven’t fully tested this function of the website yet, so although it literally works, we are unable to
provide detailed instructions or screenshots for exactly how you could use it. If you are aware of SEO and know
how to use it, please feel free to – you won’t break anything by inputting in this section. However, you won’t be at
a detriment for not using this section, as Google and Social Media will still read your page and the information on it
and use that to decide how to display your page or serve up your page in search results. Once we have fully
explored this section we will update the guide to reflect this.
News In this section we will cover:
Creating a News Page
Setting up a News Card

9
Creating a News Page All groups/regions have a news folder and can add news items (previously known as blogs). Your news folder is
orange:
• To create a news page, right click on the relevant dated news folder and select ‘News Page’.
• Give your news page a name – this is what it will display as in the content tree (Please keep this short to a
max. of 6 words)
• In the ‘News Content’ section, click ‘Add Content’ and select ‘Rich Text Box’. Input the title of your news as
you’d like it to display on the website, and in the text box input your news. If you’d like to include an image
please see the Adding images to a page section for how to do this
• Choose a date that you would like it to display as being published from. NOTE: This is not a scheduling date
for future publication, it is purely the date written on the news page. For how to schedule something for
future publishing, see the Publishing and Scheduling section.
• Input a short news summary to explain what your news page is about (max. 20 words)
• Input a news content type (most likely to be ‘News’, please use a maximum of 2 words), and where the
news is from (most likely to be your group/region)

10
• In the Hero section, click the box next to ‘Hero image’ and navigate to your media folder in the menu that
comes up. Find and select your image
• Add in a Hero Title – this will be the main title of the page
• You can also add in a description, if necessary
• In the Author section input author name, author title, author email (if necessary) and author image (if
necessary)

11
• Scroll down the page to the ‘Classification’ section
• Choose your Region/Chapter or Group
• When you’re done, click ‘Save and Publish’

12
Setting up a News Card Cards can be used for many
different purposes and can be
put on most pages. When
you’ve set up a News page, it’s
a good idea to also set up a
card for that piece of news so
that you can promote it on
your pages.
Use the ‘Cards’ section of this
guide to help you decide which
type of card will work best.
When you’re ready to set up
your news card, click on your
Cards folder, then right click
on your folder and click
‘Create’ then select the type of
card you want to create.
• Complete your card as per the instructions in the ‘Cards’ section of this document.
Events In this section we will cover:
Setting up an Event Venue
Setting up an Event
Creating Tickets – includes creating add on tickets
Setting up an event card
Adding event cards to event pages
Setting up an event venue First, if you don’t already have a Venue node set up for your event’s venue you need to do this first. If you have
already set up a venue node for it previously, you can skip this step.
• In the Events section, click your events folder, then right click your venue folder and click ‘Create’ and
‘Event Venue’.

13
• On the new page that comes up, input the name of your venue, and the venue address.
• Then input the latitude/longitude for the address if necessary, for example, if the postcode covers a larger
area and is less specific, or if you’re meeting somewhere without an address – in a field etc.
• Select whether you’d like a map to show based on the coordinates, the postcode or not at all.

14
• Then add in the venue’s website if it has one and any venue details that may be important, for example,
lifts to all floors, wheelchair access, on-site café, hearing loop etc.
• When you’re done click ‘Save and Publish’:

15
Setting up an Event • To set up an event, right click the dated event folder for when the event is happening, click ‘Create’ and
then select ‘Event Page’.
• On the event page that comes up, input the event name. This is how it’ll appear in your event node.
• Then insert a hero image (see ‘How to upload images’ section for details on how to do this) and input the
title of the event as you’d like it to appear on the event page.
• Then input the heading that comes before the event information, for example, ‘Workshop Information’,
‘Exhibition Information’, ‘Field Trip Information’, etc.

16
• Add in your event information. Please note: styles for how the text appears on the page are fixed in the
website code and can’t be changed by the user. This is to ensure consistency throughout the website.
• Select an event type from
the ‘Event Types’ folder, then
add in an Event Venue from
your event venues folder.
• Next put in the date and time
of the event into the ‘Event
display date and time’ box.
This box appears on the right-
hand side of the event page in
the event summary box so it
is important that this is
completed. There are also
separate boxes for event start
date and end date, and these
pull through to the search so
people can find your event.

17
• Add in your total capacity and
cancellation policy to the relevant
boxes.
• Then input the name, email address and
telephone number of the event organiser
and select whether you want these details
visible on the page. The email address will
be visible as an ‘Email the Organiser’ link.
• Then select the relevant region or group from the regions/groups
folders:

18
Creating Tickets In this section we cover:
Creating Main Tickets
Creating Add on Tickets
Creating Main Tickets There are four main tickets types: Member, Non-member, Group/Region or chapter member and Concessionary
rate tickets. There is also an Add-on ticket to be used for lunch, accommodation etc.
You will only be able to use each of the main ticket types once. The Add-on ticket can be used more than once. This
is to make creating tickets easier for you and prevent the need for 10+ tickets to include all possible ticket
permutations. Users will be able to select a main ticket type and then will be offered the add-on ticket options and
they will be totalled together before payment.
• Find the event you want to set up tickets for in the Content Menu and right click it. Then click ‘Create’.
• You will then be provided with a
choice of tickets types:
• Select the one you want.

19
For Member, Non-Member and Concession
tickets:
• Input the ticket name, start date and
end date of sale, and price and click
‘Save and publish’.
For the Specialist Group/Region or Chapter ticket:
• Input the ticket name, start date and end date of sale,
and price.
• For ticket type you have 3 options:
o Region/Chapter – if you’re a region or
chapter wanting your members to get a
discounted price
o Special Interest Group – if you’re a group
wanting your members to get a discounted
price
o Special Interest Group and Region/Chapter –
if you’re a chapter/region jointly putting on
an event with a group and want both sets of
members to have a discounted price
This ticket is used when the group, region or chapter putting
on the event has a discount for their own members. If a region/ chapter and a group are jointly putting on an event,
both their sets of members can use the discount. This is not validated automatically, so groups/regions/chapters
will have to check that those buying specific group discounted tickets are members of that group.
Please Note: The website will not cross-reference people buying this type of ticket against their membership so
groups/regions will have to manually check people’s eligibility by cross-referencing those who purchase this ticket
against their group or region membership list.
Creating Add on Tickets The Add on ticket can be used to include any extras someone may like to, but not need to purchase like lunch or
accommodation for example.
• As with the main tickets above, right click on your event and select ‘Add on ticket’:

20
• Input a name for the ticket, so you can
identify it easily under the event
• Input a display name for the ticket – this is
how it will be shown on the website
• Input a start and end date for sale of the add
on ticket – this can be different than your
event dates
• Input a price for the ticket
• Input a capacity for the ticket – this can be
less than the total capacity for the event. Eg:
Your event has capacity for 50, but you only
have 20 possible places for lunch
• The remaining capacity box automatically
populates once published and will
automatically reduce as tickets are
purchased
21
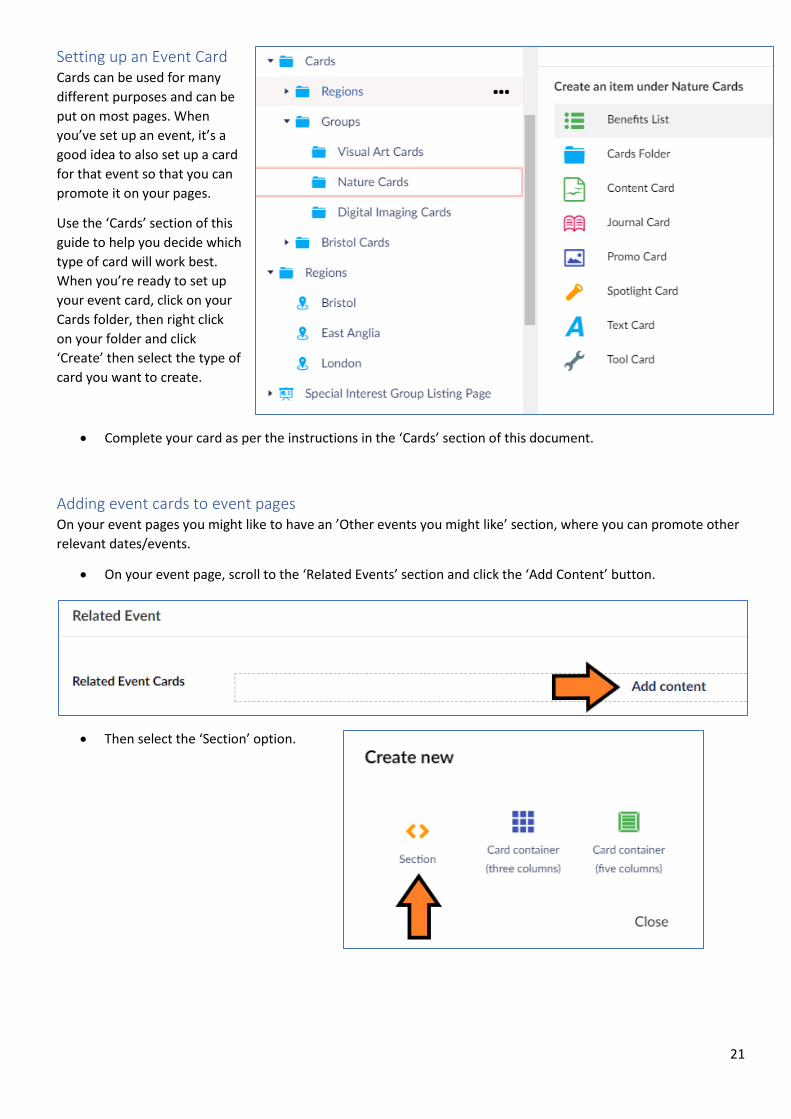
Setting up an Event Card Cards can be used for many
different purposes and can be
put on most pages. When
you’ve set up an event, it’s a
good idea to also set up a card
for that event so that you can
promote it on your pages.
Use the ‘Cards’ section of this
guide to help you decide which
type of card will work best.
When you’re ready to set up
your event card, click on your
Cards folder, then right click
on your folder and click
‘Create’ then select the type of
card you want to create.
• Complete your card as per the instructions in the ‘Cards’ section of this document.
Adding event cards to event pages On your event pages you might like to have an ’Other events you might like’ section, where you can promote other
relevant dates/events.
• On your event page, scroll to the ‘Related Events’ section and click the ‘Add Content’ button.
• Then select the ‘Section’ option.

22
• Give your section a title such as ‘Other events you might like’. You can also add a description if required.
You can then select whether you would like this section ‘Centred’ or ‘Default’ (on the left).
• Click the ‘Add Content’ button again and this time add a ‘Card Container (three columns)’:
• Click ‘Add’ next to ‘Card picker’ and find your cards folder.
• Select the cards you’d like to display and click ‘Submit’.
Cards Cards can be used on a landing page to display information and provide links to other pages. There are several
types of card and some will be more suitable than others for certain types of information. Examples of each card
and their possible uses are below.
You will start with one cards folder for your group/region, but you can subdivide this with other card folders to
make finding cards in future easier. For example, you might want to add folders for ‘Event cards’ or ‘News cards’ so
that any cards made to feature an event or news item can be filed and found easily.
When you’re ready to set up your event card, click on your Cards folder, then right click on your folder and click
‘Create’ then select the type of card you want to create.

23
Benefits List This card lists benefits of membership. If you have several benefits to our group or region, like a publication, event
discount, annual members’ exhibition etc, this card would be useful to display them. This card will only display as a
full-width card.
The Benefits List card will look like this on the website:
• Give your card a name – this will be how it is
named in your content tree.
• Give your card a title – this is the title that
will display on the card, on the website
• Add a description if necessary
• Next to ‘Benefits’ click ‘Add Content’.
• Enter a benefit and description (if required).

24
• Click ‘Add Content’ again to add another benefit. When you’ve added all your benefits, click ‘Save and
Publish’.
Content Cards A content card displays an image, title and subtitle, description, the date and category, as well as a link to
somewhere you choose. This card would be useful for displaying links to news items, or events.
This card will look like this one the website:
Clickable Card Show Button
• Give your card a name – this will be how it is named in your content tree
• Choose what size you want the card to be. Single is essentially 1/3 the width of the page, double – 2/3rds
and triple is full width

25
• Add an image from your media library by clicking the ‘+’ in the image box
• Give your card a title – this is the title that will display on the card, on the website
• Add a subtitle if necessary
• Choose a category for the card eg, Event, News, Trip etc
• Add a date for the card if relevant eg, date of event
• Add a short summary description
• Choose a CTA (call to action) link. This is where your card will lead to.
• Choose whether you want the card to be clickable, which makes the title of the card clickable, or whether
you’d like a button to show which can be edited to include an instruction ‘Learn more’, ‘Book here’ etc.

26
• When you’re done click ‘Save and Publish’
Journal Cards A Journal card is useful if you have a group/region publication or newsletter that you’d like to make an archive for,
or to display the latest version on your homepage.
The Journal cards will look like this on the website:

27
• Give your card a name – this will be how it
is named in your content tree.
• Choose what size you want the card to be.
Single is essentially 1/3 the width of the
page, double – 2/3rds and triple is full
width.
• Add an image from your media library by
clicking the ‘+’ in the image box
• Add in the name of the publication eg, The Journal, Travel Log etc
• Add in the title of the publication eg, December 2019 (will most likely be the date of publication)
• Choose a link in the CTA section for where you’d like to link to – this could be to a PDF document or a link
to Issuu. Please see the Linking to other pages, external pages and documents section for more on this
• Click ‘Save and Publish’
Promo Card Promo cards are ideal for simple links to your other pages, such as ‘Our Committee’, ‘Competitions’ or
‘Distinctions’, for example. These cards display text over an image, in three different ways, and the double and
triple versions will display the description also (if one is available).

28
The Promo Card will look like this on the website:
Clickable card, default Show button, default
Clickable card, boxed Show button, boxed
Clickable card, centred Show button, centred

29
• Give your card a name – this will be
how it is named in your content tree
• Choose what size you want the card
to be. Single is essentially 1/3 the
width of the page, double – 2/3rds
and triple is full width
• Add an image from your media library
by clicking the ‘+’ in the image box
• Give your card a title – this is the title
that will display on the card, on the
website
• Add in a description if necessary.
Remember, descriptions will only display
on double and triple sized Promo cards.
• Add in a link in the CTA section to where
you’d like this card to link to
• Select whether you would like to have the
card as a ‘Clickable card’ or for it to ‘Show
button’. Clickable card will mean the
words displayed on the image are
clickable, Show button will show a
rectangle box which links.
• Select whether you want the text on the
card to ‘Default’ (just text), ‘Boxed’ (text
in a box) or centred (just text)
• Click ‘Save and Publish’

30
Spotlight Cards Spotlight cards work well for highlighting something, such as a
monthly competition winner.
Spotlight cards will look like this on the website:
• Give your card a name – this will be
how it is named in your content tree
• Choose what size you want the card to
be. Single is essentially 1/3 the width of
the page, double – 2/3rds and triple is
full width
• Add an image from your media library
by clicking the ‘+’ in the image box

31
• Add in a description if necessary.
• Add in a link in the CTA section to where you’d like this card to link to
Text card A text card is useful for a static piece of text that is unlikely to need changing often, or when you don’t need an
image/link.
A text card will look like this on the website:
• Give your card a name – this will be
how it is named in your content tree
• Choose what size you want the card to be. Single is essentially 1/3 the width of the page, double – 2/3rds
and triple is full width
• Add in your text to the description box
• Click ‘Save and Publish’

32
Tool Cards A tool card is a smaller 1/5 size card with an image, description and link (if
required). These can be good for Committee pages where you want to
display your committee members photo and a little about them.
The Tool card will look like this on a page:
When uploading images for use in a Tool card, it might be worth saving them in a sub-folder called ‘Tool Card
Images’ as these need to be saved specifically as Cropped Tool Card images and won’t work in other sized cards.
• Give your card a name – this will be how it is named in your content tree
• Add an image – you can only add ‘Cropped Tool Card’ images
• Add in the title of your card
• Add in your text to the description box
• Add in a link if required

33
Adding cards to pages
You can read specifically how to add cards relating to events to an events page in the Events section here.
Here’s how to add cards to News pages, landing pages and your homepage.
• Click on your selected page
• Click on the ‘Add content’ button in the Content section
• Choose ‘Card container three columns’
• Click ‘Add’ in the card picker
• Navigate to your cards folder and select the card you want to add, then click ‘Submit’
Please note: If you are adding ‘Tool Cards’ to a page, these need to be added in a ‘Card
Container (five columns)’ instead.
Linking to other pages, external pages and documents
When you add a CTA (call-to-action) to a card, you can link to several places. Options include:
To link to another webpage:
• Click ‘Home’. Then find the relevant webpage in the menu. Click Submit.
To link to a document:
• Click ‘Select Media’. Find your file. Click upload if your document/image isn’t already uploaded.
To link to an external website:
• Input the link in the URL box.

34
To change the name of the link:
• Input your preferred link name in the Link Name box.
• This the wording that will appear in the link box and words like ‘Book Now’, ‘Read More’, or ‘Find out more’
will help attract people to click through.
To have the link open in a new window:
• Tick the ‘Target’ checkbox to have the link open in a new window.
• This is useful to help keep people your webpages, which will stay open in its current tab.
About Us Page/Homepage Each group, region and chapter can have ‘homepage’. This is the page in the content tree denoted by either an
easel for groups, or a location pin for regions.
For groups, this page will be linked to on the My RPS dashboard for any members. It will also be linked to via any
events tagged to that group/region.
Below is a suggested layout for your group/region page:

35
An ‘About Us’
section:
An ‘Events’ section:

36
A ‘News’ section:
In order to create this page, you will need to create cards for each of the elements:
• A text card for your ‘About Us’ section
• Individual cards for each of the events you’d like to feature
• Individual cards for any blogs you’d like to feature
• Any other cards for other items you might like to include, such as:
o Our Committee
o Publications/Archives
o Competitions
o Members’ Exhibition
You can find out more about how to make cards in the ‘Cards’ section of this guide.
Once you have created the cards you would like for your homepage, click on your homepage and build it as follows.
• Click on your group, region or chapter page.
• Give your page a name – this will be how it is named in your content tree
• Add an image – this will be displayed at the top of your page
• Add a title and short description to explain your page

37
• In the Content cards section, click ‘Add Content’ and choose ‘Section’
• Put ‘About Us’ in the title and choose default
• Click ‘Add Content’, choose ‘Card container (three columns)’ and select your About Us card
• Repeat the above three steps for any other sections you’d like (Events, Blogs, etc)
Adding a hyperlink/PDF to text
When editing text in a
Rich Text Editor, you can
insert hyperlinks.
• Input your text
and select the
word you’d like
to hyperlink.
• Then click the link icon.

38
You then have several choices:
Link to an external address
Add your link to the ‘Link’ box. Click ‘Submit’.
You can choose what the link shows by
choosing a link title. Eg: ‘Read more’, ‘Find out
more’ etc.
(If you’d like the link to open in a new window
or tab (thus leaving the page the visitor is
currently on also open), tick the ‘Target’ box).
Link to an internal page
To link to another rps.org page, you can either
search in the bar below ‘Link to Page’ or click
on the arrow next to ‘Home’ to find the page
you want to link to. Click ‘Submit’.
Link to a Media item (eg: PDF)
Click the ‘Select Media’ button and find your
required item, then click ‘Submit’.
Your chosen hyperlink text should then show in the rich text editor like this:
Adding Images
You can add images to the media library in a couple of ways:
• In Umbraco, choose ‘Media’ from the top menu.
• Select your folder.

39
• Click ‘Create’ to select
the type of file you want
to upload or click ‘or
click here to choose
files’ to open your
computer files for
selection.
• Select the file/image you want to upload and when done, click ‘Save’.
OR:
• When adding an image to a page via the rich text editor, you can upload an image then. (See Adding Images
to a Page).
OR
• When selecting an image for a page or card via the image selection box, you can upload as you go without
having to preload images.
• Click the plus in the image box
• Click ‘Upload’
• Select your image and choose what
size image you need
• It will then be added to your folder and you can click it and then click ‘Select’

40
Adding images to a page
You can add an image to a Content page in a rich text editor. In the Content section of a page, click ‘Add Content’
and add a ‘Rich Text’ box.
• Click the image icon and find the
image you want and then click
‘Submit’. If you haven’t yet
uploaded the image, click the
image icon, navigate to the folder
where you’d like to save it, and
click Upload’ next to the search
bar. Find your image and when
it’s uploaded, click ‘Save’
• The image will then be placed in the
editor box.
The image can be resized by clicking it
and dragging the squares in the corners.

41
Including credit information on images There is now a section within an image where you can add in a credit to the photographer who took the image.
• Click on any image in your Media
library
• Input the photographers name
• Click ‘Save’
This will display on the image like this:
Image sizing There are several different sizes you can use for the images, depending on where you want to use them.
For ‘Hero Images’: Upload these at 2000px wide as these span the whole width at the top of a page
For 2/3 cards: Upload at 800px wide
For 1/3 cards: Upload at 385 px wide
The website will automatically scale your image to fit the space, so it’s important that you upload your images to at
least these sizes – if you upload a small image and try to use it in a bigger space, it will be stretched/blurry. If you’re
not sure whether you want to use a 1/3 or 2/3 card, or if you think you might use the images twice for two
different sizes, upload it in the biggest size required. I would advise against uploading everything at 2000px wide
though, as bigger files will slow down the website.
Adding video to a page
• You can add an image to a page in a
rich text editor. In the Content
section of a page, click the and add a
‘Rich Text’ box.

42
• Input the URL (web address) of the video and
click ‘Retrieve’. The video will appear below with
height and width options.
•
• Click ‘Submit’ and your video will be inserted into
the rich text box. Publish the page to see it live.

43
Landing Page Example Landing pages allow you to add different blocks to a page with short descriptions and links through to pages with
more information. You can also use text cards on these pages if you need more room for text whilst still having the
ability to add cards.