The Pushbutton Programmable Controller - Das Elektronik ...
19
1 Quick Translation into English by Juergen Pintaske to help non-Germans to understand The Pushbutton Programmable Controller (TPS in German, MyCo in English) http://www.elektronik-labor.de/Projekte/TPS1.html BASCOM https://avrhelp.mcselec.com/ Elektronik-Labor Projekte TPS TPS 2: The Programming Mode Link in this docment TPS 3: Calc ulating with Variables Link in this docment TPS 4: Sprünge und Verzweigungen Link in this docment Mini-TPS mit ATmega8 not part of this document The basic idea is simple: How to program a small computer control system without the need for a PC or any programming device - using just a few pushbuttons. The command set should be so simple, that you can keep it in your head, in order to develop a small control program without any documents if necessary. As everything should be as small and manageable as possible, it should be a 4-bit system. There are 4 digital outputs, 4 digital inputs, internally processed data are 4 bit wide, and the commands are only coded with 4 bits, which means, that there is a maximum of 16 commands you have to remember.
-
Upload
khangminh22 -
Category
Documents
-
view
0 -
download
0
Transcript of The Pushbutton Programmable Controller - Das Elektronik ...

1
Quick Translation into English by Juergen Pintaske to help non-Germans to understand
The Pushbutton Programmable Controller (TPS in German, MyCo in English)
http://www.elektronik-labor.de/Projekte/TPS1.html
BASCOM https://avrhelp.mcselec.com/
Elektronik-Labor Projekte TPS
TPS 2: The Programming Mode Link in this docment
TPS 3: Calc ulating with Variables Link in this docment
TPS 4: Sprünge und Verzweigungen Link in this docment
Mini-TPS mit ATmega8 not part of this document
The basic idea is simple: How to program a small computer control system
without the need for a PC or any programming device - using just a few
pushbuttons.
The command set should be so simple, that you can keep it in your head,
in order to develop a small control program without any documents if necessary.
As everything should be as small and manageable as possible, it should be a 4-bit
system.
There are
4 digital outputs,
4 digital inputs,
internally processed data are 4 bit wide,
and the commands are only coded with 4 bits,
which means, that there is a maximum of 16 commands you have to remember.

2
When entering programs, you have a display via the four OUTPUT LEDs,
which will alternately display commands and related data.
Two keys are required for input:
S1 is used to enter data,
S2 for programming.
There must also be a reset button with which you can use
either start the program or switch to the programming mode.
This small computer can perform a wide variety of tasks, from alarm systems to
automatic battery charging stations or solar controllers. The idea developed
while on vacation. I didn't have a PC with me, but realized, that such a small
system would fit into every travel bag.
You could type in programs and train your mind in the process. Push, push,
push, and a little reaction game is programmed.
Or you could have a programming contest, to find out
who solves a task with the fewest program steps ...
So far there has only been an idea and a rough list of the most important
commands. I had developed something similar some time ago:
The environmental spy with several sensors and a simple interpreter language
(spy basic).
Later then came the Kosmos Microcontroller with its Kosmos Basic. Both were
8-bit systems, that had to be programmed via the PC. This time I want to keep it
even simpler, so only four bits and direct program input.
The whole development process should be presented here in all phases.
This means that everyone can then add their own commands and adapt the
system to their own needs.
What is the best way to start?
Of course, you could first take a controller, place it on a breadboard and connect
it to the three necessary buttons and four LEDs.
But at this moment it's not even clear which controller should be used in the end.

3
That's why I decided to develop the first steps on the STK500.
Coincidentally, an ATmega168 was just in the socket (see picture) , which is
now being used for the time being.
And the buttons and LEDs on the STK500 should be used. Two cables connect
port D to the LEDs. D0 to D4 are used. As the LEDs in this system are switched
to VCC, the outputs must be inverted during this development phase.
The firmware will be developed in Bascom.
During the first step, the interpreter should be started with only three commands
(set port output, set waiting time, jump command).
The programming mode does not yet exist, but the first mini-program is written
directly into the EEPROM with just five program steps.
The first three commands are:
1: Direct Port Output of the 4 bits: 0 ... 15
2: Waiting Time defined via 4 bits: 0 ... 15, 1 ms to 1 minute
(1ms, 2, 5, 10, 20, 50, 100, 200, 500, 1000, 2000, 5000, 10000, 20000,
30000, 60000 ms)
3: Jump Back 0 ... 15 addresses
Each of these commands has 4 bit data entered directly.
Together with the data, one byte is occupied per instruction.
In hexadecimal notation, the upper nibble therefore represents the command
and the lower nibble represents the data.
The first test program generates a simple alternating flasher:
Set 4 LEDs to 0001, Delay a sec, LEDs to 1000, Delay a sec, Jump Back to start
&H 1 1 'Port output 1 0001 0001
&H 2 9 'Waiting time 1 sec 0010 1001
&H 1 8 'Port output 8 0001 1000
&H 2 9 'Waiting time 1 sec 0010 1001
&H 3 4 'Jump back 4 0011 0100
Download: TPS1
'-------------------------------------------------------------
' Push Button Programmable Controller TPS
' Test 1: Interpreter, the first 3 instructions
'-------------------------------------------------------------

4
$regfile = "m168def.dat" '
$crystal = 11059200 '
$hwstack = 32 '
$swstack = 64 '
$framesize = 64 '
Dim Addr As Byte '
Dim Eebyte As Byte '
Dim Dat As Byte '
Dim Kom As Byte '
Ddrd = &HFF 'D0...D1 Outputs
Portd = &H0F 'STK500 inverted
Portc = &H0F 'C0..C3 Inputs with Pullup
S1 Alias Pinc.3 'Data Input Button
S2 Alias Pinc.0 'Programming Button
Waitms 200 '
Dat = &H11 : Writeeeprom Dat , 0 'Dout=1
Dat = &H29 : Writeeeprom Dat , 1 '1000 ms
Dat = &H18 : Writeeeprom Dat , 2 'Dout=8
Dat = &H29 : Writeeeprom Dat , 3 '1000 ms
Dat = &H34 : Writeeeprom Dat , 4 'Addr = Addr - 4
Waitms 200
If S2 = 0 Then
Goto Programmieren ' go to Programming
Else
Ausfuehren: ' Execute
Addr = 0
Do
Readeeprom Eebyte , Addr
Addr = Addr + 1
Dat = Eebyte And 15
Kom = Eebyte / 16
If Kom = 1 Then '1: Direct Port Output
Portd = 255 - Dat 'inverted Port Output as of STK500
End If
If Kom = 2 Then '2: Waiting time, 1ms to 1 min
If Dat = 0 Then Waitms 1 '
If Dat = 1 Then Waitms 2 '
If Dat = 2 Then Waitms 5 '
If Dat = 3 Then Waitms 10 '
If Dat = 4 Then Waitms 20 '

5
If Dat = 5 Then Waitms 50 '
If Dat = 6 Then Waitms 100 '
If Dat = 7 Then Waitms 200 '
If Dat = 8 Then Waitms 500 '
If Dat = 9 Then Waitms 1000 '
If Dat = 10 Then Waitms 2000 '
If Dat = 11 Then Waitms 5000 '
If Dat = 12 Then Waitms 10000 '
If Dat = 13 Then Waitms 20000 '
If Dat = 14 Then Waitms 30000 '
If Dat = 15 Then Waitms 60000 '
End If
If Kom = 3 Then '3: Jump – relative backwards
Addr = Addr – 1 '
Addr = Addr – Dat '
End If
Loop
End If
Programmieren: ' Programming
Do
Loop
End
Indeed, the LEDs are flashing. Our mini-interpreter is ready with its just three
commands. With this system, you can already write many different programs,
from running lights to stepper motor control.
Continue

6
TPS 2: The Programming Mode Elektronik-Labor Projekte TPS
In order to be able to program the controller via the buttons, two more cables are placed on the
STK. The keys S1 (C3) and S2 (C0) are used for programming. The position of the keys then
corresponds to the original design:
Data Entry on the left,
Programming on the right.
The Programming Mode can be started by resetting while holding down the Programming
Button S2. You can now view the entire program by just using the S2 button.
Each address requires two key presses of S2. In this way you change from the display of the
command to the display of the data.
In addition, the current address is displayed for a short time.
- First press of button S2:
- Displays the address (the lower four bits), for 300 ms
- Display is off, for 300 ms
- Show the command
- Second press of button S2
- View data
- Third press of button S2
- Show next address, 300 ms
- etc.
For example, if you only want to view an existing program with five steps, but not change it,
you can get to the end with a total of ten pushes of S2.
Orientation is easy, because the current address is briefly displayed.
You always know if the display is showing a command or data.
The S1 button is only used, if you want to change a command or your data. Basically only
numerical values between zero and 15 can be entered.
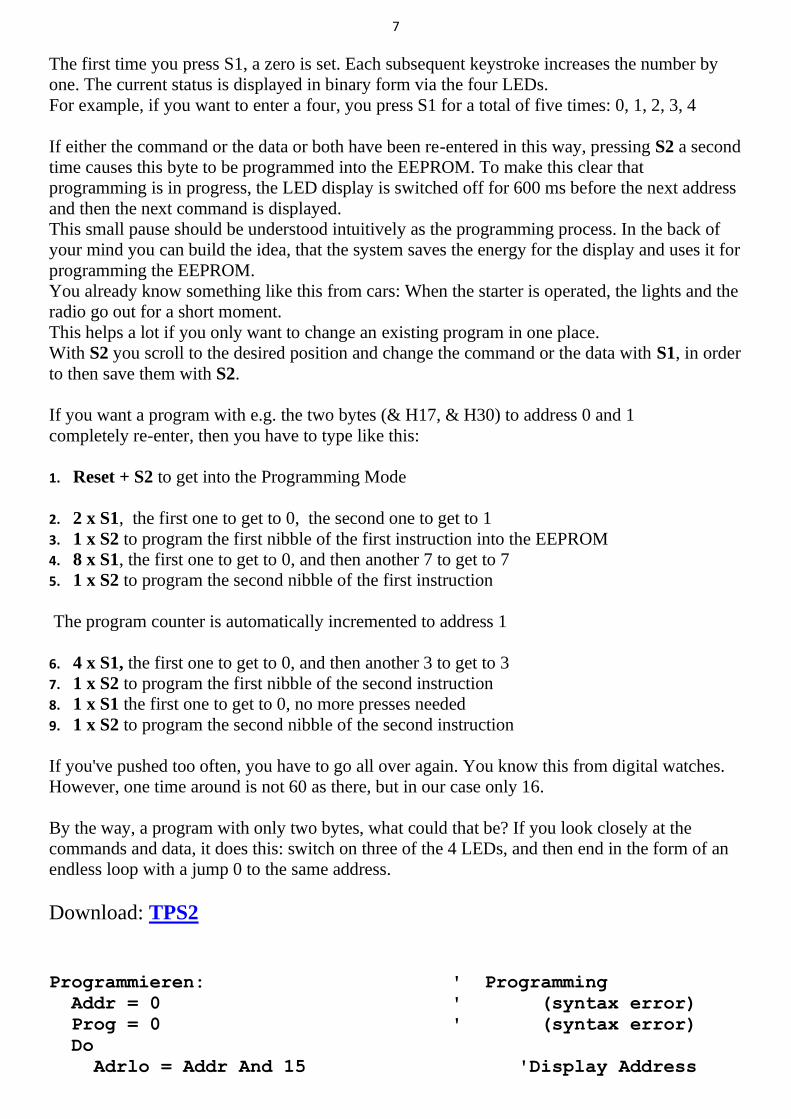
7
The first time you press S1, a zero is set. Each subsequent keystroke increases the number by
one. The current status is displayed in binary form via the four LEDs.
For example, if you want to enter a four, you press S1 for a total of five times: 0, 1, 2, 3, 4
If either the command or the data or both have been re-entered in this way, pressing S2 a second
time causes this byte to be programmed into the EEPROM. To make this clear that
programming is in progress, the LED display is switched off for 600 ms before the next address
and then the next command is displayed.
This small pause should be understood intuitively as the programming process. In the back of
your mind you can build the idea, that the system saves the energy for the display and uses it for
programming the EEPROM.
You already know something like this from cars: When the starter is operated, the lights and the
radio go out for a short moment.
This helps a lot if you only want to change an existing program in one place.
With S2 you scroll to the desired position and change the command or the data with S1, in order
to then save them with S2.
If you want a program with e.g. the two bytes (& H17, & H30) to address 0 and 1
completely re-enter, then you have to type like this:
1. Reset + S2 to get into the Programming Mode
2. 2 x S1, the first one to get to 0, the second one to get to 1
3. 1 x S2 to program the first nibble of the first instruction into the EEPROM
4. 8 x S1, the first one to get to 0, and then another 7 to get to 7
5. 1 x S2 to program the second nibble of the first instruction
The program counter is automatically incremented to address 1
6. 4 x S1, the first one to get to 0, and then another 3 to get to 3
7. 1 x S2 to program the first nibble of the second instruction
8. 1 x S1 the first one to get to 0, no more presses needed
9. 1 x S2 to program the second nibble of the second instruction
If you've pushed too often, you have to go all over again. You know this from digital watches.
However, one time around is not 60 as there, but in our case only 16.
By the way, a program with only two bytes, what could that be? If you look closely at the
commands and data, it does this: switch on three of the 4 LEDs, and then end in the form of an
endless loop with a jump 0 to the same address.
Download: TPS2
Programmieren: ' Programming
Addr = 0 ' (syntax error)
Prog = 0 ' (syntax error)
Do
Adrlo = Addr And 15 'Display Address

8
Portd = 255 – Addr '
Waitms 300 '
Portd = 255 – 0 '
Waitms 200 '
Readeeprom Eebyte , Addr '
Dat = Eebyte And 15 '
Kom = Eebyte / 16 '
Portd = 255 - Kom 'Display Instruction
Do
Loop Until S2 = 1 '
Waitms 50 '
Prog = 1 'Phase 1: Display Instruction
Do
If S1 = 0 Then '
If Prog = 1 Then '
Prog = 2 '
Kom = 15 '
End If
If Prog = 2 Then 'Phase 2: Instruction changed
Kom = Kom + 1 '
Kom = Kom And 15 '
Portd = 255 – Kom '
End If
If Prog = 3 Then : 'Phase 3: Instruction unchanged,
' change Data
Prog = 5 '
Dat = 15 '
End If
'Phase 4: Instruction and
' Data changed
Prog = 5 '
Dat = 15 '
End If
If Prog = 5 Then 'Phase 5: Data changed
Dat = Dat + 1 '
Dat = Dat And 15 '
Portd = 255 – Dat '
End If
Waitms 50 '
Do
Loop Until S1 = 1 '
Waitms 50 '

9
End If
If S2 = 0 Then
If Prog = 3 Then Prog = 7 'only displayed, not changed
If Prog = 1 Then '
Portd = 255 – Dat '
Prog = 3 '
End If
If Prog = 4 Then '
Portd = 255 – Dat '
Prog = 6
End If
If Prog = 2 Then '
Portd = 255 – Dat '
Prog = 4 '
End If
If Prog = 6 Then ' Only Instruction been changed
Dat = Dat And 15 '
Eebyte = Kom * 16 '
Eebyte = Eebyte + Dat '
Writeeeprom Eebyte , Addr '
Portd = 255 – 0 '
Waitms 600 '
Addr = Adr + 1 '
Prog = 0 '
End If
If Prog = 5 Then 'Data has been changed
Dat = Dat And 15 '
Eebyte = Kom * 16 '
Eebyte = Eebyte + Dat '
Writeeeprom Eebyte , Addr '
Portd = 255 – 0 '
Waitms 600 '
Addr = Addr + 1 '
Prog = 0 '
End If
If Prog = 7 Then '
Addr = Addr + 1 '
Prog = 0 '
End If '
Waitms 50 '
Do '
Loop Until S2 = 1 '
Waitms 50 '

10
End If '
Loop Until Prog = 0 '
Loop
End
This Bascom program works like a State Machine in Programming Mode.
When entering, it runs through several phases Prog = 0 to Prog = 7, depending
on whether the memory content is only to be displayed or also to be changed.
The keys are debounced with a waiting time of 50 ms.
And here are some programs you can enter and run at this stage:
Running light 1:
& H11, & H28, & H12, & H28, & H14, & H28, & H18, & H28, & H38
Running light 2:
& H11, & H28, & H12, & H28, & H14, & H28, & H18, & H28, & H14, & H28,
& H12, & H28, & H3C
Timer, one minute:
& H1F, & H2F, & H10, & H30
In the beginning you might write down the programs with comments, but after a
while you learn to think and feel digitally.
Man and machine become one unit, just like riding a motorcycle.
back
next

11
TPS 3: Calculating using Variables Elektronik-Labor Projekte TPS
The switch programmable controller will now be expanded with the four
variables A, B, C and D. There is now also an analog input and a PWM output.
Both are limited to 4 bits and can only be accessed via variable A (A <= ADC,
PWM <= A).
A can also be loaded directly with a number.
To fill B, C or D, you must first load A and then assign the content to the other
variable.
A and B can be used to perform some calculation steps.
C and D can serve as intermediate storage, and are used later as counters for
counting loops.
4: A <= 0...15
5: Taget Function 1...9 <= A
(Register B, C, D,
Dout (4 LEDs), or single Bits Dout 0, Dout.1, Dout.2, Dout.3,
PWM as quasi-analog Output
6: A <= Source 1...9
(Register B, C, D,
Din ( 4 Inputs), or single input bits Din.0, Din.1, Din.2, Din.3,
ADC – analog input)
7: A <= Expression 1...10
(A + 1, A = A – 1, A + B, A = A – B, A * B, A / B, ( arithmatic function)
A And B, A Or B, A Xor B, Not A) ( logic function )
The following examples are commented out and at the beginning of the source
code. You can enter the programs using the keys anyway,
or (as long as the controller is still on the STK) remove the comment characters
and transfer the respective program to the EEPROM via Bascom.

12
This time-saving method has proven very helpful and time saving during
firmware development.
'Binary Counter:
'Dat = &H71 : Writeeeprom Dat , 0 'A = A + 1
'Dat = &H54 : Writeeeprom Dat , 1 'Dout = A
'Dat = &H29 : Writeeeprom Dat , 2 '1000 ms
'Dat = &H33 : Writeeeprom Dat , 3 'Addr = Addr – 3
'Analog to Digital Converter and Output
'Dat = &H69 : Writeeeprom Dat , 0 'A = ADC
'Dat = &H54 : Writeeeprom Dat , 1 'Dout = A
'Dat = &H29 : Writeeeprom Dat , 2 '1000 ms
'Dat = &H33 : Writeeeprom Dat , 3 'Addr = Addr – 3
'Analog to Digital Converter and PWM Output
'Dat = &H69 : Writeeeprom Dat , 0 'A = ADC
'Dat = &H59 : Writeeeprom Dat , 1 'PWM =A
'Dat = &H54 : Writeeeprom Dat , 2 'Dout = A
'Dat = &H29 : Writeeeprom Dat , 3 '1000 ms
'Dat = &H34 : Writeeeprom Dat , 4 'Addr = Addr - 3
Download: TPS3
'-------------------------------------------------------------
' Pushbutton Controlled System TPS
' Test 3: Variables and Calculation Instructions
'-------------------------------------------------------------
'see line 17 and line 20
Dim A As Byte '
Dim B As Byte '
Dim C As Byte '
Dim D As Byte '
Config Adc = Single , Prescaler = Auto , Reference = Off
Start Adc
Config Timer1 = Pwm , Prescale = 8 , Pwm = 8 , Compare A Pwm =
Clear Down , Compare B Pwm = Clear Down
Start Timer1
...
Ausfuehren: ' Execute
Addr = 0 '
Do '
Readeeprom Eebyte , Addr '
Addr = Addr + 1 '

13
Dat = Eebyte And 15 '
Kom = Eebyte / 16 '
If Kom = 1 Then '1: Direct Port Output
Portd = 255 - Dat
'inverted Port Output as of STK500
End If
If Kom = 2 Then '2: Waiting Time
If Dat = 0 Then Waitms 1 '
If Dat = 1 Then Waitms 2 '
If Dat = 2 Then Waitms 5 '
If Dat = 3 Then Waitms 10 '
If Dat = 4 Then Waitms 20 '
If Dat = 5 Then Waitms 50 '
If Dat = 6 Then Waitms 100 '
If Dat = 7 Then Waitms 200 '
If Dat = 8 Then Waitms 500 '
If Dat = 9 Then Waitms 1000 '
If Dat = 10 Then Waitms 2000 '
If Dat = 11 Then Waitms 5000 '
If Dat = 12 Then Waitms 10000 '
If Dat = 13 Then Waitms 20000 '
If Dat = 14 Then Waitms 30000 '
If Dat = 15 Then Waitms 60000 '
End If
If Kom = 3 Then '3: Jump Back Relative
Addr = Addr – 1 '
Addr = Addr – Dat '
End If
If Kom = 4 Then '
A = Dat '
End If
If Kom = 5 Then '
If Dat = 1 Then B = A 'Variables
If Dat = 2 Then C = A '
If Dat = 3 Then D = A '
If Dat = 4 Then Portd = 255 - A 'Port
If Dat = 5 Then
If A.0 = 0 Then Portd.0 = 0 Else Portd.0 = 1
'Portbits
End If
If Dat = 6 Then
If A.0 = 0 Then Portd.1 = 0 Else Portd.1 = 1
End If
If Dat = 7 Then
If A.0 = 0 Then Portd.2 = 0 Else Portd.2 = 1

14
End If
If Dat = 8 Then
If A.0 = 0 Then Portd.3 = 0 Else Portd.3 = 1
End If
If Dat = 9 Then
Dd = A * 17 'PWM
Pwm1a = Dd 'PWM
End If
End If
If Kom = 6 Then
If Dat = 1 Then A = B 'Variables
If Dat = 2 Then A = C
If Dat = 3 Then A = D
If Dat = 4 Then A = Pinb 'Port
If Dat = 5 Then A = Portb.0 'Portbits
If Dat = 6 Then A = Portb.1
If Dat = 7 Then A = Portb.2
If Dat = 8 Then A = Portb.3
If Dat = 9 Then
Dd = Getadc(4) 'ADC
Dd = Dd / 64
A = Dd
End If
End If
If Kom = 7 Then
If Dat = 1 Then A = A + 1
If Dat = 2 Then A = A - 1
If Dat = 3 Then A = A + B
If Dat = 4 Then A = A - B
If Dat = 5 Then A = A * B
If Dat = 6 Then A = A / B
If Dat = 7 Then A = A And B
If Dat = 8 Then A = A Or B
If Dat = 9 Then A = A Xor B
If Dat = 10 Then A = Not A
A = A And 15
End If
Loop
End If
back
next

15
TPS 4: Jumps and Branches Elektronik-Labor Projekte TPS
Until now there has only been a simple Jump Back relative (command 3),
which only covered a maximum of 15 addresses.
Now there will be an Absolute Jump.
Since the jump destination can only be specified with 4 bits, there is an
additional command that defines the 4 Bit PAGE, i.e. the high nibble of the
address. This gives us an address space of 0 ... 255.
This should be sufficient for most of our applications.
Two Counting Loops with the variables C and D can also execute absolute
jumps if not 0 after execution, whereby the high nibble of the address can be
loaded before.
The Conditional Jumps are based on the skip commands as in AVR assembler.
If the respective condition is true, the following address is skipped. At this
location there could be a jump command or a subroutine call, for example.
Comparisons between A and B, as well as direct bit queries of the input port bits
are available as conditions.
There is also a Subroutine Call and the associated Return Command.
Several subprograms are allowed, but no further subprogram may be called from
a subprogram ( no nesting ), because the interpreter only remembers the one
return address of the calling main program.

16
8: Set Adr-high = 0...15 set the PAGE register
9: Direct Jump to Adr-high, Adr-low (0..15)
10: Counting Loop C-times Adr-high, Adr-low (0..15)
11: Counting Loop D-times Adr-high, Adr-low (0..15)
12: Conditional Jumps (Skips): If (Bedingung 1...11) then Adr = Adr + 1
( A > B, A > B, A = B,
Din.0 = 1, Din.1 = 1, Din.2 = 1, Din.3 = 1,
Din.0 = 0, Din.1 = 0, Din.2 = 0, Din.3 = 0 )
13: Subroutine Call Adr-high, Adr-low (0..15)
14: Return from Subroutine
With these additions, our programming language is now complete. However,
extensions are possible, because two possible commands (0 and 15) have not yet
been defined. And some commands such as command 12 do not yet exhaust the
possible number of their parameters.
For example, the Conditional Jump command (12) could have a few more
conditions.
The same applies to commands 5, 6 and 7.
You could define further calculation steps, more AD channels and a second
PWM output.
Examples:
'Test: Counter Loop
'Dat = &H45 : Writeeeprom Dat , 0 'A=5
'Dat = &H52 : Writeeeprom Dat , 1 'C=A
'Dat = &H11 : Writeeeprom Dat , 2 'Port=1
'Dat = &H27 : Writeeeprom Dat , 3 '200 ms
'Dat = &H10 : Writeeeprom Dat , 4 'Port=0
'Dat = &H27 : Writeeeprom Dat , 5 '200 ms
'Dat = &HA2 : Writeeeprom Dat , 6 'C-mal jmp 2
'Dat = &H30 : Writeeeprom Dat , 7 'End
'Test: Subroutine
'Dat = &H4F : Writeeeprom Dat , 0 'A=15
'Dat = &H52 : Writeeeprom Dat , 1 'C=A
'Dat = &H82 : Writeeeprom Dat , 2 'Adr 32
'Dat = &HD0 : Writeeeprom Dat , 3 'Call 32+0
'Dat = &H80 : Writeeeprom Dat , 4 'Adr 00...
'Dat = &HA2 : Writeeeprom Dat , 5 'C-mal jmp 2
'Dat = &H30 : Writeeeprom Dat , 6 'End

17
'Subroutine from address 32
'Dat = &H11 : Writeeeprom Dat , 32 'Port=1
'Dat = &H27 : Writeeeprom Dat , 33 '200 ms
'Dat = &H10 : Writeeeprom Dat , 34 'Port=0
'Dat = &H27 : Writeeeprom Dat , 35 '200 ms
'Dat = &H27 : Writeeeprom Dat , 35 '200 ms
'Dat = &HE0 : Writeeeprom Dat , 36 'Return
'Test: Branch, flash if ADC < 7
Dat = &H47 : Writeeeprom Dat , 0 'A=7
Dat = &H51 : Writeeeprom Dat , 1 'B=A
Dat = &H69 : Writeeeprom Dat , 2 'A=ADC
Dat = &H82 : Writeeeprom Dat , 3 'Adr 32...
Dat = &HC2 : Writeeeprom Dat , 4 'if A<B then Adr=Adr+1
Dat = &HD0 : Writeeeprom Dat , 5 'Call 32+0
Dat = &H80 : Writeeeprom Dat , 6 'Adr 00...
Dat = &H90 : Writeeeprom Dat , 7 'Jump 00
'Subroutine from address 32
Dat = &H11 : Writeeeprom Dat , 32 'Port=1
Dat = &H27 : Writeeeprom Dat , 33 '200 ms
Dat = &H10 : Writeeeprom Dat , 34 'Port=0
Dat = &H27 : Writeeeprom Dat , 35 '200 ms
Dat = &H27 : Writeeeprom Dat , 35 '200 ms
Dat = &HE0 : Writeeeprom Dat , 36 'Return
Download: TPS4
'------------------------------------------------------------
' Pushbuttom Programmable Controller TPS
' Test 4: Jumps and Branches
'------------------------------------------------------------
$regfile = "m168def.dat" '
$crystal = 11059200 '
$hwstack = 32 '
$swstack = 64 '
$framesize = 64 '
Dim Addr As Byte '
Dim Eebyte As Byte '
Dim Dat As Byte '
Dim Kom As Byte '
Dim Adrhi As Byte '
Dim Adrlo As Byte '
Dim Adrret As Byte '
Dim Prog As Byte '

18
Dim Dd As Word '
Waitms 200 ' Wait for 200 ms
If S2 = 0 Then '
Goto Programmieren ' Programming
Else
Ausfuehren: ' Execute
Addr = 0 '
Do
Readeeprom Eebyte , Addr '
Addr = Addr + 1 '
Dat = Eebyte And 15 '
Kom = Eebyte / 16
...
If Kom = 8 Then
Adrhi = Dat 'Upper Nibble of the Address
End If
If Kom = 9 Then
Addr = Adrhi * 16 'Jump absolute 0...255
Addr = Adr + Dat
End If
If Kom = 10 Then
C = C - 1
C = C And 15
If C > 0 Then 'C-times
Addr = Adrhi * 16 'Jump absolute 0...255
Addr = Adr + Dat
End If
End If
If Kom = 11 Then
D = D - 1
D = D And 15
If D > 0 Then 'D-times
Addr = Adrhi * 16 ' Jump absolute 0...255
Addr = Addr + Dat
End If
End If
If Kom = 12 Then
If Dat = 1 Then
If A > B Then Addr = Addr + 1
End If
If Dat = 2 Then
If A < B Then Addr = Addr + 1
End If

19
If Dat = 3 Then
If A = B Then Addr = Addr + 1
End If
If Dat = 4 Then
If Pinc.0 = 1 Then Addr = Addr + 1
End If
If Dat = 5 Then
If Pinc.1 = 1 Then Addr = Addr + 1
End If
If Dat = 6 Then
If Pinc.2 = 1 Then Addr = Addr + 1
End If
If Dat = 7 Then
If Pinc.3 = 1 Then Addr = Addr + 1
End If
If Dat = 8 Then
If Pinc.0 = 0 Then Addr = Addr + 1
End If
If Dat = 9 Then
If Pinc.1 = 0 Then Addr = Addr + 1
End If
If Dat = 10 Then
If Pinc.2 = 0 Then Addr = Addr + 1
End If
If Dat = 11 Then
If Pinc.3 = 0 Then Addr = Addr + 1
End If
End If
If Kom = 13 Then
Adrret = Addr
Addr = Adrhi * 16 'Call Subroutine absolute 0...255
Addr = Adr + Dat
End If
If Kom = 14 Then
Addr = Adrret 'Return
End If
Loop
End If
back
next
There is as well a lot of TPS documentation at https://www.facebook.com/groups/269499491046124 And there are 3 books available at amazon: https://www.amazon.co.uk/gp/product/B00K6N87UG/ref=dbs_a_def_rwt_bibl_vppi_i20 https://www.amazon.co.uk/gp/product/1731232535/ref=dbs_a_def_rwt_bibl_vppi_i29 https://www.amazon.co.uk/gp/product/B08MN15NMQ/ref=dbs_a_def_rwt_bibl_vppi_i27