The Home Treatment of Bleeding Disorders
19
The Home Treatment of Bleeding Disorders: Learning how to give factor at home Foundation
-
Upload
khangminh22 -
Category
Documents
-
view
2 -
download
0
Transcript of The Home Treatment of Bleeding Disorders

The Home Treatment of Bleeding Disorders:
Learning how to give factor at home
Foundation

Table of Contents
Giving Factor at Home . . . . . . . . . . . . . . . . . . . . . . . . . . . . . . . . . . . . . . . . . . . . . 4
Using a Specialty Pharmacy for Ordering Factor and Infusion Supplies . . . . . . . . . . . . . . . . . . . . . . . . . . . . . . . . . . . . . . . . 6
Checking Your Factor Dose . . . . . . . . . . . . . . . . . . . . . . . . . . . . . . . . . . . . . . . . . 8
Mixing Factor . . . . . . . . . . . . . . . . . . . . . . . . . . . . . . . . . . . . . . . . . . . . . . . . . . . . 12
Peripheral Infusion: Steps for Giving Factor with a Butterfly Needle into a Vein . . . . . . . . . . . . . . . . . . . . . . . . . . . . . . . . . 16
Port Access: Giving Factor Using a Port . . . . . . . . . . . . . . . . . . . . . . . . . . . . . 22
Recording Factor Infusions . . . . . . . . . . . . . . . . . . . . . . . . . . . . . . . . . . . . . . . . 32

5
We will work with you and your family to create a plan and goals for your
child’s bleeding disorder. This includes learning how to care for your child’s
bleeding disorder in the comfort of your own home. We provide education,
support, and training to make sure you feel comfortable doing this in your
home and know when to call us for help.
Giving Factor at Home
Our team and your family will work together to decide when it is a good time to learn how to
give factor at home. During your clinic visit, our infusion nurse will teach you how to give factor
infusions at home. We do not expect you to remember everything—this handbook will serve
as your guide when you are doing home infusion. There are also tips on:
• Keeping an infusion record
• Keeping a bleed record
• Ordering factor and supplies
We are always available at 513-517-CBDI (2234) if you have
questions, need to schedule an appointment in clinic, or go to
the Emergency Department.

7
Things to consider when selecting a specialty pharmacy:• Insurance—Will your insurance approve the use of this pharmacy?
• Billing and Pricing—How do they handle billing? How do they compare in price to other
specialty pharmacies?
• Hours of Operation—Will you be able to contact the pharmacy during their business hours?
• Contact information—Is there someone you can always talk to for issues/questions?
You will need to contact your specialty pharmacy when you:• Need factor, supplies or nursing services
• Have changes in your insurance coverage
Using a Specialty Pharmacy for Ordering Factor and Infusion Supplies
You will have to order factor and your infusion supplies from a specialty
pharmacy. They can also provide in-home nursing if needed. Work with your
insurance provider and our team to find the best specialty pharmacy for your
family. Our team will send factor and supply orders to your specialty pharmacy
so they know what to ship to your home.

9
Every box of factor has a different amount in it. The pharmacy uses a measurement called
International Units (IU) to measure factor. We usually refer to this measurement as units. Your child’s
specialty pharmacy will send you a dose as close to what your child needs as possible. This
should be no more or less than 10% of what your hematologist has written for in your child’s plan.
Your pharmacy will send you two types of doses of factor—one to prevent bleeding and the
other to use if your child shows signs of a bleed. Both doses are the same kind of factor; the
amount and when you give it are different. Here are the two reasons your child will get factor:
1 . Prophylactic Dose—this dose of factor is given to prevent bleeding . Your child takes this dose through the week to help them from having a bleed. Your child may
also take this dose before an activity or procedure. Make sure you call our office before your
child has any procedures or dental work so we can make a special plan for that procedure.
2 . Emergency Dose—this is a dose that your child will get for signs or symptoms of bleeding . It is important to treat with factor as soon as your child has symptoms of bleeding. If you
think your child has a bleed, give the emergency dose first and then call our office. Always
call our office if you feel your child may have a bleed. If the bleed is severe, you should get
to an emergency room as soon as possible. You can call us anytime at: 513-517-CBDI (2234).
Don’t forget “RICE” when treating a bleed:Rest
Ice
Compression
Elevation
Checking Your Factor DoseYour child’s hematologist will work with you and your child to make a plan for
their factor infusions. This plan will tell you the right kind and amount of factor
to give your child so they are less likely to have a bleed. This plan will also tell
you the amount of factor you should give when your child is bleeding.

10
Your child’s specialty pharmacy will often organize your factor doses for you to make it easier
to choose and give the correct dose.
Ask your pharmacy how they organize factor doses . • Some pharmacies use a color sticker to organize doses.
• Some pharmacies use a rubber band or bags to organize doses.
• For example: If you need two boxes for one factor dose, the pharmacy will rubber band
the two boxes together before sending it to your home.
How to check your factor dose• Know if you are giving a prophylactic dose or an emergency dose.
• Check to see how many units of factor your child should get.
• Check the actual IU on the boxes you have.
• Remember this may be slightly over or under the dose the doctor ordered (but within 10%).
• Always call our office if you have any questions about calculating your factor dose.
C A LC U L AT I N G A P R O P H Y L AC T I C D O S E
Freddie is 12 years old and weighs 40 kilograms (kg). Freddie has severe Hemophilia A and
his doctor saw him today in clinic. The doctor wrote a plan for Freddie to get factor, 50 units
per kg (50 IU/kg), two times a week for prophylaxis. What is Freddie’s prophylactic dose?
Freddie weighs 40 kilograms. He gets 50 units of factor for each 1 kilogram that he weighs.
To find the total dose: Multiply his weight in kilograms (40 kg) by the dose prescribed (50 units).
40 kg X 50 units = 2000 units (IU) per dose
Answer: Freddie’s prophylactic factor dose is 2000 units.
C A LC U L AT I N G 1 0 % O F A P R O P H Y L AC T I C D O S E
Pharmacy has prepared Freddie’s factor doses to be within 10% of his plan. What is 10% of
Freddie’s prophylactic dose?
First, we need to change 10% to a decimal. 10% is always equal to 0.1. Then, multiply Freddie’s
dose by the decimal 0.1.
2000 IU × 0.1 = 200 IU
Answer: 10% of 2000 IU is 200 IU.
C A LC U L AT I N G T H E H I G H E S T D O S E O F FAC TO R
What is the highest dose of factor the pharmacy should send for Freddie’s factor infusions?
Freddie’s prophylactic dose is 2000 IU. You know that the pharmacy can send 10% higher than
this dose. We know that 10% of the ordered dose is 200 IU (see above).
2000 IU + 200 IU = 2200 IU
Answer: The highest dose the pharmacy will send Freddie is 2200 IU. If it is higher than this,
Freddie should call his doctor.
C A LC U L AT I N G T H E LO W E S T D O S E O F FAC TO R
What is the lowest dose of factor that pharmacy should send for Freddie’s factor infusions?
The lowest dose is Freddie’s ordered dose minus the 10% for this dose. Freddie’s prophylactic
dose is 2000 IU. We know that 10% of his ordered dose is 200 IU.
2000 IU - 200 IU = 1800 IU
Answer: The lowest dose that pharmacy will send Freddie is 1800 IU. If it is lower than this,
Freddie should call his doctor.
C O N V E R T I N G P O U N D S TO K I LO G R A M S
Julie weighs 60 lbs. How many kilograms does Julie weigh?
60 ÷ 2.2 = 27.27 kilograms
Answer: Julie weighs 27.27 kilograms.
How to figure out your child’s factor doseYour hematologist orders the number of units based on your child’s weight. We use kilograms to
weigh your child. Your child’s weight in pounds divided by 2.2 will equal their kilograms in weight.
11

13
Steps for mixing factor • Make sure the work area is clean and free of clutter. Clear a flat surface and use household
disinfectant to make sure it is clean. Have family or friends watch your child while you are
mixing factor so you can focus.
• Wash your hands for 15 seconds, scrubbing with soap. (see page 15 for Hand Hygiene message)
• Check your supplies. Take this time to make sure supplies are in a safe and clean place and
easy to reach.
• Check Medicines.
• Compare factor dose with the prescription written on the pharmacy label. Check to make sure:
• It is the right type of factor
• It is the right dose (within 10%)
• You are giving it at the right time
• Check that the factor has been properly stored.
• Check that the factor has not expired.
Mixing Factor
The steps for mixing factor can vary depending on the brand of factor. We will
have you mix factor in clinic with a nurse first to make sure you are comfortable.
Each factor box usually has an insert with mixing instructions. It is also good
to look at the factor companies’ website for mixing instructions. These websites
often have videos on how to mix factor that may be helpful.

1514
Hand Hygiene: Clean Hands Protect Everyone
Germs are everywhere. Hand hygiene is one of the most
important ways to protect your child and prevent the spread of
infections. Partner with us to stop germs by cleaning your hands.
Remind everyone who comes in contact with your child to clean
their hands, too—family, visitors and friends. It’s even okay to
ask doctors and nurses to wash their hands.
When mixing factor:• It is important to keep the factor and the inside of the syringe as clean as possible. This
means you will keep the factor sterile, or free from germs. It is very important to keep the
factor sterile so that you do not get germs into your child’s body, which can cause infection.
• Most factor should be room temperature before mixing. Do not attempt to warm the factor.
• Follow the steps your clinic nurse reviewed with you.
• Turn or swirl the bottle to help the powder dissolve. Do not shake.
• Check to make sure the powder has dissolved or has become a liquid. There should be no
white clumps in the vial.
• Most factor must be infused within 3 hours after mixing.
• Do not throw away factor. If you run into trouble with mixing or getting the factor out of the
vial, call our office so we can help you.

17
Peripheral Infusion: Steps for Giving Factor with a Butterfly Needle into a Vein
Tips to make it easier to infuse factor in a vein• Have your child increase the amount of water they drink on the day of their scheduled
infusion. This helps “plump” up their veins, making them easier to “stick.”
• Apply a warm washcloth to the vein for about 2 minutes before cleaning the area.
• Call our office if you are having trouble with vein access: 513-517-CBDI (2234)
Here are the steps for peripheral infusion, where you use your child’s vein to
give factor. We will work with you and your child in the clinic before you can do
this at home. This can be a hard skill to learn and we want to make sure you
are able to do this safely at home.
Gather your supplies• Factor in syringe
• Saline flush
• Butterfly needle
• Chlorhexidine or alcohol swab
• Tourniquet
• Gloves
• Gauze
• Adhesive bandage

1918
Follow the steps for mixing factor (see page 13)
Infusion steps1 . Clear and clean the surfaces of the infusion space.
2 . Gather and arrange supplies so they are easy to reach.
3 . Check the factor vials for ordered dose, actual dose (within 10%) and expiration.
4 . Wash your hands (for about 15 seconds). (see page 15 for Hand Hygiene message)
5 . Use the tourniquet to look in 2–4 spots to find the best vein for the infusion.
6 . Place a tourniquet above the vein you selected for the infusion, but do not tighten it.
7 . Put on pair of gloves.
8 . Clean the skin over the selected spot for 15 seconds with chlorhexidine or alcohol swab.
9 . Tighten the tourniquet.
10 . Position the butterfly needle so the slanted hole at the tip of the needle is pointed toward
the ceiling. This slanted hole is called the bevel.
11 . Remove the cap from the needle and the tubing.
a . Make sure you keep the needle and end of tubing free from germs by not
touching anything.
12 . Once chlorhexidine has dried (about 15 seconds), stick the needle in the vein.
8 9
5–6 7
11 12

2120
13 . Check for blood return (you will see blood coming into the base of needle). Allow the
blood to go to end of tubing. If you do not get blood return, pull the needle out, get new
supplies and find a new vein for the infusion.
14 . Attach the syringe on the end of the tubing.
15 . Take off the tourniquet.
16 . Slowly push the plunger on the syringe to give the factor. Stop the infusion if:
a . Your child has increased pain when you push the factor
b . You find it hard to push the factor into the vein
c . You notice swelling around the needle site
You will need to get new supplies and find a new vein for infusion.
17 . After the factor is infused, remove that syringe and place a saline syringe on the end of
the tubing. Push in about 2–5 ml of saline to flush the line. This makes sure all of the factor
is out of the line and has gone into your child’s vein.
18 . Place a gauze over the needle and remove the needle. Use the safety device to cover the
needle. Dispose of the needle in a sharps container.
19 . Put pressure on the infusion site for several minutes until there is no oozing. This will help
reduce bruising and swelling.
20 . Clean your work area and throw away any needles and syringes in the biohazard container
you received from the specialty pharmacy.
21 . Record the infusion and include dose, lot, expiration, and site of bleed (if given for a bleed).
20 21
1913 14
16 17
23
Port Access: Giving Factor Using a Port
Learning sterile techniqueYou will need to learn a skill called sterile technique. Sterile technique is a way to prepare
supplies and medicines so no germs get on them. It is very important to learn how to access
the port using sterile technique so that you do not get germs into your child’s body. Any germs
in a port can cause a serious infection. If your child has any signs of infection, call the clinic or
go to the Emergency Department as soon as possible.
Below are the steps of port access and factor infusion. We will work with you
and your child in the clinic before you can do this at home. Learning these
skills can take some practice and we want to make sure you are able to do
this safely at home.
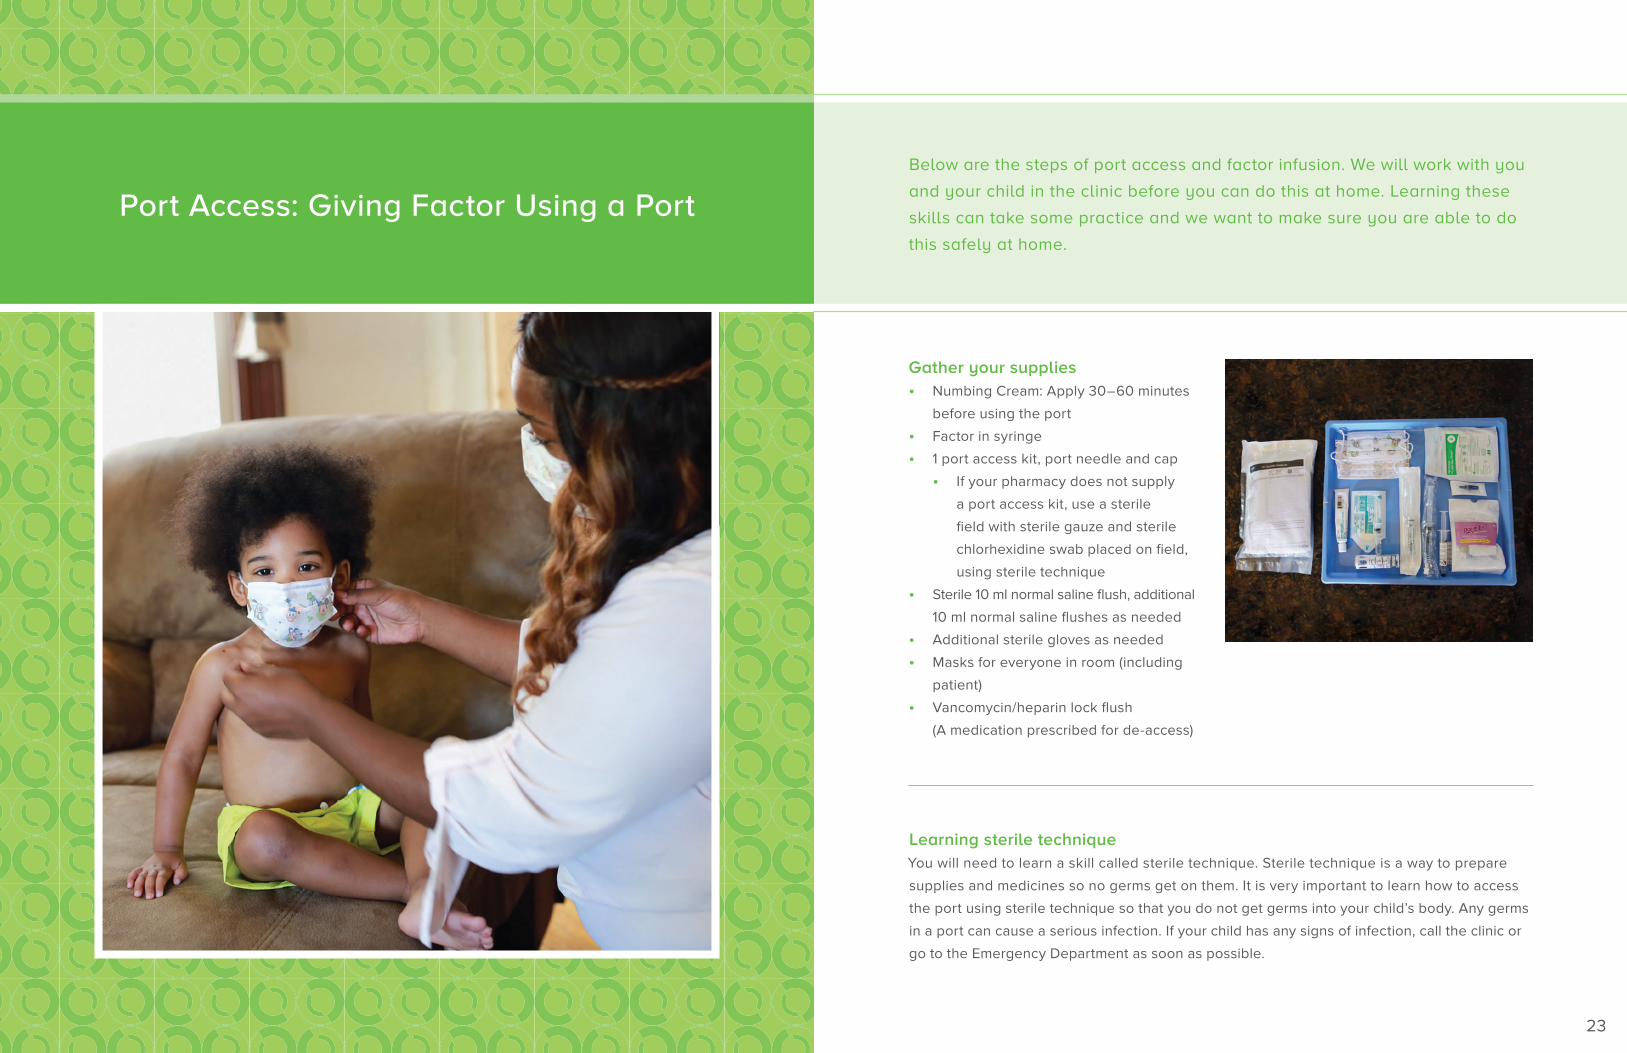
Gather your supplies• Numbing Cream: Apply 30–60 minutes
before using the port
• Factor in syringe
• 1 port access kit, port needle and cap
• If your pharmacy does not supply
a port access kit, use a sterile
field with sterile gauze and sterile
chlorhexidine swab placed on field,
using sterile technique
• Sterile 10 ml normal saline flush, additional
10 ml normal saline flushes as needed
• Additional sterile gloves as needed
• Masks for everyone in room (including
patient)
• Vancomycin/heparin lock flush
(A medication prescribed for de-access)

2524
Follow the steps for mixing factor (see page 13) Prepare your child • Talk to your child about the need to access their port.
• Make sure the child is not showing signs of infection including fever, rash, and/or chills.
• If your child has a fever of 100.4 or higher, they must be seen in the CBDI clinic or
Emergency Department as soon as possible to rule out a port infection. Call 513-517-
CBDI (2234) right away if you notice your child has a fever.
Check the port site• Remove numbing cream and make sure the port is not showing signs of infection.
• If there is drainage, swelling, pain, redness or odor, call your Hematology nurse before you
access the port.
Steps for port access and factor infusion
1 . Clean the work surface and allow it to fully dry.
2 . Everyone in the room including your child should put on a mask.
Begin Sterile Technique Step 1—Prepare the sterile field and supplies
3 . Open the port access kit. Use the outer inch of packaging to open the kit and expose the
sterile field.
4 . Drop these sterile supplies onto the sterile field:
a . Port needle
b . Cap
c . Sterile 10 ml saline syringe
1–2 3
54
5 . Place non sterile supplies next to sterile field so they are ready for use:
a . Syringe with factor
b . Additional saline syringes
c . Vancomycin/Heparin Flush

2726
Begin Sterile Technique Step 2—Sterile process to access port
6 . Put on your sterile gloves.
7 . Connect the sterile cap to end of port needle tubing.
8 . Connect 10 ml sterile saline syringe to cap.
9 . Place sterile gauze from the kit on the side of the sterile field.
10 . Over sterile gauze, push on the sterile saline syringe to remove air bubbles. This is also
called priming the tubing.
11 . Clean port site with chlorhexidine from kit for 30 seconds.
7
8
9–10
11
6

2928
If you are having any issues, stop the procedure, remove the needle, and call the Hematology Office to speak to a nurse or fellow on-call: 513-517-CBDI (2234)
12 . Allow port site to dry for about 30 seconds.
13 . Access port with port needle.
14 . Pull back on syringe to confirm the needle is in correct position.
a . If you easily get blood return, go on to step 15.
b . If you do not get blood return, remove the needle. Drop a new sterile needle, saline
syringe, chlorhexidine swab and cap on tray. Put on a pair of new sterile gloves,
clean the port site again and, using these new supplies, access the port. If you are
still unable to get blood return after two attempts, call the Hematology Department
and speak to a nurse.
15 . Slowly push saline from the syringe into the port. You should not feel any resistance, see
any swelling, and your child should not have pain:
a . If you are having any issues, stop the procedure, remove the needle, and call the
Hematology Office to speak to a nurse or fellow on-call: 513-517-CBDI (2234).
16 . Give the factor.
17 . Flush the line with 10 ml of saline.
18 . Give Vancomycin/Heparin lock flush into port.
19 . Take needle out of port. Make sure to lock safety device.
15
13 14
18 19
16 17

3130
20 . Apply gauze and pressure at the infusion site for several minutes until there is no oozing
and to reduce bruising and swelling.
21 . Clean work area and throw away sharps in the biohazard container.
22 . Record infusion, including the dose, lot, expiration, and site of bleed if given for a bleed.
21 22
20

33
Recording Factor Infusions
Keeping an infusion log is an important part in managing your child’s bleeding disorder:• The infusion log helps you know when to reorder factor and supplies.
• A correct infusion log also helps your hematologist to create and edit your child’s factor
infusion plan. This will help prevent bleeding.
• It is good to keep your child’s infusion log in a safe place near you. It is good to have in
case of an emergency.
Record the following information in your infusion log:• Date and time of the infusion
• Name of the factor
• Total number of units that you gave
• Lot number and expiration date
• Reason for the infusion, which should include if given as
• Prophylactic dose
• Additional dose for surgery or dental appointment
• A dose for a bleed. Remember to always to notify your HTC if your child has a bleed.
• Include where your child had a bleed (knee, ankle, thigh muscle, etc.)
• Include if the bleed happened because of an injury or spontaneously (without injury)
• Include any other information about the bleed
Keep a home log of all your child’s infusions and bleeding episodes. Give this
log to us on a monthly basis. You can complete the Infusion logs on an app or
on paper. Your family can choose either recording method.
Helpful Hint: When Using a Paper LogThe sticker on your factor vial should have lot, expiration, and dose in
that vial. You can pull this sticker off and put it on your paper calendar.

35
Date Day Time Factor Product Number of Bottles
Units per Bottle
Total Units Given
AMPM
AMPM
AMPM
AMPM
AMPM
AMPM
AMPM
AMPM
AMPM
AMPM
AMPM
AMPM
AMPM
AMPM
AMPM
Hemophilia Prophylactic Treatment Log
Name Factor Dose
Reason for Treatment:
(Treatment for bleeds MUST be entered on the Hemophilia Bleed Treatment Record)
Comments

©2018 Cincinnati Children’s | 3333 Burnet Avenue, Cincinnati, Ohio 45229-3026
KN1208 06/2018
BRV271567 0618 000250
For more information, please contact us:
www.cincinnatichildrens.org
513-517-CBDI (2234)