The Archaeologist's Field Handbook - UW Canvas
429
-
Upload
khangminh22 -
Category
Documents
-
view
1 -
download
0
Transcript of The Archaeologist's Field Handbook - UW Canvas


The Archaeologist’s Field Handbook
*Archaeologists Field Handbook 29/6/04 5:23 PM Page i

For Jane, Wendy, Mike and Iain
*Archaeologists Field Handbook 29/6/04 5:23 PM Page ii

The Archaeologist’s Field Handbook
Heather Burke and Claire Smith
*Archaeologists Field Handbook 29/6/04 5:23 PM Page iii
Published with the assistance of the Australian Academy of Humanities
First published in 2004
Copyright © Heather Burke and Claire Smith 2004
All rights reserved. No part of this book may be reproduced or transmitted in any form or by any means, electronic or mechanical, including photocopying, recording or by any information storage and retrieval system, without prior permission in writing from the publisher. The Australian Copyright Act 1968 (the Act) allows a maximum of one chapter or 10 per cent of this book, whichever is the greater, to be photocopied by any educational institution for its educational purposes provided that the educational institution (or body that administers it) has given a remuneration notice to Copyright Agency Limited (CAL) under the Act.
Allen & Unwin83 Alexander StreetCrows Nest NSW 2065AustraliaPhone: (61 2) 8425 0100Fax: (61 2) 9906 2218Email: [email protected]: www.allenandunwin.com
National Library of AustraliaCataloguing-in-Publication entry:
Burke, Heather and Smith, Claire.The Archaeologist’s Field Handbook.
BibliographyIncludes index.ISBN 1 86508 862 5.
1. Archaeology – Handbooks, manuals, etc. 2. Excavations (Archaeology) – Handbooks, manuals, etc. I. Smith, Claire,1957- . II. Title.
930.1028
Typeset in 10.5/13.5 pt Legacy Serif by Midland Typesetters, Maryborough, Vic.Printed by CMO Image Printing Enterprise, Singapore
10 9 8 7 6 5 4 3 2 1
*Archaeologists Field Handbook 29/6/04 5:23 PM Page iv

CONTENTS
Figures and Tables xiv
Preface xix
Acknowledgments xxiii
1 Preparing for fieldwork 1
Designing your research 3
Finding funding 7
Archaeologists and ethics 11
Planning your field kit 19
Working with the legislation 20
References and further reading 30
Useful websites 30
2 Navigation and mapping 32
Using maps 33
Using a map to calculate a grid reference 36
Making mud maps 42
Using aerial photographs 46
Using a compass 47
Using a Global Positioning System (GPS) 51
Finding north using your watch 53
Survival in the bush 53
Responsible behaviour in the bush 55
Campfire cooking 56
References and further reading 60
Useful websites 60
*Archaeologists Field Handbook 29/6/04 5:23 PM Page v

W3 Finding sites 62
What is a site? 63
Systematic surface survey 65
Developing a suitable sampling strategy 66
Recording information in the field 69
Keeping a field journal 70
Recording transects 73
Recording landform, vegetation and slope 73
Recording water sources 75
Recording soils and geological formations 76
Recording disturbance 78
Determining effective survey coverage: What reveals, what conceals 78
What to do when you find a site 80
Defining a site boundary 82
What not to do at a site 83
A note on classification systems 83
References and further reading 84
Useful websites 84
4 Site surveying 85
The basics 86
Techniques for constructing a site plan 89
Using the compass and pacing technique 90
Using the baseline/offset technique 96
Using the baseline and offset technique to record vertical surfaces 101
Basic principles of levelling 104
References and further reading 113
Useful websites 113
5 Basic excavation techniques 115
The basics 116
The principles of excavation 121
Approaches to excavation 123
Laying out a site grid 125
vi CONTENTS
*Archaeologists Field Handbook 29/6/04 5:23 PM Page vi

WLabelling trenches 127
Recording in three dimensions 130
Recording the excavation process 131
Describing deposits 132
Describing cultural features 134
Describing the excavation process 135
Recording sections 135
Interpreting stratigraphy 136
Using a trowel and brush 141
Sieving and sorting 146
Conserving finds on site 150
Labelling finds and samples 150
Collecting samples in the field 151
Managing archaeological collections 156
References and further reading 161
Useful websites 162
6 Recording historical sites 163
What are historical sites? 163
The basics 163
Finding historical sites 166
Using historical documents 167
Recording industrial sites 172
Recording maritime sites 175
Recording standing structures 176
Recording historical artefacts 185
Recording bottles and bottle glass 187
Recording ceramics 193
Recording oral histories 197
References and further reading 200
Useful websites 200
7 Recording Indigenous sites 202
What is an Indigenous site? 202
CONTENTS vii
*Archaeologists Field Handbook 29/6/04 5:23 PM Page vii

WThe basics 207
Recording stone artefacts 208
Recovering artefacts with residues and use-wear 219
Defining the boundaries of an open artefact scatter 219
Recording rockshelters 221
Recording rock art 223
Recording scarred and carved trees 226
Recording quarries 230
Recording middens 231
Recording stone arrangements 233
Recording contact sites 234
Recording Indigenous histories 235
Undertaking ethnohistoric research 236
What to do if human remains are encountered 237
References and further reading 238
Useful websites 239
8 Managing cultural heritage 240
The basics 241
How to prepare a tender 243
Assessing cultural significance 245
The categories of cultural significance 247
How to assess cultural heritage significance 251
What comes next? Assessing the impacts of development 253
Developing management strategies 254
Strategies for managing work at cultural heritage sites 256
Before you submit your report . . . 259
References and further reading 260
Useful websites 261
9 Photography and illustration 262
The basics 264
How a camera works 265
Taking good shots 268
viii CONTENTS
*Archaeologists Field Handbook 29/6/04 5:23 PM Page viii

WHolding the camera 273
When to use a tripod 273
Choosing the right camera: SLR vs digital 274
Maintaining your equipment 275
Choosing the right film 276
Scales and information boards 277
Photographing standing structures 278
Photographing excavations 279
Taking aerial photographs 280
Photographing rock art 281
Photographing artefacts 282
Keeping photographic records 283
The basics of field illustration 284
Drawing horizontal surfaces (plans) 286
Drawing vertical surfaces (sections) 289
Drawing artefacts 290
Drawing stone artefacts 298
Drawing ceramics 301
Drawing rock art 302
Storing photographs and illustrations 305
References and further reading 307
Useful websites 308
10 Getting your results out there: Writing, publication and interpretation 309
Writing well 310
Getting started 311
The stages of writing 311
Technical reports 316
Consultancy reports 318
How accountable is your report? 319
Community reports 320
Specialist publications 321
Websites 322
Press releases 322
CONTENTS ix
*Archaeologists Field Handbook 29/6/04 5:23 PM Page ix

WProducing a professional product 324
Public presentations 325
Using PowerPoint 326
Interpreting archaeology to the public 327
Presenting your research as a poster 332
Classic errors and helpful hints 334
References and further reading 337
Useful websites 338
Appendices
Appendix 1: Sample recording forms 339
Survey: Background information 340
Survey: Open sites 342
Survey: Scarred or carved trees 344
Survey: Quarries 346
Survey: Stone artefacts 348
Survey: Cemeteries 350
Excavation 1 351
Excavation 2 352
Photography 355
Appendix 2: Rim diameter chart 356
Appendix 3: Guides to dating common historical artefacts 358
Appendix 4: Detailed checklist for consultancy reports 385
Appendix 5: Sample press release 389
Appendix 6: Interpretation project planner 392
Appendix 7: Checklists for tables, figures and reports 395
Index 397
x CONTENTS
*Archaeologists Field Handbook 29/6/04 5:23 PM Page x

WVisit www.allenandunwin.com/arch_handbook.pdf for the heritage directory and
codes of ethics:
Appendix 8: Heritage directory 1
Administrative bodies (government—national) 2
Administrative bodies (government—state) 2
Archaeological associations (Australian) 4
Archaeological associations (International) 4
Archives (National Archives of Australia) 5
Archives (state) 5
Departments of Archaeology 6
Land Councils 8
Libraries 29
Museums 30
Organisations (government) 32
Organisations (non-government) 32
Appendix 9: Codes of ethics 34
Australian Archaeological Association 35
Australian Association of Consulting Archaeologists 36
Australian Institute of Maritime Archaeology 39
International Federation of Rock Art Organisations 44
World Archaeological Congress 48
CONTENTS xi
*Archaeologists Field Handbook 29/6/04 5:23 PM Page xi

*Archaeologists Field Handbook 29/6/04 5:23 PM Page xii

W
FIGURES AND TABLES
P.2.1: Content overview xx1.1: Thinking through your research problem 51.2: A typical archaeologist on fieldwork 202.1: Area coverage and scale in maps 362.2: Calculating a grid reference 382.3: Contour lines and slope 422.4: A travelling mud map 442.5: A mud map of a site 452.6: Calculating true and magnetic north 482.7: Taking a compass bearing 492.8: Making a watch compass 543.1: Survey transect widths 653.2: Different sampling strategies 683.3: A page from Robert Stone’s field journal 723.4: A guide to estimating slope by eye 753.5: Checking visibility and surface conditions 794.1: A framework of baselines for a site plan 884.2: Recording information from a compass and pacing survey 934.3: Plotting a compass and pacing survey 944.4: Correcting the error of closure 954.5: Estimating a right angle for an offset by eye 974.6: Bisecting an arc 984.7: 3–4–5 triangle 994.8: Triangulation 1004.9: Using a plumb-bob 1014.10: Creating a cross-section of a rockshelter 1024.11: Creating a vertical ‘plan’ of a wall 1034.12: Surveying changing levels 1044.13: The major components of an automatic level 1064.14: How to set up a level 1074.15: How to fill in a level booking sheet 1094.16: Checking the stadia rod (levelling staff) is vertical 111
xiii
*Archaeologists Field Handbook 29/6/04 5:23 PM Page xiii

W5.1: Recording an excavation unit, or context 1205.2: A hypothetical grid across an excavated site 1265.3: The sequence in laying out an excavation square 1295.4: Plotting the location of an excavated artefact 1315.5: Sediment composition flow chart 1335.6: Estimating the percentage of inclusions 1345.7: Estimating the degree of sorting 1355.8: The stratigraphic relationships of a Harris matrix 1385.9: Representing stratigraphic relationships in a Harris matrix 1395.10: Using the Harris matrix to record a wide variety ofcomplementary
information 1405.11: Using a trowel and brush 1425.12: Trimming the wall of a trench 1435.13: Hand sieving archaeological material 1476.1: The range of historical sites in Australia 1656.2: Two roof timbers from the same building 1796.3: The basic elements of a building 1806.4: Common carpentry joints 1806.5: Brick bonds and forms 1816.6: Stone courses, finishes and jointing 1826.7: Presenting data from a structural analysis in Harris matrix form 1866.8: The parts of a bottle 1876.9: Describing the shape of a bottle in the horizontal plane 1896.10: Describing the shape of a bottle in the vertical plane 1906.11: The parts of a ceramic vessel 1937.1: The range of Indigenous sites in Australia 2037.2: Knapping: the process of making a flaked stone artefact 2087.3: How to identify a flake 2107.4: Physical constraints of knapping 2117.5: A negative flake scar 2117.6: How to measure and record the key attributes of a stone artefact 2147.7: An example of how to work through the analysis of an artefact 2187.8: A comparison between stone and steel axe marks 2287.9: European and Indigenous scarring of trees versus natural scarring 2298.1: Steps in the significance assessment process 2529.1: Adjusting the aperture 2669.2: An exposure calculator 2679.3: Reflecting light to eliminate shadows 2709.4: Depth of field 271
xiv FIGURES AND TABLES
*Archaeologists Field Handbook 29/6/04 5:23 PM Page xiv

W9.5: The one-third rule 2719.6: Using a tripod 2749.7: Using a drawing board and graph paper in the field 2859.8: Conventions for illustrating slope 2899.9: Conventions for drawing archaeology 2919.10: Measuring the outline and details of an artefact for illustration9.11: Shading can be used to add three-dimensional form 2959.12: Tracing the outlines of engraving sites 3039.13: Using digital technology to record rock art 30610.1: Getting your information out there 31310.2: The shape of a technical report 31710.3: The interpretive process 32910.4: Using a grid to lay out interpretive text 332A5.1: How to read a ceramic registration mark 372A5.2: The parts of a nail 377A5.3: The parts of a clay pipe 380A5.4: Dating techniques for clay pipes 380
TABLES
1.1: The legal and ethical responsibilities of archaeologists working with statelegislation 23
1.2: The legal and ethical responsibilities of archaeologists working with federal legislation 29
2.1: Relationship between scale of map or plan and real distance 342.2: Steps in determining grid references 392.3: Assessing coal temperatures 573.1: Recording visibility and exposure 804.1: Acceptable levels of accuracy for site plans 1135.1: Diagonal measurements for archaeological trenches 1285.2: A guide to estimating the size of visible particles 1345.3: Some of the range of organic materials that can be radiocarbon dated 1535.4: Suggested sample quantities 1576.1: Elements to consider when recording a standing structure 1776.2: Dateable building materials and construction techniques 1846.3: Distinguishing between cut glass and pressed glass 1926.4: The changing thickness of window glass throughout the nineteenth
century 192
FIGURES AND TABLES xv
*Archaeologists Field Handbook 29/6/04 5:23 PM Page xv

W7.1: How to recognise different rock art techniques 2237.2: Characteristics for distinguishing between a humanly created shell
midden and a natural shell bed 2329.1: The pros and cons of SLR versus digital cameras for archaeological
fieldwork 2759.2: The relationship between scale and the level of detail which you can
reasonably expect to include on a site plan 2879.3: Conventions for drawing stone artefacts 299A5.1: Dating techniques for bottle glass 359A5.2: Some terms used on ceramic vessels 371A5.3: Dating ceramics by the ceramic registration mark system 373A5.4: Dating techniques for tin cans and metal containers 374A5.5: Dating techniques for nails 378A5.6: Dating techniques for tin wax vesta boxes 381
xvi FIGURES AND TABLES
*Archaeologists Field Handbook 29/6/04 5:23 PM Page xvi

W
PREFACE
This book is a successor to John Mulvaney’s Australian Archaeology: A Guide to Field andLaboratory Techniques (1972) and Graham Connah’s Australian Field Archaeology: A Guideto Techniques (1983). These were the texts we used as undergraduate students, but they havebeen out of print for some time, leaving Australian archaeology without a field booksuited to local conditions. This book was produced to fill that gap. It is a hands-on fieldmanual which provides a step-by-step guide to undertaking and successfully completinga wide variety of archaeological fieldwork projects, from simple site recordings to pro-fessional consultancies. Our aim has been to combine clear and easy-to-understandinformation on conducting fieldwork for undergraduate and postgraduate students withpractical advice for successfully undertaking archaeological consultancies. While thisbook is intended primarily for archaeologists, you don’t need to be an archaeologist to useit. We expect that it will also be of value to interested members of the public, such asmembers of historical societies or the National Trust. In this respect, our intention is tomake people aware of the legal and ethical obligations inherent in documenting andrecording cultural heritage sites responsibly and well. To this end, there are some methodswhich have been omitted entirely from this manual because they should not be under-taken by amateurs. In particular, sampling rock art motifs for dating, or any restorationor conservation work, should only be done by trained professionals.
The main problem with writing a manual, particularly in archaeology, is that manycases must be dealt with on their own merits. There can be no hard and fast ‘recipes’for being a responsible archaeologist, although there is a clear need for guidelines andstandards to ensure high-quality work. The methods and guidelines presented in thisbook outline thresholds for professional practice rather than the only methods that canbe used in a given situation. Every site is different, and to some extent the field methodsemployed in each situation will be different. The key is to be flexible: while there are basicprinciples and methods, each field project will present its own challenges and inspire itsown solutions. Moreover, there is so much variation in the legislation dealing withcultural heritage across Australia that there is also considerable diversity in the standardsfor professional conduct which are considered acceptable within each state. Through thisbook, we are trying to promote some generally accepted standards and protocols, and tomake this information available within the one, easy-to-carry volume. By firmly ground-ing essential practical techniques in an understanding of the contemporary ethical issues
xvii
*Archaeologists Field Handbook 29/6/04 5:23 PM Page xvii

Wsurrounding Australian archaeology today, we hope that this combination will teachpeople how to conduct ethical archaeology whilst at the same time providing much-needed hands-on practical advice.
ARCHAEOLOGY IN AUSTRALIA
Archaeology is the study of past human behaviour through material remains. In Australia,this translates to a variety of interests: from Indigenous archaeology which focusses on theAboriginal and Torres Strait Islander occupation of Australia over the last 50 000 years tohistorical archaeology which deals with the last few hundred years since colonial contact.Another important branch of Australian archaeology is maritime archaeology, whichdeals with underwater and coastal archaeology. While there are areas of overlap betweenall of these, each has its own specific challenges and opportunities.
Archaeologists in Australia work in a range of professional capacities. The mainemployment opportunities come from universities, museums, government departmentsand consulting. Archaeologists in universities work in either a teaching or researchcapacity, or both. Most university positions are for lecturers, who teach undergraduatecourses, supervise postgraduate students and conduct independent research. Thesepeople normally possess a PhD in archaeology. Many universities also have postdoctoralfellows, whose main task is to conduct research in their field of interest.
When working in a museum, the task of an archaeologist is either that of a curator,who manages and cares for collections, or a researcher. A curator needs to have a mini-mum of a good Honours degree in archaeology, normally with a museum specialisation,but research positions usually are filled by people with PhDs. Archaeologists working inmuseums deal with various aspects of maintaining the museum’s collections, such asliaising with other archaeologists who have conducted excavations and may wish todeposit material, or with researchers who wish to study the museum’s collections. Theyalso are involved in liaising with members of the public, researching exhibitions andconducting independent research projects.
In recent years, there has been an increasing demand for archaeologists to mediatebetween the needs of development and the desire to preserve our cultural heritage asmuch as possible. This work is usually undertaken on a consultancy basis, and is generic-ally referred to as cultural heritage management. Archaeologists can be involved in avariety of consultancies, ranging from recording and assessing the importance of sites andundertaking emergency excavations prior to development to devising protection schemesfor sites and artefacts and creating interpretive materials. Because development isgoverned by cultural heritage legislation in each state and territory, however, theseconsultants work very closely with archaeologists in the various government departments
xviii THE ARCHAEOLOGIST’S FIELD HANDBOOK
*Archaeologists Field Handbook 29/6/04 5:23 PM Page xviii

Wwhose job it is to administer this legislation. These departments are responsible for main-taining registers of sites, establishing guidelines for best practice, assessing consultants’reports and liaising with developers and members of the public. Archaeologists employedin these departments also conduct research projects related to the management needs oftheir particular department. Increasingly, archaeologists also are being employed byIndigenous groups. The kinds of work undertaken here include researching nativetitle claims, developing cultural programs or community management programsand developing interpretive materials for cultural centres.
All of these forms of archaeology involve a commitment to high ethical standards andgood professional practice. Archaeologists employed in any of these jobs are likely to workin many different and interesting places and will need to call upon a diverse range ofarchaeological methods. This handbook has been designed to provide undergraduate andpostgraduate students, as well as first-time consultants, with the basic tools needed toplan and undertake fieldwork in a wide range of field situations. The structure of thisbook follows the pattern of a typical archaeological field project: first a site has to belocated, then recorded and interpreted, and the results properly documented. Eachchapter deals with a segment of this process and covers the various methods which can beemployed to achieve this on Indigenous and non-Indigenous sites. See Figure P.1 for anoverview. While each chapter can stand alone, the information is cross-referenced to helpyou locate related materials. Specialist terms are flagged throughout the text in bold andexplained in the text rather than in a separate glossary.
Boxed texts in each chapter outline the skills; the ‘fieldwork kit’ sections outline thebasic equipment needed to undertake each phase of fieldwork; and each chapter finisheswith a list of further readings and useful resources. In order to teach some of the lessonsof ‘real’ archaeology, we have included handy hints from professional archaeologists, whohave developed their own ways to collect data in the field. The appendices collate the fourmain codes of ethics used by Australian archaeologists today and provide lists of profes-sional contacts and sample recording forms to make field preparation and recordingsimpler. These recording forms are not intended to cater for every archaeological excava-tion or survey, but to give you a guide to the kinds of information you should be recordingroutinely. Inevitably, you will have to adapt them to suit your own particular purposes.Some aspects of fieldwork require you to contact relevant organisations and bodies.Throughout this book, this symbol (*) is used to indicate important points of contact.The relevant addresses and contact details are provided on the website which comple-ments this book (www.allenandunwin.com/arch_handbook.pdf).
While this book is intended as a basic field manual, it is not an exhaustive treatmentof all techniques which are used in archaeology. In particular, because the post-fieldanalysis of artefacts and sites has its own methods and problems, this book stops at thepoint where laboratory analysis begins. For information on this aspect of archaeology, we
PREFACE xix
*Archaeologists Field Handbook 29/6/04 5:23 PM Page xix

Wxx THE ARCHAEOLOGIST’S FIELD HANDBOOK
FIGURE P.1: Content overview
*Archaeologists Field Handbook 29/6/04 5:23 PM Page xx

Wrecommend Jane Balme’s and Alistair Paterson’s Doing Archaeology: A Student Guide toArchaeological Analysis (Blackwell, 2004).
ACKNOWLEDGMENTS
This book, like any other archaeological project, could not have been completed withoutthe help of many people. First, we would like to thank the people who gave us specialadvice or assistance. In particular, we thank Val Attenbrow for thoughtful commentson our original proposal, as well as Tessa Corkhill, Richard Fullagar and Alice Gorman.Wendy Beck, Sandra Bowdler, Jay Hall, Matthew Kelly, Ian Lilley and Peter Veth allprovided detailed comments on the manuscript. Their feedback has been invaluable.Second, thanks to all those who took the time to contribute field tips: Val Attenbrow, JaneBalme, Aedeen Cremin, Bruno David, Iain Davidson, Ines Domingo-Sanz, RichardFullagar, Denis Gojak, Alice Gorman, Gordon Grimwade, Nicky Horsfall, Wayne Johnson,Lyn Leader-Elliot, Robyn Najar, Jack Radley, Richard Robins, Jennifer Rodrigues, JuneRoss, Anita Smith, Mark Staniforth, Stephen Sutton and Joe Watkins. Third, TraceyTreloar spent many hours chasing up errant details, making the compilation processmuch less painful. We would also like to thank Gordon Grimwade for use of his libraryand Martin Rowney for the matchbox illustrations in Chapter 9 and Appendix 5.
Aidan Ash, Wayne Johnson, Penny McCardle, June Ross, Matt Schlitz and MarkStaniforth kindly provided us with photographs. The scarred trees in Figures 7.1 and 7.9are published in memory of Josie Carney and courtesy of the Macquarie Warren Abor-iginal Land Council. The photo of the grieving mother in Figure 7.1 is published with thekind permission of Avis Gale, Amy Levai, June McInerney (Kunyi), Shereen Rankin andSilvio Apponyi. The axe grinding grooves in Figure 7.1 are published courtesy of theToomelah Aboriginal Land Council. All other images in Figure 7.1 are published withthanks to Phyllis Wiynjorroc, Peter Manabaru, Jimmy Wesan and Barunga-WugularrCommunity Government Council. All other photographs were taken by the authors.Finally, we thank the students of ARCH3302: Field Methods in Australian Archaeologyin 2002 and 2003. This book was developed while we were teaching this class and theiropinions and feedback helped us to clarify our ideas, our teaching and our writing.
Finally, archaeologists seek to learn about people in the past through the objects thatthey made or used and left behind them. It is not just the objects (artefacts) themselvesthat are important, but also where they are found (the sites), and what other objects ortraces of objects they are found with (their context). An artefact by itself can only tell us somuch, and it is often the context which is most important for understanding thebehaviour or activities which put the artefact there in the first place. The most importantthing to learn about archaeological fieldwork is to pay as much attention to the context
PREFACE xxi
*Archaeologists Field Handbook 29/6/04 5:23 PM Page xxi

Was to the artefact. In writing this book, we have tried not to privilege the artefact abovethe context, or the large or visually impressive site above the ordinary. When conduct-ing archaeological fieldwork, it is important to remember that all traces of past humanbehaviour are important, not just the most obvious or impressive ones. There is nosubstitute for field experience, but if you can keep this in mind, you are already behavinglike a good field archaeologist.
xxii THE ARCHAEOLOGIST’S FIELD HANDBOOK
*Archaeologists Field Handbook 29/6/04 5:23 PM Page xxii

CHAPTER ONEPREPARING FOR
FIELDWORK
WHAT YOU WILL LEARN FROM THIS CHAPTER
W What it means to be a responsible archaeologistW The legal requirements for conducting heritage fieldwork in each state and territoryW The importance of properly planning your research and fieldworkW Essential skills for finding fundingW The importance of accurate record keepingW The ethical responsibilities of working with others
The basic fieldwork toolkit
Good bootsHat and water bottleSunscreen and insect repellentPrismatic compassGlobal Positioning System (GPS) (with spare batteries)Relevant topographic maps for the area (preferably current editions at 1:50,000 or1:100 000 scale)Recording forms, field notebook, pens and pencilsScale rulerProtractor (either a 360° full circle, or a square Douglas protractor is best)
W W W
WW
1
*Archaeologists Field Handbook 29/6/04 5:23 PM Page 1

WClipboardPhotographic scales (at least one 50 centimetre and one small scale for artefactphotography)A 2 metre ranging pole (preferably collapsible or telescopic for ease of carrying)A roll of flagging tape (preferably the bio-degradable kind) and/or individual artefactflagsGraph paperCamera and film (with spare batteries)A 30 metre tape measure and a 5 metre retractable tape measureZiplock® plastic bags, in various sizesHand brush for cleaning off hard surfaces such as brickworkGardening gloves and secateurs for clearing away vegetationGood first-aid kit (see below)Pocket knifeWhistle—this can be used to locate a person if they get separated
Optional:Camping/general site equipment (billy, camp cooking gear, swag, chairs, folding tables,canvas or shade cover)
The basic fieldwork first-aid kit
Flashlight (with spare batteries)—a small one that tucks easily into a corner will doTweezers for removing splinters, thorns, prickles or ticksBandage tape and a small pair of scissors to cut it withSeveral triangular and roll bandagesBand aidsCream for itches and bitesThermometerMatches or a lighterAnaesthetic sprayBetadine or other antiseptic ointmentBoth paracetamol and codeine tablets (in case someone is allergic to one type)Aspirin, or similar anti-inflammatoryA small first-aid handbook: these come in travel sizes and will provide instructions onwhat to do in most emergencies
2 THE ARCHAEOLOGIST’S FIELD HANDBOOK
*Archaeologists Field Handbook 29/6/04 5:23 PM Page 2

WArchaeological fieldwork is not something that can be done ad hoc. Fieldwork has to betailored to particular research questions and should only be undertaken with properplanning. Before going into the field, you need to think through the aims of your field-work and what it is you want to know. What questions do you want to answer? What datado you need to address these questions? What methods will be required to collect thesedata? It is rarely possible to record everything, and in most situations you will need toprioritise the information you collect. If you are looking for Indigenous sites in a largeriver valley, for instance, but have only one and a half days to complete your survey, youare not going to be able to record the contents of every site in detail, but you will be ableto plot all site locations and record some minimum information for each. On the otherhand, if your fieldwork consists of recording a single building, you will probably be ableto make a far more detailed and exhaustive record. Of course, even the most well thought-out and carefully planned research must be flexible enough to cope with the changingconditions of fieldwork. Only in an ideal world could an archaeologist create a projectbased solely on the requirements of research alone. In reality, you will need to balancewhat you would like to do with the various constraints placed upon you and the project(Orser and Fagan 1995: 159). Routine constraints include time, not enough funding(there is never enough funding in archaeological research) and not being able to accesscertain sites or areas. If you can think of any ways to narrow down the focus of yourproject before you begin and thus make your time spent in the field more efficient, thiscan only result in a more manageable project.
DESIGNING YOUR RESEARCH
The most important thing to clarify at the beginning of any project is the purpose ofyour fieldwork. What are you doing fieldwork for? What questions are you interested ininvestigating? What kinds of sites do you expect to find? What information will you needto collect to get the job done? Without some clear idea as to what you want to know, andhow best you will be able to get it, your project will be doomed from the start. For thisreason, it is a good idea to work out your plan of attack in advance. This is not so urgentif you are working alone, and will become less necessary as you gain more experience, but ifyou are working with a field crew it can be a very expensive (not to mention frustrating)exercise to keep them waiting while you work out what to do.
The most important first step in designing research is to outline the problem. This isessentially why you think your research is important, and how you think it will contributeto the discipline of archaeology. Some research problems might contribute new light ontheories of human behaviour in the past, while others might contribute new methods forhow we go about collecting or analysing archaeological data. Not every study will be earth
PREPARING FOR FIELDWORK 3
*Archaeologists Field Handbook 29/6/04 5:23 PM Page 3

Wshattering in its findings, but every research project should be sufficiently well thought outso that it does not simply reinvent the wheel. This means that you will have to do somereading in and around your chosen research area to find out what other people havedone in similar situations. You will also have to think through how you are going tooperationalise your research problem: if I want to know this, what will I have to look for inthe field to answer my problem? It is no use wanting to answer questions about the livingconditions of nineteenth century miners if you haven’t collected any data from nineteenthcentury miners’ house sites. In fact, to answer this question properly you would probablyneed to know what they were eating and drinking and how much of each product theyconsumed—in other words, you would probably need to excavate a nineteenth centuryminer’s rubbish dump, rather than simply collect data from a surface survey.
One way to develop the planning for your project is through writing a research design.In a research design, you outline your research questions and explain how these weredeveloped, the methods you intend to use to address these questions, and how yourproposed work relates to existing research. This will help you to think through each stepof the project and will allow others (colleagues, government bodies, clients) to under-stand your project clearly. All research designs must be logical and structured around aproblem or question that is worthwhile answering—in other words, that will contributein some way to archaeological knowledge. Narrowing down your research to focus on aparticular problem is the hardest part of writing a research design, although it is the coreof any good research program (see Figure 1.1 on page 5). Writing a formal research designis not something you would undertake before every trip into the field, but it is necessaryif you are planning an academic research project or applying for an excavation permit.Under current legislation in all states of Australia, a research design forms an essentialpart of any application for an excavation permit, so it is well worth knowing how to writean acceptable one. In a sense, the worth of your project will be evaluated through yourresearch design: it is both a statement of how you intend to go about things and an outlineof why your research is important. When developing a research problem, keep thesefactors firmly in mind (Figure 1.1 on page 5):
• You must establish that the problem addresses a question, or a set of related questions,the answers to which will make an important contribution to archaeological know-ledge. The archaeology should also be able to provide insights which no otherdiscipline can. If the research proposes to answer questions that are marginal, oroutside the range of current discussion in the discipline, you will need to show evenmore clearly that the answer to these questions will make a contribution. Adequatelyjustifying your research problem is a necessary ingredient in any scientific research.
• You must define the nature and scope of the question. A research project shouldaddress a specific, clearly stated question, not just a general topic area or a set of data.
4 THE ARCHAEOLOGIST’S FIELD HANDBOOK
*Archaeologists Field Handbook 29/6/04 5:23 PM Page 4

W
Topical or data questions are rarely sufficient starting points for the design ofscientific research.
• You must establish that the answer can in fact be reached. Trying to establish the siteof the first use of specific Indigenous artefact types, for example, is unanswerable.This is part of thinking through your research and of narrowing down the focus ofyour project to make it practical.
• Your research problem will condition nearly all aspects of fieldwork. The more care-fully it is conceived, the more efficient and productive your field program will be.
PREPARING FOR FIELDWORK 5
FIGURE 1.1: Thinking through your research problem
*Archaeologists Field Handbook 29/6/04 5:23 PM Page 5

WAUSARCH-L: A list-server dedicated to Australian archaeology
A useful way of searching for information on Australian archaeology which mightnot otherwise be available from published sources is to subscribe to the AUSARCH-Llist-server. Its purpose is to facilitate discussion about all aspects of Australian archae-ology (Indigenous, historical, maritime, etc.). It is essentially a digital ‘mail room’ whereyou can exchange information with others. Messages regularly include questions toother subscribers, presentations of information and discussions of results. To subscribeto the list, send the message ‘SUBSCRIBE AUSARCH-L [insert your name here]’ [email protected]. Listproc will take your email address from the header inyour message (such as an automatic signature). Please do not add any other text to themessage. If you do, you will still be subscribed but will receive an additional messagereporting an error because the list server will not understand the first word of additionaltext. When you want to send an actual message (request, question, comment, etc.), youmust send it to [email protected]. The list is unmoderated and anyonecan subscribe and send messages to it. It is a great way to get feedback on your ideas orto find out what other archaeologists are doing. The ‘owners’ of AUSARCH-L are PeterHiscock, Peter Veth and David Roe.
Steps in developing a research design
Your research design will need to include information on the following:• The research objectives. What are you trying to do? Make sure you lay these out clearly,
so that readers do not have to guess.• Previous research in the study area or on the project’s research questions. What have
other people done that is relevant?• Background environmental or other relevant information on the study area. • The methods you intend to use. You should go into as much detail as possible here
and think beyond the fieldwork itself. What methods will you need for fieldwork,analysis and other data collection (e.g. oral histories)?
• The timeframe you envisage for the project, including the time you will need to analyseyour results and write up the report.
• If you are intending to excavate or collect material, then you will need to outlinerelevant conservation techniques, and short- and long-term measures for the appropri-ate curation and storage of the material.
• If you are intending to work with Indigenous communities, then you should indicate theirattitudes to the project and the extent of community involvement and support.
• Finally, you should outline the benefits of the project. What will it contribute to the dis-cipline? How will you return the results to the archaeological and wider community?
6 THE ARCHAEOLOGIST’S FIELD HANDBOOK
*Archaeologists Field Handbook 29/6/04 5:23 PM Page 6

WFINDING FUNDING
Finding funding for your project is important. Many projects cannot be undertakenwithout funds to cover fuel and travel costs, or to buy essential equipment. Moreimportantly, funding also allows you to increase the quality of your work, in that it mayallow you to pay specialists to undertake highly skilled technical tasks. The first step inthe process is to locate an appropriate funding body. You do this through readingthe job/funding description of your proposed funding agency to see whether you fulfiltheir essential criteria. If you don’t, then applying is a waste of time. The essentials whenapplying for funding are a product to sell, a good track record and a good or novel researchproposal.
There are two main factors which will determine whether or not you will obtainfinancial support for your project. The first is the standard of your application. Wheneveryou apply for funding, it is crucial that you submit the best possible application. For anyfunding body, you will need to demonstrate what you are going to do, how you are goingto do it and why the project is important.
The second factor is whether the funding body has a mandate to fund the type ofproject for which you are seeking support. Bear in mind that all funding programs haveparticular purposes. If the purpose of the program is to support Indigenous archaeology,for instance, it is probably pointless to apply for a maritime archaeology project unlessthere is some clear overlap (i.e. the Indigenous sites are under water). The point toremember is that funding is always targeted at achieving specific outcomes. If you intendto apply for funding from a particular body, then you will need to show that your projectwill help that body fulfil those outcomes. No matter how worthwhile the project or howwell written the application, if the project falls outside the organisation’s objectives, it willbe eliminated in the first round.
There are three main sources of funding for heritage fieldwork: government programs;industry partners; and foundations. While all three sources have common elements, thereare also some specific strategies you can use for each.
Obtaining government funding
Both state and federal governments have a range of funding programs that supportarchaeological research. One of the most important things to bear in mind when applyingfor government funding is that your application will be assessed by professionals. Thismeans that you have to be particularly careful to show how your work relates to that ofothers. You will have to refer to the work of people who have done fieldwork in yourproject’s geographic area, as well as to any previous research which has used a similartheoretical approach or dealt with a similar range of artefacts and sites. For example, if you
PREPARING FOR FIELDWORK 7
*Archaeologists Field Handbook 29/6/04 5:23 PM Page 7

Ware planning a cultural heritage project in Mount Isa, you will need to refer to previousresearch in the Mount Isa region, as well as to any work which has focused on the archaeo-logical or cultural heritage management issues relevant to your project.
The other thing to remember is to check current priority areas. These can change fromyear to year and it will strengthen your application if you are able to key into a priorityarea. Finally, some government programs will ask you to justify your budget. The normalprocess is for an assessment panel to decide which projects it would like to fund and thento look closely at the budgets to see whether they can be cut back. It is not enough to saythat you need film or a research assistant and assume that the assessment panel will agreewith you. You need to explain what you plan to photograph and how these photographsare essential to the completion of the project, or outline what tasks the research assistantwill undertake and why the project cannot be completed without them. Remember, anyitem that is not justified properly will be the first to be cut if the panel decides to trim yourbudget.
Obtaining industry funding
Finding industry money requires slightly different skills. Some government programs—such as the Discovery program of the Australian Research Council* (ARC)—simply existto further knowledge. This is rarely the case with industry funding, however. Industrybodies have specific purposes that are usually related to making money. Therefore, gettingan industry partner to support your project will involve working out some way in whichyour research can help them to make money. This does not have to be a direct link—itmight simply be through enhancing their profile or bonding with target groups, such aswith the corporate sponsorship of conferences, or through providing the research that canbe used in interpretive centres or cultural tourism. In short, industry sponsors do notfund projects for the warm and fuzzy feelings they will get out of doing so. Their job isto achieve specific outcomes that are at least partly economic, and they do not have the flexibility to give money away to good causes. The main question the industrysponsor will ask is: ‘What am I going to get out of this?’ If you bear this in mind, then you can develop your proposal so that you are able to meet both their needs and yours.For example, a local council might need archaeological sites identified to developsome cultural tourism programs. At the time you first approach them, they may bethinking of cultural tourism as food, wine and the arts. Your task becomes getting themto extend their thinking to recognise heritage as part of cultural tourism, and to identifysome specific ways in which your fieldwork will help them. This could simply be byproviding information for interpretive pamphlets or signs. Remember, you will have todraw the link for them—do not expect them to see this by themselves.
8 THE ARCHAEOLOGIST’S FIELD HANDBOOK
*Archaeologists Field Handbook 29/6/04 5:23 PM Page 8

WObtaining foundation funding
Getting funding from foundations follows the same general rules. Like governmentprograms, foundations are established for specific purposes, and it is important to showhow your project will help them to fulfil their aims. There are two special things toremember about getting foundation money. The first is that your application will beassessed by a board of people who are unlikely to be archaeologists. This means that youwill need to be especially clear in your explanation of the project and its significance, sothat it can be understood by a lay audience.
The second thing to remember is that they, like industry partners, need to be seen tobe conducting good work. You can help foundations, not only through helping themto advance their agendas, but also by giving them public recognition. For example, ifthe Ian Potter Foundation* funds an overseas speaker for your conference, then you willprobably have to refer to them as the ‘Ian Potter Foundation Keynote Speaker’. Youshould also remember to recognise all your sponsors, but particularly foundations, in allpublications and reports that arise from your project. You need to be especially vigilantwhen submitting reports to foundations. Often, the reports will be presented to the sameboard that assesses your applications, giving you a good opportunity to show the highquality of your work. This helps you to establish a track record for excellence—and willstrengthen future applications to that foundation.
Things to bear in mind when applying for funding
• Take your funding application seriously. In many ways, applying for funding is like applyingfor a job—treat it as a major project.
• Identify an appropriate funding body and make sure that your proposal is consistent withits objectives.
• Read the guidelines for applicants carefully and make sure your application falls withinthem.
• If at all possible, visit the people involved in the allocation of funding to explain your project. Thisgives them the opportunity to ask questions and to clarify any confusion. In addition,it gives them the opportunity to make personal judgments about your ability and reli-ability. This is most important for students, as you cannot expect organisations toroutinely fund unknown researchers.
• Submit the best possible application and get colleagues to comment on it to help yourefine it.
• Refine your application to highlight how it fits within the organisation’s program objectives. Anyorganisation will favour projects that relate to its priority areas.
PREPARING FOR FIELDWORK 9
*Archaeologists Field Handbook 29/6/04 5:23 PM Page 9

W• Choose your referees carefully. Make sure you choose people who can comment know-
ledgably on the project and on your capacity to achieve a successful outcome. Mostimportantly, make sure they will produce the reference on time. This is your responsi-bility, not theirs, since you are the one who will receive the funding. The bestapproach is to choose referees who know either you or the project well and thenremind them about four to five days in advance that the submission deadline isapproaching. Once the deadline has passed, you should check with the fundingagency to make certain that all references have been received and, if any are out-standing, go back to the referee, politely pointing out that the reference is overdue.
• Aim to establish a reputation for producing results. This means that the funding body canbe more certain you will use the funding granted to you to actually complete aproject.
• Take great care with all reports that you submit. Interim reports are often an institution’sprincipal method for evaluating exactly how your work is progressing. It is up to youto satisfy the funding body that its money is being spent correctly. Take even greatercare with final reports, showing that you have completed the project as planned andfulfilled all of your responsibilities. After all, you may wish to apply to this fundingbody again.
• Don’t confine yourself to one funding organisation per project. Apply wherever your projectfulfils the criteria, but let each funding body know of any other sources you haveapproached. If you end up with more than one successful application, you could try to renegotiate the terms of the funding. For example: ‘I have money from Foun-dation X for this aspect of the project, can I use the funding from you for thiscomplementary aspect?’
Getting the budget for your project right is one of the hardest parts of any fundingapplication. The most important thing is to make sure that it is realistic—there is nopoint in getting only a small amount of funding for what is really a very large job. Oneof the worst outcomes for any project is when there is enough money to undertake thefieldwork, but not enough to analyse or write up the results—this is not only bad ethicalpractice, but could have been avoided from the beginning. In short, don’t undertake aproject if you cannot finish it. Make sure your budget:
• allows for preliminary research, fieldwork, analysis and writing-up time (as a guide,you can usually allow for three days in the lab or office for every one day you spend inthe field) and, if necessary, conservation of the artefacts in the long term;
• includes fees for Indigenous consultants (both for their time in providing you withinformation and their labour if they have acted as fieldwork assistants);
10 THE ARCHAEOLOGIST’S FIELD HANDBOOK
*Archaeologists Field Handbook 29/6/04 5:23 PM Page 10

W• includes any other necessary specialists’ fees (e.g. surveyors, conservators or historians);• only includes items that are related to the part of the project for which you are seeking
funding, and that each item is fully justified.
Checklist for funding applications
Have you demonstrated:❑ the inherent value of the project;❑ how the project will further the aims of the funding body;❑ the extent of community support for the project (especially that of Indigenous people
who may be involved);❑ your ability to carry out the aims and objectives of the project;❑ your previous track record? If you are applying for funding for the first time it may be
best to start out by applying for reasonably small amounts. You have not yet estab-lished your ability and dependability. Every funding body has a responsibility to fundprojects that will be completed, and until you have established that you can be reliedupon you cannot expect to be granted substantial funding;
❑ the tangible outcomes of the project (e.g. a report, a video, photos, tapes, thephysical protection of sites, a thank you letter in the newspaper)?
Does your application:❑ fulfil each of the eligibility criteria;❑ have methods that are consistent with achieving the aims of the study;❑ have a budget that is sufficient to produce the promised outcomes, but not inflated;❑ have a structure that is logical and well organised;❑ have a timeframe that is realistic and ‘doable’?
ARCHAEOLOGISTS AND ETHICS
Unless your project involves work on your own personal or family history, you willinevitably be working with other people’s cultural heritage. Many different groups canhave an interest in archaeology, including:
• Indigenous people;• government agencies (see ‘Working with the legislation’ on page 20);• developers or other heritage clients (see Chapter 8, ‘Managing cultural heritage’);• local community groups and organisations;
PREPARING FOR FIELDWORK 11
*Archaeologists Field Handbook 29/6/04 5:23 PM Page 11

W• landowners and tenants;• other members of the heritage profession.
As a heritage practitioner, you have ethical responsibilities to each of these interestgroups. When conducting fieldwork, you need to think about how your work is likely toaffect them. Do you need to ask any of them for permission? Will your work promotepositive change? Is it collaborative? Are there measures you can take to make sure that thepeople you are working with will get some benefit from the research? Thinking throughand acting on these kinds of questions can make the difference between ethical andunethical research. The Australian Archaeological Association*, the Australian Anthropo-logical Society* and the Australian Association of Consulting Archaeologists* all havetheir own codes of ethics which clearly set out the ethical behaviours expected of heritageprofessionals (see Appendix 9, www.allenandunwin.com/arch_handbook.pdf). Other pro-fessional groups, such as the Australian Institute of Maritime Archaeology* and the WorldArchaeological Congress*, have similar codes of ethics which you should be aware of.
Contacting Indigenous communities
Correct and adequate consultation with Indigenous communities and custodians is oneof the main ethical responsibilities of anyone working with Indigenous cultural heritage.In many states, this is mandatory practice, and is ‘policed’ in a sense by the variousgovernment departments which administer cultural heritage legislation. In Queensland,for example, proper consultation must be demonstrated before you will be granted asurvey permit to even look for sites, and Indigenous permission must be obtained to viewarchaeological reports in the government database (including reports on historicalarchaeological sites). In all states, adequate consultation is an essential prerequisite forobtaining an excavation permit (see ‘Working with the legislation’ on page 20). No field-work on Indigenous sites in Australia should be conducted without proper consultation.Initially you will need to establish who the correct custodians are for your study area—usually the best way to do this is to contact the appropriate local or regional AboriginalLand Council*, which may be able to put you in contact with the correct people. Positionson these committees are elected and the composition of the executive or other details maychange, so it is advisable to contact the relevant Land Council immediately prior to con-sultation to make certain that you are dealing with the correct community. Ask First: AGuide to Respecting Indigenous Heritage Places and Values, a booklet produced by the AustralianHeritage Commission and available on the web (www.ahc.gov.au/infores/publications/indigenousheritage/index.html#pdf ), outlines the steps involved in best practice forcontacting and consulting with Indigenous communities throughout Australia andcontains tips on how to resolve conflict.
12 THE ARCHAEOLOGIST’S FIELD HANDBOOK
*Archaeologists Field Handbook 29/6/04 5:23 PM Page 12

WIt is not enough to consult with any Indigenous person, however. You need to make
sure you have consulted with the correct people who are acknowledged as the propercustodians for their country. Because this can sometimes be a long and complex process,you should start consultation as soon as possible and not leave it to the last minute.Indigenous people will not necessarily wish to work to your time schedule and you mayneed to alter your plans to accommodate their wishes. Wherever possible, you should alsotry to include Indigenous people as part of the fieldwork team—even if it is only to invitethe senior custodians to visit and observe what you are doing in the field. Bear in mindthat any such involvement of Indigenous people will require appropriate payments fortheir time, even if they have only participated in an interview. Although the recommendedfee will vary from organisation to organisation (many Aboriginal Land Councils haveset their own schedules of fees according to age and seniority), you can budget for at least$25 per hour or $300 per day. Also, remember that working with you is only one part oftheir lives and they will have other things they need to do and obligations they have tofulfil. You should be prepared to work around these.
In most states, access to non-confidential Indigenous material (whether photographic,artefactual or documentary) held in government collections (such as the NationalMuseum*, or the Australian Institute of Aboriginal and Torres Strait Islander Studies—AIATSIS*) can only be obtained with written approval from the custodians of the regionunder study. If you are affiliated to a university, all research to do with Indigenous Aus-tralians (i.e. which has the words ‘Aboriginal’ or ‘Torres Strait Islander’ in the projectoutline) will have to be approved by the university’s ethics committee. The thinkingbehind this procedure is that all research on Indigenous peoples will impact upon them,even if the non-Indigenous people conducting the research cannot foresee that impactthemselves. Riley-Mundine (1988: 13, emphasis in original) argues that Indigenous peopleshould have control of, or at the very least involvement in, all research that involves them:‘Aboriginal people, as people, surely have the right to be involved in what is said aboutthem, how it is said and what research is carried out.’
The Code of Ethics of the Australian Archaeological Association recognises thatAustralian archaeology deals with the living heritage of Indigenous people and encour-ages archaeologists to work in close collaboration with Indigenous people at all times. Ifyou are undertaking a project that involves Indigenous sites, it is essential that you contactlocal Indigenous people during the early stages, while there is still room to shape theresearch so that it fulfils both your needs and theirs.
Working with Indigenous peoples
The main foundation for good ethical practice in archaeology is a respect for otherpeople’s cultural traditions. This means that your opinions and attitudes may need to be
PREPARING FOR FIELDWORK 13
*Archaeologists Field Handbook 29/6/04 5:23 PM Page 13
Wtempered by other worldviews which are not necessarily compatible with the scientificdictates of archaeology. While this does not mean that you must subject yourself tounreasonable demands, working with Indigenous communities will routinely require thatyou behave appropriately. This can take a number of forms, from not appearing inclothing which may be deemed offensive to not visiting restricted areas or sites, or notpressuring people to accept your opinion or to answer your questions.
One of the main areas of ethical responsibility is in the use of information provided byIndigenous consultants: in Indigenous systems, knowledge is not ‘open’ in the sense thatall people have an equal right to it. Indigenous knowledge is rarely definitive (in the sensethat there is only one ‘right’ answer) and it is often restricted. Because access to this know-ledge is a source of power, it must be controlled by people with the appropriatequalifications (usually based on age seniority). In terms of archaeological fieldwork, thismeans that it is essential you obtain your information from the correct people—thosewho hold the appropriate knowledge of those sites. Bear in mind that, even if you areworking on historical sites, you may still need to consult with the senior custodians ofthe people on whose land the sites are located.
Good ethical practice also means that you have a commensurate responsibility toensure that the information is used correctly. What a scientist may view dispassionatelyas ‘data’, a senior custodian may view as highly sensitive secret/sacred information. Some-times Indigenous people will impart restricted information to you; it then becomesyour continuing responsibility to ensure that this information is not seen or heard by aninappropriate audience. Maintaining continuing consultation is a long-term (but oftenunforeseen) aspect of a working relationship, particularly when it comes to the publi-cation of your results. If you intend to publish your fieldwork, you should return to thecommunity to show them what it is you wish to publish and how you will present theinformation. It is your duty to make sure that the publication does not contain inform-ation or images which the senior custodians require to be kept restricted. Permission isnot given forever, and you will probably need to get separate permission each time youwish to publish. If your fieldwork involves artefact collection or excavation, you may alsobe required to return the material to the Indigenous community after the completionof fieldwork.
Working with other community groups
Consultation is not solely limited to Indigenous groups. Particularly if you are conductinghistorical heritage fieldwork, you may need to consult with local community groups, suchas the local branch of the National Trust, or members of the local historical society. Whileit is not usually considered mandatory to consult with local communities in the sameway it is for Indigenous groups, such consultation can have many benefits. It can help
14 THE ARCHAEOLOGIST’S FIELD HANDBOOK
*Archaeologists Field Handbook 29/6/04 5:23 PM Page 14

Wfacilitate access to sites or information and may suggest fruitful directions for yourresearch. ‘Community’ includes all the people who live in the area in which an archaeo-logical project is being undertaken and will include a range of interest groups, each ofwhich might bring particular desires or skills to a project.
Approaching landowners or tenants for permission to access their land is a mandatoryaspect of consultation however, both as a matter of politeness and privacy, and of goodethical practice. In some states, obtaining this permission is an essential prerequisite toundertaking fieldwork—in Queensland, for example, you need written permission toprove you may enter land before you can obtain a permit to survey. The simple rule ofthumb is ‘if in doubt, consult’—and certainly the more consultation you undertake, theless likely you are to alienate anyone and the fewer problems you should encounter inthe course of your project. It is both good manners and good judgment to consult withthe community with whom you are working and to make sure that the communitybenefits from the research you are undertaking.
This, in turn, raises another ethical responsibility: communicating your results to thewider community. Public excavations and site tours, school talks, public lectures, a projectwebsite and popular publications, guidebooks and interpretive materials are all excellentways to make your project and its findings accessible (see Chapter 10: Getting your resultsout there). While this seems easy in theory, in fact it can take a great deal of time andcommitment. While many academic archaeologists have stressed the importance of com-municating the results of archaeological research to the wider public, few do this inpractice. It is important to remember that the public are interested not only in the results,but also in the process. Site tours and public excavations are popular because they teachpeople about what has been found and, in the process, about how we go about ‘doing’archaeology.
Archaeologists and their profession
Archaeologists also have responsibilities to others in their profession. This relates mainlyto the ways in which data are collected, recorded and archived and the potential for yourresults to be comparable with other projects. One of the main problems with manyconsultancy projects is that their survey methods and the results of their recording andanalysis are not clearly presented, or use unclear or idiosyncratic descriptive terms. If noone understands what you mean by a ‘convex flake tool’, or if you simply refer to anartefact as ‘unusual’, this will prevent anyone from drawing comparisons between theirdata and yours. This means that your results cannot be compared to similar projectselsewhere, and therefore will not contribute to the pool of current knowledge.
Similarly, reports from your fieldwork should be available for others to refer to. Thisis not always possible, of course—particularly if your report contains secret/sacred or
PREPARING FOR FIELDWORK 15
*Archaeologists Field Handbook 29/6/04 5:23 PM Page 15

Wotherwise confidential information—but ideally you should supply one copy to the clientor funding body, one copy to the appropriate state or federal heritage authority, copies toany interest groups who participated in the project, one copy to accompany the finds (ifyour project involved collection or excavation), and one copy to the nearest appropriatepublic archive or library (Birmingham and Murray 1987: 92).
At a very basic level, it is important to make detailed recordings of all fieldwork and tomake certain that you retain and archive your field journal (see ‘Keeping a field journal’in Chapter 3 on page 70), notes, recording forms and photographs. An archive shouldcontain all the primary information relating to the collection and analysis of the data,including:
• your field notebook(s);• originals of your site recording forms;• originals of your artefact analysis forms;• originals of any other form of data collection;• a complete photographic archive;• the originals of any site plans, sketches, maps or other drawings;• copies of any oral history tapes or transcriptions made as part of the project;• copies of any historical documents collected as part of the project;• an original copy of your report;• all relevant correspondence and permissions you sent or received as part of the project.
If part of your project uses a computer database, don’t just store this on disk—computer programs can be completely outdated within a few years, rendering yourdatabase inaccessible. If you have given your archive to a client, government repository ormuseum, you probably will have no control over updating the database or its software; ifthis is the case, make sure paper copies of your database are available. Many archaeologistsroutinely use computerised data collection, especially for photographs, but you will needto have hard copy backups of essential files for the long term (for more advice on digitalarchiving, see ‘Storing photographs and illustrations’ in Chapter 9 on page 305).
Tips for making your archive lastIt is not enough simply to create an archive by putting all your materials together. Youmust also ensure that you have used the correct media so that the recordings last andthat everything is properly labelled and cross-referenced, so that if anything becomesseparated from the rest of the archive, it can be replaced correctly.
16 THE ARCHAEOLOGIST’S FIELD HANDBOOK
*Archaeologists Field Handbook 29/6/04 5:23 PM Page 16
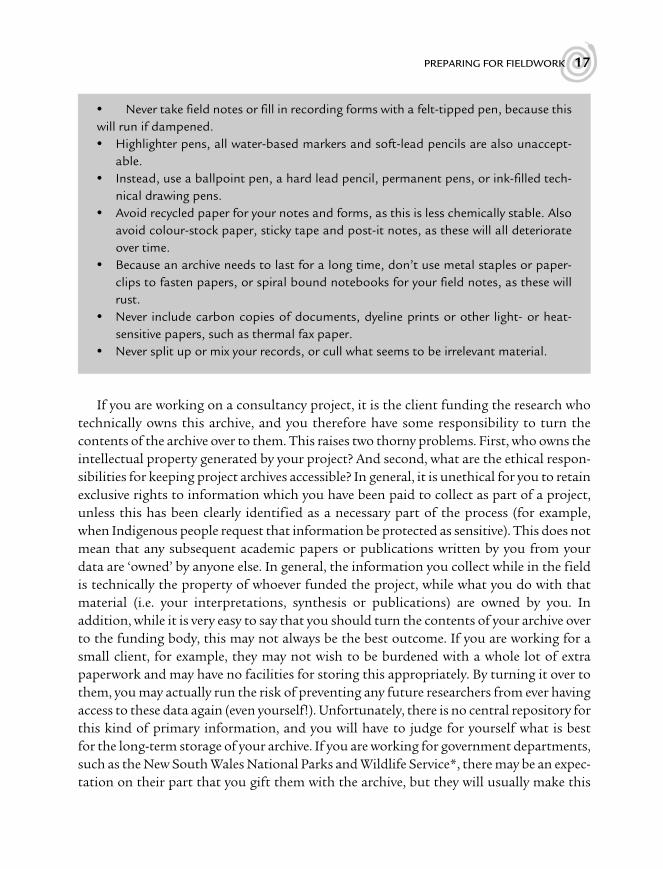
W• Never take field notes or fill in recording forms with a felt-tipped pen, because thiswill run if dampened.• Highlighter pens, all water-based markers and soft-lead pencils are also unaccept-
able.• Instead, use a ballpoint pen, a hard lead pencil, permanent pens, or ink-filled tech-
nical drawing pens.• Avoid recycled paper for your notes and forms, as this is less chemically stable. Also
avoid colour-stock paper, sticky tape and post-it notes, as these will all deteriorateover time.
• Because an archive needs to last for a long time, don’t use metal staples or paper-clips to fasten papers, or spiral bound notebooks for your field notes, as these willrust.
• Never include carbon copies of documents, dyeline prints or other light- or heat-sensitive papers, such as thermal fax paper.
• Never split up or mix your records, or cull what seems to be irrelevant material.
If you are working on a consultancy project, it is the client funding the research whotechnically owns this archive, and you therefore have some responsibility to turn thecontents of the archive over to them. This raises two thorny problems. First, who owns theintellectual property generated by your project? And second, what are the ethical respon-sibilities for keeping project archives accessible? In general, it is unethical for you to retainexclusive rights to information which you have been paid to collect as part of a project,unless this has been clearly identified as a necessary part of the process (for example,when Indigenous people request that information be protected as sensitive). This does notmean that any subsequent academic papers or publications written by you from yourdata are ‘owned’ by anyone else. In general, the information you collect while in the fieldis technically the property of whoever funded the project, while what you do with thatmaterial (i.e. your interpretations, synthesis or publications) are owned by you. Inaddition, while it is very easy to say that you should turn the contents of your archive overto the funding body, this may not always be the best outcome. If you are working for asmall client, for example, they may not wish to be burdened with a whole lot of extrapaperwork and may have no facilities for storing this appropriately. By turning it over tothem, you may actually run the risk of preventing any future researchers from ever havingaccess to these data again (even yourself!). Unfortunately, there is no central repository forthis kind of primary information, and you will have to judge for yourself what is bestfor the long-term storage of your archive. If you are working for government departments,such as the New South Wales National Parks and Wildlife Service*, there may be an expec-tation on their part that you gift them with the archive, but they will usually make this
PREPARING FOR FIELDWORK 17
*Archaeologists Field Handbook 29/6/04 5:23 PM Page 17

Wclear in the project brief. Intellectual property is a very grey area, and before undertakingany fieldwork you should investigate the requirements and expectations of all concerned.
Write it down and put your name on it—Aedeen Cremin’s tips for creating aproper archaeological archive
It is amazing how many records get lost or become useless over time because they arenot properly labelled. It is said that when Professor R.J.C. Atkinson died, a box full ofnotebooks was discovered among his things. The notebooks contained meticulousmeasurements of stones from megalithic monuments, probably including Stonehenge,which he had excavated in the 1950s. None of the notebooks were labelled and there-fore all of that work went to waste. Don’t let that happen to you. Here is a checklist foryou to think about:
• Label every piece of paper you handle, explaining what it is and put your name andthe date on it.
• Acquire a notebook for each job—and label it, with title, your name and the date ofuse. The small stitched books are best, as you are not tempted to tear pages out. Yes,you’ll end up with a box of half-empty notebooks, but at least you’ll be able to findthem when you need to. An obsolete disk or inadequate pro-forma will not give youthe information you need in six months’, let alone six years’, time.
• Never ‘lend’ your notebooks to anyone. They will never be returned, published oracknowledged. If somebody wants them that badly, they can pay to photocopythem.
• Put a copyright sign on any original documents you produce. It takes 30 seconds andprotects you. Of course, put your name and contact details on the document—people can’t acknowledge your work if they don’t know who you are.
• Fully label any sketches you make, e.g. not ‘W’ but ‘timber-framed double-hung sashwindow’ or ‘rock-cut well’, etc. Put a north arrow, scale, the date and your name onthe sketch. If the drawing is not to scale, say so. Label descriptions and measure-ments on the sketch if you can, if not list them as a caption.
• Keep a full photographic record, with as many details as you can fit in, e.g. not‘stamper battery from S’ but ‘1915 stamper battery viewed from the 1930s mineshaft. Distance from shaft 15m. Engine base is on right, stamper base on left;remains of amalgamation trays at centre. From SSE’. Carry a compass and alwayscheck, don’t guesstimate.
• Any photographs you produce should carry as full a caption as possible—writtenin biro on the back of a print, or incorporated on to the image on disk. Put yourname in full (e.g. ‘Indiana Jones’, not ‘Indy’) and the date (this is often crucial forexcavation records).
18 THE ARCHAEOLOGIST’S FIELD HANDBOOK
*Archaeologists Field Handbook 29/6/04 5:23 PM Page 18

W• Anything that involves other people needs to have their names listed in full also. An
image labelled ‘Jo, Alex and Rob on site’ is not going to be very useful to anybodyelse.
• If you must use initials, use three or four. You would be amazed how many peoplehave the same two initials as you and your colleagues.
• On a long-term project, survey or excavation, keep an ongoing field diary (yes in thesame notebook). There will be things you notice that may not be catered for inthe pro-formas and it is good to have these on record, however casually. Thesequence of work is also useful to know about later on.
• Remember that nothing is published on time, which is why you need to keep properrecords. In the 1960s, I worked on an excavation where the first director had diedunexpectedly, leaving the work unfinished. His successor finished the excavationbut never published the research, as he had other work in train. He too died unex-pectedly. Forty years later, a third person was finally commissioned to publish the fullexcavation report. Whether he did or not I don’t know—I just hope our recordkeeping was OK. I certainly have no record of any sort, not even a souvenir snapshot.This sort of thing happens.
• The notebooks are your archive. If you have a career in archaeology, they will be ofinterest to other people later, so don’t throw them away even when you think they’repast their use-by date.
PLANNING YOUR FIELD KIT
Possibly one of the most important tasks in planning for fieldwork is ensuring that youhave the right equipment to complete the job. Much archaeological fieldwork will nottake place in the cosy confines of a city, but in the bush, where sites may not have beendisturbed or destroyed by development. Before you go into the field, however, you willneed to consider what equipment will be essential for you to collect your data, what otherequipment might be necessary given where you are going, and anything else you mightneed. There are obvious essentials which should form the basics of any fieldwork kit:
• a pocket knife;• sunscreen;• insect repellent;• a good hat and boots;• a first-aid kit;• a water bottle.
PREPARING FOR FIELDWORK 19
*Archaeologists Field Handbook 29/6/04 5:23 PM Page 19

W
Other items to consider are lightweight,long-sleeved cotton shirts, which are not onlysun-sensible, but in fact have become manda-tory under Occupational Health and SafetyRegulations if you are working on some activemine sites. Other suggestions will depend onwhere you are working: in some inland areas,you may find that a fly-veil worn over your hatwill save your sanity, and in spinifex countrythick jeans which protect your lower legs willbe a godsend. Don’t embark on any fieldworkwithout making sure you have all the rightequipment and without preparing sufficientlywell—there is nothing worse than reaching a dif-ficult and isolated site only to realise that thereis no film for the camera, or that you forgot tobring the site recording forms.
Mark Staniforth’s tips for protecting your field gear
Buy a Pelican case. These are high-impact-resistant plastic cases designed to protectunderwater cameras, but make very suitable protection for any delicate field gear. I havea Pelican case set up with the following gear in it: a digital still camera, a digital moviecamera, a standard Olympus SLR camera (for taking colour slides), a GPS, a drawingboard, photo scales, a minirod, a north arrow, a hand-bearing compass, a 30 metrefibreglass tape, an 8 metre steel tape, two trowels, twelve trench corner pegs, plasticbags, string and a line level, plus assorted bits and pieces. This is enough gear to conductbasic survey work and to string out and excavate a test trench. The Pelican case is water-proof, airtight, you can stand on it and it can be locked with a padlock.
WORKING WITH THE LEGISLATION
All archaeology is governed by some form of heritage legislation. This is not intended tomake your job more difficult, but to protect sites and their contents from unwelcome
20 THE ARCHAEOLOGIST’S FIELD HANDBOOK
FIGURE 1.2: A typical archaeologist on fieldwork.In a group of fieldworkers, the archaeologist isalways the one wearing all the gear!
*Archaeologists Field Handbook 29/6/04 5:23 PM Page 20
Winterference or damage. All Australian states and territories have some form of heritagelegislation which needs to be followed. Unfortunately, this varies widely and is not neces-sarily equally effective in all states. Some states are much stricter in their requirementsthan others, even down to the preferred format in which you should present your report.In general, all states require you to apply for a permit before you excavate, collect orotherwise disturb a site. Before an administering authority will approve such a permit,however, it will require you to demonstrate that you have carefully thought through yourfieldwork. It will ask you to submit a research design as part of your permit application,outlining your research questions, excavation/collection methods and recommendationsfor the conservation and curation of any artefacts removed from the site. This last pointis very important as, under the provisions of all heritage legislation, all sites and theirmaterial contents (i.e. their artefacts) are the property of the Crown. This may mean thatyou will need to liaise with the appropriate government trustees (usually the statemuseum), the relevant Indigenous community and the legal administering body to ensurethat requirements for the proper care and long-term custodianship of artefacts removedfrom a site are being met.
There is also a requirement common to all states that you provide a written report onyour fieldwork and that you submit recording forms for any new sites you find to theadministering body. Most states maintain some form of database or register of heritagesites. Just as it may help your fieldwork to know what other sites have already beenrecorded in your area (but be aware that access to site databases or records may berestricted in some states or circumstances), other researchers may also want to knowabout your sites. As each state has its own set of standardised recording forms, make sureyou obtain copies of these before you go into the field and that you fill them in completelyand accurately before you submit them. Because the precise requirements of legislationvary from state to state, make sure that you are aware of the relevant cultural heritagelegislation and the requirements of the administering body in your state or territory beforeyou begin fieldwork.
Don’t interfere with heritage sites
In general, it is both illegal and unethical to knowingly damage a heritage site. Any formof unsanctioned alteration to, removal from, addition to or interference with the fabricof a site may be deemed damaging. Be aware that even ostensibly ‘useful’ activities havethe potential to cause damage, such as removing invasive vegetation overgrowth froman abandoned building (its removal may physically damage parts of the building),‘tidying up’ an historic site (what you perceive to be ‘old junk’ may in fact be importantarchaeological artefacts), re-erecting a collapsed official sign in a rockshelter (this may
PREPARING FOR FIELDWORK 21
*Archaeologists Field Handbook 29/6/04 5:23 PM Page 21

Wdamage the sub-surface archaeological deposits in the shelter), or cleaning graffiti froma rock art surface (this may remove traces of the art). Even though it may seem counter-intuitive, sometimes the apparent ‘messiness’ or physical degeneration of a site isactually part of its significance. Even if it is not, you must have permission from therelevant state authority before you interfere in any way with a heritage site.
State legislation
There is a lot of legislation relating to heritage matters. In Table 1.1 on page 23, we haveonly listed those Acts which are applicable to the majority of archaeological field projects.Some special circumstances to be aware of are as follows:
• Queensland is the only state which requires you to have a permit to look for sites(both Indigenous and historical), as well as to excavate or disturb them. Apart fromdetailing how and where you intend to survey, the permit application process requiresyou to demonstrate that you have consulted with the relevant Indigenous people beforeyou go into the field, and provides space to note their opinions. The process forapplying for an excavation permit is similar and also requires you to demonstrateadequate consultation with Indigenous people before you begin fieldwork. Permissionto access the Environmental Protection Authority’s collection of archaeologicalreports also requires Indigenous permission. In Queensland, a heritage site is definedas any structure or object that is at least 30 years old. In 2003 Queensland passed newheritage legislation to protect Indigenous sites. Please contact the relevant govern-ment authority for the latest procedures.
• New South Wales has the tightest provisions for protecting cultural heritage sites. TheNational Parks and Wildlife Service (NPWS) has very clear guidelines for the contentsand formats of archaeological consultancy reports which need to be followed. In NewSouth Wales, a site must be over 50 years old in order to qualify as ‘heritage’.
• As in Queensland, the ACT requires you to contact the relevant Indigenous organisa-tion prior to the disturbance of any site, whether Indigenous or historical. Althoughthere is no blanket protection for historical places, there is still an ethical responsibilityto report new historical sites to the ACT Heritage Council*.
• In Victoria, a site must be at least 50 years old in order to qualify as ‘heritage’.• In South Australia, historical archaeological sites are only protected if they are already
listed on the state’s Heritage Register. Unfortunately, there is at present no other provisionfor regulating archaeological work on any other (non-listed) historical archaeological sites.
• Like those in South Australia, historical sites in Western Australia are only protectedif they are already listed on the state’s Register of Historic Places. Other historical
22 THE ARCHAEOLOGIST’S FIELD HANDBOOK
*Archaeologists Field Handbook 29/6/04 5:23 PM Page 22

Wsites receive no protection unless it can be argued that they are also Indigenous (i.e. contact) sites.
• If you are working in a National Park in the Northern Territory, you will need to applyfor a research permit from the Parks Service. This is simply to ensure that all researchconducted within national parks is sound and conforms to their guidelines.
TABLE 1.1: The legal and ethical responsibilities of archaeologists working with statelegislation
State Legislation Administering Indig. Hist. Requirements ResponsibilitiesBody Sites Sites
Qld Cultural Record Cultural Heritage � � • Must have a • Must submit (Landscapes Branch, permit to completed Queensland and Environmental survey/look recording formsQueensland Protection Agency* for sites for any new sitesEstate) Act 1997 • Must have a you find to the EPA
permit to • Must submitexcavate, collect copies of finalor otherwise reports (fromdisturb a site either survey or
excavation/collection) tothe EPA
Qld The Queensland Cultural Heritage � • Must apply • Must submitHeritage Act Branch, through the copies of final1992–1995 Environmental EPA to the reports (from
Protection Agency* Queensland either survey orHeritage excavation/Council for collection toconsent to the EPAdevelop a siteon theQueenslandHeritage Register
NSW The Heritage NSW Heritage � • Must have a • Must submitAct 1977 Office* permit to copies of final
excavate, collect reports (fromor otherwise either survey ordisturb a site excavation/
• Must apply to collection) to the NSW the Heritage Heritage Office within Council for 12 months
PREPARING FOR FIELDWORK 23
*Archaeologists Field Handbook 29/6/04 5:23 PM Page 23

WTABLE 1.1: continued
State Legislation Administering Indig. Hist. Requirements ResponsibilitiesBody Sites Sites
consent tocarry outactivities to anitem listed onthe state Heritage Register
NSW National Parks Cultural Heritage and Wildlife Act Branch � � • Must have a • Must submit1974 Department permit to completed
of Environment excavate, recording formsand Conservation* collect or for any new sites
otherwise you find to thedisturb a site Department of(NPWS Act Environment and only affects Conservationhistorical • Must submit archaeological copies of final sites within reports (from National Parks) either survey or
excavation/colle-ction) to the DEC
• The format ofreports shouldconform to theNPWS StandardsManual
ACT Land (Planning Heritage Unit, � � • Must have a • Must reportand Environment ACT* permit to discoveries ofEnvironment) excavate, new IndigenousAct 1991 collect or places to the
otherwise minister withindisturb a site seven dayslisted on the • Must submitRegister of completedHeritage Places recording forms
for any new sitesyou find to theHeritage Council
• Must submitcopies of finalreports (fromeither survey or
24 THE ARCHAEOLOGIST’S FIELD HANDBOOK
*Archaeologists Field Handbook 29/6/04 5:23 PM Page 24

WState Legislation Administering Indig. Hist. Requirements Responsibilities
Body Sites Sites
excavation/collection) tothe HeritageCouncil
Vic Heritage Act Heritage Victoria* � • Must apply • Must submit1995 through completed
Heritage recording formsVictoria to for any new sitesthe Heritage you find toCouncil of Heritage VictoriaVictoria for • Must submitconsent to copies of finaldevelop a site reports (fromon the either survey orVictorian excavation/Heritage collection) toRegister Heritage Victoria
within three tosix months ofcompletion
Vic Heritage Act Heritage Services � � • Must have a • Must submit1995 Branch, Aboriginal permit to completed
Affairs Victoria, excavate, collect recording formsDepartment of or otherwise for any new sitesNatural Resources disturb a site you find toand Environment* Aboriginal
Affairs• Must submit
copies of finalreports (fromeither survey orexcavation/collection) toAboriginalAffairs
SA Aboriginal Department of State � • Must have a • Must report theHeritage Act Aboriginal Affairs* permit to discovery of any1988 excavate, collect site to
or otherwise Department ofdisturb a site State Aboriginal
Affairs
PREPARING FOR FIELDWORK 25
*Archaeologists Field Handbook 29/6/04 5:23 PM Page 25

WTABLE 1.1: continued
State Legislation Administering Indig. Hist. Requirements ResponsibilitiesBody Sites Sites
• Must submitcopies of finalreports (fromeither survey orexcavation/collection) toDepartment ofState AboriginalAffairs
SA Heritage Act Heritage SA*, � • Must apply to • Must submit1993 Department Heritage SA to copies of final
for Environment develop a site reports (fromand Heritage on the state either survey or
Heritage excavation/Register collection) to
• This includes Heritage SAobtaining a permit to excavate a siteif it is listed onthe register
SA State Development � • Must submit • Includes anyDevelopment Assessment an application activitiesAct 1993 Commission* to the DAC for affecting
all works that state heritagewill materially places or areasaffect a • Also enablesheritage place places of localor its context heritage value to
be listed on aninventoryattached to thestate HeritageRegister
SA State Historic Heritage SA* � • Must obtain • Must report theShipwrecks Act a permit to discovery of any1981 interfere with shipwreck or
a shipwreck or articlesto remove a associated withrelic from a a shipwreck toshipwreck Heritage SA
26 THE ARCHAEOLOGIST’S FIELD HANDBOOK
*Archaeologists Field Handbook 29/6/04 5:23 PM Page 26
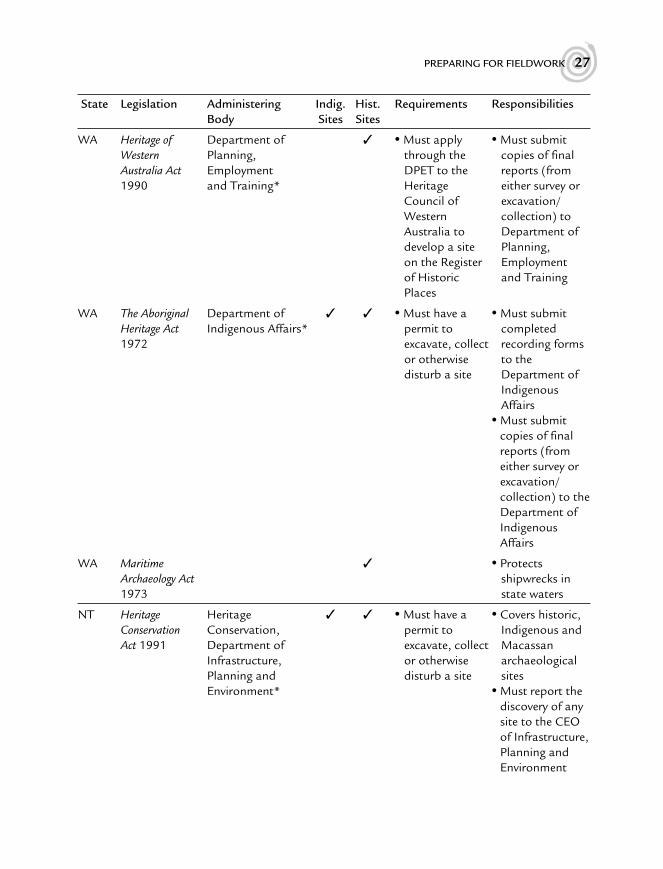
WState Legislation Administering Indig. Hist. Requirements Responsibilities
Body Sites Sites
WA Heritage of Department of � • Must apply • Must submitWestern Planning, through the copies of finalAustralia Act Employment DPET to the reports (from1990 and Training* Heritage either survey or
Council of excavation/Western collection) toAustralia to Department ofdevelop a site Planning,on the Register Employment of Historic and TrainingPlaces
WA The Aboriginal Department of � � • Must have a • Must submitHeritage Act Indigenous Affairs* permit to completed1972 excavate, collect recording forms
or otherwise to the disturb a site Department of
IndigenousAffairs
• Must submitcopies of finalreports (fromeither survey orexcavation/collection) to theDepartment ofIndigenousAffairs
WA Maritime � • ProtectsArchaeology Act shipwrecks in1973 state waters
NT Heritage Heritage � � • Must have a • Covers historic,Conservation Conservation, permit to Indigenous andAct 1991 Department of excavate, collect Macassan
Infrastructure, or otherwise archaeologicalPlanning and disturb a site sitesEnvironment* • Must report the
discovery of anysite to the CEOof Infrastructure,Planning andEnvironment
PREPARING FOR FIELDWORK 27
*Archaeologists Field Handbook 29/6/04 5:23 PM Page 27

WTABLE 1.1: continued
State Legislation Administering Indig. Hist. Requirements ResponsibilitiesBody Sites Sites
NT Sacred Sites Aboriginal � • Must have an • Can apply for anAct 1989 Areas Protection Authority Authority
Authority* Certificate if Certificate fromfieldwork is the AAPA beforebeing conductingconducted on fieldwork in casea sacred site any sacred sites
are located
Tas Aboriginal Department of � • Must have a • Must report theRelics Act Primary Industries, permit to discovery of any1975 Water and excavate, collect site to the
Environment* or otherwise Aboriginaldisturb a site Heritage
Section, DPIWE• Must submit
copies of finalreports to theAboriginalHeritage Section
Tas Historical Tasmanian � • Must apply to • Must report theCultural Heritage Council*, the Tasmanian discovery of anyHeritage Act Department of Heritage site to the1995 Primary Council for a Department of
Industries, Water permit to carry Primaryand Environment out any works Industries,
in relation to a Water andregistered place Environmentor place within a heritage area
National legislation
In general, the state Acts provide legal protection for the physical evidence of past humanoccupation, while Commonwealth Acts, such as the Aboriginal and Torres Strait IslanderHeritage Protection Act 1984, deal with heritage in a wider sense. The Historic Shipwrecks Actprotects all wrecks in Australian waters older than 75 years, regardless of whether they areknown or not (except for those in state waters, bays or rivers, which are covered by stateActs). Commonwealth Acts usually only take precedence over state Acts if there is conflict,or if the Commonwealth Government is involved in developing a site.
28 THE ARCHAEOLOGIST’S FIELD HANDBOOK
*Archaeologists Field Handbook 29/6/04 5:23 PM Page 28

WTABLE 1.2: The legal and ethical responsibilities of archaeologists working with federal
legislation
Legislation Administering Indig. Hist. Requirements ResponsibilitiesBody Sites Sites
Australian Australian � � • This will only affect you • The Australian Heritage Heritage if your work is being Heritage Commission Commission* funded by the Commission Act Act 1975 Commonwealth only applies to the
Government, or is activities of theconducted through Commonwealtha Commonwealth Government Government agency and and its if your project involves ministers, work on a site on the departments, Register of the authorities andNational Estate companies
• Under the Act, all activities judged likely tohave a significant impact on sites in the register must be referred to the Commission for comment
Aboriginal Aboriginal � • Can only be invoked and Torres and Torres by or on behalf of anStrait Islander Strait Islander Aboriginal or Torres Heritage Commission* Strait Islander Protection organisationAmendment Act 1987
Historic Individual state � • Protects gazettedShipwrecks bodies within shipwrecks and theirAct each state artefacts in Com-1976–1981 monwealth waters
from disturbance• Can’t enter a pro-
tected zone withoutauthorisation
• Must report historicshipwrecks or relics tothe federal ministerthrough the relevantstate body (HeritageSA, Heritage Victoria,etc.)
PREPARING FOR FIELDWORK 29
*Archaeologists Field Handbook 29/6/04 5:23 PM Page 29

WREFERENCES AND FURTHER READING
Australian Archaeological Association 1994, ‘Code of Ethics’, Australian Archaeology 39: 129.Australian Heritage Commission 2002, Ask First: A Guide to Respecting Indigenous Heritage
Places and Values, Australian Heritage Commission, Canberra. www.ahc.gov.au/infores/publications/indigenousheritage/index.html#pdf
Birmingham, Judy and Murray, Tim 1987, Historical Archaeology in Australia: A Handbook,National Estate Grants Program.
Langford, Ros 1983, ‘Our heritage—your playground’, Australian Archaeology 16: 1–6.Lewis, Darrell and Bird Rose, Deborah 1985, ‘Some ethical issues in archaeology: a method-
ology of consultation in northern Australia’, Australian Aboriginal Studies 1: 37–44.McBryde, Isabel 1986, Who Owns the Past? Oxford University Press, Melbourne.Orser, Charles and Fagan, Brian 1995, Historical Archaeology, Harper Collins College Publishers,
New York.Pearson, Michael and Sullivan, Sharon 1999, Looking After Heritage Places: The Basics of
Heritage Planning for Managers, Landowners and Administrators, Melbourne University Press,Melbourne.
Riley-Mundine, L. 1988, ‘An Aboriginal perspective to Australian archaeology’, unpublishedpaper, Department of Archaeology, University of New England, Armidale.
Vitelli, K.D. (ed.) 1996, Archaeological Ethics, Alta Mira Press, Walnut Creek, California.Zimmerman, Larry J., Vitelli, Karen D. and Hollowell-Zimmer, Julie (eds) 2003, Ethical Issues in
Archaeology, Alta Mira Press in cooperation with the Society of American Archaeology,Walnut Creek, California.
USEFUL WEBSITES
www.heritage.gov.au/govtagencies.html. This site, maintained by the Australian HeritageCommission, contains a listing of all government and non-government agencies with inter-ests in heritage, as well as collections of key resources and links to databases of state,territory and commonwealth heritage lists and funding bodies.
The Ian Potter Foundation: www.ianpotter.org.au. This foundation provides grants forgeneral charitable purposes in Australia. Its areas of interest are the arts, education,environment and conservation, health, social welfare, science and medical research. It alsohas a small travel grants program.
The Australian Institute of Aboriginal and Torres Strait Islander Studies (AIATSIS):www.aiatsis.gov.au. AIATSIS is a major national funding body for research in AustralianIndigenous studies. It supports research into a wide range of areas, such as history (includ-ing family and community history), politics, law, public policy, health (social, culturaland environmental aspects), biological sciences, education, linguistics, social anthro-pology, archaeology and the arts. The annual deadline for research grant applicationsis 31 January. There are two rounds for international conference support: 15 March and31 August.
30 THE ARCHAEOLOGIST’S FIELD HANDBOOK
*Archaeologists Field Handbook 29/6/04 5:23 PM Page 30

WThe Archaeological Data Service: http://ads.ahds.ac.uk: This site promotes good practice in
the use of digital data in archaeology and provides technical advice to the research com-munity. The page on standards, http://ads.ahds.ac.uk/project/userinfo/standards.html, isparticularly useful.
Australian Museums and Galleries online: www.amol.org.au/. This site is useful for back-ground research, and contains links to Australian museums and galleries, as well as anational database of museum and gallery records.
PREPARING FOR FIELDWORK 31
*Archaeologists Field Handbook 29/6/04 5:23 PM Page 31

CHAPTER TWONAVIGATION AND MAPPING
WHAT YOU WILL LEARN FROM THIS CHAPTER
W How to use maps to navigate to sitesW How to understand scaleW How to calculate a grid reference from a mapW The uses of different kinds of mapsW How to read bearings from a compassW How to use a GPSW Basic bush survival skillsW Basic bush camping skills
Navigation and mapping are two of the most important skills in archaeological fieldwork.You will need these skills to get to and from sites, to avoid getting lost, and to be able torecord the location of sites accurately. The two fundamental components of these skillsare being able to understand a map and extrapolate from that map to the physical featuresyou can see around you, and knowing how to read a compass. With these two skillsmastered, you will be able to perform most of the basic surveying processes you will everneed in the field.
W W W
WW
32
*Archaeologists Field Handbook 29/6/04 5:23 PM Page 32
WUSING MAPS
Maps are simply devices for transforming points on the curved surface of the Earth intoa flat, two-dimensional plane. There are various methods for doing this, but the mostcommon is the Universal Transverse Mercator (UTM) Grid system, which—as its namesuggests—is a worldwide mapping system that divides the world into 60 equal zones fromwest to east. Australia covers twelve zones of this system, from 47 through to 58. These arethe grid zone numbers depicted in the legend of every map. The area around Armidale, inNew South Wales, for example, is designated ‘56J’ in the UTM system. Until very recently,most maps in Australia were based on the Australian Map Grid, a UTM projection systemwhich was the best estimate of the Earth’s shape around the Australian continent(Geoscience Australia 2003). Recent updates on this system have produced the Map Gridof Australia 1994 (MGA94), which has been designed to supersede earlier AMG-derivedmaps. Because maps drawn at different times will have used different mathematicalmodels of the Earth to flatten its curved surface, it is important to note the specific systemused to generate each map (all maps will explain the system they use in the legend at thebottom or to one side). Because these systems do not match up, it is important to notewhich system you are using to calculate a grid reference, as the same grid reference underdifferent systems will not refer to the same point in space. Likewise, it is important to notewhich system your GPS unit has been set to (see ‘Using a Global Positioning System’below) to make the grid reference accurate.
There are several different types of map that you will become familiar with in thecourse of archaeological fieldwork. The most common of these are topographic maps,geological maps and orthophoto maps. All of them use the same UTM grid system—theyjust plot different kinds of information. Topographic maps depict all the visible naturaland built surface features, whereas geological maps depict rock formations, geologicalzones and soil types. Orthophoto maps combine aerial photography with topographicinformation. They can be very useful, but their coverage is usually restricted to majortowns and their immediate environs. The maritime equivalent of maps is charts, whichdepict the depth of the ocean rather than the height of the land.
Most maps are oriented with north to the top, south to the bottom, east to the rightand west to the left. At the bottom of each map is the scale, a legend to explain themapping conventions used to depict features and a small boxed section telling you howto read a grid reference. This box will also specify the grid zone designation for the map,which you will need to know when calculating a grid reference (see ‘Using a map to calculate a grid reference’ on page 36). Maps also come in a standard range of scales(although not all scales are available in all areas), from very small-scale maps which coverenormous areas (such as 1:1000 000 maps covering nearly 3000 square kilometres) tolarge-scale maps covering much smaller areas in greater detail (such as 1:25 000 scale
NAVIGATION AND MAPPING 33
*Archaeologists Field Handbook 29/6/04 5:23 PM Page 33

Wmaps covering only 750 square kilometres). Scale is simply the ratio of the size of a featureas it is drawn on the map to its actual size. This ratio is given as a representative fraction,so that 1:100 means that one unit of measurement on the map (whether 1 millimetre, 1centimetre or 1 metre) represents 100 of the same units when measured on the ground.Thus 1 millimetre on the map equals 100 millimetres on the ground, 1 centimetre equals100 centimetres and so on (see Table 2.1). To make things even easier, the representativefraction is also converted into a linear bar scale at the bottom of the map to show you thisrelationship graphically. As you can see in Table 2.1, at scales of 1:250 or larger, somethingwhich is 50 centimetres long is far too small to plot accurately on to a map.
TABLE 2.1: Relationship between scale of map or plan and real distance
Scale of plan Real measurement Scaled measurement
50 cm on the ground = 2 cm on the plan1 m on the ground = 4 cm on the plan
1:25 2 m on the ground = 8 cm on the plan(1 cm on the plan = 3 m on the ground = 12 cm on the plan25 cm on the ground) 5 m on the ground = 20 cm on the plan
10 m on the ground = 40 cm on the plan 50 m on the ground = 2 m on the plan
50 cm on the ground = 1 cm on the plan1 m on the ground = 2 cm on the plan
1:50 2 m on the ground = 4 cm on the plan(1 cm on the plan = 3 m on the ground = 6 cm on the plan50 cm on the ground) 5 m on the ground = 10 cm on the plan
10 m on the ground = 20 cm on the plan 50 m on the ground = 1 m on the plan
50 cm on the ground = 0.6 cm on the plan1 m on the ground = 1.2 cm on the plan
1:75 2 m on the ground = 2.4 cm on the plan(1 cm on the plan = 3 m on the ground = 3.6 cm on the plan75 cm on the ground) 5 m on the ground = 6 cm on the plan
10 m on the ground = 12 cm on the plan50 m on the ground = 60 cm on the plan
50 cm on the ground = 0.5 cm on the plan1 m on the ground = 1 cm on the plan
1:100 2 m on the ground = 2 cm on the plan(1 cm on the plan = 3 m on the ground = 3 cm on the plan100 cm on the ground) 5 m on the ground = 5 cm on the plan
10 m on the ground = 10 cm on the plan50 m on the ground = 50 cm on the plan
50 cm on the ground = 0.4 cm on the plan1 m on the ground = 0.8 cm on the plan
34 THE ARCHAEOLOGIST’S FIELD HANDBOOK
*Archaeologists Field Handbook 29/6/04 5:23 PM Page 34

WScale of plan Real measurement Scaled measurement
1:125 2 m on the ground = 1.6 cm on the plan(1 cm on the plan = 3 m on the ground = 2.4 cm on the plan125 cm on the ground) 5 m on the ground = 4 cm on the plan
10 m on the ground = 8 cm on the plan50 m on the ground = 40 cm on the plan
50 cm on the ground = 0.2 cm on the plan1 m on the ground = 0.4 cm on the plan
1:250 2 m on the ground = 0.8 cm on the plan(1 cm on the plan = 3 m on the ground = 1.2 cm on the plan250 cm on the ground) 5 m on the ground = 2 cm on the plan
10 m on the ground = 4 cm on the plan50 m on the ground = 20 cm on the plan
1 m on the ground = 0.2 cm on the plan1:500 2 m on the ground = 0.4 cm on the plan(1 cm on the plan = 3 m on the ground = 0.6 cm on the plan500 cm on the ground) 5 m on the ground = 1 cm on the plan
10 m on the ground = 2 cm on the plan50 m on the ground = 10 cm on the plan
1 m on the ground = 0.13 cm on the plan1:750 2 m on the ground = 0.26 cm on the plan(1 cm on the plan = 3 m on the ground = 0.39 cm on the plan750 cm on the ground) 5 m on the ground = 0.65 cm on the plan
10 m on the ground = 1.3 cm on the plan50 m on the ground = 6.5 cm on the plan
1 m on the ground = 0.1 cm on the plan1:1000 2 m on the ground = 0.2 cm on the plan1 cm on the plan =) 3 m on the ground = 0.3 cm on the plan1000 cm on the ground) 5 m on the ground = 0.5 cm on the plan
10 m on the ground = 1 cm on the plan50 m on the ground = 5 cm on the plan
Scale will make a difference to how finely you can plot features onto a map or howaccurate you need to be when measuring an area for a site plan. (See ‘Drawing horizontalsurfaces (plans)’ on page 286). To illustrate the difference which scale can make, imagineyou’re plotting the location of a site by placing a 1 millimetre dot on a map from theballpoint pen in your pocket. On a 1:25 000 scale map, the diameter of your dot willbe something like 25 metres, on a 1:100 000 scale map, its diameter will have increased to100 metres, and on a 1:1000 000 scale map, the same dot will now be covering an area ofsome 20 kilometres. If you were then to assign that dot a grid reference, so that thelocation of the site was permanently recorded, obviously the grid reference determinedfrom the 1:25 000 scale map would provide a much more accurate fix. Generally speaking,
NAVIGATION AND MAPPING 35
*Archaeologists Field Handbook 29/6/04 5:23 PM Page 35

Wa larger-scale map is better for survey purposes, as it will have a better resolution of surfacefeatures, making it easier and more accurate to plot sites. While most surveys can get awaywith plotting sites on a 1:100 000 scale map, 1:25 000 is by far the most accurate.
USING A MAP TO CALCULATE A GRID REFERENCE
When you look at any official published map, you will see solid black lines running vertic-ally and horizontally across the map. These are the grid lines. The lines that are drawnvertically on the map and on which the figures increase in magnitude from west to east,are known as eastings; the lines that are drawn horizontally across the map and on whichthe figures increase in magnitude from south to north are called northings (Biddle et al.1974: 39). Eastings represent the distance that each line is east of the start of the mapzone. Northings represent the distance each grid line is below the equator. By usingeastings and northings, it is possible to describe the location of any point on a map by
36 THE ARCHAEOLOGIST’S FIELD HANDBOOK
FIGURE 2.1: The relationship between the area of a map’s coverage and its scale
*Archaeologists Field Handbook 29/6/04 5:23 PM Page 36

Wspecifying the number of metres a point is east of the nearest vertical grid line and thenumber of metres it is north of the nearest horizontal grid line. This is called a gridreference and, depending on the degree of accuracy you want to achieve, it is possible toassign a grid reference which specifies a unique point on the surface of the Earth. To reador assign a grid reference, you must follow three simple rules:
1 Always read from the bottom left hand (southwestern) corner of the relevant gridsquare.
2 Always read the easting (the vertical line) before the northing (the horizontal line).3 Always read eastings from left to right and northings from bottom to top.
This means that, when you are reading a grid reference from a map, you need to readthe closest easting to the left of the site (because eastings are always read from left to right)and the closest northing below the site (because northings are always read from bottomto top). Because this is the convention, if you wrote down the easting incorrectly as beingthe closest line to the right of the site, for example, you would actually be indicating to thereader that the site was to the right of that line and giving a grid reference which placedthe site too far to the east.
Figure 2.2 illustrates this. The grid reference for a hypothetical heritage site on this mapcan be specified at various levels of precision. Because few maps are ever at a scale of 1:1(that’s the point of maps: to reduce a large area so it fits on to a relatively small sheet ofpaper), the degree of accuracy you will achieve in plotting a site via a grid reference willdepend both on the scale of the map you are using and the order of accuracy you give to thegrid reference. It is perfectly possible to plot a site on a map using only a four-figure grid ref-erence (see Table 2.2 on page 39). This is called an area reference but will only be accurateto a 1000 metre square around the site (i.e. all it will tell you is that your site occurs some-where within that 1000 metre square). In Figure 2.2, the area reference for the site is 2672.
To define a more accurate position, you need to refine the scale of the map down bydividing that 1000 metre square into successively smaller squares (see Figure 2.2 on page38). Each of the lines separating these smaller squares will be numbered from 1 through9, beginning in the bottom left hand corner of the square. To calculate a six-figure gridreference, you initially follow the same process as for a four-figure grid reference, addingtwo extra steps (see below). In Figure 2.2, the six-figure grid reference for the site is 268723.While far more accurate than an area reference, this still only positions the site within a100 metre square. To be even more accurate, you need to locate the site to within thenearest 10 metres. To do this, follow the same basic procedure, adding a few extra steps togive an eleven-figure grid reference. In Figure 2.2, the eleven-figure grid reference for thesame site is 32687 807235. If you are working with a map of large enough scale (anythingfrom 1:4 000 to 1:25 000), you will be able to be even more accurate and pinpoint the site
NAVIGATION AND MAPPING 37
*Archaeologists Field Handbook 29/6/04 5:23 PM Page 37

W
to the nearest metre. This will give a full grid coordinate for the site. By including the gridzone number and section letter from the map legend, you make the full grid coordinateunique, which means that no other point on the Earth will have this same reference(Biddle et al. 1974: 40). You can use the grid zone number and letter in conjunction withthe 100 000 metre square designation and any area or grid reference to give such a uniquereference. In Figure 2.2, the universal grid reference for the site is 55KCA 32687 807235.
38 THE ARCHAEOLOGIST’S FIELD HANDBOOK
FIGURE 2.2: Calculating a grid reference
*Archaeologists Field Handbook 29/6/04 5:23 PM Page 38

•Lo
cate
the
nea
rest
ver
tical
grid
line
(ea
stin
g) t
o th
ele
ft o
f the
site
•R
ead
only
the
larg
e bl
ack
figur
es w
hich
labe
l the
line
(the
y w
ill b
e on
the
top
and
the
bott
om o
f the
map
, eith
er b
esid
e or
on
the
line
itsel
f)•
Writ
e th
ese
num
bers
dow
n•
Loca
te t
he n
eare
stho
rizon
tal g
rid li
ne(n
orth
ing)
bel
ow t
he s
ite•
Rea
d on
ly t
he la
rge
blac
kfig
ures
whi
ch la
bel t
he li
ne•
Writ
e th
is n
umbe
r af
ter
the
east
ing
num
ber
•Th
e ea
stin
g an
d no
rthi
ngnu
mbe
rs t
oget
her
are
your
Are
a R
efer
ence
•Lo
cate
the
nea
rest
ver
tical
grid
line
(eas
ting)
to
the
left
of t
he s
ite•
Rea
d bo
th t
he s
mal
l bla
ck fi
gure
s an
dth
e la
rge
blac
k fig
ures
whi
ch la
bel t
helin
e (t
hey
will
be
on t
he t
op a
nd t
hebo
ttom
of t
he m
ap, e
ither
bes
ide
oron
the
line
itse
lf)•
Writ
e th
ese
num
bers
dow
n•
Div
ide
the
grid
squ
are
whi
ch c
onta
ins
the
site
into
ten
equ
al v
ertic
al s
trip
s,an
d id
entif
y th
e nu
mbe
r of
the
near
est
tent
h st
rip li
ne t
o th
e le
ft o
fth
e si
te•
Writ
e th
is n
umbe
r do
wn
afte
r th
esm
all a
nd la
rge
figur
es•
Subd
ivid
e th
is s
mal
ler
squa
re a
lso
into
ten
equ
al v
ertic
al s
trip
s an
did
entif
y th
e nu
mbe
r of
the
nea
rest
tent
h st
rip li
ne t
o th
e le
ft o
f the
site
•W
rite
this
num
ber
dow
n•
Loca
te t
he n
eare
st h
oriz
onta
l grid
line
(nor
thin
g) b
elow
the
site
•R
ead
the
smal
l bla
ck fi
gure
s an
d th
e la
rge
blac
k fig
ures
whi
ch la
bel t
helin
e•
Writ
e th
ese
num
bers
dow
n af
ter
the
east
ing
num
bers
•D
ivid
e th
e sq
uare
into
ten
equ
alho
rizon
tal s
trip
s, a
nd id
entif
y th
e
•Fi
rst
iden
tify
the
zone
num
ber
and
sect
ion
lett
er o
f the
map
(th
is is
give
n in
the
map
lege
nd a
s th
e gr
idzo
ne d
esig
natio
n)•
Not
e th
e tw
o le
tter
s w
hich
iden
tify
the
100
000
met
re s
quar
e in
whi
chth
e si
te o
ccur
s (t
his
will
be
give
nbe
neat
h th
e gr
id z
one
desi
gnat
ion)
•W
rite
thes
e nu
mbe
rs a
nd le
tter
sdo
wn
•Lo
cate
the
nea
rest
ver
tical
grid
line
(eat
sing
) to
the
left
of t
he s
ite•
Rea
d bo
th t
he s
mal
l bla
ck fi
gure
and
the
larg
e bl
ack
figur
es w
hich
labe
l the
line
(th
ey w
ill b
e on
the
top
and
the
bott
om o
f the
map
,ei
ther
bes
ide
or o
n th
e lin
e its
elf)
•W
rite
thes
e nu
mbe
rs d
own
afte
rth
e zo
ne n
umbe
r an
d se
ctio
n le
tter
•D
ivid
e th
e gr
id s
quar
e w
hich
cont
ains
the
site
into
ten
equ
alve
rtic
al s
trip
s, a
nd id
entif
y th
enu
mbe
r of
the
nea
rest
ten
th s
trip
line
to t
he le
ft o
f the
site
•W
rite
this
num
ber
dow
n•
Subd
ivid
e th
is s
mal
ler
squa
re a
lso
into
ten
equ
al v
ertic
al s
trip
s an
did
entif
y th
e nu
mbe
r of
the
nea
rest
tent
h st
rip li
ne t
o th
e le
ft o
f the
site
•Lo
cate
the
nea
rest
ver
tical
grid
line
(ea
stin
g) t
o th
e le
ftof
the
site
•R
ead
only
the
larg
e bl
ack
figur
es w
hich
labe
l the
line
(the
y w
ill b
e on
the
top
and
the
bott
om o
f the
map
,ei
ther
bes
ide
or o
n th
e lin
eits
elf)
•W
rite
thes
e nu
mbe
rs d
own
•D
ivid
e th
e gr
id s
quar
ew
hich
con
tain
s th
e si
te in
tote
n eq
ual v
ertic
al s
trip
s,an
d id
entif
y th
e nu
mbe
r of
the
near
est
tent
h st
rip li
neto
the
left
of t
he s
ite•
Writ
e th
is n
umbe
r do
wn
afte
r th
e la
rge
figur
es•
Loca
te t
he n
eare
stho
rizon
tal g
rid li
ne(n
orth
ing)
bel
ow t
he s
ite•
Rea
d on
ly t
he la
rge
blac
k fig
ures
whi
ch la
bel
the
line
•W
rite
this
num
ber
dow
naf
ter
the
east
ing
num
bers
•D
ivid
e th
e sq
uare
into
ten
equa
l hor
izon
tal s
trip
s an
did
entif
y th
e nu
mbe
r of
the
TA
BLE
2.2
:Ste
ps in
det
erm
inin
g gr
id r
efer
ence
s
To d
eter
min
e an
are
aTo
det
erm
ine
a si
x-fig
ure
To d
eter
min
e an
ele
ven-
figur
eTo
det
erm
ine
a fu
ll gr
id
refe
renc
e (a
four
-fig
ure
grid
ref
eren
cegr
id r
efer
ence
coor
dina
te (
a un
iver
sal g
rid
grid
ref
eren
ce)
refe
renc
e)
*Archaeologists Field Handbook 29/6/04 5:23 PM Page 39

num
ber
of t
he n
eare
st t
enth
str
ipbe
low
the
site
•W
rite
this
num
ber
dow
n•
Subd
ivid
e th
is s
mal
ler
squa
re a
lso
into
ten
equ
al h
oriz
onta
l str
ips
and
iden
tify
the
num
ber
of t
he n
eare
stte
nth
strip
line
bel
ow t
he s
ite•
Writ
e th
is n
umbe
r do
wn
•Th
e ea
stin
g an
d no
rthi
ng n
umbe
rsto
geth
er a
re y
our
grid
ref
eren
ce
•Im
agin
e th
at y
ou a
re s
ubdi
vidi
ngth
is s
quar
e ye
t ag
ain
and
estim
ate
how
man
y of
the
se t
enth
s th
ere
are
betw
een
the
seco
nd s
trip
line
and
the
site
•Lo
cate
the
nea
rest
hor
izon
tal g
ridlin
e (n
orth
ing)
bel
ow t
he s
ite•
Rea
d th
e sm
all b
lack
figu
res
and
the
larg
e bl
ack
figur
es w
hich
labe
lth
e lin
e•
Writ
e th
ese
num
bers
dow
n af
ter
the
east
ing
•D
ivid
e th
e sq
uare
into
ten
equ
alho
rizon
tal s
trip
s, a
nd id
entif
y th
enu
mbe
r of
the
nea
rest
str
ip li
nebe
low
the
site
•Su
bdiv
ide
this
sm
alle
r sq
uare
als
oin
to t
en e
qual
hor
izon
tal s
trip
s an
did
entif
y th
e nu
mbe
r of
the
nea
rest
tent
h st
rip li
ne b
elow
the
site
•W
rite
this
num
ber
dow
n•
Imag
ine
that
you
are
sub
divi
ding
this
squ
are
yet
agai
n an
d es
timat
eho
w m
any
of t
hese
ten
ths
ther
e ar
ebe
twee
n th
e se
cond
str
ip li
ne a
ndth
e si
te•
Writ
e th
is n
umbe
r do
wn
•A
ll of
the
eas
ting
and
nort
hing
num
bers
, tog
ethe
r w
ith t
he g
ridzo
ne d
esig
natio
n an
d th
e se
ctio
nle
tter
, are
you
r un
iver
sal g
ridre
fere
nce
near
est
tent
h st
rip li
nebe
low
the
site
•W
rite
this
num
ber
dow
naf
ter
the
larg
e nu
mbe
rs•
The
east
ing
and
nort
hing
num
bers
tog
ethe
r ar
e yo
urgr
id r
efer
ence
TA
BLE
2.2
:con
tinu
ed
To d
eter
min
e an
are
aTo
det
erm
ine
a si
x-fig
ure
To d
eter
min
e an
ele
ven-
figur
eTo
det
erm
ine
a fu
ll gr
id
refe
renc
e (a
four
-fig
ure
grid
ref
eren
cegr
id r
efer
ence
coor
dina
te (
a un
iver
sal g
rid
grid
ref
eren
ce)
refe
renc
e)
*Archaeologists Field Handbook 29/6/04 5:23 PM Page 40

WThe choice of which kind of grid reference to use will largely be a matter of how
accurate you want your grid reference to be. Obviously universal grid references are farmore accurate than area references. As a general rule, it is best to aim for the highest levelof precision when recording any site location, even if you are not going to publish theseprecise grid references (for example, some Indigenous groups may request that you use anarea reference rather than a universal reference in your published report so that the exactlocation of sites can be concealed). Before you decide on which kind of grid referenceto use, it is also worthwhile checking with the relevant government heritage authorityto find out its requirements. The New South Wales National Parks and Wildlife Service,for example, requires you to use an eleven-figure grid reference on all its standard siterecording forms.
If you are calculating a grid reference for a large site, you can either specify the coordin-ates for the corners of a square drawn around the site, or simply give a single set of gridcoordinates for the centre of the site.
Understanding contour lines
Maps don’t just contain information about the type and location of features on theground: they also give some indication of the rise and fall of the land, or its contours.The usual way to show this on a flat map surface is by using contour lines, or imaginarylines joining places of equal height. These are the thick and thin wavy lines you can seeall over the map, some of which have small numbers attached to them at various intervals.On the map, each contour line represents a particular height above sea level, and thenumbers will tell you how many metres above sea level each contour line is. The mostimportant things to remember about contour lines are that:
• when they are close together on the map they indicate steep slopes;• when they are far apart on the map they indicate gentle slopes;• when they are uniformly spaced on the map they indicate uniform slopes;• when they decrease in spacing (when read from high to low), the slope is convex
(outward sloping, like a hill);• when they increase in spacing (when read from high to low), the slope is concave
(inward sloping, like a valley).
Understanding contour lines will help you to plan your surveys. In the initial decision-making stage, particularly if you have to estimate how much time and money the survey
NAVIGATION AND MAPPING 41
*Archaeologists Field Handbook 29/6/04 5:23 PM Page 41

W
is likely to cost (see ‘How to prepare a tender’ on page 243), it will be very useful to knowwhether you are going to be walking up the side of a mountain or surveying around agorge, as opposed to walking on relatively flat ground. Each of these terrains has specificfeatures and challenges, as well as different potential for containing sites, and being awareof the rise and fall of the land is important to planning the amount of time it will take toconduct a survey.
MAKING MUD MAPS
One other kind of map which you may see referred to in reports and field notes is a ‘mud’map. Strictly speaking, these are not really maps, but rough sketches of an area which are
42 THE ARCHAEOLOGIST’S FIELD HANDBOOK
FIGURE 2.3: Contour lines and slope
*Archaeologists Field Handbook 29/6/04 5:23 PM Page 42

Wnot usually drawn to scale (i.e. they are not measured accurately). Mud maps are made intwo main situations:
• to record the route you travelled to a site, so that you or someone else can find the siteagain; and
• to give a general idea of the shape and context of a site if you don’t have enough timeto record it properly but need to know the basic layout of the site.
Travelling mud maps are an important and relatively easy way of making sure you canrelocate a site. They are made fairly quickly and only need to contain the information thatis essential to finding your way back to a site. Usually, you will make these mud maps asyou are driving to a site, and in this circumstance this is best done by a passenger. Travel-ling mud maps are something that may be used by other researchers at some stage in thefuture. These people will not have access to any local information that you may have inyour head, so it is best if you are as explicit in your directions as possible. Some funda-mental rules for making travelling mud maps are:
• Make sure that the core information relates to the decisions you make at turningpoints on the route. Every decision to turn should be recorded.
• While mud maps are not made to scale, some indication of distance travelled betweenway points is essential. You can do this by simply noting the speedometer reading inthe car, or by counting the number of paces you have walked.
• Major features on the landscape should be recorded to indicate way points on theroute. It is important that these features be permanent, like a house, rather thanephemeral, like ‘cows in a field’, or ‘beer bottle in fork of tree’.
• If you are using buildings as way points, don’t just identify them in terms of theirowners. The house that is currently owned by A. Gorman will in all likelihood beowned by somebody else in the future.
Mud maps of sites are made to give a general overview of what the site looks like. Theyare made when you don’t have time to record the site properly but still need some basicinformation. Mud maps turn abstract phrases such as ‘a large scatter of stone artefacts’ intoa concrete image of the site itself. Again, these maps are made quickly and only contain themost significant information and will not be useful for in-depth research or for makingcritical management decisions (such as how close to the site a road can be built). For eitherof these purposes you will have to return to the site and make an accurate map, drawn toscale (see Chapter 4: Site surveying). If you are working by yourself, you will probably beestablishing the dimensions of the site through pacing (see ‘Using the compass and pacingtechnique’ on page 90). Some fundamental rules for making mud maps of sites are:
NAVIGATION AND MAPPING 43
*Archaeologists Field Handbook 29/6/04 5:23 PM Page 43

W44 THE ARCHAEOLOGIST’S FIELD HANDBOOK
FIGURE 2.4: A travelling mud map
*Archaeologists Field Handbook 29/6/04 5:23 PM Page 44

W• Include at least one permanent feature on the map, and all of the major features.• Show the approximate location of all archaeological materials, the extent of their area
and any areas of damage.• Include basic information, such as a north arrow, your name and the date on which
you made the mud map.• Dimensions can be included in approximate terms (e.g. approximately 20 ✕ 8 metres),
but it is best if you pace this out. • Don’t forget to augment the mud map with a universal grid reference, photos and
notes and never rely on a mud map as the only recording of a site’s location or itscontents.
NAVIGATION AND MAPPING 45
FIGURE 2.5: A mud map of a site
*Archaeologists Field Handbook 29/6/04 5:23 PM Page 45
WUSING AERIAL PHOTOGRAPHS
Aerial photographs, as their name suggests, are literally photographs of a section of theEarth’s surface taken from the air. While aerial photographs were originally taken in orderto map major environmental features, they also form a good basis for archaeologicalresearch and interpretation. An aerial perspective can be helpful in understanding pastenvironments, as features such as recessional beach-lines and dunes are much easierto identify from a distant perspective than close up. This data can be integral to under-standing relationships between environments and people in the past, especially if you areresearching Indigenous settlement patterns. For the historic period, aerial photographscan provide valuable snapshots of changing demographic and settlement patterns. In thesame way that a larger-scale map is better for identifying particular sites or features,the lower the level of the aerial photograph (i.e. the lower the plane was flying when thephotograph was taken), the greater the level of detail it will provide. The first aerialphotographs were taken in the 1930s and, if you can obtain a sequence of photographsfor the same area taken at different times, you may well be able to literally see the majorchanges in your area over the last 50–60 years. Unfortunately, aerial photographs arelimited in their ability to show the spatial layout of sites because only large archaeologicalfeatures will be visible from the air, but they are very useful for identifying generalareas which may contain sites and which therefore might be useful to survey. In Australia,aerial photographs can be obtained through the state departments that deal with topo-graphic maps.
Aerial photography can be used to:
• key into a surveying strategy for a region;• compare regional settlement patterns through time;• detect specific sites, such as the faint outlines of old settlements, buildings or roads;• relate your site to the surrounding environment;• assess relationships between sites within a region;• assist in regional environmental analysis;• assess a region’s potential for significant sites.
At a practical level, the best approach to aerial photography is to learn how to inter-pret photographs taken by others. The amount and kinds of information you can deducefrom an aerial photograph will depend on your knowledge, training and experience. Whileyou don’t need to be a specialist in geology or geomorphology, some experience in thesefields can be helpful.
It is best not to use aerial photographs for navigational purposes, as their scale can varysubstantially.
46 THE ARCHAEOLOGIST’S FIELD HANDBOOK
*Archaeologists Field Handbook 29/6/04 5:23 PM Page 46

WUSING A COMPASS
A compass uses a magnetised needle to indicate north. Following the principle thatmagnetic force is supplied by the molten iron at the Earth’s core, the coloured end of theneedle (or the end with the letter ‘N’ on it) will point towards the north pole of the earth’smagnetic field. To align a compass to north, you simply turn the compass dial so thatNorth (0°) on the dial matches the direction of the north end of the compass needle.Unfortunately, the Earth’s poles are constantly moving and the north pole indicated bythe compass needle (‘magnetic north’) is not the same as the real north pole (‘truenorth’). This compass error is called declination and, depending where on the Earthyou are, can result in a difference of anything from a few degrees to up to 20–30° awayfrom true north. Fortunately, on the bottom of all topographic maps there is a simplechart which indicates the yearly degree of declination away from true north in anyarea (see Figure 2.6 on page 48). You should bear in mind, however, that because the polesare constantly moving, this declination is also constantly changing and may be inaccu-rate on older maps.
True north (TN) is the direction towards Earth’s geographic north pole, magneticnorth (MN) is the direction in which the compass needle points, and grid north (GN) issimply the direction of all the vertical grid lines on a map. Grid north is always used as thereference point for bearings and grid references.
Remember that a compass will point to anything metallic or magnetic that is made ofiron. This means that it cannot be used accurately if you are standing beside wire fence-lines or scrap metal, inside cars or under or beside electrical power lines. Even metalobjects on your person can affect your compass reading.
Taking bearings
The direction in which you want to travel to get to your destination is called a bearing.Because there are 360 degrees in a circle, compass bearings are referred to by the numberof degrees they are away from north, always counting in a clockwise direction. Forexample, east is one quarter of the circle away from north (which translates to 90°), southis directly opposite to north or halfway around the circle (at 180°), and west is three-quarters of the circle away from north, at 270°. The numbers on the moveable compassdial are these degrees.
NAVIGATION AND MAPPING 47
*Archaeologists Field Handbook 29/6/04 5:23 PM Page 47

W
How to read a compass bearing
• Point the compass towards your destination. If you are using the compass to makea plan of a site, this will be the point to which you want to measure (see ‘Using thecompass and pacing technique’ on page 90), otherwise it will be the direction inwhich you want to travel.
• Keeping the compass fixed on your destination, move the dial so that 0° is alignedto the magnetic compass needle (which will be pointing towards magnetic north).
• The bearing of the point, or the distance it is away from north, can now be read offthe compass dial (remembering always to read the numbers on the dial clockwisefrom 0°). This will be slightly different depending on the type of compass you areusing (see Figure 2.7 on page 49).
• For greater accuracy, use your arm to extend the directional arrow, or sight thecompass on a ranging rod, or other highly visible feature, held at your destination.
48 THE ARCHAEOLOGIST’S FIELD HANDBOOK
FIGURE 2.6: Using a topographic map to calculate the difference between true andmagnetic north
*Archaeologists Field Handbook 29/6/04 5:23 PM Page 48
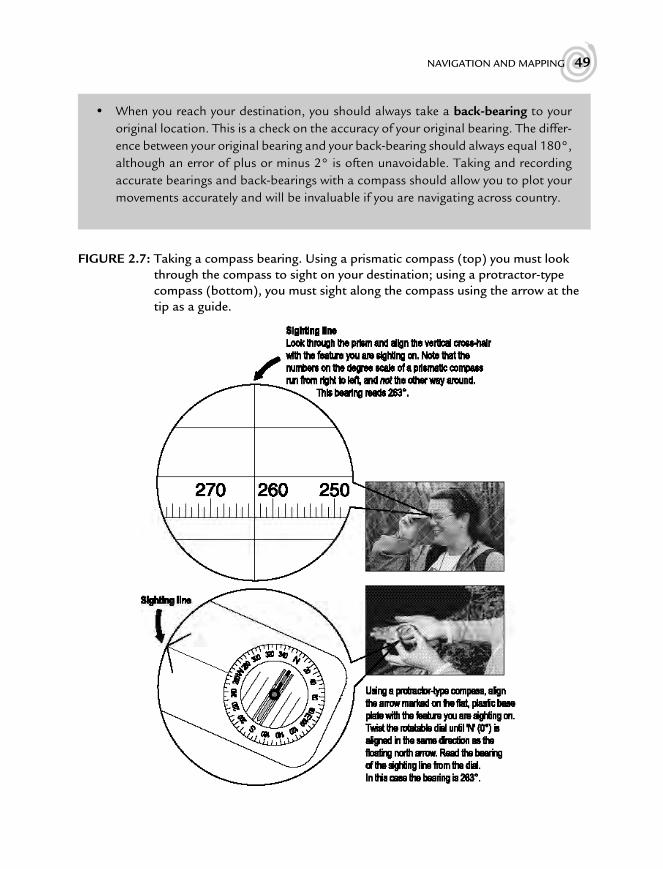
W• When you reach your destination, you should always take a back-bearing to your
original location. This is a check on the accuracy of your original bearing. The differ-ence between your original bearing and your back-bearing should always equal 180°,although an error of plus or minus 2° is often unavoidable. Taking and recordingaccurate bearings and back-bearings with a compass should allow you to plot yourmovements accurately and will be invaluable if you are navigating across country.
NAVIGATION AND MAPPING 49
FIGURE 2.7: Taking a compass bearing. Using a prismatic compass (top) you must lookthrough the compass to sight on your destination; using a protractor-typecompass (bottom), you must sight along the compass using the arrow at thetip as a guide.
*Archaeologists Field Handbook 29/6/04 5:23 PM Page 49

WIf you are using a compass to navigate your way across country, particularly if you are
moving through dense vegetation, it is important to make continuous checks to ensureyou have not moved away from your bearing. One way to do this is by continually checkingyour compass. However, by far the best way to maintain a bearing is to select a clearlyvisible object which lies along your path (such as a tree or a rock outcrop) and movetowards it. If you can’t find any obvious natural features, then send someone on ahead toact as a marker. Continue to do this for each leg of your journey. This process is calledpoint-to-point bearing.
If you are using a map and a compass in conjunction to navigate towards a site, you willneed to compensate for the declination. In other words, compass bearings taken on theground must be converted into grid bearings before they can be plotted on to a map.Likewise, grid bearings taken from a map must be converted into compass bearings beforethey can be used with a compass on the ground. To convert between bearings, simply eitheradd or subtract the degrees of magnetic variation shown on the declination chart at thebottom of the map. For example, using the chart in Figure 2.6, imagine that you have justtaken a magnetic bearing from your compass towards a scarred tree. The bearing reads 50°.To convert this to a grid bearing which you could then plot on to your map, you wouldsimply add 7 degrees (because, over time, magnetic north has moved so that it is currently7° east of grid north). Conversely, if you had taken a grid bearing of 50° from the map andwished to use it to navigate towards the scarred tree, you would first have to convert thegrid bearing to a magnetic bearing. To do this you would subtract 7 degrees, thus givingyou a magnetic bearing of 43° to follow on your compass. If you are using a GPS you canset your GPS to give you directions in magnetic degrees, thus eliminating the need to worryabout compensating for declination (see ‘Using a Global Positioning System’ on page 51).
Once you have converted your compass reading to a grid bearing, you can use a pro-tractor to measure this bearing directly on to a map. Like a compass, the outer rim of aprotractor has degrees marked around its edge (either from 0°–180° if the compass is a half circle, or from 0°–360° if the compass is a full circle or a square). To measure abearing, draw a light pencil-line from the point where you are standing to the point towhich you are navigating. Place the protractor on the map so that the centre point or holeis directly over where you are standing and the north line (or 0°) is pointing to grid northon the map (i.e. the top), parallel to the eastings. Read the degrees off the edge of theprotractor where it meets your pencil line.
How to orient a map
Whenever you use a map in the field for navigation, make sure you have the map cor-rectly oriented to start with. This means ensuring that the directions on the map
50 THE ARCHAEOLOGIST’S FIELD HANDBOOK
*Archaeologists Field Handbook 29/6/04 5:23 PM Page 50

Wcorrespond to the directions of the same features on the ground. The easiest way to dothis is simply to look for any readily identifiable features around you and turn the mapso that it and you are facing in the same direction relative to those features. If you cannotidentify any surrounding features, and are still unsure how to orient the map, you canuse a compass.• Lie the map flat. Place your compass on it and adjust the vertical lines on (grid north)
to match up with magnetic north on the compass (the swivelling arrow needle).• Check the declination in the legend at the bottom of the map and make an adjust-
ment to take into account the variation between magnetic north and grid north. Forexample, if the declination on your map is specified as 5°, you would need to shiftthe compass slightly so that its north arrow is pointing to a spot which is 5° east ofgrid north.
• The map will now be oriented correctly.
USING A GLOBAL POSITIONING SYSTEM (GPS)
Global Positioning Systems have greatly simplified the process of navigating to and fromsites and of recording site locations. A GPS can be used either on land or on water. Itcalculates a grid reference for your position from orbiting satellites, and operates on thesame map projection systems as official published maps. When using a GPS on land,make sure that you set the map system to match that of your maps. If your GPS readingsare taken using a different map system to your printed maps, then your grid references willnot plot accurately. Thus the Australian Geodetic 66 or 80 system will be most appropri-ate for older maps and the WGS84 (World Geodetic System) will suit more recent maps.If you are having persistent problems in plotting your GPS readings, this is one of the firstthings to check. When using your GPS on water, you will have to use latitude and longi-tude to plot location instead of eastings and northings, as this is the system employed onall charts.
Tips for using your GPS efficiently
• Most satellites orbit the equator, so when using a GPS in Australia hold the unitfacing north so that your body doesn’t interfere with the satellite signal.
• When using a GPS to navigate to a known grid reference, walk along until you havecorrectly located yourself along either the easting or the northing, and then followthat until you reach the correct position.
NAVIGATION AND MAPPING 51
*Archaeologists Field Handbook 29/6/04 5:23 PM Page 51

W• When you first turn on your GPS receiver, it will ‘lock on’ to all available satellites,
provided the receiver has a clear and uninterrupted view. It is often worth leaving theGPS on for a few minutes before using it for serious work, as sometimes the initialreadings can be misleading.
The best low-end models are the Garman and Magellan units, both of which areaccurate to within 10–15 metres and are easily affordable. They are also water and shockresistant, as well as light and easy to carry. Because the degree of accuracy of your GPS willdepend partly on the brand, make sure you always note down the make and model of yourGPS in your field notes and report.
GPS units are simple to use and can be a great asset in the field, provided you keepsome basic factors in mind. Most can be set to either magnetic north (good if you are nav-igating using a compass) or true north (good if you are navigating using a map). Makesure you know which one you are using. Because GPS units can be used all over the world,they also have to be set to the relevant map zone to give an accurate grid reference. Thismeans that, even if you only travel between the Northern Territory and New South Walesto use your GPS, you will have to readjust the map zone.
Since it is possible for errors to creep into any GPS reading (as a result of factors suchas the number of satellites which are accessible, their geometry, atmospheric conditionsor signal reflection), it is always wise to check every reading against a topographic map tobe certain of your location. And because GPS units are prone to running out of batterypower at the most inopportune times, or may be unable to get a fix on a sufficient numberof satellites for an accurate reading (particularly if you are surveying under dense treecover), it is always wise to know how to calculate a grid reference manually (see ‘Using amap to calculate a grid reference’ on page 36). If you plan to use a GPS under heavy treecover, you should investigate buying one with an external aerial.
Stephen Sutton’s tips for successful fieldwork
• Always have a good pair of boots. I recall a report at a conference in which thepresenter admitted that part of the study area hadn’t been surveyed ‘because therewere bindies and we didn’t have any boots’.
• Take good care of your field assistants. It’s essential to the success of fieldwork thatyour assistants are well fed and that their health and safety are assured.
• Plan your fieldwork. You need to be aware that the only data you have is whatyou collect. By this I mean that when you get back to the lab, and are working upyour notes or collection to find something missing—too bad. It’s almost always
52 THE ARCHAEOLOGIST’S FIELD HANDBOOK
*Archaeologists Field Handbook 29/6/04 5:23 PM Page 52

Wimpossible to reconstruct from memory (either yours or your colleagues’), or to findsurrogates for the missing data. The only way to do it is to return to the scene andthis is expensive and time-consuming.
• There is no ‘one way’ to do anything. Whilst careful attention to data collection isfundamental, it should also be appropriate. Work should be structured to ensurethat the final product—the reason you’re in the field in the first place—can beachieved, but after that there is a capacity to waste resources collecting data that willnever be used.
• Don’t rely on technology. There are digital machines for everything these days: GPS,laptop computers, EDMs, data-loggers, digital cameras and so on. They all have anamazing capacity to fail at the critical moment. There is no substitute for traditionalskills like map-reading and surveying and the use of back-up materials like rag-papersurvey notebooks.
FINDING NORTH USING YOUR WATCH
In case you are ever stuck in the field without either a compass or a GPS, you can useany analogue watch to find north. This is not accurate enough to be able to map a site (see ‘Using the compass and pacing technique’ on page 90) or to navigate to a site, butmight be enough in a pinch to prevent you from being lost. To find north using your watch,point the number 12 on your watch towards the sun. North will always lie mid-way betweenthe hour hand and the number 12 (see Figure 2.8 on page 54). If you have only a digitalwatch, make a sketch of an analogue watch and draw the correct time on to it, leaving offthe minute hand. Use the sketch in the same manner as a real watch to locate north.
SURVIVAL IN THE BUSH
Archaeologists often travel in remote areas on tracks, dirt roads and off-road. This can behighly dangerous, particularly if you are not prepared or are not being sufficiently careful.Never go into the bush unprepared—archaeology is not worth dying for. Most advice forworking in the bush is common sense. Make sure you take enough water, particularly ifyou are going to be surveying large areas and doing lots of physical activity (you shouldalways aim to drink the equivalent of between eight and ten glasses of water a day). If youare going to a remote area, ensure that you have spare tyres for your vehicle, emergencyfood rations and some means of reliable communication (such as a UHF radio or satellitephone, not just a mobile phone). Make sure that you tell someone exactly where you aregoing and when you expect to return.
NAVIGATION AND MAPPING 53
*Archaeologists Field Handbook 29/6/04 5:23 PM Page 53

W
Snakes are the biggest wildlife risk in the bush and Australia is home to dozens ofspecies, including some of the most venomous in the world. When walking in the bush,wear sturdy boots that come at least as high as your ankles. Keep your eyes on where youare walking. If you see a snake, stop and remain still. If the snake is curled up and quiet,you can usually detour around it, giving it a very wide berth. If the snake is moving orlooks like it intends to move, stay put. Keep quiet and do not move. Most snakes aren’taggressive and would rather flee than fight. If they feel threatened, however, they mayattack a moving target, so even if the snake is moving towards you, stay still. When thesnake has moved a safe distance away, move off slowly and quietly.
Other potentially venomous creatures are also a risk during fieldwork. When walkingin the bush, wear long-sleeved shirts and long pants, tuck your pant legs into your socksor boots and tuck your shirt in as well—this will help to prevent ticks and other insectsfrom travelling up your body inside your clothing. If you get a tick, remove it by leveringit out carefully with a pair of tweezers. Do not squeeze or pull the tick and do not try tocut it out.
It is essential to drink plenty of fluids during and after strenuous field work, particu-larly if you’re working in a hot environment. Heat exhaustion is a potentially seriouscondition which can arise if the body’s heat regulation system becomes overwhelmed. Ifsomeone loses too much fluid through sweating, this decreases their blood volume and
54 THE ARCHAEOLOGIST’S FIELD HANDBOOK
FIGURE 2.8: Making a watch compass
*Archaeologists Field Handbook 29/6/04 5:23 PM Page 54

Wthe blood flow to their vital organs. They develop mild shock which, if not treatedpromptly, can progress to heat stroke—an extremely serious and life-threateningcondition. The symptoms and warning signs of heat exhaustion include:
• normal or below-normal skin temperature;• cool, moist, pale skin, progressing to red skin;• headache;• nausea;• dizziness and weakness;• exhaustion;• sweating;• rapid, weak pulse.
If you think that you, or someone on fieldwork with you, might be suffering from heatexhaustion, treat it promptly. Encourage them to rest lying down in the shade with theirlegs slightly raised. Loosen any tight clothing and remove clothing soaked with perspir-ation. If they are fully conscious, give them frequent small drinks of cool water. Often aperson suffering from heat exhaustion will feel better after resting in a cool place anddrinking cool water. To prevent heat exhaustion from becoming heat stroke, it is veryimportant that they be persuaded to stop all activity, as they may quickly reach the stagewhere they are beyond making a rational decision for themselves. If they are vomitingand unable to take any fluids, seek urgent medical attention (Australian Red Cross 1995: 190–91).
RESPONSIBLE BEHAVIOUR IN THE BUSH
• Don’t walk on to or through private property without permission.• Use a gas stove for cooking rather than dead wood, which is part of the natural eco-
system and can provide a home for animals.• Minimise the use of soaps, shampoos and detergents. If you must use them, do so well
away from streams or rivers.• If toilets are not available, dig a small hole well away from any water source.• Carry out everything you carry in, so that it can be recycled or disposed of properly.• Leave the bush surroundings as they are as much as possible. Picking wildflowers
reduces the chances of new plants, and is illegal in many national parks. Moving rockscan disturb animal habitats.
• Don’t feed native animals, as this may cause them to become reliant on humans andunable to fend for themselves.
NAVIGATION AND MAPPING 55
*Archaeologists Field Handbook 29/6/04 5:23 PM Page 55

W• If you’re looking for somewhere to camp, check the area carefully for sites and artefacts
first. There is nothing worse than waking up in the morning to find that you havepitched your tent and cooked your meals in the middle of an archaeological site.
• If you’re making a campfire near an historical site, don’t use any historical artefacts(e.g. bricks or stones from fallen structures) to make your fire.
Joe Watkins’ and Jane Balme’s tips for surviving a group field season in thebush
• Be aware of the climatic conditions where you’ll be working and make sure you’reproperly equipped for them.
• Make an effort to find out about the place you’re going to. Check out the localhistory.
• Be considerate of other people’s privacy. In camp life there is rarely anything thatpeople don’t know about, but recognise that sometimes people need space.
• If you have any special needs (i.e. prescriptions) make sure you have a good supply.• If you wear glasses, bring an extra pair. • Find out about the living conditions well in advance. Often toilet facilities are primi-
tive to say the least. If you need a private bathroom, bring it with you.• If you’re worried about poisonous insects or animals, find out where they live and
avoid them as much as possible. • Find out what phobias you have—and get over them.• Be sensitive to the values of the culture you are working with. The kind of dress and
appearance that may be suitable for young people in the city may not be suitable forrural communities. For example, short shorts, make-up or long hair can be inappro-priate in a field situation.
• Know how to use a compass. If nothing else, practise in your own backyard. • If you can’t follow any of these tips, stick to one-person projects.
CAMPFIRE COOKING
This can be either a highlight or lowlight of archaeological fieldwork. Cooking over anopen fire is a challenge, and requires slightly different techniques to using a normalkitchen. A camp oven is the standard cooking utensil and is extremely versatile. It can beused as a saucepan, a frying pan or an oven, to cook anything from roast chicken, soupsand stews to cakes, damper and scones. When using it as an oven, the most difficult thingis to regulate the heat so that you don’t burn the food. If you can, build your fire early andwait for it to die down before you begin to cook, using coals rather than direct flame.
56 THE ARCHAEOLOGIST’S FIELD HANDBOOK
*Archaeologists Field Handbook 29/6/04 5:23 PM Page 56

WDon’t place the camp oven directly over the fire: this will provide too much heat and burnthe food. Instead, place it near to the fire on a bed of hot coals and ash and put three timesas many coals on top of the lid as underneath the oven. This will ensure even distributionof the heat, and won’t burn the bottom. Bedourie ovens in particular were designed forthis task because they have flat lids to hold the coals. Use a wooden spoon to stir a campoven, and always cook with the lid on. Unless you like ashes in your food, don’t tilt the lidwhen you remove it. When trying to assess the temperature of coals, count the number ofseconds you can hold your flat hand above them.
TABLE 2.3: Assessing coal temperatures
Seconds Heat Temperature
6–8 Slow 250°F–350°F/120–180°C4–5 Moderate 350°F–400°F/180–200°C2–3 Hot 400°F–450°F/200–230°C1 or less Very hot 450°F–500°F/230–260°C
Before use, a camp oven will need to be ‘seasoned’ with oil. This means heating itslightly, rubbing in a light coating of edible oil and then heating it to a high temperaturefor around 30 minutes. Once it has been seasoned, it should never be scrubbed with soap.A camp oven won’t rust if you season it correctly, clean it properly and keep it dry. Storethe oven in a warm, dry place with the lid cracked so that air can circulate inside. A campoven seems indestructible, but it will shatter if you drop it on to a hard surface, or crackif your pour cold water into it while it’s hot.
Jane Balme’s and Joe Watkins’ tips for successful campfire cooking
• Be aware that you are part of a team that doesn’t include your mother. Don’t expectothers to clean up after you.
NAVIGATION AND MAPPING 57
*Archaeologists Field Handbook 29/6/04 5:23 PM Page 57

W• Know how to cook at least three different meals on a campfire made from five basic
ingredients (potatoes, onions, road-kill and two others of your choosing).• For instant popularity within the group, learn how to cook one great meal. You only
have to cook on rotation, so you may only cook once or twice during the field trip.One great meal can establish your culinary skill—and you may never have to proveit again!
• If you have any special dietary needs, make sure you have a good supply of whatyou need.
• Let the organisers know if you have any special allergies.
Basic damper
3 large cups plain flour2 teaspoons cream of tartar1 teaspoon bicarb soda1 teaspoon salt1 dessertspoon sugarSufficient liquid to make a loaf (you can use water, milk, milk and cream mixed, orbuttermilk)
Mix dry ingredients. Add enough liquid and mix with a knife until it forms a firm but softdough. Place in lightly greased camp oven, cover lid of camp oven with coals and leavefor about 30 minutes.
Beer damper
3 cups self-raising flourPinch of salt3 tablespoons powdered milk3 tablespoons sugarEnough beer to make a firm dough
Mix all dry ingredients, add enough beer to make a firm dough. Place in camp oven andcook with hot coals for around half an hour.
Thai green curry
This can be made with chicken, vegetables or a combination of the two and should beserved with rice. These quantities should feed eight to ten people.
58 THE ARCHAEOLOGIST’S FIELD HANDBOOK
*Archaeologists Field Handbook 29/6/04 5:23 PM Page 58

W2 packets green curry paste (this should be about 6 tablespoons)2 tins coconut cream (you can add about 1 cup of water if you need more liquid)6 tablespoons fish sauce6 tablespoons brown sugarChillies (amount will vary depending on how hot you like your curries—one, deseeded,for mild, two or more for hot). If you don’t have fresh, use dried but lessen the amount.Basil—this recipe is best with fresh basil, but if you can’t get it, use the chopped basil thatcomes in a tube in preference to dried basil.
Cook curry paste in 1–2 tablespoons oil for 2–3 minutes, add chopped chicken, cookuntil browned. If using vegetables, stir-fry in paste 5–8 minutes (add the hardestvegetables first so they cook the longest). Add coconut milk, fish sauce, brown sugar andchillies. Simmer, stirring regularly, for 20 minutes. Add basil, stir and serve.
Iain Davidson’s recipe for chorizo and chickpeas
First, catch your chorizos.
2 chorizos—dice one and chop the other into discs1 onion, chopped finelyOlive oil1 tin tomatoes1 tin (or two) chickpeasPaprika to taste (it needs some)
Fry the chopped chorizo first (if you don’t like oil), or fry the onion and chorizo togetherin oil (if you do like oil). When the onion is softened and transparent, add the paprikato cook for a minute or so. Add the tinned tomatoes (chopped finely and with the woodyends removed) and simmer for a few minutes. Drain the chickpeas and add them to thepot and simmer until the liquid is reduced to the consistency you prefer. Enjoy.
Pineapple upside down cake
125 grams (about 1/2 cup) butter or margarine1/2 cup brown sugar1 small can sliced pineapple1 packet maraschino cherries (optional)1 plain cake mix, including ingredients listed on pack (egg, water, butter)
Melt butter or margarine in the bottom of the camp oven. Mix in brown sugar andspread evenly across the base of the oven. Save pineapple juice for the cake mix and place
NAVIGATION AND MAPPING 59
*Archaeologists Field Handbook 29/6/04 5:23 PM Page 59

Wpineapple rings in bottom of oven on top of the brown sugar. If you are usingmaraschino cherries, place one inside each pineapple ring. Substitute the pineapplejuice for some or all of the water to be added to the cake mix. Add egg and mix as perinstructions. Pour cake mixture over the brown sugar and pineapple. Bake as per instruc-tions until cake is browned and a knife comes out clean.
Golden syrup dumplings
For the dumplings:
11/2 cups self-raising flour1 heaped teaspoon (30 grams) butter or margarine2 tablespoons golden syrupApproximately 1/2 cup milk
Rub butter into flour, add golden syrup and enough milk to mix to a soft dough. Rolltablespons of dough into balls with floured hands.
For the syrup:
11/2 heaped tablespoons (45 grams) butter or margarine1 cup firmly packed brown sugar1/2 cup golden syrup2 cups water
Combine butter, sugar, syrup and water in the camp oven, then stir over heat until sugaris dissolved. Bring mixture to boil, add dumplings to syrup, cover, return to boil andsimmer for 10 minutes or until dumplings have risen to the top and are cooked through.
REFERENCES AND FURTHER READING
Australian Red Cross 1995, First Aid. Responding to Emergencies, Australian Red Cross,Melbourne.
Biddle, D.S., Milne, A.K. and Shortle, D.A. 1974, The Language of Topographic Maps, Jacaranda,Brisbane.
Geoscience Australia 2003, ‘Coordinates, datums and ellipsoids’, www.auslig.gov.au/geodesy/datums: accessed 7 January 2003.
60 THE ARCHAEOLOGIST’S FIELD HANDBOOK
*Archaeologists Field Handbook 29/6/04 5:23 PM Page 60

WUSEFUL WEBSITES
www.nima.mil. This website allows you to view satellite pictures of any part of the Earth’ssurface. You can also download ARCview for free within the same website.
www.geoscience.gov.au/bin/mapserv36?map=/public/http/www/docs/geoportal/250/index.map This site allows you to view scanned geological maps for any area of Australia.The Geosciences website contains a wide variety of information about all aspects ofAustralian mapping systems.
Aerial Archive: www.univie.ac.at/Luftbildarchiv. This site is located at the Institute for Pre-history and Protohistory of the University of Vienna. Apart from archiving a large stock ofvertical and oblique aerial photographs, it also uses sophisticated photogrammetricalhardware and software to map and visualise archaeological sites. This site is useful to thosewho are interested in aerial archaeology, taking and archiving aerial photographs, photo-interpretation or mapping and visualising sites.
The Backpacker’s Field Manual is located at www.princeton.edu/~oa/manual. The site containsonline excerpts from this excellent manual by Rick Curtis, Director of the PrincetonUniversity Outdoor Action Program. It contains illustrated sections on using a mapand compass and taking bearings when travelling, including a series of useful real-lifescenarios.
NAVIGATION AND MAPPING 61
*Archaeologists Field Handbook 29/6/04 5:23 PM Page 61

CHAPTER THREEFINDINGSITES
WHAT YOU WILL LEARN FROM THIS CHAPTER
W The advantages of a systematic surface surveyW Strategies for surveying a sample of your field areaW How your choice of strategy is likely to affect your resultsW The basics of recording slope, geology, soils, transects, ground-surface visibility
and vegetationW The importance of assessing effective survey coverageW Why you need to define a site’s boundaryW The essential information to record when you find a site
Regardless of whether you are undertaking a research or consultancy project, the initialpart of most archaeological fieldwork will be directed towards finding sites. Unfortu-nately there is no foolproof way to do this, as the likelihood of you finding sites dependson a number of factors. The ground-surface visibility conditions you encounter inthe field, how much time is available, how large an area you have to survey and even thenature of the sites themselves will all affect the potential for sites to be located. In someplaces, such as Arnhem Land, you may not be free to conduct a survey at all, as Indigenouspeople may wish to control your movements around the landscape so that you do notinadvertently encounter sites to which access is restricted. In any event, it is highly unlikelythat you will ever be able to find all of the archaeological sites that exist in an area, but in
W W W
WW
62
*Archaeologists Field Handbook 29/6/04 5:23 PM Page 62

Wgeneral you should ensure both that your surveying strategy is appropriate to the goals ofyour study (see ‘Designing your research’ on page 3), and that you try to discover thewidest possible range of sites.
WHAT IS A SITE?
A site is simply a place that represents a particular focus of past human activity (Pearsonand Sullivan 1999: 5). This activity may be related to past events, practices or beliefs andmay or may not have left behind actual physical traces. The various landing places ofCaptain Cook, for example, have become important sites, even though they contain nophysical evidence for these events. Likewise, many purely natural elements of the land-scape are important Indigenous sites because they are the embodiment of creation(‘Dreaming’) stories. If you are working with Indigenous groups you will need to take suchsites into account. While these sites may not be accompanied by any physical evidence forpast human behaviour, knowing their location can be essential to understanding the useof the landscape in the past. It is always important to remember that an absence ofmaterial evidence is not necessarily evidence for the absence of human behaviour—such aplace may be providing information about what people chose not to do. Some areas wereactively avoided by people in the past, but are nonetheless still part of how they used andunderstood the landscape around them.
By contrast, an archaeological site is any place that still contains physical evidence ofpast human activity. This evidence can take an enormous variety of forms, depending onthe nature of the site and who created it—from actual objects or traces of objects (e.g. postsor post holes) to the physical by-products of a past activity (such as plough furrows orscarred trees). Almost anything can be an artefact because what we might regard asinsignificant today may have had all sorts of meanings for people in the past.
There are some standard ‘types’ of site which archaeologists in Australia commonlyencounter. The two broadest categories reflect a general division into pre-contact andpost-contact history: Indigenous sites (sometimes called prehistoric or Aboriginal sites)and non-Indigenous sites (usually referred to as European or historical sites). Of course,there is often considerable overlap between the two: the Indigenous people of northernAustralia, for example, have had well-documented contact with non-Indigenous Macassansailors and traders since at least AD1720, and post-contact Indigenous sites, such as out-station campsites or missions, are an important part of recent Indigenous history,although they may contain predominantly European artefacts. Likewise, using the term‘European sites’ to refer to all non-Indigenous sites ignores the contributions of othergroups, such as the Chinese or the Afghans, to the settlement of Australia. For simplicity’ssake, in this book we use ‘Indigenous sites’ to refer to all Aboriginal sites, whether pre- or
FINDING SITES 63
*Archaeologists Field Handbook 29/6/04 5:23 PM Page 63

Wpost-contact, and ‘historical sites’ to refer to all non-Indigenous sites (for some idea of therange of site types in each of these categories see Chapters 6 and 7).
The site is the basic operating unit of any field survey (Davies and Buckley 1987: 28).Generally speaking, a survey is geared towards locating and recording as many sites aspossible, although there are sometimes problems with focusing exclusively on the site asthe sole unit of human behaviour. It is important to bear in mind that sites are just theconcentrated physical remains of past human behaviour and that, when created, nonewould have existed in isolation. Think of your own day-to-day behaviour: you mightperform many different activities in many places, but each place, or ‘site’, is connectedthrough the web of your movements and decision-making. In addition, many of yourmovements will leave no physical traces, and your memories of the events of the day, theplaces you visited and the ways that you used them are as much a part of your interactionswith the landscape around you as the physical substance of the places and activities them-selves. This is part of being of a place, rather than merely in it (Byrne, Brayshaw and Ireland2001: 51). People continually construct a social landscape around them at the same timeas they interact with a physical one, and the archaeological sites which are left behind aresimply the physical by-products of this ongoing process.
As an archaeologist, when you record a site you are in effect only recording one‘moment’ of human behaviour in space and time, so it is worthwhile bearing in mindhow each site might be part of wider patterns of human behaviour on a larger scale(either across space or through time). Many of these patterns may be intangible in purelyarchaeological terms, although you may be able to access some of the ways in whichpeople relate socially to the landscape around them through oral history (see ‘Recordingoral histories’ on page 197). These wider patterns create the cultural landscape, orthe totality of human physical and social activity in an area. In theory, the cultural land-scape could be analysed at any scale, but in practice it is usually viewed at a manageablelevel, such as within drainage basins, or other well-defined geographic regions. This ismainly an administrative decision, taken to limit the potentially limitless idea of a culturallandscape.
Most sites are found through systematic surface survey: walking over an area of groundin such a way that you locate as many sites as possible. During a survey, you will need torecord a wide range of complementary information. Because people use the landscape ina variety of ways, the location of sites will relate closely to their environment. It is for thisreason that it is essential to describe the topography, vegetation, water and stoneresources, ground-surface visibility conditions and the survey strategy, as well as basicinformation about any sites you find. You may not always be able to record the maximumamount of information, but you must ensure that, whatever the other limitations of theproject, you always record a basic minimum of information (see ‘What to do when youfind a site’ on page 80).
64 THE ARCHAEOLOGIST’S FIELD HANDBOOK
*Archaeologists Field Handbook 29/6/04 5:23 PM Page 64

WSYSTEMATIC SURFACE SURVEY
Without a doubt, the most effective archaeological surveys are those carried out system-atically on foot, moving slowly across the ground. A surface survey is usually conductedby walking lines or corridors (transects) across the study area. These may be straight linesbetween two points or sinuous lines following the contours of the ground. The width ofa transect and its spacing in relation to other transects will depend on the time available,the number of people involved and the nature of the terrain. Obviously, the more transectsyou walk through an area, and the closer together they are, the better your survey coveragewill be. In practice, a single field-walker can effectively scan 1 metre to either side of them;thus, if you are one of ten field-walkers, it should be possible to survey a transect which is20 metres wide in total. If, however, you are walking a transect alone, then the total widthwill be reduced to 2 metres.
Walking systematic transects is really only possible when the area you are surveying isrelatively small, or if you have ample amounts of time in which to complete the survey. Inreality, surveying for sites can be approached in a variety of ways, depending on the goalsof the survey and how much time and money is available. If a systematic surface survey onfoot is not practical—for example, if you are surveying a very large area, or if you havelimited time or resources to devote to the task—it is possible to conduct a survey bylooking for artefacts out of a slowly moving vehicle. By doing this, however, there is amuch greater risk of sites being missed, so it is not generally recommended.
FINDING SITES 65
FIGURE 3.1: The width of a survey transect is largely determined by the number of peopleavailable to walk it
*Archaeologists Field Handbook 29/6/04 5:24 PM Page 65

WIn preference, if it is not possible to undertake a complete surface survey, then you will
have to limit your survey to certain parts of the landscape: a strategy which is known assampling. Archaeologists are often only able to examine a portion, or sample, of the totalarchaeological record (either from an excavated site or the landscape) upon which they basetheir interpretations. This is perfectly legitimate provided the sample is representative, andnot skewed by sampling bias in any way. This is where a sampling strategy becomes essen-tial. Sampling strategies can be approached in a number of ways (see below), and choosingwhich parts of the landscape to survey is not a trivial task: the decisions you make as towhich parts of the area to sample will directly affect the likelihood of you finding any sites.
Richard Fullagar’s tip for successful surveying
Always be prepared to get your boots wet—even new ones. On a field trip to Papua NewGuinea, I was surveying obsidian quarries with Jim Specht. I was worried about gettingmy new boots wet, so I walked over a ridge on Garua Island instead of around on thereef. Jim got wet on the reef and discovered a fabulous obsidian source that he refusedto tell me about for over a year. Just kept it a secret. A suitable punishment, I guess, forputting clothing ahead of archaeology (which I haven’t done since).
DEVELOPING A SUITABLE SAMPLING STRATEGY
The distribution of archaeological material across the landscape depends on a number ofrelated factors, such as the preservation conditions over time, the degree to which sites areexposed through erosion or the lack of vegetation, and the actual decisions of the peoplecreating the sites and depositing the materials in the first place. The decision about whichsampling strategy to adopt will therefore centre around these kinds of factors, as well asmore practical decisions based on the number of people conducting the survey, and thefunds and time available for the project. A similar principle can be applied to the excava-tion process, since the decision about where to excavate in a site is also a sampling decision(see ‘Approaches to excavation’ on page 123). Samples can be either judgment, randomor systematic.
Judgment samples
This is a sample in which the researcher exercises their own judgment as to which areaswill be most productive to survey. It is sometimes referred to simply as a ‘stratified’ sample.This judgment is usually based on past experience of where sites are likely to be located
66 THE ARCHAEOLOGIST’S FIELD HANDBOOK
*Archaeologists Field Handbook 29/6/04 5:24 PM Page 66

Wand ethnohistoric research into how the survey area might have been used in the past(see ‘Undertaking ethnohistoric research’ on page 236). In a typical judgment survey thearea would be divided into its various geographic zones (hill, creek, plain, gully, ridge) andthe zones most likely to contain sites targeted for survey. In theory, while all zones mighthave an equal chance of containing sites, in practice we know that water, food and rawmaterial sources were all important for how people used the land and therefore wherepeople might have camped or worked. You only have to think of a map of Australia, withcities dotted around the edges, to understand this idea.
The advantage of a judgment sample is that areas which have a high likelihood ofcontaining sites (such as those close to reliable water sources) can be given preference, andareas where it is highly unlikely that sites will be found (such as on extremely steep slopes)can be avoided. This allows time and resources to be focused on the most productiveareas, and also takes the geography of the study area into consideration. Of course,this has its disadvantages too. Such a survey cannot help but be biased by the researcher’spreconceived notions of what the archaeology should be and runs the risk of creating a self-fulfilling study (Redman 1975: 149).
Random samples
Some studies attempt to remedy this bias by using a random sampling strategy, in whichsurvey areas are selected by chance rather than by design. Using this strategy, no one areais given preference over any other and all areas have an equal chance of being selected.A random sample can be simple (where random spots on the landscape are selected forsurvey, usually through imposing an imaginary grid over the study area and then select-ing areas to survey within that grid based on random numbers generated from a table orcomputer program) or stratified (where the study area is divided into its geographiczones and then sampled randomly within each zone, as you would for a simple randomsample survey). Like a judgment sample, a stratified random sample takes into accountthe geography of the study area and recognises that there might be certain factors whichaffected the location of sites in the past. In reality, sites are unlikely to be randomlyscattered about the landscape: people tend to follow behavioural patterns which relate tospecific needs within the environment, such as water or shelter, and a stratified randomsample recognises that they therefore tend to use the landscape in particular ways.
Systematic samples
One of the problems with a truly random sample is that some areas or sites are likely tobe over-represented or missed entirely. The goal of systematic samples is to remedy this
FINDING SITES 67
*Archaeologists Field Handbook 29/6/04 5:24 PM Page 67

Wby ensuring that a portion of every area is sampled. You can do this either by systematicrandom sampling, where the first sample unit or area is selected at random and all otherareas are chosen in relation to this (e.g. if you decide to place a survey square every 10 kilometres from the first, randomly chosen, survey square), or systematic unalignedsampling, where the total area is divided into large blocks and then one smaller blockwithin each larger block is chosen at random (Hester et al. 1997: 30). This still maintainsa random element in the selection process, but also gives relatively even coverage acrossthe survey area.
68 THE ARCHAEOLOGIST’S FIELD HANDBOOK
FIGURE 3.2: The advantages and disadvantages of different sampling strategies
*Archaeologists Field Handbook 29/6/04 5:24 PM Page 68

WRegardless of which strategy you consider to be ideal, the reality is that in some situ-
ations your survey area may be decided for you. A landowner may refuse access to theirproperty, Indigenous people may not want you walking in particular areas, or some placesmight simply be inaccessible. In any case, even if you are able to survey every centimetreof ground, it is likely that you will still only be able to see a portion of the total archaeo-logy of the area (Drewett 1999: 44). Sites might be covered by vegetation, soil or leaf litter,the area might not be actively eroding so that no sites are visible, or poor light fromheavily overcast conditions might cause you to miss small artefacts. The important thingis to recognise and record these and any other limitations in your field journal, so thatothers can recognise this bias and not assume a more thorough coverage of the landscapethan you have been able to achieve.
The New South Wales National Parks and Wildlife Service (Byrne 1997) recommendsadopting a three-tiered approach to archaeological survey to try to overcome thisproblem. Although it will not be foolproof, it will give you the best chance of finding arange of sites.
• Phase 1: An initial reconnaissance survey of the study area to see whether there areany obvious site types or areas of disturbance, and to get a feel for where within thestudy area it might be most productive to survey more intensively. During this phaseyou would record any obvious site types you came across (e.g. scarred or carved trees,rockshelters or quarries).
• Phase 2: Using these findings, choose a sample of the area for intensive survey, in whichyou will record all visible sites, particularly those types that were difficult to see duringthe reconnaissance survey (such as stone artefact scatters).
• Phase 3: Using these findings, choose a sub-sample of the study area where buriedartefacts or sites might occur. In this phase you would undertake some form of sub-surface testing to see whether soil or vegetation is currently covering sites.
RECORDING INFORMATION IN THE FIELD
Of course, there is more to fieldwork than simply looking for and finding sites. Thearchaeologist’s job is also to record a wide variety of complementary information whichis essential for understanding the context in which the research was undertaken, thephysical and geographical context of any sites which were found and the limitations ofthe research. This might enable the archaeologist, for instance, to make sense of why sitesmight be located in certain places and not others, or why no sites were found at all despitethe best surveying strategy. Making all facets of the fieldwork process transparent is theonly way in which archaeologists can ensure that their results will be able to be compared
FINDING SITES 69
*Archaeologists Field Handbook 29/6/04 5:24 PM Page 69

Wwith those of other projects, and therefore will contribute to the pool of current know-ledge (see ‘Archaeologists and their profession’ on page 15). There are a number ofcomplementary strands of contextual information which you should record:
• background information on the conduct of the fieldwork, the strategies which youadopted, the day-to-day operation of the project and any problems which arose, in yourfield journal;
• information on the survey transects which indicates how well covered the survey areawas, on recording forms;
• information on the landforms, vegetation, soil, geological formations encountered inthe study area, on recording forms;
• information on the water sources encountered in the study area, on recording forms;• information on the general ground-surface visibility of the survey area, on recording
forms.
Excavation requires a different set of recording forms and is dealt with in detail inChapter 5. Some examples of forms to use for recording landform, vegetation, watersources and visibility have been included in Appendix 1.
Denis Gojak’s tip for all-weather site recording
Surveyors’ and miners’ supply firms sell waterproof paper. This weighs in at about80 gsm, and can be used in a photocopier to provide recording forms that let you workin the least hospitable conditions imaginable! Team it up with a Fisher Space Pen, whichwrites upside down and on greasy surfaces, and only costs a few bucks for a refill, andyou will have no excuses left for not recording in any weather.
KEEPING A FIELD JOURNAL
One of the most important aspects of any archaeological fieldwork is keeping a fieldjournal. This is essentially a diary in which you record the day-to-day details of yourfieldwork, from the sites you record or the features you excavate, right down to theweather and light conditions (which, believe it or not, can affect your ability to locate sitesor identify artefacts, particularly stone artefacts), the names of the people who participateeach day and any problems you encounter. It is also the place where you can recordany impressions or interpretations of sites and features as they occur to you. This will beparticularly important if you are one of many fieldworkers on a large project and your
70 THE ARCHAEOLOGIST’S FIELD HANDBOOK
*Archaeologists Field Handbook 29/6/04 5:24 PM Page 70
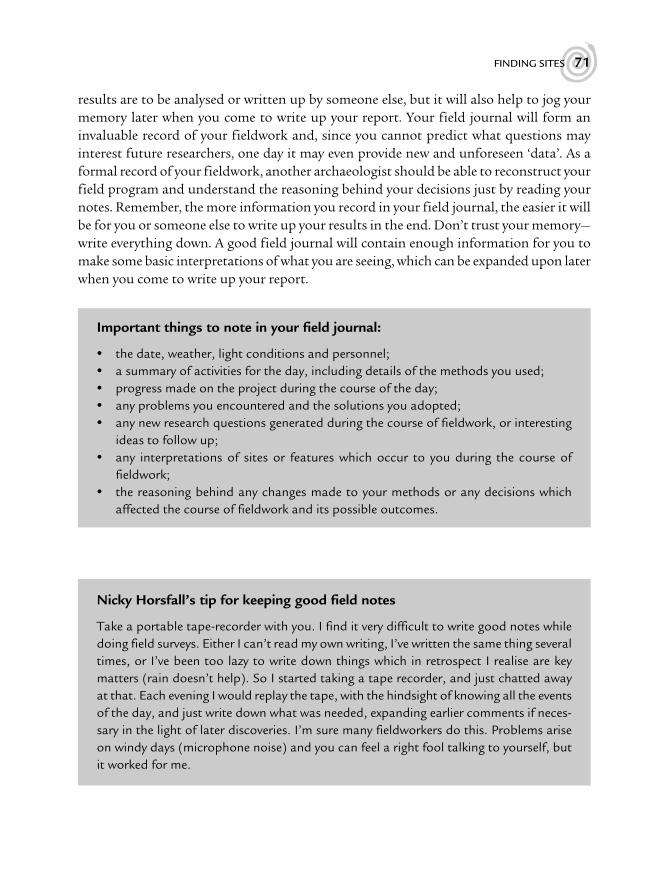
Wresults are to be analysed or written up by someone else, but it will also help to jog yourmemory later when you come to write up your report. Your field journal will form aninvaluable record of your fieldwork and, since you cannot predict what questions mayinterest future researchers, one day it may even provide new and unforeseen ‘data’. As aformal record of your fieldwork, another archaeologist should be able to reconstruct yourfield program and understand the reasoning behind your decisions just by reading yournotes. Remember, the more information you record in your field journal, the easier it willbe for you or someone else to write up your results in the end. Don’t trust your memory—write everything down. A good field journal will contain enough information for you tomake some basic interpretations of what you are seeing, which can be expanded upon laterwhen you come to write up your report.
Important things to note in your field journal:
• the date, weather, light conditions and personnel;• a summary of activities for the day, including details of the methods you used;• progress made on the project during the course of the day;• any problems you encountered and the solutions you adopted;• any new research questions generated during the course of fieldwork, or interesting
ideas to follow up;• any interpretations of sites or features which occur to you during the course of
fieldwork;• the reasoning behind any changes made to your methods or any decisions which
affected the course of fieldwork and its possible outcomes.
Nicky Horsfall’s tip for keeping good field notes
Take a portable tape-recorder with you. I find it very difficult to write good notes whiledoing field surveys. Either I can’t read my own writing, I’ve written the same thing severaltimes, or I’ve been too lazy to write down things which in retrospect I realise are keymatters (rain doesn’t help). So I started taking a tape recorder, and just chatted awayat that. Each evening I would replay the tape, with the hindsight of knowing all the eventsof the day, and just write down what was needed, expanding earlier comments if neces-sary in the light of later discoveries. I’m sure many fieldworkers do this. Problems ariseon windy days (microphone noise) and you can feel a right fool talking to yourself, butit worked for me.
FINDING SITES 71
*Archaeologists Field Handbook 29/6/04 5:24 PM Page 71

W72 THE ARCHAEOLOGIST’S FIELD HANDBOOK
FIGURE 3.3: A page from archaeologist Robert Stone’s field journal
*Archaeologists Field Handbook 29/6/04 5:24 PM Page 72

WRECORDING TRANSECTS
So that someone else reading or assessing your report can reconstruct your surveystrategy, you need to be clear about the details of your survey transects. You will need tooutline:
• where your transects were located (this is best done by plotting your transects on to amap so that the area you have covered, and by extension the area that you ignored, isimmediately apparent to the reader);
• how many transects you walked;• how long each transect was;• how wide each transect was (i.e. how many people were involved, and roughly how far
apart each person walked);• the vegetation and soil conditions which you noticed within each transect. This last set
of information will be crucial for determining the effectiveness of your survey strategy(i.e. how likely it is that you could have missed or not been able to locate sites)(see ‘Determining effective survey coverage’ on page 78).
RECORDING LANDFORM, VEGETATION AND SLOPE
Landforms are simply the topographic units of the landscape, such as creek-lines, hillslopes, ridge-lines, plains or river valleys. It is important that you note the variouslandforms across which your survey transects pass, because different landforms will beassociated with different erosional or depositional processes, as well as different typesof vegetation, ground cover and water sources, not to mention different uses in the past.For this reason, in theory you should assess the length of your transects within eachlandform unit (i.e. when you enter a new landform unit, you should end one transectand begin another) and then assess the percentages of ground-surface exposure andground-surface visibility that occur within each, although this may not always be possible(see ‘Determining effective survey coverage’ on page 78).
Archaeologists commonly assess vegetation in terms of two factors: as a guide to therange of plant resources which would have been available to Indigenous peoples inthe past; and for what it implies about current and past land use, which has the potentialboth to indicate the possible existence of historical archaeological sites, and to affectsurvey conditions such as ground-surface visibility, access and disturbance. Indigenouspeoples used plant resources for both food and medicine, as well as to manufactureobjects such as nets, string bags, shields, baskets and canoes. When recording vegetation,you should take note of:
FINDING SITES 73
*Archaeologists Field Handbook 29/6/04 5:24 PM Page 73

W• the vegetational structure (how tall the tallest trees are, what constitutes the under-
storey, and the groundcover);• the dominant species;• other prominent species you can see, including native and non-native species, because
the presence or absence of non-native species may be an indication of how intensivelythe land has been modified by Europeans;
• the approximate size of the largest trees, which is principally a guide to how old andwell-established they might be. If you are in Victoria conducting a survey for Indige-nous sites, for example, and are on the lookout for scarred or carved trees, there is nopoint in examining young trees which have only grown up in the last 50–100 years.
Because the distribution of different vegetation types depends on other environmentalfactors, such as soil type, aspect, micro-climate and the availability of water and nutrients,you will also need to record these complementary sets of information (see ‘Recordingwater sources’ on page 75 and ‘Recording soils and geological formations’ on page 76).
Archaeologists record slope as a guide to the integrity, or the degree of intactness, ofa site. Any artefact which is still in the same position as when it was discarded is called insitu. Archaeologists look specifically for in situ artefacts, because these have the mostpotential for revealing unambiguous information about human behaviour in the past.This is why assessing the integrity of a site is so important. If a site is largely undisturbed(if its integrity is good), then the artefacts within it are likely to be in situ (in the samepositions as when they were last used). If a site has been damaged or disturbed in any way,however (i.e. if its integrity is poor), then there is less likelihood of the same high levelof reliable information being retrievable.
In terms of recording slope, artefacts on a steep slope are more likely to have beendisturbed as a result of gravity than artefacts on a flat area. This can also be a useful guidewhen assessing the boundaries of the site. Take the example of a stone artefact scatterextending several hundred metres with, say, 30 artefacts distributed randomly along it. Ifthe site is located on flat ground, or on only a slight slope, you might conclude that theartefacts are part of one, long continuous site. If the site has a steep slope, however, itmight be reasonable to conclude that the artefacts could be the result of a number ofevents, and that they should therefore be recorded as individual sites. In making suchinterpretations, slope should only be used in conjunction with other evidence. In thisscenario, it would also be important to assess whether the artefacts occurred in discreteclusters, or if they had a relatively continuous distribution.
Slope is recorded in degrees, either using a clinometer or estimated according toeye (see Figure 3.4 on page 75). Using a clinometer is similar to taking a bearing with acompass. You sight through the clinometer along the angle of the slope and, dependingon whether you are sighting uphill or downhill, you can read the degrees of elevation or
74 THE ARCHAEOLOGIST’S FIELD HANDBOOK
*Archaeologists Field Handbook 29/6/04 5:24 PM Page 74

Wdepression. Sighting along flat ground (a horizontal plane), for example, will give you areading in the 0–2° range. Tilting your head (and thus the clinometer) above the hori-zontal plane will give you a reading in degrees of elevation. The higher the number, thegreater the slope. A mid-slope is in the 5–10° range and steep areas will have a value ofgreater than 10°. Conversely, if you are standing at the top of the slope looking down,then tilting your head and the clinometer below the horizontal plane will give you areading in degrees of depression.
If you are searching for archaeological sites, the most fruitful areas will be those witha gradient of 10° or less. You are unlikely to find sites on slopes with a gradient higherthan 10°, mainly because people in the past will have preferred level or gently slopingground for pathways and campsites, or because gravity may have caused the material tomove to lower ground.
RECORDING WATER SOURCES
One of the major environmental factors affecting human behaviour is water. People needto drink often and usually will not range far from reliable water sources. In thosecircumstances where they do, this is in itself an indication of a particular behaviour(such as obtaining rare or prized resources). This is less true for historic sites than forIndigenous sites, but still holds as a general rule. The main types of water sources are:
FINDING SITES 75
FIGURE 3.4: A guide to estimating slope by eye. When estimating slope, bear in mind thatthe eye tends to exaggerate slope
*Archaeologists Field Handbook 29/6/04 5:24 PM Page 75

W• permanent water, such as rivers and soaks;• semi-permanent water sources, such as large streams, some swamps and billabongs;• ephemeral water sources, such as small streams or creeks;• underground (artesian) water sources.
Proximity to water influences not only the number of sites likely to be found, but alsothe artefact density at those sites. Though sites can be located quite a distance from watersources, most are located in reasonably close proximity. In fact, the vast majority of Indige-nous archaeological sites are likely to occur within 500 metres of a water source (Byrne1993: 18) and, in general, sites located a long way from water will tend to be smaller andcontain relatively few artefacts. Sites located immediately near a water source are oftensituated on ground which is reasonably elevated above that source rather than on the flatsimmediately adjoining it, since these are likely to have been subject to periodic flooding.Water sources also provide potential access to specific site types which will not existanywhere else, such as axe-grinding grooves or native wells. When assessing the relation-ships between sites and water sources, it is important to remember that the Australiancontinent has undergone massive environmental changes during the 50 000 years thatpeople have lived here, and that Pleistocene sites (i.e. sites which are older than 10 000years) would have been located in relation to Pleistocene water sources which may notnecessarily still exist today.
When conducting a survey for Indigenous sites, you must record the location of allwater sources in the proximity. As part of all site recordings, make sure that you note:
• the distance to the nearest available water source (which may be an ephemeral creek);• the distance to the nearest reliable water source; and• the type of source in both cases.
RECORDING SOILS AND GEOLOGICAL FORMATIONS
The geological makeup of a region will affect the patterning of archaeological evidence intwo ways. The availability of particular types and quantities of stone resources will haveaffected Indigenous people’s access to the raw materials needed to make stone artefacts,and local soil types and conditions may have influenced the availability of particularplants and animals in the past, as well as the ultimate preservation of archaeological sitesin the present. Knowing the location of rock outcrops suitable for making stone artefactsis invaluable to the field archaeologist, as it is likely that Indigenous quarry sites, and theproduction of stone artefacts associated with them, will occur in the immediate vicinity.As a general rule Indigenous people tended to make stone artefacts from very fine-grained
76 THE ARCHAEOLOGIST’S FIELD HANDBOOK
*Archaeologists Field Handbook 29/6/04 5:24 PM Page 76

Wtypes of stone, as these produced the sharpest edge. Chert, mudstone, silcrete, chalcedonyand quartzite are all common sources for stone artefacts throughout Australia, althoughnot all stone artefacts are intended for cutting. Sandstone was a common material formaking grindstones, and granite—a hard volcanic rock—a common material for stoneaxes and adzes. When recording sites in the field, you should always record the locationand nature of any available stone artefact raw material sources in the area.
Sometimes on a survey you will encounter large areas of natural rock outcrop whichmay well be the kind of stone that Indigenous people favoured for stone artefacts, butwhich may not actually have been used for this purpose. In some cases, this backgroundmaterial may be sufficiently similar to real artefacts to be confusing. Silcrete, for example,can be fractured by the heat of the sun or by bushfire to resemble artefacts which havebeen heated in a campfire. While the spalling on the surface of the stone may be identicalto that on deliberately heat-fractured stone, it is a natural product. Such confusingmaterial is often referred to as background ‘noise’, and is one of the many things thatcan interfere with your ability to identify artefacts correctly.
Recognising stone artefacts in the field
The trick to recognising stone artefacts in the field is ‘getting your eye in’, or trainingyourself to recognise things that are out of place. Because they are usually chosen fortheir particularly fine grain, most stone artefact raw materials are visually distinctive andstand out from the local soil and other natural stones around them. When you’resurveying, keep a lookout for anything which is of an unusual colour compared with thebackground material, or anything which is particularly smooth or cryptocrystalline(i.e. the grain of the stone is too fine to see with the naked eye). If you find somethingwhich is suspiciously artefact-like, but is not something you can be completely sureabout, examine the surrounding area very carefully. Always pay particular attention toareas close to water.
If you think you have found a stone artefact, look carefully for any of the telltalesigns that mean it is a deliberate humanly made product, rather than an accidentally or naturally fractured piece of stone (see ‘How to identify a flaked stone artefact’ onpage 209).
Soil type is important to archaeological fieldwork in two ways. First, the ability of aparticular type of soil to support plant and animal resources which may have been usedby Indigenous peoples or non-Indigenous settlers is crucial to the potential for findingarchaeological sites. Second, the local soil conditions—in particular, whether soils areaggrading (i.e. accumulating, such as when a river valley silts up) or eroding (i.e. beingremoved)—have a great bearing on archaeological visibility. For example, small artefacts
FINDING SITES 77
*Archaeologists Field Handbook 29/6/04 5:24 PM Page 77

Wmay be covered by redeposited soils in an aggrading environment, but exposed in aneroding environment. Unfortunately, geological maps cannot provide this crucial infor-mation, although topographic maps will give some general guides, such as whether areasare likely to be flat (and therefore possibly aggrading) or steep (and possibly eroding). Theonly way to record this information accurately is to take constant note of the conditionsyou can see around you during the survey, paying particular attention to the size,frequency and cause of eroded areas (see ‘Determining effective survey coverage: whatreveals, what conceals’ below).
RECORDING DISTURBANCE
There are many different factors which can disturb an archaeological site over time, fromaccidental or deliberate human activity (ploughing, construction, demolition, removal,scavenging) to the activities of animals (grazing, trampling, burrowing, digging), insects(nesting, burrowing, eating) and plants (tree roots, vegetation overgrowth). Even theelements can disturb a site’s integrity through erosion, deposition, scouring or naturalcollapse. In reality, no site is likely to remain totally unaffected by some type of dis-turbance process. The collective name which archaeologists give to these activities istaphonomic processes; any source of such a process is called a taphonomic agent. Anassessment of the range of taphonomic processes which might have affected a sitethrough time is principally your assessment of the integrity of a site, not only in termsof how disturbed you think it may be, but also in terms of what might have caused, orbe causing, this disturbance. For this reason you need to record any potential sourcesof damage to a site, and assess whether you think the site is in excellent, good, fair orpoor condition.
A good understanding of taphonomic processes and their effects will also be essentialfor interpreting the results from any surface survey or excavation, since one of the principalaims of the analysis will be to try to isolate which artefactual patterns are a result of humanbehaviour and which are simply reflecting the results of various taphonomic agents.
DETERMINING EFFECTIVE SURVEY COVERAGE: WHATREVEALS, WHAT CONCEALS
Effective survey coverage is not just how much of the survey area you have physicallycovered, but how favourable the conditions were for you to locate artefacts and sites.Some sites are highly visible (such as buildings, scarred trees or rock shelters), while others(such as isolated artefacts) can be more difficult to locate and may even go unrecorded if
78 THE ARCHAEOLOGIST’S FIELD HANDBOOK
*Archaeologists Field Handbook 29/6/04 5:24 PM Page 78
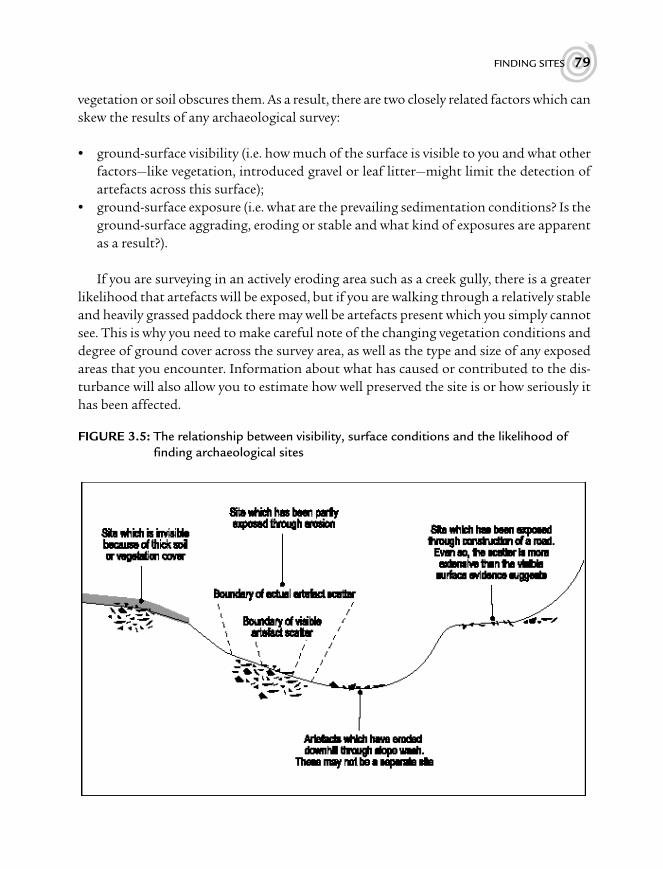
Wvegetation or soil obscures them. As a result, there are two closely related factors which canskew the results of any archaeological survey:
• ground-surface visibility (i.e. how much of the surface is visible to you and what otherfactors—like vegetation, introduced gravel or leaf litter—might limit the detection ofartefacts across this surface);
• ground-surface exposure (i.e. what are the prevailing sedimentation conditions? Is theground-surface aggrading, eroding or stable and what kind of exposures are apparentas a result?).
If you are surveying in an actively eroding area such as a creek gully, there is a greaterlikelihood that artefacts will be exposed, but if you are walking through a relatively stableand heavily grassed paddock there may well be artefacts present which you simply cannotsee. This is why you need to make careful note of the changing vegetation conditions anddegree of ground cover across the survey area, as well as the type and size of any exposedareas that you encounter. Information about what has caused or contributed to the dis-turbance will also allow you to estimate how well preserved the site is or how seriously ithas been affected.
FINDING SITES 79
FIGURE 3.5: The relationship between visibility, surface conditions and the likelihood offinding archaeological sites
*Archaeologists Field Handbook 29/6/04 5:24 PM Page 79

WTo do this properly, you really need to make some estimate of how much of the ground
surface is visible to you during a survey, and how much of this visible area has been erodedor disturbed, and is therefore more likely to reveal archaeological material. To do this, youneed to take note of the approximate percentage of the survey area which is visible as bareground, and the approximate percentage which is exposed through erosion (see Table 3.1).This does not mean that you should only focus your survey on exposed areas and ignoreanything with less visibility. It is perfectly possible to find sites in areas which technicallyhave no visibility, provided the artefacts are conspicuous enough.
These measures are usually represented as a percentage—either of the total survey areaif it is small, or within each transect or landform unit if the survey area is large. In generalit is accepted that the outcomes of any archaeological surface survey can only be repre-sentative of the visible, rather than the existing, archaeological record.
TABLE 3.1: Recording visibility and exposure: two critical factors in being able to locatearchaeological sites
Recording what reveals (exposure areas) Recording what conceals (visibility)
Note the types of exposures which you can see Note the type of ground cover which is(e.g. gully erosion, vehicle tracks, animal pads, evident (grass, shrubs, leaf litter, gravel)areas of patchy grass cover)
Note the causes contributing to this disturbance Note the approximate percentage of ground(e.g. recent rains, grazing animals, uprooted cover*trees, ants’ nests)
Note the approximate percentage of the ground Note the presence of any distracting effects,surface which is exposed* such as gravel or naturally heat-fractured
stones, which may make the identificationof artefacts more difficult
Note the approximate dimensions of the Note any other factors which may preventexposed areas you from seeing artefacts (such as dumped
soil or gravel, soil slumping)
You should also note the sedimentation conditions across the study area—which parts are activelyeroding? Which aggrading? Which are stable?
* You could assess this for the survey area as a whole, but it is more meaningful if you estimate it for eachtransect which you walk, or for each landform unit through which your transect passes.
WHAT TO DO WHEN YOU FIND A SITE
Recording a site is a selective process. On some fieldwork projects you will have ampleopportunity to record every last detail, while on others you will have limited time and a
80 THE ARCHAEOLOGIST’S FIELD HANDBOOK
*Archaeologists Field Handbook 29/6/04 5:24 PM Page 80

Wlot of work to get through. Regardless of which situation you find yourself in, there arebasic minimum requirements for recording any Indigenous or historical site. Recordingat least these aspects will ensure that, even if no further research is ever done on that site—or, in a worst case scenario, if it is destroyed before further research can be undertaken—atleast there will be a sufficient record of it.
Basic locational information
• Record a grid reference for the site, either taken using a GPS, or plotted by hand froma topographic map (of at least 1:100 000 scale) (see ‘Using a map to calculate a gridreference’ on page 36).
• Include a description of how to get to the site. Imagine someone else trying to relocatethe site from your instructions—how would you tell them to find it again?
• Make a mud map of how to get to the site which can complement your written descrip-tion. Include major landmarks or features and approximate distances along the route.
Basic descriptive information
• Include a brief description of the nature of the site, including its type, size andenvironmental context.
• Make a brief list of the major features of the site and its contents, including an assess-ment of whether further research at the site is warranted.
• Include a brief assessment of the condition of the site and its contents (i.e. Is it wellpreserved? Has it been damaged in any way? How much has been damaged? Is it indanger of being damaged in the future?).
• A sketch plan of the site should also be made. This does not have to be measuredaccurately, but on the plan you should include an arrow indicating the direction ofnorth, and some idea of the scale (otherwise the plan will be meaningless) (see ‘Makingmud maps’ on page 42).
• Take photographs of the site and its contents illustrating significant features (seeChapter 9: Photography and illustration).
For management purposes (see Pearson and Sullivan 1999: 116), you should also note:
• the name of the landowner and their attitudes to the site;• the ownership status of the land (if known). Is it freehold? Leasehold? Crown Land?
Once you’ve found a site, there are various obligations to notify the relevant heritageauthority within a certain timeframe (see ‘Working with the legislation’ on page 20).
FINDING SITES 81
*Archaeologists Field Handbook 29/6/04 5:24 PM Page 81

WYou may also have to fill out a recording form for your site and submit this to the sameauthority. Check with the relevant government department to find this out.
In addition to this basic information, you may also need to collect specific informationrelating to your research questions. A formalised recording form is the most efficient wayof gathering your information consistently, particularly if you are recording the samevariables at many different sites. A good form can act as a checklist, standardise terms andparameters and greatly speed up the recording process. Some examples of recording formsare included in Appendix 1. Other examples can be found in Flood, Johnson and Sullivan(1989) and Davies and Buckley (1987).
DEFINING A SITE BOUNDARY
Obviously some sites will have clearly defined physical boundaries (such as a rockshelter,or a stone arrangement), while others will be much harder to determine unless the visi-bility is excellent. One definition of an open ‘site’, in fact, is that it is only a unit of currenthuman observation and not necessarily a unit of past human behaviour. This means thata ‘site’ may simply be a small ‘window’ in the landscape where artefacts are exposed onthe ground surface—as a result of erosion for instance—and not necessarily an accuratereflection of the full extent of the site (see Figure 3.4 on page 75 and ‘Defining the bound-aries of an open artefact scatter’ on page 219).
If you find a site simply because of better ground-visibility in a particular place, it ispossible that the site is more extensive than you can see (i.e. there may be more artefactsin the soil beneath those you can see or hidden by the ground cover around those you cansee). Open sites in particular often tend to be larger in size than what is visible on thesurface. This can often make it difficult to decide on the site’s boundary: is it simplythe limit of visible artefacts? Is it the limit of the eroded area (if this is what has allowedyou to see the artefacts in the first place)? If you have defined a site as a concentration ofartefacts which is noticeably greater than the background scatter, do you draw theboundary at the limit of the concentration? You may even decide to use an arbitraryboundary, such as a fenceline or vehicle track to define a site. It is really up to you how youdefine a site’s boundary—just make sure that you note clearly what criteria you used toreach this decision and record it in your field journal and report.
The information from your survey must always be interpreted with care. Remember,the absence of artefacts does not necessarily mean the absence of archaeology on thatspot (simply that you cannot see it), just as the presence of artefacts does not necessarilyimply that the human activity from which they arose occurred precisely on that spot(they may have been moved there as a result of erosion, downslope movement or plough-ing, for example). You need to record as much information about the context of sites or
82 THE ARCHAEOLOGIST’S FIELD HANDBOOK
*Archaeologists Field Handbook 29/6/04 5:24 PM Page 82

Wartefacts as possible when you are in the field and take this into account when you drawyour conclusions.
WHAT NOT TO DO AT A SITE
In the event of finding a site there are some simple rules to follow. Most of the adviceabout what not to do at a site is not only good ethical practice, but simple common sense:
• Don’t interfere with the site in any way. Signing your name, chalking in engravingsat art sites, or digging or collecting artefacts without permission are not only irre-sponsible but also illegal.
• Don’t collect ‘souvenirs’, even to verify to state authorities that you have found a site.There might be some exceptional circumstances in which you should collect materialfrom a site—such as when it is at risk of imminent destruction—but this would behighly unusual.
• Don’t leave rubbish behind—take it with you when you go.• Don’t make details of the site public without obtaining the proper permissions first.
Indigenous people in particular may wish to protect sites by keeping their details secret.In Queensland, making the details of a site public is illegal without state permission.
A NOTE ON CLASSIFICATION SYSTEMS
When you locate a site, or record a series of sites, you will have to label these sites with someshorthand title to be able to refer to them in a meaningful way. ‘The long narrow site inthe bend of the river closest to the homestead’ may be a good physical description, but itwill be an unwieldy mouthful if you need to constantly refer to it in a report. Likewise,‘Site 1’ may seem a logical description at the time, but does little to tie the site into yourparticular research program or its geographic area. Many archaeologists label sites with ameaningful alphabetical prefix (such as the first letter of the name of the property onwhich it is found or the consultancy project which generated the survey) and then asequential number for each site found. Indigenous sites located during a power line surveyfor Transgrid Pty Ltd in Armidale, New South Wales for example, were labelled ‘TG1’,‘TG2’, ‘TG3’, etc. Other systems superimpose an imaginary grid over the research area andlabel each site according to its location within any square of this grid. Sites recorded in theSelwyn Ranges in northwest Queensland as part of an ongoing research program, forexample, have designations such as ‘LzBe1’ which, although unpronounceable, ensuredthat each site name was unique to that research program. While it is entirely up to you how
FINDING SITES 83
*Archaeologists Field Handbook 29/6/04 5:24 PM Page 83

Wyou code your sites, try to make your site designations meaningful and always think in thelong term, particularly if your data are going to end up in a computer database whichcentralises information from hundreds of different archaeological site reports (such as anygovernment site register). How many site ‘S1s’ are there likely to be? If your field journalor site report ever became separated from your site photographs, how likely would it bethat someone else could identify those sites as belonging to your research alone?
REFERENCES AND FURTHER READING
Byrne, D. 1993, ‘An investigation of the Aboriginal archaeological record in the TenterfieldE.I.S. area’, unpublished report to the Forestry Commission of New South Wales.
Byrne, D. (ed.) 1997, Standards Manual for Archaeological Practice in Aboriginal Heritage Manage-ment, NSW NPWS, Sydney.
Byrne, Denis, Brayshaw, Helen and Ireland, Tracey 2001, Social Significance: A Discussion Paper,NSW NPWS, Sydney.
Davies, Martin and Buckley, Krystal 1987, Archaeological Procedures Manual: Port Arthur Conser-vation and Development Project, Occasional Paper No. 13, Department of Lands, Parks andWildlife, Hobart.
Drewett, Peter 1999, Field Archaeology: An Introduction, UCL Press, London.Flood, Josephine, Johnson, Ian and Sullivan, Sharon (eds) 1989, Sites and Bytes: Recording
Aboriginal Places in Australia, Australian Government Publishing Service, Canberra.Hester, T.R., Shafer, H.J. and Feder, K.L. 1997, Field Methods in Archaeology, 7th edn, Mayfield
Publishing Co, Mountain View, California.Redman, Charles L. 1975, ‘Productive sampling strategies for archaeological sites’, in
Mueller, J.W. (ed.), Sampling in Archaeology, University of Arizona Press, Tucson, pp. 147–54.Pearson, Michael and Sullivan, Sharon 1999, Looking after Heritage Places: The Basics of Heritage
Planning for Managers, Landowners and Administrators, Melbourne University Press, Melbourne.Sullivan, Sharon 1983, ‘Making a discovery: the finding and reporting of Aboriginal sites’, in
Connah G. (ed.), Australian Field Archaeology: A Guide to Techniques, AIAS, Canberra, pp. 1–9.Winston-Gregson, J.H. 1985, ‘A guide to locating settlements in rural New South Wales’,
Australian Journal of Historical Archaeology 3: 3–7.
USEFUL WEBSITES
http://archnet.asu.edu/archnet/uconn_extras/theory/sampling/sampling.html.Covers the different kinds of sampling strategies and lets you click on samples to see the
results of a hypothetical survey. http://arts.anu.edu.au/arcworld/resources/paa/arcrock.htm.Peter Hiscock’s site for stone artefact research in Australia contains links to other stone
artefact sites and information.
84 THE ARCHAEOLOGIST’S FIELD HANDBOOK
*Archaeologists Field Handbook 29/6/04 5:24 PM Page 84

CHAPTER FOURSITE
SURVEYING
WHAT YOU WILL LEARN FROM THIS CHAPTER
W The basic principles of a chain surveyW How to produce quick and accurate site plansW How to keep your errors to a minimumW How to set up and use an automatic (‘dumpy’) levelW How to record survey information in your field notebook and on recording forms
The basic surveying toolkit
At least two 25 metre, 30 metre or 50 metre tape measures (larger sizes are best)At least two 5 metre, 8 metre or 10 metre retractable tape measures (larger sizes are best)CompassNylon builder’s line/stringPlastic clothes pegs (for fixing a tape measure to a string baseline)Tent pegs, or wooden stakes (for fixing the ends of a baseline)MalletPlumb-bobRanging rodDrawing equipment (see Chapter 9)
W W W
WW
85
*Archaeologists Field Handbook 29/6/04 5:24 PM Page 85
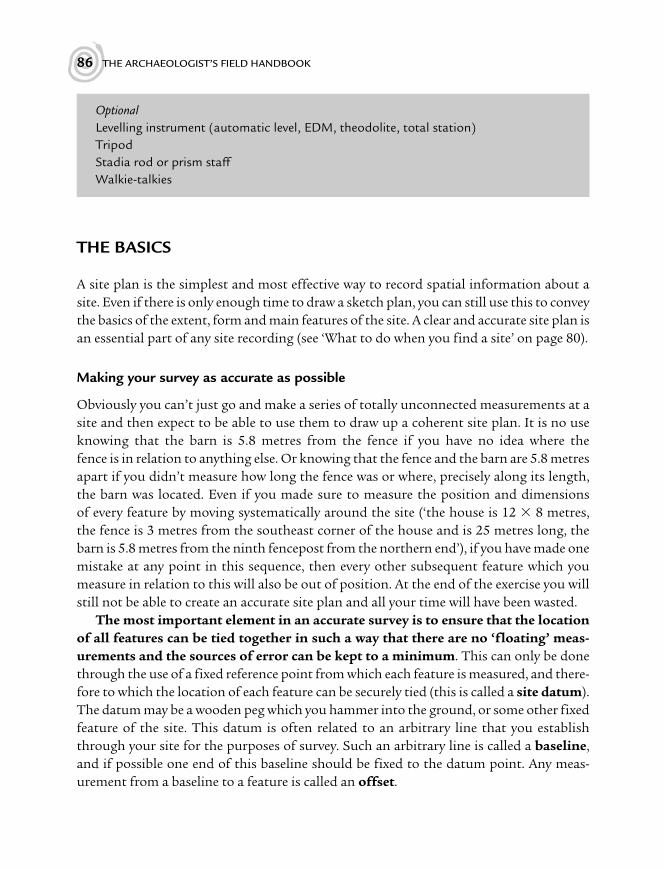
WOptionalLevelling instrument (automatic level, EDM, theodolite, total station)TripodStadia rod or prism staffWalkie-talkies
THE BASICS
A site plan is the simplest and most effective way to record spatial information about asite. Even if there is only enough time to draw a sketch plan, you can still use this to conveythe basics of the extent, form and main features of the site. A clear and accurate site plan isan essential part of any site recording (see ‘What to do when you find a site’ on page 80).
Making your survey as accurate as possible
Obviously you can’t just go and make a series of totally unconnected measurements at asite and then expect to be able to use them to draw up a coherent site plan. It is no useknowing that the barn is 5.8 metres from the fence if you have no idea where thefence is in relation to anything else. Or knowing that the fence and the barn are 5.8 metresapart if you didn’t measure how long the fence was or where, precisely along its length,the barn was located. Even if you made sure to measure the position and dimensionsof every feature by moving systematically around the site (‘the house is 12 � 8 metres,the fence is 3 metres from the southeast corner of the house and is 25 metres long, thebarn is 5.8 metres from the ninth fencepost from the northern end’), if you have made onemistake at any point in this sequence, then every other subsequent feature which youmeasure in relation to this will also be out of position. At the end of the exercise you willstill not be able to create an accurate site plan and all your time will have been wasted.
The most important element in an accurate survey is to ensure that the locationof all features can be tied together in such a way that there are no ‘floating’ meas-urements and the sources of error can be kept to a minimum. This can only be donethrough the use of a fixed reference point from which each feature is measured, and there-fore to which the location of each feature can be securely tied (this is called a site datum).The datum may be a wooden peg which you hammer into the ground, or some other fixedfeature of the site. This datum is often related to an arbitrary line that you establishthrough your site for the purposes of survey. Such an arbitrary line is called a baseline,and if possible one end of this baseline should be fixed to the datum point. Any meas-urement from a baseline to a feature is called an offset.
86 THE ARCHAEOLOGIST’S FIELD HANDBOOK
*Archaeologists Field Handbook 29/6/04 5:24 PM Page 86

WYour baseline may be a long tape measure (this is certainly simplest, because the
distance along the baseline is easy to read off the tape), or a string-line of known lengthwhich you have fixed to pegs in the ground. Where you place it will depend on the size andshape of your site; because it is an arbitrary line which you are using for convenience, itdoesn’t matter where in the site it is located, as long as you can plot most or all of thefeatures from it. If you are recording a stone arrangement, for example, you might chooseto fix the baseline through the centre of the arrangement so that you could convenientlyplot all of the stones on either side of it. Similarly, if you are recording a collection of farmbuildings, you may be able to use a fixed fenceline (provided you have measured it first)as your baseline.
If your site is particularly large or spread out, you may need to establish more than onebaseline to be able to reach all features. In this case, you could use the position of the firstbaseline to establish the position of the second and so on, but bear in mind here that ifyou have made any errors in establishing the position of the second baseline, then anysubsequent baselines will also be out and there is a real likelihood that your errors will becompounded. To try to control this process of cumulative error, the most reliable meansof surveying an area is to set up a series of baselines around the perimeter to form aframework which encases the site (see Figure 4.1 on page 88). This uses all the same prin-ciples of measurement as a single baseline, simply repeated around each side of theframework until all the details have been plotted in.
When establishing a framework, you need to keep a few basic rules in mind:
• Use as few lines as possible to keep your errors to a minimum (any form of quadri-lateral is ideal).
• Make sure that the framework is ‘rigid’—in other words, that your starting point is alsoyour end point.
• Make sure that you check the accuracy of your framework before you begin detailedmeasurement by not only measuring the length of the outside perimeter, but alsothe diagonals between points. This is why surveyors commonly divide an area tobe surveyed into triangles, then measure all of the sides (Hobbs 1983: 44–45). Thesediagonals are essential checklines which will help to keep your framework rigid.
• Try to keep the angles of the triangles in your framework between 30° and 120°. Ifyour angles are greater than 120°, it is easy for errors to creep in.
By establishing a framework first, you give yourself a method for keeping a constantcheck on the accuracy of your plan without running the risk of getting bogged down inthe details. A good framework will use the key elements of a site to establish the mainspatial relationships between features. Once you have established this, you will easily beable to check how accurately you have positioned the details in relation to these features
SITE SURVEYING 87
*Archaeologists Field Handbook 29/6/04 5:24 PM Page 87

W
and in this way your errors should be kept to a minimum. This is what surveyors meanwhen they use the maxim: Always survey from the whole to the part. This simply meansestablishing your baseline or framework first and only then measuring in the detail ofparticular features (see Figure 4.1).
When establishing any baseline, either alone or in a framework, there are several rulesto bear in mind:
• All measurements along a baseline should begin from the same point (i.e. the same endof the baseline). This will be less problematic if you use a tape measure as a baseline,because all measurements will begin at ‘zero’.
• Always measure along the baseline first and only then to the feature, and always recordyour measurements in the same order.
• Do not move or disturb the baseline until all measurements from it are complete,including any last-minute checks you need for accuracy.
Keeping your errors to a minimum
The biggest problem with all forms of survey is the potential for error to creep intoeven the most careful measurements. When you are making a series of measurements, it
88 THE ARCHAEOLOGIST’S FIELD HANDBOOK
FIGURE 4.1: A framework of baselines, the essential elements of any site plan
*Archaeologists Field Handbook 29/6/04 5:24 PM Page 88

Wis very easy for one measurement to be slightly out, thus making the next slightly out, andso on. If these errors are allowed to accumulate, you could end up with serious problems.This is why the other basic premise of all surveying is to constantly be on the alert forpotential errors, and to keep these to a minimum wherever possible. This may be some-thing as simple as making sure that all sides of your framework can be placed in areaswhich are free of excessive vegetation or other obstacles, making sure that everyone isfamiliar with the tape measures you will be using so that no mistakes will be madein calling out measurements, or making sure that all measurements are recorded con-sistently in a log book. You will have to accept that some margin of error will be inevitablein all surveys (unless you are lucky enough to be using state-of-the-art electronic survey-ing equipment), but always aim to keep this within acceptable limits (see Table 4.1 on page113). The only way to achieve this is to make independent checks on your measure-ments as often as possible. Remembering the tendency of surveyors to divide theirsurvey areas into triangles, the simplest way to make an independent check on your frame-work is to not only measure the sides of your framework, but also to measure and plot thediagonal checklines between corner points (see Figure 4.1 on page 88). Obviously this willnot always be possible, particularly if there is vegetation in the way or if you are plottinga site from a central baseline only (see ‘Using the baseline/offset technique’ on page 96).In this case, you can make independent checks on the position of key features by plottingthem from more than one point along the baseline (see Figure 4.1 on page 88). You shoulddo this for all major features of your site anyway, and for any features which are particu-larly important to your research goals and thus which need to be plotted accurately.
TECHNIQUES FOR CONSTRUCTING A SITE PLAN
The simpler forms of site plan use basic orienteering skills which anyone can master; themore complex require particular items of equipment which may not always be available.The two simplest and least technical methods for constructing a site plan are:
• compass and pacing;• baseline and offset.
The advantage of these techniques is that they require little in the way of equipmentand can be used in any situation. If you have to carry your equipment a long way toreach a site, there are obvious advantages in using simple techniques requiring basicequipment. There are disadvantages, too, in that these methods will not give the sameaccuracy as more sophisticated survey equipment, such as an automatic level or a totalstation/EDM.
SITE SURVEYING 89
*Archaeologists Field Handbook 29/6/04 5:24 PM Page 89

WThe choice of which method to use will once again come down to time and resources.
Probably the best way to deal with this dilemma is to decide how detailed your plan needsto be. If you were mapping a site which was going to be destroyed, then you would wantto record everything in minute detail, as this may well be the only recording which will everbe made of this site. In this case it would be best to use some form of electronic distance-measuring device, such as a total station, as this would give you a highly accurate anddetailed result. If, on the other hand, you simply wanted to produce a plan showing themain physical features of a site as part of public record or for publication (bearing in mindthat most plans are greatly reduced in size for publication and that, as the scale becomessmaller, the ability to depict finer units of measurement decreases—for more informationsee ‘Using maps’ in Chapter 2 on page 33 and ‘Drawing horizontal surfaces (plans)’ onpage 286), then it is probably more effective to use a simpler and less time-consumingtechnique. Whichever method you choose, make sure that you include an accuratedescription of it when writing up the methods in your report (for more information,see Chapter 10: Getting your results out there).
If at all possible, it is best to plot your results into a site plan while you are in the field(i.e. at the same time that you are taking measurements). This way you will be able to catchany mistakes as they arise and will be able to check on compass readings or particularmeasurements immediately. If you leave the site and then wait for a few days before youtry to turn your measurements into a site plan, you run the risk of lumbering yourself withmistakes which you may not be able to correct. Of course, this may not always be practical(particularly if you are recording a site by yourself), but try to draw up your plan as soonas possible while it is still fresh in your memory.
USING THE COMPASS AND PACING TECHNIQUE
This technique uses the length of your own stride to measure distance and a compass toplot direction. Its great advantage is that it enables one person to create a reasonablyaccurate plan of a small area relatively quickly. Before you can employ this techniquein the field, however, you need to calculate the length of your stride, or your pacingunit. This is the average length of a single step and varies from person to person. It alsovaries for the same individual, depending on whether you are walking uphill (when yourpace will be shorter) or downhill (when your pace will be longer). It may even vary at thebeginning and the end of each day according to how tired you are.
The compass and pacing technique is really only accurate for small areas, although thebasic principles (i.e. taking a bearing with a compass to give direction and then pacingthe distance to give a measurement in metres) can also be useful when navigating (to keeptrack of where and how far you have walked) or to give you the rough dimensions and
90 THE ARCHAEOLOGIST’S FIELD HANDBOOK
*Archaeologists Field Handbook 29/6/04 5:24 PM Page 90

Wspatial relationships of a site when drawing a mud map. Your pacing unit will be usefulany time you need to make quick approximate measurements.
How to calculate your pacing unit
To do this, you will need an area of relatively flat ground. Measure out a length of 25,50 or 100 metres (you are actually going to calculate your pacing unit as an average of100 metres, but if you can’t find that much room lay out a smaller length and multiplyit accordingly later) and walk this distance at least ten times. Because your unit will bean average, the more times you do this, the more accurate your final pacing unit willbe. Note the number of paces it takes you to walk this distance each time. Add theseup and divide by the number of times you walked the distance to average the number(if you have used a smaller measured length of 25 or 50 metres, you will need to thenmultiply the average by four or two to arrive at a figure per 100 metres). Divide 100 bythis average to give you your pacing unit. For example, if you’ve walked a length of100 metres twenty times and the sum of your paces came to 2500 then, divided by 20,this would give you an average of 125 paces per 100 metres. Divide 100 by this averageto equal a pacing unit of 0.80, or 80 centimetres. To use your pace as a unit of measure-ment, simply pace out the dimensions of whatever you are measuring and multiplyby your pacing unit to arrive at a figure in metres. If your pacing unit was 0.80, forexample, then a feature which you measured to be 6.5 paces in length would be in reality5.2 metres long.
Remember to maintain a comfortable walking pace as you pace out your measuredlength and whenever you use your pacing unit to measure features at a site. If you exag-gerate your steps, you will never obtain an accurate or replicable measure of your pace.You should also perform this exercise on sloping ground (on around a 15–20 per centslope) to give you a unit for measuring up or down hills.
How to plot an area using the compass and pacing technique
• Work out a framework for your survey, such as the outer boundaries of the site, so thatyou can plot in all of the detailed features from this framework. Use as few lines aspossible, but make sure that your framework is rigid—in other words, that the startingand end points are the same. If you leave your framework open, you will have no wayto check on the accuracy of your measurements. Each side of this framework is calleda traverse.
• Beginning at the starting point (Point A), take a compass bearing (see ‘Taking bearings’on page 47) to the second point (Point B) on the framework by aligning the compasseither on a feature (if this is what you have used as a point), or on a ranging rod held
SITE SURVEYING 91
*Archaeologists Field Handbook 29/6/04 5:24 PM Page 91

Wat the point. In surveying terms, such a bearing is often referred to as a foresight. Notedown the bearing and count the number of paces it takes you to walk to that point.Make sure you walk in a straight line, noting the distance along the line of any featureswhich cross it and the nature of these features. When you reach the second point youneed to take a back-bearing (in surveying terms, a backsight) to the starting point asan independent check. Remember that the difference between your foresight and yourbacksight should equal 180° (see ‘Using a compass’ on page 47), although an error ofplus or minus 2° is perfectly acceptable. If the difference is greater or less than 180°you will have to check your bearings and possibly take them again. It’s important thatyou get this part of the exercise right, otherwise your plan will not be accurate. If youare still having trouble, look around for any sources of magnetic interference whichmight be present, such as power lines or fences.
• Continue around the framework taking bearings to each new point, noting thedistance and nature of features along each bearing and taking back-bearings (seeFigure 4.2 on page 93), until you arrive back at your starting point (Point A again). Thisis called closing the traverse. Once you have completed your traverse, you can takebearings and measurements to any additional features located inside or outside theframework from any of the points on the framework.
• Plot your plan on to graph paper. Using a scale rule, work out a suitable scale so thatyou can fit all of the features on to the paper (you may need to roughly sketch in thedimensions and shape of your framework by hand to make sure that it fits onthe page), aligning magnetic north to the vertical lines on the graph paper.
• Beginning at your starting point (Point A), use a protractor to plot your first compassbearing on to the graph paper (see ‘Taking bearings’ on page 47). Convert the numberof paces to metres by multiplying the number of paces by your pacing unit andmeasure this distance onto the page along the protractor bearing. Continuethis process for all of the points around the framework. Because inaccuracies areinevitable in both the compass readings and the pacing measurements, it is unlikelythat your traverse will close (i.e. that your starting and end points will plot on to thegraph paper in the same location). Because of this, we will call the end point (whichis really the same as the starting point) Point A1. The distance between your originalstarting point (Point A) and end point (Point A1) is called the error of closure(see Figure 4.3 on page 94).
The best level of accuracy that can be achieved by a compass and pacing survey isapproximately 1:300, or an error of 1 metre in every 300 metres. The error of closureshould not exceed 1:100 (Davies and Buckley 1987: 141). This means that, if the totallength of your survey framework was 500 metres, an error of closure of 5 metres is themaximum acceptable error. Anything less than this is better of course, though it isunlikely that your error of closure would be less than 1.6 metres.
92 THE ARCHAEOLOGIST’S FIELD HANDBOOK
*Archaeologists Field Handbook 29/6/04 5:24 PM Page 92

WSITE SURVEYING 93
FIGURE 4.2: When recording the information from a compass and pacing survey, it isstandard practice to start at the foot of the page and proceed upwards,making sure that the figures for bearings and distances cannot be confused.A line is drawn across the page to signify the end of each leg, and details offeatures on either side of the route entered to the right or left of the centralcolumn of measurements depending on their location.
*Archaeologists Field Handbook 29/6/04 5:24 PM Page 93

W
• Before you can correct this error, much less start plotting details on to your surveyplan, you need to make sure that the error of closure for your traverse is within theacceptable limit. Add up the total length of your traverse (i.e. add the distances for eachleg of your framework). Divide this number by your error of closure distance (i.e. thedistance between Point A and Point A1 as plotted on the graph paper). If you arrive ata figure between 100 and 300 you are within the acceptable limits.
• To correct for an error of closure, first draw a line on your plan between Point A andPoint A1 (remembering that they should actually be the same point) and measure thedistance between the two. Using a set square, draw lines parallel to this line througheach point on your framework (you will need these lines later to correct the positionsfor each point) (see Figure 4.3).
• Now you need to construct a special linear scale to illustrate the error of closurebetween your starting point and your end point. To do this, draw a straight line whichis equal to the total length of your traverse. Obviously, because you are drawing thison to a sheet of graph paper, you will have to use a suitable scale to fit this line on thepaper. The scale will have to be much smaller than that used for plotting the frame-work and will really have to be smaller than 1:1500 to work properly. A total traverse
94 THE ARCHAEOLOGIST’S FIELD HANDBOOK
FIGURE 4.3: Plotting a compass and pacing survey
*Archaeologists Field Handbook 29/6/04 5:24 PM Page 94

Wlength of 300 metres, for example, could be drawn at a scale of 1:1000 (or 1 centimetre= 10 metres) as a line which is 30 centimetres in length. The left-hand end of this linerepresents your starting point (Point A), the right-hand end your end point (Point A1)(Figure 4.4). Make sure you mark off the position of each point in your traverse alongthis line.
• On the right had side of this line, draw a perpendicular line equal to the length of yourerror of closure distance (remember to reduce it to the same scale you used to repre-sent the total traverse length). In the example above, for instance, say the error ofclosure distance was 5 metres. To equal this distance at a scale of 1:1000, you woulddraw a perpendicular line 5 millimetres long at the right-hand end of your scale.
• Join the top of this vertical line back to the starting point (so that you have a triangle)and, working from the left-hand side, draw vertical lines marking off the position ofeach point in your traverse. The top of these lines will become points B1, C1, D1, etc.These distances represent the corrections necessary to adjust the error of closure ateach of these points.
SITE SURVEYING 95
FIGURE 4.4: Correcting the error of closure
*Archaeologists Field Handbook 29/6/04 5:24 PM Page 95

W• You will notice that the length of the vertical lines increase as you move towards the
right-hand end of the scale; this is because they indicate the cumulative error whichincreases for each leg of your survey. The length of these lines also indicates thedistance of each plotted framework point from its correct location—simply usethe length of each line to measure the correct location for each point on your plan. Onthe traverse map, draw lines through B, C and D, etc. that are parallel to the line youhave already drawn through A and A1. Use the corrections established above to deter-mine the positions of B1, C1, D1. Remember always to plot the corrected position foreach point in the same relationship as that for your starting-point and end-point. Inother words, if your end-point plotted to the southwest of your starting point(meaning that the correct location is really to the northeast), make sure that you plotthe corrected position for every other point to the northeast also. Join A to B1, C1, D1
and then back again to A. Your traverse should now close (see Figure 4.4 on page 95).If not, you have serious problems and may have to start again.
• You can now plot in the details of your plan, remembering always to include the namesof the people who made the map, the date, site, a scale, a north arrow and a legend ifyou have used symbols (such as shading or cross-hatching) to depict detail. Becauseyour compass readings will indicate magnetic north only, you should also use thedegree of declination from a topographic map (see ‘Using a compass’ on page 47) toindicate true north.
USING THE BASELINE/OFFSET TECHNIQUE
This technique uses the same principles as a compass and pacing survey (i.e. measuringthe location of features from an established baseline) and requires little more in the wayof equipment than a couple of long and short tape measures. Because it requires measur-ing to and from the baseline, however, it requires the labour of more than one person.
• First lay out a baseline. A long tape measure is best for this, as the distance along thebaseline can easily be read off the tape as the survey progresses. Give careful consider-ation to where you lay out your baseline—it should be aligned in such a way that most(if not all) of the features can be measured from it without having to lay out anotherone. If you are plotting the ruins of a building, for instance, the baseline would be bestlaid out through the centre and running down the long axis of the building, so thatwalls and other features on both sides can be measured from it. You can lay outthe baseline on or above the ground (i.e. fixed to free-standing pegs for instance), but it must be kept straight and as horizontal as possible. Laying the baseline flaton the ground is simplest, because raised baselines tend to stretch and sag, although a
96 THE ARCHAEOLOGIST’S FIELD HANDBOOK
*Archaeologists Field Handbook 29/6/04 5:24 PM Page 96

Wperfectly horizontal baseline is not always possible. Once again, the decision of preciselyhow much variation from the horizontal is permissible comes down to how accurateyou need your survey plan to be—obviously every deviation from the horizontal intro-duces an element of error, so try to keep this to a minimum. If you are drawing a planof a rockshelter, for example, the floor may be quite undulating and you may need tolocate the baseline some way from the floor of the shelter to keep it horizontal.
• Remember, once the baseline is fixed, don’t move it until all of your measurements arecomplete.
• Take a compass reading along your baseline (it doesn’t matter in which direction, butfor consistency’s sake from the 0 metre point on the baseline is best) and note downthe reading in your field notes. This will allow you to indicate the direction of magneticnorth on the finished plan.
• You can now begin to measure offsets from the baseline to the various features ofthe site.
• The most important thing to remember about a baseline/offset survey is that allfeatures must be measured at right angles to the baseline. You must keep all offsetsat 90° to the baseline to ensure that you are measuring the shortest distance betweenthe baseline and the feature. If your angle varies above or below 90°, then the dis-tance you are measuring will also increase or decrease, giving you an inaccuratemeasurement.
• Because they have the baseline extending to either side of them, the person standingat the baseline is the one most able to judge accurately when an offset is at the correctangle. For anything over 3 metres, you will have to use a different technique. There arethree ways you can do this, all of which use basic principles of geometry to establisha right angle:
1. bisecting an arc;2. 3–4–5 triangle;3. triangulation.
SITE SURVEYING 97
FIGURE 4.5: Over a short distance(less than 3 metres), you can estimate aright angle for an offset reasonablyaccurately by eye, but only from theposition of the baseline
*Archaeologists Field Handbook 29/6/04 5:24 PM Page 97

WMETHODS FOR MEASURING RIGHT-ANGLED OFFSETS
1: Bisecting an arc
To use this method, get one person to hold the end of a tape measure firmly on the pointwhich is being measured, while you stand at the baseline and swing the other end of thetape measure over it in a short arc. As you swing the tape measure over the baseline, youwill notice that the distance increases as the tape reaches either end of the arc, butlessens towards the centre of the arc. It is this shortest distance which you are lookingfor, because this will indicate when the tape measure is at a right angle to the baseline.If you are not confident that you can work this out by eye, then mark each end of thearc where it crosses the baseline, measure the length of this distance on the baseline andthen divide it in half. This halfway point marks the corner of the right angle.
2: 3–4–5 triangle
This method relies on the 3–4–5 ratio of a right-angled triangle (see Figure 4.7). Basic-ally if the measurements for each side of a triangle are always kept in units of 3, 4 and5, or any multiple of these (for example 30 cm–40 cm–50 cm, 60 cm–80 cm–100 cm),then the angle between the two perpendicular sides of the triangle will always be 90°.For example, you want to lie out a second baseline perpendicular to your first. At the
98 THE ARCHAEOLOGIST’S FIELD HANDBOOK
FIGURE 4.6: Bisecting an arc
*Archaeologists Field Handbook 29/6/04 5:24 PM Page 98

W
offset point on the first baseline (where the second baseline will begin), you fix the endof one tape measure. You measure along the first baseline for a distance of 1 metre. Thiswill be the base of the right-angled triangle. Holding the end of a second tape measureover this point, you give the ends of both tape measures to another person who movesaway from the baseline until they are standing at roughly 90° to the offset point. Youalready know that for the triangle to be a right-angle these two measurements mustequal 60 and 80 centimetres respectively, so keep adjusting both tape measures until youhave them at the correct length. The point where they cross at the correct lengths is theother end of your right-angled offset.
3: Triangulation
As its name suggests, this method uses triangles to plot the location of features. Thisis best done using two tape measures. Measure a known length on the baseline andhold or peg a tape measure at each point. Cross the other ends of the tape measuresover the point you are measuring to and note down the length of all three sides of thetriangle, as well as its position on the baseline. Because you know the length of all
SITE SURVEYING 99
FIGURE 4.7: 3–4–5 triangle
*Archaeologists Field Handbook 29/6/04 5:24 PM Page 99
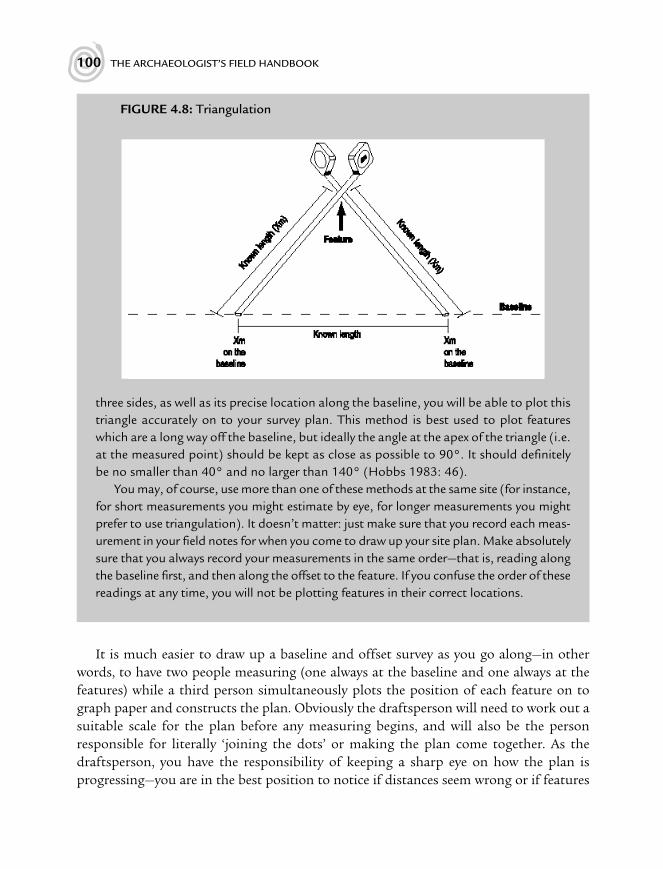
W
three sides, as well as its precise location along the baseline, you will be able to plot thistriangle accurately on to your survey plan. This method is best used to plot featureswhich are a long way off the baseline, but ideally the angle at the apex of the triangle (i.e.at the measured point) should be kept as close as possible to 90°. It should definitelybe no smaller than 40° and no larger than 140° (Hobbs 1983: 46).
You may, of course, use more than one of these methods at the same site (for instance,for short measurements you might estimate by eye, for longer measurements you mightprefer to use triangulation). It doesn’t matter: just make sure that you record each meas-urement in your field notes for when you come to draw up your site plan. Make absolutelysure that you always record your measurements in the same order—that is, reading alongthe baseline first, and then along the offset to the feature. If you confuse the order of thesereadings at any time, you will not be plotting features in their correct locations.
It is much easier to draw up a baseline and offset survey as you go along—in otherwords, to have two people measuring (one always at the baseline and one always at thefeatures) while a third person simultaneously plots the position of each feature on tograph paper and constructs the plan. Obviously the draftsperson will need to work out asuitable scale for the plan before any measuring begins, and will also be the personresponsible for literally ‘joining the dots’ or making the plan come together. As thedraftsperson, you have the responsibility of keeping a sharp eye on how the plan isprogressing—you are in the best position to notice if distances seem wrong or if features
100 THE ARCHAEOLOGIST’S FIELD HANDBOOK
FIGURE 4.8: Triangulation
*Archaeologists Field Handbook 29/6/04 5:24 PM Page 100

don’t plot where they should. Don’tjust blindly trust the measurementsbeing given to you. The measurershave no overall scheme in front ofthem to see the relationships betweeneach point, but you do. Evaluate eachmeasurement in the context of theplan as it is progressing on paper anddon’t be afraid to ask for measure-ments to be repeated or for extrameasurements to be taken. In thissense, it is really the draftsperson whodirects the survey, not the other wayaround.
If your site is large or very complexand can’t be measured using a singlebaseline, you may need to establish asurvey framework which is, in effect,a series of four baselines with thediagonals measured in to make theframework rigid (see ‘The basics’ onpage 86).
The baseline and offset technique is most accurate on level ground, but if there is anyslope you will need to take care to keep your baselines horizontal. You will also have to takecare with your offset measurements, because if any features are located considerably aboveor below the horizontal plane of the baseline (i.e. if they are on parts of the site that slopeaway from the baseline), you will not be able to simply measure along the ground to thesepoints. If you did, you would be measuring up or down the length of the slope whichwould give you a longer measurement than would a properly horizontal offset. In thiscase you will need to hold the offset tape measure above the baseline so that it is roughlyhorizontal with the location of the feature being measured and use a plumb-bob droppedbelow the tape to find your exact position on the baseline (see Figure 4.9).
USING THE BASELINE AND OFFSET TECHNIQUE TO RECORDVERTICAL SURFACES
The baseline and offset technique is also useful if you are recording standing structuresor other vertical archaeological features, or if you need to create a cross-section through
FIGURE 4.9: Using a plumb-bob to establish yourposition on the baseline
WSITE SURVEYING 101
*Archaeologists Field Handbook 29/6/04 5:24 PM Page 101

Wa site such as a rockshelter (see ‘Recording rockshelters’ on page 221). In these cases,instead of your offsets being measured from a baseline across to a feature, your offsets willbe measured above or below the baseline. Once again, you will need to give careful thoughtas to where you place your baseline to ensure that all of the major measurements can bemade from it. You also need to make sure that your baseline is kept horizontal and thatall measurements above or below it are kept as close to vertical as possible.
A case study in recording a cross-section through a rockshelter
The aim here was to produce a cross-section through the shelter to show the changes inthe height of the ceiling and the slope of the floor of the rock shelter from front to back.This is important for looking at how people have used the spaces within the shelter andwill help to make sense of the features recorded in the site plan. First, a horizontalbaseline was laid out from the front to the back of the shelter. The front of the shelterwas about 35 centimetres below the level at the rear of the shelter, so the baselineneeded to be fixed to a ranging rod located outside the shelter. Because there were arte-facts scattered across the floor of the shelter, the ranging rod had to be placed welloutside the front of the shelter so as not to disturb any potential sub-surface deposits.The end of the tape measure at the rear of the shelter was simply weighted down with alarge rock (checked out first to make sure it was not an artefact). A series of measure-ments was made above and below the baseline to record the changing levels in the roof
102 THE ARCHAEOLOGIST’S FIELD HANDBOOK
FIGURE 4.10: Hypothetical use of the baseline and offset technique to create a cross-section of a rockshelter
*Archaeologists Field Handbook 29/6/04 5:24 PM Page 102

Wand floor. For measurements of ceiling height, a retractable tape-measure was used asa plumb-bob (the end held up at the point on the ceiling being measured) and the otherend simply dropped down immediately beside the baseline to obtain a reading of height.The same technique was used to record the slope of the floor at the front of the shelter.
A case study in recording the wall of a ruined building
The aim here was to record the details of the construction techniques used in the walland the extent of damage. A string baseline was established across the width of thewall about 80 centimetres above the level of the ground. Because the wall is only1.5 metres high, this was simply a convenient height from which to measure. Thebaseline was fixed to the wall using nails inserted firmly into the mortar (making surenot to damage the wall in the process), and a tape measure pegged along the string.Measurements were made both above and below this baseline to the various features onthe wall.
SITE SURVEYING 103
FIGURE 4.11: Hypothetical use of the baseline and offset technique to create avertical ‘plan’ (or elevation) of a wall
*Archaeologists Field Handbook 29/6/04 5:24 PM Page 103

WBASIC PRINCIPLES OF LEVELLING
Using the baseline and offset technique to measure changes in the height of a rockshelteris a form of levelling, or surveying rise and fall. It is only useful over small areas, however,and indicates a major problem with the basic methods of site surveying. They can onlyprovide you with a reasonably accurate plan of the horizontal layout of a site; none ofthem can give you an accurate indication of how the land rises or falls, or how steep or flatthe area containing the site is. To document this, you will need to be able to record levels:the changing height of the ground across the site (Drewett 1999: 66).
The principle of levelling is very simple. It involves projecting an imaginary hori-zontal plane across the site and measuring the height of the ground above or below this.Surveyors refer to this as the line of collimation, and it is exactly the same in principle asthe horizontal baseline you use when drawing vertical surfaces (see ‘Using the baseline andoffset technique to record vertical surfaces’ on page 101). It can only be measured withthe proper equipment, however—such as an automatic level (often called a ‘dumpy’ level),theodolite or Electronic Distance Measuring device (EDM). You will have seen surveyorsusing these and similar equipment—they are designed to be set level on a solid tripod, andthe height at various points across the site read off a stadia rod (a telescopic staff withunits of height marked in alternate red and black segments) through the telescopic lensof the level. If you look through the telescope, you will see one vertical and one majorhorizontal cross-hair. The horizontal cross-hair represents the line of collimation and,by reading the changing height of the staff along this line, you are reading whether theground is rising or falling.
104 THE ARCHAEOLOGIST’S FIELD HANDBOOK
FIGURE 4.12: Surveying the changing height of the ground across a site
*Archaeologists Field Handbook 29/6/04 5:24 PM Page 104

WHow to set up an automatic or ‘dumpy’ level
• Step 1: Establish the location of the instrument. This is important, because ideally you wantto be able to take as many readings as possible without having to move the instrument.Try to find a centralised spot from which all parts of the site are visible. Once you havedecided on this, set up the level. First erect the tripod (the telescopic legs which formthe base). If you are working as part of a large group, you should erect the tripod to theheight of the shortest user. In any case, make sure the tripod is at a comfortable heightfor constant use, and lightly but firmly tamp the legs into the ground. Don’t makethem immovable yet, however, because the next step will be to make sure that theinstrument itself is perfectly level. Make sure that the head of the tripod (where youwill be shortly attaching the instrument) is roughly level and doesn’t have an obvioustilt in any direction.
Now attach the instrument. The level will have a base plate (see Figure 4.13 on page106) that can be screwed into the top of the tripod. Don’t screw this in tightly yet, butmake sure that the level is firmly fixed to the tripod and can’t slide off. Now you haveto level the instrument. As long as you have only lightly screwed the instrument inplace, the slightly convex surface that is the head of the tripod will allow you to slideit around in a tight circle. Note the effect this has on the levelling bubble (Figure 4.13)and see if you can get the instrument close to horizontal. All surveying equipment willhave such a visual means for you to judge how level they are—usually a centrally locatedair bubble inside a marked ring on the circular base of the instrument. You need to getthe dumpy at least close to being level at this stage (i.e. the bubble needs to be almostwithin the circle if not completely inside it), then tighten the screw holding the levelin place. This probably will change the level of the instrument slightly, but don’t worryas you can adjust this next. If you can’t get the instrument anywhere near level at thisstage you will have to rethink the positioning of the tripod legs and check whether anyneed lengthening or shortening. One of the ways to adjust the gross level of the instru-ment is to tamp the individual legs of the tripod more firmly into the ground. Keep aneye on the levelling bubble as you do this.
Most automatic levels use a combination of three large foot screws (Figure 4.13) atthe base of the instrument to make them perfectly level, although some may have aninternal levelling mechanism. These foot screws are designed to be used in pairs(imagine a triangle underneath the instrument that can be raised or lowered slightlyon each side). Align the telescope so that it lies parallel with one pair of foot screws and,using both hands, turn these two screws outwards (i.e. in opposite directions towardsthe edges of the instrument). Note the movement of the bubble as you do so. If youhad the instrument approximately level in the first stage, you will eventually succeedin getting the air bubble exactly in the centre of the bull’s-eye circle. Sometimes thisprocess is deceptively quick and simple, sometimes it seems as if you’ll never get it
SITE SURVEYING 105
*Archaeologists Field Handbook 29/6/04 5:24 PM Page 105

W
right, but you must persevere. Swing the telescope through 90° so that it lies directlyover the third foot screw and make sure the bubble is still perfectly centred. Swing thetelescope over each foot screw and check that the bubble remains centred.
• Step 2: Once the instrument is steady and level, mark the location with a permanent fixture suchas a wooden peg. This must be located directly beneath the instrument, so you will needto tie a plumb-bob to the hook underneath the centre of the tripod head and positionthe peg directly underneath it. Mark the top of this peg with an indelible cross. This isyour first survey station.
• Step 3: Measure the height of the instrument above ground with a tape measure, and recordthis in your field notes.
• Step 4: Begin taking readings. The first thing to do is to make sure the telescope is focusedcorrectly. In most models, the eyepiece will be surrounded by a rotatable dial thatfocuses the cross-hairs (Figure 4.13). Use this to make sure the cross-hairs are sharplydefined. Use the peep-sight along the top of the telescope to approximately align itwith the staff and sight on the staff through the eye piece. The horizontal fine motioncontrol knob (or pair of knobs) on the telescope’s circular base will allow you to shiftthe telescope incrementally left or right until it is perfectly aligned with the staff(Figure 4.13). Use the focusing knob on the right-hand side of the telescope’s body tobring both the cross-hairs and the face of the staff into perfect focus (Figure 4.13).
The first reading you will have to take must be a backsight (BS) to the site datumto establish the height of the line of collimation. Hold the staff at the datum, take thereading at the central horizontal cross-hair and then add it to the known heightof the datum. If the site datum has a value of 60 metres above sea level for instance,and the reading gives a height of 1.4 metres for the staff, then the height of the line of
106 THE ARCHAEOLOGIST’S FIELD HANDBOOK
FIGURE 4.13: The major components of an automatic level
*Archaeologists Field Handbook 29/6/04 5:24 PM Page 106

WSITE SURVEYING 107
FIGURE 4.14: How to set up a level
*Archaeologists Field Handbook 29/6/04 5:24 PM Page 107

Wcollimation is 61.4 metres. If you don’t know the precise height above sea level of yourdatum then you will have to assign an arbitrary height to it (for instance, 100 metres.Don’t make it zero or you’ll end up with negative numbers). The sum of the firstreading and the datum height is the value for the line of collimation (otherwise knownas the height of the instrument [HOI]).
An automatic level also has the facility to read degrees from north so that eachreading can be aligned to a particular compass bearing. As part of your first backsight,and before you move the telescope for the next reading, take a compass reading on thestaff along the same axis as the telescope to determine a bearing for the backsight. Forexample, this might be 270°. Rotate the large circular dial at the base of the instrumentso that its reading in degrees aligns with your compass bearing (i.e. so that you can read270° through the index window underneath the eye piece) (Figure 4.13 on page 106).When you’ve realigned the telescope for the next reading, you’ll be able to read thebearing for that position by simply reading the degrees shown in the index window.
Once you have taken your backsight, all subsequent readings (to various featureson the site) are called intermediate sights, or inter-sights (IS). For each inter-sight,subtract the reading at the central cross-hair from the height of the instrument to giveyou the reduced level (RL) for that spot. You can also use an automatic level tomeasure distance as well as height and so give you a plan of a site. Inside the dumpy’stelescope you will see two smaller cross-hairs above and below the major cross-hairdenoting the line of collimation. If you subtract the height of the staff at the lowestcross-hair from the height at the highest cross-hair and multiply by 100, this will giveyou the distance from the level to the staff in metres.
If you find that it is impossible to cover the entire site from one position (e.g. ifthere is heavy vegetation cover, or the site rises or falls too steeply for it all to be equallyvisible), then you will have to move the level to a new location. This follows the samesetting-up principles as before, with one additional step. The last reading you were ableto take from the present survey station will become your first foresight (FS). Don’tmove the staff from this location while the level is being moved. The rule is that thestaff must remain stationary while the level is being moved and the level must remainstationary while the staff is being moved (Casey 1972: 15).
Move the level to the new survey station (obviously you will have chosen this care-fully so that you can see new parts of the site from the new location, but are still withinsight of the last foresight). Set it up again following steps 1–3 and then take a backsightto the location of the last foresight. If you don’t take this reading you will be unableto tie the different parts of your survey together in the final plan. Calculate the new lineof collimation for the second survey station by adding the reading for the backsight tothe reduced level for that spot (which you calculated from the previous foresightreading). Continue your survey.
108 THE ARCHAEOLOGIST’S FIELD HANDBOOK
*Archaeologists Field Handbook 29/6/04 5:24 PM Page 108

WSITE SURVEYING 109
FIGURE 4.15: How to fill in a level booking sheet
*Archaeologists Field Handbook 29/6/04 5:24 PM Page 109

WHow to fill in a level booking sheet
This is relatively straightforward and lets you keep track of your readings as you go along.It is also the source data that you will use to plot your survey as a plan, so it is importantthat you do it correctly. A sample level booking sheet is included in Appendix 1. The firstcolumn on the sheet is a description of the location of the dumpy level (these are yoursurvey stations). This assumes that you may have to move the instrument, so the variouspositions it is set up in can simply be designated 1-100 or A-Z. Note the height above sealevel of your survey area (if you know it) in Column 8. If you don’t know this, choose anarbitrary level of 100 metres (so you don’t end up in negative numbers as the ground falls).This will be your first reduced level.
Remembering that the first reading after setting up a survey station will always be abacksight (either to the site datum or to the point of the last foresight), this is entered inColumn 2. There will only be one backsight per survey station, so don’t enter any furtherreadings in this column unless you have just moved the level. Don’t make the commonmistake of writing the foresights in this column—this will only confuse things later. Thebacksight will establish the line of collimation (i.e. how high the instrument is), which youcalculate by adding it to the reduced level (in this case the site datum) to get a height inmetres. Place this figure in Column 7. Align the dumpy to the correct compass bearing forthe backsight (see ‘How to set up an automatic or “dumpy” level’ on page 105) and notethe bearing in Column 11.
The next readings you will take will all be inter-sights to the various features of the siteyou wish to plot. Place the staff on a feature and take a reading on the central (major)horizontal cross-hair. Place this figure in Column 3. The difference between this figureand the height of the instrument in Column 5 will give you the reduced level for thatlocation. Record this figure in Column 8. Enter the value for the upper cross-hair inColumn 4 and for the lower cross-hair in Column 5. Enter the bearing in Column 11.
You can use the upper and lower cross-hairs visible through the dumpy’s telescope tocheck the accuracy of your survey readings. The difference between the value of thelower cross-hair and the centre cross-hair should be the same as the difference betweenthe value of the centre cross-hair and the upper cross-hair. For example, if the readingat the centre cross-hair is 1.275, and at the lower cross-hair 1.240, then the reading atthe upper cross-hair should be 1.310. Each is 0.035 metresdistant from the centre cross-hair and they need to agrees to within 0.005 metres or better. If you can’t get yourreadings to agree, you’ll have to take them again and check for potential sources of error.Is the staff vertical? Are you reading the staff correctly? If you are new to using a dumpylevel you should check your readings regularly to minimise errors.
110 THE ARCHAEOLOGIST’S FIELD HANDBOOK
*Archaeologists Field Handbook 29/6/04 5:24 PM Page 110

WCalculate the horizontal distance to that spot, so that you will be able to plot it on to
your plan later (subtract the value of the lower cross-hair from the value of the uppercross-hair and multiply by 100). Place this figure in Column 10. To check the accuracy ofyour survey, subtract the sum of the foresights from the sum of the backsights. Thensubtract the last reduced level from the first. The answers should be the same. If you’retaking many readings and using several pages of the booking form, you can check eachpage separately by making sure that each begins with a backsight and ends with a fore-sight. If an inter-sight comes at the end of a page, enter it as a foresight on that page andas a backsight on the next (Hobbs 1983: 53).
Tips for successful levelling
• The most important point is to make sure that the instrument is properly level beforeyou use it. If it isn’t, then none of your readings will be accurate.
• Once you have levelled the instrument, don’t kick or disturb the tripod. If youdo, you’ll have to re-level the instrument before you continue, including taking anew backsight to the site datum andcalculating a new line of collimation.
• If you are holding the staff, then youhave several responsibilities. First,you need to make sure that you areholding it upright. By looking throughthe telescope, the surveyor at thedumpy level will be able to see ifyou have tilted it to the right or leftand can indicate to you in whichdirection you should move it. Theywon’t know whether you have tilted itforwards or backwards, however. Tocompensate for this (it can be very difficult to know whether the staff istruly upright when you are holding it),you can rock it slightly backwards andforwards so that the person at thedumpy can take the highest reading(which will be the horizontal). Youcan also use a small carpenter’s line level, held against the back of the staff to judge when it is upright (see
SITE SURVEYING 111
FIGURE 4.16: Using a spirit level to checkwhether the stadia rod (levelling staff) isvertical
*Archaeologists Field Handbook 29/6/04 5:24 PM Page 111

WFigure 4.16 on page 111). Staffs for EDMs and total stations have a built-in air bubbleso you can make sure they are level. Second, you will have to ensure that you have notrotated the face of the staff away from the telescope. Watch the direction in which thestaff is facing and be prepared to adjust it if the surveyor can’t read it clearly.
• If the surveyor can’t see you or the staff at all (say, if there is screening vegetation inthe way) then you will have to move the staff slightly in one direction or the otheruntil it becomes visible. This is where walkie-talkies are invaluable. Sometimes onlya slight adjustment will be necessary, but take care that, as you move the staff, youkeep it upright and vertical. This is most easily done by moving the staff in small steps(sometimes only centimetres) in a given direction until the surveyor tells you to stop.
• To produce a contour plan, you need to grid the site and take spot height readingsat each point on the grid. You then need to decide on the contour interval (thedistance between contours) and join points of equal height across the site.
With the advent of more sophisticated forms of surveying equipment such as Elec-tronic Distance Measurement (EDM) instruments, it is possible to create extremelyaccurate site plans. An EDM uses a built-in transmitter to send out a laser beam towardsa reflecting prism attached to a staff held at the position which is being plotted. Thelength of time taken for the beam to reach the prism and return to the EDM forms thebasis for the calculation of distance. These measurements are all recorded digitally forlater download into a computer. A total station has both a theodolite (to measure levels)and an EDM (to measure distance) as part of the one instrument. It can therefore give youboth horizontal and vertical measurements as part of the same plan.
As a final word, no survey will ever be perfect. You will need to decide on the level ofaccuracy you require before you begin—a decision which will largely depend on why youare recording the site in the first place and what it is you want to know. For any sitesurvey, there are acceptable levels of error which you should take note of (see Table 4.1 onpage 113). For a plan plotted at a scale of 1:100, for instance, it is perfectly acceptable formeasurements to be taken to only the nearest 50 millimetres; for a plan at 1:1000, meas-urements need only be to the nearest 500 millimetres. As the scale becomes larger, the levelof accuracy increases, so at 1:10 you should try to keep your measurements to the nearest 5 millimetres, for example.
The levels of accuracy shown in Table 4.1 also will have a bearing on the final scale atwhich you can draw your site plan. Remember, if you are recording a large site, the entireplan of which will end up being drawn on a single A4 page, there is little point in record-ing things to the nearest millimetre. The relationship between the scale of your drawingand the smallest measurement you can literally draw is different from the standards foraccurate measurement in Table 4.1. Even though a plan drawn at 1:100 scale should be
112 THE ARCHAEOLOGIST’S FIELD HANDBOOK
*Archaeologists Field Handbook 29/6/04 5:24 PM Page 112

W
measured to the nearest 50 millimetres, anything which is this small will only end upbeing 0.5 millimetres on your final plan. Given the difficulty of drawing something whichis half a millimetre long, the standards for plotting are somewhat broader (see ‘Drawinghorizontal surfaces (plans)’ on page 286 and Table 9.2 on page 287).
If you draw the plan by hand, it is important to remember that you should never inkin original pencil drawings, as these form an essential element of the primary site archive(Drewett 1999: 177). Instead, you should use drafting film (not tracing paper) to redrawthe plan (for more information see Chapter 9: Photography and illustration), or scan itand redraw it using a computer graphics program.
REFERENCES AND FURTHER READING
Casey, D.A. 1972, ‘Elementary surveying for Australian archaeologists’, in D.J. Mulvaney, (ed.),Australian Archaeology: A Guide to Field and Laboratory Techniques, AIAS Press, Canberra, pp. 5–21.
Davies, Martin and Buckley, Krystal 1987, Archaeological Procedures Manual: Port Arthur Conser-vation and Development Project, Occasional Paper No. 13, Department of Lands, Parks andWildlife, Hobart.
Drewett, Peter 1999, Field Archaeology: An Introduction, UCL Press, London.Hobbs, D.R. 1983, ‘Surveying techniques useful in archaeology’, in G. Connah (ed.), Australian
Field Archaeology: A Guide to Techniques, AIAS Press, Canberra, pp. 43–63.
USEFUL WEBSITES
The Land Surveyor Reference Page, www.lsrp.com, contains a range of online resources,including links to professional publications on the topic.
SITE SURVEYING 113
TABLE 4.1: Acceptable levels of accuracy for site plans
Scale of final plan Acceptable error
1:5 2 mm1:10 5 mm1:25 10 mm1:50 20 mm1:100 50 mm1:250 100 mm1:500 200 mm1:1000 500 mm
*Archaeologists Field Handbook 29/6/04 5:24 PM Page 113

WFor Electronic Total Station Resources, http://geomechanics.geol.pdx.edu/Courses/
TotalStation/. This site contains information on using Total Stations, including instruc-tions for surveying procedures, as well as field sheets and software.
The Virtual Museum of Surveying, www.surveyhistory.org contains some interesting historicalinformation on the history of surveying and its technology.
www.sli.unimelb.edu.au/planesurvey/prot contains an introduction to the basic principlesof surveying and the main features of automatic levels, theodolites and EDMs. Onlineactivities let you practise reading a staff, and take you through the process of setting upa level.
114 THE ARCHAEOLOGIST’S FIELD HANDBOOK
*Archaeologists Field Handbook 29/6/04 5:24 PM Page 114

CHAPTER FIVEBASIC EXCAVATION
TECHNIQUES
WHAT YOU WILL LEARN FROM THIS CHAPTER
W How archaeologists excavateW Why careful control of the excavation process is importantW How to digW Standards for describing soilW How to use a Harris matrix to interpret stratificationW Basic procedures for sieving, recording, bagging and labellingW Basic procedures for collecting on-site samplesW Basic conservation measures for protecting excavated findsW Tips for surviving an excavation
The basic excavation toolkit
10–12 centimetre drop forged pointing trowel. Make sure that the neck and blade arecast in one piece, otherwise it will breakHand-shovel or dustpanPlastic bucketsSecateursDental picks/plasterer’s tools
W W W
WW
115
*Archaeologists Field Handbook 29/6/04 5:24 PM Page 115

WFine, soft paintbrushes (in a range of sizes for cleaning large areas and for reaching intosmall cavities)Hand-brush or whisk, for cleaning hard surfaces and brushing-up soilSpring balance (for weighing buckets)Carpenter’s string level (for making sure baselines are horizontal)Nested mesh sieves (in a range of sieve sizes—10, 5 and 2 millimetres are the mostcommon)Plastic sheeting, to cover the site or lay out depositsKnee pads (or foam squares) to make excavation more comfortableSoil pH test kitMunsell soil colour chartRecording formsClipboardArtefact tags (aluminium or polyethylene)Nails (for securing tags to the walls of trenches if necessary)String and line level (for marking the edges of trenches and for establishing base lines fordrawing sections)Spikes or tent pegs or chaining arrows, for marking out the trenchesMattock, pick or shovel (for removing turf or for backfilling)Drawing equipment (see Chapter 9)Photographic equipment (see Chapter 9)Tape measures, in a range of sizesZiplock® plastic bags, in various sizes
OptionalWheelbarrowsA stepladder (you may need to stand on this to photograph trenches from above)A hand sprayer (you may want to wet the walls of the trenches to observe differences insoil colour)Artefact processing equipment (plastic basins, drying trays, toothbrushes)General site equipment (chairs, folding tables, canvas or shade cover)
THE BASICS
The aim of any archaeological excavation is to try to understand what may have happenedat a site in the past by carefully excavating the various material remains which make upthat site. Excavating requires both care and patience since, to be able to understand thesequence of activities at a site, archaeologists must slowly strip away each soil layer in
116 THE ARCHAEOLOGIST’S FIELD HANDBOOK
*Archaeologists Field Handbook 29/6/04 5:24 PM Page 116

Wsuccession. The basic principle on most excavations is that each new soil layer is removedcompletely before proceeding on to the next—in other words, excavation proceeds hori-zontally first (i.e. by removing all traces of one soil layer first), and vertically second (whenexcavation of the next soil layer is begun). This kind of careful ‘layer-cake’ excavationis called the stratigraphic or context system of excavation. Although not all digs willadopt this process, it is the most common system followed by archaeologists (for moreinformation, see ‘The principles of excavation’ on page 121).
A context is any discrete archaeological entity on a site, such as a post-hole, a deposi-tional layer, a rubbish pit or an erosion event (Drewett 1999: 107), and is the same thingas a ‘layer’, a ‘feature’ or a ‘stratigraphic unit’. Under the context system, the goal of anyexcavation is not to dig as deeply as possible as quickly as possible, but rather to be surethat all of the information from each soil layer, or stratum, is kept together so that it maybe analysed later as a discrete entity. If you think of a site which has had many successiveactivities performed on it over hundreds of years, all of these activities may have leftseparate and distinct evidence behind them, trapped in different layers of the soil. Ifarchaeologists were to simply mix up all of these layers, they would be unable to separatethe information from each activity, unable to date the sequence of activities and thusunable to reconstruct exactly what had happened there in the past.
One of the most important things to realise is that, while all excavation aims to retrieveas much information as possible, in the process it literally destroys the site forever. Noexcavated site can ever be put back: once excavated, it is gone forever and only exists inyour recording forms, field notes, reports, photographs, publications and archives. Forthis reason, you must ensure that your excavations are always conducted according tothe highest possible standards. As soon as you begin an excavation, it is your ethicalresponsibility to ensure that it is done professionally, up to and including the standardsyou adopt for analysis, reporting, archiving, conservation and curation. In the end, it isbetter to go for less done well, rather than more done badly: ‘At the end of the day a wellexcavated, well recorded, fully published 1 x 1 m unit does considerably less harm thana huge, badly controlled, unpublished . . . excavation.’ (Drewett 1999: 97)
Almost everyone recognises an archaeologist as someone who excavates. All excavationor any other form of collecting artefacts, however, is inherently destructive and can neverbe repeated. It is for this reason that an excavation permit must be obtained beforeexcavation or collection can commence. Excavation should be a last resort—if youcan get all the answers you want through non-destructive recording techniques, thenDON’T excavate.
It is a primary ethical responsibility of all archaeologists that excavation is only under-taken by professionals (or under professional supervision), and never without proper
BASIC EXCAVATION TECHNIQUES 117
*Archaeologists Field Handbook 29/6/04 5:24 PM Page 117

Wresearch and planning. It is for this reason that excavation, or the collection of arti-facts, is the one aspect of archaeology which is regulated in all states and territories by legislation governing who may undertake such activities and how they should beconducted.
Removing artefacts from their location in a site or the landscape without the properlegal permissions is, in most cases, both unnecessary and harmful. While there may besome instances where it is unavoidable (such as when the place is in imminent dangerof being destroyed, or when Indigenous custodians insist on collecting items from sitesin their country), in general it is both illegal and unethical to remove artefacts. If you find a particularly interesting or unusual artefact, by all means sketch it or photograph it(or both), but leave it where you found it.
Professional recording standards require that an archaeologist be able to control theexcavation process as much as possible. Not all archaeological evidence is in the form ofthree-dimensional artefacts. Much evidence for past human behaviour will be subtle andperhaps not even instantly recognisable (such as stained soil from decomposed timberposts indicating the original location of buildings, or slightly darker layers of soil indi-cating the presence of charcoal from cooking fires). This evidence will be lost if care is notexercised during the excavation process, particularly with regard to changes in soil colour,type or texture as the excavation progresses (see ‘The principles of excavation’ on page121). Any change in the physical characteristics of the soil could be of great importance,so you should never under-estimate what’s happening under your trowel (see ‘Using atrowel and brush’ on page 141).
The main aspect of this control is to enable the archaeologist to pinpoint whereeach and every piece of evidence comes from. Archaeologists must be sure of the exactlocation of each artefact within the site (see ‘Recording in three dimensions’ on page 130).The positioning of artefacts horizontally across the site can tell archaeologists how dif-ferent parts of the site were used and what activities were performed there; the positioningof artefacts vertically through the site can tell archaeologists what happened when and theorder of events in the past. This need to be absolutely sure of the provenance of all arte-facts is what drives archaeologists to keep all the evidence from a particular contexttogether throughout the digging, sieving, sorting, bagging, cleaning and analysis process(see Figure 5.1 on page 120). It is also why archaeologists tend to excavate carefullyselected portions of a site in such a way that the boundaries of each trench are veryspecific. Usually they do this by adopting a standard grid system and stringing out theirexcavation trenches to exact dimensions (See ‘Laying out a site grid’ on page 125).Trenches are usually laid out in multiples of 1 metre, and sometimes divided into smallersquares of 25 or 50 centimetres within each metre square; these are called quadrats.
118 THE ARCHAEOLOGIST’S FIELD HANDBOOK
*Archaeologists Field Handbook 29/6/04 5:24 PM Page 118

WA consistent and logical numbering system is also imperative for each trench and for eachcontext or layer within each trench (see ‘Laying out a site grid’ on page 125), so that all thecontents of a particular context can be recorded and labelled consistently. This number-ing system is like a library catalogue: it is what ties the archaeological features andstructures, the artefacts, their locations and the physical descriptions of the various soilstrata together so that, in the end, the site may be analysed in a meaningful way (see‘Labelling trenches’ on page 127 and ‘Labelling finds and samples’ on page 150). Youshould give considerable thought to the numbering/labelling system of your site beforeyou begin excavating to ensure that numbers are not repeated and that all trenches andcontexts are numbered consistently and logically.
Public health and safety on an excavation are also your responsibility. If you’reexcavating in a public place, you may have to erect mesh fencing or some other form ofbarricade to protect the public from any accidents and, for the same reason, backfillingthe site after the completion of excavation is also your job. The location of your excava-tion trenches and their ultimate depth may also be a health and safety issue. In New SouthWales, for example, occupational health and safety regulations require that any excavationover 1 metre in depth must be shored, and there may also be regulations for how closelyyou can excavate to a standing structure (in South Australia, this is no closer than2 metres). You will need to refer to the occupational health and safety legislation in yourstate when planning archaeological fieldwork.
To avoid the dangers of deep, narrow trenches, you can cut the sides back in a series ofsteps, although this may create problems for recording. If you are going to be excavatingon a deep or difficult site, you may need to consult with a civil engineer. You are alsoresponsible for backfilling the trenches and returning the area to some semblance of itsformer appearance once the excavation is completed (i.e. ensuring that no open holes areleft behind and removing your rubbish). Before you backfill, it is common practice toplace plastic or weed mat on the bottom of the trench so that future archaeologists willknow the mixed material put back into the trenches is the result of a past archaeologicalexcavation, and not some bizarre ritual practice of past people! Plastic or weed mat willalso indicate clearly where your excavation ended, in case you or another archaeologistshould decide to re-open your trenches. Archaeologists sometimes include readily date-able items (such as coins with the current year) in the base of the trench before theybackfill as a hint to future archaeologists.
In essence, all excavation requires careful planning (see ‘Designing your research’ onpage 3). Think about what aspects are important to the success of your project and make sureyou seek out and record those aspects during excavation. One of the key things to realise is the importance of maintaining flexibility in your methods. Every site is different, so you willneed to carefully weigh up the pros and cons and tailor the excavation methods to suit yourparticular research questions, the time available and the individual nature of the site.
BASIC EXCAVATION TECHNIQUES 119
*Archaeologists Field Handbook 29/6/04 5:24 PM Page 119

WOnce you have carefully thought through your research aims and worked out how
excavation can best serve them, all excavation follows a fairly standard process:
• Lay out trenches.• Photograph entire site before commencing (see ‘Photographing excavations’ on
page 279).• Excavate (this is in reality a complex series of steps in its own right—see Figure 5.1).• Photograph entire site upon completion.• Backfill.• Analysis.• Reporting.• Conservation/curation of recovered artefacts.
120 THE ARCHAEOLOGIST’S FIELD HANDBOOK
FIGURE 5.1: A flowchart to follow when recording an excavation unit, or context. Thissequence should be repeated for all units
*Archaeologists Field Handbook 29/6/04 5:24 PM Page 120
WTHE PRINCIPLES OF EXCAVATION
Sites can be created over long or short periods of time—they can even be the remains of asingle event—but excavation assumes that the order in which the different parts of the sitehave been laid down will reflect the sequence of events which occurred at that site in thepast. This is known as the Principle of Superposition, and it simply assumes that morerecent deposits will be laid down on top of older ones. While this is not always straight-forward, it is the fundamental basis for using stratification, or the way in which thestructure of the soil is divided into different layers or deposits, to interpret whathappened at a site. You should note the distinction between stratification (the process ofsedimentary layering and its observed result) and stratigraphy (the archaeologist’s inter-pretation of the stratified layers, in words or drawings).
There are often complicating factors to this, of course, such as when various naturalprocesses deposit or remove material from a site (such as wind depositing silt or watereroding the site, or rodent burrows churning and mixing up the soil), or when later eventsremove or alter evidence of previous events. There are three other fundamental principleswhich describe these possibilities:
• The Principle of Association, which presumes that items found together in the samedeposit are of essentially the same age. This must be applied with caution, however, assome items may be looked after for a long time before they are finally thrown away(such as a treasured tool or family heirloom), making them much older than the othermaterials associated with them.
• The Principle of Reversal, which allows for those rare cases when deposits have beenremoved from the site and re-deposited in reverse order. This usually takes place as aresult of major construction activity or digging, when large quantities of earth areremoved and then redeposited upside down.
• The Principle of Intrusion, which states that an intrusion must be more recent thanthe deposits through which it cuts (Barber 1994: 85). A rubbish-pit dug into theground or an underground oven are both intrusions cutting into the older depositsaround them.
All archaeological excavation is based around these three simple principles. Togetherthey imply that, through the careful removal of the layers which make up a site, and adetailed description of their texture, colour and contents, an archaeologist can recon-struct the sequence of events (both human and natural) which took place at that site inthe past. Put simply, by analysing the stratification of a site, it is possible to work out thewhole story of human and natural processes that the site has to tell.
BASIC EXCAVATION TECHNIQUES 121
*Archaeologists Field Handbook 29/6/04 5:24 PM Page 121

WBecause stratification is so important, most excavation proceeds by carefully strip-
ping each stratigraphic layer from a site in turn. This is why, when you are excavating, itis important to describe and take note of any changes in soil colour, texture or appearanceas you dig. It is also why you should not hurry. Stratigraphy is closely linked to the processof excavation itself in that, as you remove each layer, you form opinions about how thedifferent strata in a site were laid down and how they relate to each other:
The archaeologist’s golden rule is to excavate one layer at a time—and nothing inthat layer should escape his or her detection. It isn’t possible to read significanceinto a layer or level until you know how it lies, how it was formed, what its compo-sition is, and what its relationship is to the layers above and below it. (Joukowsky1980: 171–72)
For this reason, excavation should proceed horizontally first and vertically second. Inother words, you should finish excavating one unit or layer completely before you beginthe next.
A site which has distinct layers or contexts is said to be stratified. Not all sites are likethis, however, and therefore not all excavation proceeds according to the stratigraphicsystem. Some sites have no visible stratification, while at others the more significantcultural layers might be covered by large quantities of later, less significant, debris, or theentire site may have resulted from a single event of a known date (such as a load of rubbishbeing dumped). In such cases, excavating according to stratigraphic levels would befruitless. Even if you choose not to excavate the site according to stratigraphic layers, youstill need to be able to control the removal of soil from the site if you want to draw anymeaningful conclusions about the vertical or horizontal location of artefacts. In this case,a site is often dug in arbitrary levels which can still provide sufficient vertical and hori-zontal control. These levels are sometimes referred to as spits, or units, and can be of anythickness depending on the overall depth of the site and the degree of resolution you wantto achieve in locating the artefacts. Keep in mind that whatever arbitrary depth you chooseas the standard for your levels, this will be the finest degree of resolution that you willbe able to achieve in your analysis and results. If several different activities at a site haveonly left behind them 2 centimetre layers or deposits, which you choose to excavate in5 centimetre spits, then any one of these spits is likely to contain information from at leasttwo different activities. Because you have chosen to group them together in one arbitraryspit, you will not be able to separate these in your excavation or in your subsequentanalysis or conclusions. Once again, flexibility is the key: some sites may require a com-bination of arbitrary and stratigraphic excavation, such as if you find thick homogenouslayers within an otherwise stratified site (generally at the beginning or end of the excav-ation) which can be removed by arbitrary levels.
122 THE ARCHAEOLOGIST’S FIELD HANDBOOK
*Archaeologists Field Handbook 29/6/04 5:24 PM Page 122

WAPPROACHES TO EXCAVATION
Once you have decided on the most appropriate method of excavating your site, the nextimportant decision to make is which parts of the site you are going to excavate. This isessentially a sampling decision, similar in principle to deciding how you are going toselectively survey an area (see ‘Developing a suitable sampling strategy’ on page 66).As with a surface survey, if you can’t dig the entire site, you will have to make somemeaningful decisions about which part or parts of the site are most likely to give you theinformation necessary to answer your research questions. There is an ethical element tothis decision as well, of course, in that some archaeologists argue you should always leavepart of a site intact so that future generations of archaeologists, who may bring withthem new and better methods, will still be able to retrieve some in situ information. Thereare two aspects to this decision:
• deciding how much of the area to excavate;• deciding where to place your excavation trenches.
How much?
There are two ways to approach the excavation of any site, which depend on how much ofthe site you wish to excavate: the trench system or the open-area system. The trenchsystem is concerned with obtaining a cross-section through the site and tends to excavaterelatively narrow portions of the site to sufficient depth (it is often referred to dis-paragingly as the ‘telephone box’ approach). Because it aims to dig deeply, it is well suitedto answering chronological questions, such as the sequence of dates or the dates forearliest occupation, and for indicating the richness of the deposits and revealing the strat-ification of the site, since the walls of the trench preserve the stratigraphic profile of theexcavation unit until the very end of the excavation. Because the trench system excavatesnarrow vertical slices through a site, however, it cannot expose spatial information acrossthe site. The open-area system was developed in response to this need for horizontalinformation and exposes large expanses of the site, often to only a relatively shallow depth.It is thus quite successful at revealing information about activity areas or site structure,although it may not be so successful for establishing a sequence of dates (although itmay be, if you dig deeply enough). Each system has different pros and cons, and it isimportant to realise that each is designed to recover different types of information. Theycan, of course, be used in tandem to complement each other, or be combined with othermethods such as mechanical excavation or surface stripping to answer many differentkinds of question. The choice of which to employ will depend on the time and resourcesavailable to you and the particular set of research questions you are asking.
BASIC EXCAVATION TECHNIQUES 123
*Archaeologists Field Handbook 29/6/04 5:24 PM Page 123

WWhere?
Intra-site sampling is the choice of where to excavate within a site. Remembering thatvertical trenches are designed to recover chronological information and horizontal,open-area excavations are designed to recover information about spatial activity areas,obviously the selection of excavation areas and the methods of excavation you adopt willinfluence the kind of data you can collect from a site. If you are investigating a rock-shelter which has been inhabited by people for several thousands of years, for example,you might want to know about the chronology of the site (i.e. the sequence of its occu-pation over time), or about the use of space within the site (i.e. were people usingdifferent parts of the site for sleeping, eating, cooking, etc.?). Excavating the site througha system of vertical trenches is usually the best means of obtaining enough stratigraphicinformation to determine chronology, but it is unable to tell you anything meaningfulabout how space was used across the rockshelter (because you haven’t excavated enoughof it). If you think of the rockshelter as analogous to your house, how representativewould a shallow vertical ‘slice’ through your house be for reconstructing all of your day-to-day activities? Similarly, a shallower, open-area excavation will be better suited torecovering just this kind of spatial information, but may not necessarily give you enoughdepth to obtain an adequate chronology. In reality, of course, obtaining informationabout chronology and the sequence of occupation is just as important as finding outabout the patterning of activities across space, so in deciding where to place your excavations and how much of the area you are going to excavate you will need to think carefully about what it is you want to know and how best you will be able to find this out:
• What kind of data do you want to recover?• What sampling approach best fits this goal?• What sample size will best answer your questions (i.e. how much information will
you need)?
In reality, you will only be able to decide where to excavate after you have completedan intensive surface-survey of the area in question. Careful surface-survey may revealdiscrete activity areas or clusters of certain elements or features, or the patterning ofartefacts across the ground surface may be able to tell you about differential erosional/depositional patterns across the site. Any indication that there might be more archaeo-logical evidence below the ground surface will be a useful guide as to where to place yourtrenches. You may also wish to excavate a seemingly bare area of ground to test whetherwhat you observe on the ground surface is really a good indication of what exists belowthe surface. Examining the ground carefully before you dig can also tell you what kind of
124 THE ARCHAEOLOGIST’S FIELD HANDBOOK
*Archaeologists Field Handbook 29/6/04 5:24 PM Page 124

Wtools you will need to do the job properly (Joukowsky 1980: 172). Researching the recenthistory of your site may also give you some idea of what took place in the recent past atleast, and therefore the kind of deposits you might encounter.
Sub-surface sampling
In making these decisions, the archaeologist is effectively trying to assess what might liebelow the ground surface. There are more scientific ways of doing this than simplyguessing, of course, all of which can be employed to help you decide on where it would bebest to dig. This is called sub-surface sampling. Sometimes small-scale subsurfacesampling will be necessary to determine the horizontal extent of a site. Soil cores, augerholes or shovel-test pits can be dug at intervals across the site to obtain broad strati-graphic or spatial information. Soil cores are commonly 3–5 centimetres in diameter,with auger holes slightly larger at 10–15 centimetres in diameter. Shovel-test pits areusually slightly larger than the width of a shovel blade (i.e. between 25 and 50 squarecentimetres) and have the distinct advantage of allowing you to examine the stratigraphyin the sides of the pit, something which is not possible for auger holes or cores. Com-parison between different methods of subsurface sampling suggests that shovel-test pitsare the most effective means for ‘seeing’ beneath the ground surface, although they arequite labour-intensive (Hester, Schafer and Feder 1997: 57–59). As with any form ofsampling, the best results can only be obtained after careful forethought—you will notonly have to consider where you are going to place your test pits, but also how closetogether they should be. Bear in mind, however, that any form of subsurface sampling willdestroy a small portion of the site as it is dug, so it is always wise to limit the effects of this,particularly if you are going to conduct a larger-scale excavation later. Because all formsof subsurface testing will destroy a portion of the archaeological deposit, they must alsobe conducted under the auspices of an excavation permit.
Other forms of sub-surface testing, such as magnetometry or the use of ground-penetrating radar, have the advantage of being non-invasive, but can only be conductedby specialist operators with appropriate equipment.
LAYING OUT A SITE GRID
Once you have made your decision about where to excavate, the next step is to lay outyour excavation trenches. This may seem pedantic, but is important in terms of beingable to maintain control over the positioning of artefacts and features across the site.Archaeologists often use a grid which, for convenience, divides the site into 1 metre gridunits (often called ‘squares’). An excavation trench can be any multiple or fraction of
BASIC EXCAVATION TECHNIQUES 125
*Archaeologists Field Handbook 29/6/04 5:24 PM Page 125

Wthese grid units, which are related to each other through a universal numbering system(see Figure 5.2). The two axes of the grid are labelled the ‘X’ and the ‘Y’ axis. Note that itis standard practice to begin numbering coordinates along these axes at a relatively highnumber, such as ten, to allow for the possibility of extending a trench if necessary but toavoid going into negative numbers when doing so.
You don’t actually need to string out every grid unit across the site; however, to avoidhaving to measure them again, you should mark the ends of the X and Y axes with stableand relatively permanent pegs. If you want to excavate a trench that is larger than 1 squaremetre, but don’t wish to string out the boundary of every 1 metre grid unit within it, it issimplest to mark the corners of each unit along the edges of the trench with masking tapeattached to the trench string.
You do have to formally string out each excavation trench within your site, however.The string outline of the trench serves as a constant reference point for measuring depthand for ensuring that the sides of the trench are kept straight. You must ensure that all ofyour excavation trenches are kept square (meaning horizontally rectilinear and verticallystraight-walled), because it is this which allows you to control the excavation process. Asa first step, establish where the edge of your trench will be, measure its length and thenmark the two corner points with pegs hammered lightly but firmly into the ground.
126 THE ARCHAEOLOGIST’S FIELD HANDBOOK
FIGURE 5.2: A hypothetical grid across an excavated site. Any of the squares in between thealready excavated trenches can be opened and assigned X and Y coordinatesfrom the established grid.
*Archaeologists Field Handbook 29/6/04 5:24 PM Page 126

WBecause trenches are usually laid out in multiples of 1 metre with 90° corners, the nextstep is to mark the opposite corners.
Establish a right angle from one established peg to a third corner peg using triangu-lation (see ‘Using the baseline and offset technique’ on page 96). Install a fourth cornerpeg by the same method and then measure all four sides and the diagonals to be sure thatthe trench is square. Table 5.1 provides diagonal measurements for excavation trenches upto 15 metres square, on the principal that the diagonal of a square will always measure1.414 times the length of the sides. This is related to Pythagoras’ theorem, which statesthat in a right-angled triangle, the square of the hypotenuse is equal to the sum of thesquares of the opposite sides. In practice, even though you have carefully measuredthe first side of the trench, and then triangulated the opposite two corners from this, atrench will rarely be perfectly rectilinear on the first go. Inevitably you will have to keepadjusting the positions of your pegs until the trench is actually square. The only way todo this is to keep measuring the sides and the diagonals until you have them right (see Figure 5.3 on page 129).
Once you have strung out your trench, make sure you don’t trip over the string or pegsduring excavation. For this reason, you may wish to tie flagging tape or some otherbrightly coloured material to the pegs to make them easy to see (and avoid). Rememberthat the corners will be your permanent reference points for excavating and measuring, soit is very important not to disturb them.
LABELLING TRENCHES
All excavation trenches within the grid of your site must be numbered logically so that allfinds and descriptions of deposits can be tied securely to their place of origin. There mustbe no confusion about this, so deciding on a logical labelling system is a first priority.Every artefact or sample which comes out of a trench, and every description of a layer ora feature, must be able to be described so that you know precisely where it came from,otherwise it will be impossible to draw any meaningful conclusions about your site. Eventhough you have X and Y coordinates for every grid unit, these would be very time-consuming to transcribe on to every bag or recording form, so it is best to simplify thesystem by assigning a number to each trench. At the very least, a labelling system shouldcontain a site prefix or code for the site (such as two or three letters which denote itsname), a unique number or letter for each trench, and a consecutive and unique numberfor each context or layer. Individual artefacts or samples within each context can also benumbered if required. This string of letters and numbers will be the code that is writtenon every bag containing an artefact or sample (see ‘Labelling finds and samples’ on page150), and on every recording form.
BASIC EXCAVATION TECHNIQUES 127
*Archaeologists Field Handbook 29/6/04 5:24 PM Page 127

TA
BLE
.1: D
iago
nal m
easu
rem
ents
for
arch
aeol
ogic
al t
renc
hes
Leng
th (
m)
12
34
56
78
910
1112
1314
15
11.
414
2.23
63.
162
4.12
35.
099
6.08
37.
071
8.06
29.
055
10.0
5011
.045
12.0
4213
.038
14.0
3615
.033
22.
828
3.60
64.
472
5.38
56.
325
7.28
08.
246
9.22
010
.198
11.1
8012
.166
13.1
5314
.142
15.1
33
34.
243
5.00
05.
831
6.70
87.
616
8.54
49.
487
10.4
4011
.402
12.3
6913
.342
14.3
1815
.297
45.
657
6.40
37.
211
8.06
28.
944
9.84
910
.770
11.7
0512
.649
13.6
0114
.560
15.5
24
57.
071
7.81
08.
602
9.43
410
.269
11.1
8012
.083
13.0
0013
.928
14.8
6615
.811
68.
485
9.21
910
.000
10.8
1711
.622
12.5
3013
.416
14.3
1815
.232
16.1
55
79.
899
10.6
3011
.402
12.2
0713
.038
13.8
9214
.765
15.6
5216
.553
811
.314
12.0
4212
.806
13.6
0114
.422
15.2
6416
.125
17.0
00
912
.728
13.4
5414
.213
15.0
0015
.811
16.6
4317
.493
1014
.142
14.8
6615
.620
16.4
0117
.205
18.0
28
1115
.556
16.2
7917
.029
17.8
0418
.601
1216
.970
17.6
9218
.439
19.2
09
1318
.385
19.1
0519
.849
1419
.799
20.5
18
1521
.213
Width (m)
*Archaeologists Field Handbook 29/6/04 5:24 PM Page 128

WBASIC EXCAVATION TECHNIQUES 129
FIGURE 5.3: The sequence for laying out an excavation square
*Archaeologists Field Handbook 29/6/04 5:24 PM Page 129

WStephen Sutton’s tip for stringing out an excavation trench
Even after you’ve strung out yourtrench, it’s possible for the string tomove (or, more likely, for someunfortunate person to trip over it orkick the pegs out of alignment). Tomake it easier to reconstruct theprecise location of your originalcorners, mark the place where thestrings cross with a permanent,easily visible pen line. In this way, ifthe string is ever moved, you’ll beable to see its original position easilyand replace it accordingly.
RECORDING IN THREE DIMENSIONS
Because archaeologists want to know the exact location of artefacts and features, both horizontally and vertically, they record these things according to their position bothalong the length and the width of the trench (their position on the X and Y axes ofthe site), but also their position through the depth of the deposit. This is called the Z axis(see Figure 5.4 on page 131).
The most accurate way to measure depth is to use a dumpy level or EDM to plot indi-vidual finds, although this technology is not always easy to come by. If you don’t haveaccess to it, you will have to use an old-fashioned tape measure. If you use this low-techsolution, make sure that you always measure from a fixed horizontal baseline (the stringof the trench is fine provided you use a carpenter’s string level to make sure it really is hor-izontal and hasn’t been disturbed during excavation). Any alteration or movement in thisbaseline will affect all your subsequent measurements.
On many sites, recording the precise position of every individual artefact in threedimensions is not always practical and is not necessarily going to provide you withmore accurate or ‘better’ archaeological information, unless there is good evidencethat the artefacts are still in their area of primary use or discard (Drewett 1999: 143).Recent research (Balme and Beck 2002) suggests that simply plotting artefacts to withina 25 or 50 centimetre quadrat (i.e. this artefact was recovered from Trench 1/context10/quadrat a) will provide sufficient spatial resolution to answer most questions about
130 THE ARCHAEOLOGIST’S FIELD HANDBOOK
*Archaeologists Field Handbook 29/6/04 5:24 PM Page 130

W
activity areas at a site. Any special or unique finds can still be plotted individually ifnecessary.
Whether you are more concerned with chronological or spatial questions will largelybe determined by the type of site you are excavating. Historical sites, for example,are usually formed over a relatively short period of time, and may be well documented;therefore, detailed information about chronological change is not always important.The emphasis in these sites may be more on spatial questions—changes in patterninghorizontally, across space—rather than chronological issues.
RECORDING THE EXCAVATION PROCESS
Just as with a surface survey, there are several complementary aspects to an excavationwhich must be recorded consistently and in detail as the excavation progresses. These willbe essential pieces of information in the final jigsaw puzzle which will be your archaeo-logical analysis. The core aspects to record throughout any excavation are:
• the soil or deposits (for each context or spit);• any features encountered;• the process of excavation itself.
BASIC EXCAVATION TECHNIQUES 131
FIGURE 5.4: Using X, Y and Z coordinates to plot the location of an excavated artefact
*Archaeologists Field Handbook 29/6/04 5:24 PM Page 131

WDESCRIBING DEPOSITS
The four main elements to record when describing soils are:
• colour;• texture;• consistency;• coarse components or composition.
It is important that you standardise such descriptive information as much as possible,so that other people reading your report will know precisely what you mean. If you leteveryone describe a variable such as colour in their own way, for example, you will end upwith as many descriptions as there were workers. In reality, of course, none of these attri-butes can be assessed in the field with any kind of scientific accuracy, and the standardsemployed by soil scientists and archaeologists vary considerably. Your goal should simplybe to try to record as much descriptive information in as standard a fashion as possible.
Colour should be recorded using a Munsell Soil Colour Chart, which provides aninternationally recognised standard against which to assess soil colour and makes theprocess far more objective than would otherwise be possible.
The basic divisions of soil texture are sand, silt and clay, defined in terms of the size oftheir mineral particles (sand = 0.06–2 millimetres; silt = 0.002–0.06 millimetres; clay = lessthan 0.002 millimetres). For on-site purposes, however, it is best to use a more generalmeasure which can be estimated by hand-texturing, such as whether or not the soil willhold its shape when damp. The overall rule of thumb is that clay coheres, silt adheres andsand does neither. Thus clay will be sticky and plastic, silt will have particles that are invis-ible to the naked eye, and sand will have a visible gritty feel when moistened (Roskams 2001: 178). A general test which you can apply to all types of soil is to roll it into a ball andtest its malleability (Figure 5.5 on page 133). If the soil can be rolled into a sausage shapethat still holds its shape when bent into a ring, then it is largely clay; if it breaks when bentinto a ring, it is largely silt. Sand, of course, cannot be rolled into any shape.
Consistency measures the degree of compaction of the soil and whether or not itholds together. Variations in compaction across a deposit can be important, as differentactivities on the site will have affected the consistency of the soil in different ways. Toassess consistency, take a slightly moist cube of soil and try to crush it between yourthumb and forefinger:
• If it cannot be moulded into a cube at all, it is a loose soil.• If it crushes easily (if there is no resistance), it is a weak soil.• If low pressure is required to crush it, it is a friable soil.
132 THE ARCHAEOLOGIST’S FIELD HANDBOOK
*Archaeologists Field Handbook 29/6/04 5:24 PM Page 132
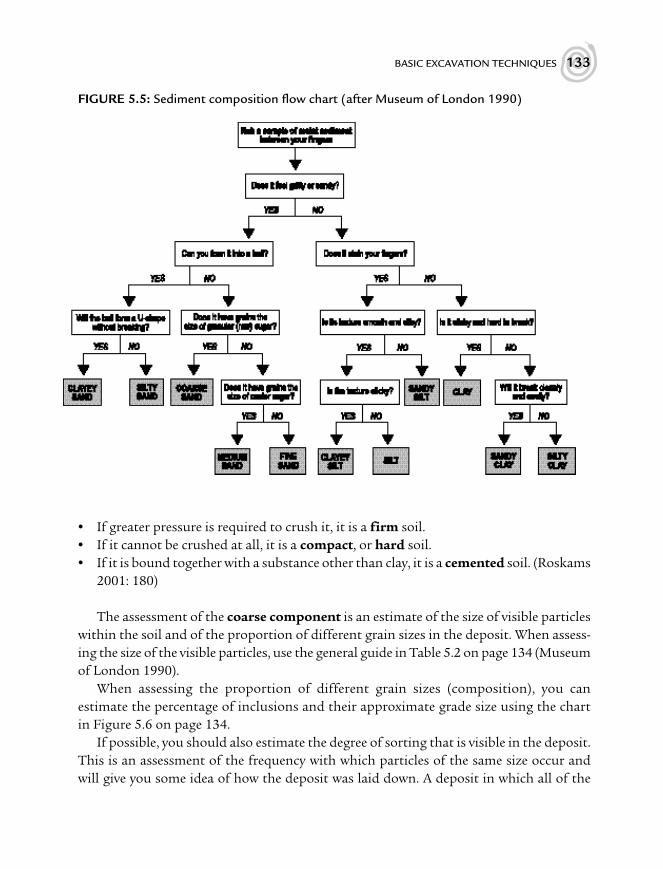
W
• If greater pressure is required to crush it, it is a firm soil.• If it cannot be crushed at all, it is a compact, or hard soil.• If it is bound together with a substance other than clay, it is a cemented soil. (Roskams
2001: 180)
The assessment of the coarse component is an estimate of the size of visible particleswithin the soil and of the proportion of different grain sizes in the deposit. When assess-ing the size of the visible particles, use the general guide in Table 5.2 on page 134 (Museumof London 1990).
When assessing the proportion of different grain sizes (composition), you canestimate the percentage of inclusions and their approximate grade size using the chartin Figure 5.6 on page 134.
If possible, you should also estimate the degree of sorting that is visible in the deposit.This is an assessment of the frequency with which particles of the same size occur andwill give you some idea of how the deposit was laid down. A deposit in which all of the
BASIC EXCAVATION TECHNIQUES 133
FIGURE 5.5: Sediment composition flow chart (after Museum of London 1990)
*Archaeologists Field Handbook 29/6/04 5:24 PM Page 133

W
particles are of very similar size, for example, indicates that it has been well sorted priorto deposition (by water or wind, for instance).
DESCRIBING CULTURAL FEATURES
Obviously you also have to record any cultural features (i.e. the artefacts) you encounterduring excavation. For example, the presence or absence of stone artefacts or charcoalwithin a rock shelter deposit is clearly an essential component. In historical archaeology,when you describe other features in the excavation (such as walls, timbers, or variousmaterials), it is important to outline their methods of construction using standardterminology so that others will understand precisely what you mean. Detailed standards
134 THE ARCHAEOLOGIST’S FIELD HANDBOOK
TABLE 5.2: A guide to estimating the size of visible particles
Description Particle size
Clay/silt Not visible to the naked eyeFine sand 0.02 mm–0.06 mmMedium sand 0.06 mm–0.20 mmCoarse sand 0.20 mm–2.00 mmFine pebbles 2 mm–6 mmMedium pebbles 6 mm–20 mmCoarse pebbles 20 mm–60 mmCobbles 60 mm–100 mm
FIGURE 5.6: Estimating the percentage of inclusions (after Museum of London 1990)
*Archaeologists Field Handbook 29/6/04 5:24 PM Page 134

W
for describing timber, brick and other remains are contained in ‘Describing structuralcomponents’ on page 178.
DESCRIBING THE EXCAVATION PROCESS
An excavation is described essentially by the information you record in your field notes,detailing the day-to-day running of the dig and any problems or successes (see ‘Keeping afield journal’ on page 70). Your details of the sequence of events for the day and thedecision-making process can be invaluable for sorting out problems in later analysis, orfor clearing up any unwitting mistakes made on recording forms or artefact bags.
RECORDING SECTIONS
One of other main ways in which archaeologists record stratigraphic information froma site is by drawing and photographing the vertical walls of their trenches. These wallsare called sections or profiles, and the aim is to represent both the visible soil layersand the discernible archaeological features as informatively as possible. Stratification is
BASIC EXCAVATION TECHNIQUES 135
FIGURE 5.7: Estimating the degree of sorting (after Museum of London 1990)
*Archaeologists Field Handbook 29/6/04 5:24 PM Page 135

Wwhat allows the archaeologist to place events at a site into chronological order. Becausethe Principle of Superposition rests on the assumption that the deposits at a site arelaid down in sequence over time, it is also the basis for relative dating (see ‘The principlesof excavation’ on page 121). This is the process of putting things into order from earliestto latest, but without assigning any specific dates to the things themselves. Absolutedating, on the other hand, uses a particular technique or process to assign a specific dateto something (such as when radiocarbon dating is used to date a piece of bone). Bothforms of dating are essential to archaeological research for obvious reasons. Withoutsome knowledge of when things happened, it is impossible to properly interpret a site.For this reason, it is important that your photographs and section drawings representthe vertical sequence of layers or contexts visible in the wall of the trench as accuratelyas possible (see ‘Photographing excavations’ on page 279 and ‘Drawing vertical surface(sections)’ on page 289).
The principle of drawing a section is exactly the same as that for drawing a site plan:using baselines with offset measurements to plot features (see ‘Using the baseline andoffset technique’ in Chapter 4 and ‘Drawing horizontal surfaces (plans) in Chapter 9 onpage 286). Remember that the scale at which you draw the section will determine howmuch detail you can include in it. The hardest part of drawing a section is deciding whereone layer or context ends and the next begins. Sometimes, lightly wetting the profile withwater from a hand sprayer will bring out distinctions in soil colour, but another wayaround this problem is to use different symbols to identify a distinct boundary as opposedto an indistinct or uncertain one.
You can draw a section either cumulatively—that is, as each context is excavated—or atthe end once all excavation is complete. If you draw your section cumulatively, make surethat you include all the necessary coordinates to allow the individual drawings to be fittedback together later. If you draw your sections at the end, you will probably have to referback to your excavation notes to know which contexts you are seeing and drawing in theprofiles. A certain amount of annotation will be necessary to make your section drawingsintelligible to someone else, but try not to reproduce all of the information from thecontext or excavation recording sheets. For more information on how to draw a section,see ‘Drawing vertical surfaces (sections)’ on page 289.
INTERPRETING STRATIGRAPHY
Current archaeological analysis does not rely solely on drawn sections for interpretation.A Harris matrix is probably the most commonly used means of making sense of archaeo-logical stratigraphy, although there are debated alternatives. Harris matrices work best forthe kind of deposits for which they were developed (i.e. complex historical archaeological
136 THE ARCHAEOLOGIST’S FIELD HANDBOOK
*Archaeologists Field Handbook 29/6/04 5:24 PM Page 136

Wsites with structures). They are not necessarily very useful for pre-contact Indigenous sites,as these tend not to have the same kinds of deposits.
A Harris matrix makes it possible to represent a complete three-dimensional strati-graphic sequence for a site in a single two-dimensional diagram. Its great virtue is that itenables all contexts excavated at a site to be shown simultaneously, not just those contextswhich appear in the section (recent research has indicated that up to 40 per cent ofrecorded contexts will not show up in any section [Bibbey 1993: 108]). According toHarris, there are only three stratigraphic events which are possible on a site (Brown andHarris 1993: 10):
• deposits (the context or layer, which can be either natural or cultural, horizontal orvertical [i.e. a structure such as a wall]). This is the result of any event which acted toplace evidence at a site, such as layers of debris or the construction of a wall;
• interfaces between one layer and the next (i.e. the surface of the context);• cuts, such as pits, wells, graves, etc., which are dug through earlier layers and which can
be defined as stratigraphic units in their own right. A ‘cut’ is essentially somethingwhich has happened on the site to remove evidence, rather than to deposit it. It is there-fore a ‘negative’ feature, but it is important to record it in the same way as you woulda ‘positive’ feature.
At the time of excavation, a decision must be made as to the nature of each context: is ita cut or a cultural or natural deposit?
There is no room here to include all of the interpretive information which can beencoded into a Harris matrix, or to explore the various alternative schemas which havebeen developed in response to its perceived flaws. We have simply included the basicprinciples of the Harris matrix as one means of attempting to define relationships betweendifferent strata on an archaeological site. A Harris matrix is best produced as excavationprogresses and each context must be added to the matrix at the time of its excavation. Thisis the only time that inconsistencies or unclear relationships between contexts can besorted out through further excavation/investigation if necessary. Interpreting stratigraphyis rarely straightforward, and you should never assume that you will be able to rememberstratigraphic relationships between units. If you are working on a large site you may onlybe excavating a small part of the total sequence anyway, so your observations of howcontexts relate to each other will be vital to the overall understanding of the site.
The essential basis of the matrix is very simple: a number, always written or drawninside a consistent rectangular box, is assigned to each context or unit. Horizontaland vertical relationships between contexts are represented by horizontal or verticallines drawn between boxes to represent the sequence. There are only three possiblechronological relationships between any two contexts (see Figure 5.8 on page 138).
BASIC EXCAVATION TECHNIQUES 137
*Archaeologists Field Handbook 29/6/04 5:24 PM Page 137

W
The elegance of the Harris matrix is that it reduces all possible forms of stratigraphicconnections to one of these three relationships and then uses these relationships to builda complete chronological sequence for the site. You can combine these three stratigraphicrelationships in a variety of ways (see Figure 5.9 on page 139).
Constructing a Harris matrix requires the excavator to think logically about the rela-tionships between contexts and ensures that all contexts, regardless of size or supposedimportance, are included in the final analysis (Bibbey 1993: 106–7). When establishingmatrix sequences:
• First, look for correlations across the sequence (i.e. horizontal correlations). This meanslooking for deposits which are of the same date, or for deposits which may once havebeen part of a single continuous unit, but which have since been cut by later intrusions(Relationship B). This last is quite difficult to do and direct correlations between unitsmust be inferred with care. It is for this reason that Harris matrices can only beproduced as excavation progresses, as decisions about where each context fits withinthe overall sequence will often be based on similarities or dissimilarities betweenphysical characteristics (colour, texture, inclusions, etc.), surface level, or the nature ordate of recovered artefacts. The physical characteristics of the units in question willprobably be the best guide as to whether or not two units are linked. This is one of thekey reasons that it is imperative to record all descriptive information about excavationunits using consistent terminology (see ‘Describing deposits’ on page 132).
• Second, decide on the associations of successive units (i.e. vertical correlations). Thismeans deciding on the sequence of deposition for the site—what is above or below eachcontext (Relationship A) ?
138 THE ARCHAEOLOGIST’S FIELD HANDBOOK
• Relationship A: 1 is later in date than 2 (in other words, 1 overlies 2)
• Relationship B: 1 and 2 are identical in date
• Relationship C: 1 and 2 have no direct temporal relationship
1
2
1 2
1 2
FIGURE 5.8: The stratigraphic relationships of a Harris matrix
*Archaeologists Field Handbook 29/6/04 5:24 PM Page 138

WBASIC EXCAVATION TECHNIQUES 139
FIGURE 5.9: Representing stratigraphic relationships in a Harris matrix (after Brown andHarris 1993)
*Archaeologists Field Handbook 29/6/04 5:24 PM Page 139

WWhere a stratigraphic sequence exists, it makes sense to interpret it from the earliestelements upwards in the same order in which it has developed (Roskams 2001: 247).
Constant use by archaeologists has amended the basic Harris matrix in many ways todepict a wide range of complementary information. By altering the form of the lines
140 THE ARCHAEOLOGIST’S FIELD HANDBOOK
FIGURE 5.10: The basic principles of the Harris matrix can be adapted to record a widevariety of complementary information (after Brown and Harris 1993)
*Archaeologists Field Handbook 29/6/04 5:24 PM Page 140

Wbetween boxes, the shape of the boxes or their relative positions, a matrix can be made todepict the strengths of linkages between strata, different types of debris resulting from dif-ferent activities, relative or absolute periods of time, and even construction sequences forstanding structures (see ‘Recording standing structures’ on page 176).
USING A TROWEL AND BRUSH
You use a trowel both to define the extent of a deposit and to remove it to expose theunderlying layers. The nature of the deposit (its texture and consistency) will determinethe most appropriate trowelling techniques. The main decision you will have to make iswhether to use the point or the edge of the trowel to remove the soil. This will reallydepend on the depth of the layer, how compacted the soil is and how large or fragile theartefacts contained within it are. If the deposit is loose or sandy, for example, then it isprobably easier to scrape the soil away with the edge of the trowel; if it is hard and com-pacted, then the only option may be to try and break it up carefully with the point of thetrowel. On the other hand, if you are excavating a site containing relatively large andfragile artefacts (such as mollusc shells), then removing the deposit in ‘chunks’ ratherthan scraping it away and risking slicing through the fragile organics may be your onlyoption.
If you are scraping, always use your trowel with the edge of the blade parallel to theground and pull it towards you. You will probably need to keep your weight over thetrowel to do this effectively, which may prevent you from sitting down as you dig. If youadopt this method you will have to work so that you pull the excavated material towardsyou on to the unexcavated portion in front of you, rather than pushing it away on to thealready exposed surface. On some sites with fragile artefacts, you may be better off toloosen a small area of soil in a corner of the square closest to you with the trowel first, andthen use the vertical face of this pit to open up the remainder of the grid unit. In this case,you can use the tip of the trowel both to loosen the dirt and at the same time to turn itover, and you will work away from yourself. For either technique, remember to alwayskeep your dustpan and bucket handy so that you can continually remove the excavatedsoil from your unit as you dig. Once you have filled up your bucket, you will probably haveto sieve the contents. As the sieves may be located some distance from the actual trenches,make sure that you do not make the buckets too heavy to carry (see ‘Sieving and sorting’on page 146).
Archaeologists use brushes to clean the soil from delicate or fragile finds and to tidyup the base of each soil layer after it has been excavated and before it is photographed (see‘Photographing excavations’ on page 279). Small brushes and excavation tools (such asdental picks or plasterer’s tools) are best for excavating in small cavities. If you come
BASIC EXCAVATION TECHNIQUES 141
*Archaeologists Field Handbook 29/6/04 5:24 PM Page 141

W
across a discolouration in the soil or other unusual feature, it may be best to brush thisdown with a hand-held brush until you can determine what it might be, rather than tokeep trowelling and run the risk of damaging it. Soft, hair-bristle brushes (like those usedfor typical household cleaning) are best for sweeping up loose dirt.
Whatever technique you adopt, you must always ensure that you work slowly and care-fully, and take careful note of any apparent changes in the texture, colour or nature of thedeposit. The goal of all stratigraphic excavation is to define as far as possible the limits ofeach stratigraphic layer as it is being removed and to remove each separately and in itsentirety before beginning work on the next. As the excavator, it is your job to ensure thatunderlying strata are not cut into prematurely, thus destroying any opportunity for youor anyone else to observe vital relationships between layers. In essence, you are onlyremoving the uppermost layer until something different appears. This is simple tosay, but not always easy to do. Some differences between stratigraphic contexts will be verysubtle (such as when one area of soil has a different texture or particle size to other areasaround it); others will be readily apparent (such as a layer of fill which is a different colourto that underneath it); There is no easy answer here, and being able to distinguish betweendifferent layers will largely be a matter of experience. Sometimes you can literally ‘feel’ thedifference as you dig when one area is harder or easier to dig than those around it. As ageneral rule, whenever you encounter any noticeable change in the soil (colour,texture, hardness, inclusions), stop and assess the situation carefully before youproceed.
142 THE ARCHAEOLOGIST’S FIELD HANDBOOK
FIGURE 5.11: Use the edge of the trowel to pull sediment towards you and onto thedustpan. Any fragile or delicate artefacts will require careful brushing toavoid damage.
*Archaeologists Field Handbook 29/6/04 5:24 PM Page 142

WIf you find you’ve made a mistake (and cut too deeply for example, or removed a layer
which you thought was uppermost but which turned out to underlie another adjacentlayer) the best response is to stop and record the situation fully (with drawings and notes)before you proceed. The most important thing to remember when excavating is always towork systematically. The best advice is to go slowly and methodically, and always ask foradvice if you are unsure.
You should already be aware by now of the necessity for archaeologists to control theexcavation process. One of the many ways in which they do this is by trying to dig theirtrenches as squarely as possible—that is, by trying to remove the soil within their trenchesin careful blocks. This is because they wish to know precisely where every artefact andfeature comes from within the site: obviously if the wall of a trench has been undercut(i.e. if it slopes away from the excavator, into the adjoining area), then any artefacts whichare recovered from that undercut zone by rights come from the next square. One of themain aims of good excavation, therefore, is to keep the sides of your trench vertical andthe walls and floor square (unless you are digging according to the context system, inwhich case the base of each context will be following a stratigraphic layer which is highlyunlikely to be square). If you are excavating many small contexts, you don’t need to betoo pedantic in keeping your walls absolutely vertical; they can be trimmed in a singleoperation before photographing the trench at the end of each context. Remember to keepthe soil from the trimmings and any artefacts it contains separate from the other contexts.You have no way of knowing whether that soil and those artefacts came from the top ofthe trench, the middle or the base—all you know is that they came from the trench wall.
FIGURE 5.12: The best way to ensure that thesides of your trench are kept vertical is tostand or kneel directly above them and trimfrom the top down. It is easy to undercut thewalls if you try and trim them with the wall infront of you since you can’t see whether youare cutting truly vertically or not.
BASIC EXCAVATION TECHNIQUES 143
*Archaeologists Field Handbook 29/6/04 5:24 PM Page 143

WIn the end, the degree of accuracy which is necessary in your excavation technique will
depend on the research questions that are being asked: if your research absolutely dependson knowing exact stratigraphic divisions between layers (such as if you are investigatingactivity areas, or precise changes in use over time), then you will have to proceed with greatcare; if you are only interested in broad divisions of use or chronology, then a less preciseexcavation strategy may be adopted—sometimes even extending to excavating the siteusing arbitrary layers (see ‘The principles of excavation’ on page 121).
Excavation etiquette
• Never undercut a trench wall, even if you can see an interesting artefact in the wallof the trench.
• Never pull an artefact, stone or other feature out of the wall of the trench.• Never pull an object out of the ground. Excavate around it until you have reached
its base and then remove it in one piece.• If an object or unusual feature is uncovered, a good rule is to leave it in place (in situ)
until the area is completely excavated and the object can be removed carefully in itsproper stratigraphic context.
• When working in a rockshelter, avoid wearing boots with big tread as the tread candisturb small artefacts and the fine silty deposits built up in these places. Tennisshoes or some other sturdy footwear with fine tread is best, although at some sitesyou may be asked to dig bare foot.
• Don’t walk on newly excavated areas (particularly someone else’s!) unless it isabsolutely unavoidable (i.e. if you need to clean up that area prior to photographingor drawing it).
• When you are excavating, always move backwards across the trench to avoid kneelingon the freshly excavated surface.
• If weeds or roots are present, cut them with secateurs—don’t pull them.• Don’t trip over the string or the pegs or disturb them in any way during excavation.• Never step too close to the edge of a trench as you may run the risk of collapsing the
wall and becoming the most unpopular person on the dig. If you are excavating in adeep trench, get someone to help you in and out, so that neither of you puts yourfull weight on the edge of the trench.
• Never sit on the edge of a trench (for the same reason).• Be willing to take your turn at a variety of tasks. Excavation requires sieving, sorting,
cleaning and backfilling as well as actual digging, and no one wants to be restrictedto one task all the time.
• Bear in mind that tempers get frazzled, particularly on long or arduous digs, and youmay have to maintain goodwill even in the face of seemingly overwhelming obstacles.
144 THE ARCHAEOLOGIST’S FIELD HANDBOOK
*Archaeologists Field Handbook 29/6/04 5:24 PM Page 144

WIt does not help anyone if you sulk, and a temper tantrum can destroy everyone’smorale for the whole day.
• Different people have different physical tolerances and may work at different paces,so be patient if someone works more slowly than you do, or needs more guidance.
• If you are a trench or site supervisor, be supportive in the way you provide advice topeople who are learning to excavate. Try to remember that people aren’t born withexcavation skills and that some people will need more specific instructions thanothers.
• If you’re supervising other workers make sure that you brief them as fully as possiblebefore the dig begins. Make clear what your aims are and what you want to know.This will help them to understand the importance of following particular proceduresand guide them in terms of what to look for. Update these briefings regularly so thatno one feels lost.
• If you are camping with other workers during the dig, remember to be tolerant ofothers, particularly after a hard day’s work. Don’t hog the shower and do your fairshare of the household tasks (like cooking or cleaning). Believe it or not, the mainsources of irritation on archaeological fieldwork expeditions is who gets priority forthe showers and who should be doing the cooking!
• Most importantly, fieldwork is a job, not a holiday, so make sure you are always ontime and promptly back at work after breaks.
Val Attenbrow’s tips for excavating shell middens
• Identify stratification and excavate accordingly. Shell middens vary widely in size, composi-tion and complexity. They range from deposits which are homogeneous throughoutto deposits which are finely stratified and may contain, for example, hearths, lensesof specific shell species and/or tool manufacturing events, as well as animal bonesand stone artefacts. Excavation should proceed in a manner that ensures any strati-fication is identified so that excavation units can reflect stratigraphic boundaries.
Where a midden appears to be homogeneous, excavators still need to takeaccount of how the deposits may have accumulated—for instance, whether there isa slope in the particular areas being excavated. If the surface of the midden (oran exposed face) suggests materials accumulated on a sloping surface, then theorientation of excavation units should not be horizontal but on a slope that approxi-mates the way the deposits accumulated. This will prevent excavation units fromcross-cutting any ‘layers’, even if they are not visible during excavation.
BASIC EXCAVATION TECHNIQUES 145
*Archaeologists Field Handbook 29/6/04 5:24 PM Page 145

W• Choose the most appropriate sieve mesh size. If the midden is composed mostly of whole
shells, then a 5 millimetre mesh may be sufficient, unless numerous small (less than5 millimetre) species are also present. Where stone artefacts are present and fishbones are abundant, then nested 5 and 2 millimetre sieves are recommended,although the shell analysis to identify species composition may be based on materi-als retained in only the 5 millimetre sieve. In deposits where fish bone is present butsparse, the addition of a sieve with 1 millimetre mesh may be necessary to recoverthe bones. Depending on the species, the addition of a 1 millimetre sieve where fishbones are abundant may enable more bone to be recovered (i.e. more fragments,greater weight), but it may not necessarily enable a greater number of species to beidentified.
• Look for shell tools and manufacturing debris. It is often the case that only samples of theshell component of middens are analysed to determine the species composition;sometimes ‘excess’ shell is discarded in the field. In such situations, these depositsshould be inspected prior to discard for any shells that may have been used as toolsor for shell that is the debris from the manufacture of shell tools. Both bivalvesand gastropods were used as scrapers and cutting implements—for example, inprocessing plant foods—and were also used as adzes to make wooden artefacts.In addition, along the eastern coast of Australia, shell fish-hooks were made fromoval pieces cut from Turbo shells. These ‘blanks’ may also be present, along withwhole and/or broken hooks.
• Make a reference collection. Make a collection of whole shells of all visible species, largeand small, from the shoreline adjacent to the excavated midden. This can be used asa reference collection to aid in the identification of midden species. Collect severalspecimens of each species, particularly gastropods, so that some can be brokenup to examine the internal surfaces and shape of the column. If an analysis ofmeat weights and so on is to be carried out, collect live specimens. Bivalves andgastropods will stay alive for some weeks or can be put into preservative to keepthem longer.
SIEVING AND SORTING
Most artefacts from sites are not recovered during the process of digging, but in thesubsequent process of sieving the excavated soil. In the interests of stratigraphic control,it is important to sieve each excavated soil layer separately and to keep all artefacts andsamples from each layer distinct through careful labelling and bagging. Never allow yourbucket of excavated soil to become mixed with buckets from another grid unit or another
146 THE ARCHAEOLOGIST’S FIELD HANDBOOK
*Archaeologists Field Handbook 29/6/04 5:24 PM Page 146

Wlayer—and never allow the artefacts you recover from your bucket to become mixed withothers unless they all come from the same context and will be bagged together anyway.
Most sieving is done by hand (i.e. by emptying your bucket into a hand-held sieve,shaking it to remove the loose soil, and then sorting through the material trapped in thesieve for artefacts). This is one of the most time-consuming jobs on site, and is usuallywhere a backlog will build up if there are not enough sieves. For this reason, make surethat you have enough sieves (and enough sievers!) to keep the process moving. On somelarge sites, it may be possible to use mechanical sieves to speed the sieving process,although you will still need the same amount of time to sort through the sieved materialfor artefacts. Hand-held sieves come in a variety of mesh sizes (2, 3, 4 or 10 millimetres areall standard), and can be ‘nested’ together (i.e. with one fitted over another) so that youcan sieve through two mesh sizes simultaneously. When using nested sieves, alwaysremember that the larger mesh size fits over the smaller one. The decision of which meshsizes to use will depend on the nature of your site and what questions you want answered.A small mesh size will obviously make a big difference to excavating a shell midden whichmay contain many small and delicate fish bones, but may be redundant on an historicalsite containing relatively large fragments of glass and ceramics.
On sites with clay soils, wet sieving may be the only way to retrieve artefacts. Immers-ing hand sieves containing excavated material into large containers of water cansometimes be effective, although at somesites a pressurised stream of water may benecessary to break down the soil and revealartefacts. Wet sieving is a much more labour-intensive process than dry sieving and candamage artefacts, particularly if you have topush the soil through the sieve to breakit down. All artefacts removed during wetsieving will have to be allowed to dry beforethey are bagged.
The other major decision in relation tosieving is where to sieve. This may sound trivialbut, as all of the soil that goes through thesieves will ultimately have to be put back intothe trenches, you should consider very care-fully where to place it. Sieve piles can becomevery large very rapidly, and have a habit ofspreading widely at the base, particularlyif people continually walk on them. Whendeciding where to place your spoil heaps:
BASIC EXCAVATION TECHNIQUES 147
FIGURE 5.13: Sorting through sieved mat-erial for artefacts
*Archaeologists Field Handbook 29/6/04 5:24 PM Page 147

W• Use flat ground not too far from the trenches. (Think how far you can expect people
to regularly carry heavy buckets full of soil. Making sure that the spoil heaps are as nearas possible to the trenches will also help you when you have to backfill.)
• Think about whether or not you will have to clear the ground surface of vegetationfirst to ensure that you don’t lose any soil.
• Think carefully about where you’re likely to excavate, particularly in terms of allowingyourself the option of extending trenches. In other words, don’t place your spoil heapswhere you may later want to dig a trench!
Once you have removed all the artefacts from the sieve, they will have to be bagged andlabelled to keep track of them. The precise system for tracking and labelling artefacts willdepend on the preferences of the excavator or site supervisor, but as a general principle allartefacts will be grouped together by context/stratigraphic unit and placed in clearlylabelled finds trays or bags. Any special finds which require immediate conservationshould be bagged and labelled separately, and treated immediately (see ‘Conserving findson site’ and ‘Labelling finds and samples’ on page 150). For detailed information on rec-ommended conservation treatments for excavated materials, see Museum of London(1990) and Watkinson and Neal (1998).
Mike Morwood’s tips for protecting rock art when excavating
Because dust is highly abrasive, it can be extremely damaging to painted rock art panels,particularly in the confined space of a rock shelter. To reduce dust during the excavationprocess:
• Place a screen or curtain (calico is suitable) between the excavation area and the artsurface and leave a gap of at least 30 centimetres between the screen and the rockart surface to allow the air to circulate.
• ‘Carpet’ the ground surface of the shelter or place wooden planks parallel to theedges of the excavation area to reduce dust stirred by traffic.
• Because sieving is the greatest generator of dust, place the sieves on plastic sheetingand contain the spoil heaps on this sheeting.
• Sieve downwind of the rock shelter, erect a screen between the sieving area and thegeneral excavation area, and place calico ‘skirts’ around the base of the sieves.
• During backfilling, place the spoil into hessian or plastic bags and stack the bags inthe trenches. Complete the backfilling by placing a layer of dirt over the bags.(Morwood 1994: 10–12)
148 THE ARCHAEOLOGIST’S FIELD HANDBOOK
*Archaeologists Field Handbook 29/6/04 5:24 PM Page 148

WSometimes artefacts will be sorted into different classes on site (e.g. glass, ceramics,
bone, metal, etc.) before being bagged but, once again, the complexity of this process willdepend on the size of the site and the preferences of the excavator. If you can, get as muchas possible of the basic processing (cleaning, washing, gross sorting) done on site.Remember that for every day you spend in the field, whether surveying or excavating, youshould ideally allow three days in the lab or office to process or write up the results—longer if both are necessary (i.e. if you first have to analyse the artefacts and then write upthe report).
When cleaning artefacts, it is always best to take a gentle approach. Ceramics, glass andstone artefacts can be cleaned with a soft toothbrush and water (Drewett 1999: 145).Other materials, such as metal, bone or shell, are often highly friable and shouldn’t bewashed unless it is obvious they won’t be damaged. Most metals are not stable and willdeteriorate rapidly when exposed to air. You should use only a dry brush to clean thesekinds of fragile materials. Bear in mind, when excavating stone artefacts, that washing willremove any potential residues from the surface of the artefact (see ‘Recovering artefactswith residues and use-wear’ on page 219). If you are worried about damaging any fragileor unusual artefacts, then store them responsibly (see ‘Conserving finds on site’ on page150) and seek professional advice before you clean them. When cleaning, make sure youkeep the overall dig recording system intact. In other words, clean each bag of artefactsseparately and make sure that every artefact goes back into the labelled bag from which itcame. Never separate the contents of any bag from its label or context identifier.
Anita Smith’s tips for a successful excavation
• Carry your own little kit of the following essentials (and have your name on them!):tweezers, pencil, soft brush, photo scale, magnifying glass, compass, line level,clinometer, baby torch, note pad—it all fits into a bum bag.
• Sitting on the sieves may not seem glamorous, but it’s where you learn heaps fromthe more experienced people around you.
• If you are unsure—ask, ask, ask and keep asking! There’s nothing worse than realis-ing you’ve discarded the only fragment of non-local stone in the entire site becauseyou didn’t think it was important.
• Fieldwork is part of the process, not simply a means to an end. It offers insights intothe archaeological material that can never be gained from lab analysis alone.
• Take notes, notes and more notes—everyone is diligent on the first day but afterthat they tend to taper off. Keep writing them regardless of the conditions; they areinvaluable when you come to analyse material months or even years later.
BASIC EXCAVATION TECHNIQUES 149
*Archaeologists Field Handbook 29/6/04 5:24 PM Page 149

WCONSERVING FINDS ON SITE
You don’t have to be specially trained as a conservator in order to care for excavated finds.A general rule of thumb is that organic materials should be stored in an environment similarto the one in which they were found: e.g. finds from a damp environment are best keptdamp; those from a waterlogged environment are best kept wet; and those from a desiccatedenvironment are best kept dry. Even ordinary soils will hold some moisture content,however, which means that artefacts may have to be dried out before they can be bagged. Forthis reason avoid placing metal or fragile organic materials directly into sealed plastic bagsbecause the moisture cannot escape and the resulting ‘sweat’ may cause the finds to deteri-orate. Instead store them in hard polythene boxes with silica gel to keep the interior of thebox dry (Drewett 1999: 146) or in perforated polythene bags to allow moisture to escape.Alternatively you can thoroughly air-dry objects before storage. If you are dealing with acompound object (i.e. one that is made up of more than one type of material, such as a shoeor a hafted tool) then do not separate the components. If you are trying to reassemblebroken artefacts (such as ceramic vessels), make sure that any chemical compounds used tohold the pieces together will not damage the artefacts and that the process is reversible. Basi-cally, common sense will always be the best on-site guide—if an artefact is fragile or friable,don’t wash it; handle and store it carefully. Seek professional curatorial advice before doinganything you are unsure of (see ‘Managing archaeological collections’ on page 156).
LABELLING FINDS AND SAMPLES
This may seem trivial, but in fact the labels which you attach to artefacts or samples needto be durable and legible for a very long time: archaeological artefacts are of little value ifthere is no record of their origin. The most durable labels are made from plastic andaluminium. Because they deteriorate easily, paper and card labels are not widely recom-mended. When you write on these labels you should use permanent markers (such asArtline 70 pens) so that the writing is as durable as the labels themselves. You can also usebasic black ballpoint biros because, although their ink is less permanent, writing with thepen will make an indelible impression in the surface of the label which can still be readeven if the ink has faded. When labelling a find or a sample, be sure to include on the label:
• the name of the site, or the site prefix;• the excavation trench from which the object came;• the context or layer from which the object came;• the date;• a basic description of the contents (e.g. glass, metal, soil sample).
150 THE ARCHAEOLOGIST’S FIELD HANDBOOK
*Archaeologists Field Handbook 29/6/04 5:24 PM Page 150

WJane Balme’s tips for excavating bone
Observing small differences in the appearance of bones during excavation can payenormous dividends in the quality of information gathered during excavation. Thepresence of clusters and alignments of bones can tell you about post-depositionalprocesses. Articulated bones indicate a lack of disturbance and hence provide informa-tion about the spatial distribution of activities.
• Observations aren’t worth having unless you communicate them to other membersof the team and write them down.
• A sample of animal bones is useless without labels containing information abouttheir source. This includes their location within the site (square and excavation unit)as well as the mesh size of the sieve from which they were taken. The best way to makesure that you don’t forget some information is to be consistent in your labelling.Write down the information in the same order each time.
• Label the sample immediately and never leave any samples lying around unlabelled.• Condensation in plastic bags will cause paper labels to disintegrate. You can
reduce condensation by putting a few pin pricks in the bag, but you will need otherlabels too. Permanent marker on the outside of the plastic bag is good but, becausethis can scratch off, make sure that you pack the bags in boxes to reduce thisproblem.
• Patience is definitely a virtue when dealing with archaeological bones. You will needpatience to pick each bone individually from the samples and lots more when youdo the identifications in the laboratory.
COLLECTING SAMPLES IN THE FIELD
Archaeologists often collect samples of materials found during excavation for analysis inthe laboratory. This may include samples of charcoal, wood or bone to use for radiocar-bon dating, soil for extracting pollen or seed samples, or even small flakes of ochre fromrock art for dating or determining the source of the ochre. It is not enough, of course, thatyou just collect anything that you like in any way that you like. The best samples are thosewhich are found in situ, are properly described and recorded, and which can be linked toarchaeologically meaningful features (such as living floors, hearths, specific occupationalperiods, etc.) (Hester, Shafer and Feder 1997: 323). When collecting samples, you mustfollow certain procedures to ensure that your samples don’t become useless for lateranalysis. In particular, you must be aware of:
BASIC EXCAVATION TECHNIQUES 151
*Archaeologists Field Handbook 29/6/04 5:24 PM Page 151

W• the proper methods for collecting different kinds of samples to avoid contamination;• the different quantities of each kind of material which will be sufficient for proper
analysis.
Collecting to avoid contamination
The major kinds of samples collected by archaeologists are:
• soils with a high proportion of silica, such as sands, or other suitable minerals, suchas quartz, feldspar or zircon, for thermoluminescence (TL) dating;
• artefacts, provided they have been kept from sunlight, for TL dating;• charcoal, for radiocarbon dating;• soils, for botanical analysis.
Tips for collecting soil samples for thermoluminescence dating
Samples that will be submitted for TL dating need to be kept away from sunlight.Thermoluminescence is used to date sediments that have been long buried and will giveyou a date for when the mineral grains within the sediment were last exposed to sunlight.
• You can collect a sample by inserting plastic piping within the wall of the excavation,but you will need to ensure the sample is not contaminated by grains which fall asthe piping is inserted.
• Only do this out of direct sunlight (i.e. collect the sample at night, or shade thecollection area).
• Place your sample directly into an opaque or semi-opaque, water-tight container andput the container immediately into a black plastic bag or other light-tight storage(Byrne 1997).
• Make absolutely certain that your TL samples are not exposed to any sunlight at allonce they have been collected and keep their exposure to fluorescent light to aminimum (less than ten minutes) (Byrne 1997).
• If you must examine the sample, use a torch or a bulb light (Byrne 1997).• You should aim to collect two samples from each level, making sure they are not
situated close together, and that each is approximately 0.5 kilograms in weight. Thiswould be roughly equivalent to a lump 10 centimetres across (Byrne 1997).
• It is best to collect samples for TL dating as far as possible away from the bedrock,as small grains of bedrock can work their way through the soil profile over time. Thisis especially important for friable soils, such as areas with sandstone outcrops.
152 THE ARCHAEOLOGIST’S FIELD HANDBOOK
*Archaeologists Field Handbook 29/6/04 5:24 PM Page 152

W• Make sure you only collect TL samples which are deeper than 20 centimetres
below the ground surface. If they are any closer to the surface, they are likely to beinaccurate (Byrne 1997).
• The laboratory which dates your TL samples will also need to know the moisturecontent of the surrounding soil. You will need to provide them with details of burialconditions, location of the samples, a description of the surrounding deposits, anda rough estimate of how the average water content of the soil relates to the probablecontent of the samples supplied (Byrne 1997).
• If there is any information about seasonal or long-term variations in rainfall, orevidence that the water table might have been anywhere near the context of yoursamples, the lab will want to know that too (Byrne 1997).
When collecting samples to use for radiocarbon dating, take particular care with thehandling and packaging of samples to avoid contamination. Because any form of moderncarbon will contaminate an archaeological sample, don’t use paper or cloth bags to holdsamples and don’t use cotton wool or tissues as packing materials for samples (Gillespie1986: 5). The best storage containers are strong polythene bags, aluminium foil and smallglass phials. While you are still in the field, pick out all obvious foreign matter from yoursamples (stones, plant roots and leaves, loose soil or sand) and make sure that you havean adequate quantity for analysis (see Table 5.4 on page 157). Any organic material can bedated with radiocarbon techniques, including:
TABLE 5.3: Some of the range of organic materials that can be radiocarbon dated
Textile Charcoal WoodShell–marine, river, estuarine Sediments/soils/peats Ice coresPlant material (e.g. seeds) Bone AntlerLeather Coprolites (fossilised faeces) PaperPollen Hair Fish remainsParchment Coral Insect remainsAvian eggshell Horn
Samples which will be submitted for botanical analysis need to be protected fromcontamination by modern seeds which can easily blow into a site. Once the sample hasbeen collected, it is impossible to distinguish between contemporary pollen and agedpollen, as they look identical.
BASIC EXCAVATION TECHNIQUES 153
*Archaeologists Field Handbook 29/6/04 5:24 PM Page 153

WAlice Gorman’s tips for collecting samples for radiocarbon dating
There are two types of radiocarbon (C14) dating: standard radiometric determinationsand AMS (Accelerator Mass Spectrometry), which can be used for samples too small forstandard dating. AMS costs more than standard dating, however, so contact the lab forthe latest prices before you begin. You will need approximately 500 milligrams for astandard radiocarbon date, but only 5–10 milligrams for an AMS radiocarbon date.When collecting samples:
• Handle them as little as possible. • In preference, pick them up using the point of the trowel or a pair of tweezers. You
can use gloves, but be advised that some forms of disposable gloves contain adusting of corn flour which, as an organic powder, may contaminate your samples.
• Wrap each sample in aluminium foil and clearly label it, so that it can easily bedistinguished. You can place your sample directly into a plastic bag, but make sureyou tell the lab what you have done.
• Remember to exclude all modern carbon from your sample, so never include a card-board or paper label in the bag with your carbon sample.
• If you must use a cardboard or paper label, double-bag the sample (put the sampleinside one bag, seal it, then place the sample and the label inside another sealedplastic bag).
• For advice on sample collection and packaging, don’t hesitate to contact thelaboratory.
Sample treatment• Samples should be dry, as bacterial activity in wet samples can affect the final age
determination. If you must dry out your sample, use a low-temperature oven whichhas never been used for radioisotope experiments. Cover the samples lightly withperforated foil and heat at a temperature of at least 40ºC until dry.
• Record details of any treatment, such as drying, to submit with the sample.
Documentation• It is important to have full documentation for all samples. Much of this information
is routinely recorded for any archaeological procedure; however, some laboratorieshave specific requirements, so check with them before collection. The kinds ofinformation needed may include:—Collection: date, sample weight, grid references, latitude and longitude, depth of
sample and stratigraphic position, stratigraphic relationship to other samplessubmitted. Was the sample sealed in a recognisable horizon, or sealed in a localised
154 THE ARCHAEOLOGIST’S FIELD HANDBOOK
*Archaeologists Field Handbook 29/6/04 5:24 PM Page 154

Wfeature such as a grave or pit? How secure is the stratigraphic context? Was thesample wet or dry when collected? Can any more material be collected? Didthe sample came from a surface or excavated deposit?
—Treatment and storage: if the sample was wet, how was it dried, did you use anychemical treatments or preservatives, was the sample cleaned?
—Estimated age: this helps the lab to select the appropriate instrument for measure-ment as well as enabling them to contact you at an early stage if the estimated ageseems to be significantly different from the measured age.
—Environment: geological, archaeological, palaeoenvironmental, associated cultural,palaeobotanical or other material; perhaps also site sketches and photographs.
—Taphonomy, or how the sample got to where you found it: the factors that arerelevant here are other, natural, activities which may have affected the carboncontent of your sample, such as visible root-penetration in the collection area,evidence of leaching or humus penetration in the soil profile, etc.
—Contamination: any other carbonaceous material in the horizon, such as calciumcarbonate (CaCO3)-bearing rocks in the catchment, potential sources of non-contemporaneous carbon, etc.
—Nature of the sample: for shells, for example, note whether they are marine or fresh-water; note the family/genus/species if known for wood, charcoal, shell, seeds etc.;note the type of bone, e.g. femur.
Submission• Most labs have web pages and submission forms online. If you are sending samples
overseas, there may be customs regulations you have to follow. • Make sure you keep copies of all of your submission forms, in case anything is lost
or needs to be checked.• Turn-around times vary from four to six weeks to a few months, so check before you
send your samples in.• Some sample types require additional pre-treatments to remove contamination, such
as dilute acid/alkali treatment for decomposed wood and charcoal, or for peat andlake sediments. Check the website and be aware that you may need to include thecost of pre-treatments in your budget.
For other organic samples (such as bone or shell)• When submitting shells, clean off all soil, sand and debris and air-dry the samples
prior to packaging.• Cleaning should only be done with a brass, steel or nylon brush. Never use animal-
bristle brushes or organic-fibre brushes.
BASIC EXCAVATION TECHNIQUES 155
*Archaeologists Field Handbook 29/6/04 5:24 PM Page 155

W• Make sure your shell sample consists of one species only, and preferably of large,
single shells rather than fragments.• When dating shell samples, make sure that you identify the shell species to the
laboratory to avoid inaccurate dates. Shell species in the ocean will absorb lessC14 from the atmosphere than lacustrine or riverine species and may return widelydifferent carbon dates.
• Shell samples should also be tested for secondary recrystallisation using x-raydiffraction (XRD), so that rogue carbons are not being dated.
• Try to avoid cleaning bone samples.
All samples must be properly recorded before collection—it is essential that basic infor-mation about possible associations, any evidence of disturbance, the method of collection,the handling and storage procedures you followed, the depth and position of the samplewithin the excavation unit, and the condition of the sample when collected are all notedat the time of collection. For example, if you handle a charcoal sample with your fingers,you will need to inform the laboratory of this, as the oil on your skin can contaminate thesample. You will need to give details of all the collecting and bagging procedures to thelaboratory when you submit your samples, as you may not get accurate dates without thisinformation.
Appropriate quantities for samples
This will vary according to how well preserved the material is and the particular techniquethat is going to be used to analyse it. The best rule is to collect as much of a sample aspossible, and to collect more than one sample of material from the same layer so that theresults can be cross-checked for discrepancies or anomalies. Table 5.4 on page 157provides a summary of appropriate quantities to collect of various materials.
MANAGING ARCHAEOLOGICAL COLLECTIONS
What happens once you have collected your artefacts or excavated your site, analysed yourresults and written your report? You are likely to be left with boxes of excavated material,some of which may be highly fragile or fragmentary, and a large paper and photographicarchive. At this point you will have to make a decision about what to do with this material.As a professional, it is your responsibility to make sure this collection is taken care offor the long term, either by turning it over to a recognised authority (a state or localmuseum or keeping place) or by returning it for reburial on site. Before you do anything
156 THE ARCHAEOLOGIST’S FIELD HANDBOOK
*Archaeologists Field Handbook 29/6/04 5:24 PM Page 156
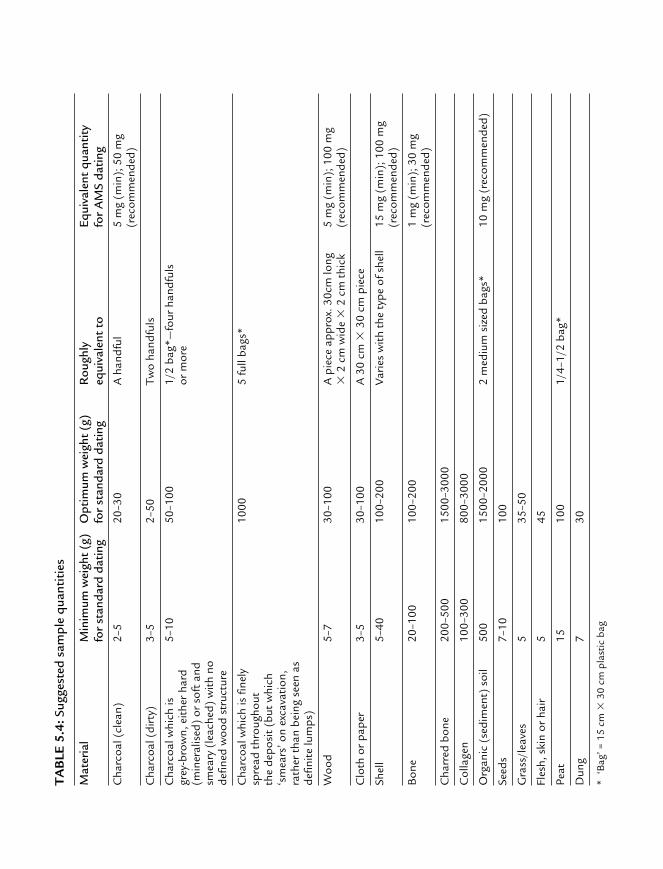
TA
BLE
5.4
:Sug
gest
ed s
ampl
e qu
anti
ties
Mat
eria
lM
inim
um w
eigh
t (g
)O
ptim
um w
eigh
t (g
)R
ough
ly
Equi
vale
nt q
uant
ity
for
stan
dard
dat
ing
for
stan
dard
dat
ing
equi
vale
nt t
ofo
r A
MS
dati
ng
Cha
rcoa
l (cl
ean)
2–5
20–3
0A
han
dful
5 m
g (m
in);
50
mg
(rec
omm
ende
d)
Cha
rcoa
l (di
rty)
3–5
2–50
Two
hand
fuls
Cha
rcoa
l whi
ch is
5–10
50–1
001/
2 ba
g*—
four
han
dful
sgr
ey-b
row
n, e
ither
har
dor
mor
e(m
iner
alis
ed)
or s
oft
and
smea
ry (
leac
hed)
with
no
defin
ed w
ood
stru
ctur
e
Cha
rcoa
l whi
ch is
fine
ly10
005
full
bags
*sp
read
thr
ough
out
the
depo
sit
(but
whi
ch‘s
mea
rs’ o
n ex
cava
tion,
rath
er t
han
bein
g se
en a
sde
finite
lum
ps)
Woo
d5–
730
–100
A p
iece
app
rox.
30c
m lo
ng
5 m
g (m
in);
100
mg
�2
cm w
ide
�2
cm t
hick
(rec
omm
ende
d)
Clo
th o
r pa
per
3–5
30–1
00A
30
cm �
30 c
m p
iece
Shel
l5–
4010
0–20
0Va
ries
with
the
typ
e of
she
ll15
mg
(min
); 1
00 m
g(r
ecom
men
ded)
Bon
e20
–100
100–
200
1 m
g (m
in);
30
mg
(rec
omm
ende
d)
Cha
rred
bon
e20
0–50
015
00–3
000
Col
lage
n10
0–30
080
0–30
00
Org
anic
(se
dim
ent)
soi
l50
015
00–2
000
2 m
ediu
m s
ized
bag
s*10
mg
(rec
omm
ende
d)
Seed
s7–
1010
0
Gra
ss/l
eave
s5
35–5
0
Fles
h, s
kin
or h
air
545
Peat
1510
01/
4–1/
2 ba
g*
Dun
g7
30
*‘B
ag’ =
15
cm �
30 c
m p
last
ic b
ag
*Archaeologists Field Handbook 29/6/04 5:24 PM Page 157

Wwith a collection, however, you will have to weigh up your ethical responsibilities(see ‘Archaeologists and their profession’ in Chapter 1 on page 15) and make sure that youare aware of your legal obligations under state legislation (which may require you to turnthe collection over to a state repository). You will also have to consult with the relevantauthorities and other interested parties. While it would be ideal to turn all excavatedcollections over to an official repository for permanent care, in reality no museum is likelyto want a collection of broken glass, fragments of domestic ceramics and miscellaneousrusted metal. You need to find out what the repository’s collection policy is before youbegin excavating, because if they agree to accept the collection, they will probably requireyou to follow particular methods when documenting and storing the archive.
Richard Robins’ tips on the proper care and management of excavatedcollections
If you intend to collect and store any archaeological material, the management of thecollection begins at the inception of your research project. As archaeological excavationsor surface collections are essentially destructive activities, it is incumbent on you toensure that the material is preserved in the best possible way. From a research perspec-tive, these collections serve the important function of providing a check on the work ofthe original collector. From a site-management perspective, well-made and managedcollections may reduce the necessity to undertake further collection or excavation on asite. There are three essential elements to proper collection management: organisation,conservation and storage.
Collection planning (organisation)As a first step, consult with staff at the repository where your collection will eventuallybe housed. Most state museums now have strict depositional requirements and theywill be able to tell you the necessary procedures and requirements for the depositionof material. If a museum has a computerised database, use it. It will be a useful tool tocoordinate and track the collected material, including the paper archive, and if you usethe museum’s official registration system from the outset, you will avoid unnecessaryduplication and minimise handling of the artefacts. One of the golden rules of col-lection management is always to consult with museum staff and conservators before youbegin fieldwork. The other is to make sure you obtain some preliminary estimates of thetime and costs required to manage and store your collection so that the final figuredoesn’t come as a nasty shock.
ConservationConservation is the most under-rated aspect of any archaeological excavation, so
158 THE ARCHAEOLOGIST’S FIELD HANDBOOK
*Archaeologists Field Handbook 29/6/04 5:24 PM Page 158

Wyou should devise a plan to manage your archive prior to undertaking a collection orexcavation. You will need to work out some preliminary costs for conservation, particu-larly in terms of estimating the time that will be needed to process the material. Prior tocollecting any material, you should consult with someone with conservation expertise.They will give you an idea of what you can and can’t do. The following are some of thebasic rules that should be followed:
• Immediately following excavation, maintain an environment around the artefactwhich is as similar to its burial conditions as possible.
• The less done to an object the better, so keep handling to a minimum.• Ensure that techniques, particularly those using chemicals, are reversible. It is also
helpful to know in advance the kind of laboratory tests you might use and any impli-cations these may have for the way in which you collect or store your samples. Thewrong treatment during excavation may make your artefacts or samples useless foranalysis.
• Document everything done to the artefacts.• Anticipate field conditions and plan accordingly—prepare a field kit with the correct
storage materials.
StorageStorage is not only an organisational issue, but also a conservation one. It is essential touse materials that will not decay or damage artefacts or aspects of them, such as bloodresidues or starch.
Do not use:• matchboxes;• plastic bags with twist ties;• coloured plastic containers;• plastics with PVC;• acidic paper or cardboard;• high-acid tissue;• paper towels;• newspaper;• glass containers;• rubber bands;• pressure-sensitive tapes.
Do use:• clear Ziplock® plastic bags;• clear plastic containers;
BASIC EXCAVATION TECHNIQUES 159
*Archaeologists Field Handbook 29/6/04 5:24 PM Page 159

W• acid-free cardboard boxes;• acid-free tissue paper;• polythene or polyether foam;• Gortex®;• unbleached muslin;• bubble pack without PVC;• silica gel;• natural fibre cloth bags.
Martha Joukowsky’s tips for excellent excavating
• Don’t hurry. Excavation requires a calm and purposeful approach.• Remember that all excavation proceeds horizontally first and vertically second.• Be systematic. When a new layer or anything unusual is encountered, stop. Clean off
the remaining soil so that none of the material from one layer will be mixed with theone below it.
• All grid units should be excavated in the same direction.• Ideally, excavation should proceed from the uphill side of the trench to the downhill
side, so that newly excavated areas won’t be trampled.• For the same reasons, always clean higher surfaces before lower ones.• Always keep the trench wall swept clean so that the area being excavated is not
contaminated by falling dirt or debris.• Always clean the top of the trench by moving the dirt back from its edges, so that the
dirt doesn’t fall into the trench and contaminate other layers.• Always keep the trench walls vertical by cutting sharp right-angled corners at the
bottom and by regularly trimming the walls as you go along to ensure they arekept straight.
• Don’t wait until the earth dries out before you trim the walls, as there is greater riskof a cave-in when the earth is dry.
• Keep the wall trimmings separate to the material excavated from the body of thetrench.
• Always be on the lookout for soil discolourations around features. This could be animportant clue to interpreting those features.
• Make sure you record sterile layers in the same way as other layers.• Make sure you record all descriptive information as objectively as possible. • Don’t swing tools (such as picks, mattocks or shovels) higher than your shoulder.
160 THE ARCHAEOLOGIST’S FIELD HANDBOOK
*Archaeologists Field Handbook 29/6/04 5:24 PM Page 160

WDon’t cut too deeply with them either, as you may damage buried artefacts.
• Only fill buckets two-thirds full with soil. Soil, particularly if it has a high clay content,can be very heavy. (Joukowsky 1980: 172–75)
REFERENCES AND FURTHER READING
Balme, Jane and Beck, Wendy 2002, ‘Starch and charcoal: useful measures of activity areas inarchaeological rock shelters’, Journal of Archaeological Science 29: 157–66.
Barber, R. 1994, Doing Historical Archaeology: Exercises Using Documentary, Oral and MaterialEvidence, Prentice Hall, New Jersey.
Barker, Philip 1998, Techniques of Archaeological Excavation, Routledge, London.Byrne, D. (ed.) 1997, Standards Manual for Archaeological Practice in Aboriginal Heritage Manage-
ment, NSW NPWS, Sydney.Bibby, David I. 1993, ‘Building stratigraphic sequences in excavations: an example from
Konstanz, Germany’, in E.C. Harris, M.R. Brown, and G. J. Brown (eds), Practices of Archae-ological Stratigraphy, Academic Press, New York, pp. 104–21.
Brown, M.R. and Harris E.C. 1993, ‘Interfaces in archaeological stratigraphy’, in E.C. Harris,M.R. Brown and G.J. Brown (eds), Practices of Archaeological Stratigraphy, Academic Press,London, pp. 7–22.
Davies, Martin and Buckley, Krystal 1987, Archaeological Procedures Manual: Port Arthur Conser-vation and Development Project, Occasional Paper No. 13, Department of Lands, Parks andWildlife, Hobart.
Drewett, Peter 1999, Field Archaeology: An Introduction, UCL Press, London.Gillespie, Richard 1986, The Radiocarbon Users’ Handbook, Oxford University Committee for
Archaeology, Monograph No. 3, Oxford.Harris, E.C., Brown, M.R. and Brown, G.J. (eds) 1993, Practices of Archaeological Stratigraphy,
Academic Press, London.Hester, T.R., Shafer, H.J. and Feder, K.L. 1997, Field Methods in Archaeology, 7th edn, Mayfield
Publishing Co, Mountain View, California.Joukowsky, Martha 1980, A Complete Manual of Field Archaeology, Prentice-Hall, Englewood
Cliffs, New Jersey. Museum of London 1990, Archaeological Site Manual, 2nd edn, Department of Urban Archae-
ology, Museum of London.NSW Department of Planning and the Heritage Council of New South Wales 1993, Historical
Archaeological Excavations: A Code of Practice, Government Printer, Sydney.Polach, H., Golson, J. and Head, J. 1983, ‘Radiocarbon dating: a guide for archaeologists on
the collection and submission of samples and age reporting practices’, in G. Connah (ed.),Australian Field Archaeology: A Guide to Techniques, AIAS, Canberra, pp. 145–52.
Roskams, Steve 2001, Excavation, Cambridge Manuals in Archaeology, Cambridge UniversityPress, Cambridge.
BASIC EXCAVATION TECHNIQUES 161
*Archaeologists Field Handbook 29/6/04 5:24 PM Page 161

WWatkinson, D. and Neal, V. 1998, First Aid for Finds, Rescue/UK Institute for Conservation
Archaeology Section, London.
USEFUL WEBSITES
For details of pre-treatment for different classes of excavated material see:www.c14dating.com/pret.html.
Free digital checkers for Munsell soil charts are available at: www.munsell.com/. A history of the Harris matrix and various publications on its uses can be found at:
www.harrismatrix.com/history.htm.The Australian Institute for the Conservation of Cultural Material Inc (AICCM) maintains
a state-by-state listing of professional conservators at www.aiccm.org.au/aiccm/people.
162 THE ARCHAEOLOGIST’S FIELD HANDBOOK
*Archaeologists Field Handbook 29/6/04 5:24 PM Page 162

CHAPTER SIXRECORDING
HISTORICAL SITES
WHAT YOU WILL LEARN FROM THIS CHAPTER
W The diversity of historical archaeological sites found in AustraliaW Basic documentary research techniquesW The difference between primary and secondary sourcesW The essential questions to ask when recording standing structuresW How to date standing structures from their componentsW The main classes of historical archaeological artefacts and how to record themW Oral history interviewing techniques
WHAT ARE HISTORICAL SITES?
Historical archaeology studies the colonial past of Australia—the places and artefacts thathave been left behind by over two centuries of non-Indigenous activity. While most ofthese sites are limited to within the last 200 years, some sites are older than this, such asthe sites created by the annual visits of Macassan fishermen to the north coast of Australiasince at least 1720, and the many shipwreck sites which predate the First Fleet. ‘Contact’sites (places where Indigenous and non-Indigenous activities overlap, such as missions orstation camps) are also deemed to be historical sites because they fall within the colonialtime period.
W W W
WW
163
*Archaeologists Field Handbook 29/6/04 5:24 PM Page 163

WHistorical sites thus represent a great diversity of activities, all part of the many ways in
which Europeans and other settler groups have attempted to explore and exploit theAustralian continent. The main categories of historical site often reflect the differentkinds of industries which have been established over the last two centuries, such asmining, pastoralism, agriculture, commerce, whaling, or timber-getting. These kinds ofexplicitly work-related categories, however, tend to exclude the historical contributionsof those other than adult males and ignore common site types such as houses, schools,hospitals or cemeteries. In reality, there are as many different types of historical site asthere are different types of human behaviour, and in a sense there is little point in tryingto separate them according to function. One distinction we have drawn in this chapter isbetween standing structures (i.e. any built feature which exists substantially above theground) and sites which have been reduced to surface or sub-surface traces only. Thisreflects the slightly different recording methods necessary for each, rather than any hard-and-fast distinction in site use (for more information, see ‘Recording standing structures’on page 176). The other useful distinction lies literally at the water’s edge: betweenmaritime (underwater) historical archaeological sites and land-based sites. Althoughmany of the techniques for recording and excavation are the same, underwater archae-ology presents its own particular challenges.
THE BASICS
Investigating historical sites is similar to investigating any other type of archaeologicalsite in Australia, in the sense that archaeologists still set out to answer a similar rangeof questions:
• What activities were people doing here and why?• When were they doing it?• Did they succeed? • When and why did the activities cease?
The chief difference between historical and other kinds of archaeology lies in the alterna-tive sources of information about past human behaviour that historical archaeologycan employ. Because historical archaeological sites have been created within the lastfew hundred years, they fall within the period of written records. This means that thereis often a wide variety of documentary records which can be used to complement anyarchaeological study. Historical archaeology therefore is as much about researching thedocumentary evidence for sites and artefacts as it is about recording and analysingthe archaeological evidence (See ‘Using historical documents’ on page 167).
164 THE ARCHAEOLOGIST’S FIELD HANDBOOK
*Archaeologists Field Handbook 29/6/04 5:24 PM Page 164

WRECORDING HISTORICAL SITES 165
FIGURE 6.1: The range of historical sites in Australia
Way
ne J
ohns
on, S
HF
A
Mar
k S
tani
fort
h
*Archaeologists Field Handbook 29/6/04 5:24 PM Page 165

WDespite having access to sometimes quite detailed written evidence of past events or
behaviours, historical archaeology still aims to be more than just ‘history with artefacts’.One of the main reasons for consulting historical records before carrying out archaeo-logical research is to make sure that what you want to know can’t just be discovered fromthe archives. The primary emphasis of historical archaeology is always on relating thedocuments to material (archaeological) evidence, and understanding just what the limi-tations of this process might be. Documents are always created for a purpose and are notnecessarily objective, and all of them have their own inherent biases. They are also fragilethings which often do not survive and are, in any case, not created around every facet ofhuman life. Most of the ordinary people who settled Australia were either unable ordisinclined to write down the daily details of their lives, leaving enormous gaps in ourunderstanding of the past. The material (archaeological) record goes some way towardsfilling these gaps: it is far more durable and was created by all kinds of people. Historicalarchaeology is a search for the many aspects of human behaviour which we could neverknow from the documents alone.
Most recording of historical sites follows the standard pattern for any site—completingrecording forms, compiling survey plans, and photographing the site and its contents—and no specialist skills or methods are required. The exceptions to this will be if you arerecording underwater sites, or when you are required to record standing structures, todate historical artefacts, or when you need to use documentary or oral sources to comple-ment the archaeology. Buildings, in particular, are a particular type of archaeologicalartefact which require their own system of recording.
FINDING HISTORICAL SITES
Although the methods used to find historical sites are identical to those used to findIndigenous sites (see Chapter 3: Finding sites), there are some strategies peculiar tohistorical archaeology that you can employ. The first and most obvious is to look fortelltale signs of old habitations or other site types, particularly remnant vegetation suchas trees and garden plantings, many of which long outlast the garden itself. Disturbedareas (perhaps the site of a former building) may also have different patterns of regrowth,and often include high densities of introduced weed species. Stinging nettles in particu-lar often invade such areas, providing a good indication of some form of past humanactivity. Remnant fencing is also an indication of European alteration of the landscape,although this does not necessarily mean that there is (or was) a habitation nearby.
Domestic artefact scatters are often easily visible as a result of the quantities of durabledomestic rubbish (such as glass and ceramics) commonly discarded. You should alwaysbe on the lookout for rubbish dumps or other potentially stratified deposits which may
166 THE ARCHAEOLOGIST’S FIELD HANDBOOK
*Archaeologists Field Handbook 29/6/04 5:24 PM Page 166

Wbe useful for excavation purposes. Obviously, if you want to excavate you need to finddeposits with some depth to them. Pit toilets and wells in particular are usually extremelyrich sources of historical archaeological information, as it was common to use them asconvenient rubbish dumps. They can thus contain all sorts of debris, from food remainsto broken ceramic vessels and used glass bottles. If you can find such deposits they willprovide the best chance of substantial and well-dateable archaeological remains relatingto the occupation of a site.
Old maps are particularly useful and can be a mine of information, quite literallyshowing you the locations of sites, although you may encounter problems with the scaleof them. Some maps simply note a scale in ‘chains’—the original steel bands used bysurveyors to measure distance. For conversion purposes, 1 chain is 66 feet, or 19.8 metres.Maps of townships will show allotments and sometimes structures, parish maps will showland allocations and the name of the first buyer or grantee, as well as tracks and roads, butusually not much else. Surveyor’s plans are sometimes quite detailed and may evencontain notes describing the structures included on the plan. For mining sites, theoriginal mine records will often contain surveyor’s plans noting surface features, althoughthe level of detail varied considerably from surveyor to surveyor.
You can also try interviewing local landholders, particularly if they maintain aninterest in local history, or if their families have lived in the area for a long time. Obviously,you cannot simply barge in and demand to know where sites are located, but even aninformal oral history interview can be a very rewarding and productive experience(see ‘Recording oral histories’ on page 197).
In any case, you should always investigate the history of an area before you go into thefield, as this will give you the best guide as to what to expect (see ‘Using historical docu-ments’ below). Once you have found a site, there are three ways to collect informationabout it:
• documentary research;• field study;• collecting oral histories and other community information.
USING HISTORICAL DOCUMENTS
This is the first and most obvious point of call for historical archaeologists. You will needto look at libraries, archives and museums for:
• archival and other document collections;• maps and plans;
RECORDING HISTORICAL SITES 167
*Archaeologists Field Handbook 29/6/04 5:24 PM Page 167

W• photos and pictures;• books, articles, reports.
Historical documents come in many forms, from company reports and accounts,birth, death and marriage certificates, wills and probate inventories, and maps and plans,to diaries, letters and photographs or newspaper articles and advertisements. It is notalways possible to search exhaustively for every piece of documentation that relates to asite, and many documents may be of little use in answering archaeological questions. Inpractice, you will probably have to target particular types of documents that are morelikely to provide you with useful information.
One major distinction you need to be aware of is between primary and secondarysources and their respective uses. Primary sources are first-hand accounts prepared at thetime of an event (such as surveyor’s plans, newspaper reports, government correspondenceor diary entries), whereas secondary sources (such as regional histories) are usuallycompiled at a much later date. Although secondary sources may well be based on primarysources, they are an interpretation of selected parts of them, and are therefore consideredless reliable. They are often a good place to start, however, as they can provide overviewsof places or events and may contain useful information which can then be cross-checkedor followed up in more detail from primary sources. When researching an area or a site,start with the secondary sources to find out where the major industries were located, orwhere the original settlements were established, and follow this up with selected primarysource research for more specific guidelines as to where to survey and what to look for.
Of course, it is equally possible for both primary and secondary sources to be wrong,and as a researcher you must keep an open mind when examining any historicaldocument. Just as you should be aware of your own biases, you should also be aware thatall documents are prepared for a reason and that this reason is not necessarily objective.Whatever documentary material you are using, you need to question the source of theinformation, and try to verify it by cross-checking with other sources wherever possible(Sagazio et al. 1992: 7). Remember also that the availability of different forms of docu-ments will vary widely from place to place and from time period to time period.
Some of the major places where primary documents can be found include thefollowing:
• Federal repositories such as the National Library*, the National Archives* or theAustralian War Memorial* contain a range of nineteenth century records and Com-monwealth government material and reports (National Archives), as well as extensivecollections of Australiana, photographs, oral histories and pictures (National Library).The Australian War Memorial holds collections relating to all aspects of Australianinvolvement in military campaigns from the nineteenth and twentieth centuries,
168 THE ARCHAEOLOGIST’S FIELD HANDBOOK
*Archaeologists Field Handbook 29/6/04 5:24 PM Page 168

Wincluding over 200 000 online photographs. The Australian Institute of Aboriginal andTorres Strait Islander Studies* maintains an excellent collection of archival and libraryresources, also linked to an online database, related to Indigenous people both pre- andpost-contact.
• State repositories such as the State* and Mitchell Libraries* in Sydney, the John OxleyLibrary* within the State Library of Queensland, the State* and Battye* Libraries inWestern Australia, or the State* and Mortlock* Libraries in South Australia holdinvaluable statewide collections of material, including personal correspondence andextensive pictorial and photographic collections.
• State archives* also hold official correspondence and records, but relating to stategovernment functions only. These may still cover a range of useful informationincluding maps and plans, newspapers and government gazettes, official corres-pondence, reports and census information.
• In addition, some government departments maintain their own special archives, suchas the Mapping Museum attached to the Department of Natural Resources inBrisbane*, the Justice and Police Museum* in Sydney, or the archives of the New SouthWales Department of Mineral Resources*.
• Private or university archives may hold special collections of information relating tospecific areas, such as university or company histories.
• Local repositories, such as historical societies or heritage centres, often contain awealth of rare local information, although this is not always easily accessible. For anyhistorical archaeological study you undertake, it is well worth visiting the localhistorical society to evaluate their material.
Most larger collections maintain up-to-date catalogues of their precise contents andsearch engines for many collections are now available online. When searching for photo-graphs or historical illustrations, the most useful online catalogues are those maintainedby the National Library of Australia, the Australian War Memorial and the NationalArchives. The major state libraries also have searchable online databases of their collec-tions. If you are unable to visit a collection, some repositories (such as the NationalArchives) will conduct research for you for a fee, although the waiting period for suchresearch can be quite lengthy.
The other important factor to bear in mind when conducting primary documentaryresearch is to ensure that you always cite primary resources adequately. This is not aseasy as it sounds. How do you reference a probate inventory? A private letter? Or anundated and unattributed newspaper clipping? While there are no hard-and-fast rules,the key to citing a primary document is to make sure that you provide enough detail toenable another researcher to find the same item. To ensure this, you must rememberto include:
RECORDING HISTORICAL SITES 169
*Archaeologists Field Handbook 29/6/04 5:24 PM Page 169

W• a description of the document, including the author and the title (if there is one).
If there is no formal title, you can refer to it in terms of the type of document (e.g. ‘marriage certificate’). If the document is a letter, it is usual to include the nameof the recipient as well.
• the date of the document or document bundle (if known). If you don’t know theprecise date, a date range will suffice, usually indicated by the use of ‘c’ for ‘circa’written before the date, indicating that it falls within a range of ten years either side. Ifyou don’t know this or can’t work it out, you will have to note down ‘n.d.’ for ‘notdated’ as part of your reference. In this way, you signal to the reader that it is thedocument which is at fault, not your scholarship.
• the location of the document, including the name of the collection, the precise refer-ence numbers allocated by the repository (if any) and the place where the documentmay be consulted. This will be a relatively simple task if the document is held in aformal collection, but may be more challenging if it is held by a local historical society,or a private individual.
As a guide to the kind of information to include, here are some hypothetical examples:
• Baptismal Register of the Church of England for the Parish of Beresfield, 1871–1898.Held at the church, Martindale.
• Correspondence and papers relating to the Easthope settlement 1883–1926, 2/8179.3.NSW Archives Authority, Sydney.
• Davis and Bolton family papers 1911–1946. Held by Mrs Jennifer Jackson, Atherton.• Mason, Arthur 1898, Survey Notebook, No. 9. Unpublished ms in Tasmanian State
Archives.• Easton and District Historical Society, n.d. Carina Provincial School, 12-page type-
script in the Easton and District Historical Society Collection, Browns Plains.• Register of burials at the Fairmont cemetery. List compiled by the Marshall Historical
Society and held by the secretary.
Carlotta Kellaway’s tips for researching the history of a building
The key to successfully researching a building is to make sure you go armed with as muchinformation about its location as possible, including its street address, the location ofany neighbouring buildings and landmarks (such as churches, police stations) and cross-streets. If possible, find out the allotment and section number for the block on whichthe building sits as well.
The three best sources for information are:
170 THE ARCHAEOLOGIST’S FIELD HANDBOOK
*Archaeologists Field Handbook 29/6/04 5:24 PM Page 170

W• post office directories and almanacs;• rate books;• Titles Office records.
Researching all three follows the same basic procedure: find a recent volume in whichyour building appears, and then work backwards methodically, following the sitethrough its various owners and occupants as far as you can.
Directories can be found in state library and state archive collections. When workingthrough directories, make sure that you stay on the track of the right building. Thenumbering system changed often throughout the nineteenth century, as did the namesof streets and houses (not to mention the creation of new streets following subdivisions).The best way to combat this is to continually note down the names of landholders oneither side of your building and to keep matching the pattern of occupiers to be sure youare documenting the right property.
Rate books are also found in state archive and state library collections and sometimesalso in local or municipal council collections. Coverage for Queensland is very sparse,however, and in Tasmania they are termed assessment or valuation rolls. Rate books willoften describe a property, as well as give you information on who was occupying it andhow much the place was worth to the council in rates. Look for changes in the descrip-tion of a building or set of buildings, the name of the owner or occupier and any changesin the value of the property. In archaeological terms, marked changes in the value of aproperty can indicate that a building has been constructed or enlarged, or that someother improvements have been carried out.
Titles Office records are held in government repositories in each state. Titles will give youa sequence of ownership for the land and sometimes information on the purchase price,any subdivision of the land and mortgages taken out by the owner. To search for theserecords, you will need the Crown allotment number for the property, as well as thesection number and the name of the Parish and County. One thing you should be awareof is that the title system has changed, from the Old System which operated until 1862,to the present Torrens System. Under the Old System, title documents are called Deeds;under the Torrens system they are called Certificates of Title. Before conversion toTorrens title, the Old System recorded all successive transactions for an allotment, fromthe name and date of the first purchaser. Often, the record of a mortgage having beentaken out on a particular piece of land will indicate the construction of a building on thatsite and the size of the mortgage will provide a fairly reliable guide to the size and con-struction material of the building. Note that in South Australia, you will need writtenpermission from the owner of the property to access title records relating to theirproperty. (Kellaway 1991)
RECORDING HISTORICAL SITES 171
*Archaeologists Field Handbook 29/6/04 5:24 PM Page 171

WRECORDING INDUSTRIAL SITES
As a specific class of historical archaeological site, industrial sites also require a par-ticular approach to research and recording. An industrial site can be anything resultingfrom large- or small-scale extractive, manufacturing or processing activities, and willcover a gamut of sites from mining, whaling, shipping and milling to factories orrailways. The study of any industrial site requires some familiarity with the technologyand processes used there. To record it adequately, you will need to know how the siteoperated—that is, what industrial processes went on there, what equipment may havebeen on site, how different parts of the site may have been used for separate aspects ofthe overall process, or how the technology or the process changed over time. This willhelp you to understand both what occurred there in the past, and the location and natureof the archaeological remains which you can see in the present. This information cansometimes be found by researching the specific history of the site, although for smaller,less well-known sites there may be little or no specific documentation remaining. Try theState or Australian Archives for this kind of information, or archival collections main-tained by government departments (such as the New South Wales Department ofMineral Resources). When working on any industrial site, you should make yourselfaware of the potential occupational health and safety issues of contamination fromindustrial by-products and take the necessary steps to minimise exposure for you andothers working for you.
How safe is your soil? Wayne Johnson’s occupational health and safety tipsfor working on historical archaeological sites
You should never assume that the soil on your site is non-toxic. Soil contamination cantake many forms, from heavy metals and chemical residues to bacteria and otherharmful residues. Many of these potential toxins are the result of chemical processesdeveloped since the advent of the Industrial Revolution and are more common than youmight think.
Industrial sites can be particularly toxic. For five millennia, industrial activities haveinvolved the processing of metal ores which usually leave residues in the soil. Arsenic andlead mines are in themselves hazardous owing to the nature of the material extracted,let alone processed. The secondary stage of metal-working, making alloys or usingchemicals as flux, will also produce toxic residues which may have been casually disposedof—usually buried as fill or in disposal pits on site. Gold mining has long used arsenic aspart of the process of separating the metal from quartz. The toxic residue was thenwashed away, to settle either in the surrounding soil or more usually down a waterway.
172 THE ARCHAEOLOGIST’S FIELD HANDBOOK
*Archaeologists Field Handbook 29/6/04 5:24 PM Page 172

WIn harbour cities, many industries were clustered around harbour sites with ready portaccess. On such sites, oils, diesel and other liquid fuel spills seep into the soil where theyremain as residues. Remediation of such sites is expensive and may not necessarily havecleared the site of all hazardous substances. In addition, seemingly innocuous metal-working industries, such as blacksmiths and iron or brass foundries, may have used fuelssuch as coal with a high tar content containing toxic trace elements.
Potential health hazards can occur even on ordinary domestic sites. Sheets ofasbestos insulation, or ‘lagging’, were commonly wound around pipes leading frommachinery such as steam boilers. Over the years, this ‘lagging’ degrades, releasing fibresinto the air which also settle on the ground in confined spaces. Between the 1910s andthe end of the twentieth century, asbestos fibrous-cement sheeting (‘fibro’) was usedextensively in the domestic building industry. Although relatively stable in sheet form, ifbroken it too will release fibres into the air. Lead-based paints were commonly used ondomestic houses throughout the twentieth century. Wherever there has been a regimeof scraping off flaking paint prior to repainting, there is a danger of high lead levels inthe surrounding soils and building interiors. Likewise, for most of the twentieth century,lead-based petroleum was used to fuel cars, escaping into the atmosphere via exhaustsystems. Since lead is relatively heavy, it does not tend to spread far from the source ofthe emission, and tested levels are found to increase closer to busy roads or in the roofspaces of buildings located close to busy roads.
Pest control within domestic structures has attracted the use of chemical poisons forat least the past two centuries. Rodents were particularly targeted with baits laid beneathfloors in an attempt to eradicate the nuisance. Nineteenth century city dwellings areoften characterised by the extensive archaeological deposits that accumulate beneathfloorboards, often attributed to the purposeful sweeping of refuse into the void beneath.Sampling of soil samples from the Cumberland Street site in Sydney’s Rocks district, forexample, indicated high arsenic levels in at least one sub-floor deposit dating to the mid-nineteenth century. Owing to their porosity, animal bones were particularly sus-ceptible to absorbing this poison. Because arsenic can be absorbed through the skin,rubber gloves had to be worn by archaeologists working with the artefacts recoveredfrom these deposits.
Even organic fertilisers can contribute to toxicity in the soil. At the 1994 CumberlandStreet excavations, tens of thousands of animal bones were recovered from a large areathat had served as a butchery from 1809–29. The discarded limbs, horns and skulls wereused as part of fill layers to build up soils above the rocky outcrops that gave the areaits name. As a result, the soils in the vicinity are particularly high in phosphates. Thebutcher responsible for this activity, George Cribb, was inadvertently poisoning his ownwell, located amidst the buried detritus. Even today, more than 170 years after theevent, water pooling on this part of the site, including in the re-excavated well, is quickly
RECORDING HISTORICAL SITES 173
*Archaeologists Field Handbook 29/6/04 5:24 PM Page 173

Wcovered with blooms of blue-green algae (Cyanobacteria). The water becomes dangerous
to drink, the algae producing neurotoxins and hepato-toxins which can cause paralysis,
liver malfunction and death. It may have been for this reason that Cribb filled in his well
around 1818 and dug another on higher ground to the southwest. On other parts of the
site, with low phosphate levels, the algal blooms do not develop.
As an archaeologist you need to be aware of such health hazards and, if necessary,
take steps to minimise direct contact or prolonged exposure. In particular, you should
be aware of the recent history of your site to minimise potential threats to your own and
other people’s health. Wherever possible, make sure you investigate the history of your
site in detail before you begin fieldwork to assess what potential toxins might be lurking
in your soil.
Nineteenth and early twentieth century technical manuals or engineering workswritten for the industry are another invaluable source of information, which are unpar-alleled for details of equipment and processes. Any of the major state libraries willhave good collections of such manuals which should be readily available. You couldalso try comparing the industrial archaeology of your site to archaeological reports forsimilar sites elsewhere, although this will involve tracking down repositories of unpub-lished archaeological reports. The administering bodies in each state and territory willmaintain collections of archaeological reports, although you may need special permissionto access these.
In addition, specialist journals were published for almost every major professionand trade throughout the nineteenth and twentieth centuries. The range and type ofspecialist information you can extract from these is unparalleled, as even the advertise-ments will contain pertinent information. For the mining industry, for example, theAustralian Mining Standard (1888– ), the Australian Mining and Engineering Review ([1908–17]afterwards known as the Chemical Engineering and Mining Review [1918–60]), and the Engi-neering and Mining Journal (1869– ), all provide first-hand descriptive and technicalinformation about many aspects of the general industry as well as specific sites. Examplesfor other industries include the Australian Storekeepers’ and Traders’ Journal (1895–1936), theAustralian Brewers’ Journal (1882–1921), the Australasian Coachbuilder and Saddler and Livery-man’s Journal (1892–1901), or the Australasian Ironmonger, Builder, Engineer and Metal Worker(1886–90), afterwards called the Australasian Ironmonger, Engineer and Metal Worker . It iswell worthwhile investigating what collections are available in your nearest major library.
174 THE ARCHAEOLOGIST’S FIELD HANDBOOK
*Archaeologists Field Handbook 29/6/04 5:24 PM Page 174

WRECORDING MARITIME SITES
Maritime archaeological sites are more than just shipwrecks; they also include manyland-based activities associated with maritime industry and trade, such as whalingstations, docks, jetties and shipyards. As such, the same basic techniques for site record-ing (e.g. surveying, mapping, photography and drawing) are used on land-basedmaritime sites. As with any other kind of industrial activity, you need to be familiar withthe way the industry operated to be able to record a land-based maritime site adequately.This means understanding how the whaling industry operated and how whales wereprocessed after killing, for example; or how dry-docks or slips worked; or how ships werebuilt. The underwater component of maritime archaeology also uses the same basic tech-niques, albeit with certain modifications to cope with the underwater environment.Underwater surveys of shipwrecks use the grid system for recording and excavation,the baseline and offset technique for drawing site plans, and scales for all underwaterphotography.
In terms of historical documents, shipping records will give you information on shipmovements which may be useful if you are tracing the voyages of a particular ship. Oftenthese won’t provide all the information you will be seeking: they may only indicate thedate a ship left a particular port and the date it returned, so you will need to read betweenthe lines to understand what this might mean. For example, if the ship was known as awhaling vessel, the time period which it was away from port may give you some indicationof how far it went, and the season during which it was absent may be a clue as to whetheror not it was engaged in whaling.
Mark Staniforth’s tips for people interested in maritime archaeology
Consider joining the Australian Institute for Maritime Archaeology (AIMA) and/or yourlocal Maritime Archaeology Association (MAA)—there is a local MAA or equivalent inmost Australian states. You can contact AIMA through its website at http://aima.iinet.net.au. AIMA publishes two newsletters a year and a journal: The Bulletin of theAustralian Institute for Maritime Archaeology. AIMA/NAS training in the techniques used inmaritime archaeology is also available through AIMA and the local MAAs. This shouldgive you the opportunity to become involved in local maritime archaeology field projects.There is no substitute for practical experience in any kind of archaeological fieldmethods—get out there and be involved.
RECORDING HISTORICAL SITES 175
*Archaeologists Field Handbook 29/6/04 5:24 PM Page 175

WJennifer Rodrigues’ tips for research and survey in maritime archaeology
• While you will use archives, the web and archaeological literature to target survey areas,remember that a lot of information is kept by local maritime museums or societies.
• The Australian national shipwreck database is a great resource which can be accessedthrough the Western Australian Museum website (www.museum.wa.gov.au). Thiswebsite also lists some useful unpublished maritime reports.
• A program for 3-D maritime survey is the ‘Web for Windows’ program developed byNick Rule for the Mary Rose excavation project. This Direct Survey Method (DSM) isbasically a technique used for mapping the x, y and z coordinates of various pointsat a site. For a ship, this may involve placing around 60 datum points in the hullstructure. As the term implies, a ‘web’ is created from the surveyed measurements.For an online example, see the site for the Centre for Maritime Archaeology,Southampton University (http://cma.soton.ac.uk/Research/Kravel/record.htm).
RECORDING STANDING STRUCTURES
Not all archaeologists excavate. Many sites have no subsurface deposits to excavate, oronly have their surface remains recorded owing to time and money constraints. The studyof standing structures is one example of how detailed archaeological information can beobtained without excavation. A ‘standing structure’ may be anything from a building,such as a house, a barn or a church, to a feature such as a kiln, a jetty or a bridge—in short,anything originally created to serve some human need in a relatively permanent locationwhich now exists substantially above the ground (cf. Davies and Buckley 1986: 86). Whenrecording any standing structure, your goal should be more than to simply describe it.A proper recording should provide enough information to recreate the sequence ofconstruction and the history of the building’s use and, from this, to reconstruct in somemeasure the changing lives of the occupants.
Recording standing structures follows a similar process to recording any other type ofarchaeological ‘site’ in that you need to ask the same range of questions. When and howwas it constructed? What material was used and where did it come from? How may thestructure have been altered through time? To do this, you need to record four sets of com-plementary information:
• the nature of the individual elements that make up the structure (i.e. the walls, thefloor, the roof );
• how the elements are put together (i.e. their construction and manufacture);
176 THE ARCHAEOLOGIST’S FIELD HANDBOOK
*Archaeologists Field Handbook 29/6/04 5:24 PM Page 176

W• details of any surface treatments (on the walls, the floor, etc.);• the overall condition of the structure and its individual parts.
The two least altered parts of a building will usually be the space in the roof and underthe floor, so make an effort to investigate these areas whenever possible. Details ofhow these areas have been constructed will often give you an excellent guide to the con-struction sequence of a building, even if all of the internal elements have been made tolook contemporary (see Figure 6.2 on page 179). Sometimes not all elements of a struc-ture will remain in situ. In this case, it may be equally important to know what might havebeen there (if there is any physical or documentary evidence of the element’s existence)and what could have happened to it. Questions to ask of each set of information areincluded in Table 6.1 (which is by no means an exhaustive list).
RECORDING HISTORICAL SITES 177
TABLE 6.1: Elements to consider when recording a standing structure
Individual elements How the elements Surface Conditionare put together treatments
• What are the wallsmade from? Theroof? The floor?The ceiling?
• Are there anyoriginal fittings orevidence for them(e.g. windows,shutters, skirtingboards, firesurrounds, rimlocks, etc.)?
• Have there beenany obviousalterations oradditions?
• Were thevarious elementsmanufactured bymachine or byhand?
• Is there evidencefor any particularlyskilled or unskilledcraftsmanship inthis?
• What methodshave been used inconstruction?
• What technologydid these methodsrequire?
• How successfullyhave the variouselements been puttogether?
• Is there evidence forany particularlyskilled or unskilledcraftsmanship inthis?
• How well suited isthe building or theparts of thebuilding to itspurpose?
• Have the internal orexternal surfacesbeen treated in anyway (e.g. withsealants, caulking,coverings)?
• Have the internal orexternal surfacesbeen finished in anyway (e.g. adzed,tuck pointed,scored)?
• Is there evidence forany decorativefinishes (such aspaint, wallpaper,mortar or plaster)?
• What decorativefeatures are there(e.g. dados,curtains, cornices,ceiling roses)?
• Is there evidence forany particularlyskilled or unskilledcraftsmanship to the
• Are any elements inparticularly goodcondition?
• Are any elements inparticularly poorcondition?
• Is there any evidencefor use–wearpatterns? (i.e. isthere physicalevidence of functionor the extent ofuse?)
• Are all elements ofthe structurepresent?
• What is missing?• Have any attempts
been made to repairthe structure?
• Is there anyevidence ofwhat mighthave caused thedeterioration ofelements?
*Archaeologists Field Handbook 29/6/04 5:24 PM Page 177

W
One of the main things to be continually aware of when you are recording a buildingis how much the structure and its components may have been affected by later activities.This is an assessment of the integrity of the place and will be particularly important ifyou are also assessing its cultural heritage significance (see ‘How to assess cultural heritagesignificance’ on page 251). As you record the individual components of a buildingand how they have been put together, look for signs of how the structure might haveevolved or been altered over time, or for signs of the re-use of materials from olderstructures.
Describing structural components
As with all archaeological recording, consistency is the watchword when describing thephysical components of a building. Always aim to use standard terminology, particularlywhen describing construction techniques and methods. We have only included the basicshere, drawn largely from the Museum of London’s descriptive standards for timber andmasonry construction. More detailed descriptions of architectural features can be foundin Apperly, Irving and Reynolds (1989) and Stapleton (1983).
178 THE ARCHAEOLOGIST’S FIELD HANDBOOK
TABLE 6.1: continued
Individual elements How the elements Surface Conditionare put together treatments
• Is there anyevidence forelements havingbeen altered orrecycled fromsomewhere else?
• Are there anytrademarks orother manufactur-ing information,such as a patent ordesign number—even a brandname?
• Do the elementshave any otherdistinctiveattributes?
finishes or thefeatures?
• Is there danger offurther deteriorationto the structure?
• Is the structureunder anyimmediate threats?
*Archaeologists Field Handbook 29/6/04 5:24 PM Page 178

WRECORDING HISTORICAL SITES 179
FIGURE 6.2: Two roof timbers from the same building. The timber at the top is earlier indate and shows the characteristic irregular zig-zag marks made by a hand-operated pit-saw. The timber at the bottom is still in situ and shows thesemi-circular marks characteristic of a circular saw, indicating that it can onlyhave been manufactured after the introduction of steam-driven saw millingtechnology.
*Archaeologists Field Handbook 29/6/04 5:24 PM Page 179

W180 THE ARCHAEOLOGIST’S FIELD HANDBOOK
FIGURE 6.3: The basic elements of a building (after Coutts 1977)
FIGURE 6.4: Common carpentry joints (after the Museum of London 1990)
*Archaeologists Field Handbook 29/6/04 5:24 PM Page 180

WRECORDING HISTORICAL SITES 181
FIGURE 6.5: Brick bonds and forms (after the Museum of London 1990)
*Archaeologists Field Handbook 29/6/04 5:24 PM Page 181

W
Denis Gojak’s tips for recording standing structures
• An orienteering compass provides a quick and easy way of drawing a complex(i.e. non-right angled) structure with all the walls correctly oriented. Simply lay theside of the compass along the wall or alignment to be measured, then turn thegraduated compass circle so that the inscribed mapping lines correspond withthe north arrow. Lay the compass on the drawing page with the same bearing relativeto north at the top of the page—that is, so that the north arrow again lines up withthe inscribed mapping lines. I have found this useful in drawing quite accurate floorplans of defence structures with complicated designs. If you want to be doubly clever,align the north arrow to an offset bearing that is equal to the difference betweenmagnetic and true north.
182 THE ARCHAEOLOGIST’S FIELD HANDBOOK
FIGURE 6.6: Stone courses, finishes and jointing (after the Museum of London 1990)
*Archaeologists Field Handbook 29/6/04 5:24 PM Page 182

W• People surveying old buildings should arm themselves with an inexpensive flat metal
150 millimetre steel rule, with imperial/metric divisions. These are ideal for gettingexact measurements of timber (the 3 X 4 inch that is really 68 X 110 millimetres) andfor checking whether floorboards are butt-boarded or tongue and groove. If a flooris butt-boarded, the ruler will slide straight through. If it stops about 5 millimetresin along a sample of boards, then they are tongue and groove. Also, a steel rule (if properly sharpened) is perfect for scraping paint, gouging divots from wallsto examine what’s underneath, cleaning fingernails and lifting lino to read the oldnewspapers.
Dating structures from their components
In general, dating a structure from its components alone is very difficult. Even if you canfind evidence of a manufacturer’s mark, trademark or patent number (the most ‘dateable’information), materials may have been stored for a considerable time before use, they mayhave been recycled from an older structure, or they may simply have been manufacturedover a long period of time. At best, you will probably only be able to narrow downconstruction to a date range, or to before or after a certain period.
Table 6.2 contains a rough guide to some major changes in building materials andconstruction techniques used throughout the nineteenth and twentieth centuries. This isnot intended as a list of all the ‘fashionable’ changes in various materials, but only as aguide to those inventions or technical developments which may be useful for assigninga rough date range to a building. Bear in mind that these dates are mainly ‘firsts’ andwon’t be exact for all areas (innovations will have taken longer to reach regional areas, forexample). If you can find them, trademarks or manufacturer’s marks may provide a finerresolution of date.
Many construction materials are less helpful in this respect than you might think. Forexample, there was no standardised size for bricks throughout the nineteenth century, sochanges in brick dimensions are not particularly useful for dating purposes. Prior to the1850s, bricks were manufactured exclusively by hand and tended to be slightly smaller insize, measuring 21.5 � 10 � 6 centimetres (Jeans 1983: 103). After the introduction of thefirst machine for mass producing bricks in the 1850s, their shape became more regularand their size slightly larger until, by the 1870s/1880s, all bricks were machine made(Freeland 1988: 188). Freeland (1988: 146) suggests a standardisation in size to 22.5 �12.5 � 7.5 centimetres after 1900, but brick size can also vary considerably even betweenbricks made from the same mould, as a result of differential shrinkage in the kiln.
Once you have decided on the sequence of construction for a building, you can
RECORDING HISTORICAL SITES 183
*Archaeologists Field Handbook 29/6/04 5:24 PM Page 183

W184 THE ARCHAEOLOGIST’S FIELD HANDBOOK
*Archaeologists Field Handbook 29/6/04 5:24 PM Page 184

W
represent it using the concepts of the Harris matrix, by assigning a context number to eachelement and then plotting them into a matrix path (see ‘Interpreting stratigraphy’ on page136). This is a sophisticated means of presenting both your data and your analysistogether in a single diagram (see Figure 6.7 on page 186).
RECORDING HISTORICAL ARTEFACTS
In all cases the recording of historical artefacts follows much the same process as record-ing any other type of artefact, asking a similar range of questions: What is it? What is itmade from? How and when was it made? How was it used? To do this you must lookfor and record those particular aspects that can most clearly show how and when theartefact was made and for what it was used. These are called diagnostic features, and arethe most useful for identification and dating purposes. For many artefacts, you may findthis information lacking entirely—for example, a small 1 � 2 centimetre fragment of darkbrown glass from the body of a bottle is unlikely to give you much information about thespecific contents of the bottle or its date of manufacture. In this case, you should notspend too much time recording this artefact, but instead focus on searching for andrecording more informative pieces of evidence.
The context in which an artefact is found—in terms of whether or not the artefacthas been disturbed since it was discarded—is particularly important to record. This isan assessment of the integrity of the site, which will be useful to your later analysis(see ‘Recording landform, vegetation and slope’ on page 73). If you think that an artefactis in its original location (in situ), you need to pay particular attention to where it wasfound and what was associated with it.
You must also make sure that you use consistent terms when describing any artefactso that other researchers can understand precisely what you mean. The following sectionscontain basic identification information and standard terminology for several commoncategories of historical artefact.
RECORDING HISTORICAL SITES 185
*Archaeologists Field Handbook 29/6/04 5:24 PM Page 185

W186 THE ARCHAEOLOGIST’S FIELD HANDBOOK
*Archaeologists Field Handbook 29/6/04 5:24 PM Page 186

WRECORDING BOTTLES AND BOTTLE GLASS
As the most common containers used in colonial society, bottles are a ubiquitous findon historical archaeological sites. Indigenous people after contact also sometimes usedbottle glass to make flaked artefacts, so recording bottle glass can form a component ofIndigenous site recording as well (see ‘Recording contact sites’ on page 234). The basiccomponents of a bottle are the body, shoulder, neck, rim, finish, base, push-up and heel(see Figure 6.8).
RECORDING HISTORICAL SITES 187
An element derived from subsurface fabric
An element derived from standing fabric
An element derived from historical sources
An element derived from both subsurface and standing fabric
Or in combination:
Applying the Harris matrix to the elements of a standing structureEither singly:
An element derived from both subsurface and historical sources
An element derived from both standing fabric and historical sources
An element derived from all three
FIGURE 6.8: The parts of a bottle
*Archaeologists Field Handbook 29/6/04 5:24 PM Page 187

WThere is enormous variation in the shape and style of bottles which can tell you when
the bottle was manufactured and the purpose for which it was used. The diagnosticfeatures to look for and record for bottle glass are:
• shape;• base;• mould marks; • mouth;• seal/closure;• trademark;• decoration;• colour.
Recording shape
The shape of some bottles will be relatively easy to describe; for others it can be verycomplex. To accurately convey the shape of the vessel, you may have to describe it in threeplanes:
• as viewed with the body horizontal (i.e. a description of the cross section of the bottleif it was cut in half through its mid-section) (see Figure 6.9 on page 189);
• as viewed with the body vertical (i.e. a description of the cross section of the bottle ifit was cut in half down its length) (see Figure 6.10 on page 190);
• its three-dimensional body shape. ‘Cylindrical’ may be a much simpler way of describ-ing the general shape of a bottle, as opposed to ‘straight/vertical, circular/horizontal’.
Recording mould marks
Changes in glass manufacturing technology have resulted in several distinctive criteriawhich can be used to date bottles (see Appendix 3: Guides to dating common historicalartefacts). Machine-made bottles have very well-defined mould seams, so make sure youtake note of the number of mould seams which are visible and their placement on thebody of the bottle.
Recording closures
This is essentially a recording of the shape and form of the neck and mouth of the bottle.Methods for sealing in the contents of a bottle have changed over time, particularly sincethe rapid technological changes of the Industrial Revolution. Make sure you take note of
188 THE ARCHAEOLOGIST’S FIELD HANDBOOK
*Archaeologists Field Handbook 29/6/04 5:24 PM Page 188

WRECORDING HISTORICAL SITES 189
FIGURE 6.9: Describing the shape of a bottle in the horizontal plane
*Archaeologists Field Handbook 29/6/04 5:24 PM Page 189

W190 THE ARCHAEOLOGIST’S FIELD HANDBOOK
FIGURE 6.10: Describing the shape of a bottle in the vertical plane
*Archaeologists Field Handbook 29/6/04 5:24 PM Page 190

Wthe way the lip and string rim of the bottle are formed, and any other evidence for how thebottle was originally sealed.
Recording trademarks, decoration and colour
Make sure you record all trademarks and their placement. Even the most inconspicuousletters and numbers can sometimes be a guide to the company which made the bottle, thecontents of the bottle, its date or its place of manufacture. Embossed letters and numberson a bottle base may refer to a mould number, the manufacturer and sometimes also theplace of manufacture. When recording such decorative information, make sure you recordboth its form and placement on the bottle.
Colour is another important aspect of bottle manufacture which you should take noteof. When describing the colour of a bottle, be careful to distinguish between ‘clear’ bottleglass, which has an aqua tint, and completely colourless glass. So-called ‘clear’ bottle glassnaturally has an aqua tint, and can only be made completely colourless by adding a bleach-ing agent, some of which are useful for dating purposes. The distinctive colour ofamethyst bottle glass, for instance, results from the use of manganese to produce clearglass; when exposed to sunlight, this is apt to discolour to purple. This practice waslimited to the period between 1890 and 1916 (Hutchinson 1981: 22) (see Appendix 3:Guides to dating common historical artefacts). After World War II most bottles in Aus-tralia were coloured or aqua-tinted rather than truly colourless.
Dark green bottle glass, commonly referred to as ‘black’ glass because its colour is sodark, was the most common material for alcohol bottles in the nineteenth century. Beforelocal manufacture commenced, most early imports came from Britain, where rigid lawsand excise controls caused clear ‘flint’ glass to be taxed highly, thus causing the cheaper,dark green bottles to be imported in large quantities (Boow 1991: 113).
Recording other types of glass
Not all glass on an archaeological site is bottle glass. Decorative glass bowls, cups, vasesand ornaments were also common on domestic sites, made from cut and pressed (ormoulded) glass. Cut glass is made by hand and has always been much more expensive thanpressed glass. Most pressed glass on Australian sites dates to between c1860 and 1870when there was an expansion in British production (Boow 1991: 88). It is relatively easyto distinguish between pressed and cut glass because of their different manufacturingmethods (see Table 6.3 on page 192). Be sure not to confuse mould-blown glass (popularfor only a very short time between 1820 and 1850) with pressed glass. While superficallythey appear similar, mould-blown glassware may still have traces of a pontil mark on thebase—where the pontil or handling rod was attached—and will be thinner and lighter.
RECORDING HISTORICAL SITES 191
*Archaeologists Field Handbook 29/6/04 5:24 PM Page 191

WTABLE 6.3: Distinguishing between cut glass and pressed glass (Boow 1991: 85–86)
Characteristics of cut glass Characteristics of pressed or moulded glass
Will not have any mould seams Will have a mould seam at the upper, outer lip,although this was sometimes deliberately blendedinto the design making it hard to see
Will be flat sided and appear to have Will have a smooth internally tapered surface sharp edges (i.e. it will flare outwards at the top)Its surface is often polished, smooth May have a ‘disturbed’ surface texture, sometimes and glossy disguised by an overall stippled designDesign edges will be sharp and distinct Design edges will tend to be rounded (Jones and
Sullivan 1989: 34–35)Designs are usually geometric Designs will occur in a greater variety of patterns, (mostly panels, flutes and mitres) including lacy, stippled and naturalistic patterns
Window glass is another form of glass that occurs at many historical sites. Because ofthe limitations of glass blowing technology, it was impossible to make large, flat sheets ofglass until after 1896 (Freeland 1988: 80). Window panes made before this date were allmade by hand and tended to be relatively small. The earliest were made using a techniquecalled ‘crown glass’ in which flat panes were literally spun from a molten bubble ofblown glass, and only measured around 25 centimetres square. From the 1830s onwards,window panes were made from a flattened glass cylinder and could measure anythingfrom 60 � 45 centimetres up to 1.5 metres � 90 centimetres (Freeland 1988: 6, 79). Theintroduction of machine technology to Australia in 1932 finally resulted in glass paneswhich were of uniform thickness and size. When you find window glass at an archaeo-logical site, you must always record its thickness and whether or not it is hand- ormachine-made.
TABLE 6.4: The changing thickness of window glass throughout the nineteenth century(Boow 1991: 111)
Type of pane Period Thickness
Crown panes to c1870 less than 2.8 mmCylinder panes to c1910 3–4 mmRolled sheet after 1890 greater than 4.5 mmDrawn sheet after 1920 up to 6 mm
192 THE ARCHAEOLOGIST’S FIELD HANDBOOK
*Archaeologists Field Handbook 29/6/04 5:24 PM Page 192

WRECORDING CERAMICS
Ceramic production originated in Japan during the Jomon period, c12 000–11 000 bp.Most of the ceramics found on historical sites in Australia, however, will be either Englishor local Australian manufactures, although fragments of Chinese domestic ceramics arealso relatively common, particularly in old mining camps. Ceramics can be eitherhandmade (such as coil pots), thrown (on a potter’s wheel) or moulded (also sometimesreferred to as ‘pressed’). Avoid using the meaningless word ‘china’ to describe ceramics;this was simply a generic term used by seventeenth century European merchants todescribe porcelain vessels exported from China. As with any kind of artefact, make sureyou describe the various parts of a ceramic vessel using consistent terminology.
RECORDING HISTORICAL SITES 193
FIGURE 6.11: The parts of a ceramic vessel
*Archaeologists Field Handbook 29/6/04 5:24 PM Page 193

WHistorical archaeologists draw many distinctions between different types of ceramic
vessels based on a whole range of features. The difference between flat ware (plate, platters,saucers, etc.) and hollow ware (bowls, cups, tureens, etc.) refers to the shape of the vessel;other distinctions are drawn according to the purpose of the vessel, or its method ofmanufacture. Archaeologists will often describe a ceramic vessel according to its use:for example, vessels used to cook, mix or store foodstuffs are called ‘kitchenware’,while vessels used in serving and consuming meals or beverages are called ‘tableware’.All of these categories are more descriptive than classificatory—in other words theytell you something about the gross general categories to which a vessel might belong(‘bowl’ versus ‘plate’, or ‘mixing bowl’ versus ‘soup bowl’), but tell you little about thespecifics of that particular piece. When recording ceramics from an archaeological site, itis better to distinguish between manufacturing methods—are they porcelain, stonewareor earthenware?—each of which had a different range of uses. Other important featuresto record are:
• the colour of the paste (i.e. the colour of the clay used to make the vessel). This is oneof the characteristics which will allow you to distinguish between stoneware andearthenware, for example. Look at the edge of a broken ceramic fragment (you mayhave to clean it first) to see the paste colour;
• the decorative technique employed;• the colour of the decoration;• any visible trademarks;• the vessel type (if you can tell).
Recording ware type
A piece of ceramic will be porcelain, stoneware or earthenware, depending on how highlyit was fired and what use it was intended for.
Porcelain is made from a mix of clay and stone fired to a very high temperature so thatit becomes impervious to liquids. It is translucent, which means that if you hold it up tothe light you will be able to see light through it. Porcelain was invented and perfected inChina and was initially very expensive. Although its price decreased through time asEnglish manufacturers produced it locally, it was still always more expensive than otherwares. Hard paste porcelain is distinguishable by virtue of an abrupt boundary betweenthe body of the vessel and the glaze; on soft paste porcelain, the glaze and the body blendtogether. Porcelain was used for all forms of table ware, as well as a variety of non-tableware items, such as dolls, marbles, figurines and buttons.
Bone china or ironstone was developed by manufacturers trying to find a cheaper,more durable alternative to porcelain. Experiments with the extremely expensive hard
194 THE ARCHAEOLOGIST’S FIELD HANDBOOK
*Archaeologists Field Handbook 29/6/04 5:24 PM Page 194

Wpaste porcelain resulted in the development of bone china, which was manufactured byadding bone ash to the refined clay body. This produced a white ceramic of good trans-lucency at reasonable cost. Other techniques added finely powdered stone and iron slagto the clay to produce ‘ironstone china’, first patented in 1813. Like bone china, this newmaterial was favoured for its cheapness and durability and was variously referred to as‘ironstone china’, ‘stone china’ or ‘opaque porcelain’. Except for the highest qualityservices, bone and ironstone china replaced porcelain in popularity during the nineteenthcentury.
Stoneware is halfway between porcelain and earthenware. It is made from coarse torefined clay and fired to a point where partial vitrification renders it impervious to liquids.Stoneware commonly has a grey, tan or brown fabric (i.e. the colour of the actual clayitself ). Even though non-porous, it is always glazed—either with a self-glaze produced bysalt-glazing (literally throwing salt into the furnace to change the colour of the outside ofthe pot) or with an applied glaze. Stoneware was very common during the early to mid-nineteenth century and was used to make a number of specialised vessels, such as crocks,jam and pickle jars, ink bottles and ginger beer and ale bottles. Its use for manufacturingtable ware was limited to c1720–1805.
Earthenware is not fired to the point where vitrification occurs, and is thereforelight and porous unless it has been glazed. Earthenware came in both common andrefined forms. Common earthenware was of lower quality and was used to make a rangeof industrial products such as flower pots, tiles and sewerage pipes, as well as tobaccosmoking pipes. Only in the seventeenth and eighteenth centuries was it used to make tablewares. Refined earthenware was made from better quality clay and, as a cheap alternativeto porcelain, was used to make a range of different table wares. It commonly has a white,buff, yellow or brown fabric. Refined and decorated white earthenware table wareswere extremely popular from the 1870s/1880s until the turn of the century and are themost common domestic ceramics found on Australian colonial sites. Plain white refinedearthenware was often used commercially and is sometimes called ‘hotel ware’, because itwas thick, durable and inexpensive, and therefore popular for hotel dinner settings.Marked hotel wares are generally dated to after 1870.
Recording decorative technique
Take note of the type of decoration and how it has been applied to the vessel. The maintypes of decoration are:
• Embossing. This is a raised or moulded decoration with no colour. Typical examplesare scalloped rims on the edge of plates. Moulding was particularly popular between1850 and 1890 on clear-glazed white ironstone vessels (Wetherbee 1985).
RECORDING HISTORICAL SITES 195
*Archaeologists Field Handbook 29/6/04 5:24 PM Page 195

W• Glazing. A glaze is a glassy coating over the inside or outside of the vessel. A slip is
a fine clay that has been diluted to a cream-like consistency with water. Vessels aredipped into this liquid clay to give them a smooth, glassy outer surface. If you find asherd with a complex glaze or slip, record the exterior or primary glaze first, followedby the interior or secondary glaze. The most common forms of this technique are(AHAPN Draft Historical Archaeological Materials Cataloguing Guidelines 1998): —Albany slip: a lustrous brown slip that coats the entire vessel.—Bristol slip: an opaque white slip containing zinc oxide. It is often found in combina-
tion with an Albany slip on stoneware bottles.—Clear glaze: this was usually applied to white earthenware vessels, although variations
of it include creamware, which has a cream-coloured tint to it, and pearlware whichhas a bluish tint.
—Rockingham: this is a dark brown, mottled glaze, that looks as if it has been ‘dripped’on to the vessel and was particularly popular between 1830 and 1870.
—Salt glaze: this is a glaze used on stoneware that results from throwing handfuls of saltinto the furnace during firing. The salt combines with the silica in the clay to forma shiny outer coating that often has a slightly pitted surface, like orange peel.
• Colour decoration. There are many ways of decorating a vessel with colour, includ-ing transfer printing, hand painting, lustre, edge banding, lithographic decals,hand-stamping, hair-lining, gilding and coloured pastes or glazes.—Transfer printing is produced from an inked design engraved on to a copper plate.
Most transfer prints used only a single colour and were common on table wares inthe 1820s. Intricate dark blue to purple transfer prints were especially common in themid-nineteenth century. A technique called flow blue, where chemicals added tothe kiln during firing caused the transfer print colour on the vessels to run or flow,was introduced to the transfer printing process in the 1820s. Flow blue was popularthroughout the nineteenth century for everyday place settings. Reproductiontransfer print designs were introduced after 1900 and are still marketed in limitedquantities. (AHAPN Draft Historical Archaeological Materials Cataloguing Guide-lines 1998).
—Hand-painting refers to colours that have been applied using a brush or the fingers.
When you record a transfer print, take note of whether it has been applied underneathor over the top of the clear glaze. The earliest transfer prints were applied over the topof the glaze which means that they will scratch or wash off. These are called overglazepatterns. Later prints were applied underneath the glaze, which means they will notcome off. They are called underglaze.
196 THE ARCHAEOLOGIST’S FIELD HANDBOOK
*Archaeologists Field Handbook 29/6/04 5:24 PM Page 196

W—Lustre uses either a metallic oxide lustre or an iridescent lustre and was particularly
popular in the 1920s.—Edge-banding is a thin band of colour applied by brush to the rim of the vessel. The
width of this band can vary from 2–6 millimetres. —Lithographic decals were supplied on paper-backed sheets and simply pressed on to the
vessel over the top of the glaze after firing. Introduced in the 1860s, they were cheaperand faster to apply than transfer prints, but not widely manufactured until the1900s. Decals are usually polychrome (many coloured) with the individual coloursprecise and distinct (AHAPN Draft Historical Archaeological Materials CataloguingGuidelines 1998).
—Hair-lining is a thin line of contrasting colour printed over or under the glaze. It isusually only 1–1.5 millimetres in width and often placed inside the rim of a cup oraround the rim of saucers and small bowls.
—Gilding is the application of liquid gold or silver to the rim of a vessel with a finebrush. It was in use in the United States from 1894.
—Coloured pastes are when the clay itself is coloured and then covered with a clear glaze.The colour of a ceramic body, or paste, refers to the fired colour of the clay. To deter-mine a paste colour, you need to examine a clean or freshly broken edge, not just theexterior glaze.
—Shell edging is a shell-edged design pressed into the rim of an earthenware vessel.After firing, the edge was often trimmed with blue or green (see also Sussman 2000).Inexpensive edge-decorated table ware was produced by British potteries from about1770 to 1850 (Noel Hume 1969: 394).
—Spongeware and spatterware: Spongeware was a distinctive form of decoration appliedwith a sponge. The result was a mottled blue, red, yellow or green pattern. Spatter-ware was most popular between the 1830s and 1840s and was applied by tapping apaintbrush dipped in pigment as the vessel was turned on a wheel (AHAPN DraftHistorical Archaeological Materials Cataloguing Guidelines 1998; Robacker andRobacker 1978: 32).
RECORDING ORAL HISTORIES
The very fact that . . . remembrances exist only in memory means that they are anonrenewable resource . . . When a generation dies, it is like burning down anarchive full of unique and nonretrievable information. (Orser and Fagan 1995: 150).
Archaeology involves working with people. If you are working in the historic period orwith Indigenous cultural material, interviewing people can give you many insights into
RECORDING HISTORICAL SITES 197
*Archaeologists Field Handbook 29/6/04 5:24 PM Page 197

Whow artefacts were used in the past, as well as the complexities of their social significance(see also ‘Recording Indigenous histories’ on page 235). Oral histories can be as valuableas written documents, particularly in relation to those aspects of daily life which don’ttranslate directly into archaeological artefacts, such as personal beliefs, feelings, reactionsor kinship networks. The most important thing to bear in mind when recording an oralhistory is that it should be treated as a collaborative process between you, as the inter-viewer, and the interviewee. It is not a process of ‘extracting’ information from an‘informant’, but building a shared understanding of what a site or artefact meant to thepeople who used it in the past. You should also be aware that all university-based researchinvolving oral histories will need clearance through the university ethics committee beforeyou can begin.
When recording an oral history, don’t just target important or historic events. Theseare singular, one-off occurrences which, while interesting, provide little informationabout ordinary people and their day-to-day life. The minutiae of many common dailyactivities (such as certain types of food preparation) would be lost to us without oralhistory. When conducting an interview, you will have to strike a balance between lettingpeople follow their own memory trails (which may provide you with information youhaven’t anticipated) and keeping them on track so that you get some minimum amountof information which is useful to you. For best results, interview people in an environmentwhere they feel comfortable (such as their own home) or take them into the field to visitthe site to identify specific features and try to prompt their memories with visual cues. Ifyou cannot take people into the field, take some photographs of the site to show themduring the interview and perhaps prompt them that way.
Wherever possible, ask open questions—that is, questions which require more thana simple ‘yes’ or ‘no’ answer—because these will elicit the most information. If youdon’t think your question has elicited enough information, try following up withexploratory queries such as: Tell me more about . . . , Explain what you mean by . . . ,Give me an example of . . . , or What date/year did that happen? For the same reason,don’t ask leading questions (‘The house was painted red, wasn’t it?’). These essentiallytell people the answer, or supply a potential answer for them rather than allowingthem to explore their own memories of the event. Once you have asked a question,wait and listen to the response. Even if the urge to interrupt—either to clarify a pointor to ask another question—is great, don’t. Make a note of the point and follow itup later.
In all interview situations, you will have to make some judgments about the reliabilityof the information and not simply accept everything at face value. People sometimes tendto repeat other (usually written) histories. Make sure the stories you are being told are notsimply being rehashed from someone else’s already published history or, if they are, thatyou trace them back to their original source.
198 THE ARCHAEOLOGIST’S FIELD HANDBOOK
*Archaeologists Field Handbook 29/6/04 5:24 PM Page 198

WThe ethics of good practice are particularly important when conducting an oral history
interview (see ‘Archaeologists and ethics’ in on page 11). The interviewee is providing youwith information, but you must be sensitive to the effects it may have on them or others.If a memory is painful or difficult to recall, or simply embarrassing, don’t press the issue.Keep a close watch on the body language of the person being interviewed, as this will tellyou how comfortable they are with the whole process.
At the beginning of the interview, you must be very clear about the nature of theproject, the purpose of the interview and how you intend to use the information. Identifyyourself and the interviewee by name at the beginning of the tape or at the beginning ofyour notes, and also note down basic particulars about the person you are interviewing.How old are they? Where were they born? Without knowing at least how old they are, youwill not be able to correlate information about events that happened to them at certainstages of their lives to calendar dates/years.
At the end of the interview, you must ask the interviewee for their permission beforeyou reproduce any part of it, or make it available in any kind of public document. Thisprocess is called ‘informed consent’ and is particularly important when you are inter-viewing Indigenous people. When obtaining informed consent, you need to give anoutline of your project and make sure people understand that their participation is vol-untary and that they can change their mind at any time about participating. Sometimesyou may need to obtain a signed consent from your interviewees. This will be essentialif you are seeking funding for Indigenous research from bodies such as the AustralianInstitute of Aboriginal and Torres Strait Islander Studies (AIATSIS*).
It is also important that you minimise any potential harm to participants. Thisincludes physical harm, subjecting people to undue stress, or undermining their self-esteem. While archaeology seems pretty innocuous on the surface, our job is actuallywriting the story of other people’s pasts and some of these stories have the potentialto hurt people. For example, in the past some archaeological research has been used tosupport racist and hurtful stereotypes of Indigenous people. You need to ask yourselfwhat kinds of precautions have been taken to keep risk to a minimum: does your studyinvolve particularly vulnerable subjects who may require special consideration?
Finally, if you are interviewing people you will need to give them the option of beinganonymous and you may need to take special measures to ensure their privacy. This isparticularly so if you are working with Indigenous people, who are often very cautiousabout how they will be portrayed by researchers. Some Indigenous groups will not consentto research being undertaken unless they have a certain amount of control over theprocess and the publications that will arise from the research.
RECORDING HISTORICAL SITES 199
*Archaeologists Field Handbook 29/6/04 5:24 PM Page 199

WREFERENCES AND FURTHER READING
Association of Historical Archaeologists of the Pacific Northwest (AHAPN) 1998, Draft His-torical Archaeological Materials Cataloguing Guidelines, Association of Historical Archaeologistsof the Pacific Northwest, accessible online at www.mindspring.com/~larinc/ahapn/crm/laboratory/labmanual.htm.
Apperly, Richard, Irving, Robert and Reynolds, Peter 1989, A Pictorial Guide to IdentifyingAustralian Architecture: Styles and Terms from 1788 to the Present, Angus & Robertson, Sydney.
Birmingham, Judy and Murray, Tim 1987, Historical Archaeology in Australia: a handbook,National Estate Grants Program.
Boow, James 1991, Early Australian Commercial Glass: Manufacturing Processes, Department ofPlanning and Heritage Council of NSW, Sydney.
Coutts, Peter 1977, ‘Old buildings tell tales’, World Archaeology 9(2): 200–219.Davies, Martin 1993, ‘The application of the Harris matrix to the recording of standing struc-
tures,’ in E.C. Harris, M.R. Brown and G.J. Brown (eds), Practices of Archaeological Stratigraphy,Academic Press, London, pp. 167–180.
Davies, Martin and Buckley, Krystal 1987, Archaeological Procedures Manual: Port Arthur Conser-vation and Developement Project, Occasional Paper No. 13, Department of Lands, Parks andWildlife, Hobart.
Freeland, J.M. 1988, Architecture in Australia: A History, Penguin, Ringwood.Jeans, Dennis 1983, ‘The building industry: materials and styles’, in J. Birmingham, I. Jack,
and D. Jeans (eds), Industrial Archaeology in Australia: Rural Industry, Heinemann, Melbourne,pp. 95–118.
Jones, Olive and Sullivan, Catherine 1989, The Parks Canada Glass Glossary, National HistoricParks and Sites, Canadian Parks Service.
Kellaway, C. 1991, ‘How to research the history of a house’, in G. Davison and C. McConville(eds), A Heritage Handbook, Allen & Unwin, Sydney, pp. 197–226.
Lewis, M. 1992, ‘Physical investigation of a building’, in C. Sagazio (ed.), The National TrustResearch Manual: Investigating Buildings, Gardens and Cultural Landscapes, Allen & Unwin,Sydney, pp. 37–53.
Museum of London 1990, Archaelogical Site Manual, 2nd edn, Department of Urban Archaeol-ogy, Museum of London.
Noel Hume, Ivor 1969, A Guide to the Artifacts of Colonial America, Alfred A. Knopf, New York.NSW Department of Planning and the Heritage Council of NSW 1993, Historical Archaeological
Sites: Investigation and Conservation Guidelines, Department of Planning, Sydney.Orser, Charles and Fagan, Brian 1995, Historical Archaeology, HarperCollins College Publishers,
New York.Robacker, Earl F. and Robacker, Ada F. 1978, Spatterware and Sponge: Hardy Perennials of
Ceramics, A.S. Barnes, New York.Sagazio, C., Kellaway, C. and McWilliam, Gwen 1992, ‘Researching buildings’, in C. Sagazio
(ed.), The National Trust Research Manual: Investigating Buildings, Gardens and Cultural Land-scapes, Allen & Unwin, Sydney, pp. 5–26.
Stapleton, Ian 1983, How to Restore the Old Aussie House, The Fairfax Library, Sydney.
200 THE ARCHAEOLOGIST’S FIELD HANDBOOK
*Archaeologists Field Handbook 29/6/04 5:24 PM Page 200

WSussman, Lynne 2000, ‘Changes in pearlware dinnerware, 1780-1830’, in D. Braund (ed.),
Approaches to Material Culture Research for Historical Archaeologists, Society for HistoricalArchaeology, Ann Arbor, pp. 37–43.
Wetherbee, J. 1985, A Second Look at White Ironstone, Wallace-Homestead, Lombard, Illinois.
USEFUL WEBSITES
Excellent searchable online sources for historical documents and pictures are available from:
• The National Library of Australia, which maintains: www.pictureaustralia.org/ (a col-lection of online picture resources held in various libraries across Australia),www.nla.gov.au/catalogue/ (its own online catalogue) and www.nla.gov.au/oz/histsite.html (a page detailing sources of Australian history available online). Italso has a register of Australian Archives and Manuscripts held in non-governmentcollections available at: www.nla.gov.au/raam/.
• The Australian War Memorial: piction1.awm.gov.au• The National Archives of Australia: www.naa.gov.au/the_collection/recordsearch.html
and www.naa.gov.au/the_collection/photosearch.html. You can view some documents,request documents to be scanned for viewing and request hard copies of documents on theinternet.
• www.archivenet.gov.au/archives.html, a general listing of websites for all archival collec-tions maintained around Australia, including some international archive links.
• The Directory of Archives in Australia at www.archivists.org.au/directory/asa_dir.htm.This site is a database of 475 archival repositories across Australia, many with links to theirrespective web pages.
www.bl.uk/services/information/patents/history.html is a site maintained by the BritishLibrary with information for people searching for British patent numbers to identifyartefacts. This site also includes a link to the US patent office.
The Internet Library of Early Journals is at www.bodley.ox.ac.uk/ilej. This contains a selectionof scanned eighteenth and nineteenth century journals, such as The Builder and BlackwoodsMagazine.
RECORDING HISTORICAL SITES 201
*Archaeologists Field Handbook 29/6/04 5:24 PM Page 201

CHAPTER SEVENRECORDING INDIGENOUS SITES
WHAT YOU WILL LEARN FROM THIS CHAPTER
W The range of Indigenous site types across AustraliaW The essential features to record for each site typeW How to identify a flaked stone artefactW How to tell a humanly scarred tree from a naturally scarred treeW The limitations of ethnohistoric researchW How to identify an Indigenous burial
WHAT IS AN INDIGENOUS SITE?
The Indigenous occupation of Australia dates back at least 40 000 years and may beconsiderably older. The many different ways in which Indigenous people have interactedwith the land and with each other over this long time period have left behind manyphysical traces. There are many different kinds of Indigenous sites, ranging from stoneartefact scatters or open sites, shell middens, rock art, and carved and scarred trees, toquarries, burials and stone arrangements, as well as many post-contact sites.
Stone artefact scatters
This is the most common type of site across Australia—groups of stone artefacts foundscattered on the ground surface. To differentiate them from sites which occur within the
W W W
WW
202
*Archaeologists Field Handbook 29/6/04 5:24 PM Page 202

WRECORDING INDIGENOUS SITES 203
FIGURE 7.1: The range of Indigenous sites in Australia
June
Ros
s
*Archaeologists Field Handbook 29/6/04 5:24 PM Page 203

Wprotection of a rockshelter, such scatters are often referred to simply as ‘open sites’. Youshould remember, however, that there are other types of open sites, such as middensand grinding grooves. Indigenous people used different kinds of stone artefacts formany day-to-day purposes—such as skinning and butchering animals, grinding seedsand nuts, manufacturing wooden artefacts—and for hafting as axes, adzes, knives orspear points.
Artefact scatters can range in size from a few artefacts to a high-density scattercontaining a wide range of different artefact types (for more information on defining asite and its boundaries, see ‘Defining the boundaries of an open artefact scatter’ on page219). Stone artefact scatters occur both as surface concentrations of material and as strat-ified deposits which may be dateable, and they may or may not be associated with othercultural remains such as ochre, charcoal, shell or bone. Archaeological information fromopen sites can be used to infer a wide range of behaviour, such as population movement,customary exchange systems, and even activity areas if there is a sufficiently wide range ofcomplementary material. An artefact scatter does not necessarily imply that peopleactually camped on a site, but may indicate only that some type of activity was performedthere (such as the manufacture of stone ‘tools’) or that people passed through the region(Hiscock 1988: 19).
Isolated stone artefacts
As the name implies, this refers to individual stone artefacts found by themselves in noobvious association with any other artefacts. Whether such artefacts were accidental orpurposeful discards, they should still be recorded. Although an isolated stone artefact isnot strictly a ‘site’ (the definition for which varies from state to state), it is often what thearchaeologist will encounter. Of course, it is possible that there were once other artefactsthere that have since been removed, or simply that the visibility conditions prevent youfrom seeing them (see ‘Determining effective survey coverage: What reveals, what conceals’on page 78). If you find such a site, make sure you search the area around it carefully toensure that it is, indeed, an isolated artefact.
Shell middens or midden scatters
A midden is literally a refuse dump left behind after people have eaten a meal. In shellmiddens, marine or freshwater shells are the dominant component. A deposit with onlya handful of scattered shells on its surface, or an excavated deposit which contains only afew sparsely distributed shells, does not count as a midden (Val Attenbrow pers. comm.).Shell middens can occur along coastlines, around estuaries, along coastal and inland riverfloodplains and around the shores of coastal or inland lakes. They can also occur as
204 THE ARCHAEOLOGIST’S FIELD HANDBOOK
*Archaeologists Field Handbook 29/6/04 5:24 PM Page 204

Wdeposits within rockshelters and can range in size from a small, low-density surface scatterof shellfish remains to a high-density midden containing a variety of shellfish species, aswell as stone artefacts and other archaeological remains. The presence of a shell middenor midden scatter does not necessarily imply that people actually camped at a place, butmay indicate only that they passed through the area.
Scarred trees
These are trees from which bark has been removed for the manufacture of everydayitems such as containers, canoes or medicines. Bark could be removed either as sheets(for making shaped artefacts such as coolamons, shields and canoes) or as fibre formaking twine. Scarring can also occur from the making of toe-holds used to climb atree or from the removal of possums, honey or grubs from the heartwood of a tree.Such scars can vary in size and can often be distinguished from natural scarring by the regularity of their shape, their size and their location on the tree, as well as thepresence of axe scars on margins of the exposed wood. Many different kinds of trees canbe scarred.
Carved trees
These are trees which have had designs carved into the bark or heartwood and in someareas may have been used to mark burial or initiation sites (e.g. McBryde 1974). Themost common carving technique involved the removal of the outer bark and sapwoodfrom a portion of the trunk, so that designs could be carved into the inner wood of thecleared panel.
Quarries
Quarry sites are locations from which Indigenous people have extracted stone formaking stone artefacts, or ochre for use in painting. Stone artefact quarry-sources rangedfrom easily acquired loose river cobbles to large outcrops which had to be activelyquarried.
Stone arrangements
These can range from cairns (piles of rocks) to extremely elaborate arrangements coveringlarge areas. Some stone arrangements were used in ceremonial activities (e.g. to marksacred or totemic sites), whilst others were constructed for more secular purposes (e.g. toact as route markers, hut walls or fish traps).
RECORDING INDIGENOUS SITES 205
*Archaeologists Field Handbook 29/6/04 5:24 PM Page 205

WRock art sites
Rock art is divided into two basic types: paintings and engravings. Rock art is producedeither through the addition of colour, by painting, stencilling or drawing, or the removalof parts of the rock surface by pecking, grinding, abrading or engraving. In areas ofnorthern Australia, it is also produced by the addition of beeswax to the rock surface (seeTable 7.1 on page 223). Rock art is of great interest to archaeologists because it encodesmany levels of social information about the people who made it. It is also very useful forarchaeological analyses because, unlike many other artefacts, it is securely tied to place.You can be sure that the rock art was made for—and meant for—the place where you findit. The great weakness of rock art study is that it is very difficult to date. While there havebeen enormous developments in rock art dating over the last decade or so, it is still onlya job for specialists and requires expensive laboratory processes. The good news is that,should you need this expertise, you can apply for funding for rock art dates from AINSE(the Australian Institute of Nuclear Science and Engineering*) and from AIATSIS (TheAustralian Institute of Aboriginal and Torres Strait Islander Studies*).
In many parts of Australia, rock art occurs on surfaces that appear to be inaccessiblewithout the use of scaffolding or ropes. In some regions, the location of paintings in suchinaccessible places is cited by Indigenous people as proof that the paintings were made byMimi spirits, rather than people. Overall, however, rock art is restricted in its distributionto regions where suitable rock surfaces occur. There is no rock art in northeast ArnhemLand, for example, because there are no suitable surfaces in this region. In other areas,rock surfaces are unstable and therefore will not preserve art in the long term.
Indigenous special places and other significant sites
These can be either modified sites/features or natural features of the landscape (such asrock outcrops or water sources) which possess special significance because of their role inIndigenous belief systems. These sites may be part of creation stories, or associated withimportant life events and ceremonies. Some may be unmodified features of the environ-ment, in which case there may be few, if any, tangible features peculiar to these sites whichindicate to non-Indigenous people that the place is of special significance. Independentinformation from Indigenous communities is essential for the identification of allsuch places.
Burials
Treatment of the dead by Indigenous people occurred in both historical/contact contexts(i.e. on campsites and missions) and in archaeological contexts (in deposits which may be
206 THE ARCHAEOLOGIST’S FIELD HANDBOOK
*Archaeologists Field Handbook 29/6/04 5:24 PM Page 206

Wexposed by erosion, development or excavation). Such sites hold great significance forIndigenous people, and the disturbance of burials, or burial places is a very sensitive issue(for more information see ‘What to do if human remains are encountered’ on page 237).
Contact sites
Contact sites are places with evidence for contact between Indigenous Australians andother groups of people. Sometimes these sites are called Indigenous historical sites,but this implies that the only group that Indigenous people had contact with wereEuropeans. However, Australia has multicultural origins, many of which are not high-lighted in the history presented today. In northern Australia, there is extensive evidenceof contact between Indigenous peoples and Macassan fishermen from Indonesia, andthroughout the 1800s and 1900s there was extensive contact and intermarriage betweenIndigenous peoples and the Chinese. In fact, there were periods during the nineteenthcentury when the population of northern Australia included more Chinese than peopleof British origin or descent. Similarly, there was contact between Indigenous Australiansand various French and Dutch mariners as early as the 1600s, and with Afghans in centralAustralia throughout the 1800s, as well as with other groups.
THE BASICS
The checklists for site recording in this section only refer to the specific elements peculiarto each type of site. All site recordings are conducted with two complementary purposesin mind: to record information about the contents, form and spatial arrangement of thesite; and to record information about preservation conditions and other managementissues. For all sites, you should always record a description of its physical location, theowner of the property on which it is found, a grid reference and a plan of the site, as well as taking photographs (see ‘What to do when you find a site’ on page 80). For allIndigenous sites, you should also record:
• the location of any Indigenous plant resources nearby;• the proximity of the site to the nearest reliable water source and its type (e.g. lake or
river);• the proximity of the site to the nearest water source and its type, regardless of its
reliability (e.g. ephemeral creek);• the proximity of the site to major Dreaming sites (if known).
RECORDING INDIGENOUS SITES 207
*Archaeologists Field Handbook 29/6/04 5:24 PM Page 207

WMost administering authorities have official site recording forms for each type of site
(i.e. one form for rockshelters, one for stone arrangements, one for rock art sites, etc.)which reflect the specific information it is important to collect about each. It is well worthhaving a supply of these to take with you into the field in the event that you locateany sites.
RECORDING STONE ARTEFACTS
Indigenous people made and used a variety of stone artefacts. Some were flaked fromlarger pieces of stone; in other cases stone was ground to produce a particular type ofartefact such as a grindstone or an axe.
Recording flaked stone artefacts
Flaked stone artefacts are made by hitting one stone (called a core) with another (calleda hammerstone). This process is called knapping. Artefacts made by knapping have anumber of things in common and it is these things which an archaeologist looks forwhen identifying a piece of stone as a flaked artefact (see ‘How to identify a flaked stoneartefact’ on page 209).
208 THE ARCHAEOLOGIST’S FIELD HANDBOOK
FIGURE 7.2: Knapping, the process of making a flaked stone artefact
*Archaeologists Field Handbook 29/6/04 5:24 PM Page 208

WThere are many systems for recording these stone artefacts in the field. Some attributes
are more reliable than others, and the recording system you choose may depend on thequestions you wish to answer. In recognition of this, we have not tried to establish a setof rules to follow. Nor have we tried to provide guidelines for detailed analysis, as thereare several debates surrounding which characteristics are considered the most useful torecord and why. All we intend here is simply an outline of some of the basic parameterswhich can provide you with quick and useful information in the field. For more detailedinformation on recording stone artefacts, see Hiscock (1989).
The first step is obviously to be able to recognise a flaked stone artefact when yousee one. Archaeologists classify flaked artefacts according to four basic technologicaldivisions:
• flakes: the piece of stone which is struck off the core;• cores: the piece of stone from which flakes have been removed;• retouched flakes: sometimes people will use a flake as a core and knap it to remove
other, smaller flakes from along the edge. These twice-knapped artefacts are calledretouched flakes. The appearance of retouch may also be created by using the flake;
• flaked pieces: artefacts which cannot be clearly identified as a flake, core or retouchedflake. This is a category for artefacts which are clearly artefacts but which have losttheir defining features, or become detached because the core has shattered in theprocess of knapping.
How to identify a flaked stone artefact
How to identify a flakeThe basic morphology is as follows (also see Figure 7.3):
• The ‘back’ of the artefact (the side that was part of the outside of the core) is calledthe dorsal surface.
• The ‘front’ of the artefact (the side that was once part of the interior of the core) iscalled the ventral surface.
• The ‘top’ of the artefact (the part that the knapper hit to remove it from the core)is called the platform or proximal end.
• The ‘bottom’ of the artefact (the end opposite the platform) is called the termin-ation, or distal end.
When trying to decide whether a piece of stone is a flake look for these importantfeatures:
• When a flake is removed from a core, there is often a distinctive circular mark where
RECORDING INDIGENOUS SITES 209
*Archaeologists Field Handbook 29/6/04 5:24 PM Page 209
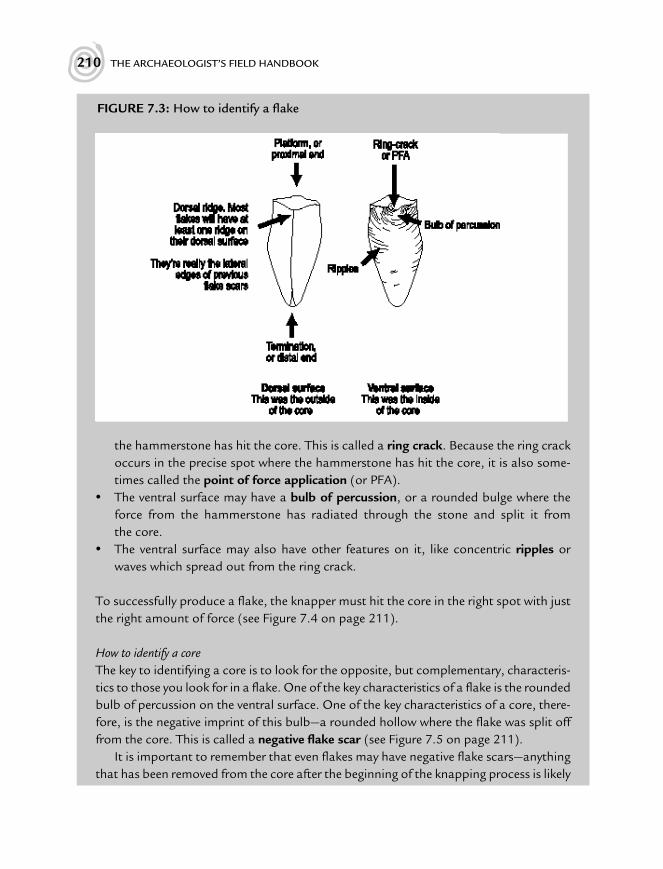
W
the hammerstone has hit the core. This is called a ring crack. Because the ring crackoccurs in the precise spot where the hammerstone has hit the core, it is also some-times called the point of force application (or PFA).
• The ventral surface may have a bulb of percussion, or a rounded bulge where theforce from the hammerstone has radiated through the stone and split it fromthe core.
• The ventral surface may also have other features on it, like concentric ripples orwaves which spread out from the ring crack.
To successfully produce a flake, the knapper must hit the core in the right spot with justthe right amount of force (see Figure 7.4 on page 211).
How to identify a coreThe key to identifying a core is to look for the opposite, but complementary, characteris-tics to those you look for in a flake. One of the key characteristics of a flake is the roundedbulb of percussion on the ventral surface. One of the key characteristics of a core, there-fore, is the negative imprint of this bulb—a rounded hollow where the flake was split offfrom the core. This is called a negative flake scar (see Figure 7.5 on page 211).
It is important to remember that even flakes may have negative flake scars—anythingthat has been removed from the core after the beginning of the knapping process is likely
210 THE ARCHAEOLOGIST’S FIELD HANDBOOK
FIGURE 7.3: How to identify a flake
*Archaeologists Field Handbook 29/6/04 5:24 PM Page 210

W
to carry away with it the negative imprint of earlier flakes. The crucial distinction in tellinga flake from a core, however, is that a flake must always have the positive attributes ofthe knapping process (a bulb of percussion), whereas a core will only have the negativeattributes (flake scars). The only exception to this will be if a flake has been used asa core, in which case you may see both kinds of attributes.
How to identify a flaked pieceThis is actually quite difficult, and your success at identifying such items will depend toa large extent on your experience. Because this category was created explicitly for allthose definite artefacts which have no defining attributes, if you are unsure about whatis or is not a ‘definite’ artefact, then this category will be highly problematic for you.Artefacts which are highly weathered or which have been shattered in a fire might fall
RECORDING INDIGENOUS SITES 211
To successfully remove a flake the angle between the platform
and the ridge must be kept to less than 90º
Less than90º
More than90º
Platform Platform
If not, no amount of force will besufficient to split a flake from the coreand the force of the hammerstone's
blow will simply dissipate
GOOD BAD
FIGURE 7.4: Physical constraints of knapping
FIGURE 7.5: A negative flake scar
*Archaeologists Field Handbook 29/6/04 5:24 PM Page 211

Winto this category, but so might artefacts which were detached as part of the knappingprocess (Hiscock 1989: 26). It is important to remember that this category is not acatch-all ‘too hard’ basket for all those things that you think might be artefacts—if youare unsure seek a second opinion. The easiest way to identify a flaked piece is to look forventral or dorsal features. If you can define any of these, such as ring cracks, negativedorsal scars, undulations, etc., then the artefact is a broken flake. If you cannot, but aresure the piece derives from knapping, then it is a flaked piece.
Recording other important classes of stone artefact• Manuports. This is a category for pieces of stone which are obviously not found
locally in the area and therefore could only have been carried in by people. It doesn’tnecessarily have to be knapped (although it may be)—just exotic to the local area.You will only be able to tell whether a piece of rock is exotic by familiarising yourselfwith the local geology.
• Grinding stones. Unlike flakes, which are customarily made from fine-grained, sharp-edged, raw materials, grinding stones are made from coarse-grained and abrasivematerials such as sandstone. They were used by Indigenous people to grind seeds,roots tubers or ochre and consist of two parts: a flattened ‘dish’ in which the materialrested and a rounded stone which was held in the hand and used as a pestle ormuller. Look for relatively flat, dish-shaped (concave) stones, and smaller roundedstones of the same material (but note that you might not find them together). Onesurface of each stone (and possibly more than one surface of the muller) is likely tobe smoother and possibly polished as a result of repeated grinding.
• Edge-ground axes. These were commonly made of volcanic raw materials, such asbasalt, because they are extremely hard. To make an axe, a ‘blank’ (an axe-shapedpiece of stone) is knapped, and one edge of this knapped further to create achopping angle. This edge of the axe was then ground smooth until it was sharp andthe axe head attached to a wooden haft with twine and gum. An entire axe will beeasy to identify because it will have these ground edges and because it will be madefrom hard volcanic material. If, after use, the edge of an axe became dull, Indigenouspeople would often knap some further flakes from the axe’s cutting edge and regrindit (see ‘Grinding grooves’ on page 213). These waste flakes are called ‘edge sharp-ening flakes’ and will also be relatively easy to spot because of their distinctive rawmaterial and because they may have polish on some margins.
• Potlids. These are small circular pieces of stone which have literally ‘popped off ’ thesurface of the artefact as a result of exposure to extreme heat. Sometimes peopledeliberately heated certain kinds of raw material (such as silcrete) to make it easierto knap; sometimes artefacts were simply thrown into cooking fires after use. Bush-fires, of course, can also cause potlids on open sites. If you find a potlid on an
212 THE ARCHAEOLOGIST’S FIELD HANDBOOK
*Archaeologists Field Handbook 29/6/04 5:24 PM Page 212

Wartefact, you will need to decide whether it has been caused by natural or culturalprocesses. Look for whether the incidence of potlids is spread evenly across the siteand across different types of raw material (this may indicate the passing of a bushfire)or whether they are highly localised, or only occur on one type of raw material.
• Grinding grooves. These are a by-product of the manufacture of ground stone axesor adzes. The highly polished surfaces and sharp edges of such artefacts arise fromgrinding them against a permanent rock surface. Such surfaces are usually horizontaland are located near water, which is an essential lubricant for the grinding process.The grooves that result from this process have their own patina, are narrow, relativelyshort (think of the length of an arm-swing) and deeper in the middle section than ateither end (see Figure 7.1 on page 203). To record these, first count the number ofvisible grooves and note their orientations. You should then measure the length,width and depth of each groove and estimate the quality and extent of patinapresent. (Is the entire groove highly patinated? Is there little or no patina?)
To produce a particular kind of artefact, a knapper will sometimes remove many flakesfrom a core until he or she has precisely the right ones. When a person sits down in aparticular spot to knap an artefact, the place is called a knapping floor. At sites that wereknapping floors, archaeologists can sometimes literally put the artefacts back together. Insome cases, this allows them to see the original shape of the core and to work out how theperson went about reducing the core to make a particular collection of stone artefacts.Many of the artefacts an archaeologist finds in the field are the waste products from thisprocess rather than the desired end product, because this was usually taken away for useelsewhere. In recording such a group of stone artefacts, archaeologists try to distinguishbetween those flakes that were removed at the beginning of the process and those thatwere removed from the core towards the end of the process. One way of doing this is tomeasure the amount of cortex, or the original, weathered, outside surface of the corewhich is visible on each flake. Cortex can be pebble cortex, from a water-rolled pebble, oroutcrop, from an exposure of stone. Either way, it will appear on the dorsal surface only.If you can see cortex on the dorsal surface of the artefact, this means it has come from theoutside of the core and was removed at the beginning of the process. If, however, theartefact has no cortex, it has obviously come from the interior of the core and was removedtowards the end of the process. Archaeologists use the relative amount of cortex on anartefact to distinguish between three types of flake, according to when they were struckoff the core:
• primary—where the entire dorsal surface is covered with cortex. This means the flakewas one of the first to be struck off the core;
RECORDING INDIGENOUS SITES 213
*Archaeologists Field Handbook 29/6/04 5:24 PM Page 213

W214 THE ARCHAEOLOGIST’S FIELD HANDBOOK
FIGURE 7.6: How to measure and record the key attributes of a stone artefact
*Archaeologists Field Handbook 29/6/04 5:24 PM Page 214

WRECORDING INDIGENOUS SITES 215
*Archaeologists Field Handbook 29/6/04 5:24 PM Page 215

W• secondary—with some cortex and some flake scars. This means the flake was not one
of the first, but was still struck off early in the manufacturing process;• tertiary—an artefact with no cortex. These flakes must come from the last stages in the
manufacturing process.
Be careful not to confuse cortex with weathering (which results from prolongedexposure to the elements). The thing to remember is that weathering can occur on allsurfaces of the artefact (including dorsal and ventral), whereas cortex will only be foundon the dorsal surface.
What to record when you’ve found a stone artefact scatter
When you have found a scatter of stone artefacts in the field, you need to record somebasic data about the artefacts and the site (a recording form is included in Appendix 1).The standard aspects of the site which you need to record are (Hiscock 1989: 21–24):
• the types of artefacts that occur. How many flakes are there? How many cores?Flaked pieces? Retouched flakes? How many of the flakes are primary, secondary ortertiary?
• the size (length and width) of each artefact, or of a representative sample of theartefacts, and their morphology (see Figure 7.2 on page 208). You need to make surethat you measure all artefacts consistently and that you write in your report exactlyhow you did this;
• the density of artefacts across the site and how this changes. This is a basic assess-ment of how many artefacts there are and is usually measured in terms of the numberof artefacts per square metre. This is often phrased as ‘X artefacts/square metre inthe centre of the site, dropping off to X artefacts/square metre on the margins ofthe site’;
• whether the extent of the site is defined by declining visibility or by a declining densityof artefacts (see ‘Defining the boundaries of an open artefact scatter’ on page 219);
• the range of raw materials which occur. You need to be able to recognise how manydifferent types of raw materials there are and what they are. You also need to take noteof how many artefacts are made from each kind of raw material. What is the mostcommon? What is the least common? If possible, you should also try and identify thesources of these raw materials. Other archaeological studies may be able to help youhere, as could a knowledge of the local geology, or information provided by ethno-graphic sources. If you are unsure of what kinds of raw materials you can expect inyour study area, research it thoroughly before you go into the field.
216 THE ARCHAEOLOGIST’S FIELD HANDBOOK
*Archaeologists Field Handbook 29/6/04 5:24 PM Page 216

WObviously, if you have found a large site with high artefact densities, it is unlikely
that you will be able to record all of this information for every single artefact. In this caseyou will have to make some decisions about how to sample your site (see ‘Developinga suitable sampling strategy’ on page 66). Some archaeologists adopt a strategy of walkingtransects across the site and measuring all artefacts which occur at set points along thattransect (e.g. by counting all artefacts within a square metre every 5 metres along thetransect); others identify different zones within the site and sample evenly within eachzone (Hiscock 1989: 33, 36).
Once you have gathered this information for all or part of your site, you can beginto compare different attributes against each other—do different types of raw materialstend to occur in specific locations? Are there areas within the site with particularlyhigh densities of artefacts (this may indicate a knapping floor)? Are there changes in therelationships between the stone artefacts and other types of artefacts or archaeologicalfeatures at the site (such as middens, mounds, hearths)?
Denis Byrne’s tips for recording stone artefact raw materials
• Use commonly accepted archaeological terminology for describing raw materialtypes, but don’t get too technical (unless you’re a geologist).
• Describe your types in a glossary so that your meanings are clear.• If you want to use more general terms such as ‘fine-grained’ or ‘coarse-grained’, make
sure you define what these terms mean in the glossary.• If you are unsure of types, either consult a specialist or flag your uncertainty (use ‘?’
or ‘unknown’, or a very general descriptive term such as ‘volcanic’ if you are sureabout this).
• Give the total number and, if possible, weight of each material type, plus theirpercentages. (Byrne 1997)
Much of the analysis of flaked stone artefacts is simply an attempt to make sense ofthe sequence of events that have happened to an artefact throughout its life. Beginningat the stage of obtaining the raw material from a source, this sequence will include theprocesses of manufacture (knapping) and use, and will end with all of the subsequentmodifications that have taken place since the artefact was discarded (Wright 1983: 123).Working through this process will not only help you to understand how the particularartefact was manufactured and used, but will also give you a good idea of the archaeo-logical context of the site and how taphonomic processes may have affected a site’scontents over time. See Figure 7.7 on page 218.
RECORDING INDIGENOUS SITES 217
*Archaeologists Field Handbook 29/6/04 5:25 PM Page 217

W218 THE ARCHAEOLOGIST’S FIELD HANDBOOK
FIGURE 7.7: An example of how to work through the analysis of an artefact. You need tolook at many different aspects of the artefact’s life history in order to analyse itproperly (after Wright 1983: 123)
*Archaeologists Field Handbook 29/6/04 5:25 PM Page 218

WRECOVERING ARTEFACTS WITH RESIDUES AND USE-WEAR
Residues and use-wear are the physical traces left on the edges of stone artefacts as a resultof their use in various tasks. Residues can include trace amounts of starch, blood, hair orwoody tissue still adhering to the artefact. Some residues will last much longer thanothers (resin, for example), particularly those that become compacted into tiny crevices inthe stone. Use-wear is a description of the physical changes to the edges of an artefact asa result of its use: artefacts used to cut grasses, for example, develop highly polished edges;others used to saw bone develop particular forms of edge damage (for a full listing ofa range of use wear types, see Fullagar 1989: 45).
A detailed recording or analysis of residues and use wear is not really practical in thefield and is best undertaken by a specialist. If you are retrieving stone artefacts for lateranalysis in a laboratory, however, bear in mind that the best artefacts to examine forresidues will be those which have been protected from the elements and are retrievedthrough excavation (Fullagar 1989: 40). It is possible to recover residues from artefacts insurface scatters, although the most productive will still be those that have been protectedin some way. When collecting stone artefacts for later analysis, follow these basic pro-cedures to ensure that any residues are preserved (Fullagar 1989: 41):
• When you excavate the artefacts, try to leave as much of the adhering soil on them aspossible.
• If you need to clean them, lightly brush them with a soft-haired paintbrush. If neces-sary, you can rinse artefacts in water.
• Don’t scrub artefacts. If soil is impacted and difficult to remove, gently rub the artefactwith a wet cotton bud or a soft-haired paintbrush.
• Try to handle the artefacts as little as possible. It is not strictly necessary to wear gloves,as many disposable types contain powdered starch which can leave a residue on theartefacts.
• Bag each artefact separately.• Don’t place an aluminium tag inside the bag (these will actually leave a residue on
the artefact which might obscure other residues).• Do submit a detailed history of excavation and handling to the analyst with the
artefact.
DEFINING THE BOUNDARIES OF AN OPEN ARTEFACT SCATTER
While this might seem a straightforward task, it is actually one of the most difficultdecisions of any survey. Indigenous people have lived in Australia for so long that large
RECORDING INDIGENOUS SITES 219
*Archaeologists Field Handbook 29/6/04 5:25 PM Page 219

Wparts of the landscape are literally littered with artefacts. If the artefacts visible on theground surface are only apparent as a result of erosion or visibility conditions, however(see ‘Determining effective survey coverage: What reveals, what conceals’ on page 78), thequestion of where the site really begins and ends is not straightforward. In some parts ofAustralia, stone artefact scatters can be found across such extensive areas that the entirelandscape could be defined as one large archaeological site. It would not only be imprac-tical to record every artefact in such a situation, but realistically, people would still haveused different parts of the region in various ways for particular reasons, and no purposewould be served by defining the whole region as a single site.
In such a situation, some archaeologists would define the boundaries according toartefact density: i.e. by placing an arbitrary boundary around the areas containing thehighest numbers of artefacts and simply defining the rest as ‘background scatter’. Thisis an arbitrary decision as well as a pragmatic one, and will be decided upon as a resultof the aims of your fieldwork and what questions you are trying to answer, as well as theenvironment in which you find yourself (Sullivan 1983: 6) (for more information, see‘Designing your research’ on page 3). Most archaeologists would accept that if you findyourself in an area literally covered with artefacts, then you are more likely to define sitesin terms of those places which contain the greatest density or variety of artefacts. On theother hand, if you have been surveying for six hours before you find your first isolatedartefact, then that artefact will assume much greater significance.
Likewise, if the artefacts you are recording are only visible as a result of erosion, youwill need to consider whether the boundary of your site is the extent of the eroded area,the limit of visible artefacts (which may or may not coincide) or some other arbitraryfeature (such as a fence-line or land boundary). As a general rule, the most importantthing to remember is to clearly state your definitions and assumptions in your report so that, whatever definition you adopt, it will be clear to others how this might haveinfluenced your results. In most cases, the boundary will have to be defined according tothe extent of visible artefacts, even though you may well suspect that there could be moreartefacts underneath the surface. One of the major decisions you will have to make inthis case is whether or not you think there are potential archaeological deposits (PADs)at the site. You should note that, because of visibility problems, some administeringauthorities may require sub-surface investigation to determine the full extent of a site asa matter of course. Even though it is common knowledge that open sites tend to be moreextensive than they appear on the surface, you should not attempt to guess at the hiddencomponent. If you have a strong suspicion that the site is greater in area than what isvisible, simply note these suspicions down in your field notes, always explaining why youthink this might be so.
220 THE ARCHAEOLOGIST’S FIELD HANDBOOK
*Archaeologists Field Handbook 29/6/04 5:25 PM Page 220

WChecklist for recording open artefact scatters
Note the following:
❑ the location of the scatter (i.e. what enabled you to see it—is it within an erosionscar? On a vehicle track? In a sparsely vegetated area? Beside a creek?);
❑ the visibility conditions on the scatter (i.e. how much of the ground surface is visiblehere?);
❑ the visibility conditions off the scatter (the comparison between this and the condi-tions on the scatter will help you to determine whether there might be more artefactspresent than you can actually see);
❑ the length of the scatter;❑ the width of the scatter;❑ the approximate density of artefacts within the scatter (usually expressed as the
number of artefacts per square metre);❑ the different raw materials within the scatter (if you can’t actually identify particular
types by name, at least note down the colour range and graininess of the stone—isit fine grained? Coarse grained?) (for more information see ‘Denis Byrne’s tips forrecording stone artefact raw materials’ on page 217);
❑ the range of artefact ‘types’ within the scatter (for more information, see ‘Recordingstone artefacts’ on page 208);
❑ the range of artefact sizes within the scatter;❑ the presence of any other indications of human behaviour (i.e. charcoal, bone,
hearths, contact materials) in the scatter;❑ any potential for sub-surface/excavatable deposits;❑ any potential sources of damage to the scatter (i.e. are animals disturbing it?
Vehicles? People?).
RECORDING ROCKSHELTERS
Many rockshelters in Australia will have been used by Indigenous people at some point inthe history of our country. Rockshelters are a place to rest, to keep out of the sun, to avoidrain, to sleep and to look out from. They are located in escarpment country, providing asafe and sheltered place with a view of the surrounding area. Those that are located nearwater are a favoured place for people to live. However, the fact that a rockshelter wasinhabited by people in the past does not mean that there will always be archaeologicalevidence of such use. Surface evidence is often ephemeral. It can blow away or be disturbedby animals, or it can be covered by later deposits.
RECORDING INDIGENOUS SITES 221
*Archaeologists Field Handbook 29/6/04 5:25 PM Page 221

WThe recording of rockshelters is fundamental to Indigenous archaeology. Once again,
when recording a rockshelter, the first decision you will need to make is where the site’sboundaries are. It doesn’t really matter at which point you decide that the shelter ends aslong as you record the reasons for your decision. You may decide that a group of fallenboulders marks one end of the shelter, or that it comes in sharply at a particular pointwhich works to define the point between inside and outside. The main thing is to recordwhy you have made your decision with the aim of making it possible for another researcherto replicate your methods and verify your results.
Checklist for recording rockshelters
Record the following:
❑ the aspect of the shelter (i.e. what direction is it facing?);❑ the degree of slope leading up to the shelter (measured with a clinometer).
Draw a plan of the rockshelter showing:
❑ the shape of the rear wall of the shelter;❑ the shape of the front of the shelter;❑ the position of the drip line(s), or the limit of the dry area under the rock overhang
(literally the line along which the rain will drip). This is particularly important torecord as it may show you the areas most intensely occupied by people and the areaoutside the shelter where artefacts may have been disturbed by erosion;
❑ the position of the limit of rock overhang (this may or may not, and usually will not,coincide with the drip line);
❑ the location of major features of the site, such as large boulders, major rock falls,grinding grooves, or rock art panels;
❑ the location of major rock art motifs;❑ the location of any surface archaeological material.
Prepare a cross-section (side view) of the shelter showing:
❑ the height of the roof;❑ the level of the floor;❑ the extent of the liveable area;❑ the location of any major features, rock art motifs or surface archaeological material.
If there is surface archaeological material, note:
❑ the range of artefact types present;❑ the range of raw materials present;
222 THE ARCHAEOLOGIST’S FIELD HANDBOOK
*Archaeologists Field Handbook 29/6/04 5:25 PM Page 222

W❑ the distribution of material across the surface (i.e. are there any obvious concentra-
tions of artefacts which might indicate places for future excavation?);❑ whether there is any evidence of animals regularly using the shelter (which could have
disturbed the archaeological material and its patterning).
RECORDING ROCK ART
The main challenge in recording rock art is to record the motifs accurately withoutdamaging them. Rock paintings, in particular, are often frail and you will have to userecording methods that do not involve touching the art surface. The most effective wayof recording rock art is through drawing the motifs in the field (see ‘Drawing rock art’ onpage 302), or taking photographs and then drawing the motifs from the photographs (see‘Photographing rock art’ on page 281). When photographing rock art, it is especiallyimportant to remember to include a metric scale which incorporates a colour standard(such as the one supplied by the International Federation of Rock Art Organisations*(IFRAO), as this will help you to judge the authenticity of the colour of the paintings.Make sure you note the technique(s) used in producing the art (see Table 7.1), the locationof the rock art panels and any sources of potential damage.
TABLE 7.1: How to recognise different rock art techniques (after Clegg 1983: 90)
Rock art technique (How it’s made) Distinguishing characteristics (What it looks like)
Rock art made by removing material from the rock surface (engravings, petroglyphs, carvings)A. Friction:A (i). Scratched (single stroke) A U-shaped or V-shaped grooveA(ii). Abraded (repeated friction) A U-shaped or V-shaped grooveA(iii).Rubbed (broad surface) A rubbed areaB. Percussion:B (i). Pounded (direct percussion, A pit (round, oval, deep, shallow, etc.)
e.g. hammering)B(ii). Pecked (indirect percussion, A pit (round, oval, deep, shallow, etc.)
e.g. chiselling)C. Rotation:Drilled A pit (round, oval, deep, shallow, etc.)
Rock art made by adding material to the rock surface (coloured paintings, drawings)D. Mechanical:D (i). Stencil Paint sprayed around the outline of an object
(often a hand)(continues)
RECORDING INDIGENOUS SITES 223
*Archaeologists Field Handbook 29/6/04 5:25 PM Page 223

WTABLE 7.1: continued
Rock art technique (How it’s made) Distinguishing characteristics (What it looks like)
E. Delineated: Will look three-dimensionalE (i). Painting (materials applied when wet)E (ii). Drawing (materials applied when dry)E(iii).Beeswax (pressed on and shaped
when moist)
Note: The symbol ‘/’ is the shorthand for denoting that one technique is applied on top of another (super-imposition)—e.g. D(i)/E(ii), or stencil superimposed on drawing.
Bruno David’s tips to see the invisible
Aboriginal and Torres Strait Islander rock paintings differ from one place to the next.They also vary over time. Yet, until recently, rock art researchers across the continent havebeen tethered by two critical factors: the difficulties of dating rock art; and the tendencyfor older art in particular to fade or to otherwise disintegrate. As a consequence, untilthe 1980s, few archaeologists systematically incorporated rock art within regionalhistorical studies and, even when they did, much rock art—and particularly the olderpigment art—failed to be recognised due to its damaged state.
One solution is now emerging. During the 1960s, secret spy satellite programs andtechnologies used in space exploration missions such as the Ranger lunar space craftprogram (1961–65) gave birth to digital image enhancement. What is relatively new isthe accessibility of this technology to the public on a large scale. The 1990 release ofAdobe Photoshop for home computers made the tools for digital image enhancementcommercially available, and subsequent versions of Photoshop for Windows PCs tookthe technology to new domestic heights.
Today, image enhancement can be undertaken using commercially availablesoftware such as Adobe Photoshop or Corel Photo Paint, and hardware that is bothcost-effective and highly portable. What this means for archaeologists is the possibilityof rendering previously invisible rock paintings visible again. The principles work like this:
• Different colours consist of electromagnetic waves of various lengths.• Rock paintings can fade through time through various processes, including the
action of water, dust and the like.• The process of fading often involves the development of opaque films—whether
silicate or otherwise—over pigment art.• These grey films are unsaturated colours—that is, they are a combination of all
colours.
224 THE ARCHAEOLOGIST’S FIELD HANDBOOK
*Archaeologists Field Handbook 29/6/04 5:25 PM Page 224

W• By asking the computer to change or enhance particular wavelengths or colours on
a digital photograph—for example, by preferentially saturating the distinctive coloursof paintings (and getting rid of greys), we can highlight pigment colours and thusminimise the effects of fading.
It is best to enhance images by first downloading digital photographs or digital scansof images on to the computer, and opening them as uncompressed TIFF rather thanJPEG files. Once opened in an enhancement program such as Adobe Photoshop, imagescan be enhanced through the Image (Adjust) channels.
Apart for revealing previously hidden rock art, digital enhancement has the advan-tage of being able to produce results immediately and, once the basic hardware andsoftware (laptop, camera, software) are to hand, results can be both checked againstrock surfaces in the field and shown to community members, including elders who maynot be able to go to the sites. These potentials are exciting and are just waiting to be fullyexploited by researchers and communities wishing to document their own ancestralplaces across Australia.
Checklist for recording rock art
Record the following:
❑ the location of the panel or motifs within the shelter or rock outcrop (this should betied to a site plan);
❑ a general description of the rock art and the motifs;❑ detailed drawings of individual panels or motifs;❑ the colours of the motifs (you can identify these by using a Munsell colour chart, or
a PANTONE® swatch set—See ‘Drawing rock art’ on page 302);❑ the time of day that you made the recording (believe it or not, the quality of light
hitting the rock surface at different times of the day can affect your ability both tosee motifs and to accurately describe their colours);
❑ photographs of the panels and motifs;❑ any potential sources of damage to the art (i.e. have wasps built their nests across
the art surface? Is rainfall washing across the rock surface? Have parts of the rocksurface flaked or fallen off?);
❑ the condition of each individual motif.
RECORDING INDIGENOUS SITES 225
*Archaeologists Field Handbook 29/6/04 5:25 PM Page 225
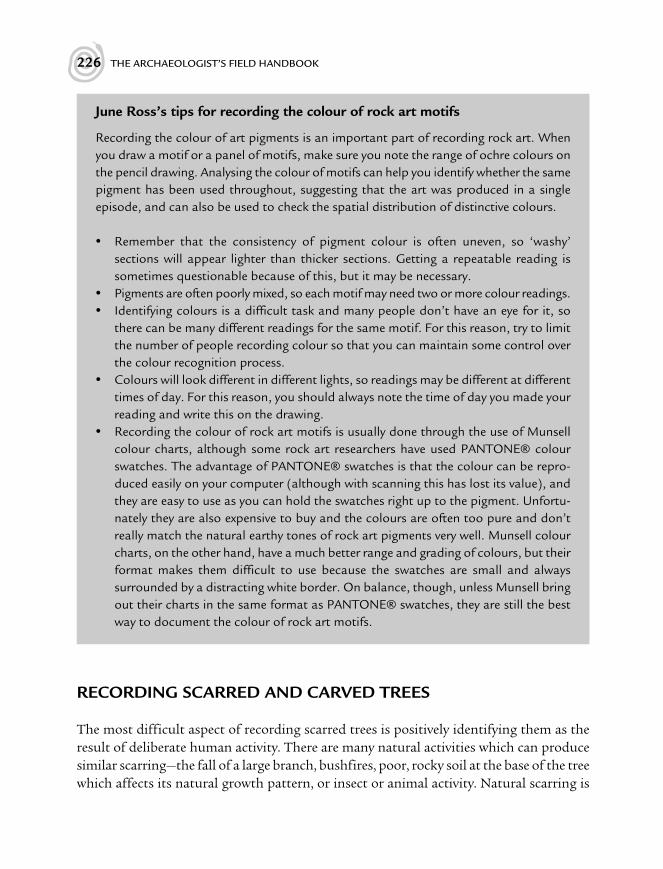
WJune Ross’s tips for recording the colour of rock art motifs
Recording the colour of art pigments is an important part of recording rock art. Whenyou draw a motif or a panel of motifs, make sure you note the range of ochre colours onthe pencil drawing. Analysing the colour of motifs can help you identify whether the samepigment has been used throughout, suggesting that the art was produced in a singleepisode, and can also be used to check the spatial distribution of distinctive colours.
• Remember that the consistency of pigment colour is often uneven, so ‘washy’sections will appear lighter than thicker sections. Getting a repeatable reading issometimes questionable because of this, but it may be necessary.
• Pigments are often poorly mixed, so each motif may need two or more colour readings.• Identifying colours is a difficult task and many people don’t have an eye for it, so
there can be many different readings for the same motif. For this reason, try to limitthe number of people recording colour so that you can maintain some control overthe colour recognition process.
• Colours will look different in different lights, so readings may be different at differenttimes of day. For this reason, you should always note the time of day you made yourreading and write this on the drawing.
• Recording the colour of rock art motifs is usually done through the use of Munsellcolour charts, although some rock art researchers have used PANTONE® colourswatches. The advantage of PANTONE® swatches is that the colour can be repro-duced easily on your computer (although with scanning this has lost its value), andthey are easy to use as you can hold the swatches right up to the pigment. Unfortu-nately they are also expensive to buy and the colours are often too pure and don’treally match the natural earthy tones of rock art pigments very well. Munsell colourcharts, on the other hand, have a much better range and grading of colours, but theirformat makes them difficult to use because the swatches are small and alwayssurrounded by a distracting white border. On balance, though, unless Munsell bringout their charts in the same format as PANTONE® swatches, they are still the bestway to document the colour of rock art motifs.
RECORDING SCARRED AND CARVED TREES
The most difficult aspect of recording scarred trees is positively identifying them as theresult of deliberate human activity. There are many natural activities which can producesimilar scarring—the fall of a large branch, bushfires, poor, rocky soil at the base of the treewhich affects its natural growth pattern, or insect or animal activity. Natural scarring is
226 THE ARCHAEOLOGIST’S FIELD HANDBOOK
*Archaeologists Field Handbook 29/6/04 5:25 PM Page 226

Wmuch more common than Indigenous scarring. As a general rule, scars made by peopleremoving bark tend to be regular in shape and located above ground level, and will oftenshow axe marks or other related evidence. Natural scars are often ragged and uneven, havepeaked ends, are strangely placed (i.e. they might be very high up the tree), or extend downto the ground surface. The identification of humanly scarred trees is complicated by thefact that trees continue to grow after scarring. As the bark around the scar continues togrow, the original edges of the scar close over and are no longer clearly definable and, asthe tree grows in height, the height of the scar above ground may also increase. Unfortu-nately, the older the scar, the greater its exposure to weathering and the harder it will beto interpret (Long 1998).
Once a tree has been identified as humanly scarred, you then need to decide whetherthe scarring results from Indigenous or European activity. In many cases, early whitesettlers used bark extensively for containers, shingles or roofs, and in these situations thescars may be indistinguishable from Indigenous scarring.
Carved trees are much easier to recognise, since the patterns carved into the heart-wood of the tree are unmistakably human. You should record the same type and rangeof information for a carved tree as a scarred one, bearing in mind that carved treeswere often associated with ceremonial grounds or burial sites, so there may well be other,highly sensitive, archaeological evidence in the vicinity (a recording form is provided inAppendix 1). You should also be aware that European surveyors occasionally marked treeswith a half-oval or gothic arch (a surveyor’s shield), containing a broad arrow or carvedfigures and letters. These are immediately recognisable, but should still be recorded.
Criteria for identifying a scarred tree
• The type of tree. First ask yourself whether the tree species is one which is known tohave been used for bark removal, or whether the nature of the bark is comparableto known species. Not surprisingly, Indigenous people used the bark of particularkinds of trees for a reason. In eastern New South Wales, for instance, box trees and riverred gums were commonly used by Indigenous people because the bark could be leveredoff in sufficiently large sections to be useful (Bowdler 1983a: 43). By extension, it ishighly unlikely that introduced species would have been scarred by Indigenous people.
• The presence of axe marks. Because of regrowth around the margins of the scar,normally only upper and lower axe marks on a scar will be visible. These will look likesingle or parallel lines at the top and base of the scar. Bear in mind that axe marks fromstone axes are likely to be less sharp and clean than those from steel axes, because theangle at the point of a stone axe is less acute. Typical stone axe marks will look likebroad, asymmetrical ‘bludgeon’ marks, with possible crushing of the underlyingsapwood. Steel axes, on the other hand, will leave straight, narrow and often quite deep
RECORDING INDIGENOUS SITES 227
*Archaeologists Field Handbook 29/6/04 5:25 PM Page 227

Wincisions (Long 1998) (see Figure 7.8). Don’t automatically discard the possibility of atree being scarred by Indigenous people just because it has steel axe marks. Steel axeswere highly valued by Indigenous people and were traded extensively throughoutAustralia long before any direct contact with Europeans. The existence of such markstherefore only dates a scar to after the initial European occupation of Sydney, ratherthan to the first direct incursion of Europeans into an area. Europeans also removedbark from trees for roof shingles, or as sheets to cover a lean-to. Often they removed itby making zig-zag ‘herringbone’ cuts at the top and the bottom of the scar, which arereadily identifiable. However, you need to be aware that in some areas Indigenouspeople produced similar ‘herringbone’ patterning when removing bark for roofingmaterial.
228 THE ARCHAEOLOGIST’S FIELD HANDBOOK
FIGURE 7.8: A comparison between stone and steel axe marks. Stone axes typically leavebroad, asymmetrical ‘bludgeon’ marks, sometimes accompanied by crushingof the underlying sapwood (a). Cut marks from steel axes, on the other hand,tend to be much deeper, straighter and narrower (b).
Because the edge of a steel axe is so sharp, the cut marks it tends to produce are typically straight, narrow and often quite deep incisions. On the left are marks produced by a modern hand steel axe; on the right are marks produced by a nineteenth century
trade axe made from wagon sprig iron and dating to the late 1800s.
Axe marks produced by stone axes tend to be broader, shallower and asymmetrical and, because it takes numerous strikes to cut through the bark, often cause crushing of the underlying sapwood. Both sets of marks were made
using a replica stone axe. Source: photos and orginal study by Penny McCardle
a
b
*Archaeologists Field Handbook 29/6/04 5:25 PM Page 228

W• The shape of the scar. Among other things, Indigenous people used bark both for
containers and as sheets for shelters. If a scar has a regular outline consistent with aparticular known artefact type (e.g. with rounded ends in the case of canoes or con-tainers, or squared ends in the case of shelter slabs), it is likely to be authentic (Long1998). There are a number of natural factors which can also cause scarring, but allinvolve the bark being ripped instead of cut off, and all consequently result in scarswith jagged and sharp ends. Such natural scars will often continue to ground level.
• The height of the scar above ground level. Indigenous people are likely to haveremoved bark from trees at comfortable working heights. Bearing in mind that thescarring of trees by Indigenous people will probably not have occurred in many areasof Australia within the last 50 years, any tree with a scar with a height above ground ofless than 1 metre is unlikely to be of Indigenous origin.
• The position of the scar. In the case of canoes and containers, bark was often removedfrom the convex side of the trunk or branch to give suitably upturned sides to thefinished artefact (Long 1998). Some deliberate human scarring removed bark fromthe branches of the tree, so examine all convex surfaces, not just the trunk.
RECORDING INDIGENOUS SITES 229
FIGURE 7.9: European and Indigenous scarring of trees versus natural scarring
*Archaeologists Field Handbook 29/6/04 5:25 PM Page 229

WChecklist for recording scarred and carved trees
Record the following:
❑ the number of scars on the tree;❑ the location(s) of scars on the tree;❑ the length of the scar (measured along the central axis);❑ the width of the scar (measured along the central axis);❑ the shape of the scar (are the ends pointed, or rounded? Does the scar have parallel
sides? Is the scar symmetrical?);❑ the degree of scarring (i.e. has only the bark been removed? Has the heartwood been
removed as well?);❑ the depth of the scar (i.e. the thickness of the bark at the edges of the scar);❑ the extent of regrowth around the edges of the scar (you will have to estimate this);❑ the presence of axe marks and whether they are from stone or steel axes;❑ the height above ground of the base of the scar;❑ any designs that are visible in the heartwood of the scar;❑ if the tree is alive, what species it is;❑ if the tree is standing, what height it is;❑ if the tree is dead, whether it is still standing or fallen;❑ the girth of the trunk (this may give you an indication of how old the tree is) at the
middle of the scar;❑ any potential sources of damage to the tree;❑ the degree of preservation of the scar (this would usually be expressed as Good
[i.e. >80 per cent intact], Fair [20–80 per cent intact] or Poor [<20 per cent intact]);❑ if the tree is a carved tree, you must also record the type of markings (i.e. are they
parallel lines? Criss-cross lines? A linear pattern?). If it is a survey tree, note thesurveyor’s mark.
If possible, you should also try to attribute an origin to the scar—is it definitely Indige-nous? Probably? Possibly natural? If you think that the scar is natural, note down whatfeatures might have caused the scarring (e.g. a fallen branch, lightning strike, poor/rockysoil, vehicle activity, etc.).
RECORDING QUARRIES
A quarry may be anything from a rock outcrop that has been quarried once to a highlyprized and carefully managed source which may have been quarried over generations andto which access was tightly controlled. In general, Indigenous people preferred particular
230 THE ARCHAEOLOGIST’S FIELD HANDBOOK
*Archaeologists Field Handbook 29/6/04 5:25 PM Page 230

Wkinds of stone when making artefacts. Very fine-grained stone not only makes thesharpest artefacts, but is also the easiest to knap successfully. Chert, mudstone, silcrete,quartzite and chalcedony were all preferred materials for stone artefacts and thus also forstone artefact quarries. A recording form for quarries or quarried stone outcrops isincluded in Appendix 1.
Checklist for recording stone artefact quarries
Record the following:
❑ the material form of the quarry (Is it a rock outcrop? River cobbles?);❑ the site location (e.g. is it on a hilltop? Beside a creek or river? On a slope?);❑ the particular features of the quarry (e.g. can you see pits from quarrying activity? Are
there flaking or knapping floors there? Are there other imported raw materials at thesite? Can you see flake removal scars on boulders?);
❑ if there is surface artefactual material, what the artefact density is;❑ whether there are other stone artefacts present. If so, what are they? What is the
percentage of cortex on these artefacts?❑ if the site is an outcrop, an estimate of the percentage that is worked;❑ any potential sources of damage to the site;❑ if known, the distance to isolated artefacts or sites in the vicinity.
RECORDING MIDDENS
The first task when recording a shell midden is to establish whether it is indeed a humanlycreated midden or a natural shell bed. This is not as simple as it sounds, however, becausea variety of factors—such as the diversity of the shoreline, the location of the midden inthe landscape and the past land use history of the area—can affect the form and contentof both natural and humanly created middens (Attenbrow 1992; Bonhomme 1999). Thereis no single criterion that positively identifies an Indigenous midden, but there are somegenerally accepted criteria which might be helpful in distinguishing a shell midden fromother types of shell deposit (Attenbrow 1992; Bonhomme 1999) (see Table 7.2).
When recording a shell midden, you need to record its form, dimensions, context andthe numbers and proportions of different shell species which are present, as well as anyother artefacts which it contains. To understand how the midden relates to its environ-ment, you should also take note of whether similar shellfish species are available nearby,and what the local estuary, river, rock platform or beach is like now (Sullivan 1989: 52).Shells are mainly calcium carbonate and, as they decay, they create a highly alkaline
RECORDING INDIGENOUS SITES 231
*Archaeologists Field Handbook 29/6/04 5:25 PM Page 231

W
environment which tends to preserve bone and other organic remains quite well. Thismeans that the excavation of a shell midden can be quite productive in terms of recover-ing a wide range of organic remains (see ‘Val Attenbrow’s tips for excavating shellmiddens’ on page 145).
Checklist for recording shell middens (after Bonhomme 1999; Sullivan1989)
Record the following:
❑ the location of the midden (Is it a beach midden? Eroding from a dune? Beside alake? On a creek or riverbank?);
❑ the local conditions (i.e. has it been revealed through erosion? Is the dune/riverbank/beach stable?);
❑ the curvature of the midden (Is it mounded? Is it flat?);❑ the shape of the midden (Is it elongated? Circular?);❑ the length of the midden;
232 THE ARCHAEOLOGIST’S FIELD HANDBOOK
TABLE 7.2: Characteristics for distinguishing between a humanly created shell midden anda natural shell bed (after Bowdler 1983b: 137; Bonhomme 1999)
Characteristics of an archaeological Characteristics of a natural shell bedshell midden
Should contain greater proportions of ‘edible’ Should contain greater proportions of ‘inedible’ shell species (usually defined as larger than shell species (smaller than 15 mm)15 mm*)Should contain a smaller proportion of Should contain a greater proportion of articulated shell articulated shellMay contain artefacts (but note that many Will not contain artefactsmiddens do not)Usually located close to the resource on thefirst available flat ground above the hightide markMay contain the bones of animals used for May contain naturally incorporated fish bonesfood (but note that many middens do not)May contain a small proportion of marine Should contain a greater proportion of marinelife not used by Aboriginal people life not used by Aboriginal people, such as tube
worms, coral, pumice, etc.
* Species are considered ‘non-edible’ if they are too small to provide a reasonable amount of flesh(Attenbrow 1992: 15)
*Archaeologists Field Handbook 29/6/04 5:25 PM Page 232

W❑ the width of the midden;❑ whether it has potentially excavatable deposits;❑ if it has some depth, whether this depth is even or uneven across the midden;❑ the minimum and maximum depths;❑ the estimated volume of the midden;❑ the species of shell(s) to be found in the midden (you should try to record the full
range of shells visible on the surface to species level if possible);❑ the relative proportions of different species (calculated by number and/or weight);❑ the size of different species and their relative proportions;❑ the condition of the shells in the midden. Are they whole? Still articulated? Water
worn? Broken? Burnt?❑ an estimate of the rank and order of abundance of shell species (what are the
dominant, rare and common species?);❑ the nature of any other artefacts in the midden;❑ any potential sources of damage to the midden.
RECORDING STONE ARRANGEMENTS
The methods you will use to record stone arrangements will be determined by the mannerin which the stones are arranged. Some stone arrangements are linear and some arecircular or oval in shape. Some are very extensive and contain tracks, circles and otherlinked sections. When you are recording a stone arrangement, you need to rememberthat the stones may not be in their original positions. Often you won’t be able to tell, butsometimes removed stones will have a different pattern of weathering to the other stonesin the arrangement and sometimes the displacement will be really clear, such as when aroad has been bulldozed through the middle. In the latter case, you would record eachpart of the arrangement as a separate feature, but record in your notes your interpretationthat these were once part of the one arrangement.
Checklist for recording stone arrangements
Record the following:
❑ a plan of the site;❑ the type(s) of stones;❑ the size of the stones;
RECORDING INDIGENOUS SITES 233
*Archaeologists Field Handbook 29/6/04 5:25 PM Page 233

W❑ the assumed function of the arrangement (e.g. fishtrap, ceremonial, etc.). This may
not always be possible to work out;❑ anything unusual about the arrangement;❑ its proximity to other sites;❑ any sources of damage to the site.
RECORDING CONTACT SITES
The recording and analysis of contact sites is an exciting and expanding area of Australianarchaeology (see, for example, Harrison and Williamson 2002; Lilley 2002). Until recently,the archaeological potential of contact sites was vastly underrated, because there was anoften implicit assumption that Indigenous behaviour since contact was not ‘traditional’,or that Indigenous ways of life in the recent past were not intrinsically interesting. In partthis may be because it can be very difficult to identify a contact site in the first place. If ascarred tree has the marks of a steel axe used to obtain bark for a traditional Indigenouscontainer, is this a contact site? In a sense it is, but this is not usually what we mean.Normally, a contact site is defined as one with evidence for the Indigenous adaptation ofmaterials or technology that were introduced to Australia by another people, usually theBritish. Thus a site containing flaked glass would be considered a contact site, as would asite which showed evidence of the re-use of iron or railway sleepers. Ironically, we do notconsider a place where Europeans have used Indigenous technology or materials to be acontact site, which indicates how Eurocentric our ideas still are. As this implies, contactsites are to do with understanding Indigenous ways of thinking and living, rather thanthe ways of other groups.
Contact sites are best identified through reference to the history of the region and thesurrounding material culture, or through interviewing Indigenous people (see ‘RecordingIndigenous histories’ on page 235). For example, if you find a pile of cans in the middleof the bush, and are not sure whether these are the remains of a European or an Indige-nous camp, you could start by looking for other types of material evidence. Are there stoneartefacts or scarred trees close by? Does the site seem to be meaningfully located inrelation to these? You need to remember that it is very difficult to prove a meaningfulassociation between artefacts in a surface assemblage, as these materials could have beenleft behind at very different times. So the location of a pile of tin cans near a stone artefactscatter or hearth does not automatically constitute a contact site. You would then needto consider the site in terms of the history of the area. If it is near a mission, a fringe campor a pastoral station, or located on Indigenous lands or along Indigenous travel pathways,
234 THE ARCHAEOLOGIST’S FIELD HANDBOOK
*Archaeologists Field Handbook 29/6/04 5:25 PM Page 234

Wthe chances of it being a contact site would be greatly increased (although, of course,contact sites may still be found outside any of these areas).
Contact sites encompass a range of site types (rock art, middens, rockshelters, openartefact scatters, etc.), but are also likely to incorporate the material culture of othergroups. Contact sites are recorded using the methods suited to that particular site type,but there are some additional factors you need to keep in mind:
• It is extremely difficult to distinguish between glass which has been flaked intention-ally and glass which has flake scars from being hit by a bulldozer, or crushed by someother means. Unless you are an expert at the identification of flaked glass, this issomething that needs to be assessed critically in terms of the site location (e.g. in themiddle of isolated bush versus beside or on a road) and against other material that isfound at the site (i.e. is there flaked stone there as well?).
• A contact site can also be indicated by the use of material in a different context tothat in which it is normally found. For example, some of the churches in northernAustralia have a mixture of both Christian and Indigenous imagery.
RECORDING INDIGENOUS HISTORIES
The methods used to record Indigenous histories are comparable to those used to recordany oral histories (see ‘Recording oral histories’ on page 197). In dealing with Indigenouspeople or communities, there are several specifics that you should bear in mind:
• Be aware that Indigenous people often think it is rude to ask direct questions. They aretherefore likely to be under more stress than non-Indigenous people when a formalinterview is being conducted.
• It is important to leave room for Indigenous people to shape the interview processthemselves. This can be done by allowing people to go off on tangents, or talkingabout the things that are important to them (but which may not be of immediateimportance to you). Often, this will deepen the quality of the interview and is part ofestablishing trust between the interviewer and the person being interviewed.
• If people avoid answering a question, it is usually because it is not something theywish to answer. Don’t harass them, and take constant note of their body language as this will give you a clue as to how comfortable they are feeling during the interview.
• Sometimes people may know the answer but will not have a right to speak on thatparticular topic. In this case, they may direct you to the person who does have a rightto speak, by saying ‘Ask Joe’ or ‘Mary might know about that’. This is not a refusal to
RECORDING INDIGENOUS SITES 235
*Archaeologists Field Handbook 29/6/04 5:25 PM Page 235

Whelp you, but Indigenous protocol for dealing with information in a system ofrestricted knowledge.
UNDERTAKING ETHNOHISTORIC RESEARCH
Ethnohistoric research is an important part of most Indigenous archaeological projectsand will form a part of the literature review for any good Indigenous consultancy project.Ethnography is the study of living peoples; ethnohistoric research uses historicalaccounts of Indigenous people written by Europeans in the early contact period to recon-struct what Indigenous culture in this period may have been like. Ethnohistoric sourcescan provide information on how people were moving through the landscape or usingparticular areas, what plant and animal resources they relied on (and, from this, wheresites might be located), their language, beliefs, diet, ceremonies, dwellings, hunting tech-niques, and what objects they made or traded with other groups. Sources of informationinclude explorers’ journals, official reports, settlers’ diaries, letters or reminiscences,accounts of early anthropologists, and any other early record left by those who came incontact with Indigenous people. You can find this material in any major or state library,and even in local historical society collections and libraries. The Australian Institute ofAboriginal and Torres Strait Islander Studies has an excellent collection linked to MURA,its searchable online database.
Archaeologists use ethnohistoric sources to reconstruct in some measure the post-contact cultural environment of Indigenous people. There are obvious problems with this,however—most notably that these sources have the same inherent problems as all writtendocuments (see ‘Using historical documents’ on page 167). They were written by a par-ticular person for a particular purpose, and will tend only to include the information thatthe observer thought was relevant at the time. The cultural barriers between Europeansand Indigenous people also affected the accuracy of their ethnographic observations—many accounts contain descriptive or other incidental observations of a culture which theEuropeans little understood and may have had little sympathy for (Byrne 1997). There isalso an expectation that the earlier the account, the more closely it will resemble the pre-contact ‘truth’ of how Indigenous people actually lived, but you must bear in mindthat by the time even the earliest accounts were written, European observers were alreadywitnessing a society radically changed by the contact process. Because of the extremelycomplex social networks linking Indigenous people throughout Australia, many groupsalready had access to European goods through their trading networks long before theyfirst saw a white person. When Ludwig Leichhardt first travelled through north Queens-land in 1845, for instance, some twenty years before the first settlers colonised this partof Australia, he mentioned seeing European artefacts in abandoned Indigenous camps.
236 THE ARCHAEOLOGIST’S FIELD HANDBOOK
*Archaeologists Field Handbook 29/6/04 5:25 PM Page 236
WOther problems with the use of ethnohistoric sources are that many observations weremade of small groups of people undertaking specific, often highly seasonal, tasks only,and do not reflect the broader range of activities of the larger Indigenous group.
Finally while ethnohistoric accounts are invaluable for the insights they can provideinto the immediate post-contact period, they are also tightly restricted in time and space,and cannot be applied to geographically separate groups of people or to people inhabit-ing the same area in even the recent, let alone the distant, pre-contact past.
WHAT TO DO IF HUMAN REMAINS ARE ENCOUNTERED
Indigenous burials can be located in many different contexts, from coastal, inlandor desert sand dunes to middens, rockshelters, caves, clay lunettes on lake margins, oreven in clefts in rocks (Thorne and Ross 1986: 9–10). For this reason, it is possiblethat you might encounter them during fieldwork. If you do encounter human remainsduring excavation or survey (this is possible if Indigenous burials are actively eroding), itis imperative that work ceases immediately until a positive identification of the remains(first, as definitely human—you would be surprised at how many sheep bones are initiallymisidentified—and second, as Indigenous) can be made.
Under no circumstances should you remove the remains or interfere with thesurrounding soil matrix in which they occur.
In some cases, it may be possible to determine whether or not the remains are Indige-nous by a careful but non-intrusive examination of the grave and any associated features.
Identifying Indigenous burials
The Skeleton Manual (Thorne and Ross 1986: 32–33) sets out some criteria for identifyingwhether or not a burial might be Indigenous:
• Is the grave small, shallow and/or oval in shape?• Is the grave outlined by salts from contact with local ground water (indicating that
it may be very old)?• Has it been dug into hard deposits but without any evidence for metal tools having
been used?• Is it associated with other Indigenous cultural material (such as stone artefacts,
ochre, animal bones or shell)?• Does the burial occur within an ancient landscape or is it associated with a known
Indigenous burial site?
RECORDING INDIGENOUS SITES 237
*Archaeologists Field Handbook 29/6/04 5:25 PM Page 237

W• Does the grave contain bones from more than one individual?• Are the bones in a flexed position (i.e. are the legs drawn up to the abdomen or chest,
or are the arms folded against or across the chest)?• Have the bones been made into a relatively small bundle (i.e. are the legs, arms and
torso very close together)?• Are the bones hard and mineralised, encrusted with carbonate or other salts, or
discoloured from long contact with the soil?
Answering yes to any of these questions may mean that the burial is Indigenous.
If your answer is still inconclusive, however, you will need the help of a physical anthro-pologist to examine the bones. Remember that, if the bones are Indigenous, they will beprotected by legislation and if the burial is recent it will immediately become a policematter. Either way, any unauthorised disturbance of the skeletal remains or theburial will be illegal. If the remains need further identification you should contactthe police and the relevant government authority for Indigenous heritage mattersimmediately.
REFERENCES AND FURTHER READING
Attenbrow, Val 1992, ‘Shell bed or shell midden’, Australian Archaeology 34: 3–21.Bonhomme, Theresa 1999, ‘Shell middens on the Central Coast of New South Wales: a
discussion of problems in distinguishing natural shell deposits from cultural shellaccumulations’, in Jay Hall and Ian McNiven (eds), Australian Coastal Archaeology, ANHPublications, Department of Archaeology and Natural History, RSPAS, ANU, Canberra,pp. 229–33.
Bowdler, Sandra 1983a, Aboriginal Sites on the Crown Timber Lands of New South Wales, a report tothe Forestry Commission of New South Wales.
Bowdler, Sandra 1983b, ‘Sieving seashells: midden analysis in Australian archaeology’, in G. Connah (ed.), Australian Field Archaeology: A Guide to Techniques, AIAS, Canberra: pp. 135–44.
Byrne, D. (ed.) 1997, Standards Manual for Archaeological Practice in Aboriginal Heritage Manage-ment, NSW NPWS, Sydney.
Clegg, John 1983, ‘Recording prehistoric art’, in G. Connah (ed.), Australian Field Archaeology: A Guide to Techniques, AIAS, Canberra, pp. 87–108.
Fullagar, Richard 1989, ‘On site functional analysis of stone tools’, in J. Flood, I. Johnson, andS. Sullivan (eds), Sites and Bytes: Recording Aboriginal Places in Australia, Australian HeritageCommission Special Australian Heritage Publication Series No. 8, Australian GovernmentPublishing Service, Canberra, pp. 39–48.
238 THE ARCHAEOLOGIST’S FIELD HANDBOOK
*Archaeologists Field Handbook 29/6/04 5:25 PM Page 238

WHarrison, Rodney and Willamson, Christine 2002 (eds), After Captain Cook. The Archaeology of
the Recent Indigenous Past in Australia, Sydney University Archaeological Methods Series 8,University of Sydney.
Hiscock, P. 1988, ‘Archaeological investigations in the Boulia district, Southwestern Queens-land’, unpublished report to the Australian Heritage Commission and the QueenslandMuseum.
Hiscock, P. 1989, ‘Artefact recording in the field’, in J. Flood, I. Johnson and S. Sullivan (eds),Sites and Bytes: Recording Aboriginal Places in Australia, Australian Heritage CommissionSpecial Australian Heritage Publication Series No. 8, Australian Government PublishingService, Canberra, pp. 20–38.
Jones, A. (ed.) 1988, Aboriginal Sites of New South Wales, New South Wales National Parks andWildlife Service, Sydney.
Lilley, Ian (ed.) 2000, Native Title and the Transformation of Archaeology in the Postcolonial World,Oceania Monograph 50, University of Sydney.
Long, A. 1998, ‘An assessment of scarred trees and a stone arrangement at Timbarra, Tenter-field, northeast NSW’, unpublished report to NSW National Parks and Wildlife Service,Northern Aboriginal Heritage Unit.
McBryde, I. 1974, Aboriginal Prehistory in New England, Sydney University Press, Sydney.Meehan, B. 1982, Shell Bed to Shell Midden, AIAS, Canberra.Morwood, Mike 1994, ‘Handy household hints for archaeological excavations at rock art sites’,
Rock Art Research 11: 10–12.Sullivan, M. 1989, ‘Recording shell midden sites’, in J. Flood, I. Johnson and S. Sullivan (eds),
Sites and Bytes: Recording Aboriginal Places in Australia, Australian Heritage CommissionSpecial Australian Heritage Publication Series No. 8, Australian Government PublishingService, Canberra, pp. 49–53.
Sullivan, Sharon 1983, ‘Making a discovery: the finding and reporting of Aboriginal sites’, inGraham Connah (ed.), Australian Field Archaeology: A Guide to Techniques, AIAS Canberra, pp. 1–9.
Thorne, A. and Ross, A. 1986, The Skeleton Manual, National Parks and Wildlife Service NSW,and the NSW Police Aborigine Liaison Unit, Sydney.
Wright, Richard 1983, ‘Stone implements’, in G. Connah (ed.), Australian Field Archaeology:A Guide to Techniques, AIAS, Canberra, pp. 118–25.
USEFUL WEBSITES
http://unicorn.aiatsis.gov.au/ hosts MURA, the online library catalogue of the AustralianInstitute of Aboriginal and Torres Strait Islander Studies.
TRACCE, the online Rock Art Bulletin, can be found at: www.geocities.com/Athens/2996/index.html.
RECORDING INDIGENOUS SITES 239
*Archaeologists Field Handbook 29/6/04 5:25 PM Page 239

CHAPTER EIGHTMANAGING CULTURAL HERITAGE
WHAT YOU WILL LEARN FROM THIS CHAPTER
W What cultural heritage significance isW How to assess the cultural heritage significance of a siteW How to make this process as objective as possibleW Strategies for assessing the impact of developmentW Why good management decisions can only be made after the assessment of significance W How to prepare a tender for a cultural heritage consultancy project
Much archaeological fieldwork is carried out within the confines of cultural heritagemanagement projects—the ‘business’ of archaeological consultancy. Cultural heritagemanagement is the branch of archaeology that deals with assessing the effects of develop-ment or other potentially harmful human activity on heritage sites, and takes steps toeither protect sites or to allow their destruction. This is no light matter—all archaeologistswould accept that not every archaeological site is worth preserving indefinitely. Not onlyare there insufficient resources for state authorities to physically look after every site, butpreserving every example of an open artefact scatter is not necessarily going to providebetter information than only preserving the best and most informative examples(otherwise known as a representative sample). One of the main tasks of culturalheritage management, therefore, is to assess which heritage sites are significant enoughto preserve and which are not. This requires an understanding of the process of assessing
W W W
WW
240
*Archaeologists Field Handbook 29/6/04 5:25 PM Page 240

Wcultural significance, or those aspects of a place which make it of value to society (see‘The categories of cultural significance’ on page 247).
To do this, a site must have some capacity to contribute to our understanding orappreciation of the human story (Pearson and Sullivan 1999: 7), for it is only through therelationship between a site and a community that a place can be said to be significant. Inother words, significance is a quality that is assigned to a place by people—it is not aninherent quality. For this reason, what is considered ‘significant’ can change throughtime, as history unfolds and communities change. To aid archaeologists and otherheritage professionals in making these assessments, many of the state and federal authori-ties who administer cultural heritage (notably the Australian Heritage Commission*and the New South Wales NPWS*) have developed guidelines for assessing culturalsignificance. These are usually based on comprehensive community surveys to identifywhat makes places important and, based on this information, professional workshopsdesigned to identify objective criteria against which places can be measured. Obviously,this is not—and never will be—a truly objective process: cultural heritage management isabout how people value a site, something which is often highly emotive and intuitiverather than rational and logical. This does not make cultural significance any less real orany less important, however. Relating to the tangible remains of the past in some wayenriches our lives and deepens our understanding of ourselves.
The process of significance assessment requires a firm understanding of the purposesand limitations of archaeology, the intent of cultural heritage legislation, the range of siteswhich exist across Australia, the management policies of the relevant state authorities,and the intricacies of appropriate site preservation and management measures. For thisreason, the minimum qualifications which are considered adequate for undertaking acultural heritage consultancy are an Honours degree in archaeology or a closely relatedfield, or some other form of postgraduate qualification in archaeology, such as a diplomaor Master of Letters. A Bachelor’s degree alone is usually not considered sufficient. Thisis a by-product of the ethical responsibilities of the archaeologist (see ‘Archaeologists andethics’ on page 11), in that you must be sufficiently well qualified to be able to carry outa job to acceptable professional standards. Poor-quality or ill-informed assessmentsdamage the archaeological resources and the professional standing of the archaeologicalcommunity, sometimes irretrievably.
THE BASICS
One-third of any consultancy is simple people skills: liaison, coordination and negotiation.You may have to liaise with traditional owners, land owners, historical societies, developersor engineers, grader drivers, architects or town planners, plus members of the general public,
MANAGING CULTURAL HERITAGE 241
*Archaeologists Field Handbook 29/6/04 5:25 PM Page 241

Wall of whom will have different questions and concerns. As a heritage practitioner, you havea primary ethical responsibility towards the proper conservation and management of theheritage resource. Nevertheless, you also must be aware of the pressures and constraints thatcan affect heritage projects and the range of agendas which will often exist in relation to anyheritage site. If you are being contracted to undertake heritage work, you must also bear inmind the legal right of the client to have full access to information about the site (see‘Archaeologists and ethics’ in Chapter 1), and your ethical responsibilities to the adminis-tering authority or other groups. The most common constraint on all cultural heritageconsultancy projects is time: if you are working as a consultant, you will not have the leisureof working to a pure-research timetable. In all likelihood, you will be working to somebodyelse’s schedule—somebody who may or may not be receptive to archaeology as a valid com-ponent of their project in the first place. This means that you will have to be highly focusedin how you approach the project and how you carry it out, and also be prepared to liaisebetween the often arcane practices of archaeologists and the realities of construction, engi-neering or mining projects. You may have to make rapid assessments of areas or sites,without the leisure time to investigate every square centimetre of ground. Don’t be pushedaround by developers, but be prepared to be flexible if the situation warrants it.
The most common cultural heritage consultancy projects are surveys designed to locateheritage sites, record them and assess their level of significance. Many different bodiesrequire cultural heritage management reports for a variety of purposes—private developers,local and shire councils, corporate developers, mining companies, government depart-ments, even in some circumstances private landowners. While all the basics of fieldworkwill be essential in any cultural heritage management job, you will also need to developsome extra skills. Most importantly, you will need a good understanding of the concept ofcultural significance and the standards for assessing this. You will also need to know howto make management recommendations for a site or area, as this is the ultimate end-taskof most consultancy projects. Remember, your role is to be as objective as possible, but youare also being employed as a heritage professional. Your first duty is to do the best job youcan for the heritage values of the place; your second is to try to reconcile the varied goalsof the developer or owner and any other interested parties (such as traditional owners)according to those cultural heritage values. In the main, this is what cultural heritage man-agement is all about—treading the minefield between what should happen in a perfectworld and what resolution it is best to achieve in this one. Above all, your recommendationsneed to be realistic and tailored to suit the individual circumstances of the job—there is nopoint in recommending the full-scale salvage of an area if you are working for a small clientwith limited funds. If you are ever worried about what recommendations to make orwhether you have assessed a place adequately, don’t hesistate to contact the local adminis-tering authority. Another resource is to look at similar studies by other archaeologists orassessors and to evaluate their assessments and recommendations.
242 THE ARCHAEOLOGIST’S FIELD HANDBOOK
*Archaeologists Field Handbook 29/6/04 5:25 PM Page 242

WHOW TO PREPARE A TENDER
This is part of the business of conducting a consultancy and is essentially a job applica-tion, so take it seriously. When preparing a tender, the key is to make sure both that youdo justice to the real costs of the job so that you don’t short-change yourself in the process,but also that you remain competitive. Some government departments (such as the NewSouth Wales NPWS) will issue a detailed project brief, and will expect you to address eachselection criterion in your tender. This is exactly like applying for a job—if you don’taddress the selection criteria properly, you won’t get the job. Other jobs will be less formal,and for these the onus will be on you to find out precisely what the job will entail andtherefore what it will be likely to cost. The essential first stage in preparing a tender is toget hold of a map of the area, and make sure you have a clear idea from the client aboutthe actual scope of the project. Make sure you know how large the area is, what the terrainis like, and what the client intends to do, as this will help you to calculate just how muchtime (and how many people) the job will take. If you are tendering for an Indigenousarchaeological consultancy, the other essential initial task is to track down and talk to therelevant traditional owners. This will establish a good working relationship with themeven if you don’t get the job and will alert you to any concerns or stipulations on the jobwhich they might have.
The second stage of the tender process is to construct a fair budget for the project.Like any application for funding, don’t inflate—but don’t under-estimate either. If youindicate in your tender that you can do the job properly in three days, but then find outin the field that you miscalculated and it will take twice as long, the client is unlikely tobe sympathetic that you made a mistake and you will have to wear the extra costs. Ifyou’re genuinely not sure precisely how long the job will take, however, indicate thisclearly in the tender, including your reasons for not being able to calculate it precisely.For example, you may be being asked to survey an area for Indigenous sites and thenmake management recommendations based on what you find. If you suspect that youmight locate highly significant or sensitive sites and that this might totally change thetraditional owners’ views on how the area should be managed, thus requiring more con-sultation time and costs, but cannot predict this with any certainty, you could indicatein your tender that this possibility is likely and provide an estimate of the additionalcosts should this eventuate. If you are really worried about your cost margins, it isconsidered acceptable to include a 10 per cent contingency to cover unforseen circum-stances, such as heavy rain preventing you from accessing sites, because the clientwill know that you can’t predict every eventuality. In some cases you may also be able tonegotiate a budget variation with the client if the work turns out to be far greater thanyou reasonably expected, although the success of this may come down partly to yournegotiation skills.
MANAGING CULTURAL HERITAGE 243
*Archaeologists Field Handbook 29/6/04 5:25 PM Page 243

WIn your tender you also must price yourself fairly according to your expertise. The
Australian Association of Consulting Archaeologists (AACA*) issues schedules for pro-fessional rates covering all levels of archaeological fieldwork. At the time of publication,AACA’s standard hourly rate for an archaeological consultant was $95 an hour rangingdown to $25 an hour for a trainee. Bear in mind, however, that you may need to balancea professional rate with the needs of the individual situation—a small client with limitedfunds may not necessarily be able to afford AACA’s rates. You need to take this intoaccount when you are working out the composition of your field team.
The other key in tendering successfully is to make sure that your budget is sufficient.Make sure, for example, that you remember to include fees for consultation and that youallow for the recommended three days in the office/lab for every one day you spend in thefield (see ‘Archaeologists and ethics’ on page 11). If you are including fees for Indigenousconsultants, it is wise to check their consultancy rates before you submit, because it is nogood getting the job and then finding out the Indigenous community routinely charge$40 an hour instead of the $20 you budgeted for. Remember to include an amount forreport production to cover the costs of copying and binding reports, buying film anddeveloping photographs, as well as the cost of any travel to and from the site. If you intendto get feedback on a draft of your report before submitting the final version, remember toallow extra time for rewriting and extra costs for a second round of copying and binding.
One of the main ethical principles for tendering is never to undercut (i.e. to knowinglycharge less than your nearest competitor to ensure you get the job), even though it canbe tempting. It is also unethical to knowingly tender too low a price for a project toensure that you get the job and then, once it is secured, to turn around and renegotiatethe price with the client based on the true value of the work. These practices devalueboth your work and that of others. They lead to substandard work and reflect poorly onthe professionalism of the archaeological community.
The third stage of the tendering process is to write the tender document: this willusually include some relevant background research on the area, an outline of yourproposed methods for fieldwork and analysis and an estimate of the total time the job islikely to take, as well as any other essential information which supports your budget. Tryto show some familiarity with previous research in the area, even if it is only to show thatyou are aware of it. Make sure you include an updated version of your CV, outlining yourrelevant experience, and that you have sufficient insurance to cover yourself and anyoneworking for you. Some clients (such as the New South Wales NPWS) will stipulate thatyou have appropriate insurance cover as an essential part of the tender process and willnot hire you as a contractor without it.
244 THE ARCHAEOLOGIST’S FIELD HANDBOOK
*Archaeologists Field Handbook 29/6/04 5:25 PM Page 244

WChecklist for tender documents
❑ Have you remembered to budget for travel time and costs (e.g. cents per kilometrefor your vehicle, the time you will spend in travelling)?
❑ Have you remembered to include a component for purchasing film, developing printsand any photocopying that may be required, as well as printing and binding yourreport?
❑ If you will be away from home, have you remembered to allow for accommodationand subsistence costs?
❑ Have you checked the fees for Indigenous consultants to ensure they are correct?❑ Have you made any allowance for contingencies, such as rain, or difficulty in tracking
down the appropriate people?❑ If there is a formal brief for the project, have you addressed all of the requirements?❑ Even if there is only an informal brief, have you demonstrated how your tender will
address the client’s needs?❑ Have you included the latest version of your CV, making sure the focus is on previous
relevant experience?❑ Have you clearly identified any potential problems or limitations that you envisage
might affect the progress of the project?
ASSESSING CULTURAL SIGNIFICANCE
There is no simple ‘recipe’ for assessing cultural significance; it is, and always should be,a well-considered assessment of the complexities of what makes a place of value to society.Recent criticisms of the standardised nature of the cultural heritage assessment processhave pointed out a lack of consistency in the ways in which people define significance, anda lack of recognition of the deeply social nature of heritage (Byrne, Brayshaw and Ireland2001: 61–72). If we accept that cultural significance is not an inherent quality of a place,but a social outcome resulting from people’s interactions with a place, then the com-munity itself must be the most important source of significance. In trying to quantify howpeople value places, however, it has become apparent that there is an urgent need tobroaden the definition of cultural heritage beyond purely physical traces (the sites andartefacts), to also incorporate the intangible traces of people’s attachments to place:
landscapes, with all their heritage places and remains, and also our minds with alltheir memories, are a form of archive of the past of our culture and of ourselves asindividuals. We mobilise elements from this archive in the process of forming ouridentity. (Byrne, Brayshaw and Ireland 2001: 69)
MANAGING CULTURAL HERITAGE 245
*Archaeologists Field Handbook 29/6/04 5:25 PM Page 245

WPathways used by Indigenous people to move between sites, for example, may have left
no physical traces, but are no less an integral part of how people interacted with andvalued that landscape (Byrne, Brayshaw and Ireland 2001: 140) (see ‘What is a site?’ onpage 63). The central question in assessing cultural heritage significance for any site orplace should always be: Who values this heritage and how do they value it? In this model,the archaeological profession is simply one sector of the community, and as such, mustmake a space for other, non-archaeological groups to value places in ways quite differentto themselves. To do this we must understand the professional value-system we takewith us into the field as supposedly ‘objective’ observers (Byrne, Brayshaw and Ireland2001: 69).
No site can be assessed in isolation—the assessment of significance is always going tobe a comparative process. Whenever you undertake an assessment, you must always tryto widen the assessment as much as possible. For an archaeological site, for example,you may need to measure it against other known sites in the local area, in the widerregion or even across the state. Does it contain features which may have been lost fromother similar sites? Does it have complementary information which may be missing fromother sites? Are there no other known sites like it? Or conversely, are there many?
In reality, just about any place can be argued to have some level of cultural heritagesignificance, but not all places are equally worthy of preservation. We can’t retain every-thing, so the assessment process is one of objectively establishing the nature of a place’ssignificance (aesthetic, historical, etc.), the level of that significance (low, moderate, high)and the degree of that significance (local, regional, state, national or global). It is only onceyou’ve done this that it is possible to develop strategies to manage the place (remember-ing that ‘managing’ is not necessarily synonymous with ‘retaining’). In all situations, theprocess of assessing significance must be made as credible as possible. As a result, in all ofyour assessments you will need to be explicit about your criteria and precisely what theymean, and to outline any limitations on your assessment which may have influenced yourdecisions.
Recognising how intimately people’s attitudes, understandings, memories and desiresare connected to the creation of cultural significance makes it no easier to assess. Over thelast twenty years, there has been much effort devoted to what criteria are essential forassessing cultural heritage significance, what precisely these criteria entail, and how sitesmay be measured against them. One way to decide on how significant a site is, is by estab-lishing whether or not it meets the nationally set threshold for cultural significance. Notall criteria have established thresholds (aesthetic significance, for example) but, for those
246 THE ARCHAEOLOGIST’S FIELD HANDBOOK
*Archaeologists Field Handbook 29/6/04 5:25 PM Page 246

Wwhich do, this gives you something objective against which to compare a site. Thesethresholds have largely been set through the work of the Australian Heritage Commissionand other bodies in an attempt to lessen the subjectivity of the assessment process.
A central component to the process of assessing cultural significance is talking to thecommunity which interacts with or values the site. Gauging the reasons why people valuea place is the essence of assessing social significance, but it is also a component ofthe assessment of all other categories of significance as well. ‘Community’ can be definedin any number of ways, of course, and one of your tasks will be to decide who the com-munity is and how its members value the place. To do this, you will have to take intoaccount how different groups value the same place, and the scale at which these groupscan be defined (are they local? regional? national?). The community which values suchsites as the Sydney Opera House, for example, could be defined at a national level as thepeople of Australia, while the community which values the original cemetery at Mintaro,South Australia, might be limited to the people of Mintaro. You may also have to take intoaccount the existence of varied and potentially conflicting values for the same place.
THE CATEGORIES OF CULTURAL SIGNIFICANCE
Cultural significance is customarily assessed in terms of four main categories: aesthetic sig-nificance; historical significance; scientific/research (in many cases archaeological)significance; and social significance. None of these categories is mutually exclusive, ofcourse: a site which has historic significance can also possess aesthetic significance aspart of its locale or scientific/archaeological significance if it can also contribute toarchaeological studies. It is also possible for the one site to possess significance forboth Indigenous and European people. This is the Burra Charter model for assessingsignificance, established as a result of several international movements to conserve andrestore monuments and sites. While by no means the only model used worldwide to estab-lish how and why places are valuable, it is the one generally followed in Australia.
An assessment of significance requires more than merely determining what categoriesof cultural significance are appropriate. Each category must also be assessed in terms ofthe degree of its significance. This is essentially an assessment of comparative signifi-cance, or of the relationship between the place and other places which are either like orunlike it. Not everything is equally significant, and assessing the degree of significanceis the first step in deciding which places are more significant than others (and why).The next step assesses the level of a place’s significance in two further ways: againstrepresentativeness and rarity. Representativeness is an assessment of whether or not aplace is a good example of its type, illustrating clearly the attributes of its significance.Rarity is an assessment of whether the place represents a rare, endangered or unusual
MANAGING CULTURAL HERITAGE 247
*Archaeologists Field Handbook 29/6/04 5:25 PM Page 247

Waspect of our history or cultural environment that has few parallels elsewhere. Thus aplace which has historical significance might be representative of the historical develop-ment of a region, but might not be rare in that other similar places might also exist inthe region. It could, however, be rare locally if no other similar examples exist in theimmediate vicinity. An outstanding place might be both representative and rare on anational scale.
Aesthetic significance
This is one of the hardest categories to evaluate, as almost everyone has their own ideaof what is visually pleasing. In addition, there is a general recognition that aesthetic sig-nificance is a Eurocentric concept which may remain quite alien to Indigenous cultures.In an attempt to break away from narrow or conventional—and certainly Eurocentric—definitions of ‘pretty’ or ‘beautiful’, the Australian Heritage Commission’s working groupinto identifying and assessing aesthetic value has defined it very broadly as:
the response derived from the experience of the environment and cultural attri-butes within it. This response can be to visual or non-visual elements and canembrace emotional responses, sense of place, sound, smell and any other factorshaving a strong impact on human thoughts, feelings and attitudes. (Paraskevo-poulos 1994: 81)
This hints at some of the problems inherent in trying to capture aesthetic signifi-cance: it is a product of a powerful emotional experience rather than a checklist ofattributes.
The qualities which might be considered part of aesthetic significance have been mostclearly set out by James Semple Kerr as the formal or aesthetic qualities of a place whichmake it visually pleasing (Kerr 1985: 10–11). Kerr argues that aesthetic significance canbe assessed in terms of the individual elements present at a place, in terms of the unityof scale, materials, texture and colour evident between elements, in terms of the degree ofcontrasting elements which may or may not be disruptive, or in terms of the entire land-scape setting in which each of these elements combine to produce an overall impression(Kerr 1985: 11). Of importance in assessing aesthetic significance is the degree to which aplace has a relationship between its parts and its setting which reinforces the quality ofboth (Kerr 1985: 11).
Obviously, many archaeological sites will be sub-surface and therefore will not beable to be assessed on aesthetic criteria. You will need to decide on a site-by-site basiswhether aesthetic significance is a relevant category to assess, rather than taking this asa given.
248 THE ARCHAEOLOGIST’S FIELD HANDBOOK
*Archaeologists Field Handbook 29/6/04 5:25 PM Page 248

WHistorical significance
Historical significance relates exclusively to the period of European occupation of Aus-tralia, although it does not refer exclusively to European archaeological material (forexample, Indigenous–European contact sites may possess significance under thiscategory). Such significance is commonly identified in terms of a set of themes whichrelate to such influences as an historic figure, event, phase or activity. More specifically, aplace may have historical significance because it typifies past practices, or because it maybe the site of an important event (Kerr 1985: 26; Pearson 1984: 32).
The Australian Heritage Commission (2001) has developed a range of generic histori-cal themes applicable to Australia as a whole. These are intended to apply to all places atall levels of significance—local, regional, state or national—and aim to stimulate you tothink more widely and help you to make comparative assessments. Some states (such asNew South Wales and Queensland) have adapted these national themes to produce setsof complementary state historical themes which you should also make yourself aware of.Any of the government bodies which administer cultural heritage matters in your stateshould be able to give you a copy of the state themes.
Scientific (archaeological) significance
This is an assessment of the research potential of a site and the relevance of any data thatthe site might contain for the pursuit of academic research questions. Bear in mindthat the research questions may well be applicable beyond the context of the single sitebeing studied (Schiffer and Gummerman 1977; Pearson 1984). Significance under thiscategory includes the research potential of the site itself and its representativenesswithin a wider suite of known sites. The scientific significance of Indigenous heritagesites is normally determined by the project archaeologist in cooperation with theIndigenous community. Ideally, scientific significance is evaluated in terms of a detailedresearch design focused on some aspect of past Indigenous lifeways. If a site can bedemonstrated to contain information important for addressing issues in the researchdesign, a defensible evaluation of scientific significance can be made.
Scientific significance is also concerned with the potential of a site to address antici-pated future trends in academic research interests and should take into consideration theissue that future research capabilities and interests cannot be predicted with any accuracy.Since it is impossible to anticipate all research questions, it is also difficult to identify andconserve suites of sites that may be capable of addressing all future research problems.To avoid the problem of using specific research designs to evaluate sites, the concept of‘representativeness’ was advocated in Australia as an additional consideration for evalu-ating scientific significance (Pearson 1984: 2). According to this concept, an adequate data
MANAGING CULTURAL HERITAGE 249
*Archaeologists Field Handbook 29/6/04 5:25 PM Page 249

Wset for all present and future research designs can be conserved by identifying andpreserving a representative sample of the complete range of site types in an area.
There is no nationally set threshold for archaeological significance, partly because theissue of what constitutes an archaeological ‘research resource’ is still highly debated. Oneguide which may help you to decide whether a site is of archaeological significance restson its ability to answer three questions (Bickford and Sullivan 1977: 23–24):
• Can it provide information not available from other sources?• Can it provide information not available on other sites?• Can it answer pertinent research questions?
Social significance
The significance of any site in terms of its social value lies mainly in its association with aparticular recognisable community, or parts of a community. Social significance is oftendefined in terms of the degree of contemporary community esteem which is attached toa place and aims to establish whether, for example, damage to the site or its contentswould cause the community a sense of loss, or whether the site contributes to a sense ofcommunity identity. To meet the National Estate threshold for social significance, a sitemust be well known and highly valued, have a long history of association, or be valued asa landmark or community signature (i.e. a place people identify with as part of who theyare, such as places they show to visitors, or places that everyone recognises as a landmark).Social significance can also be assessed in terms of representativeness and rarity, in lightof whether the place represents a seminal or optimal example of a class of items which isvalued by a community, or whether it is a scarce example of a particular style, custom orhuman activity which is esteemed by a community.
Whenever you assess social significance, you will have to make a decision about whoconstitutes the community. It is not necessarily going to be simply all the peoplewho live in a particular area, because sectors of this geographic community may beunaware of a place, or may value it completely differently to other sectors. If a place is a popular recreational destination, for example, it may be of value to a much widercommunity than simply the people who ordinarily live there. Holidaymakers may comefrom all over the country to visit it, making the community which values it much broader.
When assessing how socially significant a place may be, ask yourself these questions:
• Is it widely known amongst the community?• Is it highly valued by members of the community?• Has it been known and valued for a long period of time?• Does it have symbolic value as a local landmark or icon which people identify with?
250 THE ARCHAEOLOGIST’S FIELD HANDBOOK
*Archaeologists Field Handbook 29/6/04 5:25 PM Page 250

WAnswering yes to one or more of these questions means the place has social significance.Assessing how large the community which values it is will give you some guide as to howsignificant it may be.
HOW TO ASSESS CULTURAL HERITAGE SIGNIFICANCE
According to the New South Wales Heritage Office (2001: 6–7) ,there are eight essentialsteps in the significance assessment process (see Figure 8.1 on page 252):
• Summarise what you know about the site, place, or artefact.• Describe its previous and current uses, associations with individuals or groups and its
meaning for those people.• Assess significance using valid heritage assessment criteria (for example, for New
South Wales this means using the state heritage assessment criteria).• Check whether you can make a sound analysis of heritage significance based on this.• If you can, determine the level of significance.• If you can’t, find out whether there are other sources of information which might be
helpful.• Prepare a succinct statement of heritage significance.• Get feedback from all interested parties.• Write up your information.
The Australian Heritage Commission has published more specific sets of guidelines touse when assessing particular categories of archaeological sites. Pearson and McGowan’s(2000) Mining Heritage Places Assessment Manual, for example, deals with some of the specificproblems associated with assessing historical mining sites; Tracking the Dragon (AustralianHeritage Commission 2002) covers the identification and assessment of Chinese heritagesites in Australia; and Migrant Heritage Places in Australia (Australian Heritage Commission2001) deals with locating and assessing places associated with immigrants to Australia.
As a final note, if you find yourself in the situation of having to assess a place’s signifi-cance but without the time and resources to conduct a thorough community survey, orfind that your time has run out before you could track down all the relevant people, it isperfectly acceptable to note in your report that you couldn’t assess some categories ofsignificance with the information you had to hand. If you do this, however, you willneed to stipulate that it isn’t because these places have no significance, just that moreresearch needs to be done before this can be adequately evaluated. This could be as simpleas inserting a phrase such as ‘More information will need to be collected before anaccurate assessment of the social significance of . . . can be determined.’
MANAGING CULTURAL HERITAGE 251
*Archaeologists Field Handbook 29/6/04 5:25 PM Page 251

FIG
UR
E 8.
1: S
teps
in t
he a
sses
smen
t pr
oces
s (a
fter
NSW
Her
itag
e O
ffic
e 20
01:6
–7)
*Archaeologists Field Handbook 29/6/04 5:25 PM Page 252

WWHAT COMES NEXT? ASSESSING THE IMPACTS OFDEVELOPMENT
If your significance assessment is part of a consultancy project involved with develop-ment, then your responsibilities do not end there. Once you have established howsignificant a place is and why, the next step is to work out the potential impacts ofdevelopment on the place and, from this, to draw up a set of management recommenda-tions which indicate in detail how the place should be treated and who is responsible. Youcannot make management recommendations without a sound statement of significance.
An ‘impact’ can be defined in many ways: as something which will directly affect a site(e.g. if a site is located in the middle of a potential road corridor) and as something whichis related to the development, but which may only indirectly affect a site (such as whenincreased heavy-vehicle traffic along a track might widen or change the course of thetrack, or generate greater quantities of dust, thus affecting any sites nearby). You musttherefore carefully consider both the potential for direct and indirect impacts on sites.To do this, you will need to find out as much information as possible about the type ofdevelopment, its size and scope and the degree to which it might affect both surface andsub-surface archaeological remains. This information is not always easy to come byand you might have to quiz the builder, engineer or developer to work this out. You willalso have to consider impacts in both the short and long term. Will people continueto visit/use this site? What impact is this likely to have? Will access tracks have to becontinually maintained, even after the development work itself is completed?
The final thing to bear in mind is that assessing impacts not only involves determin-ing the potential impacts on recorded sites (i.e. those that you know about), but also theimpact on areas with archaeological potential. In other words, if you think there is a highlikelihood of archaeological evidence existing in an area, even though you were not ableto see any such evidence at the time of survey, or if the evidence you could see seemedlimited, then flag this as an area of potential, and assess what impacts the developmentcould have on it.
Gordon Grimwade’s tips for rapid site and artefact evaluations
• Consider using a metal detector to help out, but recognise its limitations if you do.They don’t pick up all metals all the time, but they do provide an indicator.
• Use a probe to investigate for sub-surface material on historical sites. The best onesare T-shaped, with the shaft about 500 millimetres long. Have a steel ball-bearing ofslightly larger diameter welded at the tip: it goes in and can be withdrawn more easilybecause the bearing is the only point of contact with the soil. If you use a probe,
MANAGING CULTURAL HERITAGE 253
*Archaeologists Field Handbook 29/6/04 5:25 PM Page 253

Wremember to be gentle when pushing it into the ground. You could be right above arare artefact.
• Grids and salvage archaeology on large sites don’t mix. Use a dumpy level, an EDMor other highly accurate survey equipment to fix the locations of finds.
• We may not agree with bottle collecting, but some collectors possess a wealth ofknowledge on the history of bottles. Some are even becoming more interested in thehistorical aspects than the dollar value of the bottles. If you need some help, it maybe worth contacting your local bottle club. There are some useful websites aroundnow too. Try:—Antique Bottles (www.antiquebottles.com);—Federation of Historical Bottle Collectors (www.fohbc.com);—www.geocities.com/redgumfalls2;—www.antique-bottles.net.
DEVELOPING MANAGEMENT STRATEGIES
The final step in an archaeological consultancy is to develop management strategieswhich can be used to direct development in a responsible way. Management refers toany actions that will affect the heritage resource and may be actions which protectsites, actions which destroy sites (bearing in mind that collection and excavation are bothforms of destruction), or actions which will change the development process so that it ismore receptive to archaeological issues. Not all management relates to development,either—heritage sites which are also tourist destinations will require strategies to managevisitors to the site, and even the interpretation of heritage sites in signs and brochures isin part a management issue. In short, managing a site can involve any combination ofseven separate but closely related issues (Burra Charter 1996):
• Conservation involves all the processes of looking after a place which will retain itscultural significance. The main processes are maintenance, preservation, restoration,reconstruction and adaptation.
• Preservation means maintaining the fabric of a place in its existing state so thatit does not deteriorate. Fabric is all the physical material of the place: on an historicmine site, for instance, this would include the mine equipment, shafts and mullockheaps, the construction materials of the mine buildings, the waste products from themining process which are still on site and any archaeological materials (either on thesurface or sub-surface). Sometimes the setting of the site can also be defined as fabric,particularly if the setting is an integral part of the site’s cultural heritage significance.
254 THE ARCHAEOLOGIST’S FIELD HANDBOOK
*Archaeologists Field Handbook 29/6/04 5:25 PM Page 254

W• Restoration means returning the existing fabric of a place to a known earlier state (e.g.
to a particular historical time-period) by removing newer material or by reassemblingexisting components without introducing any new material.
• Maintenance means the continual protection of the fabric, contents and setting of aplace as it exists at that point in time. This should not be confused with repair, whichmay involve restoration or reconstruction.
• Reconstruction involves returning a place, as nearly as possible, to a known state byintroducing outside materials (either new or old) into the fabric. A reconstructionshould always be based on solid and thorough research, and should never beconjectural. If you don’t know or are not sure what went there, then you can’t recon-struct it.
• Adaptation means modifying a place to suit proposed compatible uses, such as whenan historic building is modified to become a museum.
• In addition, there is also destruction, which involves the removal of part or all ofthe site.
When it comes to deciding the current best practices to follow for any of these issues,consult the Burra Charter, which is considered the basic conservation documentfor all sites of historic and cultural significance in Australia. It is derived from a seriesof internationally recognised resolutions on site conservation, and adherence to itsprinciples helps to ensure compliance with current conservation legislation. If you are notexperienced with heritage conservation issues, the Burra Charter sets out some generalguidelines for what measures are considered acceptable on heritage sites which havebecome standards for best practice. For an excellent explanation on how these differentprocesses have been successfully employed on many heritage sites and the variationswhich are possible, see Marquis-Kyle’s and Walker’s (2003) easy-to-read guide, TheIllustrated Burra Charter.
In essence, site management is an ethical process (see ‘Archaeologists and ethics’ onpage 11), involving four key principles (Marquis-Kyle and Walker 2003):
• respect for the significance of the fabric of a place (i.e. don’t replace any originalfabric unless there is no other alternative);
• minimum intervention in the fabric of a place (i.e. do as little as possible, but asmuch as is unavoidably necessary);
• reversibility of treatment (i.e. so that whatever is done can be undone with little orno damage);
• full documentation of all actions taken, including the rationale behind them (i.e. sothat the complete history of the place and its treatment is known and can be referredto at any time).
MANAGING CULTURAL HERITAGE 255
*Archaeologists Field Handbook 29/6/04 5:25 PM Page 255

WRemember that all physical interference with a site, whether it takes the form ofconservation, preservation, maintenance, restoration, collection, excavation or otherdestruction, can only be conducted following approval by the appropriate state orfederal authorities. This is a legal requirement for sites in all states and territoriesthat are protected by cultural heritage legislation. Sometimes you may be involved inwork which is not typical archaeological excavation or collection, such as monitoringthe excavation of building footings at an archaeological site, or even monitoring andrecording the destruction of a site. In these cases, you will still require legal permissionto conduct this work, usually through the normal excavation permitting process. Some-times this can lead to unusual definitions of ‘excavation’: in New South Wales,for example, one mine site was required to obtain an excavation permit to blast anopen-cut pit!
STRATEGIES FOR MANAGING WORK AT CULTURALHERITAGE SITES
Management is about controlling the type and degree of interference at a site, so that thecultural heritage values of the place, their levels of significance and any essential physicalchanges to the site can be properly balanced. Management strategies may be directedtowards preventing any interference with the fabric of the site, they may require inter-ference to be carefully conducted, or they may outline the way in which the site is to bedestroyed. The process for preventing or limiting the physical interference at a site iscalled mitigation. You should always outline your strategies for mitigation clearly.A developer may not be aware of proper conservation or preservation methods, and maynot realise that erecting a 6 metre high chain-link fence around the site might not be themost suitable option. This means that you will have to think through each stage ofthe management process, so that your recommendations are specific and not open toincorrect interpretation. If you recommend that a site be preserved, for example, how isthis best achieved? If it is to be fenced, what is the best form of fencing? When should thisfencing take place? Who should do it? How should it be done? If you are unsure of youroptions, take a look at recommendations for other, similar sites, or ask around to see whatelse has or hasn’t worked.
The process for outlining how a site may be destroyed often involves salvage, orthe emergency recovery of archaeological material prior to development. This should be a last resort. It is not an alternative to conservation, and if you choose it yourresponsibilities will be far-reaching. Salvage is not just the process of excavating orcollecting the material, but entails all of the subsequent analysis, conservation, curation
256 THE ARCHAEOLOGIST’S FIELD HANDBOOK
*Archaeologists Field Handbook 29/6/04 5:25 PM Page 256

Wand documentation work. You will be responsible for ensuring this is completed correctlyand that all of the artefacts from this work will be cared for in the long term and that allof the information is archived and deposited adequately (see Managing archaeological col-lections’ on page 156). In some states there is a time limit on how long you have to analyseand write up the report of a salvage project (in New South Wales, if you are working on historical sites, the time limit is twelve months, for example). Once again, you areresponsible for ensuring that all of this work can be finished within the allotted timeperiod, so don’t recommend it if you can’t complete it. Salvage is only appropriate whenall other avenues have been exhausted and where it will provide a substantial or uniquecontribution to archaeological research.
Considering that no archaeological survey is ever likely to uncover all the archaeo-logical remains in an area (see Chapter 3 ‘Finding sites’,) you may wish to adopt a strategythat flags this potential weakness and makes it into a central component of the project.One way to do this is to make sub-surface testing a component of the management rec-ommendations, so that you can examine an area in more detail prior to any workcommencing. Another way to cope with this is to recommend monitoring (i.e. employ-ing a heritage professional to watch the development process carefully and keep a look outfor any unexpected or unusual archaeological remains) for some areas of development.This is not usually considered an adequate replacement for evaluating sub-surface archaeological potential through careful sub-surface testing, however. If you suspect theremight reasonably be archaeological evidence below the ground surface, it is your ethicalresponsibility to find this out before development commences.
One way to cope with a site that has areas of different significance is to create zones ofsignificance, which will dictate their own hierarchy of management recommendations.For example:
• Zone 1, represents the areas of highest significance, containing the rarest, oldest orbest preserved archaeological remains. No work should be undertaken in these areaswhich will adversely affect these physical remains.
• Zone 2, covers the areas of medium significance, containing those archaeologicalfeatures which are not so well preserved or informative. Physical intervention in theseareas should be limited, guided by appropriate conservation principles and conductedin a sympathetic and responsible manner.
• Zone 3, covers all those areas assessed as being of low cultural significance, includingall those areas which have been heavily altered during the most recent phases of thesite’s life, or those which are severely limited in both the quality and quantity of infor-mation which they can convey. Maintenance or rehabilitation measures undertakenhere should be guided by a general recommendation that physical intervention bekept to a minimum.
MANAGING CULTURAL HERITAGE 257
*Archaeologists Field Handbook 29/6/04 5:25 PM Page 257
WThese zones can be ranked in terms of their relative significance and thus the level ofphysical intervention (defined as disturbance to the surface and sub-surface relics orremains) which is permissible within each.
If it is at all possible to encourage public participation in your project, this can be anexcellent way of creating a positive public image for the heritage management process.Wherever possible, it is worthwhile to encourage volunteers or to suggest and developdisplays or other interpretive material for public presentation which will result in positivepublicity for your project.
Throughout the process of developing management strategies, you need to keep inmind all of the options that are available to you: monitoring, salvage (collection), testexcavation, sub-surface survey, further surface survey, comparative analyses, furtherresearch, protection, conservation or destruction. When drafting your managementstrategies, do the following:
• Clearly separate which recommendations are mandatory because they arise out of legalrequirements and which are simply desirable from an archaeological or managementpoint of view (Haglund 1984: 2.4).
• Clarify all the alternatives which you can see and rank these in terms of preference froman archaeological or management point of view (Haglund 1984: 2.4).
• For any recommendations which entail allowing damage to the archaeologicalmaterial, you will need to argue clearly for these recommendations based on yourarchaeological assessment of the site. In other words, it is not sufficient to simply statethat the site is ‘unimportant’ or ‘small’, and therefore can be disturbed (Byrne 1997).You must provide clear and well-argued reasons for allowing any impact on a site orartefact.
• Clearly separate short-term from long-term management recommendations.• You may also wish to recommend that a site which has been preserved during devel-
opment is audited (checked) regularly to ensure that your recommendations weresufficient. Sites may be audited in both the short and long terms to ensure that theyare being sufficiently cared for.
• If you are recommending zones of significance or areas to be preserved or protected,make sure you show these clearly on a map. The developer will need very clear guide-lines as to what to do, and the more specific you are, the less chance there is of anymistakes occurring. If you only recommend that ‘Site A’ be fenced, without specifyinghow, when and exactly where, then you will be to blame if the developer unwittinglydestroys any part of the site or its significance in the process.
• If you are contracted to work on a large site, or for a company which employs manysubcontractors to carry out particular tasks on the site (such as a working mine site), it is the developer’s responsibility to ensure that their subcontractors comply with
258 THE ARCHAEOLOGIST’S FIELD HANDBOOK
*Archaeologists Field Handbook 29/6/04 5:25 PM Page 258
Wthe heritage management recommendations. If you are worried by this, you couldoutline a protocol for subcontractors to follow, or specify in your report that all subcontractors should be bound to the same recommendations.
• If you believe that further work or research is required before a proper assessment ofthe impacts of the development can be made, then clearly state this as a recommen-dation. So that there is no room for misunderstanding, be as clear as you can about thescope and type of work considered acceptable or unacceptable, and any protectivemeasures which you think need to be instituted.
• Finally, think about whether your site is part of a suite or complex of sites. This isprobably more likely with Indigenous sites, which are commonly thought of as part ofa wider network of places which cannot be separated, but this might also be applicableto historic sites, if there are others of the same age or purpose or with complementaryfunctions in the area. When you are formulating your management recommendations,consider what the effects of changes made to one site will have for the other sites inthe complex.
BEFORE YOU SUBMIT YOUR REPORT . . .
Get feedback, particularly if you are working with other groups of people with a vestedinterest in the site. Feedback may mean submitting a draft report to the client and to anyother interested parties, and waiting for responses before you submit the final version.This gives all stakeholders an opportunity to comment. This is particularly important ifyou are working with Indigenous communities, as they are likely to have definite andoften quite specific ideas about what they think are adequate management strategies.Before you submit your report, take your recommendations back to the community,and carefully go through them together to make sure that everyone understands what is at stake and has an opportunity to comment on whether and how they think therecommendations are suitable or unsuitable.
Finally, remember that you are not just submitting your report to a client, but also tothe government authority who administers cultural heritage in that state. The culturalheritage managers who work for these authorities (usually, but not always, archaeologists)are ultimately the people who will assess your report, and they will assess it according tohow closely it conforms to current best-practice guidelines (see Chapter 10: Getting yourresults out there: Writing, publication and interpretation). These are the people who aremost likely to ask you for clarification on certain aspects of your work, to rewrite sectionsof your report or even to request that you do more research or fieldwork before theyaccept it. You must also satisfy your client, of course, because they are paying for you todo an adequate job in the first place. A client is unlikely to be sympathetic if they have
MANAGING CULTURAL HERITAGE 259
*Archaeologists Field Handbook 29/6/04 5:25 PM Page 259

Wto pay more money because you did a substandard assessment to begin with, which laterrequires substantial reworking before the state government authority will accept it.
REFERENCES AND FURTHER READING
Australian Heritage Commission 2001, Australian Historic Themes: A Framework for Use inHeritage Assessment and Management, Australian Heritage Commission, Canberra.
Australian Heritage Commission 2002, Tracking the Dragon: A Guide for Finding and AssessingChinese Australian Heritage Places, Australian Heritage Commission, Canberra.
Bickford, Anne and Sullivan, Sharon 1977, ‘Assessing the research significance of historicsites’ in S. Sullivan and S. Bowdler (eds), Site Surveys and Significance Assessment in AustralianArchaeology, Department of Prehistory, Research School of Pacific Studies, ANU, Canberra.
Byrne, D. (ed.) 1997, Standards Manual for Archaeological Practice in Aboriginal Heritage Management.NSW NPWS, Sydney.
Byrne, Denis, Brayshaw, Helen and Ireland, Tracey 2001, Social Significance: A Discussion Paper,NSW NPWS, Sydney.
Johnston, Chris 1994, What is Social Value? A Discussion Paper, Australian Government Publish-ing Service, Canberra.
Haglund, Laila 1984, ‘Checklist and requirements for consultant’s reports’, Australian Asso-ciation of Consulting Archaeologists, Canberra.
Kerr, J.S. 1985, The Conservation Plan: A Guide to the Preparation of Conservation Plans for Places ofEuropean Cultural Significance, The National Trust of Australia, Sydney.
Marquis-Kyle, P. and Walker, M. 2003, The Illustrated Burra Charter, Australia ICOMOS, Sydney.NSW Heritage Office 2000, Assessing Heritage Significance, NSW Heritage Office, Sydney.Paraskevopoulos, John 1994, ‘Deliberations of the working groups—summary’, in J. Ramsey
and J. Paraskevopoulos (eds), More than Meets the Eye: Identifying and Assessing Aesthetic Value,Australian Heritage Commission, Canberra.
Pearson, M. 1984, ‘Assessing the significance of historical archaeological resources’, in S. Sullivan and S. Bowdler (eds), Site Surveys and Significance Assessment in Australian Archae-ology, Department of Prehistory, Research School of Pacific Studies, Australian NationalUniversity, Canberra.
Pearson, Michael and Sullivan, Sharon 1999, Looking after Heritage Places: The Basics of HeritagePlanning for Managers, Landowners and Administrators, Melbourne University Press,Melbourne.
Pearson, M. and McGowan, B. 2000, Mining Heritage Places Assessment Manual, AustralianCouncil of National Trusts and Australian Heritage Commission, Canberra.
Pennay, Bruce 1998, Placing Federation: A Checklist for Local Studies of Federation and Surveys ofFederation Places in New South Wales, NSW Heritage Office, Sydney.
Ramsey, Juliet and Paraskevopoulos, John 1994, More than Meets the Eye: Identifying and AssessingAesthetic Value, Australian Heritage Commission, Canberra.
Schiffer, M. and Gummerman, G. 1977, Conservation Archaeology, Academic Press, New York.
260 THE ARCHAEOLOGIST’S FIELD HANDBOOK
*Archaeologists Field Handbook 29/6/04 5:25 PM Page 260

WUSEFUL WEBSITES
The Australian Heritage Commission maintains an excellent website which contains a rangeof useful online publications. The Australian Historic Themes Framework, the Mining HeritagePlaces Assessment Manual, Migrant Heritage Places in Australia and Tracking the Dragon are allavailable free online at www.ahc.gov.au/index.html. The AHC website also offers a freeguide called Protecting Local Heritage Places.
www.heritage.gov.au/protect-places/scr3_06.htm has a series of guides on protecting andassessing heritage places, including step-by-step instructions on what goes into a heritagestudy.
www.icomos.org/australia, the website of the Australian branch of the International Councilon Monuments and Sites, has the Burra Charter available online.
www.heritage.nsw.gov.au, the website of the New South Wales Heritage Office, has a widerange of online guides to assessing and managing places of cultural significance, includ-ing guides to the photography of heritage places, historical research on heritage places, andpreparing thematic histories. Even though its contents are intended specifically for NewSouth Wales, they contain many useful general principles.
MANAGING CULTURAL HERITAGE 261
*Archaeologists Field Handbook 29/6/04 5:25 PM Page 261
CHAPTER NINEPHOTOGRAPHY AND ILLUSTRATION
WHAT YOU WILL LEARN FROM THIS CHAPTER
W How a camera worksW The relative benefits of digital and SLR camerasW The advantages of maintaining a good photographic recordW Techniques for photographing sitesW Techniques for photographing artefactsW What makes a good illustrationW Conventions for drawing different kinds of artefactsW How to produce high-quality photographs and drawings for publicationW Procedures for archiving your photographs and illustrations
The basic photography toolkit
A square of black, non-reflective, cotton material (velvet is ideal)A 10 centimetre IFRAO* colour scale for photographing small objectsA 1 or 2 metre scale for photographing large objectsA three-in-one collapsible gold and silver reflector and diffuserInformation board and chalkBlu-tack ®
W W W
WW
262
*Archaeologists Field Handbook 29/6/04 5:25 PM Page 262

WLens tissueLens cleanerCotton wool budsA small packet of tissuesA squeeze bulb, or blower brushTwo pieces of chamois, for cleaning the outside surfaces of the cameraA sable or camel hair brush for cleaning the camera lensSmall jeweller’s screwdriverSpare camera batteries
The basic illustration toolkit
Technical pencil or lead pencils, preferably HB or the hardest of the B seriesClean erasers: soft eraser for pencil drawings; fibreglass or special ink-eraser for final inkdrawings Pencil sharpener—metal ones are best, but in a pinch fine sand-paper will do just as wellScale rulerGraph paperMasking tapeInvisible or ‘magic’ tapeCallipers or dividersT-square or set square (make sure this is flat and right-angled)Protractor (a full circle or square ‘Douglas’ protractor is easiest to use)Permatrace (translucent drawing film) or good-quality tracing paperDrawing board—you can make one easily from plywood covered with laminated graphpaperBlu-tack ®ScissorsClothes pegsStringNailsCarpenter’s line-level
Optional: Portable camp-stool, to sit on while you are drawing.Planning frame: this is a square timber frame with an internal metric grid-work of string.
PHOTOGRAPHY AND ILLUSTRATION 263
*Archaeologists Field Handbook 29/6/04 5:25 PM Page 263

WIt is most useful for drawing rock art panels and detailed horizontal surfaces such asexcavation squares.
For final inked illustrations, you will also need a range of technical drawing pens, prefer-ably of at least three point sizes (0.25, 0.35 and 0.5), good-quality ink, a sharp scalpelwith a rounded or pointed blade and replacement blades.
Archaeologists have an ethical responsibility to produce high-quality and accurate record-ings of their work. This is done not only through written reports, but also throughphotographs and illustrations. All of these materials eventually become part of yourfieldwork archive and will be an invaluable aid to anyone involved in subsequent analysisor re-analysis of your work. Archaeologists use photographs and illustrations for a varietyof purposes: to record a site or an artefact; to document the process of excavation orsurvey; to record field conditions; to illustrate the technical data provided in a report; or tointerpret a site to the public. The best way to learn how to take good photographs or drawgood illustrations is through practice. Both activities will hone some of the basic skills ofan archaeologist: detailed observation and accurate recording.
THE BASICS
A photograph is a visual recording of a moment in time. Photography is perhaps one ofthe most important ways in which archaeologists record all aspects of their fieldwork on a daily basis. Because they are seen as objective, photographs have always played an important role in the scientific documentation of sites and excavations, as well as con-stituting important historical documents in their own right. This visual record can alsobe used to fill in some of the gaps that every archaeologist occasionally finds in theirfield notes or to revisit troublesome problems. In the case of contested finds, a detailed photographic record may become the ultimate verification of your fieldtechnique.
There are many publications which detail the essence of good photography; how-ever, it is worth pointing out that a ‘good’ archaeological photograph is not the same as a ‘good’ artistic photograph. Because archaeological photography has a particularand quite narrow aim (to document a site or artefact in the necessary technical detail), itis much more analytical and precise than simply snapping shots. For this reason, whileyou will still need to follow some basic rules of composition and lighting, archaeo-logical photography has its own set of standards. While there is always room for artistic
264 THE ARCHAEOLOGIST’S FIELD HANDBOOK
*Archaeologists Field Handbook 29/6/04 5:25 PM Page 264

Wor personal shots on a dig, the three basic elements of archaeological field photographyare:
• Learn enough basic technical skills to ensure you can take photographs which showsufficient technical detail (see ‘Taking good shots’ on page 268).
• Always include a scale, because there is no point in photographing a site or artefactwithout also indicating how big or small it is (see ‘Scales and information boards’ onpage 277).
• Always record the details of every photograph on a written recording form. Because allphotographs will ultimately become part of the permanent site archive (see ‘Archae-ologists and ethics’ on page 11), written descriptions of each photograph are alwaysnoted on recording forms, so that no detail of any photograph is lost (see ‘Keepingphotographic records’ on page 283).
In general, archaeological photographs should be descriptive and realistic, rather thaninterpretive. Think about the purpose of the photograph—what are you trying to show?What point of the report or article is this photograph intended to illustrate? Are therespecific features or elements which you want to emphasise? Always imagine that someoneelse will be analysing your results or re-analysing your material: will they be able to graspwhat you are doing, and understand the point of the photograph? Don’t just snap offphotographs, always look critically at what you are recording and assess whether thisparticular photograph will help you to show it.
HOW A CAMERA WORKS
A camera works by capturing the light reflected from an object on film. A camera has alens to focus the light, an aperture which allows a fixed amount of light to pass throughthe lens and a shutter which opens and closes to allow the light in for a specific period oftime. All of these mechanisms are designed to control the amount of light reaching thefilm so that the final picture will be neither under-exposed (as a result of too little light)nor over-exposed (as a result of too much light).
• The aperture is literally the ‘iris’ of the camera’s eye: it is the adjustable openingthrough which light passes in the lens. It is controlled by the aperture ring on the lensbarrel and can be opened or closed to allow in more or less light, depending on thesituation. The aperture controls the depth of field of a photograph, or the area thatwill be in focus (see ‘Getting things in focus’ on page 270).
PHOTOGRAPHY AND ILLUSTRATION 265
*Archaeologists Field Handbook 29/6/04 5:25 PM Page 265

W• F-stops are the numbers on the aperture ring which describe the size of the aperture.
The important thing to remember is that, as the f-stop number increases, the areaof the aperture decreases, so that moving one f-stop will either double or halve theamount of light allowed through the lens. Basically, the bigger the f-stop number,the less light will be allowed to reach the film through the iris of the camera.
• The shutter speed is the amount of time that the shutter remains open to allow lightinto the camera. The speed of the shutter is measured in fractions of a second: 1/2, 1/4,1/8, 1/15, 1/30, 1/60, 1/125, 1/250, 1/500, 1/1000 and so on. Shutter speed is closelyrelated to aperture and one of the main rules of photography is to make sure that youhave the right balance between them. They have an inverse relationship, which meansthat whatever you do to one, you will have to do the opposite to the other. In otherwords, if you are increasing the size of the aperture (i.e. moving down through the f-stop numbers), you will need to decrease the shutter speed to compensate for thegreater amount of light being allowed through the iris. Conversely, if you are makingthe aperture smaller (moving up through the f-stop numbers), you will need toincrease the shutter speed to allow the smaller amount of light being let in by the iristo expose the film for a longer period of time (see Figure 9.2 on page 267).
In archaeological photography, particularly small artefact photography, you shouldalways choose the aperture before you choose the shutter speed, because it is theaperture which controls the depth of field.
266 THE ARCHAEOLOGIST’S FIELD HANDBOOK
FIGURE 9.1: The relationship between the aperture and the amount of light passingthrough the lens. Apertures with smaller f-stops let in more light
*Archaeologists Field Handbook 29/6/04 5:25 PM Page 266

W
• Exposure is the total amount of light which is allowed to reach the film. You cancalculate exposure by multiplying the aperture by the shutter speed.
• Lenses alter a camera’s field of vision. The main ones used in archaeology aretelephoto and wide-angle. A telephoto lens (usually from 85 to 200 millimetres), bringsthe distance close, magnifying a subject. A wide-angle lens has a focal length below 35 millimetres and is ideal for taking landscape shots.
• Filters are used to help control contrast and create special effects. Polarising filterscontrol the effects of reflection, soft-focus filters soften hard edges and UV filtersreduce the blue cast that occurs in photographs taken in the shade or on overcast days.In archaeology, filters can be useful for bringing out details on artefacts.
• Film speed refers to the film’s sensitivity to light and is expressed in terms of an ISOnumber. A slow film will have an ISO of 25 or 40, a fast film one of 200 or above.Standard film speed is ISO100. Basically, the faster the film the less time it needs to beexposed to light to produce a suitable image. There is a trade-off to consider here, ofcourse. Fast film allows you to take a good image in poor light, but will also appearmuch grainier than a slow film. Grains are the tiny, light-sensitive particles of silverwhich make up the negative, and are much smaller and finer in slower films, giving
PHOTOGRAPHY AND ILLUSTRATION 267
FIGURE 9.2: An exposure calculator to help you get used to the inverse relationshipbetween aperture and shutter speed
*Archaeologists Field Handbook 29/6/04 5:25 PM Page 267

Wthem higher definition (Hester et al. 1997: 163). If you are using a manual camera,make sure you set it to the appropriate film speed.
Because they are finer-grained, slower films are better if you want to make big enlarge-ments. If you are intending to prepare posters or other interpretive materials, keep inmind that slower films, because they are more finely grained, will be better if you wantto make big enlargements.
TAKING GOOD SHOTS
The direction and intensity of lighting can make all the difference between a great anda poor photograph. Very directional light, such as through a window, can maximisetextures, cast strong shadows and reduce the mid-tones. It can also create shadows, however,and obscure the outlines of objects. Very bright or harsh light can create deep shadows andintense reflection, washing out details and making some parts of the photograph over-exposed (very bright) and others under-exposed (very dark). Very dim light will be too darkand will not reveal enough to make the outlines of any object clear. Because of the softerlighting, the best times for taking field photographs are early in the day (preferably justbefore sunrise), or later in the afternoon at evening or twilight. Obviously you will notalways be able to control the lighting conditions or wait until the perfect time to take eachphotograph. In these cases, you will simply have to make the best of the circumstances youfind yourself in, but if you have a basic working knowledge of what is important in takinga good photograph, you should know enough to be able to avoid the worst.
Essentially, the main principle in taking a good photograph is to even out the highsand lows so that all the detail of the bright and dim areas can be captured. All goodcameras will allow you to regulate the amount of light coming through the lens viacombinations of shutter speed and aperture to achieve the correct exposure for the speedof the film. If your camera is set to automatic, these decisions will be made for you,although this does not mean that your photos will always be perfect. Part of the problemwith light meters in cameras is that they tend to average the amount of light using themiddle 30–50 per cent of the scene. This means that the light reading which the camerawill then use to determine the aperture and shutter speed may not actually be reflectingoff the subject and you may run the risk of under- or over-exposing your shot. This canparticularly be a problem if you are trying to photograph artefacts on a black background,as it is very easy to include too much of the background in the meter reading (Howell andBlanc 1995: 24). Photographers often use a grey card (a piece of poster board with a
268 THE ARCHAEOLOGIST’S FIELD HANDBOOK
*Archaeologists Field Handbook 29/6/04 5:25 PM Page 268

Wneutral grey tone) to counter this problem and to determine the correct exposure forphotographs. An exposure reading taken from a grey card provides a mean readingbetween extremes that will allow you to capture the detail in both the highlights andthe lowlights.
You can also try physical solutions to problems of too much light or shadow. One wayto remove shadows is to use a reflector to brighten the darker areas (see Figure 9.3 on page270). If you don’t have a commercial reflector, you can use almost any bright object whichcomes to hand, even something as simple as a large sheet of white card, a space blanket oraluminium foil taped to a flat surface. The reflector should be placed on the shadowedside and moved just close enough to lighten the shadow, so that you are able to recorddetail in those areas. If you are also using artificial light, this should be shone directly atthe reflector, which can then be positioned so that it reflects the light on to the precisespot you want illuminated.
One way to even out the light is to use a diffuser to spread the light and minimise bothshadows and highlights. One of the best commercial diffusers available is a combinationgold reflector, silver reflector and diffuser in the one collapsible package. The gold andsilver surfaces diffuse different wavelengths of light and so give quite different results. Ifyou are photographing artefacts outdoors, you may have to diffuse the light, as direct sunoften is too harsh to give a satisfactory result. Photographs taken without diffusion indirect sunlight will have high contrasts, with the light areas very light and the dark areasvery dark, and are unlikely to show details well. This may not be necessary if the day isovercast, or if the light is shadowed or hazy, because cloud cover is actually one of the bestlight diffusers you can have. If you can’t wait for an overcast day, however, and don’t havea commercial diffuser on hand, try improvising with a large piece of paper, a white cottonshirt or sheet, or the lid of a white plastic container if you are photographing small objects.Experiment with a diffuser to work out the best effect before you take the photograph.
Grey cards can be purchased from any photography dealer, although if you find yourselfcaught without one you can improvise. A reading taken from a non-reflective brownpaper bag, hessian sack or even from the palm of your hand will come within about onef-stop of a reading taken from a grey card (Howell and Blanc 1995: 24–25). A readingtaken from a piece of plain, white paper will come within about two. To compensate,take the reading from the bag or the palm of your hand, and then over-expose thereading by one f-stop (i.e. drop the aperture one f-stop down from that suggested by thereading). If the reading from the palm of your hand suggested a shutter speed of 125 atf8, for example, then the corrected reading would be 125 at f5.6. If you are taking areading from a piece of white paper, you will need to overexpose it by two f-stops, sodrop the aperture ring down two f-stops.
PHOTOGRAPHY AND ILLUSTRATION 269
*Archaeologists Field Handbook 29/6/04 5:25 PM Page 269

WGetting things in focus
The aperture in a camera controls twothings: the exposure (i.e. the amount of lightreaching the film) and the depth of field, orthe area of the photograph which is in focus.Controlling depth of field is an importantway of concentrating attention on particularfeatures in your picture and is also essentialfor maintaining sharp focus. A shallowdepth of field can help soften unwanted ordistracting detail, while a greater depth offield will bring into focus objects that arebefore and behind the main image. Theoverall depth of field is influenced by threefactors: the focal length of the lens (howlong or short the lens is); the distance thephotographer is from the subject; and thesize of the aperture. For a large depth offield, select a small aperture (a large f-stopnumber). For a small depth of field, select alarge aperture (a small f-stop number).
A simple rule to remember is that the smaller the aperture (the larger the f-stop number),the more narrowly the light coming through the lens will be focused and therefore thegreater the depth of field will be.
When you’re photographing artefacts, getting them into sharp focus by maintainingthe maximum depth of field is one of the most difficult things to do. A general rule tofollow is the one-third rule, which suggests that you focus on a point that is one-third ofthe way into your composition (see Figure 9.5 on page 271). The depth of field in a pho-tograph extends from approximately one-third in front of the point of focus to two-thirdsbehind. If you focus on the background, this will waste the one-third that is behind thepoint of focus and give an image that is blurred for one-third in the front. Remember thatyou can’t see this zone of sharpness through your camera viewfinder, so you’ll only findout which parts of the object are out of focus when you get your finished prints back. Ifyou’re photographing a ceramic vessel, for instance, and have only focused on the very
270 THE ARCHAEOLOGIST’S FIELD HANDBOOK
FIGURE 9.3: Reflecting light to eliminateshadows (photograph courtesy Aidan Ash)
*Archaeologists Field Handbook 29/6/04 5:25 PM Page 270

W
front of the vessel, you might find that the sides and rear edges are blurred. Using theone-third rule, however, you would focus approximately one-third of the way back fromthe front edge, bringing both the foreground and the background into sharpness. Somegood SLRs may have a depth of field button that will let you see before you shoot.
PHOTOGRAPHY AND ILLUSTRATION 271
FIGURE 9.4: The effects of varying depths of field on the sharpness of a photograph
FIGURE 9.5: One-third rule
F4.5 (50 mm lens) F11 (50 mm lens) F22 (50 mm lens)
Mat
t Sch
litz
*Archaeologists Field Handbook 29/6/04 5:25 PM Page 271

WTips for taking good archaeological photographs
• Always keep the plane of the film (i.e. the back of the camera) in the same plane asthe subject to avoid distortion.
• Always take light meter readings from your subject and not the background or fore-ground. If you can’t get close enough, take a reading on something that’s a similarcolour or is in similar light.
• Try to diffuse the light wherever possible, or use reflection to reduce contrast in darkshadows.
• Always include a scale.• Always record the details of each photograph in a log or on photographic recording
forms.• Shoot the first frame on a roll of an information board, noting the site, date and
location in case your logbook or recording forms are lost.• Make sure there is no extraneous material intruding on your shot (you’d be surprised
at how distracting a yellow bucket or a red folder off to one side can be).• Check regularly to make sure your camera is set to the correct film speed and hasn’t
been moved inadvertently.• Remember that film is cheap in comparison to the cost of returning to a location.
Always take at least twice as much film as you expect to use. It is also a good idea totake more shots that you think you will need, especially if you are planning to includethe images in a report or publication.
• You can never plan for the weather. Take film in a variety of speed ratings so thatyou’ll be prepared for a range of lighting conditions.
• If you are in doubt that your choice of aperture and shutter speed will actuallygive you the correct exposure, try bracketing your photographs. This is the photo-graphic equivalent of an insurance policy. Take one shot at the exposure which youthink is correct, and then take additional shots either side of this to give more andless exposure. If you took one photograph at 1/125 of a second at f-stop 8, forexample, then you would also take one shot at 1/125 at f/5.6 and one at 1/125at f/11.
• Keep it simple. Whereas a painter starts with a blank canvas and builds on it, a pho-tographer starts with a multitude of images and edits them down. For effectivecomposition, especially when photographing small objects, take elements away untilimages are reduced to their simplest components. One of the most common errorsis to try to include too much.
272 THE ARCHAEOLOGIST’S FIELD HANDBOOK
*Archaeologists Field Handbook 29/6/04 5:25 PM Page 272

WHOLDING THE CAMERA
The quality of your image will be enhanced by how well you hold the camera. The stillerit is, the sharper the resulting image will be. How steady the camera needs to be to takea good photograph is directly related to the shutter speed. In other words, if the shutterneeds to be held open for a longer period of time to let in more light, then thecamera needs to be held steady for a longer period of time. Very few people can holda camera steady at a shutter speed of 1/60 or lower, so if your exposure time will be long,you’ll need to use a tripod (see ‘When to use a tripod’ below).
When taking a hand-held photo:
• If standing, make sure you are relaxed and comfortable. If you place your feet slightlyapart and tuck in your elbows, this will help distribute your body weight more evenlyand provide a secure platform for supporting the camera.
• Try bracing your body on a solid object, such as against a tree, table or the side ofa building.
• If squatting, steady the camera by supporting your elbow on your knee.• If kneeling, distribute your weight evenly.• If lying down, use your camera bag or case to support the camera. • Try holding your breath when you press the shutter release button.• Press the shutter release button softly to avoid sudden movement.
WHEN TO USE A TRIPOD
A tripod anchors the camera in a way that is impossible for the human hand. A highlyflexible tripod, particularly one with individually and highly adjustable legs (see Figure 9.6on page 274) will be able to cope with just about any fieldwork situation. Remember touse a cable release to take tripod pictures so that you do not have to touch (and thus jar)the camera with your hand. If you don’t have a cable release, or if you lose it, you can alsouse the self-timer built into the camera to avoid unnecessary camera movement. You willneed to use a tripod if you are taking photographs:
• with long exposures at night;• in close-up, where any camera movement will have a serious impact upon the quality
of the image;• in rough terrain, where it is hard to maintain a steady stance;• with a very small aperture (a high f-stop) to allow for maximum depth of field.
PHOTOGRAPHY AND ILLUSTRATION 273
*Archaeologists Field Handbook 29/6/04 5:25 PM Page 273

WTripod tips
• If you need to steady the tripod, tiea bottle of water or sand to it tobalance the weight of the camera.
• In gusty weather, try putting a weight(such as your camera bag) on thetripod to stop it moving.
• If you don’t have a tripod with you,a small bean bag placed on a fence-post or similar object can be used tocradle the camera.
CHOOSING THE RIGHT CAMERA: SLR VS DIGITAL
Most archaeological photography is done with 35 millimetre SLR (Single Lens Reflex)cameras, although digital cameras are becoming more common. All standardmanual/automatic cameras are 35 millimetre SLR and usually come with a range oflenses. They use mirrors and prisms to focus the light coming through the lens on to thefilm. Digital cameras, by contrast, do away with film altogether and instead use a lightsensor to capture an image. The sharpness of this image is defined according to thenumber of pixels the camera can create: basically, the more pixels, the higher the qualityof the image will be. Point-and-shoot digital cameras are relatively affordable. They workwell if you are planning to use the images on an internet site, or on your computer, butdo not produce images that are of high enough quality to be published. The equivalentimage quality of a 35 millimetre SLR camera is an 8 million pixel digital camera.This level of quality was available at the time of writing only in extremely expensive high-end models.
274 THE ARCHAEOLOGIST’S FIELD HANDBOOK
FIGURE 9.6: The advantages of using a tripod to photograph archaeological sites
*Archaeologists Field Handbook 29/6/04 5:25 PM Page 274

W
MAINTAINING YOUR EQUIPMENT
A daily and weekly routine should be established for checking photographic equipment.Inspect your cameras, lenses and tripods on a daily basis and wipe them clean. Inspect
PHOTOGRAPHY AND ILLUSTRATION 275
TABLE 9.1: The pros and cons of SLR versus digital cameras for archaeological fieldwork
The advantages of SLR The advantages of digital
The utility of an SLR camera can be improvedthrough the use of different lenses andaccessories.
The main advantage of an SLR camera inmanual mode is that you have completecontrol over the image. The camera only doeswhat you tell it to do. Therefore, if there areany mistakes, you know that you have madethem, and you can work on improving yourtechnique.
When considered in terms of comparableimage quality, SLR cameras and theiraccessories are cheaper than their digitalequivalents.
SLR photography requires less skill incomposing, as you can draw upon thetechnology of super-wide angle lenses orextra long telephoto lenses.
Digital cameras are more limited in theirformat than SLR cameras, as they do not takeinterchangeable lenses. If you are shootingdistant images, an SLR camera fitted with anextreme telephoto lens will produce a muchbetter result than a digital camera. Similarly, it is very difficult to take truly wide-angle viewson digital cameras.
SLR cameras are more robust than digitalcameras. Digital cameras are more prone tothe kinds of damage that occur in the field,such as dampness, dust, heat and cold. Also,many digital cameras have rotating parts,which are more vulnerable than fixed partsand require extra care.
Digital image-making is usually much cheaperthan buying and processing film.
Digital cameras allow you the luxury ofcontinuous point-and-shoot in thosesituations where there is no time to wait fora composed image, such as if a procession ismoving by. With digital photography you canalso take a series of images without worryingabout the cost of film and processing.
Many digital cameras have a direct-to-printercable which allows you to make prints withoutneeding a computer. This can be useful in thefield, especially if you wish to give copies ofimages to local people.
Storing digital images is easy and copies ofimages can be produced more cheaply. Imagedata is saved on to removable memory cards,but in the cheaper models these can be limitedto as few as fifteen images before they have tobe downloaded.
Unlike conventional cameras, many digitalcameras allow you to preview the image on asmall LCD screen. This means that you canassess immediately whether you have achievedthe image you were after. If you are conduct-ing ethnographic research, this also gives youan opportunity to break the ice with thepeople with whom you are working.
*Archaeologists Field Handbook 29/6/04 5:25 PM Page 275

Wthem closely once a week and clean all their outside surfaces with a clean soft rag, or pieceof chamois. Pay special attention to the interior of the camera case. Blow dust fromthe interior of a camera body and case using a squeeze bulb, or blower brush, or a canof filtered compressed gas. Commercial lens tissues are good for lint-free, dry cleaning oflenses and cameras. Tissues and lens cleaner should be used for wet cleaning, with cottonwool buds for cleaning in spots that are difficult to access. When cleaning the lens or filter,remove as much dust as possible with a soft brush and blower, then use lens cleaning fluidand tissues. Never apply lens cleaner directly to the lens, as it may leak through the casing.Instead, apply it to the lens tissue. Rub the dampened lens tissue in a spiral motionoutwards from the centre of the lens.
Some basic precautions:
• Make certain that the equipment is operational a week or so before you leave, so thatyou will have time to fix any faults.
• Store all items in dustproof containers. • While in the field, inspect and clean cameras and other equipment regularly.
CHOOSING THE RIGHT FILM
Black-and-white or colour prints are the usual choice for archaeological reports. Colourtransparencies (slides) are also common as archival documents because they are morestable than prints. Black-and-white transparency film is rarely used in archaeology. Themost stable colour print or slide film is Kodachrome, which is also relatively cheap andhas good colour balance. Your choice of film will also be determined by what you’re photo-graphing and what you’re trying to show. Colour slide film can only record a relativelynarrow range of light, colour print film a slightly greater range, and black-and-white printfilm a greater range again (Howell and Blanc 1995: 20). This means that if you’re tryingto photograph artefacts outdoors, where high contrast between light and dark areasmight be a problem, black-and-white film will be able to capture more detail in both thevery dark and very light areas. Colour slide film, on the other hand, will probably increasethe contrast and make your artefacts highly shadowed. If in doubt, use colour print film—ISO100 outdoors and ISO400 or 800 indoors.
Caring for film
• Always check the expiry date on the outside of the film carton. When you purchasefilm, make certain that it is not near the expiry date.
• In the field, store film in an esky, or wrapped in a wet towel, to keep it cool. Remember
276 THE ARCHAEOLOGIST’S FIELD HANDBOOK
*Archaeologists Field Handbook 29/6/04 5:25 PM Page 276
Wto keep the film in an airtight container, so it doesn’t become damp and remove it anhour or so before you plan to use it, so it is at room temperature when you load it intothe camera.
• Load and remove film in the shade, or at least shield it from direct sunlight with yourbody.
• Never leave a loaded camera in the glove-box or boot of your car. The high air temper-ature in confined spaces such as these can damage the film’s speed and colour.
• If the air is very humid, do not return exposed film to the canister. Keep it in an airtightbag with a few packets of silica gel to absorb any moisture.
• Have exposed film processed as soon as possible, so that if there have been majormistakes or problems you can fix them immediately.
SCALES AND INFORMATION BOARDS
All archaeological photographs for technical purposes should include a scale, irrespectiveof the subject being photographed. The purpose of a scale is to provide something ofknown dimensions against which the size of the object can be judged (Dorrell 1994: 51),so a clear and readable scale is essential. Ideally, you should have a variety of scales to suitany circumstance, but each one must have the unit of measurement clearly marked on it(e.g. millimetres, centimetres or metres) and, if possible, at least one—if not more—majorlength divisions (e.g. 10 centimetres, 15 centimetres, 50 centimetres, 1 metre). Thestandard scale for site photography is a 2 metre range pole, marked in 50 centimetresections in alternating red and white. If you do not have this, you can make your own scalefrom a length of timber by simply painting the divisions in either red and white or blackand white. The standard scale for object photography is 10 centimetres, marked in 1 centi-metre sections in alternating black and white, though a range of smaller scales can be usedfor some laboratory shots. The International Federation of Rock Art Organisations*produces a free 10 centimetre colour scale for use in artefact recording. The advantage ofthis scale is that it also includes a colour reference strip which can be used to assess thedegree of colour distortion resulting from lighting conditions or the developmentprocess.
The most important principle when using a scale is that it should not overwhelm, ordetract attention from, the object. Never place a scale on top of an artefact, even if you feelthat it does not obscure essential information. The scale should be placed to the right orleft of the object or centred across the bottom or top of the picture. Because distortion isan inherent part of the photographic process, make sure you align the scale parallel toeither the horizontal or vertical frame of the photo. This means making sure that the scaleis not leaning at an angle or twisted so that it faces away from the camera. If you happen
PHOTOGRAPHY AND ILLUSTRATION 277
*Archaeologists Field Handbook 29/6/04 5:25 PM Page 277

Wto be caught in a situation without a scale, then it is still essential to include some objectin the photograph for the same purpose. A person (of average height) is acceptable forlarger features or site photography; for small items or areas, use a relatively common andrecognisable object such as a lens cap or pencil, but remember always to include a note ofthe length of the object in your field notes and figure captions.
An information board is also useful, as it provides a basic record of the photographicevent which can be checked against other records. A small child’s blackboard is not onlyeffective as an information board, but is cheap and can be reused quickly and easily. Infor-mation boards should be marked with the location, date and roll number. Ifphotographing an excavation, you should also include information on the unit, square,context or trench. Such photographs are not always attractive, so if your aim is to produceimages for publication in articles or reports, it can be an idea to take two photographs: onewith and one without the information board.
PHOTOGRAPHING STANDING STRUCTURES
The conventional approach to architectural photography requires a measure of technicalskill and a camera or lens that can be adjusted to correct for converging vertical lines. Attheir best, these pictures convey the proportions, textures and colours of a building. Whenyou are photographing the outside of a building, try to visit it at different times duringthe day, so that you can view it in different lights. Then choose the lighting angle that best shows the shape and texture of the materials. When photographing the inside ofa building, use available light wherever possible, but if this is insufficient, try bouncing aflashlight from a ceiling or wall, or using a reflector.
To record perspective accurately, it is necessary to keep the back of the camera parallelwith the subject. When you photograph a building from ground level, however, it isusually necessary to tilt the camera back a little so that you can include the top of thebuilding in the frame. This means that the bottom of the building will seem larger thanthe top, and the sides will appear to converge. The easiest way to deal with this is to standwell back or use a telephoto lens so that you will not have to tilt the camera.
When photographing a standing structure:
• Always take orienting shots which show the building in its context, including thesurrounding landscape and other buildings.
• Take external shots of the façade with a normal or telephoto lens, and then individualshots of the details on the façade.
• If you are taking many shots of the exterior or interior of a building, it is wise to notethe direction and location of each shot on a photographic plan. Draw a sketch map of
278 THE ARCHAEOLOGIST’S FIELD HANDBOOK
*Archaeologists Field Handbook 29/6/04 5:25 PM Page 278

Wthe building or site and indicate the physical location of each shot tied to the exposurenumber and the approximate direction you were facing for each shot with an arrow.
PHOTOGRAPHING EXCAVATIONS
It is particularly important that you produce an accurate photographic recording ofarchaeological excavations. When photographing excavations, it is worthwhile taking twotypes of photographs: accurate recordings of the results of excavation and photographsthat record the work in progress. In terms of recording the past, the important point is tomake a complete record of the site before, during and after excavation. In more generalterms, you need to think of the many purposes to which archaeological photographs canbe put.
You should take each of the following:
• an establishing shot, taken with a wide-angle lens, that shows how the area to beexcavated fits into its surroundings;
• a ‘before’ series of shots that records the excavation area before it is disturbed; • overall shots of people in action. This can give a vivid impression of the excavation
process;• full-face portraits of people in action. Try to get candid shots of people performing
routine activities, such as trowelling and sieving. The best technique here is to take lotsof photographs. While people will be stiff at the beginning, after a while they willbecome less aware of you, and you will be able to get increasingly natural shots. Don’tdirect people too much. Let them be themselves, and try to capture this on film;
• shots of sponsors or visitors to the site, which may be used subsequently for publicitypurposes;
• close-ups of special finds, which should be photographed in situ. Bear in mind depthof field and make certain that all of the object is in focus;
• close-ups of individual features as they are exposed; • individual photographs of the spatial association between artefacts;• individual photographs of the step-by-step excavation of a significant discovery;• individual photographs of each context or unit once it has been excavated, recording
the particular surface characteristics of each unit. These should include both verticaland horizontal faces (i.e. separate shots of the walls and floor of the trench). Theyshould be taken after the walls have been straightened and the surface tidied andbrushed clean (see ‘Recording sections’ on page 135);
• an ‘after’ series of shots which records the excavation area once work is complete, butbefore the site is backfilled.
PHOTOGRAPHY AND ILLUSTRATION 279
*Archaeologists Field Handbook 29/6/04 5:25 PM Page 279

WWhen taking shots of successive levels in an excavation unit or trench, make sure that allshots are oriented in the same direction. In other words, if the first photograph ofthe excavation unit is taken facing north, then all subsequent shots documenting theexcavation of that square must also be taken facing north, so that the complete seriesof photos can easily be compared. Obviously, if you are also taking individual shots ofparticular features within the unit, these can be taken from any angle. To avoid problemsof distortion when photographing whole excavation units, you should try to keep theplane of the film (i.e. the back of the camera) parallel to the ground surface. This maymean elevating the photographer above the site so that the photograph can be takenlooking down (see ‘Taking aerial photographs’ below).
Trouble shooting?
• If you have problems with shadows in deep trenches, try using a reflector or diffuser(or both) to make the light more even.
• If the stratigraphy is unclear, you can lightly spray the walls with water. This willdarken the earth and can highlight differences in soil colour. In fact, at some sitesdifferential drying is the best way to record important stratigraphic boundaries. If youdo use spraying to enhance stratigraphic resolution, however, this should be recordedin your notes and on the photographic recording form.
• Take close-ups of any areas that are difficult to interpret, such as post holes, as you maywant to revisit these problems later or rethink your previous assessments.
TAKING AERIAL PHOTOGRAPHS
The purpose of aerial photography is to obtain a bird’s eye view of an archaeological site.This can give you quite a different view to that which you normally take. For example, ifyou are on the ground you may be able to see a large number of mounds, but it is onlyfrom above that it is possible to see the relationships between them. Aerial photographycan be undertaken in two ways. Either the archaeologist has to find a way to place them-selves above the site, or they have to find a way to elevate their camera. The elevation ofthe archaeologist can be achieved through the use of a light plane or a hot-air balloon. Insome instances, low elevations may be all you need and it may be enough to climb a ladder,a tower, a tree or a rock outcrop. A cherry picker is another possible solution, althoughthey can be quite expensive and are not always easily manoeuvrable on site. A higher view-point will enhance your ability to interpret the site in terms of its surroundingenvironment, as well as to make sense of the relationship between different parts of the
280 THE ARCHAEOLOGIST’S FIELD HANDBOOK
*Archaeologists Field Handbook 29/6/04 5:25 PM Page 280

Wsite. In terms of site photography, elevating the photographer or the camera can be asolution to problems of distortion inherent in photographing large areas from groundlevel. Alternatively, the camera can be elevated independently through a variety of means,such as balloons and bipods.
PHOTOGRAPHING ROCK ART
Unlike rock paintings in Europe, rock art in Australia is usually found in rockshelters oroutdoors on boulders. Normally, there is sufficient light to take good photographs.Photographs of rock art should be taken using an SLR camera, as digital images donot yet provide high enough resolution for high-quality publication and tracing. Whenphotographing rock art, take each of the following:
• orienting shots, showing the immediate environmental context;• a close-up of each motif, which can be used as the basis for tracing;• wide-angle images, which show the motifs in relation to each other;• close-ups of details, such as superimposition or areas of damage, which can be used in
site interpretation.
Remember to keep the back of the camera (i.e. the plane of the film) in the same plane asthe rock surface as much as possible to avoid distortion.
As opposed to rock paintings, rock engravings are often located at open sites and canbe difficult to photograph. The best time to photograph a particular engraving site willdepend on that site’s orientation and location in the landscape, but as a general rule it isbest to take photos in the early morning or late afternoon, when the sun is at an obliqueangle and will reveal the engraved lines more clearly.
It is especially important to visit rock art sites at different times of the day to work outwhich is the best light for photography. Experiment with filters and diffusers to seewhether they help bring out different features in the art. If the rock art is in an area of littlesun, it may have to be photographed using artificial light. In this case, it is important tomake certain that the light spreads evenly across the surface, so that you can record thegreatest detail. Sometimes, it can be helpful to photograph rock engravings at night usingan artificial light source held very close to the surface of the rock so that the light shinesacross the art surface rather than straight at it. You can also try holding a hand-held mirrorclose to the rock surface in daylight to redirect sunlight to the same effect. If you are tryingthis during the day, it is much more effective to shade the area you are trying to illumi-nate, so that the light cast from the mirror is not washed out by the brighter sunlight(Clegg 1983: 99). Using oblique light in this way highlights the relief on the surface and
PHOTOGRAPHY AND ILLUSTRATION 281
*Archaeologists Field Handbook 29/6/04 5:25 PM Page 281

Wcan be very helpful in providing detail for tracings. This technique can also be useful forrecording other hard-to-interpret relief surfaces such as weathered gravestones.
Never use chalk, paint or any chemical to outline or emphasise rock art motifs, as thiscan cause permanent damage to the art surface. For the same reason, never removegraffiti, lichen or moss from the art surface so that you can see it better. Removing anysuch coverings is likely to cause unforeseen damage and you must have permission fromthe relevant state authority before you can clean up any archaeological site. If you cannotmanage to bring out the best in the rock art through the use of filters, oblique light orother lighting conditions, then you will have to rely on tracing or drawing the rock artpanels to show their detail (see ‘Drawing rock art’ on page 302).
PHOTOGRAPHING ARTEFACTS
Because artefact photography is designed to reveal technical details, it is very importantthat you can see all parts of the artefact clearly. Lighting will be crucial in the close-upphotography of artefacts. If you are photographing something small like a coin or a stoneartefact, mount it so that it is a centimetre or two above the background. This will allowyou to focus on the object, while throwing the background out of focus. Plasticine or Blu-tack® is not ideal, as it may mark the material, but it will work.
Make sure that the background contrasts with the colour of the artefact so that theentire margin of the artefact is clear. A plain-coloured background is best: either black ora relatively neutral colour, such as the inside covers of this book. Try to avoid castingshadows, which can obscure the margins of the artefact, and try to ensure good, even light.Take the time to get it right, because you may never find that object again!
Tips for artefact photography
• The most important factor in taking a good artefact photograph is to ensure that youuse the entire negative to frame the artefact. There is nothing worse than looking ata vast expanse of background with a tiny artefact in the centre. While you can cropphotos later, if you are not focusing sufficiently closely on the artefact, your photo-graph will lack the detail necessary for a good archaeological photograph. If youare going to be taking lots of photographs of small artefacts (for example, stoneartefacts), this may mean investing in a micro-lens to get the necessary close-ups.
282 THE ARCHAEOLOGIST’S FIELD HANDBOOK
*Archaeologists Field Handbook 29/6/04 5:25 PM Page 282

W• Glass artefacts are some of the most difficult artefacts to photograph well. When
photographing flaked glass, try holding the artefact up to the light in order to revealthe detail of the worked edge.
• If you’re photographing several artefacts in the one shot (e.g. an assemblage of bonebuttons, or stone artefacts), arranging the artefacts in rows and grouping togetherartefacts of similar size usually works best.
• Choose the appropriate background for your photographs. This doesn’t always haveto be artificial (e.g. a background of pale sand can work as well as a piece of clothor paper), but make sure that the colour of the background doesn’t make it difficultto see the artefacts clearly.
• Always try to keep the plane of the film as close as possible to the horizontal orvertical to avoid distortion. When photographing artefacts, for example, you’ll needto get directly above them to keep the camera horizontal.
• The most important factor when using a person for a scale (e.g. in site/contextphotographs) is to make sure they do not look artificially posed. A photograph ofthem casually examining the site, or a detail of the site, will look more natural thana photograph of them standing to attention.
• When photographing underwater, remember that the deeper you dive, the less lightthere will be to take good photographs. You will also lose different wavelengths oflight at different depths, which will give a colour cast to your photographs.
• Also remember that objects underwater will actually be one-third further away thanthey appear.
KEEPING PHOTOGRAPHIC RECORDS
Given the enormous cost of getting into the field, it is absolutely essential that you makecertain the information relating to your photographs is not lost. Some form of recordkeeping in the field is essential if the images are to remain meaningful for archaeologicalpurposes. Precise information on when, where and why a photograph was taken can bepermanently lost if photographs are not securely correlated to good records.
• Number each roll of each type of film in sequence (colour slide film 1-X, black-and-white 1-X, and so on). When you take the first shot on each roll, make certain that itincludes either an information board or a piece of paper with the roll number, date andlocation. This means that at least one frame within each roll will have basic identify-ing information. This can be especially important if the photographic recording sheetsare ever lost, not filled in, misplaced or filed separately from the images.
PHOTOGRAPHY AND ILLUSTRATION 283
*Archaeologists Field Handbook 29/6/04 5:25 PM Page 283

W• Basic information, such as date, time, location, subject, frame number and roll number
should always be included on a photographic recording form (Appendix 1), whichshould also include specific remarks. It is also a good idea to carry a small notebookand jot down basic information, or record this in your field diary.
• Never succumb to the temptation to write up your photographic records later. Recordthe information after each photograph is taken, and update remarks and general infor-mation throughout the day. While it can be tempting to wait until evening, by then thenuances will be lost, and if you put it off until morning or for a few days, you can easilyomit important details.
• If several sites are involved, you should record the photography on a site-by-site basis,making especially certain to enter information on the first frame used on a new site onthe recording form.
• Another way of protecting information is to take photographs using a Polaroidcamera. When setting up to take a series of photographs, take a couple of Pola-roid images first and mount them directly into your field notebook. Record the roll and frame numbers alongside the appropriate Polaroid print. If other records getlost or misplaced, you can locate where the main prints were taken by comparingthem to the Polaroid scenes in your field notebook. Note that Polaroid prints areunstable and will become darker with time. For this reason, they are not suitable forarchival purposes.
THE BASICS OF FIELD ILLUSTRATION
Just as a ‘good’ archaeological photograph has a particular role to fulfil, so too a ‘good’archaeological illustration is not the same as the artistic representation of an object. Thegeneral aim of all archaeological illustration is to produce an objective drawing that canbe used for the purposes of comparison (Drewett 1999: 177). For this reason, all archaeo-logical drawings must be carefully measured and are designed to reveal technicalinformation of use to archaeological analysis. Good-quality illustrations are an importantpart of archaeological recordings. Journal articles and archaeological reports will includea range of illustrations, such as maps, site plans, section drawings, illustrations of artefactsand, in some cases, imaginative reconstructions of past lifeways. The quality of illustra-tions can make an enormous difference to the final publication. If all else fails, and youdo not draw particularly well yourself, it can be worthwhile paying someone else toproduce good illustrations for you.
The essential equipment for any good field illustration is graph paper, a sharp pencil,a scale ruler and a good eraser. You can either draw your illustrations directly on to graphpaper, or draw them on to translucent drawing film (such as Permatrace) or tracing paper
284 THE ARCHAEOLOGIST’S FIELD HANDBOOK
*Archaeologists Field Handbook 29/6/04 5:25 PM Page 284

Wheld down with sticky tape over graphpaper. You can buy drawing film from anyart supply shop.
The archaeological illustration processhas two parts: the initial in-the-fieldpencil drawing of the plan, section (seeChapter 4: Site surveying) or artefact, andthe final inked version for publication.The final inked part of the process is notso much part of the fieldwork, but some-thing which is done later in the lab. Itis essential for publication, however,and so has been included here as part ofthe general process (see also Chapter 10:Getting your results out there). Thereare also many computer programs whichcan be used to produce high-quality pro-fessional illustrations from your initialpencil drawings.
An inked drawing is essentially atracing of your pencilled original. It mustbe done on high-quality translucentdrawing film or high-quality tracing paper(make sure you avoid cheap and nasty‘lunch-wrap’-style tracing paper). Wheninking drawings, you should use high-quality technical pens (such as RotringIsograph or Castell Rapidograph penswhich come in a range of point sizes) filledwith good-quality ink. Don’t try to draw inked illustrations directly on to paper, becausethe fibres in the paper will cause the ink to bleed and make the illustration messy.Because you cannot simply rub mistakes out when you are using ink, however, you needto exercise care. Remember that, because you are simply making a copy of the originalpencil master drawing, you can make as many copies as you like and keep practising untilyou get it right. On good-quality drawing film, you will have to use a scalpel to scrape offany mistakes. The blade must be very sharp, however, and it is not something you can dotoo often as eventually it will permanently damage the surface of the drawing film. Whenremoving mistakes by scalpel, hold the blade parallel to the surface and remove the inkwith a firm, smooth sweep, using as few passes as possible. Be careful not to let the point
PHOTOGRAPHY AND ILLUSTRATION 285
FIGURE 9.7: Many archaeologists use adrawing board when in the field made froma light sheet of masonite or plywood holdinga fixed sheet of laminated A3 sized graphpaper. You can then easily tape drawing filmor tracing paper directly over the laminatedgraph paper.
*Archaeologists Field Handbook 29/6/04 5:25 PM Page 285

Wof the scalpel gouge the surface or to let the blade start and stop jerkily, as this will createcavities in the drawing film which will make the ink bleed or pool and mess up yourdrawing.
DRAWING HORIZONTAL SURFACES (PLANS)
The drawn record of any piece of archaeological fieldwork will consist mainly of measureddrawings of surfaces: either horizontal (plans) or vertical (sections) (Drewett 1999: 130).Site plans are one of the most common types of archaeological illustration. Because it isusually impractical to photograph a site from the air, a plan is often the only way todocument and convey spatial information about a site quickly and easily. Plan drawinguses the measurements taken from a baseline and offset or compass and pacing survey(see Chapter 4: Site surveying) and converts these to a suitable scale to fit on to a sheet ofgraph or drawing paper.
Because sites are rarely if ever drawn at a scale of 1:1, the first and most importantthing to consider when drawing a plan is the most appropriate scale (Table 9.2, on page287 see also Table 2.1 on page 34). Obviously the drawing can’t be so large that it won’tfit on to the paper, but by the same token, there is no point drawing it so small that youcan’t see any of the details.
How to draw a plan in the field
• Decide on the most appropriate scale before you begin. There is nothing morefrustrating than getting halfway through a plan before you find out that part ofthe site literally will not fit. To work out the scale, find out the longest measurementthat you will be required to plot and work out a scale that will fit this on to thedrawing. Obviously if you can fit the longest measurement, then everything else willfit too.
• Work out roughly where this measurement will be located on your drawing to ensurethat you can fit the other elements of the site around it (i.e. if the longest measurementis running through the middle of the site, there is no point placing this on one edge ofthe drawing).
• Mark the baseline or the edges of the planning frame lightly on to the drawing, andindicate the measurement gradations.
• Work out where north is with a compass and convert this to a north arrow on yourplan using a protractor. To do this, first take a compass bearing along your baseline(see ‘Using a compass’ in Chapter 2 on page 47). Then orient your protractor over thedrawn version of the baseline from the same point so that it faces the same direction.
286 THE ARCHAEOLOGIST’S FIELD HANDBOOK
*Archaeologists Field Handbook 29/6/04 5:25 PM Page 286

W
If you took a compass reading of 90° from the southern end of the baseline, forexample, you would position the centre of your protractor over the southern point ofthe drawn baseline so that the 90° mark lined up with the baseline. From this, youwould mark the direction of north (0°) at the edge of the protractor and then draw ashort solid line capped with an arrow to represent north. While it is the convention forall plans and maps to be oriented with north to the top of the page, because you willhave established your baseline according to where it is most useful to record archaeo-logical information, you probably will not have the luxury of being able toautomatically place north at the top of your field plan. In this case, don’t worry. Whenyou eventually come to draw the final inked version of your plan, you can simplyredraw it in a new orientation so that north will face the top of the page.
• Use the same method to convert any directional bearings from a compass which youmake during the course of the plan to directions in degrees on your plan.
PHOTOGRAPHY AND ILLUSTRATION 287
TABLE 9.2: The relationship between scale and the level of detail which you can reasonablyexpect to include on a site plan. For any objects smaller than specified, youcould indicate their location with a dot, but would not be able to include anydetails of their shape or form.
Scale Means Main uses Level of detail
1:1 Life size Only for small artefacts, Excellent, can include or examples of decoration everything.on artefacts
1:10 10 cm on the ground Sections and elevations, Expect to draw every object= 1 cm on the plan skeletons and small complex above 1 cm in length (which
deposits will be 1 mm on the plan)1:20 20 cm on the ground Feature plans Expect to draw every object
= 1 cm on the plan above 2 cm in length (1 mm on the plan)
1:50 50 cm on the ground Site plans, large simple Expect to draw every object= 1 cm on the plan sections and elevations above 5 cm in length
(1 mm on the plan)1:100 1 m on the ground Simple site plans only, Expect to draw every object
= 1 cm on the plan sketch plans above 10 cm in length (1 mm on the plan)
1:250 2.5 m on the ground Larger sites or sketch plans Expect to draw every object = 1 cm on the plan of sites above 25 cm in length
(1 mm on the plan)1:500 5 m on the ground Large, complex sites Expect to draw every object
= 1 cm on the plan above 50 cm in length (1 mm on the plan)
*Archaeologists Field Handbook 29/6/04 5:25 PM Page 287

W• Draw in the larger, dominant features first. This will help you to position the smaller
features around them and may save you time if you are running short at the end. If allelse fails, as long as you have the dominant site features accurately plotted, then youcan always draw in the lesser features by eye.
• Clearly label the drawing with the site name, trench or square designation (if you aredrawing a plan of an excavation), your name, the names of any people who havemeasured for you and the date.
• Always draw the scale of the plan as a linear (bar) scale, rather than just noting downthe scale ratio (1:10, 1:100, etc.) and make sure that you note what units of measure-ment the scale refers to. If the scale is in centimetres, mark it with a ‘cm’, if in metresmark it with an ‘m’ and so on. There is absolutely no point in drawing a beautiful,accurate scale if nobody knows what units it represents.
• If you are drawing a very large or extensive site, it may not be possible to fit theentire area on to a single plan and still preserve the detail. In this case, you may needto break the site down into discrete parts which can be drawn separately, but you willalso need to draw an overall plan of the site showing each part in relation to theothers. If your plan is running across two or more sheets of paper, make sure that younote how they fit together and that you write this on both sheets. One way to do thisis to make sure that the adjoining parts contain the matching halves of a singlesymbol (such as a circle, square or solid line) so that you can literally put the twohalves back together again. Another way is to number the sheets and mark the adjoin-ing edges ‘Plan 1 adjoins Plan 2’ and so on. If you adopt this latter method, makesure that someone else will know precisely where they join up: there is no point notingwhich plan joins which, if there is no other indication of which edges actually join.
• When you come to draw the final inked version of the plan, always remember toinclude the scale and your north arrow marked with the letter ‘N’.
There are various conventions for drawing slopes. A plan makes the distance betweenany two points appear horizontal, as if both were at the same level. In reality, of course,your site may include various kinds of slopes, which need to be indicated on yourplan. This will help you to convey an idea of the contours of the ground, and will beessential if the site you are recording consists of hummocky relief (i.e. mounds andhollows), or if there are distinct changes of slope which are an essential part ofthe arrangement of the site (such as mine-processing plants, which were commonlybuilt down the slope of a hill to take advantage of gravity to move materials between dif-ferent stages of the process). You indicate slope by using hachures, or short lines whichindicate the top of the slope with an arrow and the length of the slope with a line(see Figure 9.8 on page 289).
288 THE ARCHAEOLOGIST’S FIELD HANDBOOK
*Archaeologists Field Handbook 29/6/04 5:25 PM Page 288

W
DRAWING VERTICAL SURFACES (SECTIONS)
A section is simply the drawing of a vertical, rather than a horizontal surface, but employsall of the same basic techniques. You can apply these techniques to any vertical surface,whether the side of an excavated trench or the wall of a standing structure.
When drawing vertical surfaces:
• Set up a horizontal baseline (datum) across a suitable part of the section—either at thetop if it is a small section, or halfway down if it is a large section. To do this, first setout the datum using a piece of string secured firmly to two nails. These can be insertedinto the corners of the section if you are drawing a trench profile, or into cracks in themasonry if you are drawing a wall. Use a line level to make sure that the string ishorizontal. Once you have established this, fix a tape measure to the string baselinewith clothes pegs.
PHOTOGRAPHY AND ILLUSTRATION 289
FIGURE 9.8: Coventions for illustrating slope
*Archaeologists Field Handbook 29/6/04 5:25 PM Page 289

W• Draw the datum line lightly on to your graph paper or drafting film as a horizontal line
parallel to the top of the drafting sheet and mark the gradations of the tape measureon to it. Remember to place this appropriately on your page (i.e. at the top if yourbaseline is at the top, in the middle if your baseline is in the middle and so forth).
• Begin by drawing the gross elements, such as the limits of the section or wall, the levelof the topsoil and the base of the trench by taking offset measurements above andbelow the datum line.
• Once you have established the boundaries of the drawing, begin on the details, suchas the layer boundaries and features. If you are drawing an excavation trench, you mayhave to go back and forth between your drawing and the trench notes and recordingforms to make sure that you have all the layers.
• Remember that it is ok to draw in some smaller features by eye, or to fill in somedetails by eye, and as you gain experience this will become much easier to do.
• If you are drawing a trench profile, make sure that you label each excavated contextwhich appears in the section with its correct context number (usually representedaccording to the Harris matrix system by the number inside a square (see ‘Interpretingstratigraphy’ on page 136).
• If the four sections of a trench are to be drawn on the one sheet, then draw them in theorder of north, south, east and west.
• Clearly label your drawing with the site name, trench number and profile descriptionif appropriate, date, scale, your name and the name of anyone who has taken measure-ments for you.
If you are excavating a large and complex site, you can secure an aluminium tag clearlyshowing the unit number to the trench section as the surface of each new unit is identi-fied. This will help you later when drawing up the sections.
While there are standard systems of symbols to use in drawing sections and plans, it isdifficult to achieve a uniform system because sites and their contents vary so widely(Adkins and Adkins 1989: 74) (see Figure 9.9 on page 291).
DRAWING ARTEFACTS
Measured drawings of individual artefacts are time consuming and usually only done forpublication. The drawing of any artefact is not simply a mechanical process, but requiressome interpretation and selection (Drewett 1999: 177). First, carefully examine the object
290 THE ARCHAEOLOGIST’S FIELD HANDBOOK
*Archaeologists Field Handbook 29/6/04 5:25 PM Page 290

WPHOTOGRAPHY AND ILLUSTRATION 291
FIGURE 9.9: Conventions for drawing archaeological sections
*Archaeologists Field Handbook 29/6/04 5:25 PM Page 291

Wand decide which aspects are most important to convey. The size and shape of the objectwill always be important, but what about its material? Evidence for how it was made?Different surface finishes, or areas of damage? What will need emphasising in the finaldrawing? It is also important to consider how you will convey the three-dimensionalnature of the object on a two-dimensional surface: which side or aspect is the mostimportant to draw? This will determine what will be regarded as the ‘front’ or the ‘back’of the object, and therefore what is also drawn as the side, top or basal view. All goodartefact drawings will not only be technically correct and convey the relevant technicalinformation, but also be pleasing to the eye.
The basic process to be followed is similar for all kinds of artefacts. Unlike plans, it isfar easier to draw an object at a scale of 1:1 (i.e. actual size), rather than to try to reduce orenlarge it. If an object is particularly large or small, however, the drawing may need to bereduced or enlarged as appropriate, simply for ease of working. There are four main stagesin drawing most artefacts:
• drawing the outline;• drawing the details;• drawing a side view;• drawing a cross-section.
Some more complex artefacts may require more views than this (such as a top, base orback view for instance)—use your own judgment as to which will convey the most usefulinformation, or look at published drawings of similar artefacts as a guide.
If you are drawing more than one artefact, you will also have to give some thought tothe placement of artefacts together on a page:
• Set your drawings in horizontal rows to the extent allowed by their shape and size.• Don’t be tempted to rotate the artefacts to fit them in, however. Always keep them in
their correct conventional positions.• Put the smallest, lightest-looking artefacts at the top of the layout, and the darkest,
heaviest ones at the bottom (Addington 1986: 68).• Try to keep all the specimens of one artefact type together in a series. Do not randomly
mix your drawings in complete disregard of their classifications (Addington 1986: 69).• If you are numbering each artefact, put the numbers in the same relative position
beside each artefact and make sure that the numbers or letters are arranged in a logicalorder (i.e. running from left to right and top to bottom).
• Make the numbering or lettering as unobtrusive as possible.• Consider placing a border around the drawings to visually draw them together.
292 THE ARCHAEOLOGIST’S FIELD HANDBOOK
*Archaeologists Field Handbook 29/6/04 5:25 PM Page 292

WDrawing the outline
To draw whole objects, place the object flat on a piece of graph paper (it can be held inplace with Blu-tack® or small wooden blocks if necessary). If you are drawing a smallartefact, you may be able to trace directly around it using a sharp, long-pointed leadpencil. If you can’t trace directly around it, use the pencil to project points around the edgeof the artefact which can be joined to give the outline (see Figure 9.10 on page 294). If youare drawing a large artefact, use a set square to project points in the same fashion aroundthe edge of the object on to the paper. If the object is regular in shape, you can probablyget away with relatively few points, but if it is irregular you will need to draw as many asare necessary (generally, wherever there is a major change in angle/shape) to indicate itsprecise outline (Figure 9.10 on page 294). Remember to keep the pencil or set squarevertical while you are doing this, otherwise you will distort the shape of the object.
Now place the artefact to one side of the outline and compare them critically by eye.You will no doubt see several anomalies in the outline which have dropped out or become‘softened’ through the tracing process (indentations will be smaller than they ought to be,and bumps bigger). Correct the outline to define the details of the edge more sharply. Ifnecessary, check your measurements with callipers to ensure that your outline is accurate.Remember that you are drawing a plan of the artefact, therefore make sure that all of yourmeasurements are kept in a horizontal plane (Figure 9.10 on page 294). If you are drawinga stone artefact, make the lines of the outline angular rather than rounded, because thiswill emphasise details rather than obscure them (Mumford 1983:161).
Drawing the details
Once you have a measured outline, you can begin on the detail. You can plot in details ofthe surface of an artefact by hand (Figure 9.10 on page 294), or by measuring the artefactwith callipers. If you are doing it by hand, place the artefact over its drawn outline and holdyour pencil over the point you wish to plot. Keeping the pencil steady, slide the artefactaway, then simply lower the pencil point on to the paper immediately below. You can repeatthis process until you have enough points on the paper to draw the feature in fully.
This will give you a complete ‘skeleton’ of the artefact: its edge and all its features inoutline. Sometimes this is all that you will need to show the artefact clearly and indicate itsmain features (Figure 9.11 on page 295). If you think your artefact requires more interpre-tation, you can do this by adding shading to make it three-dimensional. Shading can beadded as stippling (small dots which increase in frequency in darker, more shaded areas), orcross-hatching (diagonal lines which increase in frequency in darker, more shaded areas). Ifyou are at all hesitant about adding shading, then don’t attempt it—it takes as much effortto do it badly as to do it well and it is not always vital to the understanding of the object(Mumford 1983: 166) (for more tips on shading, see ‘Golden rules for drawing’ on page 297).
PHOTOGRAPHY AND ILLUSTRATION 293
*Archaeologists Field Handbook 29/6/04 5:25 PM Page 293

W
Drawing a side view and cross-section
A side view is drawn by rotating the object through 90° from the surface or ‘front’ view.Always place a side view parallel and to one side of the front view—it doesn’t really matterwhich, although the convention is to place it to the right.
Many object drawings also require a cross-section to show the thickness or shape ofthe artefact. This is not a substitute for a side view. For ceramic vessels, a cross-sectionwill be a half-profile divided down the long axis of the pot; for stone artefacts, it will be
294 THE ARCHAEOLOGIST’S FIELD HANDBOOK
FIGURE 9.10: Measuring the outline and details of an artefact for illustration (afterGriffiths et al. 1990: 96; Mumford 1983:161)
*Archaeologists Field Handbook 29/6/04 5:25 PM Page 294

W
a cross-section through the middle, or most informative section of the artefact. Whenmeasuring the thickness of an artefact for a cross-section, make sure to measure it at asmany points as are necessary to convey the object’s precise form (because its thickness maynot always be constant).
Whenever you draw a cross-section, make sure you indicate the line of the section (i.e. the place on the object which the section passes through) with a short line on eitherside of the object in the appropriate spot. Make sure the cross-section is always placedparallel to the axis of these lines and to one side of the front (surface) view. In Britain andAustralia, the convention is to place this on the left-hand side, in the United States it is toplace it on the right. Either way, the cross-section should either be coloured in solid black(if it is a cross-section of a pottery vessel), or cross-hatched (if it is a stone artefact).
Reduction
Very few finished drawings of artefacts will be reproduced at life size. Drawings arereduced for many reasons, most of them economic (some artefacts are simply too largeto fit on a page and many will often need to be included on the same page). This meansthat the scale and level of detail you choose for drawing an artefact is very important.Bear in mind that reduction will affect every aspect of your drawing: every line will bereduced in thickness, the white space will be reduced in area, any shading, stippling or
PHOTOGRAPHY AND ILLUSTRATION 295
FIGURE 9.11: Shading is not always essential to an understanding of an artefact, but can beused to add three-dimensional form
*Archaeologists Field Handbook 29/6/04 5:25 PM Page 295

Wcross-hatching you have used will be closer together. This will be particularly importantif your drawing is going to be reduced to one-third or one-quarter of its size for publi-cation: if you think of how your drawing will look even when only reduced to half itssize, how much of the decoration or fine detail will still be visible? When it comes tomaking decisions as an illustrator, one of the most important things to think about isthe final scale of the published drawing: large artefacts are usually drawn at a scale of1:1, but then reduced to 1:3, or 1:4 in the final publication; while small artefacts areusually drawn at a scale of 2:1 so that they can be reduced to life size in the final publication.
The positive side of the reduction process is that it can actually make your drawing lookbetter because it reduces any flaws. If you want to get an idea of how reduction will affectyour drawing, try reducing it on the photocopier to see how it will look.
When preparing an illustration for publication:
• Draw lines which will be thick enough to reduce without disappearing. The thinnestline which can be printed confidently is 0.1 millimetre, any less than this and the linewill break up (Griffiths et al. 1990: 8). Your lines will therefore have to be proportion-ally thicker than this: for those that will be reduced to one-quarter of their size, thesafest thin line would need to be 0.4 millimetres thick, for example; for drawings whichwill be reduced to half their size, the safest thin line would need to be 0.2 millimetresthick, and so on.
• When shading or cross-hatching, make sure the lines are not so close together that theywill simply appear black in the published drawing.
• If you are using different shades of grey for infill, make sure that reducing the drawingwill not simply make them all look the same. In general, go for readily distinguishableand separable shadings (e.g. white, 50 per cent black or 100 per cent black) and notminute variations in between.
• Think about the size of your lettering or numbering, including the size of your scale,and how this will look when reduced. For scales, it is best to stick to simple and easilylegible black-and-white bar scales with lettering that is large enough to still remainlegible after the reduction process.
• Bear in mind that the white space is just as important as the black lines when it comesto the reduction process This will apply particularly to the spacing between text labelsand the objects you are labelling. Make sure that you don’t place the text too close tothe object, because the reduction process will reduce this spacing even more.
296 THE ARCHAEOLOGIST’S FIELD HANDBOOK
*Archaeologists Field Handbook 29/6/04 5:25 PM Page 296

WGolden rules for drawing
• Keep your pencil sharp.• Try not to use a hard lead pencil (H series) as this will leave an indelible mark on the
paper or drawing film, which will remain even if you rub the pencil itself out. HB orB series pencils are softer and can be rubbed out completely.
• Never give only a written description of a scale (e.g. ‘Drawn at 1:1’), as the size atwhich an illustration will be published is unlikely to be the same as the original(Mumford 1983: 168). Always include a simple bar or linear scale.
• Always include your name as the illustrator, and the names of any others who havetaken measurements for you, as well as the date and the name of the site or othertitle.
• If you are drawing a plan, always include a north arrow.• Use conventional symbols wherever possible.• Use a heavy grade of tracing paper, as lighter grades crinkle too easily and absorb
moisture from your hands. • If you decide to use drawing paper, choose one that has a smooth surface, as a
textured surface will break up the lines of ink, making copying difficult.• Never use felt-tip pens, magic markers (‘textas’), fountain pens or ballpoints to make
final illustrations.
For artefacts• Always draw an artefact as if the light is coming from the top left-hand corner. This
means that shading will be to the right and on the lower right-hand sections of theartefact. If you are unable to arrange lighting from the left-hand corner, use yourimagination to guide your shading.
• The main component is the front or surface view (remembering that ‘front’ will bearbitrary in some cases).
• Always use a consistent orientation, and make sure the vertical axis of the object isalways kept parallel to the vertical axis of the page.
• Other standard components for most artefact drawings are a side view and a cross-section. Some very complex artefacts may require a view of the top and bottom ofthe artefact as well.
• Draw views of the top or the bottom of the artefact above or below the objectrespectively.
• Side or back views should be drawn to the right of the front view.
For stippling• When stippling, hold your pen upright to produce a discrete dot rather than a small
comet. If the drawing is used in a publication, it will be reduced and stippling can
PHOTOGRAPHY AND ILLUSTRATION 297
*Archaeologists Field Handbook 29/6/04 5:25 PM Page 297
Weasily become a black blob. Start with an overall light covering and work from lighter(less dense) to darker (more dense) areas.
• Remember that the dots should be randomly placed and not ordered in rows or lines(this is harder to do than you might think). They should be evenly spaced and theirdensity should increase gradually (Mumford 1983: 167).
• If the surface of the artefact is smooth and uniform, keep the dotting fine anduniform, with only gradual changes in tone.
• If the surface is rough and coarse, stipple with more vigour in some areas accordingto the character of the surface features (Addington 1986: 18–19).
• When stippling, remember that variation in the amount of white space between dotscan give an impression of an undulating surface.
• Add the dots for the more heavily shaded areas last. Try to fade these areas gentlyinto each other, unless you are trying to indicate a change of plane. Bear in mind thatthe densest parts should be on the right-hand side, if the light is coming from theupper left-hand corner.
For cross-hatching• Cross-hatching should be at the same spacing as the line shading and generally
should be at right angles to the lighter tones.• On curved surfaces, hatching should follow the curves, either round the edges or
radiating down curved surfaces.• If you need a particularly dark shadow, add a third level of diagonal hatching across
the cross-hatching (Griffiths et al. 1990: 31). Avoid the temptation to add a fourthlevel of hatching, as it will simply appear solid black.
• It is always easier to add extra lines, cross-hatching, dots or stippling than to takethem away from too crowded a drawing. If you are unsure, it is better to do lessrather than more.
DRAWING STONE ARTEFACTS
Stone artefacts are probably one of the most difficult things to draw, simply because theycome in a wide variety of raw materials and sometimes show extremely detailed evidenceof working. One of the main conventions to follow is to use different drawing techniquesto represent the different kinds of raw materials: stippling for coarse-grained materialsuch as sandstone, commonly used in grinding implements, and hatching for smooth,fine-grained materials such as obsidian, chert or flint.
To draw a stone artefact, follow the usual basic sequence: outline, details, side view,cross-section. There are some specific conventions to follow, however:
298 THE ARCHAEOLOGIST’S FIELD HANDBOOK
*Archaeologists Field Handbook 29/6/04 5:25 PM Page 298

W• When drawing the outline, remember that pencil lead will leave a residue on the
artefact. If you are intending to analyse residues, use only a set square to projectthe outline and don’t trace around the artefact with the pencil.
• Draw the outline of the artefact first, followed by internal features such as scars andridges.
• Draw the positive features of the ventral surface, such as ring cracks, eraillure scars andundulations.
• The position of the flake scars can be measured with dividers or callipers. Rememberthat you are drawing a plan of the artefact, so all measurements need to be taken froma horizontal plane (see Figure 9.10 on page 294).
• Do not leave flake scars or retouched edges incomplete. If you can not decide whereeach starts and ends, either dot it in, or do not show it at all.
• If the outlines of the flake scars and other details have been precisely drawn, then thedirection of flaking will be self-evident (Mumford 1983: 165). You can draw curvedlines within each flake scar to indicate the direction from which flakes were struck forboth positive and negative scars, if you wish, but this is not generally recommendedunless you are sure you can do it well. If you are not confident that you can, then leaveit out.
• Indicate the point of force application with a small arrow outside the drawing.• Cross-sections are used to show the form and thickness of an artefact. When drawn,
they should be parallel to the axis on which they were taken. Draw two identifyingmarks outside the artefact plan to show the line of this axis.
• If drawing cross-sections of several flakes, make sure all cross-hatching lies in the samedirection.
• If you are in any doubt about how much detail to include, understate rather thanoverstate. An artefact is much easier to interpret if it is simply and clearly drawn.
PHOTOGRAPHY AND ILLUSTRATION 299
TABLE 9.3: Conventions for drawing stone artefacts
Feature Convention
Cortex StipplingPolished or ground artefacts StipplingFlaked stone artefacts Lines or cross-hatchingUse polish StipplingGum Black, or stipplingCross-sections Blank, or filled with cross-hatchingPart of the artefact broken or missing Short dashed lines indicating how the missing
piece must have continued the outline
*Archaeologists Field Handbook 29/6/04 5:25 PM Page 299

WAlice Gorman’s tips for stone artefact illustration
For the pencil drawing• Although it is not generally recommended, it is possible to make a pencil drawing
from a photocopy of the artefact. This is particularly useful when you have limitedaccess to the artefact, such as when you are working in a museum, or when you aredealing with use-wear and residue analysis, as it greatly reduces the amount ofhandling of the artefact. Photocopy both the ventral and dorsal surfaces and labelthese clearly. Then copy the outline on to tracing paper, referring constantly to theartefact, and checking the measurements.
• If you want to enlarge a drawing, this is easily done with a photocopier. • Remember a bar scale is essential if you, or the printer, is going to enlarge or reduce
the drawing. This will remove all doubt about an artefact’s size, but only if you labelit (e.g. in centimetres or millimetres).
• Begin with the outline and finish with the fine details.• Keep the pencil drawing as a master copy. If the ink version does not work out, you
can easily begin again
For the ink drawing• Wash your hands before you begin to prevent grease from your fingers being trans-
ferred to the drawing film. If you are attempting the final inked version of a drawing,this will be essential because the grease from your fingers will prevent the ink fromtaking.
• Keep a clean sheet of paper handy on which to rest your hand as you are working tocut down on dirt, grease or smudging.
• If you are right-handed, work down and towards your right so that the movement ofyour hand does not smudge the ink.
• Keep your wrist straight. Draw lines by moving your whole arm rather than your wrist.It is very hard to keep your hand perfectly steady just using wrist movement.
• Hold the pen as upright as possible. This ensures a more even line.• Don’t exert too much downward pressure on the pen, as you can easily break or bend
the nib.• Always use at least two pen widths: a thicker line (such as 0.35 or 0.5) for the outline,
and a thinner line (such as 0.25 or 0.35) for internal lines and detail. This is part ofconveying the three-dimensional feel of the artefact: if you draw it with all lines of thesame thickness it will look flat and uninteresting.
• Make sure all the lines meet exactly. Even the tiniest bit of overhang can make adrawing look untidy, as can lines that do not quite meet. If necessary, when you aredrawing the final inked version, remove any overhanging bits with a scalpel, and thindown any lines that are too thick.
300 THE ARCHAEOLOGIST’S FIELD HANDBOOK
*Archaeologists Field Handbook 29/6/04 5:25 PM Page 300

W• When removing ink with the scalpel, scrape only in one direction, as this will cause
less damage to the drawing film. If you have to draw over the area you have justremoved, the ink may run if you have damaged the surface. However, a lightburnishing can help restore it partially.
• When stippling (e.g. to represent cortex), be aware that your drawing may bereduced, which can make the stipples look like untidy blobs.
• Good drawing skills require practice. Don’t be too disappointed with your firstattempts. It is worth putting in the time, however, as drawing is an employable skilland it fine-hones your observation skills for artefact analysis.
DRAWING CERAMICS
Just as there are conventions for drawing stone artefacts, there are also conventions fordrawing ceramic vessels. The point of most ceramic drawings is to give an impression ofthe overall shape and size of the vessel, even if only fragments are available for drawing. Ifyou are drawing a whole pot, the convention is to draw it as though it was standingupright but had been cut in two, with one half of the drawing showing the external surfaceof the vessel, and the other half depicting the section and interior. The two halves of thevessel are demarcated by a solid vertical line. In a similar way to the process followed whendrawing stone artefacts, to capture the shape of a ceramic vessel lie it down upon thedrawing paper and use a set square to project points around the vessel down on tothe paper and simply join these dots. When drawing the section, don’t assume that thethickness will be even. Use callipers to measure the thickness of the wall of the vessel atvarious points.
If you are drawing ceramic fragments, the focus is usually on rim or base sherds, ratherthan body fragments, unless the body fragments have particularly interesting or diag-nostic decoration. If you are drawing fragments of a larger artefact, they should generallybe drawn in their correct relationship to the whole object. In other words, if you aredrawing a pot, then rim fragments should be drawn in their correct location at the rim,base sherds at the base, and so on. If you do find yourself drawing body sherds, then youwill have to make your best guess as to where they fit in relation to the original curvatureof the complete vessel.
To estimate the original curvature of a vessel from a rim or base sherd only, use a rimchart such as the one provided in Appendix 2. Hold the sherd upright with its rim or baseflat on the chart so that all parts of the rim or base are touching the surface at the sametime. Line up one end of the sherd with the 0 per cent line on the rim chart and slide itslowly along the line until you find the concentric ring which best fits the curvature of the
PHOTOGRAPHY AND ILLUSTRATION 301
*Archaeologists Field Handbook 29/6/04 5:25 PM Page 301

Wsherd. This is your estimate of the original diameter of the vessel. The radiating line closestto the end of the sherd will give you an estimate of the proportion of the vessel’s rim orbase that the sherd represents.
DRAWING ROCK ART
Drawing is a particularly important way of recording rock art. First, sketching a rock artpanel in the field makes you focus closely on the motifs, working out what is really thereand which motifs overlap. Many rock art panels contain an apparently bewildering varietyof motifs drawn around, on top of or through each other, and are often confused furtherby natural striations or planes in the rock itself. A photograph of this alone would beunlikely to help you sort out what was and wasn’t art, and may result in you confusing ornot recognising a certain proportion of the motifs. The analysis involved in drawing eachpart of the panel by hand, which often seems impossible to begin with, will actually forceyou to sort out each motif and give you an understanding of how the whole panel workstogether. Second, the time spent drawing motifs at a rock art site means that you have agreater opportunity to get a ‘feel’ for the site, so that you don’t just dash in, take a photoor two and dash out. This time spent at the site will give you a better understanding ofhow the art operated in its local environment.
Drawing is essential for establishing patterns of superimposition (where one motifcovers another), which is the major non-destructive way of dating rock art. Sometimes,however, what appears to be overlap is actually the result of micro-erosion in that part ofthe rockshelter, so you need to look for a pattern of overlap to establish regular superim-position. These patterns can then be interpreted in terms of sequences of painting events.However, you have to be very careful when undertaking these analyses as differences insuperimposition could be the result of time differences of one minute, one year, onethousand years or ten thousand years. As a result, to make some decisions about whichmotifs are older and which are younger, you will also need to take into account the dif-ferential weathering of motifs when you are developing a superimposition sequence.
One effective way of recording rock engravings is through tracing. This can be donewith heavy plastic and a range of colours using permanent ink pens (Figure 9.12 on page303). It is best to use permanent markers, in case it starts to rain when you are working andso that the colours do not rub off over time. You can use different coloured pens to codedifferent types of information. For example, you might draw the main motifs in brown, butindicate areas of overlap with blue or red. Or you might use a different colour to dot in anarea where a motif has become ‘fuzzy’, or to indicate areas where you can’t quite determineif the markings are made by people or nature. As with all archaeology, it is important thatyou record as much information as you can, as patterns may emerge later in your analysis
302 THE ARCHAEOLOGIST’S FIELD HANDBOOK
*Archaeologists Field Handbook 29/6/04 5:25 PM Page 302

Wthat you were not aware of in the field. Another effective way to draw rock art is with aplanning frame: a light, portable wooden frame with a metric grid marked out in string thatsimply rests against the rock surface and visually divides the area into small squares for easeof drawing. If you use this frame, make sure it doesn’t touch the art surface.
Inés Domingo-Sanz’s tips for digitally drawing rock art
In recent years, several research teams (e.g. Domingo and LÓpez-Montalvo 2002) havedeveloped methods for applying new digital imaging technologies to rock art recording.This new system is more objective than previous methods and is less destructive becauseit doesn’t involve direct contact with the paintings. The method is accurate but slow, asit involves a meticulous process of deciphering and continuously checking the tracingsagainst the original images.
In the field• Identify motifs. Check whether previous documentation on the site exists. If it does,
check previous recordings to identify motifs and assess the damage suffered since the
PHOTOGRAPHY AND ILLUSTRATION 303
FIGURE 9.12: Tracing the outlines of engraving sites on to plastic sheets
*Archaeologists Field Handbook 29/6/04 5:25 PM Page 303

Wsite was last documented. If there is no previous documentation, draw a sketch ofthe motifs and their location in relation to each other, as part of the recordingprocess.
• Draw a site plan. It is important to draw a plan of the site, recording dimensions andthe main structural features. The more detail the better.
• Take photographs. To trace a motif using digitised images requires high-resolutionphotographs. Because digital photography doesn’t yet provide the necessary resolu-tion, we use conventional photography (6 mm x 7 mm negatives) with large-formatcameras. The process also can be undertaken using any 35 millimetre SLR camera,though the quality of the image will not be as good. For tracing rock art, three kindsof photographs are necessary:—close-ups of each motif: these will form the basis of the tracings; —close-ups of details of motifs, such as areas of superimposition, which you can refer
to later for clarification;—wide-angle pictures, which show the motifs in relation to each other.
• Record measurements of each motif and the distances between them. Inevitably,your photographs will generate some distortion. To counteract this, measure theshape of each motif as well as the distances between motifs.
• Identify the colour range of each motif using a Munsell colour chart.
In the lab• Scan the negatives. These must be scanned at a high resolution because you will be
working with fine details. A resolution of 2400 dpi is best, although you can use othercombinations of size and resolution to give the same result (e.g. scanning thenegative at 800 dpi but at 300 per cent size so the result is the same).
• Trace the motifs using the Adobe Photoshop program, as follows (see page 306):—Open the scanned photo you want to trace (Figure 9.13a). —Select a portion of the image using the lasso tool (Figure 9.13b).—Copy and paste this area into a new layer (Figure 9.13c). It is best to work
separately with each portion of the motif, as different sections may have differentcolour values.
—Click on one of the two available colour selection tools (the ‘magic wand tool’ or‘colour range’) to select surfaces of similar chromatic range. The width of the rangedepends on the tolerance values given to the selection (using the fuzziness tool).Modify fuzziness values to small units in the dialogue box, because this will allowyou to select more homogeneous colours than if you work with high fuzzinessvalues (Figure 9.13d).
—Copy and paste the selection into a new layer and save it (Figure 9.13e). —Return to the scanned image and select a new area to trace.
304 THE ARCHAEOLOGIST’S FIELD HANDBOOK
*Archaeologists Field Handbook 29/6/04 5:25 PM Page 304

W—Repeat these steps until you’ve traced the whole figure. Each time you save a new
selection, make sure you save it at the same resolution as the old.—Sometimes Adobe Photoshop will include pixels from shadows, cracks in the wall
or the adjoining rock surface as part of the selection because these can have similarchromatic ranges to the motifs. You will have to erase these manually by compar-ing the tracings against the original images (Figure 9.13f).
—Each selection will generate a new layer and you’ll need to fit them together to seethe tracing of the entire panel (Figure 9.13g). When doing this, check that all ofyour tracings are scaled to their original size, saved at the same resolution andoriented correctly.
• Once you’ve finished the tracing process, scale the figure to its real size (which youknow from your original measurements).
• Check the accuracy of the tracings. Once the tracings are complete, you will need toreturn to the field to compare them with the original motifs. Keep checking until allthe measurements on the tracings agree with the measurements on the motifs.
• Assemble the whole panel. You can assemble the completed traced panel in AdobeIllustrator. Make sure all tracings are scaled to their original size, have been saved atthe same resolution and are oriented correctly.
STORING PHOTOGRAPHS AND ILLUSTRATIONS
Once you have completed a project, you have an ethical responsibility to store thecomplete archive of your fieldwork properly (see ‘Archaeologists and their profession’ inChapter 1 on page 15). Photographs and illustrations need special handling:
• Film negatives should be archived in a dark, cool place, such as a filing cabinet.• Always store negatives in acid-free negative strip holders, not mylar, polyester or
polyethylene plastic.• Never store prints in commercial ‘sticky backed’ photograph albums. The adhesives
will disintegrate over time, but probably not before they have damaged your photos.Ideally you should store your photographs in mylar envelopes or stacked, butseparated, with acid-free tissue paper.
• When you get your film back from the processor, put your rolls in chronological orderand compare the frame numbers on the negatives with the numbers recorded in thelog or on the recording sheets. Adjust the numbers in the log or recording sheets ifnecessary to make sure everything matches up.
• Make sure that you label every photograph individually on the back of the photo,
PHOTOGRAPHY AND ILLUSTRATION 305
*Archaeologists Field Handbook 29/6/04 5:25 PM Page 305

W306 THE ARCHAEOLOGIST’S FIELD HANDBOOK
FIGURE 9.13: Using digitaltechnology to record rock art
a b
c d
e f
g
*Archaeologists Field Handbook 29/6/04 5:25 PM Page 306

Wotherwise they lose their value as an archival recording. Imagine if your photographsbecame separated both from each other and from the photographic recording forms—would anyone else ever be able to identify whose photographs they were or what theywere of? A minimum of information to include is the roll number, the negative number,the place, the date and the subject.
• CCD images from digital cameras can be stored by direct connection to yourcomputer’s hard drive, or through removable PC cards that are slotted into the cameraand then into the computer.
• CD-ROMS can be used to archive both digital and scans of hard-copy film images.• Remember that archiving images on CD-ROMS is not foolproof. In northern Aus-
tralia, for example, CDs are only guaranteed for five years and you will have to becareful of fungal growth as well as scratches.
• When archiving digital images, use the smallest possible file-size. One way to savespace is to compress your image files. The JPEG format can compress a file to morethan 75 times smaller than the original, and can compress it to 25 per cent of theoriginal image, with very little loss of quality. TIFF files are also common and do notlose any data through compression, though they are not as small as JPEGs.
• Images of Indigenous sites should be made available to AIATSIS for copying, so thatthey can be integrated into a national database.
• For digital images, cataloguing software will catalogue your images much moreefficiently than memory. Cataloguing applications work by making a record like acard index. You can add key words, such as date or location, which makes for easysearching of the catalogue.
• Standard A4 drawings can be stored in ring-binders. • Larger drawings can be kept in a planning folder. If the drawing is going into a
planning folder, attach a small tag of masking tape on the top right-hand corner andwrite the plan number on it, so you can find it again easily (Hawker 2001: 39).
REFERENCES AND FURTHER READING
Addington, L. 1986, Lithic Illustration, The University of Chicago Press, Chicago.Adkins, L. and Adkins, R. 1989, Archaeological Illustration, Cambridge University Press,
Cambridge.Clegg, John 1983, ‘Recording prehistoric art’, in G. Connah (ed.), Australian Field Archaeology:
A Guide to Techniques, AIAS, Canberra, pp. 87–108.Daly, Tom 2000, Digital:Photography:Handbook. A User’s Guide to Creating Digital Images, Writer’s
Digest Books, Cincinnati.Domingo, Ines and López-Montalvo, E. 2002, ‘Metodología. El proceso de obtención de
PHOTOGRAPHY AND ILLUSTRATION 307
*Archaeologists Field Handbook 29/6/04 5:25 PM Page 307

Wcalcos o reproducciones’ in R. Martínez and V. Villaverde (eds), La Cova dels Cavalls en elBarranc de la Valltorta, Monografías del Instituto de arte Rupestre, 1. València, GeneralitatValenciana, pp. 75–81.
Drewett, Peter 1999, Field Archaeology: An Introduction, UCL Press, London.Dorrell, Peter G. 1994, Photography in Archaeology and Conservation, 2nd edn, Cambridge
University Press, Cambridge.Griffiths, N. Jenner, A. and Wilson C. 1990, Drawing Archaeological Finds: A Handbook, Occa-
sional Paper No. 13 of the Institute of Archaeology, University College, London.Hawker, J.M. 2001, A Manual of Archaeological Field Drawing, RESCUE—the British Archaeo-
logical Trust, Hertford.Hester, T.R., Shafer, H.J. and Feder, K.L. 1997, Field Methods in Archaeology, 7th edn, Mayfield
Publishing Co, Mountain View, California.Howell, C. and Blanc W. 1995, A Practical Guide to Archaeological Photography, Archaeological
Research Tools 6, Institute of Archaeology, University of California, Los Angeles.Mumford, Winifred 1983, ‘Stone artefacts—an illustrator’s primer’, in G. Connah (ed.),
Australian Field Archaeology: A Guide to Techniques, AIAS, Canberra, pp. 160–68.
USEFUL WEB SITES
AEL maintains a data conversion service at www.aeldata.com. It specialises in digitising news-papers, magazines, legal, scientific, technical and medical journals and other archives foronline publication. If you are considering digitising your archives, it will do a no-cost, no-obligation sample archiving of your documents and give you an estimate, regardless ofthe size of the job.
http://groups.yahoo.com/group/MCC_digital_photography. The Melbourne Camera Club’sDigital Photography Group is open to all photographers, and provides a forum for thediscussion of digital photography. A useful aspect is the group’s mentor service, providedby professional photographers and experienced members. To gain full benefit from thegroup’s online services, you should be prepared to register for a free Yahoo membership.
308 THE ARCHAEOLOGIST’S FIELD HANDBOOK
*Archaeologists Field Handbook 29/6/04 5:25 PM Page 308

CHAPTER TENGETTING YOUR RESULTS OUR THERE:
WRITING, PUBLICATION AND INTERPRETATION
WHAT YOU WILL LEARN FROM THIS CHAPTER
W Tips for getting started on writingW The basics of good archaeological writingW How to write for different audiencesW The essential components of a good archaeological reportW What constitutes good interpretationW How to plan and design interpretive materials effectivelyW How to produce a professional product
Publication of the results of archaeological fieldwork is a critical ethical responsibility.Once your fieldwork is completed, it is important to make your work available to thosepeople who have an interest in it. You should publish as quickly as practicable and in asmany forms as reasonably feasible, to inform as wide an audience as possible. Whilewriting up your results is an obligation, it also gives you the pleasure of sharing yourknowledge and experiences, and voicing your opinion. The major avenues for publishingyour results are:
• technical reports;• consultancy reports;
W W WWW
309
*Archaeologists Field Handbook 29/6/04 5:25 PM Page 309

W• community reports;• articles for academic journals;• websites;• press releases;• interpretive material.
WRITING WELL
Like all archaeological skills, writing is a skill that can only be acquired and honedthrough practice. The more you write, the easier it becomes. It is a myth that people caneither write or not write. Everyone can learn to do it well, if they are willing to put in thetime and effort.
There are many strategies you can employ to enhance the quality of your writing.Since the purpose of writing is communication, the best are those which make yourwriting accessible to as many people as possible, without losing the nuances of yourargument. While you will have to adjust your writing style to suit your particular audience,making your writing user-friendly is a great start to communicating your ideas, whateveryour audience. Above all, this means presenting your work in a professional manner (see ‘Producing a professional product’ on page 324).
AskOxford’s tips for keeping your writing user-friendly
• Over the whole document, make 15 to 20 words the average sentence length. • Use words your readers are likely to understand. • Use only as many words as you really need. • Use active voice unless there’s a good reason for using the passive. • Use the clearest, crispest, liveliest verb to express your thoughts. • Use vertical lists to break up complicated text. • Put your points positively when you can. • Reduce cross-references to the minimum. • Try to avoid discriminatory language. • Make accurate punctuation the heart of your writing. • Plan before you write. • Organise your material in a way that helps readers to grasp the important informa-
tion early and to navigate through the document easily. • Consider different ways of setting out your information. • Use clear layouts to present your words in an easily accessible way. • For more information, go to www.askoxford.com/betterwriting/plainenglish
310 THE ARCHAEOLOGIST’S FIELD HANDBOOK
*Archaeologists Field Handbook 29/6/04 5:25 PM Page 310

WGETTING STARTED
It’s simple. First I get all the words out, then I push them around a little. (EvelynWaugh, cited in McLaren 2001: 18)
Unlike Waugh, for most of us, the hardest part of writing anything is getting started.Writing is scary. It is scary for people who are writing for the first time and it can be scaryfor people who are writing for the hundredth time. Since being faced with a blank sheetof paper is daunting, the best strategy is to fill that paper as quickly as you can. This canbe done through a process known as freewriting, in which you sketch out your ideaswithout editing them, or judging them against the standard of what you want to produce.The point is simply to get rid of the scary, unfilled page. Once you have something written,you can edit it later to make it into what you want it to be.
David Schmitt’s tips for getting started
• Don’t wait for inspiration, just do it now.• Write the easiest parts first.• Begin each writing session by revising what you wrote last time.• Set clear writing goals on your schedule.• Avoid ‘one best way’ thinking and realise that there is never a perfect way.• Don’t get down on yourself if you are stuck.• Develop a positive attitude towards your work and your potential success as a writer.
(Schmitt 1992: 239)
THE STAGES OF WRITING
Research
You should already have conducted a thorough search of the archaeological literature, theweb and appropriate databases as part of writing your research design and researchingthe history of your site. The point here is to start to shape this mass of information intoa cohesive and focused report. Start by identifying comparable reports or papers, as theirstructure and content may be useful models for your own work. You may find that majorand minor headings, the range of information in each section, the sequence of points orthe effectiveness of tables and diagrams will provide you with a useful template for yourown writing. You will find that there are similarities and differences between publications,
GETTING YOUR RESULTS OUT THERE 311
*Archaeologists Field Handbook 29/6/04 5:25 PM Page 311

Wthat some ways of presenting information will appeal to you, and others will not. Inaddition, various categories of archaeological writing will have different requirements. Forinstance, the aim of a community report is quite different from that of a research paper,and this is reflected in the format, style and language of each. It is important to selectappropriate models which you can then use to develop the approach, structure and styleof your own writing.
Much of your research will be directed towards a literature review, the main purposesof which are to:
• make certain that somebody else has not already done this project;• establish the significance of your project through identifying important gaps in
existing research;• identify methods used by others to deal with comparable issues, as well as any potential
problems with your research methods;• find out how your project fits in with other people’s work;• prove that you are familiar with, and can critique, current research in the subject area.
A typical archaeological literature review is a synthesis of the known archaeology of theregion, including major sites previously found within or near to the study area. It will alsoidentify the main archaeological issues and questions being addressed by your study andassess the results of earlier studies in terms of what you propose to do. The literaturereview should include three main features:
• a geographical review, in which you show not only that you are familiar with previousresearch conducted in the study area, but also how your own research builds on this;
• a thematic review, which identifies important gaps in previous research and showshow your research has built on this. This emphasises the importance of your project;
• case studies, which highlight the importance of your questions.
First draft
The first thing to do when putting together an initial draft is to write an outline, withchapter titles, headings and sub-headings. It is worth spending a day or more on this. Thisoutline is a guide only and will need revision as your ideas develop and you get a betterhandle on the topic. It is an excellent way of thinking through your project and will helpyou identify the various elements that need to be included in your writing. This is the timefor making sure that your argument is structured logically, as an outline is much easierto shape than passages of text.
When writing a first draft, concentrate on writing whatever comes into your head,
312 THE ARCHAEOLOGIST’S FIELD HANDBOOK
*Archaeologists Field Handbook 29/6/04 5:25 PM Page 312
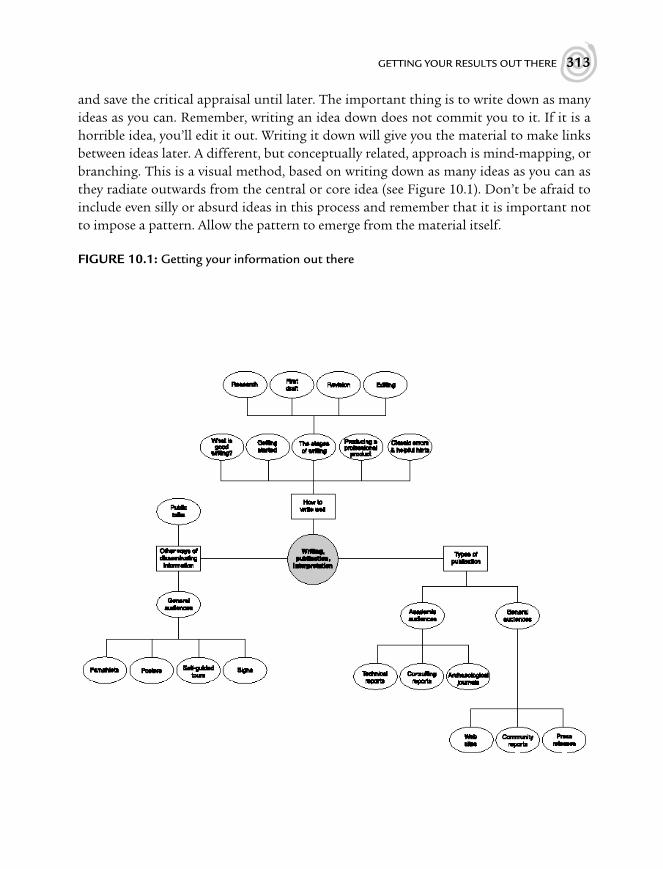
Wand save the critical appraisal until later. The important thing is to write down as manyideas as you can. Remember, writing an idea down does not commit you to it. If it is ahorrible idea, you’ll edit it out. Writing it down will give you the material to make linksbetween ideas later. A different, but conceptually related, approach is mind-mapping, orbranching. This is a visual method, based on writing down as many ideas as you can asthey radiate outwards from the central or core idea (see Figure 10.1). Don’t be afraid toinclude even silly or absurd ideas in this process and remember that it is important notto impose a pattern. Allow the pattern to emerge from the material itself.
GETTING YOUR RESULTS OUT THERE 313
FIGURE 10.1: Getting your information out there
*Archaeologists Field Handbook 29/6/04 5:25 PM Page 313

WRevision
Perfection is achieved, not when there is nothing left to add, but when there isnothing left to take away. (Antoine de St Exupery)
You are not likely to produce a perfect document in one draft. You may write three or moredrafts before you are happy with the logical progression and your expression. Revision isan essential part of good writing. This is the stage where you refine your ideas and focusyour writing so that every part of it is relevant to the original question or aim. Normally,whatever you write needs re-drafting at least twice. This is the time when you make sureyour argument is cohesive and well organised, find details and examples to support yourargument, revise those sections which are not up to scratch and refine your expression. Animportant part of revision is deletion. Remember that if you can write one set of words,you can write another. Do not treat your words as precious. In fact, deleting words (evenwhole sections) can be quite cathartic, as you work towards the lean, clean machine thatyou wish to produce.
When using a computer, one way of finding the emotional courage to cut wordsdrastically is to save the new draft with a new name, so you can go back to the old words ifyou need to. Another way is to open a new document, revise your outline and cut and pasteinto the new outline.
Robyn Najar’s tips for rewriting
• Don’t be afraid to cut and paste. If you are not working on a computer, then a pairof scissors and sticky tape will work fine.
• Read your draft version aloud. This is an effective way to detect grammatical errorsand unclear thinking.
• Tidy up your writing by eliminating or tightening your words.• Avoid lengthy quotations, as these may convey the message that you don’t know
enough about the topic to write about it yourself. On the other hand, brief quota-tions can add force to your writing.
• Allow time for your paper to get cold. This allows you to return to it with a fresh andmore objective perspective.
• Keep it simple. Do your best to avoid jargon, big words and long sentences.• Double-check the paper for accuracy. Be sure you have documented your sources
correctly.
314 THE ARCHAEOLOGIST’S FIELD HANDBOOK
*Archaeologists Field Handbook 29/6/04 5:25 PM Page 314

WEditing
It is in the editing phase that the quality of your work will be established. Sloppy editingconveys the impression that your work has been rushed, whilst painstaking editing con-veys the impression that your work has been conducted in a meticulous manner. Studentswho are writing theses should be especially aware of this. It is virtually impossible toaward a First Class Honours degree to a thesis that is full of spelling, stylistic or gram-matical errors.
It can help to have other people read through your work at this stage. While it can behard to accept criticism, it is best to get the first brunt of it from your friends, family orclose colleagues. Their comments will help you improve your writing skills, as well as thefinal product. People who are not archaeologists can be especially helpful here, as they willbe able to tell you if your writing is clear and understandable.
An essential part of editing is proofreading. This should be done at least three times:first, to see if the text flows and the ideas link coherently; second, to look solely for errorsin grammar, punctuation, spelling and word usage; and third, to check that you haveformatted your work consistently. Inconsistent styles for headings, font styles andlayout can indicate to the reader that you don’t care about the quality of your work.Those ‘silly little formatting issues’ make all the difference between an amateur and aprofessional product.
Klauser’s five Rs for writing using both sides of the brain
Klauser (1987) believes that most forms of writing follow a pattern which alternatesbetween using the left- and right-hand sides of the brain. Following these five stepsreligiously will dramatically increase your ‘fluency and persuasion’:
• Ruminate. This first stage involves left-brained activities, such as planning, thinkingabout the main issues and exploring a range of possibilities for presenting the data.
• Rapidwrite. This stage uses right-brain techniques, such as rapidwriting and branch-ing. Rapidwriting (or freewriting) is similar to brainstorming, in that the aim is toaccess your creative thinking without the censoring that can cripple so many writers.This is similar to the process of mind-mapping.
• Retreat. This is a period of about a week during which you put the work aside andthink about something else. This will allow you to go back to your writing with fresheyes. This period of rest is ‘non-negotiable’.
• Revise. When you return to your work, you will find it much easier to understandwhat works and what doesn’t. Try pencilling notes alongside the sections thatare weak or unclear. Read the work with the following questions in mind: Does this
GETTING YOUR RESULTS OUT THERE 315
*Archaeologists Field Handbook 29/6/04 5:25 PM Page 315

Wcontain all the data I need? Is there anything missing? Does the argument flowsmoothly? Don’t make major corrections at this stage, just look for the overallflow (however, it is worthwhile jotting down your ideas as they occur).
• Repeat. Now go through the cycle again. (McLaren 2001: 139–40)
TECHNICAL REPORTS
The basic nature of technical reports is that they are based on evidence. All such reportsare aimed at readers with a special interest in the subject. They present original data and,most importantly, present this data in such a way that it can be checked and verified.
The basic format of a report is like the shape of an hour glass: it leads the reader froma wider, general view (e.g. placement of the research problem within its theoreticalcontext), to the particular (the background to the region, methods and results), back tothe general (placing the results of your research into a broader regional, internationalor theoretical context). The logical progression of your argument is established throughthis format, making it easy for the reader to follow your actions and understand yourreasoning. A technical report has four main sections:
• aims and significance;• methods;• results;• discussion.
The aims section tells the reader what was done and why, what the report will cover andhow the research articulates with other projects, or fits into current theoretical debate.When writing this section, you will need to think about the gap in knowledge that is goingto be filled by your research. Definitions and assumptions can be outlined in this section,although they can also be placed in a glossary. In archaeological reports, the aims sectionnormally includes your literature review, highlighting the significance of your project interms of previous research.
The methods section describes how and where the project was undertaken, and how thedata were collected and analysed. A clear and precise description of your methods is oneof the most essential parts of any report. This is what allows others—either otherresearchers who may want to expand or re-analyse your data or, more importantly, asses-sors within the government body that administers the cultural heritage legislation—todecide whether your methods were adequate to answer your research questions, and
316 THE ARCHAEOLOGIST’S FIELD HANDBOOK
*Archaeologists Field Handbook 29/6/04 5:25 PM Page 316

W
whether they need to gather any further information before they can make a decision. Intheory, this section should provide enough detail so that a reader could replicate yourresearch if they wished.
The results section outlines what was found. This is a statement of findings or obser-vations, presented with very directed discussion. You need to present your results in alogical progression. Graphs and tables are an excellent way of communicating your
GETTING YOUR RESULTS OUT THERE 317
FIGURE 10.2: The shape of a technical report
*Archaeologists Field Handbook 29/6/04 5:25 PM Page 317

Wresults, as they present your findings in an easily understood visual format and in partallow the reader to make their own interpretations. If you use percentage graphs, makesure that you always include the raw data, so that the reader can assess whether thenumbers you present are likely to be statistically significant. Normally, numbers of lessthan ten are considered to be insufficient to be statistically significant (though they maystill represent a genuine phenomenon).
Interpretation of the significance of the results to the wider world is presented in thediscussion section of the report. It is important to tie your interpretations closely to theaims or questions that were originally posed at the beginning of your study. This is youropportunity to answer those questions. If the results are inconclusive, then say so, andprovide some possible explanations as to why. Any recommendations for future researchshould also be included in your discussion.
Technical reports will also require an abstract at the beginning that allows the reader todetermine the results and recommendations of your report quickly and succinctly. Theabstract should contain a brief overview of the major sections (aims and significance,methods, results, discussion, recommendations), but should be as short as possible.Ideally, an abstract should be one page or less. One tip for putting an abstract together isto take the first and last paragraph of each of the major chapters and reduce them to oneparagraph. When you have one paragraph per chapter, you only need to polish the text sothat it flows from one paragraph to the next. Hay et al. (2002: 106–11) outlines someuseful strategies for constructing an abstract or summary.
CONSULTANCY REPORTS
These follow the same basic structure as technical reports, but require some specificfeatures. The most important thing when writing a consultancy report is to make yourdata and results comparable with that of others. This means that you need to beabsolutely clear about all of the methods you followed, the limitations you faced, thedefinitions you used, and the data you collected and analysed. Precise descriptions ofthe extent of survey areas and the amount of coverage the survey achieved are essential(and, indeed, are mandatory in some states. For more information on determiningeffective survey coverage, see Chapter 2), and wherever possible should be supplementedwith clear diagrams showing the size and location of your transects, survey areas orsampling zones.
Instead of an abstract, a consultancy report should include a brief executive summaryat the very beginning which encapsulates all of your findings and recommendations. Thisis a device for site managers who do not wish to wade through your entire report to assessyour findings. It is also a device which allows you to be absolutely clear to your client
318 THE ARCHAEOLOGIST’S FIELD HANDBOOK
*Archaeologists Field Handbook 29/6/04 5:25 PM Page 318

Wabout what their responsibilities are and what the proper management of the site requires.Copies of reports need to be lodged with major and local public libraries as well asgovernment departments. You should also give copies to Indigenous community groups,volunteer organisations and local societies. The latter are best accompanied by plainEnglish, or community, reports. A checklist for what to include in a consultancy report isincluded in Appendix 4.
HOW ACCOUNTABLE IS YOUR REPORT?
Finally, before you submit your report, check how closely it conforms to these bestpractice expectations. Check the following:
❑ Have you used standard measures and terminology to describe sites and artefacts?❑ Have you defined all your terms and categories, either in the body of the report or in a
glossary?❑ Have you been explicit about how you chose to define a site, and the way that you
decided on the site’s boundaries?❑ Have you outlined the logic of your sampling strategy?❑ Have you shown clearly on a map where your sampling units/transects/excavation
squares were located?❑ Have you shown clearly on a map the location of all of your sites (unless requested to
keep details of sites secret)?❑ Have you been explicit about your methods during all phases of the project?❑ If you have used a new method, have you been explicit about how you went about it
and what its limitations were?❑ Have you been explicit about the limitations you encountered during all phases of
the project?❑ Have you evaluated the effectiveness of your survey coverage?❑ Have you evaluated the usefulness of your historical or ethnographic sources?❑ Have you provided grid references for all of your sites (unless requested to keep details
of sites secret)?❑ Have you made your data accessible to reinterpretation (e.g. included all supporting
material relevant to your data analysis as an appendix, such as your tables of raw data,your database and/or your recording forms)?
❑ Have you included details of all consultation undertaken with any parties or indi-viduals as part of the project?
❑ If you obtained a permit to survey or excavate, have you included details of the permitnumber in the report?
GETTING YOUR RESULTS OUT THERE 319
*Archaeologists Field Handbook 29/6/04 5:25 PM Page 319

WCOMMUNITY REPORTS
Community reports are shorter, more accessible versions of technical or consultancyreports. Their purpose is to make archaeological information accessible to members of thecommunity. Such reports are written in plain English. This means using clear languageat a level that is suited to the average person and structuring the layout of your report sothat people can easily find the information they want.
Writing in plain English is not as easy as it sounds. It takes effort and practice to writesimply without being patronising. Plain English does not mean always using wordssimplistically, especially when there are other words that are more accurate, or structur-ing your report in a naive manner. It means writing simply, clearly and effectively. Onetrick is to steer clear of jargon, which is often just a way of showing that you are part ofan in-group (and which can automatically make the reader feel part of an out-group).Another trick is to avoid using long words or sentences. If you can say something simply,then do so. As with other types of writing, the best strategy is to look at some examples,decide on the ones that you think work well, analyse how they are constructed, and modelyour own work on them.
Jack Radley’s tips for writing for a general public
Whenever you are not pleased with something you can always do better. How? You havelearned many of the facts of the profession you have chosen but this does not mean youautomatically have the word-power to write down your own ideas well enough for otherprofessionals, let alone the world in general. You might imagine your proposed work tobe a tapestry upon which you can stitch facts. However, factual evidence alone can beboring to a non-specialist reader, so you must find suitable words to embroider betweenyour facts.
Remember the taboos. Don’t use clichés. Tautology—the contextual repetition of thesame phrase, idea or statement in different words—is a wickedness that can creep up onyou, often in the same sentence or paragraph. Even the simplicity of ‘a quick riposte’ isa tautology, as a riposte is a quick retort.
Perhaps the greatest traitor of all is jargon, because it fools the author with its‘educational approach’. The use of jargon is irresponsible. It wastes the value of wordsby being used to perplex and confuse the reader rather than to communicate information.
Never forget your readers and the fact that clear communication is the real purposeof all writing.
320 THE ARCHAEOLOGIST’S FIELD HANDBOOK
*Archaeologists Field Handbook 29/6/04 5:25 PM Page 320

WSPECIALIST PUBLICATIONS
The main point to remember when writing for such publications is that you are writingfor specialist readers. When writing in this sphere, you can assume an intelligent andinformed interest on their part. You don’t need to spoon-feed them or engage theirinterest with a showy writing style. In fact, you should use restrained language for spe-cialist publications as this conveys the impression (correctly or not) that your research hasbeen conducted in an objective manner. Nevertheless, don’t let yourself be fooled by objec-tive, scientific language: it does not necessarily mean objective, scientific research, just assubjective language does not necessarily mean that the research has been conducted in anon-scientific manner.
Tips for writing for archaeological journals
• Submit articles strictly in the format of the particular journal.• Use specialist or technical terms to give clear descriptions, but be careful not to allow
this to degenerate into jargon. • If using specialist terms, remember to define them the first time you use them. For
example, TL dating should be defined as Thermoluminescence Dating the first timeyou refer to it. Other clarification can be given in footnotes, but only if this is essen-tial to a thorough understanding of the main point.
• Journal articles need to be precise. They should contain exact details, which are pre-sented in a way that makes it possible for this information to be checked.
• Use headings and illustrations to clarify your points, but remember that each figureshould be presented so that it can be understood by itself, without reference to thetext.
• Submit articles on single-sided A4 paper, with double or one-and-a-half spacing, anda minimum of a 3 centimetre margin all round.
• Clean copy is important. Make sure that the professionalism of your work is notmarred by typographical or grammatical errors, or by poor presentation.
• If you submit to a peer-reviewed journal, such as Australian Archaeology, or Archaeologyin Oceania, your paper will be assessed by one or more referees. If asked to revise andresubmit your paper, do so. Use the referees’ comments to identify any holes and toimprove the quality of your paper, but remember that you can argue against thecomments in a reply to the editor if you feel they are unwarranted. You will have amuch better chance of acceptance the second time around.
GETTING YOUR RESULTS OUT THERE 321
*Archaeologists Field Handbook 29/6/04 5:25 PM Page 321

WWEBSITES
Writing for the web is different to writing for paper publications. We read screens differ-ently to the way that we read paper and we must write differently for them as well. Themost important things to do are to structure the site for the audience you plan to attractand to use an appropriate tone. Is the site instructional? Promotional? Personal? Each ofthese will require a different tone. When writing for the web, it is especially important towrite concisely, to help your reader get to the point. Waffle on a website is a particularlyheinous crime and, since the web is self-driven, as soon as you start to bore people theywill leave (either the section or the site). Clear headings help readers to find their wayaround the site, while the multi-dimensional capacity of hot-links (which link through toanother page or site) can be used to deepen your arguments or direct people to otheruseful sites. Our best advice here is to find a site you like and can read easily, and use thisas a model for the construction of your own.
Tips for good web writing
• Put the main points at the top of the web page.• Write short paragraphs. • Write short, simple sentences. Use one idea for each sentence.• Use the present tense because this makes your writing active rather than passive.• Be friendly. Use ‘I’, ‘we’ and ‘you’ instead of ‘the archaeologists’, ‘the researcher’, and
so on.• Use hot links to deepen your argument. • Don’t clutter your site with too much colour or too many gimmicks. • Make sure that the size, font and colour of the text can be read easily against the
colour and contents of the background. A common mistake which many peoplemake is to have a highly cluttered, ‘busy’ background against which the text can’tbe read, or to use a text colour which does not read or print easily. Dark-colouredtexts against light-coloured backgrounds will always print more easily than thereverse.
PRESS RELEASES
A press release is the basic communication tool for those wanting journalists to publishtheir story. The writing style of journalists, developed through fierce competitionfor readers, is a good model to follow. Take the current front-page story in your local
322 THE ARCHAEOLOGIST’S FIELD HANDBOOK
*Archaeologists Field Handbook 29/6/04 5:25 PM Page 322

Wnewspaper. Go through it and mark out where it answers the questions who, what, when,where and why. Use this as a model for formatting your own press release. All press releasesfollow a basic format. They are normally a single page with the words ‘Press release’ at thetop and an eye-catching headline. They are dated, and have a contact name and numberat the bottom of the page.
The basic rule for writing a good press release is to ensure that it engages the interestof the reader. Journalists usually only have time to scan press releases when they aremaking an initial assessment of them, so it is important to keep your words interesting,your sentences short and your message clear.
• Present your information in short, punchy sentences using vivid language and includeonly a minimal number of ideas in each sentence.
• Use active rather than passive voice and concrete details rather than generalisations. • Present your ideas in the order of their importance, with the most interesting or
significant information first. • Use direct quotes from principals involved in the project to give the release life and a
personal angle. • Allow plenty of white space to avoid a cluttered look.
When you have written your press release, put it aside and read it again a day or twolater, preferably aloud. Get a friend to read it as well, as this will help you to see whetheryou are communicating your ideas simply and clearly. If your friend stumbles whenreading it, it needs rewriting—which probably means editing down to make it shorter,sharper and crisper. Don’t forget to keep a file of any media coverage generated by yourrelease. This information can be useful in showing public outreach for your project, assupport for funding applications and as a model for future press releases. A sample pressrelease is included in Appendix 7.
AskOxford’s checklist for writing a press release
❑ Do I need a press release?❑ Have I got anything interesting to say?❑ Would an individual approach be more successful?❑ What story do I have to tell?❑ Are there any individual tales that prove a point?❑ Do I have any statistics that support my case?❑ Are there any third-party anecdotes/trends on the same theme?❑ How can I get the story over in a nutshell?
GETTING YOUR RESULTS OUT THERE 323
*Archaeologists Field Handbook 29/6/04 5:25 PM Page 323

W❑ Have I got the who, what, where, when and why in the first paragraph?❑ What headline can I use to draw the reader in?❑ What supporting themes can I develop to sustain interest?❑ What follow-up action can I suggest (e.g. photo opportunity or interview)?❑ For more information, go to www.askoxford.com/betterwriting/osa/pr/#press
PRODUCING A PROFESSIONAL PRODUCT
A well-designed document is easy to read and reduces the chance that you will bemisunderstood or misinterpreted. Quality of presentation, while important, is no substi-tute for content. It is worthwhile thinking carefully about how you present your work.Producing a professional product is largely a matter of adhering to the conventions for thetype of writing you are undertaking and taking care that your work is free of errors andformatted in a consistent manner. Since the object of writing is to communicate ideas, itis sensible to present your work in such a way that it can be read and understood easily.Don’t forget that the quality of your work reflects directly upon you: if it looks sloppy,people will assume (rightly or wrongly) that you are sloppy and may be less inclined tobelieve you or hire you. Here are some tips:
• Make certain your grammar, spelling, punctuation and word usage are correct. Poorexpression makes writing seem unprofessional.
• Make sure the formatting is consistent. • Choose a clear font.• Use headings carefully as signposts to your argument, and format them consistently.• Use maps, illustrations, graphs, and diagrams to present your information clearly. • Always have the final publication proofread by somebody else. • Make certain you submit the project on time.
Modern technology makes it possible to choose between a wide range of fontsand layout styles, and to produce professional quality reports from your own desktop.While there are many different fonts, they do not all function in the same way. Fonts canbe divided into three broad categories: script, display and text (www.askoxford.com/betterwriting/osa/reports/#presenting).
• Comic Sans MS is a script font that simulates handwriting and gives text a light, easyfeel.
324 THE ARCHAEOLOGIST’S FIELD HANDBOOK
*Archaeologists Field Handbook 29/6/04 5:25 PM Page 324

W• Copperplate Light is a display font, which is effective at getting people’s attention.
Display fonts are used in advertising and posters but are difficult to read for anextended period.
• Text fonts can be divided into two types: serif fonts, such as Times and Times NewRoman, and sans serif fonts, such as Arial and Chicago. Serif fonts are a little moreformal than fonts without serifs, while sans serif fonts are slightly easier to read.
The font you choose will depend upon the nature of your publication and its plannedaudience. For example, it would be considered distinctly odd to submit an article to anacademic journal using a script font. Formal submissions, such as journal articles andtechnical reports, should always be in a text font. A community report, however, could wellbe suited to the relative informality of a script font, and you may choose to experimentwith something quite different for interpretive materials. Press releases and websites arebest written in a very clear font.
Tips for successful publication
• Get into the publishing habit. Start with book reviews or conference reports.• Divide a project into several publishable sections (e.g. history, theory, minor data,
the big picture).• Publish in a range of media (e.g. academic and general publications, film/video,
exhibitions) to give your ideas maximum exposure.• Offer opinion pieces to local or national newspapers and magazines.• Try to arrange publication before rather than after you have done the writing. Submit
a synopsis for a journal paper, or a prospectus for a book.• Don’t publish the same thing twice.• Be prepared for critical analysis of your work. Learn from it, and learn how to deal
with it.• Submit to one journal at a time. Start at the top and work down.
PUBLIC PRESENTATIONS
One of the most effective ways of sharing information about your project is throughgiving a public presentation. The kinds of presentations that archaeologists regularly giverange from conference presentations and talks at local schools, to public lectures andinterpretive tours.
GETTING YOUR RESULTS OUT THERE 325
*Archaeologists Field Handbook 29/6/04 5:25 PM Page 325

WTips for successful public speaking
• Only speak on topics that you know well, and have prepared fully. • The best way to be sure of giving a good presentation is to be well prepared, have
a written text to refer to and rehearse your presentation. • The best way to deal with nerves is to be well prepared, practise your speech and have
some visual material to support you.• Target your audience. Knowing the backgrounds of the people who will be your
audience allows you to shape your speech to their ages, interests and levels ofknowledge.
• Never give a public talk where you merely read a written text aloud. For formaloccasions, prepare a full script, as this ensures your speech develops logically andwithout serious omissions. When writing the text, write it in a conversational manner,rather than an essay form. Remember, your aim is oral communication, not written.Edit the script into a good outline, which you can write on palm-sized cards, andspeak to this outline.
• Keep your message simple. A speech cannot take the density of information andnuance that can be included in an essay. A listener has to grasp the ideas immedi-ately and, unlike a reader, does not have time to review the text if there is somethingthey do not understand immediately.
• If you know individual people in the audience, referring to them occasionally canmake your talk more friendly and relevant.
• Use audio-visual equipment to clarify important points (say, through graphs ormaps) and to add interest to your presentation.
• Check the audio-visual equipment before you have to speak. Make sure the equip-ment works, and that you know how to use it.
• Answer questions effectively. If someone asks a two-part question, don’t try toremember both parts. Concentrate on the second part and, after you have answeredthat, ask for clarification of the first part.
USING POWERPOINT
Even if you’ve never used it before, PowerPoint lets you produce an impressive andprofessional looking presentation the first time around. The best feature of PowerPointis that it allows you to integrate images (including moving images), text and sound intothe one presentation. As with all things, however, there are a number of guidelines thatyou should follow when using it.
326 THE ARCHAEOLOGIST’S FIELD HANDBOOK
*Archaeologists Field Handbook 29/6/04 5:25 PM Page 326

W• The judicious use of moving parts (such as moving arrows or sequentially appearing
text and images) will not only emphasise your key points, but also catch the audience’sattention. Having said this, however, having too many moving parts is simplyconfusing (not to mention annoying) and should be avoided. The same is true forsound effects, which have the potential to be very distracting. Think emphasis ratherthan everywhere.
• As with any presentation, go through it beforehand (preferably more than once) untilyou’re happy with the timing and are sure that you have the slides in exactly the rightorder. A non-specialist audience is ideal at this stage (your friends, neighbours,parents), because they can give you feedback on anything they find confusing or tellyou if you’re rushing things. The more you practise, the better you’ll feel and the morerelaxed you’ll be when you actually present.
• Don’t just read your slides to the audience (they can do that for themselves). Make theimages and text complement your words, so that people are looking, listening andreading simultaneously (and therefore staying awake).
• Don’t include enormous amounts of text as part of a PowerPoint slide. People onlywant to read the key points, not the detailed explanation of each point (that’s for youto expand upon).
• Make sure the font size is large enough to be read easily by someone sitting in the backrow. A minimum of 20–24 point font is advisable.
• Because PowerPoint can incorporate coloured and textured backgrounds as well astext, make sure that the combination works. As with websites (see ‘Tips for good webwriting’ on page 322), the size, font and colour of the text must be able to be read easilyagainst the colour and contents of the background.
• If you are presenting in a new environment, or using someone else’s technology, alwayshave an old-fashioned back-up on hand in the form of overheads and slides in case thetechnology fails. We can’t emphasise this enough—the alternative will be completelyimprovising your presentation in front of the audience with no visual support.
For more information, including step-by-step guides and tutorials to the manyfeatures of PowerPoint, try the tutorial supplied with the program or visit Microsoft’swebsite: www.microsoft.com/office/powerpoint/using/default.asp.
INTERPRETING ARCHAEOLOGY TO THE PUBLIC
Interpretation is different from information—one is simply facts, the other is intended toprovoke ideas, create new associations or even jolt people into new understandings (Carter1997: 6). The essence of good interpretation is that it reveals new insights into what makes
GETTING YOUR RESULTS OUT THERE 327
*Archaeologists Field Handbook 29/6/04 5:25 PM Page 327

Wa place or object special (Carter 1997: 6). Depending on the nature of your research, youmight choose to produce a poster, pamphlet, a self-guided tour guide, an interpretive sign,or the text for a more formal guided tour. Regardless of which type of interpretation youchoose, you will need to think through what you want to do and how you are going to doit, particularly in terms of how the interpretive story can be linked to physical artefactsor places.
The goal of any successful interpretation is to make the information you have supportan interesting story or idea. It is best to do this by careful planning, rather than simplythrowing a whole lot of information together and seeing what comes out. Start byfocusing on what you want to achieve:
• What do you want people to know as a result of your interpretation?• What do you want people to feel as a result of your interpretation?• What do you want people to do as a result of your interpretation?
The core of interpretation is to capture the essence of a place or idea, not to tell peopleeverything there is to know. If you try to present every interesting aspect of a place,people will be overwhelmed or bored, or both. At some point you will have to make achoice about what to interpret and what to leave out, which will undoubtedly involvedrastic editing. The best way to do this is to use some form of interpretation projectplanner to give your ideas structure and to force you to consider:
• Why you want to communicate with visitors?• Who will your audience be?• What does your site or object have to offer?• What do you want to say?• How best can you say or show it?
It is only by working systematically through these questions that you will be able to treada concise path through the mass of material which you have no doubt collected. This is acentral part of making sure that your story will be coherent and that the form and contentof your interpretation will be focused and will actually achieve your objectives. If youdon’t want to use a formal planner, try to write a storyline, breaking your narrative downinto its component ideas, each of which can serve as the basis for a paragraph. A sampleinterpretive planner is included in Appendix 6.
Once you have a plan, you then need to write the text and design the layout foryour interpretation. Writing good interpretive text requires a totally differentapproach to writing a consultancy report or academic paper. You are not only tryingto make information available to a much wider audience than your professional peers
328 THE ARCHAEOLOGIST’S FIELD HANDBOOK
*Archaeologists Field Handbook 29/6/04 5:25 PM Page 328

WGETTING YOUR RESULTS OUT THERE 329
FIGURE 10.3: The interpretive process (after Carter 1997: 10)
*Archaeologists Field Handbook 29/6/04 5:25 PM Page 329

Wbut, more importantly, to make it meaningful for them. This is more easily said thandone, however, and in the end you will never be able to cater for everyone. You will haveto decide who is your priority and interpret for them. There are four key dimensionsto consider when actually writing and designing your interpretive materials (Carter1997: 40–41):
• Make it grab attention (colour, font size, catchy or provocative titles, activities, thingsto handle). Audio or tactile labels, pictures and ‘hands-on’ components can actuallydouble visitors’ attention spans.
• Make it enjoyable (make it meaningful, make it personal—link it to people’s own livesif you can. Emotion is a powerful trigger which makes people pay attention andremember).
• Make it relevant. Try to give greater dimension to your interpretation by telling thestory from different perspectives or through the eyes of different people. Whereverpossible, use stories and quotations to refer to real people and their lives and usedynamic photographs of people or activities, rather than static shots of buildings orscenery. The key to any good interpretation is to forge a connection between peoplethen and people now.
• Make sure it has a structure. Use everyday language—not everyday archaeologicallanguage!—so that everyone will understand. If you are going to use specialistterms you will have to explain them. The idea is to create a closeness between thereader and the material, not to distance them by making the text difficult to read orunderstand.
• Try to keep your writing style personal and ‘chatty’, rather than formal and academic.In particular, try writing for an individual, not for the ‘general public’ or anotherarchaeologist (Binks, Dyke and Dagnall 1988: 113). If you’re worried about the toneof your text, give it to someone else to read and listen to their comments. A goodstarting point is to look critically at other leaflets, posters or signs and decide what youthink works and what doesn’t.
There are also various practical issues to consider when designing interpretivematerials. In terms of legibility, some fonts work better than others, and short, well-spacedparagraphs are much easier to read. Unless your text will be internally illuminated(e.g. from a light box), white or pale-coloured backgrounds with contrasting textwork best. Give careful consideration to what illustrative material you include as welland don’t just duplicate in images what people can already see around them. Makeyour illustrations or photos complement the text and tell their own story (e.g. try usingthem to show what people can’t see or what things may have looked like at another time)(Carter 1997: 43–44).
330 THE ARCHAEOLOGIST’S FIELD HANDBOOK
*Archaeologists Field Handbook 29/6/04 5:25 PM Page 330

WTips for making your text work
• People will seldom read more than 150–200 words at a time. Don’t be tempted towrite long paragraphs—stick to short, sharp ones.
• Keep your sentences short—around twenty words each. • Keep your titles short and sharp—a maximum of around five words for each heading.• Keep your lines well spaced so that the text does not look dense and crowded. • Remember that the greater the distance between viewer and text, the larger the font
size and the greater the spacing between words, lines and paragraphs will have to be.• Break the text into plenty of paragraphs and keep them well spaced, so that people
can visually distinguish manageable parcels of information. Try to make eachparagraph represent a particular idea or related set of points.
• Vary the font size you use throughout—e.g. a large font for titles, a lead-in sentencewhich is smaller than the title but still larger than the main text size, and then mainor body text which is smaller again.
• The size of headlines and titles needs to be at least 30 point. For sub-headings useat least 16–18 point, and 12–14 point for general text.
• Only some fonts, like Helvetica and Times, are easy to read in long runs (Binks,Dyke and Dagnall 1988: 115). Restrict the use of more exotic fonts to titles or sub-headings.
• For overall consistency, try not to use more than two fonts.• Make sure there are no spelling mistakes or typos—nothing looks worse!
Tips for making your layout work
• Keep text to a minimum and break up large columns of text with illustrationswherever possible.
• Many graphic designers use a preset grid in which the text and illustrations balanceeach other, so that the spacing between blocks of text and between images and textremains consistent (see Figure 10.4 on page 332).
• Remember that you don’t have to fill up all the space. Blank or ‘white’ space can beused to emphasise different elements, particularly images.
• Wherever possible, convert written information to a graphic or visual form.• Use large images that can attract attention from a distance.• Use headings to attract attention or to emphasise main points.• Include important or one-off information separately to the main text (in a box, like
the tips in this book). Don’t bury it in a welter of other words.• Make all aspects of the project work together—the choice of colour, font, style,
design and materials can all tell a story apart from just the words.
GETTING YOUR RESULTS OUT THERE 331
*Archaeologists Field Handbook 29/6/04 5:25 PM Page 331

W
PRESENTING YOUR RESEARCH AS A POSTER
One way of sharing information about your project is through presenting a poster, whichcan be exhibited at an archaeological or public meeting, or used as a standing display onthe walls of a school or community office.
332 THE ARCHAEOLOGIST’S FIELD HANDBOOK
FIGURE 10.4: Using a grid to lay out your interpretive text ensures that your text andimages complement each other, are arranged in a logical order and are easyto read. The grid is a guide only—your columns don’t have to be equal widthsand you can cross over columns to fit in illustrations, titles or quotations.
*Archaeologists Field Handbook 29/6/04 5:25 PM Page 332

WTips for preparing a poster
Remember that posters are initially seen from afar and need to be designed so thatpeople want to go closer to view them. The poster title and the images are what will drawthe viewer, not blocks of text (see ‘Tips for making your layout work’ on page 331).
• Keep your text to a minimum. The major mistake which many people make is to tryto fit their entire project on to their poster. Remember that people will not read blocksof more than 200 words at a time (see ‘Tips for making your text work’ on page 331).
• It can be helpful to think of a poster as telling the story in images. For the poster tobe effective, you almost need the images to stand alone. Think of the adage ‘a picturetells a thousand words’ and only choose images that will convey the story you wantto tell.
• Use no more than two or three sentences, in no less than a font size of 20 points, toexplain each image.
• Use images to convey several forms of information at once. For example, an imageof an archaeologist conducting fieldwork with an Indigenous elder can conveyinformation about local environment and collaborative relationships, as well as theway in which the actual task has been undertaken.
Lyn Leader-Elliot’s tips for presenting the perfect poster
Interpretive posters need a strong story line and the best images you can find to attractattention and tell the story.Your first step is to answer these questions:
• What idea should the poster convey?• What story will it tell?• Who is it aimed at?• What is the best way to convey the idea and tell the story to your chosen audience?• Where will the poster be displayed? This will affect your design, choice of materials
and colours.
Images• Photographs, maps, cartoons, graphs and charts all have their place, depending on
the ideas you are working with.• Use clean, uncluttered design—don’t try to put too much in.• Use empty space to separate different ideas.
GETTING YOUR RESULTS OUT THERE 333
*Archaeologists Field Handbook 29/6/04 5:25 PM Page 333

W• Keep related ideas, images and text together so that the poster is easy to read.
Text• Choose a heading (title) which immediately conveys the main theme of your story.• Focus on the main messages you want to convey—strip out the detail until you have
the essence.• Most people won’t read blocks of text on a poster.• The amount of text will depend on the purpose of your poster and its audience. You
may choose to use only a title and captions for your images, or you may want toinclude more text.
• Use simple language and sentence structures. Make every word count—you have veryfew to work with.
• Choose fonts and font sizes that are easy to read. Avoid italics, UPPER CASE andfussiness.
• And always make the images and text work together.
CLASSIC ERRORS AND HELPFUL HINTS
Discriminatory language
An important part of good writing is choosing language that doesn’t offend the audience.Language is a powerful tool, and it is important to use it in ways that empower people,rather than stereotypes or trivialises them. Government departments, universities andmany private businesses in Australia have policies requiring the use of non-discriminatorylanguage. The Style Manual for Authors, Editors and Printers, published by the AustralianGovernment Publishing Service (AGPS 2002: 112) has the following definition:
Language use is discriminatory when it makes people invisible; when it excludesthem, or highlights only one characteristic to the exclusion of other often morerelevant ones; when it stereotypes people; treats people asymmetrically; anddenigrates or insults people.
The most common form of discriminatory language is sexist bias, which either over-looks or trivialises the roles of women, or assumes that something can be done by, orapplies to, only one gender when it is really applicable to both. Often, this style of writingis done inadvertently, especially by people who are not trained in the Australian univer-sity system. Sexist bias should be avoided. It is poor English usage and makes your work
334 THE ARCHAEOLOGIST’S FIELD HANDBOOK
*Archaeologists Field Handbook 29/6/04 5:25 PM Page 334

Wappear dated and unprofessional. It also detracts attention from the very worthwhileideas that are being put forward. There are a number of ways of dealing with sexist bias inlanguage. For example, from an original which reads:
This requires not that the writer make all his sentences short, or that he avoid alldetail and treat his subjects only in outline, but that every word tells (Strunk, inStrunk and White 1979: xiv).
you could try to:
• make it a direct address. This does not require you to make all sentences short, or avoidall detail and treat subjects only in outline, but that every word tells;
• make it passive. This does not require that all sentences be short, or that all detail beavoided and subjects be treated only in outline, but that every word tells;
• turn it into a plural. This requires not that writers make all their sentences short, oravoid all detail and treat subjects only in outline, but that every word tells.
Other ways of dealing with this are to use ‘his or her’ instead of ‘his’, or to alternatebetween ‘his’ and ‘her’ as generic pronouns. These two methods are a little clumsy, so wedo not recommend them. Neither do we recommend using ‘her’ as a generic pronoun, asthis simply replaces one form of discrimination with another.
The other form of discrimination regularly found in archaeological publications isracist bias. The unthinking use of racist language has been a part of earlier stages ofarchaeology. Using value-laden terms to describe Indigenous Australians is one exampleof this. A short perusal of the early archaeological literature will find descriptionsof Indigenous peoples as ‘primitive’, ‘backward’ or as ‘children of nature’. All of theseterms reinforce erroneous stereotypes and deny the complexity and diversity of Indige-nous Australian cultures. It is particularly important that archaeologists deal with suchbiases. We write the pasts of other peoples and have a responsibility to do so withoutdiscriminatory bias.
Placing illustrations apart from the text
Some archaeologists choose to separate their illustrations in an appendix at the end oftheir report, rather than integrate them within the text proper. We do not recommendthis, as it can make the report difficult to follow, forcing the reader to move back and forthbetween text and illustrations. As a general rule of thumb, illustrations should be includedin the body of the report, preferably as closely as possible to the in-text reference. Anyadditional material that you think would be of interest to people researching a similar
GETTING YOUR RESULTS OUT THERE 335
*Archaeologists Field Handbook 29/6/04 5:25 PM Page 335

Wtopic, but which is not essential to the main argument (such as your raw data), should beincluded as an appendix.
Listing figures in a confusing manner
When you are listing figures, don’t bother separating plates from other figures—this is anold-fashioned method and will only increase your workload. It is far simpler to treat allphotographs, illustrations and maps simply as ‘figures’, numbered consecutively withineach chapter (Figure 1.1, 1.2, 2.1, 2.2, etc.). Do separate tables from figures, however, asthey contain totally different types of information. A checklist for tables and figures iscontained in Appendix 7.
Presenting numbers
Presenting your data numerically is an important part of archaeological writing, but isoften done in a confusing or inconsistent manner. The following suggestions derive fromthe recommendations of the Style Manual for Authors, Editors and Printers, published by theAustralian Government Publishing Service (AGPS 2002) and the better writingrecommendations of Oxford University Press (2003). The accepted convention is to spellout the numbers from one to ten, then to use numerals for all figures above ten (11, 12,25, etc.). Follow the same rules for ordinals: first, second, third . . . then, 11th, 12th andso on. Use figures if you are dealing with measurements (1 km, 2 per cent), rangesof numbers (2–4 months), or fractions and decimals (41/2, 4.5 months). When usingfractions, write them out (two-thirds, three-quarters), write out percentages (per cent, not%), express ranges of numbers as 10 000–12 000 (not 10–12 000) and present periods as1914 to 1920 or 1914–20. When indicating dates or ranges of years, there should beno apostrophe: e.g. 1960s, not 1960’s.
Failing to acknowledge sources adequately
In all writing, it is important that you adequately acknowledge all sources. Any ideas thatare not your own must be referenced, even if you are not using direct quotes. Otherwise,you can be accused of plagiarism, which is stealing other people’s ideas and pretendingthey are your own. One way to avoid this is to always include page numbers in referencesfor ideas or direct quotes. When referring to an internet source, your in-text referenceshould provide either the author or site name and a date (either the date of publication,the date of revision or the date you accessed the site). Your reference list should include adocument title or description, a date and a uniform resource locator (URL). Wheneverpossible, identify the author of the document and direct readers as closely as possible to
336 THE ARCHAEOLOGIST’S FIELD HANDBOOK
*Archaeologists Field Handbook 29/6/04 5:25 PM Page 336

Wthe information being cited. If you can, reference specific documents rather than home ormenu pages (www.apastyle.org/elecmedia.html).
Tips for referencing
When you are conducting your research, you will need to read widely. It is very easy toforget where a quote or piece of information came from, even though that seemedimpossible at the time you were reading it. As a minimum, you need to record the fol-lowing information for each quotation or piece of information you record:
• the title of the work;• the author, if this information is available;• the title of the journal or book from which the work was taken;• the publisher;• the date of publication;• the place of publication;• the page range of journal articles or edited chapters.
If you take the time to do this as you go along—and do it for everything you read—youwill save time later.
Distinguishing between a reference list and a bibliography
A ‘references’ or ‘bibliography’ section must be included with all reports and publishedpapers. Many people confuse a reference section and a bibliography. They are different.A reference list records only the references used in the text, while a bibliography includesthese references as well as other publications which may be of interest to the reader, butwhich are not referred to directly in the text. Sometimes, as in this book, this is called‘References and further reading’. A bibliography can also be a list of recommendedreading.
REFERENCES AND FURTHER READING
Australian Government Publishing Service 2002, Style Manual for Authors, Editors and Printers,5th edn, AGPS, Canberra.
Binks, Gillian, Dyke, John and Dagnall, Philip 1988, Visitors Welcome: A Manual on the Presenta-tion and Interpretation of Archaeological Excavations, English Heritage, London.
Carter, James 1997, An Interpretive Planning Handbook, Tourism and Environment Initiative,Inverness.
GETTING YOUR RESULTS OUT THERE 337
*Archaeologists Field Handbook 29/6/04 5:25 PM Page 337

WDwyer, J. 1993, The Business Communication Handbook, Prentice-Hall, Melbourne.Hay, I., Bochner, D. and Dungey, C. 2002, Making the Grade: A Guide to Successful Communication
and Study. 2nd edn, Oxford University Press, Melbourne.Eagleson, R.D. 1990, Writing in Plain English, Australian Government Publishing Service,
Canberra. Klauser, H. 1987, Writing on Both Sides of the Brain, Harper and Row, San Francisco. McLaren, S. 2001, Easy Writer: A Student’s Guide to Writing Essays and Reports. Pascal Press, Sydney,
NSW. One Step Ahead series by Oxford University Press.Peters, P. 1996, The Cambridge Australian English Style Guide, Cambridge University Press,
Melbourne. Schmitt, D. 1992, The Winning Edge: Maximising Success in College, Harper Collins, New York. Strunk, W. and White, E.B. 1979, The Elements of Style, 3rd edn, Macmillan, New York. White, J.P. 1983, ‘Report writing and publication’, in G. Connah (ed.), Australian Field Archae-
ology: A Guide to Techniques, AIAS, Canberra, pp. 171–78.Windshuttle, K. and Elliot, E. 1997, Writing, Researching and Communicating: Communication Skills
for the Information Age, 2nd edn, McGraw-Hill, Sydney.
USEFUL WEBSITES
The Scottish Interpretation Network: www.scotinterpnet.org.uk. The Interpretive PlanningHandbook is available free online from this website.
Ask Oxford: www.askoxford.com. Lots of excellent tips for writing well, online exercises andexpert feedback. The sections on ‘better writing’ and ‘ask the experts’ are particularlyuseful. This site also provides the key points of each book in the One Step Ahead series.
You Too Can Write Good: Writing about Archaeology for Local Newspapers: www.saa.org/publications/saabulletin/16-3/SAA17.html. This site is a guide to how to make yourarchaeological project interesting for local newspapers.
www.apastyle.org/elecref.html contains detailed information on how to cite a range ofelectronic references.
Online, searchable databases from the archives of The Australian and 150 other News Limitedpapers are available online at www.newstext.com.au.
338 THE ARCHAEOLOGIST’S FIELD HANDBOOK
*Archaeologists Field Handbook 29/6/04 5:25 PM Page 338

Appendix 1SAMPLE RECORDING
FORMS
Survey: Background information . . . . . . . . . . . . . . . . . . . . . . . . . . . . . . . . . . . . . 340Survey: Open sites . . . . . . . . . . . . . . . . . . . . . . . . . . . . . . . . . . . . . . . . . . . . . . . . 342Survey: Scarred or carved trees . . . . . . . . . . . . . . . . . . . . . . . . . . . . . . . . . . . . . . 344Survey: Quarries. . . . . . . . . . . . . . . . . . . . . . . . . . . . . . . . . . . . . . . . . . . . . . . . . . 346Survey: Stone artefacts . . . . . . . . . . . . . . . . . . . . . . . . . . . . . . . . . . . . . . . . . . . . 348Survey: Cemeteries. . . . . . . . . . . . . . . . . . . . . . . . . . . . . . . . . . . . . . . . . . . . . . . . 350Excavation 1. . . . . . . . . . . . . . . . . . . . . . . . . . . . . . . . . . . . . . . . . . . . . . . . . . . . . 351Excavation 2. . . . . . . . . . . . . . . . . . . . . . . . . . . . . . . . . . . . . . . . . . . . . . . . . . . . . 352Level booking form . . . . . . . . . . . . . . . . . . . . . . . . . . . . . . . . . . . . . . . . . . . . . . . 354Photography . . . . . . . . . . . . . . . . . . . . . . . . . . . . . . . . . . . . . . . . . . . . . . . . . . . . 355
W W W
WW
339
*Archaeologists Field Handbook 29/6/04 5:25 PM Page 339

WSURVEY: BACKGROUND INFORMATION
340 THE ARCHAEOLOGIST’S FIELD HANDBOOK
*Archaeologists Field Handbook 29/6/04 5:25 PM Page 340

WAPPENDIX 1 341
*Archaeologists Field Handbook 29/6/04 5:25 PM Page 341

WSURVEY: OPEN SITES
342 THE ARCHAEOLOGIST’S FIELD HANDBOOK
*Archaeologists Field Handbook 29/6/04 5:25 PM Page 342

WAPPENDIX 1 343
*Archaeologists Field Handbook 29/6/04 5:25 PM Page 343

WSURVEY: SCARRED OR CARVED TREES
344 THE ARCHAEOLOGIST’S FIELD HANDBOOK
*Archaeologists Field Handbook 29/6/04 5:25 PM Page 344

WAPPENDIX 1 345
*Archaeologists Field Handbook 29/6/04 5:25 PM Page 345

WSURVEY: QUARRIES
346 THE ARCHAEOLOGIST’S FIELD HANDBOOK
*Archaeologists Field Handbook 29/6/04 5:25 PM Page 346

WAPPENDIX 1 347
*Archaeologists Field Handbook 29/6/04 5:25 PM Page 347

SUR
VEY
: ST
ON
E A
RT
EFA
CT
S
*Archaeologists Field Handbook 29/6/04 5:25 PM Page 348

*Archaeologists Field Handbook 29/6/04 5:25 PM Page 349
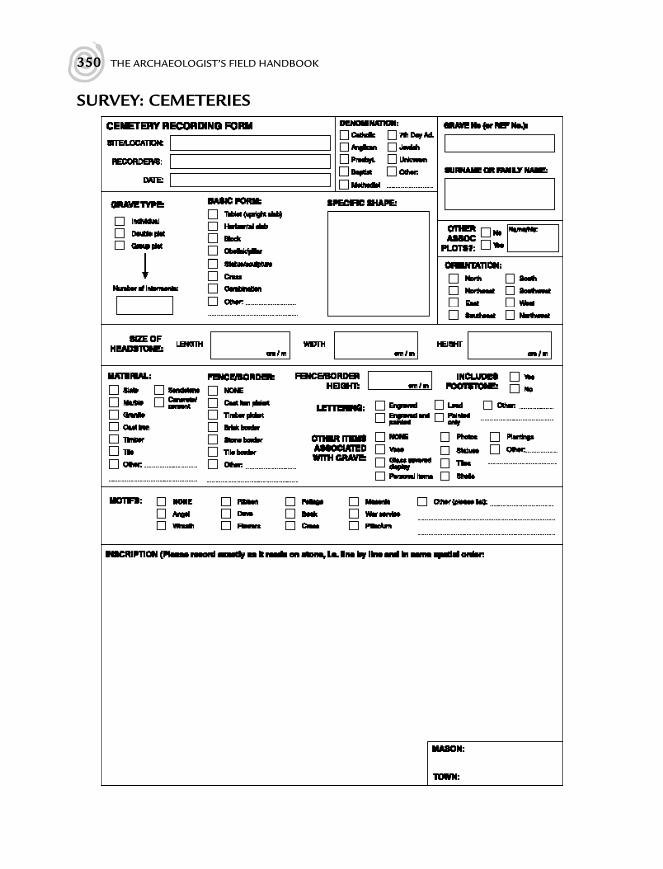
WSURVEY: CEMETERIES
350 THE ARCHAEOLOGIST’S FIELD HANDBOOK
*Archaeologists Field Handbook 29/6/04 5:25 PM Page 350

WEXCAVATION 1
APPENDIX 1 351
*Archaeologists Field Handbook 29/6/04 5:25 PM Page 351

WEXCAVATION 2
352 THE ARCHAEOLOGIST’S FIELD HANDBOOK
*Archaeologists Field Handbook 29/6/04 5:25 PM Page 352

WAPPENDIX 1 353
*Archaeologists Field Handbook 29/6/04 5:25 PM Page 353

LEV
EL B
OO
KIN
G F
OR
M
*Archaeologists Field Handbook 29/6/04 5:25 PM Page 354

WPHOTOGRAPHY
APPENDIX 1 355
*Archaeologists Field Handbook 29/6/04 5:25 PM Page 355

Appendix 2RIM DIAMETERCHART
Please note: The chart on page 357 must be enlarged by at least 206% to be accurate.
W W W
WW
356
*Archaeologists Field Handbook 29/6/04 5:25 PM Page 356

WAPPENDIX 2 357
*Archaeologists Field Handbook 29/6/04 5:25 PM Page 357

Appendix 3GUIDES TO DATING COMMON HISTORICAL ARTEFACTS
Dating common historical artefacts . . . . . . . . . . . . . . . . . . . . . . . . . . . . . . . . . . 359Dating bottle glass. . . . . . . . . . . . . . . . . . . . . . . . . . . . . . . . . . . . . . . . . . . . . . . . 359Dating ceramics . . . . . . . . . . . . . . . . . . . . . . . . . . . . . . . . . . . . . . . . . . . . . . . . . . 370Dating tins and tin cans. . . . . . . . . . . . . . . . . . . . . . . . . . . . . . . . . . . . . . . . . . . . 374Dating nails . . . . . . . . . . . . . . . . . . . . . . . . . . . . . . . . . . . . . . . . . . . . . . . . . . . . . 377Dating clay tobacco pipes . . . . . . . . . . . . . . . . . . . . . . . . . . . . . . . . . . . . . . . . . . 380Dating metal matchboxes . . . . . . . . . . . . . . . . . . . . . . . . . . . . . . . . . . . . . . . . . . 381References 383
W W W
WW
358
*Archaeologists Field Handbook 29/6/04 5:25 PM Page 358

WAPPENDIX 3 359
DATING COMMON HISTORICAL ARTEFACTS
All artefacts come in a wide range of shapes, sizes and materials. In many cases, changesin the manufacturing process have led to changes in the form, style and components of an artefact over time. Any of these changes, if their history is known, can be used to datean artefact, and by extension the site on which it is found. It is not possible here, of course,to provide a detailed list of the many variations which have occurred over time in theproduction of every common historical artefact. What we intend is simply a guide tosome of the more generally known changes in artefact manufacture or morphology thatcan suggest a rough date or date range. In many cases these ranges will be so broad thatyou will need to research your particular site and its artefacts in more detail. Mostartefacts will not be dateable to a more specific point in time without further backgroundresearch into specific manufacturers and the local situation.
DATING BOTTLE GLASS
Most dating techniques for bottle glass are based on changes in manufacturing tech-niques, particularly changes to the moulding and finishing processes and the methods ofsealing different kinds of bottles. This section presents an outline of some of the majortechnical innovations that help to date bottles, rather than a history of particular brands,trademarks or factories. When attempting to date a site from the bottle glass containedwithin it, you should also take into account the fact that empty bottles were frequentlyreused throughout the nineteenth century. An old date for a bottle, therefore, does notnecessarily imply an old date for a site.
*Archaeologists Field Handbook 29/6/04 5:25 PM Page 359

W360 THE ARCHAEOLOGIST’S FIELD HANDBOOK
*Archaeologists Field Handbook 29/6/04 5:25 PM Page 360

WAPPENDIX 3 361
TABLE A3.1: continued
*Archaeologists Field Handbook 29/6/04 5:25 PM Page 361

W362 THE ARCHAEOLOGIST’S FIELD HANDBOOK
*Archaeologists Field Handbook 29/6/04 5:25 PM Page 362

WAPPENDIX 3 363
TABLE A3.1: continued
*Archaeologists Field Handbook 29/6/04 5:25 PM Page 363

W364 THE ARCHAEOLOGIST’S FIELD HANDBOOK
*Archaeologists Field Handbook 29/6/04 5:25 PM Page 364

WAPPENDIX 3 365
TABLE A3.1: continued
*Archaeologists Field Handbook 29/6/04 5:25 PM Page 365

W366 THE ARCHAEOLOGIST’S FIELD HANDBOOK
*Archaeologists Field Handbook 29/6/04 5:25 PM Page 366

WAPPENDIX 3 367
TABLE A3.1: continued
*Archaeologists Field Handbook 29/6/04 5:25 PM Page 367

W368 THE ARCHAEOLOGIST’S FIELD HANDBOOK
*Archaeologists Field Handbook 29/6/04 5:25 PM Page 368

WAPPENDIX 3 369
TABLE A3.1: continued
*Archaeologists Field Handbook 29/6/04 5:25 PM Page 369

W370 THE ARCHAEOLOGIST’S FIELD HANDBOOK
DATING CERAMICS
Fragments of ceramic are almost as ubiquitous as fragments of bottle glass on historicalarchaeological sites. Maker’s marks or trade marks will always be the best means toaccurately date a piece of ceramic, although date ranges can also be suggested based oncolour and in some instances on pattern (Samford 1997). Blue was the most commoncolour for printed decoration on English ceramics during the nineteenth century,although black, brown, purple, green and red were introduced in the 1820s and 1830s(Samford 1997: 20–22). For example, blue transfer printed wares have a date range of atleast 1784–1859, black a range of 1785–1864, brown of 1818–1869, red of 1818–1880,green of 1818–1859 and purple of 1814–1867 (Samford 1997: 20). These date ranges,however, refer to beginning and end production dates only, not the total date range forproduction of a particular colour. They merely serve to bracket an artefact to its mostpopular production period, not to date it absolutely. Furthermore, such ranges only datethe artefacts, not necessarily the site itself. When interpreting ceramics from an archae-ological site, bear in mind that ceramic table and kitchenwares were often carefully lookedafter and only discarded when eventually broken beyond further use, so can often bemuch older than the site in which they are found.
Patterns will only be able to provide a date if you can identify who made them. Forthis, you will have to search pattern catalogues such as Coysh and Henrywood’s (1982)
*Archaeologists Field Handbook 29/6/04 5:25 PM Page 370

WDictionary of Blue and White Printed Wares, or Godden’s 1967 Illustrated Encyclopedia of BritishPottery & Porcelain.
The earliest underglaze printed pattern (standardised in 1790) was the Willow Pattern,and from 1814 onwards it was the cheapest available transfer printed pattern in thepotters’ price fixing lists (Miller 2000: 93). It became so ubiquitous that it is still in usetoday. Other types of decoration can be dated but only approximately (AHAPN DraftHistorical Archaeological Materials Cataloguing Guidelines 1998): transfer prints to1790s–1860s; plain whiteware 1850–1900; decals 1890s–present; reproduction transferprints 1890s–present; hand-painted, floral polychromes 1780s–present; embossing1850–1890; coloured glazes 1930s–1960s. Moulding or embossing was particularlypopular between 1850 and 1890 on clear-glazed, white, ironstone vessels.
Trade marks are also important chronological indicators, although it would be impos-sible to document every known trade mark in the history of ceramics manufacture. Whenyou record a trade mark, make sure you describe the design and wording of the mark itselfand indicate whether it is stamped (impressed), incised or hand painted. You should alsoinclude the colour of the trade mark. Lists of British ceramic trade marks can be found invarious editions of Geoffrey Godden’s (1993) Encyclopaedia of British Pottery and PorcelainMarks and similar catalogues are available for Australia and Europe.
TABLE A3.2: Some terms used on ceramic vessels (from Godden 1993; Kovel and Kovel1986: 229–34)
Term or mark Period of manufacture
Mark including a royal coat of arms After 1810Mark including the name of the pattern After 1810Ironstone After 1813Diamond registration mark* 1842–1883Royal After 1850Pearl or P ‘Pearl’ = After 1840, ‘P’ = After c1868Limited or Ltd After 1860, not usually on pottery until after 1880Trade mark After 1862, not usually on pottery until 1875Copyright reserved After 1876Rd No After 1884 (see Table A5.3)England After 1891Made in England After 1900, usually after 1914Nippon 1891–1921Japan After 1921Semi-vitreous After 1901Oven proof After 1933Oven tested c1935United States of America After 1935Incorporated After 1940
APPENDIX 3 371
*Archaeologists Field Handbook 29/6/04 5:25 PM Page 371

WTerm or mark Period of manufacture
Detergent proof c1944–presentR(egistration mark) After 1949Dishwasher proof After 1955Freezer–Oven–Table After 1960s
A system for registering ceramic designs came into effect in 1842. Up until 1883, thissystem used a registration diamond to indicate the precise date a design was registered(Figure A3.1). Not all ceramics contained such a mark, however, so its usefulness as adating tool is limited.
372 THE ARCHAEOLOGIST’S FIELD HANDBOOK
FIGURE A3.1: How to read a ceramic registration mark
*Archaeologists Field Handbook 29/6/04 5:25 PM Page 372

WAPPENDIX 3 373
From 1884 onwards, the diamond-shaped registration mark was replaced by a simplersystem, using the abbreviation ‘Rd No’ before the number. Note that this number onlygives the date the design was registered, and therefore the vessel could have been made anytime after that date. This system is still in use today and because the numbers changedfrom year to year, is a reliable guide to dating such marked ceramics (see Table A3.3).
1884 11885 197561886 404801887 645201888 904831889 1166481890 1412731891 1637671892 1857131893 2052401894 2247201895 2469751896 2683921897 2912411898 3116581899 3317071900 3512021901 3681541902 3851801903 4032001904 4244001905 4478001906 4718601907 4939001908 5186401909 5351701910 5520001911 5748171912 5941951913 6124311914 6301901915 6449351916 6535211917 6589881918 662872
1919 6661281920 6737501921 6801471922 6871441923 6949991924 7026711925 7101651926 7180571927 7263301928 7343701929 7427251930 7511601931 7605831932 7696701933 7792921934 7890191935 7990971936 8087941937 8172931938 8252311939 8326101940 8375201941 8385901942 8392301943 8399801944 8410401945 8426701946 8455501947 8497301948 8532601949 8569991950 8608541951 8639701952 8662801953 869300
TABLE A3.3: Dating ceramics by the ceramic registration mark system
Year Registration nos beginning with Year Registration nos beginning with
*Archaeologists Field Handbook 29/6/04 5:25 PM Page 373

W374 THE ARCHAEOLOGIST’S FIELD HANDBOOK
DATING TINS AND TIN CANS
No comprehensive study of tin-making technology and local manufacturing changes hasbeen carried out for the Australian region. Regional studies by historical archaeologistsworking in New South Wales (Heffernan and Smith 1996) and New Zealand (Ritchie andBedford 1985) have provided some broad guidelines.
Year Registration nos beginning with Year Registration nos beginning with
1954 8725311955 8760671956 8792821957 8829491958 8870791959 891665
1960 8950001961 8999141962 9046381963 9093641964 9145361965 919607
TABLE A3.4: Dating techniques for tin cans and metal containers (from Heffernan andSmith 1996; Ritchie and Bedford 1985; Rock 2000: 278–84)
*Archaeologists Field Handbook 29/6/04 5:25 PM Page 374

WAPPENDIX 3 375
TABLE A3.4: continued
*Archaeologists Field Handbook 29/6/04 5:25 PM Page 375

W376 THE ARCHAEOLOGIST’S FIELD HANDBOOK
*Archaeologists Field Handbook 29/6/04 5:25 PM Page 376

WAPPENDIX 3 377
DATING NAILS
The manufacture of nails in Australia has progressed through a number of stages, fromhand-made, wrought or forged nails to mass-produced, machine-made wire nails. Giventhis transition, and provided that the nails are sufficiently well preserved so that theirmethod of manufacture can be identified, it is possible for them to serve as broad chrono-logical markers. Hand-wrought nails, for instance, were in common use up until the1850s, although they continued to be used sporadically throughout the nineteenthcentury (Coutts 1984: 282). Generally, machine-made nails provide better subjects fordating, as their production resulted from the patenting of a specific invention (Varman1980: 31). Wire nails were manufactured from drawn wire and were first importedinto Australia around 1853, although they did not become widely used until after the1870s, when manufacturing processes improved enough to make them both cheap andplentiful (Varman 1980: 36).
The diagnostic features of a nail are the head, and sometimes characteristics on theshaft or shank.
Dating any nail is quite problematic, mostly because they rust very quickly and becausetheir heads often become distorted through use. Both of these processes alter theirdiagnostic features.
FIGURE A3.2: The parts of a nail
*Archaeologists Field Handbook 29/6/04 5:25 PM Page 377

W378 THE ARCHAEOLOGIST’S FIELD HANDBOOK
TABLE A3.5: Dating techniques for nails (from Coutts 1984; Smith 1998; Varman 1980)
*Archaeologists Field Handbook 29/6/04 5:26 PM Page 378

WAPPENDIX 3 379
TABLE A3.5: continued
*Archaeologists Field Handbook 29/6/04 5:26 PM Page 379

WDATING CLAY TOBACCO PIPES
While clay tobacco pipes are relatively common on archaeological sites, they are not thebest dating tools. The diagnostic features of a clay tobacco pipe are shown in Figure A5.3.
Great variations in the shape and style of clay pipes have existed since the start of theirmanufacture, and changes in bowl shape or stem length are not always reliable guides totheir period of manufacture. Oswald (1975: 37–41) has produced a simplified bowltypology which is of some use when dating pipes, although the many local variations indesign and manufacture make this only useful as a general tool.
380 THE ARCHAEOLOGIST’S FIELD HANDBOOK
FIGURE A3.3: The parts of a clay pipe
FIGURE A3.4: Dating techniques for clay pipes (from Oswald 1975: 37–41)
*Archaeologists Field Handbook 29/6/04 5:26 PM Page 380

WAPPENDIX 3 381
DATING METAL MATCHBOXES
The use of small tin boxes for storing matches was current from about the 1830s until the1940s. No comprehensive study has been undertaken on wax vesta matchboxes, and there-fore there are few guidelines available for dating. The most detailed studies to date havebeen completed by archaeologists working on historic mining sites in New Zealand(Bedford 1985; Ritchie and Bedford 1987) and the Northern Territory (McCarthy 1986).Without comparable regional studies from other parts of Australia, there is no betterguide at present.
TABLE A3.6: Dating techniques for tin wax vesta boxes (from Bedford 1985; Bryant andMay 1987; McCarthy 1986)
*Archaeologists Field Handbook 29/6/04 5:26 PM Page 381

W382 THE ARCHAEOLOGIST’S FIELD HANDBOOK
*Archaeologists Field Handbook 29/6/04 5:26 PM Page 382

WAPPENDIX 3 383
REFERENCES
Association of Historical Archaeologists of the Pacific Northwest (AHAPN) 1998, DraftHistorical Archaeological Materials Cataloguing Guidelines, Association of Historical Archae-ologists of the Pacific Northwest, accessible online at www.mindspring.com/~larinc/ahapn/crm/laboratory/labmanual.htm.
Beaver, Patrick 1985, Match Makers: The Story of Bryant & May, Henry Melland, London.Bedford, Stuart 1985, ‘A simplified classification for tin wax vesta matchboxes’, New Zealand
Archaeological Association Newsletter 28(1): 44–64.Boow, James 1991, Early Australian Commercial Glass: Manufacturing Processes, Department of
Planning and Heritage Council of NSW, Sydney.Bryant and May Pty Ltd 1987, ‘History of Bryant and May in Richmond’, unpublished type-
script.Coutts, Peter 1984, ‘Captain Mills, Cottage, Port Fairy, Victoria’, Records of the Victorian Archae-
ological Survey 17, VAS, Melbourne.Coysh, A.W. and Henrywood, R.K. 1982, Dictionary of Blue and White Printed Pottery 1780–1880,
2 vols, Antique Collectors’ Club.Godden, Geoffrey 1967, Illustrated Encyclopaedia of British Pottery & Porcelain, Bonanza Books,
New York.Godden, Geoffrey 1993, Encyclopaedia of British Pottery and Porcelain Marks, Barrie and Jenkins,
London.Heffernan, K.J. and Smith, L. 1996, ‘Archaeological investigations at Kiandra, Kosiusko National
Park II: Excavations at Chinese Emporia, mining races and Matthews’ Cottage, 1996’, unpub-lished report) Department of Archaeology and Anthropology, Australian National University.
Jones, Olive and Sullivan, Catherine 1989, The Parks Canada Glass Glossary for the Description ofContainers, Tableware, Flat Glass and Closures, National Historic Parks and Sites, CanadianParks Service, Environment Canada.
TABLE A3.6: continued
*Archaeologists Field Handbook 29/6/04 5:26 PM Page 383

WJones, David 1979, One Hundred Thirsty Years: Sydney’s Aerated Water Manufacturers from
1830–1930, Reliance Press, Deniliquin.Kovel, Ralph and Kovel, Terry 1986, Kovel’s New Dictionary of Marks: Pottery and Porcelain 1850
to the Present, Crown Publishers, New York.McCarthy, Justin 1986, ‘Pine Creek Heritage Zone archaeological survey’, unpublished report
to the National Trust of Australia, NT.Miller, G. 2000, ‘A revised set of CC Index values for classification and economic scaling of
English ceramics from 1787–1880’, in D. Braund (ed.), Approaches to Material Culture Researchfor Historical Archaeologists, Society for Historical Archaeology, Ann Arbor. pp. 86-110.
Oswald, Adrian 1975, ‘Clay pipes for the archaeologist’, British Archaeological Reports no. 14,BAR, Oxford.
Ritchie, Neville and Bedford, Stuart 1985, ‘An analysis of the metal containers from Chinesesites in the Cromwell area, Central Otago, New Zealand’, New Zealand Journal of Archaeology7: 95–115.
Rock, Jim 2000, ‘Cans in the Countryside’, in D. Brauner (ed.), Approaches to Material CultureResearch for Historical Archaeologists, The Society for Historical Archaeology, Ann Arbor, pp.275–89.
Samford, Patricia 1997, ‘Response to a market: dating English underglaze transfer-printedwares’, Historical Archaeology 31(2): 1–30.
Smith, A. 1987, A Teacher’s Guide to Archaeology, Department of Lands, Parks and Wildlife,Hobart.
Smith, L. 1998, ‘Cold hard cash: a study of Chinese ethnicity in archaeology at Kiandra, NewSouth Wales’, unpublished MA thesis, Australian National University.
Tasker, John 1989, Old New Zealand Bottles and Bygones, Heinemann Reid, Auckland.Varman, R. 1980, ‘The nail as a criterion for the dating of building and building sites (late 18th
century to 1900)’, The Newsletter of the Australian Society for Historical Archaeology, Sydney.
384 THE ARCHAEOLOGIST’S FIELD HANDBOOK
*Archaeologists Field Handbook 29/6/04 5:26 PM Page 384
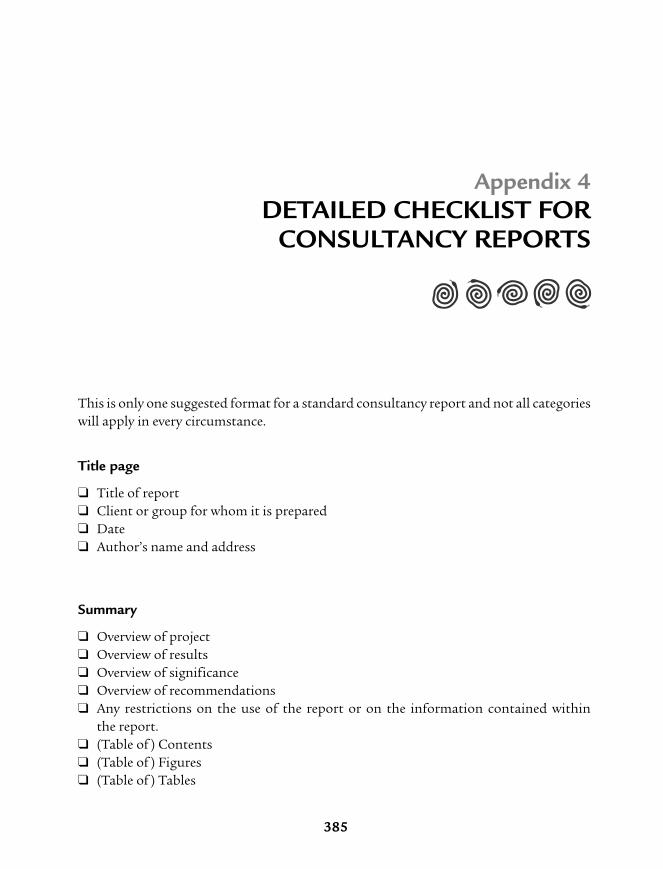
Appendix 4DETAILED CHECKLIST FOR
CONSULTANCY REPORTS
This is only one suggested format for a standard consultancy report and not all categorieswill apply in every circumstance.
Title page
❑ Title of report❑ Client or group for whom it is prepared❑ Date❑ Author’s name and address
Summary
❑ Overview of project❑ Overview of results❑ Overview of significance❑ Overview of recommendations❑ Any restrictions on the use of the report or on the information contained within
the report.❑ (Table of ) Contents❑ (Table of ) Figures❑ (Table of ) Tables
W W W
WW
385
*Archaeologists Field Handbook 29/6/04 5:26 PM Page 385

WIntroduction
❑ Brief description of project❑ Where the project is located (e.g. brief statement of nearest town, or important
geographical feature, state or area of state, borders of study area, etc.) and why theproject was commissioned/carried out
❑ Who commissioned/funded the project❑ Aims and scope of the study. Include any formal brief or informal instructions issued
as part of the project❑ Types of investigation conducted (e.g. field survey, Aboriginal consultation, excava-
tion, document searches, oral histories)❑ When fieldwork, analysis and report writing took place❑ Who undertook fieldwork, analysis and report writing❑ Any constraints or limitations which were imposed on the project (e.g. bad weather
limited time, attitudes of landowners, particular instructions which limited the surveyin any way, such as instructions from traditional owners to stay away from areas)
❑ Any constraints or limitations of the data (including documentary sources) collectedduring the project (e.g. lack of suitable oral history informants, loss of data, inabilityto find certain information)
Background information
❑ General description of study area (e.g. size, present land use, access, etc.)❑ General description of environment (e.g. geology/geomorphology, topography, water
courses, flora and fauna, relevant raw material sources, etc.)❑ Previous impacts on the study area (e.g. past logging, clearing, ploughing, mining,
erosion, etc.)❑ Description of proposed development and associated works, including what activities
could be expected to have an impact on the archaeology
Previous research
❑ Relevant ethnographic studies and findings within the region and the study area❑ Relevant historical studies and findings within the region and the study area❑ Relevant archaeological studies and findings within the region and the study area❑ Relevant oral histories and findings within the region and the study area
386 THE ARCHAEOLOGIST’S FIELD HANDBOOK
*Archaeologists Field Handbook 29/6/04 5:26 PM Page 386

WMethods
❑ Research strategy and aims❑ Detailed description of fieldwork methods for all stages of fieldwork. Outline clearly
the equipment and techniques used to implement the research strategy (e.g. choiceand location of sample areas, recording methods, collection methods, storage ofartefacts/information, methods of analysis)
❑ Discussion of any problems which arose during fieldwork, analysis or report writing❑ Detail of the constraints on archaeological visibility during the survey❑ Description of any decisions made in the field or the laboratory which changed the
scope of the study❑ Details of people involved
Results
❑ Summary of what was found or achieved (e.g. quantities, types, distribution)❑ Description of findings based on field notes and recording forms❑ Relevant tabulations of data, photographs, illustrations
Discussion
❑ Summary of points of interest or major research problems emerging from the study❑ Discussion of the evidence in regional and local perspective❑ Implications of the findings and areas for future research
Assessment of significance
❑ General statements of significance for the study area❑ Specific statements of significance for individual sites/areas (including whether
further research is necessary to adequately determine significance)
Statement of impacts
❑ Implications of the probable effects of development on the study area and the findings(including both direct and indirect impacts)
Recommendations
❑ General management recommendations, including alternatives where possible (e.g. dealing with the study area in general or with particular zones or areas within it)
APPENDIX 4 387
*Archaeologists Field Handbook 29/6/04 5:26 PM Page 387

W❑ Specific management recommendations, including alternatives where possible
(e.g. dealing with individual sites or artefacts)❑ Discussion of any issues or problems attached to these recommendations (e.g. client’s
preferences, difficulties, attitudes, compromises, etc.)❑ Identification of any legal requirements or processes which must be followed❑ References
Appendices
❑ Relevant additional information, including information which needs to be keptrestricted
❑ A glossary of any technical terms or definitions used in the report (including defini-tions of artefact types, attributes, measurements, etc.)
❑ Copy of the project brief and any other relevant information from the client outliningthe scope of work, etc.
❑ Letters of advice outlining management recommendations/opinions from communitygroups (e.g. Indigenous Land Councils)
388 THE ARCHAEOLOGIST’S FIELD HANDBOOK
*Archaeologists Field Handbook 29/6/04 5:26 PM Page 388

Appendix 5SAMPLE
PRESS RELEASE
Flinders UniversityReturns to Burra!
The year 2000 sees the beginning of long-term research and fieldwork by the Departmentof Archaeology and Cultural Studies at Flinders University, in Burra. Collaborationbetween Flinders and the Burra branch of the National Trust of South Australia, theGoyder Regional Council and the Mid-North Development Board began in 1998 when a
W W W
WW
Department of ArchaeologyFaculty of Education, Humanities, Law andTheology
GPO Box 2100Adelaide 5001 Australia
Telephone: (+61 8) 8201 2336Facsimile: (+61 8) 8201 3845Email: [email protected]
389
*Archaeologists Field Handbook 29/6/04 5:26 PM Page 389

Wpilot study was undertaken. The project will be launched with a public lecture at Burra on9 March, 2000.
One outcome of this collaboration was the award of a three-year PhD Australian Post-graduate Award (Industry), to Peter Birt in December 1999 to study the archaeology ofmulticulturalism in colonial Australia, with Burra as the case study. Peter was involved inthe 1998 pilot study and subsequently undertook his Honours research in 1999 on thevillage of Hampton, which is situated on the edge of Burra.
Peter has begun work on his PhD, which will involve extensive documentary research,archaeological survey and excavation (subject to the appropriate permits being granted).Initial plans include work at Mitchell Flat on the collapsed miner’s dugouts, further workat Hampton which includes one German-built house and a general survey of Burra’sextant early built environment. Fieldwork will begin by mid-year and will be ongoingduring the remainder of the project. Flinders University staff members involved in variousaspects of the project are Claire Smith, Jane James and Mark Staniforth. Dr ThomasStöllner, Director elect of the Bergbau Museum, Bochum, Germany, will also be involvedin the project.
The dugouts, in particular, provide a unique opportunity for archaeologists to obtaininformation about a class of people (mostly immigrant miners) who are grossly under-represented in current studies. One of the strengths of archaeology is the ability to shedlight upon the lives of ordinary people, who often are not recorded in historical material.
The project will generate information that can be used to provide additional interpre-tive information for visitors, but will also welcome the involvement of interested localsand provide a public archaeological experience for visitors. Ongoing research will seeregular visits to Burra by Flinders staff and students undertaking study and fieldwork.The collaborative aspects of the project are real and will have direct benefits, both in theshort and long term for Burra.
To enhance these benefits, staff and students of cultural tourism at Flinders Universitywill participate in the fieldwork and also become involved in determining how theproject’s outcomes can best be used. The collaboration between community, industry anddifferent areas of academia is somewhat unique (at least in South Australia) and promisesto be a fruitful experience, drawing upon a wide range of skills and knowledge to produceresults of tangible benefit to the town of Burra.
The project is innovative from an academic point of view because it consciouslyintegrates cultural tourism and archaeology. This new approach should be able to providenew directions for making archaeological research more relevant to members of the generalpublic. It is part of a growing recognition in universities that research needs to serve—andbe seen to serve—the public good, rather than just the interests of an academic elite.
This collaboration has already produced Honours theses by Peter Birt and Paul Saeki,and another student, Dianne Jones, is beginning a study of the Burra cemetery this year.
390 THE ARCHAEOLOGIST’S FIELD HANDBOOK
*Archaeologists Field Handbook 29/6/04 5:26 PM Page 390

WOther benefits that will accrue from these activities are publications in both academicand popular literature, and increased public awareness of Burra’s past and present appeal.It is hoped that, as activity increases, other students will undertake further research, whichwill value add to the project as a whole.
This project will include excavations as well as surveying and archival research. Thefirst of a series of archaeological excavations is planned for April 2000. Tourists will beable to visit the excavations, and will be guided by archaeology and cultural tourismstudents. This will allow the public to gain an understanding of the process of archaeologyas well as of the importance of the archaeological heritage of Burra.
This project provides a unique collaborative focus that will benefit all parties.‘Win–win’ situations are rare in life, but this is one with great and continued potential forall concerned.
For further information contact:
Flinders UniversityClaire Smith Ph: 8201 2336 Fax: 8201 3845Peter Birt Ph: 8201 2863 Fax: 8201 3845
Burra Branch, National Trust of South AustraliaMaureen Wright Ph/Fax: 8892 2461Barry Wright Ph/Fax: 8892 2461
Goyder Regional Council John Brak Ph: 8892 2100 Fax: 8892 2467
The Mid-North Development BoardCraig Wilson Ph: 8842 3115 Fax: 8842 1275
APPENDIX 5 391
*Archaeologists Field Handbook 29/6/04 5:26 PM Page 391

Place or element Possible stories Themes/ Story elements Sites/physicalof place messages remains
Example only Landscape: The landscape Geological events Eroded valleys,How it formed, is in a constant remnant hills,How it has been process of fossil localities;modified change rock outcropsWhy it looks theway it does now
392
Appendix 6INTERPRETATIONPROJECT PLANNER
STORY OUTLINE
Use this table to indicate an outline for your interpretation. Themes/messages are thegeneral elements of the overall story which you think are important and want to convey.Although they could just as easily be told at more than one place, the story elements arethe ways in which you would illustrate these themes/messages at this particular place.Physical elements/remains asks you to note down the physical (archaeological) featuresof the place which could be used effectively to tell particular parts of the story.
WW
WWW
*Archaeologists Field Handbook 29/6/04 5:26 PM Page 392

WINTERPRETATION PROJECT PLANNER
Program/Project (title):
Site/Place:
Intended audience (type(s) of people and their age range):
Is there any information about who visits this site now and why?
Visitor analysis (if possible)Estimate visitor numbers:
What are their needs?
What are their expectations?
What are their movements? (i.e. where have they come from and where are theygoing to?)
Linked interpretation opportunities: (are there any complementary sites?)
General objectives for audience to obtain (the aims of your interpretation):
Specific objectives for audience to obtain:
APPENDIX 6 393
*Archaeologists Field Handbook 29/6/04 5:26 PM Page 393
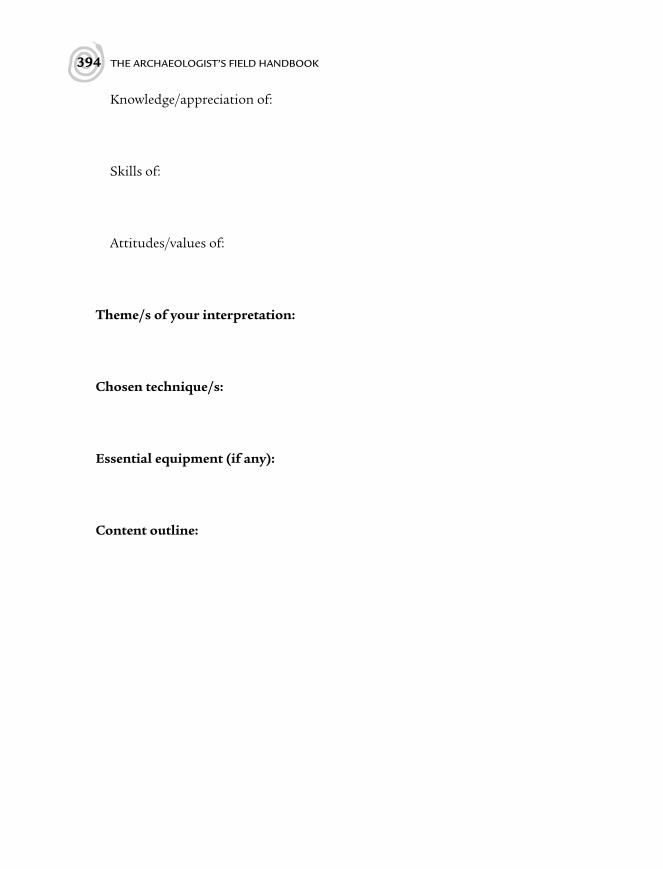
WKnowledge/appreciation of:
Skills of:
Attitudes/values of:
Theme/s of your interpretation:
Chosen technique/s:
Essential equipment (if any):
Content outline:
394 THE ARCHAEOLOGIST’S FIELD HANDBOOK
*Archaeologists Field Handbook 29/6/04 5:26 PM Page 394

Appendix 7CHECKLISTS FOR TABLES,FIGURES AND REFERENCES
Checklist for tables and figures
❑ Does the table or figure contribute to the presentation?❑ Have the data/accuracy been checked?❑ Does the table or figure follow its mention in the text?❑ Should the table or figure be included in the text or an appendix?❑ Are the tables and figures numbered consecutively?❑ Are sufficient details given to interpret the table or figure? Are they self-explanatory?❑ Is the caption sufficiently detailed?❑ Are the captions in the text consistent with the list of tables or list of figures?❑ Has a consistent format been used for all tables or figures?❑ Are units of measurement clearly stated?❑ Are abbreviations explained in the table or figure?❑ Could the table or figure be presented more simply?❑ Are column entries in tables correctly aligned?❑ In figures, are vertical and horizontal axes of graphs labelled?❑ In figures, is the zero position on the vertical axis shown?❑ In figures, are units of measurements indicated and clearly shown on axes?❑ In figures, are the separate observations comprising the graph marked?❑ Can the figure or table be easily read?❑ Is the table correctly positioned on the page?
W W W
WW
395
*Archaeologists Field Handbook 29/6/04 5:26 PM Page 395

W396 THE ARCHAEOLOGIST’S FIELD HANDBOOK
Checklist for referencing
❑ Has each page of the references been numbered?❑ Has every work cited in the text been included in the references?❑ Have the rules for alphabetical and chronological ordering of references been
consistently followed?❑ Have institutional requirements for referencing format been met?❑ Does each book reference include:
—author(s);—date of publication;—title of book;—publisher;—place of publication?
❑ Does each journal reference include:—author(s);—date of publication;—title of paper;—title of journal;—issue and volume number;—inclusive page numbers?
❑ Have the rules for spacing, capitalisation and underlining been consistently followed?
Checklist for literature reviews
❑ Have you synthesised the known archaeology of the region and identified the limitsof this in relation to the study area?
❑ Have you synthesised the known archaeology of the study area, including all sitespreviously found within or near the study area?
❑ Have you assessed the results of earlier studies in light of current knowledge and ofwhat you propose to do?
❑ Have you synthesised the ethnographic information available for the study area andits surrounding region?
❑ Have you identified the range of archaeological evidence that is likely to be expectedin the study area?
❑ From this information, have you identified the main archaeological issues and ques-tions which you will address within your study?
❑ From this information, have you presented potential models for past human use ofthe landscape that are relevant to your research problem?
*Archaeologists Field Handbook 29/6/04 5:26 PM Page 396

Aboriginal Land Council 12Aborigine see Indigenousabsolute dating 136Accelerator Mass Spectrometry (AMS) 154adaptation 255aerial photographs 33, 46, 280–1aesthetic significance 248 aggrading 77–8archaeological collections 156–61Archaeological Data Service 31archaeological significance 249–50 archaeological sites 63archaeologist responsibilities of 15–19,
23–8, 29archives 169
creation of 18–19computer recording of 16 making them last 16–17 ownership of 17–18
area reference 37artefacts 348–9
absence of 82ceramic 193–7cleaning of 149density of 220describing 134–5domestic 166
drawing of 290–6, 297, 298–301 evaluations of 253–4glass 187–93historical 185–6, 359in situ 74, 151isolated 204photographing of 282–3positioning of 118, 130–1provenance of 118recording of 130–1, 185–6removal of 118residues on 219scatters of 204, 216–18, 219–21stone 76–7, 202–4, 208–18, 298–301use-wear of 219
Atkinson, R.J.C. 18augur holes 125AUSARCH-L 6Australian Anthropological Association
12Australian Archaeological Association 12Australian Association of Consulting
Archaeologists (AACA) 12, 244Australian Geodetic System 51Australian Heritage Commission 30, 249,
251
INDEX
397
*Archaeologists Field Handbook 29/6/04 5:26 PM Page 397

WAustralian Institute of Aboriginal and
Torres Strait Islander Studies(AIATSIS) 13, 30, 169, 206
Australian Institute of Marine Archaeology 12
Australian Institute of Nuclear Scienceand Engineering (AINSE) 206
Australian Map Grid (AMG) 33Australian Research Council (ARC) 8Australian War Memorial 168–9axes 212, 213, 227–8
backfilling 119background information 340–1background noise 77bark 227, 229baseline and offset technique 96–103baselines 86–7, 88, 96–103bearings 47–51bibliography 337bone china 194–5bones 151, 156booking sheet 109, 110–13bottles 187–93, 254, 359–70boundaries 82–3, 219–21, 222brushes 141–6budgets 10, 243, 244buildings 170–1, 176–85, 278–9bulb of percussion 210burials 206–7, 237–8Burra Charter model 247, 255bush survival 53–6
cairns 205cameras 265–8, 273, 274–5campfire cooking 56–60carved trees 205, 226–30, 344–5cemeteries 350ceramics 193–7, 301–2, 370–4
china see ceramicschronology 124classification systems 83–4clay tobacco pipes 380Code of Ethics 13colour 223, 226colour decoration 196–7coloured pastes 197community groups 14–15community reports 320compass and pacing technique 90–6compasses 47–51, 90–6, 182conservation 254, 255, 256
of finds 148, 150, 158–9techniques 6
construction techniques 183–5consultancy reports 318–19, 385–9consultants 244contact sites 207, 234–5contamination 152–3, 155, 172–3context system 117, 136–41contour lines 41–2copyright 18cores 209cores 210–11cortex 213, 216cross-hatching 298cultural features 134–5cultural heritage 11, 240–61cultural landscape 64cultural significance 241, 245–52
aesthetic 248 archaeological 249–50assessing 251–2historical 249 scientific 249–50 social 250–1 threshold for 246–7
cultural tourism 8
398 THE ARCHAEOLOGIST’S FIELD HANDBOOK
*Archaeologists Field Handbook 29/6/04 5:26 PM Page 398

Wcultural traditions 13–14cuts 137
dating 136, 183–5, 359–83 bottle glass 359–70ceramics 370–4common historical artefacts 359 metal matchboxes 381–3nails 377–9radiocarbon 136, 153, 154–6thermoluminescence 152–3tin and tin cans 374–6 tobacco pipes 380
declination 47decoration 196–7deposits 121, 132–4, 137depth measurement 130destruction 255, 256development 253–4diagnostic features 185digital imaging techniques 224–5, 303–5,
307directories 171Discovery program 8discriminatory language 334–5disturbance 78documentation 154–5, 164–5, 167–71,
236, 255drawing
artefacts 290–6, 297ceramics 301–2cross-hatching 298golden rules for 297–8horizontal surfaces 286–9inked 285–6, 300–1 pencil 285, 300 plans in the field 286–7reduction 295–6rock art 302–5
scale 286–7, 295–6slopes 288stippling 297–8stone artefacts 298–301storage of 305–7vertical surfaces 289–90
earthenware 195edge-banding 197edge-ground axes 212Electronic Distance Measuring (EDM)
104, 105–9, 112embossing 195engravings 206Environmental Protection Authority 22erosion 77–8, 79, 220error of closure 92, 94–6ethics 11–19, 23–8, 29, 117, 199, 255ethnohistoric research 236–7Europeans 228, 234–5, 236–7, 249excavation 70, 115–62
approaches to 123–5basics of 116–20bone 151brushes for 141–6collecting samples 151–6conserving finds 150etiquette 144–5labelling finds 150permits for 117photographing 279–80principles of 121–2recording of 131–6, 351–3rock art protection 148shell middens 145–6sieving and sorting 146–9site grids 125–7stratigraphy 136–41successful 149, 160–1
INDEX 399
*Archaeologists Field Handbook 29/6/04 5:26 PM Page 399

Wtoolkit for 115–16 trenches 127–30 trowels 141–6 exposure 79, 80
fabric 254–5feedback 259field illustration 284–307field journals 16, 70–2field kit 1–2, 19–20fieldwork
bush survival 53–6first-aid kit for 2heritage 14–15planning 2, 52–3publication of 14purpose of 3recording information 69–70reporting results of 15–16, 21successful 52–3 toolkit for 1, 19–20
figures 336, 395film 267–8, 276–7first-aid kit 2flakes 209–12, 216flexibility 119, 122fluids 53, 54foundation funding 9–11framework 87–8funding 3
budgets 10–11foundation 9–11government 7–8industry 8obtaining 7–11 preparing applications 9–10, 11
geological formations 76–8geological maps 33
gilding 197glass 187–93, 235, 359–70glazing 196Global Positioning System (GPS) 33,
50–3government funding 7–8grids 36–42, 118, 125–7, 253grinding grooves 213grinding stones 212ground-penetrating radar 125ground surface 79–80
hachures 288hair-lining 197hand-painting 196harm 199Harris matrix 136–41, 185, 186health 119, 172–4heat exhaustion 54–5heritage legislation 20–9heritage sites 21–2historical artefacts 359historical significance 249 historical sites 63, 131
basics 164–6buildings 170–1definition of 163–4 documentation for 167–71finding 166–7 recording of 172–200
horizontal surfaces 286–9human remains 237–8
Ian Potter Foundation 9, 30illustration toolkit 263–4illustrations 284–307, 335–6impacts 253in situ artefacts 74, 151Indigenous communities
400 THE ARCHAEOLOGIST’S FIELD HANDBOOK
*Archaeologists Field Handbook 29/6/04 5:26 PM Page 400
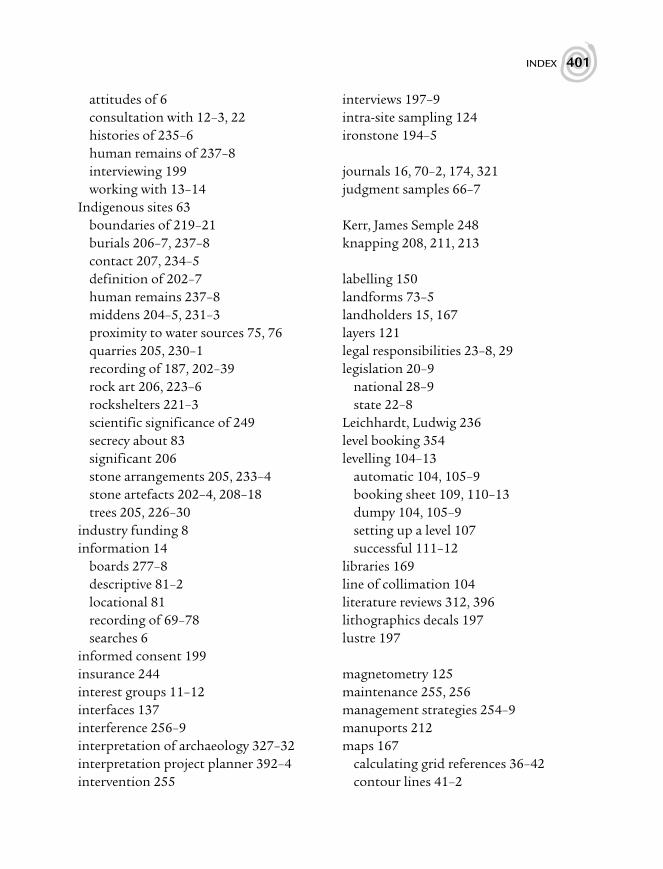
Wattitudes of 6 consultation with 12–3, 22 histories of 235–6human remains of 237–8interviewing 199working with 13–14
Indigenous sites 63boundaries of 219–21burials 206–7, 237–8contact 207, 234–5definition of 202–7human remains 237–8middens 204–5, 231–3proximity to water sources 75, 76quarries 205, 230–1recording of 187, 202–39rock art 206, 223–6rockshelters 221–3scientific significance of 249secrecy about 83significant 206stone arrangements 205, 233–4stone artefacts 202–4, 208–18trees 205, 226–30
industry funding 8information 14
boards 277–8descriptive 81–2locational 81 recording of 69–78searches 6
informed consent 199insurance 244interest groups 11–12interfaces 137interference 256–9interpretation of archaeology 327–32interpretation project planner 392–4intervention 255
interviews 197–9intra-site sampling 124ironstone 194–5
journals 16, 70–2, 174, 321judgment samples 66–7
Kerr, James Semple 248knapping 208, 211, 213
labelling 150landforms 73–5landholders 15, 167layers 121legal responsibilities 23–8, 29legislation 20–9
national 28–9state 22–8
Leichhardt, Ludwig 236level booking 354levelling 104–13
automatic 104, 105–9 booking sheet 109, 110–13dumpy 104, 105–9 setting up a level 107successful 111–12
libraries 169line of collimation 104literature reviews 312, 396lithographics decals 197lustre 197
magnetometry 125maintenance 255, 256management strategies 254–9manuports 212maps 167
calculating grid references 36–42contour lines 41–2
INDEX 401
*Archaeologists Field Handbook 29/6/04 5:26 PM Page 401
Wgeological 33mud 42–5, 81orienting 50–1orthophoto 33topographic 33use of 33–6
maritime sites 175–6matchboxes 381–3measurements 86, 88–9, 96metal detectors 253metal matchboxes 381–3middens 145–6, 204–5, 231–3mines 174, 254mitigation 256monitoring 257motifs 303–4mud maps 42–5, 81
nails 377–9 National Archives 168, 169National Library of Australia 168, 169National Museum 13National Parks and Wildlife Service
(NPWS) 17–18, 22, 41navigation 32, 50non-Indigenous sites see historical sitesnotes 71
occupational health and safety 119, 172–4offsets 86, 96–104open-area system 123open sites 204, 219–21, 342–3oral histories 197–9orthophoto maps 33outline 3
pacing unit 90, 91paintings 206Pelican case 20
people skills 241–2permits 22, 117permits 22photographs 18, 81, 223, 355
aerial 46, 280–1archaeological 264–5, 266, 272artefacts 282–3artistic 264–5basics 264–5cameras 265–8, 273, 274–5excavation 279–80film 276–7good 268–72information boards 277–8orthophoto maps 33photographic equipment 275–6photographic records 283–4rock art 281–2scales 277–8standing structure 278–9storing of 305–7tripods 273–4
photography toolkit 262–3 pigments 226pipes 380 plans 286–9plant resources 73Pleistocene sites 76poisons 173porcelain 194posters 332–4potential archaeological deposits (PADs)
220potlids 212–13PowerPoint 326–7preservation 254, 256press releases 322–4, 389–91primary sources 167, 169–70Principle of Association 121
402 THE ARCHAEOLOGIST’S FIELD HANDBOOK
*Archaeologists Field Handbook 29/6/04 5:26 PM Page 402

WPrinciple of Intrusion 121Principle of Reversal 121Principle of Superposition 121, 136probes 253–4profiles 135–6project planner 392–4provenance 118public presentations 325–6publication
fieldwork 14, 309–38illustrations for 296 presentation for 324–7 successful 325writing for 310–24, 334–6 see also writing
quarries 205, 230–1, 346–7
radiocarbon dating 136, 153, 154–6random samples 67rarity 247–8rate books 171raw materials 216, 217reading 4recipes 58–60reconstruction 255recording
bottles 187–93ceramics 193–7contact sites 234–5cultural features 134–5excavations 131, 135glass 187–93historical artefacts 185–6historical sites 163–201Indigenous histories 235–6Indigenous sites 202–39industrial sites 172–4 information 69–78
maritime sites 175–6 middens 231–3oral histories 197–9profiles 135–6quarries 230–1rock art 223–6rockshelters 221–3sections 135–6soils 132–4standing structures 176–85 stone arrangements 233–4stone artefacts 208–18three-dimensional 130–1through photographs and illustrations
264trees 226–30
records documentary 164–5, 167–71shipping 175Titles Offices 171
referees 10references 337, 395–6relative dating 136reports
accountability of 319community 320consultancy 318–19, 385–9technical 316–18
representativeness 247, 249–50representative sample 240research 311–12
design 3–6ethnohistoric 236–7Indigenous areas 12–14methods of 6objectives of 6planned 3 questions 144specific designs 249–50
INDEX 403
*Archaeologists Field Handbook 29/6/04 5:26 PM Page 403

Wtimeframe for 6
residues 219respect 255restoration 255, 256reversibility of treatment 255rim diameter chart 356–7ring crack 210ripples 210rise and fall 104–13rock art 148, 206, 223–6, 281–2, 302–5rockshelters 102–3, 221–3
safety 119, 172–4salvage 254, 256–7sampling
collection 151–6development 217excavation 123intra-site 124judgment 66–7 random 67 representative 240strategy 66–9sub-surface 125systematic 67–9
scale 33–6, 112–13, 265, 277–8, 286–7scarred trees 205, 226–30, 344–5scatters 204–5, 216–18, 219–21scientific significance 249–50 secondary sources 168sections 135–6, 289–90shell edging 197shell middens 145–6, 204–5, 231–3shells 155–6shipping records 175shipwrecks 175shovel-test pits 125sieving 146–9site datum 86
site grids 125–7site plans 89–90sites
archaeological 63boundaries of 82–3constructing plans 89–90contact 163, 207, 234–5cultural heritage 256–9definition of 63–4finding 62–84historical 63, 131, 163–201Indigenous see Indigenous sitesindustrial 172–4interference at 156–9labelling of 83–4management of 254–9maritime 175–6open 82, 204, 219–21, 342–3Pleistocene 76recording of 80–2rules about 83sampling strategy for 217significance zones of 257–8surveying of 85–114
skeletal remains 237–8sketch plan 81slope 73–5snakes 54social significance 250–1soil contamination 172–4soil cores 125soils 76–8, 132–4, 152–3sorting 146–9souvenirs 83spatterware 197specialist publications 174, 321spits 122spongeware 197standing structures 176–85, 278–9
404 THE ARCHAEOLOGIST’S FIELD HANDBOOK
*Archaeologists Field Handbook 29/6/04 5:26 PM Page 404

Wstate archives 169stippling 297–8stone arrangements 233–4stone artefacts 76–7, 202–4, 208–18,
298–301, 348–9stoneware 195storage 159–60stratification 66–7, 121–2, 135–6stratigraphy 117, 121, 136–41subcontractors 258–9sub-surface sampling 125, 257superimposition 302surface surveys 64, 65–6, 124–5surveys
accurate 86, 88–9baseline and offset technique 96–103basics of 86–9 compass and pacing 90–6coverage in 78–80effective 78–80field 64framework 87–8levelling 104–13measurements 86, 88–9, 96sample recording forms 340–50site plans 89–90 surface 64, 65–6, 124–5toolkit for 85–6
systematic samples 67–9
tables 395taphonomy 78, 155technical manuals 174technical reports 316–18 technology 53tenants 15tenders 243–5thermoluminescence dating 152–3ticks 54
tin and tin cans 374–6Titles Office records 171tobacco pipes 380toolkits
excavation 115–16 fieldwork 1, 19–20 illustration 263–4photography 262–3surveying 85–6
topographic maps 33total station 89, 90tourism 8tracing 302, 303trade marks 371transects 65, 73transfer printing 196trees 205, 226–30, 344–5trenches
labelling 127–30laying out 125–7 stringing out 118–19, 129–30system for 123
triangulation 98–100tripods 104, 105, 273–4trowels 141–6
units 122Universal Transverse Mercator (UTM)
Grid 33use-wear 219
vegetation 73–5 vertical surfaces 101–3, 289–90visibility 79, 80, 82
watch compass 53, 54water sources 75–6weathering 216websites 322
INDEX 405
*Archaeologists Field Handbook 29/6/04 5:26 PM Page 405

WWillow Pattern 371World Archaeological Congress 12World Geodetic System 51writing
acknowledging sources 336–7for archaeological journals 321community reports 320consultancy reports 318–19discriminatory language 334–5editing 315first drafts 312–13for the general public 320getting started 311
layout 321making text work 331for press releases 322–4proofreading 315research 311–12revision 314 rewriting 314for specialist publications 321stages of 311–16 technical reports 316–18 user-friendly 310for websites 322 well 310
406 THE ARCHAEOLOGIST’S FIELD HANDBOOK
*Archaeologists Field Handbook 29/6/04 5:26 PM Page 406