TECHNICAL GUIDE
44
TECHNICAL GUIDE
-
Upload
khangminh22 -
Category
Documents
-
view
0 -
download
0
Transcript of TECHNICAL GUIDE

TECHNICAL GUIDE
2
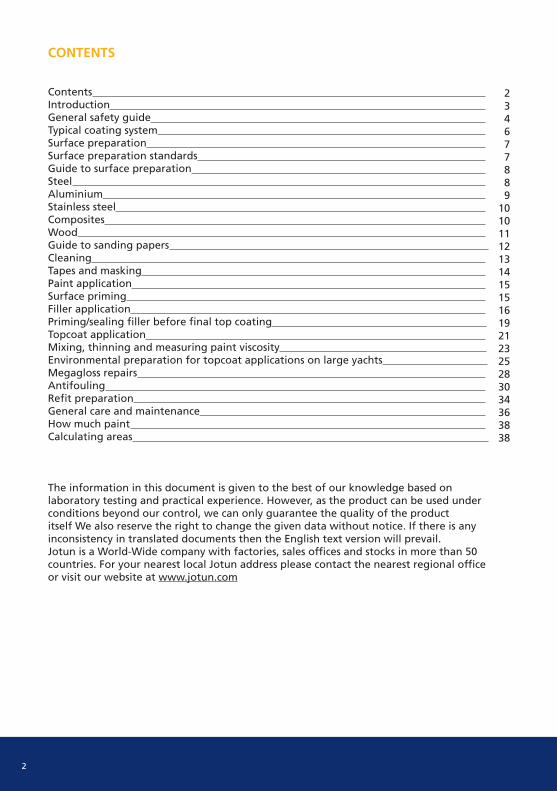
CONTENTS
Contents Introduction General safety guide Typical coating system Surface preparation Surface preparation standards Guide to surface preparation Steel Aluminium Stainless steel Composites Wood Guide to sanding papers Cleaning Tapes and masking Paint application Surface priming Filler application Priming/sealing filler before final top coating Topcoat application Mixing, thinning and measuring paint viscosity Environmental preparation for topcoat applications on large yachts Megagloss repairs Antifouling Refit preparation General care and maintenance How much paint Calculating areas
The information in this document is given to the best of our knowledge based on laboratory testing and practical experience. However, as the product can be used under conditions beyond our control, we can only guarantee the quality of the product itself We also reserve the right to change the given data without notice. If there is any inconsistency in translated documents then the English text version will prevail.Jotun is a World-Wide company with factories, sales offices and stocks in more than 50 countries. For your nearest local Jotun address please contact the nearest regional office or visit our website at www.jotun.com
234677889
10101112131415151619212325283034363838
3
INTRODUCTION
The Jotun Yachting Technical Guide has been developed with the aim of providing professional applicators with the necessary information on safety measures, surface preparation and application recommendations to apply the Jotun Yachting Paint systems designed for above water exterior and underwater areas of yachts (typically topsides and superstructures).
All Jotun Yachting products are sold with the Jotun service and support required from the initial specification stage to completion of the paint system. Jotun Yachting offers a single source solution for all coatings required in the protection and aesthetics for the modern yachts and superyachts: all areas above & below waterline, all interior areas and tanks.
Jotun has always maintained the emphasis on quality and service, that is why we offer, for example, agreed levels of technical support to our customers. Before and during the application of Yachting coatings, our coating advisers will advise the paint team and, at specified stages, undertake technical inspections of the coatings applied, recording the results of the inspection.
We have a dedicated team who bring our extensive knowledge of protective and finishing coatings to the yacht and superyacht market. With a complete assortment of primers, fillers and topcoats at our disposal, the team will discuss your requirements; explain in detail the tailored specification and the correct paint solution to use for the project.
4
GENERAL SAFETY GUIDE
Check personal protection equipment (PPE) for compliance with local regulations with CE mark or type approval.To safely use Jotun products, verify the compliance to all personal and environmental protection regulations as clearly specified in Jotun Safety Data Sheets (SDS) issued for each product.Observe the precautionary notices displayed on the container, consult the Jotun Safety Data Sheets (SDS), the Jotun Technical Data Sheets (TDS) and Application Instructions of each product prior to use.Essential requirements to safely apply fillers and spray painting:
• Provide adequate ventilation with a continuous airflow in order to avoid flammable or explosive concentration of fumes. (See section on ventilation.)
• During handling and application, do not breathe vapours, fumes and airborne particles.
• Always wear a certified respirator during and after application until an air check shows that vapours and concentration of paint particles is below Threshold Limit Value (TLV), found on all Jotun SDS.
• For eyes and skin protection, wear safety glasses, solvent resistant gloves, overalls and safety shoes.
• Nobody is permitted to enter a painting area without adequate safety protection.
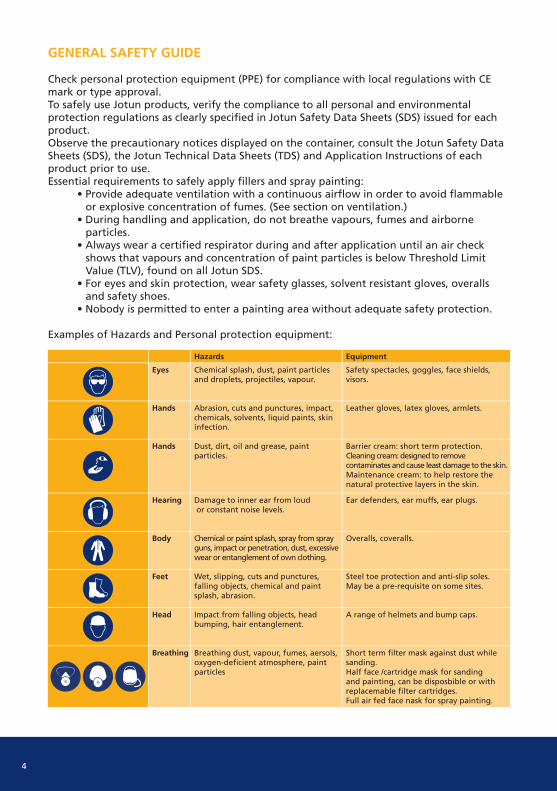
Examples of Hazards and Personal protection equipment:
Eyes
Hands
Hands
Hearing
Body
Feet
Head
Breathing
Chemical splash, dust, paint particles and droplets, projectiles, vapour.
Abrasion, cuts and punctures, impact, chemicals, solvents, liquid paints, skin infection.
Dust, dirt, oil and grease, paint particles.
Damage to inner ear from loud or constant noise levels.
Chemical or paint splash, spray from spray guns, impact or penetration, dust, excessive wear or entanglement of own clothing.
Wet, slipping, cuts and punctures, falling objects, chemical and paint splash, abrasion.
Impact from falling objects, head bumping, hair entanglement.
Breathing dust, vapour, fumes, aersols, oxygen-deficient atmosphere, paint particles
Safety spectacles, goggles, face shields, visors.
Leather gloves, latex gloves, armlets.
Barrier cream: short term protection.Cleaning cream: designed to remove contaminates and cause least damage to the skin.Maintenance cream: to help restore the natural protective layers in the skin.
Ear defenders, ear muffs, ear plugs.
Overalls, coveralls.
Steel toe protection and anti-slip soles.May be a pre-requisite on some sites.
A range of helmets and bump caps.
Short term filter mask against dust while sanding. Half face /cartridge mask for sanding and painting, can be disposbible or with replacemable filter cartridges. Full air fed face nask for spray painting.
Hazards Equipment

5
Hard hat
Chermical resistant gloves
Half-face mask (cartridge)
Full-face mask(cartridge)
Full-face mask(air fed)
Disposable overall
Safety glassesGogglesSafety glassesGoggles
Chermical resistant gloves
Safety boots
Cotton overall
6
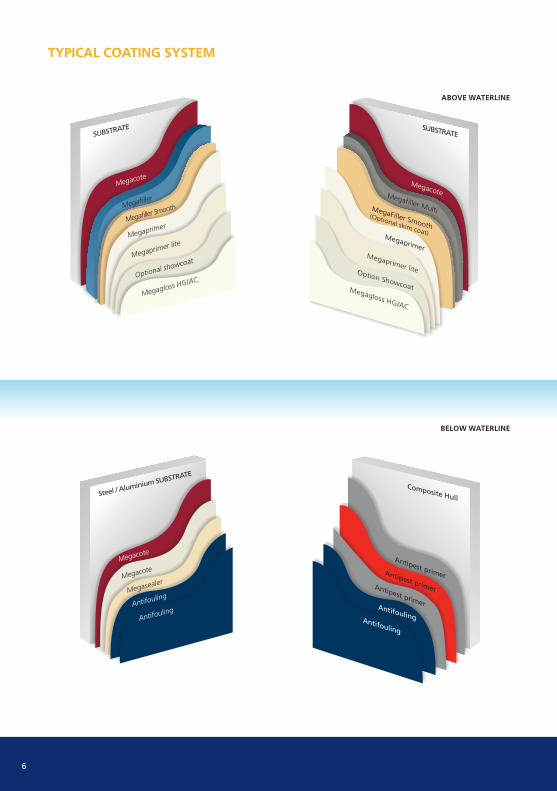
TYPICAL COATING SYSTEM
ABOVE WATERLINE
BELOW WATERLINE
SUBSTRATE
Megacote
Megafiller
Megafiller Smooth
Megaprimer
Megaprimer lite
Optional showcoat
Megagloss HG/AC
SUBSTRATE
Megagloss HG/AC
Option Showcoat
Megaprimer lite
Megafiller Multi
Megacote
Megacote
Megacote
Megasealer
Antifouling
Antifouling
Steel / Aluminium SUBSTRATE
Megaprimer
MegaFiller Smooth(Optional skim coat)
Composite Hull
Antipest primerAntipest primerAntipest primerAntifoulingAntifouling
7
SURFACE PREPARATION
The main materials used for the production of yachts can be steel, aluminium, composite and wood. Each substrate must be prepared to the highest standard before the application of Jotun products. Required surface conditions and levels of preparation are detailed in each painting specification. Surfaces are either abrasive blast, ground or sanded.
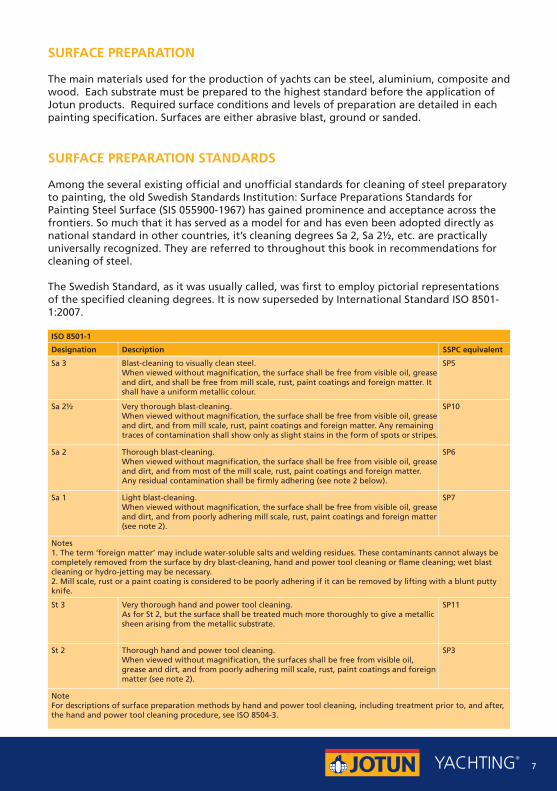
SURFACE PREPARATION STANDARDS
Among the several existing official and unofficial standards for cleaning of steel preparatory to painting, the old Swedish Standards Institution: Surface Preparations Standards for Painting Steel Surface (SIS 055900-1967) has gained prominence and acceptance across the frontiers. So much that it has served as a model for and has even been adopted directly as national standard in other countries, it’s cleaning degrees Sa 2, Sa 2½, etc. are practically universally recognized. They are referred to throughout this book in recommendations for cleaning of steel.
The Swedish Standard, as it was usually called, was first to employ pictorial representations of the specified cleaning degrees. It is now superseded by International Standard ISO 8501-1:2007.
Blast-cleaning to visually clean steel.When viewed without magnification, the surface shall be free from visible oil, grease and dirt, and shall be free from mill scale, rust, paint coatings and foreign matter. It shall have a uniform metallic colour.
Very thorough blast-cleaning.When viewed without magnification, the surface shall be free from visible oil, grease and dirt, and from mill scale, rust, paint coatings and foreign matter. Any remaining traces of contamination shall show only as slight stains in the form of spots or stripes.
Thorough blast-cleaning.When viewed without magnification, the surface shall be free from visible oil, grease and dirt, and from most of the mill scale, rust, paint coatings and foreign matter. Any residual contamination shall be firmly adhering (see note 2 below).
Very thorough hand and power tool cleaning.As for St 2, but the surface shall be treated much more thoroughly to give a metallic sheen arising from the metallic substrate.
Light blast-cleaning.When viewed without magnification, the surface shall be free from visible oil, grease and dirt, and from poorly adhering mill scale, rust, paint coatings and foreign matter (see note 2).
Thorough hand and power tool cleaning.When viewed without magnification, the surfaces shall be free from visible oil, grease and dirt, and from poorly adhering mill scale, rust, paint coatings and foreign matter (see note 2).
Notes1. The term ‘foreign matter’ may include water-soluble salts and welding residues. These contaminants cannot always be completely removed from the surface by dry blast-cleaning, hand and power tool cleaning or flame cleaning; wet blast cleaning or hydro-jetting may be necessary. 2. Mill scale, rust or a paint coating is considered to be poorly adhering if it can be removed by lifting with a blunt putty knife.
NoteFor descriptions of surface preparation methods by hand and power tool cleaning, including treatment prior to, and after, the hand and power tool cleaning procedure, see ISO 8504-3.
SP5Sa 3
SP10
SP6
SP11
SP7
SP3
Sa 2½
Sa 2
St 3
Sa 1
St 2
Description
ISO 8501-1
SSPC equivalentDesignation

8
GUIDE TO SURFACE PREPARATION
Soluble salts have a negative impact on the coating systems performance, especially when immersed. Jotun’s general recommendations for maximum soluble salts (sampled and measured as per ISO 8502-6 and -9) content on a surface are:• Water ballast tanks (PSPC): 50 mg/m².• For tanks, such as ballast tanks, grey, black and fresh water tanks, the maximum surface chloride contamination prior to full coating must be 50 mg of NaCl per m².• For seawater immersed areas such as hull below waterline and other tanks, such as bilges, etc. the maximum surface chloride contamination prior to full coating: 80 mg of NaCl per m² (equivalent to 48 mg of Cl-). This can be used as well as reference for non-immersed positions.
STEEL
Oil, grease, etc. to be removed by emulsion cleaning with an alkaline detergent Agitate the surface to activate the cleaner and before it dries, wash the treated area by Low-Pressure Water Cleaning (LPWC) to Wa 1 (ISO 8501-4) using fresh water. Non-contaminated areas shall be washed down by Low-Pressure Water Cleaning (LPWC) to Wa 1 (ISO 8501-4) using fresh water to reduce the concentration of surface chlorides.
Surface contaminates that must be removed to ensure good adhesion:• Oil/grease• Salts• Mill scale/Rust/Old coating system• Dust
Surface cleaned by:• Mechanical (wire brushing, grinding)• Abrasive blasting• Water jetting
Dry blastingCleanliness standards - steel surface: ISO 8501 Series, SSPC – SPRoughness standards - steel surface: The surface shall have a sharp and angular surface profile 30-85 µm, grade Fine to Medium G; (ISO 8503- 2). Measure the achieved profile with surface replication tape (Testex) (ISO 8503-5) or by surface roughness stylus instrument (ISO 8503-4). As per PSPC required surface profile shall be 30-75µm
Mechanical grindingFor certain areas, such as dry interior areas, engine rooms and other surfaces behind panelling, power tool cleaning may be sufficient. Surfaces to be coated shall be prepared by mechanical preparation methods to minimum St 3 (ISO 8501-1).
Suitable methods are disc grinding, hand sanding or hand wire brushing. Ensure the surface is free from mill scale, residual corrosion, failed coating and is suitable for painting. Do not use power wire brushing due to the risk of polishing the surface. The surface should appear rough and mat. PSPC requires power tool cleaning to cleanliness minimum St 3 (ISO 8501-1).Finally clean the surface with clean dry compressed air and/or a clean brush.

9
Hydro jettingAs an alternative to dry cleaning, water jetting to WJ-2 (NACE No. 5/SSPC-SP 12), may be used. Inspect the surface for process residues, hydrocarbon contamination and zinc corrosion by-products. If present, remove with an alkaline detergent. Agitate the surface to activate the detergent and before it dries, wash the treated are by Low-Pressure Water Cleaning (LPWC) to a grade corresponding to the description of Wa 1 (ISO8501-4) or higher standard using fresh water.
A flash-rust degree of maximum FR-2 (Jotun standard) is acceptable before application. This will be valid for hull or interior areas, but not for tanks. Immediately prime the surface with the specified epoxy primer.
ALUMINIUM
Oil, grease, etc. to be removed by emulsion cleaning with an alkaline detergent Agitate the surface to activate the cleaner and before it dries, wash the treated area by Low-Pressure Water Cleaning (LPWC) to Wa 1 (ISO 8501-4) using fresh water. Non-contaminated areas shall be washed down by Low-Pressure Water Cleaning (LPWC) to Wa 1 (ISO 8501-4) using fresh water to reduce the concentration of surface chlorides.
Dry blastingThe surface shall be dry abrasive brush off blast cleaned with the nozzle angle at 25-60° from perpendicular at reduced nozzle pressure to create a sharp and angular surface profile using approved non-metallic abrasive media. As a guide, a surface profile 25-55µm, grade Fine G; (ISO 8503-2) should be achieved. Alternatively refer to NACE no. 4/SSPC-SP7. Smaller areas can be lightly treated with abrasive paper. Finished surfaces shall be dull, profiled and show no areas of shiny metal. Do not handle the prepared surface with bare hands.
Mechanical grinding The surface abraded using mechanical or hand sanding methods using non-metallic abrasives or bonded fibre abrasive pads to remove all polish and to impart a scratch pattern to the surface. Do not use high speed rotational sanders.
Finally, clean the surface with clean dry compressed air and a brush. Do not use cloths as they could snag on the rough aluminium profile. Immediately prime the surface with specified epoxy primer.
Note Aluminium is vulnerable to chloride attack and liquids of a pH value above 8.5, therefore the detergent must be a neutral solvent, free of chlorides and chlorinated solvents.An aluminium surface is normally contaminated with a grease-like film, which can be difficult to remove.
On smaller areas the surface can be cleaned with hot fresh water and detergent, a Scotch-Brite pad can be used to scrub the surface. Rinse the surface with plenty of fresh water to remove any detergent residue. Repeat the process until the water flows over the surface without forming holes in the water film.
10
STAINLESS STEEL
All oil and grease must be removed by cleaning with a detergent/emulsifier free of chlorides followed by clean fresh water hosing. Alternatively steam cleaning followed by thorough freshwater washing is acceptable.
Stainless steel has to be treated similarly to mild steel when heavy duty systems are specified, e.g. by abrasive blasting. However it is important that the abrasives are free of zinc, iron and chlorides. Ensure the use of suitable abrasives, non -metallic media.
COMPOSITES
For new build hulls two types of mould constructions are used:
Female moulding Thoroughly cleaning by emulsion washing with an alkaline detergent agitate the surface to activate the cleaner and before it dries, wash the treated area by Low-Pressure Water Cleaning (LPWC) to Wa 1 (ISO 8501-4) using fresh water. A key indicator to thorough removal of release agent is that the surface will become fully wetted with water if all mould release agents has been removed. If release agents remain, water will remain in droplets on the surface. In this instance the process should be repeated.
When the surface is dry, area is to be mechanically power tool sanded with aluminium oxide or silicon carbide sandpaper with grit P80-P120 in order to obtain a suitable roughness (average surface profile of min 30 µm) for paint application. High speed orbital sanders are not recommended.Sanding dust and contamination to be removed with high pressure blow-down with oil and water-filtered compressed air or, alternatively wash-down with clean high pressure fresh water.
Male mouldingIn this case, the resin rich surface can show a waxy residue. Again a water-wetting test can be performed to evaluate if the surface is ready for painting. Otherwise the wax contamination will have to be removed with detergent, following same process as described above.
When the surface is dry, area is to be mechanically power tool sanded with aluminium oxide or silicon carbide sandpaper with grit P80-P120 in order to obtain a suitable roughness (average surface profile of min 30 µm) for paint application. High speed orbital sanders are not recommended. Sanding dust and contamination to be removed with high pressure blow-down with oil and water-filtered compressed air or, alternatively wash-down with clean high pressure fresh water.
Peel Ply Peel ply is used on high performance and large structures, using a male mould. Peel ply is used to minimize surface preparation, the surface is resin rich and can easily be sanded, surface protection from dirt, dust and contaminates that they may be exposed to over many days, months or even years before they’re needed and it leaves a much smoother finish on the laminate with minimizes pinholes and virtually eliminates the weave of the cloth, which eventually has to be filled in during the “finishing” process. Variations of peel ply materials can provide different surface profiles. Minimum of 30 microns profile is required prior any coating is applied. Composites vary and it is recommended to prime a small area, and test for adhesion before applying Jotun products.
11
Immediately after removing the Peel Ply, seal and prime the surface with Jotun recommended primer. If it is not possible to apply the primer to the exposed surface or Peel Ply has not been used, proceed as follows:• Clean the surface with Jotun Thinner 18, use one cloth to apply the Jotun Thinner 18 to the surface and a second clean cloth to dry the area and lift any contamination. • Sand the surface with 100-120 grit paper. • Remove the sanding residue with clean dry compressed air and/or a clean brush. It is important that the paint system is applied only to a fully cured composite laminate.
WOOD
Wood must be clean, dry and free from oils. Oily woods such as teak, should be degreased by wiping Thinner 18 along the grain, which will remove some of the natural oil content on the surface and ensure a greater bond with the first coat.• Sand the surface with 120 grit paper• Remove sanding residue with clean dry compressed air, by vacuum cleaner and/or clean brush.
Pre-coated woodWood must be clean, dry and free from oils. • Lightly sand along the grain with 280 grit paper, remove the sanding residue by vacuum or with a clean dry brush.• Prior to varnishing wipe the surface with a tack rag/pad.
12
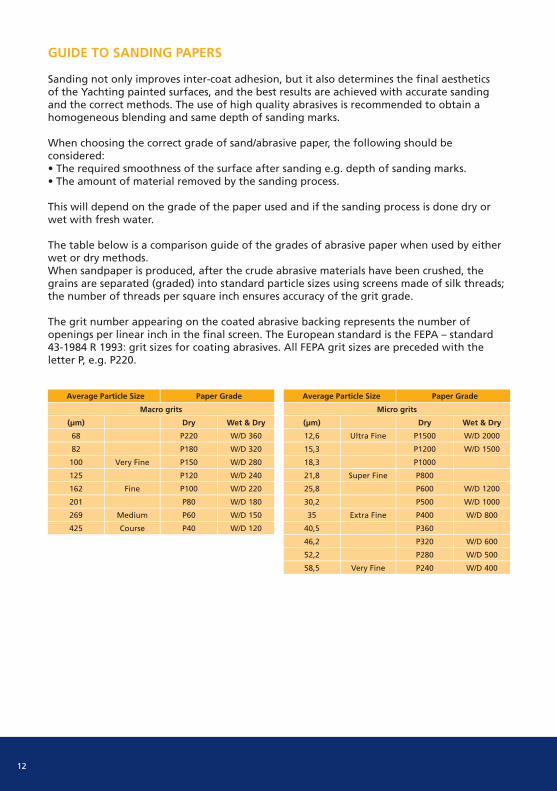
GUIDE TO SANDING PAPERS
Sanding not only improves inter-coat adhesion, but it also determines the final aesthetics of the Yachting painted surfaces, and the best results are achieved with accurate sanding and the correct methods. The use of high quality abrasives is recommended to obtain a homogeneous blending and same depth of sanding marks.
When choosing the correct grade of sand/abrasive paper, the following should be considered:• The required smoothness of the surface after sanding e.g. depth of sanding marks.• The amount of material removed by the sanding process.
This will depend on the grade of the paper used and if the sanding process is done dry or wet with fresh water.
The table below is a comparison guide of the grades of abrasive paper when used by either wet or dry methods.When sandpaper is produced, after the crude abrasive materials have been crushed, the grains are separated (graded) into standard particle sizes using screens made of silk threads; the number of threads per square inch ensures accuracy of the grit grade.
The grit number appearing on the coated abrasive backing represents the number of openings per linear inch in the final screen. The European standard is the FEPA – standard 43-1984 R 1993: grit sizes for coating abrasives. All FEPA grit sizes are preceded with the letter P, e.g. P220.
Ultra Fine
Super Fine
Extra Fine
Very Fine
Wet & Dry
W/D 2000
W/D 1500
W/D 1200
W/D 1000
W/D 800
W/D 600
W/D 500
W/D 400
Micro grits
(µm)
12,6
15,3
18,3
21,8
25,8
30,2
35
40,5
46,2
52,2
58,5
Dry
P1500
P1200
P1000
P800
P600
P500
P400
P360
P320
P280
P240
Paper GradeAverage Particle Size
Very Fine
Fine
Medium
Course
Wet & Dry
W/D 360
W/D 320
W/D 280
W/D 240
W/D 220
W/D 180
W/D 150
W/D 120
Macro grits
(µm)
68
82
100
125
162
201
269
425
Dry
P220
P180
P150
P120
P100
P80
P60
P40
Paper GradeAverage Particle Size
13
CLEANING
All surfaces must be clean, dry and free of contamination prior application of any coating. In addition, specific cleaning procedure is recommended before the application of high gloss topcoats in order to achieve the best result. Different methods con be done, but the most common is the ‘two cloth’ method.
The Two Cloth Method Using solvent cleaner:
1. Soak the first cloth in solvent (Jotun Thinner 18), wet the surface evenly; as the surface of the cloth becomes dirty turn it over to use a fresh surface.2. Use a second dry cloth to dry the area and remove the contamination from the surface.3. Repeat this operation, frequently with new cloths (non-absorbent) until the surface is perfectly clean. Treat only small areas (max. area of approximately 1m²).
Performing only one of the above operations (wet cloth or dry cloth) will result in spreading contaminates on entire surface instead of removing them.It is not recommended to use a solvent as a surface cleaning agent on filler.
After degreasing and before application of topcoats, it is recommended to wipe the surface with a tack rag/pad.
ClothsMust be clean, lint-free and have good absorbing power. Do not use sponges, towels or coloured cloths as chemical agents, oils, dyes, etc. can be transferred to the surface to be painted, and may cause contamination.
Tack Rags/PadsAfter the surface has been cleaned, and just prior to the application of the next coat, to ensure that the surface is dust free it should be wiped over with a high quality tack rag or tack pad. The tack rag/pad is lint free, so there is no risk of lint or transfer of micro fibres onto the surface; the resin to hold the dust for this purpose and will not contaminate the surface. Change tack rags/pads as required to ensure a clean surface.
Tack cloth wiping just prior to topcoating is optional but recommended to remove miniscule dust particles remaining on the surface. Tack cloths come pre-saturated with a waxy resin. They should be very gently wiped across the surface of the undercoat. Use tack cloths from a reputable manufacturer. Do not use excessive hand pressure as some resin may be left on the surface. Observe the manufacturer’s instructions on the packaging as some tack cloths must take out and be left to `breathe´ – they should not be used immediately
Note Experience has shown that some lower quality tack rags can leave residues on the surface, and can result in fish eyes, craters and wiping marks.
14
TAPES AND MASKING
TapesChoose tapes according to environmental conditions and paint process. Compatibility with two pack finishes is a minimum requirement.
To draw lines, the use of low thickness tapes (for example: 3M fine line) is recommended.Low quality tapes may cause problems:• Low resistance to solvents of adhesive can cause lifting of tape and subsequent penetration of the paint under the tape.• After long exposure to humidity and/or sunlight, traces of adhesive can remain on the surface when removing the tape.Only high-quality tapes should be used, most modern technology offers synthetic masking materials (Nylon/Polyethylene) which are specially designed to protect areas not to be painted. To ensure a fine line, and to stop creeping, the edge of the tape should be pushed down using a very fine grade of sandpaper or a plastic spreader.
Tapes with excessively sticky adhesives should be avoided as these can leave adhesive residue on the paint film.
MaskingPremature covering/masking-off, taping, `packing-in´ etc. of freshly-applied Yachting coatings can lead to paint defects such as blushing and loss of gloss and any long-term masking-off should only be after drying for the full cure time of the product (check technical data sheet). Temporary masking-off is permissible after the coating has been allowed to dry for the through-dry time from the product Technical Data Sheet. Within two days of temporary masking, the paper, plastic or tape should be removed and the coating allowed the full curing time.
Masking-off should be by two layers of solvent-resistant paper or breathable plastic (two layers to avoid condensation on the inner side of the covering). We strongly advise against the use of newspaper sheets and/or similar materials.

15
PAINT APPLICATIONSURFACE PRIMING
Before painting, surfaces needs to be dry, clean and free from contamination. Refer to surface preparation chapter and the relevant product’s Application Guide for detailed information.
Before application, test the atmospheric conditions in the vicinity of the substrate for the dew formation according to ISO 8502-4. The following restrictions must be observed:• Only apply the coating when the substrate temperature is at least 3°C above the dew point• Do not apply the coating if the substrate is wet or likely to become wet• Do not apply the coating if the weather is clearly deteriorating or unfavourable for application or curing• Do not apply the coating in high wind conditions
Depending on the product to be applied, application conditions can be different, as shown on the table below:
After careful and thorough mixing of two-component paint, induction/reaction time in the can should be allowed before applying (see product technical data sheets). This helps to ensure an efficient curing, particularly in cold conditions.
For detailed information on spray equipment, nozzles and dilution please refer to the relevant product’s Application Guide.
Compressed air supply to spraying equipment and air-powered surface preparation tools should be fitted with oil and water trap/s.
Sufficient ventilation is very important to ensure proper drying/curing of the film, particularly when applying in confined spaces. When arranging ventilation it should be understood that solvent fumes, being heavier than air, will accumulate at the bottom of the painting space.
Applicator’s best practice:When applying the specified product record:
1. Date of application2. Position/location on the yacht3. Area to be coated4. Product and dry film thickness to be applied5. Cleaning and surface prep carried out6. Ambient conditions: air temperature, substrate temperature, relative humidity7. Time of application8. Dilution (if applicable)9. Wet film thickness measured10. Relevant product batch numbers (including thinner/s)
Product type
Air temp
Surface temp
Relative Humidity
Amine cured pure epoxy coating(Megacote type)
-5ºC to 40ºC
-5ºC to 40ºC
10-85%
Polyamide cured epoxy primer(Megaprimer type)
10ºC to 40ºC
10ºC to 40ºC
10-85%

16
FILLER APPLICATION
Filler must be kept at above a minimum temperature of 10°C, but it is recommended to store it above 15°C and below 35°C. It should be stored within close vicinity of the substrate.
During summer, ensure that the filler is kept within the recommend temperature range and not i direct sunlight.
Before filling starts, surfaces needs to be dry, clean and free from contamination. Refer to surface preparation chapter and the relevant product’s Application Guide for detailed information.
Before application, test the atmospheric conditions in the vicinity of the substrate for the dew formation according to ISO 8502-4. The following restrictions must be observed:• Only apply the filler when the substrate temperature is at least 3°C above the dew point• Do not apply the filler if the substrate is wet or likely to become wet• Do not apply the filler if the weather is clearly deteriorating or unfavourable for application or curing
Depending on the product to be applied, application conditions can be different, as shown on the table below:
Product type Megafiller, Megafiller Deck
10ºC to 35ºC
10ºC to 35ºC
10-85%
Megafiller Multi Megafiller Smooth
10ºC to 40ºC 10ºC to 35ºC
10ºC to 40ºC 10ºC to 35ºC
10-85% 10-85%
The primed surface should be examined for indentations deeper than 0.5 mm, which are to be spot-filled before starting the full application, allowing the filler allowed to through-dry.
Apply filler in thin layers of maximum 5 mm per application in order to minimize shrinkage stress and risk of formation of air pockets or voids. Several applications may be needed to evenly fill large areas to the desired shape of the yacht.
Working times after mixing Jotun fillers are related to their pot lives (and of course to the ambient temperature as well). Approximate pot-life times are shown below:
Product type
Megafiller, Megafiller Deck
Megafiller Multi
Megafiller Smooth
@10ºC
60 min
90 min
90 min
@23ºC @40ºC
30 min 15 min
45 min 25 min
45 min 25 min
Air temp
Surface temp
Relative Humidity

17
Sanding properties continue to improve after the minimum dry-to-sand times.
As an inspection/control method the below general guide for Shore D hardness can be used to evaluate the curing of the filler. However, this is very dependent on actual ambient conditions where the application is taking place.
The given data must be considered as guidance only, based on application and drying at a constant surface and ambient temperature of 23ºC.
Variation on substrate or ambient temperature during the initial 24-48 hours will have an effect on the curing, thus on the Shore D value achieved.
To verify absolutely that the epoxy filler’s base and hardener was correctly mixed, it should be tested for hardness after the full curing time in the product technical data sheet using a Shore D Scale of Hardness testing device.
Applicator’s best practice:When applying the specified product record:1. Date of application2. Position/location on the yacht3. Area to be coated4. Product and dry film thickness to be applied5. Cleaning and surface prep carried out6. Ambient conditions: air temperature, substrate temperature, relative humidity7. Time of application8. Relevant product batch numbers
Application tools such as long boards, spatulas, etc. must be clean and free of any contamination.
Each filler application should be left to adequately dry before being sanded. Approximate dry-for-sanding times:
Product type
Megafiller, Megafiller Deck
Megafiller Multi
Megafiller Smooth
@10ºC
72 hrs
62 hrs
48 hrs
@23ºC @40ºC
18 hrs 12 hrs
15 hrs 10 hrs
14 hrs 10 hrs
Shore D table @23ºC
Hours
Megafiller, Megafiller Deck
Megafiller Multi
24h
18
21
48h 36h
19 21
23 25
18
The Shore D values showed below refers to product fully cured, measured according to as per ISO 868, with an average DFT: 7000mm and curing time: 14 days at 20ºC.
Filler sandingManually board sand or machine sand (with orbital sanders only) the filler using sandpaper grades according to the table below. Note that rotary power sanders are not recommended for fairing. Orbital sanders are also unsuitable on most flat surfaces. Sanding with long boards, as long as is practical, should be used on flat surfaces.
After each application, the filler is to be sanded to provide the required shape and eventually it will give a mechanical key for the next layer of filler. Cleaning of the surface is with clean dry compressed air or by vacuum and a clean brush. Do not use solvents or liquid cleaners on the exposed filler surface.
To help identify highs and lows on the surface during sanding/fairing, the use of a sacrificial `guide-coat´ is recommended such as dry powder are allowed to highlight surface imperfections, like 3M Dry Guide.
Filler guidesWhen using guiderails/tracks/ribs for fairing, the grooves left in the filler after removal of the rails must be correctly treated before filling. The grooves should be sanded so that they are graduated at a 45° angle.
This ensures the filler used in the grooves to adhere to the surrounding filler, meaning less chance of movement and cracks along these grooves during the yacht’s service.
Spot fillingWhen spot-filling deep voids or repairs in the filler itself (i.e. deeper than 5 mm), two or more layers of filler should be applied rather than filling with a single application. This ensures that, during the service life of the yacht, any shrinkage or movement of filler is the same in the holes/grooves as that of the surrounding filler.
Product type
Megafiller, Megafiller Deck
Megafiller Multi
Megafiller Smooth
Sandpaper degree
P40 – P80
P40 – P120
P80 – P160
19
Final smooth fillingBefore priming/sealing filler with epoxy primer, pores, small gouges and rough patches in the surface of the fairing compound/build filler (Megafiller or Megafiller Multi) should be closed/finished with high density hand-applied finishing filler, Megafiller Smooth.
Further, when applying fine filler onto Megafiller, which is a less resinous/more permeable product than Megafiller Multi, a full layer of Megafiller Smooth should be applied in order to guarantee a smooth, strong and solvent-resistant surface for priming/sealing.
The use of fast-drying polyester repair fillers to fill indentations and pores in the surface of Jotun fairing compounds is not recommended. Hand-applied finishing filler, Megafiller Smooth, should be used for this purpose.
Remarks:Specific filler mixing machines may be used for filler mixing only when/if approved by Jotun.Do not use a filler mixing system without consulting your local Jotun office.
PRIMING/SEALING FILLER BEFORE FINAL TOP COATING
Before painting, surfaces needs to be dry, clean and free from contamination. Refer to surface preparation chapter and the relevant product’s Application Guide for detailed information.
Before application, test the atmospheric conditions in the vicinity of the substrate for the dew formation according to ISO 8502-4. The following restrictions must be observed:• Only apply the coating when the substrate temperature is at least 3°C above the dew point• Do not apply the coating if the substrate is wet or likely to become wet• Do not apply the coating if the weather is clearly deteriorating or unfavourable for application or curing• Do not apply the coating in high wind conditions
Depending on the product to be applied, application conditions can be different, as shown on the table below:
Product type
Air temp
Surface temp
Relative Humidity
Polyamide cured epoxy primer(Megaprimer type)
10ºC to 40ºC
10ºC to 40ºC
10-85%
20
Mixing:Megaprimer range of products must be thoroughly mixed with its recommended hardener. Please note that Megaprimer Comp. “B” is a high viscosity product, hence care must be taken, especially at low temperatures, to assure that the entire quantity is poured into the component “A” and properly mixed.
A mechanical stirrer must be used when mixing 20 litres cans.
Dilution:If applied with airless spray, there is no need to dilute the product. When applied with conventional spray equipment, dilution will be needed, using Jotun Thinner No.17. The amount of thinner will depend on the actual ambient conditions and viscosity of the components, but product can be diluted up to 20% to ensure a smooth application and good film formation.
Before adding any thinner to the product, both components (base and hardener) must be mixed together and stirred thoroughly. At this point viscosity can be checked to evaluate the quantity of thinner needed to adjust viscosity for application (if any).
After careful and thorough mixing of two-component paint, induction/reaction time in the can should be allowed before applying (see product technical data sheets). This helps to ensure an efficient curing, particularly in cold conditions.
Application:For detailed information on spray equipment, nozzles and dilution please refer to the relevant product’s Application Guide.
Compressed air supply to spraying equipment and air-powered surface preparation tools should be fitted with oil and water trap/s.
Sufficient ventilation is very important to ensure proper drying/curing of the film, particularly when applying in confined spaces. Remember that solvent fumes are heavier than air.The specified Jotun primer must be applied on top of the filler system to:a) seal filler preventing any risk of solvent penetration from highly solvented topcoatsb) provide an easy to sand surface for the following application of the undercoat or topcoat.
Jotun requires that a full, continuous layer of 80-100 µm must remain on top of the filler layer after sanding. Therefore, sufficient primer thickness must be applied to ensure enough primer thickness remains over the filler.
Care shall be taken to ensure that adequate film thickness is applied and the maximum DFT indicated in the product’s TDS and AG is not exceeded.
To ensure correct film thickness, it is recommended to measure the wet film thickness continuously during application using a painter’s wet film comb (ISO 2808 Method 1A). Use a wet-to-dry film calculation table to calculate the required wet film thickness per coat.

21
After applying the final coat of epoxy primer, it should be sanded with P120 to P240 sanding paper. Following stages will depend on the subsequent type of product to be applied as per table below:
Before final priming/undercoating, the painting environment should be virtually dust-free in preparation for topcoating. At this stage of application the painting space covers, ventilation and air filtration should be excellent.
For further information on the important task of preparing the environment for top coating, please refer to Annex I - Environmental Control for Applying High Gloss Finishes on Yachtings.
Surfaces for undercoating/final priming should be solvent wiped using Jotun Thinner No. 18. Other Jotun solvents may also be used but No. 18 is recommended for its relatively mild smell, medium rate of evaporation and relatively high flash point of 47°C. For faster evaporation, use Thinner No. 19. For cleaning and degreasing the “two cloth method” should be followed.
Applicator’s best practice:When applying the specified product record:
1. Date of application2. Position/location on the yacht3. Area to be coated4. Product and dry film thickness to be applied5. Cleaning and surface prep carried out6. Ambient conditions: air temperature, substrate temperature, relative humidity7. Time of application8. Dilution (if applicable)9. Wet film thickness measured10. Relevant product batch numbers (including thinner/s)
TOPCOAT APPLICATION
PreparationBefore painting, surfaces needs to be dry, clean and free from contamination. Refer to surface preparation chapter and the relevant product’s Application Guide for detailed information.
Before application, test the atmospheric conditions in the vicinity of the substrate for the dew formation according to ISO 8502-4. The following restrictions must be observed:• Only apply the coating when the substrate temperature is at least 3°C above the dew point• Do not apply the coating if the substrate is wet or likely to become wet• Do not apply the coating if the weather is clearly deteriorating or unfavourable for application or curing• Do not apply the coating in high wind conditions
Subsequent type of product to be applied
Sanding paper degree
Epoxy finish primer
P240-P320
Polyurethane or Polyester Polyurethane topcoat
P320-P400
22
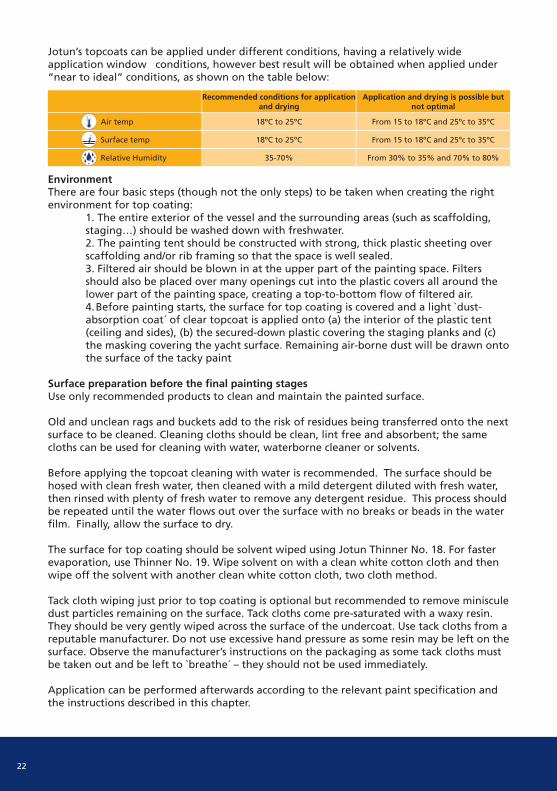
Jotun’s topcoats can be applied under different conditions, having a relatively wide application window conditions, however best result will be obtained when applied under “near to ideal” conditions, as shown on the table below:
EnvironmentThere are four basic steps (though not the only steps) to be taken when creating the right environment for top coating:
1. The entire exterior of the vessel and the surrounding areas (such as scaffolding, staging…) should be washed down with freshwater.2. The painting tent should be constructed with strong, thick plastic sheeting over scaffolding and/or rib framing so that the space is well sealed.3. Filtered air should be blown in at the upper part of the painting space. Filters should also be placed over many openings cut into the plastic covers all around the lower part of the painting space, creating a top-to-bottom flow of filtered air.4. Before painting starts, the surface for top coating is covered and a light `dust-absorption coat´ of clear topcoat is applied onto (a) the interior of the plastic tent (ceiling and sides), (b) the secured-down plastic covering the staging planks and (c) the masking covering the yacht surface. Remaining air-borne dust will be drawn onto the surface of the tacky paint
Surface preparation before the final painting stagesUse only recommended products to clean and maintain the painted surface.
Old and unclean rags and buckets add to the risk of residues being transferred onto the next surface to be cleaned. Cleaning cloths should be clean, lint free and absorbent; the same cloths can be used for cleaning with water, waterborne cleaner or solvents.
Before applying the topcoat cleaning with water is recommended. The surface should be hosed with clean fresh water, then cleaned with a mild detergent diluted with fresh water, then rinsed with plenty of fresh water to remove any detergent residue. This process should be repeated until the water flows out over the surface with no breaks or beads in the water film. Finally, allow the surface to dry.
The surface for top coating should be solvent wiped using Jotun Thinner No. 18. For faster evaporation, use Thinner No. 19. Wipe solvent on with a clean white cotton cloth and then wipe off the solvent with another clean white cotton cloth, two cloth method.
Tack cloth wiping just prior to top coating is optional but recommended to remove miniscule dust particles remaining on the surface. Tack cloths come pre-saturated with a waxy resin. They should be very gently wiped across the surface of the undercoat. Use tack cloths from a reputable manufacturer. Do not use excessive hand pressure as some resin may be left on the surface. Observe the manufacturer’s instructions on the packaging as some tack cloths must be taken out and be left to `breathe´ – they should not be used immediately.
Application can be performed afterwards according to the relevant paint specification and the instructions described in this chapter.
Air temp
Surface temp
Relative Humidity
Recommended conditions for application and drying
18ºC to 25ºC
18ºC to 25ºC
35-70%
Application and drying is possible but not optimal
From 15 to 18ºC and 25ºc to 35ºC
From 15 to 18ºC and 25ºc to 35ºC
From 30% to 35% and 70% to 80%
23
MIXING, THINNING AND MEASURING PAINT VISCOSITY Mixing:Plenty of clear plastic paint mixing pots with mixing ratio scales on them should be arranged prior start mixing and application. Alternatively, the topcoat may be mixed in any straight-sided (not flared) can using a Megagloss paint mixing ruler to measure each component. Mix each component and measure viscosity prior adding any solvent. Thinning:Solvent addition will be ranging from 25% to 40% depending on the ambient temperature, the selected thinner and the sprayer’s method.
Correct solvent selection is vital to achieve a long enough open time for good flow/levelling without it being excessive (i.e. in terms of dust inclusion). It is strongly advised that sprayers using Megagloss for the first time test the product with different thinner combinations in order to verify the blend that works best for them
Recommended thinner blends are given in application guide.
Before adding any thinner to the product, both components (base and hardener) must be mixed together and stirred thoroughly. At this point viscosity can be checked to evaluate the quantity of thinner needed to adjust viscosity for application.
ViscosityViscosity is the parameter measuring the fluidity of ready for use paints before application. It is expressed in seconds and measured following various viscosity cup systems: DIN No. 4 cup, Ford No. 4 cup, Afnor No. 4 cup, ISO No. 4. The viscosity of paint is inversely proportional to temperature; at lower temperature viscosity increases and vice versa.
Before the viscosity or measured flow rate of the material can be taken it is important that the paint is at a known temperature. The paint should be placed in the painting area or paint booth at least 48 hours before use. Paint brought into the warm paint environment (20°C) from outside may take several hours and considerable stirring to achieve uniform ambient temperature.
Jotun Yachting uses the DIN 4 or ISO 2431 as the standard viscosity cup. The requirements to take viscosity measurements are detailed as follows:• DIN 4 or ISO 2431 cup• Stopwatch• Thermometer• Paint
Method:1. Check temperature of the paint2. Dip viscosity cup into the paint until full3. Lift cup until the bottom hole is just under the surface4. Lift cup clear of the paint and simultaneously start the stopwatch5. The flow should be a smooth continuous stream6. When the flow breaks into droplets, stop the watch Due to there are different kinds of cup available, and some of these give different results, it is necessary to know which kind of cup one is using.The recommended viscosity of Megagloss through DIN#4 cup is 14 to 16 seconds.
24
Note:When applying Jotun Megagloss products, it is recommended that three wet-on-wet coats are applied. Wet on wet application refers to an applied layer of paint which is not actually “wet” when the subsequent coat is applied but, is `tack-dry´ – the surface feels sticky to the touch but, paint does not come away on the finger.
Three-coat application permits the sprayer to achieve uniform film thickness and less risk of sags, runs and curtains. It also means less chance of low spots, poor hiding/opacity and rough patches (caused by inadequate flow/levelling).
Basic guidelines for Spray Applying Megagloss Topcoats
I. Air line: 10-25 metres long with working oil and water filter/s fitted. Maximum length of 50 m.
II. Air pressure at the gun, with constant flow: approximately 2.8-3.2 bars.III. Spray tip orifice diameter for air-fed pressure pot spray gun equipment: 1.0 to 1.4
mm, dependent on spraying equipment and sprayer´s preferred paint viscosity.IV. Filtering: when pouring the mixed product into the spray gun pot, pour it through
a 90 to 125µm nylon mesh filter.V. Time duration between coats: recoat time between wet-on-wet coats is dependent
on air flow, thinner selection and substrate temperature. Allow for 45-60 minutes in hot conditions and 60-90 minutes in cold conditions.
VI. Required film thickness: in general terms 60 microns will be specified and is easily achievable with three coats “wet-on-wet”. Around 180 µm total wet film thickness is specified to ensure that the specified DFT is achieved in all places. This ensures adequate protective resin build-up at the surface of the topcoat (needed for UV resistance and protection of pigment) and it ensures excellent flow/levelling. To achieve the specified DFT, 60µm wet film thickness per coat is the target, assuming a three-coat application.
Drying time before masking-off or tapingPremature covering/masking-off, taping, `packing-in´ etc. freshly-applied Megagloss can lead to paint defects such as blushing and loss of gloss.
Megagloss should only be long-term masked-off after drying for the full cure time in the product technical data sheet. Temporary masking-off is permissible after Megagloss has been allowed to dry for the through-dry time in the product technical data sheet. Within two days of temporary masking, the paper, breathable plastic or tape should be removed and the topcoat allowed full curing time.
ApplicationFor detailed information on spray equipment, nozzles and dilution please refer to the relevant product’s Application Guide. When applying the specified product record:
1. Date of application2. Position/location on the yacht3. Area to be coated4. Product and dry film thickness to be applied5. Cleaning and surface prep carried out6. Ambient conditions: air temperature, substrate temperature, relative humidity7. Time of application8. Viscosity measurements: Type of viscosity cup used, temperature of the paint, dilution (%), time in seconds through the cup9. Wet film thickness measured10. Relevant product batch numbers (including thinner/s)

25
ENVIRONMENTAL PREPARATION FOR TOPCOAT APPLICATIONS ON LARGE YACHTS
Procedure1. Assume that at least two days of environment preparation are needed before top coating. Plan for top coating at a time when all other trades working on the vessel are off-site. Typically top coating is done at the weekend for this reason.
2. Ensure good staging with efficient access to all places for painting.
3. The painting space should be enclosed in a strong plastic tent. It cannot be expected that the tent will be airtight but, it should at least be sealed in such a way as to ensure very little air-flow to and from the tent (except where filtered ventilation is arranged). Ideally, there shall be just a single entrance to the painting space, with the entrance flap weighed down with a steel bar taped to its bottom so that it stays closed when the ventilation system is running.
4. It is recommended that a second small tent be erected as an intermediate point between the entrance to the painting space and the outside. This space should be considered partially protected from the outside environment and shall serve as a buffer zone. The entrance flap to this buffer zone should be weighed down with a steel bar taped to its bottom so that it stays closed when the ventilation system is running.
5. Arrange oil and water-filtered forced air-in at the upper part or ceiling of the painting space. High-quality filters must be used and the air line should be at least 25 metres long to ensure that the compressor is far from the painting space. The air intake on the compressor must not be close to sources of exhaust fumes or contaminants from other machinery at site.
6. Large holes should be cut near the bottom of the painting space and these must have filters fitted over them. Or, fit filtered forced air extraction near the bottom of the painting space. If using forced air extraction, ensure `positive pressure´ by adjusting the rate of air-in (m³ per minute) at more than the rate of suctioned air-out. The ventilation air flow in the painting space must always be arranged so that air flows from top to bottom, with plenty of filtered openings for air to escape. This is required to avoid dry-spray during painting.
7. Arrange heated or cooled air if outside conditions are not within the ideal temperature range for Megagloss application: 18-25°c. (The minimum and maximum temperatures for Megagloss application are 15°c and 35°c.) Ensure that humidity can be kept continuously below 85% or, preferably, below 80%.
8. Wash down everything, including staging boards and scaffold poles, with copious amounts of freshwater.
9. Install lighting. The arrangement should be excellent as the sprayers need brightly illuminated surfaces in order to do a good job. Use a mixture of background and spot illumination.
10. Mask-off all surfaces not being top coated: scaffold poles, scaffold pole connectors, staging boards etc. Staging boards must be covered in strong plastic sheets that are secured-down by weights or lines so that they are not dragged around or torn by the painting team.

26
11. Solvent wipe the surface for top coating using a relatively mild solvent with a medium rate of evaporation: Jotun Thinner No. 18. For faster evaporation use Thinner No. 19 or Thinner No. 4. Wipe solvent onto the surface of the undercoat/final primer with a clean white cotton cloth and then wipe off the solvent with another clean white cotton cloth. If silicone or oil contamination is suspected, which could cause fish-eyes/craters in the topcoat, the surface should be cleaned with a 5% ammonia solution.
12. Mask-off/cover the surface for top coating. Use two layers of plastic or solvent-resistant paper to stop condensation on the inside of the masking. Where tape is needed at the perimeter of the surface for painting, use high-quality non-silicone tape such as Soft Edge Foam Tape by 3M.
13. Leave the ventilation system running overnight in order to allow airborne dust particles to be cleared out of the painting space. Optional, suggested: use UV lights at night to verify levels of airborne dust.
14. When the environment is acceptable for painting, spray a light coat of topcoat onto all of the surfaces listed below. Note that clear topcoat should be used as this will not block light from outside the painting space which helps illuminate the painting space. • Masked-off surfaces for top coating• Masked-off surfaces not for top coating• Tent sides and ceiling • Covered staging boards or covered floor (use a heavy coat here)
This measure ensures that airborne dust particles are drawn to the fresh paint – especially onto the floor, where a heavy, sticky coat should be applied. Allow the coat to dry for thirty minutes so that airborne dust can settle into the paint. Note: the covers on the floor must be strong and well secured by weights or lines otherwise the sprayers’ shoes will stick to them and drag them.
15. Uncover the surface for topcoating.
16. Tack cloth wiping just prior to topcoating is optional but recommended to remove miniscule dust particles remaining on the surface. Tack cloths come pre-saturated with a waxy resin. They should be very gently wiped across the surface of the undercoat. Use tack cloths from a reputable manufacturer. Do not use excessive hand pressure as some resin may be left on the surface. Observe the manufacturer’s instructions on the packaging as some tack cloths must taken out and be left to `breathe´ – they should not be used immediately.
17. Apply Megagloss. For more information see the application chapter of this guide.
18. After application, leave the ventilation system running for at least the through-dry time in the product technical data sheet.
27
VentilationProper ventilation is of major concern to everybody involved in paint application. Technically the correct rate of evaporation of solvents (including water) from the applied coating is important to obtain a proper film formation of the coating without solvent retention, exudation, sagging, dry spray, cracking and other serious defects influencing the intended behaviour and properties of the coating.
From a human point of view solvents are known to be hazardous, if exposed to too high concentrations for too long a period. If solvent vapours reach a certain level of concentration in the air, even a minute spark will cause an explosion maybe resulting in loss of both materials and human lives. Every year incidents happen, where people have lost their lives or become very seriously injured due to these kinds of explosions. Typically these explosions occur in confined spaces such as tanks, engine rooms, and void spaces, when insufficient ventilation has been provided. Sometimes this occurs over the whole area, but may often be in local ‘pockets’.
To avoid explosions the concentration of solvents in the air must constantly be kept below the lower explosion limit (LEL), at all times. Due to the risk of local ‘pockets’ of higher concentration occurring, it is good practice to provide ventilation to awkward or limited areas and to proportion the amount of air for ventilation, to such a level that the concentration is kept much lower, typically not exceeding 10% of the LEL.Good practice on ventilation: Solvent vapours are heavier than air. Suction must be from lowest points.
Other considerations related to ventilationEven with adequate general mechanical ventilation there may, in certain cases, be the possibility of areas with stagnant air. Therefore, always look for local areas in confined spaces which would seem shielded from the airflow of the general ventilation or where the paint seems to dry much slower than in other areas. It may be necessary to reinforce the ventilation locally in these areas using ex-proof fans/blowers.
Solvent vapours are heavier than air; therefore, ventilation exhaust must always take place from the lowest parts of the construction. Ventilation should not be inadequate, but neither should it be excessive. In the latter case dry spraying, skin-drying, in worst cases even foaming and increased consumption may be the result. Skin-drying prevents the proper evaporation of solvents and consequently has a negative effect on the paint film similar to that of solvent retention, e.g. reduced mechanical and chemical resistance, reduced water resistance, etc.
Please note that the considerations given above concern the quality of the paint coating and the explosion risk. The long-term effect of solvent vapour, spray aerosol and dust exposure on the human being starts taking effect at much lower concentrations.Proper ventilation can therefore never compensate the need for proper health and safety equipment.
28
MEGAGLOSS REPAIRS
The following procedure is a recommendation guide only and is based on experience and best practice. However, other methods may be acceptable as well. It is good practice to ensure all parties agree prior to undertaking repairs and polishing. Providing that the defect is on the surface of the paint, and remedial action is in line with the Jotun guide lines.
Initial cleaningAn area extending beyond that which shall be painted must be cleaned thoroughly. It may be necessary to detergent scrub in order to remove traces of oil, grease, grime or waxy residues left from polishes. Certainly, for weathered surfaces, thorough freshwater washing followed by solvent cleaning is the minimum requirement for removal of salt and other contaminants.
Masking-off Use high quality tape made for spot refinishing work, such as Soft Edge Foam Tape by 3M, to mark out the perimeter of the area for refinishing. This area should extend well beyond the defective area. The sprayer must have a large area in which to graduate his application from normal thickness on the defect down to a very thin coat where the fresh paint meets the tape, to create a relatively seamless and invisible touch-up border. This requires a thin paint film at the tape line. To make the perimeter less visible, square-off the zone diagonally (less visible to the human eye) and use rounded tape at corners.
Sanding before undercoating/final primingSand only the central defective area for undercoating/final priming using fine to very fine sandpaper P150 to P220 in order to ensure maximum adhesion. Apply 100µm DFT of primer in order to seal the damaged or repaired area, the previously sanded zone. Sanding and cleaning before top coatingSand the entire area, including the undercoated/final primed area, with extra fine sandpaper P400 all the way out to the tape edge. The entire area must be matted/flattened before topcoat application. Note: the use of coarser sandpaper than P400 will leave scratch marks showing through in the new topcoat.
29
Solvent wipe using Jotun Thinner No. 18, by the two cloth method, followed by tack rag cleaning. Refer to cleaning procedures indicated above.
Application repair procedureSpot Repair, Damage Back to Substrate
1. Sand damaged area back to the substrate, finishing with P80.2. Prime the repair area surface with specified primer.3. Fill the repair area with specified filler, with a tight screed to a smooth surface, this
may take 2-3 applications.4. Sand filler ensuring there are no pinholes with P240 and the surrounding area with
P320 and finish with P400.5. Apply 1-2 coats of specified primer, once dry sand with P400.6. Apply by spray 20µm DFT of Megagloss onto the undercoat only. 7. When dry on tacky, apply another 20µm DFT of Megagloss onto the 1st touch-up
and onto the matted topcoat half-way out between the 1st touch-up coat and the tape.
8. When dry on tacky, apply another coat of about 15µm DFT onto the entire area within the touch-up zone. This coat should be thinned considerably more than the previous two – perhaps 13 seconds when measured through a DIN#4 viscosity cup.
9. Remove the tape after the Walk-on-dry time stated in the Megagloss product data sheet and application guide.
30
ANTIFOULING
Selecting the correct antifouling paintIt is important to select the correct type of antifouling paint for your vessel, to protect it for the normal conditions that it will encounter. If in doubt, please contact your local Jotun office for advice to determine which paint is most suited to your boat type and your environment. Refer to product TDS and AG to provide further information and details, and full recommendations on how to use these products safely.
Eventually, it will be necessary to remove existing, old coatings of the hull back to original primer or gelcoat layer itself. Removing all the existing antifouling and primers is usually only necessary if:• There is a very high DFT after several years of service, mainly due to build up of antifouling layers that had no polished through completely or because the use of hard matrix products. • Applying Jotun’s products on top of an existing, unknown antifouling. In this case only the existing antifouling will be removed.• The existing antifouling on the hull is known to cause compatibility issues with standard antifouling products (e.g. a Teflon-based coating).
Washing and cleaning the boat hullOnce the boat has been lifted from the water it should first be high pressure fresh water washed to remove salts, any marine growth and/or contamination. These washings should be captured and retained for treatment, as they will likely have a significant concentration of the existing anti-fouling treatment – washings and debris from the boat preparation should not be allowed to directly enter watercourses.
Additional cleaning of the hull may be required after pressure washing in case of presence of grease or oil. Use recommended Jotun Yachting washing detergent or other specialist products supplied specifically for cleaning boat hulls. Once again, all of the washing and residues arising from this cleaning procedure should be captured and treated as instructed by the marina / boatyard.
Preparing the boat hullBefore starting the preparation stage, make sure that you are wearing the appropriate PPE as listed on page 4 and 5, and that the area where you are working is safe, secure and suitable for carrying out the task. Ensure that you have sufficient paint, water and the correct utensils to complete the task. Also, make sure that bystanders are kept well away from your activity, preferably with some form of cordoning off of the area.
Removing old paintOnce the hull is clean from all traces of contamination, treatment of the surface and what remains of the existing antifouling layer may begin. The first step is to place a dust sheet or tarpaulin underneath the boat, to capture the paint flakes and scraping residues. It is also important to ensure that you are working in safe weather conditions (dry not damp, light or no wind). Dust should not be allowed to be blown outside of your working area, contaminating other vessels or people. All loose and flaking paint must first be removed using a paint scraper and wet abrasion.Triangular shaped scrapers and special-bladed (e.g. tungsten-carbide) scrapers are preferred. Coarse 40- or 60-grit wet / dry sandpaper is normally used for rubbing down, with plenty of water to keep the debris wet. Do not use standard paint removers as these may penetrate down to the gelcoat, or to the primer, and damage them.
31
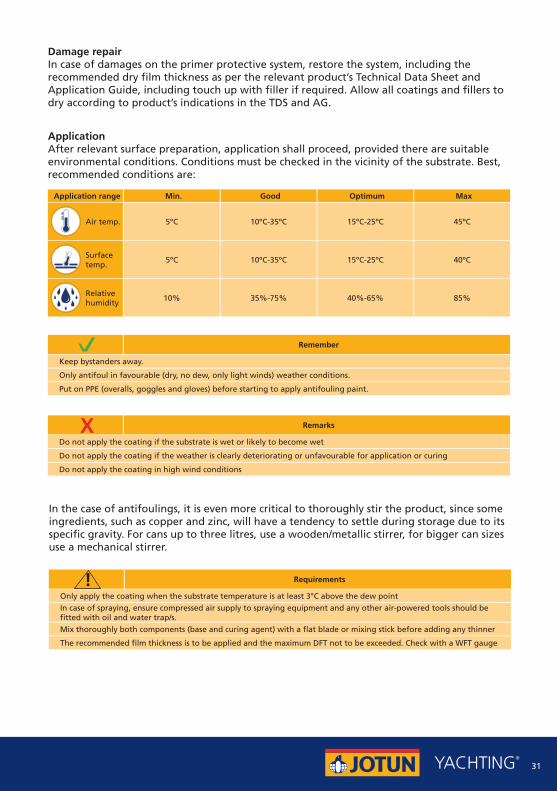
ApplicationAfter relevant surface preparation, application shall proceed, provided there are suitable environmental conditions. Conditions must be checked in the vicinity of the substrate. Best, recommended conditions are:
X Remarks
Do not apply the coating if the substrate is wet or likely to become wet
Do not apply the coating if the weather is clearly deteriorating or unfavourable for application or curing
Do not apply the coating in high wind conditions
Application range Min. Good Optimum Max
5ºC
5ºC
10%
10ºC-35ºC
10ºC-35ºC
35%-75%
15ºC-25ºC
15ºC-25ºC
40%-65%
45ºC
40ºC
85%
Air temp.
Surfacetemp.
Relativehumidity
Only apply the coating when the substrate temperature is at least 3°C above the dew point
In case of spraying, ensure compressed air supply to spraying equipment and any other air-powered tools should be fitted with oil and water trap/s.
Mix thoroughly both components (base and curing agent) with a flat blade or mixing stick before adding any thinner
The recommended film thickness is to be applied and the maximum DFT not to be exceeded. Check with a WFT gauge
! Requirements
In the case of antifoulings, it is even more critical to thoroughly stir the product, since some ingredients, such as copper and zinc, will have a tendency to settle during storage due to its specific gravity. For cans up to three litres, use a wooden/metallic stirrer, for bigger can sizes use a mechanical stirrer.
Damage repairIn case of damages on the primer protective system, restore the system, including the recommended dry film thickness as per the relevant product’s Technical Data Sheet and Application Guide, including touch up with filler if required. Allow all coatings and fillers to dry according to product’s indications in the TDS and AG.
Remember
Keep bystanders away.
Only antifoul in favourable (dry, no dew, only light winds) weather conditions.
Put on PPE (overalls, goggles and gloves) before starting to apply antifouling paint.

32
Applying the antifoulingFirst, mask the area that you intend to antifoul with the appropriate tape. Some tapes can cause problems during removal, so it is preferable to select the best tape for the job rather than standard paper masking tape. Please remember to mask off any zinc anodes and other appendices such as transducers, etc.
Ensure that the equipment (brushes or rollers, paint tray etc.) are suitable for using with antifouling paint – especially. Ensure that you continue to wear all the PPE throughout the application process. If your PPE becomes heavily contaminated, or the paint appears to be penetrating through the overalls or gloves then carefully remove and replace with fresh protection. If you contaminate rags with paint then do not leave them lying around or put them in your overall pockets – these are fire hazards and could auto-ignite if allowed to dry. Keep them wet and then dispose of safely as instructed by the boatyard.
Splashes and SpillsThe PPE should prevent any direct contact of your skin with the antifouling paint. If any paint does splash onto skin then immediately wash this off with warm soapy water. Do not use solvent or paint thinners to remove antifouling paint from skin, as these can drive the paint into the pores of the skin and hence into your body and cause damage. They will also remove the surface protective fatty layer of the skin and will cause it to dry out and hence be less protected from the paint. There are certain specialised cleaning solutions (water-detergent mixes and gritty creams) available that may be used to remove paint splashes – follow the manufacturer’s instructions if you decide to use these.Paint spillages should be contained and collected with non-combustible absorbent materials, e.g. sand, earth, vermiculite or diatomaceous earth. This mix must then be disposed of as hazardous waste.
33
It is essential that the best practice approach to cleaning up after completing the task of applying antifouling paint is followed:
1. CONTINUE to wear PPE until clean-up and disposal is complete. 2. CLEANOFF excess paint from utensils using warm soapy water and retain washings. 3. DO NOT leave rags soaked in paint lying around, in bins or in overall pockets – these are
fire hazards, especially if allowed to dry (they can auto-ignite). 4. DO NOT pour waste antifouling paint down the drain – this should be stored in a specified
area on the site ready for collection by professional hazardous waste contractors. 5. DO NOT take any contaminated equipment or PPE off-site – it is especially important not
to put any half-used tins of paint or contaminated equipment into your car as the fumes will affect your health and ability to drive. Treat all the equipment, opened cans and tools as hazardous waste.
6. COLLECT the different sources of hazardous waste into one area – Empty paint cans Used brushes, rollers and trays Paint rags and contaminated textiles Masking tape Paint flakes and residues from the preparation process Contaminated PPE Waste paint Any items splashed with paint
7. DISPOSE of all hazardous waste in accordance with local legislation
34
REFIT PREPARATION
Previously Painted SurfacesBefore attempting to paint over an existing paint system it is recommended to inspect the condition of the paint.
When evaluating the paint system it is important to work back through the coatings to the substrate. If the old paint is in poor condition and showing signs of cracking, blistering or peeling, the entire paint system should be removed.
When applied to a metal substrate, check for signs of corrosion. Blisters in the paint film can indicate potential corrosion spots or that the old filler is failing.
Having inspected the existing paint, several tests can be performed to determine the adhesion and chemical compatibility with the new Jotun paint system. It is important that testing is carried out in several places to ensure that the tests are valid. If any of the tests fail it will be an indication that either a repair is required or that the paint system should be removed.
Solvent Resistance1. Soak a piece of clean cloth with the thinners of the next coat.2. Tape the cloth over the area that was used for the adhesion test, leave for 30
minutes.3. After 30 minutes if the thinners have dissolved or softened the existing coatings, it
means that the coating is incompatible. The old coating must then be removed. 4. Allow approximately 15 minutes before the adhesion test.If paint is removed at this stage the failed layers must be removed.
Coating Compatibility for Megagloss Products1. Clean and clean the test area.2. Sand the area with 320 grit paper. 3. Remove the sanding residue.4. Paint a small patch with the Megagloss product to be used, do not use masking
tape as this may cause print through problems after the topcoat application. Allow the topcoat to cure for 24 hours.
5. Check the inter-coat adhesion with an adhesion test.If there is no reaction or loss of adhesion, the Megagloss is compatible.
35
Adhesion TestThey are destructive tests. It is advisable to be done only in case of concern of adhesion or adhesion problems have been reported. There are 2 types of adhesion tests
a) Cross-Cut test, mostly used for adhesion test of primers to substrates. b) Pull off test, requires a specific test equipment and is intended for tests on paint
systems with a film thickness up to and in excess of 200 micron.
Cross-Cut or X-Cut Test in Accordance to ISO 2409/ASTM D3359To be used on surfaces with a maximum dry film thickness of 200 microns
1. Select the surface test areas. Thoroughly clean the areas with Jotun’s Thinner No .18, using one cloth to apply the thinner and a second to wipe the surface dry.
2. Using an Elcometer 107 Cross Hatch Cutter (a sharp blade can be used to cut six vertical and six horizontal lines) to give a box of 25 squares. Make the cuts deep enough to go through to the substrate. On thick paint systems where filling is present, the test should be done in several layers.
3. Brush the surface lightly with a soft brush to remove any loose paint.4. Apply a suitable filament tape (ISO 2409/ ASTM D3359 adhesive tape) to the scribed
area; press the tape firmly onto the test area (masking tape must not be used for this operation).
5. With a sharp pull, remove the tape, pulling parallel to the surface. Pulling the tape straight up will not be viable as a test.
6. Examine the test surface. If any square of the old coating is removed the adhesion test has failed and the coating must be removed.
Pull-off test Test to be performed as per the standard ISO 4624.To be used on surfaces with a dry film thickness up to and in excess of 200 microns.
Repainting over existing paint surfacesThe surface of previous coats shall be free from contamination by water, hydrocarbon based products, wax, mud, mortar droppings and loose, chalked and flaking coating.
Inspect the surface for hydrocarbon and other contamination and if present, remove with an alkaline emulsifying detergent. Agitate the surface to activate the cleaner and before it dries, wash the treated area by low-pressure waterjetting method to Wa 1 (ISO 8501-4) using fresh water.
Surfaces not contaminated with hydrocarbon deposits shall be washed to Wa 1 (ISO 8501-4) using fresh water to reduce surface chlorides.
Once the surface is dry, follow with manual or power tool sanding with aluminium oxide or silicon carbide sandpaper with grit P320 followed with grit P400 to avoid leaving scratch marks. Feather-in any scratches or minor damages. Remove the sanding residue with clean dry compressed air, by vacuum and/or a clean brush.
Proceed with surface preparation and application recommendations as described above, and following a specific paint specification for the project.
36
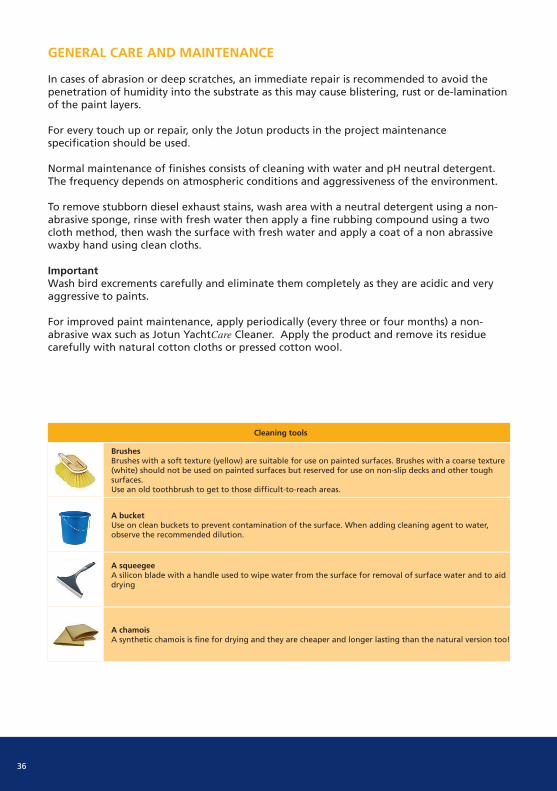
Cleaning tools
GENERAL CARE AND MAINTENANCE
In cases of abrasion or deep scratches, an immediate repair is recommended to avoid the penetration of humidity into the substrate as this may cause blistering, rust or de-lamination of the paint layers.
For every touch up or repair, only the Jotun products in the project maintenance specification should be used.
Normal maintenance of finishes consists of cleaning with water and pH neutral detergent. The frequency depends on atmospheric conditions and aggressiveness of the environment.
To remove stubborn diesel exhaust stains, wash area with a neutral detergent using a non-abrasive sponge, rinse with fresh water then apply a fine rubbing compound using a two cloth method, then wash the surface with fresh water and apply a coat of a non abrassive waxby hand using clean cloths.
ImportantWash bird excrements carefully and eliminate them completely as they are acidic and very aggressive to paints.
For improved paint maintenance, apply periodically (every three or four months) a non-abrasive wax such as Jotun YachtCare Cleaner. Apply the product and remove its residue carefully with natural cotton cloths or pressed cotton wool.
BrushesBrushes with a soft texture (yellow) are suitable for use on painted surfaces. Brushes with a coarse texture (white) should not be used on painted surfaces but reserved for use on non-slip decks and other tough surfaces.Use an old toothbrush to get to those difficult-to-reach areas.
A bucketUse on clean buckets to prevent contamination of the surface. When adding cleaning agent to water, observe the recommended dilution.
A squeegeeA silicon blade with a handle used to wipe water from the surface for removal of surface water and to aid drying
A chamoisA synthetic chamois is fine for drying and they are cheaper and longer lasting than the natural version too!

37
Following these below simple rules (do’s and don’ts), the gloss, colour and resistance of the painted surfaces will be easily maintained for a long time.
To minimise white staining, freshwater should be used, preferably from a tank fitted with water-softening equipment.
For extra protection some kind of wax can be applied. If so, the use of non-abrasive, silicone-free protective waxes are recommended.
Procedure for cleaning and protection of topcoatsThe following guidelines are for the maintenance and cleaning of yachts coated with Jotun’s Megagloss products.
This maintenance guide is intended for keeping the surfaces clean and glossy when carrying out cleaning procedures on board.
Note: No cleaning or wax products should ever be applied onto Megagloss that is not fully cured.
Procedure:1. Surface preparation:
Clean the surface with fresh water by adding jotun YachtCare cleaner to a bucket, wash the surface as normal and rinse with fresh water. For very stubborn organic stains such as oil or exhaust, use undiluted Jotun YachtCare cleaner. Add a little Jotun YachtCare cleaner to a soft wet sponge and rub onto the soiled area removing all stains. Rinse thoroughly with water.
2. Application of surface protection products:Shake well before use. Apply a thin layer, buff with a dry microfibre cloth by hand or foam pad if using a machine. It is advisable to clean small areas at a time. Do not apply on hot surfaces or in direct sunlight.
Remarks
Remarks
Wet the painted surface with low pressure fresh water.
Wash carefully with a pH neutral detergent like Jotun YachtCare Cleaner using a non-abrasive sponge.
Rinse fully with fresh water and wipe dry with chamois leather or similar.
Do not cover the surfaces immediately after washing but leave in open air to facilitate evaporation of remaining water.
Do not wash surfaces when hot (for example after long exposure to sunlight) to avoid alteration of gloss.
Never clean surfaces with solvents or non pH neutral products.
Never use abrasive materials. Scratches would facilitate deposits of dirt and salt, hence reducing the lifetime of the initial gloss.
When using teak cleaning products, avoid splashing painted surfaces as these cleaners generally contain alkaline caustic products. Remove immediately with plenty of fresh water if this happens.
Do not place wet clothes or objects (such as pillows, ropes, sails, sail bags, fenders etc.) on painted surfaces for a long time as this can cause blistering and/or de-lamination of paint.
When drying, pay attention to areas such as doors, hatches, window frames and all other areas where water can remain stagnant.
When drying, pay attention to areas such as doors, hatches, window frames and all other areas where water can remain stagnant.
X
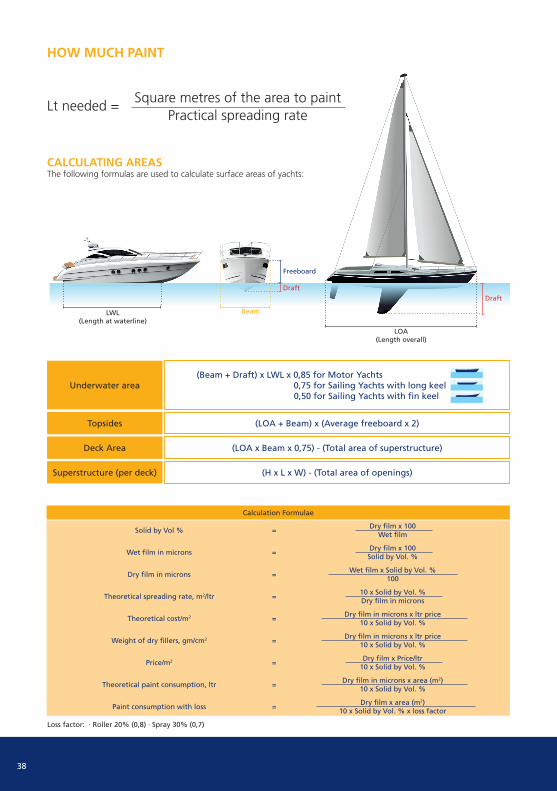
38
LOA(Length overall)
Draft
LWL(Length at waterline)
Beam
Draft
Freeboard
Lt needed =Square metres of the area to paint
Practical spreading rate
HOW MUCH PAINT
CALCULATING AREASThe following formulas are used to calculate surface areas of yachts:
Solid by Vol %
Wet film in microns
Dry film in microns
Theoretical spreading rate, m2/ltr
Theoretical cost/m2
Weight of dry fillers, gm/cm2
Price/m2
Theoretical paint consumption, ltr
Paint consumption with loss
Loss factor: · Roller 20% (0,8) · Spray 30% (0,7)
Dry film x 100Wet film
Dry film x 100Solid by Vol. %
Wet film x Solid by Vol. %100
10 x Solid by Vol. %Dry film in microns
Dry film in microns x ltr price10 x Solid by Vol. %
Dry film in microns x ltr price10 x Solid by Vol. %
Dry film x Price/ltr10 x Solid by Vol. %
Dry film in microns x area (m2)10 x Solid by Vol. %
Dry film x area (m2)10 x Solid by Vol. % x loss factor
=
=
=
=
=
=
=
=
=
Calculation Formulae
Underwater area
Topsides
Deck Area
Superstructure (per deck)
(Beam + Draft) x LWL x 0,85 for Motor Yachts 0,75 for Sailing Yachts with long keel 0,50 for Sailing Yachts with fin keel
(LOA + Beam) x (Average freeboard x 2)
(LOA x Beam x 0,75) - (Total area of superstructure)
(H x L x W) - (Total area of openings)

39
Calculation of Paint ConsumptionThere are various ways of expressing the relation between the theoretically calculated amount of paint needed to exactly match the dry film thickness specified and the practical amount of paint to be applied taking application conditions and application skills into consideration.
Jotun use the ‘Consumption Factor’ to express this relation, but some other paint manufacturers and customers use the terms ‘Loss’ or ‘Loss Factor’. The consumption factor is always greater than 1, because:• The result of a spray application will generally result in an average DFT greater than the specified DFT. Typically: Average DFT approx. 1.4 times Specified DFT.• By any practical application, there will be some paint taken into use, which does not end up on the surface. The resulting consumption factor is typically around 1.8.
The term ‘Loss’ is to be understood as the deviation between the consumption calculated by use of the specified DFT, and the actual consumption. At the end of the day the practical amount of paint used on the construction will be the same no matter which factor is being used for the calculation, because they are related - and the relations are shown below:

40
2% 12% 35%7% 25%17% 45%5% 15% 40%10% 30%20% 50%
100%
95% 93% 90% 88% 86% 84% 81% 79% 76% 71% 67% 62% 57% 52% 48%
98% 95% 93% 90% 88% 85% 83% 80% 75% 70% 65% 60% 55% 50%
80% 78% 76% 75% 72% 70% 68% 66% 64% 60% 56% 52% 48% 44% 40%
60% 59% 57% 56% 54% 53% 51% 50% 48% 45% 42% 39% 36% 33% 30%
40% 39% 38% 37% 36% 35% 34% 33% 32% 30% 28% 26% 24% 22% 20%
90% 88% 86% 84% 81% 79% 77% 75% 72% 68% 63% 59% 54% 50% 45%
75% 74% 71% 70% 68% 66% 64% 62% 60% 56% 53% 49% 45% 41% 38%
55% 54% 52% 51% 50% 48% 47% 46% 44% 41% 39% 36% 33% 30% 28%
35% 34% 33% 33% 31% 31% 30% 29% 28% 26% 24% 23% 21% 19% 17%
85% 83% 81% 79% 77% 75% 72% 71% 68% 64% 60% 55% 51% 47% 43%
65% 64% 62% 61% 59% 57% 55% 54% 52% 49% 46% 42% 39% 36% 33%
45% 44% 43% 42% 41% 40% 38% 37% 36% 34% 32% 29% 27% 25% 23%
70% 69% 67% 65% 63% 62% 60% 58% 56% 53% 49% 46% 42% 39% 35%
50% 49% 48% 47% 45% 44% 43% 42% 40% 38% 35% 33% 30% 28% 25%
30% 29% 28% 28% 27% 26% 25% 25% 24% 23% 21% 19% 18% 16% 15%
25% 24% 24% 23% 22% 22% 21% 21% 20% 19% 17% 16% 15% 14% 13%
Solids content after thinning
Ori
gin
al s
olid
s co
nte
nt
of
mat
eria
l bef
ore
ad
din
g t
hin
ner
Volume Solids with thinning
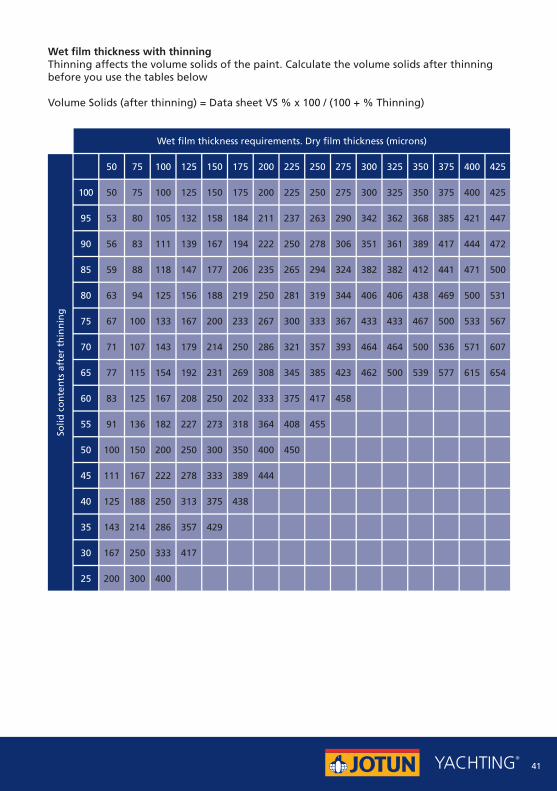
41
Wet film thickness with thinningThinning affects the volume solids of the paint. Calculate the volume solids after thinning before you use the tables below
Volume Solids (after thinning) = Data sheet VS % x 100 / (100 + % Thinning)
50 150 300100 250200 35075 175 325125 275225 375 400 425
100
95 53 80 105 132 158 184 211 237 263 290 342 362 368 385 421 447
50 75 100 125 150 175 200 225 250 275 300 325 350 375 400 425
80 63 94 125 156 188 219 250 281 319 344 406 406 438 469 500 531
60 83 125 167 208 250 202 333 375 417 458
40 125 188 250 313 375 438
90 56 83 111 139 167 194 222 250 278 306 351 361 389 417 444 472
75 67 100 133 167 200 233 267 300 333 367 433 433 467 500 533 567
55 91 136 182 227 273 318 364 408 455
35 143 214 286 357 429
85 59 88 118 147 177 206 235 265 294 324 382 382 412 441 471 500
65 77 115 154 192 231 269 308 345 385 423 462 500 539 577 615 654
45 111 167 222 278 333 389 444
70 71 107 143 179 214 250 286 321 357 393 464 464 500 536 571 607
50 100 150 200 250 300 350 400 450
30 167 250 333 417
25 200 300 400
Wet film thickness requirements. Dry film thickness (microns)
Solid
co
nte
nts
aft
er t
hin
nin
g
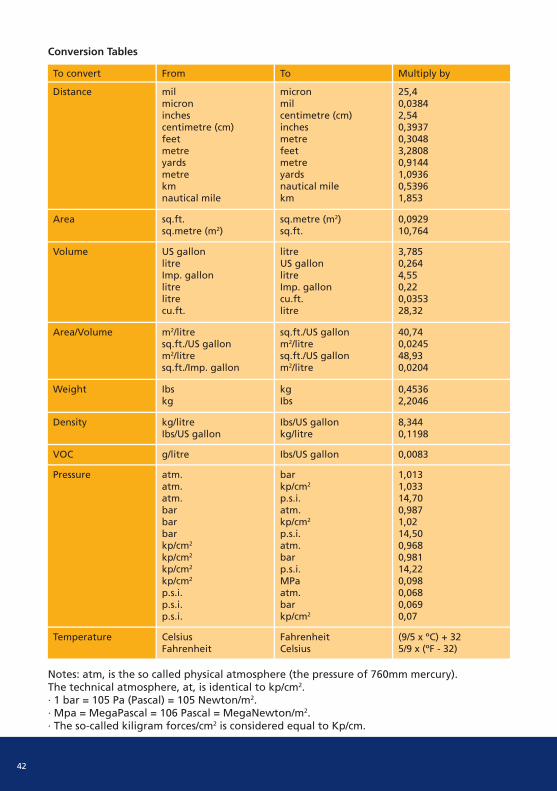
42
To convert
Distance
Area
Volume
Area/Volume
Weight
From
milmicroninchescentimetre (cm)feetmetreyardsmetrekmnautical mile
sq.ft.sq.metre (m2)
US gallonlitreImp. gallonlitrelitrecu.ft.
m2/litresq.ft./US gallonm2/litresq.ft./Imp. gallon
Ibskg
micronmilcentimetre (cm)inchesmetrefeetmetreyardsnautical milekm
sq.metre (m2)sq.ft.
litreUS gallonlitreImp. galloncu.ft.litre
sq.ft./US gallonm2/litresq.ft./US gallonm2/litre
kgIbs
25,40,03842,540,39370,30483,28080,91441,09360,53961,853
0,092910,764
3,7850,2644,550,220,035328,32
40,740,024548,930,0204
0,45362,2046
To Multiply by
Density
VOC
Temperature
Pressure
kg/litreIbs/US gallon
g/litre
CelsiusFahrenheit
atm.atm.atm.barbarbarkp/cm2
kp/cm2
kp/cm2
kp/cm2
p.s.i.p.s.i.p.s.i.
Ibs/US gallonkg/litre
Ibs/US gallon
FahrenheitCelsius
barkp/cm2
p.s.i.atm.kp/cm2
p.s.i.atm.barp.s.i.MPaatm.barkp/cm2
8,3440,1198
0,0083
(9/5 x ºC) + 325/9 x (ºF - 32)
1,0131,03314,700,9871,0214,500,9680,98114,220,0980,0680,0690,07
Notes: atm, is the so called physical atmosphere (the pressure of 760mm mercury). The technical atmosphere, at, is identical to kp/cm2.· 1 bar = 105 Pa (Pascal) = 105 Newton/m2.· Mpa = MegaPascal = 106 Pascal = MegaNewton/m2.· The so-called kiligram forces/cm2 is considered equal to Kp/cm.
Conversion Tables

43
NOTES

JOTUN YACHTING OFFICES
Jotun A/SP.O. Box 2021,N-3202 Sandefjord, NorwayTel: +47 33 45 70 00jotun.com
AUSTRALIA (New Zealand) Jotun Australia Pty Ltd 9 Cawley RoadBrooklyn, Victoria, 3025T: +61 3 9362 6754www.jotun.com.au
CHINAJotun COSCO Marine Coatings (Qingdao) Co. Ltd.Room 709-12, Goldlion Digital Network Centre,138 Tiyu Road East,GUANGZHOU, 510620T: + 86 20 38 78 07 49F: + 86 20 38 78 19 70jotun.cn
FRANCEJotun France SAS22-24 Rue du Président Wilson92532 Levallois-Perret CedexT: +33 1 4519 3880F: +33 1 4519 3894 E: [email protected]
GERMANYJotun (Deutschland) GmbHHaferweg 3822769 HAMBURGT: +49 40 851 960F: +49 40 856 234E: [email protected]
GREECE (Cyprus)Jotun Hellas Ltd.Zeppou 33,16675 GLYFADAT: +30 210 42 85 980-82F: +30 210 42 85 983E: [email protected]
ITALY (Croatia & Malta)Jotun Italia S.r.L.Via Petronio, 834015 MUGGIA (Trieste)T: +39 040 2398242F: +39 040 4606965E: [email protected]
RUSSIAJotun Paints O.O.O.Varshavskaya Str., 23/2, Office 53196128 ST. PETERSBURGT: +7 812 640 00 80F: +7 812 640 00 81E: [email protected]
SCANDINAVIA (Norway, Sweden & Denmark)Jotun A/SP.O. Box 2021,N-3202 SANDEFJORDVisiting address:Hystadveien 167, 3209 SandefjordT: +47 33 45 70 00F: +47 33 45 79 00E: [email protected]
SPAIN (Portugal)Jotun Iberica S.A.Poligono Ind. Santa Rita,Calle Estatica no. 3,08755 Castellbisbal,BARCELONAT: +34 937 711 800F: +34 937 711 022E: [email protected]
THE NETHERLANDSJotun B.V.Postbus 2083200 AE SPIJKENISSEVisiting address:Curieweg 11b, 3208 KJ SpijkenisseROTTERDAMT: +31 181 678 300F: +31 181 617 899E: [email protected]
TURKEYJotun Boya San. ve Ticaret. A.S. Hilpark Suites Sitesi Balabandere Cad. No. 10, Istinye, 34460 Sariyer - ISTANBULT: +90 21 2279 7878 F: +90 21 2279 2549 E: [email protected]
UAEJotun U.A.E. Ltd. (LLC)P.O. Box 3671,Al Quoz Industrial AreaDUBAIT: +971 4339 5000F: +971 4338 0666E: [email protected]/me
UK (Finland)Jotun Paints (Europe) Ltd. Stather Road, Flixborough, SCUNTHORPE DN15 8RRT: +44 1724 400 000 F: +44 1724 400 100 E: [email protected]/eu
USA (Caribbean)Jotun Paints Inc.9203 Highway 23Belle Chasse, LA 70037, USAT: +1 713 860 8241F: +1 713 860 8242
TEC
HN
ICA
L G
UID
E EN
201
9