Laser cladding of in situ TiB 2/Fe composite coating on steel
Upload
khangminh22Category
view
1download
0
Technical guide for cladding & flooring04.2021 - EN

04.2021 - EN
Technical guide for cladding & flooring
Index
1| This is Laminam 4
2| The Product 62.1 Sizes and Thicknesses 62.2 One surface, a multitude of technical features* 82.3 Suggested Applications 102.4 Shades and Directions 10
3| Packaging 12
4| Handling 144.1 Forklift Handling 144.2 Manual Handling 15
5| Design and Installation Guidelines 17
6| Processing 186.1 Cutting 196.2 Cutting with Manual Tools 196.3 Cutting Laminam 12+ and 20+ with Grinders 206.4 Finishes and Edge Processes 216.5 Foratura / Drilling 22
7| Laminam Flooring installation 247.1 Characteristics of the substrate 247.2 Flooring installation 257.3 Indoor Flooring intallation 267.3.1 Installation on cementitious screeds 267.3.2 Installation on Anhydrite Screeds 277.3.3 Installation on Dry Screeds 277.3.4 Installation on Radiating Screeds 287.3.5 Installation on existing Floors in Ceramic/ Porcelain Stoneware, Marble and Natural Stone 297.3.6 Installation on Parquet/Wood and PVC 307.3.7 Installation on Resin 307.3.8 Installation on Wood Slabs 307.4 Outdoor Flooring Installation 36
8| Indoor Cladding Installation 408.1 Checking the substrates 428.1.1 Cementitious plaster or render/ lime and chalk 428.1.2 Installation on existing cladding 438.1.3 Drywall 448.2 Installing Laminam 5+ size 1620x3240 44
9| Exterior Cladding Installation 459.1 Installation on Plaster 469.2 Installation on Concrete Partitions 469.3 Installation on a Thermal Insulation System 479.4 Installation on Cement Board 489.5 Mechanical Safety Hook 499.6 Efflorescence 49
10| Creating Corner Elements 50
11| Cladding Staircases 52
12| Covering doors and openings 56
13| Creating Shower Floors 57
14| Cleaning and maintenance 5814.1 Post-installation Cleaning 5814.1.1 Filo Series Cleaning 5914.1.2 Exterior cladding cleaning 6014.2 Ordinary Cleaning 60
15| Recommended adhesives 62
Certification 73
Shaping the world of tomorrow
The art of ceramics expressed on large sized architectural surfaces and elevated to excellence by means of a continuous research and innovation process.
This is Laminam.
For years our company has committed itself to an innovation-centred approach towards this ancient material. We have led it into the future, reinventing and perfecting production processes that enhance its performance. In this way we have brought to life surfaces that have no application limits thanks to our selection of sizes and thicknesses.The aesthetic dimension of all our creations expresses a multitude of different styles, all characterised by a single common denominator: elegance and beauty.
This is further enriched by qualitative perfection, stemming from Laminam’s tireless research into raw materials and state-of-the-art technologies. The result is a wide range of versatile surfaces that can be successfully utilized in different settings, for a new redefinition of spaces, redesigned in the name of beauty, modernity and sustainable processes.
One of the cornerstones of our company is attention towards the environment and the people. We dedicate the utmost attention to the selection of raw materials, which are all natural and with the highest standards, to guarantee the utmost quality and hygiene.
At Laminam every single staff member plays a determining part towards the achievement of objectives. This is why Laminam pays particular attention to the well-being of its employees and invests in continuous learning. The high technological level of production processes is upheld by highly qualified staff. All this, combined with a safe and stimulating work environment, culminates in the creation of perfect surfaces that inspire architects and designers at a global level.
1| This is Laminam
Technical guide for cladding & flooring4
Technical guide for cladding & flooring 5
2| The Product
Laminam slabs are made with advanced technologies that combine reduced thicknesses and large dimensions with high resistance to mechanical stress, chemicals, wear, scratches and deep abrasions. By nature, the material is hygienic and resistant to frost, mildew and the effects of UV rays.
All characteristics and chromatic properties of our slabs are unalterable. They do not change over time or under any weather conditions. These revolutionary slabs are also environmentally friendly: natural raw materials, sustainable technology, and entirely recyclable products are the foundation of Laminam’s green philosophy.
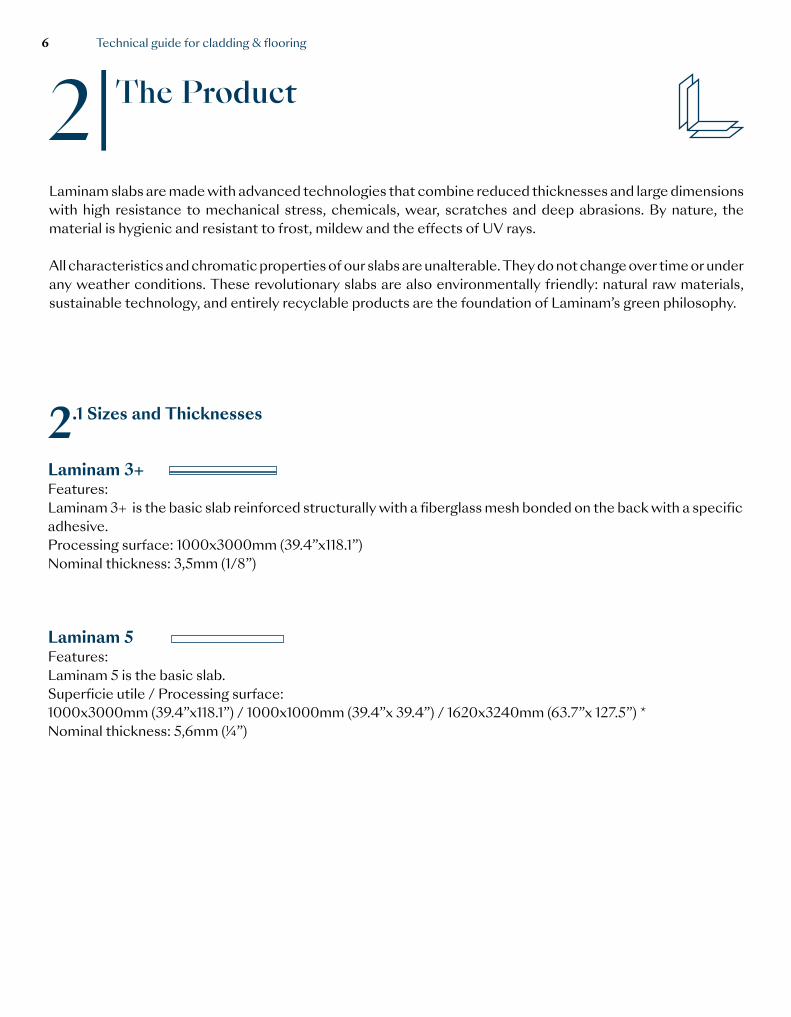
2.1 Sizes and Thicknesses
Laminam 3+ Features: Laminam 3+ is the basic slab reinforced structurally with a fiberglass mesh bonded on the back with a specific adhesive.Processing surface: 1000x3000mm (39.4”x118.1”)Nominal thickness: 3,5mm (1/8”)
Laminam 5 Features: Laminam 5 is the basic slab.Superficie utile / Processing surface: 1000x3000mm (39.4”x118.1”) / 1000x1000mm (39.4”x 39.4”) / 1620x3240mm (63.7”x 127.5”) *Nominal thickness: 5,6mm (¼”)
Technical guide for cladding & flooring6
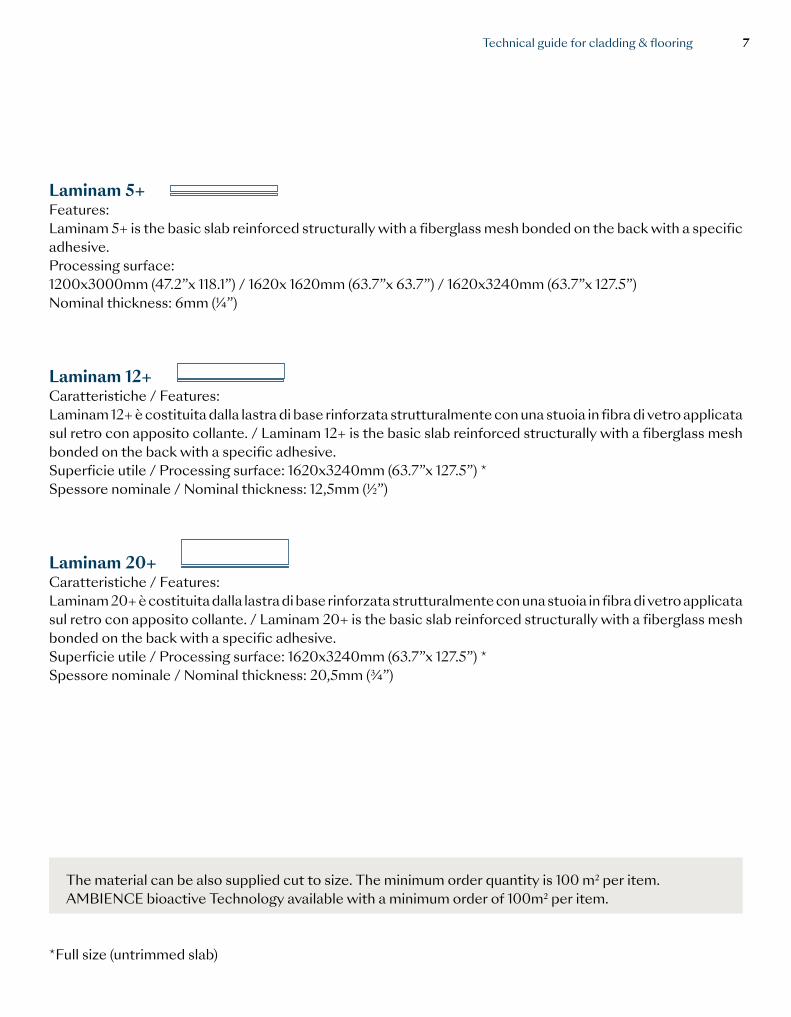
Laminam 5+ Features: Laminam 5+ is the basic slab reinforced structurally with a fiberglass mesh bonded on the back with a specific adhesive.Processing surface: 1200x3000mm (47.2”x 118.1”) / 1620x 1620mm (63.7”x 63.7”) / 1620x3240mm (63.7”x 127.5”)Nominal thickness: 6mm (¼”)
Laminam 12+ Caratteristiche / Features: Laminam 12+ è costituita dalla lastra di base rinforzata strutturalmente con una stuoia in fibra di vetro applicata sul retro con apposito collante. / Laminam 12+ is the basic slab reinforced structurally with a fiberglass mesh bonded on the back with a specific adhesive.Superficie utile / Processing surface: 1620x3240mm (63.7”x 127.5”) *Spessore nominale / Nominal thickness: 12,5mm (½”)
Laminam 20+ Caratteristiche / Features: Laminam 20+ è costituita dalla lastra di base rinforzata strutturalmente con una stuoia in fibra di vetro applicata sul retro con apposito collante. / Laminam 20+ is the basic slab reinforced structurally with a fiberglass mesh bonded on the back with a specific adhesive.Superficie utile / Processing surface: 1620x3240mm (63.7”x 127.5”) *Spessore nominale / Nominal thickness: 20,5mm (¾”)
*Full size (untrimmed slab)
The material can be also supplied cut to size. The minimum order quantity is 100 m2 per item.AMBIENCE bioactive Technology available with a minimum order of 100m2 per item.
Technical guide for cladding & flooring 7
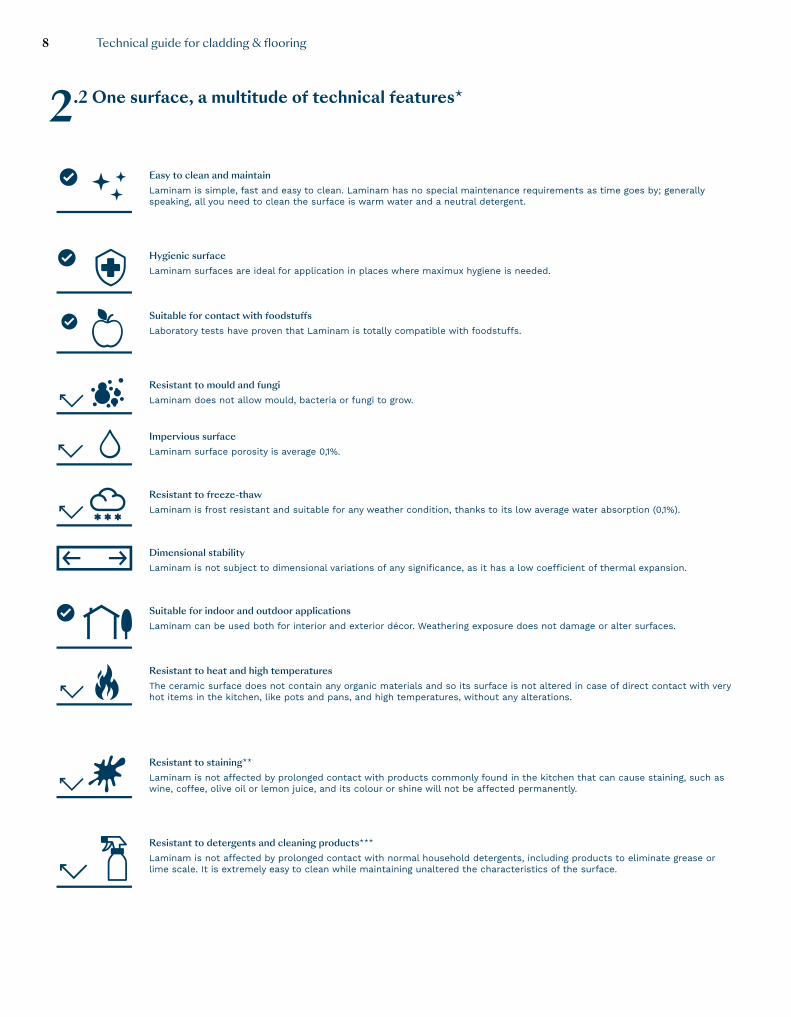
2.2 One surface, a multitude of technical features*
Easy to clean and maintainLaminam is simple, fast and easy to clean. Laminam has no special maintenance requirements as time goes by; generally speaking, all you need to clean the surface is warm water and a neutral detergent.
Hygienic surfaceLaminam surfaces are ideal for application in places where maximux hygiene is needed.
Suitable for contact with foodstuffsLaboratory tests have proven that Laminam is totally compatible with foodstuffs.
Resistant to mould and fungi Laminam does not allow mould, bacteria or fungi to grow.
Impervious surfaceLaminam surface porosity is average 0,1%.
Resistant to freeze-thaw Laminam is frost resistant and suitable for any weather condition, thanks to its low average water absorption (0,1%).
Dimensional stability Laminam is not subject to dimensional variations of any significance, as it has a low coefficient of thermal expansion.
Suitable for indoor and outdoor applications Laminam can be used both for interior and exterior décor. Weathering exposure does not damage or alter surfaces.
Resistant to heat and high temperatures The ceramic surface does not contain any organic materials and so its surface is not altered in case of direct contact with very hot items in the kitchen, like pots and pans, and high temperatures, without any alterations.
Resistant to staining**Laminam is not affected by prolonged contact with products commonly found in the kitchen that can cause staining, such as wine, coffee, olive oil or lemon juice, and its colour or shine will not be affected permanently.
Resistant to detergents and cleaning products*** Laminam is not affected by prolonged contact with normal household detergents, including products to eliminate grease or lime scale. It is extremely easy to clean while maintaining unaltered the characteristics of the surface.
Technical guide for cladding & flooring8
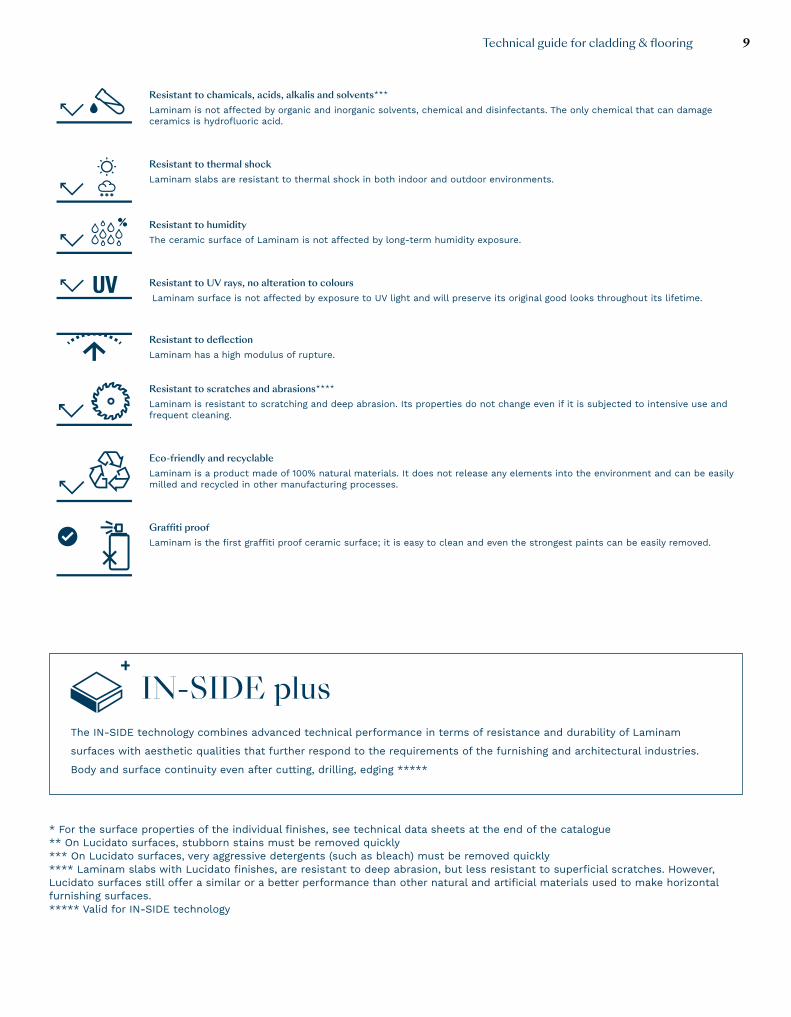
Resistant to chamicals, acids, alkalis and solvents*** Laminam is not affected by organic and inorganic solvents, chemical and disinfectants. The only chemical that can damage ceramics is hydrofluoric acid.
Resistant to thermal shock Laminam slabs are resistant to thermal shock in both indoor and outdoor environments.
Resistant to humidity The ceramic surface of Laminam is not affected by long-term humidity exposure.
Resistant to UV rays, no alteration to colours Laminam surface is not affected by exposure to UV light and will preserve its original good looks throughout its lifetime.
Resistant to deflection Laminam has a high modulus of rupture.
Resistant to scratches and abrasions****Laminam is resistant to scratching and deep abrasion. Its properties do not change even if it is subjected to intensive use and frequent cleaning.
Eco-friendly and recyclable Laminam is a product made of 100% natural materials. It does not release any elements into the environment and can be easily milled and recycled in other manufacturing processes.
Graffiti proof Laminam is the first graffiti proof ceramic surface; it is easy to clean and even the strongest paints can be easily removed.
IN-SIDE plusThe IN-SIDE technology combines advanced technical performance in terms of resistance and durability of Laminam
surfaces with aesthetic qualities that further respond to the requirements of the furnishing and architectural industries.
Body and surface continuity even after cutting, drilling, edging *****
* For the surface properties of the individual finishes, see technical data sheets at the end of the catalogue** On Lucidato surfaces, stubborn stains must be removed quickly*** On Lucidato surfaces, very aggressive detergents (such as bleach) must be removed quickly **** Laminam slabs with Lucidato finishes, are resistant to deep abrasion, but less resistant to superficial scratches. However, Lucidato surfaces still offer a similar or a better performance than other natural and artificial materials used to make horizontal furnishing surfaces.***** Valid for IN-SIDE technology
Technical guide for cladding & flooring 9
2.3 Suggested Applications
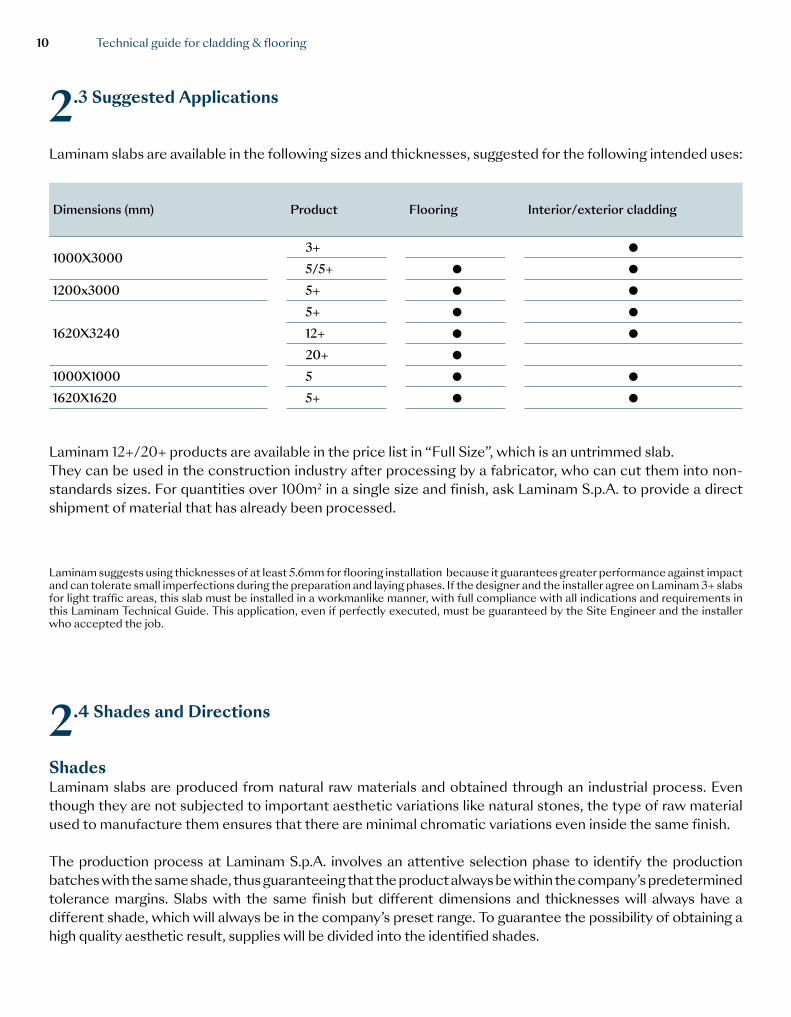
Laminam slabs are available in the following sizes and thicknesses, suggested for the following intended uses:
Dimensions (mm) Product Flooring Interior/exterior cladding
1000X30003+ ●
5/5+ ● ●
1200x3000 5+ ● ●
1620X32405+ ● ●
12+ ● ●
20+ ●
1000X1000 5 ● ●
1620X1620 5+ ● ●
Laminam 12+/20+ products are available in the price list in “Full Size”, which is an untrimmed slab.They can be used in the construction industry after processing by a fabricator, who can cut them into non-standards sizes. For quantities over 100m2 in a single size and finish, ask Laminam S.p.A. to provide a direct shipment of material that has already been processed.
Laminam suggests using thicknesses of at least 5.6mm for flooring installation because it guarantees greater performance against impact and can tolerate small imperfections during the preparation and laying phases. If the designer and the installer agree on Laminam 3+ slabs for light traffic areas, this slab must be installed in a workmanlike manner, with full compliance with all indications and requirements in this Laminam Technical Guide. This application, even if perfectly executed, must be guaranteed by the Site Engineer and the installer who accepted the job.
2.4 Shades and Directions
ShadesLaminam slabs are produced from natural raw materials and obtained through an industrial process. Even though they are not subjected to important aesthetic variations like natural stones, the type of raw material used to manufacture them ensures that there are minimal chromatic variations even inside the same finish.
The production process at Laminam S.p.A. involves an attentive selection phase to identify the production batches with the same shade, thus guaranteeing that the product always be within the company’s predetermined tolerance margins. Slabs with the same finish but different dimensions and thicknesses will always have a different shade, which will always be in the company’s preset range. To guarantee the possibility of obtaining a high quality aesthetic result, supplies will be divided into the identified shades.
Technical guide for cladding & flooring10

We suggest installing flooring in each room with a single shade, and interrupting it in case of a different shade at a door frame or passage to another room. For very large rooms, create subdivisions in correspondence to expansion joints or with regard to fixed or movable furniture that will be in the room.
In case of installation of the same color on both floor and walls, a different shade can be used to cover interior and exterior walls, granted that for each wall a single shade is utilized. It might be impossible to clad a very large outside wall in a single shade, but the presence of an architectural element or a discontinuous part in the surface is enough to reduce the perception of the difference between the shades.
For large sized spaces, the Project Engineering team of Laminam S.p.A. can provide assistance to distribute the shades supplied, together with the designer/buyer, based on the project requirements.
DirectionalityThe uniformity of the shades described can be obtained if the slabs are applied with the grain running in the same horizontal or vertical direction. If using non-standard sizes, even for uniform finishes, it is necessary that they be separated and installed in the same direction as the main slabs.
If mounting slabs in different directions, there will be a perceived chromatic variation when exposed to the light even if they are exactly the same shade.
Installation of the Filo SeriesThe colours Argento, Ghisa, Rame, Oro, Mercurio, and Rubino in the Filo series have an exclusive iridescent surface obtained through the relief application of special metal oxides. For the best aesthetic effect in applying the cladding, we recommend applying the slabs making the sides with the Made in Italy writing on the back coincide two by two, both for vertical and horizontal laying, alternately rotating the slabs by 180°as shown in figure below.
The Filo series metal finish and structure may reflect light unevenly when applied outdoors. It is not possible to guarantee a uniform reflection even for the same shade. Weather-exposed Filo series finishes could have small shade variations.
Technical guide for cladding & flooring 11
3| Packaging
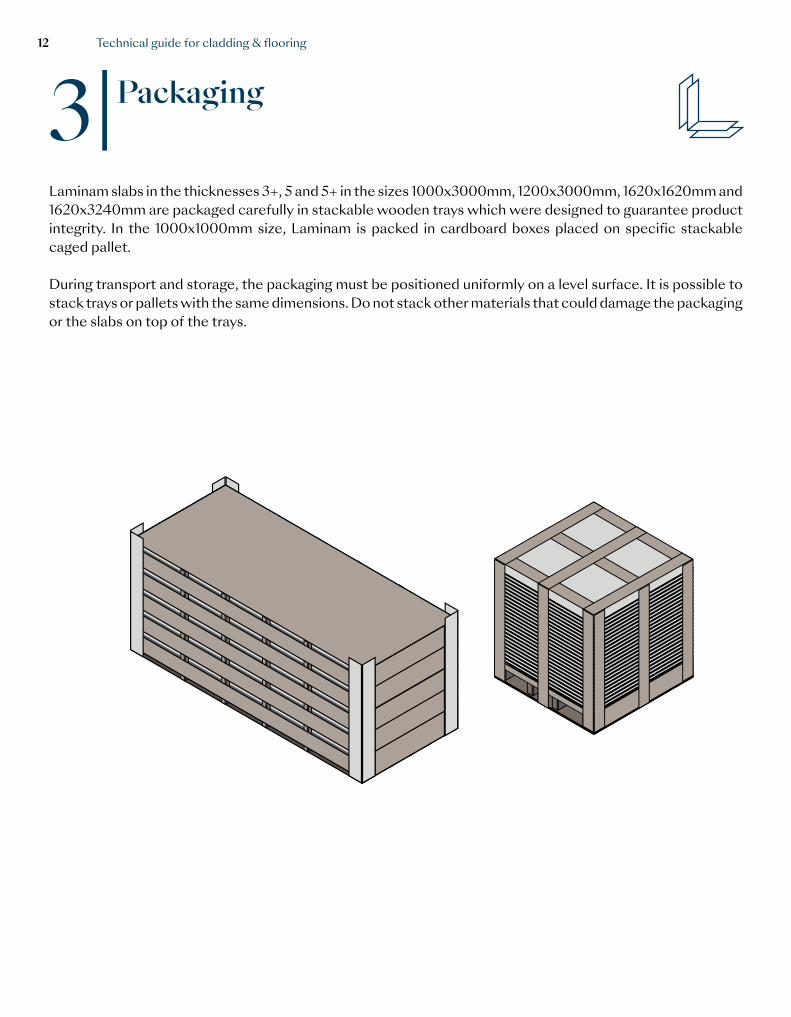
Laminam slabs in the thicknesses 3+, 5 and 5+ in the sizes 1000x3000mm, 1200x3000mm, 1620x1620mm and 1620x3240mm are packaged carefully in stackable wooden trays which were designed to guarantee product integrity. In the 1000x1000mm size, Laminam is packed in cardboard boxes placed on specific stackable caged pallet.
During transport and storage, the packaging must be positioned uniformly on a level surface. It is possible to stack trays or pallets with the same dimensions. Do not stack other materials that could damage the packaging or the slabs on top of the trays.
Technical guide for cladding & flooring12
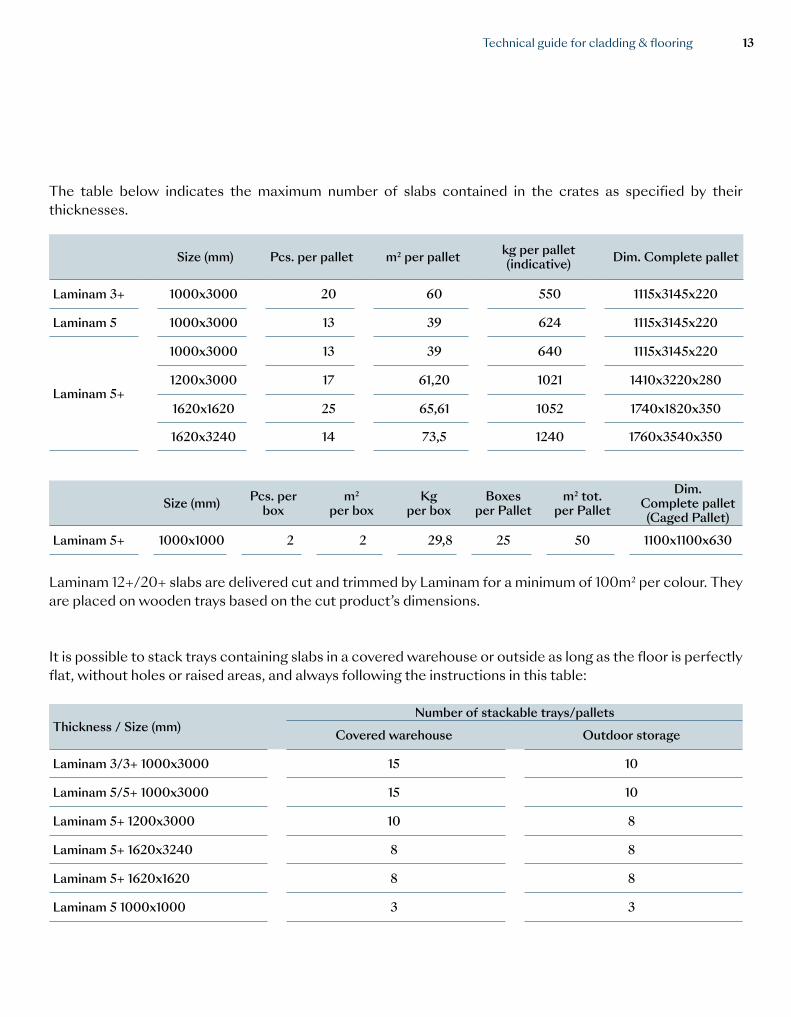
The table below indicates the maximum number of slabs contained in the crates as specified by their thicknesses.
Size (mm) Pcs. per pallet m2 per pallet kg per pallet(indicative) Dim. Complete pallet
Laminam 3+ 1000x3000 20 60 550 1115x3145x220
Laminam 5 1000x3000 13 39 624 1115x3145x220
Laminam 5+
1000x3000 13 39 640 1115x3145x220
1200x3000 17 61,20 1021 1410x3220x280
1620x1620 25 65,61 1052 1740x1820x350
1620x3240 14 73,5 1240 1760x3540x350
Size (mm) Pcs. per box
m2 per box
Kg per box
Boxes per Pallet
m2 tot. per Pallet
Dim. Complete pallet (Caged Pallet)
Laminam 5+ 1000x1000 2 2 29,8 25 50 1100x1100x630
Laminam 12+/20+ slabs are delivered cut and trimmed by Laminam for a minimum of 100m2 per colour. They are placed on wooden trays based on the cut product’s dimensions.
It is possible to stack trays containing slabs in a covered warehouse or outside as long as the floor is perfectly flat, without holes or raised areas, and always following the instructions in this table:
Thickness / Size (mm)Number of stackable trays/pallets
Covered warehouse Outdoor storage
Laminam 3/3+ 1000x3000 15 10
Laminam 5/5+ 1000x3000 15 10
Laminam 5+ 1200x3000 10 8
Laminam 5+ 1620x3240 8 8
Laminam 5+ 1620x1620 8 8
Laminam 5 1000x1000 3 3
Technical guide for cladding & flooring 13
4| Handling
4.1 Forklift Handling
Caution and the utmost attention are necessary when handling these materials. The handling area must be off limits to foot traffic.
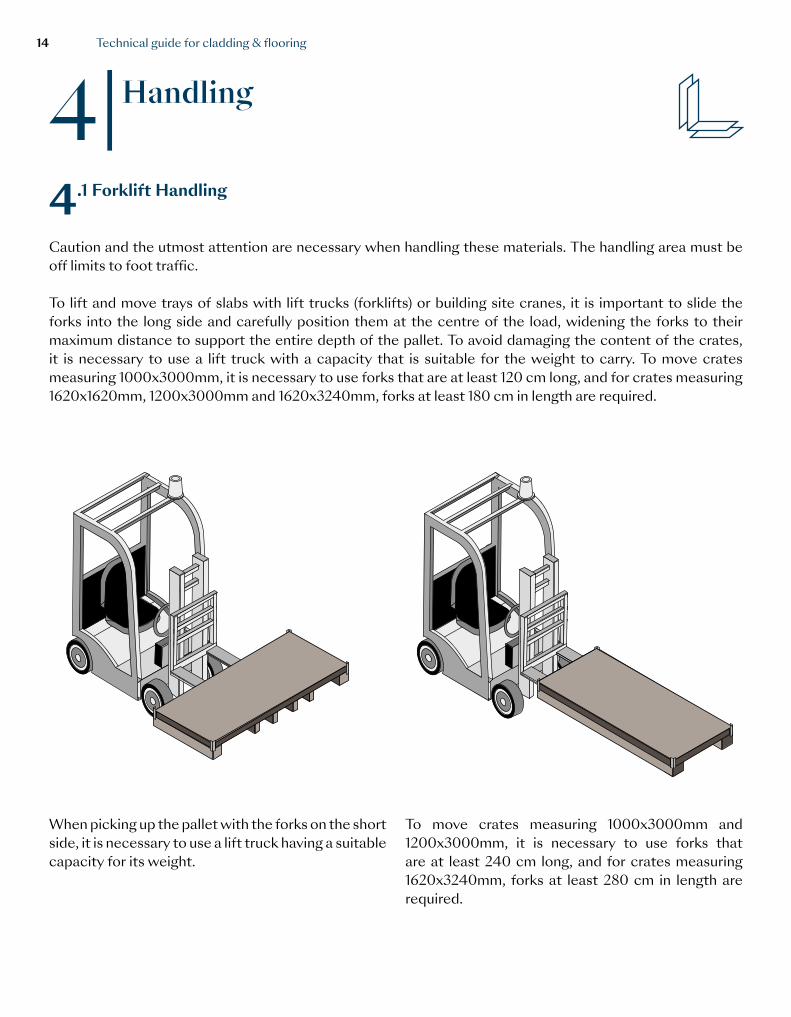
To lift and move trays of slabs with lift trucks (forklifts) or building site cranes, it is important to slide the forks into the long side and carefully position them at the centre of the load, widening the forks to their maximum distance to support the entire depth of the pallet. To avoid damaging the content of the crates, it is necessary to use a lift truck with a capacity that is suitable for the weight to carry. To move crates measuring 1000x3000mm, it is necessary to use forks that are at least 120 cm long, and for crates measuring 1620x1620mm, 1200x3000mm and 1620x3240mm, forks at least 180 cm in length are required.
When picking up the pallet with the forks on the short side, it is necessary to use a lift truck having a suitable capacity for its weight.
To move crates measuring 1000x3000mm and 1200x3000mm, it is necessary to use forks that are at least 240 cm long, and for crates measuring 1620x3240mm, forks at least 280 cm in length are required.
Technical guide for cladding & flooring14
4.2 Manual Handling
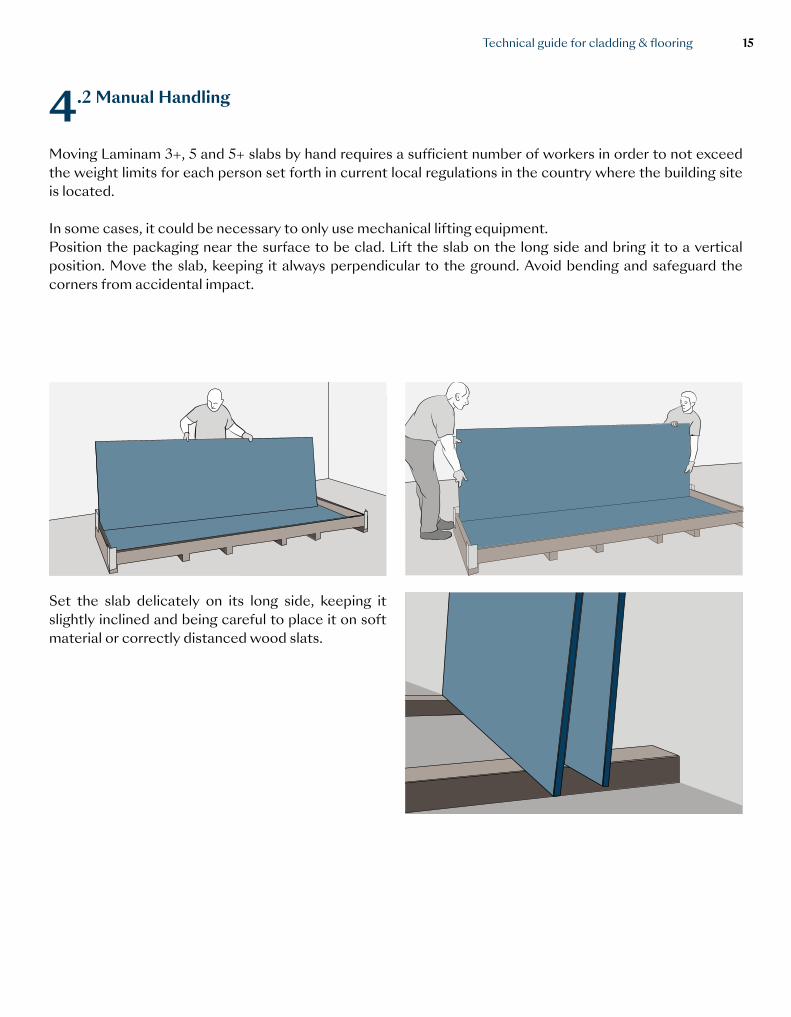
Moving Laminam 3+, 5 and 5+ slabs by hand requires a sufficient number of workers in order to not exceed the weight limits for each person set forth in current local regulations in the country where the building site is located.
In some cases, it could be necessary to only use mechanical lifting equipment.Position the packaging near the surface to be clad. Lift the slab on the long side and bring it to a vertical position. Move the slab, keeping it always perpendicular to the ground. Avoid bending and safeguard the corners from accidental impact.
Set the slab delicately on its long side, keeping it slightly inclined and being careful to place it on soft material or correctly distanced wood slats.
Technical guide for cladding & flooring 15
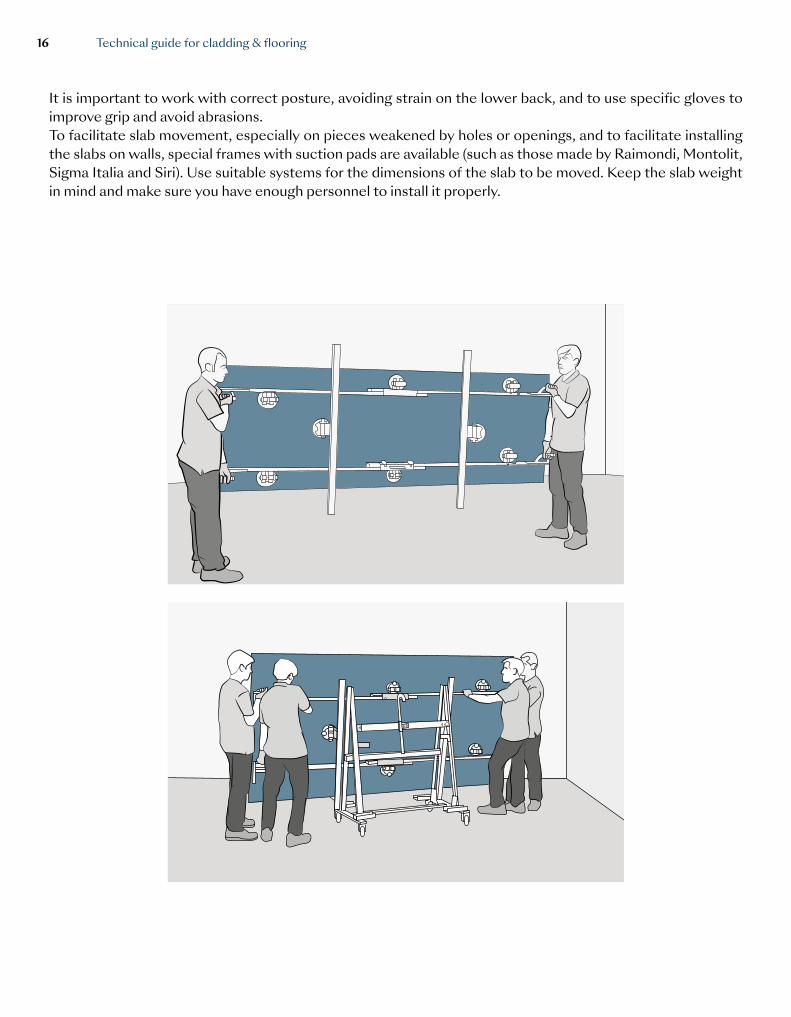
It is important to work with correct posture, avoiding strain on the lower back, and to use specific gloves to improve grip and avoid abrasions. To facilitate slab movement, especially on pieces weakened by holes or openings, and to facilitate installing the slabs on walls, special frames with suction pads are available (such as those made by Raimondi, Montolit, Sigma Italia and Siri). Use suitable systems for the dimensions of the slab to be moved. Keep the slab weight in mind and make sure you have enough personnel to install it properly.
Technical guide for cladding & flooring16
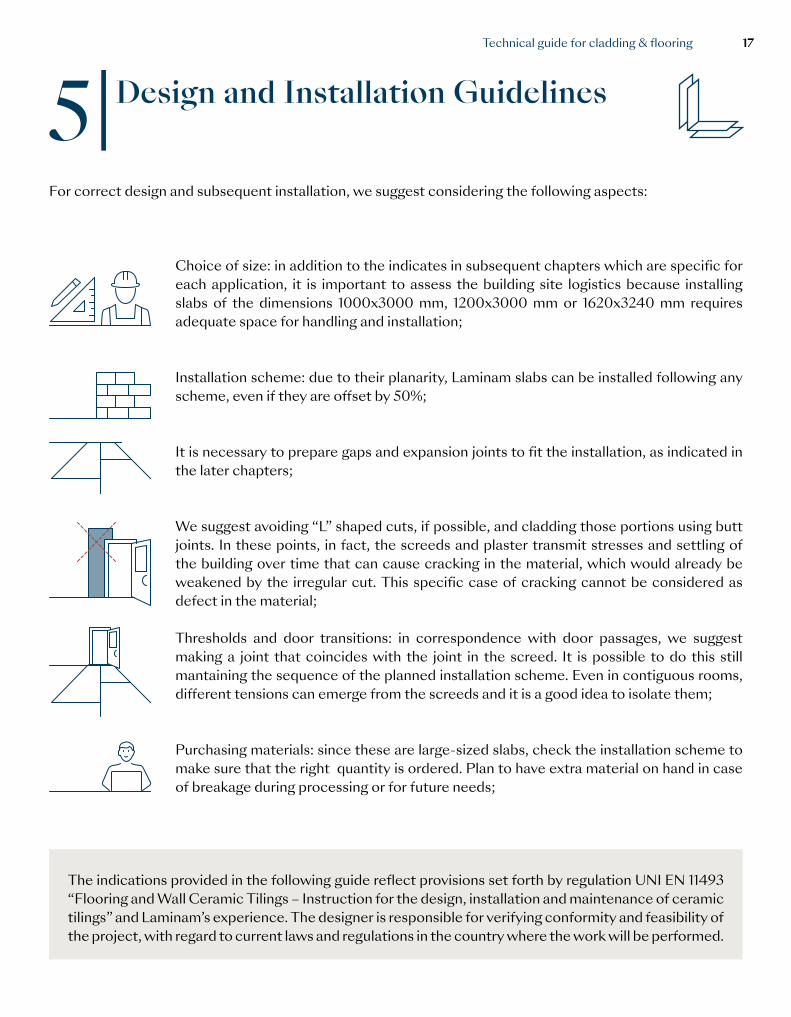
5| Design and Installation Guidelines
For correct design and subsequent installation, we suggest considering the following aspects:
Choice of size: in addition to the indicates in subsequent chapters which are specific for each application, it is important to assess the building site logistics because installing slabs of the dimensions 1000x3000 mm, 1200x3000 mm or 1620x3240 mm requires adequate space for handling and installation;
Installation scheme: due to their planarity, Laminam slabs can be installed following any scheme, even if they are offset by 50%;
It is necessary to prepare gaps and expansion joints to fit the installation, as indicated in the later chapters;
We suggest avoiding “L” shaped cuts, if possible, and cladding those portions using butt joints. In these points, in fact, the screeds and plaster transmit stresses and settling of the building over time that can cause cracking in the material, which would already be weakened by the irregular cut. This specific case of cracking cannot be considered as defect in the material;
Thresholds and door transitions: in correspondence with door passages, we suggest making a joint that coincides with the joint in the screed. It is possible to do this still mantaining the sequence of the planned installation scheme. Even in contiguous rooms, different tensions can emerge from the screeds and it is a good idea to isolate them;
Purchasing materials: since these are large-sized slabs, check the installation scheme to make sure that the right quantity is ordered. Plan to have extra material on hand in case of breakage during processing or for future needs;
The indications provided in the following guide reflect provisions set forth by regulation UNI EN 11493 “Flooring and Wall Ceramic Tilings – Instruction for the design, installation and maintenance of ceramic tilings” and Laminam’s experience. The designer is responsible for verifying conformity and feasibility of the project, with regard to current laws and regulations in the country where the work will be performed.
Technical guide for cladding & flooring 17
6| Processing
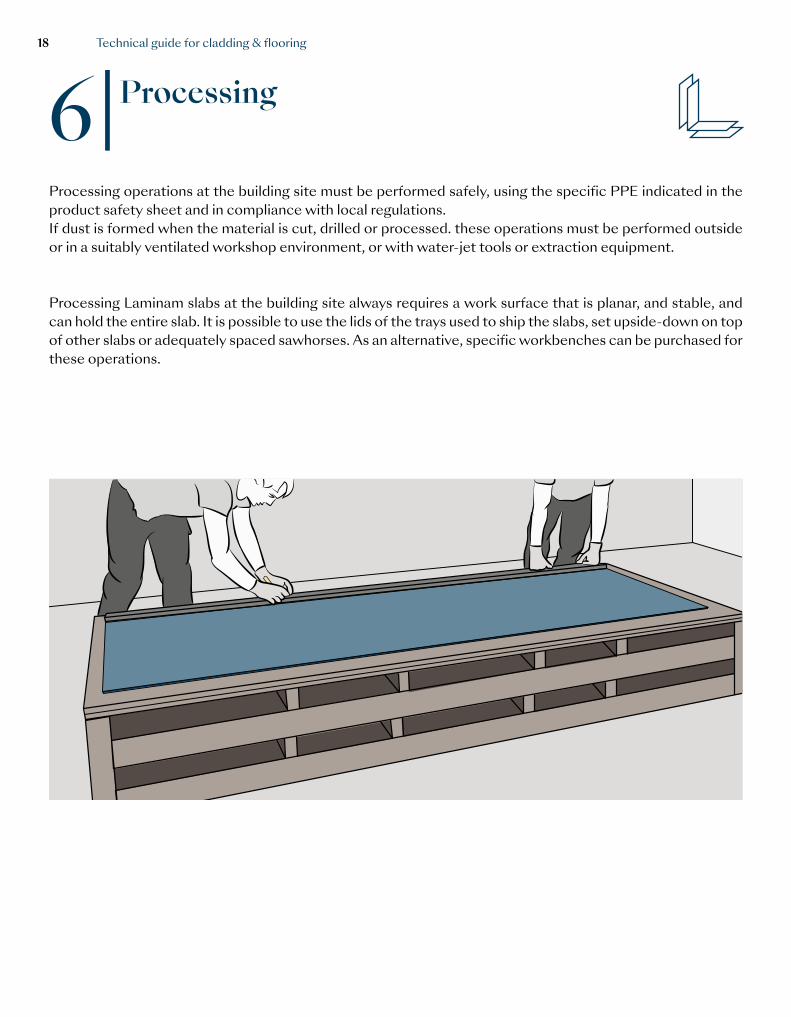
Processing operations at the building site must be performed safely, using the specific PPE indicated in the product safety sheet and in compliance with local regulations.If dust is formed when the material is cut, drilled or processed. these operations must be performed outside or in a suitably ventilated workshop environment, or with water-jet tools or extraction equipment.
Processing Laminam slabs at the building site always requires a work surface that is planar, and stable, and can hold the entire slab. It is possible to use the lids of the trays used to ship the slabs, set upside-down on top of other slabs or adequately spaced sawhorses. As an alternative, specific workbenches can be purchased for these operations.
PAG 11
Technical guide for cladding & flooring18
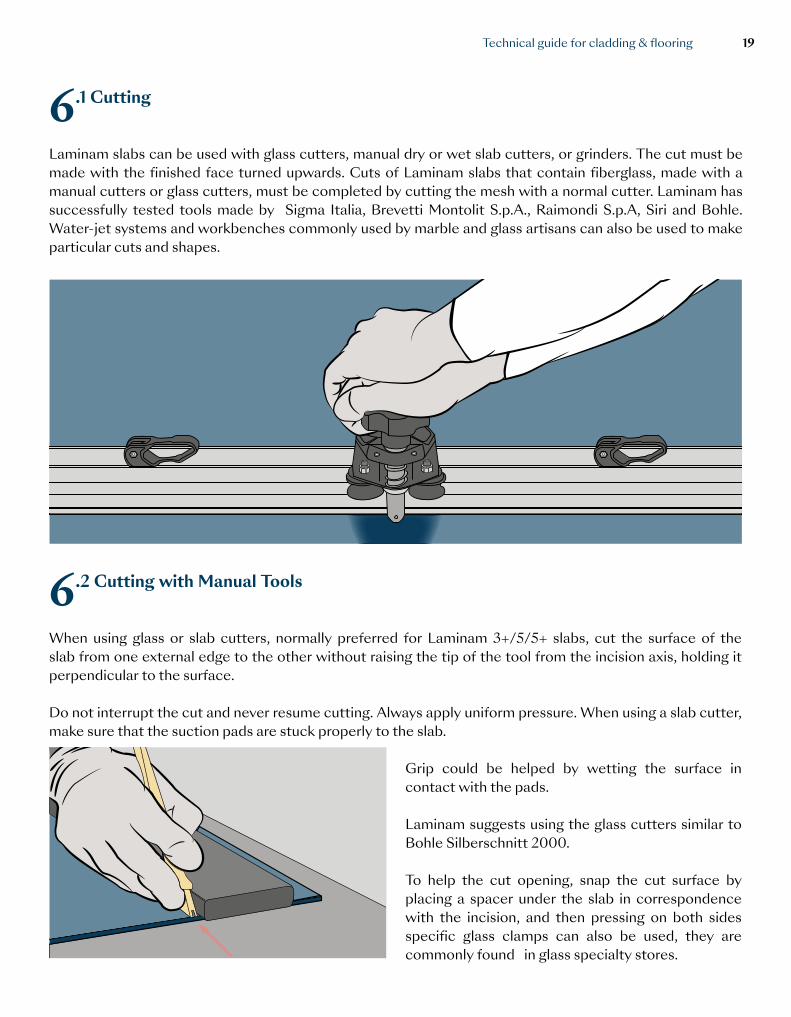
6.1 Cutting
Laminam slabs can be used with glass cutters, manual dry or wet slab cutters, or grinders. The cut must be made with the finished face turned upwards. Cuts of Laminam slabs that contain fiberglass, made with a manual cutters or glass cutters, must be completed by cutting the mesh with a normal cutter. Laminam has successfully tested tools made by Sigma Italia, Brevetti Montolit S.p.A., Raimondi S.p.A, Siri and Bohle. Water-jet systems and workbenches commonly used by marble and glass artisans can also be used to make particular cuts and shapes.
6.2 Cutting with Manual Tools
When using glass or slab cutters, normally preferred for Laminam 3+/5/5+ slabs, cut the surface of the slab from one external edge to the other without raising the tip of the tool from the incision axis, holding it perpendicular to the surface.
Do not interrupt the cut and never resume cutting. Always apply uniform pressure. When using a slab cutter, make sure that the suction pads are stuck properly to the slab.
Grip could be helped by wetting the surface in contact with the pads.
Laminam suggests using the glass cutters similar to Bohle Silberschnitt 2000.
To help the cut opening, snap the cut surface by placing a spacer under the slab in correspondence with the incision, and then pressing on both sides specific glass clamps can also be used, they are commonly found in glass specialty stores.
Technical guide for cladding & flooring 19
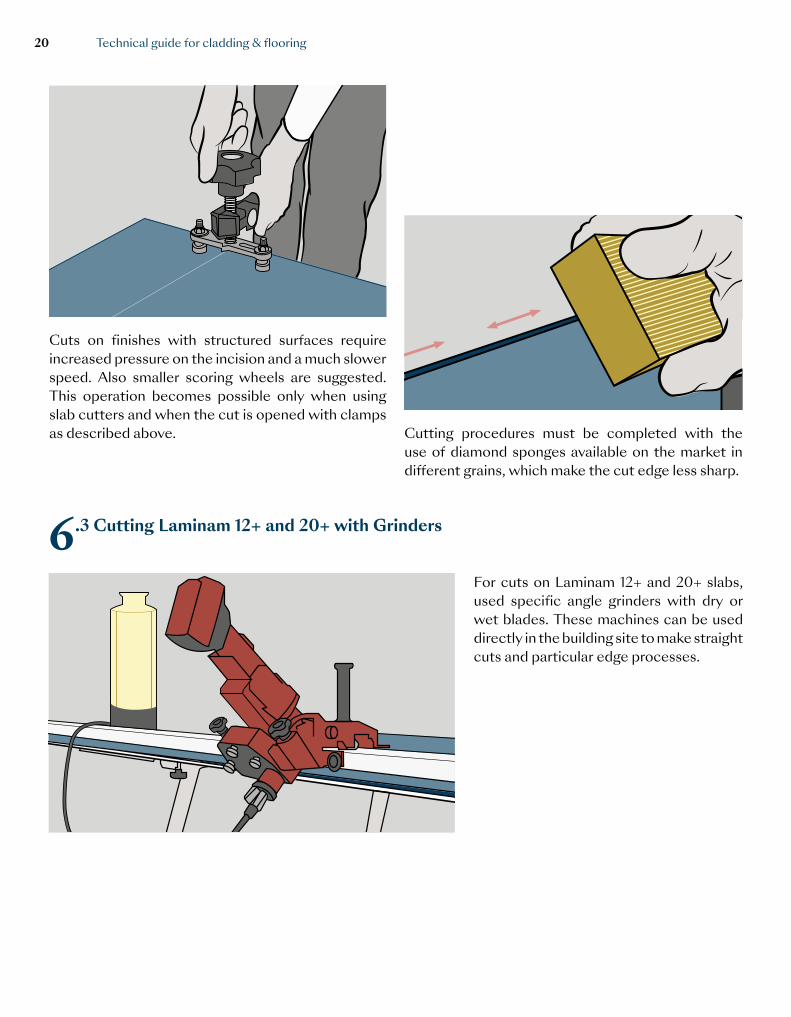
Cutting procedures must be completed with the use of diamond sponges available on the market in different grains, which make the cut edge less sharp.
6.3 Cutting Laminam 12+ and 20+ with Grinders
For cuts on Laminam 12+ and 20+ slabs, used specific angle grinders with dry or wet blades. These machines can be used directly in the building site to make straight cuts and particular edge processes.
PAG 14PAG 14
Cuts on finishes with structured surfaces require increased pressure on the incision and a much slower speed. Also smaller scoring wheels are suggested. This operation becomes possible only when using slab cutters and when the cut is opened with clamps as described above.
Technical guide for cladding & flooring20
6.4 Finishes and Edge Processes
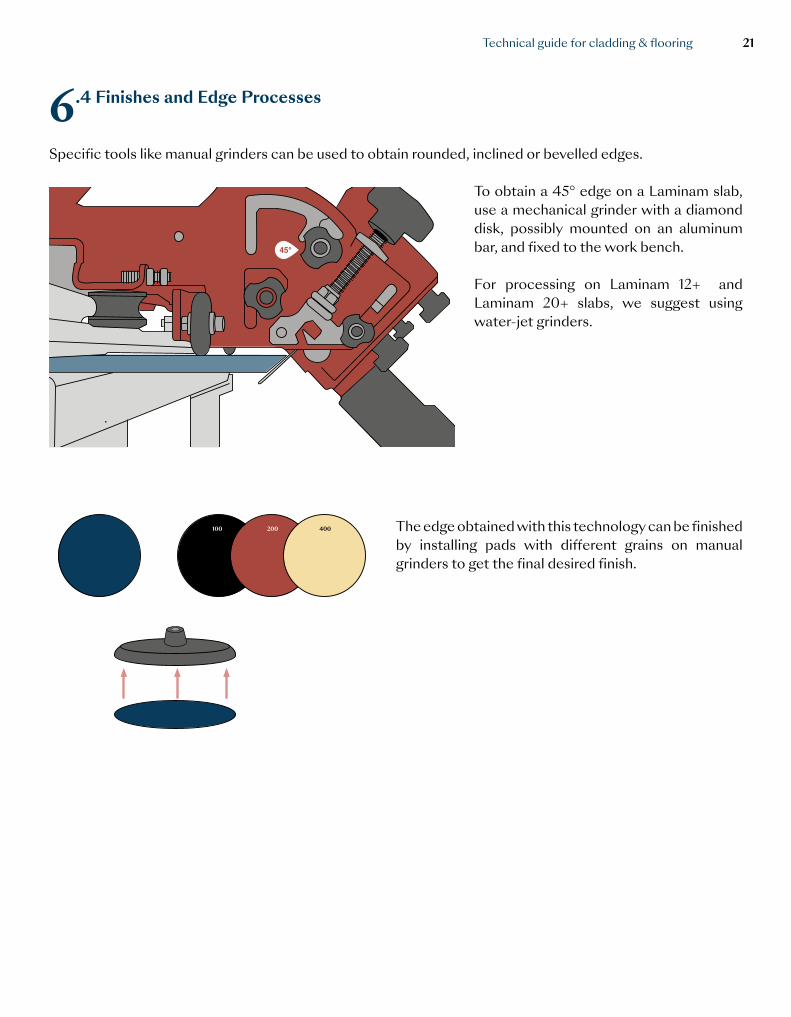
Specific tools like manual grinders can be used to obtain rounded, inclined or bevelled edges.
To obtain a 45° edge on a Laminam slab, use a mechanical grinder with a diamond disk, possibly mounted on an aluminum bar, and fixed to the work bench.
For processing on Laminam 12+ and Laminam 20+ slabs, we suggest using water-jet grinders.
The edge obtained with this technology can be finished by installing pads with different grains on manual grinders to get the final desired finish.
100 200 400
Technical guide for cladding & flooring 21
6.5 Foratura / Drilling
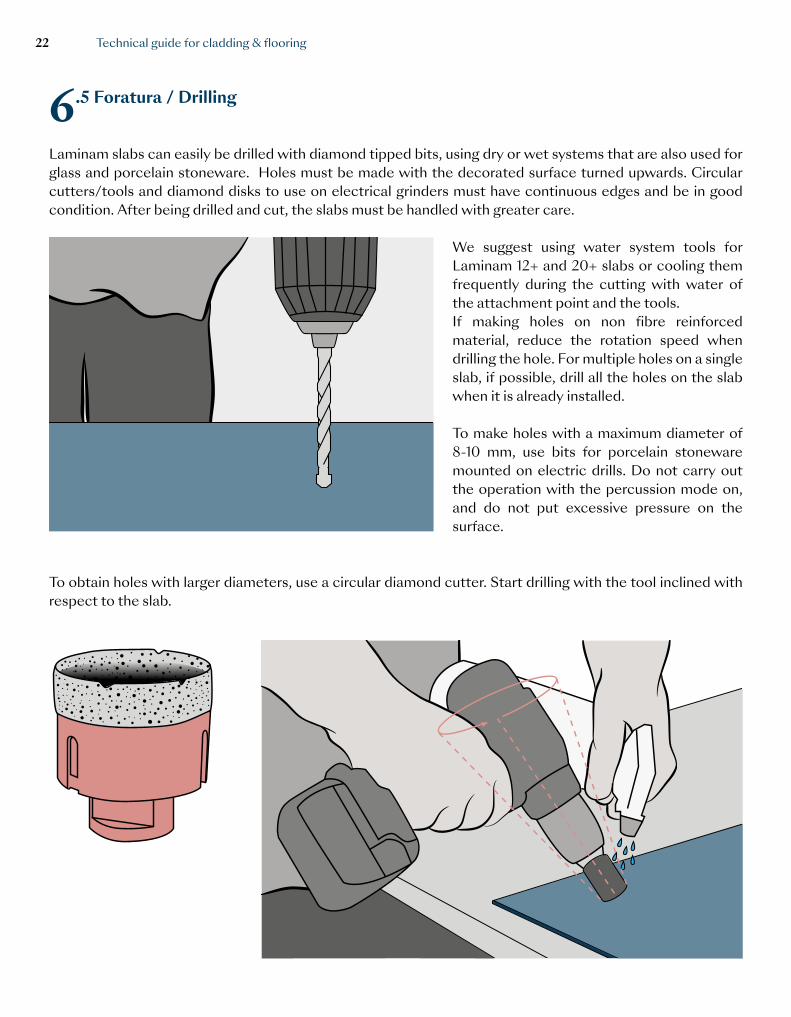
Laminam slabs can easily be drilled with diamond tipped bits, using dry or wet systems that are also used for glass and porcelain stoneware. Holes must be made with the decorated surface turned upwards. Circular cutters/tools and diamond disks to use on electrical grinders must have continuous edges and be in good condition. After being drilled and cut, the slabs must be handled with greater care.
We suggest using water system tools for Laminam 12+ and 20+ slabs or cooling them frequently during the cutting with water of the attachment point and the tools.If making holes on non fibre reinforced material, reduce the rotation speed when drilling the hole. For multiple holes on a single slab, if possible, drill all the holes on the slab when it is already installed.
To make holes with a maximum diameter of 8-10 mm, use bits for porcelain stoneware mounted on electric drills. Do not carry out the operation with the percussion mode on, and do not put excessive pressure on the surface.
To obtain holes with larger diameters, use a circular diamond cutter. Start drilling with the tool inclined with respect to the slab.
Technical guide for cladding & flooring22
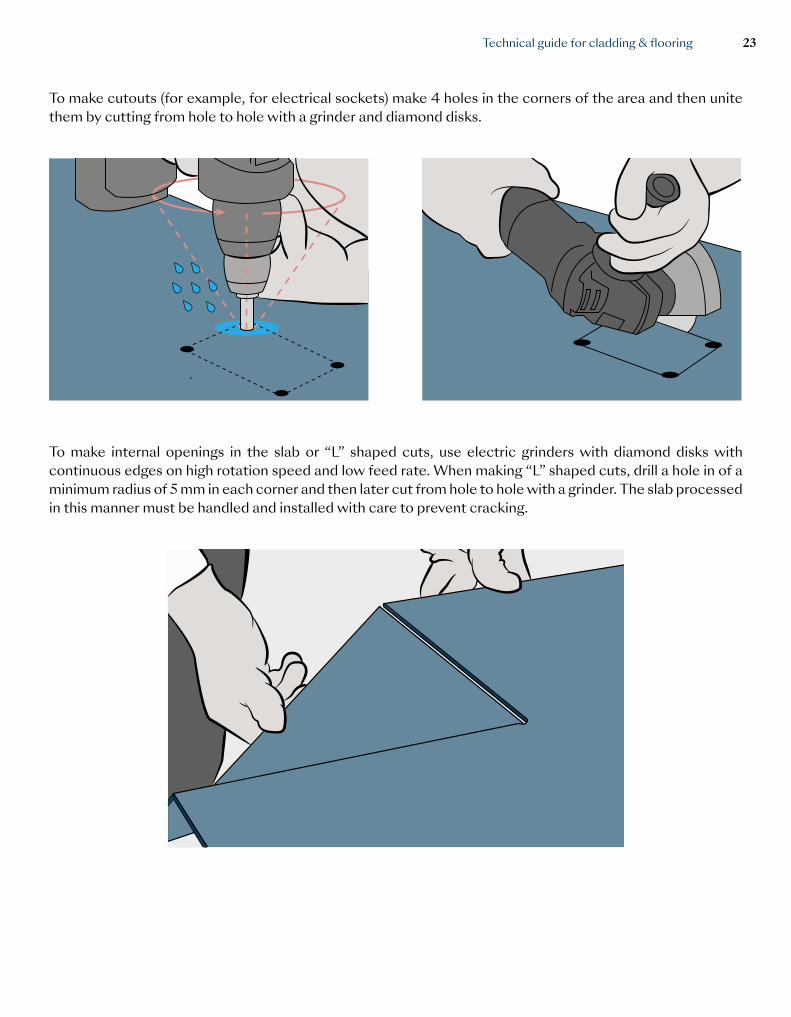
To make cutouts (for example, for electrical sockets) make 4 holes in the corners of the area and then unite them by cutting from hole to hole with a grinder and diamond disks.
To make internal openings in the slab or “L” shaped cuts, use electric grinders with diamond disks with continuous edges on high rotation speed and low feed rate. When making “L” shaped cuts, drill a hole in of a minimum radius of 5 mm in each corner and then later cut from hole to hole with a grinder. The slab processed in this manner must be handled and installed with care to prevent cracking.
Technical guide for cladding & flooring 23
7| Laminam Flooring installation
Laminam 5 | 5+, Laminam 12+ and Laminam 20+ are suitable for installation on any screed or slab at any building site - whether new or existing - as long as it has the same mechanical strength characteristics and a suitable finish for installation. Before carrying out any process on the slab and installing it, it is necessary to verify conformity of the material and the possibility of matching with shades already present at the building site. We do not accept complaints about materials that have been processed and installed.
7.1 Characteristics of the substrate
For correct installation of Laminam slabs, the substrate must comply with the following requirements at the time of installation, indicated in the reference standard UNI 11493-1. If these requirements are not satisfied, it is better to restore them.
Curing The substrate must be stable and completely cured.
Integrity The substrate must be complete, free from cracks at the time of installation and also from detached parts.
StrengthThe substrate must have a surface resistance that prevents it from showing failures that could result in detachments of elements. At any rate, it is good to verify that the substrate is compact and, if subjected to loads and stress, resistant in the depth of its thickness to bending and compression.
Rigidity The substrate must be rigid. Based on working loads, its bending deformation values must be within the reference limit.
Planarity
Regardless of the type of substrate, planarity is checked with a method defined in ISO 7976/1 1989, with 2 m long screed: setting the straight edge in all directions, the permissible tolerance is 3 mm. If the substrate is not planar on most of the surface where the slab is to be installed, it must be levelled off or rectified with suitable products. For isolated problems of planarity, correct the spaces by removing or abrading excess parts and filling valleys, also with the same adhesive that will be used at a later time for installing the slabs.
2 m
Surface FinishThe surface finish of a substrate can affect the attachment of adhesive to the substrate. A smooth surface is not favourable. Abrade the surface mechanically to render it rough. In all cases, before performing any type of work on the substrate, it is necessary to carry out all the actions which will guarantee the adhesion of the materials used with the existing substrate.
Humidity The surface of the substrate must be completely dry to prevent the risk of efflorescence.
Presence of Contaminants Contaminants (such as cement residue, formwork releasing agents, paints, etc.) must be eliminated with specific systems that will render the laying surface perfectly suited for applying the adhesive.
Technical guide for cladding & flooring24
7.2 Flooring installation
Laminam 5 and Laminam 5+ are suitable for being installed as flooring, on any screed or slab at any building site - whether new or existing - as long as it has the characteristics that are suitable for installation.
Laminam 12+ or Laminam 20+ slabs can be used for high traffic applications in which the Project Management requires a thickness exceeding 5.6 mm. Considering the weight of the material (30 kg/m2 for Laminam 12+ and 50 kg/m2 for Laminam 20+), we suggest using a smaller size, which can be obtained by cutting 1620x3240mm slab, depending on the handling and installation systems envisaged, in compliance with the current safety standards.
The designer or the Project Management team is responsible for identifying the product with the best coefficient of friction to use, based on the intended use.
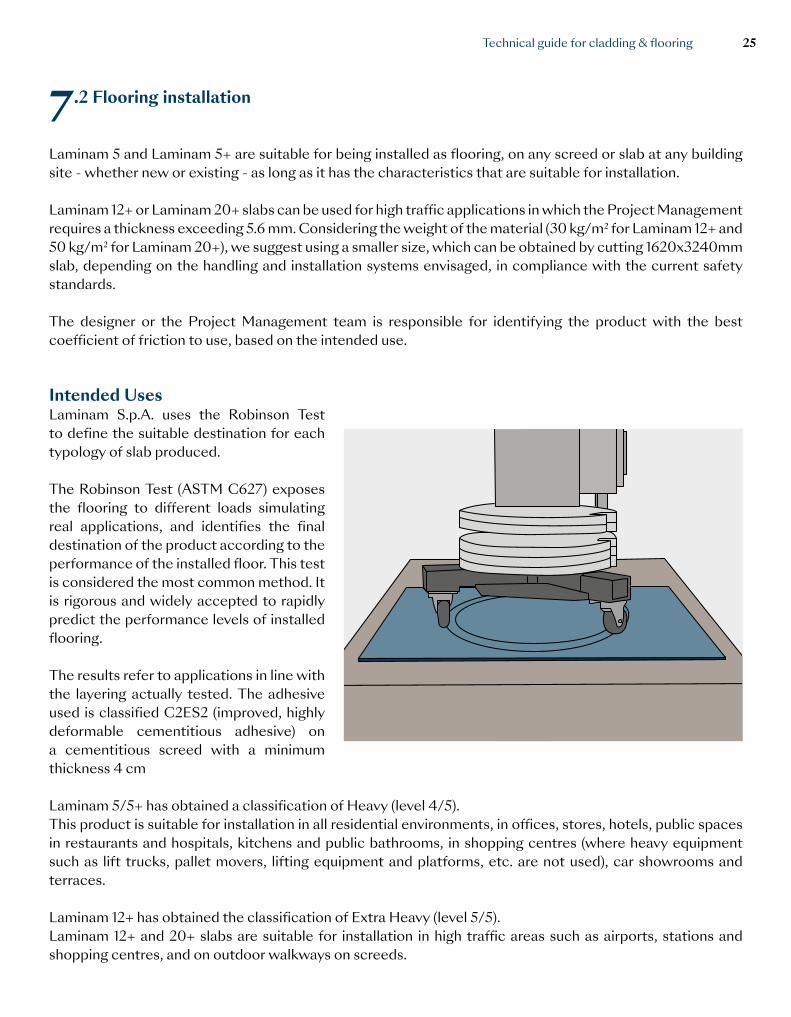
Intended UsesLaminam S.p.A. uses the Robinson Test to define the suitable destination for each typology of slab produced.
The Robinson Test (ASTM C627) exposes the flooring to different loads simulating real applications, and identifies the final destination of the product according to the performance of the installed floor. This test is considered the most common method. It is rigorous and widely accepted to rapidly predict the performance levels of installed flooring.
The results refer to applications in line with the layering actually tested. The adhesive used is classified C2ES2 (improved, highly deformable cementitious adhesive) on a cementitious screed with a minimum thickness 4 cm
Laminam 5/5+ has obtained a classification of Heavy (level 4/5). This product is suitable for installation in all residential environments, in offices, stores, hotels, public spaces in restaurants and hospitals, kitchens and public bathrooms, in shopping centres (where heavy equipment such as lift trucks, pallet movers, lifting equipment and platforms, etc. are not used), car showrooms and terraces.
Laminam 12+ has obtained the classification of Extra Heavy (level 5/5).Laminam 12+ and 20+ slabs are suitable for installation in high traffic areas such as airports, stations and shopping centres, and on outdoor walkways on screeds.
Technical guide for cladding & flooring 25
7.3 Indoor Flooring intallation
The Laminam 5 and Laminam 5+ slabs can be used indoors in their largest format. Due to the heavy weight of the single slab for safety reasons, for applications that require Laminam 12+ or Laminam 20+, we suggest a reduced size created by cutting the 1620x3240mm slab, as shown in paragraph 7.2
7.3.1 Installation on cementitious screeds
The screed must have finished its normal hygrometric shrinkage: generally speaking, cementitious screeds require 7/10 days of curing time for each cm of thickness. The entire thickness must be compact and uniform, and therefore no brittle or detached parts must be present. It is a good idea to beat the surface with a 750 g mallet, which must result in a full sound and not leave marks or cause fragments to break off. It must not be possible to cut the screed deeply, cause crumbling or fragments if scratched with a steel nail.
The screed must be perfectly planar and guarantee compression resistance based on the intended use, as indicated in the current regulations.
To prevent efflorescence, the screed must present a humidity level lower than 3%. If the screed surface is too smooth, we suggest making it rougher with a steel disk, a helicopter trowelling machine or a handheld plastering trowel, making sure that the surface is not too smooth.
Before installing the slabs, the screed must be clean and any cementitious residues, brittle parts or loose parts must be removed. Any cracks that appear after shrinkage must be sealed before laying the flooring. Proceed by removing the brittle parts near the cracks, dedusting and then filling the cracks with epoxy resin. The screed must be rigid and not bend after being subjected to a load. The screed must have expansion joints every 25 m2, perimeter joints and joints in correspondence with doors.
Any pipes must be buried at least 2.5 cm into the concrete and the screed must be reinforced in the places where they are located with a galvanized mesh 2mm in diameter.
Non-adhering screeds must have a thickness exceeding 4 cm and are made by interposing a horizontal layer as a separator. This separation layer is made of polyethylene sheets attached together with adhesive tape overlapping at least 10/15 cm. Non-adhering screeds require the installation of a perimeter joint obtained placing stripes of collapsible material along the perimeter of the walls and the pillars.
If insulation layers are present (thermal or acoustic), screeds must be correctly dimensioned and possibly reinforced with electrically welded mesh or other systems, to prevent punching and favour load distribution.
If the screed is formed in several steps, it is necessary to have expansion joints in the connection points, which must always be vertical, or to apply a solution of water and a binding agent to the hardened part to guarantee adhesion.
Technical guide for cladding & flooring26

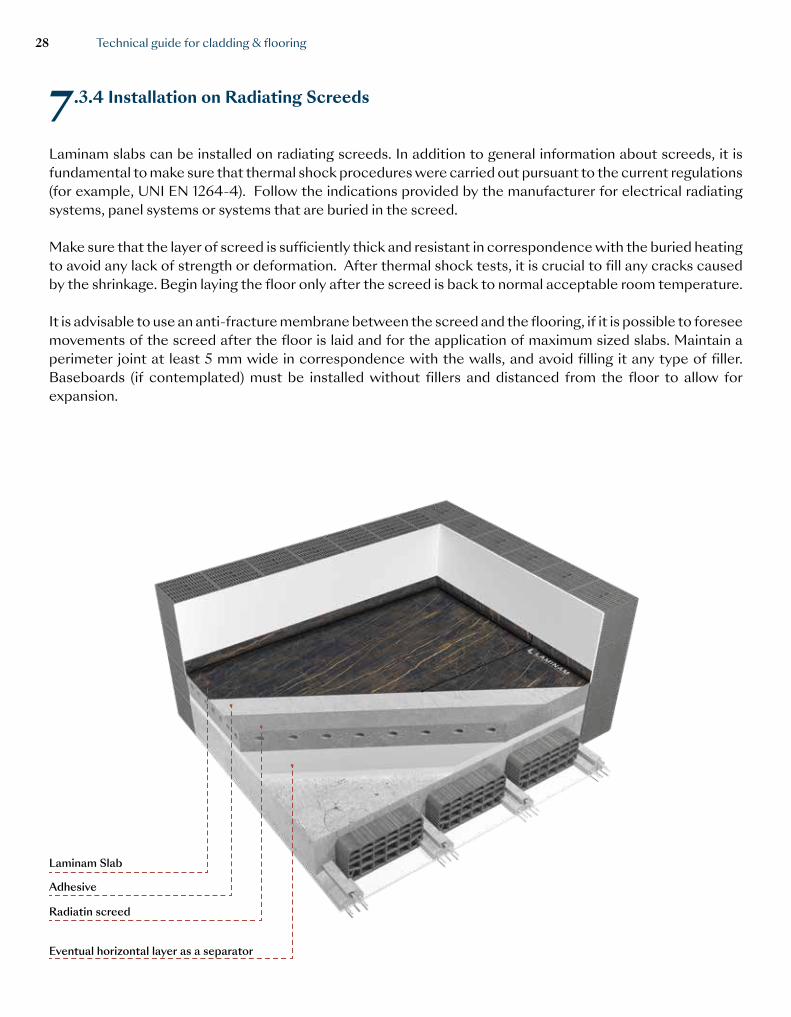
Eventual horizontal layer as a separator
Laminam Slab
Adhesive
Screed
7.3.2 Installation on Anhydrite Screeds
This type of screed is self-levelling, and must be built following the instructions of the manufacturer of the material. In addition to general verifications, anhydrite screeds must be sanded, dedusted and verified to have a humidity content equal to 0.5%. Before starting to lay the floor, it is necessary to apply a primer as indicated by the producer of the glue that you are using.
7.3.3 Installation on Dry Screeds
Dry screeds are built by applying panels in calcium sulphate, cement board or gypsum fibre boards, installed on elevated or floating structures. Before laying the flooring, verify that the manufacturer of the floor guarantees that it is suitable for use, its resistance level and any limitations applicable to the size. Use cementitious glues without applying primer if required by the producer of the panel used.
Technical guide for cladding & flooring 27
Eventual horizontal layer as a separator
Laminam Slab
Adhesive
Radiatin screed
7.3.4 Installation on Radiating Screeds
Laminam slabs can be installed on radiating screeds. In addition to general information about screeds, it is fundamental to make sure that thermal shock procedures were carried out pursuant to the current regulations (for example, UNI EN 1264-4). Follow the indications provided by the manufacturer for electrical radiating systems, panel systems or systems that are buried in the screed.
Make sure that the layer of screed is sufficiently thick and resistant in correspondence with the buried heating to avoid any lack of strength or deformation. After thermal shock tests, it is crucial to fill any cracks caused by the shrinkage. Begin laying the floor only after the screed is back to normal acceptable room temperature.
It is advisable to use an anti-fracture membrane between the screed and the flooring, if it is possible to foresee movements of the screed after the floor is laid and for the application of maximum sized slabs. Maintain a perimeter joint at least 5 mm wide in correspondence with the walls, and avoid filling it any type of filler. Baseboards (if contemplated) must be installed without fillers and distanced from the floor to allow for expansion.
Technical guide for cladding & flooring28
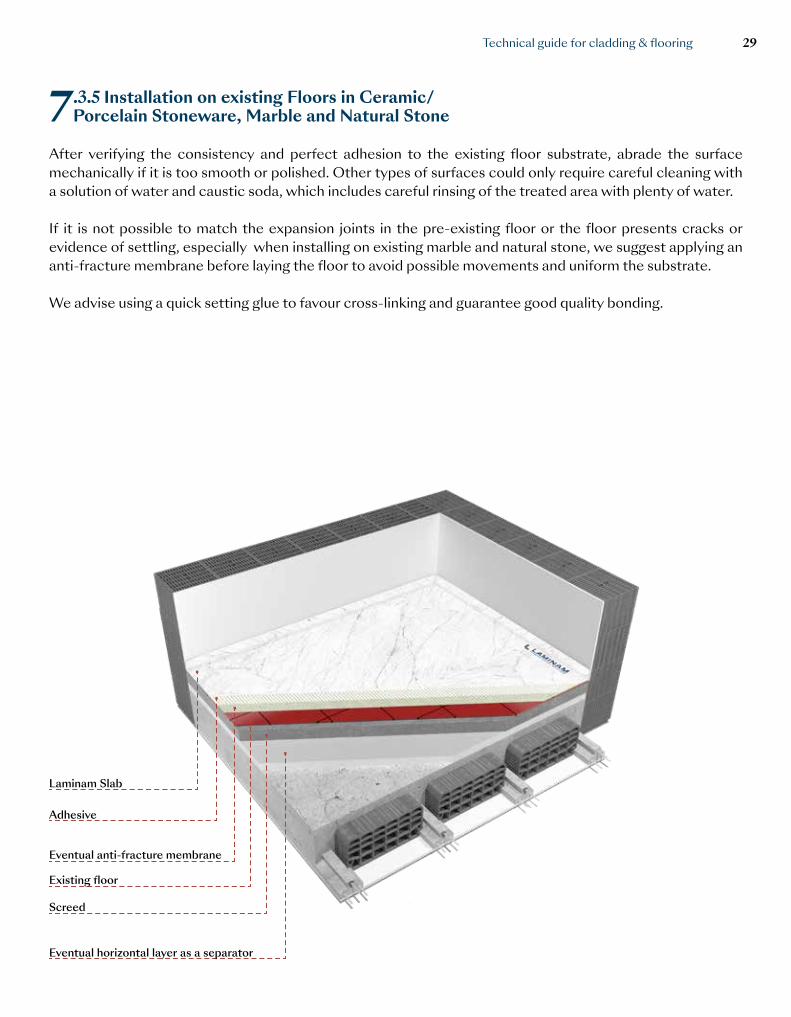
7.3.5 Installation on existing Floors in Ceramic/ Porcelain Stoneware, Marble and Natural Stone
After verifying the consistency and perfect adhesion to the existing floor substrate, abrade the surface mechanically if it is too smooth or polished. Other types of surfaces could only require careful cleaning with a solution of water and caustic soda, which includes careful rinsing of the treated area with plenty of water.
If it is not possible to match the expansion joints in the pre-existing floor or the floor presents cracks or evidence of settling, especially when installing on existing marble and natural stone, we suggest applying an anti-fracture membrane before laying the floor to avoid possible movements and uniform the substrate.
We advise using a quick setting glue to favour cross-linking and guarantee good quality bonding.
Laminam Slab
Adhesive
Eventual anti-fracture membrane
Existing floor
Screed
Eventual horizontal layer as a separator
Technical guide for cladding & flooring 29

7.3.6 Installation on Parquet/Wood and PVC
Make sure the flooring is still perfectly anchored to the substrate. If made of wood, make sure that the wood has not expanded and is stable over time. Treat the surface mechanically to remove the surface finish. Before laying the slabs, we suggest applying an anti-fracture mat and then laying the floor with sizes not exceeding 1000x1000 mm, 500x1500 mm, 1200x1000 mm or 810x1620 mm. We also suggest considering whether to remove the existing flooring because it might be cheaper than treating an existing floor and then installing the slabs on top of it.
7.3.7 Installation on Resin
Use a mechanical system to render the entire surface rough, and then open any cracks and fill them with epoxy resin. Do all the necessary verifications regarding the requirements that the substrate must have to be suitable for supporting a floor in Laminam ceramic slabs before installing the floor.
7.3.8 Installation on Wood Slabs
To apply Laminam slabs onto a wood joist slab, it is important that the surface be stable and that its maximum deformation be less than 1/250 of the clearance. Due to the different expansion coefficients of wood and ceramic, we suggest that you do not apply Laminam slabs directly onto a wooden substrate. However, it is possible to create ceramic flooring on a wood slab by first creating an intermediate layer out of divided screed at least 4 cm high or a divided mat suitable for this purpose. Evaluate the screed format based on the characteristics of the slab in question. As an alternative, it is possible to create a supporting layer obtained with dry systems.
Adhesive and Laying
The type of adhesive is selected on the basis of the following project information:• intended environment of use;• type of substrate;• slab size;
Generally speaking, when installing Laminam slabs as flooring, we suggest an adhesive of class C2S1 or C2S2, with a cementitious base (C), improved adhesive (2) and deformable (S1) or highly deformable (S2) – see synoptic enclosure. The adhesive must be applied so that it completely covers the surface (full spread), which can be done with a back-buttering technique.
Choose a trowel based on the finish and planarity of the substrate. To spread glue on Laminam slabs, we advise using a notched trowel with 6/8 mm inclined teeth for the substrate and a notched trowel with 3 mm inclined teeth for the back of the slab.
Technical guide for cladding & flooring30

Apply a full spread of adhesive, first on the back of the slab and then on the substrate. Be careful to cover the corners and edges perfectly and avoid leaving empty air pockets between the substrate and the slab. Spread the glue only on the surface that you are working on, each time, and then lay the slab, to prevent the formation of surface films that would compromise adhesion. To facilitate air flow, it is crucial that the spreading direction of the glue is the same on the substrate and on the back of the slab, and always parallel with the short side. Full Spread Double Coating
After laying the slab, hammer the surface energetically with a rubber spreader, starting on the opposite side of the applicator and being careful in eliminating empty spots and air bubbles. Always verify perfect adhesion with corners and edges. Do not walk on the floor during the laying process and afterwards. Always comply with curing times for pedestrian traffic indicated by the glue manufacturer, which would be prolonged for installation on non-absorbent substrates (for example, floors laid on existing flooring). When possible, we advise using quick setting glue, especially with the 1620x3240 size, to reduce curing time for pedestrian traffic.
It is important to protect the polished surfaces during installation to prevent them from coming in contact with tools that could stain or scratch. We also advise cleaning the floor frequently and not walking on it with dirty shoes or in presence of debris. After installation is finished and the floor has been cleaned, protect the slabs with soft cloths until the building site is closed.
Technical guide for cladding & flooring 31
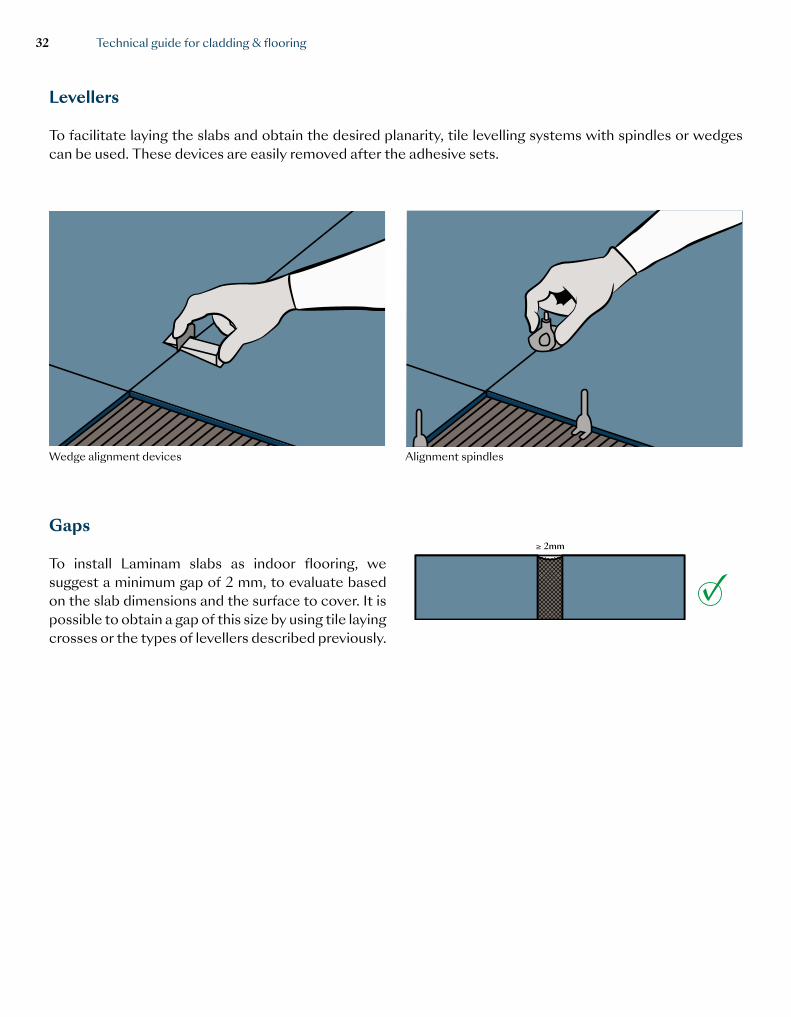
Wedge alignment devices Alignment spindles
Levellers
To facilitate laying the slabs and obtain the desired planarity, tile levelling systems with spindles or wedges can be used. These devices are easily removed after the adhesive sets.
Gaps
To install Laminam slabs as indoor flooring, we suggest a minimum gap of 2 mm, to evaluate based on the slab dimensions and the surface to cover. It is possible to obtain a gap of this size by using tile laying crosses or the types of levellers described previously.
≥ 2mm
✓≥ 2mm
✓≥ 2mm
✓
Technical guide for cladding & flooring32
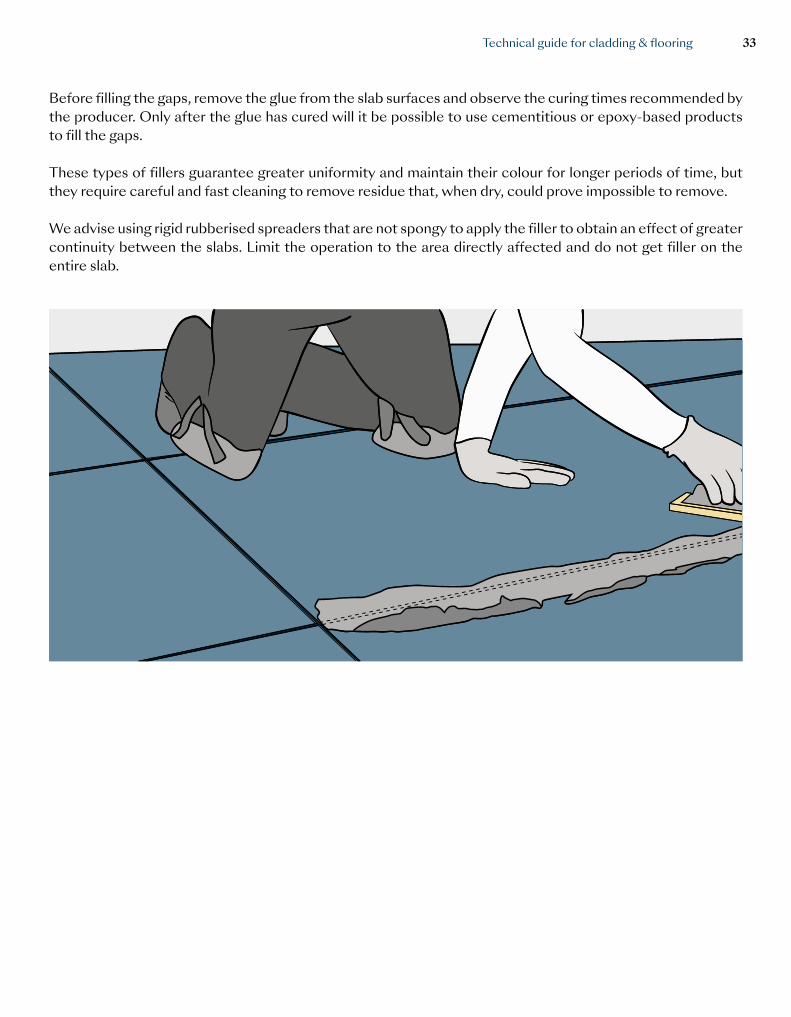
Before filling the gaps, remove the glue from the slab surfaces and observe the curing times recommended by the producer. Only after the glue has cured will it be possible to use cementitious or epoxy-based products to fill the gaps.
These types of fillers guarantee greater uniformity and maintain their colour for longer periods of time, but they require careful and fast cleaning to remove residue that, when dry, could prove impossible to remove.
We advise using rigid rubberised spreaders that are not spongy to apply the filler to obtain an effect of greater continuity between the slabs. Limit the operation to the area directly affected and do not get filler on the entire slab.
PAG 26
Technical guide for cladding & flooring 33
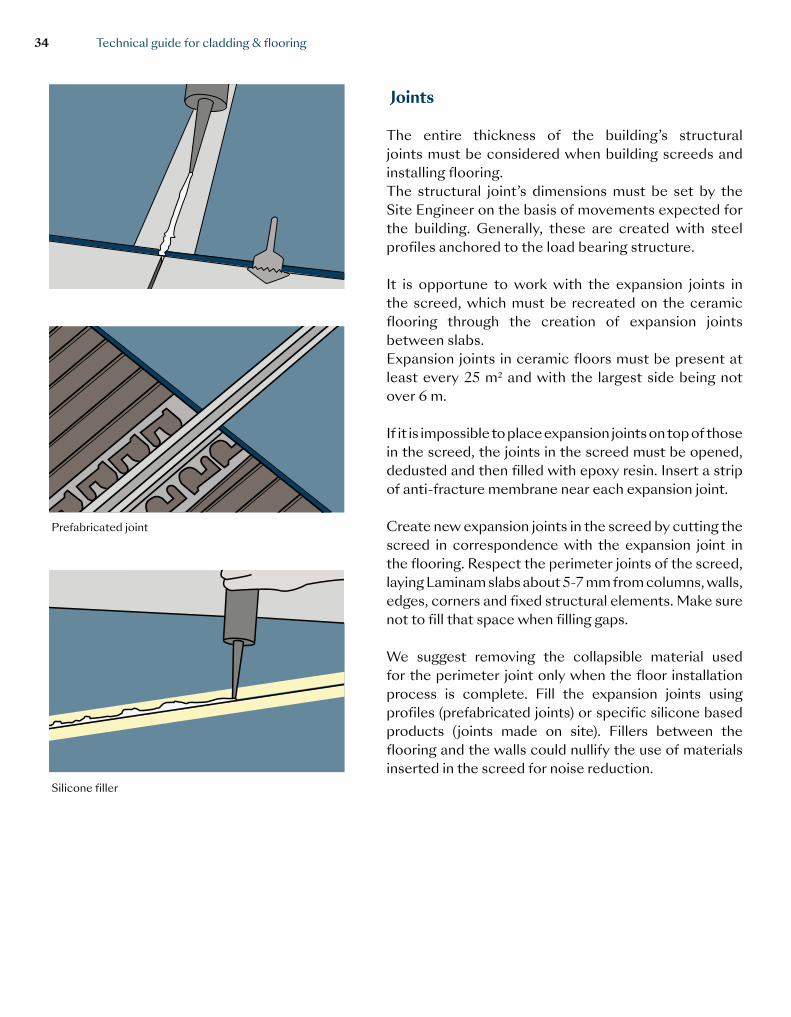
Joints
The entire thickness of the building’s structural joints must be considered when building screeds and installing flooring. The structural joint’s dimensions must be set by the Site Engineer on the basis of movements expected for the building. Generally, these are created with steel profiles anchored to the load bearing structure.
It is opportune to work with the expansion joints in the screed, which must be recreated on the ceramic flooring through the creation of expansion joints between slabs. Expansion joints in ceramic floors must be present at least every 25 m2 and with the largest side being not over 6 m.
If it is impossible to place expansion joints on top of those in the screed, the joints in the screed must be opened, dedusted and then filled with epoxy resin. Insert a strip of anti-fracture membrane near each expansion joint.
Create new expansion joints in the screed by cutting the screed in correspondence with the expansion joint in the flooring. Respect the perimeter joints of the screed, laying Laminam slabs about 5-7 mm from columns, walls, edges, corners and fixed structural elements. Make sure not to fill that space when filling gaps.
We suggest removing the collapsible material used for the perimeter joint only when the floor installation process is complete. Fill the expansion joints using profiles (prefabricated joints) or specific silicone based products (joints made on site). Fillers between the flooring and the walls could nullify the use of materials inserted in the screed for noise reduction.
Silicone filler
Prefabricated joint
Technical guide for cladding & flooring34
Membrane
We suggest using suitable anti-fracture membranes if:• If is necessary to install flooring on cracked substrates and the membrane would prevent the stress from
being transmitted to the flooring;• If the substrate is not perfectly cured, to favour a correct elimination of vapour tension;• If it is not possible to recreate the joints in the screed also in the flooring or, if an overlaid floor does not
match up with existing joints;• On radiating screeds.
Apply the anti-fracture membrane with a suitable adhesive for both the membrane and the Laminam slab, compatible with the substrate, and after verification and suitable cleaning of the substrate. Lay the slabs after the adhesive cures. In any case, it is necessary to respect the structural joints of the building.For each of the aforementioned systems, it is necessary to follow the manufacturer’s instructions.
Technical guide for cladding & flooring 35
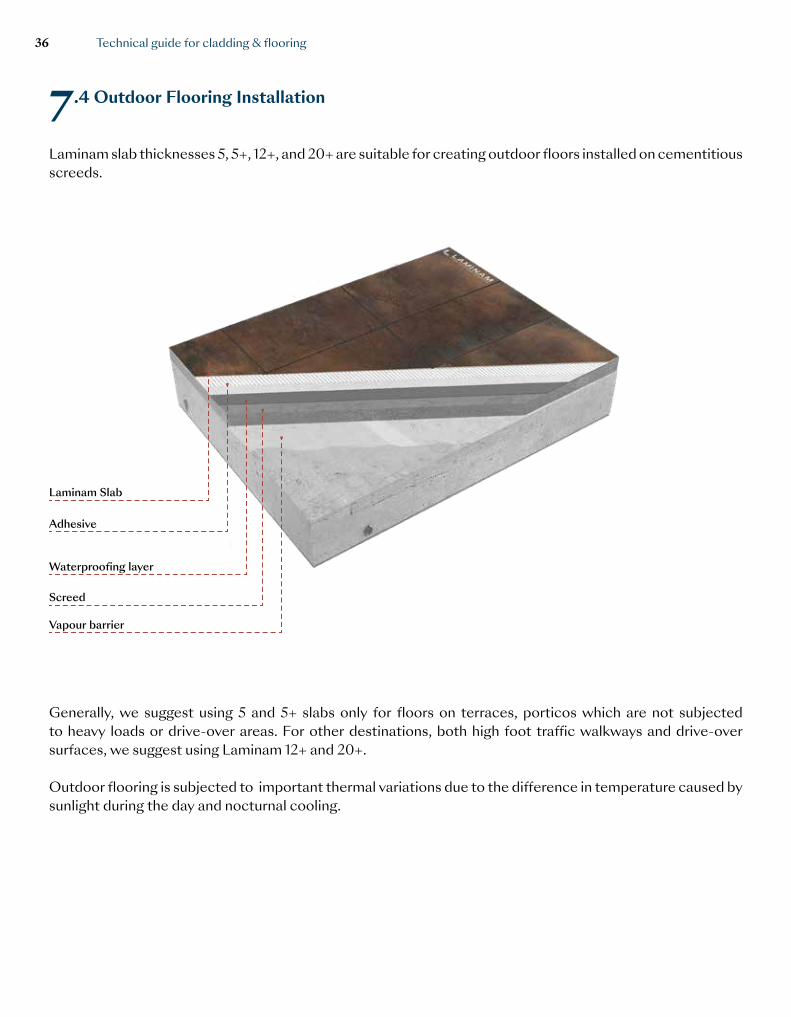
7.4 Outdoor Flooring Installation
Laminam slab thicknesses 5, 5+, 12+, and 20+ are suitable for creating outdoor floors installed on cementitious screeds.
Generally, we suggest using 5 and 5+ slabs only for floors on terraces, porticos which are not subjected to heavy loads or drive-over areas. For other destinations, both high foot traffic walkways and drive-over surfaces, we suggest using Laminam 12+ and 20+.
Outdoor flooring is subjected to important thermal variations due to the difference in temperature caused by sunlight during the day and nocturnal cooling.
Laminam Slab
Adhesive
Waterproofing layer
Screed
Vapour barrier
Technical guide for cladding & flooring36
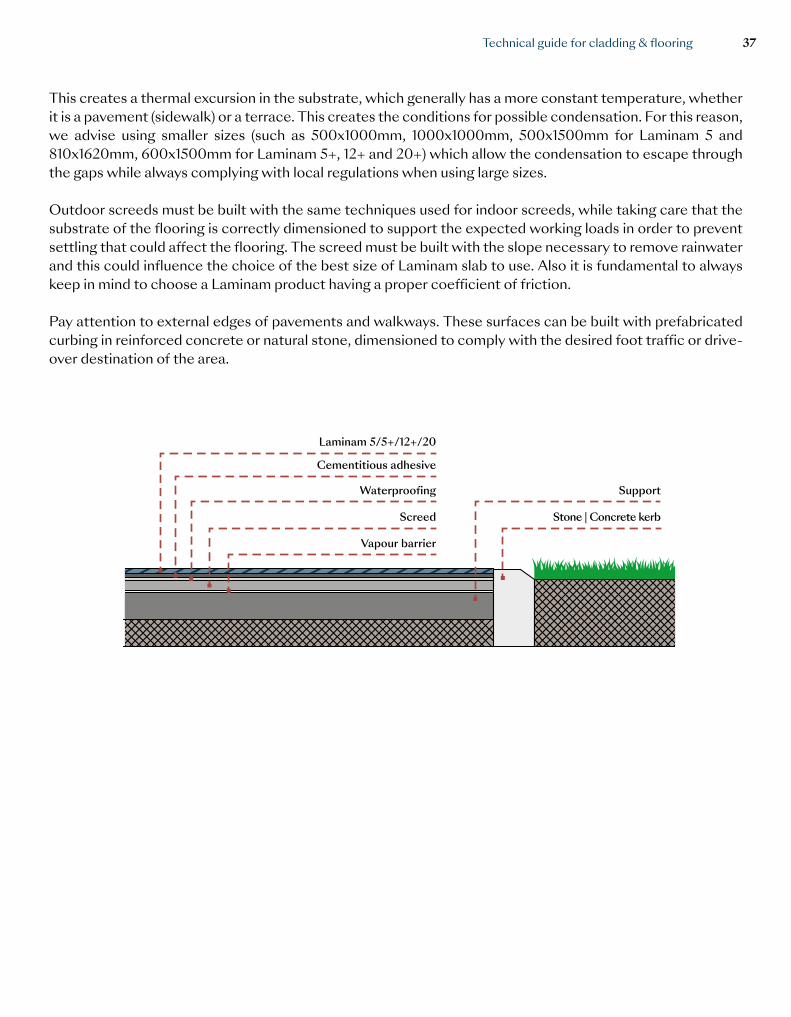
This creates a thermal excursion in the substrate, which generally has a more constant temperature, whether it is a pavement (sidewalk) or a terrace. This creates the conditions for possible condensation. For this reason, we advise using smaller sizes (such as 500x1000mm, 1000x1000mm, 500x1500mm for Laminam 5 and 810x1620mm, 600x1500mm for Laminam 5+, 12+ and 20+) which allow the condensation to escape through the gaps while always complying with local regulations when using large sizes.
Outdoor screeds must be built with the same techniques used for indoor screeds, while taking care that the substrate of the flooring is correctly dimensioned to support the expected working loads in order to prevent settling that could affect the flooring. The screed must be built with the slope necessary to remove rainwater and this could influence the choice of the best size of Laminam slab to use. Also it is fundamental to always keep in mind to choose a Laminam product having a proper coefficient of friction.
Pay attention to external edges of pavements and walkways. These surfaces can be built with prefabricated curbing in reinforced concrete or natural stone, dimensioned to comply with the desired foot traffic or drive-over destination of the area.
Laminam 5/5+/12+/20
Cementitious adhesive
Waterproofing
Screed
Vapour barrier
Support
Stone | Concrete kerb
Technical guide for cladding & flooring 37
✓≥ 5mm
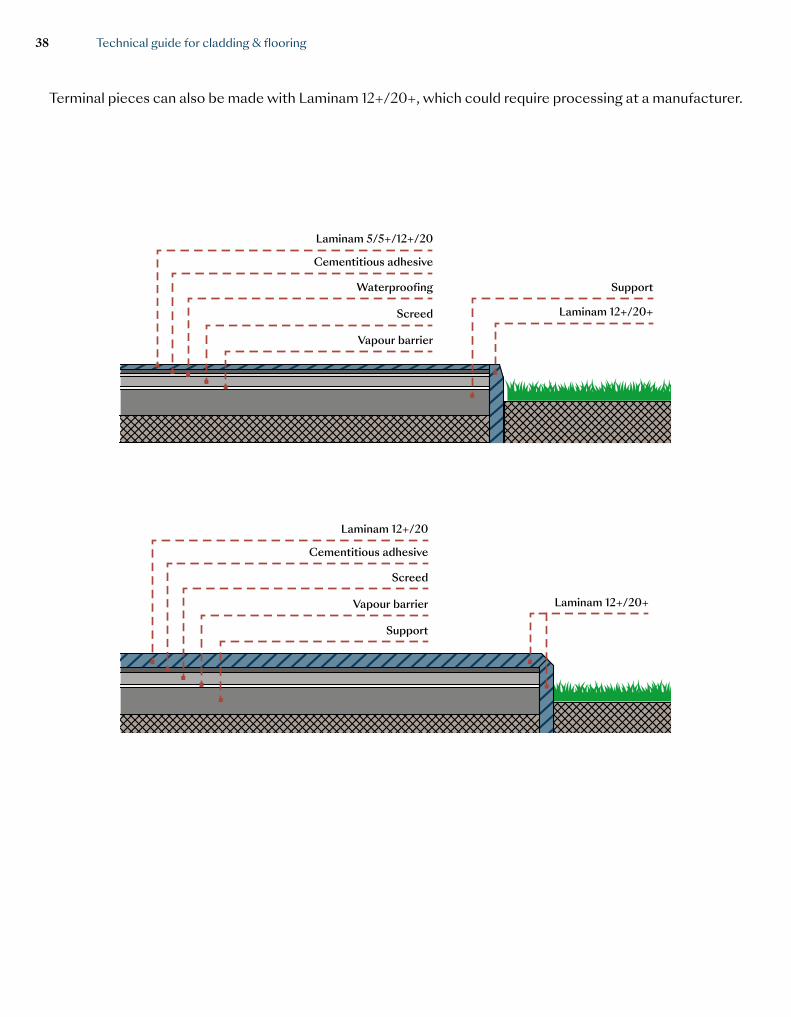
Terminal pieces can also be made with Laminam 12+/20+, which could require processing at a manufacturer.
Laminam 12+/20+
Laminam 5/5+/12+/20
Cementitious adhesive
Waterproofing
Screed
Vapour barrier
Support
Laminam 12+/20
Cementitious adhesive
Screed
Vapour barrier
Support
Laminam 12+/20+
Technical guide for cladding & flooring38
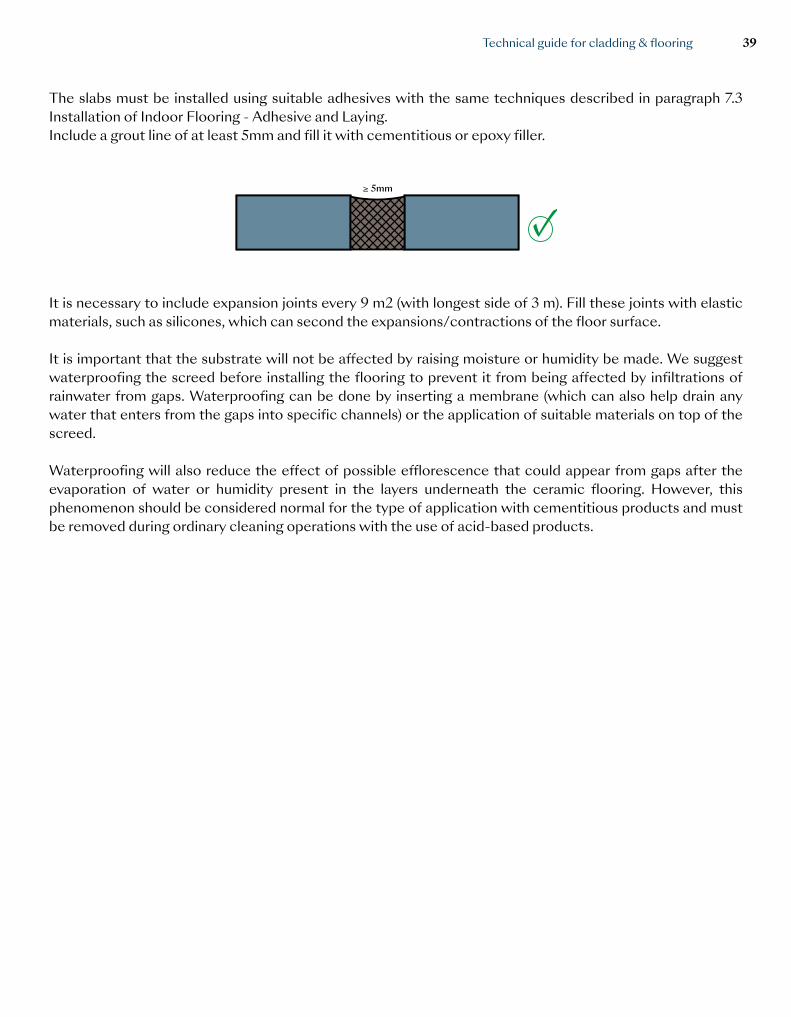
The slabs must be installed using suitable adhesives with the same techniques described in paragraph 7.3 Installation of Indoor Flooring - Adhesive and Laying. Include a grout line of at least 5mm and fill it with cementitious or epoxy filler.
✓≥ 5mm
Laminam 12+/20
Adesivo cementizio/ Cementitious adhesive
Massetto cementizio/ Screed
Barriera al vapore/ Vapour barrier
Supporto/ Support
Laminam 12+/20+
It is necessary to include expansion joints every 9 m2 (with longest side of 3 m). Fill these joints with elastic materials, such as silicones, which can second the expansions/contractions of the floor surface.
It is important that the substrate will not be affected by raising moisture or humidity be made. We suggest waterproofing the screed before installing the flooring to prevent it from being affected by infiltrations of rainwater from gaps. Waterproofing can be done by inserting a membrane (which can also help drain any water that enters from the gaps into specific channels) or the application of suitable materials on top of the screed.
Waterproofing will also reduce the effect of possible efflorescence that could appear from gaps after the evaporation of water or humidity present in the layers underneath the ceramic flooring. However, this phenomenon should be considered normal for the type of application with cementitious products and must be removed during ordinary cleaning operations with the use of acid-based products.
Technical guide for cladding & flooring 39
8| Indoor Cladding Installation
Laminam 3+ and 5 slabs, in the largest size 1000x3000 mm, and Laminam 5+, in its largest size 1200x3000 mm and 1620x3240 mm, can be applied as cladding in interiors.
Laminam 12+/20+ slabs can also be installed where its weight allows installation. In the case, of slabs that do not transmit their weight directly onto the floor, the Site Engineer must verify the need to insert mechanical restraints for safety.
Adhesive and Laying
Use a deformable (C2S1) or highly deformable (C2S2) adhesive depending on the size that is being installed. Spread a full coat of adhesive, with a back buttering technique, on the substrate and on the slab, being careful to cover the corners and edges. The quantity of to use must be directly proportional to the slab size and the substrate characteristics.
The installer will choose the tools to use: we generally advise using a 3mm V-notched trowel for the back of the slab and 6-9 mm V-notched for the substrate. The adhesive must be spread in the same direction on the back of the slab and the wall substrate. The quantity of adhesive must be sufficient to guarantee that the slab is installed without empty spaces and air pockets between it and the wall.
Spread the adhesive only on the surface that you are working on, each time, and then install the slab, to prevent the formation of surface films that would compromise adhesion. After installing the ceramic surface, use a rubber mallet to remove all the air from the adhesive. We suggest gaps of at least 1/2 mm, assessed based on the slab size, the wall dimensions and the substrate quality. Before filling the gaps, wait for the adhesive to dry according to indications from the manufacturer: products with cementitious or epoxy resin base can be used. These types of fillers guarantee greater uniformity and maintain their color for longer periods of time, but they require careful and fast cleaning.
Always observe the building’s structural joints and create expansion joints on the ceramic cladding every 25 m2 at least, with the longest side not exceeding 6 m. Fill gaps around all corners and edges with silicone-based products.The choice of size and type of the ceramic slabs must be assessed also in consideration of the handling and logistics allowed at the building site.
Technical guide for cladding & flooring40

PAG 32
PAG 32
Check planarity of the existing substrate
Spread adhesive on the back of the slab
Installation
Spread adhesive on the existing substrate
Spread adhesive on plaster
Fill the gaps
Technical guide for cladding & flooring 41
8.1 Checking the substrates
For correct slab installation, check that the substrate meets the requirements set out in section 7.1
8.1.1 Cementitious plaster or render/ lime and chalk
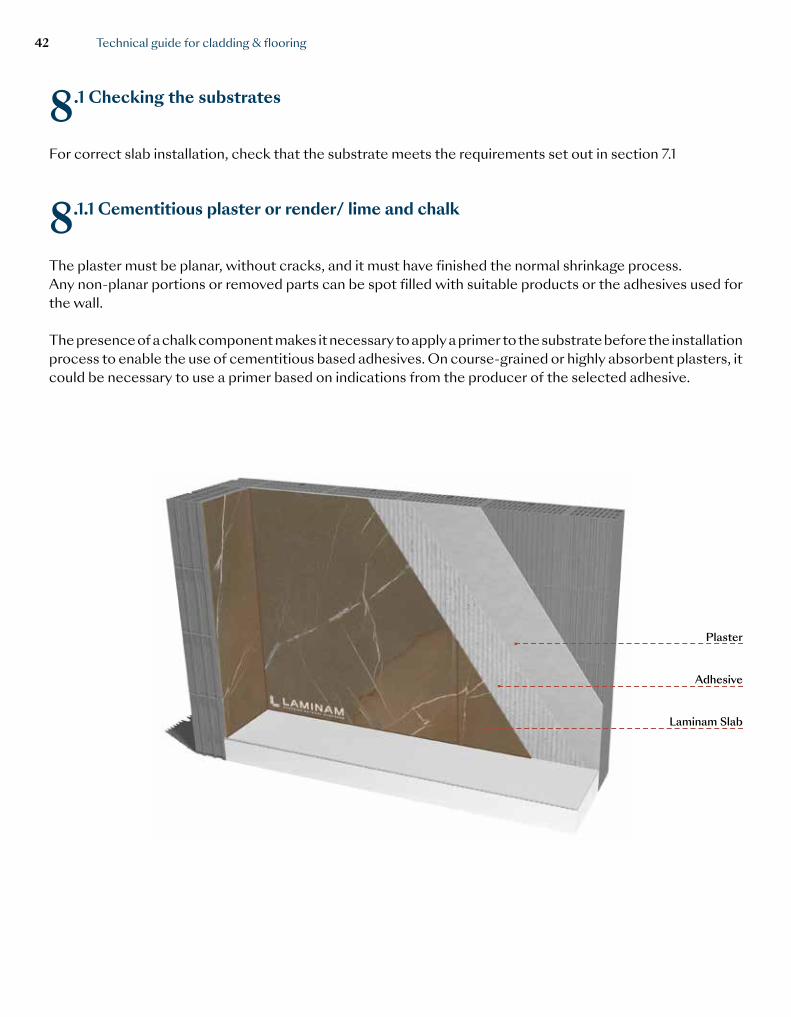
The plaster must be planar, without cracks, and it must have finished the normal shrinkage process. Any non-planar portions or removed parts can be spot filled with suitable products or the adhesives used for the wall.
The presence of a chalk component makes it necessary to apply a primer to the substrate before the installation process to enable the use of cementitious based adhesives. On course-grained or highly absorbent plasters, it could be necessary to use a primer based on indications from the producer of the selected adhesive.
Laminam Slab
Plaster
Adhesive
Technical guide for cladding & flooring42
8.1.2 Installation on existing cladding
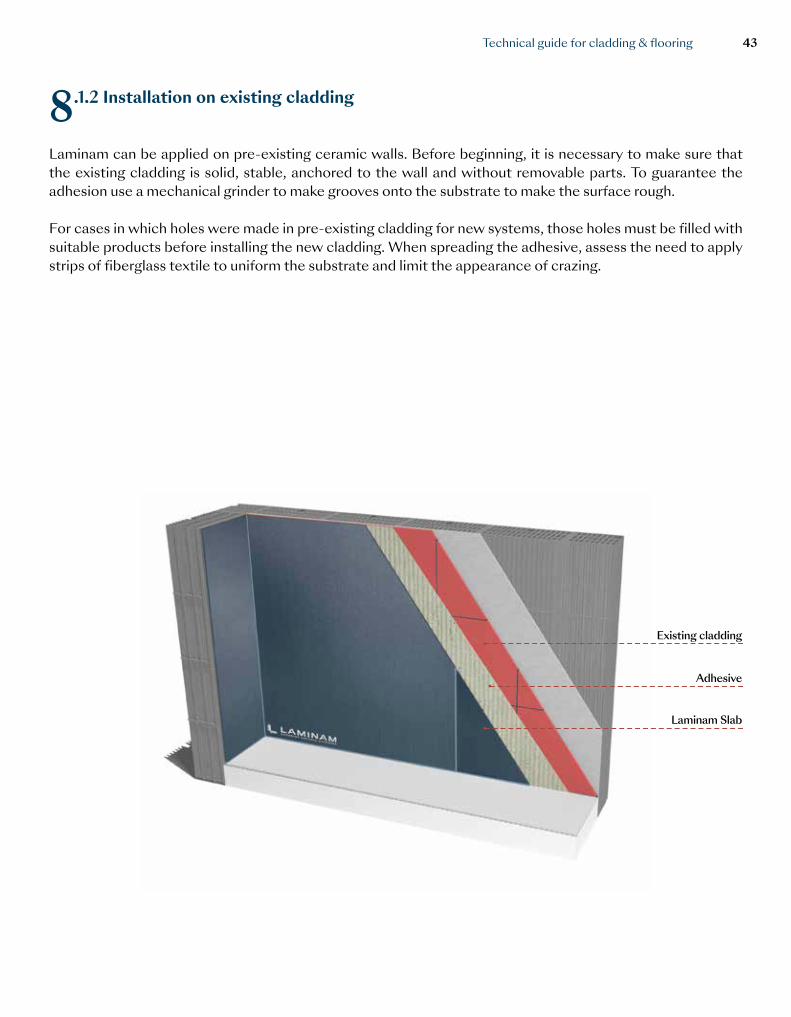
Laminam can be applied on pre-existing ceramic walls. Before beginning, it is necessary to make sure that the existing cladding is solid, stable, anchored to the wall and without removable parts. To guarantee the adhesion use a mechanical grinder to make grooves onto the substrate to make the surface rough.
For cases in which holes were made in pre-existing cladding for new systems, those holes must be filled with suitable products before installing the new cladding. When spreading the adhesive, assess the need to apply strips of fiberglass textile to uniform the substrate and limit the appearance of crazing.
Laminam Slab
Existing cladding
Adhesive
Technical guide for cladding & flooring 43

8.1.3 Drywall
Laminam can be installed on drywall, which must be dimensioned based on the height and weight of the envisaged ceramic cladding. The wall must be treated with a specific primer applied to the surface of the substrate to allow the application of cementitious adhesive.
8.2 Installing Laminam 5+ size 1620x3240
Laminam slabs set on a horizontal surface guarantee a level of planarity that makes it possible to use any size as a covering. This is not the same when the material is installed vertically, due to the large dimensions and reduced thickness, because the material could settle and take on a shape that is not perfectly planar. Mainly when using Laminam 5+/12+ in the 1620x3240 size, we offer the following additional advice:
• Use a quick setting adhesive;• Use leveling spacers as described in paragraph 7.3 Installation of Indoor Flooring – Levellers;• If necessary, support the slab in the center to prevent the possible detachment of the central part before
the adhesive sets, which would compromise the planarity of the cladding.
Laminam Slab
Drywall
Adhesive
Technical guide for cladding & flooring44
9| Exterior Cladding Installation
To install in exteriors, it is possible to use the Laminam 3/3+ and Laminam 5/5+ slabs. To choose the right slab, we advise you to consider sun exposure, the geographic position and color of the slabs (dark colors and black tend to attract more heat which results in higher thermal expansion). The choice of the size to use on the facade must be carefully evaluated to allow the operator to install it correctly (handling, back buttering, bonding and hammering) depending on the wall height and the building site equipment (scaffolding, cranes, lifts).
For exterior claddings, it is therefore advisable to use the sizes 1000x3000mm, 1200x3000mm or 1620x3240mm, but only to limit heights and when building site conditions allow installers to guarantee excellent results.Before proceeding with installation, check that the substrate meets the requirements of section 7.1 for correct slab installation.
Installation should be done with C2S2 cementitious adhesives applied with a full spread technique with the same methods as listed in the paragraph “Interior cladding” and taking care to not leave empty spaces and air pockets between the slab and the substrate.A minimum gap of 5 mm is advisable, filled with cementitious filler, epoxy filler or silicone. Always match the structural joints of the building and install expansion joints in the ceramic cladding every 9 m2, with the longest side not exceeding 4 m.
Expansion joints must be sealed with the same silicone used to fill the gaps if 1000x3000 mm, 1200x3000 mm or 1620x3240 mm Laminam slabs were installed. When the cladding has been installed, adopt all the necessary devices to prevent water infiltrations between the slabs and the substrate (installation of top elements, flashings, etc.).
To complete the exterior cladding, and before removing the lifting systems used to install the slabs, it is crucial to clean the surfaces correctly, as described in chapter 14.1, to eliminate all the residue of the building site activities.
Technical guide for cladding & flooring 45

9.1 Installation on Plaster
Laminam can be adhered directly to exterior plaster applied to infill material in brick or lightweight concrete, as long as the existing plaster has a pullout resistance of at least 1 N/mm2. The plaster must be suitable to hold ceramic cladding, which means it must be made with a type of cementitious mortar that guarantees high mechanical resistance and high adhesion to walls. If the substrates are mixed, with reinforced concrete frames and infill in masonry, it will be necessary to reinforce the plaster to prevent possible cracking which could then transfer to the cladding. For portions like reinforced concrete curbs around the perimeter, which form the substrate for insulation, the plaster must be reinforced with a galvanized mesh that is mechanically anchored to the masonry substrate wall next to these portions.
Laminam Slab
Plaster
Adhesive
9.2 Installation on Concrete Partitions
Concrete must have reached a sufficient level of curing and completed its shrinkage process. It is necessary to clean the surface by pressure washing or mechanical abrasion to remove any residue of disarming products, dust and dirt which could compromise the hold of the adhesive. For excessively smooth surfaces which could compromise adhesion, use a grinder to make them rough or apply a suitable primer.
On substrates that have planarity issues, it may be necessary to spot fill with suitable cementitious products or to apply plaster on the whole surface.
Technical guide for cladding & flooring46
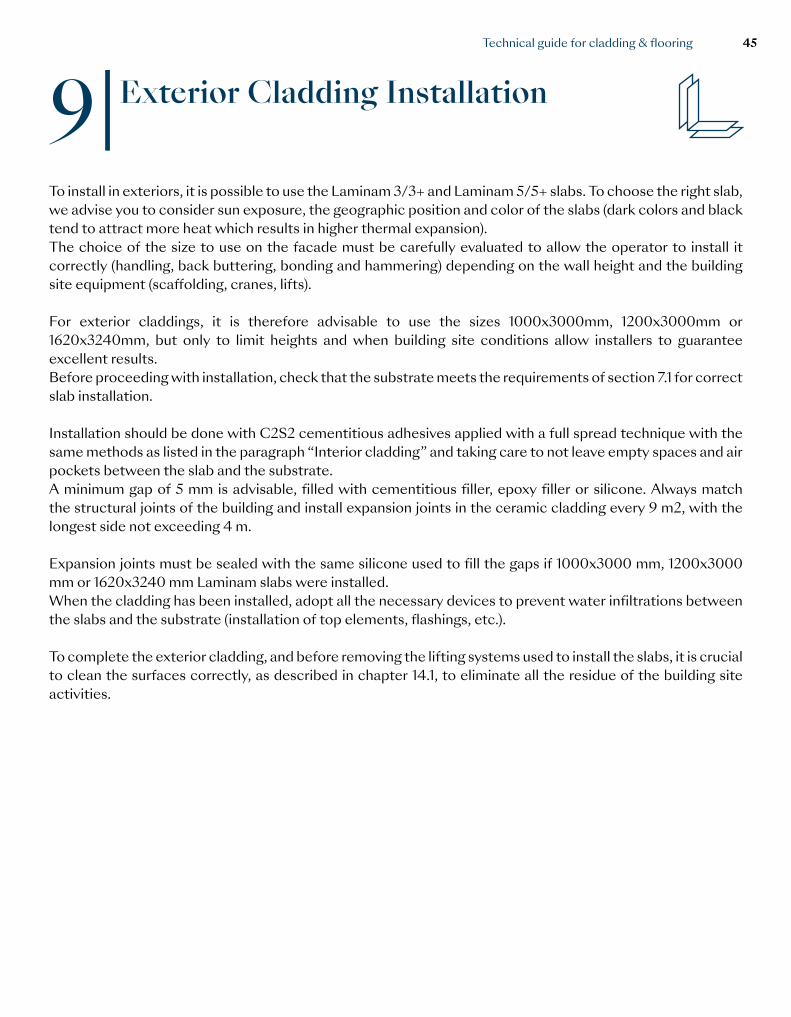
9.3 Installation on a Thermal Insulation System
Generally speaking, it is not possible to install ceramic cladding on traditional insulation systems because of the expansion differences between the two materials (stoneware and insulation). For this reason, different specific systems that can accommodate this type of application (such as Mapetherm Tile System by Mapei, Weberther Robusto Universal by Weber or Capatect Design System - Ceramic Line by Caparol) have been designed.
Before thinking about installing an application of this type, it is necessary to verify that the insulation system has been declared suitable for installation by the manufacturer. Instructions from the manufacturer must be followed regarding sizes and colors (medium to light colors are usually allowed, identified by a reflectance index available for all Laminam finishes), gap dimension and frequency, maximum cladding height, etc.
If they are not available in the market, or if the designer decides to not use a complete existing package, it is possible to build an insulation system by applying reinforced plaster on the insulation. Generally, a galvanized mesh for plaster mechanically anchored to the substrate wall is normally fastened to the insulation and covered in a layer at least 15/20mm thick of structural plaster. This type of application must be approved by the plaster producer and the installer based on their experience. The installer must also set possible limits on the sizes and colors of the material which can be applied. Laminam suggests using non-standard sizes such as 1000x1000mm, 500x1500mm with a reflectance index above 20%.
Laminam Slab
Reinforcing plaster
Isolation
Adhesive
Adhesive
Technical guide for cladding & flooring 47
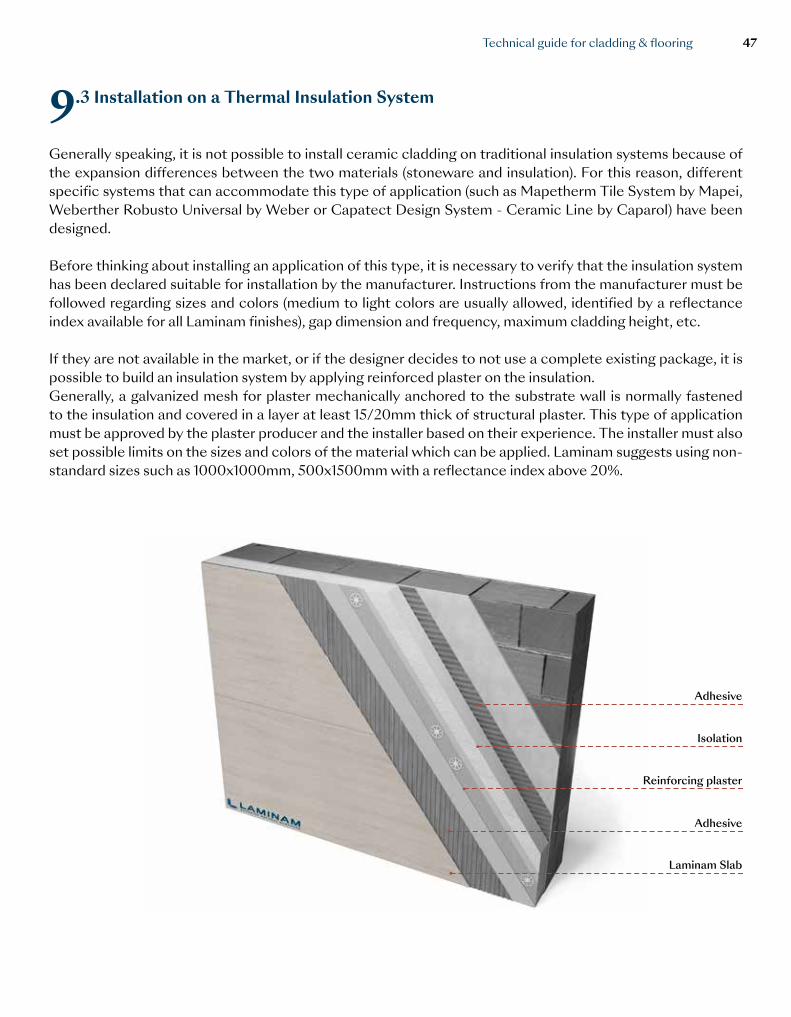
9.4 Installation on Cement Board
Laminam slabs can be installed on prefabricated panels in cement board or another material which is suitable for this use. Cement board panels can be used as an exterior layer of dry infill or as a supporting wall. The system must be guaranteed by the producer for installations under large slab wall cladding. It is important to specify that panels sensitive to water and humidity cannot be used for these applications.
Depending on the features, these products may require a preliminary finishing with fiberglass or the application of a primer to guarantee planarity of the substrate and perfect adhesion of the glue. On these types of structures, it is generally possible to install the slabs with modified adhesives.
Laminam Slab
Eventual plaster
Fibercement board
Adhesive
Technical guide for cladding & flooring48
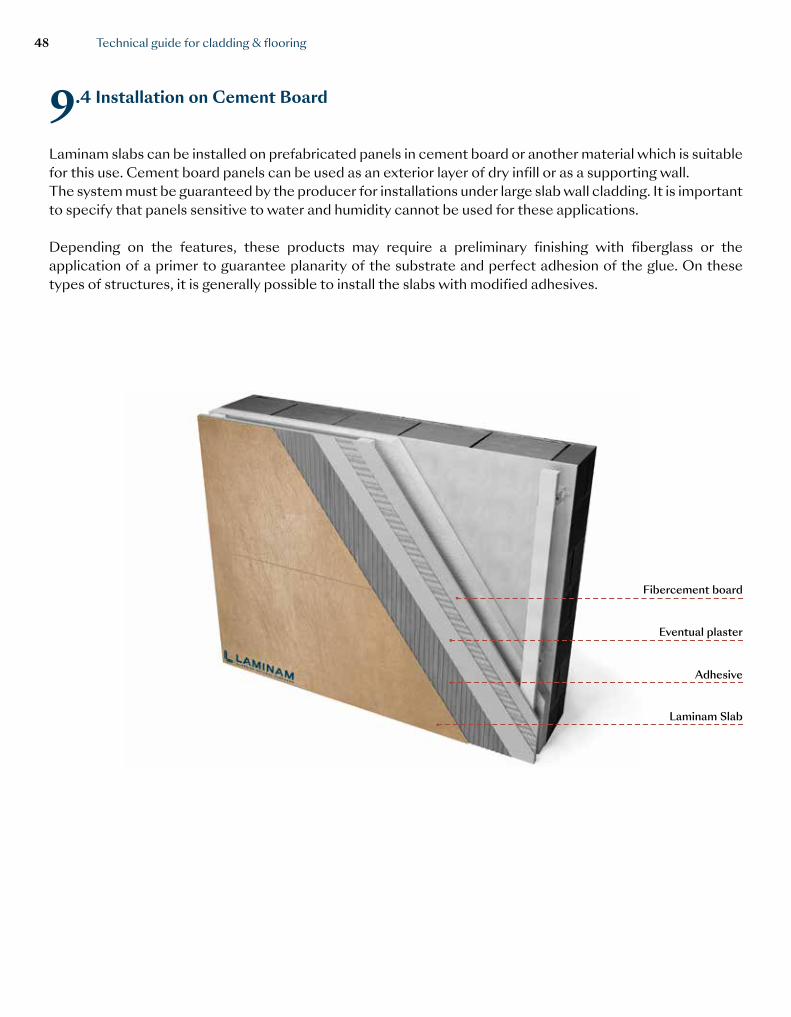
9.5 Mechanical Safety Hook
In exterior applications, it could be necessary to use safety hooks to keep the ceramic slab from tilting. The Site Engineer must consider the building site specifications and local regulations before making a choice.
The hooks must be suitable for the type of substrate and, if installed on an insulation system or cement board, it must be authorized by the manufacturers of these systems.On the Laminam 5, 5, 12+ or 20+ slabs, it is possible to use a mechanical safety holder hidden in a kerf cut into the back of the slab (Raifix). The kerf can be made directly at the building site adaptors for the cutting tool.
PAG 38
Laminam
Laminam
Adesivo cementizio/ Cementitious adhesive
Stucco cementizio o sigillante siliconico/Cementitious grout or silicon sealant
Supporto/ Support
Gancio anticaduta
9.6 Efflorescence
This phenomenon is caused by the contact of water with cementitious products, and manifests with whitish deposits appearing at the gaps. To limit efflorescence, the plaster must be properly cured, condensation and humidity from inside the building must be intercepted, and the walls must be protected by flashings, sills, etc. all equipped with anti-condensation systems.
Efflorescence must still be considered as typical of the type of application and does not constitute a defect if caused by the drying of materials used for installation or the evaporation of rainwater absorbed by the gaps. The substance can be removed with simple cleaning using an acid-based product.
Mechanical Safety Hook
Technical guide for cladding & flooring 49
10| Creating Corner Elements
Corner elements that do not use profiles can be made on site in different ways:
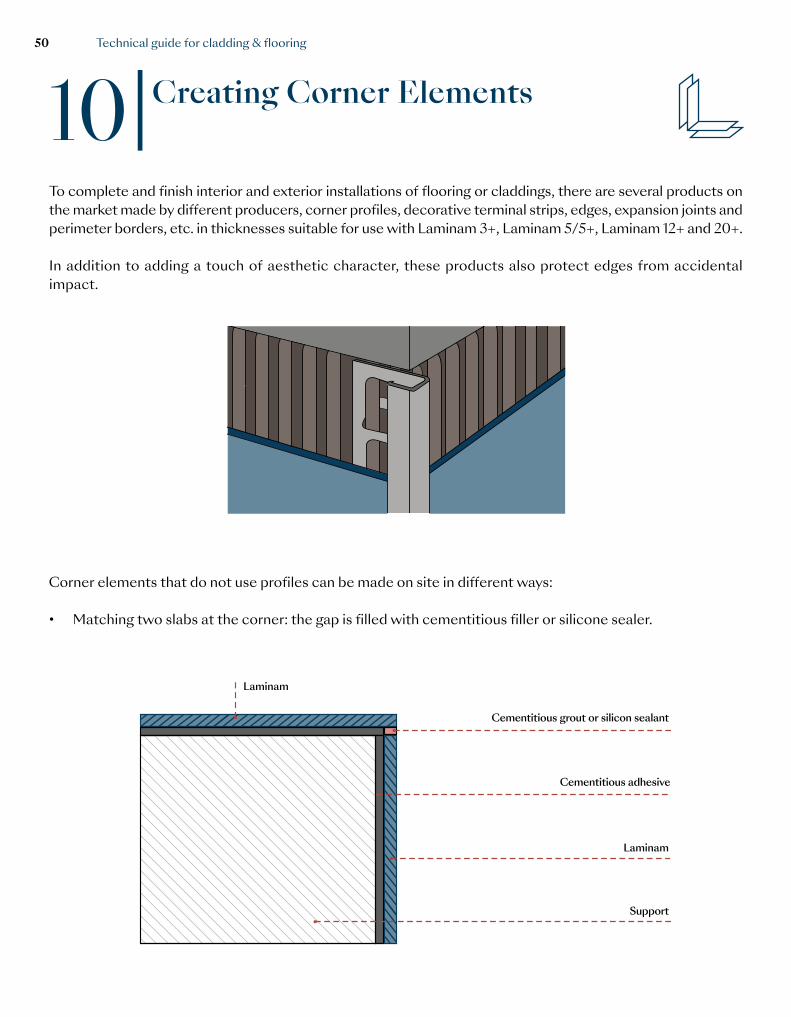
• Matching two slabs at the corner: the gap is filled with cementitious filler or silicone sealer.
To complete and finish interior and exterior installations of flooring or claddings, there are several products on the market made by different producers, corner profiles, decorative terminal strips, edges, expansion joints and perimeter borders, etc. in thicknesses suitable for use with Laminam 3+, Laminam 5/5+, Laminam 12+ and 20+.
In addition to adding a touch of aesthetic character, these products also protect edges from accidental impact.
Laminam
Laminam
Adesivo cementizio/ Cementitious adhesive
Stucco cementizio o sigillante siliconico/Cementitious grout or silicon sealant
Supporto/ Support
Laminam
Laminam
Cementitious adhesive
Cementitious grout or silicon sealant
Support
Technical guide for cladding & flooring50
Laminam Adesivo cementizio/ Cementitious adhesive
Rivestimento gradino esistente/ Existing step covering
Laminam
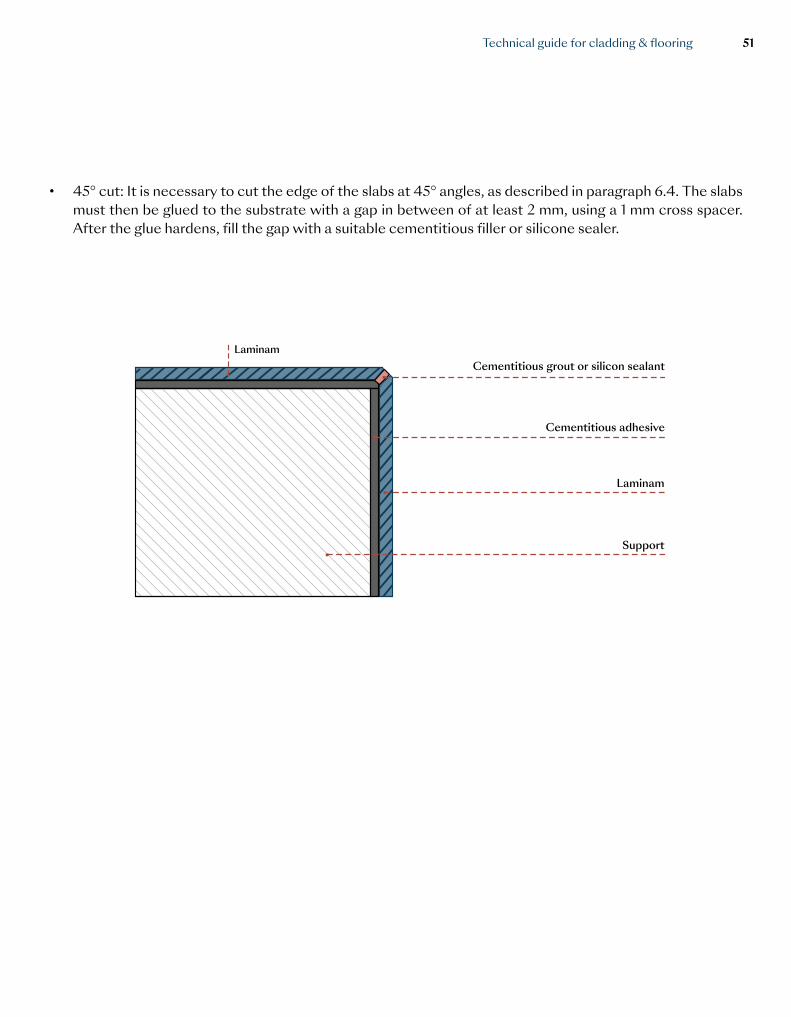
• 45° cut: It is necessary to cut the edge of the slabs at 45° angles, as described in paragraph 6.4. The slabs must then be glued to the substrate with a gap in between of at least 2 mm, using a 1 mm cross spacer. After the glue hardens, fill the gap with a suitable cementitious filler or silicone sealer.
Cementitious adhesive
Laminam
LaminamCementitious grout or silicon sealant
Support
Technical guide for cladding & flooring 51
11| Cladding Staircases
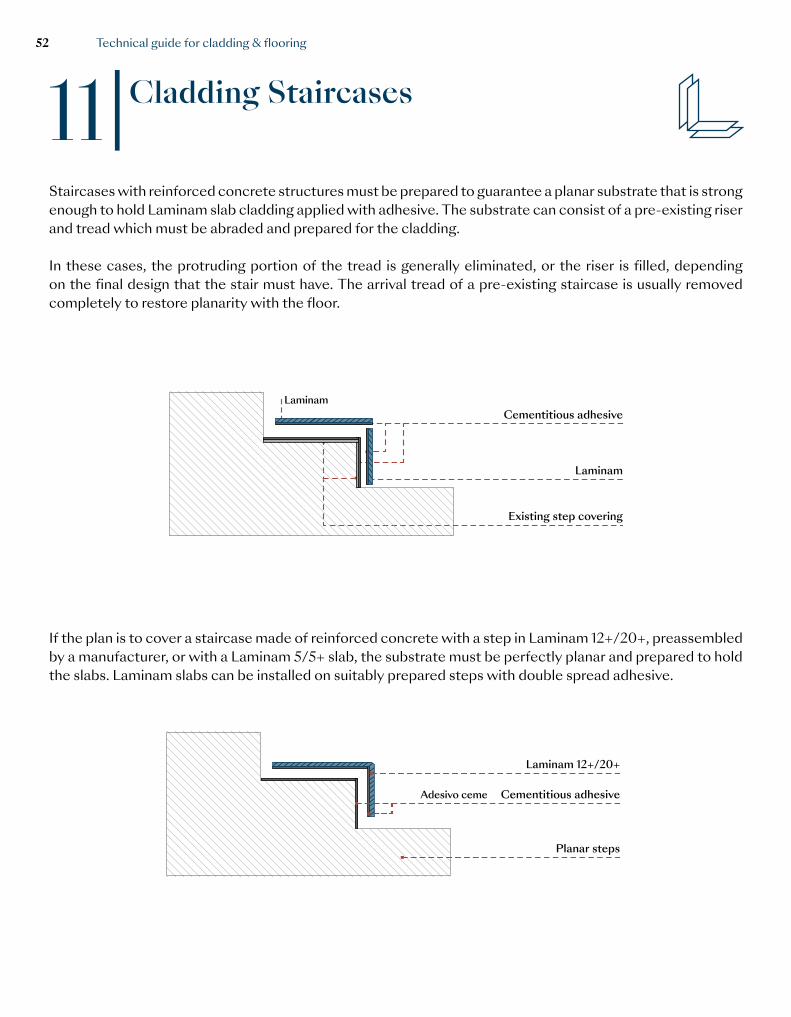
Staircases with reinforced concrete structures must be prepared to guarantee a planar substrate that is strong enough to hold Laminam slab cladding applied with adhesive. The substrate can consist of a pre-existing riser and tread which must be abraded and prepared for the cladding.
In these cases, the protruding portion of the tread is generally eliminated, or the riser is filled, depending on the final design that the stair must have. The arrival tread of a pre-existing staircase is usually removed completely to restore planarity with the floor.
If the plan is to cover a staircase made of reinforced concrete with a step in Laminam 12+/20+, preassembled by a manufacturer, or with a Laminam 5/5+ slab, the substrate must be perfectly planar and prepared to hold the slabs. Laminam slabs can be installed on suitably prepared steps with double spread adhesive.
PAG 40
Gradini planari/ Planar steps
Laminam 12+/20+
Laminam 12+/20+
Gradini grezzi/ Rough/ Unrefi ned steps
Adesivo cementizio/ Cementitious adhesive
Adesivo cementizio/ Cementitious adhesive
LaminamCementitious adhesive
Existing step covering
Laminam
Planar steps
Laminam 12+/20+
Cementitious adhesive
Technical guide for cladding & flooring52
For staircases with steel structures, the tread must be made with a tray inside it, where a screed can be formed and then the slab can be applied.Treads and/or risers in steel can be covered directly only if they are correctly dimensioned and free from bending when carrying a load. The substrate must be ground to guarantee correct bonding with the polyurethane type adhesive. For particular staircase structures, assess case by case and follow the supplier’s instructions.
For claddings on condominium staircases and foyers, it is possible to add flooring in the same type of slabs, even inside the lift. The bottom of the lift must be able to accommodate flooring. Based on the sustainable weight and structure of the base, it may necessary to use the slabs in three different thicknesses. Laminam 5/5+ must generally be installed on a honeycomb substrate with polyurethane adhesive. Avoid wooden substrates. Some companies carry a few Laminam finishes in their catalogues (such as Kone) which can be ordered directly through them.
PAG 40
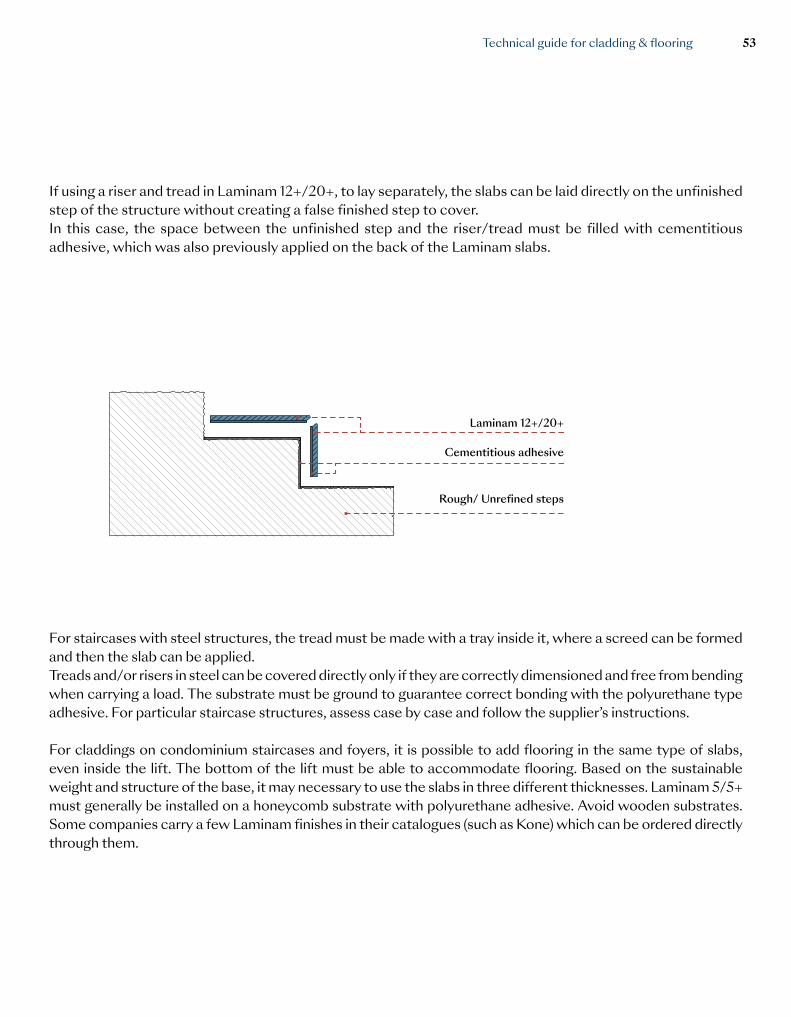
If using a riser and tread in Laminam 12+/20+, to lay separately, the slabs can be laid directly on the unfinished step of the structure without creating a false finished step to cover. In this case, the space between the unfinished step and the riser/tread must be filled with cementitious adhesive, which was also previously applied on the back of the Laminam slabs.
Laminam 12+/20+
Rough/ Unrefined steps
Cementitious adhesive
Technical guide for cladding & flooring 53
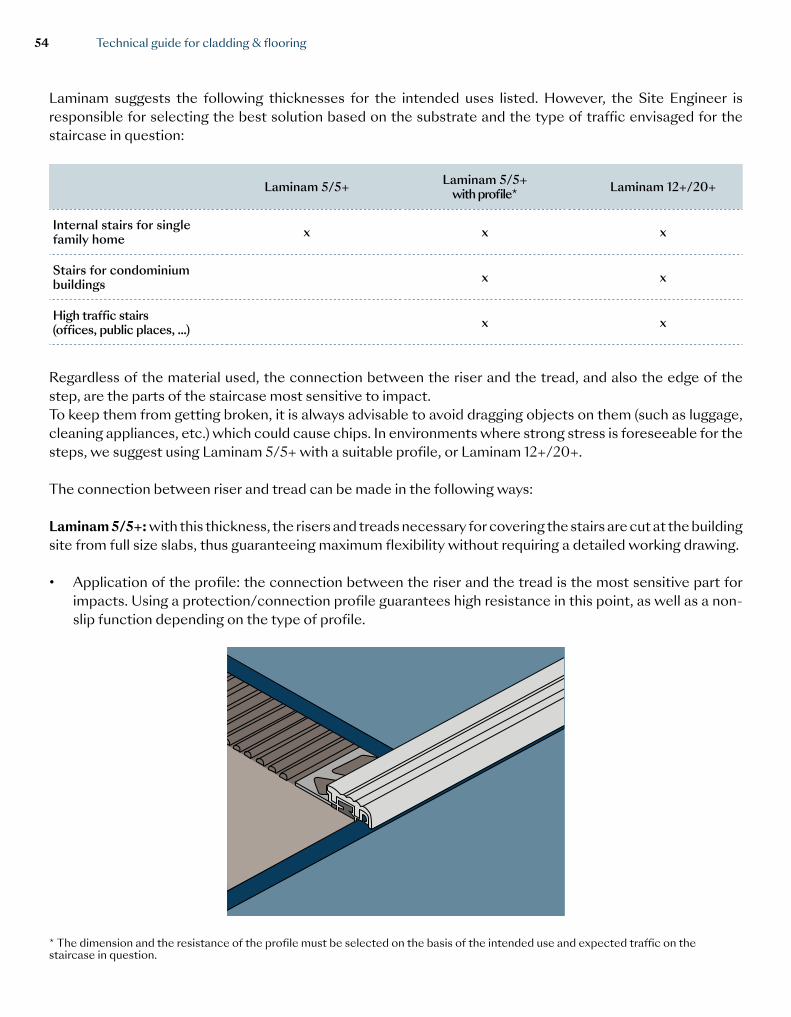
Laminam suggests the following thicknesses for the intended uses listed. However, the Site Engineer is responsible for selecting the best solution based on the substrate and the type of traffic envisaged for the staircase in question:
Laminam 5/5+ Laminam 5/5+ with profile* Laminam 12+/20+
Internal stairs for single family home x x x
Stairs for condominium buildings x x
High traffic stairs (offices, public places, ...) x x
Regardless of the material used, the connection between the riser and the tread, and also the edge of the step, are the parts of the staircase most sensitive to impact. To keep them from getting broken, it is always advisable to avoid dragging objects on them (such as luggage, cleaning appliances, etc.) which could cause chips. In environments where strong stress is foreseeable for the steps, we suggest using Laminam 5/5+ with a suitable profile, or Laminam 12+/20+.
The connection between riser and tread can be made in the following ways:
Laminam 5/5+: with this thickness, the risers and treads necessary for covering the stairs are cut at the building site from full size slabs, thus guaranteeing maximum flexibility without requiring a detailed working drawing.
• Application of the profile: the connection between the riser and the tread is the most sensitive part for impacts. Using a protection/connection profile guarantees high resistance in this point, as well as a non-slip function depending on the type of profile.
* The dimension and the resistance of the profile must be selected on the basis of the intended use and expected traffic on the staircase in question.
Technical guide for cladding & flooring54
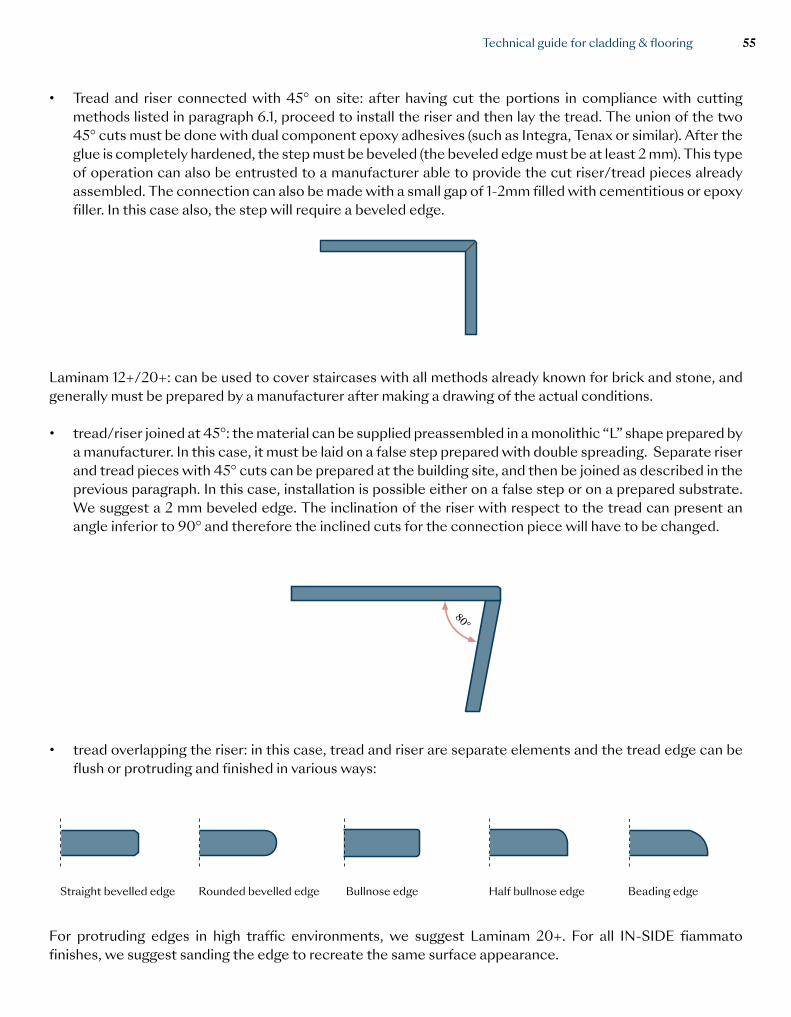
• Tread and riser connected with 45° on site: after having cut the portions in compliance with cutting methods listed in paragraph 6.1, proceed to install the riser and then lay the tread. The union of the two 45° cuts must be done with dual component epoxy adhesives (such as Integra, Tenax or similar). After the glue is completely hardened, the step must be beveled (the beveled edge must be at least 2 mm). This type of operation can also be entrusted to a manufacturer able to provide the cut riser/tread pieces already assembled. The connection can also be made with a small gap of 1-2mm filled with cementitious or epoxy filler. In this case also, the step will require a beveled edge.
80°
Costa retta arrotondataCosta retta bisellata Costa a becco di civetta
Costa a mezzo toroCosta a toro
Straight bevelled edge Rounded bevelled edge Bullnose edge Half bullnose edge Beading edge
80°
Costa retta arrotondataCosta retta bisellata Costa a becco di civetta
Costa a mezzo toroCosta a toro
80°
Costa retta arrotondataCosta retta bisellata Costa a becco di civetta
Costa a mezzo toroCosta a toro
80°
Costa retta arrotondataCosta retta bisellata Costa a becco di civetta
Costa a mezzo toroCosta a toro
80°
Costa retta arrotondataCosta retta bisellata Costa a becco di civetta
Costa a mezzo toroCosta a toro
80°
Costa retta arrotondataCosta retta bisellata Costa a becco di civetta
Costa a mezzo toroCosta a toro
For protruding edges in high traffic environments, we suggest Laminam 20+. For all IN-SIDE fiammato finishes, we suggest sanding the edge to recreate the same surface appearance.
Laminam 12+/20+: can be used to cover staircases with all methods already known for brick and stone, and generally must be prepared by a manufacturer after making a drawing of the actual conditions.
• tread/riser joined at 45°: the material can be supplied preassembled in a monolithic “L” shape prepared by a manufacturer. In this case, it must be laid on a false step prepared with double spreading. Separate riser and tread pieces with 45° cuts can be prepared at the building site, and then be joined as described in the previous paragraph. In this case, installation is possible either on a false step or on a prepared substrate. We suggest a 2 mm beveled edge. The inclination of the riser with respect to the tread can present an angle inferior to 90° and therefore the inclined cuts for the connection piece will have to be changed.
• tread overlapping the riser: in this case, tread and riser are separate elements and the tread edge can be flush or protruding and finished in various ways:
Technical guide for cladding & flooring 55
12| Covering doors and openings
Different companies sell doors (armored interior/exterior doors and interior doors) with Laminam finishes. Since these are industrial products, they guarantee excellent finishes and high-quality standards.
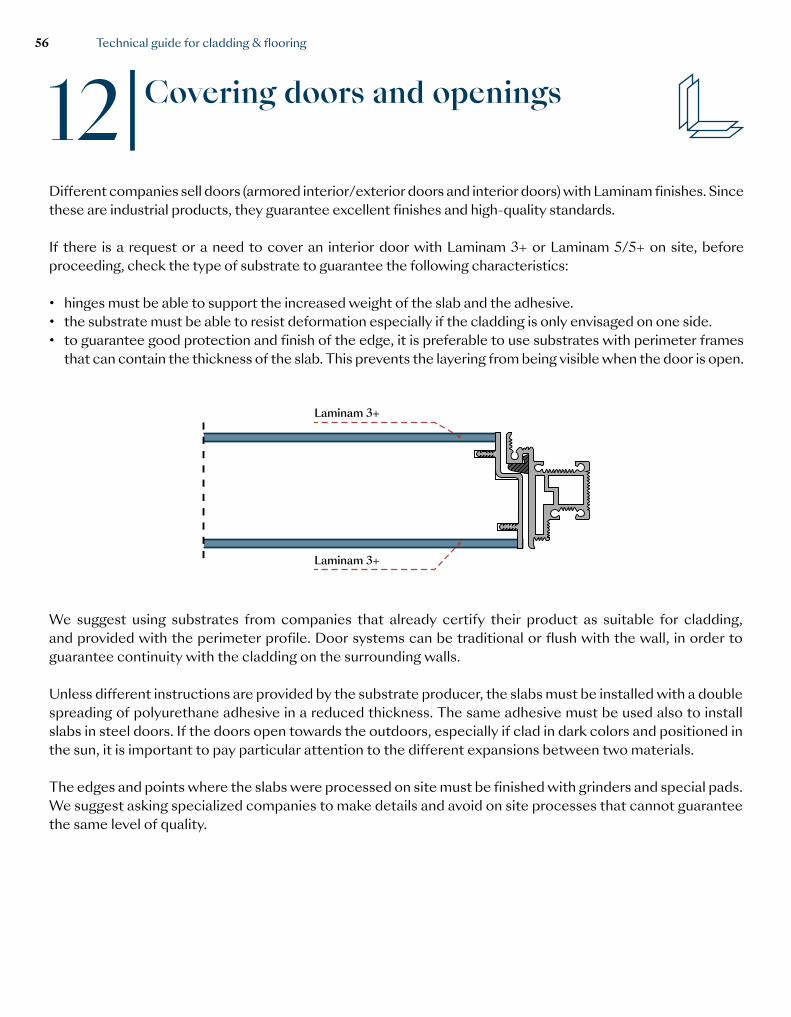
If there is a request or a need to cover an interior door with Laminam 3+ or Laminam 5/5+ on site, before proceeding, check the type of substrate to guarantee the following characteristics:
• hinges must be able to support the increased weight of the slab and the adhesive.• the substrate must be able to resist deformation especially if the cladding is only envisaged on one side.• to guarantee good protection and finish of the edge, it is preferable to use substrates with perimeter frames
that can contain the thickness of the slab. This prevents the layering from being visible when the door is open.
Laminam 3+
Laminam 3+
We suggest using substrates from companies that already certify their product as suitable for cladding, and provided with the perimeter profile. Door systems can be traditional or flush with the wall, in order to guarantee continuity with the cladding on the surrounding walls.
Unless different instructions are provided by the substrate producer, the slabs must be installed with a double spreading of polyurethane adhesive in a reduced thickness. The same adhesive must be used also to install slabs in steel doors. If the doors open towards the outdoors, especially if clad in dark colors and positioned in the sun, it is important to pay particular attention to the different expansions between two materials.
The edges and points where the slabs were processed on site must be finished with grinders and special pads. We suggest asking specialized companies to make details and avoid on site processes that cannot guarantee the same level of quality.
Technical guide for cladding & flooring56
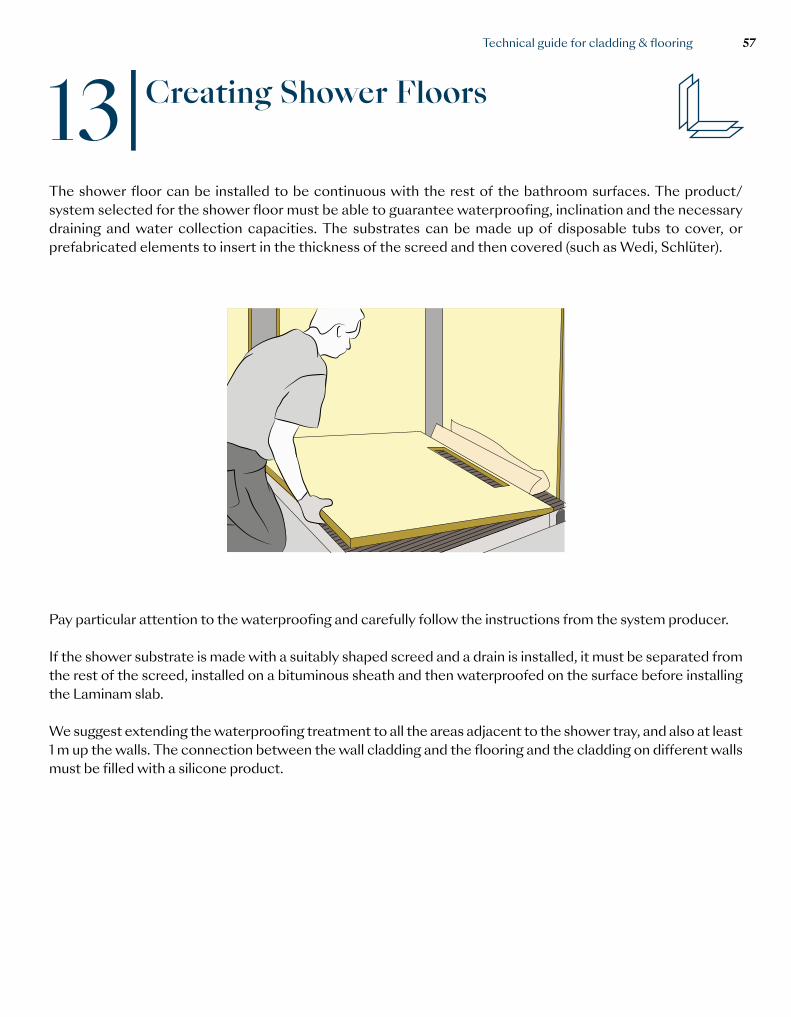
13| Creating Shower Floors
Pay particular attention to the waterproofing and carefully follow the instructions from the system producer.
If the shower substrate is made with a suitably shaped screed and a drain is installed, it must be separated from the rest of the screed, installed on a bituminous sheath and then waterproofed on the surface before installing the Laminam slab.
We suggest extending the waterproofing treatment to all the areas adjacent to the shower tray, and also at least 1 m up the walls. The connection between the wall cladding and the flooring and the cladding on different walls must be filled with a silicone product.
The shower floor can be installed to be continuous with the rest of the bathroom surfaces. The product/system selected for the shower floor must be able to guarantee waterproofing, inclination and the necessary draining and water collection capacities. The substrates can be made up of disposable tubs to cover, or prefabricated elements to insert in the thickness of the screed and then covered (such as Wedi, Schlüter).
Technical guide for cladding & flooring 57
14| Cleaning and maintenance
The slabs are extremely easy to clean and do not require particular maintenance work.The production process (involving very high-quality raw materials and high firing temperatures) makes the finishes of Laminam slabs non-absorbent and their surfaces almost completely non-porous, which means that cleaning operations are simple and efficient.In fact, the ceramic structure does not allow dirt to penetrate inside the slab.
14.1 Post-installation Cleaning
After processing and gluing the material, clean the ceramic surface to remove any contaminants (patinas, residues of fillers or adhesive, etc.) that may be present. It is crucial to perform this step properly because it may cause halos if done incorrectly.
To clean structure surfaces, we advise quickly removing stains with plenty of water and a liquid vacuum cleaner to remove the dirt that could deposit on the surface structure. It is important to complete the cleaning phase before the adhesive hardens completely because, give the surface structure, it would be more difficult to remove the adhesive after it has hardened completely.
For correct cleaning, always follow the specific instructions provided by producers of cementitious and epoxy fillers and adhesives used to install slabs to find out which products to use plus methods and waiting times. If installing slabs outdoors, we suggest cleaning up right after installation during the coolest hours of the day.Do not use abrasive substances or equipment. Under no circumstances use hydrofluoric acid or products that contain it.
The indications listed in this paragraph are not valid for the Filo series and for all Lucidato finishes. Consult paragraphs 14.1.1 for instructions for these finishes.Any inability to remove residues of materials used during installation after they have dried cannot be considered a material defect.During installation and cleaning, sweep the glossy finished products frequently to avoid surface scratches.
Technical guide for cladding & flooring58
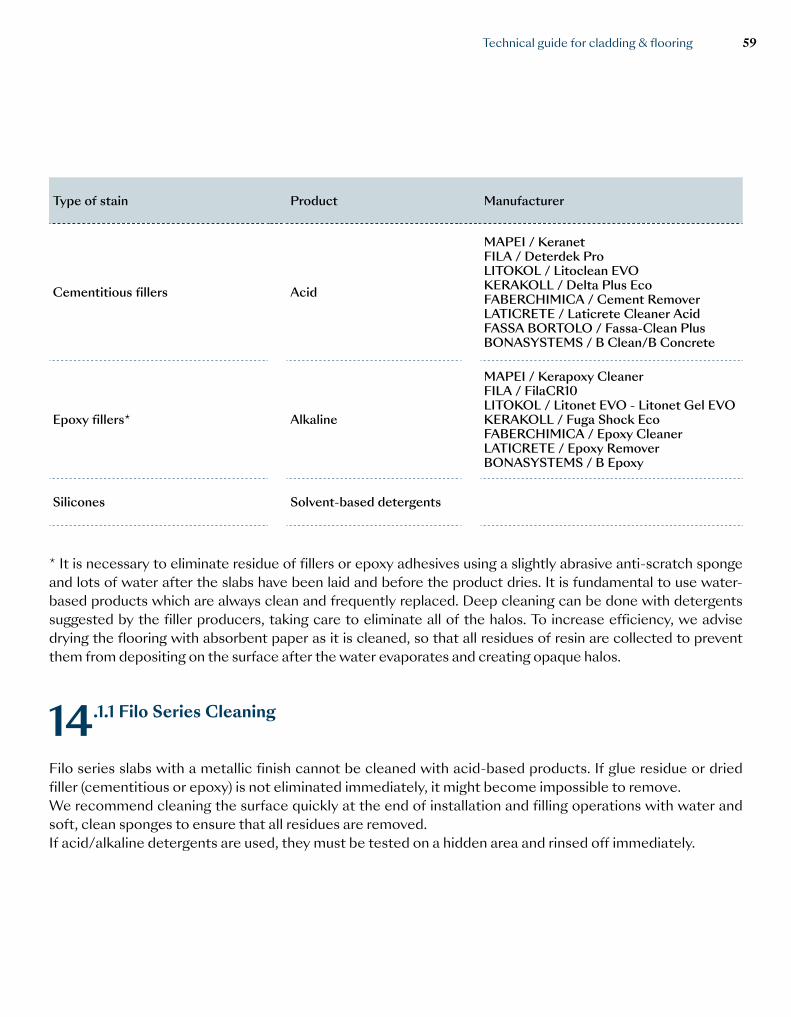
Type of stain Product Manufacturer
Cementitious fillers Acid
MAPEI / KeranetFILA / Deterdek ProLITOKOL / Litoclean EVOKERAKOLL / Delta Plus EcoFABERCHIMICA / Cement RemoverLATICRETE / Laticrete Cleaner AcidFASSA BORTOLO / Fassa-Clean PlusBONASYSTEMS / B Clean/B Concrete
Epoxy fillers* Alkaline
MAPEI / Kerapoxy CleanerFILA / FilaCR10LITOKOL / Litonet EVO - Litonet Gel EVOKERAKOLL / Fuga Shock EcoFABERCHIMICA / Epoxy CleanerLATICRETE / Epoxy RemoverBONASYSTEMS / B Epoxy
Silicones Solvent-based detergents
* It is necessary to eliminate residue of fillers or epoxy adhesives using a slightly abrasive anti-scratch sponge and lots of water after the slabs have been laid and before the product dries. It is fundamental to use water-based products which are always clean and frequently replaced. Deep cleaning can be done with detergents suggested by the filler producers, taking care to eliminate all of the halos. To increase efficiency, we advise drying the flooring with absorbent paper as it is cleaned, so that all residues of resin are collected to prevent them from depositing on the surface after the water evaporates and creating opaque halos.
14.1.1 Filo Series Cleaning
Filo series slabs with a metallic finish cannot be cleaned with acid-based products. If glue residue or dried filler (cementitious or epoxy) is not eliminated immediately, it might become impossible to remove.We recommend cleaning the surface quickly at the end of installation and filling operations with water and soft, clean sponges to ensure that all residues are removed.If acid/alkaline detergents are used, they must be tested on a hidden area and rinsed off immediately.
Technical guide for cladding & flooring 59
14.1.2 Exterior cladding cleaning
In addition to what specified above, since lifting systems are necessary to clean the facade, we suggest planning the cleaning phase after the installation works have ended, when the lifting systems are still present at the site. The cleaning process should be carried out from the top down. In addition to cleaning the surfaces from installation residues, dirt from the construction site and scaffolding must be removed.Cleaning must be carried out uniformly over the surface of the installed façade to avoid halos that could lead to color discrepancies.
14.2 Ordinary Cleaning
Before use, it is advisable to clean the entire surface with an acid-based product (except for the Filo series) to remove halos and construction site residues, rinse thoroughly with water to avoid surface patinas. For slabs with a polished finish, it is necessary to remove the protective wax-based elements between the slabs, used for packaging them. These elements can be removed with a wooden spatula or denatured alcohol.
For daily cleaning of Laminam slabs it is possible to use soft cloths, warm water, and commercially available detergents for ceramic surfaces. These must be diluted/rinsed according to the detergent instructions to avoid surface patinas which could retain dirt.
Light or dark-colored background finishes may require more frequent routine maintenance, especially if they are structured, subject to heavy traffic or have direct external access, as they tend to make dirt more visible.Depending on the type of structure, it will be necessary to use a cloth and apply sufficient pressure to keep the surface clean.
Please note that early cleaning makes it easier to remove stains. If left to settle on surfaces for a long time, some residue might require the use of a specific cleaning product. Under no circumstances use hydrofluoric acid or products that contain it.
Technical guide for cladding & flooring60
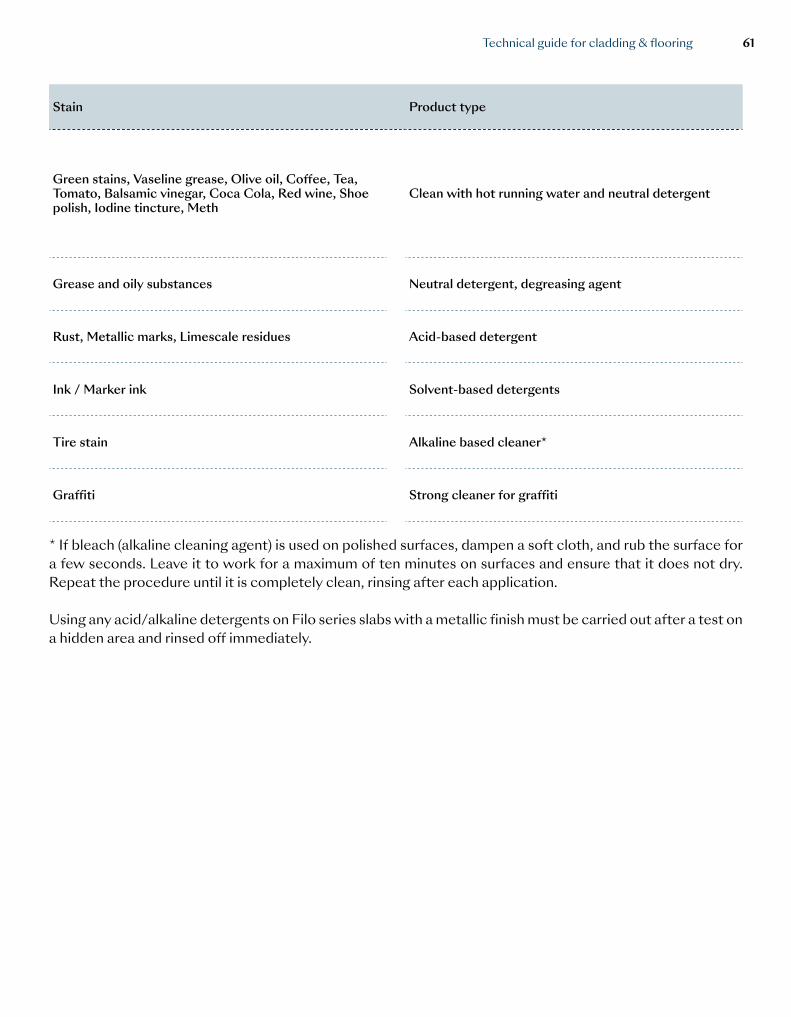
Stain Product type
Green stains, Vaseline grease, Olive oil, Coffee, Tea, Tomato, Balsamic vinegar, Coca Cola, Red wine, Shoe polish, Iodine tincture, Meth
Clean with hot running water and neutral detergent
Grease and oily substances Neutral detergent, degreasing agent
Rust, Metallic marks, Limescale residues Acid-based detergent
Ink / Marker ink Solvent-based detergents
Tire stain Alkaline based cleaner*
Graffiti Strong cleaner for graffiti
* If bleach (alkaline cleaning agent) is used on polished surfaces, dampen a soft cloth, and rub the surface for a few seconds. Leave it to work for a maximum of ten minutes on surfaces and ensure that it does not dry. Repeat the procedure until it is completely clean, rinsing after each application.
Using any acid/alkaline detergents on Filo series slabs with a metallic finish must be carried out after a test on a hidden area and rinsed off immediately.
Technical guide for cladding & flooring 61

15| Recommended adhesives
The following tables show a selection of adhesives recommended by the producers according to the type of substrate for the installation of Laminam slabs with a maximum size of 1000x3000 mm, 1200X3000 mm and for the size 1620x3240 mm.
These indications have been provided by producers of adhesives which, on the basis of tests carried out by their laboratories, declare their suitability for various intended uses and substrates indicated. The use of Laminam 3+, Laminam 5, Laminam 5+ and Laminam 12+ requires an adhesive that guarantees an adequate grip between the base and the glass fiber reinforcement placed on the back of the slab.
All products must be used in compliance with the indications and warnings shown in Technical Data Sheets. Smaller dimension slabs, types of substrate that do not fill into the listed cases and special applications, adhesives with different or less performing technical features may be used, in any case following the indications of the manufacturers. You can request this information by contacting to the adhesive manufactures.
For cladding applications, it is at the Works Management’s discretion to use anti-tip hangers, considering site specifications and local regulations.
NoteThe identified adhesives’ commercial names refer to products for the European market. We recommend that you contact the manufacturer’s branch in the country where the installation is to be carried out to check that the product name is the same as that shown in the tables.
Technical guide for cladding & flooring62

Recommended adhesives 1000x3000
1000x3000LAMINAM 3+
Wall tilling indoor Wall tilling outdoor ▲ Special cases
Concrete / Old ceramics, stone, marble / gypsum * or concrete based plaster /
Plasterboard * / Fiberciment panels Plaster / Concrete screed Wood / PVC / Rubber Iron
ADESITALNormal setting ADEFLEX T R2T ADEFLEX T R2T
ADEFLEX T R2T ADEFLEX T R2TQuick setting
ARDEXNormal setting Ardex S28 nuovo + Ardex
E90 C2 FTE S2 Ardex X77 Microtec + Ardex E90
C2T(T) E(E) S2 Ardex X90
Outdoor + Ardex E90
C2 FTE S2
Ardex WA colla R2 T
Quick setting Ardex X90 Outdoor + Ardex E90 C2 FTE S2 Ardex 90 Outdoor +
Ardex E90C2 FTE
S2
BENFERNormal setting BENFERFLEX+S1 C2TES1 BENFERFLEX MAX S2 C2TES2
BENFERJOLLY R2T BENFERJOLLY R2TQuick setting BENFERFLEX + FASTS1 C2FTES1 BENFERFLEX MAX
FAST S2 C2FTES2
FASSA BORTOLO
Normal setting AT 99 MAXYFLEX AD 8 + LATEX DE 80
C2TE S1 C2E S2 AD 8 + LATEX DE 80 C2E S2
AX 91 R2 AX 91 R2Quick setting RAPID MAXI S1
FASSATECH 2C2FT S1
C2FTE S2 FASSATECH 2 C2FTE S2
KERAKOLL
Normal settingH40 NO LIMITSH40 EXTREME
(no primer)
C2 TER2 H40 NO LIMITS
H40 EXTREMEC2 TE
R2H40 EXTREME R2 H40
EXTREME R2
Quick settingH40 REVOLUTION
H40 EXTREME (no primer)
C2 TEFR2
H40 REVOLUTIONH40 EXTREME
C2 TEFR2
LATICRETE EU
Normal setting 254 PLATINUM C2TES1 345 SUPER FLEX C2TES2LATALASTIK R2T LATALASTIK R2T
Quick setting 4237 RAPID + 211 POWDER C2FTES1 345 RAPID S C2FTES2
LITOKOLNormal setting HYPERFLEX K100 C2TE-S2 LITOELASTIC EVO R2T
LITOELASTIC EVO R2T LITOELASTIC
EVO R2TQuick setting LITOSTONE K99 +
LATEXKOL C2FE-S2
MAPEI
Normal settingULTRALITE S1
KERAFLEX MAXI S1 ZERØ ULTRALITE S2
KERABOND+ISOLASTIC
C2 TE S1 C2 TE S1 C2 E S2 C2 E S2
ULTRALITE S2 KERABOND +
ISOLASTICC2 E S2 C2 E S2
KERALASTIC KERALASTIC T ULTRABOND ECO PU 2K
KERAQUICK MAXI S1 +
LATEX PLUS
R2R2 TR2T
C2FTS2
KERALASTIC KERALASTIC T ULTRABOND ECO PU 2K
KERAQUICK MAXI S1 +
LATEX PLUS
R2R2 TR2T
C2FTS2Quick setting
ULTRALITE S1 QUICK KERAQUICK MAXI S1 ULTRALITE S2 QUICK
ELASTORAPID
C2 FT S1 C2 FT S1 C2 FE S2 C2 FTE
S2
ULTRALITE S2 QUICK ELASTORAPID
C2 FE S2 C2 FTE
S2
PCINormal setting PCI Flexmörtel S1 + 2 kg PCI
LastoflexPCI Flexmörtel S1 + 4 kg
PCI Lastoflex individuelle Beratung PCI Collastic
Quick setting PCI Flexmörtel S1 Rapid + 2 kg PCI Lastoflex
PCI Flexmörtel S1 Rapid + 4kg PCI Lastoflex
TechnokollaNormal setting TECHNOS + con TC-LASTIC C2 S2 TECHNOS + con TC-
LASTIC C2 S2ALL 9000 *** R2 T ALL 9000 R2 T
Quick setting TECHNORAP-2 C2 FT S1 TECHNORAP-2 C2 FT S1
WEBERNormal setting
webercol UltraGres 400 (fino a 3 metri di altezza) webercol UltraGres Flex
C2TE S1
C2TE S2webercol UltraGres Flex
webercol Fix CRC2TE S2
R2Twebercol Fix CR R2T webercol Fix
CR R2T
Quick setting webercol UltraGres Fast C2FTE S1 webercol UltraGres Fast+weber L50
C2FTE S2
*After application of PRIMER** Indoor environments, on a floor with stagnant water, walk-in shower, etc. *** On PVC a case-by-case assessment will be necessary▲ Outdoor applications, a reduced size slab as indicated in chapters 7 and 9 is suggested.
Technical guide for cladding & flooring 63
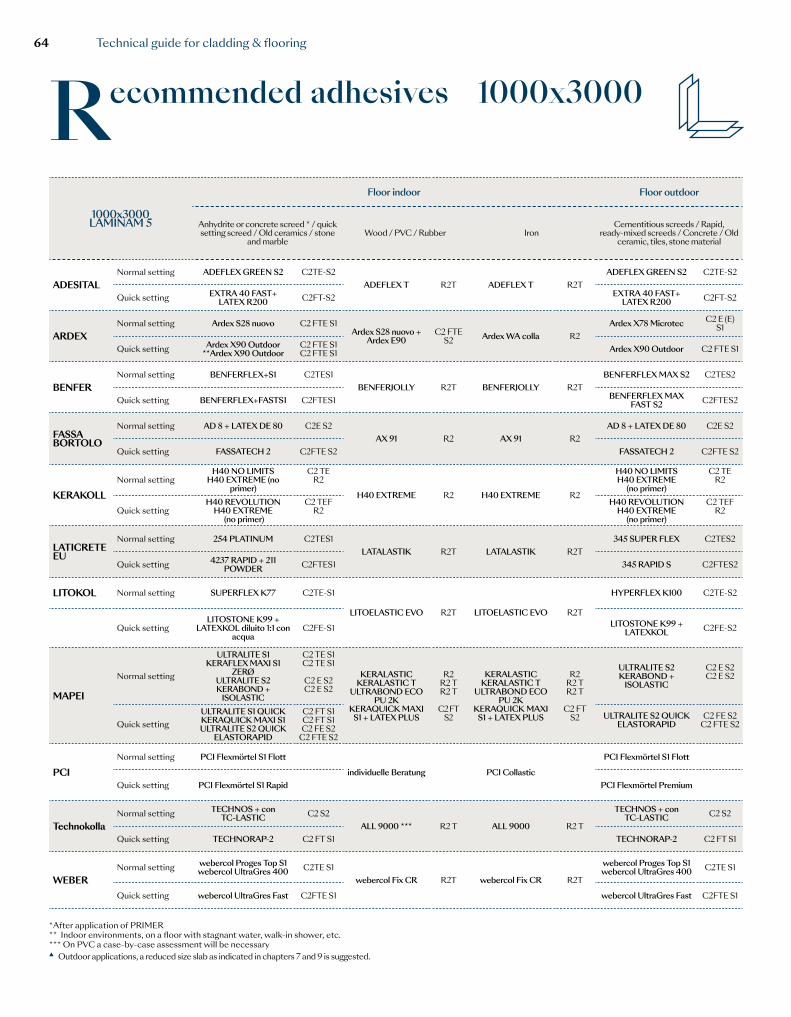
Recommended adhesives 1000x3000
*After application of PRIMER** Indoor environments, on a floor with stagnant water, walk-in shower, etc. *** On PVC a case-by-case assessment will be necessary▲ Outdoor applications, a reduced size slab as indicated in chapters 7 and 9 is suggested.
1000x3000LAMINAM 5
Floor indoor Floor outdoor
1000x3000LAMINAM 5
Wall tilling indoor Wall tilling outdoor ▲ Special cases
Anhydrite or concrete screed * / quick setting screed / Old ceramics / stone
and marbleWood / PVC / Rubber Iron
Cementitious screeds / Rapid, ready-mixed screeds / Concrete / Old
ceramic, tiles, stone material
Concrete / Old ceramics, stone, marble / gypsum * or concrete based plaster /
Plasterboard * / Fiberciment panels Plaster / Concrete screed Wood / PVC / Rubber Iron
ADESITALNormal setting ADEFLEX GREEN S2 C2TE-S2
ADEFLEX T R2T ADEFLEX T R2TADEFLEX GREEN S2 C2TE-S2
ADESITALNormal setting ADEFLEX GREEN S2 C2TE-S2 ADEFLEX GREEN S2 C2TE-S2
ADEFLEX T R2T ADEFLEX T R2TQuick setting EXTRA 40 FAST+
LATEX R200 C2FT-S2 EXTRA 40 FAST+ LATEX R200 C2FT-S2 Quick setting EXTRA 40 FAST+ LATEX
R200 C2FT-S2 EXTRA 40 FAST+ LATEX R200 C2FT-S2
ARDEXNormal setting Ardex S28 nuovo C2 FTE S1
Ardex S28 nuovo + Ardex E90
C2 FTE S2 Ardex WA colla R2
Ardex X78 Microtec C2 E (E) S1
ARDEXNormal setting Ardex S28 nuovo C2 FTE S1 Ardex X77 Microtec +
Ardex E90C2T(T) E(E)
S2 Ardex X90 Outdoor + Ardex
E90C2 FTE S2 Ardex WA colla R2 T
Quick setting Ardex X90 Outdoor**Ardex X90 Outdoor
C2 FTE S1C2 FTE S1 Ardex X90 Outdoor C2 FTE S1 Quick setting Ardex X90 Outdoor C2 FTE S1 Ardex 90 Outdoor +
Ardex E90 C2 FTE S2
BENFERNormal setting BENFERFLEX+S1 C2TES1
BENFERJOLLY R2T BENFERJOLLY R2TBENFERFLEX MAX S2 C2TES2
BENFERNormal setting BENFERFLEX+S1 C2TES1 BENFERFLEX MAX
S2 C2TES2BENFERJOLLY R2T BENFERJOLLY R2T
Quick setting BENFERFLEX+FASTS1 C2FTES1 BENFERFLEX MAX FAST S2 C2FTES2 Quick setting BENFERFLEX+FASTS1 C2FTES1 BENFERFLEX MAX
FAST S2 C2FTES2
FASSA BORTOLO
Normal setting AD 8 + LATEX DE 80 C2E S2AX 91 R2 AX 91 R2
AD 8 + LATEX DE 80 C2E S2FASSA BORTOLO
Normal setting AT 99 MAXYFLEX AD 8 + LATEX DE 80
C2TE S1 C2E S2 AD 8 + LATEX DE 80 C2E S2
AX 91 R2 AX 91 R2Quick setting FASSATECH 2 C2FTE S2 FASSATECH 2 C2FTE S2 Quick setting RAPID MAXI S1
FASSATECH 2C2FT S1
C2FTE S2 FASSATECH 2 C2FTE S2
KERAKOLLNormal setting
H40 NO LIMITSH40 EXTREME (no
primer)
C2 TER2
H40 EXTREME R2 H40 EXTREME R2
H40 NO LIMITSH40 EXTREME
(no primer)
C2 TER2
KERAKOLLNormal setting H40 NO LIMITS
H40 EXTREME (no primer)C2 TE
R2H40 NO LIMITSH40 EXTREME
(no primer)
C2 TER2
H40 EXTREME R2 H40 EXTREME R2
Quick settingH40 REVOLUTION
H40 EXTREME (no primer)
C2 TEFR2
H40 REVOLUTIONH40 EXTREME
(no primer)
C2 TEFR2 Quick setting H40 REVOLUTION
H40 EXTREME (no primer)C2 TEF
R2H40 REVOLUTION
H40 EXTREME (no primer)
C2 TEFR2
LATICRETE EU
Normal setting 254 PLATINUM C2TES1LATALASTIK R2T LATALASTIK R2T
345 SUPER FLEX C2TES2LATICRETE EU
Normal setting 254 PLATINUM C2TES1 345 SUPER FLEX C2TES2LATALASTIK R2T LATALASTIK R2T
Quick setting 4237 RAPID + 211 POWDER C2FTES1 345 RAPID S C2FTES2 Quick setting 4237 RAPID + 211 POWDER C2FTES1 345 RAPID S C2FTES2
LITOKOL Normal setting SUPERFLEX K77 C2TE-S1
LITOELASTIC EVO R2T LITOELASTIC EVO R2T
HYPERFLEX K100 C2TE-S2
LITOKOL
Normal settingSUPERFLEX K77 (escluso cartongesso e pannelli in
fibrocemento)C2TE-S1 HYPERFLEX K100 C2TE-S2
LITOELASTIC EVO R2T LITOELASTIC
EVO R2T
Quick settingLITOSTONE K99 +
LATEXKOL diluito 1:1 con acqua
C2FE-S1 LITOSTONE K99 + LATEXKOL C2FE-S2 Quick setting
LITOSTONE K99 + LATEXKOL diluito 1:1 con
acqua (escluso cartongesso e pannelli in fibrocemento)
C2FE-S1 LITOSTONE K99 + LATEXKOL C2FE-S2
MAPEI
Normal setting
ULTRALITE S1 KERAFLEX MAXI S1
ZERØ ULTRALITE S2 KERABOND +
ISOLASTIC
C2 TE S1 C2 TE S1
C2 E S2 C2 E S2
KERALASTIC KERALASTIC T
ULTRABOND ECO PU 2K
KERAQUICK MAXI S1 + LATEX PLUS
R2 R2 T R2 T
C2 FT
S2
KERALASTIC KERALASTIC T
ULTRABOND ECO PU 2K
KERAQUICK MAXI S1 + LATEX PLUS
R2 R2 T R2 T
C2 FT
S2
ULTRALITE S2 KERABOND +
ISOLASTIC
C2 E S2C2 E S2
MAPEI
Normal settingULTRALITE S1
KERAFLEX MAXI S1 ZERØ ULTRALITE S2
KERABOND+ ISOLASTIC
C2 TE S1C2 TE S1 C2 E S2 C2 E S2
ULTRALITE S2 KERABOND +
ISOLASTIC
C2 E S2 C2 E S2
KERALASTIC KERALASTIC T ULTRABOND ECO PU 2K
KERAQUICK MAXI S1 +
LATEX PLUS
R2R2 TR2 T
C2 FT S2
KERALASTIC KERALASTIC T ULTRABOND ECO PU 2K
KERAQUICK MAXI S1 +
LATEX PLUS
R2R2 TR2T
C2 FT S2
Quick settingULTRALITE S1 QUICK KERAQUICK MAXI S1 ULTRALITE S2 QUICK
ELASTORAPID
C2 FT S1 C2 FT S1 C2 FE S2
C2 FTE S2
ULTRALITE S2 QUICK ELASTORAPID
C2 FE S2 C2 FTE S2 Quick setting
ULTRALITE S1 QUICK KERAQUICK MAXI S1 ULTRALITE S2 QUICK
ELASTORAPID
C2 FT S1C2 FT S1C2 FE S2
C2 FTE S2
ULTRALITE S2 QUICK
ELASTORAPID
C2 FE S2
C2 FTE S2
PCINormal setting PCI Flexmörtel S1 Flott
individuelle Beratung PCI Collastic
PCI Flexmörtel S1 Flott
PCINormal setting PCI Flexmörtel S1 Rapid + 2
kg PCI LastoflexPCI Flexmörtel S1 + 4
kg PCI Lastoflexindividuelle Beratung PCI Collastic
Quick setting PCI Flexmörtel S1 Rapid PCI Flexmörtel Premium Quick setting PCI Flexmörtel S1 Rapid + 2 kg PCI Lastoflex
PCI Flexmörtel S1 Rapid + 4kg PCI
Lastoflex
TechnokollaNormal setting TECHNOS + con
TC-LASTIC C2 S2ALL 9000 *** R2 T ALL 9000 R2 T
TECHNOS + con TC-LASTIC C2 S2
TechnokollaNormal setting TECHNOS + con TC-
LASTIC C2 S2 TECHNOS + con TC-LASTIC C2 S2
ALL 9000 *** R2 T ALL 9000 R2 TQuick setting TECHNORAP-2 C2 FT S1 TECHNORAP-2 C2 FT S1 Quick setting TECHNORAP-2 C2 FT S1 TECHNORAP-2 C2 FT S1
WEBERNormal setting webercol Proges Top S1
webercol UltraGres 400 C2TE S1webercol Fix CR R2T webercol Fix CR R2T
webercol Proges Top S1 webercol UltraGres 400 C2TE S1
WEBERNormal setting
webercol UltraGres400 (fino a 3 metri di altezza) webercol UltraGres Flex
C2TE S1
C2TE S2
webercol UltraGres Flex
webercol Fix CR
C2TE S2
R2T webercol Fix CR R2T webercol Fix CR R2T
Quick setting webercol UltraGres Fast C2FTE S1 webercol UltraGres Fast C2FTE S1 Quick setting webercol UltraGres Fast C2FTE S1 webercol UltraGres Fast+weber L50 C2FTE S2
Technical guide for cladding & flooring64
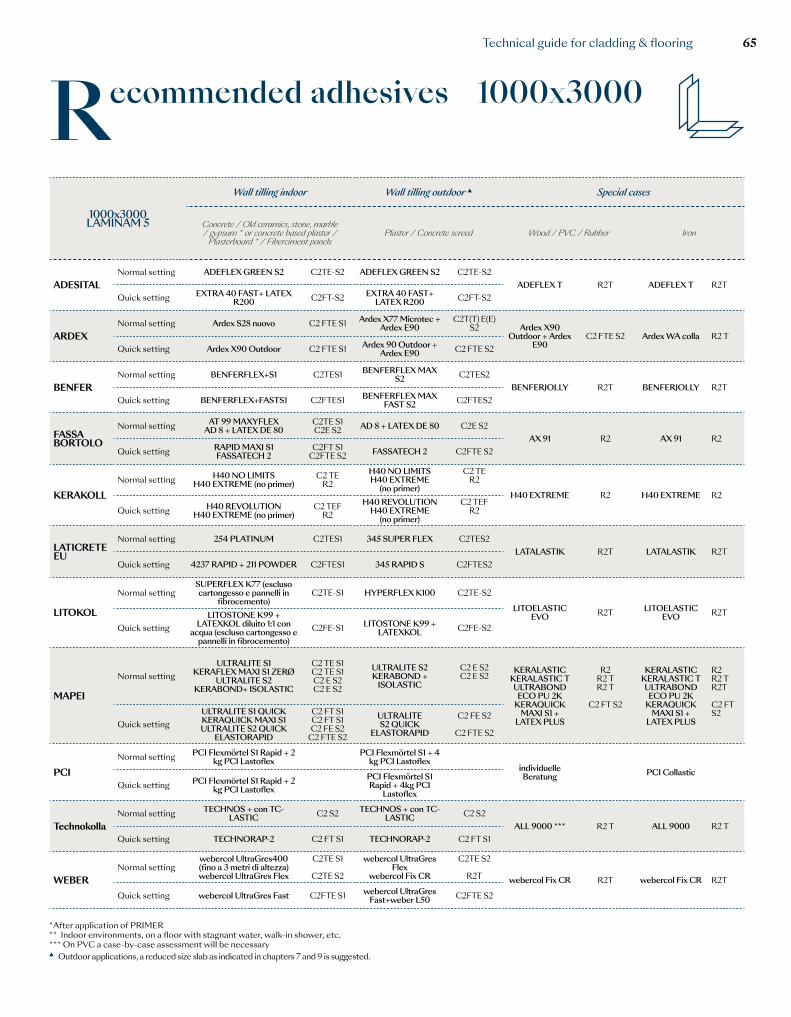
Recommended adhesives 1000x3000
*After application of PRIMER** Indoor environments, on a floor with stagnant water, walk-in shower, etc. *** On PVC a case-by-case assessment will be necessary▲ Outdoor applications, a reduced size slab as indicated in chapters 7 and 9 is suggested.
1000x3000LAMINAM 5
Floor indoor Floor outdoor
1000x3000LAMINAM 5
Wall tilling indoor Wall tilling outdoor ▲ Special cases
Anhydrite or concrete screed * / quick setting screed / Old ceramics / stone
and marbleWood / PVC / Rubber Iron
Cementitious screeds / Rapid, ready-mixed screeds / Concrete / Old
ceramic, tiles, stone material
Concrete / Old ceramics, stone, marble / gypsum * or concrete based plaster /
Plasterboard * / Fiberciment panels Plaster / Concrete screed Wood / PVC / Rubber Iron
ADESITALNormal setting ADEFLEX GREEN S2 C2TE-S2
ADEFLEX T R2T ADEFLEX T R2TADEFLEX GREEN S2 C2TE-S2
ADESITALNormal setting ADEFLEX GREEN S2 C2TE-S2 ADEFLEX GREEN S2 C2TE-S2
ADEFLEX T R2T ADEFLEX T R2TQuick setting EXTRA 40 FAST+
LATEX R200 C2FT-S2 EXTRA 40 FAST+ LATEX R200 C2FT-S2 Quick setting EXTRA 40 FAST+ LATEX
R200 C2FT-S2 EXTRA 40 FAST+ LATEX R200 C2FT-S2
ARDEXNormal setting Ardex S28 nuovo C2 FTE S1
Ardex S28 nuovo + Ardex E90
C2 FTE S2 Ardex WA colla R2
Ardex X78 Microtec C2 E (E) S1
ARDEXNormal setting Ardex S28 nuovo C2 FTE S1 Ardex X77 Microtec +
Ardex E90C2T(T) E(E)
S2 Ardex X90 Outdoor + Ardex
E90C2 FTE S2 Ardex WA colla R2 T
Quick setting Ardex X90 Outdoor**Ardex X90 Outdoor
C2 FTE S1C2 FTE S1 Ardex X90 Outdoor C2 FTE S1 Quick setting Ardex X90 Outdoor C2 FTE S1 Ardex 90 Outdoor +
Ardex E90 C2 FTE S2
BENFERNormal setting BENFERFLEX+S1 C2TES1
BENFERJOLLY R2T BENFERJOLLY R2TBENFERFLEX MAX S2 C2TES2
BENFERNormal setting BENFERFLEX+S1 C2TES1 BENFERFLEX MAX
S2 C2TES2BENFERJOLLY R2T BENFERJOLLY R2T
Quick setting BENFERFLEX+FASTS1 C2FTES1 BENFERFLEX MAX FAST S2 C2FTES2 Quick setting BENFERFLEX+FASTS1 C2FTES1 BENFERFLEX MAX
FAST S2 C2FTES2
FASSA BORTOLO
Normal setting AD 8 + LATEX DE 80 C2E S2AX 91 R2 AX 91 R2
AD 8 + LATEX DE 80 C2E S2FASSA BORTOLO
Normal setting AT 99 MAXYFLEX AD 8 + LATEX DE 80
C2TE S1 C2E S2 AD 8 + LATEX DE 80 C2E S2
AX 91 R2 AX 91 R2Quick setting FASSATECH 2 C2FTE S2 FASSATECH 2 C2FTE S2 Quick setting RAPID MAXI S1
FASSATECH 2C2FT S1
C2FTE S2 FASSATECH 2 C2FTE S2
KERAKOLLNormal setting
H40 NO LIMITSH40 EXTREME (no
primer)
C2 TER2
H40 EXTREME R2 H40 EXTREME R2
H40 NO LIMITSH40 EXTREME
(no primer)
C2 TER2
KERAKOLLNormal setting H40 NO LIMITS
H40 EXTREME (no primer)C2 TE
R2H40 NO LIMITSH40 EXTREME
(no primer)
C2 TER2
H40 EXTREME R2 H40 EXTREME R2
Quick settingH40 REVOLUTION
H40 EXTREME (no primer)
C2 TEFR2
H40 REVOLUTIONH40 EXTREME
(no primer)
C2 TEFR2 Quick setting H40 REVOLUTION
H40 EXTREME (no primer)C2 TEF
R2H40 REVOLUTION
H40 EXTREME (no primer)
C2 TEFR2
LATICRETE EU
Normal setting 254 PLATINUM C2TES1LATALASTIK R2T LATALASTIK R2T
345 SUPER FLEX C2TES2LATICRETE EU
Normal setting 254 PLATINUM C2TES1 345 SUPER FLEX C2TES2LATALASTIK R2T LATALASTIK R2T
Quick setting 4237 RAPID + 211 POWDER C2FTES1 345 RAPID S C2FTES2 Quick setting 4237 RAPID + 211 POWDER C2FTES1 345 RAPID S C2FTES2
LITOKOL Normal setting SUPERFLEX K77 C2TE-S1
LITOELASTIC EVO R2T LITOELASTIC EVO R2T
HYPERFLEX K100 C2TE-S2
LITOKOL
Normal settingSUPERFLEX K77 (escluso cartongesso e pannelli in
fibrocemento)C2TE-S1 HYPERFLEX K100 C2TE-S2
LITOELASTIC EVO R2T LITOELASTIC
EVO R2T
Quick settingLITOSTONE K99 +
LATEXKOL diluito 1:1 con acqua
C2FE-S1 LITOSTONE K99 + LATEXKOL C2FE-S2 Quick setting
LITOSTONE K99 + LATEXKOL diluito 1:1 con
acqua (escluso cartongesso e pannelli in fibrocemento)
C2FE-S1 LITOSTONE K99 + LATEXKOL C2FE-S2
MAPEI
Normal setting
ULTRALITE S1 KERAFLEX MAXI S1
ZERØ ULTRALITE S2 KERABOND +
ISOLASTIC
C2 TE S1 C2 TE S1
C2 E S2 C2 E S2
KERALASTIC KERALASTIC T
ULTRABOND ECO PU 2K
KERAQUICK MAXI S1 + LATEX PLUS
R2 R2 T R2 T
C2 FT
S2
KERALASTIC KERALASTIC T
ULTRABOND ECO PU 2K
KERAQUICK MAXI S1 + LATEX PLUS
R2 R2 T R2 T
C2 FT
S2
ULTRALITE S2 KERABOND +
ISOLASTIC
C2 E S2C2 E S2
MAPEI
Normal settingULTRALITE S1
KERAFLEX MAXI S1 ZERØ ULTRALITE S2
KERABOND+ ISOLASTIC
C2 TE S1C2 TE S1 C2 E S2 C2 E S2
ULTRALITE S2 KERABOND +
ISOLASTIC
C2 E S2 C2 E S2
KERALASTIC KERALASTIC T ULTRABOND ECO PU 2K
KERAQUICK MAXI S1 +
LATEX PLUS
R2R2 TR2 T
C2 FT S2
KERALASTIC KERALASTIC T ULTRABOND ECO PU 2K
KERAQUICK MAXI S1 +
LATEX PLUS
R2R2 TR2T
C2 FT S2
Quick settingULTRALITE S1 QUICK KERAQUICK MAXI S1 ULTRALITE S2 QUICK
ELASTORAPID
C2 FT S1 C2 FT S1 C2 FE S2
C2 FTE S2
ULTRALITE S2 QUICK ELASTORAPID
C2 FE S2 C2 FTE S2 Quick setting
ULTRALITE S1 QUICK KERAQUICK MAXI S1 ULTRALITE S2 QUICK
ELASTORAPID
C2 FT S1C2 FT S1C2 FE S2
C2 FTE S2
ULTRALITE S2 QUICK
ELASTORAPID
C2 FE S2
C2 FTE S2
PCINormal setting PCI Flexmörtel S1 Flott
individuelle Beratung PCI Collastic
PCI Flexmörtel S1 Flott
PCINormal setting PCI Flexmörtel S1 Rapid + 2
kg PCI LastoflexPCI Flexmörtel S1 + 4
kg PCI Lastoflexindividuelle Beratung PCI Collastic
Quick setting PCI Flexmörtel S1 Rapid PCI Flexmörtel Premium Quick setting PCI Flexmörtel S1 Rapid + 2 kg PCI Lastoflex
PCI Flexmörtel S1 Rapid + 4kg PCI
Lastoflex
TechnokollaNormal setting TECHNOS + con
TC-LASTIC C2 S2ALL 9000 *** R2 T ALL 9000 R2 T
TECHNOS + con TC-LASTIC C2 S2
TechnokollaNormal setting TECHNOS + con TC-
LASTIC C2 S2 TECHNOS + con TC-LASTIC C2 S2
ALL 9000 *** R2 T ALL 9000 R2 TQuick setting TECHNORAP-2 C2 FT S1 TECHNORAP-2 C2 FT S1 Quick setting TECHNORAP-2 C2 FT S1 TECHNORAP-2 C2 FT S1
WEBERNormal setting webercol Proges Top S1
webercol UltraGres 400 C2TE S1webercol Fix CR R2T webercol Fix CR R2T
webercol Proges Top S1 webercol UltraGres 400 C2TE S1
WEBERNormal setting
webercol UltraGres400 (fino a 3 metri di altezza) webercol UltraGres Flex
C2TE S1
C2TE S2
webercol UltraGres Flex
webercol Fix CR
C2TE S2
R2T webercol Fix CR R2T webercol Fix CR R2T
Quick setting webercol UltraGres Fast C2FTE S1 webercol UltraGres Fast C2FTE S1 Quick setting webercol UltraGres Fast C2FTE S1 webercol UltraGres Fast+weber L50 C2FTE S2
Technical guide for cladding & flooring 65
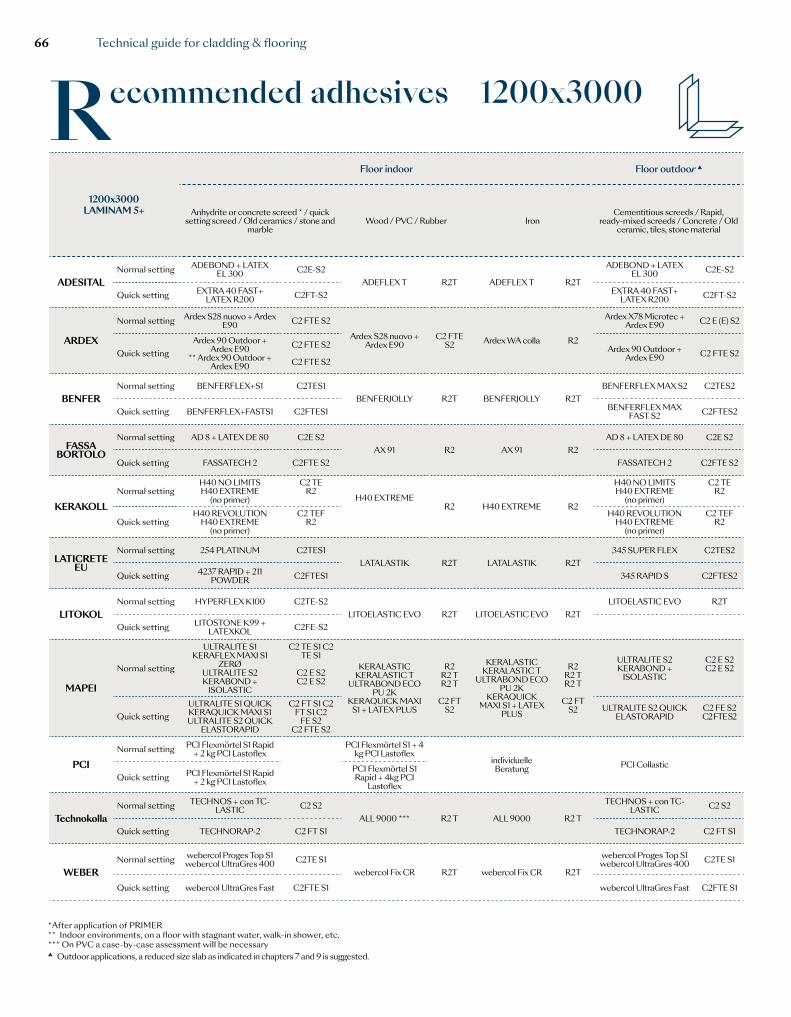
Recommended adhesives 1200x3000
*After application of PRIMER** Indoor environments, on a floor with stagnant water, walk-in shower, etc. *** On PVC a case-by-case assessment will be necessary▲ Outdoor applications, a reduced size slab as indicated in chapters 7 and 9 is suggested.
1200x3000LAMINAM 5+
Floor indoor Floor outdoor ▲
1200x3000LAMINAM 5+
Wall tilling indoor Wall tilling outdoor ▲ Special cases
Anhydrite or concrete screed * / quick setting screed / Old ceramics / stone and
marbleWood / PVC / Rubber Iron
Cementitious screeds / Rapid, ready-mixed screeds / Concrete / Old
ceramic, tiles, stone material
Concrete / Old ceramics, stone, marble / gypsum * or concrete based plaster /
Plasterboard * / Fiberciment panels Plaster / Concrete screed Wood / PVC / Rubber Iron
ADESITALNormal setting ADEBOND + LATEX
EL 300 C2E-S2ADEFLEX T R2T ADEFLEX T R2T
ADEBOND + LATEX EL 300 C2E-S2
ADESITALNormal setting ADEFLEX T R2T ADEFLEX T R2T
ADEFLEX T R2T ADEFLEX T R2TQuick setting EXTRA 40 FAST+
LATEX R200 C2FT-S2 EXTRA 40 FAST+ LATEX R200 C2FT-S2 Quick setting
ARDEX
Normal setting Ardex S28 nuovo + Ardex E90 C2 FTE S2
Ardex S28 nuovo + Ardex E90
C2 FTE S2 Ardex WA colla R2
Ardex X78 Microtec + Ardex E90 C2 E (E) S2
ARDEX
Normal setting Ardex S28 nuovo + Ardex E90 C2 FTE S2 Ardex X77 Microtec +
Ardex E90C2T(T) E(E)
S2Ardex X90
Outdoor + Ardex E90
C2 FTE S2 Ardex WA colla R2 TQuick setting
Ardex 90 Outdoor + Ardex E90
** Ardex 90 Outdoor + Ardex E90
C2 FTE S2
C2 FTE S2Ardex 90 Outdoor +
Ardex E90 C2 FTE S2 Quick settingArdex 90 Outdoor + Ardex
E90** Ardex 90 Outdoor + Ardex
E90
C2 FTE S2
C2 FTE S2Ardex 90 Outdoor +
Ardex E90 C2 FTE S2
BENFERNormal setting BENFERFLEX+S1 C2TES1
BENFERJOLLY R2T BENFERJOLLY R2TBENFERFLEX MAX S2 C2TES2
BENFERNormal setting BENFERFLEX+S1 C2TES1 BENFERFLEX MAX
S2 C2TES2BENFERJOLLY R2T BENFERJOLLY R2T
Quick setting BENFERFLEX+FASTS1 C2FTES1 BENFERFLEX MAX FAST S2 C2FTES2 Quick setting BENFERFLEX+FASTS1 C2FTES1 BENFERFLEX MAX
FAST S2 C2FTES2
FASSA BORTOLO
Normal setting AD 8 + LATEX DE 80 C2E S2AX 91 R2 AX 91 R2
AD 8 + LATEX DE 80 C2E S2FASSA
BORTOLO
Normal setting AT 99 MAXYFLEX AD 8 + LATEX DE 80
C2TE S1 C2E S2 AD 8 + LATEX DE 80 C2E S2
AX 91 R2 AX 91 R2Quick setting FASSATECH 2 C2FTE S2 FASSATECH 2 C2FTE S2 Quick setting RAPID MAXI S1
FASSATECH 2C2FT S1
C2FTE S2 FASSATECH 2 C2FTE S2
KERAKOLLNormal setting
H40 NO LIMITSH40 EXTREME
(no primer)
C2 TER2
H40 EXTREMER2 H40 EXTREME R2
H40 NO LIMITSH40 EXTREME
(no primer)
C2 TER2
KERAKOLLNormal setting H40 NO LIMITS
H40 EXTREME (no primer)C2 TE
R2H40 NO LIMITSH40 EXTREME
(no primer)
C2 TER2
H40 EXTREME R2 H40 EXTREME R2
Quick settingH40 REVOLUTION
H40 EXTREME (no primer)
C2 TEFR2
H40 REVOLUTIONH40 EXTREME
(no primer)
C2 TEFR2 Quick setting H40 REVOLUTION
H40 EXTREME (no primer)C2 TEF
R2H40 REVOLUTION
H40 EXTREME (no primer)
C2 TEFR2
LATICRETE EU
Normal setting 254 PLATINUM C2TES1LATALASTIK R2T LATALASTIK R2T
345 SUPER FLEX C2TES2LATICRETE
EU
Normal setting 254 PLATINUM C2TES1 345 SUPER FLEX C2TES2LATALASTIK R2T LATALASTIK R2T
Quick setting 4237 RAPID + 211 POWDER C2FTES1 345 RAPID S C2FTES2 Quick setting 4237 RAPID + 211 POWDER C2FTES1 345 RAPID S C2FTES2
LITOKOLNormal setting HYPERFLEX K100 C2TE-S2
LITOELASTIC EVO R2T LITOELASTIC EVO R2TLITOELASTIC EVO R2T
LITOKOLNormal setting HYPERFLEX K100 C2TE-S2 LITOELASTIC EVO R2T
LITOELASTIC EVO R2T LITOELASTIC
EVO R2TQuick setting LITOSTONE K99 +
LATEXKOL C2FE-S2 Quick setting LITOSTONE K99 + LATEXKOL C2FE-S2
MAPEI
Normal setting
ULTRALITE S1KERAFLEX MAXI S1
ZERØULTRALITE S2KERABOND +
ISOLASTIC
C2 TE S1 C2 TE S1
C2 E S2 C2 E S2
KERALASTIC KERALASTIC T
ULTRABOND ECO PU 2K
KERAQUICK MAXI S1 + LATEX PLUS
R2 R2 T R2 T
C2 FT
S2
KERALASTIC KERALASTIC T
ULTRABOND ECO PU 2K
KERAQUICK MAXI S1 + LATEX
PLUS
R2 R2 T R2 T
C2 FT
S2
ULTRALITE S2 KERABOND +
ISOLASTIC
C2 E S2 C2 E S2
MAPEI
Normal settingULTRALITE S1
KERAFLEX MAXI S1 ZERØULTRALITE S2
KERABOND + ISOLASTIC
C2 TE S1C2 TE S1C2 E S2C2 E S2
ULTRALITE S2 KERABOND +
ISOLASTIC
C2 E S2C2 E S2
KERALASTIC KERALASTIC T ULTRABOND
ECO PU 2K KERAQUICK
MAXI S1 + LATEX PLUS
R2R2 TR2 T
C2 FT S2
KERALASTIC KERALASTIC T ULTRABOND
ECO PU 2K KERAQUICK
MAXI S1 + LATEX PLUS
R2R2 TR2 T
C2 FT S2
Quick settingULTRALITE S1 QUICK KERAQUICK MAXI S1 ULTRALITE S2 QUICK
ELASTORAPID
C2 FT S1 C2 FT S1 C2
FE S2 C2 FTE S2
ULTRALITE S2 QUICK ELASTORAPID
C2 FE S2 C2 FTE S2 Quick setting
ULTRALITE S1 QUICKKERAQUICK MAXI S1ULTRALITE S2 QUICK
ELASTORAPID
C2 FT S1C2 FT S1C2 FE S2
C2 FTE S2
ULTRALITE S2 QUICK
ELASTORAPID
C2 FE S2
C2 FTE S2
PCINormal setting PCI Flexmörtel S1 Rapid
+ 2 kg PCI LastoflexPCI Flexmörtel S1 + 4
kg PCI Lastoflexindividuelle
Beratung PCI Collastic PCINormal setting PCI Flexmörtel S1 Flott
individuelle Beratung PCI Collastic
PCI Flexmörtel S1 Flott
Quick setting PCI Flexmörtel S1 Rapid + 2 kg PCI Lastoflex
PCI Flexmörtel S1 Rapid + 4kg PCI
LastoflexQuick setting PCI Flexmörtel S1 Rapid PCI Flexmörtel
Premium
TechnokollaNormal setting TECHNOS + con TC-
LASTIC C2 S2ALL 9000 *** R2 T ALL 9000 R2 T
TECHNOS + con TC-LASTIC C2 S2
TechnokollaNormal setting TECHNOS + con TC-
LASTIC C2 S2 TECHNOS + con TC-LASTIC C2 S2
ALL 9000 *** R2 T ALL 9000 R2 TQuick setting TECHNORAP-2 C2 FT S1 TECHNORAP-2 C2 FT S1 Quick setting TECHNORAP-2 C2 FT S1 TECHNORAP-2 C2 FT S1
WEBERNormal setting webercol Proges Top S1
webercol UltraGres 400 C2TE S1webercol Fix CR R2T webercol Fix CR R2T
webercol Proges Top S1 webercol UltraGres 400 C2TE S1
WEBERNormal setting
webercol UltraGres400 (fino a 3 metri di altezza)
webercol UltraGres Flex
C2TE S1
C2TE S2
webercol UltraGres Flex
webercol Fix CR
C2TE S2
R2T webercol Fix CR R2T webercol Fix CR R2T
Quick setting webercol UltraGres Fast C2FTE S1 webercol UltraGres Fast C2FTE S1 Quick setting webercol UltraGres Fast C2FTE S1 webercol UltraGres Fast+weber L50 C2FTE S2
Technical guide for cladding & flooring66
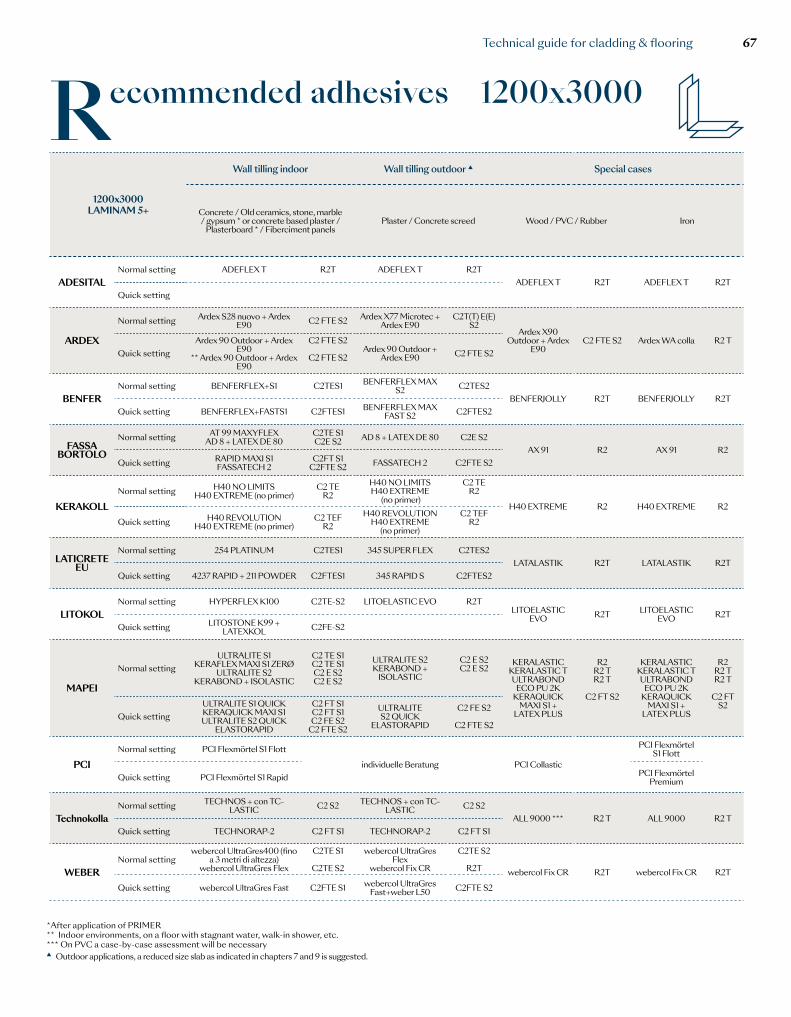
Recommended adhesives 1200x3000
*After application of PRIMER** Indoor environments, on a floor with stagnant water, walk-in shower, etc. *** On PVC a case-by-case assessment will be necessary▲ Outdoor applications, a reduced size slab as indicated in chapters 7 and 9 is suggested.
1200x3000LAMINAM 5+
Floor indoor Floor outdoor ▲
1200x3000LAMINAM 5+
Wall tilling indoor Wall tilling outdoor ▲ Special cases
Anhydrite or concrete screed * / quick setting screed / Old ceramics / stone and
marbleWood / PVC / Rubber Iron
Cementitious screeds / Rapid, ready-mixed screeds / Concrete / Old
ceramic, tiles, stone material
Concrete / Old ceramics, stone, marble / gypsum * or concrete based plaster /
Plasterboard * / Fiberciment panels Plaster / Concrete screed Wood / PVC / Rubber Iron
ADESITALNormal setting ADEBOND + LATEX
EL 300 C2E-S2ADEFLEX T R2T ADEFLEX T R2T
ADEBOND + LATEX EL 300 C2E-S2
ADESITALNormal setting ADEFLEX T R2T ADEFLEX T R2T
ADEFLEX T R2T ADEFLEX T R2TQuick setting EXTRA 40 FAST+
LATEX R200 C2FT-S2 EXTRA 40 FAST+ LATEX R200 C2FT-S2 Quick setting
ARDEX
Normal setting Ardex S28 nuovo + Ardex E90 C2 FTE S2
Ardex S28 nuovo + Ardex E90
C2 FTE S2 Ardex WA colla R2
Ardex X78 Microtec + Ardex E90 C2 E (E) S2
ARDEX
Normal setting Ardex S28 nuovo + Ardex E90 C2 FTE S2 Ardex X77 Microtec +
Ardex E90C2T(T) E(E)
S2Ardex X90
Outdoor + Ardex E90
C2 FTE S2 Ardex WA colla R2 TQuick setting
Ardex 90 Outdoor + Ardex E90
** Ardex 90 Outdoor + Ardex E90
C2 FTE S2
C2 FTE S2Ardex 90 Outdoor +
Ardex E90 C2 FTE S2 Quick settingArdex 90 Outdoor + Ardex
E90** Ardex 90 Outdoor + Ardex
E90
C2 FTE S2
C2 FTE S2Ardex 90 Outdoor +
Ardex E90 C2 FTE S2
BENFERNormal setting BENFERFLEX+S1 C2TES1
BENFERJOLLY R2T BENFERJOLLY R2TBENFERFLEX MAX S2 C2TES2
BENFERNormal setting BENFERFLEX+S1 C2TES1 BENFERFLEX MAX
S2 C2TES2BENFERJOLLY R2T BENFERJOLLY R2T
Quick setting BENFERFLEX+FASTS1 C2FTES1 BENFERFLEX MAX FAST S2 C2FTES2 Quick setting BENFERFLEX+FASTS1 C2FTES1 BENFERFLEX MAX
FAST S2 C2FTES2
FASSA BORTOLO
Normal setting AD 8 + LATEX DE 80 C2E S2AX 91 R2 AX 91 R2
AD 8 + LATEX DE 80 C2E S2FASSA
BORTOLO
Normal setting AT 99 MAXYFLEX AD 8 + LATEX DE 80
C2TE S1 C2E S2 AD 8 + LATEX DE 80 C2E S2
AX 91 R2 AX 91 R2Quick setting FASSATECH 2 C2FTE S2 FASSATECH 2 C2FTE S2 Quick setting RAPID MAXI S1
FASSATECH 2C2FT S1
C2FTE S2 FASSATECH 2 C2FTE S2
KERAKOLLNormal setting
H40 NO LIMITSH40 EXTREME
(no primer)
C2 TER2
H40 EXTREMER2 H40 EXTREME R2
H40 NO LIMITSH40 EXTREME
(no primer)
C2 TER2
KERAKOLLNormal setting H40 NO LIMITS
H40 EXTREME (no primer)C2 TE
R2H40 NO LIMITSH40 EXTREME
(no primer)
C2 TER2
H40 EXTREME R2 H40 EXTREME R2
Quick settingH40 REVOLUTION
H40 EXTREME (no primer)
C2 TEFR2
H40 REVOLUTIONH40 EXTREME
(no primer)
C2 TEFR2 Quick setting H40 REVOLUTION
H40 EXTREME (no primer)C2 TEF
R2H40 REVOLUTION
H40 EXTREME (no primer)
C2 TEFR2
LATICRETE EU
Normal setting 254 PLATINUM C2TES1LATALASTIK R2T LATALASTIK R2T
345 SUPER FLEX C2TES2LATICRETE
EU
Normal setting 254 PLATINUM C2TES1 345 SUPER FLEX C2TES2LATALASTIK R2T LATALASTIK R2T
Quick setting 4237 RAPID + 211 POWDER C2FTES1 345 RAPID S C2FTES2 Quick setting 4237 RAPID + 211 POWDER C2FTES1 345 RAPID S C2FTES2
LITOKOLNormal setting HYPERFLEX K100 C2TE-S2
LITOELASTIC EVO R2T LITOELASTIC EVO R2TLITOELASTIC EVO R2T
LITOKOLNormal setting HYPERFLEX K100 C2TE-S2 LITOELASTIC EVO R2T
LITOELASTIC EVO R2T LITOELASTIC
EVO R2TQuick setting LITOSTONE K99 +
LATEXKOL C2FE-S2 Quick setting LITOSTONE K99 + LATEXKOL C2FE-S2
MAPEI
Normal setting
ULTRALITE S1KERAFLEX MAXI S1
ZERØULTRALITE S2KERABOND +
ISOLASTIC
C2 TE S1 C2 TE S1
C2 E S2 C2 E S2
KERALASTIC KERALASTIC T
ULTRABOND ECO PU 2K
KERAQUICK MAXI S1 + LATEX PLUS
R2 R2 T R2 T
C2 FT
S2
KERALASTIC KERALASTIC T
ULTRABOND ECO PU 2K
KERAQUICK MAXI S1 + LATEX
PLUS
R2 R2 T R2 T
C2 FT
S2
ULTRALITE S2 KERABOND +
ISOLASTIC
C2 E S2 C2 E S2
MAPEI
Normal settingULTRALITE S1
KERAFLEX MAXI S1 ZERØULTRALITE S2
KERABOND + ISOLASTIC
C2 TE S1C2 TE S1C2 E S2C2 E S2
ULTRALITE S2 KERABOND +
ISOLASTIC
C2 E S2C2 E S2
KERALASTIC KERALASTIC T ULTRABOND
ECO PU 2K KERAQUICK
MAXI S1 + LATEX PLUS
R2R2 TR2 T
C2 FT S2
KERALASTIC KERALASTIC T ULTRABOND
ECO PU 2K KERAQUICK
MAXI S1 + LATEX PLUS
R2R2 TR2 T
C2 FT S2
Quick settingULTRALITE S1 QUICK KERAQUICK MAXI S1 ULTRALITE S2 QUICK
ELASTORAPID
C2 FT S1 C2 FT S1 C2
FE S2 C2 FTE S2
ULTRALITE S2 QUICK ELASTORAPID
C2 FE S2 C2 FTE S2 Quick setting
ULTRALITE S1 QUICKKERAQUICK MAXI S1ULTRALITE S2 QUICK
ELASTORAPID
C2 FT S1C2 FT S1C2 FE S2
C2 FTE S2
ULTRALITE S2 QUICK
ELASTORAPID
C2 FE S2
C2 FTE S2
PCINormal setting PCI Flexmörtel S1 Rapid
+ 2 kg PCI LastoflexPCI Flexmörtel S1 + 4
kg PCI Lastoflexindividuelle
Beratung PCI Collastic PCINormal setting PCI Flexmörtel S1 Flott
individuelle Beratung PCI Collastic
PCI Flexmörtel S1 Flott
Quick setting PCI Flexmörtel S1 Rapid + 2 kg PCI Lastoflex
PCI Flexmörtel S1 Rapid + 4kg PCI
LastoflexQuick setting PCI Flexmörtel S1 Rapid PCI Flexmörtel
Premium
TechnokollaNormal setting TECHNOS + con TC-
LASTIC C2 S2ALL 9000 *** R2 T ALL 9000 R2 T
TECHNOS + con TC-LASTIC C2 S2
TechnokollaNormal setting TECHNOS + con TC-
LASTIC C2 S2 TECHNOS + con TC-LASTIC C2 S2
ALL 9000 *** R2 T ALL 9000 R2 TQuick setting TECHNORAP-2 C2 FT S1 TECHNORAP-2 C2 FT S1 Quick setting TECHNORAP-2 C2 FT S1 TECHNORAP-2 C2 FT S1
WEBERNormal setting webercol Proges Top S1
webercol UltraGres 400 C2TE S1webercol Fix CR R2T webercol Fix CR R2T
webercol Proges Top S1 webercol UltraGres 400 C2TE S1
WEBERNormal setting
webercol UltraGres400 (fino a 3 metri di altezza)
webercol UltraGres Flex
C2TE S1
C2TE S2
webercol UltraGres Flex
webercol Fix CR
C2TE S2
R2T webercol Fix CR R2T webercol Fix CR R2T
Quick setting webercol UltraGres Fast C2FTE S1 webercol UltraGres Fast C2FTE S1 Quick setting webercol UltraGres Fast C2FTE S1 webercol UltraGres Fast+weber L50 C2FTE S2
Technical guide for cladding & flooring 67
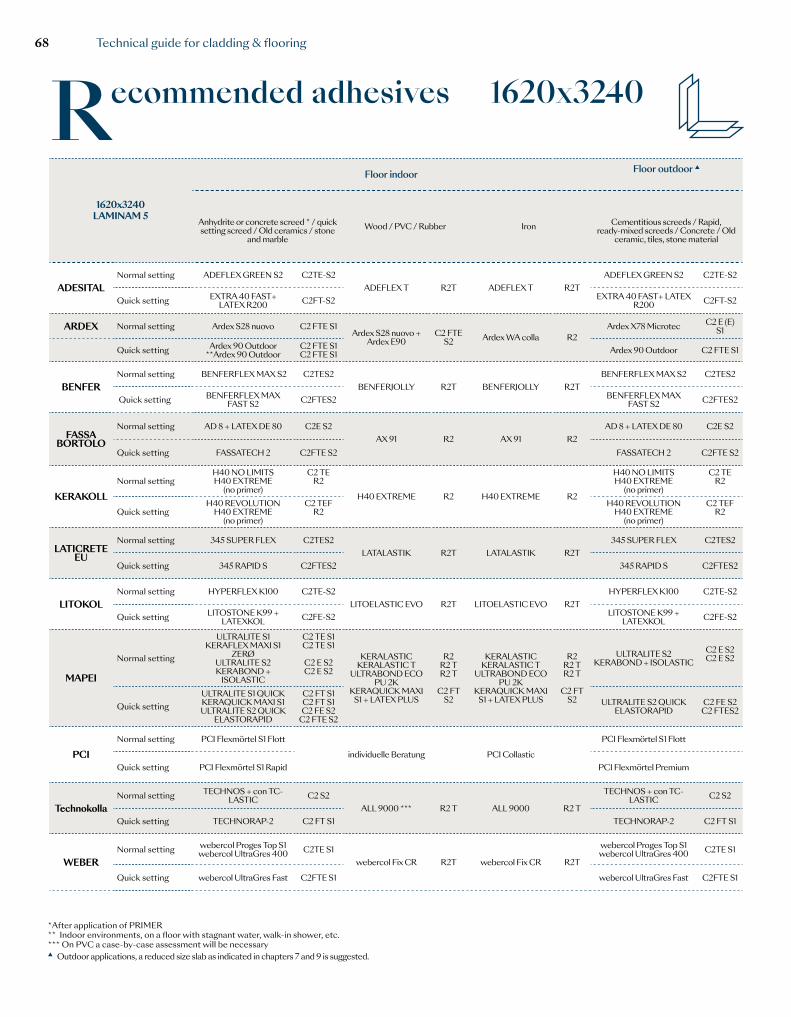
Recommended adhesives 1620x3240
*After application of PRIMER** Indoor environments, on a floor with stagnant water, walk-in shower, etc. *** On PVC a case-by-case assessment will be necessary▲ Outdoor applications, a reduced size slab as indicated in chapters 7 and 9 is suggested.
1620x3240LAMINAM 5
Floor indoor Floor outdoor ▲
1620x3240LAMINAM 5
Wall tilling indoor Wall tilling outdoor ▲ Special cases
Anhydrite or concrete screed * / quick setting screed / Old ceramics / stone
and marbleWood / PVC / Rubber Iron
Cementitious screeds / Rapid,
ready-mixed screeds / Concrete / Old ceramic, tiles, stone material
Concrete / Old ceramics, stone, marble / gypsum * or concrete based plaster /
Plasterboard * / Fiberciment panels Plaster / Concrete screed Wood / PVC / Rubber Iron
ADESITALNormal setting ADEFLEX GREEN S2 C2TE-S2
ADEFLEX T R2T ADEFLEX T R2TADEFLEX GREEN S2 C2TE-S2
ADESITALNormal setting ADEFLEX GREEN S2 C2TE-S2 ADEFLEX GREEN S2 C2TE-S2
ADEFLEX T R2T ADEFLEX T R2TQuick setting EXTRA 40 FAST+
LATEX R200 C2FT-S2 EXTRA 40 FAST+ LATEX R200 C2FT-S2 Quick setting EXTRA 40 FAST+ LATEX
R200 C2FT-S2 EXTRA 40 FAST+ LATEX R200 C2FT-S2
ARDEX Normal setting Ardex S28 nuovo C2 FTE S1Ardex S28 nuovo +
Ardex E90C2 FTE
S2 Ardex WA colla R2Ardex X78 Microtec C2 E (E)
S1ARDEX
Normal setting Ardex S28 nuvo C2 FTE S1 Ardex X77 Microtec + Ardex E90
C2T(T) E(E) S2 Ardex X90
Outdoor + Ardex E90
C2 FTE S2 Ardex WA colla R2 TQuick setting Ardex 90 Outdoor
**Ardex 90 OutdoorC2 FTE S1C2 FTE S1 Ardex 90 Outdoor C2 FTE S1 Quick setting Ardex 90 Outdoor C2 FTE S1 Ardex 90 Outdoor +
Ardex E90 C2 FTE S2
BENFERNormal setting BENFERFLEX MAX S2 C2TES2
BENFERJOLLY R2T BENFERJOLLY R2TBENFERFLEX MAX S2 C2TES2
BENFERNormal setting BENFERFLEX MAX S2 C2TES2 BENFERFLEX MAX
S2 C2TES2BENFERJOLLY R2T BENFERJOLLY R2T
Quick setting BENFERFLEX MAX FAST S2 C2FTES2 BENFERFLEX MAX
FAST S2 C2FTES2 Quick setting BENFERFLEX MAX FAST S2 C2FTES2 BENFERFLEX MAX FAST S2 C2FTES2
FASSA BORTOLO
Normal setting AD 8 + LATEX DE 80 C2E S2AX 91 R2 AX 91 R2
AD 8 + LATEX DE 80 C2E S2FASSA
BORTOLO
Normal setting AT 99 MAXYFLEX AD 8 + LATEX DE 80
C2TE S1 C2E S2 AD 8 + LATEX DE 80 C2E S2
AX 91 R2 AX 91 R2Quick setting FASSATECH 2 C2FTE S2 FASSATECH 2 C2FTE S2 Quick setting RAPID MAXI S1
FASSATECH 2C2FT S1
C2FTE S2 FASSATECH 2 C2FTE S2
KERAKOLLNormal setting
H40 NO LIMITSH40 EXTREME
(no primer)
C2 TER2
H40 EXTREME R2 H40 EXTREME R2
H40 NO LIMITSH40 EXTREME
(no primer)
C2 TER2
KERAKOLLNormal setting H40 NO LIMITS
H40 EXTREME (no primer)C2 TE
R2H40 NO LIMITSH40 EXTREME
(no primer)
C2 TER2
H40 EXTREME R2 H40 EXTREME R2
Quick settingH40 REVOLUTION
H40 EXTREME (no primer)
C2 TEFR2
H40 REVOLUTIONH40 EXTREME
(no primer)
C2 TEFR2 Quick setting H40 REVOLUTION
H40 EXTREME (no primer)C2 TEF
R2H40 REVOLUTION
H40 EXTREME (no primer)
C2 TEFR2
LATICRETE EU
Normal setting 345 SUPER FLEX C2TES2LATALASTIK R2T LATALASTIK R2T
345 SUPER FLEX C2TES2LATICRETE
EU
Normal setting 345 SUPER FLEX C2TES2 345 SUPER FLEX C2TES2LATALASTIK R2T LATALASTIK R2T
Quick setting 345 RAPID S C2FTES2 345 RAPID S C2FTES2 Quick setting 345 RAPID S C2FTES2 345 RAPID S C2FTES2
LITOKOLNormal setting HYPERFLEX K100 C2TE-S2
LITOELASTIC EVO R2T LITOELASTIC EVO R2THYPERFLEX K100 C2TE-S2
LITOKOLNormal setting HYPERFLEX K100 C2TE-S2 HYPERFLEX K100 C2TE-S2
LITOELASTIC EVO R2T LITOELASTIC
EVO R2TQuick setting LITOSTONE K99 +
LATEXKOL C2FE-S2 LITOSTONE K99 + LATEXKOL C2FE-S2 Quick setting LITOSTONE K99 +
LATEXKOL C2FE-S2 LITOSTONE K99 + LATEXKOL C2FE-S2
MAPEI
Normal setting
ULTRALITE S1 KERAFLEX MAXI S1
ZERØ ULTRALITE S2 KERABOND +
ISOLASTIC
C2 TE S1C2 TE S1
C2 E S2C2 E S2
KERALASTIC KERALASTIC T
ULTRABOND ECO PU 2K
KERAQUICK MAXI S1 + LATEX PLUS
R2R2 TR2 T
C2 FT S2
KERALASTIC KERALASTIC T
ULTRABOND ECO PU 2K
KERAQUICK MAXI S1 + LATEX PLUS
R2R2 TR2 T
C2 FT S2
ULTRALITE S2 KERABOND + ISOLASTIC
C2 E S2 C2 E S2
MAPEI
Normal settingULTRALITE S1
KERAFLEX MAXI S1 ZERØ ULTRALITE S2
KERABOND + ISOLASTIC
C2 TE S1C2 TE S1C2 E S2C2 E S2
ULTRALITE S2 KERABOND +
ISOLASTIC
C2 E S2C2 E S2
KERALASTIC KERALASTIC T ULTRABOND
ECO PU 2K KERAQUICK
MAXI S1 + LATEX PLUS
R2R2 TR2 T
C2 FT S2
KERALASTICKERALASTIC TULTRABOND
ECO PU 2KKERAQUICK
MAXI S1 + LATEX PLUS
R2R2 TR2 T
C2 FT S2
Quick settingULTRALITE S1 QUICK KERAQUICK MAXI S1 ULTRALITE S2 QUICK
ELASTORAPID
C2 FT S1C2 FT S1C2 FE S2
C2 FTE S2
ULTRALITE S2 QUICK ELASTORAPID
C2 FE S2 C2 FTES2 Quick setting
ULTRALITE S1 QUICK KERAQUICK MAXI S1 ULTRALITE S2 QUICK
ELASTORAPID
C2 FT S1C2 FT S1C2 FE S2
C2 FTE S2
ULTRALITE S2 QUICK
ELASTORAPID
C2 FE S2
C2 FTE S2
PCINormal setting PCI Flexmörtel S1 Flott
individuelle Beratung PCI Collastic
PCI Flexmörtel S1 Flott
PCINormal setting PCI Flexmörtel S1 Rapid + 2
kg PCI LastoflexPCI Flexmörtel S1 + 4
kg PCI Lastoflexindividuelle
Beratung PCI CollasticQuick setting PCI Flexmörtel S1 Rapid PCI Flexmörtel Premium Quick setting PCI Flexmörtel S1 Rapid + 2
kg PCI LastoflexPCI Flexmörtel S1 Rapid + 4kg PCI
Lastoflex
TechnokollaNormal setting TECHNOS + con TC-
LASTIC C2 S2ALL 9000 *** R2 T ALL 9000 R2 T
TECHNOS + con TC-LASTIC C2 S2
TechnokollaNormal setting TECHNOS + con TC-
LASTIC C2 S2 TECHNOS + con TC-LASTIC C2 S2
ALL 9000 *** R2 T ALL 9000 R2 TQuick setting TECHNORAP-2 C2 FT S1 TECHNORAP-2 C2 FT S1 Quick setting TECHNORAP-2 C2 FT S1 TECHNORAP-2 C2 FT S1
WEBERNormal setting webercol Proges Top S1
webercol UltraGres 400
C2TE S1 webercol Fix CR R2T webercol Fix CR R2T
webercol Proges Top S1 webercol UltraGres 400 C2TE S1
WEBERNormal setting webercol UltraGres Flex C2FTE S2
webercol UltraGres Flex
webercol Fix CR
C2TE S2
R2T webercol Fix CR R2T webercol Fix CR R2T
Quick setting webercol UltraGres Fast C2FTE S1 webercol UltraGres Fast C2FTE S1 Quick setting webercol UltraGres Fast C2FTE S1 webercol UltraGres Fast+weber L50 C2FTE S2
Technical guide for cladding & flooring68

Recommended adhesives 1620x3240
*After application of PRIMER** Indoor environments, on a floor with stagnant water, walk-in shower, etc. *** On PVC a case-by-case assessment will be necessary▲ Outdoor applications, a reduced size slab as indicated in chapters 7 and 9 is suggested.
1620x3240LAMINAM 5
Floor indoor Floor outdoor ▲
1620x3240LAMINAM 5
Wall tilling indoor Wall tilling outdoor ▲ Special cases
Anhydrite or concrete screed * / quick setting screed / Old ceramics / stone
and marbleWood / PVC / Rubber Iron
Cementitious screeds / Rapid,
ready-mixed screeds / Concrete / Old ceramic, tiles, stone material
Concrete / Old ceramics, stone, marble / gypsum * or concrete based plaster /
Plasterboard * / Fiberciment panels Plaster / Concrete screed Wood / PVC / Rubber Iron
ADESITALNormal setting ADEFLEX GREEN S2 C2TE-S2
ADEFLEX T R2T ADEFLEX T R2TADEFLEX GREEN S2 C2TE-S2
ADESITALNormal setting ADEFLEX GREEN S2 C2TE-S2 ADEFLEX GREEN S2 C2TE-S2
ADEFLEX T R2T ADEFLEX T R2TQuick setting EXTRA 40 FAST+
LATEX R200 C2FT-S2 EXTRA 40 FAST+ LATEX R200 C2FT-S2 Quick setting EXTRA 40 FAST+ LATEX
R200 C2FT-S2 EXTRA 40 FAST+ LATEX R200 C2FT-S2
ARDEX Normal setting Ardex S28 nuovo C2 FTE S1Ardex S28 nuovo +
Ardex E90C2 FTE
S2 Ardex WA colla R2Ardex X78 Microtec C2 E (E)
S1ARDEX
Normal setting Ardex S28 nuvo C2 FTE S1 Ardex X77 Microtec + Ardex E90
C2T(T) E(E) S2 Ardex X90
Outdoor + Ardex E90
C2 FTE S2 Ardex WA colla R2 TQuick setting Ardex 90 Outdoor
**Ardex 90 OutdoorC2 FTE S1C2 FTE S1 Ardex 90 Outdoor C2 FTE S1 Quick setting Ardex 90 Outdoor C2 FTE S1 Ardex 90 Outdoor +
Ardex E90 C2 FTE S2
BENFERNormal setting BENFERFLEX MAX S2 C2TES2
BENFERJOLLY R2T BENFERJOLLY R2TBENFERFLEX MAX S2 C2TES2
BENFERNormal setting BENFERFLEX MAX S2 C2TES2 BENFERFLEX MAX
S2 C2TES2BENFERJOLLY R2T BENFERJOLLY R2T
Quick setting BENFERFLEX MAX FAST S2 C2FTES2 BENFERFLEX MAX
FAST S2 C2FTES2 Quick setting BENFERFLEX MAX FAST S2 C2FTES2 BENFERFLEX MAX FAST S2 C2FTES2
FASSA BORTOLO
Normal setting AD 8 + LATEX DE 80 C2E S2AX 91 R2 AX 91 R2
AD 8 + LATEX DE 80 C2E S2FASSA
BORTOLO
Normal setting AT 99 MAXYFLEX AD 8 + LATEX DE 80
C2TE S1 C2E S2 AD 8 + LATEX DE 80 C2E S2
AX 91 R2 AX 91 R2Quick setting FASSATECH 2 C2FTE S2 FASSATECH 2 C2FTE S2 Quick setting RAPID MAXI S1
FASSATECH 2C2FT S1
C2FTE S2 FASSATECH 2 C2FTE S2
KERAKOLLNormal setting
H40 NO LIMITSH40 EXTREME
(no primer)
C2 TER2
H40 EXTREME R2 H40 EXTREME R2
H40 NO LIMITSH40 EXTREME
(no primer)
C2 TER2
KERAKOLLNormal setting H40 NO LIMITS
H40 EXTREME (no primer)C2 TE
R2H40 NO LIMITSH40 EXTREME
(no primer)
C2 TER2
H40 EXTREME R2 H40 EXTREME R2
Quick settingH40 REVOLUTION
H40 EXTREME (no primer)
C2 TEFR2
H40 REVOLUTIONH40 EXTREME
(no primer)
C2 TEFR2 Quick setting H40 REVOLUTION
H40 EXTREME (no primer)C2 TEF
R2H40 REVOLUTION
H40 EXTREME (no primer)
C2 TEFR2
LATICRETE EU
Normal setting 345 SUPER FLEX C2TES2LATALASTIK R2T LATALASTIK R2T
345 SUPER FLEX C2TES2LATICRETE
EU
Normal setting 345 SUPER FLEX C2TES2 345 SUPER FLEX C2TES2LATALASTIK R2T LATALASTIK R2T
Quick setting 345 RAPID S C2FTES2 345 RAPID S C2FTES2 Quick setting 345 RAPID S C2FTES2 345 RAPID S C2FTES2
LITOKOLNormal setting HYPERFLEX K100 C2TE-S2
LITOELASTIC EVO R2T LITOELASTIC EVO R2THYPERFLEX K100 C2TE-S2
LITOKOLNormal setting HYPERFLEX K100 C2TE-S2 HYPERFLEX K100 C2TE-S2
LITOELASTIC EVO R2T LITOELASTIC
EVO R2TQuick setting LITOSTONE K99 +
LATEXKOL C2FE-S2 LITOSTONE K99 + LATEXKOL C2FE-S2 Quick setting LITOSTONE K99 +
LATEXKOL C2FE-S2 LITOSTONE K99 + LATEXKOL C2FE-S2
MAPEI
Normal setting
ULTRALITE S1 KERAFLEX MAXI S1
ZERØ ULTRALITE S2 KERABOND +
ISOLASTIC
C2 TE S1C2 TE S1
C2 E S2C2 E S2
KERALASTIC KERALASTIC T
ULTRABOND ECO PU 2K
KERAQUICK MAXI S1 + LATEX PLUS
R2R2 TR2 T
C2 FT S2
KERALASTIC KERALASTIC T
ULTRABOND ECO PU 2K
KERAQUICK MAXI S1 + LATEX PLUS
R2R2 TR2 T
C2 FT S2
ULTRALITE S2 KERABOND + ISOLASTIC
C2 E S2 C2 E S2
MAPEI
Normal settingULTRALITE S1
KERAFLEX MAXI S1 ZERØ ULTRALITE S2
KERABOND + ISOLASTIC
C2 TE S1C2 TE S1C2 E S2C2 E S2
ULTRALITE S2 KERABOND +
ISOLASTIC
C2 E S2C2 E S2
KERALASTIC KERALASTIC T ULTRABOND
ECO PU 2K KERAQUICK
MAXI S1 + LATEX PLUS
R2R2 TR2 T
C2 FT S2
KERALASTICKERALASTIC TULTRABOND
ECO PU 2KKERAQUICK
MAXI S1 + LATEX PLUS
R2R2 TR2 T
C2 FT S2
Quick settingULTRALITE S1 QUICK KERAQUICK MAXI S1 ULTRALITE S2 QUICK
ELASTORAPID
C2 FT S1C2 FT S1C2 FE S2
C2 FTE S2
ULTRALITE S2 QUICK ELASTORAPID
C2 FE S2 C2 FTES2 Quick setting
ULTRALITE S1 QUICK KERAQUICK MAXI S1 ULTRALITE S2 QUICK
ELASTORAPID
C2 FT S1C2 FT S1C2 FE S2
C2 FTE S2
ULTRALITE S2 QUICK
ELASTORAPID
C2 FE S2
C2 FTE S2
PCINormal setting PCI Flexmörtel S1 Flott
individuelle Beratung PCI Collastic
PCI Flexmörtel S1 Flott
PCINormal setting PCI Flexmörtel S1 Rapid + 2
kg PCI LastoflexPCI Flexmörtel S1 + 4
kg PCI Lastoflexindividuelle
Beratung PCI CollasticQuick setting PCI Flexmörtel S1 Rapid PCI Flexmörtel Premium Quick setting PCI Flexmörtel S1 Rapid + 2
kg PCI LastoflexPCI Flexmörtel S1 Rapid + 4kg PCI
Lastoflex
TechnokollaNormal setting TECHNOS + con TC-
LASTIC C2 S2ALL 9000 *** R2 T ALL 9000 R2 T
TECHNOS + con TC-LASTIC C2 S2
TechnokollaNormal setting TECHNOS + con TC-
LASTIC C2 S2 TECHNOS + con TC-LASTIC C2 S2
ALL 9000 *** R2 T ALL 9000 R2 TQuick setting TECHNORAP-2 C2 FT S1 TECHNORAP-2 C2 FT S1 Quick setting TECHNORAP-2 C2 FT S1 TECHNORAP-2 C2 FT S1
WEBERNormal setting webercol Proges Top S1
webercol UltraGres 400
C2TE S1 webercol Fix CR R2T webercol Fix CR R2T
webercol Proges Top S1 webercol UltraGres 400 C2TE S1
WEBERNormal setting webercol UltraGres Flex C2FTE S2
webercol UltraGres Flex
webercol Fix CR
C2TE S2
R2T webercol Fix CR R2T webercol Fix CR R2T
Quick setting webercol UltraGres Fast C2FTE S1 webercol UltraGres Fast C2FTE S1 Quick setting webercol UltraGres Fast C2FTE S1 webercol UltraGres Fast+weber L50 C2FTE S2
Technical guide for cladding & flooring 69
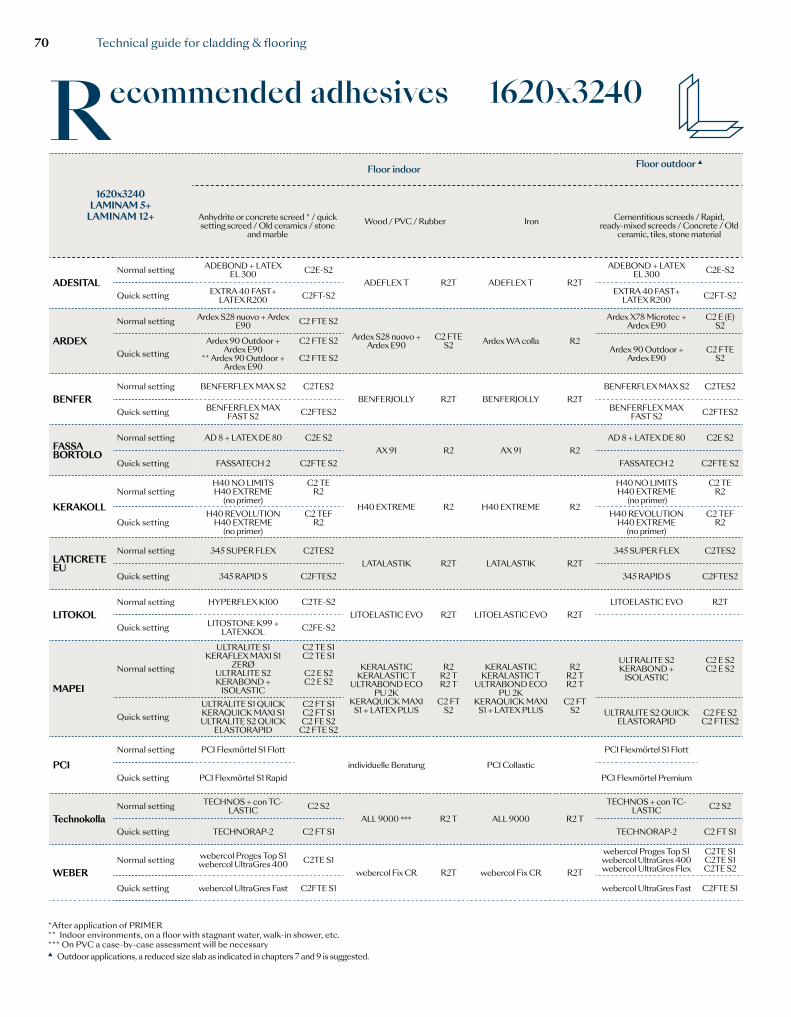
Recommended adhesives 1620x3240
*After application of PRIMER** Indoor environments, on a floor with stagnant water, walk-in shower, etc. *** On PVC a case-by-case assessment will be necessary▲ Outdoor applications, a reduced size slab as indicated in chapters 7 and 9 is suggested.
1620x3240LAMINAM 5+
LAMINAM 12+
Floor indoor Floor outdoor ▲
1620x3240LAMINAM 5+
LAMINAM 12+
Wall tilling indoor Wall tilling outdoor ▲ Special cases
Anhydrite or concrete screed * / quick setting screed / Old ceramics / stone
and marbleWood / PVC / Rubber Iron
Cementitious screeds / Rapid,
ready-mixed screeds / Concrete / Old ceramic, tiles, stone material
Concrete / Old ceramics, stone, marble / gypsum * or concrete based plaster /
Plasterboard * / Fiberciment panels Plaster / Concrete screed Wood / PVC / Rubber Iron
ADESITALNormal setting ADEBOND + LATEX
EL 300 C2E-S2ADEFLEX T R2T ADEFLEX T R2T
ADEBOND + LATEX EL 300 C2E-S2
ADESITALNormal setting ADEFLEX T R2T ADEFLEX T R2T
ADEFLEX T R2T ADEFLEX T R2TQuick setting EXTRA 40 FAST+
LATEX R200 C2FT-S2 EXTRA 40 FAST+ LATEX R200 C2FT-S2 Quick setting
ARDEX
Normal setting Ardex S28 nuovo + Ardex E90 C2 FTE S2
Ardex S28 nuovo + Ardex E90
C2 FTE S2 Ardex WA colla R2
Ardex X78 Microtec + Ardex E90
C2 E (E) S2
ARDEX
Normal setting Ardex S28 nuovo + Ardex E90 C2 FTE S2 Ardex X77 Microtec +
Ardex E90C2T(T) E(E)
S2Ardex X90
Outdoor + Ardex E90
C2 FTE S2 Ardex WA colla R2 TQuick setting
Ardex 90 Outdoor + Ardex E90
** Ardex 90 Outdoor + Ardex E90
C2 FTE S2
C2 FTE S2Ardex 90 Outdoor +
Ardex E90C2 FTE
S2 Quick settingArdex 90 Outdoor + Ardex
E90** Ardex 90 Outdoor + Ardex
E90
C2 FTE S2
C2 FTE S2Ardex 90 Outdoor +
Ardex E90 C2 FTE S2
BENFERNormal setting BENFERFLEX MAX S2 C2TES2
BENFERJOLLY R2T BENFERJOLLY R2TBENFERFLEX MAX S2 C2TES2
BENFERNormal setting BENFERFLEX MAX S2 C2TES2 BENFERFLEX MAX
S2 C2TES2BENFERJOLLY R2T BENFERJOLLY R2T
Quick setting BENFERFLEX MAX FAST S2 C2FTES2 BENFERFLEX MAX
FAST S2 C2FTES2 Quick setting BENFERFLEX MAX FAST S2 C2FTES2 BENFERFLEX MAX FAST S2 C2FTES2
FASSA BORTOLO
Normal setting AD 8 + LATEX DE 80 C2E S2AX 91 R2 AX 91 R2
AD 8 + LATEX DE 80 C2E S2FASSA BORTOLO
Normal setting AT 99 MAXYFLEX AD 8 + LATEX DE 80
C2TE S1 C2E S2 AD 8 + LATEX DE 80 C2E S2
AX 91 R2 AX 91 R2Quick setting FASSATECH 2 C2FTE S2 FASSATECH 2 C2FTE S2 Quick setting RAPID MAXI S1
FASSATECH 2C2FT S1
C2FTE S2 FASSATECH 2 C2FTE S2
KERAKOLLNormal setting
H40 NO LIMITSH40 EXTREME
(no primer)
C2 TER2
H40 EXTREME R2 H40 EXTREME R2
H40 NO LIMITSH40 EXTREME
(no primer)
C2 TER2
KERAKOLLNormal setting H40 NO LIMITS
H40 EXTREME (no primer)C2 TE
R2H40 NO LIMITSH40 EXTREME
(no primer)
C2 TER2
H40 EXTREME R2 H40 EXTREME R2
Quick settingH40 REVOLUTION
H40 EXTREME (no primer)
C2 TEFR2
H40 REVOLUTIONH40 EXTREME
(no primer)
C2 TEFR2 Quick setting H40 REVOLUTION
H40 EXTREME (no primer)C2 TEF
R2H40 REVOLUTION
H40 EXTREME (no primer)
C2 TEFR2
LATICRETE EU
Normal setting 345 SUPER FLEX C2TES2LATALASTIK R2T LATALASTIK R2T
345 SUPER FLEX C2TES2LATICRETE EU
Normal setting 345 SUPER FLEX C2TES2 345 SUPER FLEX C2TES2LATALASTIK R2T LATALASTIK R2T
Quick setting 345 RAPID S C2FTES2 345 RAPID S C2FTES2 Quick setting 345 RAPID S C2FTES2 345 RAPID S C2FTES2
LITOKOLNormal setting HYPERFLEX K100 C2TE-S2
LITOELASTIC EVO R2T LITOELASTIC EVO R2TLITOELASTIC EVO R2T
LITOKOLNormal setting HYPERFLEX K100 C2TE-S2 LITOELASTIC EVO R2T
LITOELASTIC EVO R2T LITOELASTIC
EVO R2TQuick setting LITOSTONE K99 +
LATEXKOL C2FE-S2 Quick setting LITOSTONE K99 + LATEXKOL C2FE-S2
MAPEI
Normal setting
ULTRALITE S1KERAFLEX MAXI S1
ZERØULTRALITE S2KERABOND +
ISOLASTIC
C2 TE S1C2 TE S1
C2 E S2C2 E S2
KERALASTIC KERALASTIC T
ULTRABOND ECO PU 2K
KERAQUICK MAXI S1 + LATEX PLUS
R2R2 TR2 T
C2 FT S2
KERALASTIC KERALASTIC T
ULTRABOND ECO PU 2K
KERAQUICK MAXI S1 + LATEX PLUS
R2R2 TR2 T
C2 FT S2
ULTRALITE S2 KERABOND +
ISOLASTIC
C2 E S2 C2 E S2
MAPEI
Normal settingULTRALITE S1
KERAFLEX MAXI S1 ZERØULTRALITE S2
KERABOND + ISOLASTIC
C2 TE S1C2 TE S1C2 E S2C2 E S2
ULTRALITE S2 KERABOND +
ISOLASTIC
C2 E S2 C2 E S2
KERALASTIC KERALASTIC T ULTRABOND
ECO PU 2K KERAQUICK
MAXI S1 + LATEX PLUS
R2R2 TR2 T
C2 FT S2
KERALASTIC KERALASTIC T ULTRABOND
ECO PU 2K KERAQUICK
MAXI S1 + LATEX PLUS
R2R2 TR2 T
C2 FTS2
Quick settingULTRALITE S1 QUICK KERAQUICK MAXI S1 ULTRALITE S2 QUICK
ELASTORAPID
C2 FT S1 C2 FT S1 C2 FE S2
C2 FTE S2
ULTRALITE S2 QUICK ELASTORAPID
C2 FE S2 C2 FTES2 Quick setting
ULTRALITE S1 QUICKKERAQUICK MAXI S1ULTRALITE S2 QUICK
ELASTORAPID
C2 FT S1 C2 FT S1 C2 FE S2
C2 FTE S2
ULTRALITE S2 QUICK
ELASTORAPID
C2 FE S2
C2 FTE S2
PCINormal setting PCI Flexmörtel S1 Flott
individuelle Beratung PCI Collastic
PCI Flexmörtel S1 Flott
PCINormal setting PCI Flexmörtel S1 Rapid + 2
kg PCI LastoflexPCI Flexmörtel S1 + 4
kg PCI Lastoflexindividuelle
Beratung PCI CollasticQuick setting PCI Flexmörtel S1 Rapid PCI Flexmörtel Premium Quick setting PCI Flexmörtel S1 Rapid + 2
kg PCI LastoflexPCI Flexmörtel S1 Rapid + 4kg PCI
Lastoflex
TechnokollaNormal setting TECHNOS + con TC-
LASTIC C2 S2ALL 9000 *** R2 T ALL 9000 R2 T
TECHNOS + con TC-LASTIC C2 S2
TechnokollaNormal setting TECHNOS + con TC-
LASTIC C2 S2 TECHNOS + con TC-LASTIC C2 S2
ALL 9000 *** R2 T ALL 9000 R2 TQuick setting TECHNORAP-2 C2 FT S1 TECHNORAP-2 C2 FT S1 Quick setting TECHNORAP-2 C2 FT S1 TECHNORAP-2 C2 FT S1
WEBERNormal setting webercol Proges Top S1
webercol UltraGres 400
C2TE S1 webercol Fix CR R2T webercol Fix CR R2T
webercol Proges Top S1 webercol UltraGres 400 webercol UltraGres Flex
C2TE S1 C2TE S1 C2TE S2 WEBER
Normal setting webercol UltraGres Flex C2FTE S2webercol UltraGres
Flex webercol Fix CR
C2TE S2
R2T webercol Fix CR R2T webercol Fix CR R2T
Quick setting webercol UltraGres Fast C2FTE S1 webercol UltraGres Fast C2FTE S1 Quick setting webercol UltraGres Fast C2FTE S1 webercol UltraGres Fast+weber L50 C2FTE S2
Technical guide for cladding & flooring70
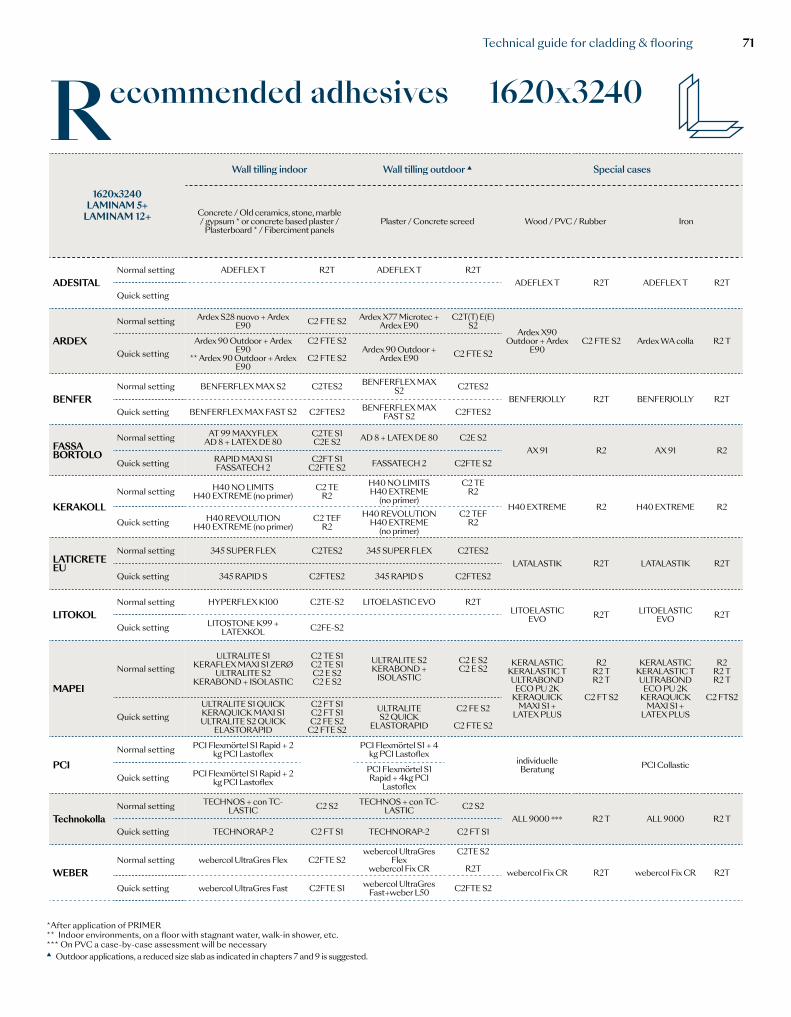
Recommended adhesives 1620x3240
*After application of PRIMER** Indoor environments, on a floor with stagnant water, walk-in shower, etc. *** On PVC a case-by-case assessment will be necessary▲ Outdoor applications, a reduced size slab as indicated in chapters 7 and 9 is suggested.
1620x3240LAMINAM 5+
LAMINAM 12+
Floor indoor Floor outdoor ▲
1620x3240LAMINAM 5+
LAMINAM 12+
Wall tilling indoor Wall tilling outdoor ▲ Special cases
Anhydrite or concrete screed * / quick setting screed / Old ceramics / stone
and marbleWood / PVC / Rubber Iron
Cementitious screeds / Rapid,
ready-mixed screeds / Concrete / Old ceramic, tiles, stone material
Concrete / Old ceramics, stone, marble / gypsum * or concrete based plaster /
Plasterboard * / Fiberciment panels Plaster / Concrete screed Wood / PVC / Rubber Iron
ADESITALNormal setting ADEBOND + LATEX
EL 300 C2E-S2ADEFLEX T R2T ADEFLEX T R2T
ADEBOND + LATEX EL 300 C2E-S2
ADESITALNormal setting ADEFLEX T R2T ADEFLEX T R2T
ADEFLEX T R2T ADEFLEX T R2TQuick setting EXTRA 40 FAST+
LATEX R200 C2FT-S2 EXTRA 40 FAST+ LATEX R200 C2FT-S2 Quick setting
ARDEX
Normal setting Ardex S28 nuovo + Ardex E90 C2 FTE S2
Ardex S28 nuovo + Ardex E90
C2 FTE S2 Ardex WA colla R2
Ardex X78 Microtec + Ardex E90
C2 E (E) S2
ARDEX
Normal setting Ardex S28 nuovo + Ardex E90 C2 FTE S2 Ardex X77 Microtec +
Ardex E90C2T(T) E(E)
S2Ardex X90
Outdoor + Ardex E90
C2 FTE S2 Ardex WA colla R2 TQuick setting
Ardex 90 Outdoor + Ardex E90
** Ardex 90 Outdoor + Ardex E90
C2 FTE S2
C2 FTE S2Ardex 90 Outdoor +
Ardex E90C2 FTE
S2 Quick settingArdex 90 Outdoor + Ardex
E90** Ardex 90 Outdoor + Ardex
E90
C2 FTE S2
C2 FTE S2Ardex 90 Outdoor +
Ardex E90 C2 FTE S2
BENFERNormal setting BENFERFLEX MAX S2 C2TES2
BENFERJOLLY R2T BENFERJOLLY R2TBENFERFLEX MAX S2 C2TES2
BENFERNormal setting BENFERFLEX MAX S2 C2TES2 BENFERFLEX MAX
S2 C2TES2BENFERJOLLY R2T BENFERJOLLY R2T
Quick setting BENFERFLEX MAX FAST S2 C2FTES2 BENFERFLEX MAX
FAST S2 C2FTES2 Quick setting BENFERFLEX MAX FAST S2 C2FTES2 BENFERFLEX MAX FAST S2 C2FTES2
FASSA BORTOLO
Normal setting AD 8 + LATEX DE 80 C2E S2AX 91 R2 AX 91 R2
AD 8 + LATEX DE 80 C2E S2FASSA BORTOLO
Normal setting AT 99 MAXYFLEX AD 8 + LATEX DE 80
C2TE S1 C2E S2 AD 8 + LATEX DE 80 C2E S2
AX 91 R2 AX 91 R2Quick setting FASSATECH 2 C2FTE S2 FASSATECH 2 C2FTE S2 Quick setting RAPID MAXI S1
FASSATECH 2C2FT S1
C2FTE S2 FASSATECH 2 C2FTE S2
KERAKOLLNormal setting
H40 NO LIMITSH40 EXTREME
(no primer)
C2 TER2
H40 EXTREME R2 H40 EXTREME R2
H40 NO LIMITSH40 EXTREME
(no primer)
C2 TER2
KERAKOLLNormal setting H40 NO LIMITS
H40 EXTREME (no primer)C2 TE
R2H40 NO LIMITSH40 EXTREME
(no primer)
C2 TER2
H40 EXTREME R2 H40 EXTREME R2
Quick settingH40 REVOLUTION
H40 EXTREME (no primer)
C2 TEFR2
H40 REVOLUTIONH40 EXTREME
(no primer)
C2 TEFR2 Quick setting H40 REVOLUTION
H40 EXTREME (no primer)C2 TEF
R2H40 REVOLUTION
H40 EXTREME (no primer)
C2 TEFR2
LATICRETE EU
Normal setting 345 SUPER FLEX C2TES2LATALASTIK R2T LATALASTIK R2T
345 SUPER FLEX C2TES2LATICRETE EU
Normal setting 345 SUPER FLEX C2TES2 345 SUPER FLEX C2TES2LATALASTIK R2T LATALASTIK R2T
Quick setting 345 RAPID S C2FTES2 345 RAPID S C2FTES2 Quick setting 345 RAPID S C2FTES2 345 RAPID S C2FTES2
LITOKOLNormal setting HYPERFLEX K100 C2TE-S2
LITOELASTIC EVO R2T LITOELASTIC EVO R2TLITOELASTIC EVO R2T
LITOKOLNormal setting HYPERFLEX K100 C2TE-S2 LITOELASTIC EVO R2T
LITOELASTIC EVO R2T LITOELASTIC
EVO R2TQuick setting LITOSTONE K99 +
LATEXKOL C2FE-S2 Quick setting LITOSTONE K99 + LATEXKOL C2FE-S2
MAPEI
Normal setting
ULTRALITE S1KERAFLEX MAXI S1
ZERØULTRALITE S2KERABOND +
ISOLASTIC
C2 TE S1C2 TE S1
C2 E S2C2 E S2
KERALASTIC KERALASTIC T
ULTRABOND ECO PU 2K
KERAQUICK MAXI S1 + LATEX PLUS
R2R2 TR2 T
C2 FT S2
KERALASTIC KERALASTIC T
ULTRABOND ECO PU 2K
KERAQUICK MAXI S1 + LATEX PLUS
R2R2 TR2 T
C2 FT S2
ULTRALITE S2 KERABOND +
ISOLASTIC
C2 E S2 C2 E S2
MAPEI
Normal settingULTRALITE S1
KERAFLEX MAXI S1 ZERØULTRALITE S2
KERABOND + ISOLASTIC
C2 TE S1C2 TE S1C2 E S2C2 E S2
ULTRALITE S2 KERABOND +
ISOLASTIC
C2 E S2 C2 E S2
KERALASTIC KERALASTIC T ULTRABOND
ECO PU 2K KERAQUICK
MAXI S1 + LATEX PLUS
R2R2 TR2 T
C2 FT S2
KERALASTIC KERALASTIC T ULTRABOND
ECO PU 2K KERAQUICK
MAXI S1 + LATEX PLUS
R2R2 TR2 T
C2 FTS2
Quick settingULTRALITE S1 QUICK KERAQUICK MAXI S1 ULTRALITE S2 QUICK
ELASTORAPID
C2 FT S1 C2 FT S1 C2 FE S2
C2 FTE S2
ULTRALITE S2 QUICK ELASTORAPID
C2 FE S2 C2 FTES2 Quick setting
ULTRALITE S1 QUICKKERAQUICK MAXI S1ULTRALITE S2 QUICK
ELASTORAPID
C2 FT S1 C2 FT S1 C2 FE S2
C2 FTE S2
ULTRALITE S2 QUICK
ELASTORAPID
C2 FE S2
C2 FTE S2
PCINormal setting PCI Flexmörtel S1 Flott
individuelle Beratung PCI Collastic
PCI Flexmörtel S1 Flott
PCINormal setting PCI Flexmörtel S1 Rapid + 2
kg PCI LastoflexPCI Flexmörtel S1 + 4
kg PCI Lastoflexindividuelle
Beratung PCI CollasticQuick setting PCI Flexmörtel S1 Rapid PCI Flexmörtel Premium Quick setting PCI Flexmörtel S1 Rapid + 2
kg PCI LastoflexPCI Flexmörtel S1 Rapid + 4kg PCI
Lastoflex
TechnokollaNormal setting TECHNOS + con TC-
LASTIC C2 S2ALL 9000 *** R2 T ALL 9000 R2 T
TECHNOS + con TC-LASTIC C2 S2
TechnokollaNormal setting TECHNOS + con TC-
LASTIC C2 S2 TECHNOS + con TC-LASTIC C2 S2
ALL 9000 *** R2 T ALL 9000 R2 TQuick setting TECHNORAP-2 C2 FT S1 TECHNORAP-2 C2 FT S1 Quick setting TECHNORAP-2 C2 FT S1 TECHNORAP-2 C2 FT S1
WEBERNormal setting webercol Proges Top S1
webercol UltraGres 400
C2TE S1 webercol Fix CR R2T webercol Fix CR R2T
webercol Proges Top S1 webercol UltraGres 400 webercol UltraGres Flex
C2TE S1 C2TE S1 C2TE S2 WEBER
Normal setting webercol UltraGres Flex C2FTE S2webercol UltraGres
Flex webercol Fix CR
C2TE S2
R2T webercol Fix CR R2T webercol Fix CR R2T
Quick setting webercol UltraGres Fast C2FTE S1 webercol UltraGres Fast C2FTE S1 Quick setting webercol UltraGres Fast C2FTE S1 webercol UltraGres Fast+weber L50 C2FTE S2
Technical guide for cladding & flooring 71
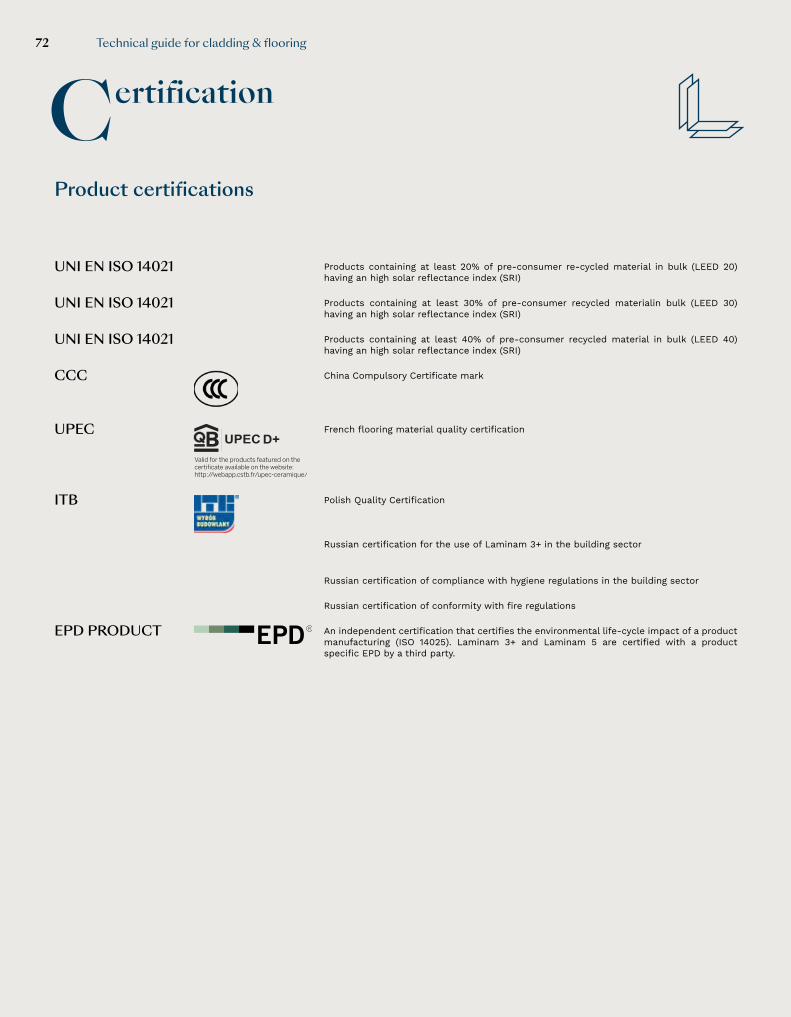
Certification
Product certifications
UNI EN ISO 14021 Products containing at least 20% of pre-consumer re-cycled material in bulk (LEED 20) having an high solar reflectance index (SRI)
UNI EN ISO 14021 Products containing at least 30% of pre-consumer recycled materialin bulk (LEED 30) having an high solar reflectance index (SRI)
UNI EN ISO 14021 Products containing at least 40% of pre-consumer recycled material in bulk (LEED 40) having an high solar reflectance index (SRI)
CCC
China Compulsory Certificate mark
UPEC French flooring material quality certification
ITB Polish Quality Certification
Russian certification for the use of Laminam 3+ in the building sector
Russian certification of compliance with hygiene regulations in the building sector
Russian certification of conformity with fire regulations
EPD PRODUCT
An independent certification that certifies the environmental life-cycle impact of a product manufacturing (ISO 14025). Laminam 3+ and Laminam 5 are certified with a product specific EPD by a third party.
Technical guide for cladding & flooring72
Certification
MED 96/98/EC e 2014/90/EU
Certification for use in the marine sector
System certifications
UNI EN ISO 9001: International Standard for Quality management systems
C-TPAT Customs-Trade Partnership Against Terrorism - USA
Technical guide for cladding & flooring 73

LAMINAM S.P.A.VIA GHIAROLA NUOVA, 25841042, FIORANO MODENESEMODENA / ITALYTEL +39 0536 [email protected]
LaminamHeadquarters
ProductionPlants
LAMINAM S.P.A.VIA GHIAROLA NUOVA, 25841042, FIORANO MODENESEMODENA / ITALYTEL +39 0536 1844200
LAMINAM S.P.A.VIA PRIMO BRINDANI, 143043, BORGO VAL DI TAROPARMA / ITALYTEL +39 0525 97864
Showrooms LAMINAM S.P.A.VIA GHIAROLA NUOVA, 25841042, FIORANO MODENESEMODENA / ITALYTEL +39 0536 1844200
LAMINAM S.P.A.VIA VERDI, 520121, MILANO / ITALYTEL +39 02 89092496
LAMINAM SERVICE S.r.lVIA GHIAROLA NUOVA 258 41042, FIORANO MODENESE MODENA / ITALYT.+39 0536 1844200
[email protected] WeChat: Laminam_Official

Campionatura gratuita di
modico valore ai sensi del
DPR 633/72 e succ.modifiche art.2
Copyright 2021 Laminam S.p.A.

LAMINAM.COM
We are designers of our own spaces seeking uniqueness.
Copyright © 2022 FDOKUMEN