Student Guide for Paycom Navigation and Timecard Procedures
27
Page 1 of 27 Questions? Contact [email protected] Student Guide for Paycom Navigation and Timecard Procedures Description: The instructions below, detailed in this guide, help the student worker navigate Paycom. • Logging into Paycom (Pg. 2) o Paycom App (Pg. 2) o Desktop Computer (Pg. 2) • Employee Self Service (ESS) Updates (Pg. 3-6) o Address and Contact Information (Pg. 3-4) o Marital Status (Pg. 4-5) o EEO (Equal Employment Opportunity) (Pg. 5-6) • Hourly Employee Guide (Desktop) (Pg. 7-20) o Clock In/Out (Pg. 7-11) o Requesting Timecard Changes (New/Edit Punch) (Pg. 12-17) o Requesting Punch Deletion (Pg. 18-20) • How to Add a Punch in Paycom App (Pg. 21-26) o Change a Punch (Pg. 21-23) o Add a New Punch (Pg. 24-26) • Retro Time Guide (Pg. 27) o Logging Missed Time on a Past Payroll (Pg. 27)
-
Upload
khangminh22 -
Category
Documents
-
view
1 -
download
0
Transcript of Student Guide for Paycom Navigation and Timecard Procedures
Page 1 of 27 Questions? Contact [email protected]
Student Guide for Paycom Navigation and Timecard Procedures
Description:
The instructions below, detailed in this guide, help the student worker navigate Paycom.
• Logging into Paycom (Pg. 2) o Paycom App (Pg. 2) o Desktop Computer (Pg. 2)
• Employee Self Service (ESS) Updates (Pg. 3-6) o Address and Contact Information (Pg. 3-4) o Marital Status (Pg. 4-5)
o EEO (Equal Employment Opportunity) (Pg. 5-6)
• Hourly Employee Guide (Desktop) (Pg. 7-20)
o Clock In/Out (Pg. 7-11)
o Requesting Timecard Changes (New/Edit Punch) (Pg. 12-17)
o Requesting Punch Deletion (Pg. 18-20)
• How to Add a Punch in Paycom App (Pg. 21-26)
o Change a Punch (Pg. 21-23)
o Add a New Punch (Pg. 24-26)
• Retro Time Guide (Pg. 27)
o Logging Missed Time on a Past Payroll (Pg. 27)
Page 2 of 27 Questions? Contact [email protected]
Page 3 of 27 Questions? Contact [email protected]
Viewing and Updating Your Information
Description: The instructions below detail how an employee can view and update their information in Paycom Employee Self Service (ESS).
• Address and Contact Information
• Marital Status
• EEO (Equal Employment Opportunity) To access ESS, go to employee.uco.edu and log in with your UCO credentials.
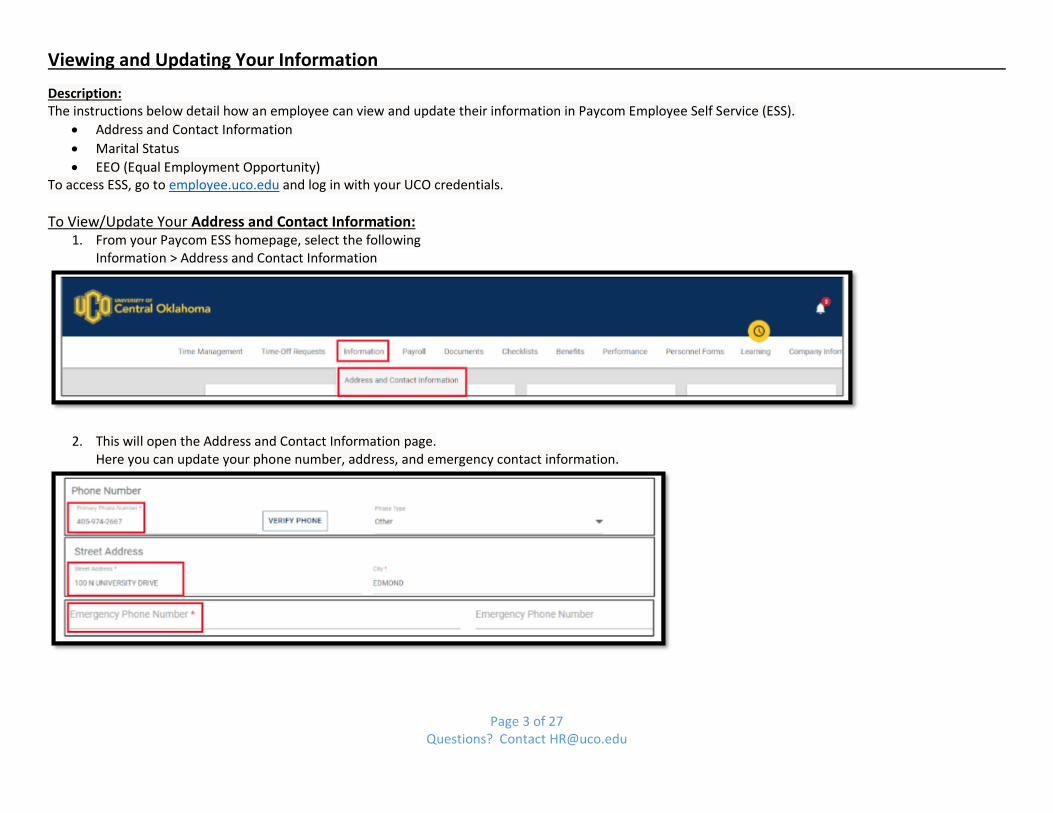
To View/Update Your Address and Contact Information: 1. From your Paycom ESS homepage, select the following
Information > Address and Contact Information
2. This will open the Address and Contact Information page. Here you can update your phone number, address, and emergency contact information.
Page 4 of 27 Questions? Contact [email protected]
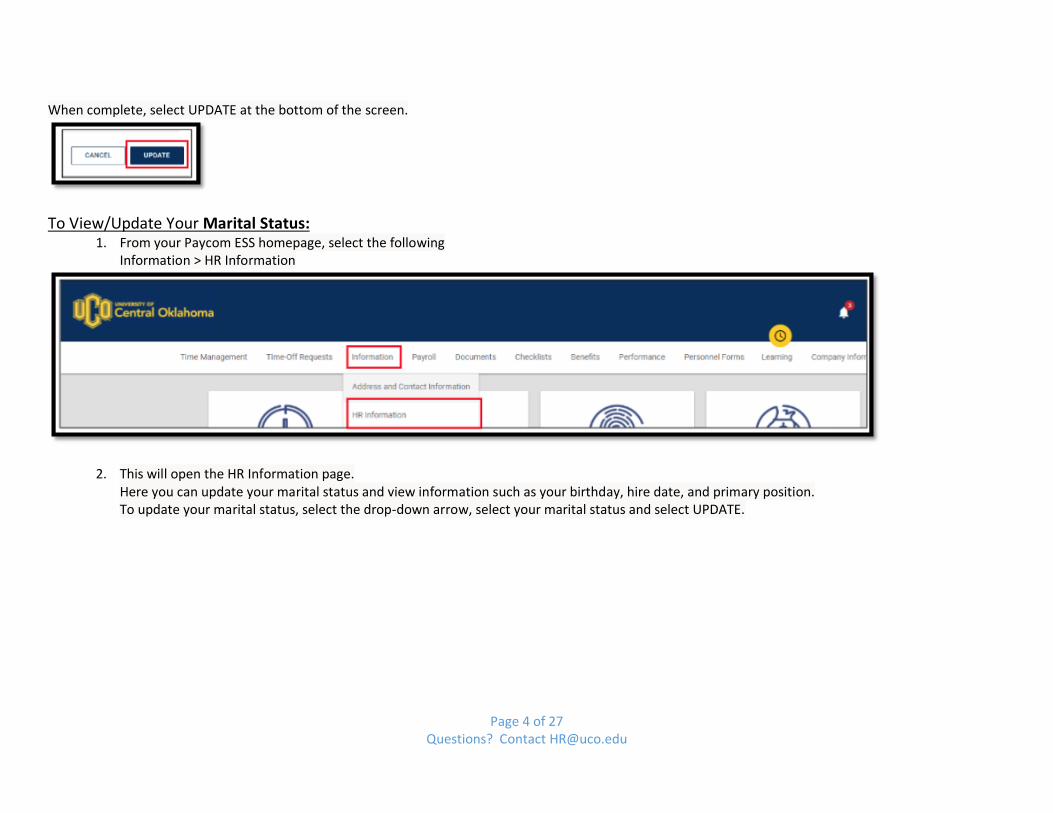
When complete, select UPDATE at the bottom of the screen.
To View/Update Your Marital Status: 1. From your Paycom ESS homepage, select the following
Information > HR Information
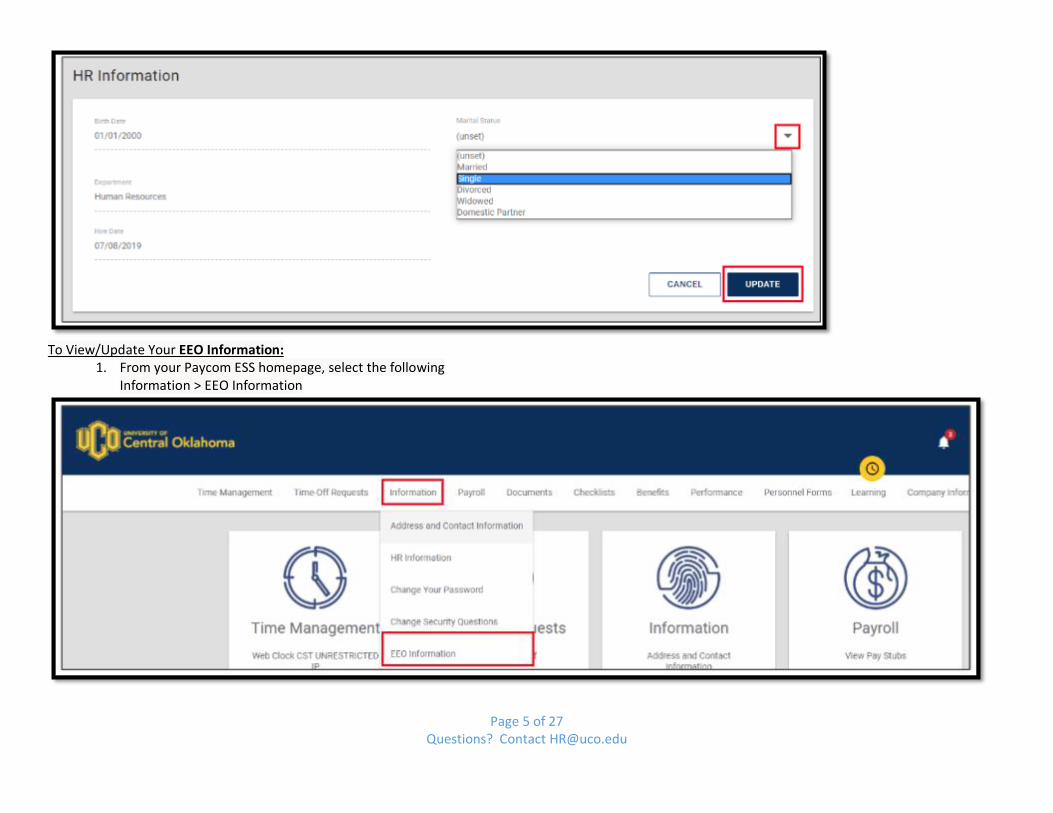
2. This will open the HR Information page. Here you can update your marital status and view information such as your birthday, hire date, and primary position. To update your marital status, select the drop-down arrow, select your marital status and select UPDATE.
Page 5 of 27 Questions? Contact [email protected]
To View/Update Your EEO Information:
1. From your Paycom ESS homepage, select the following Information > EEO Information
Page 6 of 27 Questions? Contact [email protected]
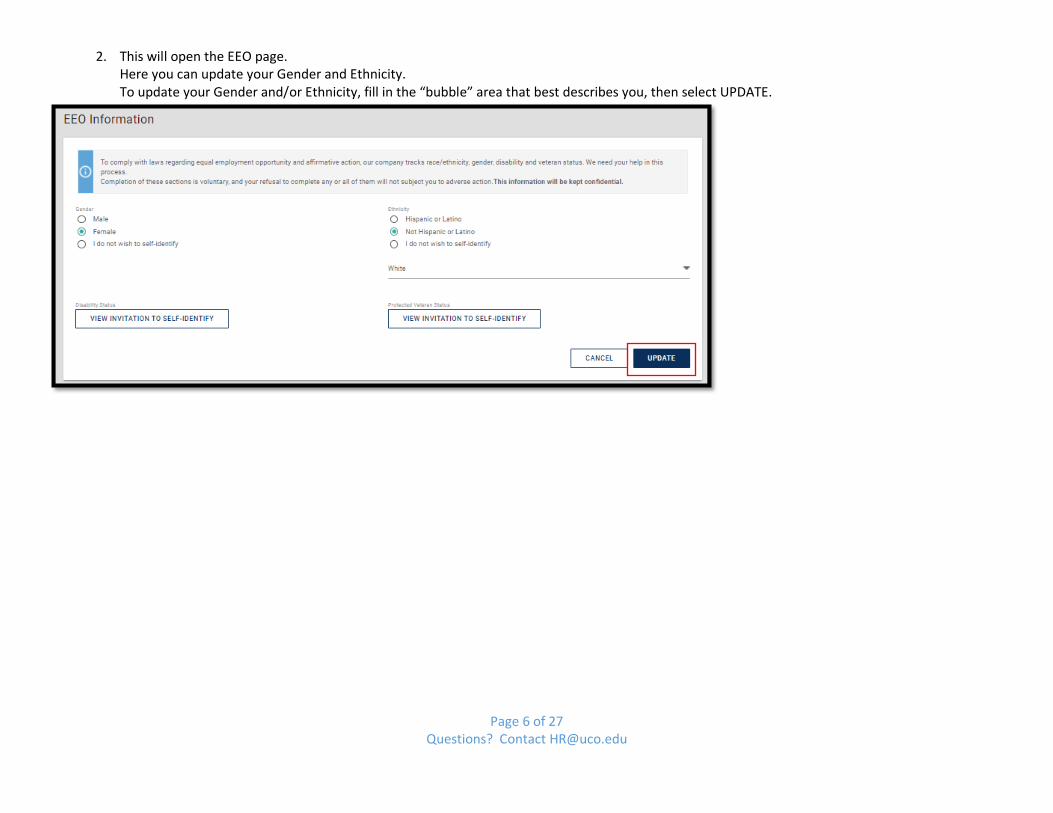
2. This will open the EEO page. Here you can update your Gender and Ethnicity. To update your Gender and/or Ethnicity, fill in the “bubble” area that best describes you, then select UPDATE.
Page 7 of 27 Questions? Contact [email protected]
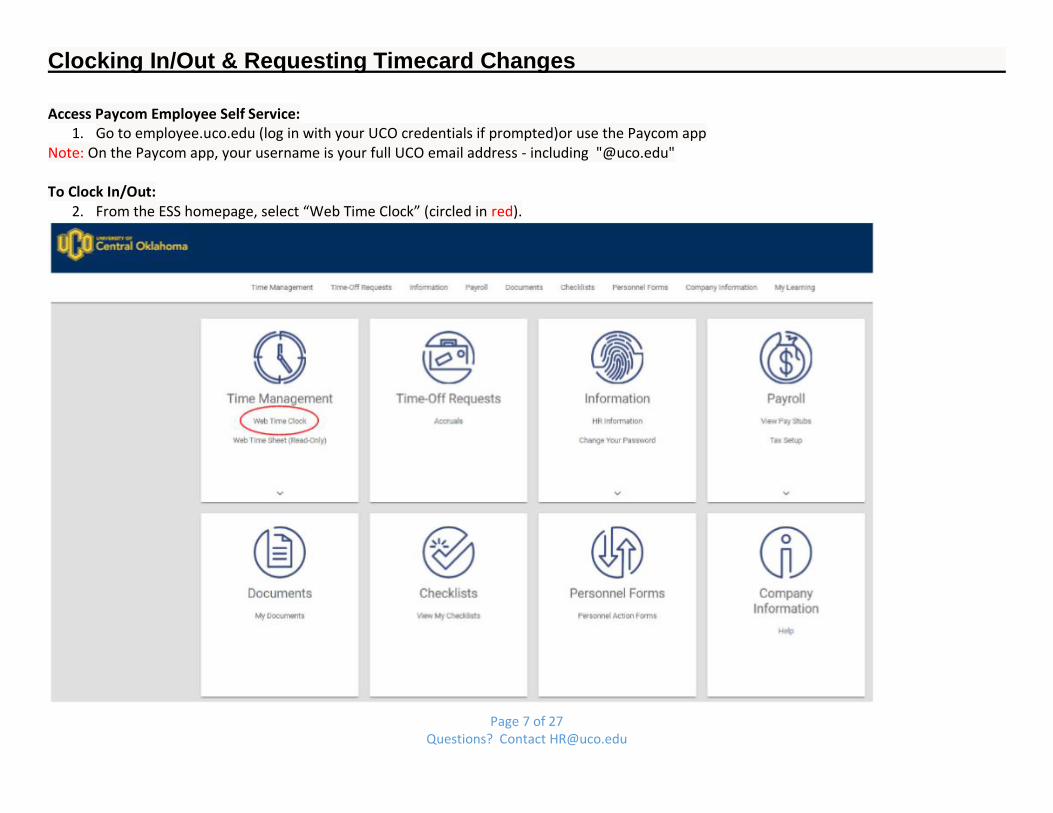
Clocking In/Out & Requesting Timecard Changes
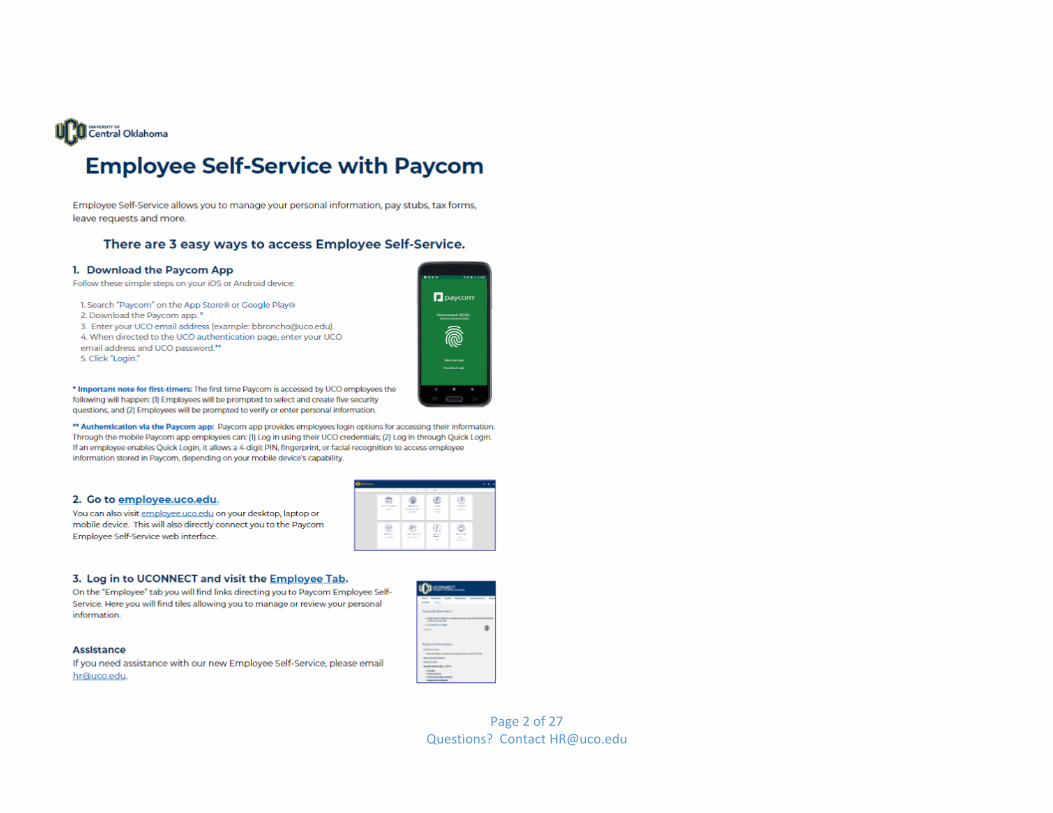
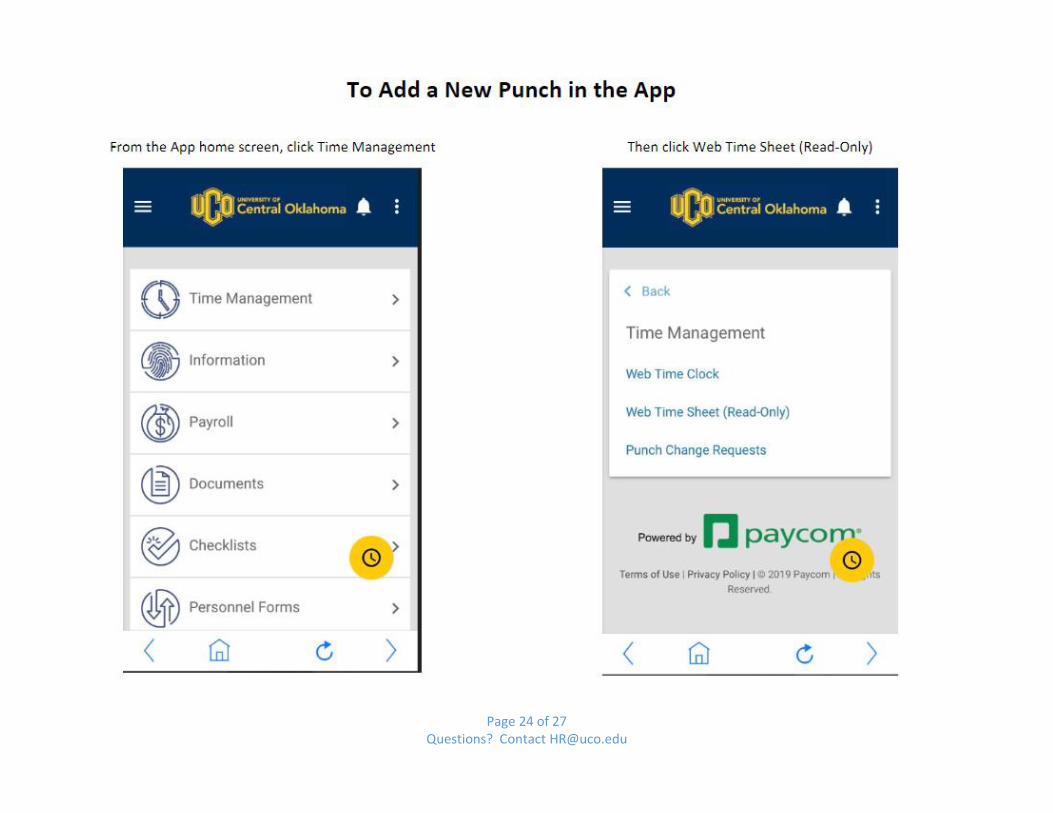
Access Paycom Employee Self Service: 1. Go to employee.uco.edu (log in with your UCO credentials if prompted)or use the Paycom app
Note: On the Paycom app, your username is your full UCO email address - including "@uco.edu" To Clock In/Out:
2. From the ESS homepage, select “Web Time Clock” (circled in red).
Page 8 of 27 Questions? Contact [email protected]
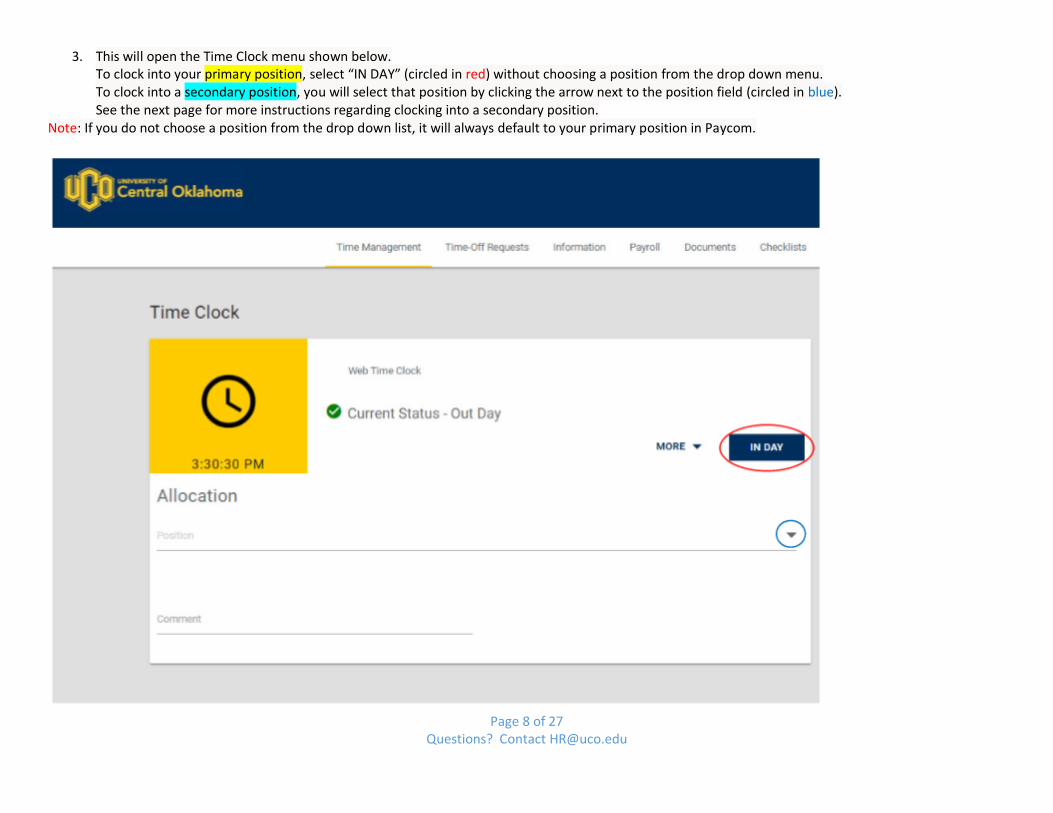
3. This will open the Time Clock menu shown below. To clock into your primary position, select “IN DAY” (circled in red) without choosing a position from the drop down menu. To clock into a secondary position, you will select that position by clicking the arrow next to the position field (circled in blue). See the next page for more instructions regarding clocking into a secondary position.
Note: If you do not choose a position from the drop down list, it will always default to your primary position in Paycom.
Page 9 of 27 Questions? Contact [email protected]
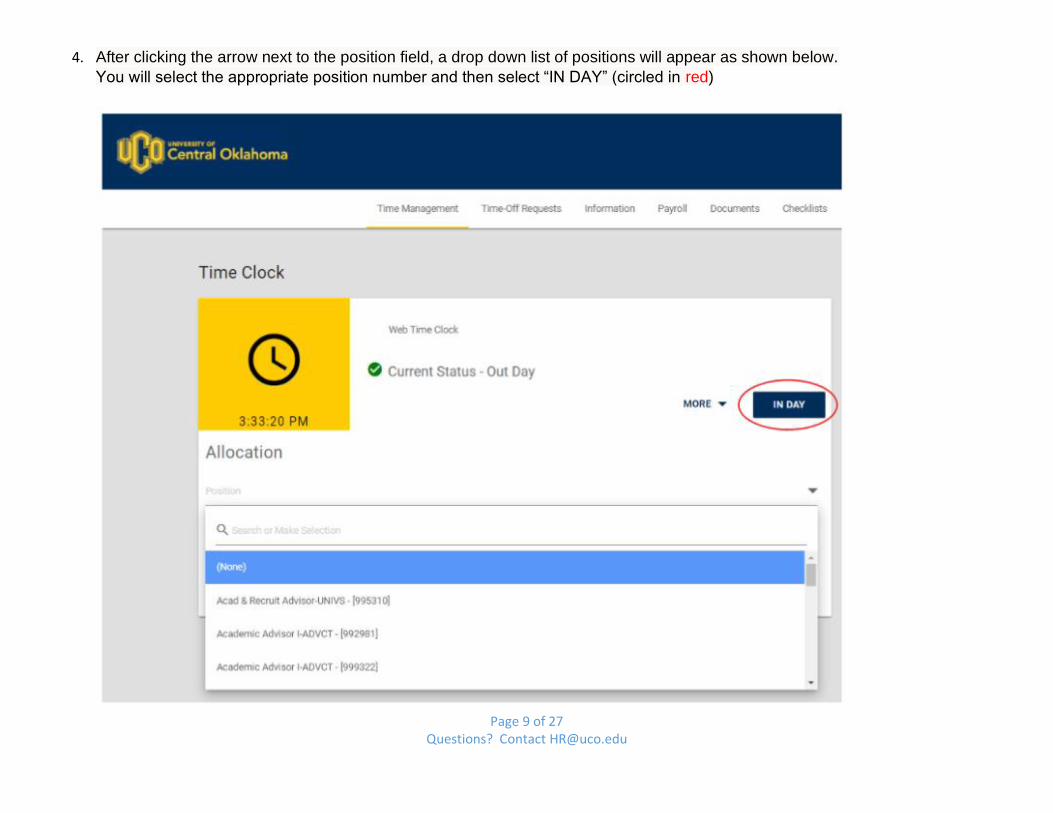
4. After clicking the arrow next to the position field, a drop down list of positions will appear as shown below. You will select the appropriate position number and then select “IN DAY” (circled in red)
Page 10 of 27 Questions? Contact [email protected]
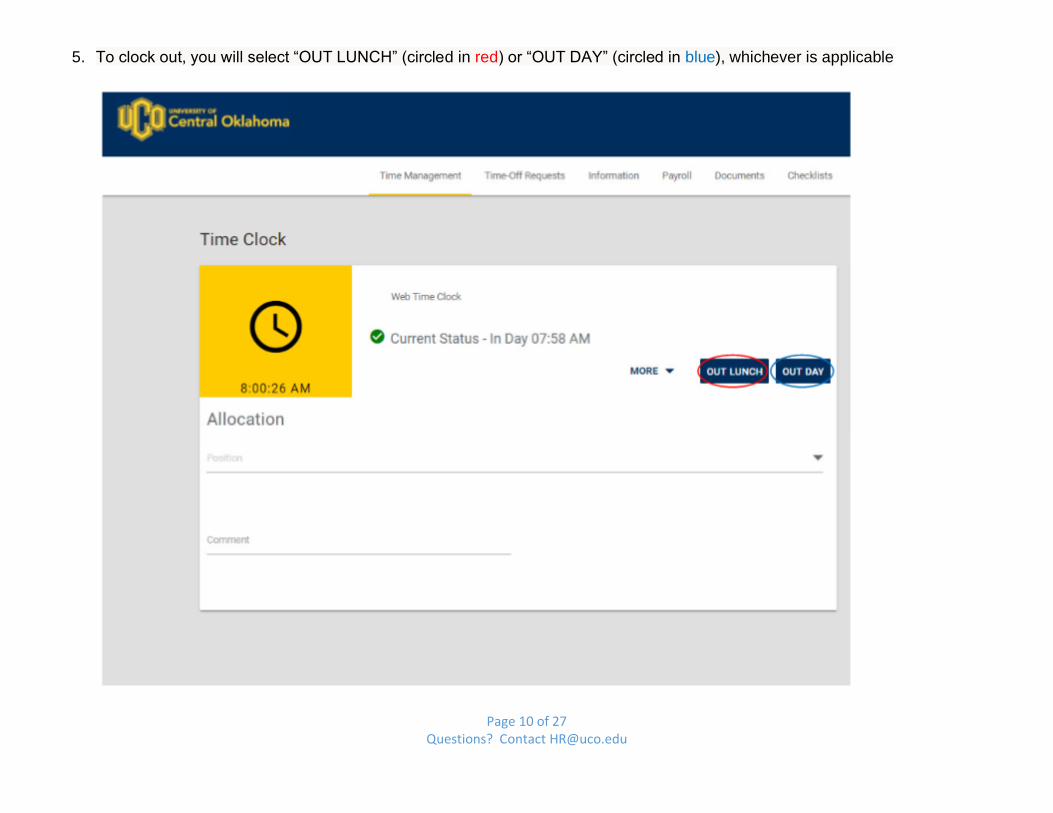
5. To clock out, you will select “OUT LUNCH” (circled in red) or “OUT DAY” (circled in blue), whichever is applicable
Page 11 of 27 Questions? Contact [email protected]
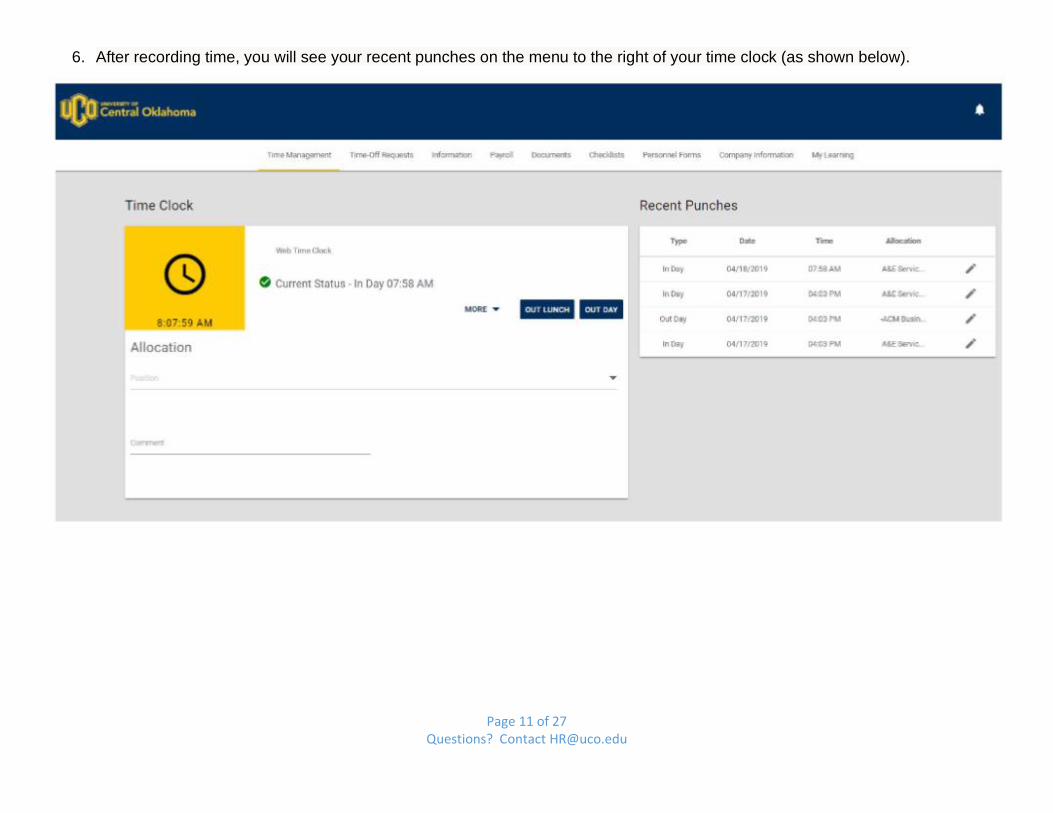
6. After recording time, you will see your recent punches on the menu to the right of your time clock (as shown below).
Page 12 of 27 Questions? Contact [email protected]
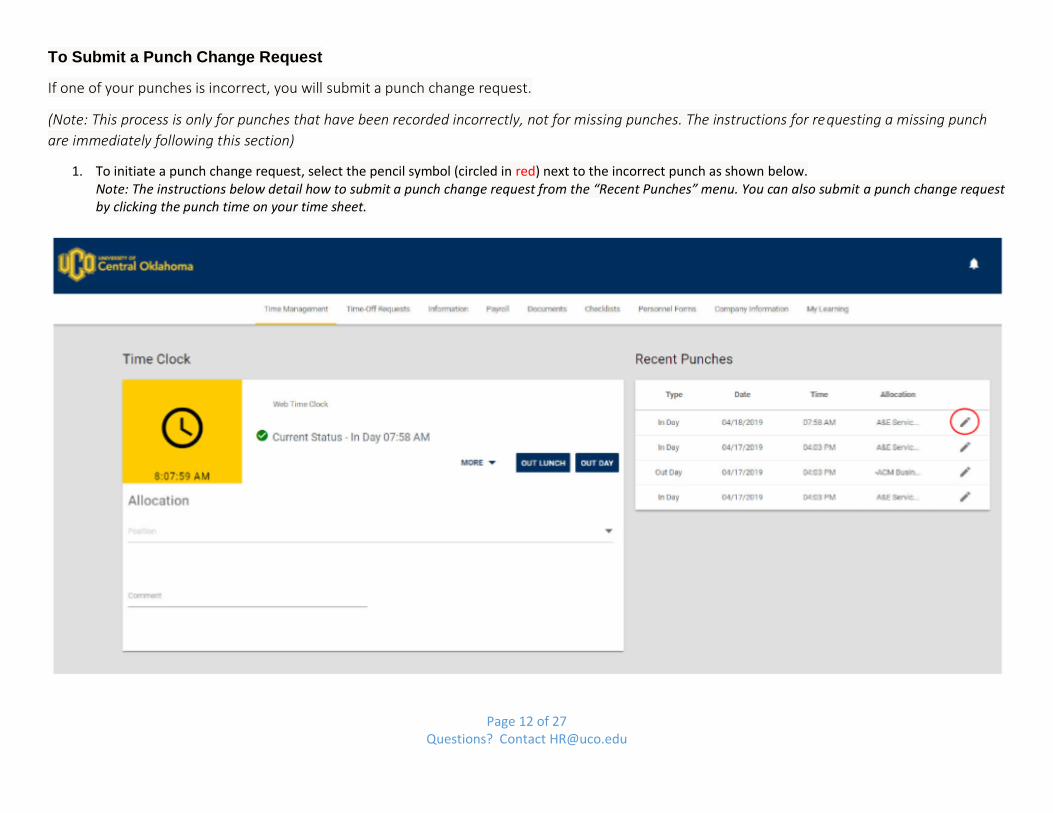
To Submit a Punch Change Request
If one of your punches is incorrect, you will submit a punch change request.
(Note: This process is only for punches that have been recorded incorrectly, not for missing punches. The instructions for requesting a missing punch
are immediately following this section)
1. To initiate a punch change request, select the pencil symbol (circled in red) next to the incorrect punch as shown below. Note: The instructions below detail how to submit a punch change request from the “Recent Punches” menu. You can also submit a punch change request by clicking the punch time on your time sheet.
Page 13 of 27 Questions? Contact [email protected]
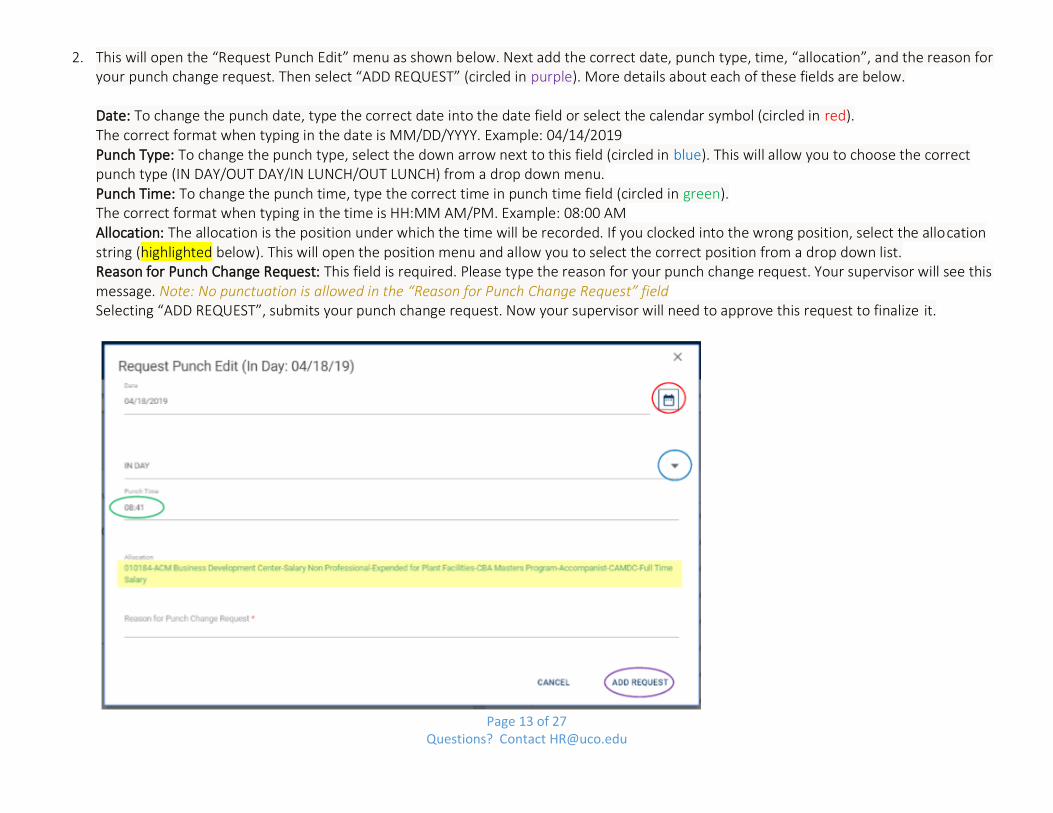
2. This will open the “Request Punch Edit” menu as shown below. Next add the correct date, punch type, time, “allocation”, and the reason for your punch change request. Then select “ADD REQUEST” (circled in purple). More details about each of these fields are below. Date: To change the punch date, type the correct date into the date field or select the calendar symbol (circled in red). The correct format when typing in the date is MM/DD/YYYY. Example: 04/14/2019 Punch Type: To change the punch type, select the down arrow next to this field (circled in blue). This will allow you to choose the correct punch type (IN DAY/OUT DAY/IN LUNCH/OUT LUNCH) from a drop down menu. Punch Time: To change the punch time, type the correct time in punch time field (circled in green). The correct format when typing in the time is HH:MM AM/PM. Example: 08:00 AM Allocation: The allocation is the position under which the time will be recorded. If you clocked into the wrong position, select the allocation string (highlighted below). This will open the position menu and allow you to select the correct position from a drop down list. Reason for Punch Change Request: This field is required. Please type the reason for your punch change request. Your supervisor will see this message. Note: No punctuation is allowed in the “Reason for Punch Change Request” field Selecting “ADD REQUEST”, submits your punch change request. Now your supervisor will need to approve this request to finalize it.
Page 14 of 27 Questions? Contact [email protected]
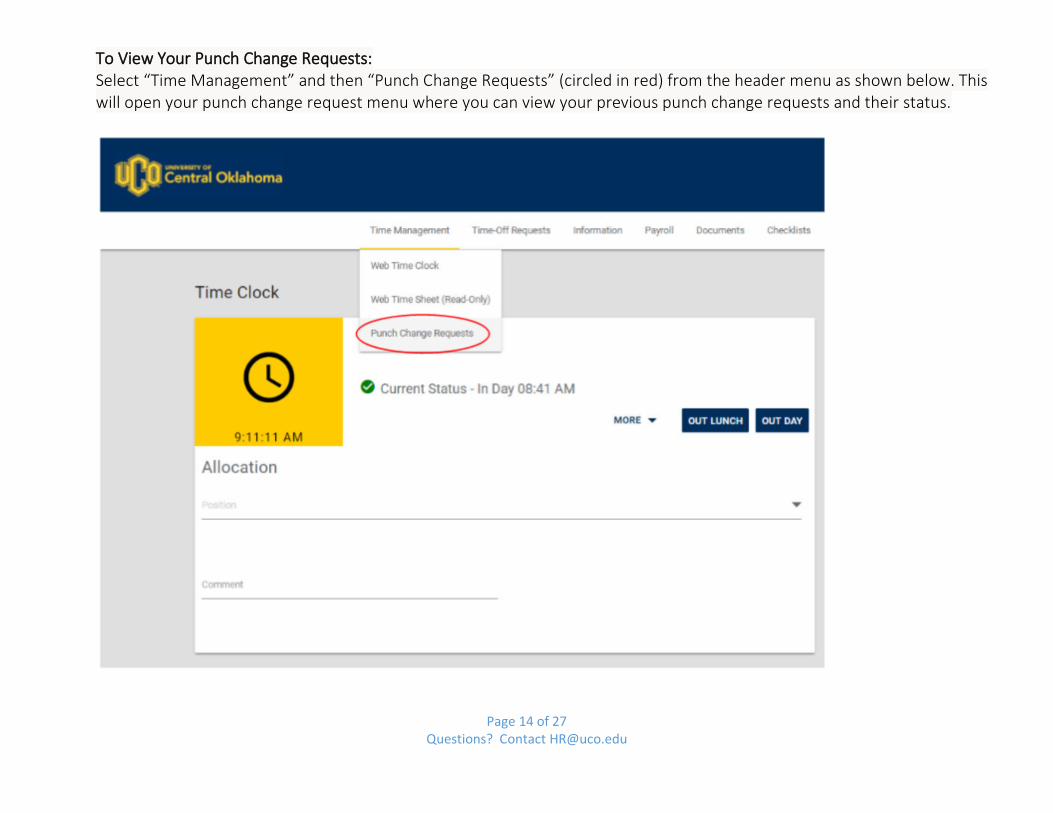
To View Your Punch Change Requests: Select “Time Management” and then “Punch Change Requests” (circled in red) from the header menu as shown below. This will open your punch change request menu where you can view your previous punch change requests and their status.
Page 15 of 27 Questions? Contact [email protected]
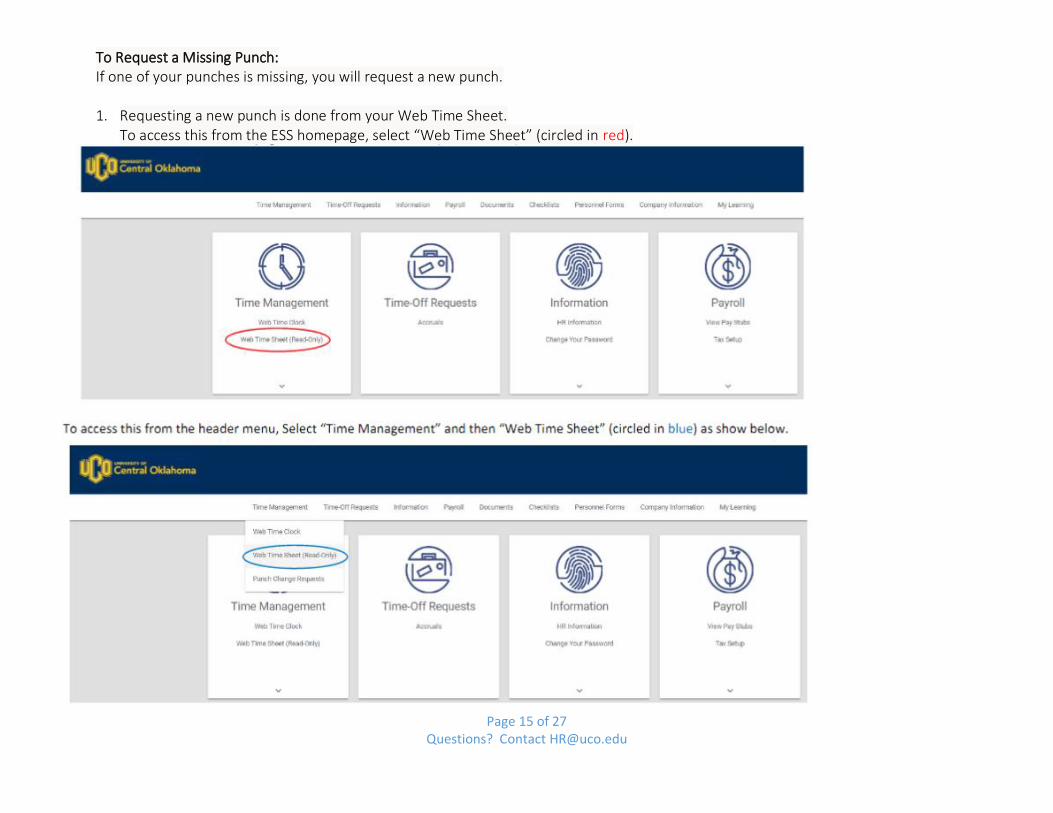
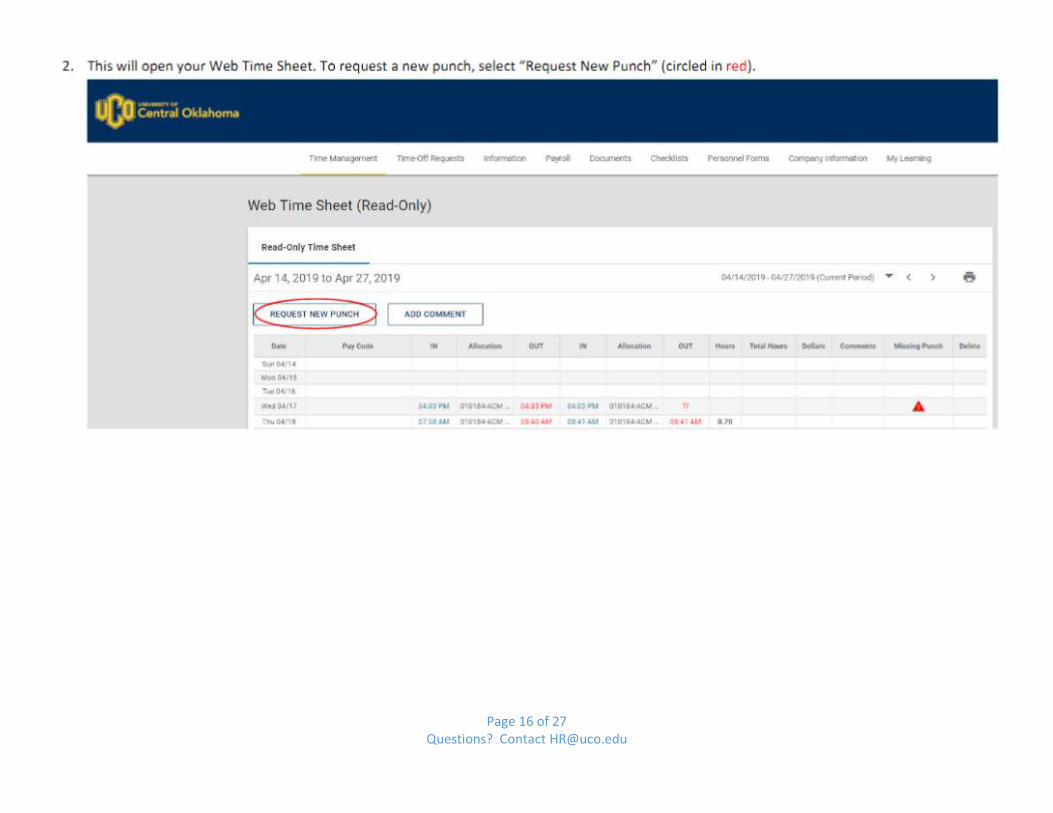
To Request a Missing Punch: If one of your punches is missing, you will request a new punch. 1. Requesting a new punch is done from your Web Time Sheet.
To access this from the ESS homepage, select “Web Time Sheet” (circled in red).
Page 16 of 27 Questions? Contact [email protected]
Page 17 of 27 Questions? Contact [email protected]
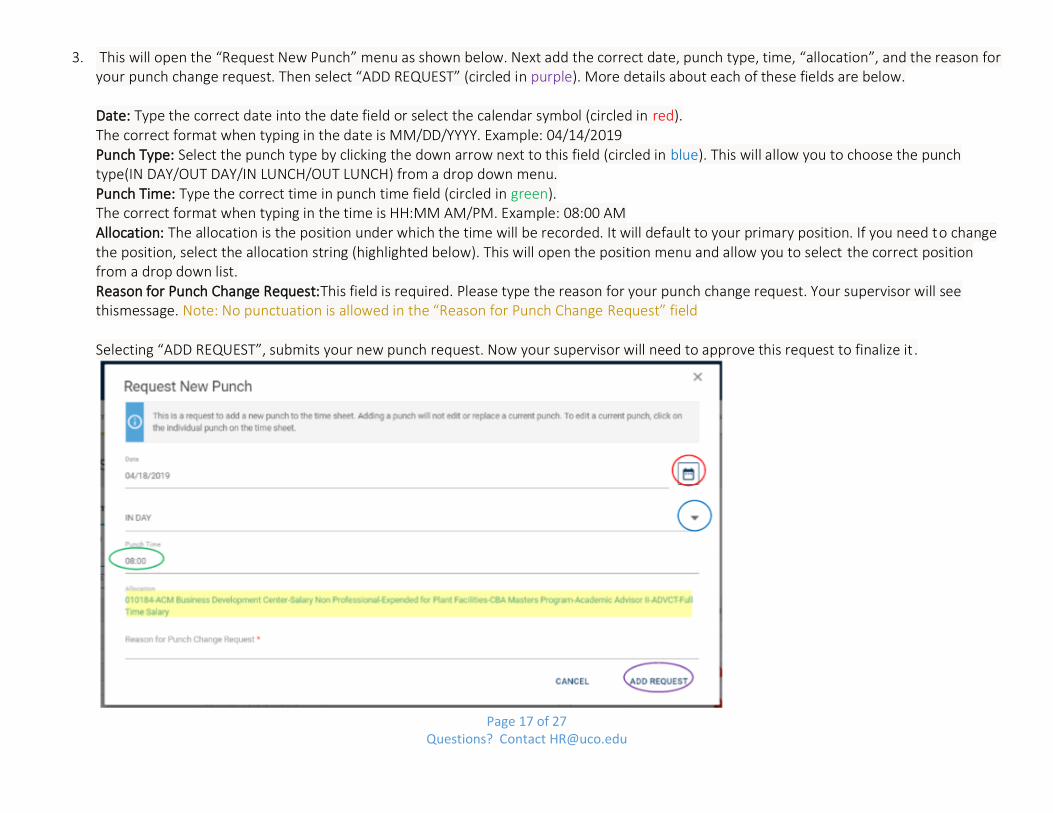
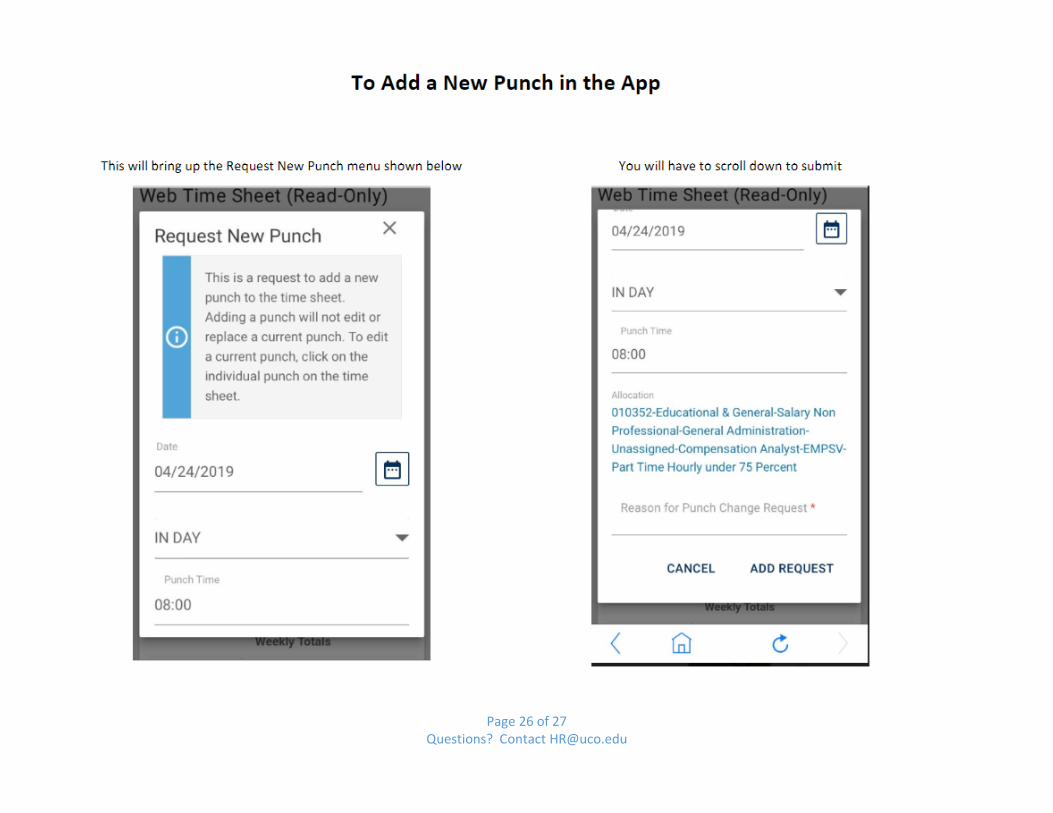
3. This will open the “Request New Punch” menu as shown below. Next add the correct date, punch type, time, “allocation”, and the reason for your punch change request. Then select “ADD REQUEST” (circled in purple). More details about each of these fields are below. Date: Type the correct date into the date field or select the calendar symbol (circled in red). The correct format when typing in the date is MM/DD/YYYY. Example: 04/14/2019 Punch Type: Select the punch type by clicking the down arrow next to this field (circled in blue). This will allow you to choose the punch type(IN DAY/OUT DAY/IN LUNCH/OUT LUNCH) from a drop down menu. Punch Time: Type the correct time in punch time field (circled in green). The correct format when typing in the time is HH:MM AM/PM. Example: 08:00 AM Allocation: The allocation is the position under which the time will be recorded. It will default to your primary position. If you need to change the position, select the allocation string (highlighted below). This will open the position menu and allow you to select the correct position from a drop down list. Reason for Punch Change Request:This field is required. Please type the reason for your punch change request. Your supervisor will see thismessage. Note: No punctuation is allowed in the “Reason for Punch Change Request” field Selecting “ADD REQUEST”, submits your new punch request. Now your supervisor will need to approve this request to finalize it .

Page 18 of 27 Questions? Contact [email protected]
Request a Punch Deletion: If one of your punches needs to be deleted, due to multiple clock in/out times, then like a punch change edit request, you will request a punch deletion.
1. To initiate a punch deletion request, there are two ways to do so. The first, details how to submit a punch deletion request from the “Recent Punches” menu. Select the pencil symbol (circled in red) next to the incorrect punch as shown below. If requesting change this way, scroll down to page 17 for continued instructions.

Page 19 of 27 Questions? Contact [email protected]
2. The second way, details how to submit a punch deletion request by clicking the punch time on your time sheet (Read-Only). Select the time you need to have deleted (circled in red)
Page 20 of 27 Questions? Contact [email protected]
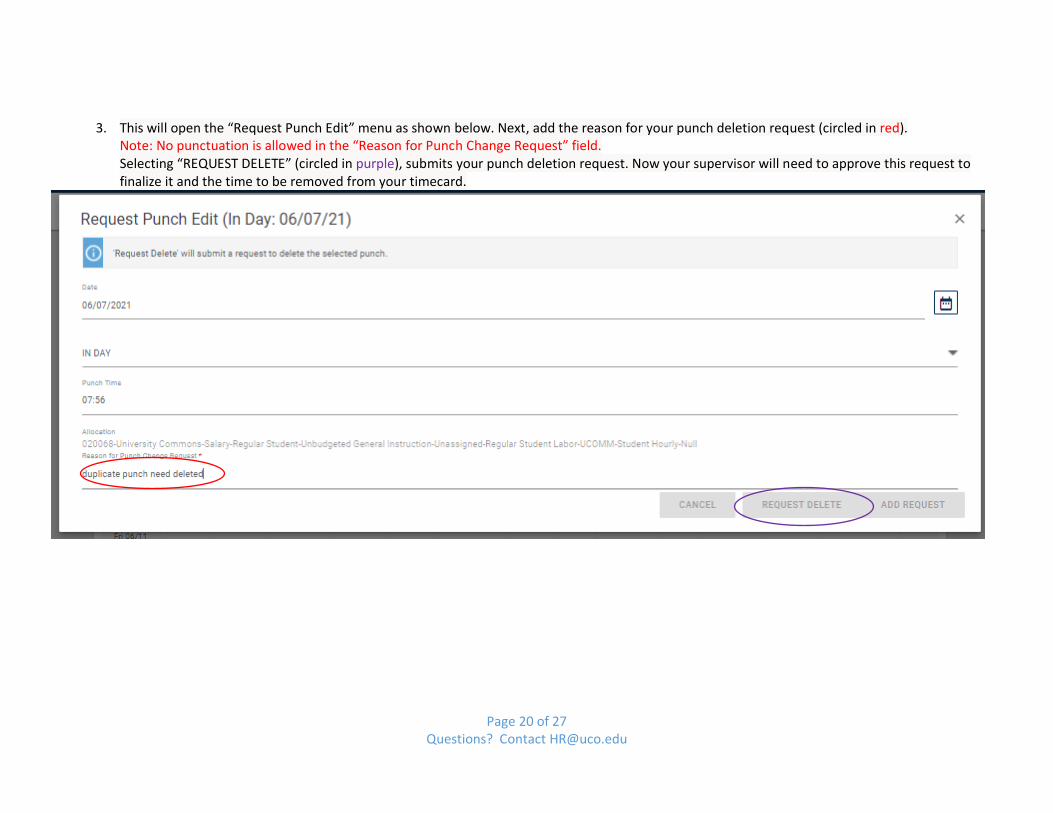
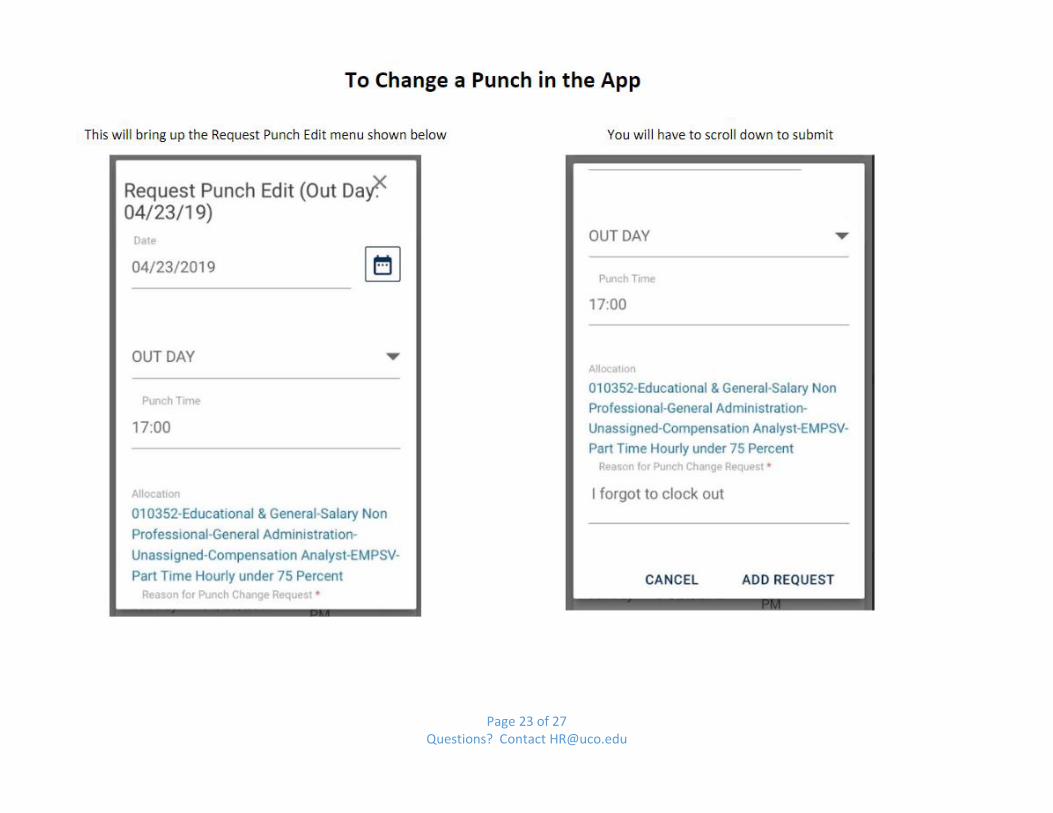
3. This will open the “Request Punch Edit” menu as shown below. Next, add the reason for your punch deletion request (circled in red). Note: No punctuation is allowed in the “Reason for Punch Change Request” field. Selecting “REQUEST DELETE” (circled in purple), submits your punch deletion request. Now your supervisor will need to approve this request to finalize it and the time to be removed from your timecard.

Page 21 of 27 Questions? Contact [email protected]
Page 22 of 27 Questions? Contact [email protected]
Page 23 of 27 Questions? Contact [email protected]
Page 24 of 27 Questions? Contact [email protected]

Page 25 of 27 Questions? Contact [email protected]
Page 26 of 27 Questions? Contact [email protected]
Page 27 of 27 Questions? Contact [email protected]
Paycom Retro Time Guide________________________________________________________________________________________
Description: Once Payroll has processed or locked a pay period timecard, the time is now considered RETRO time. In order to be paid for RETRO time owed, you and your supervisor will need to follow the steps below. Steps 1-2, the employee completes. Step 3, the supervisor completes. Note: You will not be paid for RETRO time owed until all the steps below are completed. Helpful Links: UCO Time Sheet (BI-weekly) - HERE Payroll Calendar- HERE
1. The employee will need to fill out a UCO Time Sheet (Bi-weekly), for the pay period they require payment on RETRO time. If you need to request RETRO time for multiple pay periods or for multiple positions, you will need to fill out a SEPERATE bi-weekly timesheet, per pay period/position you are requesting RETRO pay on.
Helpful tips: On the biweekly timesheet, you will need to enter your time in military time (ex. 1pm is 13:00). Also, if you enter the payroll begin date, then TAB over, the rest of the dates on the form will pre-populate for you.
2. Once you have filled out the bi-weekly timecard, then you will email the form to your supervisor for approval.
**Please be advised, Payroll will not accept any paper printed timecards in office. We request it all be done electronically, through email.**
3. The supervisor is to review the bi-weekly timecard, then if approved, the supervisor will need to forward the email, along with the attached bi-weekly timecard to [email protected], stating that they approve the attached timecard/timecards to be paid on the next upcoming payroll.