Sound Particles Manual
139
F Sound Particles Reference Manual January 2020 v 2.1
-
Upload
khangminh22 -
Category
Documents
-
view
2 -
download
0
Transcript of Sound Particles Manual

F
Sound Particles Reference Manual January 2020 v 2.1

Welcome Note
Welcome to the world of Sound Particles!
Around 2004, I realized that the most interesting visual effects I was seeing on movies used
“particle systems”, a computer graphics technique that generates thousands or millions of small
points to simulate fire, rain, dust, smoke, fairy dust, explosions. And I thought “Wouldn’t be nice
if we could use the same technology but for sound, using thousands of small sounds around
you to generate a much more interesting soundscape?”. But that was only an idea, and time
went on…
In 2012, I had finished my PhD and since no-one was using particle systems in sound, as a
computer nerd that I am (this face doesn’t fool anyone), I decided to start creating my own
particle system simulator for sound – and that was the beginning of Sound Particles.
I really hope you enjoy using Sound Particles. And if you have any question or suggestion, don’t
hesitate to contact us. We REALLY love to receive feedback from our users.
Nuno Fonseca, PhD
CEO

Contents
2
Contents Welcome Note 1
Contents 2
Welcome Screen 5 1.1 First Encounter 5 1.2 Authentication Methods 8 1.3 Buy Screen 12 1.4 “I have a voucher” 13 1.5 Offline Activation 14 1.6 Academic License 15 1.7 Account Management 17 1.8 Trial Mode 20
New Project 21
Project Window 23 3.1 General Notions 23 3.2 Views 24 3.3 Transport 29 3.4 Time Editor 31 3.5 Inspector 35
Particle & Audio Tracks 36 4.1 General Notions 36 4.2 Particle Group 36 4.3 Particle Emitter 37 4.4 Recreating new particles 38

Contents
3
4.5 Audio Tracks 38 4.6 Audio Files 40 4.7 Particle’s Starting Points 44 4.8 Modifiers 46
Random Distribution 64 5.1 Distribution Settings 64 5.2 Probability Distribution 67 5.3 Histogram 68
Microphones 69 6.1 Overview 69 6.2 Microphone Options 70 6.3 Speaker Setup 73 6.4 Microphone Position 74 6.5 Stems 75 6.6 Audio Hardware 76
Render 77 7.1 Overview 77 7.2 Auto-Render 77 7.3 Render (Manual) 78
Export 80 8.1 Export Audio 80
Video 85 9.1 Importing a video 85 9.2 Inspector - General 87 9.3 Inspector – Video Info 88 9.4 Inspector – Video Audio Hardware 89
VR 90 10.1 VR View 90 10.2 VR Client - Connection 91 10.3 VR Client – Headset 93

Contents
4
CGI Import 97 11.1. Import CGI Window 98
I/O 102 12.1 Hardware 102 12.2 Preview Audio 104 12.3 Binaural 105
Project Settings 106 13.1 Project Settings - Project File 106 13.2 Sample Rate 107 13.3 Sound Propagation 108 13.4 Reset 111
Preferences 112 14.1 Render 112 14.2 Units 113 14.3 GUI 116 14.4 VR 118
Other Features 119 15.1 Track Presets 119 15.2 Batch Processing 121 15.3 User Project Templates 125 15.4 Slider Controls 127
Shortcuts 128 16.1 Views Navigation 128 16.2 Time Editor 128 16.3 Menu Bar & Shortcuts 129
EULA 133
ASIO SDK 137

Chapter 1 – Welcome Screen
5
Chapter 1
Welcome Screen
1.1 First Encounter
The first time you run Sound Particles 2.0 on your computer, you will be presented with a
Welcome Screen. This screen will give you access to many options regarding you Sound
Particles experience, from:
Initial Welcome Screen

Chapter 1 – Welcome Screen
6
1. Log In - log into your existent account and have access to all of your license.
Note: If you already own one or more Sound Particles 2 licenses, Sound Particles will
automatically create a new project with your highest tiered subscription.
2. Try Sound Particles - initiate the Trial version of Sound Particles.
TIP: The Trial version has all the features of the Commercial license, but…
Note 1: … You are required to log-in or to register with an account.
Note 2: … You cannot use it for Commercial or Public projects.
Note 3: … Audio quality is limited to 15 bits.
Note 4: … Any exported audio will have an inaudible watermark.
3. Buy Sound Particles - buy a license of Sound Particles 2. You will then be required
either to log-in or to register, where afterwards you will be redirected to our
webstore (https://my.soundparticles.com) to complete the purchase process.
Note: By logging-in/registering on the app, you will be redirected to your browser
automatically logged-in.
4. Academic License - this will take you to the Academic registration screen, allowing
you to register yourself with your academic information to be granted a full
Academic license to Sound Particles 2 for 1 year.

Chapter 1 – Welcome Screen
7
Note 1: If you are a student, tutor or staff member of any educational institution (even
not or without classes related to audio), you can request a free Academic license that
will grant you free access to the full software for 1 year.
Note 2: The Academic version has all the features of the Sound Particles 2 Indie license.
Note 3: The only limitation to this Academic version is that you cannot use it for
Commercial projects.
5. “I have a voucher” - if you received a Sound Particles 2 voucher code, either from a
friend, co-worker, a reseller, this option will allow you to claim any voucher you
might have to your account (log-in or register required).
6. Activate Offline - if you wish to activate a Sound Particles 2 license without
logging-in into your account on the app, you can do that through this screen.
7. Quit Sound Particles - close the application.

Chapter 1 – Welcome Screen
8
1.2 Authentication Methods
There are two possible authentication methods, 1. Logging-In or 2. Registering. You will be
required to register or login to access the “Buy” and “I have a voucher” screens.
Additionally, the logging in page also lets you reset your password in case you have forgot it.
Authentication Choice after clicking Buy
Note: You need an Internet connection to be able to do any of these actions.

Chapter 1 – Welcome Screen
9
1.2.1 Log In There are three possible moments that you are required to log-in into your account:
First Page
Buy
I have a voucher
Log-In Screen
1. Authentication Details - the e-mail and password of your account needed for
authentication.
2. Keep me logged in - keeps you logged in to your account when you close the
software.
3. Login (button) - authenticates the inserted information above.
Note 1: If the authentication fails, error messages, in red, will appear, and also contact
link to our support team.
Note 2: After logging in, Sound Particles will open a new project with your highest tiered
valid license.

Chapter 1 – Welcome Screen
10
4. Forgot Password - takes you to the screen to for your account’s password
recovery.
5. Back - returns you to the previous screen.
1.2.2 Forgot Password In the case you have forgotten your account’s password, you will be redirected to a screen
where you can start the process of resetting the password.
Reset Password Screen
1. E-mail - the e-mail of your account. You will then receive a mail with instructions to
reset the password.
2. Reset - sends the request after the e-mail was written.

Chapter 1 – Welcome Screen
11
1.2.3 Register If you don’t have an account back at our webstore, registering on the application will
automatically create you a new account there and you will be automatically logged-in.
Sing Up Screen
1. Account Information - here you can write down your Name, e-mail, password (and
its confirmation) and country.
Note: You cannot change your e-mail after registering your account.
2. Newsletter Subscription - if you want, you can opt-in to receive newsletters from
us by checking the box.
Note: You can opt-out at any time.
3. Register - after filling out everything, this button finishes up the registration.

Chapter 1 – Welcome Screen
12
1.3 Buy Screen
On the home screen, after you press “Buy” and completing one of the Authentication Methods,
you will see a “Buy” button (1). By clicking that button, you will be redirected already
authenticated to your client panel, on our webstore, through your default browser, for you to
complete the purchase of the license you require.
Buy Screen
When you return to Sound Particles after acquiring a license, you will be presented with your
My Account Panel already opened (see Section 1.7), where then, by refreshing it, the newly
purchase license should appear.

Chapter 1 – Welcome Screen
13
1.4 “I have a voucher”
The initial process, after activating this option on the home screen, is the same as the Buy one:
you have first log-in or register. Afterwards, you will then be presented with a Voucher Claim
screen, that will allow you to write down your voucher code and claim it to your logged account.
Redeem Voucher Screen
1. Voucher Code Form - in here, you will insert the 12-digit voucher code you have
received.
2. Redeem - this will start the process of verifying the voucher code written down.
Note: If the voucher code is wrong or there’s another a problem, a red error message will
appear and also a quick link for our support e-mail.

Chapter 1 – Welcome Screen
14
1.5 Offline Activation
With the Offline Activation, you can activate a local license without the need to authenticate
yourself on the application.
Note: You still need to have a valid account with at least 1 license bought/assigned.
This works by going to the respective screen, and then taking the 5-digit number that it displays
onto the “Offline Activation” screen on your “Manage License” screen of your account on our
webstore. Then, in return, it will give you the 12-digit number needed for that activation.
Note 1: Each of both 5-digit and 12-digit numbers are never the same, meaning that if
you enter the Offline Activation screen again, it will display a new 5-digit number, and
that will also change how the 12-digit is composed of.
Note 2: If you’re activating a Team license, you will also need the correct Project Name.
Make sure it is the correct one, as even if you have the correct Offline code, inserting the
wrong Project name will not allow you to activate the license.
Offline Activation Screen

Chapter 1 – Welcome Screen
15
1. Activation Code - insert the 12-digit number obtained from your client panel.
2. Project Name (Team) - if your license is a Team license, you will have to write
down the correct Project name.
3. Activate - validate the place information to proceed to the activation.
1.6 Academic License
If you’re an academic student, tutor or staff member, you are entitled to a 1-year free license of
the Indie license of Sound Particles.
To have that license, you will have to enter the “Academic” screen through the home page,
where you will be redirected to a page for you to register an account with your academic
information.
Academic Registration Screen
1. Academic Account Information - a form for you to fill with your academic
information.
Chapter 1 – Welcome Screen
16
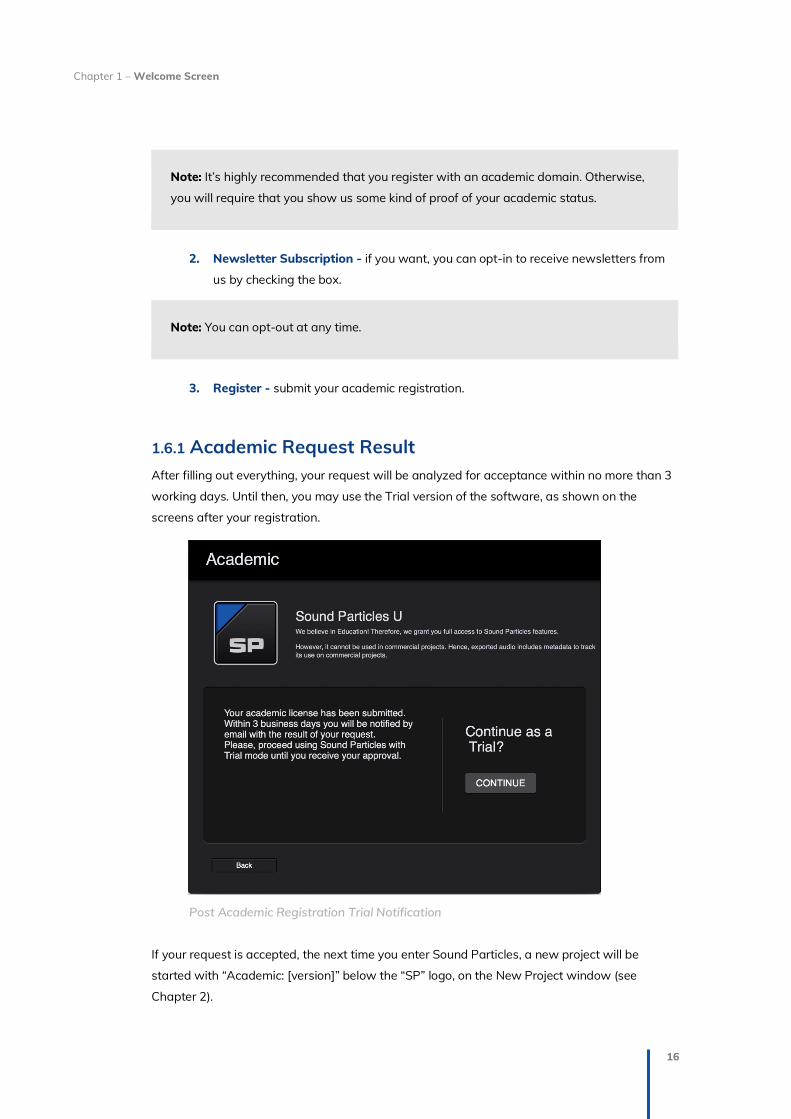
Note: It’s highly recommended that you register with an academic domain. Otherwise,
you will require that you show us some kind of proof of your academic status.
2. Newsletter Subscription - if you want, you can opt-in to receive newsletters from
us by checking the box.
Note: You can opt-out at any time.
3. Register - submit your academic registration.
1.6.1 Academic Request Result After filling out everything, your request will be analyzed for acceptance within no more than 3
working days. Until then, you may use the Trial version of the software, as shown on the
screens after your registration.
Post Academic Registration Trial Notification
If your request is accepted, the next time you enter Sound Particles, a new project will be
started with “Academic: [version]” below the “SP” logo, on the New Project window (see
Chapter 2).

Chapter 1 – Welcome Screen
17
1.7 Account Management
After logging-in/registering on the application, you will then be able to access your Account
panel that provides your subscriptions details, such as subscription type, project (if applied) and
expiration date.
When logging-in through, “Buy” from the home page, your account panel will open even if the
then browser window blocks the view.
To access your Account Management screen, you need to go to “Sound Particles -> Manage
Account”, on the Menu Bar, when on a project window.
User Account Panel
1. Account Information - your account information, such as Name and E-mail. 2. Subscriptions - your acquired subscriptions. Here, you can also select which
subscription you want activated and to use.
3. Subscription Information - information regarding the selected subscription, such as
its Expiration Date, its Plan and Type, and if it’s Active or Expired/Invalid.
4. Request an Academic license – activating this option automatically signs your
account for an Academic license on our database. (Only visible if your account does
not have an Academic license).

Chapter 1 – Welcome Screen
18
5. Activate Offline – opens the Offline activation screen, allowing you to activate one
of your licenses without being connected to the Internet (you will need to have
Internet access on another device).
6. Claim Voucher– opens the Claim Voucher screen, allowing you to redeem a voucher
of a product not yet activated on your account (if valid).
7. Buy a new license – opens my.soundparticles.com on your account homepage on
your Internet browser.
8. Refresh (button) - a refresh button to allow any new/updated licenses to appear
after refreshing the list.
9. OK - opens a new project with Sound Particles running the active license.
10. Logoff - logs off of the account and returns you to the home page of the Welcome
Screen.
1.7.1 Invalid License If you have kept your account logged-in or log-in into an account where its last active license
became expired or invalid, a warning screen will appear warning you about it, also giving you 3
options to resolve the situation.
Invalid License Screen
1. Renew Subscription - this will open your default browser and will take to your
“Manage Licenses” screen.
2. Manage Licenses - open the “My Account” screen on the app.

Chapter 1 – Welcome Screen
19
3. Continue as Trial - continue using Sound Particles as a Trial (rules of usage on
Commercial and Public projects will apply; see Section 1.1).
4. Logout - log off of the account and return to the Welcome Page.

Chapter 1 – Welcome Screen
20
1.8 Trial Mode
If you want to give Sound Particles 2.0 a try before being certain if you want to buy it, you can,
just by clicking on “Trial”. You will be required to log-in or register yourself with an account (that
will be further created on my.soundparticles.com). After logging-in/registering, you will be then
required to agree with the conditions of usage of the Trial Version:
• Cannot be used on Commercial nor Public projects
• Exported audio with maximum quality of 15 bits
• Exported audio with inaudible watermark
• Cannot edit some of the Metadata fields
Trial Mode Agreement Window
TIP: The Trial version has ALL the features and you can try it for as long as you want.

Chapter 2 – New Project
21
Chapter 2
New Project When you open a Sound Particles project after choosing your license, a project window will
open presenting you the “New Project” panel that will give help you in pre-selecting what kind
of project you want based on numerous default Templates (with descriptions and audio
comparisons between the original and templated samples) and also with which microphone
you want to start your project with, alongside other utilities.
New Project Window
1. Templates - the list of available default Templates, which contain different project
settings that you can both previews visually (2) and also compare between the
original (3) and altered (4) audio samples of that selected Template.

Chapter 2 – New Project
22
TIP: If you want to start from scratch, select the “Empty” template.
2. Template Viewfinder - this viewfinder shows you a video preview of how the
selected Template scene looks like.
Note: The video preview will synchronize when you playback the Template sample (4).
3. Original Audio Sample - the original, unaltered audio sample of the selected
Template. Press the button to listen to it.
4. Template Audio Sample - the audio sample resulted from rendering the selected
Template with the original audio sample (3).
5. Template Description - a small description of the Template.
6. Microphone Type - a pop-up button that allows you to select a microphone that you
may want to start your project with:
6.1. None
6.2. Mono (Omni)
6.3. Stereo (XY) window
6.4. 5.1
6.5. 7.1
6.6. Dolby Atmos (9.1)
6.7. Auro-3D (11.1)
TIP: For more insight about the Microphones, go to Chapter 6.
7. Website/Forums/Videos - buttons that allow you to access useful links about the
software, such as our website, our forums and our video tutorials.
8. Cancel - cancel the creation of the project.
9. Open… - open a previously saved project file.
10. OK - open the selected Template.

Chapter 3 – Project Window
23
Chapter 3
Project Window
3.1 General Notions
The Project Window is the most important part of your workflow, as it is where you will find all
the tools that will help you in creating your scene, shaping it to your needs and also allowing
you to access other innovative tools to expand your workflow and project previewing, such as
the VR (chapter 10) and Binaural (chapter 12) modes.
The Project Window is divided into 4 sections:
Project Window
1. Views - where you can observe and edit your scene and its objects through various
perspectives. Can be used as a Dual or Single View.

Chapter 3 – Project Window
24
2. Transport - where you can add objects to the scene, control the Playback, watch
the current time and special modes status (VR, Binaural), access utility menus and
choose how to render the scene.
3. Time Editor - where you can sort, move and control your created tracks
(particles/audio tracks, microphones and video tracks). You can also Mute/Solo each
track, and also manually create automation tracks for compatible tracks.
4. Inspector - where you will edit/add parameters of selected objects or navigate
through the utility menus (I/O, VR and Project Settings).
3.2 Views
3.2.1 Available Views Sound Particles 2 has a set of 8 views in total. Within these, they can be divided into 4
categories/items:
• 3D Views
• Video View
• 360º View
• VR Views
Views of Sound Particles

Chapter 3 – Project Window
25
1. 3D View - Top View - placed above the scene.
2. 3D View - Front View - parallel with the Left-Right directions, with Top-Bottom in
front of it.
3. 3D View - Left View - placed 90º to the left of the horizontal plane, having the
Front at the left and the Back at the right.
4. 3D View - Right View - placed 90º to the right of the horizontal plane, having the
Back at the left and the Front at the right.
5. 3D View - Perspective View - gives you a full 3D perspective of the scene, allowing
you to move, rotate and zoom in and out on it.
TIP: See Chapter 15, Section 15.1, on how to move and control the 3D Views.
6. Video View - if you import a Video Reference to Sound Particles, you can watch it
by itself and as imported on this view.
7. 360º View - with this view, you have a 360º horizontal and 180º vertical perspective
of the scene. This view is useful if you want to work with particles on top of videos,
both for standard or full 360º videos (see chapter 9).
8. VR View - this view allows you to see your scene from a 360º camera perspective,
with the particles surrounding as constructed on the scene.
3.2.2 View’s Anatomy Each category of View mentioned on 3.2.1 has its own anatomy of unique elements to it, also
sharing some common items with the sister Views.
I. 3D Views
Top View

Chapter 3 – Project Window
26
1. View Mode - a pop-up button that allows you to select if you want Single or Dual
Views and/or which view you want to be active on the current panel.
2. Directions - these labels show what direction is represented on that axis.
3. 3D Manipulator - this icon allows you to move the selected object around more
easily just by pressing & dragging it on the View (except for 3D View – Perspective).
4. Scale - display a comparison figure to show how much the 3D View grid squares
have in size.
5. Maximize - this button maximizes the View to full-screen, keeping only the
Transport visible.
II. Video Views
The Video View allows you to watch the imported Video Reference without any particles or
other scene element on top of it, giving you a clear view of it.
Video View

Chapter 3 – Project Window
27
III. 360º Views
In this view, you have unique elements regarding the 360ºh/180ºv workflow, such as:
360º View
1. Top/Bottom - indication of where the top (+90º) and bottom (-90º) of the view are.
2. Vertical angles - angular sub-divisions of the vertical axis (-90º - 90º).
3. Horizontal angles - angular sub-divisions of the horizontal axis (-180º to 180º).
IV. VR Views
On the VR view, you can playback and visualize your whole scene within a 360º camera,
allowing you to move around and watch its playback in real-time.

Chapter 3 – Project Window
28
VR View
By then adding an Ambisonics microphone to the scene (see Chapter 6), and then activating
the Binaural mode (see chapters 12), you can simulate a head tracking experience as the audio
of the scene will adjust to your orientation and as you move around with the camera.
Also, if you import a 360º video reference, you can watch and look around that same video in
full 360º (see chapter 10).
More information regarding the full use of the VR tools of Sound Particles found on chapter 10.
TIP: The red vertical curve, as shown on the image, represents the center of the View.
You can also use the VR “Home” button to reset the View (see Chapter 10).

Chapter 3 – Project Window
29
3.3 Transport
The Transport allows you to do various actions regarding your project, both from the Time
Editor control; project configuration, saving and rendering; and hardware configuration. The
available elements are:
Transport
TIP: You can disable this view by clicking Cmd / Ctrl + Shift + T or deactivating it through
the Menu Bar’s (“View -> Transport”).
1. Add - this button allows you to add numerous objects to your scene, such as:
1.1. “Add Audio Track” - add an Audio Track to the scene (see Chapter 4).
Note: The default Audio Track has a “Mono” source.
1.2. “Add Particle Group” - add a Particle Group to the scene (see Chapter 4).
1.3. “Add Particle Emitter” - add a Particle Emitter to the scene (see Chapter 4).
1.4. “Add Microphone” - add a Microphone to the scene (see Chapter 6).
Note: The default mic is “Stereo”.
1.5. “Add Video Reference” - add a Video track to the scene (see Chapter 9).
2. Playback Controller - these buttons allow you to control the playback of your
scene:
2.1. “From Start” - places the playhead at the beginning (00:00:00:00) of the
Time Editor.
2.2. “Rewind 10 seconds” - places the playhead 10 seconds before its
current position.
2.3. “Play/Pause” - starts/pauses the scene’s playback.
TIP: If you have “Unrendered” microphones, and have the Auto-Render
“On”, this will render and playback audio in real-time (see Topic 8).

Chapter 3 – Project Window
30
2.4. “Forward 10 seconds” - places the playin-head 10 seconds ahead its
current position.
3. Mini-Display - in here, you can find information regarding:
3.1. “Forward 10 seconds” - places the playhead 10 seconds ahead its
current position.
3.2. Binaural (headphones) - if the headphone’s icon is displayed, the
Binaural mode is “On” (see Chapter 12).
3.3. Current Time - the current Time position of the Time Editor playhead.
3.4. VR - if the “VR” label is displayed, Sound Particles is connected to the
Sound Particles VR app (see Chapter 10).
4. I/O - access the I/O inspector (see Chapter 12).
5. VR - access the VR inspector (see Chapter 10).
6. Project Settings - access the Project Settings menu (see Chapter 13)
7. Render (Manual) - manually render the scene (see Chapter 7).
Note: Only has an effect if there are sections unrendered. If everything is rendered, this
button will have no effect.
TIP: You can still use this button even with the Auto-Render “On”.
8. Auto-Render - activate/deactivate the Auto-Render mode.
TIP: If “On”, you can playback your unrendered scene/sections in real-time, allowing you
to preview any part of your scene without fully and manually rendering it.

Chapter 3 – Project Window
31
3.4 Time Editor
Time Editor
The Time Editor is where all the elements (tracks) within your scene are displayed.
To start placing items on the Time Editor, you can simply use the “Add” button on the Transport,
or use “Project -> Add” on the Menu Bar (top of the project window).
With it, you can place, move and organize your items as you like, and it’s also your gateway to
access the element Inspectors to edit their parameters and configurations, by just clicking over
an existing track.
On the left end of the tracks, you are also able to SOLO or MUTE every kind of track through the
“M” & “S” buttons, and also add Automation (for every available parameter of that track) by
clicking on the “+” button.
The Time Editor track order is done with the following tier:
1. Video Track (if available)
2. Particle/Audio Tracks
3. Microphone Tracks

Chapter 3 – Project Window
32
TIP 1: You can drag your tracks around (excluding Microphones) by pressing and
holding on top of them with your mouse. This will also change the “Start Time” of the
track (see Chapter 4).
TIP 2: You can disable this view by clicking Cmd / Ctrl + T or deactivating it through the
Menu Bar’s (“View -> Time Editor”).
All the Time Editor elements are highlighted below:
Detailed Time Editor
1. Time Sub-Divisions – the Time sub-divisions and their respective value.
TIP: Depending if you zoom in or out, the sub-divisions could range more or less Time on
the same space.
2. Playhead – the position where the playback will start.
TIP: By changing the position of the playhead, you can immediately see the current
frame of the views according to its position.
3. Video Track – when you import a Video Reference, its respective track will appear
always at the top of the Time Editor.
Chapter 3 – Project Window
33
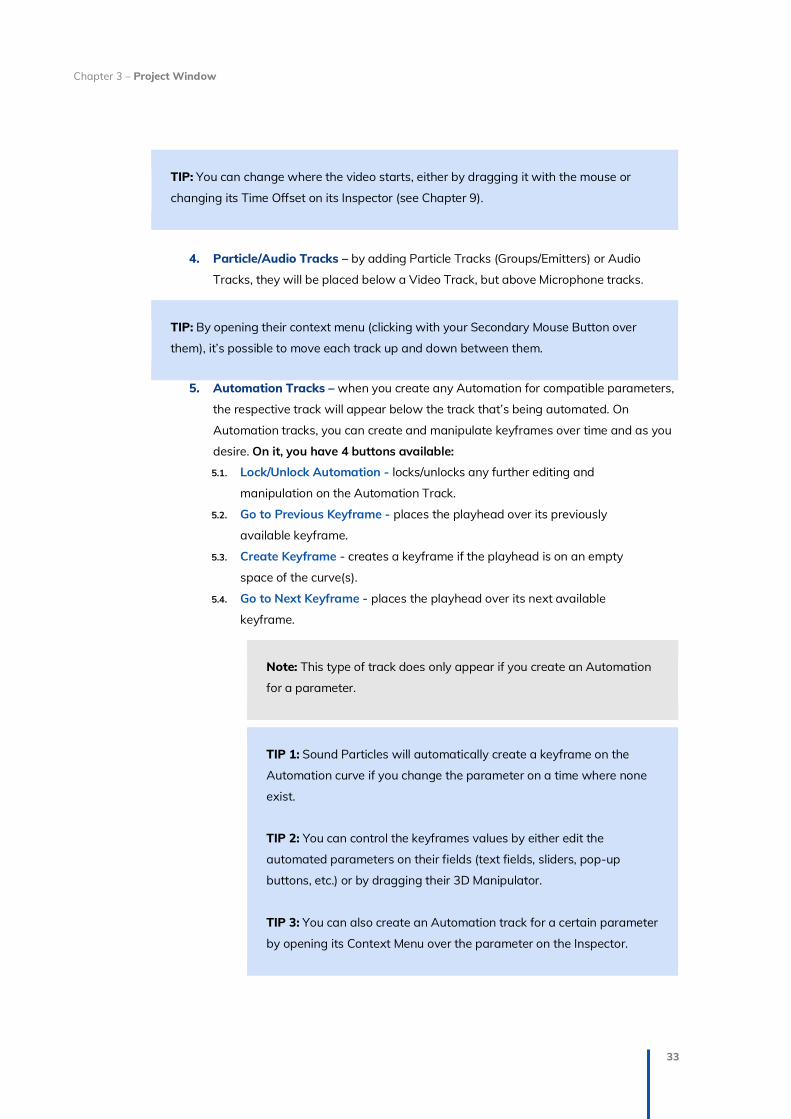
TIP: You can change where the video starts, either by dragging it with the mouse or
changing its Time Offset on its Inspector (see Chapter 9).
4. Particle/Audio Tracks – by adding Particle Tracks (Groups/Emitters) or Audio
Tracks, they will be placed below a Video Track, but above Microphone tracks.
TIP: By opening their context menu (clicking with your Secondary Mouse Button over
them), it’s possible to move each track up and down between them.
5. Automation Tracks – when you create any Automation for compatible parameters,
the respective track will appear below the track that’s being automated. On
Automation tracks, you can create and manipulate keyframes over time and as you
desire. On it, you have 4 buttons available:
5.1. Lock/Unlock Automation - locks/unlocks any further editing and
manipulation on the Automation Track.
5.2. Go to Previous Keyframe - places the playhead over its previously
available keyframe.
5.3. Create Keyframe - creates a keyframe if the playhead is on an empty
space of the curve(s).
5.4. Go to Next Keyframe - places the playhead over its next available
keyframe.
Note: This type of track does only appear if you create an Automation
for a parameter.
TIP 1: Sound Particles will automatically create a keyframe on the
Automation curve if you change the parameter on a time where none
exist.
TIP 2: You can control the keyframes values by either edit the
automated parameters on their fields (text fields, sliders, pop-up
buttons, etc.) or by dragging their 3D Manipulator.
TIP 3: You can also create an Automation track for a certain parameter
by opening its Context Menu over the parameter on the Inspector.

Chapter 3 – Project Window
34
You can also do certain key combinations when working with keyframes, such as:
• Select Single Keyframe: Primary Mouse Button Click (on keyframe)
• Select Multiple Keyframes: Primary Mouse Button Click on empty area inside
Automation track + Drag (to expand selection area)
• Create Keyframe: Double Click with Primary Mouse Button on an empty section.
• Add Keyframe to Selection: Cmd/Ctrl + Primary Mouse button click (on
keyframe) or Cmd/Ctrl + Primary Mouse Button Click on empty section inside the
Automation track + Drag (to expand selection area)
• Remove Keyframe from Selection: Cmd/Ctrl + Primary Mouse Button Click (on
keyframe)
• Single Drag: Primary Mouse Button Click (on keyframe) + Drag
• Multiple Drag: Shift + Primary Mouse Button Click + Drag
• Single/Multiple Keyframe Horizontal Drag: Shift + Alt + Primary Mouse Button
Click + Drag
• Single/Multiple Vertical Drag: Shift + Cmd/Ctrl + Primary Mouse Button Click +
Drag
6. Microphone Tracks - when you create a Microphone, a respective track will be
displayed on the Time Editor, which also allows you to access the Microphone’s
Inspector (see Chapter 6). It will also display the waveform of any render done to
your scene.
TIP 1: If the scene is unrendered, the Microphone(s) track will be displayed reddish and
with a “Unrendered Label”.
TIP 2: if by changing the volumes of Tracks and/or the Microphone clips the render, there
will be sections in red displaying the respective clipped sections.
7. Scroll bars - allows you to navigate horizontally or vertically through the Time
Editor.
Note: Depending on the levels of zoom or track length, the scroll bars may not be
enabled.
8. Zoom In/Out - allows you zoom-in (+) or zoom-out (-) both horizontally or vertically.

Chapter 3 – Project Window
35
3.5 Inspector
The Inspector is the panel on the right side of the screen that allows you to access all the
options and parameters related to a certain track / utility.
I/O Transport
1. Title - the title of the track/utility that you’ve selected.
2. Software version - the software version will appear in all inspectors on the top-
right corner.
3. Close / Open Panel - use this button to close or re-open one of the panels available.
4. Quick Help - use this button to access a Quick Help window displaying information
regarding that same panel and all of its components.
TIP: You can disable this view by clicking Cmd / Ctrl + I or deactivating it through the
Menu Bar’s (“View -> Inspector”).

Chapter 4 – Particle & Audio Tracks
36
Chapter 4
Particle & Audio Tracks
4.1 General Notions
Particle Tracks are objects that create particles in your scene, and there are two different types:
• Particle group
• Particle emitter
• Single sound sources (e.g. a single particle emitting a mono sound)
Additionally, you can opt for an Audio Track, that allows you to only have a single audio source
file that can then create a number of particles, according to the format of the audio file imported
to it.
4.2 Particle Group
A Particle Group creates, by default, stationary particles in the scene, each individual group’s
particles are created at the same time.
Particles Group Panel

Chapter 4 – Particle & Audio Tracks
37
1. Description - a brief description to identify this group.
2. Particles - the total number of particles of this group.
3. Color (button) - the color of the particles (used only for visualization - doesn’t affect
the sound).
4. Recreate (button) - creates a new set of particles.
5. Volume - the volume (audio gain) of the sound created by these particles (can be
automated).
4.3 Particle Emitter
A Particle Emitter is a particle object that creates particles over a given period of time.
Particles Emitter Panel
1. Description - a brief description to identify this group.
2. Particle rate - how many particles, per second, do you want to create? (can be
automated).
3. Duration - how long should the emitter continue to create new particles? This value
does not affect the sound duration of each particle. The parameter is applied to the
created particles.
4. Total - a label with the total number of particles (total = rate * duration).
5. Color (button) - the color of the particles (used only for visualization - doesn’t affect
the sound).
6. Recreate (button) - creates a new alternate set of particles.
7. Volume - the volume (audio gain) of the sound created by these particles (can be
automated).
Chapter 4 – Particle & Audio Tracks
38
4.4 Recreating new particles
Since particles are randomly created (within the user specified constraints), the same settings
can be applied to a new set of particles to generate different output results. Each time the user
presses the “Recreate” button, a different set of particles is created, which will generate a
slightly different result. From a practical point-of-view, this acts as a new “recording take”,
allowing you to generate a slightly different output result.
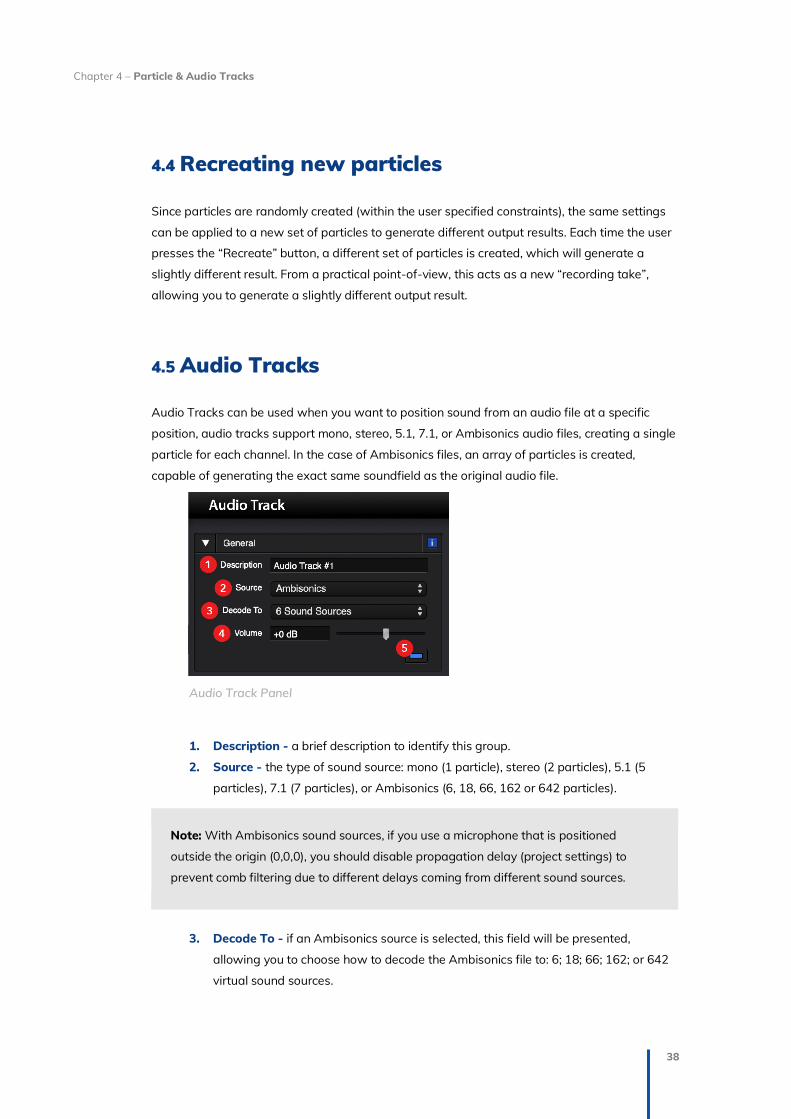
4.5 Audio Tracks
Audio Tracks can be used when you want to position sound from an audio file at a specific
position, audio tracks support mono, stereo, 5.1, 7.1, or Ambisonics audio files, creating a single
particle for each channel. In the case of Ambisonics files, an array of particles is created,
capable of generating the exact same soundfield as the original audio file.
Audio Track Panel
1. Description - a brief description to identify this group.
2. Source - the type of sound source: mono (1 particle), stereo (2 particles), 5.1 (5
particles), 7.1 (7 particles), or Ambisonics (6, 18, 66, 162 or 642 particles).
Note: With Ambisonics sound sources, if you use a microphone that is positioned
outside the origin (0,0,0), you should disable propagation delay (project settings) to
prevent comb filtering due to different delays coming from different sound sources.
3. Decode To - if an Ambisonics source is selected, this field will be presented,
allowing you to choose how to decode the Ambisonics file to: 6; 18; 66; 162; or 642
virtual sound sources.

Chapter 4 – Particle & Audio Tracks
39
4. Volume - the volume (audio gain) of the sound created by these particles (can be
automated).
5. Color (button) - the color of the particles (used only for visualization - doesn’t affect
the sound).

Chapter 4 – Particle & Audio Tracks
40
4.6 Audio Files
You can add one or more audio files to your particle Group/Emitter. Each particle will randomly
select one of the available files. For Audio Tracks, only one audio file can be added.
Audio Files Panel
1. + - add a new audio file.
2. + Impulse - add a simple impulse. This easy-to-render signal can be used for tests
or when you want to capture an impulse response.
3. Trash - remove the audio file from the available audio files. Don't worry, this will
NOT remove the audio file from your computer.
4. Table - table displaying the available audio files (streams) that will be played by the
particles, presenting their enabled/disabled state, filename, the used channel,
original sample rate and full path.
TIP: You can enable or disable your imported audio files to allow to try different results
using different combinations between the imported files.
Note: When you enable/disable an audio file, you will have to re-render the scene’s
microphone(s).
Chapter 4 – Particle & Audio Tracks
41
5. Audio Player - as you select a file within the table, an audio player control will
appear, allowing you to listen its audio content.
Note: This control uses the audio output defined in the settings of the I/O.
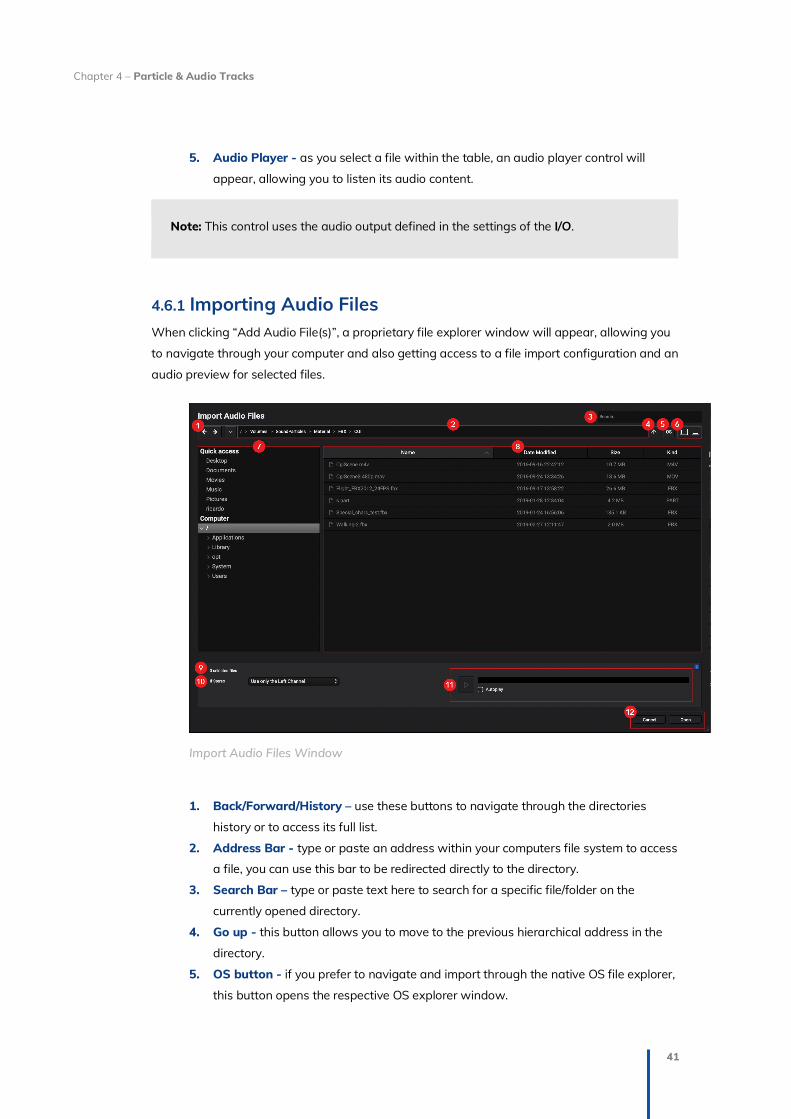
4.6.1 Importing Audio Files When clicking “Add Audio File(s)”, a proprietary file explorer window will appear, allowing you
to navigate through your computer and also getting access to a file import configuration and an
audio preview for selected files.
Import Audio Files Window
1. Back/Forward/History – use these buttons to navigate through the directories
history or to access its full list.
2. Address Bar - type or paste an address within your computers file system to access
a file, you can use this bar to be redirected directly to the directory.
3. Search Bar – type or paste text here to search for a specific file/folder on the
currently opened directory.
4. Go up - this button allows you to move to the previous hierarchical address in the
directory.
5. OS button - if you prefer to navigate and import through the native OS file explorer,
this button opens the respective OS explorer window.

Chapter 4 – Particle & Audio Tracks
42
6. Hide/Show Quick Access & Preview – use these buttons to either hide or show the
Quick Access (left) or the Preview (right).
7. Quick Access & Computer Global View - a list with the most usual Quick Access
links to preferred directories and also the access to a tree-view that shows you all
directories starting at the root of your computer.
8. Directory View - a “detailed list” view of the current selected directory, showing all
its files (Name, Date Modified, Size and Kind).
TIP: You can reorder (in ascending or descending orders) each available column.
9. Number of Selected Files - how many files are currently selected.
10. Import Options - the following conversion options are available when importing
multichannel audio files.
10.1. “If Stereo” - for Groups/Emitters and Mono/Stereo Audio Tracks, you
have the following options:
10.1.1. Use only the Left Channel - your particles will play only the left
channel.
10.1.2. Use only the Right Channel - your particles will play only the right
channel.
10.1.3. Convert to Mono - a mono version of the file will be created and
used by the particles.
10.1.4. [Non-Mono objects] Use Both Channels - some particles will
reproduce the left channel and other particles reproduce the right
channel.
10.2. Format (Audio Tracks - 5.1 / 7.1) - when importing files for 5.1 or 7.1
Audio Tracks, you can select a specific format:
10.2.1. 5.1
• SMPTE - L R C LFE Ls Rs
• Film - L C R Ls Rs LFE
10.2.2. 7.1
• SMPTE - L R C LFE Lss Rss Lsr Rsr
• Film - L C R Lss Rss Lsr Rsr LFE
10.3. LFE (Audio Tracks - 5.1 / 7.1) - when importing files for 5.1 or 7.1 Audio
Tracks, you can select what to do with the LFE channel:
10.3.1. Use - mix the file's LFE channel within all the other channels.
10.3.2. Ignore - don't use the LFE channel for the audio track.
Chapter 4 – Particle & Audio Tracks
43
10.4. Ch. Order (Audio Tracks - Ambisonics) - when importing Ambisonics
files for Ambisonics Audio Tracks, you can select which channel order to
use for your Ambisonics file:
10.4.1. ACN - 0(W) 1(Y) 2(Z) 3(X)
10.4.2. FuMa - W(0) X(3) Y(1) Z(2)
10.5. Norm (Audio Tracks - Ambisonics) - when importing Ambisonics files
for Ambisonics Audio Tracks, you can select which normalization method
to use for your Ambisonics file:
10.5.1. SN3D
10.5.2. N3D
10.5.3. maxN
10.5.4. FuMa
11. Preview - if you select one audio file, an audio preview control will appear, allowing
you to listen to the file. This control uses the audio output defined on the I/O
"Hardware" settings.
12. Cancel/OK - cancel the import / import the selected audio files with the defined
Import Options.
Note 1: If the audio file has a different sample rate from the sample rate of your project,
a warning dialog will appear, only to inform you that the audio file is automatically
resampled to the new sample rate.
Note 2: If you change the sample rate of your project, all audio files are resampled for
the new sample rate (if required) based on the original audio stream (not from the
already resampled version).

Chapter 4 – Particle & Audio Tracks
44
4.7 Particle’s Starting Points
Information about when and where the particles start.
Particles Starting Panel
1. Starting Time - particles are created after this initial time value. If you don’t want all
particles to start at the same time, you can add a Delay audio modifier (available at
the Audio Modifiers section) or use a particle Emitter.
2. Start Zone - area where particles are initially created.
Possible values:
2.1. Point - all particles are created at the same point.
2.2. Line - all particles are creating within a line segment.
2.3. Circle (line) - all particles are created within a circle line.
2.4. Circle (inside) - all particles are created inside a circle.
2.5. Rectangle - all particles are created inside a rectangle.
2.6. Triangle - all particles are created inside a triangle.
2.7. Sphere (surface) - all particles are created within the surface of a
sphere.
2.8. Sphere (inside) - all particles are created inside a sphere.
2.9. Cylinder (inside) - all particles are created inside a cylinder.
2.10. Cylinder (surface) - all particles are created within the round surface
of a cylinder.
Chapter 4 – Particle & Audio Tracks
45
2.11. Box - all particles are created inside a box.
2.12. Torus - all particles are created inside a torus.
3. Starting zone settings - depending on the starting zone, several parameters are
available:
3.1. Point - point.
3.2. Line - endpoint A, endpoint B.
3.3. Circle (line) - center point, radius.
3.4. Circle (inside) - center point, radius.
3.5. Rectangle - center point, width/depth (rectangle sides).
3.6. Triangle - endpoint A, endpoint B, endpoint C.
3.7. Sphere (surface) - center point, radius.
3.8. Sphere (inside) - center point, radius.
3.9. Cylinder (inside) - center point, radius, height.
3.10. Cylinder (surface) - center point, radius, height.
3.11. Box - center point, width/depth/height (box sides).
3.12. Torus - center point, main radius, section radius.
4. Random Settings Button(s) - some parameters may have a random settings
button, which allows you to define special random distributions.
TIP: For instance, imagine that you want particles spread on a circle, but either at a
radius of 1, 2 or 3 meters. You can specify a radius of 3 meters but change the random
settings to a discrete distribution which possible values are 1, 2 or 3.
Note: A purple border on this button indicates that a custom random setting was chosen
by the user.
5. Yaw/Pitch/Roll (checkbox) - by activating the yaw/pitch/roll checkbox, you can add
some additional rotation to your starting set (e.g. a tilted circle or a diagonal
rectangle).
6. Yaw/Pitch/Roll - Three new parameters will appear: yaw, pitch, and roll, which add
rotation on the azimuth, elevation and roll.
TIP: These 3 parameters can even be automated if you like to change their values
through time.

Chapter 4 – Particle & Audio Tracks
46
7. You can also select the rotation order according to the x, y, z axis, such as:
7.1. XYZ (Pitch/Yaw/Roll)
7.2. YZX (Yaw/Roll/Pitch)
7.3. ZXY (Roll/Pitch/Yaw)
7.4. XZY (Pitch/Roll/Yaw)
7.5. YXZ (Yaw/Pitch/Roll)
7.6. ZYX (Roll/Yaw/Pitch)
4.8 Modifiers
4.8.1 Movement Modifiers Movement can be obtained by adding movement modifiers or by using automation with the
Starting settings (Starting panel). You may add as many movement modifiers as you want,
including several modifiers of the same type.
I. Movement Modifiers Panel
Movement Modifiers Panel
1. + - add a new movement modifier.

Chapter 4 – Particle & Audio Tracks
47
Note: You may add as many movement modifiers as you want, including several
modifiers of the same type.
2. Trash - remove the movement modifier.
Note: This button is only visible when a movement modifier is selected on the list.
3. List - a list with all movement modifiers currently applied to the particles.
TIP 1: Select one of the modifiers to see/edit its information.
TIP 2: You can enable or disable the modifiers to try different combinations or to easily
disable a modifier from being applied to the respective object.
Note 1: Each line has the following syntax: “(Particles/Emitter): (Movement Description)”.
Note 2: The “Particles” word indicates that the movement is applied to the particles. If
using a particle emitter, the “Emitter” word can also be used, to distinguish if the
movement is applied to the particles or to the emitter.
Note 3: By enabling or disabling modifiers, you will have to re-render the scene’s
microphone(s)
4. Edit Panel - where you can see and edit all parameters of a movement modifier.
Note: This panel is only visible when a movement modifier is selected on the list.

Chapter 4 – Particle & Audio Tracks
48
II. Movement Modifier - Velocity (Straight Line)
This will apply movement to the particles, making them to move on a straight line.
Velocity (Straight Line) Modifier Panel
1. Description - a brief description to identify this group.
2. X/Y/Z - The velocity within each axis (x, y or z). The x axis corresponds to the left-
right direction, the y axis corresponds to the front-back direction, and the z axis
corresponds to the up-down direction.
3. Random Settings Button - This button allows you to change the random settings
of the modifier. By default, the movement modifier will randomly create a velocity
value for each particle, with a uniform distribution. You may use these settings to
control different velocity distributions.
Note: A purple border on this button indicates that a custom random setting was chosen
by the user.
4. Pin Button - This button allows you to force this value to all particles. Instead of
generating random velocities to each particle (within the range you have specified),
this will force the same velocity to all particles.
Example 1 / Moving all particles to the left at 1m/s: x=1m/s (pin), y=0, z=0
Example 2 / Moving either to left or right, but each particle with a different velocity
(maximum velocity of 1m/s): x=1m/s, y=0, z=0
Example 3 / Moving to any direction, with each particle with a different velocity
(maximum velocity of 1 m/s): x=1m/s, y=1m/s, z=1m/s, “range from [-v, v]”

Chapter 4 – Particle & Audio Tracks
49
III. Movement Modifier - Acceleration (Straight Line)
This will apply a straight-line movement to the particles, but instead of a constant velocity,
acceleration will gradually add velocity to the particles.
Acceleration (Straight Line) Modifier Panel
1. Description - A short description for this movement.
2. X/Y/Z - The velocity within each axis (x, y or z). The x axis corresponds to the left-
right direction, the y axis corresponds to the front-back direction, and the z axis
corresponds to the up-down direction.
3. Random Settings Button - This button allows you to change the random settings
of the modifier. By default, the movement modifier will randomly create a velocity
value for each particle, with a uniform distribution. You may use these settings to
control different velocity distributions.
Note: A purple border on this button indicates that a custom random setting was chosen
by the user.
4. Pin Button - This button allows you to force this value to all particles. Instead of
generating random velocities to each particle (within the range you have specified),
this will force the same velocity to all particles.

Chapter 4 – Particle & Audio Tracks
50
IV. Movement Modifier - Velocity (Rotation)
This will apply a rotation movement to the particles, making them to move on circles around the
origin (0, 0, 0).
Velocity (Rotation) Modifier Panel
1. Description - A short description for this movement. 2. Azimuth/Elevation - the velocity of rotation – azimuth velocity to control the
rotation at the horizontal plane, the elevation velocity to control the vertical
movement.
3. Radius - the velocity, in terms of distance to the origin.
TIP 1: If you want the particles to maintain the same distance to the origin (circle
movement), enter 0.
TIP 2: If you want particles to move in circles moving away (increasing the radius of their
circle), enter a positive value.
TIP 3: To approximate, enter a negative value.
4. Random Settings Button - this button allows you to change the random settings of
the modifier. By default, the movement modifier will randomly create a velocity value
for each particle, with a uniform distribution. You may use these settings to control
different velocity distributions.
Note: A purple border on this button indicates that a custom random setting was chosen
by the user.

Chapter 4 – Particle & Audio Tracks
51
5. Pin Button - This button allows you to force this value to all particles. Instead of
generating random velocities to each particle (within the range you have specified),
this will force the same velocity to all particles.
Example 1 / Moving in circles, all with the same direction and the same velocity:
az.=60°/s (pin), el.=0, rad.=0
Example 2 / Moving in circles, different directions and velocities: az.=60°/s, el.=0, rad.=0
V. Movement Modifier - Acceleration (Rotation)
This will apply a rotation movement to the particles, making them to move on circles around the
origin (0, 0, 0). Instead of a constant velocity, acceleration will gradually add velocity to the
particles.
Acceleration (Rotation) Modifier Panel
1. Description - A short description for this movement.
2. Azimuth/Elevation - this will apply a rotation movement to the particles, making
them to move on circles around the origin (0, 0, 0). Instead of a constant velocity,
acceleration will gradually add velocity to the particles.
3. Radius - The velocity, in terms of distance to the origin.
TIP 1: If you want the particles to maintain the same distance to the origin (circle
movement), enter 0.
TIP 2: If you want the particles to maintain the same distance to the origin (circle
movement), enter 0.
TIP 3: To approximate, enter a negative value.

Chapter 4 – Particle & Audio Tracks
52
4. Random Settings Button - This button allows you to change the random settings
of the modifier. By default, the movement modifier will randomly create a velocity
value for each particle, with a uniform distribution. You may use these settings to
control different velocity distributions.
Note: A purple border on this button indicates that a custom random setting was chosen
by the user.
5. Pin Button - This button allows you to force this value to all particles. Instead of
generating random velocities to each particle (within the range you have specified),
this will force the same velocity to all particles.

Chapter 4 – Particle & Audio Tracks
53
4.9.1 Audio Modifiers To add some audio diversity, you can add Audio Modifiers, making each particle sounding
slightly different from any other particle (e.g. random frequency response, random gains, etc.).
Audio Modifiers Panel
1. + - add a new audio modifier.
2. Trash - remove the audio modifier.
Note: This button is only visible when an audio modifier is selected on the list.
3. List - a list with all audio modifiers currently applied to the particles.
TIP 1: Select one of the modifiers to see/edit its information.
TIP 2: You can enable or disable the modifiers to try different combinations or to easily
disable a modifier from being applied to the respective object.
Note: By enabling or disabling modifiers, you will have to re-render the scene’s
microphone(s)
4. Edit Panel - where you can see and edit all parameters of an audio modifier.

Chapter 4 – Particle & Audio Tracks
54
Note: This panel is only visible when an audio modifier is selected on the list.
I. Audio Modifier - Random Gain
This audio modifier will apply a random gain to each particle.
Note: Without this audio modifier, all particles emit their sound with the same intensity
(“volume”).
TIP: By adding this modifier, you get more diversity, in terms of sound intensity.
Random Gain Modifier Panel
1. Description - A short description for this audio modifier.
2. Dynamic Range - the dynamic range of the random gains.
TIP: For instance, by specifying a dynamic range of 20 dB, each particle will receive a
random gain that ranges from -20 to 0 dB of attenuation. This value is represented
between parentheses on the "Audio Modifiers" list.
3. Random Settings Button - this button allows you to change the random settings of
the modifier.
TIP: By default, each particle will have a random gain with an uniform distribution. You
may use these settings to control different distributions (for instance, if you want most
particles to have mid-range values).

Chapter 4 – Particle & Audio Tracks
55
Note: A purple border on this button indicates that a custom random setting was chosen
by the user.
II. Audio Modifier EQ - Random Delay
This audio modifier will apply a random filter to each particle.
Note: Without this audio modifier, all particles start to play their sound at the same time.
TIP: By adding this modifier, each particle will have an initial random delay.
Random Delay Modifier Panel
1. Description - A short description for this audio modifier.
2. Max. Delay - the maximum delay time.
TIP: For instance, by specifying a maximum delay of 2 seconds, each particle will have a
random delay that ranges from 0 to 2 seconds.
3. Random Settings Button - this button allows you to change the random settings of
the modifier.
TIP: By default, each particle will have a random delay with a uniform distribution. You
may use these settings to control different distributions (for instance, if you want most
particles to have mid-range values).

Chapter 4 – Particle & Audio Tracks
56
Note: A purple border on this button indicates that a custom random setting was chosen
by the user.

Chapter 4 – Particle & Audio Tracks
57
III. Audio Modifier - EQ - Random EQ
This audio modifier will apply a random EQ to each particle, which result in a random frequency
response.
Random EQ Modifier Panel
1. Description - A short description for this audio modifier.
2. # of Bands - the number of bands.
TIP: For instance, if you specify 10 bands, the original audio stream will be split in 10
frequency bands, with each particle reproducing one of the available bands.
3. Depth - the depth of the filter.
Note: Since the system uses a FIR filter, this value corresponds to the number of
coefficients of the filter. A higher number creates more complex filters with higher
separation between bands, but will increase the complexity of the render process.
TIP: Low complexity filters will have around 20 coefficients, medium complexity filters
will have around 100 coefficients, and high complex filters will have around 500
coefficients.
4. Dynamic Range - the maximum variation in each EQ band.
5. Dry/Wet - the impact of the defined random band.
TIP: The higher its value, the more impact it has, and vice-versa.

Chapter 4 – Particle & Audio Tracks
58
IV. Audio Modifier - EQ - Random Filters
This audio modifier will apply a random filter to each particle, which result in a random
frequency response.
Random Filters (EQ) Modifier Panel
1. Description - A short description for this audio modifier.
2. Depth - the depth of the filter.
Note 1: Since the system uses a FIR filter, this value corresponds to the number of
coefficients of the filter.
Note 2: A higher number creates more complex filters with higher impact and higher
slopes, but will increase the complexity of the render process.
TIP: Low complexity filters will have around 20 coefficients, medium complexity filters
will have around 100 coefficients, high complex filters will have around 500 coefficients.
3. Dry/Wet - the impact of the defined random filter.
TIP: If you choose "100%", it will play the filtered audio in its entirety, and "0%" will
cancel the filter and will only play the original sample. In-between values will render a
mix result between the filtered and the original audio sample.

Chapter 4 – Particle & Audio Tracks
59
V. Audio Modifier - EQ - Random Bands
This audio modifier will apply a random filter to each particle, which result in a random
frequency response.
Random Bands (EQ) Modifier Panel
1. Description - a short description for this audio modifier.
2. # of Bands - the number of bands.
TIP: For instance, if you specify 10 bands, the original audio stream will be split in 10
frequency bands, with each particle reproducing one of the available bands.
3. Depth - the depth of the filter.
Note: Since the system uses a FIR (Finite Impulse Response) filter, this value
corresponds to the number of coefficients of the filter. A higher number creates more
complex filters with higher separation between bands, but will increase the complexity
of the render process.
TIP: Low complexity filters will have around 20 coefficients, medium complexity filters
will have around 100 coefficients, and high complex filters will have around 500
coefficients.
4. Dry/Wet - the impact of the defined random band.

Chapter 4 – Particle & Audio Tracks
60
TIP: If you choose "100%", it will play the filtered audio in its entirety, and "0%" will
cancel the filter and will only play the original sample. In-between values will render a
mix result between the filtered and the original audio sample.
5. Distribute in Sequence - to obtain a better distribution, this feature will distribute
the available bands in sequence.
Note 1: If checked (blue light), the system will distribute bands in sequence – the first
particle will get the first band, the second particle will get the second band, and so on.
Note 2: If unchecked (black), each particle will get a random band, which could result in
some bands being reproduced by much more particles than others.
VI. Audio Modifier - Granular Synthesis
This audio modifier allows you to use granular synthesis. Each particle will only reproduce a
small fragment (grain) of the audio file, instead of the entire audio file.
Granular Synthesis Modifier Panel
1. Description - a short description for this audio modifier.
2. Size - this popup button allows you to choose from:
2.1. “Fixed size” - all particles will have the same grain duration.
2.2. “Random size”- each particle will have a random duration.
3. Grain Size - the duration of each grain.

Chapter 4 – Particle & Audio Tracks
61
Note 1: If a “Random size” is selected, this value represents the maximum grain size.
Note 2: By default, each particle will have a random grain with a uniform distribution.
You may use these settings to control different distributions (for instance, if you want
most particles to have mid-range values).
Note 3: A purple border on this button indicates that a custom random setting was
chosen by the user.
4. Window - several windows are supported, to smooth the attack and the release
part of each grain:
4.1. Rectangle window (instant attack/release)
4.2. Normal (Gauss) window
4.3. Hann window
4.4. Triangle window
4.5. Tukey window
5. Distribute in Sequence - instead of random grains, the “Distribute in Sequence”
feature will start to distribute the available grains in sequence.
Note 1: If checked (blue light), the system will distribute grains in sequence – the first
particle will get the first grain, the second particle will get the second grain, and so on.
Note 2: If unchecked (black), each particle will get a random grain.
6. Play in sync - this feature will add an additional delay to each particle, equal to the
start time of its grain. This creates a jumping effect, almost like an audio stream that
is jumping from particle to particle.
Note: for Particle Emitters, this parameter is disabled since the emitter itself equally
delays particles between them.

Chapter 4 – Particle & Audio Tracks
62
VII. Audio Modifier - Random Time/Pitch
This audio modifier will change the speed of the audio stream, changing both time and pitch
(varispeed).
Random Time/Pitch Modifier Panel
1. Description - A short description for this audio modifier.
2. Time - The interval of the possible time changes to the audio sample
Note: This parameter is affected by the Pitch parameter below.
TIP 1: A value higher than 100% will speed up audio and increase pitch.
TIP 2: A value lower than 100% will slow down audio and decrease pitch.
3. Pitch - The range of the pitch variation.
Note: By changing this parameter, the speed parameter will also change accordingly.
TIP: This range is, by default, symmetric, meaning that, e.g., "12 semitones" means that
the pitch will range between -12 and +12 decibels.
4. Random Settings Button - This button allows you to change the random settings
of the modifier.

Chapter 4 – Particle & Audio Tracks
63
Note 1: By default, each particle will have a random time/pitch value with a uniform
distribution.
Note 2: A purple border on this button indicates that a custom random setting was
chosen by the user.
TIP: You may use these settings to control different distributions (for instance, if you
want most particles to have mid-range values).

Chapter 5 – Random Distribution
64
Chapter 5
Random Distribution
5.1 Distribution Settings
This will control how random values will be generated for this specific property (e.g. the
azimuth of a circle).
Random Distribution Panel
1. Cancel - ignore any changes and return to the previous screen.
2. Apply - use the new generated set of values.
3. Distributions – different random distributions you can choose from:
3.1. Uniform Distribution - with a uniform distribution, each random value
will be generated anywhere in the range between the minimum value
and the maximum value.
3.2. Normal Distribution - with a normal distribution, each random value will
have a higher probability to be generated near a specific value.

Chapter 5 – Random Distribution
65
3.2.1. Mean - where do you want more values to be created near?
3.2.1.1. Standard Deviation - how near do you want to create those
values?
TIP 1: Higher value tends to generate numbers almost uniformly
between minimum and maximum values.
TIP 2: A lower value tends to generate numbers only very near the
“mean” value.
3.2.2. Minimum value - what is the lowest possible value?
3.2.3. Maximum value - what is the highest possible value?
3.3. Triangle Distribution - with a triangle distribution, each random value
will have a higher probability to be generated near a specific value, but
with a different behavior.
3.3.1. Minimum value - what is the lowest possible value?
3.3.2. Middle value - where do you want more values to be created near?
3.3.3. Maximum value - what is the highest possible value?
3.4. Ramp Distribution - with a ramp distribution, the probability decreases
near one of the edges and increases near the other edge.
3.4.1. Minimum value - what is the lowest possible value?
3.4.2. Maximum value - what is the highest possible value?
3.4.3. Slope - a value between -1 and 1, indicating the slope of the
distribution ramp.
3.5. Discrete Distribution - with a discrete distribution, you specify all the
possible values.
3.5.1. Possible Values - write the possible values, using a blank space to
separate them.
TIP: For instance, if you specify 0 and 10, the random generator will
only create 0’s or 10’s (no values in-between).
3.6. Custom Distribution - the custom distribution is a mix of discrete and
normal distributions. Instead of specifying only one central value (normal
distribution), you specify several discrete values, and the random

Chapter 5 – Random Distribution
66
generator will create random values on the neighborhood of each
discrete value.
3.6.1. Main values - several central values (separated by blank spaces).
3.6.2. Std. Deviation - how near do you want to create values? A higher
value tends to generate values almost uniform. A lower value
tends to generate values only very near one of the main values.
3.6.3. Left margin/right margin - the range before and after the central
value.
TIP 1: A higher value tends to generate values almost uniform.
TIP 2: A lower value tends to generate values only very near one of the
main values.
4. Random/Sequence Values - it is possible for you to choose how to randomize the
particles within the distribution you are defining:
4.1. Random Values - allows you to select a range of Seeds (a total of
2097153 seeds) where each one is a different possible combination for
the particles’ displacement.
TIP 1: Each Seed is a unique one, meaning that if you were to open a
different project, and apply the same modifier, you would just need to
insert the same Seed number from the previous project.
4.2. Sequence Values - allows you to distribute the particles in even parts
within the range you defined in your distribution mode, and you can
choose between:
“Steps” and “Per Step” parameters
4.2.1. (1) No. of Steps - how many sections you want to divide your
distribution (this value will divide the number of particles of your
Group/Emitter, affecting how many Particles Per Step there are).

Chapter 5 – Random Distribution
67
Note: This value will divide the number of particles of your
Group/Emitter, affecting how many Particles Per Step there are.
4.2.2. (2) Particles Per Step - how many particles per step there are.
Note: This value will divide the number of particles of your
Group/Emitter, affecting how many Steps there will be.
5. Parameters – depending on the distribution you select; its respective parameters
will appear in this area.
6. Seed – by default, “Random Values” is active, showing this “Seed” parameter for
you to choose one (see step 4.1).
7. Recreate new values - completely recreate a new set of random numbers.
5.2 Probability Distribution
This view presents the probability distribution of the generated random values for this property:
Probability Distribution Panel
Note: This is a theoretical point-of-view, which may not correspond to the actual
generated values, especially if the number of particles is low. Nevertheless, it shows
what would be the expected distribution between the minimum and maximum values.

Chapter 5 – Random Distribution
68
TIP: A higher value in some range means that the probability of generating values on
that range is higher.
5.3 Histogram
This view presents the histogram of the generated random values for this property:
Distribution Histogram Panel
Note: A bar graph shows how the values are actually distributed between the minimum
and maximum values.
TIP: A higher bar means that more values exist on that range.

Chapter 6 – Microphones
69
Chapter 6
Microphones
6.1 Overview
The virtual microphones of Sound Particles allow you to capture the surrounding events
surrounding them on the 3D scene. Various types of microphones are available.
Microphones General Panel
1. Description - a short description of this microphone.
2. Volume - the volume of the render of the microphone.
Note: the applied Volume change will affect the volume of the exported render file.
3. Output - the output type of the microphone/
Possible values:
3.1. Mono - for single microphones.
3.2. Stereo - for stereo pairs and arrays.
3.3. Ambisonics - up to 6th order Ambisonics.
3.4. Multichannel - for complex multichannel setups (5.1, etc).

Chapter 6 – Microphones
70
6.2 Microphone Options
Depending on the chosen microphone (output type), different options are available.
6.2.1 Mono
Microphone Options of a Mono Microphone
For a mono microphone, you can choose the type (1) of microphone:
- Omnidirectional
- Figure-of-eight
- Cardioid
- Hypercardioid
6.2.2 Stereo
Microphone Options of a Stereo Microphone
For a stereo pair/array, several types (1) are available, each one with its own set of
parameters (2):
- Mid/Side pair
- Mid/Side
- Left/Right
- XY pair
- Angle
- Type
- Blumlein pair
- AB pair
- Distance between microphones

Chapter 6 – Microphones
71
- Types
- ORTF pair
- Distance between microphones
- Angle
- Types
- Decca Tree
- Front distance (distance between the front mic and the line of the side
mics)
- width (distance between left and right mic)
- angle (between left/right mics)
- output format (left/right; center/left/right)
- Type
6.2.3 Ambisonics
Microphone Options of an Ambisonics Microphone
For an Ambisonics microphone, you may choose its type (1) and edit its parameters
(2): • Soundfield Microphone (A format)
- Type of microphone capsules
- Cardioid
- Hypercardioid
- Subcardioid
- Distance
• 1st order Ambisonics
• 2nd order Ambisonics
• 3rd order Ambisonics
• 4th order Ambisonics
• 5th order Ambisonics
• 6th order Ambisonics

Chapter 6 – Microphones
72
Note 1: For the regular Ambisonics, you can specificy: the normalization method (N3D,
SN3D, maxN, FuMa) and the naming/order convention (ACN, FuMa, SID).
Note 2: For Ambisonics of 4th order or above, only ACN naming/ordering are available.
Note 3: The default values are SN3D normalization and ACN naming.
6.2.4 Multichannel
Microphone Options of a Multichannel Microphone
For multichannel, the system uses “Vector Base Amplitude Panning (VBAP)”, which
is capable of complex setups.
Note: The “Speakers” button (2) allows you to enter a speaker setup dialog, where you
can choose one of the available speaker templates or create your own speaker setup.

Chapter 6 – Microphones
73
6.3 Speaker Setup
On the Speaker Setup panel, you can use the default or create your own custom setup of
speakers, allowing you to define the number of main speakers, LFE channels and their
characteristics, such as position and angle of capture.
Multichannel Setup Panel
1. Speaker Presets - here you can find both the default and the user created setups.
2. Description - a short description for this speaker setup.
3. Main Channels - the number of full range channels (number of outputs, excluding
LFE/Sub-woofers).
4. LFE Channels - the number of LFE/Sub-woofer Channels.
5. Edit Mode - You may edit speakers using 3 possible modes:
5.1. Azimuth
5.2. Azimuth/Elevation
5.3. XYZ
6. [Speaker] Description - a short description for the speaker.

Chapter 6 – Microphones
74
Note: Positive values to the left and negative values to the right.
7. Azimuth/Elevation/XYZ - in this area, you can edit the different parameters referred
on step 5:
7.1. Azimuth - The azimuth of the speaker, i.e., the angle between the
speaker and the front position, considering the horizontal plane
(positive values to the left and negative values to the right.).
7.2. Elevation - The elevation of the speaker, i.e., the angle between the
speaker and the horizontal plane (positive values above; negative
values below).
7.3. XYZ - The XYZ coordinates of the speaker, considering a central
position at (0,0,0).
6.4 Microphone Position
The location and direction of the virtual microphone:
Microphone Position Panel
1. X (Azimuth), Y (Elevation), Z (Distance) - location of the microphone.
2. Azimuth / Elevation/ Roll - change the direction of the microphone:
2.1. Azimuth - rotation over the z axis (left/right).
2.2. Elevation - rotation over the x axis (up/down).
2.3. Roll - rotation over the y axis (spin in its own axis).
3. Order - Change the rotation order of your microphone between:

Chapter 6 – Microphones
75
3.1. XYZ (Elevation/Azimuth/Roll)
3.2. YZX (Azimuth/Roll/Elevation)
3.3. ZXY (Roll/Elevation/Azimuth)
3.4. XZY (Elevation/Roll/Azimuth)
3.5. YXZ (Azimuth/Elevation/Roll)
3.6. ZYX (Roll/Azimuth/Elevation)
6.5 Stems
This feature allows you to create stems, indicating if the microphone should capture every
particle group or only some groups (using other microphones to capture the remaining
groups/sources).
Microphone Stems Panel
1. All - press this button to activate all groups (capturing the sound of everything).
2. None - Press this button to deactivate all groups (the microphone will not capture
any groups/sources).
TIP: This button acts as a quick shortcut to disable all groups before you activate the
few desired groups.
Note 1: Having a microphone with all groups disabled will be useless, since it will not
capture anything.
Note 2: Pressing this button will also deactivate the "Include new groups" checkbox.

Chapter 6 – Microphones
76
3. Groups - a list of all existing particle groups is presented, allowing you to
enable/disable the groups that you want to capture with the current microphone.
4. Include new groups - this checkbox gives information about the desired behavior if
a new group is added latter on (should it be also captured by the microphone or
not?).
6.6 Audio Hardware
This panel maps the output of the virtual microphone with the outputs of your audio interface.
Microphone Audio Hardware Panel
1. Device name: this small label reminds you what is the current selected audio device.
TIP: You may choose a different audio interface on the “I/O” menu.
2. Channels: for each output of your virtual microphone, a pop-up button is presented
that allows you to select which output from your audio interface should be used to
reproduce audio.
TIP: An “off” choice is also available, if you do not want to reproduce some channels of
your virtual microphone.

Chapter 7 – Render
77
Chapter 7
Render
7.1 Overview
After constructing your scene and creating all the tracks and microphone(s) you require, it’s
time to render it all up so that you can listen to the audio of your project.
You can render your scene within two possible ways: Auto-Render or manual Render.
7.2 Auto-Render
Newly to Sound Particles 2, with this mode active (see Chapter 3, Section 3.3), you can render
your scene while playing it back in real-time, allowing you to listen to your scene as the
software renders it.
TIP: Ideal to make quick/small changes and for simple projects (few particles) …
Note: … but not for highly complex scenes, as it is a heavy CPU processing component.

Chapter 7 – Render
78
7.3 Render (Manual)
If either you will not be available to listen to your scene or it is too heavy and complex to
process in real-time, you can opt for starting a manual render process (see Chapter 3, Section
3.3).
TIP: While rendering, you can listen to sections that were already rendered.
Note 1: you cannot edit your scene while this render is processing.
Note 2: this mode opens its own Inspector (see below).
Render Inspector
1. Render Progress (simple) - a simple illustration of the progression of the current
render, with only a percentage and a progress bar.
2. Cancel Render - cancels the current render process.

Chapter 7 – Render
79
Note: canceling a render does NOT erase any sections that were already render,
meaning they will still be listenable.
3. Render Progress (full) - a more detailed information regarding the progress of the
render. It displays:
3.1. Progress - the percentage of render completion.
3.2. Rendered Frames - how many frames were rendered of the total
number of frames of your project.
Note: The number of frames goes accordingly to the Sample Rate of
your project (see Chapter 13, Section 13.2), meaning that, e.g., if you
have 1 million total frames with 48 kHz of Sample Rate, you will then
have 2 million total frames with 96 kHz.
3.3. Elapsed Time - how much time has passed since the render was
initiated.
3.4. Estimated Remaining Time - how much time it’s expected for the
render to finish.
4. “Play after render” - if you wish to, check this box if you want the scene audio
playback to start automatically when the render finishes.
5. CPU & Memory - information regarding the CPU and Memory usage during the
render process:
5.1. CPU Usage - the percentage of the total CPU being used onto the
Render.
Note: For every 100%, that means the 1 core is being additionally used
(e.g: 200% = 2 cores; 400% = 4 cores; 1000% = 10 cores; etc.).
5.2. Memory (Resident) - the current memory usage of RAM that’s being
used for rendering.
5.3. Memory (Virtual) - the whole memory usage (RAM + Disk) being used
for rendering.

Chapter 8 – Export
80
Chapter 8
Export After your scene is all rendered through the microphones, you may then export the rendered
audio onto the system.
To do that, you can open the “Export Audio” panel either through “File -> Export -> Export
Audio…” or by opening the context menu (secondary mouse button) above one of the
microphones and clicking “Export Audio…”.
TIP: By clicking on “Export Audio…” through a microphone’s context menu, the Export
window will immediately have that same mic selected for exporting.
Note: The microphone you want to export from has to be rendered.
8.1 Export Audio
The “Export Audio” window lets you to configure how you want to export the audio from a
microphone of your scene, from the mic’ to export, interleaving mode, file format, bit depth,
metadata inclusion and also channel order and selection.

Chapter 8 – Export
81
Export Audio Window
1. Microphone - the microphone to export the audio from.
2. Interleaved - choose how you want to export your audio:
2.1. Interleaved - one single file with all the selected channels on it.
2.2. Non-Interleaved - each selected channel will be exported to its own
audio file.
3. File Format - the format that the file(s) will be exported:
3.1. BWF (.WAV)
3.2. AIFF (.AIFF)
3.3. FLAC (.FLAC)
4. Bit Depth - The bit depth of the export audio file(s): 4.1. 16-bit
4.2. 24-bit
4.3. 32-bit (float)
TIP: The higher the Bit Depth, the better quality the audio file will have (but will also be
larger).

Chapter 8 – Export
82
5. Sample Rate - the Sample Rate at which the audio file(s) will be exported.
Note: This value is affected by the Sample Rate chosen on the “Project Settings” (see
Chapter 13, section 13.2). If you wish to export to a different Sample Rate, you’ll have to
change your project’s Sample Rate and re-render the microphone again.
6. Channel Order – the channel order that the channels will have when exporting the
audio file(s). You can choose from:
6.1. SMPTE
6.1.1. 5.1: L R C LFE Ls Rs
6.1.2. 7.1 (3/4): L R C LFE Lss Rss Lsr Rsr
6.2. Film
6.2.1. 5.1: L C R Ls Rs LFE
6.2.2. 7.1 (3/4): L C R Lss Rss Lsr Rsr LFE
6.3. Custom: a custom channel order.
Note: This option is only available when the default 5.1 / 7.1 (3/4) setups are applied on
the respective microphone.
7. Include Metadata - check this box if you want to include Metadata information on
the audio file(s), such as the project “Title”, “Artist”, “Copyright”, etc. (see Section
8.1.1).
Note 1: This checkbox will become disabled if you select “FLAC” or “AIFF” on “File
Format”.
Note 2: This checkbox is “checked” and locked if you are running the Trial version.
8. Channel List - this list displays all the channels from your microphone, including
with their names and order, and also checkboxes for you to select which channels
you want to export.
9. Move Up/Down - use these buttons if you want to move up or down a channel on
the list.

Chapter 8 – Export
83
Note: this value is affected by the Sample Rate chosen on the “Project Settings” (see
Chapter 13, section 13.2). If you wish to export to a different Sample Rate, you’ll have to
change your project’s Sample Rate and re-render the microphone again.
10. Cancel/OK - cancel the export process or accept the changes and go to the file
explorer / Metadata screen (if “Include Metadata” is selected).
8.1.1 Include Metadata If you checked the “Include Metadata” checkbox on the “Export Audio” window, the window of
same name will appear after Export process is proceeded. On this window, you will be able to
edit many labels regarding your project, from its “Title”, “Artist”, “Keywords” and others.
Include Metadata Window
1. Title - the given title of the project.
2. Artist - the original artist of the project.
3. Copyright - copyright information you may require for the project.
4. Date - a date you may want to identify the project with (e.g: when it was started,
when is to be released, etc.)
5. Software - the software you used for the project.
6. Keywords - keywords that might help you or your team to identify/sort the project.
7. Comments - additional comments to the project that may be useful.
8. Cancel - cancel the export process and return to your project window.

Chapter 8 – Export
84
9. OK - accept the “Include Metadata” changes and open your OS file explorer/finder.
After concluding the “Include Metadata” process, the OS file explorer will open, and you will be
able to select where you want to save and what name should the file have.
Note: Closing the OS window with “Cancel” will only return you to the Project Window,
and you will have to restart the Export process again if required.

Chapter 9 – Video
85
Chapter 9
Video In Sound Particles, you can import a Video Reference for your project to help working on your
scene with a visual aid, both for plain or 360º/VR image references.
9.1 Importing a video
You can start importing a video by going to the “Add” button on the Transport (see Chapter 3,
Section 3.3) or by going through “File -> Import -> Import Video…” on the Menu Bar above (see
Chapter 15).
That will open the “Import Video” panel, and you can use that panel to import a video reference
file to your project, allowing you to specify if you want to import the entire file or only a
fragment of it.

Chapter 9 – Video
86
Video Import Setup Panel
1. Import Entire Video/ From To - use this popup button to specify if you want to
import the entire video or only a part of it.
2. From/To/Duration - If you choose to import only a part of the video, these will
specify the start frame, the end frame and the duration of it.
Note 1: All fields are only enabled if the "Import From To" choice is selected.
Note 2: All fields use the SMPTE format (hours:minutes:seconds:frames).
3. Import Audio - leave this checkbox checked if you want to import the audio from
the video. The audio from the video will then be played when you play your project.
Note: The video’s audio will not appear on any exported render.
4. Resolution/Frame Rate - the resolution and frame rate of the original video file.
5. Duration - the duration of the original video file.
6. Video Preview - the video preview allows you to watch the video as you define your
import settings.

Chapter 9 – Video
87
TIP: Above the video preview, you can see the image characteristics (resolution and
frame rate) and duration of the original video file.
7. Transport - use the transport buttons to control the video preview.
8. Mark In/Mark Out - set the start and the end of the imported clip.
Note: Using these buttons will automatically activate the "Import From To" mode.
9. Current Time – the current time of the video playback.
10. Play Bar - use the play bar to quickly navigate through the video file.
Note: the "From/To" points will appear in orange markers.
11. Cancel - cancel the video import.
12. OK - import the video with the changes done on the panel.
9.2 Inspector - General
After importing a video, the “Video” inspector will open and will give you access to certain
parameters and information regarding the imported video. This inspector can then be accessed
by clicking on the video track on you Time Editor.
Video General Panel
1. Description - a small description for this video track.
2. Time Offset - the time offset of the video clip.
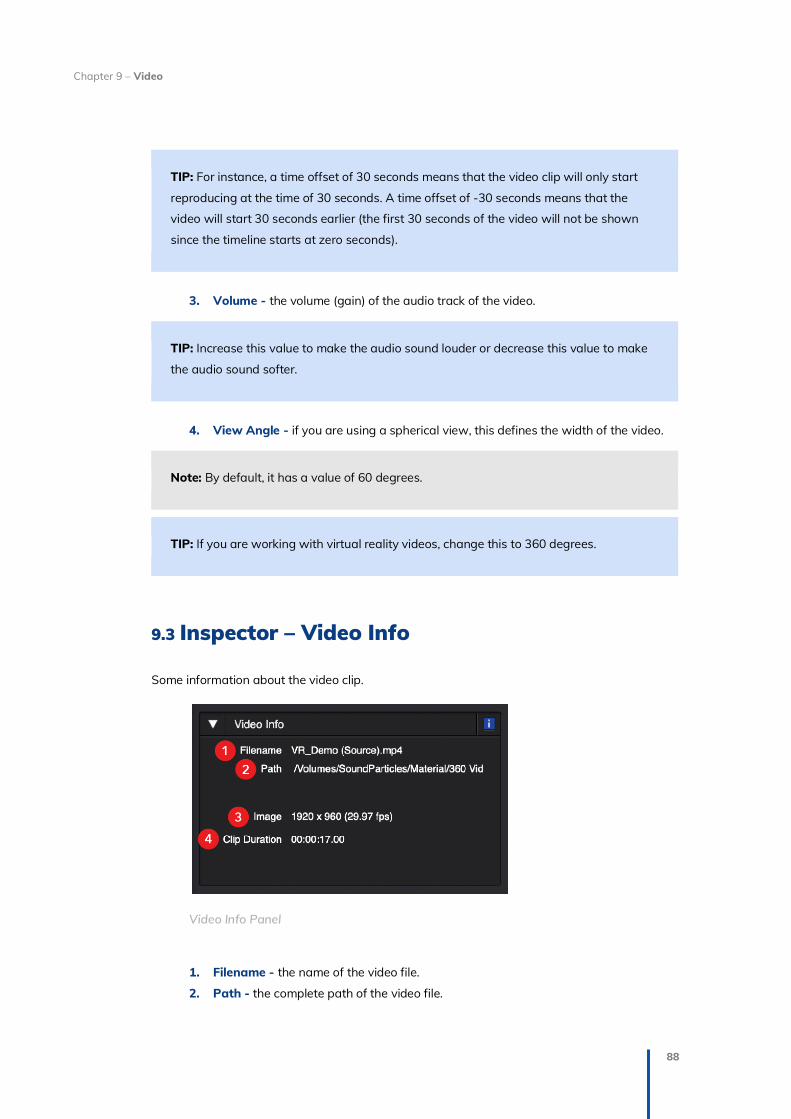
Chapter 9 – Video
88
TIP: For instance, a time offset of 30 seconds means that the video clip will only start
reproducing at the time of 30 seconds. A time offset of -30 seconds means that the
video will start 30 seconds earlier (the first 30 seconds of the video will not be shown
since the timeline starts at zero seconds).
3. Volume - the volume (gain) of the audio track of the video.
TIP: Increase this value to make the audio sound louder or decrease this value to make
the audio sound softer.
4. View Angle - if you are using a spherical view, this defines the width of the video.
Note: By default, it has a value of 60 degrees.
TIP: If you are working with virtual reality videos, change this to 360 degrees.
9.3 Inspector – Video Info
Some information about the video clip.
Video Info Panel
1. Filename - the name of the video file.
2. Path - the complete path of the video file.

Chapter 9 – Video
89
3. Image - the image characteristics of the video, including the image resolution and
the video frame rate.
4. Clip Duration - the duration of the imported clip.
Note: The original video could have had a larger duration, but this value only represents
the duration of the video segment that was imported into the project.
9.4 Inspector – Video Audio Hardware
This panel maps the output of the stereo audio tracks with the outputs of your audio interface.
Video Hardware Panel
1. Device name - this small label reminds you what is the current selected audio
device.

Chapter 10 – VR
90
Chapter 10
VR With Sound Particles, you can test your VR-designed projects with our VR tools, such as the VR
View or the VR Client mobile application.
Note: To take advantage of the full VR workflow, an Ambisonics microphone must be
sed in order for the Binaural mode to work with the VR functionalities.
10.1 VR View
VR View

Chapter 10 – VR
91
With the VR View (see Chapter 3, section 3.2.2-IV), you can control, with your mouse, the
camera orientation as if you were simulating using VR googles, and with the Binaural mode
“On” and importing a 360º video (see Chapter 9, section 2), you can already have a coherent
simulation of your final 360º/VR project.
However, there’s also the possibility to connect Sound Particles to the Sound Particles VR
android app client, which allows you to use your mobile device, maybe with an additional pair
of googles, for the best preview of your VR/360º.
10.2 VR Client - Connection
I. Mobile App
On the “VR” inspector, accessed through the Transport (see Chapter 3, Sector 3.3), you can
connect to your Sound Particles VR Client, an Android app that can be used to test your VR
projects.
Note 1: You can download the app at
https://play.google.com/store/apps/details?id=com.soundparticles.vrclient.soundparticles
vr
Note 2: The connection with the app is done by a password-protected wireless network.
TIP: To use this, connect the headphones on the computer, while video is shown on the
smartphone app.
Sound Particles VR Client App - Connection Screen

Chapter 10 – VR
92
II. Desktop App
Through the Inspector, you have the “Connection” section that will help you on getting your
desktop app being connected to the mobile app.
VR Client Connection Panel
1. Video Uploading Progress - the status of the upload of the video you have on your
project.
Note: There must be a video on your scene for this progress bar to appear.
2. IP - the IP address of the VR Client (4 numbers, e.g. 10.0.0.1).
TIP: This information appears on the main screen of your VR Client app.
3. Port - The port of the VR Client (one number, e.g. 6006).
TIP: This information appears on the main screen of your VR Client app.
4. Connect/Disconnect - use this button to connect or disconnect to the VR client.

Chapter 10 – VR
93
10.3 VR Client – Headset
I. Mobile App
After successfully connecting with the mobile app, you will immediately see on it a 360º grid,
alongside a “VR” icon with the label “Center”, which represents the center point of the view, in
case you need to reorient yourself through your VR scene.
Sound Particles VR Client App – 360º View Grid
Also, by moving your device around, you will immediately notice that both the view on your
device and on the VR View move as you do with it.
As stated before, if you have a rendered Ambisonics microphone on your scene, and activate
the Binaural mode, starting the playback will immediately have an effect within the VR app, as
moving the device around will track the camera’s orientation and the audio output will be
affected respectively, adjusted to where you’re looking onto the scene.
If you happen to have a Video Reference (see Chapter 9, Section 9.1) on your project, the
desktop VR Client will immediately start to upload the same video to the mobile VR client. After
it is successfully uploaded (see 10.3 – II – 1-1.3), you will be able to see your video within the
360º view on the mobile app.

Chapter 10 – VR
94
Sound Particles VR Client App – 360º Video running in-app with Dual View
TIP: If you have a pair of VR googles, you can place your device on them and use that to
control the device around with your head. Combining with your headphones connected
to your computer, you will then experience your project in a full 360º experience.
II. Desktop App
On the VR Client inspector, use the “Headset” panel to control the headset or to get information
from it.
VR Headset Info Panel

Chapter 10 – VR
95
1. Video File
This shows the current status of the video file on the smartphone:
1.1. None - the current project doesn't have a video track.
1.2. OK - the video is loaded on the VR client.
1.3. Uploading - the video is being uploaded at the moment.
1.4. Missing - the video is not loaded on the VR client (cancelled upload,
deleted cache, etc.).
TIP: If “Missing”, use the Upload button (next to it) to re-upload the video.
2. Upload Video/ Cancel Upload - use this button to re-upload the video file or
to cancel the current upload.
Note: These buttons only appear if you have a video file that, by some reason, was not
uploaded automatically (cancelled upload, deleted cache, etc.) or during the upload
process, respectively.
3. Used Storage - all video files are uploaded to the smartphone, and stored in a
cache directory.
TIP: This allows you to see the amount of storage currently in use by the VR Client.
4. Clear Cache - use this button to remove all video files from VR client cache folder.
TIP: The contents of the cache folder of the smartphone can also be deleted by the
smartphone system, if storage is required for other apps/system.
5. View Mode (mobile app) - use this pop-up button to select between:
5.1. Single View - a single, full screen view of the world.
5.2. Headset View (stereo) - a dual view (one for each eye).
TIP 1: Use “Single View” when using the VR client without a headset (e.g.
holding the phone on your hand).
TIP 2: Use “Headset View (stereo)” when using the VR client with a
headset.

Chapter 10 – VR
96
6. Yaw/Pitch/Roll - you can see the Yaw (azimuth), Pitch (elevation) and Roll angles of
the head position of the VR headset.
7. "Head" (button) - force the system to use the home position (0,0,0) instead of the
current VR position.
8. "Lock" (button) - force the system to maintain the last VR position.

Chapter 11 – CGI Import
97
Chapter 11
CGI Import A newcomer to Sound Particles 2.0, now it’s possible to import CGI animation files to Sound
Particles.
With this new feature, you can select any 3D Model of the scene, or even only a section of the
model (e.g.: a wing of an airplane), to be transformed into any particle objects, and you can also
import the scene’s Cameras as microphones. All of this process will then import every inherent
automation(s) that every object had when animated originally.
This feature, combined with the Video Import, can help you in working on your animation
projects much more efficiently, as you won’t need to manually create and automate the
particles over a 2D Video Reference.
Note: Only FBX files are accepted.

Chapter 11 – CGI Import
98
11.1. Import CGI Window
You can start the CGI Import process by going to “File -> Import -> Import CGI…” on the top
Menu Bar, opening the CGI Import window with information regarding your file and how to
import it.
Import CGI window
1. Mesh List - a list of all the meshes of the selected FBX file.
TIP: you can filter this list by using the buttons on point 3
2. Search Bar - a search bar that allows you to find objects faster by writing down
keywords or part of keywords.
3. List Filters – this are the filters for the object list, only showing objects that
correspond to the respective selected filter(s):
3.1. Cameras
3.2. Objects
3.3. Lights
3.4. Null Objects
4. File Info – information regarding the FBX file, containing its: filename; path on the
computer; duration and frame rate.

Chapter 11 – CGI Import
99
5. Measurement Units – the unit of measurement at which the original ones will be
transformed into when put on the project scene.
TIP: for example, if you worked with an object with 10 meters of length, and
choose “Inches”, it will turn its length, on the Sound Particles scene, to 10 inches.
6. Name – the name given to the selected object when imported.
7. Import as & Single/Multiple Point – select what kind of particle object you want the
selected model to become when select what kind of particle object you want the
selected model to become when imported:
7.1. Audio Track – one single Audio Track point that only plays one audio file.
7.2. Particle Group – a single point or multiple points Particle Group.
TIP: working with a single point Particle Group is ideal for you to try out different
configurations over time over the Group, as with different forms, modifiers, etc.)
7.3. Particle Emitter – a single or multiple points that have emitters that spawn
particles.
You will then be able to select if you want to only have a Single Point or Multiple
Points assigned to the model:
7.4. Single Point – only one point is created within the model. You then can edit its
Offset from the center of the model itself, distributing it through the XYZ axis.
7.5. Multiple Point – here, you will create various points (particles) through the 3D
model, and you can select how you want the points distribution to be:
Note: Single Point is the default mode when importing as an Audio Track.
Note: the “Single/Multiple Points” only appear when Particle Group or Emitter
are selected.

Chapter 11 – CGI Import
100
8. Include Children – check this box if you also want to import any children that a
currently selected mesh has.
TIP: you can see that a mesh has children if there’s a triangle at the left of its
name on the Mesh List
9. Parameters – for each Single/Multiple Points mode, each will display its own set of
parameters to edit:
9.1. Single Point – in Single Point mode, you can edit the Offset of the respective
point, changing where the object is placed within the 3D model when imported
to the scene.
9.2. Multiple Point – in Multiple Point mode, you can work within two Convert
Methods:
9.2.1. Use Vertices as particles – choose the number of particles that will be
created for each available vertex on that model.
9.2.2. Random points in mesh lines – choose how much particles per mesh line
(between two vertices) you want to be created.
10. Add/Remove/Update Mesh – these buttons allow you to interact with the
placement of meshes on the “To import” list (#13).
10.1. Add to list – add the current selected meshed to the “To import” list. 10.2. Remove – remove the selected mesh of the “To Import” list.
10.3. Update – if you need to change anything on a mesh you’ve already placed on
“To Import”, just select it there, do the changes, and click on this button.
11. Mesh View – allows you to see the selected mesh within the different 3D
perspectives (see Chapter 3, Sector 3.2). It works as a regular View, allowing you to
move around, zoom, rotate, and also allows to maximize the View for a better
insight.
Note: the number of particles per vertex will be divide with the total number
of vertices, also meaning that the maximum number of particles per vertex
that you can choose is equal to the total number of vertices.

Chapter 11 – CGI Import
101
12. View Controls – these elements allow you to configure how the Mesh View is
presented:
12.1. Top parent – shows the selected mesh in yellow within its top-parent mesh
(the furthest mesh without a parent).
12.2. Show box – shows the box of the volume/area occupied by the mesh.
TIP: the box margins correspond to the Single Point Offset limits, giving
you a better insight on where and how further the point was/can be
moved.
12.3. Mesh Opacity (slider) – this slider allows you to adjust the opacity of the mesh
on the View.
TIP: different opacities may work differently from monitor to monitor, so,
level it out until you reach a comfortable state.
12.4. Pause/Play – this button allows to stop/resume the camera rotation around
the mesh on the Mesh View.
13. Items to Import – this list includes all the meshes that you previously edited and
will import to the scene.
14. Import All – a shortcut to add all the FBX meshes and objects to the “Items to
Import” window.
15. Cancel/OK – cancel the import/import the “Items to Import” objects.

Chapter 12 – I/O
102
Chapter 12
I/O The I/O menu allows you to manage configurations and modes related to your
connected/available output(s).
12.1 Hardware
With this panel, you can select which and how your output is configured, also displaying visual
information on the volume coming out through your output.
I/O Hardware Panel
1. Audio API/ Engine - a list of the available audio APIs/engines of your computer.
Chapter 12 – I/O
103
2. Audio Interface - a list of the available audio interfaces of your computer (including
the number of output channels of each device).
TIP: You can choose the interface that you want to use with your projects.
Note: If you have an Avid interface, make sure Pro Tools is closed before launching
Sound Particles.
3. Sample Rate (hardware) - shows the sample rate used by the selected audio
interface.
Note: The audio interface may use a sample rate that is different from the sample rate
of your project. If that is the case, Sound Particles will automatically resample the output
audio streams before sending them to the outputs.
4. Buffer Size – since the CPU cannot be interrupted to process each sample, the
audio interface will group as many samples together to be processed as a block.
Note: The higher the block size, the lower the risk of getting audio glitches or similar
issues. The only downside is that higher block sizes will had a higher latency, shown in
milliseconds (but which is not an issue with Sound Particles, since it doesn’t not process
input hardware audio).
5. Volume - the volume of the hardware output.
Note: This doesn't affect the audio that is saved on file - it only affects the listened audio
that you output on the audio interface.
6. VU Meters - a visual representation of the output signal on each hardware output.
TIP: You may reset them by clicking on top of them, or right-click and choose "Clear clip
light".

Chapter 12 – I/O
104
Note: A red clipping indicator light will appear each time a clipping situation exists.
12.2 Preview Audio
Sometimes you need to preview some audio material: listen to a file before importing it,
listening a specific file you have already imported, listening to template audio (original vs.
template). This panel allow you to config how do you want to route that audio into your audio
hardware: which output channels to use and their volume.
I/O Preview Audio Panel
1. Volume - Applies some volume to the preview audio, which could be useful if you
are working on a dubbing stage, and you don't want to listen to full scale audio
material.
2. Left/Right - Which hardware channel do you want to use for audio output (left and
right channels)?
Note: As mentioned before, these channels will only be used for previewing (any
playback outside the main time editor.

Chapter 12 – I/O
105
12.3 Binaural
If you are using headphones, you can use binaural audio to simulate 3D sound over
headphones.
Note: only effective for Ambisonics or multichannel virtual microphones.
I/O Binaural Setup Panel
1. Enable Binaural Audio - activates the binaural audio output, and disables the
regular audio output, sending audio only in 2 channels.
2. Dataset/Subject - Sound Particles has several HRTF datasets, and each dataset
includes measurements for several individuals or manikins.
TIP: Since each person has different ears, test between different datasets and subjects,
until you find the one that feels more natural to you.
3. Left/Right - which hardware channel do you want to use for audio output (left and
right channels)?

Chapter 13 – Project Settings
106
Chapter 13
Project Settings On the Project Settings, you can configure certain aspects regarding your project(s), from what
is saved on the “Save” file, what is the project sample rate and the physical behavior of sound
in your scene.
13.1 Project Settings - Project File
What do you want to include on your project file?
Project File Panel
1. Include Rendered Audio - by default, this feature is enabled, which means that all
rendered audio is stored on the project file.
TIP: If you disable this, the saved file will be smaller, but you will need to re-render the
project again to be able to listen to it.
2. Include Original Audio Files - by default, this feature is disabled, which means that
your project file will only save the file locations of each original audio file (the files
you use to assign audio to the particles).

Chapter 13 – Project Settings
107
TIP: by enabling it, you add all input audio files on the saved file, increasing its size, but
allowing you to easily move the project to another computer without worrying about file
locations.
13.2 Sample Rate
The sample rate of your project will define the sample rate of your final render.
Note: Any input audio file that presents a different sample rate, will be automatically
resampled (done in memory – Sound Particles never changes the content of input audio
files).
TIP: Take into consideration that as you increase the sample rate value, you also
increase the render complexity – doubling a sample rate value will double the time
needed to render the project.
Project Sample Rate Panel
1. Render - choose the sample rate of your final render.
The following choices are available:
1.1. 44 100 Hz
1.2. 48 000 Hz
1.3. 88 200 Hz
1.4. 96 000 Hz
1.5. 192 000 Hz
1.6. Custom

Chapter 13 – Project Settings
108
Note 1: The default value is 48 000 Hz.
Note 2: If there is a difference (sample rate of the render vs. sample rate of the
hardware), the system will automatically resample the output audio streams before
sending them to the audio hardware.
2. Hardware - this label allows you to see what the current sample rate of your
hardware, which could be different from the sample rate of your project (render).
TIP: For instance, you may work on a 192 kHz project, but with an audio interface that
only supports up to 96 kHz.
3. Custom - besides the standard sample rate values, you can use a custom sample
rate value.
Note: This field only appears when the user selects “Custom” from the sample rate
popup menu.
13.3 Sound Propagation
These settings will define the behavior of sound propagation between the particles and the
virtual microphones.
Project Sound Propagation Panel

Chapter 13 – Project Settings
109
1. Air Delay - sound takes some time to travel between points.
TIP 1: A checked value (blue light) will add some delay between the moment the
particle starts to reproduce sound and the moment that sound is captured by the virtual
microphone (the amount of delay depends on the distance between the particle and the
microphone).
TIP 2: An unchecked value (black) will consider an instantaneous traveling between particles and microphones. Eventually, you may uncheck this, if you have particles at
different distances from the microphone that you want to capture perfectly in sync.
Note: The default value is checked.
2. Speed of Sound - the speed of sound slightly depends on the temperature and it
usually varies between 330 and 340 meters per second.
TIP: You can specify a different speed value for any creative reasons.
Note 1: The default value is 340 m/s.
Note 2: This parameter only appears if the “Air Delay” is checked.
3. Distance Attenuation - sound suffers attenuation as it travels through the air.
TIP 1: If checked (blue light), the distance between the particle and the microphone will control the amount of the attenuation applied to the sound.
TIP 2: If unchecked (black), the distance will not affect the attenuation of sound.
Consider disabling this, if you want all particles to reach the microphone with the same
strength, regardless of its distance.
Note: The default value is checked.

Chapter 13 – Project Settings
110
4. Attenuation - what is the amount of dB attenuation that is applied to the sound as
the distance doubles?
Note 1: This is a very important parameter, as it controls the relation between the
foreground sounds (near the microphone) and the background sounds (further away),
acting almost like a depth-of-field parameter.
TIP 1: For instance, a 6 dB attenuation means that a particle located at 8 meters from
the microphone will have a sound 6 dB weaker when compared with a 4 meter distance,
or a 12 dB weaker when compared with a 2 meter distance, or 18dB weaker when
compared with a 1 meter distance.
TIP 2: Increase this value if you want to attenuate the background (distant) sounds,
or decrease this value (near zero) if you want to increase the impact of the
background (distant) sounds.
Note 2: The default value is +4.5 dB.
Note 3: This parameter only appears if the “Distance Attenuation” is checked.
5. Min. Distance - As you decrease the distance between the particle and the
microphone, the intensity of the captured sound increases. As the distance value
gets near a zero value, the increase of intensity gets near infinity, which will create
problems. Even with the normalization process that prevents clipping, such increase
of intensity will result in full attenuation of all other sounds.
To prevent strange results, this “minimum distance” parameter exists – if the
distance between the particle and the microphone reaches a value that is lower
than this “min. distance”, the render process will not continue to increase its
strength.
Note 1: The default value is 0.1 meter.
Note 2: This parameter only appears if the “Distance Attenuation” is checked.

Chapter 13 – Project Settings
111
6. Within - if the distance between the particle and the microphone reaches the “min.
distance” value, you can specify 2 possible behaviors:
6.1. Consider Min. Distance: the render engine will use the “min. distance”
value (instead of the actual distance) to calculate the gain/attenuation of
its signal.
6.2. Mute Particle: the render engine will mute the particle, as long the
particle is within the min. distance.
Note 1: The default value is “Consider Min. Distance”.
Note 2: This parameter only appears if the “Distance Attenuation” is checked.
7. Doppler - changes of movement between the sound source and the listener result in
frequency changes. This is called the “Doppler effect”, and it is the responsible for
the passing-by type of sound.
TIP 1: If checked (blue light), the render will take movement into consideration,
applying the corresponding Doppler effect on the output result.
TIP 2: If unchecked (black), no audio changes occur due to movement between
particles and microphones (the original delay on the start of sound reproduction by the
particle will continue during the entire life of the particle). You may want to uncheck this,
if you don’t want pitch variations due to movement (for instance, flying violins that don’t
have their pitch changed due to movement).
Note: The default value is checked.
13.4 Reset
Press the “Reset Settings” button to reset the project settings to their default values.
Project Settings Reset

Chapter 14 – Preferences
112
Chapter 14
Preferences On the Preferences, you can find mostly Graphical User Interface (GUI) and User Experience
(UX) related configurations, such as the units of measurement, Views and particles sizes,
window color and resizing memory, and more. Also, preferences for your Render processes are
also available
14.1 Render
Preferences regarding the render process.
Note: This will be the first window to appear when you open the Preferences for the first
time, so, some common items throughout the preferences will be reference ahead.
Render Preferences

Chapter 14 – Preferences
113
1. Navigation Panel – navigate through the different Preferences categories.
2. Rendering Engine - currently, only the CPU can be used for rendering audio. In the
future, other devices could be added (GPU, DSP, etc.).
3. Normalize Level - Sound Particles requires a very high dynamic range, since it could
be used for capturing the sound of a near explosion or a faraway whisper. As such,
a normalization process is implemented on the end of the render process.
Note: This value defines the maximum peak value of the final result.
4. Reset – resets ALL the preferences, including the ones not visible on the current
panel.
14.2 Units
You can choose your favorite units to work with, which will be used to present the values to
you.
TIP: Nevertheless, all other units are still valid when entering values, as long you specify
the unit itself (e.g. “2 km”; “10ft”).
Units Settings
1. Time: Unit used to specify time. The available units are:
1.1. Second (s)
1.2. Millisecond (ms)

Chapter 14 – Preferences
114
Note: The default value is “Second”.
2. Length: unit used to specify length (distances, positions, etc.).
The available units are:
2.1. Meter (m)
2.2. Millimeter (mm)
2.3. Kilometer (km)
2.4. Inch (in)
2.5. Foot (ft)
2.6. Yard (yd)
2.7. Mile (mi)
Note: The default value is “Meter”.
3. Angle: unit used to specify angles.
The available units are:
3.1. Degree (°)
3.2. Radian (rad)
3.3. Pi radian (π rad)
3.4. Rotation (rot) * * One rotation equals to 360°, i.e., a full turn.
Note: The default value is “Degree”.
4. Velocity: unit used to specify velocity.
The available units are:
4.1. Meter/second (m/s)
4.2. Kilometer/hour (km/h)
4.3. Inch/second (in/s)
4.4. Foot/second (ft/s)
4.5. Yard/second (yd/s)
4.6. Mile/Hour (mi/h)
Note: The default value is “Meter/Second”.

Chapter 14 – Preferences
115
5. Angular Velocity: unit used to specify angular velocity.
The available units are:
5.1. Degree/second (°/s)
5.2. Degree/hour (°/h)
5.3. Radian/second (rad/s)
5.4. Radian/hour (rad/h)
5.5. Pi radian/second (π rad/s)
5.6. Pi radian/hour (π rad/h)
5.7. Hertz (Hz) *
5.8. Rotation/second (rot/s) *
5.9. Rotation/minute (rpm) * Both "Hertz" and "Rotation/second" correspond to the same numeric
values. The difference it's only a matter of unit.
Note: The default value is “Degree/Second”.
6. Acceleration: unit used to specify acceleration.
The available units are: 6.1. Meter/second² (m/s²)
6.2. G (G)
6.3. Foot/second² (ft/s²)
Note: The default value is “Meter/Second2”.
7. Angular Acceleration: unit used to specify angular acceleration.
The available units are:
7.1. Degree/second² (°/s²)
7.2. Radian/second² (rad/s²)
7.3. Pi radian/second² (π rad/s²)
Note: The default value is “Degree/Second2”.

Chapter 14 – Preferences
116
14.3 GUI
In here, you can change your preferences regarding the Graphical User Interface (GUI).
Note: None of these settings have impact on the audio.
GUI Settings
1. GUI Brightness - you can use this slider to control the brightness of the Graphical
User Interface, making it darker or lighter.
2. 3D View - Particle Size - the size, in pixels, of each particle, within the 3D views.
TIP: You can specify a different value for the 360º/VR views.
Note 1: Greatly increasing the size of particles may affect their shape depending on the
machine specifications and operating system.
Note 2: The default value is 1px; 2px for 360ª/VR.
3. 3D View - Particle size depends on depth - within the 360º/VR views, instead of a
fixed particle size, you can enable this checkbox to have a better representation of
depth.

Chapter 14 – Preferences
117
TIP: When enabled, the visual size of each particle will depend on the distance to the
origin (depth) - closer particles will be bigger, and distant particles will be smaller.
Note: The default value is disable.
4. Edit Points using azimuth/elevation/distance coord. - by default, you specify
points using a XYZ coordinate system (left/right, front/back, top/down). By activating
this checkbox, you use spherical coordinates instead: Azimuth, Elevation and
Distance.
TIP: Azimuth represents the angle on the horizontal plane; Elevation represents the
angle on the vertical plane; Distance represents the distance between the point and the
origin (0,0,0).
Note: The default value is disable.
5. Remember Window Sizes - by enabling the "Remember Window Sizes", each time
you resize a window, Sound Particles will remember the new window size and apply
it when you create new projects, allowing the windows of the new projects to use a
similar size.
Note: The default value is enabled.
6. Show Tooltips - With this option activated, tooltips will appear after a while after
you place your mouse cursor on top of certain visual elements (buttons, text fields,
checkboxes, etc.), giving a short description of the effect of the respective element.
Note: The default value is enabled.

Chapter 14 – Preferences
118
7. Maximum decimal places – allows you to select how many decimal places are to be
visible on decimal numbers
Note: this will not affect the precision of inputted values with more decimal places than
the ones defined on this parameter, only rounding them up to the respective maximum
visible decimal places.
14.4 VR
Here, you can change your preferences regarding the Virtual Reality 3D view, a special view
(like Top or Perspective) that allow you to see a 360° video as a desktop VR image.
Note: None of these settings have impact on the audio.
VR Settings
1. Show Grid - if enabled, Sound Particles will draw a grid on top of the video image
on the VR 3D view.
Note: The default value is enable.
2. Show Particles - if enabled, Sound Particles will draw particles and microphones on
top of the video image on the VR 3D view.
Note: The default value is enable.

Chapter 15 – Other Features
119
Chapter 15
Other Features 15.1 Track Presets
With Track Presets, you can instantly apply a preset to a track, while maintaining its audio files,
allowing you to easily tests different parameters and exploring new possibilities for your audio
material.
You can create presets from the following objects:
• Audio Tracks
• Particle Groups
• Particle Emitters
• Microphones
15.1.1 Applying Track Presets There are two ways that you can load a Track Preset:
• Apply a preset to an existent track: by opening the context menu (secondary mouse
button) over one track, you can apply a compatible preset for that same track by
selecting on “Apply Track Preset”, overriding the previous one with the new preset.
Note: you can only see and apply presets over compatible tracks, meaning that you will
only be able to apply Audio/Particle Presets over Audio Tracks, Particle Groups and
Particle Emitters tracks, and apply Microphone Presets over Microphone tracks

Chapter 15 – Other Features
120
“From Presets” menu located on the Add menu of the Transportwewew
• Creating a new track based on a preset: on the Add (+) menu of the Transport, you
have the “From Presets” menu that allows you to add a new, single Audio/Particles or
Microphone preseted tracks.
“From Presets” menu located on the Add menu of the Transport
TIP: Several Track Presets are available on the software by default, both from tracks of
the Project Templates and also newly customized ones.

Chapter 15 – Other Features
121
15.1.2 Saving Track Presets
To save a track preset, you can click over it with your secondary mouse button, and then
clicking “Save as Track Preset…”, opening then the “Save Preset” window on top of your project
window (you can also open the window by going on the “Track” menu, above on the Menu Bar,
and activate the same option).
Save Track Preset window
On the window, you can define the Preset Name and clicking “OK” to complete its saving.
Note 1: The Preset Name will NOT affect the track’s saved Description and vice-versa.
Note 2: Currently, it’s not possible to delete a preset or overwrite one over another with
the same name, displaying the respective warning message. If you intend to delete an
existent present, go to “~/Library/Application Support/Sound Particles/Sound Particles”
on MacOS or C:\Users\[Username]\AppData\Roaming\Sound Particles\Sound Particles
on Windows, and delete the intended presets on the “TrackGroupTemplates” or
“TrackMicTemplates” folders.
15.2 Batch Processing
The Batch Processing feature allows you to automatically generate multiple renders using
different audio material, which can be used to achieve
• Create 50 variations of the same sound.
• Render the same project using a different original sound for each project.
• Render the same project using different groups of sounds, organized in different
folders.

Chapter 15 – Other Features
122
• All the above together.
In terms of workflow, for the current project:
1. You select the input folder, making a different render for each sound or for each sub-
folder of sounds.
2. Eventually re-render the same project more than once, recreating new particles in
each render, to obtain different audio “takes”.
3. Exporting all the audio files to specific folder with additional suffixes.
Batch Processing
1. Audio Material Source – select how you want the Batch Processing to place audio
onto the project or track(s). You can opt for several options:
1.1. Use existing audio material from project – each render process utilizes the
already imported audio files on each available track.
1.2. Import new audio material on track # x (“[Name of track]”) – new files from
the Input Folder will be imported to the selected track.

Chapter 15 – Other Features
123
TIP: if your project has more than 1 track, you can individually select which track you
want to be processed with the new audio.
Note: a path from your computer/network must be defined to use this option.
1.3. Import new audio material on all tracks – all the tracks from your project will
have every audio file from the Input Folder imported to them and then
subsequently rendered with those files.
Note 1: this option is only available when your project has more than 1 track.
Note 2: a path from your computer/network must be defined to use this option.
2. Input Folder – the path of the folder that contains the audio file(s) and/or sub-
folder(s) you want to use on the runs.
Note 1: For every file or sub-folder that exists on the selected Input Folder, the software
will count each one for every run, as shown on the “Number of Audio Files Sets”.
WARNING: The Input Folder cannot be the same one as the Output Folder.
TIP: You can either manually write down the path or you can use the “Browse” button to
use the file explorer.
3. Non-Mono Audio Files – select how you want the software to import non-mono
audio files (e.g.: Stereo, 5.1, etc.). You can select from:
3.1. Use only the Left channel – only imports the Left channel of the audio
file(s).
3.2. Use only the Right channel – only imports the Right channel of the audio
file(s).
3.3. Convert to Mono – mixes and imports all the channels of the audio file(s)
into a Mono audio stream.

Chapter 15 – Other Features
124
3.4. Use all channels as different streams – imports all of the channels of the
audio file(s) into different streams.
4. Number of Audio Files Sets – displays the number of the audio file sets (audio files
+ sub-folders) to be used on the Batch’s runs.
5. Recreate particles for each run – activating this option makes that, for every
executed run, all the particles Groups/Emitters will be recreated.
TIP: Using this option allows for more diverse renders between the imported audio
file(s)/sub-folder(s).
6. Number of runs – how many runs you want the software to run for each imported
audio file/sub-folder.
Note: this parameter is only enabled if “Recreate particles for each run” is enabled.
7. Total Render Jobs – the total number of renders of the executed Batch (Number of
Audio File Sets x Number of runs).
8. Output Folder – the folder where the runs will be exported to.
TIP: You can either manually write down the path or you can use the “Browse” button to
use the file explorer.
Note: The Output Folder cannot be the same one as the Input Folder.
9. Add suffix to exported files – if enabled, you can write down a suffix to be added
to the exported file’s name.
10. Save a copy of each project file – if enabled, for every executed run, its respective
project file will be saved alongside it.
11. Save one audio file with all renders – if enabled, this will save all the renders into a
single file. If disabled, each render will be saved into its own file.
12. Export Audio Settings – opens the “Export Audio” window, allowing you to
configure the export parameters of each microphone (see Chapter 8, section 8.1).

Chapter 15 – Other Features
125
13. Metadata Settings – opens the “Metadata” window, allowing you to edit the
respective Metadata information of the save files (see Chapter 8, section 8.1.1).
Note: This button will become disabled if you select “FLAC” or “AIFF” as “File Format” on
the “Export Audio Settings” window.
14. Cancel – cancels the Batch Processing and closes its window.
15. Run Batch – runs the Batch with the defined configurations.
15.3 User Project Templates
It is possible for you to save a project as a Project Template, adding it to the Project Templates
list, allowing you to reuse when needed for future projects.
15.3.1 Creating a Project Template
You can start creating your Project by going on the “File” menu, of the Menu Bar, and clicking
“Save as Template…”.
“Save as Template” location on the Menu Bar

Chapter 15 – Other Features
126
The “Save as Template” window will then appear:
“Save as Template” window
1. Template Name – the name of your Project Template.
Note: You cannot create a Template with the same name as of another one already
existent.
2. Include existing microphones in the template – if enabled, the microphones of your
project will be included on the saved template, being present on it when opening.
3. Include existing audio files in the template – saves the imported audio of your
project into the template, meaning that the next time you load the template, the
respective audio files will already be present on their assigned tracks.
4. Cancel – cancels the template creation.
5. OK – creates the User Template with the respective configurations on the Project
Template’s list on the “New Project” window.

Chapter 15 – Other Features
127
15.3.2 Loading a Project Template To create a new project using one User Project Template, you can find the create User
Templates created at the bottom of the Project Templates list of the “New Project” window
The User Templates location on the “New Project” window
Note: it’s not possible to select a Microphone Type when opening a User Template, even
if the “Include existing microphones in the template” option, upon saving, was
deactivated
15.4 Slider Controls
You can control certain parameters with a Slider Control, allowing you to easily achieve an
intended value more rapidly.
You can use certain key combinations alongside a mouse click to achieve certain effects when
controlling a slider:
• Alt + Primary Mouse Button: resets the parameter value and places the slider
accordingly.
• Ctrl + Primary Mouse Button: makes the slider move slower, allowing you to pick a
value more precisely.
• Shift + Primary Mouse Button: only available for parameters with a Degree unit, this
allows you to instantly loop its value around when one of the tips is reached.

Chapter 16 – Shortcuts
128
Chapter 16
Shortcuts
16.1 Views Navigation
3D Navigation Mac Windows
Translate View Mouse Drag Mouse Drag
Zoom View Ctrl + Mouse Drag Ctrl + Mouse Drag
Rotate View ⌥ + Mouse Drag Alt + Mouse Drag
16.2 Time Editor
Tracks Mac Windows
Duplicate Track ⌘ + D Ctrl+ D
Automation Mac Windows
Create Keyframe Double Click on Line Double Click on Line
Add/Remove Keyframe to Selection ⌘+ Primary Mouse Button (on keyframe)
Ctrl+ Primary Mouse Button (on keyframe)
Drag Keyframe(s) Shift + Primary Mouse Button (drag)
Shift + Primary Mouse Button (drag)
Drag Keyframe(s) Horizontally Shift + Alt + Primary Mouse Button (drag)
Shift + Alt + Primary Mouse Button (drag)
Drag Keyframe(s) Vertically Shift + ⌘+ Primary Mouse Button (drag)
Shift + Ctrl+ Primary Mouse Button (drag)
Zoom Mac Windows
Zoom+ Horizontally + +
Zoom- Horizontally - -
Zoom+ Vertically ⌘ + Ctrl+
Zoom- Vertically ⌘ - Ctrl -
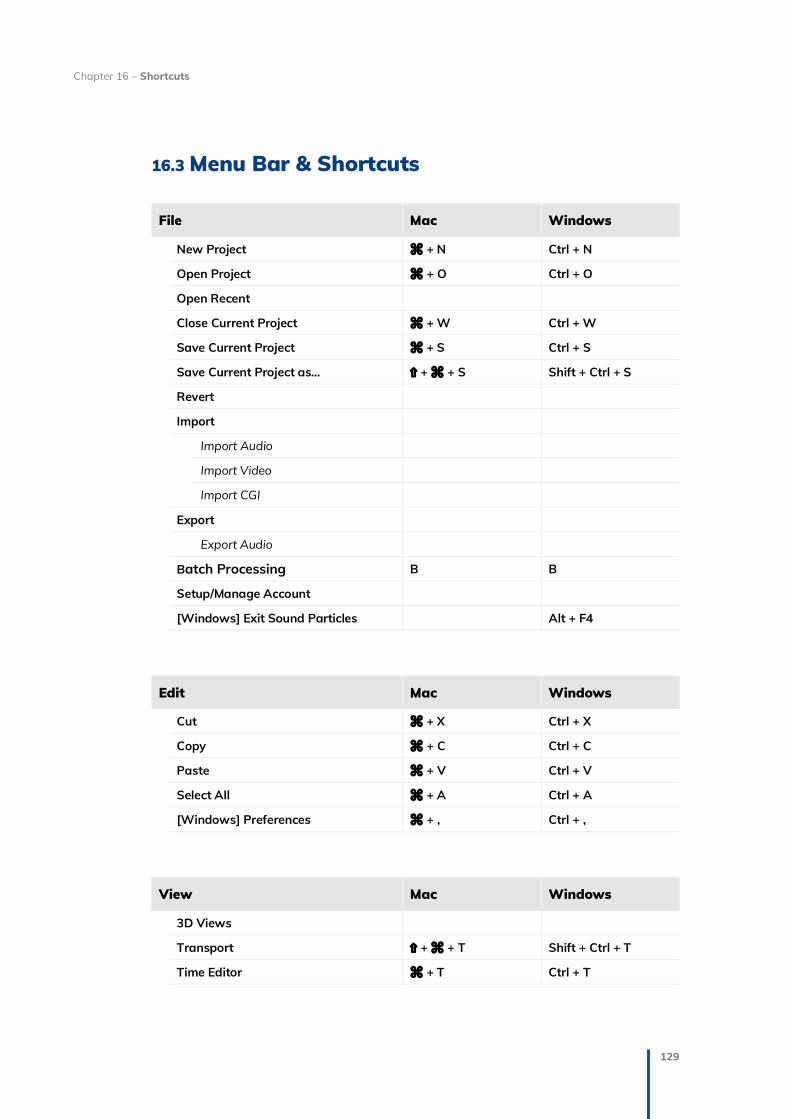
Chapter 16 – Shortcuts
129
16.3 Menu Bar & Shortcuts
File Mac Windows
New Project ⌘ + N Ctrl + N
Open Project ⌘ + O Ctrl + O
Open Recent
Close Current Project ⌘ + W Ctrl + W
Save Current Project ⌘ + S Ctrl + S
Save Current Project as… ⇧ + ⌘ + S Shift + Ctrl + S
Revert
Import
Import Audio
Import Video
Import CGI
Export
Export Audio
Batch Processing B B
Setup/Manage Account
[Windows] Exit Sound Particles Alt + F4
Edit Mac Windows
Cut ⌘ + X Ctrl + X
Copy ⌘ + C Ctrl + C
Paste ⌘ + V Ctrl + V
Select All ⌘ + A Ctrl + A
[Windows] Preferences ⌘ + , Ctrl + ,
View Mac Windows
3D Views
Transport ⇧ + ⌘ + T Shift + Ctrl + T
Time Editor ⌘ + T Ctrl + T

Chapter 16 – Shortcuts
130
Inspector ⌘ + I Ctrl + I
Single View Q Q
Dual View W W
Left View
Top View 1 1
Front View 2 2
Left View 3 3
Right View 4 4
Perspective View 5 5
Video View 6 6
360º View 7 7
VR View 8 8
Maximize 0 0
Right View
Top View ⌘ + 1 Ctrl + 1
Front View ⌘ + 2 Ctrl + 2
Left View ⌘ + 3 Ctrl + 3
Right View ⌘ + 4 Ctrl + 4
Perspective View ⌘ + 5 Ctrl + 5
Video View ⌘ + 6 Ctrl + 6
360º View ⌘ + 7 Ctrl + 7
VR View ⌘+ 8 Ctrl + 8
Maximize ⌘ + 0 Ctrl + 0
Autofit (3D Views) F F
Enter Full Screen ⌘ + F Ctrl + F
Project Mac Windows
Render R R
Clear Render ⌘ + Ctrl + Backspace
Recreate All Particles ⇧ + V Shift + V
Add
Audio Track ⌥+ 1 Alt + 1
Particles Group ⌥+ 2 Alt + 2

Chapter 16 – Shortcuts
131
Particles Emitter ⌥+ 3 Alt + 3
Microphone ⌥+ 4 Alt + 4
Video Reference
Project Settings S S
Track Mac Windows
Multichannel Setup
Normalize Mic ⌥ + ⇧ + N Shift + Alt + N
Normalize All Mics ⇧ + N Alt + N
Recreate Particles V V
Color
Stems
Capture All
Capture None
Add
Add…
Add Impulse
Remove
Duplicate ⌘ + D Ctrl + D
Delete Backspace
3D Manipulator M M
Playback Mac Windows
Play Space Space
Reset Position ⇧ + ← Shift + ←
Rewind ⌘ + ← Ctrl + ←
Forward ⌘ + → Ctrl + →
I/O

Chapter 16 – Shortcuts
132
Window Mac Windows
Minimize ⌘ + M Ctrl + M
Zoom
Miscellaneous Mac Windows
Preferences ⌘ + , Ctrl + ,
Hide Sound Particles ⌘ + H
Hide Others ⌥ + ⌘ + H
Quit Sound Particles ⌘ + Q
Exit Alt + F4

EULA
133
EULA
END USER LICENSE AGREEMENT OF SOUND PARTICLES – DECEMBER 2018
I. GENERAL
The following End User License Agreement ("EULA") represents an agreement between you ("Licensee") and “Sound Particles, Lda.”, with head office at IDD, Rua da carvalha, 570, 2400-441 Leiria, Portugal (hereinafter “Sound Particles”) for the use of software including related media documentation (for example, program descriptions and manuals) and other documents and materials manufactured by Sound Particles (the “Product(s)"). By installing the software on your computer, you declare yourself in agreement with these conditions. If you do not agree with these conditions, you must not install the software or use it.
II. SCOPE OF USE
The Products are intellectual property of Sound Particles and are protected by law. Licensee, as purchaser of the Products, acquires only a limited, non-exclusive and non-transferable license to use, personally or professionally, the Products. Any other use or exploitation not explicitly granted to Licensee in this EULA shall not be allowed without prior written consent from Sound Particles. Specifically, Licensee is not entitled to copy, decompile, reverse engineer the Product or parts thereof, create derivative works from the Products or sublicense or provide the Products as “software as a service”. Licensee must ensure by appropriate and reasonable steps that third parties, including its own employees, cannot make unauthorized use of the Product. Licensee shall be liable to Sound Particles for any loss or damage in this context. The Software is being licensed to you and you hereby acknowledge that no title or ownership in the Software is being transferred or assigned and this EULA is not to be construed as a sale of any rights in the Software. Sound Particles retains all right, title and interest in the Products, including, but not limited to, all copyrights, trademarks, trade secrets, trade names, proprietary rights, patents, titles, computer codes, audiovisual effects, themes, settings, artwork, sound effects, musical works, and moral rights whether registered or not and all applications thereof. 1. Sound Particles grants Licensee the non-exclusive right without restrictions in time or place to use the Products. Sound Particles is not obliged to disclose the Products’ software underlying source code, including the associated development documentation. 2. Licensee may either:

EULA
134
a) Install and use the licensed Products’ software on several devices (e.g. one laptop, one desktop), provided that the said software is used only by the same single person - Per user licensing. Simultaneous use on more than one hardware device is not permitted. b) Install the licensed Products’ software on a single device, allowing its use by several users on the device (e.g. studio computer) - Per seat licensing.
3. Licensee may copy the licensed Products’ software, only if such reproduction is necessary for the contractually agreed use. Licensee is authorized to create a backup, only if this is necessary to secure the future use. 4. Licensee is not authorized to modify the Products’ software. 5. Licensee shall not attempt to develop any software that contains the “look and feel” of any of the Products’ or is otherwise derivative of its software. 6. Third Parties
a) Renting or lending the licensed Products’ software to a third party is expressly forbidden. Apart from that and if not provided otherwise within this EULA, Licensee may leave the software to a third party for a certain amount of time, if the third party agrees to the terms of this EULA and Licensee does not use the software during this period. b) Except if otherwise stated within this EULA, Licensee may resell the software to a third party or transfer the software permanently free of charge, provided the third party agrees in writing with this EULA and Licensee ceases all use of the software, completely removes all installed copies of the software from its computer and – if the software was not purchased via download – deletes or transfers the original data storage to the third party (if Licensee is not obliged to a longer storage by law). In addition, Licensee is required to de-register the purchased software with Sound Particles. Following respective request from Licensee via its email address registered with Sound Particles, the serial number of the Product will be transferred by Sound Particles to the third party, and at the same time the registration of Licensee for the Product purchased will be deleted. c) Licensee may not (i) distribute, lease, license, sell, rent, lend, convey or otherwise transfer or assign the Products or any copies thereof, (ii) make publicly available or available on a network for use or download by multiple users, (iii) remove, obscure or modify any copyright, trademark or other proprietary rights notices, marks or labels contained on or within the Products, falsify or delete any author attributions, legal notices or other labels of the origin or source of the material
7. In addition, for certain Products from Sound Particles the following shall apply: a) Bundles (product bundles consisting of hardware and software or software-only bundles) can only be resold / transferred as a whole. The individual components of a bundle must not be resold / transferred separately. b) Any Products from Sound Particles labeled or otherwise provided to you as "NFR" (Not For Resale) shall only be used for demonstration, testing and evaluation purposes. NFR Products must not be used for commercial purposes, and must not be resold or transferred. NFR Products are exempt from update, upgrade or crossgrade offers and cannot be purchased with or exchanged for vouchers or coupons. c) Any Products from Sound Particles labeled or otherwise provided to you as an EDU (Educational) version shall only be used by students or those working in educational institutions. This definition includes students, faculty, staff and administration attending and / or working at an educational institutional facility: private / public schools, training facilities,

EULA
135
colleges, universities and similar. EDU Products must not be used for commercial purposes, and must not be resold or transferred. EDU Products are exempt from update, upgrade or crossgrade offers, and cannot be purchased with or exchanged for vouchers or coupons. d) Any Products from Sound Particles labeled or otherwise provided to you as "Demo Versions" or similar, shall only be used for demonstration, testing and evaluation purposes. Demo Versions must not be used for commercial or public purposes, and must not be resold or transferred.
If you are not sure which license type you own – (FULL / NFR / EDU) – please contact our Support Team.
III. THIRD PARTY RIGHTS
Some content included in Sound Particles software Products, as well as any associated intellectual property rights and titles, belongs to third parties. This content may be protected by copyright or other intellectual property laws and treaties and may be subject to terms and conditions from the third party providing the content.
IV. DUTIES TO PROTECT
Copyright notices, serial numbers and other identification features of the program may not be removed from the software or altered in any way.
V. WARRANTY, LEGAL LIABILITY, DAMAGES
DISCLAIMER OF WARRANTIES: YOU EXPRESSLY ACKNOWLEDGE AND AGREE THAT USE OF THE SOFTWARE IS AT YOUR SOLE RISK AND THAT THE ENTIRE RISK AS TO SATISFACTORY QUALITY, PERFORMANCE, AND ACCURACY IS WITH YOU. TO THE MAXIMUM EXTENT PERMITTED BY APPLICABLE LAW, THE SOFTWARE IS PROVIDED “AS IS,” WITH ALL FAULTS AND WITHOUT WARRANTY OF ANY KIND, AND SOUND PARTICLES HEREBY DISCLAIMS ALL WARRANTIES AND CONDITIONS WITH RESPECT TO THE SOFTWARE PRODUCT, EITHER EXPRESS, IMPLIED OR STATUTORY, INCLUDING, BUT NOT LIMITED TO, THE IMPLIED WARRANTIES AND/OR CONDITIONS OF MERCHANTABILITY, OF SATISFACTORY QUALITY, OF FITNESS FOR A PARTICULAR PURPOSE, OF ACCURACY, OF QUIET ENJOYMENT, AND NON-INFRINGEMENT OF THIRD PARTY RIGHTS. SOUND PARTICLES DOES NOT WARRANT AGAINST INTERFERENCE WITH YOUR ENJOYMENT OF THE SOFTWARE, THAT THE FUNCTIONS CONTAINED IN THE SOFTWARE WILL MEET YOUR REQUIREMENTS, THAT THE OPERATION OF THE SOFTWARE WILL BE UNINTERRUPTED OR ERROR-FREE, OR THAT DEFECTS IN THE SOFTWARE WILL BE
CORRECTED. NO ORAL OR WRITTEN INFORMATION OR ADVICE GIVEN BY SOUND PARTICLES OR A SOUND PARTICLES AUTHORIZED REPRESENTATIVE SHALL CREATE A WARRANTY. SHOULD THE SOFTWARE PROVE DEFECTIVE, SOUND PARTICLES MAY CHOOSE TO REPLACE THE LICENSEE’S COPY OF THE SOFTWARE. SOME JURISDICTIONS DO NOT ALLOW THE EXCLUSION OF IMPLIED WARRANTIES OR LIMITATION ON APPLICABLE STATUTORY RIGHTS OF A CONSUMER, SO THE ABOVE EXCLUSION AND LIMITATIONS MAY NOT APPLY TO YOU. THIS LIMITATION OF WARRANTY SHALL NOT BE APPLICABLE SOLELY TO THE EXTENT THAT ANY SPECIFIC PROVISION OF THIS LIMITATION OF LIABILITY IS PROHIBITED BY ANY LAW, WHICH CANNOT BE PRE-EMPTED.

EULA
136
LIMITATION OF LIABILITY: TO THE MAXIMUM EXTENT PERMITTED BY APPLICABLE LAW, IN NO EVENT SHALL SOUND PARTICLES OR ITS AFFILIATES BE LIABLE FOR ANY SPECIAL, INCIDENTAL, INDIRECT OR CONSEQUENTIAL DAMAGES WHATSOEVER (INCLUDING, WITHOUT LIMITATION, DAMAGES FOR LOSS OF BUSINESS PROFITS, BUSINESS INTERRUPTION, LOSS OF BUSINESS INFORMATION, OR ANY OTHER PECUNIARY LOSS) ARISING OUT OF THE USE OF OR INABILITY TO USE THE SOFTWARE OR DEFECT IN OR CAUSED BY THE SOFTWARE, INCLUDING BUT NOT LIMITED TO COMPROMISING THE SECURITY OF YOUR COMPUTER, OPERATING SYSTEM OR FILES, OR THE PROVISION OF OR FAILURE TO PROVIDE SUPPORT SERVICES, EVEN IF SOUND PARTICLES HAS BEEN ADVISED OF THE POSSIBILITY OF SUCH DAMAGES. IN ANY CASE, SOUND PARTICLES ENTIRE LIABILITY UNDER ANY PROVISION OF THIS EULA SHALL BE LIMITED TO THE AMOUNT ACTUALLY PAID BY YOU FOR THE SOFTWARE OR REPLACEMENT OF THE SOFTWARE WITH PRODUCT OF COMPARABLE RETAIL VALUE, AS SOUND PARTICLES MAY ELECT IN ITS SOLE DISCRETION. IF SOME JURISDICTIONS DO NOT ALLOW THE EXCLUSION OR LIMITATION OF LIABILITY, THE ABOVE LIMITATION MAY NOT APPLY TO YOU IN PART OR WHOLE. THIS LIMITATION OF LIABILITY SHALL NOT BE APPLICABLE SOLELY TO THE EXTENT THAT ANY SPECIFIC PROVISION OF THIS LIMITATION OF LIABILITY IS PROHIBITED BY ANY LAW, WHICH CANNOT BE PRE-EMPTED.
Licensee agrees to indemnify, defend and hold harmless Sound Particles and its affiliates and their respective officers, employees, directors, agents, licensees (excluding you), sublicensees (excluding you), successors and assigns from and against any and all liability, costs, losses, damages, and expenses (including reasonable attorneys’ fees and expenses) arising out of any claim, suit, or cause of action relating to and/or arising from (a) your breach of any term of this EULA; (b) your violation of any rights of any third party; or (c) your use or misuse of the Software. Your indemnification obligations set forth in the immediately preceding sentence shall survive the termination of this EULA.
VI. CLOSING PROVISIONS
1. If any stipulation of this EULA should be or become invalid, either completely or in part, this shall not affect the validity of the remaining stipulations. The parties undertake instead to replace the invalid stipulation with a valid regulation which comes as close as possible to the purpose originally intended. 2. TERMINATION: This EULA will terminate automatically if you fail to comply with its terms and conditions. In such event, you must destroy all copies of the Product and all of its component parts (including the software) and cease and desist from accessing any Products. 3. This Agreement shall be governed and construed by the laws of Portugal. The United Nations Convention for the International Sale of Goods shall not apply. The exclusive place of jurisdiction with respect to all disputes based on or in connection with this Agreement shall be Leiria, Portugal. However, Sound Particles reserves the right to sue Licensee at Licensee's place of residence or place of business.
Should you have any queries concerning this EULA, please write to this address: Sound Particles Lda IDD, Rua da Carvalha, 570 2400-441 Leiria, Portuga

ASIO SDK
137
ASIO SDK
"ASIO is a trademark and software of Steinberg Media Technologies GmbH"

www.soundparticles.com