Sound Bar - Sony
183
HT-Z9F Operating Instructions GB 4-727-538-38(1) Sound Bar The software of this system may be updated in the future. To find out details on any available updates, please visit the following URL. http://www.sony-asia.com/section/support ©2018 Sony Corporation Printed in Malaysia HT-Z9F AR Sound Bar
-
Upload
khangminh22 -
Category
Documents
-
view
5 -
download
0
Transcript of Sound Bar - Sony

HT-Z9F 4-727-538-38(1)
HT-Z9F 4-727-538-36(1)
E:\Works\4727538381\4727538381HTZ9FEA3\00COV-HTZ9FEA3\H1_GB Cov.fm
masterpage:Right
HT-Z9F4-727-538-38(1)
HT-Z9F
Operating Instructions GB
4-727-538-38(1)
Sound Bar
The software of this system may be updated in the future. To find out details on any available updates, please visit the following URL.http://www.sony-asia.com/section/support
©2018 Sony Corporation Printed in Malaysia
HT-Z9F
AR Sound Bar

2GB
Do not install the appliance in a confined space, such as a bookcase or built-in cabinet.
To reduce the risk of fire, do not cover the ventilation opening of the appliance with newspapers, tablecloths, curtains, etc.Do not expose the appliance to naked flame sources (for example, lighted candles).
To reduce the risk of fire or electric shock, do not expose this appliance to dripping or splashing, and do not place objects filled with liquids, such as vases, on the appliance.
The unit is not disconnected from the mains as long as it is connected to the AC outlet, even if the unit itself has been turned off.
As the main plug is used to disconnect the unit from the mains, connect the unit to an easily accessible AC outlet. Should you notice an abnormality in the unit, disconnect the main plug from the AC outlet immediately.
CAUTIONRisk of explosion if the battery is replaced by an incorrect type.Do not expose batteries or appliances with battery-installed to excessiveheat, such as sunshine and fire.
Indoor use only.
Recommended cablesProperly shielded and grounded cables and connectors must be used for connection to host computers and/or peripherals.
For the Bar SpeakerThe nameplate is located on the bottom of the Bar Speaker.
Caution for mounting the Bar Speaker on a wallMake sure to use the supplied wall mounting brackets when mounting the Bar Speaker on a wall.Make sure to use the supplied wall mounting brackets when mounting the Bar Speaker on a wall. Do not mount the Bar Speaker on a wall directly. The temperature inside of the Bar Speaker rises considerably, and it may cause damage or malfunction.
WARNING

GB
Table of ContentsWhat’s in the Box ..........................5What You Can Do with the
System .....................................6Guide to Parts and Controls ..........8About the Home Menu ................ 14
Connecting to a TV or AV Device
Connecting Sony TV with the BLUETOOTH Function Wirelessly .............................. 16
Connecting a TV with an Analog Audio Cable ........................... 19
Connecting a 4K TV and 4K Devices ..................................20
Connecting a TV Compatible with eARC ...................................... 23
Connecting to a NetworkConnecting to a Wired
Network .................................24Connecting to a Wireless
Network ................................. 25
Preparing to Use the SystemMounting the Bar Speaker or Rear
Speaker (not supplied) on a Wall ..................................... 27
Attaching the Grille Frame ..........30Connecting the Subwoofer and Rear
Speakers Wirelessly ..............30When the TV Remote Control does
not Work ................................ 32
Watching ImagesWatching TV ................................ 33Playing the Connected AV
Device .................................... 33
Listening to Music/SoundListening to Music/Sound with the
BLUETOOTH® Function ..........34Listening to Music on a USB
Device ....................................36Listening to Music on your PC via a
Home Network ...................... 37Listening to the Device Connected
with an Analog Audio Cable ......................................38
Using Spotify ................................39Using the MUSIC SERVICE
Button ....................................39Listening to Music of the Streaming
Service by Using Chromecast built-in ...................................40
Using Sony | Music Center .......... 41Connecting the Wireless Multi
Room-Compatible Device (Wireless Multi Room) ........... 41
Listening to Sound of the Connected TV or Device from Headphones ..........................42
Adjusting the Sound QualityEnjoying Immersive Surround
Experience (VERTICAL S.) ......45Setting the Sound Effect that is
Tailored to Sound Sources (Sound Mode) ........................46
Making Dialogs Clearer (VOICE) ................................... 47
Enjoying Clear Sound with Low Volume at Midnight (NIGHT) .................................. 47
Adjusting the Volume of the Subwoofer and Rear Speakers ................................48
Adjusting the Delay Between the Picture and Sound .................49
Connecting to a TV or AV Device with the HDMI Cable
Startup Guide (separate document)
3GB

Playing Compressed Audio Files or CDs by Upscaling to Near Hi-Resolution Sound Quality (DSEE HX) .............................. 50
Enjoying Multiplex Broadcast Sound (AUDIO) ................................. 50
Adjusting the Dialog Volume While the DTS:X Content is Played Back ........................................ 51
Using the Control for HDMI Function
Using the Control for HDMI Function .................................53
Using the “BRAVIA” Sync Function ................................ 55
Changing the SettingsCustomizing the Speaker Settings
for Surround Sound .............. 56Changing the Brightness of the
Front Panel Display and BLUETOOTH Indicator (DIMMER) ...............................57
Saving Power in Standby Mode ..................................... 58
Performing Easy Setup ............... 58Performing Advanced
Settings ................................. 59Updating the Software ............... 64
TroubleshootingTroubleshooting .......................... 66Resetting the System ...................75
Additional InformationSpecifications ...............................76Playable Types of Audio Files ..... 78Supported Input Audio
Formats ..................................79Supported HDMI Video
Formats ................................. 80On BLUETOOTH
Communication .................... 82END USER LICENSE
AGREEMENT .......................... 83Precautions ................................. 87Index .............................................91
4GB

5GB
What’s in the Box• Bar Speaker (1)
• Grille frame (1)
• Subwoofer (1)
• Remote control (1)
• R03 (size AAA) battery (2)
• HDMI cable (supports the specification equal to Premium High Speed HDMI Cable with Ethernet) (1)
• WALL MOUNT TEMPLATE (1)
• Wall mounting bracket (2), Screw (2)
• Startup Guide
• Operating Instructions

What You Can Do with the System
“Listening to Music on a USB Device” (page 36)
Blu-ray Disc™ player, cable box, satellite box, etc.
“Using the Control for HDMI Function” (page 53)“Using the “BRAVIA” Sync Function” (page 55)
“Connecting the Subwoofer and Rear Speakers Wirelessly” (page 30)
“Watching TV” (page 33)“Playing the Connected AV Device” (page 33)
Basic connection: Refer to “Startup Guide” (separate document).Other connections: See “Connecting to a TV or AV Device” (page 16).
“Connecting Sony TV with the BLUETOOTH Function Wirelessly” (page 16)
Rear speakers (not supplied)
The system supports object-based audio formats such as Dolby Atmos and DTS:X as well as HDR video formats such as HDR10, HLG, and Dolby Vision.
“Using Spotify” (page 39)*“Using the MUSIC SERVICE Button” (page 39)
* This service may not be available in some countries/regions.
6GB

“Listening to Music/Sound with the BLUETOOTH® Function” (page 34)“Using Sony | Music Center” (page 41)
“Listening to Sound of the Connected TV or Device from Headphones” (page 42)
“Connecting to a Wired Network” (page 24)
InternetRouter
Modem
Wireless LAN router
“Connecting to a Wireless Network” (page 25)
“Listening to Music on your PC via a Home Network” (page 37)
“Connecting the Wireless Multi Room-Compatible Device (Wireless Multi Room)” (page 41)
7GB

Guide to Parts and ControlsDetails are omitted from the illustrations.
Front
(power) buttonTurns on the system or sets it to standby mode.
(input select) buttonSelects the input for playback on the system.
BLUETOOTH button (page 34)
(MUSIC SERVICE) button (page 39)This button may not be available in some countries/regions.
+/– (volume) buttons
BLUETOOTH indicator– Flashes quickly in blue: During
pairing standby status– Flashes in blue: BLUETOOTH
connection is being attempted.– Lights in blue: BLUETOOTH
connection has been established.
Front panel display
Remote control sensorPoint the remote control at the remote control sensor to operate the system.
Bar Speaker (Main Unit)
8GB

Rear
LAN(100) port
HDMI IN 2 jackFor specifications and notes on connections, see “Supported HDMI Video Formats” (page 80).
HDMI IN 1 jackFor specifications and notes on connections, see “Supported HDMI Video Formats” (page 80).
HDMI OUT (TV eARC/ARC) jackConnect a TV that has an HDMI input jack with an HDMI cable.The system is compatible with eARC and ARC. ARC is the function that sends TV sound to an AV device such as the system from the TV’s HDMI jack. eARC is an extension of ARC and enables transmission of the object audio and multi-channel LPCM content that cannot be transmitted with ARC. For details of eARC, see
“Connecting a TV Compatible with eARC” (page 23). For supported audio formats, see “Supported Input Audio Formats” (page 79). For specifications and notes on connections, see “Supported HDMI Video Formats” (page 80).
(USB) port (page 36)
ANALOG IN jack
TV IN (OPT) jack
IR repeater (page 32)Transmits the remote signal of the TV remote control to the TV.
9GB
Power indicator– Flashes slowly in green: The
subwoofer is not connected to the system.
– Lights in green: The subwoofer is connected to the system.
– Flashes twice repeatedly in green: The subwoofer is attempting to connect to the system.
– Flashes/lights in orange: The software is updating.
– Lights in red: The subwoofer is in standby mode.
– Turns off: The subwoofer is turned off.
(power) buttonTurns on or off the subwoofer.
LINK button (page 31)
Ventilation holesFor safety, do not block the ventilation holes.
Subwoofer
10GB

You can enjoy the surround sound by connecting two rear speakers (not supplied).For connecting, see “Connecting the Subwoofer and Rear Speakers Wirelessly” (page 30).
Power indicator– Flashes slowly in green: The rear
speaker is not connected to the system.
– Lights in green: The rear speaker is connected to the system.
– Flashes twice repeatedly in green: The rear speaker is attempting to connect to the system.
– Flashes/lights in orange: The software is updating.
– Lights in red: The rear speaker is in standby mode.
– Turns off: The rear speaker is turned off.
(power) buttonTurns on or off the rear speaker.
LINK button (page 31)
Wall mount hole (page 29)
Mounting hole for the general speaker stand
Rear Speaker (SA-Z9R) (not supplied)
11GB
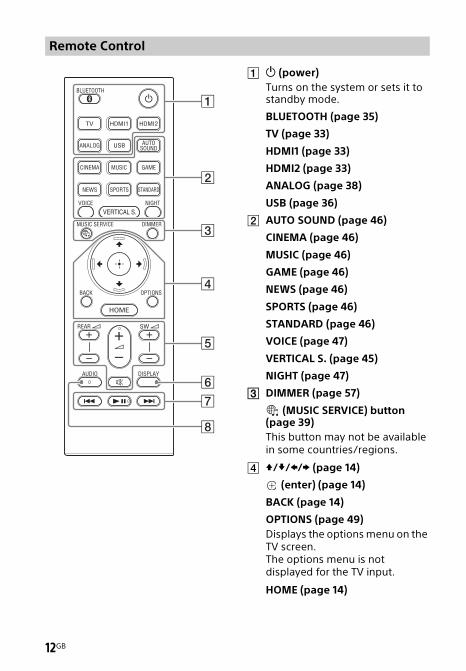
(power) Turns on the system or sets it to standby mode.
BLUETOOTH (page 35)
TV (page 33)
HDMI1 (page 33)
HDMI2 (page 33)
ANALOG (page 38)
USB (page 36)
AUTO SOUND (page 46)
CINEMA (page 46)
MUSIC (page 46)
GAME (page 46)
NEWS (page 46)
SPORTS (page 46)
STANDARD (page 46)
VOICE (page 47)
VERTICAL S. (page 45)
NIGHT (page 47)
DIMMER (page 57)
(MUSIC SERVICE) button (page 39)This button may not be available in some countries/regions.
/// (page 14)
(enter) (page 14)
BACK (page 14)
OPTIONS (page 49)Displays the options menu on the TV screen.The options menu is not displayed for the TV input.
HOME (page 14)
Remote Control
12GB

REAR (rear speakers volume) +/–Adjusts the volume of the rear speakers when connecting rear speakers (not supplied).
(volume) +*/– Adjusts the volume.
SW (subwoofer volume) +/–Adjusts the volume of the subwoofer.
(muting)Turns off the sound temporarily.
DISPLAYDisplays playback information on the TV screen.Playback information is not displayed for the TV input.
Playback operation buttons
/ (previous/next)Selects the previous/next track or file.Pressing and holding searches backward or forward (rewind/fast forward) during playback.
(play/pause)*Starts, pauses, or re-starts playback (resume play).
AUDIO* (page 50)
* The AUDIO, , and + buttons have a tactile dot. Use it as a guide during operation.
About the replacement of batteries for the remote controlWhen the system does not respond by operating with the remote control, replace two batteries with new batteries.Use R03 (size AAA) manganese batteries for replacement.
13GB

About the Home MenuYou can display the home menu on the TV screen by connecting the system and TV with the HDMI cable (supplied). From the home menu, you can set the various settings and select the input.The home menu is displayed in the language that is selected in [Easy Setup]. (The following screen is an example when English is selected.)
1 Press HOME.
The home menu appears on the TV screen.
2 Press // to select the category that you want, then press or .
The items for the selected category appear under the category list on the TV screen.
3 Press /// to select the item that you want, then press .
The selected input or setting display appears on the TV screen.To return to the previous screen, press BACK.
[Watch]Selects the input of the TV or AV device that is connected to the system.See “Watching Images” (page 33).
Using the Home Menu
Categories
Category items
HOME
BACK
///, (enter)
14GB

[Listen]Selects the input of the audio device that is connected to the system or music service for playing back on the system.See “Listening to Music/Sound” (page 34).
[Setup]Performs the basic initial settings by using [Easy Setup] or various advanced settings of the system.See “Performing Easy Setup” (page 58) or “Performing Advanced Settings” (page 59).If the system detects update information for the system on the network, the update notification and [Software Update] that performs the software update appears. See “Updating the Software” (page 64).
In these Operating Instructions, the operations are described as steps that are operated on the home menu displayed on the TV screen by using the remote control while the system and TV are connected with the HDMI cable (supplied).
The operating steps that select items on the TV screen by using /// and are simplified in the following way.
Example: Select [Setup] - [Advanced Settings] on the home menu.The operation that selects a category and category item by pressing /// and is expressed as “select.” The category and category item are linked with “-.”
Example: Select [Speaker Settings] - [Manual Speaker Settings].When repeating the operation that selects an item by pressing /// and , the selected items are linked with “-.”
Tips• You can use the buttons on the main unit if they have the same or similar names as those
on the remote control.• Characters in brackets [ ] appear on the TV screen. Characters in quotes “ ” appear in the
front panel display.
About the Steps Description
15GB

Connecting to a TV or AV Device with the HDMI Cable
To connect a 4K TV or 4K devicesSee “Connecting a 4K TV and 4K Devices” (page 20).
To connect a TV compatible with eARCFor the connection, refer to Startup Guide (separate document). For the settings, see “Connecting a TV Compatible with eARC” (page 23).
To connect to a TV other than the above, refer to Startup Guide (separate document).
Connecting Sony TV with the BLUETOOTH Function WirelesslyWhen using Sony TV* with the BLUETOOTH function, you can listen to sound of the TV or device that is connected to the TV by connecting the system and TV wirelessly.
* The TV needs to be compatible with A2DP (Advanced Audio Distribution Profile) of the BLUETOOTH profile.
• If connecting the system and TV by using the BLUETOOTH function, you cannot display the operation screen for the system such as the home menu on the TV screen, and use the function of the system other than the listening function for the sound of the TV or device that is connected to the TV.To use all the functions of the system, connect the system and TV with the HDMI cable (supplied). For details about connections and operations to listen to TV sound by connecting with the HDMI cable, refer to Startup Guide (separate document).
• This function is available only for Sony TV that is compatible with BLUETOOTH A2DP.
Connecting to a TV or AV Device
Notes
Blu-ray Disc player, cable box, satellite box, etc.
16GB

To connect the system and TV wirelessly, you need to perform pairing of the system and TV by using the BLUETOOTH function.Pairing is the process required to mutually register the information on BLUETOOTH devices to be connected wirelessly in advance.
1 Set up the remote control.
2 Turn on the TV.
3 Turn on the system.
4 Press and hold the BLUETOOTH button on the main unit and TV on the remote control simultaneously for 5 seconds.
The system enters the pairing mode, “BT” appears in the front
panel display, and the BLUETOOTH indicator flashes quickly.
5 On the TV, search the system by performing the pairing operation.The list of the BLUETOOTH devices that are searched appears on the TV screen.For the operation method to pair the BLUETOOTH device to the TV, refer to the operating instructions of the TV.
6 Pair the system and TV by selecting “HT-Z9F” from the list on the TV screen.
7 Make sure that the BLUETOOTH indicator on the main unit lights in blue and “TV (BT)” appears in the front panel display.A connection between the system and TV has been established.
8 Select the program or input of the device by using the TV remote control.The sound of the displayed image on the TV screen is output from the system.
9 Adjust the volume of the system by using the TV remote control.When pressing the muting button on the TV remote control, the sound is muted temporarily.
Listening to TV Sound by Connecting the System and TV Wirelessly
TV
BLUETOOTH button
17GB

• If the TV sound is not output from the system, press TV and check the status of the front panel display and indicators on the Bar Speaker.– “TV (BT)” appears in the front panel
display: The system and TV are connected and TV sound is output from the system.
– The BLUETOOTH indicator flashes quickly and “BT” appears in the front panel display: Perform pairing on the TV.
– “TV” appears in the front panel display: Perform steps from the start.
• When you connect the system and TV with the HDMI cable (supplied), the BLUETOOTH connection is canceled. To connect the system and TV with the BLUETOOTH function again, disconnect the HDMI cable, then perform the connecting operation from the start.
You can turn the system on/off, adjust the volume, and mute the sound by using the TV remote control when connecting the TV to the system wirelessly.
1 Turn the TV on with the TV remote control.The system is turned on by interlocking with the TV power, and TV sound is output from the system.
2 Select the program or input of the device by using the TV remote control.The sound of the displayed image on the TV screen is output from the system.
3 Adjust the volume of the system by using the TV remote control.When pressing the muting button on the TV remote control, the sound is muted temporarily.
TipWhen the TV is turned off, the system is also turned off by interlocking with the TV power.
Notes Listening to Sound of the Paired TV
18GB

About operations with the remote control that is supplied with the systemYou can use the following buttons.You can adjust the volume of the subwoofer and rear speakers, and adjust sound quality in addition to turning the system on/off and adjusting volume that can be operated by the TV remote control.
• If you select the input other than TV on the remote control supplied with the system, the TV sound is not output from the system. To output the TV sound, press TV on the remote control to change to the TV input.
• During the connecting the TV with the BLUETOOTH function, the following remote control buttons do not work.///, (enter), OPTIONS, HOME, DISPLAY, (play/pause), / (previous/next)
Connecting a TV with an Analog Audio CableTo connect the following devices to the system, connect them via the ANALOG IN jack on the system.– TVs that do not have an HDMI jack and
optical digital output jack– Portable audio devices such as
smartphones and WALKMAN®For listening to the connected device, see “Listening to the Device Connected with an Analog Audio Cable” (page 38).
Notes
SW +/–
+/–
REAR +/–
Sound mode selecting buttons
VOICEVERTICAL S.NIGHT
Smartphone, WALKMAN®, other audio devices, etc.
TV
Analog audio out
Analog audio cable (not supplied)
19GB

If the TV’s headphone jack also serves as an audio output jack, check the audio output settings of the TV. For details, refer to the operating instructions of the TV.
Connecting a 4K TV and 4K DevicesAll HDMI jacks on the system support 4K video format and HDCP2.2 (High-bandwidth Digital Content Protection System Revision 2.2).To watch 4K video content, connect the 4K TV and 4K devices to the system via an HDCP2.2-compatible HDMI jack on each device.You can only view 4K video content through the HDCP2.2-compatible HDMI jack connection.
Note
20GB

HDMI cable (supplied) HDMI cable (not supplied)
Use an HDMI cable which supports the 4K video format that you want to watch. For details, see “Supported HDMI Video Formats” (page 80).
1 Check which HDMI IN jack on your TV is compatible with HDCP2.2.Refer to the operating instructions of the TV.
2 Connect the HDCP2.2-compatible HDMI IN jack on the TV and HDMI OUT jack on the main unit with the HDMI cable (supplied).TV connection is complete.
3 Connect the HDCP2.2-compatible HDMI OUT jack of the 4K device and HDMI IN jack of the main unit with the HDMI cable (not supplied).Refer to the operating instructions of the 4K device to check that the HDMI OUT jack of the 4K device is compatible with HDCP2.2.4K device connection is complete.
If your TV’s HDCP2.2-compatible HDMI IN jack is not compatible with eARC or ARC, the TV sound is not output from the system.In this case, connect the optical output jack of the TV and the TV IN (OPT) jack on the main unit with the optical digital cable (not supplied).
When an HDCP2.2-Compatible HDMI Jack on the TV is Labeled with “eARC” or “ARC”
HDCP2.2-compatible HDMI jack
Blu-ray Disc player, cable box, satellite box, etc.
HDCP2.2-compatible HDMI jack
TV
When an HDCP2.2-Compatible HDMI Jack on the TV is not Labeled with “eARC” or “ARC”
21GB

HDMI cable (supplied) HDMI cable (not supplied)
Use an HDMI cable which supports the 4K video format that you want to watch. For details, see “Supported HDMI Video Formats” (page 80).
Optical digital cable (not supplied)
To watch 4K video content, select the appropriate setting for the connected 4K TV and 4K device.
1 Press HOME.The home menu appears on the TV screen.
2 Select [Setup] - [Advanced Settings] on the home menu.
3 Select [HDMI Settings] - [HDMI Signal Format].The [HDMI Signal Format] screen appears on the TV screen.
4 Select [HDMI IN 1]/[HDMI IN 2] (select the input that you want to change the setting of), then select the setting you want.• [Standard format] (default
setting): Select when the connected TV and devices support standard bandwidth video formats.
• [Enhanced format]: Select when both the connected TV and devices support high bandwidth video formats such as 4K 60p 4:4:4 etc.
For the relation of the [HDMI Signal Format] setting options, supported video format signals, and HDMI cables to be used, see “Supported HDMI Video Formats” (page 80).
• Depending on the TV, the TV setting for HDMI output may be required. Refer to the operating instructions of the TV.
• When the picture is not displayed after [HDMI Signal Format] is set to [Enhanced format], set it to [Standard format].
HDCP2.2-compatible HDMI jack
Blu-ray Disc player, cable box, satellite box, etc.
HDCP2.2-compatible HDMI jack
TV
Setting the HDMI Signal Format to Watch 4K Video Content
Notes
22GB

Connecting a TV Compatible with eARCThe system is compatible with eARC (Enhanced Audio Return Channel). eARC is a new function standardized by HDMI 2.1 and supports latest audio formats in addition to audio formats that are supported with existing ARC (Audio Return Channel).You can enjoy object audio content, such as Dolby Atmos - Dolby TrueHD and DTS:X, or multi-channel LPCM content that cannot be transmitted with ARC by connecting the system and TV compatible with eARC using an HDMI cable.For the connection, refer to Startup Guide (separate document).
1 If the HDMI output jack of the system is labeled with “ARC,” perform a software update (page 64).The system is compatible with the eARC function if the HDMI output jack of the system is labeled with “eARC/ARC.”
2 Press HOME.The home menu appears on the TV screen.
3 Select [Setup] - [Advanced Settings] on the home menu.
4 Select [HDMI Settings] - [eARC] - [On].The eARC function is enabled and it works while connecting a TV compatible with eARC.The ARC function works while connecting a TV compatible with ARC (not compatible with eARC).
• If [eARC] does not appear on the setup display in step 4, perform a software update (page 64).
• When [eARC] is set to [On], make sure of the eARC setting of the connected TV. For details, refer to the operating instructions of the TV.
Preparing to Use the eARC Function
Notes
23GB

Connecting to a Wired NetworkPrepare the network by connecting the system and PC to your home network with a LAN cable.
The following illustration is the example for connection of the system and PC to your home network.
The server needs to be connected to the same network as that of the system.
TipWe recommend that you use a shielded straight interface cable (not supplied).
1 Press HOME.The home menu appears on the TV screen.
2 Select [Setup] - [Advanced Settings] on the home menu.
3 Select [Network Settings] - [Internet Settings] - [Wired LAN Settings].
4 Select [Auto].The system starts network settings and the network setting status appears.Press / to browse information, and then press .
5 Select [Save & Connect].The system starts connecting to the network. For details, refer to the messages that appear on the TV screen.
1 Press HOME.The home menu appears on the TV screen.
2 Select [Setup] - [Advanced Settings] on the home menu.
3 Select [Network Settings] - [Internet Settings] - [Wired LAN Settings].
4 Select [Manual].
Connecting to a Network
Connecting to a PC or Router with a LAN Cable
Note
Internet
LAN cable (not supplied)
Server
Router
Modem
Connecting by Obtaining the Network Information Automatically
Connecting by Using a Fixed IP Address
24GB

5 Perform the setting by following the on-screen instructions.The system starts network settings and the network setting status appears.Press / to browse information, and then press .
6 Select [Save & Connect].The system starts connecting to the network. For details, refer to the messages that appear on the TV screen.
If you select IPv6, you cannot use a fixed IP address.
Connecting to a Wireless NetworkPrepare the network by connecting the system and PC to your wireless LAN router.
The server needs to be connected to the same network as that of the system.
When your wireless LAN router (access point) is Wi-Fi Protected Setup (WPS)-compatible, you can easily set the network settings with the WPS button.
1 Press HOME.The home menu appears on the TV screen.
2 Select [Setup] - [Advanced Settings] on the home menu.
3 Select [Network Settings] - [Internet Settings] - [Wireless LAN Settings].The list of the network name appears on the TV screen.
4 Select [Wi-Fi Protected Setup™ (WPS)].
5 Select [Start].
6 Press the WPS button on the access point.The system starts connecting to the network.
Note
Note
Connecting with the WPS Button
25GB

If your wireless LAN router (access point) is not compatible with Wi-Fi Protected Setup (WPS), check the following information in advance.– The network name (SSID)*
_____________________________________
– The security key (password)**
_____________________________________
* SSID (Service Set Identifier) is a name that identifies a particular access point.
**This information should be available from a label on your wireless LAN router/access point, from the operating instructions, from the person who set up your wireless network, or from the information provided by your Internet service provider.
1 Press HOME.The home menu appears on the TV screen.
2 Select [Setup] - [Advanced Settings] on the home menu.
3 Select [Network Settings] - [Internet Settings] - [Wireless LAN Settings].The list of the network name appears on the TV screen.
4 Select the desired network name (SSID).
5 Enter the security key (or password) using the software keyboard, and then select [Enter].The system starts connecting to the network.
Select [New connection registration] -[Manual registration] in step 4 of “Connecting by Selecting the Network Name (SSID)”and follow the on-screen instructions.
Select [New connection registration] in step 4 of “Connecting by Selecting the Network Name (SSID)” and select [(WPS) PIN Method].
Sony | Music Center can connect the system to the same wireless network as that of the mobile device. For details, follow the instruction of the app or refer to the following URL.http://www.sony.net/smcqa/
Connecting by Selecting the Network Name (SSID)
Connecting by Using a Fixed IP Address
Connecting by Using a PIN Code
Connecting by Sony | Music Center
26GB

Mounting the Bar Speaker or Rear Speaker (not supplied) on a WallYou can mount the Bar Speaker or rear speakers on a wall.
• Prepare screws (not supplied) that are suitable for the wall material and strength. As a plasterboard wall is especially fragile, attach the screws securely in the wall beam. Install the speakers horizontally, hung by screws in studs in a continuous flat section of the wall.
• Have the installation done by a Sony dealer or licensed contractor and pay special attention to safety during the installation.
• Sony shall not be held responsible for accidents or damage caused by improper installation, insufficient wall strength, improper screw installation or natural disaster, etc.
1 Prepare two screws (not supplied) that are suitable for the hole on the wall mounting bracket (supplied).
2 Stick WALL MOUNT TEMPLATE (supplied) on a wall.
1 Align TV CENTER LINE () of WALL MOUNT TEMPLATE with the center line of your TV.
2 Align TV BOTTOM LINE () of WALL MOUNT TEMPLATE with the bottom of your TV, then stick WALL MOUNT TEMPLATE on a wall by using a commercially available adhesive tape, etc.
Preparing to Use the System
Notes
Rear speakers
Bar Speaker
Mounting the Bar Speaker on a Wall
Wall mounting bracket
4 mm
More than 30 mm
Center of the TV
WALL MOUNT TEMPLATE
Adhesive tape, etc.
27GB

3 Fasten the wall mounting brackets (supplied) securely with screws (not supplied) into the marks () on SCREW LINE () of WALL MOUNT TEMPLATE as in the illustration below.
4 Remove WALL MOUNT TEMPLATE.
5 Fasten the screws (supplied) securely on the rear of the Bar Speaker not to loosen the screws.
6 Hang the attached screws on the wall mounting brackets.Align the screws on the rear of the Bar Speaker with the holes of the wall mounting brackets, then hang the Bar Speaker on the wall mounting brackets.
• When sticking WALL MOUNT TEMPLATE, smooth it out fully.
• If the positions of the screws on the rear of the Bar Speaker and holes of the wall mounting bracket do not align, adjust the left-right position of the wall mounting bracket finely.
• Make sure to use the supplied wall mounting brackets when mounting the Bar Speaker on a wall. Do not mount the Bar Speaker on a wall directly. The temperature inside of the Bar Speaker rises considerably, and it may cause damage or malfunction.
• When you do not use WALL MOUNT TEMPLATE, install the Bar Speaker apart from the TV by 70 mm or more.
Marks ()
368.5 mm 368.5 mm
Mark ()
Wall mounting bracket
Screw
Notes
28GB

1 Prepare a screw (not supplied) that is suitable for the wall mount hole on the rear of the rear speaker.
2 Fasten the screw in the wall.
3 Hang the rear speaker by confirming the right/left of the rear speaker.Check the label on the rear of the rear speaker. “REAR R” is for the right, “REAR L” is for the left.
Mounting the Rear Speaker on a Wall
Hole on the rear of the rear speaker
4 mm
More than 30 mm
5.0 mm
10 mm
Approx. 9.5 mm
29GB

Attaching the Grille FrameYou can protect the speakers by attaching the supplied grille frame.We recommend that you use the main unit without attaching the grille frame if you will be listening to High-Resolution Audio.
Attach the grille frame parallel to the front panel.Attach it with the cushions of the grille frame on the bottom.
TipThe grille frame is fixed by a magnet.
Connecting the Subwoofer and Rear Speakers WirelesslyThe subwoofer and rear speakers are connected to the system automatically when they are turned on.For details, refer to Startup Guide (separate document) for the subwoofer connection, or see the following steps for the rear speakers connection.
You can enjoy the surround sound by connecting optional two rear speakers. Perform the following steps for each rear speaker.
1 Connect the AC power cord (mains lead).The rear speaker is turned on and connected to the system wirelessly.
2 Make sure that the power indicator on the rear speaker lights in green.When the power indicator lights in green, the connection of the system and rear speaker is established.If the connection is not established, connect the rear speaker to the system manually by referring to
Cushions
Adding the Rear Speakers
AC power cord (mains lead)
Power indicator
30GB

“Connecting the Subwoofer or Rear Speakers Manually” (page 31).
3 Install the rear speaker by confirming the right/left of the rear speaker.Check the label on the rear of the rear speaker. “REAR R” is for the right, “REAR L” is for the left.
If you cannot connect the subwoofer or optional rear speakers to the system, or you use multiple wireless products and want to specify the wireless connection to link the system to the subwoofer and rear speakers, perform the manual connection.
1 Press HOME.The home menu appears on the TV screen.
2 Select [Setup] - [Advanced Settings] on the home menu.
3 Select [Speaker Settings] - [Wireless Speaker Settings] - [Start manual linking].The [Start manual linking] screen appears on the TV screen.
4 Press LINK on all the speakers that you use (subwoofer and rear speakers).The power indicator of the subwoofer or rear speaker that had LINK pressed flashes twice repeatedly in green.
5 Select [Start].The manual link starts.The connecting process appears on the TV screen.To cancel the manual link, select [Cancel].
6 When [Connected] appears on all the speakers that you use (subwoofer or rear speaker), select [Finish].
7 Press .The link is established and the power indicator of the subwoofer or rear speaker lights in green.
Connecting the Subwoofer or Rear Speakers Manually
LINK
Power indicator
LINK
Power indicator
31GB

• If you perform [Start manual linking], [Link mode] of [Wireless Speaker Settings] is set to [Manual] automatically (page 60).
• Only the subwoofer or rear speaker that is linked when selecting [Finish] in Step 6 is connected to the system. If the connection of the subwoofer or rear speakers cannot be established, perform the manual connection again.
If you use multiple wireless systems, such as a wireless LAN, the wireless signals may become unstable. In this case, the transmission may improve by changing the following [RF Channel] setting.
1 Press HOME.The home menu appears on the TV screen.
2 Select [Setup] - [Advanced Settings] on the home menu.
3 Select [Speaker Settings] - [Wireless Speaker Settings] - [RF Channel].
4 Select the setting you want.• [On] (default setting): Normally
select this. The system automatically selects the better channel for transmission. Stronger mode for wireless interference.
• [Off]: The system selects a channel from the limited frequency band to prevent external wireless interference. If sound dropping occurs while [On] is selected, it may be improved by selecting [Off].
If you change the [RF Channel] setting from [Off] to [On], it may take 1 minute to reconnect.
When the TV Remote Control does not WorkWhen the main unit obstructs the remote control sensor of the TV, the TV remote control may not work. In that case, enable the IR repeater function of the system.You can control the TV with the TV remote control by sending the remote signal from the rear of the main unit.
1 Press HOME.The home menu appears on the TV screen.
2 Select [Setup] - [Advanced Settings] on the home menu.
3 Select [System Settings] - [IR-Repeater].The [IR-Repeater] screen appears on the TV screen.
4 Select [On].
• Be sure to check that the TV remote control cannot control the TV, and then set [IR-Repeater] to [On]. If it is set to [On] when the remote control can control the TV, appropriate operation may not be obtained because of the interference between the direct command from the remote control and command via the main unit.
• If [IR-Repeater] is set to [On], this function may not work depending on your TV. Also, the remote controls of other devices such as an air conditioner may not work correctly. In this case, change the installation position of the system or TV.
Notes
If Wireless Transmission is Unstable
Note
Notes
32GB
33GB
Watching TV
1 Press HOME.The home menu appears on the TV screen.
2 Select [Watch] - [TV] on the home menu.
3 Select the program using the TV remote control.The selected TV program appears on the TV screen and the TV sound is output from the system.
4 Adjust the volume.• Adjust the volume by pressing
+/– on the remote control.• Adjust the subwoofer volume by
pressing SW +/– on the remote control (page 48).
• Adjust the rear speakers volume by pressing REAR +/– on the remote control (page 48).
Set the speaker setting of the TV (BRAVIA) to Audio System. Refer to the operating instructions of your TV regarding how to set the TV.
TipYou can select [TV] directly by pressing TV on the remote control.
Playing the Connected AV Device
1 Press HOME.The home menu appears on the TV screen.
2 Select [Watch], then select the input ([HDMI1] or [HDMI2]) on the home menu.• [HDMI1]: Device that is connected
to the HDMI IN 1 jack• [HDMI2]: Device that is connected
to the HDMI IN 2 jackThe image of the selected device appears on the TV screen and the sound is output from the system.
3 Adjust the volume.• Adjust the volume by pressing
+/– on the remote control.• Adjust the subwoofer volume by
pressing SW +/– on the remote control (page 48).
• Adjust the rear speakers volume by pressing REAR +/– on the remote control (page 48).
TipYou can select [HDMI1] or [HDMI2] directly by pressing HDMI1 or HDMI2 on the remote control.
Watching Images
Note

Listening to Music/Sound with the BLUETOOTH® FunctionYou can listen to music stored on a mobile device such as a smartphone or tablet via a wireless connection by connecting the system and mobile device with the BLUETOOTH function.When connecting to the mobile device with the BLUETOOTH function, you can operate by simply using the supplied remote control without turning the TV on.
To use the BLUETOOTH function, you need to perform pairing of the system and mobile device in advance.
1 Press and hold BLUETOOTH on the main unit for 2 seconds.
The system enters the pairing mode, “BT” appears in the front panel display, and the BLUETOOTH indicator flashes quickly.
2 On the mobile device, search the system by performing the pairing operation.The list of the BLUETOOTH devices that are searched appears on the screen of the mobile device.For the operation method to pair the BLUETOOTH device to the mobile device, refer to the operating instructions of the mobile device.
3 Pair the system and mobile device by selecting “HT-Z9F” from the list on the screen of the mobile device.If a Passkey is requested, enter “0000.”
Listening to Music/Sound
BLUETOOTH
SW +/–
+/–
Playback operation buttons
REAR +/–
BLUETOOTH button
Listening to Music by Pairing the Mobile Device that is Connected for the First Time
34GB

4 Make sure that the BLUETOOTH indicator on the main unit lights in blue.A connection between the system and mobile device has been established.
5 Start audio playback with the music app on the connected mobile device.Sound is output from the main unit.
6 Adjust the volume.• Adjust the volume by pressing
+/– on the remote control.• Adjust the subwoofer volume by
pressing SW +/– on the remote control (page 48).
• Adjust the rear speakers volume by pressing REAR +/– on the remote control (page 48).
• You can play or pause the content by using the playback operation buttons on the remote control.
To check the connection status of the BLUETOOTH function
Tips• If there is no mobile device that has been
paired (ex. immediately after the purchase of the system), the system goes into pairing mode simply by changing the input to the BLUETOOTH input.
• Once the BLUETOOTH connection is established, an indication recommending which application to install will be displayed according to what device you have connected. Following the instructions displayed, an
application called Sony | Music Center, which will enable you to operate this system, can be installed. See “Using Sony | Music Center” (page 41) for details on Sony | Music Center.
• Perform pairing for the second and subsequent mobile devices.
1 Turn the BLUETOOTH function of the mobile device to on.
2 Press BLUETOOTH.The system automatically reconnects to the mobile device it was most recently connected to.
3 Make sure that the BLUETOOTH indicator lights in blue.A connection between the system and mobile device has been established.
4 Start audio playback with the music app on the connected mobile device.Sound is output from the main unit.
5 Adjust the volume.• Adjust the volume by pressing
+/– on the remote control.• Adjust the subwoofer volume by
pressing SW +/– on the remote control (page 48).
• Adjust the rear speakers volume by pressing REAR +/– on the remote control (page 48).
• You can play or pause the content by using the playback operation buttons on the remote control.
To disconnect the mobile devicePerform any of the following items.• Disable the BLUETOOTH function on
the mobile device.
Status BLUETOOTH indicator
During pairing standby status
Flashes quickly in blue
Connection is being attempted
Flashes in blue
Connection has been established
Lights in blue
Listening to Music from the Paired Device
35GB

• Press BLUETOOTH while the [Bluetooth Audio] screen appears on the TV screen.
• Set [Bluetooth Mode] to [Transmitter] or [Off] (page 62).
• Turn off the system or mobile device.
TipWhen the connection is not established, select “HT-Z9F” on the mobile device.
Listening to Music on a USB DeviceYou can play music files stored on a connected USB device.For playable types of files, see “Playable Types of Audio Files” (page 78).
1 Connect the USB device to the (USB) port.
2 Press HOME.The home menu appears on the TV screen.
3 Select [Listen] - [USB (Connected)] on the home menu.
4 Select the folder on which songs are stored, then select a song.The selected song is played and sound is output from the system.
5 Adjust the volume.• Adjust the volume by pressing
+/– on the remote control.• Adjust the subwoofer volume by
pressing SW +/– on the remote control (page 48).
• Adjust the rear speakers volume by pressing REAR +/– on the remote control (page 48).
Do not remove the USB device during operation. To avoid data corruption or
Note
36GB

damage to the USB device, turn the system off before connecting or removing the USB device.
Select the following buttons on the screen by pressing /, then press .• (play)/ (pause)
Starts or pauses playback. You can also operate by using on the remote control.
• (previous)/ (next)Plays the previous or next music file.You can also operate by using / on the remote control.
• (Shuffle play)Shuffles the playback order. Each time you press , on/off of the shuffle play is switched.
• (Repeat play)Press repeatedly to switch the repeat mode.
TipYou can rewind/fast forward by pressing and holding / on the remote control during playback.
Listening to Music on your PC via a Home NetworkYou can play music files stored on your PC via your home network.Music files can be played by operating Sony | Music Center on a mobile device such as a smartphone or tablet.
1 Connect the system to a network.See “Connecting to a Wired Network” (page 24) or “Connecting to a Wireless Network” (page 25).
2 Connect the PC to a network.For details, refer to the operating instructions of the PC.
3 Set the PC.To use the PC on your home network, you need to set the PC as the server. For details, refer to the operating instructions of the PC.
TipSee [Setup] - [Advanced Settings] - [Network Settings] - [Network Connection Status] when checking the network connection status.
About the Music Playback Screen
Repeat mode Explanation
(Repeat All) Repeats all music files.
(Repeat Folder)
Repeats all music files in a folder.
(Repeat One)
Repeats a music file that is being played.
(Off) Cancels the repeat play.
Preparing the Home Network
37GB

You can play music files stored on the PC by operating Sony | Music Center that is installed to a mobile device such as a smartphone or tablet. For details of Sony | Music Center, refer to the following URL.http://www.sony.net/smcqa/
Listening to the Device Connected with an Analog Audio CableYou can listen to sound of an audio device such as a TV, WALKMAN®, etc that is connected to the ANALOG IN jack on the system.
1 Press HOME.The home menu appears on the TV screen.
2 Select [Listen] - [Analog] on the home menu.The [Analog] screen is displayed on the TV screen.
3 Adjust the volume.• Adjust the volume by pressing
+/– on the remote control.• Adjust the subwoofer volume by
pressing SW +/– on the remote control (page 48).
• Adjust the rear speakers volume by pressing REAR +/– on the remote control (page 48).
TipYou can also select [Analog] directly by pressing ANALOG.
Listening to Music on a PC by Using Sony | Music Center
PC
Wireless LAN router
Smartphone or tablet
38GB

Using SpotifyYou can select the music on the Spotify app and play it on the system.
Use your phone, tablet or computer as a remote control for Spotify. Go to spotify.com/connect to learn how.
TipIf [Network/Bluetooth Standby] is set to [On] (page 62), you can play music quickly even when the system is in standby mode.
1 Press MUSIC SERVICE.When you have played the music of Spotify on the system, the music that was played with Spotify is resumed. For details, see “Using the MUSIC SERVICE Button” (page 39).
The Spotify app may not be available in some countries/regions.
Using the MUSIC SERVICE ButtonWhen you have played the music of Spotify on the system, you can resume the music that was played with Spotify.To enjoy music services, the system must be connected to the Internet.
Press MUSIC SERVICE.The music that was played with Spotify is resumed. See “Using Spotify” (page 39).
• Music services may not be available in some countries/regions.
• If the resume playback function is not available, the last playlist played on the system plays.
Playing Music on the System by Using the “Spotify Connect” Function
Resuming Music that has been Played on the Mobile Device
Note
Notes
MUSIC SERVICE
39GB

Listening to Music of the Streaming Service by Using Chromecast built-inThe system is compatible with Chromecast built-in that can stream music to the speaker from the mobile device.You can select music content from the Chromecast-enabled app and play back audio contents on the system or group that the system is included in.
Perform the settings for using Chromecast built-in on the system, and install the Chromecast-enabled app to the mobile device.
1 Press HOME.The home menu appears on the TV screen.
2 Select [Listen] - [Chromecast built-in] on the home menu.Perform the settings to use Chromecast built-in on the system by following the on-screen message.After performing the settings, [Network/Bluetooth Standby] is set to [On] automatically and you can play music quickly even when the system is in standby mode (page 62).
3 Connect the mobile device by Wi-Fi to the same network as that of the system.
4 Install the Chromecast-enabled app to the mobile device.
1 Start the Chromecast-enabled app, tap the cast button, and select the system or group that the system is included in.
2 Select and play music on the Chromecast-enabled app.The music is played on the system.
Depending on the country and region, Chromecast built-in and the Chromecast-enabled app may not be provided.
You can listen to music on the system by talking to the Google Assistant device by linking the system and Google Assistant device with the Google Home app. For details, check the Google Home app.
Preparing the System and Mobile Device
Listening to Music by Operating the Mobile Device
Note
Listening to Music on the System by Talking to the Google Assistant Device
40GB

Using Sony | Music CenterSony | Music Center is an application for controlling compatible Sony audio devices using the mobile device such as a smartphone or tablet.
For details about Sony | Music Center, refer to the following URL.http://www.sony.net/smcqa/
1 Install the free Sony | Music Center app to the mobile device.Search for Sony | Music Center at Google Play or the App Store and install it onto your mobile device.
2 Connect the system and mobile device with the BLUETOOTH function (page 34) or network function (page 24).
3 Start Sony | Music Center.
4 Operate by following the Sony | Music Center screen.
• Before using Sony | Music Center with the BLUETOOTH function, be sure to set the [Bluetooth Mode] to [Receiver] (page 62).
• Use Sony | Music Center of the latest version. For details about Sony | Music Center, refer to Google Play or the App Store. If you cannot connect the system and a BLUETOOTH device via the BLUETOOTH function, uninstall Sony | Music Center and try to connect via the BLUETOOTH function again.
TipWhen connecting with the network function, connect the mobile device to the same network as that of the system.
Connecting the Wireless Multi Room-Compatible Device (Wireless Multi Room)You can enjoy music in any room by using the system with the wireless multi room-compatible wireless speaker.
You can enjoy the following music or sound in different rooms with high sound quality using your home wireless network.• Music on the music service• Music stored in your PC or smartphone• Sound of the [TV] (including
connection with the BLUETOOTH function), [HDMI1], [HDMI2], [Bluetooth Audio], [USB], or [Analog] input of the system*
* You can enjoy the sound of the device that is connected to the system. The sound of the system is delayed behind the picture to synchronize with the sound of other speakers. If you are bothered by the time gap between the sound and picture, try the following.• For the HDMI1 or HDMI2 input: Press
OPTIONS and set [Multi-room Sync] to [Off].
• For the TV or analog input: Press OPTIONS, / until “MSYNC” appears on the front panel display, and (enter), then press / until “OFF”
Notes
41GB

appears on the front panel display and press (enter).
The sound of the system is synchronized with the picture though the sound output from other speakers is delayed.
You can operate with Sony | Music Center that is installed on a mobile device. To use multiple devices, connect them to the same wireless LAN.
To perform setting on Sony | Music CenterPerform the setting by following the help on Sony | Music Center.
• When playing back the same music between devices that are compatible with Chromecast built-in, use the Chromecast-enabled app (page 40).
• When [Bluetooth Audio] is selected during use of the wireless multi room function, the system may reconnect to the BLUETOOTH device.
• During use of the wireless multi room function, the HDMI audio input may be limited.
TipFor details of Sony | Music Center, refer to the following URL.http://www.sony.net/smcqa/
Listening to Sound of the Connected TV or Device from HeadphonesYou can listen to sound of the connected TV or device from BLUETOOTH compatible headphones by connecting it with the BLUETOOTH function.
1 Set the BLUETOOTH compatible headphones to the pairing mode.Refer to the operating instructions of the headphones for pairing method.
2 Press HOME.The home menu appears on the TV screen.
3 Select [Setup] - [Advanced Settings] on the home menu.
4 Select [Bluetooth Settings] - [Bluetooth Mode] - [Transmitter].The system enters BLUETOOTH transmission mode.
5 Select the name of the headphones from the [Device List] in [Bluetooth Settings].When the BLUETOOTH connection is established, [Bluetooth device is connected.] appears.If you cannot find the name of your headphones in [Device List], select [Scan].
Notes
Listening to Sound by Pairing with Headphones
42GB

6 Return to the home menu, select [Watch] or [Listen], and
select the input.The image of the selected input appears on the TV screen, “BT TX” appears in the front panel display, then the sound is output from the headphones.No sound is output from the system.For selecting input, see “Watching Images” (page 33) or “Listening to Music/Sound” (page 34).
7 Adjust the volume.Adjust the volume level of the headphones first. The volume level of the headphones can be controlled with +/– on the main unit and +/– on the remote control.
To remove a registered device from the device list
1 Press HOME.The home menu appears on the TV screen.
2 Select [Setup] - [Advanced Settings] on the home menu.
3 Select [Bluetooth Settings] - [Device List].
4 Move the cursor to the name of the headphones, and then press OPTIONS.
5 Select [Remove].
6 Follow the on-screen instructions to delete the desired headphones from the device list.
1 Set the BLUETOOTH function of the headphones to on.
2 Press HOME.The home menu appears on the TV screen.
3 Select [Setup] - [Advanced Settings] on the home menu.
4 Select [Bluetooth Settings] - [Bluetooth Mode] - [Transmitter].The system enters BLUETOOTH transmission mode and the system automatically reconnects to the headphones that was most recently connected to.
5 Return to the home menu, select [Watch] or [Listen], and
select the input.The image of the selected input appears on the TV screen, “BT TX” appears in the front panel display, then the sound is output from the headphones.No sound is output from the system.For selecting input, see “Watching Images” (page 33) or “Listening to Music/Sound” (page 34).
6 Adjust the volume.Adjust the volume level of the headphones. You can also adjust volume level of the headphones with +/– on the remote control.
Listening to Sound with Paired Headphones
43GB

To disconnect the headphonesPerform any of the following items.– Disable the BLUETOOTH function on
the headphones.– Set [Bluetooth Mode] to [Receiver] or
[Off] (page 62).– Turn off the system or headphones.– Select the device name of the
connected headphones from [Setup] - [Advanced Settings] -
[Bluetooth Settings] - [Device List]. [Connected] of the device name disappears.
• You may not be able to adjust the volume level depending on the BLUETOOTH compatible headphones.
• Input of BLUETOOTH is disabled when [Bluetooth Mode] is set to [Off] or [Transmitter].
• You can register up to 9 BLUETOOTH devices. If a 10th BLUETOOTH device is registered, the oldest connected BLUETOOTH device will be overwritten by the new one.
• The system can display up to 15 detected BLUETOOTH devices in the [Device List].
• You cannot change the sound effect or settings while transmitting sound to the BLUETOOTH compatible headphones.
• Some content may not be output due to content protection.
• Playback of audio/music on the BLUETOOTH device is delayed compared to that on the main unit due to the characteristics of BLUETOOTH wireless technology.
• You can enable or disable the reception of LDAC audio from the BLUETOOTH device (page 62).
About the Connection of the Headphones
44GB

Enjoying Immersive Surround Experience (VERTICAL S.)You can feel immersed by the sound from not only the horizontal direction, but also from the upward direction by using Vertical Surround Engine* effectively for sound modes (page 46) other than [News]. This function also works for the 2.0 channel signal such as a TV program.
* Vertical Surround Engine is a highly precise digital sound field processing technology developed by Sony that produces the sound field in the height direction virtually in addition to a sound field in the horizontal direction by only using front speakers and without using top speakers.You do not need to install speakers on a ceiling and you can enjoy the sound with rich presence regardless of the ceiling height. Also, this function is hardly affected by the shape of a room because it does not use the sound reflected from a wall and enables improved surround playback.
1 Press VERTICAL S.The vertical surround setting appears on the TV screen.
2 Press the button repeatedly to select the setting.
• The surround effect from all directions differs depending on the sound source.
• The vertical surround setting does not appear on the TV screen while the TV input is selected.
• A time gap between the sound and picture may occur depending on the sound source. If your TV has a function that delays the image, use it for adjustment.
Adjusting the Sound Quality
VERTICAL S.
Mode Explanation
[On] Activates the vertical surround function.
[Off] Deactivates the vertical surround function.
Notes
45GB

Setting the Sound Effect that is Tailored to Sound Sources (Sound Mode)You can easily enjoy pre-programmed sound effects that are tailored to different kinds of sound sources.
1 Press one of the sound mode selecting buttons (AUTO SOUND, CINEMA, MUSIC, GAME, NEWS, SPORTS, STANDARD) to select the sound mode.The selected sound mode appears on the TV screen.
• The sound mode function is disabled in the following conditions.– [Sound Effect] is set to a setting other
than [Sound Mode On] (page 60).– Chromecast built-in is used (page 40).– The wireless multi room function is used
(page 41).– BLUETOOTH device is connected in
BLUETOOTH transmission mode (page 42).
– Test tone is emitted (page 56).• The sound mode does not appear on the
TV screen while the TV input is selected.• A time gap between the sound and
picture may occur depending on the sound source. If your TV has a function that delays the image, use it for adjustment.
Sound mode Explanation
[Auto Sound] The appropriate sound setting is automatically selected for the sound source with ClearAudio+.
[Cinema] You feel immersed by the sound that travels behind you and surrounds your entire body. This mode is suitable for watching movies.
Sound Mode selecting buttons
[Music] Vividness and glossiness of the sound are expressed in detail. This mode is suitable for enjoying music in a way that moves you.
[Game Studio]
You can immerse yourself in your game by reproducing the feeling of movement and distance of objects, as well as clearly hearing the dialog.
[News] Recreates the clear speech of newscasts.
[Sports] You can experience an atmosphere as if you were watching an event in a stadium. However, narrations of commentators are reproduced vividly.
[Standard] The sound of a TV program can be heard clearly.
Notes
Sound mode Explanation
46GB

Making Dialogs Clearer (VOICE)
1 Press VOICE.The voice mode appears on the TV screen.
2 Press the button repeatedly to select the voice mode.
The voice mode does not appear on the TV screen while the TV input is selected.
Enjoying Clear Sound with Low Volume at Midnight (NIGHT)Sound is output at low volume with minimum loss of fidelity and clarity of dialog.
1 Press NIGHT.The night mode appears on the TV screen.
2 Press the button repeatedly to select the night mode.
• When you turn the system off, this setting is set to [Off] automatically.
• The night mode does not appear on the TV screen while the TV input is selected.
Mode Explanation
[Up Off] Standard
[Up 1] Dialog is easily heard by enhancing dialog range.
[Up 2] Dialog range is enhanced more than [Up 1] mode.
Note
VOICE
Mode Explanation
[On] Activates the night mode function.
[Off] Deactivates the night mode function.
Notes
NIGHT
47GB

Adjusting the Volume of the Subwoofer and Rear SpeakersThe subwoofer is designed for playback of bass or low frequency sound.The rear speakers are designed for playback of the surround part of the multi-channel sound and surround sound that is created from the 2-channel sound using virtual processing.
To adjust the subwoofer volumePress SW (subwoofer volume) +/–.
To adjust the rear speaker volumePress REAR (rear speaker volume) +/–.
• When the input source does not contain much bass sound, such as in TV programs, the bass sound from the subwoofer may be difficult to hear.
• When the input source does not contain much surround sound, the surround sound from the rear speakers may be difficult to hear.
• SW +/– does not work when the subwoofer is not connected and REAR +/– does not work when the rear speakers are not connected.
• REAR +/– does not work if no sound is output from the rear speakers due to the processing result of the input signal and sound mode.
Notes
SW +/–
REAR +/–
48GB

Adjusting the Delay Between the Picture and SoundWhen the sound does not match the pictures on the TV screen, you can adjust the delay between the picture and sound.The setting method differs depending on the input.
1 Press OPTIONS.“SYNC” appears in the front panel display.
2 Press or The adjusting time appears in the front panel display.
3 Adjust the delay using /, then press .You can adjust from 0 msec to 300 msec in 25 msec increments.
4 Press OPTIONS.The options menu in the front panel display turns off.
1 Press OPTIONS.The options menu appears on the TV screen.
2 Select [A/V Sync].
3 Adjust the delay using /, then press .You can adjust from 0 msec to 300 msec in 25 msec increments.
TipIf your TV has a function that adjusts the delay between the picture and sound, use it for adjustment. For details, refer to the operating instructions of the TV.
When Watching the TV
OPTIONS
///,
When Watching Another Device
49GB

Playing Compressed Audio Files or CDs by Upscaling to Near Hi-Resolution Sound Quality (DSEE HX)DSEE HX upscales existing sound sources to near hi-resolution sound quality, and it makes you feel as if you are in a recording studio or at a concert.
1 Press HOME.The home menu appears on the TV screen.
2 Select [Setup] - [Advanced Settings] on the home menu.
3 Select [Audio Settings] - [DSEE HX].
4 Select [On].
• This function is only available when [Auto Sound]* or [Music] is selected as the sound mode (page 46).
• This function is compatible with the 2-channel digital input signals of 44.1 kHz or 48 kHz sampling frequency.
• The sampling frequency/bit depth after upscaling is up to 96 kHz/24 bit.
• This function is not compatible with DSD signals.
• This function does not work when using Chromecast built-in.
• This function does not work when [Advanced Auto Volume] is set to [On] (page 61).
* Only when [Music] is selected with [Auto Sound].
Enjoying Multiplex Broadcast Sound (AUDIO)You can enjoy multiplex broadcast sound when the system receives a Dolby Digital multiplex broadcast signal.
1 Press AUDIO.
The audio signal appears in the front panel display.
2 Press the button repeatedly to select the desired audio signal.
• To receive a Dolby Digital signal, you need to connect the TV that is compatible with eARC or ARC (page 54) to the HDMI OUT (TV eARC/ARC) jack with the HDMI cable (supplied), or other devices to the HDMI IN 1 or HDMI IN 2 jack with the HDMI cable (not supplied).
• If your TV’s HDMI IN jack is not compatible with eARC or ARC (page 54), connect the TV to the TV IN (OPT) jack with the optical
Notes Audio signal Explanation
“MAIN” Sound of the main language will be output.
“SUB” Sound of the sub language will be output.
“MN/SB” Mixed sound of both the main and sub languages will be output.
Notes
AUDIO
50GB

digital cable (not supplied) to receive a Dolby Digital signal. Adjusting the Dialog
Volume While the DTS:X Content is Played BackBy adjusting the dialog volume, you can easily listen to dialog since it stands out from the ambient noise. This function works while playing content that is compatible with the DTS:X dialog control function.The setting method differs depending on the input.
1 Press OPTIONS, display “DIALOG” in the front panel display using /, then press .
2 Adjust the dialog volume using /, then press .You can adjust from 0.0 dB to 6.0 dB in 1.0 dB increments.
3 Press OPTIONS.The system returns to the previous display.
When Playing on the TV
OPTIONS
///,
51GB
1 Press OPTIONS.The options menu appears on the TV screen.
2 Select [Dialog Control].
3 Adjust the dialog volume using /, then press .You can adjust from 0.0 dB to 6.0 dB in 1.0 dB increments.
When Playing on the AV Device
52GB

Using the Control for HDMI FunctionConnecting a device such as a TV or Blu-ray Disc player compatible with the Control for HDMI function* by an HDMI cable enables you to easily operate the device by a TV remote control. The following functions can be used with the Control for HDMI function.
• System Power Off function• System Audio Control function• eARC/ARC (Enhanced Audio Return
Channel/Audio Return Channel)• One-Touch Play function• Menu Operation by TV Remote Control• HDMI Standby Through power saving
setting • Language Follow
These functions may work with devices other than those manufactured by Sony, but operation is not guaranteed.
* Control for HDMI is a standard used by CEC (Consumer Electronics Control) for allowing HDMI (High-Definition Multimedia Interface) devices to control each other.
Set [Setup] - [Advanced Settings] - [HDMI Settings] - [Control for HDMI] on the system to [On] (page 61). The default setting is [On]. Enable the Control for HDMI function settings for the TV and other device connected to the system.
TipIf you enable the Control for HDMI (“BRAVIA” sync) function when using a TV manufactured by Sony, the Control for HDMI function of the system is also enabled automatically.When the [Control for HDMI] settings are changed to [On], “DONE” appears in the front panel display.
When you turn off the TV, the system will turn off automatically.Set [Setup] - [Advanced Settings] - [HDMI Settings] - [Standby Linked to TV] on the system to [On] or [Auto] (page 61). The default setting is [Auto].
The connected device may not turn off depending on the status of the device.
If you turn on the system while you are watching the TV, the TV sound will be output from the speakers of the system. The volume of the system can be adjusted using the TV remote control.When you turn on the TV, the system is turned on automatically and the TV sound is output from the speakers of the system.Operations can also be made by the TV’s menu. For details, refer to the operating instructions of your TV.
• The number for the system’s volume level is displayed on the TV screen depending on the TV. The volume number displayed on the TV may differ from the number on the front panel display of the system.
• Depending on the settings of the TV, the System Audio Control function may not
Using the Control for HDMI Function
Note
Preparing to Use the Control for HDMI Function
System Power Off Function
Note
System Audio Control Function
Notes
53GB

be available. For details, refer to the operating instructions of your TV.
• Depending on the TV, if the TV sound was output from the speakers of the TV the previous time you watched the TV, the system may not turn on by interlocking with the TV power even if the TV is turned on.
If the system is connected to a TV’s HDMI IN jack compatible with eARC or ARC, you can listen to TV sound from the speakers of the system without connecting an optical digital cable.On the system, set [Setup] - [Advanced Settings] - [HDMI Settings] - [TV Audio Input Mode] to [Auto] (page 61). The sound of eARC or ARC takes priority while set to [Auto]. The default setting is [Auto].
• Enable the eARC or ARC function of the TV. For details, refer to the operating instructions of the TV.
• If the TV is not compatible with eARC or ARC, the optical digital cable (not supplied) needs to be connected (refer to the supplied Startup Guide).
When you play content on a device (Blu-ray Disc player, “PlayStation®4,” etc.) connected to the system, the system and TV are turned on automatically, the input of the system is switched to the input for the device played, and sound is output from the speakers of the system.
• If [Setup] - [Advanced Settings] - [HDMI Settings] - [Standby Through] on the system is set to [On] or [Auto] and the
TV sound was output from the speakers of the TV the previous time you watched the TV, the system may not turn on and the sound and picture may be output from the TV even if device content is played (page 61).
• Depending on the TV, the beginning part of content being played may not play correctly.
You can select the system using the SYNC MENU button on the TV remote control and operate the system.This function can be used if the TV supports the Sync Menu. For details, refer to the operating instructions of your TV.
• In the TV’s Sync Menu, the system is recognized by the TV as “Player.”
• Some operations may not be available with some TVs.
HDMI Standby Through power saving setting (page 61) is a function that allows you to enjoy the sound and picture of a connected device without turning on the system.Set [Setup] - [Advanced Settings] - [HDMI Settings] - [Standby Through] to [Auto] (page 61). The default setting is [Auto].
If the picture of a device connected to the system is not displayed on the TV, set [Standby Through] to [On]. If you connect a TV other than those manufactured by Sony, we recommend you to select this setting.
eARC/ARC (Enhanced Audio Return Channel/Audio Return Channel)
Notes
One-Touch Play Function
Notes
Menu Operation by TV Remote Control
Notes
HDMI Standby Through Power Saving Setting
Note
54GB

When you change the language for the on-screen display of the TV, the system’s on-screen display language is also changed.
Using the “BRAVIA” Sync FunctionIn addition to the Control for HDMI function, you can also use the following functions on devices compatible with the “BRAVIA” sync function.• Sound mode/Scene Select function• Home Theatre Control
These functions are proprietary functions of Sony. This function cannot operate with products other than those manufactured by Sony.
The sound mode of the system is automatically switched according to the setting of the TV’s Scene Select function or sound mode. For details, refer to the operating instructions of your TV. Set the sound mode to [Auto Sound] (page 46).
When using a TV compatible with the Home Theatre Control function, setting the system, setting the sound mode settings, input switching, etc. can be done without switching the TV input.This function can be used when the TV is connected to the Internet. For details, refer to the operating instructions of your TV.
Language Follow
Note
Sound mode/Scene Select Function
Home Theatre Control Function
55GB

Customizing the Speaker Settings for Surround SoundTo obtain a good surround sound, set the speaker distance from your listening position and their output level, etc. The default settings are underlined.
1 Press HOME.The home menu appears on the TV screen.
2 Select [Setup] - [Advanced Settings] on the home menu.
3 Select [Speaker Settings] - [Manual Speaker Settings].The [Manual Speaker Settings] screen appears on the TV screen.
4 Perform the speaker settings.Select the setting item from the following items by pressing / and , then set the value in accordance with the environment by pressing / and .
[Distance]Set the distance from the listening position to the speakers.You can set the value from 0 meters to 10 meters (0.1 m step) (0 ft to 33 ft (1/4 ft step)).[Front]: Sets the front speaker distance.[Subwoofer]: Sets the subwoofer distance.[Rear Speaker (L)]*: Sets the left rear speaker distance.[Rear Speaker (R)]*: Sets the right rear speaker distance.
* This item appears when using the rear speakers.
TipYou can change measurement units (feet or meters) by pressing OPTIONS.
[Level]Adjust the sound level of the speakers.You can set the value from -6.0 dB to 6.0 dB (0.5 dB step).[Front]: Sets the front speaker level.[Subwoofer]: Sets the subwoofer level.[Rear Speaker (L)]*: Sets the left rear speaker level.[Rear Speaker (R)]*: Sets the right rear speaker level.
* This item appears when using the rear speakers.
[Test Tone]The test tone is emitted from the speakers for checking the available speakers.[Off]: The test tone is not emitted from the speakers.[On]: The test tone is emitted from the speaker.
Changing the Settings
56GB

Changing the Brightness of the Front Panel Display and BLUETOOTH Indicator (DIMMER)You can change the brightness of the front panel display and BLUETOOTH indicator.
1 Press DIMMER.The display mode appears in the front panel display.
2 Press the button repeatedly to select the desired display mode.
The front panel display is turned off when “OFF” is selected. It turns on automatically when you press any button, then turns off again if you do not operate the system for about 10 seconds. However, in some cases, the front panel display may not turn off. In
this case, the brightness of the front panel display is same as “DARK.”
Mode Explanation
“BRIGHT” The front panel display and BLUETOOTH indicator light brightly.
“DARK” The front panel display and BLUETOOTH indicator light darkly.
“OFF” The front panel display is turned off.
Note
DIMMER
57GB

Saving Power in Standby ModeCheck that you have made the following settings:– [Standby Through] is set to [Off]
(page 61).– [Network/Bluetooth Standby] is set to
[Off] (page 62).
Performing Easy SetupYou can make basic initial settings, speaker settings, and network settings for the system easily by performing Easy Setup.
1 Press HOME.The home menu appears on the TV screen.
2 Select [Setup] - [Easy Setup] on the home menu.The [Easy Setup] screen appears on the TV screen.
3 Select the desired setting.• [Easy Initial Setup]: Performs the
basic initial settings including the speaker settings and network settings.
• [Easy Speaker Setup]: Performs the basic speaker settings for the rear speakers.
• [Easy Network Setup]: Performs the basic network settings.
4 Perform settings by following the on-screen instructions.
58GB

Performing Advanced SettingsYou can make various adjustments to items such as picture and sound.The default settings are underlined.
1 Press HOME.The home menu appears on the TV screen.
2 Select [Setup] - [Advanced Settings] on the home menu.The [Advanced Settings] screen appears on the TV screen.
3 Select the setting item.
Setting item Explanation
[Speaker Settings]Makes the speaker and subwoofer settings for installing and connections. (page 60)
[Audio Settings] Makes the audio output settings. (page 60)
[HDMI Settings] Makes the HDMI settings. (page 61)
[Bluetooth Settings] Makes detailed settings for the BLUETOOTH function. (page 62)
[System Settings] Makes the system-related settings. (page 62)
[Network Settings] Makes detailed settings for the Internet. (page 63)
[Resetting] Resets the system to the factory default settings. (page 64)
[Software Update] Updates the software of the system, subwoofer, or rear speakers. (page 64)
59GB

[Manual Speaker Settings]You can perform the speaker settings to obtain the best possible surround sound. For details, see “Customizing the Speaker Settings for Surround Sound” (page 56).
[Wireless Speaker Settings]You can perform connecting settings of the wireless speakers (subwoofer and rear speakers).• [Link mode]
You can set the connection method for the subwoofer and rear speakers.[Auto]: Connects the subwoofer and rear speakers to the system automatically.[Manual]: Connects the subwoofer and rear speakers manually.
• [Start manual linking]Perform the manual connection of the subwoofer and rear speakers to the system. For details, see “Connecting the Subwoofer and Rear Speakers Wirelessly” (page 30).
• [Check wireless connection]You can check the connection status of the subwoofer and rear speakers.
• [RF Channel]You can minimize interference with other wireless devices. For details, see “If Wireless Transmission is Unstable” (page 32).
• [Wireless Playback Quality]You can set the wireless playback quality of the subwoofer and rear speakers.[Sound Quality]: The sound quality takes priority over the connection status of the wireless connection.[Connection]: The connection status takes priority over the sound quality.
• [Software Version]You can check the software version of the subwoofer and rear speakers.
[DSEE HX]This function is only available when [Auto Sound]* or [Music] is selected as the sound mode.[On]: Upscales the compressed audio files or CDs to a High-Resolution sound quality and reproduces the clear high-range sound which is often lost (page 50).[Off]: Off
* Only when [Music] is selected with [Auto Sound].
[Audio DRC]You can compress the dynamic range of the sound track.[Auto]: Automatically compresses sound encoded in Dolby TrueHD.[On]: The system reproduces the dolby and DTS sound track with the kind of dynamic range that the recording engineer intended.[Off]: No compression of dynamic range.
[Sound Effect]You can select sound effects such as the sound mode.[Sound Mode On]: Vertical Surround Engine enhances the surround and height speaker channels to create an immersive and enveloping virtual surround effect such as sound mode (page 46) and vertical surround (page 45). [Dolby Speaker Virtualizer]: Dolby Speaker Virtualizer enhances the surround and height speaker channels to create an immersive and enveloping virtual surround effect when you play
[Speaker Settings]
[Audio Settings]
60GB

Dolby format. Disables sound effects other than Dolby format.[Off]: Disables the sound effects. Select this when you do not want to set the upper limit of sampling frequency.
[Advanced Auto Volume]You can reduce the change of volume due to the input signal. This function is effective when the volume of a TV commercial is louder than that of the TV program.[On]: Adjusts the volume automatically.[Off]: Off
This function is not suitable for listening to music.
[Control for HDMI][On]: The Control for HDMI function is enabled. Devices connected with an HDMI cable can control each other.[Off]: Off
[Standby Linked to TV]This function is available when you set [Control for HDMI] to [On].[Auto]: If the input of the system is [TV], [HDMI1], or [HDMI2], the system turns off automatically when you turn off the TV.[On]: The system turns off automatically when you turn off the TV regardless of the input.[Off]: The system does not turn off when you turn off the TV.
[Standby Through]This function is available when you set [Control for HDMI] to [On].[Auto]: Signals are output from the system’s HDMI OUT (TV eARC/ARC) jack when the TV is turned on while the system is not turned on. The system standby power consumption can be
reduced more than when set to [On] by turning off the connected TV.[On]: Signals are always output from the system’s HDMI OUT (TV eARC/ARC) jack when the system is not turned on. If you connect a TV other than those manufactured by Sony, we recommend that you select this setting.[Off]: Signals are not output from the system’s HDMI OUT (TV eARC/ARC) jack when the system is not turned on. Turn on the system to enjoy on the TV content of a device connected to the system. The system standby power consumption can be reduced more than when set to [On].
[TV Audio Input Mode]Set this function when the system is connected to a TV’s HDMI IN jack that is compatible with eARC or ARC. The eARC or ARC function is available when you set [Control for HDMI] to [On].[Auto]: You can listen to TV sound from the speakers of the system. The sound of eARC or ARC takes priority while set to [Auto].[Optical]: Use this setting when an optical digital cable is connected.
[eARC]Set this function when the system is connected to a TV’s HDMI IN jack that is compatible with eARC. When connecting to a TV compatible with ARC (not compatible with eARC), the ARC function works regardless of this setting.[On]: Enables the eARC function. The eARC function works when connecting a TV compatible with eARC.[Off]: Disables the eARC function.
When [eARC] is set to [On], make sure of the eARC setting of the connected TV. For details, refer to the operating instructions of the TV.
Note
[HDMI Settings]
Note
61GB

[HDMI Signal Format]You can select the HDMI signal format for the input signal. For details, see “Setting the HDMI Signal Format to Watch 4K Video Content” (page 22).
[Bluetooth Mode]You can enjoy content from a BLUETOOTH device by using this system or listen to sound from this system by using BLUETOOTH compatible headphones.[Receiver]: This system is in receiver mode, which enables it to receive and output audio from the BLUETOOTH device.[Transmitter]: This system is in transmitter mode, which enables it to send audio to the BLUETOOTH compatible headphones. If you switch the input of the system, “BT TX” appears on the front panel display.[Off]: The BLUETOOTH function is turned off and you cannot select the [Bluetooth Audio] input.
[Device List]Displays a list of paired and detected BLUETOOTH devices (SNK device) when [Bluetooth Mode] is set to [Transmitter].
[Bluetooth Codec - AAC]This function is only available when you set [Bluetooth Mode] to [Receiver].[On]: Enables AAC codec.[Off]: Disables AAC codec.
You can enjoy high-quality sound if AAC is enabled and your device supports AAC.
[Bluetooth Codec - LDAC]This function is only available when you set [Bluetooth Mode] to [Receiver] or [Transmitter].
[On]: Enables LDAC codec.[Off]: Disables LDAC codec.
• You can enjoy more high-quality sound if LDAC is enabled and your device supports LDAC.
• When connecting a BLUETOOTH device, this setting cannot be changed.
[Wireless Playback Quality]You can set the transmission data rate of LDAC playback. This function is only available when you set [Bluetooth Mode] to [Transmitter] and [Bluetooth Codec - LDAC] to [On].[Sound Quality]: The highest bit rate is used. Sound is sent in a higher quality; however, audio playback sometimes may become unstable when the link quality is not good enough. If audio playback is unstable in this mode, select [Auto].[Auto]: The data transfer rate is automatically changed depending on the environment.
[OSD Language]You can select the language you want for the system on-screen display.
[IR-Repeater][On]: Remote signals for the TV are sent from the rear of the main unit.[Off]: Turns off the function. For details, see “When the TV Remote Control does not Work” (page 32).
[Network/Bluetooth Standby][On]: You can turn the system on via the network or BLUETOOTH function.[Off]: You can save power in standby mode. It takes time to output sound from the subwoofer or rear speakers after turning the system on.
[Bluetooth Settings]
Note
Notes
[System Settings]
62GB

• If you agree to use the Chromecast built-in function, [Network/Bluetooth Standby] automatically switches to [On].
• If you set [RF Channel] to [On] (page 32), [Network/Bluetooth Standby] automatically switches to [On].
[Auto Standby][On]: Turns on the [Auto Standby] function. When you do not operate the system while no signal is input for about 20 minutes, the system enters standby mode automatically.[Off]: Off
[Software Update Notification][On]: Sets the system to inform you of latest software version information (page 64).[Off]: Off
[Auto Update Settings]• [Auto Update]
[On]: Software update is automatically executed between 2 a.m. and 5 a.m. local time in the selected [Time Zone] while this system is not in use. If you select [Off] in [Network/Bluetooth Standby], software update is performed after you turn off the system.[Off]: Off
• [Time Zone]Select your country/region.
• Software update may be performed even if you select [Off] in [Auto Update] depending on the details of the updates.
• Software update is performed automatically within 11 days of a new software release.
[Device Name Setting]You can change the name of this system according to your preference when using the following functions.• The BLUETOOTH function
• The home network• Spotify• The Chromecast built-in functionFollow on-screen instructions and use the software keyboard to enter the name.
[System Information]You can display the system information such as the software version, the MAC address.
[Privacy Setting]The system collects the information of your device usage. Read the privacy policy, which will appear when this setting is required, and decide whether you agree to the information gathering.[Agree]: Select this when you accept the information gathering.[Do not agree]: Select this when you do not accept the information gathering.
TipEven if you have selected [Agree], you will be able to stop the information gathering by reselecting [Do not agree] or resetting [System Settings] to the factory default via [Resetting] (page 64).
[Software License Information]You can display the Software License Information.
[Internet Settings]Connect the system to the network beforehand. [Wired LAN Settings]: Select this when you connect to a broadband router using a LAN cable. When you select this setting, the wireless LAN function of the system is disabled automatically.[Wireless LAN Settings]: Select this when you use the built-in Wi-Fi function of the system to connect to a wireless network.
Notes
Notes
[Network Settings]
63GB

TipFor further details, visit the following website and check the FAQ:http://www.sony-asia.com/section/support
[Network Connection Status]Displays the current network connection status.
You can reset the system settings to the factory default by selecting the group of settings. All the settings within the group will be reset.For details, see “Resetting the System” (page 75).
You can update the software of the system, subwoofer, or rear speakers. For details, see “Updating the Software” (page 64).
Updating the SoftwareBy updating your software to the latest version, you can take advantage of the newest functions.For information about update functions, visit the following website: http://www.sony-asia.com/section/support
• It may take up to 40 minutes for the update to be completed.
• An Internet environment is necessary to perform updates via Internet.
• While the updating operation is in progress, do not turn on or off the system, disconnect the AC power cord (mains lead), disconnect/connect the HDMI cable, or operate the system or TV. Wait for the software update to complete.
• Set [Auto Update] to [On] when you want to perform software updates automatically (page 63). Software update may be performed even if you select [Off] in [Auto Update] depending on the details of the updates.
1 Press HOME.The home menu appears on the TV screen.
2 Select [Setup] - [Advanced Settings] on the home menu.If the system detects update information for the system on the network, the update notification and [Software Update] appears on the home menu. In this case, select [Software Update] and go to step 4.
3 Select [Software Update].The [Software Update] screen appears on the TV screen.
4 Select the item for updating.Select the updating item from the following items by pressing / and , then update the software
[Resetting]
[Software Update]
Notes
64GB

by following the on-screen instructions.When a software update starts, the system automatically reboots.During a software update, “UPDT” appears in the front panel display. After the update is complete, the system automatically reboots.
[Network update]Updates the software using the available network. Make sure that the network is connected to the Internet.
[USB update]Updates the software using a USB memory. For details of updating, refer to the instructions that are displayed when downloading the update file.
[Wireless speakers only]Updates the software of the subwoofer and rear speakers when the software of the system is the latest version. Make sure that the subwoofer and rear speakers are turned on and connected to the system (page 30).
• You can perform [USB update] by pressing and holding the BLUETOOTH and button on the main unit for 7 seconds.
• You can perform [Network update] on Sony | Music Center.
• If the updating of the subwoofer or rear speakers does not work, move them to a location near the main unit and update.
Notes
65GB

TroubleshootingIf you experience any of the following difficulties while using the system, use this troubleshooting guide to help remedy the problem before requesting repairs. Should any problem persist, consult your nearest Sony dealer.Be sure to bring your main unit, subwoofer, and rear speakers (not supplied), even if it seems as though only one has a problem, when you request to repair.
The system does not power up. Check that the AC power cord (mains
lead) is connected securely. Disconnect the AC power cord (mains
lead) from the wall outlet (mains), and then reconnect after several minutes.
The system does not turn on even when the TV is turned on. Set [Setup] - [Advanced Settings]
- [HDMI Settings] - [Control for HDMI] to [On] (page 61). The TV must support the Control for HDMI function (page 53). For details, refer to the operating instructions of your TV.
Check the speaker settings of the TV. The system power syncs with the speaker settings of the TV. For details, refer to the operating instructions of your TV.
Depending on the TV, if the sound was output from the speakers of the TV the previous time, the system may not turn on by interlocking with the TV power even when the TV is turned on.
The system turns off when the TV is turned off. Check the setting of [Setup] -
[Advanced Settings] - [HDMI Settings] - [Standby Linked to TV] (page 61). When [Standby Linked to TV] is set to [On] or [Auto], the system turns off automatically when you turn off the TV.
The system does not turn off even when the TV is turned off. Check the setting of [Setup] -
[Advanced Settings] - [HDMI Settings] - [Standby Linked to TV] (page 61). To turn the system off automatically regardless of the input when you turn off the TV, set [Standby Linked to TV] to [On]. The TV must support the Control for HDMI function (page 53). For details, refer to the operating instructions of your TV.
The system cannot be turned off. The system may be in demo mode. To
cancel demo mode, reset the system. Press and hold (power) and – (volume) on the main unit for more than 5 seconds (page 75).
There is no picture or the picture is not output correctly. Select the appropriate input
(page 33). When there is no picture while the TV
input is selected, select the TV channel that you want using the TV remote control.
When there is no picture while the HDMI1/2 input is selected, press the playback button of the connected device.
Disconnect the HDMI cable, then connect it again. Make sure that the cable is firmly inserted.
Troubleshooting
Power
Picture
66GB

When there is no picture from the connected device or the picture from the connected device is not output correctly, set [Setup] - [Advanced Settings] - [HDMI Settings] - [HDMI Signal Format] - [HDMI IN 1]/[HDMI IN 2] to [Standard format] (page 22).
If you connect a device supporting HDCP 2.2, be sure to connect the device to the HDMI IN jack and the TV to the HDMI OUT (TV eARC/ARC) jack of the system.
The system is connected to an input device that is not HDCP (High-bandwidth Digital Content Protection) compliant. In this case, check the specifications of the connected device.
3D content from the HDMI IN 1/2 jack do not appear on the TV screen. Depending on the TV or video device,
3D content may not appear. Check the supported HDMI video format (page 80).
4K video content from the HDMI IN 1/2 jack do not appear on the TV screen. Depending on the TV or the video
device, 4K video content may not appear. Check the video capability and settings of your TV and video device.
The picture may not be displayed properly if the [HDMI Signal Format] setting is changed. In this case, change the setting to [Standard format] (page 22).
Use a Premium High Speed HDMI Cable with Ethernet that supports 18Gbps or High Speed HDMI Cable with Ethernet (page 80).
An image is not displayed on the entire TV screen. The aspect ratio on the media is fixed.
Picture and sound of the device that is connected to the system are not output from the TV when the system is not turned on. Set [Setup] - [Advanced Settings]
- [HDMI Settings] - [Control for HDMI] to [On] on the system, and then set [Standby Through] to [Auto] or [On] (page 61).
Turn on the system, and then switch the input for the device playing.
If connected to devices other than those manufactured by Sony that support the Control for HDMI function, set [Setup] - [Advanced Settings] - [HDMI Settings] - [Standby Through] to [On] (page 61).
HDR contents cannot show as high-dynamic range. Check the settings of the TV and
connected device. For details, refer to the operating instructions of your TV and the connected device.
Some devices may convert HDR contents to SDR if the bandwidth is not enough. In that case, set
[Setup] - [Advanced Settings] - [HDMI Settings] - [HDMI Signal Format] - [HDMI IN 1]/[HDMI IN 2] to [Enhanced format] if the TV and the connected device support a bandwidth of up to 18Gbps (page 22). When you select [Enhanced format], be sure to use a Premium High Speed HDMI Cable with Ethernet that supports 18Gbps (page 80).
The system cannot connect to a TV with the BLUETOOTH function. When you connect the system and TV
with the HDMI cable (supplied), the BLUETOOTH connection is canceled.
Sound
67GB

No TV sound is output from the system. Check the type and connection of the
HDMI cable, optical digital cable, or analog audio cable that is connected to the system and the TV (refer to the supplied Startup Guide).
Disconnect the cables that are connected between the TV and the system, then connect them firmly again. Disconnect the AC power cords (mains leads) of the TV and the system from the AC outlets (mains), then connect them again.
When the system and TV are connected with an HDMI cable, check the following.– The HDMI jack of the connected TV
is labeled with “eARC” or “ARC.”– The Control for HDMI function of the
TV is set to on.– The eARC or ARC function of the TV
is enabled.– On the system, [Control for HDMI] is
set to [On] and [TV Audio Input Mode] to [Auto] (page 61).
If your TV is not compatible with eARC, set [Setup] - [Advanced Settings] - [HDMI Settings] - [eARC] to [Off] (page 61).
If your TV is not compatible with eARC or ARC, connect the optical digital cable (not supplied) (refer to the supplied Startup Guide). If the TV is not compatible with eARC or ARC, TV sound will not be output from the system even if the system is connected to the TV’s HDMI IN jack.
Switch the input of the system to the TV input. When you connect the system and TV with an analog audio cable (not supplied), switch input of the system to the ANALOG input (page 38).
Increase the volume on the system or cancel muting.
If sound of a cable box/satellite box connected to the TV is not output, connect the device to a HDMI IN 1 or
HDMI IN 2 jack of the system and switch input of the system to the input for the connected device ([HDMI1] or [HDMI2]) (refer to the supplied Startup Guide).
Depending on the order in which you connect the TV and the system, the system may be muted and “MUTING” is displayed on the front panel display of the system. If this happens, turn on the TV first, then the system.
Set the speakers setting of the TV (BRAVIA) to Audio System. Refer to the operating instructions of your TV regarding how to set the TV.
Picture and sound of the device that is connected to the system are not output from the TV when the system is not turned on. Set [Setup] - [Advanced Settings]
- [HDMI Settings] - [Control for HDMI] to [On] on the system, and then set [Standby Through] to [Auto] or [On] (page 61).
Turn on the system, and then switch the input for the device playing.
If connected to devices other than those manufactured by Sony that support the Control for HDMI function, set [Setup] - [Advanced Settings] - [HDMI Settings] - [Standby Through] to [On] (page 61).
The sound is output from both the system and TV. Mute the sound of the system or TV.
The sound is interrupted while watching a TV program or content on a Blu-ray Disc, etc. Check the sound mode setting
(page 46). If the sound mode is set to [Auto Sound], the sound may be interrupted when the sound mode is changed automatically according to the information of the program that is being played. If you do not want to change the sound mode
68GB

automatically, set the sound mode to a setting other than [Auto Sound].
The TV sound from this system lags behind the image. Set the adjustment value of the delay
between the picture and sound to 0 msec if it is set to the range between 25 msec and 300 msec (page 49).
A time gap between the sound and picture may occur depending on the sound source. If your TV has a function that delays the image, use it for adjustment.
No sound or only a very low-level sound of the device connected to the system is heard. Press + on the remote control and
check the volume level (page 12). Press or + on the remote control
to cancel the muting function (page 12).
Make sure the input source is selected correctly. You should try other input sources by pressing the input select button on the remote control (TV/HDMI1/HDMI2/ANALOG/USB/BLUETOOTH) (page 12).
Check that all the cables and cords of the system and connected device are firmly inserted.
When you play content compatible with copyright protection technology (HDCP), it may not be output from the system.
Set [Setup] - [Advanced Settings] - [HDMI Settings] - [HDMI Signal Format] to [Standard format] (page 22).
The surround effect cannot be obtained. Depending on the input signal and
the sound mode setting, surround sound processing may not work effectively. The surround effect may be subtle, depending on the program or disc.
To play multi-channel audio, check the digital audio output setting on the device connected to the system. For details, refer to the operating instructions supplied with the connected device.
The sound is delayed behind the picture when using the wireless multi room function. When the sound of the [TV] (including
the connection with the BLUETOOTH function), [HDMI1], [HDMI2], [Bluetooth Audio], or [Analog] input is played in the wireless multi room function, the sound of the system is delayed behind the picture to synchronize with the sound of other speakers. If you are bothered by the time gap between the sound and picture, try the following.• For the HDMI1 or HDMI2 input: Press
OPTIONS and set [Multi-room Sync] to [Off].
• For the TV or analog input: Press OPTIONS, / until “MSYNC” appears on the front panel display, and (enter), then press / until “OFF” appears on the front panel display and press (enter).
The sound of the system is synchronized with the picture though the sound output from other speakers is delayed.
No sound or only a very low-level sound is heard from the subwoofer. Press SW + on the remote control
to increase the subwoofer volume (page 48).
Make sure that the power indicator on the subwoofer is lit in green.
If the power indicator on the subwoofer does not light, try the following.
Subwoofer
69GB

– Make sure the AC power cord (mains lead) of the subwoofer is connected properly.
– Press (power) of the subwoofer to turn on the power.
If the power indicator on the subwoofer flashes slowly in green or lights in red, try the following.– Move the subwoofer to a location
near the main unit so that the power indicator on the subwoofer lights in green.
– Follow the steps in “Connecting the Subwoofer and Rear Speakers Wirelessly” (page 30).
– Check the wireless connection status (page 60).
If the power indicator on the subwoofer flashes in red, press (power) of the subwoofer to turn off the power and check whether the ventilation holes of the subwoofer is blocked or not.
If the input sources contain very little bass sound components (i.e., a TV broadcast), the sound from the subwoofer may be difficult to hear. You can check the subwoofer sound by emitting the test tone (page 56).
Set the night mode to off. For details, see “Enjoying Clear Sound with Low Volume at Midnight (NIGHT)” (page 47).
If you change the [RF Channel] setting from [Off] to [On] (page 32), it may take 1 minute for the sound to be output.
Sound skips or has noise. If there is a device nearby that
generates electromagnetic waves, such as a wireless LAN or a microwave oven in use, locate the system apart from it.
If there is an obstacle between the main unit and the subwoofer, move or remove it.
Locate the main unit and the subwoofer as close as possible.
Change the [RF Channel] setting (page 32).
Switch the network connection of the TV or Blu-ray Disc player from wireless to wired.
No sound is heard from the rear speakers. Make sure the AC power cord (mains
lead) of the rear speaker is connected properly.
If the power indicator on the rear speaker does not light, try the following.– Make sure the AC power cord
(mains lead) of the rear speaker is connected properly.
– Press (power) of the rear speaker to turn on the power.
If the power indicator on the rear speaker flashes slowly in green or lights in red, try the following.– Move the rear speaker to a location
near the main unit so that the power indicator on the rear speaker lights in green.
– Follow the steps in “Connecting the Subwoofer and Rear Speakers Wirelessly” (page 30).
– Check the wireless connection status (page 60).
Press REAR + on the remote control to increase the rear speakers volume (page 48).
If you change the [RF Channel] setting from [Off] to [On] (page 32), it may take 1 minute for the sound to be output.
Sound skips or has noise. If there is a device nearby that
generates electromagnetic waves, such as a wireless LAN or a microwave oven in use, locate the system apart from it.
Rear Speakers (not supplied)
70GB

If there is an obstacle between the main unit and the rear speaker, move or remove it.
Locate the main unit and the rear speaker as close as possible.
Switch the network connection of the TV or Blu-ray Disc player from wireless to wired.
The USB device is not recognized. Try the following: Turn the system off. Remove and reconnect the USB
device. Turn the system on.
Make sure that the USB device is securely connected to the (USB) port (page 36).
Check to see if the USB device or a cable is damaged.
Make sure that the USB device is on. If the USB device is connected via a
USB hub, disconnect it and connect the USB device directly to the system.
When connecting a WALKMAN® or smartphone, its internal storage or external storage (such as a memory card) may not be recognized.
Pairing cannot be achieved. Bring this system and the
BLUETOOTH device closer together. Make sure this system is not receiving
interference from a wireless LAN device, other 2.4 GHz wireless devices, or a microwave oven. If a device that generates electromagnetic radiation is nearby, move the device away from this system.
BLUETOOTH connection cannot be completed. Make sure that the BLUETOOTH
indicator of the main unit is lit (page 35).
Make sure the BLUETOOTH device to be connected with is turned on and the BLUETOOTH function is enabled.
Bring this system and the BLUETOOTH device closer together.
Pair this system and the BLUETOOTH device again. You may need to cancel the pairing with this system using your BLUETOOTH device first.
Pairing information may be deleted. Perform pairing operation again (page 34).
Sound of the connected BLUETOOTH mobile device is not output from the system. Make sure that the BLUETOOTH
indicator of the main unit is lit (page 35).
Bring this system and the BLUETOOTH device closer together.
If a device that generates electromagnetic radiation, such as a wireless LAN device, other BLUETOOTH devices, or a microwave oven is nearby, move the device away from this system.
Remove any obstacle between this system and the BLUETOOTH device or move this system away from the obstacle.
Reposition the connected BLUETOOTH device.
Switch the wireless LAN frequency of any nearby wireless LAN router or PC to 5 GHz range.
Increase the volume on the connected BLUETOOTH device.
USB Device Connection
Mobile Device Connection
71GB

Pairing cannot be achieved. Bring this system and the
BLUETOOTH device closer together. Make sure this system is not receiving
interference from a wireless LAN device, other 2.4 GHz wireless devices, or a microwave oven. If a device that generates electromagnetic radiation is nearby, move the device away from this system.
BLUETOOTH connection cannot be completed. Make sure that the BLUETOOTH
indicator of the main unit is lit (page 8).
Make sure the BLUETOOTH device to be connected with is turned on and the BLUETOOTH function is enabled.
Bring this system and the BLUETOOTH device closer together.
Pair this system and the BLUETOOTH device again. You may need to cancel the pairing for the BLUETOOTH device with this system first. See “To remove a registered device from the device list” (page 43).
Pairing information may be deleted. Perform pairing operation again (page 42).
No sound is output from the connected BLUETOOTH headphones. Make sure that the BLUETOOTH
indicator of the main unit is lit (page 8).
Bring this system and the BLUETOOTH device closer together.
If a device that generates electromagnetic radiation, such as a wireless LAN device, other BLUETOOTH devices, or a microwave
oven is nearby, move the device away from this system.
Remove any obstacle between this system and the BLUETOOTH device, or move this system away from the obstacle.
Reposition the connected BLUETOOTH device.
Switch the wireless LAN frequency of any nearby wireless LAN router or PC to 5 GHz range.
Increase the volume on the connected BLUETOOTH device.
Set [Wireless Playback Quality] to [Auto] (page 62).
Some content may not be output due to content protection.
The system cannot connect to the network. Check the network connection
(page 24) and network settings (page 63).
You cannot connect your PC to the Internet after [Wi-Fi Protected Setup™ (WPS)] is performed. The wireless settings of the router
may change automatically if you use the Wi-Fi Protected Setup function before adjusting the settings of the router. In this case, change the wireless settings of your PC accordingly.
The system cannot connect to the network or the network connection is unstable. Make sure the wireless LAN router is
on. Check the network connection
(page 25) and network settings (page 63).
Headphones Connection with the BLUETOOTH function
Wired LAN Connection
Wireless LAN Connection
72GB

Depending on the usage environment (including the wall material), radio wave reception conditions, or obstacles between the system and wireless LAN router, the possible communication distance may be shortened. Move the system and wireless LAN router closer to each other.
Devices that use a 2.4 GHz frequency band, such as a microwave, BLUETOOTH, or digital cordless device, may interrupt communication. Move the main unit away from such devices, or turn off such devices.
The wireless LAN connection may become unstable depending on the usage environment, especially while using the BLUETOOTH function of the system. In this case, adjust the usage environment.
The wireless LAN router you want is not shown in the wireless network list. Press BACK to return to the previous
screen, and try [Wireless LAN Settings] again (page 25). If the wireless LAN router you want is still not detected, select [New connection registration] from the network list, then select [Manual registration] to input a network name (SSID) manually.
You cannot connect the system to the Internet. Check the wired or wireless LAN
connection. Restart the router or wireless LAN
router.
The sound is delayed behind the picture. When the sound of the [TV] (including
the connection with the BLUETOOTH function), [HDMI1], [HDMI2], [Bluetooth Audio] input is played in the wireless multi room function, the sound of the system is delayed behind the picture to synchronize with the sound of other speakers. If you are bothered by the time gap between the sound and picture, try the following.• For the HDMI1 or HDMI2 input: Press
OPTIONS and set [Multi-room Sync] to [Off].
• For the TV or analog input: Press OPTIONS, / until “MSYNC” appears on the front panel display, and (enter), then press / until “OFF” appears on the front panel display and press (enter).
The sound of the system is synchronized with the picture though the sound output from other speakers is delayed.
The wireless multi room function cannot be used on Sony | Music Center. Connect the mobile device to the
same network as that of the system.
The remote control of this system does not function. Point the remote control at the
remote control sensor on the main unit (page 8).
Remove any obstacles in the path between the remote control and the system.
Internet Connection
Wireless Multi Room
Remote Control
73GB

Replace both batteries in the remote control with new ones, if they are weak.
Make sure you are pressing the correct button on the remote control.
TV remote control does not work. This problem might be solved by
enabling the IR repeater function (page 32).
The Control for HDMI function does not work properly. Check the connection with the
system (refer to the supplied Startup Guide).
Enable the Control for HDMI function on the TV. For details, refer to the operating instructions of your TV.
Wait a while, and then try again. If you unplug the system, it will take a while before operations can be made. Wait for 15 seconds or longer, and then try again.
Make sure the devices connected to the system support the Control for HDMI function.
Enable the Control for HDMI function on the devices connected to the system. For details, refer to the operating instructions of your device.
The type and number of devices that can be controlled by the Control for HDMI function is restricted by the HDMI CEC standard as follows: – Recording devices (Blu-ray Disc
recorder, DVD recorder, etc.): up to 3 devices
– Playback devices (Blu-ray Disc player, DVD player, etc.): up to 3 devices (this system uses one of them)
– Tuner-related devices: up to 4 devices
– Audio system (receiver/headphones): up to 1 device (used by this system)
“PRTCT” flashes in the front panel display and the system is turned off. Disconnect the AC power cord (mains
lead) and make sure nothing is obstructing the ventilation holes of the system.
“PRTCT,” “PUSH,” speaker name (“SUB,” “SUR L,” or “SUR R”), and “POWER” flash alternately in the front panel display. Press (power) on the
corresponding speaker (“SUB”: subwoofer, “SUR L”: left rear speaker, “SUR R”: right rear speaker) to turn off. For the subwoofer, disconnect the AC power cord (mains lead) and make sure nothing is obstructing the ventilation holes of the subwoofer, then restart the system. For the rear speaker, disconnect the AC power cord (mains lead), then restart the system. If they are reconnected properly, the display in the front panel display returns to the normal display.
“BT TX” appears in the front panel display. Set [Bluetooth Mode] to [Receiver].
“BT TX” appears if [Bluetooth Mode] is set to [Transmitter] (page 62).
Sensors of the TV do not work properly. The main unit may block some
sensors (such as the brightness sensor), the remote control receiver of your TV or the emitter for 3D glasses (infrared transmission) of a 3D TV that supports the infrared 3D glass system, or wireless communication. Move the main unit away from the TV within a range that allow those parts to operate properly. For the locations
Others
74GB

of the sensors and remote control receiver, refer to the operating instructions supplied with the TV.
Wireless functions (wireless LAN, the BLUETOOTH function, subwoofer, or rear speakers) are unstable. Do not place metal objects other than
a TV around the system.
Music that you are not familiar with suddenly plays. The pre-installed sample music may
have been played. Press on the main unit to stop playback.
The system cannot be turned off or [Advanced Settings] cannot be used./When pressing (power), “.DEMO” appears in the display window and the system cannot be turned off. The system may be in demo mode. To
cancel demo mode, reset the system. Press and hold (power) and – (volume) on the main unit for more than 5 seconds (page 75).
Spotify cannot be played with the MUSIC SERVICE button, or cannot be played on the way of playback. Play the music of Spotify on the
system by using the Spotify Connect function on the Spotify app of the mobile device. For details, see “Using Spotify” (page 39).
The system restarts. When connecting to a TV with a
resolution that is different from that of the system, the system may restart to reset the picture output setting.
Resetting the SystemIf the system still does not operate properly, reset the system as follows.
1 Press HOME.The home menu appears on the TV screen.
2 Select [Setup] - [Advanced Settings] on the home menu.
3 Select [Resetting].
4 Select the menu item you want to reset.
5 Select [Start].
To cancel resettingSelect [Cancel] in step 5.
Press and hold (power) and – (volume) on the main unit for more than 5 seconds.The settings return to their initial status.
By resetting, the link with the subwoofer and rear speakers may be lost. In this case, perform “Connecting the Subwoofer and Rear Speakers Wirelessly” (page 30).
If You Cannot Perform Resetting Using the Home Menu
Note
75GB

Specifications
Amplifier sectionPOWER OUTPUT (rated)
Front L + Front R: 60 W + 60 W (at 4 ohms, 1 kHz, 1% THD)
POWER OUTPUT (reference)Front L/Front R/Center speaker blocks: 100 W (per channel at 4 ohms, 1 kHz)
InputsHDMI IN 1/2*ANALOG INTV IN (OPT)
OutputsHDMI OUT (TV eARC/ARC)*
* HDMI IN 1/2 and HDMI OUT (TV eARC/ARC) jacks support HDCP 2.2 protocol. HDCP 2.2 is newly enhanced copyright protection technology that is used to protect content such as 4K movies.
HDMI SectionConnector
Type A (19pin)
USB section (USB) port:
Type A (For connecting USB memory)
LAN sectionLAN(100) terminal
100BASE-TX Terminal
Wireless LAN sectionCommunication system
IEEE 802.11 a/b/g/nFrequency band
2.4 GHz, 5 GHz
BLUETOOTH sectionCommunication system
BLUETOOTH Specification version 4.2
Output BLUETOOTH Specification Power Class 1
Maximum communication range Line of sight approx. 30 m1)
Maximum number of devices to be registered9 devices
Frequency band 2.4 GHz band (2.4 GHz - 2.4835 GHz)
Modulation method FHSS (Freq Hopping Spread Spectrum)
Compatible BLUETOOTH profiles2) A2DP (Advanced Audio Distribution Profile)AVRCP (Audio Video Remote Control Profile)
Supported Codecs3) SBC4), AAC5), LDAC
Transmission range (A2DP) 20 Hz - 40,000 Hz (LDAC sampling frequency 96 kHz with 990 kbps transmission)20 Hz - 20,000 Hz (Sampling frequency 44.1 kHz)
1) The actual range will vary depending on factors such as obstacles between devices, magnetic fields around a microwave oven, static electricity, cordless phone use, reception sensitivity, the operating system, software applications, etc.
2) BLUETOOTH standard profiles indicate the purpose of BLUETOOTH communication between devices.
3) Codec: Audio signal compression and conversion format
4) Abbreviation for Subband Codec 5) Abbreviation for Advanced Audio
Coding
Front L/Front R/Center speaker block sectionSpeaker system
Full Range speaker system, Acoustic suspension
Speaker46 mm cone type
GeneralPower requirements
120 V - 240 V AC, 50 Hz/60 Hz
Additional Information
Bar Speaker (SA-Z9F)
76GB

Power consumptionOn: 52 W[Network/Bluetooth Standby] - [On]: Less than 2.4 W[Network/Bluetooth Standby] - [Off]: Less than 0.5 W*
* When [Standby Through] is set to [Off], or [Standby Through] is set to [Auto] while the connected TV is turned off.
Dimensions* (approx.) (w/h/d)1000 mm × 64 mm × 98 mm (without grille frame)1000 mm × 64 mm × 99 mm (with grille frame)
*Not including projection portionMass (approx.)
2.9 kg (without grille frame)3.1 kg (with grille frame)
Compatible iPhone/iPod modelsThe compatible iPhone/iPod models are as follows. Update your iPhone/iPod with the latest software before using with the system.Made for:iPhone X/iPhone 8/iPhone 8 Plus/iPhone 7/iPhone 7 Plus/iPhone SE/iPhone 6s/iPhone 6s Plus/iPhone 6/iPhone 6 Plus/iPhone 5s/iPhone 5c/iPhone 5iPod touch (6th generation)/iPod touch (5th generation)
POWER OUTPUT (reference)100 W (at 4 ohms, 100 Hz)
Speaker systemSubwoofer speaker system, Bass reflex
Speaker160 mm cone type
Power requirements120 V - 240 V AC, 50 Hz/60 Hz
Power consumptionOn: 20 WStandby mode: 1 W or lessTurned off: 0.5 W or less
Dimensions (approx.) (w/h/d)190 mm × 382 mm × 386 mm (not including projection portion)
Mass (approx.)8.1 kg
Communication systemWireless Sound Specification version 4.0
Frequency band5 GHz
Modulation methodOFDM
Design and specifications are subject to change without notice.
Subwoofer (SA-WZ9F)
Wireless Transmitter/Receiver Section
77GB
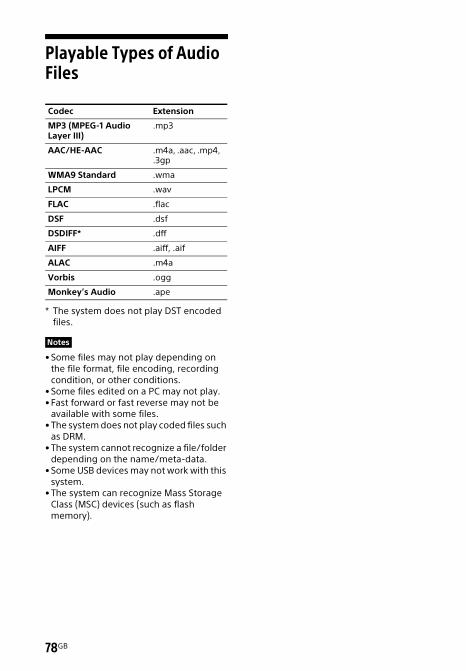
Playable Types of Audio Files
* The system does not play DST encoded files.
• Some files may not play depending on the file format, file encoding, recording condition, or other conditions.
• Some files edited on a PC may not play.• Fast forward or fast reverse may not be
available with some files. • The system does not play coded files such
as DRM.• The system cannot recognize a file/folder
depending on the name/meta-data.• Some USB devices may not work with this
system.• The system can recognize Mass Storage
Class (MSC) devices (such as flash memory).
Codec Extension
MP3 (MPEG-1 Audio Layer III)
.mp3
AAC/HE-AAC .m4a, .aac, .mp4, .3gp
WMA9 Standard .wma
LPCM .wav
FLAC .flac
DSF .dsf
DSDIFF* .dff
AIFF .aiff, .aif
ALAC .m4a
Vorbis .ogg
Monkey’s Audio .ape
Notes
78GB

Supported Input Audio FormatsAudio formats supported by this system are as follows.
: Supported format.–: Unsupported format.
The HDMI IN 1/2 jacks do not support audio format that contains copy protections, such as Super Audio CD or DVD-Audio.
Format Function
“HDMI1”“HDMI2”
“TV” (eARC)
“TV” (ARC)
“TV” (OPT)
LPCM 2ch
LPCM 5.1ch – –
LPCM 7.1ch – –
Dolby Digital
Dolby TrueHD – –
Dolby Digital Plus –
Dolby Atmos - Dolby TrueHD – –
Dolby Atmos - Dolby Digital Plus –
DTS
DTS-ES Discrete 6.1, DTS-ES Matrix 6.1
DTS 96/24
DTS-HD High Resolution Audio – –
DTS-HD Master Audio – –
DTS-HD LBR – –
DTS:X – –
DSD – – –
Note
79GB

Supported HDMI Video FormatsVideo formats supported by this system are as follows.
: Compatible with 3D signal in Side-by-Side (Half)3) format: Compatible with 3D signal in Frame packing and Over-Under (Top-and-Bottom)3)
format
1) Use a Premium High Speed HDMI Cable with Ethernet that supports 18Gbps.2) Use a Premium High Speed HDMI Cable with Ethernet or Sony High Speed HDMI Cable
with Ethernet with the Cable Type Logo.3) The OPTIONS button does not work and the On-Screen Display (OSD) of the system is
not displayed.
• Use an HDMI-authorized cable.• We do not recommend using an HDMI-DVI conversion cable.• Audio signals (sampling frequency, bit length, etc.) transmitted from an HDMI jack
may be suppressed by the connected device.• Sound may be interrupted when the sampling frequency or the number of channels
of audio output signals from the playback device is switched.
Resolution Frame Rate 3D Color Space Color Depth [HDMI Signal Format] setting
4K4096 × 2160p3)
3840 × 2160p
50/59.94/60 Hz
–RGB 4:4:4
YCbCr 4:4:4 8 bit
[Enhanced format]1)– YCbCr 4:2:2 8/10/12 bit
– YCbCr 4:2:0 10/12 bit
23.98/24/25/29.97/30 Hz – RGB 4:4:4YCbCr 4:4:4 10/12 bit
4K4096 × 2160p3)
3840 × 2160p
50/59.94/60 Hz – YCbCr 4:2:0 8 bit
[Standard format]2)
23.98/24/25/29.97/30 Hz– RGB 4:4:4
YCbCr 4:4:4 8 bit
– YCbCr 4:2:2 8/10/12 bit
1920 × 1080p25/29.97/30/50/
59.94/60 Hz –
RGB 4:4:4YCbCr 4:4:4YCbCr 4:2:2 8/10/12 bit
23.98/24 Hz
1920 × 1080i 50/59.94/60 Hz
1280 × 720p50/59.94/60 Hz
23.98/24/29.97/30 Hz –
720 × 480p 59.94/60 Hz –
720 × 576p 50 Hz –
640 × 480p 59.94/60 Hz – RGB 4:4:4
Notes on HDMI Jack and HDMI Connections
80GB

• When the TV input is selected, video signals via one of the HDMI IN 1/2 jacks selected last time are output from the HDMI OUT (TV eARC/ARC) jack.
• This system supports “TRILUMINOS.”• All HDMI IN and HDMI OUT (TV eARC/ARC) jacks support bandwidth up to 18Gbps,
HDCP 2.21), BT.2020 wide color spaces2), and HDR (High Dynamic Range)3) contents pass-through.
• When connecting to a TV with a resolution that is different from that of the system, the system may restart to reset the picture output setting.1) HDCP 2.2 is newly enhanced copyright protection technology that is used to protect
content such as 4K movies.2) BT.2020 color space is new wider color standard that is defined for ultra-high definition
television systems.3) HDR is an emerging video format that can display a wider range of brightness levels.
The system is compatible with HDR10, HLG (Hybrid Log-Gamma), and Dolby Vision.
81GB

On BLUETOOTH Communication• BLUETOOTH devices should be used
within approximately 10 meters (33 feet) (unobstructed distance) of each other. The effective communication range may become shorter under the following conditions.– When a person, metal object, wall or
other obstruction is between the devices with a BLUETOOTH connection
– Locations where a wireless LAN is installed
– Around microwave ovens that are in use– Locations where other electromagnetic
waves occur• BLUETOOTH devices and wireless LAN
(IEEE 802.11 b/g/n) use the same frequency band (2.4 GHz). When using your BLUETOOTH device near a device with wireless LAN capability, electromagnetic interference may occur. This could result in lower data transfer rates, noise, or inability to connect. If this happens, try the following remedies:– Use this system at least 10 meters
(33 feet) away from the wireless LAN device.
– Turn off the power to the wireless LAN device when using your BLUETOOTH device within 10 meters (33 feet).
– Install this system and BLUETOOTH device as closer to each other as possible.
• The radio waves broadcast by this system may interfere with the operation of some medical devices. Since this interference may result in malfunction, always turn off the power on this system and BLUETOOTH device in the following locations:– In hospitals, on trains, in airplanes, at
gas stations, and any place where flammable gasses may be present
– Near automatic doors or fire alarms• This system supports security functions
that comply with the BLUETOOTH specification to ensure secure connection
during communication using BLUETOOTH technology. However, this security may be insufficient depending on the setting content and other factors, so always be careful when performing communication using BLUETOOTH technology.
• Sony cannot be held liable in any way for damages or other loss resulting from information leaks during communication using BLUETOOTH technology.
• BLUETOOTH communication is not necessarily guaranteed with all BLUETOOTH devices that have the same profile as this system.
• BLUETOOTH devices connected with this system must comply with the BLUETOOTH specification prescribed by the Bluetooth SIG, Inc., and must be certified to comply. However, even when a device complies with the BLUETOOTH specification, there may be cases where the characteristics or specifications of the BLUETOOTH device make it impossible to connect, or may result in different control methods, display or operation.
• Noise may occur or the audio may cut off depending on the BLUETOOTH device connected with this system, the communications environment, or surrounding conditions.
If you have any questions or problems concerning your system, please consult your nearest Sony dealer.
82GB

END USER LICENSE AGREEMENT
IMPORTANT: BEFORE USING THE SOFTWARE, PLEASE READ THIS END USER LICENSE AGREEMENT (“EULA”) CAREFULLY. BY USING THE SOFTWARE YOU ARE ACCEPTING THE TERMS OF THIS EULA. IF YOU DO NOT ACCEPT THE TERMS OF THIS EULA, YOU MAY NOT USE THE SOFTWARE.
This EULA is a legal agreement between you and Sony Home Entertainment & Sound Products Inc. (“SONY”). This EULA governs your rights and obligations regarding the SONY software of SONY and/or its third party licensors (including SONY’s affiliates) and their respective affiliates (collectively, the “THIRD-PARTY SUPPLIERS”), together with any updates/upgrades provided by SONY, any printed, on-line or other electronic documentation for such software, and any data files created by operation of such software (collectively, the “SOFTWARE”).
Notwithstanding the foregoing, any software in the SOFTWARE having a separate end user license agreement (including, but not limited to, GNU General Public license and Lesser/Library General Public License) shall be covered by such applicable separate end user license agreement in lieu of the terms of this EULA to the extent required by such separate end user license agreement (“EXCLUDED SOFTWARE”).
SOFTWARE LICENSEThe SOFTWARE is licensed, not sold. The SOFTWARE is protected by copyright
and other intellectual property laws and international treaties.
COPYRIGHTAll right and title in and to the SOFTWARE (including, but not limited to, any images, photographs, animation, video, audio, music, text and “applets” incorporated into the SOFTWARE) is owned by SONY or one or more of the THIRD-PARTY SUPPLIERS.
GRANT OF LICENSESONY grants you a limited license to use the SOFTWARE solely in connection with your compatible device (“DEVICE”) and only for your individual, non-commercial use. SONY and the THIRD-PARTY SUPPLIERS expressly reserve all rights, title and interest (including, but not limited to, all intellectual property rights) in and to the SOFTWARE that this EULA does not specifically grant to you.
REQUIREMENTS AND LIMITATIONSYou may not copy, publish, adapt, redistribute, attempt to derive source code, modify, reverse engineer, decompile, or disassemble any of the SOFTWARE, whether in whole or in part, or create any derivative works from or of the SOFTWARE unless such derivative works are intentionally facilitated by the SOFTWARE. You may not modify or tamper with any digital rights management functionality of the SOFTWARE. You may not bypass, modify, defeat or circumvent any of the functions or protections of the SOFTWARE or any mechanisms operatively linked to the SOFTWARE. You may not separate any individual component of the SOFTWARE for use on more than one DEVICE unless expressly authorized to do so by SONY. You may not remove, alter, cover or deface any trademarks or notices on the
83GB

SOFTWARE. You may not share, distribute, rent, lease, sublicense, assign, transfer or sell the SOFTWARE. The software, network services or other products other than SOFTWARE upon which the SOFTWARE’S performance depends might be interrupted or discontinued at the discretion of the suppliers (software suppliers, service suppliers, or SONY). SONY and such suppliers do not warrant that the SOFTWARE, network services, contents or other products will continue to be available, or will operate without interruption or modification.
USE OF SOFTWARE WITH COPYRIGHTED MATERIALSThe SOFTWARE may be capable of being used by you to view, store, process and/or use content created by you and/or third parties. Such content may be protected by copyright, other intellectual property laws, and/or agreements. You agree to use the SOFTWARE only in compliance with all such laws and agreements that apply to such content. You acknowledge and agree that SONY may take appropriate measures to protect the copyright of content stored, processed or used by the SOFTWARE. Such measures include, but are not limited to, counting the frequency of your backup and restoration through certain SOFTWARE features, refusal to accept your request to enable restoration of data, and termination of this EULA in the event of your illegitimate use of the SOFTWARE.
CONTENT SERVICEPLEASE ALSO NOTE THAT THE SOFTWARE MAY BE DESIGNED TO BE USED WITH CONTENT AVAILABLE THROUGH ONE OR MORE CONTENT SERVICES (“CONTENT SERVICE”). USE OF THE SERVICE AND THAT CONTENT IS SUBJECT TO THE TERMS OF SERVICE OF
THAT CONTENT SERVICE. IF YOU DECLINE TO ACCEPT THOSE TERMS, YOUR USE OF THE SOFTWARE WILL BE LIMITED. You acknowledge and agree that certain content and services available through the SOFTWARE may be provided by third parties over which SONY has no control. USE OF THE CONTENT SERVICE REQUIRES AN INTERNET CONNECTION. THE CONTENT SERVICE MAY BE DISCONTINUED AT ANY TIME.
INTERNET CONNECTIVITY AND THIRD PARTY SERVICESYou acknowledge and agree that access to certain SOFTWARE features may require an Internet connection for which you are solely responsible. Further, you are solely responsible for payment of any third party fees associated with your Internet connection, including but not limited to Internet service provider or airtime charges. Operation of the SOFTWARE may be limited or restricted depending on the capabilities, bandwidth or technical limitations of your Internet connection and service. The provision, quality and security of such Internet connectivity are the sole responsibility of the third party providing such service.
EXPORT AND OTHER REGULATIONSYou agree to comply with all applicable export and re-export restrictions and regulations of the area or country in which you reside, and not to transfer, or authorize the transfer, of the SOFTWARE to a prohibited country or otherwise in violation of any such restrictions or regulations.
HIGH RISK ACTIVITIESThe SOFTWARE is not fault-tolerant and is not designed, manufactured or intended for use or resale as on-line
84GB

control equipment in hazardous environments requiring fail-safe performance, such as in the operation of nuclear facilities, aircraft navigation or communication systems, air traffic control, direct life support machines, or weapons systems, in which the failure of the SOFTWARE could lead to death, personal injury, or severe physical or environmental damage (“HIGH RISK ACTIVITIES”). SONY, each of the THIRD-PARTY SUPPLIERS, and each of their respective affiliates specifically disclaim any express or implied warranty, duty or condition of fitness for HIGH RISK ACTIVITIES.
EXCLUSION OF WARRANTY ON SOFTWAREYou acknowledge and agree that use of the SOFTWARE is at your sole risk and that you are responsible for use of the SOFTWARE. The SOFTWARE is provided “AS IS,” without warranty, duty or condition of any kind.
SONY AND EACH OF THE THIRD-PARTY SUPPLIERS (for purposes of this Section, SONY and each of the THIRD-PARTY SUPPLIERS shall be collectively referred to as “SONY”) EXPRESSLY DISCLAIM ALL WARRANTIES, DUTIES OR CONDITIONS, EXPRESS OR IMPLIED, INCLUDING, BUT NOT LIMITED TO, THE IMPLIED WARRANTIES OF MERCHANTABILITY, NONINFRINGEMENT AND FITNESS FOR A PARTICULAR PURPOSE. SONY DOES NOT WARRANT OR MAKE ANY CONDITIONS OR REPRESENTATIONS (A) THAT THE FUNCTIONS CONTAINED IN ANY OF THE SOFTWARE WILL MEET YOUR REQUIREMENTS OR THAT THEY WILL BE UPDATED, (B) THAT THE OPERATION OF ANY OF THE SOFTWARE WILL BE CORRECT OR ERROR-FREE OR THAT ANY DEFECTS WILL BE CORRECTED, (C) THAT THE SOFTWARE WILL NOT DAMAGE ANY OTHER SOFTWARE, HARDWARE OR
DATA, (D) THAT ANY SOFTWARE, NETWORK SERVICES (INCLUDING THE INTERNET) OR PRODUCTS (OTHER THAN THE SOFTWARE) UPON WHICH THE SOFTWARE’S PERFORMANCE DEPENDS WILL CONTINUE TO BE AVAILABLE, UNINTERRUPTED OR UNMODIFIED, AND (E) REGARDING THE USE OR THE RESULTS OF THE USE OF THE SOFTWARE IN TERMS OF ITS CORRECTNESS, ACCURACY, RELIABILITY, OR OTHERWISE.
NO ORAL OR WRITTEN INFORMATION OR ADVICE GIVEN BY SONY OR AN AUTHORIZED REPRESENTATIVE OF SONY SHALL CREATE A WARRANTY, DUTY OR CONDITION OR IN ANY WAY INCREASE THE SCOPE OF THIS WARRANTY. SHOULD THE SOFTWARE PROVE DEFECTIVE YOU ASSUME THE ENTIRE COST OF ALL NECESSARY SERVICING, REPAIR OR CORRECTION. SOME JURISDICTIONS DO NOT ALLOW THE EXCLUSION OF IMPLIED WARRANTIES, SO THESE EXCLUSIONS MAY NOT APPLY TO YOU.
LIMITATION OF LIABILITYSONY AND EACH OF THE THIRD-PARTY SUPPLIERS (for purposes of this Section, SONY and each of the THIRD-PARTY SUPPLIERS shall be collectively referred to as “SONY”) SHALL NOT BE LIABLE FOR ANY INCIDENTAL OR CONSEQUENTIAL DAMAGES FOR BREACH OF ANY EXPRESS OR IMPLIED WARRANTY, BREACH OF CONTRACT, NEGLIGENCE, STRICT LIABILITY OR UNDER ANY OTHER LEGAL THEORY RELATED TO THE SOFTWARE, INCLUDING, BUT NOT LIMITED TO, ANY DAMAGES ARISING OUT OF LOSS OF PROFITS, LOSS OF REVENUE, LOSS OF DATA, LOSS OF USE OF THE SOFTWARE OR ANY ASSOCIATED HARDWARE, DOWN TIME AND USER’S TIME, EVEN IF ANY OF THEM HAVE BEEN ADVISED OF THE POSSIBILITY OF SUCH DAMAGES. IN ANY CASE, EACH AND ALL
85GB

OF THEIR AGGREGATE LIABILITY UNDER ANY PROVISION OF THIS EULA SHALL BE LIMITED TO THE AMOUNT ACTUALLY PAID FOR THE PRODUCT. SOME JURISDICTIONS DO NOT ALLOW THE EXCLUSION OR LIMITATION OF INCIDENTAL OR CONSEQUENTIAL DAMAGES, SO THE ABOVE EXCLUSION OR LIMITATION MAY NOT APPLY TO YOU.
AUTOMATIC UPDATE FEATURE From time to time, SONY or the THIRD-PARTY SUPPLIERS may automatically update or otherwise modify the SOFTWARE, including, but not limited to, for purposes of enhancement of security functions, error correction and improvement of functions, at such time as you interact with SONY’s or third parties’ servers, or otherwise. Such updates or modifications may delete or change the nature of features or other aspects of the SOFTWARE, including, but not limited to, functions you may rely upon. You acknowledge and agree that such activities may occur at SONY’s sole discretion and that SONY may condition continued use of the SOFTWARE upon your complete installation or acceptance of such update or modifications. Any updates/modifications shall be deemed to be, and shall constitute part of, the SOFTWARE for purposes of this EULA. By acceptance of this EULA, you consent to such update/modification.
ENTIRE AGREEMENT, WAIVER, SEVERABILITY This EULA and SONY’s privacy policy, each as amended and modified from time to time, together constitute the entire agreement between you and SONY with respect to the SOFTWARE. The failure of SONY to exercise or enforce any right or provision of this EULA shall not constitute a waiver of
such right or provision. If any part of this EULA is held invalid, illegal, or unenforceable, that provision shall be enforced to the maximum extent permissible so as to maintain the intent of this EULA, and the other parts will remain in full force and effect.
GOVERNING LAW AND JURISDICTIONThe United Nations Convention on Contracts for the International Sale of Goods shall not apply to this EULA. This EULA shall be governed by the laws of Japan, without regards to conflict of laws provisions. Any dispute arising out of this EULA shall be subject to the exclusive venue of the Tokyo District Court in Japan, and the parties hereby consent to the venue and jurisdiction of such courts.
EQUITABLE REMEDIESNotwithstanding anything contained in this EULA to the contrary, you acknowledge and agree that any violation of or non-compliance with this EULA by you will cause irreparable harm to SONY, for which monetary damages would be inadequate, and you consent to SONY obtaining any injunctive or equitable relief that SONY deems necessary or appropriate in such circumstances. SONY may also take any legal and technical remedies to prevent violation of and/or to enforce this EULA, including, but not limited to, immediate termination of your use of the SOFTWARE, if SONY believes in its sole discretion that you are violating or intend to violate this EULA. These remedies are in addition to any other remedies SONY may have at law, in equity or under contract.
TERMINATIONWithout prejudice to any of its other rights, SONY may terminate this EULA if
86GB
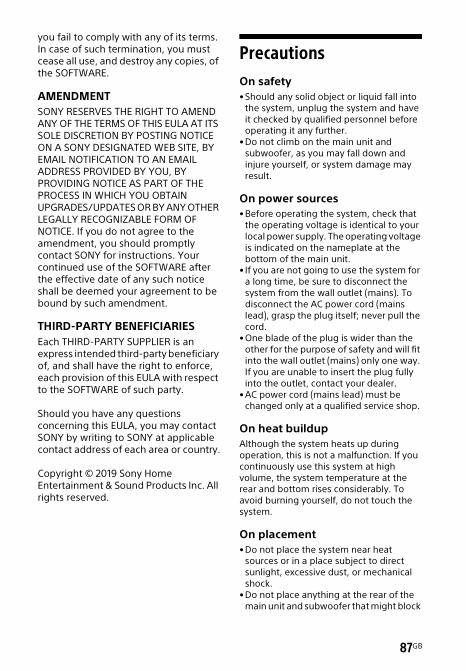
you fail to comply with any of its terms. In case of such termination, you must cease all use, and destroy any copies, of the SOFTWARE.
AMENDMENTSONY RESERVES THE RIGHT TO AMEND ANY OF THE TERMS OF THIS EULA AT ITS SOLE DISCRETION BY POSTING NOTICE ON A SONY DESIGNATED WEB SITE, BY EMAIL NOTIFICATION TO AN EMAIL ADDRESS PROVIDED BY YOU, BY PROVIDING NOTICE AS PART OF THE PROCESS IN WHICH YOU OBTAIN UPGRADES/UPDATES OR BY ANY OTHER LEGALLY RECOGNIZABLE FORM OF NOTICE. If you do not agree to the amendment, you should promptly contact SONY for instructions. Your continued use of the SOFTWARE after the effective date of any such notice shall be deemed your agreement to be bound by such amendment.
THIRD-PARTY BENEFICIARIESEach THIRD-PARTY SUPPLIER is an express intended third-party beneficiary of, and shall have the right to enforce, each provision of this EULA with respect to the SOFTWARE of such party.
Should you have any questions concerning this EULA, you may contact SONY by writing to SONY at applicable contact address of each area or country.
Copyright © 2019 Sony Home Entertainment & Sound Products Inc. All rights reserved.
Precautions
On safety• Should any solid object or liquid fall into
the system, unplug the system and have it checked by qualified personnel before operating it any further.
• Do not climb on the main unit and subwoofer, as you may fall down and injure yourself, or system damage may result.
On power sources• Before operating the system, check that
the operating voltage is identical to your local power supply. The operating voltage is indicated on the nameplate at the bottom of the main unit.
• If you are not going to use the system for a long time, be sure to disconnect the system from the wall outlet (mains). To disconnect the AC power cord (mains lead), grasp the plug itself; never pull the cord.
• One blade of the plug is wider than the other for the purpose of safety and will fit into the wall outlet (mains) only one way. If you are unable to insert the plug fully into the outlet, contact your dealer.
• AC power cord (mains lead) must be changed only at a qualified service shop.
On heat buildupAlthough the system heats up during operation, this is not a malfunction. If you continuously use this system at high volume, the system temperature at the rear and bottom rises considerably. To avoid burning yourself, do not touch the system.
On placement• Do not place the system near heat
sources or in a place subject to direct sunlight, excessive dust, or mechanical shock.
• Do not place anything at the rear of the main unit and subwoofer that might block
87GB

the ventilation holes and cause malfunctions.
• Do not place metal objects other than a TV around the system. Wireless functions may be unstable.
• If the system is being used in combination with a TV, VCR, or tape deck, noise may result and picture quality may suffer. In such a case, place the system away from the TV, VCR, or tape deck.
• Use caution when placing the system on a surface that has been specially treated (with wax, oil, polish, etc.), as staining or discoloration of the surface may result.
• Take care to avoid any possible injury from the corners of the main unit and subwoofer.
• Keep 3 cm or more space under the main unit when you hang it on a wall.
• The speakers of this system are not of magnetically shielded type. Do not place magnetic cards on the system or near it.
On handling the subwooferDo not place your hand into the slit of the subwoofer when lifting it. The speaker driver may be damaged. When lifting it, hold the bottom of the subwoofer.
On operationBefore connecting other devices, be sure to turn off and unplug the system.
If you encounter color irregularity on a nearby TV screenColor irregularities may be observed on certain types of TV sets.
If color irregularity is observed...Turn off the TV set, then turn it on again after 15 to 30 minutes.
If color irregularity is observed again...Place the system further away from the TV set.
On cleaningClean the system with a soft, dry cloth. Do not use any type of abrasive pad, scouring powder, or solvent such as alcohol or benzine.
If you have any question or problem concerning your system, please consult your nearest Sony dealer.
Disclaimer regarding services offered by third partiesNetwork services, content and the (operating system and) software of this product may be subject to individual terms and conditions and changed, interrupted or discontinued at any time and may require fees, registration and credit card information.
Notes on updatingThis system allows you to update the software automatically when connected to the Internet via a wired or wireless network.You can add new features and use the system with more convenience and safety by updating the system.If you do not want to update automatically, you can disable the function by using Sony | Music Center installed on your smartphone or tablet. However, the system may update the software automatically for reasons such as safety, even if this function is disabled. You can also update the software using the settings menu when this function is disabled. See “Performing Advanced Settings” (page 59) for details. You may not use the system while the software is being updated.
88GB

This system incorporates Dolby* Digital and the DTS** Digital Surround System.
* Manufactured under license from Dolby Laboratories. Dolby, Dolby Audio, Dolby Atmos, Dolby Vision, and the double-D symbol are trademarks of Dolby Laboratories.
**For DTS patents, see http://patents.dts.com. Manufactured under license from DTS, Inc. DTS, the Symbol, DTS and the Symbol together, DTS:X, and the DTS:X logo are registered trademarks and/or trademarks of DTS, Inc. in the United States and/or other countries. © DTS, Inc. All Rights Reserved.
The BLUETOOTH® word mark and logos are registered trademarks owned by Bluetooth SIG, Inc. and any use of such marks by Sony Corporation is under license. Other trademarks and trade names are those of their respective owners.
The terms HDMI and HDMI High-Definition Multimedia Interface, and the HDMI Logo are trademarks or registered trademarks of HDMI Licensing Administrator, Inc. in the United States and other countries.
Google, Google Play, Chromecast built-in and other related marks and logos are trademarks of Google LLC.
Apple, iPhone, iPod, and iPod touch are trademarks of Apple Inc., registered in the U.S. and other countries. App Store is a service mark of Apple Inc., registered in the U.S. and other countries.
Use of the Made for Apple badge means that an accessory has been designed to connect specifically to the Apple product(s) identified in the badge, and has been certified by the developer to meet Apple performance standards. Apple is not responsible for the operation of this device or its compliance with safety and regulatory standards.
“BRAVIA” logo is a trademark of Sony Corporation.
“ClearAudio+” is a trademark of Sony Corporation.
WALKMAN® and WALKMAN® logo are registered trademarks of Sony Corporation.
“PlayStation” is a registered trademark or trademark of Sony Interactive Entertainment Inc.
MPEG Layer-3 audio coding technology and patents licensed from Fraunhofer IIS and Thomson.
Windows Media is either a registered trademark or trademark of Microsoft Corporation in the United States and/or other countries.This product is protected by certain intellectual property rights of Microsoft Corporation. Use or distribution of such technology outside of this product is prohibited without a license from Microsoft or an authorized Microsoft subsidiary.
Wi-Fi®, Wi-Fi Protected Access® and Wi-Fi Alliance® are registered trademarks of Wi-Fi Alliance.
Wi-Fi CERTIFIED™, WPA™, WPA2™ and Wi-Fi Protected Setup™ are trademarks of Wi-Fi Alliance.
LDAC™ and LDAC logo are trademarks of Sony Corporation.LDAC is an audio coding technology developed by Sony that enables the transmission of High-Resolution (Hi-Res) Audio content, even over a Bluetooth connection. Unlike other Bluetooth compatible coding technologies such as SBC, it operates without any down-conversion of the Hi-Res Audio content*, and allows approximately three times more data** than those other technologies to be transmitted over a Bluetooth wireless network with unprecedented sound
Copyrights and Trademarks
89GB

quality, by means of efficient coding and optimized packetization.
* excluding DSD format contents
**in comparison with SBC (Subband Coding) when the bitrate of 990 kbps (96/48 kHz) or 909 kbps (88.2/44.1 kHz) is selected
This product contains software that is subject to the GNU General Public License (“GPL”) or GNU Lesser General Public License (“LGPL”). These establish that customers have the right to acquire, modify, and redistribute the source code of said software in accordance with the terms of the GPL or the LGPL.
For details of the GPL, LGPL and other software licenses, please refer to [Software License Information] under [Setup] - [Advanced Settings] - [System Settings] on the product.
The source code for the software used in this product is subject to the GPL and LGPL, and is available on the Web. To download, please access the following:URL: http://oss.sony.net/Products/Linux
Please note that Sony cannot answer or respond to any inquiries regarding the content of this source code.
“DSEE HX” is a trademark of Sony Corporation.
DLNA™, the DLNA Logo and DLNA CERTIFIED™ are trademarks, service marks, or certification marks of the Digital Living Network Alliance.
“TRILUMINOS” and “TRILUMINOS” logo are a registered trademark of Sony Corporation.
The Spotify Software is subject to third party licenses found here: https://www.spotify.com/connect/third-party-licenses.
Spotify and Spotify logos are trademarks of the Spotify Group.*
* Depending on the country and region, this function may not be available.
All other trademarks are trademarks of their respective owners.
90GB

Index
AAdvanced Auto Volume 61ARC (Audio Return Channel) 9, 54, 61Audio DRC 60Audio Settings 60Auto Standby 63Auto Update 63Auto Update Settings 63
BBluetooth Codec - AAC 62Bluetooth Codec - LDAC 62Bluetooth Mode 62Bluetooth Settings 62BT.2020 81
CControl for HDMI 53, 61
DDevice List 62Device Name Setting 63DIMMER 57DSEE HX 60
EeARC (Enhanced Audio Return
Channel) 9, 23, 54, 61
HHDCP 2.2 81HDMI Settings 61HDMI Signal Format 22, 62, 80HDR 81
IInternet Settings 63IR-Repeater 62
MManual Speaker Settings 60Multiplex broadcast sound 50MUSIC SERVICE button 39
NNetwork 24Network Connection Status 64Network Settings 63Network update 65Network/Bluetooth Standby 62NIGHT 47
OOSD Language 62
PPrivacy Setting 63PRTCT 74
RRemote control 12Resetting 64, 75
SSoftware License Information 63Software Update 64Software Update Notification 63Sony | Music Center 41Sound Effect 60Sound Mode 46Speaker Settings 60Standby Linked to TV 61Standby Through 54, 58, 61Subwoofer 48, 69System Information 63System Settings 62
TTime Zone 63TV Audio Input Mode 61
UUpdate 64USB update 65
VVERTICAL S. 45VOICE 47
91GB

WWireless Playback Quality 60, 62Wireless Speaker Settings 60Wireless speakers only 65
92GB

ووحدة التحكم عن بعد 12
وضع الصوت 46
92AR

A61 Advanced Auto Volume
61 ،54 ،9 ARC (Audio Return Channel)60 Audio DRC
60 Audio Settings63 Auto Standby63 Auto Update
63 Auto Update Settings
B62 Bluetooth Codec - AAC
62 Bluetooth Codec - LDAC62 Bluetooth Mode
62 Bluetooth Settings81 BT.2020
C61 ،53 Control for HDMI
D62 Device List
63 Device Name Setting57 DIMMER60 DSEE HX
EeARC (Enhanced Audio Return Channel)
61 ،54 ،23 ،9H
81 HDCP 2.261 HDMI Settings
80 ،62 ،22 HDMI Signal Format81 HDR
I64 Internet Settings
62 IR-Repeater
M60 Manual Speaker Settings
N63 Network Connection Status
63 Network Settings65 Network update
62 Network/Bluetooth Standby47 NIGHT
O62 OSD Language
P63 Privacy Setting
74 PRTCT
R75 ،63 Resetting
S63 Software License Information
64 Software Update63 Software Update Notification
41 Sony | Music Center60 Sound Effect
60 Speaker Settings61 Standby Linked to TV
61 ،58 ،54 Standby Through63 System Information
62 System Settings
T63 Time Zone
61 TV Audio Input Mode
U65 USB update
V45 VERTICAL S.
47 VOICE
W62 ،60 Wireless Playback Quality
60 Wireless Speaker Settings65 Wireless speakers only
تتحديث 64
ز39 MUSIC SERVICE زر
شالشبكة 24
صصوت البث متعدد اإلرسال 50
قم
مضخم الصوت الفرعي 48، 69
الفهرس
91AR

GNU يحتوي هذا املنتج عىل برنامج يخضع لرتخيصGeneral Public License (املشار إليه باالختصار
GNU Lesser General Public License أو ("GPL"(املشار إليه باالختصار "LGPL"). تقرر هذه الرتاخيص أن للعمالء الحق يف الحصول عىل التعليامت الربمجية املصدر
GPL لربنامج محدد وتعديلها وإعادة توزيعها وفقا لرشوط.LGPL أو
للتفاصيل حول GPL وLGPL وغريها من تراخيص الربامج، [Software License Information] يرجى مراجعة
- [Advanced Settings] - [Setup] ضمن[System Settings] املتعلقة باملنتج.
تخضع التعليامت الربمجية املصدر الخاصة بالربنامج املستخدم يف هذا املنتج إىل GPL وLGPL، وتتوفر عىل الويب. لتنزيلها،
يرجى الوصول إىل التايل: :URL عنوان
http://oss.sony.net/Products/Linux
يرجى مالحظة أنه يتعذر عىل رشكة Sony اإلجابة أو الرد عىل جميع االستفسارات ذات الصلة مبحتوى التعليامت الربمجية
املصدر هذه.
Sony هي عالمة تجارية لرشكة "DSEE HX".Corporation
™DLNA وشعار DLNA و™DLNA CERTIFIED هي عالمات تجارية أو عالمات خدمة أو عالمات توثيق لتحالف
رشكات األجهزة الرقمية املتطورة.
"TRILUMINOS" وشعار "TRILUMINOS" هام عالمتان .Sony Corporation تجاريتان مسجلتني لرشكة
يخضع برنامج Spotify لرتاخيص الطرف الثالث املوجودة هنا: https://www.spotify.com/connect/
third-party-licenses.
Spotify وشعارات Spotify هي عالمات تجارية لرشكة *.Spotify Group
قد ال تكون هذه الوظيفة متوفرة وفقا للدولة واملنطقة.*
جميع العالمات التجارية األخرى هي عالمات تجارية خاصة مبالكيها املعنيني.
90AR

حقوق النرش والعالمات التجارية Dolby* Digital يشمل هذا النظام تقنية.DTS** Digital Surround Systemو
* .Dolby تم التصنيع مبوجب ترخيص من معامل Dolby ،Dolby Atmos ،Dolby Audio ،Dolby
Vision، ورمز D املزدوج هي عالمات تجارية مسجلة .Dolby ملعامل
**لالطالع عىل براءات اخرتاع DTS، انظر املوقع http://patents.dts.com. مصنع مبوجب ترخيص
من رشكة .DTS .DTS, Inc، الرمز، DTS والرمز معا، DTS:X، والشعار DTS:X هي عالمات تجارية مسجلة و/أو عالمات تجارية لرشكة .DTS, Inc يف الواليات املتحدة
و/أو دول أخرى. رشكة .DTS, Inc © جميع الحقوق محفوظة.
عالمة الكلمة ®BLUETOOTH والشعارات هي عالمات Bluetooth SIG, Inc. تجارية مسجلة متتلكها رشكة
Sony واي استعامل لهذه العالمات بواسطة رشكةCorporation هو تحت ترخيص. العالمات التجارية
واألسامء التجارية األخرى خاصة مبالكيها املعنيني.
HDMI High-Definitionو HDMI مصطلحاMultimedia Interface وشعار HDMI عالمات تجارية
HDMI Licensing أو عالمات تجارية مسجلة لرشكة.Administrator, Inc يف الواليات املتحدة األمريكية
ودول أخرى.
Chromecast built-in ،Google Play ،Googleوغريها من العالمات والشعارات ذات الصلة هي عالمات
.Google LLCتجارية خاصة ب
تعد Apple وiPhone وiPod وiPod touch عالمات تجارية لرشكة .Apple Inc، مسجلة يف الواليات املتحدة األمريكية وبلدان أخرى. App Store هو عالمة خدمة
.Apple Inc. لرشكة
استخدام شعار صنع من أجل Apple يعني أنه قد تم تصميم Apple (منتجات) أحد امللحقات ليتصل بشكل خاص مبنتج
التي تم تحديدها يف الشعار، وأنه قد تم اعتامده من قبل املطور ليلبي معايري أداء Apple. ال تعد Apple مسؤولة عن تشغيل هذا الجهاز أو امتثاله ملعايري السالمة والتنظيم.
"BRAVIA" هو عالمة تجارية لرشكة .Sony Corporation
"+ClearAudio" هي عالمة تجارية لرشكة .Sony Corporation
®WALKMAN وشعار ®WALKMAN هي عالمات .Sony Corporation تجارية مسجلة متتلكها رشكة
"PlayStation" هي عالمة تجارية مسجلة أو عالمة تجارية .Sony Interactive Entertainment Inc. لرشكة
تقنية ترميز الصوت MPEG Layer-3 وبراءات االخرتاع .Fraunhofer IIS and Thomson مرخصة من رشكة
Windows Media هي إما عالمة تجارية مسجلة أو عالمة تجارية لرشكة Microsoft Corporation بالواليات
املتحدة و/أو البلدان األخرى.هذا املنتج محمي بحقوق ملكية فكرية معينة لرشكة
Microsoft Corporation. يحظر استخدام هذه التقنية أو توزيعها بعيدا عن هذا املنتج دون الحصول عىل ترخيص
من رشكة Microsoft أو الرشكات املعتمدة التابعة لها.
Wi-Fi Protected Access®و Wi-Fi®و®Wi-Fi Alliance هي عالمات تجارية مسجلة لرشكة
.Wi-Fi Alliance
WPA2™و WPA™و Wi-Fi CERTIFIED™و™Wi-Fi Protected Setup هي عالمات تجارية
.Wi-Fi Alliance لرشكة
Sony والشعار هام عالمتان تجاريتان لرشكة LDAC™.Corporation
Sony هي تقنية ترميز الصوت التي قامت رشكة LDAC ،(Hi-Res) بتطويرها لتتيح إرسال محتوى الصوت عايل الدقة
حتى عرب اتصال Bluetooth. وعىل عكس تقنيات الرتميز األخرى املتوافقة مع Bluetooth مثل SBC، فهذه التقنية
تعمل بدون أي تحويل خافض لرتدد محتوى الصوت عايل الدقة Hi-Res*، كام تتيح إرسال بيانات أكرث مبعدل ثالثة
أضعاف تقريبا ** عن التقنيات األخرى التي يتم إرسالها عرب شبكة Bluetooth السلكية بجودة صوت منقطعة النظري من
خالل الرتميز الفعال وتكوين الحزم املحسن. *DSD باستثناء املحتويات بصيغة
**مقارنة بتقنية SBC (ترميز النطاق الفرعي) عند تحديد معدل بت يبلغ 990 كيلوبت في الثانية (48/96 كيلوهرتز) أو 909 كيلوبت في الثانية
(44.1/88.2 كيلوهرتز)
89AR

ال تضع أشياء معدنية سوى التلفزيون حول النظام. فقد • يتسبب هذا يف عدم استقرار الوظائف الالسلكية.
يف حالة استخدام النظام مع تلفزيون أو مسجل كاسيت • الفيديو (VCR) أو حامل األرشطة املمغنطة، قد يؤدي ذلك إىل حدوث ضوضاء وقد تنخفض جودة الصورة. يف مثل هذه
الحالة، قم بوضع النظام بعيدا عن التلفزيون أو VCR أو مسجل الصوت.
توخ الحذر عند وضع النظام عىل سطح متت معالجته بشكل • خاص (بالشمع أو الزيت أو الدهانات املصقولة، إلخ)؛ فقد
يؤدي ذلك إىل ظهور بقع عىل السطح أو تغري لونه.احرص عىل تجنب أية إصابة محتملة بسبب أركان الوحدة •
الرئيسية ومضخم الصوت الفرعي.اترك فراغا مبقدار 3 سم أو أكرث أسفل الوحدة الرئيسية عند •
تعليقها عىل الحائط.مكربات صوت هذا النظام ليست من النوع املغلف •
مغناطيسيا. ال تضع البطاقات املغناطيسية عىل النظام أو بالقرب منه.
عند التعامل مع مضخم الصوت الفرعيال تدخل يدك يف شق مضخم الصوت الفرعي عند رفعه. فقد
يتلف محرك مكرب الصوت. وعند رفع مضخم الصوت الفرعي، أمسك الجزء السفيل منه.
نبذة حول التشغيلقبل توصيل األجهزة األخرى، تأكد من إيقاف تشغيل النظام
وفصله.إذا حدث تشوه ألوان عىل شاشة تلفزيون
قريبقد تالحظ تشوهات األلوان يف أنواع معينة من أجهزة
التلفزيون.إذا متت مالحظة تشوه ألوان...
قم بإيقاف تشغيل التلفزيون، ثم قم بتشغيله مجددا بعد 15 إىل 30 دقيقة.
إذا متت مالحظة تشوه ألوان مجددا...قم بوضع النظام بشكل أبعد عن جهاز التلفزيون.
حول التنظيفقم بتنظيف النظام بقطعة قامش ناعمة وجافة. ال تستعمل أي نوع من اللبادة الكاشطة، أو مسحوق التنظيف أو املواد
املذيبة مثل الكحول أو البنزين.
إذا كان لديك أي سؤال أو مشكلة تتعلق بنظامك، فريجى استشارة أقرب وكيل رشكة Sony لديك.
إخالء املسؤولية بشأن الخدمات التي تقدمها الجهات الخارجية
خدمات الشبكة واملحتوى (ونظام التشغيل) والربنامج الخاص بهذا املنتج، قد تخضع جميعها للرشوط واألحكام الفردية ويتم
تغيريها أو إيقافها أو إنهائها يف أي وقت، وقد تتطلب رسوما وتسجيال ومعلومات بطاقة االئتامن.مالحظات حول التحديث
يتيح لك هذا النظام تحديث الربنامج تلقائيا عند االتصال باإلنرتنت عرب شبكة سلكية أو السلكية.
ميكنك إضافة ميزات جديدة واستخدام النظام بشكل أكرث مالءمة وأمانا عن طريق تحديث النظام.
ويف حالة عدم رغبتك يف التحديث تلقائيا، ميكنك تعطيل الوظيفة باستخدام تطبيق Sony | Music Center املثبت
عىل هاتفك الذيك أو الكمبيوتر اللوحي. ومع ذلك، قد يقوم النظام بتحديث الربنامج تلقائيا ألسباب مثل السالمة، حتى عند
تعطيل هذه الوظيفة. كام ميكنك تحديث الربنامج باستخدام قامئة اإلعدادات عند تعطيل هذه الوظيفة. للتفاصيل، انظر
«تنفيذ اإلعدادات املتقدمة» (صفحة 59).قد ال تتمكن من استخدام النظام أثناء تحديث الربنامج.
88AR

AMENDMENTSONY RESERVES THE RIGHT TO AMEND ANY OF THE TERMS OF THIS EULA AT ITS SOLE DISCRETION BY POSTING NOTICE ON A SONY DESIGNATED WEB SITE, BY EMAIL NOTIFICATION TO AN EMAIL ADDRESS PROVIDED BY YOU, BY PROVIDING NOTICE AS PART OF THE PROCESS IN WHICH YOU OBTAIN UPGRADES/UPDATES OR BY ANY OTHER LEGALLY RECOGNIZABLE FORM OF NOTICE. If you do not agree to the amendment, you should promptly contact SONY for instructions. Your continued use of the SOFTWARE after the effective date of any such notice shall be deemed your agreement to be bound by such amendment.
THIRD-PARTY BENEFICIARIESEach THIRD-PARTY SUPPLIER is an express intended third-party beneficiary of, and shall have the right to enforce, each provision of this EULA with respect to the SOFTWARE of such party.
Should you have any questions concerning this EULA, you may contact SONY by writing to SONY at applicable contact address of each area or country.
Copyright © 2019 Sony Home Entertainment & Sound Products Inc. All rights reserved.
احتياطات
نبذة عن األمانإذا سقط أي جسم صلب أو سائل داخل النظام، افصل قابس •
النظام واطلب من أشخاص مؤهلني القيام بفحصه قبل تشغيله مجددا.
ال تتسلق الوحدة الرئيسية ومضخم الصوت الفرعي، فقد •تسقط وتتعرض لإلصابة أو قد يتلف النظام.
نبذة عن مصادر الطاقةقبل تشغيل النظام، تحقق من أن فولطية التشغيل مطابقة •
إلمدادات الطاقة املحلية. يشار إىل جهد التشغيل عىل لوحة االسم يف أسفل الوحدة الرئيسية.
إذا كنت ال تريد استخدام النظام لفرتة زمنية طويلة، فاحرص •عىل فصل النظام من مأخذ التيار املثبت بالحائط. لفصل
سلك طاقة التيار املرتدد AC، أمسك القابس نفسه؛ ال تسحب السلك مطلقا.
يكون أحد نصيل القابس أعرض من اآلخر ألغراض السالمة، •وميكن تركيبه مبأخذ التيار عىل الحائط من ناحية واحدة
فقط. إذا مل تتمكن من إدخال القابس يف املأخذ بشكل كامل، فاتصل بالوكيل.
يتعني تغيري سلك طاقة التيار املرتدد AC يف مركز صيانة •مؤهل فنيا.
حول ازدياد الحرارةعىل الرغم من سخونة النظام أثناء التشغيل، إال أن ذلك ال يعد
خلال وظيفيا. إذا كنت تستخدم هذا النظام مبستوى صوت كبري بشكل متواصل، فسرتتفع درجة حرارة النظام يف الخلف
واألسفل بشكل كبري. لتجنب حرق نفسك، ال تلمس النظام.
حول مكان الرتكيبال تضع النظام بالقرب من مصادر الحرارة أو يف مكان معرض •
ألشعة الشمس املبارشة أو الغبار الكثيف أو الصدمات امليكانيكية.
ال تضع أي يشء خلف الوحدة الرئيسية ومضخم الصوت •الفرعي ميكنه أن يسد فتحات التهوية ويسبب أعطاال.
87AR
HT-Z9F 4-727-538-35(1)

INCIDENTAL OR CONSEQUENTIAL DAMAGES, SO THE ABOVE EXCLUSION OR LIMITATION MAY NOT APPLY TO YOU.
AUTOMATIC UPDATE FEATURE From time to time, SONY or the THIRD-PARTY SUPPLIERS may automatically update or otherwise modify the SOFTWARE, including, but not limited to, for purposes of enhancement of security functions, error correction and improvement of functions, at such time as you interact with SONY's or third parties' servers, or otherwise. Such updates or modifications may delete or change the nature of features or other aspects of the SOFTWARE, including, but not limited to, functions you may rely upon. You acknowledge and agree that such activities may occur at SONY's sole discretion and that SONY may condition continued use of the SOFTWARE upon your complete installation or acceptance of such update or modifications. Any updates/modifications shall be deemed to be, and shall constitute part of, the SOFTWARE for purposes of this EULA. By acceptance of this EULA, you consent to such update/modification.
ENTIRE AGREEMENT, WAIVER, SEVERABILITY This EULA and SONY’s privacy policy, each as amended and modified from time to time, together constitute the entire agreement between you and SONY with respect to the SOFTWARE. The failure of SONY to exercise or enforce any right or provision of this EULA shall not constitute a waiver of such right or provision. If any part of this EULA is held invalid, illegal, or unenforceable, that provision shall be enforced to the maximum extent permissible so as to maintain the intent
of this EULA, and the other parts will remain in full force and effect.
GOVERNING LAW AND JURISDICTIONThe United Nations Convention on Contracts for the International Sale of Goods shall not apply to this EULA. This EULA shall be governed by the laws of Japan, without regards to conflict of laws provisions. Any dispute arising out of this EULA shall be subject to the exclusive venue of the Tokyo District Court in Japan, and the parties hereby consent to the venue and jurisdiction of such courts.
EQUITABLE REMEDIESNotwithstanding anything contained in this EULA to the contrary, you acknowledge and agree that any violation of or non-compliance with this EULA by you will cause irreparable harm to SONY, for which monetary damages would be inadequate, and you consent to SONY obtaining any injunctive or equitable relief that SONY deems necessary or appropriate in such circumstances. SONY may also take any legal and technical remedies to prevent violation of and/or to enforce this EULA, including, but not limited to, immediate termination of your use of the SOFTWARE, if SONY believes in its sole discretion that you are violating or intend to violate this EULA. These remedies are in addition to any other remedies SONY may have at law, in equity or under contract.
TERMINATIONWithout prejudice to any of its other rights, SONY may terminate this EULA if you fail to comply with any of its terms. In case of such termination, you must cease all use, and destroy any copies, of the SOFTWARE.
86AR

of nuclear facilities, aircraft navigation or communication systems, air traffic control, direct life support machines, or weapons systems, in which the failure of the SOFTWARE could lead to death, personal injury, or severe physical or environmental damage ("HIGH RISK ACTIVITIES"). SONY, each of the THIRD-PARTY SUPPLIERS, and each of their respective affiliates specifically disclaim any express or implied warranty, duty or condition of fitness for HIGH RISK ACTIVITIES.
EXCLUSION OF WARRANTY ON SOFTWAREYou acknowledge and agree that use of the SOFTWARE is at your sole risk and that you are responsible for use of the SOFTWARE. The SOFTWARE is provided "AS IS," without warranty, duty or condition of any kind.SONY AND EACH OF THE THIRD-PARTY SUPPLIERS (for purposes of this Section, SONY and each of the THIRD-PARTY SUPPLIERS shall be collectively referred to as "SONY") EXPRESSLY DISCLAIM ALL WARRANTIES, DUTIES OR CONDITIONS, EXPRESS OR IMPLIED, INCLUDING, BUT NOT LIMITED TO, THE IMPLIED WARRANTIES OF MERCHANTABILITY, NONINFRINGEMENT AND FITNESS FOR A PARTICULAR PURPOSE. SONY DOES NOT WARRANT OR MAKE ANY CONDITIONS OR REPRESENTATIONS (A) THAT THE FUNCTIONS CONTAINED IN ANY OF THE SOFTWARE WILL MEET YOUR REQUIREMENTS OR THAT THEY WILL BE UPDATED, (B) THAT THE OPERATION OF ANY OF THE SOFTWARE WILL BE CORRECT OR ERROR-FREE OR THAT ANY DEFECTS WILL BE CORRECTED, (C) THAT THE SOFTWARE WILL NOT DAMAGE ANY OTHER SOFTWARE, HARDWARE OR DATA, (D) THAT ANY SOFTWARE, NETWORK SERVICES (INCLUDING THE INTERNET) OR PRODUCTS (OTHER THAN THE SOFTWARE) UPON WHICH THE SOFTWARE’S PERFORMANCE DEPENDS
WILL CONTINUE TO BE AVAILABLE, UNINTERRUPTED OR UNMODIFIED, AND (E) REGARDING THE USE OR THE RESULTS OF THE USE OF THE SOFTWARE IN TERMS OF ITS CORRECTNESS, ACCURACY, RELIABILITY, OR OTHERWISE.NO ORAL OR WRITTEN INFORMATION OR ADVICE GIVEN BY SONY OR AN AUTHORIZED REPRESENTATIVE OF SONY SHALL CREATE A WARRANTY, DUTY OR CONDITION OR IN ANY WAY INCREASE THE SCOPE OF THIS WARRANTY. SHOULD THE SOFTWARE PROVE DEFECTIVE YOU ASSUME THE ENTIRE COST OF ALL NECESSARY SERVICING, REPAIR OR CORRECTION. SOME JURISDICTIONS DO NOT ALLOW THE EXCLUSION OF IMPLIED WARRANTIES, SO THESE EXCLUSIONS MAY NOT APPLY TO YOU.
LIMITATION OF LIABILITYSONY AND EACH OF THE THIRD-PARTY SUPPLIERS (for purposes of this Section, SONY and each of the THIRD-PARTY SUPPLIERS shall be collectively referred to as "SONY") SHALL NOT BE LIABLE FOR ANY INCIDENTAL OR CONSEQUENTIAL DAMAGES FOR BREACH OF ANY EXPRESS OR IMPLIED WARRANTY, BREACH OF CONTRACT, NEGLIGENCE, STRICT LIABILITY OR UNDER ANY OTHER LEGAL THEORY RELATED TO THE SOFTWARE, INCLUDING, BUT NOT LIMITED TO, ANY DAMAGES ARISING OUT OF LOSS OF PROFITS, LOSS OF REVENUE, LOSS OF DATA, LOSS OF USE OF THE SOFTWARE OR ANY ASSOCIATED HARDWARE, DOWN TIME AND USER’S TIME, EVEN IF ANY OF THEM HAVE BEEN ADVISED OF THE POSSIBILITY OF SUCH DAMAGES. IN ANY CASE, EACH AND ALL OF THEIR AGGREGATE LIABILITY UNDER ANY PROVISION OF THIS EULA SHALL BE LIMITED TO THE AMOUNT ACTUALLY PAID FOR THE PRODUCT. SOME JURISDICTIONS DO NOT ALLOW THE EXCLUSION OR LIMITATION OF
85AR

The software, network services or other products other than SOFTWARE upon which the SOFTWARE’S performance depends might be interrupted or discontinued at the discretion of the suppliers (software suppliers, service suppliers, or SONY). SONY and such suppliers do not warrant that the SOFTWARE, network services, contents or other products will continue to be available, or will operate without interruption or modification.
USE OF SOFTWARE WITH COPYRIGHTED MATERIALSThe SOFTWARE may be capable of being used by you to view, store, process and/or use content created by you and/or third parties. Such content may be protected by copyright, other intellectual property laws, and/or agreements. You agree to use the SOFTWARE only in compliance with all such laws and agreements that apply to such content. You acknowledge and agree that SONY may take appropriate measures to protect the copyright of content stored, processed or used by the SOFTWARE. Such measures include, but are not limited to, counting the frequency of your backup and restoration through certain SOFTWARE features, refusal to accept your request to enable restoration of data, and termination of this EULA in the event of your illegitimate use of the SOFTWARE.
CONTENT SERVICEPLEASE ALSO NOTE THAT THE SOFTWARE MAY BE DESIGNED TO BE USED WITH CONTENT AVAILABLE THROUGH ONE OR MORE CONTENT SERVICES ("CONTENT SERVICE"). USE OF THE SERVICE AND THAT CONTENT IS SUBJECT TO THE TERMS OF SERVICE OF THAT CONTENT SERVICE. IF YOU DECLINE TO ACCEPT THOSE TERMS, YOUR USE OF THE SOFTWARE WILL BE
LIMITED. You acknowledge and agree that certain content and services available through the SOFTWARE may be provided by third parties over which SONY has no control. USE OF THE CONTENT SERVICE REQUIRES AN INTERNET CONNECTION. THE CONTENT SERVICE MAY BE DISCONTINUED AT ANY TIME.
INTERNET CONNECTIVITY AND THIRD PARTY SERVICESYou acknowledge and agree that access to certain SOFTWARE features may require an Internet connection for which you are solely responsible. Further, you are solely responsible for payment of any third party fees associated with your Internet connection, including but not limited to Internet service provider or airtime charges. Operation of the SOFTWARE may be limited or restricted depending on the capabilities, bandwidth or technical limitations of your Internet connection and service. The provision, quality and security of such Internet connectivity are the sole responsibility of the third party providing such service.
EXPORT AND OTHER REGULATIONSYou agree to comply with all applicable export and re-export restrictions and regulations of the area or country in which you reside, and not to transfer, or authorize the transfer, of the SOFTWARE to a prohibited country or otherwise in violation of any such restrictions or regulations.
HIGH RISK ACTIVITIESThe SOFTWARE is not fault-tolerant and is not designed, manufactured or intended for use or resale as on-line control equipment in hazardous environments requiring fail-safe performance, such as in the operation
84AR

END USER LICENSEAGREEMENT
IMPORTANT:BEFORE USING THE SOFTWARE, PLEASE READ THIS END USER LICENSE AGREEMENT ("EULA") CAREFULLY. BY USING THE SOFTWARE YOU ARE ACCEPTING THE TERMS OF THIS EULA. IF YOU DO NOT ACCEPT THE TERMS OF THIS EULA, YOU MAY NOT USE THE SOFTWARE.This EULA is a legal agreement between you and Sony Home Entertainment & Sound Products Inc. ("SONY"). This EULA governs your rights and obligations regarding the SONY software of SONY and/or its third party licensors (including SONY’s affiliates) and their respective affiliates (collectively, the "THIRD-PARTY SUPPLIERS"), together with any updates/upgrades provided by SONY, any printed, on-line or other electronic documentation for such software, and any data files created by operation of such software (collectively, the "SOFTWARE"). Notwithstanding the foregoing, any software in the SOFTWARE having a separate end user license agreement (including, but not limited to, GNU General Public license and Lesser/Library General Public License) shall be covered by such applicable separate end user license agreement in lieu of the terms of this EULA to the extent required by such separate end user license agreement ("EXCLUDED SOFTWARE").
SOFTWARE LICENSEThe SOFTWARE is licensed, not sold. The SOFTWARE is protected by copyright and other intellectual property laws and international treaties.
COPYRIGHTAll right and title in and to the SOFTWARE (including, but not limited to, any images, photographs, animation, video, audio, music, text and "applets" incorporated into the SOFTWARE) is owned by SONY or one or more of the THIRD-PARTY SUPPLIERS.
GRANT OF LICENSESONY grants you a limited license to use the SOFTWARE solely in connection with your compatible device ("DEVICE") and only for your individual, non-commercial use. SONY and the THIRD-PARTY SUPPLIERS expressly reserve all rights, title and interest (including, but not limited to, all intellectual property rights) in and to the SOFTWARE that this EULA does not specifically grant to you.
REQUIREMENTS AND LIMITATIONSYou may not copy, publish, adapt, redistribute, attempt to derive source code, modify, reverse engineer, decompile, or disassemble any of the SOFTWARE, whether in whole or in part, or create any derivative works from or of the SOFTWARE unless such derivative works are intentionally facilitated by the SOFTWARE. You may not modify or tamper with any digital rights management functionality of the SOFTWARE. You may not bypass, modify, defeat or circumvent any of the functions or protections of the SOFTWARE or any mechanisms operatively linked to the SOFTWARE. You may not separate any individual component of the SOFTWARE for use on more than one DEVICE unless expressly authorized to do so by SONY. You may not remove, alter, cover or deface any trademarks or notices on the SOFTWARE. You may not share, distribute, rent, lease, sublicense, assign, transfer or sell the SOFTWARE.
83AR
HT-Z9F 4-727-538-35(1)

BLUETOOTH حول اتصال • BLUETOOTH ينبغي استخدام األجهزة املزودة بتقنية
يف نطاق مسافة 10 أمتار (33 قدما) (مسافة بدون عوائق) عن بعضها. ميكن أن يصبح مدى االتصال الفعال أقرص يف
الحاالت التالية.عند وجود شخص أو جسم معدين أو حائط أو عائق آخر –
BLUETOOTH بني األجهزة املزودة باتصالأماكن مركب فيها شبكة LAN السلكية –بالقرب من أفران امليكروويف قيد التشغيل –أماكن تحدث فيها موجات كهرومغناطيسية أخرى – • LAN وشبكة BLUETOOTH تستخدم أجهزة
الالسلكية (IEEE 802.11 b/g/n) نفس نطاق الرتدد BLUETOOTH (2.4 جيجاهرتز). عند استخدام جهاز
LAN بالقرب من جهاز به إمكانية االتصال بشبكةالالسلكية، قد يحدث تداخل كهرومغناطييس. وقد يؤدي
ذلك إىل انخفاض معدالت نقل البيانات أو حدوث تشويش أو تعذر االتصال. إذا حدث ذلك، فجرب الحلول التالية:
استخدم هذا النظام عىل مسافة 10 أمتار (33 قدما) عىل –األقل من جهاز شبكة LAN الالسلكية.
افصل الطاقة عن جهاز شبكة LAN الالسلكية عند –استخدام جهاز BLUETOOTH عىل مسافة 10 أمتار
(33 قدما).قم برتكيب هذا النظام وجهاز BLUETOOTH عىل –
أقرب مسافة ممكنة من بعضهام.قد يتداخل بث موجات الراديو مع هذا النظام عند تشغيل •
بعض األجهزة الطبية. ونظرا إلمكانية حدوث عطل بفعل هذا التداخل، احرص دامئا عىل فصل الطاقة عن هذا النظام
وجهاز BLUETOOTH يف األماكن التالية:يف املستشفيات والقطارات والطائرات ومحطات الوقود –
وأي مكان ميكن أن توجد فيه غازات قابلة لالشتعالبالقرب من األبواب اآللية أو أجراس إنذار الحريق –يدعم هذا النظام وظائف األمان التي تتوافق مع مواصفات •
BLUETOOTH لضامن االتصال اآلمن أثناء االتصال باستخدام تقنية BLUETOOTH. ومع ذلك، قد يكون
مستوى األمان هذا غري كاف وفقا ملحتوى اإلعداد وعوامل أخرى، لذلك يجب توخي الحذر دامئا عند االتصال باستخدام
.BLUETOOTH تقنية
ال ميكن أن تتحمل رشكة Sony بأي حال من األحوال، • مسؤولية األرضار أو الخسائر األخرى الناتجة عن ترسب
.BLUETOOTH املعلومات أثناء االتصال باستخدام تقنيةاتصال BLUETOOTH ليس مضمونا بالرضورة مع جميع •
أجهزة BLUETOOTH التي لها نفس القطاع كالنظام.يجب أن تتوافق أجهزة BLUETOOTH املتصلة بهذا •
النظام مع مواصفات BLUETOOTH املحددة بواسطة رشكة .Bluetooth SIG, Inc، كام يجب اعتامد توافقها.
ومع ذلك، قد توجد حاالت لخصائص أو مواصفات جهاز BLUETOOTH تؤدي إىل تعذر التوصيل أو وجود طرق
مختلفة للتحكم أو العرض أو التشغيل، حتى وإن كان الجهاز .BLUETOOTH متوافقا مع مواصفات
قد يحدث ضجيج أو قد يتقطع الصوت وفقا لجهاز • BLUETOOTH املوصول بهذا النظام أو بيئة االتصاالت أو
الظروف املحيطة.
إذا كان لديك أي سؤال أو مشكلة تتعلق بنظامك، فريجى استشارة أقرب وكيل رشكة Sony لديك.
82AR

عند تحديد إدخال TV، يتم إخراج إشارات الفيديو عرب مقبس HDMI IN 1/2 الذي تم تحديده يف املرة األخرية من • .HDMI OUT (TV eARC/ARC) مقبس
•."TRILUMINOS" هذا النظام يدعمجميع مقابس HDMI IN و HDMI OUT (TV eARC/ARC) تدعم نطاقا تردديا يصل إىل 18 جيجابت يف الثانية، و•
1HDCP 2.2)، و BT.2020 مساحات ألوان كبرية2)، ومترير محتويات HDR (النطاق الدينامييك العايل)3).عند التوصيل بتلفزيون بدقة مختلفة عن دقة النظام، فقد يقوم النظام بإعادة التشغيل إلعادة ضبط إعداد إخراج الصورة.•
1 (.4K هي تقنية محسنة جديدة لحامية حقوق النسخ تستخدم لحامية املحتوى مثل أفالم بدقة HDCP 2.2 مساحة ألوان BT.2020 عبارة عن معيار ألوان جديد أوسع قارص عىل أنظمة التلفزيون فائقة الوضوح.) 23 ( HLG و ،HDR10 هو تنسيق فيديو واعد ميكنه عرض نطاق أوسع من مستويات السطوع. النظام متوافق مع HDR
.Dolby Vision و ،(Hybrid Log-Gamma)
81AR

تنسيقات فيديو HDMI املدعومةفيام ييل تنسيقات الفيديو املدعومة عىل هذا النظام.
إعداد [HDMI Signal عمق اللونمساحة اللون3Dمعدل اإلطارالدقة[Format
4K(3
4096 × 2160p 3840 × 2160p
60/59.94/50 هرتز
–RGB 4:4:4
YCbCr 4:4:48 بت
(1[Enhanced format]
–YCbCr 4:2:212/10/8 بت
–YCbCr 4:2:012/10 بت
30/29.97/25/24/23.98هرتز
–RGB 4:4:4YCbCr 4:4:4
12/10 بت
4K(3
4096 × 2160p 3840 × 2160p
8 بتYCbCr 4:2:0–60/59.94/50 هرتز
(2[Standard format]
30/29.97/25/24/23.98هرتز
–RGB 4:4:4
YCbCr 4:4:48 بت
–YCbCr 4:2:212/10/8 بت
1920 × 1080p
/50/30/29.97/2560/59.94 هرتز
–
RGB 4:4:4YCbCr 4:4:4YCbCr 4:2:212/10/8 بت
24/23.98 هرتز
1920 × 1080i60/59.94/50 هرتز
1280 × 720p
60/59.94/50 هرتز
30/29.97/24/23.98–هرتز
720 × 480p60/59.94 هرتز–
720 × 576p50 هرتز–
640 × 480p60/59.94 هرتز–RGB 4:4:4متوافق مع إشارة 3D بتنسيق جنبا إىل جنب (املنتصف)3) :
متوافق مع إشارة 3D بتنسيق تجميع اإلطار وأعىل-أسفل (فوق وتحت)3) :
استخدم كابل HDMI برمييوم عايل الرسعة مع إيرثنت يدعم رسعة تبلغ 18 جيجابت يف الثانية.) 1استخدم كابل HDMI برمييوم عايل الرسعة مع إيرثنت أو كابل HDMI عايل الرسعة من Sony مع إيرثنت يحمل الشعار ) 2
املوضح لنوع الكابل.زر OPTIONS ال يعمل كام ال يظهر العرض عىل الشاشة (OSD) الخاص بالنظام.) 3
HDMI وتوصيالت HDMI مالحظات حول مقبساستخدم كابل HDMI معتمد.• ال نويص باستخدام كابل HDMI-DVI تحوييل.• قد يتم كتم إشارات الصوت (تردد العينة وطول البت، وما إىل ذلك) املرسلة من مقبس HDMI بواسطة الجهاز املتصل.• قد ينقطع الصوت عند تغيري تردد العينة أو عدد قنوات إشارات إخراج الصوت من جهاز التشغيل.•
80AR

تنسيقات صوت اإلدخال املدعومةفيام ييل صيغ الصوت املدعومة عىل هذا النظام.
الوظيفةالصيغة"HDMI1""HDMI2"
"TV"(eARC)
"TV"(ARC)
"TV"(OPT)
LPCM 2ch
LPCM 5.1ch––
LPCM 7.1ch––
Dolby Digital
Dolby TrueHD––
Dolby Digital Plus–
Dolby Atmos - Dolby TrueHD––
Dolby Atmos - Dolby Digital Plus–
DTS
DTS-ES Discrete 6.1, DTS-ES Matrix 6.1
DTS 96/24
DTS-HD High Resolution Audio––
DTS-HD Master Audio––
DTS-HD LBR––
DTS:X––
DSD–––
: تنسيق مدعوم.–: تنسيق غري مدعوم.
مالحظة.DVD-Audio أو Super Audio CD ال يدعم تنسيق الصوت الذي يحتوي عىل حقوق نسخ، مثل HDMI IN 1/2 مقبس
79AR
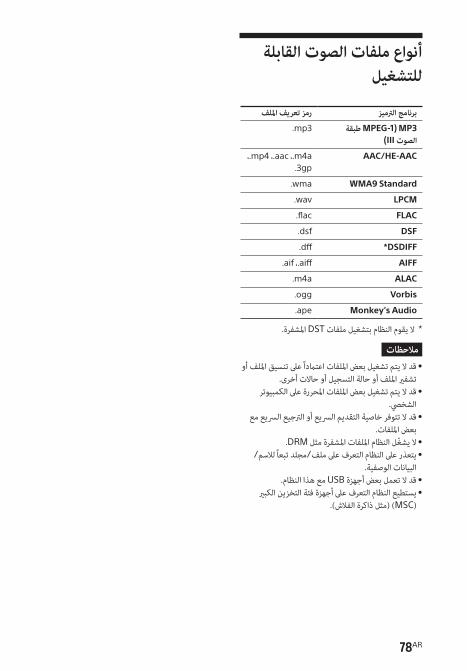
أنواع ملفات الصوت القابلة للتشغيل
رمز تعريف امللفبرنامج الرتميزMPEG-1) MP3 طبقة
(III الصوت.mp3
AAC/HE-AAC ،.mp4 ،.aac ،.m4a.3gp
WMA9 Standard.wma
LPCM.wav
FLAC.flac
DSF.dsf
*DSDIFF.dff
AIFF.aif ،.aiff
ALAC.m4a
Vorbis.ogg
Monkey’s Audio.ape
ال يقوم النظام بتشغيل ملفات DST املشفرة.* مالحظات
قد ال يتم تشغيل بعض امللفات اعتامدا عىل تنسيق امللف أو • تشفري امللف أو حالة التسجيل أو حاالت أخرى.
قد ال يتم تشغيل بعض امللفات املحررة عىل الكمبيوتر • الشخيص.
قد ال تتوفر خاصية التقديم الرسيع أو الرتجيع الرسيع مع • بعض امللفات.
•.DRM ال يشغل النظام امللفات املشفرة مثليتعذر عىل النظام التعرف عىل ملف/مجلد تبعا لالسم/•
البيانات الوصفية.قد ال تعمل بعض أجهزة USB مع هذا النظام.• يستطيع النظام التعرف عىل أجهزة فئة التخزين الكبري •
(MSC) (مثل ذاكرة الفالش).
78AR

عاممتطلبات الطاقة
120 فولت - 240 فولت تيار مرتدد، 50 هرتز/60 هرتزاستهالك الطاقة
تشغيل: 52 واط :[On] - [Network/Bluetooth Standby]
أقل من 2.4 واط :[Off] - [Network/Bluetooth Standby]
أقل من 0.5 واط*عندما يكون [Standby Through] مضبوطا عىل *
[Off]، أو يكون [Standby Through] مضبوطا عىل [Auto] بينام يكون التلفزيون املتصل يف وضع
اإليقاف.األبعاد* (تقريبا) (العرض/االرتفاع/العمق)
1000 مم × 64 مم × 98 مم (بدون إطار الشبكة)1000 مم × 64 مم × 99 مم (مع إطار الشبكة)
بدون الجزء البارز* الوزن (تقريبا)
2.9 كجم (بدون إطار الشبكة)3.1 كجم (مع إطار الشبكة)
طرازات iPhone/iPod املتوافقةفيام ييل طرازات iPhone/iPod املتوافقة. قم بتحديث
أجهزة iPhone/iPod بأحدث إصدارات الربامج قبل استخدامها مع النظام.
صنع من أجل:iPhone X/iPhone 8/iPhone 8 Plus/
iPhone 7/iPhone 7 Plus/iPhone SE/iPhone 6s/iPhone 6s Plus/iPhone 6/iPhone 6 Plus/iPhone 5s/iPhone 5c/
iPhone 5
iPod touch (الجيل السادس)/iPod touch (الجيل الخامس)
(SA-WZ9F) مضخم الصوت الفرعيخرج الطاقة (مرجع)
100 واط (مبقاومة 4 أوم، 100 هرتز)نظام مكرب الصوت
نظام مكرب صوت مضخم الصوت الفرعي، انعكاس صوت الجهري الخفيض
مكرب الصوت160 مم نوع مخروطي
متطلبات الطاقة120 فولت - 240 فولت تيار مرتدد، 50 هرتز/
60 هرتز
استهالك الطاقةتشغيل: 20 واط
وضع االستعداد: 1 واط أو أقلإيقاف: 0.5 واط أو أقل
األبعاد (تقريبا) (العرض/االرتفاع/العمق)190 مم × 382 مم × 386 مم (بدون الجزء البارز)
الوزن (تقريبا)8.1 كجم
قسم جهاز اإلرسال/جهاز االستقبال الالسليكنظام االتصال
مواصفات الصوت الالسليك اإلصدار 4.0نطاق الرتدد
5 جيجاهرتزطريقة التضمنيOFDM
التصميم واملواصفات عرضة للتغيري دون إشعار.
77AR

معلومات إضافيةاملواصفات
(SA-Z9F) مكرب الصوت الطويلقسم مضخم الصوت
خرج الطاقة (معدل)السامعة األمامية اليرسى + السامعة األمامية اليمنى:
60 واط + 60 واط (مبقاومة 4 أوم، 1 كيلوهرتز، 1% من التشوه التوافقي الكيل)
خرج الطاقة (مرجع)مجموعات مكربات الصوت األمامية اليرسى/األمامية اليمنى/الوسطى: 100 واط (للقناة الواحدة مبقاومة
4 أوم، 1 كيلوهرتز)مدخالت
*HDMI IN 1/2ANALOG INTV IN (OPT)
مخرجات*HDMI OUT (TV eARC/ARC)
HDMI OUT و HDMI IN 1/2 مقابس * .HDCP 2.2 تدعم بروتوكول (TV eARC/ARC)
HDCP 2.2 هي تقنية محسنة جديدة لحامية حقوق .4K النسخ تستخدم لحامية املحتوى مثل أفالم بدقة
HDMI قسماملوصل
النوع A (19سنا)USB قسم
:(USB) منفذ(USB لتوصيل ذاكرة) A النوع
LAN قسم شبكةLAN(100) طرف توصيل
100BASE-TX طرف توصيلقسم شبكة LAN الالسلكية
نظام االتصالIEEE 802.11 a/b/g/n
نطاق الرتدد2.4 جيجاهرتز، 5 جيجاهرتز
BLUETOOTH قسمنظام االتصال
مواصفات BLUETOOTH اإلصدار 4.2خرج
مواصفات BLUETOOTH فئة الطاقة 1الحد األقىص لنطاق االتصال
خط النظر 30 مرتا تقريبا1) العدد األقىص لألجهزة التي ميكن تسجيلها
9 أجهزةنطاق الرتدد
2.4 جيجاهرتز (2.4 جيجاهرتز - 2.4835 جيجاهرتز) طريقة التضمني
(Freq Hopping Spread Spectrum) FHSSقطاعات BLUETOOTH املتوافقة2)
Advanced Audio Distribution) A2DP(Profile
Audio Video Remote Control) AVRCP(Profile
برامج الرتميز املدعومة3) LDAC ،(5AAC ،(4SBC
(A2DP) نطاق اإلرسال20 هرتز - 40,000 هرتز (LDAC تردد العينة 96 كيلوهرتز مبعدل إرسال يبلغ 990 كيلوبت يف
الثانية)20 هرتز - 20,000 هرتز (تردد أخذ العينة
44.1 كيلوهرتز)يختلف املدى الحقيقي وفقا لعوامل مثل العوائق بني (1األجهزة واملجاالت املغناطيسية حول فرن مايكرويف
والكهرباء الساكنة واستخدام الهاتف الالسليك وحساسية االستقبال ونظام التشغيل والتطبيقات الربمجية، وما إىل
ذلك.تشري ملفات تعريف BLUETOOTH القياسية إىل الغرض (2
من اتصال BLUETOOTH بني األجهزة.برنامج الرتميز: ضغط إشارة الصوت وصيغة التحويل (3
اختصار لربنامج ترميز النطاق الفرعي (4
اختصار لربنامج ترميز الصوت املتقدم (5
قسم مجموعات مكربات الصوت األمامية اليرسى/األمامية اليمنى/الوسطى
نظام مكرب الصوتنظام مكرب صوت كامل النطاق، تعليق صويت
مكرب الصوت46 مم نوع مخروطي
76AR

الوظائف الالسلكية (شبكة LAN الالسلكية أو وظيفة BLUETOOTH أو مضخم الصوت
الفرعي أو مكربات الصوت الخلفية) غري مستقرة.
.ال تضع أشياء معدنية سوى التلفزيون حول النظاميتم تشغيل موسيقى غري مألوفة بالنسبة لك
فجأة. .رمبا يكون قد تم تشغيل العينة املوسيقية املثبتة مسبقا
اضغط عىل بالوحدة الرئيسية إليقاف التشغيل.ال ميكن إيقاف تشغيل النظام أو ال ميكن
استخدام [Advanced Settings]./عند الضغط عىل (الطاقة)، تظهر "DEMO." يف نافذة العرض وال ميكن إيقاف تشغيل النظام.
قد يكون النظام يف الوضع التجريبي. من أجل إلغاءالوضع التجريبي، قم بإعادة ضبط النظام. اضغط مطوال
عىل (الطاقة) و – (مستوى الصوت) عىل الوحدة الرئيسية ملدة أكرثمن 5 ثوان (صفحة 75).
MUSIC بواسطة زر Spotify ال ميكن تشغيلSERVICE أو ال ميكن تشغيله عىل طريقة
التشغيل. عىل النظام باستخدام Spotify قم بتشغيل موسيقى
Spotify عىل تطبيق Spotify Connect وظيفةالخاص بالجهاز املحمول. للتفاصيل، انظر «استخدام
Spotify» (صفحة 39).
تتم إعادة تشغيل النظام. ،عند التوصيل بتلفزيون بدقة مختلفة عن دقة النظام
فقد يقوم النظام بإعادة التشغيل إلعادة ضبط إعداد إخراج الصورة.
إعادة ضبط النظامإذا استمر النظام يف العمل بشكل غري صحيح، فقم بإعادة
ضبط النظام كام ييل.
1 .HOME اضغطتظهر القامئة الرئيسية عىل شاشة التلفزيون.
2 Advanced] - [Setup] اخرتSettings] عىل القامئة الرئيسية.
3 .[Resetting] اخرتحدد عنرص القامئة الذي تريد إعادة ضبطه. 45 .[Start] اخرت
إللغاء إعادة الضبطحدد [Cancel] يف الخطوة 5.
إذا تعذر القيام بإعادة الضبط باستخدام القامئة الرئيسية
اضغط مطوال عىل (الطاقة) و – (مستوى الصوت) عىل الوحدة الرئيسية ملدة أكرث من 5 ثوان.
تعود اإلعدادات إىل حالتها األولية.مالحظة
مبجرد إعادة الضبط، قد يفقد االتصال مبضخم الصوت الفرعي ومكربات الصوت الخلفية. يف هذه الحالة، قم بتنفيذ «توصيل
مضخم الصوت الفرعي ومكربات الصوت الخلفية السلكيا» (صفحة 30).
75AR

قم باستبدال كلتا البطاريتني يف وحدة التحكم عن بعدببطاريتني جديدتني إذا كانت شحنتهام ضعيفة.
تأكد من الضغط عىل الزر الصحيح بوحدة التحكمعن بعد.
وحدة التحكم عن بعد الخاص بالتلفزيون ال يعمل.
قد يتم حل هذه املشكلة عن طريق متكني وظيفة مكرراألشعة تحت الحمراء (صفحة 32).
أخرىالتحكم لوظيفة HDMI ال يعمل بشكل
صحيح. تحقق من االتصال بالنظام (راجع دليل بدء التشغيل
املرفق). بالتلفزيون. لالطالع HDMI قم بتمكني التحكم لوظيفة
عىل التفاصيل، راجع تعليامت تشغيل التلفزيون. انتظر بعض الوقت، ثم حاول مرة أخرى. وإذا قمت
بفصل النظام، فسيستغرق األمر بعض الوقت قبل إمكانية تنفيذ العمليات. انتظر ملدة 15 ثانية أو أكرث،
ثم أعد املحاولة. تأكد من أن األجهزة املتصلة بالنظام تدعم التحكم
.HDMI لوظيفة عىل األجهزة HDMI قم بتمكني التحكم لوظيفة
املتصلة بالنظام. لالطالع عىل التفاصيل، راجع تعليامت تشغيل الجهاز.
نوع وعدد األجهزة التي ميكن التحكم فيها بواسطة HDMI CEC محدد مبعيار HDMI التحكم لوظيفة
عىل النحو التايل: أجهزة التسجيل (مسجل Blu-ray Disc، مسجل –
DVD، إلخ): حتى 3 أجهزةأجهزة التشغيل (مشغل Blu-ray Disc، مشغل –
DVD، إلخ): حتى 3 أجهزة (هذا النظام يستخدم واحدا منهم)
األجهزة ذات الصلة باملوالف: حتى 4 أجهزة –نظام الصوت (جهاز استقبال/سامعة رأس): حتى –
جهاز واحد (يستخدم بواسطة هذا النظام)
تومض "PRTCT" يف شاشة العرض باللوحة األمامية ويتم إيقاف النظام.
افصل سلك طاقة التيار املرتدد (كابل الطاقة) وتأكد منعدم وجود أية عوائق تسد فتحات التهوية بالنظام.
تومض كل من "PRTCT" و"PUSH" واسم مكرب الصوت ("SUB" أو "SUR L" أو
"SUR R") و"POWER" بالتناوب عىل شاشة العرض باللوحة األمامية.
(الطاقة) عىل مكرب الصوت إليقاف التشغيل، اضغط :"SUR L" ،مضخم الصوت الفرعي :"SUB") املتطابقمكرب الصوت الخلفي األيرس، "SUR R": مكرب الصوت
الخلفي األمين). بالنسبة ملضخم الصوت الفرعي، افصل سلك طاقة التيار املرتدد وتأكد من عدم وجود ما يعيق فتحات التهوية الخاصة مبضخم الصوت الفرعي، ثم قم
بإعادة تشغيل النظام. بالنسبة ملكرب الصوت الخلفي، افصل سلك طاقة التيار املرتدد ثم قم بإعادة تشغيل النظام. إذا متت إعادة توصيلهم بشكل صحيح، يعود العرض عىل شاشة العرض باللوحة األمامية إىل شكله
الطبيعي.تظهر "BT TX" عىل شاشة العرض باللوحة
األمامية. .[Receiver] عىل [Bluetooth Mode] اضبط
[Bluetooth Mode] إذا تم ضبط "BT TX" تظهرعىل [Transmitter] (صفحة 62).
مستشعرات التلفزيون ال تعمل بشكل صحيح. قد تعوق الوحدة الرئيسية بعض املستشعرات (مثل
مستشعر السطوع) وجهاز استقبال وحدة التحكم عن بعد يف التلفزيون أو املرسل للنظارات ثالثية األبعاد
3D (إرسال باألشعة تحت الحمراء) الخاصة بتلفزيون 3D 3 الذي يدعم نظام النظارات ثالثية األبعادD
باألشعة تحت الحمراء أو االتصال الالسليك. قم بنقل الوحدة الرئيسية بعيدا عن التلفزيون يف نطاق يسمح
لهذه األجزاء بالعمل بشكل صحيح. بالنسبة ملواقع املستشعرات وجهاز استقبال وحدة التحكم عن بعد،
راجع تعليامت التشغيل املرفقة مع التلفزيون.
74AR

بحسب بيئة االستعامل (مبا يف ذلك املواد املستخدمة يفتصنيع الحائط)، أو ظروف استقبال املوجات الالسلكية
ه شبكة LAN الالسلكية، قد أو العوائق بني النظام وموجيتم اختصار مسافة االتصال املحتملة. قم بنقل النظام
ه شبكة LAN الالسلكية إىل أقرب مسافة ممكنة وموجمن بعضهام.
ها ذا تردد قد يؤدي استعامل األجهزة التي تستخدم موج2.4 جيجاهرتز مثل امليكرويف أو BLUETOOTH أو جهازا رقميا السلكيا إىل قطع االتصال. قم بنقل الوحدة
الرئيسية بعيدا عن هذه األجهزة، أو أوقف تشغيلها. الالسلكية غري مستقر LAN قد يصبح اتصال شبكة
وفقا لبيئة االستخدام، وخاصة أثناء استخدام وظيفة BLUETOOTH بالنظام. يف هذه الحالة، اضبط بيئة
االستخدام.موجه LAN الالسليك املطلوب غري معروض يف
قامئة الشبكات الالسلكية. ،للرجوع إىل الشاشة السابقة BACK اضغط عىل الزر
وحاول [Wireless LAN Settings] مرة أخرى LAN ه (صفحة 25). إذا استمر عدم اكتشاف موج
New connection] الالسليك الذي تريده، فحددregistration] من قامئة الشبكات، ثم حدد
[Manual registration] إلدخال اسم الشبكة (SSID) يدويا.
االتصال باإلنرتنتال ميكنك توصيل النظام باإلنرتنت.
.السلكية أو الالسلكية LAN تحقق من اتصال شبكة .الالسليك LAN ه ه أو موج أعد تشغيل املوج
الغرف املتعددة الالسلكيةيتأخر الصوت عن الصورة عند استخدام
وظيفة الغرف املتعددة الالسلكية. مبا يف ذلك االتصال) [TV] عند تشغيل صوت دخل
بوظيفة BLUETOOTH ) أو [HDMI1] أو [HDMI2] أو [Bluetooth Audio] باستخدام
وظيفة الغرف املتعددة الالسلكية، يتأخر صوت النظام عن صوت الصورة للتزامن مع صوت مكربات الصوت
األخرى. إذا كانت الفجوة الزمنية بني الصوت والصورة تزعجك، حاول ما ييل.
• OPTIONS اضغط :HDMI2 أو HDMI1 إلدخال.[Off] عىل [Multi-room Sync] واضبط
• / ،OPTIONS أو تناظري: اضغط TV إلدخالحتى تظهر "MSYNC" عىل شاشة العرض باللوحة
األمامية و (إدخال)، ثم اضغط / إىل أن تظهر "OFF" عىل شاشة العرض باللوحة األمامية واضغط
(إدخال).تتم مزامنة صوت النظام مع الصورة ولكن يتأخر خرج
الصوت الصادر من مكربات الصوت األخرى.ال ميكن استخدام وظيفة الغرف املتعددة .Sony | Music Center الالسلكية عىل
.صل الجهاز املحمول بنفس الشبكة املتصل بها النظام
وحدة التحكم عن بعدوحدة التحكم عن بعد لهذا النظام ال تعمل.
قم بتوجيه وحدة التحكم عن بعد ناحية مستشعروحدة التحكم عن بعد بالوحدة الرئيسية (صفحة 8).
قم بإزالة أي عوائق يف املسار بني وحدة التحكم عنبعد والنظام.
73AR

اتصال سامعات الرأس بواسطة وظيفة BLUETOOTH
ال ميكن إجراء االقرتان. من BLUETOOTH قم بتقريب هذا النظام وجهاز
بعضهام. تأكد من أن هذا النظام ال يتلقى تداخال من جهاز شبكة
LAN الالسلكية أو أجهزة السلكية أخرى برتدد 2.4 جيجاهرتز أو فرن ميكرويف. يف حالة وجود جهاز يولد إشعاعا كهرومغناطيسيا يف مكان قريب، فقم بتحريكه
بعيدا عن هذا النظام..BLUETOOTH ال ميكن إكامل اتصال
بالوحدة BLUETOOTH تأكد من إضاءة مؤرشالرئيسية (صفحة 8).
الذي سيتم BLUETOOTH تأكد من تشغيل جهاز.BLUETOOTH االتصال به ومتكني وظيفة
من BLUETOOTH قم بتقريب هذا النظام وجهازبعضهام.
مرة BLUETOOTH قم بإقران هذا النظام وجهاز BLUETOOTH أخرى. قد تحتاج إىل إلغاء اقرتان جهاز
مع هذا النظام أوال. انظر «لحذف جهاز مسجل من قامئة األجهزة» (صفحة 43).
قد يتم حذف معلومات االقرتان. قم بإجراء عمليةاالقرتان مرة أخرى (صفحة 42).
ال يصدر أي صوت من سامعات رأس BLUETOOTH املتصلة.
بالوحدة BLUETOOTH تأكد من إضاءة مؤرشالرئيسية (صفحة 8).
من BLUETOOTH قم بتقريب هذا النظام وجهازبعضهام.
يف حالة وجود جهاز يولد إشعاعا كهرومغناطيسيا، مثل BLUETOOTH الالسلكية أو أجهزة LAN جهاز شبكة
أخرى، أو فرن ميكرويف قريب، قم بإبعاد الجهاز عن هذا النظام.
قم بإزالة أي عائق بني هذا النظام وجهازBLUETOOTH أو قم بتحريك هذا النظام بعيدا
عن العائق. .املتصل BLUETOOTH قم بتغيري موقع جهاز ه قم بتغيري تردد شبكة LAN الالسلكية ألي موج
LAN السليك قريب أو كمبيوتر شخيص إىل نطاق 5 جيجاهرتز.
.املتصل BLUETOOTH قم برفع مستوى صوت جهاز عىل [Wireless Playback Quality] اضبط
[Auto] (صفحة 62).
.قد ال يتم إخراج بعض املحتوى بسبب حامية املحتوى
توصيل شبكة LAN السلكيةالنظام ال يستطيع االتصال بالشبكة.
تحقق من اتصال الشبكة (صفحة 24) وإعداداتالشبكة (صفحة 63).
اتصال شبكة LAN الالسلكيةال ميكنك توصيل الكمبيوتر الشخيص باإلنرتنت
Wi-Fi Protected Setup™] بعد إجراء.[(WPS)
ه تلقائيا إذا قد تتغري اإلعدادات الالسلكية للموجاستعملت وظيفة Wi-Fi Protected Setup قبل ه. يف هذه الحالة، غري اإلعدادات ضبط إعدادات املوج
الالسلكية للكمبيوتر الشخيص وفقا لذلك.النظام ال يستطيع التوصيل بالشبكة أو توصيل
الشبكة غري مستقر. الالسلكية قيد LAN ه شبكة تأكد ما إذا كان موج
التشغيل. تحقق من اتصال الشبكة (صفحة 25) وإعدادات
الشبكة (صفحة 63).
72AR

إذا كان هناك عائق بني الوحدة الرئيسية ومكرب الصوتالخلفي، قم بنقله أو إزالته.
قم بوضع الوحدة الرئيسية عىل أقرب مسافة ممكنة منمكرب الصوت الخلفي.
Blu-ray قم بتغيري اتصال شبكة التلفزيون أو مشغلDisc من السليك إىل سليك.
USB توصيل جهاز.USB ال يتم التعرف عىل جهاز
:جرب ما ييلإيقاف تشغيل النظام.
فصل جهاز USB وإعادة توصيله. تشغيل النظام.
متصل بشكل محكم مبنفذ USB تأكد من أن جهاز (USB) (صفحة 36).
.أو الكابل تالفا USB تحقق مام إذا كان جهاز .قيد التشغيل USB تأكد من أن جهاز ،USB عرب لوحة وصل USB إذا تم توصيل جهاز
فافصله وقم بتوصيل جهاز USB بالنظام مبارشة. ،أو هاتف ذيك WALKMAN® عند القيام بتوصيل
فقد ال يتم التعرف عىل تخزينه الداخيل أو الخارجي (مثل بطاقة الذاكرة).
توصيل جهاز محمولال ميكن إجراء االقرتان.
من BLUETOOTH قم بتقريب هذا النظام وجهازبعضهام.
LAN تأكد من أن هذا النظام ال يتلقى تداخال من جهازالسليك أو أجهزة السلكية أخرى برتدد 2.4 جيجاهرتز أو فرن ميكروويف. يف حالة وجود جهاز يولد إشعاعا كهرومغناطيسيا يف مكان قريب، فقم بتحريكه بعيدا
عن هذا النظام.
.BLUETOOTH ال ميكن إكامل اتصال بالوحدة BLUETOOTH تأكد من إضاءة مؤرش
الرئيسية (صفحة 35). الذي سيتم BLUETOOTH تأكد من تشغيل جهاز
.BLUETOOTH االتصال به ومتكني وظيفة من BLUETOOTH قم بتقريب هذا النظام وجهاز
بعضهام. مرة BLUETOOTH قم بإقران هذا النظام وجهاز
أخرى. قد تحتاج إىل إلغاء االقرتان مع هذا النظام باستخدام جهاز BLUETOOTH أوال.
قد يتم حذف معلومات االقرتان. قم بإجراء عمليةاالقرتان مرة أخرى (صفحة 34).
BLUETOOTH ال يتم إخراج صوت جهازاملحمول املتصل من النظام.
بالوحدة BLUETOOTH تأكد من إضاءة مؤرشالرئيسية (صفحة 35).
من BLUETOOTH قم بتقريب هذا النظام وجهازبعضهام.
يف حالة وجود جهاز يولد إشعاعا كهرومغناطيسيا، مثلجهاز LAN السليك أو أجهزة BLUETOOTH أخرى،
أو فرن مايكرويف قريب، قم بإبعاد الجهاز عن هذا النظام.
قم بإزالة أي عائق بني هذا النظام وجهازBLUETOOTH أو بتحريك هذا النظام بعيدا عن
العائق. .املتصل BLUETOOTH قم بتغيري موقع جهاز ه قم بتغيري تردد شبكة LAN الالسلكية ألي موج
LAN السليك قريب أو كمبيوتر شخيص إىل نطاق 5 جيجاهرتز.
.املتصل BLUETOOTH قم برفع مستوى صوت جهاز
71AR

تأكد من توصيل سلك طاقة التيار املرتدد (كابل –الطاقة) الخاص مبضخم الصوت الفرعي بشكل
صحيح.اضغط عىل (تشغيل) مبضخم الصوت الفرعي –
لتشغيل الطاقة. إذا كان مؤرش الطاقة مبضخم الصوت الفرعي يومض
ببطء باللون األخرض أو ييضء باللون األحمر، فجرب ما ييل.
قم بنقل مضخم الصوت الفرعي إىل مكان بالقرب من –الوحدة الرئيسية حتى ييضء مؤرش الطاقة املوجود
مبضخم الصوت الفرعي باللون األخرض.قم باتباع الخطوات الواردة يف «توصيل مضخم –
الصوت الفرعي ومكربات الصوت الخلفية السلكيا» (صفحة 30).
تحقق من حالة االتصال الالسليك (صفحة 60). – إذا كان مؤرش الطاقة مبضخم الصوت الفرعي يومض
باللون األحمر، فاضغط عىل (تشغيل) مبضخم الصوت الفرعي إليقاف تشغيل الطاقة وتحقق مام إذا كانت فتحة التهوية مبضخم الصوت الفرعي مسدودة
أم ال. إذا كانت مصادر اإلدخال تحتوي عىل القليل من
مكونات صوت الجهري الخفيض (مثال بث التلفزيون)، قد يكون من الصعب سامع الصوت من مضخم الصوت
الفرعي. ميكنك التحقق من صوت مضخم الصوت الفرعي عن طريق إصدار نغمة االختبار (صفحة 56).
اضبط الوضع اللييل عىل إيقاف. للتفاصيل، انظر«االستمتاع بصوت واضح مع مستوى صوت منخفض يف
منتصف الليل (NIGHT)» (صفحة 47). إىل [Off] من [RF Channel] إذا قمت بتغيري إعداد
[On] (صفحة 32)، فقد يستغرق األمر دقيقة حتى يتم إخراج الصوت.
يتم تخطي الصوت أو توجد ضوضاء. إذا كان هناك جهاز قريب يولد موجات كهرومغناطيسية
مثل شبكة LAN السلكية أو فرن مايكرويف قيد االستخدام، قم بوضع النظام بعيدا عنه.
إذا كان هناك عائق بني الوحدة الرئيسية ومضخمالصوت الفرعي، فقم بنقله أو إزالته.
قم بوضع الوحدة الرئيسية ومضخم الصوت الفرعي يفأقرب مكان ممكن.
.(32 صفحة) [RF Channel] لتغيري إعداد Blu-ray قم بتغيري اتصال شبكة التلفزيون أو مشغل
Disc من السليك إىل سليك.
مكربات الصوت الخلفية (غري مرفقة)ال يسمع أي صوت من مكربات الصوت
الخلفية. تأكد من توصيل سلك طاقة التيار املرتدد الخاص مبكرب
الصوت الخلفي بشكل صحيح. إذا مل يضئ مؤرش الطاقة مبكرب الصوت الخلفي، قم
بتجربة ما ييل.تأكد من توصيل سلك طاقة التيار املرتدد الخاص مبكرب –
الصوت الخلفي بشكل صحيح.اضغط (الطاقة) مبكرب الصوت الخلفي لتشغيل –
الطاقة. إذا كان مؤرش الطاقة مبكرب الصوت الخلفي يومض ببطء
باللون األخرض أو ييضء باللون األحمر، قم بتجربة ما ييل.
قم بنقل مكرب الصوت الخلفي إىل مكان بالقرب من –الوحدة الرئيسية حتى ييضء مؤرش الطاقة املوجود
مبكرب الصوت الخلفي باللون األخرض.قم باتباع الخطوات الواردة يف «توصيل مضخم –
الصوت الفرعي ومكربات الصوت الخلفية السلكيا» (صفحة 30).
تحقق من حالة االتصال الالسليك (صفحة 60). – عىل وحدة التحكم عن بعد REAR + اضغط عىل
لزيادة مستوى صوت مكربات الصوت الخلفية (صفحة 48).
إىل [Off] من [RF Channel] إذا قمت بتغيري إعداد[On] (صفحة 32)، فقد يستغرق األمر دقيقة حتى
يتم إخراج الصوت.يتم تخطي الصوت أو توجد ضوضاء.
إذا كان هناك جهاز قريب يولد موجات كهرومغناطيسيةمثل شبكة LAN السلكية أو فرن ميكرويف قيد
االستخدام، قم بوضع النظام بعيدا عنه.
70AR

صوت التلفزيون الصادر من هذا النظام متأخر عن الصورة.
0 اضبط قيمة ضبط التأخري بني الصورة والصوت عىلمليل ثانية إذا كانت مضبوطة عىل النطاق بني 25
و 300 مليل ثانية (صفحة 49). قد تحدث الفجوة الزمنية بني الصوت والصورة تبعا
ملصدر الصوت. إذا كان التلفزيون به وظيفة تعمل عىل تأخري الصورة، فاستخدمها للضبط.
ال يسمع أي صوت أو يسمع صوت مبستوى منخفض جدا للجهاز املتصل بالنظام.
عىل وحدة التحكم عن بعد وتحقق من + اضغطمستوى الصوت (صفحة 12).
عىل وحدة التحكم عن بعد إللغاء + أو اضغطوظيفة كتم الصوت (صفحة 12).
تأكد من اختيار مصدر اإلدخال بشكل صحيح. يجبعليك أن تجرب مصادر إدخال أخرى بالضغط عىل زر
تحديد اإلدخال عىل وحدة التحكم عن بعد TV/HDMI1/HDMI2/ANALOG/USB/)
BLUETOOTH) (صفحة 12).
تأكد من إدخال جميع كابالت وأسالك النظام والجهازاملتصل بشكل محكم.
عند تشغيل محتوى متوافق مع تقنية حامية حقوقالنسخ (HDCP)، فقد ال يتم إخراجه من النظام.
Advanced] - [Setup] قم بضبط HDMI] - [HDMI Settings] - [Settings
[Standard format] عىل [Signal Format(صفحة 22).
ال ميكن الحصول عىل مؤثر الصوت املحيط. وفقا إلشارة اإلدخال وإعداد وضع الصوت، قد ال تعمل
معالجة الصوت املحيطي بشكل فعال. قد يكون مؤثر الصوت املحيط مخفيا، وفقا للربنامج أو القرص.
لتشغيل صوت متعدد القنوات، تحقق من إعداد إخراجالصوت الرقمي بالجهاز املتصل بالنظام. لالطالع عىل
التفاصيل، راجع تعليامت التشغيل املرفقة مع الجهاز املتصل.
يتأخر الصوت عن الصورة عند استخدام وظيفة الغرف املتعددة الالسلكية.
مبا يف ذلك) [TV] عند تشغيل صوت دخل[HDMI1] أو ( BLUETOOTH االتصال بوظيفة
أو [HDMI2] أو [Bluetooth Audio] أو [Analog] باستخدام وظيفة الغرف املتعددة
الالسلكية، يتأخر صوت النظام عن صوت الصورة للتزامن مع صوت مكربات الصوت األخرى. إذا كانت
الفجوة الزمنية بني الصوت والصورة تزعجك، حاول ما ييل.
• OPTIONS اضغط :HDMI2 أو HDMI1 إلدخال.[Off] عىل [Multi-room Sync] واضبط
• / ،OPTIONS أو تناظري: اضغط TV إلدخالحتى تظهر "MSYNC" عىل شاشة العرض باللوحة
األمامية و (إدخال)، ثم اضغط / إىل أن تظهر "OFF" عىل شاشة العرض باللوحة األمامية واضغط
(إدخال).تتم مزامنة صوت النظام مع الصورة ولكن يتأخر خرج
الصوت الصادر من مكربات الصوت األخرى.
مضخم الصوت الفرعي ال يوجد صوت أو يتم فقط سامع صوت ذي
مستوى منخفض جدا من مضخم الصوت الفرعي.
عىل وحدة التحكم عن بعد SW + اضغط عىللزيادة صوت مضخم الصوت الفرعي (صفحة 48).
تأكد من أن مؤرش الطاقة مبضخم الصوت الفرعي ييضءباللون األخرض.
إذا مل يضئ مؤرش الطاقة مبضخم الصوت الفرعي، فجربما ييل.
69AR

ال يتم إصدار صوت التلفزيون من النظام. أو الكابل الرقمي HDMI تحقق من نوع وتوصيل كابل
البرصي أو كابل الصوت التناظري املتصل بالنظام والتلفزيون (راجع دليل بدء التشغيل املرفق).
افصل الكابالت املوصولة بني التلفزيون والنظام، ثم قمبتوصيلها مرة أخرى بإحكام. افصل أسالك التيار املرتدد
(كابالت الطاقة) الخاصة بالتلفزيون والنظام من فتحات مأخذ التيار ثم قم بتوصيلها مرة أخرى.
تحقق ،HDMI عند توصيل النظام والتلفزيون بكابلمام ييل.
مقبس HDMI للتلفزيون املتصل ملصق عليه –."ARC" أو "eARC"
تم ضبط التحكم لوظيفة HDMI للتلفزيون عىل –وضع التشغيل.
وظيفة eARC أو ARC الخاصة بالتلفزيون مفعلة. –عىل النظام، [Control for HDMI] مضبوطة عىل –
[On] و [TV Audio Input Mode] مضبوطة عىل [Auto] (صفحة 61).
اضبط ،eARC إذا مل يكن التلفزيون متوافقا مع - [Advanced Settings] - [Setup]
[Off] عىل [eARC] - [HDMI Settings](صفحة 61).
قم ،ARC أو eARC إذا مل يكن التلفزيون متوافقا معبتوصيل الكابل الرقمي البرصي (غري مرفق) (راجع دليل
بدء التشغيل املرفق). إذا مل يكن التلفزيون متوافقا مع eARC أو ARC، فلن يصدر صوت التلفزيون من
HDMI IN النظام حتى مع توصيل النظام مبقبسبالتلفزيون.
عند قيامك .TV قم بتغيري إدخال النظام إىل إدخالبتوصيل النظام والتلفزيون بكابل صوت تناظري (غري
ANALOG مرفق)، قم بتغيري إدخال النظام إىل إدخال(صفحة 38).
.قم بزيادة مستوى صوت النظام أو إلغاء كتم الصوت إذا مل يتم إخراج الصوت من جهاز الكابل/جهاز القمر
الصناعي املتصل بالتلفزيون، فقم بتوصيل الجهاز مبقبس HDMI IN 1 أو HDMI IN 2 بالنظام وقم بتغيري
مدخل النظام إىل مدخل الجهاز املتصل ([HDMI1] أو [HDMI2]) (راجع دليل بدء التشغيل املرفق).
وفقا للرتتيب الذي اتبعته عند توصيل التلفزيونوالنظام، فقد يتم كتم الصوت بالنظام ويظهر
"MUTING" عىل شاشة العرض باللوحة األمامية للنظام. إذا حدث ذلك، فقم أوال بتشغيل التلفزيون
ثم النظام. (BRAVIA) اضبط إعداد مكربات صوت التلفزيون
عىل نظام الصوت. راجع تعليامت التشغيل الخاصة بالتلفزيون حول كيفية ضبط التلفزيون.
ال يتم إخراج صورة وصوت الجهاز املتصل بالنظام من التلفزيون عندما يكون النظام يف
وضع إيقاف التشغيل. Advanced] - [Setup] قم بضبط
Control] - [HDMI Settings] - [Settingsfor HDMI] عىل النظام عىل [On]، ثم اضبط
[On] أو [Auto] عىل [Standby Through](صفحة 61).
قم بتشغيل النظام، ثم قم بتغيري اإلدخال للجهاز قيدالتشغيل.
يف حالة التوصيل بأجهزة أخرى بخالف املصنعة من قبلرشكة Sony التي تدعم التحكم لوظيفة HDMI، قم
[Advanced Settings] - [Setup] بضبط [Standby Through] - [HDMI Settings] -
عىل [On] (صفحة 61).يتم إصدار الصوت من كل من النظام
والتلفزيون. .قم بكتم صوت النظام أو التلفزيون
تتم مقاطعة الصوت أثناء مشاهدة برنامج تلفزيوين أو محتوى عىل Blu-ray Disc، الخ
تحقق من إعداد وضع الصوت (صفحة 46). إذا تمضبط وضع الصوت عىل [Auto Sound]، فقد تتم مقاطعة الصوت عند تغيري وضع الصوت تلقائيا وفقا
للمعلومات الخاصة بالربنامج الذي يتم عرضه. إذا كنت ال تريد تغيري وضع الصوت تلقائيا، قم بضبط وضع
.[Auto Sound] الصوت عىل إعداد آخر غري
68AR

عند عدم وجود صورة من الجهاز املتصل أو عند عدمإخراج الصورة من الجهاز املتصل بشكل صحيح، قم
[Advanced Settings] - [Setup] بضبط HDMI Signal] - [HDMI Settings] -
Format] - [HDMI IN 2]/[HDMI IN 1] عىل [Standard format] (صفحة 22).
فتأكد من ،HDCP 2.2 إذا قمت بتوصيل جهاز يدعمتوصيل الجهاز مبقبس HDMI IN وتوصيل التلفزيون مبقبس HDMI OUT (TV eARC/ARC) بالنظام.
النظام متصل بجهاز إدخال غري متوافق مع تقنيةHDCP (حامية املحتوى الرقمي ذي النطاق الرتددي
العايل). يف مثل هذه الحالة، قم مبراجعة مواصفات الجهاز املتصل.
ال يظهر محتوى 3D الذي يتم إخراجه من مقبس HDMI IN 1/2 عىل شاشة التلفزيون.
وفقا لجهاز التلفزيون أو الفيديو، قد ال يظهر محتوى3D. تحقق من تنسيق فيديو HDMI املدعوم
(صفحة 80).ال يظهر محتوى الفيديو بدقة 4K الذي يتم
إخراجه من مقبس HDMI IN 1/2 عىل شاشة التلفزيون.
وفقا لجهاز التلفزيون أو الفيديو، قد ال يظهر محتوىالفيديو بدقة 4K. تحقق من قدرات الفيديو وإعدادات
جهاز التلفزيون والفيديو. قد ال يتم عرض الصورة بشكل صحيح إذا تم تغيري
اإلعداد [HDMI Signal Format]. يف هذه [Standard format] الحالة، قم بتغيري اإلعداد إىل
(صفحة 22). برمييوم عايل الرسعة مع إيرثنت HDMI استخدم كابل
يدعم رسعة تبلغ 18 جيجابت يف الثانية أو كابل HDMI عايل الرسعة مع إيرثنت (صفحة 80).
ال يتم عرض الصورة مبلء شاشة التلفزيون. .نسبة العرض إىل االرتفاع عىل الوسائط ثابتة
ال يتم إخراج صورة وصوت الجهاز املتصل بالنظام من التلفزيون عندما يكون النظام يف
وضع إيقاف التشغيل. Advanced] - [Setup] قم بضبط
Control] - [HDMI Settings] - [Settingsfor HDMI] عىل النظام عىل [On]، ثم اضبط
[On] أو [Auto] عىل [Standby Through](صفحة 61).
قم بتشغيل النظام، ثم قم بتغيري اإلدخال للجهاز قيدالتشغيل.
يف حالة التوصيل بأجهزة أخرى بخالف املصنعة من قبلرشكة Sony التي تدعم التحكم لوظيفة HDMI، قم
[Advanced Settings] - [Setup] بضبط [Standby Through] - [HDMI Settings] -
عىل [On] (صفحة 61).ال ميكن عرض محتويات HDR كنطاق
دينامييك عايل. تحقق من إعدادات التلفزيون والجهاز املتصل. لالطالع
عىل التفاصيل، راجع تعليامت تشغيل جهاز التلفزيون والجهاز املتصل.
إىل HDR قد تقوم بعض األجهزة بتحويل محتوياتSDR إذا مل يكن النطاق الرتددي العريض كافيا. يف هذه
Advanced] - [Setup] الحالة، قم بضبط HDMI] - [HDMI Settings] - [Settings
[HDMI IN 1]/[HDMI IN 2] - [Signal Formatعىل [Enhanced format] إذا كان التلفزيون والجهاز
املتصل يدعامن نطاقا تردديا يصل إىل 18 جيجابت يف Enhanced] الثانية (صفحة 22). عند قيامك بتحديدformat]، تأكد من استخدام كابل HDMI برمييوم عايل
الرسعة مع إيرثنت يدعم رسعة تبلغ 18 جيجابت يف الثانية (صفحة 80).
الصوتال ميكن للنظام أن يتصل بالتلفزيون بواسطة
.BLUETOOTH وظيفة HDMI عندما تقوم بتوصيل النظام والتلفزيون بكابل
.BLUETOOTH (مرفق)، يتم إلغاء اتصال
67AR

استكشاف الخطأ وإصالحهاستكشاف الخطأ وإصالحه
إذا واجهت أي من املشاكل التالية أثناء استخدام النظام، فارجع إىل دليل استكشاف األخطاء وإصالحها هذا للحصول عىل مساعدة بشأن عالج املشكلة قبل طلب إجراء عمليات
إصالح. إذا استمرت أية مشكلة، قم باستشارة أقرب وكيل Sony لديك.
عند طلب إجراء عملية إصالح، تأكد من إحضار كل من الوحدة الرئيسية ومضخم الصوت الفرعي ومكربات الصوت
الخلفية (غري مرفقة)، حتى إذا كان يبدو أن املشكلة يف واحد منهم فقط.
الطاقةال يعمل النظام.
بشكل AC تحقق من توصيل سلك طاقة التيار املرتددمحكم.
من فتحة مأخذ AC افصل سلك طاقة التيار املرتددالتيار عىل الحائط، ثم أعد التوصيل بعد عدة دقائق.
ال يعمل النظام حتى عند تشغيل التلفزيون. Advanced] - [Setup] قم بضبط
Control] - [HDMI Settings] - [Settingsfor HDMI] عىل [On] (صفحة 61). يجب أن يدعم
التلفزيون التحكم لوظيفة HDMI (صفحة 53). لالطالع عىل التفاصيل، راجع تعليامت تشغيل
التلفزيون. تحقق من إعدادات مكربات الصوت بالتلفزيون. تتزامن
طاقة النظام مع إعدادات مكربات الصوت بالتلفزيون. لالطالع عىل التفاصيل، راجع تعليامت تشغيل
التلفزيون. إذا تم إصدار الصوت من مكربات صوت التلفزيون
يف املرة السابقة، فقد يتعذر تشغيل النظام بواسطة التداخل مع طاقة التلفزيون حتى مع تشغيل التلفزيون،
وذلك بحسب التلفزيون.
يتوقف النظام عند إيقاف تشغيل التلفزيون. Advanced] - [Setup] تحقق من إعداد
Standby] - [HDMI Settings] - [SettingsLinked to TV] (صفحة 61). عند ضبط
[Standby Linked to TV] عىل [On] أو [Auto]، يتوقف تشغيل النظام تلقائيا عند إيقاف
تشغيل التلفزيون.ال يتوقف تشغيل النظام حتى عند إيقاف
تشغيل التلفزيون. Advanced] - [Setup] تحقق من إعداد
Standby] - [HDMI Settings] - [SettingsLinked to TV] (صفحة 61). إليقاف تشغيل النظام
تلقائيا برصف النظر عن اإلدخال عند إيقاف تشغيل [Standby Linked to TV] التلفزيون، اضبط
عىل [On]. يجب أن يدعم التلفزيون التحكم لوظيفة HDMI (صفحة 53). لالطالع عىل التفاصيل، راجع
تعليامت تشغيل التلفزيون.يتعذر إيقاف تشغيل النظام.
قد يكون النظام يف الوضع التجريبي. من أجل إلغاءالوضع التجريبي، قم بإعادة ضبط النظام. اضغط مطوال
عىل (الطاقة) و – (مستوى الصوت) عىل الوحدة الرئيسية ملدة أكرثمن 5 ثوان (صفحة 75).
الصورةال توجد صورة أو ال يتم إخراج الصورة بشكل
صحيح. .(33 صفحة) حدد اإلدخال املناسب حدد قناة ،TV عند عدم وجود صورة رغم تحديد إدخال
التلفزيون التي تريدها باستخدام وحدة التحكم عن بعد الخاصة بالتلفزيون.
،HDMI1/2 عند عدم وجود صورة رغم تحديد دخلاضغط عىل زر التشغيل بالجهاز املتصل.
ثم أعد توصيله. وتأكد من إدخال ،HDMI افصل كابلالكابل بإحكام.
66AR

عندما يبدأ تحديث الربنامج، يقوم النظام تلقائيا بإعادة التشغيل.
أثناء تحديث الربامج، تظهر "UPDT" عىل شاشة العرض باللوحة األمامية.
بعد اكتامل التحديث، يقوم النظام تلقائيا بإعادة التشغيل.
[Network update]لتحديث الربنامج باستخدام الشبكة املتوفرة. تأكد من
اتصال الشبكة باإلنرتنت.[USB update]
لتحديث الربنامج باستخدام ذاكرة USB. للتفاصيل الخاصة بالتحديث، راجع التعليامت املعروضة عند تحميل ملف
التحديث.[Wireless speakers only]
لتحديث الربنامج الخاص مبضخم الصوت الفرعي ومكربات الصوت الخلفية عندما يكون برنامج النظام هو أحدث
إصدار. تأكد من تشغيل مضخم الصوت الفرعي ومكربات الصوت الخلفية واتصالها بالنظام (صفحة 30).
مالحظاتميكنك تنفيذ [USB update] بالضغط مطوال عىل زر •
BLUETOOTH و عىل الوحدة الرئيسية ملدة 7 ثوان.ميكنك تنفيذ [Network update] عىل تطبيق •
.Sony | Music Centerإذا مل يعمل التحديث الخاص مبضخم الصوت الفرعي أو •
مكربات الصوت الخلفية، قم بنقلها إىل مكان قريب من الوحدة الرئيسية ومن ثم قم بالتحديث.
65AR

تلميحللحصول عىل مزيد من التفاصيل، تفضل بزيارة موقع الويب
التايل ومراجعة األسئلة املتداولة:http://www.sony-asia.com/section/support
[Network Connection Status]لعرض حالة توصيل الشبكة الحالية.
[Resetting] ميكنك إعادة ضبط إعدادات النظام عىل إعداد املصنع
االفرتايض بواسطة تحديد مجموعة اإلعدادات. ستتم إعادة ضبط كل اإلعدادات ضمن املجموعة.
للتفاصيل، انظر «إعادة ضبط النظام» (صفحة 75).
[Software Update] ميكنك تحديث الربنامج الخاص بالنظام أو مبضخم الصوت
الفرعي أو مبكربات الصوت الخلفية.للتفاصيل، انظر «تحديث الربنامج» (صفحة 64).
تحديث الربنامجبتحديث الربنامج إىل أحدث إصدار، ميكنك االستمتاع
بأحدث الوظائف.للحصول عىل معلومات حول وظائف التحديث، تفضل
بزيارة موقع الويب التايل: http://www.sony-asia.com/section/support
مالحظاتقد يستغرق اكتامل التحديث ما يصل إىل 40 دقيقة.• يلزم توفري بيئة اتصال باإلنرتنت إلجراء التحديثات عرب •
اإلنرتنت.بينام تكون عملية التحديث قيد التقدم، ال تقم بأي مام ييل، •
تشغيل أو إيقاف تشغيل النظام، أو فصل سلك التيار املرتدد (كابل الطاقة)، أو فصل/توصيل كابل HDMI، أو تشغيل النظام أو التلفزيون. وانتظر حتى يكتمل تحديث الربامج.
اضبط [Auto Update] عىل [On] إذا كنت ترغب • يف إجراء تحديثات الربامج تلقائيا (صفحة 63). ميكن
Auto] يف [Off] إجراء تحديث الربامج حتى مع تحديدUpdate] اعتامدا عىل تفاصيل التحديثات.
1 .HOME اضغطتظهر القامئة الرئيسية عىل شاشة التلفزيون.
2 Advanced] - [Setup] اخرتSettings] عىل القامئة الرئيسية.
إذا اكتشف النظام وجود معلومات تحديث له عىل Software] الشبكة، يظهر إشعار التحديث و
Update] عىل القامئة الرئيسية. ويف هذه الحالة، حدد [Software Update] واذهب إىل خطوة
.43 .[Software Update] اخرت
تظهر شاشة [Software Update] عىل شاشة التلفزيون.
اخرت البند الذي سيتم تحديثه. 4 / اخرت البند من البنود التالية بالضغط عىل، ثم قم بتحديث الربنامج عن طريق اتباع و
التعليامت املعروضة عىل الشاشة.
64AR

مالحظات •Chromecast built- إذا وافقت عىل استخدام وظيفة
[Network/Bluetooth Standby] تتحول ،in.[On] تلقائيا إىل
إذا قمت بضبط [RF Channel] عىل [On] (صفحة 32)، • تتحول [Network/Bluetooth Standby] تلقائيا
.[On] إىل
[Auto Standby] [On]: لتشغيل وظيفة [Auto Standby]. عندما
ال تشغل النظام بينام ال يتم إدخال أي إشارة ملدة حوايل 20 دقيقة، يدخل النظام يف وضع االستعداد تلقائيا.
[Off]: متوقف
[Software Update Notification][On]: لضبط النظام عىل اإلخطار باملعلومات املتعلقة
بأحدث إصدار الربامج (صفحة 64).[Off]: متوقف
[Auto Update Settings] •[Auto Update]
[On]: يتم تنفيذ تحديث الربامج تلقائيا خالل الفرتة من الساعة 2 إىل الساعة 5 صباحا بالتوقيت املحيل يف [Time Zone] املحددة عندما ال يكون هذا النظام
Network/] يف [Off] قيد االستخدام. يف حالة تحديدBluetooth Standby]، يتم تنفيذ تحديث الربامج
بعد إيقاف تشغيل النظام.[Off]: متوقف
•[Time Zone]حدد الدولة/املنطقة.
مالحظاتميكن إجراء تحديث الربامج حتى مع تحديد [Off] يف •
[Auto Update] اعتامدا عىل تفاصيل التحديثات.يتم تنفيذ تحديث الربامج تلقائيا خالل 11 يوما من أي •
إصدار جديد للربامج.
[Device Name Setting] ميكنك تغيري اسم هذا النظام وفقا ملا تفضله عند استعامل
الوظائف التالية. •BLUETOOTH وظيفة
الشبكة املنزلية• •Spotify •Chromecast built-in وظيفة
اتبع التعليامت التي تظهر عىل الشاشة واستخدم لوحة مفاتيح الربنامج إلدخال االسم.
[System Information]ميكنك عرض معلومات النظام مثل إصدار الربنامج وعنوان
.MAC
[Privacy Setting ]يقوم النظام بجمع املعلومات الخاصة باستخدام جهازك.
اقرأ سياسة الخصوصية التي ستظهر عندما يكون هذا اإلعداد مطلوبا، وقرر ما إذا كنت توافق عىل جمع
املعلومات.[Agree]: اخرت هذا إذا كنت توافق عىل جمع املعلومات.
[Do not agree]: اخرت هذا إذا كنت ال توافق عىل جمع املعلومات.
تلميححتى إذا كنت قد اخرتت [Agree]، سيكون مبقدورك
Do not] إيقاف جمع املعلومات عن طريق إعادة اختيارagree] أو إعادة ضبط [System Settings] عىل إعدادات املصنع االفرتاضية عرب [Resetting] (صفحة
.(64
[Software License Information] ميكنك عرض معلومات ترخيص الربنامج.
[Network Settings] [Internet Settings]
قم بتوصيل النظام بالشبكة مسبقا.[Wired LAN Settings]: حدد هذا اإلعداد عند
التوصيل مبوجه نطاق واسع باستخدام كابل LAN. عند قيامك بتحديد هذا اإلعداد، يتم تعطيل وظيفة شبكة
LAN الالسلكية للنظام تلقائيا.[Wireless LAN Settings]: حدد هذا اإلعداد عند استخدام وظيفة Wi-Fi املدمجة بالنظام لالتصال بشبكة
السلكية.
63AR
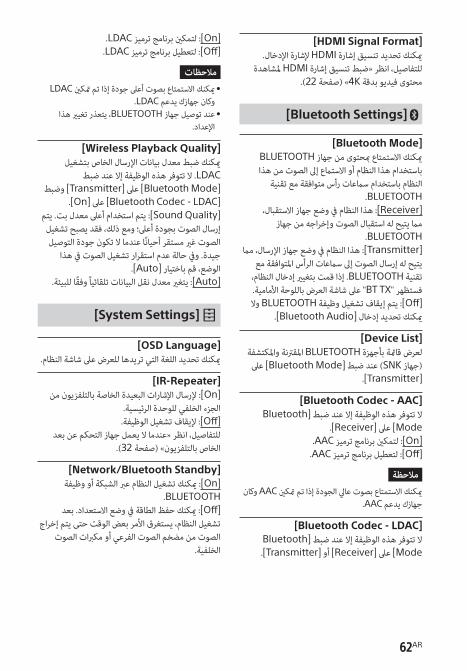
[HDMI Signal Format] ميكنك تحديد تنسيق إشارة HDMI إلشارة اإلدخال.
للتفاصيل، انظر «ضبط تنسيق إشارة HDMI ملشاهدة محتوى فيديو بدقة 4K» (صفحة 22).
[Bluetooth Settings] [Bluetooth Mode]
BLUETOOTH ميكنك االستمتاع مبحتوى من جهازباستخدام هذا النظام أو االستامع إىل الصوت من هذا
النظام باستخدام سامعات رأس متوافقة مع تقنية .BLUETOOTH
[Receiver]: هذا النظام يف وضع جهاز االستقبال، مام يتيح له استقبال الصوت وإخراجه من جهاز
.BLUETOOTH[Transmitter]: هذا النظام يف وضع جهاز اإلرسال، مام
يتيح له إرسال الصوت إىل سامعات الرأس املتوافقة مع تقنية BLUETOOTH. إذا قمت بتغيري إدخال النظام، فستظهر "BT TX" عىل شاشة العرض باللوحة األمامية.
[Off]: يتم إيقاف تشغيل وظيفة BLUETOOTH وال .[Bluetooth Audio] ميكنك تحديد إدخال
[Device List]لعرض قامئة بأجهزة BLUETOOTH املقرتنة واملكتشفة (جهاز SNK) عند ضبط [Bluetooth Mode] عىل
.[Transmitter]
[Bluetooth Codec - AAC] Bluetooth] ال تتوفر هذه الوظيفة إال عند ضبط
.[Receiver] عىل [Mode.AAC لتمكني برنامج ترميز :[On]
.AAC لتعطيل برنامج ترميز :[Off]
مالحظةميكنك االستمتاع بصوت عايل الجودة إذا تم متكني AAC وكان
.AAC جهازك يدعم
[Bluetooth Codec - LDAC] Bluetooth] ال تتوفر هذه الوظيفة إال عند ضبط.[Transmitter] أو [Receiver] عىل [Mode
.LDAC لتمكني برنامج ترميز :[On].LDAC لتعطيل برنامج ترميز :[Off]
مالحظات • LDAC ميكنك االستمتاع بصوت أعىل جودة إذا تم متكني
.LDAC وكان جهازك يدعمعند توصيل جهاز BLUETOOTH، يتعذر تغيري هذا •
اإلعداد.
[Wireless Playback Quality] ميكنك ضبط معدل بيانات اإلرسال الخاص بتشغيل
LDAC. ال تتوفر هذه الوظيفة إال عند ضبط [Bluetooth Mode] عىل [Transmitter] وضبط
.[On] عىل [Bluetooth Codec - LDAC][Sound Quality]: يتم استخدام أعىل معدل بت. يتم إرسال الصوت بجودة أعىل؛ ومع ذلك، فقد يصبح تشغيل الصوت غري مستقر أحيانا عندما ال تكون جودة التوصيل
جيدة. ويف حالة عدم استقرار تشغيل الصوت يف هذا .[Auto] الوضع، قم باختيار
[Auto]: يتغري معدل نقل البيانات تلقائيا وفقا للبيئة.
[System Settings] [OSD Language]
ميكنك تحديد اللغة التي تريدها للعرض عىل شاشة النظام.[IR-Repeater]
[On]: إلرسال اإلشارات البعيدة الخاصة بالتلفزيون من الجزء الخلفي للوحدة الرئيسية.
[Off]: إليقاف تشغيل الوظيفة. للتفاصيل، انظر «عندما ال يعمل جهاز التحكم عن بعد
الخاص بالتلفزيون» (صفحة 32).[Network/Bluetooth Standby]
[On]: ميكنك تشغيل النظام عرب الشبكة أو وظيفة .BLUETOOTH
[Off]: ميكنك حفظ الطاقة يف وضع االستعداد. بعد تشغيل النظام، يستغرق األمر بعض الوقت حتى يتم إخراج
الصوت من مضخم الصوت الفرعي أو مكربات الصوت الخلفية.
62AR

[Advanced Auto Volume] ميكنك تقليل التغري يف مستوى الصوت الناتج عن إشارة
اإلدخال. هذه الوظيفة فعالة عندما يكون مستوى صوت اإلعالن التلفزيوين أعىل من مستوى صوت الربنامج
التلفزيوين.[On]: لضبط مستوى الصوت تلقائيا.
[Off]: متوقف
مالحظةهذه الوظيفة غري مناسبة عند االستامع إىل املوسيقى.
[HDMI Settings] [Control for HDMI]
[On]: تم تفعيل التحكم لوظيفة HDMI. ميكن لألجهزة املتصلة بكابل HDMI التحكم ببعضها البعض.
[Off]: متوقف
[Standby Linked to TV] Control for] ال تتوفر هذه الوظيفة إال عند ضبط
.[On] عىل [HDMI [HDMI1] ،[TV] إذا كان إدخال النظام هو :[Auto]أو [HDMI2] فسيتم إيقاف تشغيل النظام تلقائيا عند
إيقاف تشغيل التلفزيون.[On]: يقوم النظام بإيقاف التشغيل تلقائيا عند إيقاف
تشغيل التلفزيون برصف النظر عن اإلدخال.[Off]: ال يتوقف النظام عند إيقاف تشغيل التلفزيون.
[Standby Through] Control for] ال تتوفر هذه الوظيفة إال عند ضبط
.[On] عىل [HDMI HDMI OUT إلخراج اإلشارات من مقبس :[Auto]
(TV eARC/ARC) بالنظام عند تشغيل التلفزيون وأثناء إيقاف تشغيل النظام. وميكن خفض استهالك النظام للطاقة يف وضع االستعداد بقدر أكرب مقارنة بوضع [On] بواسطة
إيقاف تشغيل جهاز التلفزيون املتصل.
HDMI OUT إلخراج اإلشارات دامئا من مقبس :[On](TV eARC/ARC) بالنظام عند إيقاف تشغيل النظام.
يف حالة توصيل تلفزيون آخر غري املصنع بواسطة رشكة Sony، نويص بتحديد هذا اإلعداد.
HDMI OUT ال يتم إخراج اإلشارات من مقبس :[Off](TV eARC/ARC) بالنظام عند إيقاف تشغيل النظام.
قم بتشغيل النظام لتستمتع مبشاهدة محتوى الجهاز املتصل بالنظام عىل التلفزيون. وميكن خفض استهالك
النظام للطاقة يف وضع االستعداد بقدر أكرب مقارنة بوضع .[On]
[TV Audio Input Mode] اضبط هذه الوظيفة عندما يكون النظام متصال مبقبس eARC الخاص بالتلفزيون واملتوافق مع HDMI INأو ARC. تتوفر وظيفة eARC أو ARC عند ضبط
.[On] عىل [Control for HDMI][Auto]: ميكنك االستامع إىل صوت التلفزيون من مكربات ARC أو eARC صوت النظام. يتم إعطاء األولوية لصوت
.[Auto] أثناء الضبط عىل[Optical]: استخدم هذا اإلعداد عند توصيل كابل رقمي
برصي.[eARC]
اضبط هذه الوظيفة عندما يكون النظام متصال مبقبس .eARC الخاص بالتلفزيون واملتوافق مع HDMI IN
عند التوصيل بتلفزيون متوافق مع ARC (ليس متوافقا مع eARC)، تعمل وظيفة ARC بغض النظر عن هذا
اإلعداد.[On]: لتمكني وظيفة eARC. تعمل وظيفة eARC عند
.eARC توصيل تلفزيون متوافق مع.eARC لتعطيل وظيفة :[Off]
مالحظةعندما يكون [eARC] مضبوطا عىل [On]، تأكد من
إعداد eARC الخاص بالتلفزيون املتصل. لالطالع عىل التفاصيل، راجع تعليامت تشغيل التلفزيون.
61AR

[Speaker Settings] [Manual Speaker Settings]
ميكنك تنفيذ إعدادات مكرب الصوت للحصول عىل أفضل صوت محيطي ممكن. للتفاصيل، انظر «تخصيص إعدادات
مكرب الصوت للصوت املحيطي» (صفحة 56).[Wireless Speaker Settings]
ميكنك القيام بإعدادات التوصيل الخاصة مبكربات الصوت الالسلكية (مضخم الصوت الفرعي ومكربات الصوت
الخلفية). •[Link mode]
ميكنك ضبط طريقة االتصال ملضخم الصوت الفرعي ومكربات الصوت الخلفية.
[Auto]: لتوصيل مضخم الصوت الفرعي ومكربات الصوت الخلفية بالنظام تلقائيا.
[Manual]: لتوصيل مضخم الصوت الفرعي ومكربات الصوت الخلفية يدويا.
•[Start manual linking]للقيام بتوصيل مضخم الصوت الفرعي ومكربات الصوت الخلفية بالنظام يدويا. للتفاصيل، انظر «توصيل مضخم
الصوت الفرعي ومكربات الصوت الخلفية السلكيا» (صفحة 30).
•[Check wireless connection]ميكنك التحقق من حالة اتصال مضخم الصوت الفرعي
ومكربات الصوت الخلفية. •[RF Channel]
ميكنك تقليل التداخل مع األجهزة الالسلكية األخرى. للتفاصيل، انظر «إذا كان اإلرسال الالسليك غري مستقر»
(صفحة 32). •[Wireless Playback Quality]
ميكنك ضبط جودة التشغيل الالسليك ملضخم الصوت الفرعي ومكربات الصوت الخلفية.
[Sound Quality]: تكون لجودة الصوت األولوية عىل حساب حالة االتصال الخاصة بالتوصيل الالسليك.
[Connection]: تكون لحالة االتصال األولوية عىل حساب جودة الصوت.
•[Software Version]ميكنك التحقق من إصدار الربنامج الخاص مبضخم
الصوت الفرعي ومكربات الصوت الخلفية.
[Audio Settings] [DSEE HX]
*[Auto Sound] تتوفر هذه الوظيفة فقط عند تحديدأو [Music] كوضع للصوت.
[On]: يعمل عىل ترقية امللفات الصوتية املضغوطة أو األقراص املدمجة إىل جودة صوت عايل الدقة، وعىل إعادة إنتاج صوت نطاق الرتدد العايل الواضح الذي غالبا ما يفقد
(صفحة 50).[Off]: متوقف
*.[Auto Sound] مع [Music] فقط عند تحديد
[Audio DRC] ميكنك ضغط املدى الدينامييك ملسار الصوت.
Dolby للضغط التلقايئ للصوت املشفر يف :[Auto].TrueHD
Dolby يقوم النظام بإعادة إنتاج مسار الصوت :[On]و DTS مع نوع املدى الدينامييك الذي وضعه مهندس
التسجيل.[Off]: ال يوجد ضغط للمدى الدينامييك.
[Sound Effect] ميكنك اختيار املؤثرات الصوتية مثل وضع الصوت.
[Sound Mode On]: يعمل املحرك املحيطي العمودي عىل تحسني قنوات مكرب الصوت املحيطي والعلوي لخلق
تأثري محيطي حقيقي غامر ومكتنف كوضع الصوت (صفحة 46) واملحيط العمودي (صفحة 45).
[Dolby Speaker Virtualizer]: أداة محاكاة مكرب الصوت Dolby تعمل عىل تحسني قنوات مكرب الصوت
املحيطي والعلوي لخلق تأثري محيطي حقيقي غامر ومكتنف عندما تقوم بتشغيل تنسيق Dolby. لتعطيل
.Dolby املؤثرات الصوتية األخرى بخالف تنسيق[Off]: لتعطيل املؤثرات الصوتية. اخرت هذا عندم ال ترغب
يف ضبط الحد األعىل الخاص برتدد أخذ العينة.
60AR

تنفيذ اإلعدادات املتقدمةميكنك إجراء عمليات ضبط متعددة عىل عنارص مثل الصورة والصوت.
يتم متييز اإلعدادات االفرتاضية بخط أسفلها.
1 .HOME اضغطتظهر القامئة الرئيسية عىل شاشة التلفزيون.
اخرت [Setup] - [Advanced Settings] عىل القامئة الرئيسية. 2تظهر شاشة [Advanced Settings] عىل شاشة التلفزيون.
حدد عنرص اإلعداد. 3الرشحعنرص اإلعداد
[Speaker Settings]يضبط إعدادات مكرب الصوت ومضخم الصوت الفرعي من أجل التثبيت
والتوصيالت. (صفحة 60)
[Audio Settings](60 صفحة) .يضبط إعدادات إخراج الصوت
[HDMI Settings](61 صفحة) .HDMI يضبط إعدادات
[Bluetooth Settings](62 صفحة) .BLUETOOTH يضبط اإلعدادات التفصيلية لوظيفة
[System Settings](62 صفحة) .لضبط اإلعدادات ذات الصلة بالنظام
[Network Settings](63 صفحة) .لضبط اإلعدادات التفصيلية لإلنرتنت
[Resetting](64 صفحة) .إلعادة ضبط النظام عىل إعدادات املصنع االفرتاضية
[Software Update]لتحديث الربنامج الخاص بالنظام أو مبضخم الصوت الفرعي أو مبكربات
الصوت الخلفية. (صفحة 64)
59AR

حفظ الطاقة يف وضع االستعدادتأكد من ضبط اإلعدادات التالية:
– [Off] عىل [Standby Through] اضبط(صفحة 61).
اضبط [Network/Bluetooth Standby] عىل –[Off] (صفحة 62).
تنفيذ اإلعداد السهلميكنك القيام باإلعدادات األولية األساسية وإعدادات مكرب الصوت وإعدادات الشبكة للنظام بسهولة من خالل تنفيذ
اإلعداد السهل.
1 .HOME اضغطتظهر القامئة الرئيسية عىل شاشة التلفزيون.
اخرت [Setup] - [Easy Setup] عىل 2القامئة الرئيسية.
تظهر شاشة [Easy Setup] عىل شاشة التلفزيون.حدد اإلعداد املطلوب. 3
[Easy Initial Setup]: للقيام باإلعدادات • األولية األساسية مبا يف ذلك إعدادات مكرب الصوت
وإعدادات الشبكة.[Easy Speaker Setup]: للقيام بإعدادات •
مكرب الصوت األساسية ملكربات الصوت الخلفية.[Easy Network Setup]: للقيام باإلعدادات •
األساسية للشبكة.قم بتنفيذ اإلعدادات باتباع التعليامت التي تظهر 4
عىل الشاشة.
58AR

تغيري سطوع شاشة العرض باللوحة األمامية
BLUETOOTH ومؤرش(DIMMER )
ميكنك تغيري سطوع شاشة العرض باللوحة األمامية ومؤرش .BLUETOOTH
DIMMER
1 .DIMMER اضغطيظهر وضع العرض عىل شاشة التلفزيون.
اضغط عىل الزر بشكل متكرر لتحديد وضع العرض 2املطلوب.
الرشحالوضع"BRIGHT" تيضء شاشة العرض
باللوحة األمامية ومؤرش BLUETOOTH بسطوع.
"DARK" تيضء شاشة العرضباللوحة األمامية ومؤرش
BLUETOOTH بإضاءة داكنة خفيفة.
"OFF" يتم إيقاف تشغيل شاشة العرضباللوحة األمامية.
مالحظةعند تحديد "OFF"، يتم إيقاف تشغيل شاشة العرض باللوحة
األمامية. وتعمل تلقائيا عند الضغط عىل أي زر، ثم تتوقف مرة أخرى إذا مل تقم بتشغيل النظام ملدة 10 ثوان تقريبا. ومع
ذلك، قد ال يتم إيقاف تشغيل شاشة العرض باللوحة األمامية يف بعض الحاالت. ويف هذه الحالة، يكون سطوع شاشة العرض
."DARK" باللوحة األمامية هو نفس سطوع اإلعداد
57AR

تغيري اإلعدادات
تخصيص إعدادات مكرب الصوت للصوت املحيطي
للحصول عىل صوت محيطي جيد، قم بضبط مسافة مكربات الصوت من موضع االستامع ومستوى اإلخراج
لها، إلخ. يتم متييز اإلعدادات االفرتاضية بخط أسفلها.
1 .HOME اضغطتظهر القامئة الرئيسية عىل شاشة التلفزيون.
2 Advanced] - [Setup] اخرتSettings] عىل القامئة الرئيسية.
3 Manual] - [Speaker Settings] اخرت.[Speaker Settings
[Manual Speaker Settings] تظهر شاشةعىل شاشة التلفزيون.
قم بتنفيذ إعدادات مكربات الصوت. 4حدد عنرص اإلعداد من العنارص التالية عن طريق
، ثم اضبط القيمة وفقا الضغط عىل / و . للبيئة عن طريق الضغط عىل / و
[Distance] اضبط املسافة من موضع االستامع إىل مكربات الصوت.ميكنك ضبط القيمة من 0 مرت إىل 10 أمتار (0.1 م يف املرحلة) (0 قدم إىل 33 قدم (1/4 قدم يف املرحلة)).
[Front]: لضبط مسافة مكرب الصوت األمامي.[Subwoofer]: لضبط مسافة مضخم الصوت الفرعي.[Rear Speaker (L)]*: لضبط مسافة مكرب الصوت
الخلفي األيرس.[Rear Speaker (R)]*: لضبط مسافة مكرب الصوت
الخلفي األمين.يظهر هذا البند عند استخدام مكربات الصوت الخلفية.*
تلميحميكنك تغيري وحدات القياس (أقدام أو أمتار) عن طريق
.OPTIONS الضغط عىل
[Level]اضبط مستوى الصوت ملكربات الصوت.
ميكنك ضبط القيمة من 6.0- ديسيبل إىل 6.0 ديسيبل (0.5 ديسيبل يف املرحلة).
[Front]: لضبط مستوى مكرب الصوت األمامي.[Subwoofer]: لضبط مستوى مضخم الصوت الفرعي.[Rear Speaker (L)]*: لضبط مستوى مكرب الصوت
الخلفي األيرس.[Rear Speaker (R)]*: لضبط مستوى مكرب الصوت
الخلفي األمين.يظهر هذا البند عند استخدام مكربات الصوت الخلفية.*
[Test Tone]تصدر نغمة االختبار من مكربات الصوت للتحقق من
مكربات الصوت املتاحة.[Off]: ال تصدر نغمة االختبار من مكربات الصوت.
[On]: تصدر نغمة االختبار من مكرب الصوت.
56AR

اتباع اللغةعند تغيري لغة العرض عىل شاشة التلفزيون، تتغري أيضا لغة
العرض عىل شاشة النظام. استخدام وظيفة مزامنة
"BRAVIA"باإلضافة إىل التحكم لوظيفة HDMI ، ميكنك أيضا
استخدام الوظائف التالية عىل األجهزة املتوافقة مع وظيفة ."BRAVIA" مزامنة
Sound mode/وظيفة تحديد املشهد• التحكم يف املرسح املنزيل•
مالحظةهذه الوظائف خاصة برشكة Sony. ويتعذر تشغيل هذه
الوظيفة مع املنتجات األخرى غري املصنعة بواسطة رشكة .Sony
Sound mode/وظيفة تحديد املشهد
يتم تغيري وضع الصوت الخاص بالنظام تلقائيا وفقا إلعداد وظيفة تحديد املشهد بالتلفزيون أو لوضع الصوت. لالطالع
عىل التفاصيل، راجع تعليامت تشغيل التلفزيون. [Auto Sound] قم بضبط وضع الصوت عىل
(صفحة 46).
وظيفة التحكم يف املرسح املنزيلعند استخدام تلفزيون متوافق مع وظيفة التحكم يف
املرسح املنزيل، ميكن ضبط النظام وضبط إعدادات وضع .TV الصوت وتغيري اإلدخال وما إىل ذلك بدون تغيري إدخال
وميكن استخدام هذه الوظيفة إذا كان التلفزيون متصال باإلنرتنت. لالطالع عىل التفاصيل، راجع تعليامت تشغيل
التلفزيون.
55AR

إذا تم إصدار صوت التلفزيون من مكربات صوت التلفزيون • يف املرة السابقة التي شاهدت فيها التلفزيون، فقد يتعذر
تشغيل النظام بواسطة التداخل مع طاقة التلفزيون حتى مع تشغيل التلفزيون، وذلك بحسب التلفزيون.
Enhanced Audio) eARC/ARC Return Channel/Audio
(Return Channel
إذا كان النظام متصال مبقبس HDMI IN الخاص بالتلفزيون واملتوافق مع eARC أو ARC، ميكنك االستامع
إىل صوت التلفزيون الصادر من مكربات الصوت الخاصة بالنظام بدون توصيل كابل رقمي برصي.
Advanced] - [Setup] يف النظام، قم بضبط TV Audio] - [HDMI Settings] - [Settings
Input Mode] عىل [Auto] (صفحة 61). يتم إعطاء األولوية لصوت eARC أو ARC أثناء الضبط عىل
.[Auto] اإلعداد االفرتايض هو .[Auto]
مالحظاتقم بتمكني وظيفة eARC أو ARC الخاصة بالتلفزيون. •
لالطالع عىل التفاصيل، راجع تعليامت تشغيل التلفزيون.إذا مل يكن التلفزيون متوافقا مع eARC أو ARC، قم •
بتوصيل الكابل الرقمي البرصي (غري مرفق) (راجع دليل بدء التشغيل املرفق).
.٠ وظيفة التشغيل بلمسة واحدة ،Blu-ray Disc عند تشغيل املحتوى عىل جهاز (مشغل
"PlayStation®4"، وما إىل ذلك) متصل بالنظام، يتم تشغيل النظام والتلفزيون تلقائيا، ويتم تغيري إدخال النظام
إىل إدخال الجهاز الذي تم تشغيله، ويصدر الصوت من مكربات الصوت الخاصة بالنظام.
مالحظات • Advanced] - [Setup] يف حالة ضبط
Standby] - [HDMI Settings] - [SettingsThrough] بالنظام عىل [On] أو [Auto] وكان صوت التلفزيون صادرا من مكربات الصوت الخاصة بالتلفزيون يف املرة السابقة التي شاهدت فيها التلفزيون، فقد يتعذر تشغيل النظام وقد يصدر الصوت والصورة من التلفزيون
حتى عند تشغيل محتوى الجهاز (صفحة 61).
بحسب التلفزيون، قد ال يتم عرض جزء البداية من املحتوى • الذي يجري تشغيله بشكل صحيح.
تشغيل القامئة من خالل وحدة التحكم عن بعد الخاصة بالتلفزيون
SYNC MENU ميكنك تحديد النظام باستخدام الزربوحدة التحكم عن بعد الخاصة بالتلفزيون وتشغيل
النظام.وميكن استخدام هذه الوظيفة إذا كان التلفزيون يدعم
قامئة املزامنة. لالطالع عىل التفاصيل، راجع تعليامت تشغيل التلفزيون.
مالحظاتيف قامئة املزامنة الخاصة بالتلفزيون، يتعرف التلفزيون عىل •
النظام بوصفه «املشغل».وقد ال تتوفر بعض العمليات مع بعض أجهزة التلفزيون. •
إعداد توفري الطاقة باستخدام وظيفة HDMI Standby Through
HDMI Standby Through إعداد توفري الطاقة(صفحة 61) عبارة عن وظيفة تتيح لك االستمتاع بالصوت
والصورة لجهاز متصل دون تشغيل النظام. [Advanced Settings] - [Setup] قم بضبط- [HDMI Settings] - [Standby Through] عىل .[Auto] (صفحة 61). اإلعداد االفرتايض يف وضع [Auto]
مالحظةإذا مل تعرض صورة الجهاز املتصل بالنظام عىل التلفزيون، فاضبط [Standby Through] عىل [On]. يف حالة
توصيل تلفزيون آخر غري املصنع بواسطة رشكة Sony، نويص بتحديد هذا اإلعداد.
54AR

HDMI استخدام التحكم بوظيفة
استخدام التحكم بوظيفة HDMI
Blu-ray Disc توصيل جهاز مثل التلفزيون أو مشغلمتوافق مع التحكم لوظيفة HDMI* باستخدام كابل
HDMI يتيح لك تشغيل الجهاز بسهولة باستخدام وحدة التحكم عن بعد الخاصة بالتلفزيون.
ميكن استخدام الوظائف التالية بواسطة التحكم لوظيفة .HDMI
وظيفة إيقاف تشغيل النظام• وظيفة التحكم بصوت النظام• • Enhanced Audio Return) eARC/ARC
(Channel/Audio Return Channelوظيفة التشغيل بلمسة واحدة• تشغيل القامئة من خالل وحدة التحكم عن بعد الخاصة •
بالتلفزيون • HDMI إعداد توفري الطاقة باستخدام وظيفة
Standby Throughاتباع اللغة•
مالحظةقد تعمل هذه الوظائف مع األجهزة األخرى غري املصنعة
بواسطة رشكة Sony، ولكن ال ميكن ضامن تشغيلها. * CEC هو معيار يستخدم بواسطة HDMI التحكم لوظيفة
(التحكم بآليات املستهلك) للسامح لألجهزة التي تعمل بتقنية HDMI (واجهة الوسائط املتعددة عالية الوضوح)
بالتحكم ببعضها البعض.
التحضري الستخدام التحكم بوظيفة HDMI
[Advanced Settings] - [Setup] قم بضبط [Control for HDMI] - [HDMI Settings] -بالنظام عىل [On] (صفحة 61). اإلعداد االفرتايض هو
.[On]
قم بتمكني التحكم إلعدادات وظيفة HDMI الخاصة بالتلفزيون والجهاز اآلخر املتصل بالنظام.
تلميح ("BRAVIA" مزامنة) HDMI يف حالة متكني التحكم لوظيفةعند استخدام تلفزيون من تصنيع رشكة Sony، فسيتم أيضا
متكني وظيفة HDMI الخاصة بالنظام بشكل تلقايئ. ،[On] إىل [Control for HDMI] عند تغيري إعدادات
تظهر "DONE" عىل شاشة العرض باللوحة األمامية.
وظيفة إيقاف تشغيل النظامعند إيقاف تشغيل التلفزيون، سيتم إيقاف تشغيل النظام
تلقائيا. [Advanced Settings] - [Setup] قم بضبط
[Standby Linked to TV] - [HDMI Settings] -عىل النظام عىل [On] أو [Auto] (صفحة 61). اإلعداد
.[Auto] االفرتايض يف وضعمالحظة
قد ال يتم إيقاف تشغيل الجهاز املتصل بناء عىل حالة الجهاز.
وظيفة التحكم بصوت النظامإذا قمت بتشغيل النظام أثناء مشاهدة التلفزيون، فسيتم
إصدار صوت التلفزيون من مكربات الصوت بالنظام. ميكن ضبط مستوى صوت النظام باستخدام وحدة التحكم
عن بعد للتلفزيون.عندما تقوم بتشغيل التلفزيون، يتم تلقائيا تشغيل النظام
ويصدر صوت التلفزيون من مكربات الصوت الخاصة بالنظام.
ميكن إجراء العمليات أيضا باستخدام قامئة التلفزيون. لالطالع عىل التفاصيل، راجع تعليامت تشغيل التلفزيون.
مالحظاتوفقا للتلفزيون، يتم عرض الرقم الخاص مبستوى صوت •
النظام عىل شاشة التلفزيون. وقد يختلف رقم مستوى الصوت املعروض عىل التلفزيون عن الرقم الذي يظهر عىل
شاشة العرض باللوحة األمامية بالنظام.ووفقا إلعدادات التلفزيون، قد ال تتوفر وظيفة التحكم •
بصوت النظام. لالطالع عىل التفاصيل، راجع تعليامت تشغيل التلفزيون.
53AR

AV عند التشغيل عىل جهاز1 .OPTIONS اضغط
تظهر قامئة الخيارات عىل شاشة التلفزيون.2 .[Dialog Control] اخرتاضبط مستوى صوت الحوار باستخدام /، ثم 3
. اضغط ميكنك الضبط فيام بني 0.0 ديسيبل إىل 6.0
ديسيبل بزيادة قدرها 1.0 ديسيبل.
52AR

إذا كان مقبس HDMI IN الخاص بالتلفزيون غري متوافق • مع eARC أو ARC (صفحة 54)، قم بتوصيل التلفزيون
مبقبس TV IN (OPT) بواسطة الكابل الرقمي البرصي (غري .Dolby Digital مرفق) الستقبال إشارة
لضبط مستوى صوت الحوار DTS:X أثناء بث محتويات
بواسطة ضبط مستوى صوت الحوار ميكنك االستامع إىل الحوار بسهولة حيث أنه يربز واضحا من وسط الضوضاء
املحيطة. تعمل هذه الوظيفة أثناء تشغيل محتوى متوافق .DTS:X مع وظيفة التحكم يف حوار
تختلف طريقة الضبط اعتامدا عىل اإلدخال.
،///
OPTIONS
عند التشغيل عىل التلفزيوناضغط OPTIONS، لعرض "DIALOG" عىل 1
شاشة العرض باللوحة األمامية باستعامل /، ثم . اضغط
اضبط مستوى صوت الحوار باستعامل /، ثم 2. اضغط
ميكنك الضبط فيام بني 0.0 ديسيبل إىل 6.0 ديسيبل بزيادة قدرها 1.0 ديسيبل.
3 .OPTIONS اضغطيعود النظام إىل الشاشة السابقة.
51AR

تشغيل امللفات الصوتية املضغوطة أو األقراص املدمجة
عن طريق ترقية الصوت إىل (DSEE HX) صوت عايل الدقة
تعمل وظيفة DSEE HX عىل ترقية مصادر الصوت الحالية وتحسينها للحصول عىل جودة صوت عايل الدقة،
فتشعر كام لو كنت يف استوديو تسجيل أو يف حفلة موسيقية.
1 .HOME اضغطتظهر القامئة الرئيسية عىل شاشة التلفزيون.
2 Advanced] - [Setup] اخرتSettings] عىل القامئة الرئيسية.
3 .[DSEE HX] - [Audio Settings] اخرت4 .[On] حدد
مالحظات • *[Auto Sound] تتوفر هذه الوظيفة فقط عند تحديد
أو [Music] كوضع للصوت (صفحة 46).تتوافق هذه الوظيفة مع إشارات اإلدخال الرقمية بقناتني •
والتي لها تردد أخذ عينة يصل إىل 44.1 كيلوهرتز أو 48 كيلوهرتز.
يصل تردد العينة/عمق البت بعد الرتقية إىل 96 • كيلوهرتز/24 بت.
•.DSD ال تتوافق هذه الوظيفة مع إشارات • Chromecast ال تعمل هذه الوظيفة عند استخدام
.built-in • Advanced Auto] ال تعمل هذه الوظيفة عند ضبط
Volume] عىل [On] (صفحة 61).
*.[Auto Sound] مع [Music] فقط عند تحديد
االستمتاع بصوت البث متعدد (AUDIO) اإلرسال
ميكنك االستمتاع بصوت البث متعدد اإلرسال عندما Dolby يستقبل النظام إشارة البث متعدد اإلرسال بتقنية
.Digital
AUDIO
1 .AUDIO اضغطتظهر اإلشارة الصوتية عىل شاشة العرض باللوحة
األمامية.اضغط عىل الزر بشكل متكرر لتحديد إشارة الصوت 2
املطلوبة.الرشحإشارة الصوت
"MAIN" سيتم إخراج الصوت باللغةالرئيسية.
"SUB" سيتم إخراج الصوت باللغةالفرعية.
"MN/SB" سيتم إخراج صوت ممزوجباللغتني الرئيسية والفرعية.
مالحظاتلتلقي إشارة Dolby Digital، تحتاج إىل توصيل •
التلفزيون املتوافق مع eARC أو ARC (صفحة 54) مبقبس HDMI OUT (TV eARC/ARC) بواسطة كابل HDMI (مرفق)، أو توصيل أجهزة أخرى مبقبس HDMI بواسطة كابل HDMI IN 2 أو HDMI IN 1
(غري مرفق).
50AR

ضبط التأخري بني الصورة والصوت
عندما ال يتطابق الصوت مع الصور عىل شاشة التلفزيون، ميكنك ضبط التأخري بني الصورة والصوت.
تختلف طريقة الضبط اعتامدا عىل اإلدخال.
،///
OPTIONS
عند مشاهدة التلفزيون1 .OPTIONS اضغط
تظهر "SYNC" عىل شاشة العرض باللوحة األمامية.اضغط أو 2
يظهر وقت الضبط عىل شاشة العرض باللوحة األمامية.
3 . اضبط التأخري باستخدام /، ثم اضغط عىل ميكنك الضبط فيام بني 0 مليل ثانية إىل 300 مليل
ثانية بزيادة قدرها 25 مليل ثانية.4 .OPTIONS اضغط
يتم إيقاف تشغيل قامئة الخيارات عىل شاشة العرض باللوحة األمامية.
عند مشاهدة جهاز آخر1 .OPTIONS اضغط
تظهر قامئة الخيارات عىل شاشة التلفزيون.2 .[A/V Sync] اخرت3 . اضبط التأخري باستخدام /، ثم اضغط عىل
ميكنك الضبط فيام بني 0 مليل ثانية إىل 300 مليل ثانية بزيادة قدرها 25 مليل ثانية.
تلميحإذا كان التلفزيون به وظيفة تعمل عىل ضبط التأخري بني
الصورة والصوت، فاستخدمها للضبط. لالطالع عىل التفاصيل، راجع تعليامت تشغيل التلفزيون.
49AR

ضبط مستوى صوت مضخم الصوت الفرعي ومكربات
الصوت الخلفيةتم تصميم مضخم الصوت الفرعي لتشغيل جهري خفيض أو
صوت منخفض الرتدد.مكربات الصوت الخلفية مصممة لتشغيل الجزء املحيطي من الصوت متعدد القنوات والصوت املحيطي الذي ينشأ
عن الصوت مزدوج القناة باستخدام معالجة حقيقية.
REAR +/–
SW +/–
لضبط مستوى صوت مضخم الصوت الفرعي
اضغط SW (مستوى صوت مضخم الصوت الفرعي) . +/–
لضبط مستوى صوت مكرب الصوت الخلفياضغط REAR (مستوى صوت مكرب الصوت الخلفي)
. +/–
مالحظاتعندما ال يحتوي مصدر اإلدخال عىل الكثري من الصوت •
منخفض الطبقة، كام هو حال الربامج التلفزيونية، فقد يكون من الصعب سامع الصوت منخفض الطبقة الصادر من
مضخم الصوت الفرعي.عندما ال يحتوي مصدر اإلدخال عىل الكثري من الصوت •
املحيطي، فقد يتعذر سامع الصوت املحيطي من مكربات الصوت الخلفية.
–/+ SW ال يعمل عندما يكون مضخم الصوت الفرعي • غري متصل، كام ال يعمل –/+ REAR عندما تكون
مكربات الصوت الخلفية غري متصلة.
–/+ REAR ال تعمل إذا مل يتم إخراج صوت من • مكربات الصوت الخلفية بسبب نتيجة املعالجة الخاصة
بإشارة اإلدخال ووضع الصوت.
48AR

جعل الحوارات أكرث وضوحا (VOICE )
VOICE
1 .VOICE اضغطيظهر وضع الصوت عىل شاشة التلفزيون.
اضغط عىل الزر بشكل متكرر لتحديد وضع الصوت. 2الرشحالوضع
[Up Off]قيايس[Up 1] يسمع الحوار بسهولة من خالل
تحسني نطاق الحوار.[Up 2] يتم تحسني نطاق الحوار أكرث من
.[Up 1] وضع
مالحظةال يظهر وضع الصوت عىل شاشة التلفزيون عندما يكون
إدخال TV مختارا.
االستمتاع بصوت واضح مع مستوى صوت منخفض يف (NIGHT ) منتصف الليل
يصدر الصوت مبستوى صوت منخفض مع وضوح الحوار وأقل نسبة من فقد الدقة.
NIGHT
1 .NIGHT اضغطيظهر الوضع اللييل عىل شاشة التلفزيون.
اضغط عىل الزر بشكل متكرر لتحديد الوضع اللييل. 2الرشحالوضع[On].لتنشيط وظيفة الوضع اللييل[Off] إللغاء تنشيط وظيفة الوضع
اللييل.
مالحظاتعند إيقاف تشغيل النظام، يتم ضبط هذا اإلعداد عىل •
[Off] تلقائيا.ال يظهر الوضع اللييل عىل شاشة التلفزيون عندما يكون •
إدخال TV مختارا.
47AR

ضبط مؤثر الصوت املصمم ملالءمة مصادر الصوت ( وضع
الصوت)ميكنك االستمتاع بسهولة مبؤثرات الصوت املربمجة مسبقا
املصممة ملالءمة أنواع مختلفة من مصادر الصوت.
أزرار تحديد وضع الصوت
اضغط أحد أزرار تحديد وضع الصوت 1 ،CINEMA ،AUTO SOUND)
،SPORTS ،NEWS ،GAME ،MUSICSTANDARD) الختيار وضع الصوت.
يظهر وضع الصوت املختار عىل شاشة التلفزيون.الرشحوضع الصوت
[Auto Sound] يتم تحديد إعداد الصوتاملناسب ملصدر الصوت تلقائيا
.ClearAudio+ بواسطة[Cinema] تشعر بأنك مغمور بالصوت
الذي ينترش خلفك ويحيط جسدك بأكمله. هذا الوضع
مناسب ملشاهدة األفالم.
الرشحوضع الصوت[Music] التفاصيل تعرب عن قوة الصوت
وتألقه. هذا الوضع مناسب لالستمتاع باملوسيقى بطريقة
تحرك مشاعرك. Game][Studio
ميكنك أن تستغرق يف لعبتك من خالل إعادة إنتاج الشعور بالحركة واملسافة من األشياء،
باإلضافة إىل سامع الحوار بوضوح.
[News] يعيد تكوين الكالم الواضحللنرشات اإلخبارية.
[Sports] ميكنك أن تستمتع بتجربةمشابهة ألجواء مشاهدة حدث يف امللعب. لكن تتم إعادة إنتاج روايات املعلقني بشكل حاميس.
[Standard] ميكن سامع صوت التلفزيونبوضوح.
مالحظاتيتم تعطيل وظيفة وضع الصوت يف الحاالت التالية.•
عند ضبط [Sound Effect] عىل إعداد بخالف –[Sound Mode On] (صفحة 60).
عند استخدام Chromecast built-in (صفحة 40). –وظيفة الغرف املتعددة الالسلكية مستخدمة –
(صفحة 41).عند توصيل جهاز BLUETOOTH يف وضع إرسال –
BLUETOOTH (صفحة 42).عند صدور نغمة الصوت (صفحة 56). –ال يظهر وضع الصوت عىل شاشة التلفزيون عندما يكون •
إدخال TV مختارا.قد تحدث الفجوة الزمنية بني الصوت والصورة تبعا ملصدر •
الصوت. إذا كان التلفزيون به وظيفة تعمل عىل تأخري الصورة، فاستخدمها للضبط.
46AR
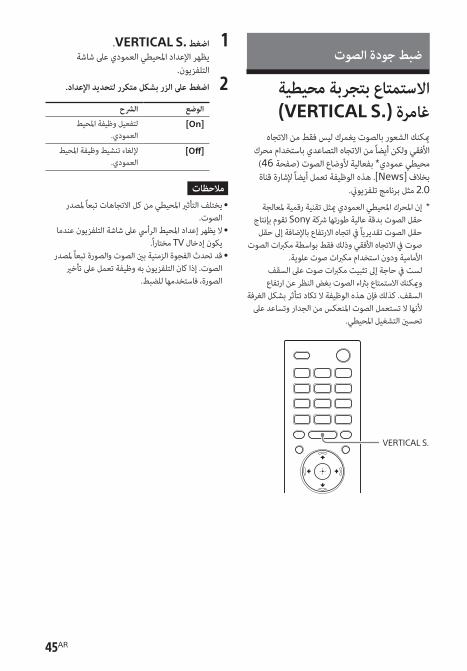
ضبط جودة الصوت
االستمتاع بتجربة محيطية (VERTICAL S. ) غامرة
ميكنك الشعور بالصوت يغمرك ليس فقط من االتجاه األفقي ولكن أيضا من االتجاه التصاعدي باستخدام محرك محيطي عمودي* بفعالية ألوضاع الصوت (صفحة 46) بخالف [News]. هذه الوظيفة تعمل أيضا إلشارة قناة
2.0 مثل برنامج تلفزيوين.إن املحرك املحيطي العمودي ميثل تقنية رقمية ملعالجة *
حقل الصوت بدقة عالية طورتها رشكة Sony تقوم بإنتاج حقل الصوت تقديريا يف اتجاه االرتفاع باإلضافة إىل حقل
صوت يف االتجاه األفقي وذلك فقط بواسطة مكربات الصوت األمامية ودون استخدام مكربات صوت علوية.
لست يف حاجة إىل تثبيت مكربات صوت عىل السقف وميكنك االستمتاع برثاء الصوت بغض النظر عن ارتفاع
السقف. كذلك فإن هذه الوظيفة ال تكاد تتأثر بشكل الغرفة ألنها ال تستعمل الصوت املنعكس من الجدار وتساعد عىل
تحسني التشغيل املحيطي.
VERTICAL S.
1 .VERTICAL S. اضغطيظهر اإلعداد املحيطي العمودي عىل شاشة
التلفزيون. اضغط عىل الزر بشكل متكرر لتحديد اإلعداد. 2
الرشحالوضع[On] لتفعيل وظيفة املحيط
العمودي.[Off] إللغاء تنشيط وظيفة املحيط
العمودي.
مالحظاتيختلف التأثري املحيطي من كل االتجاهات تبعا ملصدر •
الصوت.ال يظهر إعداد املحيط الرأيس عىل شاشة التلفزيون عندما •
يكون إدخال TV مختارا.قد تحدث الفجوة الزمنية بني الصوت والصورة تبعا ملصدر •
الصوت. إذا كان التلفزيون به وظيفة تعمل عىل تأخري الصورة، فاستخدمها للضبط.
45AR

لفصل سامعات الرأسقم بتنفيذ أي من العنارص التالية.
قم بتعطيل وظيفة BLUETOOTH بسامعات الرأس. –اضبط [Bluetooth Mode] عىل [Receiver] أو –
[Off] (صفحة 62).قم بإيقاف تشغيل النظام أو سامعات الرأس. –اخرت اسم الجهاز الخاص بسامعات الرأس املتصلة من –
- [Advanced Settings] - [Setup] .[Device List] - [Bluetooth Settings]
تختفي [Connected] الخاصة باسم الجهاز.
حول توصيل سامعات الرأسقد ال تتمكن من ضبط مستوى الصوت بحسب سامعات •
.BLUETOOTH الرأس املتوافقة معيتم إبطال إدخال BLUETOOTH عند ضبط •
[Bluetooth Mode] عىل [Off] أو .[Transmitter]
• .BLUETOOTH ميكنك تسجيل ما يصل إىل 9 أجهزةإذا تم تسجيل جهاز BLUETOOTH العارش، فسيتم استبدال أقدم جهاز BLUETOOTH متصل بالجهاز
الجديد.ميكن للنظام عرض ما يصل إىل 15 جهاز •
.[Device List] مكتشف يف BLUETOOTHال ميكنك تغيري مؤثر الصوت أو اإلعدادات أثناء •
إرسال الصوت إىل سامعات الرأس املتوافقة مع .BLUETOOTH
قد ال يتم إخراج بعض املحتوى بسبب حامية املحتوى.• يتأخر تشغيل الصوت/املوسيقى بجهاز •
BLUETOOTH مقارنة بالتشغيل عىل الوحدة BLUETOOTH الرئيسية بسبب خصائص تقنية
الالسلكية.ميكنك متكني استقبال صوت LDAC من جهاز •
BLUETOOTH أو تعطيله (صفحة 62).
44AR

ارجع إىل القامئة الرئيسية واخرت [Watch] أو 6 [Listen]، وحدد اإلدخال.
تظهر صورة اإلدخال املحدد عىل شاشة التلفزيون، ويظهر "BT TX" يف شاشة العرض باللوحة األمامية،
ثم يصدر الصوت من سامعات الرأس.ال يصدر الصوت من النظام.
لتحديد اإلدخال، انظر «مشاهدة الصور» (صفحة 33) أو «االستامع إىل املوسيقى/الصوت»
(صفحة 34).اضبط مستوى الصوت. 7
اضبط مستوى الصوت بسامعات الرأس أوال. ميكن التحكم يف مستوى الصوت بسامعات الرأس
باستخدام الرمزين –/+ بالوحدة الرئيسية و –/+ بوحدة التحكم عن بعد.
لحذف جهاز مسجل من قامئة األجهزة1 .HOME اضغط
تظهر القامئة الرئيسية عىل شاشة التلفزيون.2 [Advanced Settings] - [Setup] اخرت
عىل القامئة الرئيسية.3 .[Device List] - [Bluetooth Settings] اخرتحرك املؤرش إىل اسم سامعات الرأس، ثم اضغط عىل 4
.OPTIONS
5 .[Remove] اخرتاتبع التعليامت التي تظهر عىل الشاشة لحذف سامعات 6
الرأس املطلوبة من قامئة األجهزة.
االستامع إىل الصوت بواسطة سامعات الرأس املقرتنة
اضبط وظيفة BLUETOOTH بسامعات الرأس 1عىل وضع التشغيل.
2 .HOME اضغطتظهر القامئة الرئيسية عىل شاشة التلفزيون.
3 Advanced] - [Setup] اخرتSettings] عىل القامئة الرئيسية.
4 - [Bluetooth Settings] اخرت.[Transmitter] - [Bluetooth Mode]
يدخل النظام وضع إرسال BLUETOOTH ويقوم النظام تلقائيا بإعادة االتصال بآخر سامعات رأس تم
االتصال بها.ارجع إىل القامئة الرئيسية واخرت [Watch] أو 5
[Listen]، وحدد اإلدخال.تظهر صورة اإلدخال املحدد عىل شاشة التلفزيون،
ويظهر "BT TX" يف شاشة العرض باللوحة األمامية، ثم يصدر الصوت من سامعات الرأس.
ال يصدر الصوت من النظام.لتحديد اإلدخال، انظر «مشاهدة الصور»
(صفحة 33) أو «االستامع إىل املوسيقى/الصوت» (صفحة 34).
اضبط مستوى الصوت. 6اضبط مستوى الصوت بسامعات الرأس. ميكنك أيضا
ضبط مستوى الصوت بسامعات الرأس باستخدام –/+ بوحدة التحكم عن بعد.
43AR

االستامع إىل صوت الجهاز أو التلفزيون املتصل من سامعات
الرأسميكنك االستامع إىل صوت الجهاز أو التلفزيون املتصل من سامعات الرأس املتوافقة مع BLUETOOTH عن طريق
.BLUETOOTH توصيلها باستخدام وظيفة
االستامع إىل الصوت عن طريق االقرتان بسامعات الرأس
اضبط سامعات الرأس املتوافقة مع 1BLUETOOTH عىل وضع االقرتان.
راجع تعليامت التشغيل الخاصة بسامعات الرأس للتعرف عىل طريقة االقرتان.
2 .HOME اضغطتظهر القامئة الرئيسية عىل شاشة التلفزيون.
3 Advanced] - [Setup] اخرتSettings] عىل القامئة الرئيسية.
4 - [Bluetooth Settings] اخرت.[Transmitter] - [Bluetooth Mode]
.BLUETOOTH يدخل النظام يف وضع إرسالحدد اسم سامعات الرأس من [Device List] يف 5
.[Bluetooth Settings]
،BLUETOOTH عندما يتم إنشاء اتصال Bluetooth device is] تظهر رسالة
.[connected.إذا تعذر عليك العثور عىل اسم سامعات الرأس يف
.[Scan] فاخرت ،[Device List]
تتم مزامنة صوت النظام مع الصورة ولكن سيتأخر خرج الصوت من مكربات الصوت األخرى.
Sony | Music ميكنك التشغيل باستخدام تطبيقCenter املثبت عىل جهاز محمول. الستخدام أجهزة
متعددة، قم بتوصيلها بنفس شبكة LAN الالسلكية.
Sony | Music Center إلعدادقم بتنفيذ اإلعداد باتباع التعليامت الخاصة بتطبيق
.Sony | Music Center
مالحظاتعند تشغيل نفس املوسيقى بني األجهزة املتوافقة مع •
Chromecast built-in، استخدم التطبيق الذي يعمل بتقنية Chromecast (صفحة 40).
عند اختيار [Bluetooth Audio] أثناء استخدام وظيفة • الغرف املتعددة الالسلكية، فقد يقوم النظام بإعادة االتصال
.BLUETOOTH بجهازقد يكون إدخال صوت HDMI محدودا أثناء استخدام •
وظيفة الغرف املتعددة الالسلكية.تلميح
ملزيد من التفاصيل حول Sony | Music Center، راجع الرابط التايل.
http://www.sony.net/smcqa/
42AR

استخدام تطبيق Sony | Music Center
Sony | Music Center هو تطبيق للتحكم يف أجهزة الصوت املتوافقة من Sony باستخدام جهاز محمول مثل
الهاتف الذيك أو الكمبيوتر اللوحي.
للتفاصيل حول تطبيق Sony | Music Center، راجع عنوان URL التايل.
http://www.sony.net/smcqa/
1 Sony | Music Center قم بتثبيت تطبيقاملجاين عىل جهازك املحمول.
ابحث عن تطبيق Sony | Music Center عىل Google Play أو App Store وقم بتثبيته عىل
جهازك املحمول.قم بتوصيل النظام والجهاز املحمول باستخدام 2
وظيفة BLUETOOTH (صفحة 34) أو عرب وظيفة الشبكة (صفحة 24).
3 .Sony | Music Center ابدأ تطبيققم بالتشغيل من خالل اتباع شاشة 4
.Sony | Music Center
مالحظاتقبل استخدام تطبيق Sony | Music Center بواسطة •
Bluetooth] تأكد من ضبط ،BLUETOOTH وظيفةMode] عىل [Receiver] (صفحة 62).
• Sony | Music استخدم أحدث إصدارات تطبيق ،Sony | Music Center للتفاصيل حول .Center
راجع Google Play أو App Store. إذا تعذر توصيل النظام وجهاز BLUETOOTH عرب وظيفة
Sony | Music قم بإلغاء تثبيت ،BLUETOOTH BLUETOOTH وحاول االتصال عرب وظيفة Center
مرة أخرى.تلميح
عند التوصيل باستخدام وظيفة الشبكة، قم بتوصيل الجهاز املحمول بنفس شبكة النظام.
توصيل الغرف املتعددة الالسلكية-الجهاز املتوافق
(الغرف املتعددة الالسلكية)ميكنك االستمتاع باملوسيقى يف أية غرفة باستخدام النظام
من خالل الغرف املتعددة الالسلكية-مكرب الصوت الالسليك املتوافق.
ميكنك االستمتاع باملوسيقى أو الصوت التايل يف غرف مختلفة بجودة عالية أو منخفضة باستخدام الشبكة
الالسلكية املنزلية.املوسيقى عىل خدمة املوسيقى• املوسيقى املخزنة عىل الكمبيوتر أو الهاتف الذيك• صوت [TV] (مبا يف ذلك االتصال بوظيفة •
[HDMI2] أو [HDMI1] أو (BLUETOOTHأو [Bluetooth Audio] أو [USB] أو إدخال
[Analog] الخاص بالنظام*
ميكنك االستمتاع بصوت الجهاز املتصل بالنظام. يتأخر صوت * النظام عن صوت الصورة حتى يتزامن مع صوت مكربات
الصوت األخرى. إذا كانت الفجوة الزمنية بني الصوت والصورة تزعجك، حاول ما ييل.
• OPTIONS اضغط :HDMI2 أو HDMI1 إلدخال.[Off] عىل [Multi-room Sync] واضبط
إلدخال TV أو تناظري: اضغط / ،OPTIONS حتى • تظهر "MSYNC" عىل شاشة العرض باللوحة األمامية و (إدخال)، ثم اضغط / إىل أن تظهر "OFF" عىل
شاشة العرض باللوحة األمامية واضغط (إدخال).
41AR

االستامع إىل موسيقى من خدمة البث الحي باستخدام Chromecast built-inالنظام متوافق مع Chromecast built-in الذي
ميكنه بث موسيقى إىل مكرب الصوت من الجهاز املحمول.ميكنك اختيار محتوى املوسيقى من التطبيق الذي يعمل بتقنية Chromecast وتشغيل محتويات الصوت عىل
النظام أو املجموعة التي تضم النظام.
تحضري النظام والجهاز املحمولChromecast built- قم بتنفيذ اإلعدادات الستخدام
in عىل النظام، وقم بتثبيت التطبيق الذي يعمل بتقنية Chromecast عىل الجهاز املحمول.
1 .HOME اضغطتظهر القامئة الرئيسية عىل شاشة التلفزيون.
2 Chromecast built-] - [Listen] اخرتin] عىل القامئة الرئيسية.
Chromecast قم بتنفيذ اإلعدادات الستخدامbuilt-in عىل النظام عن طريق اتباع الرسالة التي
تظهر عىل الشاشة.بعد تنفيذ اإلعدادات، يتم تلقائيا ضبط
[Network/Bluetooth Standby] عىل [On] وميكنك تشغيل املوسيقى رسيعا حتى عندما
يكون النظام يف وضع االستعداد (صفحة 62).3 Wi-Fi قم بتوصيل الجهاز املحمول عرب اتصال
بنفس شبكة النظام.قم بتثبيت التطبيق الذي يعمل بتقنية 4
Chromecast عىل الجهاز املحمول.
االستامع إىل املوسيقى بواسطة تشغيل الجهاز املحمول
ابدأ تشغيل التطبيق الذي يعمل بتقنية 1Chromecast، واضغط عىل زر cast وحدد
النظام أو املجموعة املشتملة عىل النظام.
حدد ملفات املوسيقى عىل التطبيق الذي يعمل 2بتقنية Chromecast وقم بتشغيلها.
يتم تشغيل املوسيقى عىل النظام.مالحظة
Chromecast وفقا للدولة واملنطقة، قد ال تتوفر تقنية.Chromecast والتطبيق الذي يعمل بتقنية built-in
االستامع إىل املوسيقى عىل النظام من خالل التحدث إىل جهاز مساعد
ميكنك االستامع إىل املوسيقى عىل النظام من خالل التحدث إىل جهاز مساعد Google عن طريق ربط النظام وجهاز .Google Home بواسطة تطبيق Google مساعد
.Google Home للتفاصيل، تحقق من تطبيق
40AR

Spotify استخدام ميكنك تحديد املوسيقى عىل تطبيق Spotify وتشغيلها
عىل النظام.
تشغيل املوسيقى عىل النظام باستخدام "Spotify Connect" وظيفة
استخدم هاتفك أو الكمبيوتر اللوحي أو جهاز الكمبيوتر كوحدة تحكم عن بعد لـ Spotify. انتقل إىل
spotify.com/connect للتعرف عىل كيفية القيام بذلك.
تلميحإذا كانت [Network/Bluetooth Standby] مضبوطة عىل [On] (صفحة 62)، ميكنك تشغيل املوسيقى رسيعا حتى
إذا كان النظام يف وضع االستعداد.
استئناف املوسيقى التي تم تشغيلها عىل الجهاز املحمول
1 .MUSIC SERVICE اضغط عىلعند قيامك بتشغيل موسيقى Spotify عىل النظام،
يتم استئناف املوسيقى التي تم تشغيلها باستخدام Spotify. لالطالع عىل التفاصيل، انظر «استخدام
الزر MUSIC SERVICE» (صفحة 39).مالحظة
قد ال يتوفر تطبيق Spotify يف بعض الدول/املناطق.
استخدام الزر MUSIC SERVICE
عند قيامك بتشغيل موسيقى Spotify عىل النظام، ميكنك .Spotify استئناف املوسيقى التي تم تشغيلها باستخدام
لالستمتاع بخدمات املوسيقى، يجب توصيل النظام باإلنرتنت.
MUSIC SERVICE
.MUSIC SERVICE اضغط عىليتم استئناف املوسيقى التي تم تشغيلها بواسطة
Spotify. انظر «استخدام Spotify» (صفحة 39).
مالحظاتقد ال تتوفر خدمات املوسيقى يف بعض الدول/املناطق.• يف حالة عدم توفر استئناف التشغيل، يتم تشغيل قامئة •
التشغيل األخرية التي تم تشغيلها عىل النظام.
39AR

االستامع إىل املوسيقى عىل جهاز الكمبيوتر باستخدام تطبيق Sony | Music Center
ه شبكة LAN الالسلكية موج
جهاز الكمبيوتر
هاتف ذيك أو كمبيوتر لوحي
ميكنك تشغيل ملفات املوسيقى املخزنة عىل جهاز Sony | Music Center الكمبيوتر بتشغيل تطبيق
املثبت عىل جهاز محمول مثل هاتف ذيك أو كمبيوتر Sony | Music لوحي. ملزيد من التفاصيل حول
Center، راجع الرابط التايل.http://www.sony.net/smcqa/
االستامع إىل الجهاز املتصل بكابل صوت تناظري
ميكنك االستامع إىل الصوت الصادر من جهاز صوت مثل التلفزيون، ®WALKMAN، وما إىل ذلك من األجهزة
املتصلة مبقبس ANALOG IN عىل النظام.
1 .HOME اضغطتظهر القامئة الرئيسية عىل شاشة التلفزيون.
اخرت [Listen] - [Analog] من القامئة 2الرئيسية.
تظهر شاشة [Analog] عىل شاشة التلفزيون.اضبط مستوى الصوت. 3
اضبط مستوى الصوت بالضغط عىل –/+ يف • وحدة التحكم عن بعد.
اضبط مستوى صوت مضخم الصوت الفرعي • بالضغط عىل –/+ SW يف وحدة التحكم عن
بعد (صفحة 48).اضبط مستوى صوت مكرب الصوت الخلفي •
بالضغط عىل –/+ REAR يف وحدة التحكم عن بعد (صفحة 48).
تلميحكام ميكنك أيضا اختيار [Analog] مبارشة بواسطة الضغط
.ANALOG عىل
38AR

مالحظةال تنزع جهاز USB أثناء التشغيل. لتجنب تلف البيانات أو
تلف جهاز USB، قم بإيقاف تشغيل النظام قبل توصيل جهاز USB أو نزعه.
عن شاشة تشغيل املوسيقى ،/ اخرت األزرار التالية عىل الشاشة بواسطة الضغط عىل
. ثم اضغط (تشغيل)/ (إيقاف مؤقت)•
لبدء أو إيقاف التشغيل مؤقتا. ميكنك التشغيل أيضا باستخدام يف وحدة التحكم عن بعد.
(السابق)/ (التايل)• لتشغيل ملف املوسيقى السابق أو التايل. ميكنك
التشغيل أيضا باستخدام / يف وحدة التحكم عن بعد.
(تشغيل عشوايئ)• ، يتم لخلط ترتيب التشغيل. يف كل مرة تضغط عىل
التبديل بني تشغيل/إيقاف التشغيل العشوايئ. (تشغيل متكرر)•
اضغط بشكل متكرر لتبديل وضع التكرار.الرشحوضع التكرار
لتكرار كل ملفات املوسيقى. (تكرار الكل)لتكرار كل ملفات املوسيقى يف مجلد. (تكرار المجلد)
لتكرار ملف موسيقى قيد التشغيل. (تكرار واحد)
إللغاء التشغيل املتكرر. (إيقاف التشغيل)
تلميحميكنك الرتجيع/التقديم الرسيع بواسطة الضغط مطوال عىل
/ يف وحدة التحكم عن بعد أثناء التشغيل.
االستامع إىل املوسيقى عىل جهاز الكمبيوتر عرب شبكة
منزليةميكنك تشغيل ملفات املوسيقى املخزنة عىل جهاز
الكمبيوتر عرب شبكتك املنزلية.وميكن تشغيل ملفات املوسيقى عن طريق تشغيل
Sony | Music Center عىل جهاز محمول مثل هاتف ذيك أو كمبيوتر لوحي.
تجهيز الشبكة املنزليةقم بتوصيل النظام بالشبكة. 1
انظر «االتصال بشبكة سلكية» (صفحة 24) أو «االتصال بشبكة السلكية» (صفحة 25).
قم بتوصيل جهاز الكمبيوتر بالشبكة. 2لالطالع عىل التفاصيل، راجع تعليامت تشغيل جهاز
الكمبيوتر.اضبط جهاز الكمبيوتر. 3
الستخدام جهاز الكمبيوتر عىل شبكتك املنزلية، تحتاج إىل ضبط جهاز الكمبيوتر كخادم. لالطالع عىل
التفاصيل، راجع تعليامت تشغيل جهاز الكمبيوتر.تلميح
- [Setup] عند التحقق من حالة اتصال الشبكة، انظر - [Network Settings] - [Advanced Settings]
.[Network Connection Status]
37AR

اضغط عىل BLUETOOTH أثناء ظهور • [Bluetooth Audio] عىل شاشة التلفزيون.
• [Transmitter] عىل [Bluetooth Mode] اضبطأو [Off] (صفحة 62).
قم بإيقاف تشغيل النظام أو الجهاز املحمول.• تلميح
يف حالة عدم إنشاء االتصال، حدد "HT-Z9F" بالجهاز املحمول.
االستامع إىل املوسيقى املوجودة USB عىل جهاز
USB ميكنك تشغيل ملفات املوسيقى املخزنة عىل جهازمتصل.
للتعرف عىل أنواع امللفات القابلة للتشغيل، انظر «أنواع امللفات القابلة للتشغيل» (صفحة 78).
1 .(USB) مبنفذ USB قم بتوصيل جهاز
2 .HOME اضغطتظهر القامئة الرئيسية عىل شاشة التلفزيون.
3 [USB (Connected)] - [Listen] اخرتمن القامئة الرئيسية.
حدد املجلد الذي عليه األغاين املخزنة، ثم اخرت 4أغنية.
يتم تشغيل األغنية املختارة ويصدر الصوت من النظام.
اضبط مستوى الصوت. 5اضبط مستوى الصوت بالضغط عىل –/+ يف •
وحدة التحكم عن بعد.اضبط مستوى صوت مضخم الصوت الفرعي •
بالضغط عىل –/+ SW يف وحدة التحكم عن بعد (صفحة 48).
اضبط مستوى صوت مكرب الصوت الخلفي • بالضغط عىل –/+ REAR يف وحدة التحكم
عن بعد (صفحة 48).
36AR

تأكد من أن مؤرش BLUETOOTH بالوحدة 4الرئيسية ييضء باللون األزرق.
بذلك يكون تم إنشاء اتصال بني النظام والجهاز املحمول.
ابدأ تشغيل الصوت باستخدام تطبيق املوسيقى 5بالجهاز املحمول املتصل.
يخرج الصوت من الوحدة الرئيسية.اضبط مستوى الصوت. 6
اضبط مستوى الصوت بالضغط عىل –/+ يف • وحدة التحكم عن بعد.
اضبط مستوى صوت مضخم الصوت الفرعي • بالضغط عىل –/+ SW يف وحدة التحكم عن
بعد (صفحة 48).اضبط مستوى صوت مكرب الصوت الخلفي •
بالضغط عىل –/+ REAR يف وحدة التحكم عن بعد (صفحة 48).
ميكنك تشغيل املحتوى أو إيقاف تشغيله مؤقتا • باستخدام أزرار عملية التشغيل املوجودة بوحدة
التحكم عن بعد.
للتحقق من حالة اتصال وظيفة BLUETOOTH
مؤرش BLUETOOTHالحالةأثناء حالة االستعداد
لإلقرانيومض برسعة باللون األزرق
محاولة االتصال قيد التقدم
يومض باللون األزرق
ييضء باللون األزرقتم إنشاء االتصال
تلميحاتإذا مل يتم إقران أي جهاز محمول (مثال، بعد رشاء النظام •
مبارشة)، يدخل النظام يف وضع اإلقران ببساطة عن طريق .BLUETOOTH تغيري اإلدخال إىل إدخال
مبجرد تأسيس اتصال BLUETOOTH، ستظهر إشارة تويص • بالتطبيق املطلوب تثبيته وفقا ألي من األجهزة التي قمت
بتوصيله.باتباع التعليامت املعروضة، ميكن تثبيت تطبيق يسمى
Sony | Music Center، من شأنه أن ميكنك من تشغيل هذا النظام.
،Sony | Music Center للتفاصيل حول تطبيق «Sony | Music Center انظر «استخدام تطبيق
(صفحة 41).قم بإجراء االقرتان للجهاز املحمول الثاين واألجهزة املحمولة •
التالية.
االستامع إىل املوسيقى من الجهاز املقرتن
قم بتشغيل وظيفة BLUETOOTH بالجهاز 1املحمول.
2 .BLUETOOTH اضغطيقوم النظام تلقائيا بإعادة االتصال بآخر جهاز
محمول تم االتصال به.تأكد من أن مؤرش BLUETOOTH ييضء باللون 3
األزرق.تم إنشاء اتصال بني النظام والجهاز املحمول.
ابدأ تشغيل الصوت باستخدام تطبيق املوسيقى 4بالجهاز املحمول املتصل.
يخرج الصوت من الوحدة الرئيسية.اضبط مستوى الصوت. 5
اضبط مستوى الصوت بالضغط عىل –/+ يف • وحدة التحكم عن بعد.
اضبط مستوى صوت مضخم الصوت الفرعي • بالضغط عىل –/+ SW يف وحدة التحكم عن
بعد (صفحة 48).اضبط مستوى صوت مكرب الصوت الخلفي •
بالضغط عىل –/+ REAR يف وحدة التحكم عن بعد (صفحة 48).
ميكنك تشغيل املحتوى أو إيقاف تشغيله مؤقتا • باستخدام أزرار عملية التشغيل املوجودة بوحدة
التحكم عن بعد.
لفصل الجهاز املحمولقم بتنفيذ أي من العنارص التالية.
قم بتعطيل وظيفة BLUETOOTH بالجهاز املحمول.•
35AR

االستامع إىل املوسيقى/الصوت
االستامع إىل املوسيقى/الصوت باستخدام وظيفة
BLUETOOTH®ميكنك االستامع إىل املوسيقى املخزنة عىل جهاز محمول
مثل الهاتف الذيك أو الكمبيوتر اللوحي عرب اتصال السليك عن طريق توصيل النظام والجهاز املحمول باستخدام
.BLUETOOTH وظيفةعند التوصيل بالجهاز املحمول باستخدام وظيفة
BLUETOOTH، ميكنك التشغيل ببساطة باستخدام وحدة التحكم عن بعد املرفقة بدون تشغيل التلفزيون.
BLUETOOTH
+/–
SW +/–
REAR +/–
أزرار عملية التشغيل
BLUETOOTH زر
االستامع إىل املوسيقى بواسطة إقران جهاز الجوال املتصل للمرة األوىل
الستخدام وظيفة BLUETOOTH، تحتاج إىل إجراء إقران للنظام والجهاز املحمول مقدما.
اضغط مطوال عىل BLUETOOTH املوجودة عىل 1الوحدة الرئيسية ملدة ثانيتني.
"BT" يدخل النظام يف وضع االقرتان، يظهر الرمزعىل شاشة العرض باللوحة األمامية، ويومض مؤرش
BLUETOOTH برسعة.
عىل الجهاز املحمول، قم بالبحث يف النظام بواسطة 2القيام بعملية اإلقران.
تظهر قامئة أجهزة BLUETOOTH التي تم البحث عنها عىل شاشة الجهاز املحمول.
لالطالع عىل طريقة التشغيل إلقران جهاز BLUETOOTH بالجهاز املحمول، راجع تعليامت
التشغيل الخاصة بالجهاز املحمول.قم بإقران النظام والجهاز املحمول بواسطة اختيار 3
"HT-Z9F" من القامئة املوجودة عىل شاشة الجهاز املحمول.
إذا طلب منك إدخال مفتاح املرور، فأدخل ."0000"
34AR

33AR
مشاهدة الصور مشاهدة التلفزيون
1 .HOME اضغطتظهر القامئة الرئيسية عىل شاشة التلفزيون.
اخرت [Watch] - [TV] من القامئة الرئيسية. 2حدد الربنامج باستخدام وحدة التحكم عن بعد 3
بالتلفزيون.يظهر برنامج التلفزيون املحدد عىل شاشة التلفزيون
ويصدر صوت التلفزيون من النظام.اضبط مستوى الصوت. 4
اضبط مستوى الصوت بالضغط عىل –/+ يف • وحدة التحكم عن بعد.
اضبط مستوى صوت مضخم الصوت الفرعي • بالضغط عىل –/+ SW يف جهاز التحكم عن
بعد (صفحة 48).اضبط مستوى صوت مكرب الصوت الخلفي •
بالضغط عىل –/+ REAR يف وحدة التحكم عن بعد (صفحة 48).
مالحظةاضبط إعداد مكربات صوت التلفزيون (BRAVIA) عىل نظام
الصوت. راجع تعليامت التشغيل الخاصة بالتلفزيون حول كيفية ضبط التلفزيون.
تلميحميكنك تحديد [TV] مبارشة بواسطة الضغط عىل زر TV يف
وحدة التحكم عن بعد.
تشغيل جهاز AV املوصول1 .HOME اضغط
تظهر القامئة الرئيسية عىل شاشة التلفزيون.اخرت [Watch]، ثم اخرت اإلدخال 2
([HDMI1] أو [HDMI2]) عىل القامئة الرئيسية. •HDMI IN 1 الجهاز املتصل مبقبس :[HDMI1] •HDMI IN 2 الجهاز املتصل مبقبس :[HDMI2]
تظهر صورة الجهاز املحدد عىل شاشة التلفزيون ويصدر الصوت من النظام.
اضبط مستوى الصوت. 3اضبط مستوى الصوت بالضغط عىل –/+ يف •
وحدة التحكم عن بعد.اضبط مستوى صوت مضخم الصوت الفرعي •
بالضغط عىل –/+ SW يف وحدة التحكم عن بعد (صفحة 48).
اضبط مستوى صوت مكرب الصوت الخلفي • بالضغط عىل –/+ REAR يف وحدة التحكم
عن بعد (صفحة 48).تلميح
ميكنك تحديد [HDMI1] أو [HDMI2] مبارشة بواسطة الضغط عىل زر HDMI1 أو HDMI2 يف وحدة التحكم عن
بعد.

مالحظاتإذا قمت بتنفيذ [Start manual linking]، يتم •
Wireless Speaker] لـ [Link mode] تلقائيا ضبطSettings] عىل [Manual] (صفحة 60).
فقط مضخم الصوت الفرعي أو مكرب الصوت الخلفي الذي • يكون متصال عند اختيار [Finish] يف خطوة 6 هو ما يتم
توصيله بالنظام. إذا تعذر إنشاء االتصال الخاص مبضخم الصوت الفرعي أو مكربات الصوت الخلفية، قم بتنفيذ
االتصال اليدوي مرة أخرى.
إذا كان اإلرسال الالسليك غري مستقر LAN إذا كنت تستخدم عدة أنظمة السلكية، مثل شبكةالالسلكية، فإن اإلشارات الالسلكية قد تصبح متقطعة. يف هذه الحالة، قد يتحسن اإلرسال عن طريق تغيري إعداد
[RF Channel] التايل.
1 .HOME اضغطتظهر القامئة الرئيسية عىل شاشة التلفزيون.
2 Advanced] - [Setup] اخرتSettings] عىل القامئة الرئيسية.
3 Wireless] - [Speaker Settings] اخرت.[RF Channel] - [Speaker Settings
اخرت اإلعداد الذي تريده. 4[On] (اإلعداد االفرتايض): اخرت هذا اإلعداد عادة. •
عندئذ، يحدد النظام تلقائيا أفضل قناة لإلرسال. وضع أقوى للتداخل الالسليك.
[Off]: يقوم النظام باختيار قناة من نطاق الرتدد • املحدود ملنع التداخل الالسليك الخارجي. إذا حدث انخفاض يف الصوت بينام يكون [On] مختارا، فقد
.[Off] يتحسن من خالل اختيارمالحظة
،[On] إىل [Off] من [RF Channel] إذا قمت بتغيري إعدادفقد يستغرق األمر دقيقة واحدة حتى تتم إعادة االتصال.
عندما ال يعمل وحدة التحكم عن بعد الخاص بالتلفزيون
عندما تعوق الوحدة الرئيسية مستشعر وحدة التحكم عن بعد الخاص بالتلفزيون، قد ال يعمل وحدة التحكم عن بعد للتلفزيون. ويف هذه الحالة، قم بتمكني وظيفة مكرر
األشعة تحت الحمراء للنظام.ميكنك التحكم يف التلفزيون باستخدام وحدة التحكم عن
بعد للتلفزيون عن طريق إرسال اإلشارة البعيدة من الجزء الخلفي بالوحدة الرئيسية.
1 .HOME اضغطتظهر القامئة الرئيسية عىل شاشة التلفزيون.
2 Advanced] - [Setup] اخرتSettings] عىل القامئة الرئيسية.
3 - [System Settings] اخرت.[IR-Repeater]
تظهر شاشة [IR-Repeater] عىل شاشة التلفزيون.
4 .[On] حددمالحظات
احرص عىل التحقق من عدم قدرة وحدة التحكم عن • بعد للتلفزيون عىل التحكم يف التلفزيون، ثم اضبط
[IR-Repeater] عىل [On]. إذا تم ضبط هذه الوظيفة عىل [On] عندما يكون بإمكان وحدة التحكم عن بعد
القيام بالتحكم يف التلفزيون، فقد يتعذر التشغيل املناسب بسبب التداخل الناشئ بني األمر املبارش من وحدة التحكم
عن بعد واألمر الصادر عرب الوحدة الرئيسية.إذا كان [IR-Repeater] مضبوطا عىل [On]، فقد ال •
تعمل هذه الوظيفة وفقا لجهاز التلفزيون الخاص بك. كذلك فإن وحدات التحكم عن بعد الخاصة باألجهزة األخرى
مثل جهاز تكييف الهواء قد ال تعمل بصورة صحيحة. يف هذه الحالة، قم بتغيري موضع الرتكيب الخاص بالنظام أو
التلفزيون.
32AR

قم بتثبيت مكرب الصوت الخلفي بواسطة التأكد من 3اليمني/اليسار ملكرب الصوت الخلفي.
تحقق من امللصق املوجود عىل الجزء الخلفي ملكرب الصوت الخلفي. "REAR R" لناحية اليمني،
"REAR L" لناحية اليسار.
توصيل مضخم الصوت الفرعي أو مكربات الصوت الخلفية يدويا
إذا تعذر عليك توصيل مضخم الصوت الفرعي أو مكربات الصوت الخلفية االختيارية بالنظام، أو كنت تستخدم
العديد من املنتجات الالسلكية وترغب يف تحديد االتصال الالسليك لربط النظام مبضخم الصوت الفرعي ومكربات
الصوت الخلفية، قم بتنفيذ االتصال اليدوي.
مؤرش الطاقة
LINK
LINK
مؤرش الطاقة
1 .HOME اضغطتظهر القامئة الرئيسية عىل شاشة التلفزيون.
2 Advanced] - [Setup] اخرتSettings] عىل القامئة الرئيسية.
3 Wireless] - [Speaker Settings] اخرت Start manual] - [Speaker Settings
.[linking
تظهر شاشة [Start manual linking] عىل شاشة التلفزيون.
اضغط LINK عىل كل مكربات الصوت التي 4تستخدمها (مضخم الصوت الفرعي ومكربات
الصوت الخلفية).مؤرش الطاقة الخاص مبضخم الصوت الفرعي أو مبكرب
الصوت الخلفي الذي تم ضغط LINK عليه يومض مرتني بشكل متكرر باللون األخرض.
5 .[Start] اخرتيبدأ االتصال اليدوي.
تظهر عملية االتصال عىل شاشة التلفزيون..[Cancel] إللغاء االتصال اليدوي، اخرت
6 [Connected] عندما تظهر [Finish] اخرتعىل كل مكربات الصوت التي تستخدمها (مضخم
الصوت الفرعي أو مكرب الصوت الخلفي).7 . اضغط
يتم إنشاء االتصال ييضء مؤرش الطاقة الخاص مبضخم الصوت الفرعي أو مبكرب الصوت الخلفي
باللون األخرض.
31AR

تثبيت إطار الشبكةميكنك حامية مكربات الصوت بتثبيت إطار الشبكة املرفق.
وننصح باستخدام الوحدة الرئيسية بدون تثبيت إطار الشبكة إذا كنت ستستمع إىل محتوى صوت عايل الدقة.
تثبيت إطار الشبكة مبوازاة اللوحة األمامية.قم بتثبيتها مع كون حشيات إطار الشبكة باألسفل.
حشيات
تلميحإطار الشبكة مثبت بواسطة مغناطيس.
توصيل مضخم الصوت الفرعي ومكربات الصوت الخلفية
السلكيامبجرد تشغيلها، تكون مكربات الصوت الخلفية ومضخم
الصوت الفرعي متصلة بالنظام تلقائيا.للتفاصيل، راجع دليل بدء التشغيل (وثيقة منفصلة)
لتوصيل مضخم الصوت الفرعي أو انظر الخطوات التالية لتوصيل مكربات الصوت الخلفية.
إضافة مكربات الصوت الخلفيةميكنك االستمتاع بالصوت املحيطي من خالل توصيل اثنني من
مكربات الصوت الخلفية االختيارية.قم بتنفيذ الخطوات التالية لكل مكرب صوت خلفي.
سلك طاقة التيار املرتدد
مؤرش الطاقة
قم بتوصيل سلك طاقة التيار املرتدد. 1يتم تشغيل مكرب الصوت الخلفي وتوصيله بالنظام
السلكيا.تأكد من أن مؤرش الطاقة مبكرب الصوت الخلفي 2
ييضء باللون األخرض.عندما ييضء مؤرش الطاقة باللون األخرض يعني هذا
أن قد تم إنشاء االتصال بني النظام ومكرب الصوت الخلفي.
إذا مل يتم إنشاء االتصال، قم بتوصيل مكرب الصوت الخلفي بالنظام يدويا بواسطة الرجوع إىل «توصيل مضخم الصوت الفرعي أو مكربات الصوت الخلفية
يدويا» (صفحة 31).
30AR

تركيب مكرب الصوت الخلفي عىل الحائط
قم بتحضري برغي (غري مرفق) يناسب فتحة الرتكيب 1بالحائط املوجودة عىل الجزء الخلفي ملكرب الصوت
الخلفي.
4 مم
أكرث من 30 مم
فتحة عىل الجزء الخلفي ملكرب الصوت الخلفي
5.0 مم
10 مم
قم بتثبيت الربغي يف الحائط. 2
9.5 مم تقريبا
قم بتعليق مكرب الصوت الخلفي بواسطة التأكد من 3اليمني/اليسار ملكرب الصوت الخلفي.
تحقق من امللصق املوجود عىل الجزء الخلفي ملكرب الصوت الخلفي. "REAR R" لناحية اليمني،
"REAR L" لناحية اليسار.
29AR

أحكم ربط كتائف الرتكيب بالحائط (مرفقة) مع 3الرباغي (غري مرفقة) يف العالمات () عىل خط
الربغي () الخاص بقالب التثبيت الجداري كام هو مبني يف الرسم التوضيحي أدناه.
368.5 مم368.5 مم
كتيفة الرتكيب بالحائط
() العالمات
() العالمات
قم بإزالة قالب التثبيت الجداري. 4أحكم ربط الرباغي (مرفقة) عىل الجزء الخلفي ملكرب 5
الصوت الطويل بحيث ال ترتخي الرباغي.
الربغي
قم بتعليق الرباغي املثبتة عىل كتائف الرتكيب 6بالحائط.
قم مبحاذاة الرباغي املوجودة عىل الجزء الخلفي ملكرب الصوت الطويل مع فتحات كتائف الرتكيب بالحائط،
ثم قم بتعليق مكرب الصوت الطويل عىل كتائف الرتكيب بالحائط.
مالحظاتعند تثبيت قالب التثبيت الجداري، قم بتثبيته بالكامل •
برفق.إذا مل تتحاذى أوضاع الرباغي املوجودة عىل الجزء الخلفي •
ملكرب الصوت الطويل مع فتحات كتائف الرتكيب بالحائط، قم بضبط الوضع األمين-األيرس لكتيفة الرتكيب بالحائط
بدقة.تأكد من استخدام كتائف الرتكيب بالحائط املرفقة عند •
تعليق مكرب الصوت الطويل عىل الحائط. ال تقم بتعليق مكرب الصوت الطويل عىل الحائط مبارشة. ترتفع درجة الحرارة
جدا داخل مكرب الصوت الطويل وقد تؤدي إىل حدوث تلف أو عطل.
يف حالة عدم استخدام قالب التثبيت الجداري، قم بتثبيت • مكرب الصوت الطويل بعيدا عن التلفزيون مبسافة 70 مم
أو أكرث.
28AR

اإلعداد الستخدام النظام
تركيب مكرب الصوت الطويل أو مكرب الصوت الخلفي (غري
مرفق) عىل الحائطميكنك تركيب مكرب الصوت الطويل أو مكربات الصوت
الخلفية عىل الحائط.
مكرب الصوت الطويل
مكربات الصوت الخلفية
مالحظاتقم بإحضار براغي (غري مرفقة) مناسبة ملادة وقوة الحائط. •
مبا أن الحائط املصنوع من الجبس قابل للكرس بشكل خاص، قم بتثبيت الرباغي بإحكام يف إطار الحائط. قم برتكيب
مكربات الصوت أفقيا، ومعلقة بواسطة الرباغي يف مواقع املسامري عدمية الرأس عىل قسم مسطح متواصل من الحائط.
يجب الرتكيب من قبل وكيل رشكة Sony أو مقاول مرخص • له وإيالء اهتامم خاص للسالمة أثناء الرتكيب.
ال تتحمل رشكة Sony املسؤولية عن الحوادث أو األرضار • الناتجة عن الرتكيب الخاطئ أو قوة الحائط غري الكافية أو
الرتكيب الخاطئ للرباغي أو الكوارث الطبيعية، وما إىل ذلك.
تركيب مكرب الصوت الطويل عىل الحائط
قم بتجهيز اثنني من الرباغي (غري مرفقة) مناسبة 1للفتحة املوجودة عىل كتيفة الرتكيب بالحائط
(مرفقة).4 مم
أكرث من 30 مم
كتيفة الرتكيب بالحائط
قم بتثبيت قالب التثبيت الجداري (مرفق) بالحائط. 2مركز التلفزيون
قالب التثبيت الجداري
رشيط الصق، إلخ.
1 () قم مبحاذاة الخط األوسط للتلفزيونالخاص بقالب التثبيت الجداري مع الخط
األوسط للتلفزيون لديك.قم مبحاذاة الخط السفيل للتلفزيون () الخاص 2
بقالب التثبيت الجداري مع الجزء السفيل من التلفزيون لديك، ثم قم بتثبيت قالب التثبيت
الجداري عىل حائط عن طريق استخدام رشيط الصق متوفر تجاريا، إلخ.
27AR
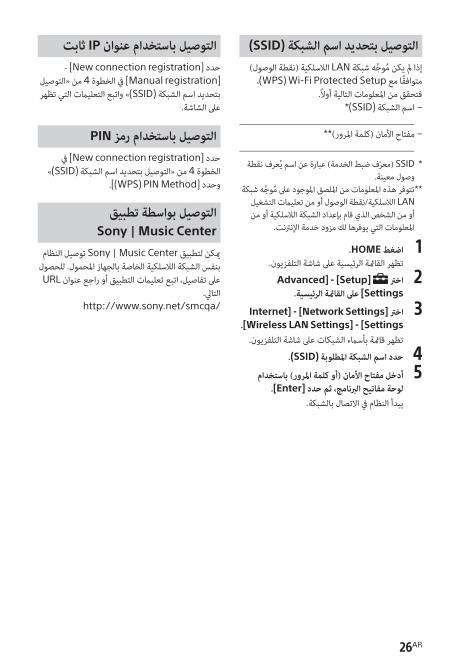
(SSID) التوصيل بتحديد اسم الشبكةه شبكة LAN الالسلكية (نقطة الوصول) إذا مل يكن موج
،(WPS) Wi-Fi Protected Setup متوافقا معفتحقق من املعلومات التالية أوال.
– *(SSID) اسم الشبكة_______________________________________
مفتاح األمان (كلمة املرور)** –_______________________________________
SSID (معرف ضبط الخدمة) عبارة عن اسم يعرف نقطة * وصول معينة.
ه شبكة **تتوفر هذه املعلومات من امللصق املوجود عىل موجLAN الالسلكية/نقطة الوصول أو من تعليامت التشغيل أو من الشخص الذي قام بإعداد الشبكة الالسلكية أو من
املعلومات التي يوفرها لك مزود خدمة اإلنرتنت.
1 .HOME اضغطتظهر القامئة الرئيسية عىل شاشة التلفزيون.
2 Advanced] - [Setup] اخرتSettings] عىل القامئة الرئيسية.
3 Internet] - [Network Settings] اخرت.[Wireless LAN Settings] - [Settings
تظهر قامئة بأسامء الشبكات عىل شاشة التلفزيون.4 .(SSID) حدد اسم الشبكة املطلوبةأدخل مفتاح األمان (أو كلمة املرور) باستخدام 5
.[Enter] لوحة مفاتيح الربنامج، ثم حدديبدأ النظام يف االتصال بالشبكة.
التوصيل باستخدام عنوان IP ثابت - [New connection registration] حدد
[Manual registration] يف الخطوة 4 من «التوصيل بتحديد اسم الشبكة (SSID)» واتبع التعليامت التي تظهر
عىل الشاشة.
PIN التوصيل باستخدام رمزحدد [New connection registration] يف
«(SSID) الخطوة 4 من «التوصيل بتحديد اسم الشبكة.[(WPS) PIN Method] وحدد
التوصيل بواسطة تطبيق Sony | Music Center
ميكن لتطبيق Sony | Music Center توصيل النظام بنفس الشبكة الالسلكية الخاصة بالجهاز املحمول. للحصول URL عىل تفاصيل، اتبع تعليامت التطبيق أو راجع عنوان
التايل.http://www.sony.net/smcqa/
26AR

قم بتنفيذ اإلعداد باتباع التعليامت التي تظهر عىل 5الشاشة.
يبدأ النظام يف إعدادات الشبكة وتظهر حالة إعداد الشبكة.
اضغط عىل / لتصفح املعلومات، ثم اضغط . عىل
6 .[Save & Connect] اخرتيبدأ النظام يف االتصال بالشبكة. ملعرفة التفاصيل،
راجع الرسائل التي تظهر عىل شاشة التلفزيون.مالحظة
إذا اخرتت IPv6، فلن تتمكن من استخدام عنوان IP ثابت.
االتصال بشبكة السلكيةقم بإعداد الشبكة عن طريق توصيل النظام وجهاز
ه شبكة LAN الالسلكية. الكمبيوتر مبوجمالحظة
يجب توصيل الخادم بنفس شبكة النظام.
WPS التوصيل باستخدام زره شبكة LAN الالسلكية (نقطة الوصول) عندما يكون موج
،(WPS) Wi-Fi Protected Setup متوافقا معميكنك ضبط إعدادات الشبكة بسهولة باستخدام الزر
.WPS
1 .HOME اضغطتظهر القامئة الرئيسية عىل شاشة التلفزيون.
2 Advanced] - [Setup] اخرتSettings] عىل القامئة الرئيسية.
3 Internet] - [Network Settings] اخرت.[Wireless LAN Settings] - [Settings
تظهر قامئة بأسامء الشبكات عىل شاشة التلفزيون.4 .[Wi-Fi Protected Setup™ (WPS)] اخرت5 .[Start] اخرتاضغط عىل الزر WPS املوجود عىل نقطة الوصول. 6
يبدأ النظام يف االتصال بالشبكة.
25AR
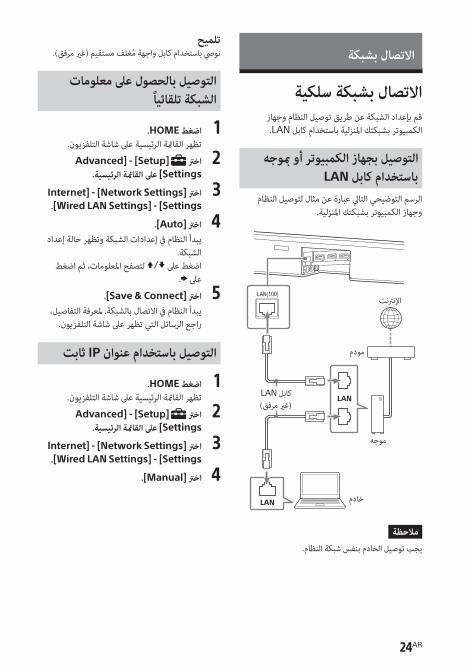
االتصال بشبكة
االتصال بشبكة سلكيةقم بإعداد الشبكة عن طريق توصيل النظام وجهاز
.LAN الكمبيوتر بشبكتك املنزلية باستخدام كابل
التوصيل بجهاز الكمبيوتر أو مبوجه LAN باستخدام كابل
الرسم التوضيحي التايل عبارة عن مثال لتوصيل النظام وجهاز الكمبيوتر بشبكتك املنزلية.
اإلنرتنت
مودم
LAN كابل(غري مرفق)
موجه
خادم
مالحظةيجب توصيل الخادم بنفس شبكة النظام.
تلميحنويص باستخدام كابل واجهة مغلف مستقيم (غري مرفق).
التوصيل بالحصول عىل معلومات الشبكة تلقائيا
1 .HOME اضغطتظهر القامئة الرئيسية عىل شاشة التلفزيون.
2 Advanced] - [Setup] اخرتSettings] عىل القامئة الرئيسية.
3 Internet] - [Network Settings] اخرت.[Wired LAN Settings] - [Settings
4 .[Auto] اخرتيبدأ النظام يف إعدادات الشبكة وتظهر حالة إعداد
الشبكة.اضغط عىل / لتصفح املعلومات، ثم اضغط
. عىل5 .[Save & Connect] اخرت
يبدأ النظام يف االتصال بالشبكة. ملعرفة التفاصيل، راجع الرسائل التي تظهر عىل شاشة التلفزيون.
التوصيل باستخدام عنوان IP ثابت1 .HOME اضغط
تظهر القامئة الرئيسية عىل شاشة التلفزيون.2 Advanced] - [Setup] اخرت
Settings] عىل القامئة الرئيسية.
3 Internet] - [Network Settings] اخرت.[Wired LAN Settings] - [Settings
4 .[Manual] اخرت
24AR

توصيل تلفزيون متوافق مع eARC
Enhanced Audio) eARC النظام متوافق معeARC .(Return Channel هي وظيفة جديدة موحدة بواسطة HDMI 2.1 وتدعم أحدث تنسيقات
الصوت باإلضافة إىل تنسيقات الصوت املدعومة بواسطة ARC (Audio Return Channel) الحالية.
Dolby ميكنك االستمتاع مبحتوى الصوت الهدف، مثلAtmos و Dolby TrueHD و DTS:X أو محتوى LPCM متعدد القنوات الذي ال ميكن إرساله بواسطة
ARC من خالل توصيل النظام والتلفزيون املتوافق مع .HDMI باستعامل كابل eARC
للتوصيل، راجع دليل بدء التشغيل (وثيقة منفصلة).
eARC اإلعداد الستخدام وظيفةإذا كان مقبس خرج HDMI الخاص بالنظام ملصقا 1
عليه "ARC"، قم بتحديث الربنامج (صفحة 64).يكون النظام متوافقا مع وظيفة eARC إذا كان مقبس خرج HDMI الخاص بالنظام ملصقا عليه
."eARC/ARC"2 .HOME اضغط
تظهر القامئة الرئيسية عىل شاشة التلفزيون.3 Advanced] - [Setup] اخرت
Settings] عىل القامئة الرئيسية.
4 .[On] - [eARC] - [HDMI Settings] اخرتوظيفة eARC مفعلة وتعمل أثناء توصيل تلفزيون
.eARC متوافق معوظيفة ARC تعمل أثناء توصيل تلفزيون متوافق
.(eARC ليس متوافقا مع) ARC معمالحظات
إذا مل تظهر [eARC] عىل شاشة اإلعداد يف خطوة 4، قم • بتحديث الربنامج (صفحة 64).
عندما يكون [eARC] مضبوطا عىل [On]، تأكد من إعداد • eARC الخاص بالتلفزيون املتصل. لالطالع عىل التفاصيل،
راجع تعليامت تشغيل التلفزيون.
23AR

HDMI مقبساملتوافق مع HDCP2.2
تلفزيون
HDMI مقبساملتوافق مع HDCP2.2
،Blu-ray Disc مشغلجهاز الكابل، جهاز القمر
الصناعي، وما إىل ذلك
كابل HDMI (مرفق) كابل HDMI (غري مرفق)
استخدم كابل HDMI يدعم تنسيق الفيديو بدقة 4K الذي HDMI ترغب يف مشاهدته. للتفاصيل، انظر «تنسيقات فيديو
املدعومة» (صفحة 80). كابل رقمي برصي (غري مرفق)
ضبط تنسيق إشارة HDMI ملشاهدة 4K محتوى فيديو بدقة
ملشاهدة محتوى فيديو بدقة 4K، حدد اإلعداد املناسب .4K 4 املتصل والجهاز بدقةK لجهاز التلفزيون بدقة
1 .HOME اضغطتظهر القامئة الرئيسية عىل شاشة التلفزيون.
2 Advanced] - [Setup] اخرتSettings] عىل القامئة الرئيسية.
3 HDMI Signal ] - [HDMI Settings] اخرت.[Format
تظهر شاشة [HDMI Signal Format] عىل شاشة التلفزيون.
اخرت [HDMI IN 1]/[HDMI IN 2] (اخرت 4اإلدخال الذي ترغب يف تغيري اإلعداد الخاص به)، ثم
اخرت اإلعداد املرغوب.[Standard format] (اإلعداد االفرتايض): •
حدد هذا اإلعداد عندما يدعم التلفزيون املتصل واألجهزة تنسيقات الفيديو ذات النطاق الرتددي
القيايس.[Enhanced format]: حدد هذا اإلعداد •
عندما يدعم كل من التلفزيون املتصل واألجهزة تنسيقات الفيديو ذات النطاق الرتددي العايل مثل
4K 60p 4:4:4 إلخ.
HDMI Signal] ملعرفة العالقة بني خيارات إعدادFormat] وإشارات تنسيق الفيديو املدعومة وكابالت HDMI التي يتعني استخدامها، انظر
«تنسيقات فيديو HDMI املدعومة» (صفحة 80).مالحظات
• .HDMI تبعا للتلفزيون، قد يلزم إعداد التلفزيون لخرجراجع تعليامت تشغيل التلفزيون.
• HDMI Signal] عند عدم عرض الصورة بعد ضبطFormat] عىل [Enhanced format]، قم بضبطه عىل
.[Standard format]
22AR

عندما يكون مقبس HDMI املتوافق مع HDCP2.2 املوجود عىل التلفزيون
"ARC" أو "eARC" ملصقا عليه
HDMI مقبساملتوافق مع HDCP2.2
تلفزيون
،Blu-ray Disc مشغلجهاز الكابل، جهاز القمر
الصناعي، وما إىل ذلك
مقبس HDMI املتوافق HDCP2.2 مع
كابل HDMI (مرفق) كابل HDMI (غري مرفق)
استخدم كابل HDMI يدعم تنسيق الفيديو بدقة 4K الذي HDMI ترغب يف مشاهدته. للتفاصيل، انظر «تنسيقات فيديو
املدعومة» (صفحة 80).
تحقق ملعرفة أي من مقابس HDMI IN املوجودة 1.HDCP2.2 عىل التلفزيون متوافق مع
راجع تعليامت التشغيل الخاصة بالتلفزيون.قم بتوصيل مقبس HDMI IN املتوافق مع 2
HDCP2.2 املوجود عىل التلفزيون ومقبس HDMI OUT املوجود عىل الوحدة الرئيسية
باستخدام كابل HDMI (مرفق).اكتمل توصيل التلفزيون.
قم بتوصيل مقبس HDMI OUT املتوافق مع 3HDCP2.2 الخاص بالجهاز بدقة 4K ومقبس
HDMI IN الخاص بالوحدة الرئيسية باستخدام كابل HDMI (غري مرفق).
راجع تعليامت تشغيل الجهاز بدقة 4K للتحقق من توافق مقبس HDMI OUT الخاص بالجهاز بدقة
.HDCP2.2 4 معK.4K اكتمل توصيل الجهاز بدقة
عندما ال يوجد ملصق "eARC" أو "ARC" عىل مقبس HDMI املتوافق
مع HDCP2.2 املوجود عىل التلفزيون HDCP2.2 املتوافق مع HDMI IN إذا كان مقبس
بالتلفزيون غري متوافق مع eARC أو ARC، فلن يصدر صوت التلفزيون من النظام.
ويف هذه الحالة، قم بتوصيل مقبس اإلخراج البرصي الخاص بالتلفزيون ومقبس TV IN (OPT) املوجود عىل الوحدة
الرئيسية باستخدام الكابل الرقمي البرصي (غري مرفق).
21AR

مالحظةإذا كان مقبس سامعة الرأس بالتلفزيون يعمل أيضا كمقبس خرج صوت، فتحقق من إعدادات خرج الصوت للتلفزيون.
لالطالع عىل التفاصيل، راجع تعليامت تشغيل التلفزيون.
4K توصيل تلفزيون بدقة 4K وأجهزة بدقة
تدعم كل مقابس HDMI املوجودة بالنظام تنسيق الفيديو 4K و HDCP2.2 (نظام حامية املحتوى الرقمي ذي
النطاق الرتددي العايل إصدار 2.2 ).ملشاهدة محتوى فيديو 4K، قم بتوصيل التلفزيون بدقة HDMI 4 بالنظام بواسطة مقبسK 4 واألجهزة بدقةK
متوافق مع HDCP2.2 بكل جهاز.ال ميكنك عرض محتوى فيديو بدقة 4K إال عرب التوصيل
.HDCP2.2 متوافق مع HDMI مبقبس
20AR

عن العمليات املمكن إجرائها بواسطة وحدة التحكم عن بعد املرفق مع النظام
ميكنك استخدام األزرار التالية.ميكنك ضبط مستوى صوت مضخم الصوت الفرعي
ومكربات الصوت الخلفية وضبط جودة الصوت باإلضافة إىل تشغيل/إيقاف النظام وضبط مستوى الصوت الذي ميكن تشغيله بواسطة وحدة التحكم عن بعد الخاص
بالتلفزيون.
أزرار تحديد وضع الصوت
VOICEVERTICAL S.
NIGHT
SW +/–
REAR +/–
+/–
مالحظاتإذا قمت باختيار إدخال آخر بخالف التلفزيون من عىل •
وحدة التحكم عن بعد املرفق مع النظام، لن يتم إصدار صوت التلفزيون من النظام. إلصدار صوت التلفزيون، اضغط
.TV عىل وحدة التحكم عن بعد للتغيري إىل إدخال TV زر • ،BLUETOOTH أثناء توصيل التلفزيون بواسطة وظيفة
فإن األزرار التالية املوجودة عىل وحدة التحكم عن بعد ال تعمل.
،HOME ،OPTIONS ،(إدخال) ،/// ،DISPLAY (تشغيل/إيقاف مؤقت)،
/ (السابق/التايل)
توصيل تلفزيون بواسطة كابل صوت تناظري
لتوصيل األجهزة التالية بالنظام، قم بتوصيلها من خالل مقبس ANALOG IN املوجود بالنظام.
– HDMI أجهزة التلفزيون التي ال تحتوي عىل مقبسومقبس خرج رقمي برصي
أجهزة الصوت املحمولة مثل الهواتف الذكية و –WALKMAN®
لالستامع إىل الجهاز املتصل، انظر «االستامع إىل الجهاز املتصل بكابل صوت تناظري» (صفحة 38).
كابل صوت تناظري (غري مرفق)
هاتف ذيك، ®WALKMAN، أجهزة صوت أخرى وما إىل ذلك
تلفزيون
خرج صوت تناظري
19AR

مالحظات • TV إذا مل يصدر صوت التلفزيون من النظام، اضغط زر
وتحقق من حالة شاشة العرض باللوحة األمامية وحالة املؤرشات عىل مكرب الصوت الطويل.
تظهر "TV (BT)" عىل شاشة العرض باللوحة األمامية: –تم توصيل النظام والتلفزيون ويصدر صوت التلفزيون
من النظام.– "BT" برسعة وتظهر BLUETOOTH يومض مؤرش
عىل شاشة العرض باللوحة األمامية: تنفيذ االقرتان عىل التلفزيون.
تظهر "TV" عىل شاشة العرض باللوحة األمامية: نفذ –الخطوات من البداية.
• HDMI عندما تقوم بتوصيل النظام والتلفزيون بكابل(مرفق)، يتم إلغاء اتصال BLUETOOTH. لتوصيل النظام
والتلفزيون بواسطة وظيفة BLUETOOTH مرة أخرى، افصل كابل HDMI ثم قم بعملية االتصال من البداية.
االستامع إىل صوت التلفزيون املقرتنميكنك تشغيل/إيقاف النظام وضبط مستوى الصوت
وكتم الصوت باستخدام وحدة التحكم عن بعد الخاص بالتلفزيون عند توصيل التلفزيون بالنظام السلكيا.
تشغيل التلفزيون بواسطة وحدة التحكم عن بعد 1الخاص بالتلفزيون.
يتم تشغيل النظام من خالل التداخل مع طاقة التلفزيون، ويصدر صوت التلفزيون من النظام.
اخرت الربنامج أو اإلدخال الخاص بالجهاز باستخدام 2وحدة التحكم عن بعد الخاص بالتلفزيون.
يتم إصدار الصوت الخاص بالصورة املعروضة عىل شاشة التلفزيون من النظام.
ضبط مستوى صوت النظام باستخدام وحدة التحكم 3عن بعد الخاص بالتلفزيون.
عند الضغط عىل زر كتم الصوت املوجود عىل وحدة التحكم عن بعد الخاص بالتلفزيون، يتم كتم الصوت
مؤقتا.تلميح
عند إطفاء التلفزيون، فإن النظام أيضا يتم إيقافه عن طريق التداخل مع طاقة التلفزيون.
18AR

االستامع إىل صوت التلفزيون عن طريق توصيل النظام والتلفزيون السلكيا
لتوصيل النظام والتلفزيون السلكيا، تحتاج إىل القيام بإقران .BLUETOOTH النظام والتلفزيون باستخدام وظيفة
اإلقران هو العملية الالزمة لتسجيل املعلومات تبادليا عىل أجهزة BLUETOOTH ليك يتم توصيلها السلكيا مقدما.
TV
BLUETOOTH زر
قم بإعداد وحدة التحكم عن بعد. 1قم بتشغيل التلفزيون. 2قم بتشغيل النظام. 34 BLUETOOTH اضغط مطوال وبالتزامن عىل زر
املوجود عىل كل من الوحدة الرئيسية وحدة التحكم عن بعد الخاص بالتلفزيون ملدة 5 ثوان.
"BT" يدخل النظام يف وضع االقرتان، يظهر الرمزعىل شاشة العرض باللوحة األمامية، ويومض مؤرش
BLUETOOTH برسعة.
يف التلفزيون ابحث يف النظام بواسطة القيام بعملية 5اإلقران.
تظهر قامئة أجهزة BLUETOOTH التي تم البحث عنها عىل شاشة التلفزيون.
لالطالع عىل طريقة التشغيل إلقران جهاز BLUETOOTH بالتلفزيون، راجع تعليامت
التشغيل الخاصة بالتلفزيون.قم بإقران النظام والتلفزيون بواسطة اختيار 6
"HT-Z9F" من القامئة املوجودة عىل شاشة التلفزيون.
تأكد من أن مؤرش BLUETOOTH املوجود عىل 7الوحدة الرئيسية ييضء باللون األزرق ومن ظهور "TV (BT)" عىل شاشة العرض باللوحة األمامية.
تم إنشاء اتصال بني النظام والتلفزيون.اخرت الربنامج أو اإلدخال الخاص بالجهاز باستخدام 8
وحدة التحكم عن بعد الخاص بالتلفزيون.يتم إصدار الصوت الخاص بالصورة املعروضة عىل
شاشة التلفزيون من النظام.ضبط مستوى صوت النظام باستخدام وحدة التحكم 9
عن بعد الخاص بالتلفزيون.عند الضغط عىل زر كتم الصوت املوجود عىل وحدة التحكم عن بعد الخاص بالتلفزيون، يتم كتم الصوت
مؤقتا.
17AR

AV التوصيل بالتلفزيون أو بجهاز
التوصيل بالتلفزيون أو بجهاز HDMI بواسطة كابل AV
لتوصيل تلفزيون بدقة 4K أو أجهزة بدقة 4K
«4K 4 وأجهزة بدقةK انظر «توصيل تلفزيون بدقة(صفحة 20).
eARC لتوصيل تلفزيون متوافق معللتوصيل، راجع دليل بدء التشغيل (وثيقة منفصلة).
«eARC لإلعدادات، انظر «توصيل تلفزيون متوافق مع(صفحة 23).
لتوصيل تلفزيون بخالف الذي يف األعىل، راجع دليل بدء التشغيل (وثيقة منفصلة).
Sony توصيل تلفزيون BLUETOOTH بوظيفة
السلكياعند استخدام تلفزيون Sony* مع وظيفة
BLUETOOTH، ميكنك االستامع إىل صوت التلفزيون أو الجهاز املتصل بالتلفزيون بواسطة توصيل النظام
والتلفزيون السلكيا. * A2DP ينبغي أن يكون التلفزيون متوافقا مع
(Advanced Audio Distribution Profile).BLUETOOTH الخاص بقطاع
،Blu-ray Disc مشغلجهاز الكابل، جهاز القمر
الصناعي، وما إىل ذلك
مالحظاتإذا تم توصيل النظام بالتلفزيون بواسطة وظيفة •
BLUETOOTH، ال ميكنك عرض شاشة العملية للنظام مثل القامئة الرئيسية عىل شاشة التلفزيون واستخدام وظيفة النظام بخالف وظيفة االستامع إىل صوت التلفزيون أو الجهاز
املتصل بالتلفزيون.الستخدام كل وظائف النظام، قم بتوصيل النظام والتلفزيون باستخدام كابل HDMI (مرفق). للتفاصيل حول التوصيالت والعمليات لالستامع إىل صوت التلفزيون عن طريق التوصيل
بكابل HDMI، راجع دليل بدء التشغيل (وثيقة منفصلة).هذه الوظيفة متاحة فقط لتلفزيون Sony املتوافق مع •
.BLUETOOTH A2DP
16AR

[Listen] الختيار اإلدخال الخاص بجهاز الصوت املتصل بالنظام أو خدمة املوسيقى للتشغيل عىل النظام.
راجع «االستامع إىل املوسيقى/الصوت» (صفحة 34).
[Setup] لتنفيذ اإلعدادات األولية األساسية باستخدام [Easy Setup] أو اإلعدادات املتقدمة املختلفة الخاصة بالنظام.
راجع «تنفيذ اإلعداد السهل» (صفحة 58) أو «تنفيذ اإلعدادات المتقدمة» (صفحة 59). [Software Update] إذا اكتشف النظام وجود معلومات تحديث له عىل الشبكة، يظهر إشعار التحديث و
الذي يقوم بتحديث الربنامج. انظر «تحديث الربنامج» (صفحة 64).
نبذة حول وصف الخطواتيف تعليامت التشغيل هذه، يتم توضيح العمليات يف صورة خطوات يتم تنفيذها يف القامئة الرئيسية املعروضة عىل شاشة
التلفزيون باستخدام وحدة التحكم عن بعد أثناء توصيل كل من النظام والتلفزيون بكابل HDMI (مرفق).
تم تبسيط خطوات التشغيل التي تحدد العنارص عىل شاشة التلفزيون باستخدام /// و بالطريقة التالية.
مثال: اخرت [Setup] - [Advanced Settings] عىل القامئة الرئيسية.يتم التعبري عن العملية التي تحدد الفئة وعنرص الفئة بواسطة الضغط عىل /// و بكلمة «حدد». يتم الربط بني
الفئة وعنرص الفئة بواسطة "-".
.[Manual Speaker Settings] - [Speaker Settings] مثال: اخرت، يتم ربط العنارص املحددة بالرمز "-". عند تكرار العملية التي تحدد عنرصا بواسطة الضغط عىل /// و
تلميحاتميكنك استخدام األزرار املوجودة بالوحدة الرئيسية إذا كانت تحمل نفس األسامء املوجودة عىل وحدة التحكم عن بعد أو أسامء •
مشابهة لها.تظهر الرموز بني القوسني [ ] عىل شاشة التلفزيون. تظهر الرموز بني القوسني " " عىل شاشة العرض باللوحة األمامية.•
15AR

نبذة حول القامئة الرئيسيةميكنك عرض القامئة الرئيسية عىل شاشة التلفزيون عن طريق توصيل النظام والتلفزيون باستخدام كابل HDMI (مرفق).
ميكنك ضبط اإلعدادات املختلفة وتحديد اإلدخال من القامئة الرئيسية.يتم عرض القامئة الرئيسية باللغة املحددة يف [Easy Setup]. (الشاشة التالية هي مثال عند تحديد اإلنجليزية.)
الفئات
عنارص الفئة
استخدام القامئة الرئيسية
///، (إدخال)
HOME
BACK
1 .HOME اضغطتظهر القامئة الرئيسية عىل شاشة التلفزيون.
2 . اضغط // الختيار الفئة املرغوبة، ثم اضغط أو عنارص الفئة املختارة تظهر ضمن قامئة الفئات عىل شاشة التلفزيون.
3 . اضغط /// الختيار العنرص املرغوب، ثم اضغط يظهر اإلدخال املحدد أو شاشة اإلعداد عىل شاشة التلفزيون.
.BACK للرجوع إىل الشاشة السابقة، اضغط
[Watch] الختيار اإلدخال الخاص بالتلفزيون أو بجهاز AV املتصل بالنظام.
راجع «مشاهدة التلفزيون» (صفحة 33).
14AR

REAR (مستوى صوت مكربات الصوت الخلفية) –/+
يضبط مستوى صوت مكربات الصوت الخلفية عند توصيلها (غري مرفقة).
(مستوى الصوت) –/*+ لضبط مستوى الصوت.
SW (مستوى صوت مضخم الصوت الفرعي) –/+
لضبط مستوى صوت مضخم الصوت الفرعي. (كتم الصوت)
إليقاف تشغيل الصوت بشكل مؤقت.DISPLAY
لعرض معلومات التشغيل عىل شاشة التلفزيون..TV معلومات التشغيل غري معروضة لدخل
أزرار عملية التشغيل / (السابق/التايل)
لتحديد املسار أو امللف السابق/التايل.الضغط مطوال للبحث للخلف أو لألمام (ترجيع/
تقديم رسيع) أثناء التشغيل. (تشغيل/إيقاف مؤقت)*
لبدء التشغيل أو إيقافه أو إلعادة التشغيل (استئناف التشغيل).
AUDIO* (صفحة 50)
تحتوي أزرار ،AUDIO، وأزرار + عىل نقطة * بارزة. استخدمها كدليل أثناء التشغيل.
حول استبدال بطاريات وحدة التحكم عن بعد
عندما ال يستجيب النظام بواسطة التشغيل بوحدة التحكم عن بعد، قم باستبدال بطاريتني بأخريني جديدتني.
.(AAA حجم) القلوية R03 لالستبدال، استعمل بطاريات
13AR
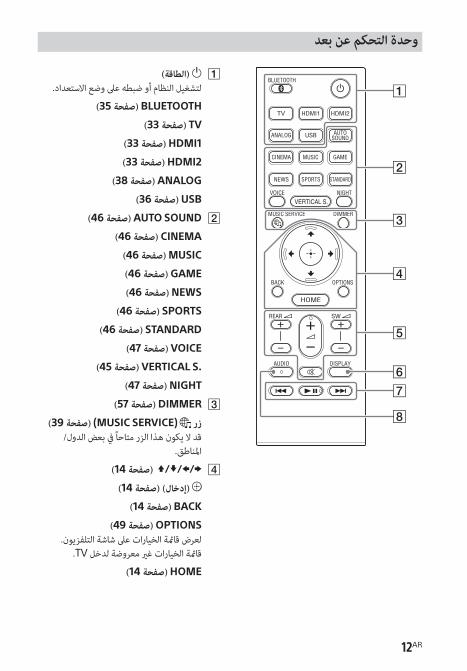
وحدة التحكم عن بعد (الطاقة)
لتشغيل النظام أو ضبطه عىل وضع االستعداد.BLUETOOTH (صفحة 35)
TV (صفحة 33) HDMI1 (صفحة 33) HDMI2 (صفحة 33)
ANALOG (صفحة 38) USB (صفحة 36)
AUTO SOUND (صفحة 46) CINEMA (صفحة 46)
MUSIC (صفحة 46) GAME (صفحة 46) NEWS (صفحة 46)
SPORTS (صفحة 46) STANDARD (صفحة 46)
VOICE (صفحة 47) .VERTICAL S (صفحة 45)
NIGHT (صفحة 47) DIMMER (صفحة 57)
زر (MUSIC SERVICE) (صفحة 39) قد ال يكون هذا الزر متاحا يف بعض الدول/
املناطق./// (صفحة 14)
(إدخال) (صفحة 14)BACK (صفحة 14)
OPTIONS (صفحة 49) لعرض قامئة الخيارات عىل شاشة التلفزيون.
.TV قامئة الخيارات غري معروضة لدخلHOME (صفحة 14)
12AR

ميكنك االستمتاع بالصوت املحيطي من خالل توصيل اثنني من مكربات الصوت الخلفية (غري مرفقة).
للتوصيل، انظر «توصيل مضخم الصوت الفرعي ومكربات الصوت الخلفية السلكيا» (صفحة 30).
مؤرش الطاقة يومض ببطء باللون األخرض: مكرب الصوت الخلفي –
غري متصل بالنظام.ييضء باللون األخرض: مكرب الصوت الخلفي متصل –
بالنظام.يومض مرتني بشكل متكرر باللون األخرض: محاولة –
اتصال مكرب الصوت الخلفي بالنظام قيد التقدم.يومض/ييضء باللون الربتقايل: جار تحديث –
الربنامج.ييضء باللون األحمر: مكرب الصوت الخلفي يف –
وضع االستعداد.اإليقاف: تم إيقاف مكرب الصوت الخلفي.–
زر (الطاقة) لتشغيل أو إيقاف مكرب الصوت الخلفي.
زر LINK (صفحة 31)
فتحة الرتكيب بالحائط (صفحة 29)
فتحة تركيب حامل مكرب الصوت العام
مكربات الصوت الخلفية (SA-Z9R) (غري مرفقة)
11AR
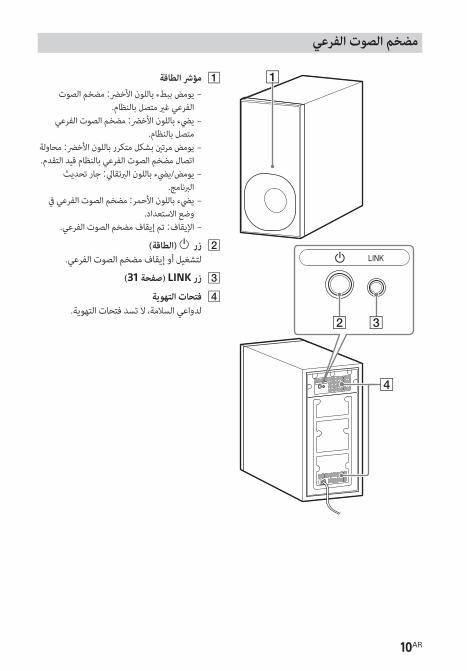
مضخم الصوت الفرعي
مؤرش الطاقة يومض ببطء باللون األخرض: مضخم الصوت –
الفرعي غري متصل بالنظام.ييضء باللون األخرض: مضخم الصوت الفرعي –
متصل بالنظام.يومض مرتني بشكل متكرر باللون األخرض: محاولة –
اتصال مضخم الصوت الفرعي بالنظام قيد التقدم.يومض/ييضء باللون الربتقايل: جار تحديث –
الربنامج.ييضء باللون األحمر: مضخم الصوت الفرعي يف –
وضع االستعداد.اإليقاف: تم إيقاف مضخم الصوت الفرعي.–
زر (الطاقة) لتشغيل أو إيقاف مضخم الصوت الفرعي.
زر LINK (صفحة 31) فتحات التهوية
لدواعي السالمة، ال تسد فتحات التهوية.
10AR

منظر خلفي
LAN(100) منفذ HDMI IN 2 مقبس
ملعرفة املواصفات واملالحظات حول التوصيالت، انظر «تنسيقات فيديو HDMI املدعومة»
(صفحة 80).HDMI IN 1 مقبس
ملعرفة املواصفات واملالحظات حول التوصيالت، انظر «تنسيقات فيديو HDMI املدعومة»
(صفحة 80).HDMI OUT (TV eARC/ARC) مقبس HDMI قم بتوصيل تلفزيون به مقبس إدخال
.HDMI بكابلالنظام متوافق مع eARC و ARC .ARC هي الوظيفة التي تقوم بإرسال صوت التلفزيون إىل
جهاز AV مثل النظام من مقبس HDMI الخاص بالتلفزيون. eARC هو امتداد لـ ARC ويتيح إرسال الصوت الهدف ومحتوى LPCM متعدد
.ARC القنوات الذي ال ميكن إرساله بواسطةللتفاصيل الخاصة بـ eARC، انظر «توصيل تلفزيون متوافق مع eARC» (صفحة 23).
لتنسيقات الصوت املدعومة، انظر «تنسيقات صوت اإلدخال املدعومة» (صفحة 79). ملعرفة
املواصفات واملالحظات حول التوصيالت، انظر «تنسيقات فيديو HDMI املدعومة»
(صفحة 80).منفذ (USB) (صفحة 36)
ANALOG IN مقبس TV IN (OPT) مقبس
مكرر األشعة تحت الحمراء (صفحة 32) يرسل اإلشارة البعيدة الخاصة بوحدة التحكم عن
بعد الخاص بالتلفزيون إىل التلفزيون.
9AR

دليل األجزاء وأزرار التحكمتم حذف التفاصيل من الرسوم التوضيحية.
مكرب الصوت الطويل (الوحدة الرئيسية) منظر أمامي
زر (الطاقة) لتشغيل النظام أو ضبطه عىل وضع االستعداد.
زر (تحديد اإلدخال) يحدد اإلدخال الذي يتم تشغيله عىل النظام.
زر BLUETOOTH (صفحة 34)زر (MUSIC SERVICE) (صفحة 39)
قد ال يكون هذا الزر متاحا يف بعض الدول/املناطق.
أزرار –/+ (مستوى الصوت)
BLUETOOTH مؤرش يومض برسعة باللون األزرق: أثناء حالة االستعداد –
لإلقرانيومض باللون األزرق: محاولة اتصال –
BLUETOOTH قيد التقدم.ييضء باللون األزرق: تم إنشاء اتصال –
.BLUETOOTH
شاشة العرض باللوحة األمامية مستشعر وحدة التحكم عن بعد
قم بتوجيه وحدة التحكم عن بعد ناحية مستشعر وحدة التحكم عن بعد لتشغيل النظام.
8AR

ه شبكة LAN الالسلكية موج
مودم
اإلنرتنتموجه
«التوصيل بشبكة سلكية» (صفحة 24)
«التوصيل بشبكة السلكية» (صفحة 25)
«االستماع إلى الموسيقى على جهاز الكمبيوتر عبر شبكة منزلية» (صفحة 37)
«االستماع إلى الموسيقى/الصوت باستخدام وظيفة ®BLUETOOTH» (صفحة 34)
«Sony | Music Center استخدام تطبيق»(صفحة 41)
«االستماع إلى صوت الجهاز أو التلفزيون المتصل من سماعات الرأس» (صفحة 42)
«توصيل الغرف املتعددة الالسلكية-الجهاز املتوافق (الغرف املتعددة الالسلكية)»
(صفحة 41)
7AR

ما ميكنك فعله باستخدام النظاميدعم النظام تنسيقا ت الصوت القامئة عىل التشفري املجسم ملصادر الصوت مثل Dolby Atmos و DTS:X باإلضافة إىل
.Dolby Vision و HLG و HDR10 مثل HDR تنسيقات الفيديو
«مشاهدة التلفزيون» (صفحة 33)«تشغيل جهاز AV املوصول»
(صفحة 33)
اتصال رئييس: راجع «دليل بدء التشغيل» (وثيقة منفصلة).
توصيالت أخرى: راجع «التوصيل بالتلفزيون أو بجهاز AV» (صفحة 16).
مشغل Blu-ray DiscTM، جهاز الكابل، جهاز القمر الصناعي، وما إىل ذلك
«توصيل تلفزيون Sony بوظيفة BLUETOOTH السلكيا»
(صفحة 16)
«HDMI استخدام التحكم بوظيفة»(صفحة 53)
«"BRAVIA" استخدام وظيفة املزامنة»(صفحة 55)
«توصيل مضخم الصوت الفرعي ومكربات الصوت الخلفية السلكيا»
(صفحة 30)
«االستامع إىل املوسيقى «USB املوجودة عىل جهاز
(صفحة 36)
مكربات الصوت الخلفية (غري مرفقة)
«Spotify استخدام»(صفحة 39)*
«استخدام الزر «MUSIC SERVICE
(صفحة 39)
قد ال تتوفر هذه الخدمة يف بعض الدول/املناطق. *
6AR

5AR
امللحقات املرفقةمكرب الصوت الطويل (1)•
إطار الشبكة (1)•
مضخم الصوت الفرعي (1)•
وحدة التحكم عن بعد (1)•
•(2) (AAA بحجم) R03 بطارية
• HDMI يدعم مواصفات مساوية لكابل) HDMI كابلبرمييوم عايل الرسعة مع إيرثنت) (1)
قالب التثبيت الجداري (1)•
كتيفة الرتكيب بالحائط (2)، الربغي (2) •
دليل بدء التشغيل•
تعليامت التشغيل•

تشغيل امللفات الصوتية املضغوطة أو األقراص املدمجة عن طريق ترقية الصوت إىل صوت
50 .......................... (DSEE HX) عايل الدقةاالستمتاع بصوت البث متعدد اإلرسال
50 .............................................. (AUDIO)لضبط مستوى صوت الحوار أثناء بث محتويات
51 ....................................................DTS:X
HDMI استخدام التحكم بوظيفة53 .......................HDMI استخدام التحكم بوظيفة55 .................."BRAVIA" استخدام وظيفة مزامنة
تغيري اإلعداداتتخصيص إعدادات مكرب الصوت للصوت
املحيطي................................................... 56تغيري سطوع شاشة العرض باللوحة األمامية
57 ....(DIMMER) BLUETOOTH ومؤرش58 .......................... حفظ الطاقة يف وضع االستعداد58 .......................................... تنفيذ اإلعداد السهلتنفيذ اإلعدادات املتقدمة................................... 5964 ................................................ تحديث الربنامج
استكشاف الخطأ وإصالحه66 ................................. استكشاف الخطأ وإصالحهإعادة ضبط النظام............................................. 75
معلومات إضافيةاملواصفات......................................................... 7678 .................. أنواع ملفات الصوت القابلة للتشغيلتنسيقات صوت اإلدخال املدعومة....................... 79تنسيقات فيديو HDMI املدعومة...................... 8082 ............................BLUETOOTH حول اتصال83 ....END USER LICENSE AGREEMENT87 ......................................................... احتياطاتالفهرس.............................................................. 91
4AR

AR
جدول املحتوياتامللحقات املرفقة................................................... 5ما ميكنك فعله باستخدام النظام.............................6دليل األجزاء وأزرار التحكم....................................8نبذة حول القامئة الرئيسية................................... 14
AV التوصيل بالتلفزيون أو بجهازالتوصيل بالتلفزيون أو
بجهاز AV بواسطة كابل HDMI
دليل بدء التشغيل(وثيقة منفصلة)
توصيل تلفزيون Sony بوظيفة BLUETOOTH السلكيا........................... 1619 ........ توصيل تلفزيون بواسطة كابل صوت تناظري20 ........4K 4 وأجهزة بدقةK توصيل تلفزيون بدقة23 ...................eARC توصيل تلفزيون متوافق مع
االتصال بشبكةاالتصال بشبكة سلكية........................................ 24االتصال بشبكة السلكية...................................... 25
اإلعداد الستخدام النظامتركيب مكرب الصوت الطويل أو مكرب الصوت
الخلفي (غري مرفق) عىل الحائط................. 27تثبيت إطار الشبكة............................................ 30
توصيل مضخم الصوت الفرعي ومكربات الصوت 30 ......................................... الخلفية السلكيا
عندما ال يعمل وحدة التحكم عن بعد الخاص بالتلفزيون................................................ 32
مشاهدة الصورمشاهدة التلفزيون............................................ 3333 ................................. تشغيل جهاز AV املوصول
االستامع إىل املوسيقى/الصوتاالستامع إىل املوسيقى/الصوت باستخدام وظيفة
34 ...................................BLUETOOTH®االستامع إىل املوسيقى املوجودة عىل جهاز
36 .......................................................USBاالستامع إىل املوسيقى عىل جهاز الكمبيوتر عرب
37 ............................................. شبكة منزليةاالستامع إىل الجهاز املتصل بكابل صوت تناظري... 3839 ...........................................Spotify استخدام39 ...................MUSIC SERVICE استخدام الزر
االستامع إىل موسيقى من خدمة البث الحي 40 ......Chromecast built-in باستخدام41 .......Sony | Music Center استخدام تطبيق
توصيل الغرف املتعددة الالسلكية-الجهاز 41 ........... املتوافق (الغرف املتعددة الالسلكية)
االستامع إىل صوت الجهاز أو التلفزيون املتصل من سامعات الرأس.................................... 42
ضبط جودة الصوتاالستمتاع بتجربة محيطية غامرة
45 ...................................(VERTICAL S.)ضبط مؤثر الصوت املصمم ملالءمة مصادر
الصوت (وضع الصوت).............................. 4647 ...............(VOICE) جعل الحوارات أكرث وضوحا
االستمتاع بصوت واضح مع مستوى صوت 47 .........(NIGHT) منخفض يف منتصف الليل
ضبط مستوى صوت مضخم الصوت الفرعي ومكربات الصوت الخلفية........................... 4849 ....................... ضبط التأخري بني الصورة والصوت
3AR

2AR
HT-Z9F 4-727-538-38(1)
تحذير
ال تركب الجهاز يف مكان محصور، مثل خزانة الكتب او كابينة داخلية.
لتقليل خطر نشوب حريق، ال تغطي فتحات تهوية الجهاز بورق الصحف، اغطية املائدة، الستائر، الخ.
ال تعرض الجهاز اىل مصادر اللهب املكشوفة (عىل سبيل املثال، شموع مشتعلة).
لتقليل خطر نشوب حريق او الصدمة الكهربائية، ال تعرض الجهاز اىل قطرات او ارتشاق السوائل، وال تضع اجسام
مملوءة بالسوائل، مثل املزهريات، عىل الجهاز.
هذه الوحدة غري مفصولة من الطاقة الرئيسية طاملا انها موصولة مع فتحة التيار املرتدد AC، حتى اذا كانت الوحدة
نفسها متوقفة عن التشغيل.
الن قابس الطاقة الرئيسية مستعمل لفصل الوحدة من AC الطاقة الرئيسية، اوصل الوحدة مع فتحة تيار مرتدد
سهل الوصول اليها. اذا الحظت اي يشء غري طبيعي يف الوحدة، افصل قابس الطاقة الرئيسية من فتحة التيار
املرتدد AC فورا.
تنبيهخطر وقوع انفجار إذا تم استبدال البطارية بنوع غري
صحيح.ال تعرض البطاريات او االجهزة والبطاريات مركبة بداخلها
للحرارة الزائدة، مثل اشعة الشمس والنار.
لالستخدام يف األماكن املغلقة فقط.
الكابالت املوىص بهايجب استخدام كابالت وموصالت محمية ومؤرضة بشكل
جيد للتوصيل بأجهزة الكمبيوتر املضيفة و/أو األجهزة الطرفية.
بالنسبة ملكرب الصوت الطويلوجد لوحة االسم بالجزء السفيل من مكرب الصوت الطويل.
تنبيه بخصوص تركيب مكرب الصوت الطويل عىل الحائط
عند تركيب مكرب الصوت الطويل عىل الحائط، تأكد من استخدام كتائف الرتكيب بالحائط
املرفقة.عند تركيب مكرب الصوت الطويل عىل الحائط، تأكد من
استخدام كتائف الرتكيب بالحائط املرفقة. ال تقم برتكيب مكرب الصوت الطويل عىل الحائط مبارشة. ترتفع درجة
الحرارة داخل مكرب الصوت الطويل بشكل كبري، وقد تتسبب يف حدوث تلف أو عطل.