Head Mounted Display - Sony
64
4-297-824-61(1) HMZ-T1 Head Mounted Display Reference Guide GB CT Before Initial Use Refer to the “Startup Guide” for instructions on connecting the system, wearing the unit, and completing initial settings.
-
Upload
khangminh22 -
Category
Documents
-
view
0 -
download
0
Transcript of Head Mounted Display - Sony
4-297-824-61(1)
HMZ-T1
Head Mounted Display
Reference Guide GB
CT
Before Initial UseRefer to the “Startup Guide” for instructions on connecting the system, wearing the unit, and completing initial settings.
GB
2
To reduce the risk of fire or electric shock, do not expose this apparatus to rain or moisture.
To prevent fire or shock hazard, do not place objects filled with liquids, such as vases, on the apparatus.
Install this system so that the mains lead can be unplugged from the wall outlet (mains) immediately in the event of trouble.
Do not install this equipment in a confined space such as a bookshelf or similar unit.
PrecautionThe set is not disconnected from the AC power source (mains) as long as it is connected to the wall outlet (mains), even if the set itself has been turned off.
Notice for customers in the United KingdomA molded plug complying with BS1363 is fitted to this equipment for your safety and convenience.
Should the fuse in the plug supplied need to be replaced, a fuse of the same rating as the supplied one and approved by ASTA or BSI to BS1362, (i.e., marked with or mark) must be used.
If the plug supplied with this equipment has a detachable fuse cover, be sure to attach the fuse cover after you change the fuse. Never use the plug without the fuse cover. If you should lose the fuse cover, please contact your nearest Sony service station.
Notice for customers: the following information is only applicable to equipment sold in countries applying EU directives.The manufacturer of this product is Sony Corporation, 1-7-1 Konan Minato-ku Tokyo, 108-0075 Japan. The Authorized Representative for EMC and product safety is Sony Deutschland GmbH, Hedelfinger Strasse 61, 70327 Stuttgart, Germany.
For any service or guarantee matters please refer to the addresses given in separate service or guarantee documents.
This equipment has been tested and found to comply with the limits set out in the EMC Directive using a connection cable shorter than 3 meters.
Disposal of Old Electrical & Electronic Equipment (Applicable in the European Union and other European countries with separate collection systems)
This symbol on the product or on its packaging indicates that this product shall not be treated as household waste. Instead it shall be handed over to the applicable collection point for the recycling of electrical and electronic equipment. By ensuring this product is disposed of correctly, you will help prevent potential negative consequences for the environment and human health, which could otherwise be caused by inappropriate waste handling of this product. The recycling of materials will help to conserve natural resources. For more detailed information about recycling of this product, please contact your local Civic Office, your household waste disposal service or the shop where you purchased the product.
Warning

GB
3
GB
Age LimitationsWatching video images or playing games by this device may affect the health of growing children. This device should not be used by children 15 and under.Use password protection feature (page 21) of this device to restrict children from using this device.
Watching Video with the Head Mounted Display• Some people may experience discomfort (such
as eye strain, fatigue, nausea, or motion sickness) while watching video images or playing games. Sony recommends that all viewers take regular breaks while watching video images or playing games. The length and frequency of necessary breaks will vary from person to person. You must decide what works best. If you experience any discomfort, you should stop watching the video images or playing games until the discomfort ends; consult a doctor if you believe necessary.
• Avoid wearing the unit in environments where your head may shake, or while you are walking or performing exercise, because there is a higher possibility that you experience discomfort.
• You should also review (i) the instruction manual of any other device or media used with this device and (ii) our website below for the latest information.
For customers in Europe, Russia and UK:http://support.sony-europe.com/
For customers in the U.S.A.:http://esupport.sony.com/
For customers in Canada:http://esupport.sony.com/CA/
For customers in China:http://service.sony.com.cn/index.htm
For customers in other countries/regions:http://www.sony-asia.com/support/
Correct Use• Ensure that you are wearing the head mounted
unit correctly.– For instructions on wearing the unit, refer to
the “Startup Guide.”– To avoid watching with the screens skewed,
check screen alignment by referring to the confirmation screen displayed initially.
– Note that dropping the unit or handling it roughly may skew the screens.
• The head mounted unit can be adjusted in a range of 55 mm – 72 mm to suit the distance between your eyes (interpupillary distance). If you cannot use the system within this range, refrain from using the system.
• By default, a warning message for automatic shutdown will be displayed after three hours of continuous viewing. If you clear the message and continue watching, the system will automatically turn off after another 3 hours.
For Comfortable ViewingImages are perceived as appearing some distance from the viewer.If you normally wear glasses or contact lenses, wear them as usual during use (with the exception of reading glasses). Note that watching with bifocals may be less than optimal.
Health Precautions

GB
4
Power SupplyPosition the system near the mains used. In case of strange noises, fumes, or smoke from the system, immediately unplug the mains lead to turn all power off. Only pressing the power button on the head mounted unit will not turn the system off completely.
Installation EnvironmentAvoid installation in the following environments. • Places subject to vibration• In direct sunlight, or where it is very hot or
humid• Places that are extremely coldAlso avoid putting liquid-filled containers (such as flower vases) on top of the processor unit, or using the system where it may be splashed. The system may be damaged if splashed with water.
CondensationCondensation occurs when moisture in the air condenses on metal panels or other parts, forming droplets. Condensation may form on outer surfaces or internally if the system is suddenly moved from a cold to a warm environment, or when a heater is turned on in a cold room where the system is installed. If condensation forms, do not use the system until the droplets evaporate.• If the system is not plugged into a mains
Leave the system unplugged, and wait until the droplets evaporate.
• If the system is not onLeave the system off, and wait until the droplets evaporate.
• If the system is onLeave the system on, and wait until the droplets evaporate.
Using the system when condensation has formed may damage it.
Lens Care• Handle the lenses on the head mounted unit
carefully to avoid smears or scratches. If the lenses become dirty, wipe them gently with a soft lens-cleaning cloth.
• Do not use liquid solutions, such as lens-cleaning fluid, water, or alcohol-based cleaners.
Cleaning the SystemClean outer surfaces of the system using a soft cloth lightly moistened with a mild detergent. Do not use solvents, such as thinner, benzine, or alcohol, which may damage surfaces.
Extended Listening at High VolumeListening at high volume over extended periods may harm hearing. To protect your hearing, avoid listening at excessive volume.
Initial VolumeTo avoid sudden loud output, keep the initial volume low. Increase the volume gradually until the desired level is reached.
Packaging MaterialsKeep the original box and protective cushioning for future use, in case you move or need to ship the system for repair or other reasons.
Precautions

GB
5
HDMI Jacks and ConnectorsTake these precautions to avoid damaging HDMI jacks and connectors.• When inserting cables, note the shape and
orientation of the connector and the HDMI jack on the back of the processor unit.
• Before moving the processor unit, always disconnect the HDMI cable.
• When connecting or disconnecting HDMI cables, hold the connector straight. Do not hold the connector at an angle or force it into the HDMI jack.
• Use either the supplied HDMI cable or a commercially available High-Speed HDMI cable.
Head Mounted Unit Cord HandlingTake these precautions to avoid damaging the HMD OUT jack or cord connector.• When inserting the connecting cord, note the
shape and orientation of the connector and the HMD OUT jack on the front of the processor unit.
• Before moving the processor unit, always disconnect the connecting cord.
• When connecting or disconnecting the connecting cord, hold the connector straight. Do not hold the connector at an angle or force it into the HMD OUT jack.
HDMI input and output
The connector is upside-down
HDMI input and output
The connector is not straight

GB
6
Health Precautions . . . . . . . . . . . . . . . . . . . . . . . . . . . . . . . . . . . . . . . . . . . . . 3
Precautions . . . . . . . . . . . . . . . . . . . . . . . . . . . . . . . . . . . . . . . . . . . . . . . . . . . 4
Product Highlights . . . . . . . . . . . . . . . . . . . . . . . . . . . . . . . . . . . . . . . . . . . . . 7
Supplied Accessories . . . . . . . . . . . . . . . . . . . . . . . . . . . . . . . . . . . . . . . . . . . 7
Parts and Controls . . . . . . . . . . . . . . . . . . . . . . . . . . . . . . . . . . . . . . . . . . . . . 9
Fitting the Head Mounted Unit . . . . . . . . . . . . . . . . . . . . . . . . . . . . . . . . . . 11
Confirming Screen Alignment . . . . . . . . . . . . . . . . . . . . . . . . . . . . . . . . . . . 14
System Settings . . . . . . . . . . . . . . . . . . . . . . . . . . . . . . . . . . . . . . . . . . . . . . 16
Troubleshooting . . . . . . . . . . . . . . . . . . . . . . . . . . . . . . . . . . . . . . . . . . . . . . 23
Specifications . . . . . . . . . . . . . . . . . . . . . . . . . . . . . . . . . . . . . . . . . . . . . . . . 29
Licence and Trademark Notice . . . . . . . . . . . . . . . . . . . . . . . . . . . . . . . . . . 30
Contents

GB
7
Wearing the head mounted display, you can watch 3D movies and play 3D games from connected Blu-ray Disc™ player and game consoles.
Product highlights are as follows.
• Enjoy video with impact, simulating the big-screen cinematic experience through a wide 45° horizontal field of view.
• Watch high-contrast, high-definition video produced by Sony HD OLED (Organic Light-Emitting Diode) panels in the head mounted unit.
• Connect the system to 3D-compatible equipment for a realistic 3D viewing experience. Simultaneous display on both OLED screens eliminates the cross-talk (double images) that older systems with alternating images are susceptible to.
• Hear immersive multi-channel virtual surround-sound with depth, produced by the headphones in the head mounted unit and by Virtualphones Technology (VPT).
Make sure the following items are included with the system after purchase. If any items are missing, contact your Sony dealer or a local authorised Sony service centre.
• Mains lead (1)• HDMI cable (1)
• Light blocker (1 each for the left and right)
• Headband strap clip (1)
• Connecting cord holder (1)
Product Highlights Supplied Accessories

GB
8
• Forehead supporter (3)
• Forehead supporter cover (1)
• Reference Guide (this guide) (1)• Startup Guide (1)
Type A (thin)
Type B (medium)
Type C (thick)
The type B forehead supporter is attached to the head mounted unit at the time of purchase.

GB
9
Head Mounted Unit
Parts and Controls
Top headband strapForehead supporter
Illumination
Lens span adjusters
Control buttons (v/V/b/B, MENU*)
VOL +/– buttons1 (Power On/Standby) button
Headband strap release button
Bottom headband strap
Headband strap release button
* The MENU button serves two purposes. Press the MENU button to view setting menus as well as to confirm setting changes (when it functions as an Enter button).
Lenses Nose pad
HeadphonesConnecting cord

GB
10
Processor Unit (Front)
Processor Unit (Back)
HMD OUT jack (HMD Output)
Insert the connecting cord of the head mounted unit.
Power indicator
Lit in green when the system is on, and lit in red in standby mode.
PASS THROUGH indicator
Lit in amber when HDMI pass-through is used.
HDMI OUT jack(HDMI Output)
• Source signals cannot be passed through the HDMI OUT jack until the HDMI pass-through is enabled (page 21) and the Head Mount system is turned off.
Note
HDMI IN jack(HDMI Input)
AC IN terminal
GB
11
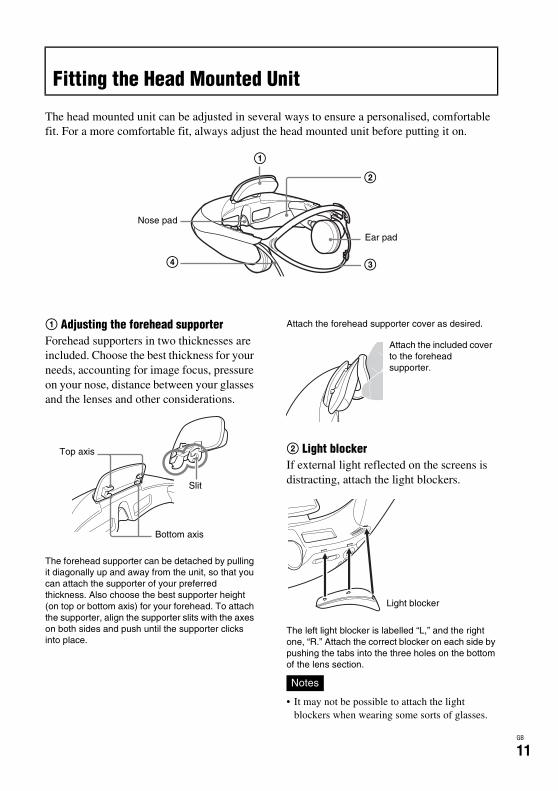
The head mounted unit can be adjusted in several ways to ensure a personalised, comfortable fit. For a more comfortable fit, always adjust the head mounted unit before putting it on.
1 Adjusting the forehead supporterForehead supporters in two thicknesses are included. Choose the best thickness for your needs, accounting for image focus, pressure on your nose, distance between your glasses and the lenses and other considerations.
The forehead supporter can be detached by pulling it diagonally up and away from the unit, so that you can attach the supporter of your preferred thickness. Also choose the best supporter height (on top or bottom axis) for your forehead. To attach the supporter, align the supporter slits with the axes on both sides and push until the supporter clicks into place.
Attach the forehead supporter cover as desired.
2 Light blockerIf external light reflected on the screens is distracting, attach the light blockers.
The left light blocker is labelled “L,” and the right one, “R.” Attach the correct blocker on each side by pushing the tabs into the three holes on the bottom of the lens section.
• It may not be possible to attach the light blockers when wearing some sorts of glasses.
Fitting the Head Mounted Unit
Nose pad
Ear pad
3
2
1
4
Slit
Top axis
Bottom axis
Notes
Attach the included cover to the forehead supporter.
Light blocker

GB
12
• If external light is still distracting with the light blockers on, dim the room lights or move away from external light.
3 Further headband strap adjustmentIf necessary, you can tighten the lower headband strap even more by using the supplied clip to shorten it.
4 Attaching the connecting cord holderTo keep the connecting cord of the head mounted unit out of the way, use the supplied connecting cord holder and attach the connecting cord to the lower headband strap.
For a Comfortable Fit
Have the weight of the head mounted unit balanced between your forehead and the back of your head
Wear the head mounted unit so that it is supported both by the forehead supporter and the lower headband strap. Fasten it to keep it level on your head. If there is too much pressure on the nose pad, remove the unit and adjust the fit. Try moving the lower headband strap down on your head or switching forehead supporters (page 11).
Ensure a secure fit
If either headband strap is too loose or too tight, adjust the strap length for a better fit.
Headband strap clip
Connecting cord holder
Hook for bottom headband strap
Hook for connecting cord
Lower headband strap
Forehead supporter

GB
13
Replacing ConsumablesThe following replacement parts are available.• Ear pad (EP-G1)• Ear cushion• Nose pad• Forehead supporter (Type A (thin),
Type B (medium) or Type C (thick))• Forehead supporter cover• Headband strap clip• Light blocker (1 each for the left and right)• Connecting cord holderWhen these consumables break or show signs of wear, consult your nearest Sony dealer or Sony service centre.You can replace the ear pads, the ear cushions, and the nose pad as shown below.
Removing ear pads, replacing ear cushions
Pull the ear pad toward the edge, away from the headphone. Be careful not to pull too forcefully, which may tear the ear pad.
Peel the new ear cushions away from the adhesive backing. When attaching them, align the slit with the ear cushion’s opening. After replacing the ear cushions, reattach the ear pads.
Replacing the nose pad
Pull off the nose pad to remove it. To attach a new nose pad, push the nose pad clip into the opening.
Ear cushionSlit
Remove the ear cushion.
Adhesive backing

GB
14
Confirm screen alignment by referring to the confirmation screen displayed initially after lens span adjustment. Screens on the head mounted unit are described below, with an explanation of how to confirm alignment.
The display section of the head mounted unit consists of two small screens, on the left and right. Images on each screen overlap to form a single image.Always check screen alignment by referring to the confirmation screen before use to make sure the screens are aligned properly.
Confirming Screen Alignment
Left image Right image
Image perceived with both eyes
GB
15
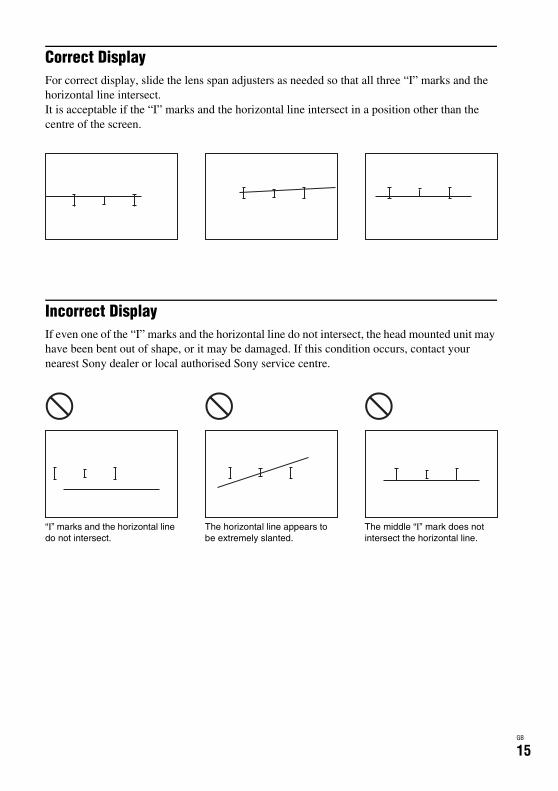
Correct DisplayFor correct display, slide the lens span adjusters as needed so that all three “I” marks and the horizontal line intersect.It is acceptable if the “I” marks and the horizontal line intersect in a position other than the centre of the screen.
Incorrect DisplayIf even one of the “I” marks and the horizontal line do not intersect, the head mounted unit may have been bent out of shape, or it may be damaged. If this condition occurs, contact your nearest Sony dealer or local authorised Sony service centre.
“I” marks and the horizontal line do not intersect.
The horizontal line appears to be extremely slanted.
The middle “I” mark does not intersect the horizontal line.

GB
16
Setting menus can be accessed at any time to change or adjust a variety of system settings, such as video picture quality, audio output format, and 3D display format. To view the menus, press the MENU button on the head mounted unit.
System Settings
Basic Menu Operations1 Press the MENU button on the head
mounted unit.
2 Press the v/V button to select the desired setting category icon, and then press the MENU button.
3 Press the v/V button to select the desired menu, and then press the MENU button.
4 Press the v/V/b/B buttons to change or adjust settings as needed, and then press the MENU button to enter your changes.
A Setting category iconsB CategoryC Setting menuD Current settings in each menuE Summary of the selected menu
• After 90 seconds of inactivity, the setting menu will automatically close.
• To return to the previous menu, press the b button.
• To exit the setting menu, press the b button in the setting category icon menu.
Note
Tips

GB
17
MenusDefault settings are underlined.
InformationIdentifies input signals (video and audio signals) from the equipment connected to the processor unit. “Unsupported signal” indicates that the input signal is incompatible with the system, and “No signal” is shown when no signals are input.
Lens span adjustment
3D Settings
Back Returns to the previous menu.
Lens span adjustment
Adjusts the lens span of the head mounted unit to match the distance between your eyes (interpupillary distance), for an optimal viewing experience. Use the lens span adjusters on the head mounted unit for adjustment. For details, refer to the “Startup Guide.”
• Without the lens span adjusted correctly, you cannot enjoy an optimal viewing experience. Always adjust the lens span before use.
• Audio is muted during adjustment.• The volume cannot be changed during adjustment.
Back Returns to the previous menu.
Reset Resets all “3D Settings” items to the original default values.
Notes

GB
18
Display
3D Display Manually select the display format for 3D content. Available settings vary depending on whether the source signal includes a 3D format identification signal, as follows.
For 3D content without a 3D format identification signalOver-Under: Select for top-and-bottom 3D content, with
similar images displayed on top and bottom.Side-by-Side: Select for side-by-side 3D content, with similar
images displayed side by side.Off: Select to display content in 2D format.
For 3D content with a 3D format identification signalOn: Select to display content in 3D format.Off: Select to display content in 2D format.
• If 3D content is not displayed correctly using the selected settings, try changing “Over-Under” to “Side-by-Side” or vice-versa.
• When selecting “Over-Under” or “Side-by-Side,” change the setting to “Off” after viewing 3D content.
Auto 3D On: Automatically switches to 3D display mode when a 3D format identification signal is detected. If the 3D format identification signal is no longer detected, the system will automatically switch to 2D display mode.
Off: Deactivates this function.
• If images do not appear in 3D when “Auto 3D” is set to “On,” try changing the “3D Display” setting.
3D Signal Notification
On: Notifies you when a 3D format identification signal is detected.
Off: Deactivates this function.
Back Returns to the previous menu.
Picture Mode Vivid: Vivid colours and sharp contrast, for concerts, sports, and other televised content.
Standard: Emphasises a natural picture. Standard picture quality for a variety of video sources.
Cinema: Picture quality designed especially for cinematic content.
Custom: Stores your customised preferred picture quality, adjusting from original flat picture.
Notes
Note
GB
19
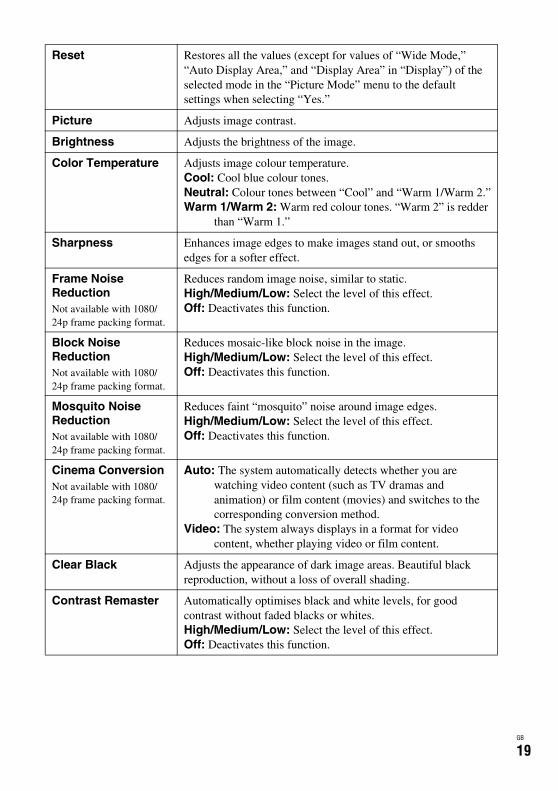
Reset Restores all the values (except for values of “Wide Mode,” “Auto Display Area,” and “Display Area” in “Display”) of the selected mode in the “Picture Mode” menu to the default settings when selecting “Yes.”
Picture Adjusts image contrast.
Brightness Adjusts the brightness of the image.
Color Temperature Adjusts image colour temperature.Cool: Cool blue colour tones.Neutral: Colour tones between “Cool” and “Warm 1/Warm 2.”Warm 1/Warm 2: Warm red colour tones. “Warm 2” is redder
than “Warm 1.”
Sharpness Enhances image edges to make images stand out, or smooths edges for a softer effect.
Frame Noise ReductionNot available with 1080/24p frame packing format.
Reduces random image noise, similar to static.High/Medium/Low: Select the level of this effect.Off: Deactivates this function.
Block Noise ReductionNot available with 1080/24p frame packing format.
Reduces mosaic-like block noise in the image.High/Medium/Low: Select the level of this effect.Off: Deactivates this function.
Mosquito Noise ReductionNot available with 1080/24p frame packing format.
Reduces faint “mosquito” noise around image edges. High/Medium/Low: Select the level of this effect.Off: Deactivates this function.
Cinema ConversionNot available with 1080/24p frame packing format.
Auto: The system automatically detects whether you are watching video content (such as TV dramas and animation) or film content (movies) and switches to the corresponding conversion method.
Video: The system always displays in a format for video content, whether playing video or film content.
Clear Black Adjusts the appearance of dark image areas. Beautiful black reproduction, without a loss of overall shading.
Contrast Remaster Automatically optimises black and white levels, for good contrast without faded blacks or whites.High/Medium/Low: Select the level of this effect.Off: Deactivates this function.

GB
20
Sound
Wide ModeNot available during 3D playback.
Normal: Displays the images at the original 4:3 aspect ratio.Full: Displays 4:3 content in full-screen, stretching the images
horizontally. 16:9 content is also displayed full-screen, at the original aspect ratio.
Zoom: Enlarges the images vertically and horizontally, preserving the original aspect ratio.
• “Normal” is not available with HD input sources (1080i, 720p, or 1080p).
Auto Display AreaNot available during 3D playback.
On: Automatically adjusts the picture to the optimal display area.
Off: Deactivates this function.
Display AreaAvailable only when “Auto Display Area” is set to “Off.”
+1: Displays images in the original display area.Normal: Displays the images in the recommended display area.–1: Enlarges the images to cover screen edges. Use this option
if there is distracting noise or image artifacts by the screen edges.
Back Returns to the previous menu.
Reset Resets all “Sound” settings to the original default values.
Surround Standard: Provides standard surround-sound with moderate reverberation. Creates spacious soundstage for a range of content.
Cinema: Emphasises a natural soundstage, especially for spoken dialogue. Surround-sound with a soundstage rivaling the impressive acoustics of movie theatres. Immersive, with each channel blended naturally. A good choice for movies.
Game: Provides pinpoint sound localisation, for a clear sense of where sounds originate. A good choice when playing immersive content such as games with multi-channel surround-sound effects.
Music: Emphasises detail and purity of source audio. Faithful reproduction, similar to monitor equipment at recording studios. A good choice for music, sports, and documentaries.
Off: Deactivates surround-sound effects.
• Volume may vary depending on the source audio signal and selected surround-sound mode.
Note
Note

GB
21
General Setup
Treble Adjusts high-frequency audio output.
Bass Adjusts low-frequency audio output.
Back Returns to the previous menu.
Set passwordThe name of this setting item changes to “Cancel password” after your password is entered.
A password can be set to restrict use of the system. Once a password is specified, it must be entered each time the system is turned on.To cancel password protection, select “Cancel password” and enter the password.
• The system automatically turns off in the following situations. Either turn the system on and enter the password again or cancel password protection.– When the password is entered incorrectly, and you close the
displayed setting menu by using the MENU or b button– After 90 seconds of inactivity on the password input screen
HDMI pass-through On: Activates pass-through, enabling you to watch or listen to content on a TV or other display device when the system is in standby mode. For details, refer to the “Startup Guide.”
Off: Deactivates this function. To save power, select “Off” when a TV or other display device is not connected to the processor unit.
Control for HDMI On: Activates control for HDMI CEC (Consumer Electronic Control)-compatible equipment connected to the processor unit using the v/V/b/B buttons on the head mounted unit.v button: Starts playback.V button: Pauses playback.b button: Jumps to the previous chapter. Hold the
button down for fast-rewind.B button: Jumps to the next chapter. Hold the button
down for fast-forward.Off: Deactivates this function. Use the remote control of the
connected equipment to control it.
• If control is not possible with this setting activated, the connected equipment is not compatible with the system’s “Control for HDMI” function. Control connected equipment directly.
Note
Note

GB
22
Guide of HDMI device controlDisplays the operation guide for head mounted unit buttons that can be used with “Control for HDMI” function (page 21).
Power off when unmounted
On: Turns the system off automatically 30 minutes after you take the head mounted unit off.
Off: Deactivates this function.
• Regardless of this setting, the screens will go off automatically 10 seconds after you remove the head mounted unit.
Illumination On: Activates the illumination on the head mounted unit.Off: Deactivates this function.
Language setting Sets the language used for menus and other interface elements.
• Audio is muted while this setting is configured. • The volume cannot be adjusted while this setting is configured.
Prolonged viewing warning
On: Activates automatic display of a warning about whether to turn the power off after 3 hours of continuous viewing. Selecting “Yes” on the warning screen will turn the power off. Selecting “No” will cause the power to be turned off 3 hours later, after 6 hours of continuous viewing.
Off: Deactivates this function.
• When the warning is displayed after 3 hours of viewing, if no response is made in 90 seconds, the power will automatically be turned off.
• A warning screen will be displayed at 30 minutes and 5 minutes before the system will turn itself off.
Startup viewer warning
On: Activates automatic display of a startup warning.Off: Deactivates this function.
Reset to factory settings
Resets all settings to the original default values.
• The password set in “Set password” (in “General Setup”) will also be cleared.
Tip
Notes
Notes
Note

GB
23
If the following symptoms occur when using the system, check the Cause/Action column before requesting service. If the issue persists, contact your Sony dealer or local authorised Sony service centre.
Power Supply
Troubleshooting
Symptom Cause/Action
The system does not turn on
p Confirm that the mains lead is fully plugged in.p Make sure the head mounted unit connecting cord is fully
inserted in the HMD OUT jack.p Startup normally takes a few seconds.
The system does not go off p Hold down the 1 (Power On/Standby) button for at least one second.

GB
24
VideoSymptom Cause/Action
No video, or output video is distorted
p Refer to the “Startup Guide” and confirm that the mains lead, HDMI cable, and connecting cord of the head mounted unit are connected correctly.
p Make sure that equipment connected to the HDMI IN jack on the processor unit is on.
p Confirm that the source signal is supported by the system. For information on supported signals, see “Supported HDMI input and output signals:” in “Specifications” (page 29).
p When the PlayStation®3 (PS3™) is used with this system and if the video and audio output settings on the PS3™ do not match those of this system or the cable and TV in use, there may be no video and audio outputs. If such symptoms occur, turn off the PS3™, and then turn it on again by pressing its power button for at least 5 seconds until you hear a beep sound twice. The video and audio output settings will automatically be reset to the standard settings.
p The HDMI cable may be loose. Confirm that the HDMI cable is fully plugged in. If video quality does not improve, the HDMI cable may be damaged. In this case, try a new cable.
p When selecting “Over-Under” or “Side-by-Side” in “3D Display” (in “3D Settings”), change the setting to “Off” after viewing 3D content (page 18).
p If equipment is connected to the processor unit via an AV amplifier (receiver), try connecting the equipment directly to the processor unit instead. For details, refer to the instruction manual of the equipment used.
p When using an HDMI selector, make sure the input on the selector is switched correctly.
p Use either the supplied HDMI cable or a commercially available HDMI cable identified as a High-Speed cable.
p Make sure to disable video output with the Deep Colour signal on the connected equipment. If this option is not available on the equipment and the content is being output at 1080/60p, change the HDMI video output mode to 1080i video mode.
The screen is dark or blurry
p Refer to the “Startup Guide” and confirm that the mains lead, HDMI cable, and connecting cord of the head mounted unit are connected correctly, and that you are wearing the head mounted unit correctly.
p The lens span may have been adjusted incorrectly (page 15). Perform adjustment again by accessing “Lens span adjustment” in the setting menu (page 17).
p If the lenses in the head mounted unit are dirty, wipe them with a soft dry cloth to clean them.

GB
25
The screens suddenly go off
p After 3 hours of continuous viewing, the system will display a warning screen and go off after 90 seconds of inactivity. If you clear the message and continue watching, the system will automatically go off after another 3 hours to encourage healthy viewing habits. For details, see “Prolonged viewing warning” (page 22).
p Wear the head mounted unit correctly. 10 seconds after the sensor in the head mounted unit detects that you have removed the unit, the displayed screen will automatically go off. For details, see “Power off when unmounted” (page 22).
Image display dims over time
p Although image display of photos or nearly motionless images may dim over time, this does not indicate system damage. To restore normal brightness, perform some operation on the head mounted unit or the connected equipment directly.
Some pixels on the screens are not lit, or some pixels are always lit
p Although OLED panels are produced using extremely high-precision manufacturing technologies, in some cases pixels may be permanently black or lit in red, blue, or green. This does not indicate system damage.
Video is not shown in 3D p If the same image is displayed side by side or on top and bottom, the 3D display format setting may be incorrect. Try changing the “3D Display” setting in “3D Settings” (page 18).
p 3D perception varies by viewer.p If the “3D Settings” menu is displayed but images are not shown
in 3D, try restarting the connected equipment used for 3D playback.
p The system does not support 2D to 3D conversion (simulated 3D).
p Viewing anaglyphic images in 3D requires anaglyphic glasses (with red and blue lenses, for example).
p Also check the settings of playback equipment connected to the processor unit.
3D display is not activated automatically
p Make sure the “Auto 3D” setting in “3D Settings” is set to “On” (page 18).
p 3D content without a 3D format identification signal is not automatically displayed in 3D. Try changing the “3D Display” setting in “3D Settings” to “Over-Under” or “Side-by-Side” (page 18).
Symptom Cause/Action

GB
26
AudioSymptom Cause/Action
There is no sound /There is static /Volume cannot be increased
p Adjust the volume using the VOL +/– buttons.p Refer to the “Startup Guide” and confirm that the mains lead,
HDMI cable, and connecting cord of the head mounted unit are connected correctly.
p Confirm that the source signal is supported by the system. For information on supported signals, see “Supported HDMI input and output signals:” in “Specifications” (page 29). If the input signal is unsupported, check the audio output settings of connected equipment.
p When the PlayStation®3 (PS3™) is used with this system and if the video and audio output settings on the PS3™ do not match those of this system or the cable and TV in use, there may be no video and audio outputs. If such symptoms occur, turn off the PS3™, and then turn it on again by pressing its power button for at least 5 seconds until you hear a beep sound twice. The video and audio output settings will automatically be reset to the standard settings.
p If equipment is connected to the processor unit via an AV amplifier (receiver), try connecting the equipment directly to the processor unit instead. For details, refer to the instruction manual of the equipment used.
p When the system is connected to HDMI CEC-compatible home theatre systems or AV amplifiers (receivers), check the following settings.– Make sure the “Control for HDMI” setting in “General Setup”
is set to “On” (page 21).– Make sure “Control for HDMI” is activated on the AV
amplifier (receiver) or other equipment. For details, refer to the instruction manual of the equipment used.
There is no surround-sound effect
p Make sure the “Surround” setting in “Sound” is not set to “Off” (page 20).
p Sound perception varies by listener.
GB
27
HDMI Control
Other Issues
Symptom Cause/Action
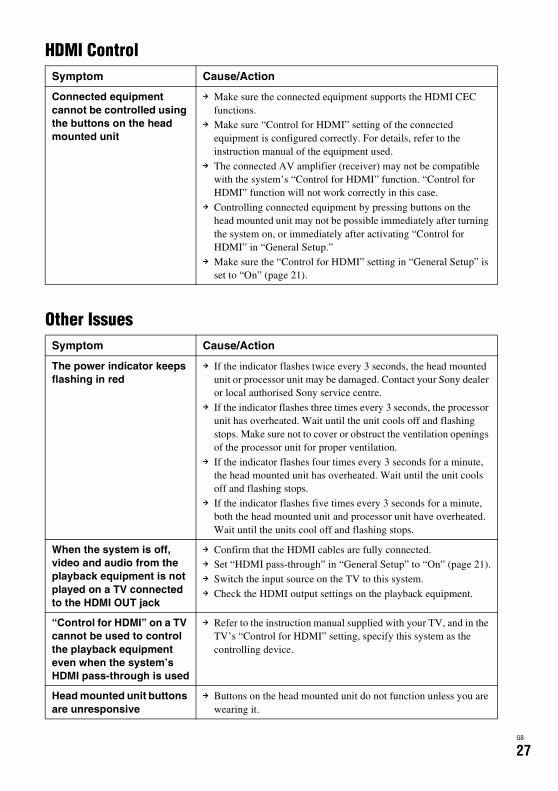
Connected equipment cannot be controlled using the buttons on the head mounted unit
p Make sure the connected equipment supports the HDMI CEC functions.
p Make sure “Control for HDMI” setting of the connected equipment is configured correctly. For details, refer to the instruction manual of the equipment used.
p The connected AV amplifier (receiver) may not be compatible with the system’s “Control for HDMI” function. “Control for HDMI” function will not work correctly in this case.
p Controlling connected equipment by pressing buttons on the head mounted unit may not be possible immediately after turning the system on, or immediately after activating “Control for HDMI” in “General Setup.”
p Make sure the “Control for HDMI” setting in “General Setup” is set to “On” (page 21).
Symptom Cause/Action
The power indicator keeps flashing in red
p If the indicator flashes twice every 3 seconds, the head mounted unit or processor unit may be damaged. Contact your Sony dealer or local authorised Sony service centre.
p If the indicator flashes three times every 3 seconds, the processor unit has overheated. Wait until the unit cools off and flashing stops. Make sure not to cover or obstruct the ventilation openings of the processor unit for proper ventilation.
p If the indicator flashes four times every 3 seconds for a minute, the head mounted unit has overheated. Wait until the unit cools off and flashing stops.
p If the indicator flashes five times every 3 seconds for a minute, both the head mounted unit and processor unit have overheated. Wait until the units cool off and flashing stops.
When the system is off, video and audio from the playback equipment is not played on a TV connected to the HDMI OUT jack
p Confirm that the HDMI cables are fully connected.p Set “HDMI pass-through” in “General Setup” to “On” (page 21).p Switch the input source on the TV to this system.p Check the HDMI output settings on the playback equipment.
“Control for HDMI” on a TV cannot be used to control the playback equipment even when the system’s HDMI pass-through is used
p Refer to the instruction manual supplied with your TV, and in the TV’s “Control for HDMI” setting, specify this system as the controlling device.
Head mounted unit buttons are unresponsive
p Buttons on the head mounted unit do not function unless you are wearing it.
GB
28
“DEMO” appears in the upper-right corner of the setting menu screen
p Contact your Sony dealer or local authorised Sony service centre.
Symptom Cause/Action

GB
29
Power requirementsNorth American model:
120 V AC, 60 HzUK, Hong Kong, and European models:
220 V – 240 V AC, 50/60 HzRussian model:
220 V – 240 V AC, 50/60 HzTaiwan model:
110 V AC, 60 HzChinese model:
220 V – 240 V AC, 50/60 Hz
Power consumption15 W (in operation)0.35 W (in standby mode)1.6 W (in standby mode using HDMI pass-
through)
Operating temperature5 °C to 35 °C
Operating humidity25 % to 80 %
Dimensions (W×H×D, including largest protrusions)Head mounted unit:
Approx. 210 mm × 126 mm × 257 mm
Processor unit:Approx. 180 mm × 36 mm × 168 mm
MassHead mounted unit:
Approx. 420 g (excluding connecting cord)
Processor unit:Approx. 600 g (excluding mains lead)
Interpupillary distance55 mm – 72 mm
HeadphonesFrequency response: 12 Hz – 20,000 Hz
Inputs and outputsHMD OUT:
Dedicated 15-pin connectorHDMI IN and HDMI OUT*:
HDMI 19-pin standard connectorSupported HDMI input and output signals:
Video input (2D formats):480/60p, 576/50p, 720/24p, 720/50p, 720/60p, 1080/50i, 1080/60i, 1080/24p, 1080/50p, 1080/60p
Video input (3D: Frame Packing, Side-by-Side and Top-and-Bottom formats):
720/50p, 720/60p, 1080/50i, 1080/60i, 1080/24p
Audio input:Up to 5.1 channel linear PCM audio formats (32/44.1/48 kHz, 16/20/24-bit)
* When HDMI pass-through is activated, signals supplied to the processor unit are passed through the processor unit to the HDMI output. However, the following signals are not compatible with pass-through.
– Deep Colour signals– Video signals at 4k resolution (at a high
resolution exceeding 3,840 (horizontal) × 2,160 (vertical) pixels)
Supplied accessoriesMains lead (1)*HDMI cable (1)Light blocker (1 each for the left and right)Headband strap clip (1)Connecting cord holder (1)Forehead supporter (2)Forehead supporter cover (1)Reference Guide (this guide) (1)Startup Guide (1)
* Use the supplied mains lead only with this system, not with other electronics.
System specifications and appearance are subject to change for improvement without notice.
Specifications

GB
30
Trademarks• This product incorporates High-Definition
Multimedia Interface (HDMI™) technology.HDMI, the HDMI logo, and High-Definition Multimedia Interface are trademarks or registered trademarks of HDMI Licensing LLC in the United States and other countries.
• “PlayStation” is a registered trademark of Sony Computer Entertainment Inc. Also, “PS3” is a trademark of the same company.
• VPT, Virtualphones Technology is a registered trademark of Sony Corporation.
• Other system and product names are generally trademarks or registered trademarks of the manufacturers. ™ and ® marks are not indicated in this document.
Notices and Licences for Software Used in this ProductPortions of the software in this product are licensed under the FreeType Project License.
Portions of this software are copyright © 2006 The FreeType Project (www.freetype.org). All rights reserved.
Licence and Trademark Notice

GB
31
CT
2
為了降低火災或觸電的危險,切勿讓本裝置暴露於雨中或潮濕處。
為了防止火災或電擊危險,請勿將花瓶等裝滿液體的物體放置在本設備上。
安裝本系統時,要讓電源線可以在出問題時立即從牆上的插座拔掉。
請不要將本設備安裝在受侷限的空間 (例如書架或類似的東西)中。
注意事項
只要是連接在牆上的電源插座上,本機都不會中斷與交流電源的連接,即使本機已經關閉也一樣。
年齡限制以本裝置觀賞視頻影像或玩遊
戲可能會影響成長中孩童的健康。15 歲以及 15 歲以下的孩子不應該使用本裝置。請用本裝置的密碼保護功能
(21 頁)限制孩子使用本裝置。
用頭戴式顯示器觀賞視頻• 有些人在觀賞視頻影像或玩電玩遊戲時可能會覺得不舒服 (例如眼睛疲勞、倦怠、噁心或暈眩)。Sony建議所有觀眾在觀賞 3D 視頻影像或玩電玩遊戲時要定時休息。需要的休息時間和頻率會因人而異。您必須自行決定怎麼做效果 好。如果有任何不舒服,您應該停止觀賞視頻影像或播放遊戲,直到不舒服的感覺停止為止。如果覺得有必要,就要看醫生。
• 請避免在您的頭可能會晃動的環境中、或者在您走動或運動時配戴螢幕,因為比較有可能會感到不舒服。
• 您也應該仔細閱讀 (i)以本裝置使用的任何其他裝置或媒體的使用說明書,以及 (ii)我們的下列網站,以獲得 新資訊。
注意
健康注意事項

CT
3
CT
歐洲、俄國與英國的用戶:http://support.sony-europe.com/
美國的用戶:http://esupport.sony.com/
加拿大的用戶:http://esupport.sony.com/CA/
中國的用戶:http://service.sony.com.cn/index.htm
其他國家 / 地區的用戶:http://www.sony-asia.com/support/
正確的使用• 頭戴式顯示器螢幕的配戴一定要正確。– 關於顯示器螢幕的配戴說明,請參考 “入門指南”。
– 為了防止以歪斜的畫面觀賞,請參考初次顯示出來的確認畫面,以檢查畫面的對齊情形。
– 請注意,掉落顯示器或者粗暴的操作可能會使得畫面歪斜。
• 頭戴式顯示器螢幕可以在55公釐-72 公釐的範圍內調整,以便與您的兩眼之間的距離 (瞳孔之間的距離)配合。如果不能在這個範圍內使用系統,請不要使用系統。
• 根據預設,連續觀賞三個小時之後,會顯示自動關機的警告訊息。如果清除訊息並繼續觀賞,系統會再等三個小時後才自動關機。
若要舒適的觀賞影像看起來會好像是與觀賞者有一
段距離。如果您平常有戴眼睛或隱形眼鏡,
請像平常一樣戴著 (老花眼鏡除外)。請注意,用雙焦點眼鏡觀賞的效果可能不是非常好。
電源請將系統擺在所用的電源插座附
近。萬一系統出現異音、冒出煙霧,請立即拔掉交流電源插頭以切斷所有電力。只有按頭戴式顯示器螢幕上的電源按鈕並不能完全關閉系統。
安裝環境請避免安裝在下列環境中。
• 會受到震動的地方• 陽光直射或者非常熱或潮濕的地方• 非常寒冷的地方也要避免將裝滿液體的容器 (例
如花瓶)擺在訊號處理器上面,或者在會被水潑濺到的地方使用系統。如果被水潑濺到,系統可能會受損。
結露結露發生於空氣中的濕氣在金屬面
板或其他零件上凝結成水珠時。如果突然從寒冷的地方搬到溫暖的環境、或者在安裝系統的寒冷房間內開啟暖氣,系統外部或內部的表面便可能會結露。如果形成結露,請等到露珠蒸發之後再使用系統。• 如果系統的電源插頭沒有插入電源插座不要插上系統的電源插頭,並等待露珠蒸發。
• 如果系統沒有開機讓系統保持關機,並等待露珠蒸發。
• 如果系統已經開機讓系統保持開機,並等待露珠蒸發。在結露形成時使用,可能會損及系
統。
注意事項

CT
4
鏡片的保養• 對頭戴式顯示器螢幕上的鏡片要小心,以免弄髒或刮傷。如果鏡片髒了,請用柔軟的鏡片清潔布輕輕擦拭。
• 請勿使用鏡片清潔液之類的液體溶劑、水、或酒精類的清潔液。
清潔系統請用沾了少許溫和清潔劑的軟布清
潔系統的外部表面。請不要使用可能會傷害表面的稀釋劑、揮發油或酒精之類的溶劑。
以大音量長時間聆聽以大音量長時間聆聽可能會損傷聽
覺。為了保護您的聽覺,請避免以過大的音量聆聽。
起始音量為了避免突然發出大音量,請保持
微弱的起始音量。逐漸增加音量,直到達到您要的音量為止。
包裝材料請保留原始的盒子和保護櫬墊,以
便萬一將來要搬家或者因為要修理或其他原因而需要郵寄系統時使用。
HDMI 插孔與接頭請注意這些事項,以免損及 HDMI
插孔與接頭。• 插入纜線時,要注意訊號處理器背後的接頭與 HDMI 插孔的形狀與方向。
• 移動訊號處理器之前,一定要拔掉HDMI 纜線。
• 連接或拔掉 HDMI 纜線時,接頭要握直。握持接頭時不要傾斜或者強力將其插入 HDMI 插孔。
• 使用隨附的HDMI纜線或市售的高速HDMI 纜線。
頭戴式顯示器螢幕的纜線處理請注意這些事項,以免損及 HMD
OUT 插孔或纜線接頭。• 插入連接纜線時,要注意接頭與訊號處理器正面的 HMD OUT 插孔的形狀與方向。
• 移動訊號處理器之前,一定要拔掉連接纜線。
• 連接或拔掉連接纜線時,接頭要握直。握持接頭時不要傾斜或者強力將其插入 HMD OUT 插孔。
HDMI 輸入與輸出
接頭上下顛倒
HDMI 輸入與輸出
接頭沒有對齊成一直線

CT
5
健康注意事項 . . . . . . . . . . . . . . . . . . . 2
注意事項 . . . . . . . . . . . . . . . . . . . . . 3
產品簡介 . . . . . . . . . . . . . . . . . . . . . 6
隨附的配件 . . . . . . . . . . . . . . . . . . . . 6
零組件與控制器 . . . . . . . . . . . . . . . . . . 8
配戴頭戴式顯示器螢幕 . . . . . . . . . . . . . . . 10
確認畫面對齊 . . . . . . . . . . . . . . . . . . . 14
系統設定 . . . . . . . . . . . . . . . . . . . . . 16
故障排除 . . . . . . . . . . . . . . . . . . . . . 24
規格 . . . . . . . . . . . . . . . . . . . . . . . 30
授權與商標通知 . . . . . . . . . . . . . . . . . . 32
內容

CT
6
配戴頭戴式顯示器,便可以從連接的 Blu-ray DiscTM 播放器與遊戲控制台觀賞 3D 影片和玩3D 遊戲。
產品簡介如下。
•透過寬闊的 45°水平視野享受模擬大螢幕劇院觀賞經驗的震撼視頻。
•觀賞在頭戴式顯示器螢幕中的Sony HD OLED (有機發光二極體)面板所產生的高對比度、高解析度視頻。
•將系統連接到 3D 相容設備以享受逼真的 3D 觀賞經驗。同時顯示於兩個 OLED 螢幕上可以消除影像交替出現的舊式系統可能會有的串擾 (雙重影像)。
•聆聽有深度感、能讓人融入其中的多聲道虛擬環繞音效,這種聲音由頭戴式顯示器螢幕中的耳機和 Virtualphones Technology (VPT)產生。
購買之後,請確認系統包含下列東西。如果少了任何東西,請聯絡 Sony 經銷商或當地經過授權的 Sony 服務中心。
•交流電源線 (1)
• HDMI 纜線 (1)
•遮光器 (左右各 1 個)
•頭帶夾 (1)
•連接線固定器 (1)
產品簡介 隨附的配件

CT
7
•前額支撐墊 (3)
•前額支撐器蓋 (1)
•參考指南 (本指南)(1)
•入門指南 (1)
A 型(薄)
B型(中)
C型(厚)
購買時頭戴式顯示器螢幕上安裝的是B型前額支撐墊。

CT
8
頭戴式顯示器螢幕
零組件與控制器
上頭帶前額支撐墊
照明
鏡片間距調整器
控制按鈕 (v/V/b/B,MENU*)
VOL +/- 按鈕1 (電源 / 待機)按鈕
頭帶釋放按鈕
下頭帶
頭帶釋放按鈕
* MENU 按鈕有兩個用途。按 MENU 按鈕可以看到設定選單以及確認設定變更 (作為輸入按鈕使用時)。
鏡片 鼻墊
耳機連接線

CT
9
訊號處理器 (正面)
訊號處理器 (背面)
HMD OUT 插孔 (HMD 輸出)
插入頭戴式顯示器螢幕的連接纜線。
電源指示燈
系統開啟時點亮綠燈,待機模式中點亮紅燈。
PASS THROUGH 指示燈
使用 HDMI 直通時點亮琥珀色的燈。
HDMI OUT 插孔(HDMI 輸出)
•啟用 HDMI 直通(22 頁)並且關閉頭戴式系統之前,來源訊號無法通過 HDMI OUT 插孔。
附註
HDMI IN 插孔(HDMI 輸入)
AC IN 端子

CT
10
頭戴式顯示器螢幕可以用好幾種方式調整,以確保個人化的舒適配戴。為了更舒適的配戴,戴上之前一定要調整好頭戴式顯示器螢幕。
1調整前額支撐墊
隨附的前額支撐墊有兩種厚度。請根據影像的焦點、鼻子承受的壓力、眼鏡與鏡片之間的距離以及其他考慮因素,選擇 適合您需要的厚度。
將前額支撐墊從顯示器螢幕上斜向拉開,便可以將其拆下來,以便安裝您要的厚度的支撐墊。此外還要選擇最適合您的前額的支撐墊高度(在上軸或下軸)。若要安裝支撐墊,請將支撐墊凹槽與兩邊的軸對齊,然後將支撐墊壓入到卡入定位為止。
視需要安裝前額支撐墊蓋。
配戴頭戴式顯示器螢幕
鼻墊
耳墊
3
2
1
4
凹槽
上軸
下軸
將隨附的蓋子裝在前額支撐墊上。
CT
11
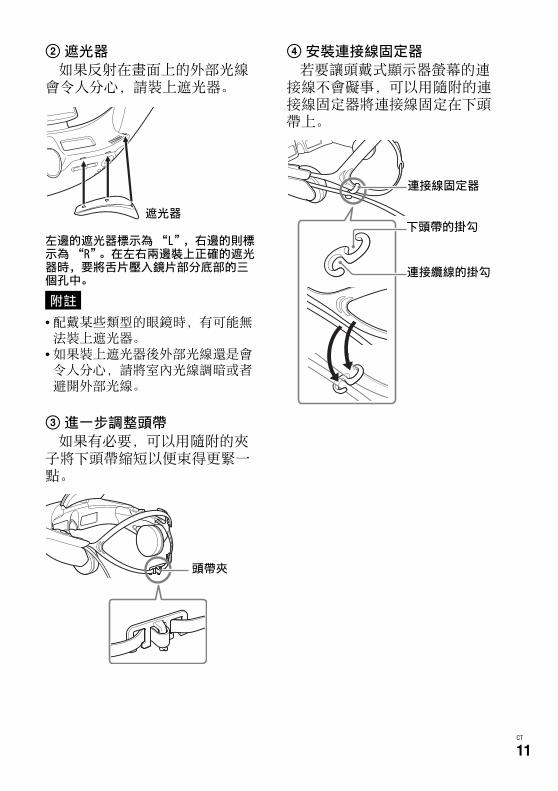
2遮光器
如果反射在畫面上的外部光線會令人分心,請裝上遮光器。
左邊的遮光器標示為 “L”,右邊的則標示為 “R”。在左右兩邊裝上正確的遮光器時,要將舌片壓入鏡片部分底部的三個孔中。
• 配戴某些類型的眼鏡時,有可能無法裝上遮光器。
• 如果裝上遮光器後外部光線還是會令人分心,請將室內光線調暗或者避開外部光線。
3進一步調整頭帶
如果有必要,可以用隨附的夾子將下頭帶縮短以便束得更緊一點。
4安裝連接線固定器
若要讓頭戴式顯示器螢幕的連接線不會礙事,可以用隨附的連接線固定器將連接線固定在下頭帶上。
附註
遮光器
頭帶夾
連接線固定器
下頭帶的掛勾
連接纜線的掛勾

CT
12
舒適的配戴
請讓頭戴式顯示器螢幕在您的前額與後腦之間保持平衡
配戴頭戴式顯示器螢幕時,要讓它得到前額支撐墊與下頭帶的支撐。束緊時要令其在您的頭上保持水平狀態。如果鼻墊上的壓力太大,請取下顯示器螢幕加以調整。可以在您的頭上將下頭帶往下移或者換用另一個前額支撐墊試試看 (10 頁)。
務必要配戴牢靠
如果有一條頭帶太鬆或太緊,請將帶子調整到更合適的長度。
更換消耗品
可以更換的零組件如下。
•耳墊 (EP-G1)
•護耳襯墊
•鼻墊
•前額支撐墊 (A型 (薄)、B 型(中)或 C型 (厚))
•前額支撐器蓋
•頭帶夾
•遮光器 (左右各 1 個)
•連接線固定器
這些消耗品壞掉或者有磨損的跡象時,請就近與 Sony 經銷商或 Sony 服務中心聯繫。您可以用下述方式更換耳墊、
護耳襯墊以及鼻墊。
取下耳墊,更換護耳襯墊
將耳墊朝邊緣方向從耳機上拉下來。小心不要太用力拉,以免將耳墊扯破。
下頭帶
前額支撐墊

CT
13
將新的護耳襯墊從黏膠底板上撕下來。裝上去時,護耳襯墊的開口要與凹槽對齊。換上護耳襯墊之後,再將耳墊裝回去。
更換鼻墊
將鼻墊拉下來。若要安裝新的鼻墊,請將鼻墊夾推入開口。
護耳襯墊凹槽
取下護耳襯墊。
黏膠底板

CT
14
請參考調整鏡片間距之後初次顯示出來的確認畫面,以確認畫面的對齊情形。底下描述頭戴式顯示器螢幕上的畫面,並解釋如何確認對齊的情形。
頭戴式顯示器螢幕的顯示部分由左右兩個畫面構成。各個畫面上的影像重疊以形成一個影像。使用之前一定要參考確認畫面來檢查畫面的對齊情形,以確認畫面有
適當的對齊。
確認畫面對齊
左邊影像 右邊影像
兩眼看到的影像

CT
15
正確的顯示
若要正確的顯示,請視需要推動鏡片間距調整器,使得三個 “I”符號全都與水平線相交。“I”符號不是在畫面中央的位置與水平線相交也可以。
不正確的顯示
即使有一個 “I”符號沒有與水平線相交,頭戴式顯示器螢幕也有可能變形或者是受損。如果發生這種情況,請就近與 Sony 經銷商或當地經過授權的 Sony 服務中心聯繫。
“I”符號與水平線沒有相交。
水平線顯得非常傾斜。 中間的 “I”符號沒有與水平線相交。

CT
16
設定選單隨時都可以用來變更或調整各種系統設定,例如視頻畫質、音頻輸出格式以及 3D 顯示格式。若要檢視選單,請按頭戴式顯示器螢幕上的 MENU 按鈕。
系統設定
基本的選單操作
1 按頭戴式顯示器螢幕上的 MENU按鈕。
2 按 v/V按鈕選擇需要的設定類別圖示,然後按 MENU 按鈕。
3 按 v/V 按鈕選擇需要的選單,然後按 MENU 按鈕。
4 按 v/V/b/B 按鈕視需要變更或調整設定,然後按 MENU 按鈕輸入您的變更。
A設定類別圖示
B類別
C設定選單
D各選單中目前的設定
E所選選單摘要
• 90 秒鐘沒有動作之後,設定選單會自動關閉。
• 若要回到上一個選單,請按 b 按鈕。
• 若要退出設定選單,請按設定類別圖示選單中的 b 按鈕。
附註
提示

CT
17
選單預設設定會加上底線。
Information識別從連接到訊號處理器的設備輸入的訊號 (視頻與音頻訊號)。
“Unsupported signal”表示輸入訊號與系統不相容,而沒有輸入訊號時則會顯示 “No signal”。
Lens span adjustment
3D Settings
Back 回到前一個選單。
Lens span adjustment
根據您兩眼之間的距離 (瞳孔間的距離)調整頭戴式顯示器螢幕的鏡片,以便獲得 佳的觀賞經驗。請用頭戴式顯示器螢幕上的鏡片間距調整器進行調整。詳情請參考 “入門指南”。
• 沒有正確的調整鏡片間距,就不能享受 佳觀賞經驗。使用前一定要調整鏡片間距。
• 調整時音頻會被靜音。• 調整時不能變更音量。
Back 回到前一個選單。
Reset 將所有 “3D Settings”項目重設為原始預設值。
附註
CT
18
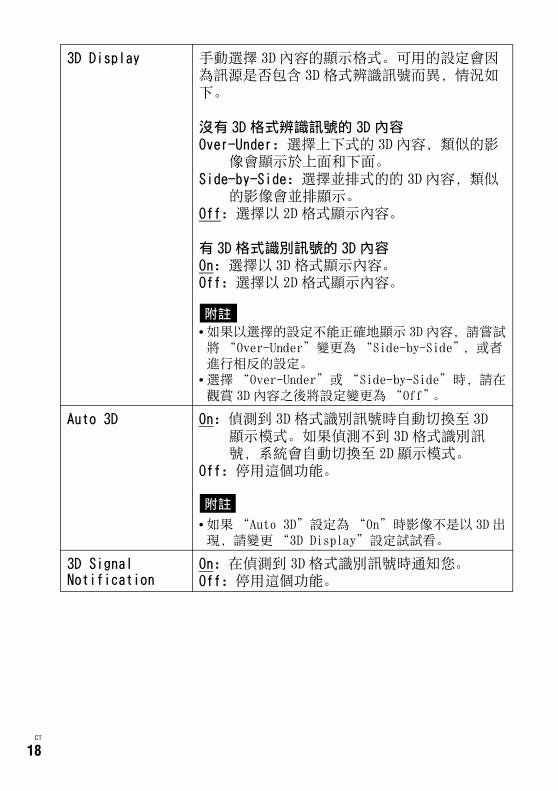
3D Display 手動選擇 3D 內容的顯示格式。可用的設定會因為訊源是否包含 3D 格式辨識訊號而異,情況如下。
沒有 3D 格式辨識訊號的 3D 內容Over-Under:選擇上下式的 3D 內容,類似的影
像會顯示於上面和下面。Side-by-Side:選擇並排式的的 3D 內容,類似
的影像會並排顯示。Off:選擇以 2D 格式顯示內容。
有 3D 格式識別訊號的 3D 內容On:選擇以 3D 格式顯示內容。Off:選擇以 2D 格式顯示內容。
• 如果以選擇的設定不能正確地顯示 3D 內容,請嘗試將 “Over-Under”變更為 “Side-by-Side”,或者進行相反的設定。
• 選擇 “Over-Under”或 “Side-by-Side”時,請在觀賞 3D 內容之後將設定變更為 “Off”。
Auto 3D On:偵測到 3D 格式識別訊號時自動切換至 3D顯示模式。如果偵測不到 3D 格式識別訊號,系統會自動切換至 2D 顯示模式。
Off:停用這個功能。
• 如果 “Auto 3D”設定為 “On”時影像不是以 3D 出現,請變更 “3D Display”設定試試看。
3D Signal Notification
On:在偵測到 3D 格式識別訊號時通知您。Off:停用這個功能。
附註
附註

CT
19
Display
Back 回到前一個選單。
Picture Mode Vivid:鮮豔的色彩與銳利的對比,適合演奏會、運動以及其他電視轉播的內容。
Standard:強調自然的影像。適合各種視頻訊源的標準畫質。
Cinema:專門針對電影內容設計的畫質。Custom:將從平坦的原始影像調整得來的偏好
自訂畫質儲存起來。
Reset 選擇 “Yes”時,將 “Picture Mode”選單中所選模式的所有數值 (“Display”中的 “Wide Mode”、“Auto Display Area”以及“Display Area”的數值除外)恢復為預設的設定。
Picture 調整影像的對比度。
Brightness 調整影像的亮度。
Color Temperature
調整影像的色溫。Cool:寒冷的藍色調。Neutral:介於 “Cool”與 “Warm 1/Warm 2”
之間的色調。Warm 1/Warm 2:溫暖的紅色調。“Warm 2”比
“Warm 1”更紅。
Sharpness 強化影像的邊緣讓影像顯得突出,或者平滑邊緣以得到比較柔和的效果。
Frame Noise Reduction不能用於以 1080/
24p 圖幀封裝的格式。
減少類似靜電雜訊的隨機影像雜訊。High/Medium/Low:選擇這個效果的強度。Off:停用這個功能。
Block Noise Reduction不能用於以 1080/
24p 圖幀封裝的格式。
減少影像中馬賽克似的方塊形雜訊。High/Medium/Low:選擇這個效果的強度。Off:停用這個功能。
Mosquito Noise Reduction不能用於以 1080/
24p 圖幀封裝的格式。
減少影像邊緣附近微弱的 “飛蚊”噪訊。High/Medium/Low:選擇這個效果的強度。Off:停用這個功能。

CT
20
Cinema Conversion不能用於以 1080/
24p 圖幀封裝的格式。
Auto:系統會自動偵測您是在觀賞視頻內容(例如,電視劇與動畫)還是影片內容(電影),並切換至相關的轉換方法。
Video:不論是播放視頻還是影片內容,系統都會以視頻內容的格式顯示。
Clear Black 調整陰暗影像區的外貌。漂亮地再現黑色,而不會損失整體的明暗度。
Contrast Remaster
自動 佳化黑階與白階,以獲得 佳對比度,而不會讓黑色或白色褪色。High/Medium/Low:選擇這個效果的強度。Off:停用這個功能。
Wide Mode當 3D 播放時,不
能使用。
Normal:以原始的 4:3 長寬比顯示影像。Full:將影像水平伸展,以全螢幕顯示 4:3 的
內容。16:9 的內容也會以原始的長寬比以全螢幕顯示。
Zoom:將影像垂直和水平放大,並保持原始的長寬比。
•“Normal”不能用於 HD 輸入的訊源(1080i、720p 或1080p)。
Auto Display Area當 3D 播放時,不
能使用。
On:自動將影片調整至 佳顯示區。Off:停用這個功能。
Display Area只能用於 “Auto
Display Area”設定為 “Off”時。
+1:在原始的顯示區顯示影像。Normal:在建議的顯示區顯示影像。-1:放大影像以覆蓋螢幕邊緣。如果畫面邊緣
有令人分心的雜訊或影像假像,請使用這個選項。
附註

CT
21
Sound
General Setup
Back 回到前一個選單。
Reset 將所有 “Sound”設定重設為原始預設值。
Surround Standard:以中等的迴響提供標準的環繞音效。為一個範圍的內容創造寬闊的音場。
Cinema:強調自然的音場,尤其是對話。音場足以媲美電影院動人音響效果的環繞音效。各聲道自然混合,讓人有如身歷其境。是看電影時的好選擇。
Game:提供精準的聲音定位,可以清楚的感覺到聲音的來源。以多聲道環繞音效播放遊戲之類身歷其境內容時的好選擇。
Music:強調訊源音頻的細節與純度。忠實的再現,類似錄音室中的監聽設備。播放音樂、體育以及紀錄片時的好選擇。
Off:停用環繞音效。
• 音量可能因為音頻訊源與所選的環繞音效模式而異。
Treble 調整高頻音頻輸出。
Bass 調整低頻音頻輸出。
Back 回到前一個選單。
Set password在您輸入密碼之
後,這個設定項目的名稱會變成“Cancel password”。
可以設定密碼以限制系統的使用。一旦指定密碼之後,每次開啟系統時都必須輸入。若要取消密碼保護,請選擇 “Cancel password”並輸入密碼。
• 系統會在下列情況中自動關閉。打開系統並再度輸入密碼或者取消密碼保護。– 密碼輸入不正確而且您用 MENU 或 b 按鈕關閉顯示的設定選單時
– 在密碼輸入畫面上 90 秒鐘沒有採取行動之後
附註
附註

CT
22
HDMI pass-through
On:系統處於待機模式時,啟用直通,讓您可以觀賞或聆聽電視或其他顯示裝置的內容。詳情請參考 “入門指南”。
Off:停用這個功能。若要省電,電視或其他顯示裝置沒有連接訊號處理器時,請選擇“Off”。
Control for HDMI On:用頭戴式顯示器螢幕上的 v/V/b/B 按鈕啟用連接在訊號處理器上的 HDMI CEC (消費性電子控制)相容設備的控制。v 按鈕:開始播放。V 按鈕:暫停播放。b 按鈕:跳至上一章。按住按鈕快速倒轉。B 按鈕:跳至下一章。按住按鈕快速前進。
Off:停用這個功能。用外接設備的遙控器加以控制。
• 如果啟用這項設定時無法進行控制,表示外接的設備與系統的 “Control for HDMI”功能不相容。直接控制外接的設備。
Power off when unmounted
On:在您取下頭戴式顯示器螢幕 30 分鐘後自動關閉系統。
Off:停用這個功能。
• 不論這項設定如何,畫面都會在您取下頭戴式顯示器螢幕 10 秒鐘後自動關閉。
Illumination On:啟用頭戴式顯示器螢幕上的照明。Off:停用這個功能。
Language setting 設定用於選單與其他介面元素的語言。
• 配置這項設定時音頻會被靜音。• 配置這項設定時不能調整音量。
附註
提示
附註

CT
23
Guide of HDMI device control顯示可以用 “Control for HDMI”功能 (22 頁)使用的頭戴式顯示
器螢幕按鈕的操作指南。
Prolonged viewing warning
On:啟用自動顯示是否在連續觀賞 3小時之後關閉電源的警告。選擇警告畫面上的“Yes”會將電源關閉。選擇 “No”會讓電源在再過 3 小時後,也就是連續觀賞 6 小時之後關閉。
Off:停用這個功能。
• 觀賞3小時之後出現警告時,如果沒有在90秒鐘之內回應,電源就會自動關閉。
• 系統會在關機之前30分鐘和5分鐘時顯示警告畫面。
Startup viewer warning
On:啟用開機警告自動顯示。Off:停用這個功能。
Reset to factory settings
將所有設定重設為原始預設值。
• 在 “Set password”(在 “General Setup”中)中設定的密碼也會被清除。
附註
附註
CT
24
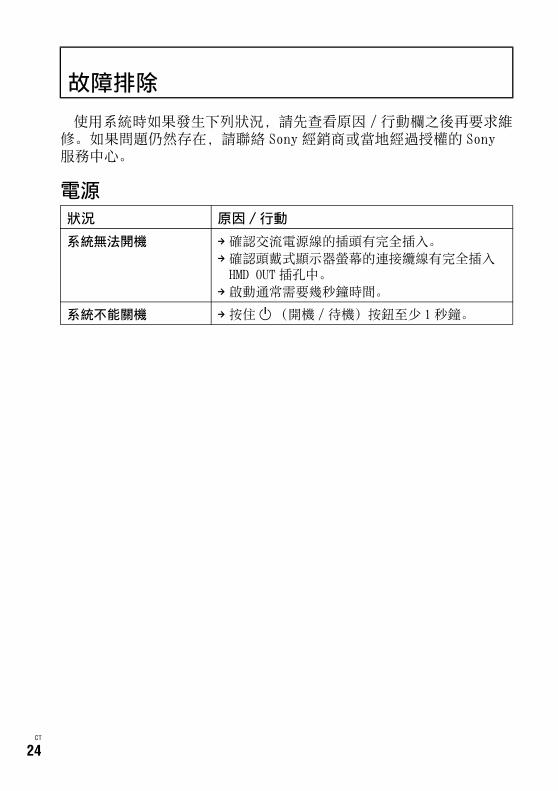
使用系統時如果發生下列狀況,請先查看原因 /行動欄之後再要求維修。如果問題仍然存在,請聯絡 Sony 經銷商或當地經過授權的 Sony服務中心。
電源
故障排除
狀況 原因 / 行動
系統無法開機 p 確認交流電源線的插頭有完全插入。
p 確認頭戴式顯示器螢幕的連接纜線有完全插入HMD OUT 插孔中。
p 啟動通常需要幾秒鐘時間。
系統不能關機 p 按住 1 (開機 / 待機)按鈕至少 1秒鐘。

CT
25
視頻
狀況 原因 /行動
沒有視頻,或者輸出的視頻失真
p 請參考 “入門指南”並確認頭戴式顯示器螢幕的交流電源線、HDMI 纜線以及連接線有正確地連接。
p 確認連接到訊號處理器上HDMI IN插孔的設備有開機。
p 確認來源訊號受系統支援。關於支援訊號的資訊,請參閱 “規格”(31 頁)中的 “支援的HDMI 輸入與輸出訊號:”。
p 以本系統使用 PlayStation®3 (PS3™),而且PS3™ 上的視頻與音頻輸出設定無法與本系統上的設定或者與所用的纜線和電視機搭配時,可能就不會有視頻與音頻輸出。如果發生這種癥狀,請關閉 PS3™,然後按住其電源按鈕至少5秒鐘將其再度開啟,直到聽到兩聲嗶聲為止。視頻與音頻輸出設定就會自動重設為標準設定。
p 可能是 HDMI 纜線鬆脫。確認 HDMI 纜線有完全插入。如果視頻品質沒有改善,可能是 HDMI 纜線受損。在這種情況下,請試用新的纜線。
p 選擇 “3D Display”(在 “3D Settings”中)中的 “Over-Under”或 “Side-by-Side”時,請在觀賞 3D 內容之後將設定變更為 “Off”(18 頁)。
p 如果設備是經由 AV 擴大機 (收音擴大機)連接到訊號處理器,請改為將設備直接連接到訊號處理器試試看。詳情請參考所用設備的使用說明書。
p 使用 HDMI 選擇器時,請確認選擇器上的輸入切換正確。
p 請使用隨附的 HDMI 纜線或者標示為高速纜線的HDMI 纜線。
p 務必要將外接設備上的Deep Colour訊號的視頻輸出關閉。如果設備上沒有這個選項,而且內容是以 1080/60p 輸出,請將 HDMI 視頻輸出模式變更為 1080i 視頻模式。

CT
26
畫面陰暗或模糊 p 請參考 “入門指南”並確認頭戴式顯示器螢幕的交流電源線、HDMI 纜線以及連接線有正確地連接,而且頭戴式顯示器螢幕的配戴方式也正確。
p 可能是鏡片的間距調整不正確 (15 頁)。請用設定選單 (17 頁)中的 “Lens span adjustment”再次進行調整。
p 如果是頭戴式顯示器螢幕的鏡片髒了,請用柔軟的乾布將其擦乾淨。
螢幕突然關閉 p 連續觀賞 3 個小時之後,系統會顯示一個警告畫面,然後在沒有採取行動 90 秒鐘之後關閉。如果清除訊息並繼續觀賞,系統會再等三個小時後自動關機,以鼓勵養成健康的觀賞習慣。詳情請參閱 “Prolonged viewing warning”(23頁)。
p 正確的配戴頭戴式顯示器螢幕。頭戴式顯示器螢幕中的感應器偵測到您取下顯示器 10 秒鐘之後,會自動關閉顯示畫面。詳情請參閱“Power off when unmounted”(22 頁)。
影像顯示在一段時間之後變暗
p 相片或幾乎不動的影像的影像顯示會在一段時間之後變暗,不過這並不表示系統損壞。若要恢復正常的亮度,請在頭戴式顯示器螢幕或連接的設備上直接執行一些操作。
螢幕上的某些像素沒有點亮,或者某些像素永遠亮著
p OLED 面板是以精確度極高的製造技術生產的,不過在某些情況下,像素可能會永遠不亮或者點亮紅色、藍色或綠色。這並不表示系統損壞。
視頻沒有以 3D 顯示 p 如果相同的影像以並排或上下的方式顯示,可能是 3D 顯示格式的設定不正確。請變更 “3D Settings”(18 頁)中的 “3D Display”設定試試看。
p 3D 的觀賞感受會因人而異。
p 如果 “3D Settings”選單顯示出來,但是影像不是以 3D 顯示,請重新啟動用來進行 3D 播放的外接設備試試看。
p 系統不支援 2D 至 3D 的轉換 (模擬 3D)。
p 觀賞 3D 立體影像需要有立體影像眼鏡 (例如,有紅色與藍色的鏡片)。
p 還要檢查連接到訊號處理器的播放設備的設定。
狀況 原因 / 行動

CT
27
音頻
3D顯示不會自動啟動 p 確認 “3D Settings”中的 “Auto 3D”設定是設定為 “On”(18 頁)。
p 沒有3D格式辨識訊號的3D內容不會自動以3D顯示。將 “3D Settings”中的 “3D Display”設定變更為 “Over-Under”或 “Side-by-Side”(18 頁)試試看。
狀況 原因 /行動
沒有聲音 /有靜電雜訊 /音量無法增加
p 請用 VOL +/- 按鈕調整音量。
p 請參考 “入門指南”並確認頭戴式顯示器螢幕的交流電源線、HDMI 纜線以及連接線有正確地連接。
p 確認來源訊號受系統支援。關於支援訊號的資訊,請參閱 “規格”(31 頁)中的 “支援的HDMI 輸入與輸出訊號:”。如果輸入訊號不支援,請檢查外接設備的音頻輸出設定。
p 以本系統使用 PlayStation®3 (PS3™),而且PS3™ 上的視頻與音頻輸出設定無法與本系統上的設定或者與所用的纜線和電視機搭配時,可能就不會有視頻與音頻輸出。如果發生這種癥狀,請關閉 PS3™,然後按住其電源按鈕至少5秒鐘將其再度開啟,直到聽到兩聲嗶聲為止。視頻與音頻輸出設定就會自動重設為標準設定。
p 如果設備是經由 AV 擴大機 (收音擴大機)連接到訊號處理器,請改為將設備直接連接到訊號處理器試試看。詳情請參考所用設備的使用說明書。
p 系統連接到與 HDMI CEC 相容的家庭劇院系統或AV 擴大機 (收音擴大機)時,請檢查下列設定。– 確認 “General Setup”中的 “Control for HDMI”設定是設定為 “On”(22 頁)。
– 確認 “Control for HDMI”已經在 AV 擴大機(收音擴大機)或其他設備上啟用。詳情請參考所用設備的使用說明書。
狀況 原因 /行動

CT
28
HDMI 控制
沒有環繞音效 p 確認 “Sound”中的 “Surround”設定不是設定為 “Off”(21 頁)。
p 聲音的聆聽感受會因人而異。
狀況 原因 / 行動
外接設備不能以頭戴式顯示器螢幕上的按鈕控制
p 請確認外接設備支援 HDMI CEC 功能。
p 請確認外接設備的 “Control for HDMI”設定已經正確地配置。詳情請參考所用設備的使用說明書。
p 連接的 AV 擴大機 (收音擴大機)可能與系統的“Control for HDMI”功能不相容。“Control for HDMI”功能不能在此情況下正確地運作。
p 系統開機之後,或者在 “General Setup”中啟用 “Control for HDMI”之後,可能無法立即按頭戴式顯示器螢幕上的按鈕來控制外接設備。
p 確認 “General Setup”中的 “Control for HDMI”設定是設定為 “On”(22 頁)。
狀況 原因 / 行動

CT
29
其他問題
狀況 原因 /行動
電源指示燈持續閃紅燈 p 如果指示燈每 3秒鐘閃兩次,可能是頭戴式顯示器螢幕或訊號處理器損壞。請聯絡 Sony 經銷商或當地經過授權的 Sony 服務中心。
p 如果指示燈每 3秒鐘閃三次,表示訊號處理器過熱。請等到訊號處理器冷卻而且指示燈不再閃爍為止。切勿遮住或阻礙訊號處理器的通風口,以便適當的通風。
p 如果指示燈每 3秒鐘閃四次長達一分鐘之久,表示頭戴式顯示器螢幕過熱。請等到頭戴式顯示器冷卻而且指示燈不再閃爍為止。
p 如果指示燈每 3秒鐘閃五次長達一分鐘之久,表示頭戴式顯示器螢幕和訊號處理器都過熱。請等到頭戴式顯示器螢幕和訊號處理器冷卻而且停止閃爍為止。
系統關機之後,來自播放設備的視頻與音頻不在連接到 HDMI OUT 插孔的電視機上播放
p 確認 HDMI 纜線已經完全連接好。
p 請在 “General Setup”中,將 “HDMI pass-through”設定為 “On”(22 頁)。
p 將電視機上的輸入來源切換至本系統。
p 檢查播放設備上的 HDMI 輸出設定。
即使使用系統的 HDMI直通時,也不能用電視機上的 “Control for HDMI”控制播放設備
p 請參考電視機隨附的使用說明書,並在電視機的 “Control for HDMI”設定中將本系統指定為控制裝置。
頭戴式顯示器螢幕的按鈕沒有反應
p 除非戴在頭上,否則頭戴式顯示器螢幕的按鈕不會有作用。
“DEMO”出現在設定選單畫面的右上角
p 請聯絡Sony經銷商或當地經過授權的Sony服務中心。
CT
30
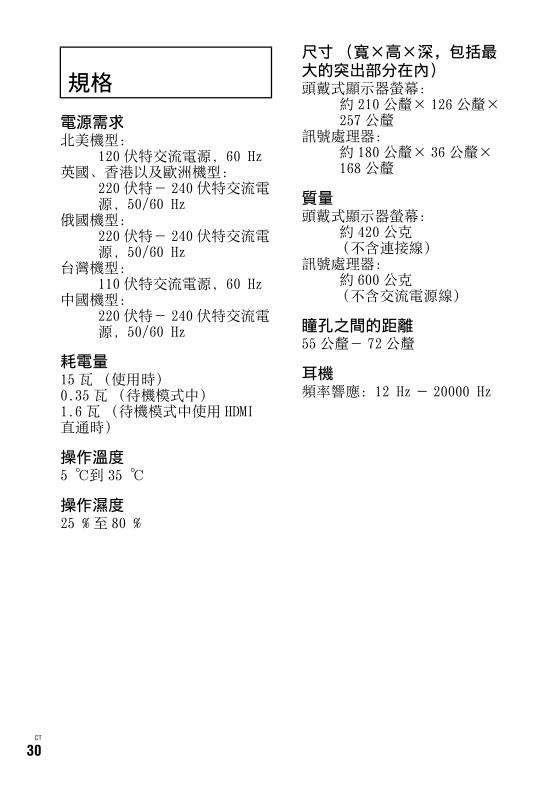
電源需求北美機型:
120 伏特交流電源,60 Hz英國、香港以及歐洲機型:
220 伏特- 240 伏特交流電源,50/60 Hz
俄國機型:220 伏特- 240 伏特交流電源,50/60 Hz
台灣機型:110 伏特交流電源,60 Hz
中國機型:220 伏特- 240 伏特交流電源,50/60 Hz
耗電量15 瓦 (使用時)0.35 瓦 (待機模式中)1.6 瓦 (待機模式中使用 HDMI直通時)
操作溫度5 ℃到 35 ℃
操作濕度25 % 至 80 %
尺寸(寬×高×深,包括最大的突出部分在內)頭戴式顯示器螢幕:
約 210 公釐× 126 公釐×257 公釐
訊號處理器:約 180 公釐× 36 公釐×168 公釐
質量頭戴式顯示器螢幕:
約 420 公克(不含連接線)
訊號處理器:約 600 公克(不含交流電源線)
瞳孔之間的距離55 公釐- 72 公釐
耳機頻率響應:12 Hz - 20000 Hz
規格

CT
31
輸入與輸出HMD OUT:
專用的 15 針接頭HDMI IN 和 HDMI OUT*:
HDMI 19 針標準接頭支援的 HDMI 輸入與輸出訊號:
視頻輸入 (2D 格式):480/60p,576/50p,720/24p,720/50p,720/60p,1080/50i,1080/60i,1080/24p,1080/50p,1080/60p
視頻輸入 (3D:幀封裝,並排與上下格式):
720/50p,720/60p,1080/50i,1080/60i,1080/24p
音頻輸入:多 5.1 聲道線性 PCM 音
頻格式(32/44.1/48 kHz,16/20/24 位元)
* HDMI 直通啟用時,供應給訊號處理器的訊號會通過訊號處理器傳送至HDMI 輸出。不過,下列訊號與直通不相容。
– Deep Colour 訊號
– 解析度為 4k(超過 3840(水平)× 2160 (垂直)像素的高解析度)的視頻訊號
隨附的配件交流電源線 (1) *HDMI 纜線 (1)遮光器 (左右各 1個)頭帶夾 (1)連接線固定器 (1)前額支撐墊 (2)前額支撐器蓋 (1)參考指南 (本指南)(1)入門指南 (1)
* 隨附的交流電源線只能用於本系統,不能用於其他電器。
系統規格與外觀可能為了改善而變更,恕不另行通知。

CT
32
商標
•本產品採用高解析度多媒體介面 (HDMI™)技術。HDMI、HDMI 標誌和 High-Definition Multimedia Interface 是 HDMI Licensing LLC 在美國和其他國家的商標或註冊商標。
•“PlayStation”是 Sony Computer Entertainment Inc.的註冊商標。“PS3”也是同一家公司的商標。
• VPT,Virtualphones Technology 是 Sony Corporation 的註冊商標。
•其他系統和產品名稱通常是製造廠商的商標或註冊商標。本文件中不標示 ™ 和 ® 標誌。
本產品所用軟體的通知與授權
本產品所用的部分軟體是在FreeType Project 的授權下使用。
Portions of this software are copyright © 2006 The FreeType Project (www.freetype.org). All rights reserved.
授權與商標通知

CT
33
© 2011 Sony Corporation Printed in Japan 4-297-824-61(1)