DSC-RX100 - Sony Corporation
56
D-032-100-81(1) DSC-RX100 Digital Still Camera / Instruction Manual GB 數位照相機 / 使用說明書 CT If the product number of your camera is within the range below, refer to the following URL. 3010001 - 9000000 9330001 - 9999000 http://helpguide.sony.net/dsc/rx100/ d035100811.pdf
-
Upload
khangminh22 -
Category
Documents
-
view
0 -
download
0
Transcript of DSC-RX100 - Sony Corporation

D-032-100-81(1)
DSC-RX100
Digital Still Camera / Instruction Manual GB
數位照相機 / 使用說明書 CT
If the product number of your camera is within the range below, refer to the following URL.3010001 - 90000009330001 - 9999000
http://helpguide.sony.net/dsc/rx100/d035100811.pdf

GB
2
For question regarding your product or for the Sony Service Center nearest you, call 1-800-222-SONY (7669).
Declaration of ConformityTrade Name: SONYModel: DSC-RX100Responsible Party: Sony Electronics Inc.Address: 16535 Via Esprillo, San Diego, CA 92127 U.S.A.Telephone Number: 858-942-2230
This device complies with part 15 of the FCC rules. Operation is subject to the following two conditions: (1) This device may not cause harmful interference, and (2) this device must accept any interference received, including interference that may cause undesired operation.
English
Learning more about the camera (“Help Guide”)
“Help Guide” is an on-line manual. You can read the “Help Guide” on your computer or smartphone.Refer to it for in-depth instructions on the many functions of the camera.
URL:http://rd1.sony.net/help/dsc/1740/h_zz/
For Customers in the U.S.A.

B
GB
3
G
The number in parentheses indicates the number of pieces.• Camera (1)• Rechargeable Battery Pack NP-BX1 (1)• Micro USB Cable (1)• AC Adaptor (1)• Power Cord (mains lead) (supplied in some countries/regions) (1)• Wrist Strap (1)• Strap adapter (2)
(Strap adapters are used to attach the shoulder strap (sold separately), as illustrated.)
• Instruction Manual (this manual) (1)• Reference Guide (1)
About language settingChange the screen language before using the camera if necessary (page 11).
Checking the supplied items

GB
4
A ON/OFF (Power) buttonB Power/Charge lampC Shutter buttonD Mode dial
(Intelligent Auto)/(Superior Auto)/
(Program Auto)/(Aperture Priority)/(Shutter Priority)/(Manual Exposure)/(Memory recall)/
(Movie)/ (Sweep Panorama)/ (Scene Selection)
E For shooting: W/T (zoom) leverFor viewing: (Index) lever/Playback zoom lever
F Self-timer lamp/Smile Shutter lamp/AF illuminator
G Flash• Do not cover the flash with your
finger.• When using the flash, the flash
pops up automatically. If not using the flash, press it down manually.
H MicrophoneI Hook for strapJ Control ringK LensL SpeakerM Light sensorN MonitorO Fn (Function) buttonP MOVIE (Movie) buttonQ Micro USB connectorR MENU buttonS Control wheel
Identifying parts
B
GB
5
G
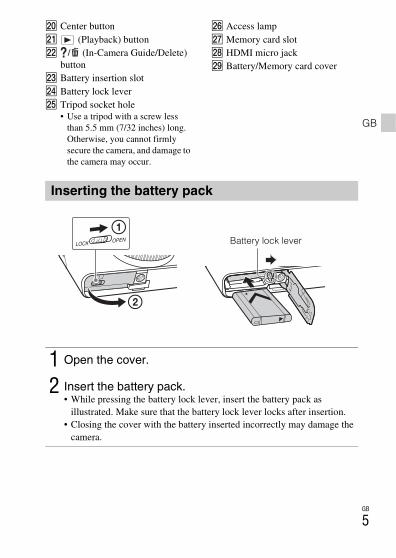
T Center buttonU (Playback) buttonV / (In-Camera Guide/Delete)
buttonW Battery insertion slotX Battery lock leverY Tripod socket hole
• Use a tripod with a screw less than 5.5 mm (7/32 inches) long. Otherwise, you cannot firmly secure the camera, and damage to the camera may occur.
Z Access lampwj Memory card slotwk HDMI micro jackwl Battery/Memory card cover
Inserting the battery pack
1 Open the cover.
2 Insert the battery pack.• While pressing the battery lock lever, insert the battery pack as
illustrated. Make sure that the battery lock lever locks after insertion.• Closing the cover with the battery inserted incorrectly may damage the
camera.
Battery lock lever
GB
6
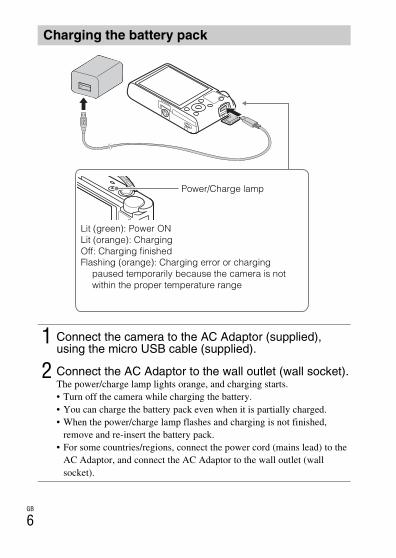
Charging the battery pack
1 Connect the camera to the AC Adaptor (supplied), using the micro USB cable (supplied).
2 Connect the AC Adaptor to the wall outlet (wall socket).The power/charge lamp lights orange, and charging starts.• Turn off the camera while charging the battery.• You can charge the battery pack even when it is partially charged.• When the power/charge lamp flashes and charging is not finished,
remove and re-insert the battery pack.• For some countries/regions, connect the power cord (mains lead) to the
AC Adaptor, and connect the AC Adaptor to the wall outlet (wall socket).
Lit (green): Power ONLit (orange): ChargingOff: Charging finishedFlashing (orange): Charging error or charging
paused temporarily because the camera is not within the proper temperature range
Power/Charge lamp

B
GB
7
G
• If the power/charge lamp on the camera flashes when the AC Adaptor is connected to the wall outlet (wall socket), this indicates that charging is temporarily stopped because the temperature is outside the recommended range. When the temperature gets back within the appropriate range, the charging resumes. We recommend charging the battery pack in an ambient temperature of between 10°C to 30°C (50ºF to 86ºF).
• The battery pack may not be effectively charged if the terminal section of the battery is dirty. In this case, wipe any dust off lightly using a soft cloth or a cotton swab to clean the terminal section of the battery.
• When charging is finished, disconnect the AC Adaptor from the wall outlet (wall socket).
• Be sure to use only genuine Sony brand battery packs, micro USB cable (supplied) and AC Adaptor (supplied).
x Charging time (Full charge)The charging time is approximately 155 min. using the AC Adaptor (supplied). The power/charge lamp lights up and then turns off immediately when the battery pack is fully charged.
• The above charging time applies when charging a fully depleted battery pack at a temperature of 25°C (77°F). Charging may take longer depending on conditions of use and circumstances.
x Charging by connecting to a computerThe battery pack can be charged by connecting the camera to a computer using a micro USB cable. Connect the camera to the computer with the camera turned off.
Notes
Notes
To a USB jack

GB
8
• If the camera is connected to a laptop computer that is not connected to a power source, the laptop battery level decreases. Do not charge for an extended period of time.
• Do not turn on/off or restart the computer, or wake the computer to resume from sleep mode when a USB connection has been established between the computer and the camera. That may cause the camera to malfunction. Before turning on/off, or restarting the computer or waking the computer from sleep mode, disconnect the camera and the computer.
• No guarantees are made for charging using a custom-built computer or a modified computer.
x Battery life and number of images that can be recorded and played back
• The above estimates for battery life and number of recordable images apply when the battery pack has been fully charged. The battery life and number of images may decrease depending on the conditions of use.
• The battery life and number of recordable images are estimates based on shooting with the default settings under the following conditions:– Using the battery pack at an ambient temperature of 25°C (77°F).– Using Sony Memory Stick PRO Duo (Mark2) media (sold separately)
• The numbers for “Shooting (still images)” are based on the CIPA standard and shooting under the following conditions:(CIPA: Camera & Imaging Products Association)– One picture is taken every 30 seconds.– The power is turned on and off once every ten times.– The flash strobes once every two times.– The zoom is switched alternately between the W and T ends.
• The number of minutes for movie shooting is based on the shooting under the following conditions:– The image quality is set to AVCHD 60i 17M(FH)/50i 17M(FH)– Battery life based on non-stop shooting until the limit (29 minutes) has been
reached, and then continued by pressing the MOVIE (Movie) button again. Other functions, such as zooming, are not operated.
Notes
Battery life Number of images
Shooting (still images) Approx. 165 min. Approx. 330 images
Viewing (still images) Approx. 250 min. Approx. 5000 images
Shooting (movies) Approx. 80 min. —
Notes

B
GB
9
G
x Supplying powerThe camera can be supplied with power from the wall outlet (wall socket) by connecting to the AC Adaptor (supplied), using the micro USB cable (supplied). This way, you do not need to worry about draining the battery when shooting or playing back for extended periods of time.Shooting and playback are possible without a battery pack in the camera.
Inserting a memory card (sold separately)
1 Open the cover.
2 Insert the memory card.• With the notched corner facing as illustrated, insert the memory card
until it clicks into place.
3 Close the cover.
Ensure the notched corner faces correctly.
1
GB0
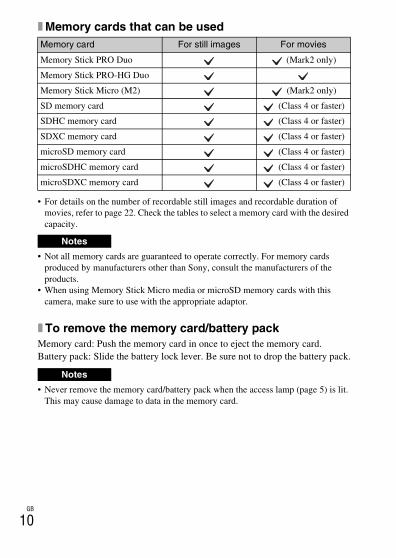
x Memory cards that can be used
• For details on the number of recordable still images and recordable duration of movies, refer to page 22. Check the tables to select a memory card with the desired capacity.
• Not all memory cards are guaranteed to operate correctly. For memory cards produced by manufacturers other than Sony, consult the manufacturers of the products.
• When using Memory Stick Micro media or microSD memory cards with this camera, make sure to use with the appropriate adaptor.
x To remove the memory card/battery packMemory card: Push the memory card in once to eject the memory card.Battery pack: Slide the battery lock lever. Be sure not to drop the battery pack.
• Never remove the memory card/battery pack when the access lamp (page 5) is lit. This may cause damage to data in the memory card.
Memory card For still images For movies
Memory Stick PRO Duo (Mark2 only)
Memory Stick PRO-HG Duo
Memory Stick Micro (M2) (Mark2 only)
SD memory card (Class 4 or faster)
SDHC memory card (Class 4 or faster)
SDXC memory card (Class 4 or faster)
microSD memory card (Class 4 or faster)
microSDHC memory card (Class 4 or faster)
microSDXC memory card (Class 4 or faster)
Notes
Notes

B
GB
11
G
Setting the language and the clock
1 Press the ON/OFF (Power) button.Language setting screen is displayed when you turn on the camera for the first time.• It may take time for the power to turn on and allow operation.
2 Select a desired language, then press the center of the control wheel.Date & Time setting screen is displayed.
3 When the message [Set Area/Date/Time.] is displayed, select [Enter] and press the center.
4 Select a desired geographic location by following the on-screen instructions, then press the center.
5 Set [Daylight Savings], [Date/Time] and [Date Format], then press the center.• When setting [Date/Time], midnight is 12:00 AM, and noon is
12:00 PM.
6 Check that [Enter] is selected, then press the center.
Control wheel
ON/OFF (Power)
Select items: v/V/b/BSet the numeric value of date and time: v/V/ /Set: Center button
Center button
Power/Charge lamp (green)

1
GB2
Shooting still images
Shooting movies
Shooting still images/movies
1 Press the shutter button halfway down to focus.When the image is in focus, a beep sounds and the focus indicator (z) lights.• When the camera cannot focus automatically, the focus indicator
flashes.
2 Press the shutter button fully down to shoot an image.
1 Press the MOVIE (Movie) button to start recording.• Use the W/T (zoom) lever to change the zoom scale.• Press the shutter button to shoot still images while continuing to record
the movie.
2 Press the MOVIE button again to stop recording.
Mode dial
Shutter button
: Intelligent Auto: Movie
MOVIE
W/T (zoom) lever
W: zoom outT: zoom in
B
GB
13
G
• Do not pull up the flash manually. This may cause a malfunction.• When using the zoom function while shooting a movie, the sound of the camera
operating will be recorded. The sound of the MOVIE button operating may also be recorded when movie recording is finished.
• Continuous movie shooting is possible for a maximum of approximately 29 minutes at one time with the camera’s default settings and when the ambient temperature is approximately 25°C (77°F). When movie recording is finished, you can restart recording by pressing the MOVIE button again. Recording may stop to protect the camera depending on the ambient temperature.
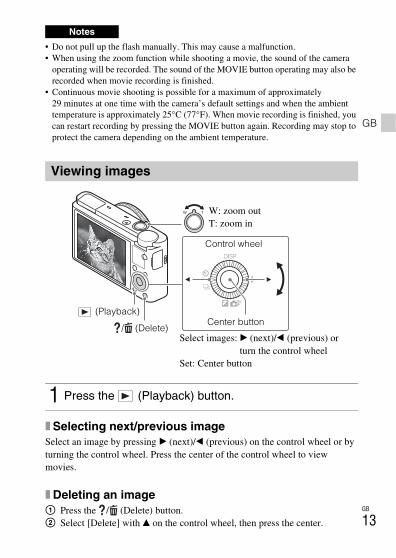
x Selecting next/previous imageSelect an image by pressing B (next)/b (previous) on the control wheel or by turning the control wheel. Press the center of the control wheel to view movies.
x Deleting an image1 Press the / (Delete) button.2 Select [Delete] with v on the control wheel, then press the center.
Notes
Viewing images
1 Press the (Playback) button.
/ (Delete)
Control wheel
(Playback)
W: zoom outT: zoom in
Select images: B (next)/b (previous) or turn the control wheel
Set: Center button
Center button

1
GB4
x Rotating an imagePress the Fn (Function) button.
x Returning to shooting imagesPress the shutter button halfway down.
This camera is equipped with a built-in instruction guide.
In-Camera GuideThe camera displays explanations for MENU items and the setting values.
Shooting TipThe camera displays shooting tips for the shooting mode selected.
Viewing the Guide
1 Press the MENU button.
2 Select the desired MENU item, then press / (In-Camera Guide) button.
1 Press / (In-Camera Guide) button in shooting mode.
2 Select the desired shooting tip, then press the center of the control wheel.The shooting tip is displayed.• You can scroll the screen using v/V and change shooting tips using
b/B.
/ (In-Camera Guide)
MENU

B
GB
15
G
x Control wheelDISP (Display contents): Allows you to change the screen display.
(Drive Mode): Allows you to switch between shooting methods, such as single shooting, continuous shooting, self-timer shooting or bracket shooting.
/ (Exposure Comp./Photo Creativity): Allows you to adjust image brightness./Allows you to operate the camera intuitively and shoot creative images easily.
(Flash Mode): Allows you to select a flash mode for still images.Center button (Standard): If you press this key when the [Focus Area] is set to [Flexible Spot], you can change the position of the focus area by pressing v/V/b/B on the control wheel. Depending on the options selected in [Focus Area] or [Center Lock-on AF], the available functions varies when pressing the key.
x Fn (Function) buttonAllows you to register 12 functions and recall those functions when shooting.1 Press the Fn (Function) button.2 Select the desired function by pressing v/V/b/B on the control wheel.3 Select the setting value by turning the control wheel or the control ring.
Introduction of other functions
Control ring
Control wheelFn (Function)
MENU

1
GB6
x Control ringYour favorite functions can be assigned to the control ring. When shooting, established settings can be changed just by turning the control ring.
x Menu Items (Camera Settings)
Image Size Selects the size of still images.
Aspect Ratio Selects the aspect ratio for still images.
Quality Sets the image quality for still images.
Img. Size(Dual Rec)Sets the size of still images shot when recording a movie.
Panorama: Size Selects the size of panoramic images.
Panorama: Direction Sets the shooting direction for panoramic images.
File Format Selects the movie file format.
Record Setting Selects a frame-rate and bit-rate for the movie.
Drive Mode Sets the drive mode, such as for continuous shooting.
Flash Mode Sets the flash settings.
Flash Comp. Adjusts the intensity of flash output.
Red Eye Reduction Reduces the red-eye phenomenon when using flash.
Focus Mode Selects the focus method.
Focus Area Selects the area of focus.
AF IlluminatorSets the AF illuminator, which provides light for a dark scene to aid focusing.
Exposure Comp. Compensates for the brightness of the entire image.
ISO Sets the ISO sensitivity.
Metering Mode Selects the method for measuring brightness.
White Balance Adjusts color tones of an image.
DRO/Auto HDRCompensates automatically for brightness and contrast.
Creative StyleSelects the desired image processing. You can also adjust contrast, saturation and sharpness.

B
GB
17
G
Picture EffectSelects the desired effect filter to achieve a more impressive and artistic expression.
Focus MagnifierEnlarges the image before shooting so that you can check the focus.
Long Exposure NR
Sets noise reduction processing for shots with a shutter speed of 1/3 second or longer.
High ISO NRSets noise reduction processing for high-sensitivity shooting.
Center Lock-on AFSets the function to track a subject and continue focusing when pressing the center button in the shooting screen.
Smile/Face Detect.Selects to detect faces and adjust various settings automatically. Sets to automatically release the shutter when a smile is detected.
Soft Skin Effect Sets the Soft Skin Effect and the effect level.
Auto Obj. Framing
Analyzes the scene when capturing faces, close-ups, or subjects tracked by Lock-on AF function, and automatically trims and saves another copy of the image with a more impressive composition.
Scene SelectionSelects pre-set settings to match various scene conditions.
MovieSelects the exposure mode to suit your subject or effect.
SteadyShotSets SteadyShot for shooting still images. Reduces blur from camera shake when shooting while holding the camera.
SteadyShot Sets SteadyShot for shooting movies.
Color Space Changes the range of reproducible colors.
Audio Recording Sets whether to record audio when shooting a movie.
Wind Noise Reduct. Reduces wind noise during movie recording.
Shooting Tip List Accesses all shooting tips.
Memory recallSelects a setting registered in advance when the mode dial is set to MR (Memory recall). Optical zoom scale, etc. can be registered.
Memory Registers the desired modes or camera settings.

1
GB8
(Custom Settings)
(Playback)
MF Assist Displays an enlarged image when focusing manually.
Focus Magnif. TimeSets the length of time the image will be shown in an enlarged form.
Grid LineSets a grid line display to enable alignment to a structural outline.
Auto ReviewSets auto review to display the captured image after shooting.
DISP ButtonSets the type of information to be displayed on the monitor by pressing DISP on the control wheel.
Peaking LevelEnhances the outline of in-focus ranges with a specific color when focusing manually.
Peaking Color Sets the color used for the peaking function.
Zoom SettingSets whether to use the Clear Image Zoom and Digital Zoom when zooming.
Face RegistrationRegisters or changes the person to be given priority in the focus.
Write DateSets whether to record a shooting date on the still image.
Function Menu Set.Customizes the functions displayed when the Fn (Function) button is pressed.
Custom Key SettingsAssigning functions to the various keys allows you to perform operations more quickly by pressing the keys when shooting images.
MOVIE Button Sets whether to always activate the MOVIE button.
Delete Deletes an image.
View ModeSets the way in which images are grouped for playback.
Image Index Displays multiple images at the same time.
Display Rotation Sets the playback direction of the recording image.
Slide Show Shows a slide show.

B
GB
19
G
(Setup)
Protect Protects the images.
Specify Printing Adds a print order mark to a still image.
Monitor Brightness Sets the monitor brightness.
Volume Settings Sets the volume for movie playback.
Audio signals Sets the operating sound of the camera.
Upload SettingsSets the upload function of the camera when using an Eye-Fi card.
Mode Dial GuideTurns the mode dial guide (the explanation of each shooting mode) on or off.
Pwr Save Start TimeSets the length of time until the camera turns off automatically.
Demo Mode Sets demonstration playback of a movie to on or off.
HDMI Settings Sets the HDMI settings.
USB Connection Sets the USB connection method.
USB LUN Setting
Enhances compatibility by limiting the functions of the USB connection. Set to [Multi] in normal conditions and to [Single] only when the connection between the camera and a computer or AV component cannot be established.
USB Power SupplySets whether to supply power via USB connection when the camera is connected to a computer or USB device using a micro USB cable.
Language Selects the language.
Date/Time Setup Sets date and time, and daylight savings.
Area Setting Sets the location of use.
Format Formats the memory card.
File NumberSets the method used to assign file numbers to still images and movies.
Select REC FolderChanges the selected folder for storing still images and movies (MP4).
2
GB0
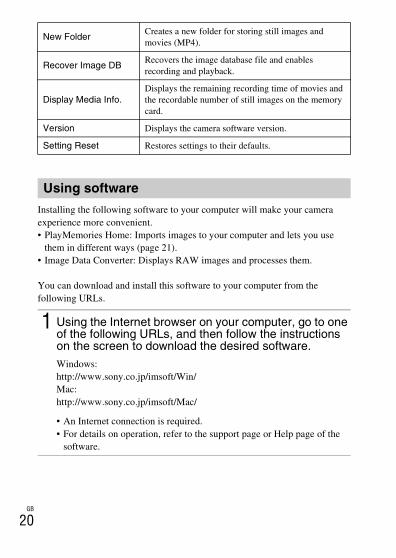
Installing the following software to your computer will make your camera experience more convenient.• PlayMemories Home: Imports images to your computer and lets you use
them in different ways (page 21).• Image Data Converter: Displays RAW images and processes them.
You can download and install this software to your computer from the following URLs.
New FolderCreates a new folder for storing still images and movies (MP4).
Recover Image DBRecovers the image database file and enables recording and playback.
Display Media Info.Displays the remaining recording time of movies and the recordable number of still images on the memory card.
Version Displays the camera software version.
Setting Reset Restores settings to their defaults.
Using software
1 Using the Internet browser on your computer, go to one of the following URLs, and then follow the instructions on the screen to download the desired software.Windows:http://www.sony.co.jp/imsoft/Win/Mac:http://www.sony.co.jp/imsoft/Mac/
• An Internet connection is required.• For details on operation, refer to the support page or Help page of the
software.

B
GB
21
G
The software PlayMemories Home allows you to import still images and movies to your computer and use them. PlayMemories Home is required for importing AVCHD movies to your computer.http://www.sony.net/pm/
• An Internet connection is required to use PlayMemories Online or other network services. PlayMemories Online or other network services may not be available in some countries or regions.
• If the software PMB (Picture Motion Browser), supplied with models released before 2011, has already been installed on your computer, PlayMemories Home will overwrite it during the installation. Use PlayMemories Home, the successor software of PMB.
• New functions may be installed in PlayMemories Home. Connect the camera to your computer even if PlayMemories Home is already installed on your computer.
• Do not disconnect the micro USB cable (supplied) from the camera while the operating screen or the accessing screen is displayed. Doing so may damage the data.
• To disconnect the camera from the computer, click on the tasktray, then click [Eject DSC-RX100].
Importing images to your computer and using them (PlayMemories Home)
Notes
Importing images from your camera
Sharing images on PlayMemories Online
Uploading images to network services
Creating movie discs
Viewing images on a calendar
For Windows, the following functions are also available:
Playing back imported images

2
GB2
The number of still images and recordable time may vary depending on the shooting conditions and the memory card.
x Still imagesThe table below shows the approximate number of images that can be recorded on a memory card formatted with this camera. The values are defined using Sony standard memory cards for testing.
[ Image Size]: L: 20M
When [ Aspect Ratio] is set to [3:2]*
* When the [ Aspect Ratio] is set to other than [3:2], you can record more pictures than shown above. (Except when [ Quality] is set to [RAW].)
x MoviesThe table below shows the approximate total recording times using a memory card formatted with this camera.
• Continuous movie shooting is possible for a maximum of approximately 29 minutes at one time with the camera’s default settings and when the ambient temperature is approximately 25°C (77°F).
Number of still images and recordable time of movies
QualityNumber of still images
8 GB 64 GB
Standard 1200 images 9600 images
Fine 690 images 5500 images
RAW & JPEG 235 images 1900 images
RAW 355 images 2850 images
File Format
Record SettingRecordable time
(h (hour), m (minute))
8 GB 32 GB 64 GB
AVCHD 60i 24M(FX)/50i 24M(FX) 40 m 3 h 6 h
60i 17M(FH)/50i 17M(FH) 1 h 4 h 5 m 8 h 15 m
60p 28M(PS)/50p 28M(PS) 35 m 2 h 30 m 5 h 5 m
MP4 1440×1080 12M 1 h 20 m 5 h 30 m 11 h 5 m
VGA 3M 4 h 55 m 20 h 40 h 10 m

B
GB
23
G
• The recordable time of movies varies because the camera is equipped with VBR (Variable Bit-Rate), which automatically adjusts image quality depending on the shooting scene. When you record a fast-moving subject, the image is clearer but the recordable time is shorter because more memory is required for recording.The recordable time also varies depending on the shooting conditions, the subject or the image quality/size settings.
Functions built into this camera• This manual describes 1080 60i-compatible devices and 1080 50i-compatible
devices. To check whether your camera is a 1080 60i-compatible device or 1080 50i-compatible device, check for the following marks on the bottom of the camera. 1080 60i-compatible device: 60i 1080 50i-compatible device: 50i
• This camera is compatible with 1080 60p or 50p-format movies. Unlike standard recording modes up to now, which record in an interlacing method, this camera records using a progressive method. This increases the resolution, and provides a smoother, more realistic image. Movies recorded in 1080 60p/1080 50p format can be played back only on 1080 60p/1080 50p-supported devices.
On use and careAvoid rough handling, disassembling, modifying, physical shock, or impact such as hammering, dropping, or stepping on the product. Be particularly careful of the lens.
Notes on recording/playback• Before you start recording, make a trial recording to make sure that the camera is
working correctly.• The camera is neither dust-proof, nor splash-proof, nor water-proof.• Do not directly expose the lens to beams such as laser beams. That may damage
the image sensor and cause the camera to malfunction.• Do not expose the camera to sunlight or shoot sunward for a long time. The
internal mechanism may be damaged.• Do not aim the camera at the sun or other bright light. It may cause the
malfunction of the camera.• If moisture condensation occurs, remove it before using the camera.• Do not shake or strike the camera. It may cause a malfunction and you may not be
able to record images. Furthermore, the recording media may become unusable or image data may be damaged.
Notes on using the camera
2
GB4
Do not use/store the camera in the following places• In an extremely hot, cold or humid place
In places such as in a car parked in the sun, the camera body may become deformed and this may cause a malfunction.
• Storing under direct sunlight or near a heaterThe camera body may become discolored or deformed, and this may cause a malfunction.
• In a location subject to rocking vibration• Near a location that generates strong radio waves, emits radiation or is strongly
magnetic place. Otherwise, the camera may not properly record or play back images.
• In sandy or dusty placesBe careful not to let sand or dust get into the camera. This may cause the camera to malfunction, and in some cases this malfunction cannot be repaired.
On carryingDo not sit down in a chair or other place with the camera in the back pocket of your trousers or skirt, as this may cause malfunction or damage the camera.
Notes on continuous shootingDuring continuous shooting, the monitor may flash between the shooting screen and a black screen. If you keep watching the screen in this situation, you may experience uncomfortable symptoms such as feeling of unwellness. If you experience uncomfortable symptoms, stop using the camera, and consult your doctor as necessary.
ZEISS lensThe camera is equipped with a ZEISS lens which is capable of reproducing sharp images with excellent contrast. The lens for the camera has been produced under a quality assurance system certified by ZEISS in accordance with the quality standards of ZEISS in Germany.

B
GB
25
G
Notes on the monitor and lens• The monitor is manufactured using extremely high-precision technology, and over
99.99% of the pixels are operational for effective use. However, some tiny black and/or bright dots (white, red, blue or green) may appear on the monitor. These dots are a normal result of the manufacturing process, and do not affect the recording.
• If the monitor gets wet from water droplets, etc., wipe it off immediately with a soft cloth. Leaving the monitor wet will cause the surface of the monitor to deteriorate or degrade, and malfunctions may occur.
• Take care that your fingers or other objects are not caught in the lens when it is operating.
Notes on the flash• Do not carry the camera by the flash unit, or use excessive strength on it.• If water, dust or sand get into the open flash unit, it may cause a malfunction.• Take care that your finger is not in the way when pushing the flash down.
Sony accessoriesUse only genuine Sony brand accessories, otherwise it may cause a malfunction. Sony brand accessories may not come to market for some countries or regions.
On camera’s temperatureCamera body and battery may get warm with use – this is normal.
On the overheat protectionDepending on the camera and battery temperature, you may be unable to record movies or the power may turn off automatically to protect the camera. A message will be displayed on the screen before the power turns off or you can no longer record movies. In this case, leave the power off and wait until the camera and battery temperature goes down. If you turn on the power without letting the camera and battery cool down enough, the power may turn off again or you may be unable to record movies.
On charging the battery• If you charge a battery that has not been used for a long time, you may be unable
to charge it to the proper capacity.This is due to the battery characteristics. Charge the battery again.
• Batteries which have not been used for more than a year may have become deteriorated.
Warning on copyrightTelevision programs, films, videotapes, and other materials may be copyrighted. Unauthorized recording of such materials may be contrary to the provisions of the copyright laws.
2
GB6
No guarantee in the case of damaged content or recording failuresSony can provide no guarantees in the event of failure to record or loss or damage of recorded images or audio data due to a malfunction of the camera or recording media, etc. We recommend backing up important data.
Cleaning the camera surfaceClean the camera surface with a soft cloth slightly moistened with water, then wipe the surface with a dry cloth. To prevent damage to the finish or casing:– Do not expose the camera to chemical products such as thinner, benzine, alcohol,
disposable cloths, insect repellent, sunscreen or insecticide.
Maintaining the monitor• Hand cream or moisturizer left on the monitor may dissolve its coating. If you get
any on the monitor, wipe it off immediately.• Wiping forcefully with tissue paper or other materials can damage the coating.• If fingerprints or debris are stuck to the monitor, we recommend that you gently
remove any debris and then wipe the monitor clean with a soft cloth.

B
GB
27
G
Camera
[System]Image device: 13.2 mm × 8.8 mm
(1.0 type) CMOS sensorEffective pixel number of camera:
Approx. 20.2 MegapixelsTotal pixel number of camera:
Approx. 20.9 MegapixelsLens: ZEISS Vario-Sonnar T 3.6×
zoom lensf = 10.4 mm – 37.1 mm (28 mm – 100 mm (35 mm film equivalent))F1.8 (W) – F4.9 (T)While shooting movies (16:9): 29 mm – 105 mm*1
While shooting movies (4:3): 36 mm – 128 mm*1 When [ SteadyShot] is set to
[Standard]SteadyShot: OpticalFile format (Still images): JPEG (DCF,
Exif, MPF Baseline) compliant, RAW (Sony ARW 2.3 Format), DPOF compatible
File format (Movies):AVCHD format (AVCHD format Ver. 2.0 compatible):Video: MPEG-4 AVC/H.264Audio: Dolby Digital 2ch, equipped with Dolby Digital Stereo Creator• Manufactured under license from
Dolby Laboratories.Movies (MP4 format):Video: MPEG-4 AVC/H.264Audio: MPEG-4 AAC-LC 2ch
Recording media: Memory Stick PRO Duo media, Memory Stick Micro media, SD cards, microSD memory cards
Flash: Flash range (ISO sensitivity (Recommended Exposure Index) set to Auto): Approx. 0.3 m to 17.1 m (11 3/4 inches to 56 ft. 1 3/4 inches) (W)/Approx. 0.55 m to 6.3 m (1 ft. 9 1/2 inches to 20 ft. 8 inches) (T)
[Input/Output connectors]HDMI connector: HDMI micro jackMicro USB connector:
USB communicationUSB communication: Hi-Speed USB
(USB 2.0)
[Monitor]LCD monitor:
7.5 cm (3.0 type) TFT driveTotal number of dots:
1 228 800 dots
Specifications

2
GB8
[General]Rated input: 3.6 V , 1.5 WOperating temperature:
0 to 40 °C (32 to 104 °F)Storage temperature:
–20 to 60 °C (–4 to 140 °F)Dimensions (W/H/D) (Approx.):
101.6 × 58.1 × 35.9 mm 4 × 2 3/8 × 1 7/16 in.
Mass (Approx.): 240 g (8.5 oz) (including battery pack, Memory Stick PRO Duo media)
Microphone: StereoSpeaker: MonauralExif Print: CompatiblePRINT Image Matching III:
Compatible
AC Adaptor AC-UUD11/AC-UUD12/AC-UUE12Rated input:
100 – 240 V , 50/60 Hz, 0.2 ARated output: 5 V , 1.5 A
Rechargeable Battery Pack NP-BX1Rated voltage: 3.6 V
Design and specifications are subject to change without notice.
Trademarks• Memory Stick and are
trademarks or registered trademarks of Sony Corporation.
• “AVCHD Progressive” and “AVCHD Progressive” logotype are trademarks of Panasonic Corporation and Sony Corporation.
• Dolby and the double-D symbol are trademarks of Dolby Laboratories.
• HDMI, the HDMI logo and High-Definition Multimedia Interface are trademarks or registered trademarks of HDMI Licensing LLC.
• Windows is a registered trademark of Microsoft Corporation in the United States and/or other countries.
• Mac is a registered trademark of Apple Inc. in the United States and other countries.
• SDXC logo is a trademark of SD-3C, LLC.
• Facebook and the “f” logo are trademarks or registered trademarks of Facebook, Inc.
• YouTube and the YouTube logo are trademarks or registered trademarks of Google Inc.
• Eye-Fi is a trademark of Eye-Fi, Inc.• In addition, system and product
names used in this manual are, in general, trademarks or registered trademarks of their respective developers or manufacturers. However, the ™ or ® marks may not be used in all cases in this manual.

B
GB
29
G
On GNU GPL/LGPL applied softwareThe software that is eligible for the following GNU General Public License (hereinafter referred to as “GPL”) or GNU Lesser General Public License (hereinafter referred to as “LGPL”) are included in the product.This informs you that you have a right to have access to, modify, and redistribute source code for these software programs under the conditions of the supplied GPL/LGPL.Source code is provided on the web. Use the following URL to download it.http://oss.sony.net/Products/Linux/We would prefer you do not contact us about the contents of source code.Licenses (in English) are recorded in the internal memory of your product.Establish a Mass Storage connection between the product and a computer to read licenses in the “PMHOME” - “LICENSE” folder.
Additional information on this product and answers to frequently asked questions can be found at our Customer Support Website.

CT
2
中文 (繁體字)
進一步瞭解相機 (“說明指南”)
“說明指南”是一部線上說明書。您可以閱讀電腦上或智慧型手機上的 “說明指南”。請參閱此說明書,以深入瞭解有關相機的眾多功能。
URL:http://rd1.sony.net/help/dsc/1740/h_zz/
T
CT
3
C
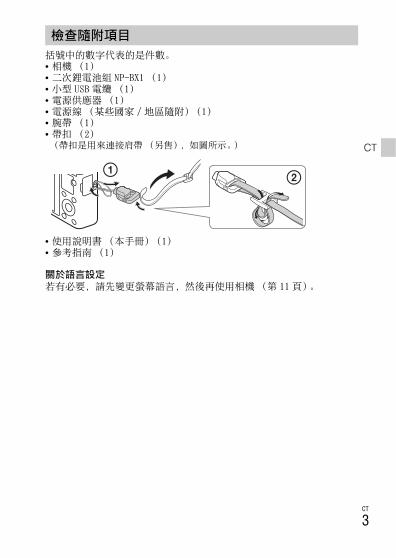
括號中的數字代表的是件數。• 相機 (1)• 二次鋰電池組 NP-BX1 (1)• 小型 USB 電纜 (1)• 電源供應器 (1)• 電源線 (某些國家 / 地區隨附)(1)• 腕帶 (1)• 帶扣 (2)(帶扣是用來連接肩帶 (另售),如圖所示。)
• 使用說明書 (本手冊)(1)• 參考指南 (1)
關於語言設定若有必要,請先變更螢幕語言,然後再使用相機 (第 11 頁)。
檢查隨附項目

CT
4
A ON/OFF (電源)按鈕
B 電源 /充電指示燈
C 快門按鈕
D 模式轉盤(智慧式自動)/(高級自動)/
(程式自動)/(光圈優先)/(快門速度優先)/(手動曝光)/(記憶回復)/(動態影像)/(全景攝影)/(場景選擇)
E 用來拍攝:W/T (變焦)桿用於觀看: (索引)桿 / 播放變焦桿
F 自拍定時器指示燈 /微笑快門指示燈 /AF 照明器
G 閃光燈• 請勿讓手指遮住閃光燈。• 使用閃光燈時,閃光燈會自動跳起來。如果不使用閃光燈,請以手動方式將其往下按。
H 麥克風
I 掛帶掛勾
J 控制環
K 鏡頭
L 喇叭
M 光感應器
N 螢幕
O Fn (功能)按鈕
P MOVIE (動態影像)按鈕
Q 微型 USB 接頭
R MENU 按鈕
S 控制滾輪
T 中央按鈕
認識各部件

T
CT
5
C
U (播放)按鈕
V / (相機指南 / 刪除)按鈕
W 電池插入槽
X 電池鎖定桿
Y 三腳架安裝孔• 請使用螺絲長度在 5.5 公釐以下的三腳架。否則無法將相機牢靠地固定住,而且可能會對相機造成損壞。
Z 存取指示燈
wj記憶卡插槽
wk HDMI 微型插孔
wl電池 / 記憶卡蓋
插入電池
1 打開蓋子。
2 插入電池。• 如圖所示,在按下電池鎖定桿時插入電池。確保電池鎖定桿在插入後鎖住。
• 在電池插入不正確的情況下闔上蓋子可能對相機造成損壞。
電池鎖定桿

CT
6
為電池組充電
1 用小型 USB 電纜 (附件)將相機連接到電源供應器 (附件)上。
2 將電源供應器連接到電源插座。電源 / 充電指示燈點亮橘色的燈,充電開始。• 對電池充電時,關閉相機電源。• 即使電池仍有部份充電,您也可以對其充電。• 電源 / 充電指示燈閃爍而且充電未完成時,取出電池之後再插回去。
• 對於某些國家 / 地區,將電源線連接到電源供應器,並將電源供應器連接到牆上的電源插座。
點亮 (綠色):電源開啟點亮 (橘色):充電中熄滅:充電完成閃爍 (橘色):充電錯誤或由於相機非介於合適的溫
度範圍內而暫時停止充電
電源 / 充電指示燈
T
CT
7
C
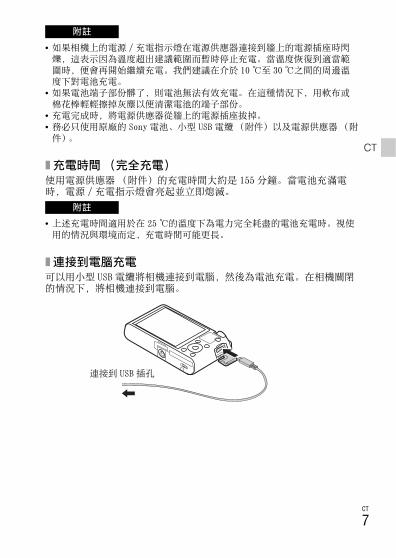
• 如果相機上的電源 / 充電指示燈在電源供應器連接到牆上的電源插座時閃爍,這表示因為溫度超出建議範圍而暫時停止充電。當溫度恢復到適當範圍時,便會再開始繼續充電。我們建議在介於 10 ℃至 30 ℃之間的周邊溫度下對電池充電。
• 如果電池端子部份髒了,則電池無法有效充電。在這種情況下,用軟布或棉花棒輕輕擦掉灰塵以便清潔電池的端子部份。
• 充電完成時,將電源供應器從牆上的電源插座拔掉。• 務必只使用原廠的 Sony 電池、小型 USB 電纜(附件)以及電源供應器(附件)。
x 充電時間 (完全充電)使用電源供應器 (附件)的充電時間大約是 155 分鐘。當電池充滿電時,電源 / 充電指示燈會亮起並立即熄滅。
• 上述充電時間適用於在 25 ℃的溫度下為電力完全耗盡的電池充電時。視使用的情況與環境而定,充電時間可能更長。
x 連接到電腦充電可以用小型 USB 電纜將相機連接到電腦,然後為電池充電。在相機關閉的情況下,將相機連接到電腦。
附註
附註
連接到 USB 插孔

CT
8
• 若相機連接到未連接電源的筆記型電腦,筆記型電腦的電量會降低。請勿長時間充電。
• 當電腦與相機之間已建立 USB 連線時,請勿開 / 關或重新啟動電腦,或從睡眠模式叫醒電腦。這可能會造成相機故障。在開啟 / 關閉電源或是重新啟動電腦或將電腦從睡眠模式喚醒之前,請中斷相機與電腦的連接。
• 不保證可使用自組電腦、改裝電腦充電。
x 電池壽命以及可以錄製和播放的影像數目
• 上述估計的電池使用時間和可錄製影像張數適用於電池完全充電的狀況。視使用情況而定,電池使用時間和影像張數可能減少。
• 電池使用時間和可錄製影像張數,是根據下列情況下以預設設定進行拍攝所估計:-在 25 ℃的環境溫度下使用電池。-使用 Sony Memory Stick PRO Duo (Mark2) (另售)
•“拍攝 (靜態影像)”的數目是根據 CIPA 標準,並在下列情況下所拍攝:(CIPA:Camera & Imaging Products Association)-每 30 秒鐘拍攝一張相片。-每拍攝十次開啟和關閉電源一次。-每拍攝兩次閃光燈閃光一次。-變焦在 W和 T 端之間輪流切換。
• 動態影像拍攝的分鐘數是根據下列情況下所拍攝的:-影像畫質設定為 AVCHD 60i 17M(FH)/50i 17M(FH)-根據不間斷的拍攝直到已達到上限 (29 分鐘),然後再度按下 MOVIE(動態影像)按鈕繼續的電池壽命。未操作其他功能 (例如變焦)。
x 供電用小型 USB 電纜 (附件)連接到電源供應器 (附件),便可以從牆上的電源插座為相機供應電源。如此一來,您就不必擔心在長時間拍攝或播放時電池會沒電。相機裡沒有電池也可以拍攝與播放。
附註
電池壽命 影像的數目
拍攝 (靜態影像) 大約 165 分鐘 大約 330 張影像
觀賞 (靜態影像) 大約 250 分鐘 大約 5000 張影像
拍攝 (動態影像) 大約 80 分鐘 -
附註
T
CT
9
C
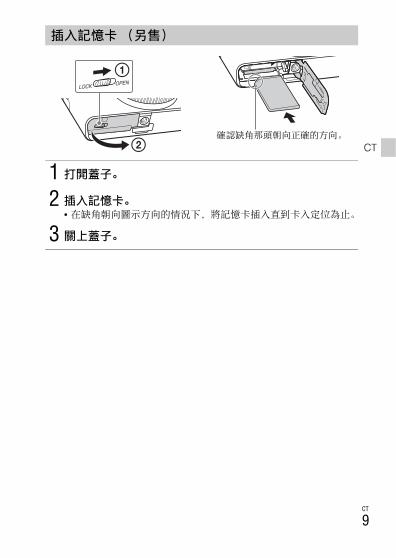
插入記憶卡 (另售)
1 打開蓋子。
2 插入記憶卡。• 在缺角朝向圖示方向的情況下,將記憶卡插入直到卡入定位為止。
3 關上蓋子。
確認缺角那頭朝向正確的方向。

1
CT0
x 可以使用的記憶卡
• 有關靜態影像的可拍攝張數和動態影像的可錄製時間長度的詳細資訊,請參閱第 22 頁。查看表格以選擇具備所需容量的記憶卡。
• 概不保證所有記憶卡皆可正常運作。對於非 Sony 製造商所生產的記憶卡,請洽詢該產品製造商。
• 以本相機使用Memory Stick Micro或 microSD記憶卡時,務必要使用適當的轉接卡。
x 若要取出記憶卡 /電池記憶卡:按壓記憶卡一次以退出記憶卡。電池組:滑動電池鎖定桿。確保勿讓電池掉落。
• 切勿在存取指示燈(第 5 頁)發亮時取出記憶卡 /電池。這可能會對記憶卡中的資料造成損壞。
記憶卡 對於靜態影像 對於動態影像
Memory Stick PRO Duo (僅限 Mark2)
Memory Stick PRO-HG Duo
Memory Stick Micro (M2) (僅限 Mark2)
SD 記憶卡 (Class 4 或者更快)
SDHC 記憶卡 (Class 4 或者更快)
SDXC 記憶卡 (Class 4 或者更快)
microSD 記憶卡 (Class 4 或者更快)
microSDHC 記憶卡 (Class 4 或者更快)
microSDXC 記憶卡 (Class 4 或者更快)
附註
附註
T
CT
11
C
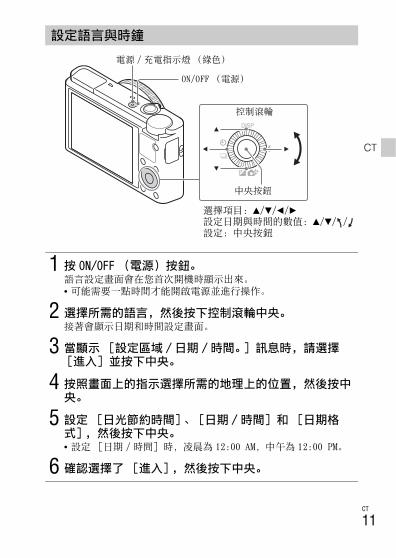
設定語言與時鐘
1 按 ON/OFF (電源)按鈕。語言設定畫面會在您首次開機時顯示出來。• 可能需要一點時間才能開啟電源並進行操作。
2 選擇所需的語言,然後按下控制滾輪中央。接著會顯示日期和時間設定畫面。
3 當顯示 [設定區域 /日期 /時間。]訊息時,請選擇[進入]並按下中央。
4 按照畫面上的指示選擇所需的地理上的位置,然後按中央。
5 設定 [日光節約時間]、[日期 / 時間]和[日期格式],然後按下中央。• 設定 [日期 /時間]時,凌晨為 12:00 AM,中午為 12:00 PM。
6 確認選擇了 [進入],然後按下中央。
控制滾輪
ON/OFF (電源)
選擇項目:v/V/b/B
設定日期與時間的數值:v/V/ /設定:中央按鈕
中央按鈕
電源 / 充電指示燈(綠色)

1
CT2
拍攝靜態影像
拍攝動態影像
• 請勿以手動方式拉起閃光燈。否則可能會造成故障。• 拍攝動態影像的同時使用變焦功能時,會錄下相機的操作聲音。當動態影像錄製完成時,可能也會錄下 MOVIE 按鈕操作的聲音。
• 當周邊溫度約 25 ℃時,按相機的預設設定,一次可能持續拍攝動態影像的最長時間約為 29 分鐘。動態影像錄製完成時,您可以透過再度按下 MOVIE按鈕重新開始錄製。視周邊溫度而定,可能會停止錄製以保護相機。
拍攝靜態影像 / 動態影像
1 將快門按鈕按下一半以便對焦。影像合焦時,會發出一個嗶音,而且對焦指示燈 (z)會亮起。• 當相機無法自動對焦時,對焦指示燈會閃爍。
2 完全按下快門按鈕以拍攝影像。
1 按下 MOVIE (動態影像)按鈕以開始錄製。• 用 W/T (變焦)桿變更變焦比率。• 繼續記錄動態影像的同時按快門按鈕拍攝靜態影像。
2 再按一次 MOVIE 按鈕以停止錄製。
附註
模式轉盤
快門按鈕
:智慧式自動:動態影像
MOVIE
W/T (變焦)桿
W:縮小T:放大

T
CT
13
C
x 選擇下一個 /上一個影像透過按下控制滾輪上的 B (下一個)/b (上一個)或轉動控制滾輪,選擇一個影像。按下控制滾輪中央以觀賞動態影像。
x 刪除一個影像1 按下 / (刪除)按鈕。2 用控制滾輪上的 v 選擇 [刪除],然後按下中央。
x 轉動影像按 Fn(功能)按鈕。
x 返回拍攝影像半按下快門按鈕。
觀賞影像
1 按 (播放)按鈕。
/ (刪除)
控制滾輪
(播放)
W:縮小T:放大
選擇影像:B (下一個)/b (上一個)或轉動控制滾輪
設定:中央按鈕
中央按鈕
1
CT4
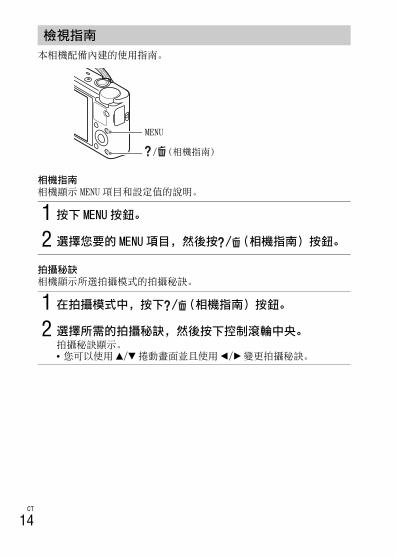
本相機配備內建的使用指南。
相機指南相機顯示 MENU 項目和設定值的說明。
拍攝秘訣相機顯示所選拍攝模式的拍攝秘訣。
檢視指南
1 按下 MENU 按鈕。
2 選擇您要的 MENU 項目,然後按 / (相機指南)按鈕。
1 在拍攝模式中,按下 / (相機指南)按鈕。
2 選擇所需的拍攝秘訣,然後按下控制滾輪中央。拍攝秘訣顯示。• 您可以使用 v/V 捲動畫面並且使用 b/B 變更拍攝秘訣。
/ (相機指南)
MENU
T
CT
15
C
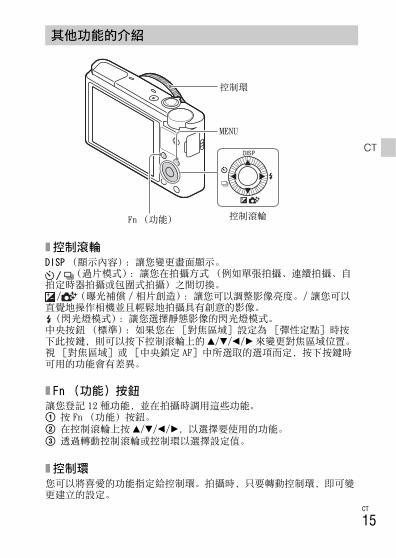
x 控制滾輪DISP (顯示內容):讓您變更畫面顯示。
(過片模式):讓您在拍攝方式 (例如單張拍攝、連續拍攝、自拍定時器拍攝或包圍式拍攝)之間切換。
/ (曝光補償 / 相片創造):讓您可以調整影像亮度。/ 讓您可以直覺地操作相機並且輕鬆地拍攝具有創意的影像。(閃光燈模式):讓您選擇靜態影像的閃光燈模式。
中央按鈕 (標準):如果您在 [對焦區域]設定為 [彈性定點]時按下此按鍵,則可以按下控制滾輪上的 v/V/b/B 來變更對焦區域位置。視 [對焦區域]或 [中央鎖定 AF]中所選取的選項而定,按下按鍵時可用的功能會有差異。
x Fn (功能)按鈕讓您登記 12 種功能,並在拍攝時調用這些功能。1 按 Fn (功能)按鈕。2 在控制滾輪上按 v/V/b/B,以選擇要使用的功能。3 透過轉動控制滾輪或控制環以選擇設定值。
x 控制環您可以將喜愛的功能指定給控制環。拍攝時,只要轉動控制環,即可變更建立的設定。
其他功能的介紹
控制環
控制滾輪Fn (功能)
MENU
1
CT6
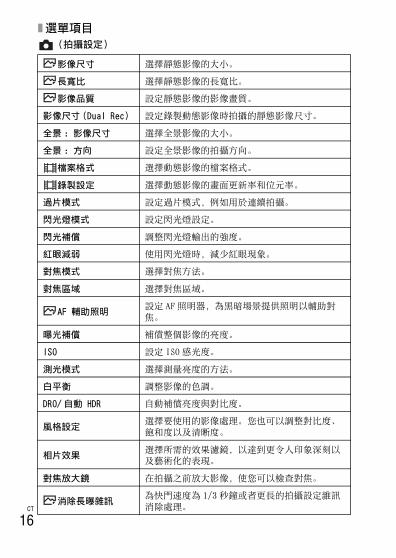
x 選單項目
(拍攝設定)
影像尺寸 選擇靜態影像的大小。
長寬比 選擇靜態影像的長寬比。
影像品質 設定靜態影像的影像畫質。
影像尺寸 (Dual Rec) 設定錄製動態影像時拍攝的靜態影像尺寸。
全景 : 影像尺寸 選擇全景影像的大小。
全景 : 方向 設定全景影像的拍攝方向。
檔案格式 選擇動態影像的檔案格式。
錄製設定 選擇動態影像的畫面更新率和位元率。
過片模式 設定過片模式,例如用於連續拍攝。
閃光燈模式 設定閃光燈設定。
閃光補償 調整閃光燈輸出的強度。
紅眼減弱 使用閃光燈時,減少紅眼現象。
對焦模式 選擇對焦方法。
對焦區域 選擇對焦區域。
AF 輔助照明設定 AF照明器,為黑暗場景提供照明以輔助對焦。
曝光補償 補償整個影像的亮度。
ISO 設定 ISO 感光度。
測光模式 選擇測量亮度的方法。
白平衡 調整影像的色調。
DRO/ 自動 HDR 自動補償亮度與對比度。
風格設定選擇要使用的影像處理。您也可以調整對比度、飽和度以及清晰度。
相片效果選擇所需的效果濾鏡,以達到更令人印象深刻以及藝術化的表現。
對焦放大鏡 在拍攝之前放大影像,使您可以檢查對焦。
消除長曝雜訊為快門速度為 1/3 秒鐘或者更長的拍攝設定雜訊消除處理。

T
CT
17
C
(自訂設定)
高 ISO 雜訊消除 設定高感光度拍攝的雜訊消除處理。
中央鎖定 AF按下拍攝螢幕的中央按鈕時,設定功能以追蹤被攝體並繼續對焦。
微笑 / 面孔偵測選擇偵測面孔並自動調整各種不同的設定。設定偵測到微笑時自動釋放快門。
柔膚效果 設定柔膚效果以及效果等級。
自動取景捕捉面孔影像、近拍或透過鎖定 AF功能追蹤被攝體時分析場景,並以更令人印象深刻的構圖,自動修剪並儲存影像的另一個副本。
場景選擇 選擇預設的設定,以便與各種場景條件配合。
動態影像 選擇曝光模式,以便配合拍攝物體或效果。
SteadyShot設定 SteadyShot 以拍攝靜態影像。減少手持相機拍攝時因相機晃動而造成的模糊。
SteadyShot 設定 SteadyShot 以拍攝動態影像。
色彩空間 變更可再生色彩的範圍。
音訊錄製 設定拍攝動態影像時是否錄製聲音。
減少風噪音 減少動態影像錄製期間的風噪音。
拍攝祕訣清單 檢視所有拍攝秘訣。
記憶回復當模式轉盤設定為 MR (記憶回復)時,選擇事先登錄的設定。可以登錄光學變焦比例等。
記憶 登記要使用的模式或相機設定。
MF 輔助 在手動對焦時顯示放大的影像。
對焦放大時間 設定影像會以放大形式顯示的時間長度。
格線 設定格線顯示,以便與結構輪廓對齊。
自動檢視 設定拍攝後自動檢視以顯示捕捉的影像。
DISP 按鈕透過按下控制滾輪上的 DISP,設定要顯示在螢幕上的資訊類型。
峰值等級 在手動對焦時以特定顏色增強對焦範圍的輪廓。
峰值顏色 設定用於峰值功能的顏色。

1
CT8
(播放)
(設定)
變焦設定設定是否要在變焦時使用清晰影像變焦以及數位變焦。
面孔登錄 登錄或變更要優先對焦的人。
寫入日期 設定是否在靜態影像上記錄拍攝日期。
功能選單設定 自訂按下 Fn (功能)按鈕時顯示的功能。
自訂鍵設定指定功能給各種按鍵,可讓您在拍攝影像時,透過按下按鍵更快執行操作。
MOVIE 按鈕 設定是否一律啟動 MOVIE 按鈕。
刪除 刪除一個影像。
觀看模式 設定影像用於播放的分組方式。
影像索引 同時顯示多個影像。
顯示旋轉 設定記錄影像的播放方向。
循環播放 顯示循環播放。
保護 保護影像。
指定列印 將列印命令標記新增至靜態影像。
螢幕亮度 設定螢幕亮度。
音量設定 設定動態影像播放的音量。
音頻訊號 設定相機的操作聲音。
上傳的設定 設定使用 Eye-Fi 卡時相機的上傳功能。
模式轉盤指南開啟或關閉模式轉盤指南 (解釋各種拍攝模式)。
省電開始時間 設定相機自動關機前的時間長度。
示範模式 設定開啟或關閉動態影像的展示播放。
HDMI 設定 進行 HDMI 設定。
USB 連線 設定 USB 連接法。

T
CT
19
C
USB LUN 設定
透過限制 USB 連接功能提高相容性。在正常的狀況下,設定為 [多種],只有在無法建立相機和電腦或 AV 組件之間的連線時,才設定為 [單一]。
USB 電源供給設定相機使用小型 USB 電纜連接到電腦或 USB 裝置時是否透過 USB 連線供電。
語言 選擇語言。
日期 / 時間設定 設定日期與時間,以及日光節約時間。
區域設定 設定使用的地點。
格式化 格式化記憶卡。
檔案編號設定用來對靜態影像和動態影像指定檔案編號的方法。
選擇 REC 資料夾變更用於儲存靜態影像和動態影像 (MP4)的選定資料夾。
新資料夾建立新資料夾用來儲存靜態影像與動態影像(MP4)。
還原影像資料庫 還原影像資料庫檔案並使錄製與播放可以進行。
顯示媒體資訊顯示記憶卡上動態影像的剩餘錄製時間和靜態影像的可拍攝張數。
版本 顯示相機軟體版本。
出廠重設 將設定還原為預設設定。

2
CT0
將下列軟體安裝到您的電腦,將使您的相機體驗更加方便。• PlayMemories Home:將影像匯入電腦,並讓您以不同方式使用它們(第 21 頁)。
• Image Data Converter:顯示及處理 RAW 影像。
您可以在下列 URL 下載本軟體並安裝到您的電腦。
使用軟體
1 使用電腦上的網際網路瀏覽器,前往下列 URL 其中之一,然後遵循螢幕上的指示下載所需的軟體。
Windows:http://www.sony.co.jp/imsoft/Win/Mac:http://www.sony.co.jp/imsoft/Mac/
• 必須有網際網路連線。• 如需操作的詳細資料,請參閱支援頁面或軟體的說明頁面。

T
CT
21
C
PlayMemories Home 軟體讓您可以將靜態影像和動態影像匯入您的電腦中並加以使用。將 AVCHD 動態影像匯入您的電腦需要 PlayMemories Home。http://www.sony.net/pm/
• 需要有網際網路連線才能使用 PlayMemories Online 或其他網路服務。在某些國家或區域可能無法使用 PlayMemories Online 或其他網路服務。
• 如果您的電腦上已經安裝 2011 年以前販賣機型所隨附的 PMB (Picture Motion Browser)軟體,PlayMemories Home 會在安裝期間加以覆寫。使用PMB 的後續軟體 PlayMemories Home。
• PlayMemories Home 中可能已安裝新的功能。即使您的電腦上已安裝PlayMemories Home,也將相機連接到您的電腦。
• 請勿在操作畫面或是存取畫面顯示時將小型 USB 電纜(附件)從相機拔出。如此做可能對資料造成損壞。
• 要將相機從電腦中斷連接,按一下工作列上的 ,然後按一下 [退出 DSC-RX100]。
將影像匯入電腦並使用它們 (PlayMemories Home)
附註
從相機匯入影像
在 PlayMemories Online 上分享影像
將影像上傳至網路服務
製作動態影像光碟
在日曆上觀賞影像
對於 Windows,也可使用下列功能:
播放匯入的影像

2
CT2
靜態影像的張數以及可錄製時間可能依拍攝情況以及記憶卡而有所差異。
x 靜態影像下表顯示以本相機格式化的記憶卡,可以記錄的影像大略數目。這些數值是使用 Sony 標準記憶卡進行測試而定義出來的。
[ 影像尺寸]:L: 20M
當 [ 長寬比]設定為 [3:2]時 *
* 當[ 長寬比]設定為 [3:2]以外時,您可以錄製比以上所示更多的照片。(當 [ 影像品質]設定為 [RAW]時除外。)
x 動態影像下表顯示的是,使用在本相機上格式化的記憶卡可以錄製的大約總時間。
• 當周邊溫度約 25 ℃時,按相機的預設設定,一次可能持續拍攝動態影像的最長時間約為 29 分鐘。
• 動態影像可以記錄的時間會因相機配有可以根據拍攝場景而自動調整畫質VBR (Variable Bit-Rate)而有所不同。錄製快速移動的被攝體時,影像會比較清晰,但是可錄製時間會比較短,因為需要更多記憶體進行錄製。可錄製時間也會依拍攝情況、被攝體或者影像畫質 / 大小設定之不同而有所差異。
靜態影像的張數以及動態影像的可錄製時間
影像品質靜態影像的數目
8 GB 64 GB
標準 1200 張影像 9600 張影像
精細 690 張影像 5500 張影像
RAW 與 JPEG 235 張影像 1900 張影像
RAW 355 張影像 2850 張影像
檔案格式 錄製設定
可錄製時間(h (小時)、m (分鐘))
8 GB 32 GB 64 GB
AVCHD 60i 24M(FX)/50i 24M(FX) 40 m 3 h 6 h
60i 17M(FH)/50i 17M(FH) 1 h 4 h 5 m 8 h 15 m
60p 28M(PS)/50p 28M(PS) 35 m 2 h 30 m 5 h 5 m
MP4 1440 × 1080 12M 1 h 20 m 5 h 30 m 11 h 5 m
VGA 3M 4 h 55 m 20 h 40 h 10 m

T
CT
23
C
本相機內建的功能• 本說明書描述 1080 60i 相容裝置以及 1080 50i 相容裝置。如要檢查您的相機是否為 1080 60i 相容裝置或是 1080 50i 相容裝置,檢查相機底部是否有下列標記。1080 60i 相容裝置:60i1080 50i 相容裝置:50i
• 本相機與1080 60p或 50p格式的動態影像相容。與到目前為止都是以隔行掃描法記錄的標準記錄模式不同的是,本相機是以逐行掃描法記錄。這樣可以增加解析度,提供更順暢、更真實的影像。以 1080 60p/1080 50p 格式記錄的動態影像,只能在支援 1080 60p/1080 50p 的裝置上播放。
使用與保養須知避免粗暴處理、拆卸、改造或物理性撞擊本產品,或因捶打、掉落或踩踏而使產品受到衝擊。特別小心鏡頭。
有關錄製 / 播放的注意事項• 在您開始錄製之前,先進行試錄以確認相機正常運作。• 本相機不防塵、不防潑濺、也不防水。• 切勿將鏡頭直接暴露在雷射光之類的射線下。因為這可能會損壞感應器並導致相機故障。
• 請勿讓相機長時間曝曬在陽光下或朝陽光拍攝。內部機構可能會損壞。• 請勿將相機朝向陽光或其他的強光。那樣可能會令您的相機故障。• 如果發生濕氣凝結,要在使用相機之前將其清除。• 請勿搖晃或撞擊本相機。這可能造成故障,而且您可能無法錄製影像。此外,錄製媒體可能會變得無法使用或是影像資料可能受損。
請勿在下列地方使用 / 存放相機• 在極度炎熱、寒冷或潮濕的地方例如,在停在太陽底下的車廂中,相機機身可能變形而造成故障。
• 存放在直射的陽光下或加熱器附近相機機身可能褪色或變形,而這可能會造成故障。
• 在會受到搖擺振動的地方• 靠近會產生強烈無線電波、發出輻射或者強烈磁性的地方。否則相機可能無法正確地記錄或播放影像。
• 在多沙或多灰塵的地方小心不要讓沙子或灰塵進入相機中。否則可能會造成相機故障,有時候這種故障是無法修理的。
有關使用相機的注意事項

2
CT4
攜帶時不要在相機放置於褲子或裙子的後面口袋中時坐在椅子或其他地方,因為這樣可能會造成故障或者損害相機。
持續拍攝的注意事項持續拍攝過程中,螢幕可能會在拍攝畫面和黑色畫面之間閃爍。如果在此情況下持續觀看螢幕,可能會發生不舒服的症狀,例如不適感。如果發生不舒服症狀,請停止使用相機,如有必要,請向您的醫師諮詢。
ZEISS 鏡頭本相機配備有 ZEISS 鏡頭,能以優越的對比再生清晰的影像。本相機的鏡頭是根據德國 ZEISS 的品質標準,在經過 ZEISS 認證的品質保證系統底下生產的。
有關螢幕和鏡頭的注意事項• 螢幕利用極高精確度技術製造,並且超過 99.99% 的像素都可以有效使用。但是有一些細小的黑點和 /或亮點 (白色、紅色、藍色或綠色)可能出現在螢幕上。這些點是製造過程中的正常結果,不會影響錄製。
• 如果螢幕被水滴等弄濕,請立即以軟布擦掉。如果讓螢幕潮濕,將會導致螢幕表面劣化或侵蝕,並可能發生故障。
• 當鏡頭正在伸縮時,請注意不要使您的手指或其他東西被夾到。
有關閃光燈的注意事項• 請不要以抓住閃光燈的方式拿相機,或者是對閃光燈施加太大的力量。• 如果水、灰塵或沙子進入打開的閃光燈,可能會造成故障。• 將閃光燈壓下時,請注意不要壓到您的手指。
Sony 配件僅使用原廠的 Sony 品牌配件,否則可能造成故障。Sony 品牌配件可能未在某些國家或區域上市。
相機溫度須知使用時,相機機身與電池的溫度可能會升高,這是正常情況。
過熱保護須知視相機和電池溫度而定,您可能無法錄製動態影像或是電源可能會自動關閉以保護相機。在電源關閉或是您可能不再錄製動態影像之前,螢幕上會顯示一個訊息。在這種情況下,使電源維持在關閉狀態並等候直到相機和電池溫度下降為止。如果您在未讓相機和電池足夠冷卻的情況下開啟電源,電源可能會再度關閉或是您可能無法錄製動態影像。

T
CT
25
C
電池充電須知• 如果您對一個很久未使用的電池充電,您可能無法將其充電至適當的容量。這是因為電池特性的緣故。再度對電池充電。
• 電池若超過一年以上沒有使用可能會劣化。
版權警告電視節目、影片、錄影帶及其他資料可能具有版權。未經許可錄製這些資料可能會觸犯版權法的規定。
對於內容受損或是錄製失敗不提供補償對於因相機或記錄媒體等的故障而造成的記錄失敗或記錄影像或音訊資料遺失或損毀,Sony 不提供保證。我們建議備份重要資料。
清潔相機表面以稍微用水沾濕的軟布輕輕將相機表面擦乾淨,然後以乾布擦拭表面。若要防止對表面塗層或外殼造成損傷:-請勿讓相機接觸稀釋劑、揮發油、酒精、拋棄式清潔巾、驅蟲劑、防曬品或殺蟲劑等化學產品。
維護螢幕• 留在螢幕上的護手霜或保濕品可能會將其塗層溶解。如果螢幕上留有任何物質,將其立即擦淨。
• 以面紙或其他材質用力擦拭可能會傷害塗層。• 如果螢幕上沾有指印或碎屑,我們建議您輕輕取下任何碎屑,然後用軟布將螢幕擦拭乾淨。

2
CT6
相機
[系統]
影像裝置:13.2 公釐× 8.8 公釐(1.0 類型)CMOS 感應器
相機的有效像素數:大約 20.2 百萬像素
相機的總像素數:大約 20.9 百萬像素
鏡頭:ZEISS Vario-Sonnar T 3.6 ×變焦鏡頭f = 10.4 公釐 - 37.1 公釐(28 公釐 - 100 公釐 (等同於35公釐底片機))F1.8 (W)- F4.9 (T)拍攝動態影像 (16:9)時:29公釐 - 105 公釐 *1
拍攝動態影像 (4:3)時:36公釐 - 128 公釐*1 當[ SteadyShot]設定為[標準]時
SteadyShot:光學檔案格式 (靜態影像):符合 JPEG
(DCF, Exif, MPF Baseline),RAW (Sony ARW 2.3 格式),DPOF 相容
檔案格式 (動態影像):AVCHD 格式 (AVCHD 格式 Ver. 2.0 相容):視頻:MPEG-4 AVC/H.264音頻:Dolby Digital 2 聲道,配備 Dolby Digital Stereo Creator• 由 Dolby Laboratories 授權製造。
動態影像 (MP4 格式):視頻:MPEG-4 AVC/H.264音頻:MPEG-4 AAC-LC 2 聲道
記錄媒體:Memory Stick PRO Duo、Memory Stick Micro、SD 卡、microSD 記憶卡
閃光燈:閃光範圍 (ISO 感光度(建議的曝光指數)設定為自動):大約0.3公尺至17.1公尺(W)/大約 0.55 公尺至 6.3 公尺 (T)
[輸入 / 輸出接頭]
HDMI 接頭:HDMI 微型插孔微型 USB 接頭:USB 通訊USB通訊:Hi-Speed USB(USB 2.0)
[螢幕]
LCD 螢幕:7.5 公分 (3.0 類型)TFT 驅動
總點數:1 228 800 點
[一般]
額定輸入值:3.6 V ,1.5 W操作溫度:0 至 40 ℃存放溫度:-20 至 60 ℃尺寸 (寬 / 高 /深)(概略值):
101.6 × 58.1 × 35.9 公釐質量 (概略值):240 公克
(包含電池、Memory Stick PRO Duo)
麥克風:立體聲揚聲器:單聲Exif Print:相容PRINT Image Matching III:相容
電源供應器 AC-UUD11/AC-UUD12/AC-UUE12額定輸入值:100 - 240 V ,
50/60 Hz,0.2 A額定輸出值:5 V ,1.5 A
二次鋰電池組 NP-BX1額定電壓:3.6 V
設計及規格如有變更,恕不另行通知。
規格
T
CT
27
C
商標• Memory Stick 和 是 Sony Corporation 的商標或註冊商標。
•“AVCHD Progressive”與“AVCHD Progressive”標誌是 Panasonic Corporation 與 Sony Corporation的商標。
• Dolby 和雙 D 標記是 Dolby Laboratories 的商標。
• HDMI、HDMI 標誌以及 High-Definition Multimedia Interface 是 HDMI Licensing LLC的商標或註冊商標。
• Windows是Microsoft Corporation在美國和 /或其他國家的註冊商標。
• Mac是 Apple Inc.在美國和其他國家的註冊商標。
• SDXC 標誌是 SD-3C, LLC 的商標。• Facebook 和 “f”標誌是Facebook, Inc. 的商標或註冊商標。
• YouTube和YouTube標誌是Google Inc. 的商標或註冊商標。
• Eye-Fi 是 Eye-Fi, Inc. 的商標。• 此外,在本使用說明書中所使用的系統和產品的名稱通常是其各自的開發商或製造商的商標或註冊商標。然而在本說明書中可能並非所有情況皆使用 ™ 或 ® 標記。
在 GNU GPL/LGPL 套用的軟體上本產品包含的軟體符合以下的GNU 通用公共授權 (以下簡稱“GPL”)或 GNU 較寬鬆通用公共授權 (以下簡稱 “LGPL”)。這是告知您,在隨附的 GPL/LGPL的條件之下,您有權限可存取、修改及再發佈這些軟體程式的原始碼。原始碼提供於網站上。您可以使用以下 URL 下載。http://oss.sony.net/Products/Linux/我們希望您不要就原始碼內容與我們聯繫。授權 (英文版)記錄於本產品的內部記憶體中。您可以在本產品與電腦之間建立大量儲存連線,以閱讀位於“PMHOME”- “LICENSE”資料夾中的授權。
在我們的客戶支援網站可以查到本產品新增的資訊和常見問題的答案。

© 2017 Sony Corporation