Schema Generation - Software AG Documentation
40
Natural Schema Generation Version 6.3.10 for Windows April 2011
-
Upload
khangminh22 -
Category
Documents
-
view
1 -
download
0
Transcript of Schema Generation - Software AG Documentation

Natural
Schema Generation
Version 6.3.10 for Windows
April 2011

This document applies to Natural Version 6.3.10 for Windows.
Specifications contained herein are subject to change and these changes will be reported in subsequent release notes or new editions.
Copyright © 2003-2011 Software AG, Darmstadt, Germany and/or Software AG USA, Inc., Reston, VA, United States of America,and/or their licensors.
Detailed information on trademarks and patents owned by Software AG and/or its subsidiaries is located athttp://documentation.softwareag.com/legal/.
Use of this software is subject to adherence to Software AG's licensing conditions and terms. These terms are part of the product doc-umentation, located at http://documentation.softwareag.com/legal/ and/or in the root installation directory of the licensed product(s).
This softwaremay include portions of third-party products. For third-party copyright notices and license terms, please refer to "LicenseTexts, Copyright Notices and Disclaimers of Third-Party Products". This document is part of the product documentation, located athttp://documentation.softwareag.com/legal/ and/or in the root installation directory of the licensed product(s).

Table of Contents
1 Schema Generation .......................................................................................................... 12 Introduction ..................................................................................................................... 3
What is Schema Generation? ..................................................................................... 4Restrictions ................................................................................................................. 4
3 What's New? .................................................................................................................... 5Prerequisites for the New Features ............................................................................ 6New Features ............................................................................................................. 7
4 Before You Start ............................................................................................................... 9Installation ................................................................................................................ 10Enabling the Use of Plug-ins .................................................................................... 10Activating a Plug-in ................................................................................................. 11Connecting to a Development Server ...................................................................... 14
5 Elements of Schema Generation .................................................................................... 17Menu Commands ..................................................................................................... 18Toolbar ...................................................................................................................... 18
6 Generating External Objects .......................................................................................... 197 Incorporating External Objects ...................................................................................... 27Index ................................................................................................................................. 35
iii

iv

1 Schema Generation
This documentation is organized under the following headings:
What is Schema Generation? Restrictions.Introduction
New features and enhancements.What's New?
How to activate this plug-in and how to connect to the developmentserver.
Before You Start
Menu commands and toolbar buttons that are available in theNatural Studio window when this plug-in has been activated.
Elements of Schema Generation
How to generate an external object from a documentation object.Generating External Objects
How to create a documentation object by incorporating informationfrom an external object.
Incorporating External Objects
Note: Reference documentation is provided separately. See External Objects in Predict fordetailed information.
1

2

2 Introduction
■ What is Schema Generation? .............................................................................................................. 4■ Restrictions ...................................................................................................................................... 4
3

This chapter covers the following topics:
What is Schema Generation?
Schema Generation is available as an optional plug-in unit for Natural Studio.
External objects can be generated or incorporated with Predict on the server or with SchemaGeneration in Natural Studio. Both have access to the same data.
Restrictions
In this version, generation and incorporation is supported for Adabas and DB2 structures. Thisincludes generation and incorporation of the following:
■ Adabas databases (incorporation only),■ Adabas files,■ DB2 databases,■ DB2 procedures/functions (generation only),■ DB2 storagegroups,■ DB2 tablespaces,■ DB2 tables/views,■ DDMs for Natural (generation only),■ activation of automatic processing rules (generation only).
Generation and incorporation of other external objects is currently only possible with Predict.
Schema Generation4
Introduction

3 What's New?
■ Prerequisites for the New Features ....................................................................................................... 6■ New Features ................................................................................................................................... 7
5

This chapter summarizes the new, improved and modified features provided by this version ofSchema Generation.
Prerequisites for the New Features
The new features can only be used with the version numbers listed below. When older versionsare installed, the commands for the new features listed below are dimmed in Natural Studio, andnew options are not shown in the wizard.
The following Software AG product must have been installed on the PC:
■ Natural Version 6.3 for Windows or above.
The following Software AG products must have been installed on the server:
■ Predict Version 4.5 or above on mainframe or UNIX platforms.■ Either Natural Development Server Version 2.2 or above on mainframe platforms,■ or the Natural Development Server which is part of Natural Version 6.3 for UNIX or above onUNIX platforms.
See also Prerequisites for Natural Single Point of Development in the Natural Single Point of Develop-ment (SPoD) documentation which lists the minimum requirements for this plug-in.
Schema Generation6
What's New?
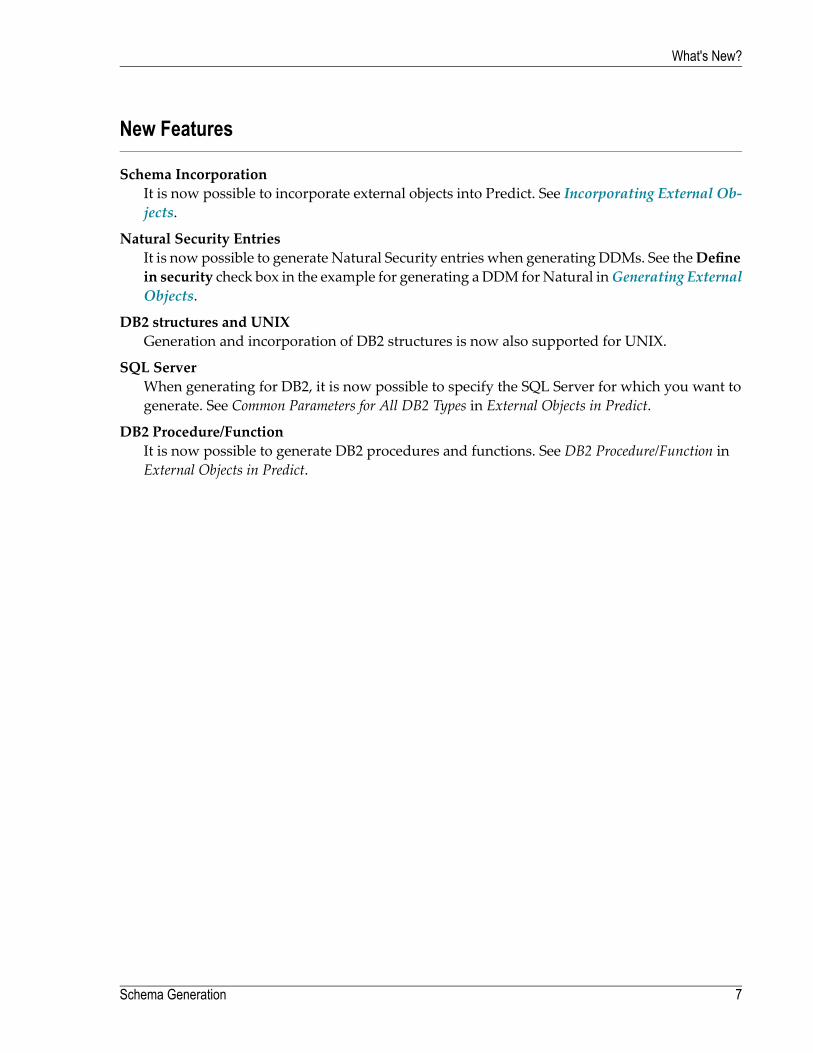
New Features
Schema IncorporationIt is now possible to incorporate external objects into Predict. See Incorporating External Ob-jects.
Natural Security EntriesIt is now possible to generate Natural Security entries when generating DDMs. See theDefinein security check box in the example for generating a DDM forNatural inGenerating ExternalObjects.
DB2 structures and UNIXGeneration and incorporation of DB2 structures is now also supported for UNIX.
SQL ServerWhen generating for DB2, it is now possible to specify the SQL Server for which you want togenerate. See Common Parameters for All DB2 Types in External Objects in Predict.
DB2 Procedure/FunctionIt is now possible to generate DB2 procedures and functions. See DB2 Procedure/Function inExternal Objects in Predict.
7Schema Generation
What's New?

8

4 Before You Start
■ Installation ..................................................................................................................................... 10■ Enabling the Use of Plug-ins .............................................................................................................. 10■ Activating a Plug-in .......................................................................................................................... 11■ Connecting to a Development Server .................................................................................................. 14
9

You have to activate this plug-in using the Plug-in Manager before you can use it.
This chapter covers the following topics:
Installation
The installation of this plug-in is part of theNatural forWindows installation. You can either installthis plug-in during a first-time installation or install it later in a separate setup process.
For further information on the installation procedure, see the Natural for Windows installationdocumentation.
Enabling the Use of Plug-ins
When the use of plug-ins has already been enabled in Natural Studio, the command Plug-inManager is available in the menu Tools > Configuration Tools. In this case, you can skip thissection.
If the command Plug-in Manager is not available in Natural Studio, you have to enable the useof plug-ins as described below.
To enable the use of plug-ins
1 From the Toolsmenu, chooseOptions.
TheOptions dialog box appears.
2 Choose theWorkspace tab.
3 Activate the Enable Plug-ins check box.
Schema Generation10
Before You Start

4 Choose theOK button.
The Plug-inManager command and the corresponding toolbar button are now available (seebelow). When the use of plug-ins is not enabled, this command and toolbar button are notshown.
Activating a Plug-in
A plug-in is not active by default. It can be activated when the Plug-inManager has been enabled.
Two types of activation mode are available:
■ AutomaticThe plug-in is automatically activated each time Natural is started.
11Schema Generation
Before You Start

■ ManualThe plug-in must be activated manually on demand (default).
Schema Generation12
Before You Start

To activate a plug-in
1 From the Toolsmenu, choose Configuration Tools > Plug-in Manager.
Or:
Choose the following toolbar button:
Note: The display of the toolbar containing this button can be switched on and off bychoosing Customize from the Toolsmenu.
The Plug-in Managerwindow appears.
2 Select the entry for the plug-in that you want to activate.
3 Click the right mouse button or press SHIFT+F10 and from the resulting context menu, chooseActivation mode > Automatic.
This does not automatically activate the plug-in for the current session. To activate it, you caneither restart Natural or proceed as described with the next step.
4 Click the right mouse button or press SHIFT+F10 while the entry for the plug-in is still selectedand from the resulting context menu, choose Activate.
13Schema Generation
Before You Start

Connecting to a Development Server
In order to work with a plug-in, you have to connect to a mapped Natural development server.
Once a development server has beenmapped, a node for this development server session is shownin the tree. To connect to a mapped development server, simply expand the node (or double-clickthe node, or select the node and press ENTER). If required, specify a password in the resultingMapEnvironment dialog box (detailed information on this dialog box is provided below).
When the required development server has not yet been mapped, proceed as described below.
To map to a development server
1 From the Toolsmenu, chooseMap > Environment.
Or:
Choose the following toolbar button:
Note: The display of the toolbar containing this button can be switched on and off bychoosing Customize from the Toolsmenu.
TheMap Environment dialog box appears. Your user ID is automatically provided.
Schema Generation14
Before You Start

2 In theHost name text box, enter the name of the development server.
3 In the Server port text box, enter the TCP/IP port number of the development server.
4 Optionally. In the Environment name text box, enter the name that is to appear in the tree.If you leave this text box blank, a combination of server name and port number is shown inthe tree.
5 If dynamic parameters are required for your development server, specify them in the Sessionparameters text box. Otherwise, leave this text box blank.
6 If Natural Security is installed on the development server, specify the required password inthe Password text box. Otherwise, leave this text box blank.
7 Choose theOK button.
When the connection has been established, all libraries (according to the security profile) forthis session are shown in your library workspace. You are automatically logged on to yourdefault library.
15Schema Generation
Before You Start

16

5 Elements of Schema Generation
■ Menu Commands ............................................................................................................................ 18■ Toolbar .......................................................................................................................................... 18
17

When Schema Generation has been activated in the Plug-in Manager, the following additionalelements are available in the Natural Studio window:
Menu Commands
When Schema Generation has been activated, the Tools > Development Toolsmenu provides thecascading menu Schema Generationwith the following commands:
Using this command, you can ...Command
Generate an external object from a documentation object.Schema Generation
Create a documentation object by incorporating information froman external object.Schema Incorporation
Toolbar
When Schema Generation has been activated, an additional toolbar is shown. The toolbar buttonsrepresent the following menu commands:
Schema Generation
Schema Incorporation
Note: The display of this toolbar can be switched on and off by choosing Customize fromthe Toolsmenu.
Schema Generation18
Elements of Schema Generation

6 Generating External Objects
This chapter describes the wizard that is used for schema generation.
Thewizard provides several pages inwhich you have to specify information. The number of pagesand the information on these pages depends on the object type that has been selected on the firstpage of the wizard.
For detailed information on the object type-specific information that can be specified using thiswizard, see Generation of External Objects in External Objects in Predict.
The wizard uses edit controls such as text boxes, check boxes or drop-down list boxes. For thedescription of check boxes, the reference documentation External Objects in Predict uses the abbre-viations Y (yes) and N (no). Y means that the check box is selected, and N means that the checkbox is not selected.
To generate an external schema
1 From the Tools > Development Tools > Schema Generationmenu, choose Schema Genera-tion.
Or:
Choose the following toolbar button:
The schema generation wizard appears, providing several pages.
19

Note: If DB2 is not installed at your site, the generation functions for DB2 objects arenot available.
2 Select the option button for the type of external object that you want to generate.
3 From the drop-down list box, select the object for which generation is to take place.
Or:
If you know the name of the object, you can also type its name in the drop-down list box.
4 Choose theNext button to proceed to the next page.
Note: TheNext button is only available when all required information has beenprovided.
The number of pages and the information on the next pages depends on the object type thathas been selected on the first page.
Schema Generation20
Generating External Objects

Example - generate DDM for Natural:
Note: This type of page, on which you can select information from a drop-down listbox, is only shown for specific types of external objects. Its appearence also dependson specific defaults defined by the administrator and/or the object that has been selectedon the first page of the wizard.
5 Specify the required information and choose theNext button to proceed to the next page.
21Schema Generation
Generating External Objects

Example - generate DDM for Natural:
TheDefine in security check box is only shown when you are working in an environmentin which Natural Security is active.
6 Specify the required information and choose theNext button to proceed to the next page.
Schema Generation22
Generating External Objects

The following page is only shownwhen you generate a DDM for Natural, and only when theDefine in security check box has been selected in the previous page. When this check box isnot selected, you proceed directly to page 5.
For information on the security parameters on this page, see the Natural Security document-ation.
7 Specify the required information and choose theNext button to proceed to the next page.
23Schema Generation
Generating External Objects

Example - generate DDM for Natural:
This page shows only the settings which have been modified on the previous page.
8 If all required information has been specified, choose the Finish button to start generation.
Note: As long as you do not choose the Finish button, you can go back to the previouspages by choosing the Back button.
When the generation process has completed, the last page of the wizard is shown. If the Listoption has been selected previously, a report is shown. If this option has not been selected,the corresponding text box is empty.
However, if an error occurs during the generation process, an error report is shown in thetext box. The error report is always shown. The setting of the List option is not considered inthis case.
Note: The complete name for the List option depends on the selected object type. Forexample, if you have selected a DDM for Natural, the name of the option is List gener-ated code.
Schema Generation24
Generating External Objects

Example - generate DDM for Natural:
When you choose the Print button, you can print the report on a printer that is defined underWindows.
9 Choose theOK button to close the dialog box.
Or:
If you want to start generation for another object, choose theNew Start button and proceedas described above.
25Schema Generation
Generating External Objects

26

7 Incorporating External Objects
This chapter describes the wizard that is used for schema incorporation.
Thewizard provides several pages inwhich you have to specify information. The number of pagesand the information on these pages depends on the object type that has been selected on the firstpage of the wizard.
For detailed information on the object type-specific information that can be specified using thiswizard, see Incorporation in External Objects in Predict.
The wizard uses edit controls such as text boxes, check boxes or drop-down list boxes. For thedescription of check boxes, the reference documentation External Objects in Predict uses the abbre-viations Y (yes) and N (no). Y means that the check box is selected, and N means that the checkbox is not selected.
To incorporate an external schema
1 From theTools >Development Tools > SchemaGenerationmenu, choose Schema Incorpor-ation.
Or:
Choose the following toolbar button:
The schema incorporation wizard appears, providing several pages.
27

Note: If DB2 is not installed at your site, the incorporation functions for DB2 objectsare not available.
2 Select the option button for the type of external object that you want to incorporate.
3 Choose theNext button to proceed to the next page.
The information on the next pages depends on the object type that has been selected on thefirst page.
Schema Generation28
Incorporating External Objects

Example - incorporate Adabas file:
4 Specify the selection criteria and choose theNext button to proceed to the next page.
29Schema Generation
Incorporating External Objects

Example - incorporate Adabas file:
The incorporation functions that are available on this page depend on the object type that hasbeen selected on the first page.
5 From the drop-down list box, select the object that you want to incorporate.
When an object has been selected, the option button(s) for the incorporation function(s) thatcan be executed for this object are no longer dimmed.
For general information on these buttons, see Overview of Incorporation Options in ExternalObjects in Predict.
6 Select the option button for the incorporation function that you want to execute and choosetheNext button to proceed to the next page.
Schema Generation30
Incorporating External Objects

An additional page appears when you have selected the incorporation function Incorporateor Connect. You can then specify the incorporation or connect options.
Example - incorporation options for an Adabas file:
Note: Such a page does not appear for the incorporation functions Test and DisplayMasters.
7 Specify the required information and choose theNext button to proceed to the next page.
31Schema Generation
Incorporating External Objects

Example - incorporate Adabas file:
This page shows only the settings which have been modified on the previous pages.
8 If all required information has been specified, choose the Finish button to start incorporation.
Note: As long as you do not choose the Finish button, you can go back to the previouspages by choosing the Back button.
When the incorporation process has completed, the last page of the wizard is shown. If theList incorporated code option has been selected previously, a report is shown. If this optionhas not been selected, the corresponding text box is empty.
However, if an error occurs during the generation process, an error report is shown in thetext box. The error report is always shown. The setting of the List incorporated code optionis not considered in this case.
Schema Generation32
Incorporating External Objects

Example - incorporate Adabas file:
When you choose the Print button, you can print the report on a printer that is defined underWindows.
9 Choose theOK button to close the dialog box.
Or:
If youwant to start incorporation for another object, choose theNewStart button and proceedas described above.
33Schema Generation
Incorporating External Objects

34

Index
DDevelopment server
connect, 14map, 14
EExternal object
wizard for generating schemas, 19wizard for incorporating schemas, 27
GGeneration
invoke wizard, 19
IIncorporation
invoke wizard, 27Installation, 10
KKeywords
shown in wizard, 24
MMap environment, 14Menu commands
for Schema Generation, 18
NNatural Studio
Schema Generationelements in Natural Studio window, 17
PPlug-in
activate in Plug-in Manager, 11Plug-in Manager
enable, 10
RReport
display in wizard, 24
TToolbar
for Schema Generation, 18
WWizard
generate schema, 19incorporate schema, 27
35

36