
SAS Event Stream Processing 6.2: Using the ESP Server
62
SAS ® Event Stream Processing 6.2: Using the ESP Server Setting Up and Using the ESP Server Overview The ESP server is an engine executable that instantiates and executes projects. Each engine can contain zero or more projects. The ESP server supports two sets of HTML services: n an administrative service for control communication through which you can start, stop, create, and remove projects. You can also publish events and query windows. n a publish/subscribe service to support SAS Event Stream Processing Streamviewer. The ESP server supports Insert, Update, Upsert, and Delete opcodes. It uses pi_HASH as the default primary index. You can set the primary index at the project, continuous query, or window level. You must run at least one metering server to maintain event counts on production ESP servers. When starting ESP servers from the command line, you should start the metering server before you start the ESP servers. For more information, see “Using the Metering Server”. Note: The ESP server does not support Kerberos authentication in Windows environments. Configuration Directory After you deploy SAS Event Stream Processing, configuration files are located in a specific location:
-
Upload
khangminh22 -
Category
Documents
-
view
3 -
download
0
Transcript of SAS Event Stream Processing 6.2: Using the ESP Server

SAS® Event Stream Processing 6.2: Using the ESP Server
Setting Up and Using the ESP Server
OverviewThe ESP server is an engine executable that instantiates and executes projects. Each engine can contain zero or more projects. The ESP server supports two sets of HTML services:
n an administrative service for control communication through which you can start, stop, create, and remove projects. You can also publish events and query windows.
n a publish/subscribe service to support SAS Event Stream Processing Streamviewer.
The ESP server supports Insert, Update, Upsert, and Delete opcodes. It uses pi_HASH as the default primary index. You can set the primary index at the project, continuous query, or window level.
You must run at least one metering server to maintain event counts on production ESP servers. When starting ESP servers from the command line, you should start the metering server before you start the ESP servers. For more information, see “Using the Metering Server”.
Note: The ESP server does not support Kerberos authentication in Windows environments.
Configuration DirectoryAfter you deploy SAS Event Stream Processing, configuration files are located in a specific location:

Table 1 Default Location of Configuration Files
Operating System Location
Linux /opt/sas/viya/config/etc/SASEventStreamProcessingEngine/default
Windows %ProgramData%\SAS\Viya\etc\SASEventStreamProcessingEngine\default
On Windows, if the environment variable ProgramData is defined, it is placed at the beginning of the configuration directory’s path, before \SAS\.
You can use two environment variables to set up alternative configurations.
Table 2 Environment Variables to Set Up Alternative Configurations
Environment Variable Description
DFESP_CONFIG Replaces the default location. You must copy files from the default location to the full path specified in order to use alternative logs, metering, and MAS stores. The ESP servers run by a user with this variable set would abide by configuration values specified in the alternative location.
DFESP_CONFIG_TAIL Appends to the default location. You must copy files from the default location to the specified subdirectory in order to use alternative logs, metering, and MAS stores.
Note: To edit configuration files, you must be a member of the sas group.
Setting Up the ESP Server as a DaemonOn Linux systems, init.d contains scripts used by init, the first process that the kernel runs after initialization. You can use these scripts to configure, start, and stop services and daemons.
To set up your system so that the ESP server starts as a daemon, edit the following files in the init.d subdirectory of the configuration directory:
n espsrvd.conf — the primary initialization file
n espsrvd.rh — the Linux (x86 installation) initialization script
n espsrvd.db — the Debian and Ubuntu initialization script
Follow these steps to set up an ESP server as a system daemon:
1 Edit espsrvd.conf to reflect your preferences.
For example:
export DFESP_HOME=/opt/sas/viya/home/SASEventStreamProcessingEngine/6.1 a
... SASTK=/opt/sas/viya/home/SASFoundation/sasexe b ...
2

ESPENV="server.http=31999" c
ESPENV=${ESPENV}",logging.loggers.root.logdir=/tmp/daemon/" d
ESPENV=${ESPENV}",logging.loggers.root.level=error" export LD_LIBRARY_PATH=$DFESP_HOME/lib:${SASTK} export ESPENV
a The value that appears here is the default location. You can set it to the root directory of an alternative deployment.
b The value that appears here is the default location. When DFESP_HOME is set to a different location, set it to the following location:
SASTK=${DFESP_HOME}/lib/tk
c Use the ESPENV environment variable to override server property values set in esp-properties.yml. Specify the property in terms of the hierarchy that appears in the file (for example, top level server, property http). This line sets the HTTP port to 31999, overriding the default value of 31415.
d The first logging lines changes the log directory to be used by appenders to /tmp/daemon. The second line sets the logging level to error.
2 Create links from the SAS Event Stream Processing init directories to your system init directory:
cd /etc/sysconfig sudo ln -s /opt/sas/viya/config/etc/SASEventStreamProcessingEngine/default/init.d/espsrvd.conf ./espsrvd
Linux (x86 architecture)
cd /etc/init.d sudo ln -s /opt/sas/viya/config/etc/SASEventStreamProcessingEngine/default/init.d/espsrvd.rh ./espsrvd
Debian or Ubuntu
cd /etc/init.d sudo ln -s /opt/sas/viya/config/etc/SASEventStreamProcessingEngine/default/init.d/espsrvd.db ./espsrvd
3 Make sure that the script is denoted as executable:
sudo chmod +x /etc/init.d/espsrvd
4 Enable the service to start automatically at run levels 2345:
Linux (x86 architecture)
sudo chkconfig espsrvd on
Debian or Ubuntu
update-rc.d espsrvd defaults
5 Start the service:
sudo service espsrvd start
After this setup, standard init.d functionality is available.
/etc/init.d/espsrvd {start|stop|restart|status}
3

Configuring the ESP Server
OverviewConfigure the ESP server by setting the values of key-value pairs that are specified in esp-properties.yml, which is located in the configuration directory. The file contains five sections:
n server configuration properties
n connector configuration properties
n security configuration properties
n logger configuration properties
n metering server configuration properties
The properties in each section are hierarchical, and can contain as many as six levels (for example, security.oauth2.client.grant_types.password.username). The top level always refers to the class of behavior to be governed: server, connectors, security, logger, meta.
You can override property values in four ways:
n With the ESPENV environment variable.
n With the appropriate element in an XML file that specifies the event stream processing model.
n Through a specific ESP server command line argument.
n Though a key-value pair set with the -C argument to the ESP server command.
For example, the HTTP port is set to 31413 in the configuration file. Using the following command line overrides that port value:
dfesp_xml_server -C "server.http=54321"
Using the following command line would also override that port value:
dfesp_xml_server -http 54321
When you run a model that contains the following lines, the value in the XML element value overrides whatever value is set on the command line:
<http-servers> <http-server port=”54321”/></http-servers>
Finally, setting the ESPENV environment variable sets the port value for any subsequent ESP server that you start:
export ESPENV="server.http=54321"
Server Configuration PropertiesThe file esp-properties.yml contains the following server configuration properties. After you start an ESP server, the values that you set here are applied:
server:
http: 31415 # Port used by the HTTP REST API
4

pubsub: 31416 # Publish/subscribe port used by the server
disableTrace: true # Disable trace by default to avoid log injection
single_port_mode: false # Single pubsub port, no ephemeral ports! 1
binaddress: # If defined, bind the ESP server to the specified IP address 2
loadProjectOnly: true # When set to true, a project is loaded but not started 3
# daemon: false # When set to true, run the ESP server as a daemon
# engine: esp # Specify default engine name/ID -- one of two elements used to identify a running ESP server
# protected: false # When set to true, models submitted to the ESP server must be encrypted 4
# logcapture: false # When set to true, enables ESP server log messages to be retrieved by a rest call
# "logcapture-size": 100 # Specify maximum number of log messages capture. Only valid when logcapture: true 5
# "mas-threads": 0 # When set to 0, creates one MAS thread per CPU. Set to the number of MAS threads desired across CPUs.
# license: # Specify /full/path/to/license
# store-location: # Specify location of MAS stores
# loglevel: esp=trace # You can specify a list of specify comma-separated key-value pairs 6
# restore: # Specify the path from which ESP restores a project
# trace: # Specify trace format: XML, JSON, or CSV
# badevents: # Specify path to the file to which bad events are written
# plugins: # Specify plugins (functions) to use
# plugindir: # Specify directory to search for user-defined and dynamically loaded plugins
# model: "file://model.xml" # Specify a file that contains XML code for a model to run when the ESP server starts
# xml: | # Alternatively to specifying a model, embed XML code to run when the ESP server starts
# <engine>
...
# </engine>
# "on-project-fatal": "stop-and-remove" # Specifies the action to take when a project results in a fatal error 7
# projects.persist: false # When true restore all persisted projects, and maintain any changes that had been made to
them 8
# projects.backingstore: # Specify a fully qualified patch where all projects get stored and restored from
# esm: # The URL of a SAS Event Stream manager instance that an ESP server registers with
1 When the ESP server is behind a firewall that does not permit TCP traffic through dynamically created ephemeral ports, set this to true. All clients use only the port specified with pubsub.
2 Set a value when the computer system on which the ESP server is running has multiple NICs. This enables you to bind to a specific NIC.
3 When a project is loaded but not started, you must explicitly start the project through the RESTful API. This provides a way for web-based clients to synchronize with projects.
4 Specifies whether the ESP server is run in protected mode. When true:
n Models submitted to the server must be encrypted.
n The /eventStreamProcessing/v1/projects REST request returns only windows with publish/subscribe enabled.
n You cannot retrieve the XML for a model.
5 Specifies the number of log messages to keep in memory. Enable log capturing by setting logcapture to true.
6 Sets the initial logging level. You can set the level for individual logging contexts. Here, the ESP logger is set to trace.
7 Specifies the action to take when a project results in a fatal error. Valid values are:
n exit
n exit-with-core
n stop-and-remove
5

8 When set to true, all loaded or changed projects are saved in a backup store. When the ESP server is restarted, that set of projects are restored. Unless you specify an alternative path with the project-backingstore property, projects are stored in the configuration directory.
Properties to Set Environment VariablesThe ESPENV environment variable is available to override server property values set in esp-properties.yml. There might be times, though, when the limit on the maximum length of an environment variable makes the exclusive use of ESPENV inconvenient. The env section of esp-properties.yml enables you to set additional environment variables.
Each ESP configurable property can be specified by a field in the section. You can uniquely identify the property with a string that is formed by concatenating field names starting from the top level using “.”.
You can put a configurable property in this section and map it to an environment variable other than ESPENV. It is your responsibility to make sure the environment variable is unique. The ESP server uses the environment variable specified here for that particular property.
In the following code, the ESP server is instructed to assign the value server.xml to the environment variable ESPENV_XML and the value of server.license to the environment variable ESPENV_LICENSE.
env: server.xml: ESPENV_XML server.license: ESPENV_LICENSE
Properties to Expose ESP Server Metrics for PrometheusPrometheus is an open-source application used to monitor events and alerts. The prometheus section of esp-properties.yml exposes ESP server metrics using Prometheus format.
Prometheus uses a multi-dimensional data model. It stores all data as time series, identified by metric name and key-value pairs (labels). Here is the data format:
metric_name{label_name="label_value"...}
For example, using this data format you can represent the total number of HTTP POST requests to the /messages endpoint as follows:
api_http_requests_total{method="POST", handler="/messages"}
By default, Prometheus scrapes the ESP server’s /metrics endpoint for server metrics. You can modify the default endpoint with the prometheus.url property.
Prometheus offers four core metric types, of which SAS Event Stream Processing uses three:
6

Table 3 Prometheus Core Metric Types Supported by SAS Event Stream Processing
Core Metric Type Description
Gauge A single numerical value that can arbitrarily rise or fall. The ESP server exposes two types of gauges: window_cpu_usage and esp_mem_usage.
window_cpu_usage represents a family of gauge metrics. Each metric has the label window_name to identify what window that owns the metric. You can specify additional labels under the labels field.
esp_mem_usage represents a family of three gauge metrics that differ by memory_type. The ESP server exposes total RAM (total), Resident Set Size (rss) and virtual memory (vm).
Counter A cumulative metric that represents a single monotonically increasing counter. The ESP server exposes two counters:
prometheus_transferred_bytes_total is number of bytes that are transferred to the Prometheus server.
prometheus_scrapes_total is number of times that the ESP server is scraped by a Prometheus server.
Summary Samples observations such as request durations and response sizes. It provides a total count of observations and a sum of all observed values. It also calculates configurable quantiles over a sliding time window. The ESP server exposes prometheus_request_latencies.
Note: SAS Event Stream Processing currently does not use the Histogram core metric type.
prometheus: #existing metrics that can be scraped by prometheus url: metrics # specify the URL for Prometheus to use in order to scrape metrics gauge: window_cpu_usage: # This is a family name, do not change it. # You can comment out an entire family # if you do not want to expose it. help: "percentage of CPU utilization" labels: #default lables: window_name label1: value1 # additional labels esp_mem_usage: # This is a family name, do not change it. help: "memory usage of the ESP process" labels: #default label: memory_type (total/rss/vm) label1: value1 # additional labels counter: # This is a family name, do not change it. prometheus_transferred_bytes_total: help: Transferred bytes to metrics services prometheus_scrapes_total: help: Number of times metrics were scraped labels: label1: value1 summary: prometheus_request_latencies: #This is a family name, do not change it. help: Number of times metrics were scraped quantiles: 0.5,0.05;0.9,0.01;0.99,0.0001 # Specify ";" separated pairs,
7

# A pair represents quantile;error, # Separated each pair with "," # Do not use spaces labels: label1: value1 histogram:
For more information about Prometheus, see the documentation.
Setting Environment VariablesBefore you start the ESP server, you must set the following environment variables:
Table 4 SAS Event Stream Processing Environment Variables
Variable UNIX Windows
DFESP_HOME /opt/sas/viya/home/SASEventStreamProcessingEngine/6.1
C:\PROGRA~1\SAS\Viya\SASEventStreamProcessingEngine\6.1
The setting for this variable does not affect the default installation location, which is C:\Program Files\SAS\Viya.
If you installed in a location other than the default, update the path to match the installation directory.
LD_LIBRARY_PATH $DFESP_HOME/lib:/opt/sas/viya/home/SASFoundation/sasexe
If you need to maintain your LD_LIBRARY_PATH setting for another SAS product, then apply the following:
$DFESP_HOME/lib:/opt/sas/viya/home/SASFoundation/sasexe:$LD_LIBRARY_PATH
There is no need to set this variable in Windows environments.
PATH $PATH:$DFESP_HOME/bin %PATH%;%DFESP_HOME%\bin;C:\PROGRA~1\SAS\Viya\SASFoundation\sasexe
If you installed in a location other than the default, update the path to match the installation directory.
SAS Event Stream Processing includes the internal component SAS Micro Analytic Service. To use the Anaconda Python support in SAS Micro Analytic Service, you must set one of the optional variables listed in the table for your version of Python. For more information, see SAS Micro Analytic Service: Programming and Administration Guide, which is available on the SAS Event Stream Processing product page.
8

You can base64 encode the string value of an environment variable. Add b64 in front of the encoded string, and then pass the combined string to the environment variable. The ESP server base64 decodes the combined string before assigning the value to the environment variable.
When you pass a long string value, such as set of XML statements, as the value of an environment variable, do not exceed the maximum length of the environment variable. That maximum length often depends on the operating system. You can also use a compression program such as gzip to compress a string before you base64 encode it. The ESP server decodes it and decompresses it before assigning the value.
Starting the ESP Server on the Command LineAfter you set the DFESP_HOME and PATH environment variables, run the following command to start the ESP server:
dfesp_xml_server
When you run the command, the ESP server starts on the HTTP and publish/subscribe port values that are specified in esp-properties.yml.
You can use the following arguments to tune and enable ESP server functionality.
Table 5 Command Arguments for the ESP Server
Argument Description
-http port | ports Runs an ESP server where projects are dynamically created, started, stopped, and destroyed.
Specify the port for the HTTP REST API. The value of port cannot exceed 65535.
You can specify ports in order to start a secure HTTP server (for example, -http 8091s).
—pubsub port Specifies the publish/subscribe port of the ESP server. The value of port cannot exceed 65535.
-model url Runs an ESP server as a stand-alone engine with pre-defined projects. Starting the server with a specified model does not preclude the dynamic arrangement of projects.
Specify the URL to the XML model. Use the URL notation for files, specifying the full path to the XML model (file://fullpathtofile).
-auth mechanism Enables authentication using the specified mechanism, which is one of the following values:
saslogon://host:port?user=user
Restricts publish/subscribe activity to the specified user.
oauth://OAuth_User
Restricts activity to the specified OAuth_User.
kerberos://Kerberos_Service_Name
Restricts activity to the specified Kerberos service.
9

Argument Description
-badevents file Specifies the file to which bad events are written.
-engine name Specifies the name of the ESP engine. The default is 'esp'.
-esm file://fullpath/esm.xml
Specifies the name of a file that contains one or more SAS Event Stream Manager endpoints. The ESP server reads the contents of this file and saves SAS Event Stream Manager server information. The ESP server attempts to register with all specified SAS Event Stream Manager servers by sending a REST registration request to the endpoint.
For more information, see the SAS Event Stream Processing on Linux: Deployment Guide.
-license path Specifies an alternative path for the product license key. By default, SAS Event Stream Processing looks for license.txt in $DFESP_HOME/etc/license.
—loglevel "context=level"
Sets the initial logging level for the specified logging context. For a list of logging contexts, see “Enabling Logging Contexts on the ESP Server Command Line” in SAS Event Stream Processing: Troubleshooting.
Set level to off | trace | debug | info | warn | error | fatal.
You can set the logging level for more than one context on a single command line. For example:
dfesp_xml_server -loglevel "esp=error,common.http=debug,esp.windows=trace"
sets the logging level to error for the ESP server, to debug for HTTP requests that come into the ESP server, and totrace for window issues .
-logcapture | -logcapture-size value
Turns on capturing the ESP server log. You can provide the captured log to clients through a REST connection or a WebSocket connection. By default, log capturing is turned off.
After an ESP server is running, you can turn log capturing on and off through the RESTful API.
When log capturing is turned on, the ESP server stores 100 log messages by default. You can change this value by specifying a value with the -logcapture-size argument.
-logconfig file Specifies the SAS logging facility configuration file to use. This is an XML file or a set of SAS program statements that determines how log events are processed.
For more information about the SAS logging facility, see the SAS 9.4 Logging: Configuration and Programming Reference, Second Edition.
IMPORTANT When you specify a logging facility configuration file with this argument, the ESP server does not refer to esp-properties.yml for logging properties.
-mas-threads size Specifies the size of the SAS Micro-Analytic Service thread pool. Defaults to one thread per core.
-messages dir Specifies the directory in which to search for localized message files.
10

Argument Description
-meta list Specifies a &-separated list of name=value pairs used to set configuration data for the ESP server.
on-project-fatal exit | exit-with-core | stop-and-remove
Specifies what action to take when a project results in fatal command-line message.
-plugindir dir Specifies the directory in which to search for user-defined and dynamically loaded plug-ins, defaults to plugins.
-protected Runs the ESP server in protected mode. This means the following:
n Models submitted to the server must be encrypted. This applies to models that you specify on the command line with the -model argument and models you load through the RESTful API.
For more information, see “Working with Encrypted Models”.
n The /eventStreamProcessing/v1/projects REST request returns only windows with publish/subscribe enabled:
<window-source name='trades' insert-only='true' pubsub='true'>
n You cannot retrieve the XML for a model. Thus, when you run the following:
$ dfesp_xml_client -url "http://host:port/eventStreamProcessing/v1/projects/p?xml=true"
The request returns successfully, but the model XML is not included.
When the ESP server is running in protected mode, it automatically tries to decrypt any model data that you submit. When the data is not encrypted, this generates an error.
-restore path Specifies the path from which SAS Event Stream Processing restores a project.
-project—persist Specifies to persist all projects. Unless you specify a location with -projects-backingstore, persisted projects are stored in the configuration directory.
-project—backingstore path
Specifies a path where persisted projects should be stored.
Enabling Server IdentificationUse two IDs to enable the identification of a running ESP server: the system site ID and an engine ID (name).
The first time that you run an ESP server, it writes a file named $DFESP_HOME/etc/syssiteid that contains a Globally Unique Identifier (GUID). Any subsequent run of dfesp_xml_server on the same computer system gets the same GUID. This GUID serves as the system site ID.
11

When you start an ESP server, you can pass it an engine ID using the -engine argument. Alternatively, you can set the engine ID in the server section of esp-properties.yml. If you do not set it, it defaults to a unique GUID.
When you start an ESP server, these two IDs appear in an INFO message in the server log. They are also sent to the metering server.
$ dfesp_xml_server -http 31415 -engine work -loglevel DF.ESP.STATS=trace -model file://model.xml
019-02-01T11:03:56,934; INFO ; 00000004; DF.ESP.ENGINE; (dfESPengine.cpp:638); {work}[Engine0044] dfESPengine::initialize() System SITE ID: d30b5fc4-d5b4-4232-a986-c007e0bab596, Engine ID: work
***Metering event: <meter-data license='0050835083-0300152159' properties='licenseType=EDGE,engineID=work,sysSiteID=d30b5fc4-d5b4-4232-a986-c007e0bab596,hostname=espsrv01.orion.com' time='1549019037477' project='project' query='cq' window='srcW' events='13'/>
Stopping the ESP Server on the Command LineTo stop the ESP server, run the following command:
dfesp_xml_client -url "http://host:port/eventStreamProcessing/v1/server/state?value=stopped" -put
<response> <message>esp exiting</message></response>
Using SAS Event Stream Manager to Load Projects in a Kubernetes ClusterAfter you deploy SAS Event Stream Processing to a Kubernetes cluster, you can use SAS Event Stream Manager to deploy projects to that cluster. When you do so, an ESP server is created on demand in the cluster. When you stop the project, the ESP server is deleted from the cluster.
For more information, see SAS Event Stream Manager: Using SAS Event Stream Manager.
12

Using the Metering Server
OverviewA metering server aggregates event counts based on license, source window, and hour of the day. It stores aggregated results in an H2 database, which a client can query in order to track the total volume of events processed. In this way, you can ensure that your production ESP servers are in compliance with the terms of your software license.
You can start a metering server from the command line of the server where you run ESP servers. When you run SAS Event Stream Processing in a Kubernetes cluster, you deploy a pre-built image of the metering server in the cluster.
You are not required to track events on development ESP servers because they do not contribute to the event volume assigned to your software license.
Command Line Quick StartYou must run at least one metering server to maintain event counts on your production ESP servers. To start and use the metering server on the command line, follow these steps:
1 Obtain Write permissions to the configuration directory.
2 Examine the meta section of esp-properties.yml. Ensure that the enableMetaProject, meteringinterval, and meteringhost parameters are uncommented. You can use their default values.
3 In a UNIX environment, run the following command to start the metering server using its default port (31001) and an H2 database:
dfesp_metering -d
In a Windows environment, sign in to the server as an administrator and start a Command Prompt with Run as Administrator. Then run the following command:
%DFESP_HOME%\bin\dfesp_metering.bat -d
When you start the metering server with the -d argument, a log file is automatically created in the configuration directory.
Note: Do not run dfesp_metering with the sudo command unless your root environment has set all the appropriate environment variables (DFESP_HOME and LD_LIBRARY_PATH ). It is not recommended to run the metering server as root.
Note: Any ESP servers started after this step log their usage to the metering server.
13
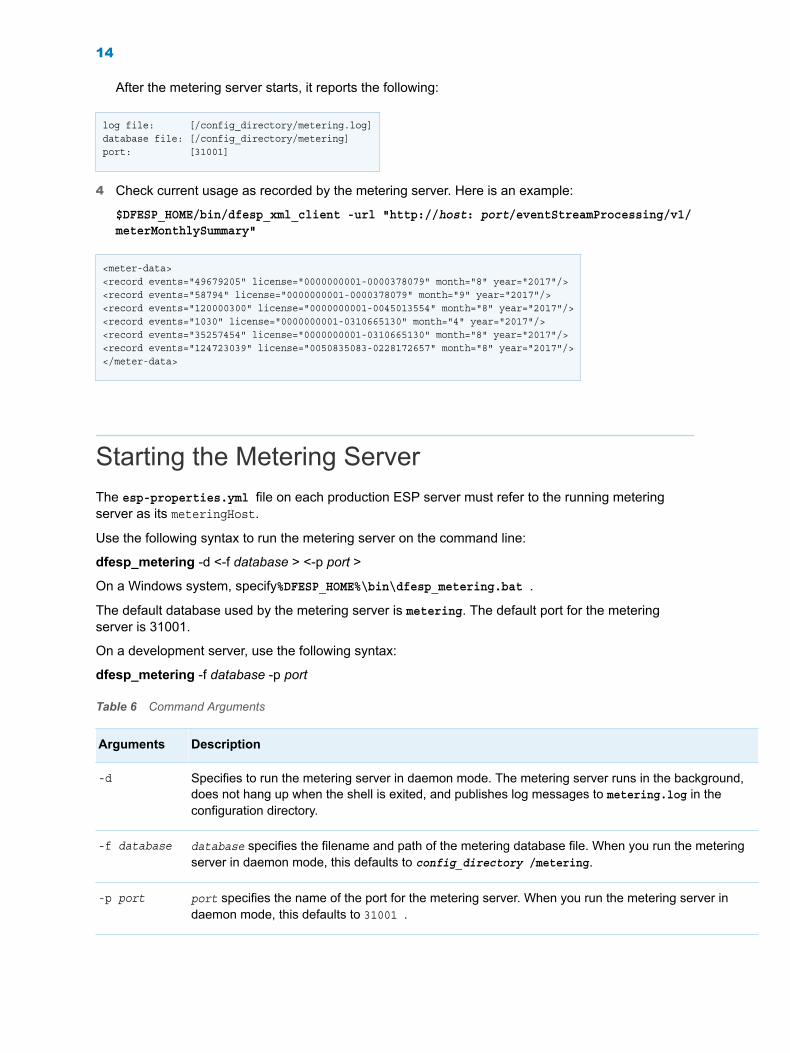
After the metering server starts, it reports the following:
log file: [/config_directory/metering.log]database file: [/config_directory/metering]port: [31001]
4 Check current usage as recorded by the metering server. Here is an example:
$DFESP_HOME/bin/dfesp_xml_client -url "http://host: port/eventStreamProcessing/v1/meterMonthlySummary"
<meter-data><record events="49679205" license="0000000001-0000378079" month="8" year="2017"/><record events="58794" license="0000000001-0000378079" month="9" year="2017"/><record events="120000300" license="0000000001-0045013554" month="8" year="2017"/><record events="1030" license="0000000001-0310665130" month="4" year="2017"/><record events="35257454" license="0000000001-0310665130" month="8" year="2017"/><record events="124723039" license="0050835083-0228172657" month="8" year="2017"/></meter-data>
Starting the Metering ServerThe esp-properties.yml file on each production ESP server must refer to the running metering server as its meteringHost.
Use the following syntax to run the metering server on the command line:
dfesp_metering -d <-f database > <-p port >
On a Windows system, specify%DFESP_HOME%\bin\dfesp_metering.bat .
The default database used by the metering server is metering. The default port for the metering server is 31001.
On a development server, use the following syntax:
dfesp_metering -f database -p port
Table 6 Command Arguments
Arguments Description
-d Specifies to run the metering server in daemon mode. The metering server runs in the background, does not hang up when the shell is exited, and publishes log messages to metering.log in the configuration directory.
-f database database specifies the filename and path of the metering database file. When you run the metering server in daemon mode, this defaults to config_directory /metering.
-p port port specifies the name of the port for the metering server. When you run the metering server in daemon mode, this defaults to 31001 .
14

Configuring How the ESP Server Interacts with the Metering ServerConfigure how the ESP server interacts with the metering server through properties specified in the meta section of esp-properties.yml . This file is located in the configuration directory.
Table 7 Required Properties
Property Description
enableMetaProject:true Ensures that the meta project is created.
meteringinterval: seconds Specifies how frequently a metering event should be generated while data is flowing.
meteringhost: host Specifies the host name of the metering server.
meteringport: port Specifies the port on which the metering server was started. The port defaults to 31001 in daemon mode.
Table 8 Optional Properties
Property Description
meteringbuffersize: size Specifies the buffer size for devices that have intermittent internet connection. The default value is 64*1024.
Additional parameters are available to extend the metering window schema for a subscriber’s specific needs:
Table 9 Additional Parameters
Parameter Description
meteringfields: field1<,field2,...fieldN > Specifies fields to add to the end of the metering window schema.
meteringvalues: value1<,value2,...valueN > Specifies static values of the added fields.
These additional meteringfields include the following:
n licenseType=EDGE | SERVER | CAS
n engineID= engineID
n hostname= server_hostname
15

Retrieving Data from the Metering Server
Using the ESP ClientYou can use the ESP client to retrieve data from a running metering server, as follows:
dfesp_xml_client -url "http://host: port/eventStreamProcessing/v1/meterData<?license= license><&project= project_name><&contquery= contquery_name><&window=window_name><&year=year><&month=month >"
Enter the name of the metering server as the host and specify the port it uses. Specify one or more of the optional arguments to filter metering data. If you do not specify any of the optional arguments, all metering data is returned.
Using SAS Event Stream ManagerYou can use SAS Event Stream Manager to monitor the metering server. For more information, see “Working with Metering Servers” in SAS Event Stream Manager: Using SAS Event Stream Manager.
Using the RESTful APIYou can use the following RESTful API request to retrieve metering data:
GET http://host: port/eventStreamProcessing/v1/meterData<?license= license><&project= project_name><&contquery= contquery_name><&window=window_name><&year=year><&month=month >
Retrieving Summarized DataTo retrieve data that is summarized by license and year or month, use the ESP client with the following optional parameter:
dfesp_xml_client -url "http://host: port/eventStreamProcessing/v1/meterMonthlySummary?license=...&year=...&month=..."
To retrieve yearly summary requests by license and year, use the ESP client with the following optional parameter:
dfesp_xml_client -URL "http://host: port/eventStreamProcessing/v1/meterYearlySummary?license=...&year=..."
Stopping the Metering ServerTo stop the metering server, run the following on the command line:
dfesp_xml_client -url "http://host: port/eventStreamProcessing/v1/exit"
16

Here, specify the name of the metering server as the host and the port for the metering server.
Obtaining Memory Usage StatisticsYou can obtain memory usage statistics two ways:
n You can view memory and CPU usage in SAS Event Stream Manager. When you view an ESP server in SAS Event Stream Manager, the Performance tab provides you information about server memory usage and CPU usage for each project and window. For more information, see “Monitor a Specific Deployment” in SAS Event Stream Manager: Using SAS Event Stream Manager.
n You can submit a GET request through the RESTful API in order to obtain memory usage statistics:
eventStreamProcessing/v1/projectStats?memory=true
When you use the GET request, the ESP server reports the following in megabytes:
Table 10 Memory Usage Reported
Memory Type Description
system How much memory is installed on your system.
virtual How much memory is available to the engine. This is not a hard limit. As resident size grows, the ESP server requests more virtual memory.
resident How much memory the engine actually consumes.
<project-stats> <server-memory> <system>129062</system> <virtual>5098</virtual> <resident>283</resident> </server-memory></project-stats>
As with any request to the RESTful API, you can submit it directly to the ESP server through any client that is capable of formatting an HTTP request. Thus, when you use a web browser, submit the following:
http://host:http_port/eventStreamProcessing/v1/projectStats?memory=true
17

Determining How Projects Use CPUUse dfesp_xml_top to determine how running projects consume CPU. The command generates XML code that appears on the console.
UNIX: $DFESP_HOME/bin/dfesp_xml_top
Windows: %DFESP_HOME%\bin\dfesp_xml_top.bat
Required Argument Description
-h host:port Specifies the host:port of the ESP server.
-p project Specifies the project about which to report CPU utilization.
Optional Argument Description
-m CPU_load Suppresses information about windows that consume less than the specified CPU load. For example, -m 50 suppresses the display of windows that consume less than 50% of the CPU.
-i refresh Specifies how often to refresh the reported information. The default value is 2 seconds.
? Echoes usage information.
In a UNIX environment, running the following command displays memory usage about the project textTopic on espsrv01. All windows in the project are displayed; -m 0 displays output when the CPU load is greater than or equal to 0.
dfesp_xml_top –h espsrv01:31415 –p textTopic –m 0
Here is the output:
<project-stats> <project name='textTopic'> <contquery name='cq'> <window cpu='98.5038' interval='2020392' name='textTopicAnalysis'/> <window cpu='1.26708' interval='2020391' name='textTopicNames'/> <window cpu='0.944866' interval='2020392' name='textTopicStats'/> <window cpu='0.201199' interval='2020392' name='rate'/> <window cpu='0.12265' interval='2020391' name='textInput'/> </contquery> </project></project-stats>
The interval displayed is the number of microseconds since the last request for project statistics.
You can redirect the output to a log file:
dfesp_xml_top –h espsrv01:31415 –p textTopic > /tmp/top.log
18

Estimating Memory Consumption
OverviewSAS Event Stream Processing is designed to optimize low latency and high throughput. Estimating how much memory an event consumes can help you size the computer resources required to run a SAS Event Stream Processing model.
An event is an instance of the dfESPevent class. This class maintains an event as a tuple of components: a meta event portion that consists of certain metadata (opcode, flag) and a reference-counted data event portion that contains the binary packed field data. Open DFESP_HOME/doc/html/index.html in a web browser in order to access information about this class.
Assume the following:
N Number of fields in the event
PB Packed binary size of all the fields in the event. Assume no padding and that strings are NULL–terminated.
16 Size of the event class, which consists of a meta event portion and a data event portion
32 Size of meta event memory consumption
[ 4 * (N+5) + PB ]
Size of data event memory consumption
The total memory consumed by an event is the sum of these components: 16 + 32 + [ 4 * (N+5) + PB ].
The final memory allocation is rounded up to 16 bytes. That rounding affects only the size of the data event storage.
Additional overhead is required for indexes, and the amount of overhead depends on the compiler libraries (C++ and Boost). Minimally, you need an additional 32 bytes per element for an index type of pi_RBTREE and another 36 bytes per element for an index type of pi_HASH.
Memory Consumption for Two Stateful Source Windows That Feed a Stateful JoinSuppose that you have two Source windows that are stateful: src_win1 and src_win2. These windows feed a stateful Join window: join_win. The Join window contains reference_counted copies of both Source windows in addition to its own set of indexes.
19

You can include a reference-counted copy of an event in the total memory consumption estimate for the window: (16 + 32 + 0) per event.
Note: The data event portion is the same in the left and right indexes of the join as it is in the Source window, hence the 0 in the formula.
Let:
NR1 Number of events streaming through src_win1
N1 Number of fields in src_win1
PB1 Size of binary packed data for src_win1
NR2 Number of events streaming through src_win2
N2 Number of fields in src_win2
PB2 Size of binary packed data for src_win2
NR3 Number of events streaming through join_win
N2 Number of fields in the join
PB3 Size of binary packed data for the join
Assume that you use the basic formula to compute memory for the join windows and use pi_RBTREE indexes. You derive the following [memory for events] + [memory for indexes]:
src_win1 [NR1 * (16 + 32 + (4*(N1+5) + PB1))] + [NR1 * 32]
src_win2 [NR2 * (16 + 32 + (4*(N2+5) + PB2))] + [NR2 * 32]
join_left [NR1 * (16 + 32 + 0)] + [NR1 * 32]
join_right [NR2 * (16 + 32 + 0)] + [NR2 * 32]
join_win [NR3 * (16 + 32 + (4*(N3+5) + PB3))] + [NR3 * 32]
The total memory consumed by this stateful join is the sum of these components: src_win1 + src_win2 + join_left + join_right + join_win.
Additional ConsiderationsConsider the following additional points when you estimate memory consumption:
20

n Setting pubsub="auto" at the project level significantly increases the memory used by the project. Each stateful window has a publish/subscribe index that is automatically created. These windows use reference–counted copies of the windows data, but they still consume significant memory.
n To avoid needlessly increasing memory consumption, it is recommended that you set pubsub="manual". You then can enable publish/subscribe for the windows that need to support subscriptions.
n Adding aggregation, pattern matching, and secondary join indexes to a model complicates the estimation of memory consumption. Expect to consume more memory when deploying these features.
Reducing Model Memory Consumption
OverviewSAS Event Stream Processing trades speed for memory. It can consume more memory than you expect in order to achieve high throughput rates and a consistent computational model. For more information, see “Estimating Memory Consumption”.
Without specific information about the size of each event or how many events are being retained by the ESP server, it is impossible to precisely compute memory consumption. Because SAS Event Stream Processing reference counts events, it is difficult to know whether the data portion of events, the index nodes that hold events, or both dominate memory consumption.
Even so, you can reduce memory consumption by not indexing events (use pi_EMPTY indices). The discussion that follows provides use cases with pi_EMPTY indexes even when incoming events are a mix of Insert, Upsert, Update, and Delete events.
For an example using a Join window, see “Using a Stateful Local Join Index to Resolve the State” in SAS Event Stream Processing: Using Source and Derived Windows .
State Resolution for Updates, Upserts, and DeletesStateful indexes store events and resolve Updates, Upserts, and Deletes into fully qualified events that can be used in downstream processing. A fully qualified event has the following characteristics:
n It has no ambiguity (Upsert is ambiguous) and it carries sufficient information for downstream processing.
n For an Update event, it is the old event and the new event.
n For a Delete event, it is the entire event that is being deleted.
21

Using One-to-One Windows to Resolve the Event StateThe following figure depicts how to set up one-to-one windows (one input implies one output) to resolve the event state. The chain, which begins with a set of pi_EMPTY windows, terminates with a stateful window that resolves the state of all incoming events. The stateful window can use any other index type, such as pi_HASH or pi_RBTREE. This final stateful window is typically a Copy, Compute, or Functional window or the lookup side of a non-regenerate join.
Figure 1 Chain of One-to-One Windows
The final stateful window that resolves all non-insert opcodes retains all current events (minus deleted events). This means that this final stateful window could be potentially unbounded. To maintain bounded finite memory consumption, do one of the following:
n Ensure that the cardinality of the total set of keys is finite (the number of Updates, Inserts, and Deletes does not need to be finite).
n Make the final stateful window a Copy window with retention. This forces a finite number of events to be retained.
What follows is a project that contains several pi_EMPTY Compute windows.
Here is the Source window:
<?xml version="1.0" encoding="utf-8" ?> <engine> <projects> <project name='project' pubsub='auto' threads='1'> <contqueries> <contquery name='cq' trace='copyW'> <windows> <window-source name='srcW' index='pi_EMPTY'> <schema>
22

<fields> <field name='ID' type='int64' key='true'/> <field name='int1' type='int64'/> <field name='int2' type='int64'/> <field name='int3' type='int64'/> <field name='int4' type='int64'/> <field name='int5' type='int64'/> </fields> </schema> <connectors> <connector class='fs' name='pub'> <properties> <property name='type'>pub</property> <property name='fstype'>csv</property> <property name='fsname'>input.csv</property> <property name='transactional'>false</property> <property name='blocksize'>1</property> </properties> </connector> </connectors> </window-source>
Here are the Compute windows:
<window-compute name='computeW1' index='pi_EMPTY'> <schema> <fields> <field name='ID' type='int64' key='true'/> <field name='int1' type='int64'/> <field name='int2' type='int64'/> <field name='int3' type='int64'/> <field name='int4' type='int64'/> <field name='int5' type='int64'/> <field name='comp1' type='int64'/> </fields> </schema> <output> <field-expr>int1</field-expr> <field-expr>int2</field-expr> <field-expr>int3</field-expr> <field-expr>int4</field-expr> <field-expr>int5</field-expr> <field-expr>int1+int2</field-expr> </output> </window-compute> <window-compute name='computeW2' index='pi_EMPTY'> <schema> <fields> <field name='ID' type='int64' key='true'/> <field name='int1' type='int64'/> <field name='int2' type='int64'/> <field name='int3' type='int64'/> <field name='int4' type='int64'/> <field name='int5' type='int64'/> <field name='comp1' type='int64'/> <field name='comp2' type='int64'/>
23
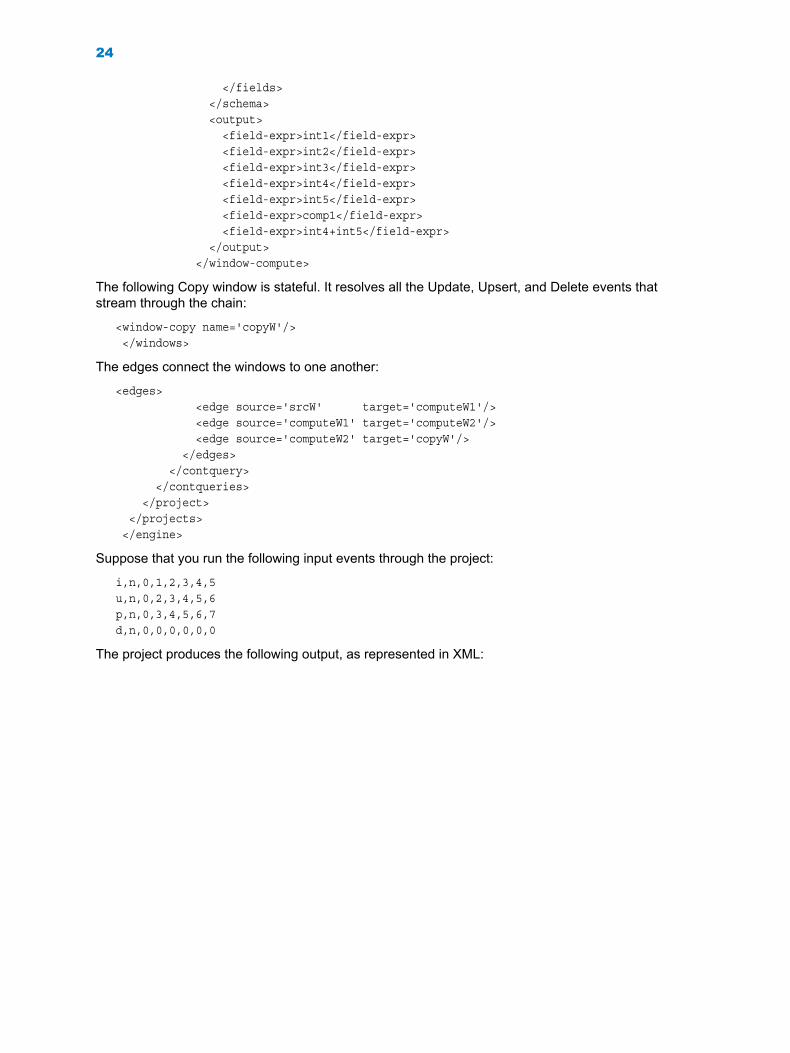
</fields> </schema> <output> <field-expr>int1</field-expr> <field-expr>int2</field-expr> <field-expr>int3</field-expr> <field-expr>int4</field-expr> <field-expr>int5</field-expr> <field-expr>comp1</field-expr> <field-expr>int4+int5</field-expr> </output> </window-compute>
The following Copy window is stateful. It resolves all the Update, Upsert, and Delete events that stream through the chain:
<window-copy name='copyW'/> </windows>
The edges connect the windows to one another:
<edges> <edge source='srcW' target='computeW1'/> <edge source='computeW1' target='computeW2'/> <edge source='computeW2' target='copyW'/> </edges> </contquery> </contqueries> </project> </projects> </engine>
Suppose that you run the following input events through the project:
i,n,0,1,2,3,4,5u,n,0,2,3,4,5,6p,n,0,3,4,5,6,7d,n,0,0,0,0,0,0
The project produces the following output, as represented in XML:
24

<event opcode='insert' window='project/cq/copyW'> <value name='ID'>0</value> <value name='comp1'>3</value> <value name='comp2'>9</value> <value name='int1'>1</value> <value name='int2'>2</value> <value name='int3'>3</value> <value name='int4'>4</value> <value name='int5'>5</value> </event> <event opcode='updateblock' window='project/cq/copyW'> <value name='ID'>0</value> <value name='comp1'>5</value> <value name='comp2'>11</value> <value name='int1'>2</value> <value name='int2'>3</value> <value name='int3'>4</value> <value name='int4'>5</value> <value name='int5'>6</value> </event> <event opcode='delete' window='project/cq/copyW'> <value name='ID'>0</value> <value name='comp1'>3</value> <value name='comp2'>9</value> <value name='int1'>1</value> <value name='int2'>2</value> <value name='int3'>3</value> <value name='int4'>4</value> <value name='int5'>5</value> </event> <event opcode='updateblock' window='project/cq/copyW'> <value name='ID'>0</value> <value name='comp1'>7</value> <value name='comp2'>13</value> <value name='int1'>3</value> <value name='int2'>4</value> <value name='int3'>5</value> <value name='int4'>6</value> <value name='int5'>7</value> </event> <event opcode='delete' window='project/cq/copyW'> <value name='ID'>0</value> <value name='comp1'>5</value> <value name='comp2'>11</value> <value name='int1'>2</value> <value name='int2'>3</value> <value name='int3'>4</value> <value name='int4'>5</value> <value name='int5'>6</value> </event> <event opcode='delete' window='project/cq/copyW'> <value name='ID'>0</value> <value name='comp1'>7</value> <value name='comp2'>13</value> <value name='int1'>3</value> <value name='int2'>4</value> <value name='int3'>5</value> <value name='int4'>6</value> <value name='int5'>7</value> </event>
25

Using the RESTful API
OverviewThe RESTful API that is provided with SAS Event Stream Processing is based on resource-oriented URLs. It uses HTTP authentication and HTTP verbs and returns HTTP response codes to indicate API errors. All of these features help you integrate the API into your applications and scripts in a standard way.
You can send HTTP requests directly to a running ESP server through any client that is capable of formatting an HTTP request. Use the following base URI:
http://ESPhost:port/eventStreamProcessing/v1
n a web browser
Note: Web browsers can run only GET requests.
n the UNIX curl command. Responses appear on the console. For example, when you enter the following command, the API returns a collection of projects running on the ESP server espsrv01:
$ curl "http://espsrv01:33333/eventStreamProcessing/v1/projects"
Whenever you encounter an error condition during the processing of a request, the API responds with a standard error format:
<error errorCode=integer-error-code httpStatusCode=integer-HTTP-status-code> <details> <detail>Additional text to describe the error</detail> <detail>There may be 0 or more detail strings</detail> </details> <links/> <message>error message</message> <remediation>remediation message</remediation> <version>1</version></error>
For clients that receive JSON, the error format is as shown:
{ "errorCode": integer-error-code, "httpStatusCode": integer-HTTP-status code, "details": [ "Additional text to describe the error", "There may be 0 or more detail strings" ], "links": [], "message": "error message", "remediation": "possible ways to remediate this error (i.e. list missing fields, fields out of range, etc.)", "version": 1
26

}
Viewing the RESTful API on a Web BrowserAfter you start an ESP server, you can open a web browser to view a complete catalog of the methods available:
http://ESPhost:http_port/eventStreamProcessing/v1/apiDoc?format=html
Accessing the RESTful API through SwaggerYou can use the REST API using the Swagger user interface. Swagger is an open-source platform that enables developers to build, document, and consume RESTful web services. You can use Swagger to create event stream processing projects, inject events, query models, and so on.
Assume that you have started an ESP server at ESPhost and http_port.
On a Linux system, follow these steps to set up Swagger and use the Python simple HTTP server:
1 Create an empty working directory (for example, myswagger).
2 Navigate to myswagger.
3 Install Swagger from the Git repository
$ git clone https://github.com/swagger-api/swagger-ui.git
4 From myswagger, start a Python HTTP server. The following examples invoke the server at port 55000:
Python 2.x
$ python -m SimpleHTTPServer 55000
Python 3.x
$ python -m http.server 55000
5 Open a web browser and enter the following:
http://Linuxhost:55000/swagger-ui/dist/?url=http://ESPhost:http_port/eventStreamProcessing/v1/apiDoc
Note: This example assumes that Linuxhost and ESPhost are two different systems. They could be the same system.
You can use the page that appears to access API documentation and to generate and test code.
For example, navigate to Projects and click GET. Then click Try it out:
27

Figure 2 RESTful Interface through Swagger
Using the RESTful API over Message Queues
OverviewThe ESP server supports HTTP requests over Kafka and MQTT message queues, processing requests as if they were sent over a TCP/IP socket. This can be useful when direct TCP/IP connections are not available. In addition, you can send a single HTTP request to any number of ESP servers and receive responses from each one. For example, you can load the same project to ten ESP servers with a single request, or check the server status of those servers with a single request.
Enabling HTTP over Kafka in the ESP ServerTo enable HTTP over Kafka in the ESP server, run the following command:
$ dfesp_xml_server -kafka-http topic/host:port
where topic is the Kafka topic on which to receive requests, and host:port is the Kafka server information. When you do not specify the port, the Kafka default (9092) is used. Because the ESP server dynamically loads the Kafka library (librdkafka), you must acquire the library and place it in your server plugins directory.
Enabling HTTP over MQTT in the ESP ServerTo enable HTTP over MQTT in the ESP server, run the following command:
$ dfesp_xml_server -mqtt-http topic/host:port
28

where topic is the MQTT topic on which to receive requests, and host:port is the MQTT server information. When you do not specify the port, the MQTT default (1883) is assumed. Since the server dynamically loads the MQTT library (libmosquitto), you must acquire the library and place it in your server plug-ins used. Because the MQTT library depends on libssl, you must have libssl present on your system. You must point to its containing directory in LD_LIBRARY_PATH on Linux and PATH on Windows.
Communicating with the ESP ServerAfter the ESP server is running and properly enabled, it looks for HTTP requests arriving from the specified topic. The following example obtains the server status for all ESP servers that are listening on the topic.
GET /eventStreamProcessing/v1/server HTTP/1.1accept-language: en_US.UTF-8X-Request-ID: c4a727a2-0708-4ecd-a7a2-e6a3887213bb<CRLF>
It is essential to include <CRLF> in requests such as these.
The following example loads a project to all ESP servers that are listening on the topic.
PUT /eventStreamProcessing/v1/projects/p HTTP/1.1accept-language: en_US.UTF-8content-type: text/xmlX-Request-ID: e50e95ce-6711-464f-8402-8deb3a097841Proxy-connection: Keep-AliveHost: host:portContent-length: 796
<project name='p' pubsub='auto' threads='4'> <contqueries> <contquery name='cq'> <windows> <window-source name='s' autogen-key='true' insert-only='true'> <schema> <fields> <field name='id' type='string' key='true'/> <field name='data' type='string'/> </fields> </schema> </window-source> <window-copy name='copy'> <retention type='bycount_sliding'>100</retention> </window-copy> </windows> <edges> <edge source='s' target='copy'/> </edges> </contquery> </contqueries></project>
In both examples, the X-Request-ID request header is an arbitrary value that enables a sender to map responses to a request. Here, values are GUIDs generated by the client.
The X-Request-ID is important when there are numerous servers and clients writing to and reading from a single topic. When the client includes the X-Request-ID header in the request, the server
29

includes that same header value in the response. In this way, a client can write an HTTP request to the topic, and then read the topic looking for an HTTP response that contains the same X-Request-ID value.
Using the ESP Client to Send RESTful Requests over Message QueuesYou can use the ESP client to send REST requests over message queues, collect the responses, and present them as a single result. The client does not know how many ESP servers are subscribing to a topic when it writes a request to that topic. Therefore, you can specify either the number of responses to collect or an amount of time to wait for responses to return to the client through URL parameters.
When you want to specify the number of responses to collect before returning, use the _responses parameter and set it to the number of responses to collect. When you want to specify the number of seconds to wait for responses, use the _timeout parameter and set it to the number of seconds to wait for responses. Both of these parameters are stripped from the request before it is sent to the server.
For example, suppose you are running three ESP servers that support MQTT HTTP on topic espserver. Obtain the status of all three servers with the following command:
$ dfesp_xml_client -url "mqtt-espserver://solace01/eventStreamProcessing/v1/server?_responses=3"<responses> <server id='ESP Server 6.2 (esp-3)'> <esp-server version='6.2' engine='esp-3' analytics-license='true' primary-server='true' pubsub='44301'/> </server> <server id='ESP Server 6.2 (esp-2)'> <esp-server version='6.2' engine='esp-2' analytics-license='true' primary-server='true' pubsub='44201'/> </server> <server id='ESP Server 6.2 (esp-1)'> <esp-server version='6.2' engine='esp-1' analytics-license='true' primary-server='true' pubsub='44101'/> </server></responses>
The server ID attribute contains the ESP version of the server along with the engine ID. To load a simple project from file model.xml to all three servers, run the following command:
$ dfesp_xml_client -url "mqtt-espserver://solace01/eventStreamProcessing/v1/projects/p?overwrite=true&_responses=3" -put file://
model.xml
<responses>
<server id='ESP Server 6.2 (esp-1)'>
<message>load project p succeeded</message>
</server>
<server id='ESP Server 6.2 (esp-3)'>
<message>load project p succeeded</message>
</server>
<server id='ESP Server 6.2 (esp-2)'>
<message>load project p succeeded</message>
</server>
</responses>
30

Using the ESP Client
Overview to the ClientTo communicate with an ESP server using the HTTP protocol, run $DFESP_HOME/bin/dfesp_xml_client on UNIX systems. Run %DFESP_HOME%\bin\dfesp_xml_client on Windows systems. You can send GET, POST, PUT, and DELETE requests as you need. GET requests are sent by default.
The client supports communication with the ESP server over a secure HTTP channel using HTTPS.
To send HTTP requests to the ESP server, use the following command.
dfesp_xml_client -url URL <-authmechanism > <-headers headers > <-cert certificate > <-pass passphrase > <-auth-token-url url > <-post > <-put > <-head> <-delete > <-data > <-showheaders> <-binary > <-wscommand >
Table 11 Command Arguments for the ESP Client
Argument Description
-url URL Specifies the URL to which to send an HTTP request.
-auth mechanism Enables authentication using the specified mechanism , which is one of the following values:
saslogon:// user?secure= on | off
Set to enable or disable HTTPS.
oauth-token:// OAuth_Token
oauth-token-url:// Host:Port /path
kerberos:// Kerberos_Service_Name
-headers headers Specifies a comma-separated list of colon-separated name-value pairs. These pairs specify headers to URL requests.
-cert certificate_file Specifies the certificate file to which to refer when using HTTPS.
-pass passphrase Specifies the SSL passphrase for HTTP.
-post Specifies to send an HTTP POST request.
-put Specifies to send an HTTP PUT request.
-head Specifies to send an HTTP HEAD request.
31

Argument Description
-delete Specifies to send an HTTP DELETE request
-data Specifies the data to send in an HTTP PUT or POST request.
-showheaders Specify to display the HTTP response headers.
-binary Specify to receive binary data.
-wscommand Specify to read and send WebSocket commands from standard input.
If you are using HTTPS, specify the applicable certificate and pass phrase information.
Get the Current ProjectTo get the current project from the local host, run the following command line:
dfesp_xml_client -url "http://host: port/eventStreamProcessing/v1/projects"
<projects> <project name='project'> <contqueries> <contquery name='query'> <windows> <window-source name='trades'/> <window-counter name='counter'/> <window-filter name='largeTrades'/> </windows> <edges> <edge source='trades' target='largeTrades counter'/> </edges> </contquery> </contqueries> </project></projects>
When no project is running, an empty projects tag is returned:
<projects/>
Get Event CountsTo get the event counts for windows in the model, run the following command:
dfesp_xml_client -url "http://host: port/eventStreamProcessing/v1/windows?count=true"
32

<windows> <window-join contquery='query' count='51158' name='addBrokerData' project='project'/> <window-join contquery='query' count='36578' name='addRestrictedData' project='project'/> ... </windows>
Retrieve Events from a WindowTo retrieve events from the window brokerAlerts, run the following command:
dfesp_xml_client -url "http://host: port/eventStreamProcessing/v1/events/project/query/brokerAlerts"
<events> <event window='project/query/brokerAlerts'> <broker>1012334</broker> <brokerName>Lisa</brokerName> <closeMarking>0</closeMarking> <frontRunningBuy>0</frontRunningBuy> <frontRunningSell>0</frontRunningSell> <id>14228114</id> <openMarking>0</openMarking> <restrictedTrades>1</restrictedTrades> <total>1</total> </event> <event window='project/query/brokerAlerts'> <broker>1012334</broker> <brokerName>Lisa</brokerName> <closeMarking>1</closeMarking> <frontRunningBuy>0</frontRunningBuy> <frontRunningSell>0</frontRunningSell> <id>14205698</id> <openMarking>0</openMarking> <restrictedTrades>0</restrictedTrades> <total>1</total> </event> ...</events>
To retrieve at most three events from all windows in the model with brokerName=Curt , sorted by price, run the following command:
$ dfesp_xml_client -url "http://host :port/eventStreamProcessing/v1/events?brokerName=Curt&sortBy=price&start=0&limit=3"
33

<events count='3'> <event window='project/query/transform'> <broker>1012445</broker> <brokerAddress>SAS Campus Drive Cary NC 27513</brokerAddress> <brokerEmail>919-123-4567</brokerEmail> <brokerName>Curt</brokerName> <brokerage>ESP</brokerage> <buyer>0</buyer> <buysellflg>0</buysellflg> <closeSeconds>57600</closeSeconds> <closeTimeGMT>20:00:00</closeTimeGMT> <currency>87236</currency> <date>2010-08-04 15:58:31</date> <id>10429043</id> <msecs>146</msecs> <openSeconds>34200</openSeconds> <openTimeGMT>13:30:00</openTimeGMT> <price>205.230000</price> <quant>1000</quant> <seller>8359384</seller> <symbol>MA</symbol> <time>1280951911</time> <timeAfterOpen>23311</timeAfterOpen> <timeTillClose>89</timeTillClose> <tradeSeconds>57511</tradeSeconds> <venue>55333</venue> </event> ... </events>
To retrieve events from all Aggregate windows in the model, run the following command:
$ dfesp_xml_client -url "http://host :port/eventStreamProcessing/v1/events?windowFilter=eq(type,'window-aggregate')"
<events count='10'> <event window='project/query/brokerAlertsAggr'> <brokerName>Joe</brokerName> <closeMarking>0</closeMarking> <frontRunningBuy>1</frontRunningBuy> <frontRunningSell>1</frontRunningSell> <openMarking>17</openMarking> <restrictedTrades>2</restrictedTrades> <total>21</total> </event> <event window='project/query/brokerAlertsAggr'> <brokerName>Curt</brokerName> <closeMarking>2</closeMarking> <frontRunningBuy>1</frontRunningBuy> <frontRunningSell>1</frontRunningSell> <openMarking>21</openMarking> <restrictedTrades>2</restrictedTrades> <total>27</total> </event> .... </events>
34

Reload the ModelTo reload the model from the original input model, run the following command:
dfesp_xml_client -url "http://host: port/eventStreamProcessing/v1/server/state?value=reloaded" -put
<response code='0'> <message>esp server reloaded</message></response>
Persist the ModelTo save the model to the espdata directory, run the following command:
$ dfesp_xml_client -url "http://host :port/eventStreamProcessing/v1/server/state?value=persisted&path=espdata" -put
<response> <message>esp successfully saved to 'espdata'</message></response>
Start a ProjectTo start a project, run the following command:
dfesp_xml_client -url "http://host: port/eventStreamProcessing/v1/projects/project/state?value=running" -put
<response> <message>project 'project' successfully started</message></response>
Stop a ProjectTo stop a project, run the following command:
dfesp_xml_client -url "http://host: port/eventStreamProcessing/v1/projects/project/state?value=stopped" -put
35

<response> <message>project 'project' successfully stopped</message></response>
To stop all projects, run the following command:
$ dfesp_xml_client -url "http://host :port/eventStreamProcessing/v1/stoppedProjects/project" -post
<response> <message>project 'project1' successfully stopped project 'project2' successfully stopped project 'project3' successfully stopped</message></response>
Load a ProjectTo load the project contained in the local file model.xml , run the following command:
$ dfesp_xml_client -url "http://host :port/eventStreamProcessing/v1/projects/project" -put "file://model.xml"
<message>load project 'project' succeeded</message>
To load model.xml from an HTTP URL, run the following command:
$ dfesp_xml_client -url "http://host :port/eventStreamProcessing/v1/projects/newproject" -put "http://whatever.com/model.xml"
<message>load project 'project' succeeded</message>
Delete a ProjectTo delete a project, run the following command:
dfesp_xml_client -url "http://host: port/eventStreamProcessing/v1/projects/ project" -delete
Inject Events into a Source WindowTo tell the server to pull events from a specified URL and inject them into project/query/trades using a block size of 10000, run the following command:
dfesp_xml_client -url "http://host: port/eventStreamProcessing/v1/windows/project/query/trades/state?value=injected&eventUrl=file://trades.csv&blocksize=10000" -put
36

<response><msg>1000000 events injected into Source window project/query/trades with blk size 10000</msg></response>
To read events from the URL specified in the -put command line argument and send them to the server for injection, run the following command:
$ dfesp_xml_client -url "http://host :port/eventStreamProcessing/v1/windows/project/query/trades/state?value=injected&blocksize=10000" -put "file://trades.csv"
<response><msg>1000000 events injected from file://trades.csv into Source window project/query/trades with blk size 10000</msg></response>
Run a Project and Get ResultsTo send the project results.xml to the server, have it run, and return the contents of the brokerAlertsAggr window, run the following command:
dfesp_xml_client -url "http://host: port/eventStreamProcessing/v1/projectResults?windows=brokerAlertsAggr" -post "file://results.xml"
<results> <window key='project/query/brokerAlertsAggr'> <events> <event> <brokerName>Joe</brokerName> <closeMarking>0</closeMarking> <frontRunningBuy>1</frontRunningBuy> <frontRunningSell>1</frontRunningSell> <openMarking>17</openMarking> <restrictedTrades>2</restrictedTrades> <total>21</total> </event> <event> <brokerName>Curt</brokerName> <closeMarking>2</closeMarking> <frontRunningBuy>1</frontRunningBuy> <frontRunningSell>1</frontRunningSell> <openMarking>21</openMarking> <restrictedTrades>2</restrictedTrades> <total>27</total> </event> ... </events> </window> <message>project project successfully run</message></results>
Validate a ModelTo validate a project model, run the following command:
37

dfesp_xml_client -url "http://host: port/eventStreamProcessing/v1/projectValidationResults" -post file://model.xml
<schema-validation-success xsd='file:///mnt/data/home/../modeling-xml/schema/model.rng'/>
Working with Encrypted ModelsTo retrieve encrypted model data for a model that is currently loaded in the server, run the following command:
dfesp_xml_client -url "http://host: port/eventStreamProcessing/v1/encryptedProjects/ project"
The response is plaintext base64–encoded encrypted data for the model that is currently loaded in the server with name project .
You can submit this encrypted data to an ESP server that is running in protected mode, using either the command line or the REST interface to load the project. If you submit it to a server that is not running in protected mode, the system generates an error.
To encrypt the model in the file model.xml, run the following command:
dfesp_xml_client -url "http://host: port/eventStreamProcessing/v1/encryptedProjects" -put "file://model.xml" > model_encrypt.xml
The encrypted model is written to the file model_encrypt.xml
To load the retrieved encrypted model, run the following command:
dfesp_xml_client -url "http://host: port/eventStreamProcessing/v1/projects" -put file://model_encrypt.xml
Accessing WebSockets through the ESP ClientYou can access the WebSockets API through the ESP client. The ESP client sets up the subscriber defined in your specified URI and then waits to receive events. These events appear on the console in the specified format.
You can also send messages over the WebSocket by entering XML on the command line of the console. To enable this, specify the -wscommand parameter to dfesp_xml_client on the command line. This subscribes the client for real-time event notifications. You can send load or properties messages through the console and receive data from them.
To subscribe to an ESP server through dfesp_xml_client, enter the following on the command line:
dfesp_xml_client -url "ws://host:port/eventStreamProcessing/v1/subscribers/project/continuous_query/window"
You can use all of the subscriber parameters in this URI.
38

When you want to send a list of commands after establishing a connection, use the data parameter:
dfesp_xml_client -url "ws://host:port/eventStreamProcessing/v1/subscribers/project/continuous_query/window" —data “file://filename”
For example, suppose you are running the ESP server on espsrv01. The project p with continuous query cq has a model that contains an aggregation window named brokerAlertsAggr. Now suppose you have a file named load.xml that contains the following line:
<load/>
You run the following command:
dfesp_xml_client -url "ws://espsrv01:26000/eventStreamProcessing/v1/subscribers/p/cq/brokerAlertsAggr?format=xml" -data "file://load.xml"
The output would look something like this:
<events page='0' pages='0'> <event> <brokerName>Joe</brokerName> <closeMarking>0</closeMarking> <frontRunningBuy>36</frontRunningBuy> <frontRunningSell>58</frontRunningSell> <openMarking>68</openMarking> <restrictedTrades>28</restrictedTrades> <total>190</total> </event> <event> <brokerName>Curt</brokerName> <closeMarking>8</closeMarking> <frontRunningBuy>41</frontRunningBuy> <frontRunningSell>46</frontRunningSell> <openMarking>84</openMarking> <restrictedTrades>48</restrictedTrades> <total>227</total> </event> <event> <brokerName>Steve</brokerName> <closeMarking>12</closeMarking> <frontRunningBuy>16</frontRunningBuy> <frontRunningSell>40</frontRunningSell> <openMarking>72</openMarking> <restrictedTrades>28</restrictedTrades> <total>168</total> </event> <event> <brokerName>Lisa</brokerName> <closeMarking>12</closeMarking> <frontRunningBuy>40</frontRunningBuy> <frontRunningSell>50</frontRunningSell> <openMarking>92</openMarking> <restrictedTrades>32</restrictedTrades> <total>226</total> </event> <event> <brokerName>Sally</brokerName> <closeMarking>12</closeMarking> <frontRunningBuy>20</frontRunningBuy> <frontRunningSell>42</frontRunningSell> <openMarking>60</openMarking> <restrictedTrades>44</restrictedTrades> <total>178</total> </event></events>
39
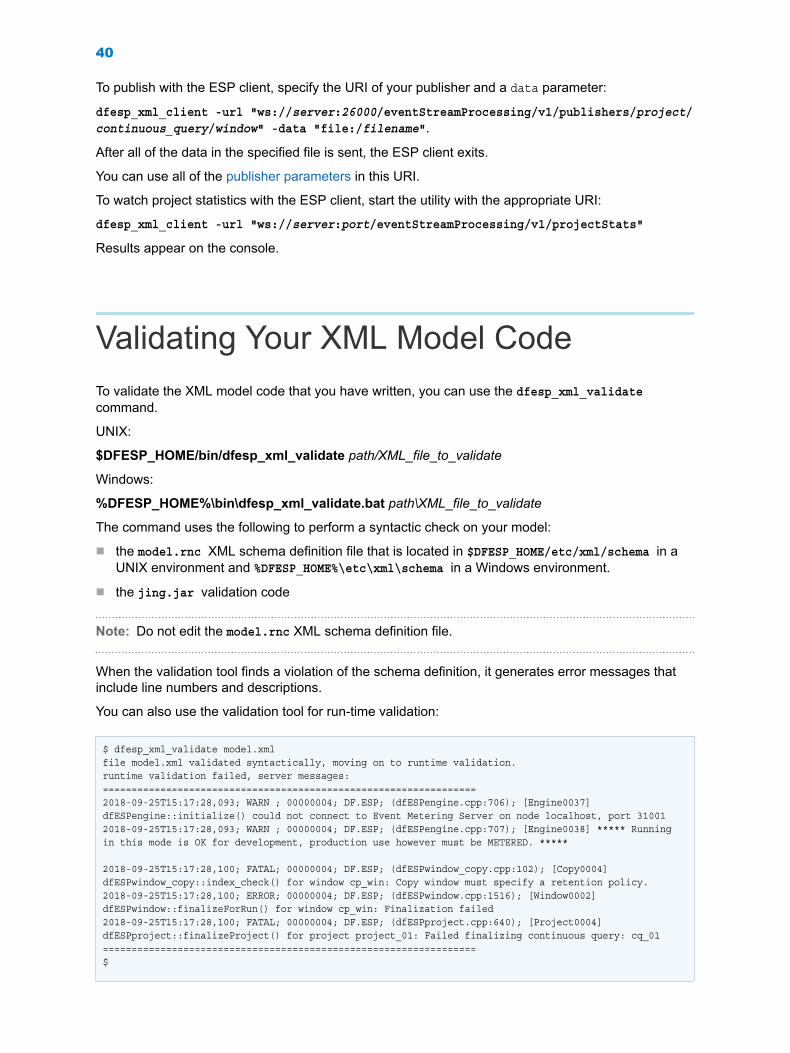
To publish with the ESP client, specify the URI of your publisher and a data parameter:
dfesp_xml_client -url "ws://server:26000/eventStreamProcessing/v1/publishers/project/continuous_query/window" -data "file:/filename".
After all of the data in the specified file is sent, the ESP client exits.
You can use all of the publisher parameters in this URI.
To watch project statistics with the ESP client, start the utility with the appropriate URI:
dfesp_xml_client -url "ws://server:port/eventStreamProcessing/v1/projectStats"
Results appear on the console.
Validating Your XML Model CodeTo validate the XML model code that you have written, you can use the dfesp_xml_validate command.
UNIX:
$DFESP_HOME/bin/dfesp_xml_validate path/XML_file_to_validate
Windows:
%DFESP_HOME%\bin\dfesp_xml_validate.bat path\XML_file_to_validate
The command uses the following to perform a syntactic check on your model:
n the model.rnc XML schema definition file that is located in $DFESP_HOME/etc/xml/schema in a UNIX environment and %DFESP_HOME%\etc\xml\schema in a Windows environment.
n the jing.jar validation code
Note: Do not edit the model.rnc XML schema definition file.
When the validation tool finds a violation of the schema definition, it generates error messages that include line numbers and descriptions.
You can also use the validation tool for run-time validation:
$ dfesp_xml_validate model.xmlfile model.xml validated syntactically, moving on to runtime validation.runtime validation failed, server messages:=================================================================2018-09-25T15:17:28,093; WARN ; 00000004; DF.ESP; (dfESPengine.cpp:706); [Engine0037] dfESPengine::initialize() could not connect to Event Metering Server on node localhost, port 310012018-09-25T15:17:28,093; WARN ; 00000004; DF.ESP; (dfESPengine.cpp:707); [Engine0038] ***** Running in this mode is OK for development, production use however must be METERED. *****
2018-09-25T15:17:28,100; FATAL; 00000004; DF.ESP; (dfESPwindow_copy.cpp:102); [Copy0004] dfESPwindow_copy::index_check() for window cp_win: Copy window must specify a retention policy.2018-09-25T15:17:28,100; ERROR; 00000004; DF.ESP; (dfESPwindow.cpp:1516); [Window0002] dfESPwindow::finalizeForRun() for window cp_win: Finalization failed2018-09-25T15:17:28,100; FATAL; 00000004; DF.ESP; (dfESPproject.cpp:640); [Project0004] dfESPproject::finalizeProject() for project project_01: Failed finalizing continuous query: cq_01=================================================================$
40

Follow these suggestions to improve the speed of the model creation process and reduce errors:
n Draw the directed graph that represents the continuous query, identifying the window type of each node. At first, make the model insert-only.
n Connect two windows with an edge. Start the ESP server and submit the model to the server.
n Use Streamviewer to publish to and subscribe from windows of the query. This enables you to see whether you are getting the expected data flow.
n Successively add windows to the query, each time testing whether the data flow is as you expected.
Using Event Generators
Overview of Event GeneratorsYou can use an event generator to generate an event to inject into an event stream processing model. Event generators can be created, destroyed, started, and stopped through the SAS Event Stream Processing HTTP interface. They can use the support functions available with the product. For more information about these functions, see SAS Event Stream Processing: Using Source and Derived Windows.
A set of XML elements is available to implement an event generator. These elements can do the following:
n specify a Source window as a publish destination
<event-generator insert-only='true|false' autogen-key='true|false'> <publish-target>pub/sub_URL</publish-target></event-generator>
n define resources from which you can read maps, lists, and sets to be accessed from your event generation functions
<event-generator insert-only='true|false' autogen-key='true|false'> <resources> <map name='' outer='' inner=''>map_values</map> <map-url name=''>URL_of_map_data</map-url> <list name='' delimiter=''>list_values</list> <list-url name=''>URL_of_list_data</list-url> <set name='' delimiter=''>set_values</set> <set-url name=''>URL_of_set_data</set-url> ... </resources></event-generator>
n define a set of values to be initialized upon the start of event generation
<event-generator insert-only='true|false' autogen-key='true|false'> <init> <value name=''>code</value> ... </init>
41

</event-generator>
n specify a function to specify an opcode to be used on existing events (must generate either Upsert or Delete)
<event-generator insert-only='true|false' autogen-key='true|false'> <exists-opcode>code</exists-opcode> </event-generator>
n define a set of functions to actually generate the event values
<event-generator insert-only='true|false' autogen-key='true|false'> <fields> <field name=''>code</value> ... </fields></event-generator>
Event State
Stateful Models (Insert-Only=False)Because a stateful model maintains events, you would not inject more than one event with the same key using the Insert opcode. The event generator keeps track of the event keys injected into the model. When an event is generated using the same key as a previously injected event, the following occurs:
n If you have specified a function through the exists-opcode element, then the function is run to see whether a value of Upsert or Delete is returned. When a valid value is returned, the opcode for the event is set accordingly. Otherwise, the event gets a Delete opcode.
n If you have not specified a function through the exists-opcode element, then the event gets a Delete opcode. This ensures that existing events are not injected with Insert. This assumes that the event generator is the only input mechanism into the event stream processing engine. The event generator does not track events that are injected through other means.
Stateless Models (Insert-Only=True)Issues arise when you use a blocksize of greater than 1. Putting multiple events with the same key into an event block to be injected results in an error when the block is sent into the model. The generator keeps track of all event keys in the currently building event block. When the same key is generated more than one time for an event block, the generator halts that event and starts again. This ensures that events with the same key are not added more than one time to any event block destined for injection.
LoggingEvent generators use the logging context event.generator to provide operational information at different logging levels
42

Table 12 Logging Levels for Event Generators
Logging Level Description Sample Output
INFO Display information about starting and stopping generators.
2016-03-15T14:36:44,987; INFO ; 00000000; DF.ESP; (EventGenerator.cpp:117); 'starting generator mygen, number of events=10000, block size=1000, event rate=500/second' 2016-03-15T14:36:47,720; INFO ; 00000000; DF.ESP; (EventGenerator.cpp:309); 'stopping generator mygen, number of events=10000, block size=1000, event rate=500/second'
DEBUG Display information about generator setup.
2016-03-15T14:36:30,417; DEBUG; 00000000; DF.ESP; (EventGenerator.cpp:499); 'load list 'symbols' from url http://espsrv01:18080/esp/stuff/tradesData/symbols.txt, number of values=3608' 2016-03-15T14:36:30,418; DEBUG; 00000000; DF.ESP; (EventGenerator.cpp:499); 'load list 'brokers' from url http://espsrv01:18080/esp/stuff/tradesData/brokers.txt, number of values=5' 2016-03-15T14:36:30,419; DEBUG; 00000000; DF.ESP; (EventGenerator.cpp:499); 'load list 'venues' from url http://espsrv01:18080/esp/stuff/tradesData/venues.txt,number of values=10'
TRACE Display information about generator iterations, publishing, and so on.
2016-03-15T14:36:36,465; TRACE; 00000000; DF.ESP; (EventGenerator.cpp:245); 'generator mygen, publishing 1000 event(s)' 2016-03-15T14:36:36,465; TRACE; 00000000; DF.ESP; (EventGenerator.cpp:263); 'generator mygen, exceeded rate of 500 events/second, pausing for 965 milliseconds'
XML Elements for Event Generators
event-generatorUse this required element to specify the container for an event generator.
Table 13 Attributes of the event-generator Element
Attributes Description
insert-only This attribute should be set according to whether the Source window into which you are inserting events is Insert-only. If it is insert-only, then the generator removes any duplicate keys from the event blocks (has no effect if block size is 1) before publishing the event block.
autogen-key If the model is going to automatically generate keys for these events, this should be set to true. Otherwise, it should be set to false. Set to true only when insert-only is also set. You get an error when values are set in some other fashion.
43

publish-targetUse this required element to specify the event stream processing publish/subscribe URL for the Source window recipient of the published events. It should be in the following format: dfESP://host:port/project/query/window
resourcesUse this optional element to specify resources that contain data that you can use in generating your events. It can contain the following elements:
n Use map to specify a collection of name-value pairs to use with the mapValue and mapValues functions.
n Use map-url to specify a collection of name-value pairs retrieved from a specified URL.
n Use list to specify list of values to use with the listSize and listItem functions.
n Use list-url to specify a list of values to retrieve from a specified URL.
n Use set to specify a list of unique values to use with the setContains function. The data for each resource type can be included directly in the configuration or referred to by a URL.
<resources> ...<list-url name='symbols'>http://espsrv01:18080/esp/stuff/tradesData/symbols.txt</list-url> ...</resources>
mapUse this optional element to specify a collection of name-value pairs. The data for the collection is contained in the text of the element.
Table 14 Attributes of the map Element
Attributes Description
name Specifies the name of the map.
outer The outer delimiter that separates map entities.
inner The inner delimiter that separates map entities.
<map name='personalinfo' outer=' ' inner='='>name=bob occupation=developer gender=m</map>
44

map-urlUse this optional element to specify a collection of name-value pairs. The data for the collection is retrieved from the URL specified in the text of the element. The URL must provide newline-separated name-value pairs, where the name-value pairs are separated by the '=' character.
Table 15 Attributes of the map-url Element
Attributes Description
name Specifies the name of the collection.
url The URL that provides map data.
listUse this optional element to specify a list of values. Data for the list is contained in the text of the element.
Table 16 Attributes of the list Element
Attributes Description
name Specifies the name of the list.
delimiter Specifies the list delimiter
<list name='symbols' delimiter=' '>IAK IAT IAU IBA IBI IBM IBN ICA ICB ICE ICF ICI ICN ICO</list>
list-urlUse this optional element to specify a list of values. The data for the list is retrieved from the URL that is specified in the text of the element. The URL must provide newline-separated values.
Table 17 Attributes of the list-url Element
Attributes Description
name Specifies the name of the list
url The URL that provides the list data.
45

setUse this optional element to specify a set of values. A set differs from a list in that the values are unique and that the ordering is random. The only function that you can run on a set is setContains to determine whether a specified value is in the set. The data for the set is contained in the text of the element.
Table 18 Attributes of the set Element
Attributes Description
name Specifies the name of the set
delimiter Specifies the set delimiter
<set name='' delimiter=''>QR BU IM ZX BB</set>
set-urlUse this optional element to specify a set of values available at a URL. A set differs from a list in that the values are unique and that the ordering is random. The only function you can run on a set is setContains to determine whether a specified value is in the set. The data for the set is retrieved from the url specified in the text of the element. The URL must provide newline-separated values.
Table 19 Attributes of the set-url Element
Attributes Description
name Specifies the name of the set.
url Specifies the URL where the set resides.
initUse this optional element as a container of value elements that you want initialized when the generator is started. These values are accessible from the functions used to generate event values.
<init> <value name='i'>999</value> </init>
46

valueUse this optional element to specify the value set when the generator starts up. You can specify a literal value or you can specify a function from which the value is derived. The value can be referenced as variables from any successive functions.
Use the name attribute to assign a name.
<value name='id'>0</value>
<value name='clock'>i32(timeParse('Sat Mar 12 11:19:59 EST 2016'))</value>
<value name='numBrokers'>listSize(#brokers)</value>
<value name='numSymbols'>listSize(#symbols)</value>
exists-opcodeUse this optional element to specify one of two opcodes, Upsert or Delete, to be applied to any event whose key has already been inserted into the model. Use only when you are injecting into a non-insert-only Source window. Within this element, you define a function that returns either Upsert or Delete. If neither value is returned, then Delete is used.
The following code sends Upserts for any event that does not contain a name field with a value of Steve.
<exists-opcode>if (eq($name,'Steve'),'delete','upsert')</exists-opcode>
fieldsUse this required element to generate field values by executing functions that are associated with the field elements contained within it. Fields are executed in the order in which they exist in the configuration.
The following code uses a running clock to generate an increasing time value:
<init> ... <value name='clock'> i32(timeParse('Sat Mar 12 11:19:59 EST 2016')) </value> ...</init><fields> ...
47

<field name='clock'> i64(sum($clock,random(0,3))) </field> <field name='time'>$clock</field> ...</fields>
The clock field is not in the event schema, but is rather used to increment the running clock. The time field is the event field that uses the clock field to generate the necessary value.
fieldUse this required element to specify the value set upon each generator iteration. The value is derived by executing the functions specified in the text of the element. The value can be referenced as variables from any successive fields.
Use the name attribute to name the field.
Example
Generating Stock Trading Events<event-generator insert-only='true'> <publish-target>dfESP://localhost:26003/project/query/trades</publish-target> <resources> <list-url name='symbols'> http://espsrv01:18080/esp/stuff/tradesData/symbols.txt </list-url> <list-url name='brokers'> http://espsrv01:18080/esp/stuff/tradesData/brokers.txt </list-url> <list-url name='venues'> http://espsrv01:18080/esp/stuff/tradesData/venues.txt </list-url> </resources> <init> <value name='id'>0</value> <value name='clock'>i32(timeParse('Sat Mar 12 11:19:59 EST 2016'))</value> <value name='numBrokers'>listSize(#brokers)</value> <value name='numSymbols'>listSize(#symbols)</value> <value name='numVenues'>listSize(#venues)</value> </init> <fields> <field name='clock'>i64(sum($clock,random(0,3)))</field> <field name='id'>sum($id,1)</field> <field name='symbol'>listItem(#symbols,random(0,$numSymbols))</field> <field name='currency'>0</field> <field name='time'>$clock</field> <field name='msecs'>0</field> <field name='price'>random(1.5,200.0)</field> <field name='quant'>random(1000,5000)</field>
48

<field name='venue'>listItem(#venues,random(0,$numVenues))</field> <field name='broker'>listItem(#brokers,random(0,$numBrokers))</field> <field name='buyer'>random(1,1000)</field> <field name='seller'>random(1,100)</field> <field name='buysellflg'>random(0,1)</field> </fields></event-generator>
Using the Router
Overview to the RouterThe router enables you to integrate multiple event stream processing engines with one another. Integrating multiple engines can be useful in the following circumstances:
n You can break up and distribute event stream processing across multiple engines. One engine can do data preparation and dimensional lookups. Another engine can subscribe to the first and perform pattern matching. Still another engine can subscribe to the first and perform outlier notifications. The router enables you to integrate these associated engines.
n You can route events by examining the contents of events (fields) and then send events to one of many downstream engines.
The router adds an XML configuration layer over the C++ publish/subscribe API in order to integrate engines. The XML router definition enables you to specify regular expressions that determine the windows to which you want to subscribe. For example:
n Subscribe to aggregate or Copy windows
<esp-route name='myroute' to='publisher'> <type-expr>aggregate|copy</type-expr></esp-route>
n Subscribe to all windows whose name ends in Join or Copy
<esp-route name='myroute' to='publisher'> <window-expr>.*Join|.*Copy</window-expr></esp-route>
n Subscribe to all filter windows in projects project1 and project2 in engine esp2
<esp-route name='myroute' to='publisher'> <engine-expr>esp2</engine-expr> <project-expr>project1|project2</project-expr> <type-expr>filter</type-expr></esp-route>
The router configuration resides in the standard ESP server model configuration directly beneath the engine element. This placement enables you to embed a router directly with an engine. When you embed the router within an engine into which you are publishing, the publishers directly inject events into projects instead of going through the publish/subscribe API.
<engine> <esp-routers>
49

<esp-router name="myrouter"> ... </esp-router> </esp-routers>
<projects> <project name="myproject"> ... </project> </projects>
</engine>
Alternatively, you can put a router configuration into a model by itself. This runs a server that acts solely as a router using the publish/subscribe API.
<engine> <esp-routers> <esp-router name="myrouter"> ... </esp-router> </esp-routers></engine>
XML Elements for the Router
esp-routersUse this required element to specify a container for one or more esp-router elements.
Use the ping-interval attribute to specify the interval, in seconds, at which all esp-router instances are pinged. This enables each router instance to check each of its engines to ensure that the connection is up and properly functioning. The default is 1 second.
esp-routerUse this required element to specify the top-level element for the router.
Table 20 Attributes of the esp-router Element
Attributes Description:
name Specifies the name of the router.
primary-retries When the router detects an engine connection failure, the router attempts to reconnect to the engine this number of times every time that the router is pinged. If no connection is re-established after this many attempts, the router waits longer before it attempts to reconnect. The default value is 10.
50

Attributes Description:
secondary-retry-interval When the router detects an engine connection failure and the number of failed reconnection attempts has exceeded the number of primary-retries, the router waits this long between additional reconnection attempts. The default value is 10 seconds.
output-stats-interval Specifies the interval, in seconds, at which the router writes router processing statistics to the console.
esp-enginesUse this required element to specify the container for one or more esp-engine elements.
esp-engineUse this required element to specify an engine in terms of its publish/subscribe host and port. It contains one of following elements:
n Use auth-token to specify the token for OAuth authentication
n Use auth-token-url to specify the URL for the OAuth token location.
n Use auth-user to specify the SASLogon authentication user.
These elements are mutually exclusive. You must use one of these parameters when the publish/subscribe engine to which you are connecting is using authentication.
Table 21 Attributes of the esp-engine Element
Attributes Description
name The specified name must be unique in the scope of the router.
host Name of the publish/subscribe connection.
port The publish/subscribe port of the engine.
esp-destinationsUse this required element to specify the container for one or more router destinations. You must define at least one.
publish-destinationUse this required element to specify the destination used to publish events into a model.
51

Table 22 Attributes of the publish-destination Element
Attributes Description
name The specified name must be unique in the scope of the router.
opcode Opcode to use on all events injected into the model. If not set, the opcode from the incoming event is used. Valid values are as follows:
n Insert
n Update
n Delete
n Upsert
n Safedelete
filter-funcUse this optional element to specify the function used to filter the events that are published. The function is run for each event. Its Boolean value is evaluated to determine whether to publish the event to the appropriate target Source window.
publish-targetUse this required element to define the target source window into which incoming events are published. It contains functions that are run to determine the target of event injection. You must specify each of the four functions to resolve the engine, project, continuous query, and window into which to inject each event. Alternatively, you can specify hardcoded values. In that case, no functions are run for that entity.
engine-funcUse this required element to specify the function used to resolve the target engine. It must resolve to the name of one of the engines that are defined in the router context.
project-funcUse this required element to specify the function used to resolve the target project. It must resolve to the name of a project in the engine that is resolved in engine-func .
contquery-funcUse this required element to specify the function used to resolve the target continuous query. It must resolve to the name of a continuous query in the project that is resolved in project-func.
52

window-funcUse this required element to specify a function used to resolve the target Source window. It must resolve to the name of a source window in the continuous query that is resolved in contquery-func .
event-fieldsUse this optional element to specify a container for functions to be run in order to add or modify event fields.
initUse this optional element to specify a container for functions to be run in order to initialize variables. These variables can be used in any subsequent functions.
valueUse this optional element to specify a function to run in order to initialize variables. These variables can be used in any subsequent functions.
fieldsUse this optional element to specify a container for functions to be run in order to set event field values.
fieldUse this optional element to specify a function to run in order to generate an event field value to put into the event before injecting it into the model. The name of the event field that is generated is specified by the name attribute.
writer-destinationUse this required element to specify a destination that is used to write events to a file or to the console.
Table 23 Attributes of the writer-destination Element
Attributes Description
name Specifies the name of the destination, which must be unique in the scope of the router.
53

Attributes Description
format Specifies the format of event output. Valid values are XML, JSON, and CSV. The default is XML.
dateformat Specifies the format to use for any date or timestamp fields in the output. If not specified, the time-related fields are written numerically.
append When true, the router opens files in append mode instead of truncating them and losing events. The default value is true.
max-open-files Specifies maximum number of open files.
file-funcUse this required element to specify a function used to resolve the name of the file into which the events are written. If it resolves to _console, events are written to the console.
esp-routesUse this required element to specify a route that consists of subscription information along with destinations to which the received events are sent. Use regular expressions to specify the windows to which the route must subscribe. You can specify regular expressions for each level of the hierarchy (the window level has two expressions so that you can subscribe by window name or type or both). Expressions are optional. For any level for which you do not specify an expression, the route uses all available instances of that entity. Thus, when you do not specify expressions, the route subscribes to all windows in all continuous queries in all projects in all engines.
Table 24 Attributes of the esp-routes Element
Attributes Description
name Name of the route, which must be unique in the scope of the router.
to Comma-separated list of destinations that receive all of the events coming in from the subscriptions contained within the route.
snapshot When true, grab a snapshot of the initial window contents.
engine-exprUse this optional element to specify a regular expression that resolves the engine(s) to which the route should subscribe. If it is not specified, the route subscribes to all engines.
54

project-exprUse this optional element to specify a regular expression that resolves the project(s) to which the route should subscribe. If it is not specified, the route subscribes to all projects.
contquery-exprUse this optional element to specify a regular expression that resolves the continuous queries to which the route should subscribe. If it is not specified, the route subscribes to all continuous queries.
window-exprUse this optional element to specify a regular expression that resolves the window(s) to which the route should subscribe. If it is not specified, the route subscribes to all windows.
type-exprUse this optional element to specify a regular expression that resolves the window type(s) to which the route should subscribe. If it is not specified, the route subscribes to all window types.
Fault ToleranceRouters constantly monitor the health of engine connections through the publish/subscribe ping API request. If and when an engine failure is detected, the containing router takes the following actions:
n Cleans up any subscription and publish clients coming from and going to that engine
n Clears any cached information from the router's storage, such as model information and schemas
n Begins reconnection, which involves the following:
o Each time that the router is pinged, up to the specified number of primary-retries, sends a ping request to the disconnected host and port.
o When more than the specified number of primary-retries have failed, the router waits until the expiration of the secondary-retry-interval before attempting a ping.
o If the ping is successful, re-reads model and schema information from the engine. Then re-establishes all appropriate subscribers and publishers.
When a connection to an engine has failed, you might see messages such as the following on the console (depending on your log levels):
2016-03-08T13:16:26,612; INFO ; 00000000; DF.ESP; (EspRouter.cpp:591); 'retrying engine esp1 (espsrv01.unx.sas.com:26003), retries 1'2016-03-08T13:16:26,612; ERROR; 00000000; DF.ESP; (dfESPpubsubClient.cpp:1197); connectToHost(): trying to connect to espsrv01.unx.sas.com:26003, connect: Connection refused
You might see the following messages upon successful reconnection:
55

2016-03-08T13:35:02,919; INFO ; 00000000; DF.ESP; (EspRouter.cpp:614); 'engine esp1 reinitialized'
Because the destination and route definitions contain dynamic definitions, they are all run against the new model retrieved from the newly reconnected engine. So suppose you were subscribing to all Aggregate windows and the engine was taken down to add two Aggregate windows. You would subscribe to all of those windows upon a successful reconnection.
FunctionsRouter destinations can use functions to dynamically determine how to deal with each incoming event. For example, a publish-destination can dynamically publish an event to a different engine, project, continuous query, and source window depending on the content of the event. A writer-destination can generate the output filename from the content of the event.
You can use any functions described in SAS Event Stream Processing: Using Source and Derived Windows. To reference an event variable, prepend a $ to the name of the event field:
equals($brokerName,'Joe')
You also get some extra contextual variables that you can use:
n _router - the name of the containing router
n _project - the name of the project from which the event arrived
n _contquery - the name of the continuous query from which the event arrived
n _window - the name of the window from which the event arrived
You use these variables the same way as you would event values:
<file-func>string('output/',$_router,'.',$_window,'.data')</file-func>
A publish-destination can also use functions to manipulate event values prior to publishing. To do this, just specify an <event-fields> element in the configuration for the destination:
<event-fields> <init> <value name='guid'>guid()</value> <value name='counter'>0</value> </init> <fields> <field name='instance'>$guid</field> <field name='counter'>sum($counter,1)</field> </fields></event-fields>
The <init> section contains functions to initialize values to be used by functions in the <fields> section. For each event, all functions in the <fields> section are run. For any <field> element with a name matching a field in the event schema, the output of the function is used to set the event field value. The functions modify only event values for that destination and do not affect any other destinations to which the event is sent.
56

Logging LevelsRouters use the logging context esp.router to provide operational information at different logging levels:
n INFO - shows information about setting up subscribers and publishers. Since publishers can be dynamic, this information is not always shown in the log. However, if you have a static publisher (no functions used to determine the destination Source window), the log shows it when the publisher is initialized.
2016-03-09T07:52:48,335; INFO ; 00000000; DF.ESP; (Destination.cpp:543); 'setting up publisher: esp2/project/query/trades'2016-03-09T07:52:48,537; INFO ; 00000000; DF.ESP; (EspRouter.cpp:1187); 'create route 'trades' engine=esp1 window=transform subscribe to: esp1/project/query/transform destinations: tradesend create route 'trades'
2016-03-09T07:52:49,001; INFO ; 00000000; DF.ESP; (EspRouter.cpp:1187); 'create route 'logger' engine=esp2 type=aggregate|copy subscribe to: esp2/project/query/brokerAlertsAggr subscribe to: esp2/project/query/frontRunningBuy subscribe to: esp2/project/query/frontRunningSell subscribe to: esp2/project/query/violationCounts destinations: logend create route 'logger'
n •DEBUG - shows information about the actual routing of events when there is event traffic. It shows the subscriber that received events, the number of events received, and the destinations to which they are sent:
2016-03-09T08:09:15,337; DEBUG; 00000008; DF.ESP; (EspRouter.cpp:1333); 'handle 1302 events for subscriber: dfESP://espsrv01.unx.sas.com:26003/project/query/transform, sending to destination(s) trades'2016-03-09T08:09:15,381; DEBUG; 00000012; DF.ESP; (EspRouter.cpp:1333); 'handle 1 events for subscriber: dfESP://espsrv01.unx.sas.com:27003/project/query/frontRunningBuy, sending to destination(s) log'2016-03-09T08:09:15,382; DEBUG; 00000016; DF.ESP; (EspRouter.cpp:1333); 'handle 1 events for subscriber: dfESP://espsrv01.unx.sas.com:27003/project/query/violationCounts, sending to destination(s) log'2016-03-09T08:09:15,382; DEBUG; 00000010; DF.ESP; (EspRouter.cpp:1333); 'handle 2 events for subscriber: dfESP://espsrv01.unx.sas.com:27003/project/query/brokerAlertsAggr, sending to destination(s) log
57

n TRACE - displays the actual events received (this can be quite a lot of information streaming to the console of course).
2016-03-09T08:13:05,605; TRACE; 00000008; DF.ESP; (EspRouter.cpp:1329); 'handle 1064 events for subscriber: dfESP://espsrv01.unx.sas.com:26003/project/query/transform, sending to destination(s) tradesevent (insert): broker=1012334,brokerAddress=SAS Campus Drive Cary NC 27513,brokerEmail=919-123-4567,brokerName=Lisa,brokerage=ESP & SAS,buyer=0,buysellflg=0,closeSeconds=54000,closeTimeGMT=20:00:00,currency=87236,date=Wed Aug 4 09:30:00 2010,id=10046471,msecs=2005,openSeconds=30600,openTimeGMT=13:30:00,price=20.92,quant=1539,seller=8377283,symbol=LOW,time=1280928600,timeAfterOpen=3600,timeTillClose=19800,tradeSeconds=34200,venue=55111event (insert): broker=1012334,brokerAddress=SAS Campus Drive Cary NC 27513,brokerEmail=919-123-4567,brokerName=Lisa,brokerage=ESP & SAS,buyer=0,buysellflg=1,closeSeconds=54000,closeTimeGMT=20:00:00,currency=87236,date=Wed Aug 4 09:30:00 2010,id=10116905,msecs=728,openSeconds=30600,openTimeGMT=13:30:00,price=109.94,quant=1000,seller=8123541,symbol=LQD,time=1280928600,timeAfterOpen=3600,timeTillClose=19800,tradeSeconds=34200,venue=55555...
Example: Subscribing to a Window in One Engine and Publishing Events to AnotherThe following example defines two engines. It subscribes to a single window in the one of them, esp1, and publishes these events to the second, esp2. It also subscribes to all aggregate and Copy windows in esp2 and sends them to a writer-destination, which writes the events to a file.
<engine> <esp-routers> <esp-router name='router'> <esp-engines> <esp-engine name='esp1' host='espsrv01.unx.sas.com' port='26003' /> <esp-engine name='esp2' host='espsrv01.unx.sas.com' port='27003' /> </esp-engines> <esp-destinations> <publish-destination name='trades' opcode='insert'> <publish-target> <engine-func>esp2</engine-func> <project-func>project</project-func> <contquery-func>query</contquery-func> <window-func>trades</window-func> </publish-target> <event-fields> <fields> <field name='field1'> string($_project,'/',$_contquery,'/',$_window) </field> <field name='field2'>$brokerName</field> </fields> </event-fields>
58

</publish-destination> <writer-destination name='log' format='json'> <file-func> string('output/',$_router,'.',$_window,'.data') </file-func> </writer-destination> </esp-destinations> <esp-routes> <esp-route name='trades' to='trades'> <engine-expr>esp1</engine-expr> <window-expr>transform</window-expr> </esp-route> <esp-route name='logger' to='log'> <engine-expr>esp2</engine-expr> <type-expr>aggregate|copy</type-expr> </esp-route> </esp-routes> </esp-router> </esp-routers></engine>
The full schema is as follows:
<esp-routers><esp-router name=""> <esp-engines> <esp-engine name="" host="" port="" /> ... </esp-engines> <esp-destinations> <publish-destination name="" opcode=""> <filter-func>[code]</filter-func> <publish-target> <engine-func>[code]</engine-func> <project-func>[code]</project-func> <contquery-func>[code]</contquery-func> <window-func>[code]</window-func> </publish-target> <event-fields> <init> <value name="">[code]</value> ... </init> <fields> <field name="">[code]</field> ... </fields> </event-fields> </publish-destination> ... <writer-destination name="" format="" dateformat=""> <file-func>[code]</file-func> </writer-destination> ... </esp-destinations> <esp-routes> <esp-route name="" to="" snapshot="true|false">
59

<engine-expr>[regex]</engine-expr> <project-expr>[regex]</project-expr> <contquery-expr>[regex]</contquery-expr> <window-expr>[regex]</window-expr> <type-expr>[regex]</type-expr> </esp-route> ... </esp-routes> </esp-router></esp-routers>
Dynamic Model Changes
OverviewYou can change models that are running in the ESP server by submitting a modified XML project to the server.
Suppose that you start a model, which might be connected to a data source through a connector or adapter:
dfesp_xml_server -http 62000 -pubsub 62001 -model file://model.xml
Submit the modified model to the server:
dfesp_xml_client -url "http://localhost:62000/eventStreamProcessing/v1/projects/project_01/state?value=modified&projectUrl=file://model-updated.xml" -put
The server compares the submitted project to the currently running project to determine a sequence of Insert, Replace, and Delete window actions. It transforms the running project into the submitted project.
SafeguardsThe ESP server attempts to force an all-or-nothing atomic update on the model by checking for valid model changes before performing the low-level model changes:
n The updated project must pass XML schema validation.
n The updated project must pass run-time validation. A temporary project is created using the updated project, and the directed graph is traversed to determine whether all run-time constraints are valid. This traversal ensures that the updated project starts if it is simply loaded as a new project.
n The existing project and the updated project are compared. A sequence of project changes is constructed. This sequence is checked to see whether any explicitly disallowed change operations are present.
60

Window Modifications
Insert a WindowA new window is inserted into the directed graph and its edges are created. Any data that can be obtained from the input windows of the new window are placed in the execution queue of the new window to be immediately processed. There are no restrictions on window insertion.
Delete a WindowYou cannot delete a window that is participating in connector orchestration. There are no restrictions on changing a window that has a connector when it is not part of connector orchestration and has no output edges. Deletion of a window internal to a continuous query forces the deletion of all windows farther down the directed graph. This is accomplished by recursively deleting all windows that are output windows of the deleted window. None of these windows can participate in connector orchestration. It is not possible to delete a window from the middle of a continuous query without deleting its children.
Replace a WindowYou can replace one window with another as long as there are no connectors associated with it. The replaced window must be of the same type and have the same name and schema as the window being replaced. Replaced windows maintain the full state of all indices. When the window being replaced has a retention policy, the new window must have the same type of retention policy. However, you can change the retention amount (number of time units or events). Expression calculations can also change, as well as slot expressions. Incomplete pattern instances are lost.
Replace an Aggregate WindowWhen the old aggregate window is nonadditive, all aggregate functions can be changed. The internal state for the aggregate is regenerated.
When the old aggregate window is additive, there are two possible cases:
n If the new replacement Aggregate window does not change any aggregation functions, all state is retained. Future operations on the new Aggregate window produce consistent results.
n If some aggregations functions were changed, then the state for all the aggregate functions is cleared. Aggregation effectively restarts with new events coming in. This works for insert-only data, but in the case of non-insert-only data, the first update or delete event causes the aggregate values to return NULL. There is no way to compute the correct answer.
Replace an EdgeYou can modify an edge if the only change is to the specified output slot.
61

RestrictionsThe following project- or query-level changes are not allowed:
n changes to elements or attributes that are not windows or edges
n changes that involve only adding or removing edges
n the addition of a new edge whose target is an existing window
n requests to modify a project whenever a window in that project has publisher or subscriber clients
To further clarify, the dynamic service facility currently implements an add window call. This call takes as parameters the new window and the parent windows of that new window. The add window call implicitly creates edges from the parent windows to the new window. There is no command to add an edge, so it is impossible to create a new edge from any window to an existing window.
SAS® and all other SAS Institute Inc. product or service names are registered trademarks or trademarks of SAS Institute Inc. in the USA and other countries. ® indicates USA registration. Other brand and product names are trademarks of their respective companies. Copyright © 2019, SAS Institute Inc., Cary, NC, USA. All Rights Reserved. January 2021 6.2-P1:espxmllayer
62