Aldelo EDC 6.2 User Manual
264
Aldelo ® EDC 6.2 User Manual
-
Upload
khangminh22 -
Category
Documents
-
view
4 -
download
0
Transcript of Aldelo EDC 6.2 User Manual

Aldelo® EDC 6.2 User Manual


PUBLISHED BY
Aldelo Systems Inc.
4641 Spyres Way, Suite 4
Modesto, CA 95356
Copyright © 1997-2009 by Aldelo Systems Inc.
All rights reserved. No part of the contents of this book may be reproduced or transmitted in any
form or by any means whatsoever without the written permission of the publisher.
Printed and Bound in the United States of America.
This manual is available through Aldelo Systems Inc. and resellers worldwide. For further
information about other languages that the manual may be translated into, please contact Aldelo
Systems Inc. or visit our website at www.aldelo.com. Send comments about this manual to
Aldelo is the registered trademark of Aldelo Systems Inc. Other products or company names
mentioned herein may be the trademarks of their respective owners.
The example companies, organizations, products, logos, people, places, and events depicted herein
are fictitious. No association with any real company, organization, product, logo, person, place, or
event is intended or should be inferred.


Table of Contents
INTRODUCTION --------------------------------------------------------------------------------------------------1
CHAPTER 1 OVERVIEW OF ALDELO®
EDC -------------------------------------------------------------------3
What is Aldelo® EDC? --------------------------------------------------------------------------------------3
Why Choose Aldelo® EDC? --------------------------------------------------------------------------------4
Who Are the Target Customers of Aldelo® EDC? ------------------------------------------------------5
Who Are the Merchant Service Providers? --------------------------------------------------------------5
What Do I Need Before I Can Proceed? -----------------------------------------------------------------5 How to Obtain Live Technical Assistance ---------------------------------------------------------------6
CHAPTER 2 REQUIREMENTS AND PLANNING -----------------------------------------------------------------7 Technology Overview ---------------------------------------------------------------------------------------7
Microsoft .NET Framework 3.5 ------------------------------------------------------------------------7
ASP.NET Web Services ---------------------------------------------------------------------------------7 Extensible Markup Language (XML) -----------------------------------------------------------------8
Simple Mail Transport Protocol (SMTP) -------------------------------------------------------------8 Microsoft Internet Information Services (IIS) --------------------------------------------------------8
Secured Socket Layer (SSL) ----------------------------------------------------------------------------8 Microsoft SQL Server 2005 -----------------------------------------------------------------------------9
OPOS (OLE for POS) ------------------------------------------------------------------------------------9 Microsoft Point of Service for .NET -------------------------------------------------------------------9
Windows Server 2003 / 2008 ------------------------------------------------------------------------- 10 Windows XP Professional with Service Pack 3 or Windows Vista Business / Enterprise /
Ultimate -------------------------------------------------------------------------------------------------- 10
Broadband Internet Connectivity --------------------------------------------------------------------- 10 Dial Backup Internet Failover ------------------------------------------------------------------------ 11
Firewall and Antivirus Software --------------------------------------------------------------------- 11 The Aldelo
® EDC Server Component --------------------------------------------------------------- 11
Aldelo® EDC Client Component --------------------------------------------------------------------- 11
Basic Computer Terminology ------------------------------------------------------------------------ 12
System Requirements ---------------------------------------------------------------------------------- 12 Aldelo
® EDC Server Component Baseline System Configuration --------------------------- 12
Minimum Server Computer Specifications --------------------------------------------------- 12 Recommended Server Computer Specifications --------------------------------------------- 12 Operating System Requirements --------------------------------------------------------------- 13 Warnings ------------------------------------------------------------------------------------------- 13 Other Software Requirements ------------------------------------------------------------------ 13
Connectivity Requirements --------------------------------------------------------------------- 13 Optional Enhancements-------------------------------------------------------------------------- 14 SMTP Mail Account ----------------------------------------------------------------------------- 14
Aldelo® EDC Client Component Baseline System Configuration --------------------------- 14
Minimum Client Computer Specifications --------------------------------------------------- 14 Recommended Client Computer Specifications --------------------------------------------- 14 Operating System Requirements --------------------------------------------------------------- 14
Warnings ------------------------------------------------------------------------------------------- 15 Other Software Requirements ------------------------------------------------------------------ 15 Connectivity Requirements --------------------------------------------------------------------- 15

Deployment Planning ------------------------------------------------------------------------------- 15 Deployment Preparation Check List ----------------------------------------------------------- 15 Single System Deployment --------------------------------------------------------------------- 15 Client / Server Deployment --------------------------------------------------------------------- 16
SQL Server 2005 Pre-Exist Condition Deployment ----------------------------------------- 16 Software Upgrades ---------------------------------------------------------------------------------- 16
CHAPTER 3 INSTALLATION ----------------------------------------------------------------------------------- 17 Getting Started --------------------------------------------------------------------------------------------- 17
Determining the Existence of Internet Information Services (IIS) ------------------------------ 17
Installing Internet Information Services (IIS) ------------------------------------------------------ 19
Installing Internet Information Services (IIS) in Windows Vista ---------------------------- 20
The Aldelo®
Prerequisite Installer ---------------------------------------------------------------------- 22 Installing the Aldelo
® Prerequisite Installer -------------------------------------------------------- 23
Installing the Required Software Using the Aldelo®
Prerequisite Installer -------------------- 26 Installing Microsoft .NET Framework 3.5 ------------------------------------------------------- 27
Installing Microsoft Point of Service for .NET 1.12 ------------------------------------------- 27 Installing Microsoft SQL Server 2005 Express ------------------------------------------------- 33
Performing ASP.NET 2.0 to IIS Registration --------------------------------------------------- 37 Uninstalling the Aldelo
® Prerequisite Installer ----------------------------------------------------- 38
Installation of Aldelo® EDC -------------------------------------------------------------------------- 39
Typical Setup ----------------------------------------------------------------------------------------- 43
Custom Setup ---------------------------------------------------------------------------------------- 45 Server Setup --------------------------------------------------------------------------------------- 45 Client Setup --------------------------------------------------------------------------------------- 47
Receipt Printing -------------------------------------------------------------------------------------- 48 Post Installation Verification ------------------------------------------------------------------------- 48
Verify Firewall Port is Open ----------------------------------------------------------------------- 48 Verify Aldelo
® EDC Folder Securities ----------------------------------------------------------- 52
Verify Aldelo® EDC Web Service is Functioning Properly----------------------------------- 53
Verify SQL Server 2005 is Running -------------------------------------------------------------- 56 CHAPTER 4 CONFIGURATION & TESTING ------------------------------------------------------------------ 57
Summary ---------------------------------------------------------------------------------------------------- 57
License Activation -------------------------------------------------------------------------------------- 58 Database Setup Wizard -------------------------------------------------------------------------------- 59
General System Information Tab------------------------------------------------------------------ 59
User Accounts and Passwords Tab --------------------------------------------------------------- 60 E-mail Notifications Tab --------------------------------------------------------------------------- 61 Finish Tab -------------------------------------------------------------------------------------------- 63 Aldelo
® EDC – Login ------------------------------------------------------------------------------- 64
Resetting a Forgotten Password ---------------------------------------------------------------- 65
Merchant Account Setup --------------------------------------------------------------------------- 67 Merchant Account Editor Tab ------------------------------------------------------------------ 68
Merchant Accounts Tab ------------------------------------------------------------------------- 70 Merchant Accounts Toolbar -------------------------------------------------------------------- 70
Show All ------------------------------------------------------------------------------------------------------------ 70 New Button -------------------------------------------------------------------------------------------------------- 70 Save Button -------------------------------------------------------------------------------------------------------- 71 Delete Button ------------------------------------------------------------------------------------------------------ 71 Cancel Button ----------------------------------------------------------------------------------------------------- 71 Done Button ------------------------------------------------------------------------------------------------------- 71

System Utilities --------------------------------------------------------------------------------------------- 71 Manage Database --------------------------------------------------------------------------------------- 71
SQL Server 2005 Settings -------------------------------------------------------------------------- 73 Select SQL Server Instance --------------------------------------------------------------------- 73
Select Authentication Type --------------------------------------------------------------------- 74 Current Data Source Link ----------------------------------------------------------------------- 74
Database Activities ---------------------------------------------------------------------------------- 74 Select Database Activity Type ------------------------------------------------------------------ 74
Select Existing Database ----------------------------------------------------------------------------------------- 75 Create New Database -------------------------------------------------------------------------------------------- 76 Attach Database From Data File ------------------------------------------------------------------------------- 77 Restore Database From Backup -------------------------------------------------------------------------------- 79
Setup Toolbar ---------------------------------------------------------------------------------------- 85 Test Button ---------------------------------------------------------------------------------------- 85 Detach Button ------------------------------------------------------------------------------------- 86 Backup Button ------------------------------------------------------------------------------------ 87
Reindex Button ----------------------------------------------------------------------------------- 89 Connect Button ----------------------------------------------------------------------------------- 90
Exit Button ---------------------------------------------------------------------------------------- 91 Manage SQL Accounts -------------------------------------------------------------------------------- 91
Manage Database Logins --------------------------------------------------------------------------- 92
Add Windows Authentication Login ---------------------------------------------------------- 93
Add SQL Server Authentication Login ------------------------------------------------------- 94 SQL Editor ----------------------------------------------------------------------------------------------- 95 Software Update ---------------------------------------------------------------------------------------- 95
Main Menu -------------------------------------------------------------------------------------------------- 96 Store Settings -------------------------------------------------------------------------------------------- 96
General Tab------------------------------------------------------------------------------------------- 96 Payment Server Settings Group Box ---------------------------------------------------------- 96 Application Settings Group Box --------------------------------------------------------------- 97
Options Tab------------------------------------------------------------------------------------------- 97 Default Startup Screen Size --------------------------------------------------------------------- 98
Main Screen Picture ------------------------------------------------------------------------------ 98 Receipt Tab ----------------------------------------------------------------------------------------- 100 Notifications Tab ---------------------------------------------------------------------------------- 101
Security Settings -------------------------------------------------------------------------------------- 102 Security Roles Tab -------------------------------------------------------------------------------- 103
Security Settings Toolbar ---------------------------------------------------------------------- 104 Show All Button ------------------------------------------------------------------------------------------------- 104 New Button ------------------------------------------------------------------------------------------------------ 105 Save Button ------------------------------------------------------------------------------------------------------ 105 Delete Button ---------------------------------------------------------------------------------------------------- 105 Cancel Button --------------------------------------------------------------------------------------------------- 105 Done Button ----------------------------------------------------------------------------------------------------- 105
Security Role Editor Tab ------------------------------------------------------------------------- 106 User Accounts ----------------------------------------------------------------------------------------- 108
User Accounts Tab -------------------------------------------------------------------------------- 109 Users Toolbar ----------------------------------------------------------------------------------- 110
Show All Button ------------------------------------------------------------------------------------------------- 110 New Button ------------------------------------------------------------------------------------------------------ 110 Delete Button ---------------------------------------------------------------------------------------------------- 111

Cancel Button --------------------------------------------------------------------------------------------------- 111 Done Button ----------------------------------------------------------------------------------------------------- 111
User Account Editor Tab -------------------------------------------------------------------------- 111 Users Toolbar ------------------------------------------------------------------------------------ 112
Reset Button ----------------------------------------------------------------------------------------------------- 112 New Button ------------------------------------------------------------------------------------------------------ 114 Save Button ------------------------------------------------------------------------------------------------------ 114 Delete Button ---------------------------------------------------------------------------------------------------- 115 Cancel Button --------------------------------------------------------------------------------------------------- 115 Done Button ----------------------------------------------------------------------------------------------------- 115
Merchant Accounts ------------------------------------------------------------------------------------ 115 Merchant Accounts Tab --------------------------------------------------------------------------- 116
Merchant Accounts Toolbar ------------------------------------------------------------------- 117 Show All Button ------------------------------------------------------------------------------------------------- 117 New Button ------------------------------------------------------------------------------------------------------ 117 Delete Button ---------------------------------------------------------------------------------------------------- 117 Cancel Button --------------------------------------------------------------------------------------------------- 118 Done Button ----------------------------------------------------------------------------------------------------- 118
Merchant Account Editor Tab ----------------------------------------------------------------- 118 Save Button ------------------------------------------------------------------------------------------------------ 120 Delete, Cancel, and Done Buttons ---------------------------------------------------------------------------- 120
Log Off -------------------------------------------------------------------------------------------------- 120
Performing Test Transactions with Live Credit Cards ------------------------------------------- 120 CHAPTER 5 ADMINISTRATIVE TASKS ---------------------------------------------------------------------- 123
System Utilities -------------------------------------------------------------------------------------------- 123 Import & Export --------------------------------------------------------------------------------------- 123
Export ------------------------------------------------------------------------------------------------ 124
Import ------------------------------------------------------------------------------------------------ 127 Software Update --------------------------------------------------------------------------------------- 128
Main Menu ------------------------------------------------------------------------------------------------ 129 Technical Support ------------------------------------------------------------------------------------- 129
Available Providers Tab --------------------------------------------------------------------------- 130
Contact Information Toolbar ------------------------------------------------------------------ 130 Visit Aldelo Website Button ----------------------------------------------------------------------------------- 130 Remote Support Button ---------------------------------------------------------------------------------------- 130 Done Button ----------------------------------------------------------------------------------------------------- 131
Support Service Tab -------------------------------------------------------------------------------- 132 Visit Aldelo Website, Remote Support, and Done Buttons ------------------------------------------------- 132
About ---------------------------------------------------------------------------------------------------- 133 Log Off -------------------------------------------------------------------------------------------------- 134 Exit Program ------------------------------------------------------------------------------------------- 134
Main Screen ----------------------------------------------------------------------------------------------- 135 Batch Tab ----------------------------------------------------------------------------------------------- 135
Inquire Current Batch ------------------------------------------------------------------------------ 135 Review Transactions Tab ---------------------------------------------------------------------- 136
Trace Output Tab -------------------------------------------------------------------------------- 137 Summary Tab ------------------------------------------------------------------------------------ 138
Transaction Selector Toolbar --------------------------------------------------------------------- 138
Reprint Receipt Button ------------------------------------------------------------------------- 138 Done Button -------------------------------------------------------------------------------------- 139
Close Current Batch -------------------------------------------------------------------------------- 139 Close Batch Tab --------------------------------------------------------------------------------- 141

Trace Output Tab ------------------------------------------------------------------------------- 142 Batch Settlement Toolbar ------------------------------------------------------------------------ 142
Close Primary Merchant Button -------------------------------------------------------------- 142 Print Button -------------------------------------------------------------------------------------- 143
Done Button ------------------------------------------------------------------------------------- 143 Periodic Password Changes ------------------------------------------------------------------------- 143
CHAPTER 6 AUDIT TRAIL ----------------------------------------------------------------------------------- 145 Main Menu ------------------------------------------------------------------------------------------------ 145
View Audit Trail Events ----------------------------------------------------------------------------- 145
Events Tab ------------------------------------------------------------------------------------------ 146
Filter Tab----------------------------------------------------------------------------------------- 147
Audit Log Viewer Toolbar ----------------------------------------------------------------------- 147 Refresh Button ---------------------------------------------------------------------------------- 147 Reset To Default Button ----------------------------------------------------------------------- 148 Done Button ------------------------------------------------------------------------------------- 148
CHAPTER 7 REPORTS ---------------------------------------------------------------------------------------- 149 Main Screen ---------------------------------------------------------------------------------------------- 149
Credit Tab ---------------------------------------------------------------------------------------------- 149 Gift Tab ------------------------------------------------------------------------------------------------ 149
Reports Group Box -------------------------------------------------------------------------------- 149
Detail Report Button --------------------------------------------------------------------------- 150 Gift Card Details Report Tab --------------------------------------------------------------------------------- 150 Account Filters Tab --------------------------------------------------------------------------------------------- 151 General Filters Tab --------------------------------------------------------------------------------------------- 152 Action Filters Tab ----------------------------------------------------------------------------------------------- 153
Online Portal Button --------------------------------------------------------------------------- 153 Report Toolbar ---------------------------------------------------------------------------------- 153
Refresh Button --------------------------------------------------------------------------------------------------- 153 Reset to Default Button----------------------------------------------------------------------------------------- 154 Done Button ----------------------------------------------------------------------------------------------------- 154
Debit Tab ---------------------------------------------------------------------------------------------- 154 Other Group Box ---------------------------------------------------------------------------------- 154
Online Portal Button --------------------------------------------------------------------------- 154
Debit Canada Tab ------------------------------------------------------------------------------------- 154
Reports Group Box -------------------------------------------------------------------------------- 154 Detail Report Button --------------------------------------------------------------------------- 155
Canadian Debit Details Report Tab -------------------------------------------------------------------------- 155 Account Filters Tab --------------------------------------------------------------------------------------------- 156 General Filters Tab --------------------------------------------------------------------------------------------- 157 Action Filters Tab ----------------------------------------------------------------------------------------------- 158
Online Portal Button --------------------------------------------------------------------------- 158 Report Toolbar ---------------------------------------------------------------------------------- 158
Refresh Button --------------------------------------------------------------------------------------------------- 158 Reset to Default Button----------------------------------------------------------------------------------------- 159 Done Button ----------------------------------------------------------------------------------------------------- 159
EBT Tab ----------------------------------------------------------------------------------------------- 159 Other Group Box ---------------------------------------------------------------------------------- 159
Online Portal Button --------------------------------------------------------------------------- 159 Check Tab --------------------------------------------------------------------------------------------- 159
Reports Group Box -------------------------------------------------------------------------------- 159
Detail Report Button --------------------------------------------------------------------------- 160 Check Processing Details Report Tab ----------------------------------------------------------------------- 160

Account Filters Tab -------------------------------------------------------------------------------------------- 161 General Filters Tab -------------------------------------------------------------------------------------------- 162 Action Filters Tab ---------------------------------------------------------------------------------------------- 163
Online Portal Button ---------------------------------------------------------------------------- 163 Report Toolbar ----------------------------------------------------------------------------------- 163
Refresh Button -------------------------------------------------------------------------------------------------- 163 Reset to Default Button ---------------------------------------------------------------------------------------- 164 Done Button ----------------------------------------------------------------------------------------------------- 164
Batch Tab ----------------------------------------------------------------------------------------------- 164 Batch Reports Group Box ------------------------------------------------------------------------- 164
Batch Summary Report Button ---------------------------------------------------------------- 165 Batch Summary Report Tab ----------------------------------------------------------------------------------- 165 Account Filters Tab -------------------------------------------------------------------------------------------- 166 General Filters Tab -------------------------------------------------------------------------------------------- 167
Report Toolbar ----------------------------------------------------------------------------------- 167 Refresh Button -------------------------------------------------------------------------------------------------- 167 Reset to Default Button ---------------------------------------------------------------------------------------- 168 Done Button ----------------------------------------------------------------------------------------------------- 168
Transaction Summary Report Button --------------------------------------------------------- 168 Transaction Summary Report Tab ---------------------------------------------------------------------------- 169 Account Filters Tab -------------------------------------------------------------------------------------------- 170 General Filters Tab -------------------------------------------------------------------------------------------- 171 Action Filters Tab ---------------------------------------------------------------------------------------------- 172
Report Toolbar ----------------------------------------------------------------------------------- 172 Refresh Button -------------------------------------------------------------------------------------------------- 172 Reset to Default Button ---------------------------------------------------------------------------------------- 172 Done Button ----------------------------------------------------------------------------------------------------- 172
Transaction Details Report Button ------------------------------------------------------------ 173 Transaction Details Report Tab ------------------------------------------------------------------------------ 173 Account Filters Tab -------------------------------------------------------------------------------------------- 174 General Filters Tab -------------------------------------------------------------------------------------------- 175 Action Filters Tab ---------------------------------------------------------------------------------------------- 176
Report Toolbar ----------------------------------------------------------------------------------- 176 Refresh Button -------------------------------------------------------------------------------------------------- 176 Reset to Default Button ---------------------------------------------------------------------------------------- 176 Done Button ----------------------------------------------------------------------------------------------------- 177
Online Portal Button ---------------------------------------------------------------------------- 177
CHAPTER 8 USING ALDELO®
EDC IN STAND-ALONE MODE ------------------------------------------- 179 Main Screen ----------------------------------------------------------------------------------------------- 179
Credit Tab ---------------------------------------------------------------------------------------------- 179
Authorization Group Box ------------------------------------------------------------------------- 179 Pre-Authorization Button ----------------------------------------------------------------------- 179
Pre-Auth Tab ---------------------------------------------------------------------------------------------------- 181 Trace Output Tab ----------------------------------------------------------------------------------------------- 181
Post Authorization Button ---------------------------------------------------------------------- 182 Void Post Authorization Button --------------------------------------------------------------- 183
Sale Group Box ------------------------------------------------------------------------------------- 184
Sale Button --------------------------------------------------------------------------------------- 184 Sale Tab ---------------------------------------------------------------------------------------------------------- 186 Trace Output Tab ----------------------------------------------------------------------------------------------- 186
Voice Capture Button --------------------------------------------------------------------------- 187 Voice Capture Tab ---------------------------------------------------------------------------------------------- 189 Trace Output Tab ----------------------------------------------------------------------------------------------- 189
Void Sale Button -------------------------------------------------------------------------------- 190

Return Group Box --------------------------------------------------------------------------------- 191 Return Button ----------------------------------------------------------------------------------- 191
Return Tab ------------------------------------------------------------------------------------------------------- 193 Trace Output Tab ----------------------------------------------------------------------------------------------- 193
Void Return Button ---------------------------------------------------------------------------- 194 Gift Tab ------------------------------------------------------------------------------------------------ 195
Issue/Reload Group Box -------------------------------------------------------------------------- 195 Issue Button ------------------------------------------------------------------------------------- 195
Issue Tab --------------------------------------------------------------------------------------------------------- 197 Trace Output Tab ----------------------------------------------------------------------------------------------- 197
Reload Button ----------------------------------------------------------------------------------- 198 Reload Tab ------------------------------------------------------------------------------------------------------- 199 Trace Output Tab ----------------------------------------------------------------------------------------------- 199
Void Reload Button ---------------------------------------------------------------------------- 200 Balance Button ---------------------------------------------------------------------------------- 201
Balance Tab ----------------------------------------------------------------------------------------------------- 202 Trace Output Tab ----------------------------------------------------------------------------------------------- 202
Redemption Group Box -------------------------------------------------------------------------- 203
Sale Button -------------------------------------------------------------------------------------- 204 Sale Tab ---------------------------------------------------------------------------------------------------------- 205 Trace Output Tab ----------------------------------------------------------------------------------------------- 205
Void Sale Button-------------------------------------------------------------------------------- 206
Return Group Box --------------------------------------------------------------------------------- 207
Return Button ----------------------------------------------------------------------------------- 207 Return Tab ------------------------------------------------------------------------------------------------------- 209 Trace Output Tab ----------------------------------------------------------------------------------------------- 209
Void Return Button ---------------------------------------------------------------------------- 210 Debit Tab ---------------------------------------------------------------------------------------------- 211
Transaction Group Box --------------------------------------------------------------------------- 212 Sale Button -------------------------------------------------------------------------------------- 212
Sale Tab ---------------------------------------------------------------------------------------------------------- 213 Trace Output Tab ----------------------------------------------------------------------------------------------- 213
Return Button ----------------------------------------------------------------------------------- 214 Return Tab ------------------------------------------------------------------------------------------------------- 215 Trace Output Tab ----------------------------------------------------------------------------------------------- 216
Debit Canada Tab ------------------------------------------------------------------------------------- 216 Transaction Group Box --------------------------------------------------------------------------- 217
Sale Button -------------------------------------------------------------------------------------- 217 Sale Tab ---------------------------------------------------------------------------------------------------------- 218 Trace Output Tab ----------------------------------------------------------------------------------------------- 218
Sale with Gratuity Button --------------------------------------------------------------------- 219 Sale with Gratuity Tab ----------------------------------------------------------------------------------------- 220 Trace Output Tab ----------------------------------------------------------------------------------------------- 221
Return Button ----------------------------------------------------------------------------------- 221 Return Tab ------------------------------------------------------------------------------------------------------- 223 Trace Output Tab ----------------------------------------------------------------------------------------------- 223
Utility Group Box --------------------------------------------------------------------------------- 224 Key Change Button ---------------------------------------------------------------------------- 224
Key Change Tab ------------------------------------------------------------------------------------------------ 226 Trace Output Tab ----------------------------------------------------------------------------------------------- 227
EBT Tab ----------------------------------------------------------------------------------------------- 227
Food Stamp Group Box --------------------------------------------------------------------------- 228 Food Stamp Sale Button ----------------------------------------------------------------------- 228

Food Stamp Sale Tab------------------------------------------------------------------------------------------- 229 Trace Output Tab ----------------------------------------------------------------------------------------------- 229
Food Stamp Return Button --------------------------------------------------------------------- 230 Food Stamp Return Tab ---------------------------------------------------------------------------------------- 231 Trace Output Tab ----------------------------------------------------------------------------------------------- 231
Food Stamp Balance Button ------------------------------------------------------------------- 232 Food Stamp Balance Tab -------------------------------------------------------------------------------------- 233 Trace Output Tab ----------------------------------------------------------------------------------------------- 233
Cash Group Box ------------------------------------------------------------------------------------ 234 Cash Sale Button -------------------------------------------------------------------------------- 234
Sale Tab ---------------------------------------------------------------------------------------------------------- 235 Trace Output Tab ----------------------------------------------------------------------------------------------- 235
Cash Balance Button ---------------------------------------------------------------------------- 236 Balance Tab ----------------------------------------------------------------------------------------------------- 237 Trace Output Tab ----------------------------------------------------------------------------------------------- 237
Check Tab ---------------------------------------------------------------------------------------------- 237 Driver License Group Box ------------------------------------------------------------------------ 237
Auth Driver License Button -------------------------------------------------------------------- 237 Auth by Driver License Tab ----------------------------------------------------------------------------------- 239 Trace Output Tab ----------------------------------------------------------------------------------------------- 239
MICR Group Box ---------------------------------------------------------------------------------- 240 Auth MICR Button ------------------------------------------------------------------------------ 240
Auth by MICR Tab ---------------------------------------------------------------------------------------------- 242 Trace Output Tab ----------------------------------------------------------------------------------------------- 242
Batch Tab ----------------------------------------------------------------------------------------------- 243
CHAPTER 9 USING ALDELO®
EDC IN INTEGRATED MODE ---------------------------------------------- 245
CHAPTER 10 FREQUENTLY ASKED QUESTIONS ---------------------------------------------------------- 247 APPENDIX 1 SOFTWARE UPGRADES ------------------------------------------------------------------ 251

1
Introduction
Merchants in today’s marketplace must constantly compete to provide customer satisfaction and to
gain customer loyalty. Simplified, reliable, and secure credit card payment acceptance can
significantly enhance the quality of service. Customer satisfaction and cardholder data security go
hand in hand. A responsible merchant ensures the security of his customers’ sensitive cardholder
data, thereby helping to reduce fraud and enhancing the overall customer experience. Aldelo® EDC
(Electronic Data Capture) enables merchants to achieve simplified, reliable, and secure payment
acceptance. It enhances the quality of service by conforming to Payment Card Industry (PCI)
security compliance standards. Aldelo® EDC is the next generation payment processing solution for
the Restaurant, Retail, and Mail Order Telephone Order (MOTO) industries.
Merchants everywhere have discovered the benefits of the Aldelo® EDC payment processing
solution. We are pleased that you have chosen Aldelo® EDC as your payment processing solution.
This user manual has been created to help you understand the ins and outs of our payment
processing software. By the time you finish reading this manual, you will be able to install, setup,
operate, and troubleshoot Aldelo® EDC like a pro.
You should devote the time required to read this manual thoroughly in its entirety before attempting
to install and configure Aldelo® EDC. The manual provides complete step-by step instructions on
how to get Aldelo® EDC up and running. Most of the time, questions that occur to you as you
follow the instructions in the manual are answered in the manual before you finish reading it.
Reading the manual before starting your installation helps make the installation process a smooth
one.
However, this manual is also designed for use as a reference guide. The information in each section
of the manual is explained in detail so that the user does not have to rely on information from
previous sections to make sense of a topic. Care has been taken to make sure each topic in the
manual stand on its own. Therefore, the user can reference any section of the manual and find that
the explanation of the topic is complete, without having to thumb through previous sections or
chapters to find the definition of terms or other prerequisite information.
Aldelo® EDC has been assessed for compliance with the Payment Application Best Practices
(PABP) standard and has been included by Visa in their list of Validated Payment Applications.
Compliance with the PABP is determined based upon data and information developed by an
evaluation of the application by a Qualified Payment Application Security Company (QPASC).
Although Visa reviews the QPASC-developed data and information, Visa does not independently
confirm such data or information, nor does Visa perform any tests or analysis of the functionality,
performance, or suitability of any of the applications and/or products listed. Visa makes no
endorsement or recommendation of applications or products, or of their respective developers or
distributors. A list of Visa’s Validated Payment Applications may be found online at:
http://usa.visa.com/download/merchants/validated_payment_applications.pdf.
You should also spend the time to view Visa’s Business Guide to Data Security. This 28 minute
animated presentation provides you with a basic understanding of data security and the type of
questions you should be asking yourself as well as the questions you should be asking your

2
software, hardware, and processing vendors. The presentation may be found at:
http://usa.visa.com/merchants/risk_management/data_security_demo/popup.html?popupwindow.
For more detailed information, Aldelo strongly recommends that you also read the Payment Card
Industry (PCI) Data Security Standard (DSS). This document may be found at:
https://www.pcisecuritystandards.org/security_standards/pci_dss_download.html. It explains in
detail the 12 Payment Card Industry Data Security Standard requirements. The understanding and
implementation of these requirements help to ensure that your customers’ data is as safe as possible
from security breaches.

3
Chapter 1
Overview of Aldelo® EDC
What is Aldelo® EDC?
Aldelo® EDC is credit card payment processing software that utilizes broadband Internet (DSL,
cable, etc.) to deliver super-fast payment authorization and settlement. Aldelo® EDC works with
payment gateways and processors to make reliable and secure payment transactions a reality.
Aldelo® EDC contains core features that enable merchants to accept credit cards quickly and
efficiently. These core features include credit card sales, pre-authorizations, gratuity adjustments,
post-authorizations, returns, voids, voice capture, duplicate overrides, AVS (Address Verification
System) verification, CVV (Card Verification Value) verification, Level II transactions (for
supported Merchant Service Providers), review current batch, close current batch, auto batch
closure, reporting, and more. The security and encryption features built into Aldelo® EDC are
second to none. All transactions and user activities are logged for audit trail purposes, and all
cardholder data is stored in AES (Advanced Encryption Standard) encrypted state and cleared after
batch close. Aldelo® EDC even has auto healing capability for critical transactional data in case of
system corruption. On top of all these built-in application level securities, Aldelo® EDC uses
Microsoft SQL Server 2005 (or the Express Edition) as the back end data store for maximum
reliability and scalability.
The Aldelo® EDC architecture is a client-server based solution to deliver the best possible
performance. The server side of Aldelo® EDC is the payment engine web service. It is hosted within
Microsoft Internet Information Services (IIS) for performance, scalability, and security. The server
component supports both Intranet and Extranet (Internet) deployment. Additionally, the Server
component also supports Secured Socket Layer (SSL) to secure all data transport within unsecured
public or wireless networks. This server component may be installed on Windows Server 2003
(except Domain Controller), Windows XP Professional with Service Pack 3, or Windows Vista
Business, Enterprise, or Ultimate editions. The client side of Aldelo® EDC is a Windows client
application used for setup, testing, batching, reporting, manual payment transactions, and other
tasks. This client component communicates with the server component to execute server based
payment processing actions. You may install this client component on the same computer as the
server component, or deploy it to another PC running Windows Server 2003 (except Domain
Controller), Windows XP Professional with Service Pack 3, or Windows Vista Business, Enterprise,
or Ultimate editions.
Aldelo® EDC is designed to function either as a stand-alone system or integrated with external
business software, such as a point-of-sale solution. When used as a stand-alone credit card payment
terminal, Aldelo® EDC helps you avoid monthly terminal rental charges. When used in integrated
environments, Aldelo®
EDC eliminates double entry and promotes better user productivity and
performance. Seamless integration by third party solutions to Aldelo® EDC is a breeze. Since the
core payment engine is a set of ASP.NET Web Service methods, any solution (whether it’s a
windows application or web solution) that uses web services may take advantage of this. All

4
response messages are returned from the web service in the form of XML for simple and quick
parsing. Additionally, Aldelo® EDC is fully integrated with the Aldelo
® For Restaurants point-of-
sale solution. Overall, Aldelo® EDC is a simple to use, reliable, secure, and scalable credit card
payment processing solution for any merchant who wishes to accept credit cards from customers.
Why Choose Aldelo® EDC?
There are many options when it comes to credit card processing. Traditionally, merchants process
credit card transactions via specialized hardware payment terminals such as Nurit or Verifone. In
recent years, a new breed of payment acceptance technology has emerged. These are software based
credit card processing solutions designed to save merchants equipment costs. They offer much more
flexibility and functionality. This is similar to the evolution of cash registers into full fledged
computerized POS software solutions. In addition, the software based credit card processing
solutions offer something the hardware payment terminals cannot in today’s market: the ability to
utilize affordable broadband internet, such as DSL (Digital Subscriber Line) or cable, to achieve
super-fast authorization and settlement. Moreover, software based credit card solutions have the
ability to be fully integrated into computerized POS solutions in order to reduce double entry and
increase user productivity. Clearly, software based credit card processing solutions will eventually
emerge as the primary choice in payment processing as more and more merchants adopt
computerized POS solutions for their businesses.
There are numerous software based payment solutions on the market and most fall under one of two
categories: Store Deployed Payment Middleware and Internet Payment Gateways. Both offer
advantages when it comes to payment processing. The Store Deployed Payment Middleware
solutions are PC based and may operate in stand-alone mode or as part of an integrated solution.
Software such as Aldelo® EDC belongs to this category. The advantages of Store Deployed
Payment Middleware are ease of deployment, multiple processor choices, and ease of
troubleshooting by isolating problems within the store for faster resolution. The Internet Payment
Gateways are usually deployed by Merchant Service Providers (MSP’s) or Internet Payment
Processors. Gateways such as Mercury Pay, PPI, PayMover, EFSnet, and others, are all Internet
Payment Gateways. Merchants usually do not integrate directly to the Internet Payment Gateways
since it is the responsibility of the client payment solution. The main advantages of Internet
Payment Gateways for merchants are more value added services and possibly better competitive
rates. The disadvantage of course, is that the choices are limited if a payment solution integrates to
only one processing platform. Aldelo® EDC integrates to various Internet Payment Gateways and
processors to deliver the benefits of both Store Deployed Payment Middleware and Internet
Payment Gateways.
Merchants who use Aldelo® EDC enjoy the benefits of processor choice, super-fast transaction
processing, security compliance, ease of troubleshooting, and much more. Aldelo® EDC also stands
out in terms of the extensive built-in security features, simple integration, reliable transaction
processing and storage, and easy to understand reports. Best of all, Aldelo® EDC is fully supported
by the Aldelo Technical Support Staff 7 days per week, 24 hours per day. Merchants who use
Aldelo® EDC enjoy peace of mind in the complex world of payment processing. Finally, Aldelo
®
EDC is the only fully supported credit card processing software that integrates seamlessly with the
Aldelo® For Restaurants POS solution. Aldelo
® For Restaurants can have certain payment
processing features enabled only when integrated with Aldelo® EDC, and the Aldelo Technical
Support Staff is trained to provide assistance with both solutions within the same support call.

5
Who Are the Target Customers of Aldelo® EDC?
Aldelo® EDC caters to two different types of merchants within the Restaurant, Retail, and Mail
Order Telephone Order (MOTO) industries: Integrated Merchants and Stand-Alone Merchants.
Integrated Merchants are those who must process credit card transactions via an integrated
environment. An example of this is the Aldelo® For Restaurants POS solution integrated with
Aldelo® EDC. This combination delivers a unified payment acceptance solution. Under integrated
environments, all primary payment activities originate from the integrated POS solution. The
Aldelo® EDC client application is used mainly for setup, administration, batching, and reporting
purposes.
Stand-alone merchants are those who wish to process credit cards in stand-alone environments such
as doctors’ offices, reservation desks, service departments, and other businesses that traditionally do
not use a POS solution for integrated payment processing. Under the stand-alone environment, all
primary payment activities originate from the Aldelo® EDC client application.
Who Are the Merchant Service Providers?
With Aldelo® EDC, multiple Merchant Service Providers (MSP’s) are available to choose from
right out of the box. Each of these Merchant Service Providers has certified our payment solution to
ensure proper account setup and integration. In addition, Aldelo Systems Inc. adds Merchant
Service Providers from time to time, based on the needs of our customers.
Merchants who choose to use one of the certified Merchant Service Providers offered through
Aldelo® EDC ensures maximum compatibility with other Aldelo point-of-sale solutions, and full
support from both Aldelo and the certified Merchant Service Provider. Best of all, certified
Merchant Service Providers usually are able to match or beat the merchant’s existing payment
processing rates. For a current list of available certified Merchant Service Providers, please contact
our sales office.
What Do I Need Before I Can Proceed?
In order to setup payment processing for your business, please follow the action items listed below
in sequence:
1. Ensure that you have a PC that meets the minimum base-line requirements.
2. Select a certified Merchant Service Provider supported by Aldelo® EDC.
3. Sign up with the Merchant Service Provider selected in step 2 above, and retrieve your
account credentials.
4. Review your deployment strategy, perform the installation and setup, and conduct test
transactions.
The rest of this User Manual will discuss the above steps in detail. Be sure to review this entire
manual before attempting to deploy the Aldelo® EDC solution.

6
How to Obtain Live Technical Assistance
Should you have any questions during the setup of Aldelo®
EDC, help is just a phone call away.
Our Technical Support Staff is available 7 days per week, 24 hours per day to assist you.
Technical Support Department
Aldelo Systems Inc.
Telephone: (209) 338-5481
Web: www.aldelo.com
E-mail: [email protected]

7
Chapter 2
Requirements and Planning
Technology Overview
This chapter serves as an educational primer on key technologies used in or involved with Aldelo®
EDC. The goal is to ensure that installers and administrators are fully aware of how the various
technologies work together and how Aldelo® EDC makes use of these technologies in a transparent,
hands free manner to promote ease of use. Next, this chapter moves on to system requirements
analysis and planning details. We use this section to discuss the various scenarios you may
encounter when deploying Aldelo® EDC. This section also serves as a great reference advisor when
performing the first install.
Microsoft .NET Framework 3.5
The Microsoft .NET Framework is a managed environment for the next generation of applications
running on Microsoft Windows platforms. Both the server and client components of Aldelo® EDC
are built entirely on the .NET Framework. There are currently five .NET Framework libraries: .NET
Framework 1.0, 1.1, 2.0, 3.0, and 3.5. Aldelo® EDC requires the .NET Framework 3.5. You may
install multiple versions of these frameworks on the same system at the same time. It is also
important to keep up with latest .NET Framework service updates. As an installer, administrator, or
user of Aldelo® EDC, you do not need to understand the inner workings of the .NET Framework.
The only requirement is to ensure that the .NET Framework is installed in the supported Windows
operating system. For simplicity, install the Aldelo Prerequisite Installer package which provides a
simplified deployment of the .NET Framework 3.5.
ASP.NET Web Services
ASP.NET Web Services is the next generation of Intranet and Internet based remote method of
communication. The Aldelo® EDC server component is built as an ASP.NET Web Service. All of
the payment processing and utility methods are encapsulated into a web service called EDC. Since
the server component is a web service, it must be hosted within Microsoft Internet Information
Services (IIS, described below). The ASP.NET Web Service architecture allows better scalability
and performance. As an installer, administrator, or user of Aldelo® EDC, you do not need to
understand the inner workings of the ASP.NET Web Service. The only requirement is to ensure that
IIS is already installed in the supported Windows operating system before attempting to install
Aldelo® EDC. If the .NET Framework 3.5 was installed prior to IIS or ASP.NET is not properly
associated with IIS, then you must perform the “Register ASP.NET to IIS” menu action installed as
part of the Aldelo Prerequisite Installer package.

8
Extensible Markup Language (XML)
Extensible Markup Language (XML) is the native language of Aldelo® EDC. All information
packets and data storage units are in XML format to allow for simpler parsing. As an installer,
administrator, or user of Aldelo®
EDC, familiarity with the inner workings of XML is not required.
However, if you are a third party solutions integrator, you will be pleased to learn that response
messages are delivered in XML format. For information on third party integration needs, please
contact the Aldelo Technical Support department.
Simple Mail Transport Protocol (SMTP)
SMTP is the protocol used to send e-mail messages. Aldelo® EDC uses SMTP to send notification
and event alerts to select recipients. This e-mail notification feature alerts the recipients of key
events such as errors, warnings, and successful events. Please contact your Internet Service Provider
or network administrator for instructions on how to setup SMTP notification. As an installer,
administrator, or user of Aldelo®
EDC, advanced knowledge of SMTP is not required. Use of the
SMTP notification feature is strongly recommended, but optional.
Microsoft Internet Information Services (IIS)
Microsoft Internet Information Services (IIS) is the host environment for web pages and web
services. The Aldelo® EDC server component is hosted under IIS to allow for built-in security and
scalability. Windows XP Professional with Service Pack 3 comes with IIS 5.0, Windows Server
2003 comes with IIS 6.0, while Windows Vista and Windows Server 2008 come with IIS 7.0. IIS
may not be installed by default, so it is important to ensure that IIS is installed prior to installing
Aldelo® EDC. If IIS is not already installed, in Windows Vista you may install it by navigating to
Start > Control Panel > Programs and Features > Turn Windows features on or off. In Windows XP
you may install it by navigating to Start > Control Panel > Add or Remove Programs >
Add/Remove Windows Components. Under IIS 5.0, the ASP.NET Web Services use a built-in
account called ASPNET by default. Under IIS 6.0 and IIS 7.0, the ASP.NET Web Services use the
Network Service account by default. Also, to use IIS 7.0, you must install IIS 6 Management
Compatibility. This is found by navigating to Start > Control Panel > Programs and Features > Turn
Windows features on or off and then expanding Internet Information Services, expanding Web
Management Tools, and placing a checkmark in the checkbox next to “IIS 6 Management
Compatibility.” As an installer, administrator, or user of Aldelo® EDC, it isn’t necessary to know
how the IIS software works. Accept the default settings for IIS during the installation process, as
these settings are appropriate for most customers.
Secured Socket Layer (SSL)
Secured Socket Layer (SSL) is a transport security protocol that secures data transport against
public or wireless networks. We highly recommend the use of SSL when you expose the Aldelo®
EDC server component either to the public network or to a wireless network. If your setup is 100%

9
internal LAN based, then SSL is not required in most cases. To setup SSL, you must purchase an
SSL certificate from a trusted Certificate Authority. The setup of SSL within IIS is a fairly
straightforward process. Consult with your network administrator for instructions on how to
properly configure and setup SSL if your deployment situation requires it. As an installer,
administrator, or user of Aldelo® EDC, intimate knowledge of SSL is not necessary. Aldelo
® EDC
automatically handles the interface with SSL. The only requirement is the acquisition of a valid SSL
certificate and its installation to IIS.
Microsoft SQL Server 2005
Microsoft SQL Server 2005 is an enterprise level database management system that delivers
maximum data consistency, security, performance, and reliability. The SQL Server 2005 Express
edition is a streamlined and free distribution version of SQL Server 2005, targeting small groups of
users.
Aldelo® EDC uses SQL Server 2005 to store operation and transaction data from payment
processing activities. This database does not store cardholder information beyond the current batch.
When cardholder information is stored temporarily, such information is stored in AES (Advanced
Encryption Standard) encrypted state for maximum security. The Aldelo Prerequisite Installer
package contains a preconfigured installation of SQL Server 2005 Express as an Aldelo Instance.
SQL Server 2005 Express should be sufficient for most merchants processing credit card
transactions with Aldelo® EDC. If you are a merchant who already has SQL Server 2005, you may
use your existing instance. As an installer, administrator, or user of Aldelo® EDC, an understanding
of SQL Server 2005 is not required, as SQL Server 2005 is controlled through Aldelo® EDC.
OPOS (OLE for POS)
OPOS, also known as OLE (Object Linking and Embedding) for POS (Point-of-Sale), is a well
known standards initiative developed by Microsoft and key peripheral device manufacturers. The
goal of OPOS is to create a common integration interface that works with hardware from multiple
manufacturers, without requiring modification of the programming code. OPOS enabled peripheral
devices, such as printers, must be configured properly with the manufacturer’s OPOS driver.
Aldelo® EDC uses OPOS indirectly via Microsoft Point of Service for .NET (described below) for
printing needs within the client application. OPOS driver installation and configuration is not
required unless you are using Aldelo® EDC in stand-alone mode and require receipt printing.
Microsoft Point of Service for .NET
Microsoft Point of Service for .NET (POS for .NET) is a .NET Framework enabled version of
OPOS. In essence, the POS for .NET is a .NET wrapper that enables receipt printing with OPOS
enabled printer devices. POS for .NET is not required for Aldelo® EDC, unless there is a need to
print receipts from within the Aldelo® EDC client application. During installation of the Aldelo
®

10
EDC software, you are prompted to install OPOS Common Control Objects. These libraries are
required if POS for .NET is used.
Windows Server 2003 / 2008
Windows Server 2003 is a server grade operating system designed for small to large enterprises.
There are several editions of Windows Server 2003. Aldelo® EDC works with the Windows Server
2003 platform, except for the Small Business Server or Domain Controller versions. Before
installing Aldelo® EDC onto Windows Server 2003, please make sure that IIS is already installed. If
not, you can install it by navigating to Control Panel > Add or Remove Programs > Add/Remove
Windows Components > Application Server. Instructions for Windows Server 2008 are similar.
Windows XP Professional with Service Pack 3 or Windows Vista Business /
Enterprise / Ultimate
Windows XP Professional with Service Pack 3 or Windows Vista Business / Enterprise / Ultimate
are ideal for POS and Aldelo®
EDC deployments. IIS is included in the operating system; however
it may not be pre-installed on your computer. To deploy Aldelo® EDC with its server component,
please ensure that IIS has been previously installed on the system.
Broadband Internet Connectivity
Aldelo® EDC requires Broadband Internet connectivity in order to process credit card transactions.
Broadband Internet, such as DSL, cable, wireless, or even ISDN, is acceptable. The key is to ensure
that such internet services will remain connected, and in cases where the internet connection is lost,
the router or modem equipment will automatically reconnect immediately. Satellite or other high
latency internet types are not recommended. Additionally, Aldelo does not recommend using dialup
internet as your primary access method unless your ISP can guarantee that your connection will not
be dropped and that the modem will automatically reconnect in the event of a dropped call. Aldelo®
EDC does not require high bandwidth, so you can save on monthly service charges.
A static IP address is not required unless you plan to host the Aldelo® EDC payment engine web
service on the internet for third party solutions located outside your store. If you are opening the
web service to the public internet, then you must secure it with SSL. Finally, the cost of monthly
broadband Internet is relatively competitive with a telephone line dedicated for the purpose of credit
card payment processing. Plus, payment transaction speed on broadband internet always
outperforms payment transaction speed on dialup internet.

11
Dial Backup Internet Failover
For the most part, broadband internet is always working and trouble free. However, in some rare
instances, the connection may be lost for a short time. For this reason, Aldelo recommends that our
merchants prepare Dial Backup Internet Failover. The simple way to achieve this is to install the
Aldelo® Auto Dialer software to actively monitor your broadband connection and re-establish a
connection through a dialup PPP (Point-to-Point Protocol) account when it detects that the
broadband connection has failed. This is handled by the Aldelo® Auto Dialer utility. The Aldelo
®
Auto Dialer is a free utility from Aldelo Systems Inc. for Aldelo® EDC customers.
Firewall and Antivirus Software
Antivirus software normally does not conflict with Aldelo® EDC. However, if you have a
firewall, then you must open port 80 for HTTP (Hypertext Transfer Protocol). If you are using SSL,
then you must open port 443. In the event you have exposed Aldelo® EDC to the internet for third
party solutions such as web ordering vendors, you must then allow port 443 and NAT (Network
Address Translation) port forwarding to the PC containing Aldelo®
EDC. For detailed help with
firewall and antivirus software, please contact your local internet service provider or your network
administrator.
The Aldelo® EDC Server Component
The Aldelo® EDC Server Component is the web service hosted within IIS. This is a set of ASP.NET
web service methods that handle payment processing and utility functions. Client applications (both
Aldelo® EDC Client Components and third party solutions) communicate directly with this set of
web service methods to achieve payment processing integration. The Server Component must be
deployed to one of the qualified computers within the merchant’s store (see System Requirements,
below). Additionally, the computer hosting the Server Component must have access to the internet
in order to communicate with back end payment processors.
Aldelo® EDC Client Component
The Aldelo® EDC Client Component is an administrative tool for the Aldelo
® EDC Server
Component. Since the Server Component does not offer a user interface for operations, you must
use the Client tool to setup, administer, or use the Aldelo® EDC solution. In essence, the Aldelo
®
EDC Client Component is the user interface for the server.
The Client Component may be installed on a computer separate from the Server Component. You
may also install the Client Component on additional computers, however, at least one copy of the
Client Component must be installed on the same computer hosting SQL Server 2005 in order for the
Client Component to create and maintain the Aldelo® EDC database.

12
Basic Computer Terminology
PC: Personal Computer
OS: Operating System
CPU: Central Processing Unit, such as Intel Celeron, Pentium, Xeon, Core Dual, etc.
RAM: Random Access Memory for a PC, usually expressed in Megabytes (MB) or
Gigabytes (GB)
MB: Megabyte, a unit of measure for PC Storage or RAM capacity, approximately equal to
220
bytes
GB: Gigabyte, a unit of measure for PC Storage or RAM capacity, approximately equal to
230
bytes
Video Card: The graphical display board or integrated circuit within a PC that generates
video output
NIC: Network Interface Card, used to connect the PC to other PC’s on the same network
Hard Drive: Data storage device for a PC
System Requirements
In order to use the Aldelo® EDC payment processing solution effectively, Aldelo recommends the
following baseline system configuration. If your system does not meet the recommended baseline
system configuration, it does not necessarily exclude you from using Aldelo® EDC, however, if
there are any technical difficulties, the Aldelo Technical Support Staff will advise you to upgrade
your system to meet or exceed the baseline system configuration before continuing the
troubleshooting steps.
Aldelo® EDC Server Component Baseline System Configuration
Minimum Server Computer Specifications
Intel Celeron CPU 1.5+ GHz processor / Pentium 4 class CPU 2+ GHz processor
512 MB of system RAM with Windows XP / 1 GB of system RAM with Windows Vista
Video card with 16 MB of video RAM (If video RAM is shared with system RAM, limit to
32 MB maximum)
1 GB of available hard drive space
10/100 network interface card (NIC)
Keyboard and mouse
Monitor or LCD supporting 800 x 600 or 1024 x 768 resolutions
Recommended Server Computer Specifications

13
Pentium 4 class CPU 3 GHz processor / Pentium Core Dual or Core 2 Dual CPU 3 GHz
processor
1 GB of system RAM with Windows XP / 2 GB of system RAM with Windows Vista
Video card with 16 MB of video RAM (If video RAM is shared with system RAM, limit to
32 MB maximum)
2 GB of available hard drive space
10/100 network interface card (NIC)
Keyboard and mouse
Monitor or LCD supporting 800 x 600 or 1024 x 768 resolutions
Operating System Requirements
Microsoft Windows Server 2003 with Service Pack 1 or
Microsoft Windows XP Professional with Service Pack 3 or
Microsoft Windows Vista Business, Enterprise, or Ultimate editions with Service Pack 1 or
Microsoft Windows Server 2008 with R2
Application of all the latest Windows updates and hot fixes
Warnings
Microsoft Small Business Server is not supported
Windows Server 2003 and 2008 Domain Controller is not supported
Windows XP Embedded is not supported
Other Software Requirements
Internet Information Services (IIS) 5.0, 6.0, or 7.0 (dependent on OS)
.NET Framework 3.5
SQL Server 2005 (or Express edition)
Connectivity Requirements
Access to broadband internet connectivity, such as DSL, cable, wireless, etc.
Avoid using high latency internet access connectivity, such as satellite

14
Optional Enhancements
Dial Backup Failover via the Aldelo® Auto Dialer software utility reconnects to the internet
using a modem if the broadband internet connection fails for any reason
SMTP Mail Account
For sending event and alert notifications from Aldelo® EDC
Aldelo® EDC Client Component Baseline System Configuration
Minimum Client Computer Specifications
Intel Celeron / Pentium 4 class CPU with 1.5 GHz processor
512 MB of system RAM
Video card with 16 MB of video RAM (If video RAM is shared with system RAM, limit to
32 MB maximum)
200 MB of available hard drive space
10/100 network interface card (NIC)
Keyboard and mouse
Monitor or LCD supporting 800 x 600 or 1024 x 768 resolutions
Recommended Client Computer Specifications
Pentium 4 class CPU 3 GHz processor / Pentium Core Dual or Core 2 Dual CPU 3 GHz
processor
1 GB of system RAM with Windows XP / 2 GB of system RAM with Windows Vista
Video card with 16 MB of video RAM (If video RAM is shared with system RAM, limit
to 32 MB maximum)
2 GB of available hard drive space
10/100 network interface card (NIC)
Keyboard and mouse
Monitor or LCD supporting 800 x 600 or 1024 x 768 resolutions
Operating System Requirements
Microsoft Windows Server 2003 with Service Pack 1, or
Microsoft Windows XP Professional with Service Pack 3, or
Microsoft Windows Vista Business, Enterprise, or Ultimate editions with Service Pack 1 or
Microsoft Windows Server 2008 with R2

15
Application of all the latest Windows updates and hot fixes
Warnings
Microsoft Small Business Server is not supported
Windows Server 2003 and 2008 Domain Controller is not supported
Windows XP Embedded is not supported
Other Software Requirements
.NET Framework 3.5
Connectivity Requirements
Access to Aldelo® EDC Server Component System via TCP/IP
Deployment Planning
Deployment Preparation Check List
Ensure that the system to which Aldelo® EDC will be deployed meets the Baseline System
Configuration
Ensure that you have the Windows Operating System CD during deployment
Ensure that you have your merchant account setup information from your Merchant Service
Provider
Ensure that you have SMTP account setup information from your ISP (optional)
Download and deploy the Aldelo® Prerequisite Installer software
Download and install the Aldelo® EDC software
Download and install all of the latest Microsoft Windows updates
Single System Deployment
Single System Deployment is ideal for most merchants due to its simplicity and ease of
maintenance. Under this deployment strategy, you will install both Aldelo® EDC Server and Client
Components onto the same system. This deployment strategy does require you to meet the Baseline
System Configuration of both the Server and Client. It is highly recommended that you increase the

16
System RAM to 1 GB for better performance. If the target system needs the .NET Framework 3.5,
SQL Server 2005 Express, and/or Microsoft Point of Service for .NET 1.12, then install the Aldelo
Prerequisite Installer package first, and invoke the desired menu options. Once prerequisite
requirements are met, Aldelo® EDC deploys as a Single System. Select the “Typical” option during
Aldelo® EDC software installation. This option installs the Client Component and the Server
Component.
Client / Server Deployment
Client / Server Deployment is necessary in the environment where there is one server but one or
more Aldelo® EDC client applications on different computers. This deployment strategy does not
apply to third party integrated clients (for example, Aldelo®
For Restaurants) connecting to the
server. The usefulness of having multiple Aldelo®
EDC client applications may be for
administrative reasons, or in the case of stand-alone mode, to process credit card transactions on
multiple systems. For example, the server may be located in a closet and is normally inaccessible.
However, in order to perform administrative duties, you wish to access the Aldelo® EDC client
application from a system located in an office.
Under Client Server Deployment, you deploy Aldelo® EDC as a server, and then as a client. The
Server deployment is always the same as Single System Deployment, described above. The reason
we deploy everything on the server is to have the ability to create and maintain the database, as well
as other server administrative duties.
The Client deployment is simply installing just the client components. This allows multiple clients
to communicate with the server for both transaction processing and administrative duties. To deploy
as the Client, please see the “Custom Setup” screen below for selected options.
(Note: Integrated clients such as Aldelo® For Restaurants do not require Client / Server
deployment.)
SQL Server 2005 Pre-Exist Condition Deployment
If you need to deploy Aldelo® EDC as a single system deployment but SQL Server 2005 is already
installed as the default instance, then you must deploy Aldelo® EDC without the database engine.
However, if the existing SQL Server 2005 is installed as named instances, then you may still be able
to perform single system deployment. Under this scenario, since SQL Server 2005 is already
installed, you may utilize the existing database engine to host your Aldelo®
EDC database. To
deploy Aldelo® EDC under this situation, do not manually install SQL Server 2005 Express
separately.
Software Upgrades
For information about upgrading an existing installation of Aldelo® EDC, see Appendix 1 of this
manual.

17
Chapter 3 Installation Getting Started
Regardless of the Deployment Plans you choose from Chapter 2, the following sections provide
step-by-step installation guidance for the deployment of Aldelo® EDC. This chapter describes how
to install the software onto Windows Vista Business Edition with Service Pack 2. The steps to
install onto other Windows Operating Systems are similar, and any differences are noted.
Determining the Existence of Internet Information Services (IIS)
The server component of Aldelo® EDC requires the existence of Internet Information Services (IIS)
on the system. IIS is not automatically installed during initial operating system setup. The following
steps describe how to determine if IIS is already installed on your system.
Select “Start” on the Windows Task Bar (See Figure 3-1).
Figure 3-1

18
Select “Control Panel” on the Start Menu (See Figure 3-2).
Figure 3-2

19
On the left side of the Control Panel, select “Classic View,” and then select “Administrative Tools”
(See Figure 3-3).
Figure 3-3
In Administrative Tools, look for “Internet Information Services (IIS)” in the list of installed
options. If found, IIS is already installed on this system (See Figure 3-4).
Figure 3-4
If Internet Information Services is not found in the list, you must install IIS before installing
Aldelo® EDC.
Installing Internet Information Services (IIS)
Internet Information Services (IIS) is a requirement for the Aldelo® EDC Server Component
deployment. If the system does not have IIS already installed, please follow the instructions listed
below to complete IIS installation. Do not attempt to install Aldelo® EDC until IIS is installed, or

20
the EDC installation will fail. IIS is a feature of Windows XP Professional, Windows Server 2003,
Windows Server 2008, and Windows Vista. You may need to place the Windows Operating System
CD into the disk drive while performing the IIS installation, so please have it handy.
Installing Internet Information Services (IIS) in Windows Vista
Select the “Start” button on the Windows Task Bar (See Figure 3-5).
Figure 3-5
Select “Control Panel” on the Start Menu (See Figure 3-6).
Figure 3-6

21
On the Control Panel screen, click on “Classic View” and then click on “Programs and Features”
(See Figure 3-7).
Figure 3-7
On the Programs and Features screen, select “Turn Windows features on or off” from the left side
of the screen (See Figure 3-8).
Figure 3-8

22
On the User Account Control screen, click the “Continue” button (See Figure 3-9).
Figure 3-9
On the Windows Features screen, select the “Internet Information Services” checkbox. It is not
necessary to turn on all of the features in Internet Information Services. Accept the default features,
and then click the “OK” button. Internet Information Services is now installed (See Figure 3-10).
Figure 3-10
The Aldelo
® Prerequisite Installer
The Aldelo® Prerequisite Installer makes easy work of the installation and setup of the additional
software that is required to run Aldelo® EDC. First the user must download and install the installer,
and then from the installer the required additional software may be installed.
(Note: Internet Information Services [IIS] must be installed prior to the installation of this required
additional software. See Installing Internet Information Services [IIS], above).

23
Installing the Aldelo® Prerequisite Installer
After verifying that your system meets the minimum system requirements, download the Aldelo®
Prerequisite Installer file from the Aldelo website. Double-click the file to begin installation (See
Figure 3-11).
Figure 3-11
When the Welcome screen appears, click the “Next” button to continue (See Figure 3-12).
Figure 3-12

24
Select “Typical” on the setup screen, then click the “Next” button to continue (See Figure 3-13).
Figure 3-13
On the Ready to Install the Program screen, review the Current Settings. When you are sure they are
correct, click the “Install” button to begin the installation process (See Figure 3-14).
Figure 3-14

25
The installation progress screen displays. Please wait while the InstallShield Wizard performs the
installation (See Figure 3-15).
Figure 3-15
When finished, the InstallShield Wizard Completed screen displays. Click on the “Finish” button to
complete the installation process (See Figure 3-16).
Figure 3-16

26
Installing the Required Software Using the Aldelo® Prerequisite Installer
After you have successfully installed the Aldelo® Prerequisite Installer, you must then install the
software components that are required to run Aldelo® EDC. After verifying that Internet
Information Services (IIS) is installed (See Determining the Existence of Internet Information
Services (IIS), above), from your desktop, click on Start > All Programs > Aldelo Prerequisite
Installer to display a list of the components that may be installed (See Figure 3-17).
Figure 3-17
The sections below provide step-by-step instructions on how to install each component.

27
Installing Microsoft .NET Framework 3.5
From your desktop, open the Aldelo Prerequisite Installer menu and click on the “Install Microsoft
.NET Framework 3.5” menu item (See Figure 3-18).
Figure 3-18
The installation begins immediately. The process is completely automated and the user is not
required to select any options. While the installation proceeds, the Extracting Files screen displays
(See Figure 3-19).
Figure 3-19
As soon as the installation is finished, the Extracting Files screen disappears.
Installing Microsoft Point of Service for .NET 1.12
Microsoft Point of Service for .NET 1.12 (POS for .NET) is a .NET Framework enabled version of
OPOS. In essence, POS for .NET 1.12 is a .NET wrapper that enables receipt printing with OPOS
enabled printer devices. POS for .NET is not required for Aldelo® EDC, unless there is a need to
print receipts from within the Aldelo® EDC client application. During installation of the Aldelo
®
EDC software, you are prompted to install OPOS Common Control Objects. These libraries are
required if POS for .NET is used.

28
To install the service, open the Aldelo Prerequisite Installer menu from your desktop and click on
the “Install Microsoft Point of Service for .net 1.12” menu item (See Figure 3-20).
Figure 3-20
The InstallShield Wizard screen displays. If desired, read the documentation by clicking the on the
“Documentation” button. Otherwise, click on the “Install” button directly below it to begin the
installation process (See Figure 3-21).
Figure 3-21

29
The Customer Information screen displays next. Enter your User Name and Organization Name
(Company Name) in the appropriate fields. Accept the default value for the Product Key and click
on the “Next” button. (See Figure 3-22).
Figure 3-22
(Note: The “Product Key” field boxes are disabled and cannot be edited. It is OK to use this default
Product Key when installing POS for .NET 1.12.)

30
On the License Agreement screen that follows, read the licensing agreement carefully and in its
entirety. Acceptance of the licensing agreement creates a legal agreement between you and
Microsoft Corporation. If you accept the terms of the licensing agreement, click the “Accept”
button to continue (See Figure 3-23).
Figure 3-23
(Note: If you do not accept the terms of the licensing agreement, you cannot install the software.)

31
The next screen is the Installation Options screen. The default installation folder is listed in the
“Install to” field. If you wish to install to a different folder, click the “Browse” button and navigate
to your desired folder. You may also create a new folder from this window. Choose the “Typical”
installation type, and then click the “Next” button to continue (See Figure 3-24).
Figure 3-24
(Note: For the purposes of Aldelo® EDC, it is not necessary to select either the “Complete”
installation option or the “Custom” installation option. The “Typical” installation option includes
everything needed.)

32
On the Summary screen, review your installation components. When you are satisfied that they are
correct, click the “Install” button (See Figure 3-25).
Figure 3-25
The Installation Progress screen displays a series of progress bars while the software is being
installed (See Figure 3-26).
Figure 3-26

33
When the installation is complete, the system automatically continues to the next screen.
Finally, the Installation Completed screen indicates that you have successfully installed Microsoft
POS for .NET 1.12. Click the “Finish” button to close the wizard (See Figure 3-27).
Figure 3-27
Installing Microsoft SQL Server 2005 Express
Microsoft SQL Server 2005 is an enterprise level database management system that delivers
maximum data consistency, security, performance, and reliability. The SQL Server 2005 Express
edition is a streamlined and free distribution version of SQL Server 2005, targeting small groups of
users. Aldelo® EDC uses SQL Server 2005 to store operation and transaction data from payment
processing activities. This database does not store cardholder information beyond the current batch.
When cardholder information is stored temporarily, such information is stored in AES (Advanced
Encryption Standard) encrypted state for maximum security. The Aldelo® Prerequisite Installer
package contains a preconfigured SQL Server 2005 Express as an Aldelo Instance. SQL Server
2005 Express should be sufficient for most merchants processing credit card transactions with
Aldelo® EDC. However, if you are a merchant who already has SQL Server 2005, you may use
your existing instance.

34
To install the software, open the Aldelo® Prerequisite Installer menu from your desktop and click on
the “Install Microsoft SQL Server 2005 Express” menu item (See Figure 3-28).
Figure 3-28
The installation begins immediately. The process is completely automated and no user interaction is
required. While the installation proceeds, the Extracting Files screen displays (See Figure 3-29).
Figure 3-29

35
When the Extracting Files screen disappears, the Installing Prerequisites screen displays a progress
bar as it installs the software components that are required before the installation of SQL Server
2005 Express may proceed (See Figure 3-30). This installation proceeds automatically. There is no
need to click the “Install” button, as it is disabled.
Figure 3-30

36
Next, the installation program performs a system configuration check. Again, this process is
automatic, requiring no user intervention (See Figure 3-31).
Figure 3-31

37
Upon completion of the configuration check, the Setup Progress screen indicates that the selected
components are being configured (See Figure 3-32).
Figure 3-32
When the Setup Progress screen closes, the installation process is complete.
Performing ASP.NET 2.0 to IIS Registration
ASP.NET is used by the Aldelo® EDC Server component to deliver the payment engine web service
to client computers. ASP.NET must be associated with Internet Information Services (IIS) in order
to function properly. ASP.NET is part of the .NET Framework and is deployed when the .NET
Framework is installed.
To perform the association, open the Aldelo Prerequisite Installer menu from your desktop and click
on the “Perform ASP.NET 2.0 to IIS Registration” menu item (See Figure 3-33).
Figure 3-33

38
A DOS window opens and briefly flashes on your screen as ASP.NET is installed. When it
disappears, the registration is complete.
Uninstalling the Aldelo® Prerequisite Installer
Once you have installed all of the required software, you may uninstall the Aldelo® Prerequisite
Installer. From your computer desktop, navigate to Start > All Programs > Aldelo Prerequisite
Installer, and then click on the “Uninstall Prerequisite Installer” menu option (See Figure 3-34).
Figure 3-34
A confirmation window appears. Click the “Yes” button to continue (See Figure 3-35).
Figure 3-35
While the uninstall proceeds, a progress window displays (See Figure 3-36).
Figure 3-36
When this window closes, the Aldelo® Prerequisite Installer has been successfully removed from
your system.

39
Installation of Aldelo® EDC
The installation of Aldelo® EDC is very straightforward. Prior to installation, please ensure that IIS
is already installed. If the .NET Framework was installed prior to IIS, be sure to associate IIS with
ASP.NET through the use of the Aldelo® Prerequisite Installer. The Aldelo
® EDC installation is
dependent upon the deployment plan chosen in Chapter 2 of this manual. Please refer to the section
entitled “Deployment Planning” in Chapter 2 for detailed deployment strategies. This section
describes each of the steps involved in performing the Aldelo® EDC software installation.
Double-click the Aldelo®
EDC installation file to begin the installation process. The welcome
screen appears. Click the “Next” button to continue (See Figure 3-37).
Figure 3-37

40
Next, the License Agreement screen displays. Read the agreement carefully. If you wish, you may
print a hard copy of it by clicking the “Print” button. By accepting the terms of the License
Agreement, you are creating a legal agreement between you and Aldelo Systems Inc. If you agree
with the terms, select the “I accept the terms in the license agreement” radio button and then click
the “Next” button to continue (See Figure 3-38).
Figure 3-38
(Note: If you do not agree with the terms of the License Agreement, you cannot install the
software.)

41
Next, the Readme Information screen appears. Read it carefully and when finished, click the “Next”
button to continue (See Figure 3-39).
Figure 3-39
On the Destination Folder screen that follows, accept the default folder for the installation, or if you
prefer, click the “Change” button and navigate to your desired installation location. When finished,
click the “Next” button to proceed (See Figure 3-40).
Figure 3-40

42
On the Setup Type screen, select the type of setup that suits your needs (“Typical” or “Custom”).
The Aldelo® EDC installation is dependent upon the deployment plan chosen in Chapter 2 of this
manual. Please refer to the section entitled “Deployment Planning” in Chapter 2 for detailed
deployment strategies. Click the “Next” button to continue (See Figure 3-41).
Figure 3-41

43
Typical Setup
If you chose the typical setup type, the Ready to Install the Program screen appears next. Verify that
the current settings are correct. If they are not, click the “Back” button and make any necessary
changes. When ready to proceed, click the “Install” button (See Figure 3-42).
Figure 3-42
During the installation process, the following screen displays (See Figure 3-43).
Figure 3-43

44
Click “Finish” on the InstallShield Wizard Completed screen to exit the wizard (See Figure 3-44).
Figure 3-44
When finished, restart your computer, whether or not you are prompted to do so.
If you performed the “Typical Setup,” your installation is now complete. Skip the following
“Custom Setup” section and continue with the section entitled “Receipt Printing.”

45
Custom Setup
Server Setup
If you chose “Custom” on the Setup Type screen (See Figure 3-41, above), the Custom Setup screen
follows. Here you may install either the client software or the server software. Choose the “Server”
icon to install the required software on your server and then click the “Next” button to continue (See
Figure 3-45).
Figure 3-45

46
The “Ready to Install the Program” screen appears. Click the “Install” button to continue (See
Figure 3-46).
Figure 3-46
During the installation process, the following screen displays (See Figure 3-47).
Figure 3-47

47
Click “Finish” on the InstallShield Wizard Completed screen to exit the wizard (See Figure 3-48).
When finished, restart your computer, whether or not you are prompted to do so.
Figure 3-48
Client Setup
To install Aldelo® EDC on your client computer, choose the “Client” icon on the Custom Setup
screen, and then click the “Next” button (See Figure 3-49).
Figure 3-49

48
The rest of the client installation process is identical to that of the server installation process, as
described in the previous section. When finished, restart your computer, whether or not you are
prompted to do so.
Receipt Printing
If you need to print receipts directly from the Aldelo® EDC client application, you must install
Microsoft POS for .NET. The installation software for POS for .NET is included as part of the
Aldelo Prerequisite Installer.
Post Installation Verification
Once you have installed Aldelo®
EDC, it is a good idea to verify that the installation was successful
and that everything is setup properly. The following sections show you how to perform this
verification. Although this procedure is not required, it is highly recommended.
Verify Firewall Port is Open
Since the Aldelo® EDC Server component is an ASP.NET web service, you must make sure that
Port 80 (Port 443 if SSL is enabled) is open in the firewall on the server computer that hosts
Aldelo® EDC. To configure this port access, open the firewall software on your server computer. If
you are using the Windows firewall, follow the instructions below. If you are using a third party
firewall product, please refer to the firewall software’s user manual for instructions on how to
configure port access.

49
From your desktop, navigate to Start > All Programs > Control Panel (See Figure 3-50).
Figure 3-50

50
On the Control Panel screen, click on “Classic View” and then double-click on “Windows Firewall”
(See Figure 3-51).
Figure 3-51

51
On the following screen, click the “Allow a program through Windows Firewall” menu item on the
left side of the screen (See Figure 3-52).
Figure 3-52
The Windows Firewall Settings screen appears. Click on the Exceptions tab at the top of the screen,
and then click on the “Add Port” button (See Figure 3-53).
Figure 3-53

52
The Add a Port window displays. Give the new port a name (for example, “HTTP Port”), enter “80”
as the port number (if SSL is enabled, name the port “HTTPS Port” and enter “443” as the port
number), and select the “TCP” radio button as the protocol type. When finished, click the “OK”
button (See Figure 3-54).
Figure 3-54
The Add a Port window closes and you are returned to the Windows Firewall Settings screen.
Notice that there is now an entry in the Program or port list for the port you just added. Click on the
“OK” button to close the Windows Firewall Settings screen (See Figure 3-55).
Figure 3-55
Verify Aldelo® EDC Folder Securities
Aldelo® EDC requires certain folder securities to be setup properly. The Aldelo
® EDC installation
software automatically configures these folder securities for you. This section provides a detailed
explanation of security permissions and how they affect Aldelo® EDC. Knowledge of manual

53
security configuration is desirable if you must maintain the folder securities yourself. In general,
both the Aldelo® EDC Client and Server folders must be given Full Control security with the
“Users” group. Additionally, if the system is running Windows Vista, add the “ASPNET” account
with Full Control security. If the operating system is Windows Server 2003, add “Network
Security” and give it Full Control security. If security permissions are not setup properly, you may
receive errors such as “Web Service Unavailable” or “Server Page Not Found.”
Verify Aldelo® EDC Web Service is Functioning Properly
The quickest way to ensure that IIS, ASP.NET, and the Aldelo® EDC Server component (web
service) are working properly is to execute a web service test. The following instructions describe
how to perform such a test.
From your computer’s desktop, select Start > Run (See Figure 3-56).
Figure 3-56

54
In the Run window that appears type “http://localhost/AldeloEDC/EDC.asmx” into the “Open”
field. If the web service is located on a remote computer, substitute the remote computer’s name or
its IP address for the word “localhost” in the web address above. If the web service is hosted under
SSL, then replace “http” with “https” (exclude the quotation marks in all of the above). When
finished entering the address, click the “OK” button to continue (See Figure 3-57)
Figure 3-57
After a few moments, your Internet Explorer Browser appears, displaying a list of available web
methods (See Figure 3-58).
Figure 3-58

55
Scroll down, locate the “Verify Success” web method, and click on it. On the following screen,
click the “Invoke” button (See Figure 3-59).
Figure 3-59

56
Next, a browser screen displays some XML code. Read the displayed messages. If the messages
indicate that any errors have occurred or that the server page was not found, recheck the Aldelo®
EDC folder securities settings (See Figure 3-60).
Figure 3-60
Verify SQL Server 2005 is Running
SQL Server 2005 needs to be running in order to provide data access to Aldelo® EDC. If you
installed SQL Server 2005 for the first time, be sure to restart the computer so that SQL Server 2005
is started automatically.

57
Chapter 4 Configuration & Testing
Summary
When you start the Aldelo® EDC client application for the first time, you are prompted to activate
the license and to setup the database. This procedure should be performed on the server computer
containing both the Aldelo® EDC server and client components. License Activation is optional and
may be deferred to a later time before going live. When you operate Aldelo® EDC in unlicensed
mode, each credit card transaction is limited to $1.00. This chapter provides you with step-by-step
configuration and testing procedures to ensure proper setup of Aldelo® EDC. Your actual setup may
vary slightly based upon the deployment strategy chosen in Chapter 2 of this manual.
Start the Aldelo Client Application. The first screen you see prompts you to select the EDC product
edition you wish to use. Select the appropriate payment processor from the available selections (See
Figure 4-1).
Figure 4-1
For the purposes of this manual, Mercury Payment is used for the examples.
(Note: Not all of the features described in this manual are supported by all payment processors. The
processor you use may support a different set of features in Aldelo® EDC.)

58
To begin, select the “Mercury Payment” button and then click on “Start” (See Figure 4-2).
Figure 4-2
Next, you are prompted to activate the software.
License Activation
When you launch Aldelo® EDC for the first time, you are prompted to activate the product license
(See Figure 4-3). Each computer running Aldelo®
EDC must be activated before going live. The
activation process requires that you have the product serial number available. To activate, please
contact the Aldelo Technical Support Department.
Figure 4-3

59
Database Setup Wizard
If the Aldelo® EDC client application detects that you do not have an active database connected, the
New Database Setup wizard appears when you launch the software. This wizard helps you to
automatically create the database and setup account information, saving you a significant amount of
time. In order to use the wizard, you must deploy Aldelo® EDC as a single system deployment.
Otherwise, you must perform the setup manually. When entering the required information, please
be sure to enter PCI compliant passwords. See the PCI Compliance Guide for instructions. The PCI
Compliance Guide may be found from your desktop by navigating to Start > All Programs > Aldelo
EDC > PCI Compliance Guide.
General System Information Tab
In the “SQL Server Location” field, enter the location of your SQL Server instance. This is typically
on the local machine. In this case, enter “(local)Aldelo” in this field (without the quotation marks).
In the “EDC Web Service Host Name” field, enter the location of the Web Service. Again, this is
typically on the local machine. In this case, enter “localhost” in this field (again, without the
quotation marks). If either your Web Service or your SQL Server instance is not located on your
local machine, contact Aldelo Technical Support for instructions on what to enter into these fields.

60
In the “Daily Auto Batch Close Time” field, enter the time of day that you wish to perform the Auto
Batch Close. This should be at a time when there is either no activity taking place (i.e., after your
business has closed for the day) or when there is the least amount of activity taking place (the
slowest time of day in a 24 hour operation). Typically, this time should be at least one hour after the
close of business to allow for any delays in the closing of the business for the day (See Figure 4-4).
Figure 4-4
User Accounts and Passwords Tab
Next, click on the User Accounts and Passwords tab. In both the Card Encryption Password and the
Confirm Password fields, accept the default password values.
In the “Administrator User Name” field, choose a user name for the administrator. Enter an
administrator password and confirm the password by entering it again in the corresponding fields.
Be sure to choose a password that is PCI compliant (See Database Setup Wizard, previous page).

61
Follow the same procedure to select and enter both a Batch User Name and a POS User Name.
Again, you must choose passwords that are PCI compliant (See Figure 4-5).
Figure 4-5
Please keep a record of these user names and passwords, as you will need them for future use.
E-mail Notifications Tab
Under the E-mail Notifications tab, you enter the required information to allow Aldelo® EDC to
deliver e-mail alerts of successes, failures, errors, and other audit trail activities.
(Note: The use of the e-mail notification feature is strongly recommended, but optional.)
To send notifications, you must have an SMTP account. The information necessary to setup this
account must be obtained from your Internet Service Provider (ISP). If your ISP requires SMTP
authentication, then you must enter the SMTP Server Name, the SMTP Port, the Authentication
User Name, and the Authentication Password in the first four fields on this screen.
(Note: The default port number for SMTP is 25; however, make sure to verify this with your ISP, as
some internet service providers are now using different port numbers to help reduce the occurrence
of “spam” [unsolicited and/or undesired e-mail messages].)

62
The sender e-mail address field indicates the e-mail address from which the e-mail was sent.
Typically, a user selects a sender e-mail address such as “[email protected]” where “xyz.com”
represents your normal e-mail domain. The notification feature allows up to three parties to be
notified of selected events. Enter the e-mail addresses of these parties in the last three fields on the
form (See Figure 4-6).
Figure 4-6
Typically the manager and a person with technical skills are notified, with the third party being the
Merchant Service Provider (or Aldelo Technical Support when troubleshooting). Please be sure to
receive permission from third parties before setting them up in your notification list.

63
Finish Tab
When you have entered all of the required information on the General System Information tab, the
User Accounts and Passwords tab, and the Email Notifications tab, click on the Finish tab. Next,
click on the “Create Database” button to have the New Database Setup wizard perform the creation
of the database for you (See Figure 4-7).
Figure 4-7
(Note: If you wish to postpone the database creation until a later time, click the “Exit Wizard”
button instead of the “Create Database” button. When you want to continue with the database
creation, refer to the “Advanced Database Setup” section, below.)
When the wizard is done creating the new database, the Database Creation Complete window
appears. Click on the “OK” button to complete the process (See Figure 4-8).
Figure 4-8

64
Aldelo® EDC – Login
Next, the Aldelo® EDC – Login screen prompts you to enter your user name and password. Enter
the Administrator User Name and Administrator User Password that you created under the User
Accounts and Passwords tab of the New Database Setup wizard. Click on the “Login” button to
continue (See Figure 4-9).
Figure 4-9
Next, you are prompted to enter the answers to three personal security challenge questions. Enter
the answers to these questions as honestly as possible, as you may need to remember and re-enter
the answers to these questions sometime in the future if you forget your password and need to reset
it. The answers to these questions are saved in the database. (See Figure 4-10).
Figure 4-10
When finished entering the answers to the challenge questions, the user may login with the user
name and password setup previously.

65
Resetting a Forgotten Password
If the user ever forgets his password, he may click on “Forgot Your Password?” on the login screen
to display the Reset Forgotten Password screen. Here the user re-enters the answers to the three
security questions. If the answers match those saved in the database, the user is allowed to reset his
password. After entering the answers to the security questions, click the “Validate” button to
continue (See Figure 4-11).
Figure 4-11
If the user successfully enters the answers to the three security challenge questions, a message box
displays letting the user know that the password is ready to be reset. Click the “OK” button to
continue (See Figure 4-12).
Figure 4-12

66
Enter the new password and then re-enter it to confirm that it was typed correctly. When finished,
click the “Update” button (See Figure 4-13).
Figure 4-13
(Note: You may not enter the same password that you used previously.)
If successful, a message displays letting the user know that the password has been updated. Click
the “OK” button to complete the process (See Figure 4-14).
Figure 4-14
The user may now login with the new password.

67
Merchant Account Setup
Upon logging in, the main screen of Aldelo® EDC displays. Click the round button in the upper left
corner of the window and then select “Merchant Accounts” from the left side of the displayed menu
to continue (See Figure 4-15).
Figure 4-15

68
Merchant Account Editor Tab
The Merchant Accounts screen opens to the Merchant Accounts tab. On the bottom of the window,
click the “New” button to open the Merchant Account Editor Tab where you create a new merchant
account (See Figure 4-16).
Figure 4-16
In the General Settings group box under the Merchant Account Editor tab, enter the necessary
information. For the Account Name, enter the name of your business or any other name you deem
appropriate. Next, select the Account Type from the drop-down list box. Then choose your
Merchant Service Provider and Business Type from their respective drop-down list boxes.
Next, select from the four checkboxes on the lower half of the form, as appropriate. The “Active
Account” checkbox indicates that the account is currently in use by your business. The “Enable
Tracing” checkbox, when selected, allows Aldelo® EDC to create a log file that can be used by the
Aldelo Technical Support department should you have a problem with the software. The “Hide
Account” checkbox is used to change the account status to inactive. This checkbox is used when
you change your Merchant Service Provider or change accounts within the same Merchant Service
Provider. The account is hidden and not deleted because there may still be a need to retrieve
historical transactions from the account. The “Demo Mode” checkbox allows Aldelo®
EDC to be
used for training purposes (See warning, following page). Any transactions completed in Demo
Mode are not submitted for payment.
If you want to change the number of seconds before the connection times out or the response times
out, enter the new value in the appropriate field, otherwise, leave the default values in these fields.
If you are in a tax jurisdiction that requires a second level of taxation, contact Aldelo Technical
Support for instructions on how to use the two fields next to the checkboxes of the General Settings
group box. These fields are used by certain Merchant Service Providers to automatically transmit
the additional second level tax information with each transaction.

69
In the Processor Settings group box, enter the information as necessary. This required information is
dependent upon the Merchant Service Provider selected. Contact your Merchant Service Provider
for help in filling in these fields (See Figure 4-17).
Figure 4-17
(Warning! Demo Mode is to be used for training purposes only! When in Demo Mode, credit
card transactions are NOT processed against a live merchant account. Likewise, such charges
are NOT posted against the customer’s credit card. As a result, this merchant account does
NOT receive any funds from activities processed in Demo Mode. If you use Demo Mode for
training purposes, be sure not to forget to uncheck the “Demo Mode” checkbox when you are
finished training and wish to return to Live Mode.)
When finished entering the required information, click the “Save” button on the bottom of the
screen. A confirmation message displays, indicating that your information was saved successfully.
Click the “OK” button to complete the process (See Figure 4-18).
Figure 4-18

70
Merchant Accounts Tab
Next, select the Merchant Accounts tab. The merchant account you just setup, as well as any others
that may have been setup previously, are now listed here. If an account is hidden, it is listed under
the Merchant Accounts tab with a checkmark in the “Hidden” checkbox (See Figure 4-19).
Figure 4-19
Merchant Accounts Toolbar
The Merchant Accounts Toolbar appears at the bottom of the Merchant Account Setup screen. Use
the buttons on the toolbar to perform the following actions.
Show All
For the payment processor used in the examples, the “Show All” button only appears under the
Merchant Accounts tab of the Merchant Account setup screen. Clicking it displays all of the
merchant accounts that have been setup previously, including any hidden accounts.
New Button
If you wish to enter a new merchant account, click the “New” button to display the Merchant
Account Detail screen where you may enter a new merchant account.

71
Save Button
The “Save” button only appears under the Merchant Account Editor tab of the Merchant Account
setup screen. Click the “Save” button to save any new account information or any changes made to
existing accounts. If you fail to save the information, it is deleted automatically when you exit the
screen. After saving, the new or updated information appears under the Merchant Accounts tab.
Delete Button
If you wish to permanently delete a merchant account that has been setup previously, click on the
“Delete” button while the account information is displayed. Please note that you cannot
permanently delete an account unless it has no transaction data associated with it. If you have ever
used it to process a transaction, it cannot be deleted. In this case, select the “Hide Account”
checkbox instead to hide the account from the displayed list of accounts on the Merchant Accounts
tab.
Cancel Button
If you are in the process of entering information to create a new merchant or editing the information
of an existing account and wish to exit without saving the information, click the “Cancel” button.
Done Button
To exit the Merchant Accounts screen, click the “Done” button. Please note that if you also want to
save any changes made, click the “Save” button before clicking the “Done” button to exit the
screen.
System Utilities
Manage Database
In the event you cannot use the Database Setup Wizard as described above, or you choose to
manually perform your database setup, please follow the instructions below.
(Note: The default SA [Super Administrator] account password is “Aldelo2005” (without the
quotation marks). This SA password is updated automatically each time the card encryption key is
changed. In addition, the SA account should not be used within Aldelo® EDC.)

72
From the main screen of the Aldelo® EDC client application, click the round button in the upper left
corner of the window and then select “Manage Database” from the right side of the displayed menu
(See Figure 4-20).
Figure 4-20
The Aldelo® EDC database setup screen displays (See Figure 4-21).
Figure 4-21

73
SQL Server 2005 Settings
Under the SQL Server 2005 Settings group box, the user must select an SQL Server Instance and an
Authentication Type.
Select SQL Server Instance
In the “Select SQL Server Instance” field, enter either “(local)” or “.” (without the quotation marks)
if SQL Server is located on the same computer. If SQL Server is located on a remote computer,
enter the name or the IP address of the remote computer. When creating a new database, SQL
Server must be located on the local computer (See Figure 4-22).
Figure 4-22

74
Select Authentication Type
In the Select Authentication Type group box, choose the “Windows Authentication” radio button
(See Figure 4-23).
Figure 4-23
If for some reason you are unable to connect to SQL Server by using the Windows Authentication
method, then you can use SQL Server Authentication as an alternative by entering the user name
and password as configured in “Add SQL Server Authentication Login,” below.
Current Data Source Link
The Current Data Source Link group box displays the version of SQL Server that is running on your
system, the name of the selected SQL Server Instance, the Authentication Type chosen, and the
name of the selected database. This box only displays this information when you are connected to a
database.
Database Activities
The Database Activities group box is where you select your database. The user may select an
existing database, create a new database, attach a database from a data file, or restore a database
from a backup.
Select Database Activity Type
In the Select Database Activity Type group box, select the radio button that corresponds to the
action you wish to perform.

75
Select Existing Database
The “Select Existing Database” option allows you to select an existing SQL Server Aldelo® EDC
database. To connect to the existing database, choose the “Select Existing Database” radio button,
and then make sure you have entered the SQL Server Instance and the Authentication Type. Then
choose the database name from the Database Name drop-down list and click the “Connect” button
on the Setup toolbar (See Figure 4-24).
Figure 4-24
A popup message indicates that the connection to the existing database was successful. Click the
“OK” button to exit (See Figure 4-25).
Figure 4-25

76
Create New Database
The “Create New Database” option allows you to create a new SQL Server database for use with
Aldelo®
EDC. To create a new database, choose the “Create New Database” radio button and make
sure you have entered the SQL Server Instance and the Authentication Type. Then create a name for
the new database and enter it in the “Database Name” field. Enter the Data File Path by clicking the
navigation button ( ) and then navigating to the desired location. Finally, click on the “Create”
button on the Setup toolbar to begin creating the database (See Figure 4-26).
Figure 4-26
A popup message asks you if you wish to create the new database now. Click the “Yes” button to
continue (See Figure 4-27).
Figure 4-27

77
After a few moments, a message indicates that the new database creation was successful. Click on
the “OK” button to complete the process (See Figure 4-28).
Figure 4-28
Attach Database From Data File
The Attach Database From Data File option allows to you to re-attach a previously detached
SQL Server database. To attach the database from the data file, choose the “Attach Database From
Data File” radio button and make sure you have entered the SQL Server Instance and the
Authentication Type. Next, click the Data File Path navigation button (See Figure 4-29).
Figure 4-29

78
Navigate to the folder where the data file is located. Next, select the data file that you wish to use
from the right side of the screen (it has a .mdf file extension) and then click on the “Open” button
(See Figure 4-30).
Figure 4-30
The file you just selected now appears in the “Data File Path” field. Click the “Attach” button on
the Setup toolbar to continue (See Figure 4-31).
Figure 4-31

79
On the “Attach Database” confirmation message box, click on the “Yes” button (See Figure 4-32).
Figure 4-32
When finished, the “Successful” message box displays, indicating that you have successfully
attached the database. Click the “OK” button to complete the process (See Figure 4-33).
Figure 4-33
Restore Database From Backup
The “Restore Database From Backup” option allows you to restore the database from a backup
copy. Please note that before you can restore from a backup copy, you must have previously created
a backup copy of the database file (See “Backup Button,” below). The first thing you must do to
restore your database from a backup file is to detach from the database to which you are currently
connected. The current database is displayed in the lower right corner of the main screen of Aldelo®
EDC (See Figure 4-34).
Figure 4-34
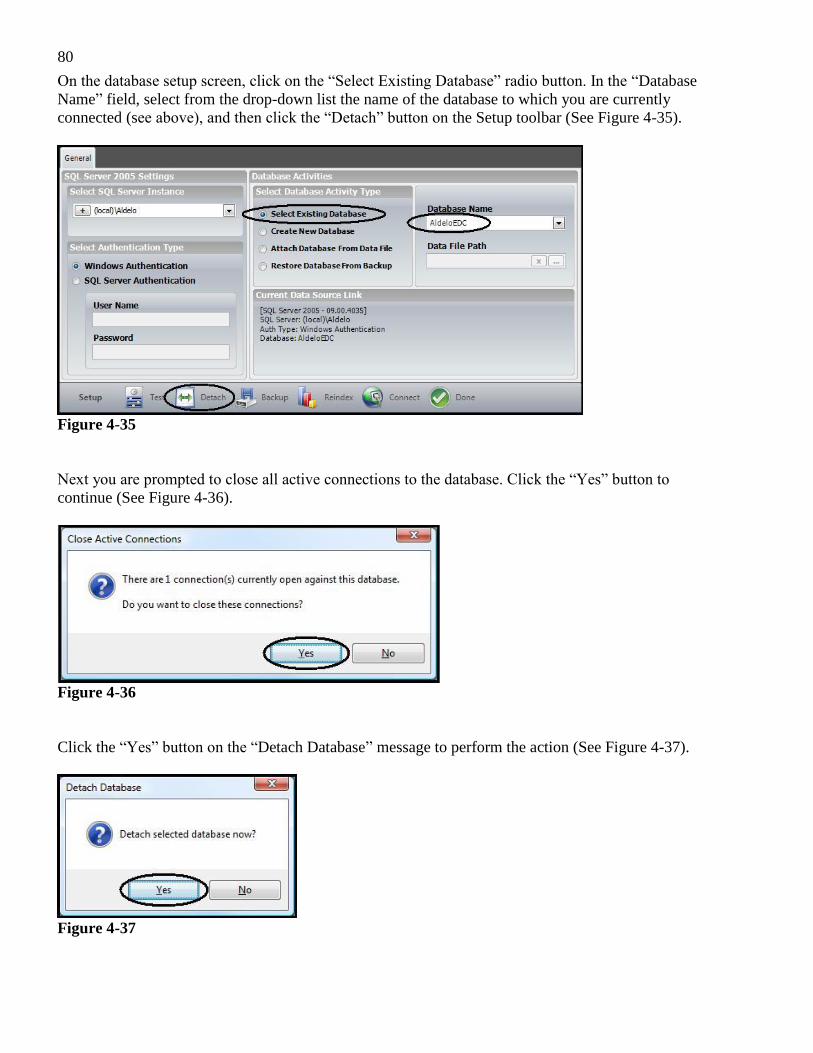
80
On the database setup screen, click on the “Select Existing Database” radio button. In the “Database
Name” field, select from the drop-down list the name of the database to which you are currently
connected (see above), and then click the “Detach” button on the Setup toolbar (See Figure 4-35).
Figure 4-35
Next you are prompted to close all active connections to the database. Click the “Yes” button to
continue (See Figure 4-36).
Figure 4-36
Click the “Yes” button on the “Detach Database” message to perform the action (See Figure 4-37).
Figure 4-37

81
The following message indicates that you have successfully detached the database. Click the “OK”
button to finish (See Figure 4-38).
Figure 4-38
To restore the database from a backup file, you must first create a new database file. The backup is
restored as the name of the new file, not the old one. In the “Database Name” field, enter a name for
the new database. Then, in the Select Database Activity Type group box, select the “Create New
Database” radio button. Next, click the “Create” button on the Setup toolbar (See Figure 4-39).
Figure 4-39
The “Create Database” confirmation message appears. Click on the “Yes” button to create the new
database (See Figure 4-40).
Figure 4-40

82
The “Successful” message displays, indicating that you have successfully created the new database.
Click the “OK” button to complete the process (See Figure 4-41).
Figure 4-41
Now make sure the “Select Existing Database” radio button is selected and then click the “Connect”
button on the Setup toolbar to connect to your newly created database. The “Successful” message
box appears. Click the “OK” button to continue (See Figure 4-42).
Figure 4-42

83
Next, click the “Restore Database From Backup” radio button, and then click on the navigation
button of the “Backup File Name” field. In the window that pops up, navigate to the Backup
folder in the panel on the left side of the screen and click on it. From the list of files in the panel on
the right side of the screen, select the backup file you wish to restore, and then click on the “Open”
button (See Figure 4-43).
Figure 4-43

84
The file you selected now appears in the “Backup File Name” field. Click the “Restore” button on
the Setup toolbar to continue (See Figure 4-44).
Figure 4-44
A message box asks if you want to close the active connections currently open against the chosen
database. Click the “Yes” button to continue (See Figure 4-45).
Figure 4-45
On the following screen, click the “Yes” button to begin the restoration (See Figure 4-46).
Figure 4-46

85
When the restoration is finished, the “Successful” message appears. Click on the “OK” button to
complete the restoration of the database from the backup file (See Figure 4-47).
Figure 4-47
Setup Toolbar
The buttons on the Setup toolbar change based upon what you select in the Select Database Activity
Type group box.
Test Button
The “Test” button on the toolbar allows you to test your communication with SQL Server. Click on
the button to perform the connection test. When the “Successful” message displays, click the “OK”
button to exit the test (See Figure 4-48).
Figure 4-48
(Note: If the server connection test fails, an error message is generated and displayed on your
screen. In this case, please contact Aldelo Technical Support for help. Have the error message
handy. The Technical Support Representative needs this information to help you get connected.)

86
Detach Button
The “Detach” button on the toolbar allows you to detach the currently selected SQL Server
database. To detach the database, select the desired database in the “Database Name” field, and then
click on the “Detach” button on the Setup toolbar (See Figure 4-49).
Figure 4-49
When the confirmation message displays, click the “Yes” button to continue (See Figure 4-50).
Figure 4-50
The “Successful” message appears, indicating that you have successfully detached the selected SQL
Server Database. Click on the “OK” button to complete the process (See Figure 4-51).
Figure 4-51

87
Backup Button
The “Backup” button allows you to create a backup of the SQL database to which you are currently
connected. To backup the database, make sure the database to which you are currently connected
displays in the “Database Name” field (it should match the database listed in the Current Data
Source Link group box). Then, click on the “Backup” button of the Setup toolbar (See Figure 4-52).
Figure 4-52
On the confirmation message that follows, click on the “Yes” button (See Figure 4-53).
Figure 4-53
The “Successful” message appears, indicating that you have successfully created a backup of the
selected SQL Server database. Click on the “OK” button to complete the process (See Figure 4-54).
Figure 4-54

88
The backup file of the database may now be found on your computer in the Program Data \ Aldelo \
Aldelo EDC \ Backup folder of your root directory. The backup files have a .bak file extension (See
Figure 4-55).
Figure 4-55

89
Reindex Button
The “Reindex” button on the Setup toolbar allows you to perform a database statistics update. This
procedure compacts the database to remove empty memory spaces, thereby improving performance.
Reindexing your database on a regular basis can help prevent minor problems before they occur. To
reindex the database, make sure the database to which you are currently connected displays in the
“Database Name” field (it should match the database listed in the Current Data Source Link group
box). Then, click on the “Reindex” button of the Setup toolbar (See Figure 4-56).
Figure 4-56
On the confirmation message that follows, click on the “Yes” button (See Figure 4-57).
Figure 4-57

90
The “Successful” message appears, indicating that you have successfully reindexed the selected
database. Click on the “OK” button to complete the process (See Figure 4-58).
Figure 4-58
Connect Button
The “Connect” button on the Setup toolbar allows you to connect to the selected SQL Server
database for use with Aldelo® EDC. Select the database to which you wish to connect in the
“Database Name” field, and then click the “Connect” button (See Figure 4-59).
Figure 4-59
The “Successful” message appears, indicating that you have successfully connected to the selected
database. Click on the “OK” button to complete the process (See Figure 4-60).
Figure 4-60

91
(Note: You may only connect to one database at a time. If you attempt to connect to a second
database, the new connection succeeds and the original connection is lost.)
Exit Button
When you finish performing your database setup, click the “Done” button to close the setup screen
and return to the EDC main screen (See Figure 4-61).
Figure 4-61
Manage SQL Accounts
If you are using Windows Authentication in SQL Server, and the ASPNET account has become
disassociated with your database, you must perform a re-association. Additionally, if you are using
SQL Server Authentication, you must manually create a user account.
(Note: Do not use the SA account under any circumstances, as this creates an extreme security risk.)

92
From the Aldelo® EDC main screen, click the round button in the upper left corner of the window
and then select “Manage Manage SQL Accounts” from the right side of the displayed menu (See
Figure 4-62).
Figure 4-62
Manage Database Logins
The Manage Database Logins screen displays. On this screen, you setup Windows and SQL Server
authentication login information.

93
Add Windows Authentication Login
(Note: The following procedure for adding Windows Authentication Login is provided for
backward compatibility and should only be performed if your computer uses the Microsoft
Windows XP operating system. It is not necessary to perform this procedure if you use the
Microsoft Vista operating system, as Vista uses the built-in users for database authentication.)
To re-associate the ASPNET account with the SQL Server database in Microsoft Windows XP,
select the “Computer Name” radio button, make sure “ASPNET” is entered in the “Account Name”
field, and click the “Add” button on the left portion of the screen (See Figure 4-63).
Figure 4-63
After a moment, the “Successful” message displays. Click on the “OK” button to complete the
association process (See Figure 4-64).
Figure 4-64

94
Add SQL Server Authentication Login
To create a new SQL Server Authentication user account, enter a user name and password, and re-
enter the password for verification purposes in the fields on the right half of the screen. Click the
“Add” button on the lower right portion of the screen to create the account (See Figure 4-65).
Figure 4-65
After a moment, the “Successful” message displays. Click on the “OK” button to complete the
process (See Figure 4-66).
Figure 4-66

95
SQL Editor
The SQL Editor feature allows changes to be made to the database. When you click on the “SQL
Editor” menu item, you are presented with a login screen. After you login, the system displays a
warning message (See Figure 4-67). Please contact Aldelo Technical Support for help in using this
feature of the software.
Figure 4-67
Software Update
Selecting the Software Update feature of Aldelo® EDC directs the user to the Aldelo website.
Contact information is available by selecting “Contact Us” on any web page.

96
Main Menu
Store Settings
The Store Settings item under the main menu contains configuration settings for the entire store.
These settings should be configured before proceeding any further. To open Store Settings, from the
Aldelo® EDC main screen, click the round button in the upper left corner of the window and then
select “Store Settings” from the main menu (See Figure 4-68).
Figure 4-68
General Tab
On the General tab, fields listed with their descriptions in bold type are required.
Payment Server Settings Group Box
In the “Payment Web Service Host Name (or IP)” field, enter the IP address (or “localhost” if it’s
the same system) of the system hosting the Aldelo® EDC software. Preferably, this station should be
given a static IP address since the system is hosting a service that is accessed via an IP address.

97
Accept the default name in the “Payment Web Service Application Name” field unless you
manually change it in IIS (only advanced networking professionals should make changes to this).
Application Settings Group Box
Enter a password in the “Card Encryption Password” field. This password is used to encrypt all
transactions that are stored in the database. Enter the password again in the following field for
verification purposes. The “Audit Trail History Kept Days” is the number of days the system keeps
recorded activities in the system. These activities can be viewed in the Reports section of the
software. The optional “Auto Batch Close Time” is the time that the automatic batch close is
triggered. The batch will close every 24 hours at the selected time of day. This feature is very useful
if you plan to let the Aldelo® EDC client application manage the daily batch closing activity for
you. If you use this feature, you must not turn off the computer hosting the Aldelo® EDC server and
client components, as well as the machine upon which the database resides. Additionally, you must
not exit the Aldelo® EDC client application or log off of Windows. Otherwise, the automatic batch
close will not be triggered, and you will receive a 48 hour batch warning. Additionally, make sure
these computers are not programmed to use the hibernation, sleep mode, or hard drive power down
energy saving options. These may also interfere with the auto batch close scheduler. Do not turn off
the computer or exit the Aldelo® EDC Client application, or the auto batching will fail to function.
If the computer is scheduled to restart each night, make sure it restarts at least 2 hours after the
scheduled auto batch close time.
The “Auto Batch Close User Name” field is the user account name that performs the auto batch.
The Batch User Account used must have security settings to perform sales transactions and batch
close activities (See Figure 4-69).
Figure 4-69
Options Tab
The Options tab is used to set your user interface options.

98
Default Startup Screen Size
Click the down arrow in the “Default Startup Screen Size” field if you wish to change your screen
resolution. Choose one of the options from the list and click on it. The new resolution now appears
in the field. Click the “Save” button to change the setting permanently (See Figure 4-70).
Figure 4-70
Main Screen Picture
As you have seen, the main screen displays a picture. If you wish to change this picture to
something more appropriate for your business (for example, a picture of your restaurant or an item
from your menu), first save a copy of the picture file in the ProgramData > Aldelo > Aldelo EDC >
Pictures folder of your root directory. Then click on the navigation button and select the file
from this same directory. You must choose a picture from this directory, or the picture will not
display. Once the picture is selected, a thumbnail copy displays in the window below the field.
Click the “Save” button to change the picture permanently (See Figure 4-71).
Figure 4-71

99
To return to the default picture, clear the file name from the “Main Screen Picture” field and click
the “Save” button.
The checkboxes on the lower half of the Options tab screen allow you to choose additional options
(See Figure 4-72).
Figure 4-72
Check the “Close Control Button Exits Program” checkbox if you want to close Aldelo®
EDC completely whenever you click on the “Close” button of any screen. If this
option is not checked, clicking the “Close” button only minimizes Aldelo® EDC; it does not
close it.
Check the “Run Minimized on Startup” checkbox if you want Aldelo® EDC to initially open
minimized in the system tray. If this option is not checked, the program opens normally.
Check the “Login Not Required on Resume” checkbox if you want to be able to resume
using Aldelo® EDC after minimizing it without having to login again.
(Note: Due to PCI Compliance requirements, “Login Not Required on Resume” is only
active if the resume action is within 15 minutes of minimizing the program.)
Check the “Auto Launch When Windows Starts” checkbox if you want Aldelo® EDC to
open automatically when you first start your computer and Windows starts.
After making changes to the status of any of these checkboxes, be sure to select the “Save” button
to accept the changes.

100
Receipt Tab
The settings on the Receipt tab are optional. If you operate Aldelo® EDC in stand-alone mode or
print receipts from within Aldelo® EDC, then setup this information accordingly. The values in the
“Initial Print Receipt Copies” and “Re-Print Receipt Copies” fields affect the number of receipts
that the integrated client Aldelo® For Restaurants POS solution prints (See Figure 4-73).
Figure 4-73
If you wish to print the Auto Batch Close Receipt, select the checkbox on the right side of the
screen. The Auto Batch Close Report shows the batch number, the total batch item count, and the
total batch dollar amount.
When you finish entering the receipt information, click the “Save” button to save your settings.

101
Notifications Tab
Under the Notifications tab, enter the required information to allow Aldelo® EDC to deliver e-mail
and alerts of successes, failures, errors, and other audit trail activities. If you used the Database
Setup Wizard, many of these fields are already populated and require no further changes, but be
sure to select the types of notifications you wish to receive from the checkboxes on the right side of
the window and click the “Save” button when finished (See Figure 4-74).
Figure 4-74
To send notifications, you must have an SMTP account. The information necessary to setup this
account must be obtained from your Internet Service Provider (ISP). If your ISP requires SMTP
authentication, then you must enter the SMTP Server Name, the Authentication User Name, and the
Authentication Password in the fields on the left side of this screen. Be sure to use SMTP port 25
unless your ISP designates a different port number for SMTP.
The sender e-mail address field indicates the e-mail address from which the e-mail was sent.
Typically, a user selects a sender e-mail address such as “[email protected]” where “xyz.com”
represents your normal e-mail domain.
The notification feature allows up to three parties to be notified of selected events. Enter the e-mail
addresses of these parties in the three Notification Email Address fields on the form. Typically the
manager and a person with technical skills are notified, with the third party being the Merchant
Service Provider (or Aldelo Technical Support when troubleshooting). Please be sure to receive
permission from third parties before setting them up in your notification list.
Select the corresponding checkboxes for the notifications you wish to deliver.
Select the “Email Batch Close Success” checkbox to notify your recipients whenever a batch
is closed successfully.
Select the “Email Batch Close Failure” checkbox to notify your recipients whenever an
attempt to close a batch fails.

102
Select the “Email Batch Close Error” checkbox to notify your recipients whenever a batch
close attempt returns an error message.
Select the “Email Self Heal & Other Events” checkbox to notify your recipients whenever a
Self Heal event or any other event not covered by the other categories occurs. A Self Heal
event occurs when one or more database synchronizations were skipped due to the fact that
the computer’s processor was too busy at the scheduled synchronization time to perform the
synchronization.
Select the “Email Critical Error” checkbox to notify your recipients whenever the software
reports the fact that a critical error has occurred.
Select the “Email Database Maintenance Access” checkbox to notify your recipients
whenever someone attempts to access your database to make changes to it.
Select the “Email Denied Logons” checkbox to notify your recipients whenever an
unauthorized attempt is made to login to the system.
Be sure to click the “Save” button when finished.
Security Settings
Before you can use the software to its full potential, you must setup at least one user account. Each
user account has permissions associated with it by assigning it a security role. These security roles
must first be created before they can be assigned to user accounts. Aldelo® EDC comes with several
default security roles, but you may create an unlimited number of custom security roles.

103
Security Roles Tab
To view the default security roles, click the round button in the upper left corner of the main screen
window and then select the “Security Settings” menu item (See Figure 4-75).
Figure 4-75
On the next window that displays, select the Security Roles tab (See Figure 4-76).
Figure 4-76

104
Security Settings Toolbar
Show All Button
Click the “Show All” button on the Security Settings toolbar to display the current list of Security
Roles (See Figure 4-77).
Figure 4-77
Next, double-click on one of the security role names to view the allowable access permissions for
that security role name. Follow this procedure for each of the items under the Security Roles tab to
view them all (See Figure 4-78).
Figure 4-78

105
New Button
To create a new security role, click the “New” button on the Security Settings toolbar (see Security
Role Editor Tab, below).
Save Button
Click the “Save” button after making changes to any information on the Security Roles tab to keep
the changes.
Delete Button
To delete a security role, select its name from the “Security Role Name” field and then click the
“Delete” button on the Security Settings toolbar. When the confirmation message appears, click the
“Yes” button to permanently delete the security role (See Figure 4-79).
Figure 4-79
Cancel Button
To exit the Security Roles tab screen without saving any changes and return to the Aldelo® EDC
main screen, click the “Cancel” button on the Security Settings toolbar.
Done Button
To save your changes and exit the Security Roles tab screen, click the “Save” and “Done” buttons
on the Security Settings toolbar.

106
Security Role Editor Tab
On the Security Role Editor tab you may create new, edit existing, hide, or delete security roles. To
open the Security Role Editor tab, click the round button in the upper left corner of the main screen
window and then select the “Security Settings” menu item (See Figure 4-80).
Figure 4-80
On the next window that displays, select the Security Role Editor tab (See Figure 4-81).
Figure 4-81

107
To create a new security role, click the “New” button on the Security Settings toolbar. This clears
the fields and checkboxes on the Security Role Editor tab, except for several default permissions.
Create a name for the new security role and enter it into the “Security Role Name” field. If desired,
enter a value in the “Sort Order” field (the sort order only affects the order in which the security
roles display on the Security Roles tab; if nothing is entered in the Sort Order fields, the security
roles display in alphabetical order). Finally, select the permissions you wish to allow for the new
security role from the checkboxes in the Management Securities and the Transactions Reports
Securities group boxes. The default permissions are not required and may be deselected if desired
(See Figure 4-82).
Figure 4-82
Your first security role should be that of Administrator. This user has all rights in the software so
make sure to check all checkboxes to allow access to everything. When finished entering the
information, click the “Done” button on the Security Settings toolbar to save and exit, or click the
“Save” button to display the “save successfully completed” message. Click the “OK” button on this
message to complete the creation of the new security role and remain in the Security Role Editor
screen (See Figure 4-83).
Figure 4-83
Click the “Save” button on the Security Settings toolbar after you create a new security role or edit
an existing security role to commit the changes to the database. If you fail to do this, your changes
are lost when you navigate away from the Security Role Editor tab.

108
The “Delete,” “Cancel,” and “Done” buttons of the Security Settings toolbar work identically to the
way they work when accessed from the Security Roles tab (See “Security Settings Toolbar,”
above).
User Accounts
After you have created the Administrator security role that has full access to the software, you must
assign this Administrator role to your first user. This user shall be the Administrator of the software
since he has full access to all of the software features. Additionally, this Administrator is also
considered the Key Custodian (as per PCI Compliance standards) and is responsible for the periodic
changing of the Card Encryption Password. As a Key Custodian, it is recommended that the
merchant require the Administrator to sign an acknowledgement of responsibilities agreement form
issued by the merchant.
(Tech-Tip: It is a good idea to setup more than one Administrator account and password in
your system. In this way, if an administrator becomes “locked out” due to failure to change
the password within the allotted period of time or due to attempting to login unsuccessfully
multiple times, the other administrator can unlock the account.)

109
User Accounts Tab
To view the User Accounts tab, click the round button in the upper left corner of the main screen
window and then select the “User Accounts” menu item (See Figure 4-84).
Figure 4-84
On the next window that displays, select the User Accounts tab (See Figure 4-85).
Figure 4-85

110
Users Toolbar
The Users toolbar appears at the bottom of both the User Accounts tab and the User Account Editor
tab.
Show All Button
Click the “Show All” button on the Users toolbar of the User Accounts tab to display the screen
where all your existing user accounts are listed. There are several default user accounts that have
already been created for you. You may use these accounts as desired (See Figure 4-86).
Figure 4-86
New Button
To create a new user account, click the “New” button on the Users toolbar to display the User
Account Editor tab with all of its fields and checkboxes cleared of information (See Figure 4-87).
Figure 4-87

111
Delete Button
To delete an existing user account, select its name from the User Name column and click the
“Delete” button on the Users toolbar. When the “Delete Confirmation” message displays, click the
“Yes” button to complete the deletion (See Figure 4-88).
Figure 4-88
Cancel Button
Click the “Cancel” button on the Users toolbar to exit the User Accounts tab without saving any
changes you made and return to the Aldelo® EDC main screen.
Done Button
Click the :Save” and “Done” buttons on the Users toolbar to save any changes you made and exit
the User Accounts tab.
User Account Editor Tab
On the User Account Editor tab you may create new, edit existing, hide, or delete user accounts.
Users with an Administrator level security role may also reset forgotten user passwords.

112
Users Toolbar
Reset Button
As a security measure, if a user forgets his password and attempts to login unsuccessfully several
times, the system issues a final warning that if the next login attempt fails, the user will be locked
out. If the message below appears, click the “OK” button to continue (See Figure 4-89).
Figure 4-89
After receiving the above warning, if the next attempt fails, the system locks the user out, requiring
a 30 minute wait before another login attempt can be made. If the message below appears, click the
“OK” button to continue (See Figure 4-90).
Figure 4-90

113
At this point, the user may wait until the lockout period expires and try logging in again or the user
may have the Administrator reset the password. To reset a password for a user, an Administrator
must enter the user’s account name in the “User Name” field and then click the “Reset” button on
the Users toolbar (See Figure 4-91).
Figure 4-91
A message displays, indicating that the lockout reset has been completed successfully. Click the
“OK” button on this message to continue (See Figure 4-92).
Figure 4-92
Next, re-enter the data in the User Name, Password, and Re-enter Password fields of the User
Account Editor tab. Finally, assign a security role to this user (if you use the same user name, a new
password is required; you may not re-enter the old password). Make note of the user name and
password, and then click either the “Save” button or the “Done” button to save the changes. The
user may now login with the new user name and password.
(Note: Aldelo recommends using Integration Tokens to integrate Aldelo® EDC with Aldelo
® For
Restaurants. This information does not expire and is more secure than passwords for integration.
See Chapter 9 of this manual for information on how to use the Integration Token In Aldelo® For
Restaurants.)

114
New Button
To create a new user, click the “New” button on the Users toolbar. Enter a new user name and
password, and re-enter the password for verification purposes. Do not enter anything in the
“Integration Token” field. This value is generated and assigned automatically by the software. Next,
enter a password hint that will remind you of your password should you forget it. Finally, assign a
security role to the new user and click on the “Save” button and “Done” buttons to save the new
information and exit the current screen (See Figure 4-93).
Figure 4-93
The new user is now listed under the User Accounts tab.
(Note: All passwords must be PCI Compliant. For detailed information on the rules to which your
selected passwords must adhere, see the section entitled “Users” in Chapter 3 of the CISP/PCI
Implementation Guidance document. This document may be found from your computer desktop by
navigating to Start > All Programs > Aldelo EDC > PCI Compliance Guide.)
Save Button
Click the “Save” button on the Users toolbar after you create a new user or edit an existing user to
commit the changes to the database. If you fail to do this, your changes are lost when you navigate
away from the User Account Editor tab.

115
Delete Button
To delete an existing user account, enter its name in the “User Name” field and click the “Delete”
button on the Users toolbar. When the “Delete Confirmation” message displays, click the “Yes”
button to complete the deletion (See Figure 4-94).
Figure 4-94
Cancel Button
Click the “Cancel” button on the Users toolbar to exit the User Account Editor tab without saving
any changes you made and return to the Aldelo® EDC main screen.
Done Button
Click the “Save” and “Done” buttons on the Users toolbar to save any changes you made and exit
the User Account Editor tab.
At this point you should create additional user accounts for batch operations and integrated
applications. The batch operations user account must have security permissions to perform batch
and sales transactions. The integrated applications user account should have security permissions
limited to sales, tip adjust, and void transactions.
Merchant Accounts
Once you have setup your first user, you can now setup your merchant account in Aldelo® EDC.
This is the core of the software. You must have previously setup a merchant account with your
Merchant Service Provider to complete this section.

116
Merchant Accounts Tab
Open Merchant Accounts by clicking the round button in the upper left corner of the main screen
window and selecting the “Merchant Accounts” menu item from the main menu (See Figure 4-95).
Figure 4-95
Next, click on the Merchant Accounts tab.

117
Merchant Accounts Toolbar
Show All Button
From the Merchant Accounts tab, click the “Show All” button on the Merchant Accounts toolbar to
display any currently existing merchant accounts (See Figure 4-96).
Figure 4-96
New Button
To create a new merchant account, click the “New” button on the Merchant Accounts toolbar to
display the Merchant Account Editor tab with most of the fields and all of the checkboxes cleared
(See User Account Editor Tab, below).
Delete Button
To delete an existing merchant account, select its name from the Account Name column and click
the “Delete” button on the Merchant Accounts toolbar. When the “Delete Confirmation” message
displays, click the “Yes” button to complete the deletion (See Figure 4-97).
Figure 4-97

118
(Note: If you have ever used a merchant account to perform live transactions, it cannot be deleted.
In such a case, hide the account instead to prevent its display under the Merchant Accounts tab.)
Cancel Button
Click the “Cancel” button on the Merchant Accounts toolbar to exit the Merchant Accounts tab
without saving any changes you made and return to the Aldelo® EDC main screen.
Done Button
Click the “Done” button on the Merchant Accounts toolbar to save any changes you made and exit
the Merchant Accounts tab.
Merchant Account Editor Tab
On the Merchant Account Editor tab you may create new, edit existing, hide, or delete merchant
accounts. To create a new merchant account, click the “New” button on the Merchant Accounts
toolbar to display the Merchant Account Editor tab with most of the fields and all of the checkboxes
cleared. Enter a name for this account. This name is typically the name of the business, followed by
the Merchant Service Provider name (for example, “Checkers Restaurant – XYZ Payment”). Next,
choose an account type by making a selection from the drop-down list of the “Account Type” field,
choose your Merchant Service Provider by making a selection from the drop-down list of the
“Merchant Service Provider” field, and select you business type by making a selection from the
drop-down list of the “Business Type” field. If your business handles gratuities, select “Restaurant”
as your Business Type. If your business does not handle gratuities, select “Retail” as your Business
Type. If your business handles mail order / telephone order / e-commerce, select “MOTO” as your
Business Type.
If you wish to change the number of seconds before the connection times out or the response times
out, enter the new value in the appropriate field, otherwise, leave the default values in these fields.
Next, select from the four checkboxes on the left side of the form, as appropriate. The “Active
Account” checkbox indicates that the account is currently in use by your business. The “Enable
Tracing” checkbox, when selected, allows Aldelo® EDC to create a log file that can be used by the
Aldelo Technical Support department should you have a problem with the software. The “Hide
Account” checkbox is used to change the account status to inactive. This checkbox is used when
you change your Merchant Service Provider or change accounts within the same Merchant Service
Provider. The account is hidden and not deleted because there may still be a need to retrieve
historical transactions from the account. The “Demo Mode” checkbox allows Aldelo®
EDC to be
used for training purposes (See warning, following page). Any transactions completed in Demo
Mode are not submitted for payment.
If you are in a tax jurisdiction that requires a second level of taxation, contact Aldelo Technical
Support for instructions on how to use the two fields at the bottom of the General Settings group
box.

119
In the Processor Settings group box, enter the information as necessary. This required information is
dependent upon the Merchant Service Provider selected. Contact your Merchant Service Provider
for the information that goes in these fields (See Figure 4-98).
Figure 4-98
(Warning! Demo Mode is to be used for training purposes only! DO NOT ENABLE DEMO
MODE UNLESS IT IS UNDER THE SUPERVISION OF THE ALDELO TECHNICAL
SUPPORT STAFF VIA LIVEMEETING. When in Demo Mode, credit card transactions are not
processed against a live merchant account. Likewise, such charges are NOT posted against the
customer’s credit card. As a result, this merchant account does NOT receive any funds from
activities processed in Demo Mode. If you use Demo Mode for training purposes, do not to
forget to uncheck the “Demo Mode” checkbox when you are finished training and wish to
return to Live Mode.)

120
Save Button
When finished entering the required information, click the “Save” button near the top of the screen.
A confirmation message displays, indicating that your information was saved successfully. Click on
the “OK” button to complete the process (See Figure 4-99).
Figure 4-99
Delete, Cancel, and Done Buttons
The “Delete,” “Cancel,” and “Done” buttons of the Merchant Accounts toolbar work identically to
those accessed from the Merchant Accounts tab (See Merchant Accounts Toolbar, above).
Aldelo® EDC allows multiple merchant accounts to be configured, but you may only designate one
merchant account as active. All payment processing activities are routed to this active merchant
account. Do not change the active merchant accounts unless you are aware of the results. Be sure to
close the current batch of the currently active merchant account before you attempt to switch
merchant accounts. Aldelo® EDC has built-in protection to prevent mistakes during an open batch.
The Merchant Setup blocks out certain fields if a batch is open or any pending transactions exist.
Aldelo recommends leaving the default Connect Time Out and Response Time Out values at 30, as
this should be sufficient time for the supported Merchant Service Providers (these Time Out values
are expressed in seconds).
Log Off
The Log Off menu item allows the user to log off of the system. This is usually used during periods
when the user is away from the machine and wants to prevent unauthorized use. To log off, simply
click the “Log Off” menu item of the main menu. When the user returns and wishes to continue, he
must login again.
Performing Test Transactions with Live Credit Cards
After you have properly configured Aldelo® EDC, the next step is to perform test transactions with
live credit cards against the live merchant account. Make sure that all transactions performed are
using live credit cards, and that the merchant account is live as well. This test ensures that Aldelo®
EDC is properly communicating with the selected Merchant Service Provider. The following is a

121
script of tests to perform. If any of these tests yield an error, please contact your Merchant Service
Provider for help in resolving the issue.
1. Perform a manual sale transaction for $1.00 with invoice number 1.
2. Perform a swiped sale transaction for $1.01 with invoice number 2.
3. Perform a void sale transaction for either of the sale transactions performed above.
4. Perform a pre-auth transaction for $2.00 with invoice number 3.
5. Perform an adjust tip transaction for the above pre-auth transaction for 50¢ (if your selected
Business Type is “Restaurant”).
6. Perform a post-auth transaction for the above pre-auth transaction.
7. Perform a void post-auth transaction for the above post-auth transaction.
8. Perform a return transaction for 50¢ with invoice number 4.
9. Perform a manual sale transaction with AVS and CVV verification for $1.50 with invoice
number 5.
10. Repeat the above test procedures for each credit card type accepted by the merchant.
11. Perform a batch close transaction.
Once these tests have been completed successfully, you are ready to go live with Aldelo® EDC. If
you are using Aldelo® EDC in a stand-alone environment, you can follow the same procedures
described in the test transactions above to process live credit cards in a live environment. If you are
using Aldelo® EDC in an integrated environment, please refer to Chapter 9, “Using Aldelo
® EDC in
Integrated Mode,” for more information.

122

123
Chapter 5
Administrative Tasks System Utilities
Import & Export
The Import & Export feature allows you to move your database data from one computer to
another. From the Aldelo® EDC main screen, click the round button in the upper left corner of the
window and then select “Import & Export” from the right side of the displayed menu (See Figure
5-1).
Figure 5-1
The Import & Export screen displays. On this screen, you setup the options and settings that you
wish to export or import.

124
Export
On the Import & Export screen, choose the data and settings you wish to export from the Select
Transform Options group box. You may choose from store settings, audit logs, security settings,
and merchant accounts. Choosing the “Select All Options” checkbox selects all of the options at
once (See Figure 5-2).
Figure 5-2

125
Next, click the navigation button in the “File Path” field to open the navigation window. Select
the location to which you would like to export the file, give the file a name in the “File Name”
field, and then click the “Open” button (See Figure 5-3).
Figure 5-3
The file path and file name you just selected now appear in the “File Path” field. Click the
“Export” button on the Import & Export toolbar to create the file in the selected folder (See Figure
5-4).
Figure 5-4

126
A message asks you to confirm the export of the selected file. Click the “Yes” button to continue
(See Figure 5-5).
Figure 5-5
The Successful window indicates that the export is complete. Click the “OK” button to close the
window (See Figure 5-6).
Figure 5-6
The exported file now appears in the selected folder.

127
Import
From the General tab of the Import & Export screen, click the navigation button in the “File
Path” field to open the navigation window. Navigate to the location from which you wish to
import the file, select the file by clicking on it, and then click the “Open” button of the navigation
window. The file path and file name you just selected now appear in the “File Path” field. Next,
choose what to import by making your selections from the Select Transform Options group box.
Then, click the “Import” button on the Import & Export toolbar (See Figure 5-7).
Figure 5-7
A message asks you to confirm the import of the selected data. Click the “Yes” button to continue
(See Figure 5-8).
Figure 5-8

128
The Successful window indicates that the import is complete. Click on the “OK” button to close
the window (See Figure 5-9).
Figure 5-9
The import is now complete.
Software Update
Selecting the Software Update feature of Aldelo® EDC directs the user to the Aldelo website.
Contact information is available by selecting “Contact Us” on any web page.

129
Main Menu
Technical Support
From the Aldelo® EDC main screen, click the round button in the upper left corner of the window
and then select “Technical Support” from the left side of the displayed menu (See Figure 5-10).
Figure 5-10

130
Available Providers Tab
The Technical Support screen opens to the Available Providers tab by default. The provider listed
under this tab is always the same as the edition of the software you are running (for example, the
PPI edition of Aldelo® EDC lists PPI as the Available Merchant Service Provider). Since Mercury
Payment is used for the examples in this manual, Mercury Payment is listed in the figure below.
However, the Standard Edition of Aldelo® EDC lists all of the merchant service providers that are
currently available (See Figure 5-11).
Figure 5-11
Contact Information Toolbar
Visit Aldelo Website Button
Select the “Visit Aldelo Website” button to be instantly redirected to the Aldelo Systems website.
You may select the “Contact Us” button on the left side of any webpage on the Aldelo website to
view contact information for both Aldelo and its international distributors.
Remote Support Button
The “Remote Support” button should only be used under the supervision of the Aldelo Technical
Support department. The remote support feature allows the Aldelo technician to remotely connect
to your computer and troubleshoot issues on your behalf.

131
Clicking on the “Remote Support” button displays a disclaimer of liabilities screen. Please read the
disclaimer carefully. If you agree with the disclaimer and wish to continue with remote support,
click on the “Yes” button. If you do not agree with the disclaimer, click on the “No” button (See
Figure 5-12).
Figure 5-12
(Note: if you do not agree with the disclaimer, you cannot use the remote support feature).
Done Button
Select the “Done” button to close the technical support screen and return to the main screen of
Aldelo® EDC.

132
Support Service Tab
The Support Service tab displays two group boxes; the Aldelo Systems Technical Support Contact
Information group box and the Active Merchant Service Provider Contact Information group box.
Contact information for Aldelo technical support and the active merchant service provider’s
technical support are listed here, respectively (See Figure 5-13).
Figure 5-13
Visit Aldelo Website, Remote Support, and Done Buttons
The “Visit Aldelo Website,” “Remote Support,” and “Done” buttons of the Contact Information
toolbar work identically to those accessed from the Available Providers tab (See Contact
Information Toolbar, above).

133
About
From the Aldelo® EDC main screen, click the round button in the upper left corner of the window
and then select “About” from the left side of the displayed menu (See Figure 5-14).
Figure 5-14

134
The About Aldelo EDC screen displays information on the product version, the database version,
the web service version, and the copyright. Click the “Done” button when you are finished
viewing the information to return to the main screen of Aldelo® EDC (See Figure 5-15).
Figure 5-15
Log Off
The Log Off menu item allows the user to log off of the system. This is usually used during
periods when the user is away from the machine and wants to prevent unauthorized use. To log
off, simply click the “Log Off” menu item of the main menu. When the user returns and wishes to
continue, he must login again.
Exit Program
The Exit Program menu item closes Aldelo® EDC completely. To reopen the program, you must
select the Aldelo® EDC menu item from the main menu of Windows. Please note that exiting
Aldelo® EDC completely disables the Daily Auto Batching capability of the software. Daily Auto
Batching enables proper settlement and payment of credit card transactions from your merchant
service provider and your bank. Failure to perform Daily Auto Batching may result in the failure
of receiving funds from your bank and/or merchant service provider and may prevent you from
processing any further credit card transactions. Aldelo Systems strongly recommends that you DO
NOT turn off the Daily Auto Batching feature by exiting Aldelo® EDC.

135
Main Screen
Batch Tab
The Batch tab is where the user may view the current batch and close the current batch. Several
reports may also be accessed from the Batch tab.
Inquire Current Batch
From time to time, you may wish to review the information in the current batch. You may access
this information from the main screen by clicking on the Batch tab and then selecting the “Inquire
Current Batch” button (See Figure 5-16).
Figure 5-16
The Inquire Current Batch screen opens to the Review Transactions tab by default.

136
Review Transactions Tab
Click on the Review Transactions tab to view all pending (unsettled) transactions for the current
batch. If you wish to view a summary of an individual transaction, select it from the list of
transactions. The summary information displays in the box on the lower left side of the window.
Use the scroll bar to view the unseen portion at the bottom (See Figure 5-17).
Figure 5-17

137
Trace Output Tab
Clicking on the Trace Output tab displays two separate windows; the Transaction Request Trace
window and the Transaction Response Trace window. The Transaction Request Trace window
displays the transaction information transmitted from the merchant to the Merchant Service
Provider. The Transaction Response Trace window displays the response information transmitted
from the Merchant Service Provider back to the merchant. This information is used by the Aldelo
Technical Support team in diagnosing any problems that may occur (See Figure 5-18).
Figure 5-18

138
Summary Tab
Clicking on the Summary tab displays your transaction count and total dollar amount for the
unsettled transactions in your current batch. This feature is useful when you want a brief up-to-the-
minute snapshot of how your business is doing for the day (See Figure 5-19).
Figure 5-19
Transaction Selector Toolbar
The buttons on the Transaction Selector Toolbar are available to the user under all three tabs of the
Inquire Current Batch screen.
Reprint Receipt Button
If you need to reprint a receipt for any reason, select the transaction from the Transaction List and
then click the “Re-Print Receipt” button on the Transaction Selector toolbar (See Figure 5-20).
Figure 5-20
A window displays asking you to select the desired POS printer. Choose the appropriate printer
from the drop-down list, and then click the “Print” button.

139
Done Button
Click the “Done” button on the Transaction Selector toolbar to exit the current window and return
to the Aldelo® EDC main screen (See Figure 5-21).
Figure 5-21
Close Current Batch
From time to time, you may have a need to close the current batch manually. You may do so from
the main screen of Aldelo® EDC by clicking on the Batch tab and then selecting the “Close
Current Batch” button (See Figure 5-22).
Figure 5-22

140
The Close Current Batch screen opens to the Close Batch tab by default. Click on the “Close
Primary Merchant” button on the Batch Settlement toolbar to initiate the close (See Figure 5-23).
Figure 5-23
A batch close should be performed on a daily basis. Closing a batch settles pending transactions
and initiates the funds transfer process. Aldelo® EDC prevents transactions from being processed
if there are any open transactions older than 48 hours. This prevents further processing errors if the
merchant does not close his batches frequently. Merchant Service Providers usually assess non-
qualifying fees if the merchant does not close his batch within 24 hours after the first transaction in
the batch. Therefore, Aldelo recommends that all merchants close their batches at the end of their
business days or pick a time of day to close their batches automatically on a daily basis. For
information on closing your batch automatically in Aldelo® EDC, see the subsection entitled
“Application Settings Group Box” under the General Tab of the “Store Settings” menu item of the
“Main Menu” section in Chapter 4 of this manual.
(Note: Certain Merchant Service Providers may inadvertently Post-Authorize some of your
transactions or your open batch may be settled automatically by your Merchant Service Provider
because they have an arbitrary daily cutoff time by which your batch must close. If one of these
situations applies to you, your batch may become out of sync with that of your Merchant Service
Provider and you may need to close the batch. Please Contact Aldelo Technical Support for
instructions on how to close your batch manually.)

141
Close Batch Tab
Click on the Close Batch tab to view the results of your settlement of the current batch. The three
blank fields in the Batch Settlement Results group box are populated when the approval response
is received from your Merchant Service Provider. It is not necessary to enter any information
manually into these three blank fields (see Figure 5-24).
Figure 5-24

142
Trace Output Tab
Clicking on the Trace Output tab displays two separate windows; the Transaction Request Trace
window and the Transaction Response Trace window. The Transaction Request Trace window
displays the batch close information transmitted from the merchant to the Merchant Service
Provider. The Transaction Response Trace window displays the batch close response information
transmitted from the Merchant Service Provider back to the merchant. This information is used by
the Aldelo Technical Support team in diagnosing any problems that may occur (See Figure 5-25).
Figure 5-25
Batch Settlement Toolbar
Close Primary Merchant Button
When you are ready to close your batch manually, click the “Close Primary Merchant” button to
send the batch close information to your Merchant Service Provider. After a few moments
(depending on your connection speed), the Batch Settlement Results group box displays the batch
close information under the Close Batch tab. If you setup a secondary merchant account, the Batch
Settlement toolbar displays an additional “Close Secondary Merchant” button. Use this button if
you wish to close the batch for the secondary merchant account.

143
Print Button
If you have an OPOS-enabled printer connected to your system, you may click the “Print” button
on the Batch Settlement toolbar if you wish to print a batch close receipt for your records. When
you select the button, a window appears where you must select your printer. Choose the OPOS-
enabled printer you wish to use from the drop-down list, and then click the “Print” button to send
the job to the printer (See Figure 5-26).
Figure 5-26
(Note: For more information on OPOS, please see the sub-section entitled “OPOS (OLE for POS)”
in the Technology Overview section of Chapter 2 of this manual.)
Done Button
Click the “Done” button on the Batch Settlement toolbar to exit the current window and return to
the Aldelo® EDC main screen.
Periodic Password Changes
As per PCI compliancy requirements and general security best practices, user passwords must be
changed frequently. In Aldelo® EDC, user passwords automatically expire every 90 days. The
Card
Encryption Password in Store Settings expires every 90 days as well. If the Card Encryption
Password is expired, Aldelo® EDC cannot process any credit card transactions. If the Auto-Batch
User account password expires, Aldelo® EDC cannot perform batch close functions. Although the
Aldelo® EDC Client application shows a warning message when a user login password expiration
date is within 14 days, Aldelo still recommends that administrators mark their calendars and
change these passwords more frequently.
(Tech-Tip: If you selected the “Email Critical Error” checkbox on the Notifications tab in
Store Settings, new passwords are e-mailed out when they expire to prevent lockout
situations. The system also e-mails reminders that the passwords are about to expire
beginning 14 days before the actual expiration date. As a general security best practice, be
sure to change your passwords as soon as you receive the reminder e-mails.)

144

145
Chapter 6 Audit Trail
Main Menu
View Audit Trail Events
From the Aldelo® EDC main screen, click the round button in the upper left corner of the window
and then select “Audit Trail” from the left side of the displayed menu (See Figure 6-1).
Figure 6-1
When dealing with credit cards, it is extremely important to maintain a record of all actions that
are performed in the system. In Aldelo® EDC, when any action is performed, a record of that
action is recorded automatically in the audit trail. While troubleshooting issues that may occur
while processing credit cards, the audit trail should be your first source of information. The audit
trail is regarded as the authority for what happened with any particular transaction or batch. The
items in this log are recorded verbatim from both Aldelo® EDC and the gateway or processor.

146
Events Tab
Click on the Events tab to view the contents of the audit log. The events are listed in a table of
several columns with each row representing an audit record. Click on an individual record in the
table to view the details of the record in the fields on the right side of the screen (See Figure 6-2).
Figure 6-2
This audit trail is kept in the database for a specified period of time. This period of time may be
adjusted by clicking the round button in the upper left corner of the main screen of Aldelo® EDC,
selecting the Store Settings menu item from the main menu, and editing the value in the “Audit
Trail History Kept Days” field of the Applications settings Group box See Figure 6-3).
Figure 6-3
The history must be kept for a minimum of 90 days to maintain PCI compliance (you must enter a
value greater than 90 in this field, otherwise the value in the field defaults to 90).

147
Filter Tab
To view information from days other than the current day, you must adjust the From (Date) and To
(Date) fields in the Filter Options group box under the Filter tab. Clicking on the down arrow on
the right side of the text box displays a calendar control from which the desired dates may be
chosen graphically. To further narrow your search, adjust the values in the From (Time) and To
(Time) fields (See Figure 6-4).
Figure 6-4
Audit Log Viewer Toolbar
The buttons on the Audit Log Viewer Toolbar are available to the user under both the Events and
Filter tabs of the Audit Trail screen.
Refresh Button
After changing any of the options under the Filter tab, you must click the “Refresh” button on the
Audit Log Viewer toolbar to update the information displayed in the Audit Log. When you click
the “Refresh” button while the Filter tab is open, the display automatically returns to the Events
tab where you may view the updated Audit Log entries.

148
Reset To Default Button
The “Reset To Default” button reverses any changes made to the filter options under the Filter tab.
The dates revert to the current date and the From and To times revert to 12:00 AM and 11:59 PM,
respectively. If the Events tab is open when the button is clicked, the display automatically returns
to the Filter tab. After restoring the default values, you must click the “Refresh” button again to
update the Audit Log entries.
Done Button
Click the “Done” button on the Audit Log Viewer toolbar to exit the current window and return to
the Aldelo® EDC main screen.

149
Chapter 7 Reports Main Screen
All reports in Aldelo® EDC are accessed from the main screen. Reports are accessed by clicking
on the tab at the top of the screen that corresponds to the type of report that you wish to view and
then selecting the report by clicking its button in the Reports group box.
Credit Tab
Credit card transactions are performed under the Credit tab of the main screen of Aldelo® EDC.
No reports are available under the Credit tab.
Gift Tab
Transactions related to the sale and redemption of gift cards are performed under the Gift tab of
the main screen of Aldelo® EDC.
Reports Group Box
The Reports group box under the Gift tab on the main screen displays a button for each available
report that is related to the gift card feature.

150
Detail Report Button
Gift Card Details Report Tab
Select the “Detail Report” button and click on the Gift Card Details Report tab to display the Gift
Card Details Report. The report displays all gift card transactions that have occurred within the
specified date range and time range. The report displays information that runs from the From date
to the To date and from the From time to the To time as setup under the General Filters tab (see
below). The report lists the total dollar amount and total count for gift card issues, reloads, sales,
returns, and also void transactions (See Figure 7-1).
Figure 7-1
Following the Transaction Summary, the individual transactions are listed. For each transaction,
the report lists the date and time, the transaction number, the operator, the action type, the result,
and the transaction amount. Under the “Card Number” field, the report lists only the last four
digits of the card number.

151
Account Filters Tab
If your business has multiple accounts setup for any of the account types, select the Account
Filters tab to control which account’s information displays on the Gift Card Details Report. The
information for only one account of each type may be displayed at one time. For example, if the
merchant has two or more credit accounts setup, select the Account Filters tab, click on the down
arrow next to the “Credit Account” field, and select the account whose information you wish to
view on the report. Click the “Refresh” button to implement the changes (See Figure 7-2).
Figure 7-2

152
General Filters Tab
The display of the Gift Card Details Report may be further filtered by editing the selections under
the General Filters tab. The period of time that the report covers may be changed by editing the
From and To dates and the From and To times. Excluding transactions for all but a specific
operator may be accomplished by entering the operator’s name in the “Operator Name” field.
Please note that the operator name must match exactly the way the user name is entered as he logs
into the system. A specific transaction number or a specific invoice number may be displayed by
entering the number in the respective field. Finally, the user may filter the results to display
approved, declined, or error transactions (or any combination of the above) and the sort order may
be selected. Click the “Refresh” button on the Report toolbar when finished (See Figure 7-3).
Figure 7-3

153
Action Filters Tab
The types of transactions that display under the Gift tab may be modified by selecting or
deselecting the appropriate checkboxes under the Action Filters tab. Click the “Refresh” button
when finished (See Figure 7-4).
Figure 7-4
Online Portal Button
The “Online Portal” button is available under all of the tabs on the main screen except the Credit
tab. Clicking the “Online Portal” button takes the user to the merchant service provider’s customer
service portal where he may gain access to additional reporting features and/or customer service
features. Depending on which merchant service provider the merchant uses, the information
displayed may be different when the user clicks the “Online Portal” button under each of the tabs
of the Aldelo® EDC main screen.
Report Toolbar
Use the Report toolbar to initiate any changes made under the filters tabs.
Refresh Button
Select the “Refresh” button after making changes to any of the settings under any of the filter tabs
to reflect those changes in the Gift Card Details Report. Viewing the report after clicking the
“Refresh” button displays the report with the changes.

154
Reset to Default Button
Select the “Reset to Default” button whenever you wish to cancel any changes made under the
filter tabs and revert to the default settings.
Done Button
Select the “Done” button to exit any of the filter tab screens.
Debit Tab
Debit card transactions are performed under the Debit tab of the main screen of Aldelo® EDC.
Other Group Box
No reports are available in Aldelo® EDC under the Debit tab of the main screen.
Online Portal Button
The “Online Portal” button is available under all of the tabs on the main screen except the Credit
tab. Clicking the “Online Portal” button takes the user to the merchant service provider’s customer
service portal where he may gain access to additional reporting features and/or customer service
features. Depending on which merchant service provider the merchant uses, the information
displayed may be different when the user clicks the “Online Portal” button under each of the tabs
of the Aldelo® EDC main screen.
Debit Canada Tab
Canadian Debit card transactions are performed under the Debit Canada tab of the main screen of
Aldelo® EDC.
Reports Group Box
The Reports group box under the Debit Canada tab on the main screen displays a button for each
available report that is related to the Debit Canada feature.

155
Detail Report Button
Canadian Debit Details Report Tab
Select the “Detail Report” button and click on the Canadian Debit Details Report tab to display the
Canadian Debit Details Report. The report displays all Canadian debit card transactions that have
occurred within the specified date range and time range. The report displays information that runs
from the From date to the To date and from the From time to the To time as setup under the
General Filters tab (see below). The report lists the total dollar amount and total count for
Canadian debit card sales, sales with gratuity, and returns (See Figure 7-5).
Figure 7-5
Following the Transaction Summary, the individual transactions are listed. For each transaction,
the report lists the date and time, the transaction number, the invoice number, the action type, the
result, the card number and sequence number, the gratuity, and the total dollar amount of the
transaction. Under the “Card Number” field, the report lists only the last four digits of the card
number.

156
Account Filters Tab
If your business has multiple accounts setup for any of the account types, select the Account
Filters tab to control which account’s information displays on the Canadian Debit Details Report.
The information for only one account of each type may be displayed at one time. For example, if
the merchant has two or more credit accounts setup, select the Account Filters tab, click on the
down arrow next to the “Credit Account” field, and select the account whose information you wish
to view on the report. Click the “Refresh” button to implement the changes (See Figure 7-6).
Figure 7-6

157
General Filters Tab
The display of the Canadian Debit Details Report may be further filtered by editing the selections
under the General Filters tab. The period of time that the report covers may be changed by editing
the From and To dates and the From and To times. Excluding transactions for all but a specific
operator may be accomplished by entering the operator’s name in the “Operator Name” field.
Please note that the operator name must match exactly the way the user name is entered as he logs
into the system. A specific transaction number or a specific invoice number may be displayed by
entering the number in the respective field. Finally, the user may filter the results to display
approved, declined, or error transactions (or any combination of the above), for specific card types,
and the sort order may be selected. Click the “Refresh” button on the Report toolbar when finished
(See Figure 7-7).
Figure 7-7

158
Action Filters Tab
The types of transactions that display under the Debit Canada tab may be modified by selecting or
deselecting the appropriate checkboxes under the Action Filters tab. Click the “Refresh” button
when finished (See Figure 7-8).
Figure 7-8
Online Portal Button
The “Online Portal” button is available under all of the tabs on the main screen except the Credit
tab. Clicking the “Online Portal” button takes the user to the merchant service provider’s customer
service portal where he may gain access to additional reporting features and/or customer service
features. Depending on which merchant service provider the merchant uses, the information
displayed may be different when the user clicks the “Online Portal” button under each of the tabs
of the Aldelo® EDC main screen.
Report Toolbar
Use the Report toolbar to initiate any changes made under the filters tabs.
Refresh Button
Select the “Refresh” button after making changes to any of the settings under any of the filter tabs
to reflect those changes in the Canadian Debit Card Details Report. Viewing the report after
clicking the “Refresh” button displays the report with the changes.

159
Reset to Default Button
Select the “Reset to Default” button whenever you wish to cancel any changes made under the
filter tabs and revert to the default settings.
Done Button
Select the “Done” button to exit any of the filter tab screens.
EBT Tab
EBT (Electronic Benefit Transfer) card transactions are performed under the EBT tab of the main
screen of Aldelo® EDC.
Other Group Box
No reports are available in Aldelo® EDC under the EBT tab of the main screen.
Online Portal Button
The “Online Portal” button is available under all of the tabs on the main screen except the Credit
tab. Clicking the “Online Portal” button takes the user to the merchant service provider’s customer
service portal where he may gain access to additional reporting features and/or customer service
features. Depending on which merchant service provider the merchant uses, the information
displayed may be different when the user clicks the “Online Portal” button under each of the tabs
of the Aldelo® EDC main screen.
Check Tab
Check transactions are performed under the Check tab of the main screen of Aldelo® EDC.
Reports Group Box
The Reports group box under the Check tab on the main screen displays a button for each
available report that is related to the Check feature.

160
Detail Report Button
Check Processing Details Report Tab
Select the “Detail Report” button and click on the Check Processing Details Report tab to display
the Check Processing Details Report. The report displays all check transactions that have occurred
within the specified date range and time range. The report displays information that runs from the
From date to the To date and from the From time to the To time as setup under the General Filters
tab (see below). The report lists the total dollar amount and total count of check transactions
authorized by either method (by driver license or by MICR device -See Figure 7-9).
Figure 7-9
Following the Transaction Summary, the individual transactions are listed. For each transaction,
the report lists the date and time, the transaction number, the invoice number, the action type, the
result, the account number, the check number, and the dollar amount of the transaction. Under the
“Account Number” field, the report lists only the last four digits of the account number.

161
Account Filters Tab
If your business has multiple accounts setup for any of the account types, select the Account
Filters tab to control which account’s information displays on the Check Processing Details
Report. The information for only one account of each type may be displayed at one time. For
example, if the merchant has two or more credit accounts setup, select the Account Filters tab,
click on the down arrow next to the “Credit Account” field, and select the account whose
information you wish to view on the report (See Figure 7-10).
Figure 7-10

162
General Filters Tab
The display of the Check Processing Details Report may be further filtered by editing the
selections under the General Filters tab. The period of time that the report covers may be changed
by editing the From and To dates and the From and To times. Excluding transactions for all but a
specific operator may be accomplished by entering the operator’s name in the “Operator Name”
field. Please note that the operator name must match exactly the way the user name is entered as
he logs into the system. A specific transaction number or a specific invoice number may be
displayed by entering the number in the respective field. Finally, the user may filter the results to
display approved, declined, or error transactions (or any combination of the above) and the sort
order may be selected. Click the “Refresh” and button on the Report toolbar when finished (See
Figure 7-11).
Figure 7-11

163
Action Filters Tab
The types of transactions that display under the Check tab may be modified by selecting or
deselecting the appropriate checkboxes under the Action Filters tab. Click the “Refresh” button
when finished (See Figure 7-12).
Figure 7-12
Online Portal Button
The “Online Portal” button is available under all of the tabs on the main screen except the Credit
tab. Clicking the “Online Portal” button takes the user to the merchant service provider’s customer
service portal where he may gain access to additional reporting features and/or customer service
features. Depending on which merchant service provider the merchant uses, the information
displayed may be different when the user clicks the “Online Portal” button under each of the tabs
of the Aldelo® EDC main screen.
Report Toolbar
Use the Report toolbar to initiate any changes made under the filters tabs.
Refresh Button
Select the “Refresh” button after making changes to any of the settings under any of the filter tabs
to reflect those changes in the Check Processing Details Report. Viewing the report after clicking
the “Refresh” button displays the report with the changes.

164
Reset to Default Button
Select the “Reset to Default” button whenever you wish to cancel any changes made under the
filter tabs and revert to the default settings.
Done Button
Select the “Done” button to exit any of the filter tab screens.
Batch Tab
Batch transactions are performed under the Batch tab of the main screen of Aldelo® EDC.
Batch Reports Group Box
The Batch Reports group box under the Batch tab on the main screen displays a button for each
available report that is related to the Batch feature.

165
Batch Summary Report Button
Batch Summary Report Tab
Select the “Batch Summary Report” button and click on the Batch Summary Report tab to display
the Batch Summary Report. The Batch Summary Report displays a breakdown of each batch
during the specified time period. Each Batch ID and time period covered by the batch are listed
along with summary information about each batch (See Figure 7-13).
Figure 7-13
For detailed information about a batch, select the Audit Trail menu item from the main menu of
Aldelo® EDC and under the Events tab, select the desired batch log by finding its record in the
displayed list. The detailed batch log information displays in the panel on the right side of the
screen.

166
Account Filters Tab
Select the Account Filters tab to display the Account Selections group box. Here you may select
the specific accounts for which you wish to generate the Batch Summary Report. Please note that
this screen only displays the types of accounts that you have setup in Aldelo® EDC. For example,
if you do not have a Canadian Debit account setup, the field does not display. Furthermore, if you
have only one account setup for a specific account type, there are no choices to be made and that
account displays as your default account for that account type. After making changes to any of the
fields, click the “Refresh” button to view the updated Batch Summary Report (See Figure 7-14).
Figure 7-14

167
General Filters Tab
Select the General Filters tab to display the Filter & Sort Options group box. Here you may set the
date range and the time range for the report by entering the desired From and To dates and times in
the appropriate fields. Click the “Refresh” button when finished (See Figure 7-15).
Figure 7-15
Report Toolbar
The buttons on the Report Toolbar are available to the user under all of the tabs of the Batch
Summary Report screen (See Figure 7-16).
Figure 7-16
Refresh Button
After changing any of the options under any of the filters tabs, you must click the “Refresh” button
on the Report toolbar to update the information displayed in the Batch Summary Report. When
you click the “Refresh” button while the respective filter tab is open, the display automatically
returns to the Batch Summary Report tab where you may view the updated information in the
report.

168
Reset to Default Button
The “Reset to Default” button reverses any changes made to the filter options under any of the
filter tabs. The dates revert to the current date and the From and To times revert to 12:00 AM and
11:59 PM, respectively. Once the button is clicked, the display automatically returns to the
Account Filters tab, no matter which tab the screen was displaying at the time. After restoring the
default values, you must click the “Refresh” button again to update the information in the report.
Done Button
Click the “Done” button on the Report toolbar to exit the current window and return to the Aldelo®
EDC main screen.
Transaction Summary Report Button
The Transaction Summary Report displays the total dollar amount of Sale, Pre-Auth, Post-Auth,
Return, Void Sale, Void Post-Auth, Void Return, and Voice Capture transactions. It also shows a
count for each type of transaction.

169
Transaction Summary Report Tab
Select the “Transaction Summary Report” button and click on the Transaction Summary Report
tab to display the Transaction Summary Report. The report is grouped by card type (credit, debit,
and EBT), with a summary of all of your transactions at the bottom of the report. The time period
covered by the report is listed near the top (See Figure 7-17).
Figure 7-17

170
Account Filters Tab
If your business has multiple accounts setup for any of the account types, select the Account
Filters tab to control which account’s information displays on the Transaction Summary Report.
The information for only one account of each type may be displayed at one time. For example, if
the merchant has two or more credit accounts setup, select the Account Filters tab, click on the
down arrow next to the “Credit Account” field, and select the account whose information you wish
to view on the report (See Figure 7-18).
Figure 7-18

171
General Filters Tab
The display of the Transaction Summary Report may be further filtered by editing the selections
under the General Filters tab. The period of time that the report covers may be changed by editing
the From and To dates and the From and To times. Excluding transactions for all but a specific
operator may be accomplished by entering the operator’s name in the “Operator Name” field.
Please note that the operator name must match exactly the way the user name is entered as he logs
into the system. A specific batch ID number or a specific invoice number may be displayed by
entering the number in its respective field. Finally, the user may filter the results to display the
transactions for specific card types by selecting the checkboxes next to the desired card types in
the Card Types group box (See Figure 7-19).
Figure 7-19

172
Action Filters Tab
The types of transactions that display on the Transaction Summary Report may be modified by
selecting or deselecting the appropriate checkboxes under the Action Filters tab. Click the
“Refresh” button when finished (See Figure 7-20).
Figure 7-20
Report Toolbar
Use the Report toolbar to initiate any changes made under the filters tabs.
Refresh Button
Select the “Refresh” button after making changes to any of the settings under any of the filter tabs
to reflect those changes in the Check Processing Details Report. Viewing the report after clicking
the “Refresh” button displays the report with the changes.
Reset to Default Button
Select the “Reset to Default” button whenever you wish to cancel any changes made under the
filter tabs and revert to the default settings.
Done Button
Select the “Done” button to exit any of the filter tab screens.

173
Transaction Details Report Button
The Transaction Details Report displays additional information regarding each individual
transaction. Each transaction is listed on this report along with the transaction summary.
Transaction Details Report Tab
Select the “Transaction Details Report” button and click on the Transaction Details Report tab to
display the Transaction Details Report. The transaction summary displays the total dollar amount
for each type of transaction and is grouped by card type. It also displays the counts of each
transaction result type. Below the summary the individual transaction details are listed. These
details include the date and time of the transaction, the transaction number, the invoice number,
the transaction type, the result, the card number (only the last four digits display), the total amount
of the transaction, and the number of the batch under which the transaction was closed. The time
period covered by the report is listed near the top (See Figure 7-21).
Figure 7-21

174
Account Filters Tab
If your business has multiple accounts setup for any of the account types, select the Account
Filters tab to control which account’s information displays on the Transaction Details Report. The
information for only one account of each type may be displayed at one time. For example, if the
merchant has two or more credit accounts setup, select the Account Filters tab, click on the down
arrow next to the “Credit Account” field, and select the account whose information you wish to
view on the report (See Figure 7-22).
Figure 7-22

175
General Filters Tab
The display of the Transaction Details Report may be further filtered by editing the selections
under the General Filters tab. The period of time that the report covers may be changed by editing
the From and To dates and the From and To times. Excluding transactions for all but a specific
operator or a specific card holder may be accomplished by entering the operator’s name or the card
holder’s name in their respective fields. Please note that the operator name must match exactly the
way the user name is entered as he logs into the system and the card holder’s name must match
exactly the way it is listed on his account. To find an individual transaction, enter the number of
the transaction in the “Transaction Number” field. A specific batch ID number or a specific
invoice number may be displayed by entering the number in the respective field. The user may
filter the results to display the transactions for specific card types and transaction results by
selecting the appropriate checkboxes in the Card Types and Tran. Results group boxes. Finally, the
sort order may be modified. Click the “Refresh” button when finished to display the updated
Transaction Details Report (See Figure 7-23).
Figure 7-23

176
Action Filters Tab
The types of transactions that display on the Transaction Details Report may be modified by
selecting or deselecting the appropriate checkboxes under the Action Filters tab. Click the
“Refresh” button when finished (See Figure 7-24).
Figure 7-24
Report Toolbar
Refresh Button
After changing any of the options under any of the filter tabs, you must click the “Refresh” button
on the Report toolbar to update the information displayed in the Transaction Details report. When
you click the “Refresh” button while any of the filter tabs are open, the display automatically
returns to the Transaction Details Report tab where you may view the updated information in the
report.
Reset to Default Button
The “Reset to Default” button reverses any changes made to the filter options under the any of the
filter tabs. The dates revert to the current date and the From and To times revert to 12:00 AM and
11:59 PM, respectively. If the Transaction Details Report tab is open when the button is clicked,
the display automatically returns to the Account Filters tab. After restoring the default values, you
must click the “Refresh” button again to update the information in the report.

177
Done Button
Click the “Done” button on the Report toolbar to exit the current window and return to the Aldelo®
EDC main screen.
Online Portal Button
The “Online Portal” button is available under all of the tabs on the main screen except the Credit
tab. Clicking the “Online Portal” button takes the user to the merchant service provider’s customer
service portal where he may gain access to additional reporting features and/or customer service
features. Depending on which merchant service provider the merchant uses, the information
displayed may be different when the user clicks the “Online Portal” button under each of the tabs
of the Aldelo® EDC main screen.

178

179
Chapter 8
Using Aldelo® EDC in
Stand-Alone Mode
Stand-alone merchants are those who wish to process credit cards in stand-alone environments
such as doctors’ offices, reservation desks, service departments, and other businesses that
traditionally do not use a POS solution for integrated payment processing. Under the stand-alone
environment, all primary payment activities originate from the Aldelo® EDC client application.
Main Screen
Credit Tab
Transactions for customers using credit cards, such as authorizations, sales, returns, and
adjustments, are made under the Credit tab of the main screen of Aldelo® EDC.
Authorization Group Box
Pre-Authorization Button
Pre-authorizations are performed when the merchant wishes to verify that a customer’s credit card
is valid and has a sufficient credit limit to pay for the product or service being provided but the
merchant does not yet know what the final total will be. For example, a merchant who sells
gasoline might pre-authorize a customer’s credit card for $100.00 before the customer begins
pumping his gasoline. After the customer finishes, the pre-authorized transaction is post-
authorized for the actual amount of the sale. By pre-authorizing the transaction, the merchant
protects himself from the situation where a customer has already filled his tank and then his credit
card is declined. In this case, the actual amount is almost always less than the pre-authorized
amount.
Pre-authorization is also used by merchants whose customer’s typically pay a gratuity to the
merchant’s service staff. In this case, the customer’s credit card is pre-authorized for the total
amount of the meal. The receipt is printed and presented to the customer for his signature. The
customer has the option to add a gratuity to the receipt before signing. If the customer does so, the
amount of the gratuity is added to total amount of the check and the pre-authorized transaction is
post-authorized for the new amount that includes the gratuity.

180
To perform a pre-authorization transaction in stand-alone mode, select the Credit tab from the
main screen of Aldelo® EDC and in the Authorization group box, click on the “Pre Authorization”
button. Swipe the credit card through the card reader device. Enter the invoice number and the pre-
authorization amount in their respective fields. Click the “Process” button on the Credit Card
toolbar to send the transaction to the merchant service provider (See Figure 8-1).
Figure 8-1

181
Pre-Auth Tab
When the pre-authorization has been sent and a response has been received, the type of response is
displayed near the top of the window under the Pre-Auth tab. Click the “Clear” button on the
Credit Card toolbar to remove all of the information from the fields on this screen (See Figure 8-
2).
Figure 8-2
Trace Output Tab
The Trace Output tab displays information about the pre-auth transaction. The left panel of the
screen displays information about the transaction request sent from Aldelo®
EDC to the merchant
service provider and the right panel displays information about the transaction response sent from
the merchant service provider back to Aldelo® EDC (See Figure 8-3).
Figure 8-3

182
The trace output information is a record of exactly what was sent to the merchant service provider
and what was received from the merchant service provider. If there is a problem with a transaction,
this information may be used by the merchant service provider’s technical support department to
help determine the cause.
(Note: The trace output information only displays if the “Enable Tracing” checkbox has been
selected for the account in the Merchant Account Editor.)
Post Authorization Button
Once you have pre-authorized a transaction, you must post-authorize it with the final settle
amount. To post-authorize a pre-authorized transaction in stand-alone mode, select the Credit tab
from the main screen of Aldelo® EDC and in the Authorization group box, click on the “Post
Authorization” button. Select the transaction to post-authorize from the list of transactions
displayed under the Post-Auth tab. Enter in the “Settle Amount” field the final total. When
finished, click the “Post-Auth” button on the Transaction Selector toolbar (See Figure 8-4).
Figure 8-4
(Note: When using a merchant account of the restaurant type, a “Gratuity Amount” field displays
to the left of the “Settle Amount” field. This field is used to add the gratuity given by the customer
to the wait staff. In this case, make the final adjustment to the settle amount by making the
adjustment to the “Gratuity Amount” field [added gratuities may only be positive amounts]. Click
the “Update Gratuity” button followed by the “Post-Auth” button to complete the process.)

183
The “Post-Auth Successful” message indicates that the transaction was approved. Click the “OK”
button to complete the process (See Figure 8-5).
Figure 8-5
Void Post Authorization Button
At times, it may be necessary to reverse a post-authorized transaction. To do so, select the Credit
tab from the main screen of Aldelo® EDC and in the Authorization group box, click on the “Void
Post Authorization” button. Select the transaction to void from the list of transactions displayed
under the Void Post-Auth tab. When finished, click the “Void Post-Auth” button on the
Transaction Selector toolbar (See Figure 8-6).
Figure 8-6

184
The “Void Post-Auth Successful” message indicates that the transaction was approved. Click the
“OK” button to complete the process (See Figure 8-7).
Figure 8-7
Sale Group Box
Sale Button
A sale transaction is made when there is no need to perform a pre-authorization because the
product or service is not provided to the customer until the credit card transaction is complete. If
the card is declined, the merchant simply refuses to provide the product or service to the customer.

185
To perform a sale transaction in stand-alone mode, select the Credit tab from the main screen of
Aldelo® EDC and in the Sale group box, click on the “Sale” button. Swipe the credit card through
the card reader device. Enter the invoice number and the settle amount in their respective fields.
Click the “Process” button on the Credit Card toolbar to send the transaction to the merchant
service provider (See Figure 8-8).
Figure 8-8

186
Sale Tab
When the sale transaction has been sent and a response has been received, the type of response is
displayed near the top of the window under the Sale tab. Click the “Clear” button on the Credit
Card toolbar to remove all of the information from the fields on this screen (See Figure 8-9).
Figure 8-9
Trace Output Tab
The Trace Output tab displays information about the sale transaction. The left panel of the screen
displays information about the transaction request sent from Aldelo® EDC to the merchant service
provider and the right panel displays information about the transaction response sent from the
merchant service provider back to Aldelo® EDC (See Figure 8-10).
Figure 8-10

187
The trace output information is a record of exactly what was sent to the merchant service provider
and what was received from the merchant service provider. If there is a problem with a transaction,
this information may be used by the merchant service provider’s technical support department to
help determine the cause.
(Note: The trace output information only displays if the “Enable Tracing” checkbox has been
selected for the account in the Merchant Account Editor.)
Voice Capture Button
The voice capture feature of Aldelo® EDC allows the merchant to continue operating his business
and accepting credit cards while his internet connection to the merchant service provider is down
for any reason. The merchant processes the customer’s credit card by using an imprint device. The
imprint device captures the credit card type, the credit card number, and the expiration date. The
merchant adds the invoice number and the settle amount to the imprint. The merchant then calls
the merchant service provider to obtain a voice authorization. The merchant typically gives the
merchant service provider all of the above information over the phone. The merchant service
provider then gives the merchant a voice authorization code which the merchant records on the
imprint. Upon obtaining this voice code authorization, the merchant may give the customer a copy
of the imprint as a receipt. Later, when the internet connection has been restored, the merchant
may enter these transactions manually into Aldelo® EDC by using the voice capture feature.

188
To use the voice capture feature, select the Credit tab from the main screen of Aldelo® EDC and in
the Sale group box, click on the “Voice Capture” button. From the previously completed credit
card imprint, manually enter the credit card type, the credit card number, the expiration date, the
invoice number, the settle amount, and the voice authorization code (if the customer’s card is still
available, it may be swiped instead to capture its type, number, and expiration date). When
finished, click the “Process” button (See Figure 8-11).
Figure 8-11
(Note: It is not necessary to manually enter the cardholder’s name when using the voice capture
feature.)

189
Voice Capture Tab
When the voice capture transaction has been sent and a response has been received, the type of
response is displayed near the top of the window under the Voice Capture tab. Click the “Clear”
button on the Credit Card toolbar to remove all of the information from the fields on this screen
(See Figure 8-12).
Figure 8-12
Trace Output Tab
The Trace Output tab displays information about the voice capture transaction. The left panel of
the screen displays information about the transaction request sent from Aldelo® EDC to the
merchant service provider and the right panel displays information about the transaction response
sent from the merchant service provider back to Aldelo® EDC (See Figure 8-13).
Figure 8-13

190
The trace output information is a record of exactly what was sent to the merchant service provider
and what was received from the merchant service provider. If there is a problem with a transaction,
this information may be used by the merchant service provider’s technical support department to
help determine the cause.
(Note: The trace output information only displays if the “Enable Tracing” checkbox has been
selected for the account in the Merchant Account Editor.)
Void Sale Button
Occasionally, you may find the need to void a sale transaction. To do so, select the Credit tab from
the main screen of Aldelo® EDC and in the Sale group box, click on the “Void Sale” button. Select
the sale transaction to void from the list of transactions displayed under the Void Sale tab. When
finished, click the “Void Sale” button on the Transaction Selector toolbar (See Figure 8-14).
Figure 8-14

191
The “Void Sale Successful” message indicates that the transaction was approved. Click the “OK”
button to complete the process (See Figure 8-15).
Figure 8-15
Return Group Box
Return Button
A return transaction is made when the merchant wishes to refund money to a customer. Unlike a
void transaction, a return transaction is not tied to a corresponding sale transaction. A return
transaction may be performed for any amount at any time. The processing of a return transaction
results in a credit to the customer’s credit card account and a debit to the amount due the merchant
from the merchant service provider.

192
To perform a return transaction in stand-alone mode, select the Credit tab from the main screen of
Aldelo® EDC and in the Return group box, click on the “Return” button. Swipe the credit card
through the card reader device. Enter the invoice number and the settle amount (the amount to be
refunded to the customer) in their respective fields. Click the “Process” button on the Credit Card
toolbar to send the transaction to the merchant service provider (See Figure 8-16).
Figure 8-16

193
Return Tab
When the return transaction has been sent and a response has been received, the type of response is
displayed near the top of the window under the Return tab. Click the “Clear” button on the Credit
Card toolbar to remove all of the information from the fields on this screen (See Figure 8-17).
Figure 8-17
Trace Output Tab
The Trace Output tab displays information about the return transaction. The left panel of the
screen displays information about the transaction request sent from Aldelo®
EDC to the merchant
service provider and the right panel displays information about the transaction response sent from
the merchant service provider back to Aldelo® EDC (See Figure 8-18).
Figure 8-18

194
The trace output information is a record of exactly what was sent to the merchant service provider
and what was received from the merchant service provider. If there is a problem with a transaction,
this information may be used by the merchant service provider’s technical support department to
help determine the cause.
(Note: The trace output information only displays if the “Enable Tracing” checkbox has been
selected for the account in the Merchant Account Editor.)
Void Return Button
Occasionally, you may find the need to void a return transaction. To do so, select the Credit tab
from the main screen of Aldelo® EDC and in the Return group box, click on the “Void Return”
button. Select the transaction to void from the list of return transactions displayed under the Void
Return tab. When finished, click the “Void Return” button on the Transaction Selector toolbar
(See Figure 8-19).
Figure 8-19

195
The “Void Return Successful” message indicates that the transaction was approved. Click the
“OK” button to complete the process (See Figure 8-20).
Figure 8-20
Gift Tab
All gift card transactions are handled under the Gift tab of the main screen of Aldelo® EDC. Gift
cards may be issued and reloaded. The customer’s gift card balance may be checked. Sale and
return transactions may be made with gift cards.
(Note: To use the gift card feature in Aldelo® EDC, the merchant must use gift cards issued by the
Merchant service provider. Gift cards issued internally by the merchant cannot be used.)
Issue/Reload Group Box
Gift cards may be issued for the first time, value may be added to the remaining balance, and the
balance remaining on the gift card may be checked by using the features of the Issue/Reload group
box.
Issue Button
An issue transaction is made when the merchant sells a new gift card to a customer, as opposed to
adding value to an existing gift card.

196
To perform an issue transaction in stand-alone mode, select the Gift tab from the main screen of
Aldelo® EDC and in the Issue/Reload group box, click on the “Issue” button. Swipe a new gift
card through the card reader device. Enter the invoice number and the transaction amount in their
respective fields. Click the “Process” button on the Gift Card toolbar to send the transaction to the
merchant service provider (See Figure 8-21).
Figure 8-21

197
Issue Tab
When the issue transaction has been sent and a response has been received, the type of response is
displayed near the top of the window under the Issue tab. Click the “Clear” button on the Gift Card
toolbar to remove all of the information from the fields on this screen (See Figure 8-22).
Figure 8-22
Trace Output Tab
The Trace Output tab displays information about the issue transaction. The left panel of the screen
displays information about the transaction request sent from Aldelo® EDC to the merchant service
provider and the right panel displays information about the transaction response sent from the
merchant service provider back to Aldelo® EDC (See Figure 8-23).
Figure 8-23

198
The trace output information is a record of exactly what was sent to the merchant service provider
and what was received from the merchant service provider. If there is a problem with a transaction,
this information may be used by the merchant service provider’s technical support department to
help determine the cause.
(Note: The trace output information only displays if the “Enable Tracing” checkbox has been
selected for the account in the Merchant Account Editor.)
Reload Button
A reload transaction is made when the customer buys additional value to add to his existing gift
card, as opposed to buying a new gift card.
To perform a reload transaction in stand-alone mode, select the Gift tab from the main screen of
Aldelo® EDC and in the Issue/Reload group box, click on the “Reload” button. Swipe the
previously issued gift card through the card reader device. Enter the invoice number and the
transaction amount in their respective fields. Click the “Process” button on the Gift Card toolbar to
send the transaction to the merchant service provider (See Figure 8-24).
Figure 8-24

199
Reload Tab
When the reload transaction has been sent and a response has been received, the type of response
is displayed near the top of the window under the Reload tab. Click the “Clear” button on the Gift
Card toolbar to remove all of the information from the fields on this screen (See Figure 8-25).
Figure 8-25
Trace Output Tab
The Trace Output tab displays information about the reload transaction. The left panel of the
screen displays information about the transaction request sent from Aldelo®
EDC to the merchant
service provider and the right panel displays information about the transaction response sent from
the merchant service provider back to Aldelo® EDC (See Figure 8-26).
Figure 8-26

200
The trace output information is a record of exactly what was sent to the merchant service provider
and what was received from the merchant service provider. If there is a problem with a transaction,
this information may be used by the merchant service provider’s technical support department to
help determine the cause.
(Note: The trace output information only displays if the “Enable Tracing” checkbox has been
selected for the account in the Merchant Account Editor.)
Void Reload Button
Occasionally, you may find the need to void a reload transaction. To do so, select the Gift tab from
the main screen of Aldelo® EDC and in the Issue/Reload group box, click on the “Void Reload”
button. Select the reload transaction to void from the list of transactions displayed under the Void
Reload tab. When finished, click the “Void Reload” button on the Gift Card Voids toolbar (See
Figure 8-27).
Figure 8-27

201
The “Void Reload Successful” message indicates that the transaction was approved. Click the
“OK” button to complete the process (See Figure 8-28).
Figure 8-28
Balance Button
At times, a customer may ask the merchant to check the balance remaining on his gift card. To
check the balance in stand-alone mode, select the Gift tab from the main screen of Aldelo® EDC
and in the Issue/Reload group box, click on the “Balance” button. Swipe the customer’s gift card
through the card reader device and click the “Process” button on the Gift Card toolbar to send the
transaction to the merchant service provider (See Figure 8-29).
Figure 8-29

202
Balance Tab
When the balance transaction has been sent and a response has been received, the type of response
is displayed near the top of the window under the Balance tab. Click the “Clear” button on the Gift
Card toolbar to remove all of the information from the fields on this screen (See Figure 8-30).
Figure 8-30
Trace Output Tab
The Trace Output tab displays information about the balance transaction. The left panel of the
screen displays information about the transaction request sent from Aldelo®
EDC to the merchant
service provider and the right panel displays information about the transaction response sent from
the merchant service provider back to Aldelo® EDC (See Figure 8-31).
Figure 8-31

203
The trace output information is a record of exactly what was sent to the merchant service provider
and what was received from the merchant service provider. If there is a problem with a transaction,
this information may be used by the merchant service provider’s technical support department to
help determine the cause.
(Note: The trace output information only displays if the “Enable Tracing” checkbox has been
selected for the account in the Merchant Account Editor.)
Redemption Group Box
Gift cards may be redeemed by the merchant by using the Sale feature of the Redemption group
box. These sales may also be voided when necessary.

204
Sale Button
A gift card sale transaction is made when a customer wishes to use some or all of the available
balance remaining on his gift card. To perform a gift card sale transaction in stand-alone mode,
select the Gift tab from the main screen of Aldelo® EDC and in the Redemption group box, click
on the “Sale” button. Swipe the customer’s gift card through the card reader device. Enter the
invoice number and the transaction amount in their respective fields. Click the “Process” button on
the Gift Card toolbar to send the sale transaction to the merchant service provider (See Figure 8-
32).
Figure 8-32

205
Sale Tab
When the sale transaction has been sent and a response has been received, the type of response is
displayed near the top of the window under the Sale tab. Click the “Clear” button on the Gift Card
toolbar to remove all of the information from the fields on this screen (See Figure 8-33).
Figure 8-33
Trace Output Tab
The Trace Output tab displays information about the gift card sale transaction. The left panel of
the screen displays information about the transaction request sent from Aldelo® EDC to the
merchant service provider and the right panel displays information about the transaction response
sent from the merchant service provider back to Aldelo® EDC (See Figure 8-34).
Figure 8-34

206
The trace output information is a record of exactly what was sent to the merchant service provider
and what was received from the merchant service provider. If there is a problem with a transaction,
this information may be used by the merchant service provider’s technical support department to
help determine the cause.
(Note: The trace output information only displays if the “Enable Tracing” checkbox has been
selected for the account in the Merchant Account Editor.)
Void Sale Button
Occasionally, you may find the need to void a gift card sale transaction. To do so, select the Gift
tab from the main screen of Aldelo® EDC and in the Redemption group box, click on the “Void
Sale” button. Select the sale transaction to void from the list of transactions displayed under the
Void Sale tab. When finished, click the “Void Sale” button on the Gift Card Voids toolbar (See
Figure 8-35).
Figure 8-35

207
The “Void Sale Successful” message indicates that the transaction was approved. Click the “OK”
button to complete the process (See Figure 8-36).
Figure 8-36
Return Group Box
Return Button
A gift card return transaction is made when the merchant wishes to refund money to a customer by
adding additional value to the balance of the customer’s gift card. Unlike a void transaction, a
return transaction is not tied to a corresponding sale transaction. A return transaction may be
performed for any amount at any time.

208
To perform a gift card return transaction in stand-alone mode, select the Credit tab from the main
screen of Aldelo® EDC and in the Return group box, click on the “Return” button. Swipe the gift
card through the card reader device. Enter the invoice number and the transaction amount (the
amount to be refunded to the customer’s gift card) in their respective fields. Click the “Process”
button on the Gift Card toolbar to send the transaction to the merchant service provider (See
Figure 8-37).
Figure 8-37

209
Return Tab
When the gift card return transaction has been sent and a response has been received, the type of
response and the new gift card balance are displayed near the top of the window under the Return
tab. Click the “Clear” button on the Gift Card toolbar to remove all of the information from the
fields on this screen (See Figure 8-38).
Figure 8-38
Trace Output Tab
The Trace Output tab displays information about the gift card return transaction. The left panel of
the screen displays information about the transaction request sent from Aldelo® EDC to the
merchant service provider and the right panel displays information about the transaction response
sent from the merchant service provider back to Aldelo® EDC (See Figure 8-39).
Figure 8-39

210
The trace output information is a record of exactly what was sent to the merchant service provider
and what was received from the merchant service provider. If there is a problem with a transaction,
this information may be used by the merchant service provider’s technical support department to
help determine the cause.
(Note: The trace output information only displays if the “Enable Tracing” checkbox has been
selected for the account in the Merchant Account Editor.)
Void Return Button
Occasionally, you may find the need to void a gift card return transaction. To do so, select the Gift
tab from the main screen of Aldelo® EDC and in the Return group box, click on the “Void Return”
button. Select the return transaction to void from the list of transactions displayed under the Void
Return tab. When finished, click the “Void Return” button on the Gift Card Voids toolbar (See
Figure 8-40).
Figure 8-40

211
The “Void Return Successful” message indicates that the transaction was approved. Click the
“OK” button to complete the process (See Figure 8-41).
Figure 8-41
Debit Tab
A debit card provides an alternative payment method to cash when making purchases. It can be
considered an electronic check, as the funds are withdrawn directly from either the user’s bank
account or, in the case of prepaid debit cards, from the remaining balance on the card. All debit
card transactions, other than those performed in Canada, are handled under the Debit tab of the
main screen of Aldelo®
EDC.
(Note: The standard edition of Aldelo® EDC does not process debit transactions.)

212
Transaction Group Box
Sale Button
A debit card sale transaction is made when a customer wishes to pay by directly accessing the
balance in his checking or savings account (or, in the case of prepaid debit cards, the remaining
balance on the card). To perform a debit card sale transaction in stand-alone mode, select the Debit
tab from the main screen of Aldelo® EDC and in the Transaction group box, click on the “Sale”
button. Enter the invoice number, the purchase total, and the amount of cash the customer wants
back (if applicable) in their respective fields on the screen and then click the “Process” button on
the Debit Card toolbar (See Figure 8-42).
Figure 8-42
Next, have the customer swipe his debit card through the pinpad device and follow the prompts.
After the customer swipes his debit card, the pinpad device displays the transaction dollar amount
and prompts the customer to approve the amount by clicking the “OK” button on the pinpad. Next,
the customer is prompted to select which of his bank accounts he wishes to debit (checking or
savings) by pressing the appropriate button on the pinpad device. Finally, the customer is
prompted to enter his PIN (personal identification number) and press the “OK” button on the
pinpad device to complete the transaction.

213
Sale Tab
When the debit card sale transaction has been sent and a response has been received, the type of
response is displayed near the top of the window under the Sale tab. Click the “Clear” button on
the Debit Card toolbar to remove all of the information from the fields on this screen (See Figure
8-43).
Figure 8-43
Trace Output Tab
The Trace Output tab displays information about the debit card sale transaction. The left panel of
the screen displays information about the transaction request sent from Aldelo® EDC to the
merchant service provider and the right panel displays information about the transaction response
sent from the merchant service provider back to Aldelo® EDC (See Figure 8-44).
Figure 8-44

214
The trace output information is a record of exactly what was sent to the merchant service provider
and what was received from the merchant service provider. If there is a problem with a transaction,
this information may be used by the merchant service provider’s technical support department to
help determine the cause.
(Note: The trace output information only displays if the “Enable Tracing” checkbox has been
selected for the account in the Merchant Account Editor.)
Return Button
A debit card return transaction is made when the merchant wishes to refund money to a customer
by crediting the amount directly back to the customer’s bank account. Unlike a void transaction, a
return transaction is not tied to a corresponding sale transaction. A return transaction may be
performed for any amount at any time.
To perform a debit card return transaction in stand-alone mode, select the Debit tab from the main
screen of Aldelo® EDC and in the Transaction group box, click on the “Return” button. Enter the
invoice number and the return total in their respective fields on the screen and then click the
“Process” button on the Debit Card toolbar (See Figure 8-45).
Figure 8-45
Next, have the customer swipe his debit card through the pinpad device and follow the prompts.
After the customer swipes his debit card, the pinpad device displays the transaction dollar amount

215
and prompts the customer to approve the amount by clicking the “OK” button on the pinpad. Next,
the customer is prompted to select which of his bank accounts he wishes to credit (checking or
savings) by pressing the appropriate button on the pinpad device. Finally, the customer is
prompted to enter his PIN (personal identification number) and press the “OK” button on the
pinpad device to complete the transaction.
Return Tab
When the debit card return transaction has been sent and a response has been received, the type of
response is displayed near the top of the window under the Return tab. Click the “Clear” button on
the Debit Card toolbar to remove all of the information from the fields on this screen (See Figure
8-46).
Figure 8-46

216
Trace Output Tab
The Trace Output tab displays information about the debit card return transaction. The left panel of
the screen displays information about the transaction request sent from Aldelo® EDC to the
merchant service provider and the right panel displays information about the transaction response
sent from the merchant service provider back to Aldelo® EDC (See Figure 8-47).
Figure 8-47
The trace output information is a record of exactly what was sent to the merchant service provider
and what was received from the merchant service provider. If there is a problem with a transaction,
this information may be used by the merchant service provider’s technical support department to
help determine the cause.
(Note: The trace output information only displays if the “Enable Tracing” checkbox has been
selected for the account in the Merchant Account Editor.)
Debit Canada Tab
A debit card provides an alternative payment method to cash when making purchases. It can be
considered an electronic check, as the funds are withdrawn directly from either the user’s bank
account or, in the case of prepaid debit cards, from the remaining balance on the card.
All debit card transactions performed in Canada are handled under the Debit Canada tab of the
main screen of Aldelo® EDC. Canadian debit card transactions are handled slightly differently
than those in the United States.
(Note: The standard edition of Aldelo® EDC does not process Canadian debit transactions.)

217
Transaction Group Box
Sale Button
A Canadian debit card sale transaction is made when a customer wishes to pay by directly
accessing the balance in his checking or savings account.
To perform a Canadian debit card sale transaction in stand-alone mode, select the Debit Canada
tab from the main screen of Aldelo® EDC and in the Transaction group box, click on the “Sale”
button. Enter the invoice number and the purchase total in their respective fields on the screen and
then click the “Process” button on the Debit Card (Canada) toolbar (See Figure 8-48).
Figure 8-48
Next, have the customer swipe his debit card through the pinpad device and follow the prompts.
After the customer swipes his debit card, the pinpad device displays the transaction dollar amount
and prompts the customer to approve the amount by clicking the “OK” button on the pinpad. Next,
the customer is prompted to select which of his bank accounts he wishes to debit (checking or
savings) by pressing the appropriate button on the pinpad device. Finally, the customer is
prompted to enter his PIN (personal identification number) and press the “OK” button on the
pinpad device to complete the transaction.

218
Sale Tab
When the Canadian debit card sale transaction has been sent and a response has been received, the
type of response is displayed near the top of the window under the Sale tab. Click the “Clear”
button on the Debit Card (Canada) toolbar to remove all of the information from the fields on this
screen (See Figure 8-49).
Figure 8-49
Trace Output Tab
The Trace Output tab displays information about the Canadian debit card sale transaction. The left
panel of the screen displays information about the transaction request sent from Aldelo® EDC to
the merchant service provider and the right panel displays information about the transaction
response sent from the merchant service provider back to Aldelo® EDC (See Figure 8-50).
Figure 8-50

219
The trace output information is a record of exactly what was sent to the merchant service provider
and what was received from the merchant service provider. If there is a problem with a transaction,
this information may be used by the merchant service provider’s technical support department to
help determine the cause.
(Note: The trace output information only displays if the “Enable Tracing” checkbox has been
selected for the account in the Merchant Account Editor.)
Sale with Gratuity Button
A Canadian debit card sale with gratuity transaction is made when a customer wishes to pay for a
transaction which includes a gratuity by directly accessing the balance in his checking or savings
account.
To perform a Canadian debit card sale with gratuity transaction in stand-alone mode, select the
Debit Canada tab from the main screen of Aldelo®
EDC and in the Transaction group box, click on
the “Sale with Gratuity” button. Enter the invoice number, the purchase total, and the gratuity
amount in their respective fields on the screen and then click the “Process” button on the Debit
Card (Canada) toolbar (See Figure 8-51).
Figure 8-51
Next, have the customer swipe his debit card through the pinpad device and follow the prompts.
After the customer swipes his debit card, the pinpad device displays the transaction dollar amount

220
and prompts the customer to approve the amount by clicking the “OK” button on the pinpad. Next,
the customer is prompted to select which of his bank accounts he wishes to debit (checking or
savings) by pressing the appropriate button on the pinpad device. Finally, the customer is
prompted to enter his PIN (personal identification number) and press the “OK” button on the
pinpad device to complete the transaction.
Sale with Gratuity Tab
When the Canadian debit card sale with gratuity transaction has been sent and a response has been
received, the type of response is displayed near the top of the window under the Sale with Gratuity
tab. Click the “Clear” button on the Debit Card (Canada) toolbar to remove all of the information
from the fields on this screen (See Figure 8-52).
Figure 8-52

221
Trace Output Tab
The Trace Output tab displays information about the Canadian debit card sale with gratuity
transaction. The left panel of the screen displays information about the transaction request sent
from Aldelo® EDC to the merchant service provider and the right panel displays information about
the transaction response sent from the merchant service provider back to Aldelo® EDC (See Figure
8-53).
Figure 8-53
The trace output information is a record of exactly what was sent to the merchant service provider
and what was received from the merchant service provider. If there is a problem with a transaction,
this information may be used by the merchant service provider’s technical support department to
help determine the cause.
(Note: The trace output information only displays if the “Enable Tracing” checkbox has been
selected for the account in the Merchant Account Editor.)
Return Button
A Canadian debit card return transaction is made when the merchant wishes to refund money to a
customer by crediting the amount directly back to the customer’s bank account. Unlike a void
transaction, a Canadian debit card return transaction is not tied to a corresponding sale transaction.
A Canadian debit card return transaction may be performed for any amount at any time.

222
To perform a Canadian debit card return transaction in stand-alone mode, select the Debit Canada
tab from the main screen of Aldelo® EDC and in the Transaction group box, click on the “Return”
button. Enter the invoice number and the refund total in their respective fields on the screen and
then click the “Process” button on the Debit Card (Canada) toolbar (See Figure 8-54).
Figure 8-54
Next, have the customer swipe his debit card through the pinpad device and follow the prompts.
After the customer swipes his debit card, the pinpad device displays the refund dollar amount and
prompts the customer to approve the amount by clicking the “OK” button on the pinpad. Next, the
customer is prompted to select which of his bank accounts he wishes to credit (checking or
savings) by pressing the appropriate button on the pinpad device. Finally, the customer is
prompted to enter his PIN (personal identification number) and press the “OK” button on the
pinpad device to complete the return transaction.

223
Return Tab
When the Canadian debit card return transaction has been sent and a response has been received,
the type of response is displayed near the top of the window under the Return tab. Click the
“Clear” button on the Debit Card (Canada) toolbar to remove all of the information from the fields
on this screen (See Figure 8-55).
Figure 8-55
Trace Output Tab
The Trace Output tab displays information about the Canadian debit card return transaction. The
left panel of the screen displays information about the transaction request sent from Aldelo® EDC
to the merchant service provider and the right panel displays information about the transaction
response sent from the merchant service provider back to Aldelo® EDC (See Figure 8-56).
Figure 8-56

224
The trace output information is a record of exactly what was sent to the merchant service provider
and what was received from the merchant service provider. If there is a problem with a transaction,
this information may be used by the merchant service provider’s technical support department to
help determine the cause.
(Note: The trace output information only displays if the “Enable Tracing” checkbox has been
selected for the account in the Merchant Account Editor.)
Utility Group Box
Key Change Button
When performing Canadian debit transactions, the transactions must be performed in numbered
sequence. This sequence number is maintained by the pinpad device. If the pinpad device is
changed for any reason or if the power to the pinpad device is interrupted for more than a few
minutes, you may receive a “Declined - Perform Key Change Now” message when you try to
perform a Canadian debit transaction. Whenever you receive this message (or if instructed to do so
by your merchant service provider), a key change operation must be performed to synchronize the
software with the pinpad device (See Figure 8-57).
Figure 8-57

225
(Note: Whenever you install a new pinpad device, you must perform a key change operation
immediately following the installation and before running any transactions or the first transaction
will fail.)
The key change operation retrieves the current sequence number from the pinpad device so that
Aldelo® EDC may assign the correct number to the next transaction, thereby maintaining the
correct transaction sequence.
To perform a Canadian debit key change operation in stand-alone mode, select the Debit Canada
tab from the main screen of Aldelo® EDC and in the Utility group box, click on the “Key Change”
button and then click the “Process” button on the Debit Card (Canada) toolbar (See Figure 8-58).
Figure 8-58

226
Key Change Tab
When the Canadian debit key change transaction has been sent and a response has been received,
the type of response is displayed near the top of the window under the Key Change tab. Click the
“Clear” button on the Debit Card (Canada) toolbar to remove all of the information from the fields
on this screen (See Figure 8-59).
Figure 8-59
Once the key change operation has been approved, you may again perform Canadian debit
transactions.

227
Trace Output Tab
The Trace Output tab displays information about the Canadian debit key change transaction. The
left panel of the screen displays information about the transaction request sent from Aldelo® EDC
to the merchant service provider and the right panel displays information about the transaction
response sent from the merchant service provider back to Aldelo® EDC (See Figure 8-60).
Figure 8-60
The trace output information is a record of exactly what was sent to the merchant service provider
and what was received from the merchant service provider. If there is a problem with a transaction,
this information may be used by the merchant service provider’s technical support department to
help determine the cause.
(Note: The trace output information only displays if the “Enable Tracing” checkbox has been
selected for the account in the Merchant Account Editor.)
EBT Tab
EBT (Electronic Benefit Transfer) is an electronic system that allows a recipient to authorize
transfer of his government benefits from a federal account to a retailer account to pay for products
received. EBT is used in all 50 States, the District of Columbia, Puerto Rico, the Virgin Islands,
and Guam. EBT has been implemented in all states since June of 2004.
EBT card transactions are performed under the EBT tab of the main screen of Aldelo® EDC.
Depending on the recipient, the EBT card allows the EBT customer to access his SNAP
(Supplemental Nutrition Assistance Program) benefits (commonly known as food stamps), his
TAFDC (Transitional Aide to Families with Dependent Children) benefits (commonly known as
cash welfare), or both with the EBT card. The EBT card is used at a retail establishment much the
same way as a credit card is used. The purchase amount is deducted from the balance remaining in
the recipient’s account.

228
(Note: The standard edition of Aldelo® EDC does not process EBT transactions.)
Food Stamp Group Box
Use the features in the Food Stamp group box to perform transactions related to the customer’s
federal food stamp account.
Food Stamp Sale Button
A food stamp sale transaction is made when a customer wishes to use some or all of the available
balance remaining in the food stamp portion of his EBT account to purchase merchandise from a
participating food retailer. To perform a food stamp sale transaction in stand-alone mode, select
the EBT tab from the main screen of Aldelo® EDC and in the Food Stamp group box, click on the
“Food Stamp Sale” button. Swipe the customer’s EBT card through the card reader device. Enter
the invoice number and the purchase total in their respective fields. Click the “Process” button on
the EBT Card toolbar to send the sale transaction to the merchant service provider (See Figure 8-
61).
Figure 8-61

229
Food Stamp Sale Tab
When the food stamp sale transaction has been sent and a response has been received, the type of
response is displayed near the top of the window under the Sale tab. Click the “Clear” button on
the EBT Card toolbar to remove all of the information from the fields on this screen (See Figure 8-
62).
Figure 8-62
Trace Output Tab
The Trace Output tab displays information about the EBT card food stamp sale transaction. The
left panel of the screen displays information about the transaction request sent from Aldelo® EDC
to the merchant service provider and the right panel displays information about the transaction
response sent from the merchant service provider back to Aldelo® EDC (See Figure 8-63).
Figure 8-63

230
The trace output information is a record of exactly what was sent to the merchant service provider
and what was received from the merchant service provider. If there is a problem with a transaction,
this information may be used by the merchant service provider’s technical support department to
help determine the cause.
(Note: The trace output information only displays if the “Enable Tracing” checkbox has been
selected for the account in the Merchant Account Editor.)
Food Stamp Return Button
An EBT card food stamp return transaction is made when the merchant wishes to refund money to
a customer by electronically crediting the customer’s federal food stamp account balance. A food
stamp return transaction may be performed for any amount at any time.
To perform an EBT card food stamp return transaction in stand-alone mode, select the EBT tab
from the main screen of Aldelo® EDC and in the Food Stamp group box, click on the “Food Stamp
Return” button. Swipe the EBT card through the card reader device. Enter the invoice number and
the return total (the amount to be refunded to the customer’s food stamp account) in their
respective fields. Click the “Process” button on the EBT Card toolbar to send the transaction to the
merchant service provider (See Figure 8-64).
Figure 8-64

231
Food Stamp Return Tab
When the food stamp return transaction has been sent and a response has been received, the type
of response is displayed near the top of the window under the Food Stamp Return tab. Click the
“Clear” button on the EBT Card toolbar to remove all of the information from the fields on this
screen (See Figure 8-65).
Figure 8-65
Trace Output Tab
The Trace Output tab displays information about the food stamp return transaction. The left panel
of the screen displays information about the transaction request sent from Aldelo® EDC to the
merchant service provider and the right panel displays information about the transaction response
sent from the merchant service provider back to Aldelo® EDC (See Figure 8-66).
Figure 8-66

232
The trace output information is a record of exactly what was sent to the merchant service provider
and what was received from the merchant service provider. If there is a problem with a transaction,
this information may be used by the merchant service provider’s technical support department to
help determine the cause.
(Note: The trace output information only displays if the “Enable Tracing” checkbox has been
selected for the account in the Merchant Account Editor.)
Food Stamp Balance Button
At times, a customer may ask the merchant to check the balance remaining in his food stamp
account. To check the balance in stand-alone mode, select the EBT tab from the main screen of
Aldelo® EDC and in the Food Stamp group box, click on the “Food Stamp Balance” button. Swipe
the customer’s EBT card through the card reader device and enter an invoice number. Click the
“Process” button on the EBT Card toolbar to send the transaction to the merchant service provider
(See Figure 8-67).
Figure 8-67

233
Food Stamp Balance Tab
When the balance transaction has been sent and a response has been received, the type of response
and the customer’s remaining food stamp balance are displayed near the top of the window under
the Food Stamp Balance tab. Click the “Clear” button on the EBT Card toolbar to remove all of
the information from the fields on the screen.
Trace Output Tab
The Trace Output tab displays information about the balance transaction. The left panel of the
screen displays information about the transaction request sent from Aldelo®
EDC to the merchant
service provider and the right panel displays information about the transaction response sent from
the merchant service provider back to Aldelo® EDC.
The trace output information is a record of exactly what was sent to the merchant service provider
and what was received from the merchant service provider. If there is a problem with a transaction,
this information may be used by the merchant service provider’s technical support department to
help determine the cause.
(Note: The trace output information only displays if the “Enable Tracing” checkbox has been
selected for the account in the Merchant Account Editor.)

234
Cash Group Box
Use the features in the Cash group box to perform transactions related to the customer’s cash
welfare benefits account.
Cash Sale Button
A cash sale transaction is made when a customer wishes to use some or all of the available balance
remaining in his cash welfare account. To perform an EBT cash sale transaction in stand-alone
mode, select the EBT tab from the main screen of Aldelo®
EDC and in the Cash group box, click
on the “Cash Sale” button. Swipe the customer’s EBT card through the card reader device. Enter
the invoice number and the purchase total in their respective fields. Click the “Process” button on
the EBT Card toolbar to send the sale transaction to the merchant service provider (See Figure 8-
68).
Figure 8-68

235
Sale Tab
When the sale transaction has been sent and a response has been received, the type of response and
the customer’s remaining cash welfare balance are displayed near the top of the window under the
EBT Cash Sale tab. Click the “Clear” button on the EBT Card toolbar to remove all of the
information from the fields on this screen.
Trace Output Tab
The Trace Output tab displays information about the EBT cash sale transaction. The left panel of
the screen displays information about the transaction request sent from Aldelo® EDC to the
merchant service provider and the right panel displays information about the transaction response
sent from the merchant service provider back to Aldelo® EDC.
The trace output information is a record of exactly what was sent to the merchant service provider
and what was received from the merchant service provider. If there is a problem with a transaction,
this information may be used by the merchant service provider’s technical support department to
help determine the cause.
(Note: The trace output information only displays if the “Enable Tracing” checkbox has been
selected for the account in the Merchant Account Editor.)

236
Cash Balance Button
At times, a customer may ask the merchant to check the balance remaining in his cash welfare
account. To check the balance in stand-alone mode, select the EBT tab from the main screen of
Aldelo® EDC and in the Cash group box, click on the “Cash Balance” button. Swipe the
customer’s gift card through the card reader device and enter an invoice number. Click the
“Process” button on the EBT Card toolbar to send the transaction to the merchant service provider
(See Figure 8-69).
Figure 8-69

237
Balance Tab
When the balance transaction has been sent and a response has been received, the type of response
and the customer’s remaining cash welfare balance are displayed near the top of the window under
the EBT Cash Balance tab. Click the “Clear” button on the EBT Card toolbar to remove all of the
information from the fields on this screen.
Trace Output Tab
The Trace Output tab displays information about the cash balance transaction. The left panel of the
screen displays information about the transaction request sent from Aldelo®
EDC to the merchant
service provider and the right panel displays information about the transaction response sent from
the merchant service provider back to Aldelo® EDC.
The trace output information is a record of exactly what was sent to the merchant service provider
and what was received from the merchant service provider. If there is a problem with a transaction,
this information may be used by the merchant service provider’s technical support department to
help determine the cause.
(Note: The trace output information only displays if the “Enable Tracing” checkbox has been
selected for the account in the Merchant Account Editor.)
Check Tab
The check feature of Aldelo® EDC allows the user to verify whether a customer’s prior check
writing history with the merchant service provider includes any bounced checks. Although the
feature does not guarantee the merchant that the check will not bounce, it does provide an
indication as to the credit worthiness of the customer. If the customer has no history of writing bad
checks, he is less likely to write a bad check to the merchant than a customer who has written bad
checks in the past.
(Note: The standard edition of Aldelo® EDC does not process check transactions.)
Driver License Group Box
Auth Driver License Button
The user performs an authorization by driver license when he wishes to check to see if the
customer has previously bounced any checks that were authorized by his current merchant service
provider.

238
To perform an authorization by driver license in stand-alone mode, select the Check tab from the
main screen of Aldelo® EDC and in the Driver License group box, click on the “Auth Driver
License” button. Enter the customer’s driver license number, date of birth, state code (available
from your merchant service provider), check number, invoice number, and the purchase total in
their respective fields. Click the “Process” button on the Check Processing toolbar to send the
request for authorization to the merchant service provider (See Figure 8-70).
Figure 8-70

239
Auth by Driver License Tab
When the auth by driver license request has been sent and a response has been received, the type
of response is displayed near the top of the window under the Auth By Driver License tab. Click
the “Clear” button on the Check Processing toolbar to remove all of the information from the
fields on this screen (See Figure 8-71).
Figure 8-71
Trace Output Tab
The Trace Output tab displays information about the auth by driver license request. The left panel
of the screen displays information about the transaction request sent from Aldelo® EDC to the
merchant service provider and the right panel displays information about the transaction response
sent from the merchant service provider back to Aldelo® EDC (See Figure 8-72).
Figure 8-72

240
The trace output information is a record of exactly what was sent to the merchant service provider
and what was received from the merchant service provider. If there is a problem with a transaction,
this information may be used by the merchant service provider’s technical support department to
help determine the cause.
(Note: The trace output information only displays if the “Enable Tracing” checkbox has been
selected for the account in the Merchant Account Editor.)
MICR Group Box
A MICR is a device that reads the encoded information from the bottom of a check. This
information includes the bank’s routing number, the checking account number, and the number of
the individual check. This information is captured by the MICR and used to populate the fields of
the auth by MICR screen. If all of the information is known, the fields may also be populated
manually if a MICR device is not available.
Auth MICR Button
The user performs an authorization by MICR when he wishes to check to see if the customer’s
checking account currently has sufficient fund to cover the value of the check. Although the funds
are not guaranteed, the merchant can refuse to accept a check when he knows that there is not
currently enough money in the customer’s to cover it.

241
To perform an authorization by MICR in stand-alone mode, select the Check tab from the main
screen of Aldelo® EDC and in the MICR group box, click on the “Auth MICR” button. Run the
check through the MICR device (or alternatively, enter the MICR number [available from your
merchant service provider], the check routing number, and the account number) and then enter the
customer’s state code (available from your merchant service provider), check number, invoice
number, and the purchase total in their respective fields. Click the “Process” button on the Check
Processing toolbar to send the request for authorization to the merchant service provider (See
Figure 8-73).
Figure 8-73

242
Auth by MICR Tab
When the auth by MICR request has been sent and a response has been received, the type of
response is displayed near the top of the window under the Auth By MICR tab. Click the “Clear”
button on the Check Processing toolbar to remove all of the information from the fields on this
screen (See Figure 8-74).
Figure 8-74
Trace Output Tab
The Trace Output tab displays information about the auth by MICR request. The left panel of the
screen displays information about the transaction request sent from Aldelo®
EDC to the merchant
service provider and the right panel displays information about the transaction response sent from
the merchant service provider back to Aldelo® EDC (See Figure 8-75).
Figure 8-75
The trace output information is a record of exactly what was sent to the merchant service provider
and what was received from the merchant service provider. If there is a problem with a transaction,

243
this information may be used by the merchant service provider’s technical support department to
help determine the cause.
(Note: The trace output information only displays if the “Enable Tracing” checkbox has been
selected for the account in the Merchant Account Editor.)
Batch Tab
For information on how to use the features under the Batch tab of the main screen in Aldelo®
EDC, see the subsection entitled “Batch Tab” of the “Main Menu” section in Chapter 5 of this
manual.

244

245
Chapter 9 Using Aldelo
® EDC in
Integrated Mode
Aldelo® EDC is perfect for integrated environments. Since the integration consists of a set of
ASP.NET Web Services methods, third party application integration with Aldelo® EDC can be
either COM or .NET based. The Aldelo® For Restaurants POS solution is fully integrated with
Aldelo® EDC. This chapter describes the steps involved to properly integrate the Aldelo
® For
Restaurants POS solution with Aldelo® EDC. The minimum version requirement for Aldelo
® For
Restaurants is 3.8.B in order to integrate with Aldelo® EDC release 6.2.01 or later.
Follow the steps below to integrate the Aldelo® For Restaurants POS solution with Aldelo
® EDC:
1. Launch the Aldelo® For Restaurants POS solution.
2. From the main screen, click the “Back Office” button.
3. Under Common Tasks, click on “Store Settings.”
4. Click on the Revenue tab and then on the Payments tab (See Figure 9-1).
5. Select the “Enable Aldelo EDC Payment Interface” checkbox (See Figure 9-1).
6. In the “Aldelo EDC Server Name” field, enter the IP Address of the computer on which
Aldelo® EDC is installed. Enter the actual IP address; do not use “localhost” in this field.
7. In the “Aldelo EDC Application Name” field, accept the default value (“AldeloEDC”).
8. In the “Aldelo EDC User Account Name” field, enter a user account name that has the
proper security permissions in Aldelo® EDC to perform payment transactions. Payment
transactions are defined as Sales Transactions, Void Transactions, Return Transactions,
and Gratuity Transactions. The user account entered into this field must be able to perform
all of these types of transactions.
9. In the “Aldelo EDC Integration Token” field, enter the integration token for the user
account selected above. Alternatively, you may copy and paste the Integration Token from
Aldelo®
EDC into this field (See Figure 9-1). The Integration Token may be found on the
User Accounts screen of Aldelo® EDC by selecting the User Name from the User Accounts
tab and then selecting the User Account Editor tab.
10. The entry in the “Print Credit Card Receipt Copies” field defines how many receipts shall
print. This setting is automatically retrieved from the Aldelo® EDC Store Settings.
11. The entry in the “Enable Restaurant Mode (Handle Tips)” field enables credit card tip
adjustments within the Aldelo® For Restaurants POS solution. This feature is automatically
retrieved from the Aldelo® EDC Store Settings.

246
12. When finished, click the “Save” and “Done” buttons at the bottom of the Store Settings
screen (See Figure 9-1).
Figure 9-1
Upon successful integration of the Aldelo® For Restaurants POS solution with Aldelo
® EDC, be
sure to perform several test transactions from the POS software to ensure proper communication.
Additionally, make sure that the server computer’s firewall port 80 (or port 443 if SSL is enabled)
is open. Should you have any questions regarding integration, please contact the Aldelo Technical
Support Staff. Technical support is available 24 hours per day, 7 days per week.

247
Chapter 10
Frequently Asked Questions
Q: Which certified Merchant Service Providers does Aldelo® EDC support?
A: For a current list of certified Merchant Service Providers supported by Aldelo® EDC,
please visit the following web page:
http://www.myaldelo.net/dl/Downloads/EDCChart.pdf.
Q: Which Merchant Service Provider offers the best service and rates?
A: Aldelo Systems does not rate the service quality or review processing rates from merchant
service providers. Please contact the Merchant Service Providers directly for rate
comparisons.
Q: Can I use Aldelo® EDC if I currently process with a Merchant Service Provider not on the
supported list?
A: Usually the answer is no. Each Merchant Service Provider must be certified by Aldelo in
order to function properly with Aldelo® EDC. Aldelo Systems does have plans to actively
add additional Merchant Service Providers and acquirers, dependent on the needs of our
customers. However, Aldelo does support most major Merchant Service Providers.
Q: Will I be able to save on processing rates if I use Aldelo® EDC?
A: Many of our customers have been able to save on processing rates by switching to one of
the certified Merchant Service Providers. Please contact the certified Merchant Service
Providers directly for information on their processing rates.
Q: Will I be able to switch from my current unsupported processor to one supported by
Aldelo® EDC, even though I have a contract?
A: Some certified Merchant Service Providers may offer to buy out your existing contract or
offer you incentives to switch. Please contact the certified Merchant Service Providers
directly for details.
Q: How do I sign up with a supported Merchant Service Provider?
A: Please contact the Merchant Service Provider from the supported list to sign up.
Q: Can I install Aldelo® EDC on Windows Small Business Server 2003?
A: No, because Windows Small Business Server 2003 acts as a Domain Controller. Aldelo®
EDC does not function on servers used for Domain Controller purposes.
Q: Can I install Aldelo® EDC on Windows Server 2003 running as a Domain Controller?
A: No, because Aldelo® EDC does not function on servers used for Domain Controller
purposes.

248
Q: Can I install Aldelo® EDC on Windows Vista?
A: Yes, Aldelo® EDC supports Vista Business, Enterprise, and Ultimate editions.
Q: Can I install Aldelo® EDC on Windows XP Embedded?
A: No, because Windows XP Embedded usually does not support IIS.
Q: Can I install Aldelo® EDC on Windows 2000 Professional?
A: Yes, however the Aldelo Technical Support Staff does not provide assistance with Aldelo®
EDC when installed on Windows 2000 Professional.
Q: Can I install Aldelo® EDC on Windows XP Home Edition?
A: No, because Windows XP Home Edition does not support IIS.
Q: Can I install Aldelo® EDC on Windows 95/98/ME?
A: No, because these operating systems have been retired by Microsoft and do not come with
IIS.
Q: Can I install Aldelo® EDC on Windows XP Professional with Service Pack 3?
A: Yes, Windows XP Professional with Service Pack 3 or greater is the preferred operating
system for use with Aldelo® EDC.
Q: Can I install Aldelo® EDC on Windows Server 2000?
A: Yes, however the Aldelo Technical Support Staff does not provide assistance with Aldelo®
EDC when installed on Windows Server 2000.
Q: Can I install Aldelo® EDC on Windows Server 2003?
A: Yes, Aldelo® EDC supports Windows Server 2003.
Q: What if I do not have my Windows Operating System Installation CD?
A: Please contact either Microsoft or your reseller to obtain a Windows CD. You must have
the
Windows CD in order to perform the installation of IIS.
Q: Can I use Microsoft SQL Server 2005 with Aldelo® EDC?
A: Yes, Aldelo® EDC works with Microsoft SQL Server 2005, both the Express version and
the full version.
Q: Can I use Microsoft Access 2003?
A: No, Aldelo® EDC works only with Microsoft SQL Server 2005.
Q: I cannot execute the ASP.NET web service. It indicates that the web service is not working
or that the page was not found.
A: Please check the following items:
Verify that the .NET Framework 3.5 is installed
Verify that ASP.NET is associated with IIS
Verify that the Aldelo® EDC Server and Client folders have been given proper
security permissions
Verify that the Aldelo® EDC Web Service under IIS is configured properly
Verify that the Aldelo® EDC Web Service under IIS is using .NET 3.5

249
Q: I cannot communicate from the integrated client application (such as Aldelo® For
Restaurants) to the Aldelo® EDC Web Service.
A: Verify that the server computer hosting the Web Service has port 80 (or port 443 if SSL is
enabled) open
Q: I get a message saying SQL Server is not running.
A: Please check the following items:
Verify SQL Server 2005 is installed and configured properly
Verify that the computer has been restarted since SQL Server 2005 was installed
Q: I get an e-mail failure message from SMTP.
A: Verify that the SMTP setup information is accurate. Check with your ISP for details.
Q: I got locked out of the system because I tried to login too many times with an invalid
password.
A: Wait 30 minutes or have an administrator reset / unlock your account. You may also
contact the Aldelo Technical Support Staff to unlock your account if you are the
administrator and nobody else can unlock the account for you.

250

251
Appendix 1 Software Upgrades
This section explains how to upgrade an existing installation of Aldelo® EDC.
Upgrading Existing Single System Deployment Setup
Select the “Typical” setup option during the Aldelo® EDC installation setup to update both
the server and the client components on the system.
Upgrading Existing Client System Setup
Select the “Custom” setup option during the Aldelo® EDC installation setup. Then,
configure the custom options accordingly.
Upgrading Existing SQL Server 2005 to the Latest Service Pack
Exit the Aldelo® EDC Client Application.
Double click the SQL Server Service Pack Installer to perform installation procedures.

252