
S7 - Optimized communication with OPC UA - Copa-Data
20
zenon driver manual S7 - Optimized communication with OPC UA v.8.20
-
Upload
khangminh22 -
Category
Documents
-
view
5 -
download
0
Transcript of S7 - Optimized communication with OPC UA - Copa-Data

zenon driver manual S7 - Optimized
communication with OPC
UA
v.8.20

© 2020 Ing. Punzenberger COPA-DATA GmbH
All rights reserved.
Distribution and/or reproduction of this document or parts thereof in any form are permitted solely
with the written permission of the company COPA-DATA. Technical data is only used for product
description and are not guaranteed properties in the legal sense. Subject to change, technical or
otherwise.

Contents
1 Welcome to COPA-DATA help ............................................................................................................... 4
2 S7 - Optimized Communication ............................................................................................................. 4
3 Configure PC station in the TIA project ............................................................................................... 5
4 Configure connection ............................................................................................................................... 7
5 Configure Simatic PC station .................................................................................................................. 8
6 Set up the connection in zenon............................................................................................................. 11
7 Note on password-protected communication .................................................................................. 18
8 Redundant structure ............................................................................................................................... 20

Welcome to COPA-DATA help
4 | 20
1 Welcome to COPA-DATA help
ZENON VIDEO TUTORIALS
You can find practical examples for project configuration with zenon in our YouTube channel
(https://www.copadata.com/tutorial_menu). The tutorials are grouped according to topics and give an
initial insight into working with different zenon modules. All tutorials are available in English.
GENERAL HELP
If you cannot find any information you require in this help chapter or can think of anything that you
would like added, please send an email to [email protected].
PROJECT SUPPORT
You can receive support for any real project you may have from our customer service team, which
you can contact via email at [email protected].
LICENSES AND MODULES
If you find that you need other modules or licenses, our staff will be happy to help you. Email
2 S7 - Optimized Communication
The instructions describe the necessary project configuration steps in order for zenon to achieve
optimized communication with an existing S7-1500 station.
The following steps are necessary:
Configure PC station in the TIA project (on page 5)
Configure connection (on page 7)
Configure Simatic PC station by import (on page 8)

Configure PC station in the TIA project
5 | 20
Set up the connection in zenon (on page 11)
Optional: Set up password protection (on page 18)
Optional: Redundant structure (on page 20)
REQUIREMENTS
The following is required for these instructions:
Siemens software:
TIA Portal (Step 7) Version 13 SP1 or higher
SIMATIC NET Softnet-IE Version 12 SP2 or higher lean
Siemens hardware:
S7-1200 series CPU from version 4
or
S7-1500 series CPU
A complete PLC project should be present in the TIA portal. In this example, we are referring to an
S7-1511.
3 Configure PC station in the TIA project
To add a PC station in the TIA project:
1. Add a PC station from the Hardware catalog.
2. Add an Ethernet card IE_Allgemein to Index 2.

Configure PC station in the TIA project
6 | 20
3. Add the OPC server to Index 3. Ensure that the version of the firmware matches the SIMATIC
NET Sofnet-IE version.
Caution: In order for optimized communication to be supported, the firmware version of
the OPC server must be V12.0.0 or higher.
4. You can, as an option, generate an XDB file. This makes it easier to set up the Simatic PC
station, for example if this is on a different computer.
SETTING THE HARDWARE PARAMETERS
To set the hardware parameters:
1. Enter the name of the PC station.
Note: If the name is identical to the PC name, activate the Computer Name Identical to
PC station name option.

Configure connection
7 | 20
2. Set the IP address of the network card.
You can also configure information for a router.
3. Configure the OPC Tags.
The Tags can be selected individually and given write and read rights, or access to all tags
can be activated.
4 Configure connection
The connections are configured in the TIA in the Device & Network overview:

Configure Simatic PC station
8 | 20
1. Select an S7 connection as the connection type.
2. Use Drag&Drop to create a connection from the IE/PN interface to the OPC Server of the PC
station.
3. Compile the project.
An XDB file is created in the definable subfolder of the project folder of the TIA project.
The Simatic PC station can be configured by import with this file.
5 Configure Simatic PC station
To configure the station by means of import:

Configure Simatic PC station
9 | 20
1. Select, in the Station Configuration Editor, the Import Station interface.
The IP address must match that of the station.

Configure Simatic PC station
10 | 20
2. Accept the configuration by clicking on OK.
The PC station is configured.
Note: Alternatively, the PC station can also be configured online using the TIA portal.
Requirement: The station must be contactable.
The IE module (Index 2), for example, can thus be set up so that the station is available via Ethernet.
The station can then be downloaded using the download function in the TIA portal.

Set up the connection in zenon
11 | 20
LOAD PROJECT CONFIGURATION INTO THE PLC
The connection configuration must now be loaded into the Simatic PLC:
1. Load the compiled program onto the CPU of the Simatic PLC.
2. Follow the instructions of the TIA portal.
3. Restart the PLC if required.
Information
Changes to the database must also be transferred to the respective PC stations.
6 Set up the connection in zenon
To set up the connection in zenon:
1. Create a new driver.
2. In the Siemens category, select the S7-optimized communication SN.

Set up the connection in zenon
12 | 20
3. Click on the OK button. The dialog for the configuration of the driver is opened.
4. Set the Global updatetime option to 100 ms.
5. Switch to tab Connections.
Set up the connection in zenon
13 | 20
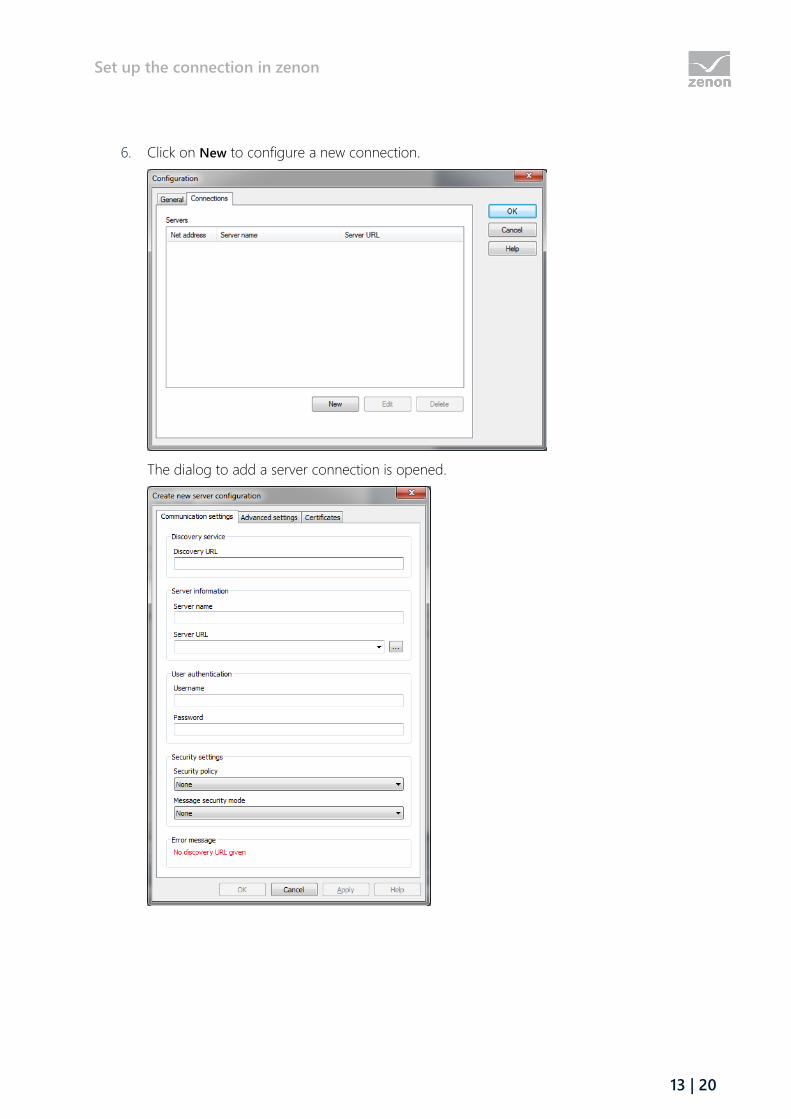
6. Click on New to configure a new connection.
The dialog to add a server connection is opened.

Set up the connection in zenon
14 | 20
7. For the Discovery URL option, enter the address opc.tcp://IP-Adresse:4850.
As an IP address, select the address of the computer on which SIMATIC NET has been
installed.
192.168.250.136 in this example.
The port number 4850 is the default value of the OPC UA server in Simatic NET.
8. Switch to the Server URL option.
9. Click on the ... button

Set up the connection in zenon
15 | 20
The server information is read. If the PC can be contacted using naming resolution, this
setting can be accepted as it is.

Set up the connection in zenon
16 | 20
If the server cannot be contacted using naming resolution (pinging the server name does not
get a response), the IP address can also be used as an alternative.
10. Click on OK to accept the settings.
The dialog is closed.
11. Click on OK in the driver dialog.
The dialog is closed.
IMPORT VARIABLES
The variables can now be imported:
1. Right-click on the driver.

Set up the connection in zenon
17 | 20
2. Select Import variables from driver.
The server is read and the available variables are displayed.
3. Amend the list to your requirements with filtering.
4. Highlight the desired variables.
5. Click on the Add button.

Note on password-protected communication
18 | 20
The variables are selected for import.
6. Click on OK to import the variables. The dialog is closed in the process.
7 Note on password-protected communication
You can set password protection:

Note on password-protected communication
19 | 20
The exchange of data with configured data continues to work:

Redundant structure
20 | 20
8 Redundant structure
You can allow redundant communication in that, on the zenon computer (Server 1 or Server 2), the
SIMATIC NET - Softnet-IE program is installed. In this case, use localhost or 127.0.0.1 as the network
address in the driver dialog.
This way both servers have access to the communication. A second PC station must be configured in
the TIA project accordingly.