COPA-Sem-1-Practical.pdf - Jupiter software
146
(1) AIM: Identification of externally visible computer components PROCEDURE: 1) Look at the computer and its macro-components. Identify the following components: a. Central Processing Unit (CPU) b. Monitor (Light Emitting Diode LED/ Liquid Crystal Display LCD/ Cathode Ray Tube CRT) – size 10”, 15.6”, 20”, etc. diagonal size. c. Mouse – Left, right and centre buttons. Centre button is a roller. d. Keyboard – 107 keys; US International layout. e. Power button of CPU. f. Reset button of CPU. 2) Look at the back panel of the Central Processing Unit. Identify the following components: a. Personal System/2 (PS/2) port – for keyboard and mouse – 2 ports
-
Upload
khangminh22 -
Category
Documents
-
view
2 -
download
0
Transcript of COPA-Sem-1-Practical.pdf - Jupiter software
(1) AIM: Identification of externally visible computer components
PROCEDURE:
1) Look at the computer and its macro-components. Identify the following components:
a. Central Processing Unit (CPU) b. Monitor (Light Emitting Diode LED/ Liquid Crystal Display LCD/
Cathode Ray Tube CRT) – size 10”, 15.6”, 20”, etc. diagonal size. c. Mouse – Left, right and centre buttons. Centre button is a roller. d. Keyboard – 107 keys; US International layout. e. Power button of CPU. f. Reset button of CPU.
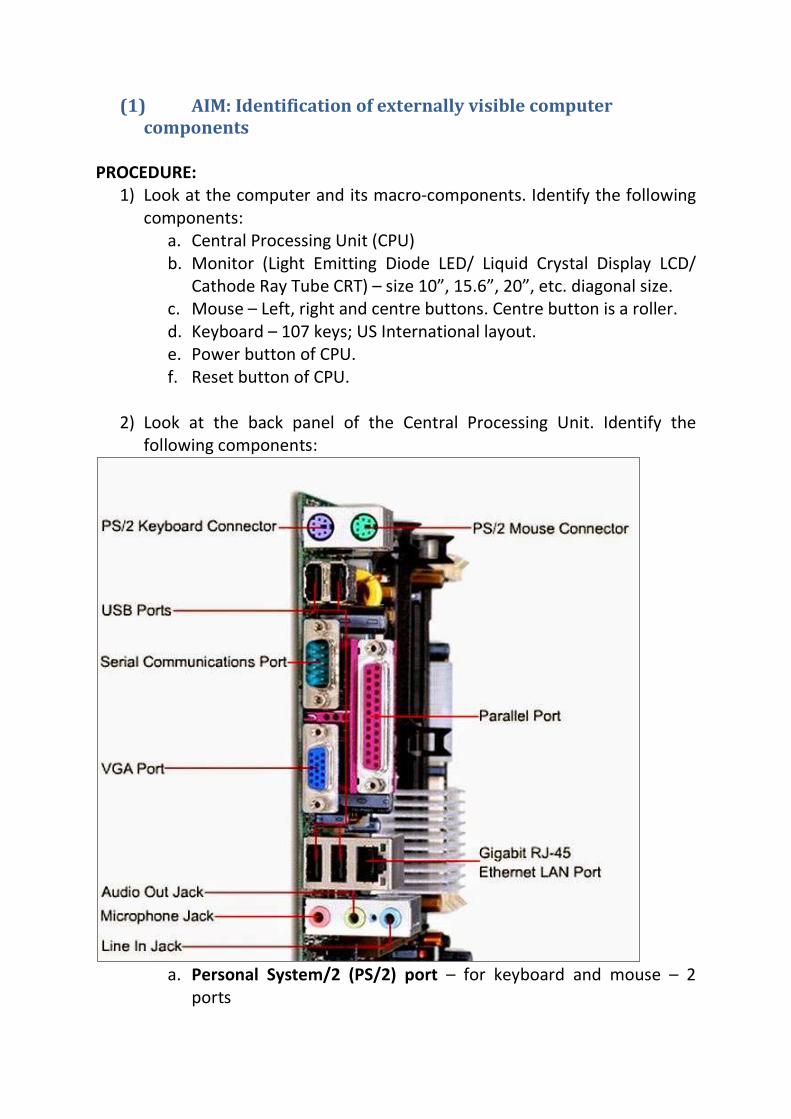
2) Look at the back panel of the Central Processing Unit. Identify the
following components:
a. Personal System/2 (PS/2) port – for keyboard and mouse – 2
ports
2
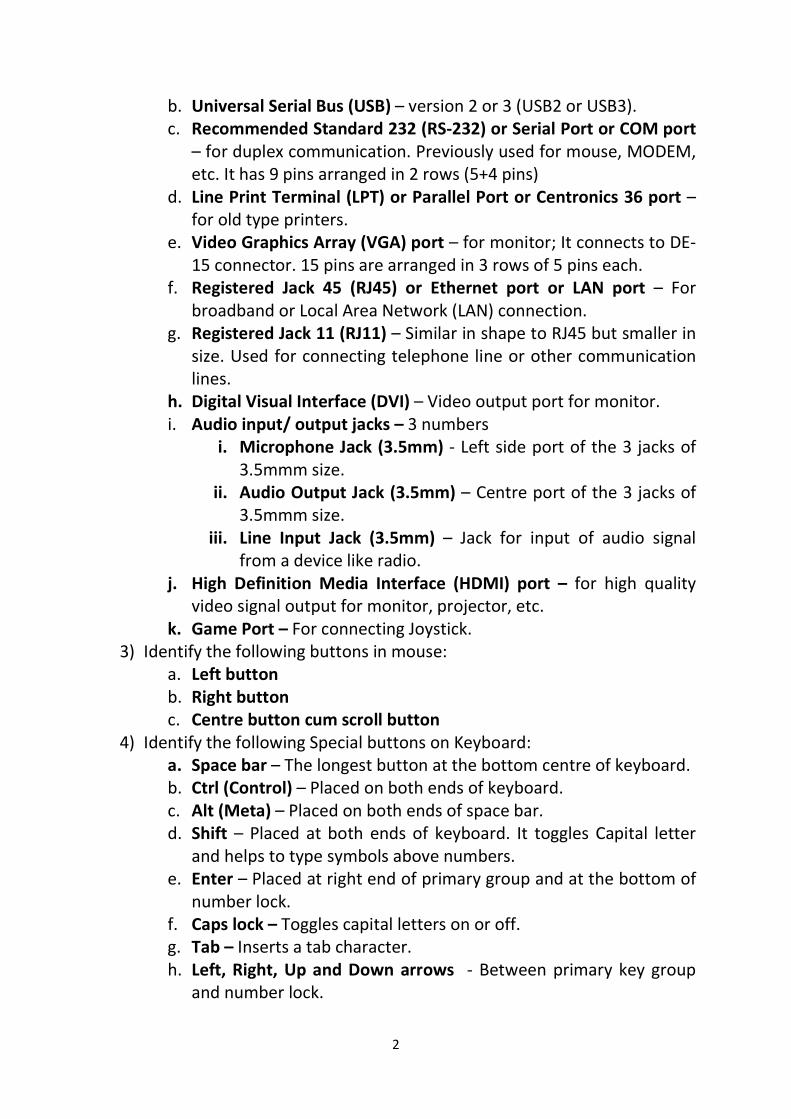
b. Universal Serial Bus (USB) – version 2 or 3 (USB2 or USB3). c. Recommended Standard 232 (RS-232) or Serial Port or COM port
– for duplex communication. Previously used for mouse, MODEM, etc. It has 9 pins arranged in 2 rows (5+4 pins)
d. Line Print Terminal (LPT) or Parallel Port or Centronics 36 port – for old type printers.
e. Video Graphics Array (VGA) port – for monitor; It connects to DE-15 connector. 15 pins are arranged in 3 rows of 5 pins each.
f. Registered Jack 45 (RJ45) or Ethernet port or LAN port – For broadband or Local Area Network (LAN) connection.
g. Registered Jack 11 (RJ11) – Similar in shape to RJ45 but smaller in size. Used for connecting telephone line or other communication lines.
h. Digital Visual Interface (DVI) – Video output port for monitor. i. Audio input/ output jacks – 3 numbers
i. Microphone Jack (3.5mm) - Left side port of the 3 jacks of 3.5mmm size.
ii. Audio Output Jack (3.5mm) – Centre port of the 3 jacks of 3.5mmm size.
iii. Line Input Jack (3.5mm) – Jack for input of audio signal from a device like radio.
j. High Definition Media Interface (HDMI) port – for high quality video signal output for monitor, projector, etc.
k. Game Port – For connecting Joystick. 3) Identify the following buttons in mouse:
a. Left button b. Right button c. Centre button cum scroll button
4) Identify the following Special buttons on Keyboard: a. Space bar – The longest button at the bottom centre of keyboard. b. Ctrl (Control) – Placed on both ends of keyboard. c. Alt (Meta) – Placed on both ends of space bar. d. Shift – Placed at both ends of keyboard. It toggles Capital letter
and helps to type symbols above numbers. e. Enter – Placed at right end of primary group and at the bottom of
number lock. f. Caps lock – Toggles capital letters on or off. g. Tab – Inserts a tab character. h. Left, Right, Up and Down arrows - Between primary key group
and number lock.
3
i. Insert, Delete, Home, End, Page Up & Page Down – Placed above arrow keys.
j. Print Screen, Scroll Lock & Pause/Break – Placed at the top right of keyboard.
k. Function keys F1 to F12 – 12 function keys are placed at topmost row of keyboard.
l. Esc – Placed at the top left of keyboard. (2) AIM: Identifying internal components of Computer
Procedure: Identify the following components inside the CPU
1) Hard Disk Drive: the device used for storage of large amount of data. It is a secondary storage (Data stored in it is available even after reboot).
2) Optical Drive/ CD Drive / DVD Drive: Optical drive is used to read and write CD or DVD.
3) SATA: Serial Advanced Technology Attachment. 4) PATA: Parallel Advanced Technology Attachment. 5) Floppy Disk Drive: Obsolete. It was used to read floppy disk. 6) RAM: Random Access Memory 7) CMOS: Complementary Metal Oxide Semi-Conductor memory. 8) CMOS Battery: CR2032 battery for CMOS 9) Processor: The micro-processor chip.
4
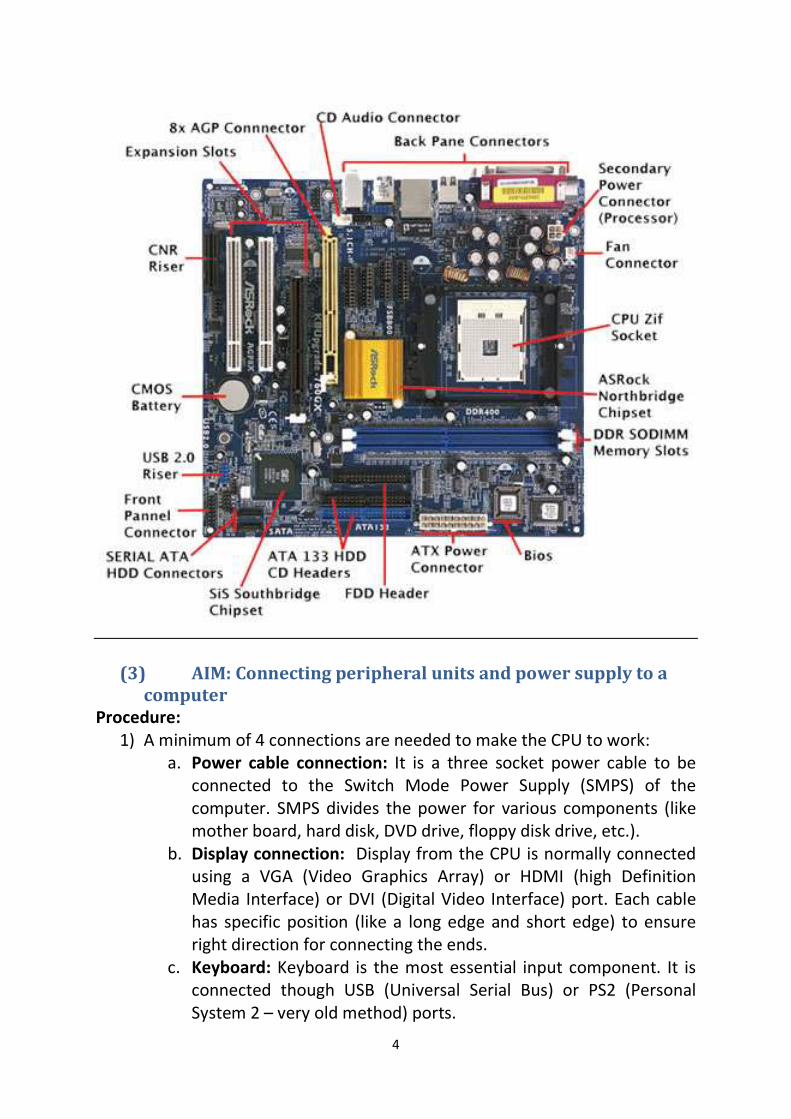
(3) AIM: Connecting peripheral units and power supply to a computer
Procedure: 1) A minimum of 4 connections are needed to make the CPU to work:
a. Power cable connection: It is a three socket power cable to be connected to the Switch Mode Power Supply (SMPS) of the computer. SMPS divides the power for various components (like mother board, hard disk, DVD drive, floppy disk drive, etc.).
b. Display connection: Display from the CPU is normally connected using a VGA (Video Graphics Array) or HDMI (high Definition Media Interface) or DVI (Digital Video Interface) port. Each cable has specific position (like a long edge and short edge) to ensure right direction for connecting the ends.
c. Keyboard: Keyboard is the most essential input component. It is connected though USB (Universal Serial Bus) or PS2 (Personal System 2 – very old method) ports.

5
d. Mouse: Mouse may be connected through USB (Universal Serial Bus) or through Serial port/ RS232 (Recommended Standard 232) port or through PS2 (Personal System 2).
2) After connecting power cable, display cable, keyboard and mouse to the back panel of the CPU, power on the
(4) AIM: Opening the back lid of a laptop and identifying components
Procedure 1) Place the laptop with the bottom side up. 2) Identify the screws and unscrew them using appropriate screwdriver. 3) Keep all the removed screws in a safe location. 4) Gently open the back lid without applying undue force. 5) Identify processor, RAM, CMOS battery and hard disks. 6) Remove CMOS Battery and refix the same. 7) Remove RAM by relaxing the knobs on both sides of the RAM and gently
pulling out from the slot.. 8) Refix the RAM at its slot by gently inserting the same in its slot. The pins
lock the RAM automatically. 9) Remove hard disk after detaching from the SATA power and SATA data
connections. 10) Refix the hard disk and connect the SATA power and SATA data
slots.
(5) AIM: Identifying power output cables from Switch Mode Power Supply (SMPS)
Procedure: 1) Open the left panel of the CPU. 2) Switch Mode Power Supply (SMPS) is located at the top rear. It converts
Alternating Current (AC) input to Direct Current (DC) output. 3) SMPS output voltage may be in the range of 12V to 15V at 0.5A current.
Switch Mode Power Supply (SMPS)
6
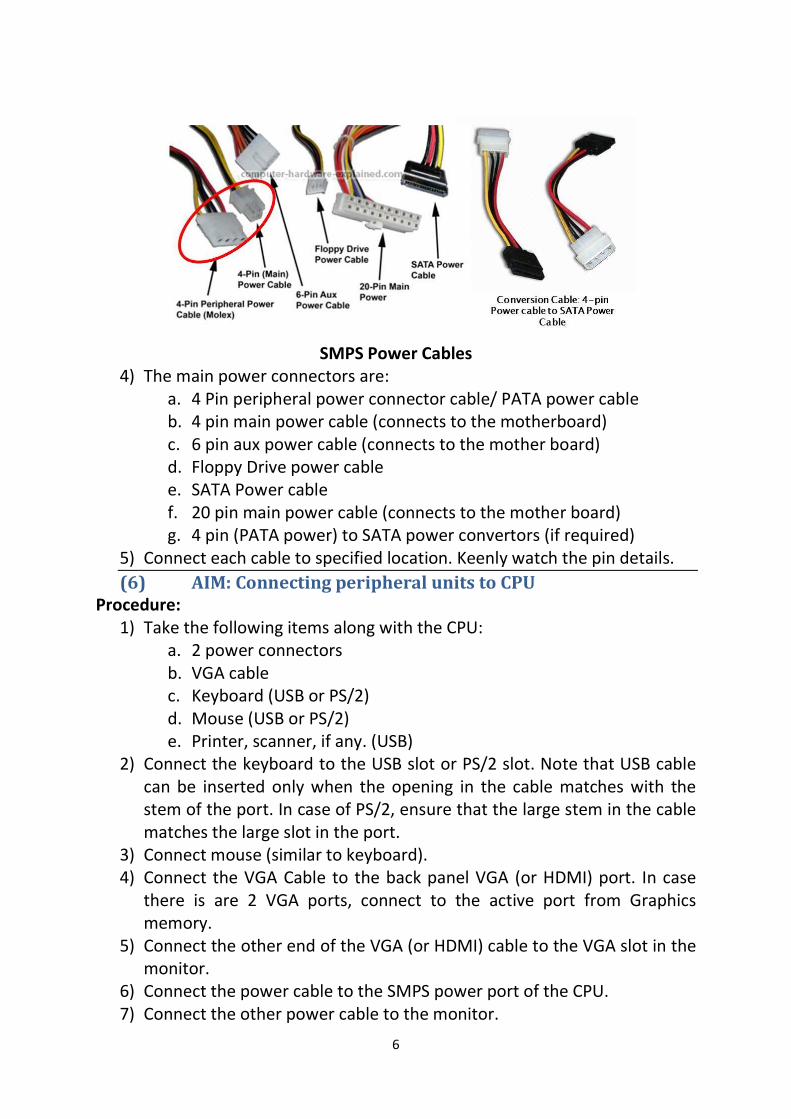
SMPS Power Cables
4) The main power connectors are: a. 4 Pin peripheral power connector cable/ PATA power cable b. 4 pin main power cable (connects to the motherboard) c. 6 pin aux power cable (connects to the mother board) d. Floppy Drive power cable e. SATA Power cable f. 20 pin main power cable (connects to the mother board) g. 4 pin (PATA power) to SATA power convertors (if required)
5) Connect each cable to specified location. Keenly watch the pin details. (6) AIM: Connecting peripheral units to CPU
Procedure: 1) Take the following items along with the CPU:
a. 2 power connectors b. VGA cable c. Keyboard (USB or PS/2) d. Mouse (USB or PS/2) e. Printer, scanner, if any. (USB)
2) Connect the keyboard to the USB slot or PS/2 slot. Note that USB cable can be inserted only when the opening in the cable matches with the stem of the port. In case of PS/2, ensure that the large stem in the cable matches the large slot in the port.
3) Connect mouse (similar to keyboard). 4) Connect the VGA Cable to the back panel VGA (or HDMI) port. In case
there is are 2 VGA ports, connect to the active port from Graphics memory.
5) Connect the other end of the VGA (or HDMI) cable to the VGA slot in the monitor.
6) Connect the power cable to the SMPS power port of the CPU. 7) Connect the other power cable to the monitor.
7
8) Connect the free ends of both power cables to a power source supported by Uninterruptible Power Supply (UPS).
9) Power on the UPS. 10) Power on the CPU and verify that the computer works. (7) AIM: Working with MS Paint
Procedure: 1) Open MS Paint. Press Windows+R. Type mspaint and press enter. 2) MS Paint is opened. Resize the canvas to suit the size of your drawing. 3) MS Paint contains File, Home and View menus. 4) To access the items contained in the File menu, click File or Press Alt+F.
Following items are available under File menu: a. New (Ctrl+N or Alt+F+N) b. Open (Ctrl+O or Alt+F+O) c. Save (Ctrl+S or Alt+F+S) d. Print (Ctrl+P or Alt+F+P) e. From Scanner or Camera (Alt+F+M) f. Send in Email (Alt+F+D) g. Set as Desktop Background (Alt+F+B) h. Properties (Alt+F+E) i. About Paint (Alt+F+T) j. Exit (Alt+F+X)
5) Home (Alt+H) menu in MS Paint has the following items: a. Paste (Ctrl+V or Alt+H+V+P or Alt+H+V+F) b. Cut (Ctrl+X or Alt+H+X) c. Copy (Ctrl+C or Alt+H+C) d. Select (Alt+H+SE)
i. Rectangle selection (Alt+H+SE+R) ii. Freeform selection (Alt+H+SE+F)
iii. Select All (Ctrl+A or Alt+H+SE+A) iv. Invert selection (Alt+H+SE+I) v. Transparent selection (Alt+H+SE+T)
e. Crop (Alt+H+RP) f. Resize (Alt+H+RE) g. Rotate (Alt+H+RO)
i. Rotate Right 90o (Alt+H+RO+R) ii. Rotate Left 90o (Alt+H+RO+L)
iii. Rotate 180o (Alt+H+RO+T) iv. Flip Vertical (Alt+H+RO+V) v. Flip Horizontal (Alt+H+RO+H)
h. Pencil (Alt+H+P) i. Fill tool (Alt+H+K)
8
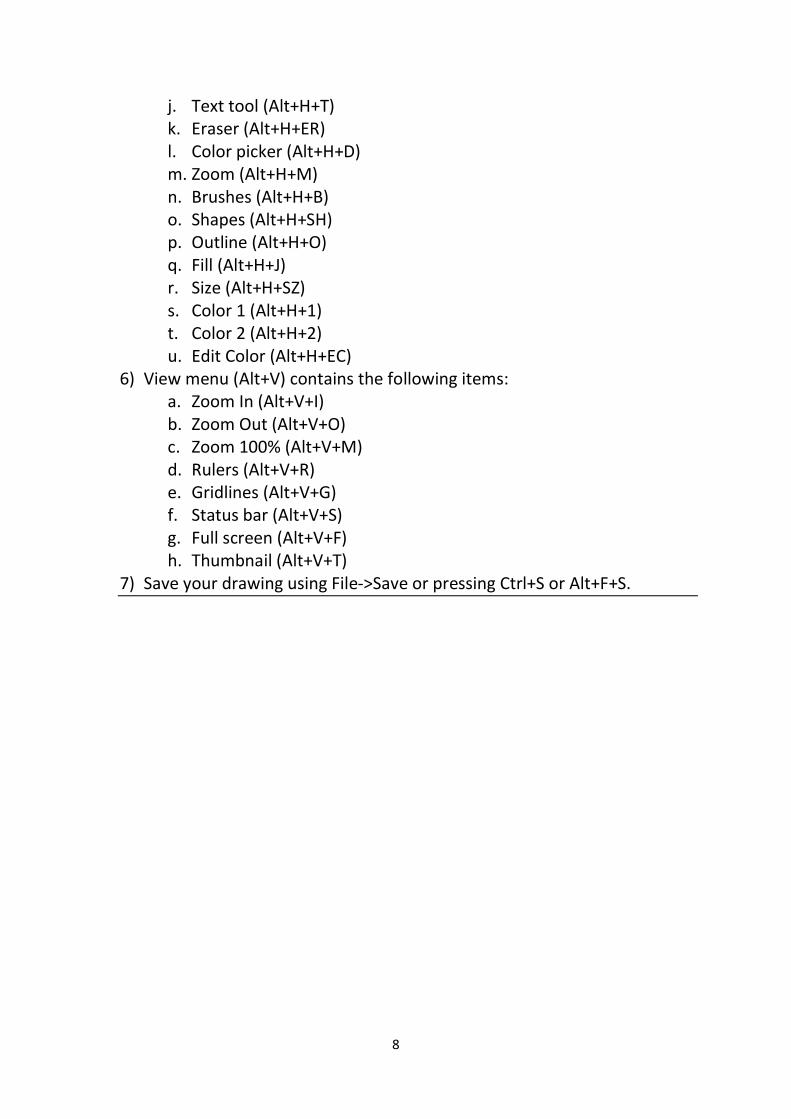
j. Text tool (Alt+H+T) k. Eraser (Alt+H+ER) l. Color picker (Alt+H+D) m. Zoom (Alt+H+M) n. Brushes (Alt+H+B) o. Shapes (Alt+H+SH) p. Outline (Alt+H+O) q. Fill (Alt+H+J) r. Size (Alt+H+SZ) s. Color 1 (Alt+H+1) t. Color 2 (Alt+H+2) u. Edit Color (Alt+H+EC)
6) View menu (Alt+V) contains the following items: a. Zoom In (Alt+V+I) b. Zoom Out (Alt+V+O) c. Zoom 100% (Alt+V+M) d. Rulers (Alt+V+R) e. Gridlines (Alt+V+G) f. Status bar (Alt+V+S) g. Full screen (Alt+V+F) h. Thumbnail (Alt+V+T)
7) Save your drawing using File->Save or pressing Ctrl+S or Alt+F+S.
9
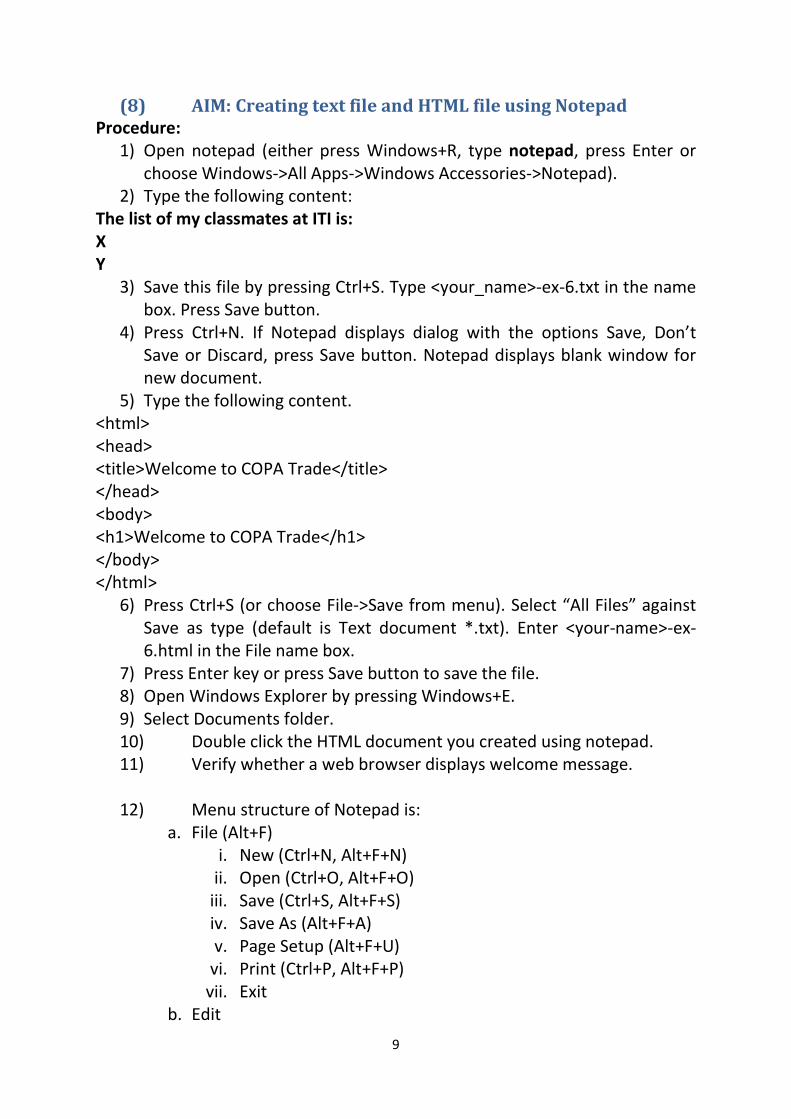
(8) AIM: Creating text file and HTML file using Notepad Procedure:
1) Open notepad (either press Windows+R, type notepad, press Enter or choose Windows->All Apps->Windows Accessories->Notepad).
2) Type the following content: The list of my classmates at ITI is: X Y
3) Save this file by pressing Ctrl+S. Type <your_name>-ex-6.txt in the name box. Press Save button.
4) Press Ctrl+N. If Notepad displays dialog with the options Save, Don’t Save or Discard, press Save button. Notepad displays blank window for new document.
5) Type the following content. <html> <head> <title>Welcome to COPA Trade</title> </head> <body> <h1>Welcome to COPA Trade</h1> </body> </html>
6) Press Ctrl+S (or choose File->Save from menu). Select “All Files” against Save as type (default is Text document *.txt). Enter <your-name>-ex-6.html in the File name box.
7) Press Enter key or press Save button to save the file. 8) Open Windows Explorer by pressing Windows+E. 9) Select Documents folder. 10) Double click the HTML document you created using notepad. 11) Verify whether a web browser displays welcome message.
12) Menu structure of Notepad is:
a. File (Alt+F) i. New (Ctrl+N, Alt+F+N)
ii. Open (Ctrl+O, Alt+F+O) iii. Save (Ctrl+S, Alt+F+S) iv. Save As (Alt+F+A) v. Page Setup (Alt+F+U)
vi. Print (Ctrl+P, Alt+F+P) vii. Exit
b. Edit
10
i. Undo (Ctrl+Z) ii. Cut (Ctrl+X), Copy (Ctrl+C), Paste (Ctrl+V), Delete (Del)
iii. Find (Ctrl+F), Find Next (F3), Replace (Ctrl+H), Go to (Ctrl+G) iv. Select All (Ctrl+A) v. Time (F5)
c. Format i. Wordwrap
ii. Font d. View
i. Status Bar (Alt+V+S) e. Help
i. View Help (Alt+H+H) ii. About Notepad (Alt+H+A)
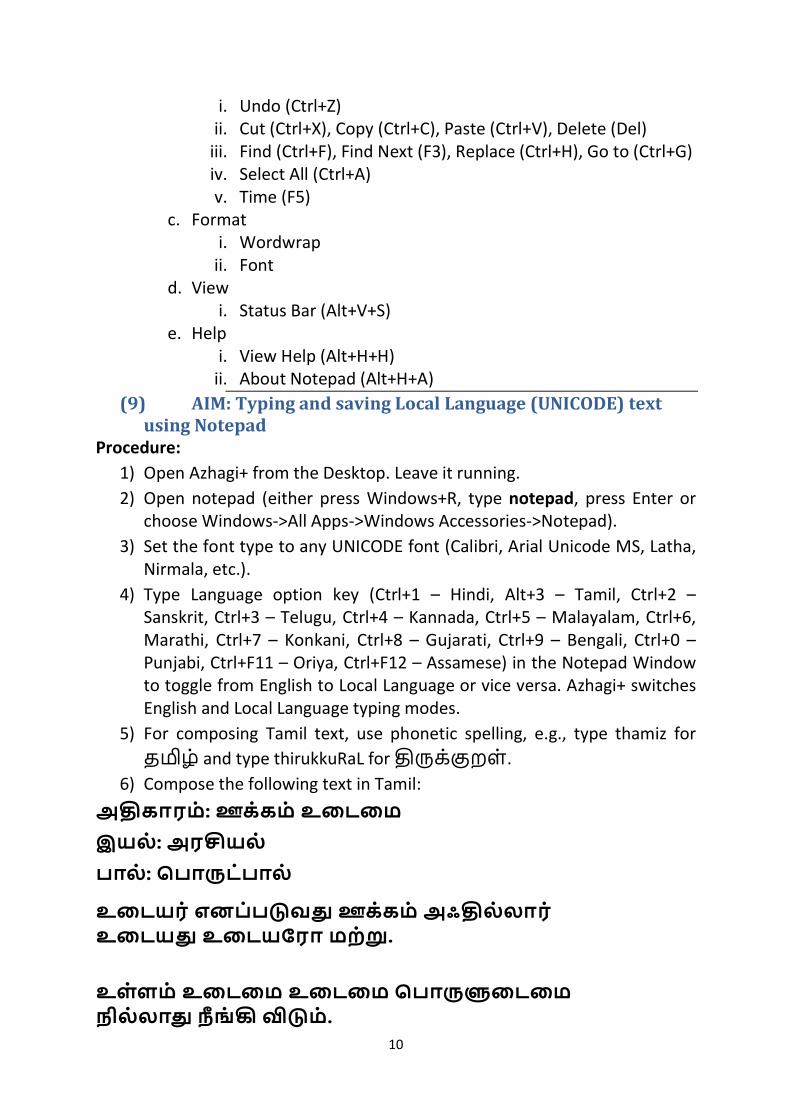
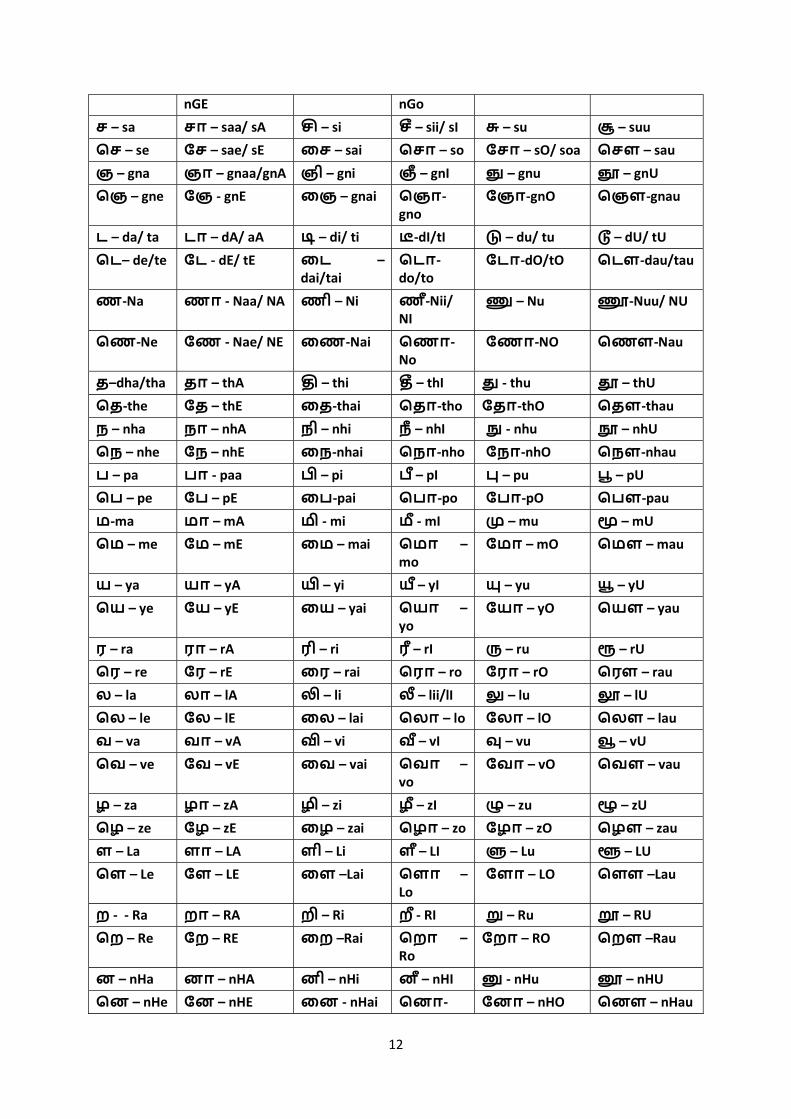
(9) AIM: Typing and saving Local Language (UNICODE) text using Notepad
Procedure: 1) Open Azhagi+ from the Desktop. Leave it running. 2) Open notepad (either press Windows+R, type notepad, press Enter or
choose Windows->All Apps->Windows Accessories->Notepad). 3) Set the font type to any UNICODE font (Calibri, Arial Unicode MS, Latha,
Nirmala, etc.). 4) Type Language option key (Ctrl+1 – Hindi, Alt+3 – Tamil, Ctrl+2 –
Sanskrit, Ctrl+3 – Telugu, Ctrl+4 – Kannada, Ctrl+5 – Malayalam, Ctrl+6, Marathi, Ctrl+7 – Konkani, Ctrl+8 – Gujarati, Ctrl+9 – Bengali, Ctrl+0 – Punjabi, Ctrl+F11 – Oriya, Ctrl+F12 – Assamese) in the Notepad Window to toggle from English to Local Language or vice versa. Azhagi+ switches English and Local Language typing modes.
5) For composing Tamil text, use phonetic spelling, e.g., type thamiz for த ழ் and type thirukkuRaL for க் றள்.
6) Compose the following text in Tamil: அ காரம்: ஊக்கம் உைடைம
இயல்: அர யல்
பால்: ெபா டப்ால்
உைடயர் எனப்ப வ ஊக்கம் அஃ ல்லார் உைடய உைடயேரா மற் . உள்ளம் உைடைம உைடைம ெபா ைடைம நில்லா நீங் ம்.
11
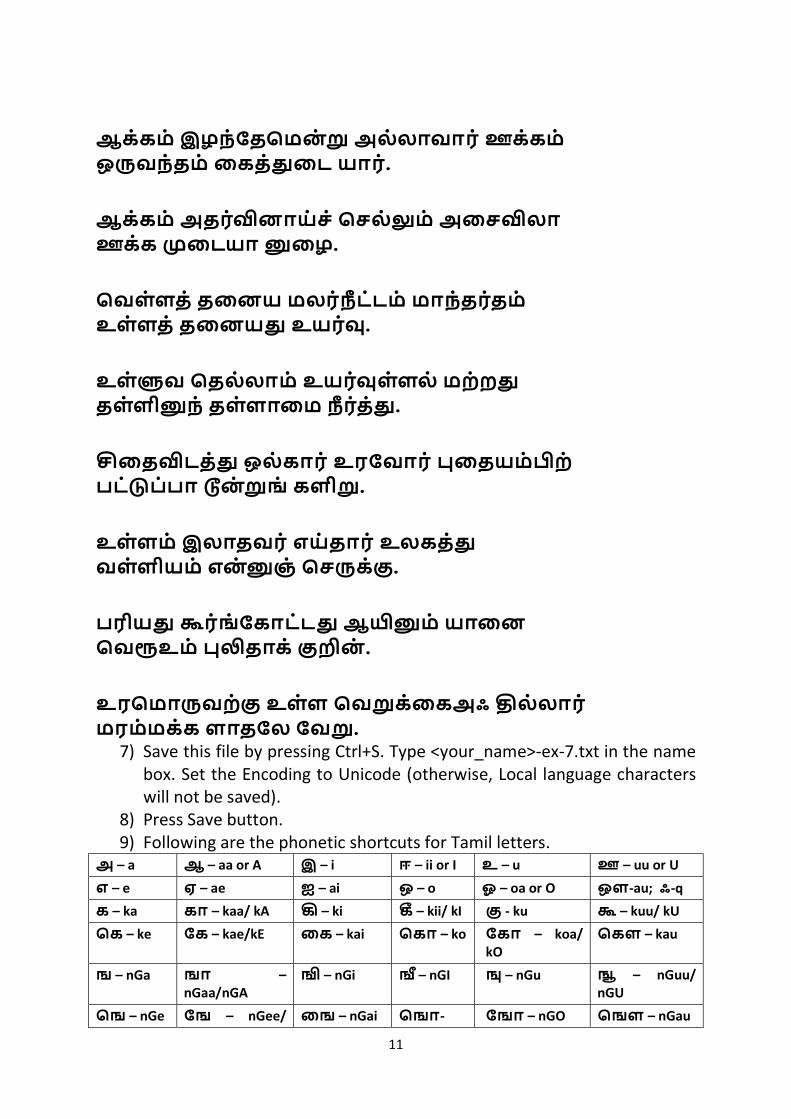
ஆக்கம் இழந்ேதெமன் அல்லாவார ்ஊக்கம் ஒ வந்தம் ைகத் ைட யார.் ஆக்கம் அதர் னாய்ச ்ெசல் ம் அைச லா ஊக்க ைடயா ைழ. ெவள்ளத் தைனய மலர்நீடட்ம் மாந்தரத்ம் உள்ளத் தைனய உயர் . உள் வ ெதல்லாம் உயர் ள்ளல் மற்ற தள்ளி ந் தள்ளாைம நீரத்் .
ைத டத் ஒல்கார ்உரேவார ் ைதயம் ற் பட் ப்பா ன் ங் களி . உள்ளம் இலாதவர ்எய்தார ்உலகத் வள்ளியம் என் ஞ் ெச க் . பரிய ர்ங்ேகாட்ட ஆ ம் யாைன ெவ உம் தாக் ன். உரெமா வற் உள்ள ெவ க்ைகஅஃ ல்லார் மரம்மக்க ளாதேல ேவ .
7) Save this file by pressing Ctrl+S. Type <your_name>-ex-7.txt in the name box. Set the Encoding to Unicode (otherwise, Local language characters will not be saved).
8) Press Save button. 9) Following are the phonetic shortcuts for Tamil letters.
அ – a ஆ – aa or A இ – i ஈ – ii or I உ – u ஊ – uu or U
எ – e ஏ – ae ஐ – ai ஒ – o ஓ – oa or O ஔ-au; ஃ-q
க – ka கா – kaa/ kA – ki – kii/ kI - ku – kuu/ kU
ெக – ke ேக – kae/kE ைக – kai ெகா – ko ேகா – koa/ kO
ெகௗ – kau
ங – nGa ஙா – nGaa/nGA
– nGi – nGI – nGu – nGuu/ nGU
ெங – nGe ேங – nGee/ ைங – nGai ெஙா- ேஙா – nGO ெஙௗ – nGau
12
nGE nGo
ச – sa சா – saa/ sA – si – sii/ sI – su – suu
ெச – se ேச – sae/ sE ைச – sai ெசா – so ேசா – sO/ soa ெசௗ – sau
ஞ – gna ஞா – gnaa/gnA ஞி – gni ஞீ – gnI – gnu – gnU
ெஞ – gne ேஞ - gnE ைஞ – gnai ெஞா-gno
ேஞா-gnO ெஞௗ-gnau
ட – da/ ta டா – dA/ aA – di/ ti -dI/tI – du/ tu – dU/ tU
ெட– de/te ேட - dE/ tE ைட – dai/tai
ெடா-do/to
ேடா-dO/tO ெடௗ-dau/tau
ண-Na ணா - Naa/ NA ணி – Ni ண-ீNii/ NI
– Nu -Nuu/ NU
ெண-Ne ேண - Nae/ NE ைண-Nai ெணா-No
ேணா-NO ெணௗ-Nau
த–dha/tha தா – thA – thi – thI - thu – thU
ெத-the ேத – thE ைத-thai ெதா-tho ேதா-thO ெதௗ-thau
ந – nha நா – nhA நி – nhi நீ – nhI - nhu – nhU
ெந – nhe ேந – nhE ைந-nhai ெநா-nho ேநா-nhO ெநௗ-nhau
ப – pa பா - paa – pi – pI – pu – pU
ெப – pe ேப – pE ைப-pai ெபா-po ேபா-pO ெபௗ-pau
ம-ma மா – mA - mi - mI – mu – mU
ெம – me ேம – mE ைம – mai ெமா – mo
ேமா – mO ெமௗ – mau
ய – ya யா – yA – yi – yI – yu – yU
ெய – ye ேய – yE ைய – yai ெயா – yo
ேயா – yO ெயௗ – yau
ர – ra ரா – rA ரி – ri ர ீ– rI – ru – rU
ெர – re ேர – rE ைர – rai ெரா – ro ேரா – rO ெரௗ – rau
ல – la லா – lA – li – lii/lI – lu – lU
ெல – le ேல – lE ைல – lai ெலா – lo ேலா – lO ெலௗ – lau
வ – va வா – vA – vi – vI – vu – vU
ெவ – ve ேவ – vE ைவ – vai ெவா – vo
ேவா – vO ெவௗ – vau
ழ – za ழா – zA – zi – zI – zu – zU
ெழ – ze ேழ – zE ைழ – zai ெழா – zo ேழா – zO ெழௗ – zau
ள – La ளா – LA ளி – Li ள ீ– LI – Lu – LU
ெள – Le ேள – LE ைள –Lai ெளா – Lo
ேளா – LO ெளௗ –Lau
ற - - Ra றா – RA – Ri - RI – Ru – RU
ெற – Re ேற – RE ைற –Rai ெறா – Ro
ேறா – RO ெறௗ –Rau
ன – nHa னா – nHA னி – nHi ன ீ– nHI - nHu – nHU
ென – nHe ேன – nHE ைன - nHai ெனா- ேனா – nHO ெனௗ – nHau
13
nHo
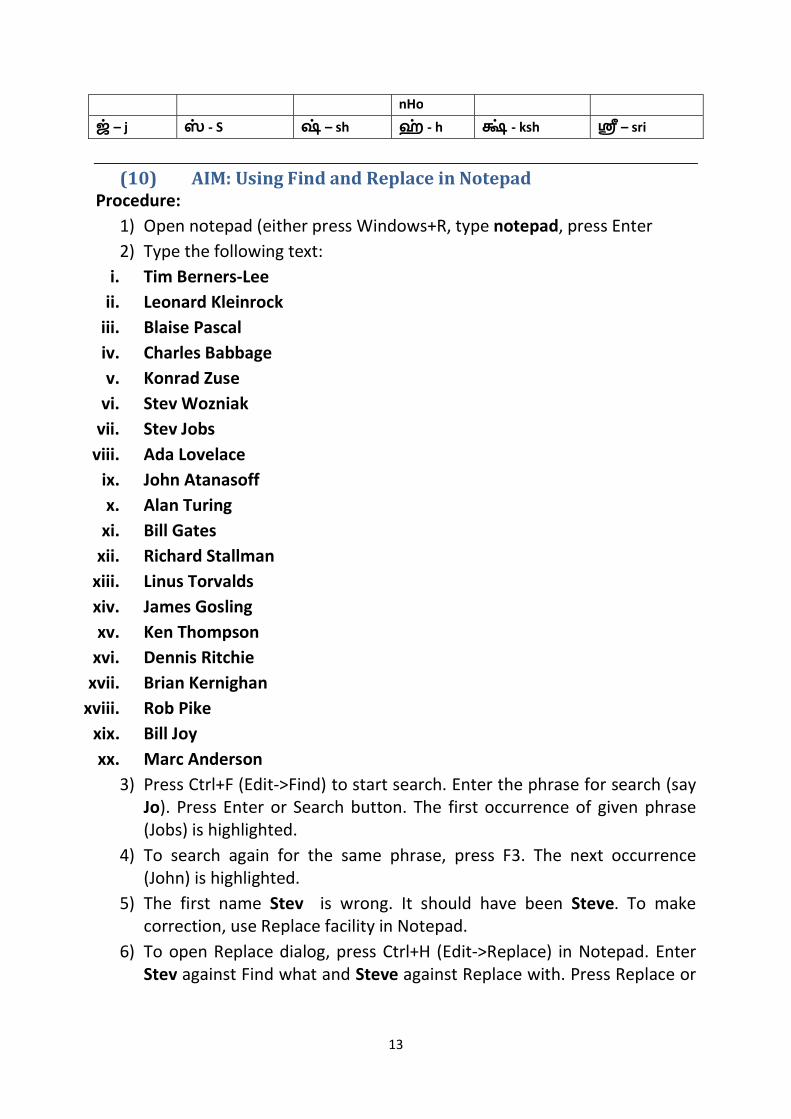
ஜ் – j ஸ் - S ஷ் – sh ஹ் - h ் - ksh – sri
(10) AIM: Using Find and Replace in Notepad
Procedure: 1) Open notepad (either press Windows+R, type notepad, press Enter 2) Type the following text:
i. Tim Berners-Lee ii. Leonard Kleinrock
iii. Blaise Pascal iv. Charles Babbage v. Konrad Zuse
vi. Stev Wozniak vii. Stev Jobs
viii. Ada Lovelace ix. John Atanasoff x. Alan Turing
xi. Bill Gates xii. Richard Stallman
xiii. Linus Torvalds xiv. James Gosling xv. Ken Thompson
xvi. Dennis Ritchie xvii. Brian Kernighan
xviii. Rob Pike xix. Bill Joy xx. Marc Anderson
3) Press Ctrl+F (Edit->Find) to start search. Enter the phrase for search (say Jo). Press Enter or Search button. The first occurrence of given phrase (Jobs) is highlighted.
4) To search again for the same phrase, press F3. The next occurrence (John) is highlighted.
5) The first name Stev is wrong. It should have been Steve. To make correction, use Replace facility in Notepad.
6) To open Replace dialog, press Ctrl+H (Edit->Replace) in Notepad. Enter Stev against Find what and Steve against Replace with. Press Replace or
14
Replace All buttons to make the corrections to the names of Steve Wozniak and Steve Jobs.
7) To go to a particular line number, press Ctrl+G (Edit->Go To). Enter line number. Press Enter or Ok button.
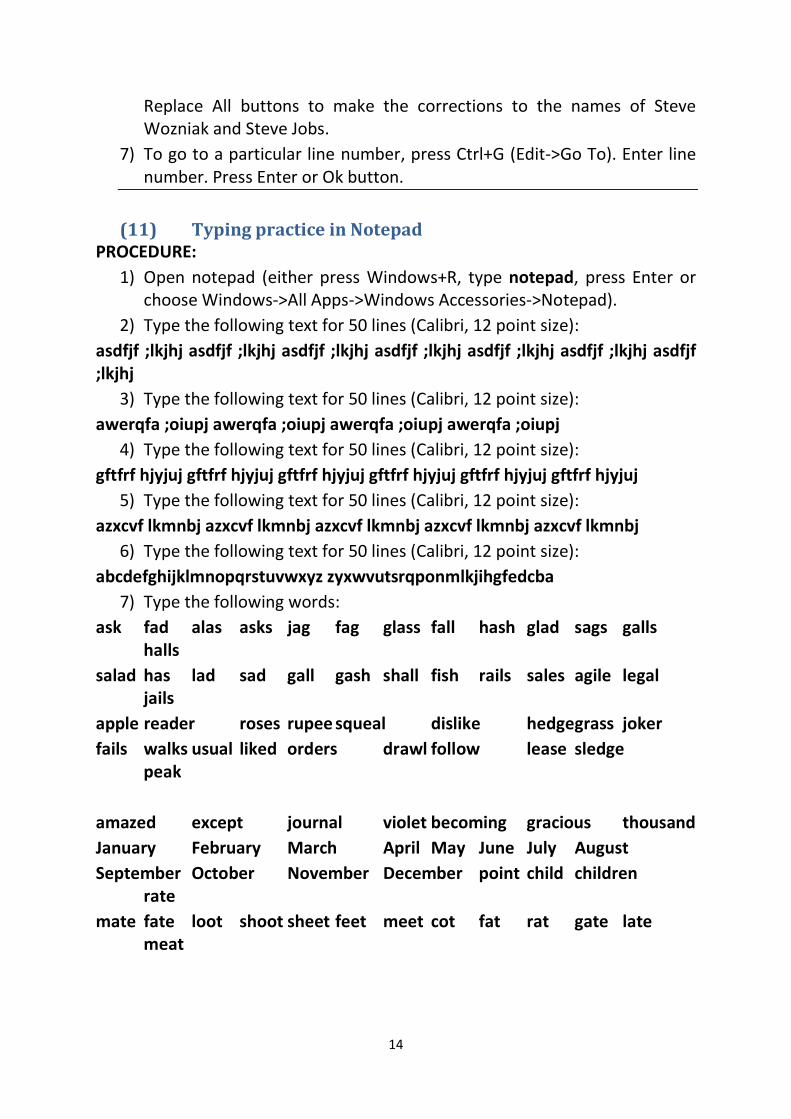
(11) Typing practice in Notepad
PROCEDURE: 1) Open notepad (either press Windows+R, type notepad, press Enter or
choose Windows->All Apps->Windows Accessories->Notepad). 2) Type the following text for 50 lines (Calibri, 12 point size):
asdfjf ;lkjhj asdfjf ;lkjhj asdfjf ;lkjhj asdfjf ;lkjhj asdfjf ;lkjhj asdfjf ;lkjhj asdfjf ;lkjhj
3) Type the following text for 50 lines (Calibri, 12 point size): awerqfa ;oiupj awerqfa ;oiupj awerqfa ;oiupj awerqfa ;oiupj
4) Type the following text for 50 lines (Calibri, 12 point size): gftfrf hjyjuj gftfrf hjyjuj gftfrf hjyjuj gftfrf hjyjuj gftfrf hjyjuj gftfrf hjyjuj
5) Type the following text for 50 lines (Calibri, 12 point size): azxcvf lkmnbj azxcvf lkmnbj azxcvf lkmnbj azxcvf lkmnbj azxcvf lkmnbj
6) Type the following text for 50 lines (Calibri, 12 point size): abcdefghijklmnopqrstuvwxyz zyxwvutsrqponmlkjihgfedcba
7) Type the following words: ask fad alas asks jag fag glass fall hash glad sags galls halls salad has lad sad gall gash shall fish rails sales agile legal jails apple reader roses rupee squeal dislike hedge grass joker fails walks usual liked orders drawl follow lease sledge peak amazed except journal violet becoming gracious thousand January February March April May June July August September October November December point child children rate mate fate loot shoot sheet feet meet cot fat rat gate late meat

15
man van sane insane cane moon fan lane mane tan lean peen lawn gone phone loan moan shown lawn don fun ten men trap sap nap leap keep soap pop peep reap rope lope tape gap read seed feed road God mad pod lead head load fade mode shade I only soon water far play many old the could paper without get use around state animal help while other play back earth turn which more answer most start story me hard by take they you girl see show girl does who night run help new tree are might follow into me car above later black many ask back without now under own thing one saw think was red hear upon put out feet part play about on should almost another four did place run into work and something earth. each some same got word seem close city I tell had might turn big cut sometimes tell or life when too once study small side such these right together people them best tell learn something need help here who three and give way why without him put live find around saw then said go you world before follow want school world much if get her earth story saw to more few thing three find its keep those war and but each few oil water the get almost line example. car tree word do may think those live open talk also place a page why idea up something enough if place life has by stop as while every more show went from these still more large they for state mile and live would is family left really up must walk over state still need being ask air head into night into something fall think great up fall also like group part time then turn go then oil out know got was below school below no between write began where same. together why help let four use more page under air any went people war list air at enough black side out above find their oil same one men hard walk down fire good thought turn been took seem miss away thing live will should that each than by they could fall write make two name put plant around his show take year this story but air that list thing really hand next down while
16
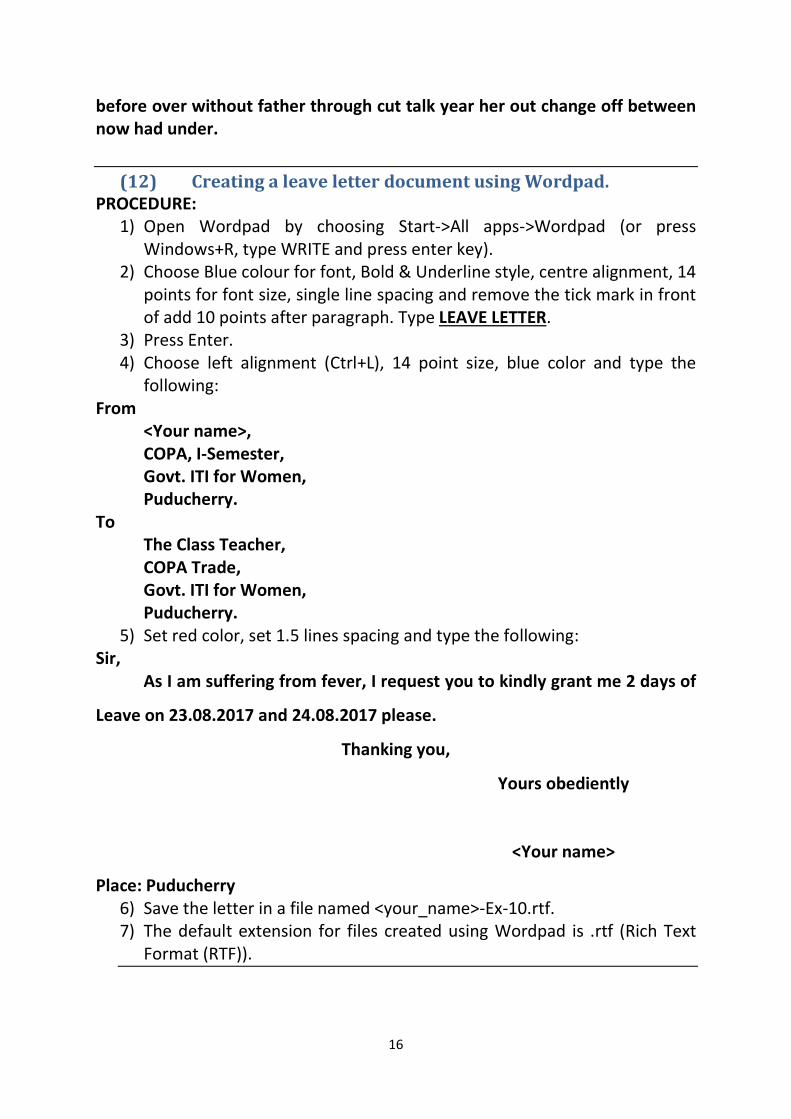
before over without father through cut talk year her out change off between now had under.
(12) Creating a leave letter document using Wordpad. PROCEDURE:
1) Open Wordpad by choosing Start->All apps->Wordpad (or press Windows+R, type WRITE and press enter key).
2) Choose Blue colour for font, Bold & Underline style, centre alignment, 14 points for font size, single line spacing and remove the tick mark in front of add 10 points after paragraph. Type LEAVE LETTER.
3) Press Enter. 4) Choose left alignment (Ctrl+L), 14 point size, blue color and type the
following: From <Your name>, COPA, I-Semester, Govt. ITI for Women, Puducherry. To The Class Teacher, COPA Trade, Govt. ITI for Women, Puducherry.
5) Set red color, set 1.5 lines spacing and type the following: Sir, As I am suffering from fever, I request you to kindly grant me 2 days of
Leave on 23.08.2017 and 24.08.2017 please.
Thanking you,
Yours obediently
<Your name>
Place: Puducherry 6) Save the letter in a file named <your_name>-Ex-10.rtf. 7) The default extension for files created using Wordpad is .rtf (Rich Text
Format (RTF)).
17
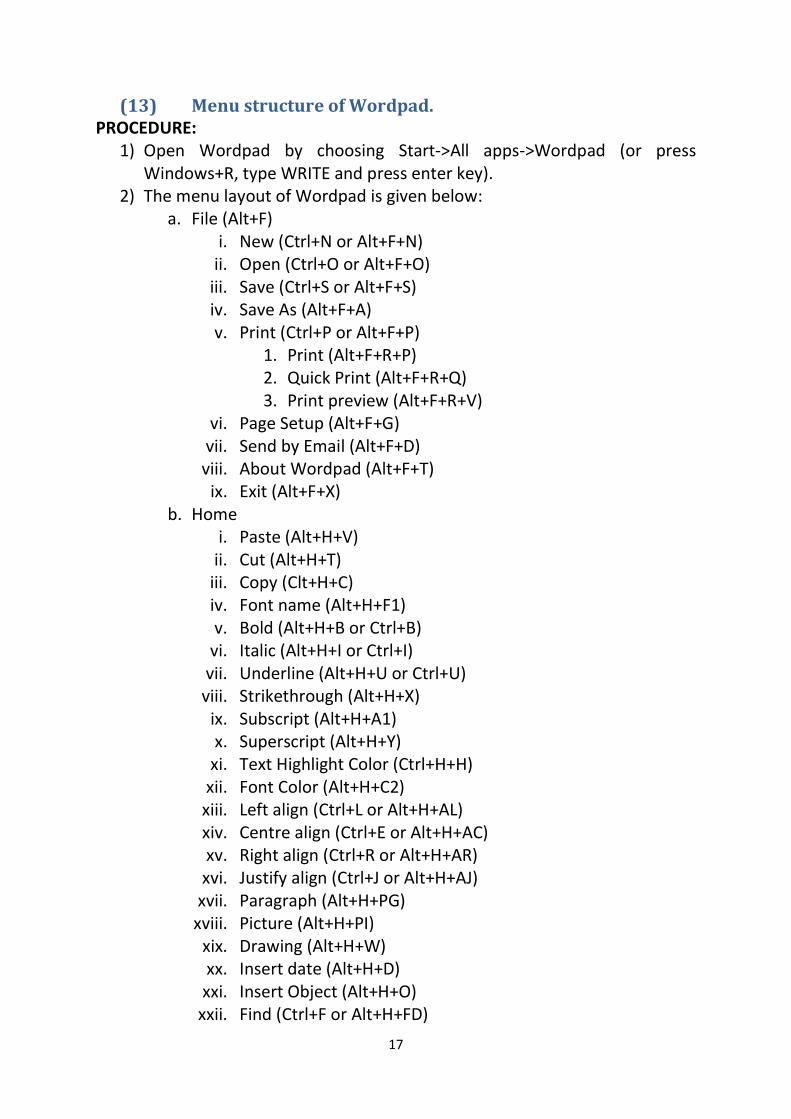
(13) Menu structure of Wordpad. PROCEDURE:
1) Open Wordpad by choosing Start->All apps->Wordpad (or press Windows+R, type WRITE and press enter key).
2) The menu layout of Wordpad is given below: a. File (Alt+F)
i. New (Ctrl+N or Alt+F+N) ii. Open (Ctrl+O or Alt+F+O)
iii. Save (Ctrl+S or Alt+F+S) iv. Save As (Alt+F+A) v. Print (Ctrl+P or Alt+F+P)
1. Print (Alt+F+R+P) 2. Quick Print (Alt+F+R+Q) 3. Print preview (Alt+F+R+V)
vi. Page Setup (Alt+F+G) vii. Send by Email (Alt+F+D) viii. About Wordpad (Alt+F+T)
ix. Exit (Alt+F+X) b. Home
i. Paste (Alt+H+V) ii. Cut (Alt+H+T)
iii. Copy (Clt+H+C) iv. Font name (Alt+H+F1) v. Bold (Alt+H+B or Ctrl+B)
vi. Italic (Alt+H+I or Ctrl+I) vii. Underline (Alt+H+U or Ctrl+U) viii. Strikethrough (Alt+H+X)
ix. Subscript (Alt+H+A1) x. Superscript (Alt+H+Y)
xi. Text Highlight Color (Ctrl+H+H) xii. Font Color (Alt+H+C2) xiii. Left align (Ctrl+L or Alt+H+AL) xiv. Centre align (Ctrl+E or Alt+H+AC) xv. Right align (Ctrl+R or Alt+H+AR) xvi. Justify align (Ctrl+J or Alt+H+AJ)
xvii. Paragraph (Alt+H+PG) xviii. Picture (Alt+H+PI)
xix. Drawing (Alt+H+W) xx. Insert date (Alt+H+D) xxi. Insert Object (Alt+H+O)
xxii. Find (Ctrl+F or Alt+H+FD)
18
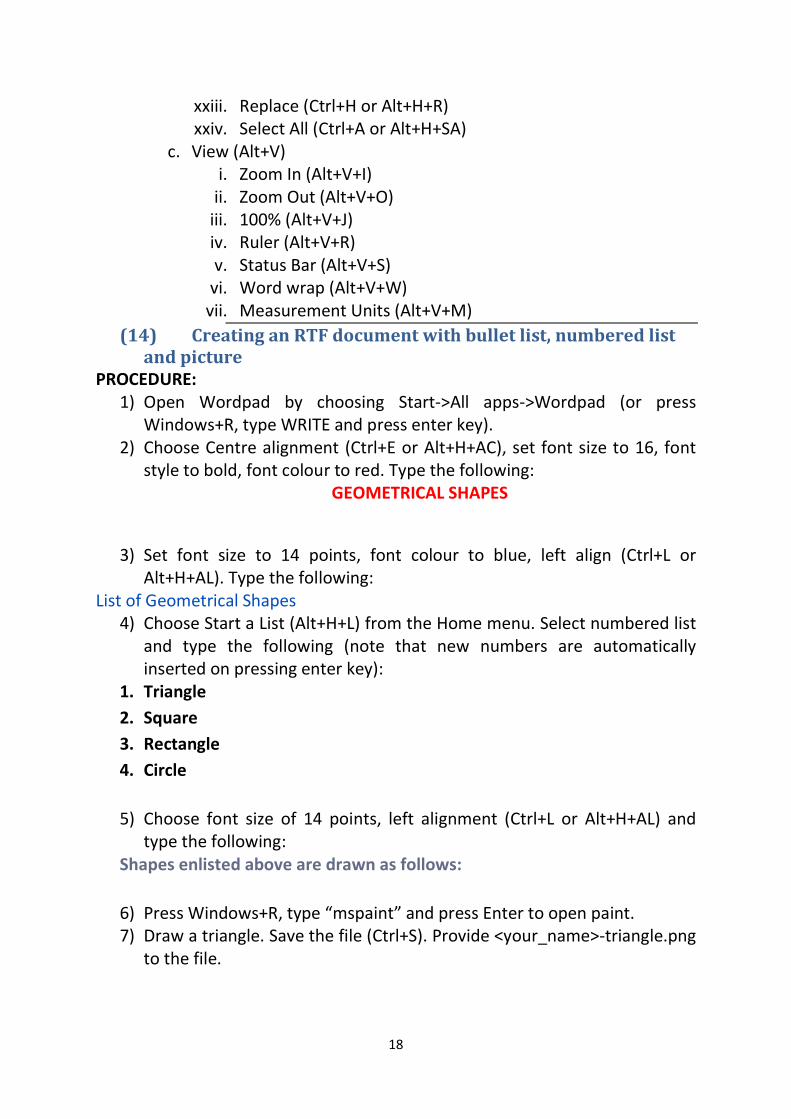
xxiii. Replace (Ctrl+H or Alt+H+R) xxiv. Select All (Ctrl+A or Alt+H+SA)
c. View (Alt+V) i. Zoom In (Alt+V+I)
ii. Zoom Out (Alt+V+O) iii. 100% (Alt+V+J) iv. Ruler (Alt+V+R) v. Status Bar (Alt+V+S)
vi. Word wrap (Alt+V+W) vii. Measurement Units (Alt+V+M)
(14) Creating an RTF document with bullet list, numbered list and picture
PROCEDURE: 1) Open Wordpad by choosing Start->All apps->Wordpad (or press
Windows+R, type WRITE and press enter key). 2) Choose Centre alignment (Ctrl+E or Alt+H+AC), set font size to 16, font
style to bold, font colour to red. Type the following: GEOMETRICAL SHAPES
3) Set font size to 14 points, font colour to blue, left align (Ctrl+L or
Alt+H+AL). Type the following: List of Geometrical Shapes
4) Choose Start a List (Alt+H+L) from the Home menu. Select numbered list and type the following (note that new numbers are automatically inserted on pressing enter key):
1. Triangle 2. Square 3. Rectangle 4. Circle
5) Choose font size of 14 points, left alignment (Ctrl+L or Alt+H+AL) and
type the following: Shapes enlisted above are drawn as follows:
6) Press Windows+R, type “mspaint” and press Enter to open paint. 7) Draw a triangle. Save the file (Ctrl+S). Provide <your_name>-triangle.png
to the file.
19
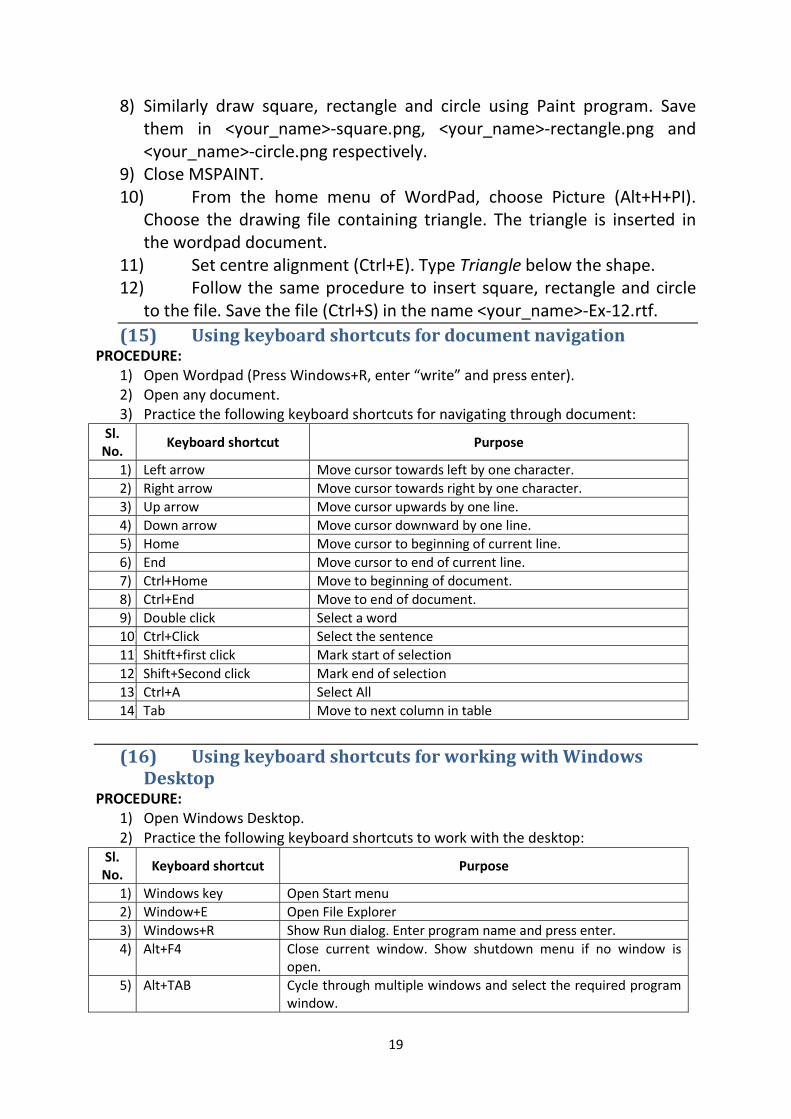
8) Similarly draw square, rectangle and circle using Paint program. Save them in <your_name>-square.png, <your_name>-rectangle.png and <your_name>-circle.png respectively.
9) Close MSPAINT. 10) From the home menu of WordPad, choose Picture (Alt+H+PI).
Choose the drawing file containing triangle. The triangle is inserted in the wordpad document.
11) Set centre alignment (Ctrl+E). Type Triangle below the shape. 12) Follow the same procedure to insert square, rectangle and circle
to the file. Save the file (Ctrl+S) in the name <your_name>-Ex-12.rtf. (15) Using keyboard shortcuts for document navigation
PROCEDURE: 1) Open Wordpad (Press Windows+R, enter “write” and press enter). 2) Open any document. 3) Practice the following keyboard shortcuts for navigating through document:
Sl. No. Keyboard shortcut Purpose
1) Left arrow Move cursor towards left by one character. 2) Right arrow Move cursor towards right by one character. 3) Up arrow Move cursor upwards by one line. 4) Down arrow Move cursor downward by one line. 5) Home Move cursor to beginning of current line. 6) End Move cursor to end of current line. 7) Ctrl+Home Move to beginning of document. 8) Ctrl+End Move to end of document. 9) Double click Select a word 10) Ctrl+Click Select the sentence 11) Shitft+first click Mark start of selection 12) Shift+Second click Mark end of selection 13) Ctrl+A Select All 14) Tab Move to next column in table
(16) Using keyboard shortcuts for working with Windows
Desktop PROCEDURE:
1) Open Windows Desktop. 2) Practice the following keyboard shortcuts to work with the desktop:
Sl. No. Keyboard shortcut Purpose
1) Windows key Open Start menu 2) Window+E Open File Explorer 3) Windows+R Show Run dialog. Enter program name and press enter. 4) Alt+F4 Close current window. Show shutdown menu if no window is
open. 5) Alt+TAB Cycle through multiple windows and select the required program
window.
20
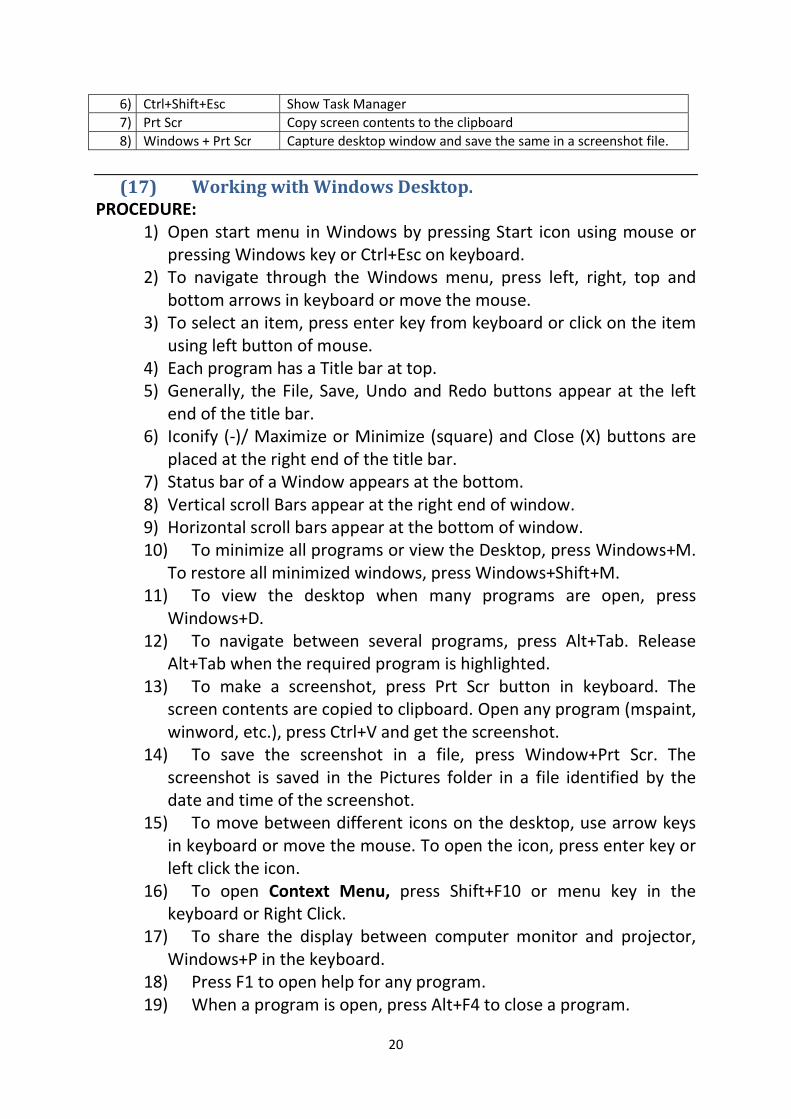
6) Ctrl+Shift+Esc Show Task Manager 7) Prt Scr Copy screen contents to the clipboard 8) Windows + Prt Scr Capture desktop window and save the same in a screenshot file.
(17) Working with Windows Desktop.
PROCEDURE: 1) Open start menu in Windows by pressing Start icon using mouse or
pressing Windows key or Ctrl+Esc on keyboard. 2) To navigate through the Windows menu, press left, right, top and
bottom arrows in keyboard or move the mouse. 3) To select an item, press enter key from keyboard or click on the item
using left button of mouse. 4) Each program has a Title bar at top. 5) Generally, the File, Save, Undo and Redo buttons appear at the left
end of the title bar. 6) Iconify (-)/ Maximize or Minimize (square) and Close (X) buttons are
placed at the right end of the title bar. 7) Status bar of a Window appears at the bottom. 8) Vertical scroll Bars appear at the right end of window. 9) Horizontal scroll bars appear at the bottom of window. 10) To minimize all programs or view the Desktop, press Windows+M.
To restore all minimized windows, press Windows+Shift+M. 11) To view the desktop when many programs are open, press
Windows+D. 12) To navigate between several programs, press Alt+Tab. Release
Alt+Tab when the required program is highlighted. 13) To make a screenshot, press Prt Scr button in keyboard. The
screen contents are copied to clipboard. Open any program (mspaint, winword, etc.), press Ctrl+V and get the screenshot.
14) To save the screenshot in a file, press Window+Prt Scr. The screenshot is saved in the Pictures folder in a file identified by the date and time of the screenshot.
15) To move between different icons on the desktop, use arrow keys in keyboard or move the mouse. To open the icon, press enter key or left click the icon.
16) To open Context Menu, press Shift+F10 or menu key in the keyboard or Right Click.
17) To share the display between computer monitor and projector, Windows+P in the keyboard.
18) Press F1 to open help for any program. 19) When a program is open, press Alt+F4 to close a program.
21
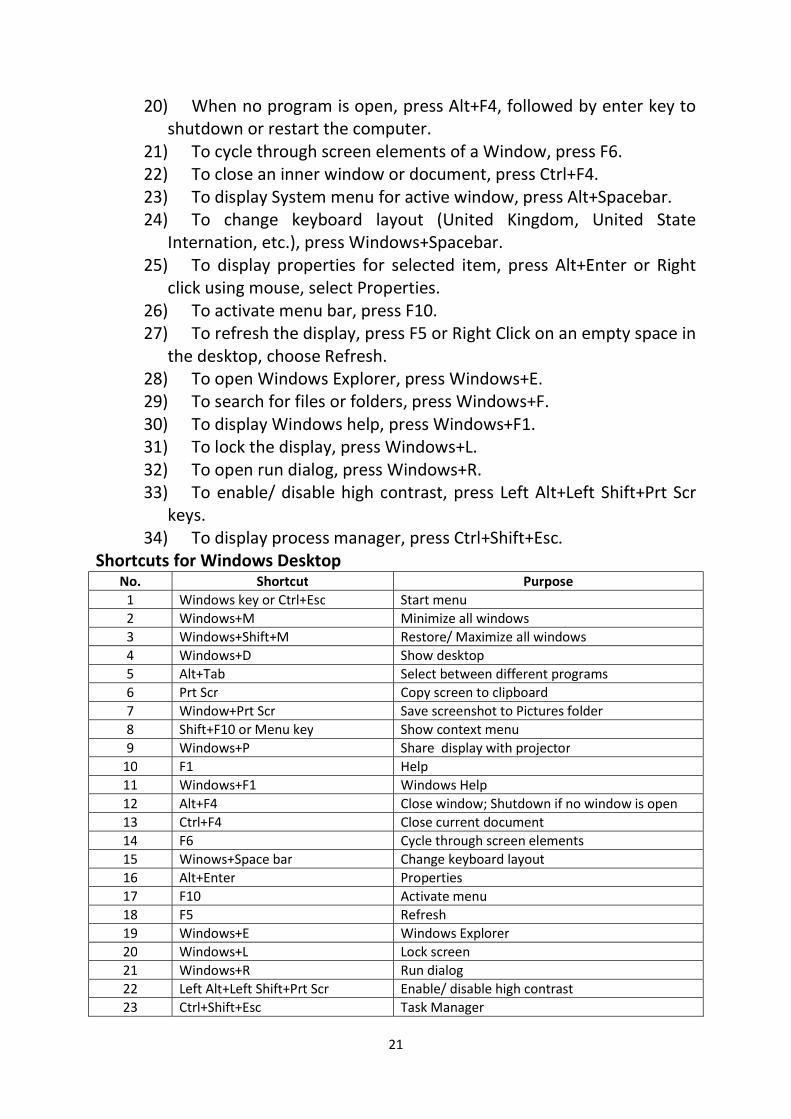
20) When no program is open, press Alt+F4, followed by enter key to shutdown or restart the computer.
21) To cycle through screen elements of a Window, press F6. 22) To close an inner window or document, press Ctrl+F4. 23) To display System menu for active window, press Alt+Spacebar. 24) To change keyboard layout (United Kingdom, United State
Internation, etc.), press Windows+Spacebar. 25) To display properties for selected item, press Alt+Enter or Right
click using mouse, select Properties. 26) To activate menu bar, press F10. 27) To refresh the display, press F5 or Right Click on an empty space in
the desktop, choose Refresh. 28) To open Windows Explorer, press Windows+E. 29) To search for files or folders, press Windows+F. 30) To display Windows help, press Windows+F1. 31) To lock the display, press Windows+L. 32) To open run dialog, press Windows+R. 33) To enable/ disable high contrast, press Left Alt+Left Shift+Prt Scr
keys. 34) To display process manager, press Ctrl+Shift+Esc.
Shortcuts for Windows Desktop No. Shortcut Purpose
1 Windows key or Ctrl+Esc Start menu 2 Windows+M Minimize all windows 3 Windows+Shift+M Restore/ Maximize all windows 4 Windows+D Show desktop 5 Alt+Tab Select between different programs 6 Prt Scr Copy screen to clipboard 7 Window+Prt Scr Save screenshot to Pictures folder 8 Shift+F10 or Menu key Show context menu 9 Windows+P Share display with projector
10 F1 Help 11 Windows+F1 Windows Help 12 Alt+F4 Close window; Shutdown if no window is open 13 Ctrl+F4 Close current document 14 F6 Cycle through screen elements 15 Winows+Space bar Change keyboard layout 16 Alt+Enter Properties 17 F10 Activate menu 18 F5 Refresh 19 Windows+E Windows Explorer 20 Windows+L Lock screen 21 Windows+R Run dialog 22 Left Alt+Left Shift+Prt Scr Enable/ disable high contrast 23 Ctrl+Shift+Esc Task Manager

22
(18) Working with Windows File Explorer (or My Computer)
PROCEDURE: 1) Open Windows File Explorer, choose Start->All apps->Windows System-
>File Explorer (or press Windows+E). 2) The left side panel of File Explorer contains the following items:
a. Quick Access b. This PC - Desktop, Documents, Downloads, Music, Pictures, Videos,
Local Disk (C:), Local Disk (D:), etc., Network, Home Group 3) On clicking any of the items enlisted in 2.a or 2.b, the right side starts to
display contents of that particular location. 4) To pin a folder to quick access, choose Home->Pin to Quick Access (or
press Alt+H+PI). 5) To Copy selected file, choose Home->Copy (or press Ctrl+C or
Alt+H+CO). 6) To Cut selected file, choose Home->Cut (or press Ctrl+X or Alt+H+T). 7) To Paste file, choose Home->Paste (or press Ctrl+V or Alt+H+V). 8) To Copy the path of selected file, choose Home->Copy Path (or press
Alt+H+CP). 9) To paste shortcut to file (not the entire file), choose Home->Paste
Shortcut (or press Alt+H+PS). 10) To delete an item, choose Home->Delete->Recycle or Home->Delete-
>Permanently Delete or Home->Delete->Recycle Confirmation (or press Alt+H+D), choose the item and press enter on Recycle or Permanently Delete or Recycle Confirmation).
11) To rename a file, choose Home->Rename (or press F2 or Alt+H+R). 12) To create a new folder, choose Home->New Folder (or press Alt+H+N). 13) To create a new file or folder, choose Home->Create Item (or press
Alt+H+W). 14) To open selected file, choose Home->Open (or press Alt+H+PE) and
choose the appropriate program. 15) To edit selected file, choose Home->Edit (or press Alt+H+E). 16) To open selected file, choose Home->Open (or press Alt+H+PE). 17) To open file history, choose Home->History (or press Alt+H+H). 18) To select all items, choose Home->Select All (or press Ctrl+A), To
deselect items, press Alt+H+SN. 19) To invert selection, choose Home->Invert Selection (or Alt+H+SI). 20) To share a file, choose Share->Share (or Alt+S+S1). 21) To email a file, choose Share->Email (or Alt+S+E). 22) To Zip (compress) a file, choose Share->Zip (or Alt+S+C). 23) To Burn a file to CD or DVD, choose Share->Burn to Disk (or Alt+S+B).
23
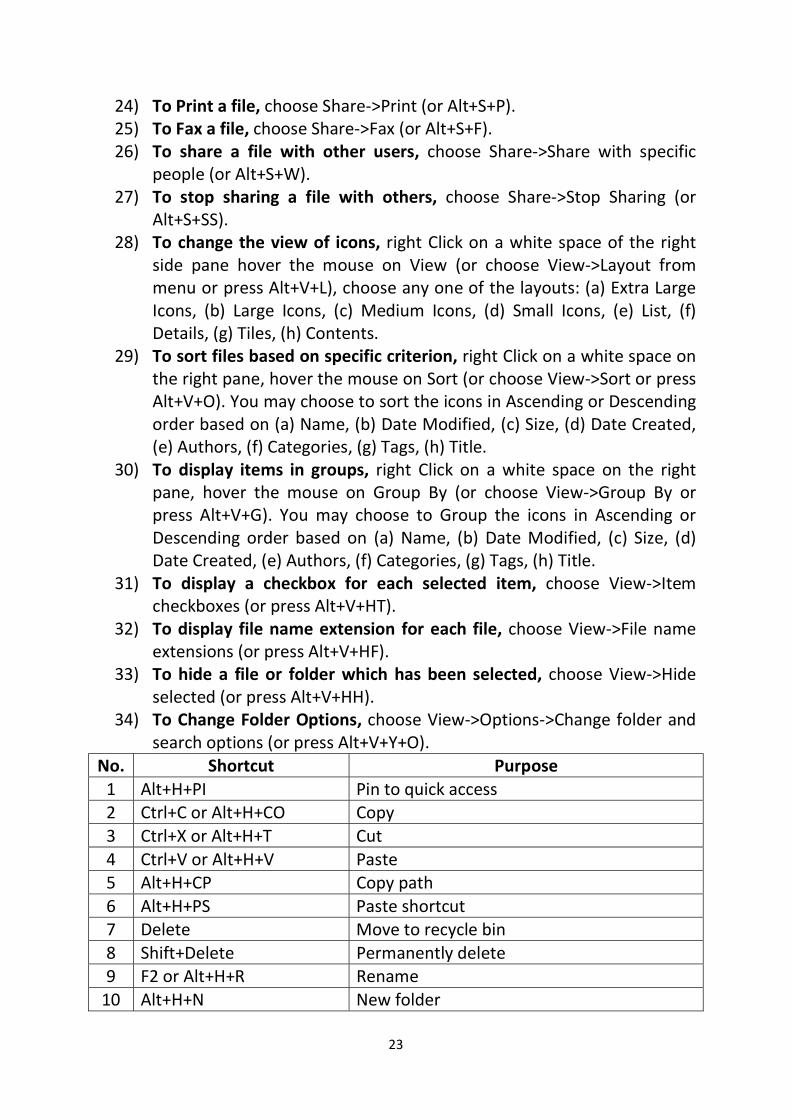
24) To Print a file, choose Share->Print (or Alt+S+P). 25) To Fax a file, choose Share->Fax (or Alt+S+F). 26) To share a file with other users, choose Share->Share with specific
people (or Alt+S+W). 27) To stop sharing a file with others, choose Share->Stop Sharing (or
Alt+S+SS). 28) To change the view of icons, right Click on a white space of the right
side pane hover the mouse on View (or choose View->Layout from menu or press Alt+V+L), choose any one of the layouts: (a) Extra Large Icons, (b) Large Icons, (c) Medium Icons, (d) Small Icons, (e) List, (f) Details, (g) Tiles, (h) Contents.
29) To sort files based on specific criterion, right Click on a white space on the right pane, hover the mouse on Sort (or choose View->Sort or press Alt+V+O). You may choose to sort the icons in Ascending or Descending order based on (a) Name, (b) Date Modified, (c) Size, (d) Date Created, (e) Authors, (f) Categories, (g) Tags, (h) Title.
30) To display items in groups, right Click on a white space on the right pane, hover the mouse on Group By (or choose View->Group By or press Alt+V+G). You may choose to Group the icons in Ascending or Descending order based on (a) Name, (b) Date Modified, (c) Size, (d) Date Created, (e) Authors, (f) Categories, (g) Tags, (h) Title.
31) To display a checkbox for each selected item, choose View->Item checkboxes (or press Alt+V+HT).
32) To display file name extension for each file, choose View->File name extensions (or press Alt+V+HF).
33) To hide a file or folder which has been selected, choose View->Hide selected (or press Alt+V+HH).
34) To Change Folder Options, choose View->Options->Change folder and search options (or press Alt+V+Y+O).
No. Shortcut Purpose 1 Alt+H+PI Pin to quick access 2 Ctrl+C or Alt+H+CO Copy 3 Ctrl+X or Alt+H+T Cut 4 Ctrl+V or Alt+H+V Paste 5 Alt+H+CP Copy path 6 Alt+H+PS Paste shortcut 7 Delete Move to recycle bin 8 Shift+Delete Permanently delete 9 F2 or Alt+H+R Rename
10 Alt+H+N New folder
24
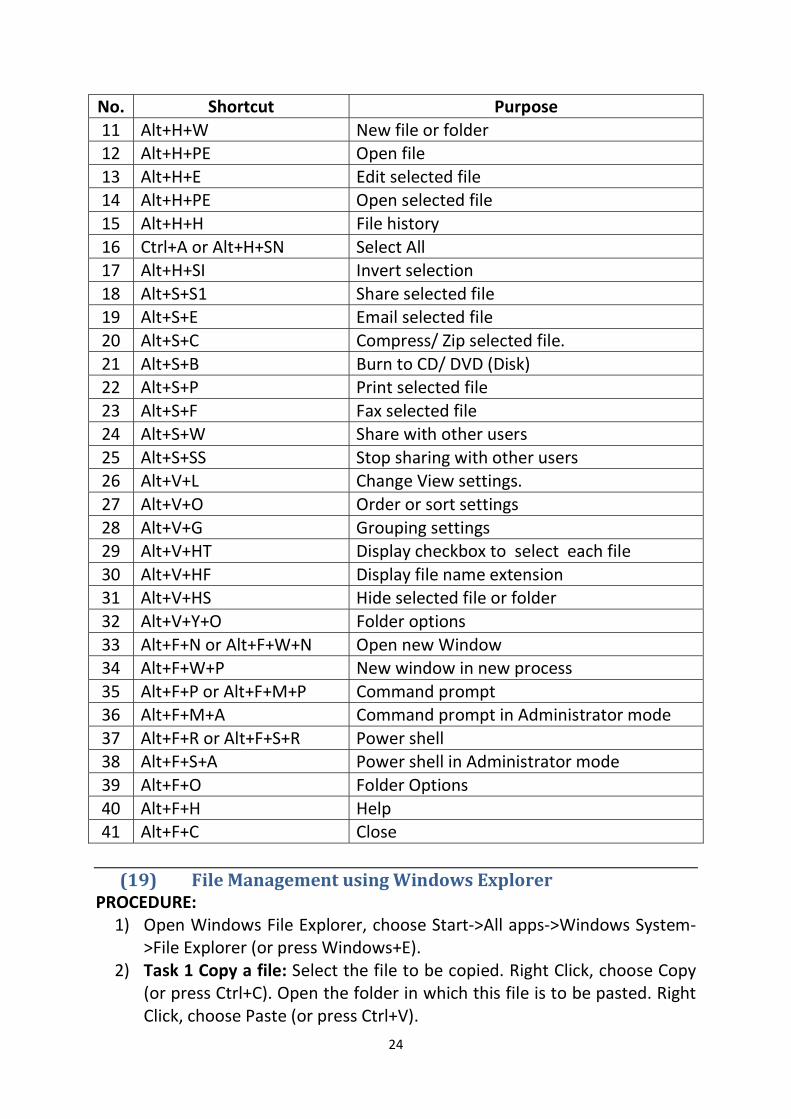
No. Shortcut Purpose 11 Alt+H+W New file or folder 12 Alt+H+PE Open file 13 Alt+H+E Edit selected file 14 Alt+H+PE Open selected file 15 Alt+H+H File history 16 Ctrl+A or Alt+H+SN Select All 17 Alt+H+SI Invert selection 18 Alt+S+S1 Share selected file 19 Alt+S+E Email selected file 20 Alt+S+C Compress/ Zip selected file. 21 Alt+S+B Burn to CD/ DVD (Disk) 22 Alt+S+P Print selected file 23 Alt+S+F Fax selected file 24 Alt+S+W Share with other users 25 Alt+S+SS Stop sharing with other users 26 Alt+V+L Change View settings. 27 Alt+V+O Order or sort settings 28 Alt+V+G Grouping settings 29 Alt+V+HT Display checkbox to select each file 30 Alt+V+HF Display file name extension 31 Alt+V+HS Hide selected file or folder 32 Alt+V+Y+O Folder options 33 Alt+F+N or Alt+F+W+N Open new Window 34 Alt+F+W+P New window in new process 35 Alt+F+P or Alt+F+M+P Command prompt 36 Alt+F+M+A Command prompt in Administrator mode 37 Alt+F+R or Alt+F+S+R Power shell 38 Alt+F+S+A Power shell in Administrator mode 39 Alt+F+O Folder Options 40 Alt+F+H Help 41 Alt+F+C Close
(19) File Management using Windows Explorer
PROCEDURE: 1) Open Windows File Explorer, choose Start->All apps->Windows System-
>File Explorer (or press Windows+E). 2) Task 1 Copy a file: Select the file to be copied. Right Click, choose Copy
(or press Ctrl+C). Open the folder in which this file is to be pasted. Right Click, choose Paste (or press Ctrl+V).

25
3) Task 2 Move a file: Select the file to be copied. Right Click, choose Cut (or press Ctrl+X). Open the folder in which this file is to be pasted. Right Click, choose Paste (or press Ctrl+V).
4) Task 3 rename a file: Select the file to be to be shared. Right Click, choose Rename (or press F2). Enter the new name for file when the name becomes editable. Press Enter key to complete rename process.
5) Task 4 Compress a file or folder: Select the file to be to be compressed. Right Click, choose Compress (If a third party program like WinRar is installed, use the options provided by the same). The file or folder would be compressed.
6) Task 5 Unzip a compressed file: Select the zip file. Right click on the file and choose Extract (or use the options provided by third party compression program like WinRar). The file would be unzipped.
7) Task 6 Open a file with different program: Select the file to be to be opened using a program other than the default program. Right Click (or hold shift and right click), choose Open With, select the program from the list displayed.
8) Task 7 share a file with other users: Select the file to be to be shared. Right Click, choose Share With, select the share with specific people.
9) Task 8 share a file with other users: Select the file to be to be shared. Right Click, choose Share With, select the share with specific people.
10) Task 9 create shortcut to a file: Select the file to be to be shared. Right Click, choose Create Shortcut. Copy the shortcut. Paste the shortcut file to wherever you want. Double clicking the shortcut opens the required file.
11) Task 10 Send file to specified locations (Including desktop shortcut): Select the file. Right Click, choose Send to, select the location (including the Bluetooth targets, desktop, DVD drive, etc.) where the file needs to be sent. A shortcut (in case of desktop) or a full copy (in case of Bluetooth, DVD drive, etc.) will be performed.
12) Task 11 delete a file: Select the file. Right Click, choose Delete. The file is sent to the recycle bin.
13) Task 12 permanently delete a file: Select the file. Press Shift+Delete. The file is deleted permanently. File deleted using Shift+Delete cannot be restored from Recycle Bin.
14) Task 13 view file or folder properties: Select the file. Right Click. Select Properties (at the bottom of the context menu). View the items displayed under General, Security, Details, Previous versions. The file may be hidden or read only (uneditable) by placing tick mark against appropriate tick boxes.

26
15) Task 14 view drive properties: Right click on a drive (C:, D:, etc.). Choose Properties. View the total size available in the drive, space used and remaining space. Do not change any property unless you know about that property.
(20) Installing Printer Driver PROCEDURE:
1) Right click on the driver software installer. 2) Choose Run as Administrator. 3) Press Yes button when confirmation dialog appears. 4) After extracting required files, the installer requests you to connect the
printer (if not already connected to the computer). 5) Place a tick mark against the checkbox when displays the label I accept
the license agreement. 6) Power on the printer and connect the USB cable to an appropriate USB
port in the CPU. 7) When the printer is connected, the driver installer detects the printer
and completes installation of the software required for the printer. 8) After the installation is complete, a test page is printed when Finish
button is pressed. 9) Printer properties can be accessed by opening control panel, typing
printer in the search box, choosing Devices and Printers and right clicking on the printer.
(21) Working with pen drive
PROCEDURE: 1) Insert the pen drive in the USB slot. Hold Shift key while inserting the
pen drive to prevent AutoRun of any program stored in the pen drive. 2) Task 1 Format the pen drive: Right click the drive letter of the pen drive
(on the Navigator pane or My Computer). Choose Format. Provide a label to the Pen drive. Press Start button. The allow the formatting process to complete. Now, the pen drive does not have any previous data and freshly ready for use.
3) Task 2 Copy file from Computer to Pen drive: Go to Documents (any other folder from which you wish to copy). Select required file. Press Ctrl+C or Right Click, choose Copy. Select the drive name/ drive letter of the pen drive from the Navigation Pane (or My Computer). Press Ctrl+V (or Right click on a blank space, choose Paste).
4) Task 3 Move file from Computer to Pen drive: Go to Documents (any other folder from which you wish to move). Select required file. Press Ctrl+X or Right Click, choose Cut. Select the drive name/ drive letter of
27
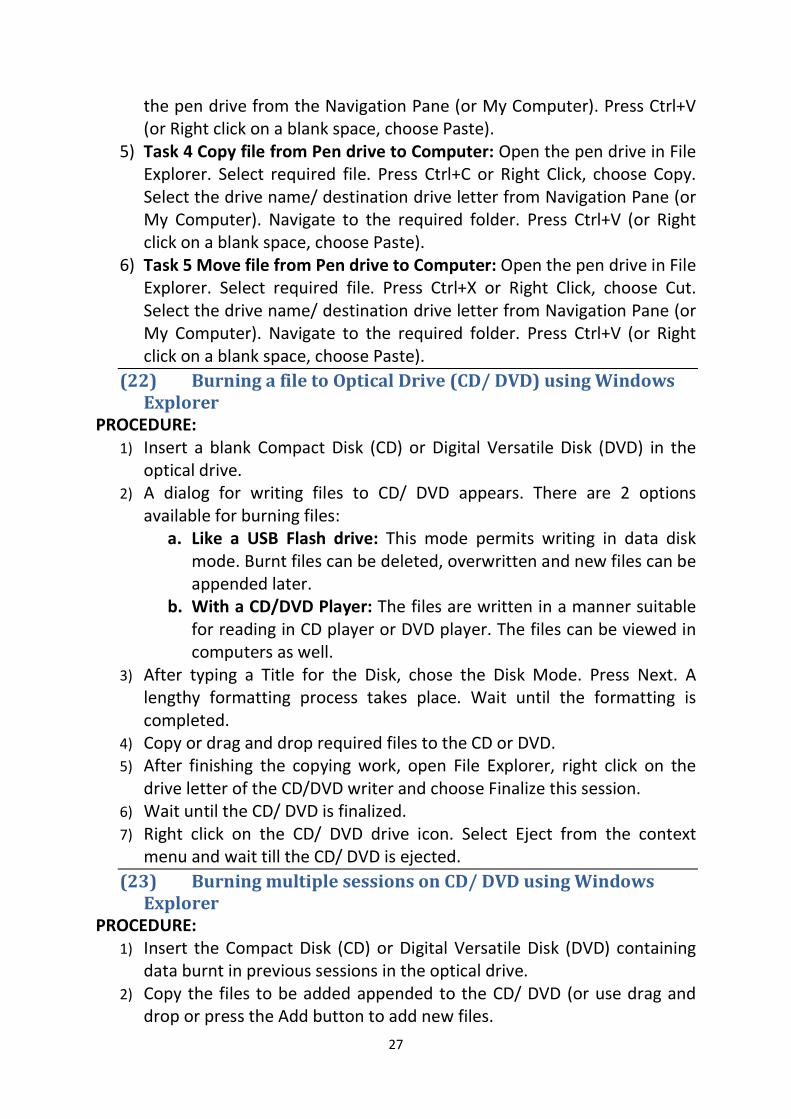
the pen drive from the Navigation Pane (or My Computer). Press Ctrl+V (or Right click on a blank space, choose Paste).
5) Task 4 Copy file from Pen drive to Computer: Open the pen drive in File Explorer. Select required file. Press Ctrl+C or Right Click, choose Copy. Select the drive name/ destination drive letter from Navigation Pane (or My Computer). Navigate to the required folder. Press Ctrl+V (or Right click on a blank space, choose Paste).
6) Task 5 Move file from Pen drive to Computer: Open the pen drive in File Explorer. Select required file. Press Ctrl+X or Right Click, choose Cut. Select the drive name/ destination drive letter from Navigation Pane (or My Computer). Navigate to the required folder. Press Ctrl+V (or Right click on a blank space, choose Paste).
(22) Burning a file to Optical Drive (CD/ DVD) using Windows Explorer
PROCEDURE: 1) Insert a blank Compact Disk (CD) or Digital Versatile Disk (DVD) in the
optical drive. 2) A dialog for writing files to CD/ DVD appears. There are 2 options
available for burning files: a. Like a USB Flash drive: This mode permits writing in data disk
mode. Burnt files can be deleted, overwritten and new files can be appended later.
b. With a CD/DVD Player: The files are written in a manner suitable for reading in CD player or DVD player. The files can be viewed in computers as well.
3) After typing a Title for the Disk, chose the Disk Mode. Press Next. A lengthy formatting process takes place. Wait until the formatting is completed.
4) Copy or drag and drop required files to the CD or DVD. 5) After finishing the copying work, open File Explorer, right click on the
drive letter of the CD/DVD writer and choose Finalize this session. 6) Wait until the CD/ DVD is finalized. 7) Right click on the CD/ DVD drive icon. Select Eject from the context
menu and wait till the CD/ DVD is ejected. (23) Burning multiple sessions on CD/ DVD using Windows
Explorer PROCEDURE:
1) Insert the Compact Disk (CD) or Digital Versatile Disk (DVD) containing data burnt in previous sessions in the optical drive.
2) Copy the files to be added appended to the CD/ DVD (or use drag and drop or press the Add button to add new files.
28
3) After adding required files, open right click on the CD/ DVD drive icon in Windows Explorer and choose close session.
4) After closing the session, choose Eject to complete the multi-session burning of CD/ DVD.
(24) Creating Data CD/ DVD using Burn Aware Free Software PROCEDURE:
1) Insert CD/ DVD in the optical drive. 2) Open BurnAware software and choose Data Disk. 3) Press Add button. 4) Select required files and press Add files button at the bottom of the
dialog. 5) Close the file addition dialog. 6) Press Burn button. 7) Wait till the finishing of burning operation. The CD/ DVD is ejected on
completion of burning. (25) Candidate registration in National Scholarship Portal
(NSP) PROCEDURE:
1) Open any browser (Firefox, Microsoft Edge or Google Chrome). 2) Enter the following URL in the address bar and press enter:
https://scholarships.gov.in/ . 3) Click upon New Registration. 4) The terms and conditions are displayed. Place tick mark against the 3
items of agreement and press Continue button. 5) The registration for is displayed. Select State (Puducherry), enter name
(as per Aadhaar), Date of birth, gender, Type (Scholarship) Applicant category (Post-metric), enter mobile number and enter email ID.
6) Enter IFS Code of the bank twice (The code is hidden during first entry and visible during second entry).
7) Enter the account number twice (The account number is hidden during first entry and visible during the second entry).
8) Choose Aadhaar or data validation. 9) Enter your Aadhaar number (without spaces). 10) Enter the CAPTCHA text. 11) Press Register button. 12) The registration number is displayed in the next screen. Take a
screenshot. 13) The registration number and password are sent to the registered
mobile number. 14) Go to login screen. Enter the registration ID and the password
(DoB in dd/mm/yyyy format).
29
15) An OTP is received in the registered mobile number. 16) Enter the mobile OTP and enter the new password twice.
(26) To create an email ID.
PROCEDURE 1) Open browser. Enter the address of the email server (e.g.
mail.google.com, mail.yahoo.com, rediffmail.com, fastmail.fm, www.hotmail.com, etc.).
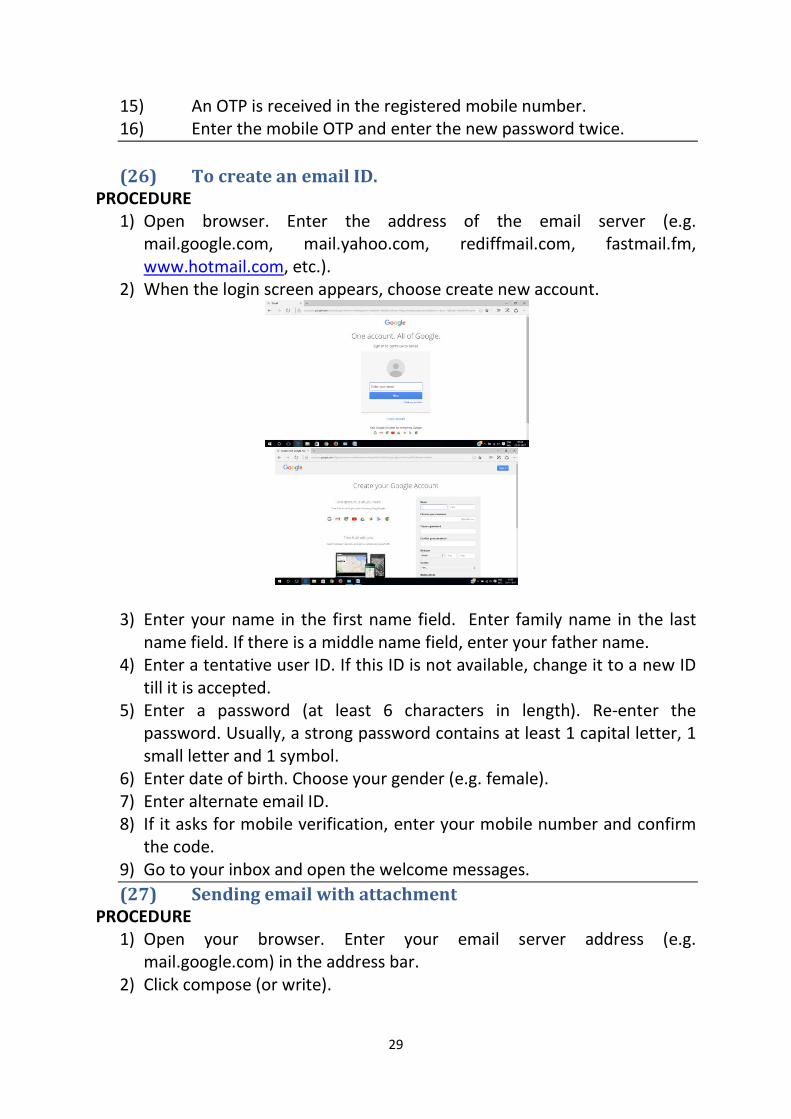
2) When the login screen appears, choose create new account.
3) Enter your name in the first name field. Enter family name in the last name field. If there is a middle name field, enter your father name.
4) Enter a tentative user ID. If this ID is not available, change it to a new ID till it is accepted.
5) Enter a password (at least 6 characters in length). Re-enter the password. Usually, a strong password contains at least 1 capital letter, 1 small letter and 1 symbol.
6) Enter date of birth. Choose your gender (e.g. female). 7) Enter alternate email ID. 8) If it asks for mobile verification, enter your mobile number and confirm
the code. 9) Go to your inbox and open the welcome messages. (27) Sending email with attachment
PROCEDURE 1) Open your browser. Enter your email server address (e.g.
mail.google.com) in the address bar. 2) Click compose (or write).
30
3) Enter email ID of the recipient in the To address. Enter visible copy recipient in the CC field. Enter invisible recipient in the BCC field.
4) Enter a subject (one line description of your email message). 5) Type the email message. 6) Click the A icon or clip icon to select any file that should be attached to
your email. Attachment for an email is optional. 7) Click send button.
(28) Creating ISO image file using Burn Aware Free Software PROCEDURE:
1) If you wish to create ISO image file from an existing CD or DVD, insert the disk in the drive.
2) Open BurnAware free software and choose Copy to ISO. 3) If you wish to create an ISO image using data files, choose Make ISO.
Select the files to be added to the ISO. 4) Press Make button. 5) Choose the directory and enter a name for the ISO image. 6) Wait until the image file is created. (29) Burning ISO image to CD/ DVD using Burn Aware Free
Software PROCEDURE:
1) Copy the ISO image of Ubuntu (or any other software given to you) to the hard disk of the computer (preferably D: drive).
2) Insert blank DVD (or CD in the compuer). 3) Open BurnAware. Choose Burn ISO from the left side panel or the File
menu. 4) In the Burn ISO menu, click Browse button and choose the ISO image
copied by you. 5) Click the Burn button or choose Burn from File menu. 6) Wait until the burning process is completed. 7) On completion, the CD/ DVD is automatically ejected from the tray.
(30) Control Panel – Setting Clock, Language and Region
PROCEDURE: 1) Open Control Panel using Start->All Apps->Windows Settings->Control
Panel (or press Windows+R, type CONTROL followed by Enter key). 2) At the top right corner, there is a search box. You can type specific
control panel item in the search box to find results.
31
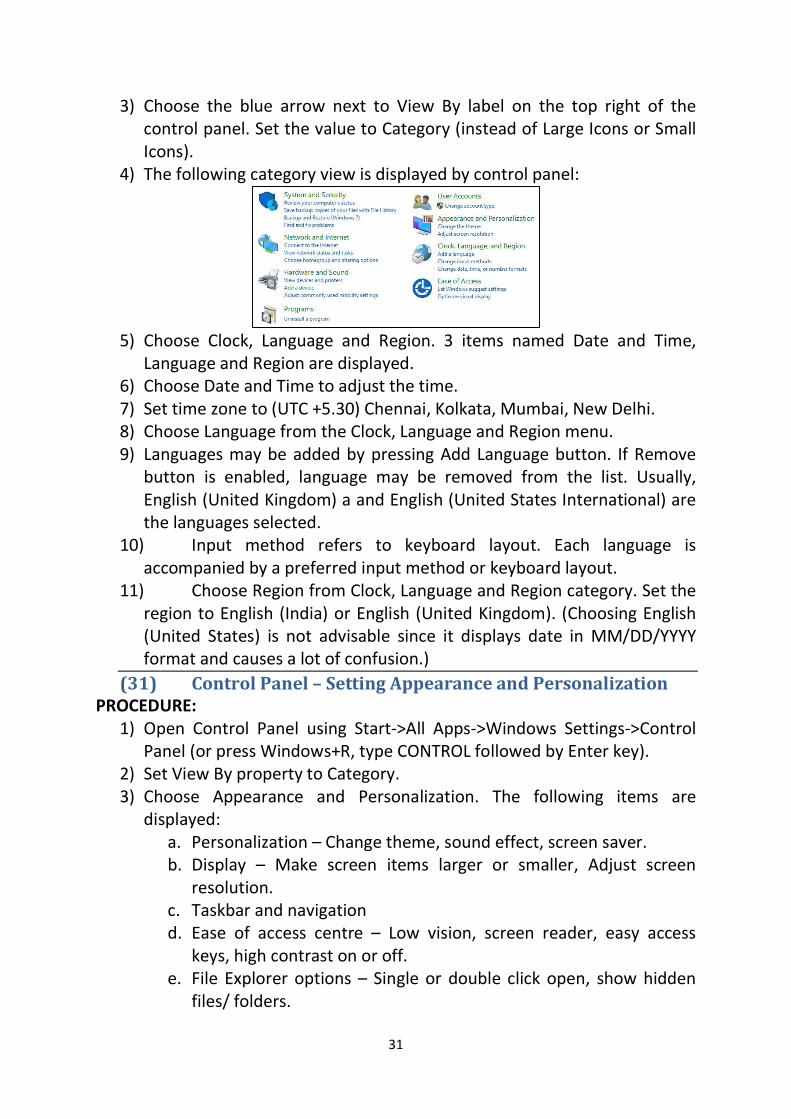
3) Choose the blue arrow next to View By label on the top right of the control panel. Set the value to Category (instead of Large Icons or Small Icons).
4) The following category view is displayed by control panel:
5) Choose Clock, Language and Region. 3 items named Date and Time,
Language and Region are displayed. 6) Choose Date and Time to adjust the time. 7) Set time zone to (UTC +5.30) Chennai, Kolkata, Mumbai, New Delhi. 8) Choose Language from the Clock, Language and Region menu. 9) Languages may be added by pressing Add Language button. If Remove
button is enabled, language may be removed from the list. Usually, English (United Kingdom) a and English (United States International) are the languages selected.
10) Input method refers to keyboard layout. Each language is accompanied by a preferred input method or keyboard layout.
11) Choose Region from Clock, Language and Region category. Set the region to English (India) or English (United Kingdom). (Choosing English (United States) is not advisable since it displays date in MM/DD/YYYY format and causes a lot of confusion.)
(31) Control Panel – Setting Appearance and Personalization PROCEDURE:
1) Open Control Panel using Start->All Apps->Windows Settings->Control Panel (or press Windows+R, type CONTROL followed by Enter key).
2) Set View By property to Category. 3) Choose Appearance and Personalization. The following items are
displayed: a. Personalization – Change theme, sound effect, screen saver. b. Display – Make screen items larger or smaller, Adjust screen
resolution. c. Taskbar and navigation d. Ease of access centre – Low vision, screen reader, easy access
keys, high contrast on or off. e. File Explorer options – Single or double click open, show hidden
files/ folders.
32
f. Fonts – Manage fonts, change font settings, adjust cleartype text. 4) Under Personalization section, set the theme, background, sound effects
and screen saver to be used when the computer is idle. 5) Under display section, adjust the size of font and other display elements.
Screen resolution, screen orientation, etc. can be adjusted under this section.
6) Taskbar properties like auto-hide, display taskbar at bottom, top, left or right of screen, etc. can be controlled from this section.
7) The ease of access section displays the same items reached through clicking Ease of Access from category view of control panel.
8) The 4 basic ease of access items displayed at the top of the screen are: a. Screen Magnifier – to enlarge parts of screen. b. Start narrator – to read the text pointed by the mouse pointer. c. Start onscreen keyboard – A keyboard which can be operated
using mouse. d. Setup high contrast – set the parameters to be used in high
contrast mode. 9) Under File Explorer Options, choose Single click or Double click to open
files and folders. You can also choose to display hidden files. 10) Fonts can be managed using Fonts section. You can choose to
adjust the screen display settings by selecting Adjust cleartype text. (32) Control Panel – Managing User Accounts
PROCEDURE: 1) Open Control Panel using Start->All Apps->Windows Settings->Control
Panel (or press Windows+R, type CONTROL followed by Enter key). 2) Set View By property to Category. 3) Choose User Accounts. 4) Click User Accounts again. The first 2 items display Change your user
name and Change your account type. You may set a new name to your account or downgrade your account from administrator to standard.
5) On Pressing Manage Another Account, the existing user accounts are displayed. Click any one of the accounts to see the following settings:
a. Change the account name – already explained b. Change the password – Set or change password for selected
account c. Change the account type – already explained d. Delete the account – Delete selected account. e. Manage another account
6) Choose Manage another account again. 7) New user account may be added by clicking the link Add a new user
account in PC settings. Click the + Add someone else to this PC. Enter
33
User Name. Type the password and retype the same to confirm the password. Password hint is a tip to guess the password in case it is forgotten.
8) Press Next button to complete the user account creation. 9) By default, new user is created under Standard user. You may choose to
change the user to Administrator to permit access to system settings. 10) You can see the new account from the Use Accounts, Manage
Another Account section of control panel. (33) Control Panel – Managing programs
PROCEDURE: 1) Open Control Panel using Start->All Apps->Windows Settings->Control
Panel (or press Windows+R, type CONTROL followed by Enter key). 2) At the top right corner, there is a search box. You can type specific
control panel item in the search box to find results. 3) Select Category under View by option. 4) Choose Programs category. 5) The following options are available under programs section:
a. Programs and Features – Uninstall a program, Turn Windows features on or off, View installed updates, Run programs made for previous version of Windows, How to install a program.
b. Default Programs – Change default settings for media devices, Make a file type always open in a specific program, Set your default programs.
6) To uninstall a program, choose Programs -> Programs and Features->Uninstall a program. Choose the program to be uninstalled. Make the choices for uninstallation.
7) To turn on or off some framework or library feature in Windows, choose Programs->Programs and Features->Turn Windows Features on or off. Make a mark or remove a mark against the feature of Windows that should be turned on or off.
8) To change the default programs used for opening video or audio disk, choose Programs->Default Programs->Change default settings for media devices. Choose the program to be used for each device type and media type.
9) To change the default program used to open a specific file name extension, choose Programs->Default Programs->Make a file type open in a specific program.
10) To associate each program with specific file types, choose Programs->Default Programs->Set Default Program.
34
(34) Control Panel – Ease of Access PROCEDURE:
1) Open Control Panel using Start->All Apps->Windows Settings->Control Panel (or press Windows+R, type CONTROL followed by Enter key).
2) At the top right corner, there is a search box. You can type specific control panel item in the search box to find results.
3) Select Category under View by option. 4) Ease of access is available as a separate item and under Appearance
and Personalization->Ease of Access Centre. 5) To set basic settings for use of computer under visually impaired or
other accessibility mode, choose Ease of Access->Ease of Access Centre. It displays Start magnifier, start narrator (reads out), start on screen keyboard, set up high contrast.
6) The ease of access centre contains Use a computer without a display, make the computer easier to see, Use the computer without a mouse or keyboard, Make the mouse easier to use, Make the keyboard easier to use, Use text or visual alternatives for sounds, Make it easier to focus on tasks, Make touch and tablet easier to use.
7) To control the computer using voice commands and to type to documents using dictation, choose Ease of Access->Speech Recognition->Start Speech Recognition.
8) You can set up a microphone, take speech tutorial and train your computer for speech recognition from Ease of Access->Speech Recognition->Start Speech Recognition section.
35
(35) Control Panel – Network and Internet PROCEDURE:
1) Open Control Panel using Start->All Apps->Windows Settings->Control Panel (or press Windows+R, type CONTROL followed by Enter key).
2) At the top right corner, there is a search box. You can type specific control panel item in the search box to find results.
3) Select Category under View by option. 4) Choose Network and Internet. The following items are displayed: (i)
Network and Sharing Centre, (ii) Home Group, (iii) Internet Options. 5) To view connection status in a network, connect to a new network or
to trouble shoot any network connection issues, choose Network and Internet->Network and Sharing Centre.
6) When several computers are connected through a common networking device (modem, bridge, switch, hub, etc.), Home Group can be created. Home group helps in file and printer sharing. To manage home group, choose Network and Internet->Home Group.
7) Home page for browsing and browsing history may be managed using Network and Internet->Internet Options->General.
8) Security Level (Internet, local Intranet, trusted site, restricted site) may be set using Network and Internet->Internet Options->Security.
9) Popup-Blocker may be enabled or disable using Network and Internet->Internet Options->Privacy.
10) Security certificates, auto-complete options and feeds and web slices may be managed using Network and Internet->Internet Options->Content.
11) The default programs used for accessing Internet and opening downloaded files may be managed using Network and Internet->Internet Options->General.
(36) Control Panel – Hardware and sound PROCEDURE:
1) Open Control Panel using Start->All Apps->Windows Settings->Control Panel (or press Windows+R, type CONTROL followed by Enter key).
2) At the top right corner, there is a search box. You can type specific control panel item in the search box to find results.
3) Select Category under View by option. 4) Choose Hardware and sounds. The following sections are available
under this category: a. Devices and printers – List of printers, scanners and other
peripherals connected to the computer is displayed. Press Add a device or Add a printer to add new device/ printer to the computer. Driver for the new device should be available.
36
i. Right click on a printer. Choose See what is printing to view print jobs underway, choose Set as Default Printer to make the printer default or choose Preferences to set paper size, toner mode, etc.
ii. Select AutoPlay option to set default programs to open media containing audio, video, etc.
iii. Choose power options to set battery usage modes (Performance/ Balanced and Power saver).
iv. Display option permits setting the scaling level and display font size (same as the one found under Appearance and Personalization).
v. Windows mobility centre provides a single point access to display brightness, sound, Battery status, power manager, connecting to external displays, synchronization and presentation settings.
(37) Control Panel – System and Security PROCEDURE:
1) Open Control Panel using Start->All Apps->Windows Settings->Control Panel (or press Windows+R, type CONTROL followed by Enter key).
2) At the top right corner, there is a search box. You can type specific control panel item in the search box to find results.
3) Select Category under View by option. Choose System and Security. a. Open Security and Maintenance to set Firewall on or off, virus
protection on or off, disable apps that automatically start and to check for solutions for unreported problems. Recovery option resets the PC.
b. Windows Firewall section may be used to enable or disable firewall protection in the PC.
c. System section may be used to see the amount of RAM, processor type and Windows activation status.
d. Device Manager, available as a tab on the Navigation panel of System section helps to update drivers for devices.
e. Power Options are the same as that available under Devices and Printers.
f. File History permits automatic backup of data in another drive, for recovery in case the original data is lost.
g. Backup and Restore creates system backup. Restore can be performed when the system runs in to trouble.
h. Storage spaces can set backup options to store data in 2 or more drives. This helps complete recovery of data even if one drive fails.

37
i. Administrative Tools help to control Computer Management (Disk Management), Defragment drives, Disk cleanup, Print Management, Services running in the background, Task scheduler, Windows firewall and Windows memory diagnostics.
(38) Changing settings in Windows 10 PROCEDURE:
1) Open settings from Start menu -> Settings. 2) Open the following settings and make changes to the settings:
a. System: Make changes to brightness, sound (audio devices), notifications and actions, focus assist, power & sleep, battery performance, storage, tablet mode (behaves like a phone/ tablet), multitasking, projecting to this PC, clipboard, Remote desktop and about PC.
b. Devices: Change the settings for Bluetooth devices, printers and scanners, mouse, touchpad, typing, pen & windows ink, autoplay and USB.
c. Phone: Link a phone to the computer. d. Network and Internet: Make changes to status, WiFi, dialup, VPN,
Airplane mode, Mobile Hotspot, Data Usage, Proxy. e. Personalization: Background, colours, lock screen, themes, fonts,
start, taskbar. f. Apps: Make changes to apps and features, default apps, offline
maps, apps for websites, video playback, startup. g. Accounts: Make changes to basic info, email accounts, sign-in
options, access work or school, family & other users, sync your settings.
h. Time & language: Make changes to time, region and language and speech.
i. Gaming: Make changes to game bar, capture, broadcasting, game mode, Xbox networking.
j. Search: Make changes to permissions & history, searching windows and more details.
k. Cartana: Make changes to talk to Cartana, permissions, etc. l. Privacy: Make changes to location sharing, camera, microphone,
etc. m. Update and security: Manage windows updates and security
settings
(39) Managing BIOS settings PROCEDURE:
38
3) BIOS settings are accessible when the computer is just powered on. 4) Different motherboards have different key to access BIOS (displayed at
the time of start up). Some of the most common keys to enter BIOS are: (i) DEL – legacy; (ii) F2 (Acer); (iii) Esc (HP), etc.
5) Under Information section, look at the general details of the computer. 6) Under Main category, change the date, time, etc. 7) Under Security section, set password for user or supervisor. 8) Under Boot section, set the boot device priority (first, second, third, etc.
boot devices). 9) Normally, pressing F10 saves the data and exits BIOS. 10) Use Tab to move between different sections of the same settings. 11) Use Up and Down arrows to access change BIOS settings. 12) Some BIOSes use + or – to change BIOS values. Some other BIOSes
use F5 and F6 for changing options. 13) You can set the Optimal System defaults through Exit menu
(Normally accessed through F9 shortcut). 14) Each BIOS displays tips at the bottom and right side to help
manage the BIOS values correctly.
(40) Installation of Windows Operating System (Windows 10) PROCEDURE:
1) Attach the CD/ DVD/ Pen drive containing installation files for Windows operating system in your computer.
2) Boot the computer. Look at the BIOS post message. Press the designated key to enter BIOS settings (DEL, Esc, F2, Enter, etc.).
3) Change the first boot device to the drive/ media containing Windows operating system.
4) When the message stating “Press any key to boot from CD or DVD ...” appears, press any key. Windows operating system begins to load.
5) The Windows installer requests you to choose the language for installation (choose English), time and currency format (choose English United Kingdom or English India), Keyboard or input format (choose English United States International). Press Next button.
6) Press Install now to start the installation. 7) Enter product key, if the screen for product key entry appears. The
hyphen symbol appears automatically if you keep typing. Remember to distinguish between 1 and I, 0 and O.
8) The EULA (End User License Agreement) appears. Read and press tick mark against accept. Press Next button.
39
9) The option screen requesting to choose an Upgrade to existing operating system or Custom/ Fresh installation of Windows appears. Choose Custom.
10) The partitioning screen appears. If there is a previous operating system, the drives are shown. Delete all the drives.
11) Press New when keeping the cursor on unpartitioned space. Enter the size to be allotted to the C: drive first.
12) The size is entered in MB (Enter 20480 for 20GB, 51200 for 50 GB, 102400 for 100 GB, 153600 for 150 GB, 204800 for 200GB – the size in GB multiplied by 1024).
13) On creating the first partition, Windows will show a dialog stating that additional partitions are required. Press OK. It will create one of more additional partitions.
14) Create several other partitions. The size rule is M = 1024*G, where M is size in Mega Byte and T is size in Giga Byte.
15) Format each partition after creating it. 16) Choose the first large partition (not the 100MB to 500MB partition
created by the operating system for reserved purposes, which is too small for installation).
17) The installation starts. Wait until the installation is completed. 18) When the system reboots, do not press any key during startup.
Because, you will end up doing steps 4 to 17 again and again instead of configuring newly installed Windows.
19) Enter the network settings (or choose Skip). 20) Manage the detailed settings of Windows (or press Express Settings). 21) Enter the user name and password for new user. 22) Login to the newly installed Windows operating System.
(41) Installation of MS Office and other Application software packages in Windows
PROCEDURE: 1) Insert the media (CD/ DVD or Pen drive). 2) Right click on the Setup.exe file of MS Office. Choose Run as
Administrator. 3) When a confirmation screen appears, choose OK to run the program
with Administrator privileges. 4) Enter product key for the MS Office Software. 5) Press Next button. 6) Choose complete installation of MS Office. 7) Allow the installation to finish.
40
8) Install AdobeReader, WinRar, Azhagi+ and BurnAware software packages. For installation, always right click and choose Run as Administrator.
9) Install GIMP for image editing. 10) Install OpenOffice, which is an alternate to MS Office for preparation
of documents. 11) Install Photoshop, if needed for image editing.
(42) Installation of Ubuntu Linux PROCEDURE:
1) Insert the media (CD/ DVD or Pen drive) containing Ubuntu Linux operating system.
2) Choose Start->Power and press Shift+Restart in the previous Windows operating system.
3) Hit the BIOS or boot menu key when the BIOS loads on restart. 4) Choose the Ubuntu Linux DVD as the boot source. 5) Wait until the menu containing Try Ubuntu and Install Ubuntu
appears. Choose Try Ubuntu. 6) When the Ubuntu operating system loads, double click Install Ubuntu
from the Desktop. 7) Choose English language for installation. Press Continue. 8) Choose Do not connect to WiFi network. Press Continue. 9) Place a tick mark against install third party software. Press Continue. 10) Choose Something else for multiple operating system installation
options. Press Continue. 11) Delete (- symbol) the last partition (/dev/sda4 or /dev/sda6) which
has more than 30GB space. 12) Add (+ symbol) new partition having 90% of the space available, select
/ against mount point and Ext4 against file system type. 13) Press Ok. New partition is created. 14) Add new partition in the available free space (+ symbol). Choose Swap
against partition type. Press OK to add new partition. 15) Press Install Now to install the operating system on the partition
having / against mount point. 16) Choose Kolkata against time zone. 17) Choose English US against keyboard layout. 18) Enter user name and password. Confirm the password. Press
Continue. 19) Wait until the installation completes. 20) After completing the installation, Ubuntu Linux restarts. 21) When the DVD is ejected, remove the DVD and restart the computer. 22) When the operating system menu appears, choose Ubuntu Linux.

41
23) After logging in, press Alt key or Windows key, enter terminal and open terminal application.
24) Type cd /boot/grub. 25) Type sudo gedit grub.cfg. Enter your password when requested. 26) Count the menu entry number for Windows operating system and
enter the same against default. The counting starts with 0 (zero). 27) Start working with Linux operating system.
(43) Creating multiplication table using OpenOffice.org Writer PROCEDURE:
1) Open Writer program. 2) Centre align the text (Ctrl+E) and type TABLES. 3) Set the alignment to left and type 2 Tables. 4) Choose Tables->Insert Table from the menu bar. Set number of rows
to 10 and number of columns to 5. 5) In the first row (cells A1 to E1), enter 2, x, 1 and = (space =) in cells A1
to D1. 6) Enter the formula =<A1>*<C1> in the cell E1. 7) Copy first row. 8) Select rows 2 to 10 and press Ctrl+V to paste. 9) Change the values in cells C2 to C10 from 2 to 10. 10) Copy the table and its heading. 11) Paste them below the first table. 12) Change the table header to 3 Tables. Change the values in first column
to 3. (44) Creating GST bill form using OpenOffice.org Calc
PROCEDURE: 1) Open Calc program. 2) Merge cells A1 to E1 and enter Green City Departmental Store. 3) Merge cells A2 to E2 and enter address of the store (17, East Car
Street, Villianur). 4) Enter Mobile: 34343422 and Phone: 0413-23423 in cells A3 and D3. 5) Select cells A4 to E19. Choose Format->Cells. Select Borders. Choose
All borders. 6) Enter the values Sl. No., Item, Quantity, Rate, Amount in cells A4 to
E4. Set the font to bold, alignment to center. 7) Enter item number, item name, quantity and rate in cells A5 to D5.
Enter the formula C5*D5 in cell E5. 8) In cell B16, enter Total. In cell D15, enter the formula =Sum(E5:E15). 9) In cell B17, enter SGST @ 6%. In cell D17, enter the formula
=round(E16*6/100, 0).
42
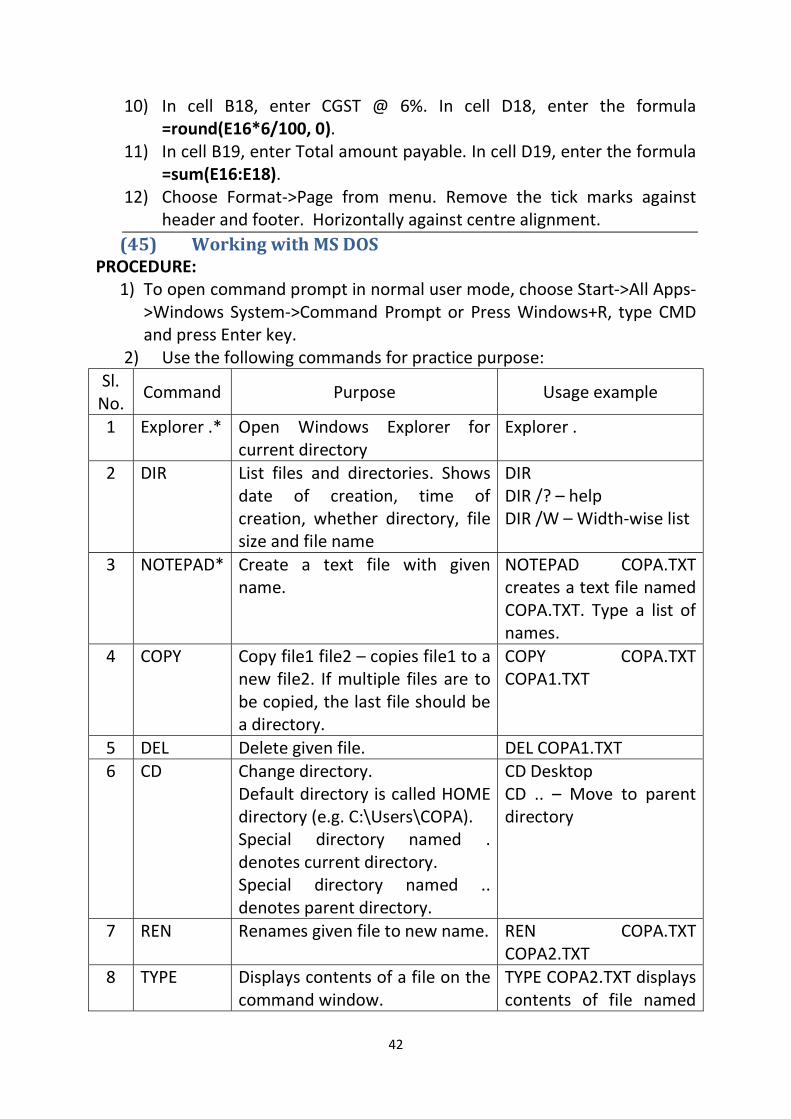
10) In cell B18, enter CGST @ 6%. In cell D18, enter the formula =round(E16*6/100, 0).
11) In cell B19, enter Total amount payable. In cell D19, enter the formula =sum(E16:E18).
12) Choose Format->Page from menu. Remove the tick marks against header and footer. Horizontally against centre alignment.
(45) Working with MS DOS PROCEDURE:
1) To open command prompt in normal user mode, choose Start->All Apps->Windows System->Command Prompt or Press Windows+R, type CMD and press Enter key.
2) Use the following commands for practice purpose: Sl.
No. Command Purpose Usage example
1 Explorer .* Open Windows Explorer for current directory
Explorer .
2 DIR List files and directories. Shows date of creation, time of creation, whether directory, file size and file name
DIR DIR /? – help DIR /W – Width-wise list
3 NOTEPAD* Create a text file with given name.
NOTEPAD COPA.TXT creates a text file named COPA.TXT. Type a list of names.
4 COPY Copy file1 file2 – copies file1 to a new file2. If multiple files are to be copied, the last file should be a directory.
COPY COPA.TXT COPA1.TXT
5 DEL Delete given file. DEL COPA1.TXT 6 CD Change directory.
Default directory is called HOME directory (e.g. C:\Users\COPA). Special directory named . denotes current directory. Special directory named .. denotes parent directory.
CD Desktop CD .. – Move to parent directory
7 REN Renames given file to new name. REN COPA.TXT COPA2.TXT
8 TYPE Displays contents of a file on the command window.
TYPE COPA2.TXT displays contents of file named

43
COPA2.TXT in the command window.
9 CLS Clear screen. Clears the command window and places the cursor at the topmost line.
CLS
10 DATE Displays system date. If date is to be reset, enter new date separated by – symbol (E.g. 23-09-2017). New date will be accepted by the system only if the command window is opened with Administrator privilege.
DATE
11 TIME Displays system time. To change time, enter new time in HH.MM.SS format.
TIME
* - Not an MS DOS command. Used for convenience 3) Type exit to close MS DOS window.
(46) Working with MS DOS – Internal DOS Commands
PROCEDURE: 1) To open command prompt in normal user mode, choose Start->All Apps-
>Windows System->Command Prompt or Press Windows+R, type CMD and press Enter key.
2) Use the following commands for practice purpose: Sl.
No. Command Purpose Usage example
1 VER Displays version of MS DOS
VER
2 VOL Displays volume information (name, serial number, etc.) for given drive. If no argument is provided, current volume details are displayed.
VOL VOL D:
3 COPY CON
Copy the keyboard input to a file. To end the copying process, press Ctrl+Z
COPY CON TEMP.TXT CPU Monitor Mouse
44
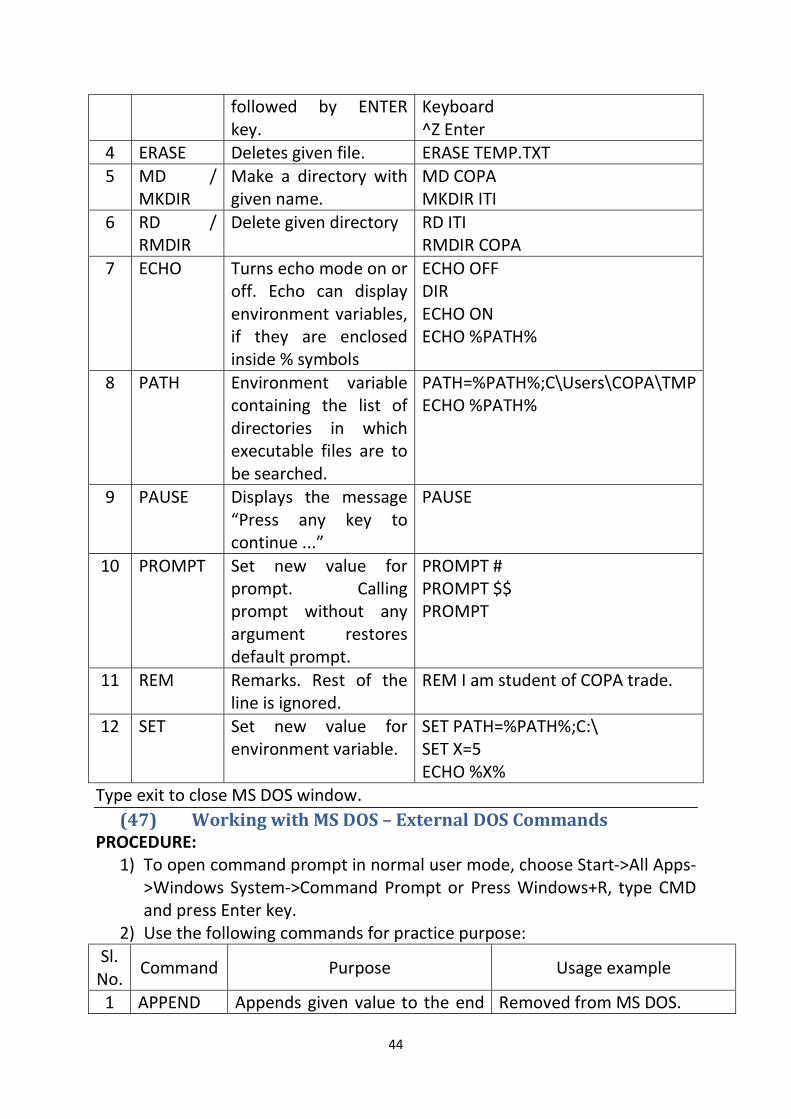
followed by ENTER key.
Keyboard ^Z Enter
4 ERASE Deletes given file. ERASE TEMP.TXT 5 MD /
MKDIR Make a directory with given name.
MD COPA MKDIR ITI
6 RD / RMDIR
Delete given directory RD ITI RMDIR COPA
7 ECHO Turns echo mode on or off. Echo can display environment variables, if they are enclosed inside % symbols
ECHO OFF DIR ECHO ON ECHO %PATH%
8 PATH Environment variable containing the list of directories in which executable files are to be searched.
PATH=%PATH%;C\Users\COPA\TMP ECHO %PATH%
9 PAUSE Displays the message “Press any key to continue ...”
PAUSE
10 PROMPT Set new value for prompt. Calling prompt without any argument restores default prompt.
PROMPT # PROMPT $$ PROMPT
11 REM Remarks. Rest of the line is ignored.
REM I am student of COPA trade.
12 SET Set new value for environment variable.
SET PATH=%PATH%;C:\ SET X=5 ECHO %X%
Type exit to close MS DOS window. (47) Working with MS DOS – External DOS Commands
PROCEDURE: 1) To open command prompt in normal user mode, choose Start->All Apps-
>Windows System->Command Prompt or Press Windows+R, type CMD and press Enter key.
2) Use the following commands for practice purpose: Sl.
No. Command Purpose Usage example
1 APPEND Appends given value to the end Removed from MS DOS.
45
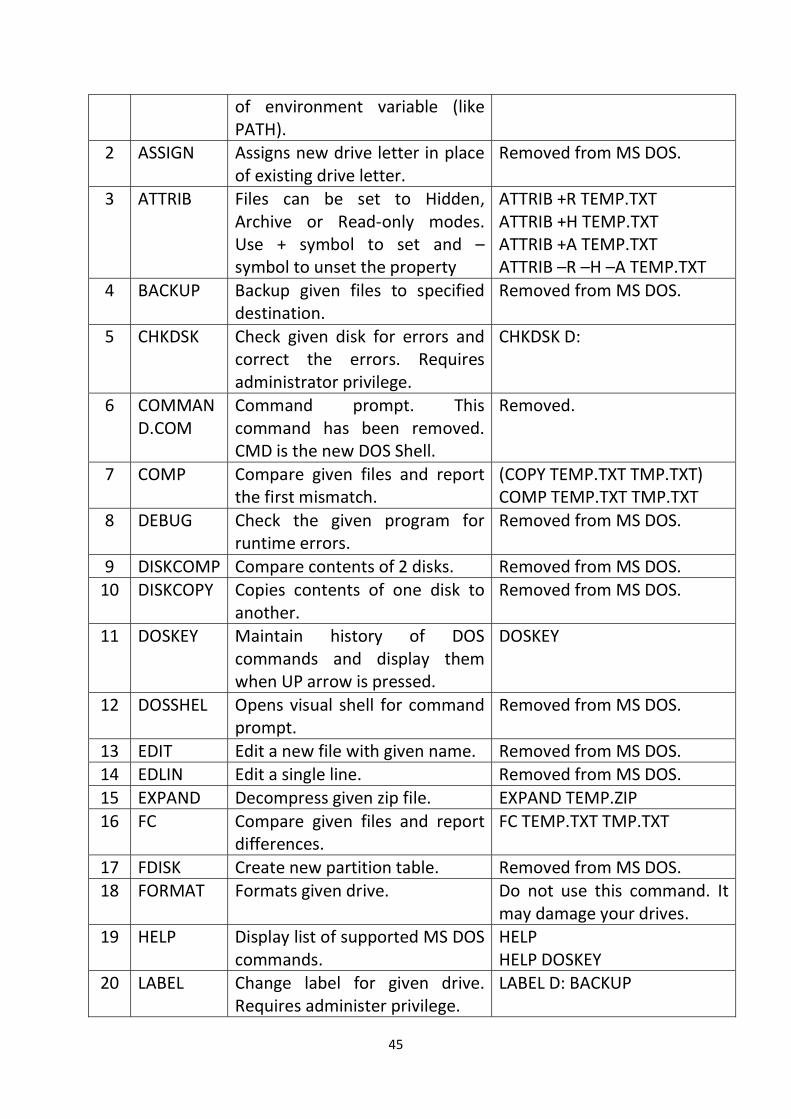
of environment variable (like PATH).
2 ASSIGN Assigns new drive letter in place of existing drive letter.
Removed from MS DOS.
3 ATTRIB Files can be set to Hidden, Archive or Read-only modes. Use + symbol to set and – symbol to unset the property
ATTRIB +R TEMP.TXT ATTRIB +H TEMP.TXT ATTRIB +A TEMP.TXT ATTRIB –R –H –A TEMP.TXT
4 BACKUP Backup given files to specified destination.
Removed from MS DOS.
5 CHKDSK Check given disk for errors and correct the errors. Requires administrator privilege.
CHKDSK D:
6 COMMAND.COM
Command prompt. This command has been removed. CMD is the new DOS Shell.
Removed.
7 COMP Compare given files and report the first mismatch.
(COPY TEMP.TXT TMP.TXT) COMP TEMP.TXT TMP.TXT
8 DEBUG Check the given program for runtime errors.
Removed from MS DOS.
9 DISKCOMP Compare contents of 2 disks. Removed from MS DOS. 10 DISKCOPY Copies contents of one disk to
another. Removed from MS DOS.
11 DOSKEY Maintain history of DOS commands and display them when UP arrow is pressed.
DOSKEY
12 DOSSHEL Opens visual shell for command prompt.
Removed from MS DOS.
13 EDIT Edit a new file with given name. Removed from MS DOS. 14 EDLIN Edit a single line. Removed from MS DOS. 15 EXPAND Decompress given zip file. EXPAND TEMP.ZIP 16 FC Compare given files and report
differences. FC TEMP.TXT TMP.TXT
17 FDISK Create new partition table. Removed from MS DOS. 18 FORMAT Formats given drive. Do not use this command. It
may damage your drives. 19 HELP Display list of supported MS DOS
commands. HELP HELP DOSKEY
20 LABEL Change label for given drive. Requires administer privilege.
LABEL D: BACKUP
46
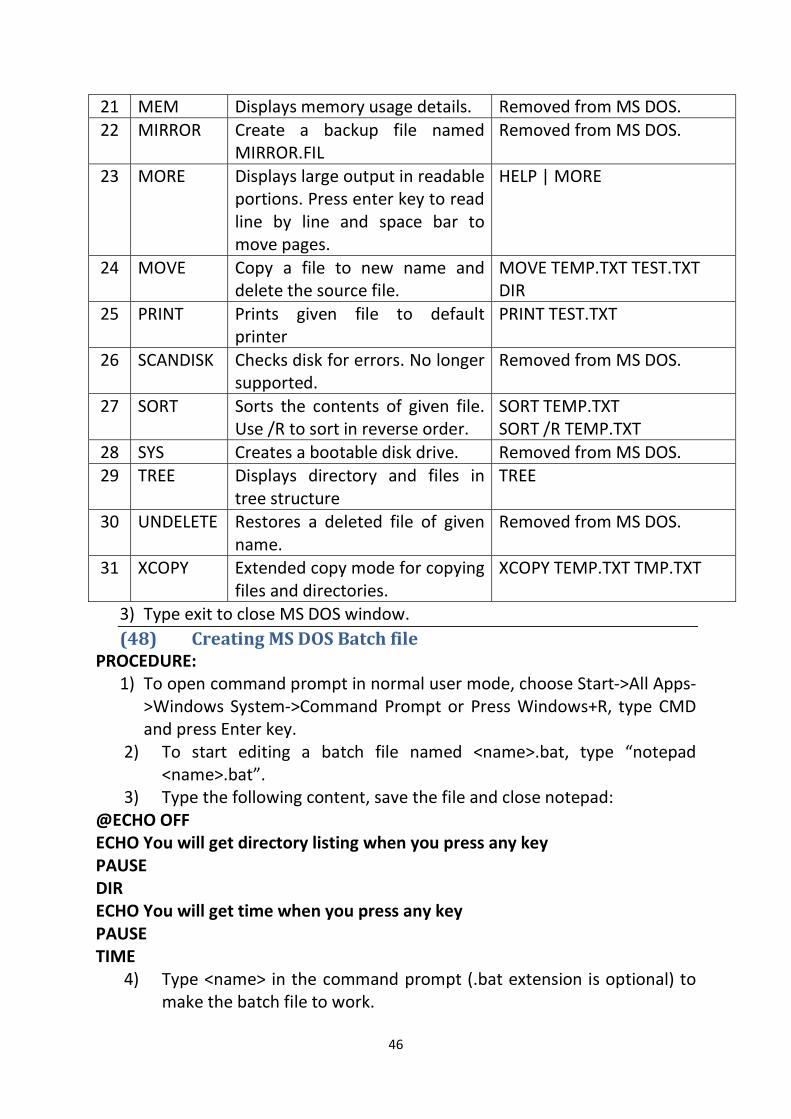
21 MEM Displays memory usage details. Removed from MS DOS. 22 MIRROR Create a backup file named
MIRROR.FIL Removed from MS DOS.
23 MORE Displays large output in readable portions. Press enter key to read line by line and space bar to move pages.
HELP | MORE
24 MOVE Copy a file to new name and delete the source file.
MOVE TEMP.TXT TEST.TXT DIR
25 PRINT Prints given file to default printer
PRINT TEST.TXT
26 SCANDISK Checks disk for errors. No longer supported.
Removed from MS DOS.
27 SORT Sorts the contents of given file. Use /R to sort in reverse order.
SORT TEMP.TXT SORT /R TEMP.TXT
28 SYS Creates a bootable disk drive. Removed from MS DOS. 29 TREE Displays directory and files in
tree structure TREE
30 UNDELETE Restores a deleted file of given name.
Removed from MS DOS.
31 XCOPY Extended copy mode for copying files and directories.
XCOPY TEMP.TXT TMP.TXT
3) Type exit to close MS DOS window. (48) Creating MS DOS Batch file
PROCEDURE: 1) To open command prompt in normal user mode, choose Start->All Apps-
>Windows System->Command Prompt or Press Windows+R, type CMD and press Enter key.
2) To start editing a batch file named <name>.bat, type “notepad <name>.bat”.
3) Type the following content, save the file and close notepad: @ECHO OFF ECHO You will get directory listing when you press any key PAUSE DIR ECHO You will get time when you press any key PAUSE TIME
4) Type <name> in the command prompt (.bat extension is optional) to make the batch file to work.
47
5) To create another batch file for input and sorting, type “notepad <name1>.bat”.
6) Type the following contents, save the file and close notepad. @ECHO OFF ECHO Input names of at least 5 computer components. Press Ctrl+Z Enter to end input COPY CON TMP.TXT ECHO . ECHO Press any key to see the contents of file typed by you PAUSE TYPE TMP.TXT ECHO . ECHO Press any key to see the sorted list of items (ascending) PAUSE SORT TMP.TXT ECHO . ECHO Press any key to see the sorted list of items (descending) PAUSE SORT /R TMP.TXT
7) Type exit to close MS DOS window.
(49) Using File Redirection and Special Characters in MSDOS PROCEDURE:
1) To open command prompt in normal user mode, choose Start->All Apps->Windows System->Command Prompt or Press Windows+R, type CMD and press Enter key.
2) To redirect output of program to a new file, use the > operator. Sample usage (Omit the content within brackets while typing in command line):
COPY CON NAME.TXT TYPE NAME.TXT TYPE NAME.TXT > TMP.TXT TYPE TMP.TXT
3) To redirect output of program and append the contents to a file, use the >> operator. Sample usage (Omit the content within brackets while typing in command line):
COPY CON NAME.TXT TYPE NAME.TXT TYPE NAME.TXT > TMP.TXT TYPE NAME.TXT >> TMP.TXT TYPE NAME.TXT >> TMP.TXT

48
TYPE TMP.TXT 4) The contents of a file may be directed to a new program using the pipe
(|) operator. Sample usage: COPY CON NAME.TXT TYPE NAME.TXT TYPE NAME.TXT | SORT TYPE DIR | SORT /R TYPE DIR | MORE
5) Use * to match any number of unknown characters. Sample usage: COPY CON NAME.TXT DIR *.TXT DIR NAME.*
6) Use ? to match a single unknown characters. Sample usage: COPY CON NAME.TXT DIR NAM?.TXT DIR NAME.?XT
(50) Working with Linux shell commands – Part 1 PROCEDURE:
1) Open Linux operating system. 2) Login using your ID and password. 3) Press Windows (or Alt) key. Type Terminal (which brings terminal into
view). Click on Terminal icon to open bash (Bourne Again Shell) in Linux.
4) To display file listing, use ls command (try ls, ls –l, ls –a, ls –d, ls *.txt). 5) To create new directory, use mkdir (try: mkdir name, mkdir iti). 6) To remove a directory, use rmdir (try: rmdir name, rmdir iti). 7) To create a text file (fl.txt) from command line, type cp – > fl.txt. The
– symbol denotes keyboard (standard input). 8) To copy file, use cp (try: cp fl.txt fl1.txt, cp fl1.txt fl2.txt). 9) To move a file, use mv (Try: mv fl2.txt fl3.txt). 10) To change to a new directory, use cd command (Try: cd iti, cd .., cd ~,
cd /, cd). 11) To know the current directory, use pwd (Try: pwd). 12) To know who are logged in, use finger. 13) To know the operating system type and version, use uname –a. 14) To mount a file system, use mount command. 15) To un-mount a file system, use umount command. 16) To eject a cd or dvd, use eject /dev/sdb (or device name).
49
17) To power off a computer, use shutdown –h now (Try: shutdown –h 20s).
18) To restart a computer, use shutdown –r now (Try: shutdown –r 20s). 19) To stop processing for specified duration, use sleep <duration>
command (Try: sleep 40s). 20) To sort contents of a file, use sort fl (Try: sort fl.txt, sort fl1.txt). 21) To delete a file, use rm command (Try: rm fl2.txt). 22) To display system date and time, use date command (to change
change date, use sudo date yymmddhhMMss). 23) To link a file to a new name, use ln (Try: ln fl.txt fl5.txt). 24) To create a tape archive file, use tar czf <file/ folder> (Try: tar czf
fl.txt). 25) To unzip the contents of an archive file, use tar xzf <archive>. (Try: tar
xzf fl.tar). 26) To compress a file, use zip or gzip (Try: zip fl.txt, gzip fl1.txt). 27) To uncompress a zip or gzip file, use unzip or gunzip (Try: unzip fl.zip,
gunzip fl1.gzip). 28) To display help on a command, use man <command> (Try man mv). 29) To calculate results of numerical expression, use bc. 30) To display calendar, use cal command. (Try: cal 10 2017, cal 2018). 31) To calculate time taken for a program to complete, use time
<program>. 32) To display contents of file on the screen, use cat (Try: cat fl.txt, cat
fl1.txt).
(51) Working with Linux shell commands – Part 2 PROCEDURE:
1) Open Linux operating system. 2) Login using your ID and password. 3) Press Windows (or Alt) key. Type Terminal (which brings terminal into
view). Click on Terminal icon to open bash (Bourne Again Shell) in Linux. 4) To set date and time use sudo date MMDDhhmmYY or sudo date
MMDDhhmmYYYY (try sudo date 1011093517, sudo date 101109352017). Enter password when the system prompts.
5) To create a text document use gedit welcome.c. Type the following lines and save the file:
#include <stdio.h>
50
void main() { printf(“Welcome to C!\n”); }
6) To compile C language program, use cc command (try: cc welcome.c, ./a.out).
7) To change to special directories (/ - root directory, ~ - Home directory, . – Current directory, .. – parent directory), try cd /, cd ~, cd and cd .. .
8) To change owner and group names for a file, use sudo chown root.root welcome.c. To reverse the ownership of file to COPA, use sudo chown vn.vn welcome.c.
9) To count the number of lines, words and characters in a file, use wc (Try: wc welcome.c, wc –l welcome.c, wc –w welcome.c, wc –m welcome.c).
(52) Changing file permissions in Linux
PROCEDURE: 1) Open Linux operating system. 2) Login using your ID and password. 3) Press Windows (or Alt) key. Type Terminal (which brings terminal into
view). Click on Terminal icon to open bash (Bourne Again Shell) in Linux. 4) Linux supports 3 permission (Execute – 1, Read – 2, Write – 4) for 3
login credentials (UGO - User, Group, Others). 5) To grant all 3 permission, the number is 7 (1+2+4 = 7). To grant read
and write permission, the number is 6 (2+4 = 6). To grant read only permission, the number is 2. To grant read and execute permissions, the number is 3 (1+2 = 3).
6) Create a file <name>.txt using gedit add.sh. Type the following code in the file and save:
#!/bin/sh echo “Enter x: ” read x echo “Enter y: ” read y z=`expr $x + $y` echo “$x + $y = $z”
7) Type ls –l. The add.sh does not have execute permission. 8) To grant execute, read and write permission to the owner, execute and
read permissions to group and others, use the command chmod 755 add.sh. (Now type ./add.sh to run the shell script. It adds 2 numbers.)
51
9) To make the shell script have x, r, w permissions for all, use chmod 777 add.sh.
10) To grant all permissions to owner and only read permission to others, use chmod 744 add.sh.
11) To redirect input from a file, use < operator (Try: cat - > in.txt, type 25 36, Ctrl+d. Type add.sh < in.txt).
12) To substitute one letter for another (suppose all caps for small letters), use tr [old-list] [new-list] (Try: cat welcome.c | tr [a-z] [A-Z]).
13) To know location of a file in path, use which (Try: which cal, which sh). 14) To know the type of file based on its content, file (file add.sh, file in.txt) (53) Using regular expressions and filters in Linux
PROCEDURE: 1) Open Linux operating system.
2) Login using your ID and password. 3) Press Windows (or Alt) key. Type Terminal (which brings terminal into
view). Click on Terminal icon to open bash (Bourne Again Shell) in Linux. 4) To search for a pattern from file or standard input, use grep (Try: ls |
grep wel, cat add.sh | grep “Enter”, cat welcome.c | grep ’;$’, cat add.sh | grep ‘^pr’, grep m *.c).
5) To search for patterns typed in a file, use fgrep (Try: cat - > fl.txt, main clued in separate lines, fgrep –f fl.txt welcome.c).
6) To search and replace patterns, use sed (Try: cat add.sh | sed ‘s/Enter/Input/g’. This replaces (s - substitute) the word Enter with Input in global scope (g), cat add.sh | sed ‘/echo/d’, cat add.sh | sed ‘/read/q’, echo add.sh | sed ‘/read/p’).
7) To process strings which match given pattern, use awk. (Try ls –l | awk ‘{printf(“%s\t%s\n”, $9, $5)}’).
8) To learn disk free space levels for each filesystem, use df (Try: du) 9) To learn about disk usage level for each file, use du. 10) To search for file having particular name, use find . –name <file> (Try:
find . –name “*.txt”, find . –name “*.txt” –exec wc {} \;, find . –name “*.scr” –exec rm –r -f {} \;
(54) Creating simple shell scripts in Linux PROCEDURE:
1) Open Linux operating system. 2) Login using your ID and password. 3) Press Windows (or Alt) key. Type Terminal (which brings terminal into
view). Click on Terminal icon to open bash (Bourne Again Shell) in Linux. 4) To create a shell script for adding 2 numbers, type gedit add.sh, enter
the following code and save the file:
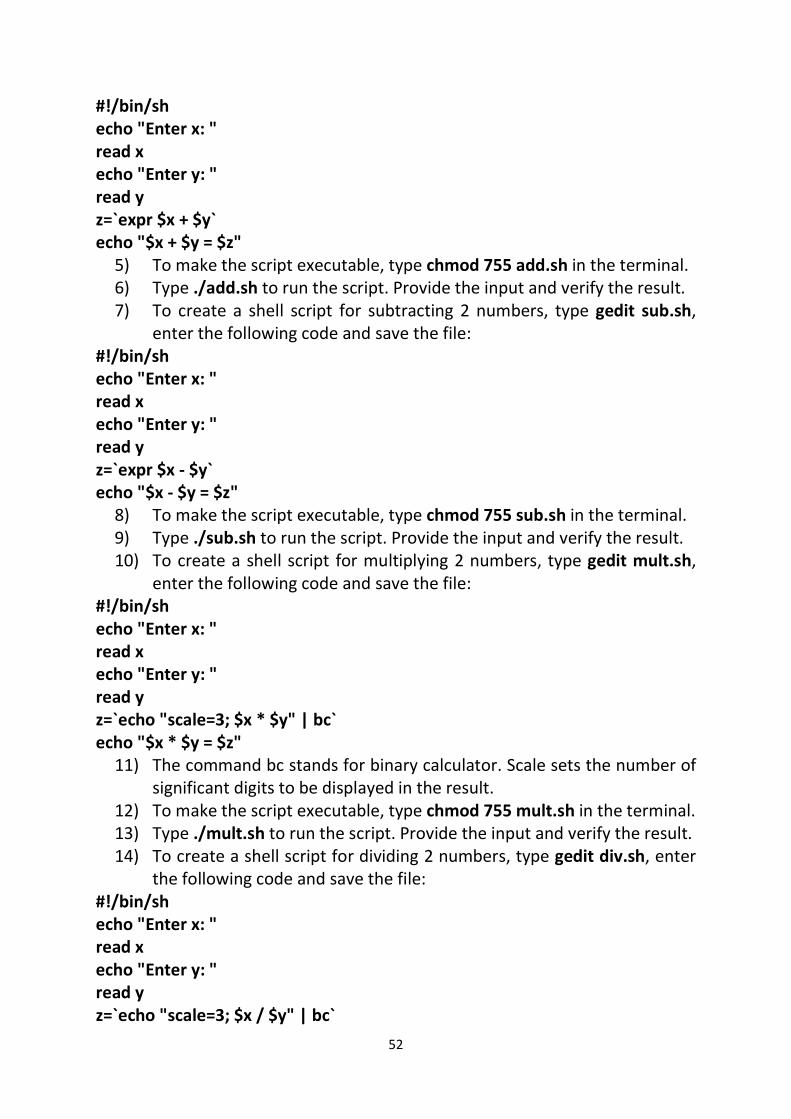
52
#!/bin/sh echo "Enter x: " read x echo "Enter y: " read y z=`expr $x + $y` echo "$x + $y = $z"
5) To make the script executable, type chmod 755 add.sh in the terminal. 6) Type ./add.sh to run the script. Provide the input and verify the result. 7) To create a shell script for subtracting 2 numbers, type gedit sub.sh,
enter the following code and save the file: #!/bin/sh echo "Enter x: " read x echo "Enter y: " read y z=`expr $x - $y` echo "$x - $y = $z"
8) To make the script executable, type chmod 755 sub.sh in the terminal. 9) Type ./sub.sh to run the script. Provide the input and verify the result. 10) To create a shell script for multiplying 2 numbers, type gedit mult.sh,
enter the following code and save the file: #!/bin/sh echo "Enter x: " read x echo "Enter y: " read y z=`echo "scale=3; $x * $y" | bc` echo "$x * $y = $z"
11) The command bc stands for binary calculator. Scale sets the number of significant digits to be displayed in the result.
12) To make the script executable, type chmod 755 mult.sh in the terminal. 13) Type ./mult.sh to run the script. Provide the input and verify the result. 14) To create a shell script for dividing 2 numbers, type gedit div.sh, enter
the following code and save the file: #!/bin/sh echo "Enter x: " read x echo "Enter y: " read y z=`echo "scale=3; $x / $y" | bc`
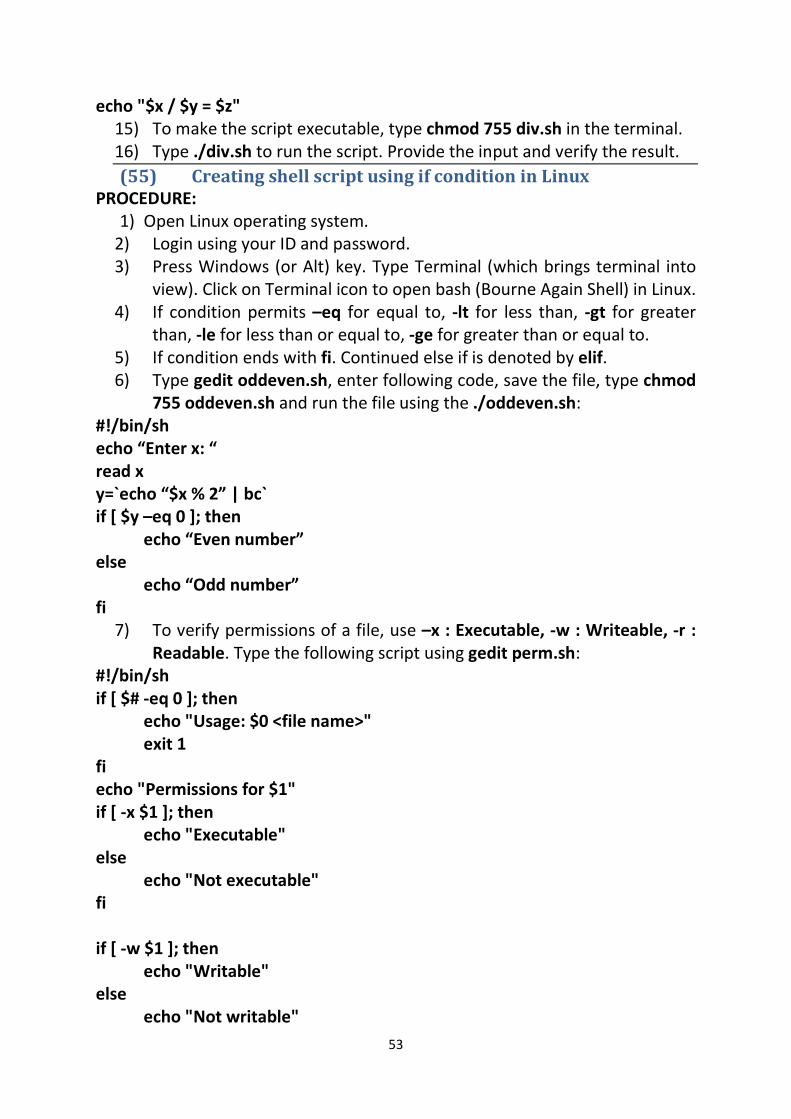
53
echo "$x / $y = $z" 15) To make the script executable, type chmod 755 div.sh in the terminal. 16) Type ./div.sh to run the script. Provide the input and verify the result. (55) Creating shell script using if condition in Linux
PROCEDURE: 1) Open Linux operating system.
2) Login using your ID and password. 3) Press Windows (or Alt) key. Type Terminal (which brings terminal into
view). Click on Terminal icon to open bash (Bourne Again Shell) in Linux. 4) If condition permits –eq for equal to, -lt for less than, -gt for greater
than, -le for less than or equal to, -ge for greater than or equal to. 5) If condition ends with fi. Continued else if is denoted by elif. 6) Type gedit oddeven.sh, enter following code, save the file, type chmod
755 oddeven.sh and run the file using the ./oddeven.sh: #!/bin/sh echo “Enter x: “ read x y=`echo “$x % 2” | bc` if [ $y –eq 0 ]; then echo “Even number” else echo “Odd number” fi
7) To verify permissions of a file, use –x : Executable, -w : Writeable, -r : Readable. Type the following script using gedit perm.sh:
#!/bin/sh if [ $# -eq 0 ]; then echo "Usage: $0 <file name>" exit 1 fi echo "Permissions for $1" if [ -x $1 ]; then echo "Executable" else echo "Not executable" fi if [ -w $1 ]; then echo "Writable" else echo "Not writable"
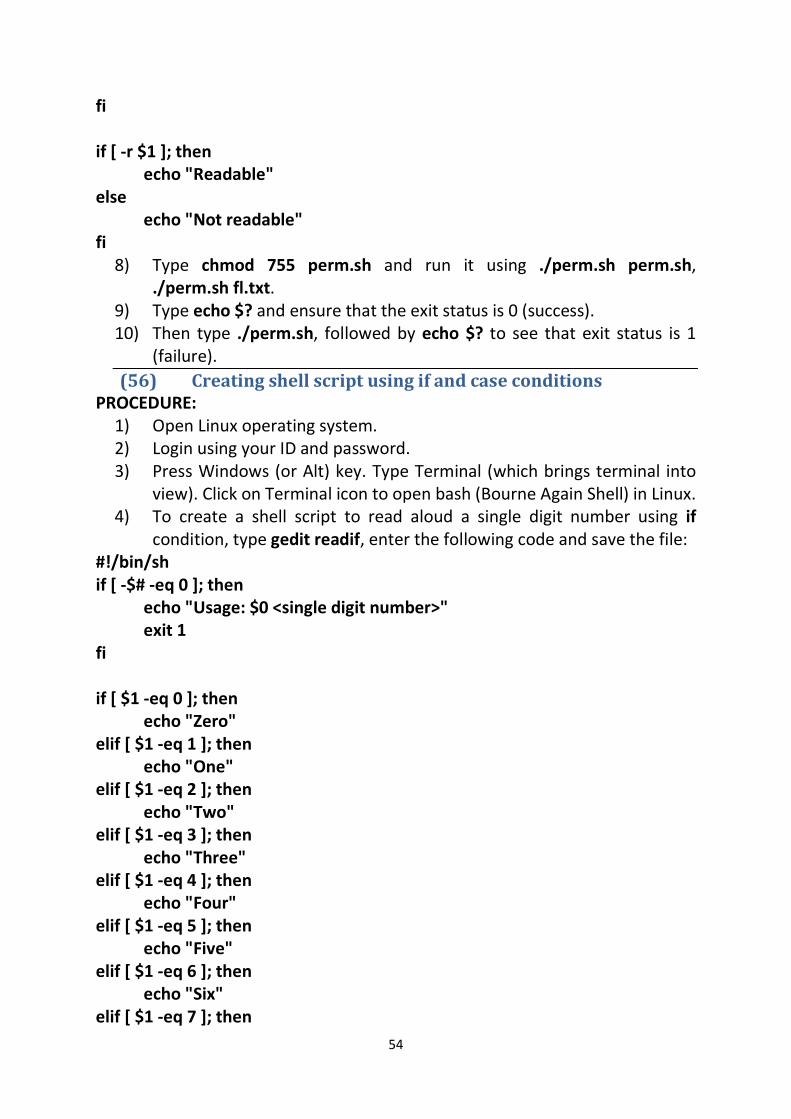
54
fi if [ -r $1 ]; then echo "Readable" else echo "Not readable" fi
8) Type chmod 755 perm.sh and run it using ./perm.sh perm.sh, ./perm.sh fl.txt.
9) Type echo $? and ensure that the exit status is 0 (success). 10) Then type ./perm.sh, followed by echo $? to see that exit status is 1
(failure). (56) Creating shell script using if and case conditions
PROCEDURE: 1) Open Linux operating system. 2) Login using your ID and password. 3) Press Windows (or Alt) key. Type Terminal (which brings terminal into
view). Click on Terminal icon to open bash (Bourne Again Shell) in Linux. 4) To create a shell script to read aloud a single digit number using if
condition, type gedit readif, enter the following code and save the file: #!/bin/sh if [ -$# -eq 0 ]; then echo "Usage: $0 <single digit number>" exit 1 fi if [ $1 -eq 0 ]; then echo "Zero" elif [ $1 -eq 1 ]; then echo "One" elif [ $1 -eq 2 ]; then echo "Two" elif [ $1 -eq 3 ]; then echo "Three" elif [ $1 -eq 4 ]; then echo "Four" elif [ $1 -eq 5 ]; then echo "Five" elif [ $1 -eq 6 ]; then echo "Six" elif [ $1 -eq 7 ]; then
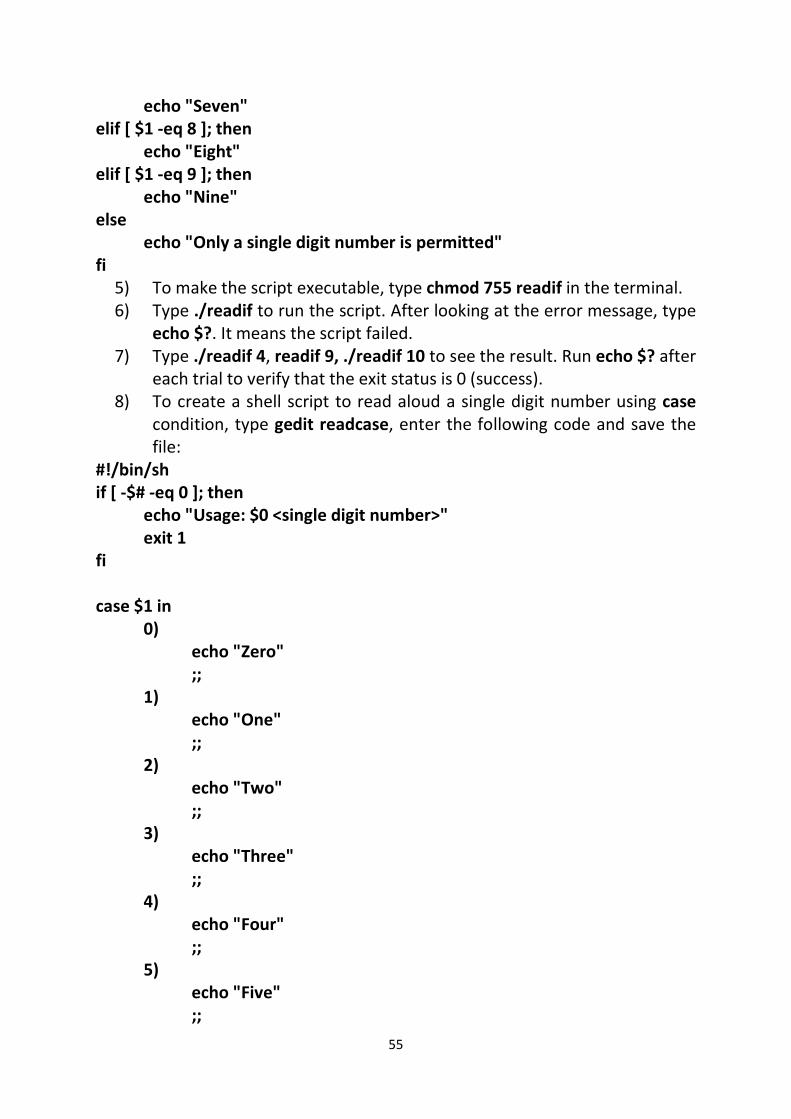
55
echo "Seven" elif [ $1 -eq 8 ]; then echo "Eight" elif [ $1 -eq 9 ]; then echo "Nine" else echo "Only a single digit number is permitted" fi
5) To make the script executable, type chmod 755 readif in the terminal. 6) Type ./readif to run the script. After looking at the error message, type
echo $?. It means the script failed. 7) Type ./readif 4, readif 9, ./readif 10 to see the result. Run echo $? after
each trial to verify that the exit status is 0 (success). 8) To create a shell script to read aloud a single digit number using case
condition, type gedit readcase, enter the following code and save the file:
#!/bin/sh if [ -$# -eq 0 ]; then echo "Usage: $0 <single digit number>" exit 1 fi case $1 in 0) echo "Zero" ;; 1) echo "One" ;; 2) echo "Two" ;; 3) echo "Three" ;; 4) echo "Four" ;; 5) echo "Five" ;;
56
6) echo "Six" ;; 7) echo "Seven" ;; 8) echo "Eight" ;; 9) echo "Nine" ;; *) echo "Only a single digit number is permitted" ;; esac
9) To make the script executable, type chmod 755 readcase in the terminal.
10) Type ./readcase to run the script. After looking at the error message, type echo $?. It means the script failed.
11) Type ./readcase 1, readcase 5, ./readcase 25 to see the result. Run echo $? after each trial to verify that the exit status is 0 (success).
(57) Creating shell script using for loop PROCEDURE:
1) Open Linux operating system. 2) Login using your ID and password. 3) Press Windows (or Alt) key. Type Terminal (which brings terminal into
view). Click on Terminal icon to open bash (Bourne Again Shell) in Linux. 4) To create a shell script to calculate the sum of first n integers, type
gedit sum, enter the following code and save the file: #!/bin/sh if [ $# -ne 1 ]; then echo "Usage: $0 <integer>" exit 1 fi sum=0 for i in `seq 1 $1` ; do sum=`expr $sum + $i` done echo "1+...+$1 = $sum"
57
5) To make the script executable, type chmod 755 sum in the terminal. 6) Type ./sum to run the script. Type ./sum 4, ./sum 9, ./sum 20 to see
the result. Run echo $? after each trial to verify that the exit status is 0 (success).
7) To create a shell script to display the file type of each file using for loop, type gedit , enter the following code and save the file:
#!/bin/bash for i in $( ls ); do file $i done
8) To make the script executable, type chmod 755 forloop in the terminal. 9) Type ./forloop to run the script. 10) This script displays name of each file and a brief description of the file. (58) Creating shell script using while and until loops
PROCEDURE: 1) Open Linux operating system. 2) Login using your ID and password. 3) Press Windows (or Alt) key. Type Terminal (which brings terminal into
view). Click on Terminal icon to open bash (Bourne Again Shell) in Linux. 4) To calculate factorial of given number (e.g., 4! = 1x2x3x4) using while
loop, type gedit fact, enter the following script and save the file: #!/bin/sh if [ $# -ne 1 ]; then echo "Usage: $0 <number>" exit 1 fi i=1 f=1 while [ $i -le $1 ]; do f=`echo "$f * $i" | bc` i=`expr $i + 1` done echo "$1! = $f"
5) To make the script executable, type chmod 755 fact in the terminal. 6) Run the script without any argument ($# - argument count, $1 – first
argument to the program). Type echo $? To find the exit status (0 denotes success).
7) Type ./fact 3, ./fact 7, ./fact 10, etc. and check the sum displayed. 8) Verify exit status using the command echo $? after each run. 9) To calculate display first n numbers of Fibonacci sequence using until
loop, type gedit fibo, enter the following script and save the file:
58
#!/bin/sh echo "Enter number of elements of Fibonacci series" read n x=1 y=1 printf "First %d elements of Fibonacci series:\n%d\t" $n $x # First element is 1 until [ $n -eq 1 ]; do printf "%d\t" $y # Current value of Fibonacci element z=$y # Save present value of y in z y=`expr $x + $y` # Calculate new value of y from the sum of x and y x=$z # Store the value of y (saved in z) in x n=`expr $n - 1` # Decrease the value of n by 1 sleep 1s # Wait for 1 second before displaying the result done echo ""
10) The portions to the right of # symbol stand for comment. Comment is ignored by the shell.
11) To make the script executable, type chmod 755 fibo in the terminal. 12) Run the script without any argument ($# - argument count, $1 – first
argument to the program). Type echo $? To find the exit status (0 denotes success).
13) Type ./fibo 3, ./fibo 7, ./fibo 25, etc. and check the sum displayed. 14) Verify exit status using the command echo $? after each run.
(59) Creating shell script to check Armstrong numer
PROCEDURE: 1) Open Linux operating system.
2) Login using your ID and password. 3) Press Windows (or Alt) key. Type Terminal (which brings terminal into
view). Click on Terminal icon to open bash (Bourne Again Shell) in Linux. 4) To calculate factorial of given number (e.g., 4! = 1x2x3x4) using while
loop, type gedit arm, enter the following script and save the file: #!/bin/sh echo "Enter number: " read n sum=0 x=$n until [ $x -eq 0 ]; do
59
y=`expr $x % 10` sum=`expr $sum + $y \* $y \* $y` x=`expr $x / 10` done if [ $n -eq $sum ]; then echo "$n is an Armstrong number" else echo "$n is not an Armstrong number" fi
5) To make the script executable, run the command chmod 755 arm. 6) Run the script using the command ./arm <argument number>. 7) To test the script, it should identify 153 as an Armstrong number and
reject 160 as not being an Armstrong number.
(60) Creating shell script to reverse a number and check whether it is palindrome
PROCEDURE: 1) Open Linux operating system.
2) Login using your ID and password. 3) Press Windows (or Alt) key. Type Terminal (which brings terminal into
view). Click on Terminal icon to open bash (Bourne Again Shell) in Linux. 4) To reverse a number, last digit is extracted (d=`expr $x % 10`) and
added to the sum of the previous digits multiplied by 10. 5) Type gedit rev, enter the following script and save the file:
#!/bin/sh echo "Enter an integer" read n x=$n y=0 while [ $x -gt 0 ]; do d=`expr $x % 10` y=`expr $y \* 10 + $d` x=`expr $x / 10` done echo "Reverse of $n is $y" if [ $n -eq $y ]; then echo "$n is a palindrome number" else
60
echo "$n is not a palindrome number" fi
6) To make the script executable, run the command chmod 755 rev. 7) Run the script using the command ./rev <argument number>. 8) To test the script, it should identify 1221 which should be identified as
palindrome and 132331 which should be identified as non-palindrome.
(61) Settings in Ubuntu Desktop PROCEDURE:
1) Login to Ubuntu Desktop using your ID and Password. 2) Open Settings, which is available from the trinagle shaped button placed
at the right top corner of the Desktop. 3) Settings have got the following subsections:
a. WiFi: To connect to a WiFi network or to create a WiFi hotspot. b. Network: To setup network connections and VPN (Virtual Private
Network). c. Bluetooth: To pair with blue tooth enabled devices like mobile
phones and headsets. d. Appearance: To choose theme and to adjust icon sizes. e. Notifications: To control which programs send notifications on the
Desktop. f. Search: To control the places at which search takes place. g. Application: It displays a list of aoolicaion installed in Ubuntu. h. Privacy: To control what type of infoamtion is shared with the
servers, including geo-location. i. Online Accounts: To setup email accounts and otjer login details. j. Sharing: To setup how to share the screen with other display
devices like projector. k. Sound: To set and volume of spekers and system notification
types. l. Power: To choose what happens when display is adle. It also
chooses the power usage levels of the system. m. Displays: To set the resolution and colour scheme of monitor n. Mouse and Touchpad: To set the mouse as left handed/ right
handed and to choose scrolling methods. o. Keyboard shortcuts: General shortcuts available for Ubuntu
Desktop p. Printers: List of printers is displayed. One may choose the default
printer, printer preferences and to see what is printing from this setting.
61
q. Region & Language: To select the time zone and typing preferences.
r. Universal Access: To enable screen magnifier, onscreen ketboard and other accessibility features.
s. Users: To add or remove new users and groups. t. Default Applications: To set the application associated with each u. Date & Time: To set the date and time v. About: To view the operating system version and date of creation.
4) Change the Desktop backround. 5) Verify the time and change the time if necessary. 6) See the list of printers and the print jobs currently running (if any).
(62) Using pen drive in Ubuntu Desktop
PROCEDURE: 1) Login to the Ubuntu Desktop. 2) The left side panel is called Activities (or unity panel). 3) The status bar at the top of the Desktop displays network connection
status, date, time, volume control, battery status. 4) A triangle shaped pull down menu is available for controlling the
volume, display brightness, network connectivity, settings. 5) Power button is available for shutting down or restarting the computer. 6) Open Files App. The left panel displays places for access. 7) Insert the pen drive. 8) Copy file from source location. 9) Click upon the pen drive name in the left panel. 10) Right click and choose paste (or press Ctrl+V). 11) Click the triangle shaped icon to the right side of the pen drive
name to eject the pen drive.
(63) Creating and saving a Word document PROCEDURE:
1) Press Windows+R, type winword and press Enter key (or choose Start->All Apps->Microsoft Office->Microsoft Office Word.)
2) MS Word opens with a blank document. 3) Open Page Layout->Page Setup (shortcut: Alt+P+SP). Page Setup dialog
appears. Choose A4 under Paper tab, Set 2.5cm (1”) against top margin, 2.5cm (1”) against bottom margin, 3cm (1.25”) against left margin and 2.5cm (1”) against right margin.
62
4) Open Paragraph dialog (shortcut: Alt+H+PG/ Alt+P+PG). Choose 0 pt against Before, 0 pt against After and Single against Line spacing.
5) Press centre alignment (Ctrl+E), Bold font (shortcut: Ctrl+B). Set Font size (shortcut: Alt+H+FS) to 14. Type the following sentence:
LEAVE LETTER 6) Press Enter key to terminate the line. 7) Press Bold (shortcut: Ctrl+B) to reset bold font to normal font, set
alignment to Right (shortcut: Ctrl+R) to reset centre alignment and type the following.
Puducherry, dated 27-Oct-2017 8) Set alignment to Justified (shortcut: Ctrl+J) to reset right alignment to
justified alignment. 9) Type the following content:
From <name>, COPA, Govt. ITI for Women, Puducherry. To The Principal, Govt. ITI for Women, Puducherry. Sir,
10) Choose Home->Paragraph (shortcut: Alt+H+PG), set Line Spacing to 1.5 lines (Ctrl+5 for 1.5 line, Ctrl+1 for single line, Ctrl+2 for double line).
11) Type the following content: As I am suffering from fever, please grant me one day of Casual Leave on
23.10.2017. Medical Certificate for treatment of fever is attached herewith for
perusal and acceptance please.
12) Press enter key to end paragraph. 13) Click Centre align (shortcut: Ctrl+E) and type the following:
Thanking you,
Yours obediently,
63
(<NAME>) Encl: Medical certificate
14) Name should be typed in bold letters. 15) Select the lines containing Yours obediently and name. Press TAB key
until the two lines are placed sufficiently to the right side. If an extra TAB has been hit and the sentences break to next line, hit Shift+TAB to bring them to the left.
16) The finished letter should appear as follows:
LEAVE LETTER Puducherry, dated 27-Oct-2017
From <name>, COPA, I-Semester, Govt. ITI for Women, Puducherry. To The Principal, Govt. ITI for Women, Puducherry. Sir, As I am suffering from fever, please grant me one day of Casual Leave on
23.10.2017.
Thanking you, Yours obediently,
(<NAME>) Encl: Medical certificate
17) Press File->Save (shortcut: Ctrl+S) to save the document. When File Dialog appears, type <name>-Ex-46 in the file name box and press Save button.
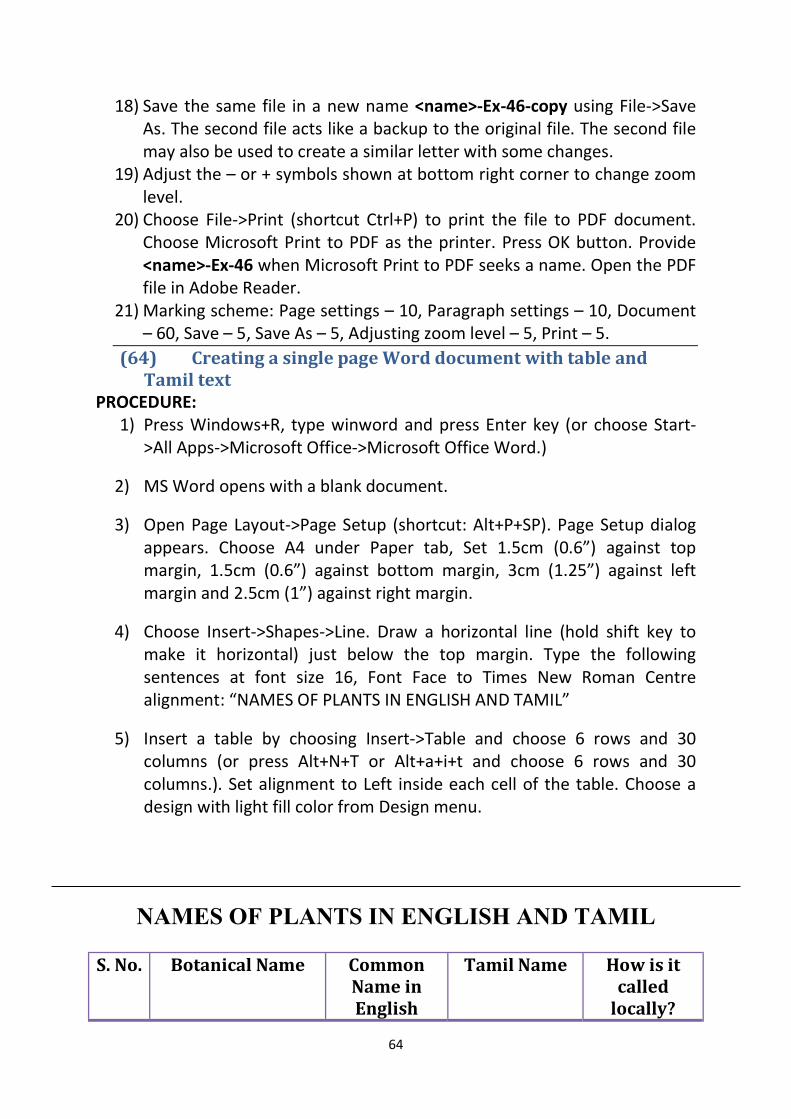
64
18) Save the same file in a new name <name>-Ex-46-copy using File->Save As. The second file acts like a backup to the original file. The second file may also be used to create a similar letter with some changes.
19) Adjust the – or + symbols shown at bottom right corner to change zoom level.
20) Choose File->Print (shortcut Ctrl+P) to print the file to PDF document. Choose Microsoft Print to PDF as the printer. Press OK button. Provide <name>-Ex-46 when Microsoft Print to PDF seeks a name. Open the PDF file in Adobe Reader.
21) Marking scheme: Page settings – 10, Paragraph settings – 10, Document – 60, Save – 5, Save As – 5, Adjusting zoom level – 5, Print – 5.
(64) Creating a single page Word document with table and Tamil text
PROCEDURE: 1) Press Windows+R, type winword and press Enter key (or choose Start-
>All Apps->Microsoft Office->Microsoft Office Word.)
2) MS Word opens with a blank document.
3) Open Page Layout->Page Setup (shortcut: Alt+P+SP). Page Setup dialog appears. Choose A4 under Paper tab, Set 1.5cm (0.6”) against top margin, 1.5cm (0.6”) against bottom margin, 3cm (1.25”) against left margin and 2.5cm (1”) against right margin.
4) Choose Insert->Shapes->Line. Draw a horizontal line (hold shift key to make it horizontal) just below the top margin. Type the following sentences at font size 16, Font Face to Times New Roman Centre alignment: “NAMES OF PLANTS IN ENGLISH AND TAMIL”
5) Insert a table by choosing Insert->Table and choose 6 rows and 30 columns (or press Alt+N+T or Alt+a+i+t and choose 6 rows and 30 columns.). Set alignment to Left inside each cell of the table. Choose a design with light fill color from Design menu.
NAMES OF PLANTS IN ENGLISH AND TAMIL
S. No. Botanical Name Common Name in English
Tamil Name How is it called
locally?

65
1 Abelmoscus esculentus Lady’s finger bt©il 2 Acacia coccina Soap acacia Áif¡fhய் 3 Achyranthes aspera ehÍUé 4 Anacardium occidentale Cashew KªÂç 5 Anona squamosa Custard apple Ójh¥gH« 6 Artocarpus integrifolia Jack fruit Gyh 7 Bryophyllum f£o¥ ngh£lhš
F£o¥nghL«
8 Calotropis gigantean Madar plant vU¡F 9 Citrus sinensis Sweet orange rh¤J¡Fo
10 Cocus nucifera Coconut bj‹id 11 Coriandrum sativum Coriander bfh¤Jkšè,
jåah
12 Gossypium arboretum Cotton gU¤Â 13 Cucumis sativus Cucumber btŸsç¡fhய்,
njhir¡fhய்
14 Cucurbita maxima Pumpkin órâ¡fhய் / gu§»¡fhய்/ murhiz¡fhய்
15 Cuscuta reflexa Amar bell m«ikah® Tªjš 16 Ficus glomerata Fig m¤Â 17 Impatiens balsamia Balsam ghšr«/ghšbr©L 18 Lablab purpurreus Bean mtiu 19 Lycopersicon
esculentum Tomato j¡fhë
20 Mangifera Indica Mango kh 21 Mimosa pudica Touch-me-not
plant bjh£lhš ÁQ§»
22 Mirabilis jalapa Four o’ clock plant
mªÂkªjhiu
23 Nelumbo nucifera Indian lotus jhkiu 24 Oyza sativa Paddy/ rice beš 25 Pisum sativum Pea g£lhâ 26 Polyalthia longifolia Mast tree be£oè§f« 27 Pyrus malus Apple M¥ÃŸ 28 Ricinus communis Castor Mkz¡F/K¤J¡
bfh£il
29 Tridax procumbens bt£L¡fha¥
ó©L¢bro
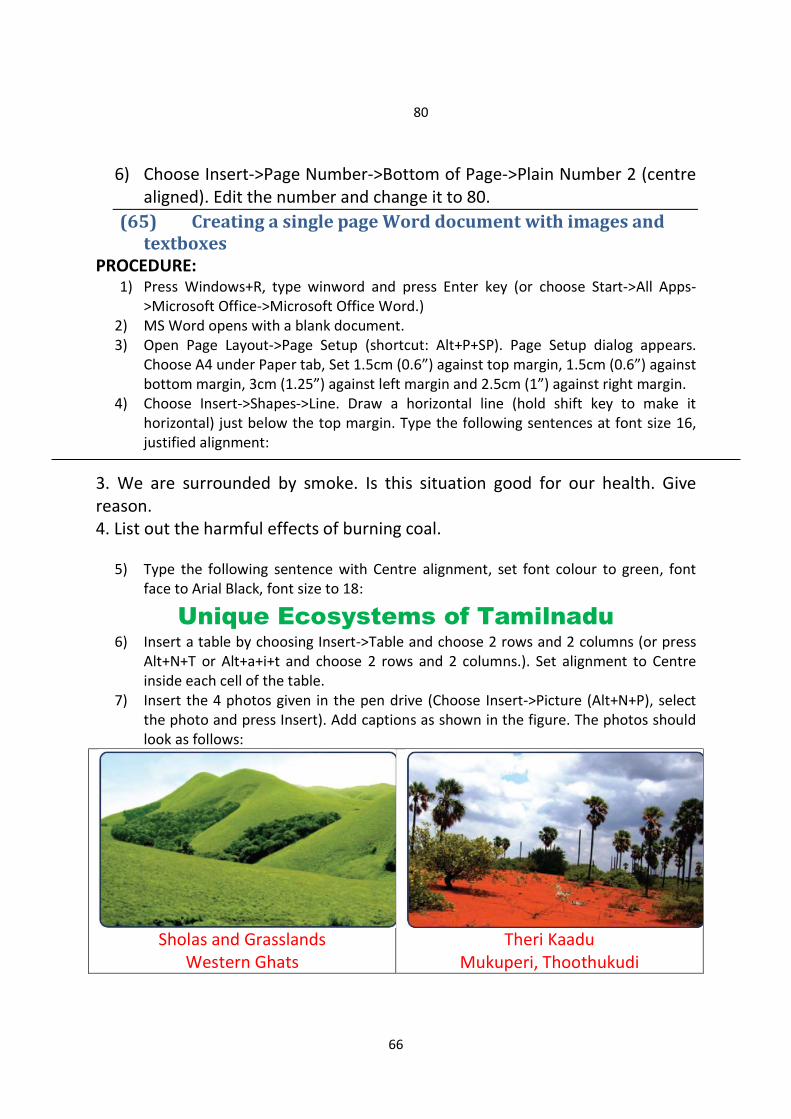
66
6) Choose Insert->Page Number->Bottom of Page->Plain Number 2 (centre aligned). Edit the number and change it to 80.
(65) Creating a single page Word document with images and textboxes
PROCEDURE: 1) Press Windows+R, type winword and press Enter key (or choose Start->All Apps-
>Microsoft Office->Microsoft Office Word.) 2) MS Word opens with a blank document. 3) Open Page Layout->Page Setup (shortcut: Alt+P+SP). Page Setup dialog appears.
Choose A4 under Paper tab, Set 1.5cm (0.6”) against top margin, 1.5cm (0.6”) against bottom margin, 3cm (1.25”) against left margin and 2.5cm (1”) against right margin.
4) Choose Insert->Shapes->Line. Draw a horizontal line (hold shift key to make it horizontal) just below the top margin. Type the following sentences at font size 16, justified alignment:
3. We are surrounded by smoke. Is this situation good for our health. Give reason. 4. List out the harmful effects of burning coal.
5) Type the following sentence with Centre alignment, set font colour to green, font face to Arial Black, font size to 18:
Unique Ecosystems of Tamilnadu 6) Insert a table by choosing Insert->Table and choose 2 rows and 2 columns (or press
Alt+N+T or Alt+a+i+t and choose 2 rows and 2 columns.). Set alignment to Centre inside each cell of the table.
7) Insert the 4 photos given in the pen drive (Choose Insert->Picture (Alt+N+P), select the photo and press Insert). Add captions as shown in the figure. The photos should look as follows:
Sholas and Grasslands Western Ghats
Theri Kaadu Mukuperi, Thoothukudi
80
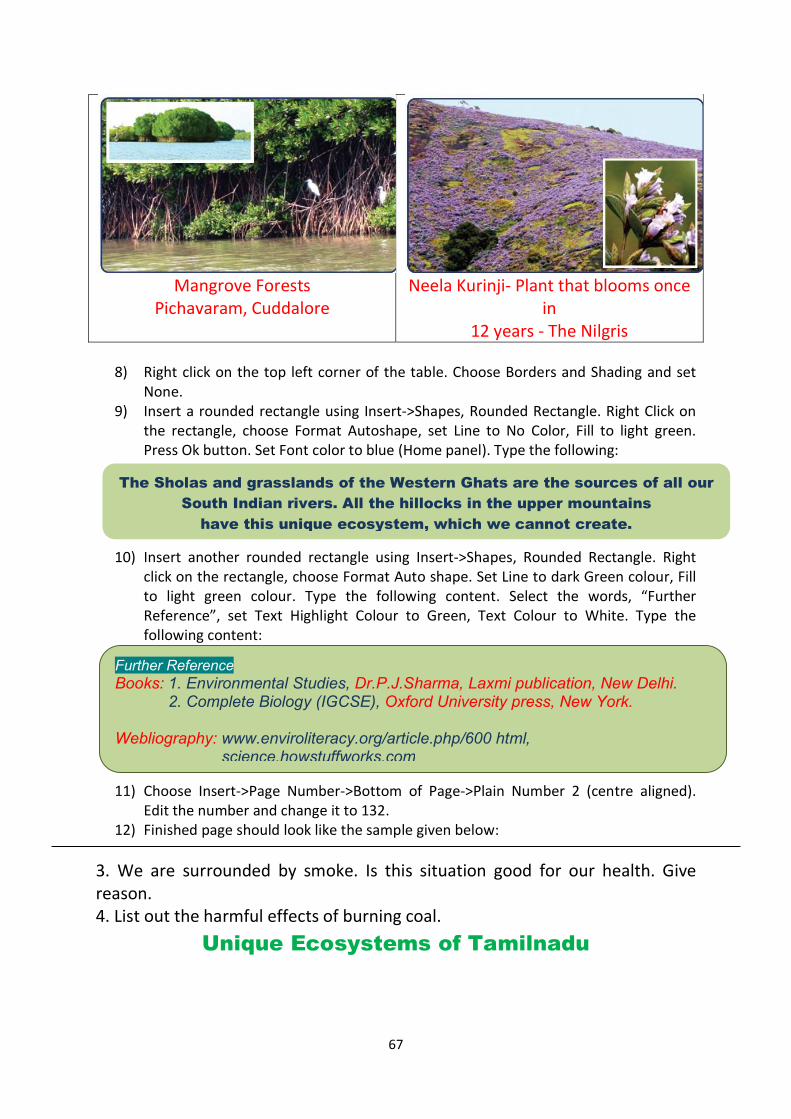
67
Mangrove Forests Pichavaram, Cuddalore
Neela Kurinji- Plant that blooms once in
12 years - The Nilgris
8) Right click on the top left corner of the table. Choose Borders and Shading and set None.
9) Insert a rounded rectangle using Insert->Shapes, Rounded Rectangle. Right Click on the rectangle, choose Format Autoshape, set Line to No Color, Fill to light green. Press Ok button. Set Font color to blue (Home panel). Type the following:
10) Insert another rounded rectangle using Insert->Shapes, Rounded Rectangle. Right click on the rectangle, choose Format Auto shape. Set Line to dark Green colour, Fill to light green colour. Type the following content. Select the words, “Further Reference”, set Text Highlight Colour to Green, Text Colour to White. Type the following content:
11) Choose Insert->Page Number->Bottom of Page->Plain Number 2 (centre aligned). Edit the number and change it to 132.
12) Finished page should look like the sample given below: 3. We are surrounded by smoke. Is this situation good for our health. Give reason. 4. List out the harmful effects of burning coal.
Unique Ecosystems of Tamilnadu
The Sholas and grasslands of the Western Ghats are the sources of all our South Indian rivers. All the hillocks in the upper mountains
have this unique ecosystem, which we cannot create.
Further Reference Books: 1. Environmental Studies, Dr.P.J.Sharma, Laxmi publication, New Delhi. 2. Complete Biology (IGCSE), Oxford University press, New York. Webliography: www.enviroliteracy.org/article.php/600 html, science.howstuffworks.com

68
Sholas and Grasslands
Western Ghats
Theri Kaadu
Mukuperi, Thoothukudi
Mangrove Forests
Pichavaram, Cuddalore
Neela Kurinji- Plant that blooms once in
12 years - The Nilgris
(66) Creating a flow charts using MS Word PROCEDURE:
1) Press Windows+R, type winword and press Enter key (or choose Start->All Apps->Microsoft Office->Microsoft Office Word.)
2) MS Word opens with a blank document. 3) Open Page Layout->Page Setup (shortcut: Alt+P+SP). Page Setup dialog appears.
Choose A4 under Paper tab, Set 2.0cm (0.8”) against top margin, 2cm (0.8”) against bottom margin, 2.54cm (1”) against left margin and 2cm (0.8”) against right margin.
4) Flow chart is a collection of Shape objects like ellipse, rectangle, rhombus, circle, etc. interconnected by arrows.
5) Choose Insert->Shapes->Ellipse. Draw an ellipse. Right click on the ellipse. Choose Add text from the context menu. Type Start. Press Ctrl+E to centre the text.
6) Choose Insert->Shapes->Flowchart->Input from the menu and place the shape below the start. Right click, choose Add text, type Read n and press Ctrl+E to centre the text.
The Sholas and grasslands of the Western Ghats are the sources of all our South Indian rivers. All the hillocks in the upper mountains
have this unique ecosystem, which we cannot create.
Further Reference Books: 1. Environmental Studies, Dr.P.J.Sharma, Laxmi publication, New Delhi. 2. Complete Biology (IGCSE), Oxford University press, New York. Webliography: www.enviroliteracy.org/article.php/600 html, science.howstuffworks.com
132
Start
Read n
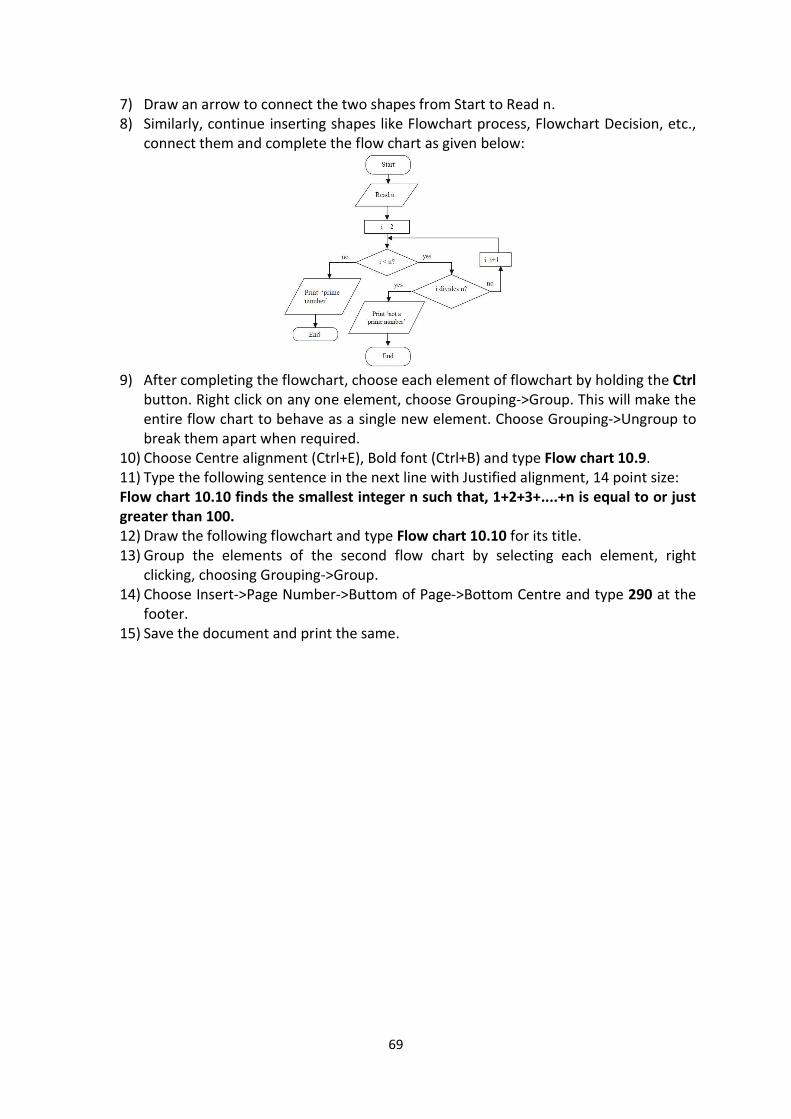
69
7) Draw an arrow to connect the two shapes from Start to Read n. 8) Similarly, continue inserting shapes like Flowchart process, Flowchart Decision, etc.,
connect them and complete the flow chart as given below:
9) After completing the flowchart, choose each element of flowchart by holding the Ctrl
button. Right click on any one element, choose Grouping->Group. This will make the entire flow chart to behave as a single new element. Choose Grouping->Ungroup to break them apart when required.
10) Choose Centre alignment (Ctrl+E), Bold font (Ctrl+B) and type Flow chart 10.9. 11) Type the following sentence in the next line with Justified alignment, 14 point size: Flow chart 10.10 finds the smallest integer n such that, 1+2+3+....+n is equal to or just greater than 100. 12) Draw the following flowchart and type Flow chart 10.10 for its title. 13) Group the elements of the second flow chart by selecting each element, right
clicking, choosing Grouping->Group. 14) Choose Insert->Page Number->Buttom of Page->Bottom Centre and type 290 at the
footer. 15) Save the document and print the same.
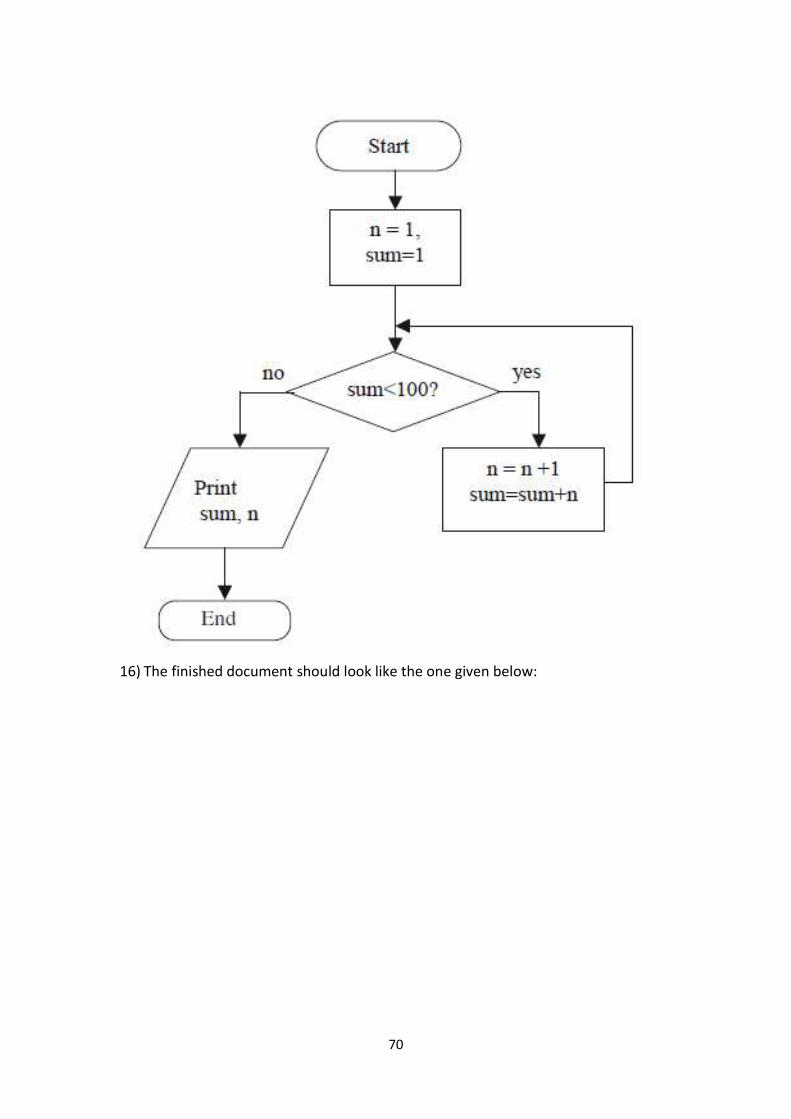
70
16) The finished document should look like the one given below:
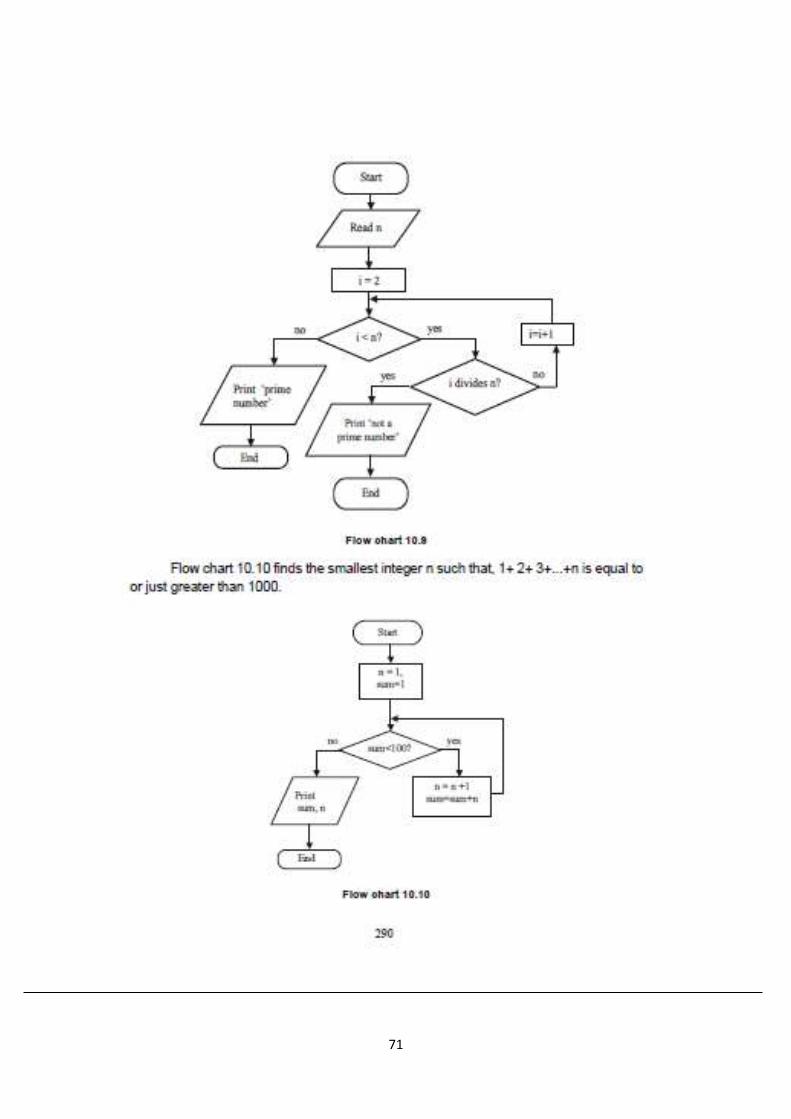
71
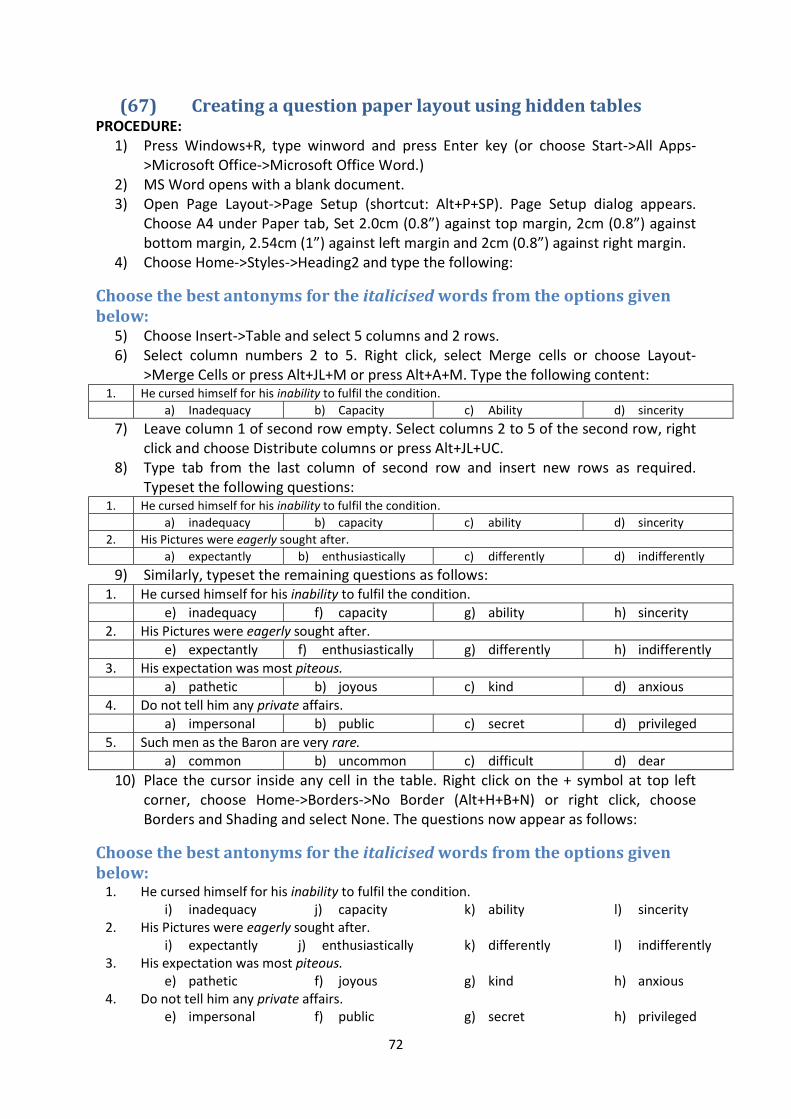
72
(67) Creating a question paper layout using hidden tables PROCEDURE:
1) Press Windows+R, type winword and press Enter key (or choose Start->All Apps->Microsoft Office->Microsoft Office Word.)
2) MS Word opens with a blank document. 3) Open Page Layout->Page Setup (shortcut: Alt+P+SP). Page Setup dialog appears.
Choose A4 under Paper tab, Set 2.0cm (0.8”) against top margin, 2cm (0.8”) against bottom margin, 2.54cm (1”) against left margin and 2cm (0.8”) against right margin.
4) Choose Home->Styles->Heading2 and type the following:
Choose the best antonyms for the italicised words from the options given below:
5) Choose Insert->Table and select 5 columns and 2 rows. 6) Select column numbers 2 to 5. Right click, select Merge cells or choose Layout-
>Merge Cells or press Alt+JL+M or press Alt+A+M. Type the following content: 1. He cursed himself for his inability to fulfil the condition.
a) Inadequacy b) Capacity c) Ability d) sincerity 7) Leave column 1 of second row empty. Select columns 2 to 5 of the second row, right
click and choose Distribute columns or press Alt+JL+UC. 8) Type tab from the last column of second row and insert new rows as required.
Typeset the following questions: 1. He cursed himself for his inability to fulfil the condition.
a) inadequacy b) capacity c) ability d) sincerity 2. His Pictures were eagerly sought after.
a) expectantly b) enthusiastically c) differently d) indifferently 9) Similarly, typeset the remaining questions as follows:
1. He cursed himself for his inability to fulfil the condition. e) inadequacy f) capacity g) ability h) sincerity
2. His Pictures were eagerly sought after. e) expectantly f) enthusiastically g) differently h) indifferently
3. His expectation was most piteous. a) pathetic b) joyous c) kind d) anxious
4. Do not tell him any private affairs. a) impersonal b) public c) secret d) privileged
5. Such men as the Baron are very rare. a) common b) uncommon c) difficult d) dear 10) Place the cursor inside any cell in the table. Right click on the + symbol at top left
corner, choose Home->Borders->No Border (Alt+H+B+N) or right click, choose Borders and Shading and select None. The questions now appear as follows:
Choose the best antonyms for the italicised words from the options given below:
1. He cursed himself for his inability to fulfil the condition. i) inadequacy j) capacity k) ability l) sincerity
2. His Pictures were eagerly sought after. i) expectantly j) enthusiastically k) differently l) indifferently
3. His expectation was most piteous. e) pathetic f) joyous g) kind h) anxious
4. Do not tell him any private affairs. e) impersonal f) public g) secret h) privileged
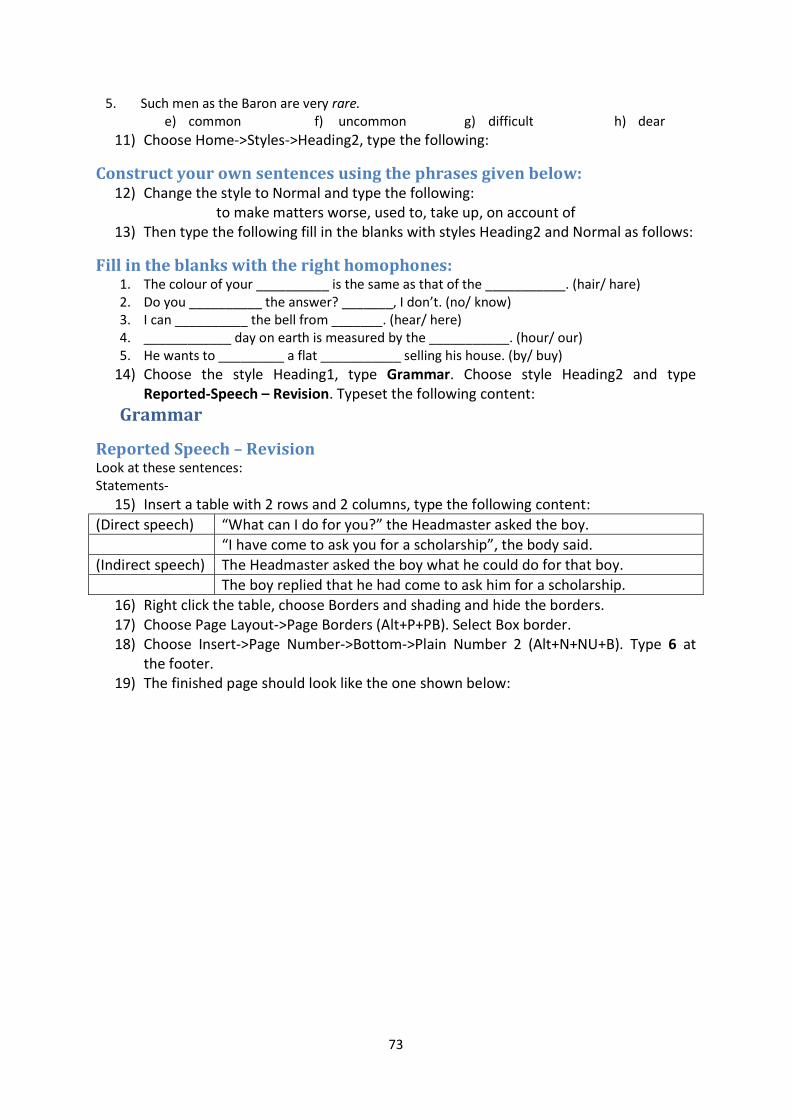
73
5. Such men as the Baron are very rare. e) common f) uncommon g) difficult h) dear 11) Choose Home->Styles->Heading2, type the following:
Construct your own sentences using the phrases given below: 12) Change the style to Normal and type the following:
to make matters worse, used to, take up, on account of 13) Then type the following fill in the blanks with styles Heading2 and Normal as follows:
Fill in the blanks with the right homophones: 1. The colour of your __________ is the same as that of the ___________. (hair/ hare) 2. Do you __________ the answer? _______, I don’t. (no/ know) 3. I can __________ the bell from _______. (hear/ here) 4. ____________ day on earth is measured by the ___________. (hour/ our) 5. He wants to _________ a flat ___________ selling his house. (by/ buy)
14) Choose the style Heading1, type Grammar. Choose style Heading2 and type Reported-Speech – Revision. Typeset the following content:
Grammar
Reported Speech – Revision Look at these sentences: Statements-
15) Insert a table with 2 rows and 2 columns, type the following content: (Direct speech) “What can I do for you?” the Headmaster asked the boy. “I have come to ask you for a scholarship”, the body said. (Indirect speech) The Headmaster asked the boy what he could do for that boy. The boy replied that he had come to ask him for a scholarship.
16) Right click the table, choose Borders and shading and hide the borders. 17) Choose Page Layout->Page Borders (Alt+P+PB). Select Box border. 18) Choose Insert->Page Number->Bottom->Plain Number 2 (Alt+N+NU+B). Type 6 at
the footer. 19) The finished page should look like the one shown below:
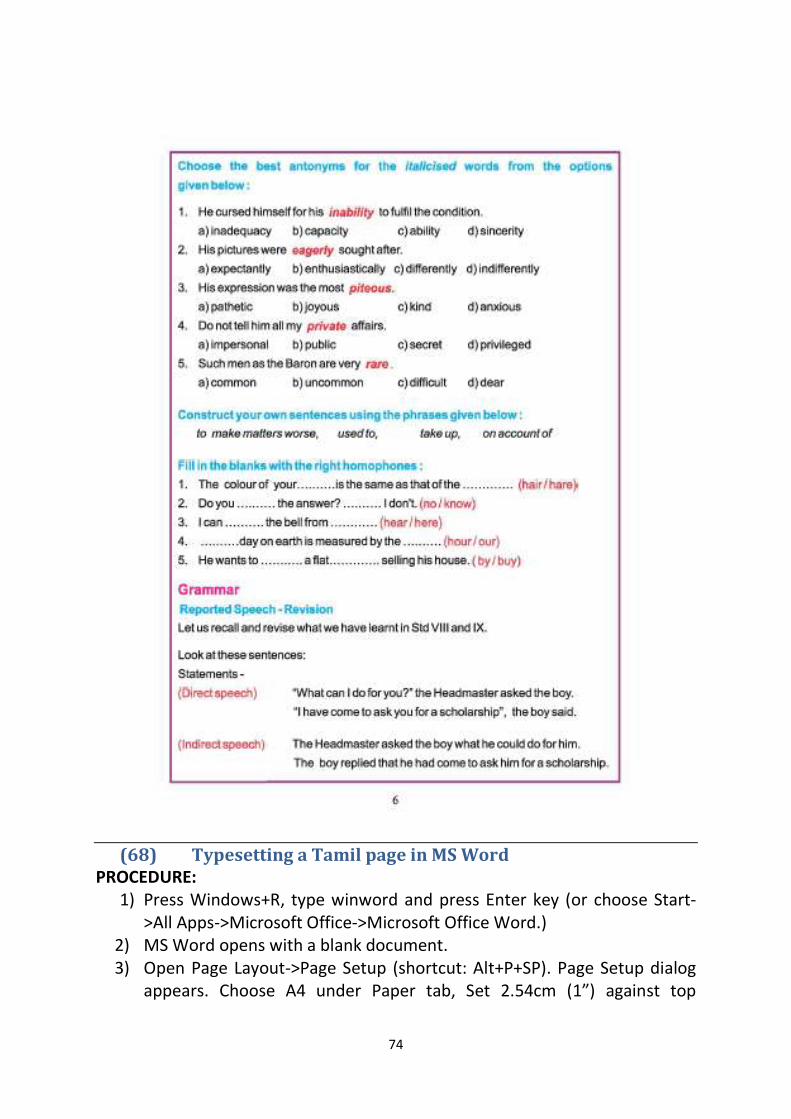
74
(68) Typesetting a Tamil page in MS Word
PROCEDURE: 1) Press Windows+R, type winword and press Enter key (or choose Start-
>All Apps->Microsoft Office->Microsoft Office Word.) 2) MS Word opens with a blank document. 3) Open Page Layout->Page Setup (shortcut: Alt+P+SP). Page Setup dialog
appears. Choose A4 under Paper tab, Set 2.54cm (1”) against top
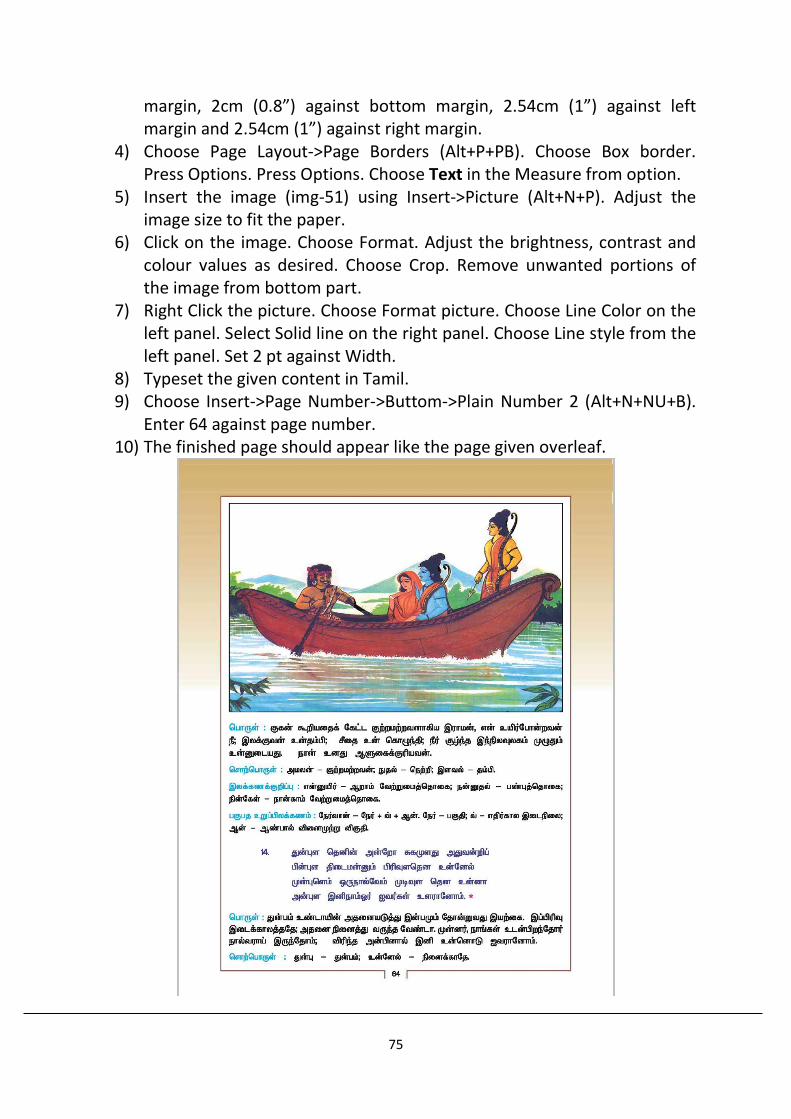
75
margin, 2cm (0.8”) against bottom margin, 2.54cm (1”) against left margin and 2.54cm (1”) against right margin.
4) Choose Page Layout->Page Borders (Alt+P+PB). Choose Box border. Press Options. Press Options. Choose Text in the Measure from option.
5) Insert the image (img-51) using Insert->Picture (Alt+N+P). Adjust the image size to fit the paper.
6) Click on the image. Choose Format. Adjust the brightness, contrast and colour values as desired. Choose Crop. Remove unwanted portions of the image from bottom part.
7) Right Click the picture. Choose Format picture. Choose Line Color on the left panel. Select Solid line on the right panel. Choose Line style from the left panel. Set 2 pt against Width.
8) Typeset the given content in Tamil. 9) Choose Insert->Page Number->Buttom->Plain Number 2 (Alt+N+NU+B).
Enter 64 against page number. 10) The finished page should appear like the page given overleaf.
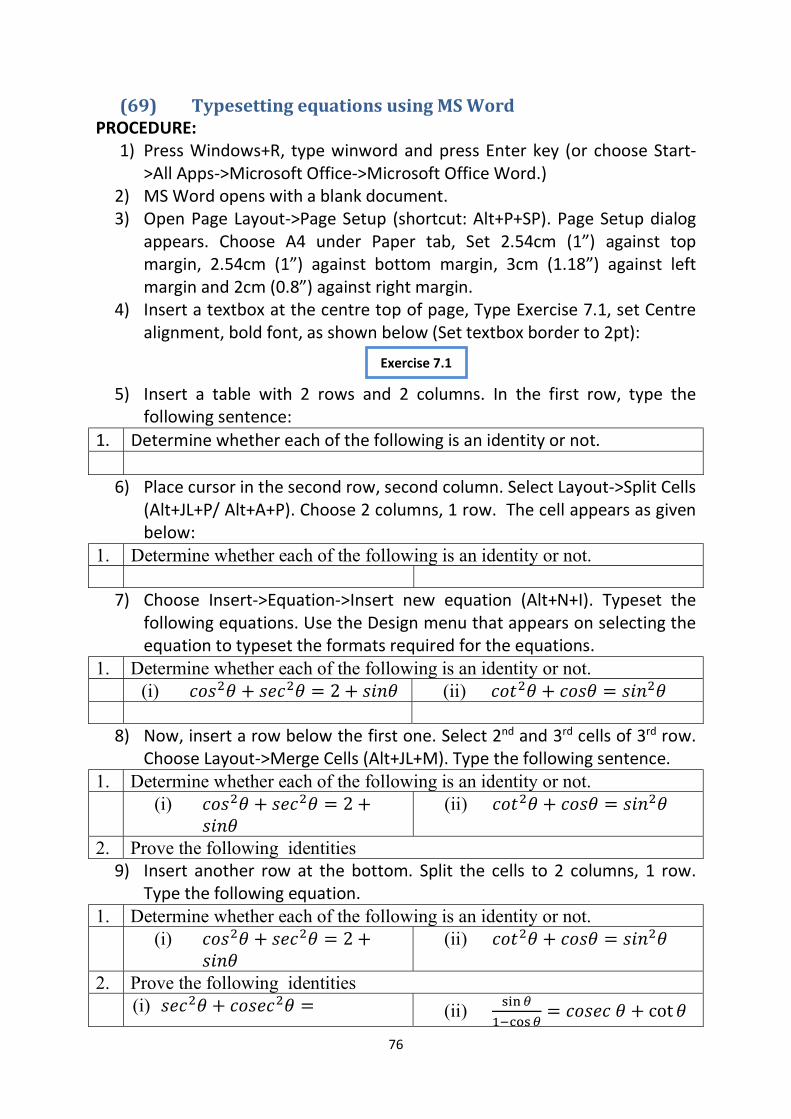
76
(69) Typesetting equations using MS Word PROCEDURE:
1) Press Windows+R, type winword and press Enter key (or choose Start->All Apps->Microsoft Office->Microsoft Office Word.)
2) MS Word opens with a blank document. 3) Open Page Layout->Page Setup (shortcut: Alt+P+SP). Page Setup dialog
appears. Choose A4 under Paper tab, Set 2.54cm (1”) against top margin, 2.54cm (1”) against bottom margin, 3cm (1.18”) against left margin and 2cm (0.8”) against right margin.
4) Insert a textbox at the centre top of page, Type Exercise 7.1, set Centre alignment, bold font, as shown below (Set textbox border to 2pt):
5) Insert a table with 2 rows and 2 columns. In the first row, type the
following sentence: 1. Determine whether each of the following is an identity or not.
6) Place cursor in the second row, second column. Select Layout->Split Cells (Alt+JL+P/ Alt+A+P). Choose 2 columns, 1 row. The cell appears as given below:
1. Determine whether each of the following is an identity or not.
7) Choose Insert->Equation->Insert new equation (Alt+N+I). Typeset the following equations. Use the Design menu that appears on selecting the equation to typeset the formats required for the equations.
1. Determine whether each of the following is an identity or not. (i) 𝑐𝑜𝑠 𝜃 + 𝑠𝑒𝑐 𝜃 = 2 + 𝑠𝑖𝑛𝜃 (ii) 𝑐𝑜𝑡 𝜃 + 𝑐𝑜𝑠𝜃 = 𝑠𝑖𝑛 𝜃
8) Now, insert a row below the first one. Select 2nd and 3rd cells of 3rd row. Choose Layout->Merge Cells (Alt+JL+M). Type the following sentence.
1. Determine whether each of the following is an identity or not. (i) 𝑐𝑜𝑠 𝜃 + 𝑠𝑒𝑐 𝜃 = 2 +
𝑠𝑖𝑛𝜃 (ii) 𝑐𝑜𝑡 𝜃 + 𝑐𝑜𝑠𝜃 = 𝑠𝑖𝑛 𝜃
2. Prove the following identities 9) Insert another row at the bottom. Split the cells to 2 columns, 1 row.
Type the following equation. 1. Determine whether each of the following is an identity or not. (i) 𝑐𝑜𝑠 𝜃 + 𝑠𝑒𝑐 𝜃 = 2 +
𝑠𝑖𝑛𝜃 (ii) 𝑐𝑜𝑡 𝜃 + 𝑐𝑜𝑠𝜃 = 𝑠𝑖𝑛 𝜃
2. Prove the following identities (i) 𝑠𝑒𝑐 𝜃 + 𝑐𝑜𝑠𝑒𝑐 𝜃 = (ii) = 𝑐𝑜𝑠𝑒𝑐 𝜃 + cot 𝜃
Exercise 7.1
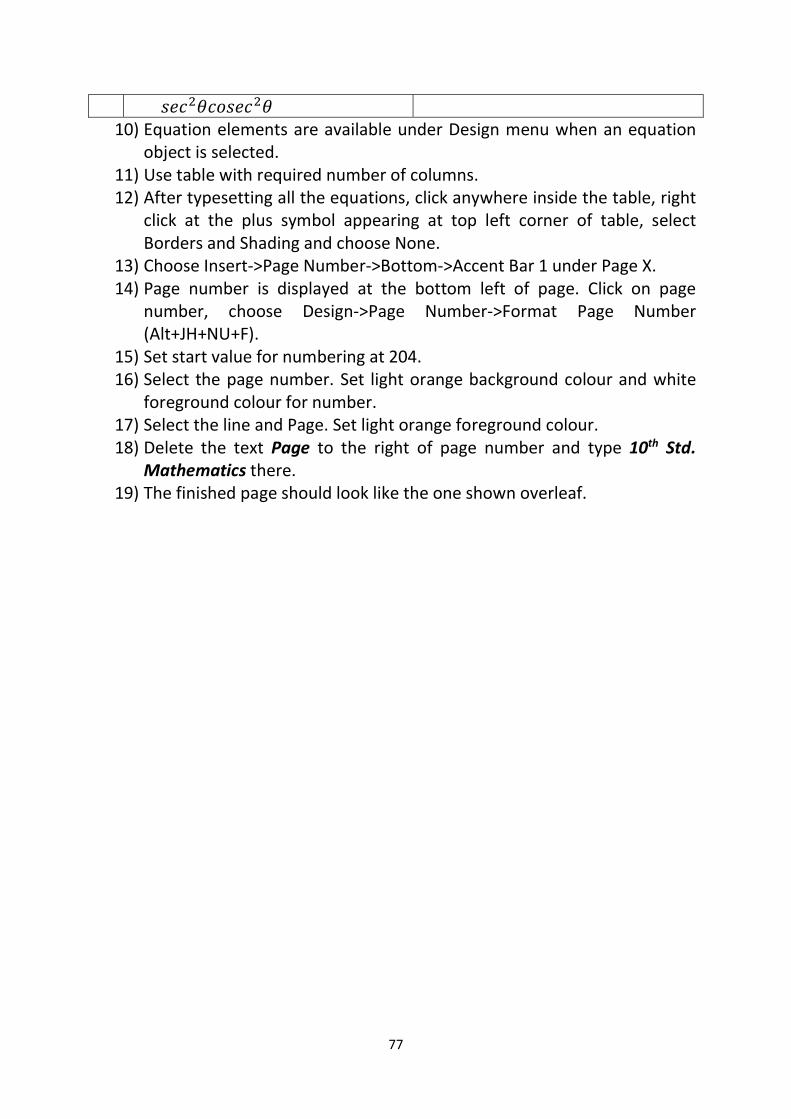
77
𝑠𝑒𝑐 𝜃𝑐𝑜𝑠𝑒𝑐 𝜃 10) Equation elements are available under Design menu when an equation
object is selected. 11) Use table with required number of columns. 12) After typesetting all the equations, click anywhere inside the table, right
click at the plus symbol appearing at top left corner of table, select Borders and Shading and choose None.
13) Choose Insert->Page Number->Bottom->Accent Bar 1 under Page X. 14) Page number is displayed at the bottom left of page. Click on page
number, choose Design->Page Number->Format Page Number (Alt+JH+NU+F).
15) Set start value for numbering at 204. 16) Select the page number. Set light orange background colour and white
foreground colour for number. 17) Select the line and Page. Set light orange foreground colour. 18) Delete the text Page to the right of page number and type 10th Std.
Mathematics there. 19) The finished page should look like the one shown overleaf.
78
(70) To prepare a birthday invitation using MS Word
ITEM SPECIFICATION
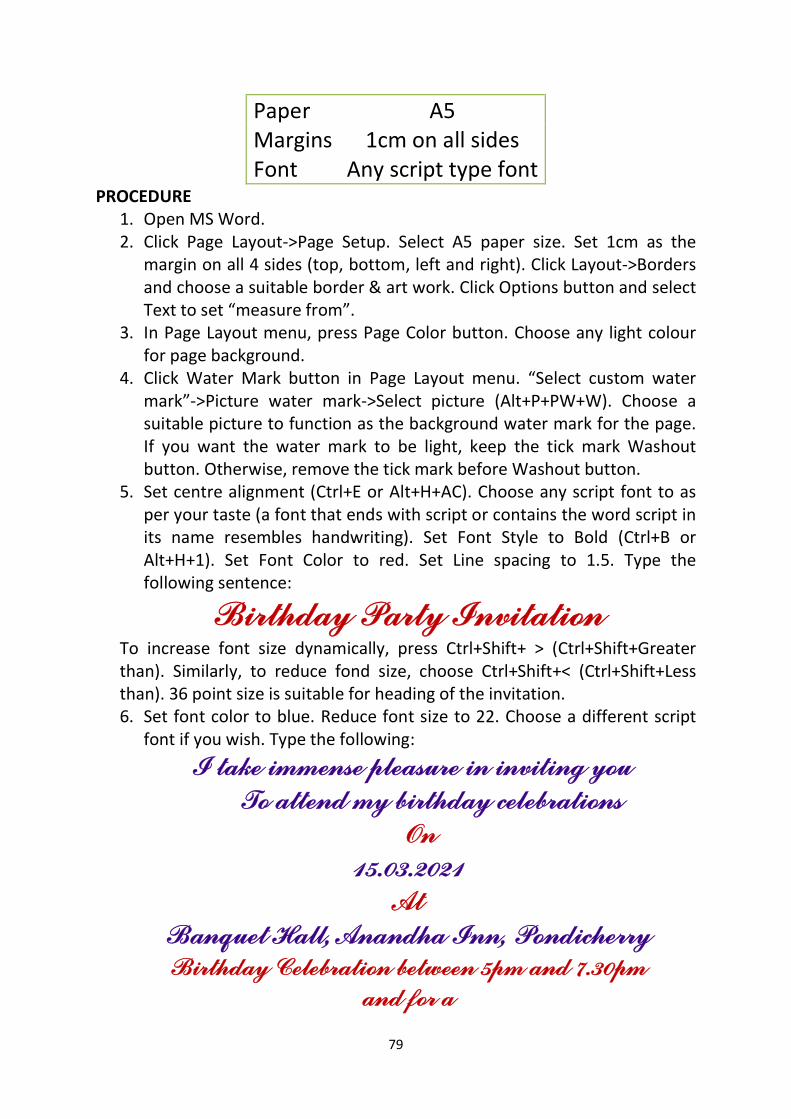
79
Paper A5 Margins 1cm on all sides Font Any script type font
PROCEDURE 1. Open MS Word. 2. Click Page Layout->Page Setup. Select A5 paper size. Set 1cm as the
margin on all 4 sides (top, bottom, left and right). Click Layout->Borders and choose a suitable border & art work. Click Options button and select Text to set “measure from”.
3. In Page Layout menu, press Page Color button. Choose any light colour for page background.
4. Click Water Mark button in Page Layout menu. “Select custom water mark”->Picture water mark->Select picture (Alt+P+PW+W). Choose a suitable picture to function as the background water mark for the page. If you want the water mark to be light, keep the tick mark Washout button. Otherwise, remove the tick mark before Washout button.
5. Set centre alignment (Ctrl+E or Alt+H+AC). Choose any script font to as per your taste (a font that ends with script or contains the word script in its name resembles handwriting). Set Font Style to Bold (Ctrl+B or Alt+H+1). Set Font Color to red. Set Line spacing to 1.5. Type the following sentence:
Birthday Party Invitation To increase font size dynamically, press Ctrl+Shift+ > (Ctrl+Shift+Greater than). Similarly, to reduce fond size, choose Ctrl+Shift+< (Ctrl+Shift+Less than). 36 point size is suitable for heading of the invitation. 6. Set font color to blue. Reduce font size to 22. Choose a different script
font if you wish. Type the following:
I take immense pleasure in inviting you To attend my birthday celebrations
On 15.03.2021
At Banquet Hall, Anandha Inn, Pondicherry Birthday Celebration between 5pm and 7.30pm
and for a
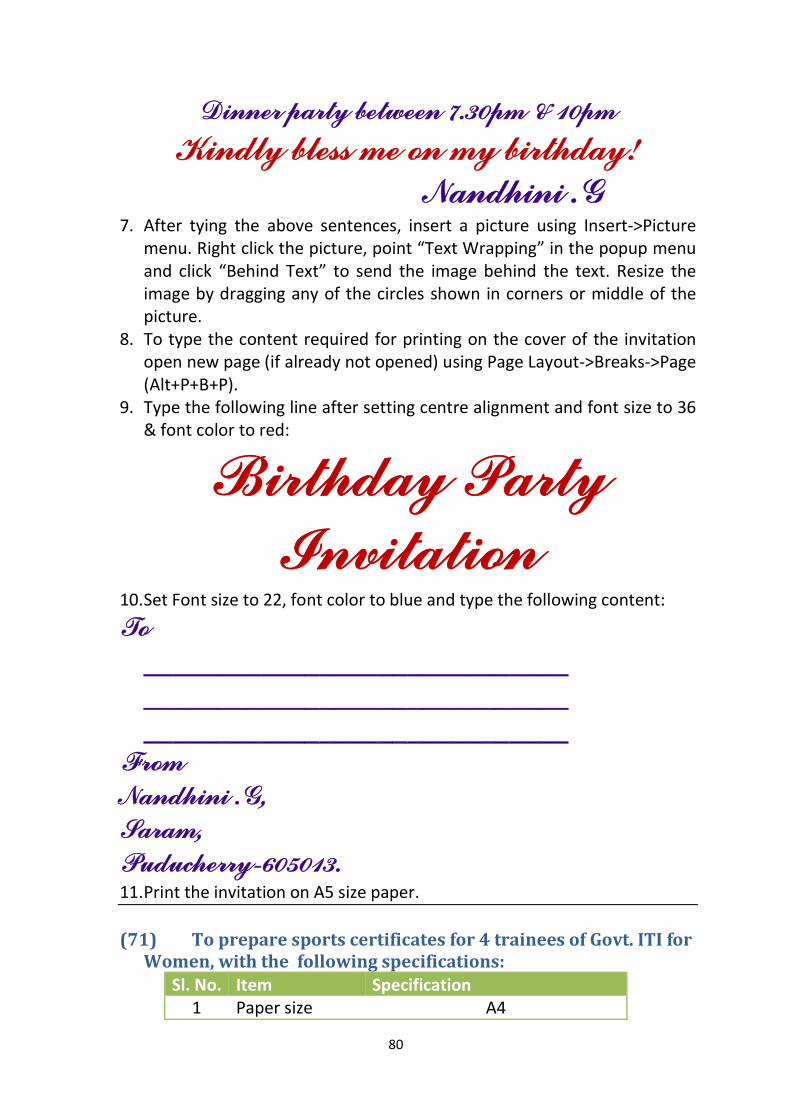
80
Dinner party between 7.30pm & 10pm Kindly bless me on my birthday!
Nandhini .G 7. After tying the above sentences, insert a picture using Insert->Picture
menu. Right click the picture, point “Text Wrapping” in the popup menu and click “Behind Text” to send the image behind the text. Resize the image by dragging any of the circles shown in corners or middle of the picture.
8. To type the content required for printing on the cover of the invitation open new page (if already not opened) using Page Layout->Breaks->Page (Alt+P+B+P).
9. Type the following line after setting centre alignment and font size to 36 & font color to red:
Birthday Party Invitation
10. Set Font size to 22, font color to blue and type the following content:
To _____________________________ _____________________________ _____________________________
From Nandhini .G, Saram, Puducherry-605013. 11. Print the invitation on A5 size paper.
(71) To prepare sports certificates for 4 trainees of Govt. ITI for
Women, with the following specifications: Sl. No. Item Specification
1 Paper size A4
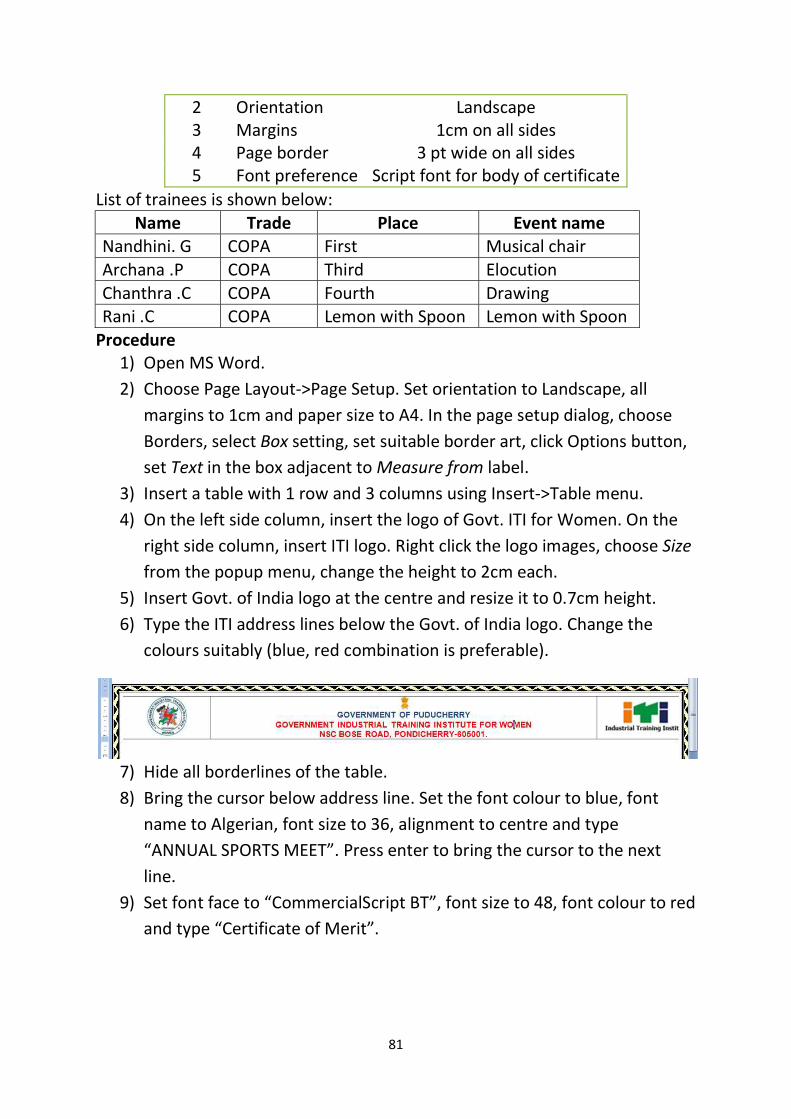
81
2 Orientation Landscape 3 Margins 1cm on all sides 4 Page border 3 pt wide on all sides 5 Font preference Script font for body of certificate
List of trainees is shown below: Name Trade Place Event name
Nandhini. G COPA First Musical chair Archana .P COPA Third Elocution Chanthra .C COPA Fourth Drawing Rani .C COPA Lemon with Spoon Lemon with Spoon
Procedure 1) Open MS Word. 2) Choose Page Layout->Page Setup. Set orientation to Landscape, all
margins to 1cm and paper size to A4. In the page setup dialog, choose Borders, select Box setting, set suitable border art, click Options button, set Text in the box adjacent to Measure from label.
3) Insert a table with 1 row and 3 columns using Insert->Table menu. 4) On the left side column, insert the logo of Govt. ITI for Women. On the
right side column, insert ITI logo. Right click the logo images, choose Size from the popup menu, change the height to 2cm each.
5) Insert Govt. of India logo at the centre and resize it to 0.7cm height. 6) Type the ITI address lines below the Govt. of India logo. Change the
colours suitably (blue, red combination is preferable).
7) Hide all borderlines of the table. 8) Bring the cursor below address line. Set the font colour to blue, font
name to Algerian, font size to 36, alignment to centre and type “ANNUAL SPORTS MEET”. Press enter to bring the cursor to the next line.
9) Set font face to “CommercialScript BT”, font size to 48, font colour to red and type “Certificate of Merit”.
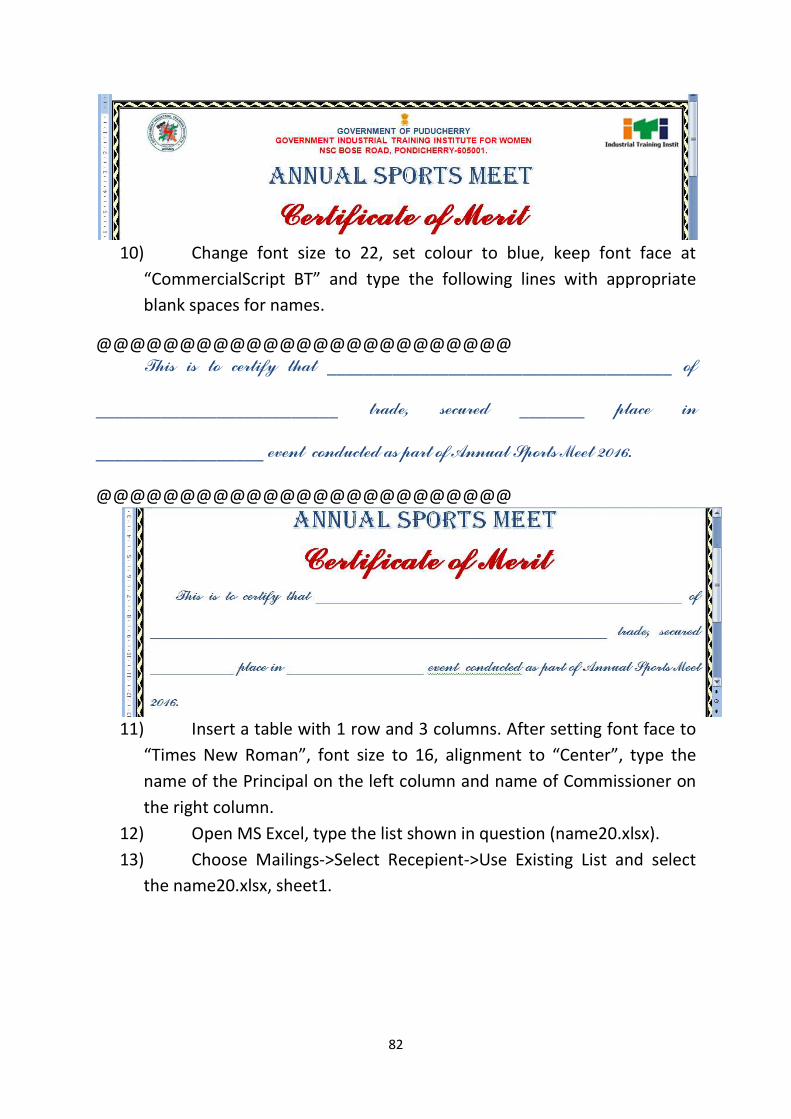
82
10) Change font size to 22, set colour to blue, keep font face at
“CommercialScript BT” and type the following lines with appropriate blank spaces for names.
@@@@@@@@@@@@@@@@@@@@@@@@@ This is to certify that _____________________________________ of
__________________________ trade, secured _______ place in
__________________ event conducted as part of Annual Sports Meet 2016.
@@@@@@@@@@@@@@@@@@@@@@@@@
11) Insert a table with 1 row and 3 columns. After setting font face to
“Times New Roman”, font size to 16, alignment to “Center”, type the name of the Principal on the left column and name of Commissioner on the right column.
12) Open MS Excel, type the list shown in question (name20.xlsx). 13) Choose Mailings->Select Recepient->Use Existing List and select
the name20.xlsx, sheet1.
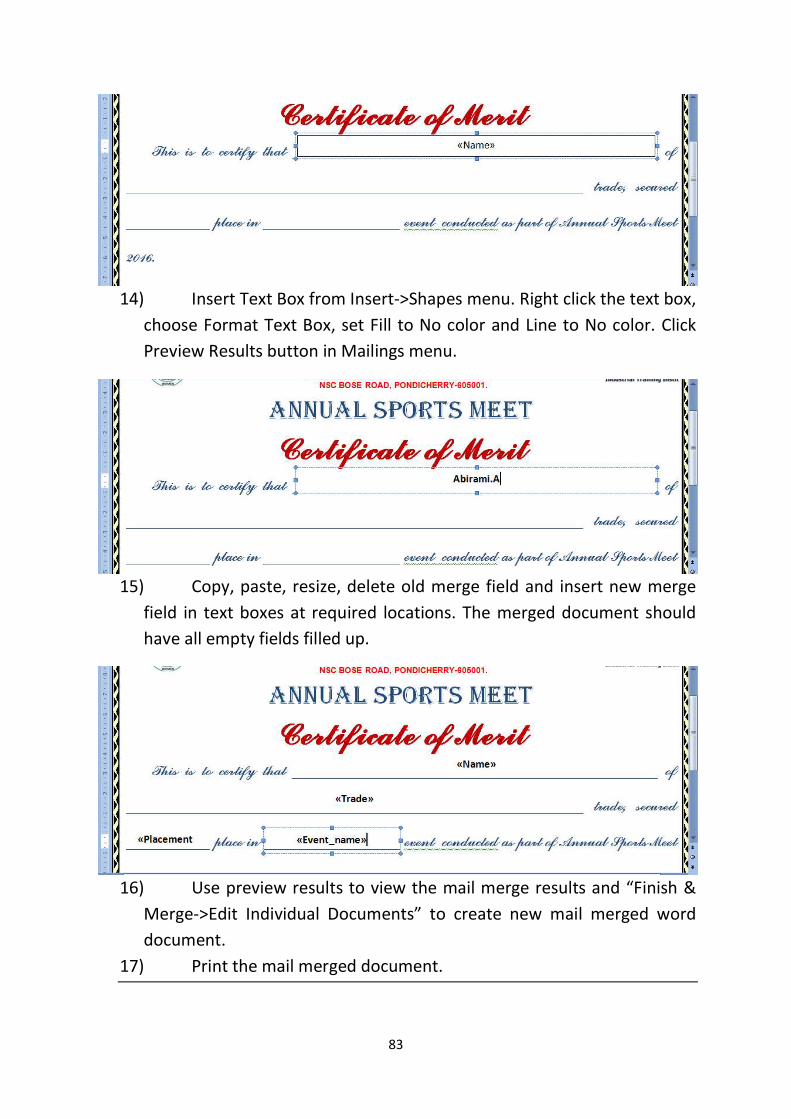
83
14) Insert Text Box from Insert->Shapes menu. Right click the text box,
choose Format Text Box, set Fill to No color and Line to No color. Click Preview Results button in Mailings menu.
15) Copy, paste, resize, delete old merge field and insert new merge
field in text boxes at required locations. The merged document should have all empty fields filled up.
16) Use preview results to view the mail merge results and “Finish &
Merge->Edit Individual Documents” to create new mail merged word document.
17) Print the mail merged document.
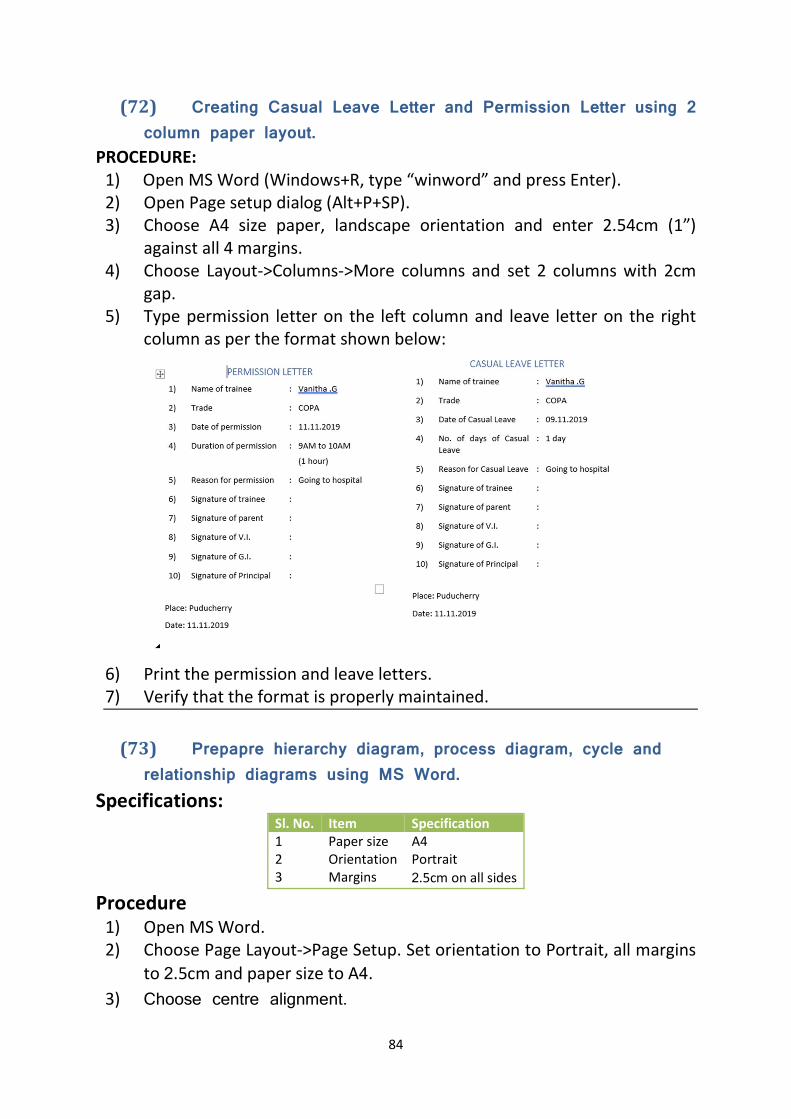
84
(72) Creating Casual Leave Letter and Permission Letter using 2 column paper layout.
PROCEDURE: 1) Open MS Word (Windows+R, type “winword” and press Enter). 2) Open Page setup dialog (Alt+P+SP). 3) Choose A4 size paper, landscape orientation and enter 2.54cm (1”)
against all 4 margins. 4) Choose Layout->Columns->More columns and set 2 columns with 2cm
gap. 5) Type permission letter on the left column and leave letter on the right
column as per the format shown below:
6) Print the permission and leave letters. 7) Verify that the format is properly maintained.
(73) Prepapre hierarchy diagram, process diagram, cycle and
relationship diagrams using MS Word. Specifications:
Sl. No. Item Specification 1 Paper size A4 2 Orientation Portrait 3 Margins 2.5cm on all sides
Procedure 1) Open MS Word. 2) Choose Page Layout->Page Setup. Set orientation to Portrait, all margins
to 2.5cm and paper size to A4. 3) Choose centre alignment.
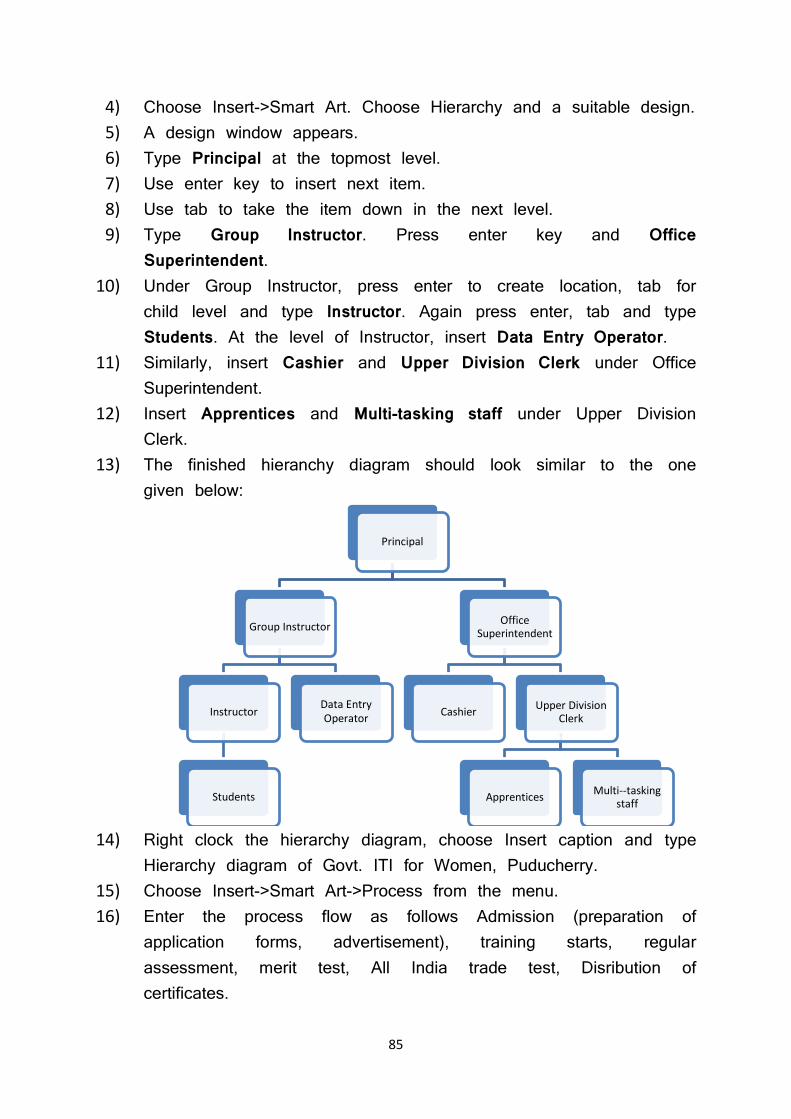
85
4) Choose Insert->Smart Art. Choose Hierarchy and a suitable design. 5) A design window appears. 6) Type Principal at the topmost level. 7) Use enter key to insert next item. 8) Use tab to take the item down in the next level. 9) Type Group Instructor. Press enter key and Office
Superintendent. 10) Under Group Instructor, press enter to create location, tab for
child level and type Instructor. Again press enter, tab and type Students. At the level of Instructor, insert Data Entry Operator.
11) Similarly, insert Cashier and Upper Division Clerk under Office Superintendent.
12) Insert Apprentices and Multi-tasking staff under Upper Division Clerk.
13) The finished hieranchy diagram should look similar to the one given below:
14) Right clock the hierarchy diagram, choose Insert caption and type
Hierarchy diagram of Govt. ITI for Women, Puducherry. 15) Choose Insert->Smart Art->Process from the menu. 16) Enter the process flow as follows Admission (preparation of
application forms, advertisement), training starts, regular assessment, merit test, All India trade test, Disribution of certificates.
Principal
Group Instructor
Instructor
Students
Data Entry Operator
Office Superintendent
Cashier Upper Division Clerk
Apprentices Multi--tasking staff
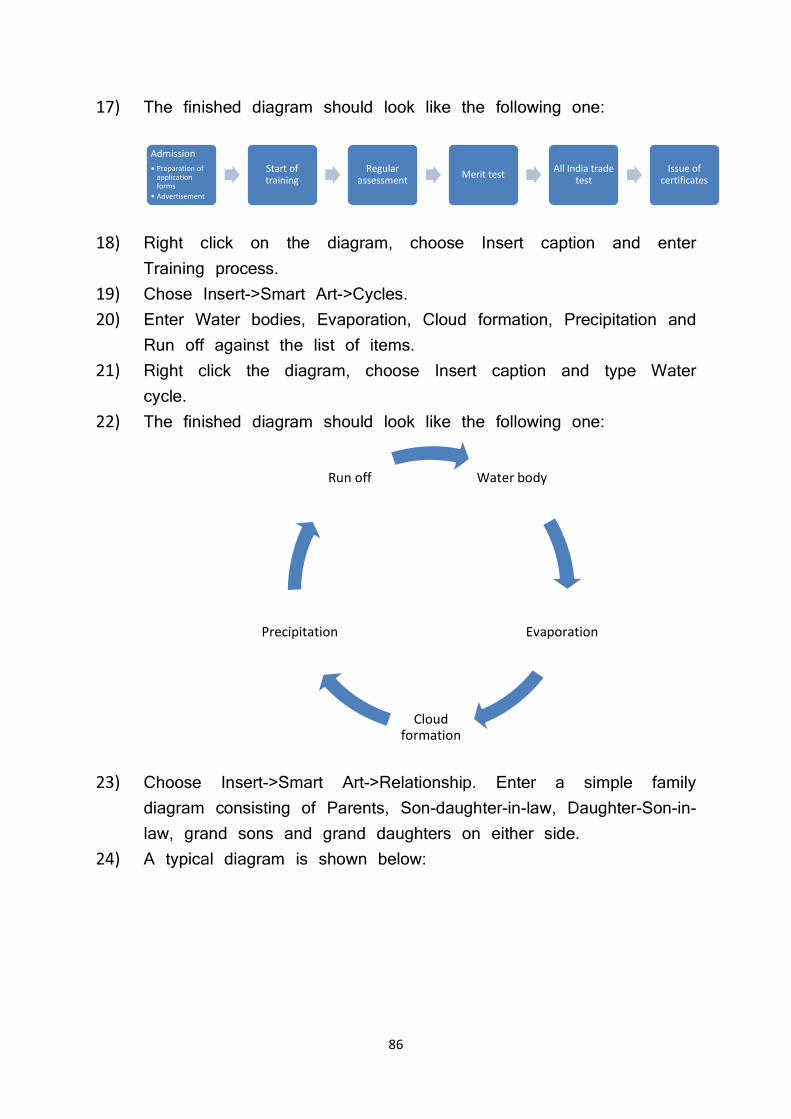
86
17) The finished diagram should look like the following one:
18) Right click on the diagram, choose Insert caption and enter
Training process. 19) Chose Insert->Smart Art->Cycles. 20) Enter Water bodies, Evaporation, Cloud formation, Precipitation and
Run off against the list of items. 21) Right click the diagram, choose Insert caption and type Water
cycle. 22) The finished diagram should look like the following one:
23) Choose Insert->Smart Art->Relationship. Enter a simple family
diagram consisting of Parents, Son-daughter-in-law, Daughter-Son-in-law, grand sons and grand daughters on either side.
24) A typical diagram is shown below:
Admission• Preparation of
application forms
• Advertisement
Start of training
Regular assessment Merit test All India trade
testIssue of
certificates
Water body
Evaporation
Cloud formation
Precipitation
Run off
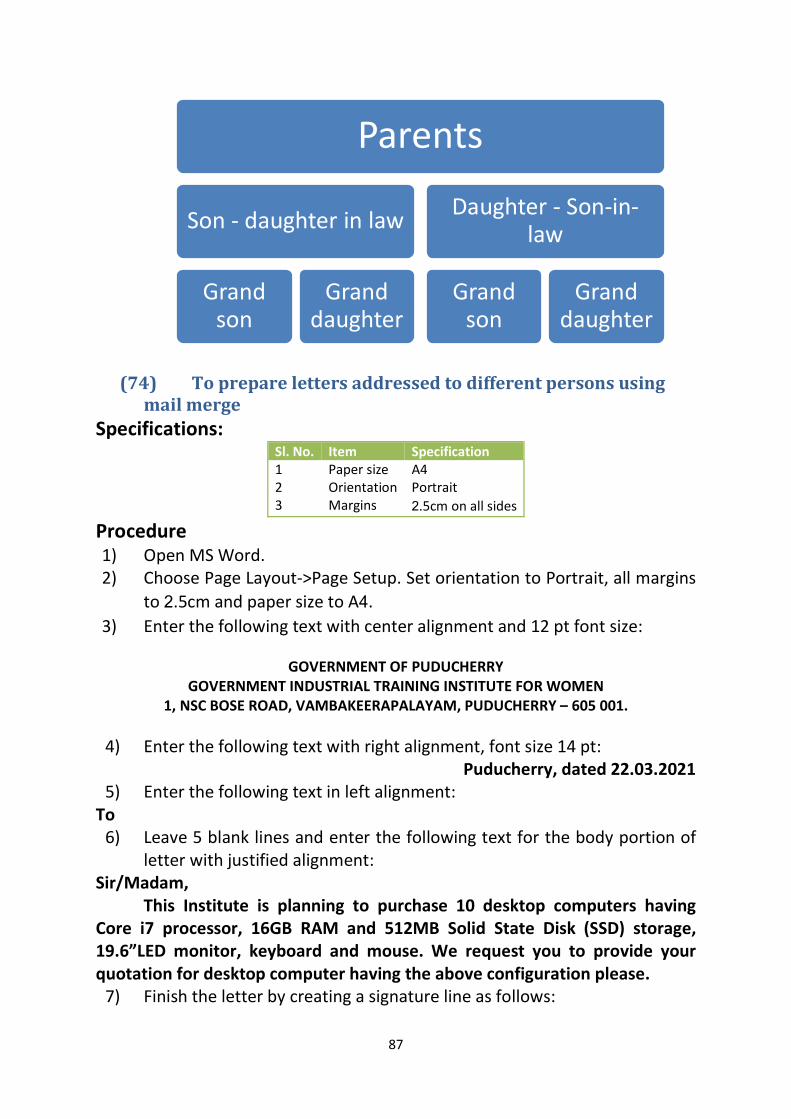
87
(74) To prepare letters addressed to different persons using mail merge
Specifications: Sl. No. Item Specification 1 Paper size A4 2 Orientation Portrait 3 Margins 2.5cm on all sides
Procedure 1) Open MS Word. 2) Choose Page Layout->Page Setup. Set orientation to Portrait, all margins
to 2.5cm and paper size to A4. 3) Enter the following text with center alignment and 12 pt font size:
GOVERNMENT OF PUDUCHERRY
GOVERNMENT INDUSTRIAL TRAINING INSTITUTE FOR WOMEN 1, NSC BOSE ROAD, VAMBAKEERAPALAYAM, PUDUCHERRY – 605 001.
4) Enter the following text with right alignment, font size 14 pt:
Puducherry, dated 22.03.2021 5) Enter the following text in left alignment:
To 6) Leave 5 blank lines and enter the following text for the body portion of
letter with justified alignment: Sir/Madam, This Institute is planning to purchase 10 desktop computers having Core i7 processor, 16GB RAM and 512MB Solid State Disk (SSD) storage, 19.6”LED monitor, keyboard and mouse. We request you to provide your quotation for desktop computer having the above configuration please.
7) Finish the letter by creating a signature line as follows:
Parents
Son - daughter in law
Grand son
Grand daughter
Daughter - Son-in-law
Grand son
Grand daughter
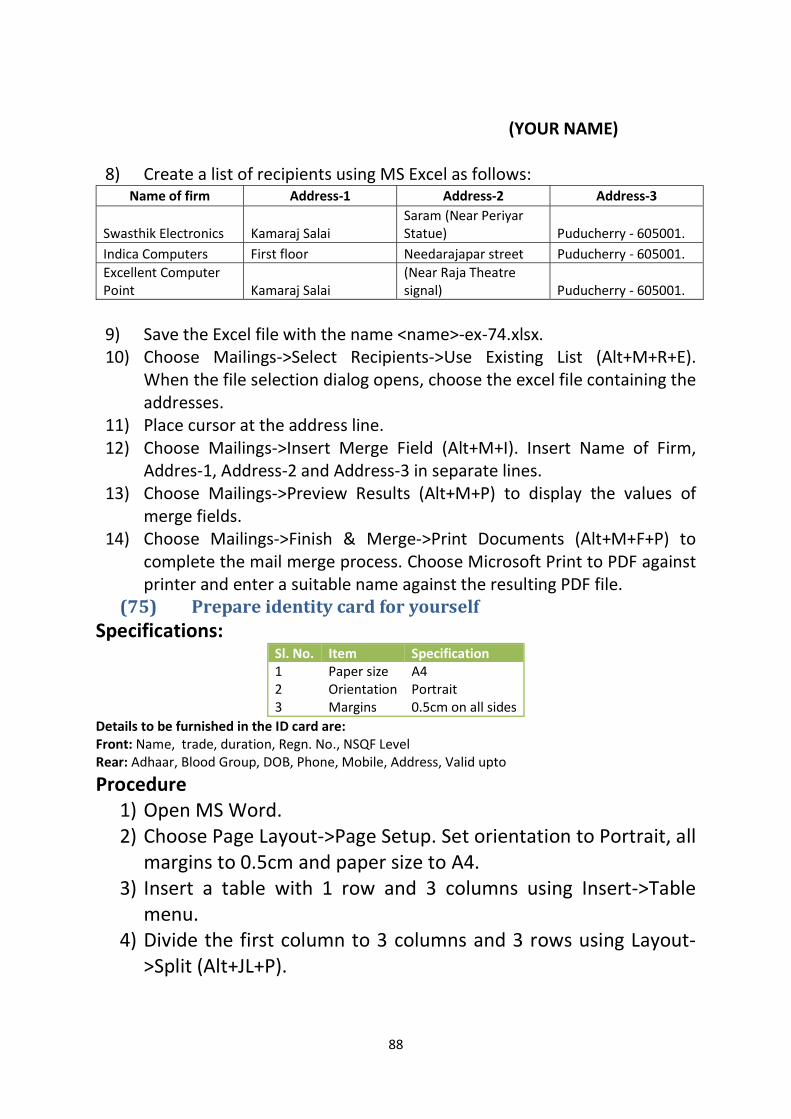
88
(YOUR NAME)
8) Create a list of recipients using MS Excel as follows:
Name of firm Address-1 Address-2 Address-3
Swasthik Electronics Kamaraj Salai Saram (Near Periyar Statue) Puducherry - 605001.
Indica Computers First floor Needarajapar street Puducherry - 605001. Excellent Computer Point Kamaraj Salai
(Near Raja Theatre signal) Puducherry - 605001.
9) Save the Excel file with the name <name>-ex-74.xlsx. 10) Choose Mailings->Select Recipients->Use Existing List (Alt+M+R+E).
When the file selection dialog opens, choose the excel file containing the addresses.
11) Place cursor at the address line. 12) Choose Mailings->Insert Merge Field (Alt+M+I). Insert Name of Firm,
Addres-1, Address-2 and Address-3 in separate lines. 13) Choose Mailings->Preview Results (Alt+M+P) to display the values of
merge fields. 14) Choose Mailings->Finish & Merge->Print Documents (Alt+M+F+P) to
complete the mail merge process. Choose Microsoft Print to PDF against printer and enter a suitable name against the resulting PDF file.
(75) Prepare identity card for yourself Specifications:
Sl. No. Item Specification 1 Paper size A4 2 Orientation Portrait 3 Margins 0.5cm on all sides
Details to be furnished in the ID card are: Front: Name, trade, duration, Regn. No., NSQF Level Rear: Adhaar, Blood Group, DOB, Phone, Mobile, Address, Valid upto
Procedure 1) Open MS Word. 2) Choose Page Layout->Page Setup. Set orientation to Portrait, all
margins to 0.5cm and paper size to A4. 3) Insert a table with 1 row and 3 columns using Insert->Table
menu. 4) Divide the first column to 3 columns and 3 rows using Layout-
>Split (Alt+JL+P).
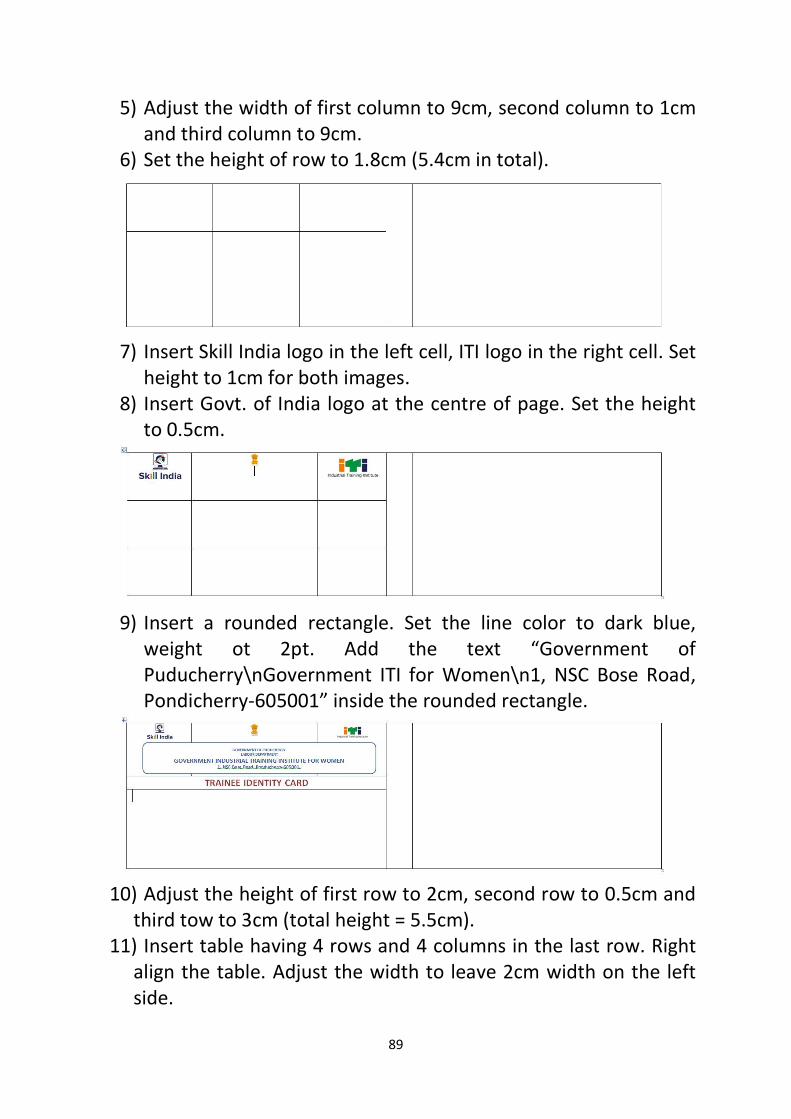
89
5) Adjust the width of first column to 9cm, second column to 1cm and third column to 9cm.
6) Set the height of row to 1.8cm (5.4cm in total).
7) Insert Skill India logo in the left cell, ITI logo in the right cell. Set
height to 1cm for both images. 8) Insert Govt. of India logo at the centre of page. Set the height
to 0.5cm.
9) Insert a rounded rectangle. Set the line color to dark blue,
weight ot 2pt. Add the text “Government of Puducherry\nGovernment ITI for Women\n1, NSC Bose Road, Pondicherry-605001” inside the rounded rectangle.
10) Adjust the height of first row to 2cm, second row to 0.5cm and
third tow to 3cm (total height = 5.5cm). 11) Insert table having 4 rows and 4 columns in the last row. Right
align the table. Adjust the width to leave 2cm width on the left side.
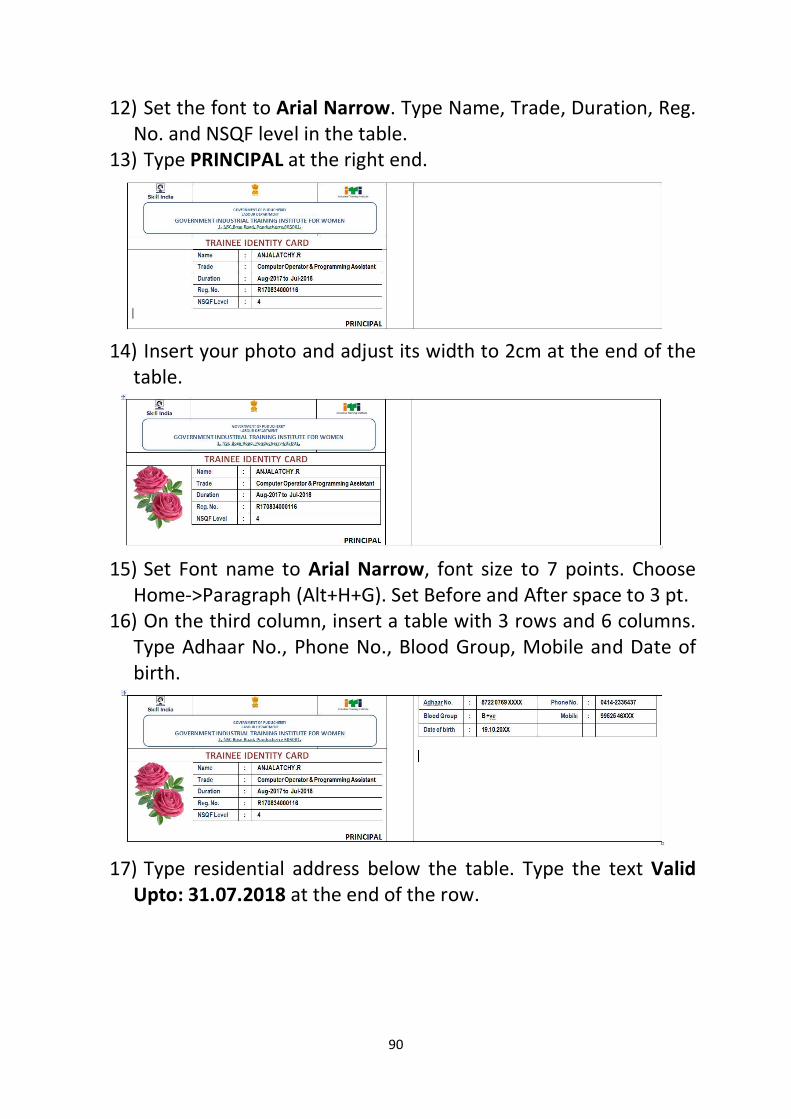
90
12) Set the font to Arial Narrow. Type Name, Trade, Duration, Reg. No. and NSQF level in the table.
13) Type PRINCIPAL at the right end.
14) Insert your photo and adjust its width to 2cm at the end of the
table.
15) Set Font name to Arial Narrow, font size to 7 points. Choose
Home->Paragraph (Alt+H+G). Set Before and After space to 3 pt. 16) On the third column, insert a table with 3 rows and 6 columns.
Type Adhaar No., Phone No., Blood Group, Mobile and Date of birth.
17) Type residential address below the table. Type the text Valid
Upto: 31.07.2018 at the end of the row.
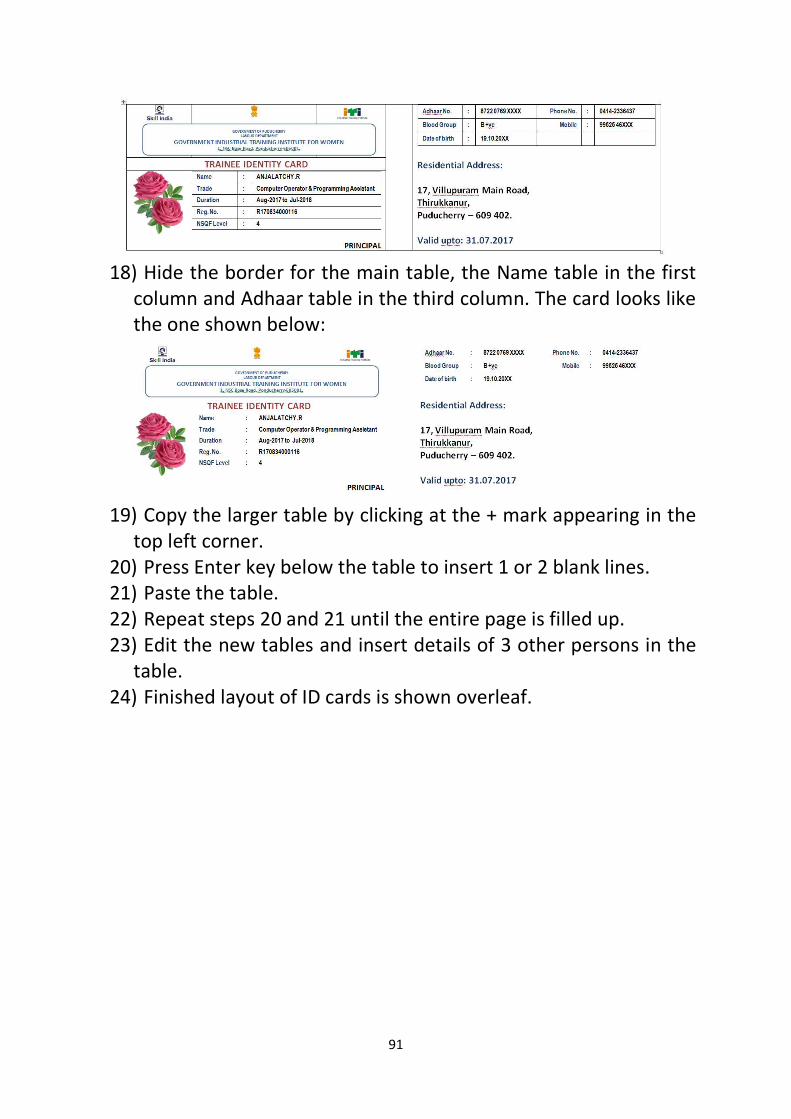
91
18) Hide the border for the main table, the Name table in the first
column and Adhaar table in the third column. The card looks like the one shown below:
19) Copy the larger table by clicking at the + mark appearing in the
top left corner. 20) Press Enter key below the table to insert 1 or 2 blank lines. 21) Paste the table. 22) Repeat steps 20 and 21 until the entire page is filled up. 23) Edit the new tables and insert details of 3 other persons in the
table. 24) Finished layout of ID cards is shown overleaf.
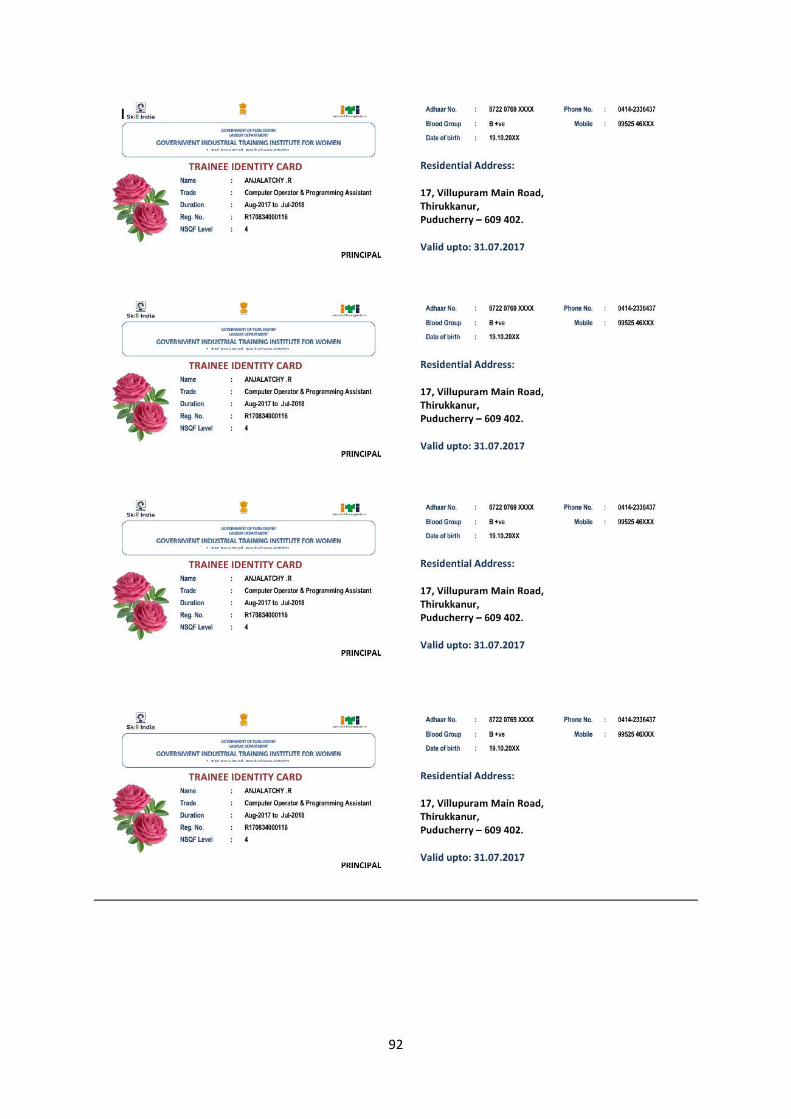
92
93
(76) Creating Macros with keyboard shortcut using MS Word PROCEDURE:
1) Open MS Word (Windows+R, type “winword” and press Enter). 2) Open File->Trust Centre (Alt+F+I). 3) Select Trust Centre from left panel. 4) Open Trust Centre Settings. 5) Choose Enable All Macros. 6) Under Popular option in left panel, place a tick mark against “Show
Developer Tab in the Ribbon”. 7) Choose Developer->Record Macro (Alt+L+R). 8) Enter a name for macro. Choose keyboard. Enter acshortcut
combination (e.g., Ctrl+Shift+K, Ctrl+Shift+N, Ctrl+Alt+M, etc.). 9) Press OK. A face icon is shown to indicate that a macro is being
recorded. 10) Carry out your work (e.g., type your name). 11) After completing your work, choose Developer->Stop Recording
(Alt+L+R). 12) Use your key combinations to verify that the work desired by you is
carried out automatically.
(77) Creating Macros with button shortcut using MS Word PROCEDURE:
1) Open MS Word (Windows+R, type “winword” and press Enter). 2) Open File->Trust Centre (Alt+F+I). 3) Select Trust Centre from left panel. 4) Open Trust Centre Settings. 5) Choose Enable All Macros. 6) Under Popular option in left panel, place a tick mark against “Show
Developer Tab in the Ribbon”. 7) Choose Developer->Record Macro (Alt+L+R). 8) Enter a name for macro. Choose Button. Add a separator in the menu
customization panel. Add a button. Choose Edit to change its icon. 9) Press OK. A face icon is shown to indicate that a macro is being
recorded. 10) Carry out your work (e.g., type your name). 11) After completing your work, choose Developer->Stop Recording
(Alt+L+R). 12) Use your key combinations to verify that the work desired by you is
carried out automatically.
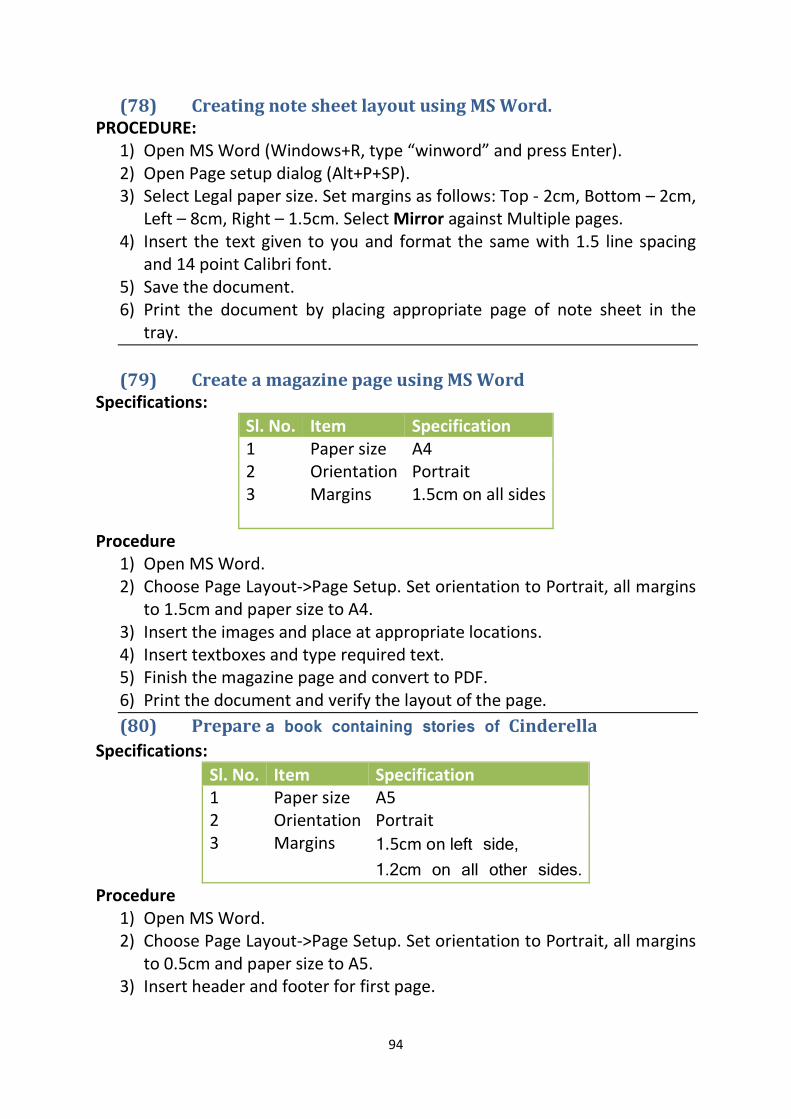
94
(78) Creating note sheet layout using MS Word. PROCEDURE:
1) Open MS Word (Windows+R, type “winword” and press Enter). 2) Open Page setup dialog (Alt+P+SP). 3) Select Legal paper size. Set margins as follows: Top - 2cm, Bottom – 2cm,
Left – 8cm, Right – 1.5cm. Select Mirror against Multiple pages. 4) Insert the text given to you and format the same with 1.5 line spacing
and 14 point Calibri font. 5) Save the document. 6) Print the document by placing appropriate page of note sheet in the
tray.
(79) Create a magazine page using MS Word Specifications:
Sl. No. Item Specification 1 Paper size A4 2 Orientation Portrait 3 Margins 1.5cm on all sides
Procedure
1) Open MS Word. 2) Choose Page Layout->Page Setup. Set orientation to Portrait, all margins
to 1.5cm and paper size to A4. 3) Insert the images and place at appropriate locations. 4) Insert textboxes and type required text. 5) Finish the magazine page and convert to PDF. 6) Print the document and verify the layout of the page. (80) Prepare a book containing stories of Cinderella
Specifications: Sl. No. Item Specification 1 Paper size A5 2 Orientation Portrait 3 Margins 1.5cm on left side,
1.2cm on all other sides. Procedure
1) Open MS Word. 2) Choose Page Layout->Page Setup. Set orientation to Portrait, all margins
to 0.5cm and paper size to A5. 3) Insert header and footer for first page.
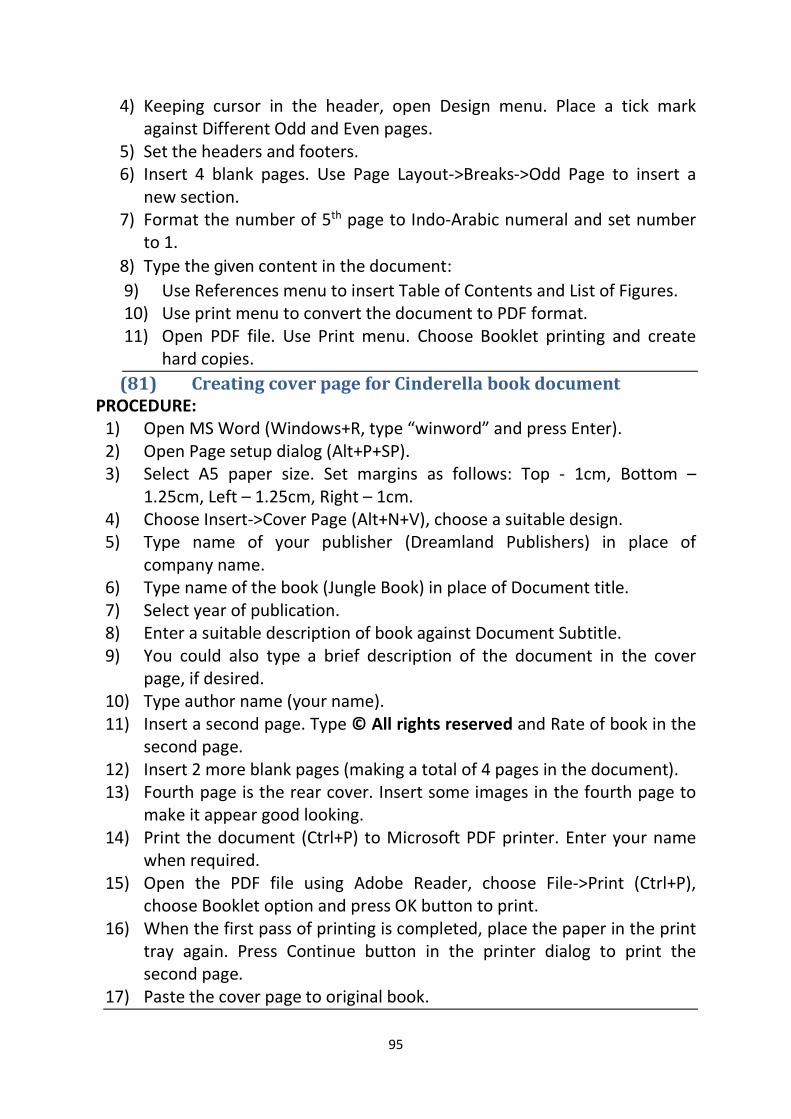
95
4) Keeping cursor in the header, open Design menu. Place a tick mark against Different Odd and Even pages.
5) Set the headers and footers. 6) Insert 4 blank pages. Use Page Layout->Breaks->Odd Page to insert a
new section. 7) Format the number of 5th page to Indo-Arabic numeral and set number
to 1. 8) Type the given content in the document: 9) Use References menu to insert Table of Contents and List of Figures. 10) Use print menu to convert the document to PDF format. 11) Open PDF file. Use Print menu. Choose Booklet printing and create
hard copies. (81) Creating cover page for Cinderella book document
PROCEDURE: 1) Open MS Word (Windows+R, type “winword” and press Enter). 2) Open Page setup dialog (Alt+P+SP). 3) Select A5 paper size. Set margins as follows: Top - 1cm, Bottom –
1.25cm, Left – 1.25cm, Right – 1cm. 4) Choose Insert->Cover Page (Alt+N+V), choose a suitable design. 5) Type name of your publisher (Dreamland Publishers) in place of
company name. 6) Type name of the book (Jungle Book) in place of Document title. 7) Select year of publication. 8) Enter a suitable description of book against Document Subtitle. 9) You could also type a brief description of the document in the cover
page, if desired. 10) Type author name (your name). 11) Insert a second page. Type © All rights reserved and Rate of book in the
second page. 12) Insert 2 more blank pages (making a total of 4 pages in the document). 13) Fourth page is the rear cover. Insert some images in the fourth page to
make it appear good looking. 14) Print the document (Ctrl+P) to Microsoft PDF printer. Enter your name
when required. 15) Open the PDF file using Adobe Reader, choose File->Print (Ctrl+P),
choose Booklet option and press OK button to print. 16) When the first pass of printing is completed, place the paper in the print
tray again. Press Continue button in the printer dialog to print the second page.
17) Paste the cover page to original book.
96
(82) To create a spreadsheet containing list of marks and analyse the data using MS Excel
PROCEDURE: 1) Open MS Excel (Press Windows+R, type “excel” and press Enter or choose
Start->All Apps->Microsoft Office->Excel from the start menu). 2) Right click on Sheet1. Rename it to “Mark”. 3) In the spreadsheet, columns are named A, B, C, ..., Z, AA, ... ZZ in alphabets
and rows are named 1, 2, 3, ... in numbers. 4) The address of a cell is a combination of column name and row number.
Hence, the first cell is called A1, the next cell on the same row is called B1, the cell just below the first cell is called A2.
5) Type Sl. No., Name, Mark and Rank in cells A1, B1, C1 and D1. 6) Enter 1 in cell A2. Type =A2+1 in cell A3. The next number appears. 7) Click on or move the cursor to cell A2. Press Ctrl+C (copy). 8) Move the cursor down. Press Shift Key and keep pressing down arrow till the
cells A4 to A11 are selected. Press Ctrl+V (or Enter key) to create automatic numbers.
9) Enter names of any 10 persons in cells B2 to B11. 10) Enter marks in cells C2 to C11. 11) Enter the following formula in cell D2: =rank(C2, C$2, C$11). It displays the
rank of the first student in relation to 9 other students. 12) Copy the formula from cell D2 to cells D3:D11 range. Rank for each student is
displayed. 13) Select the header row and make the text bold. 14) Adjust column width to suit the length of name. 15) Select the area filled with Data. Choose Home->Borders->All Borders (or
press Alt+H+B+A). 16) Save the document with password using Tools->General Options available in
the file save dialog. 17) Open Page Layout->Page Setup. Set 1 Page wide by 1 page high. 18) Select Margins, place tick mark against Center on Page->Horizontallly. 19) Select Header/Footer, Click Custom Header and type “Statement of Marks:
COPA” at centre. Set Bold font with 16 point size. 20) At the end of the book, use Average, stdev, Max, Min and Mode formulae to
calculate statistical parameters. 21) Select Custom Footer. Insert Page number using # symbol at centre. Insert
your name to the right side. 22) Print the document. 23) Choose Formulas->Show Formulas. Print the same document again to show
all the formulas.
97
(83) Using Date function and randbetween to create create data
PROCEDURE: 24) Open MS Excel (Press Windows+R, type “excel” and press Enter or choose
Start->All Apps->Microsoft Office->Excel from the start menu). 25) Enter the values Sl. No., Name, DOB, Percentage Mark in cells A1, B1, C1
and D1. 26) Select cells A1:D1, choose bold font, select Home->Wrap Text, align centre
vertically and align centre horizontally. 27) Enter the value 1 in cell A2. 28) Type the formula =A2+1 in cell A3. 29) Copy the contents of cell A3 and paste it in the rage A4:A11. 30) Type the names of 10 persons. 31) Enter date of birth using the function =date(year, month, day) format in cells
C2 to C11. 32) Enter the formula =randbetween(75,100) in cells D2 to D11.
98
(84) To use conditional formatting in Excel cells to highlight cells
PROCEDURE: 1) Open MS Excel (Press Windows+R, type “excel” and press Enter or choose
Start->All Apps->Microsoft Office->Excel from the start menu). 2) Copy the raw data from Sheet1. Paste the values in Sheet2. 3) Rename Sheet2 to Conditional-Format. 4) Select cells D2:D11. Choose Home->Conditional Formating->Top and Bottom-
>Top 10 (Alt+H+L+T+T). Select top 3, set colour scheme. Press OK to apply conditional formatting.
5) Select cells C2:C11. Choose Home->Conditional Formating->Top and Bottom->Top 10 (Alt+H+L+T+T). Select top 2, set colour scheme. Press OK to apply conditional formatting for selecting 2 oldest persons. Apply the same procedure to for selecting youngest 2 persons.
(85) Sorting data using Excel.
PROCEDURE: 1) Open MS Excel (Press Windows+R, type “excel” and press Enter or choose
Start->All Apps->Microsoft Office->Excel from the start menu). 6) Copy the raw data from Sheet2. Paste the values in Sheet3. 7) Rename Sheet3 to Sorted. 8) Select cells B1:D11. 2) Select Data->Sort. 3) In the sort dialog, ensure that the box in front of My Data has header is ticked. 4) Choose Percentage of Marks->Largest to Smallest. 5) Press Add Level. 6) In the second level, choose DOB->Oldest to youngest. 7) Press Add Level. 8) In the third level, choose Name->A to Z. 9) Press OK. 10) Verify whether the data is properly sorted. (86) Applying filter for data in Excel.
PROCEDURE: 1) Open MS Excel (Press Windows+R, type “excel” and press Enter or choose
Start->All Apps->Microsoft Office->Excel from the start menu). 2) Copy the raw data from Sheet3. Paste the values in Sheet4. 3) Rename Sheet4 to Filtered. 4) Select cells B1:D11. 5) Choose Data->Filter (Alt+A+T). 6) A triangle mark appears at each column heading. 7) Click the triangular mark and choose the sorting options. 8) Verify that the data is properly sorted based on given criterion.
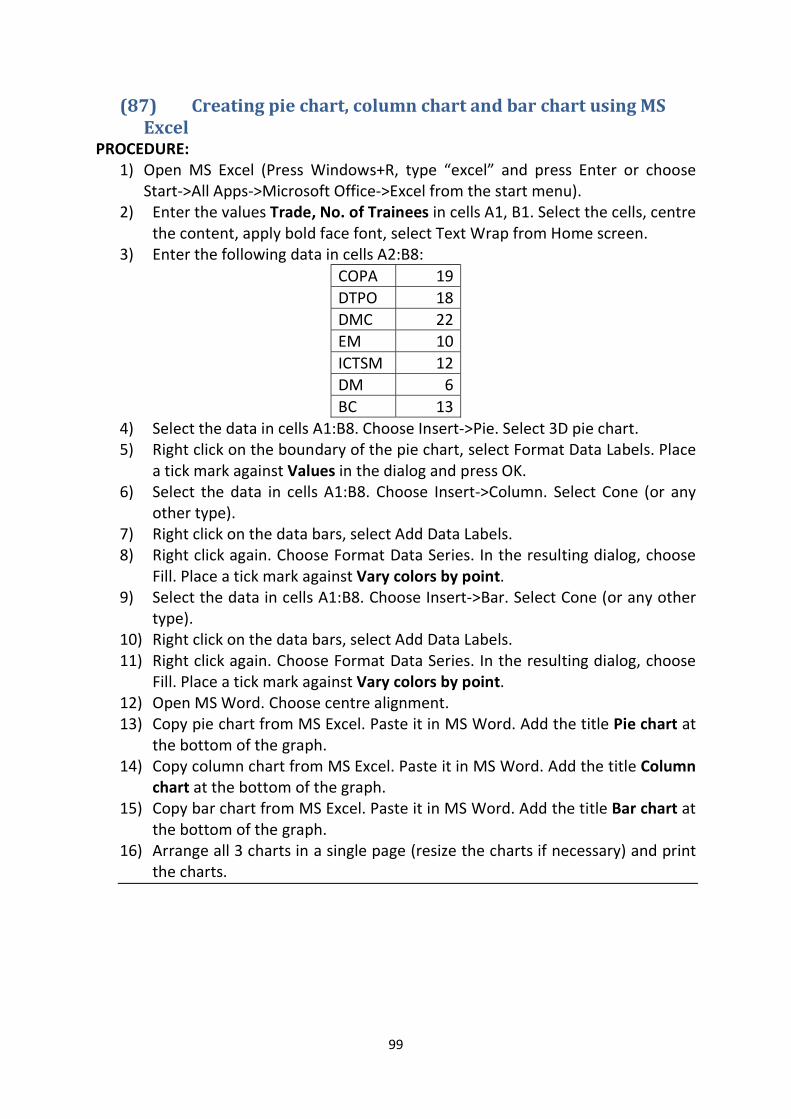
99
(87) Creating pie chart, column chart and bar chart using MS Excel
PROCEDURE: 1) Open MS Excel (Press Windows+R, type “excel” and press Enter or choose
Start->All Apps->Microsoft Office->Excel from the start menu). 2) Enter the values Trade, No. of Trainees in cells A1, B1. Select the cells, centre
the content, apply bold face font, select Text Wrap from Home screen. 3) Enter the following data in cells A2:B8:
COPA 19 DTPO 18 DMC 22 EM 10 ICTSM 12 DM 6 BC 13
4) Select the data in cells A1:B8. Choose Insert->Pie. Select 3D pie chart. 5) Right click on the boundary of the pie chart, select Format Data Labels. Place
a tick mark against Values in the dialog and press OK. 6) Select the data in cells A1:B8. Choose Insert->Column. Select Cone (or any
other type). 7) Right click on the data bars, select Add Data Labels. 8) Right click again. Choose Format Data Series. In the resulting dialog, choose
Fill. Place a tick mark against Vary colors by point. 9) Select the data in cells A1:B8. Choose Insert->Bar. Select Cone (or any other
type). 10) Right click on the data bars, select Add Data Labels. 11) Right click again. Choose Format Data Series. In the resulting dialog, choose
Fill. Place a tick mark against Vary colors by point. 12) Open MS Word. Choose centre alignment. 13) Copy pie chart from MS Excel. Paste it in MS Word. Add the title Pie chart at
the bottom of the graph. 14) Copy column chart from MS Excel. Paste it in MS Word. Add the title Column
chart at the bottom of the graph. 15) Copy bar chart from MS Excel. Paste it in MS Word. Add the title Bar chart at
the bottom of the graph. 16) Arrange all 3 charts in a single page (resize the charts if necessary) and print
the charts.
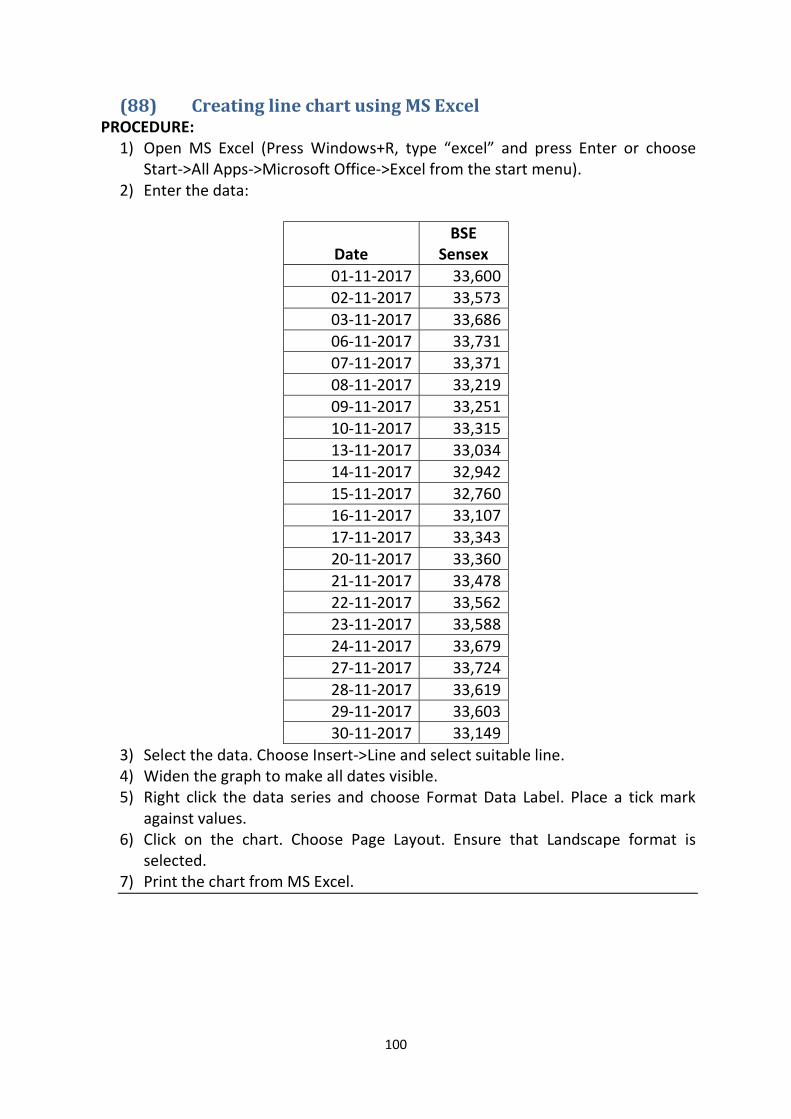
100
(88) Creating line chart using MS Excel PROCEDURE:
1) Open MS Excel (Press Windows+R, type “excel” and press Enter or choose Start->All Apps->Microsoft Office->Excel from the start menu).
2) Enter the data:
Date BSE
Sensex 01-11-2017 33,600 02-11-2017 33,573 03-11-2017 33,686 06-11-2017 33,731 07-11-2017 33,371 08-11-2017 33,219 09-11-2017 33,251 10-11-2017 33,315 13-11-2017 33,034 14-11-2017 32,942 15-11-2017 32,760 16-11-2017 33,107 17-11-2017 33,343 20-11-2017 33,360 21-11-2017 33,478 22-11-2017 33,562 23-11-2017 33,588 24-11-2017 33,679 27-11-2017 33,724 28-11-2017 33,619 29-11-2017 33,603 30-11-2017 33,149
3) Select the data. Choose Insert->Line and select suitable line. 4) Widen the graph to make all dates visible. 5) Right click the data series and choose Format Data Label. Place a tick mark
against values. 6) Click on the chart. Choose Page Layout. Ensure that Landscape format is
selected. 7) Print the chart from MS Excel.
101
(89) Creating series of lines using scatter diagram in MS Excel PROCEDURE:
1) Open MS Excel (Press Windows+R, type “excel” and press Enter or choose Start->All Apps->Microsoft Office->Excel from the start menu).
2) Enter the titles Angle, Sin, Cos in cells A1, B1,C1. 3) Enter 0 in cell A2, =SIN(A2*PI()/180) in B2 and =COS(A2*PI()/180) in C2. 4) Enter =A2+0.5 in cell A3, =SIN(A2*PI()/180) in B3 and =COS(A2*PI()/180) in
C3. 5) Copy the cells A3, B3, C3 and paste them from row 4 to row 2001. 6) Select the data. Choose Insert->Scatter. 7) Increase the width of chart to make the graphs easily visible. 8) Click on the graph, choose Page Layout and apply landscape format. 9) Print the graph.
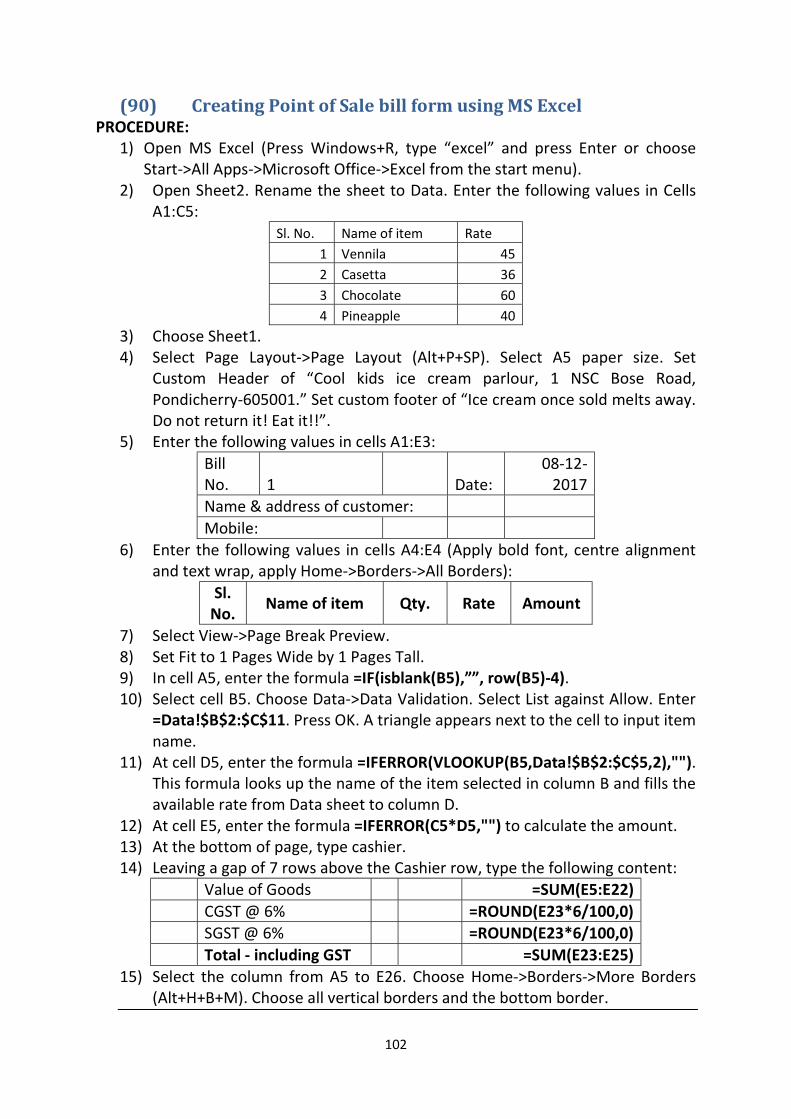
102
(90) Creating Point of Sale bill form using MS Excel PROCEDURE:
1) Open MS Excel (Press Windows+R, type “excel” and press Enter or choose Start->All Apps->Microsoft Office->Excel from the start menu).
2) Open Sheet2. Rename the sheet to Data. Enter the following values in Cells A1:C5:
Sl. No. Name of item Rate 1 Vennila 45 2 Casetta 36 3 Chocolate 60 4 Pineapple 40
3) Choose Sheet1. 4) Select Page Layout->Page Layout (Alt+P+SP). Select A5 paper size. Set
Custom Header of “Cool kids ice cream parlour, 1 NSC Bose Road, Pondicherry-605001.” Set custom footer of “Ice cream once sold melts away. Do not return it! Eat it!!”.
5) Enter the following values in cells A1:E3: Bill No. 1 Date:
08-12-2017
Name & address of customer: Mobile:
6) Enter the following values in cells A4:E4 (Apply bold font, centre alignment and text wrap, apply Home->Borders->All Borders):
Sl. No.
Name of item Qty. Rate Amount
7) Select View->Page Break Preview. 8) Set Fit to 1 Pages Wide by 1 Pages Tall. 9) In cell A5, enter the formula =IF(isblank(B5),””, row(B5)-4). 10) Select cell B5. Choose Data->Data Validation. Select List against Allow. Enter
=Data!$B$2:$C$11. Press OK. A triangle appears next to the cell to input item name.
11) At cell D5, enter the formula =IFERROR(VLOOKUP(B5,Data!$B$2:$C$5,2),""). This formula looks up the name of the item selected in column B and fills the available rate from Data sheet to column D.
12) At cell E5, enter the formula =IFERROR(C5*D5,"") to calculate the amount. 13) At the bottom of page, type cashier. 14) Leaving a gap of 7 rows above the Cashier row, type the following content:
Value of Goods =SUM(E5:E22) CGST @ 6% =ROUND(E23*6/100,0) SGST @ 6% =ROUND(E23*6/100,0) Total - including GST =SUM(E23:E25)
15) Select the column from A5 to E26. Choose Home->Borders->More Borders (Alt+H+B+M). Choose all vertical borders and the bottom border.

103
(91) Creating monthly GST report for shops PROCEDURE:
1) Open MS Excel (Press Windows+R, type “excel” and press Enter or choose Start->All Apps->Microsoft Office->Excel from the start menu).
2) Merge the cells A1 and B1. Enter Total amount in the merged cells. 3) Enter the formula =SUM(C3:C1002) in C1, =SUM(D3:D1002) in D1,
=SUM(E3:E1002) in E1 and =SUM(F3:F1002) in F1. 4) Enter the following column names in cells A2 to F2: Bill No.
Date Cost of items
CGST @ 6%
SGST @ 6%
Total cost
5) Enter the following formulae from cells D2 to F2.
6) Copy and paste the formulae from cells D2:F2. Paste the same from cells
D3:F3 to D1002:F1002. 7) Select cells from C2:C1002. Open Data->Conditional Formatting. Choose Date,
between 01-04-2019 and 30-04-2019. 8) Select cells A1:F2. Choose View->Freeze Panes->Freeze top rows. 9) Format the cells A1:F1 with bold font and 14 point size. 10) Enter some bill numbers, date, item cost and verify whether CGST, SGST and
total amount care calculated properly. 11) Print the result on A4 size paper with appropriate header and footer.
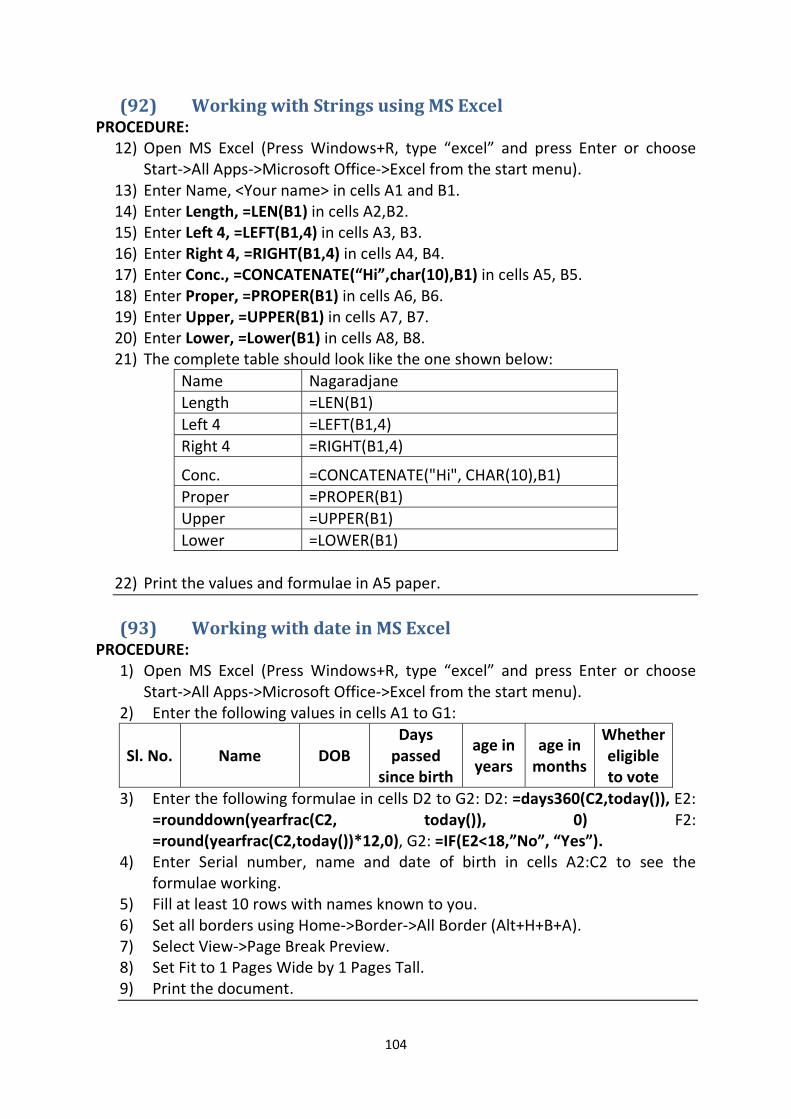
104
(92) Working with Strings using MS Excel PROCEDURE:
12) Open MS Excel (Press Windows+R, type “excel” and press Enter or choose Start->All Apps->Microsoft Office->Excel from the start menu).
13) Enter Name, <Your name> in cells A1 and B1. 14) Enter Length, =LEN(B1) in cells A2,B2. 15) Enter Left 4, =LEFT(B1,4) in cells A3, B3. 16) Enter Right 4, =RIGHT(B1,4) in cells A4, B4. 17) Enter Conc., =CONCATENATE(“Hi”,char(10),B1) in cells A5, B5. 18) Enter Proper, =PROPER(B1) in cells A6, B6. 19) Enter Upper, =UPPER(B1) in cells A7, B7. 20) Enter Lower, =Lower(B1) in cells A8, B8. 21) The complete table should look like the one shown below:
Name Nagaradjane Length =LEN(B1) Left 4 =LEFT(B1,4) Right 4 =RIGHT(B1,4)
Conc. =CONCATENATE("Hi", CHAR(10),B1) Proper =PROPER(B1) Upper =UPPER(B1) Lower =LOWER(B1)
22) Print the values and formulae in A5 paper.
(93) Working with date in MS Excel
PROCEDURE: 1) Open MS Excel (Press Windows+R, type “excel” and press Enter or choose
Start->All Apps->Microsoft Office->Excel from the start menu). 2) Enter the following values in cells A1 to G1:
Sl. No. Name DOB Days
passed since birth
age in years
age in months
Whether eligible to vote
3) Enter the following formulae in cells D2 to G2: D2: =days360(C2,today()), E2: =rounddown(yearfrac(C2, today()), 0) F2: =round(yearfrac(C2,today())*12,0), G2: =IF(E2<18,”No”, “Yes”).
4) Enter Serial number, name and date of birth in cells A2:C2 to see the formulae working.
5) Fill at least 10 rows with names known to you. 6) Set all borders using Home->Border->All Border (Alt+H+B+A). 7) Select View->Page Break Preview. 8) Set Fit to 1 Pages Wide by 1 Pages Tall. 9) Print the document.
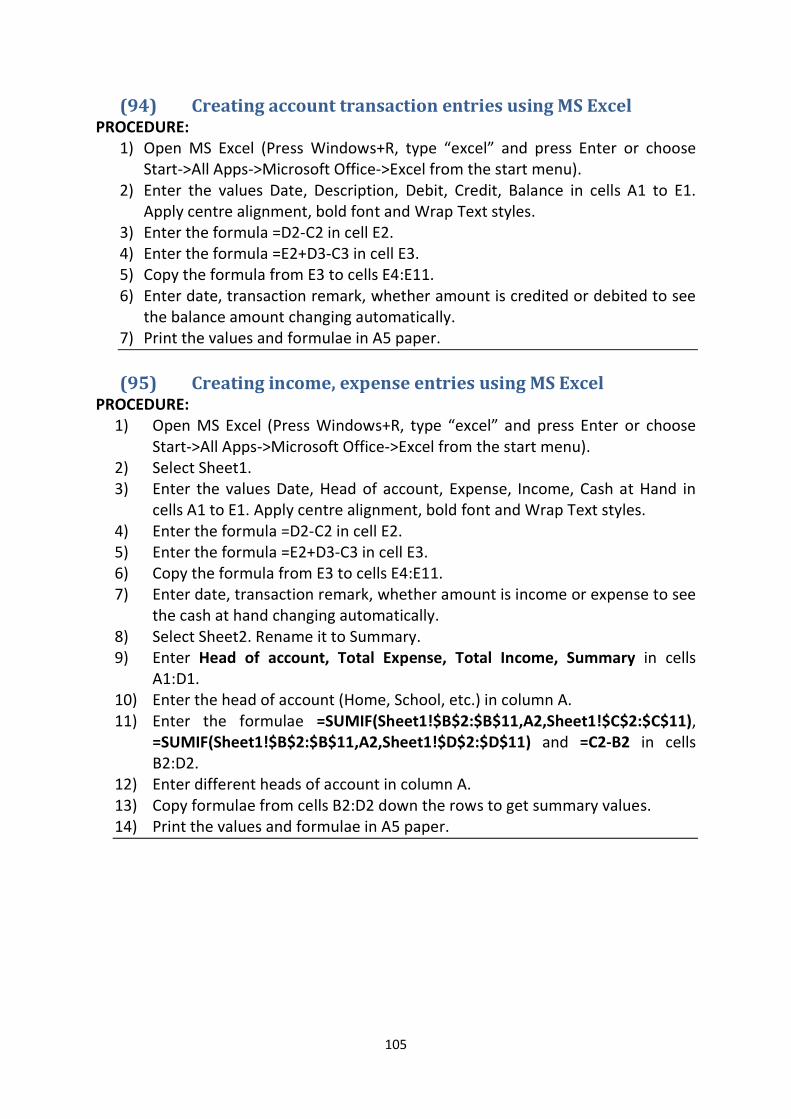
105
(94) Creating account transaction entries using MS Excel PROCEDURE:
1) Open MS Excel (Press Windows+R, type “excel” and press Enter or choose Start->All Apps->Microsoft Office->Excel from the start menu).
2) Enter the values Date, Description, Debit, Credit, Balance in cells A1 to E1. Apply centre alignment, bold font and Wrap Text styles.
3) Enter the formula =D2-C2 in cell E2. 4) Enter the formula =E2+D3-C3 in cell E3. 5) Copy the formula from E3 to cells E4:E11. 6) Enter date, transaction remark, whether amount is credited or debited to see
the balance amount changing automatically. 7) Print the values and formulae in A5 paper.
(95) Creating income, expense entries using MS Excel
PROCEDURE: 1) Open MS Excel (Press Windows+R, type “excel” and press Enter or choose
Start->All Apps->Microsoft Office->Excel from the start menu). 2) Select Sheet1. 3) Enter the values Date, Head of account, Expense, Income, Cash at Hand in
cells A1 to E1. Apply centre alignment, bold font and Wrap Text styles. 4) Enter the formula =D2-C2 in cell E2. 5) Enter the formula =E2+D3-C3 in cell E3. 6) Copy the formula from E3 to cells E4:E11. 7) Enter date, transaction remark, whether amount is income or expense to see
the cash at hand changing automatically. 8) Select Sheet2. Rename it to Summary. 9) Enter Head of account, Total Expense, Total Income, Summary in cells
A1:D1. 10) Enter the head of account (Home, School, etc.) in column A. 11) Enter the formulae =SUMIF(Sheet1!$B$2:$B$11,A2,Sheet1!$C$2:$C$11),
=SUMIF(Sheet1!$B$2:$B$11,A2,Sheet1!$D$2:$D$11) and =C2-B2 in cells B2:D2.
12) Enter different heads of account in column A. 13) Copy formulae from cells B2:D2 down the rows to get summary values. 14) Print the values and formulae in A5 paper.
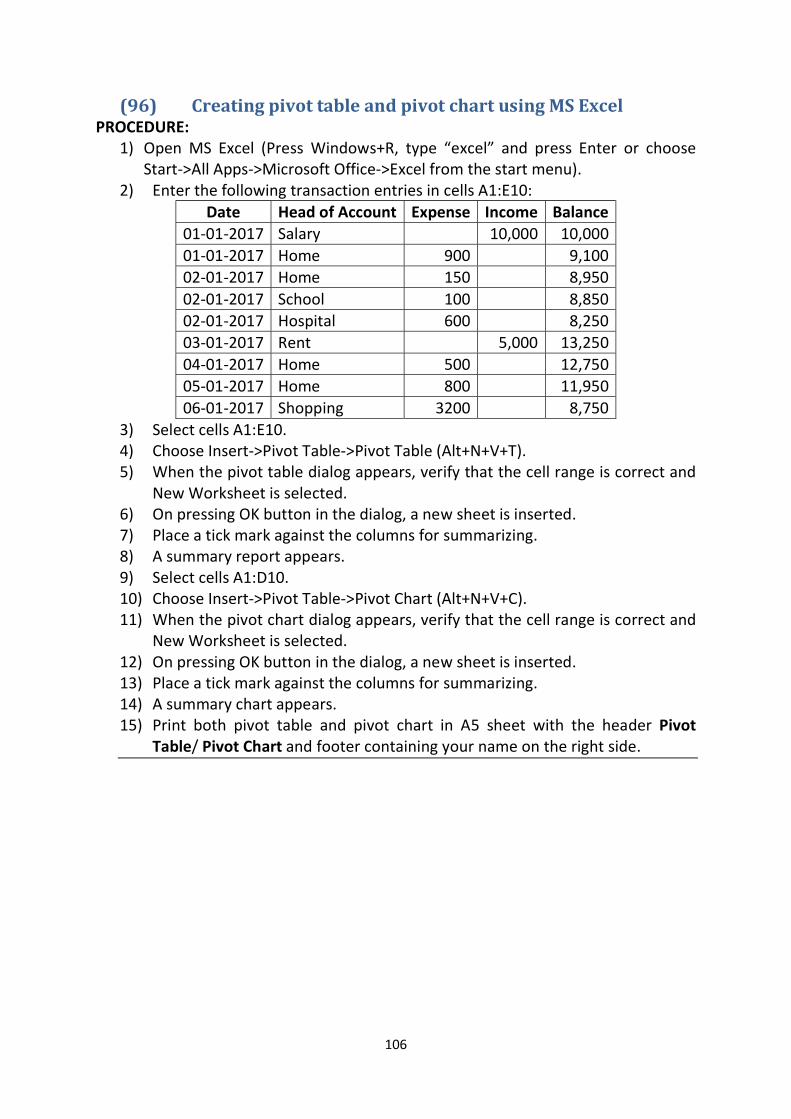
106
(96) Creating pivot table and pivot chart using MS Excel PROCEDURE:
1) Open MS Excel (Press Windows+R, type “excel” and press Enter or choose Start->All Apps->Microsoft Office->Excel from the start menu).
2) Enter the following transaction entries in cells A1:E10: Date Head of Account Expense Income Balance
01-01-2017 Salary 10,000 10,000 01-01-2017 Home 900 9,100 02-01-2017 Home 150 8,950 02-01-2017 School 100 8,850 02-01-2017 Hospital 600 8,250 03-01-2017 Rent 5,000 13,250 04-01-2017 Home 500 12,750 05-01-2017 Home 800 11,950 06-01-2017 Shopping 3200 8,750
3) Select cells A1:E10. 4) Choose Insert->Pivot Table->Pivot Table (Alt+N+V+T). 5) When the pivot table dialog appears, verify that the cell range is correct and
New Worksheet is selected. 6) On pressing OK button in the dialog, a new sheet is inserted. 7) Place a tick mark against the columns for summarizing. 8) A summary report appears. 9) Select cells A1:D10. 10) Choose Insert->Pivot Table->Pivot Chart (Alt+N+V+C). 11) When the pivot chart dialog appears, verify that the cell range is correct and
New Worksheet is selected. 12) On pressing OK button in the dialog, a new sheet is inserted. 13) Place a tick mark against the columns for summarizing. 14) A summary chart appears. 15) Print both pivot table and pivot chart in A5 sheet with the header Pivot
Table/ Pivot Chart and footer containing your name on the right side.
107
(97) Data validation using MS Excel PROCEDURE:
1) Open MS Excel (Press Windows+R, type “excel” and press Enter or choose Start->All Apps->Microsoft Office->Excel from the start menu).
2) Enter the values Sl. No., Name and DOB in cells A1 to C1. Apply centre alignment, bold font and Wrap Text styles.
3) Select cells A2:A11. 4) Choose Data->Data Validation->Data Validation (Alt+A+V+V). 5) Select Whole Number. Choose a validation criterion (between). Enter values
for validation (start: 1 end: 10). Click Input. Enter Heading (Number required). Enter a message (Number between 1 and 10).
6) Select cells B2:B11. 7) Choose Data->Data Validation->Data Validation (Alt+A+V+V). 8) Select Text Length. Choose a validation criterion (between). Enter values for
validation (start: 1 end: 4). Click Input. Enter Heading (Text input). Enter a message (Text length between 1 and 4 characters).
9) Select cells C2:C11. 10) Choose Data->Data Validation->Data Validation (Alt+A+V+V). 11) Select Date. Choose a validation criterion (between). Enter values for
validation (start: 01-01-1917 end: 31-07-2002). Click Input. Enter Heading (Date input). Enter a message (Date value between 01-01-1917 and 31-07-2002).
12) Deliberately enter wrong data in the fields (20 in A2, <your name> in B2 and 23-09-2003 in C2). Verify that wrong input is greeted by an error message
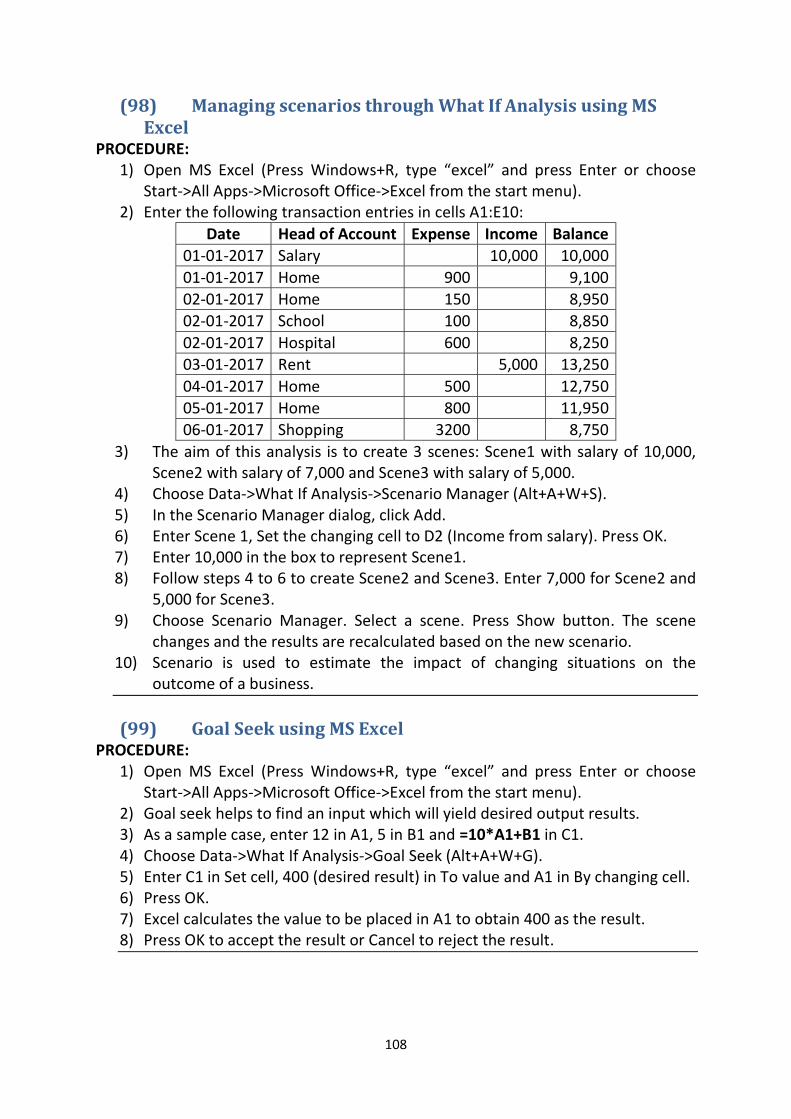
108
(98) Managing scenarios through What If Analysis using MS Excel
PROCEDURE: 1) Open MS Excel (Press Windows+R, type “excel” and press Enter or choose
Start->All Apps->Microsoft Office->Excel from the start menu). 2) Enter the following transaction entries in cells A1:E10:
Date Head of Account Expense Income Balance 01-01-2017 Salary 10,000 10,000 01-01-2017 Home 900 9,100 02-01-2017 Home 150 8,950 02-01-2017 School 100 8,850 02-01-2017 Hospital 600 8,250 03-01-2017 Rent 5,000 13,250 04-01-2017 Home 500 12,750 05-01-2017 Home 800 11,950 06-01-2017 Shopping 3200 8,750
3) The aim of this analysis is to create 3 scenes: Scene1 with salary of 10,000, Scene2 with salary of 7,000 and Scene3 with salary of 5,000.
4) Choose Data->What If Analysis->Scenario Manager (Alt+A+W+S). 5) In the Scenario Manager dialog, click Add. 6) Enter Scene 1, Set the changing cell to D2 (Income from salary). Press OK. 7) Enter 10,000 in the box to represent Scene1. 8) Follow steps 4 to 6 to create Scene2 and Scene3. Enter 7,000 for Scene2 and
5,000 for Scene3. 9) Choose Scenario Manager. Select a scene. Press Show button. The scene
changes and the results are recalculated based on the new scenario. 10) Scenario is used to estimate the impact of changing situations on the
outcome of a business.
(99) Goal Seek using MS Excel PROCEDURE:
1) Open MS Excel (Press Windows+R, type “excel” and press Enter or choose Start->All Apps->Microsoft Office->Excel from the start menu).
2) Goal seek helps to find an input which will yield desired output results. 3) As a sample case, enter 12 in A1, 5 in B1 and =10*A1+B1 in C1. 4) Choose Data->What If Analysis->Goal Seek (Alt+A+W+G). 5) Enter C1 in Set cell, 400 (desired result) in To value and A1 in By changing cell. 6) Press OK. 7) Excel calculates the value to be placed in A1 to obtain 400 as the result. 8) Press OK to accept the result or Cancel to reject the result.

109
(100) Creating Single input data table to calculate profit after rebate using MS Excel
PROCEDURE: 1) Open MS Excel (Press Windows+R, type “excel” and press Enter or choose Start->All
Apps->Microsoft Office->Excel from the start menu). 2) Data table calculates large number of results based on a model calculation. 3) Enter Input values, Sales rate of cloth, Purchase rate of cloth, Percentage rebate,
Profit in cells A1 to A5. Enter 200, 150, 10%, =B2*(1-B4)-B3 in cells B2 to B5 (Cell B4 should be formatted to Percentage). Input data looks like this:
Input data Sales rate of cloth 200
Purchase rate of cloth 150
Rebate % 10.00%
Profit =B2*(1-B4)-B3
4) To create a column based Data table, format cells A9:A12 to percentage and fill the following values in cells A7 to B12:
Column based Data Table
=B5
5.00% 10.00% 15.00% 20.00%
5) The aim is to automatically calculate the results for cells B9:B12. 6) Select cells A8:B12. Choose Data->What If Analysis->Data Table (Alt+A+W+T). 7) Enter $B$4 as the column input value. Leave Row input blank. Press Ok. 8) You will find that All the values are calculated the results displayed as shown below:
Column based Data Table
30
5.00% 40
10.00% 30
15.00% 20
20.00% 10
9) Similarly, enter the following values in cells A14:E16: Row based Data Table 5.00% 10.00% 15.00% 20.00%
=B5 10) Select cells A15:E16. Choose Data->What If Analysis->Data Table (Alt+A+W+T). 11) Enter $B$4 in the Row input. Leave column input blank. Press OK and verify that
you get the following result: 5.00% 10.00% 15.00% 20.00%
30 40 30 20 10
12) Print the sheet in A5 size paper with the header Data table in Excel. ***
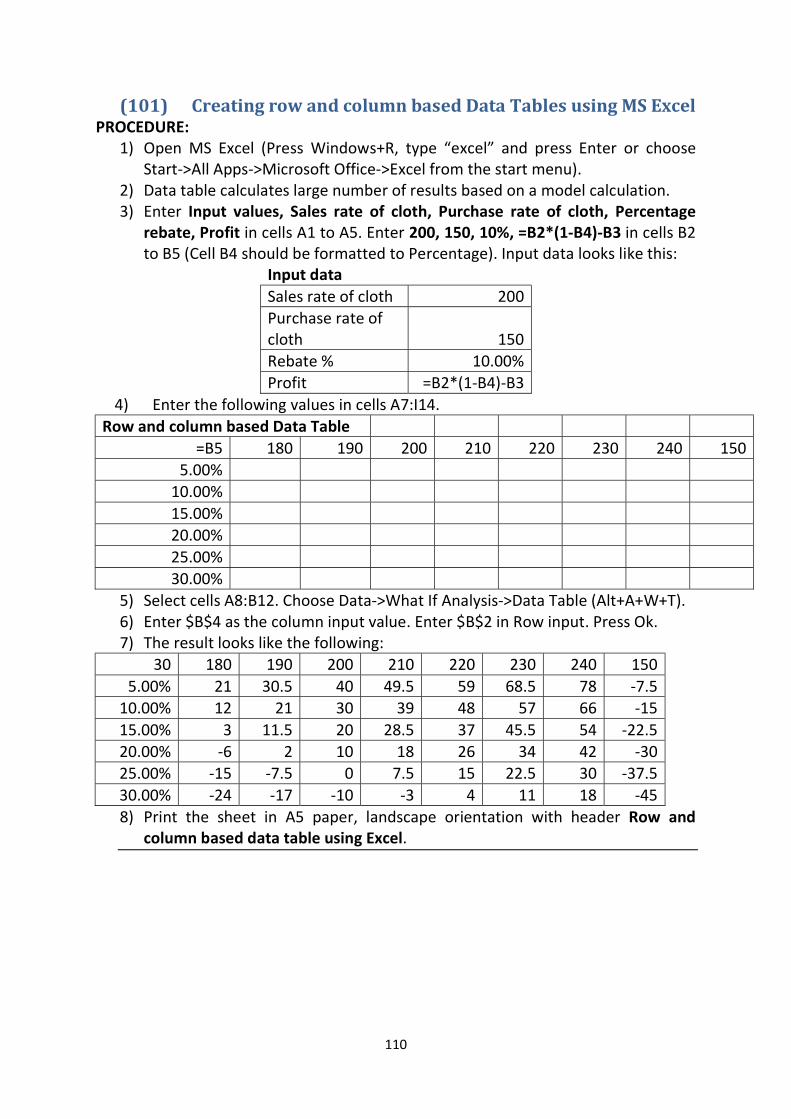
110
(101) Creating row and column based Data Tables using MS Excel PROCEDURE:
1) Open MS Excel (Press Windows+R, type “excel” and press Enter or choose Start->All Apps->Microsoft Office->Excel from the start menu).
2) Data table calculates large number of results based on a model calculation. 3) Enter Input values, Sales rate of cloth, Purchase rate of cloth, Percentage
rebate, Profit in cells A1 to A5. Enter 200, 150, 10%, =B2*(1-B4)-B3 in cells B2 to B5 (Cell B4 should be formatted to Percentage). Input data looks like this:
Input data Sales rate of cloth 200 Purchase rate of cloth 150 Rebate % 10.00% Profit =B2*(1-B4)-B3
4) Enter the following values in cells A7:I14. Row and column based Data Table
=B5 180 190 200 210 220 230 240 150 5.00%
10.00% 15.00% 20.00% 25.00% 30.00%
5) Select cells A8:B12. Choose Data->What If Analysis->Data Table (Alt+A+W+T). 6) Enter $B$4 as the column input value. Enter $B$2 in Row input. Press Ok. 7) The result looks like the following:
30 180 190 200 210 220 230 240 150 5.00% 21 30.5 40 49.5 59 68.5 78 -7.5
10.00% 12 21 30 39 48 57 66 -15 15.00% 3 11.5 20 28.5 37 45.5 54 -22.5 20.00% -6 2 10 18 26 34 42 -30 25.00% -15 -7.5 0 7.5 15 22.5 30 -37.5 30.00% -24 -17 -10 -3 4 11 18 -45 8) Print the sheet in A5 paper, landscape orientation with header Row and
column based data table using Excel.
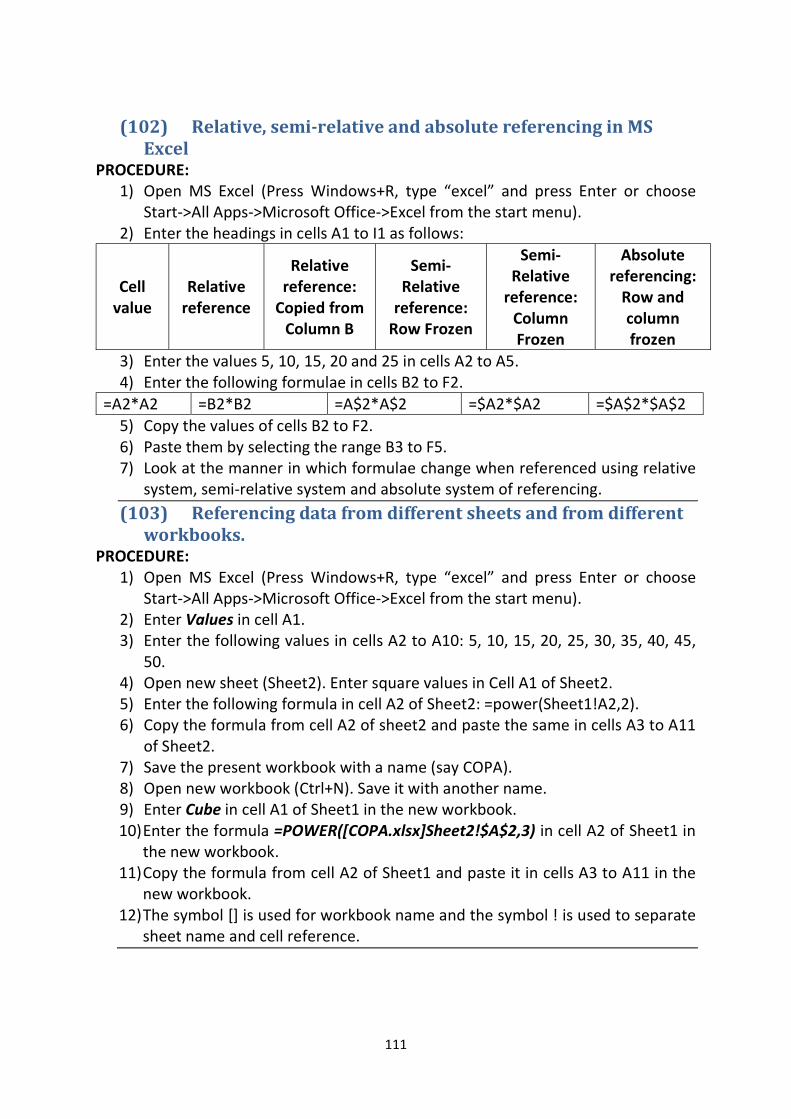
111
(102) Relative, semi-relative and absolute referencing in MS
Excel PROCEDURE:
1) Open MS Excel (Press Windows+R, type “excel” and press Enter or choose Start->All Apps->Microsoft Office->Excel from the start menu).
2) Enter the headings in cells A1 to I1 as follows:
Cell value
Relative reference
Relative reference:
Copied from Column B
Semi-Relative
reference: Row Frozen
Semi-Relative
reference: Column Frozen
Absolute referencing:
Row and column frozen
3) Enter the values 5, 10, 15, 20 and 25 in cells A2 to A5. 4) Enter the following formulae in cells B2 to F2.
=A2*A2 =B2*B2 =A$2*A$2 =$A2*$A2 =$A$2*$A$2 5) Copy the values of cells B2 to F2. 6) Paste them by selecting the range B3 to F5. 7) Look at the manner in which formulae change when referenced using relative
system, semi-relative system and absolute system of referencing. (103) Referencing data from different sheets and from different
workbooks. PROCEDURE:
1) Open MS Excel (Press Windows+R, type “excel” and press Enter or choose Start->All Apps->Microsoft Office->Excel from the start menu).
2) Enter Values in cell A1. 3) Enter the following values in cells A2 to A10: 5, 10, 15, 20, 25, 30, 35, 40, 45,
50. 4) Open new sheet (Sheet2). Enter square values in Cell A1 of Sheet2. 5) Enter the following formula in cell A2 of Sheet2: =power(Sheet1!A2,2). 6) Copy the formula from cell A2 of sheet2 and paste the same in cells A3 to A11
of Sheet2. 7) Save the present workbook with a name (say COPA). 8) Open new workbook (Ctrl+N). Save it with another name. 9) Enter Cube in cell A1 of Sheet1 in the new workbook. 10) Enter the formula =POWER([COPA.xlsx]Sheet2!$A$2,3) in cell A2 of Sheet1 in
the new workbook. 11) Copy the formula from cell A2 of Sheet1 and paste it in cells A3 to A11 in the
new workbook. 12) The symbol [] is used for workbook name and the symbol ! is used to separate
sheet name and cell reference.
112
(104) Creating presentation for Cinderella story using MS Power point
PROCEDURE: 1) Open MS Powerpoint (Press Windows+R, type “powerpnt” and press
Enter or choose Start->All Apps->Microsoft Office->Microsoft Office Powerpoint from the start menu).
2) By default, power point opens a blank title page. 3) Choose Design->Themes and choose a theme (Alt+G+H). 4) Choose Design->Colors (Alt+G+TC), Design->Fonts (Alt+G+TF) and Design-
>Effects (Alt+G+TE) and customize the colours, fonts and slide transition effects as you desire.
5) Choose Insert->Header & Footer (Alt+N+H), select Slide. Place tick mark against Date and Time, choose date/ time format, place tick mark against Slide number, Place a tick mark against Footer (enter your name in the footer box). Place a tick mark against Don’t show on title slide.
6) Choose Animation. Set Transition speed and Transition sound as you wish. Choose Apply to all to apply the settings to all slides.
7) In the first slide, type the title of the presentation (“Jungle Book” and author name (“<your name>”).
8) To insert a new slide, choose Home->New Slide (Alt+H+I) and select the layout suitable for your purpose (whether you need 1 column or 2 columns).
9) Enter a title for the slide. Insert the text. If you need to insert a picture or table, choose Insert->Picture (Alt+N+P) or Insert->Table (Alt+N+T).
10) If you need to change the layout of a slide after inserting it, choose Home->Layout (Alt+H+L) and change the layout.
11) You can increase or decrease font size using Home->Font Size (Alt+H+FS) or using Ctrl+Shift+< (decrease)/ Ctrl+Shift+> (increase).
12) After completing the presentation, choose View->Slide Show (Alt+W+S) or F5 to start the presentation from the first slide.
13) If you wish to start the presentation from current slide, press Shift+F5. 14) Connect projector to the CPU and make a presentation of the content
created by you.
113
(105) Adding narration to slides using MS Powerpoint
PROCEDURE: 1) Open MS Powerpoint (Press Windows+R, type “powerpnt” and press
Enter or choose Start->All Apps->Microsoft Office->Microsoft Office Powerpoint from the start menu).
2) Choose the slide for which you wish to record narration. 3) Select Slide Show->Record Narration (Alt+S+N). 4) Press OK in the dialog to start recording. 5) Start speaking the information related to the slide. 6) After completing the narration, press Esc key. 7) When a dialog to save the narration appears, choose Save. 8) Press Shift+F5 and verify whether the narration plays well. 9) If the narration plays out well, proceed to next narration. If the narration
is not acceptable, re-record the narration. (106) To create handouts using MS Powerpoint
PROCEDURE: 1) Open MS Powerpoint (Press Windows+R, type “powerpnt” and press
Enter or choose Start->All Apps->Microsoft Office->Microsoft Office Powerpoint from the start menu).
2) Open the original presentation for Jungle Book story. 3) Choose File->Publish->Create Handouts in Microsoft Office Word. 4) Choose Outline only in the dialog that appears to select the format. 5) Press OK. 6) MS Word opens with the text outline of the presentation. 7) You may change the font and style to suit printing of the handout.
114
(107) Preparing resume using MS Word PROCEDURE: 1) Open MS Word (Press Windows+R, type “winword” and press Enter or
choose Start->All Apps->Microsoft Office->Microsoft Office Word from the start menu).
2) Set paper size to A4, orientation to Portrait and margins to 2.54cm on all sides.
3) Choose Home->Paragraph (Alt+H+PG), select single line spacing and 0 points above and below paragraph.
4) Select 14 point size, bold style, centre alignment and type RESUME. 5) With left alignment, type Objective. 6) Selecting normal font style and justified alignment type your career
objective (Say: “Sustainable progress through technological means.”). 7) Insert a table with 3 columns. Type Name, Skills, Qualification,
Experience, Address, Mobile, Email in the first column. 8) Place colon in the second column. 9) Enter your details in the third column. 10) With centre alignment, type CERTIFICATE. Type “I hereby certify that the
details furnished above are true to the best of my knowledge and belief.” 11) Type your name in the signature line.
115
(108) To create personal details and contact details tables using MS Access
PROCEDURE: 1) Open MS Access (Press Windows+R, type “msaccess” and press Enter or
choose Start->All Apps->Microsoft Office->Microsoft Office Access from the start menu).
2) By default, MS Access shows a list of database templates. 3) When opening MS Access for the first time, choose Blank Database (Top
left). When opening MS Access subsequently, choose the name of database from the list shown on the right side.
4) On choosing blank database, MS Access requests you to input a name for the database. Enter your name. The default database extension is .accdb.
5) Right click on Table1 and choose Design View. Change the table name to personal_data.
6) Choose columns ID (Auto Number), Contact Name (Text), Address (Text), DOB (Date/Time, Medium Data). Right click the table name, choose Save followed by Close.
7) Then create a new table named contact_details using Create->Table (Alt+C+TN) with the following columns: ID (Auto Increment), person_id (Number, Required YES), Mobile1 (Text 50), Mobile2 (Text 50), email (Text, validation Rule Like “*@*”, validation text Invalid email ID).
(109) To create relationship between tables using MS Access PROCEDURE:
1) Open MS Access (Press Windows+R, type “msaccess” and press Enter or choose Start->All Apps->Microsoft Office->Microsoft Office Access from the start menu).
2) Select the database created by in the previous exercise (containing 2 tables named personal_data and contact_details).
3) Choose Database Tools->Relationships (Alt+A+E). 4) In the dialog shown to select database tables, select personal_data and
press Add. Then select contact_details and press Add. 5) Press Close to dismiss the table selection dialog. 6) Click on ID column in the personal_data table, drag the mouse and drop
on the person_id column of contact details. 7) A dialog appears to connect ID column of personal_data to person_id
table column of contact_details table. 8) Press Create button. 9) A line appears connecting ID column of personal_data and person_id
column of contact_details. 10) Now the tables personal_data and contact_details are related
through ID and person_id columns.
116
(110) To create blank form for data entry using MS Access
PROCEDURE: 1) Open MS Access (Press Windows+R, type “msaccess” and press Enter or
choose Start->All Apps->Microsoft Office->Microsoft Office Access from the start menu).
2) Select the database created by in the previous exercise (containing 2 tables named personal_data and contact_details).
3) Choose Create->Blank Form (Alt+C+FB). 4) Press Show all tables label shown on the right side panel to visualize all
tables. 5) Choose personal_data table. 6) Double click on Contact name. 7) Double click on address. 8) Double click on DOB. 9) The ID column need not be manually filled since it belongs to
auto_increment category. 10) Fill the columns. 11) Press next column and the entries are saved. (111) To Create Report using in MS Access
PROCEDURE: 1) Open MS Access (Press Windows+R, type “msaccess” and press Enter
or choose Start->All Apps->Microsoft Office->Microsoft Office Access from the start menu).
2) Open your database. 3) Choose Create->Report (Alt+C+RN). 4) Select the columns to be included in the report. 5) Select Report View. 6) You can also use the report wizard to create new report. 7) Choose Create->Report Wizard. 8) Select the columns required to be included in the report. 9) Under groupings, choose none. 10) On finishing the wizard, the report of data contained in the table is
displayed.
117
(112) To Generate Query using in MS Access PROCEDURE:
1) Open MS Access (Press Windows+R, type “msaccess” and press Enter or choose Start->All Apps->Microsoft Office->Microsoft Office Access from the start menu).
2) Choose Create->Query Wizard. 3) Select the table and columns to be included in the query. 4) On completing the wizard, choose Design view. 5) Choose filter values to be applied for the columns. 6) Choose Datasheet view to view the results. (113) To create form using Wizard in MS Access
PROCEDURE: 1) Open MS Access (Press Windows+R, type “msaccess” and press Enter or
choose Start->All Apps->Microsoft Office->Microsoft Office Access from the start menu).
2) Select the database created by in the previous exercise (containing 2 tables named personal_data and contact_details).
3) Choose Create->More Forms->Form Wizard (Alt+C+FM+W). 4) Choose the table and the columns to be used in the form. 5) Press Next. Choose Layout of the form (Columnar, tabular, datasheet or
justified). 6) Choose the style (from several alternate styles listed with preview). 7) Press Next. 8) Choose Finish. 9) Navigate between existing records. 10) When the record after the last record is chosen, blank form for entering
new data is displayed.
118
(114) Installing GNU Image Manipulation Program (GIMP) PROCEDURE:
1) Right click the GIMP installer. Choose Run As Administrator from the popup men.
2) Choose Yes when the system requires confirmation. 3) Choose install for all users. 4) Choose English as the language for installation. 5) Press Next button. 6) Wait till completion of installation. 7) Press Finish button. 8) Take a screenshot of the program and print it. (115) Correcting low light images using GIMP
PROCEDURE: 1) Open the image in GIMP (Right click the image, choose Open with,,
select GIMP (or open GIMP from start->All Apps. Press Ctrl+O and open required image).
2) Print the original image and save it as PDF using Microsoft Print to PDF. 3) Choose Color->Curves from the menu. 4) Adjust the color line till the low light image is clearly visible. 5) Print the reconstructed image. (116) Correcting over-exposed images using GIMP
PROCEDURE: 1) Open the image in GIMP (Right click the image, choose Open with,,
select GIMP (or open GIMP from start->All Apps. Press Ctrl+O and open required image).
2) Print the over original image and save it as PDF using Microsoft Print to PDF.
3) Choose Color->Curves from the menu. 4) Adjust the color line till the over exposed image is clearly visible. 5) Print the reconstructed image. (117) Scaling of images, restricting image size and adding text to
images PROCEDURE:
1) Open the image in GIMP (Right click the image, choose Open with,, select GIMP (or open GIMP from start->All Apps. Press Ctrl+O and open required image).
2) Choose Image->Scale image from the menu. 3) In the scale image dialog, set the unit to cm. 4) Enter 3cm against the height of image. If the height to width link is
maintained, width is automatically changed.
119
5) Set the resolution to 72 pixels in width and 72 pixels (suitable for uploading over the network. For printing, it is preferable to fix 300 pixels as the resolution of image).
6) Press Scale button. 7) Choose View->Zoom-> Fill Window from the menu. 8) Choose text tool (A icon) from the toolbar. 9) Draw a rectangle for text. 10) Set the text size to 7 or 8 pixels. Enter your name. Drag it using the
move tool. 11) Choose File->Export As (Ctrl+Shift+A) from the menu. 12) Enter <name>.jpg in the export dialog. 13) In the resulting dialog, place a tick against show preview. 14) Change the quality of the image so that the image size is more
than 10kb and less than 20 kb (It is resolution needed for signature in online forms. For passport size photo, image size should be between 100kb and 200kb).
15) Print the resulting image. (118) Extracting an image from white background and pasting it
as a new image with transparent background PROCEDURE:
1) Open the image in GIMP (Right click the image, choose Open with,, select GIMP (or open GIMP from start->All Apps. Press Ctrl+O and open required image).
2) Press Tab key to show (or hide) dockable dialogs and buttons. 3) Choose Fuzzy Selection tool from the toolbox. 4) Click on white area. Entire white background portion is selected. 5) Choose Select -> Invert (Ctrl+I) from the menu. Now, the image object is
selected instead of the white background. 6) Choose Edit -> Copy from the menu (Press Ctrl+C). 7) Choose File -> Create -> From Clipboard. A new image is pasted with
transparent background. 8) Choose File -> Export As (Ctrl+Shift+E) and choose image format as PNG. 9) Save the image with as in XCF format. (119) Placing images in different background.
PROCEDURE: 1) Open the image in GIMP (Right click the image, choose Open with,, select
GIMP (or open GIMP from start->All Apps. 2) Press Tab key to show (or hide) dockable dialogs and buttons. 3) Use rectangle selection tool 4) Open the two cat images (created in exercises 111 and 112). 5) Open the tab containing the garden image.
120
6) Choose Image->Scale Image. Note width (W), height (H) and resolution (R). 7) Open the tab containing the cat image. Set the height to 100 pixels and
resolution to 72 pixels per inch. 8) Choose Edit->Select All (Ctrl+A) and copy the image using Edit->Copy
(Ctrl+C). 9) Open the garden image and choose Edit->Paste as -> New layer. The cat is
placed in a new layer. 10) Use Move tool to drag the cat to appropriate place. 11) Use the same procedure for the next cat. 12) Paste and relocate the cat as necessary. 13) Export the image to PNG file. 14) Save the image to garden-<name>.xcf.
(120) Creating passport size and stamp size photos using GIMP PROCEDURE: 1) Open the image in GIMP (Right click the image, choose Open with,, select
GIMP (or open GIMP from start->All Apps. 2) Press Tab key to show (or hide) dockable dialogs and buttons. 3) Right click on the given image, choose Open with->GIMP. 4) Select required portion of the image. Copy the selection (Ctrl+C). 5) Choose File->Create New->From clipboard. 6) Choose Image->Scale Image. Set the width to 3cm and resolution to 300
pixels per inch. 7) Create a new page using File->New (Ctrl+N) from meu. 8) Set width to 12 inches, height to 8 inches, resolution to 300 pixels per inch
and background colour to white. 9) Copy the passport size photo. Paste it in the background. Drag and place it
at the top left corner. 10) Place successive copies of the image one near the other. 11) Copy one row of photos and paste them one below the other. 12) Choose File->Export as from the menu. Export the file to JPG format. 13) Choose File->Save from the menu. Save the file in XCF format. 14) Print the photos using GIMP software.
(121) Creating photo album using GIMP PROCEDURE:
1) Open the image in GIMP (Right click the image, choose Open with,, select GIMP (or open GIMP from start->All Apps. Press Ctrl+O and open required image). The garden image opens.
2) Press Tab key to show (or hide) dockable dialogs and buttons. 3) Choose File->New (Ctrl+N). Set the size to 16 inch width and height 12
inches. Set the resolution to 300 pixels/inch.
121
4) Right click on the given image, choose Open with->GIMP. 5) Choose Image->Scale Image. Choose the right size and resolution
(300PPI) to scale the image. 6) Press Ctrl+A to select the entire image. Copy the image (Ctrl+C). 7) Go to the original album page and paste the image. 8) Apply rotation, scaling and place the image appropriately. 9) Save the page in XCF format. 10) Export the page to JPG format. 11) Print the album pages using GIMP software. (122) Creating maxi / postcard size photo layout using GIMP
PROCEDURE: 1) Open the image in GIMP (Right click the image, choose Open with,,
select GIMP (or open GIMP from start->All Apps. Press Ctrl+O and open required image). The garden image opens.
2) Press Tab key to show (or hide) dockable dialogs and buttons. 3) Choose File->New (Ctrl+N). Set the size to 12 inch width and height 8
inches. Set the resolution to 300 pixels/inch. 4) Drag the left margin and place it at 6 inch distance. 5) Drag the top margin and place the divider at 4 inch height. 6) Right click on the given image, choose Open with->GIMP. 7) Choose Image->Scale Image. 8) Choose the resolution (300PPI) to scale the image. 9) Set the width to 6 inches or height to 4 inches. 10) Press Ctrl+A to select the entire image. Copy the image (Ctrl+C). 11) Go to the original page and paste the image. 12) Apply rotation, scaling and place the image appropriately. 13) Save the page in XCF format. 14) Export the page to JPG format. 15) Print the album pages using GIMP software. (123) Restoration of damaged images using GIMP
PROCEDURE: 1) Open the image in GIMP (Right click the image, choose Open with,, select
GIMP (or open GIMP from start->All Apps. Press Ctrl+O and open required image). The garden image opens.
2) Press Tab key to show (or hide) dockable dialogs and buttons. 3) Remove unwanted portions of the image by making a selection and choosing
Image->Crop to Selection from the menu. 4) Choose Clone tool or Heal tool. Adjust the shape and size of the tool to suit
the image. 5) Zoom the damaged area of the image.
122
6) Hold control key and take a sample from an area adjoining the damaged portion of the image.
7) Click on the damaged portion and apply the healing or clone tool as necessary. 8) Save the image in a new name and export it as a new JPG file. 9) Print the file using appropriate settings. (124) Installation of scanner and scanning a photo using GIMP
PROCEDURE: 1) Right click on the driver software for the scanner. 2) Choose Run as administrator. 3) When Windows requests confirmation to run the software as administrator,
choose Yes. 4) Press Next button in the installer Window. Then click Yes to agree to the End
User License agreement. 5) When the installer prompts for connecting the scanner, connect the scanner. 6) Wait for a few minutes till the dialog for completion of driver installation
appears. 7) Place a photo in the scanner tray. 8) Open GIMP software. Choose File->Create->Scanner / camera. 9) In the scanner dialog, choose preview, adjust the selection if necessary and
press scan button. 10) Save and print the scanned image. (125) Donning cap and spectacles to photo using GIMP
PROCEDURE: 1) Open the image in GIMP (Right click the image, choose Open with,,
select GIMP (or open GIMP from start->All Apps. Press Ctrl+O and open required image). The garden image opens.
2) Press Tab key to show (or hide) dockable dialogs and buttons. 3) Right click on the photo of the girl to be decorated with cap and
spectacles. 4) Choose Image->Scale Image. Set 300PPI resolution. Resize the image to
5inch width. 5) Right click on the cap image. 6) Use Fuzzy selection tool to select the white area. 7) Choose Select->Invert (Ctrl+I) from menu and copy the image (Ctrl+C). 8) Choose Edit->Paste as->New layer. Resize and rotate the cap and place it
on the head of the image of the girl. 9) Right click on the spectacles. Choose Open with->GIMP. 10) Remove unwanted portions of the spectacles. 11) Choose bucket fill, select desired colour and set opacity to 40%. 12) Click inside the spectacles to apply the colour. 13) Copy the image of spectacle. Paste it as a new layer on top of the image
of the girl. Resize the spectacles.
123
14) Save the image and print it. (126) Creating banner using GIMP
PROCEDURE: 1) Open the image in GIMP (Right click the image, choose Open with,, select
GIMP (or open GIMP from start->All Apps. Press Ctrl+O and open required image). The garden image opens.
2) Press Tab key to show (or hide) dockable dialogs and buttons. 3) Choose File->New (Ctrl+N). 4) Set the size to 6 feet width and 4 feet height. 5) Set the resolution to 300 pixels/inch. 6) Copy the background image (env-0.jpg) and paste it on the banner. Resize it to
match the size of the banner. 7) Copy and paste the environmental pollution related images (env-1.jpg, env-
2.jpg and env-3.jpg) on the banner. Resize them as required on the left side of the banner.
8) Copy and paste the environmental protection related images (env-4.jpg, env-5.jpg and env-6.jpg) on the banner. Resize them as required on the right side of the banner.
9) Save and print the banner.

124
(127) Using Open Office.org to create a Leave Letter form and Permission letter form
PROCEDURE: 1) Open OpenOffice Writer by choosing Start->All Apps->OpenOffice-
>OpenOffice Writer (or Press Windows+R, type swriter and press enter). 2) Choose Format->Page (Alt+O+P) to set A4 page size, 2.54cm left and top
margins, 2.00cm right and bottom margins. 3) Change to font size to 14 points from the Toolbar. You can change the font
settings using Format->Character (Alt+O+H) from the menu. 4) Change the line spacing to 1.5 lines using Format->Paragraph (Alt+O+A) from
the Paragraph menu. 5) Set Font style to bold (using Format->Characters or using Tool Bar or pressing
Ctrl+B). 6) Set alignment to Centre (Press Ctrl+E or use the toolbar or open Format-
>Paragraph). 7) Type the word LEAVE LETTER with centre alignment. Press enter key to go to
new line. 8) Choose Justified alignment (press Ctrl+J or choose Format->Paragraph-
>Alignment->Justified). 9) Insert a table having 4 columns and 2 rows using Insert->Table menu (or press
Ctrl+F12). 10) Enter 1, Name, :, <Your name> in first row; 2, Trade, :, Computer Operator &
Programming Assistant in second row; 3, Date of Leave, :, <date> in third row; 4, No. of days of Leave, :, <days> in fourth row, 5, Reason for Leave, :, <reason> in fifth row, 6, Signature of trainee, :, <> in sixth row; 7, Signature of Parent/Guardian, :, <> in seventh row; 8, Signature of VI, :, <> in eighth row; 9, Signature of GI, :, <> in ninth row; 10, Signature of Principal, :, <> in the tenth row;
11) Move the cursor out of the table and Type Place: Puducherry; Date: <date>. 12) Insert new page using Insert->Manual Break from menu (Alt+I+B) and
choosing Page Break. 13) Repeat steps 7 to 11 by replacing all the words LEAVE with PERMISSION. Row
4 should be 4, Duration of Permission, :, <duration>. 14) Save the file by providing <your_name>-leave-letter.odt (.odt is the extension
for swriter documents). 15) Print both pages in the front and back of an A4 sheet by choosing appropriate
page number for each side or choosing Properties->Finishing->Print on both side from print dialog.

125
(128) To create equations using OpenOffice Equation editor.
PROCEDURE 1) Open OpenOffice Writer by choosing Start->All Apps->OpenOffice-
>OpenOffice (or Press Windows+R, type soffice and press enter). Choose File->New->Formula.
2) Choose Format->Page (Alt+O+P) to set A4 page size, 2.54cm left and top margins, 2.00cm right and bottom margins.
3) Choose Insert->Object->Formula (Alt+I+O+F) from the menu. 4) Type the following in the bottom panel and verify that the equation
is displayed: (a+b)^2=a^2+b^2+2ab 5) Type the following in the bottom panel and verify that the equation
is displayed: x = {x_1+x_2} over {2} 6) Type the following in the bottom panel and verify that the equation
is displayed: sin^2 %theta + cos^2 %theta = 1
7) Type the following in the bottom panel and verify that the equation
is displayed: %alpha, %beta = {-b +- sqrt{b^2 - 4ac}} over 2a
8) Print the four equations. 9) Save the file by entering <your name>-formula.odf (.odf is the extension
for open document formula). (129) To create drawings using OpenOffice Draw
PROCEDURE 1) Open OpenOffice Draw by choosing Start->All Apps->OpenOffice-
>OpenOffice Draw (or Press Windows+R, type sdraw and press enter). 2) Choose Format->Page (Alt+O+P) to set A4 page size, 2.54cm left and top
margins, 2.00cm right and bottom margins. 3) Choose View->Toolbars->Drawing (Alt+V+T+D) from the menu. 4) Draw the shapes you desire and save them. 5) Print the shapes using File->Print (or Ctrl+P).
(a+b)2=a2+b2+2ab
x=x1+x2
2
sin2θ+cos2
θ=1
α ,β= − b±√b2
− 4ac2a
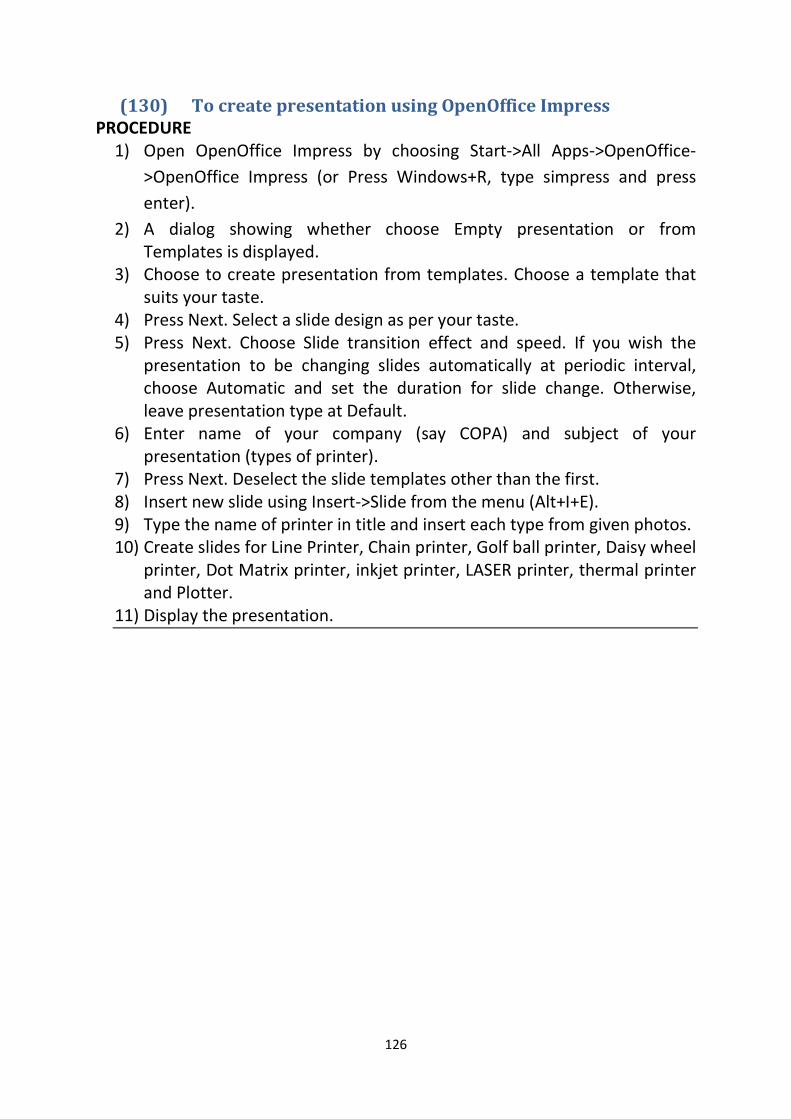
126
(130) To create presentation using OpenOffice Impress PROCEDURE
1) Open OpenOffice Impress by choosing Start->All Apps->OpenOffice->OpenOffice Impress (or Press Windows+R, type simpress and press enter).
2) A dialog showing whether choose Empty presentation or from Templates is displayed.
3) Choose to create presentation from templates. Choose a template that suits your taste.
4) Press Next. Select a slide design as per your taste. 5) Press Next. Choose Slide transition effect and speed. If you wish the
presentation to be changing slides automatically at periodic interval, choose Automatic and set the duration for slide change. Otherwise, leave presentation type at Default.
6) Enter name of your company (say COPA) and subject of your presentation (types of printer).
7) Press Next. Deselect the slide templates other than the first. 8) Insert new slide using Insert->Slide from the menu (Alt+I+E). 9) Type the name of printer in title and insert each type from given photos. 10) Create slides for Line Printer, Chain printer, Golf ball printer, Daisy wheel
printer, Dot Matrix printer, inkjet printer, LASER printer, thermal printer and Plotter.
11) Display the presentation.
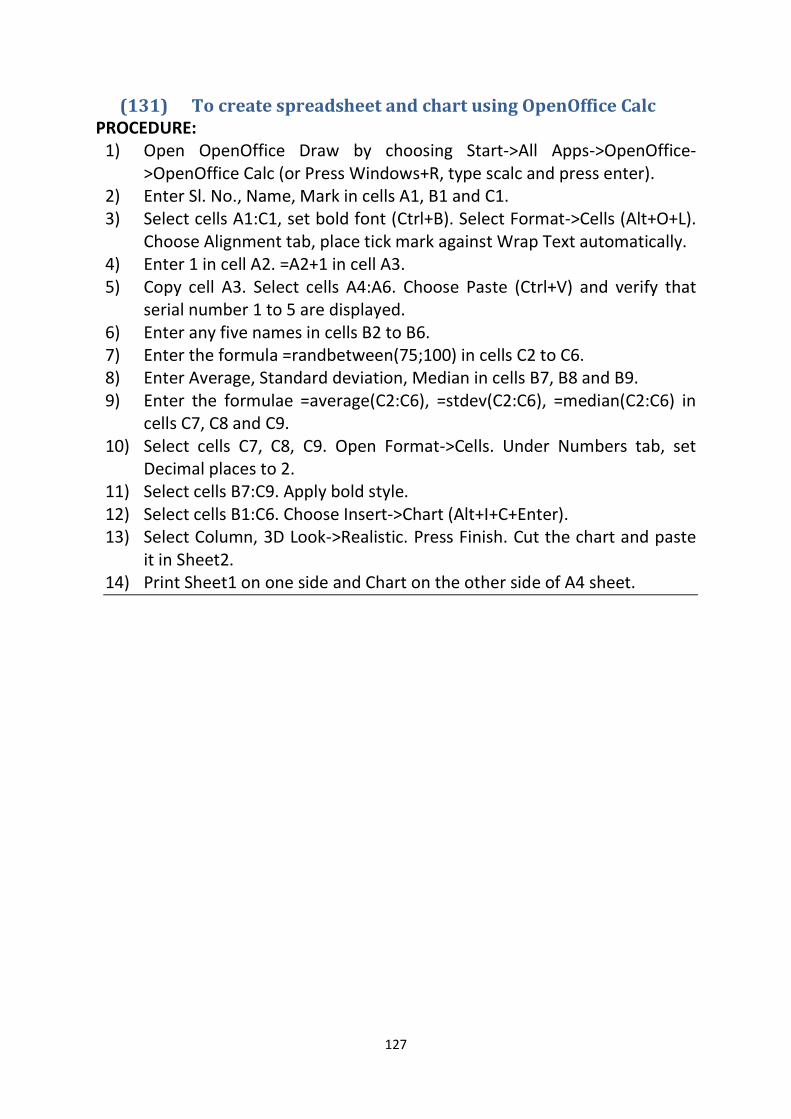
127
(131) To create spreadsheet and chart using OpenOffice Calc PROCEDURE:
1) Open OpenOffice Draw by choosing Start->All Apps->OpenOffice->OpenOffice Calc (or Press Windows+R, type scalc and press enter).
2) Enter Sl. No., Name, Mark in cells A1, B1 and C1. 3) Select cells A1:C1, set bold font (Ctrl+B). Select Format->Cells (Alt+O+L).
Choose Alignment tab, place tick mark against Wrap Text automatically. 4) Enter 1 in cell A2. =A2+1 in cell A3. 5) Copy cell A3. Select cells A4:A6. Choose Paste (Ctrl+V) and verify that
serial number 1 to 5 are displayed. 6) Enter any five names in cells B2 to B6. 7) Enter the formula =randbetween(75;100) in cells C2 to C6. 8) Enter Average, Standard deviation, Median in cells B7, B8 and B9. 9) Enter the formulae =average(C2:C6), =stdev(C2:C6), =median(C2:C6) in
cells C7, C8 and C9. 10) Select cells C7, C8, C9. Open Format->Cells. Under Numbers tab, set
Decimal places to 2. 11) Select cells B7:C9. Apply bold style. 12) Select cells B1:C6. Choose Insert->Chart (Alt+I+C+Enter). 13) Select Column, 3D Look->Realistic. Press Finish. Cut the chart and paste
it in Sheet2. 14) Print Sheet1 on one side and Chart on the other side of A4 sheet.
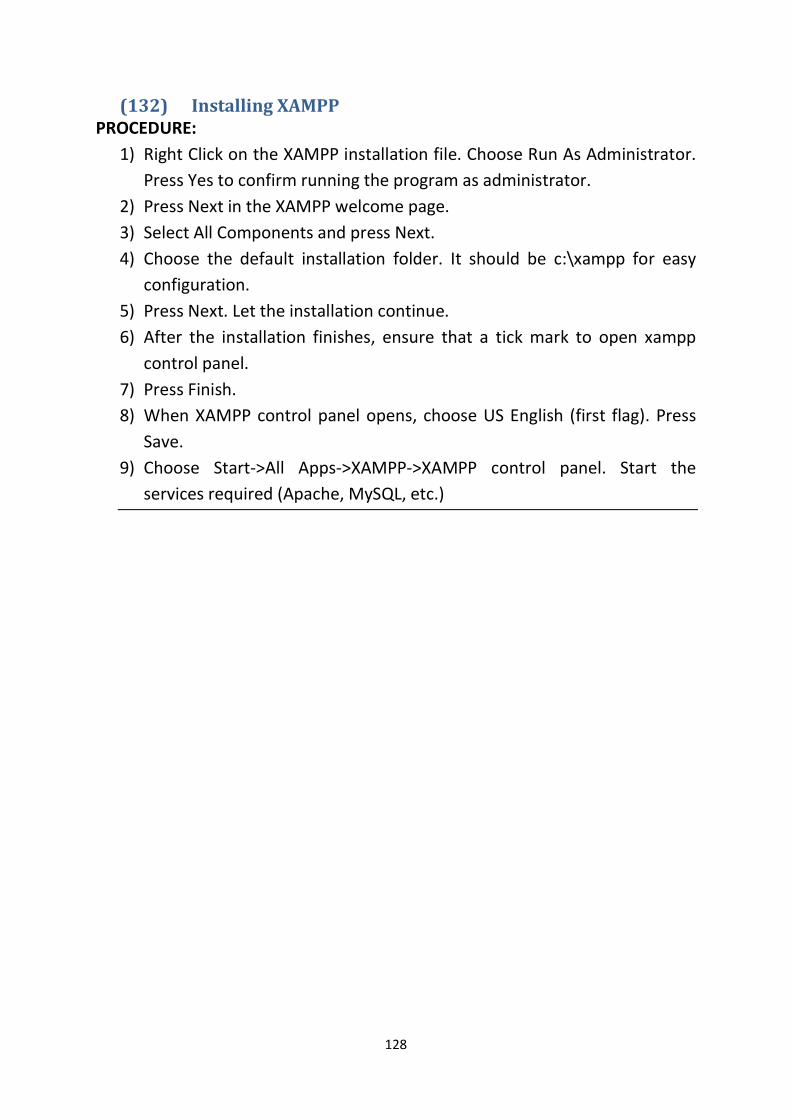
128
(132) Installing XAMPP PROCEDURE:
1) Right Click on the XAMPP installation file. Choose Run As Administrator. Press Yes to confirm running the program as administrator.
2) Press Next in the XAMPP welcome page. 3) Select All Components and press Next. 4) Choose the default installation folder. It should be c:\xampp for easy
configuration. 5) Press Next. Let the installation continue. 6) After the installation finishes, ensure that a tick mark to open xampp
control panel. 7) Press Finish. 8) When XAMPP control panel opens, choose US English (first flag). Press
Save. 9) Choose Start->All Apps->XAMPP->XAMPP control panel. Start the
services required (Apache, MySQL, etc.)
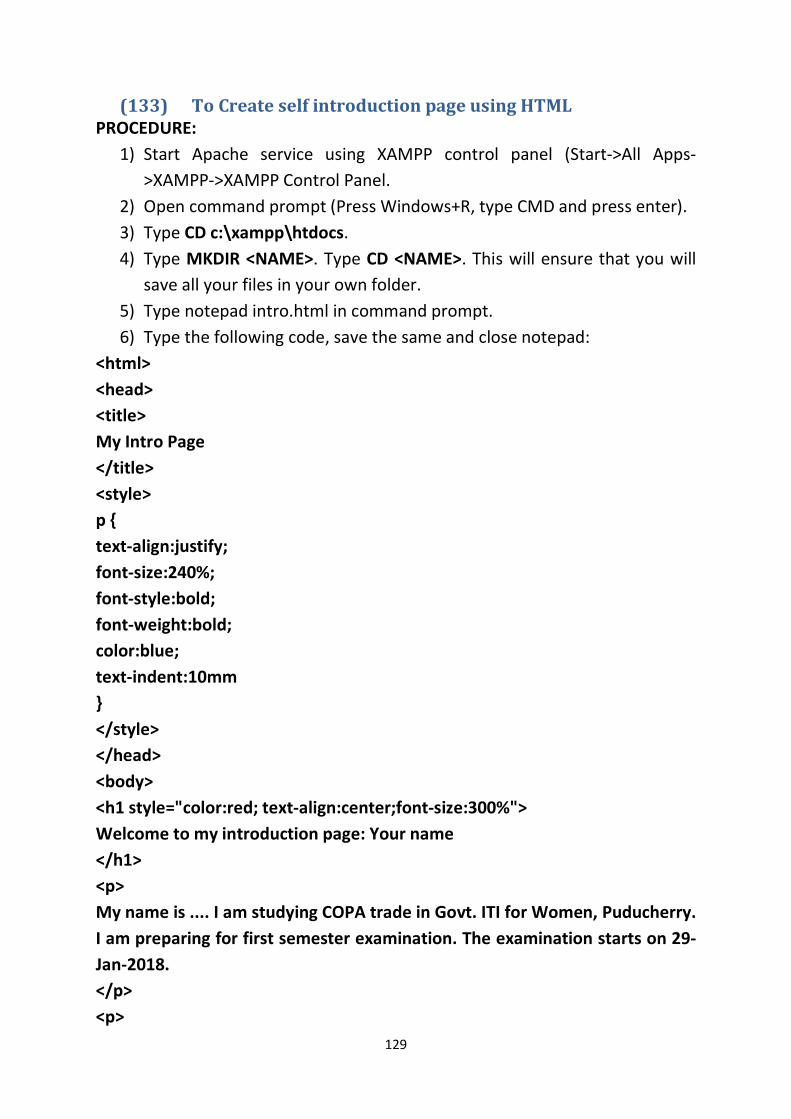
129
(133) To Create self introduction page using HTML PROCEDURE:
1) Start Apache service using XAMPP control panel (Start->All Apps->XAMPP->XAMPP Control Panel.
2) Open command prompt (Press Windows+R, type CMD and press enter). 3) Type CD c:\xampp\htdocs. 4) Type MKDIR <NAME>. Type CD <NAME>. This will ensure that you will
save all your files in your own folder. 5) Type notepad intro.html in command prompt. 6) Type the following code, save the same and close notepad:
<html> <head> <title> My Intro Page </title> <style> p { text-align:justify; font-size:240%; font-style:bold; font-weight:bold; color:blue; text-indent:10mm } </style> </head> <body> <h1 style="color:red; text-align:center;font-size:300%"> Welcome to my introduction page: Your name </h1> <p> My name is .... I am studying COPA trade in Govt. ITI for Women, Puducherry. I am preparing for first semester examination. The examination starts on 29-Jan-2018. </p> <p>

130
The second semester starts on 01-02-2018. </p> </body> </html>
7) Open FireFox browser, press Ctrl+L and type the URL http://127.0.0.1/<name>/intro.html.
8) Verify that the introduction page loads.
(134) To Create ordered and unordered list using HTML PROCEDURE:
1) Start Apache service using XAMPP control panel (Start->All Apps->XAMPP->XAMPP Control Panel.
2) Open command prompt (Press Windows+R, type CMD and press enter). 3) Type CD c:\xampp\htdocs\<NAME>. 4) Type notepad list.html in command prompt. 5) Type the following code, save the same and close notepad:
<html> <head> <title> List of computer peripherals </title> <style> h1{text-align:center; color:blue} ol {font-size:120%; color:red} </style> </head> <body> <h1>List of computer peripherals</h1> <ol> <li>Monitor</li> <li>Keyboard</li> <li>Mouse</li> <li>Printer <ul> <li>Line matrix printer</li> <li>Daisy wheel printer</li>
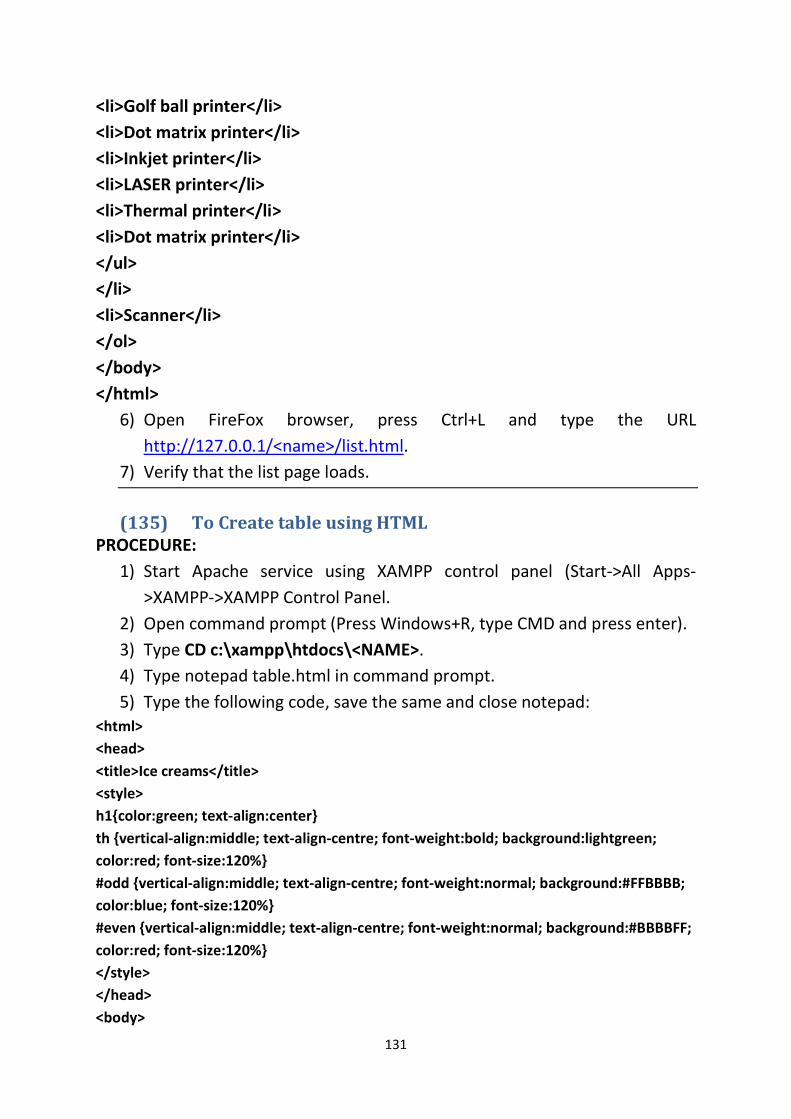
131
<li>Golf ball printer</li> <li>Dot matrix printer</li> <li>Inkjet printer</li> <li>LASER printer</li> <li>Thermal printer</li> <li>Dot matrix printer</li> </ul> </li> <li>Scanner</li> </ol> </body> </html>
6) Open FireFox browser, press Ctrl+L and type the URL http://127.0.0.1/<name>/list.html.
7) Verify that the list page loads.
(135) To Create table using HTML PROCEDURE:
1) Start Apache service using XAMPP control panel (Start->All Apps->XAMPP->XAMPP Control Panel.
2) Open command prompt (Press Windows+R, type CMD and press enter). 3) Type CD c:\xampp\htdocs\<NAME>. 4) Type notepad table.html in command prompt. 5) Type the following code, save the same and close notepad:
<html> <head> <title>Ice creams</title> <style> h1{color:green; text-align:center} th {vertical-align:middle; text-align-centre; font-weight:bold; background:lightgreen; color:red; font-size:120%} #odd {vertical-align:middle; text-align-centre; font-weight:normal; background:#FFBBBB; color:blue; font-size:120%} #even {vertical-align:middle; text-align-centre; font-weight:normal; background:#BBBBFF; color:red; font-size:120%} </style> </head> <body>
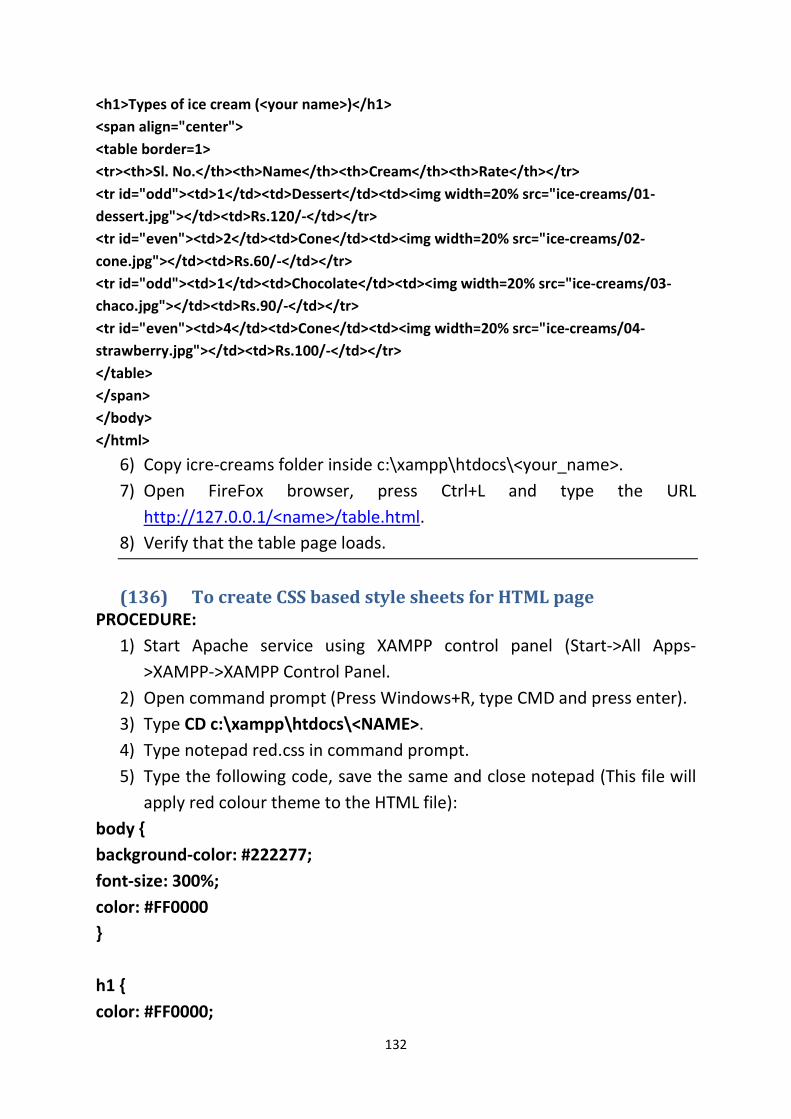
132
<h1>Types of ice cream (<your name>)</h1> <span align="center"> <table border=1> <tr><th>Sl. No.</th><th>Name</th><th>Cream</th><th>Rate</th></tr> <tr id="odd"><td>1</td><td>Dessert</td><td><img width=20% src="ice-creams/01-dessert.jpg"></td><td>Rs.120/-</td></tr> <tr id="even"><td>2</td><td>Cone</td><td><img width=20% src="ice-creams/02-cone.jpg"></td><td>Rs.60/-</td></tr> <tr id="odd"><td>1</td><td>Chocolate</td><td><img width=20% src="ice-creams/03-chaco.jpg"></td><td>Rs.90/-</td></tr> <tr id="even"><td>4</td><td>Cone</td><td><img width=20% src="ice-creams/04-strawberry.jpg"></td><td>Rs.100/-</td></tr> </table> </span> </body> </html>
6) Copy icre-creams folder inside c:\xampp\htdocs\<your_name>. 7) Open FireFox browser, press Ctrl+L and type the URL
http://127.0.0.1/<name>/table.html. 8) Verify that the table page loads.
(136) To create CSS based style sheets for HTML page
PROCEDURE: 1) Start Apache service using XAMPP control panel (Start->All Apps-
>XAMPP->XAMPP Control Panel. 2) Open command prompt (Press Windows+R, type CMD and press enter). 3) Type CD c:\xampp\htdocs\<NAME>. 4) Type notepad red.css in command prompt. 5) Type the following code, save the same and close notepad (This file will
apply red colour theme to the HTML file): body { background-color: #222277; font-size: 300%; color: #FF0000 } h1 { color: #FF0000;
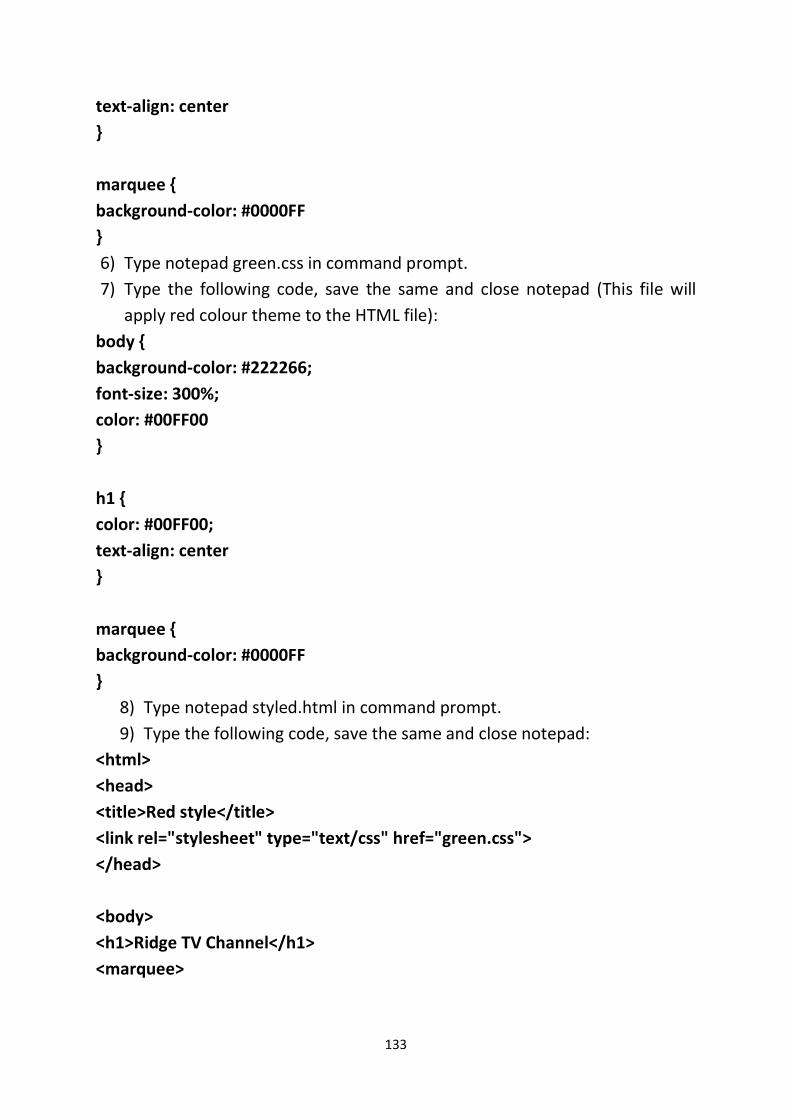
133
text-align: center } marquee { background-color: #0000FF } 6) Type notepad green.css in command prompt. 7) Type the following code, save the same and close notepad (This file will
apply red colour theme to the HTML file): body { background-color: #222266; font-size: 300%; color: #00FF00 } h1 { color: #00FF00; text-align: center } marquee { background-color: #0000FF }
8) Type notepad styled.html in command prompt. 9) Type the following code, save the same and close notepad:
<html> <head> <title>Red style</title> <link rel="stylesheet" type="text/css" href="green.css"> </head> <body> <h1>Ridge TV Channel</h1> <marquee>
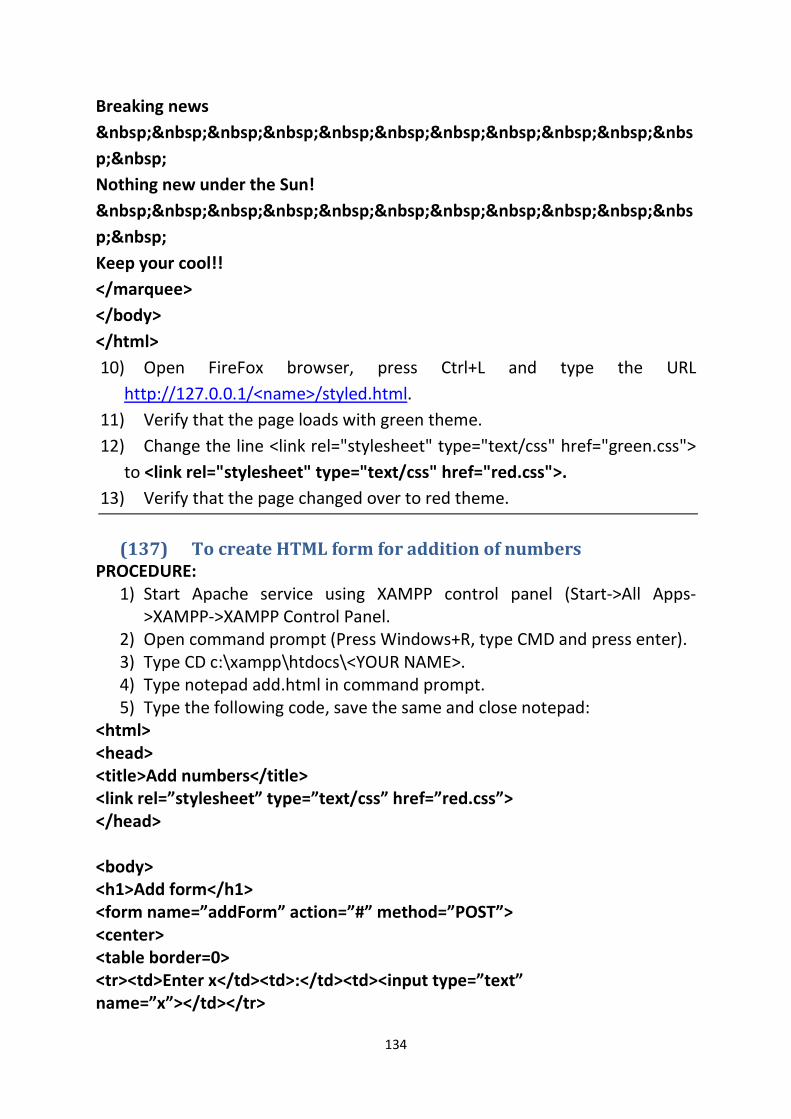
134
Breaking news Nothing new under the Sun! Keep your cool!! </marquee> </body> </html> 10) Open FireFox browser, press Ctrl+L and type the URL
http://127.0.0.1/<name>/styled.html. 11) Verify that the page loads with green theme. 12) Change the line <link rel="stylesheet" type="text/css" href="green.css">
to <link rel="stylesheet" type="text/css" href="red.css">. 13) Verify that the page changed over to red theme.
(137) To create HTML form for addition of numbers
PROCEDURE: 1) Start Apache service using XAMPP control panel (Start->All Apps-
>XAMPP->XAMPP Control Panel. 2) Open command prompt (Press Windows+R, type CMD and press enter). 3) Type CD c:\xampp\htdocs\<YOUR NAME>. 4) Type notepad add.html in command prompt. 5) Type the following code, save the same and close notepad:
<html> <head> <title>Add numbers</title> <link rel=”stylesheet” type=”text/css” href=”red.css”> </head> <body> <h1>Add form</h1> <form name=”addForm” action=”#” method=”POST”> <center> <table border=0> <tr><td>Enter x</td><td>:</td><td><input type=”text” name=”x”></td></tr>
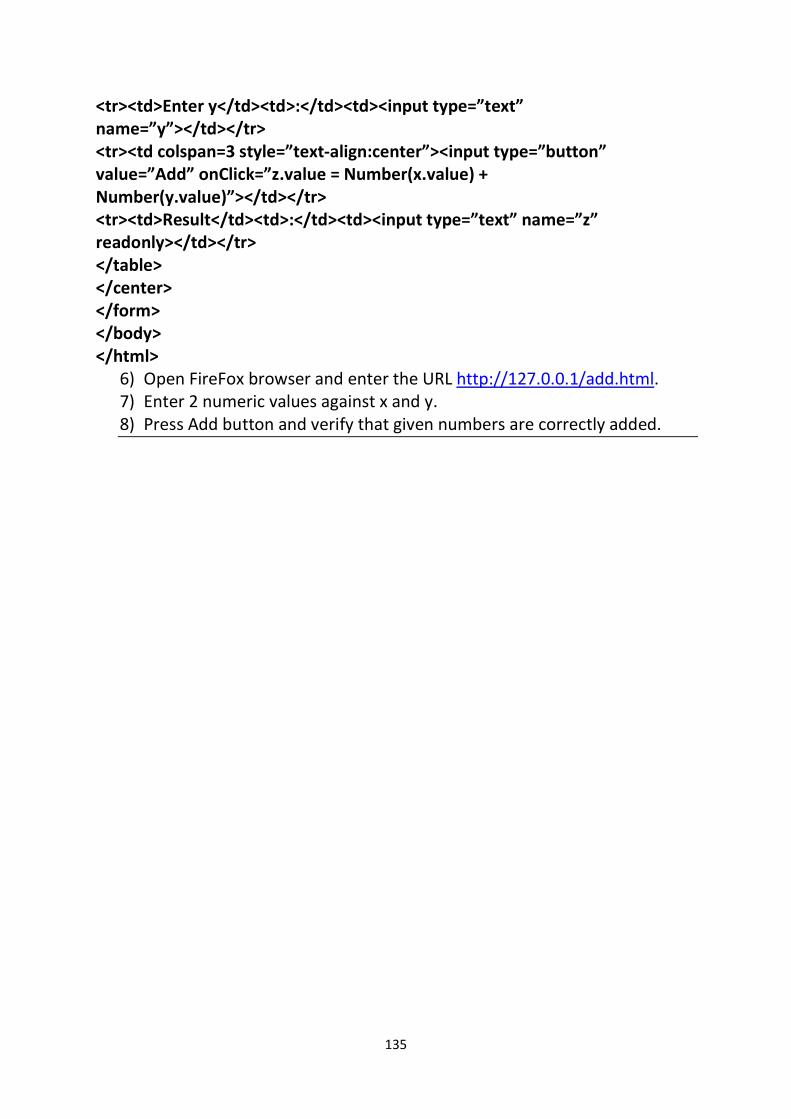
135
<tr><td>Enter y</td><td>:</td><td><input type=”text” name=”y”></td></tr> <tr><td colspan=3 style=”text-align:center”><input type=”button” value=”Add” onClick=”z.value = Number(x.value) + Number(y.value)”></td></tr> <tr><td>Result</td><td>:</td><td><input type=”text” name=”z” readonly></td></tr> </table> </center> </form> </body> </html>
6) Open FireFox browser and enter the URL http://127.0.0.1/add.html. 7) Enter 2 numeric values against x and y. 8) Press Add button and verify that given numbers are correctly added.
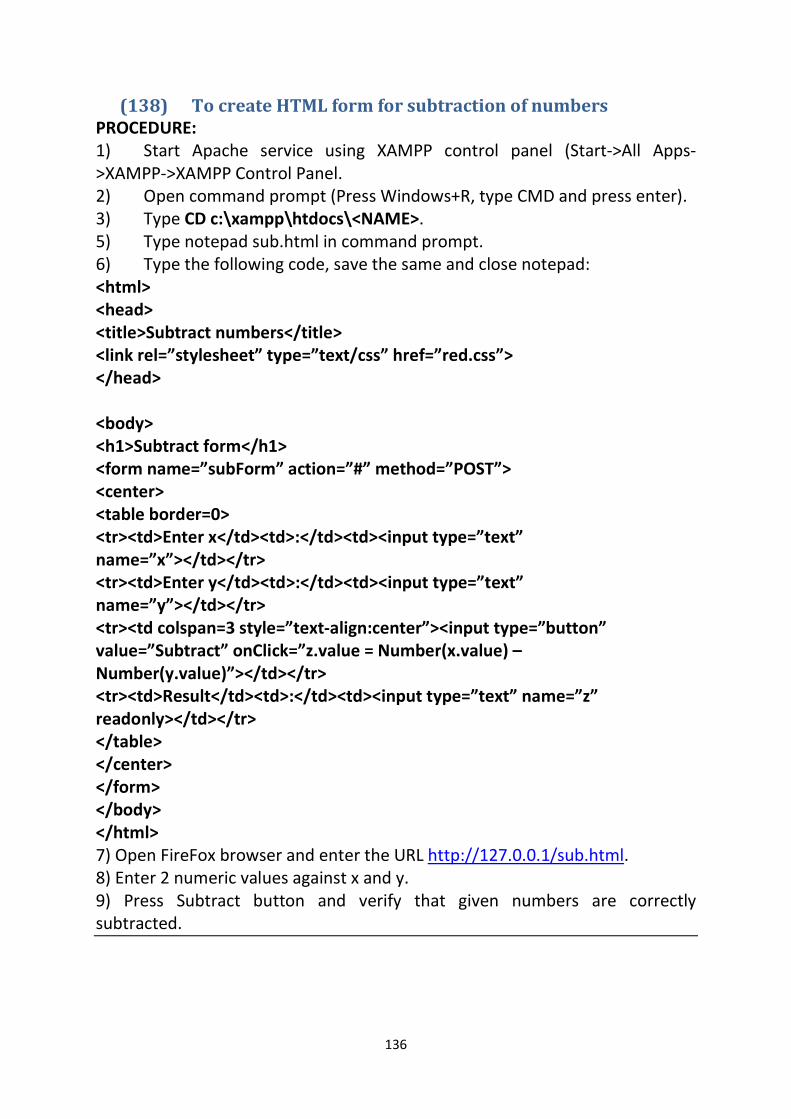
136
(138) To create HTML form for subtraction of numbers PROCEDURE: 1) Start Apache service using XAMPP control panel (Start->All Apps->XAMPP->XAMPP Control Panel. 2) Open command prompt (Press Windows+R, type CMD and press enter). 3) Type CD c:\xampp\htdocs\<NAME>. 5) Type notepad sub.html in command prompt. 6) Type the following code, save the same and close notepad: <html> <head> <title>Subtract numbers</title> <link rel=”stylesheet” type=”text/css” href=”red.css”> </head> <body> <h1>Subtract form</h1> <form name=”subForm” action=”#” method=”POST”> <center> <table border=0> <tr><td>Enter x</td><td>:</td><td><input type=”text” name=”x”></td></tr> <tr><td>Enter y</td><td>:</td><td><input type=”text” name=”y”></td></tr> <tr><td colspan=3 style=”text-align:center”><input type=”button” value=”Subtract” onClick=”z.value = Number(x.value) – Number(y.value)”></td></tr> <tr><td>Result</td><td>:</td><td><input type=”text” name=”z” readonly></td></tr> </table> </center> </form> </body> </html> 7) Open FireFox browser and enter the URL http://127.0.0.1/sub.html. 8) Enter 2 numeric values against x and y. 9) Press Subtract button and verify that given numbers are correctly subtracted.
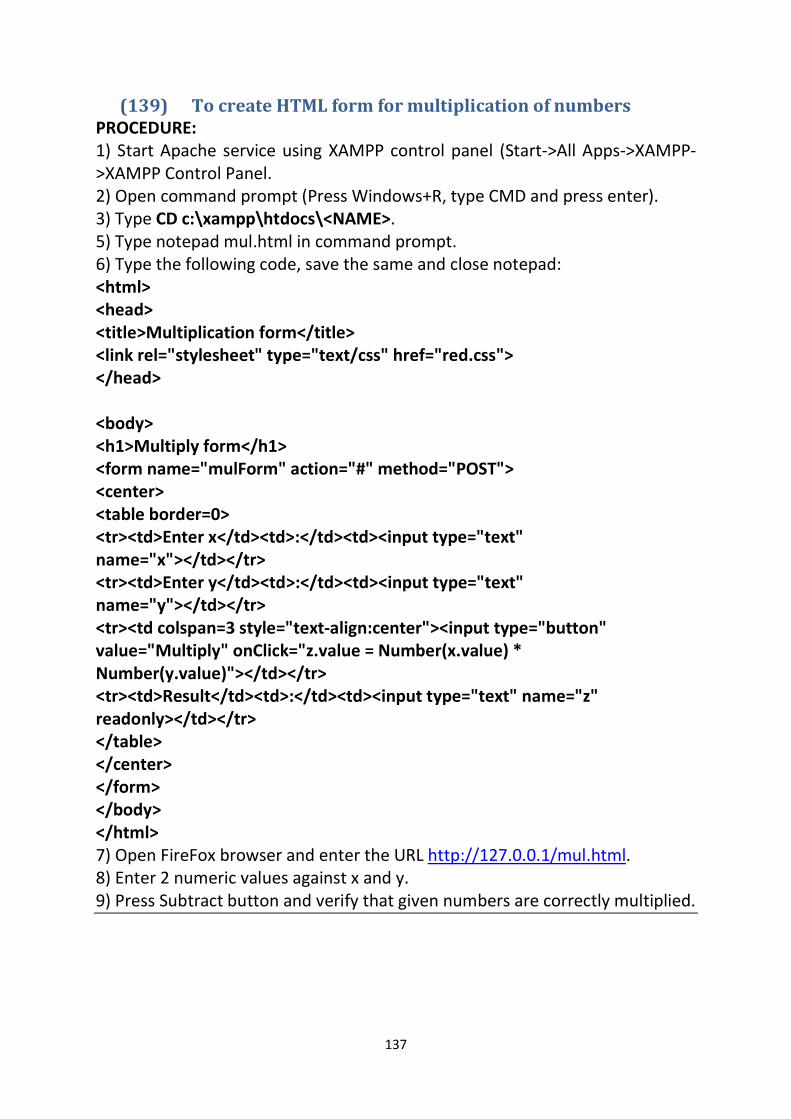
137
(139) To create HTML form for multiplication of numbers PROCEDURE: 1) Start Apache service using XAMPP control panel (Start->All Apps->XAMPP->XAMPP Control Panel. 2) Open command prompt (Press Windows+R, type CMD and press enter). 3) Type CD c:\xampp\htdocs\<NAME>. 5) Type notepad mul.html in command prompt. 6) Type the following code, save the same and close notepad: <html> <head> <title>Multiplication form</title> <link rel="stylesheet" type="text/css" href="red.css"> </head> <body> <h1>Multiply form</h1> <form name="mulForm" action="#" method="POST"> <center> <table border=0> <tr><td>Enter x</td><td>:</td><td><input type="text" name="x"></td></tr> <tr><td>Enter y</td><td>:</td><td><input type="text" name="y"></td></tr> <tr><td colspan=3 style="text-align:center"><input type="button" value="Multiply" onClick="z.value = Number(x.value) * Number(y.value)"></td></tr> <tr><td>Result</td><td>:</td><td><input type="text" name="z" readonly></td></tr> </table> </center> </form> </body> </html> 7) Open FireFox browser and enter the URL http://127.0.0.1/mul.html. 8) Enter 2 numeric values against x and y. 9) Press Subtract button and verify that given numbers are correctly multiplied.
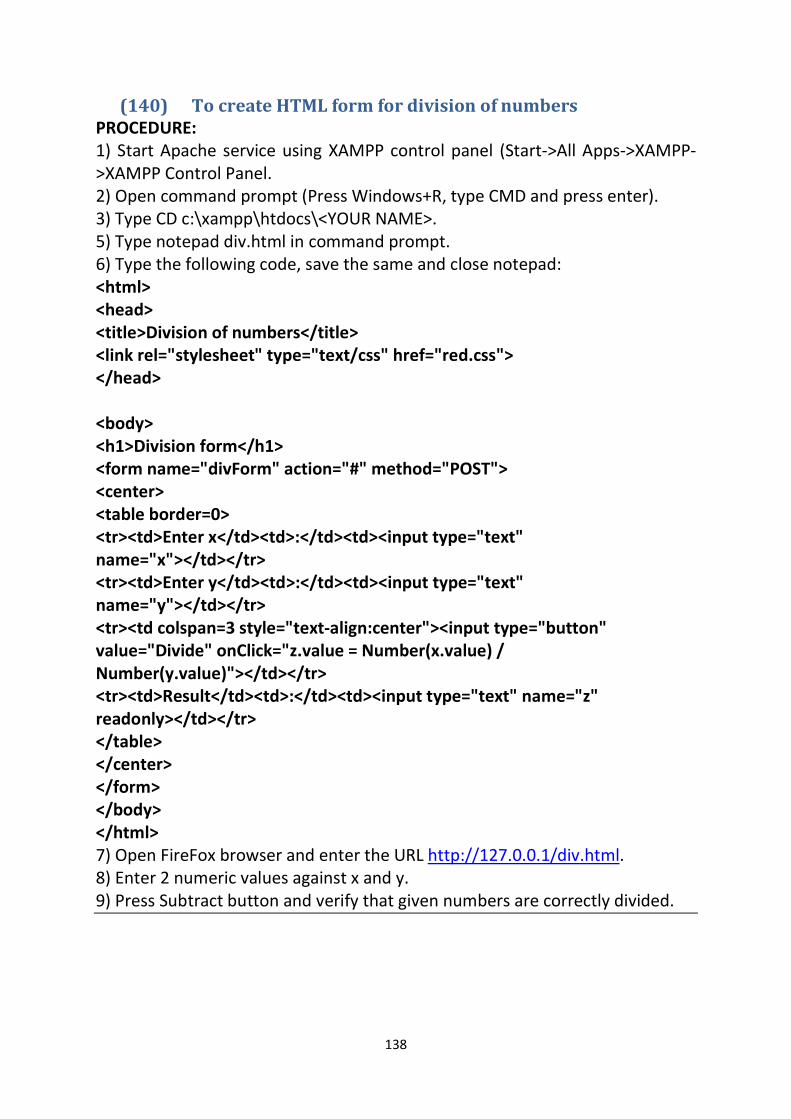
138
(140) To create HTML form for division of numbers PROCEDURE: 1) Start Apache service using XAMPP control panel (Start->All Apps->XAMPP->XAMPP Control Panel. 2) Open command prompt (Press Windows+R, type CMD and press enter). 3) Type CD c:\xampp\htdocs\<YOUR NAME>. 5) Type notepad div.html in command prompt. 6) Type the following code, save the same and close notepad: <html> <head> <title>Division of numbers</title> <link rel="stylesheet" type="text/css" href="red.css"> </head> <body> <h1>Division form</h1> <form name="divForm" action="#" method="POST"> <center> <table border=0> <tr><td>Enter x</td><td>:</td><td><input type="text" name="x"></td></tr> <tr><td>Enter y</td><td>:</td><td><input type="text" name="y"></td></tr> <tr><td colspan=3 style="text-align:center"><input type="button" value="Divide" onClick="z.value = Number(x.value) / Number(y.value)"></td></tr> <tr><td>Result</td><td>:</td><td><input type="text" name="z" readonly></td></tr> </table> </center> </form> </body> </html> 7) Open FireFox browser and enter the URL http://127.0.0.1/div.html. 8) Enter 2 numeric values against x and y. 9) Press Subtract button and verify that given numbers are correctly divided.
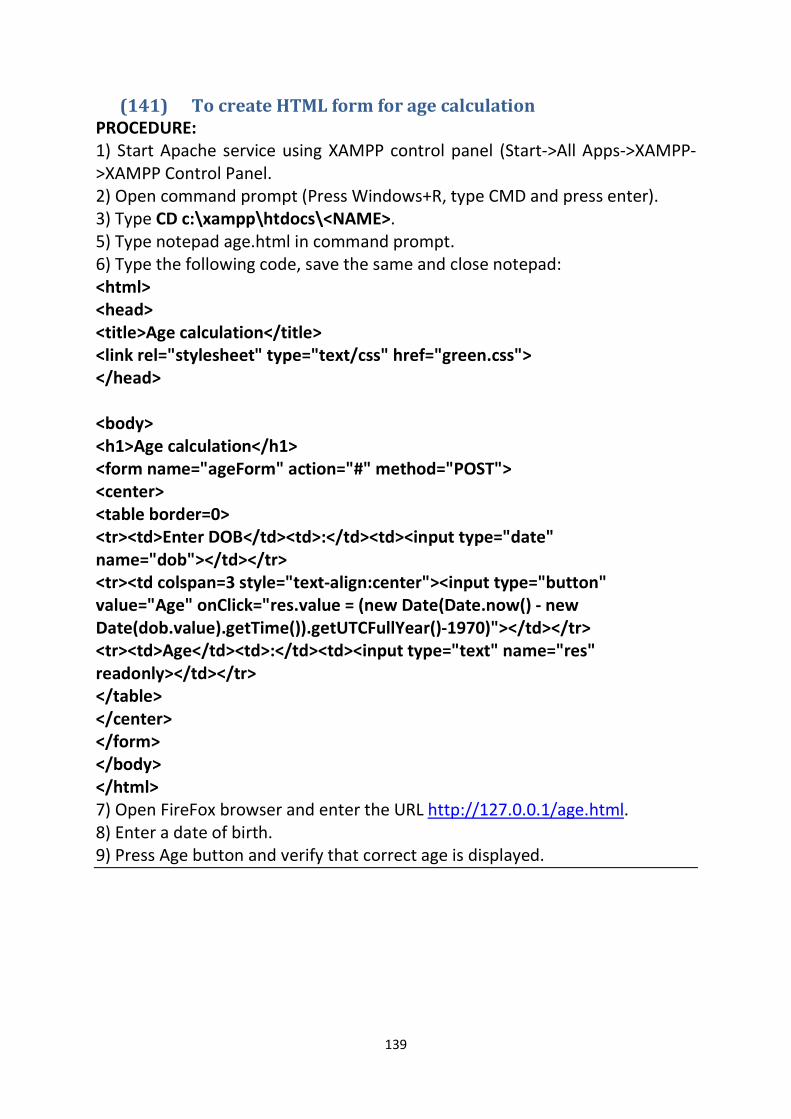
139
(141) To create HTML form for age calculation PROCEDURE: 1) Start Apache service using XAMPP control panel (Start->All Apps->XAMPP->XAMPP Control Panel. 2) Open command prompt (Press Windows+R, type CMD and press enter). 3) Type CD c:\xampp\htdocs\<NAME>. 5) Type notepad age.html in command prompt. 6) Type the following code, save the same and close notepad: <html> <head> <title>Age calculation</title> <link rel="stylesheet" type="text/css" href="green.css"> </head> <body> <h1>Age calculation</h1> <form name="ageForm" action="#" method="POST"> <center> <table border=0> <tr><td>Enter DOB</td><td>:</td><td><input type="date" name="dob"></td></tr> <tr><td colspan=3 style="text-align:center"><input type="button" value="Age" onClick="res.value = (new Date(Date.now() - new Date(dob.value).getTime()).getUTCFullYear()-1970)"></td></tr> <tr><td>Age</td><td>:</td><td><input type="text" name="res" readonly></td></tr> </table> </center> </form> </body> </html> 7) Open FireFox browser and enter the URL http://127.0.0.1/age.html. 8) Enter a date of birth. 9) Press Age button and verify that correct age is displayed.
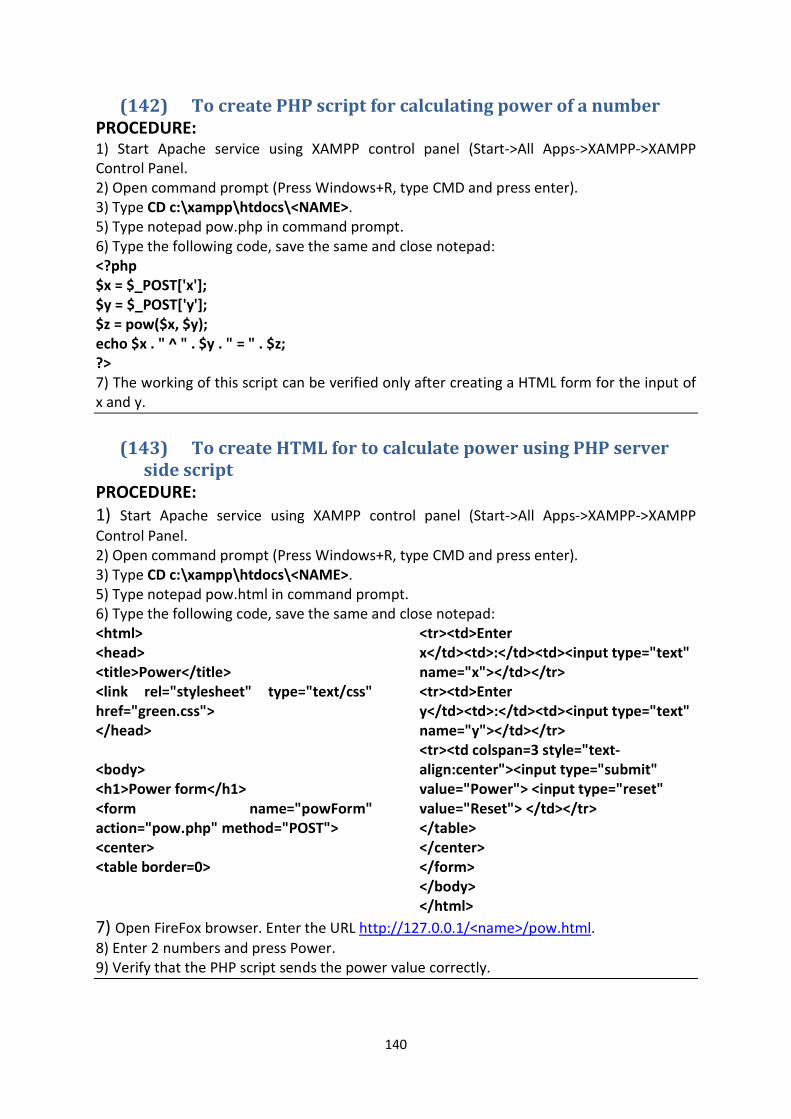
140
(142) To create PHP script for calculating power of a number PROCEDURE: 1) Start Apache service using XAMPP control panel (Start->All Apps->XAMPP->XAMPP Control Panel. 2) Open command prompt (Press Windows+R, type CMD and press enter). 3) Type CD c:\xampp\htdocs\<NAME>. 5) Type notepad pow.php in command prompt. 6) Type the following code, save the same and close notepad: <?php $x = $_POST['x']; $y = $_POST['y']; $z = pow($x, $y); echo $x . " ^ " . $y . " = " . $z; ?> 7) The working of this script can be verified only after creating a HTML form for the input of x and y.
(143) To create HTML for to calculate power using PHP server
side script PROCEDURE: 1) Start Apache service using XAMPP control panel (Start->All Apps->XAMPP->XAMPP Control Panel. 2) Open command prompt (Press Windows+R, type CMD and press enter). 3) Type CD c:\xampp\htdocs\<NAME>. 5) Type notepad pow.html in command prompt. 6) Type the following code, save the same and close notepad: <html> <head> <title>Power</title> <link rel="stylesheet" type="text/css" href="green.css"> </head> <body> <h1>Power form</h1> <form name="powForm" action="pow.php" method="POST"> <center> <table border=0>
<tr><td>Enter x</td><td>:</td><td><input type="text" name="x"></td></tr> <tr><td>Enter y</td><td>:</td><td><input type="text" name="y"></td></tr> <tr><td colspan=3 style="text-align:center"><input type="submit" value="Power"> <input type="reset" value="Reset"> </td></tr> </table> </center> </form> </body> </html>
7) Open FireFox browser. Enter the URL http://127.0.0.1/<name>/pow.html. 8) Enter 2 numbers and press Power. 9) Verify that the PHP script sends the power value correctly.

141
(144) To create Database using MySQL PROCEDURE:
1) Start MySQL service using XAMPP control panel (Start->All Apps->XAMPP->XAMPP Control Panel.
2) Open command prompt (Press Windows+R, type CMD and press enter). 3) Type CD c:\xampp\mysql\bin. 4) Type mysql –u root –p in command prompt. 5) When prompted for a password, press blank enter (since there is
password by default for MySQL server in XAMPP). 6) The MySQL prompt opens. 7) Enter the SQL command create database <your name>; (create
database amala;). Press enter. 8) Issue the command use <your name>. 9) Issue the command exit to close MySQL prompt. (145) To create table to store contacts data.
PROCEDURE: 1) Start MySQL service using XAMPP control panel (Start->All Apps-
>XAMPP->XAMPP Control Panel. 2) Open command prompt (Press Windows+R, type CMD and press enter). 3) Type CD c:\xampp\mysql\bin. 4) Type mysql –u root –p –D <your name> in command prompt. 5) Press enter key when prompted for a password. 6) To create a table with columns (id, name, mobile) issue the following
SQL command: create table contacts (id bigint auto_increment primary key, name varchar(30) not null key, moble varchar(20), email varchar(30));
7) To verify the structure of the table, issue the command describe contacts;
8) Verify that the description looks like the following result: MariaDB [test]> describe contacts; +-------+-------------+------+-----+---------+----------------+ | Field | Type | Null | Key | Default | Extra | +-------+-------------+------+-----+---------+----------------+ | id | bigint(20) | NO | PRI | NULL | auto_increment | | name | varchar(30) | NO | | NULL | | | moble | varchar(20) | YES | | NULL | | | email | varchar(30) | YES | | NULL | | +-------+-------------+------+-----+---------+----------------+ 4 rows in set (0.09 sec)
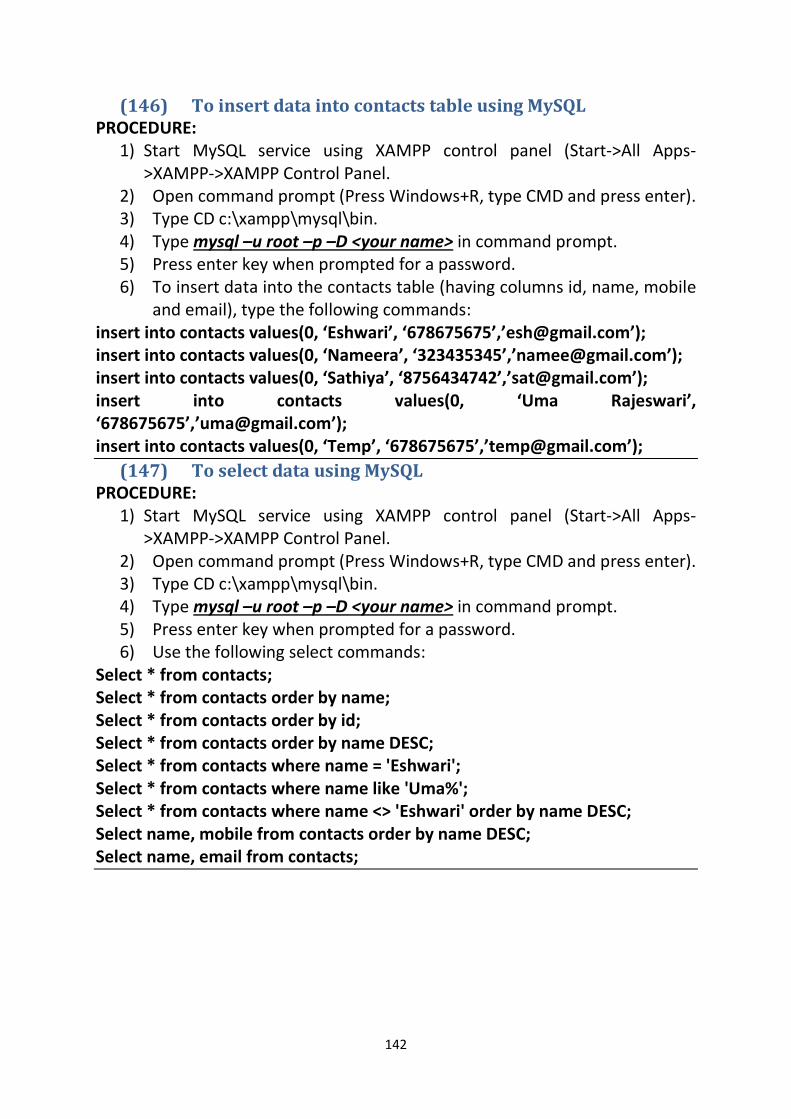
142
(146) To insert data into contacts table using MySQL PROCEDURE:
1) Start MySQL service using XAMPP control panel (Start->All Apps->XAMPP->XAMPP Control Panel.
2) Open command prompt (Press Windows+R, type CMD and press enter). 3) Type CD c:\xampp\mysql\bin. 4) Type mysql –u root –p –D <your name> in command prompt. 5) Press enter key when prompted for a password. 6) To insert data into the contacts table (having columns id, name, mobile
and email), type the following commands: insert into contacts values(0, ‘Eshwari’, ‘678675675’,’[email protected]’); insert into contacts values(0, ‘Nameera’, ‘323435345’,’[email protected]’); insert into contacts values(0, ‘Sathiya’, ‘8756434742’,’[email protected]’); insert into contacts values(0, ‘Uma Rajeswari’, ‘678675675’,’[email protected]’); insert into contacts values(0, ‘Temp’, ‘678675675’,’[email protected]’);
(147) To select data using MySQL PROCEDURE:
1) Start MySQL service using XAMPP control panel (Start->All Apps->XAMPP->XAMPP Control Panel.
2) Open command prompt (Press Windows+R, type CMD and press enter). 3) Type CD c:\xampp\mysql\bin. 4) Type mysql –u root –p –D <your name> in command prompt. 5) Press enter key when prompted for a password. 6) Use the following select commands:
Select * from contacts; Select * from contacts order by name; Select * from contacts order by id; Select * from contacts order by name DESC; Select * from contacts where name = 'Eshwari'; Select * from contacts where name like 'Uma%'; Select * from contacts where name <> 'Eshwari' order by name DESC; Select name, mobile from contacts order by name DESC; Select name, email from contacts;
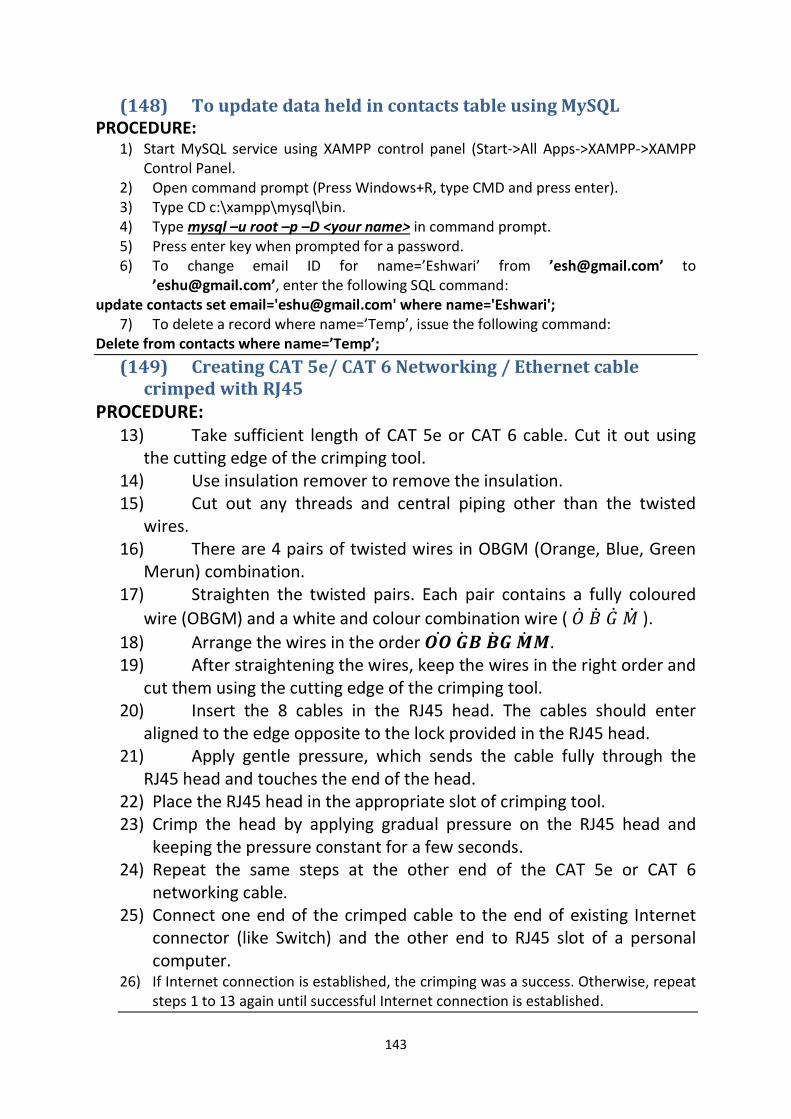
143
(148) To update data held in contacts table using MySQL PROCEDURE:
1) Start MySQL service using XAMPP control panel (Start->All Apps->XAMPP->XAMPP Control Panel.
2) Open command prompt (Press Windows+R, type CMD and press enter). 3) Type CD c:\xampp\mysql\bin. 4) Type mysql –u root –p –D <your name> in command prompt. 5) Press enter key when prompted for a password. 6) To change email ID for name=’Eshwari’ from ’[email protected]’ to
’[email protected]’, enter the following SQL command: update contacts set email='[email protected]' where name='Eshwari';
7) To delete a record where name=’Temp’, issue the following command: Delete from contacts where name=’Temp’;
(149) Creating CAT 5e/ CAT 6 Networking / Ethernet cable crimped with RJ45
PROCEDURE: 13) Take sufficient length of CAT 5e or CAT 6 cable. Cut it out using
the cutting edge of the crimping tool. 14) Use insulation remover to remove the insulation. 15) Cut out any threads and central piping other than the twisted
wires. 16) There are 4 pairs of twisted wires in OBGM (Orange, Blue, Green
Merun) combination. 17) Straighten the twisted pairs. Each pair contains a fully coloured
wire (OBGM) and a white and colour combination wire ( �̇� �̇� �̇� �̇� ). 18) Arrange the wires in the order 𝑶�̇� �̇�𝑩 �̇�𝑮 �̇�𝑴. 19) After straightening the wires, keep the wires in the right order and
cut them using the cutting edge of the crimping tool. 20) Insert the 8 cables in the RJ45 head. The cables should enter
aligned to the edge opposite to the lock provided in the RJ45 head. 21) Apply gentle pressure, which sends the cable fully through the
RJ45 head and touches the end of the head. 22) Place the RJ45 head in the appropriate slot of crimping tool. 23) Crimp the head by applying gradual pressure on the RJ45 head and
keeping the pressure constant for a few seconds. 24) Repeat the same steps at the other end of the CAT 5e or CAT 6
networking cable. 25) Connect one end of the crimped cable to the end of existing Internet
connector (like Switch) and the other end to RJ45 slot of a personal computer.
26) If Internet connection is established, the crimping was a success. Otherwise, repeat steps 1 to 13 again until successful Internet connection is established.
144
(150) Search the web for information PROCEDURE:
1) Open browser (Press Windows+R, type iexplore and press enter). 2) Enter the URL www.google.com in the address bar of the browse and
press enter. 3) Enter any keyword in the search box (like generations of computer,
UNIX, Windows 10, etc.). 4) Press the search button and find the results. 5) Click some of the results based on summary and read the information. 6) Change the result type from web to image or video or news or book.
Look at the change in results. 7) Change the search language and do the search in local language. 8) Do not click to open sites that promise offer money, music or video
unless you are sure about their authenticity. The sites may lead to great scandals and implant viruses in computer.
9) While entering keywords, follow the advices given below: a. Keep it short: The fewer words you use, the more accurate your
search will be. Every time you add a new word to the mix, you limit your results.
b. Use quotes: Double quotes around a set of words tells Google to consider the exact words in that exact order without any change.
c. Search a web site: Google allows you to specify that your search results must come from a given website. For example, try alyssa site:sitepoint.com to get your Alyssa fix.
d. Search a domain extension: Use the “site” operator above to search a whole class of sites. Try elearning site:.edu to find online learning tools provided by an educational institution.
e. Tell it what you don’t want: Use a minus sign (-) to signify words you do not want to appear in your results. The minus sign should appear immediately before the word and should be preceded with a space (so it’s not confused with a hyphen).
f. Be picky about what you don’t want: You can exclude as many words as you want by using the minus sign in front of each one. You can also exclude more than just words. For example, place a hyphen before the “site” operator to exclude a specific site from your search results. Try this: web developer forum -site:sitepoint.com.

145
g. Search for this or that: Use OR between words (in all CAPS) or the pipe symbol (|) to allow either one of several words.
h. Use the wildcard: The asterisk (*) tells Google to treat the star as a placeholder for any unknown term(s) and then find the best matches. Try: w3c founded *
i. Avoid synonyms: Force Google to skip their synonym suggestions by using a plus sign (+). This works just like using double quotes around your search terms. Try a search using both methods and compare the results.
j. Do a specialty search: Using certain syntax can turn Google Search into an even more powerful tool.
k. Sports scores: Type the team or league name. l. Track packages: Type your tracking number for UPS, Fedex or USPS
packages. m. Weather: Type “weather” followed by the name of the city or
zipcode. n. Unit conversion: Enter your desired conversion for height, weight
and volume measurements (i.e. 5 cups in ounces). 10) Calculator: Enter the calculation you’d like the answer to.
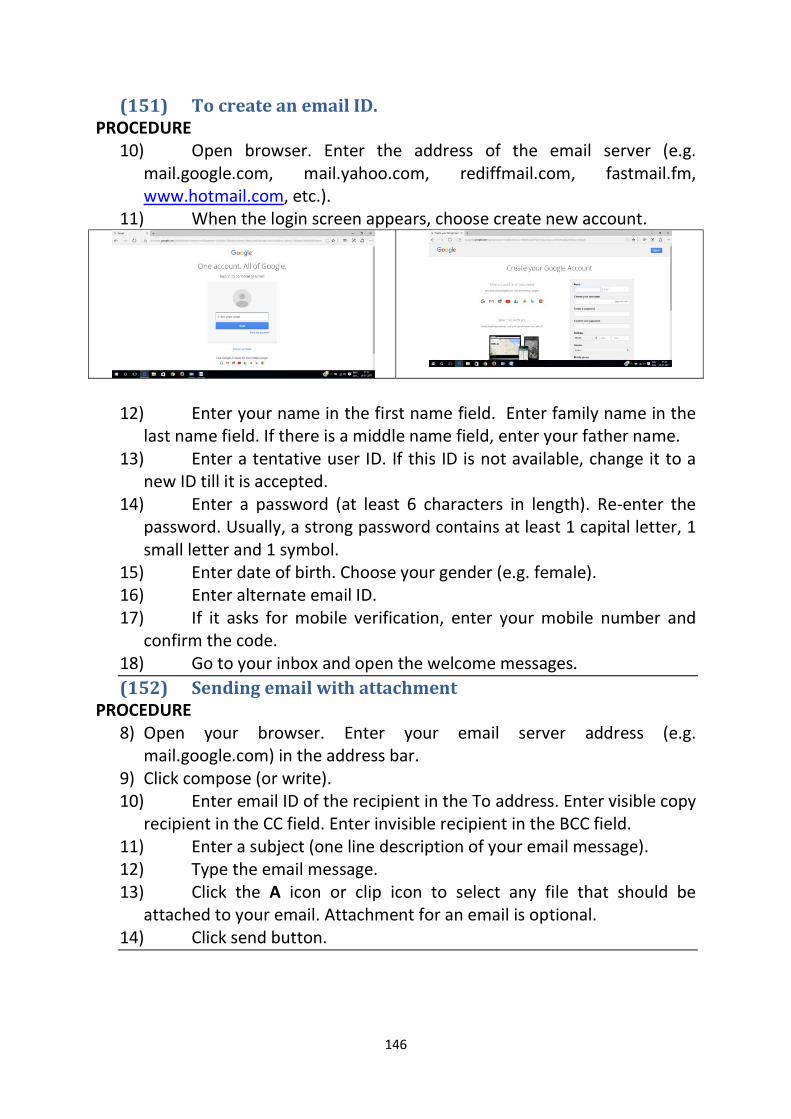
146
(151) To create an email ID. PROCEDURE
10) Open browser. Enter the address of the email server (e.g. mail.google.com, mail.yahoo.com, rediffmail.com, fastmail.fm, www.hotmail.com, etc.).
11) When the login screen appears, choose create new account.
12) Enter your name in the first name field. Enter family name in the
last name field. If there is a middle name field, enter your father name. 13) Enter a tentative user ID. If this ID is not available, change it to a
new ID till it is accepted. 14) Enter a password (at least 6 characters in length). Re-enter the
password. Usually, a strong password contains at least 1 capital letter, 1 small letter and 1 symbol.
15) Enter date of birth. Choose your gender (e.g. female). 16) Enter alternate email ID. 17) If it asks for mobile verification, enter your mobile number and
confirm the code. 18) Go to your inbox and open the welcome messages. (152) Sending email with attachment
PROCEDURE 8) Open your browser. Enter your email server address (e.g.
mail.google.com) in the address bar. 9) Click compose (or write). 10) Enter email ID of the recipient in the To address. Enter visible copy
recipient in the CC field. Enter invisible recipient in the BCC field. 11) Enter a subject (one line description of your email message). 12) Type the email message. 13) Click the A icon or clip icon to select any file that should be
attached to your email. Attachment for an email is optional. 14) Click send button.