zenon manual - Runtime - Copa-Data
94
zenon manual Runtime v.7.20
-
Upload
khangminh22 -
Category
Documents
-
view
0 -
download
0
Transcript of zenon manual - Runtime - Copa-Data
zenon manual Runtime
v.7.20

©2015 Ing. Punzenberger COPA-DATA GmbH
All rights reserved.
Distribution and/or reproduction of this document or parts thereof in any form are permitted solely with the written permission of the company COPA-DATA. Technical data is only used for product description and are not guaranteed qualities in the legal sense. Subject to change, technical or otherwise.
3
Contents
1. Welcome to COPA-DATA help ...................................................................................................... 6
2. Runtime ...................................................................................................................................... 6
3. 32 and 64-bit version ................................................................................................................... 7
4. Hardware requirements ............................................................................................................... 9
4.1 Paths for setup and operation .................................................................................................................. 11
4.2 Demo mode .............................................................................................................................................. 13
4.3 Runtime under Windows Embedded Standard ........................................................................................ 13
4.4 Runtime for Windows CE .......................................................................................................................... 14
5. System requirements ................................................................................................................. 14
5.1 System requirements when using DirectX ................................................................................................ 15
5.2 Operating system ...................................................................................................................................... 16
5.3 Virus scan .................................................................................................................................................. 18
5.4 File Structure ............................................................................................................................................. 18
5.5 Free ports .................................................................................................................................................. 20
5.6 Updates (Build Setups), Service Packs and Upgrades ............................................................................... 21
5.7 Exceptions for anti-virus ........................................................................................................................... 23
5.8 firewall setup ............................................................................................................................................ 24
6. Runtime for Windows CE ........................................................................................................... 25
6.1 System files ............................................................................................................................................... 27
6.2 Update of the Windows CE Runtime ........................................................................................................ 27
6.3 Manual installation and Runtime-update ................................................................................................. 35
7. Supported protocols .................................................................................................................. 36
8. Putting Runtime into operation.................................................................................................. 41
8.1 zenon Standard installation ...................................................................................................................... 42
8.1.1 Error treatment .......................................................................................................................... 48
8.2 Uninstalling Runtime ................................................................................................................................. 49

4
9. Starting the Runtime ................................................................................................................. 49
9.1 Set up Runtime autostart .......................................................................................................................... 51
9.2 Keyblock Runtime Start ............................................................................................................................. 51
9.3 Configure start delay ................................................................................................................................. 52
10. Starting Runtime as a service ..................................................................................................... 52
10.1 Configuration of zenon Logic Runtime ...................................................................................................... 55
10.2 Configuration in the Startup Tool ............................................................................................................. 55
10.3 Remote Transport ..................................................................................................................................... 56
10.4 Procedure .................................................................................................................................................. 58
11. Runtime as ActiveX control ........................................................................................................ 59
12. Operating during Runtime ......................................................................................................... 59
12.1 Mouse ....................................................................................................................................................... 60
12.2 Touch......................................................................................................................................................... 64
12.2.1 Navigation with Multi-Touch in the worldview .......................................................................... 64
12.3 Keyboard operation .................................................................................................................................. 67
12.3.1 Functions .................................................................................................................................... 67
12.4 Block keyboard shortcuts .......................................................................................................................... 70
12.5 Define sort order inside a frame ............................................................................................................... 72
12.6 Positioning and operation of frames ........................................................................................................ 73
12.7 Configurable lists ....................................................................................................................................... 78
13. Runtime files ............................................................................................................................. 80
13.1 Compatibility Runtime files ....................................................................................................................... 81
14. Runtime profiles ........................................................................................................................ 83
14.1 Load and create profile in the Runtime .................................................................................................... 84
14.2 Configuring functions ................................................................................................................................ 85
14.3 Allocate and administrate profile ............................................................................................................. 86
14.4 Storage directories of the profiles ............................................................................................................ 89
15. Filter profiles ............................................................................................................................. 90
15.1 Export and import filter profiles ............................................................................................................... 91
16. Handling of date and time .......................................................................................................... 92

5
16.1 Switch to daylight saving time .................................................................................................................. 93
Welcome to COPA-DATA help
6
1. Welcome to COPA-DATA help
GENERAL HELP
If you cannot find any information you require in this help chapter or can think of anything that you would like added, please send an email to [email protected] (mailto:[email protected]).
PROJECT SUPPORT
You can receive support for any real project you may have from our Support Team, who you can contact via email at [email protected] (mailto:[email protected]).
LICENSES AND MODULES
If you find that you need other modules or licenses, our staff will be happy to help you. Email [email protected] (mailto:[email protected]).
2. Runtime
Runtime is software that supports graphic display possibilities for HMI/SCADA projects.
License information
The zenon Runtime must be licensed. The license is calculated according to the used TAGs or IOs. For details about licensing see chapter Licensing.
It offers:
Process display,

32 and 64-bit version
7
Archiving of data such as messages and process values,
Integrated alarm message list,
Recipes,
Multi-Touch and much more.
Attention
For the optimum display of zenon in Runtime, the value Less than - 100% is recommended as a setting for the Windows display. Higher values can lead to graphic elements, symbols, texts, etc. not being displayed correctly.
Runtime is available as a 32-bit version and a 64-bit version from zenon 7.10. Projects can run on both versions. You can read details on compatibility with versions of zenon 7.10 in the Project conversion manual, in the 64-bit version (on page 7) chapter. The Runtime is available as zenon Supervisor and as zenon Operator for Embedded operating systems. The versions differ in their functionalities. For details see Restrictions for zenon Operator.
SEVERAL INSTANCES OF RUNTIME
Only one instance of zenon Runtime can be started on a computer at any time. This applies regardless of whether Runtime is started as an EXE file, a Web Client or as Runtime Control (OCX).
Exception: On the terminal server or terminal client, one instance of Runtime per user can be started as an EXE file, as a Web Client or as Runtime Control (OCX). Only 1 instance can run at any time within a user context.
3. 32 and 64-bit version
zenon is now available for Editor and Runtime as a 32-bit and 64-bit version. A 32-bit and a 64-bit zenon Editor and a 32-bit and a 64-bit zenon Runtime are installed on 64-bit operating systems. The file names of the executable files are identical for 32-bit and 64-bit.
On 64-bit systems, all services present in 64-bit are registered and used in the 64-bit version. Editor and Runtime can be started alternately. Projects can be executed in both Editors and in both Runtimes.
Components such as, for example, zenon Logic Runtime, zenon Logic Workbench, drivers, Process Gateway and other tools are always only used in the 32-bit version.
GENERAL LIMITATIONS
The basic limitation of only 64-bit DLLs being able to be loaded in 64-bit processes also means that there are certain limitations when operating zenon. This mostly affects external components that are loaded

32 and 64-bit version
8
in the Editor or Runtime. DLLs that are loaded using VBA/VSTA code and ActiveX controls are directly affected. These DLLs must be present as a 64-bit version for use in the 64-bit Editor or Runtime. ActiveX controls supplied by COPA-DATA are always available in 32-bit and 64-bit versions.
CONVERSION OF ZENON 5.50 PROJECTS
No zenon 5.50 projects can be converted with the 64-bit editor. These must be converted beforehand with the 32-bit Editor.
RGM LIMITATION
The Access database is no longer supported in the RGM. In order to be able to use MS Access data from previous versions under 64-bit, the project must first be converted in the 32-bit Editor. The DataSource property is no longer available from version 7.10. For details, see the Converting Recipegroup manager database chapter.
VBA
VBA was converted to VBA version 7.1. Therefore VBA is also available in zenon 64-bit. If, in the VBA code, Windows API or other imported DLL functions are accessed, these calls must be adapted to 64-bit. In general, the following applies: A VBA file created with a 32-bit version cannot be used without changes in a 64--bit version.
There are some defines/functions available in VBA in order to write 32-bit and 64-bit compatible code. For example:
#if Win64 then
Declare PtrSafe Function MyMathFunc Lib "User32" (ByVal N As LongLong) As LongLong
#else
Declare Function MyMathFunc Lib "User32" (ByVal N As Long) As Long
#end if
#if VBA7 then
Declare PtrSafe Sub MessageBeep Lib "User32" (ByVal N AS Long)
#else
Declare Sub MessageBeep Lib "User32" (ByVal N AS Long)
#end if
You can also obtain some useful notes on the porting of VBA 32-bit code to VBA 64-bit from Microsoft:
Microsoft Office 2010, notes on porting: http://msdn.microsoft.com/en-us/library/ee691831.aspx (http://msdn.microsoft.com/en-us/library/ee691831.aspx)
32-bit and 64-bit declares for API calls: http://www.jkp-ads.com/articles/apideclarations.as (http://www.jkp-ads.com/articles/apideclarations.as)p

Hardware requirements
9
COMPONENTS IN 32-BIT ONLY
The following components are also only available as 32-bit versions on 64-bit computers:
Some programs, such as SIC.exe and DiagViewer.exe
Licensing
Process Gateway
Startup Tool
Windows CE
Driver
zenon Logic Runtime and Workbench
4. Hardware requirements
One of the requirements for putting Runtime into operation is that setup has been completed successfully. It is also important to have a valid license.
The minimum requirements are listed in the following table. These are based on a complete installation of Runtime. For extensive projects or several projects loaded at the same time you will need accordingly faster/stronger hardware. The minimum requirements can increase as a result of this.

Hardware requirements
10
Hardware Minimum requirements Recommended
CPU Single core with SSE2 support. Quad Core
RAM memory Windows 7/8: from 512 MB.
Note: Projects with big amounts of data, Network projects, multiple projects simultaneously and projects in redundance mode need more memory.
Windows 7/8: 4096 MB
Harddisk 2 GB free space for the Runtime-installation plus additional space for the projects.
Attention: If you log historical data (e.g. Archive dataorAlarm-/CEL-Data), you need sufficient harddisk space or you have to make sure during engineering that the historical data is evacuated or deleted.
Monitor resolution VGA with 640 x 480 pixels.
Graphics adapter 64 MB dedicated memory. Cards with shared memory can lead to performance loss. Note the System requirements when using DirectX (on page 15) chapter in relation to this.
Input devices Keyboard and/or mouse. Operation via touchscreen is also possible. Many individual, customizable soft keyboards for the touchscreen are available for you.
USB interface
(optional)
For installation. Installation also possible via network or other storage media.
For dongle. Network dongle also available.
Network connection
(optional) 64 kBits/s for standard Client/Server projects.
100 Mbit/s full duplex for redundant operation.
100 Mbits/s full duplex for standard Client/Server projects.
Remote connection
(optional) Minimum requirements: Dial-up modem with 9600 Bit/s.
1 Mbit/s full duplex.
WAN connection
(optional) Any desired connection via router, e.g. per ISDN or DSL Data transfer is slower in a WAN than in a local network for technical reasons. Be sure to check the possible data transfer rates of your WAN technology already at the time when you create the project.
Message Control
(optional): Please refer to chapter Message Control for the requirements.
Hardware requirements
11
Interfaces (optional) The necessary interfaces depend on the requirements of the PLC and/or the bus connection, for example serial RS232 or RS422/485 interfaces, ISA/PCI slots, etc.
4.1 Paths for setup and operation
Paths for zenon:
Setup
Runtime
Info
You can display many default paths with the help of the set command:
start the command line (enter cmd in the Windows start area)
enter command set
with click in button Enter standard folders for Windows and zenon are displayed
Note: As absolute paths differ in different operating system, the paths are displayed as Windows
environment variable in this chapter. For example %ProgramData% instead of C:\ProgramData.
SETUP
During setup, paths are set for required software from third-party providers as well as the zenon Runtime folder.
The setup needs administrator rights . This is also true for changing the installtion paths.
REQUIREMENTS
The installation paths of the required third-party software match the standard paths of the respective manufacturer and cannot be changed during setup.
The additional software packages that need to be installed depend on the type of installation:
zenon Editor
zenon Runtime
zenon Web Client
Hardware requirements
12
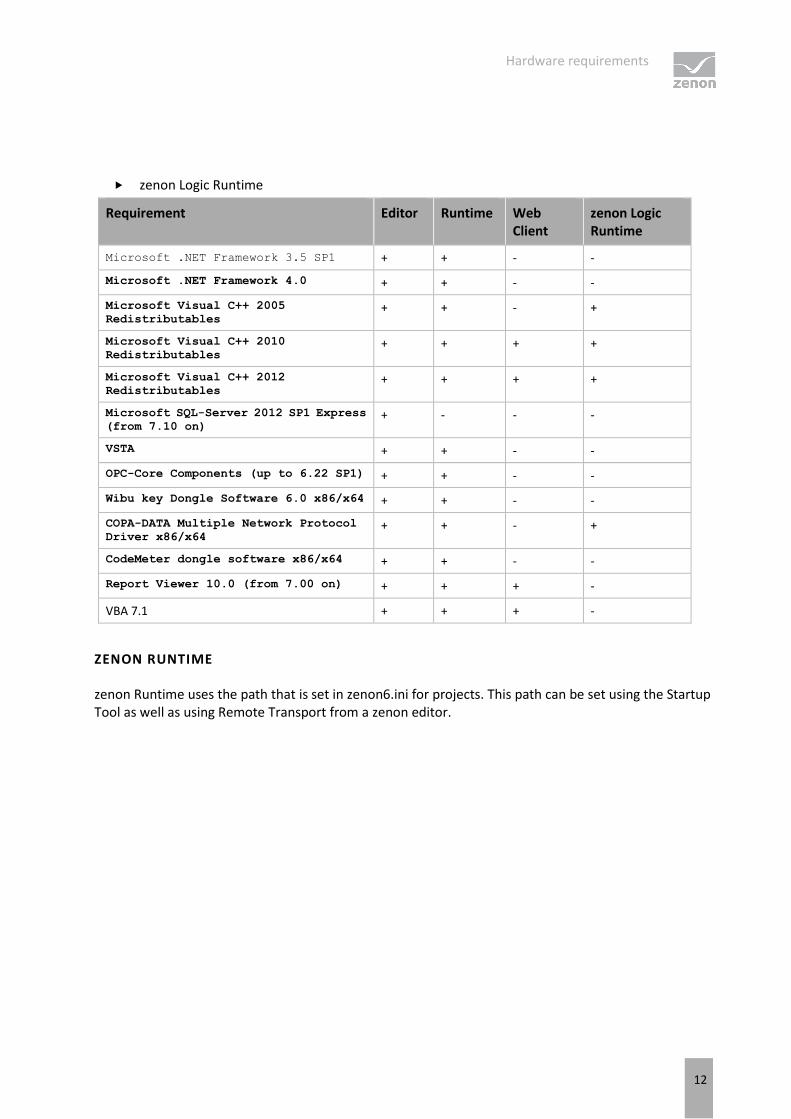
zenon Logic Runtime
Requirement Editor Runtime Web Client
zenon Logic Runtime
Microsoft .NET Framework 3.5 SP1 + + - -
Microsoft .NET Framework 4.0 + + - -
Microsoft Visual C++ 2005
Redistributables + + - +
Microsoft Visual C++ 2010
Redistributables + + + +
Microsoft Visual C++ 2012
Redistributables + + + +
Microsoft SQL-Server 2012 SP1 Express
(from 7.10 on) + - - -
VSTA + + - -
OPC-Core Components (up to 6.22 SP1) + + - -
Wibu key Dongle Software 6.0 x86/x64 + + - -
COPA-DATA Multiple Network Protocol
Driver x86/x64 + + - +
CodeMeter dongle software x86/x64 + + - -
Report Viewer 10.0 (from 7.00 on) + + + -
VBA 7.1 + + + -
ZENON RUNTIME
zenon Runtime uses the path that is set in zenon6.ini for projects. This path can be set using the Startup Tool as well as using Remote Transport from a zenon editor.

Hardware requirements
13
Object Path
Project [user-defined path]\[project]\RT
External files [User-defined path]\[project]\RT\FILES\...
Exported archives,
Chronological Event
List and Alarm
Message List
[User-defined path]\[project]\Export
Note: Is created at the first export.
System files Windows system folder.
ZENON LOGIC
Paths for zenon Logic are created analogous to the zenon paths.
4.2 Demo mode
If Runtime is not licensed, it can be used in demo mode for 30 days. Licensing (soft licensing or dongle licensing) is possible at anytime by entering a valid serial number and activation number. Licensing is only effective once zenon has been restarted.
Note: From the 41st start or the 31st day in demo mode, Runtime only runs for 10 minutes. Runtime always runs for 30 minutes in demo mode.
4.3 Runtime under Windows Embedded Standard
The minimum requirements are valid for a Runtime installation adapted to the Windows Embedded Standard 7 SP1 operating system. The hardware must be accordingly more powerful for extensive projects.
This table only states the figures that are different to the standard installation. The other parameters correspond to the figures described in the Hardware requirements for Runtime chapter.

System requirements
14
Hardware Minimum requirement Recommended
RAM memory 512 MB.
Note: Projects with big amounts of data, Network projects, multiple projects simultaneously and projects in redundance mode need more memory.
2048 MB
Storage medium 2 GB of free memory on C:\ drive before the installation of .NET Framework 3.5 and 4.5 800 MB of free memory after the installation of the .NET Framework
Plus memory space for the projects, archives, etc.
80 GB
Attention: If you log historical data (e.g. Archive dataorAlarm-/CEL-Data), you need sufficient harddisk space or you have to make sure during engineering that the historical data is evacuated or deleted.
4.4 Runtime for Windows CE
The minimum requirements are based on a complete installation of the Runtime for Windows CE. The hardware must be accordingly more powerful for extensive projects.
Hardware Minimum requirement Recommended
CPU At least 400 MHz 1 GHz.
RAM memory 64 MB.
1024 MB for Windows CE 6.0.
Storage medium 64 MB free harddisk space.
Permanent recordable remanent storage medium for project data
256 MB free harddisk space or more.
Network connection For standard Client/Server projects: 10 Mbit/s full duplex.
5. System requirements
zenon 7.20 can be used on all current Microsoft operating systems. The hardware being used is not important. The operating system abstracts hardware functions so far that zenon can normally be used without restrictions on any hardware.

System requirements
15
zenon is always tested with the most up-to-date version of the operating systems with the newest available Service Packs and Hotfixes. You can thus assume that zenon can usually be used with the most recent service packs and hotfixes.
Changes in Microsoft's Service Packs and hotfixes or patches can cause incompatibilities and affect the software's functionality. If this is the case, COPA-DATA will release an updated version as soon as possible. In this case, please contact our Support: [email protected].
Attention
For the optimum display of zenon in Runtime, the value Less than - 100% is recommended as a setting for the Windows display. Higher values can lead to graphic elements, symbols, texts, etc. not being displayed correctly.
5.1 System requirements when using DirectX
The following minimum requirements must be met when using DirectX hardware or DirectX software:
Note: For extensive projects or several projects loaded at the same time you will need accordingly faster/stronger hardware. The minimum requirements can increase as a result of this.

System requirements
16
Parameters Minimum requirements Recommended
CPU: Single core with SSE2 support. Quad Core or more cores
Graphics card:
(DirectX hardware only) DirectX 11 mainstream graphics card.
Note: When an integrated graphics chip is used in particular, it is possible, depending on the driver used, that there are impairments to the display quality.
Dedicated DirectX 11 AMD or nVidia high-end graphics card
Graphics memory:
(DirectX hardware only)
1 GB VRAM
Note: The size that is actually needed depends on the number of screens called up and the elements displayed.
2 GB VRAM
Driver graphics card:
(DirectX hardware only)
The graphics card manufacturer's most recent driver.
Operating system:
DirectX hardware and DirectX software only works on operating
systems that support DirectX11.1.
If the system does not support DirectX 11.1, it automatically switches to
Windows Enhanced.
The current DirectX- Runtime must be installed. For zenon it is installed together with the setup. For the Web Client it must be installed manually.
You can check the DirectX hardware compatibility of the graphics card and the driver with the Windows operating system tool dxdiag.exe. Up to Windows 7: Check the DDI version value under Display. The value 11 for example means DirectX 11. From Windows 8: All supported versions of DirectX are displayed in the Display tab under Feature
Levels. For example, DirectX 11 is displayed as 11.0.
5.2 Operating system
Operating system
Required service pack
zenon Editor
zenon Runtime
zenon Web Server
zenon Web Client
zenon Logic Runtime
zenon Analyzer Server

System requirements
17
Windows 7 (Professional, Enterprise and Ultimate version, x86 and x64 versions).
SP 1 SP 1 SP 1 SP 1 SP 1 SP 1 - x64
Windows Embedded Standard 7 (if all necessary operating system components exist).
Cannot run
SP 1 SP 1 SP 1 SP 1 Cannot run
Windows 8 and 8.1 (Standard, Professional, Enterprise version, x86 and x64 versions)
SP 0 SP 0 SP 0 SP 0 SP 0 SP 0 - x64
Windows Embedded 8 Standard (if all necessary operating system components exist).
Cannot run
SP 0 SP 0 SP 0 SP 0 Cannot run
Windows 10 SP 0 SP 0 SP 0 SP 0 SP 0 SP 0
Windows Server 2008 R2 (All editions with the exception of Core)
SP 1 SP 1 SP 1 SP 1 SP 1 SP 1 - x64
Windows Server 2012 and 2012 R2 (All editions with the exception of Core)
SP 0 SP 0 SP 0 SP 0 SP 0 SP 0 - x64
Windows CE 6.0 (ARM and x86)
Cannot run
zenon Operator only
Pro Light only
Cannot run
Running Cannot run
Windows Embedded Compact 7 (ARM and x86)
Cannot run
zenon Operator only
Pro Light only
Cannot run
Running Cannot run
All operating systems are supported in the multi-lingual version.
Windows RT 8 and Windows RT 8.1 are not supported due to the system.
Itanium processors are not supported for any operating system.
Attention
Automatic Windows updates influence the installation
If an update of the Windows operating system is carried out while the zenon setup is running, it can cause problems during the zenon installation. To prevent this:
deactivate the automatic Windows update during the time of installation or
carry out the Windows update before starting the zenon installation
MICROSOFT .NET FRAMEWORK
zenon needs the Microsoft .NET Framework 3.5 or higher for VSTA and WPF. If the framework is not installed, an attempt is made to install it automatically. If the .NET Framework is an operating system component, it cannot be installed automatically. The setup then displays an error message and aborts.

System requirements
18
The .NET framework must be activated manually for these operating systems: Control panel - >Programs
and functions - >Activate or deactivate Windows functions.
OVERVIEW
Windows Embedded 7/8 Standard
Windows Embedded 8.1 Pro/Industry
Windows 7 SP1/Windows 8 and 8.1/ Server 2008 (R2) SP1, 2012 and 2012 R2
Windows CE
Editor X X -
Runtime X X X -
Runtime for
Windows CE - - - X
Web Server X X X X
Web Client X X X -
Processors supported in the different Windows CE operating systems are listed in chapter CE versions/supported processors. You can find installation instruction for Runtime under Windows CE in chapter Runtime.
Information
If you always use the latest version (Service Pack) of your operating system, you not only avoid compatibility issues but also security problems.
5.3 Virus scan
Anti-virus software can slow down or even prevent the installation of zenon.
Note: If the anti-virus software you use leads to problems during installation, deactivate the anti-virus software for the duration of the installation. Note that the computer in question is subject to higher risks in this period. Activate your anti-virus software immediately after the installation of zenon.
5.4 File Structure
The special file structure is created or extended during the installation.
The zenon program files are copied to a folder which can be defined during the installation.

System requirements
19
Additionally the installation asks for a folder for the SQL databases of the projects. The storage medium for project archiving (SQL, screens etc.) must have enough free space, because all current and future project data is stored there.
Folder Path
Program folder 32-bit system: C:\Program
Files\COPA-DATA\zenon7xxx
64-bit system:
C:\Program
Files\COPA-DATA\zenon7xxx
C:\Program Files
(x86)\COPA-DATA\zenon7xxx
Program data folder, e.g. global symbols, print templates, log
files etc.
C:\ProgramData\COPA-DATA\zenon7xx
x
Database folder (SQL) C:\ProgramData\COPA-DATA\SQL
System folder C:\ProgramData\COPA-DATA\System
Settings Editor and profiles C:\Users\UserName\AppData\Local\C
OPA-DATA\zenon\Editor
Settings Diagnosis Viewer C:\Users\UserName\AppData\Local\C
OPA-DATA\zenon\DiagView
DEFINITION RUNTIME FOLDER AND DATA FOLDER
RUNTIME FOLDER
The Editor creates Runtime files in the Runtime folder, or they are transferred to this folder with the help of Remote Transport. When creating a project, you must define the Runtime folder. Later it can be changed in the project properties. With Remote Transport, the Runtime folder is defined in Remote Transport settings.
DATA FOLDER
The Runtime saves all data files that were created at runtime like alarm files, archive files etc. in the data folder. The data folder is created as a subfolder of the Runtime folder by default. The folder is automatically assigned the name of the computer the Runtime is running on. You can change this save location in the project properties (General/Data folder).
Hint: Never set the data folder to a removable device such as an USB stick or a network device. It is recommended that the data is recorded locally and backed up externally.

System requirements
20
Attention
If the defined path does not exist or is not available, no more data is written from the Runtime. This means a complete loss of data. The Runtime can still be operated but must be restarted as soon as the path is available again. The availability of the folder can be checked via system driver variable Runtime folder not available (SYSDRV.chm::/25965.htm) .
5.5 Free ports
zenon and zenon Logic need certain communication ports for the communication in the network. If these ports are occupied by other programs like e.g. an already installed SQL server, the communication of zenon can be disturbed.
This is how you check the port assignments:
1. Enter netstat -a -n -o in the command line.
You can reach the command line in Windows:
by pressing the Windows-key and R
Enter cmd and confirm with OK.
A DOS-window pops up
enter the command netstat
2. A list of all currently used TCP and UDP ports will pop up.
3. Check the listening ports (status: LISTEN) if the process-ID (PID) of the ports needed by zenon and zenon Logic corresponds with the processes of zenon and zenon Logic.
These PIDs can be found in the window Processes of the Windows Task Manager; for this purpose activate the column PID in the menu Select view/columns.
4. If other software uses these ports, reconfigure this software. You can see the ports that zenon and zenon Logic use in the Port assignment by zenon and zenon Logic table. Here you can also see if these ports can be amended in these programs.
System requirements
21
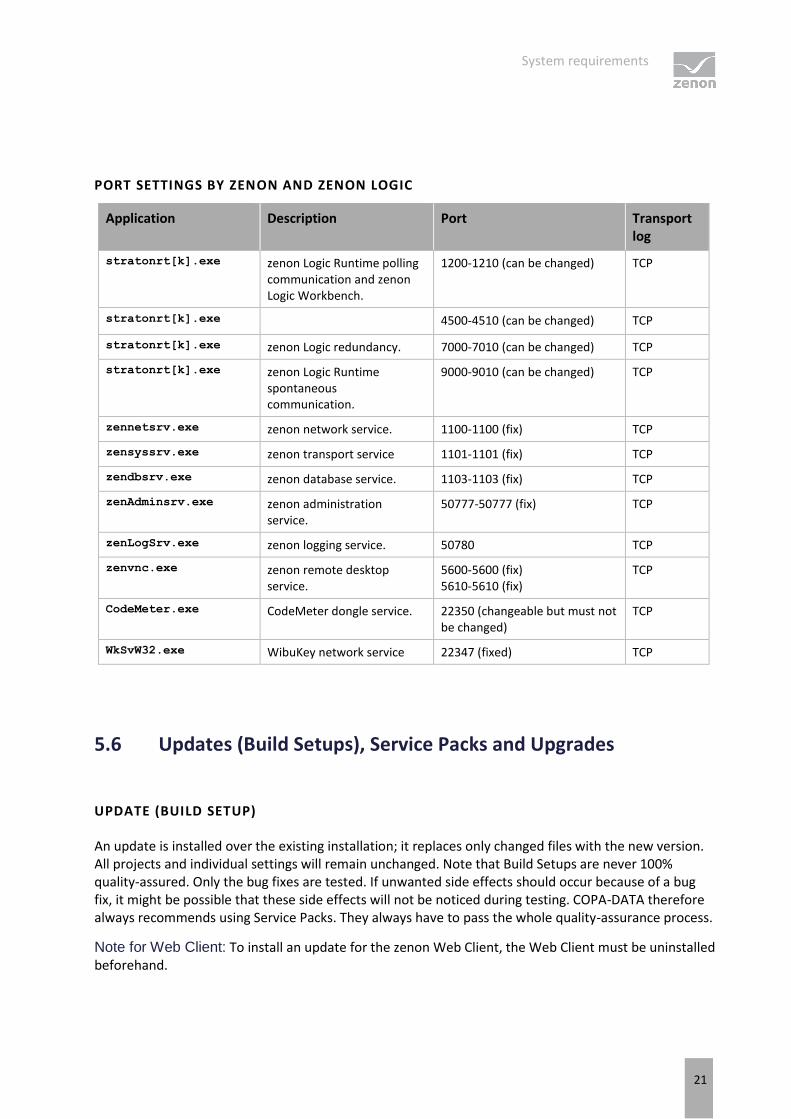
PORT SETTINGS BY ZENON AND ZENON LOGIC
Application Description Port Transport log
stratonrt[k].exe zenon Logic Runtime polling communication and zenon Logic Workbench.
1200-1210 (can be changed) TCP
stratonrt[k].exe 4500-4510 (can be changed) TCP
stratonrt[k].exe zenon Logic redundancy. 7000-7010 (can be changed) TCP
stratonrt[k].exe zenon Logic Runtime spontaneous communication.
9000-9010 (can be changed) TCP
zennetsrv.exe zenon network service. 1100-1100 (fix) TCP
zensyssrv.exe zenon transport service 1101-1101 (fix) TCP
zendbsrv.exe zenon database service. 1103-1103 (fix) TCP
zenAdminsrv.exe zenon administration service.
50777-50777 (fix) TCP
zenLogSrv.exe zenon logging service. 50780 TCP
zenvnc.exe zenon remote desktop service.
5600-5600 (fix) 5610-5610 (fix)
TCP
CodeMeter.exe CodeMeter dongle service. 22350 (changeable but must not be changed)
TCP
WkSvW32.exe WibuKey network service 22347 (fixed) TCP
5.6 Updates (Build Setups), Service Packs and Upgrades
UPDATE (BUILD SETUP)
An update is installed over the existing installation; it replaces only changed files with the new version. All projects and individual settings will remain unchanged. Note that Build Setups are never 100% quality-assured. Only the bug fixes are tested. If unwanted side effects should occur because of a bug fix, it might be possible that these side effects will not be noticed during testing. COPA-DATA therefore always recommends using Service Packs. They always have to pass the whole quality-assurance process.
Note for Web Client: To install an update for the zenon Web Client, the Web Client must be uninstalled beforehand.

System requirements
22
SERVICE PACKS
Service Packs always contain a complete version of zenon. The installation routine doesn´t replace some files. Instead, it removes the old version and installs the new one. If you install a Service Pack, all your projects and individual settings remain intact. Projects aren´t converted to the new version during installation. The respective project is converted when it´s being opened for the first time in the Editor. A dialog box notifies you about this procedure. The old version is automatically backed up.
A service pack always contains all bug fixes of previous builds.
UPGRADE
If you want to install a new version of zenon, start the installation routine. The new version is being installed parallel to the old one. All projects and individual settings will remain unchanged. Projects aren´t converted to the new version during installation. The respective project is converted when it´s being opened for the first time in the Editor. A dialog box notifies you about this procedure. The old version is automatically backed up. If you want to use only the most up-to-date version, use the Windows control panel software deinstallation routine to remove the old version.
Attention
If an upgrade involves changing the SQL server (for example, an update from zenon 7.00 to zenon 7.10 or higher), you must back up all projects or the workspace before the installation. This backup is read back after the installation. For details see also section Multi-user projects/Update with change of SQL servers.
If you want to use multiple versions of zenon simultaneously, you have to manage them using the Startup Tool. You can start only one version at a time. You can select which version you want to run using the Startup Tool that automatically adjusts all necessary settings. You can find details in chapter Startup Tool.
Information
New versions (Service Pack, Upgrade) always bring about structural changes. Projects and settings remain untouched during installation. If you open the Editor for the first time, projects are converted to the new version. Simultaneously, an automatic backup of the old version is created.
Converted projects cannot be edited in legacy versions. From version 6.2 on, the Editor is able to create projects for different Runtime versions.
Important tips for converting projects can be found in the revision text. This is provided
with the Service Pack/Update on the installation medium under Information. It is also available online.
MULTI-USER PROJECTS
To ensure a change to a new zenon version in multi-user projects without data loss:

System requirements
23
1. Check in all checked out elements on all Clients -> Accept changes. Nothing must be checked out. This is true for all projects.
2. Install the new zenon version on the Server.
3. Convert all Server projects to the new version: For this load all projects in the Editor on the Server computer.
4. Install the new zenon version on the Client computers.
5. Load projects on the Clients and check them out again.
UPDATE WITH CHANGE OF THE SQL SERVER
If an upgrade involves changing the SQL server (e.g. update from zenon 6.51 to zenon 7.20), additional steps are needed. These steps are carried out:
after all projects are checked in
before the new version is installed
Procedure when changing the SQL Server:
1. check in all checked out elements on all Clients -> Accept changes.
2. at the multi-user Server open the Editor in the starting version
3. create backups of all projects which you want to edit or open with the new version
either as single project backups
or as backup of the complete workspace
4. install the new version on the Server
5. convert all Server projects to the new version by loading the project backups which you have created before once in the Editor
6. install the update on every Client
7. transfer the projects from the multi-user Server to the Clients (regard the new name of the SQL instance)
8. the projects are converted, synchronized and ready for action
Attention: Make sure that the settings of the firewall allows the data traffic between the multi-user Server and the Clients.
5.7 Exceptions for anti-virus
However zenon needs a range of services and operations that could categorize anti-virus programs as potentially dangerous.

System requirements
24
Examples of this:
Communication with CodeMeter --> USB dongle
Loading VBA or VSTA code
Embedding ActiveX elements in screens
Frequent file access, for example for archiving, CEL, AML...
Note: There are compatibility problems with Ahnlabs V3 virus scanner. If zenon refuses to start with an error message, put V3 into game mode or uninstall V3.
5.8 firewall setup
zenon uses a number of ports. Any firewall that is present must allow communication via these ports. These must be enabled in the firewall if applicable.
PORTS USED
For communication within zenon, only TCP ports are used; no UDP ports are used. zenon requires the following ports in a network:
Service File Goal TCP-port
Network service zenNetSrv.exe Runtime communication. 1100
Transport service zenSysSrv.exe Data transfer by means of Remote Transport (Editor).
1101
zenon Web Server zenWebSrv.exe On-site logging machine between web client and Runtime
1102
Port numbers can be amended individually by means of the Listening ports tab in the Startup Tool. Note in this case that all devices affected must be amended.
furthermore, zenon services use a range of ports:

Runtime for Windows CE
25
Application Standard port
Administration Service 50777
Analyzer Connector Service 50778
Analyzer License Service 50779
DB Service 1103
Logging Service 50780
Network Service 1100
SNMP Trap Service 50782
Transport Service 1101
WEB Service Classic 1102
WEB Service Tunneling 8080
Note: zenon drivers that communicate by means of Ethernet use TCP and thus need authorizations in the firewall in this case, regardless of the port used.
6. Runtime for Windows CE
The Runtime installation for Windows CE consists of the following files:

Runtime for Windows CE
26
File name Description
zenonrCE.exe The Runtime application
Cd_tooCE.dll Necessary for the Runtime
ZennetsrvCE.dll The control system netservice for Windows CE. Necessary for network projects.
SysSrvCE.exe Transport service
LogCliLibCE.dll The logserver client
zenon6.ini Text file with settings for the Runtime like e.g. start project, language of the Runtime, etc.
UpdateCE.exe Application, necessary for the CE Update tool.
RgermaCE.dll German language file
RengliCE.dll English language file
RfrancCE.dll French language file
RitaliCE.dll Italian language file
RrussiCE.dll Russian language file
RspaniCE.dll Spanish language file
Install the Runtime to the CE device with the entry CE Runtime Update-Programme (under menu Option).
Info
The following is true for a connection to Windows CE 6.0 with CX1000, Profibus or SYCONuni: Make sure that the file CDMemDrv.dll has been transferred to the device. CDMemDrv.dll is a Windows CE device driver. The DLL is available for x86 and for ARMV4I.
Additionally there are a number of other drivers for hardware communication. If the processor type of the CE device is recognised by the editor, the Remote Transport automatically transports the drivers used in the project to the CE device. The manner or The number of transferred files is displayed in the Output Window of the Editor.
These files always have to be compatible with the according CE version and with the according processor type. Mixing files from different CE versions or even service packs can lead to failures and unwanted side effects, and is thus is not permitted.
Info
When starting zenonrce.exe, the file syssrvce.exe is also executed. Thus it is guaranteed that a TCP connection can also be established. Long delays are avoided and only one file is necessary for the autostart functionality.
Runtime for Windows CE
27
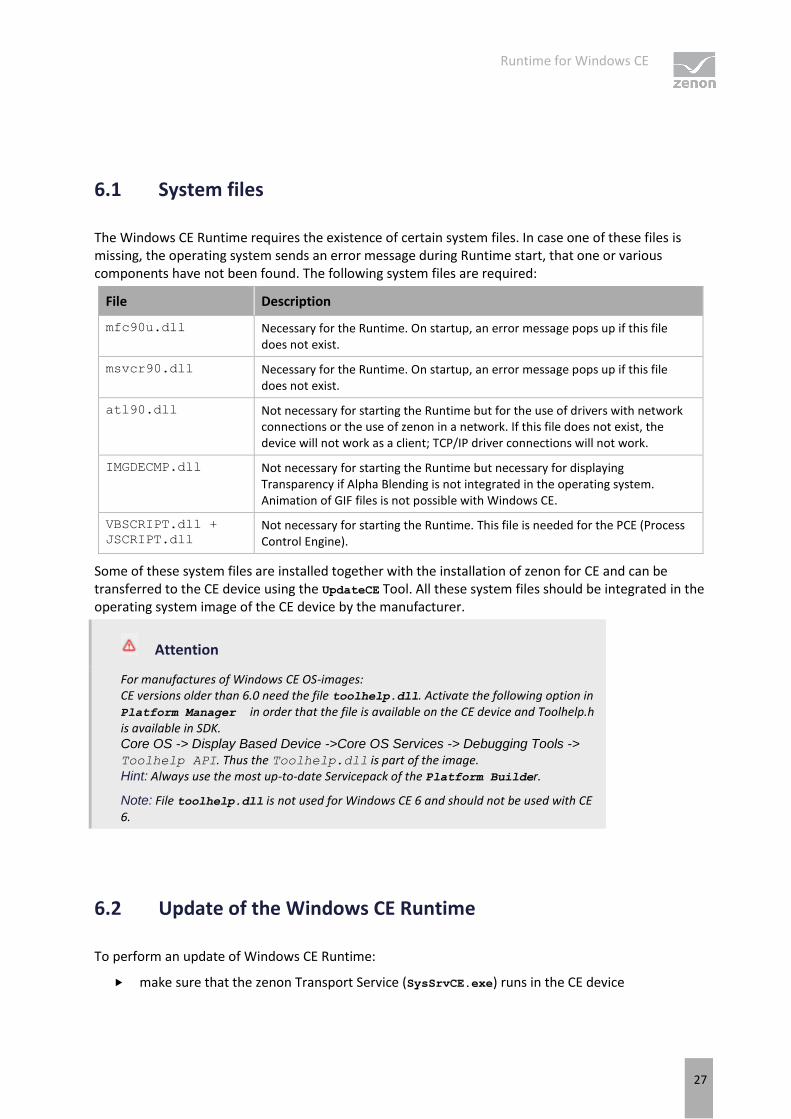
6.1 System files
The Windows CE Runtime requires the existence of certain system files. In case one of these files is missing, the operating system sends an error message during Runtime start, that one or various components have not been found. The following system files are required:
File Description
mfc90u.dll Necessary for the Runtime. On startup, an error message pops up if this file does not exist.
msvcr90.dll Necessary for the Runtime. On startup, an error message pops up if this file does not exist.
atl90.dll Not necessary for starting the Runtime but for the use of drivers with network connections or the use of zenon in a network. If this file does not exist, the device will not work as a client; TCP/IP driver connections will not work.
IMGDECMP.dll Not necessary for starting the Runtime but necessary for displaying Transparency if Alpha Blending is not integrated in the operating system. Animation of GIF files is not possible with Windows CE.
VBSCRIPT.dll +
JSCRIPT.dll Not necessary for starting the Runtime. This file is needed for the PCE (Process Control Engine).
Some of these system files are installed together with the installation of zenon for CE and can be transferred to the CE device using the UpdateCE Tool. All these system files should be integrated in the operating system image of the CE device by the manufacturer.
Attention
For manufactures of Windows CE OS-images: CE versions older than 6.0 need the file toolhelp.dll. Activate the following option in Platform Manager in order that the file is available on the CE device and Toolhelp.h is available in SDK. Core OS -> Display Based Device ->Core OS Services -> Debugging Tools -> Toolhelp API. Thus the Toolhelp.dll is part of the image. Hint: Always use the most up-to-date Servicepack of the Platform Builder.
Note: File toolhelp.dll is not used for Windows CE 6 and should not be used with CE 6.
6.2 Update of the Windows CE Runtime
To perform an update of Windows CE Runtime:
make sure that the zenon Transport Service (SysSrvCE.exe) runs in the CE device

Runtime for Windows CE
28
make sure that you do not have established a remote connection via the zenon Editor to the device
In the zenon Menu, select Options and then Update Windows CE Runtime.
The dialog for transfer of Runtime files opens
configure the link
define the data you want to transfer
choose the appropriate version
start the update
Note: If you are transferring/installing Runtime for the first time, note the information in the Manual installation and Runtime update (on page 35) chapter. (on page 35)
CONFIGURE CONNECTION
You can configure the connections to the Windows CE device in the tab Connection.

Runtime for Windows CE
29
Parameters Description
Serial Settings for serial connection with Windows CE device, you have to select a port.
TCP/IP Settings for TCP/IP-connection to the Windows CE device.
Adress IP address.
Name Computer name
Syssrvce.exe starts with these settings Settings for starting syssrvce.exe.
Serial Active:: serial connection selected, port must be selected.
TCP/IP Active: TCP/IP-connection selected.
Connection with MS ActiveSync Settings for connection via MS ActiveSync
Use MS ActiveSync for initial transport of
syssrvce.exe Active: syssrvce.exe is transferred during the first transport via MS ActiveSync.
Destination folder Target folder.
Help Opens online-help
Save Saves all changes.
Exit Closes the update CE-tool and reminds you before to save unsaved changes.
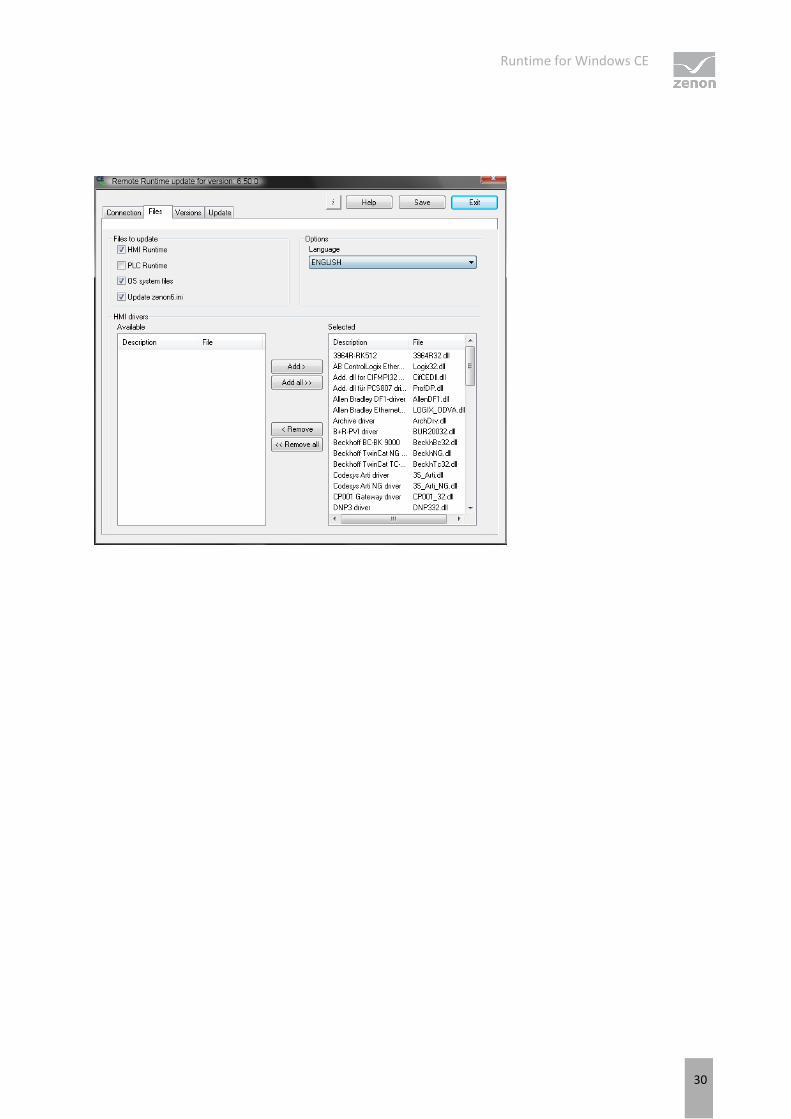
DEFINE FILES YOU WANT TO TRANSFER
Runtime for Windows CE
30

Runtime for Windows CE
31
Parameters Description
Files to update Files to be transferred.
HMI Runtime Active: Transfers zenon files to the target device.
Default: active
PLC Runtime Active: Transfers zenon Logic files to the target device.
Default: inactive
OS system files Active: Transfers necessary files for the OS.
Default: active
Update zenon6.ini Transfers zenon6.ini to the target device. This way, the license information of the target device is also changed.
Options
Language Desired target system language.
Default: English
HMI drivers Selection of HMI drivers for transfer.
Available List of available dirves.
Selected List of selected drivers.
Add Adds chosen drivers to the list of selected drivers.
Add all Adds all drivers to the list of selected drivers.
Remove Removes chosen drivers from the list of selected drivers.
Remove all Removes all drivers from the list of selected drivers.
Help Opens online-help
Save Saves all changes.
Exit Closes the update CE-tool and reminds you before to save unsaved changes.
SELECT VERSION
Select the correct version in the tab Versions if it wasn´t automatically recognized.

Runtime for Windows CE
32

Runtime for Windows CE
33
Parameters Description
WinCE version Version of the target device Windows CE OS. Click the button to open a drop-down list for selection.
Processor type Processor of the device.
Source path Path to the folder that contains the files. Click the button ... and a dialog opens to select a folder.
New Inserts a new, empty entry in the list.
Delete Deletes the selected entry from the list
Test Verifies settings.
Help Opens online-help
Save Saves all changes.
Exit Closes the update CE-tool and reminds you before to save unsaved changes.
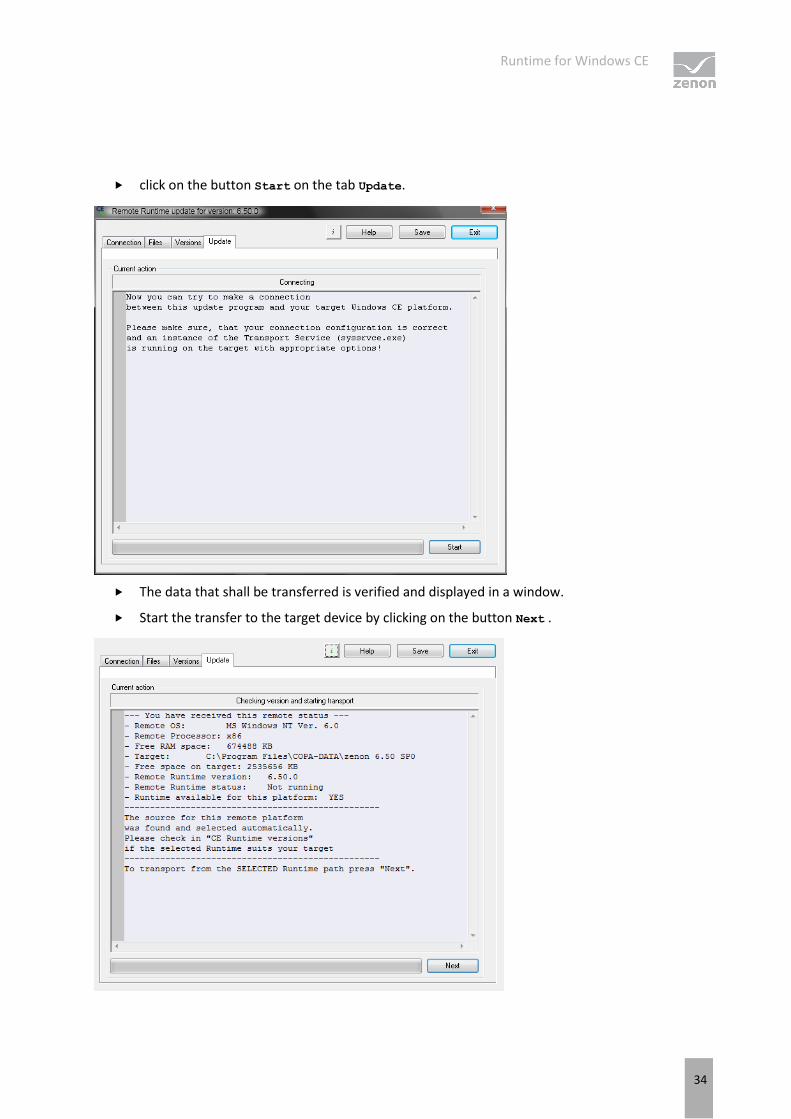
START UPDATE
To establish a connection:
Runtime for Windows CE
34
click on the button Start on the tab Update.
The data that shall be transferred is verified and displayed in a window.
Start the transfer to the target device by clicking on the button Next .
Runtime for Windows CE
35
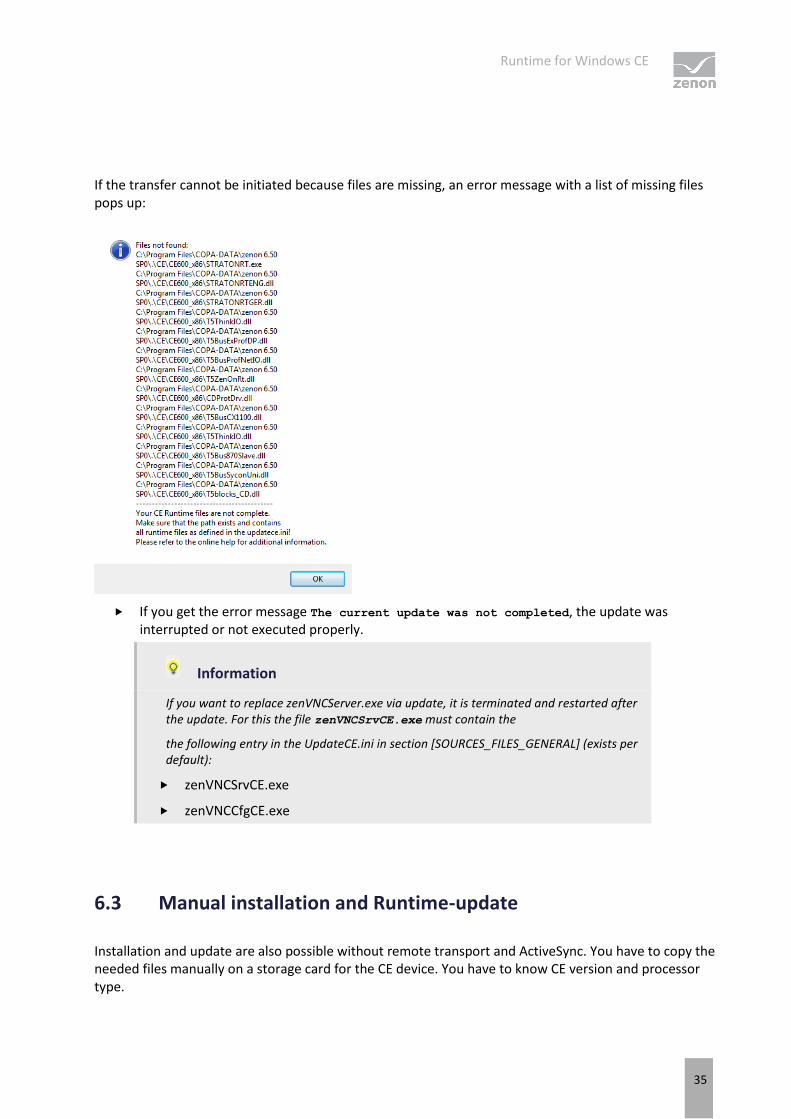
If the transfer cannot be initiated because files are missing, an error message with a list of missing files pops up:
If you get the error message The current update was not completed, the update was interrupted or not executed properly.
Information
If you want to replace zenVNCServer.exe via update, it is terminated and restarted after the update. For this the file zenVNCSrvCE.exe must contain the
the following entry in the UpdateCE.ini in section [SOURCES_FILES_GENERAL] (exists per default):
zenVNCSrvCE.exe
zenVNCCfgCE.exe
6.3 Manual installation and Runtime-update
Installation and update are also possible without remote transport and ActiveSync. You have to copy the needed files manually on a storage card for the CE device. You have to know CE version and processor type.

Supported protocols
36
It is mandatory to copy the following files from the according folder for the correct platform to a storage card for the CE device:
zenonRCE.exe (Runtime)
LogCliLibCE.dll (Diagnosis DLL)
zenon6.ini (Configuration file)
Cd_tooCE.dll (Help DLL)
ZenNetSrvCE.dll (Network)
CDHelper.dll (Help DLL)
One of the following language DLLs: RChineCE.dll, RCzechCE.dll, REngliCE.dll, RFrancCE.dll, RGermaCE.dll, RItaliCE.dll, RRussiCE.dll, RSpaniCE.dll (the selected language is stipulated in the zenon6.ini file.)
syssrvce.exe (Transport service and diagnosis server)
atl90.dll (System file, possibly part of the operating system)
mfc90u.dll (System file, possibly part of the operating system)
msvcr90.dll (System file, possibly part of the operating system)
Further files, for example the driver or the remote desktop software (zenVNCCfgCE.exe and zenVNCSrvCE.exe), are optional.
7. Supported protocols
Runtime communicates with all possible controllers using drivers. The drivers support a number of protocols.
AVAILABLE DRIVERS:
3964R-RK512 driver (Win, CE)
Allen Bradley DF1-driver (Win, CE)
Allen-Bradley ODVA driver (Win, CE)
Applicom driver (Win)
Applicom IO configuration (Win)
Archive driver (RAW format) (Win, CE)
ARCNET - Driver for ABB (Win)
AS-interface (Win)
Bachmann M1 driver (Win)

Supported protocols
37
Bacnet and DDC4000 driver (Win)
BACnet driver Next Generation (Win, CE)
Beckhoff BC-BK 9000 (Win, CE)
Beckhoff TwinCat ADS driver (Win)
Beckhoff TwinCat NG driver (Win, CE)
Beckhoff TwinCat TC-ADS driver (Win, CE)
Biffi DCM (Win)
BR TCP-IP driver (Win)
BR Transponder Reader 4102/4150 (Win, CE)
BR-PVI based driver (Win, CE)
BR-PVI based driver (replaced) (Win, CE)
Brodersen IOTOOLS (Win)
Buderus32 driver (Win)
Codesys Arti NG SoftPLC driver (Win, CE)
Codesys Arti SoftPLC driver (Win, CE)
Codesys SoftPLC driver (Win)
CP001 Gateway driver (Win, CE)
CTI driver (Win, CE)
Danfoss driver (Win)
DataTaker driver (Win, CE)
DDE Client driver (Win)
DMX 512 driver (Win)
DNP3 driver (Win, CE)
DNP3 Slave/Outstation (Win)
Driver for ABB 07KT94 (Win)
Driver for ESA PCI CIB (Win, CE)
Driver for Esser BMZ 8000 (Win, CE)
Driver for IBH Soft PLC (Win, CE)
Driver for internal variables (Win, CE)
Driver for Mathematics variable (Win, CE)
Driver for Otis controller (Win, CE)
Driver for SE-Elektronic (Win)
Supported protocols
38
Driver for simulator variables (Win, CE)
Driver for Slot PCL SPCx00 (Win)
Driver for system variables (Win, CE)
Driver for the buttons /Ketop (Win, CE)
Driver for VIPA CE touchpanel (Win, CE)
Drv for BCI hand-held scanner (Win)
Eldatic driver (Win)
Elrest CAN Network driver (Win)
Energy analysis device UPM 3000 (Win)
European Installation Bus (Win)
Festo EasyIP Multiprog driver (Win)
Festo Serial-CI driver, FST (Win)
File driver (Win)
FMS with PC card from Siemens (Win)
Hekatron driver (Win)
Hilscher CIF driver (Win)
Hilscher CIF Profibus (Win, CE)
Hilscher MPI driver (Win, CE)
Hilscher SYCON CifX (Win)
Hilscher SYCON configuration (Win, CE)
Hilscher SYCON configuration (Win, CE)
Hitachi driver (Win, CE)
HMI adapter driver (Win, CE)
HMS configuration (Win)
Hydrometer Driver (Win)
i-LON 100 driver (Win)
Idec driver (Win)
Ident System driver (Win, CE)
IEC 60870 - 5 - 103 Driver (Win)
IEC 60870-5-101_104 driver (Win, CE)
IEC 61400-25-4 Annex C (Win, CE)
IEC 61499 driver (Win)

Supported protocols
39
IEC 61850 Client (Master) (Win, CE)
IEC 61850 driver (Win, CE)
IEC 61850 Server (Slave) (Win, CE)
IEC-62056-21 Driver (Win)
IEC60870-5-101/104 Slave (Win, CE)
Interbus S driver (Win)
Interbus-S (Win)
Internal driver with time stamp (Win, CE)
Jetter Treiber (Win)
K-Bus driver for CX1000 (Win, CE)
Kemro User ID Driver (Win, CE)
Kieback + Peter driver (Win)
KOYO Sequence driver (Win, CE)
LogiCAD driver (Win)
LON driver (Win)
LS Industrial Systems-XGT (Win)
Matsushita TCP-IP driver (Win)
Mininet-Master driver (Win, CE)
Mitsubishi - Melsec A-Q driver (Win, CE)
Mitsubishi - Melsec FX driver (Win, CE)
Modbus Energy driver (Win, CE)
MODBUS Master protocol (Win, CE)
Modbus RTU and Open Modbus TCP (Win, CE)
MODBUS Slave protocol (Win, CE)
Modicon TSX Micro driver (Win, CE)
Moeller Electric PSUNI driver (Win, CE)
OMRON driver (Win, CE)
Omron FINS driver (Win, CE)
OPC Client V2-0 driver (Win, CE)
OPC UA Client driver (Win, CE)
OSAI TCP/IP driver (Win, CE)
Panasonic serial driver (Win)

Supported protocols
40
Passive Modbus RTU driver (Win)
PC Adapter - Vipa Green Cable (Win, CE)
PCS807 Profibus DP driver (Win, CE)
PCS812 S7 connection (Win, CE)
PDNet PCI - driver (Win)
PICnet driver (Win, CE)
PILZ-PSS driver (Win, CE)
Profibus DP Master driver (Win)
ProfiNet IO RT (Win, CE)
Reis Robotics driver (Win)
RTK9000 driver (Win)
S5 H1 driver (Win)
S5 TCP-IP driver (Win)
S7 driver for S7-200 (Win, CE)
S7 driver Softnet based (Win)
S7 MPI for Siemens CE terminals (Win, CE)
S7 TCP-IP driver (Win, CE)
S7_MPIISA driver (Win)
Saia Directly driver (Win, CE)
SAIA2ND32 driver (Win)
SaNORS - Asfinag SOS-telephones (Win)
Schiele S400 driver (Win, CE)
Schiele S800 driver (Win, CE)
Siclimat X Decos (Win)
Siemens S5 PD driver (Win, CE)
Siemens Sigmasys driver (Win)
SIGMATEK driver (Win)
Sigmatek Lasal Driver (Win, CE)
Simotion driver (Win)
SNMP Driver (Win)
SoftNet ProfibusDP (Win)
SQL Driver (Win)
Putting Runtime into operation
41
SST Driver (Win)
Standard M-Bus driver (Win, CE)
straton driver (Win, CE)
straton NG driver (Win, CE)
straton to zenon RT connection (Win, CE)
Swarco Futurit (Win)
System 2000 driver (Win)
System 2000 driver with logging (Win)
Telco200 driver (Win)
Teleperm driver (Win)
ThinkIO/IOSystem758 (Win, CE)
TI 505 - 545 driver (Win)
Trend Driver (Win)
Trend NG driver (Win)
VDMA-XML driver (Win, CE)
VMEBUS driver (Win)
Win32 Shared memory (Win)
WINAC driver (Win)
Write variable values in SQL (Win)
8. Putting Runtime into operation
The procedure for putting Runtime into operation for the first time depends on whether the device you are operating is a turn-key device with Runtime installed or a device on which Runtime must be installed. If Runtime is already installed on the device, only the desired project needs to be copied to the Runtime device.
To do this:
Save your project files on an external data medium.
Use Drag&Drop or Copy&Paste to transfer these to your Runtime device.
or
Get the project from the server on the Runtime device.
Create a Client using the network topology.

Putting Runtime into operation
42
Note: This is also possible by means of remote transport.
If Runtime is not yet installed on the device, it must first be installed. You can read how this works in the zenon standard installation (on page 42) chapter.
A license is required after installation in order to put it into operation. The license information is on a license form, which is enclosed with the device or the installation medium.
Note: The hard drive of the device you are operating may stop working after many years of use in a harsh industrial environment. To avoid loss of data, it may be a good idea to ensure that there is a redundant environment, such as working with both a Server and a Standby Server.
8.1 zenon Standard installation
zenon will automatically start its installation routine and guide you through the whole installation process when the zenon installation medium is connected. Alternatively, it is possible to start the installation by executing start.exe in the root directory of your zenon installation medium.
Putting Runtime into operation
43
Attention
The computer is automatically restarted during installation if necessary. Close all other programs before installation.
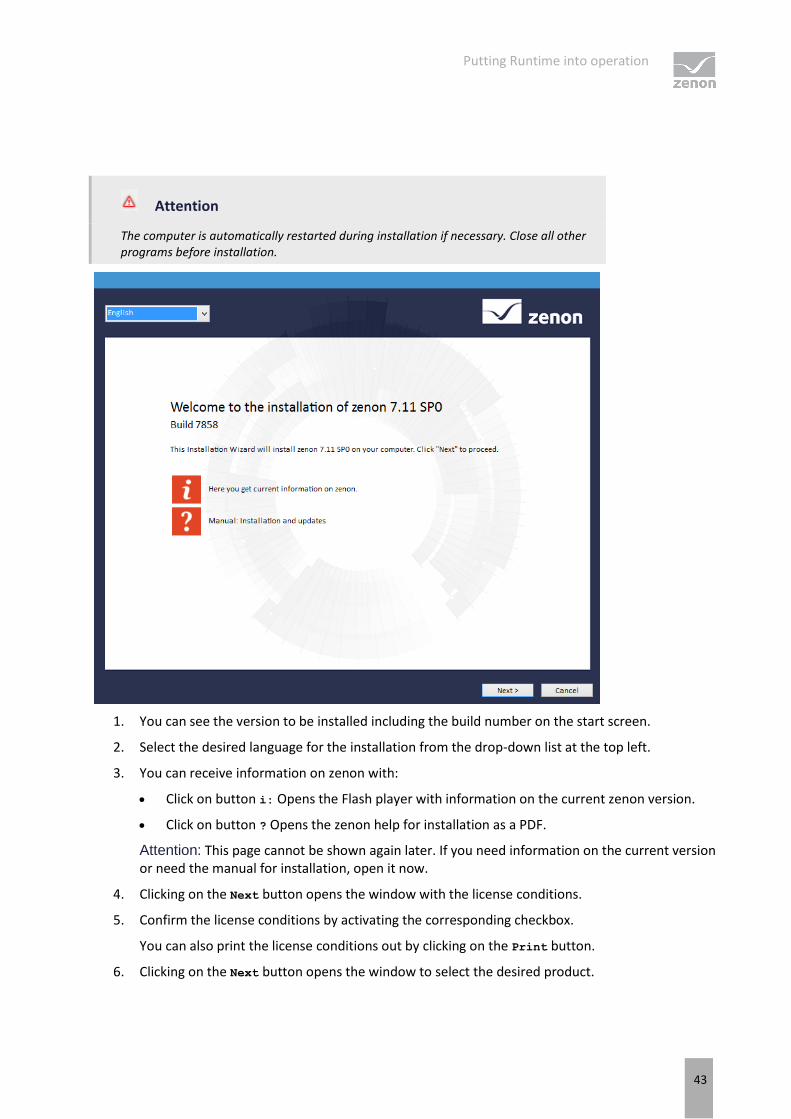
1. You can see the version to be installed including the build number on the start screen.
2. Select the desired language for the installation from the drop-down list at the top left.
3. You can receive information on zenon with:
Click on button i: Opens the Flash player with information on the current zenon version.
Click on button ? Opens the zenon help for installation as a PDF.
Attention: This page cannot be shown again later. If you need information on the current version or need the manual for installation, open it now.
4. Clicking on the Next button opens the window with the license conditions.
5. Confirm the license conditions by activating the corresponding checkbox.
You can also print the license conditions out by clicking on the Print button.
6. Clicking on the Next button opens the window to select the desired product.
Putting Runtime into operation
44
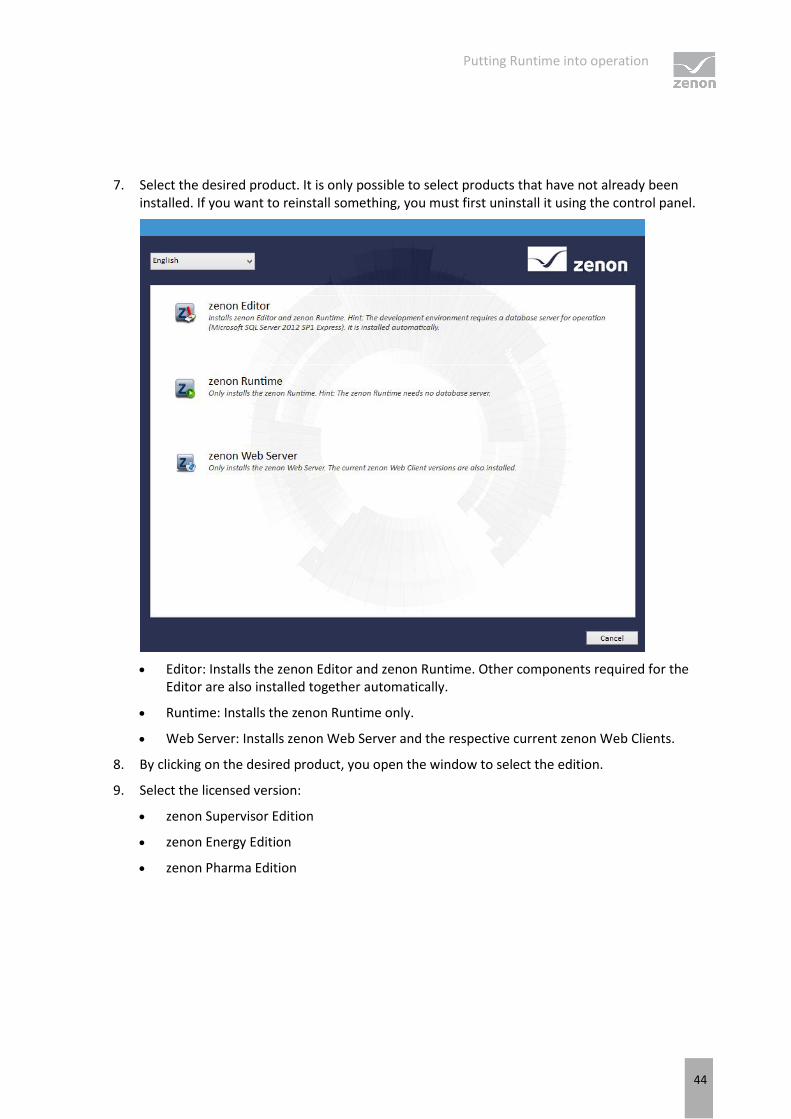
7. Select the desired product. It is only possible to select products that have not already been installed. If you want to reinstall something, you must first uninstall it using the control panel.
Editor: Installs the zenon Editor and zenon Runtime. Other components required for the Editor are also installed together automatically.
Runtime: Installs the zenon Runtime only.
Web Server: Installs zenon Web Server and the respective current zenon Web Clients.
8. By clicking on the desired product, you open the window to select the edition.
9. Select the licensed version:
zenon Supervisor Edition
zenon Energy Edition
zenon Pharma Edition

Putting Runtime into operation
45
zenon Operator Edition
10. Click on the desired edition to open the window to select the type of installation:
Install now: Starts the installation of the selected edition. The computer may be restarted automatically during installation. Follow the instructions of the wizard
User defined: Opens other windows for individual installation. You can enter an existing serial number here and change the installation path.

Putting Runtime into operation
46
USER-DEFINED INSTALLATION
1. If you select user-defined during installation, the window to enter the serial number is opened:
Select demo version if you do not have a license.
I you already have a license, enter the serial number and activation number.

Putting Runtime into operation
47
2. Clicking on the Next button opens the window to amend the installation folder.
If necessary, define you individual folder for the 32-bit version and the 64-bit version of the program.
Define the target folder for the project database. Note: This folder cannot be changed afterwards. The save location selected here must have sufficient memory space. All users need write authorization.
If you would also like to install the demo project, activate the corresponding checkbox. The demo project provides examples of possible usage scenarios in different industries. You can find details in the section Encryption zenon Demo-Project.
3. Click on the Install button. Installation of the selected edition is started. The computer may be restarted automatically during installation. Follow the instructions of the wizard

Putting Runtime into operation
48
8.1.1 Error treatment
CHECK BEFORE INSTALLATION:
The system requirements are checked before installation. If the requirements are not met, you are shown these on a separate page with notices on how to rectify this.
ERROR DURING INSTALLATION
You will receive an error message if there are errors during installation.
If you need help from the Technical Consulting department of COPA-DATA:
1. If possible, create a screenshot of the error message
2. Navigate to the folder called %Temp%/SCADALOG.
3. Here you can find the log files of the installation.
4. Create a ZIP file with the content of the folder.
5. Forward the file and the screenshot to [email protected]
If you have already closed the error message window, you can find the log files with all the installation information for the SQL server in the following folder: C:\Program Files\Microsoft SQL Server\110\Setup Bootstrap\LOG
Hint: The file summary.txt provides information for troubleshooting.
Information
Firewalls: zenon automatically configures the firewall installed with Windows during installation. Firewalls from other providers must be properly configured by the user
FREQUENT SOURCES OF ERROR DURING INSTALLATION:
The virus scanner is active and blocks the installtion because the scanner thinks it´s a virus. Solution: Seperate the system from the network, disable the virus scanner, execute the installation again.
The firewall was not configured correctly. Solution: Seperate the system from the network, disable the firewall, execute the installation again.
Erroneous SQL-installation on the system. Solution: Create project backups; if possible, deinstall SQL server, rename the SQL folder, and restart installation.

Starting the Runtime
49
8.2 Uninstalling Runtime
To uninstall Runtime:
1. Open the Control Panel.
2. Click on Programs.
3. Click on Programs and Features.
4. Select the zenon 7.20 programs.
5. Click on Uninstall.
6. Follow the uninstall wizard.
9. Starting the Runtime
There are several possibilities for starting zenon Logic Runtime:
Using the Editor
by pressing key F5
via symbol Start Runtime in the tool barRuntime files
Via the Startup-Tool
via the Windows start menu
using Windows Autostart.
Via the zenStartupMgr (on page 52) service
DIENST ZENADMINSRV
The zenAdminSrv service must be started to start the Runtime. If the service is not available, you will receive an error message accordingly.
When starting via Windows Autostart, zenon attempts to start Runtime until the service is available or you end the error message by clicking on the Cancel button.
SIZE OF THE MAIN WINDOW
The size of the Runtime window when Runtime is started is configured for the local computer in the zenon Editor. Carry out the following steps for this configuration:
Starting the Runtime
50
1. Select the Workspace in the zenon Editor.
2. Click on the Local Runtime size property group.
3. Enter the values for Runtime window width [pixel].
4. Enter the values for Runtime window height [pixel].
FUNCTION "WINDOW TO FOREGROUND"
The Runtime can be moved behind other running programs with the help of function Window to the
background. With function Window to foreground it is moved to the foreground.
Information
At moving the Runtime to the foreground the Runtime window is defined as the topmost window. At this the alarm status line is covered. In order to get the alarm status line back to the foreground, you can:
activate the system keys (deactivate project settting Lock system keys) and get back the alarm status line via Alt+Tab to the foreground
activate the Windows task bar and click un window Status
move the Runtime back to the background
restart the Runtime
SET START PROJECT
If you have created a project, you can start this in different ways.
Note: It is a requirement that the project generated is first transferred to the target system if the configuration computer is not also the target system.
There are several possibilities for starting a project in Runtime:
Using the Editor:
1. Start the zenon Editor.
2. Select the project that you want to set as the start project.
3. Click on Set project as start project in the context menu
Via the Startup Tool:
1. Open the Startup Tool.
2. Click on Item-->Properties...
3. Select, in the RT project field, the project that you want to set as the start project.
Via Remote Transport:
Starting the Runtime
51
1. Activate the project in in the toolbar.
2. Select the desired project as the start project.
Via the network topology:
1. Add a computer.
2. Select this computer.
3. Select the desired project as the start project.
9.1 Set up Runtime autostart
To set up Runtime autostart, proceed as follows:
1. Select the zenonrt.32.exe application from the C:\Program Files (x86)\COPA-DATA\zenon 7.20 SP0 directory.
2. Create a local link for this.
3. Copy this into the Autostart folder from the start menu.
Runtime thus starts automatically the next time you log on.
9.2 Keyblock Runtime Start
Keyblock Runtime Start is a program with which zenon Runtime runs as a shell. In doing so, zenon Runtime is started, but all Windows system tasks are blocked. Shortcuts such as Windows key or Ctrl+Alt+Del no longer have an effect. User can no longer access the operating system but only work on the zenon user interface.
The precondition for this is that the project properties are set Runtime title to No title (full screen). Then zenon runs in full screen mode and the Runtime cannot be minimized.
Note also the information provided in the Protect Runtime files chapter.
License information
Part of the standard license of the Editor and Runtime.
Starting Runtime as a service
52
9.3 Configure start delay
When using dongles for licensing, the Codemeter service must be ready before zenon Runtime starts. To amend the start time, you can configure a start delay for zenon Runtime.
ZENON RUNTIME START DELAY
Stipulate a start delay of at least 30 seconds in the zenon6.ini file for zenon.
To do this:
1. Open the zenon6.ini file with a text editor.
2. Navigate to the [DEFAULT] area
3. Enter the desired delay for STARTDELAY= .
Example:
[DEFAULT]
STARTDELAY= 30000
Information
You can find zenon6.ini in the following path:
Windows 7/8: %ProgramData%\COPA-DATA\System\
10. Starting Runtime as a service
The zenon Runtime can automatically be started as a service by the zenStartupMgr service.
Attention: If Runtime is started using the zenStartupMgr, it can no longer be stopped or restarted by users.
To start Runtime as a service:
1. Register the file zenStartupMgr.exe as a service:
2. Configure the properties for sign-in.
3. Start, if necessary, Remote Transport (on page 56) with zenStartupMgr
4. Define the Runtime to be started in the Startup Tool (on page 55)
5. Configure a start delay (on page 52) for zenon Runtime if you are using a dongle license

Starting Runtime as a service
53
REGISTER SERVICE
To register zenStartupMgr.exe as a service:
1. Open the command line.
2. Go to the save location of the file zenStartupMgr.exe. (default with 32-bit OS: %ProgramFiles(x86)%\Common Files\COPA-DATA\zenStartupMgr
(default 64-bit OS: %ProgramFiles\Common Files\COPA-DATA\zenStartupMgr)
3. Register the file as a service with the zenStartupMgr.exe –service command. Note: The service, if it is already running, is first stopped and then registered. If zenStartupMgr is running, it is closed.
CONFIGURE SERVICE FOR THE USE OF MANY DRIVERS
Windows as an operating system limits the number of windows that can be created due to its fixed, reserved desktop memory, depending on the version and possible integration with the desktop.
Version/action Interactive Desktop Non-Interactive Desktop
Windows 7 32-Bit 12 MB 512 KB
Windows 7/Windows Server 2008 R2 64-bit 20 MB 768 KB
zenon drivers each need several windows. The number of drivers that can be used can be influenced using the Allow data exchange between service and desktop option in the properties of the service.
Inactive A maximum of 20 drivers can be started.
Active: As many drivers as there are in a Runtime started as a user process can be started.
To activate the Allow data exchange between service and desktop option:
1. Open the Windows Service Manager.
2. Open the properties of the zenStartupMgr service.
Starting Runtime as a service
54
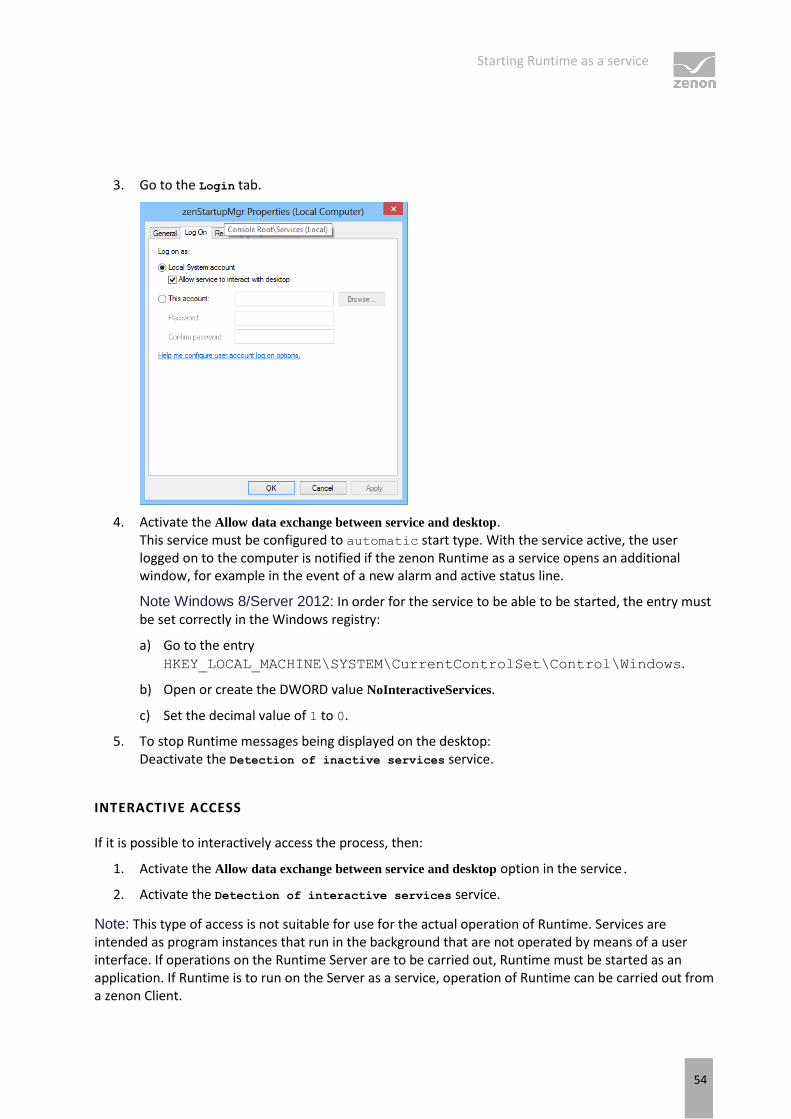
3. Go to the Login tab.
4. Activate the Allow data exchange between service and desktop. This service must be configured to automatic start type. With the service active, the user logged on to the computer is notified if the zenon Runtime as a service opens an additional window, for example in the event of a new alarm and active status line.
Note Windows 8/Server 2012: In order for the service to be able to be started, the entry must be set correctly in the Windows registry:
a) Go to the entry
HKEY_LOCAL_MACHINE\SYSTEM\CurrentControlSet\Control\Windows.
b) Open or create the DWORD value NoInteractiveServices.
c) Set the decimal value of 1 to 0.
5. To stop Runtime messages being displayed on the desktop: Deactivate the Detection of inactive services service.
INTERACTIVE ACCESS
If it is possible to interactively access the process, then:
1. Activate the Allow data exchange between service and desktop option in the service.
2. Activate the Detection of interactive services service.
Note: This type of access is not suitable for use for the actual operation of Runtime. Services are intended as program instances that run in the background that are not operated by means of a user interface. If operations on the Runtime Server are to be carried out, Runtime must be started as an application. If Runtime is to run on the Server as a service, operation of Runtime can be carried out from a zenon Client.

Starting Runtime as a service
55
LIMITATIONS TO INTERACTIVE ACCESS
If zenon Runtime is started as a service and this is nevertheless to have a graphic user interface (GUI), this is implemented by the operating system by means of the Secure Desktop (detection of interactive services) system service.
Access to the Runtime user interface via the Windows system service has been subject to several restrictions since the Vista/Server 2008 version for security reasons. Above all:
The interactive desktop is automatically ended after one minute of inactivity and the windows login screen is displayed.
Display of DirectX effects, such as glow or shadowing for elements is not possible.
Multi-monitor operation is not possible.
10.1 Configuration of zenon Logic Runtime
If zenon is running as a service, the user interface of the integrated zenon Logic Runtime is not available. To make changes to the configuration of zenon Logic Runtime, Runtime must be started normally.
There are different possibilities for configuration:
1. You can connect to the panel on which Runtime is to run via remote transport and enter the license for Runtime there.
2. Network configuration: Encryption via Remote Transport can also be configured.
3. See the zenon6.ini, General settings [DEFAULT] chapter.
10.2 Configuration in the Startup Tool
You can define how several programs are to be started by the service in the Startup Tool. To start an existing zenon Runtime as a service:
1. Open the zenon Startup Tool.
2. Click on Application.
3. Select Options.
4. The dialog with the settings is opened.

Starting Runtime as a service
56
5. Navigate to the Service Startup tab.
6. To define a Runtime, click on the New button
7. The dialog for selecting a program is opened.
8. Click on the ... button to open the file selection dialog
9. Go to the corresponding zenon folder
10. Select Zenrt32.exe.
11. Close the selection dialog and the Startup Tool.
10.3 Remote Transport
In its standard settings, zenon Remote Transport runs in the context of a logged-in user. In this configuration, it can neither start Runtime as a service nor reload or stop it.
Remote Transport must therefore be started with zenStartupMgr. To do this:
1. Create an entry for the start of zenSysSrv in Startup Tool -> Service startup.

Starting Runtime as a service
57
2. Place the entry before the entry for zenrt32.exe.
3. Deactivate zenSysSrv for logged-in users.
The Remote Transport can:
Transfer data to the server
Reload data
If Runtime runs as a service, it cannot be stopped or started by means of Remote Transport.
DEACTIVATE REMOTE TRANSPORT FOR LOGGED-IN USERS
If zenSysSrv is started with zenStartupMgr, it can no longer be started by logged-in users. To avoid this, remove it from the registry manually.
zenSysSrv up to Windows 8:
1. Open the Windows dialog to execute commands (Windows key + R).
2. Enter msconfig.
3. The system configuration dialog is opened.
4. Go to the Start tab.
5. Deactivate the automatic start of zenon by deactivating the checkbox in front of zenSysSrv.exe.
6. Click on Accept.
7. Close the dialog by clicking on OK.
8. Restart the computer
zenSysSrv from Windows 8:
1. Open the Task Manager (Crtl + Shift + Esc keys).
2. Go to the Autostart tab.
3. Deactivate the automatic start of zenon by deactivating the checkbox in front of zenSysSrv - Transport service.
4. Click on Deactivate.
5. Restart the computer
Attention: If a zenon version is re-registered via the Startup Tool, the entry is recreated and must be removed manually again.

Starting Runtime as a service
58
10.4 Procedure
If the zenStartupMrg service is started, then it starts all processes entered in the Startup Tool consecutively as child processes. If the service is ended, it ends all processes it has sent in reverse order.
RIGHTS
All processes started by zenStartupMrg run under the user under which the the service is started by the system. This is generally the local system account. Only resources that can access the local system account can be used. The following are thus generally not reachable:
Network drives
Network printers
Databases with the option Use Windows NT integrated security activated
If zenStartupMgr is started under a dedicated Windows user, no interaction with the desktop is possible. Warning: The password of a dedicated user can neither be changed nor expire. Otherwise the service will no longer start.
SECURE DESKTOP
Secure Desktop can be used to interactively access a process that has a user interface and is executed in a system context. The following must be the case for this:
In the zenStartupMgr service, the option Allow data exchange between service and desktop must be activated
The system service Detection of interactive services must be started
Note: This type of access is not suitable for use for the actual operation of Runtime. Services are intended as program instances that run in the background that are not operated by means of a user interface. If operations on the Runtime Server are to be carried out, Runtime must be started as an application. If Runtime is to run on the Server as a service, operation of Runtime can be carried out from a zenon Client.
Message boxes and modal dialogs are automatically suppressed if:
zenon Runtime is started via zenStartupMgr in the system context and
Secure Desktop is not displayed

Runtime as ActiveX control
59
Attention
Modal dialogs must never be called up via VBA or VSTA, because there is no possibility to close these again through user interaction.
11. Runtime as ActiveX control
For KUKA HMIs, there is an ActiveX control available that allows the complete Runtime to run in a control. Runtime can thus be inserted into another application as a sub-program. The control acts, with a few exceptions, in the same way as the zenon Web Client and can also run in a browser.
Name Control: zenRuntimeCtrl.ocx
Differences to zenon Web Server:
Can only run within a 32-bit zenon Runtime installation
Server and standalone is also possible, not just client
Also starts the driver
The license is read from zenon6.ini, so a zenon Runtime license is therefore required
The start project is read from zenon6.ini; OCX properties server, zenon Web Server and project do not exist
Network communication is carried out using zenNetSrv.exe, not via zenNetSrv.dll
12. Operating during Runtime
TYPES OF OPERATION
Runtime can be operated with a mouse as well as with a keyboard or touch screen. For mouse or touch operation, you can primarily use buttons, status buttons, switches and invisible buttons in your project. The possibility of mouse operation of a screen object is signalized with a change in the cross symbol of the cursor for a button on the computer, for example by the symbol
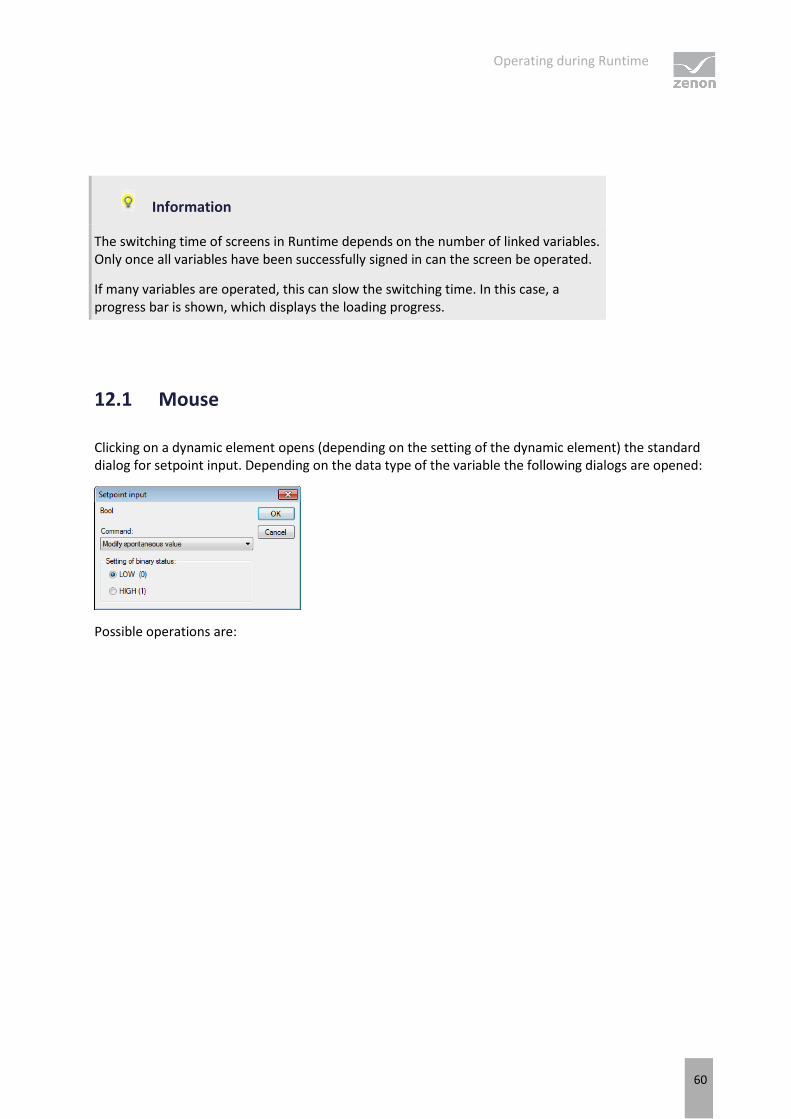
Operating during Runtime
60
Information
The switching time of screens in Runtime depends on the number of linked variables. Only once all variables have been successfully signed in can the screen be operated.
If many variables are operated, this can slow the switching time. In this case, a progress bar is shown, which displays the loading progress.
12.1 Mouse
Clicking on a dynamic element opens (depending on the setting of the dynamic element) the standard dialog for setpoint input. Depending on the data type of the variable the following dialogs are opened:
Possible operations are:
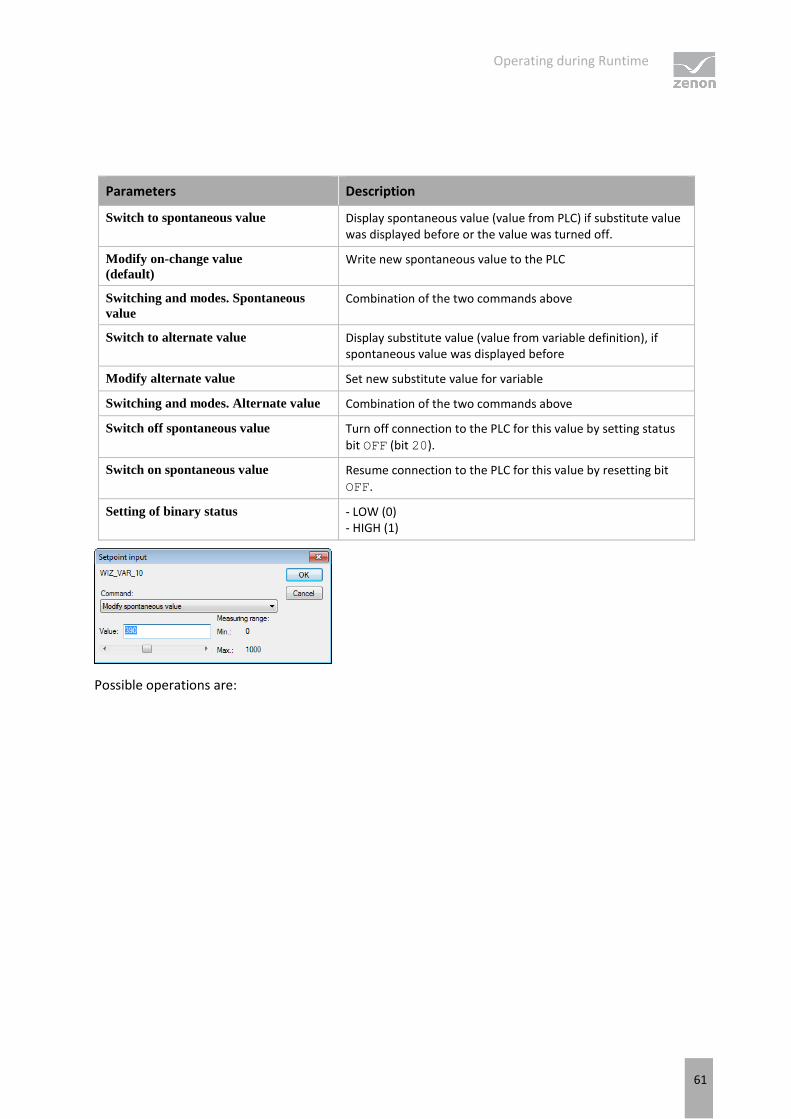
Operating during Runtime
61
Parameters Description
Switch to spontaneous value Display spontaneous value (value from PLC) if substitute value was displayed before or the value was turned off.
Modify on-change value (default)
Write new spontaneous value to the PLC
Switching and modes. Spontaneous
value Combination of the two commands above
Switch to alternate value Display substitute value (value from variable definition), if spontaneous value was displayed before
Modify alternate value Set new substitute value for variable
Switching and modes. Alternate value Combination of the two commands above
Switch off spontaneous value Turn off connection to the PLC for this value by setting status
bit OFF (bit 20).
Switch on spontaneous value Resume connection to the PLC for this value by resetting bit
OFF.
Setting of binary status - LOW (0) - HIGH (1)
Possible operations are:
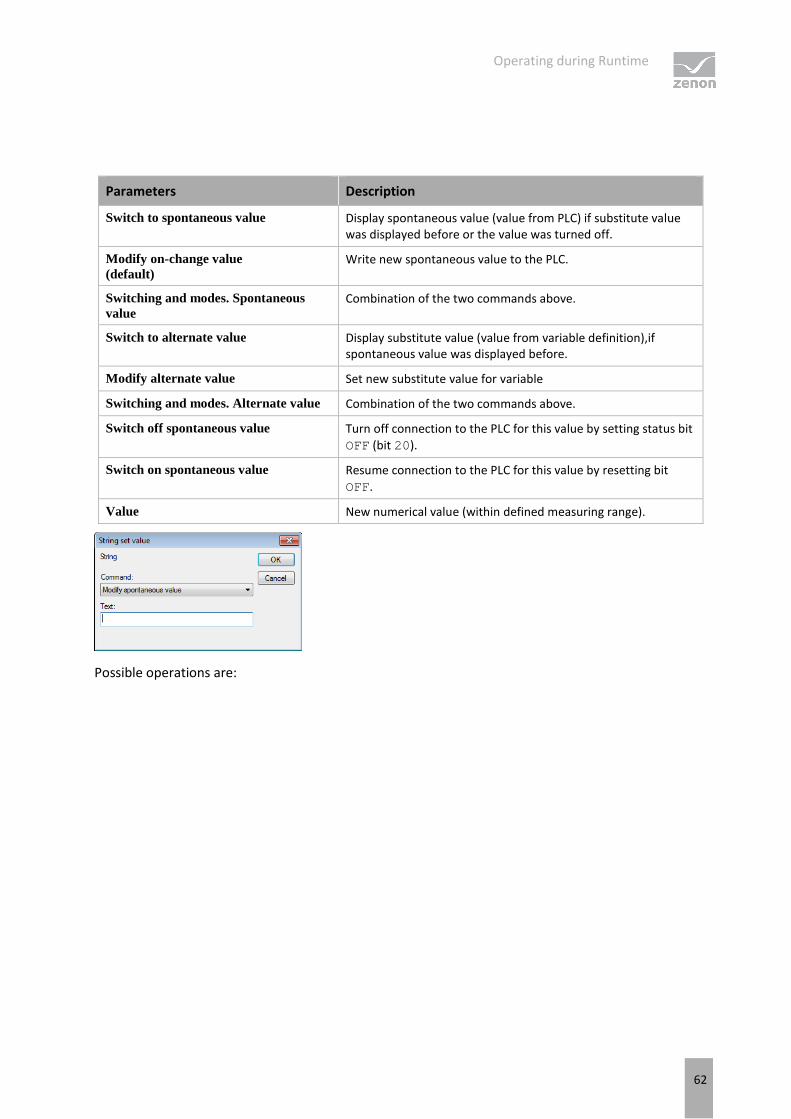
Operating during Runtime
62
Parameters Description
Switch to spontaneous value Display spontaneous value (value from PLC) if substitute value was displayed before or the value was turned off.
Modify on-change value (default)
Write new spontaneous value to the PLC.
Switching and modes. Spontaneous
value Combination of the two commands above.
Switch to alternate value Display substitute value (value from variable definition),if spontaneous value was displayed before.
Modify alternate value Set new substitute value for variable
Switching and modes. Alternate value Combination of the two commands above.
Switch off spontaneous value Turn off connection to the PLC for this value by setting status bit
OFF (bit 20).
Switch on spontaneous value Resume connection to the PLC for this value by resetting bit
OFF.
Value New numerical value (within defined measuring range).
Possible operations are:

Operating during Runtime
63
Parameters Description
Switch to spontaneous value Display spontaneous value (value from PLC) if substitute value was displayed before or the value was turned off.
Modify on-change value (default)
Write new spontaneous value to the PLC
Switching and modes. Spontaneous
value Combination of the two commands above
Switch to alternate value Display substitute value (value from variable definition), if spontaneous value was displayed before
Modify alternate value Set new substitute value for variable
Switching and modes. Alternate value Combination of the two commands above
Switch off spontaneous value Turn off connection to the PLC for this value by setting status
bit OFF (bit 20).
Switch on spontaneous value Resume connection to the PLC for this value by resetting bit
OFF.
Text New text
LASSO
Dynamic elements which are linked with a variable or function can be pre-selected with the lasso in the Runtime and therefore by used for VBA events.
SELECTION PER LASSO
To select elements with the lasso in the Runtime, you must:
activate property Runtime settings/Runtime lasso in the project settings
activate property Runtime/selectable with lasso in the property of the dynamic element
In the Runtime several methods for selecting elements are available:
Select elements: Left-click on a free area and move lasso over the screen elements while holding the mouse button pressed.
Extend selecton: Ctrl+mouse click on an element in order to select/deselect it in addition to the other elements already selected
Add elements: While spanning the lasso press and hold Ctrl in order to add elements to the existing selection
Cancel selection: Spanning a lasso which does not contain elements.

Operating during Runtime
64
12.2 Touch
With zenon, touch screens can also be operated with Multi-Touch gestures. You can obtain an example project from your zenon consultant.
The following is recommended for Multi-Touch:
Use of a DirectX 11-compatible graphics card
Use DirectX hardware in the project settings for the graphics quality.
Note: With Windows 8 gestures, interaction can be configured in many areas via Multi-Touch via properties with no additional programing necessary.
12.2.1 Navigation with Multi-Touch in the worldview
Multi-Touch gestures for zooming and scrolling are suitable for navigation on touch panels in the worldview. For this a screen of type Worldview overview is not necessary. The navigation can be implemented with:
Windows 7 touch gestures (on page 65)
Windows 8 touch gestures (on page 66)
RULES
Move: If a screen in a container is not a worldview, it accepts the settings of the faceplate screen.
MOVING THE WORLDVIEW OR WORLDVIEW IN THE CONTAINER OF A FACEPLATE
Screen is bigger than the frame: Content of the screen is moved.
Screen is the same size or smaller than the frame: No reaction.
WORLDVIEW EMBEDDED IN FACEPLATE.
Screen is bigger than the frame: Content of screen is moved.
Screen is the same size or smaller than the frame: No reaction.

Operating during Runtime
65
MOVE THE FRAME OR BORDER WITH THE MOUSE IF THE SCREEN IS A WORLDVIEW AND THE SAME SIZE OR SMALLER THAN THE FRAME:
With the right mouse button: No reaction.
With the left mouse button: Frame is moved.
CHANGE WORLDVIEW SIZE
The size of the worldview cannot be changed. Exception: If the worldview is a faceplate, the size cannot be changed.
Click with right mouse button:
Screen is bigger than the frame: Contents are moved.
Screen is the same size or smaller than the frame: No reaction.
PROJECT CONVERSION
Values for Move horizontally and Move vertically when converting from an earlier version to zenon 7.20:
Screen is bigger than the frame: Move.
Screen is the same size or smaller than the frame: No reaction.
Navigation under Windows 7
To be able to use Multi-Touch gestures under Windows 7 to navigate in the worldview, you must:
activate them via property Multi-Touch for zoom and scroll
or implement them via VBA/VSTA
ZOOM AND SCROLL VIA PROPERTY MULTI-TOUCH FOR ZOOM AND SCROLL
To use Multi-Touch without VBA/VSTA:
1. In the project properties in the Interaction node for the Recognition property, activate Windows 7.
2. Deactivate property Screen size from frame in node Frame at the properties of the screen
3. Activate property Multi-Touch for zoom and scroll in node Interaction at the properties of the screen
With this you can scroll and zoom in the screen with touch operation using Multi-Touch gestures. With this VBA/VSTA for zooming and scrolling is deactivated.

Operating during Runtime
66
ZOOM AND SCROLL VIA VBA/VSTA
To implement zooming and scrolling via VBA/VSTA Events, property Multi-Touch for zoom and scroll must not be active.
The following is available in the DynPicture:
Property
int ZoomLevel: Displays the current zoom level in the worldview (valid value only in the Runtime and for a worldview).
Style
SetZoomAndPos(float ZoomX, float ZoomY, int ZoomLevel, int CursorX, int CursorY, int PosX, int PosY, int PosMode):
ZoomX -> New zoom factor X direction; if not used, set to 0
ZoomY -> New zoom factor Y direction; if not used, set to 0
ZoomLevel -> Zoom level, if not used, set to -1
CursorX -> Cursorposition X
CursorY -> Cursorposition Y
PosX -> New position X (see PosMode)
PosY -> New position Y (see PosMode)
PosMode -> Coordinates in Pos
-1 = PosX, PosY are ignored
0 = center point , original coordinates
1 = center point, zoomed coordinates
2 = left top, original coordinates
3 = left top, zoomed coordinates
4 = zoomed coordinates of the cursor from the top left The position of the window is changed in such a way that after the zooming the mouse cursor is still over the position of the screen
Attention: ZoomX, ZoomY and ZoomLevel can never be used simultaneously. Either you enter a ZoomLevel or a zoom factor for x and y axis.
Navigation under Windows 8
To navigate in a worldview with Multi-Touch under Windows 8:
1. In the project properties in the Interaction node for the Recognition property, activate Windows 8.
Operating during Runtime
67
2. Deactivate, for the screen in the Frame group, the Screen size from frame property and define the screen size as larger than the frame.
3. navigate to group Interaction in the screen properties.
4. Configure the properties for Zoomen and Verschieben.
For the move gesture, you can define the direction - horizontal, vertical or both. To do this, use the Horizontal verschieben and Vertikal verschieben properties.
12.3 Keyboard operation
You can use the keyboard also for the complete navigation and operation in the Runtime. In doing so, the focus is first set to a frame; within the frame, you can navigate with the cursor keys and instigate an action with the Enter key. The following functions (on page 67) are used for control:
Set focus to frame
Take focus away from frame
Move focus
Activate input to the element with the focus
The order in which the elements are selected is defined via the allocation of index numbers (on page 72) to the elements of a screen. This definition of the navigation order also works with symbols.
The keyboard operation can also be carried out with freely allocated shortcuts such as Ctrl+M. The shortcuts can be assigned to each operation element at the property Key combination.
12.3.1 Functions
For engineering the keyboard operation use the following functions:
SET FOCUS TO FRAME
This function sets the focus to a defined frame when operating the keys in Runtime.
To configure the function:
1. Select, in the list of functions, in the Screens node, the Set focus to frame function
2. The dialog for selecting a screen is opened
3. select the frame you wish to assign
4. For multi-monitor projects, select the virtual monitor for opening the frame

Operating during Runtime
68
The frame with a focus is displayed with a frame in runtime. The line width and color of the frame are defined in the Graphical design/Screens node in project properties.
FRAME SELECTION DIALOG
In the frame selection dialog, frames can be selected for the execution of functions, from:
Current project
Subprojects
All projects in the workspace with the Keep project in memory option active

Operating during Runtime
69
Parameters Description
Project tree window Displays all projects in the workspace. Frames can be selected from the current project and from all projects with the Keep project in memory option active
Frames window Selection of a frame.
If several frames are selected, the frame at the top of the list is used to execute the function.
No selection Removes selection and closes dialog.
OK Applies settings and closes the dialog.
Cancel Discards all changes and closes the dialog.
Help Opens online help.
Set focus on frame with multiple frames called up
If a frame is displayed on a monitor several times, then the focus is switched in the reverse of the switching sequence each time the functions of the focus are executed. If, for example, with a frame that is called up several times, the screens Screen1, Screen2 and Screen3 are open and then the focus is set to this frame, the focus goes to the last screen opened, Screen3. When the Set focus to frame function is called up again, the focus is set to Screen2 etc.
MOVE FOCUS
This function set the focus on a particular element in runtime with keyboard operation and can therefore be used to navigate within a frame.
Operating during Runtime
70
Property Action
Direction Define the direction in which the focus should be moved. The following defined sequence applies in the editor in the context menu or under Edit/change focus
sequence...
on the element Definition of the element for the focus. Enter the object name of the element.
ACTIVATE INPUT TO THE ELEMENT WITH THE FOCUS
This function activates the element that is being focused on in the frame selected.
TAKE FOCUS AWAY FROM FRAME
This function takes the focus from the current frame in runtime. To continue operating the keyboard, the focus must be set to a frame again.
12.4 Block keyboard shortcuts
Windows keyboard shortcuts can be blocked for online operation. The block is configured in the Editor. It is also possible to block all system keys for Runtime.
LOCK WINDOWS SHORTCUTS
To block Windows keyboard shortcuts, activate the Lock system keys property in the Interaction area of the project properties.

Operating during Runtime
71
Locked are:
Key combination effect
Alt + Esc Switches to the next application.
Alt + Tab Switches between open applications.
Direction: forwards.
Alt + Shift + Tab Switches between open applications. Direction: backwards.
Ctrl + Tab Switches to the next window within the application. Can be assigned application-specifically.
Ctrl + Esc Calls up Start menu.
Alt + F4 Closes application.
Ctrl + F4 Closes window within an application.
Ctrl + Shift + Esc Starts up the Windows Task Manager.
Windows key Calls up Start menu.
Windows key + D Minimizes or maximizes all windows.
Windows key + E Opens Windows Explorer.
Windows key + F Opens the search
Windows key + M Minimizes all windows present on the task bar.
Windows key + P Switches to presentation mode.
Windows key + R Starts the Execute dialog.
All corresponding combinations with mouse actions are also blocked.
Not locked are:
Key combination effect
Ctrl+Alt+Del Restarts the computer.
Windows key + L Locks the computer.
LOCK ALL SYSTEM KEYS
To lock all systen keys in the Runtime:
Activate the property Lock system keys
start the Runtime via Keyblock Runtime Start (on page 51)

Operating during Runtime
72
consider the hints in chapter protect Runtime files
12.5 Define sort order inside a frame
You define the sequence for the actuation of the elements in a screen with the project configuration in the zenon Editor:
1. Open the screen.
2. Right-click an empty area.
3. Select Shift order for focus from the context menu.
4. Select from the drop-down list Order for left/right or Order for up/down.
5. Each element in the screen is displayed with a number in the top left corner.
6. Click on the element which should be selected first.
7. the number of the element changes to 1.
8. click on all other elements in the order you want them to be selected:
Elements which have already been defined change the background color of the number.
Elements which cannot be selected with the help of the keyboard in the Runtime (property Focus is set to the element inactive) are displayed with a red number.
If you click on an element while holding Ctrl, the numbering starts with the index number of this element.
Information
In the properties of the elements the position is displayed via the properties Focus
position left/right and Focus position top/bottom. These properties are for information only. The index values of the position cannot be changed there.
SYMBOLS
An index can also be assigned to symbols. During compiling the Runtime files, the symbol is disjointed and its elements are inserted. Thereby the order for selecting the elements which was defined in the symbol is taken into consideration.

Operating during Runtime
73
Example
There are three elements in this screen: the numerical value Z, the button B and the symbol VS. The symbol from the project library receives the three numerical values: N1, N2 and N3.
If you define the order in the screen as: B - LS - Z, the order in the Runtime is: B - N1 - N2 - N3 - N.
12.6 Positioning and operation of frames
Frames can be switched to fixed or relatively defined positions in Runtime. In this way, keyboard screens or pop-up screens can be positioned exactly where the mouse pointer or the element to be switched is located. Frames can be switched in runtime:
at an absolute position
relative to the mouse position
relative to element
Absolute and relative positions are defined in the properties of the frame in the zenon Editor.
KEEP POSITION WHEN DISPLAYING AGAIN
Windows always take their screen position from the template. If pop up screens are planned and moved whilst the program is running, the pop up screen is moved back to the planned position the next time the screen switching function is activated. Using the Keep position and size on reopening property, the template can be set to keep its position as long as it is open, regardless of screen switches. If the property is active:
If a screen is opened in Runtime in a manually-moved frame, its position and size are also retained if the screen is switched.
If another screen is opened in the in the same template, its position is retained. This also applies for a substituted call.
With this, a different position position for a template can be used on each client, because the local position is always saved.
ABSOLUTE POSITIONING
The frame is always switched at fixed, pre-defined coordinates. A fixed screen position is always used for all screens that are loaded automatically by the system, e.g. by the time control or a limit violation.

Operating during Runtime
74
RELATIVE POSITIONING
Relative positioning is especially suited to loading pop-ups, keyboard screens or command processing screens. This is possible for all screen switches, set value inputs with freely defined keyboard screens, and command processing screens that are started manually by the user. It does not matter whether the action was triggered by a screen switch function, a set value function or directly via an element. Relative positioning is available for:
dynamic elements to which you can allocate a function
dynamic elements that can be used to send a set value (buttons, combined elements)
Main and Context Menus
execute the screen-specific function in the Alarm Message List screen
Relative positioning also works for nested function calls, i.e. when screen switching or the setting of values are triggered by a script. If the screen would stand over the screen border, it is automatically positioned at the screen border. This also applies to multi-monitor management, where screen would rise into the neighboring monitor.
Attention
Relative positioning only works when called up directly by the user, not with automated functions or via VBA.
RELATIVE TO THE ELEMENT
Positions the reference point of the frame relative to the element from which the screen switch was initiated (e.g. a button or a combined element). The frame's reference point is then always placed on the element's calculated reference point. If the frame cannot be switched off in this position because the screen would then be outside the visible screen area, the alternative reference points are used.
First define a reference point for your frame and then the preferred position in the element. The following settings are available:
Operating during Runtime
75
Property Value
Reference point element vertical bottom
top
Reference point element horizontal Left
Right
Vertical movement in pixels Enter the desired movement
Horizontal movement in pixels Enter the desired movement
ALTERNATIVE POSITION
Define an alternative position for the reference point of the frame and the reference point at the element. Proceed with the definition of the alternative positions in the same way as with the definition of the favored positions. The alternative position is used when the frame can not be placed at the favored position.
RELATIVE TO THE MOUSE POINTER
The screen is displayed depending on the position of the mouse pointer. If the reference point is at the top left side, the frame will be loaded to the bottom right side of the reference point. If the screen cannot be displayed completely at the configured position, the position will be moved until the complete screen is inside the displayed area of the screen.
Define the frame's reference point above the two properties, vertical reference point and horizontal reference point. The reference point is marked on the frame with a red dot. The following settings are available:
Property Value
Reference point frame vertical top
bottom
centered
Horizontal frame reference point Left
Right
Centered
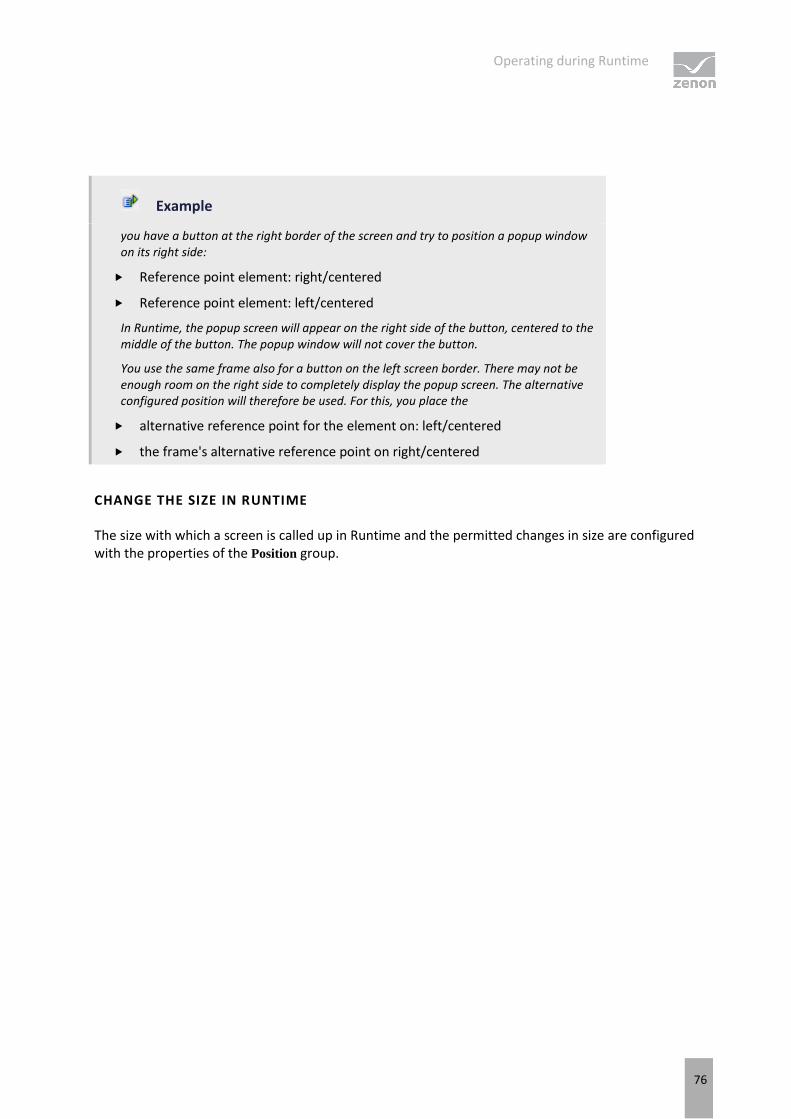
Operating during Runtime
76
Example
you have a button at the right border of the screen and try to position a popup window on its right side:
Reference point element: right/centered
Reference point element: left/centered
In Runtime, the popup screen will appear on the right side of the button, centered to the middle of the button. The popup window will not cover the button.
You use the same frame also for a button on the left screen border. There may not be enough room on the right side to completely display the popup screen. The alternative configured position will therefore be used. For this, you place the
alternative reference point for the element on: left/centered
the frame's alternative reference point on right/centered
CHANGE THE SIZE IN RUNTIME
The size with which a screen is called up in Runtime and the permitted changes in size are configured with the properties of the Position group.
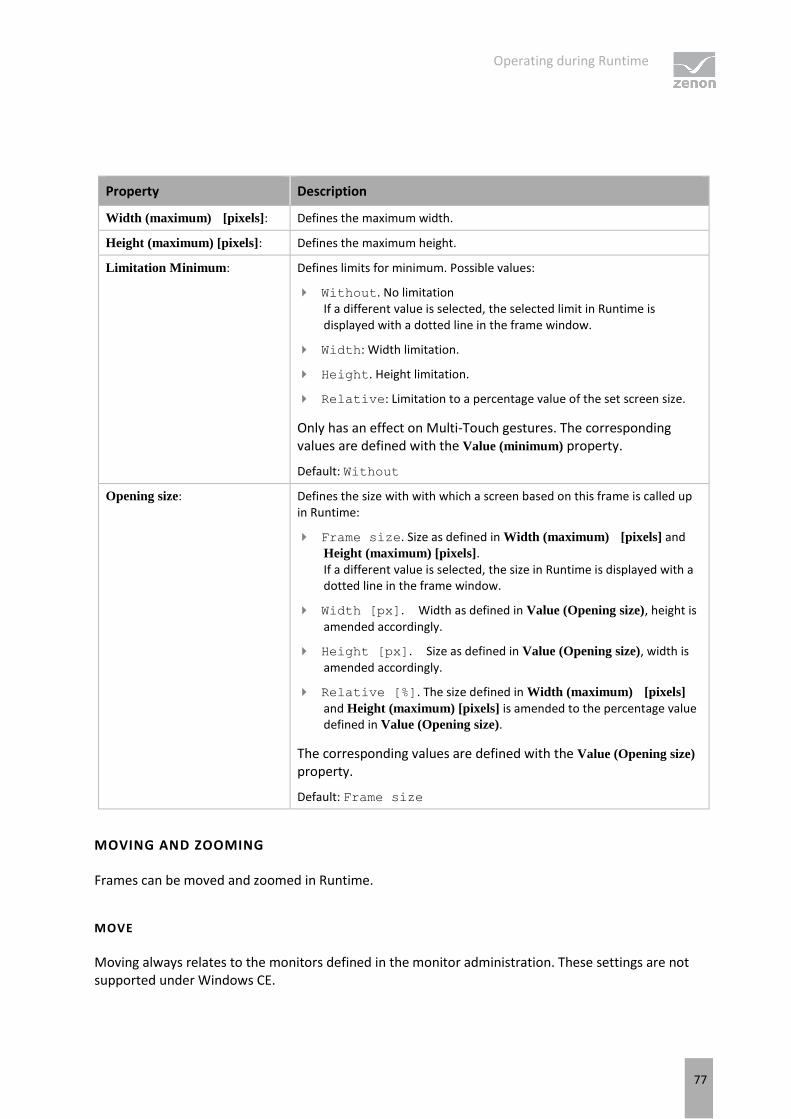
Operating during Runtime
77
Property Description
Width (maximum) [pixels]: Defines the maximum width.
Height (maximum) [pixels]: Defines the maximum height.
Limitation Minimum: Defines limits for minimum. Possible values:
Without. No limitation If a different value is selected, the selected limit in Runtime is displayed with a dotted line in the frame window.
Width: Width limitation.
Height. Height limitation.
Relative: Limitation to a percentage value of the set screen size.
Only has an effect on Multi-Touch gestures. The corresponding values are defined with the Value (minimum) property.
Default: Without
Opening size: Defines the size with with which a screen based on this frame is called up in Runtime:
Frame size. Size as defined in Width (maximum) [pixels] and Height (maximum) [pixels]. If a different value is selected, the size in Runtime is displayed with a dotted line in the frame window.
Width [px]. Width as defined in Value (Opening size), height is amended accordingly.
Height [px]. Size as defined in Value (Opening size), width is amended accordingly.
Relative [%]. The size defined in Width (maximum) [pixels] and Height (maximum) [pixels] is amended to the percentage value defined in Value (Opening size).
The corresponding values are defined with the Value (Opening size) property.
Default: Frame size
MOVING AND ZOOMING
Frames can be moved and zoomed in Runtime.
MOVE
Moving always relates to the monitors defined in the monitor administration. These settings are not supported under Windows CE.

Operating during Runtime
78
The moving of frames in Runtime can be limited to:
Frame border: The frame cannot be moved beyond the monitor limit.
Frame border area: The frame can be moved beyond the monitor limit. However there must be an area on the monitor (Minimum frame margin) that can be accessed for further actions.
The limit is only effective if the frame is already within the defined limit when it is opened. If the moving of a frame is not limited, it can - with Multi-Touch gestures for example - be moved beyond the visible area.
Information
The moving of frames is most of all envisaged for full-screen operation. The Runtime application itself should not be moved to a different screen. If Runtime is moved, this can lead to limitations when moving.
ZOOM
The limits also apply for zooming. If a limit is reached when zooming, an attempt is made to continue zooming in the free space. In doing so, the side ratio is retained.
12.7 Configurable lists
A range of lists can be individually configured in Runtime:
Active Directory:
List in the Active Directory window (but not: tree)
AML
AML filter/CEL filter/time filter:
Lots: Archive selection
Lots: Lot selection
Batch:
List of master recipes
Control Recipes List
CEL
User list:
User list
Extended Trend:
Expanded curve list

Operating during Runtime
79
Message Control:
Message queue
RGM:
Recipe list and recipe value table (but not: CE recipe value table)
The possible actions for these lists include the coloring of columns and the emphasis of the position with the focus.
EDIT CELLS
You have the following possibilities for editing cells in the configurable list type lists:
Double click on the entry
Click in the cell, immediately followed by a second click (slow double click)
Depending on the screen type, there may also be a button available to activate editing.
COLOR COLUMNS
In configurable lists, the text color and background color of each column can be defined individually. To do this, configure the User-defined colors area in the screen switching function of the respective screen, in the Format columns tab.
SHOW FOCUS
In configurable lists, the respective focus can be signalized by means of different text and background colors. The cell, column or line that is in focus is emphasized in bold. These colors are configured in the Selection colors for the object lists project properties in the Graphical design node.
PRIORITIES
If several colors are applied on a list, the following priorities apply:
1. General: Selection colors for the object lists
2. RGM: Recipe value validation
3. RGM: Online validation
4. RGM: Interlocking
5. List: Column color

Runtime files
80
13. Runtime files
DEFINITION OF RUNTIME FILES, RUNTIME DATA, RUNTIME FOLDER AND DATA FOLDER
RUNTIME FILES
Runtime files are files that are created by the editor that are read and interpreted by Runtime. Some Runtime files are modified by Runtime, for example:
Standard Recipes,
Recipegroup Manager etc.
The Runtime files are stored in the Runtime folder. This is defined in the Editor under General, in the properties window.
RUNTIME DATA
All data that is created and administered by Runtime, such as data from:
The alarm message list,
The chronological event list
The Historian etc.
This also includes data that is created by the Editor (Runtime files) and that can be amended by Runtime, such as data from:
Standard Recipes,
Recipegroup Manager,
User administration, etc.
The Runtime data is stored in the Runtime folder. This is defined in the Editor under General, in the properties window.
RUNTIME FOLDER
The Runtime files of the project are saved in this folder. The path is entered into zenon6.ini when the start project is set. The Runtime folder can be amended in the project properties. In the Runtime folder, there is the subfolder RT and a subfolder with the name of the computer. In the RT folder, there are all
Runtime files that are created by the Editor. In the Computer name folder, there are all data files that are created in Runtime.

Runtime files
81
Note: Ensure that there is sufficient memory where the Runtime data is, because there can be much data, due to archiving, AML, CEL etc.
DATA FOLDER
The Runtime saves all data files that were created at runtime like alarm files, archive files etc. in the data folder. The data folder is created as a subfolder of the Runtime folder by default. The folder is automatically assigned the name of the computer the Runtime is running on. This save location can be amended in the project properties (General/Data folder).
Hint: Never set the data folder to a removable device such as an USB stick or a network device. It is recommended that the data is recorded locally and backed up externally.
13.1 Compatibility Runtime files
The zenon Runtime is backward compatible. The Runtime can always load projects from older version and interpret and display these projects in accordance with their version.
Projects from version 6.20 SP4 on can be started directly without being converted first. Projects with a lower version number must be converted beforehand.
A mixed operation is also possible. This means: With the multi-project administration projects from different versions can be loaded and run at the same time.
ONLINE COMPATIBILITY
The Runtime online compatibility makes interoperability of Runtime systems (also via Web Clients) in the zenon network possible even if the version of the client Runtime is higher than the version of the server Runtime.
The current Runtime cam load projects of the following versions:
6.20 SP4
6.21 SP0
6.21 SP1
6.22 SP0
6.22 SP1
6.50 SP0
6.51 SP0
7.00 SP0
7.10 SP0
7.11 SP0

Runtime files
82
Due to the multi-project administration projects from different versions can be loaded. For example the Integration project can have version 7.11, a sub-project version 7.00 and another sub-project version 6.51. Mixed operation also works in the network. With this different versions can also be started with the zenon Web Client.
Note: If, from version 7.00 a different graphics quality to Windows Basic is set for a project (including the corresponding setting for the Create RT files for), Runtime up to zenon version 6.51 loads the Windows extended graphics quality. If the Windows basic graphics quality is set, this is retained.
Attention: Server and Standby Server must have the same version.
Note for Batch Control module: Runtime files for Batch Control up to and including version 7.00 SP0 are not compatible with subsequent versions. Versions from version 7.10 and later are compatible.
COMPATIBILITY BETWEEN THE EDITOR AND RUNTIME:
With the zenon Editor, Runtime files can be created for different versions of Runtime. The Runtime version therefore does not need to correspond to the Editor version. This backward compatibility is particularly suited for use of mixed systems. For example: A project that was planned with Editor 6.50 can also be started with Runtime 6.22.
Attention
If, in a project with a later version of the Editor, properties are shown that are not available in the earlier version, these are not available. This can lead to unwanted results in Runtime.
CREATING RUNTIME FILES
To create Runtime files in the editor for earlier versions:
1. Select the project in the project tree
2. Navigate to the General section in project properties
3. Open the Create RT files for property drop-down list
4. Select the desired version:
Default: The Runtime files are created for the current version of the editor
6.20 SP4: The Runtime files are created for version 6.20 Service Pack 4.
6.21 SP0: The Runtime files are created for version 6.21 Service Pack 0.
6.21 SP1: The Runtime files are created for version 6.21 Service Pack 1.
6.22 SP0: The Runtime files are created for version 6.22 Service Pack 0.
6.22 SP1: The Runtime files are created for version 6.22 Service Pack 1.
6.50 SP0: The Runtime files are created for version 6.50 Service Pack 0.
Runtime profiles
83
6.51 SP0: The Runtime files are created for version 6.51 Service Pack 0.
7.00 SP0: The Runtime files are created for version 7.00 Service Pack 0.
Attention: In order to ensure consistency of Runtime files, all Runtime files must be newly created each time this property is changed. The configurations for all drivers are converted. Settings that do not exist in the respective version are set to the default setting.
14. Runtime profiles
A Runtime profile is a reproducible optical snapshot of the screen in the Runtime including information about:
Screen pattern (succession and position)
Monitor allocation
Filter
Runtime profiles are project- and user-related.
The following screen types support Runtime profiles:
Alarm Message List
Archive revision
Chronological Event List
Extended Trend
Industrial Maintenance Manager
Industrial Performance Analyzer
Report Viewer
Message Control
Variable diagnosis
Every zenon user has an own folder in which he can administrate his profiles. Administrators can see and edit all profiles of all users and copy them to user System. From user account System all users can load Runtime profiles. It serves as an exchange account for Runtime profiles.
Note: Only administrators an copy to and manage profiles in user account System. All other users can only manage their own profiles and load the profiles of user System.

Runtime profiles
84
PREDEFINED PROFILES
Besides the individual profiles there are two pre-defined Runtime profiles:
DEFAULT: created by the user and selected as standard profile
LAST: is automatically saved to the folder of the user when he logs out Exception: Profile LAST is not saved:
for user System
a temporary login without writting permission
To each zenon user a start profile (on page 86) can be allocated during log in.
Attention
Profiles can only be saved correctly at the Server if all projects are available at the Server:
from which screens are called up at the Client
which call up screens with a screen switch function
Saving Runtime profiles which do not match these conditions can lead to errors in the Runtime.
14.1 Load and create profile in the Runtime
In order to create a profile in the Runtime you must engineer a respective function (on page 85):
Save profile: saves the current profile as it was defined in the function
Profile administration (on page 86): opens the administration of the profiles for saving, loading, allocating and administrating profiles
In addition already existing profiles can be activated in the Runtime:
Load profile
When loading a profile, the same state as when the profile was saved is restored. The screen structure including all filters as it was when the profile was saved is restored.
Attention: If there are screen switch functions defined at the properties of a screen for functions Start
function or End function - such as (Screen switch, Index screen or Screen back ), they are not carried out! All other function types are carried out again.
If a script is called up in the two functions, the complete script and all screen switching functions therein are executed. Therefore it can happen that the screen structure after loading the profile does not match the screen structure when saving the profile.

Runtime profiles
85
A similar behavior displays variable Screen active variable: If a limit which contains a screen switch function is carried out in the variable, the function is carried out and may affect the display in an undesired way.
14.2 Configuring functions
In order to load, save and administrate profiles in the Runtime, you engineer a function in the Editor and assigned it to a button:
select New Function
navigate to node Screens
select Runtime profiles
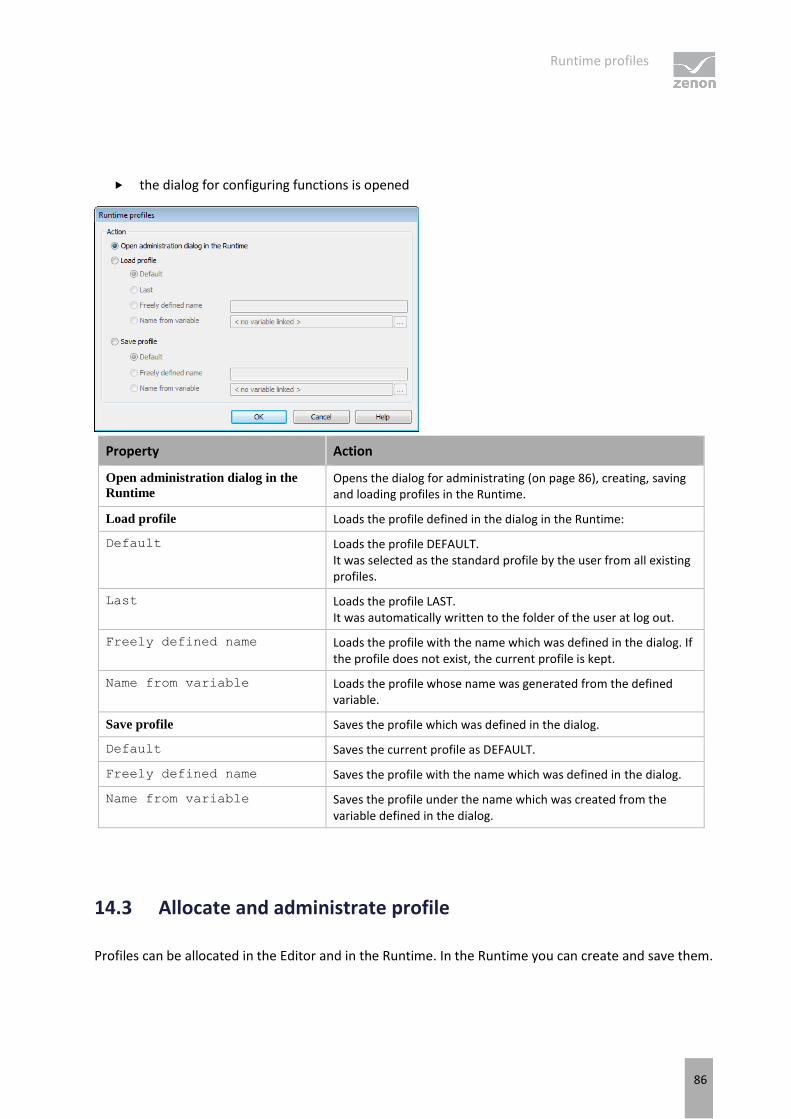
Runtime profiles
86
the dialog for configuring functions is opened
Property Action
Open administration dialog in the
Runtime Opens the dialog for administrating (on page 86), creating, saving and loading profiles in the Runtime.
Load profile Loads the profile defined in the dialog in the Runtime:
Default Loads the profile DEFAULT. It was selected as the standard profile by the user from all existing profiles.
Last Loads the profile LAST. It was automatically written to the folder of the user at log out.
Freely defined name Loads the profile with the name which was defined in the dialog. If the profile does not exist, the current profile is kept.
Name from variable Loads the profile whose name was generated from the defined variable.
Save profile Saves the profile which was defined in the dialog.
Default Saves the current profile as DEFAULT.
Freely defined name Saves the profile with the name which was defined in the dialog.
Name from variable Saves the profile under the name which was created from the variable defined in the dialog.
14.3 Allocate and administrate profile
Profiles can be allocated in the Editor and in the Runtime. In the Runtime you can create and save them.

Runtime profiles
87
IN THE EDITOR
Users are assigned Runtime profiles in the Editor:
in the dialog for creating a new user with the property Runtime profile which is loaded after log in:
Via the property Runtime profile of a user:
In the drop-down list the following settings are available:
None: No profile is allocated (default setting)
DEFAULT: Profile DEFAULT is allocated
LAST: Profile LAST is allocated
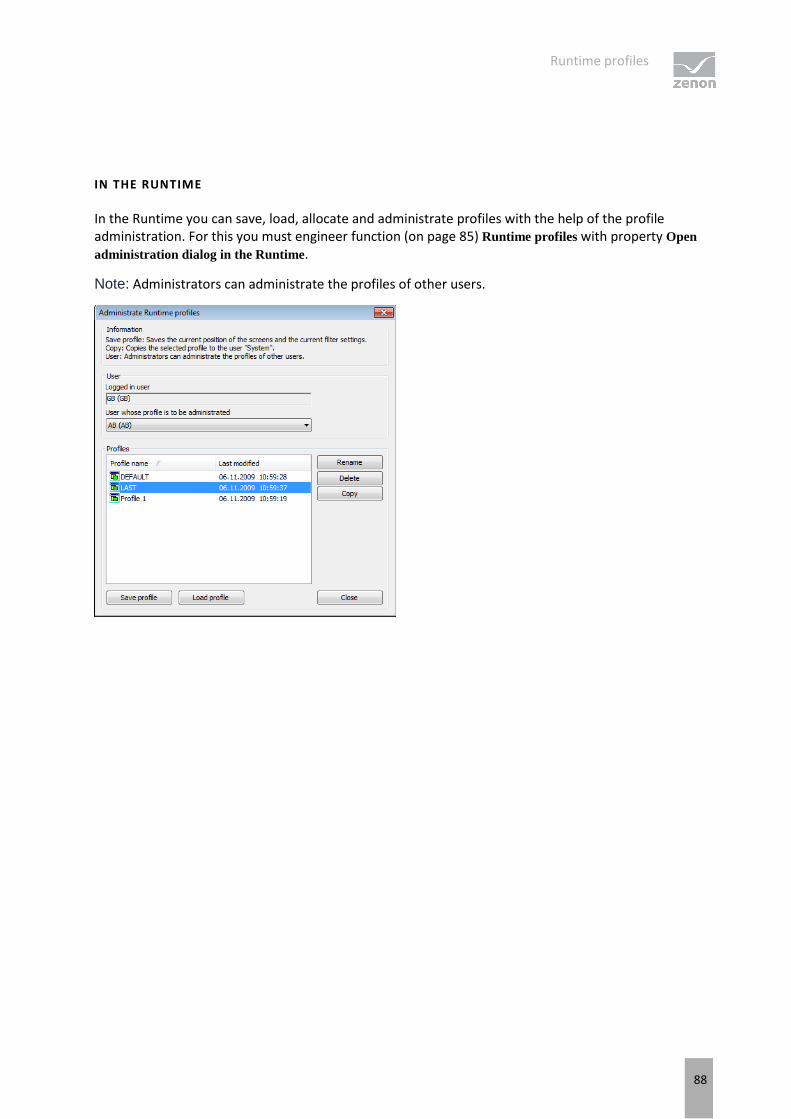
Runtime profiles
88
IN THE RUNTIME
In the Runtime you can save, load, allocate and administrate profiles with the help of the profile administration. For this you must engineer function (on page 85) Runtime profiles with property Open
administration dialog in the Runtime.
Note: Administrators can administrate the profiles of other users.

Runtime profiles
89
Property Action
Logged in user User who is currently logged in to the system.
User whose profiles are administrated User whose profiles are displayed and can be administrated.
Profiles List of the available profile.
Profile name Name of the profile.
Last modified Date and time of the last modification.
Rename Opens the selected profile name in order to rename it.
Delete Deletes the selected profile after a confirmation message.
Copy Copies the selected profile to the user System. At this
the name can be changed. Hint: Profiles at user System are available for all users which are not logged in.
Save profile Opens the dialog for assigning a profile name and saving the profile under this name. The following characters are forbidden: Space and the special characters / | \ : * ? ! " < > $
Load profile Loads the selected profile.
Close Closes the dialog.
KEYBOARD SHORTCUTS
Key Action
F5 Updates the profiles' list.
At unexpected events in the zenon network such as the loss of server or standby the contents of the list are automatically updated.
Esc Closes the dialog.
Enter Loads the selected profile.
Ins Saves the current state of the new profile.
F2 Makes it possible to change the name of the selected profile.
Del Deletes the selected profile after a confirmation message.
14.4 Storage directories of the profiles
The profile data are stored differently depending on their use in the Runtime:

Filter profiles
90
Type of Runtime Storage directory
Server or standalone: Data are stored locally.
Client Data are stored on the server and are requested and changed interactively.
Standby Data are stored on the server and are requested and changed interactively and are synchronized locally.
15. Filter profiles
Filter profiles are filter settings that the user can save and call up in Runtime in relation to a certain screen.
To be able to use filter profiles, the following control elements must be configured:
Control element Description
Filter profiles Profile administration in Runtime.
Profile selection Selection of a saved profile in Runtime from a drop-down list.
Save Clicking on the button in Runtime saves the filter settings as a profile.
Delete Clicking on the (X) button in Runtime deletes the selected profile.
With this you can in the Runtime:
save filters
use saved filters
delete filter profiles
Filter profiles can also be exported and imported (on page 91) with further control elements.
SAVE FILTER PROFILE
To create a filter profile:
1. define filter conditions in the Runtime
2. assign a name using property filter profiles
3. Click on Save
Filter profiles
91
USE FILTER PROFILE
To use a filter profile:
1. select a filter from the drop-down list property filter profiles
2. the filter is immediately applied
DELETE FILTER PROFILE
To delete a filter profile:
1. select a filter from the drop-down list property filter profiles
2. click on button X
3. the profile is deleted
4. the deleted filter is still applied as long as a new filter is defined or selected
15.1 Export and import filter profiles
You can transfer filter profiles to other projects and other computers with the control elements for import and export.
To export profiles:
1. create the control elements for import and export in the screen: Control elements -> Filter profiles -> Import or Export
2. start the Runtime
3. open the screen
4. create the desired profiles
5. save the profiles
6. export the profiles: these are saved in an XML file and can be imported at the same screen type in another project
To import profiles:
1. save (on page 89) the XML file with the desired profiles at the Runtime computer if it is another computer as the export computer
2. start the Runtime
3. open the screen
4. import the profiles

Handling of date and time
92
Information
At the import all existing profiles are deleted. The profile active at the time is not changed.
XML files can only be imported in the screen type in which they were created. If you try to import profiles of other screen types, the import is canceled and an error message is displayed.
16. Handling of date and time
Date and time in zenon are either local time, UTC time or time periods. The basic principle is that:
all times "from - to" in filter such as screen switch to AML or CEL are saved in UTC
Times in modules such as PFS and Load Management are made in local time
Time periods are in seconds
Exceptions:
the IPA writes historic data in local time as "datetime" in the database
Read time from variable or write to variable does not save times but takes over the local time formatted as string from the control or writes it to the control
UTC
UTC means Coordinated Universal Time. The time unit is second. UTC is the uniform basis for the international time determination and is made available to the public via time senders and other time services. Dependent on the time zone certain time periods must be added or subtracted to or from UTC. This time period can vary one hour because of the day light saving time. Example:

Handling of date and time
93
Country Local time
Alaska UTC -9
Australia, Queensland UTC
+10
Bulgaria UTC +2
United Kingdom UTC
Korea UTC +9
Central Europe (CET) UTC +1
Central Europe (CET) Day Light Saving Time UTC +2
Saudi Arabia UTC +3
USA East coast UTC -5
United Arabic Emirates UTC +4
CONSEQUENCES TO THE CONFIGURATION
Engineered date and time mean different date and time depending on the execution location of the Runtime.
For example: In the Editor you engineer in the PFS for the execution of a function in time zone UTC +1 the local time 14:00 o' clock. After transferring the files to a Runtime in tiem zone UTC +10, the function is carried out at 23:00 o' clock.
SWITCHING OF TIME ZONE
If the time zone is switched in the operating system, this change is automatically applied in zenon Runtime.
16.1 Switch to daylight saving time
The following is applicable for the switch to daylight saving time/standard time:
You must use the automatic Windows time amendment of the computer.
Do not switch the time manually!
Manual changes can cause problems with relevant times indicated for zenon, for example for save times of archives, time control, etc.
You configure the action of the Scheduler and Production & Facility Scheduler for time switching in the settings of this module:

Handling of date and time
94
Scheduler time switching
Production & Facility Scheduler time switching