Rubik's Note Shortorial Document - Daniel Panster
29
-
Upload
khangminh22 -
Category
Documents
-
view
2 -
download
0
Transcript of Rubik's Note Shortorial Document - Daniel Panster

Rubik's Note Shortorial
Document
Created for Rubik Cube User
by
Daniel Panster
Build with LATEX
June 6, 2019

Ern® Rubik
Born 13 July 1944. is a Hungarian inventor, architect and professor of architecture. He
is best known for the invention of mechanical puzzles including Rubik's Cube (1974),
Rubik's Magic, Rubik's Magic: Master Edition, and Rubik's Snake.
While Rubik became famous for inventing the Rubik's Cube and his other puzzles, much
of his recent work involves the promotion of science in education. Rubik is involved with
several organizations such as Beyond Rubik's Cube, the Rubik Learning Initiative and the
Judit Polgar Foundation all of whose aim is to engage students in science, mathematics,
and problem solving at a young age.1
1https://en.wikipedia.org/wiki/Ern%C5%91_Rubik

Contents
1 Notation 7
2 Cube 1x3x3 9
2.1 Set Of Four Pieces . . . . . . . . . . . . . . . . . . . . . . . . . . . . . . . 9
2.2 Turn Sides Alternately . . . . . . . . . . . . . . . . . . . . . . . . . . . . . 9
3 Cube 2x2x2 10
3.1 Bottom Layer . . . . . . . . . . . . . . . . . . . . . . . . . . . . . . . . . . 10
3.2 Swap 2 Top Layer Pieces . . . . . . . . . . . . . . . . . . . . . . . . . . . . 10
3.3 Finish Top Layer . . . . . . . . . . . . . . . . . . . . . . . . . . . . . . . . 11
4 Cube 3x3x3 12
4.1 Create A Cross . . . . . . . . . . . . . . . . . . . . . . . . . . . . . . . . . 12
4.2 Move And Turn Corners At Bottom Layer . . . . . . . . . . . . . . . . . . 12
4.3 2nd Layer Edges . . . . . . . . . . . . . . . . . . . . . . . . . . . . . . . . 13
4.4 Cross Top Layer . . . . . . . . . . . . . . . . . . . . . . . . . . . . . . . . 13
4.5 Connect top layer side edge pieces . . . . . . . . . . . . . . . . . . . . . . 14
4.6 Change Corner Pieces Top Layer . . . . . . . . . . . . . . . . . . . . . . . 15
4.7 Orientate Last Corners . . . . . . . . . . . . . . . . . . . . . . . . . . . . . 16
4.8 Rotate Center Pieces . . . . . . . . . . . . . . . . . . . . . . . . . . . . . . 16
5 Cube 3x3x3 Void 18
5.1 Corner Permutation . . . . . . . . . . . . . . . . . . . . . . . . . . . . . . 18
5.2 Edge Permutation . . . . . . . . . . . . . . . . . . . . . . . . . . . . . . . 18
6 Cube 3x3x4 19
6.1 Default Orientation . . . . . . . . . . . . . . . . . . . . . . . . . . . . . . . 19
6.2 Edges 2nd Layer . . . . . . . . . . . . . . . . . . . . . . . . . . . . . . . . 19
6.3 Edges 3rd Layer . . . . . . . . . . . . . . . . . . . . . . . . . . . . . . . . . 20
6.4 Center Pieces 3rd Layer . . . . . . . . . . . . . . . . . . . . . . . . . . . . 20
6.4.1 Swap Counterpart Center Pieces . . . . . . . . . . . . . . . . . . . 21
6.4.2 Swap Adjacent Center Pieces . . . . . . . . . . . . . . . . . . . . . 21
6.5 White Cross . . . . . . . . . . . . . . . . . . . . . . . . . . . . . . . . . . . 22
6.6 White Corners . . . . . . . . . . . . . . . . . . . . . . . . . . . . . . . . . 22
6.7 Swap Corners Top Layer . . . . . . . . . . . . . . . . . . . . . . . . . . . . 23
Daniel Panster � June 6, 2019 Rubik's Note Shortorial Document

6.8 Swap Center Edges Top Layer . . . . . . . . . . . . . . . . . . . . . . . . . 23
6.9 Parity Edges 2nd and 3rd Layer . . . . . . . . . . . . . . . . . . . . . . . . 24
7 Cube 4x4x4 25
7.1 Four Center Color Pieces . . . . . . . . . . . . . . . . . . . . . . . . . . . . 25
7.2 Group Egdes . . . . . . . . . . . . . . . . . . . . . . . . . . . . . . . . . . 25
7.2.1 Connect Edges Right Layer . . . . . . . . . . . . . . . . . . . . . . 25
7.2.2 Swap Edges Right Layer . . . . . . . . . . . . . . . . . . . . . . . . 26
7.2.3 Connect Edges Same Layer . . . . . . . . . . . . . . . . . . . . . . 26
7.2.4 Solve like 3x3x3 . . . . . . . . . . . . . . . . . . . . . . . . . . . . . 27
7.3 Corner Permutation . . . . . . . . . . . . . . . . . . . . . . . . . . . . . . 27
7.4 Edge Permutation . . . . . . . . . . . . . . . . . . . . . . . . . . . . . . . 28
7.5 Edge Orientation . . . . . . . . . . . . . . . . . . . . . . . . . . . . . . . . 29
Daniel Panster � June 6, 2019 Rubik's Note Shortorial Document

List of Figures
1 Notation: Right inner layer r . . . . . . . . . . . . . . . . . . . . . . . . . 8
2 Notation: Top inner layer u' inverted . . . . . . . . . . . . . . . . . . . . . 8
3 Set Of Four Pieces . . . . . . . . . . . . . . . . . . . . . . . . . . . . . . . 9
4 Turn Sides Alternately . . . . . . . . . . . . . . . . . . . . . . . . . . . . . 9
5 Bottom Layer . . . . . . . . . . . . . . . . . . . . . . . . . . . . . . . . . . 10
6 Swap 2 Top Layer Pieces . . . . . . . . . . . . . . . . . . . . . . . . . . . . 10
7 Create A Cross . . . . . . . . . . . . . . . . . . . . . . . . . . . . . . . . . 12
8 Move And Turn Corners At Bottom Layer . . . . . . . . . . . . . . . . . . 12
9 Tilt To Right . . . . . . . . . . . . . . . . . . . . . . . . . . . . . . . . . . 13
10 Tilt To Left . . . . . . . . . . . . . . . . . . . . . . . . . . . . . . . . . . . 13
11 Cross Up Left Corner . . . . . . . . . . . . . . . . . . . . . . . . . . . . . . 14
12 Horizontal Line . . . . . . . . . . . . . . . . . . . . . . . . . . . . . . . . . 14
13 Centered Counterpart . . . . . . . . . . . . . . . . . . . . . . . . . . . . . 15
14 Adjacent Center Pieces . . . . . . . . . . . . . . . . . . . . . . . . . . . . . 15
15 Change Corner Pieces Top Layer . . . . . . . . . . . . . . . . . . . . . . . 16
16 Orientate Last Corners . . . . . . . . . . . . . . . . . . . . . . . . . . . . . 16
17 Rotate 180◦ . . . . . . . . . . . . . . . . . . . . . . . . . . . . . . . . . . . 17
18 Rotate 180◦ . . . . . . . . . . . . . . . . . . . . . . . . . . . . . . . . . . . 17
19 3x3x3 Void Corner Permutation top layer . . . . . . . . . . . . . . . . . . 18
20 3x3x3 Void Edge Permutation top layer . . . . . . . . . . . . . . . . . . . 18
21 Default Orientation . . . . . . . . . . . . . . . . . . . . . . . . . . . . . . . 19
22 Edges 2nd Layer . . . . . . . . . . . . . . . . . . . . . . . . . . . . . . . . 20
23 Edges 3rd Layer . . . . . . . . . . . . . . . . . . . . . . . . . . . . . . . . . 20
24 Swap Counterpart Center Pieces . . . . . . . . . . . . . . . . . . . . . . . 21
25 Swap Adjacent Center Pieces . . . . . . . . . . . . . . . . . . . . . . . . . 21
26 White Cross . . . . . . . . . . . . . . . . . . . . . . . . . . . . . . . . . . . 22
27 White Corners . . . . . . . . . . . . . . . . . . . . . . . . . . . . . . . . . 22
28 Swap Corners Top Layer . . . . . . . . . . . . . . . . . . . . . . . . . . . . 23
29 Top Edge Counterpart Pieces . . . . . . . . . . . . . . . . . . . . . . . . . 23
30 Top Edge Adjacent Pieces . . . . . . . . . . . . . . . . . . . . . . . . . . . 24
31 Parity Edges 2nd and 3rd Layer . . . . . . . . . . . . . . . . . . . . . . . . 24
32 Four Center Color Pieces . . . . . . . . . . . . . . . . . . . . . . . . . . . . 25
33 Connect Edges Right Layer . . . . . . . . . . . . . . . . . . . . . . . . . . 26
Daniel Panster � June 6, 2019 Rubik's Note Shortorial Document

34 Swap Edges Right Layer . . . . . . . . . . . . . . . . . . . . . . . . . . . . 26
35 Connect Edges Same Layer . . . . . . . . . . . . . . . . . . . . . . . . . . 27
36 Paired Inner Layer Pieces . . . . . . . . . . . . . . . . . . . . . . . . . . . 27
37 4x4x4 Corner Permutation top layer . . . . . . . . . . . . . . . . . . . . . 28
38 Adjacent Permutation . . . . . . . . . . . . . . . . . . . . . . . . . . . . . 28
39 Counterpart Permutation . . . . . . . . . . . . . . . . . . . . . . . . . . . 29
40 Edge Orientation . . . . . . . . . . . . . . . . . . . . . . . . . . . . . . . . 29
Daniel Panster � June 6, 2019 Rubik's Note Shortorial Document

1 NOTATION 7
1 Notation
Regarding the 3x3x3 cube, the following notation can be used by 1x1x3, 2x2x2, 3x3x3,
3x3x4 and 4x4x4 cubes.
R rotate right layer (pull front from bottom to top)
L rotate left layer (pull front from top to bottom)
F rotate front layer (turn clockwise)
U rotate top layer (pull front from right to left)
D rotate down layer (pull right to left)
M rotate center layer (pull front from bottom to top, like R)
B rotate back layer (turn counterclockwise, like F')
R' rotate right layer invers (pull front from top to bottom)
L' rotate left layer (pull front from bottom to top)
F' rotate front layer (turn counterclockwise)
U' rotate top layer (pull front from left to right)
D' rotate down layer (pull left to right)
M' rotate center layer (pull front from top to bottom, like L)
B' rotate back layer (turn clockwise, like F)
Daniel Panster � June 6, 2019 Rubik's Note Shortorial Document

1 NOTATION 8
Additionally for the 3x3x4 and 4x4x4 we have extra layers. These are inner layers wich
described by lower case letters like r l u' d'.
Examples:
Figure 1: Right inner layer r
Figure 2: Top inner layer u' inverted
Daniel Panster � June 6, 2019 Rubik's Note Shortorial Document

2 CUBE 1X3X3 9
2 Cube 1x3x3
You can solve this simple Rubik cube in two steps.
2.1 Set Of Four Pieces
Create a set of four pieces on the top face. Note that the sides of the set must have color
pairs. In the example orientate it to top left.
Figure 3: Set Of Four Pieces
2.2 Turn Sides Alternately
Turn right side, then front side alternately with same rotation until cube is solved.
Figure 4: Turn Sides Alternately with R F
Daniel Panster � June 6, 2019 Rubik's Note Shortorial Document

3 CUBE 2X2X2 10
3 Cube 2x2x2
There is no need to pay attention for a default orientation of color sides.
3.1 Bottom Layer
First solving the bottom layer. Turn the cube 180◦ like in the �gure, so that the layer
to solve is on top. The algorithm in the �guer cycles the top front right corner. Simply
rotate the top layer to the next unsolved color and repeat the alorithm until each pice
has it's correct orientation.
Figure 5: 2x(R' D' R D)
3.2 Swap 2 Top Layer Pieces
Turn the cube back (180◦), so that the currently solved layer is bottom layer. You may
must swap two pieces the get the right position for the pieces on top layer.
Figure 6: R U' L' U R' U' L
Daniel Panster � June 6, 2019 Rubik's Note Shortorial Document

3 CUBE 2X2X2 11
3.3 Finish Top Layer
Finally solve the top layer like in Figure 5. Turn only the top layer to the next piece
wich must be rotated, when �nished a swap with the algorithm R' D' R D .
Daniel Panster � June 6, 2019 Rubik's Note Shortorial Document

4 CUBE 3X3X3 12
4 Cube 3x3x3
Some cubes have no yellow on one side with the opposite side white surface. It is
important to note that you must not know about counterpart or adjacent colors.
4.1 Create A Cross
Have a look at the cornes colors. That is your starting point. In the example below
the green color at the bottom face has a red and a yellow adjacent side. Turn cube so
that you create a cross where the center piece colors of each side can match the corner
colors.
Figure 7:
4.2 Move And Turn Corners At Bottom Layer
Turn a corner piece with this algorithm.
Figure 8: R U R' U' R U R'
Daniel Panster � June 6, 2019 Rubik's Note Shortorial Document

4 CUBE 3X3X3 13
4.3 2nd Layer Edges
Here are two possibilities to tilt the top middle edge piece to right and to left on the 2nd
layer.
• Tilt to the right side
Figure 9: U R U' R' U' F' U F
• Tilt to the left side
Figure 10: U' L' U L U F U' F'
4.4 Cross Top Layer
After �nish solving the middle layer, create a cross on the top layer.
There are some possible patterns to orientate before using the algorithm.
• A face with one center colored piece (no orientation needed)
Daniel Panster � June 6, 2019 Rubik's Note Shortorial Document

4 CUBE 3X3X3 14
• A cross must orientate to the up left corner (Figure 11)
• A middle line must orientate horizontal (Figure 12)
Execute the algorithm F R U R' U' F' until you get a cross under consideration of the
possible patterns.
Figure 11: Cross Up Left Corner
Figure 12: Horizontal Line
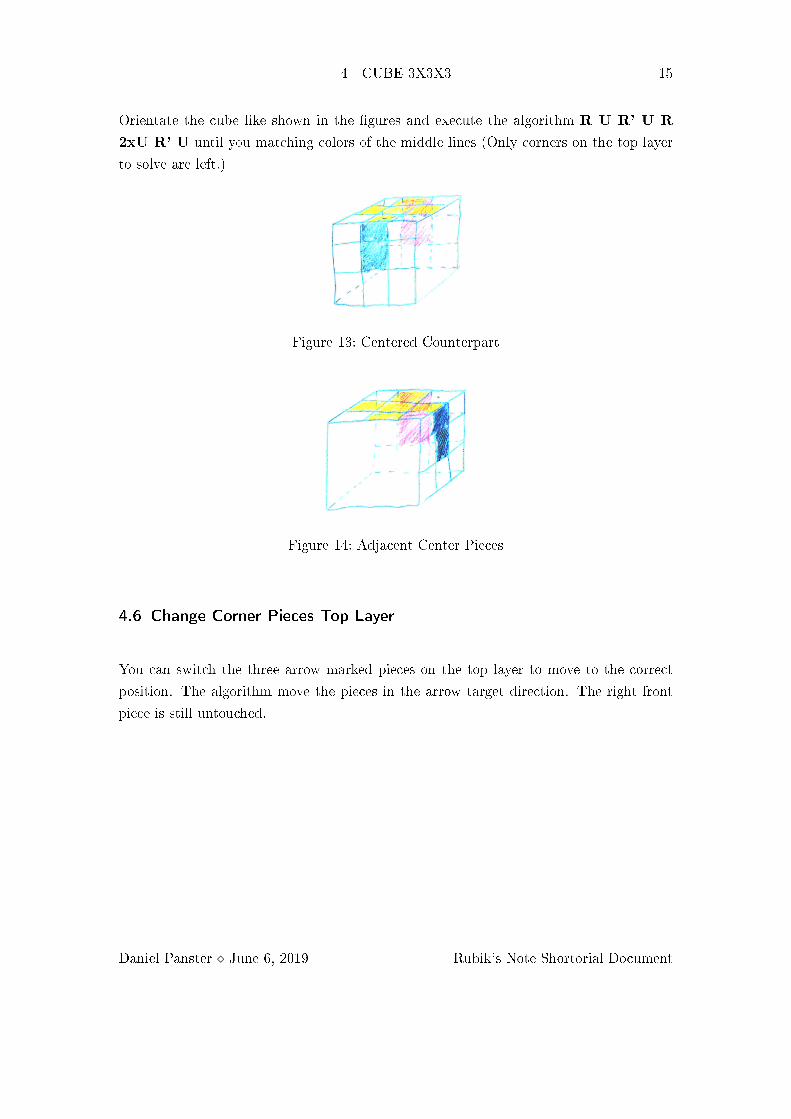
4.5 Connect top layer side edge pieces
Also here there are two possible patterns.
• Counterpart center pieces have the same color regarding the edge color shown in
Figure 13.
• Center piece colors match with the top layer edge color in adjacent position shown
in Figure 14. Orientate the matching color sides to right and back.
Daniel Panster � June 6, 2019 Rubik's Note Shortorial Document
4 CUBE 3X3X3 15
Orientate the cube like shown in the �gures and execute the algorithm R U R' U R
2xU R' U until you matching colors of the middle lines (Only corners on the top layer
to solve are left.)
Figure 13: Centered Counterpart
Figure 14: Adjacent Center Pieces
4.6 Change Corner Pieces Top Layer
You can switch the three arrow marked pieces on the top layer to move to the correct
position. The algorithm move the pieces in the arrow target direction. The right front
piece is still untouched.
Daniel Panster � June 6, 2019 Rubik's Note Shortorial Document

4 CUBE 3X3X3 16
Figure 15: U R U' L' U R' U' L
4.7 Orientate Last Corners
Execute the algorithm until right front corner matching side colors (1). Then do U' until
next get the next corner to rotate. Note that the right side layer is temporarly destroyed
while switching U' to next piece to orientate. Execute the algorithm until the last piece
has correct orientation.
Figure 16: R' D' R D
4.8 Rotate Center Pieces
Perhaps you have a custom cube where the center pieces of a face must have a special
orientation. So you can rotate pieces with two possible algorithms in 180◦ or 90◦.
• Center piece to rotate is up (top face). Rotate 180◦
Daniel Panster � June 6, 2019 Rubik's Note Shortorial Document

4 CUBE 3X3X3 17
Figure 17: (5x(R U R' U))
• Rotate two center pieces. The top face center piece rotates 90◦ counter clockwise
and the front face center piece rotates 90◦ clockwise
Figure 18: (5x(M U M' U'))
Daniel Panster � June 6, 2019 Rubik's Note Shortorial Document

5 CUBE 3X3X3 VOID 18
5 Cube 3x3x3 Void
A Void Cube has no center piece, so you don't know about the �proper� color of the
centers.
You can solve this cube like the 3x3x3. But if your center piece (that you don't see)
does not match the face colors, you end up with permutations at the top layer like in
Figure 19 or Figure 20. Use the algorithm in the �gure descriptions to solve the cube
completely.
Note that the corner permutation algorithm ends up in an edge permutation.
5.1 Corner Permutation
Figure 19: R U R' U' R' F 2xR U' R' U' R U R' F
5.2 Edge Permutation
Figure 20: M' 2xU M 2xU M' B U B' 4x(M' U) B U' B'
Daniel Panster � June 6, 2019 Rubik's Note Shortorial Document

6 CUBE 3X3X4 19
6 Cube 3x3x4
Lower case letters like u' stand for use of inner layers. Upper case like D stand for use
of outer layers (top and bottom).
6.1 Default Orientation
First orientate colors on the 2nd layer. Move correct color pieces at the centers. Note
that you must check the corner pieces must �t the possible face colors, so that you can
solve the next step.
Figure 21: Default Orientation
6.2 Edges 2nd Layer
Insert Edges shown in the �gure below. Note that the edge to insert must be invert
(color swaped). You can use upper Uu and or only lower u caes letters for turn, because
the top and bottom layers not a�ected.
Daniel Panster � June 6, 2019 Rubik's Note Shortorial Document

6 CUBE 3X3X4 20
Figure 22: R Uu R U'u' R
6.3 Edges 3rd Layer
Swap Edges shown in the �gure below. Swap the right front edge with the right back
edge. You can use upper Uu and or only lower u caes letters for turn, because the top
and bottom layers not a�ected.
Figure 23: (R Uu R U'u' R U'u') Dd (R U'u' R Uu R) D'd'
6.4 Center Pieces 3rd Layer
Here you can or must use the following two algorithms to center the correct pieces in the
3rd layer. You can use upper Uu and or only lower u case letters for turn, because the
top and bottom layers not a�ected.
Daniel Panster � June 6, 2019 Rubik's Note Shortorial Document

6 CUBE 3X3X4 21
6.4.1 Swap Counterpart Center Pieces
You can swap the center pieces front with back side with following algorithm.
Figure 24: 3x(R 2xUu)
6.4.2 Swap Adjacent Center Pieces
Here you can swap the adjacent center pieces on the 3rd layer (front with right). You
can use upper Uu and or only lower u case letters for turn, because the top and bottom
layers not a�ected.
Figure 25: 2x(R Uu) 2x(R 2xUu) R Uu R U'u' R
Daniel Panster � June 6, 2019 Rubik's Note Shortorial Document

6 CUBE 3X3X4 22
6.5 White Cross
You can swap the top center edge piece on the right side with the bottom right center
like in the �gure below.
Figure 26: U' R U R U'
6.6 White Corners
You can swap the top right front piece with the bottom right front piece like in the �gure
below. It is important, that you turn the top layer to the next piece, if there is at least
one to solve. To understand, have a look at Section 4.7.
And you may end up with an Parity at layer 2 and 3. Don't worry about this you can
solve it in section 6.9.
Figure 27: R U R U' R
Daniel Panster � June 6, 2019 Rubik's Note Shortorial Document

6 CUBE 3X3X4 23
6.7 Swap Corners Top Layer
You can swap the top right front piece with the top right back piece like in the �gure
below. This is the � same �algorithm like in Figure 23.
Figure 28: (R U R U' R U') D (R U' R U R) D'
6.8 Swap Center Edges Top Layer
� Last � step is to swap the counterpart and/or adjacent edges on the top layer. You
can use the algorithms described in 6.4.1 and 6.4.2. Note that you turn only the top
layer. You must use � U � and � U' � instead of � u � and � u' � .
• Solving top edge counterpart pieces
Figure 29: 3x(R 2xU)
• Adjacent center pieces
Daniel Panster � June 6, 2019 Rubik's Note Shortorial Document

6 CUBE 3X3X4 24
Figure 30: 2x(R U) 2x(R 2xU) R U R U' R
6.9 Parity Edges 2nd and 3rd Layer
In some cases two edge pieces on the 2nd and 3rd layer are swaped when the cube seems
to be �nished. You can solve these issue with the following algorithm. Hold the front
side with parity pieces left and right like in the picture below.
Figure 31: 2xUu R F 2xu F R 2xUu
Daniel Panster � June 6, 2019 Rubik's Note Shortorial Document

7 CUBE 4X4X4 25
7 Cube 4x4x4
Here we use the same notation like at the 3x3x4 cube.
Lower case letters like l, r or u stand for use of inner layers, the 2nd and 3rd row or
column. Upper case letters like L, R or U stand for use of outer layers, left, right, front,
back, top or bottom layer. Note that we will use a � connected � notation like Rr to
turn two layers at the same time.
7.1 Four Center Color Pieces
First solve the four connected center pieces on each side. Pay attention for correct
counterpart colors. You can look at the colors of the corner pieces to get an information
about the correct color sides.
Figure 32: Four Center Color Pieces
7.2 Group Egdes
Use following three algorithms to connect two center pieces of same color.
7.2.1 Connect Edges Right Layer
If not the last group you can connect the counterpart pieces shown in the �gure below.
The pieces to connect must not in the same layer. Use the transport layer U to save the
Daniel Panster � June 6, 2019 Rubik's Note Shortorial Document

7 CUBE 4X4X4 26
groups.
Figure 33: u' R (U) (Transport) R' u
7.2.2 Swap Edges Right Layer
If the last group is not solved, and the pieces not on the same layer, you must swap these
�rst.
Figure 34: R U R' U' F' U F
7.2.3 Connect Edges Same Layer
Connect the last pieces. The similar colored pieces must be on the same layer.
Daniel Panster � June 6, 2019 Rubik's Note Shortorial Document

7 CUBE 4X4X4 27
Figure 35: Dd R F' U R' F Dd'
7.2.4 Solve like 3x3x3
If you have inner layer pieces paired like shown in ??, then you can image that this could
be simply a 3x3x3 Rubik Cude. Solve it like them, but note you might possible end up
with parity (edge or corner permutation) isssues when the cube seem to be solved.
Figure 36: Paired Inner Layer Pieces
7.3 Corner Permutation
You can solve it by using the algorithm from corner permutation issue of 3x3x3 Void Cube
shown in capitel 3x3x3 Void Corner Permutation. Apply the same algorithm. Note that
the corner permutation algorithm ends up in an edge permutation.
Daniel Panster � June 6, 2019 Rubik's Note Shortorial Document

7 CUBE 4X4X4 28
Figure 37: R U R' U' R' F 2xR U' R' U' R U R' F
7.4 Edge Permutation
Here are two posibilities of an edge permutation. You can have swapped edges in adjacent
or counterpart positions. Hold the cube shown in the �gures and apply the algorithm
2xUu 2xRr 2xU 2xr 2xU 2xRr 2xUu.
Note that solving the adjacent permutation end up in a edge counterpart permutation.
• Adjacent Permutation
Figure 38:
• Counterpart Permutation
Daniel Panster � June 6, 2019 Rubik's Note Shortorial Document

7 CUBE 4X4X4 29
Figure 39: 2xr 2xU 2xr 2xUu 2xr 2xU 2xUu
7.5 Edge Orientation
Only one middle pair of pieces are swapped.
Figure 40: 2xUu 2xRr 2xU 2xr 2xU 2xRr 2xUu
Daniel Panster � June 6, 2019 Rubik's Note Shortorial Document