Fluorescent Vesicle System A New Technique for Measuring Blood Flow in the Retina
Upload
khangminh22Category
view
4download
0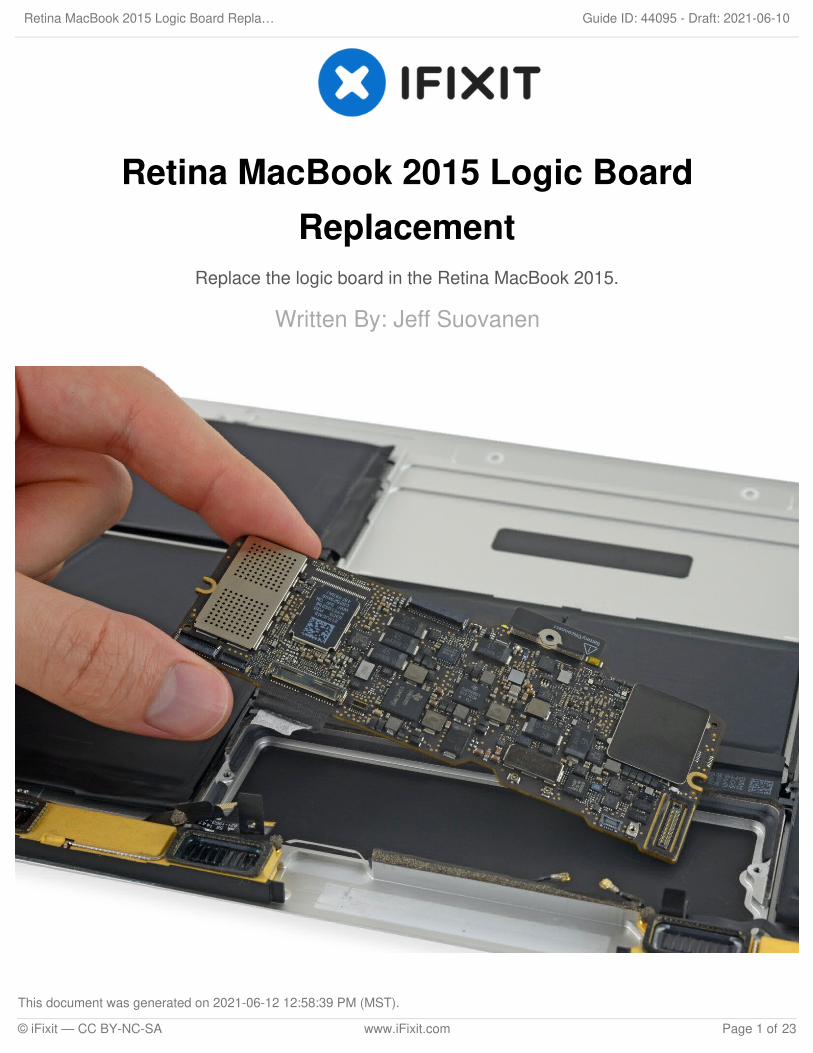
Retina MacBook 2015 Logic BoardReplacement
Replace the logic board in the Retina MacBook 2015.
Written By: Jeff Suovanen
Retina MacBook 2015 Logic Board Repla… Draft: 2021-06-10Guide ID: 44095 -
This document was generated on 2021-06-12 12:58:39 PM (MST).
© iFixit — CC BY-NC-SA www.iFixit.com Page 1 of 23
INTRODUCTION
Use this guide to replace the logic board in your Retina MacBook 2015. The logic board includes aflash storage chip containing all of your personal data, so make sure it's backed up (if possible)before attempting this repair.
To avoid logic board damage, when your MacBook repair is complete but before powering it on,connect it to low-voltage power using a 5-Watt iPhone charger and a USB-C to USB-A cable. Theseaccessories are not included with your MacBook, so make sure you have them ready before youbegin.
TOOLS:Phillips #00 Screwdriver (1)iPad Battery Isolation Pick (1)P5 Pentalobe Screwdriver Retina MacBook
Pro and Air (1)Spudger (1)T5 Torx Screwdriver (1)Tweezers (1)Tri-point Y00 Screwdriver (1)
PARTS:MacBook 12" Retina (Early 2015) Logic
Board (1)MacBook 12" Retina (Early 2015 to 2017)
Lower Case Screw Set (1)USB Power Adapter for iPhone and iPod
(1)USB-C to USB-A Cable (1)
Retina MacBook 2015 Logic Board Repla… Draft: 2021-06-10Guide ID: 44095 -
This document was generated on 2021-06-12 12:58:39 PM (MST).
© iFixit — CC BY-NC-SA www.iFixit.com Page 2 of 23
Step 1 — Retina MacBook 2015 Opening Lower Case Assembly
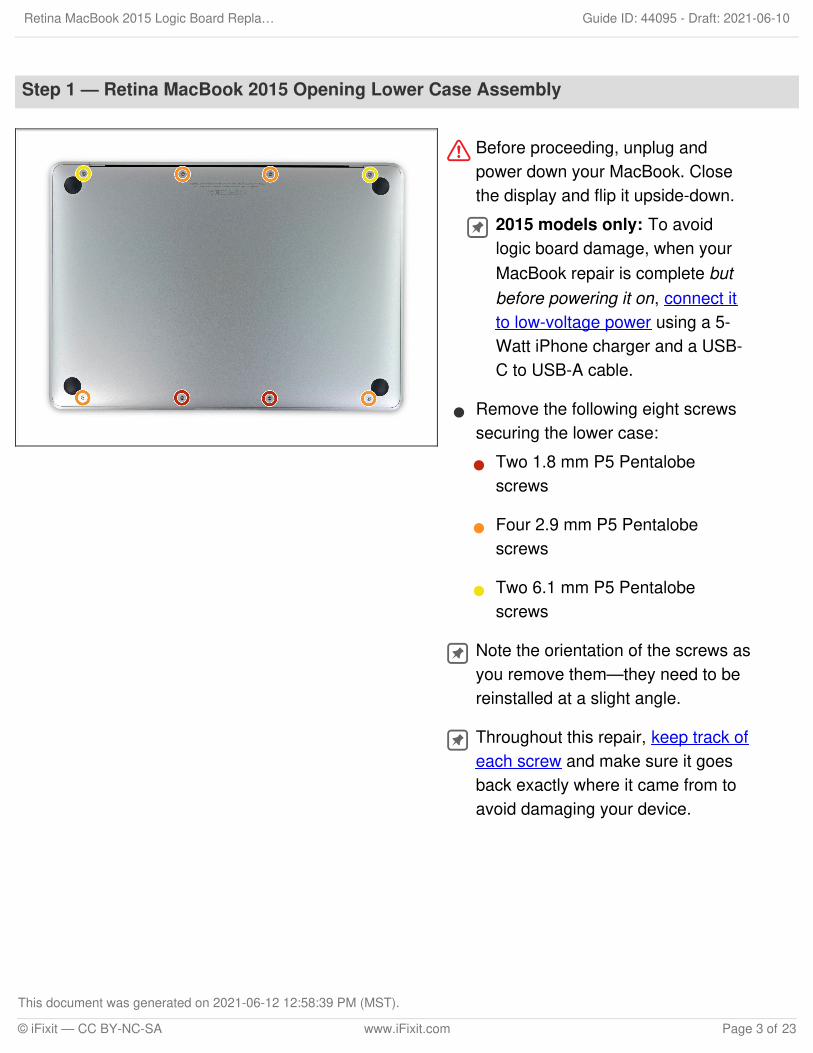
Before proceeding, unplug andpower down your MacBook. Closethe display and flip it upside-down.
2015 models only: To avoidlogic board damage, when yourMacBook repair is complete butbefore powering it on, connect itto low-voltage power using a 5-Watt iPhone charger and a USB-C to USB-A cable.
Remove the following eight screwssecuring the lower case:
Two 1.8 mm P5 Pentalobescrews
Four 2.9 mm P5 Pentalobescrews
Two 6.1 mm P5 Pentalobescrews
Note the orientation of the screws asyou remove them—they need to bereinstalled at a slight angle.
Throughout this repair, keep track ofeach screw and make sure it goesback exactly where it came from toavoid damaging your device.
Retina MacBook 2015 Logic Board Repla… Draft: 2021-06-10Guide ID: 44095 -
This document was generated on 2021-06-12 12:58:39 PM (MST).
© iFixit — CC BY-NC-SA www.iFixit.com Page 3 of 23
Step 2
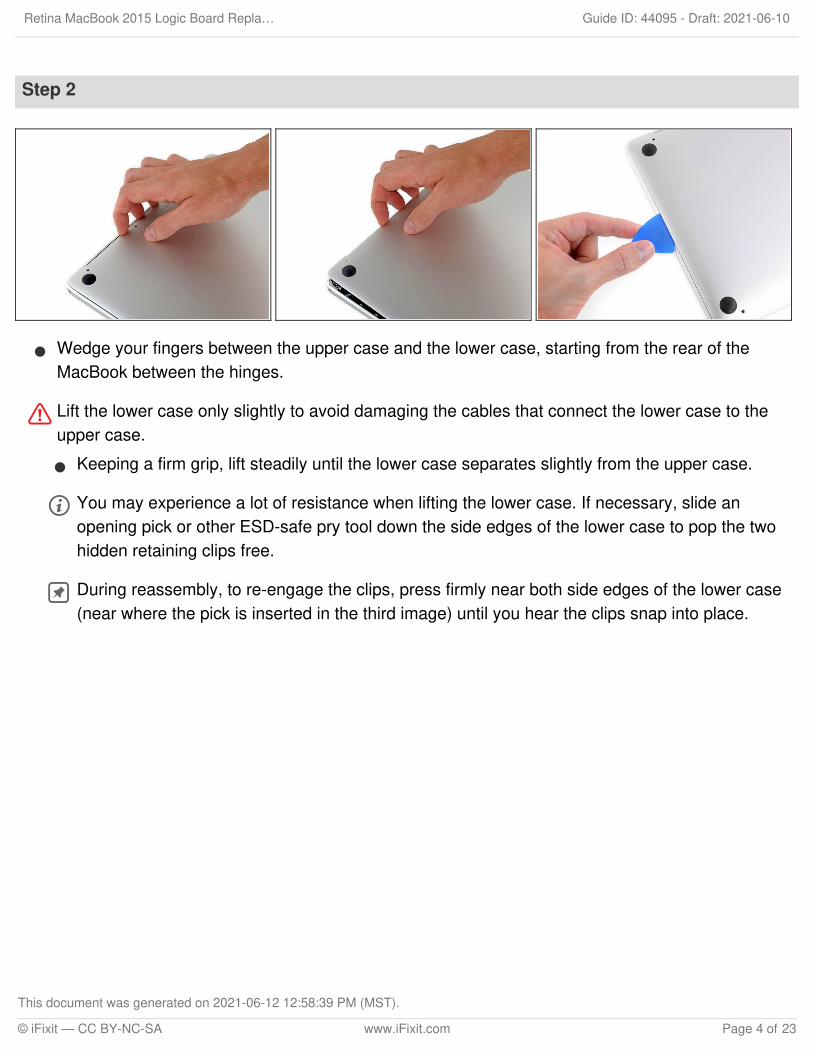
Wedge your fingers between the upper case and the lower case, starting from the rear of theMacBook between the hinges.
Lift the lower case only slightly to avoid damaging the cables that connect the lower case to theupper case.
Keeping a firm grip, lift steadily until the lower case separates slightly from the upper case.
You may experience a lot of resistance when lifting the lower case. If necessary, slide anopening pick or other ESD-safe pry tool down the side edges of the lower case to pop the twohidden retaining clips free.
During reassembly, to re-engage the clips, press firmly near both side edges of the lower case(near where the pick is inserted in the third image) until you hear the clips snap into place.
Retina MacBook 2015 Logic Board Repla… Draft: 2021-06-10Guide ID: 44095 -
This document was generated on 2021-06-12 12:58:39 PM (MST).
© iFixit — CC BY-NC-SA www.iFixit.com Page 4 of 23
Step 3
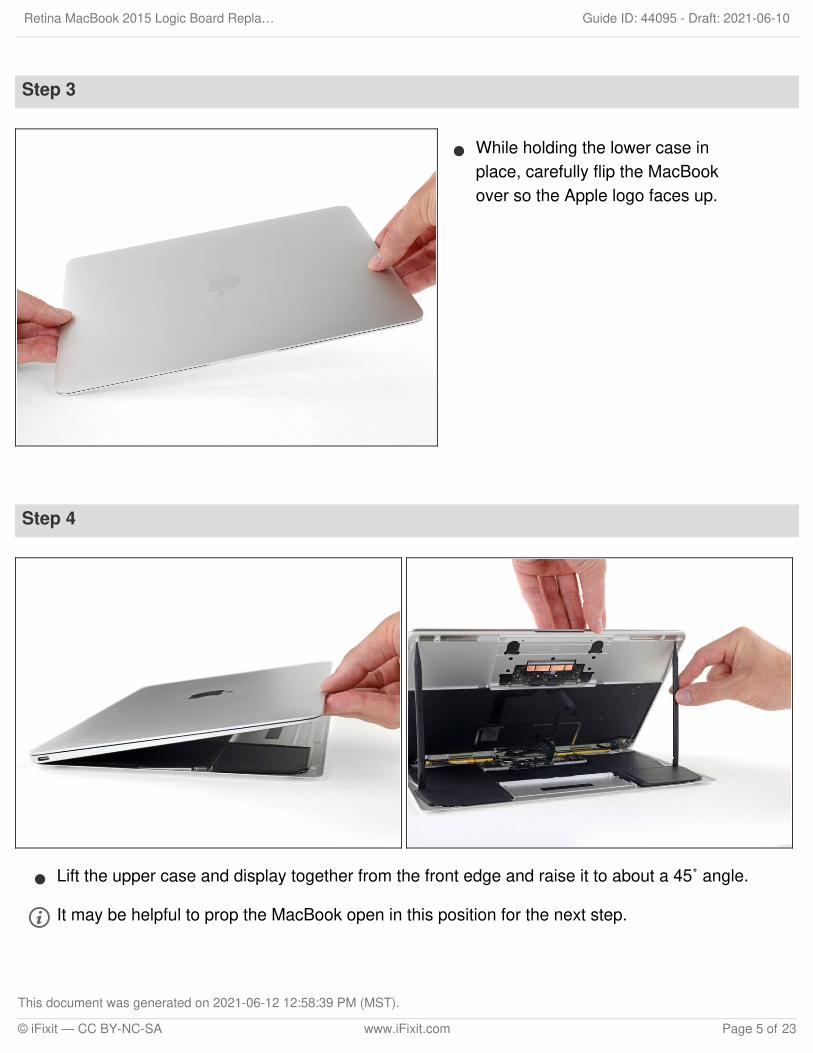
While holding the lower case inplace, carefully flip the MacBookover so the Apple logo faces up.
Step 4
Lift the upper case and display together from the front edge and raise it to about a 45˚ angle.
It may be helpful to prop the MacBook open in this position for the next step.
Retina MacBook 2015 Logic Board Repla… Draft: 2021-06-10Guide ID: 44095 -
This document was generated on 2021-06-12 12:58:39 PM (MST).
© iFixit — CC BY-NC-SA www.iFixit.com Page 5 of 23

Step 5
Use the flat end of a spudger to press and hold the small gold 'battery disconnect' button.
If the power LED is lit up, continue holding the button until the LED goes dark, and then release.This may take up to 10 seconds.
If the LED does not light, release the button after 5-10 seconds. Press and hold it again for 5-10seconds, and release. Finally, press and hold it a third time for 5-10 seconds, and release.
This step ensures the MacBook is fully powered down and safe to work on.
Step 6
Close the MacBook and carefully flipit upside-down.
Retina MacBook 2015 Logic Board Repla… Draft: 2021-06-10Guide ID: 44095 -
This document was generated on 2021-06-12 12:58:39 PM (MST).
© iFixit — CC BY-NC-SA www.iFixit.com Page 6 of 23

Step 7
Lifting from the front edge, open thelower case to an angle of about 45°.
Take care not to damage the ribboncables that still attach the lower caseto the MacBook.
Step 8
Use tweezers to peel back the tape covering the trackpad cable ZIF connector.
Retina MacBook 2015 Logic Board Repla… Draft: 2021-06-10Guide ID: 44095 -
This document was generated on 2021-06-12 12:58:39 PM (MST).
© iFixit — CC BY-NC-SA www.iFixit.com Page 7 of 23

Step 9
Use a spudger to carefully flip up the retaining flap on the trackpad cable ZIF connector.
Step 10
Disconnect the trackpad ribbon cable from the trackpad by pulling it gently through its slot in theframe.
Retina MacBook 2015 Logic Board Repla… Draft: 2021-06-10Guide ID: 44095 -
This document was generated on 2021-06-12 12:58:39 PM (MST).
© iFixit — CC BY-NC-SA www.iFixit.com Page 8 of 23

Step 11
Carefully turn the MacBook over, so that the lower case lays flat.
Raise the upper case/display assembly to about a 90° angle, and prop it up against somethingsturdy so you don't have to hold it.
Add a piece of tape near the track pad to secure the upper case and prevent accidentalmovement.
It's possible to open the MacBook all the way and lay both sides down flat, but this may damagethe flex cables and is not recommended.
Retina MacBook 2015 Logic Board Repla… Draft: 2021-06-10Guide ID: 44095 -
This document was generated on 2021-06-12 12:58:39 PM (MST).
© iFixit — CC BY-NC-SA www.iFixit.com Page 9 of 23
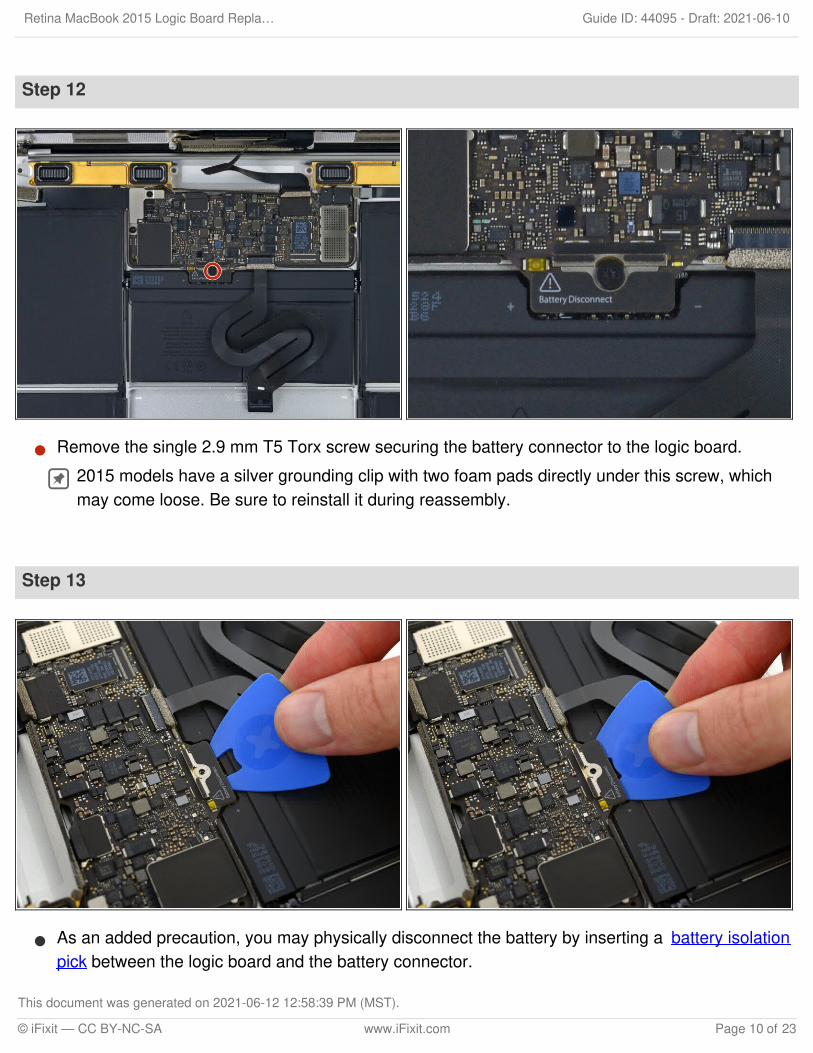
Step 12
Remove the single 2.9 mm T5 Torx screw securing the battery connector to the logic board.
2015 models have a silver grounding clip with two foam pads directly under this screw, whichmay come loose. Be sure to reinstall it during reassembly.
Step 13
As an added precaution, you may physically disconnect the battery by inserting a battery isolationpick between the logic board and the battery connector.
Retina MacBook 2015 Logic Board Repla… Draft: 2021-06-10Guide ID: 44095 -
This document was generated on 2021-06-12 12:58:39 PM (MST).
© iFixit — CC BY-NC-SA www.iFixit.com Page 10 of 23
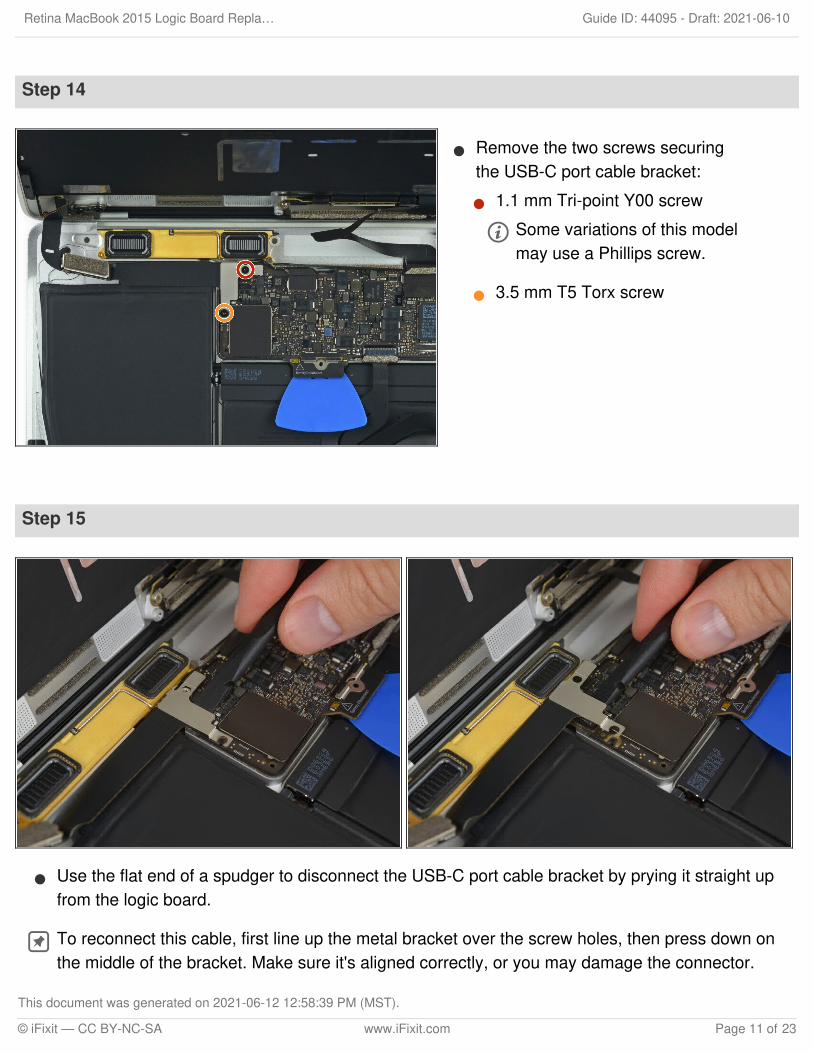
Step 14
Remove the two screws securingthe USB-C port cable bracket:
1.1 mm Tri-point Y00 screw
Some variations of this modelmay use a Phillips screw.
3.5 mm T5 Torx screw
Step 15
Use the flat end of a spudger to disconnect the USB-C port cable bracket by prying it straight upfrom the logic board.
To reconnect this cable, first line up the metal bracket over the screw holes, then press down onthe middle of the bracket. Make sure it's aligned correctly, or you may damage the connector.
Retina MacBook 2015 Logic Board Repla… Draft: 2021-06-10Guide ID: 44095 -
This document was generated on 2021-06-12 12:58:39 PM (MST).
© iFixit — CC BY-NC-SA www.iFixit.com Page 11 of 23

Step 16
Use a spudger to flip open the retaining flap on the audio jack board cable ZIF connector.
Step 17
Disconnect the audio jack boardribbon cable by pulling it straightback out of the ZIF connector.
During reassembly, orient the ribboncable so that the side with the whitestripe faces you, as shown.
Retina MacBook 2015 Logic Board Repla… Draft: 2021-06-10Guide ID: 44095 -
This document was generated on 2021-06-12 12:58:39 PM (MST).
© iFixit — CC BY-NC-SA www.iFixit.com Page 12 of 23
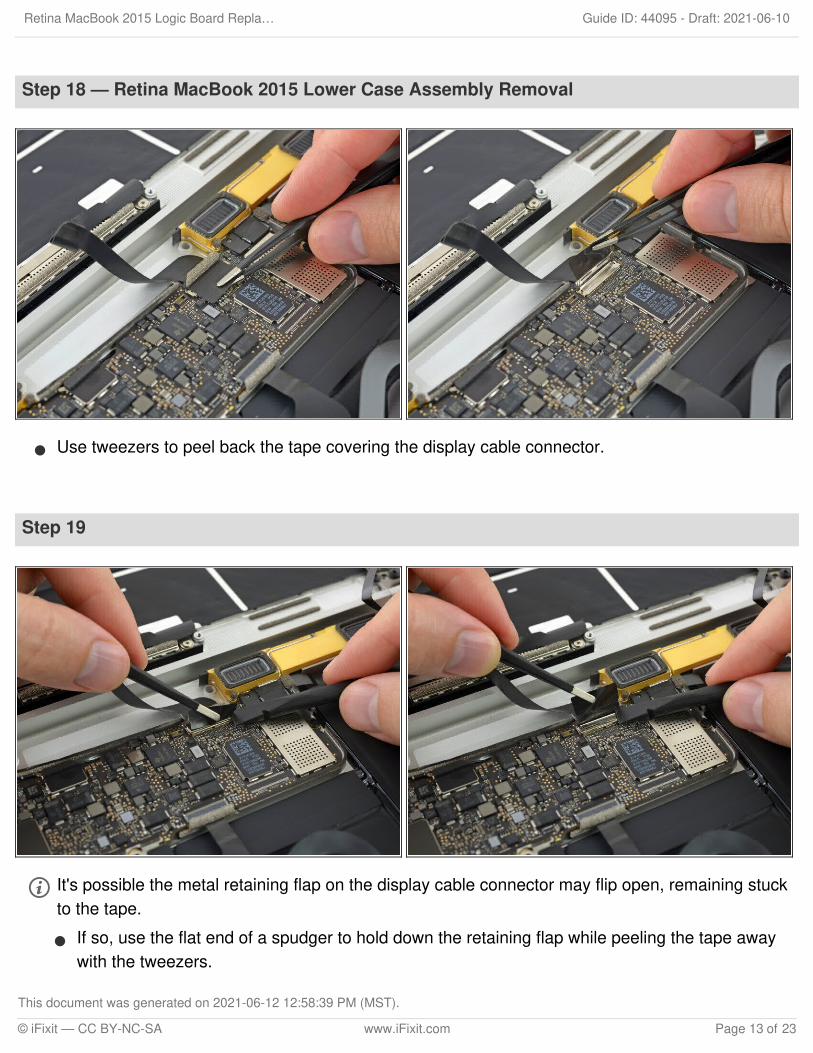
Step 18 — Retina MacBook 2015 Lower Case Assembly Removal
Use tweezers to peel back the tape covering the display cable connector.
Step 19
It's possible the metal retaining flap on the display cable connector may flip open, remaining stuckto the tape.
If so, use the flat end of a spudger to hold down the retaining flap while peeling the tape awaywith the tweezers.
Retina MacBook 2015 Logic Board Repla… Draft: 2021-06-10Guide ID: 44095 -
This document was generated on 2021-06-12 12:58:39 PM (MST).
© iFixit — CC BY-NC-SA www.iFixit.com Page 13 of 23
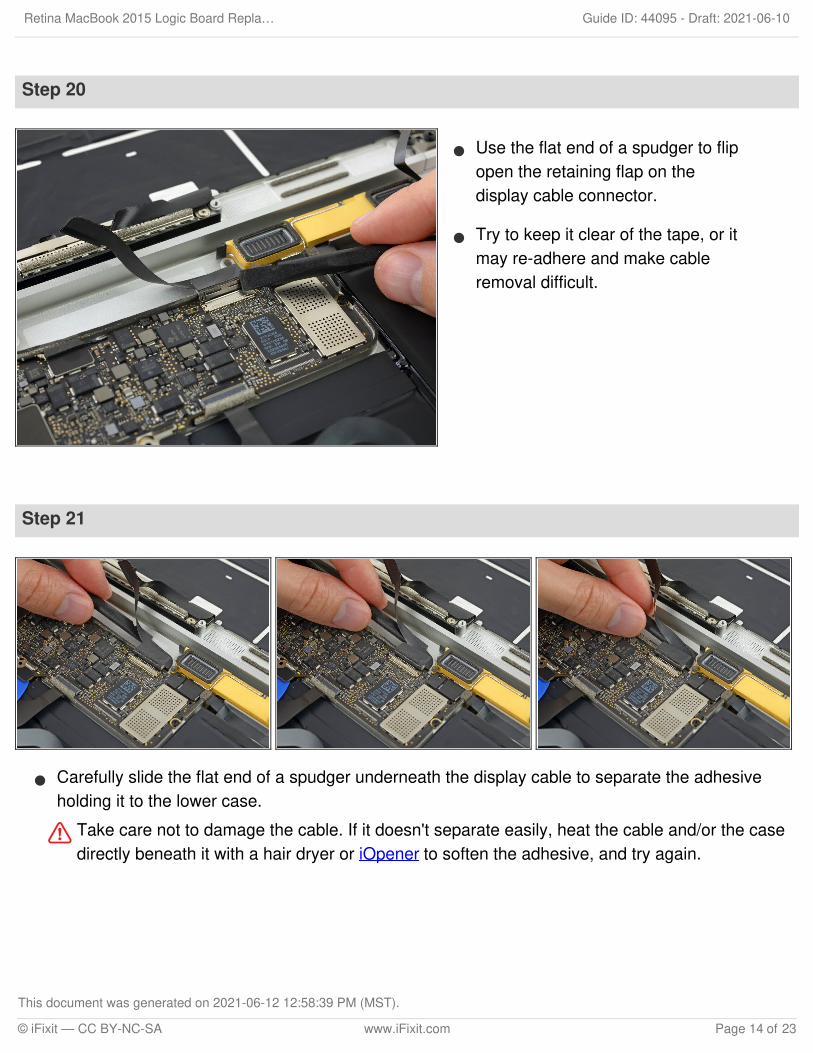
Step 20
Use the flat end of a spudger to flipopen the retaining flap on thedisplay cable connector.
Try to keep it clear of the tape, or itmay re-adhere and make cableremoval difficult.
Step 21
Carefully slide the flat end of a spudger underneath the display cable to separate the adhesiveholding it to the lower case.
Take care not to damage the cable. If it doesn't separate easily, heat the cable and/or the casedirectly beneath it with a hair dryer or iOpener to soften the adhesive, and try again.
Retina MacBook 2015 Logic Board Repla… Draft: 2021-06-10Guide ID: 44095 -
This document was generated on 2021-06-12 12:58:39 PM (MST).
© iFixit — CC BY-NC-SA www.iFixit.com Page 14 of 23
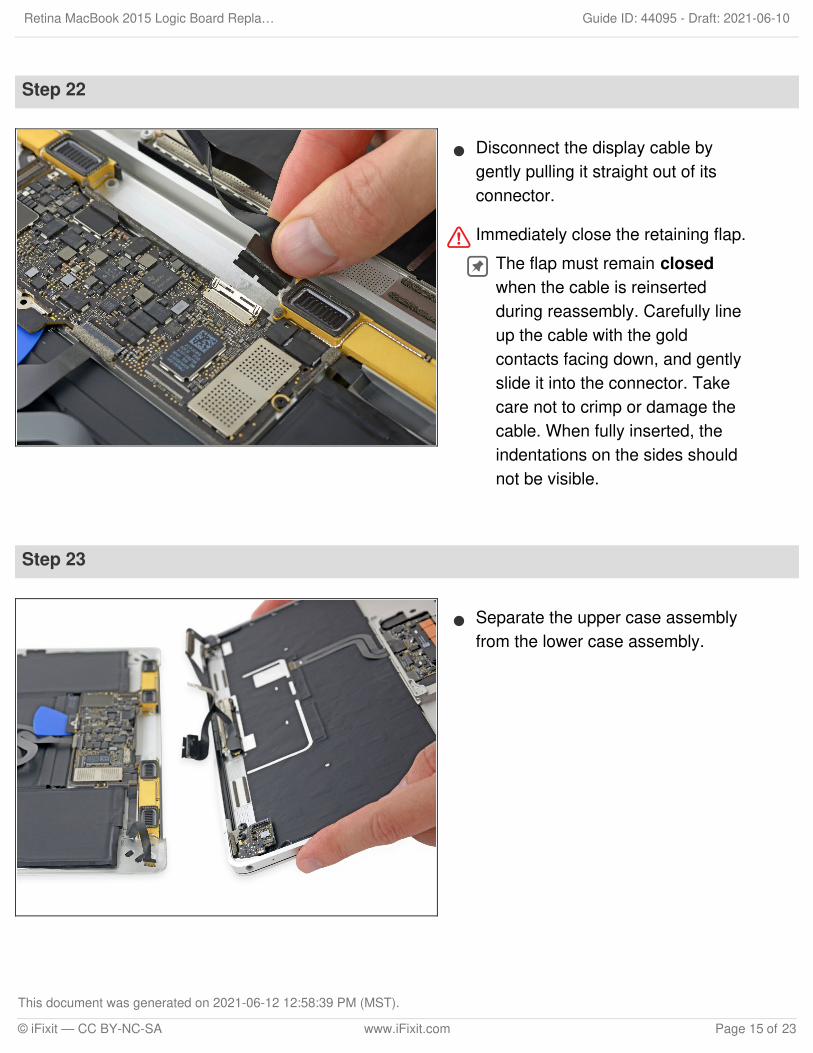
Step 22
Disconnect the display cable bygently pulling it straight out of itsconnector.
Immediately close the retaining flap.The flap must remain closedwhen the cable is reinsertedduring reassembly. Carefully lineup the cable with the goldcontacts facing down, and gentlyslide it into the connector. Takecare not to crimp or damage thecable. When fully inserted, theindentations on the sides shouldnot be visible.
Step 23
Separate the upper case assemblyfrom the lower case assembly.
Retina MacBook 2015 Logic Board Repla… Draft: 2021-06-10Guide ID: 44095 -
This document was generated on 2021-06-12 12:58:39 PM (MST).
© iFixit — CC BY-NC-SA www.iFixit.com Page 15 of 23
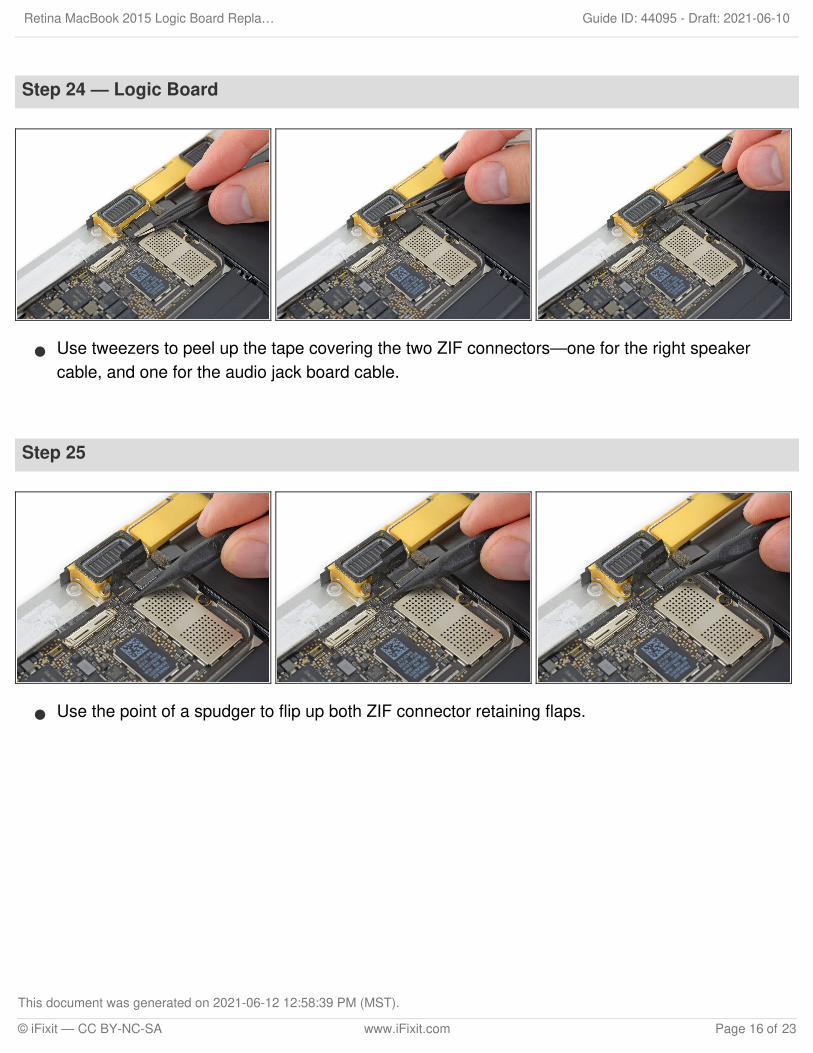
Step 24 — Logic Board
Use tweezers to peel up the tape covering the two ZIF connectors—one for the right speakercable, and one for the audio jack board cable.
Step 25
Use the point of a spudger to flip up both ZIF connector retaining flaps.
Retina MacBook 2015 Logic Board Repla… Draft: 2021-06-10Guide ID: 44095 -
This document was generated on 2021-06-12 12:58:39 PM (MST).
© iFixit — CC BY-NC-SA www.iFixit.com Page 16 of 23

Step 26
Carefully pull straight back on the two pieces of tape you just peeled up to disconnect the tworibbon cables.
Step 27
Use the point of a spudger to peel up the foam pad covering the two antenna connectors.
Retina MacBook 2015 Logic Board Repla… Draft: 2021-06-10Guide ID: 44095 -
This document was generated on 2021-06-12 12:58:39 PM (MST).
© iFixit — CC BY-NC-SA www.iFixit.com Page 17 of 23
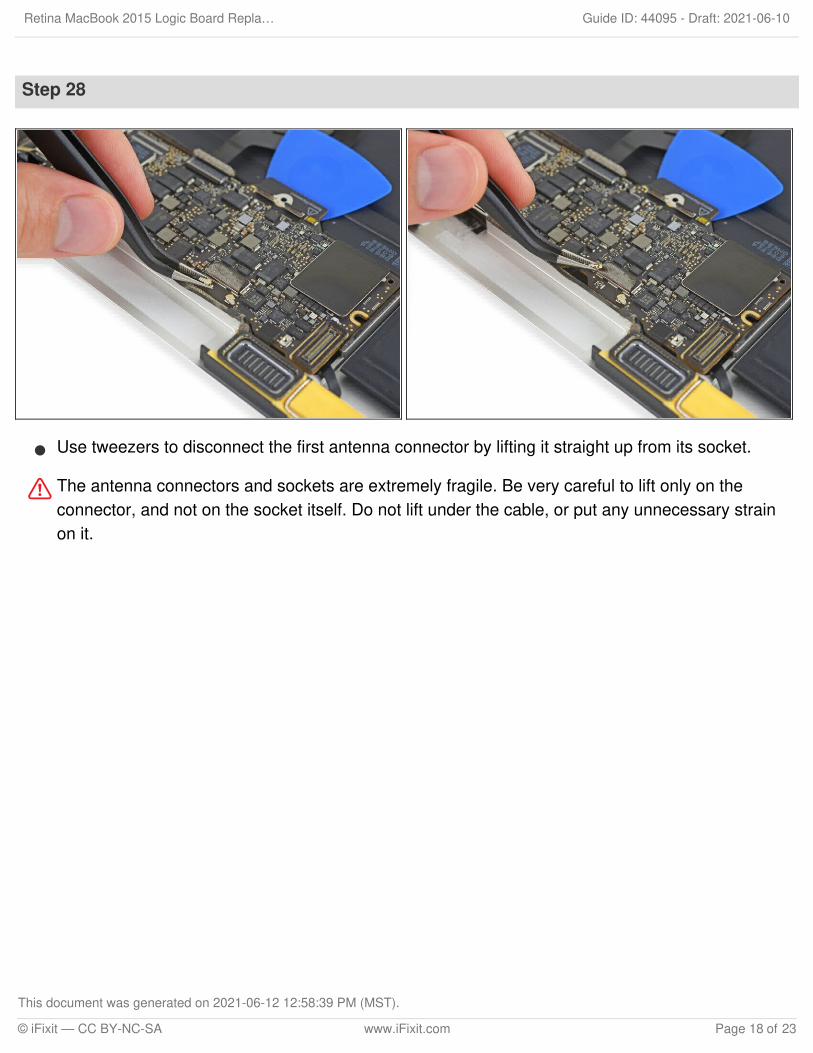
Step 28
Use tweezers to disconnect the first antenna connector by lifting it straight up from its socket.
The antenna connectors and sockets are extremely fragile. Be very careful to lift only on theconnector, and not on the socket itself. Do not lift under the cable, or put any unnecessary strainon it.
Retina MacBook 2015 Logic Board Repla… Draft: 2021-06-10Guide ID: 44095 -
This document was generated on 2021-06-12 12:58:39 PM (MST).
© iFixit — CC BY-NC-SA www.iFixit.com Page 18 of 23

Step 29
Use tweezers to disconnect the second antenna connector by lifting it straight up from its socket.
The antenna connectors and sockets are extremely fragile. Be very careful to lift only on theconnector, and not on the socket itself. Do not lift under the cable, or put any unnecessary strainon it.
Retina MacBook 2015 Logic Board Repla… Draft: 2021-06-10Guide ID: 44095 -
This document was generated on 2021-06-12 12:58:39 PM (MST).
© iFixit — CC BY-NC-SA www.iFixit.com Page 19 of 23
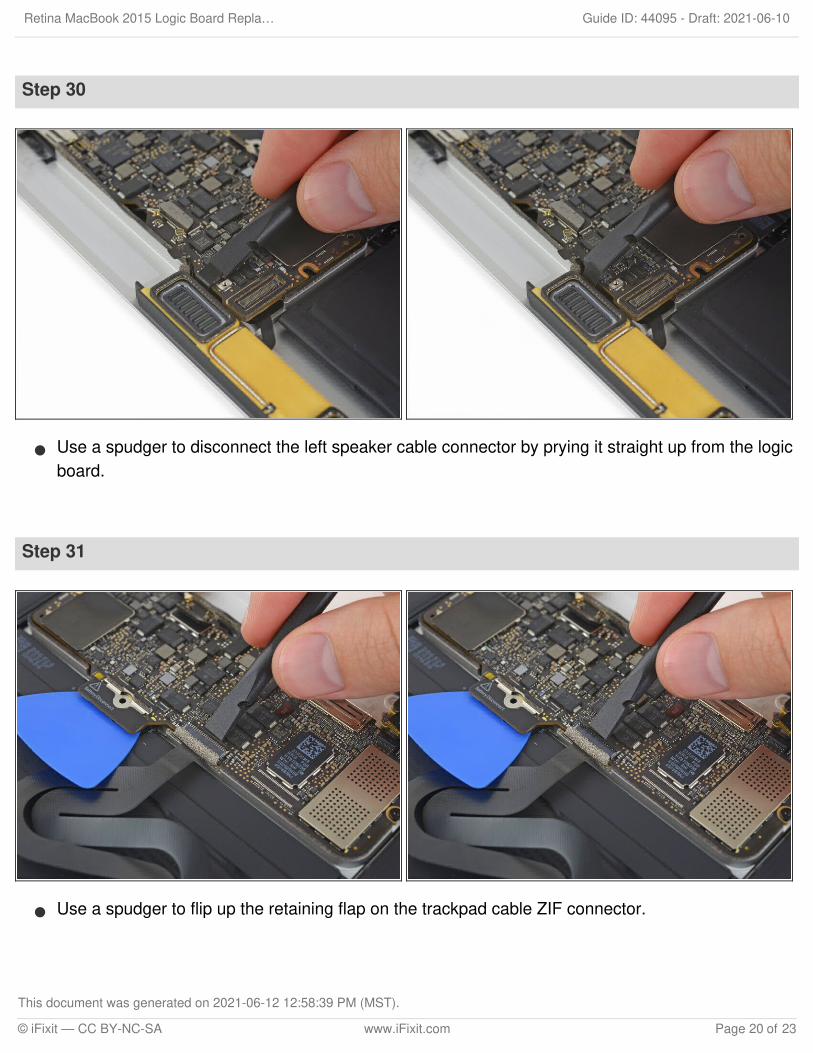
Step 30
Use a spudger to disconnect the left speaker cable connector by prying it straight up from the logicboard.
Step 31
Use a spudger to flip up the retaining flap on the trackpad cable ZIF connector.
Retina MacBook 2015 Logic Board Repla… Draft: 2021-06-10Guide ID: 44095 -
This document was generated on 2021-06-12 12:58:39 PM (MST).
© iFixit — CC BY-NC-SA www.iFixit.com Page 20 of 23
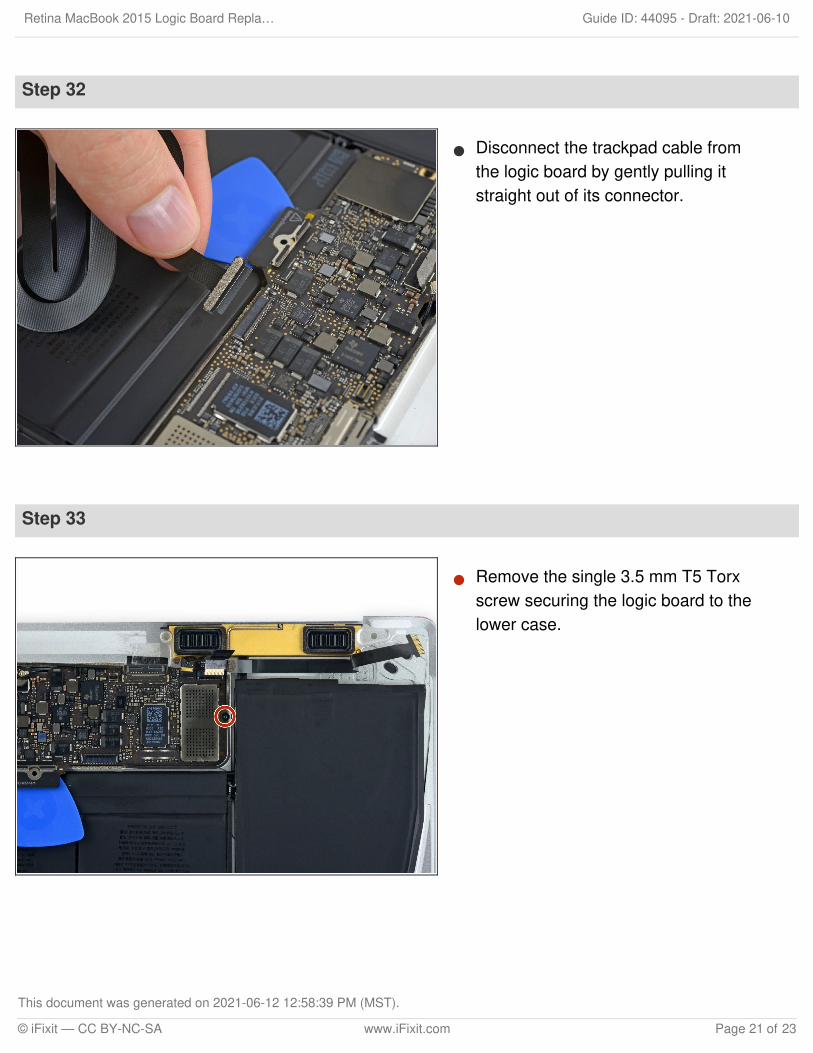
Step 32
Disconnect the trackpad cable fromthe logic board by gently pulling itstraight out of its connector.
Step 33
Remove the single 3.5 mm T5 Torxscrew securing the logic board to thelower case.
Retina MacBook 2015 Logic Board Repla… Draft: 2021-06-10Guide ID: 44095 -
This document was generated on 2021-06-12 12:58:39 PM (MST).
© iFixit — CC BY-NC-SA www.iFixit.com Page 21 of 23

Step 34
Flip up the front edge of the logic board.
Handle the logic board only by its edges.
Lift and detach the EMI tape securing the logic board to the lower case.
Warming the tape with a hair dryer or iOpener makes it easier to detach.
Reattach the tape securely during reassembly.
Step 35
Remove the logic board.
Retina MacBook 2015 Logic Board Repla… Draft: 2021-06-10Guide ID: 44095 -
This document was generated on 2021-06-12 12:58:39 PM (MST).
© iFixit — CC BY-NC-SA www.iFixit.com Page 22 of 23

To reassemble your device, follow these instructions in reverse order. To avoid logic board damage,when your MacBook repair is complete but before powering it on, connect it to low-voltage power usinga 5-Watt iPhone charger and a USB-C to USB-A cable.
Retina MacBook 2015 Logic Board Repla… Draft: 2021-06-10Guide ID: 44095 -
This document was generated on 2021-06-12 12:58:39 PM (MST).
© iFixit — CC BY-NC-SA www.iFixit.com Page 23 of 23
Copyright © 2022 FDOKUMEN