Residential plumbing installation guide | Uponor
60
Residential plumbing installation guide
-
Upload
khangminh22 -
Category
Documents
-
view
1 -
download
0
Transcript of Residential plumbing installation guide | Uponor

Residential plumbing installation guide

Uponor residential plumbing installation guide is published by
Uponor, Inc. 5925 148th Street West Apple Valley, MN 55124 USA Tel: 800.321.4739 Fax: 952.891.2008 uponorpro.com
Uponor Ltd. 6510 Kennedy Road Mississauga, ON L5T 2X4 CANADA Tel: 888.994.7726 Fax: 800.638.9517 uponorpro.com
© 2019 Uponor North America All Rights Reserved.
Second Edition August 2019 First Printing January 2019 Printed in the United States of America
Uponor has used reasonable efforts in collecting, preparing and providing quality information and material in this installation guide. However, system enhancements may result in modification of features or specifications without notice.Uponor is not liable for installation practices that deviate from this installation guide or are not acceptable practices within the mechanical trades.

Uponor residential plumbing installation guide l i
Table of contents Section 1: The Uponor plumbing system . . . . . . . . . . . . . . 1Applications . . . . . . . . . . . . . . . . . . . . . . . . . . . . . . . . . . . . 1Hydrostatic temperature and pressure ratings . . . . . . . . . . . . . . . . . . 2Excessive temperature and pressure capability . . . . . . . . . . . . . . . . . . 2Recirculation systems . . . . . . . . . . . . . . . . . . . . . . . . . . . . . . . 2
Section 2: Working with Uponor AquaPEX® piping . . . . . . . . . 3Bending the pipe . . . . . . . . . . . . . . . . . . . . . . . . . . . . . . . . . . 3Bend supports . . . . . . . . . . . . . . . . . . . . . . . . . . . . . . . . . . . 4Storing and handling guidelines . . . . . . . . . . . . . . . . . . . . . . . . . . 4
Section 3: Making ProPEX® connections. . . . . . . . . . . . . . . 7Distance between fittings . . . . . . . . . . . . . . . . . . . . . . . . . . . . . 7General ProPEX connection tips . . . . . . . . . . . . . . . . . . . . . . . . . 8Making ProPEX connections with Milwaukee® ProPEX expansion tools . . . . . 9Making ⅜" ProPEX connections. . . . . . . . . . . . . . . . . . . . . . . . . 11Proper expander tool and head maintenance . . . . . . . . . . . . . . . . . . 11Brass transition fittings . . . . . . . . . . . . . . . . . . . . . . . . . . . . . . 12Other manufacturers’ pipe and fittings. . . . . . . . . . . . . . . . . . . . . . 12Troubleshooting ProPEX connections . . . . . . . . . . . . . . . . . . . . . . 12
Fittings won’t seal . . . . . . . . . . . . . . . . . . . . . . . . . . . . . . 12Expansion is difficult . . . . . . . . . . . . . . . . . . . . . . . . . . . . 13Expansion head slips out of piping when making expansions . . . . . . . 13ProPEX ring slides down piping during expansion . . . . . . . . . . . . . 13More than the recommended number of expansions are needed to make a connection . . . . . . . . . . . . . . . . . . . . . . . 13Cold-weather expansions . . . . . . . . . . . . . . . . . . . . . . . . . . 13
Section 4: Water service phase . . . . . . . . . . . . . . . . . . . . 15Handling and repairs. . . . . . . . . . . . . . . . . . . . . . . . . . . . . . . 15Trench bottom preparation. . . . . . . . . . . . . . . . . . . . . . . . . . . . 15Piping embedment . . . . . . . . . . . . . . . . . . . . . . . . . . . . . . . . 15Installation . . . . . . . . . . . . . . . . . . . . . . . . . . . . . . . . . . . . 16Handling and repairs. . . . . . . . . . . . . . . . . . . . . . . . . . . . . . . 16Trace wire . . . . . . . . . . . . . . . . . . . . . . . . . . . . . . . . . . . . 16Joining methods and fittings . . . . . . . . . . . . . . . . . . . . . . . . . . . 17Water service disinfection . . . . . . . . . . . . . . . . . . . . . . . . . . . . 17ProPEX water meter fittings and valves . . . . . . . . . . . . . . . . . . . . . 17

ii | uponorpro.com
Section 5: Installation methods . . . . . . . . . . . . . . . . . . . . 19Below-grade or in-slab installations . . . . . . . . . . . . . . . . . . . . . . . 19Installing Uponor AquaPEX piping in wood-frame construction. . . . . . . . . 20
Piping runs . . . . . . . . . . . . . . . . . . . . . . . . . . . . . . . . . 20Recessed light fixtures . . . . . . . . . . . . . . . . . . . . . . . . . . . 21Fluorescent lighting . . . . . . . . . . . . . . . . . . . . . . . . . . . . . 21LED lighting . . . . . . . . . . . . . . . . . . . . . . . . . . . . . . . . . 21Piping supports: general guidelines . . . . . . . . . . . . . . . . . . . . 22Piping supports: horizontal runs . . . . . . . . . . . . . . . . . . . . . . 22Piping supports: vertical in-wall piping . . . . . . . . . . . . . . . . . . . 23Strapping . . . . . . . . . . . . . . . . . . . . . . . . . . . . . . . . . . 23Bundling . . . . . . . . . . . . . . . . . . . . . . . . . . . . . . . . . . . 23 Spray-foam insulation . . . . . . . . . . . . . . . . . . . . . . . . . . . . 24 Closed-cell spray foam insulation . . . . . . . . . . . . . . . . . . . . 24 Icynene® spray-foam insulation . . . . . . . . . . . . . . . . . . . . . 24
Uponor Logic plumbing system . . . . . . . . . . . . . . . . . . . . . . . . . 24 Supporting Uponor multiport tees . . . . . . . . . . . . . . . . . . . . . . . . 25ProPEX out-of-the-wall support system . . . . . . . . . . . . . . . . . . . . . 26ProPEX drop ear LF brass elbows . . . . . . . . . . . . . . . . . . . . . . . 27Metal straight-through supports . . . . . . . . . . . . . . . . . . . . . . . . . 27Grommets . . . . . . . . . . . . . . . . . . . . . . . . . . . . . . . . . . . . 27Water hammer arrestors . . . . . . . . . . . . . . . . . . . . . . . . . . . . . 27Steel plate protectors . . . . . . . . . . . . . . . . . . . . . . . . . . . . . . 27Shower valve connections . . . . . . . . . . . . . . . . . . . . . . . . . . . . 28Hose bibs . . . . . . . . . . . . . . . . . . . . . . . . . . . . . . . . . . . . 28ProPEX copper tub ells . . . . . . . . . . . . . . . . . . . . . . . . . . . . . 28ProPEX copper stub ells . . . . . . . . . . . . . . . . . . . . . . . . . . . . . 28Straight and angle stop valves. . . . . . . . . . . . . . . . . . . . . . . . . . 29
Installing compression connections. . . . . . . . . . . . . . . . . . . . . 29Termiticide or pesticide treatment . . . . . . . . . . . . . . . . . . . . . . . . 29
Section 6: Pressure testing and water system disinfection . . . . 31Pressure testing . . . . . . . . . . . . . . . . . . . . . . . . . . . . . . . . . 31Water system disinfection . . . . . . . . . . . . . . . . . . . . . . . . . . . . 31

Uponor residential plumbing installation guide l iii
Appendix A: Laying out an Uponor Logic system. . . . . . . . . . 33Uponor Logic plumbing systems vs. conventional thinking . . . . . . . . . . . 33
Features and benefits . . . . . . . . . . . . . . . . . . . . . . . . . . . . 33 Uponor Logic plumbing . . . . . . . . . . . . . . . . . . . . . . . . . . . 34 Trunk-and-branch plumbing. . . . . . . . . . . . . . . . . . . . . . . . . 35 Homerun plumbing . . . . . . . . . . . . . . . . . . . . . . . . . . . . . 36 Two-story home: planning example . . . . . . . . . . . . . . . . . . . . 37 Slab-on-grade home: planning example . . . . . . . . . . . . . . . . . . 41
Appendix B: Standards, listings and codes . . . . . . . . . . . . . 45Standards . . . . . . . . . . . . . . . . . . . . . . . . . . . . . . . . . . . . 45Listings . . . . . . . . . . . . . . . . . . . . . . . . . . . . . . . . . . . . . . 46Codes . . . . . . . . . . . . . . . . . . . . . . . . . . . . . . . . . . . . . . 46Material designation code . . . . . . . . . . . . . . . . . . . . . . . . . . . . 46Piping identification . . . . . . . . . . . . . . . . . . . . . . . . . . . . . . . 46Print stream identification . . . . . . . . . . . . . . . . . . . . . . . . . . . . 47
Appendix C: Troubleshooting tips and tricks . . . . . . . . . . . . 49Reforming kinked piping . . . . . . . . . . . . . . . . . . . . . . . . . . . . . 49Thawing frozen piping . . . . . . . . . . . . . . . . . . . . . . . . . . . . . . 50
Appendix D: Installation checklist . . . . . . . . . . . . . . . . . . 51

iv | uponorpro.com
Foreword
This installation guide is published for building officials, plumbing professionals and contractors interested in Uponor professional plumbing systems. This manual describes general installation recommendations that use Uponor AquaPEX®1 piping products. Always follow local code requirements.
Note: The Uponor plumbing system can include Uponor AquaPEX white, blue or red piping as well as Uponor AquaPEX reclaimed water (purple) piping, pre-sleeved Uponor AquaPEX piping and pre-insulated Uponor AquaPEX piping. For readability, this document will refer to Uponor AquaPEX piping when information applies to any or all forms of Uponor AquaPEX piping.
Uponor has used reasonable efforts in collecting, preparing and providing quality information and material in this manual. However, system enhancements may result in modification of features or specifications without notice. For the most current technical information, go to the Uponor website at uponorpro.com.
Uponor is not liable for installation practices that deviate from this manual or are not acceptable practices within the mechanical trades. Refer to the Uponor Residential Fire Safety System Installation Guide to install Uponor AquaPEX piping in Uponor fire safety systems.
Prior to installing Uponor plumbing systems, Uponor recommends all installers attend Uponor plumbing systems installation training performed by an Uponor trainer or manufacturer’s representative. To schedule a training session at your business or job site, contact your local Uponor representative or call 800.321.4739.
Please direct any questions regarding the suitability of an application or a specific design to your local Uponor representative. For the name of your local representative, please call toll free 800.321.4739.
1 Uponor AquaPEX® is a registered trademark of Uponor, Inc. and Uponor Ltd. ProPEX® is a registered trademark of Uponor, Inc. ProPEX™ is a trademark of Uponor Ltd.

Uponor residential plumbing installation guide l 1
Section 1The Uponor plumbing systemThe Uponor plumbing system consists of the following Uponor AquaPEX piping and Uponor plumbing components:
• Uponor AquaPEX red, white and blue piping
• Uponor AquaPEX reclaimed water (purple) piping
• Pre-insulated Uponor AquaPEX piping• Pre-sleeved Uponor AquaPEX piping• ProPEX® engineered polymer
(EP) fittings • ProPEX lead-free (LF) brass fittings• ProPEX EP multiport tees• Supports • Finishes
PEX is an acronym for crosslinked polyethylene. The “PE” refers to the raw material used to make PEX (polyethylene), and the “X” refers to crosslinking the polyethylene across its molecular chains. The molecular chains are linked into a three-dimensional network that makes PEX remarkably durable within a wide range of temperatures and pressures.
Uponor manufactures PEX piping using a hot-crosslinking process. The actual crosslinking takes place during the extrusion process when the base polyethylene is above its melting temperatures. Classified within the industry as PEX-a piping, this type of PEX is superior to other PEX types due to its consistent, uniform and evenly crosslinked formula. Uponor AquaPEX
also demonstrates a great resistance to chemical-dissolving agents. This unique structure is stable and inert, and it is unaffected by chemicals commonly found in plumbing and heating systems.
Uponor AquaPEX pipe and ProPEX fittings are approved for use in national building codes. Always consult local building codes for approvals in specific jurisdictions. For a complete listing of Uponor AquaPEX pipe and ProPEX fittings standards, listings and codes, refer to Appendix B.
ApplicationsUponor AquaPEX piping is versatile and has a broad range of uses.
• Potable hot- and cold-water distribution• Fire protection systems• Water reclamation systems • Water service (see Section 4 for
details)• Closed-loop hydronic radiant
heating (radiant floor, baseboard and radiator connections)
• Closed-loop snow and ice melting systems
Note: Uponor AquaPEX does not have an oxygen barrier. Only use the pipe in hydronic radiant heating or snow and ice melting systems containing no ferrous corrodible components or where ferrous corrodible components are isolated from the piping.

2 | uponorpro.com
Our extensive listings and history of system testing ensures Uponor AquaPEX piping is suitable for use in many types of residential applications, including, but not limited to, the following:
• Single-family homes
• Townhomes
• Apartments• Condominiums
Note: For multifamily installations, including risers, pipe support, hanger spacing, expansion/contraction, firestopping, etc., refer to the Uponor Plumbing Design Assistance Manual (PDAM).
Hydrostatic temperature and pressure ratingsUponor maintains standard-grade ratings for its PEX piping. Uponor AquaPEX carries the following temperature and pressure ratings shown in Table 1-1.
Note: ProPEX EP and LF brass fittings carry the same temperature and pressure ratings as Uponor AquaPEX pipe.
ASTM F876 temperature and pressure ratings for SDR9 PEX
Rated temp.
Hydrostatic design stress
(HDS) psi
Pressure rating for water psi
73.4°F (23°C) 630 160 psi
(11 bar)180°F (82°C) 400 100 psi
(6.9 bar)200°F (93°C) 315 80 psi
(5.5 bar)Table 1-1: Hydrostatic temperature and pressure ratings for Uponor PEX pipe
Excessive temperature and pressure capabilityIn accordance with ASTM F876, Standard Specification for Crosslinked Polyethylene (PEX) Piping, the excessive temperature and pressure capability of Uponor AquaPEX is 210ºF (99ºC) at 150 psi (10 bar).
This standard requires that Uponor AquaPEX piping maintain its integrity for a period of 720 hours (30 days) at 210ºF (99ºC) at 150 psi (10 bar). If installed as directed, Uponor AquaPEX will withstand these conditions.
Note: Excessive temperature and pressure requirements are always subject to approval by local building codes (e.g., temperature and pressure-relief valves).
Recirculation systemsBased on extensive history of use and independent-laboratory testing, Uponor AquaPEX piping and ProPEX fitting systems are approved for use in timed, sensor-activated, self-activated or continuous hot-water recirculation systems operating at the following parameters:
• Temperature not exceeding 140°F (60°C)
• Velocity not exceeding 2 feet per second (fps)
Note: Uponor does not promote the use of continuous recirculation due to excessive energy waste.
For the greatest effectiveness, use a hot-water recirculation line in an Uponor Logic plumbing layout. See Appendix A for details.

Uponor residential plumbing installation guide l 3
Section 2 Working with Uponor PEX pipingBending the pipeThe flexible nature of Uponor AquaPEX piping allows it to bend with each change in direction, minimizing required fittings on the job. The minimum bend radius of Uponor AquaPEX piping is six times the outside diameter (O.D.).
To alleviate stress on ProPEX connections and fittings, do not change direction immediately after a ProPEX connection. To aid in determining whether or not the directional change is too soon, refer to Figure 2-2 and Figure 2-3.
Uponor recommends a minimum of two times the O.D. of the pipe as the minimum distance before changing direction; however, it is up to the installer to use best judgment.
Bend supports are available for pipe sizes up to 1" to facilitate 90-degree rigid bends (see Figures 2-4 and 2-5 on the following page). When minimum distance cannot be achieved with a bend support, Uponor recommends using a ProPEX elbow.
For piping larger than 1", Uponor recommends using ProPEX elbows, unless adequate space is available for a proper bend.
Figure 2-1: Bend radius
Radius
2 x O.D.
Figure 2-2: Correct bending
Figure 2-3: Incorrect bending

4 | uponorpro.com
Bend supportsUponor offers various bend supports to secure piping in a 90-degree bend. Metal and plastic snap-on bend supports are available for ⅜", ½" and ¾" piping. PVC conduit supports are available for up to 1" piping and are also appropriate for use when exiting a slab to protect the piping and control direction.
Metal and plastic drop-ear bend supports are available for ⅜" and ½" piping to provide a 90-degree exit from a standard 2" x 4" (or larger) stud wall or floor. To install, fasten the flange to the front edge of the stud for support. Use a horizontal brace to position the drop-ear bend support between two studs.
Storing and handling guidelinesAlthough not comprehensive, the following highlights the most common guidelines when storing and handling Uponor AquaPEX piping and ProPEX fittings.
• Do not store outdoors. • Keep in the original packaging
until time of installation.• Install Uponor systems according
to the installation instructions. Failure to follow the instructions and installation guidelines in this manual can compromise the performance of the system.
• Do not use where temperatures and pressures exceed ratings.
• Do not use or store Uponor AquaPEX white pipe or ProPEX EP fittings where they will be exposed to direct sunlight for more than one month.
• Do not use or store Uponor AquaPEX red or blue pipe where it will be exposed to direct sunlight for more than six months.
• Do not reuse or reclaim ProPEX EP or LF brass fittings.
Figure 2-4: Support for 90-degree bend
Figure 2-5: Drop-ear bend supports

Uponor residential plumbing installation guide l 5
• Do not weld, glue or apply adhesives or tape [except polyethylene (PE) tape] to the pipe. Uponor approves the temporary use of adhesive tape during installation provided the tape is removed after installation is complete.
• Do not apply an open flame.• Uponor AquaPEX may be connected
directly to electric water heaters, as well as power-vented gas water heaters where allowed by local code.
• Do not install within 6" of any gas appliance vents. One exception is double-wall B-vents, which have a minimum clearance of 1".
• Do not install within 12" (over or under) of any recessed light fixture unless protected with suitable insulation.
• When installing Uponor AquaPEX within 6" of fluorescent lighting, insulate the pipe from heat exposure with closed-cell or fiberglass pipe insulation. Ensure the pipe is protected 18" beyond each side of the fluorescent light source and maintains a minimum clearance of 1" from the fluorescent light source.
• When pipe is directly under or within 3 feet laterally of fluorescent lighting, sleeve the pipe with HDPE poly sheathing, closed-cell pipe insulation or any suitable pipe covering material that is black in color to protect it from UV exposure. Ensure the coverage extends 18" beyond each side of the fluorescent light source.
• If installing Uponor AquaPEX within 18" of an LED light source, cover the pipe with foam insulation or some other protective covering. Such protection should cover the pipe to a distance of at least 18" from the light source.
• Do not use to convey natural gas.• Do not solder, braze, weld, or
fusion-weld within 18" of any Uponor AquaPEX pipe or ProPEX EP fitting in the same waterline. Make sweat connections prior to making the ProPEX connection.
• Do not install Uponor AquaPEX pipe between the tub/shower valve and tub spout.
• Do not use Uponor AquaPEX pipe for an electrical ground.
• Use only approved and appropriate firestop materials with Uponor AquaPEX pipe.
• Do not subject to blunt impact.• Do not spray on or allow organic
chemicals, strong acids or strong bases to come into contact with Uponor AquaPEX pipe or ProPEX EP fittings.
• Do not use petroleum or solvent-based paints, greases or sealants on Uponor AquaPEX pipe or ProPEX EP fittings.
• Do not allow rodents, insects or other pests to come into contact with Uponor AquaPEX pipe or ProPEX EP fittings.
• During remodeling or ceiling repair, take appropriate precautions to protect from damage.
• Do not install in soil contaminated with solvents, fuels, organic compounds, pesticides or other materials that may cause permeation, corrosion, degradation or structural failure. If necessary, perform a chemical analysis of the soil or groundwater to determine installation acceptability. Check local codes for additional requirements. For more information, refer to the termiticide or pesticide treatment section on page 29.

6 | uponorpro.com
• When using urethane foam insulation/ sealant, cover ProPEX EP fittings with a protective (PE, foil, etc.) wrap to prevent direct contact.
• Do not expose ProPEX EP fittings to bending loads greater than 100 lbs.
• When transitioning to copper, do not press ProPEX LF brass copper sweat transition fittings (LF450 and LF451 parts).

Uponor residential plumbing installation guide l 7
Section 3 Making ProPEX connectionsUponor ProPEX ASTM F1960 and CAN/CSA B137.5 cold-expansion fittings make solid, permanent, manufactured connections without the need for torches, glues, solder, flux or gauges. The unique shape memory of Uponor AquaPEX piping forms a tight seal around the fitting, creating a strong, reliable connection.
This document shows how to make proper ProPEX connections using the Milwaukee® M12™ or M18™ ProPEX expansion tools. For questions about these tools, contact Milwaukee Tool directly at 800.729.3878.
Note: If making ProPEX connections larger than 1½", use the Milwaukee M18 FORCE LOGIC 2" - 3" ProPEX Expansion Tool or the Uponor ProPEX 201 Expander Tool. Refer to the Uponor Plumbing Design Assistance Manual (PDAM) for installation instructions and tool maintenance.
Distance between fittingsUponor requires a minimum distance between ProPEX fittings to avoid damaging the fittings during installation and to protect against elevated stress on the pipe and fittings. Refer to Table 3-1 for the minimum distance between fittings, which is expressed as cut length of pipe.
Nominal fitting size Cut length of pipe
½" 2"¾" 3"1" 3½"
1¼" 4½"1½" 4½"
Table 3-1: Minimum distance between ProPEX fittings
Figure 3-2: Milwaukee M12 ProPEX Expansion Tool
Figure 3-3: Milwaukee M18 ProPEX Expansion Tool
Figure 3-4: Milwaukee M18 FORCE LOGIC 2" - 3" ProPEX Expansion Tool
Cut length of pipe
Figure 3-1: Cut length of pipe
8 | uponorpro.com
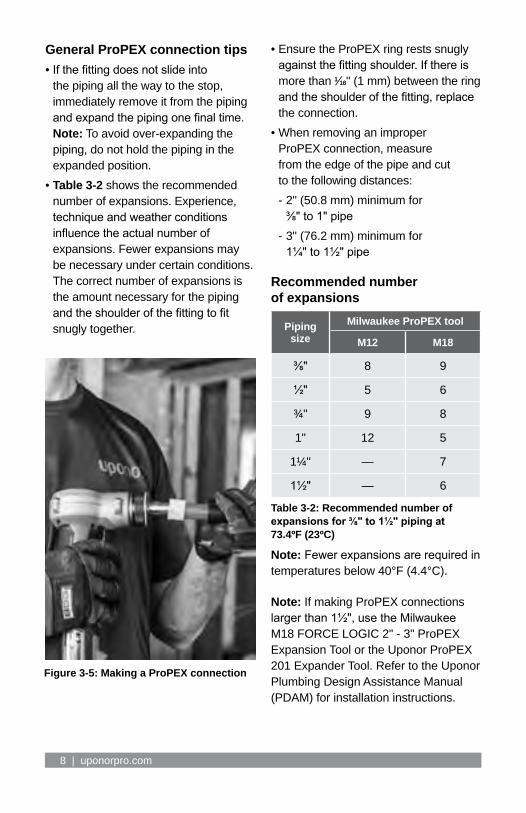
General ProPEX connection tips• If the fitting does not slide into
the piping all the way to the stop, immediately remove it from the piping and expand the piping one final time. Note: To avoid over-expanding the piping, do not hold the piping in the expanded position.
• Table 3-2 shows the recommended number of expansions. Experience, technique and weather conditions influence the actual number of expansions. Fewer expansions may be necessary under certain conditions. The correct number of expansions is the amount necessary for the piping and the shoulder of the fitting to fit snugly together.
• Ensure the ProPEX ring rests snugly against the fitting shoulder. If there is more than 11⁄1616" (1 mm) between the ring and the shoulder of the fitting, replace the connection.
• When removing an improper ProPEX connection, measure from the edge of the pipe and cut to the following distances: - 2" (50.8 mm) minimum for ⅜" to 1" pipe
- 3" (76.2 mm) minimum for 1¼" to 1½" pipe
Recommended number of expansions
Piping size
Milwaukee ProPEX tool
M12 M18
⅜" 8 9
½" 5 6
¾" 9 8
1" 12 5
1¼" — 7
1½" — 6
Table 3-2: Recommended number of expansions for ⅜" to 1½" piping at 73.4ºF (23ºC)
Note: Fewer expansions are required in temperatures below 40°F (4.4°C).
Note: If making ProPEX connections larger than 1½", use the Milwaukee M18 FORCE LOGIC 2" - 3" ProPEX Expansion Tool or the Uponor ProPEX 201 Expander Tool. Refer to the Uponor Plumbing Design Assistance Manual (PDAM) for installation instructions.
Figure 3-5: Making a ProPEX connection

Uponor residential plumbing installation guide l 9
Making ProPEX connections with Milwaukee ProPEX expansion toolsRefer to the following steps to make a proper ProPEX connection with a Milwaukee ProPEX expansion tool.
1. Square cut the PEX piping perpendicular to the length of the piping. Remove all excess material or burrs that might affect the fitting connection.
Figure 3-6: Square cut the pipe
2. Slide the ProPEX ring over the end of the piping until it reaches the stop edge. If using a ⅜" ProPEX ring, which does not feature a stop edge, extend the ring over the end of the piping no more than 11/1616" (1 mm).
Important! If making a ⅜" ProPEX connection, you must first expand each side of the ring before placing it on the piping. Refer to the “Making ⅜" ProPEX connections” instructions on page 11 for further information.
Figure 3-7: Place ring on pipe
Figure 3-8: Ensure pipe reaches ring’s stop edge
3. Milwaukee ProPEX expansion tools come with built-in auto rotation. Simply hold the piping and tool in place while holding the trigger to expand the piping. The head will automatically rotate to ensure the piping is evenly expanded. Continue expanding until the piping and ring are snug against the shoulder on the expander head (see Figure 3-9). See Table 3-2 on page 8 for the recommended number of expansions for each piping size.
¾" to 3" ⅜" to ½"
Shoulder
Shoulder
Figure 3-9: Milwaukee expansion heads

10 | uponorpro.com
Note: Do not force the pipe onto the expander head.
Important! Ensure the tool head is rotating with each expansion. Lack of head rotation will cause deep grooves in the piping which can result in potential leak paths.
Figure 3-13: Milwaukee M18 ProPEX expansion tool
Figure 3-14: Insert the fitting
Figure 3-15: Fitting shoulders
ProPEX tee
ProPEX coupling
Shoulder
4. After the final expansion, immediately remove the tool and insert the fitting. Ensure the piping and ring seat against the shoulder of the fitting.
Important! Only perform the necessary number of expansions. DO NOT over expand the pipe. If you experience the ring slipping down the pipe during the expansion process, refer to page 13 for instructions.
Figure 3-12: Milwaukee M12 ProPEX expansion tool
Figure 3-10: Expansion with proper rotation
Figure 3-11: Expansion without proper rotation

Uponor residential plumbing installation guide l 11
Making ⅜" ProPEX connectionsThe ⅜" ProPEX ring must be expanded once on each side to properly fit over the piping. Refer to the following instructions to make a ⅜" ProPEX connection.
1. Square cut the PEX piping perpendicular to the length of the piping. Remove all excess material or burrs that might affect the fitting connection.
2. Expand each side of the ⅜" ProPEX ring once.
3. Slide the expanded ring over the end of the piping. Extend the end of the ring over the end of the piping no more than 11⁄1616" (1 mm).
4. After the ring is on the piping, continue with the regular steps for making a proper connection with your specific tool.
Note: The thicker ⅜" ProPEX ring shrinks over the fitting faster than larger-sized rings.
B
A
A
B
Figure 3-16: Expand each side of the ring
Figure 3-17: Extend ring 1⁄16" (1 mm) over pipe
Max. 11⁄1616"
Proper expander tool and head maintenance• Use a lint-free cloth to apply a light
coat of lubricant to the cone prior to making any ProPEX connections.
• If used regularly, apply the lubricant daily to the cone of the ProPEX expander tool. Failure to keep these tools lubricated may result in improper connections.
• Keep all other parts of the tool free from lubricant.
• Once a month, soak the heads in degreasing agent to remove any grease from between the segments. Clean the cone using a clean, dry cloth.
Caution: Excessive lubrication may result in improper connections. Only use a small amount of lubrication to keep the tool working properly.

12 | uponorpro.com
Brass transition fittingsUponor offers a comprehensive line of LF brass sweat transition fittings as well as copper press transition adapters. For the complete offering, refer to the Uponor product catalog.
Note: When transitioning to copper, DO NOT press ProPEX LF brass copper sweat transition fittings (LF450 and LF451 parts). Only press Uponor ProPEX LF brass copper press adapters (LFP450 and LFP451 parts).
Other manufacturers’ pipe and fittingsUponor approves the use of its AquaPEX piping with any type of SDR9 PEX fitting, including compression fittings (offered by Uponor or other manufacturers). Install compression fittings with an insert stiffener to ensure the pipe wall does not collapse under compression, compromising the connection.
Note: Uponor cautions the use of other manufacturer’s PEX pipe with Uponor ProPEX rings as well as using other manufacturer’s expansion rings with Uponor AquaPEX (PEX-a) pipe. Because of the lower degree and uniformity of crosslinking in PEX-b and PEX-c pipe, stress cracking of the PEX-b and PEX-c pipe wall can occur during expansion, compromising the strength of the fitting connection.
Additionally, the 25-year limited warranty for Uponor AquaPEX systems is only valid when using both Uponor AquaPEX pipe and Uponor ProPEX fittings. Mixing the ProPEX rings with other manufacturer’s PEX
pipe or mixing other manufacturer’s expansion rings with Uponor AquaPEX pipe will limit the warranty. For complete warranty details, refer to uponorpro.com/warranties.
Troubleshooting ProPEX connectionsTrouble-free ProPEX installations begin with a tool that is maintained in proper working condition. If the tool or segment fingers are damaged, it is very difficult to make a proper connection. Refer to the following guidelines to assist with challenges in the field.
Fittings won’t seal• Make sure the expander head is
securely tightened onto the tool.• Ensure the segment fingers are not
bent. If the head does not completely close when the drive unit is fully retracted or the handles of the manual tool are open, replace the head.
• Examine the tool for excess grease on the segment fingers. Remove excess grease prior to making connections.
• Check the fitting for damage. Nicks and gouges will cause the fitting to leak.
• Make sure the internal driver cone is not damaged or bent.
• Make sure the last expansion is not held in the expanded position before the fitting is inserted. You should feel some resistance as the fitting goes into the piping. If you do not feel any resistance, the piping may be over expanded and will require additional time to shrink over the fitting.

Uponor residential plumbing installation guide l 13
Expansion is difficult• Make sure the internal cone is
properly greased.
Expansion head slips out of piping when making expansions• Ensure the piping and ProPEX ring
are dry.• Make sure that grease is not getting
into the piping.• Examine the segment fingers to
ensure they are not damaged or bent.
ProPEX ring slides down piping during expansion• Ensure your hands are clean and dry
while handling the piping. Any sweat or oils on your hands can act as a lubricant. Due to the smoothness of PEX, any form of lubricant can cause the ProPEX ring to slide down the piping during expansion.
• If you anticipate the ProPEX ring may possibly slide down, position the ring slightly farther over the end of the piping and make the first couple of expansions slowly. Once the ring and the piping begin to expand together, continue with the normal number and type of expansions.
• Place your thumb against the ProPEX ring to help support it and feel for any movement. If caught early, you can slide the ring up the piping and expand as described in the previous bullet point.
More than the recommended number of expansions are needed to make a connection• Ensure the head is hand-tightened
to the expander tool.• Examine the segment fingers
for damage.• Be sure to completely cycle
the tool on each expansion (i.e., release the trigger).
Cold-weather expansions• Temperatures affect the time
required for the piping and ring to shrink onto the fitting. The colder the temperature, the slower the contraction time.
• Warming ProPEX fittings and ProPEX rings reduces contraction time. Put fittings and rings in your pockets prior to installation to keep them warm.
• Fewer expansions are required in temperatures below 40ºF (4.4ºC).
Note: Do not use a heat gun on ProPEX EP fittings to speed up the contraction time as this could result in damage to the fitting.

14 | uponorpro.com

Uponor residential plumbing installation guide l 15
Trench bottom preparationTo achieve a satisfactory installation, it is essential that the soil provides stable and continuous support for the piping.
Figure 4-1: Good soil conditions — If the trench is dug smoothly, install the piping directly on the prepared bottom. The bottom must be flat with no hollows, lumps or rocks.
Figure 4-2: Poor soil conditions — With rocky, clay, muddy or other poor soil conditions, it may be necessary to prepare the trench bottom using granular material of such size and grading to provide a stable base. See local code for additional requirements.
Piping embedmentWhen embedding Uponor AquaPEX piping, pressurize the piping prior to backfilling. Then, backfill using sand or gravel with a ¾" maximum particle size.
Compact the initial backfill for adequate piping support and to limit settling. Note that it is especially important to effectively compact the soil around the tap connection.
In heavy vehicular traffic areas, compact backfill to 90% of maximum soil density. Do not use highly plastic clays, silts, organic materials, or sharp or large rocks as backfill near the piping.
Compact the backfill from the subgrade to a level per local code that will cover the piping 4" to 6".
For additional information, refer to the ANSI/AWWA C904 Standard for installation of PEX piping in underground water service applications.
Uponor AquaPEX piping
Undisturbed soilExcavation level
Undisturbed soilFill levelExcavation level
Uponor AquaPEX piping
Section 4Water service phase
Uponor AquaPEX piping meets the requirements of the ANSI/AWWA Standard C904, Crosslinked Polyethylene (PEX) ½ inch (12 mm) through 1 inch (25 mm) for Water Service.
Refer to the ANSI/AWWA C904 Standard for information regarding the selection, use and proper application of PEX piping in water service.

16 | uponorpro.com
InstallationInstall Uponor AquaPEX piping underground in a manner that ensures external loads will not subsequently cause a decrease in the vertical dimension of the cross section of the piping that exceeds 5% of the O.D. Install Uponor AquaPEX piping in a snaking pattern with sufficient slack in the line to allow for contraction of the line due to temperature change prior to backfilling.
Per PPI TR-21 Thermal Expansion and Contraction in Plastics Piping Systems, restrain a buried or concrete-encased pipe from both lateral and axial movement with surrounding embedment material. The magnitude of the frictional restraining force is dependent on the nature of the soil and on installation and operating conditions.
For example, the extent of compaction near the pipe can affect the quality of contact between the pipe and surrounding soil. The anchoring or restraining effect of surrounding soil on pipe movement can be significantly augmented by external pipe geometry. Tees, lateral connections and changes in direction all help to anchor a pipe in the surrounding soil.
Note: Do not use blocking to support the piping or change the piping grade. Do not install potable water service piping in, under or above cesspools, septic tanks, septic-tank drainage fields or pits.
Caution: Do not install Uponor AquaPEX piping in soil environments contaminated with
solvents, fuels, organic compounds, pesticides or other detrimental materials that may cause permeation, corrosion, degradation or structural failure of the piping. Where such conditions are suspected, perform a chemical analysis of the soil or groundwater to ascertain the acceptability of Uponor AquaPEX piping for the specific installation. Check local codes for additional requirements.
Handling and repairsAlthough Uponor AquaPEX piping is highly resistant to kinking and abrasion, it is important to handle with care while installing the piping to prevent damage and possible failure. If damage occurs during installation, cut out and repair the area before backfilling.
To reform kinked piping, refer to the reforming kinked piping section in Appendix C. If the piping is damaged beyond its thermal-memory capacity, use a ProPEX EP or LF brass coupling. Do not reuse or reclaim ProPEX EP or LF brass fittings.
Note: For horizontal directional drilling (HDD) applications, refer to the Uponor Plumbing Design Assistance Manual (PDAM).
Trace wireUponor recommends the use of trace wire to facilitate in the detection of underground pipe systems. Trace wire should be 14-gauge minimum solid copper with thermoplastic insulation suitable for direct burial. Refer to local code for further requirements.

Uponor residential plumbing installation guide l 17
Joining methods and fittingsUse ProPEX or approved compression fittings to connect piping to itself or to the corporation and curb stops. Approved manufactures are Ford Meter Box Company, Mueller Company, A.Y. McDonald Mfg. Co. and Philmac.
When using compression fittings with Uponor AquaPEX piping, use a plastic or stainless-steel insert stiffener on the inside of the piping at the connection to prevent the pipe from collapsing.
For applications requiring direct burial, use Uponor ProPEX EP or LF brass fittings for Uponor AquaPEX piping up to 3".
Water service disinfectionUponor recommends flushing an Uponor AquaPEX plumbing system with clean, potable water. When system disinfection is required, disinfect Uponor AquaPEX piping in accordance with AWWA C651, Standard for Disinfecting Water Mains, or local codes.
Important! To prevent reduced service life of system components, disinfection solutions should not remain in the system longer than 24 hours. Use a chlorine solution of 50 parts per million (ppm) for 24 hours or 200 ppm for three hours for disinfection. Flush the system with potable water after disinfection.
ProPEX water meter fittings and valvesUponor offers ProPEX water meter fittings and valves designed for connecting ¾" and 1" pipe to ⅝" to 1" water meters. The offering is available in both EP or LF brass and features NPSM swivel connections.
Figure 4-3: ProPEX water meter fittings
The system includes a mounting bracket which can accommodate “felt” type sound isolation wrapped around the fittings or valves to support the water meter system.
When installing the system, be sure to accommodate for the varying length of meters (typically between 7" to 9") with a proper length of “flow tube”.
Figure 4-4: ProPEX LF brass water meter valves

18 | uponorpro.com

Uponor residential plumbing installation guide l 19
Section 5Installation methods
Below-grade or in-slab installationsUponor AquaPEX piping along with ProPEX EP and LF brass fittings are approved for installation below grade, under slab or in a concrete slab in addition to direct burial in the soil.
For convenience, Uponor offers a pre-sleeved piping product for these types of applications. For the complete product offering, refer to the Uponor product catalog.
To properly install Uponor AquaPEX piping below grade or in a concrete slab, refer to the following instructions.
1. Always follow local code when installing Uponor AquaPEX pipe below grade or in the slab, as some jurisdictions require additional sleeving and protection.
2. Protect piping where it enters and exits a concrete slab with 0.025" (0.064 mm) thick protective material, such as HDPE wrapping, PE tape, closed-cell pipe insulation, PVC elbows and sleeves or equivalent, that allow expansion and contraction of the piping.
3. Lay the Uponor AquaPEX pipe in a trench and backfill as needed with dirt to prevent the pipe from recoiling in the trench.
a. Ensure the soil provides stable and continuous support for the piping with no hollows, lumps or rocks.
b. For poor soil conditions (e.g., rocky, clay, muddy, etc.), prepare the trench bottom with a granular material to provide a stable base.
c. Backfill with sand or gravel with a maximum particle size of ¾". Do not use highly plastic clays, silts, organic materials, or sharp or large rocks as backfill.
d. Compact the backfill from the subgrade to a level per local code that will cover the piping 4" to 6" to provide protection around the piping.
e. Refer to local code for additional requirements.
4. Uponor recommends installing the pipe in one long, continuous run. If a connection is necessary, Uponor ProPEX EP and LF brass fittings are approved for use in below-grade and in-slab applications.
Note: Uponor recommends using a ProPEX EP coupling to repair piping damaged during a concrete pour. If a ProPEX EP coupling is not available, use a ProPEX LF brass coupling wrapped with a protective polyethylene sleeve to prevent direct contact between the concrete and the brass coupling.
5. After installation, pressurize the system (typically 20 psi above working pressure) before backfilling or pouring the concrete.

20 | uponorpro.com
Installing Uponor AquaPEX piping in wood-frame constructionPiping runs• Leave extra piping at the beginning
and end of runs to simplify the connection to fittings and multiports.
• Ensure runs are as direct as possible between fittings and multiports and the fixtures they supply.
• Insulate hot- and cold-water piping runs where code requires or as necessary.
• Refer to page 23 for bundling pipe requirements.
• For information about locations and techniques for drilling though load-bearing construction, consult your local building codes.
• Use grommets when installing Uponor AquaPEX pipe in steel-stud applications.
• When installing in attics, refer to local code for insulation requirements.
Figure 5-1: Running Uponor AquaPEX main lines through open-web trusses

Uponor residential plumbing installation guide l 21
Recessed light fixturesThere are two types of recessed lights: Type I.C. (insulation contact), which allows direct contact with thermal insulation, and Type Non-I.C. (non-insulation contact), that requires a 3" minimal clearance from thermal insulation.
Install Uponor AquaPEX a minimum of 2" away from Type I.C. fixtures and 12" away from Type Non-I.C. fixtures.
When it is necessary to install closer than 12" from a Type Non-I.C. fixture, follow these guidelines:
• If there is not enough room in the joist cavity to meet the 12" restriction, use insulation around the piping.
• Use only insulation rated to withstand the temperature generated by the fixture.
• Insulate all piping that is within 12" of the recessed light with closed-cell polyethylene, polyolefin or other suitable pipe insulation for a distance of 12" on either side of the light fixture.
• Insulation is required near UV light sources (including fluorescent bulbs); be sure to protect piping from direct UV exposure.
Fluorescent lightingWhen installing Uponor AquaPEX within 6" of fluorescent lighting, insulate the pipe from heat exposure with closed-cell or fiberglass pipe insulation. Ensure the pipe is protected 18" beyond each side of the fluorescent light source and maintains a minimum clearance of 1" from the fluorescent light source.
When pipe is directly under or within 3 feet laterally of fluorescent lighting, sleeve the pipe with HDPE poly sheathing, closed-cell pipe insulation or any suitable pipe covering material that is black in color to protect it from UV exposure. Ensure the coverage extends 18" beyond each side of the fluorescent light source.
LED lightingIf installing Uponor AquaPEX within 18" of an LED light source, cover the pipe with foam insulation or some other protective covering. Such protection should cover the pipe to a distance of at least 18" from the light source.
Figure 5-2: Recessed light fixture
Figure 5-3: Fluorescent lights

22 | uponorpro.com
Piping supports: general guidelines• Uponor recommends using plastic
or metal piping supports designed for use with plastic piping.
• Do not use supports that will damage the piping. Inspect metal supports for sharp edges.
• Allow for the linear expansion rate of Uponor AquaPEX piping — approximately 1.1" (27.9 mm) per 10°F (5.6°C) temperature change for every 100 ft. of piping. - When installing piping runs, thermal expansion calls for an extra ⅛" to 33⁄1616" of longitudinal clearance per foot of run. Do not allow piping to dip excessively between supports. Do not pull piping tight during installation.
• Allow adequate clearance between PEX piping and the structure (bored holes or sleeves) to allow
piping to move freely due to thermal expansion and contraction.
Piping supports: horizontal runsSupport piping in accordance with Table 5-1. If continuously supporting horizontal runs (i.e., truss-to-truss spacing is 32" or less), place pipe supports on every other support member (truss).
Follow local code requirements when installing PEX piping in fire-resistive construction floors, ceilings or walls.
32"
Figure 5-4: Pipe talons for horizontal runs
Nom
inal
pi
pe s
ize Maximum horizontal support spacing Maximum vertical
support spacing
Uniform Plumbing Code (UPC) and International
Plumbing Code (IPC)
National Plumbing Code of Canada
(NPCC) All codes
½"
2.67 ft. (32")
2.67 ft. (32") 5 ft. (60")
¾"
1"
1¼"
4 ft. (48")
1 ½"
2"
2½"
3"
Table 5-1: Maximum support spacing
Pipe talon
Table 5-1 spacing

Uponor residential plumbing installation guide l 23
Piping supports: vertical in-wall pipingReference Table 5-1 for vertical support spacing.
Strapping
Pipe talon supports
Plastic bend support
Figure 5-6: Pipe talons and plastic bend support for vertical runs
Figure 5-7: Bundled Uponor AquaPEX pipe
Figure 5-5: Plastic bend support
Approved strapping materials for bare Uponor AquaPEX include:
- Pipe talons - Clamps - Stand-off brackets - Nylon banding and cable ties (60 lb. minimum) suited for the application temperature
• Ensure steel straps are coated or have no sharp edges.
• Do not use cable ties for suspension alone.
• Use insulation or stand-off brackets to isolate piping from other mechanical, electrical and plumbing (MEP) systems.
BundlingParallel runs of Uponor AquaPEX may be bundled together given the following guidelines:
• Support the entire bundle at the required O.C. distances.
• Use cable ties to maintain a tight bundle of Uponor AquaPEX.
• Do not use cable ties as the sole means of supporting the bundle.
• Do not use wire ties, metal strapping or duct tape for bundling.
• Keep hot and cold bundles 6" apart if uninsulated.
• There is no restriction on the number of lines bundled.

24 | uponorpro.com
Spray-foam insulationUponor approves the use of spray-foam insulation directly on its PEX pipe and ProPEX LF brass fittings. However, ProPEX EP fittings require an overwrap of 4 to 6 mil poly or other suitable waterproof protection.
Closed-cell spray foam insulationWhen using closed-cell spray foams, ensure the maximum temperature of 250ºF/121.1ºC is not exceeded during the foam-setting process. To help insulate the pipe from heat during the spray-foam process, place a light initial layer of spray foam over the PEX piping prior to spraying the entire area.
Table 5-2 shows temperatures relating to the foam depth of lift.
Depth of lift Temperature
1" 130ºF/54.4ºC2" 200ºF/93.3ºC3" 320ºF/160ºC
Table 5-2: Closed-cell spray foam temperatures in relation to depth of lift
If the job requires more than 2" of lift, Uponor recommends using a two-lift application: Apply the first layer, 2" or less. Wait 15 minutes (the time required for the heat from a 2" lift to dissipate). Then, apply the second layer.
Icynene® spray-foam insulationIcynene® Classic (LD-C-50™), Classic Max™ (LD-C-50-V2) and MD-C-200™ spray-foam insulation is compatible with Uponor AquaPEX pipe and ProPEX fittings.
Ensure the insulation is installed by an Icynene-licensed dealer and factory-
Figure 5-8: ProPEX EP multiport tees
Figure 5-9: Multiport tee installation
trained installer. For further information, refer to the Icynene installer’s manual.
Uponor Logic plumbing system The Uponor Logic plumbing system is an organized arrangement of Uponor AquaPEX piping, EP multiport tees, ProPEX fittings and out-of-the-wall systems offering rapid hot water delivery with superior flow characteristics.
For the installer, Uponor Logic minimizes the number of required fittings and connections by way of remote multiport tees, creating a water distribution system that is more efficient to install, reducing liability and increasing profitability.
Multiport tees are available in both flow-through and branch configurations and do not require access. Refer to Appendix A for detailed Uponor Logic layout instructions.

Uponor residential plumbing installation guide l 25
Figure 5-10: In-wall supports for multiport tees
Plastic piping support
Commercialmultiporttee with mountingclips(included)
Blocking(typical)
6" max.
6" max.
Supporting Uponor multiport tees
Figure 5-11: Supporting multiport tees on wood I-joists
Wood I-joist
Multiport tee
6"max.
Figure 5-12: Supporting multiport tees on open-web wood trusses
6"max.
Open-web truss
Multiport tee

26 | uponorpro.com
Figure 5-13: Installation example of ProPEX out-of-the-wall support system
ProPEX out-of-the-wall support systemThe ProPEX out-of-the-wall support system is a complete, easily installed system that makes exiting the wall with PEX easier than ever.
The system includes:
• PEX wall support bracket with alternating ½" and ¾" holes
• ½" plastic bend support• ProPEX escutcheon in chrome or
white finish for ½" PEX piping• The plastic bend support snaps into
the mating wall support bracket, providing rigid support from all angles.
• The escutcheon allows you to make a ProPEX connection inside the sleeve and fully concealed.
Installation example 1. Feed the Uponor AquaPEX
piping through the wall opening (see Figure 5-13).
2. Measure 2" to 2 33⁄1616" from the wall and mark the piping. Note: If you cut the piping at 2 33⁄1616", this will allow enough length for additional adjustments, but may require re-cutting.
3. Square cut the piping after measuring for the desired cut location.
4. Slide the ProPEX escutcheon towards exposed piping. Then slide the flared sleeve over the exposed piping and position the escutcheon against the wall.
5. Slide on the ProPEX ring until it hits the stop edge.
6. Ensure that you have properly aligned all components. If necessary, remove the escutcheon and sleeve; then re-cut the piping to the appropriate length.
7. Expand the ProPEX ring and piping according to instructions.
8. Fully insert the stop valve into the expanded piping until the ring hits the stop of the valve.

Uponor residential plumbing installation guide l 27
ProPEX drop ear LF brass elbowsThe ProPEX drop ear LF brass elbow provides a rigid 90-degree bend and the ability to secure ⅜" to 1" Uponor AquaPEX piping where it exits a wall.
Figure 5-14: ProPEX drop ear LF brass elbow
Metal straight-through supportsUponor straight-through supports provide rigid support and the ability to secure Uponor AquaPEX piping as it exits a wood floor.
GrommetsUse grommets suitable for steel-stud applications when installing Uponor AquaPEX pipe through steel framing. Grommets are not required for wood-frame applications.
Water hammer arrestorsUponor AquaPEX piping withstands repeated pressure surges well beyond its rated pressure capacity.
• Uponor AquaPEX piping minimizes surge pressure (40% less than rigid pipes).
• Water hammer arrestors are only necessary if local code requires them.
Steel plate protectorsThe Steel Plate Protector (F5700002) protects installed piping from possible damage (e.g., if piping is in danger of damage by drywall, paneling, trim screws or nails).
• Use these protectors to safeguard the pipe during and after construction.
• If installing Uponor AquaPEX piping through hollow masonry walls or metal studs, always protect with suitable sleeves or grommets.
Figure 5-15: Straight-through support
Figure 5-16: Steel plate protectors

28 | uponorpro.com
Figure 5-20: Standard hose bibs
Shower valve connectionsUponor AquaPEX piping is suitable for hot and cold inlets on the shower valve, as well as the supply to the showerhead. Refer to Figure 5-17 for an illustration of valve connections.
Note: Numerous manufacturers offer valves with ASTM F1960 connections. A ProPEX fitting sweat or press adapter is still required to use Uponor AquaPEX for the shower head supply.
Hose bibs• Connect Uponor AquaPEX via ProPEX
threaded, sweat or press adapters, or other manufacturers’ hose bibs with ASTM F1960 connections.
• Rigidly anchor the hose bib to prevent it from loosening.
ProPEX copper tub ellsProPEX copper tub ells provide a 90-degree transition from tub and shower valves to Uponor AquaPEX piping.
For the complete product offering, refer to the Uponor Product Catalog. Caution: Do not use Uponor AquaPEX piping to connect the tub and shower valve to the tub downspout as this may create excessive back pressure in the valve, causing it to remain slightly open.
ProPEX copper stub ellsProPEX copper stub ells provide a 90-degree transition from Uponor AquaPEX piping to copper.
Use a ProPEX copper stub ell at the fixture to exit from the wall instead of using a drop-ear bend support.
For the complete product offering, refer to the Uponor Product Catalog.
ProPEX copper tub ell
Copper only
To tub spout
½" PEX
Figure 5-17: Valve connection example
Figure 5-18: Tub ell
Figure 5-19: Stub ell

Uponor residential plumbing installation guide l 29
Straight and angle stop valvesUponor offers ProPEX LF brass straight and angle stop valves as well as chrome-plated LF brass compression straight and angle stop valves for point of use at the fixture. Standard compression straight and angle stop valves are approved for use with Uponor AquaPEX pipe, provided the installer uses an insert stiffener (included with Uponor stop valves).
Installing compression connections1. Square cut the piping perpendicular
to the piping length.
2. Place the nut and then the compression ring over the end of the piping.
3. Use the brass compression ring included with the stop valve.
4. Install the brass or stainless steel insert into the piping end. Be sure to set the insert completely against the end of the piping.
5. Slowly tighten the compression nut to the opposing thread.
Note: Retighten all compression fittings after initial installation.
6. Wait 30 minutes to allow the piping to relax, and then retighten each fitting.
Termiticide or pesticide treatmentUponor AquaPEX piping is often installed in soil that is treated with liquid termiticides/pesticides categorized into two types: organic solvent-based (also known as petroleum solvent-based) and water-based (water solvent-based).
Organic-based termiticides/pesticides have largely disappeared from the North American marketplace for this application, and the majority of products available today are water-based. Water-based products are generally safer for the environment and pose less risk of infiltration into Uponor AquaPEX piping.
Although all research data and anecdotal evidence strongly suggest that there are no permeation issues with water-based termiticides/pesticides and PEX, caution is required to ensure safe installation of Uponor AquaPEX piping and to prevent misapplication of the liquid termiticides/pesticides, especially to prevent pooling or puddling of these chemicals around Uponor AquaPEX piping.
Figure 5-21: ProPEX LF brass straight and angle stop valves
Figure 5-22: Chrome-plated LF brass compression stop valves

30 | uponorpro.com
Caution: The misapplication of termiticides or pesticides between Uponor AquaPEX piping and slab penetration protection devices could result in pooling or puddling of the products around the piping, a prohibited practice. The application of pesticides or termiticides between Uponor AquaPEX piping and slab penetration protection devices is strictly prohibited.

Uponor residential plumbing installation guide l 31
Section 6Pressure testing and water system disinfection
Pressure testing Pressure test the system with water, air or a mixture of both in accordance with local code requirements. The recommended test pressure is at least 25 psi above working pressure or 100 psi (not to exceed 120 psi). Slight fluctuations of pressure are normal due to ambient temperature changes.
Note: Higher test pressures can cause a slight radial expansion of the piping and a subsequent relaxation of the material, resulting in a reduction of test pressure. This is normal and does not indicate a leak.
Caution: If using water to pressure test the system, purge all water from the system prior to the ambient air temperatures falling to 32°F (0°C). Failing to remove the water from the system can result in damage to the piping and associated equipment.
Note: When pressure testing in multifamily applications, refer to the Uponor Plumbing Design Assistance Manual (PDAM) or the Uponor Piping Pocket Guide for detailed instructions.
Water system disinfectionUponor recommends flushing an AquaPEX plumbing system with clean, potable water. Disinfect Uponor AquaPEX piping in accordance with AWWA C651, Standard for Disinfecting Water Mains, or local codes.
Important! To prevent reduced service life of system components, disinfection solutions should not remain in the system longer than 24 hours. Use a chlorine solution of 50 parts per million (ppm) for 24 hours or 200 ppm for three hours for disinfection. Flush the system with potable water after disinfection.

32 | uponorpro.com

Uponor residential plumbing installation guide l 33
Uponor Logic is an organized arrangement of flexible PEX pipe, innovative multiport tees and out-of-the-wall support systems to provide a water distribution system that is more efficient to install, limits liability with fewer fittings and connections, and offers rapid hot-water delivery with superior flow characteristics.
Features and benefits• Efficient use of time and materials• Fewer connections limits liability• Fast hot-water delivery potential• Full line of multiport tees for ultimate
design flexibility
In a Logic layout, a main line connects to a multiport tee with distribution lines going out from the tee. These individual lines extending from the single multiport
tee provide water to all fixtures in a single or adjacent grouping.
This design uses significantly less pipe than a home-run layout, with just a few more connections. Plus, it requires considerably fewer connections compared to a trunk-and-branch installation.
For example, a 2,300-square-foot, two-story home using a Logic design requires only 637 feet of pipe while a home-run system uses 1,515 feet. Logic also installs much faster compared to a trunk-and-branch system due to the vast reduction in connections. With the two-story home, a Logic layout uses only 16 fittings and 59 connections compared to 96 fittings and 165 connections for trunk and branch.
Uponor Logic fittings: 16
Uponor Logic pipe: 637'
Trunk-and-branch fittings: 96
Homerun pipe: 1,515'
Figure A-1: Fitting and pipe usage comparison
Appendix A Laying out an Uponor Logic system
Uponor Logic plumbing systems vs. conventional thinking

34 | uponorpro.com
83% fewer fittings
58% less pipe
Uponor Logic plumbing
Minimal connections
Minimal use of pipe
Quick delivery of hot water
637' Uponor AquaPEX pipe 59 ProPEX connections 16 fittings
The optimal design approach
Figure A-2: Uponor Logic plumbing diagram

Uponor residential plumbing installation guide l 35
Many connections
More time to install
Higher potential for leaks
Dry-fit concerns
540' pipe (copper, CPVC, PEX) 165 connections 96 fittings
165 connections
Trunk-and-branch plumbing
Figure A-3: Trunk-and-branch plumbing diagram
36 | uponorpro.com
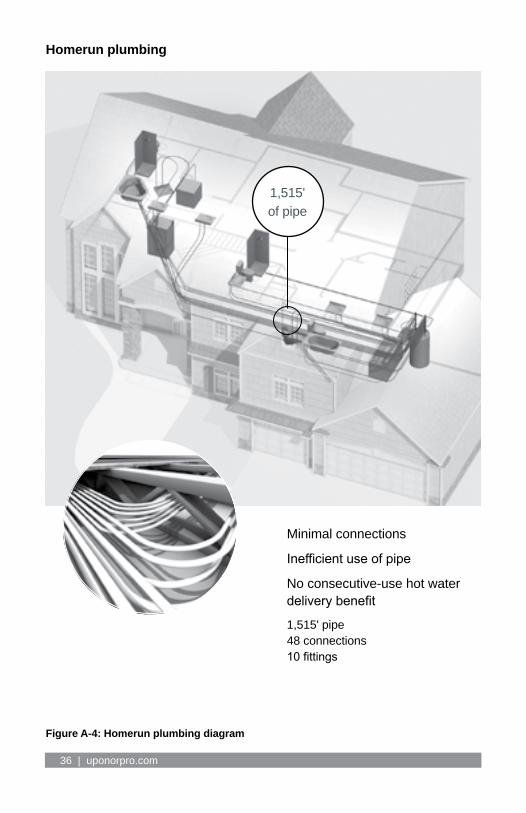
Minimal connections
Inefficient use of pipe
No consecutive-use hot water delivery benefit
1,515' pipe 48 connections 10 fittings
1,515' of pipe
Homerun plumbing
Figure A-4: Homerun plumbing diagram

Uponor residential plumbing installation guide l 37
First floorSecond floor
Both floors combined
Step 1: Uponor Logic• Identify location of all plumbing outlets.• Identify fixture groupings within approximately 10-ft. radius on both floors.
• Cold-water outlet• Hot-water outlet
4 cold outlets
3 hot outlets
1
Two-story home: planning example
Figure A-5: Step 1 – Uponor Logic in a two-story home is a simple, three-step process.

38 | uponorpro.com
Step 2: Uponor Logic• Plan path through the house to connect fixture groupings.• Identify number of hot and cold outlets for each grouping.
33
23
34
24
44
# hot-water outlet# cold-water outlet
4 cold outlets
3 hot outlets
2
33 Master bathroom/kitchen
34 Master bathroom/ice maker
24 Bathroom B/guest bathroom
23 Bathroom A
44 Bathroom B/laundry
Figure A-6: Step 2 – Uponor Logic in a two-story home
Two-story home: planning example

Uponor residential plumbing installation guide l 39
Step 3: Uponor Logic• Identify appropriate location of multiport tee for each grouping.• Select appropriate multiport tee and fittings.
4 cold outlets
3 hot outlets
3
Figure A-7: Step 3 – Uponor Logic in a two-story home
Two-story home: planning example

40 | uponorpro.com
Q2227557 (2)
Q2237557 (2)
Q2247557 (4)
Q2237550 (2)
Total components for Uponor Logic project
Figure A-8: Total components for Uponor Logic in a two-story home
Two-story home: planning example

Uponor residential plumbing installation guide l 41
Slab-on-grade home: planning example
• Cold-water outlet• Hot-water outlet
5 cold outlets
4 hot outlets
1
Step 1: Uponor Logic• Identify location of all plumbing outlets.• Identify fixture groupings within an approximate 10-ft. radius.
Figure A-9: Step 1 – Uponor Logic in a slab-on-grade home is a simple, three-step process.

42 | uponorpro.com
Step 2: Uponor Logic• Plan path through the house to connect fixture groupings.• Identify number of outlets for each grouping.
2
45 Master bathroom 2
3 Bathroom 44 Kitchen/laundry
44
23
5 cold outlets (6 ports)
4 hot outlets
45
# hot-water outlet# cold-water outlet
Figure A-10: Step 2 – Uponor Logic in a slab-on-grade home
Slab-on-grade home: planning example

Uponor residential plumbing installation guide l 43
Step 3: Uponor Logic• Identify appropriate location of multiport tee for each grouping.• Select appropriate multiport tee and fittings.
3
5 cold outlets (6 ports)
4 hot outlets
Figure A-11: Step 3 – Uponor Logic in a slab-on-grade home
Slab-on-grade home: planning example

44 | uponorpro.com
Q2227557 (1)
Q2237557 (1)
Q2247557 (2)
Q2247550 (1)
Q2267550 (1)
Total components for Uponor Logic project
Figure A-12: Total components for a slab-on-grade home
Slab-on-grade home: planning example

Uponor residential plumbing installation guide l 45
Appendix BStandards, listings and codes
StandardsUponor AquaPEX piping, ProPEX EP and LF brass fittings, EP multiport products and ProPEX LF brass valves are manufactured and tested to the following standards. Standard SpecificationASTM F876 Standard specification for cross-linked polyethylene (PEX) piping
ASTM F877 Standard specification for cross-linked polyethylene (PEX) plastic hot- and cold-water distribution systems
ASTM F1960 Standard specification for cold expansion fittings with PEX reinforcing rings for use with cross-linked polyethylene (PEX) piping
ASTM F2023Standard test method for evaluating the oxidative resistance of cross-linked polyethylene (PEX) piping and systems to hot chlorinated water
ASTM F2657 Standard test method for outdoor weathering exposure of cross-linked polyethylene (PEX) piping
ASTM E84 Standard test method for surface burning characteristics of building materials
ASTM E119 Standard test methods for fire tests of building construction and materials
ASTM E814 Standard test method for fire tests of through-penetration firestop systems
CAN/CSA B137.5 Crosslinked polyethylene (PEX) piping systems for pressure applications
CAN/CSA B214 Installation code for hydronic heating systems
CAN/ULC-S102.2Standard method of test for surface burning characteristics of flooring, floor covering and miscellaneous materials and assemblies
CAN/ULC-S101 Standard methods of fire endurance tests of building; construction and materials
CAN/ULC-S115 Standard method of fire tests of firestop systemsCAN/ULC/ORD-C199P Combustible piping for sprinkler systemsANSI/NSF Standard 14 Plastics piping system components and related materialsANSI/NSF Standard 61 Drinking water system components — health effects
ANSI/NSF 359 Valves for crosslinked polyethylene (PEX) water distribution tubing systems
ANSI/AWWA C904 Crosslinked polyethylene (PEX) pressure pipe, ½" (12 mm) through 3" (76 mm) for water service
ANSI/UL 263 Standard for safety for fire tests of building construction and materials
UL 1821* Standard for safety for thermoplastic sprinkler pipe and fittings for fire protection service (NFPA 13D applications only)
UL 2846 Standard for fire test of plastic water distribution plumbing pipe for visible flame and smoke characteristics
Table B-1: Standards *Uponor AquaPEX white pipe only

46 | uponorpro.com
Listings• cNSFus-fs• cNSFus-rfh• cNSFus-pw• cQAIus • CSA
• PPI-TR-4• ICC-ES PMG • IAPMO• BMEC • CCMC
Note: Obtain listings at: www.qai.org www.nsf.org
Codes• ICC• IPC• IMC• IRC
• UPC• UMC• NSPC• HUD
• UFGS• NPC of
Canada• NBC of
Canada
Note: Check with your local Uponor representative for code compliance in your area.
Material designation codeUponor AquaPEX white piping has a material designation code of PEX 5106. Uponor AquaPEX red and blue piping has a material designation code of PEX 5306. Material designation codes are tested in accordance with and defined by ASTM F876. Each digit in the code is further explained below.
First digitThe first digit in the material designation code is for chlorine resistance tested in accordance with ASTM F2023. A digit 5 indicates the PEX piping has been tested and meets the requirements for minimum chlorine resistance at end-use conditions 100% of the time at 140°F (60°C). A 5 digit is the highest classification for chlorine resistance.
Second digitThe second digit is for demonstrated UV resistance of PEX material when tested in accordance with ASTM F2657. A digit of 1 indicates the PEX piping has a UV resistance of one month; a digit of 2 has a UV resistance of three months; a digit of 3 has a UV resistance of six months.
Third and fourth digitsThe third and fourth digits are for hydrostatic design stress (HDS) as tested in accordance with the PPI Technical Report TR-4. The digits of 06 indicate the PEX piping has an HDS of 73°F (23°C) at 630 psi (43 bar).
Piping identification The labeling (print line) on Uponor AquaPEX piping provides several identifications.
For example, Uponor AquaPEX ½" piping reads as follows:
UPONOR AquaPEX® PEX 5106 ½ IN UB04130415 SDR9 B137.5 POTABLE/cNSFus-pw
U.P. Code CCMC 13529-R (ASTM F876/F877/F2023) (ASTM F1960/F2080) cWHIus FS25/SD50 WITH 1/2IN FG INSULATION ICC ESR-1099 ANSI/AWWA C904cQAIus P321 ULC/ORD-C199P IAPMO UES 0253 ASTM E84 and CAN/ULC-S102.2 HUD MR1269d/160PSI 73.4°F / 100PSI 180°F / 80PSI 200°F
UPONOR-PEX-a TUBING *UB04130415 **xxxxx

Uponor residential plumbing installation guide l 47
Print stream identification
Print stream on piping Explanation
UPONOR AquaPEX® Brand name
PEX 5106 ASTM F2023 and ASTM F2657 I/A/W ASTM F876
½ IN Pipe size (i.e., ½")
UB04130415Manufacturing Code to Audit Material Source (USA, material type, extruder no., year, month, day)
SDR9 Standard dimension ratio of 9
B137.5 POTABLE Potable water listing by CSA
cNSFus-pw Potable water listing by NSF
Listings by UL
U.P. Code Uniform plumbing code marking
CCMC 13529-R Canadian Construction Materials Centre Evaluation Report 13529-R
ASTM F876/F877/F2023 ASTM pipe standards
ASTM F1960/F2080/F1807/F2098 ASTM fitting standards
cWHIus FS25/SD50 Warnock Hersey Listing for 25/50 FS/SD plenum rating
ICC-ES-PMG 1006 ICC evaluation services plumbing, mechanical and fuel gas 1006
ANSI/AWWA C904 American Water Works Association Standard for Water Service
cQAIus P321 QAI listing for 25/50 FS/SD plenum rating
130PSI 120°F UL 1821 UL standard for NFPA 13D fire protection service
ULC/ORD-C199P ULC standard for combustible sprinkler piping
IAPMO UES 0253 IAPMO evaluation services report ER-0253
ASTM E84 Standard test method for surface burning characteristics -U.S.
CAN/ULC-S102.2 Standard test method for surface burning characteristics -CA
HUD MR1269e HUD Material Release Report 1269e
160PSI 73.4°F / 100PSI 180°F / 80PSI 200°F Hydrostatic ratings from PPI I/A/W ASTM F876
UPONOR-PEX-a TUBING Type of crosslinking (PEX-a)
xxxxxx Footage marker in increments of 5 ft.
Table B-2: Print stream identification

48 | uponorpro.com

Uponor residential plumbing installation guide l 49
Appendix C Troubleshooting tips and tricks
Reforming kinked pipingIf the piping is kinked and hinders flow, refer to the following instructions for repairs.
1. Make sure the system is not pressurized.
2. Straighten the kinked portion of the piping.
3. Heat the kinked area with an electric heat gun (approximately 450 watts of power). When using the heat gun, move it around to ensure an even distribution of heat until the piping returns to its original size and shape. Do not use an open flame.
4. Let the repaired Uponor AquaPEX piping cool undisturbed to room temperature. When the piping returns to its opaque appearance, the repair is complete.
Caution: Do not allow surface temperature of the piping to exceed 338°F (170°C), and do not apply direct flame to the piping. Uponor AquaPEX piping repaired according to these recommendations will return to its original shape and strength. If the piping is sliced, punctured or otherwise damaged beyond the capacity of the crosslinked memory, install a ProPEX coupling. Uponor AquaPEX piping cannot be welded or repaired with adhesives.
Note: You may temporarily affix adhesive tape to Uponor AquaPEX piping or ProPEX EP fittings during
installation. However, to protect the integrity of the system, remove the tape and residual adhesive after completing the installation.
Figure C-1: Reforming kinked piping

50 | uponorpro.com
Thawing frozen piping Uponor AquaPEX can withstand extreme freeze-thaw cycles better than other piping materials. The crosslinking of the piping allows it to expand and absorb much of the expansion energy from the freezing process. No piping product is freeze-proof, but Uponor AquaPEX piping is extremely resistant to freeze damage.
If freezing occurs, the contractor should advise the end user to correct the lack of insulation or heat to eliminate the problem from reoccurring.
Should Uponor AquaPEX piping experience an ice blockage, thaw the piping using one or more of the following methods.
• Pour hot water over the affected portion of piping.
• Wrap hot towels around the affected portion of piping.
• Place a small portable heating unit in the area to heat the space and thaw the ice blockage from the piping.
• Slowly heat the affected area with a hair dryer. Rub a hand over the area while heating to ensure the piping does not get too hot.
Figure C-2: CPVC vs. PEX freeze test

Uponor residential plumbing installation guide l 51
Appendix D Installation checklistFittings, connections and site preparation Yes No N/A Notes and comments
Proper storage to avoid UV exposure q q q
Ring properly against fitting stop on ProPEX connections q q q
Acceptable distance between fittings (for ½" pipe, minimum cut length of pipe is 2"; for ¾" pipe, minimum cut length is 3"; for 1" pipe, minimum cut length is 3½")
q q q
Elbows replaced with bend supports q q q
Kinks or strains on fittings/pipe q q qTrenches free from large stones q q q
Hangers/supports Yes No N/A Notes and comments
Proper bundling q q qProper horizontal support distance q q q
Proper use of supports on wood structure (tube talons) q q q
Grommets for steel-stud penetrations/nail plates for wood studs
q q q
Proper support for out-of-the-wall applications q q q
Support multiport tees within 6" q q qSleeve concrete penetrations q q qSeal slab penetrations q q q
Insulation Yes No N/A Notes and comments
Insulation requirements verified q q qProper spacing (or insulation) from lighting fixtures
q q q

Notes

Notes

Uponor Inc. 5925 148th Street West Apple Valley, MN 55124 USA
T 800.321.4739 F 952.891.2008
Uponor Ltd. 6510 Kennedy Road Mississauga, ON L5T 2X4 CANADA
T 888.994.7726 F 800.638.9517 uponorpro.com
ResidPlumb_InsG_01901_0819, Copyright © 2019 Uponor. Printed in the United States.