
PTC Creo® 3.0 Installation and Administration Guide
200
PTC Creo ® 3.0 Installation and Administration Guide PTC Creo Parametric PTC Creo Direct PTC Creo Layout PTC Creo Simulate PTC Creo Options Modeler Datecode M010
-
Upload
khangminh22 -
Category
Documents
-
view
0 -
download
0
Transcript of PTC Creo® 3.0 Installation and Administration Guide

PTC Creo® 3.0 Installationand Administration Guide
PTC Creo ParametricPTC Creo DirectPTC Creo Layout
PTC Creo SimulatePTC Creo Options Modeler
Datecode M010

Copyright © 2014 PTC Inc. and/or Its Subsidiary Companies. All Rights Reserved.
User and training guides and related documentation from PTC Inc. and its subsidiary companies (collectively"PTC") are subject to the copyright laws of the United States and other countries and are provided under alicense agreement that restricts copying, disclosure, and use of such documentation. PTC hereby grants to thelicensed software user the right to make copies in printed form of this documentation if provided on softwaremedia, but only for internal/personal use and in accordance with the license agreement under which theapplicable software is licensed. Any copy made shall include the PTC copyright notice and any otherproprietary notice provided by PTC. Training materials may not be copied without the express written consentof PTC. This documentation may not be disclosed, transferred, modified, or reduced to any form, includingelectronic media, or transmitted or made publicly available by any means without the prior written consent ofPTC and no authorization is granted to make copies for such purposes.
Information described herein is furnished for general information only, is subject to change without notice,and should not be construed as a warranty or commitment by PTC. PTC assumes no responsibility or liabilityfor any errors or inaccuracies that may appear in this document.
The software described in this document is provided under written license agreement, contains valuable tradesecrets and proprietary information, and is protected by the copyright laws of the United States and othercountries. It may not be copied or distributed in any form or medium, disclosed to third parties, or used in anymanner not provided for in the software licenses agreement except with written prior approval from PTC.
UNAUTHORIZED USE OF SOFTWARE OR ITS DOCUMENTATION CAN RESULT IN CIVILDAMAGES AND CRIMINAL PROSECUTION. PTC regards software piracy as the crime it is, and we viewoffenders accordingly. We do not tolerate the piracy of PTC software products, and we pursue (both civillyand criminally) those who do so using all legal means available, including public and private surveillanceresources. As part of these efforts, PTC uses data monitoring and scouring technologies to obtain and transmitdata on users of illegal copies of our software. This data collection is not performed on users of legallylicensed software from PTC and its authorized distributors. If you are using an illegal copy of our softwareand do not consent to the collection and transmission of such data (including to the United States), ceaseusing the illegal version, and contact PTC to obtain a legally licensed copy.
Important Copyright, Trademark, Patent, and Licensing Information: See the About Box, or copyrightnotice, of your PTC software.
UNITED STATES GOVERNMENT RESTRICTED RIGHTS LEGEND
This document and the software described herein are Commercial Computer Documentation and Software,pursuant to FAR 12.212(a)-(b) (OCT’95) or DFARS 227.7202-1(a) and 227.7202-3(a) (JUN’95), and areprovided to the US Government under a limited commercial license only. For procurements predating theabove clauses, use, duplication, or disclosure by the Government is subject to the restrictions set forth insubparagraph (c)(1)(ii) of the Rights in Technical Data and Computer Software Clause at DFARS 252.227-7013 (OCT’88) or Commercial Computer Software-Restricted Rights at FAR 52.227-19(c)(1)-(2) (JUN’87),as applicable. 01012014
PTC Inc., 140 Kendrick Street, Needham, MA 02494 USA

Contents
About This Guide ........................................................................................................7
Preparing to Install Your PTC Software ....................................................................... 11What You Receive ..............................................................................................12Generating Licenses ...........................................................................................12Before You Begin................................................................................................13Opening a PTC Online Account ...........................................................................13About PTC Installation Assistant ..........................................................................14Working with PTC Installation Assistant................................................................16PTC Software License Agreement .......................................................................17Authenticating Your User Access .........................................................................18
Quick-Start Installation for Experienced Users .............................................................19Updating PTC License Server..............................................................................20Installing PTC Creo Applications..........................................................................20Where Your Software Is Installed .........................................................................21
Configuring Licenses for the PTC Creo Applications ....................................................23Using PTC Installation Assistant for Licensing.......................................................24Using the License Server Manager ......................................................................24Verifying System Requirements ...........................................................................25Before You Proceed............................................................................................25Generating or Updating Licenses .........................................................................26
Installing PTC Creo Applications, PTC Mathcad, and other Utilities ...............................33Installation Prerequisites .....................................................................................34File Format Compatibility.....................................................................................34Installing the PTC Creo Applications: Simple Installation Process...........................34Using PTC Quality Agent with the PTC Creo Applications ......................................38
Customizing the Installation of the PTC Creo Applications ............................................41Customizing an Installation..................................................................................42Defining the Installation Components ...................................................................43Installing PTC Creo Mold Analysis (CMA) Component ...........................................45Modifying License Configurations ........................................................................46Configuring Windows Shortcuts ...........................................................................48Setting Licenses for PTC Creo Simulate ...............................................................48
Completing the Installation and Starting the PTC Creo Applications ..............................51Completing the Installation ..................................................................................52Installing and Uninstalling the PTC Creo Applications in Silent Mode ......................53Starting the PTC Creo Applications ......................................................................53Configuring the PTC Creo Application Startup.......................................................53
3

Directory Permissions to Start PTC Creo Applications ...........................................56Installing PTC Creo Platform Agent ......................................................................56Configuring a PTC Creo Parametric Installation ....................................................56Uninstalling the PTC Creo Applications ................................................................61
Installing and Accessing PTC Creo Help .....................................................................63Overview of the Help Center ................................................................................64Browser Support for PTC Creo Help.....................................................................64Accessing Help from within a PTC Creo Application ..............................................64Choosing a Location for the Help Center Installation..............................................65Installing the Help Center ....................................................................................65Enabling the Help Center from a Network Drive.....................................................67Installing the Help Center on a Web Server...........................................................67Viewing the Help Center Independent of a PTC Creo Application ...........................69Uninstalling the Help Center ................................................................................70
Updating an Installation .............................................................................................71Updating the License Server................................................................................72Updating PTC Creo Applications..........................................................................72Customizing an Existing Installation of a PTC Creo Application ..............................73Installing a Maintenance Release.........................................................................74Upgrading an Existing Version of an Installation ....................................................74
Appendix A.License Management Software ................................................................77Overview of PTC Licensing .................................................................................78License Types ....................................................................................................78Simplified License Management Process .............................................................78PTC License Server............................................................................................84Benefits of Using FlexNet Publisher .....................................................................84Downward License Compatibility Using FlexNet Publisher .....................................84Running FlexNet Publisher with Other Applications ...............................................85Understanding Timeout Parameters .....................................................................85Suppressing the Regained Network License Dialog Box for PTC CreoParametric ......................................................................................................87
Using the Ptcflush Utility......................................................................................87License Borrowing ..............................................................................................88
Appendix B.lmadmin License Server Manager.............................................................93Overview of lmadmin as a GUI-Client ...................................................................94Differences between lmgrd and lmadmin ..............................................................94Installing PTC License Server Based on lmadmin..................................................94Working with the FLEXnet License Administrator Web Interface .............................95
Appendix C.System Administration Information ...........................................................99Temporary Directories....................................................................................... 101System Management Utilities ............................................................................ 101Supported Graphics Modes ............................................................................... 102General Plotter Information................................................................................ 102Using the ModelCHECK Metrics Tool with PTC Creo Parametric .......................... 103Using Fonts...................................................................................................... 114
4 PTC Creo® 3.0 Installation and Administration Guide

OpenType Font Support .................................................................................... 116UNICODE Font Support .................................................................................... 117Available System Fonts for Menu Items.............................................................. 117Extended ASCII Set .......................................................................................... 117Displaying the Text Symbol Palette in PTC Creo Parametric ................................ 118Exporting Special Symbols to IGES.................................................................... 118Font Definition .................................................................................................. 119AVI Compression Codecs.................................................................................. 135Exporting Data to Portable Document Format ..................................................... 136Meeting Browser Requirements ......................................................................... 136Opening a PDF File within the PTC Creo Browser ............................................... 137Using PTC Creo View Express to Open PTC Creo Objects .................................. 137Opening PTC Creo Objects from Windows Explorer ............................................ 138JavaScript Security ........................................................................................... 139
Appendix D.Installing and Configuring PTC Quality Agent .......................................... 141Overview.......................................................................................................... 142Installing PTC Quality Agent .............................................................................. 142Configuring PTC Quality Agent .......................................................................... 142Using Quality Agent .......................................................................................... 146Uninstalling PTC Quality Agent .......................................................................... 146
Appendix E.Installing PTC MKS Platform Components .............................................. 149Overview.......................................................................................................... 150Installing PTC MKS Platform Components.......................................................... 150
Appendix F.Installing the PTC Creo Applications in Silent Mode.................................. 151Guidelines and Advantages of a Silent Installation............................................... 152Strategies for the Mass Deployment of PTC Creo Applications............................. 153Workflow for a Silent Installation ........................................................................ 154Command Syntax for a Silent Installation............................................................ 156Locating the XML Files...................................................................................... 157Editing the XML Files ........................................................................................ 158Uninstalling the PTC Creo Applications in Silent Mode......................................... 164Installing and Uninstalling Client-Side Components in Silent Mode ....................... 164Installing PTC Quality Agent and PTC MKS Platform Components in SilentMode............................................................................................................ 166
Updating the Registry File ................................................................................. 166
Appendix G.Port Usage by Creo Applications ............................................................ 167Using Communication Ports .............................................................................. 168
Appendix H.Distributed Computing Technology for PTC Creo Parametric .................... 173Overview of Distributed Computing .................................................................... 174Supported Functions......................................................................................... 174Configuring Workstations for Distributed Computing............................................ 175
Appendix I.Troubleshooting Tips............................................................................... 177General Debugging Hints .................................................................................. 178Online Information ............................................................................................ 178Troubleshooting List.......................................................................................... 178
Contents 5

Appendix J.Workflow for Installation and Configuration .............................................. 183Workflow for Generating Licenses for the PTC Creo Applications ......................... 184Workflow for Installing the PTC Creo Applications ............................................... 185Workflow for Reconfiguring the PTC Creo Applications........................................ 186
Glossary................................................................................................................. 187
Index...................................................................................................................... 195
6 PTC Creo® 3.0 Installation and Administration Guide

About This Guide
The PTC Creo design software package encompasses the CAD, CAM, CAE,CAID, and Visualization applications of PTC. It provides flexibility to add newinteroperable capabilities such as 2D modeling, direct modeling, and BOM-drivenassemblies to your software tools. This guide describes how to generate andconfigure licenses, and how to install and maintain the PTC Creo applications—PTC Creo Parametric, PTC Creo Direct, PTC Creo Layout, PTC Creo Simulate,and PTC Creo Options Modeler—using PTC Installation Assistant. Theinstallation instructions are also common for PTC Creo Distributed ServicesManager.System administrators who are installing the PTC Creo applications for the firsttime must be experienced in application installations and must have a goodunderstanding of operating systems.
How to Use This GuideThis guide supplements the tooltips in PTC Installation Assistant and providesinstallation instructions and reference information. To generate or update licensesand then install or reconfigure the PTC Creo applications, see the followingchapters:
Chapter Role InformationPreparing to InstallYour PTC Software onpage 11
All users Describes the materials in yoursoftware shipment. Alsoprovides an overview of PTCInstallation Assistant.
Quick-Start Installationfor Experienced Users
Advanced users Describes a quick-startapproach for users who have
7

Chapter Role Informationon page 19 previously installed license
management and productsoftware.
Configuring Licensesfor the PTC CreoApplications on page23
All users Describes how to generate orupdate licenses and install PTCLicense Server.
Installing the PTC CreoApplications on page33
All users Describes a simple installationprocess for the PTC Creoapplications.
Customizing theInstallation of the PTCCreo Applications onpage 41
Advanced users Describes the advancedcustomization options forinstalling the PTC Creoapplications.
Completing theInstallation and Startingthe PTC CreoApplications on page51
All users Describes the steps to completethe installation of PTC Creoapplications and the procedureto uninstall them.
Installing and UsingPTC Creo Help on page63
Advanced users andsystem administrators
Describes how to install andaccess Help for PTC CreoParametric, PTC Creo Direct,PTC Creo Layout, PTC CreoSimulate, and PTC CreoOptions Modeler from a localhost computer, a network drive,and from a Web server.
Updating anInstallation on page 71
All users Describes how to update thePTC Creo applications on yoursystem.
Installing the PTC CreoApplications in SilentMode on page 151
System administrators Describes how to install anduninstall the PTC Creoapplications and the client-sidecomponents in silent mode.
Related DocumentationThe following documents on the Reference Documents page may be helpful asyou use this guide:
8 PTC Creo® 3.0 Installation and Administration Guide

• Installing PTC Creo 3.0: Creo Schematics• Installing PTC Creo 3.0: Creo View• Installing PTC Creo 3.0: Creo Illustrate• FlexNet Publisher License Administration Guide that discusses the third-party
license management software for distributing PTC Creo licenses• Installing and Configuring the Standalone PTC License Server that discusses
the installation of the lmadmin-based PTC License Server
Technical SupportContact PTC Technical Support via the PTC Web site, phone, fax, or e-mail if youencounter problems using your software. You can log a new case or track anexisting case or SPR (Software Performance Report) using the PTC Web page athttps://www.ptc.com/appserver/cs/portal. To log a new case, see the eSupportTools on the left.You must have a Service Contract Number (SCN) before you can receivetechnical support. You can find this number on your Shipment confirmation e-mailfrom PTC or by contacting Customer Care. See the Contact table in the CustomerSupport Guide.
Documentation for PTC ProductsPTC provides documentation for download at PTC.com and also on a DVD. Thefollowing forms of documentation for PTC Creo Parametric, PTC Creo Direct,PTC Creo Layout, PTC Creo Simulate, and PTC Creo Options Modeler areavailable:
• A Help Center with context-sensitive Help, search facility, and quick links tohelpful information.
• PTC Creo 3.0 Installation and Administration Guide and other books as PDFfiles. To view and print the books, you must have the Adobe Acrobat Readerinstalled.
After you install the Help component, press F1 on a user interface item to get
context-sensitive Help. To access the Help Center, click .To access all PTC Documentation from PTC.com, you must have a valid useraccount. Go to the New Account page to request a user account or call theCustomer Support.
Feedback to DocumentationPTC welcomes your suggestions and comments on its documentation—sendfeedback to the following address:
About This Guide 9

Please include the name of the application and its release with your comments.For online books, provide the book title.Additionally, you can report any documentation issues using the online CaseLogger tool. On the second Case Logger page, select a product, release, datecode,and then select Help Center / Documentation from the Technical Area list. Uponsubmission of all information, a case number is returned immediately.
Documentation ConventionsPTC documentation uses the following conventions:
Convention Item ExampleBold Menu paths, dialog box options,
buttons, and other selectableelements from the user interface
Click File ▶ New.Click OK.
Courier User input, system messages,directories, and file names
Processingcompleted.
Courier with less-than and greater-thansymbols (< >)
Variables for which anappropriate value is substituted
output=<LOADPOINT>
10 PTC Creo® 3.0 Installation and Administration Guide

1Preparing to Install Your PTC
SoftwareWhat You Receive .....................................................................................................12Generating Licenses..................................................................................................12Before You Begin ......................................................................................................13Opening a PTC Online Account ..................................................................................13About PTC Installation Assistant.................................................................................14Working with PTC Installation Assistant ......................................................................16PTC Software License Agreement ..............................................................................17Authenticating Your User Access................................................................................18
This chapter describes the materials in your software shipment. It also provides anoverview of how you can use PTC Installation Assistant for obtaining licenses andinstalling your software.
11

What You ReceivePTC sends the following materials related to your software order:
• PTC Software Order Confirmation e–mail—Before the receipt of your PTCsoftware, you will receive an e-mail containing all the details of your order.
• Software and Help DVDs—Your order contains one or more DVDs for eachproduct purchased. It also contains the Help DVD for the PTC Creoapplications: PTC Creo Parametric, PTC Creo Direct, PTC Creo Layout, PTCCreo Simulate, and PTC Creo Options Modeler in all the supported languages.
Generating LicensesBoth new and existing customers can generate licenses in one of two ways.
• Using PTC Installation Assistant• Using PTC License Management Web tools—Request your License Pack via
e-mail.
New Software Orders and ConfigurationsFor new software orders, configure the license for the purchased products in oneof the following ways:• Use PTC Installation Assistant to generate the license and install PTC License
Server.• Contact PTC License Management directly for licenses.• Click the Configure New Software link under License Management on the PTC
Creo eSupport Center page and follow the instructions.
Maintenance ShipmentsIf you are updating your PTC software, you can use PTC Installation Assistant togenerate a license file. The license generation process is based on the product codefor your Maintenance Release shipment. Alternatively, you can request electroniccopies of your License Packs by either contacting PTC License Managementdirectly or using the PTC Creo eSupport Center page and clicking RetrieveExisting License Packs under License Management and following the instructions.A License Pack for a Maintenance Release shipment contains all the qualifyinglicenses for the specified site.
12 PTC Creo® 3.0 Installation and Administration Guide

NoteThe contents of the License Pack reflect your order. If your configurationshave changed since a maintenance release, contact PTC License Managementfor a new License Pack.
Before You BeginBefore you install your PTC Creo software, make sure that the followingprerequisites are met:
• You have opened an online account at PTC.com.• You have received the Software Confirmation Order e-mail with the product
code or the Sales Order Number for your shipment. Alternatively, you musthave received your License Pack via e-mail from PTC License Management.
• You have received the product DVD in your software shipment. If not, followthe link on your Software Confirmation Order e-mail to download theinstallation package to a folder on the local or the network computer.
• You have checked the Hardware Notes for platform support, systemrequirements, and supported graphics card details at http://www.ptc.com/WCMS/files/160242/en/PTC_Creo_Future_Platform_Support_Summary.pdf.
• If you are an existing user, you must have verified whether a FlexNetPublisher license server is available for updating with new license codes.
• You have read the READ THIS FIRST document for installation prerequisites.
Opening a PTC Online AccountYou must have a PTC online account to generate a license and install the PTCCreo applications. Use the following instructions to create an online account:
1. On a computer connected to the Internet, go to the New Account page.2. Fill in any empty boxes.3. Click Create Account. A confirmation page indicates a successful account
creation.4. Review and print this confirmation for your record. A confirmation of your
account is sent to your e-mail address.
Preparing to Install Your PTC Software 13

Resetting Your PasswordIf at any time you do not remember your PTC.com password, follow theseinstructions:
1. Open the Reset Your Password page.2. Type your user name.3. Click Continue. A URL to reset your password is sent to your e-mail address.
About PTC Installation AssistantPTC Installation Assistant generates licenses and installs the PTC Creoapplications based on the license sources that you have been provided. You canperform the following tasks using PTC Installation Assistant:
• Generate or update node-locked or floating licenses at runtime• Drag-and-drop previously downloaded node-locked or floating license files• Download node-locked licenses to a specific location. In case of floating
licenses, install PTC License Server• Identify license sources listed in a PTC_D_LICENSE_FILE variable set on
your computer or if a license server is already running• View a list of the available applications based on the entitlements listed in the
license file• Download and install the PTC Creo applications from PTC.com• Perform a simple installation. Alternatively, customize the installation to add
specific features and configurations• Reconfigure an existing installationSee Workflow for Installation and Configuration on page 183 for flowcharts onthe installation and reconfiguration tasks.
Accessing PTC Installation AssistantYou can access PTC Installation Assistant from the DVD in your softwareshipment. You can also download the Assistant from the Web by following thelink on your PTC Software Order Confirmation e-mail. After downloading theinstallation package from the Web, extract the contents to a folder on yourcomputer or onto a network server location depending on how you want toconfigure your installation.
14 PTC Creo® 3.0 Installation and Administration Guide

Privileges for Starting PTC Installation AssistantTo start PTC Installation Assistant on Windows, you must have elevatedprivileges assigned to you by an administrator. In addition, the startup behavior ofthe Assistant depends on the following criteria:• The permission group or the access token associated with the logged-in user
account• The User Account Control (UAC) settings for that accountThe startup behavior for the Assistant is summarized below:
Access Token UAC Status Type of Prompt ResultAdministrator Enabled Prompt for consent You can start the
Assistant after youprovide yourconsent.
Administrator Disabled No prompt You can start theAssistant with afull administrativeaccess token.
Standard User Enabled Prompt forcredentials
You can start theAssistant with afull administrativeaccess token.
Standard User Disabled Not applicable You cannot startthe Assistant.
Starting PTC Installation AssistantYou can start PTC Installation Assistant by running setup.exe from the rootdirectory of either the DVD or the downloaded installation files. Other than usingthe default of English, you can run the Assistant in French, German, Italian,Spanish, Simplified Chinese, Traditional Chinese, Korean, Japanese, and Russian.See the next section for details. If you are starting the Assistant from a DVD, theAssistant starts automatically if your computer has autorun enabled for yourDVD drive. If it does not happen, follow one of these methods:
• Start Windows Explorer, browse to the DVD drive, and double-click thesetup.exe icon.
• At an MS-DOS prompt, type <dvd>:\setup.exe, where <dvd> is theDVD drive letter.
• From the task bar, select Start ▶ Run, and enter <dvd>:\setup.exe.
Preparing to Install Your PTC Software 15

Working with PTC Installation AssistantIn addition to generating and updating licenses, you can install some of the PTCCreo applications using PTC Installation Assistant. When you start the Assistant,the Welcome screen appears as shown below:
On this screen select a task based on your installation requirements and click Nextto proceed.
• Install new software
• Upgrade existing software
• Reconfigure existing software
• Setup license
As you perform the various tasks, the processes involved are highlighted on theleft pane. Take one of the following actions to end the installation process:
• Click Install and then click Finish to complete the installation and close theAssistant.
• Click Finish to close the Assistant if you are only generating or updatinglicenses.
• Click [X] at the top-right corner of the Assistant to stop the installation andexit the Assistant at any stage during the installation.
16 PTC Creo® 3.0 Installation and Administration Guide

PTC Software License AgreementBefore you use PTC Installation Assistant for generating licenses or installingsoftware, you must accept the PTC software license agreement. To do so, followthese steps:
1. Start the Assistant and select a task on the Welcome screen.2. Click Next. The Software License Agreement screen appears.
The license agreement is in the language specified for the languageenvironment variable LANG. If you are running the Assistant in a language
other than English, click to open a PDF file with the English licenseagreement.
3. Read and accept the license agreement.
• You must accept the license agreement to proceed even if a licenseagreement already exists. The license agreement shown above supersedesthe previous license agreement.
• If you decline the license agreement, you cannot proceed. Click Finish tostop the installation and exit the Assistant. A page with instructions thatyou should follow after you decline the license agreement, opens in yourdefault browser window.
4. Click the check box at the bottom of the screen to confirm that you areinstalling and using the software in compliance with the export agreement.
5. Click to print the license agreement.
Preparing to Install Your PTC Software 17

Authenticating Your User AccessIf you are accessing PTC Installation Assistant from the Web, the following loginscreen may appear at any stage after you accept the software license agreement.This happens in case your user access has not already been authenticated:
Perform the following steps for authentication:
1. Type your user name using the format <user [email protected]> in theUsername text box.
2. Type the password corresponding to the user name in the Password text box.3. If you do not remember your user name or password, click Reset my
password. You are redirected to a page on PTC.com to reset your password.4. Click Log In.If necessary, click the link at the bottom of the dialog box to create a new account.
18 PTC Creo® 3.0 Installation and Administration Guide

2Quick-Start Installation for
Experienced UsersUpdating PTC License Server ....................................................................................20Installing PTC Creo Applications.................................................................................20Where Your Software Is Installed ................................................................................21
This chapter provides a quick-start approach for experienced users who havepreviously installed license management and product software on license server,license client, and node-locked machines. For step-by-step installation instructionson using PTC Installation Assistant, read the subsequent chapters in this guide.New users can refer to the section Installing the Creo Applications: SimpleInstallation Process on page 34.
19

Updating PTC License ServerIf you are updating your software to a later release, you must update your PTClicenses. See Updating the License Server on page 72 for details.
Installing PTC Creo ApplicationsInstall PTC Creo applications one at a time to a client machine and to the licenseserver machine using the following workflow:
1. Start PTC Installation Assistant.2. Click Install new software on the Welcome screen.3. Accept the software license agreement.4. Configure a license source (a license file or a license server) using the
instructions in the chapter Configuring Licenses for the PTC CreoApplications on page 23. If you have already configured a license source,select it from the License Summary area of the License Identification screen.
5. Select one or more PTC Creo applications to install.6. Select a folder for the installation. To install into a folder other than the
default, either type the full path or browse to the folder to select it.
To install more than one PTC Creo application at a custom location, make sureto install them in a common folder. The files common to the applications getinstalled in the <creo_loadpoint>\<datecode>\Common Filesfolder accessible to all the applications.
7. Customize each PTC Creo application using the steps that follow or clickInstall to start a simple installation.
a. Click Customize after selecting an application.b. Define the platforms, languages, and the other components.c. Modify the license configuration information to associate specific licenses
to the application startup command. You can attach multiple licenses to asingle command name.
d. Configure the Windows shortcut preferences as required.
See Installing PTC Creo Applications, PTC Mathcad, and other Utilities onpage 33 for details on the simple installation process. See Customizing anInstallation on page 42 for the customization details.
8. Click Finish.
20 PTC Creo® 3.0 Installation and Administration Guide

Where Your Software Is InstalledPTC Installation Assistant defines and installs software into a default installationdirectory that you can modify for your environment during installation. Thedefault path is as follows:C:\Program Files\PTC\Creo 3.0\<datecode>\<app_name>
PTC License Server, the PTC Creo applications, and any related components areinstalled into separate subdirectories within the PTC directory.
NoteAll the 32-bit applications are installed at C:\Program Files (X86) evenif you have specified your installation path as C:\Program Files.
Quick-Start Installation for Experienced Users 21


3Configuring Licenses for the PTC
Creo ApplicationsUsing PTC Installation Assistant for Licensing .............................................................24Using the License Server Manager .............................................................................24Verifying System Requirements..................................................................................25Before You Proceed...................................................................................................25Generating or Updating Licenses................................................................................26
This chapter explains how to generate or update licenses using PTC InstallationAssistant. It also provides instructions to install PTC License Server, a third-partylicense management software for your PTC Creo applications. You must installPTC License Server before installing your PTC Creo applications unless you havepurchased uncounted node-locked licenses. Refer to your sales documents foryour license type. For the license server version requirements appropriate for yourinstallation, see the READ THIS FIRST.PTC uses FlexNet Publisher from Flexera Software, Inc. as its license server. SeeLicense Management Software on page 77 for an overview and benefits of thelicense management software. The FlexNet Publisher License AdministrationGuide may be helpful as you install PTC License Server.
23

Using PTC Installation Assistant forLicensingYou must generate or update exiting licenses to use the latest software for PTCCreo 3.0. Licenses determine the PTC Creo applications that you are authorized torun on your computer. The Assistant helps you perform the following licensing-related tasks:
• Generate a new license file based on your product code• Update and reuse an existing license file on your computer or at a remote
server location• Install a single or a triad license server
Using the License Server ManagerThe license server manager handles the initial contact with your PTC software thatuses FlexNet licensing. It passes the connection to the appropriate vendor daemon.A license server manager serves the following purposes:
• Starts and maintains vendor daemons for serving license rights from differentsoftware.
• Transfers specific software requests to the correct vendor daemon.There are two versions of the license server manager for license administration:
• lmadmin—Uses a graphical user interface (GUI)• lmgrd—Uses a command-line interfacePTC currently ships with its products a license server manager based onlmadmin with the ptc_d vendor daemon at version 11.11.1. It is a replacementto the lmgrd−based license server manager shipped with the earlier releases ofPTC products. If you are using an lmgrd−based license server manager withptc_d vendor daemon of version 10.8.x, it is recommended that you migrate tolmadmin although it is not necessary.
NoteOn a 64–bit Windows operating system, if you are installing FlexNetPublisher with a lmadmin-based license server manager, a 32–bit version ofthe FlexNet Publisher is installed in the C:\Program Files folder.
24 PTC Creo® 3.0 Installation and Administration Guide

Verifying System RequirementsInstallation requirements for the PTC Creo applications in this guide follow:
• For Windows 7, you must have administrative privileges to install PTCLicense Server.
• You must have TCP/IP (Transmission Control Protocol/Internet Protocol)installed and configured correctly on your Windows system before installingthe software.
• To use the lmadmin−based license server manager on Windows platforms,you must install the Microsoft Visual C++ 2010 Redistributable Package(x86).
NoteFor information on platform support for the PTC Creo applications, see http://www.ptc.com/WCMS/files/160242/en/PTC_Creo_Future_Platform_Support_Summary.pdf.
Before You ProceedGather all the necessary information that follows about the installation:
• Check the following documents for the latest installation settings:
○ The Hardware Notes for platform support, system requirements, andsupported graphics card details at http://www.ptc.com/WCMS/files/160242/en/PTC_Creo_Future_Platform_Support_Summary.pdf
○ The READ THIS FIRST document of your product for any changes toyour computer settings
○ The FlexNet License Server Hardware Notes for license server installationrequirements at www.ptc.com/WCMS/files/121640/en/FlexNet_Licensing.pdf
• Make note of your product code that arrives via e-mail. If you have received alicense file via e-mail, store it at a secure location on your disk.
• If you have already installed PTC License Server based on lmgrd and choosenot to migrate to lmadmin, you must still update the license server withlicense codes compatible with PTC Creo 3.0.
• If you have already installed PTC License Server based on lmgrd and chooseto migrate to lmadmin, complete these steps before the migration:
Configuring Licenses for the PTC Creo Applications 25

1. Shut down any lmgrd service or processes running on the system.2. Save the license.dat file from your existing license server installation
to a secure location.3. Uninstall the previous installation completely.
See Migrating from lmgrd to lmadmin, in the FlexNet Publisher LicenseAdministration Guide for more information.
About the Product CodesA product code is a unique serial number corresponding to the license that you arerequesting. An example of a product code is BH381111ED12345H4B5CXD.Product codes are nontransferable. They can be used by only one individual ononly one computer. Product codes are usually provided by PTC when yoursoftware order is confirmed. You can use the product codes to generate licensesusing PTC Installation Assistant.
Generating or Updating LicensesAfter you have received an e-mail from PTC with the Sales Order Number (SON)or product codes for your software order, generate or update licenses using PTCInstallation Assistant as follows:
1. Start the Assistant. The Welcome screen appears.2. Select either Setup license or Install new software depending on the tasks that
you want to perform:
• Setup license generates or installs licenses.• Install new software performs license generation or identification tasks
after which you can install the software.3. Click Next. The Software License Agreement screen appears.4. Read and accept the software license agreement and click the check box at the
bottom of the screen to accept the export agreement.5. Click Next. The License Identification screen appears. The License Summary
area shows the available license sources installed using the Assistant or the
26 PTC Creo® 3.0 Installation and Administration Guide

licenses found on the computer. The license availability is shown in the Statuscolumn.
6. Click Skip Licensing if you want to proceed with the installation withoutproviding the licensing information. You can provide the licensing informationat a later stage by re-running the PTC Installation Assistant.
NoteIf you click Skip Licensing, the Command Configuration tabbed page onthe Application Custom Setting dialog box is not available duringcustomizing the PTC Creo application. You can add, edit, or delete alicense configuration using the Command Configuration tabbed page on theApplication Custom Setting dialog box.
Using the Simple License Entry OptionsUse the Simple License Entry area on the License Identification screen and performthe following steps:
1. Type your sales order number or product code in the corresponding text box.2. Click Install Licensing. If the sales order number matches your software order,
all the available licenses corresponding to the sales order number areautomatically generated into the license file.
Configuring Licenses for the PTC Creo Applications 27

• For node-locked licenses, a single set of available node-locked licensefeatures are added to the license file and downloaded to the “C:\ProgramData\PTC\licensing\ folder.
• For floating licenses, all the available licenses are added to the license fileand the PTC FlexNet Publisher license server is installed.
The complete path of the license file or the port@hostname value of thelicense server appears in the Source column of the License Summary area.This area displays all the license files or servers available for use on yourcomputer.
3. To complete the license setup, click one of the following buttons depending onthe options you have selected on the Welcome screen:
• Click Finish to close the Assistant if you have selected Setup license.• Click Next if you have selected Install new software to proceed with the
installation.
Using the Advanced License Entry OptionsUse the Advanced License Entry area on the License Identification screen to editthe default license port and for the setup of a Triad license server as follows:
1. Click next to Advanced License Entry to expand the area.
2. Type your Sales Order Number or your product code in the corresponding textbox.
28 PTC Creo® 3.0 Installation and Administration Guide

3. Click Host ID Setup to open the Host ID Setup dialog box.
The sales order number or the product code from the previous step appears inthe dialog box. The Machine ID, Port, and the Host columns for the localcomputer is shown.
a. To change the default port for a single license, edit the number in the Porttext box and click Install Licensing. Then skip to the last step in thissection.
b. For triad server installations, follow these steps:
i. Click next to Triad Server to expand the area.ii. Provide the host ID, port number, and the host name for the other two
servers.iii. Click Install Licensing. An authentication dialog box to connect to
PTC.com may open if your user access has not already been validated.If so, provide your credentials and click Log In.
The license server is installed and appears in the License Summary area ofthe License Identification screen.
4. To complete the license setup, click one of the following buttons depending onthe options you have selected on the Welcome screen:
• Click Finish to close the Assistant if you have selected Setup license.• Click Next if you have selected Install new software to proceed with the
installation.
Installing the License Server at a Custom LocationIf required, you can install the license server at a custom location, as follows:
Configuring Licenses for the PTC Creo Applications 29

1. Copy the PTC Creo product installation DVD or the product installationpackage that you downloaded from the web, to a temporary location (<temp_folder>) on your disk.
2. Edit the <temp_folder>/pim/xml/flexadmin.xml file and modifythe INSTALLBASE name attribute of the PROPERTY node to specify thecustom installation location for the license server as shown:<PROPERTY name="[INSTALLBASE]">[PROGRAMFILES]\PTC</PROPERTY>
Modify to:<PROPERTY name="[INSTALLBASE]">D:\NEWFLEXDIR</PROPERTY>
Where, D:\NEWFLEXDIR is the custom installation location for the licenseserver.
3. Save the <temp_folder>/pim/xml/flexadmin.xml file.4. Start the PTC Installation Assistant from the locally copied <temp_
folder> folder, and install the license server. The license server is installedat the custom location D:\NEWFLEXDIR.
Note• PTC recommends that you do not edit the flexadmin.xml file unless there
is a specific need to do so.• You can edit only those nodes that are documented in this section.
Specifying License Entry for Previously GeneratedLicense FilesUsing the License Summary area, you can install licenses using the license filesthat you have already received as follows:
1. Drag and drop or type the path to the license file.2. Click outside the License Summary area to begin the installation of the license
server for floating licenses. For the node-locked licenses, this step checks thehost ID of the local computer.
30 PTC Creo® 3.0 Installation and Administration Guide

NoteNode-locked licenses that you specify using the License Summary area arenot remembered in the subsequent sessions unless you add themspecifically to the PTC_D_LICENSE_FILE variable.
3. Click the or the buttons in the License Summary area to add or removelicense sources from the current session.
NoteRemoving license sources does not delete or uninstall license files or thelicense server.
4. To complete the license setup, click one of the following buttons depending onthe options you have selected on the Welcome screen:
• Click Finish to close the Assistant if you have selected Setup license.• Click Next if you have selected Install new software to proceed with the
installation.
Configuring Licenses for the PTC Creo Applications 31


4Installing PTC Creo Applications,PTC Mathcad, and other Utilities
Installation Prerequisites............................................................................................34File Format Compatibility ...........................................................................................34Installing the PTC Creo Applications: Simple Installation Process .................................34Using PTC Quality Agent with the PTC Creo Applications.............................................38
This chapter provides information on how to install the following PTC products:
• PTC Creo applications:
○ PTC Creo Parametric○ PTC Creo Direct○ PTC Creo Layout○ PTC Creo Simulate○ PTC Creo Options Modeler○ PTC Creo Distributed Services Manager
• PTC Mathcad• Utilities
33

Installation PrerequisitesSee Before You Begin on page 13 to check if all the installation prerequisites aremet. Install the PTC Creo applications and PTC Creo Distributed ServicesManager after you have obtained a license and installed PTC License Server. Seethe chapter Configuring Licenses for the PTC Creo Applications on page 23 fordetails on how to obtain licenses for your software. You can install your productsoftware on a license server, a license client, a node-locked machine, or on anycombination of these machines.
Note• Usage of uncounted, node-locked licenses does not require PTC License
Server.• License configuration is a part of the installation process.
File Format CompatibilityYou can retrieve files (parts, assemblies, drawings) created in a previous release ofa PTC Creo application using the current version of the same application.
Installing the PTC Creo Applications:Simple Installation ProcessUsing PTC Installation Assistant, you can install the PTC Creo applications andPTC Creo Distributed Services Manager using a simple installation process. Youcan also customize their installation using this installer. A simple installationprocess is described below:
1. Start the Assistant. The Welcome screen appears.2. Click Install new software.
34 PTC Creo® 3.0 Installation and Administration Guide

3. Click Next. The Software License Agreement screen appears.4. Accept the agreement and click the check box at the bottom of the screen to
confirm that you are installing the software in compliance with the exportagreement.
5. Click Next. The License Identification screen appears.
Installing PTC Creo Applications, PTC Mathcad, and other Utilities 35

6. If you have not already obtained your licenses or installed PTC LicenseServer, follow the instructions in the chapter Configuring Licenses for thePTC Creo Applications on page 23.
If you have configured your licenses, confirm that your desired license sourceappears in the License Summary area, or add it using one of the followingmethods:
• Drag and drop a valid license file into the Source column for a node-locked license.
• Specify the port@hostname value of the license server in the Sourcecolumn for a single floating license server.
• Specify the name of a member of the Triad license server in the Sourcecolumn. The License Summary area is automatically populated with theentire Triad license server information.
After you provide the correct license information, the availability of thelicense appears in the Status column.
7. Click Next. The Application Selection screen appears.
8. Specify an installation folder or retain the default folder.
Selecting Application for InstallationSelect one or more applications from the list:
36 PTC Creo® 3.0 Installation and Administration Guide

• PTC Creo:
○ PTC Creo Direct○ PTC Creo Distributed Services Manager○ PTC Creo Layout○ PTC Creo Options Modeler○ PTC Creo Parametric○ PTC Creo Simulate
• PTC Mathcad:
○ PTC Mathcad Viewable Support — Enables PTC Mathcad Prime whenintegrated with Windchill to generate PDF rendering of the worksheet.This component is required when using Windchill integration.
○ PTC Mathcad Prime.
For information on installation of standalone PTC Mathcad Prime, refer to thePTC Mathcad Prime 3.0 Installation and Administration Guide here.
NoteTo enable the integration of PTC Mathcad Prime with any of the PTC Creoapplications, ensure that you have installed both, the PTC Mathcad Primeand the corresponding PTC Creo application.
• Utilities:
○ Microsoft .NET Framework 4 Setup○ PTC Creo Platform Agent○ PTC Creo Thumbnail Viewer○ PTC Creo View Express○ PTC MKS Platform Components 9.x○ PTC Quality Agent
NoteRequired utilities for applications that you select to install, areautomatically marked for installation. You can deselect the PTC CreoThumbnail Viewer, andPTC Creo View Express for installation. The PTCMKS Platform Components 9.x is not selected by default.
Installing PTC Creo Applications, PTC Mathcad, and other Utilities 37

Before selecting applications from the list, check if you are installing the correctversion of the software and whether the disk space requirements are met.Perform one of the following steps:
• Click Install to install the applications without any customization.• Select the applications and click Customize to customize their installation. The
Application Custom Setting screen appears with the applications selected forcustomization on the left pane. Refer to the chapter Customizing theInstallation of the PTC Creo Applications on page 41 for more information.
NoteSome of the applications on the Application Selection screen cannot becustomized. For such applications, the Customize button is not available.
Using PTC Quality Agent with the PTCCreo ApplicationsPTC Quality Agent is a required utility that gets installed by default when youinstall any of the PTC Creo applications. Click or clear the check box at thebottom of the Application Selection screen for enabling or disabling PTC QualityAgent reporting. By default, PTC Quality Agent reporting is always enabled.
38 PTC Creo® 3.0 Installation and Administration Guide

PTC Quality Agent helps you to gather and send reports to PTC on theperformance and usage of the PTC Creo applications. Before clicking the checkbox, read the instructions in the data collection document whose link is providedat the bottom of the screen. See Installing PTC Quality Agent on page 141formore information on the uses of PTC Quality Agent.
Installing PTC Creo Applications, PTC Mathcad, and other Utilities 39


5Customizing the Installation of the
PTC Creo ApplicationsCustomizing an Installation ........................................................................................42Defining the Installation Components ..........................................................................43Installing PTC Creo Mold Analysis (CMA) Component..................................................45Modifying License Configurations ...............................................................................46Configuring Windows Shortcuts..................................................................................48Setting Licenses for PTC Creo Simulate......................................................................48
This chapter explains how to customize an installation of the PTC Creoapplications. This information also applies to PTC Creo Distributed ServicesManager. Some of the application features in this chapter are specific to individualPTC Creo applications.
41

Customizing an InstallationYou can customize the installation of a PTC Creo application using the followingprocedure:
1. Perform steps 1 through 8 as described in the section Installing the PTC CreoApplications: Simple Installation Process on page 34.
2. Select the applications on the Application Selection screen and clickCustomize. The Application Custom Setting dialog box opens. The selectedapplications for customization appear on the left pane. The customizationtabbed pages appear on the right pane as shown in the following figure.
• To install customized application features using the Application Featurestabbed page, see Defining the Installation Components on page 43.
• To modify license configurations using the Command Configuration tabbedpage, see Modifying License Configurations on page 46.
• To configure Windows shortcut preferences using the Shortcuts tabbedpage, see Configuring Windows Shortcuts on page 48.
3. Click an application on the left pane and then click a tabbed page on the rightpane to proceed.
4. After selecting the options on all the tabbed pages, perform one of thefollowing actions:
42 PTC Creo® 3.0 Installation and Administration Guide

• Click OK to finish the customization and return to the Application Selectionscreen.
• Click Cancel.5. Complete the installation of the PTC Creo application. See Completing the
Installation and Starting the PTC Creo Applications on page 51 for details.
Defining the Installation ComponentsUsing the Application Features tabbed page, you can define the followingcomponents for installation. Refer to the Application column for the applicationwith which you can install the component.
Component Application Description<application_name> All the PTC Creo
applications and PTCCreo DistributedServices Manager
Installs the PTC Creoapplication and itscomponents. By default, thecomponents are installed at<creo_loadpoint>\<datecode>\<app_name> and thestartup scripts are installed at<creo_loadpoint>\<datecode>\<app_name>\bin.
Options PTC Creo Parametric Installs additionalcomponents such as PTCCreo Modelcheck, JRE, MoldComponent Catalog, PTCCreo Mold Analysis, NC-GPOST, VERICUT, and PTCCreo Parametric DistributedComputing Extension withPTC Creo Parametric. SeeInstalling PTC Creo MoldAnalysis (CMA) Componenton page 45 for information oninstalling PTC Creo MoldAnalysis.
API Toolkits PTC Creo applicationsand PTC CreoDistributed ServicesManager
Installs the files necessary torun the Application ProgramInterface toolkits.
Customizing the Installation of the PTC Creo Applications 43

Component Application DescriptionInterfaces PTC Creo Installs the external
interfaces.NoteTo install PTC CreoParametric Interface forCADDS 5, you must alsoselect MKS PlatformComponents 9.x forinstallation on theApplication Selectionscreen. See InstallingMKS PlatformComponents on page 149for more information.
Platforms All the PTC Creoapplications and PTCCreo DistributedServices Manager
Selects your machine’sarchitecture automatically asthe default platform forinstalling the components.PTC provides separatesoftware installer (DVDmedia and downloadablepackage) for the 32–bit and64–bit systems.
Languages All the PTC Creoapplications and PTCCreo DistributedServices Manager
Selects the languages for theinstallation. The software isinstalled in English by defaultand cannot be disabled.
Enable Quality AgentReporting
All the PTC Creoapplications
If enabled, collectsinformation related to thePTC Creo applications andother system-relatedinformation and sends it toPTC. See Installing QualityAgent on page 141for moreinformation on QualityAgent.
Verification Models PTC Creo Simulate Installs the verificationmodels as described in theSimulation Verification GuideHelp.
44 PTC Creo® 3.0 Installation and Administration Guide

Component Application DescriptionPTC Creo ParametricDistributed ComputingExtension
PTC Creo Simulate Installs this component to rundistributed computing tasksthat include import/export,printing operations, andstudies in case of PTC CreoSimulate.
Direct ModelingConverter
PTC Creo Parametric,PTC Creo Simulate,PTC Creo Direct
Installs files that are requiredto convert and open PTCCreo Elements/Direct files.
Installing PTC Creo Mold Analysis (CMA)ComponentPTC Creo Mold Analysis (CMA) is an injection molding simulation application.You can use CMA to verify the part design for manufacturing to avoid themolding defects. CMA uses the IntelMPI process to launch parallel computing.The smpd-intel-4.0.3.009–x64 or smpd-intel-4.0.3.009–x86process on your system verifies whether the IntelMPI is installed or not.You can install IntelMPI using following procedure:
1. Open a command window as an administrator.2. Browse to the location of the smpd-intel-4.0.3.009–x64.exe file,
for a 64–bit system. If you install the PTC Creo Mold Analysis componentwith the default installation path for the PTC Creo Parametric application, thepath is C:\Program Files\PTC\Creo 3.0\<datecode>\CommonFiles\x86e_win64\cma\Bin\IntelMPI\. Similarly, the path for the32–bit system is C:\Program Files\PTC\Creo 3.0\<datecode>\Common Files\i486_nt\cma\Bin\IntelMPI\.
3. Run the executable file to start the installation process. For example, run thefollowing command for a 64–bit system:
smpd-intel-4.0.3.009-x64.exe –installSimilarly, run the following command for a 64–bit system to uninstall the PTCCreo Mold Analysis component:
smpd-intel-4.0.3.009-x64.exe –uninstall
Customizing the Installation of the PTC Creo Applications 45

Modifying License ConfigurationsUsing the Command Configuration tabbed page, you can add, edit, or delete alicense configuration. The figures in this section show the default licenseconfigurations for PTC Creo Parametric. Similar screens appear for the other PTCCreo applications.
Perform the following steps:
1. Click Add to add additional configurations. The Add configuration dialog boxopens.
46 PTC Creo® 3.0 Installation and Administration Guide

a. In the Configuration Name box specify a file name (*.psf) for the licenseconfiguration information. Use alphanumeric characters without spaces todefine the configuration name.
b. From the Configuration Type list, select a configuration type.c. In the Configuration Description box, type a description for each of the
license configurations that you have defined. This information is displayedon the startup of PTC Creo Parametric. The description can contain spacesand other characters.
d. The Available License(s) column displays the set of all licenses to run andthe startup extensions and floating licenses. Highlight the required licensein this column and move it to the Startup extensions and floating optionscolumn.
e. Click OK. The newly added license configuration appears on the LicenseConfiguration tabbed page.
2. To edit a license configuration, select it on the Command Configuration tabbedpage and click Edit. Use the options on the Edit configuration dialog box forediting.
3. To delete a license configuration, select it and click Delete.
Customizing the Installation of the PTC Creo Applications 47

Configuring Windows ShortcutsUsing the Shortcut tabbed page, you can configure the Windows shortcutpreferences for the PTC Creo applications. Set the Windows shortcut settings thatare shown in the following figure:
Setting Licenses for PTC Creo SimulateThe Licenses tabbed page appears when you click PTC Creo Simulate.
48 PTC Creo® 3.0 Installation and Administration Guide

Using this tabbed page you can configure licenses for PTC Creo Simulate. A listof license types against the selected licenses appears on this tabbed page. Type avalue in the Selected License(s) text box to change the license for the selectedlicense type.
Customizing the Installation of the PTC Creo Applications 49


6Completing the Installation and
Starting the PTC Creo ApplicationsCompleting the Installation .........................................................................................52Installing and Uninstalling the PTC Creo Applications in Silent Mode.............................53Starting the PTC Creo Applications.............................................................................53Configuring the PTC Creo Application Startup .............................................................53Directory Permissions to Start PTC Creo Applications ..................................................56Installing PTC Creo Platform Agent.............................................................................56Configuring a PTC Creo Parametric Installation ...........................................................56Uninstalling the PTC Creo Applications .......................................................................61
This chapter explains how to complete an installation of a PTC Creo application.This information is common to PTC Creo Distributed Services Manager.Information on how to start the PTC Creo applications and configure their startupis also given. Proceed to the end of the chapter for the procedure to uninstall thePTC Creo applications.
51

Completing the InstallationAfter configuring your settings, follow these steps to complete the installation:
1. Click Back and review information to make sure that your settings are correct.2. Click Install to begin the installation. The Installation Progress screen displays
the status.
NoteUtilities that are required for applications that you select on the ApplicationSelection screen, get installed prior to the installation of the selectedapplications.
On this screen you can also perform the following operations using buttons tothe right of the progress bars and below them:
• Click to stop an installation.
• Click to restart an installation.• Click Finish after the applications are installed to close the Assistant. You
can also click [X] at the top-right corner of the Assistant to exit theinstaller.
52 PTC Creo® 3.0 Installation and Administration Guide

Installing and Uninstalling the PTC CreoApplications in Silent ModeYou can install and uninstall all the PTC Creo applications included in this guidein silent mode using command-line arguments. See Installing the PTC CreoApplications in Silent Mode on page 151 for details.
Starting the PTC Creo ApplicationsAfter your license management and product software have been installed, start thePTC Creo applications. You can run the applications using the shortcut defined onyour desktop or using the Start menu. Click All Programs ▶ PTC Creo and selectthe PTC Creo 3.0 application that you want to start.
Configuring the PTC Creo ApplicationStartupWhen you configure the startup of a PTC Creo application, an executable filenamed <app>.exe, for example, parametric.exe and one or moreconfiguration files (.psf) are created for each startup configuration. Theconfiguration file contains an area where you can specify and set user-definedenvironment variables. This user-defined information is preserved duringreconfiguration and update installations of the PTC Creo applications. Aconfiguration file is created when you complete the installation of a PTC Creoapplication.The configuration file is created in the <creo_loadpoint>\<datecode>\<app_name>\bin\ directory.You can run <creo_loadpoint>\<datecode>\<app_name>\bin\<app_name>.exe to display a list of the available startup configurations.The startup command is a combination of the startup executable and theconfiguration file. For example,parametric.exe <filename>.psf
In this case, <filename> is the name of the configuration file.A sample configuration file follows. The text is the default information that isused when you start PTC Creo Parametric. The bold text following the // USER- PSF section is the user-defined information for starting PTC Creo Parametric.
Completing the Installation and Starting the PTC Creo Applications 53

NoteModify only the last text line of this sample configuration file.
// PTC - PSF file: parametric//ENV=PATH+=<creo_loadpoint>%PRO_MACHINE_TYPE%\deflibENV=PATH+=<creo_loadpoint>%PRO_MACHINE_TYPE%\libENV=PRO_COMM_MSG_EXE=<creo_loadpoint>%PRO_MACHINE_TYPE%\OBJ\pro_comm_msg.exeENV=CDRS_DATA=<creo_loadpoint>ENV=PRO_IMAGE_CONVERTER=<creo_loadpoint>%PRO_MACHINE_TYPE%\obj\convert_image.exeENV=SPG_DIRECTORY=<creo_loadpoint>ENV=PROTABLE_DIRECTORY=<creo_loadpoint>\protableENV=PROTAB=<creo_loadpoint>%PRO_MACHINE_TYPE%\OBJ\protab.exeENV=CLHOME=<creo_loadpoint>\text\pcldataENV=CV_ENV_HOME=<creo_loadpoint>%PRO_MACHINE_TYPE%\CV102ENV=LM_LICENSE_FILE=7788@staticENV=CREOPMA_FEATURE_NAME=CREOPMA_BASICRUN=<creo_loadpoint>%PRO_MACHINE_TYPE%\nms\nmsd.exe -timeout 300RUN=<creo_loadpoint>%PRO_MACHINE_TYPE%obj\xtop.exe// USER - PSF// Add User specific environment or run applications below hereENV=PRO_LANG=german
You can set the value of an environment variable or specify the startup of a third-party application under the // USER - PSF section of the configuration file.If you run PTC Creo application without creating a configuration file, a errormessage indicates that the PTC Creo application cannot be started. In such casesyou must run ptcsetup from the <creo_loadpoint>\<datecode>\<app_name>\bin\ folder and create a PTC Startup File (PSF) for that PTCCreo application. You can then run that PTC Creo application using correspondingPSF file.If you create only one configuration file for a PTC Creo application, thatapplication uses the configuration file by default.
Specifying Environmental VariablesYou can use a configuration file to specify the value of an environmental variablein the configuration file, follow these instructions:
• Use the ENV or RUN entry to specify the value of an environment variable orto run an external application.
• Use the equal sign (=) following ENV to change the existing value of thevariable.
• Use the plus and equal to signs (+=) to add a value after an existing value ofthe variable.
54 PTC Creo® 3.0 Installation and Administration Guide

• Use the minus and equal to signs (-=) to insert a value before an existingvalue of the variable.
• Use the RUN entry to run an external command on startup.
Reading of Configuration Files at StartupA PTC Creo application automatically reads configuration files from severallocations. If an option is in more than one configuration file, the most recentlyloaded or the most recently read setting is applied.At startup, a PTC Creo application first reads in a protected system configurationfile called config.sup. It then searches for and reads in the configuration files(config.pro, config.win, menu_def.pro) from various directories inthe following order:
1. <creo_loadpoint>\<datecode>\Common Files\text (creo_loadpoint is the PTC Creo application installation directory)—Yoursystem administrator may have put configuration files in this location tosupport company standards for windows configuration settings, formats, andlibraries. Any user starting a PTC Creo application from this loadpoint usesthe values in this file.
2. HOME environment variable—You can set this environment variable to pointto a directory created for your login ID. You can place your configuration fileshere to start the PTC Creo application from any folder without having to copythe files in each folder.
3. Startup directory—This is your current or the working directory when youstart a PTC Creo application. Since the local configuration files(config.pro, config.win, and menu_def.pro) in this directory arethe last to be read, they override any conflicting configuration file optionentries. The config.pro file does not, however, override anyconfig.sup entries.
Generating a Debug Log FileThe debug log file contains the environment variables that you have set. You canrun the <app_name>.exe executable in debug mode by setting the value of theenvironment variable APPL_STARTUP_LOG to true. A debug file namedapplstarter.log is created in the C:\ drive.
Completing the Installation and Starting the PTC Creo Applications 55

Directory Permissions to Start PTC CreoApplicationsYou cannot start a PTC Creo application from a directory without writepermissions unless you specify an alternative directory to store the trail files. Ifyou start a PTC Creo application from a directory without write permissions, adialog box opens as shown in the following example:
Specify another directory with write permissions. The working directory remainsthe same, but the trail files are stored in the new working directory that you havespecified.
Installing PTC Creo Platform AgentWhen you begin the installation of a PTC Creo application, an appropriate versionof thePTC Creo Platform Agent gets installed. PTC Creo Platform Agent is asystem level component of PTC Creo that acts as a broker connecting otherindependent PTC Creo components. Installation of PTC Creo Platform Agentenables the following functionality:
• Invokes the LearningConnector for PTC Creo application• Facilitates PTC Windchill SocialLink integration with the PTC Creo
applicationsSee Installing and Uninstalling Client-Side Components in Silent Mode on page164 for instructions on performing a silent installation of PTC Creo PlatformAgent.
Configuring a PTC Creo ParametricInstallationAfter you have installed PTC Creo Parametric, you can perform the followingoperations either by setting configuration options before starting PTC CreoParametric or by installing the necessary components at startup
56 PTC Creo® 3.0 Installation and Administration Guide

• Change the units of measure by setting configuration options in yourconfig.pro file before PTC Creo Parametric startup
• Allocate memory for running PTC Creo Parametric on 32-bit platforms bysetting a configuration option before or after starting PTC Creo Parametric
• Generate a traceback log file by setting a configuration option before or afterstarting PTC Creo Parametric
Changing the Units of Measure for PTC CreoParametricYou can change the units of measure for your PTC Creo Parametric installation.Use the settings in the next table to update values for the configuration options inyour config.pro file:
ConfigurationOption English Metricdrawing_setup_file
<creo_loadpoint>\<datecode>\Common Files\text\prodetail.dtl
<creo_loadpoint>\<datecode>\Common Files\text\iso.dtl
format_setup_file
<creo_loadpoint>\<datecode>\Common Files\text\prodetail.dtl
<creo_loadpoint>\<datecode>\Common Files\text\iso.dtl
pro_unit_length
unit_inch unit_mm
pro_unit_mass unit_pound unit_kilogram
template_designasm
<creo_loadpoint>\<datecode>\Common Files\templates\inlbs_asm_design.asm
<creo_loadpoint>\<datecode>\Common Files\templates\mmks_asm_design.asm
template_drawing
<creo_loadpoint>\<datecode>\Common Files\templates\c_drawing.drw
<creo_loadpoint>\<datecode>\Common Files\templates\a3_drawing.drw
template_sheetmetalpart
<creo_loadpoint>\<datecode>\Common Files\templates\inlbs_part_sheetmetal.prt
<creo_loadpoint>\<datecode>\Common Files\templates\mmks_part_sheetmetal.prt
template_solidpart
<creo_loadpoint>\<datecode>\Common Files\templates\inlbs_part_solid.prt
<creo_loadpoint>\<datecode>\Common Files\templates\mmks_part_solid.prt
todays_date_note_format
%Mmm-%dd-%yy %dd-%Mmm-%yy
Completing the Installation and Starting the PTC Creo Applications 57

ConfigurationOption English Metrictolerance_standard
ansi iso
tol_mode nominal nominal
weld_ui_standard
ansi iso
Allocating Memory on a 32-bit Windows System forRunning Creo ParametricWhen working with large models or a large data set in PTC Creo Parametric on a32-bit Windows system, processes may use all available memory and exitprematurely. To receive an early warning, use the proe_memory_buffer_size configuration option. You can save you work under some situations.Specify the size of the memory buffer in megabytes as a reserve for a possible out-of-memory situation. The default value is 50 megabytes for a moderately sizedmodel. The default has a minimal impact on the memory available to otherapplications running simultaneously.Consider the following guidelines when setting your memory buffer:• The proe_memory_buffer_size configuration option is processed at
PTC Creo Parametric startup. If you change its value in the current session,exit the PTC Creo Parametric and restart it for the configuration option to takean effect.
• When you specify a large value for the proe_memory_buffer_sizeconfiguration option, an out-of-memory situation is detected at an early stage.In such a case, you increase the probability of saving your work before theavailable memory is used.
• When you reserve memory, the virtual memory available to other applicationsrunning simultaneously is reduced. If you specify a large value for the proe_memory_buffer_size configuration option, it is recommended that youincrease the system settings for the size of the virtual memory paging file.
Using a Zero or Nonzero Value for Buffer SizeIf you set the value of the proe_memory_buffer_size configuration optionto zero instead of a nonzero value, no warning messages appear.If you specify a nonzero value for the proe_memory_buffer_sizeconfiguration option, memory usage is checked periodically while working with alarge data set. If the size of the preserved memory buffer is sufficient, warningmessages appear in an out-of-memory situation as discussed below.
58 PTC Creo® 3.0 Installation and Administration Guide

For operations that you can cancel, such as, retrieval or regeneration, an errormessage appears to indicate that the system is running short of memory. You arealso informed that if you continue with the current operation, the session mayterminate.Respond in one of the following ways:
• Click Cancel. Save your work, exit PTC Creo Parametric, and restart thesession.
• Click OK to continue. In this case PTC Creo Parametric may exit as soon asthe preallocated memory is exhausted.
For operations you cannot cancel, a message appears to indicate that the system isrunning short of memory. This may cause the session to terminate. Click OK tocontinue. After you complete the operation, save your work, exit the PTC Creoapplication, and restart the session.
Generating a Traceback Log File for PTC CreoParametricIn the event of a premature exit, PTC Creo Parametric can output a stack trace ofyour last operations if you set the auto_traceback configuration option toyes. The default value is no. By default, this information is stored in thetraceback.log file in the startup directory. The following message appears toindicate the premature exit of PTC Creo Parametric:
The traceback.log file can sometimes be useful to Technical Support toresolve the premature exit issue. If you click Cancel, PTC Creo Parametric exitswithout creating the traceback.log file. If you click OK, the followingmessage appears:
Completing the Installation and Starting the PTC Creo Applications 59

PTC Creo Parametric exits after creating the traceback.log file in the currentworking directory.
NoteIf you start PTC Creo Parametric from a directory without write permissions,the traceback.log file is stored in the directory that you have specifiedusing the Choose startup directory dialog box.
Working with CADDS 5 Models in PTC CreoParametricYou can import and export 3D CADDS 5 parts and assemblies within PTC CreoParametric by installing the CADDS 5 interface during the installation of PTCCreo Parametric. To do so, select PTC Creo Parametric Interface for CADDS 5under Interfaces on the Application Features tabbed page on the ApplicationCustom Setting screen. To use this interface, consider the following instructions:
• After you have installed PTC Creo Parametric Interface for CADDS 5 with PTCCreo Parametric, a configuration file config_cadds.pro is automaticallysaved in the <creo_loadpoint>\<datecode>\Parametric\text\folder. This file contains configuration options whose settings determine howthe CADDS 5 interface works with PTC Creo Parametric. A sampleconfig_cadds.pro file follows:atb_ident_cadds_files yescadds_import_layer yesintf_cadds_import_make_solid yesintf_cadds_version 14! extend_cvpath is similar to config-option search_path for Creo Parametric.! It allows to find user's CADDS 5 objects on import...! extend_cvpath
Check the config_cadds.pro file for the above configuration options. Ifrequired, copy the configuration options to your local config.pro file andupdate their values.
• Check whether the components listed below are installed:
○ PTC Creo Parametric Interface for CADDS 5
○ PTC MKS platform components. See Installing PTC MKS PlatformComponents on page 149 for installation instructions.
○ PTC Portmapper that is installed as a part of the PTC MKS platformcomponents. Click Start ▶ Control Panel ▶ Programs and Features to open
60 PTC Creo® 3.0 Installation and Administration Guide

the Uninstall or change a program screen. You must see PTC Portmapper asan installed program.
Uninstalling the PTC Creo ApplicationsYou can remove an installation of a PTC Creo application through the ControlPanel as follows:
1. Click Start ▶ Control Panel ▶ Programs and Features. The Uninstall or changea program screen appears.
2. In the application list, click the specific release or datecode of the applicationyou want to remove.
3. Click Uninstall. A confirmation dialog box opens. Upon confirmation, the PTCCreo application is removed.
NoteIf you have installed more than one PTC Creo application, make sure that theCommon Files folder and its contents are still available in the PTC Creoload point.
Completing the Installation and Starting the PTC Creo Applications 61


7Installing and Accessing PTC Creo
HelpOverview of the Help Center.......................................................................................64Browser Support for PTC Creo Help ...........................................................................64Accessing Help from within a PTC Creo Application .....................................................64Choosing a Location for the Help Center Installation ....................................................65Installing the Help Center ...........................................................................................65Enabling the Help Center from a Network Drive ...........................................................67Installing the Help Center on a Web Server .................................................................67Viewing the Help Center Independent of a PTC Creo Application ..................................69Uninstalling the Help Center .......................................................................................70
This chapter provides an overview of the Help Center. It explains how to installand access Help for PTC Creo Parametric, PTC Creo Direct, PTC Creo Layout,PTC Creo Simulate, and PTC Creo Options Modeler from a local host computer, anetwork drive, or a Web server.
63

Overview of the Help CenterThe Help Center provides access to documentation and includes the followingfeatures:
• Context-sensitive Help for PTC Creo applications — PTC Creo Parametric,PTC Creo Direct, PTC Creo Layout, PTC Creo Simulate, and PTC CreoOptions Modeler.
• A search facility and quick links to helpful information.
Browser Support for PTC Creo HelpPTC Creo Help supports following browsers:• Internet Explorer 9.0 and later• Mozilla Firefox 10.0.1 and laterThe Help Center for the PTC Creo application opens in your default browser. Youcan set one of these browsers as the default on your computer.
Accessing Help from within a PTC CreoApplicationEach PTC Creo application launches its Help in a separate window of your defaultbrowser. The value of the PRO_LANG environment variable determines thelanguage of the Help Center. You can access Help topics in the following ways:
• For context-sensitive Help, point to a user interface item and press F1.
• To browse the Help Center, click .The Help Center is accessed from the following locations:
• help.ptc.com—The default if you do not install the Help Center and set thePTC_<app_name>_HC_URL_3 environment variable.
• Local host computer—The default if you install the Help Center but do notspecify an alternate location, such as a network drive, for accessing Help.
NoteWhen you upgrade a PTC Creo application, you must also upgrade theHelp center to the corresponding datecode of the application. Otherwise,the PTC Creo application accesses the corresponding Help Center fromPTC.com.
64 PTC Creo® 3.0 Installation and Administration Guide

Choosing a Location for the Help CenterInstallationUsing the Help DVD, you can install the Help Center for the PTC Creoapplications at one of the following locations:
• A local host computer where the PTC Creo applications are installed.• A network drive. This location is helpful for administering multiple clients on
a network.• AWeb server.
Installing the Help CenterUsing the Help DVD in your shipment, proceed with the installation as described.You can also download the Help DVD from the Order or Download SoftwareUpdates page at PTC.com. If you have installed the Help Center on a networkdrive, perform the steps explained in Enabling the Help Center from a NetworkDrive on page 67 to access the Help Center from the PTC Creo application.
1. Start Windows Explorer, browse to the DVD drive, and double-clicksetup.exe. Alternatively, download the DVD as described in the previousparagraph. The PTC Installation Assistant begins.
2. Perform steps 1 through 4 as described in Installing the PTC CreoApplications: Simple Installation Process on page 34.
3. Click Next. The Application Selection screen appears.
Installing and Accessing PTC Creo Help 65

4. Select one or more Help Centers from the list of Help Centers.5. Retain the default folder, for example, C:\Program Files\PTC, or click
and specify the full path of an alternative folder.6. Click Install to install the Help Center without any customization.
Alternatively, click Customize to open the Application Custom Setting dialogbox and customize the installation as follows:
a. On the Application Features tab, select the Help Center languages toinstall.
b. On the Shortcuts tab, specify the shortcut preferences for the PTC CreoHelp startup commands and other Windows preferences. See ConfiguringWindows Shortcuts on page 48 for information on how to perform theseoperations.
7. Click OK.8. Click Install on the Application Selection screen. The Installation Progress
screen shows the status of the installation. You can click Cancel at any time tocancel the installation.
9. Click Finish. The Help Center is installed in the <help_install_path>\PTC\Creo 3.0\help\creo_help_<app_name> directory.
For example, if you specify the default path, the Help Center is installed in theC:\Program Files\PTC\Creo 3.0\help\creo_help_<app_name> directory.
66 PTC Creo® 3.0 Installation and Administration Guide

Enabling the Help Center from a NetworkDriveTo enable the Help Center that is installed on a network drive, you must configurethe PTC Creo application as explained in the following example:
1. If you have installed the Help Center on computer machine03d at C:\Program Files\PTC\Creo 3.0\help, share the folder C:\ProgramFiles\PTC\Creo 3.0 as:\\machine03d\Creo 3.0.
2. On a client computer where you want to access the Help Center, map theshared folder to a local drive, say Q. After mapping, the folder with the Helpinstallation files appears as Q:\Help\help\creo_help_<app_name>.
3. Set the PTC_<app_name>_HC_URL_3 environment variable for the PTCCreo applications as listed:
• PTC Creo Parametric—PTC_PMA_HC_URL_3
• PTC Creo Direct—PTC_DMA_HC_URL_3
• PTC Creo Layout—PTC_LCD_HC_URL_3
• PTC Creo Simulate—PTC_SIM_HC_URL_3
• PTC Creo Options Modeler—PTC_OPTM_HC_URL_3
a. Click Start ▶ Control Panel ▶ System ▶ Advanced system settings. TheSystem Properties dialog box opens.
b. Click the Advanced tab and then click Environment Variables.c. Click New under the User variables area. The New User Variable dialog box
opens.d. Specify the environment variable and its value in the boxes listed below.
For example, for PTC Creo Parametric Help, set the environment variableas follows:
• Variable name—PTC_PMA_HC_URL_3
• Variable value—Q:\Help\help\creo_help_pma
e. Click OK and again click OK on the System Properties dialog box.4. Start the PTC Creo application and access Help.
Installing the Help Center on a WebServerYou can install the Help Center on any Web server. If you are using Apache,install the Help Center in the DocumentRoot directory as follows:
Installing and Accessing PTC Creo Help 67

1. Perform steps 1 through 4 as described in Installing the Help Center on page65.
2. Specify <DocumentRoot> as the installation path.3. Click OK and click Install on the Application Selection screen.
The selected application help is installed in the <DocumentRoot>\Creo3.0\help\creo_help_<app_name> directory.
4. To distribute the Help Center files from the <DocumentRoot>\Creo 3.0\help\creo_help_<app_name> directory for context sensitive Helpaccess, set the PTC_<app_name>_HC_URL_3 environment variable for thePTC Creo applications as listed:
• PTC Creo Parametric—PTC_PMA_HC_URL_3
• PTC Creo Direct—PTC_DMA_HC_URL_3
• PTC Creo Layout—PTC_LCD_HC_URL_3
• PTC Creo Simulate—PTC_SIM_HC_URL_3
• PTC Creo Options Modeler—PTC_OPTM_HC_URL_3
a. Click Start ▶ Control Panel ▶ System ▶ Advanced system settings. TheSystem Properties dialog box opens.
b. Click the Advanced tab and then click Environment Variables.c. Click New under the User variables area. The New User Variable dialog box
opens.d. Specify the environment variable and its value in the boxes listed below.
For example, for PTC Creo Parametric Help, set the environment variableas follows:
• Variable name—PTC_<app_name>_HC_URL_3
• Variable value—<Help_Center URL>
For example, for a Help Center installed on Apache server configuredon port number 8080, the Help Center URL is http://<server_name>:8080/Creo 3.0/help/creo_help_<app_name>.
e. Click OK and again click OK on the System Properties dialog box.Alternatively, you can copy the Help Center of an application that is installed onthe local host computer in the <DocumentRoot> directory of the servletcontainer.For example, if you have installed PTC Creo Parametric Help Center on the localhost computer at the default path, you can copy the Help Center directory C:\Program Files\PTC\Creo 3.0\help\creo_help_pma to the<DocumentRoot> directory. Specify the appropriate URL as the value for thePTC_PMA_HC_URL_3 variable to access the context-sensitive Help.
68 PTC Creo® 3.0 Installation and Administration Guide

NoteIf you specify <DocumentRoot> directory as the location for theinstallation of the Help Center, you can access the context-sensitive helpdirectly from this directory. Set the Help Center URL as the value of the PTC_<app_name>_HC_URL_3 environment variable to access the context-sensitive Help through the Web server URL.
Viewing the Help Center Independent of aPTC Creo ApplicationTo view the Help Center that is installed on a host computer independent of thecorresponding PTC Creo application, open the following page in a browserwindow:<creo_help_install_path>\help\creo_help_<app>\<language>\index.html
For example, to open the Help Center for PTC Creo Parametric in English, openthe following page in a browser window:<creo_help_install_path>\help\creo_help_pma\usascii\index.html
The Help Center opens in the browser window.To view the Help Center that is installed on a Web server independent of the PTCCreo application, specify the following URL in a browser window:http://<server_name>:<port_number>/Creo 3.0/help/creo_help_<app_name>/<language>/index.html
For example, to open the Help Center installed on a Web server that has theTomcat servlet container configured on port number 8080 for PTC CreoParametric in English, open the following page in a browser window:http://<server_name>:8080/Creo 3.0/help/creo_help_pma/usascii/index.html
A Help Center opens in the browser window.
NoteContext-sensitive Help is not supported when you view the Help Centerindependent of a PTC Creo application.
Installing and Accessing PTC Creo Help 69

Uninstalling the Help CenterYou can remove the Help Center from the local host computer independent of aPTC Creo application using the following steps:
1. Click Start ▶ Control Panel ▶ Programs and Features. The Uninstall or changea program screen appears.
2. In the application list, click PTC Creo Help <release><date_code> forany of the PTC Creo applications.
3. Click Uninstall. A confirmation dialog box opens.4. Click Yes to uninstall the Help Center for the application.
NoteIf you have uninstalled the Help Center on the host computer or have not setthe PTC_<app_name>_HC_URL_3 environment variable, you can accessthe Help Center from PTC.com from within a PTC Creo application.Additionally, if you uninstall or remove the Help Center from the Web server,you must remove or unset the PTC_<app_name>_HC_URL_3 environmentvariable.
70 PTC Creo® 3.0 Installation and Administration Guide

8Updating an Installation
Updating the License Server ......................................................................................72Updating PTC Creo Applications ................................................................................72Customizing an Existing Installation of a PTC Creo Application .....................................73Installing a Maintenance Release ...............................................................................74Upgrading an Existing Version of an Installation...........................................................74
This chapter explains how to update the PTC Creo applications installed on yoursystem. Use the same procedure to update PTC Creo Distributed ServicesManager. Each time you update your software, you must update your license file.New license codes are not required if you are updating to a new build of PTCCreo within the same release. In some cases you may have to update the currentinstallation of PTC License Server. See the next section for details.
71

Updating the License ServerYou can update the current installation of PTC License Server with your newlicense information when updating your PTC software. An installation update ofPTC License Server is typically required in one of these scenarios:
• Adding license information from your new Sales Order• Updating the existing license features in your license file with those of a
Maintenance ReleaseYou may have to update the license server software itself depending on theversion installed. In such cases, with administrative privileges uninstall PTCLicense Server and follow the instructions in the chapter Configuring Licenses forthe PTC Creo Applications on page 23 to install PTC License Server. Update PTCLicense Server using this workflow:
1. Make note of the product code that you have received via e-mail.Alternatively, use the PTC License Management Web tools to request for alicense file via email. Save the license file in an ASCII format to a securelocation on your disk.
2. Start PTC Installation Assistant from the mounted DVD or from theinstallation package downloaded from the Web. The Welcome screen appears.
3. Click Setup license and then click Next. The License Identification screenappears.
4. Type your new product code or Sales Order Number in the respective text boxand click Install Licensing. Alternatively, drag and drop your new license fileinto the Source column of the License Summary area.
If a license server is already installed or running, the Assistant replaces theexisting license file with the new one. If a license server is not running, theAssistant checks whether the new license file requires a license server. If so,the license server is automatically downloaded and installed. See Generatingor Updating Licenses on page 26 for details.
5. Click Finish.The Assistant restarts PTC License Server. For Triad configurations, two of thethree partner machines must be running before licenses can be distributed.
Updating PTC Creo ApplicationsAfter you install PTC Creo applications of a particular release, you can performthe following operations:
• Customize an existing installation—After the update, all the previouslyinstalled files including the ones in the <creo_loadpoint>\
72 PTC Creo® 3.0 Installation and Administration Guide

<datecode>\Common Files folder remain unchanged. The updated filesrelevant to the customization are added to the <datecode> folder.
• Install a new maintenance release—After the installation, a new<datecode> folder corresponding to the datecode of the maintenancerelease is created within the <creo_loadpoint> folder. This foldercontains all the files for the maintenance release.
• Upgrade an existing installation—After the upgrade, the highest version of therelease that is installed is removed and the new maintenance release isinstalled in the installation path that you specify. If there is no installed versionat the specified installation path, then the new maintenance release is installedat that path.
Customizing an Existing Installation of aPTC Creo ApplicationCustomizing an existing installation of a PTC Creo application implies enablingor disabling Quality Agent reporting for the application, updating or creatingstartup commands, and updating Windows shortcut preferences. You cannot addor delete application features during this process.Rerun PTC Installation Assistant from the DVD and perform the following steps:
1. Start the Assistant. The Welcome screen appears.2. Click Reconfigure existing software and click Next. The License Identification
screen appears.3. Check the license information and update it if required. See Generating or
Updating Licenses on page 26 for details.4. Click Next. The Application Selection screen appears with a list of applications
that you previously installed.5. Click Customize after selecting the applications. The Application Custom
Setting dialog box opens.6. Select an application on the left pane and perform one of the following
actions:
• Select or clear the Enable Quality Agent reporting check box using theApplication Features tabbed page. See Defining the InstallationComponents on page 43 for details.
• Add, edit, or delete a license configuration using the CommandConfiguration tabbed page. See Modifying License Configurations on page46 for details.
Updating an Installation 73

• Configure the Windows shortcut preferences and path settings using theShortcut tabbed page. See Configuring Windows Shortcuts on page 48 fordetails.
• Click OK on the Application Custom Setting screen and then click Install onthe Application Selection screen to customize the installation.
7. Click Finish.
Installing a Maintenance ReleaseIf you have installed an earlier release of a PTC Creo application, use the stepsbelow to install a newer maintenance release. Refer to the chapters about theinstallation of various components for detailed information.
1. Start PTC Installation Assistant. Select Install new software on the Welcomescreen. Click Next. The License Identification screen appears.
2. Generate or update your license file. If required, PTC License Server is alsoupdated based on your license file. Click Next. The Application Selectionscreen appears.
3. Select an application to install.4. Specify an installation folder.5. To customize the installation for specific application features, license
configurations, or Windows shortcut preferences, click Customize. Use theApplication Custom Setting screen that opens for the customization.
6. After you select all the options, click Install on the Application Selectionscreen. The common files folder created for the previous release gets replacedwith common files folder for the release you are installing.
7. Click Finish to complete the installation and close the Assistant.
Upgrading an Existing Version of anInstallation1. Start PTC Installation Assistant. Select Upgrade existing software on the
Welcome screen. Click Next. The License Identification screen appears.
74 PTC Creo® 3.0 Installation and Administration Guide

NoteIf there is no installed version of the release, the Upgrade existing softwareoption is not available on the Welcome screen
2. Generate or update your license file. If required, the PTC License Server isalso updated based on your license file. Click Next. The Application Selectionscreen appears.
3. The path of the last installed version of the release appears on the ApplicationSelection screen as the default installation path. If you retain this defaultinstallation path, the installed applications appear selected, and you cannotdeselect them.
NoteIf an earlier version of the release exists at the specified installation path,Upgrade from <version> appears in the Status column. However, ifan installed version does not exists at the specified installation path, thestatus appears as New.
Alternatively, you can specify a different installation path. If an installation ofan application does not exist in the specified alternative path, this installationis treated as a new installation. You can select any or all such applications onthe Application Selection screen.
NoteIf a version of the release of an application exists at the specifiedalternative installation path, Upgrade from <version> appears in theStatus column for that application.
Additionally, if the version of a release of an application that you are installingalready exists at the specified installation path, the same version of thatapplication is upgraded with the customizations of the application.
4. To customize the installation for specific application features, licenseconfigurations, or Windows shortcut preferences, click Customize. Use theApplication Custom Setting screen that opens for the customization.
Updating an Installation 75

5. After you select all the options, click Install on the Application Selectionscreen.
6. Click Finish to complete the installation and close the Assistant.
76 PTC Creo® 3.0 Installation and Administration Guide

ALicense Management Software
Overview of PTC Licensing ........................................................................................78License Types...........................................................................................................78Simplified License Management Process ....................................................................78License Simplification—Advantages ...........................................................................79License Simplification—General Information ...............................................................80License Simplification—Technical Information .............................................................80PTC License Server ..................................................................................................84Benefits of Using FlexNet Publisher ............................................................................84Downward License Compatibility Using FlexNet Publisher............................................84Running FlexNet Publisher with Other Applications......................................................85Understanding Timeout Parameters............................................................................85Changing the Inactivity Timeout Parameter .................................................................87Suppressing the Regained Network License Dialog Box for PTC Creo
Parametric...................................................................................................87Using the Ptcflush Utility ............................................................................................87License Borrowing.....................................................................................................88Initiating License Borrowing .......................................................................................88Using the <creo_app>_borrow.bat File........................................................................89Determining the Borrowed License Status ...................................................................90Early Return of a Borrowed License ............................................................................90
This appendix discusses license management software and describes the benefitsof PTC License Server. License simplification is explained for new and existingusers.
77

Overview of PTC LicensingPTC software including PTC optional applications must be licensed for use.Licensing authorizes the installed software to run. PTC supports the followinglicenses for different product types:
• Commercial—Licenses for using full versions of PTC software. Theselicenses are not time-sensitive.
• Educational—Also known as student licenses used at educational institutions.These licenses are time-sensitive. The objects created in an educational orstudent version of the software are not compatible with the commercialversion of the same software.
• Evaluation—Licenses that limit your use of the software to a specified timeperiod.
License TypesDepending on the PTC product, a license can be one of the following types.
• Node-locked licenses—Restricts the use of the software to a particularmachine (independent workstation).
• Floating licenses—Served by the license server and can be used on anymachine connected over the network. There are two different types of floatinglicenses:
○ Single server licenses—Configured for a single machine as the server.○ Triad licenses—Configured for a set of three machines on the same
network that work together to manage a pool of floating licenses. Thisconfiguration provides redundant backup in case of a server outage. Anidentical license file is used for each Triad partner.
• Extended license—An extended license makes floating licenses available forlocked modules.
• Borrowed license—A borrowed license allows you to work temporarily onyour machine without being connected to the license server. Refer to LicenseBorrowing on page 88for details.
For more information on the additional license types that are supported for yourproduct, refer to the product documentation.
Simplified License Management ProcessPTC Creo uses license simplification for an easy license configuration,installation, and tracking process. This process provides flexibility in configuringyour licenses and minimizes the number of generated Service Contract Numbers(SCNs). You can combine all the PTC Creo licenses and options into a singleSCN. You can also assign a single SCN to the required license server.
78 PTC Creo® 3.0 Installation and Administration Guide

Each PTC product is defined in the license file with a unique feature name. Thislicense file format follows a standard approach by using the PTC License Server.This format has been in use by PTC since Pro/ENGINEER 2001 datecode2001440. Pro/ENGINEERWildfire 2.0 or later automatically uses simplifiedlicenses as license simplification is required for Pro/ENGINEERWildfire 2.0 andlater releases.
NoteLicense configuration is a part of the installation process.
Visit www.ptc.com/olm/ls_faq for more information on license simplificationincluding the advantages of simplifying your licenses.
License Simplification—AdvantagesLicense simplification has the following advantages:
• Increased flexibility in managing PTC licenses—With the licenseconfiguration process integrated into the installation process, you can alter theassignment and configuration of functions without contacting the PTC LicenseManagement team.
• Fewer licensing rules—Licenses are assigned to a machine through a SCN(Service Contract Number).
• Stable number of licensing SCNs—With no licensing requirements for SCNs,you have significantly fewer SCNs to manage. License changes do not forceyou to change the SCN.
• Reduced time associated with licensing PTC products—You and PTC do notneed to research and maintain the tight control over the multiple types oflicenses based on how you purchased the products originally.
• Reduced system administration time for license changes—With the use ofcommon feature names in licenses, updates to the client are reduced as thelicenses are moved between servers. The feature name and the startupcommands remain the same.
License Management Software 79
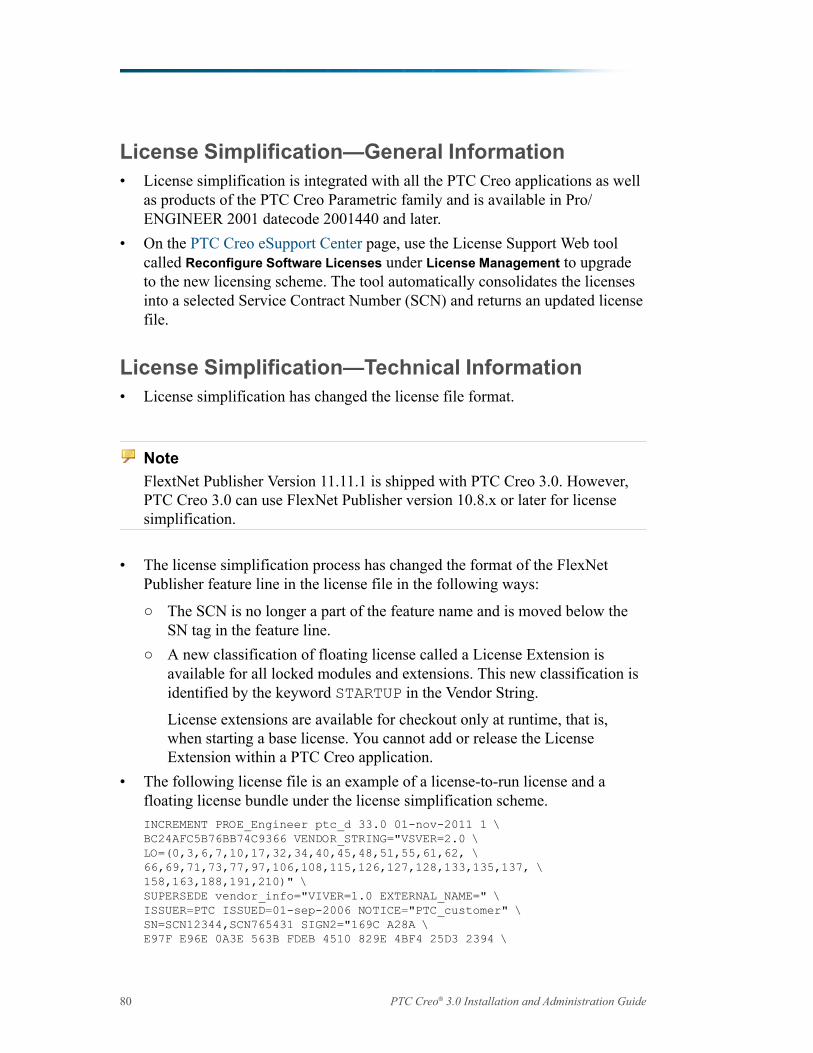
License Simplification—General Information• License simplification is integrated with all the PTC Creo applications as well
as products of the PTC Creo Parametric family and is available in Pro/ENGINEER 2001 datecode 2001440 and later.
• On the PTC Creo eSupport Center page, use the License Support Web toolcalled Reconfigure Software Licenses under License Management to upgradeto the new licensing scheme. The tool automatically consolidates the licensesinto a selected Service Contract Number (SCN) and returns an updated licensefile.
License Simplification—Technical Information• License simplification has changed the license file format.
NoteFlextNet Publisher Version 11.11.1 is shipped with PTC Creo 3.0. However,PTC Creo 3.0 can use FlexNet Publisher version 10.8.x or later for licensesimplification.
• The license simplification process has changed the format of the FlexNetPublisher feature line in the license file in the following ways:
○ The SCN is no longer a part of the feature name and is moved below theSN tag in the feature line.
○ A new classification of floating license called a License Extension isavailable for all locked modules and extensions. This new classification isidentified by the keyword STARTUP in the Vendor String.
License extensions are available for checkout only at runtime, that is,when starting a base license. You cannot add or release the LicenseExtension within a PTC Creo application.
• The following license file is an example of a license-to-run license and afloating license bundle under the license simplification scheme.INCREMENT PROE_Engineer ptc_d 33.0 01-nov-2011 1 \BC24AFC5B76BB74C9366 VENDOR_STRING="VSVER=2.0 \LO=(0,3,6,7,10,17,32,34,40,45,48,51,55,61,62, \66,69,71,73,77,97,106,108,115,126,127,128,133,135,137, \158,163,188,191,210)" \SUPERSEDE vendor_info="VIVER=1.0 EXTERNAL_NAME=" \ISSUER=PTC ISSUED=01-sep-2006 NOTICE="PTC_customer" \SN=SCN12344,SCN765431 SIGN2="169C A28A \E97F E96E 0A3E 563B FDEB 4510 829E 4BF4 25D3 2394 \
80 PTC Creo® 3.0 Installation and Administration Guide

0444 2FD4 6C23 0168 A8A5 AEBE 54B0 1FF6 B79B DC75 \2014 A278 33CC 1B90 8647 6A12 F4D6 45BF"INCREMENT 10108 ptc_d 33.0 01-nov-2011 1 \1C75006B8512AA3C4EBE VENDOR_STRING="VSVER=2.0 LO=()" \SUPERSEDE vendor_info="VIVER=1.0 EXTERNAL_NAME=" \ISSUER=PTC ISSUED=01-sep-2006 NOTICE="PTC_customer" \SN=SCN12344,SCN765431 SIGN2="1A34 408F 40D4 749F 5980 \2DFE 15B0 0FAF 0ED7 A5F5 DCEA E318 6529 2E27 A055 \1A21 F766 D9E1 F7AB BD1F 993E B3B2 2975 E46C 06AC \6304 25AD E576 9E37 8794"INCREMENT PROBUNDLE_10108 ptc_d 33.0 01-nov-2011 99999 \4CF5E08B0EF55FF34082 VENDOR_STRING="VSVER=2.0 \LO=(6,32,56,91,92,94,104,131)" SUPERSEDE \ISSUED=01-sep-2006 SIGN2="14A8 7CE3 57D9 1246 D07F \3610 E235 2120 4322 A874 681C 282B 5449 3150 BC5A \0867 853D FE8E F8E9 9E29 6CD1 987C 4A8D 0024 BDAA \AEBC 065B 9530 3AAB 441D"
• Using PTC Installation Assistant, you can define startup commands withadditional license extensions or floating options. Defining a startup commandmeans specifying the license-to-run for an application at startup. You can alsospecify additional floating options to grab at startup. This enables additionaloptional modules for a session that are not otherwise enabled by the license-to-run. The designation of the licenses to grab at startup results in the definitionof an environment variable <APP>_FEATURE_NAME, where <APP> is theabbreviation for PTC Creo application name that you are configuring. Forexample, CREOPMA_FEATURE_NAME identifies the licenses to grab whenrunning PTC Creo Parametric. Similarly, CREODMA_FEATURE_NAMErefers to PTC Creo Direct. The value of this environment variable can be a listof licenses-to-run, followed by a parenthesized list of optional modules. Onlyone license-to-run is checked out while all the options from the parenthesizedlist are checked out. For the license-to-run, checkout attempts are made in theorder listed, until one is successfully checked out. Then the option list isattempted. Consider the following example:
CREOPMA_FEATURE_NAME=PROE_FLEX3C PROE_FoundationAdv(61 108)
This example shows an environment variable definition identifying twolicenses-to-run and two options. This environment variable prescribes thatPTC Creo Parametric will first try to checkout PROE_FLEX3C license-to-run;if it fails, it will try to checkout PROE_FoundationAdv. If either one issuccessful, it will then attempt to check both options – 61 (Web.Link) and 108(Piping).
• Using PTC Installation Assistant, you can define startup commands withadditional license extensions or floating options. When you add licenseextensions, or floating options, to a startup command, a value is assigned tothe <APP>_FEATURE_NAME variable. This value can be one of CREOPMA_
License Management Software 81

FEATURE_NAME, CREODMA_FEATURE_NAME, or CREOSIM_FEATURE_NAME depending on the PTC Creo application that you have installed. Thisvariable is defined in the application startup command.
• During a session, if a license is lost and you try to recover the license-to-run,the PTC Creo application attempts to reacquire the license-to-run and all otheroptions specified in the startup command.
• The output of the Ptcstatus utility provides the location of the SCN in thelicense file. You can use the Ptcstatus utility in two modes:
• Normal mode—Run the Ptcstatus utility at the command line without anyarguments.
ptcstatus
• Verbose mode—Run the Ptcstatus utility at the command line with the -vargument.
ptcstatus -v
The following output illustrates the difference between the two Ptcstatusutility modes:
Ptcstatus Normal ModeDisplaying status for license file: 7788@staticLicense Server: staticptc_d FlexNet Publisher version: 11.11.1
License In Use Free
PROE_Engineer Uncounted,Locked
2
Foundation_Adv 0 2
Pro/SURFACE * 0 2
Behavioral_Modeler 0 2
Pro_Plastic_Advisor 0 2
Tool_Design_Set* 0 2
* = License Extensions - Available only on startup^ = Borrowed License
Ptcstatus Verbose ModeDisplaying status for license file: 7788@staticLicense Server: staticptc_d FlexNet Publisher version: 11.11.1
82 PTC Creo® 3.0 Installation and Administration Guide

License In Use Free Version
ExpirationDate
SCN
PROE_Engineer Uncounted 2 33.0 Locked to00-11-22-33-44-5512345
Foundation_Adv 0 2 33.0
Pro/SURFACE * 0 2 33.0
Behavioral_Modeler
0 2 33.0
Pro_Plastic_Advisor
0 2 33.0
Tool_Design_Set*
0 2 33.0
• You can specify a name for a license instead of its default name by changingthe value of the attribute EXTERNAL_NAME in the feature line of the licensefile.
For example, to change the feature PROE_Engineer to My_License_Name in a license file, specify the value of the EXTERNAL_NAME attribute asshown in the original and changed files.
Original license file:INCREMENT PROE_Engineer ptc_d 33.0 01-nov-2011 1 \BC24AFC5B76BB74C9366 VENDOR_STRING="VSVER=2.0 \LO=(0,3,6,7,10,17,32,34,40,45,48,51,55,61,62, \66,69,71,73,77,97,106,108,115,126,127,128,133,135,137, \158,163,188,191,210)" SUPERSEDE vendor_info="VIVER=1.0 \EXTERNAL_NAME=" ISSUER=PTC ISSUED=01-sep-2006 \NOTICE="PTC_customer" SN=SCN912344,SCN765431 SIGN2="169C A28A \E97F E96E 0A3E 563B FDEB 4510 829E 4BF4 25D3 2394 \0444 2FD4 6C23 0168 A8A5 AEBE 54B0 1FF6 B79B DC75 \2014 A278 33CC 1B90 8647 6A12 F4D6 45BF"
Changed license file:INCREMENT PROE_Engineer ptc_d 33.0 01-nov-2011 1 \BC24AFC5B76BB74C9366 VENDOR_STRING="VSVER=2.0 \LO=(0,3,6,7,10,17,32,34,40,45,48,51,55,61,62, \66,69,71,73,77,97,106,108,115,126,127,128,133,135,137, \158,163,188,191,210)" SUPERSEDE vendor_info="VIVER=1.0 \EXTERNAL_NAME=My_License_Name ISSUER=PTC ISSUED=01-sep-2006 \NOTICE="PTC_customer" SN=SCN12344,SCN765431 SIGN2="169C A28A \E97F E96E 0A3E 563B FDEB 4510 829E 4BF4 25D3 2394 \0444 2FD4 6C23 0168 A8A5 AEBE 54B0 1FF6 B79B DC75 \2014 A278 33CC 1B90 8647 6A12 F4D6 45BF"
Notice the text after the EXTERNAL_NAME attribute in the changed license file.With this change, the output of the Ptcstatus utility displays the new name, My_License_Name, instead of PROE_Engineer.
License Management Software 83

PTC License ServerFlexera Software, Inc.’s FlexNet Publisher license management software isintegrated with PTC software. For more information, visit www.flexerasoftware.com.
NoteFlextNet Publisher Version 11.11.1 is shipped with PTC Creo 3.0. However,PTC Creo 3.0 can use FlexNet Publisher version 10.8.x or later for licensesimplification.
Benefits of Using FlexNet PublisherUsing FlexNet Publisher to control usage of licenses offers the following keyadvantages:
• Single-Server Solution—FlexNet Publisher can manage PTC software andother vendor applications without conflict. Note that the PTC license filecannot be combined with the license files of other vendors.
• Immediate License Recovery—If there is a premature exit of the licensedsoftware (for example, the system shuts down), the FlexNet Publisher licenseserver automatically reclaims the PTC license.
• Increased Flexibility—System administrators can reserve or deny licensesbased on user name, host name, display name, or IP address. For moreinformation see Managing the Options File in the FlexNet Publisher LicenseAdministration Guide.
• Centralized License Storage—PTC customers can store all PTC licenses forall PTC products in a single file for each license server.
• Multiple Licenses for a Single Command—One command can be used toexecute multiple licenses of PTC software based on availability.
• License Borrowing—PTC Creo 3.0 allows license borrowing with FlexNetPublisher.
Downward License Compatibility UsingFlexNet PublisherFlexNet Publisher license servers have downward compatibility with PTCapplications using FLEXlm license servers. For example, a PTC Creo Parametric3.0 license can run Pro/ENGINEER 2001 software, because both releases of thesoftware use the same PTC License Server.
84 PTC Creo® 3.0 Installation and Administration Guide

NoteTo run the current release of PTC Creo, you must install FlexNet Publisherversion 10.8.x or later. FlextNet Publisher Version 11.11.1 is shipped withPTC Creo 3.0.
Running FlexNet Publisher with OtherApplicationsYou can use FlexNet Publisher to run PTC products as well as other applications.Each application that uses FLEXlm or FlexNet Publisher has a correspondinglicense server manager (lmgrd ) or (lmadmin) and a vendor daemon. Thelicense server manager starts the vendor daemon (for example, ptc_d) thatcontrols the usage of licenses.You cannot combine a PTC license file with a license file of another vendor. Donot, for example, combine PTC feature lines with those of other vendors in asingle license file. This action causes the licenses to be invalid.If all applications and vendor daemons are FLEXlm 10.8.x or later, lmgrd orlmadmin can process multiple license files. This is true even when the Host IDsare different (as long as the license files refer to the same node). For moreinformation, see Managing Licenses from Multiple Software Publishers in theFlexNet Publisher License Administration Guide.
Understanding Timeout ParametersTimeout parameters enable the license client and the license server tocommunicate with one another so that licenses are released and available uponrequest.You can reconfigure the TIMEOUTALL parameter within a specified range, asdescribed in the next section, Changing the Inactivity Timeout Parameter on page87.
License Management Software 85

TimeoutParameter Value DescriptionInactivity timeout(TIMEOUTALL)
120 minutes(default)
This parameter prevents a license fromremaining idle. If the license client isinactive for a specific period, the licensecan be reclaimed by the license server andused by another license client. For the PTCCreo applications, the inactivity timeoutdefault is 120 minutes.Activity is measured as active menuselections.You can change the default of 120 minutesso that the parameter ranges from 20minutes (minimum value) to infinity(maximum value).
License refresh 1 minute A license refresh occurs at intervals of 1minute. When you select a command aftersuch an interval, the license clientcommunicates with the license server. Thelicense client and the license server bothmust be working. If the license server isnot found, the license client loses itslicense to run. If the license client is notfound, the server reclaims the license foruse by another license client.
Validation retries None The first time a license client cannotvalidate its license the application'sgraphical user interface will freeze. Youare immediately given the following threeoptions:Click Retry to request a license from anactive license server.Click Save File(s).Click Exit to close the application withoutsaving the file or files.
Startup 10 seconds Upon starting a session, the license clientrequests a license and has 10 seconds inwhich to have the request validated.
86 PTC Creo® 3.0 Installation and Administration Guide

Changing the Inactivity Timeout ParameterYou can set the TIMEOUTALL parameter that determines how long the systemallows a license to remain idle before it is reclaimed by the license server. Tochange the default inactivity timeout parameter, you must update the FlexNetPublisher option file, ptc.opt in <ptc License Server loadpoint>/FLEXnet Publisher/licensing. The default is 120 minutes. Edit thedefault parameter TIMEOUTALL 7200 by changing 7200 seconds (120 minutes)to another value in seconds.The minimum value is 20 minutes (or 1200 seconds) and the maximum value isinfinity. To make infinity the default, remove the TIMEOUTALL parameter fromthe ptc.opt file. If you set a minimum value to less than 20 minutes, the systemdefaults to 20 minutes.
Suppressing the Regained NetworkLicense Dialog Box for PTC CreoParametricBeginning with Pro/ENGINEER 2000i, you can disable the Regained NetworkLicense dialog box using a configuration option. In the config.pro file, set thesuppress_license_loss_dialog option to yes. The default is no. If youlose or regain your network license-to-run PTC Creo Parametric, a status messageappears but a dialog box does not.
Using the Ptcflush UtilityThe Ptcflush utility is used only when a license client application fails to shutdown and does not break the TCP/IP connection between the license server andthe client. This situation most commonly occurs when a client exits prematurelyor does not respond. However, it is not mandatory to use the Ptcflush utility.You can use the Ptcflush utility once every 10 minutes. For Ptcflush to work withthe lmadmin-based license server, set licenseReclaimAllowed=”true” inthe server.xml file at license_server_manager_loadpoint/conf.The syntax for running Ptcflush is as follows:% ptcflush feature_name hostname port handle
Execute the ptcstatus command to list the <feature host porthandle> information and copy and paste this listing at the command prompt torun Ptcflush.To flush a license in use, for example, type% ptcflush PROE_Engineertitan 7788 101 using the feature name and not the user-defined name if youassigned an alias.
License Management Software 87

License BorrowingWith license borrowing for all supported platforms, you can run PTC Creoapplications on clients without being connected to the license server. The licenseserver must be running FlexNet Publisher 10.8.x or later and must use the LicensePack of version 33 or later. With license borrowing, you can:
• Choose from a pool of available licenses• Specify the expiration date of the license• Work remotely on design and manufacturing projectsThe appearance of the BORROW keyword on the feature line in the license fileindicates that the license is borrowable. If this keyword is missing, contact PTCLicense Management to regenerate your license file for a borrowable license. Anexample of a license file with the BORROW keyword follows:INCREMENT PROE_Engineer ptc_d 33.0 01-nov-2011 1 \BC24AFC5B76BB74C9366 VENDOR_STRING="VSVER=2.0 \LO=(0,3,6,7,10,17,32,34,40,45,48,51,55,61,62, \66,69,71,73,77,97,106,108,115,126,127,128,133,135,137, \158,163,188,191,210)" SUPERSEDE vendor_info="VIVER=1.0 EXTERNAL_NAME=" \ISSUER=PTC ISSUED=01-sep-2006 BORROW=264 NOTICE="PTC_customer" \SN=SCN12344,SCN765431 SIGN2="123F 6758 5955 8D78 \F718 4995 3F6F EA5B F56A 2759 6A9A F6B3 773A F2B9 \0F31 0219 EC28 6D28 0345 4971 B5C4 8835 7E88 28A6 \7581 8191 BB82 CB3D 8BF8 8282"
Initiating License BorrowingYou can initiate license borrowing using one of the following methods:
• Running a batch file available in the \<creo_loadpoint>\<datecode>\<app_name>\bin directory
• Specifying the command-line argument to borrow licenses as instructed in theFlexNet Publisher License Administration Guide.
NoteIf you may possibly want an early return of a borrowed license, set the PRO_ALLOW_EARLY_RETURN environment variable prior to borrowing thelicense from the license server. See Early Return of a Borrowed License onpage 90 for more information.
88 PTC Creo® 3.0 Installation and Administration Guide

Using the <creo_app>_borrow.bat FileUse the <creo_app>_borrow.bat file with the PTC Creo application toinitiate license borrowing as follows:
1. Browse to the \<creo_loadpoint>\<datecode>\<app_name>\bindirectory and run the <creo_app>_borrow.bat file. A dialog box opensin which you can specify a startup configuration.
2. Under Startup Configurations, select the desired startup configuration.3. Specify the number of days that you want the borrowed license.
The start date for borrowing the license is today’s date. The end date is basedon the number of days that you request.
NoteBy default the maximum borrowing duration is 5 days. Using theenvironment variable LM_BORROW_DURATION=0-14, you can borrowa license for a maximum of 14 days.
4. Click Start to start the PTC Creo application in the borrow configurationmode.
5. After starting the PTC Creo application, you can include additional floatingoptions with the borrowed license.
All the licenses that you check out during this session are borrowed from thelicense server and cached on your computer. Each license is created on thelocal machine in the registry under current user.
License Management Software 89

6. Exit the PTC Creo application.7. Disconnect from the license server and use the borrowed license. You must
start the application subsequently on the same computer and as the same userto use this borrowed license.
NoteMultiple licenses with separate expiration dates can be borrowed to aclient computer. Each time you start a PTC Creo application using aborrowed license, the application checks for and removes any expiredborrowed licenses from the client computer. You can borrow licensesagain, if required.
Determining the Borrowed License StatusYou can run Ptcstatus for the following information on borrowed license status:
• Licenses that have been borrowed• Expiration for each of the borrowed licenses• License server information for borrowing licenses• Local borrowed license information
Early Return of a Borrowed LicenseAll arrangements to return the borrowed licenses early must be made beforeinitiating license borrowing. Before borrowing a license from the server, you mustset the environment variable PRO_ALLOW_EARLY_RETURN to true to returnthat license early. If you frequently return licenses early, then permanently set theenvironment variable using the System Properties dialog box.
NoteSetting the PRO_ALLOW_EARLY_RETURN environment variable has noeffect on an unborrowed license.
For an lmadmin-based license server, set adminOnly="false” in theserver.xml file at license_server_manager_loadpoint/conf toreturn a borrowed license early. See Returning a Borrowed License Early in theFlexNet Publisher License Administration Guide for a procedure on returning theborrowed licenses early.
90 PTC Creo® 3.0 Installation and Administration Guide

Using the lmutil lmborrow UtilityFor an early return of a borrowed license, you can use the lmborrow subfunctionwith the lmutil Flexnet utility. The lmutil utility resides at C:\ProgramFiles\PTC\Creo 3.0\<datecode>\Common Files\x86e_win64\obj.Before running the lmutil lmborrow utility, you can run the followingcommand in a command shell to check the status of the borrowed license:lmutil lmborrow -status
Then read the command output to determine the optional arguments for thelmutil lmborrow utility. See the next table. To use the lmutil lmborrowutility, open a command shell and type the following command at the prompt:lmutil lmborrow -return [-fqdn][-c license_file_list] [-ddisplay] feature
Optional arguments are enclosed within brackets in the previous command syntax.Descriptions of the arguments follow.
Argument Description-fqdn Specifies that a fully qualified domain name was
used for license borrowing, rather than a simplehost name. Use the lmutil lmstat commandto determine the format of the host name usedwhen the license was borrowed.
-c license_file_list Specifies the license server from which thelicense was borrowed. In most cases specifyingthe port@hostname value for the server issufficient.
NoteYou can avoid using this argument by settingthe LM_LICENSE_FILE variable. Set thevariable as LM_LICENSE_FILE=port@hostname to point to the server usedfor borrowing the license.
-d display Displays the system name. Required only if thedisplayed system name is different than the oneused to initiate borrowing.
feature Names the borrowed license feature to bereturned early. Use the lmborrow -statuscommand for a list of borrowed license features.
License Management Software 91


Blmadmin License Server Manager
Overview of lmadmin as a GUI-Client..........................................................................94Differences between lmgrd and lmadmin.....................................................................94Installing PTC License Server Based on lmadmin ........................................................94Working with the FLEXnet License Administrator Web Interface....................................95Controlling the License Server Manager Settings.........................................................95Reconfiguring the Vendor Daemon .............................................................................96
This appendix contains basic information on lmadmin, a Web-based licenseserver manager. It also provides information on migrating from lmgrd tolmadmin.
93

Overview of lmadmin as a GUI-ClientThe lmadmin license server manager supports a Graphical User Interface (GUI)client with connection over HTTP. It provides a Web-based administrativeinterface. It is compatible with license files and vendor daemons created withFlexNet Publisher 10.8.x and later. Use lmadmin for the following functions:
• Perform server configurations and administration functions• Start the license server manager without any configuration options• Directly configure vendor daemon and the license server manager without
editing the license files• Import existing license files• Support multiple vendor daemons with a single lmadmin process• Display license rights status• Display alerts and monitor status of various processes, such as license
expiration or unavailable licensesSee the chapter lmadmin − GUI−based License Server Manager in the FlexNetPublisher License Administration Guide for more information.
Differences between lmgrd and lmadminThe lmadmin license server manager includes all the features of the lmgrdlicense server manager. The differences between the two license server managersfollow:lmgrd lmadminUses a command-lineinterface.
Supports a GUI client with connection overHTTP.
Configuration settings areretained for all the sessions.
Configuration settings are session-based.
See the chapter Migrating from lmgrd to lmadmin in the FlexNet PublisherLicense Administration Guide for more information.
Installing PTC License Server Based onlmadminFollow the instructions given in the section Generating or Updating Licenses onpage 26 to install PTC License Server based on lmadmin. After you install thelicense server, you can configure the license server administration settings usingthe FLEXnet License Administrator Web interface.
94 PTC Creo® 3.0 Installation and Administration Guide

Working with the FLEXnet LicenseAdministrator Web InterfaceThe lmadmin-based license server uses the FLEXnet License Administrator Webinterface. This interface replaces the lmtools utility used by the lmgrd-basedlicense server. You can launch the interface by clicking Yes at the end of the PTCLicense Server installation. Alternatively, from the Windows Start menu click AllPrograms ▶ PTC ▶ PTC License Server ▶ PTC FLEXnet Admin License Server WebInterface to open the interface. Using the FLEXnet License Administrator, you cancheck the server status, start and stop the server, or reconfigure the server.The FLEXnet License Administrator Web interface has two main pages: theDashboard and the Administration pages. Click the Help button for information onthe FLEXnet License Administrator interface elements.
• Dashboard—Displays any alerts and the current activity of the license servermanager.
• Administration—Provides configuration tools for the license servermanagement system. The default username/password combination is admin/admin for this password-protected page. You are prompted to change thesecredentials the first time you log in. Only the overview information for theServer Configuration and the Vendor Daemon Configuration tabs on theAdministration page is included in this document. Click a tab to open thecorresponding pages.
Controlling the License Server Manager SettingsA server administrator can use the options on the Server Configuration page tocontrol the settings for the License Server Manager.
lmadmin License Server Manager 95

Reconfiguring the Vendor DaemonA server administrator can use the Vendor Daemon Configuration tab to verifywhether the server is running and to reconfigure the vendor daemon.
96 PTC Creo® 3.0 Installation and Administration Guide

If PTC License Server has been successfully installed, Running appears underthe Status column.
lmadmin License Server Manager 97


CSystem Administration
Information
Temporary Directories.............................................................................................. 101System Management Utilities ................................................................................... 101PTC Creo Utilities ................................................................................................... 101FlexNet Publisher Utilities ....................................................................................... 102Supported Graphics Modes...................................................................................... 102General Plotter Information ...................................................................................... 102Using the ModelCHECK Metrics Tool with PTC Creo Parametric................................. 103Requirements for Installation.................................................................................... 104How to Install the ModelCHECK Metrics Tool............................................................. 105Database for the Metrics Tool ................................................................................... 108Using Fonts ............................................................................................................ 114OpenType Font Support........................................................................................... 116UNICODE Font Support........................................................................................... 117Available System Fonts for Menu Items..................................................................... 117Extended ASCII Set................................................................................................. 117Displaying the Text Symbol Palette in PTC Creo Parametric ....................................... 118Exporting Special Symbols to IGES .......................................................................... 118Font Definition......................................................................................................... 119Text Parameters ...................................................................................................... 119Character Parameters ............................................................................................. 123Definition Commands .............................................................................................. 123ASCII Font Definition ............................................................................................... 125Filled Font Definition................................................................................................ 126Special Font Definition ............................................................................................. 127LATIN_1 Font Definition ........................................................................................... 128How to Edit Fonts or Create New Fonts..................................................................... 129How to Modify a Font File......................................................................................... 129How to Create a User-Defined Font File .................................................................... 130How to Store a New Font ......................................................................................... 130How to Set Your Font as the Default.......................................................................... 130How to Create or Customize a Font .......................................................................... 130
99

AVI Compression Codecs ........................................................................................ 135Exporting Data to Portable Document Format............................................................ 136Meeting Browser Requirements................................................................................ 136Browser Requirements ............................................................................................ 136Starting a PTC Creo Application through an External Browser .................................... 137Opening a PDF File within the PTC Creo Browser...................................................... 137Printing a PDF File .................................................................................................. 137Using PTC Creo View Express to Open PTC Creo Objects......................................... 137Opening PTC Creo Objects from Windows Explorer................................................... 138JavaScript Security.................................................................................................. 139
This appendix describes general system administration information, includingsystem management utilities and machine configuration settings.
100 PTC Creo® 3.0 Installation and Administration Guide

Temporary DirectoriesPTC Creo applications use a temporary directory as defined by your systemenvironment to store parts. You can modify the location of the temporary directoryby setting the temporary directory environment variable in the PTC Creoapplication startup window before you run the application. This environmentvariable is TMP.
System Management UtilitiesThis section briefly describes the utilities for PTC Creo Parametric, PTC CreoSimulate, PTC Creo Direct, PTC Creo Layout, and FlexNet Publisher. The fileslisted in the next two tables are installed into the bin directory of yourinstallation directory. Further information can be found in the FlexNet PublisherLicense Administration Guide.
PTC Creo UtilitiesYou can execute the PTC Creo commands listed next, from the \<creo_loadpoint>\<datecode>\<app_name>\bin directory when the licenseserver is running. The load point is the directory where the software is installed.
Command Functionptchostid Returns the PTC Host ID with required formatting used for
FlexNet Publisher license codes.parametric Runs PTC Creo Parametric. Can be user-defined.
direct Runs PTC Creo Direct. Can be user-defined.
simulate Runs PTC Creo Simulate. Can be user-defined.
layout Runs PTC Creo Layout. Can be user-defined.
optionsmodeler Runs PTC Creo Options Modeler. Can be user-defined.
ptcflush Releases licenses. This may be necessary if there arenetwork problems. Formerly called proflush.
ptcstatus Displays information on the current usage and availability oflicenses.
ptcborrow
and<creo_app_
borrow>
Initiate license borrowing.
System Administration Information 101

FlexNet Publisher UtilitiesIf you have installed PTC License Server based on the lmgrd license servermanager, you can execute the commands listed below from the \<flexnet_loadpoint>\bin directory when the license server is running.
Command Functionlmtools Runs the PTC License Management tools utility
lmtools.bat. Functionality includes customerconfiguration of the FlexNet Publisher service, startingand stopping the lmgrd license server(s), server andlicensing status, as well as diagnostic tools. The shortcuticon created in Start ▶ All Programs ▶ PTC LicenseManagement tools starts the Lmtools graphical userinterface.
lmutil Provides optional arguments to check the server andlicensing status. Refer to the FlexNet Publisher LicenseAdministration Guide.
ptcshutdown Shuts down a license server process for administrativemaintenance of the license server. You can also use theFLEXnet Control Panel to stop a license server process.
ptcstartserver Starts a license server process. You can also use theFLEXnet Control Panel to start a license server process.See Using License Administration Tools, in the FlexNetPublisher License Administration Guide.
Lmtools UtilityThe lmtools.bat program runs the PTC License Management tools utility thatis started from the Start ▶ All Programs ▶ PTC License Server tools menu.Functionality includes starting and stopping the license server from the Start/Stop/ReRead tab.
Supported Graphics ModesFor graphics support information, refer to the PTC Hardware Configuration Notesat http://www.ptc.com/WCMS/files/160242/en/PTC_Creo_Future_Platform_Support_Summary.pdf.
General Plotter InformationPTC supplies software that writes plot files in plotter format. You can specify aplot command in the config.pro file. The physical connection, however, is theresponsibility of the computer and plotter vendors, because they are hardware andsystem software experts. Depending on the hardware configuration, the systemsoftware may require a different setup. If you have difficulty in set up, contact thecustomer support department of your hardware vendor.
102 PTC Creo® 3.0 Installation and Administration Guide

NotePTC Creo applications described in this guide do not support any HPIBinterfacing.
Using the ModelCHECK Metrics Tool withPTC Creo ParametricThe ModelCHECK Metrics Tool is a web-based utility for tracking data quality,standards, and best practices relevant to PTC Creo Parametric data. This tool usesthe metric file output from ModelCHECK to calculate quality trends and enablesyou to represent the ModelCHECK analysis results graphically. Although specificlicenses are not required, an administrator needs a PTC Creo Parametric licenseand an executable while installing the tool.
NoteYou cannot install the Metrics Tool using PTC Installation Assistant.
You can do the following operations using the ModelCHECK Metrics Tool:
• Generate a high-level picture of design trends.• Define quality goals based on the checks, errors, and warnings.• Define critical checks for monitoring and highlighting the number of errors
and warnings for these checks.• Generate a report of failed checks.• Define the quality goals based on each check and highlight the progress of the
goals. Evaluate the results using indicators. Display the results for a user,group of users, or an organization.
• Enforce standards and best practices for better data quality.• Specify the experience level of a user using specific color codes.• Define what a user will see as overview information while navigating the
ModelCHECK Metrics Tool.• Display information pictorially as charts and graphs.• Monitor the quality of models for specific ModelCHECK failures.• Resolve issues by providing adequate training and solutions.
System Administration Information 103

Refer to the ModelCHECK online Help in the PTC Creo Parametric Help Centerfor details.
Requirements for InstallationYou can install the ModelCHECK Metrics Tool if you use a supportedconfiguration for the workstation or for the server. See http://www.ptc.com/WCMS/files/160242/en/PTC_Creo_Future_Platform_Support_Summary.pdf forsupported platforms. You are not required to run ModelCHECK to access the tool.
104 PTC Creo® 3.0 Installation and Administration Guide

You must have a Web server to access the Metrics Tool information. After youinstall and start the Metrics Tool, you can view the ModelCHECK results usingMozilla 1.6 and later or Internet Explorer 6.0 and later.
How to Install the ModelCHECK Metrics ToolTo install the ModelCHECK Metrics Tool, install and set up the Tomcat server,create a correct context configuration file, and deploy the Metrics Tool. Beforeyou begin, perform the following steps:
• Install j2sdk-1_4_2_xx through a local installation or download it fromwww.oracle.com/technetwork/java/index.html.
• Install Tomcat for Java Web Services Developer Pack through a localinstallation or from www.oracle.com/technetwork/java/index.html.
• Set the CATALINA_HOME environment variable to point to the top-leveldirectory of the Tomcat installation: tomcat50-jwsdp. This environmentvariable identifies the Tomcat installation directory and sends the informationto the server.
• Set JAVA_HOME to the j2sdk-1_4_2_xx installation directory to pointTomcat to the Java path. If you do not set this variable correctly, Tomcat failsto handle the Java Server pages correctly.
NoteThis variable must list the Java Development Kit (JDK) installationdirectory and not the bin sub directory.
• Install the Web server to view the charts and graphs to be stored and displayedin the ModelCHECK Metrics Tool. You can use either Internet InformationServices (IIS) or download the Web server from www.apache.org.
How to Start the Tomcat Server and Deploy the Metrics ToolAfter you have installed the Tomcat server, ensure that the file tomcat50-jwsdp\conf\tomcat-users.xml has all the required settings to access theMetrics Tool. A sample tomcat-users.xml file follows:<?xml version='1.0' encoding='utf-8'?><tomcat-users><role rolename="tomcat"/><role rolename="role1"/><role rolename="manager"/><role rolename="admin"/><user username="tomcat" password="tomcat" roles="tomcat"/><user username="both" password="tomcat" roles="tomcat,role1"/>
System Administration Information 105

<user username="role1" password="tomcat" roles="role1"/><user username="admin" password="admin" roles="admin,manager"/></tomcat-users>
In the above sample file, the Tomcat Web Server Administration Tool defines theroles.
1. Start Tomcat using tomcat50-jwsdp\bin\startup.bat.2. Open a browser and type http://<machine_name>:port/admin,
where machine_name is the name of the machine with the Tomcatinstallation.
3. In the next screen, provide a user name and type the password as admin.4. Using the Tomcat Web Server Administration Tool, create a new data source by
providing details of the database to use for the Metrics Tool and save thechanges. Use Oracle or MSAccess as a database for the Metrics Tool.
NoteThe information in the new data source must match that given in the new_admin.xml file that is used to deploy the Metrics Tool.
5. Ensure that you have created the context configuration file (new_admin.xml) to enable the deployment of the Metrics Tool. See ContextConfiguration File on page 106 for details.
6. In Tomcat Web Application Manager window, provide the path to the contextconfiguration file (new_admin.xml) and the WAR file (new_admin.war) under the Deploy area.
7. Click Deploy to start the Metrics Tool.8. Open a browser. Specify the name of the server on which the Metrics Tool is
deployed along with the port and new_admin as the name of the tool.
NoteYou can specify any name for the tool. But, ensure that the specified toolname matches the name specified in the context configuration file.
Context Configuration FileThe new_admin.xml file is a context configuration to deploy theModelCHECK Metrics Tool. The new_admin.xml file and the new_admin.war file are stored in the following directory:
106 PTC Creo® 3.0 Installation and Administration Guide

<creo_loadpoint>/<datecode>/Common Files/modchk/mc_admin/new_admin/dist/
Parameter Name Descriptiondbname Name of the database
dbtype Type of the database, such as Oracle orMSAccess
adminserver Machine name of a server for the Metrics Tool
Adminport Port number type of the server for the MetricsTool
Imagedir Path to the image directory
ImagedirLink Link to the image directory for storing graphs
collect_mc_db_interval
Time interval in hours after which theModelCHECK database is updated (minimum 1hour)
You must specify the path to the image directory in the new_admin.xml file.The generated graphs are stored in the image directory. The value for theImagedir in the new_admin.xml file must be the same as that of theDocumentRoot variable in your Web server configuration file. A samplecontext configuration file follows:<Context path="/new_admin" docBase="new_admin.war" debug="5"reloadable="true" crossContext="true" privileged="true"><Resource name="jdbc/mcadmin" scope="Shareable"type="javax.sql.DataSource" /><ResourceParams name="jdbc/mcadmin"><parameter><name>maxWait</name><value>50000</value></parameter><parameter><name>maxActive</name><value>100</value></parameter><parameter><name>password</name><value>yourpass</value></parameter><parameter><name>url</name><value>jdbc:oracle:thin:@machine1:1521:mcadmin</value></parameter><parameter><name>driverClassName</name><value>oracle.jdbc.driver.OracleDriver</value></parameter><parameter><name>maxIdle</name><value>100</value>
System Administration Information 107

</parameter><parameter><name>username</name><value>yourpass</value></parameter></ResourceParams><ResourceLink name="jdbc/mcadmin" global="mcadmin"/><ManagerclassName="org.apache.catalina.session.PersistentManager"debug="0" saveOnRestart="false"maxActiveSessions="-1"minIdleSwap="-1" maxIdleSwap="-1" maxIdleBackup="-1"><Store className="org.apache.catalina.session.FileStore" /></Manager><Parameter name="dbname" value="mcadmin" /><Parameter name="dbtype" value="oracle" /><Parameter name="adminserver" value="machine1" /><Parameter name="adminport" value="80" /><Parameter name="imagedir"value="d:\projects\mcadminwork\admingraphs" /><Parameter name="imagedirLink" value="admingraphs"/></Context>
In above file, the value of Imagedir is d:\projects\mcadminwork\admingraphs. Therefore, if you configure Apache as your Web server, thevalue of DocumentRoot will be d:\projects\mcadminwork.
Database for the Metrics ToolThe Web-based ModelCHECK Metrics Tool generates graphs and reports basedon the metric files that ModelCHECK writes after every session. You must createthe following database tables to initialize the ModelCHECK database:
• mc_database
• trng_database
• user_database
Use Oracle or MSAccess to create the database table. Additionally, you must alsocreate a database table named processedfiles for the processed files. Theseprocessed files ensure that the data is populated correctly from the .txt metricfiles into the database tables. They avoid repeated entries and ensure that thedatabase tables are up-to-date.The command line utility create_mcadmin_db.jar available at <creo_loadpoint>/<datecode>/Common Files/modchk/mc_admin/new_admin/dist/ enables you to populate the database tables with informationfrom the .txt metric files. The utility reads and interprets the data in the metricfiles and automatically updates the relevant database tables. Each row of a metricfile is appropriately included in the corresponding database tables. The names ofthe.txt metric files and the date of inclusion of their contents into the relevant
108 PTC Creo® 3.0 Installation and Administration Guide

database tables are also simultaneously written in the processedfilesdatabase table so that information is not repeated in the database tables. A sampleprocessedfiles table follows (syntax for Oracle):CREATE TABLE processedfiles(filename VARCHAR(256),mergedate DATE);INSERT INTO processedfiles VALUES('jsmith_200503091600.txt',to_timestamp('2002-01-11 11:14:07','YYYY-MM-DD HH24:MI:SS'));
Using create_mcadmin_db.jar to Update the DatabaseTables1. Set the CLASSPATH environment variable to the path of the create_
mcadmin_db.jar file as shown below.
set CLASSPATH=<path to file_1>;<path to file_2>
For example:
set CLASSPATH=d:\wildfire\modchk\mc_admin\new_admin\dist\create_mcadmin_db.jar;d:\wildfire\modchk\mc_admin\new_admin\dist\classes111.jar
NoteThe classes 111.jar file is required to manually execute the create_mcadmin_db.jar utility when an Oracle database is used.
2. Update the user_database table using the following command:
<java home> <class name to update user_database><database type> <database driver> <database url><username> <password> <path to CSV file>
where the CSV file has the following sample information and structure:
usr1,Devid,Boon,K,CADQA,23453,3380,09-04-2000,QA,d:\projects\devid
usr2,Alan,Donald,Y,CADDESIGN,23367,3181,10-02-2000,DESIGN,d:\projects\alan
System Administration Information 109

NoteYou must manually execute the above command. The command updatesthe user_database table with the information from the CSV file.
For example:
• For an Oracle database, use the following command:
$JAVA_HOME/bin/java com.ptc.usersdb.McUsersCreatororacle oracle.jdbc.driver.OracleDriverjdbc:oracle:thin:@machine1:1521:admin user1userpass d:\wildfire\user.txt
• For a Microsoft Access database, use the following command:
$JAVA_HOME/bin/java com.ptc.usersdb.McUsersCreatormsaccess sun.jdbc.odbc.JdbcOdbcDriverjdbc:odbc:admin user1 userpass d:\wildfire\user.txt
A sample user_database table is shown below:
3. Update the mc_database table using the following command:
<java home> <class name to update mc_database> <databasetype> <database driver> <database url> <username><password>
• The mc_database table is automatically updated when the new_admin.war file is deployed. See How to Start the Tomcat Server and Deploy theMetrics Tool on page 105 for details. You can also manually execute theabove command if required. Either way, the mc_database table isupdated with information from all the metrics files at the locationsspecified in the user_database table.
• As each metrics file is processed, its name is added to the processedfilestable.
For example:• For an Oracle database, use the following command:
$JAVA_HOME/bin/javacom.ptc.metricsdb.McMetricsCollectororacleoracle.jdbc.driver.OracleDriver
110 PTC Creo® 3.0 Installation and Administration Guide

jdbc:oracle:thin:@machine1:1521:admin user1userpass
• For a Microsoft Access database, use the following command:
$JAVA_HOME/bin/javacom.ptc.metricsdb.McMetricsCollector msaccesssun.jdbc.odbc.JdbcOdbcDriver jdbc:odbc:admin user1userpass
A sample mc_database table is shown below:
A sample processedfiles table is shown below:
Metrics DatabaseThe metrics database, mc_database, enables you to generate graphs and reportsfor the ModelCHECK data.The data fields stored in the mc_database table follow:
• UserId—User ID• date_n_time DATE—Date and time• mdlname—Model name• mdltype—Model type• checktag—Check type• chkstat—Check status• info1— Information• mcmode—ModelCHECK modeA sample mc_database table follows (syntax for Oracle):CREATE TABLE mc_database
(UserId VARCHAR(256),
System Administration Information 111

date_n_time DATE,
mdlname VARCHAR(256),
mdltype VARCHAR(5),
checktag VARCHAR(256),
chkstat VARCHAR(10),
info1 VARCHAR(256),
mcmode VARCHAR(20));
INSERT INTO mc_database VALUES('jsmith', to_date('03-04-2005 11:14:07','MM-DD-YYYY HH24:MI:SS'),'rim.prt','PRT', 'BURIED_FEAT', 'ERR', 'Feature id8','Interactive');
For more details, refer to the ModelCHECK online Help in the Help Center.
Training DatabaseThe training database, trng_database, enables you to generate graphs andreports related to the training of ModelCHECK users. The data fields stored in thetrng_database table follow:
• UserId—User ID• CourseId—Training course ID• CourseName—Training course name• CourseDate DATE—Training course date• provider—Training course provider• instructor—Training instructor's name• location—Training course location• cost—Total investment on training• grade—The grade achievedA sample trng_database table follows (syntax for Oracle):CREATE TABLE trng_database
(UserId VARCHAR(256),
CourseId VARCHAR(256),
CourseName VARCHAR(256),
CourseDate DATE,
provider VARCHAR(256),
instructor VARCHAR(256),
112 PTC Creo® 3.0 Installation and Administration Guide

location VARCHAR(256),
cost VARCHAR(256),
grade VARCHAR(256));
INSERT INTO trng_databaseVALUES('austin','101','Fundamentals of Drawing', to_date('2002-01-11','YYYY-MM-DD'), 'PTC', 'JackWebb','Dallas','1500','Good');
For more details, refer to the ModelCHECK online Help in the PTC Creo HelpCenter.
User DatabaseThe user database, user_database, enables you to generate graphs and reportsrelated to the details of the ModelCHECK users.The data fields stored in the user_database table follow:
• UserId—User ID• lastname—Last name• firstname—First name• middlename—Middle name• group_b—Group to which a user belongs• phone—Telephone number• extension—Extension number• parametricdate DATE—Date when the user ran ModelCHECK for
which the metrics files were created• info1—InformationA sample user_database table follows (syntax for Oracle):CREATE TABLE user_database(UserId VARCHAR(8),lastname VARCHAR(256),firstname VARCHAR(256),middlename VARCHAR(256),group_b VARCHAR(256),phone VARCHAR(20),extension VARCHAR(20),parametricdate DATE,info1 VARCHAR(256),location VARCHAR(256));INSERT INTO user_database VALUES('jsmith','smith','john','VP', 'designer1','4082131', '3182', to_timestamp('2000-01-1111:14:07','YYYY-MM-DD HH24:MI:SS'), 'aviation','/net/machine1/usr3/jsmith/mc_metrics');INSERT INTO user_database VALUES('dwells',wells,'David','K', 'designer2',
System Administration Information 113

'4053182', '3481', to_timestamp('2001-01-1111:14:07','YYYY-MM-DD HH24:MI:SS'), 'sqlstar','/net/machine2/usr2/dwells/demo/mc_metrics');INSERT INTO user_database VALUES('asewell','Sewell','Annie','P ', 'designer3','4082725', '3192', to_timestamp('1997-01-1111:14:07','YYYY-MM-DD HH24:MI:SS'), 'explosive','/net/machine1/usr3/asewell/mc_metrics');
For more details, refer to the ModelCHECK Online Help in the PTC Creo HelpCenter.
Using FontsPTC provides 42 third-party TrueType fonts and the default PTC fonts with yoursoftware. In addition, you can also use any TrueType font available on Windows.The third-party TrueType fonts include 13 different font styles. If you are runninga PTC Creo application in Chinese Traditional or Chinese Simplified, you can usetwo additional TrueType fonts:
• Chinese Traditional• Monotype Hei Medium• Monotype Sung Light• Chinese Simplified• Monotype HeiGB Medium• Monotype SungGB LightNew fonts appear in the current font list in Detailed Drawings and Sketcher. PTCfonts are listed first, followed by the third-party fonts supplied by AgfaCorporation.TrueType fonts are stored in the <creo_loadpoint>\<datecode>\Common Files\text\fonts folder. You can change this default location byplacing the fonts in another folder and setting the value of the pro_font_dirconfiguration option to this folder. PTC Creo applications use the fonts in thefolder specified by the pro_font_dir configuration option.The following table lists the TrueType fonts, their corresponding file names, andwhether the font supports kerning. Kerning controls the space between certainpairs of characters, improving the appearance of the text string. Kerning is acharacteristic of the particular font.
Font Name File NameSupportsKerning
Blueprint MT bluprnt.ttf No
Blueprint MT Bold bluprntb.ttf No
CG Century Schoolbook schlbk.ttf YesCG Century Schoolbook Bold schlbkb.ttf Yes
114 PTC Creo® 3.0 Installation and Administration Guide

Font Name File NameSupportsKerning
CG Century Schoolbook Bold Italic schlbkbi.ttf YesCG Century Schoolbook Italic schlbki.ttf YesCG Omega cgomg.ttf No
CG Omega Bold cgomgb.ttf No
CG Omega Bold Italic cgomgbi.ttf No
CG Omega Italic cgomgbit.ttf No
CG Times cgtime.ttf No
CG Times Bold cgtimebd.ttf No
CG Times Bold Italic cgtimebi.ttf No
CG Times Italic cgtimeit.ttf No
CG Triumvirate trium.ttf YesCG Triumvirate Bold triumb.ttf YesCG Triumvirate Bold Italic triumbi.ttf YesCG Triumvirate Condensed Bold triumcb.ttf YesCG Triumvirate Italic triumi.ttf YesGaramond Kursiv garamdi.ttf No
Garamond Halbfett garamdb.ttf No
Garamond Antiqua garamd.ttf No
Garamond Kursiv Halbfett garamdbi.ttf No
Garth Graphic gargra.ttf Yes
Garth Graphic Black gargrabl.ttf Yes
Garth Graphic Bold Italic gargrabi.ttf Yes
Garth Graphic Italic gargrai.ttf Yes
Grotesque MT grotesq.ttf No
Grotesque MT Bold grotesqb.ttf No
Microstyle Extended microex.ttf YesMicrostyle Extended Bold microexb.ttf YesNeographik MT neograph.ttf Yes
SackersEnglishScript sackengs.ttf No
Shannon shanno.ttf YesShannon Bold shannob.ttf Yes
System Administration Information 115

Font Name File NameSupportsKerning
Shannon Extra Bold shannoeb.ttf YesShannon Oblique shannoo.ttf YesSpartan Four MT sparton4.ttf Yes
Spartan One Two MT sparton12.ttf Yes
Spartan One Two MT Bold sparton12b.ttf Yes
Symbol symbol.ttf No
CG Triumvirate Inserat triin.ttf No
If required, you can purchase additional TrueType and OpenType fonts. Forinformation, contact Monotype Imaging at www.fonts.com.When you work with PTC Creo applications, you use two categories of fonts:
• Fonts specific to PTC Creo applications—These fonts appear in the graphicswindows of PTC Creo applications. They define alphanumeric characters andspecial symbols in text files. You can edit these files by:
○ Modifying the look of existing characters and symbols○ Adding new symbols to the files○ Creating new fonts○ Hardware fonts—These fonts appear in the application window headers.
They are machine- and language-specific.
OpenType Font SupportPTC Creo applications provide additional support for OpenType fonts. Thesefonts are based on Unicode for multilanguage support. OpenType fonts offer anexpanded character set and layout features. In PTC Creo Parametric, you can usethese fonts in Sketcher to define geometry from sketched text and in DetailedDrawings to place drawing notes. OpenType fonts contain kerning information.You can enable or disable it to adjust the spacing between letters.
NotePTC does not provide any OpenType fonts for general use with the PTC Creoapplications.
116 PTC Creo® 3.0 Installation and Administration Guide

UNICODE Font SupportYou can insert or read out-of-locale characters and symbols using True Type,Open Type, or certain specific PTC fonts. When using True Type or Open Typefonts, make sure to install and store these fonts locally on all machines where youretrieve objects with text from multiple locales. You can then set the value of thepro_font_dir configuration option to this directory for an application to usethese fonts.Out-of-locale text support is also available through a number of PTC fonts. Thetable below identifies the fonts along with the locales that they support.
Font name Supported localefont_chinese_cn Simplified Chinese
font_chinese_tw Traditional Chinese
font_hebrew Hebrew
font_japanese Japanese
font_korean Korean
font_latin English, French, German, Italian, Spanish
All these fonts are located under <creo_loadpoint>\<datecode>\Common Files\text within the folder of the respective locale. Additionally,these fonts are copies of the ‘font’ font files that are available in each locale.The purpose of these fonts is to allow unambiguous out-of-locale access to all thedefault PTC fonts that are currently referred to as ‘font’. If the text is displayedin the ‘font’ font, to display it correctly and consistently across all locales,change the text to use the applicable ‘font_<locale>’ font.
Available System Fonts for Menu ItemsTo specify the font for menu items, set the configuration file option menu_font.The value for this option is the name of the font file supported by the X-serverrunning the PTC Creo applications. The fonts are listed in the Control Panel underFonts. The font for text in PTC Creo application window headers is determined bythe setting of your window manager.
Extended ASCII SetASCII is the default font in all PTC Creo applications. You can modify ASCIIcharacters. You can also replace ASCII with your own font as the default.The extended ASCII character set used in the United States and Western Europe issupplied by PTC Creo through a combination of two font files, ascii.src andlatin_1.src.
System Administration Information 117

NoteCharacters through 146 are defined in ascii.src. The remaining charactersare defined in latin_1.src.
To use the European LATIN_1 characters, use one of the following procedures:
• Make sure your keyboard is set up for the appropriate language. A specific setof LATIN_1 characters is available with each keyboard language setting.
• Use a key sequence specific to your machine type to produce the desiredcharacter. If necessary, contact your hardware vendor for additionalinformation.
Displaying the Text Symbol Palette in PTCCreo ParametricTo display the Text Symbol palette:
1. Open a drawing and click Insert ▶ Note to create a note.2. Select a location on the drawing to place the note. The Text Symbol palette
appears.3. Click on a symbol in the palette.Alternatively, you can create a new symbol. PTC Creo Parametric representsspecial symbols with standard ASCII characters.To use special symbols in drawing notes, follow these steps:
1. Enter the sequence CTRL+A.2. Enter the ASCII character that represents the special symbol.3. Enter the sequence CTRL+B.When you create a new symbol, you should either redefine an existing character tothe new symbol or create a new special symbol font. You can add new specialsymbols to the font file, special.src, by defining the graphic representation.
Exporting Special Symbols to IGESSpecial symbols and their corresponding ASCII characters map to the IGES fonttable 1001. Only two symbols (Total Runout and the Least Material Condition) donot map to the 1001 table. They are supported by the 1003 font table. Theconfiguration file option use_iges_font_1003 determines which IGES fonttable outputs data to IGES.When you assign an ASCII character to a new symbol,select a character from either the 1001 or 1003 font table. Use 1001 or 1003exclusively when you anticipate that a drawing will be exported in an IGES file.(Refer to your IGES documentation for more information on IGES font tables.)
118 PTC Creo® 3.0 Installation and Administration Guide

Font DefinitionPTC Creo defines fonts using two sets of parameters:
• Text parameters—The settings of a character definition box and otherparameters used by all characters.
• Character parameters—The individual definition of each character (that is,how the character is drawn).
Comment lines in font definition source files are preceded with the “#” character.These parameters do not define the actual size of characters. They establishrelative coordinates for stroking the character in the graphics windows. Youcontrol the actual size of text and symbols using the appropriate options in a PTCCreo application. In case of PTC Creo Parametric, you can change the actual sizeof text in drawings only.
Text ParametersText parameters for a given font are specified only once, at the head of the fontfile, and are used for every character definition in the file.
NoteThe exception to this is the proportional fonts, such as Iso, Leroy, and Cal_grek, which require you to specify a specific width for each character. Thefollowing parameters define a character box with a grid (where <n> is aninteger):
• height<n>—Defines the total number of grid spaces in the vertical direction.The maximum height is 63.
• width<n>—Defines the total number of grid spaces in the horizontaldirection. The maximum width is 63.
• gap<n>—Defines the total number of grid spaces between character boxes.• xextent<n>—Defines the maximum number of grid spaces in the horizontal
direction.• ascender<n>—Defines the number of grid spaces above the character
designated for placing special characters such as accent acute and accentgrave.
• base_offset<n>—Enables character alignment. The base offset positions thetext box relative to a common baseline, so the drawn character definitionsappear correct relative to each other.
System Administration Information 119

• spec_height<n>—Defines the height of a character without the ascenderabove the baseline.
• ics (intercharacter spacing)—Turns on and off the effect of individualcharacter width on horizontal spacing.
• If you set ics to 1, each character definition must contain an individual widthsetting to determine the placement of the next character.
• If you do not specify ics, the system assumes it is 0, and the system ignoresindividual width settings.
• If ics = 0, the system uses fixed width character spacing.• If ics = 1, the system uses proportional width character spacing.• codeset—Identifies a font type. Codesets have the following meanings:• 0—Primary alphanumeric font set (such as ascii.src, filled.src, or
leroy.src).• 2—Extended font set (such as latin_1.src).• 4—Special character font set or palette (such as special.src).
NoteThe filled font has the same codeset as ASCII. Therefore, only one or theother can exist in the font.ndx file.
• polygons—Turns on character filling.• If you set it to 1, all closed polygons in the character definitions are filled
(refer to the section Filled Font Definition on page 126).• If you do not specify this parameter, the system uses the default value 0.• fixed_width<n>—Can be 0 or 1.• If you set it to 1, the font is independent of the text_width_factor
option in the drawing setup file.• If you set it to 0, you can control the font width by using the text_width_
factor option or by modifying the text width manually.The following figure illustrates the text parameters that define a font.
120 PTC Creo® 3.0 Installation and Administration Guide

When you modify text parameters, consider how the font will appear in text withother fonts. Fonts used in the same text line (such as ASCII and LATIN_1 forEuropean languages, or ASCII and special) must be compatible. Altering one fontmight create inconsistency in appearance and placement.For example, changing the base_offset value at the top of the font file affectsthe positioning of all the font characters, relative to the text baseline, as shown inthe following figure.
System Administration Information 121

In addition to the width parameter, an individual width parameter can occur ineach character definition. Use the individual width parameter to create a variablehorizontal distance between the characters. In this case, if the ics parameter = 1,the individual width for each character overrides the width at the top of the file. Ifics = 0, the system ignores individual width parameters. The following figureshows the effect of the ics parameter on the calculation of character width.
The following figure shows the effect of the fixed_width parameter on thecalculation of character width.
122 PTC Creo® 3.0 Installation and Administration Guide

Character ParametersBelow the text parameters section, a font file contains an individual definition foreach character. A character definition contains the following information:
• First line—An ASCII character, in double quotes, that represents the characterto be drawn. For ASCII and filled primary fonts, it is the character itself.Special characters also use ASCII characters to represent them. The LATIN_1fonts use the decimal and hexadecimal codes representing the character.
• Second line (optional)—Individual width value (used only if ics is turned on).• The remainder of the file consists of drawing-definition commands, described
in the next section.
Definition CommandsThe drawing definition of characters and special symbols in the font files is donewith the following commands (where <X> and <Y> are integers):
• [m<X>, <Y>]—This command moves an imaginary pen to the grid point (X,Y).
• [d<X>, <Y>]—This command draws a line from the current position to gridpoint (X, Y).
• For each font, you can use 63 or fewer grid points to create characters andsymbols. PTC Creo provides optimum values, giving adequate characterdefinition with a minimal grid. Enter characters centered or left-justified
System Administration Information 123

within a character box, depending on how you decide to draw them. Thefollowing figure illustrates text justification.
You can change a font file to alter the appearance of any given font. Consider theASCII font definition for the character “A”, both in the original and modifiedform.If you modify the text parameters without redefining the character parameters, theappearance of the fonts changes. For example, if you change the grid height fromthe default value of 16 to 20, the character appears smaller. Because the characterwas originally defined with a maximum grid value of 16, the original ratio was 16/16; after the change, the ratio is 16/20. Therefore, the new text height appears tobe 80 percent of the original height.
124 PTC Creo® 3.0 Installation and Administration Guide

ASCII Font DefinitionUse the following parameters to define ASCII characters:
• codeset: 0• height: 16• width: 16• base_offset: 4• gap: 0
System Administration Information 125

The following figure illustrates how ASCII characters are mapped. Note thatASCII characters are defined in a character box consisting of 16x16 grid spaces.All characters have modifiable width and are centered within a character box.
Filled Font DefinitionUse the following text parameters to define a filled font:
• codeset: 0• height: 63• width: 48• base_offset: 16• gap: 0• polygons: 1• ics: 1In the filled font, characters are mapped within 63 vertical grid spaces. However,the width for each character is different. The ics parameter (set to 1) tells thesystem to ignore the global width parameter given at the top of the file. Instead,the system uses the individual character width, which precedes each characterdefinition, to map a character.Define the outline of a filled character by drawing polygons (closed loops). Whenthe polygons parameter at the top of a font file is set to 1, the PTC Creoapplication fills with color any closed polygon drawn in a character definition.
126 PTC Creo® 3.0 Installation and Administration Guide

Special Font DefinitionThe following text parameters are used to define a special font:
• codeset: 4• height: 38• width: 36• xextent: 63• spec_height: 24• base_offset: 8• ascender: 6• fixed_width: 1• ics: 1• gap: 4In the special font, all characters are defined in 38 vertical grid spaces. Eachcharacter has an individual width declared in front of its definition. To establishspacing between character boxes, the “gap” parameter is set to 4. The followingfigure illustrates the definition of the special font character.
System Administration Information 127

LATIN_1 Font DefinitionThe following text parameters define the LATIN_1 font:
• codeset: 2• height: 40• width: 32• xextent: 63• spec_height: 24• base_offset: 8• ascender: 8• fixed_width: 0• ics: 0• gap: 0The LATIN_1 font is defined with a character box of 40x32 grid spaces. Allcharacters have constant width and are centered in the character box. In the doublequoted line above the character definition, the decimal and hexadecimal coderepresenting the character is shown, as follows:code <decimal> <hex>
The following figure illustrates how to map a LATIN_1 character.
128 PTC Creo® 3.0 Installation and Administration Guide

How to Edit Fonts or Create New Fonts1. Edit an existing or create a new .src file, which resides in <creo_
loadpoint>\<datecode>\Common Files\text\<language>.2. Compile the font file by using the command compile_font.3. Make the new font available locally or for all users.
How to Modify a Font File1. Copy the appropriate .src font file into your working directory. The .src
files reside at <creo_loadpoint>\<datecode>\Common Files\text\<language>.
2. Modify the font file.3. From the <creo_loadpoint>\<datecode>\Common Files\text\
<language> area, copy the appropriate index file to your working directory.4. Copy the compile_font command to your working area.5. To compile the font, enter the following command for each font file you
modify: compile_font fontfilename.src fontfilename.fnt
System Administration Information 129

NoteIf you modify the ASCII font definitions, it alters the appearance of thedefault font in every PTC Creo application.
How to Create a User-Defined Font File1. Define a new font in a file with the extension .src. Store the new font in
your working directory.2. Create an index file that includes the new font file. Make sure the index file
contains fonts with unique codesets.3. Copy the compile_font command to your working area.4. Enter the following command for each font file you create: compile_font
fontfilename.src fontfilename.fnt
5. Recompile user-defined fonts whenever you install a new major release ofPTC Creo.
You can include user-defined fonts as default or auxiliary fonts in drawings.
How to Store a New Font1. Store the updated index file with the .src and .fnt files in your local
directory if the new font is for your personal use.2. To make a new font available to all users, reference the font in the index and
store the index and source files in the directory <creo_loadpoint>\<datecode>\Common Files\text\<language>. Store the .fnt filein the following directory: <creo_loadpoint>/<datecode>/CommonFiles/<machine_type>/text/<language>
How to Set Your Font as the Default1. Rename your file to ascii.src.2. Recompile the ascii.src file using the compile_font command to
produce a local ascii.fnt file.
How to Create or Customize a Font1. Copy or create font source files in the local working directory. In this example,
the default primary ASCII and special symbol fonts are copied and renamed.
130 PTC Creo® 3.0 Installation and Administration Guide

cp /usr/pro/text/usascii/ascii.src custom.src
(primary font with codeset 0)
cp/usr/pro/text/usascii/special.src symbols.src
(special symbols font with codeset 4)2. Edit the source files to include all the required definitions and changes.
vi custom.src
vi symbols.src
3. Copy the compile_font script from the directory <creo_loadpoint>/<datecode>/Common Files/<machine_type>/obj into the samelocal working directory.
cp /usr/pro/i486_nt/obj/compile_font
4. Compile the font files.
compile_font custom.src custom.fnt
compile_font symbols.src symbols.fnt
5. Create a new index file to reference the compiled font files. Note that theindex file name does not need to be the same as the primary font name. If thecustom font created is not a primary font (codeset 0), be sure to include a fontwith a codeset of 0 in the index file. In this example, the new font index filereferences both customized font files (primary and special symbols).
myfont.ndx (new customized .ndx file)
custom (new custom primary font (codeset 0))
latin_1 (system extended ASCII font(codeset 2))
symbols (new special symbols font (codeset 4))
This font index file references the new customized special symbols font only.It uses the system default primary font.
myfont2.ndx (new customized .ndx file)
ascii (system default primary font (codeset 0))
latin_1 (system extended ASCII font (codeset 2))
symbols (new special symbols font (codeset 4))
You can use the new font in the following ways:
System Administration Information 131

• To use the font as a global auxiliary font, place the .src and .ndx files inthe <creo_loadpoint>\<datecode>\Common Files\text\<language> directory.
• Then put the compiled .fnt files in the directory <creo_loadpoint>/<datecode>/Common Files/<machine_type>/text/<language>.
mv custom.src symbols.src myfont.ndx /usr/pro/text/usascii
mv custom.fnt symbols.fnt /usr/pro/i486_nt/text/usascii
• To set the new font as the system default, rename the primary source andcompiled font (codeset of 0) files to ascii.src and ascii.fnt,respectively. The system font.ndx file already references the ASCII fontfile and, therefore, does not need to be modified. Locate the new ascii.srcand ascii.fnt files in the appropriate directories (see the previous sectionthat describes how to use the font as a global auxiliary font). Note that thesystem overrides the original ascii.src and ascii.fnt files, unless youfirst rename them.
The next time you start a PTC Creo application, it uses the new custom font asthe system default font.
mv custom.src /usr/pro/text/usascii/ascii.src
mv custom.fnt /usr/pro/i486_nt/text/usascii/ascii.fnt
Customizing the Text Symbol Palette for PTC CreoParametricYou can customize fonts and add symbols and characters to the Text Symbolpalette in PTC Creo Parametric from the special font file. You can also replace,reorder, or remove symbols using the text symbol palette layout file.
How to Add New Symbols to the Text Symbol Palette
1. Customize the special font file, special.src, using the method describedin the section Using Fonts on page 114.
2. Add a definition for each of the new symbols that you want to insert in theText Symbol palette and associate an ASCII code to the symbol.
3. Create new images for each of the symbols that you have defined in thecustomized special font file.
132 PTC Creo® 3.0 Installation and Administration Guide

4. Save the images as sp_#.gif where # is the ASCII code of the imagedefined in the special font file. For example, you can save an image as sp_133.gif, where 133 is the ASCII code that is associated with the image.
5. Store all the image files in the <creo_loadpoint>/<datecode>/Common Files/text/resource directory.
6. Define a text symbol palette layout file and save this file in your workingdirectory. See the next section, How to Create a Text Symbol Palette LayoutFile on page 133, for details.
7. In your config.pro file, set the value of the configuration optioncustom_text_symbol_palette_file to point to the full path of thecustomized text symbol palette layout file. For example, for a file named my_custom_palette.txt and saved in the D:\my_parametric\my_custom_palette.txt directory, set the configuration option as follows:
custom_text_symbol_palette_file D:\my_parametric\my_custom_palette.txt
This path enables PTC Creo Parametric to display the Text Symbol paletteaccording to the settings in the customized layout file.
8. Create or modify a drawing in a new session of PTC Creo Parametric, andverify the presence of the customized Text Symbol palette.
How to Create a Text Symbol Palette Layout FileAfter you have created images files for the symbols that you have defined in thespecial font file, create a text symbol palette layout file using this procedure:
1. Create a file with .txt extension in your working directory, for example,my_custom_palette.txt.
2. Specify an integer in the first line of the file. This integer represents thenumber of columns in the Text Symbol palette in PTC Creo Parametric.
3. Specify integers on all other lines of the file. These integers must represent theASCII codes of the symbols for the Text Symbol palette. The integers must liefrom 32–255.
On every line separate each of the ASCII codes with one space. The order ofthe ASCII codes in the file represents the order of the symbols in the TextSymbol palette. For additional information, see Examples of the Text SymbolPalette Layout File on page 135.
System Administration Information 133

ASCII Codes for GTOL SymbolsASCII codes for GTOL symbols are based on the setting for the gtol_symbols_same_size detailing setup option. If you set the value to no, theANSI codes are used to identify the special fonts to be used. If it is set to yes, theISO codes are used to identify the special font in the Text Symbol palette. Refer tothe next table for the ANSI and ISO codes for GTOL symbols.
GTOL Symbol ANSI Code ISO CodeStraight 33 133Flat 99 136Circular 101 138Cylinder 103 140Profile Line 107 146Profile Surf 100 137Angular 97 135Perpendicular 108 147Parallel 102 139Position 106 145Concentric 114 148Runout Circular 104 141Total Runout 34 134Symmetrical 105 144
In a PTC Creo Parametric drawing, the GTOL symbols in the Text Symbol palettechange if you change the value of the gtol_symbol_same_size detailingsetup option.
Guidelines for Customizing the Text Symbol Palette Layout FileAdministrators must verify that the text symbol palette layout file is customizedcorrectly and all the entries in this file are valid. If the customization is incorrect,PTC Creo Parametric uses the default settings to display the Text Symbol palettewithout a warning message.Guidelines for customizing the text symbol palette layout file follow:
• When creating images, ensure that the height and width of the images does notexceed 16 pixels and 24 pixels, respectively.
• The file must contain only integers. All nonintegers are treated as spaces.• Specify ASCII codes from 32–255.• Do not duplicate ASCII codes.
134 PTC Creo® 3.0 Installation and Administration Guide

• Place the same number of ASCII codes on each row as the integer that youhave specified in the first line of the file. This listing approximates theappearance of the customized Text Symbol palette in PTC Creo Parametric.
• Use the ASCII codes for the dtl options carefully. The usage of thesesymbols in a drawing changes between ANSI and ISO according to the valuethat you set for the detailing setup option, gtol_symbols_same_size.
Examples of the Text Symbol Palette Layout File
• If you specify #1.15 in the first row of the text symbol palette layout file,PTC Creo Parametric ignores the crosshatch (#) character. One column isdisplayed in the Text Symbol palette. The decimal point (.) after 1 is ignored.The integer 15 is taken as the first ASCII code but is ignored. Only thoseASCII codes from 32–255 are displayed in the Text Symbol palette.
• File 1 and File 2 represent the same Text Symbol palette in PTC CreoParametric:
File 1 File 23
60
61
62
35
37
68
65
66
70
75
3
60 61 62
35 37 68
65 66 70
75
AVI Compression CodecsYou can capture an AVI file using the third-party compression codecs installed onyour system. PTC does not provide codecs that support AVI compression. Awarning message appears when you try to capture an AVI file under the followingconditions and the process aborts prematurely:
System Administration Information 135

• You have not installed or licensed the compression codecs correctly on yourwindows system.
• You have installed a codec that is defective.• The codec does not work with specific compression settings.
Exporting Data to Portable DocumentFormatYou can use the Interface for PDF application through PTC Creo Parametric toexport model drawings to Portable Document Format. The Interface for PDFprovides enhanced navigation, search, and presentation capabilities. The licensesfor this application can be node-locked or floating.The Interface for PDF enables you to do the following tasks:
• Insert the PTC Creo Parametric parameter data as searchable metadata in thePDF file.
• Modify the font types, color, style, and resolution of the PDF output.• Insert PTC Creo Parametric drawing text and numerical values as searchable
and selectable content in the PDF file.• Insert bookmarks for the various PTC Creo Parametric layers, sheets, zones,
flag notes, and revision tags.• Control the access and security rights of the PDF file.For more details, see the Interface Help available in the PTC Creo ParametricHelp Center.
Meeting Browser RequirementsThis section describes the requirements for the PTC Creo browser for all the PTCCreo applications. For information on Web browser support for the PTC Creoapplications, see http://www.ptc.com/WCMS/files/160242/en/PTC_Creo_Future_Platform_Support_Summary.pdf. For information related to the Help Center, seeInstalling and Using PTC Creo Help on page 63.
Browser RequirementsPTC Creo browser runs in the Creo agent and uses the engine of the InternetExplorer (IE) by default.The multi-process architecture of IE browser allows PTC Creo to run theembedded browser in the out-of-process mode. That is, the IE browser runs as aseparate process that is not within the PTC Creo process.The Creo agent is the same across all PTC Creo applications. Therefore, the 32-bitembedded browser is the same across different PTC Creo applications.
136 PTC Creo® 3.0 Installation and Administration Guide

When PTC Creo applications are connected to the same Creo agent, you can onlyuse a single browser type in a session of a PTC Creo application. You cannotchange the browser type in the session. To change the browser type, you must exitthe current session of the application and all other PTC Creo applications. Youmust then make sure that the Creo agent process is not running before you specifyanother browser type and restart the PTC Creo application.You can specify the PTC Creo browser to use the embedding engine of theInternet Explorer (IE) browser. Before you start a PTC Creo application, ensurethat the value of the windows_browser_type configuration option in yourconfig.pro file is set as follows:
• ie_browser—Specifies that the browser uses the IE engine in a Creo agentprocess initiated from the PTC Creo process. The windows_browser_type configuration option is set to ie_browser by default.
Starting a PTC Creo Application through an ExternalBrowserTo start a PTC Creo application from an external browser, register a helperapplication in the bin directory. The helper application gets installedautomatically when you install the PTC Creo application. This application,<app_name>.exe, is also referred to as the PTC Creo Application Starter.Registration of the helper application involves registering files with .phaextension.
Opening a PDF File within the PTC CreoBrowserYou can view a PDF file in the PTC Creo browser using Adobe Acrobat Reader.On Windows, Adobe Acrobat Reader is available as a plug-in.
Printing a PDF FileYou can view a PDF file in the PTC Creo browser using Adobe Acrobat Reader.To print the PDF file, click the Adobe Acrobat Reader Print icon instead of thePTC Creo browser Print icon.
Using PTC Creo View Express to OpenPTC Creo ObjectsThe PTC Creo objects that you can open using PTC Creo View Express follow:
File Extension File Type.asm Assembly file
.dft Draft file
System Administration Information 137

File Extension File Type.dgm Diagram file
.drw Drawing file
.frm Format file
.pic Picture file
.prt Part file
.rep Report file
.mfg Manufacturing file
.sec Sketcher Section file
On Windows, double-click a file with a registered PVX extension to open the filein Internet Explorer.
Opening PTC Creo Objects from WindowsExplorerIf you have not installed PTC Creo View Express, you can open a PTC Creoobject directly from Windows Explorer in a PTC Creo session. PTC Creo objectstypically appear with a PTC icon in Windows Explorer. Double-click an object inWindows Explorer to open it in a PTC Creo session.If you have installed PTC Creo View Express, a PTC Creo object is opened inInternet Explorer only for viewing when you double-click the object in WindowsExplorer. Right-click on the object and choose the PTC Creo application in whichto open the object.You can open objects with the following file types:
File Extension File Type.asm Assembly file
.dgm Diagram file
.drw Drawing file
.frm Format file
.cem Layout file
.mfg Manufacturing file
.mrk Markup file
.prt Part file
.sec Sketcher Section file
If a PTC Creo session is already running and you double-click an object inWindows Explorer, the object is automatically loaded within the same PTC Creosession in a new window. This new window becomes the active window.
138 PTC Creo® 3.0 Installation and Administration Guide

If a PTC Creo session is not running and you double-click an object in WindowsExplorer, the PTC Creo application startup configuration file dialog box opens.You are prompted to select a file from the list of available configuration files.Upon selecting the required startup configuration file, a PTC Creo session isstarted using the selected configuration file. The selected object is loaded in thisPTC Creo session.
If multiple sessions of PTC Creo applications are running, the selected object isloaded in the session that you started first.
JavaScript SecurityIn PTC Creo, a JavaScript bridge is used so that the JavaScript code inside adisplayed HTML page interacts with the PTC Creo application. For example,Feature info reports, folder content listings, and new connection registrations alluse the JavaScript bridge for security purposes.A PTC Creo application automatically activates the JavaScript bridge only frompages generated by the application or Windchill Solutions. If a page generatedfrom another source tries to access the PTC Creo application through theJavaScript bridge, a warning message appears and the operation is stopped.Take one of the following actions:
• If the URL in the message is from an unreliable source, contact your systemadministrator and avoid accessing this page again.
• If the URL in the message is from a reliable source, such as a PTC WindchillSolution, contact Technical Support.
System Administration Information 139


DInstalling and Configuring PTC
Quality Agent
Overview ................................................................................................................ 142Installing PTC Quality Agent..................................................................................... 142Configuring PTC Quality Agent................................................................................. 142Preferences ............................................................................................................ 143Data Filters ............................................................................................................. 143Pending Data .......................................................................................................... 144Last Sent ................................................................................................................ 145Using Quality Agent................................................................................................. 146Uninstalling PTC Quality Agent................................................................................. 146
This appendix contains information on PTC Quality Agent.
141

OverviewPTC Quality Agent is an application that gathers and sends reports to PTC on theperformance and usage of PTC Creo applications. It also reports the systeminformation of a user. It serves as a medium to help PTC improve the quality of itsproducts.
Installing PTC Quality AgentPTC Quality Agent is installed by default when you install any of the PTC Creoapplications. The PTC Quality Agent reporting is enabled by default for all thePTC Creo applications. Clear the check box at the bottom of the ApplicationSelection screen to disable this process. A single installation of PTC QualityAgent can be used with all the PTC Creo applications for which you have enabledPTC Quality Agent reporting.
NoteWhen customizing a PTC Creo application, if you clear the Enable QualityAgent reporting check box on the Application Custom Setting screen , thisselection supersedes the selection that you made on the Application Selectionscreen. PTC Quality Agent reporting is not enabled in this case.
You can install PTC Quality Agent on a host computer or a network locationdepending on where you are installing your PTC Creo application. If you arerunning a PTC Creo application from a remote host computer or a networklocation, set the quality_agent_path configuration option in yourconfig.pro to access PTC Quality Agent. Specify the complete installationpath of PTC Quality Agent (for example, <creo_loadpoint>\%PRO_MACHINE_TYPE%\obj\qualityagent.exe) as the value of theconfiguration option.
Configuring PTC Quality AgentAfter installing PTC Quality Agent, you can configure it as per your company’srequirements. To open the PTC Quality Agent dialog box, browse to the installationpath or use a previously created shortcut.
142 PTC Creo® 3.0 Installation and Administration Guide

The tabs on the above dialog box show the configurable settings.
PreferencesIf you have write permissions to the PTC Quality Agent installation folder andfiles, specify the frequency for the collection and transfer of the product andsystem information to PTC using the Preferences tab. Set the frequency toMonthly, Quarterly, or Biannually.
NoteA user without write permissions to the installation folder can view thepreferences but cannot change the settings.
Data FiltersIf you have write permissions to the PTC Quality Agent installation folder andfiles, click the Data Filters tab. Select specific information to be blocked frombeing transferred to PTC.
Installing and Configuring PTC Quality Agent 143

NoteYou cannot filter information that PTC considers mandatory. Those checkboxes are unavailable.
The customized preferences and data filters are stored at <All UserProfiles>\Application Data\PTC\QualityAgent\Filters.
Pending DataFor each PTC Creo application you have installed, you can view the collectedproduct and system information on the Pending Data tab.
144 PTC Creo® 3.0 Installation and Administration Guide

On the active application tab, click a button to perform the following actions:• Send Now—Sends the product and system information to the database via an
https secure communication protocol. For example, if the PTC Creo Direct tabis active, sends the product and system information for PTC Creo Direct to thedatabase.
• Send via e-mail—Sends a report in ASCII format as an e-mail attachment to adesignated PTC Technical Support Engineer. For example, if the PTC CreoDirect tab is active, you can send a report for PTC Creo Direct to a PTCTechnical Support Engineer or to your e-mail address.
Last SentFor each PTC Creo application you have installed, you can view on the Last Senttab, the product and system information that was last collected and transferred toPTC.
Installing and Configuring PTC Quality Agent 145

Click Send via e-mail to send an aggregated report in ASCII format. The report issent as an e-mail attachment to a designated PTC Technical Support Engineer orto your e-mail address.
Using Quality AgentPTC Quality Agent automatically collects information related to the applicationand system information and transfers it to PTC. The information transfer is basedon the filter settings in the Data Filters tab and the frequency settings in thePreferences tab. For each session, PTC Quality Agent checks for new data beforethe transfer. The information is automatically encrypted and transferred using theSSL methodology.As a user of a PTC Creo application, you can open the PTC Quality Agent dialogbox to view the pending data to be transferred to PTC on the Pending Data tab.You can click the Send via e-mail button to send the PTC Creo application-relatedand system information report in ASCII format as an e-mail attachment to adesignated PTC Technical Support Engineer and to your e-mail address. Both youand PTC Technical Support can then review the information simultaneously.
Uninstalling PTC Quality AgentYou can remove PTC Quality Agent independent of a PTC Creo application usingthe following steps:
146 PTC Creo® 3.0 Installation and Administration Guide

1. Click Start ▶ Control Panel ▶ Programs and Features. The Uninstall or changea program screen appears.
2. In the application list, click PTC Quality Agent.3. Click Uninstall. A confirmation dialog box opens.4. Click Yes to remove PTC Quality Agent.
Installing and Configuring PTC Quality Agent 147


EInstalling PTC MKS Platform
Components
Overview ................................................................................................................ 150Installing PTC MKS Platform Components ................................................................ 150
This appendix contains information on how to install PTC MKS platformcomponents to work with CADDS 5 models.
149

OverviewYou must install PTC MKS Platform Components 9.x along with the PTC CreoParametric Interface for CADDS 5 component during PTC Creo Parametricinstallation to work with CADDS 5 parts and assemblies within PTC CreoParametric. PTC MKS Platform Components 9.x is a third-party application thatsupports the following functions:
• Simulates a UNIX environment on the 32-bit and 64-bit Windows operatingsystems.
• Emulates UNIX commands on the Windows operating systems.• Installs the Portmapper service for interoperability between CADDS 5 and
PTC Creo Parametric.• Copies the necessary startup files and libraries required to work with CADDS
5 files into a separate installation directory.
Installing PTC MKS Platform ComponentsInstall PTC MKS Platform components using the following instructions:
1. Perform steps 1 through 7 as described in the section Installing the PTC CreoApplications: Simple Installation Process on page 34.
2. Click the PTC MKS Platform Components 9.x check box on the ApplicationSelection screen.
3. Click Install. The Installation Progress screen indicates the progress of theinstallation.
4. Click Finish to complete the installation and close the Assistant.After the installation is complete, see Working with CADDS 5 Models in PTCCreo Parametric on page 60 before you start.
NoteIf you want to install updated packages of PTC MKS Platform components,you must first uninstall its existing instance. Follow the steps below touninstall PTC MKS Platform components:
Navigate to the /cadds5_mks folder of the DVD image and run thefollowing commands:
• For a 64–bit system — msiexec /X cadds5_mks_for_windows64.msi /q
• For a 32–bit system — msiexec /X cadds5_mks_for_windows32.msi /q
150 PTC Creo® 3.0 Installation and Administration Guide

FInstalling the PTC Creo
Applications in Silent Mode
Guidelines and Advantages of a Silent Installation ..................................................... 152Strategies for the Mass Deployment of PTC Creo Applications ................................... 153Workflow for a Silent Installation ............................................................................... 154Command Syntax for a Silent Installation .................................................................. 156Locating the XML Files ............................................................................................ 157Editing the XML Files............................................................................................... 158Editing the PROPERTY Node .................................................................................. 158Editing the SHORTCUT Node .................................................................................. 160Editing the PSF Node .............................................................................................. 161Editing the QUALITY_AGENT Node ......................................................................... 162Editing the LANGUAGE Node .................................................................................. 162Editing the PACKAGE Node..................................................................................... 163Editing the CDSECTION Nodes ............................................................................... 163Uninstalling the PTC Creo Applications in Silent Mode ............................................... 164Installing and Uninstalling Client-Side Components in Silent Mode.............................. 164Installing PTC Quality Agent and PTC MKS Platform Components in Silent
Mode ........................................................................................................ 166Updating the Registry File ........................................................................................ 166
This appendix for system administrators is applicable only for Windows. Itprovides information on how to perform a silent installation of the following PTCCreo applications: PTC Creo Parametric, PTC Creo Direct, PTC Creo Layout,PTC Creo Simulate, and PTC Creo Options Modeler. The instructions for usingcommand-line arguments are also common for PTC Creo Distributed ServicesManager.
151

Guidelines and Advantages of a SilentInstallationThe PTC Creo applications installed for the first time using PTC InstallationAssistant can be reinstalled during subsequent installation sessions in silent(nongraphics and noninteractive) mode. The silent installation process withcommand-line arguments uses an XML file with application-specificconfiguration settings. An independent XML file is stored for each of the PTCCreo applications that you have installed. To perform a silent installation, providethe path to the corresponding XML file as an argument when runningsetup.exe from the DVD root directory at the command prompt. SeeCommand Syntax for a Silent Installation on page 156 for more information.Remember the following points for a silent installation:
• You cannot use the independent XML file of an earlier release or amaintenance release for a silent installation in the following cases:
○ The major release to be installed and the release of the application forgenerating the XML file are not the same.
○ The selected PTC Creo application, language, platform, or package is noton the DVD.
○ The prerequisites for installing the PTC Creo application are not met.• You must run the Assistant only from the DVD when installing the PTC Creo
applications for the first time.• You cannot generate and download a license or install PTC License Server in
silent mode. The installer cannot connect to PTC.com in silent mode. Hence,the license sources must already be accessible to all the computers on whichthe application software will subsequently be run. The silent installationprocess will neither validate any license nor attempt to access the licensesources.
• You cannot copy an existing installation while performing a silent installation.
NoteIf you change the installation folder structure of an installed PTC Creoapplication, “uninstall” or “reconfiguration” utilities may not work properlyfor that installation of the PTC Creo application.
Some of the advantages of a silent installation follow:
152 PTC Creo® 3.0 Installation and Administration Guide

• You can efficiently mass-deploy PTC Creo applications across a largeenterprise.
• You can source all the configuration settings, such as installation location,license source list, and startup commands, for installing a PTC Creoapplication from an XML file.
Strategies for the Mass Deployment ofPTC Creo ApplicationsAs an administrator you can adopt one of the following strategies to mass-deployPTC Creo applications and client-side components such as PTC Creo ViewExpress, PTC Creo Thumbnail Viewer, and PTC Creo Platform Agent in a largeenterprise:
• Perform a silent installation of PTC Creo applications on all the clientcomputers. See Workflow for a Silent Installation on page 154 for details. Youcan then choose to install the client-side components on each client computer.See Installing and Uninstalling Client-Side Components in Silent Mode onpage 164 for details.
• Provide the client computers access to the applications installed on a singlenetwork-accessible machine. Perform the following steps for the client-sideconfiguration:
1. If required, install the client-side components on each client computer. SeeInstalling and Uninstalling Client-Side Components in Silent Mode onpage 164 for details.
2. Update the registry entry for each PTC Creo application on each clientcomputer using the created.reg file. See Updating the Registry Fileon page 166 for details.
• Copy a single prototypical installation onto each client computer. Thenperform the following steps for the client-side configuration:
1. If required, install the client-side components on each client computer. SeeInstalling and Uninstalling Client-Side Components in Silent Mode onpage 164 for details.
2. Update the registry entry for each PTC Creo application on each clientcomputer using the created.reg file. See Updating the Registry Fileon page 166 for details.
Installing the PTC Creo Applications in Silent Mode 153

Note○ If you have installed the PTC Creo applications on your local computer
and have also run the silent installation process, you need not updatethe registry file.
○ After the silent installation is complete, if you want to reconfigure theinstallation using PTC Installation Assistant, you must explicitlyprovide the license source information on the License Identificationscreen.
Workflow for a Silent InstallationA system administrator can follow the workflow described below for a silentinstallation of one or more PTC Creo applications on a network location or on aclient computer:
1. Perform a typical product installation with the configuration that you want touse for future installations.
a. Open a command shell and run setup.exe from the root directory of theDVD. PTC Installation Assistant starts.
b. On the Welcome screen click Install new software.c. On the License Identification screen perform one of the following
operations:
• Drag a node-locked or floating license file into the License Summaryarea.
• Enter the port@host address of the running license server.
154 PTC Creo® 3.0 Installation and Administration Guide

Note• Downloading a license file or installing PTC License Server must be
done in a separate installation session.• A license source is not validated during the silent installation process.
Hence, you must ensure the accuracy of the license source list that isconfigured in the commands (.psf files) for starting the PTC Creoapplications.
• The license source specification is designated in an XML file. It can beoverridden using a command-line argument during the silentinstallation process. See Command Syntax for a Silent Installation onpage 156 for details.
d. Select the applications to install, customize your installation, and specifyany other site-specific configurations.
e. Click Install to begin the installation.f. Click Finish to close the Assistant.
An independent XML file for each installed PTC Creo application is storedwith a .p.xml extension at <creo_loadpoint>\<datecode>\<app_name>\bin\pim\xml. When installing PTC Creo applications, theCommon Files folder is installed. The XML file for this folder is stored atthe following location:
<creo_loadpoint>Creo 3.0\<datecode>\Common Files\bin\pim\xml\creobase.p.xml.
Additionally, PTC Creo applications require XML files for the followingcomponents:
• PTC Quality Agent — <dvd>:\pim\xml\qualityagent.xml
• PTC MKS Platform Components — (Required only if installing CADDS 5Adaptor) <dvd>:\pim\xml\mkscomponents.xml
NoteEdit the qualityagent.xml and mkscomponents.xml files, andset the value of the install attribute to yes.
2. Copy one or more PTC Creo application specific XML files, along with thecreobase.p.xml,qualityagent.xml, and mkscomponents.xml
Installing the PTC Creo Applications in Silent Mode 155
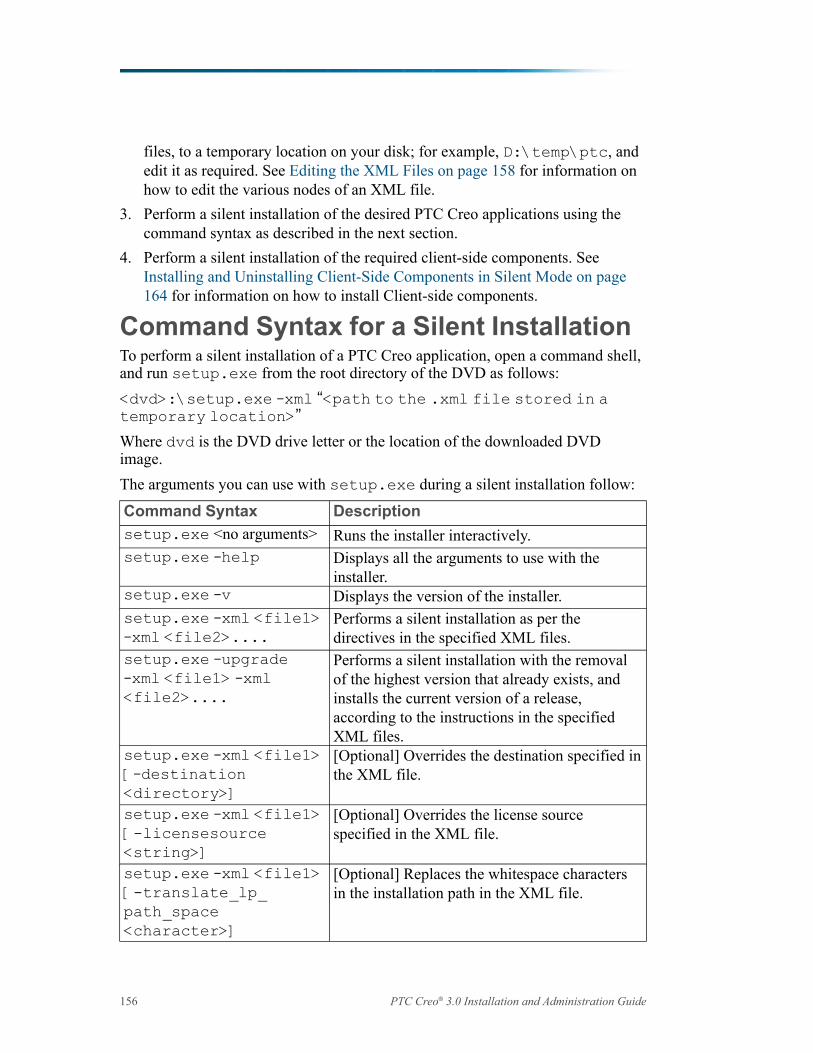
files, to a temporary location on your disk; for example, D:\temp\ptc, andedit it as required. See Editing the XML Files on page 158 for information onhow to edit the various nodes of an XML file.
3. Perform a silent installation of the desired PTC Creo applications using thecommand syntax as described in the next section.
4. Perform a silent installation of the required client-side components. SeeInstalling and Uninstalling Client-Side Components in Silent Mode on page164 for information on how to install Client-side components.
Command Syntax for a Silent InstallationTo perform a silent installation of a PTC Creo application, open a command shell,and run setup.exe from the root directory of the DVD as follows:<dvd>:\setup.exe –xml “<path to the .xml file stored in atemporary location>”Where dvd is the DVD drive letter or the location of the downloaded DVDimage.The arguments you can use with setup.exe during a silent installation follow:
Command Syntax Descriptionsetup.exe <no arguments> Runs the installer interactively.setup.exe –help Displays all the arguments to use with the
installer.setup.exe –v Displays the version of the installer.setup.exe –xml <file1>–xml <file2>....
Performs a silent installation as per thedirectives in the specified XML files.
setup.exe –upgrade–xml <file1> –xml<file2>....
Performs a silent installation with the removalof the highest version that already exists, andinstalls the current version of a release,according to the instructions in the specifiedXML files.
setup.exe –xml <file1>[–destination<directory>]
[Optional] Overrides the destination specified inthe XML file.
setup.exe –xml <file1>[-licensesource<string>]
[Optional] Overrides the license sourcespecified in the XML file.
setup.exe –xml <file1>[-translate_lp_path_space<character>]
[Optional] Replaces the whitespace charactersin the installation path in the XML file.
156 PTC Creo® 3.0 Installation and Administration Guide

Command Syntax Descriptionsetup.exe –xml <file1>[-licfeat_regen]
[Optional] Overrides the license feature listspecified in the XML file. The default list isregenerated by checking the license source listas it is originally generated from an initialinstallation. Without this argument, the defaultlicense feature list is taken from the XML file.
setup.exe –xml <file1>[-licfeat_preference<string>]
[Optional] Prepends the preferred licensefeature names to the default license feature list.Specify the preferred names within quotes or asa space-separated list without parentheses.Without this argument, the default licensefeature list is used as is.
setup.exe–progressbar –xml<file1>
[Optional] Displays the indicative progress barduring the installation using the XML file.
Consider the example of performing a silent installation of PTC Creo Parametricwith Common Files, and a required component PTC Quality Agent. Open acommand shell and enter the following command:E:\setup.exe –xml “D:\temp\ptc\pma.p.xml” —xml “D:\temp\ptc\creobase.p.xml”• E—The DVD drive letter• D:\temp\ptc\pma.p.xml—The location for the <app_name>.p.xml
file.• D:\temp\ptc\creobase.p.xml—The location of the XML file for the
Common Files folder.• D:\temp\ptc\qualityagent.xml—The location of the XML file for
the required component PTC Quality Agent.
Locating the XML FilesOn a successful installation of the PTC Creo applications, XML files for each ofthe installed PTC Creo applications are created. The file location and file name isas shown:
Installing the PTC Creo Applications in Silent Mode 157

Application Files File Name File LocationPTC Creo applicationfiles
<app_name>.p.xml <creo_loadpoint>\Creo 3.0\<datecode>\<app_name>\bin\pim\xml
Common Files folder creobase.p.xml <creo_loadpoint>\Creo 3.0\<datecode>\Common Files\bin\pim\xml
For example, if you have installed PTC Creo Parametric, the XML filepma.p.xml is stored at <creo_loadpoint>\Creo 3.0\<datecode>\Parametric\bin\pim\xml. The XML file for the Common Files folder isstored at <creo_loadpoint>\Creo 3.0\<datecode>\Common Files\bin\pim\xml\creobase.p.xml.
Editing the XML FilesYou can edit and customize only those XML files listed in the table in theprevious section with the settings required for future installations. In such cases,copy the XML files to a temporary location and edit the nodes in the XML filesusing a text editor or an XML editor. The following sections describe the variousnodes in the XML file that can be edited.
Note• PTC recommends you not to edit the XML files unless there is a specific need
to do so.• You can edit only those nodes that are documented in the subsequent sections.• The nodes in the XML file may differ for various PTC Creo applications.
Editing the PROPERTY NodeYou can edit the following name attributes of the PROPERTY node:
158 PTC Creo® 3.0 Installation and Administration Guide

INSTALLBASEUse the INSTALLBASE name attribute to change the root path for installing thePTC Creo applications in the current session. You can change the INSTALLBASEname attribute in the PTC Creo applications (<app_name>.p.xml) andCommon Files (creobase.p.xml) XML files. The default value is usually thePTC folder under the Program Files folder.
NoteEnsure that you specify same root path in the PTC Creo applications (<app_name>.p.xml) and Common Files (creobase.p.xml) XML files.
• Before editing the INSTALLBASE name attribute, the PROPERTY nodeappears as shown:<PROPERTY name="[INSTALLBASE]">"F:Program Files\PTC"</PROPERTY>
• After editing the INSTALLBASE name attribute, the PROPERTY nodeappears as shown:<PROPERTY name="[INSTALLBASE]">"[PROGRAMFILES]\PTC"</PROPERTY>
The [PROGRAMFILES] variable in the above example represents the defaultprogram location on a local computer. You can use this variable instead of theabsolute path F:\Program Files to make the default program locationaccessible on all the computers. For a 32-bit application running on a 64-bitcomputer, you can also use the [PROGRAMFILESx86] variable as shown inthe following example:<PROPERTY name="[INSTALLBASE]">"[PROGRAMFILESx86]\PTC"</PROPERTY>
The [PROGRAMFILESx86 variable represents the default program locationfor a 32-bit application on a 64-bit computer.
NoRegistryActionsYou can add the NoRegistryActions name attribute to skip processing of theREGISTRY nodes. REGISTRY nodes define file associations.<PROPERTY name="NoRegistryActions"</PROPERTY>
LP and CREOCOMMONFILESThe permitted editing of the LP and CREOCOMMONFILES property values islimited to changing or removing the whitespace characters. For example, you canchange Creo 3.0 to Creo_3.0 or Creo3.0. Similarly, you can change
Installing the PTC Creo Applications in Silent Mode 159

Common Files to Common_Files or CommonFiles. You must not modifyany other aspects of the LP or CREOCOMMONFILES paths. Before editing theseproperty values, the PROPERTY node appears as shown:<PROPERTY name="[LP]">[INSTALLBASE]/Creo 3.0/Parametric</PROPERTY><PROPERTY name="[CREOCOMMONFILES]"[INSTALLBASE]/Creo 3.0/Common Files</PROPERTY>
After editing the LP and CREOCOMMONFILES property values, the PROPERTYnode appears as shown:<PROPERTY name="[LP]">[INSTALLBASE]/Creo_3.0/Parametric</PROPERTY><PROPERTY name="[CREOCOMMONFILES]"[INSTALLBASE]/Creo_3.0/Common_Files</PROPERTY>
Note• The CREOCOMMONFILES attribute is used by all the PTC Creo applications
that are installed at the common loadpoint. When editing this attribute in anXML file, make sure to edit the value of this attribute in the XML files of allthe individual applications installed at the same loadpoint.
• You can use the command line argument translate_lp_path_space toremove whitespace characters instead of manually editing the LP andCREOCOMMONFILES name attributes. See Command Syntax for a SilentInstallation on page 156 for more information on translate_lp_path_space.
Editing the SHORTCUT NodeA SHORTCUT node represents shortcut definitions associated with certainpackage nodes. A SHORTCUT node is processed in order to create the shortcutsfor a package that is being installed. In a SHORTCUT node, you must edit only thecreate attribute for each of the PROGRAMSMENU, STARTMENU, DESKTOP,and QUICKLAUNCH subnodes. A value Y set for the create attribute creates theshortcuts.A sample SHORTCUT node in an XML file that creates a shortcut only in thePrograms menu is as shown:<SHORTCUT allusers="Y" id="pma_shortcut"><NAME>Creo Parametric [VERSION]</NAME><ICON>[LP]/install/nt/parametric.ico</ICON><INDEX>0</INDEX><PATH>[LP]/bin/parametric.exe</PATH><WIN7APPID>PTC.Creo_Parametric</WIN7APPID><PROGRAMSMENU create="Y" installed="Y">PTC Creo</PROGRAMSMENU><STARTMENU create="N"/><DESKTOP create="N"/>
160 PTC Creo® 3.0 Installation and Administration Guide

<QUICKLAUNCH create="N"/></SHORTCUT>
Editing the PSF NodeA PSF node represents the license configurations created in the Customize dialogbox of the Assistant. Individual PSF nodes are created in the XML file for each ofthe configurations created in this dialog box. The resultant *.psf file is used forsetting up the appropriate environment variables and for indicating the executablesto be run. You can edit the following subnodes of the PSF node:
Subnode ValueLICENSE_IDENTIFIERS Provide a list of license sources separated
by semicolons. The license sources can benode-locked license files or server-basedport@host identifiers.
FEATURE_NAME Provide a list of FLEXnet license-to-runfeatures separated by spaces. The feature listis followed by a list of additional optionswithin parentheses. Choose the options toacquire at startup.
DESCRIPTION Identify the PSF run definition to be used bythe software wrapper program (for example,parametric.exe) in case multiple PSFrun definitions exist. The software wrapperprogram then opens a dialog box with a listof descriptions for launching the startupdefinition profile.
A sample PSF node and its subnodes in an XML file are as shown:<PSF dest="[LP]/bin/parametric.psf" id="parametric" installed="Y"name="parametric" source="psf_templates.xml><EXE>parametric.exe</EXE><LICTYPE name="CreoPma"><Creo Parametric</LICTYPE><PREFIX>CREOPMA PROE</PREFIX><DESCRIPTION>Creo Parametric (default)</DESCRIPTION><LICENSE_IDENTIFIERS>7788@localhost</LICENSE_IDENTIFIERS><FEATURE_NAME>CREOPMA_CUSTOMER ()</FEATURE_NAME><DFOR_PATH>%PRO_DIRECTORY%\libs\dfor\lib</DFOR_PATH><CV_ENV_HOME>%PRO_DIRECTORY%\%PRO_MACHINE_TYPE%\CV140</CV_ENV_HOME></PSF>
Installing the PTC Creo Applications in Silent Mode 161

Editing the QUALITY_AGENT NodeThe QUALITY_AGENT node represents the PTC Quality Agent settings for aninstalled PTC Creo application. You can edit the following attribute of theQUALITY_AGENT node:
Attribute Valueenable Enables or disables the PTC Quality Agent
reporting for a PTC Creo application. Forexample, if this attribute is set to Y, PTCQuality Agent reporting is enabled.
NoteIf the required attribute is set to Y, youmust not change the value of the enableattribute to N. If you do so, a PTC Creoapplication will not run because ofconflicting settings.
A sample QUALITY_AGENT node in an XML file is as shown:<QUALITY_AGENT enable="Y" keyname="QualityAgentOptIn" required="N"/>
Editing the LANGUAGE Node
NoteEditing the LANGUAGE, PLATFORM, and PACKAGE nodes is not trivial. Forediting these nodes you must manually edit the CDSECTION nodes. Instead,PTC recommends that you perform a template-based installation graphicallywith the required language, platform, and package settings.
A LANGUAGE node represents the languages supported on the DVD media for theinstallation of a PTC Creo application. Individual LANGUAGE nodes are created inthe XML file for each of the supported languages. You can edit the followingattribute of the LANGUAGE node:Attribute Valueinstall Set this attribute to Y or N depending on
whether you want to install the PTC Creoapplication in that language. If therequired attribute is set to Y do notchange the install attribute.
162 PTC Creo® 3.0 Installation and Administration Guide

A sample LANGUAGE node in an XML file follows:<LANGUAGE install="Y" installed="N" name="usascii"required="Y">English</LANGUAGE><LANGUAGE install="N" installed="N" name="japanese">Japanese</LANGUAGE>
Editing the PACKAGE NodePACKAGE nodes in an XML file represent the required and the optional packagesselected for a PTC Creo application on the Customize dialog box of the Assistant.There may be many PACKAGE nodes in an XML file. You can edit the followingattribute of the PACKAGE node:Attribute Valueinstall For a specific PACKAGE node, set this
attribute to Y or N depending on whether youwant to install the package with the PTCCreo application. For a parent package withmultiple child packages, set the installattribute of the parent package to Y to installany of its child packages.
A sample PACKAGE node in an XML file follows:<PACKAGE hidden="N" install="Y" label="ModelCHECK name="modelcheck"parent="creooptions" required="N"></PACKAGE>
Editing the CDSECTION NodesEdit the CDSECTION node only if you want to edit the LANGUAGE, PLATFORM,or the PACKAGE nodes. Check for the following attributes before you edit theCDSECTION nodes:
• For each LANGUAGE node, locate the CDSECTION nodes with the languageattribute reflecting the appropriate language.
• Then locate the CDSECTION nodes with the platform attribute reflecting theappropriate operating system.
• Finally locate the CDSECTION nodes with the name attribute reflecting thepackage to be installed with the PTC Creo application.
If all the attributes for the above nodes are to be considered for the installation, setthe install attribute of the CDSECTION node to Y. Otherwise, set the attributeto N.A sample CDSECTION node in an XML file follows:<CDSECTION install="Y" installed="Y" location="[CREOCOMMONFILES]/[SHIPCODE]"name="ModelCHECK" size="7126314>
Installing the PTC Creo Applications in Silent Mode 163

Uninstalling the PTC Creo Applications inSilent ModeYou can uninstall the PTC Creo applications in silent mode by entering thefollowing command for each of the applications in a command shell:<creo_loadpoint>\<datecode>\<app_name>\bin\uninstall.exe -quiet
For example, to uninstall PTC Creo Parametric in silent mode, enter the followingcommand:C:\>"C:\Program Files\PTC\Creo 3.0\<datecode>Parametric\bin\uninstall.exe" -quiet
You must navigate to the installation directory of each PTC Creo application tosilently uninstall it. In case the Common Files folder is installed, uninstallingthe last PTC Creo application referencing the Common Files folder removesthis folder automatically.
Installing and Uninstalling Client-SideComponents in Silent ModeThe installers (MSIs) of the following client-side components reside on the DVDmedia, at path <dvd>:\install\addon\:
• PTC Creo Platform Agent• PTC Creo Thumbnail Viewer• PTC Creo View ExpressOnly the PTC Creo Platform Agent component get installed when you performinstallation of any of the PTC Creo applications on a client computer. Refer to thefollowing sections for the command-line syntax to run the installers for each ofthese components.
PTC Creo Platform AgentOpen a command shell and enter a command to install or uninstall PTC CreoPlatform Agent in silent mode:
• Install PTC Creo Platform Agent at the default location using the followingcommand:"<dvd>:\install\addon\creoagent_32_64.msi" /passive
• Uninstall PTC Creo Platform Agent installed at the default location using thefollowing command:msiexec /uninstall "<dvd>:\install\addon\creoagent_32_64.msi"/passive
164 PTC Creo® 3.0 Installation and Administration Guide

PTC Creo Thumbnail ViewerOpen a command shell and enter a command to install or uninstall PTC CreoThumbnail Viewer in silent mode:
• Install PTC Creo Thumbnail Viewer using the following command:"<dvd>:\install\addon\Thumbviewer_32_64.msi" /passive
• Uninstall PTC Creo Thumbnail Viewer using the following command:msiexec /uninstall "<dvd>:\install\addon\Thumbviewer_32_64.msi" /passive
PTC Creo View ExpressTo perform a silent installation of PTC Creo View Express, follow these steps:
1. Deploy the application using the PTC Creo View Express executable as shownin the following example:start /w <dvd>:\install\addon\pvx32_64\CreoSetup.exe/vADDLOCAL="ALL" /qn
In the previous example:
• /qn installs the application in silent mode• start /w starts the application from the command prompt and waits for
the application to terminateIf you have not specified the APPLICATIONFOLDER property, the defaultinstallation path is used. To override this path, specify theAPPLICATIONFOLDER property at the command prompt as shown in thefollowing example:“start /w <dvd>:\install\addon\pvx32_64\CreoSetup.exe/vADDLOCAL=”ALL” APPLICATIONFOLDER=”c:\ptc\CreoViewExpress” /qn”
To uninstall PTC Creo View Express in silent mode, enter the following commandin a command shell:msiexec.exe /x <dvd>:\install\addon\pvx32_64\pvexpress\CreoView_Express_32_64.msi /qn
NoteRunning the PTC CreoView_Express_32_64.msi file alone does notcompletely install PTC Creo View Express unless certain softwareprerequisites are met. Microsoft C++ Runtimes, OpenGL 1.1 or later, andArbortext IsoView (optional) are required for installing and running PTC CreoView Express directly using the MSI file.
Installing the PTC Creo Applications in Silent Mode 165

For more information on installing and uninstalling PTC Creo View Express insilent mode, see Chapter 7, Deploying Creo View and Customizing theInstallation, in Installing PTC Creo 3.0: Creo View.
Installing PTC Quality Agent and PTCMKS Platform Components in Silent ModeTo silently install PTC Quality Agentand PTC MKS Platform Components, youmust copy the qualityagent.xml and the mkscomponents.xml filesfound at <dvd>:\pim\xml\ to your local computer. Edit the "install="attribute of the MSI entry to be "Y" and then perform the silent installation at thecommand prompt.
Updating the Registry FileA list of registry changes made by PTC Installation Assistant during theprototypical installation is recorded on the computer where the PTC Creoapplications are installed. The file resides at the following location:<creo_loadpoint>\<datecode>\<app_name>\bin\pim\xml\created.reg
Use this file to perform client configuration changes (registry edits) on a clientcomputer on which you did not run the silent installation process. For example,the client computer can be the one that runs the software from a networkinstallation. It can also be the one that received a copy of the installation.The default location of the registry file for some of the PTC Creo applications isas shown:C:\Program Files\PTC\Creo 3.0\<datecode>\Parametric\bin\pim\xml\created.reg
(PTC Creo Parametric)C:\Program Files\PTC\Creo 3.0\<datecode>\Direct\bin\pim\xml\created.reg
(PTC Creo Direct)To make configuration changes on the client computer, open the created.regfile stored on the computer where the PTC Creo applications are installed. Thenperform one of the following steps:
• Merge the entries of this file with another file you are using on the clientcomputer.
• Open the Registry Editor dialog box and click File ▶ Import to import theentries of the file to the client computer.
166 PTC Creo® 3.0 Installation and Administration Guide

GPort Usage by Creo Applications
Using Communication Ports ..................................................................................... 168Port Usage for PTC License Server .......................................................................... 170
This appendix provides information on the communication ports used by variousPTC Creo applications and the related client applications.
167

Using Communication PortsMany of the PTC Creo applications communicate with one another and with theother client applications through a TCP/IP communication protocol. Suchapplications must be registered in the firewall. The TCP/IP protocol uses a port asa communication endpoint in the operating system of the host computer. A port isassociated with the IP address of the host computer. It is identified for each IPaddress and protocol by a 16-bit number commonly known as the port number.The port number for a TCP/IP communication can be allocated by a PTC Creoapplication. In such cases you can configure the port number using anenvironment variable. If a port number is allocated dynamically by the operatingsystem on the host computer, you cannot change the value.The port allocation for various PTC Creo and client applications follow:
Application Environment Variable SettingNmsd—PTC name service used byasynchronous Pro/TOOLKITapplications and PTC CreoDistributed Services Manager toconnect to PTC Creo Parametric.This application runs on the clientworkstation and uses the same hostTCP/IP communication protocolfor all the processes on thatworkstation. The default portnumber is 1239.
Set PTCNMSPORT using Control Panel ▶System ▶ Advanced system settings ▶Environment Variables.
NoteYou cannot set this environmentvariable in your .psf file.
pro_comm_msg.exe—Facilitates communicationbetween the executablextop.exe and asynchronous Pro/TOOLKIT applications.
NoteThe executable xtop.exerefers to all the desktop-basedPTC Creo applications.
A port number can be allocated by a PTCCreo application or it can be setdynamically.• 6000–Change this value by specifying a
value to the PRO_COMM_MSG_COMPAT_PORT environmentvariable. Either the first unused portstarting with the value of PRO_COMM_MSG_COMPAT_PORT or of 6001, whichever is bigger,is allocated.
• 2 dynamic ports—Cannot configureassigned port values after theirallocation.
PTC Portmapper—If installed,communicates port informationbetween Pro/TOOLKIT and a PTC
Not supported.
168 PTC Creo® 3.0 Installation and Administration Guide

Application Environment Variable SettingCreo application. If it is notinstalled, Windows registry is usedto store the port values. Thisapplication runs on the clientworkstation and uses the same hostTCP/IP communication protocolfor all the processes on thatworkstation.xtop.exe—Connects tocreoagent, nmsd, and pro_comm_msg to open a fewdynamically allocated ports. Thisapplication uses the same hostTCP/IP communication protocolfor all the processes on aworkstation.
Not supported.
creoagent.exe—Uses dynamically allocated portsto connect to all the PTC Creoapplications. This application usesthe same host TCP/IPcommunication protocol for all theprocesses on a client workstation.
Not supported.
Async TK Apps—Use dynamicallyallocated ports to connect to pro_comm_msg.exe on a clientworkstation.
Not supported.
Converters—Use dynamicallyallocated ports to connect todesktop-based PTC Creoapplications on a clientworkstation.
Not supported.
CreoView—Uses dynamicallyallocated ports to communicatewith browser plugins, nmsd, andcomm_brk_svc.exe on a clientworkstation.
Not supported.
Port Usage by Creo Applications 169

Application Environment Variable Settingcomm_brk_svc.exe—Uses dynamically allocated portsto support communication betweenxtop.exe, third-party CADsoftware, and Creo View sessions.
Not supported.
PTC Creo Distributed ServicesManager—Uses the TCP/IPcommunication protocols betweenmultiple workstations.• The executable
dbatchc.exe is the dbatchclient interface that runs on aclient workstation. Thisinterface communicates withthe Service Manager dsq.exelocated on a differentworkstation.
• The dbatch service executabledbatchs.exe runs on aservice workstation.
• The executable dsq.exe usesa dynamic port to communicatewith dbatchc.exe andmultiple dbatchs.exeprocesses. Each serviceworkstation runs nmsd.exe.
Set PTCNMSPORT using Control Panel ▶System ▶ Advanced system settings ▶Environment Variables to configure thedefault port number. Make sure that you setthe same port number value on all theservice workstations.
Port Usage for PTC License ServerPTC License Server runs on a designated server and requires a two-way TCP/IPcommunication between the client workstation and the server. The default port7788 is used by the lmgrd and the lmadamin license server managers. Thevendor daemon ptc_d dynamically selects an available port. You can designate aport value other than the default value for lmgrd, lmadamin, and ptc_d usingthe procedures given in the subsequent sections. After designating appropriateport values for these applications, you must register the values in the firewall.Otherwise license transactions will not happen.
170 PTC Creo® 3.0 Installation and Administration Guide

Changing the Default Port on the ServerDifferent procedures for changing the default port on the designated server forlmgrd and the lmadmin follow. If you are running lmgrd as the license servermanager, use the following procedure:
1. Navigate to the <license_server_manager_loadpoint>\licensing folder.
2. Open the license.dat file in a text editor.3. At the end of the line beginning with SERVER, change the port number
7788 to the desired open port.4. Save and close the file.5. Stop and restart the license server process using the lmtools utility.6. Edit the Creo 3.0\app\bin\*.psf and the Creo 3.0\app\bin\
*.bat files to change the reference of LM_LICENSE_FILE= or PTC_D_LICENSE_FILE = to reflect the new port@hostname for the server.
If you are running lmadmin as the license server manager, use the followingprocedure to change the default port on the designated server:
1. Perform the previous steps 1 through 4.2. Stop the lmadmin_ptc service.3. Navigate to the <license_server_manager_loadpoint>\conf
folder.4. Open the server.xml file in a text editor.5. In the line beginning with licenseServer, change the reference port
7788 to the desired port matching the SERVER line in the license.datfile.
6. Navigate to the <license_server_manager_loadpoint>\binfolder.
7. Restart the lmadmin_ptc service.8. Edit the Creo 3.0\app\bin\*.psf and the Creo 3.0\app\bin\
*.bat files to change the reference of LM_LICENSE_FILE= or PTC_D_LICENSE_FILE = to reflect the new port@hostname for the server.
Setting a Nondefault Vendor Daemon PortDifferent procedures for setting a nondefault vendor daemon port on the lmgrdand lmadmin follow. If you are running lmgrd as the license server manager,use the following procedure:
Port Usage by Creo Applications 171

1. Navigate to the <license_server_manager_loadpoint>\licensing folder.
2. Open the license.dat file in a text editor.3. Add the keyword port=52727 (or any number > 2000) at the end of the line
beginning with DAEMON. This designates the desired listening port for theptc_d daemon.
4. Save and close the file.5. Stop and restart the license server process using the lmtools utility.If you are running lmadmin as the license server manager, use the followingprocedure to set a nondefault vendor daemon port:
1. Perform steps 1 through 4 explained previously.2. Stop the lmadmin_ptc service.3. Navigate to the <license_server_manager_loadpoint>\conf
folder.4. Open the server.xml file in a text editor.5. In the line beginning with DAEMON, change port=0 to the desired port
matching the DAEMON line in the license.dat file.6. Restart the lmadmin_ptc service.
Updating the Client Computers for the New License ServerPortIf you have changed the license server manager port for lmgrd or lmadmin, youmust update the client computers to obtain a license:
1. For each installed PTC Creo application, navigate to the bin folder in thePTC Creo load point. For example, if PTC Creo Parametric is one of theinstalled applications, navigate to the <creo_loadpoint>\Parametric\bin folder.
2. Run reconfigure.exe to open PTC Installation Assistant. The optionReconfigure existing software is selected by default.
3. Click Next. The License Identification screen appears.
4. Click in the License Summary area to remove the old server reference.5. Type the port@hostname value corresponding to the new server under the
Source column. For example, the port and the host name can be7788@myhostname. Click to add any new license sources.
6. Click Next.7. Click Install and then click Exit.
172 PTC Creo® 3.0 Installation and Administration Guide

HDistributed Computing
Technology for PTC CreoParametric
Overview of Distributed Computing........................................................................... 174Interactions between the Controller and the Agent ..................................................... 174Supported Functions ............................................................................................... 174Configuring Workstations for Distributed Computing................................................... 175
This appendix contains information on the Distributed Computing technology thatis used by PTC Creo Parametric to augment your existing hardware.
173

Overview of Distributed ComputingPTC Creo Parametric uses Distributed Computing technology to performcomputationally intensive tasks by augmenting your existing hardware.Distributed Computing technology includes the following elements:
• A PTC Creo Parametric session or the controller.• Participating networked workstations.• A daemon running on each participating workstation.• One or more agents running on the workstations. These agents could be the
PTC Creo Parametric sessions running as server processes.• A task or a collection of jobs.
NoteDistributed Computing is suitable only for multiobject design studies.
Interactions between the Controller and the AgentWith PTC Creo Parametric you can optimize the distribution of tasks usingDistributed Computing technology. The controller communicates with the daemonon each workstation and determines load averages. Agent sessions areautomatically started depending on load averages and the number of processors.These agents are started only once for every distributed computing task and notfor every job. Communication of data is also optimized. Data, that is, models,information, and instructions, are efficiently streamed directly to each agentthrough the daemon. No files are copied to a workstation before a job is carriedout. As subsequent jobs are dispatched to the same agent, only data that isdifferent between the jobs is streamed. If the data involved is the same, it is notstreamed again.
Supported FunctionsDistributed Computing technology supports the following functions:
• Workstations with multiple CPUs are leveraged so that an agent process existsfor every CPU (depending on the system load average).
• Workstations are engaged in distributed computing unless the load on a CPUexceeds 20 percent.
• Tasks are dispatched to workstations based on the following real-timeconditions:
○ The workstations must be online.
174 PTC Creo® 3.0 Installation and Administration Guide

○ The load average on the workstations must be within permissible limits.The load average is calculated over time, not with a single measurement ata specific point in time.
○ If a workstation shuts down during distributed computing, the active taskis not interrupted. The controller detects the shutdown and routes the job toanother agent.
○ If multiple users are performing distributed computing tasks, workstationsare engaged on a first-come, first-served basis. While a workstation isprocessing jobs dispatched by a certain controller, it is unavailable to othercontroller sessions.
After the controller completes its task, any active controller can thenengage the workstation.
NoteAvoid using distributed computing when dispatching jobs across firewalls.
Configuring Workstations for DistributedComputingSystem administrators can configure the workstations after installing PTC CreoParametric as follows:
1. From the available workstations, choose the ones to participate in distributedcomputing sessions.
2. Run the dcadsetup script on each participating workstation. This scriptstarts a required daemon process for distributed computing. No other setuptask is required.
3. To shut down the daemon process and thus disable a workstation fromparticipating in distributed computing sessions, run the dcadshutdownscript.
4. Optionally, register the dcadsetup command within the boot script of aworkstation. This command enables the workstation for distributed computingafter it is shut down and restarted.
Distributed Computing Technology for PTC Creo Parametric 175


ITroubleshooting Tips
General Debugging Hints......................................................................................... 178Online Information ................................................................................................... 178Troubleshooting List ................................................................................................ 178Failure to Start the Software ..................................................................................... 178Xtop Icon Disappears from the Taskbar ..................................................................... 178Inaccurate Ptcstatus Command Information .............................................................. 179Invalid Licenses ...................................................................................................... 179FlexNet Publisher Fails to Start (Triad Configurations)................................................ 180ModelCHECK Metrics Tool Display Problems ............................................................ 180
This appendix documents common problems that occur when you install PTCsoftware and PTC License Server. This appendix also provides general debuggingtechniques and cites other sources of information available from the PTC Website.
177

General Debugging HintsThe ptc.log file records license server activities and can be found in“\FLEXnet Admin License Server\logs\”. This file has usefulinformation that you should check when you have a problem.
Online InformationSee www.ptc.com/support/index.htm for a wealth of how-to information for newand experienced users, including order and license support. The Technical Supportpage provides online tools and other support services. You can search theKnowledge Base of over 14,000 technical documents or download referencedocuments. For information on FlexNet Publisher diagnostic environmentvariables, consult the FlexNet Publisher License Administration Guide.
Troubleshooting ListSkim through the following list of problems to find any that appear to be the sameas the one you are experiencing. The information is presented in the followingformat.Symptom: Describes the problem.Cause: Lists the cause of the problem.Solution: Provides steps to resolve the problem.
Failure to Start the SoftwareSymptom: When you attempt to start your PTC software, you see an MS-DOSwindow that contains the message: Cannot find <Installation_Directory>\<mc_type>\filename.Cause: The system PATH, an environment variable, is either not set to the<Installation_Directory>\bin or it is improperly set due to a syntax orspelling error.Solution: Check the system PATH.
Xtop Icon Disappears from the TaskbarSymptom: An Xtop icon appears for a few seconds in the taskbar and quicklydisappears.Cause: Network configuration settings are not properly set.Solution: Make sure that the network settings are in accordance with theSuggested Technique for Configuration of a workstation for executing the PTCCreo application.
178 PTC Creo® 3.0 Installation and Administration Guide

Look for a file in the startup location called std.out and see if there arereferences to network errors. If there is a line that states Exception Code Was-1073741819, make sure the latest graphics driver is installed. The most recentgraphics driver can be downloaded from the manufacturer's Web site. Analternative is to set the config.pro option graphics win32_gdi.
Inaccurate Ptcstatus Command InformationSymptom: On Windows systems for Pro/ENGINEER Release 20 and later, theptcstatus command returns the following message,Displaying status for license file 77880@ptc Warning(-15):Cannot connect to license servers (-15, 10; 10061).Cause: The license server is not running or the license client cannot reach theserver.Solution: Verify that the license server manager and ptc_d daemons are running.A network problem exists if a license client attempts to ping the server by hostname and the ping fails.
Invalid LicensesSymptom: You receive the error message Invalid license.Cause: Licensing information is inaccurate.Solution: Return to the FLEXnet license editor and verify that the informationentered is exactly as it appears in your License Pack. If no licenses are listed,return to the FLEXnet license editor and ensure no text is highlighted.If all licenses are listed as invalid, verify that the PTC Host_ID in theLicense Pack corresponds with what you see in the FLEXnet license editor. Forexample, one server line and one daemon line represent a single server. Threeserver lines and one daemon line represent a fault-tolerant or Triad configuration.Remove all the lines that do not pertain to the PTC HOST_ID.Your incremental lines must have no blank lines. Verify that all continuationcharacters (\) are at the end of each line, except for the last line. If some licensesare valid while others are invalid, find the invalid feature name lines in theLicense File window and correct the text.If you received your license codes via e-mail, remove any extraneous text such asthe header and footer. Another option is to delete the invalid license in theFLEXnet license editor window.
Troubleshooting Tips 179

FlexNet Publisher Fails to Start (TriadConfigurations)Symptom: PTC License Server does not start after a Triad server is installed andconfigured.Cause: The following requirement has not been met: two of the three partners ofthe Triad configuration must be running (Quorum) before licenses can bedistributed.Solution: Go to a shell window or a command prompt and change into the<FLEXnet_Installation_Directory>\bin. Type in ptcstartserver.
ModelCHECK Metrics Tool Display ProblemsWhile using the Web-based ModelCHECK Metrics Tool, you may encounterproblems with the display of the graphs and reports in the Internet Explorer or theMozilla browser. Causes of the problem and possible solutions follow:Cause: The path to the Image Directory is not specified in the new_admin.xmlconfiguration file. If specified, it may be incorrect. Solution: Verify the location ofthe Image Directory and the path specified in the new_admin.xmlconfiguration file. If found incorrect in the new_admin.xml file, specify thecorrect path, and deploy the Metrics Tool again.Cause: The Apache Web server is not up and running or is not available. Solution:Verify if the Apache Web server is up and running and start the Apache Webserver, if required. Before starting the server, make sure that the location of theImage Directory is valid and exists.Cause: The DocumentRoot path in Apache\conf\httpd.conf file is notset properly. Solution: Specify the DocumentRoot path correctly. If the problempersists, specify the Image Directory location to match the DocumentRoot path.Cause: The Metrics Tool displays the connection pool exhausted error.Solution: Check the values for Max. Active Connections, Max. IdleConnections,and Max. Wait for Connection in the Data Sources page of the Tomcat Web ServerAdministration Tool. Increase the value of Max. Active Connections and Max. IdleConnections and start the Metrics Tool again.
NoteMake sure that you click Commit Changes on the Tomcat Web ServerAdministration Tool when you edit information in the Data Sources page.
180 PTC Creo® 3.0 Installation and Administration Guide

Cause: The information specified in the Data Sources page of the Tomcat WebServer Administration Tool does not match the information specified in the new_admin.xml configuration file. Solution: Verify if a mismatch of informationoccurred. In case of a mismatch, ensure that the information in both placesmatches.Cause: The location of the Image Directory specified in the new_admin.xmlconfiguration file does not match the location specified in the DocumentRootpath of the Apache\conf\httpd.conf file. Solution: Ensure that the pathsare same in both files.Cause: The parameters related to the display of graphics are not set in the new_admin.xml configuration file. Solution: Check the new_admin.xmlconfiguration file and set the following parameters and their corresponding values:
• dbname—The name of the database• dbtype—The type of database used, such as Oracle or Microsoft Access• imagedir—The location or path of the Image Directory• imagedirLink—The link to the Image Directory that stores the images of the
graphs and reports in the metrics tool.
Troubleshooting Tips 181


JWorkflow for Installation and
Configuration
Workflow for Generating Licenses for the PTC Creo Applications................................ 184Workflow for Installing the PTC Creo Applications...................................................... 185Workflow for Reconfiguring the PTC Creo Applications .............................................. 186
This chapter provides simple workflows for generating licenses and installing andreconfiguring the PTC Creo applications. The workflow is presented as aflowchart for each of these processes. If you have received a license file via e-mailfrom PTC License Management, use that license file instead of the product codesfor licensing. After the installation, you can configure the installation ofapplications like PTC Creo Parametric for units of measurement or drawingstandards.
183

Workflow for Generating Licenses for thePTC Creo Applications
184 PTC Creo® 3.0 Installation and Administration Guide

Workflow for Installing the PTC CreoApplications
Workflow for Installation and Configuration 185

Workflow for Reconfiguring the PTC CreoApplications
186 PTC Creo® 3.0 Installation and Administration Guide

Glossary
Term Definition
Application ProgramInterface (API)
A set of standards or conventions by whichprograms can call specific operating system ornetwork services.
authentication A process of logging in to a secure server to verifyyour identity.
commercial license The license you get when you purchase PTCsoftware for commercial purposes.
counted locked license Although a locked license is managed by aFlexNet Publisher license server, its usage isrestricted to a machine for which it is licensed.The license server allows the use of up to thenumber of licenses purchased.
PTC Creo Direct A 3D mechanical design automation applicationthat helps you create and modify 3D designsquickly and easily through direct interaction withtheir geometry.
PTC Creo Layout A 2D mechanical design application fordeveloping concepts from scratch using existing2D data or 3D cross sections. A native dataconnection to PTC Creo Parametric allows rapidtransition from 2D concept to 3D design.
PTC Creo Options Modeler An application that includes limited parametricmodeling and configuration modeling features.
PTC Creo Parametric A 3D mechanical design automation application,PTC Creo Parametric provides associative andinteroperable product design and an engineeringmodeling system.
PTC Creo Parametric J-Link A Java-based toolkit, J-Link allows developers tocreate Java applications to access a PTC CreoParametric session.
PTC Creo Parametric Pro/Web.Link
PTC Creo Parametric Web.Link lets you interactwith PTC Creo Parametric through a Webbrowser. With this feature, you can create a
187

Term Definition
customized Web page, which you can then use toautomate and streamline aspects of yourengineering process.
PTC Creo ParametricTOOLKIT
An API that enables adding of functionality toPTC Creo Parametric using the C programminglanguage.
PTC Creo Parametric VBAPI
A visual basic toolkit, Visual Basic API allowsdevelopers to create VB.NET or VBA applicationsto access a PTC Creo Parametric session.
PTC Creo Plastic Advisor PTC Creo Plastic Advisor simulates mold fillingfor injection molded plastic parts and providesdesigners with immediate, easy access to reliablemanufacturing feedback and advice.
PTC Creo Simulate A Computer Aided Engineering application. Ithelps you simulate the physical behavior of amodel and understand and improve the mechanicalperformance of your design. You can directlycalculate stresses, deflections, frequencies, heattransfer paths, and other factors, showing you howyour model will behave in a test lab or in the realworld using this application.
PTC Creo View Express A PTC application used to view, mark up, interact,and collaborate on all forms of digital productdata. It is a scaled-down version of PTC CreoView.
datecode A unique number to identify a specific version ofPTC software. The datecode can be found printedon the jacket of the software DVD.
daemon line An entry in the license file that defines• The name of the PTC daemon, which is a
customized software program that grants anddenies floating PTC licenses by reading thelicense file
• The path where this executable resides, that isin the FlexNet Publisher installation directory
• The path to the FlexNet Publisher options file,which contains various operating parameters
educational license A license used at educational institutes to run PTCsoftware, also known as a students license. This is
188 PTC Creo® 3.0 Installation and Administration Guide

Term Definition
a time-bound license.evaluation license An evaluation license allows use of a software
product for a trial period.feature line The feature or increment line is an entry in the
license file that describes the product that the useris allowed to use, as well as any optional softwareproducts that are associated with that license.Following is a sample of the feature line:INCREMENT PROE_Engineer ptc_d 33.0 01-jan-20111\BC24AFC5B76BB74C9366VENDOR_STRING="VSVER=2.0 \LO=(0,3,6,7,10,17,32,34,40,45,48,51,55,\61,62,66,69,71,73,77,97,106,108,115,126,\127,128,133,135,137,158,163,188,191,210)"\SUPERSEDE vendor_info="VIVER=1.0 \EXTERNAL_NAME=" \ISSUER=PTC ISSUED=01-sep-2006 \NOTICE="PTC_customer" SN=SCN12344,SCN765431\SIGN2="169C A28A E97F E96E 0A3E563B FDEB\4510 829E 4BF4 25D3 2394 0444 2FD4 6C23 0168\A8A5 AEBE 54B0 1FF6 B79B DC75 2014 A278 33CC\1B90 8647 6A12 F4D6 45BF"\
feature name The feature name is the name of the license thatthe application requests. It is composed of aproduct prefix and a configuration ID (forexample, PROE_Engineer).
FlexNet Publisher The license management software that is used todistribute licenses
floating license A floating license can be used on more than onesystem. Floating licenses are distributed by alicense server process that runs on a machine. Thismachine is also called the license server. Seelicense-to-run.
hardware reconfiguration The process of changing any aspect of themachines currently mapped to the ConfigurationID.
increment line See feature line.installation directory The directory in which PTC software is installed.
Also called the load point.intellectual property Proprietary information stored within PTC Creo
data files.
Glossary 189

Term Definition
install number A number used by the PTC order managementsystem before October 20, 1997, to identify asingle software installation.
license A license grants a user permission to run a PTCproduct.
license borrowing A functionality of FlexNet Publisher. You canborrow licenses from a license server and run alicensed application on a remote client withoutbeing connected to the license server.
license client A machine or software session that requests alicense from another machine or software session.
license file The license.txt file on each user's disk drivewhen FlexNet Publisher is installed andconfigured. This file contains the information usedby FlexNet Publisher to authorize the use ofsoftware.
license information The data from the PTC License Pack that is usedby FlexNet to authorize the use of software.
license-locked Refers to an optional module for use with aspecific licensed product, which may be eitherfloating or node-locked. If an optional module islicense-locked to a node-locked license, it mayonly be used on the specifically authorizedmachine. If an optional module is license-lockedto a floating license, it may be used on anymachine in the network (in conjunction with thatlicense).
license-locked option An optional module of PTC software that islocked to a license of PTC software. When thelicense is successfully started, all license-lockedoptions associated to the licenses are available.
license management The PTC organization responsible for allinstallation-based activities.
license managementsoftware
See FlexNet Publisher.
license server A machine or system process that distributeslicenses to license clients. For example, if youstart PTC Creo Parametric on machine A and itrequests a license from machine B, then machineB is the license server. The license server keeps
190 PTC Creo® 3.0 Installation and Administration Guide

Term Definition
track of the number of licenses in use. A systemadministrator can use a license server to controllicenses by placing restrictions on a particularfeature.
license-to-run A license-to-run invokes the license of a specificPTC application, such as PTC Creo Parametric.Floating licenses are available for use on any hostmachine on the network at any particular site. Seefloating license.
lmgrd license servermanager daemon
The FlexNet Publisher license server managerdaemon (lmgrd or lmadmin) runs on the licenseserver and works with the PTC vendor daemon. Itdoes not manage license usage. The lmgrd orlmadmin daemon starts vendor daemons, refersapplications to the appropriate vendor daemon,and communicates with other license servermanager daemons on the network for Triadinstallations.
load point Directory where the software is installed. Anexample of the PTC Creo Parametric load point isC:\Program Files\PTC\Creo 3.0.
maintenance release request A request for postproduction PTC software, whichfeatures enhancements after a major new revision.
maintenance shipment An update to the next major release of PTCsoftware.
ModelCHECK A software productivity tool for PTC CreoParametric, ModelCHECK analyzes parts,drawings and assemblies, and recommends properPTC Creo Parametric modeling techniques.
ModelCHECK Metrics Tool Aweb-based utility for tracking data quality,standards, and best practices. This tool uses themetric file output from ModelCHECK to calculatequality trends and enables you to represent theModelCHECK analysis results graphically.
name_service daemon(nmsd)
This daemon process enables remotecommunication between PTC Creo Parametric andother PTC applications.
node-locked license A license that can be used on only one specificmachine or node. Node-locked licenses arerestricted to a specific Host ID, or CPU ID. If the
Glossary 191

Term Definition
node-locked license does not match the CPU ID ofthe machine running the software, then the licensecannot be used on that machine. Node-lockedlicenses can be counted or uncounted.
product prefix This standard prefix corresponds to a particularproduct. This product prefix might be used as aprefix within a feature name, such as PROE_Engineer_12345, where 12345 is theConfiguration ID.
Pro/BUNDLE A type of floating optional module that iscomprised of several existing optional modules.PTC licensing recognizes the bundled software asa single licensed entity.
PTC Application Manager A utility that appears as a toolbar that enables theuser to start and close other applications during aPTC Creo Parametric session.
PTC daemon The PTC vendor daemon (ptc_d) runs on thelicense server and works with the FlexNetPublisher daemon. It manages license usage byreading the PTC license file. The PTC daemonalso contains the authentication information forPTC license security.
PTC Host ID The number used to uniquely identify yourmachine. This is the same number used in PTClm,called the CPU ID. Also referred to as the machineaddress.
PTC Installation Assistant A utility with menus, dialog boxes, and screens forobtaining licenses and installing PTC Creoapplications.
reconfigurations The process of modifying the configuration ofsoftware (moving modules from one license toanother).
server line An entry in the license file that identifies theserver or servers that distribute the software.
silent mode A nongraphics mode for installing and uninstallingsoftware using command-line arguments.
silent installation The process of installing software usingcommand-line arguments.
startup command The command that is used to start an installed
192 PTC Creo® 3.0 Installation and Administration Guide

Term Definition
software product. The startup command is createdduring installation and is associated with at leastone license from the license managementcomponent. Modules that are in separate featurelines can also be associated with the startupcommand. When a startup command is executed,the associated licenses and modules areautomatically licensed for use by the user whoexecuted the startup command.
Thumbnail viewer AWindows-only utility for viewing thumbnails ofobjects outside PTC Creo Parametric.
trail file A trail file records the procedures the end userperformed while running a PTC Creo session.
triad servers A configuration of three license servers on thesame network that work together to manage a poolof floating licenses.
uncounted node-lockedlicense
A node-locked license whose permission to usethe license is managed by the PTC application, notthe license server. Unlimited number of uncountednode-locked license sessions can be run on asingle machine at one time.
Glossary 193


Index
AASCII font definition, 100-103, 105-106, 108, 114, 116, 118-119, 123,125-128, 135-137, 139
Bborrowed licenses, 77-80, 84-85, 87-88, 90browser requirementsPTC Creo, 100-103, 105-106, 108,114, 116, 118-119, 123, 125-128,135-137, 139Windows, 100-103, 105-106, 108,114, 116, 118-119, 123, 125-128,135-137, 139
CCDSECTION nodesediting, 151-154, 156-158, 160-164,166
characterbox, 100-103, 105-106, 108, 114,116, 118-119, 123, 125-128, 135-137, 139definitions, 100-103, 105-106, 108,114, 116, 118-119, 123, 125-128,135-137, 139modifying, 100-103, 105-106, 108,114, 116, 118-119, 123, 125-128,135-137, 139parameters, 100-103, 105-106, 108,114, 116, 118-119, 123, 125-128,135-137, 139
client-side components
installing and uninstalling silently,151-154, 156-158, 160-164, 166
commandsPTC Installation Assistant, 71-73ptcflush, 77-80, 84-85, 87-88, 90,100-103, 105-106, 108, 114, 116,118-119, 123, 125-128, 135-137,139ptchostid, 100-103, 105-106, 108,114, 116, 118-119, 123, 125-128,135-137, 139ptcstatus, 100-103, 105-106, 108,114, 116, 118-119, 123, 125-128,135-137, 139
communication portsusage, 167-168
compatibilityfile format, 33-34
Compression Codecs, 100-103, 105-106, 108, 114, 116, 118-119, 123,125-128, 135-137, 139configuringworkstations for distributedcomputing, 173-175
Context Configuration file, 100-103,105-106, 108, 114, 116, 118-119, 123,125-128, 135-137, 139controller and agent interactions, 173-175
Ddefining components, 41, 43, 48Distributed Computing technology,173-175documentation
195

conventions, 7, 10
Eextended licenses, 77-80, 84-85, 87-88,90
Ffilled font definition, 100-103, 105-106, 108, 114, 116, 118-119, 123,125-128, 135-137, 139FLEXnet License Administrator Webinterface, 93-95FlexNet Publisherbenefits of using, 77-80, 84-85, 87-88, 90downward compatibility, 77-80, 84-85, 87-88, 90restrictions, 77-80, 84-85, 87-88, 90
FlexNet Publisher LicenseAdministration Guide, 77-80, 84-85,87-88, 90floating licenses, 77-80, 84-85, 87-88,90font definitionASCII font, 100-103, 105-106, 108,114, 116, 118-119, 123, 125-128,135-137, 139character parameters, 100-103, 105-106, 108, 114, 116, 118-119, 123,125-128, 135-137, 139definition commands, 100-103, 105-106, 108, 114, 116, 118-119, 123,125-128, 135-137, 139Latin font, 100-103, 105-106, 108,114, 116, 118-119, 123, 125-128,135-137, 139special font, 100-103, 105-106, 108,114, 116, 118-119, 123, 125-128,135-137, 139
text parameters, 100-103, 105-106,108, 114, 116, 118-119, 123, 125-128, 135-137, 139
fonts for PTC Creo applications, 100-103, 105-106, 108, 114, 116, 118-119,123, 125-128, 135-137, 139
Ggenerating traceback log, 51, 53, 56,59, 61
HHelp Centerenabling context-sensitive Helpfrom a custom location, 63, 65, 67
installing locally, 63, 65, 67
Iinstallationupdate installation, 71-73
installingAPI Toolkits, 41, 43, 48Direct Modeling Converter, 41, 43,48interface tools, 41, 43, 48Pro/CDT, 41, 43, 48Pro/FEM-POST, 41, 43, 48PTC Creo applications, 33-34PTC Creo Distributed Batch, 41, 43,48PTC Creo Mold Analysis, 41, 43, 48TCP/IP on Windows requirements,23, 25Verification Models, 41, 43, 48
interactionscontroller and agent, 173-175
interface for PDF, 100-103, 105-106,108, 114, 116, 118-119, 123, 125-128,135-137, 139interface tools, installing, 41, 43, 48
196 PTC Creo® 3.0 Installation and Administration Guide

JJavaScript bridge, 100-103, 105-106,108, 114, 116, 118-119, 123, 125-128,135-137, 139JavaScript security, 100-103, 105-106,108, 114, 116, 118-119, 123, 125-128,135-137, 139
LLANGUAGE nodeediting, 151-154, 156-158, 160-164,166
LATIN_1 font definition, 100-103,105-106, 108, 114, 116, 118-119, 123,125-128, 135-137, 139license borrowing, 77-80, 84-85, 87-88, 90determining status, 77-80, 84-85,87-88, 90early return, 77-80, 84-85, 87-88, 90initiating, 77-80, 84-85, 87-88, 90overview, 77-80, 84-85, 87-88, 90
license simplificationadvantages, 77-80, 84-85, 87-88, 90general information, 77-80, 84-85,87-88, 90overview, 77-80, 84-85, 87-88, 90technical information, 77-80, 84-85,87-88, 90
license types, 77-80, 84-85, 87-88, 90licensesborrowed, 77-80, 84-85, 87-88, 90extended, 77-80, 84-85, 87-88, 90floating, 77-80, 84-85, 87-88, 90refreshing, 77-80, 84-85, 87-88, 90updating codes, 71-73
lmadminoverview, 93-95
lmgrd and lmadmindifferences, 93-95
lmtools utility, 100-103, 105-106, 108,114, 116, 118-119, 123, 125-128,135-137, 139
Mmass-deploymentinstallation strategy, 151-154, 156-158, 160-164, 166
ModelCHECK, 100-103, 105-106,108, 114, 116, 118-119, 123, 125-128,135-137, 139ModelCHECK Metrics Tool, 100-103,105-106, 108, 114, 116, 118-119, 123,125-128, 135-137, 139databases, 100-103, 105-106, 108,114, 116, 118-119, 123, 125-128,135-137, 139deploying, 100-103, 105-106, 108,114, 116, 118-119, 123, 125-128,135-137, 139installing, 100-103, 105-106, 108,114, 116, 118-119, 123, 125-128,135-137, 139
modifyingPTC Creo, 71-73
Nnetwork connectiontroubleshooting, 77-80, 84-85, 87-88, 90
node-locked license, 77-80, 84-85, 87-88, 90
OOpen Type font, 100-103, 105-106,108, 114, 116, 118-119, 123, 125-128,135-137, 139
Index 197

PPACKAGE nodeediting, 151-154, 156-158, 160-164,166
Portable Document Format, 100-103,105-106, 108, 114, 116, 118-119, 123,125-128, 135-137, 139exporting, 100-103, 105-106, 108,114, 116, 118-119, 123, 125-128,135-137, 139
program shortcuts on Windows forPTC Creo applications, 41, 43, 48PROPERTY nodeediting, 151-154, 156-158, 160-164,166
PSF nodeediting, 151-154, 156-158, 160-164,166
PTC Creobrowser requirements, 100-103,105-106, 108, 114, 116, 118-119,123, 125-128, 135-137, 139updating, 71-73utilities, 100-103, 105-106, 108,114, 116, 118-119, 123, 125-128,135-137, 139
PTC Creo applicationscompatibility, 33-34completing installation, 51, 53, 56,59, 61customizing, 41, 43, 48removing installation, 51, 53, 56, 59,61specifying directory permissions, 51,53, 56, 59, 61starting, 51, 53, 56, 59, 61uninstalling, 151-154, 156-158, 160-164, 166
PTC Creo View Express, 100-103,105-106, 108, 114, 116, 118-119, 123,125-128, 135-137, 139PTC Installation Assistant, 11, 16
PTC License Serveroverview, 77-80, 84-85, 87-88, 90
PTC licensing overview, 77-80, 84-85,87-88, 90PTC MKS platform componentsinstalling, 149-150overview, 149-150
PTC Quality Agent, 141-146configuring, 141-146setting filters, 141-146setting preferences, 141-146uninstalling, 141-146uses, 141-146viewing information, 141-146viewing last sent information, 141-146
ptcflush utilityusage, 77-80, 84-85, 87-88, 90
QQUALITY_AGENT nodeediting, 151-154, 156-158, 160-164,166
Rregistry fileupdating, 151-154, 156-158, 160-164, 166
requirementsWindows, 23, 25
restrictionsFlexNet Publisher, 77-80, 84-85, 87-88, 90
SSHORTCUT nodeediting, 151-154, 156-158, 160-164,166
shortcuts
198 PTC Creo® 3.0 Installation and Administration Guide

creating for PTC Creo applications,41, 43, 48
silent installationcommand syntax, 151-154, 156-158,160-164, 166guidelines and advantages, 151-154,156-158, 160-164, 166workflow, 151-154, 156-158, 160-164, 166
symbolsspecial, 100-103, 105-106, 108, 114,116, 118-119, 123, 125-128, 135-137, 139
system management utilities, 100-103,105-106, 108, 114, 116, 118-119, 123,125-128, 135-137, 139
TTCP/IP, 77-80, 84-85, 87-88, 90installation requirement, 23, 25
textbase offset, 100-103, 105-106, 108,114, 116, 118-119, 123, 125-128,135-137, 139characters, 100-103, 105-106, 108,114, 116, 118-119, 123, 125-128,135-137, 139parameters, 100-103, 105-106, 108,114, 116, 118-119, 123, 125-128,135-137, 139modifying, 100-103, 105-106,108, 114, 116, 118-119, 123,125-128, 135-137, 139
width, 100-103, 105-106, 108, 114,116, 118-119, 123, 125-128, 135-137, 139
text fontsASCII definition, 100-103, 105-106,108, 114, 116, 118-119, 123, 125-128, 135-137, 139
creating, 100-103, 105-106, 108,114, 116, 118-119, 123, 125-128,135-137, 139definition, 100-103, 105-106, 108,114, 116, 118-119, 123, 125-128,135-137, 139LATIN_1 definition, 100-103, 105-106, 108, 114, 116, 118-119, 123,125-128, 135-137, 139
text parameters, 100-103, 105-106,108, 114, 116, 118-119, 123, 125-128,135-137, 139Tomcat server, 100-103, 105-106, 108,114, 116, 118-119, 123, 125-128,135-137, 139traceback loggenerating, 51, 53, 56, 59, 61
troubleshootinginvalid licenses, 177-179network connection failure, 77-80,84-85, 87-88, 90ptcflush utilitysyntax, 77-80, 84-85, 87-88, 90
software execution, 177-179tips, 177-179
UuninstallingPTC Creo applications, 51, 53, 56,59, 61
update installation, 71-73utilitieslmtools, 100-103, 105-106, 108,114, 116, 118-119, 123, 125-128,135-137, 139lmutil, 100-103, 105-106, 108, 114,116, 118-119, 123, 125-128, 135-137, 139PTC Creo, 100-103, 105-106, 108,114, 116, 118-119, 123, 125-128,135-137, 139
Index 199

ptcflush, 77-80, 84-85, 87-88, 90ptcshutdown, 100-103, 105-106,108, 114, 116, 118-119, 123, 125-128, 135-137, 139ptcstartserver, 100-103, 105-106,108, 114, 116, 118-119, 123, 125-128, 135-137, 139system management, 100-103, 105-106, 108, 114, 116, 118-119, 123,125-128, 135-137, 139
WWeb browser requirements, 100-103,105-106, 108, 114, 116, 118-119, 123,125-128, 135-137, 139Windowsbrowser requirements, 100-103,105-106, 108, 114, 116, 118-119,123, 125-128, 135-137, 139creating program shortcuts for PTCCreo applications, 41, 43, 48temporary directory, 100-103, 105-106, 108, 114, 116, 118-119, 123,125-128, 135-137, 139
workstations for distributed computingconfiguring, 173-175
XXML fileediting, 151-154, 156-158, 160-164,166locating, 151-154, 156-158, 160-164, 166
Xtop icon, 177-179
200 PTC Creo® 3.0 Installation and Administration Guide