Producing OpenOffice.org User Guides - The Document ...
27
Contributors’ Guide Chapter 2 Producing LibreOffice User Guides
-
Upload
khangminh22 -
Category
Documents
-
view
2 -
download
0
Transcript of Producing OpenOffice.org User Guides - The Document ...
Contributors’ Guide
Chapter 2 Producing LibreOffice User Guides
Copyright
This document is Copyright © 2012 by its contributors as listed below. You may distribute it and/or modify it under the terms of the Creative Commons Attribution License (http://creativecommons.org/licenses/by/3.0/), version 3.0 or later.
All trademarks within this guide belong to their legitimate owners.
ContributorsJean Hollis WeberDan Lewis
FeedbackPlease direct any comments or suggestions about this document to: [email protected]
Publication datePublished 24 August 2013.
Documentation for LibreOffice is available at http://www.libreoffice.org/get-help/documentation
Contents
Copyright..............................................................................................................................2Contributors.....................................................................................................................................2
Feedback.........................................................................................................................................2
Publication date...............................................................................................................................2
Introduction..........................................................................................................................5
How to set up LibreOffice for working with user guides.................................................5Change General options..................................................................................................................5
Change View options.......................................................................................................................6
Change Memory options.................................................................................................................6
Change Advanced options...............................................................................................................7
Download and install the chapter template.....................................................................................8
(If necessary) Download and install the Liberation fonts................................................................9
(Optional) Download and install the LO Docs Team .bau file.......................................................10Finding the location of AutoText files........................................................................................10
(Optional) Create AutoText entries for Tip, Note, Caution, and data tables..................................11
(Optional) Create AutoFormats for Tip, Note, Caution, and data tables.......................................12
How to create a new chapter from the template.............................................................12
How to update the chapter template from the website..................................................13
How to update a chapter from a changed template.......................................................14
How to create images for LibreOffice user guides.........................................................14Screen captures.............................................................................................................................14
Cropping........................................................................................................................................15
Annotation (labelling).....................................................................................................................15
Flowcharts and other diagrams.....................................................................................................15
How to insert images into ODT files................................................................................16
How to cross-reference within a document....................................................................16Cross-referencing to figures, tables, headings, other items.........................................................17
Cross-referencing to bookmarks...................................................................................................18
How to cross-reference to another document................................................................18
How to index a user guide chapter..................................................................................19Adding index entries......................................................................................................................19
Generating a chapter index...........................................................................................................20
Viewing and editing index entries..................................................................................................21
Compiling and editing the index for a book...................................................................................21
Tips for indexing chapters.............................................................................................................22
How to review a chapter....................................................................................................23What to look for in a review...........................................................................................................23
How to publish a chapter..................................................................................................23
How to compile a book using a master document.........................................................24
Producing OpenOffice.org User Guides 3

How to compile a book without using a master document...........................................26
Publishing a book..............................................................................................................26
Naming conventions for LibreOffice user guides..........................................................27Naming convention for draft chapters...........................................................................................27
Naming convention for published chapters...................................................................................27
Naming convention for published books.......................................................................................27
4 Producing OpenOffice.org User Guides
Introduction
This document is for anyone working on the LibreOffice user guides, which are produced using LibreOffice for distribution in .ODT, .PDF, and possibly other forms such as ePub, wiki, or HTML.
It assumes some familiarity with Writer (the word processor).
Note
When working on the English version of the user guides, please download and use the US version of LibreOffice, not the British or any other English version. This is to improve consistency within the guides; some dialogs have different field labels in theUS and British versions.
How to set up LibreOffice for working with user guides
When working on the user guides, you may need to change a few option settings in LibreOffice. You also need to download and install some files, and you may wish to create some AutoText and Table AutoFormat entries.
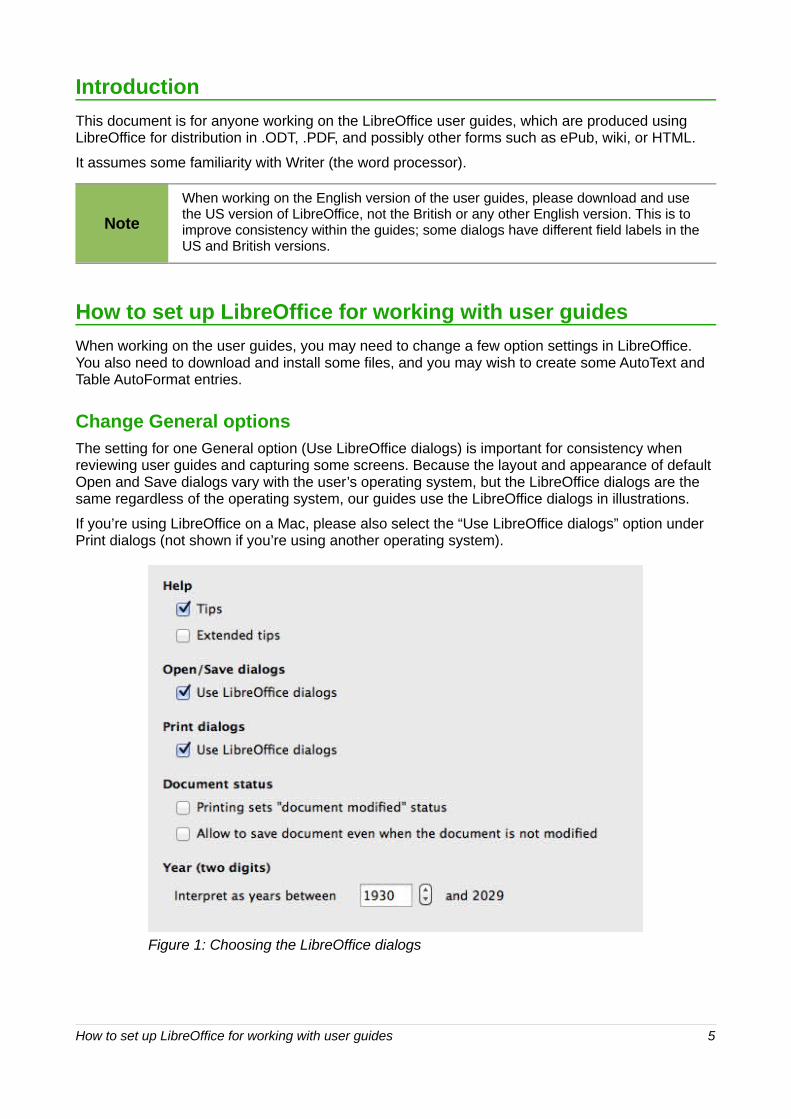
Change General optionsThe setting for one General option (Use LibreOffice dialogs) is important for consistency when reviewing user guides and capturing some screens. Because the layout and appearance of default Open and Save dialogs vary with the user’s operating system, but the LibreOffice dialogs are the same regardless of the operating system, our guides use the LibreOffice dialogs in illustrations.
If you’re using LibreOffice on a Mac, please also select the “Use LibreOffice dialogs” option under Print dialogs (not shown if you’re using another operating system).
Figure 1: Choosing the LibreOffice dialogs
How to set up LibreOffice for working with user guides 5

Change View optionsThe setting for one View option (Icon size and style) is important for consistency when capturing screens to illustrate our documents; another setting is a matter of personal preference.
Go to Tools > Options > LibreOffice > View and make sure the choices for Icon size and style in the User Interface section near the top are set to Small, Galaxy (default).
A text or graphics selection is indicated by a pale background. You can adjust the transparency of the background by changing the percentage given for the Transparency option under Selection. If you are making screen captures, please keep the setting at the default, 75%.
If you are using Ubuntu or another Linux distribution and the icon style drop-down list does not show Galaxy as one of the choices, go into the package manager and install the libreoffice-style-galaxy package.
Figure 2: Choosing View options for working with LibreOffice user guides.
Change Memory optionsUser guide chapters often contain a lot of images, and a full book may have several hundred. When you open one of these documents in LibreOffice, you may discover that images seem to disappear from the document. In most cases, the images are still in the file even if you cannot see them on screen or in a PDF created from the file.
The “invisible images” problem can usually be cured by changing the default memory settings for LibreOffice, to make more memory available to LibreOffice, to increase the time that objects remain in memory, and to increase the number of cached objects. To offset the extra memory needed for large numbers of objects, you can usually decrease the memory for each object (images in our documents are typically less than 1 MB) and decrease the number of Undo steps.
6 Producing OpenOffice.org User Guides

Note
Be aware that choices made for memory allocated to LibreOffice can affect the performance of other programs, but most modern computers have enough memory that this is unlikely to be a problem. Also, the best settings for working with our user guides may not be the best settings for other documents that you work on, if those other documents contain larger objects.
To change memory settings, go to Tools > Options > LibreOffice > Memory.
Here are some suggested settings for working with LibreOffice user guide files:
• Undo
– Number of steps: 20
• Graphics cache
– Use for LibreOffice: 250 MB
– Memory per object: 1.0 MB
– Remove from memory after: 1:10 hh:mm
• Cache for inserted objects
– Number of objects: 250
Figure 3: Choosing Memory options for working with LibreOffice user guide files
Change Advanced optionsDepending on what you are writing about, you may need to enable some of the optional options found in Tools > Options > LibreOffice > Advanced (Figure 4).
How to set up LibreOffice for working with user guides 7
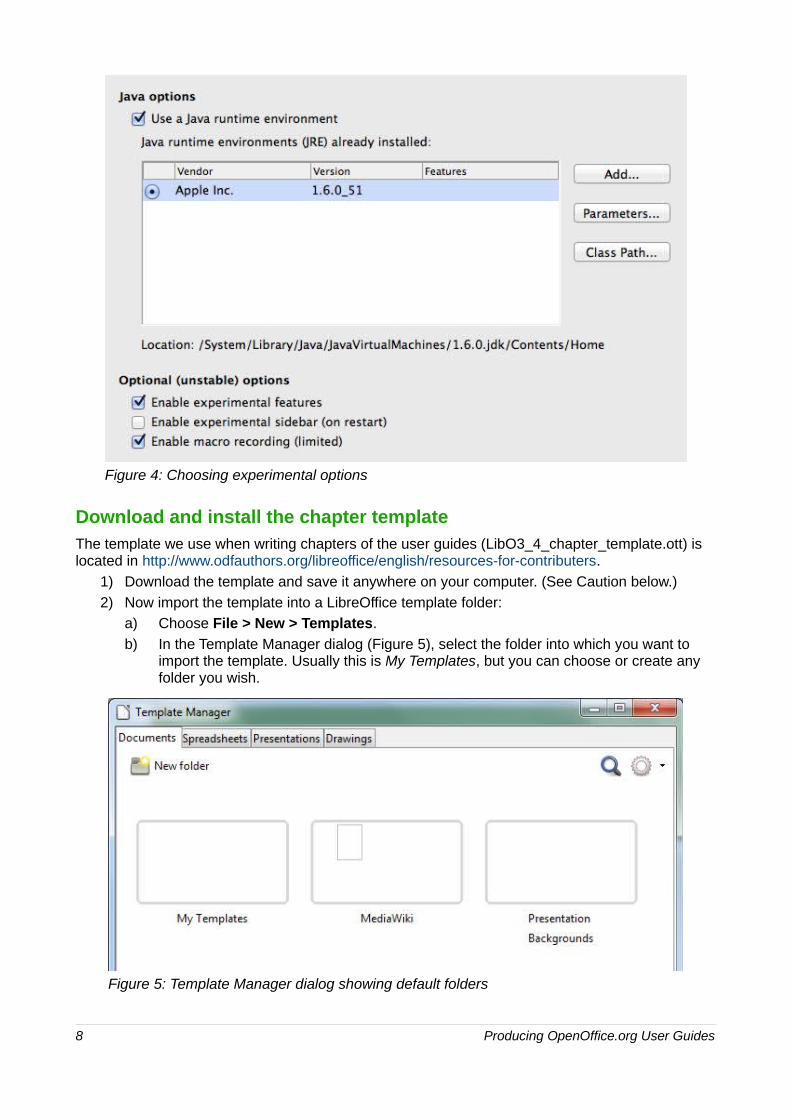
Figure 4: Choosing experimental options
Download and install the chapter templateThe template we use when writing chapters of the user guides (LibO3_4_chapter_template.ott) is located in http://www.odfauthors.org/libreoffice/english/resources-for-contributers.
1) Download the template and save it anywhere on your computer. (See Caution below.)
2) Now import the template into a LibreOffice template folder:
a) Choose File > New > Templates.
b) In the Template Manager dialog (Figure 5), select the folder into which you want to import the template. Usually this is My Templates, but you can choose or create any folder you wish.
Figure 5: Template Manager dialog showing default folders
8 Producing OpenOffice.org User Guides
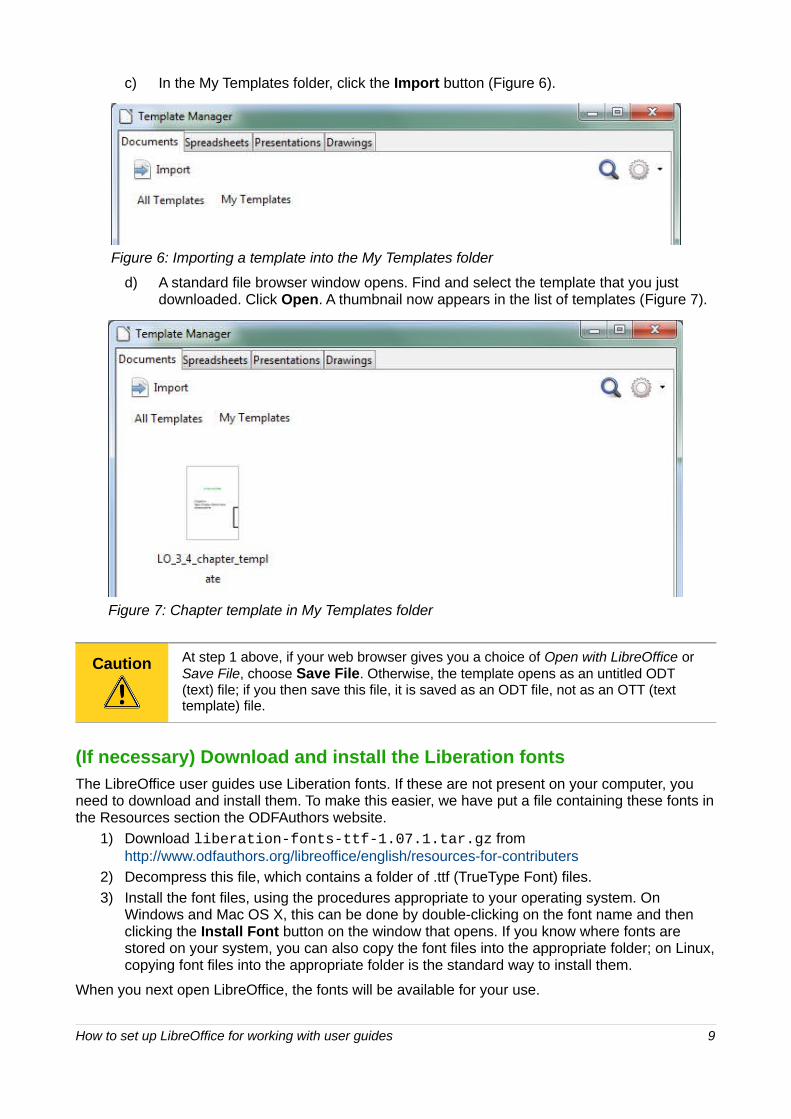
c) In the My Templates folder, click the Import button (Figure 6).
Figure 6: Importing a template into the My Templates folder
d) A standard file browser window opens. Find and select the template that you just downloaded. Click Open. A thumbnail now appears in the list of templates (Figure 7).
Figure 7: Chapter template in My Templates folder
Caution At step 1 above, if your web browser gives you a choice of Open with LibreOffice or Save File, choose Save File. Otherwise, the template opens as an untitled ODT (text) file; if you then save this file, it is saved as an ODT file, not as an OTT (text template) file.
(If necessary) Download and install the Liberation fontsThe LibreOffice user guides use Liberation fonts. If these are not present on your computer, you need to download and install them. To make this easier, we have put a file containing these fonts inthe Resources section the ODFAuthors website.
1) Download liberation-fonts-ttf-1.07.1.tar.gz from http://www.odfauthors.org/libreoffice/english/resources-for-contributers
2) Decompress this file, which contains a folder of .ttf (TrueType Font) files.
3) Install the font files, using the procedures appropriate to your operating system. On Windows and Mac OS X, this can be done by double-clicking on the font name and then clicking the Install Font button on the window that opens. If you know where fonts are stored on your system, you can also copy the font files into the appropriate folder; on Linux,copying font files into the appropriate folder is the standard way to install them.
When you next open LibreOffice, the fonts will be available for your use.
How to set up LibreOffice for working with user guides 9
(Optional) Download and install the LO Docs Team .bau fileTips, Notes, and Cautions use tables for layout. In addition, we include tables of data. The chapter template provides examples of these tables. You can copy and paste these tables as needed, but you may find it easier to insert them using AutoText. With AutoText, once you have set up the entries, you just have to type the shortcut (for example, tip or note) and press F3 to insert one. Theformatting of the table (column widths, text, and any graphics) is preserved. You can then add or change anything you want in the table.
We have collected some AutoText entries into a .bau (AutoText) file which you can download and install on your computer. If you prefer, you can create the same AutoText entries yourself, as described in the following section.
The format of .bau files is independent of the operating system. These files can be copied from onecomputer and pasted into the appropriate place on any other computer.
To install the LibreOffice Documentation Team’s .bau file, follow these steps:
1) Download the LO.bau file from http://www.odfauthors.org/libreoffice/english/resources-for-contributers.
2) Find where LibreOffice stores the .BAU files on your computer. (See “Finding the location ofAutoText files” below.)
3) Paste the file into your personal AutoText folder located in step 2.
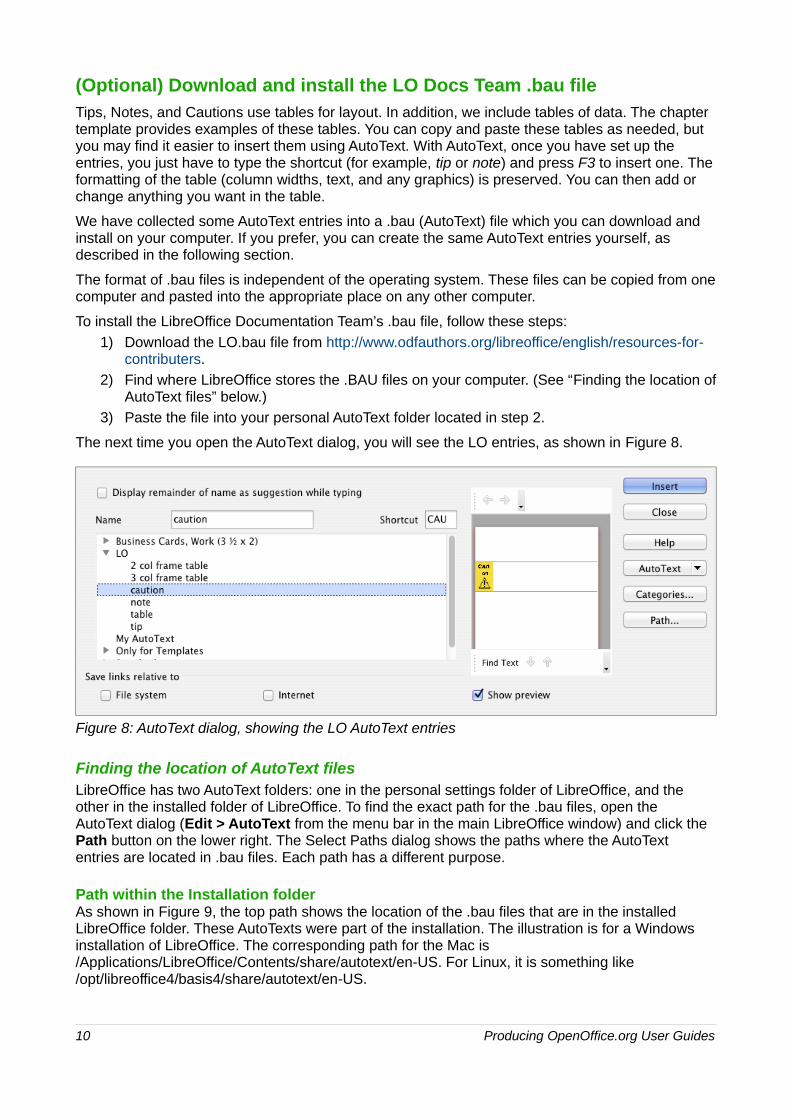
The next time you open the AutoText dialog, you will see the LO entries, as shown in Figure 8.
Figure 8: AutoText dialog, showing the LO AutoText entries
Finding the location of AutoText filesLibreOffice has two AutoText folders: one in the personal settings folder of LibreOffice, and the other in the installed folder of LibreOffice. To find the exact path for the .bau files, open the AutoText dialog (Edit > AutoText from the menu bar in the main LibreOffice window) and click the Path button on the lower right. The Select Paths dialog shows the paths where the AutoText entries are located in .bau files. Each path has a different purpose.
Path within the Installation folderAs shown in Figure 9, the top path shows the location of the .bau files that are in the installed LibreOffice folder. These AutoTexts were part of the installation. The illustration is for a Windows installation of LibreOffice. The corresponding path for the Mac is /Applications/LibreOffice/Contents/share/autotext/en-US. For Linux, it is something like /opt/libreoffice4/basis4/share/autotext/en-US.
10 Producing OpenOffice.org User Guides
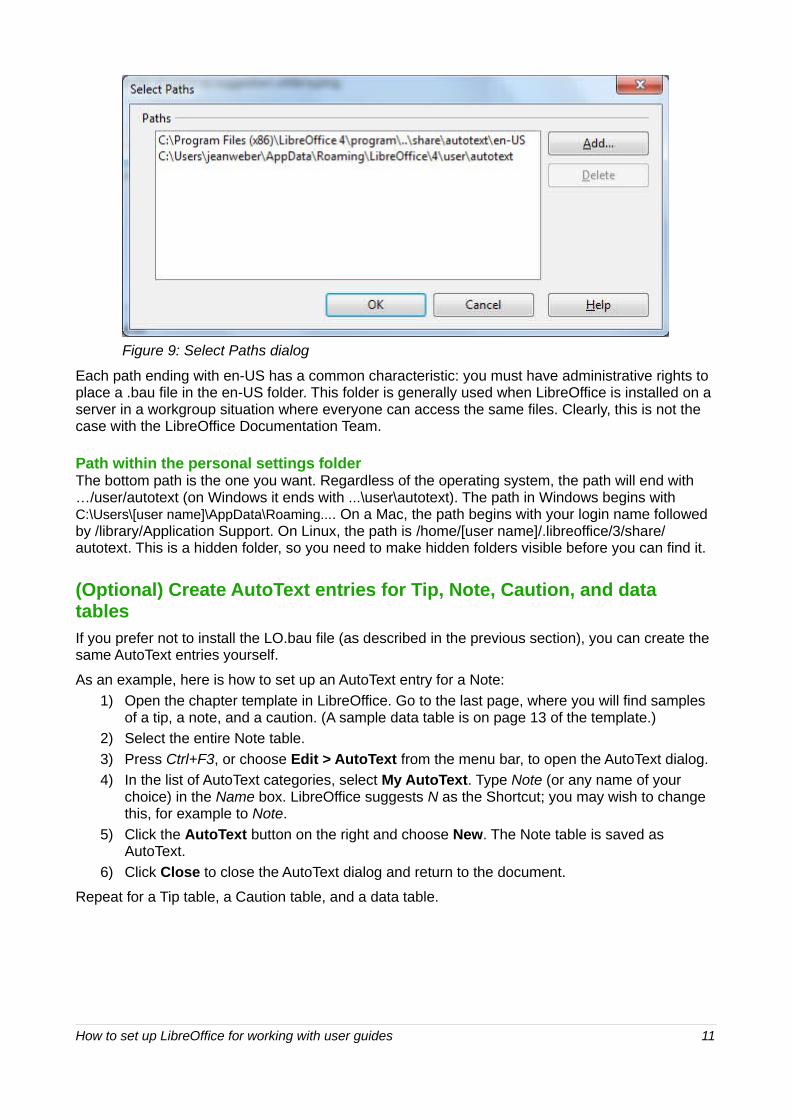
Figure 9: Select Paths dialog
Each path ending with en-US has a common characteristic: you must have administrative rights to place a .bau file in the en-US folder. This folder is generally used when LibreOffice is installed on a server in a workgroup situation where everyone can access the same files. Clearly, this is not the case with the LibreOffice Documentation Team.
Path within the personal settings folderThe bottom path is the one you want. Regardless of the operating system, the path will end with …/user/autotext (on Windows it ends with ...\user\autotext). The path in Windows begins with C:\Users\[user name]\AppData\Roaming.... On a Mac, the path begins with your login name followed by /library/Application Support. On Linux, the path is /home/[user name]/.libreoffice/3/share/ autotext. This is a hidden folder, so you need to make hidden folders visible before you can find it.
(Optional) Create AutoText entries for Tip, Note, Caution, and data tablesIf you prefer not to install the LO.bau file (as described in the previous section), you can create the same AutoText entries yourself.
As an example, here is how to set up an AutoText entry for a Note:
1) Open the chapter template in LibreOffice. Go to the last page, where you will find samples of a tip, a note, and a caution. (A sample data table is on page 13 of the template.)
2) Select the entire Note table.
3) Press Ctrl+F3, or choose Edit > AutoText from the menu bar, to open the AutoText dialog.
4) In the list of AutoText categories, select My AutoText. Type Note (or any name of your choice) in the Name box. LibreOffice suggests N as the Shortcut; you may wish to change this, for example to Note.
5) Click the AutoText button on the right and choose New. The Note table is saved as AutoText.
6) Click Close to close the AutoText dialog and return to the document.
Repeat for a Tip table, a Caution table, and a data table.
How to set up LibreOffice for working with user guides 11
(Optional) Create AutoFormats for Tip, Note, Caution, and data tablesWhen you are applying the template to existing material, you may need to reformat some of the Tip, Note, Caution, or data tables. To do this quickly and accurately, you can apply table AutoFormats that you have previously defined. (AutoText does not work for this purpose.)
To define a table autoformat:
1) Select the example table (tip, note, caution, or data) in the chapter template.
2) Choose Table > AutoFormat from the menu bar.
3) On the AutoFormat dialog, click the Add button.
4) In the pop-up dialog, type a name for the table format, for example LOData. Click OK. The table format is now listed in the AutoFormat dialog.
To apply a table autoformat:
1) Click anywhere in the table you wish to reformat.
2) Choose Table > AutoFormat from the menu bar.
3) On the AutoFormat dialog, select the format you wish to apply. Click OK.
How to create a new chapter from the template
To create a new document from the chapter template:
1) Do one of the following to open the Templates and Documents dialog:
• From the Start Center, choose Templates.
• From the menu bar, choose File > New > Templates.
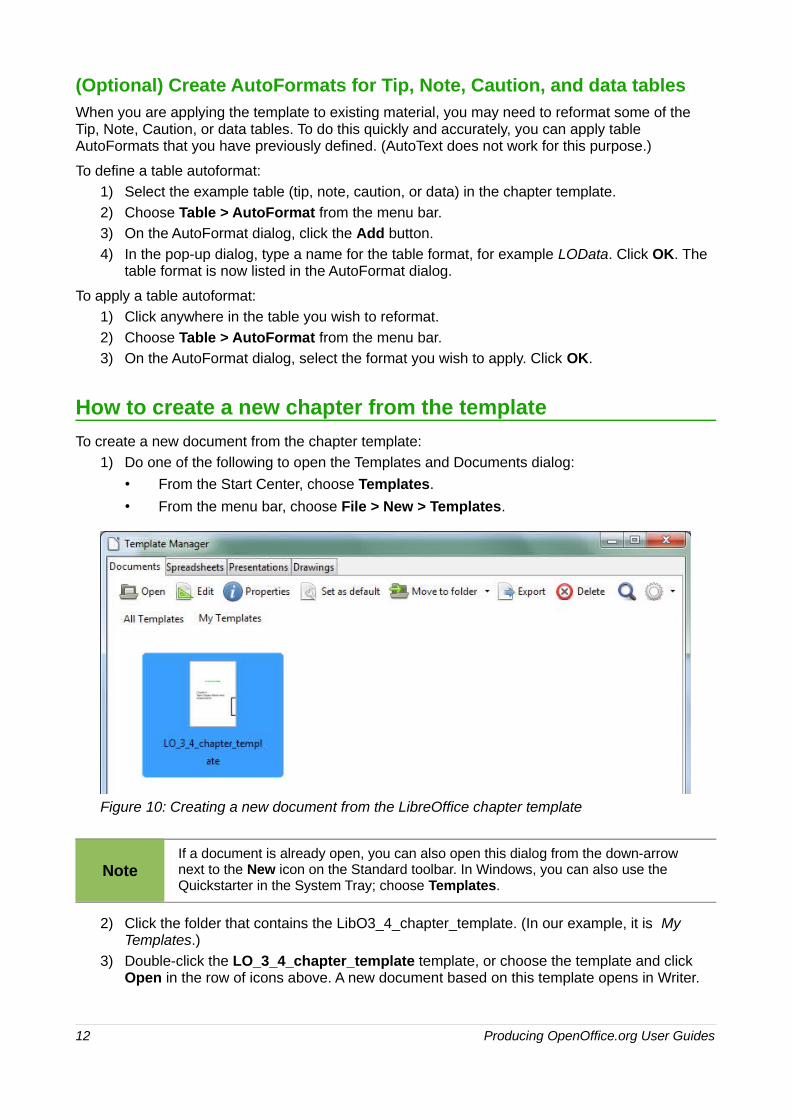
Figure 10: Creating a new document from the LibreOffice chapter template
NoteIf a document is already open, you can also open this dialog from the down-arrow next to the New icon on the Standard toolbar. In Windows, you can also use the Quickstarter in the System Tray; choose Templates.
2) Click the folder that contains the LibO3_4_chapter_template. (In our example, it is My Templates.)
3) Double-click the LO_3_4_chapter_template template, or choose the template and click Open in the row of icons above. A new document based on this template opens in Writer.
12 Producing OpenOffice.org User Guides
The new document includes all the text and graphics contained in the template. Much of this material must be modified or deleted, as follows:
1) On the title page:
• Change [Component] to the name of the book this chapter will be in, for example Getting Started, Calc, Writer. If you are using the template for some other document (such as a HowTo or Tutorial) that is not part of a user guide, delete the words [Component Guide] but leave the paragraph marker so the rest of the text on the pageis spaced out correctly.
• Change n to the chapter number. Do not delete the two blank spaces after the chapter number; they are required for correct spacing of text in the footer in a compiled book.
• Change Type Chapter Name Here to the name of the new chapter.
2) Choose File > Properties and go to the Description page. In the Title field, replace LO_3_4_chapter_template.ott with the name of the chapter that you put on the title page. Delete the template revision information in the Comments box. Click OK.
3) On the Copyright page:
• For a new chapter, change 2012 to the current year.
• Add your name in the Contributors section.
• Add anything you wish to the Acknowledgments section (optional).
• In the Publication date and software version section, replace [N.n] with the version of LibreOffice used for this chapter.
• Other changes to the page will be made later.
4) We recommend that you read the template document before beginning to write; it explains what styles to use for what purpose. You may wish to retain some or all of the contents for reference while you are writing and delete them only when ready to upload the chapter for review. This information is also in Chapter 6, Using the LibreOffice Chapter Template, of this Contributors’ Guide.
5) If you have not made AutoText entries from the Tip, Note, Caution, and data tables, now is a good time to do that. Otherwise, you may wish to keep those examples in the file so you can copy them as needed.
Before you continue, save the file using the naming convention for draft chapters on page 27.
Just before uploading a chapter for review, do these things:
1) Update the table of contents: hover the mouse cursor over the TOC, right-click, and chooseUpdate Index/Table from the context menu.
2) On the Copyright page, in the Publication date and software version section, replace [date] with the current date.
How to update the chapter template from the website
When the chapter template is updated, a note will be sent to the Documentation mailing list. It is a good idea to get a copy of the revised template to replace the one on your computer.
If you have been away for awhile or do not check the Documentation list very often, you may wish to check whether you have the latest version of the template and update it on your computer.
How to update the chapter template from the website 13
How to update a chapter from a changed template
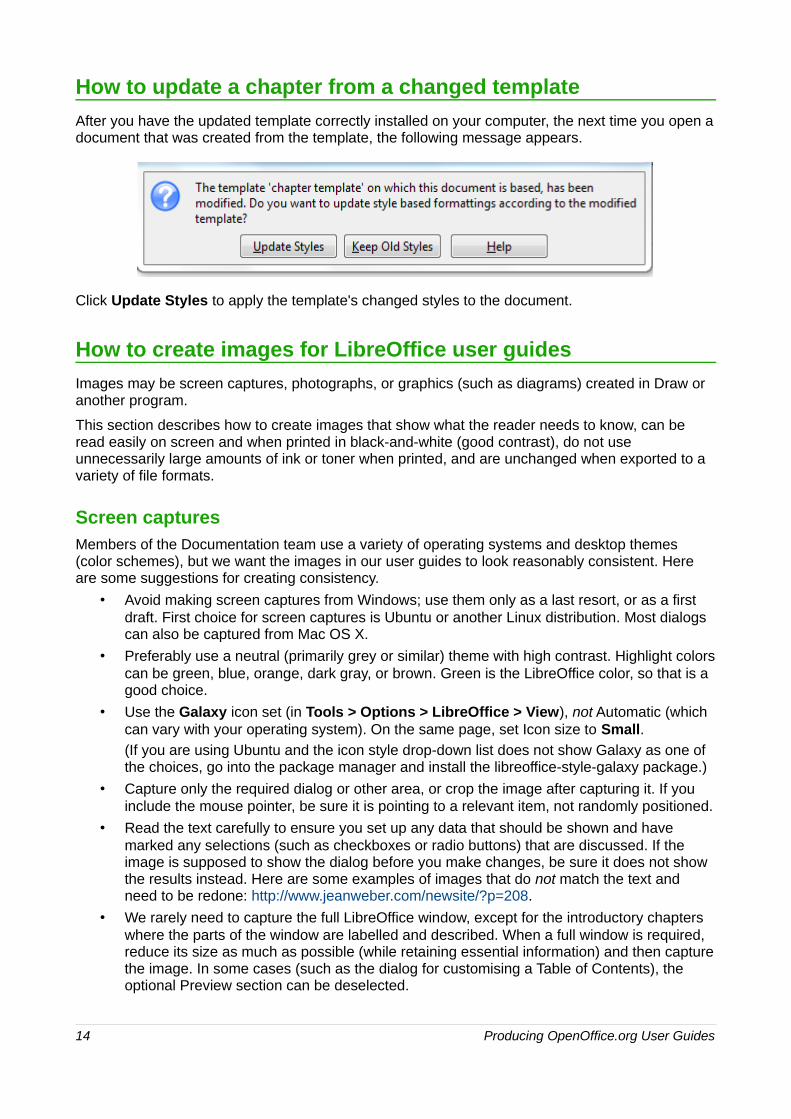
After you have the updated template correctly installed on your computer, the next time you open adocument that was created from the template, the following message appears.
Click Update Styles to apply the template's changed styles to the document.
How to create images for LibreOffice user guides
Images may be screen captures, photographs, or graphics (such as diagrams) created in Draw or another program.
This section describes how to create images that show what the reader needs to know, can be read easily on screen and when printed in black-and-white (good contrast), do not use unnecessarily large amounts of ink or toner when printed, and are unchanged when exported to a variety of file formats.
Screen capturesMembers of the Documentation team use a variety of operating systems and desktop themes (color schemes), but we want the images in our user guides to look reasonably consistent. Here are some suggestions for creating consistency.
• Avoid making screen captures from Windows; use them only as a last resort, or as a first draft. First choice for screen captures is Ubuntu or another Linux distribution. Most dialogs can also be captured from Mac OS X.
• Preferably use a neutral (primarily grey or similar) theme with high contrast. Highlight colorscan be green, blue, orange, dark gray, or brown. Green is the LibreOffice color, so that is a good choice.
• Use the Galaxy icon set (in Tools > Options > LibreOffice > View), not Automatic (which can vary with your operating system). On the same page, set Icon size to Small.
(If you are using Ubuntu and the icon style drop-down list does not show Galaxy as one of the choices, go into the package manager and install the libreoffice-style-galaxy package.)
• Capture only the required dialog or other area, or crop the image after capturing it. If you include the mouse pointer, be sure it is pointing to a relevant item, not randomly positioned.
• Read the text carefully to ensure you set up any data that should be shown and have marked any selections (such as checkboxes or radio buttons) that are discussed. If the image is supposed to show the dialog before you make changes, be sure it does not show the results instead. Here are some examples of images that do not match the text and need to be redone: http://www.jeanweber.com/newsite/?p=208.
• We rarely need to capture the full LibreOffice window, except for the introductory chapters where the parts of the window are labelled and described. When a full window is required, reduce its size as much as possible (while retaining essential information) and then capturethe image. In some cases (such as the dialog for customising a Table of Contents), the optional Preview section can be deselected.
14 Producing OpenOffice.org User Guides
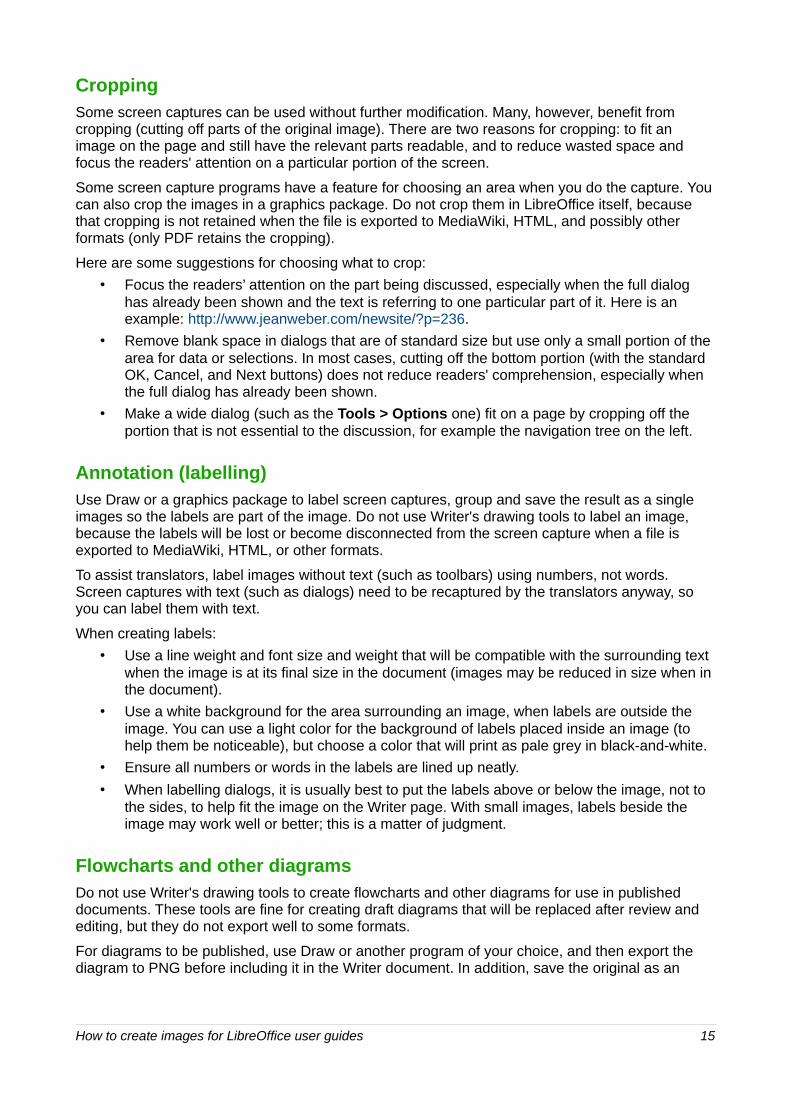
CroppingSome screen captures can be used without further modification. Many, however, benefit from cropping (cutting off parts of the original image). There are two reasons for cropping: to fit an image on the page and still have the relevant parts readable, and to reduce wasted space and focus the readers' attention on a particular portion of the screen.
Some screen capture programs have a feature for choosing an area when you do the capture. You can also crop the images in a graphics package. Do not crop them in LibreOffice itself, because that cropping is not retained when the file is exported to MediaWiki, HTML, and possibly other formats (only PDF retains the cropping).
Here are some suggestions for choosing what to crop:
• Focus the readers’ attention on the part being discussed, especially when the full dialog has already been shown and the text is referring to one particular part of it. Here is an example: http://www.jeanweber.com/newsite/?p=236.
• Remove blank space in dialogs that are of standard size but use only a small portion of the area for data or selections. In most cases, cutting off the bottom portion (with the standard OK, Cancel, and Next buttons) does not reduce readers' comprehension, especially when the full dialog has already been shown.
• Make a wide dialog (such as the Tools > Options one) fit on a page by cropping off the portion that is not essential to the discussion, for example the navigation tree on the left.
Annotation (labelling)Use Draw or a graphics package to label screen captures, group and save the result as a single images so the labels are part of the image. Do not use Writer's drawing tools to label an image, because the labels will be lost or become disconnected from the screen capture when a file is exported to MediaWiki, HTML, or other formats.
To assist translators, label images without text (such as toolbars) using numbers, not words. Screen captures with text (such as dialogs) need to be recaptured by the translators anyway, so you can label them with text.
When creating labels:
• Use a line weight and font size and weight that will be compatible with the surrounding text when the image is at its final size in the document (images may be reduced in size when in the document).
• Use a white background for the area surrounding an image, when labels are outside the image. You can use a light color for the background of labels placed inside an image (to help them be noticeable), but choose a color that will print as pale grey in black-and-white.
• Ensure all numbers or words in the labels are lined up neatly.
• When labelling dialogs, it is usually best to put the labels above or below the image, not to the sides, to help fit the image on the Writer page. With small images, labels beside the image may work well or better; this is a matter of judgment.
Flowcharts and other diagramsDo not use Writer's drawing tools to create flowcharts and other diagrams for use in published documents. These tools are fine for creating draft diagrams that will be replaced after review and editing, but they do not export well to some formats.
For diagrams to be published, use Draw or another program of your choice, and then export the diagram to PNG before including it in the Writer document. In addition, save the original as an
How to create images for LibreOffice user guides 15
editable file such as .ODG and upload it to the ODFAuthors website along with the chapter .ODT file.
When diagrams contain text, use a line weight and font size and weight that will be compatible withthe surrounding text when the image appears in the document.
If a diagram needs color to improve its usefulness, choose colors that provide good contrast when printed in black-and-white (grayscale). Consider using hatching patterns. Be sure any text has good contrast with its background when printed in grayscale.
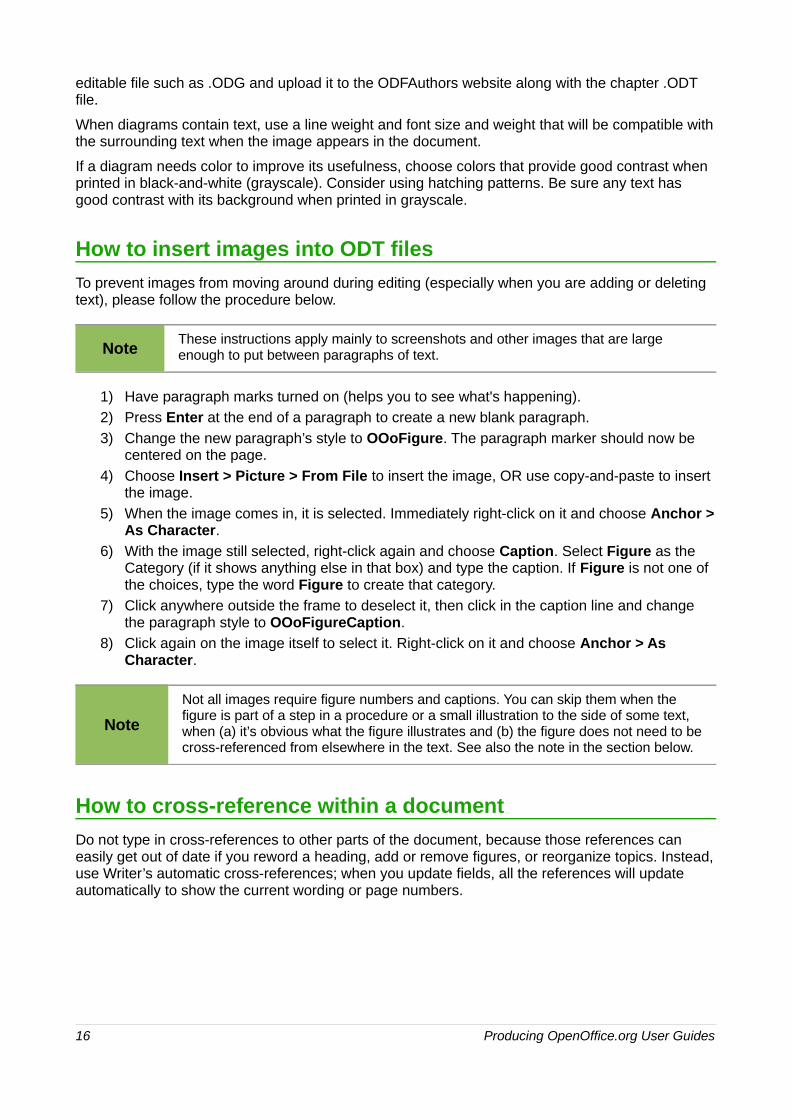
How to insert images into ODT files
To prevent images from moving around during editing (especially when you are adding or deleting text), please follow the procedure below.
NoteThese instructions apply mainly to screenshots and other images that are large enough to put between paragraphs of text.
1) Have paragraph marks turned on (helps you to see what's happening).
2) Press Enter at the end of a paragraph to create a new blank paragraph.
3) Change the new paragraph’s style to OOoFigure. The paragraph marker should now be centered on the page.
4) Choose Insert > Picture > From File to insert the image, OR use copy-and-paste to insert the image.
5) When the image comes in, it is selected. Immediately right-click on it and choose Anchor >As Character.
6) With the image still selected, right-click again and choose Caption. Select Figure as the Category (if it shows anything else in that box) and type the caption. If Figure is not one of the choices, type the word Figure to create that category.
7) Click anywhere outside the frame to deselect it, then click in the caption line and change the paragraph style to OOoFigureCaption.
8) Click again on the image itself to select it. Right-click on it and choose Anchor > As Character.
Note
Not all images require figure numbers and captions. You can skip them when the figure is part of a step in a procedure or a small illustration to the side of some text, when (a) it’s obvious what the figure illustrates and (b) the figure does not need to becross-referenced from elsewhere in the text. See also the note in the section below.
How to cross-reference within a document
Do not type in cross-references to other parts of the document, because those references can easily get out of date if you reword a heading, add or remove figures, or reorganize topics. Instead,use Writer’s automatic cross-references; when you update fields, all the references will update automatically to show the current wording or page numbers.
16 Producing OpenOffice.org User Guides

Note
We do not follow the practice that every figure and table must have a numbered caption and must be cross-referenced in the text. This is for practical reasons: cross-referencess have a tendency to randomly be mis-numbered when chapters are combined into a book. (We believe the problem is related to the convoluted history of many of our chapters, not a bug in LibreOffice.)
We recommend that you do not use a cross-reference any time that does not cause usability problems for the reader. For example, when the figure immediately follows the paragraph in which it is discussed and it is obvious which figure is being discussed, no cross-reference is needed.
Cross-referencing to figures, tables, headings, other itemsThe Cross-references tab of the Fields dialog lists some items, such as headings, numbered paragraphs, and bookmarks. If figure captions, table captions, user-defined number range variables, and some other items have been defined in a document, they also appear in the Type list. You can leave this dialog open while you insert many cross-references.
To insert a cross-reference to a heading, figure, or other item shown on the Cross-references tab:
1) In your document, place the cursor where you want the cross-reference to appear.
2) If the Fields dialog is not open, click Insert > Cross Reference. On the Cross-references tab, in the Type list, click the type of item you are referencing (for example, Heading or Figure).
Figure 11: The Cross-references tab of the Fields dialog
How to cross-reference within a document 17
3) Click on the required item in the Selection list, which shows both automatically created entries (for example Headings) as well as user-defined references (for example bookmarks).
4) In the Insert reference to list, choose the type of reference required. The choices vary with the item being referenced.
• For headings, usually you will choose Reference (to insert the full text of the heading)or Page (to insert the number of the page the heading is on).
• For figures, you will usually choose Category and Number (to insert the word “Figure” and its number), Page (to insert the number of the page the figure is on), or Numbering (to insert only the figure number). We do not normally use Reference (to insert the word “Figure” with its number and the full text of the caption), Above/Below or the other choices.
5) Click Insert.
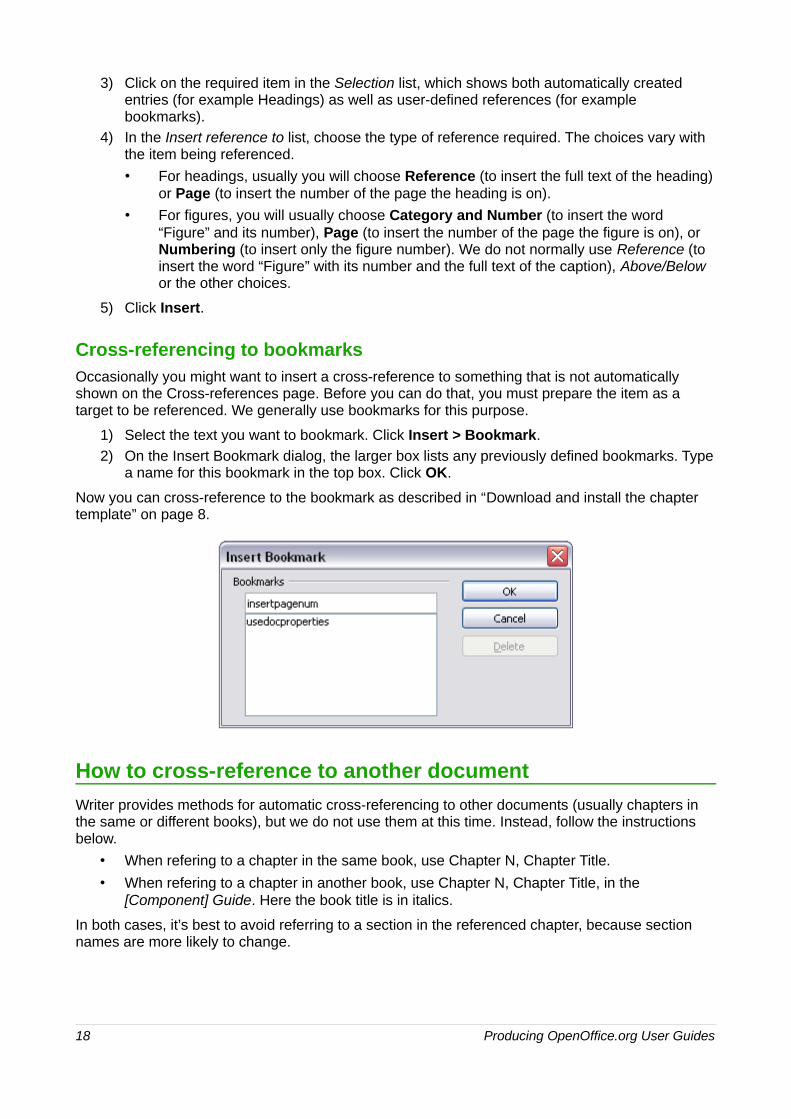
Cross-referencing to bookmarksOccasionally you might want to insert a cross-reference to something that is not automatically shown on the Cross-references page. Before you can do that, you must prepare the item as a target to be referenced. We generally use bookmarks for this purpose.
1) Select the text you want to bookmark. Click Insert > Bookmark.
2) On the Insert Bookmark dialog, the larger box lists any previously defined bookmarks. Typea name for this bookmark in the top box. Click OK.
Now you can cross-reference to the bookmark as described in “Download and install the chapter template” on page 8.
How to cross-reference to another document
Writer provides methods for automatic cross-referencing to other documents (usually chapters in the same or different books), but we do not use them at this time. Instead, follow the instructions below.
• When refering to a chapter in the same book, use Chapter N, Chapter Title.
• When refering to a chapter in another book, use Chapter N, Chapter Title, in the [Component] Guide. Here the book title is in italics.
In both cases, it’s best to avoid referring to a section in the referenced chapter, because section names are more likely to change.
18 Producing OpenOffice.org User Guides

How to index a user guide chapter
An alphabetical index (referred to as an index) is a list of keywords or phrases used throughout a document that, if listed in order, may help the reader find information quickly. Generally an index is found in the back of book or document and lists several keywords or phrases in alphabetical order with page numbers.
We use the tools built into Writer to embed index entries into the chapter ODT files. Writer's tools are fairly easy (though tedious) to use. The difficult part, of course, is deciding what terms to include. Here is a checklist of things to consider when creating, reviewing, or editing an index: “Tips for indexing chapters” on page 22.
Adding index entriesTo create (embed) some index entries in a chapter, follow these instructions:
1) Either highlight the word or phrase to add to the index or place the cursor at the beginning of the word or phrase. (If you want to add multiple words as one entry it will generally be better to highlight the entire phrase.)
2) Click Insert > Indexes and Tables > Entry to display a dialog similar to that shown below. You can accept the word or phrase shown in the Entry box or change it to whatever you want. If you placed the cursor at the beginning of a word, clicking on the Entry text box inserts the word into the text box. See below for an explanation of the fields on this dialog.
3) Click Insert to create the entry.
4) When you are satisfied with the entries, click Close.
Note We do NOT use initial capital letters on all index entries, as some publishers do.
Figure 12: Inserting an index entry
You can create multiple entries without closing the dialog. For each one:
1) Click at the location in the document that you want to index.
2) Click again on the dialog.
3) Change the entry if needed, and click Insert.
4) Repeat steps 1–3 until you have finished with the entries, then click Close.
How to index a user guide chapter 19
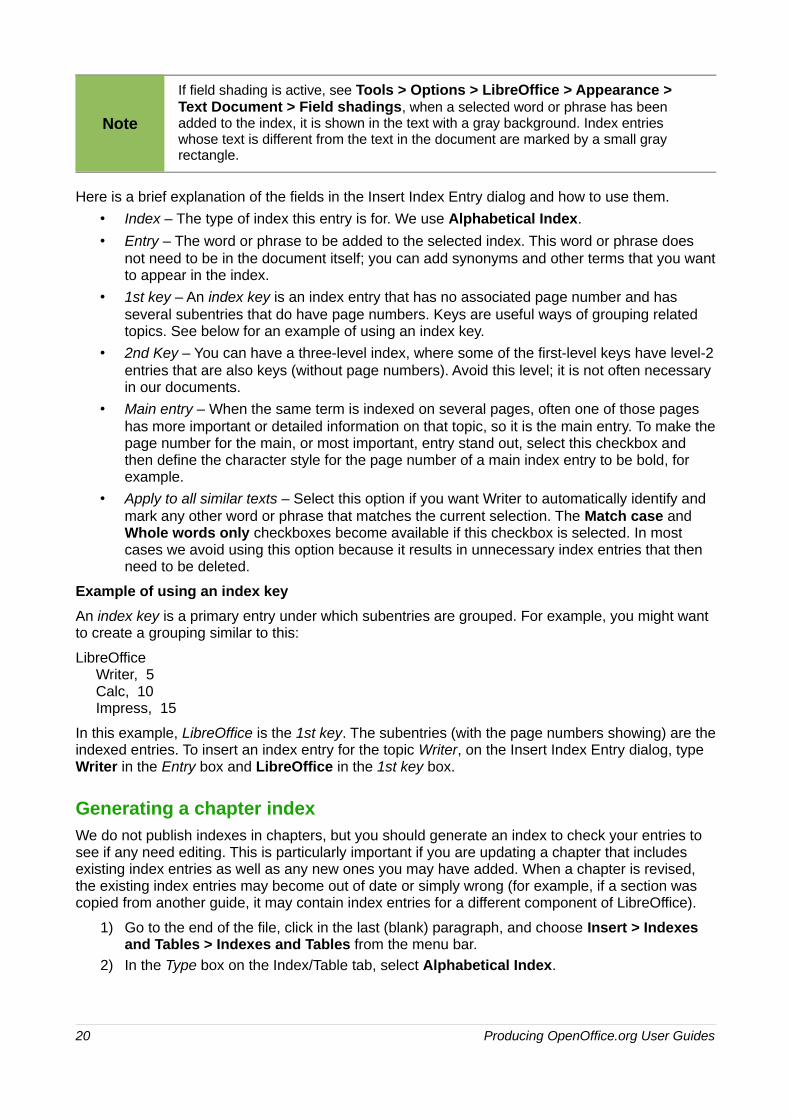
Note
If field shading is active, see Tools > Options > LibreOffice > Appearance > Text Document > Field shadings, when a selected word or phrase has been added to the index, it is shown in the text with a gray background. Index entries whose text is different from the text in the document are marked by a small gray rectangle.
Here is a brief explanation of the fields in the Insert Index Entry dialog and how to use them.
• Index – The type of index this entry is for. We use Alphabetical Index.
• Entry – The word or phrase to be added to the selected index. This word or phrase does not need to be in the document itself; you can add synonyms and other terms that you wantto appear in the index.
• 1st key – An index key is an index entry that has no associated page number and has several subentries that do have page numbers. Keys are useful ways of grouping related topics. See below for an example of using an index key.
• 2nd Key – You can have a three-level index, where some of the first-level keys have level-2entries that are also keys (without page numbers). Avoid this level; it is not often necessary in our documents.
• Main entry – When the same term is indexed on several pages, often one of those pages has more important or detailed information on that topic, so it is the main entry. To make thepage number for the main, or most important, entry stand out, select this checkbox and then define the character style for the page number of a main index entry to be bold, for example.
• Apply to all similar texts – Select this option if you want Writer to automatically identify and mark any other word or phrase that matches the current selection. The Match case and Whole words only checkboxes become available if this checkbox is selected. In most cases we avoid using this option because it results in unnecessary index entries that then need to be deleted.
Example of using an index key
An index key is a primary entry under which subentries are grouped. For example, you might want to create a grouping similar to this:
LibreOffice Writer, 5 Calc, 10 Impress, 15
In this example, LibreOffice is the 1st key. The subentries (with the page numbers showing) are theindexed entries. To insert an index entry for the topic Writer, on the Insert Index Entry dialog, type Writer in the Entry box and LibreOffice in the 1st key box.
Generating a chapter indexWe do not publish indexes in chapters, but you should generate an index to check your entries to see if any need editing. This is particularly important if you are updating a chapter that includes existing index entries as well as any new ones you may have added. When a chapter is revised, the existing index entries may become out of date or simply wrong (for example, if a section was copied from another guide, it may contain index entries for a different component of LibreOffice).
1) Go to the end of the file, click in the last (blank) paragraph, and choose Insert > Indexes and Tables > Indexes and Tables from the menu bar.
2) In the Type box on the Index/Table tab, select Alphabetical Index.
20 Producing OpenOffice.org User Guides
3) In the Options section, uncheck Case sensitive (so that capitalized and lower-case words are treated as the same word) and uncheck Combine identical entries with p or pp.
4) Because we are not publishing this index, it does not matter what it looks like, but you may wish to go to the Columns tab and choose 2.
5) Click OK to generate the index.
6) Look at the index and decide what's missing or needs to be changed. Delete, insert, or amend entries as needed in the chapter itself. (Never edit an index directly.)
7) Writer does not update an index automatically. If you add, delete, or change the text of index entries, you need to update the index. To do this, right-click anywhere in the index and choose Update Index/Table from the pop-up menu.
You can also update the index from the Navigator by right-clicking on Indexes > Table of Contents1 and choosing Index > Update from the pop-up menu.
You may need to go through several iterations before you are done.
8) When you are done, delete the compiled index from the end of the chapter.
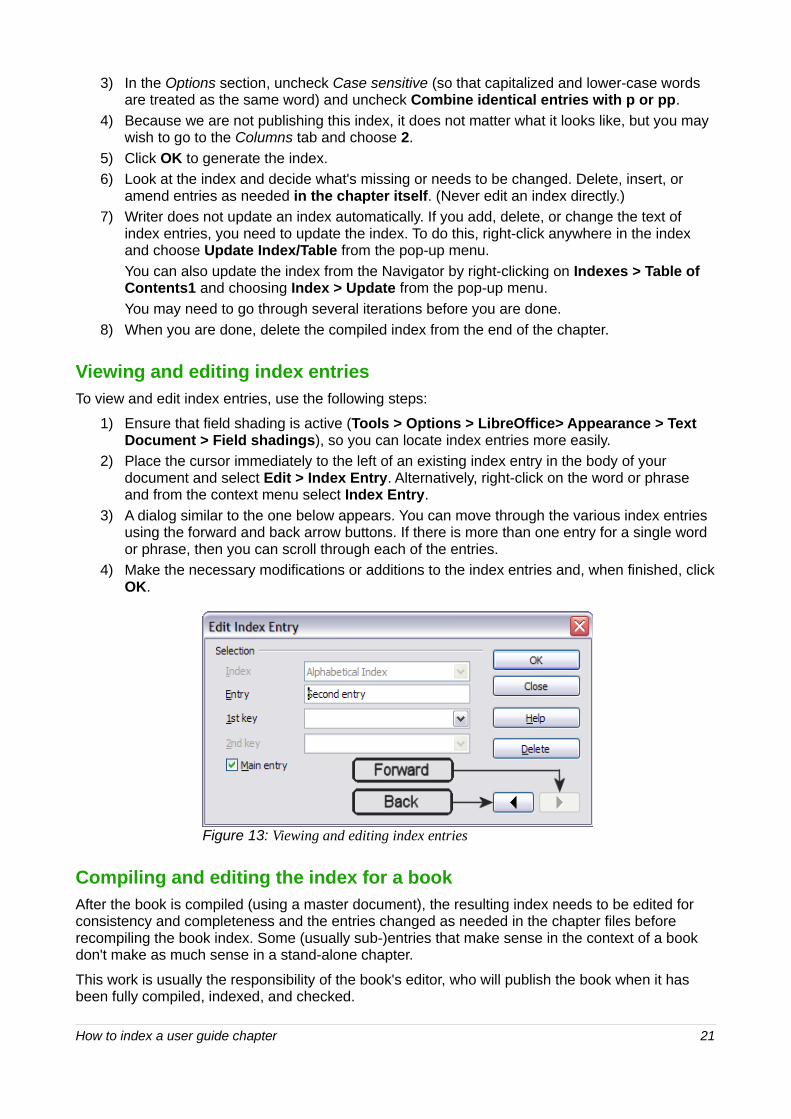
Viewing and editing index entriesTo view and edit index entries, use the following steps:
1) Ensure that field shading is active (Tools > Options > LibreOffice> Appearance > Text Document > Field shadings), so you can locate index entries more easily.
2) Place the cursor immediately to the left of an existing index entry in the body of your document and select Edit > Index Entry. Alternatively, right-click on the word or phrase and from the context menu select Index Entry.
3) A dialog similar to the one below appears. You can move through the various index entries using the forward and back arrow buttons. If there is more than one entry for a single word or phrase, then you can scroll through each of the entries.
4) Make the necessary modifications or additions to the index entries and, when finished, clickOK.
Figure 13: Viewing and editing index entries
Compiling and editing the index for a bookAfter the book is compiled (using a master document), the resulting index needs to be edited for consistency and completeness and the entries changed as needed in the chapter files before recompiling the book index. Some (usually sub-)entries that make sense in the context of a book don't make as much sense in a stand-alone chapter.
This work is usually the responsibility of the book's editor, who will publish the book when it has been fully compiled, indexed, and checked.
How to index a user guide chapter 21
Tips for indexing chaptersHere is a checklist of things to consider when creating, reviewing, or editing an index.
• The first word of an index entry (especially a level 1 entry) should be meaningful, something the reader is likely to be looking for.
• In most cases, do not start an entry with a verb such as using or displaying. The reader is more likely to be looking for the thing being used or displayed. (In some cases, for exampleprinting, such words might be appropriate; in most cases, they are not. You will need to useyour judgment.)
• Do not make a main entry (level 1) for the name of the product (the topic of the book) and then put numerous level 2 entries under it. Turn all those level 2 entries into level 1 entries. (Some topics do appropriately go under the name of the product, but they are the exceptions.)
• Make sure all important topics have a main entry (level 1), not just appearing as level 2 entries. A common problem is for field names to be listed as subentries under the window or dialog name. Readers must then know what command to look up before they can find the parameter entry. This also often leads to long lists of subentries, all on the same page.
• Don't start entries with how, what, why, where, or similar words.
• Try to think of concepts and synonyms that readers might be likely to be looking for, and put them in the index as well.
• If a main entry has subentries under it, change the main entry so that no page numbers print on the higher level.
• Avoid third level entries, unless there is a very good reason for them.
• After indexing a chapter, generate the index and review it.
• If two or more topics start with the same word or phrase, in most cases they can be turned into level 2 entries under the common word.
• Check for non-significant differences in capitalisation or plurals that cause separate index entries to appear, rather than one entry with more than one page number. Either make the entries identical, or make the difference explicit in level 2 entries.
• Check for not enough detail. In most cases, any one index entry should not have more thantwo page numbers listed for it. If it has three or more page numbers listed, the entry probably should be split into subentries, to help readers find exactly what they are looking for. Sometimes two or more of the pages contain exactly or essentially the same information; in this case, simply remove the entry for one of the pages (usually you would leave the first one in).
• Check for too much detail. The most common error here is to have a level 1 entry with several level 2 entries, where all the level 2s are on the same page (or on a series of pages, all identical). Usually the solution is to make the level 2s into level 1s and have the original level 1 entry as a main entry as well, but removing the subentries beneath it.
• If a main entry has only 1 subentry under it, combine the subentry into the main entry.
• Remove any irrelevant entries.
• Do some random lookups in the book, to see whether the term or topic is in the index. If several random selections are not in the index, this suggests that a lot more work needs to be done.
When all the chapters are put together into a book, inevitably some changes will be needed to the index entries in individual chapters, so the book index is consistent.
22 Producing OpenOffice.org User Guides

How to review a chapter
1) Download the chapter from the ODFAuthors website. If your browser gives you a choice of opening or saving the file, choose Save File.
2) In LibreOffice, turn on Record changes (Edit > Changes > Record).
3) To leave a comment, use Insert > Comment.
4) Add your name to the Contributors section of the chapter’s copyright page.
5) When done, upload the reviewed file to the Feedback folder for the relevant book.
What to look for in a reviewChapters must be checked carefully against the latest released version of LibreOffice (or the forthcoming version, when writing or updating in preparation for a new release). Please do not just improve the wording or grammar; that is important, but well-worded wrong instructions are worse than poorly-worded correct information. If a chapter has been reviewed and you are copyediting it, please include item 3 below in your list of things to look for.
1) Make sure the correct template is applied to the chapter; we often change templates between releases (for example, between LibreOffice 3.3.x and LO 3.4.x).
2) Make sure the correct email address for feedback is on the copyright page. Some chapters may still have an old address (missing “global”).
3) Go through the instructions in the chapter. Follow the instructions exactly as they are written, so you can see if anything is different between the instructions and the software.
4) Pay close attention to the screenshots. If anything is different, make a note of it. If you can capture new screenshots that will match the ones in the chapter, then you can replace the out of date ones with up to date ones. If you cannot match the existing screenshots, then leave a comment in the file that figure x needs to be replaced.
5) Ensure that the text and the illustrations (such as screenshots) agree with each other. For example, sometimes the name of an option is changed in the program, but the writer fails to change the name in the text. See this page for some more examples: http://www.jeanweber.com/newsite/?p=226
6) Please also suggest other topics that should be included in the chapter, or better ways of explaining things, or any other improvements you can think of. These might include adding topics or examples (or creating stand-alone tutorials or how-tos and referring to them from the user guide), revising topics to make them more useful, or reorganising chapters (either moving topics within a chapter or, in some cases, moving material from one chapter to another).
Be aware that in some cases a topic may be covered in another chapter; in that case a cross-reference would be helpful, or in some cases duplicating some information might be the best solution.
7) Check that the paragraph and character styles used are correct (see Chapter 6, Using the LibreOffice Chapter Template). Check the spelling.
How to publish a chapter
When you have decided that a chapter is ready for publishing, do the following:
1) Make a final pass to check page breaks and make any necessary changes. (Use the keep-with-next attribute, not manual page breaks, and/or change the sequence of text and figures.)
How to publish a chapter 23
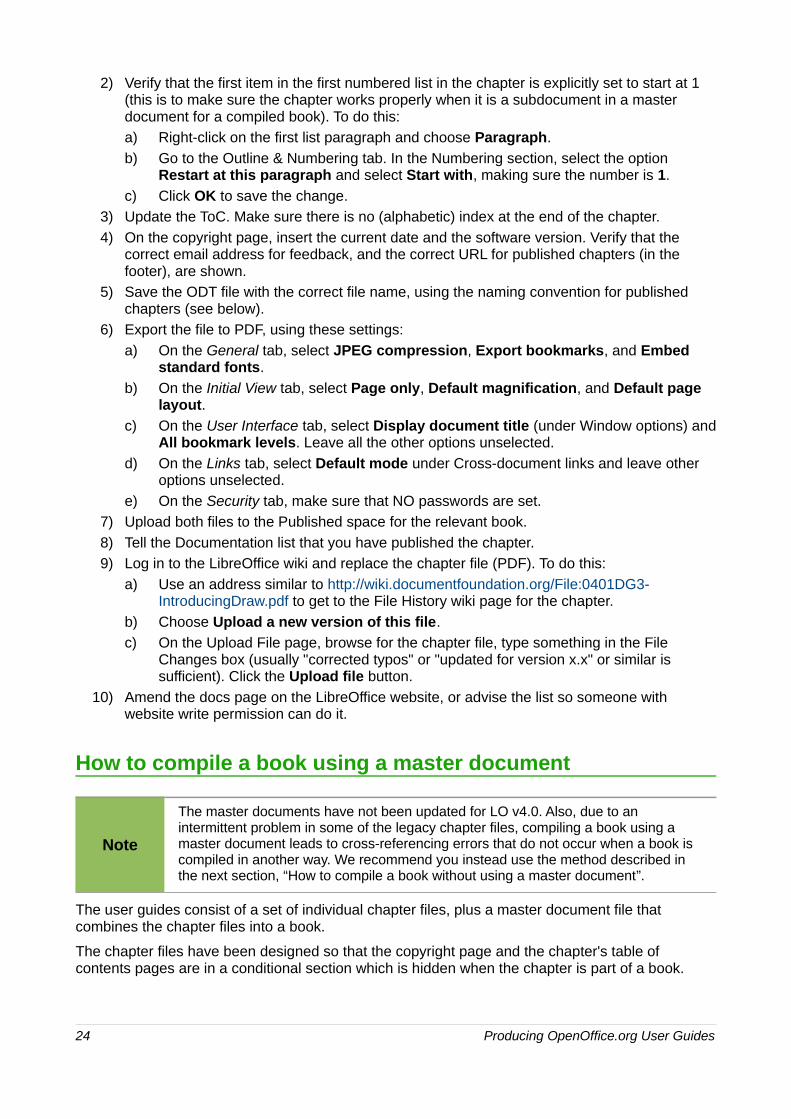
2) Verify that the first item in the first numbered list in the chapter is explicitly set to start at 1 (this is to make sure the chapter works properly when it is a subdocument in a master document for a compiled book). To do this:
a) Right-click on the first list paragraph and choose Paragraph.
b) Go to the Outline & Numbering tab. In the Numbering section, select the option Restart at this paragraph and select Start with, making sure the number is 1.
c) Click OK to save the change.
3) Update the ToC. Make sure there is no (alphabetic) index at the end of the chapter.
4) On the copyright page, insert the current date and the software version. Verify that the correct email address for feedback, and the correct URL for published chapters (in the footer), are shown.
5) Save the ODT file with the correct file name, using the naming convention for published chapters (see below).
6) Export the file to PDF, using these settings:
a) On the General tab, select JPEG compression, Export bookmarks, and Embed standard fonts.
b) On the Initial View tab, select Page only, Default magnification, and Default page layout.
c) On the User Interface tab, select Display document title (under Window options) andAll bookmark levels. Leave all the other options unselected.
d) On the Links tab, select Default mode under Cross-document links and leave other options unselected.
e) On the Security tab, make sure that NO passwords are set.
7) Upload both files to the Published space for the relevant book.
8) Tell the Documentation list that you have published the chapter.
9) Log in to the LibreOffice wiki and replace the chapter file (PDF). To do this:
a) Use an address similar to http://wiki.documentfoundation.org/File:0401DG3-IntroducingDraw.pdf to get to the File History wiki page for the chapter.
b) Choose Upload a new version of this file.
c) On the Upload File page, browse for the chapter file, type something in the File Changes box (usually "corrected typos" or "updated for version x.x" or similar is sufficient). Click the Upload file button.
10) Amend the docs page on the LibreOffice website, or advise the list so someone with website write permission can do it.
How to compile a book using a master document
Note
The master documents have not been updated for LO v4.0. Also, due to an intermittent problem in some of the legacy chapter files, compiling a book using a master document leads to cross-referencing errors that do not occur when a book is compiled in another way. We recommend you instead use the method described in the next section, “How to compile a book without using a master document”.
The user guides consist of a set of individual chapter files, plus a master document file that combines the chapter files into a book.
The chapter files have been designed so that the copyright page and the chapter's table of contents pages are in a conditional section which is hidden when the chapter is part of a book.
24 Producing OpenOffice.org User Guides

The master document file contains a copyright page listing all the authors of all the chapters in the book and a table of contents for the full book, a TOC for the entire book, and an index for the entirebook. It also has front and back cover images.
To compile a full book, do this:
1) Be sure the ODT files for the latest version of all chapters are in the Published Chapters folder for the book.
2) Download all the ODT (chapter) files and the ODM (master document) file and place them in a folder on your computer.
3) Open the ODM (master doc) file for the book. When asked "Update all links?" click Yes.
4) Wait while the file loads and paginates; this may take several minutes. To avoid errors, do not do anything with the file until it finishes paginating; do not even scroll through the file.
5) If any chapter files do not load, you may need to edit the path for those files in the Navigator for the master document. Problem files are shown in red in the Navigator.
6) When all the files have loaded and the book has finished paginating, check that the copyright pages and ToCs of the individual chapters do NOT appear in the book, and that the [Component} Guide paragraph does not appear on the individual chapters' title pages. Fix in the problem chapter as needed.Note: Do not make changes to chapters within a master document, because they are lost when you close the file. Normally these files are read-only when in a master document; do not override this setting.
7) Regenerate the table of contents and index by right-clicking on each of them and choosing Update from the pop-up menu.
8) Check that the Contributors section of the master document's copyright page includes all the contributors’ names from all the chapters.
9) Check that the information in File > Properties is correct.
10) On the copyright page, change the publication date to the current date, change the LibreOffice version information to the version covered by the book, and check that the email address for LibreOffice documentation (under Feedback) and the URL for the published chapters (in the footer) are correct.
11) Check that the footers show the correct information: book title on left-hand (even) pages and chapter title on right-hand (odd) pages.
12) Check that the first item in the first numbered list in each chapter from Chapter 2 on is numbered "1" as it should be; it may continue the numbering from the last list in the preceeding chapter. If necessary, open each problem chapter and explicitly restart at "1" the number of the first list paragraph in the first numbered list in each chapter. To do this:
a) Right-click on the first list paragraph and choose Paragraph.
b) Go to the Outline & Numbering tab. In the Numbering section, select the checkbox for Restart at this paragraph and select the checkbox for Start with, making sure the number is 1.
c) Click OK to save the change.
13) Review the compiled index. If any entries need to be changed, open the relevant chapter and make the changes in the chapter file, not in the index visible in the master document. See also “How to index a user guide chapter” on page 19.
14) If you have made any changes to the chapters, reload the master document and wait for it to paginate again. Recheck to ensure all is well. Repeat as needed.
15) Something in some of our older files causes some figure and table numbers, and some cross-references to figures and tables, to be incorrect in the master doc, even though they are correct in the subdocs. You really need to go through the entire book, checking and fixing any incorrect figure numbers or references. This is a major nuisance, so we do not regenerate the books very often. To fix the x-refs, open the subdoc itself, delete the wrong
How to compile a book using a master document 25
x-refs, and recreate them—even though they appear to be correct in the subdoc. This will usually cure the problem (for that x-ref) in the master document. After editing the subdocs, reload the chapters into the master document.
Please see the next section (How to compile a book without using a master document) for an alternative way to compile books.
16) When all changes have been done, regenerate the TOC and index in the master document.Save the master document.
17) Create one ODT file from the master doc and its subdocs, as explained in Chapter 13 (Working with Master Documents) in the Writer Guide.
18) Close the master doc and open the ODT file. Name this ODT file according to the naming convention for published documents (see below).
19) Remove the links to the sections, to embed the text into the ODT file.
20) Check the ODT file you just created again to make sure the cross-references, page breaks,list numbering, and other potential problems are fixed. If not, remove the write protection onthe sections and edit the file directly.
21) Select File > Export as PDF. Choose the following settings:
a) On the General tab, select Export bookmarks.
b) On the Initial View tab, select Page only, Default magnification, and Default page layout.
c) On the User Interface tab, select Display document title (under Window options) andAll bookmark levels. Leave all the other options unselected.
d) On the Links tab, select Default mode under Cross-document links and leave other options unselected.
e) On the Security tab, make sure that NO passwords are set.
22) Name the PDF according to the naming convention for published documents (see below).
How to compile a book without using a master document
As noted in the previous section, in some books some cross-references to figures and tables are incorrect. This problem is much less common when a book is compiled without using a master document as described in this section.
1) Download all the ODT (chapter) files and the ODM (master document) file and place them in a folder on your computer.
2) Open the ODM (master doc) file for the book. When asked "Update all links?" click No.
3) Create an ODT file from the master document. Name this ODT file according to the namingconvention for published documents (see below).
4) Close the master doc and open the ODT file.
This procedure is being written.
Publishing a book
1) Upload the master document (ODM) file, and the ODT and PDF files containing the full book, to the Published folder for the book.
2) If any chapter files have been modified during book production, upload the changed files to the Published folder for the book, replacing the previous versions.
26 Producing OpenOffice.org User Guides
3) Log in to the LibreOffice wiki and add the ODT and PDF files to the Publications page.
4) Amend the Documentation page on the LibreOffice website to point to the files on the wiki, or advise the list so someone with website write permission can do it.
5) Tell the Documentation list that you have published the book. Put a note about it on the team’s blog, http://libodocs.wordpress.com/.
Naming conventions for LibreOffice user guides
Book initials used in filenames:GS = Getting StartedWG = Writer GuideCG = Calc GuideDG = Draw GuideIG = Impress GuideBG = Base GuideMG = Math GuideBH = Base Handbook
Naming convention for draft chaptersFile names take the following form: AA4xBB-Name_Author_Date, where AA=book initials, 4=LibreOffice V4, x=the next digit in the version, BB=chapter number, Name=chapter name, Author=initials of author/editor/reviewer, Date=date of review (may be in any of several forms: YYYYMMDD, DDMmmYYYY, as long as date is unambiguous).
In the chapter name, each word begins with a capital letter and there are no spaces between words.
For example, the third chapter of the LO 4.1 Writer Guide, Working with Text, reviewed by Jean Hollis Weber on 24 August 2013, has the following file name: WG4103-WorkingWithText_JHW_24Aug2013.odt
Naming convention for published chaptersFile names take the following form: AA4xBB-Name, where AA=book initials, 4=LibreOffice V4, x=the next digit in the version, BB=chapter number, and Name=Chapter name.
In the chapter name, each word begins with a capital letter and there are no spaces between words.
For example, the third chapter of the LO 4.1 Writer Guide, Working with Text, has the following file name: WG4103-WorkingWithText.odt
Naming convention for published booksFile names take the following form: AA4x-Name.pdf, where AA=book initials, 4=LibreOffice V4, x=the next digit in the version, and Name=book name (may be abbreviated).
In the book name, each word begins with a capital letter and there are no spaces between words.
For example, the file name for Getting Started [with LibreOffice 4] is GS40-GettingStarted.pdf
Naming conventions for LibreOffice user guides 27