5 Handy Guides - Popular Woodworking Magazine
36
Handsaw Basics 5 Handy Guides For Making the Cut FROM THE EDITORS OF POPULAR WOODWORKING MAGAZINE SPONSORED BY PLUS: Use Handsaws to Build a 6-Board Chest
-
Upload
khangminh22 -
Category
Documents
-
view
3 -
download
0
Transcript of 5 Handy Guides - Popular Woodworking Magazine

Handsaw Basics5 Handy Guides For Making the Cut
FroM tHe editors oF PoPular WoodWorking Magazine
sponsored by
Plus: Use Handsaws
to build a 6-board Chest

Hand sawing a piece of wood requires patience, practice and the right saw. At Lee Valley, you will fi nd a variety of quality handsaws suitable for just about any sawing task that may come to hand, including
Saws that Make the Cut
• Carpentry saws • Flush-cut saws • Carcass saws• Dovetail saws • Panel saws • Sash saws• Crosscut saws • Detail saws • Razor saws• Rip saws • Compact/folding saws • Box saws• Tenon saws • Pocket saws • Coping saws • Toolbox saws • Ryoba saws • Fret saws • Gent's saws • Plywood saws • Compass saws• Backsaws • Dozuki saws• Veneer saws
1-800-683-8170 leevalley.com Find us on:
Browse our catalog online or download it to the Lee Valley Library app for iPad®, iPod®, iPhone® or Android™ devices.

contents
popularwoodworking.com ■ 1
2 How to SawPractice doesn’t necessarily make perfect
– especially if what you’re practicing is
incorrect. Improve your technique with these
10 rules and three tricks for better sawing.
by chrIstoPher schwar z
9 Understanding Western Backsaws
once near-lost to power tools and Japanese
saws, western saws are back in a big way.
Learn how they work, what they’re good for
and which ones you should consider.
by chrIstoPher schwar z
14 Japanese Saws Vs. Western Saws
you push one, pull the other, right? right – but
the differences don’t stop there. read about
the history, and pros and cons of each, then
decide which saw tradition is for you.
by chrIstoPher schwar z
19 Improve a Coping Saw
Despite a storied history, most modern
coping saws just aren’t very good. Learn how
much quality costs – and try a 50-cent fix for
a hardware-store coping saw.
by chrIstoPher schwar z
24 Discover Flush-cut Saw Techniques
while a powerful tool for quick and accurate
finish work, an incorrectly used flush-cut saw
can make a real mess. Learn techniques for
getting good results with this handy saw.
by gLen D. huey
28 6-board ChestPractice your handsaw skills with this age-
old form. It’s quick to build and adaptable to
centuries of design influence to fit your style.
by chrIstoPher schwar z
cover: FLush-cut saw Photo by aL ParrIsh; aLL other Photos by chrIstoPher schwarz thIs Page: DovetaIL saws Photo by chrIstoPher schwarz; 6-boarD chest Photo by aL ParrIsh
9
28
EDITor’S NoTE
Handsaws or power saws? The question’s been bandied about so often that factions formed on
either side. Partisan devotion notwith-standing, there are practical reasons to understand handsaws, even if electrical outlets line your shop walls.
For starters, if you can see the line, you can cut the line with a handsaw, no jigs needed. Easy peasy.
And where sharpened blades spinning
at accelerated rpms threaten woodwork-ers’ extremities, a handsaw, though ca-pable of some injury, is less likely to leave parts of you lying on the worksurface.
Handsaws offer economic advantages too – a good crosscut or rip saw costs far less than a good table saw. You can also make handsaw cuts in the field, no exten-sion cord or ear protection required – I like working outside with the birds, so, to me, that matters. And really, hand-
The Hand-powered Cut saws just make some cuts better than a powered blade.
Inside, you’ll find articles to get you up to speed: what saws you need, how they’re used and a project to practice mak-ing hand-powered cuts.
Rodney Wilson,managing editor

Let’s begin at the end: dovetails.If you don’t cut dovetails by hand,
chances are that you aspire to. That’s because to the modern woodworker, dovetails are like teeth. A couple rows of tight and tidy dovetails make a good first impression – just like a mouth full of pearly whites. (Similarly, furniture mouldings are like our lips. We use these to hide our snaggle-tooth dove-tails and orthodonture.)
And so for many woodworkers, their first handsaw purchase is a dovetail saw. Then they read every magazine article ever written on all the different methods of making the joint. (Well, they attempt to read every article. It’s actually impossible to do this in just one lifetime.) And perhaps they take a class in cutting the joint by hand at a local woodworking store.
Despite all this effort, their dove-tails still look like a mouthful of gappy teeth from a dental hygienist’s darkest nightmare. Why is this joint so dif-ficult? Here’s my theory: I think most woodworkers go about learning dove-tails all wrong.
I’m not talking about cutting pins-first or tails-first, I’m talking about ten-ons-first. Or how about cutting straight lines first? Then maybe cutting some slanted lines? Cutting dovetails, you see, is all about learning to saw. If you saw correctly, the chiseling part is easy.
The problem is that most woodwork-ers don’t know how to saw. We make sawing harder than it has to be. We hold the saw incorrectly. We work too aggressively. We stand in the wrong place. And we don’t know (or don’t use) the tricks to make straight and clean handsaw cuts.
Once you master these details, you’ll be on your way to cutting dovetails. But you also will have achieved something far more important: freedom. Being able to cut to any line – angled, compound, you name it – is the most liberating experience I know of in the craft. Sud-denly, you can escape the tyranny of 90° – the always-right angle encour-aged by our machines. Chairs, with
Photos by the author
How to Saw
b y c h r I s to P h e r s c h wa r z
Practice won’t help if you are practicing
a poor method. here are 10 rules and 3 tricks
to improve your sawing.

popularwoodworking.com ■ 3
their compound angles, won’t seem so daunting. Plus, you’ll build fewer jigs for your machines.
10 rules of sawingThere’s a lot to learn about sawing, from the tools themselves to the techniques for using them. I think the place to be-gin is to understand how to wield the saw in any cut, whether you are mak-ing joints or just breaking down rough stock to get it in your car in the Home Depot parking lot. Here are the 10 prin-ciples I’ve compiled from books, other woodworkers and my own experience.
1. Use a relaxed grip on the tote of the saw. Clenching the handle will push
you off your line. Someone once told me that when you hold your saw you should pretend you are holding a baby bird and that you are trying to keep it in your hand without crushing it. You want to hold your tool with just enough force to keep it from flopping around and getting away from you. And this is something that you will be reminding yourself of for the rest of your life. It’s easy to forget.
2. Extend your index finger out on the tote. A good Western saw handle is designed for a three-finger grip. Mash-ing your four fingers into the tote will make sawing difficult and your hand sore. Extending your index finger is
good to do with any user-guided tool because it is a reminder to your body to perform that operation in a straight line. Try extending your index finger on your cordless drill, your jigsaw, your handplane.
That said, this rule is somewhat troubling when it comes to Japanese pullsaws. I’ve seen grip recommenda-tions that violate this rule from people who get tremendous results. In fact, I grip my dozukis with my thumb ex-tended out along the straight handle of the saw. I suspect that extending my thumb has the same effect as extending an index finger. In fact, early writings on hammers – which have a straight
On a Western saw, it’s always best to extend your index finger out along the tote. Saws are designed for a three-fingered grip.
This is what a good sawing stance looks like. All the parts of my body are lined up so my sawing arm swings freely. The rest of my body is positioned in such a way that it encourages me to saw straight. Note how my toe touches the bench.
One of the most common mistakes begin-ning sawyers will make is they will keep their elbow tucked against their torso when sawing.
Constant vigilance is required here. As you saw, if you feel your elbow touching your torso, you’re doing it wrong. Stop and adjust.
On Japanese saws the advice is mixed. Some people saw with their index finger out. Others extend the thumb.

4 ■ Handsaw Basics
handle similar to that of a dozuki – offer the same advice about extending the thumb for precision nailing. (Yes, there is such a thing.)
3. Always work so your sawing elbow swings free like a steam loco-motive. Now we’re getting into body position – a critical point. Don’t ever work with your arm rubbing your body. And don’t move your arm at an angle that’s not in line with the back of the saw – your arm and the saw should all be one straight line. This involves posi-tioning your body so all your parts line up with your cut and all your moving parts swing free.
4. Use proper footwork. This rule works in conjunction with the rule above. If you position your feet cor-rectly, chances are your sawing arm will also end up in the right place. Here’s the
drill: If you are right-handed, stand so your left foot is forward and your right foot is behind you. (Reverse this if you are left-handed.) Your feet should be almost perpendicular to one another, as shown on the previous page. I like to place my left toe up against the leg of my workbench because I can then feel how my workbench is behaving when sawing. If my workbench is unstable, then I’ll feel it in my left foot.
5. Whenever possible, work so you can see your line. First, position your work so that the line is visible through-out your entire cut. If you are right-handed, this means you should try to have the sawblade cut on the right side of the line whenever possible. (Again, reverse this if you’re sinister.) If you cannot position your saw this way, you need to move your head and peer over the sawblade so you can see the line. Never let the blade of the saw obscure your line. If you cannot see the line, you cannot follow it.
6. Use minimal downward pressure when sawing. Western backsaws have a heavy back for two reasons: One, to stiffen the blade. Two, to give the saw some weight to carry it down into the cut. A sharp and well-tuned saw should require almost no downward pressure during the cut. When teaching the act of sawing, I tell students that their job is to move the saw forward and back. Gravity takes it down into the cut.
Using excess downward pressure almost always will drive you off your line. It is impossible (for me, at least) to
force the saw through the cut with ac-curacy. Don’t worry about the speed of your cut if it seems slow. As your skills pick up your strokes will be faster. Plus, remember this: It takes a lot to effort to correct a cut that has gone awry. So rushing a cut will only slow your overall progress.
7. Always imagine the saw is longer than it really is. I picked up this men-tal trick from a book a long time ago, and it has served me well. This bit of self-deception will fool you into using longer strokes, which will allow you to saw faster and wear your saw’s teeth evenly. Most beginners use about half of the teeth in their saw, mostly the teeth in the middle. You should aim to use 80 to 90 percent of your teeth.
8. Whenever possible, advance your cut on two lines. This trick always in-creases your accuracy when sawing. There are lots of ways to make this trick work to your advantage. For example, when cutting tenons, I like to start the cut diagonally on a corner. Then I ex-tend the kerf a bit down the edge of the board. Then I use that accurate kerf to guide my sawplate as I extend the kerf along the end grain. I’ll work back and forth this way, using the existing kerf to guide my saw.
9. Always work right against a line. This rule is true with all saws, whether they are powered by electricity or by Ding Dongs. Try to avoid sawing a cer-tain distance away from a line. It’s hard to saw a consistent distance away from a line. Sawing on a line is always easier.
This cut leaves behind too much waste. People are timid about sawing, so they saw far away from the line and leave some waste to pare away with a chisel or plane. Be bold (it’s easier, too). Saw right up on the line or split the line.
Here, I’m cutting a tenon cheek. I begin with a diagonal cut, then tip the saw to extend the kerf down the edge of the board (left). Then I use that kerf to guide the sawplate to extend the kerf along the end grain (right). Note that I’m peering over the saw’s back to watch my lines.
If you can see the line you can cut the line. So never let the sawblade obscure your line. Sometimes this involves moving the saw (or planning how to hold your work). Sometimes it involves moving your head without violating the rules on proper body stance.

popularwoodworking.com ■ 5
Sometimes you will want to leave the entire line intact and sometimes you will want to split the line, depending on the joint you are cutting. But what’s important is that you are on the line at all times.
10. Lifting the saw a tad on the re-turn stroke clears your line of sawdust. This isn’t a rule as much as it is a tip for catching your breath. If you lift up your saw on the return stroke, less sawdust will sprinkle onto your cut line and obscure it. As a result, you don’t have to huff and puff your line clear with every stroke (there will always be some huffing, however).
This also relates to the proper rhythm and sound that result from efficient sawing. You can always tell a veteran carpenter from a newbie by listening to them saw. New sawyers drag the tool back through the kerf, making an unpleasant sound. Plus, they use short strokes because they are using only the teeth in the middle of the sawblade. The old pros make most of their noise on the cutting stroke only. Plus, their strokes are longer. And, as a bonus, they’re not out of breath from puffing the line as well.
How to start a sawcutWhile those 10 rules above will help you make a sawcut, they don’t help much with the hardest part of saw-ing: Starting a kerf with your saw. In sawing (as with most things in hand tools) how you begin the cut is critical
to how well the rest of the cut proceeds. If you start correctly, you are much
more likely to hit your line all the way down. If you start poorly, you’ll spend your first few strokes trying to cor-rect your cut, making your kerf unac-ceptably wide and fighting the saw the entire way.
There is a good deal of advice on how to begin a cut, some of it conflict-ing. One old chestnut is to begin a kerf with a few strokes of the saw that are in reverse of the tool’s normal cutting action. That is, if you have a Western saw that cuts on the push stroke, you should begin your kerf by making a few strokes on the pull stroke. These strokes make a little notch for the saw to ride in.
This is how I was taught to use a full-size handsaw on sawhorses as a boy. The advice shows up frequently in old texts on carpentry, and I think it’s good technique when working with the big 26"-long handsaws or rip saws.
However, the older texts are mostly silent on beginning a joinery cut with a backsaw, such as a dovetail, carcase or tenon saw. So many modern wood-workers have assumed that the same rules for carpentry apply to making furniture cuts.
I’m not so sure they do.For many years I used this trick
with my backsaws, and many times it didn’t seem to help much. Yes, it made a notch for the saw to begin in, but the notch wasn’t the shape I wanted. This trick made a sizable V-shaped cut, with part of the V chipping across my line and into the part of the work I wanted to keep.
After I abandoned this trick when using my backsaws, my results were more consistent. So here’s how I start a backsaw cut when I’m cutting to a pencil line.
After I draw the line, I place the saw-blade on a corner of the work so I can see the line. With my off-hand (which is my left), I pinch the edge next to my cut line and use my thumb to nudge the sawplate left or right until I am exactly where I want to begin.
(A quick aside: Determining exactly where to begin requires you to instinc-
Here, I’m about to break down some rough stock with a full-size 26"-long handsaw. Unlike when you use a backsaw, it’s good practice to begin this cut with a few strokes of the saw that are the reverse of the tool’s normal cutting action. The small notch shown in the photo is a boon to starting a cut with a large handsaw.
The thumb positions the work. Nudge the saw to the right by pinching your finger and thumb, which swells them both a bit. Move the saw to the left by relaxing your fingertips a bit and scooting the sawplate against your thumb.
tively know how wide your saw’s kerf is. Once you have a gut feeling for that, you will place the tool right where you want it. This is also a good reason not to work with six different dovetail saws with six different-size kerfs – you’ll never master them all.)
Now check the position of your saw-plate in the reflection of your sawblade (assuming you have a shiny saw). If you are sawing a line that is square and plumb, then the reflection of your board should line up perfectly with the actual board. This trick works no matter where your head or eyeballs are located.
Trust your eyes here. We have an innate ability to sense plumb and square, which is perhaps why we like our houses and furniture made that way (instead of something out of a sur-realist painting). If it looks square, it probably is.
This is a good argument for keeping your saws shiny and free of rust – the reflective qualities of the sawplate are an important feature. Also, a shiny saw tends to move more smoothly during a cut, and a rust-free saw will be easier to resharpen – you’ll never lose a tooth to a bit of pitting on your sawblade. That’s why I wipe down my saws with an oily rag after every use.

6 ■ Handsaw Basics
Now check your body position and ensure your sawing arm will swing free. Push the saw forward with your finger-tips still on the board and against the sawplate (you won’t get cut, I promise). After two strokes or so like this, you should begin angling the saw to start laying a kerf all along one of your layout lines. Now let all the other rules above kick into full gear as you make your cut.
the three Classes of saw CutsThe above advice and techniques are good for fairly accurate work, but not for high-precision sawing – such as cutting the shoulders of tenons. Most beginning sawyers ask too much of themselves and of their tools, sort of like expecting to be able to cut dovetails with a chainsaw.
There are lots of techniques to im-prove the accuracy and appearance of your saw cuts. But Robert Wearing’s book “The Essential Woodworker” (Lost Art Press) organizes all those tricks in an orderly fashion and shows you how to apply them to your work in a way that makes sense.
In his book, Wearing divides all saw cuts into three classes:
■ Third-class saw cuts, where speed is more important than either accuracy or the final appearance of the work. This is a rough cut designed for sizing stock before processing it further.
■ Second-class saw cuts, where ac-curacy is more important than speed or the final appearance of the work. This is for joinery cuts where the joint will not be visible in the end.
■ First-class saw cuts, where both accuracy and appearance are critical.
Each type of saw cut has a different set of procedures to prepare your work for sawing. Let’s begin with third-class saw cuts for rough work. For me, the interesting thing about third-class sawcuts is that the technique for this lowly saw cut is a lot like what modern woodworkers use for all their sawing – so it’s no wonder people love their table saws.
third-class saw CutThe third-class saw cut is fast, rudi-mentary and useful when breaking down rough lumber into manageable pieces. I use it only when the board is going to be refined further by shooting the ends with a plane or crosscutting the board to a finished length with a powered saw or finer handsaw.
Begin by marking the cut line on the face and edge of your board with a sharp pencil. I like a carpenter’s pencil that has a sharp chisel edge on its lead when working on rough stock, or a mechanical pencil when working on boards that have been surfaced.
Place the teeth of your saw on the waste side of your line and use your thumb to keep the saw positioned as you make your initial strokes to de-fine your kerf. Advance on the face and edge of your board simultaneously to increase your accuracy. Saw rapidly through the board until you get near the end of your cut. Then use lighter and shorter strokes to cut the waste away cleanly.
This is the sort of cut I’ll use with a full-size handsaw on my sawbench. Or when cutting wooden pins to rough length before pounding them into a drawbored joint.
second-class saw CutA second-class saw cut is used when accuracy is important, such as when sawing the cheeks of a tenon or a lapped dovetail joint inside a case piece. The results of your cut will be buried in the mortise or in the dovetail socket, so ap-pearance isn’t of primary importance. But if you wander too much in the cut, your joint won’t fit its mate.
Begin a second-class saw cut by marking your cut line with a knife all around your work. You can use a mark-ing knife and a try square – I know some woodworkers use the corner of a chisel to make this mark. When marking tenon cheeks I’ll use a cutting gauge, which is essentially a marking gauge with a knife in place of a pin. One common commercial example is the Tite-Mark.
All of these types of marking devices make a line that is almost V-shaped. One edge drops directly down at 90°; the other comes in at an angle – the result of the bevel on the tool.
Now, you can get a little too fussy here, but I try to always put the sloped part of the V on the waste side of my line. This fine point is more important when it comes to first-class saw cuts, but it’s a good thing to be thinking about as you make second-class ones as well.
You can judge if your saw is plumb and square by looking at the work’s mirror image in your sawplate. Here you can see a cut that is slightly off square (left) and one that is slightly off plumb (right).
Right on. And here is the sawplate positioned correctly.

popularwoodworking.com ■ 7
This is the most common third-class saw cut in my shop. Here I’m breaking down rough stock into manageable lengths to work (either by hand or by machine). If I stray from the line, it’s OK because the stock will be refined further during construction.
Here, I’m making a second-class saw cut. You can see how a cutting gauge incises a line that has one flat face and one beveled face. Try to put the sloping part of the V on your waste side.
Here you can see the notch I’ve made with a chisel to begin my second-class cut. The flat side of the notch helps funnel the sawblade into the waste side of the work.
Tenon cheeks are an ideal place to employ a second-class saw cut. The cheeks must be sawn as closely to the line as possible without going over. If you saw too wide, you’ll have a tenon cheek that requires a lot of work with a shoulder plane, chisel or rasp. If you saw over your line, you’ll have made some pretty firewood.
How do you get back on your line when you stray? there are two tech-niques that I employ. If the correction is needed early in the kerf, I’ll
twist my wrist for two strokes (and no more) to english the tool back on line.Most people botch this technique because they twist their wrist for
too many strokes so the saw wanders across the line in the other direction. then they twist their wrist to correct that mistake and they wander back over the line again. after a couple cycles of that foolishness, the kerf looks like it just failed a drunk-driving test. If the error is particularly bad, the saw-plate can jam in the wobbly kerf.
remember: Just like working with a band saw, handsaws have a bit of delay when steering them. so make a couple strokes with your wrist twisted, then relax to your normal sawing position. Make a couple more strokes and see if you are moving back on line.
If the error occurs deep in the cut and I’ve done a good job up to that point, I’ll use a different trick: I’ll “lay down” the saw. when I do this, I lower the angle of the sawblade to about 20° so I can put as much of the blade into the good kerf as possible. then I take a few strokes. the good kerf guides the tool back on line. — cs
CorrECT a WaNDErINg CUT
Here I’m laying down the saw into its previously cut kerf to correct a saw cut that is starting to drift across my line. Make a few strokes with the saw
in this position and then return to your normal sawing position.

8 ■ Handsaw Basics
Now, at the corner where you will begin your cut, place a chisel in your knife line with the bevel of the chisel facing the waste. Press the chisel into the work, remove the chisel and then come back and pare a triangle of waste that leads up to that corner.
Now place your saw in this notch and begin cutting. The notch ensures you begin the cut correctly. One of the nice things about this notch is that it actually is just like the little notch made with a full-size handsaw when you draw the tool backward for a couple strokes. The cutting begins at the bot-tom of the V. The difference here is that the V is shaped differently to guide your saw more accurately.
I use a second-class sawcut when-ever I’m working on a joint that won’t see the light of day. Nobody cares if the corners of your tenon are a bit ragged as long as the joint fits tightly.
First-class saw CutFirst-class sawing is reserved for parts of the joint that will be visible on the
finished piece, such as the shoulder cut on a tenon or half-lap joint. It requires a couple of extra steps, but the results are worth it.
First mark your cut line with a mark-ing knife on all surfaces that will be cut, just like you did for your second-class saw cut. Then take a wide chisel and place the tool’s edge into your knife line with the bevel facing the waste. Rap the handle of the chisel to drive it into the knife line all around the joint. It only takes a couple raps. You don’t want to drive too deeply.
Remove the chisel, then pare away a wedge-shaped piece of wood on the waste side, working up to your now-widened knife line. The second chisel cut must be deep enough so that the set of your saw’s teeth falls below the surface of your workpiece.
Secure your work to the bench. Place your saw into the chiseled notch and make the cut. By using a chisel to define the kerf of your saw, you eliminate the common problem of the saw’s teeth tearing up the surface of your work.
Here’s why: You actually used your chisel to cut the part of the joint that will show; the chisel cut created the tenon shoulder. The saw cut began be-low the surface thanks to the trench you chiseled out. That’s how you get crisp shoulder lines with a handsaw – you use a chisel instead.
What About dovetails?So which class of cut is the dovetail? That’s a tough question. The 18th-cen-tury woodworker would argue that the
dovetail is probably a third- or second-class saw cut because the resulting joint would be covered in moulding. The goal (then, at least) was to remove material quickly with some accuracy.
But many modern woodworkers like to show off their dovetail joinery in a piece of handmade furniture. So the dovetail really encompasses more aspects of the first-class saw cut. Yet no one I know would ever chisel out the marked lines of every pin and tail.
Instead, we work this joint more like it is a third-class saw cut. What allows us to do this is the dovetail saw, which was developed specifically for this joint. Its teeth are finer than other joinery saws. And the small scale of the saw allows us to get our eyeballs on our work to see what we are doing.
So while I still treat the dovetail like a third-class joint when marking it, I use a first-class tool. (And sometimes, when things get hairy, I’ll even use some second-class notches to start a critical cut or two.)
So here we end where we started – still vexed about dovetails and how to cut them correctly and with skill. And while I cannot tell you everything about how to cut dovetails, I can tell you this: If you use the above techniques to saw and practice the three classes of saw cuts, then dovetails will suddenly become much easier.
Sometimes practice counts. PWM
Christopher is the editor at Lost Art Press and the author of the forthcoming book
“Roman Workbenches.”
With a first-class saw cut you remove a wedge-shaped piece of waste all along your cut line. The chisel ends up making the critical part of the joint that shows.
The chisel here is deepening the line made by my marking knife for a first-class saw cut. You might be concerned about the chisel walking backward when you rap it, like what hap-pens when chopping waste from a dovetail. However, the shape of my knife line and the shallow depth of the chisel cut keep your line in the same place.

popularwoodworking.com ■ 9
The backsaws that built nearly every piece of antique English and American furniture almost became extinct, thanks to the universal motor and the Japanese obsession with qual-ity.
A basic kit of at least three back-saws – a dovetail, carcase and tenon saw – were in the toolbox of every English-speaking cabinetmaker and joiner in the 18th, 19th and early 20th centuries. But after World War II, the
manufacturing of these venerable saws went into steep decline with the rise of inexpensive portable routers and saws that were powered by the compact and cheap universal motor.
Handsaw giants such as Disston and
Photos by the author
Understanding Western Backsaws
b y c h r I s to P h e r s c h wa r z
the western backsaw has almost vanished. but a few toolmakers are trying to
turn back the clock to when this saw was in every toolbox.

10 ■ Handsaw Basics
Atkins faltered. Their enormous facto-ries were shuttered, and the remnants of these companies began churning out low-quality saws with chunky handles and poorly formed teeth.
But it wasn’t portable power tools that delivered the coup de grace to Western handsaws. That occurred at the hands of Japanese sawmakers. As Western saws became worse, the high-quality Japanese saw became more at-tractive to the woodworker who still needed a backsaw or two for joinery.
Thanks to Japan’s thriving carpentry trade that still requires handwork (a result of their traditional timber-frame construction), outstanding manufac-turing acumen and a general respect for traditional ways, Japanese saws were in-expensive and worked extremely well.
This was the opposite of the pricey and snaggle-toothed Western saw, which barely cut wood. And so the Japanese saw – which was once the laughingstock in the West as the tool that cut backward – became the best-selling style of saw in North America in less than a generation. And it is, by far, the dominant form today.
two Guys revive a dead patientAnd if it weren’t for two tool collectors, that might have been the final word: Either buy antique Western saws or new Japanese ones. But thanks to Pete Taran and Patrick Leach, the Western saw is today experiencing a revival. The two men had technical backgrounds in engineering and software, but that didn’t stop them from becoming saw-makers in 1996. They founded Inde-pendence Tool and started making a maple-handled dovetail saw based on an early 19th-century example.
The saw, which was made with an in-credible amount of handwork, became a cult classic among woodworkers on the Internet, and the saw began appearing in tool catalogs alongside the pages and pages of Japanese saws.
The Independence saw itself was a technical success. I’ve inspected and used pristine examples of these saws and can personally attest that they were a revelation when compared to
the chunky, lifeless and dull Western backsaws I used in my first woodwork-ing class.
But the company was short-lived. Leach left Independence Tool and went on to become a full-time tool dealer (his site is supertool.com), and Taran announced in 1998 that he wasn’t able to do his day job and still make saws at night. It looked like quality Western backsaws were about to disappear off the market again.
But then Taran sold Independence Tool to Lie-Nielsen Toolworks, which was cranking up its production of hand-planes but wasn’t yet making saws. (Taran isn’t entirely out of the saw busi-ness. He now sells restored antique saws at vintagesaws.com as a side job.) Shortly after the sale, Lie-Nielsen began offering a dovetail saw – branded with both the Independence and Lie-Nielsen names – and then the company began selling other patterns of Western saws.
Recently, other makers have en-tered the Western saw market, in-cluding Adria Tools, Wenzloff & Sons, Gramercy Tools and a host of other small makers. And while these companies are making just a dent in the market share commanded by the Japanese sawmakers, it is now pos-sible to purchase an entire kit of qual-ity Western backsaws that work right out of the box. And that is a milestone.
Why Use Western Handsaws?If you do the math, mass-produced high-quality Japanese saws are a bar-gain. You can buy a Japanese dovetail
saw for $35 that works just as well as a $125 Western-style dovetail saw. Plus, the consensus among many craftsmen and woodworking magazines is that the Japanese saws are easier to start and cut smoother.
So why would anyone (with the exception of a historical re-enactor or pigheaded purist) buy an expensive Western saw? The differences between the two tools are more extensive than the fact that one cuts on the pull stroke and the other cuts on the push. The sawplate on Japanese saws is thinner. Japanese teeth are more complex and longer. And sharpening Japanese teeth yourself can be difficult or impossible, depending on the saw.
As a result of these differences, Japa-nese saws are easier to kink and ruin, especially in unskilled hands. The teeth can break off in some hard Western-hemisphere woods – I’ve had particular problems in ring-porous species such as white oak. The expensive Japanese saws need to be sent to a specialist for re-sharpening (sometimes this specialist is in Japan). The inexpensive saws have impulse-hardened teeth, which makes them last a long time but also makes them impossible to refile. The teeth are as hard as a file, so a saw-sharpening file cannot abrade them. This makes the saws somewhat disposable – though you can cut up the sawplates, discard the super-hard teeth and make some thin scrapers with the steel.
In contrast to Japanese saws, West-ern saws have robust teeth. When I tally the tooth-decay problems I’ve had with
One of the earliest tool catalogs we have, “Smith’s Key,” shows the four types of backsaws available in 1816 from makers in Sheffield, England. Note how this tool catalog shows the blades as tapered – they are narrower at the toe than at the heel. There’s a likely reason for that.

popularwoodworking.com ■ 11
saws, I’ve probably lost 20 teeth in Japa-nese saws but have yet to chip a tooth on a Western saw. You can resharpen Western teeth yourself, or get the job done domestically. Any Western saw can last for generations.
For some woodworkers, the above are compelling reasons to use West-ern saws. If you are one of those, read on. If you still prefer Japanese saws and want to learn more about using them for joinery, I recommend you get your hands on the immensely readable “Japanese Woodworking Tools: Their Tradition, Spirit and Use” (Linden) by Toshio Odate.
Four Western backsawsThe backsaws shown in this article are particular to the English-speaking world for the most part. Traditional European woodworkers still use frame saws, where a thin sawblade is held in tension in a wooden frame, though other saw forms are available and used on the Continent.
Western backsaws are typically separated into four forms, and their details (blade length, number of teeth etc.) are usually traced back to Edward H. Knight’s 1876 opus “American Me-chanical Dictionary.” But some modern woodworkers are confused about which of these four saws they need in their shop, so here is a discussion of each saw, its details and the operations that it excels at.
the dovetail sawThe most familiar saw to modern eyes, the dovetail saw is the smallest backsaw and has a blade that is 6" to 10" long. The blade’s width is between 11⁄2" and 2". It can have a pistol-grip or a straight handle. Most beginners seem to prefer the pistol grip because it whispers to your body when the blade is straight up and down. However, using a straight-handled “gent’s saw” isn’t difficult. It just takes a little more getting used to.
The teeth of a dovetail saw are quite fine: Between 14 and 18 points per inch (ppi) is typical. However I’ve seen dove-tail saws with as many as 23 ppi.
Most woodworkers prefer the teeth filed for a rip cut – a rip tooth has its cutting face filed so it is 90° (or nearly so) to the sides of the tooth.
Recently, Lie-Nielsen Toolworks has begun making a dovetail saw with what is called “progressive pitch.” At its toe, the saw has 16 ppi. Each tooth gets bigger and bigger until the saw has 9 ppi at the heel. The fine teeth make the tool easy to start and the coarse teeth at the heel make it cut fast. The resulting finish is remarkably smooth and, after using this saw for a couple years, I have become quite fond of it.
The number of teeth on your dove-tail saw should relate to what kind of job you use that saw for. When you have fewer teeth, the saw will cut faster but coarser. The speed comes from the fact that fewer teeth equals deeper “gullets,”
which is the space between each tooth. When gullets fill up with waste, the saw stops cutting until the sawdust is removed as the tooth exits the work.
So a fine-tooth saw works well for small work in thin material, such as 1⁄2"-thick drawer sides. A coarse dove-tail saw works better when sawing car-case dovetails in 3⁄4" stock or thicker. You don’t have to have two dovetail saws, however. I’d just pick a saw that reflects the work you do most of the time.
Speaking of pushing your tool into unfamiliar territory, many woodwork-ers end up using their dovetail saws for other chores, including some crosscut-ting. You can get away with this many times because the teeth of the saw are so fine. However, your cut will be more ragged than if you used the correct tool: the carcase saw.
the Carcase sawBy far, the most-used saw in my shop is my carcase saw. This saw is so named because it is useful for many opera-tions in building a furniture carcase. A Western carcase saw always has a pistol grip, though ancient versions might have looked more like a chef’s knife with a straight handle and no back.
The blade of a carcase saw is 10" to 14" long and 2" to 3" wide. It typi-cally has 12 to 14 ppi, and the saw teeth are sharpened to make crosscuts. A crosscut tooth looks different than a
A classic vintage carcase saw from Wheeler, Madden & Clemson. This saw is 14" long and has 12 ppi. The carcase saw is used for almost all joinery crosscuts when building furniture.
The saw on the bottom is a typical pistol-grip dovetail saw from sawmaker Mike Wenzloff of Wenzloff & Sons. Also shown (at top) is a straight-handled dovetail saw known as a gent’s saw, so named (we’re told) because it was used by gentlemen hobbyist woodworkers in the 19th century.

12 ■ Handsaw Basics
rip tooth in that its cutting surface is at a 15° to 24° angle to the sides – 20° is typical. This angle is called “fleam” and it allows the tooth to sever the grain like a knife, reducing the raggedness that would be left behind by a rip tooth.
I haven’t found the number of teeth in a carcase saw to be as critical as it is with the other forms of saws. A 12-point saw and a 14-point saw cut plenty fast enough for most operations, and they both leave an acceptable surface be-hind.
The difference I think you should pay attention to is the length of the blade. In general, longer saws tend to saw straighter, so I avoid saws that are 10" long. Getting an 11" saw makes a difference. A 14"-long saw even more so.
Keep in mind that a saw doesn’t have to be labeled a carcase saw to be a car-case saw. There is some overlap in the saw forms. Pay attention to the specs of a saw in a catalog or in the store. A saw that is 14" long and filed crosscut with 12-14 ppi is a carcase saw, no mat-ter what the tool seller might label it.
Carcase saws are the jack plane of the backsaw family. They get used for everything, from cutting tenon shoul-ders to trimming through-tenons to notching out corners to cutting miters. I use them for cutting door rails and stiles to length when working by hand – pretty much any precision crosscut that is on a board that is less than 6" wide. Plus, almost every time I reach for my carcase saw I’m also reaching for my bench hook.
tenon sawsWhen you start wading into tenon saws, it can get confusing. Knight’s diction-ary says a tenon saw should be 16" to 20" long (that’s huge) and 31⁄2" to 41⁄2" wide (also huge). Tenon saws should have about 10 ppi.
Modern tenon saws are not nearly this big.
These ancient giant tenon saws have nearly disappeared, except in vintage tool collections and from one lone maker, Wenzloff & Sons. I purchased one of these old-school tenon saws and was surprised (strike that, amazed) at how easy it is to use, even when cut-
ting tenons that were dwarfed by the saw’s blade.
The long blade definitely helps the saw track a line straighter and work quickly – a 11⁄4" tenon cheek can be sawn down one side in six to seven long strokes. And the extra weight of the saw allowed the tool to supply all the downward force necessary when sawing.
The saw’s size does intimidate some woodworkers and they worry that they will tip the tool too much as they begin the cut. However, if you use a second-class sawcut, then starting the saw isn’t much of a challenge.
Some fellow woodworkers have also fronted the theory that this big saw was intended more for cutting the tenons to entryway and passage doors – not for furniture. Perhaps. But I have a couple great old photos that show some real old-timers sawing out huge tenon cheeks. They’re using a big 26" rip saw. Wow.
I do have one caution if you choose to get a large tenon saw: The sawplate is more fragile than on other Western backsaws. Historically, the sawplate on
a tenon saw is quite thin, and because of this vast acreage of thin metal and the fact that the brass back is so far away from the toothline, there is the danger of the saw bending if it is mis-used. I’m not saying you need to use your tool gingerly. I just don’t know if lending it to your neighbor or teenager is a good idea.
No matter what size tenon saw you choose, the teeth should be filed for a rip cut. Tenon saws are used to cut the cheeks of tenons, which is a rip cut. The carcase saw handles the shoulder cut, which is a crosscut. I also use my tenon saw for other sizable rip cuts, such as when defining the top of a cabriole leg – the square part that attaches to the table’s apron. I also use it for laying a kerf down a tenon to accept wedges (a dovetail saw is slow and makes too small a kerf in most cases).
But if you don’t think the ancient tenon saw is for you, then you should do what most woodworkers do and buy a true sash saw.
sash sawsIf you think tenon saws are confusing, you haven’t gotten into a discussion on sash saws. Their name suggests that they were used for cutting the joinery for window sashes, yet they show up in tool catalogs and inventories of people who built fine furniture. And there is no consensus among tool scholars as to whether they were filed rip or crosscut or both.
So what is a sash saw? Knight’s dic-tionary says that a sash saw has a blade that’s 14" to 16" long and 21⁄2" to 31⁄2" wide. The sash saw has 11 ppi. Those specifications look a lot like what we
bad Axe tool Worksbadaxetoolworks.com or 608-520-0729
Gramercy toolsFrom tools for working woodtoolsforworkingwood.com or 718-499-5877
Lie-nielsen toolworkslie-nielsen.com or 800-327-2520
Wenzloff & sons saw Makerswenzloffandsons.com
Prices correct at time of publication.
SoUrCES oF SUpply
These two saws are so different in size that it’s hard to believe that they both are called tenon saws. The big saw is a much older (and almost extinct) form.

popularwoodworking.com ■ 13
moderns would call a tenon saw.To see if I could learn anything about
the sash saw by using it, I bought two sash saws that were made to Knight’s general specifications, one filed cross-cut and the other rip. After a couple years of use I found that the crosscut sash saw was effortlessly doing all the
jobs of my carcase saw, and the rip-tooth sash saw had somehow become my daily tenon saw.
This makes sense because the sash saw’s specifications overlap with both the carcase and tenon saws, according to Knight’s dictionary. What became clear to me in the end is that you might not need a sash saw if you already have a tenon saw and a carcase saw.
your basic saw KitI think that most woodworkers who want to use Western handsaws can do all the common operations with three backsaws: A dovetail saw, a large backsaw that’s filed crosscut (either a sash or a carcase saw), and a large backsaw that’s filed rip (either a sash or a tenon saw). Exactly which saw you need depends on the size of your work and the characteristics of your body. Do you have large hands? Then you should try a tenon saw. Do you build jewelry boxes? Then you should select a fine-tooth dovetail saw.
Once you pick your three saws, I recommend that you stick with that set for a couple years before you get disgruntled and start test-driving other saws. Sawing (like sharpening) is a skill that develops with months and months of practice. And one of the criti-cal parts of learning to saw is getting comfortable with your saws. You need to understand – by instinct – how wide each saw’s kerf is, as well as how fast each saw cuts.
Many woodworkers find that certain forms of saws speak to them when they use them. I’ve let more than 100 stu-dents use my saws and find that to be true. Certain people gravitate to certain forms of saws. A few people end up pur-chasing all the forms. But one thing is certain: After using a sharp well-made Western saw, almost none of them go back to their Japanese saws. PWM
Christopher is the editor at Lost Art Press and a con-tributing editor to Popular Woodworking.
Nice saws, but what are they good for? Sash saws are a bit of a mystery to modern wood-workers. Were they undersized tenon saws or oversized carcase saws? Or both?
Recently some woodworkers (myself included) have become interested in halfback saws, a rare form of
saw that was made by several sawmakers, including Diss-ton, which made the saw between 1860 until the 1920s, according to Pete taran.
the halfback was supposed to be a hybrid saw between a full-size handsaw and a backsaw. the small back wouldn’t get in the way of many large crosscutting chores, but it would stiffen up the blade enough for joinery.
the saws are fairly rare, so it’s safe to assume the idea didn’t catch on with consumers. while that would doom the saw in the mind of a pragmatist, I reasoned that the halfback might be a tool whose time had not yet come. Perhaps it’s like the low-angle jack plane – that tool was a commercial flop last century when it was invented but is an extremely popular plane in this one.
so I’ve been using a few ver-sions of halfback saws in my shop
for the last three years. and here’s my conclusion: I think the halfback is a good tool for a woodworker who doesn’t want to own both a carcase saw and a full-size handsaw that’s filed for crosscuts. you can use this one
tool for both. It’s not perfect for both operations, but it does a yeo-man’s job.
when crosscutting stock on a sawbench, the halfback is fairly useful until you start trying to crosscut boards wider than 6". then the little brass back tends to strike the work during the downstroke. when used at the workbench, the halfback is indeed stiff enough for most cuts that a carcase saw would be used for, but it’s not as assured a tool as the carcase saw on small bits of work (it is, for example, over-kill when crosscutting dowel pins).
so I don’t think every shop needs a halfback saw. but mine does. I enjoy using it a great deal, and it keeps me from shuffling as many saws around on my work-bench when it’s out. — CS
HalFBaCk SaWS: a JaCk oF all TraDES or a HalF-BakED IDEa?
Useful or -less? This custom halfback saw is beautiful, but is it just wall jewelry?

14 ■ Handsaw Basics
It might shock you to hear this, but in the last decade or so more than three centuries of a Western tool-making tradition has been undone.
The Western handsaw, a tool that cuts on the push stroke and was the pride of the English-speaking world, isn’t the tool most woodworkers now reach for when they need a handsaw.
It has been replaced by the Japanese saw, which cuts on the pull stroke and once was mocked by Westerners as “backwards.”
The numbers tell the story best:■ Sixty percent of the saws sold by
Lee Valley Tools are Japanese-style, says Rob Lee, president of Lee Valley, one of the world’s largest hand-tool catalogs.
■ Woodcraft Supply Corp. sells 100 Japanese saws for every Western saw, says Peter Collins, a product manager for the large catalog and retail company.
■ And Japan Woodworker, which sold many Western saws 30 years ago, now sells 1,000 Japanese saws for every Western saw, says Fred Damsen, the former owner.
What caused this shift to Japanese saws? While some say it’s because saw-ing on the pull stroke is superior to sawing on the push stroke, the issue actually is more complex.
And which saw is best? The pre-vailing wisdom says Japanese saws are superior and easier for beginners to learn. But if you’ve ever worked with a sharp, well-tuned Western saw, you know this can’t be entirely true.
To answer these questions, we de-cided to scrutinize the two types of saws to learn their true differences, beyond the information in catalogs. Armed with this knowledge, you can choose a saw that’s right for your wood-
working and your budget. Our journey begins in ancient Egypt.
the First HandsawsModern woodworkers would almost immediately recognize the first known metal saws, which were excavated in Egypt.
They had long, knife-like blades and straight grips, and they cut on the pull stroke like Japanese saws. Why the pull stroke?
Early Egyptian saws were made with a thin sheet of copper (as thin as 0.03") and had no rigid spine like the modern backsaw.
“(If they had been used) on the push stroke, the saw would have buckled and bent,” according to Geoffrey Kil-len, author of numerous books and articles on Egyptian woodworking and the head of faculty at the Design and
Photos by the author; “egyPtIan hanDsaw” ILLustratIon by Matt bantLy
Japanese Saws vs. Western Saws
b y c h r I s to P h e r s c h wa r z
the difference is more
than just pushing or pulling.

popularwoodworking.com ■ 15
Technology Department of the Stratton Upper School and Community College in England.
What is unusual about these saws is that all the teeth were set (meaning they were bent) to one side of the blade. This makes the saw difficult to steer, and the Egyptians had to come up with ingenious ways of wedging the saw kerf open during each cut, according to Killen.
The advent of bronze tools brought some refinements, as did the iron saws developed by the Romans. But the basic form was still a pull saw with a thin blade.
It was the invention of the frame saw (plus teeth set to both sides of the blade) that allowed these thin metal blades to be used on either the push stroke or the pull stroke – much like a modern coping saw or bowsaw, ac-cording to “The History of Woodwork-ing Tools” (G. Bell & Sons) by W.L. Goodman.
The frame saw might not have been invented by the Romans, but they cer-tainly refined it and produced a wide variety of them.
This is an important fork in the road in saw history that affects us to this day. The Japanese developed pull saws like
the Egyptians, but they never seem to have developed frame saws, according to several students of Japanese history (though a Chinese frame saw did come into use in 15th century Japan).
So the Japanese, with their scarce metal resources and their traditions of working low to the ground, stuck with the pull saw and refined it to a high art.
In the West, most of the European continent stuck with the bowsaw. But the Dutch and English took a different path. In the mid-17th century, wider steel blades became possible thanks to water-driven mills, and the modern handsaw that cuts on the push stroke was born.
the West stumblesThe 19th and early 20th centuries were the golden age of Western handsaws. There were hundreds of saw manufac-turers, fierce competition, high-quality tools and a very hungry market.
But as the demand for quality hand tools declined, so did the number of manufacturers. And quality slipped dramatically.
“Western manufacturers thought it was OK to ship a saw that was poorly set, dull and had a handle that looked like it was made by a third-grade art student,” says Thomas Lie-Nielsen, owner of Lie-Nielsen Toolworks. “You couldn’t use the saws right out of the box. It’s no wonder the Japanese ate their lunch.”
When Western saws suitable for cabinetmaking disappeared off the
shelves, the Japanese saws picked up the slack.
“In Japan, the product lines have not been cheapened,” says Lee of Lee Valley Tools. “Even products that have been mass produced have not been cheapened.”
So while it was tough to find a decent new Western saw at almost any price, the Japanese exported saws to the West
Egyptian handsaw. The first known metal saws hail from Egypt and, like Japanese saws, cut on the pull stroke.
teeth irregular
and set to one
side16"
1"
1⁄32"
101⁄2"
The Western handsaw, shown here being used by Don McConnell with an overhand rip grip, cuts on the push stroke.
Instead of benches, Japanese craftsmen use low trestles. Sawing a tenon with a Japanese saw this way is efficient and requires sawing at a less awkward angle than at a high West-ern bench. However, you need to be in good shape to work this way.

16 ■ Handsaw Basics
that were sharp, straight, perfectly set and inexpensive. A good Japanese back-saw still costs only about $40. So it’s little wonder that the Japanese saw now is in many North American workshops. It was, in many ways, a simple matter of economics.
Facts About Japanese sawsJapanese craftsmen would be quite curious about the way Westerners use their saws. For one, we work on a high bench and clamp our work when sawing. The Japanese furniture maker works on a low sawhorse (6" high or so) and does not generally have a vise.
“(Westerners) tend to clamp ev-erything,” says Harrelson Stanley of JapaneseTools.com. “The Japanese don’t clamp unless they have to. They do some wedging. Mostly they saw in toward a solid object,” such as the work,
Advantages:■ thinner kerf removes less wood, which means less effort.■ the inexpensive saws are of high quality and work very well right out
of the box.■ the teeth are generally harder and can go longer between sharpen-
ings. the best western saws are 52-54 on the rockwell “c” scale. Japanese saws are 51-58 for the handmade saws, and 61 and higher for the machine-made impulse-hardened saws. while the harder teeth stay sharp longer, they also are more brittle and prone to break.
■ there are many manufacturers who sell a wide variety of saws with different teeth configurations (more than 100 kinds, by harrelson stanley’s count) for every woodworking task and every type of wood.
disadvantages:■ It’s almost impossible for a woodworker to sharpen a Japanese saw.
the teeth are too complex on handmade saws and too hard on the impulse-hardened ones. handmade saws usually go to Japan for sharpening. Impulse-hardened saws become scrapers or go in the garbage.
■ the crosscut teeth are more delicate. If you hit a knot or cut quickly into particularly tough wood, you could lose a tooth or two.
■ the saws are easier to ruin. because the blade is thin, you can bend it on the return stroke if you push too hard and the saw isn’t aligned properly in the kerf.
■ Japanese saws pull sawdust toward you, obscuring your line.■ Japanese saws made for dimensioning lumber (not joinery) have
shorter blades than full-size western handsaws. Depending on the saw, the pull saw might require more strokes to do the same work.
■ Japanese saws are designed to be used in traditional Japanese fashion on low benches. when used in western fashion, some Japanese saws are not always as effective as they should be.
JapaNESE SaWS:
which is secured by their foot, he says.A second difference is that many
Westerners use the crosscut dozuki saw (a saw with a rigid spine) for cut-ting dovetails, which is primarily a ripping operation.
The Japanese woodworker instead uses a rip-tooth dozuki (which is uncommon in the West) or a rip saw without a back, says Damsen of Ja-pan Woodworker. That’s because the Japanese philosophy on dovetails and tenons is, at times, different than the Western approach.
“When they cut dovetails they don’t want the cut too smooth,” he says. “They compress the joint before assembly and let it expand and lock the joint.”
Westerners want a smoother cut and are willing to sacrifice the speed of a rip tooth. Many Japanese dovetail saws
for the Western market have some sort of combination tooth, in some cases a tooth that was designed to cut plywood that also works quite well for dovetails, Damsen says.
types of Japanese sawsBut one thing Japanese and Western craftsmen share is having to choose what type of Japanese saw to buy: a ma-chine-made saw or a craftsman-made saw. There are important differences:
■ A good-quality machine-made saw costs about $20-$50. The price of a craftsman-made saw averages $150, and the premium tools can cost more than $250.
■ Generally, craftsman-made saws have softer teeth than the machine-made saws, which are typically im-pulse-hardened. Impulse hardening is a fast, high-voltage process that hardens only the teeth. While the machine-made saws stay sharp longer, they can-not be resharpened.
Craftsman-made saws can be re-sharpened and even customized to the way you work. But this is meaningless to Western woodworkers, says Frank Tashiro, owner of Tashiro Hardware, which sells the line of ZETA Saws.
“(The sharpener) doesn’t know your work so he does the best he can, so it doesn’t work out,” says Tashiro, who adds that the best value and perfor-mance come from a Japanese saw with replaceable impulse-hardened blades.
But replaceable blades rankle wood-workers who don’t believe in dispos-able tools.
To counter that, Japanese saw manu-facturers say that once your impulse-hardened saw becomes too dull for woodworking, it is still plenty sharp for work in the garden as a pruning saw.
“You can make a nice scraper out of the blade, too,” Damsen says of the saws.
■ Another difference is that many craftsman-made saws are more delicate because of their thinner blades. Even the most robust craftsman-made saw should not fall into the hands of a be-ginning woodworker.
“Just because you have a $200 saw doesn’t mean you will saw better,” says

popularwoodworking.com ■ 17
Stanley. “It’s important to practice the technique. Start with impulse-hard-ened saws. Don’t get a $250 saw and break it. As your skills improve you can use thinner saws.”
When using Japanese joinery saws, most everyone agrees that you shouldn’t be aggressive or saw at a radical angle. Just a bit of downward pressure on the pull stroke is all it takes, and you shouldn’t apply any downward pressure on the return push.
Facts About Western sawsNo one can deny that Japanese saws cut very well, but so do Western saws that are sharp and properly set. The problem is finding Western saws suitable for woodworking. There are still some manufacturers of full-size Western saws that do a decent job for woodworking, including E. Garlick & Son, Pax, Paragon, Sandvik/ Bahco, Lynx and Augusta. Some of them also make joinery saws – backsaws with a rigid spine on the blade. And com-panies such as Lie-Nielsen and Adria now make premium joinery saws that are the equal of the outstanding saws of the 19th century.
But by far, the biggest sources of quality Western saws are flea markets and auctions. Top-of-the-line Disston, Simonds and E.C. Atkins saws can be purchased for $5-$25. These, however, can be rusty, dull and bent. If you have no desire to restore one of these old saws, there is an alternative.
Pete Taran runs the website Vintage-
Saws.com, which is a sawyer’s paradise. He takes classic handsaws and back-saws and returns them to their former glory by making them sharp, properly set and ready to cut. A vintage highly tuned handsaw or backsaw will cost between $80 and $150 at Vintage Saws.
The site also is a treasure trove of good historical information on saws. One of Taran’s primary goals is to teach woodworkers how to sharpen their Western saws, which is easier than you might think.
He sells the files and saw sets you need, plus there is a fantastic tutorial on his website that explains the process from start to finish. And if you just want to get your feet wet, Taran even offers a saw filing kit to get you started. The kit comes with a user-grade saw with freshly cut teeth, a file, a file handle and complete instructions. When you’re done, you’ll have some more confidence and a saw that cuts very well.
Sharpening a Western saw is prob-ably one of the biggest stumbling blocks for woodworkers.
“No one knows how to sharpen Western saws,” says Graham Black-burn, author of “Traditional Wood-working Handtools” (available at black-burnbooks.com) and an instructor at Marc Adams Woodworking School. “I ask the students to bring in their worst plane and their worst saw. Once they sharpen their saws they never go back to Japanese saws.”
But if you don’t want to learn to sharpen, you still can get a flea-market saw professionally tuned. Taran offers sharpening-service levels ranging from $39 to $129.
Western saw tipsOnce sharpened, a Western saw is easier to use than you might think. Here are a few tips:
For crosscutting in joinery, the Japanese
will use a dozuki (which means “shoul-
der of a tenon”). There are various ways to grip
the saw.
Some students of woodworking history think the push stroke was developed in the West because we work on high benches, unlike Japanese craftsmen who work near the floor on low trestles or beams.
Japanese rip teeth. The length of the rip teeth are graduated on Japanese saws. They start small near the handle and get larger.
Japanese crosscut teeth. Note the long slender teeth and three bevels filed on each tooth. The tips are discolored from impulse-hardening.
18 ■ Handsaw Basics
■ Though it sounds obvious, use a rip saw for rip cuts, such as dovetail-ing. Some dovetail saws are filed for crosscut. They work OK, but not as well as a rip saw.
■ Let the saw do the work. Don’t use a lot of downward pressure on the kerf – this is surely the No. 1 problem faced by beginners. The saw will wander and you’ll never cut straight.
■ Don’t clench the handle tightly. Hold the saw with just enough pres-sure to keep it under control. And use only three fingers – your index finger should point down the blade.
Worst of both Worlds?All this has to make you wonder why someone hasn’t built a saw that merges the best qualities of both tra-ditions. Well, a few companies have tried, though nothing has been able to challenge the dominance of the pure Japanese-style saw.
And the reason might be illustrated by the experience of one veteran wood-worker.
A few years ago, Blackburn was pok-ing around a flea market and discovered a beautiful old Spear & Jackson backsaw.
The saw had a perfectly shaped handle, much like the one on the out-standing Lie-Nielsen dovetail saw. But the blade of this Spear & Jackson was horribly bent. So Blackburn hung it on his wall.
One day a friend noticed the saw and offered to send it to Japan to see if they could straighten it out. Black-burn agreed. The saw came back a few months later straight as an arrow but with one major and shocking change.
They had filed Japanese-style teeth on the blade. Trying to keep an open mind, Blackburn gave it a try. “It cuts well,” he says, “but it feels wrong to me. So it still hangs on the wall.”
Chalk it up to this: When it comes to traditional hand-tool skills, it’s hard to defy tradition. Now you just have to decide which tradition is best for you. PWM
Christopher is the editor at Lost Art Press and the author of the forthcoming book
“Roman Workbenches.”
Advantages:■ the teeth are more durable than those on Japanese saws and are
highly unlikely to break, even under the worst conditions. the blades them-selves are thicker and less likely to buckle in use.
■ they will last you a lifetime. the teeth can be resharpened many times. saws can even be refiled by the user to a different tooth configuration if their needs change.
■ with a little practice, you can sharpen a western saw with inexpen-sive and easy-to-obtain tools.
■ western dovetail saws that are properly filed for a rip cut will cut more aggressively than the crosscut-filed dozuki that’s commonly used for dove-tails in the united states.
■ they push the sawdust away from your cut line.■ high-quality secondhand western saws are both plentiful and inex-
pensive in most parts.
disadvantages:■ high-quality new or restored western saws are more expensive than
their Japanese counterparts. Japanese joinery saws average about $45; the equivalent-quality western saw costs $125.
■ Inexpensive new western saws are – in general – dull and poorly set compared to similarly priced Japanese saws. Learning to saw with these less-expensive tools frustrates many beginners, swearing them off western saws.
■ while vintage western saws are plentiful in most parts of the united states, you must first learn to restore them before putting them to work: straightening the blades, fixing the teeth and sharpening.
■ the teeth are softer and require more frequent sharpening, though it is a task you can do yourself after a little education and practice.
■ In general, the saws are heavier and have a thicker kerf, so they require more effort to use.
WESTErN SaWS:
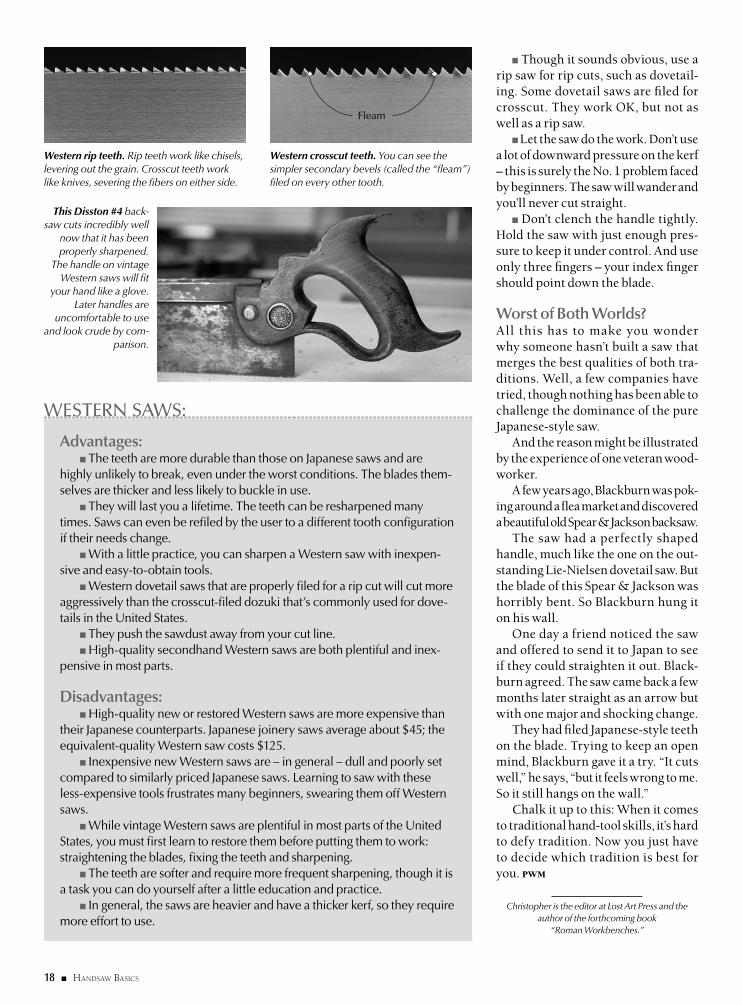
Western rip teeth. Rip teeth work like chisels, levering out the grain. Crosscut teeth work like knives, severing the fibers on either side.
Western crosscut teeth. You can see the simpler secondary bevels (called the “fleam”) filed on every other tooth.
Fleam
This Disston #4 back-saw cuts incredibly well
now that it has been properly sharpened.
The handle on vintage Western saws will fit
your hand like a glove. Later handles are
uncomfortable to use and look crude by com-
parison.

popularwoodworking.com ■ 19
When I was a kid, the first saw I bought was a Craftsman coping saw with a chrome frame and red-stained handle. For years I did everything with that saw – crosscuts, rips, curves and even joints. But I made none of those cuts particularly well.
Part of the problem was that I was 11 years old. But part of it was the saw. I still own that saw – it’s sitting in front of me now – and it simply will not tension a blade enough to prevent it from twist-ing. A good coping saw will keep the blade fixed at one position when fully tensioned and it will allow the blade to move freely for scrollwork when the tension is backed off.
If you’ve bought a coping saw some-time in the last 40 years, you probably have encountered the same problems that I did. While cutting, the blade at the toe rotates, while the blade at the heel stays stationary. This results in a poor cut and broken blades.
It wasn’t always this way. Coping saws (and their ancestors) have a 500-year track record in woodworking. And after buying and using dozens of vin-tage coping saws, I have come to the conclusion that most of the modern ones aren’t worth much. They don’t ten-sion the blade enough and their frames are weak at best. I know of three solu-tions: 1. Buy a Knew Concepts coping saw, which costs $149 and tensions the blade brilliantly. 2. Hunt down a well-made vintage coping saw with a stiff and well-tensioned frame. 3. Improve a $12 coping saw with 50 cents’ worth of hardware-store washers.
All three approaches are valid. But before diving into the nitty-gritty, I think it’s important to understand where this ubiquitous woodworking saw came from. It has noble roots.
From throne rooms to toysWhile frame saws likely were invented by either the Romans or the Greeks, it
Photos by the author
Improve a Coping Saw
b y c h r I s to P h e r s c h wa r z
your saw can work better by adding washers or by
changing the way you saw.
Around the bend. If your coping saw doesn’t work how you think it should, it could be the saw.

20 ■ Handsaw Basics
wasn’t until the Golden Age of veneered marquetry in the 16th century that the delicate bowsaws required for the intricate work appeared. Several wood-working historians think marquetry saws developed from the jeweler’s saw, a small metal-framed saw used to cut precious materials.
In 1676, André Félibien published a drawing of a petite sie de marqueterie that looks for all the world like a mod-ern coping saw – you can even see that the teeth point away from the handle. Furniture covered in marquetry was a favorite of royalty in Europe and (by the 17th century) in England.
By the 18th century, these sorts of saws were sometimes called “Morris saws” – perhaps it was a bastardization of the word “Moorish,” or it relates to the inlaid game board for an old game called “Nine Men’s Morris.” These saws were used for all sorts of intricate cuts, both by cabinetmakers and jewelers. And the saws had blades designed to cut not only wood, but tortoiseshell, brass and other semi-precious materials.
In the 19th century, the saws were commonly called “bracket saws,” and
during the middle part of the century a fretwork craze developed – you find advertisements for the saws and plans in publications that have nothing to do with woodwork, such as The Pacific Tourist and Beautiful Homes magazines.
Soon the saws spread to the schools, where 19th-century craft-based schools using the Sloyd system taught hand-work that was based around using a knife, a “frame compass saw” and other simple tools to make toys. By the early 20th century, the saw had acquired its modern name, “coping saw,” as carpen-ters found the tool handy for coping inside corners when cutting moulding.
Historical purists might not agree that the coping saw is a descendant of the early marquetry saw, but from a user’s perspective these saws are func-tional equivalents: a metal frame that tensions a thin blade that is used for curved and intricate cuts.
3 Ways to Fix the bladeWhile researching coping saws, I found three primary ways of keeping the blade aligned at both the toe and heel of the tool.
1. Tension alone. A lot of coping saws – good and bad – use the frame alone to tension the blade and fix it in one position. The two arms of the frame spread out so the opening for the blade is too big. You push the arms together to get the blade into the frame, which ten-
sions the blade somewhat. And you can then increase the tension by turning the handle clockwise, which pulls the arms of the frame even closer together.
This works fine if the frame is rigid and keeps its original shape. Many cop-ing saws with lightweight frames lose their shape after a few months. The
Twisted. The toe of my old coping saw tends to slip when I want it locked, even when the saw is fully tensioned. This makes the saw wander and produces an out-of-square cut.
From le Home Depot? This small frame saw for marquetry was shown in a 1676 French text on woodworking and architecture. It looks only slightly fancier than coping saws from today’s home center.
Tighten it. The Olson, and many saws like it, rely on the frame alone to fix the blade in one position. Over time, the frame can become slack.

popularwoodworking.com ■ 21
arms bend in and stay bent. I have old saws from the early part of the 20th century that still tension the blade beautifully. So some key metallurgi-cal point has been forgotten or ignored.
2. Stops. Some saws have fixed de-tents or stops in the frame that help the blade stay aligned at the toe and heel. This solution can work brilliantly or not at all. Some modern coping saws have detents that are too shallow to hold anything – so you are back to relying on
the frame alone to keep the blade fixed.A downside to a saw with stops is
that they don’t always work well when you want the blade to rotate as you cut, such as when you are cutting curva-ceous fretwork in thin materials. The stops are actually too aggressive. If you don’t use your coping saw for fretwork, however, one of these saws is likely for you.
3. Pulleys. Some older coping saws that were designed for fretwork use an ingenious system of pulleys or rollers to keep the blade aligned at the toe and heel. The Jones Patent saw made by E.C. Atkins uses a string that passes through the saw’s frame to keep the blade aligned. The Fenner Patent saw uses a chain. (Both are shown below.)
These saws excel at coping fretwork. The Jones Patent saw works almost like magic. When using these to saw out dovetail waste, however, you need to
pinch the handle and saw frame with your fingers to lock the blade’s position.
A bargain solutionNow you might be thinking that I’m go-ing to send you on a wild goose chase for one of the aforementioned saws, which can be expensive, rare or both. And that is certainly an option for people who like vintage or well-made tools.
But what if you just want a dang coping saw that works? For the last five years (at least), I’ve been fooling around with this idea, trying to find the best inexpensive coping saw and the simplest way to modify it to make it work well.
Here’s the scoop: Buy an Olson De-luxe Coping Saw – they are available for about $12 from many woodworking suppliers. Right from the box (actually the plastic bag) the Olson is a good saw. It’s unique in that it has a locking mechanism at both the toe and heel. So you can get the blade to stay fairly aligned if you don’t get too aggressive with it when cutting.
But with the addition of two pieces of 25-cent hardware from any hard-ware store, you can turn this saw into a blade-clamping monster. What you need are two 5⁄16" split washers, some-times called “spring lock washers.”
I have experimented with a lot of different kinds of washers, including wave washers and serrated-tooth wash-ers. While these improve the saw, the wave washers wear out too quickly for my taste, and the serrated-tooth wash-ers prevent the blade from rotating in one direction only.
Feel free to experiment with more exotic washers – I hear the conical Bel-leville washers are the cat’s pajamas – or just get it done with the cheap-o split washers.
With the washers in place (see pic-tures on page 22, top), your saw is ready to go. You should be able to lock the blade so it might require pliers to move. That’s great for cleaning out dovetail waste. Remove the washers, and the blade will rotate easily for scrollwork.
One last note: Good blades help. The hardware-store varieties are usually overset and break easily. A good-quality
Stop it. These saws – a Crary Machine Works (right) and a Knew Concepts – have detents that keep the blade fixed at a certain number of positions.
Spin it. Coping saws with pulleys keep the
blade aligned no matter what sort of cutting you do. Sometimes
they spin too much for waste removal, but you
learn to control them.

22 ■ Handsaw Basics
blade, such as those made by Olson or Pegas, lasts longer and makes sawing smoother. And just like with your band saw, your saw and your blade will last longer if you relax the tension when you are done for the day.
Choosing bladesCoping saws come in a variety of tooth configurations. You can get them with different teeth per inch (tpi). The typi-cal range is 10 tpi up to 20 tpi. I use the 10-tpi blades for waste removal and usually a 15- or 18-tpi blade for scroll-work. If the material is thick, consider a skip-tooth blade. The wide spaces between the teeth prevent the blade’s gullets from filling with sawdust.
I wish that coping saws didn’t have so much set to the teeth, but there is little you can do about that with typical workshop equipment.
One last detail on blades: I have found that the length of coping saw blades isn’t consistent. Some blades are longer than others. If your saw suddenly stops tensioning properly, it might be that your blades are a little too long.
How to CutThere is a lot of debate about whether you should set up the saw to cut on
the pull or the push stroke. I think the answer is obvious: Orient the blade so the tearing or splintering from the blade is where you want it.
When your work is vertical in a vise or sawing donkey, the teeth should point away from the handle so the splin-tering is on the backside, which you cannot see while standing at the bench.
When sawing material held horizon-tally (more on that in a bit), orient the
For those woodworkers who have prime-rib tastes, I recommend the Knew concepts coping saw. It is
astonishingly lightweight (8 ounces), tensions the blade to a high note and can lock the blade in eight positions.
except for the wooden handle, the tool’s makers redesigned the tool from scratch. I’ve been using one for about 18 months and have zero complaints, except for the color. the factory red was just too much for me. so I painted it black to match my planes and my tool chest.
at $149, it is the most expensive coping saw on the market, but it also has no equal.
For more information, contact Knew concepts at 831-234-4652 or knewconcepts.com. — cs
kNEW CoNCEpTS – THE alUmINUm CaDIllaC
Modern technology. The Knew Concepts saw is different than traditional coping saws on almost every point.
Not that. The current crop of Olson saws come with a plain washer between the handle and the saw frame. Remove it and replace it with a 5⁄16" split washer (left). Then add a split washer between the screw at the toe and the frame (right).
Simple & cheap is best. The simple split steel washer works better in a coping saw than the fancier serrated-tooth washers or bronze cut washers.
bench Pin
cloth-covered board to protect desktop
Desk Iron clamp
Cut anywhere. The V-shaped board, called a bench pin, acts as a sawing platform. With the blade cutting near the point of the V, thin materials won’t vibrate during the cut.

popularwoodworking.com ■ 23
teeth so they point toward the handle. Then the splintering will be on the backside of the work facing the floor, which you cannot see while sawing.
Of course, if you are just removing dovetail waste with the saw, the tearing will be chopped away. So do whatever you like.
When you set up your work to saw it, many woodworkers prefer to saw
the work while it’s held vertically in a vise. And in some cases, such as when you are sawing dovetail waste, this is the best approach.
But when you look at 19th-century photos of schoolchildren sawing out a “Dinky Bird” or squirrel shape, they’re holding the work horizontal on a table or a platform with a V-shaped cutout for support below (see the illustration on
page 22). With small pieces of work, you can hold the work with your off-hand and saw with your dominant hand, holding the saw vertical.
With big pieces of work, clamp the work to the bench (you can use your face vise or tail vise for outboard sup-port) and hold the handle of the coping saw with both hands. Try it, and I think you will be shocked how easy it is to follow a line and keep your cut square to your face. Gravity is lending a hand.
When you saw with the work hori-zontal, try not to get too aggressive. You should feel like you are moving smoothly – not quickly – through the work. Speed will come in time with this method because gravity helps pull the saw down and into the cut, and it helps clear the kerf of dust as well.
Like with most things in handwork, it’s more about finesse than force. And practice always helps. But there are times when the tool really is the culprit, and I’m afraid that is definitely the case with many coping saws. So fix your saw and learn to cope. PWM
Christopher is the editor at Lost Art Press and the author of the forthcoming book
“Roman Workbenches.”
I cope out the waste between my dovetails because that’s how I learned to do it, and I am
fast at it. when I demonstrate that technique, a common gripe from the peanut gallery is that it’s an unnecessary modern complication to dove-tailing.
It’s actually not modern. In “turning and Mechanical Manipulation…” (1856), charles holtzapffel wrote:
“the wood between the dovetail pins is generally cut out with the bow or turning saw, leaving the space as at b, fig. 694; and the spaces are then pared out with the firmer chisel from opposite sides, as at c, the chisel being placed exactly on the gage lines, but slightly overhang-ing, so that the insides are cut hollow rather than square, to insure the exact contact at the inner and outer edges of the dovetails.”
unless you’re a geologist, I consider 158 years to be a good long run for a woodworking technique. — cs
CopINg DoVETaIl WaSTE IS aN olD TECHNIqUE
Figure that. Sawing out your dovetail waste is a technique that dates back to 1856 at least.
Sit & saw. When I cut scrollwork, I clamp the work flat on the bench and sit on a sawbench. Keep your chin right above the work and both hands on the saw if possible.

24 ■ Handsaw Basics LeaD Photo by aL ParrIsh; steP Photos by the author
Discover Flush-cut Saw Techniques
b y g L e n D. h u e y
trim the fat from flush-cut saw techniques. with proper practice
your finished cuts will be extra-smooth.
“Is it the saw or operator error?” That question arises in discussions about problems using flush-cut saws. Learning proper technique puts half that question to bed.

popularwoodworking.com ■ 25
When I began building furni-ture, I bought a flush-cut saw. Knowing that I was going to build Shaker-style furniture and that square pegs were used in nearly every project, I was cer-tain the saw would be one of the most-used hand tools in my shop. With saw in hand, and willing to spend some time testing the cut, I loaded a few pegs into a chunk of wood and started at it.
Having no formal woodworking education – I’d last received lessons in junior high shop class – I made the flush cuts. I wasn’t sure how to correctly handle the saw or even if I had my hands in the right position. Was there a proper method to using these saws? Pictures of the saws in woodworking catalogs show the blade of the saw bent just short of a 90º angle. I always wondered if this was the correct sawing position.
I positioned the saw flat to the sur-face while I sawed back and forth, al-lowing the saw blade to slide over the surface of the wood. Some cuts were acceptable, some weren’t. Eventually I found more cuts weren’t acceptable. The blade dug into the wood and my overall sanding time escalated as I found myself leveling the surface to remove the gash left in the wood. The saw was causing too much repair work. And so I pitched it into the garbage. Was I doing something wrong? Was my technique bad?
I then adopted a new technique of cutting close to the face of my project with a regular backsaw, then sand-ing the pegs flush with a random-orbit sander. Sometimes I’d place a piece of laminate or a business card over the peg and trim as close as possible then sand everything flush. I worked this way for years.
Recently I brought a number of flush-cut saws into the shop to test and to select the best saw. At the same time, I thought I would get some first-hand experience using this type of saw. I’d refine my technique. So, I loaded some pegs into a block of wood in order to perform a couple dozen cuts and com-plete the tests.
Seeing the momentous number of advertisements and pictures of these saws being used with that huge bend, I again wondered if I was approach-ing this cut in the correct manner. Not wanting to miss an opportunity to learn, I bent the saw to that extreme angle and began to cut. It wasn’t a good thing. At that angle, the saw cut worse than if I’d just taken a small hatchet and chopped at the peg. I couldn’t keep the saw flat on the surface and the cut was ragged at best.
Practicing a few times with the same results, I began to think that I just wasn’t going to be capable of using this technique to cut flush. So, I enlisted the help of editors Christopher Schwarz and Robert W. Lang to help uncover my problem. Was it me or were all those photos and advertisements wrong?
“Trust your gut instinct.” “Your first thought is probably correct.” Do these sayings sound familiar? They do to me. I contemplated these truisms as I watched Chris and Bob step to the bench one at a time. I didn’t let them know what I was looking to find, only that I needed them to cut the peg with a flush-cut saw.
Much to my relief, they both ap-proached the peg with the saw flat on the work and didn’t bend the blade as they worked. I now knew I had the basic technique correct. What I needed was to refine the procedure and make the saws work for me instead of against me by leaving that huge gash in the wood.
the technique, step by stepI needed to start at the beginning, so
I mulled over the process of using the flush-cut saw. First things first: Posi-tion the blade flat on the surface of the project. There shouldn’t be any set in the teeth of a flush-cut saw so placing the saw to either side of the peg is ac-ceptable. I’m right-handed, thus you might think it’s correct to begin with the blade on the right-hand side of the peg. However, if you’re right-handed it’s best if you begin with the saw on the left side of the peg. This requires that you rotate your wrist 180º or change your grip on the handle.
As we determine the correct place-ment of the left hand, you’ll see why this saw positioning is so important. Two fingers of the left hand should hold the blade flat to the surface. This keeps the blade flat, minimizing the chance of it lifting from the surface, which would result in a proud peg. And, it prevents the teeth from diving into your nearly finished surface and causing those nasty gash lines, which would be worse.
Your fingers act as a hold-down for the saw as you stroke the saw back and forth, allowing the blade to slide between your fingers and the surface. Make sure that you hold your wrist so the blade remains flat. If you twist forward, you place additional stress at the front of the blade, which increases the chances of digging into the surface. If you twist back you’ll place that stress at the rear of the blade and your cut won’t be flat and smooth across the peg. Using a saw with a wide blade provides you a better chance to remain flat to the surface. A wide blade helps obtain a better cut.
Bad technique or a bad saw? Either way this is not good. The only recourse from here is to level the surface to the gash left by the saw.
This cut started on the right. Rolling the wrist caused the blade to ride upward as the cut progressed, which resulted in a higher left side. Additional work is needed to flush the peg. Holding the wrist level results in a smooth cut.

26 ■ Handsaw Basics
And here is the importance of setting your hands properly: As you finish the cut through the peg the saw blade isn’t traveling toward your hand. If you’ve cut with your hands positioned differ-ently – moving the blade toward your stationary hand – when you finished the cut I’ll bet you jabbed the blade into your hand. I’ve seen this happen on more than one occasion in the classes I’ve taught. I’ll let you in on a secret: I’ve done this a time or two myself (third time’s the charm). If you haven’t made this mistake, consider yourself lucky, as well as warned.
Location dictates the directionWhat happens when you need to make a cut with the blade positioned on the right-hand side of the peg because there
isn’t enough room on the left side of the peg for you to place the blade flat on the project?
If you’re a left-handed woodworker, the procedure is as described, only mir-rored. If you’re a right-handed wood-worker, the process requires a reposi-tioning of the stationary (or left) hand.
Now, in order to keep your station-ary hand out of the line of fire as you complete the cut, it’s necessary to reach across the peg to place your fingers on the blade. (See the photo at top) This position may feel awkward but, rest assured, you will not cut your hand as the saw slices through the peg.
Making the Flush CutWith hand positioning covered, how do you cut? I’ve seen people try to make this cut using surprising tech-
niques. One such technique was to slice through the cut by starting at the back end of the blade and zipping completely past the front end of the blade – all in one swift motion. This action was re-peated numerous times until the cut was complete – each time introducing the blade to the peg and the surface of the project.
Basic handsawing techniques sug-gest that you start the cut with a few short strokes in the direction that is opposite of the tool’s cutting motion. On Western saws this would indicate a cut on the pull stroke. On the Japanese design, which includes most flush-cut saws, the cut would begin with a push stroke. Once the cut is begun and the saw is nestled into the kerf and run-ning smooth, you should use full and complete strokes of the blade.
Using the entire blade does two things. First, it allows for better waste removal. When the gullets between the teeth fill up with dust, the saw stops cutting. Using full strokes helps empty the gullets. Second, using full strokes allows all the teeth to cut, which keeps the blade sharper longer. If you only use a small sampling of the teeth, those
Ideal hand place-ment. My fingers keep
the blade flat on the surface. Once the cut is finished, the hand is
clear of danger.
This cut is wrong in so many ways. The blade is not held flat, it’s not
supported through the cut and the blade has
direct access to the stationary hand. This is an accident waiting to
happen.
When having to cut toward your stationary hand, make sure to raise the wrist and other appendages out of harm’s way. Maintain two fingers on the blade for support and guidance.

popularwoodworking.com ■ 27
teeth wear faster. One area of particular interest when
using handsaws, especially thin-bladed saws such as the flush-cut saw, is the amount of pressure you exert as you saw. In working with any saw, the more force you use, the more apt you are to veer from the line. This happens (in part) because the blade bends or warps under the force.
Continuous sawing as the blade bends causes the kerf to drift. This is not acceptable when using the flush-cut saw. If your blade moves off the flat surface you’ll end up with a cut into the project or a cut that is nowhere near flush. In extreme instances it’s possible to actually kink the blade of flush-cut saws.
Allow the blade to cut with minimal pressure. If the length of time it takes to make the cut seems long, it’s probably because the saw isn’t sharpened cor-rectly or the teeth per inch (TPI) count is high. The higher the TPI, the finer the cut – and the slower the cut is made. Lower TPI saws are more aggressive.
About the CutShould you perform the cut from only one direction, or do you start the cut on one side of a peg and then move to the second or opposing side to complete the operation?
The simplest method is to start the cut and saw through the entire peg. That’s fine if all you’re looking to do is hack away waste material. Much of the time, this is exactly what you’re after. But problems surface if you catch the second-to-last stroke wrong. As you return to make the last stroke, it’s pos-sible to break the remaining material before it’s cut by the teeth. Because the break is at the outer edge of the peg, it’s conceivable that the fibers of the wood will tear down the peg side versus simply breaking off. That can leave a jagged finish to the peg that will require additional work or a nasty visible area that has to be addressed. This is the same reason why tree loggers make a relief cut on the back side of the trunk as they fell trees.
Creating a cut on one side prior to completing the cut from the opposing
side reduces this possibility. If some-thing does happen (say the peg breaks as the two cut areas intersect), the peg will not rip down the outer edge, but break somewhere in the interior of the peg. If material is left protruding from the surface, it’s much easier to pare the center of the peg with a chisel without damaging the project surrounding the peg.
A Final noteIn most woodworking if you’re trim-ming pegs, chances are you’ve installed them using some type of glue. Glue is the enemy of flush-cut saws (and saws in general). The teeth are small and the glue easily becomes lodged in them. Within a short time, the saw becomes
useless or untrustworthy as it cuts. Either scenario is something to avoid. Make sure to clean any glue remnants as soon as they’re discovered.
Develop correct cutting methods and a flush-cut saw will reap huge re-wards in your woodworking. These fine-toothed saws are indeed delicate, but, if cared for properly, they’re capable of lasting a lifetime. PWM
Glen is a former managing editor of this publication.
The number of teeth per inch (TPI) influ-ences the time required to make the cut. More teeth keeps the saw at its job longer, and that increases the chances for mistakes.
Starting the cut on one side and finishing on the opposing side reduces any chances of ripping the grain down the side of the peg. A faux pas such as this shows in a finished project.
The main use for flush-cut saws in my wood-working is to trim pegs. Those often have been glued into position. The glue fills the teeth, rendering the saw useless. So you must clean the teeth well on a regular basis.

28 ■ Handsaw Basics
Six-board chests have been an enduring form of furniture in Western cultures for hundreds of years. And while they differ in their details dur-ing different ages, the basic form and the way it is built has been unchanged since the form appeared.
The chest in this article has details I’ve seen on chests in the 18th and 19th centuries. You can choose different mouldings (or omit them), or add carv-ing or a stenciled design to make the chest suit the time period you prefer.
design with the boardsI built my chest using an 8'-long board and a 12'-long board. Both pine boards were 181⁄2" wide. If you don’t have ac-cess to wide lumber, feel free to glue up panels to the final width. If your chest is painted, no one will notice.
Because my boards were 181⁄2" wide, I used that fact to help design the chest – there’s no need to rip 1" off a wide board or glue on 1". The design of these chests is pretty flexible.
I crosscut the 45"-long lid piece from the 8'-long board and set it aside. Why
LeaD Photos by aL ParrIsh; steP Photos by the author; ILLustratIons by robert w. Lang FroM the author’s MoDeL
6-board Chestb y c h r I s to P h e r s c h wa r z
use two planks, two days and two piles of nails to make this age-old form.
Variations on a form. The bottom chest is the one I built for this article – but let your wood and aesthetics dictate your build. (The middle chest is by Timothy Henriksen; the top chest is by Ty Black.)

popularwoodworking.com ■ 29
45"? These chests are typically 32" to 48" long, and 45" was the clearest length of wood I could get from the board. This piece sets the die for the length and depth of the chest.
With the lid cut, I cut the two ends, which determine the height of the chest. These chests typically range from 18" to 27" tall – a good height for a chest when it comes to lifting the lid and bending over to get something out of storage. It’s not too high and not too low.
I cut the ends to 21" long from the remainder of my 8'-long board. This length allowed me to cut around some knots and eliminate some checks on the end of the board. I then set the two ends aside and grabbed my second board.
From this board I cut my front, back, bottom, moulding and battens.
When you cut moulding by hand, the best way to do it is to “stick” one long piece of moulding and then cut your three pieces from that piece. Stick-ing three pieces of moulding is tricky; it’s unlikely that you will be able to cre-ate exactly the same moulding profile on all three pieces.
Find a piece for the moulding that is long enough to wrap around the front and two ends. (Moulding on the rear of a chest is unnecessary.) Cut that piece free from your board, then cut the front and back pieces to size. The hard part
is done. The remaining stock will be your bottom and lid battens.
Joinery on the endsThe first step in creating the joinery for this chest is to deal with the end pieces. They have long notches cut into their long edges to receive the front and back. Not all chests had these notches, but they give you a cleaner look – the outside surfaces of the front, back and ends are all flush, even at the feet. They also make assembling the chest easier.
Some woodworkers create this
notch by scabbing on a small bit at the floor. It seems like a good idea, but I don’t have evidence that this was done on historical chests. Perhaps they didn’t do it that way because these chests sat on dirt floors that got wet. And a hide glue joint there would come loose.
Cutting these long notches is easy. Sandwich the boards together and lay out the long notches – each is 5⁄8" wide and is as long as the front and back pieces are wide.
Pinch the sandwiched boards in your vise and saw the long notches. With the boards still pinched together, use a plane plus a chisel or rasp to true up the notch.
The last task while the ends are sandwiched together is to cut the deco-rative profile on the bottom of the ends that creates the feet of the chest.
The simplest profile is what antique dealers call the “bootjack” – it’s a simple inverted V that resembles the tool used for pulling your boots off your feet. This profile is just two lines, two cuts and done. A fancier profile is a half-circle or an ogee. Both of these are laid out with a compass, cut with a frame saw and smoothed with a rasp.
in the HouseThe next decision is whether or not to plow dados – housed joints – in the ends that will grasp the bottom board. Here are some pros and cons.
Rip then crosscut. If you rip the moulding piece first before crosscutting the front from the back, you will get a nice long piece of straight-grained stock.
Twice as accurate. Ripping the long notches in the ends is easier if you sandwich the two pieces together. Your cut is more likely to remain square.
A plane job. Most of the clean-up of the notches is with a plane. Work to your layout lines and then clean up any excess in the corner.
Around the bend. I lay out my ogee on both outside faces of the ends. This helps me make an accurate saw cut because I can peer over the board during the cut to ensure I’m on track.

30 ■ Handsaw Basics
Pros: A dado lets you slide the bot-tom board in without any battens or glue blocks for support. You don’t even need to add glue when sliding the bot-tom in place.
Cons: Cutting these dados requires extra tools and time.
I always opt for cutting the dados because it makes assembly easier. The first time you cut a long dado, you can nail or clamp a fence to your work to guide your saw. After a dado or two you will realize that the stiffness of the saw’s plate is enough to keep you straight.
Saw the walls of your dados, then remove most of the waste with a chisel driven by a mallet. Finish the job with a router plane. The dado is 1⁄4" deep, 7⁄8" wide and begins 5" from the bottom of the end pieces.
Front & backThe front and back pieces are a blank canvas – both for decoration and for joinery. Shallow (1⁄4") rabbets on their ends help make the chest easier to as-semble. And you can carve the front, which is typical of 17th-century chests. Or make some simple scratched deco-ration. Or grain paint it, which was typical in the 19th century.
Let’s talk about the joinery first. The
reasons to cut the rabbets on the front and back are simple:
1. They help prevent the case from racking after assembly – especially when transporting the chest.
2. They make it easier to assemble the chest yourself. The rabbets lock into the notches in the end pieces. Then you hit a few nails.
3. You can get away with using short-er (and cheaper) nails. If you make this chest using 1"-thick stock, you need 8d nails to assemble the carcase. However, if you cut 1⁄4"-deep rabbets in the front and back pieces, you can use 6d nails instead. If you buy handmade nails, the savings add up.
Cut your 1⁄4"-deep rabbets with a simple rabbet plane or a moving fillister plane. If you are using a simple rabbet plane, first knife a line where you want the shoulder of the rabbet to be. Tilt the plane and put a corner of the tool’s sole into the knife line to turn the knife line into a V-shaped trench. Then continue to plane until you complete the rabbet. You’ll need to tip the plane a little off vertical at first. Then you’ll need to tip it vertical.
Cut the rabbets. They don’t need to be deep – 1⁄4" is perfect – but they need to be consistent in depth so that your carcase is square and everything is flush on the outside. Make the rab-bets 7⁄8" wide to match the thickness of your ends.
With the rabbets complete, clean up the inside surfaces of your ends and the front and back. This is the best time to do this because you are about to nail some things together.
nail the back to the endsIf you’ve cut rabbets and dados in your parts, here’s how to assemble the chest: Nail on the back (add glue if you like). Fit the bottom in the dados. Nail on the front. Then nail the bottom in place all around.
But first, there are some details to consider. The length of your nails should suit the amount of wood that wasn’t rabbeted away in the front and the back boards. If you have 1"-thick stock and cut a 1⁄4" rabbet, then you should use 6d nails – 8d if you’re work-ing in pine. If you have 7⁄8"-thick stock and cut a 1⁄4"-deep rabbet, you can use 5d nails – 6d in pine.
You need a nail with a sizable head for this operation – such as a rosehead. Headless nails or plain brads won’t do because they don’t have enough hold-ing power. Depending on your stock, you might need to drill a pilot. In some pines and with some nails, you won’t. So make a test joint in scrap to find out what holds and what doesn’t split. After some experience you will get a feel about what will work.
One last detail: Angle these nails slightly at a small slope – about 5°. And alternate the slopes with every nail. This slope helps keep the front and back wedged onto the ends.
With the back nailed to the ends, cut the bottom board to slide into the dados so the fit is snug and the carcase is square. This is a hand-tool way of approaching the bottom: Create the opening and fit the piece to the opening. If you are machining your bottom, you should be able to hit the length bang-on
The hungry chisel. A chisel takes a bigger bite than a router plane, so do as much work as possible with the chisel.
Squaring rabbets. Cross-grain rabbets help square the carcase and line up the pieces during assembly.

popularwoodworking.com ■ 31
and nail the bottom onto the ends first.Usually when I make the bottom
with hand tools, it ends up too thick for the dados. Instead of reducing the thickness of the entire bottom, I bevel the underside of the ends – like a raised panel – until the bottom slides in.
I glue the bottom in place all around – then nail it in after assembly. The glue helps here because all the expansion and contraction is in your favor. So take advantage of it.
You don’t need to use fancy nails to secure the bottom. Just use 6d or 8d cut finish brads – four through each end and five or six through the front and back. Set these below the surface if they will be covered by moulding.
sticking it to the MouldingSkip the moulding if you are going for a plain chest. But the moulding adds the appearance of a classic plinth – the visual separation between the base sec-tion and the not-base section. Surviving pieces were made both ways, with and without moulding.
Cut the moulding on an 80"-long piece of stock. Then cut the miters. This ensures that your profiles will match at the miters. I profile the moulding on a sticking board – a long and flat board with a high fence. I used a 3⁄8"-square ovolo for this profile.
on MiteringThe less you fuss about mitering the better your miters will be. Just cut
18"
7⁄8"
16"
431⁄4"
21"
When you examine these chests as a builder, they are a bit of a puzzle. the puzzle isn’t how they go together, but instead, how they stay that
way over time.these chests disobey many rules of wood movement. the grain on the
front and back of the chest is horizontal. the grain on the ends is vertical. the front and back should have split and fallen off. and take a gander at the lid. the grain of the battens that help keep the lid flat and the dust out is 90° to the grain on the lid.
by all rights, the battens should have fallen off, the lid should have split and the whole chest should be a collection of interesting splinters.
nails – the right nails – allow you to get away with serious crimes of wood movement. nails are almost always more flexible than screws or dowels. so a nail allows the wood to expand and contract, bending back and forth through the yearly humidity cycles.
except for hardened masonry nails, I’ve found that all nails will bend, including wrought nails, cut nails, wire nails and pneumatic ones. the rea-son I’ve always preferred cut nails for making furniture is that they hold bet-ter than wire or pneumatic nails. cut nails are a wedge that – when properly driven – bend and crush the wood fibers in a way that holds the nail fast.
wire and pneumatic nails aren’t wedges, and while they do compress some of the surrounding wood fibers, they are just not in the same league as cut nails (or wrought nails).
another bonus: a good cut nail will have a rough finish, especially com-pared to a smooth wire nail. that rough finish also gives the nail some extra bite. this is why many pneumatic nails are coated with a glue that helps them stick in the wood – every little bit helps. — cs
WHy 6-BoarD CHESTS SUrVIVE
bottom fits in dados in ends. width of bottom = width between notches in ends. Length of bottom = distance between dado bottoms when ends are in place with back
width of rabbet on ends of front/back = thickness of ends
ends are 1⁄2" narrower than top. top is width of widest board available
Length of notch = width of front/back. Depth of notch = thickness of front/back beyond rabbet
Length of front & back = length of top less the thickness of both battens
exPLoDeD vIew
Head in. Cut nails with a broad head are the ideal fastener for attaching the front and back to the ends. You can use nails with a smaller head for attaching the bottom.

32 ■ Handsaw Basics
them with confidence and calm. I wish someone had told me that when I was starting out.
Wrapping moulding around three sides of a carcase is cake compared to making the full 360°. Focus on getting one corner good and tight. Then clamp those two pieces in place on the chest and mark the other corner for its miter.
With both miters cut on the front piece you can focus on getting the fit tight on the returns (the pieces that “return” down the ends of your chest). I leave the returns long until after ev-erything is glued and nailed in place.
Glue the entire front of the moulding to the case. On the returns, glue only the miters and the front one-third of the moulding to the ends. Press every-thing in place for a minute or two. Then drive the brads. The moulding should not shift. Set the brads. Then saw the returns flush at the back of the carcase.
About the LidThe lid has two important components: its moulding profile around the rim and the battens on its underside. The moulding profile makes the lid look like something more sophisticated than leftover siding. The battens keep the lid flat – if you attach them correctly.
First cut the moulding profile on the two ends and the front of the lid. It can be almost any profile you have on hand. I have a larger ovolo plane (1⁄2" wide) that looks like a lot of other lids for chests that I’ve seen. Cut the profile on the ends first, then on the front edge. This allows you to erase any splintering from working across the grain.
The battens on the ends of the lid
keep it flat. Nailing the battens to the lid isn’t enough – the battens will fall off when the top moves. Gluing the battens won’t do. Nailing and gluing is better, but the lid’s movement is still stronger than that joint.
You have two choices: old school and modern. The modern approach is to screw the battens to the underside of the lid and ream out the pilot holes for the screws so the lid can move. The other approach is to drive nails through the battens and the lid so that the tips protrude through the moulding, then bend the tips back into the moulding.
Choose nails that protrude about 1⁄2" beyond the moulding. Then turn the tip of the nail over like a fishhook and drive it back into the moulding. This secures the batten to the lid and keeps the lid fairly flat.
Hinge & FinishThere are a variety of ways to attach the hinges to the carcase and lid. Snipe hinges are an old solution (you can make your own using 2" cotter pins).
These chests were typically painted on the outside and left bare inside. The paint highlights the form of the chest and obscures the distracting cross-
grain aspects of the form. What paint you choose should be
based on:■ Do you hate strong smells? Use
latex.■ Does the paint need to be bomb-
proof? Consider oil-based.■ Do you want a traditional look?
Use commercial milk paint.■ Are you a glutton for punishment?
Make your own paint.I use commercial “milk” paint. I
know it’s not historically accurate, but it does give me a look I like. Plus it is quite durable and fairly low on the toxicity scale. I apply two coats of paint and sand between the coats with a #320-grit sanding sponge.
After building several of these chests, both by myself and with friends, I found that the process became faster and faster (two days is almost a luxuri-ous amount of time). In fact, it took lon-ger to type this explanation of building the piece than to actually make it. PWM
Christopher is the editor at Lost Art Press and a con-tributing editor to Popular Woodworking.
6-board Chest no. iteM diMensions (inCHes) MAteriAL CoMMents t w l
❏ 1 Lid 7⁄8 181⁄2 45 Pine
❏ 2 ends 7⁄8 18 21 Pine
❏ 2 Front & back 7⁄8 16 431⁄4 Pine 1⁄4 rabbet both ends
❏ 1 bottom 7⁄8 163⁄4 42 Pine in dados in ends
❏ 2 battens 7⁄8 7⁄8 181⁄2 Pine
Miter slices. Here is how you miter your stuck moulding. By
sawing close to your line you can make the
grain and profile match around the corner
perfectly.
Bent over. Clenching the nails back into the moulding hooks the battens to the underside of the lid.

1-800-683-8170 leevalley.com
Our Veritas® premium joinery saws are innovative blends of tradition and technology, incorporating critical characteristics of a classic fi ne joinery saw, yet executed using modern production processes and state-of-the-art materials. All share the same platform, with a revolutionary spine injection molded from a mixture of stainless-steel powder for weight, glass fi ber for stiffness and a polymer resin binder. The high-carbon steel blade and stainless-steel handle-mounting bolt are molded into the spine, creating a solid blade/spine/mount assembly. The saws have excellent balance, cut easily and true, and have a comfortable hardwood grip that makes the saw feel as if it’s an extension of your arm. Patented. Made in Canada.
A Cut Above
For more information about our Veritas® premium joinery saws, call or visit:
1. Veritas® Rip Tenon Saw, 9 tpi 05T14.01 2. Veritas® Crosscut Tenon Saw, 12 tpi 05T14.05 3. Veritas® Crosscut Carcass Saw, 14 tpi 05T07.01 4. Veritas® Rip Carcass Saw, 12 tpi 05T07.05 5. Veritas® Fine-Cut Dovetail Saw, 20 tpi 05T05.05 6. Veritas® Standard Dovetail Saw, 14 tpi 05T05.017. Veritas® Rip Gent's Saw, 20 tpi 05T10.018. Veritas® Crosscut Gent's Saw, 22 tpi 05T10.05
2
1
6
3
7
4
8
5
Find us on:

1-800-683-8170 leevalley.com
To help beginners build confi dence while they learn straightforward hand-cut joinery techniques, such as dovetails and fi nger joints, Veritas® has developed a number of magnetic saw guides that hold a saw at the correct place and the correct angle for a perfect cut.
Skill Development
Find us on:
Browse our catalog online or download it to the Lee Valley Library app for iPad®, iPod®, iPhone® or Android™ devices.
1. Veritas® Dovetail Saw 05T02.03 2. Veritas® 14° Dovetail Guide 05T02.05 3. Veritas® 1:8 Dovetail Guide 05T02.12 4. Veritas® 1:6 Dovetail Guide 05T02.11 5. Veritas® Right-Angle Guide with Saw 05T04.05 6. Veritas® Saw Depth Stop 05G45.107. Veritas® Crosscut Carcass Saw, 14 tpi 05T07.01 8. Veritas® Magnetic Saw Guide, 8 05T20.01 9. Veritas® Rip Carcass Saw, 12 tpi 05T07.05
2
1
6
3
4
5
7
8
9