NIRSC Radio Program Guides
32
ICOM IC-A6 NIRSC Radio Programming Guides
-
Upload
khangminh22 -
Category
Documents
-
view
1 -
download
0
Transcript of NIRSC Radio Program Guides

ICOM IC-A6
NIRSC Radio Programming Guides

ICOM IC-A6 PORTABLE RADIO BASIC OPERATION & CONTROLS
1. Press and Hold the “PWR“ softkey for 3 seconds until the power turns “ON”.2. Select a valid AM frequency from one of the memory locations or direct enter a valid AM frequency via the keypad.3. Adjust the volume by turning the Volume Knob to the desired level.4. Adjust the Squelch by pushing the “SQL“ softkey, then rotate the tuning dial to desired squelch level (00 - 24).
(See Figure 1)Note: “SQL -- 0” is open squelch and “SQL -- 24” is tight squelch.
If the Squelch control is set too high, squelch may not open for weak signals.
5. Press the “ANL“ softkey to reduce pulse noise caused by engine ignitions or other outside interference.
The radio is ready to operate on the selected frequency.
6. To Transmit, press and hold the Push-To-Talk (PTT).Note: The display will indicate the radio is transmitting by displaying a “TX” icon on the top portion of the LCD.
(See Figure 2)
7. Pause 1 second and talk in a normal voice into the microphone.Note: Try to shield the microphone from wind and other loud background noises for clearer transmissions.
8. Release the PTT to stop transmitting and receive incoming transmissions.Note: The display will indicate the radio is receiving by displaying a “RX” icon on the top portion of the LCD.
(See Figure 3)
ICOM A-6 Front View
SQL --20
M1 5Figure 1
TX 132.250
M1 5Figure 2
RX 132.250
M1 5Figure 3
Antenna
LCD
Active Memory Channel
Active Bank
Power Softkey
Delete/Clear Softkey
Scan/ANL Softkey
Microphone
Speaker
Active Frequency
Function Softkey
Tuning Dial
Volume Knob
PTT
Back Light
Recall Softkeys
Keypad
Enter Softkey
NIRSC Radio Programming Guides

ICOM IC-A6 PORTABLE RADIO SETTINGS/OPTIONS
MANUAL FREQUENCY ENTRY USING THE KEYPAD• Press and Hold the “PWR“ softkey for 3 seconds until the power turns “ON”.• Press the “CLR“ softkey to select Frequency Mode.• Enter a valid 6 digit AM frequency and press the “ENT“ key. Display will indicate the current selected frequency.
(See Figure 1)Note: Only “2”, ‘5”, “7”, and “0” can be entered as the 5th and final digit.
MANUAL FREQUENCY ENTRY USING THE TUNING DIAL• Press and Hold the “PWR“ softkey for 3 seconds until the power turns “ON”.• Push the “CLR“ softkey to select Frequency Mode.• Rotate the tuning dial to set the desired frequency. (See Figure 1)
Note: To select 1Mhz tuning step, press the “F“ softkey once, push the “F“ softkey again to return to normaltuning.
PROGRAMMING A MEMORY CHANNEL• Set the desired frequency using the keypad, the radio must be in frequency mode to enter new frequency.• Press the “F“soft key, followed by the “MR“ softkey. The LCD will flash the “Mx XX” in the lower display.
(See Figure 2)• Select a memory bank (0-9) to program by pressing the “F“ softkey followed by the “0“ softkey, then selecting a
desired Bank using the tuning dial. Press the “ENT“ softkey once the desired bank is located.Note: Default is Bank-0 (See Figure 3)
• Select a memory channel (00-19) to be programmed using the tuning dial.• Press the “ENT“ key to enter that frequency into the selected memory location. (See Figure 4)
MEMORY CHANNEL SELECTION• Press the “MR“ key to select Memory Mode.• Select the desired memory location by rotating the tuning dial to desired memory channel and press “ENT“.• Display will indicate the corresponding frequency of the memory location including bank location. (See Figure 4 )
Note: To CLEAR the memory contents, select the memory channel to be cleared. Press the “F“ softkey, thenpress and hold the “CLR“ softkey for 2 seconds.
SELECTING A BANK• Press the “F“ softkey, followed by the “0“ softkey.• Select the desired bank (0-9) using the top tuning dial.• Press the “ENT“ softkey to make the selected bank active.
RECALL FUNCTION Recall stores the last 10 frequencies used in the radio.• To recall a used frequency, press the “ “ softkeys to find the desired used frequency. (See Figure 5)
Note: To CLEAR the recall contents, select the recall channel to be cleared. Press the “F“ softkey, then push and hold the “CLR“ softkey for 2 seconds.
KEYPAD LOCK FUNCTIONTo Enable Key Lock, press the “F“ key, then press the “7“ key (Key Lock) to turn "ON" the function. (See Figure 6)
• Display indicates that the key Lock functions is enabled by displaying the “ “ icon in the upper part of theLCD.
To Disable Key Lock, repeat the process. Note: The lock function prevents accidental frequency changes & accidental function activation.
AUTOMATIC NOISE LIMITER (ANL) FUNCTIONTo Enable ANL, press the “ANL“ softkey.
• Display indicates that the ANL function is enabled by displaying “ANL” icon in the lower part of the LCD.(See Figure 7)
To Disable ANL, press the “ANL“ softkey. Note: The ANL function reduces pulse noise such as ignition noise, computer, lights and other outside interference.
BACK LIGHT FUNCTIONTo Enable the LCD Back Light, press the Light side button. (Bottom side button)To Disable the LCD Back Light, Press the Light side button. Note: The Light button turns on the LCD back light and the keypad lighting. The light will stay on until it is disabled.
SETTING SQUELCH LEVEL (See Figure 8)To Set Squelch Level, press the “SQL“ softkey, then rotate the tuning dial to desired squelch level (00 - 24).
Note: “SQL -- 0” is open squelch and “SQL -- 24” is tight squelch. (NIICD suggested level is 20)
125.550
Figure 1
125.550
M0 0Figure 2
BANK - - 0
Figure 3
125.550
M2 5Figure 4
122.900
r 3Figure 5
125.550 ANL
M2Figure 6
125.550 ANL
M2 5Figure 7
SQL - - 20
M2 5Figure 8
NIRSC Radio Programming Guides

KING DPH/DPHx
NIRSC Radio Programming Guides

DPH/DPHx PORTABLE RADIO BASIC OPERATION & CONTROLS
DPHx Front View
1. Turn power ON by turning the ON/OFF Volume Knob clockwise.Note: A beep indicates the radio is operational. The LCD will briefly indicate the current group before indicating the current
channel.2. Select a group number by pressing the "#" key and entering a 2-digit number followed by the "ENT" key.3. Select a channel by turning the Channel Select Knob to one of the 16 available positions.4. Adjust the volume by turning the Squelch Knob clockwise to open the squelch and setting the volume to a desired level.5. Adjust the Squelch by turning the Squelch Knob counterclockwise until the squelch closes.
Note: This is the Threshold Squelch Setting.Turn the squelch Knob fully counterclockwise into the detent position to place the RX in Code Guard. RX must have a tone programmed in order for RX Code Guard to function properly. Putting the RX in Code Guard, will enable the RX not to open squelch unless the it receives the correct RX tone.
The radio is now ready to RECEIVE on the selected group and channel.
6. To transmit, press and hold the Push-To-Talk (PTT) button on the side of the radio.Note: The Transmit Indicator Light should glow red while transmitting. If not, the battery may be low or the channel is RX only or
busy.
7. Pause 1 second and talk in a normal voice into the microphone.Note: Try to shield the microphone from wind and other loud background noises for clearer transmissions.
8. Release the PTT to stop transmitting and receive incoming transmissions.
BroadbandAntenna
ON/OFFVolumeKnob
PTT
LCD
Microphone
Speaker
Keypad
ProgrammingPlug
ClamshellRelease
Clamshell
SquelchCode Guard
AntennaConnector
16 PositionChannel
Knob
HI/LOWPower
PriScan
Toggle
ScanToggle
RX LED
TXLED
DPHx Top View
NIRSC Radio Programming Guides

DPH/DPHx PORTABLE RADIO SETTINGS/OPTIONS
ADD/REMOVE CHANNELS FROM SCAN LISTTo ADD channel to Scan List, select a channel to scan with the channel select knob and press the "ENT" key.
• LCD will display "SCN" in the upper section, indicating that the current displayed channel is in the scan list.(See Figure 1)
To REMOVE channel from Scan List, select the channel to remove with the channel select knob and press the "CLR" key.
• "SCN" will be removed from the upper section of the LCD.Note: Scan must be disabled in order to add or remove channels from the scan list, by toggling the "SCAN" and
"PRI" toggle switches in the down position. (Toward the front of the radio)
ADD PRIORITY SCAN CHANNEL NIICD default is set to all PRI off.To select a channel as a Priority Scan Channel, select a channel and press the "PRI" key. (See Figure 2)
• LCD will display "PR" in the upper section, indicating that the current displayed channel is now the Priority 1Channel.
Note: Scan must be disabled in order to add or remove the Priority 1 Channel, by toggling the "SCAN" and "PRI" toggle switches in the down position. (Toward the front of the radio)Priority 2 Channel can only be changed in the "CH 00" parameters. (See "CH 00" Settings)
Note: Enabling PRI Scan will only scan the Priority Channel(s). In order to scan the scan list channels and the Priority Channel(s), both the Scan and PRI Toggle switches must be enabled.
ENABLE/DISABLE SCAN/PRIORITY SCANTo Enable Scan, by toggling the Scan Toggle Switch to the up position. (Toward the back of the radio)
• LCD will indicate scan is enabled by flashing "-- --" in the right side of the display if alphanumeric mode in disabled.(See Figure 3)
or• LCD will indicate scan is enabled by flashing "SCN" in the upper part of the display if alphanumeric mode is en-
abled.
To Disable Scan, by toggling the Scan Toggle Switch to the down position. (Toward the front of the radio)To Enable Priority Scan, by toggling the PRI Toggle Switch to the up position. (Toward the back of the radio)
• LCD will indicate Priority Scan is enabled by flashing "-- --" in the right side of the display and with a "PR" icon inthe top portion of the display if alphanumeric mode is disabled. (See Figure 4)
or• LCD will indicate Priority Scan is enabled by flashing "SCN" in the upper part of the display if alphanumeric mode is
enabled.
To Disable Priority Scan, by toggling the PRI Toggle Switch to the down position. (Toward the front of the radio) Note: Depending on what type of Priority Scan Mode is enabled, the LCD will display and operate differently for
each priority mode. Check the priority mode in the "CH 00" Group Settings.NIICD Default is set to Priority Mode A, Priority Channels follows the selected channel.
CHANGING GROUPSTo Change Groups, press the "#" key followed with the 2-digit number of the desired group and press "ENT" or wait 3 seconds. (See Figure 5)
Note: All DPH/DPHx NIICD model radios have a 25 group capacity. Groups 1-5 contain the Standard NIICD Frequencies.
TX USER SELECTABLE TONESTo Enable Selectable Tone, press one of number keys (1-9) to select a pre programmed TX User Selectable Tone.
• Display will indicate a TX User Selectable Tone is enabled by displaying the "CG" icon in the top portion of the LCD.• If Alphanumeric Mode is Disabled, display will also indicate the selected TX User Tone. (See Figure 6)
To Disable Selectable Tone, press the "0" key on the keypad. Note: NIICD default is TX User Selectable Tones Disabled and can be enabled through the "CH 00" functions.
HI/LOW POWER SETTINGSTo Select Low Power, toggle the LO/HI Toggle Switch to the up position. (Toward the back of the radio)To Select High Power, toggle the LO/HI Toggle Switch to the down position. (Toward the front of the radio)
Note: NIICD Low Power setting is set to 2.0 Watts, High Power setting is set to 5.0 Watts. (Current draw dependent)
ENABLE/DISABLE KEYPADTo Disable keypad, press and hold the "FNC" key until the LCD displays "LOCKED". (See Figure 7)To Enable keypad, press and hold the "FNC" key until the LCD displays "UNLOCKED". (See Figure 8)
SCN
CHAN 1Figure 1
PR SCN
CHAN 1Figure 2
CH 1 -- --Figure 3
PR
CH 1 -- --Figure 4
GRP 01Figure 5
CG
CH 1 9 Figure 6
UNLOCKEDFigure 8
LOCKEDFigure 7
NIRSC Radio Programming Guides

DPH/DPHx PORTABLE RADIO ANALOG PROGRAMMING GUIDE
1. Turn on the radio and select the desired group before accessing the program mode.
2. Access Program Mode (See Figure 1)• Insert a programming plug into the side accessories connector of the radio.• Press and hold the red Master Switch on the programming plug.• Simultaneously press and hold the "FCN" key for approximately three seconds until the LCD displays "-- -- -- ID".• Enter a valid password. NIICD default password is set to "000000"• Press the "ENT" key to proceed into the programming mode.• If the correct password was entered, the LCD displays "CH 00". (See Figure 2)
3. From the "CH 00" mode, select a 2-digit channel number (01-16) to program using the keypad.Note: Once a channel is entered, pressing the "FNC" key will scroll through that particular channel parameters.
4. Channel Bandwidth Setting, press the " # " key to toggle between Wide-Band and Narrow-Band. (See Figure 3)• Once the Bandwidth is set, press the "FCN" key to scroll to the next programming parameter.
Note: The "N" indicates that the channel is set for Narrow-Band operation, No indication for Wide-Band operation.
5. Channel Receive Frequency, press the "CLR" key to clear the current frequency and enter a valid VHF RXfrequency and press the "ENT" key to save the RX frequency and scroll to the next parameter. (See Figure 4)
6. Channel Receive Mode, press the "PRI" key to toggle between "A", "D", or "M". Select "A" for Analog Mode andpress the "ENT" key to save the RX mode and scroll to the next parameter. (See Figure 5)Note: A=Analog Channel, D=Digital Channel, and M=Mixed Mode Channel
7. Channel Receive Code Guard, press te "CLR" key to clear the tone and enter a valid tone using the keypad andpress the "ENT" key to save the RX Tone and scroll to the next parameter. (See Figure 6)Note: Enter "000.0" for no tone.
8. Channel Receive NAC, used for programming the RX Network Access Code.This is a Digital Channel Function, press the "ENT" key to skip to the next programming parameter.
9. Channel Squelch Mode, press the "PRI" key to toggle between "NRM", or "SEL". Select "NRM" for analog settingsand press the "ENT" key to save the Squelch Mode and scroll to the next parameter. (See Figure 7)Note: "SEL" is used only in Digital or Mixed Mode to use Talk Groups or Individual Call Functions.
10. Channel Transmit Frequency, press the "CLR" key to clear the current frequency and enter a valid VHF TXfrequency and press the "ENT" key to save the TX Frequency and scroll to the next parameter. (See Figure 8)
11. Channel Transmit Mode, press the "PRI" key to toggle between "A", "D", or "M". Select "A" for Analog Mode andpress the "ENT" key so save the TX Mode and scroll to the next parameter. (See Figure 9)Note: A=Analog Channel, D=Digital Channel, and M=Mixed Mode Channel
12. Channel Transmit Code Guard, press the "CLR" key to clear the current tone and enter a valid tone using thekeypad and press the "ENT" key to save the TX Tone and scroll to the next parameter. (See Figure 10)Note: Enter "000.0" for no tone.
13. Channel Transmit NAC, used for programming the TX Network Access Code.This is a Digital Channel Function, press the "ENT" key to scroll to the next programming parameter.
14. Channel Talk Group ID, used for programming the TX Talk Group ID.This is a Digital Channel Function, press the "ENT" key to scroll to the next programming parameter.
15. Channel Label, press the "ENT" key to keep name/label and finish programing the channel or press the "CLR" keyto change the name/label for that channel. (See figure 11)Changing Channel Label• Press the "CLR" key to clear the label.• Press the "PRI" key to scroll through available Alphanumeric Characters.• Press the "FCN" key to enter a character and shift to the left for the next character.• Repeat the process until desired name/label is entered and press the "ENT" key when complete.Note: LCD is an 8 character display. NIICD default is set to display the numeric characters only in the "CH 00"
parameters.
16. Once the label is entered and saved, the program will bring the first channel parameter up, channel programming iscomplete and saved at this point. The user may select another channel to program by starting on step 3 or exit theprogram mode by cycling power to the radio.
PRG -- -- -- ID
Figure 1
PRG
CH 00Figure 2
PRG
CH 01NFigure 3
PRG RX
XXX.XXXXFigure 4
PRG RX
MODE -- AFigure 5
PRG RX CG
000.0Figure 6
PRG RX ID
SQL -- NRMFigure 7
PRG TX
XXX.XXXXFigure 8
PRG TX CG
MODE -- AFigure 9
PRG TX CG
000.0Figure 10
PRG
CMD 8Figure11
NIRSC Radio Programming Guides

DPH/DPHx PORTABLE RADIO "CH 00" SETTINGS
PRG
CH 00Figure 1
PRG
P000000Figure 2
PRG ID
0000000Figure 3
PRG TX
160 SECFigure 4
PRG SCN
2.0 SECFigure 5
PRG
PRI 1 OFFFigure 6
PRG
PRI 2 OFFFigure 7
1. Select a group you wish to program and Access the Program Mode to enter the "CH 00 " Settings. (See Figure 1)(See Access Program Mode)Note: Once "CH 00" is displayed, press the "FNC" key to scroll to the first "CH 00" parameter.
2. Group Password, press the "ENT" and advance to the next programming parameter. (See Figure 2)Note: NIICD does not recommend changing the group password. NIICD default password is set to "P000000"
3. Group Automatic Numeric Identification parameter (ANI): This is used as either a radio management number ortransmitted as a DTMF tone. Press the "ENT" or "FNC" key to advance to the next parameter.NIICD default is set to "0000000" (See Figure 3)
4. Transmit Tim-Out Timer (TOT) duration: To change the TOT, press the "PRI" key to increase the TOT duration andpress the "ENT" to store the value and advance to the next parameter.NIICD default is set to "120 SEC", A TOT value of 0.0 Seconds, disables the TOT. (See Figure 4)
5. Scan Delay Time: To change the Scan Delay Time, press the "PRI" key to increase the duration and press the"ENT" key to store the value and advance to the next parameter.NIICD default is set to "2.0 SEC" (See Figure 5)
6. Priority 1 Channel: To enable a Priority 1 Channel, press the "PRI" key to select a channel or turn OFF thefunction and press the "ENT" key to store the value and advance to the next parameter.NIFC Default is set to "OFF" (See Figure 6)Note: Priority 1 Channel can be programmed as a fixed channel, selected by the channel select knob, or OFF.
If the PRI 1 is set as fixed, it can be changed through the front keypad by pressing the "PRI" key.
7. Priority 2 Channel: To enable the Priority 2 Channel, press the "PRI" key to select a channel or turn OFF thefunction and press the "ENT" key to store and advance to the next field.NIFC Default is set to "OFF" (See Figure 7)Note: Priority 2 Channel can only be changed via the "CH 00" parameters.
8. "Ch 00" Group One, Two, Three Functions (See Figure 8)Note: The group functions can be enabled or disabled by pressing the number key corresponding to that function.
CH 00 Group 1 Functions NIICD default is "1-12345" (See Figure 8)1-12345.....Battery Saver Inhibit (Disables the Battery Saver Function for current drain on battery life.)1-12345.....Group Scan (Enables the current group to be scanned while in Group Scan Mode.)1-12345.....TX on PRI 1 (Enables transmission on PRI 1 when PRI Scan is Enabled.)1-12345.....Priority 1 Lock (Enables the Lock out of the "PRI" key, so user can not change the Priority 1 Channel.)1-12345.....Scan List Lock (Enables the Scan List Lock out, so user can not add/remove channels from the scan list.)
CH 00 Group 2 Functions NIICD default is "2-12345" (See Figure 9)2-12345.....User CH Code Guard (Enables keypad to independently select a Channel Code Guard value from programmed channels.)2-12345.....Busy Channel Indicator (Yellow LED illuminates when signal is received on selected channel.)2-12345.....Busy Channel Lockout (Yellow LED illuminates and PTT is disabled when a signal is received on selected channel.)2-12345.....Busy Channel Lockout/Over-ride (Same as Busy Channel Lockout, but PTT can be activating the Squelch Code Guard.)2-12345.....ANI (Enables the ANI ID number to be transmitted with each press of the PTT as a DTMF tone.)2-12345.....Manual DTMF Encoder (Enables keypad for manual DTMF operation.)2-12345.....Manual DTMF/ANI Encoder (Enables the ANI ID number to be transmitted only after the "ENT" key is pressed during TX.)
CH 00 Group 3 Functions NIICD default is "3-12345" (See Figure 10)3-12345.....Reserved3-12345.....Reserved3-12345.....LCD Back light ON Display Change (LCD back light will illuminate each time the display receives an input.)3-12345.....LCD Back light ON Key Press (LCD back light will illuminate each time a key is pressed.)3-12345.....Alphanumeric Mode (LCD will display Alphanumeric Characters.)
9. Back Light Duration: To change the back light duration, press the "PRI" key to select an available setting and pressthe "ENT" key to store the value and advance to the next parameter.NIICD default is "OFF" (See Figure 11)
10. Group Label: Press the "ENT" key to advance back to the "CH 00" starting point. (See Figure 12)At this point, pressing the "FNC" key repeatedly will scroll down each value parameter of the "CH 00" settings forthat group.If no changes are needed, exit the program mode by cycling power to the radio or continue with channelprogramming.
PRG
1 -- 12345Figure 8
PRG
2 -- 12345Figure 9
PRG
3 -- 12345Figure 10
PRG
LITE OFFFigure 11
PRG
GROUP XXFigure 12
NIRSC Radio Programming Guides
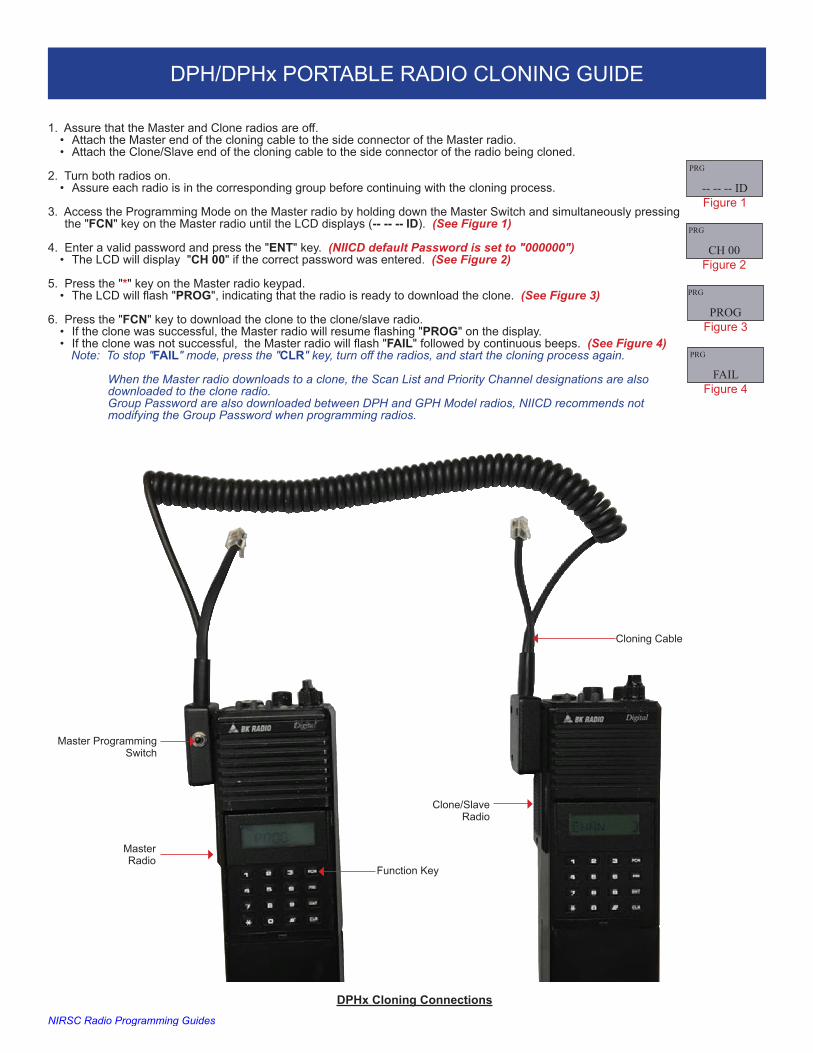
DPH/DPHx PORTABLE RADIO CLONING GUIDE
1. Assure that the Master and Clone radios are off.• Attach the Master end of the cloning cable to the side connector of the Master radio.• Attach the Clone/Slave end of the cloning cable to the side connector of the radio being cloned.
2. Turn both radios on.• Assure each radio is in the corresponding group before continuing with the cloning process.
3. Access the Programming Mode on the Master radio by holding down the Master Switch and simultaneously pressingthe "FCN" key on the Master radio until the LCD displays (-- -- -- ID). (See Figure 1)
4. Enter a valid password and press the "ENT" key. (NIICD default Password is set to "000000")• The LCD will display "CH 00" if the correct password was entered. (See Figure 2)
5. Press the "*" key on the Master radio keypad.• The LCD will flash "PROG", indicating that the radio is ready to download the clone. (See Figure 3)
6. Press the "FCN" key to download the clone to the clone/slave radio.• If the clone was successful, the Master radio will resume flashing "PROG" on the display.• If the clone was not successful, the Master radio will flash "FAIL" followed by continuous beeps. (See Figure 4)
Note: To stop "FAIL" mode, press the "CLR" key, turn off the radios, and start the cloning process again.
When the Master radio downloads to a clone, the Scan List and Priority Channel designations are also downloaded to the clone radio.Group Password are also downloaded between DPH and GPH Model radios, NIICD recommends not modifying the Group Password when programming radios.
DPHx Cloning Connections
PRG
-- -- -- IDFigure 1
PRG
CH 00Figure 2
PRG
PROGFigure 3
PRG
FAILFigure 4
Cloning Cable
Master Radio
Clone/Slave Radio
Function Key
Master ProgrammingSwitch
NIRSC Radio Programming Guides

RELM BK KING KNG2-P150/P400
NIRSC Radio Programming Guides

KNG2 P150/P400 PORTABLE RADIO BASIC OPERATION & CONTROLS
KNG2 P150 Front View
1. Turn the power ON by turning the "VOL" Knob clockwise.• The LCD will indicate the current Zone and Channel label.
2. Select a zone number by pressing the "Zone" softkey. Enter the zone number via the keypad and press the "ENT" softkey. OR
Press the "Zone" softkey then press the PREV/NEXT soft keys to highlight desired zone and press the "ENT" softkey.
3. Select a channel by turning the Channel Select Knob to one of the 16 available positions.
4. Adjust the volume by pressing and holding the "Monitor" button once to open the squelch and set the volume to desired level, pressthe "Monitor" key once more to close the Squelch.
The radio is now ready to operate on the selected group and channel.
6. To transmit, press and hold the Push-To-Talk (PTT) button on the side of the radio.Note: The Transmit Indicator Light should glow red while transmitting.
If not, the battery may be low or the channel is RX only or busy.
7. Pause 1 second and talk in a normal voice into the microphone.Note: Try to shield the microphone from wind and other loud background noises for clearer transmissions.
8. Release the PTT to stop transmitting and receive incoming transmissions.
KNG2 P150 Top View
AntennaConnector
Antenna
Monitor
Nuisance CHDelete
KeypadLock/Unlock
Speaker
PTT
LCD
Softkeys
Alpha Numeric Keypad
Microphone
ON/OFFVolume
16 PositionChannel Knob
Scan Toggle
Pri Scan Toggle
TX/RXLED
NIRSC Radio Programming Guides

KNG2 P150/P400 PORTABLE RADIO SETTINGS/OPTIONS
NIFC Zone 1 CHAN 1
Figure 1
CHANGING ZONES• To change groups, press the "Zone" softkey.• Enter the zone number via the key pad and press the "ENT" softkey. (See Figure 1 & 2)
OR• Press the "Zone" softkey. Press the PREV/NEXT keypad keys to desired zone and press the "ENT" softkey.
(See Figure 1 & 2)
ENABLING/DISABLING CHANNEL SCAN (See Figure 3)• To Enable Scan - Toggle the "Scan Toggle" switch towards the front of the radio.
The display will indicate the radio is in Scan Mode by displaying a "C " icon on the LCD. • To Disable Scan - Toggle the "Scan Toggle" switch towards the back of the radio.
ENABLING/DISABLING PRIORITY SCAN• To Enable Priority Scan - Toggle the "PRI Toggle" switch towards the front of the radio.
The display will indicate the radio is in Priority Scan Mode by displaying a flashing "SCN" icon on the LCD.• To Disable Priority Scan - Toggle the "PRI Toggle" switch towards the back of the radio.
Note: A priority scan channel must be enabled via programming or the radio will display "No Priority Channels Selected"
ADD/REMOVE CHANNEL FROM SCAN LIST (See Figure 4)• To Add a Channel to Scan List - Press the "Menu" softkey, scroll down to "Chan Scan List" and press the
"ENT" softkey.• Select the channel/channels to scan using the "PREV/NEXT" softkeys, then press the "+/-" softkey to add or
delete the channel from the scan list. (See Figure 5)• Press the "ESC" softkey when complete to save settings. Press "ESC" softkey to reach main menu.
Note: An "+" next to the select channel indicates the Channel is in the Scan List. Press the "ESC" softkeytwice to return to normal operation.Note: A small check mark icon " √ " will appear on the LCD indicating that channel is in the scan list.
• To Remove a Channel from Scan List - Repeat the process and select "-".
TX POWER SELECTION (See Figure 6 and 7)• To Enable Low or HighPower - Press the "PWR" softkey to toggle between High and Low power setting.
Once enabled, a "H" for High Power or "L" for Low Power is displayed on the LCD.
LOCKING KEYPAD • To Lock Keypad - Turn the top bezel button located on the top of the radio to the " " position. If any
keys on the front panel are pushing while the keypad is locked, the LCD will display the following "ControlsLocked" message. (See Figure 8)
• To Unlock the Keypad - Turn the top bezel button to the " " position.
MENU PWR LITE ZONE
Zone Select 1: Zone 1 2: Zone 2 3: Zone 3 4: Zone 4 5: Zone 5
Figure 2ESC PREV NEXT ENT
Figure 3
NIFC Zone 1 CHAN 1MENU PWR LITE ZONE
√
Figure 4
1: Cloning 2: Chan Scan List 3: Priority Chans 4: User Rx Tones 5: User Tx Tones 6: Squelch Adjust
ESC PREV NEXT ENT
Chan Scan List 1: CHAN 1 2: CHAN 2 3: CHAN 3 4: CHAN 4 5: CHAN 5
Figure 5ESC PREV NEXT + / -
Figure 6
NIFC Zone 1 CHAN 1MENU PWR LITE ZONE
L√
Figure 7
NIFC Zone 1 CHAN 1MENU PWR LITE ZONE
H√
Figure 8
Controls Locked
NIRSC Radio Programming Guides

KNG2 P150/P400 PORTABLE RADIO ANALOG PROGRAMMING GUIDE
1. Turn on the radio.
2. Access the Program Mode• Press the "Menu" softkey. (See Figure 1,2,3)• Scroll down using the PREV/NEXT softkeys to highlight "Keypad Prog" and press the "ENT" softkey.• Enter the 6-digit NIICD password and press the "ENT" softkey. NIICD password is set to "000000"• Highlight "Keypad" and press the "ENT" softkey.• Highlight "Channel" and press the "ENT" softkey.• Highlight "Edit Channel" and press the "ENT" softkey.• Highlight the appropriate Zone and Channel to program and press the "ENT" softkey.
4. Once in Channel Program Mode, scroll using PREV/NEXT to highlight "RX Frequency" and press "ENT".• Press the "CLR" or "EDIT" softkey and enter a valid RX Frequency and press "ENT". (See Figure 4)
5. Highlight "Rx Mode" and press "ENT", highlight "Analog" and press "ENT". (See Figure 5)Note: Analog, Digital, or Mix Mode available
6. Highlight "Rx Guard" and press "ENT". Select "OFF" if NO tone is used on RX. (See Figure 6)• Highlight "Tone" and press "ENT".• Press the "CLR" or "EDIT" softkey and enter a valid RX Tone and press "ENT".
Note: OFF - Operates on carrier squelch mode. Tone - CTCSS tones. Digital - DSC value tones.
7. Highlight "Bandwidth" and press "ENT", highlight "Narrowband" and press "ENT". (See Figure 7)
8. Highlight "TX Power" and press "ENT". (See Figure 8)• Select "Low Power", "High Power", "Selectable Low", or "Selectable High" and press "ENT".
Note: Low Power - Locks Channel to low power mode. High Power - Locks Channel to high power mode.
Selectable - Allows High/Low TX power selection from assigned button.
9. Highlight "TX Frequency" and press "ENT".• Press the "CLR" or "EDIT" softkey and enter a valid TX Frequency and press "ENT". (See Figure 9)
10. Highlight "TX Mode" and press "ENT", highlight "Narrowband" and press "ENT". (See Figure 10)Note: Analog, Digital, or Selectable available.
11. Highlight "TX Guard" and press "ENT". Select "OFF" if NO tone is used on TX. (See Figure 11)• Highlight "Tone" and press "ENT".• Press the "CLR" or "EDIT" softkey and enter a valid TX Tone and press "ENT".Note: OFF - Operates on carrier squelch mode. Tone - CTCSS tones. Digital - DSC value tones.
12. Highlight "DTMF Live Dial" and press "ENT", highlight "ON" and press "ENT". (See Figure 12)
13. Highlight "Channel Label" and press "ENT" to edit the channel name.• Press the "CRL" or "EDIT" softkey and enter a new channel name and press the "ENT".
Note: Up to 16 characters on the display are allowed.
14. Press "ESC" once to edit another channel or "ESC" all the way back to the main menu.
NIFC Zone 1 CHAN 1
Figure 1MENU PWR LITE ZONE
Figure 2
11: Date and Time 12: Enhanced Scan 13: Dual Mode Scan 14: Radio Info 15: System Test 16: Keypad Prog
ESC PREV NEXT ENT
Enter Password
0 0 0 0 0 0
Figure 3ESC BACK ENT
RX Frequency
168.20000MHz
Figure 4ESC CLR EDIT
RX Mode
Analog Digital Mixed
Figure 5ESC PREV NEXT ENT
RX Gaurd Off Tone: 110.9 Hz Digital: Select:
Figure 6ESC PREV NEXT ENT
Bandwidth Narrowband Wideband
Figure 7ESC PREV NEXT ENT
TX Power Low Power High Power Selectable Low Selectable High
Figure 8ESC PREV NEXT ENT
TX Frequency
168.20000MHz
Figure 9ESC CLR EDIT
TX Mode
Analog Digital Selectable
Figure 10ESC PREV NEXT ENT
TX Gaurd Off Tone: 110.9 Hz Digital: Select:
Figure 11ESC PREV NEXT ENT
DTMF Live Dial Off On
Figure 6ESC PREV NEXT ENT
NIRSC Radio Programming Guides

KNG2 P150/P400 PORTABLE RADIO CLONING GUIDE
1. Assure that both radios are off and attach the cloning cable to both the Source and Target radios.Note: If using the KAA0701 KNG/Legacy Cloning cable, the source/master radio must be connected to thesingle ended cable end. (See Figure 1)
2. Turn both radios on.
3. Select a Source Group/Zone on the source/master radio. (See Step 2 on Basic Operation and Controls)
4. Select a Target Group/Zone on the target/slave radio. (See Step 2 on Basic Operation and Controls)
5. Place the Target radio in Cloning Mode by pressing the "Menu" softkey, highlight "Cloning" and press "ENT". (See Figure 2)
6. On the Target/Slave radio select "Enter Dest Clone" to allow cloning information from the Master radio.The LCD will display "Distination Clone Mode Waiting...". (See Figure 3, 4)
7. Place the Source/Master radio in cloning mode by pressing the "Menu" softkey, then highlight "Cloning" and press "ENT". (See Figure 2)
8. On the Source/Master radio select "Clone Active Zone" to clone active group/zone to active group/zone on Target/Slave Radio. (See Figure 5)
The LCD on Master radio will display "Cloning in Progress". (See Figure 6)The LCD on the Target radio will display "Destination Clone Start". (See Figure 7)
9. Once clone is complete the Target/Slave radio will recycle power and return to the Main Operating Menu screen.
10. Once the clone is complete the Master/Source radio will display "Source Clone Complete" momenterly andreturn to the cloning menu. At this point an other slave/target radio can be cloned by repeating steps 4, 5,6,and 7.
Figure 1KNG P150s Cloning Connections
Cloning Cable
Master Radio
Slave Radio
Figure 2
01: Cloning 02: Chan Scan List 03: Priority Chans 04: User RX Tones 05: User TX Tones 06: Squelch Adjust
ESC PREV NEXT ENT
Cloning Clone Active Zone Clone Picklist Enter Dest Clone
Figure 3ESC PREV NEXT ENT
Destination CloneMode
Waiting...
Figure 4EXIT
Cloning Clone Active Zone Clone Picklist Enter Dest Clone
Figure 5ESC PREV NEXT ENT
Cloning In Progress
Figure 6EXIT
Destination CloneStart
Figure 7EXIT
NIRSC Radio Programming Guides

KING KNG-P150s
NIRSC Radio Programming Guides

KNG P150s PORTABLE RADIO BASIC OPERATION & CONTROLS
KNG P150s Front View
1. Turn the power ON by turning the "VOL" Knob clockwise.• The LCD will indicate the current Zone and Channel label.
2. Select a zone number by pressing the "Zone" softkey. Enter the zone number via the keypad and press the "OK" softkey. OR
Press the "Zone" softkey then press the UP/Down soft keys to highlight desired zone and press the "OK" softkey.
3. Select a channel by turning the Channel Select Knob to one of the 16 available positions.
4. Adjust the volume by pressing the "Monitor" button once to open the squelch and set the volume to desired level, press the"Monitor" key once more to close the Squelch.
The radio is now ready to operate on the selected group and channel.
6. To transmit, press and hold the Push-To-Talk (PTT) button on the side of the radio.Note: The Transmit Indicator Light should glow red while transmitting.
If not, the battery may be low or the channel is RX only or busy.
7. Pause 1 second and talk in a normal voice into the microphone.Note: Try to shield the microphone from wind and other loud background noises for clearer transmissions.
8. Release the PTT to stop transmitting and receive incoming transmissions.
KNG P150s Top View
AntennaConnector
Antenna
Monitor
Nuisance CHDelete
KeypadLock/Unlock
Speaker
PTT
LCD
Softkeys
Alpha Numeric Keypad
Microphone
ON/OFFVolume
16 PositionChannel Knob
Scan Toggle
Pri Scan Toggle
TX/RXLED
NIRSC Radio Programming Guides

KNG P150s PORTABLE RADIO SETTINGS/OPTIONS
CHANGING ZONES• To change groups, press the "Zone" softkey.• Enter the zone number via the key pad and press the "ENT" softkey. (See Figure 1 & 2)
OR• Press the "Zone" softkey. Press the UP/Down keypad keys to desired zone and press the "ENT" softkey.
(See Figure 1 & 2)
ENABLING/DISABLING SCAN (See Figure 1)• To Enable Scan - Toggle the "Scan Toggle" switch towards the front of the radio.
The display will indicate the radio is in Scan Mode by displaying a flashing "SCN" icon on the LCD.• To Disable Scan - Toggle the "Scan Toggle" switch towards the back of the radio.
ENABLING/DISABLING PRIORITY SCAN• To Enable Priority Scan - Toggle the "PRI Toggle" switch towards the front of the radio.
The display will indicate the radio is in Priority Scan Mode by displaying a flashing "SCN" icon on the LCD.• To Disable Priority Scan - Toggle the "PRI Toggle" switch towards the back of the radio.
ADD/REMOVE CHANNEL FROM SCAN LIST (See Figure 3)• To Add a Channel to Scan List - Press the "Menu" softkey, scroll down to "Scan List" using the UP/DOWN
softkeys and press the "ENT" softkey.• Select the channel to scan using the UP/DOWN softkeys, then press the "+/-" softkey to add or delete the
channel from the scan list.Note: An "+" next to the select channel indicates the Channel is in the Scan List. Press the "ESC" softkeytwice to return to normal operation.
• To Remove a Channel from Scan List - Repeat the process and select "-".
TX POWER SELECTION (See Figure 4)• To Enable Low Power - Press the "LPW" softkey to enable low power setting.
Once enabled, a black background around the "LPW" display will be outlined.• To Enable High Power - Press the "LPW" softkey to disable low power setting.
LOCKING KEYPAD • To Lock Keypad - Turn the top bezel button located on the top of the radio to the " " position. If any keys
on the front panel are pushing while the keypad is locked, the LCD will display the following "Keys Locked"message. (See Figure 5)
• To Unlock the Keypad - Turn the top bezel button to the " " position.
SCNZn 1: Ch 1CHAN 1
MENU LPW LIGHT ZONE
Figure 1
SCNSelect ZoneZone 1Group 1 ESC ZONE
Figure 2
SCNChannel Scan+ Chan 1 Chan 2
ESC +/-
Figure 3
SCNZn 1 : Ch 1CHAN 1
ESC LPW LIGHT ZONE
Figure 4
SCN
Keys Locked
ESC LPW LIGHT ZONE
Figure 5
NIRSC Radio Programming Guides

KNG P150s PORTABLE RADIO ANALOG PROGRAMMING GUIDE
1. Turn on the radio.
2. Access the Program Mode (See Figure 1 and 2)• Press the "Menu" softkey.• Scroll down using the Up/Down softkeys to highlight "Keypad Prog" and press the "ENT" softkey.• Highlight "Keypad Prog" and the press the "ENT" softkey.• Enter the 7-digit NIICD password and press the "ENT" softkey. NIICD password is set to "0000000"
3. Once in Program Mode, scroll up/down to highlight "Channels" and press "ENT".
4. Scroll to the desired Zone/Group using the up/down softkeys and press "ENT".
5. Scroll to the desired Channel using the up/down softkeys and press "ENT".
6. Highlight "Rx Freq" and press "ENT". (See Figure 6)• Press the "CLR" softkey and enter a valid RX Frequency and press "ENT".
7. Highlight "Rx Mode" and press "ENT", highlight "Analog" and press "ENT". (See Figure 7)
8. Highlight "Rx Guard" and press "ENT". (See Figure 8)• Press the "CLR" softkey and enter a valid RX Tone and press "ENT".
Note: "RX NAC" is a Digital function and should be skipped while programming an Analog channel.Note: "Squelch Mode" can not be changed while programming an Analog Channel.
9. Highlight "Tx Freq" using the up/down softkeys and press "ENT". (See Figure 9)• Press the "CLR" softkey and enter a valid TX Frequency and press "ENT".
10. Highlight "Tx Mode" and press "ENT", highlight "Analog" and press "ENT". (See Figure 10)
11. Highlight "Bandwidth" and press "ENT", highlight "12.5 Khz" for Narrowband and press "ENT".(See Figure 11)
12. Highlight "Tx Guard" and press "ENT". (See Figure 12)• Press the "CLR" softkey and enter a valid TX Tone and press "ENT".
Note: "TX NAC" is a Digital function and should be skipped while programming an Analog channel."TGID" is a Digital function and should be skipped while programming an Analog channel.
13. Highlight "Secure Mode" and press "ENT", highlight "Clear" and press "ENT". (See Figure 13)Note: "Key" and "Key Lock" options or for Encryption only, and should be skipped while programming anAnalog Channel.
14. Highlight "Low Pow Lock" and press "ENT", highlight "OFF" and press "ENT". (See Figure 14)Note: Selecting "ON" will enable low power at all times for that particular channel.
15. Highlight "Plist Disable" using the up/down softkey and press "ENT", select "OFF" and press "ENT".
16. Press "ESC" once and select another channel to program repeat steps 6 through 15, or press "ESC" severaltimes to exit the programming mode.
User Tx TonesSquelch SetKeypad Prog ESC ENT
Figure 1
Keypad ProgUser Tones
ESC ENT
Figure 2
ChannelsZone ParamsGlobal Params ESC ENT
Figure 3
Select ZoneZone 1Group 1 ESC ENT
Figure 4
Select ChannelChan 1Chan 2 ESC ENT
Figure 5
Chan LabelRX FreqRX Mode ESC ENT
Figure 6
Chanel LabelRX FreqRX Mode ESC ENT
Figure 7
RX FreqRX ModeRX Guard ESC ENT
Figure 8
RX NACSquelch ModeTX Freq ESC ENT
Figure 9
Squelch ModeTX FreqTX Mode ESC ENT
Figure 10
TX FreqTX ModeBandwidth ESC ENT
Figure 11
TX ModeBandwidthTX Guard ESC ENT
Figure 12
TX NACTGIDSecure Mode ESC ENT
Figure 13
KeyKey LockLow Pow Lock ESC ENT
Figure 14
NIRSC Radio Programming Guides

KNG P150s PORTABLE RADIO CLONING GUIDE
1. Assure that both radios are off and attach the cloning cable to both the Source and Target radios.
2. Turn both radios on.Note: Determine which group needs to be cloned from the Source radio, and to which group on the targetradio will be cloned.
3. Place the Master radio in Cloning Mode by pressing the "Menu" softkey, highlight "Cloning" and press "ENT".(See Figure 1)
4. Select the type of clone to be preformed by the Master radio. (See Figure 2)• Active Zone - Information from the current selected zone in the source radio will be sent to the current active
zone on the target radio.• Zone-to-Zone - User selects the source and target zones to be cloned.• Entire Radio - All information from the Source radio will be cloned to the target radio.
Note: Radios programmed with blocked zones will not receive cloning information when a Entire Radio cloneis selected. Entire radio cloning transfers all radio information except the following:
• Radio Serial Number• P25 Identification Number• Encryption Keys• Passwords
Active Zone: (See Figure 2)• Highlight "Active Zone" and press "ENT".
Zone-to-Zone: (See Figure 3)• Highlight "Zone-to-Zone" and press "ENT".• Scroll and select the "Source Zone" and press "ENT".• Scroll and select the "Destination Zone" and press "ENT".
Entire Radio: (See Figure 4)• Highlight "Entire Radio" and press "ENT".
5. Once the cloning is complete press "ESC" on the Source radio for normal operation. (See Figure 5)Note: If cloned failed, its possible that the Target zone is blocked from accepting any incoming clone.(See Figure 6)
KNG P150s Cloning Connections
Cloning Cable
Master Radio Slave
Radio
CloningScan ListPri. Channels ESC ENT
Figure 1
CloneActive ZoneZone-to-Zone ESC ENT
Figure 2
CloneActive ZoneZone-to-Zone ESC ENT
Figure 3
CloneZone-to-ZoneEntire Radio ESC ENT
Figure 4
Zone-to-ZoneSuccessfully
Cloned ESC ENT
Figure 5
Cloned Failed:Target Zone
Locked ESC ENT
Figure 6
NIRSC Radio Programming Guides

KNG PORTABLE RADIO QUICK CLONING GUIDE
KNGs to KNGs1. Assure that both radios are off and attach the cloning cable to both the Source and Target radios.2. Turn both radios on and select desired zone to clone on each Source and Target radios.3. Place the Master radio in Cloning Mode by pressing the "Menu" softkey, highlight "Cloning" and press "ENT".4. Select the type of clone to be preformed by the Master radio, ("Active Zone", "Zone-to-Zone" or "Entire Radio"), then press the
"ENT" key.• Active Zone - Information from the current selected zone in the source radio will be sent to the current active zone on the target
radio.• Zone-to-Zone - User selects the source and target zones to be cloned.• Entire Radio - All information from the Source radio will be cloned to the target radio
5. Once the cloning is complete press "ESC" on the Source radio for normal operation.
KNG to KNGs1. Assure that both radios are off and attach the cloning cable to both the Source and Target radios.2. Turn both radios on and select desired zone to clone on each Source and Target radios.3. On Source/Master radio, press the "Menu" softkey.
• Select "Cloning" using the Up/Down softkeys, then press the "ENT" softkey.• Select "Clone Active Zone" using the Up/Down softkeys, then press the "ENT" softkey to send clone.
4. Once the cloning is complete, press "ESC" on the Source radio for normal operation.
KNG to KNG1. Assure that both radios are off and attach the cloning cable to both the Source and Target radios.2. Turn both radios on and select desired zone to clone on each Source and Target radios.3. On Target radio, press the "Menu" softkey.
• Select "Cloning" using the Up/Down softkey, then press the "ENT" softkey.• Select "Enter Dest Clone" using the Up/Down softkeys, then press the "ENT" softkey to send clone.
4. On the Source radio, press the "Menu" softkey.• Select "Cloning" using the up/down softkeys, then press the "ENT" softkey.• Select "Clone Active Zone" using the up/down softkeys, then press the "ENT" softkey.
4. Once the cloning is complete, press "ESC" on the Source radio for normal operation.
KNG to DPH/DPHx1. Assure that both radios are off and attach the cloning cable to both the Source and Target radios.2. Turn both radios on and select desired zone to clone on each Source and Target radios.3. On the Source radio, press the "Menu" softkey.
• Select "Cloning" using the up/down softkeys, then press the "ENT" softkey.• Select "Clone Active Zone" using the up/down softkeys, then press the "ENT" softkey.
4. Once the cloning is complete, press "ESC" on the Source radio for normal operation.
DPH/DPHx to KNG/KNGs1. Assure that both radios are off and attach the cloning cable to both the Source and Target radios.2. Turn both radios on and select desired zone to clone on each Source and Target radios.3. On the Source radio, access the program mode by holding down the Master Switch and simultaneously pressing the "FCN" key until
the LCD displays (-- -- -- ID).• Enter a valid password and the "ENT" key.
4. Press the "*" key on the master radio.• The LCD will flash "PROG", indicating the radio is ready to download the clone.
5. Press the "FCN" key to download the clone to the Target radio.6. Once the cloning is complete, cycle power on the Target radio.
Note: Radios programmed with blocked zones will not receive cloning information when a Entire Radio clone is selected. Note: If cloned failed, its possible that the Target zone is blocked from accepting any incoming clone.
Entire radio cloning transfers all radio information except the following:• Radio Serial Number• P25 Identification Number• Encryption Keys• Passwords
NIRSC Radio Programming Guides

MIDLAND STP105B/404A
NIRSC Radio Programming Guides
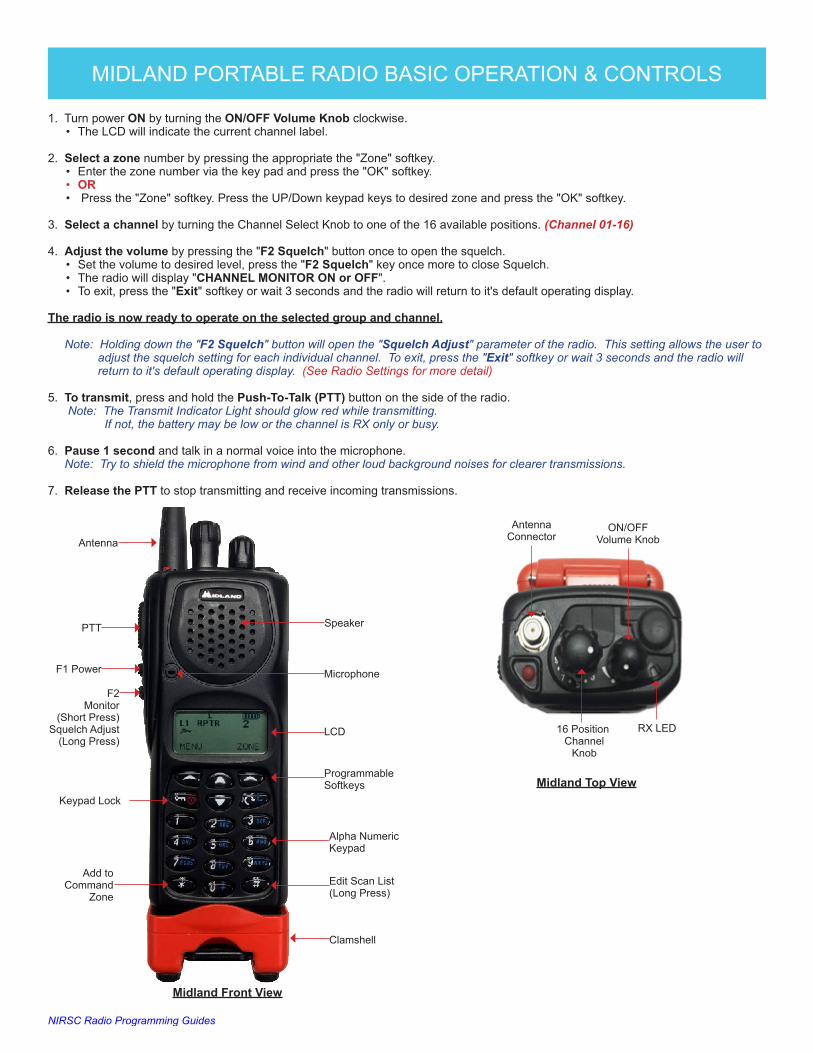
MIDLAND PORTABLE RADIO BASIC OPERATION & CONTROLS
1. Turn power ON by turning the ON/OFF Volume Knob clockwise.• The LCD will indicate the current channel label.
2. Select a zone number by pressing the appropriate the "Zone" softkey.• Enter the zone number via the key pad and press the "OK" softkey.• OR• Press the "Zone" softkey. Press the UP/Down keypad keys to desired zone and press the "OK" softkey.
3. Select a channel by turning the Channel Select Knob to one of the 16 available positions. (Channel 01-16)
4. Adjust the volume by pressing the "F2 Squelch" button once to open the squelch.• Set the volume to desired level, press the "F2 Squelch" key once more to close Squelch.• The radio will display "CHANNEL MONITOR ON or OFF".• To exit, press the "Exit" softkey or wait 3 seconds and the radio will return to it's default operating display.
The radio is now ready to operate on the selected group and channel.
Note: Holding down the "F2 Squelch" button will open the "Squelch Adjust" parameter of the radio. This setting allows the user to adjust the squelch setting for each individual channel. To exit, press the "Exit" softkey or wait 3 seconds and the radio will return to it's default operating display. (See Radio Settings for more detail)
5. To transmit, press and hold the Push-To-Talk (PTT) button on the side of the radio.Note: The Transmit Indicator Light should glow red while transmitting.
If not, the battery may be low or the channel is RX only or busy.
6. Pause 1 second and talk in a normal voice into the microphone.Note: Try to shield the microphone from wind and other loud background noises for clearer transmissions.
7. Release the PTT to stop transmitting and receive incoming transmissions.
Midland Top View
Midland Front View
SpeakerPTT
LCD
Keypad Lock
16 Position Channel
Knob
Microphone
ProgrammableSoftkeys
Alpha NumericKeypad
Edit Scan List(Long Press)
Clamshell
Add to Command
Zone
F1 Power
F2 Monitor
(Short Press)Squelch Adjust
(Long Press)
Antenna
RX LED
AntennaConnector
ON/OFFVolume Knob
NIRSC Radio Programming Guides

MIDLAND PORTABLE RADIO SETTINGS/OPTIONS
CHANGING ZONESTo change groups - press the "Zone" softkey.
• Enter the zone number via the key pad and press the "OK" softkey. (See Figure 1) OR
• Press the "Zone" softkey.• Press the UP/Down keypad keys to desired zone and press the "OK" softkey. (See Figure 2)
ENABLING/DISABLING SCANTo Enable Scan - press the " C " softkey.
The display will indicate the radio is scanning by a "T " icon in the upper right corner. (See Figure 3)
To Disable Scan - press the " C " softkey.Note: Pressing the "Menu" softkey while scanning will also disable scan.
If no channels are in the scan list, the user will get the following error "Enter Scan List" on the display.
ADD/REMOVE CHANNEL FROM SCAN LISTTo Add a Channel - press the "Menu" softkey. (See Figure 4)
• Scroll down to "Channel Parameter" using the up/down softkeys and press the "Select" softkey.• Scroll to "Channel Scan" and press the "Select" softkey.• Scroll down/up to desired channel and press the "Select" softkey.• Scroll to "Add to List", "1st Priority" or "2nd Priority" and press the "OK" softkey. (See Figure 5)• Press the "Exit" softkey, and continue adding more channels to the scan list.• Once complete, press "Exit" twice to close scan edit list.
To Remove a Channel - Repeat the process and select "Remove". (See Figure 6)
Note: Holding down the "#" key will also bring up the Edit Scan List menu.
TX POWER SELECTIONTo Change Power Settings - press the "F1" side button to cycle between HI/MID/LOW power settings. Note: H= HI Power/ M=Medium Power/ L=Low Power (See Figure 7)
LOCKING KEYPAD To Lock the Keypad - press the " " softkey once to lock the key pad.
• LCD momentarily displays "Key Lock Active"To Unlock the Keypad - press the " " softkey once.
• Then press the "Unlock" softkey to unlock keypad.• LCD momentarily displays "Key Lock Inactive"
SQUELCH ADJUSTMENT (See Figure 8)To Adjust Squelch - press and hold the "F2 Squelch" button to open the "Squelch Adjust" parameter.
• Adjust the squelch setting by using the up/down softkeys and press the "OK" softkey.
Note: Setting squelch to the far left, completely opens the squelch sensitivity setting (Open Squelch).
L
Chan 1 1
MENU ZONE
Figure 1
L
1: Zone 1Zone NO:(1)
OK EXIT
Figure 2
L
Chan 1 1
MENU ZONE
Figure 3
L
CHANNEL PARAMETERS
SELECT EXIT
Figure 4
L -Chan 1 1
Add to List OK ZONE
Figure 5
L +Chan 1 1
Remove OK ZONE
Figure 6
H
Chan 1 1
MENU ZONE
Figure 7
H
SQUELCH0 + +
OK EXIT
Figure 8
NIRSC Radio Programming Guides

MIDLAND PORTABLE RADIO ANALOG PROGRAMMING GUIDE
1. Select the group you wish to program (See Basic Operation and Controls)
2. Select the "Menu" softkey, scroll down/up to "Channel Parameters" and press the "Select" softkey.(See Figure 1)
3. Scroll down/up to "Channel" and press the "Select" softkey to enter channel programming mode.
4. Enter the 5-Digit Password and press the "OK" softkey. NIICD Password is "00000" (See Figure 2)
5. Scroll up/down to desired channel to program and press the "Select" softkey to enter the channel parameters.(See Figure 3)
Channel Parameters; Scroll up/down to edit each of the following channel parameters6. Channel Mode: Default is set to "Analog". (See Figure 4)
• To change Channel Mode, press the "Edit" softkey and scroll up/down to select "Analog, Digital, orMulti" and press the "OK" softkey.
7. RX Frequency: Press the "Edit" softkey to edit the Receive Frequency.• To change Receive Frequency, press the " C " key several times to clear the frequency and enter the
new Receive Frequency and press the "OK' softkey. (See Figure 5)
8. TX Frequency: Press the "Edit" softkey to edit the Transmit Frequency.• To change Transmit Frequency, press the " C " key several times to clear the frequency and enter the
new Transmit Frequency and press the "OK' softkey. (See Figure 6)
9. TX Power: Default is set to Medium (2 Watts).• To change power, press the "Edit" softkey and scroll up/down to select "Low, "Medium", or "High" Power
and press the "OK" softkey.
10. Channel Name: Default is channel numbers.• To change the Channel Name, press the "Edit" softkey and press the " C " key several time to clear the
channel name. Enter a new channel name via the numeric key pad and press the "OK" softkey.
11. TX Timeout: Default is set to "Yes". (Timer is set to 120 seconds)• To change TOT, press the "Edit" softkey and scroll up/down to select "No or Yes" and press the "OK"
softkey.
12. RX Tone Type: Default is set to "CCS".• To change Receive Tone Type, press the "Edit" softkey and scroll up/down to select "CCS" or "DCS" and
press the "OK" softkey.
13. RX Tone: Default is set to "None".• To change Receive Tone, press the "Edit" softkey and scroll up/down to select desired tone from list and
press the "OK" softkey.
14. TX Tone Type: Default is set to "CCS".• To change Transmit Tone Type, press the "Edit" softkey and scroll up/down to select "CCS" or "DCS"
and press the "OK" softkey.
15. TX Tone: Default is set to "None".• To change Transmit Tone, press the "Edit" softkey and scroll up/down to select desired tone from list and
press the "OK" softkey.
16. Chan Spacing: Default is set to Narrowband "12.5Khz".• To change Channel Spacing, press the "Edit" softkey and scroll up/down to select either "12.5Khz" or
"15Khz" and press the "OK" softkey.
17. ANI Type: Default is set to "None".• To change ANI, press the "Edit" softkey and scroll up/down to select either "None, "5-Tone", or "DTMF"
and press the "OK" softkey.
18. Selcall Type: Default is set to "None".• To change Selcall, press the "Edit" softkey and scroll up/down to select "None", "2-Tone", or "5-Tone"
and press the "OK" softkey.
19. Once all parameters are entered, press the "Exit" softkey. (See Figure 7)• Display will show "Save Changes Permanently?", press the "Yes" softkey key to save all parameters.
L
CHANNEL PARAMETERS
SELECT EXIT
Figure 1
L
Channel Edit Password?
- - - - - OK EXIT
Figure 2
L
1: Chan 1 Channel No?
- - - SELECT EXIT
Figure 3
L
1: Chan 1 Channel Mode: ANALOG
EDIT EXIT
Figure 4
L
1: Chan 1 TX Freq.: 415.50000 Hz
EDIT EXIT
Figure 5
L
1: Chan 1 RX Freq.: 415.50000 Hz
EDIT EXIT
Figure 6
L
SAVE CHANGES PERMANENTLY?
YES NO
Figure 7
NIRSC Radio Programming Guides

MIDLAND PORTABLE RADIO CLONING GUIDE
1. Turn both radios ON.
2. Attach each end of the cloning cable to each Accessories Jack on top of the radio.(See Midland Cloning Connections)• There is no master or slave connections on the cloning cable.
Note: The Master radio will clone from it's current group into the Slaves current group, verify the Master andthe Slave radios are in the appropriate groups before cloning.
3. On the Master radio, select "Menu" using the left radio softkey. (See Figure 1)• Scroll down to "Channel Parameters" via the up/down arrow softkeys and press the "Select" softkey.
(See Figure 2)• Scroll down to "Clone" and press the "Select" softkey. (See Figure 3)• Select "Single Zone" or "All Zones" via the up/down arrow softkeys and press the "Select" softkey.
(See Figure 4)• Press the "Prog" softkey to send the clone over to the Slave radio. (See Figure 5)• The Master radio will communicate with the slave radio and write the cloned group. (See Figure 6)
4. Once the cloning is successful, press the "Exit" softkey three times to exit out of the programming/cloningmode. (See Figure 7)
Midland Cloning Connections
L
Chan 1 1
MENU ZONE
Figure 1
L
CHANNEL PARAMETERS
SELECT EXIT
Figure 2
L
CLONER
SELECT EXIT
Figure 3
L Select Clone Type: Single Zone
SELECT EXIT
Figure 4
L Press PROG. to Clone
PROG. EXIT
Figure 5
L Cloning unit. Please wait.....
PROG. EXIT
Figure 6
L Successful Cloning.
PROG. EXIT
Figure 7
Master Radio Clone/Slave Radio
Cloning Cable
NIRSC Radio Programming Guides
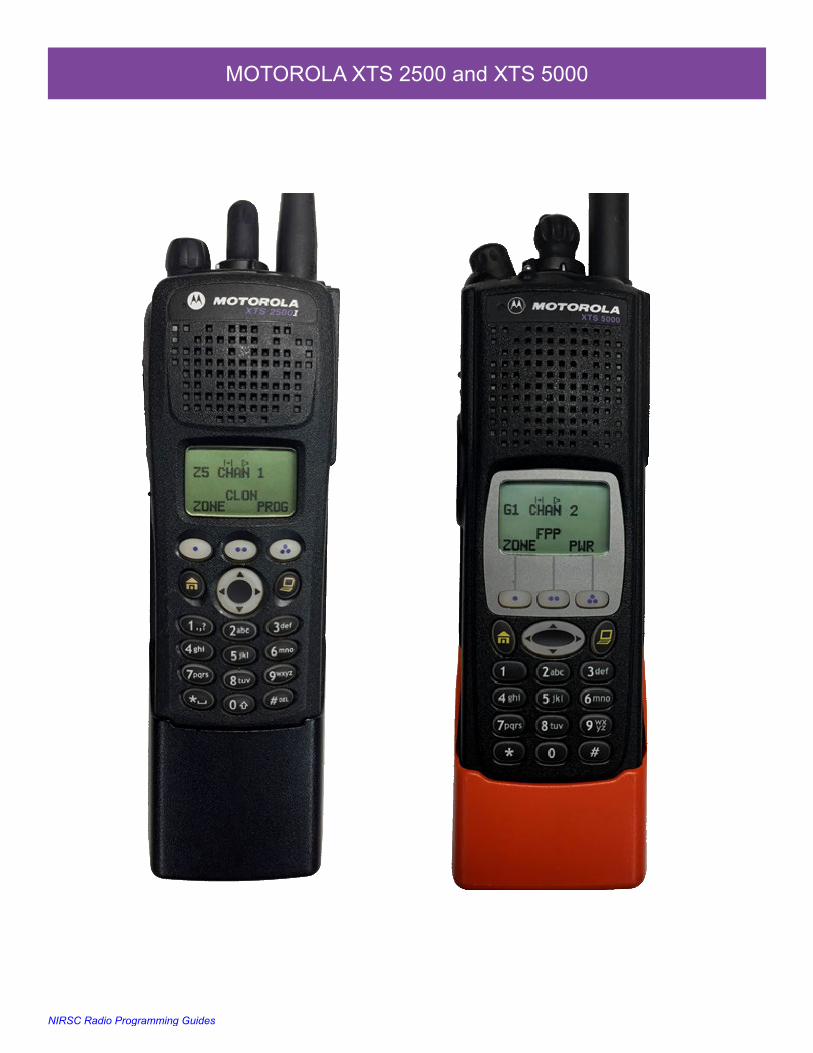
MOTOROLA XTS 2500 and XTS 5000
NIRSC Radio Programming Guides

MOTOROLA XTS 2500 PORTABLE BASIC OPERATION & CONTROLS
1. Turn power ON by turning the ON/OFF Volume Knob clockwise.• The LCD will indicate the current group and channel label.
2. Select a zone number by pressing the appropriate Menu Select soft key labeled "ZONE".• Select a zone by pressing the 4-Way Navigation switch to the right or left.
or• Direct enter a 2 digit group/zone number via the keypad.• Press the "Home" key when finished.
3. Select a channel by turning the Channel Select Knob to one of the 16 available positions. (Channel 01-16)
4. Adjust the volume by pressing and holding the "Monitor" key until it beeps and the squelch stay open.• Set the volume to desired level.• Press the "Monitor" key once more to close Squelch.
The radio is now ready to RECEIVE on the selected group and channel.
6. To transmit, press and hold the Push-To-Talk (PTT) button on the side of the radio.Note: The Transmit Indicator Light should glow red while transmitting.
If not, the battery may be low or the channel is RX only or busy.
7. Pause 1 second and talk in a normal voice into the microphone.Note: Try to shield the microphone from wind and other loud background noises for clearer transmissions.
8. Release the PTT to stop transmitting and receive incoming transmissions.
XTS 2500 Front View
Speaker
5 Line LCD
Keypad
4-Way NavigationSwitch
Clamshell
Microphone
XTS 2500 Top View
RX/TX LED
AntennaConnector
ON/OFFVolume Knob
XTS 2500 Side View
16 PositionChannel
Knob
3 - Position SwitchA= Scan OFFB/C = Scan ON
Monitor(Open Squelch)
Push-to-Talk(PTT)
Clamshell MagazineRelease Latch
(Both Sides)
Clamshell CoverRelease Tabs(Both Sides)
UHF Antenna
Home Softkey
Menu SelectSoftkeys
Unassigned
Unassigned
NIRSC Radio Programming Guides

MOTOROLA XTS 5000 PORTABLE BASIC OPERATION & CONTROLS
1. Turn power ON by turning the ON/OFF Volume Knob clockwise.• The LCD will indicate the current group and channel label.
2. Select a zone number by pressing the appropriate Menu Select soft key labeled "ZONE".• Select a zone by pressing the 4-Way Navigation switch to the right or left.
or• Direct enter a 2 digit group/zone number via the keypad.• Press the "Home" key when finished.
3. Select a channel by turning the Channel Select Knob to one of the 16 available positions. (Channel 01-16)
4. Adjust the volume by pressing and holding the "Monitor" key until it beeps and the squelch stay open.• Set the volume to desired level.• Press the "Monitor" key once more to close Squelch.
The radio is now ready to RECEIVE on the selected group and channel.
6. To transmit, press and hold the Push-To-Talk (PTT) button on the side of the radio.Note: The Transmit Indicator Light should glow red while transmitting.
If not, the battery may be low or the channel is RX only or busy.
7. Pause 1 second and talk in a normal voice into the microphone.Note: Try to shield the microphone from wind and other loud background noises for clearer transmissions.
8. Release the PTT to stop transmitting and receive incoming transmissions.
XTS 5000 Top View
XTS 5000 Front View XTS 5000 Side View
Speaker
5 Line LCD
4-Way NavigationSwitch
Clamshell
Keypad
Microphone
Home Softkey
Menu SelectSoftkeys
VHF Antenna
AntennaConnector
ON/OFFVolume Knob
16 PositionChannel
Knob
3 - Position SwitchC= Scan OFFA/B = Scan ON
RX/TXLED
Monitor(Open Squelch)
Push-to-Talk(PTT)
Unassigned
UnassignedClamshell Cover
Release Tabs(Both Sides)
NIRSC Radio Programming Guides

MOTOROLA XTS 2500/5000 PORTABLE SETTINGS/OPTIONS
CHANGING ZONES/GROUPSTo change zones/groups, press the "ZONE" softkey from the default screen/display. (See Figure 1)
• Select the desired zone/group by scrolling right/left with the 4-Way Navigation Switch or direct enter a 2 digitzone/group number via the key. (See Figure 2)
• Once a desired zone/group is selected, press the "HOME" button to make that zone/group active.
ENABLE/DISABLE SCAN/PRIORITY SCANTo Enable Scan, turn the 3-Position Rotary/Toggle Switch to the "B" or "C" position.
Note: LCD will indicate the radio is in scan mode, by displaying an ( ) icon on the upper part of the LCD. (See Figure 3)
To Disable Scan, turn the 3-Position Rotary/Toggle Switch to the "A" position.Note: If no channels are in the Scan List, the radio will beep and indicate empty scan list on the LCD when scan is enabled.
ADD/REMOVE CHANNELS FROM SCAN/PRIORITY LISTTo add a channel to the Scan List, press the "PROG" softkey from the default screen/display. (See Figure 4)
• Press the "SCAN" softkey to enter into the scan list. (See Figure 5)• Select the desired channel to scan using the top 16 Channel Select Knob.• Press the "SEL" softkey once to enter that selected channel in the scan list. (See Figure 6)
Note: LCD will indicate the channel is in the scan list, by displaying an ( ) icon on the upper part of the LCD.
• Press the "SEL" softkey once more to enter that selected channel as the scan priority 1 channel.Note: LCD will indicate the radio is PRI 1 by displaying an ( .) icon on the upper part of the LCD.
• Press the "SEL" softkey once more to enter that selected channel as the scan priority 2 channel.Note: LCD will indicate the radio is PRI 2 by displaying an ( .) icon on the upper part of the LCD. Note theflashing DOT on the end.
• Press the "SEL" softkey once more to remove the channel from the scan list completely Or press the"DEL" softkey to remove the channel from the scan list.
• Press the "HOME" button to return to the main screen.
Figure 1
08:30AM
Z1 CHAN 1
CLON ZONE PROG
Figure 2
08:30AM
Z2 CHAN 1
Figure 3
08:30AM
Z1 CHAN 1
CLON ZONE PROG
Figure 4
08:30AM
Z1 CHAN 1
CLON ZONE PROG
Figure 5
08:30AM
Z1 CHAN 1
SCAN
Figure 6
08:30AM
Z1 CHAN 1
DEL SEL RCL
NIRSC Radio Programming Guides

MOTOROLA XTS PORTABLE ANALOG PROGRAMMING GUIDE
1. Turn radio ON and select a Zone/Group you wish to program.
2. Press the 4-Way Navigation key to the right once or until the "FPP" softkey is visible on the display.• Press the "FPP" softkey to proceed into programming mode. (See figure 1)• Radio will indicate or ask for programming password, press the "OK" softkey to enter program mode.
(See Figure 2)• Radio will display active zone, select the desired zone by pressing the 4-Way Navigation key left or right.
(See Figure 3)• Once the desired zone is reached, press the "VIEW" softkey to change the channel programming
information. (See Figure 4)
3. Select the desired channel to program, by pressing the 4-Way Navigation key left or right.• Once the desired channel is reached, press the "VIEW" softkey to change the Channel Parameters.
Channel Parameters:4. "TX:xxx.xxxxxx", press the "EDIT" softkey to change the Transmit Frequency. (See Figure 5)
• Enter the valid Transmit Frequency and press the "OK" softkey, then press the 4-Way Navigation key tothe right to the next parameter.
5. "RX:xxx.xxxxxx", press the "EDIT" softkey to change the Receive frequency. (See Figure 6)• Enter the valid RX frequency and press the "OK" softkey, then press the 4-Way Navigation key to the right
to the next parameter.
6. "TX PL: 0 CSQ", press the "EDIT" softkey to change the Transmit Tone. (See Figure 7)• Enter a valid Transmit Tone via the keypad and press the "OK" softkey, or• Press the 4-Way Navigation key up or down and select the desired tone and press the "OK" softkey.• Press the 4-Way Navigation key to the right to the next parameter.
Note: "0 CSQ" is default for NO TONE.
7. "RX PL: 0 CSQ", press the "EDIT" softkey to change the Receive Tone. (See Figure 8)• Enter a valid RX tone via the keypad and press the "OK" softkey, or• Press the 4-Way Navigation Key up or down and select the desired tone and press the "OK" softkey.• Press the 4-way Navigation key to the right to the next parameter.
Note: "0 CSQ" is default for NO TONE.
9. "TX DPL: 0 CSQ", is a digital function do not change for Analog Programming.10. "RX DPL: 0 CSQ", is a digital function do not change for Analog Programming.11. "TX NAC: $293", is a digital function do not change for Analog Programming.12. "RX NAC: $293", is a digital function do not change for Analog Programming.
Note: Do not change TX/RX DPL, or TX/RX NAC for analog channels, these parameters are used for digitalchannels only. TX/RX DPL and TX/RX NAC will display analog equivalent information.
13. "RX Type: ANALOG", press the "EDIT" softkey to change the Receive Type. (See Figure 9)• Toggle between "ANALOG", "MIXED", or "DIGITAL" by pressing the 4-Way Navigation Switch up or down.• For Analog channels, select "ANALOG" and press the "OK" softkey, then press the 4-Way Key to the right
to the next parameter.
14. "TX Type: ANALOG", press the "EDIT" softkey to change the Transmit Type. (See Figure 10)Note: The Transmit Type can not be changed if Receive Mode is set to Analog.
15. "Bandwidth: 12.5 Khz", press the "EDIT" softkey to change the Channel Bandwidth. (See Figure 11)• Toggle between either "12.5 Khz" for Narrowband or "25.0 Khz" for Wideband by pressing the 4- Way
Navigation Switch up or down and press the "OK" key.• Press the 4-Way Navigation Key to the right to the next parameter.
Note: UHF models are capable of selecting "20.0 Khz" for bandwidth, DO NOT SELECT THIS OPTION.
16. "Chan Name: CHAN 1", press the "EDIT" softkey to change the Channel Label.• Enter the desired channel name using the alpha numeric keypad and press the "OK" softkey when done.• Press the 4-Way Navigation Key to the right, to the next parameter.
Note: For Space Character, press the 4-Way Navigation Switch to the Right.
17. "Zone Name: Z1", press the "EDIT" softkey to change the Zone Label.• Enter the desired Zone Name using the alpha numeric keypad and press the "OK" softkey when done.
Note: NIICD does not recommend changing the Zone Name.
18. Once the Zone Name is edited, pressing the 4-way Navigation Switch to the right will scroll back to theTransmit Frequency parameter, programming for that particular channel is complete.• Once all the programming parameters have been entered for that channel press the "DONE" softkey and
select another channel to program or press the "HOME" Button to exit programming mode.
Figure 1
08:30AM
Z1 CHAN 1
FPP
Figure 2
08:30AM
Password:
EDIT DEL OK
Figure 3
08:30AM
Zone:Z1
EXIT VIEW
Figure 4
08:30AM
Channel:CHAN 1
BACK VIEW
Figure 5
08:30AM
Tx:xxx.xxxxxx
DONE EDIT
Figure 6
08:30AM
Rx:xxx.xxxxxx
DONE EDIT
Figure 7
08:30AM
Tx: PL:0 CSQ
DONE EDIT
Figure 8
08:30AM
Rx: PL:0 CSQ
DONE EDIT
Figure 9
08:30AM
Rx TYPE:ANALOG
DONE EDIT
Figure 10
08:30AM
Tx TYPE:ANALOG
DONE
Figure 11
08:30AM
Bandwidth:12.5kHz
DONE EDIT
NIRSC Radio Programming Guides

MOTOROLA XTS 2500/5000 PORTABLE CLONING GUIDE
1. Connect the cloning cable to both the Master and Slave radios. (See Motorola Cloning Connections)
2. Turn both radios on.
3. On the MASTER RADIO, press the “CLON” softkey from the default screen to bring up the cloning menu. (See Figure 1)• The Master radio will momentarily display “TARGET RADIO CONNECTED” if a slave radio is connected correctly.• The Slave radio will display “CLONE MODE” on the LCD.
4. Select a desired zone/group by pressing the 4-Way Navigation Key to the left or right. (See Figure 2)
5. Once a zone is selected, press the “SEL” softkey to enable that zone to be sent over to the slave radio.• The display will indicate the zone is enabled by an “C” icon on the right side of the LCD. (See Figure 3)
6. Press the “DONE” softkey to select a target zone/group. (See Figure 4)
7. The display will indicate “Target: Zx:”, select a desired group/zone that the Master radio will write/clone over the Slaveradio.
• Press the “SEL” softkey when desired target group/zone is selected.• The display will indicate the target zone is enabled by an “C” icon on the right side of the LCD. (See Figure 4)
8. Press the “OK” softkey to begin cloning.• Display on Master will indicate “Wait: Cloning.....”. • Display on Master will indicate “CLONE SUCCESSFUL” once clone is complete. (See Figure 6)
9. Press the “EXIT” softkey to exit clone mode and return to default screen.
Figure 1
08:30AM
Z1 CHAN 1
CLON ZONE PROG
Figure 2
08:30AM
Source:Z1
EXIT SEL
Figure 3
08:30AM
Source: CZ1
DONE SEL
Figure 4
08:30AM
Target:Z1
BACK SEL
Figure 5
08:30AM
Target: CZ1
BACK OK
Figure 6
08:30AM
CLONESUCCESSFUL
BACK EXIT
Motorola Cloning Connections
Clone/Slave RadioMaster Radio
Cloning Cable
NIRSC Radio Programming Guides

MOTOROLA XTS 2500 PORTABLE CLAMSHELL REMOVAL
1a. Squeeze ClamshellCover Release Tabs
Figure 1
1b. Push the radio with thumb through the
bottom opening of the clamshell cover
Clamshell Magazine Release Latch
Clamshell Cover Release Tabs
Figure 2
2a. Slide the Clamshell Cover down until
removed from the Clamshell Magazine
Figure 3Figure 4
Figure 5 Figure 6
3a. Slide down the Clamshell Magazine
Release Latches
4a. Pull the top end of the Clamshell
Magazine slightly away from the radio
5a. Push the radio slightly down and out
to release from the bottom portion of the Clamshell Magazine
6a. Pull the radio from the Clamshell
Magazine and replace the batteries if needed
Note: Once the Clamshell cover is removed, batteries
can be easily replaced without removing the Clamshell Magazine
NIRSC Radio Programming Guides