Fastly Guides - Fastly Docs Archive
237
12/13/2014 Fastly Documentation https://docs.fastly.com/guides/aio 1/237 Generated: Sat, 13 Dec 2014 16:58:12 +0000 Guides (/guides/) Getting Started with Fastly • Getting Started (/guides/gettingstarted/) · About Domain Names and Fastly’s CDN Service (/guides/gettingstarted/about domainnamesandfastlyscdnservice) A domain name is a component of a Uniform Resource Locator (http://en.wikipedia.org/wiki/Uniform_Resource_Locator) (URL). A domain name represents an Internet Protocol (http://en.wikipedia.org/wiki/Internet_Protocol) (IP) resource and, in this context, refers to the IP address of a server computer hosting a website (http://en.wikipedia.org/wiki/Web_site), the website itself, or any other service communicated via the Internet. Customers associate their domain names with their origin (content source) when provisioning a Fastly service. Domain names are made up of components as follows: Domain Name Component Example URL http://www.example.com/index.html TopLevel Domain Name com SecondLevel Domain Name example.com Host Name www.example.com Domain names are registered with a domain name registrar. Fastly is not a domain name registrar. Fastly supports the use of multiple subdomains for the same origin server, and allows the specification of any number of subdomains for each origin. Some customers use only their second level or apex domain (/guides/domainsanddns/caniuse fastlywithasecondleveldomain) (e.g., example.com rather than www.example.com) as their canonical domain. Unfortunately, due to limitations in the DNS specification, we don't recommend using Fastly with domains this way. · Adding New Users to Your Account (/guides/gettingstarted/addingnewusersto youraccount) Adding new users to your account can be done by anyone assigned the superuser role (/guides/customersupport/whattype ofaccessdodifferentusershave). If you have been assigned the role of superuser, follow the steps below to invite a new user to be added your account. 1. Log in to the Fastly application (https://app.fastly.com/). 2. Click the account tab to access your Account Settings. 3. In the User Invitations area, click the Invite button. The Invite User window appears. Fastly Guides
-
Upload
khangminh22 -
Category
Documents
-
view
6 -
download
0
Transcript of Fastly Guides - Fastly Docs Archive

12/13/2014 Fastly Documentation
https://docs.fastly.com/guides/aio 1/237
Generated: Sat, 13 Dec 2014 16:58:12 +0000
Guides (/guides/)Getting Started with Fastly
• Getting Started (/guides/gettingstarted/)
· About Domain Names and Fastly’s CDN Service (/guides/gettingstarted/aboutdomainnamesandfastlyscdnservice)A domain name is a component of a Uniform Resource Locator (http://en.wikipedia.org/wiki/Uniform_Resource_Locator)(URL). A domain name represents an Internet Protocol (http://en.wikipedia.org/wiki/Internet_Protocol) (IP) resource and, in thiscontext, refers to the IP address of a server computer hosting a website (http://en.wikipedia.org/wiki/Web_site), the websiteitself, or any other service communicated via the Internet. Customers associate their domain names with their origin (contentsource) when provisioning a Fastly service.
Domain names are made up of components as follows:
Domain Name Component Example
URL http://www.example.com/index.html
TopLevel Domain Name com
SecondLevel Domain Name example.com
Host Name www.example.com
Domain names are registered with a domain name registrar. Fastly is not a domain name registrar.
Fastly supports the use of multiple subdomains for the same origin server, and allows the specification of any number ofsubdomains for each origin. Some customers use only their second level or apex domain (/guides/domainsanddns/caniusefastlywithasecondleveldomain) (e.g., example.com rather than www.example.com) as their canonical domain.Unfortunately, due to limitations in the DNS specification, we don't recommend using Fastly with domains this way.
· Adding New Users to Your Account (/guides/gettingstarted/addingnewuserstoyouraccount)Adding new users to your account can be done by anyone assigned the superuser role (/guides/customersupport/whattypeofaccessdodifferentusershave). If you have been assigned the role of superuser, follow the steps below to invite a new userto be added your account.
1. Log in to the Fastly application (https://app.fastly.com/).2. Click the account tab to access your Account Settings.3. In the User Invitations area, click the Invite button. The Invite User window appears.
Fastly Guides

12/13/2014 Fastly Documentation
https://docs.fastly.com/guides/aio 2/237
4. In the Email field, type the email address of the user you'd like to invite to become a billing contact.5. From the Role drop down menu select the role to assign (/guides/customersupport/whattypeofaccessdodifferent
usershave) once the user accepts the invitation.6. Click the Invite button to send an invitation to the email you specified.
Remember: If you're adding a new user to make them the billing contact for your account, be sure you complete the additionalsteps (/guides/billingandprices/canigetacopyofmybillsenttoapersonotherthantheowneroftheaccount) once theyaccept the invitation to be added to your account.
· Browser Recommendations When Using the Fastly Application (/guides/gettingstarted/browserrecommendationswhenusingthefastlyapplication)The Fastly application (https://app.fastly.com/) works well with all modern browsers. We recommend always using the latestversion of your favorite browser to prevent malicious websites from compromising your systems. Uptodate browser versionsalso (usually) correct bugs and limitations that show up when you visit websites, making those sites harder to use.
You can find the latest version of all major browsers online. The list at Browse Happy (http://browsehappy.com/) may help you.
· CNAME Instructions for most providers (/guides/gettingstarted/cnameinstructionsformostproviders)In order to use Fastly with your website you will need to CNAME your domains to point at global.prod.fastly.net . This pageprovides a list of instructions for many of the major Domain Name providers. Select your provider from the list below to getdetailed instructions for how to CNAME your domain.
If you cannot find your provider or are still having trouble configuring your CNAME records, contact us at [email protected](mailto:[email protected]).
GoDaddy.com1. Log in to your account at www.godaddy.com (http://godaddy.com/) by clicking the My Account tab.2. Under the Domains drop down, find the domain you're using for your service.3. Select your domain by clicking on the link that appears in the Domain Name column of the table of domains. The
Settings, DNS Zone File, and Contacts tabs appear with the Settings tab selected by default.4. Click the DNS Zone File tab.5. Above the CNAME (Alias) section, click Add Record. A new row appears in the CName (Alias) table.6. In the new row that appears, enter the following information:
Host: Enter the subdomain name for the alias assignment. For example, if you chose www.example.com as your hostaddress, type www .
12/13/2014 Fastly Documentation
https://docs.fastly.com/guides/aio 3/237
Points to: Enter global.prod.fastly.net .TTL: Select how long the server should cache the information.
7. Click Save.
DynECT Managed DNS1. Log in to your account at manage.dynect.net (https://manage.dynect.net/).2. Click on Manage Domain.3. Click Add New Node.4. Enter the address for your Fastly service and click OK. For example, if you chose www.example.com as the address, you
should enter www.example.com .5. Click Add New Record and then choose CNAME from the dropdown menu.6. Set your TTL (Time To Live) if desired and then add the full path to Fastly's server. Example: if you chose
www.example.com you should enter www.example.com.global.prod.fastly.net .7. Click Publish Now.
IX Web Hosting1. Log in to your account at manage.ixwebhosting.com (https://manage.ixwebhosting.com/).2. Click Manage below the Hosting Account section.3. On the left side, click the domain you'd like to use with Fastly.4. Next to DNS Configuration, click EDIT.5. Click Add DNS CNAME Record.6. Under Name, enter only the part of your website address that you designated for your Fastly Service. For example, if you
picked www.example.com as your address, just enter www as the entry under Name.7. Enter global.prod.fastly.net under Data.8. Click Submit.
1and11. Log in to your account at admin.1and1.com (https://admin.1and1.com/).2. If it's not already selected, click the Administration tab.3. Click Domains. The Domain Overview page appears.4. From the New dropdown menu, select Create Subdomain. (If you've already created a subdomain for your website's
address, skip to step six.)5. Enter the prefix of the address for your Fastly service, and click OK. Example: if you chose www.example.com you should
enter www .6. Check the box next to the subdomain.7. From the DNS menu, select Edit DNS Settings.8. Click the radio button next to CNAME.9. Next to Alias, enter global.prod.fastly.net10. Click OK.
EveryDNS.net1. Log in to your account at www.everydns.net (http://www.everydns.net/).2. On the left side, click the domain you'd like to use with Fastly.3. Since EveryDNS.net is your hosting service, and not your domain registrar, be sure that your domain points to
EveryDNS.net's nameservers. This will allow your CNAME record configuration to take effect.4. Below Add a Record:, you can create your CNAME record.5. Next to Fully Qualified Domain Name, enter only the part of your website address that you designated for your Fastly
service. For example, if you picked www.example.com as your website's address, just enter www as the entry next to Fully

12/13/2014 Fastly Documentation
https://docs.fastly.com/guides/aio 4/237
Qualified Domain Name.6. Select CNAME as the Record Type.7. Enter global.prod.fastly.net as the Record Value.8. Click Add Record.
Yahoo! Small Business1. Log in to your account at smallbusiness.yahoo.com (http://smallbusiness.yahoo.com/services).2. Click Domain Control Panel below the domain you'd like to use with Fastly.3. Click Manage Advanced DNS Settings.4. Click Add Record.5. In the Source field, enter the part of the address you chose for your website using Fastly. For example, if you chose
www.example.com , enter www in the Source field.6. Enter global.prod.fastly.net in the Destination field.7. Click Submit.
NoIP1. Log in to your account at www.noip.com (http://www.noip.com/).2. On the left side, click Host/Redirects.3. Click Manage underneath Host/Redirects.4. Click Add for a new entry, or click Modify and skip to step six for an existing entry.5. Enter the part of the address that you picked for Fastly as the host name, and select your domain name. For example, if
you entered www.example.com as your address, enter www as the host name.6. Select DNS alias CNAME at the host type.7. Enter global.prod.fastly.net as the Target Host and click Modify.
DNS Park1. Log in to your account at www.dnspark.net (https://www.dnspark.net/).2. On the left side, click DNS Hosting.3. Click the domain you'd like to use with Fastly.4. Since DNS Park is your hosting service, and not your domain registrar, be sure that your domain points to DNS Park's
nameservers. This will allow your CNAME record configuration to take effect.5. Click Alias Records.6. Under Host Name, enter only the part of your website address that you designated for Fastly. If you picked
www.example.com as your website's address, enter www .7. Enter global.prod.fastly.net under Destination Name.8. Click Add Alias.
eNom1. Log in to your account at www.enom.com (http://www.enom.com/).2. From the dropdown menu at the Domains tab, select My Domain. You'll be directed to the Manage Domains page.3. Click the domain that you'd like to use with Fastly.4. Click Host Settings.5. To add a CNAME record, click NEW ROW. If you've already created a CNAME record for the address, simply edit the
existing CNAME record.6. Enter the part of the address that you want to use with Fastly. For example, if you entered www.example.com as your
address, enter www .7. Enter global.prod.fastly.net for the host name.8. Click Save.

12/13/2014 Fastly Documentation
https://docs.fastly.com/guides/aio 5/237
Network Solutions1. Log in to your account at www.networksolutions.com (http://www.networksolutions.com/).2. In the left navigation bar, open the nsWebAddress (Domains) menu by clicking the + icon.3. Click Manage Domain Names.4. On the Domain Details page for the domain you're using with Fastly, select the Designated DNS radio button to the right
of Change domain to point to. (If you've already configured advanced DNS settings, click Edit next to Advanced DNSSettings.)
5. Click the Apply Changes button.6. Under the Advanced DNS Manager heading, click Manage Advanced DNS Records.7. Under the Host Aliases (CNAME Records) heading, click Add/Edit.8. In the Alias box, enter your custom URL prefix (such as www ).9. Select the radio button to the left of the Other Host box.10. Enter global.prod.fastly.net in the Other Host box.11. Click Continue.12. Review your changes and click Save Changes to create the CNAME record.
MyDomain.com1. Log in to your account at www.mydomain.com/login (http://www.mydomain.com/login/).2. Click on the My Services tab.3. Under Manage My Services, click on Manage Services.4. Go to Domain Overview.5. Click on Domain Administration.6. Select the domain you're using with Fastly.7. Click the DNS tab, and select DNS Records.8. Click Add New DNS record.9. From the dropdown menu, select CNAME, and click Next.10. Enter your custom URL prefix (such as www ), and then enter global.prod.fastly.net .11. Click Finish.
Domain Direct1. Go to www.domaindirect.com (http://www.domaindirect.com/).2. Click my account, and log in to your domain.3. On the Domain tab, click Advanced Settings.4. Click Edit Zone File. Note: Do not delete the A record for *.domain.com and domain.com , or you will have problems later.5. Under CNAME, create an entry for the part of the address that you want to use with Fastly. For example, if you are using
www.example.com as your address, enter www .6. Point this CNAME record to global.prod.fastly.net .
Gandi.net1. Log in to your account at www.gandi.net (http://www.gandi.net/).2. Click the Administration tab, and then click the control panel link.3. Click the domain you want to manage, and go to Technical Settings.4. Click Manage DNS zone file.5. Click Add an entry, and for each field, do the following:
Name: Enter your custom URL prefix (such as www).Type: Select CNAME.Value: Enter global.prod.fastly.net. , making sure to include a trailing dot (.) at the end of the value.Click Submit.

12/13/2014 Fastly Documentation
https://docs.fastly.com/guides/aio 6/237
6. You should be back to the list of entries. Click Submit Changes.
EuroDNS1. Log in to your account at www.eurodns.com (https://www.eurodns.com/).2. Click My Domains in the My Domains menu on the left side of the page. A table listing your domains should appear.3. Click the DNS column on the row of the domain you wish to change. The DNS records for your domain should now be
displayed.4. From the Add... dropdown menu of the HOST NAME table, choose Host Alias, and click the Add button next to it.5. In the Alias: field, add the name you chose for your service Fastly. For example, if you chose www.example.com as your
address, enter www .6. Enter global.prod.fastly.net in the Host Name field.7. Click the Save Settings button.
Register.com1. Log in to your account at www.register.com (http://www.register.com/).2. Under the My Accounts tab, click the domain that you're using with Fastly.3. Scroll down to the Advanced Technical Settings heading, and click Edit Domain Aliases Records.4. In the box to the left of your domain name, enter your URL prefix (such as www ).5. Enter global.prod.fastly.net in the points to box.6. Click Continue.7. Review your changes, and click Continue to create the CNAME record.
MyHosting1. Go to myhosting.com (http://myhosting.com/).2. Click on the Account link at the top of the page.3. Log in with your Domain Name and Password.4. Click on the Domain Name tab.5. Click DNS Management in the lefthand pane.6. Click the Manage DNS button.7. Add an ALIAS (CNAME) RECORD by doing the following in the ZONE SERVER area:
Enter your URL prefix (such as www ).Enter global.prod.fastly.net .
Namecheap1. Log in to your account at www.namecheap.com/myaccount/loginonly.aspx
(http://www.namecheap.com/myaccount/loginonly.aspx).2. Click on Your Domain/Products in the right hand sidebar.3. Click on the domain you are using under the main Your Domains heading.4. Click on URL Forwarding under the Host Management tab on the left.5. Enter global.prod.fastly.net into the IP Address/URL column for both @ and www as a CNAME.6. Click Save Changes.
· Creating a New Service (/guides/gettingstarted/creatinganewservice)To create a new service, follow the steps below.
1. Log in to the Fastly application.2. Click the configure button (the wrench icon at the top of the window).

12/13/2014 Fastly Documentation
https://docs.fastly.com/guides/aio 7/237
3. At the top right of the window, click the green New Service button.
The New Service window appears.
4. Fill out the New Service window as follows:
In the Name field, type the name of the first service you'd like to create. You can rename this service(/guides/faqs/howdoirenamemyservice) at any time.In the Origin Server Address field, type the IP address (or hostname) and port number (usually 80 ) for yourwebsite's server.In the Domain Name field, type the domain name of your website. We need this information to properly routerequests to your website.
5. Click the Create button. A new service appears in the list of services available.
· Deleting Account Users (/guides/gettingstarted/deletingaccountusers)To delete a user from your account, follow the steps below.
REMEMBER: You must be assigned the role of super user (/guides/customersupport/whattypeofaccessdodifferentusershave) in order to delete other user accounts.

12/13/2014 Fastly Documentation
https://docs.fastly.com/guides/aio 8/237
1. Log in to the Fastly application (https://app.fastly.com/).2. Click on the account tab. The Account Settings controls appear.3. Scroll down to the Users area and search for the name of the user you wish to delete.4. Click the gear icon to the right of the user's name and select Delete from the menu that appears.
A confirmation window appears.5. Click Confirm on the confirmation window.
· Enabling an IP Whitelist for Account Logins (/guides/gettingstarted/enablinganipwhitelistforaccountlogins)Fastly allows you to define the range of IP addresses authorized to access your Fastly account. This optional IP whitelistingfunctionality is not enabled by default.
IMPORTANT: If you decide to use optional IP whitelisting, your account owner must have a valid telephone number onfile. During setup, Fastly checks your current IP address against the list you provide to ensure you don't lock yourself out ofyour account. If your IP addresses change at a later date (for example, because you move offices) and you forget to updateyour whitelist configuration, you will be locked out of your account. You will need to contact [email protected] to request thata Customer Support representative contact your account's owner via telephone during Fastly's regular business hours. Toprotect your account's security, we will not unlock your account (/guides/customersupport/help!imlockedoutofmyaccount!) based on an email request alone.
To restrict access to your Fastly account based on a specific list or range of IP addresses, follow these steps.
1. Log in to the Fastly application.2. Click the account tab to access the Account Settings information.
3. In the IP Whitelist field of the Company Settings area, type the IP addresses to which your account access should berestricted.
In the IP Whitelist field you can include single or multiple (separated by commas) IP addresses or IP ranges as follows:
a single IPv4 address (e.g., 192.168.0.1 )an IPv4 CIDR range (e.g., 192.168.0.0/32 )an IPv4 Wildcard range (e.g., 192.168.0.* , 192.168.*.1 , 192.168.*.* )
4. Click the Update Company button.
12/13/2014 Fastly Documentation
https://docs.fastly.com/guides/aio 9/237
· Enabling and disabling twofactor authentication (/guides/gettingstarted/enablinganddisablingtwofactorauthentication)Fastly supports twofactor authentication (/guides/faqs/doesthefastlyapplicationsupportmultifactorauthentication), a twostep verification system, for logging in to the application. To use this security feature with your Fastly account, you must obtaina mobile device such as a smartphone or tablet capable of scanning a barcode or QR code. Then you must download andinstall an authenticator application. We recommend the following:
For Android, iOS, and Blackberry: Google Authenticator (https://support.google.com/accounts/answer/1066447?hl=en)For Android and iOS: Duo Mobile (http://guide.duosecurity.com/thirdpartyaccounts)For Android: AWS Virtual MFA (http://www.amazon.com/gp/product/B0061MU68M#)For Windows Phone: Authenticator (http://www.windowsphone.com/enus/store/app/authenticator/021dd79f0598e011986b78e7d1fa76f8)
IMPORTANT: If you enable twofactor authentication via the user interface, you will no longer be able to use a simpleusername+password when using the API, and must use the API key for authentication.
Enabling twofactor authentication
To enable twofactor authentication with the Fastly application, follow the steps below.
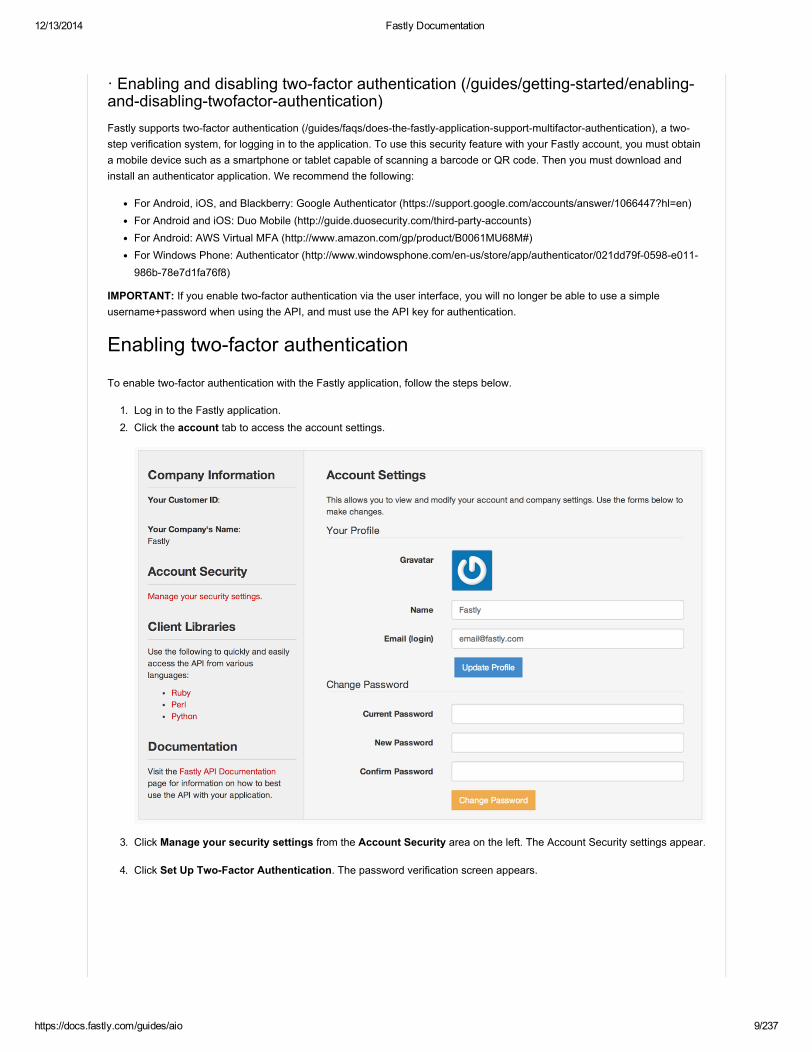
1. Log in to the Fastly application.2. Click the account tab to access the account settings.
3. Click Manage your security settings from the Account Security area on the left. The Account Security settings appear.
4. Click Set Up TwoFactor Authentication. The password verification screen appears.

12/13/2014 Fastly Documentation
https://docs.fastly.com/guides/aio 10/237
5. In the Verify Your Password field type your Fastly password and then click Continue. The authentication QR codeappears.
6. Launch the authenticator application installed on your mobile device and scan the displayed QR code or manually enterthe key displayed in the setup window. A timebased authentication code appears on your mobile device.
7. In the Authentication Code field, type the timebased authentication code displayed on your mobile device.
Android Users: Please note a common time syncing issue may cause your authenticator codes to fail. You can correctthis using Google's instructions (https://support.google.com/accounts/answer/185834?hl=en#sync) for your authenticatorapp.
8. Click Enable TwoFactor Authentication. The confirmation screen appears along with your recovery codes.

12/13/2014 Fastly Documentation
https://docs.fastly.com/guides/aio 11/237
IMPORTANT: If you’re ever unable to access your mobile device, the displayed recovery codes can be used to log in whenyour account has twofactor authentication enabled. Each of these recovery codes can only be used once, but you canregenerate a new set of 10 at any time (any unused codes at that time will be invalidated). Store your recovery codes in a safeplace.
After you enable twofactor authentication, logging in to your Fastly account will require your email address and password, andthen an authentication code generated by the authenticator application you've installed on your mobile device. By default, thesystem requires you to authenticate your login using an authentication code at least every two weeks for each computer andbrowser you use to access the Fastly application. You may be required to authenticate more or less often depending on thetimeframe specified by your account owner, however.
Account owners and super users: You can view who has enabled twofactor authentication at any time by viewing the Usersarea in the Account Settings on the account tab while logged into the Fastly application. Any user with twofactor authenticationactivated will appear in the users list with a padlock next to their name.
Disabling twofactor authentication
Twofactor authentication is disabled by default when you sign up for Fastly services. Once it’s been enabled for your account,you can disable it at any time by following the steps below.
1. Log in to the Fastly application.2. Click the account tab to access the account settings.3. In the Account Security area of the settings sidebar, click Manage your security settings. The twofactor
authentication controls appear.
4. Click Disable TwoFactor Authentication. The verification screen appears.
5. In the Authentication Code field, type the timebased authentication code displayed in the authenticator application onyour mobile device, then click Disable.

12/13/2014 Fastly Documentation
https://docs.fastly.com/guides/aio 12/237
What to Do If You Lose Your Mobile Device
If you’ve enabled twofactor authentication and you lose your mobile device, use a recovery code to log in to your account. Youcan continue to use recovery codes to log in until you get your mobile device back. Recovery codes can only be used once,however, so remember to regenerate a new list of codes to avoid running out before you recover your mobile device.
If you don’t believe you will be able to recover your lost mobile device and you still have at least two recovery codes left, youcan log in with one recovery code and disable twofactor authentication with a second code. Once twofactor authentication isdisabled, you can reenable it with a new mobile device at a later time and regenerate a new set of codes.
Locked out of your account? See our article on what you can do about it (/guides/customersupport/help!imlockedoutofmyaccount!).
· How to Get Started with Fastly (/guides/gettingstarted/howtogetstartedwithfastly)In this article we explain what Fastly does and how best to use it with your site.
How Fastly WorksIn a nutshell, Fastly works by storing your website's content on servers all over the world and speedily delivering that content toyour users.
We track the geolocation of each user and make sure they are connecting to a server that is closest to them. This makes yoursite faster by reducing the time spent waiting for data to be sent from the server to the user.
We also give you full control over when and how we store content from your servers. You can easily set a Time To Live (TTL)for any path on your site and instantly invalidate or Purge any path on your site using our Purge API (/api/purge).
By using these tools you may only have to generate pages for the site once for many millions of page views. This saves timefor your users and costs on your server bills.
Advanced FeaturesFastly also provides many advanced features that will help you monitor how your data is being accessed and customize howcontent is delivered.

12/13/2014 Fastly Documentation
https://docs.fastly.com/guides/aio 13/237
Instant Purging (/guides/purging/) allows you to have fine grained control over when and how content is updated for yourusers. Gone are the days of waiting up to 24 hours to change data at the edge, with Fastly you can update you data when youwant and as often as you want.
With Real Time Analytics you always have a top level view of your network and how your site is performing. Every second wecompile the relevant data about all of your traffic into an easytoread report.
Using Conditions (/guides/tutorials/conditionstutorial) you can change how requests are routed, what headers to send,and how content is cached.
We make it easy to setup Health Checks (/guides/backendservers/healthcheckstutorial) that monitor the status of one ormany of your backend servers. This way if anything goes wrong with your servers you will know about it immediately.
System Logs (/guides/logstreaming/settingupremotelogstreaming) can be quickly and easily configured to sendinformation from your servers anywhere and in the format you want.
Your entire configuration can even be handled programmatically via the Fastly API (/api/). This allows you to write scripts tohandle basic configuration tasks and even create your own administrative views (so they can be directly coupled with yourexisting admin software).
Getting StartedIf you don't have an account then you should sign up now (https://www.fastly.com/signup/). Feel free to choose the developerplan so you can test how Fastly works on your site.
If you are excited to begin using Fastly but don't know where to begin then check out our Getting Started (/guides/gettingstarted/) documentation. You can learn everything you need to set up and configure your first service for your site. Once you'reready to explore more, check out the configuration Basics documentation to learn more about caching, as well as features likepurging (/guides/purging/) and shielding (/guides/shielding/). And if you're looking for information on more advanced features,especially related to things like load balancing (/guides/loadbalancing/) or the Varnish Control Language (/guides/vclfaqs/) wesupport, you can check out our Advanced Configuration section of our help files or the API Reference (/api/), which includes afull reference to the Fastly API.
Finally, if you are having problems check out the list of Frequently Asked Questions (/guides/faqs/) or send us a message [email protected] (mailto:[email protected]) and we'll help sort things out.
· Sign Up and Create Your First Service (/guides/gettingstarted/signupandcreateyourfirstservice)To create a Fastly account and set up your first service, follow the steps below.
Sign Up at Fastly.com

12/13/2014 Fastly Documentation
https://docs.fastly.com/guides/aio 14/237
Before you do anything else, you must sign up for a Fastly account.
1. Click on any Try Fastly Now button on the Fastly.com website or simply point a browser to the signup form(https://www.fastly.com/signup/).
2. When the signup form appears, fill in all the fields with your contact information. All the fields are required.
Note: You'll be able to change your password and email address (/guides/customersupport/howdoichangetheemailorpasswordassociatedwithmyaccount) any time after signup.
3. Click the Sign Up button. The confirmation screen will appear with instructions on what to do next and you'll be sent an email that contains a verification link.

12/13/2014 Fastly Documentation
https://docs.fastly.com/guides/aio 15/237
4. Check your inbox and find the confirmation email we sent you.
5. Click the verification link (we need to make sure you're not a spam robot and verify your email). The verification link willimmediately take you to the first step of the quick start process so you can create your first service.
Create Your First Service & Test ItOnce you've verified your email, we log you into the application automatically and immediately take you through the quick startprocess to create your first service.
1. In the Name Your Service field, type the name of the first service you'd like to create. This name can be anything at allthat will help you distinguish this service from any others you create in the future. You can rename this service(/guides/faqs/howdoirenamemyservice) at any time.
2. In the Server Address field, type the IP address (or hostname) and port number (usually 80) for your website's server.We need this to make sure your cache updates properly. If you have many servers you can configure the rest later.
3. In the Domain Name field, type the domain name of your website. We need this information to properly route requests toyour website.
4. Click the Configure button to create your first service. The system configures your service and displays a link for you totest.
5. Click the configuration test link that appears. Your website should appear, but it may take up to 60 seconds as all thesystems start talking to each other.
CNAME Your DomainTo complete the process of creating your first service, you must CNAME your domain to global.prod.fastly.net . CNAMEingto Fastly will direct traffic to us. Each service provider does this a little differently, but we've written a separate guide that detailsthe information most of the major providers (/guides/gettingstarted/cnameinstructionsformostproviders) will ask you for.Once you've completed this step, you should be all ready to go!

12/13/2014 Fastly Documentation
https://docs.fastly.com/guides/aio 16/237
If you are having any problems, feel free to contact us at [email protected] (mailto:[email protected]).
· Transferring Account Ownership to Another User (/guides/gettingstarted/transferringaccountownership)To transfer account ownership to another user, please contact [email protected] (mailto:[email protected]) for assistance.
Remember that you can always add users to your account by inviting them (/guides/gettingstarted/addingnewuserstoyouraccount), and then assigning them the appropriate role (/guides/customersupport/whattypeofaccessdodifferentusershave).
• Billing & Prices (/guides/billingandprices/)
· Can I get a copy of my bill sent to a person other than the owner of the account?(/guides/billingandprices/canigetacopyofmybillsenttoapersonotherthantheowneroftheaccount)By default, billing invoices (/guides/billingandprices/whattypesofbillingareavailablehowwillibebilled) are sent to theowner of a company's account with Fastly. That contact can be changed by anyone assigned the superuser role(/guides/customersupport/whattypeofaccessdodifferentusershave) for an account. If you have been assigned the role ofsuperuser, follow the steps below to have your billing invoice sent to a person other than the owner of your account with Fastly.
REMEMBER: Invoices are only sent to the email addresses of the account Owner and and the Billing Contact. Invoices are notsent to users with a "billing" role. To send invoices to multiple people, we recommend setting up an email group and settingthat email group as your Billing Contact user.
1. Log in to the Fastly application (https://app.fastly.com/).2. Click the account tab to access your Account Settings.3. In the User Invitations area, click the Invite button. The Invite User window appears.
4. In the Email field, type the email address of the user you'd like to invite to become a billing contact.5. From the Role drop down menu select the role to assign (/guides/customersupport/whattypeofaccessdodifferent
usershave) once the user accepts the invitation.6. Click the Invite button to send an invitation to the email you specified.7. Once the user has accepted the invitation return to the Account tab in the application.8. In the Company Settings area, select the user's name from the Billing Contact drop down menu, and then click Update
Company to set the billing contact.

12/13/2014 Fastly Documentation
https://docs.fastly.com/guides/aio 17/237
· Can I really test out your service for free? (/guides/billingandprices/canireallytestoutyourserviceforfree)Our development plan allows you to try out our services free of charge and test everything to ensure it fits your requirementswithout needing to worry about costs while doing so. Our development plan isn't limited in functionality; however, it's notdesigned for you to use with your regular production traffic. For that we ask you to move over to a paid plan.
Conveniently, our paid plan is a payasyougo option. No commitment is required. We bill monthly according to that month'susage (the combined total of your bandwidth and request usage), using the rates stated on our pricing page(http://www.fastly.com/pricing/). We do, however, include a $50 minimum each month on these usage fees once you're pushingproductionlevel traffic to us. Once your testing is complete, we charge this monthly minimum fee to make sure we can fullysupport all of our customers. If your usage fees fall below this amount in any individual month, we round up to $50.
For example, say that most of your site's traffic is in North America and Europe and you're done testing out Fastly's services.You've begun to push productionlevel traffic through Fastly. If your site uses 10GB of traffic over 10 million requests, thecharge per Fastly's pricing page would be $8.70. Because this amount falls below the $50 monthly minimum, we would chargeyou $50 for that month. The AsiaPacific, Australia, and new Zealand prices are slightly higher, but at the above traffic levelsthey would still fall within the $50 monthly minimum.
If you'd like any help getting set up with a development account (which you can move over to a paid account later if you like theservice), please don't hesitate to reach out to us. Technical questions are best sent to the [email protected](mailto:[email protected]) email address, and commercial ones through [email protected] (mailto:[email protected]) (just soyou get a speedy response appropriately).
· Can I set up automatic payments? (/guides/billingandprices/canisetupautomaticpayments)To set up automatic payement of your bill (/guides/billingandprices/whattypesofbillingareavailablehowwillibebilled) forFastly services, you must have a credit card on file in the Billing & Invoices (/guides/fastlyswebinterface/aboutthebillingandinvoicecontrols.html) of your account settings and specifically set your account.
1. Log into the Fastly application (https://app.fastly.com).

12/13/2014 Fastly Documentation
https://docs.fastly.com/guides/aio 18/237
2. Click the billing tab. The Billings & Invoices controls appear.
3. In the Credit Card area of the Settings pane, add the credit card number, card verification code, and expiration date forthe credit card to be used for automatic billing.
4. From the Auto Pay drop down menu, select Yes.5. In the Limit field, type the maximum dollar amount you are willing to charge to the credit card on file. If the total bill for
Fastly services exceeds the limit you set for the card we have on file, the card will not be charged at all and you will berequired to make your payment manually for the invoiced billing cycle.
6. Click Update to save your credit card and billing limit information.
· How do I cancel my account? (/guides/billingandprices/howdoicancelmyaccount)To cancel your account, log into the Fastly application and click the account tab:
In the Company Settings area, click the Cancel Account button.

12/13/2014 Fastly Documentation
https://docs.fastly.com/guides/aio 19/237
After your account is canceled, you'll be billed for any outstanding charges (/guides/billingandprices/whattypesofbillingareavailablehowwillibebilled) accrued through the day you canceled. If you decide at a later date to reactivate your account,feel free to contact customer support (mailto:[email protected]) and request reactivation.
· How do I pay? (/guides/billingandprices/howdoipay)During the month you can keep up to date on what your current incurred amount is by logging into the Fastly application andaccessing your billing page (https://app.fastly.com/#billing).
At the end of each month you'll be sent an email with how much you've incurred that month and a link to a specific page for thatinvoice.
From there you'll have a button to pay which will pop up a window for you to enter in your credit card details.

12/13/2014 Fastly Documentation
https://docs.fastly.com/guides/aio 20/237
Fastly never sees your credit card number and all transactions are handled by our fully PCI compliant payment gateway(https://stripe.com/us/help/faq#securityandpci), Stripe.
Once that's done the bill will update to indicate its been paid.
You also have the option to save your credit card details (again, Fastly never sees these details, they're stored with ourpayment gateway). When your card is stored it makes it easy for you to pay future invoices with one button. Alternatively youcan set up Fastly so that your invoices are automatically charged to that credit card each month with an optional limit (leave thelimit blank to have no limit).

12/13/2014 Fastly Documentation
https://docs.fastly.com/guides/aio 21/237
If you want to change any of your details later then you can just go to the settings pane of your billing tab.
· How do I switch from a Developers Plan to a Paid Plan? (/guides/billingandprices/howdoiswitchfromadevelopersplantoapaidplan)Once you've completed any development testing (/guides/billingandprices/canireallytestoutyourserviceforfree), you canswitch your account to a Paid Plan by selecting "Paid" from the Change pricing plan menu under the Pricing Plan area of theSettings section on the billing tab.

12/13/2014 Fastly Documentation
https://docs.fastly.com/guides/aio 22/237
· How much do Fastly's services cost? (/guides/billingandprices/howmuchdofastlysservicescost)Prices for Fastly's content delivery, streaming delivery, and SSL service options are detailed on the Fastly website pricing page(http://www.fastly.com/pricing/). Our SSL service options are also described in depth in our SSL pricing guide(/guides/ssl/whichssloptionsareavailableandhowmuchdotheycost). Prices for SSL service options are applied in additionto normal content delivery and streaming charges.
If you're using Fastly for content delivery via Heroku's cloud development services, please see Fastly's Heroku addons pricingplan (https://addons.heroku.com/fastly) for more details.
Do you have other questions about pricing? Please feel free to contact [email protected] (mailto:[email protected]) for moreinformation.
· What types of billing are available? How will I be billed? (/guides/billingandprices/whattypesofbillingareavailablehowwillibebilled)
What types of billing are available?
We generally bill for both content delivery and streaming services based on bandwidth used (measured in Gbytes) and numberof requests. All pricing rates appear on the pricing page (http://www.fastly.com/pricing/) of our website.
We give discounts for larger pricing plans, for commitments of 12 months or longer, and for larger customers. For somecustomers we can also bill for bandwidth on the 95th percentile.
Are you an open source developer? We believe open source pulls the best thought from the best minds (in fact, we contributeheavily to Varnish, Chef, Ganglia and a number of other leading opensource initiatives). If you’re an open source developer,contact us. We'll host you for free.
Please contact [email protected] (mailto:[email protected]) for additional information.

12/13/2014 Fastly Documentation
https://docs.fastly.com/guides/aio 23/237
How will I be billed?
Fastly bills in arrears, not in advance, meaning that we bill you for services after you've used them, not before. For example, ifyou sign up for and start using Fastly services in January, the bill you receive in February reflects January's charges andservices, your March bill reflects February's charges services, and so forth.
We send invoices out at the beginning of the month that allow you to pay by credit card. We offer the ability to have a creditcard on file for automatic billing (/guides/billingandprices/canisetupautomaticpayments) and we include the ability to setlimits to prevent unexpected billing surprises. See our article about how to pay (/guides/billingandprices/howdoipay) formore information.
If necessary we can also accept checks or wire transfers. Please contact [email protected] (mailto:[email protected]) foradditional information.
Who receives the bill?
By default, the account owner will receive the bill for Fastly services. You can change your billing contact (/guides/billingandprices/canigetacopyofmybillsenttoapersonotherthantheowneroftheaccount.html) at any time. If you ever deleteyour billing contact, billing will automatically revert to the account owner.
• FAQs (/guides/faqs/)
· Can Fastly host my content? (/guides/faqs/canfastlyhostmycontent)We accelerate your site by caching both static assets and dynamic content by acting as a reverse proxy(http://en.wikipedia.org/wiki/Reverse_proxy) to your origin server (also known as "Origin Pull"), but we do not provide servicesfor uploading your content to our servers.
In addition to using your own servers as the source, we also support various "cloud storage" services as your origin, such asAmazon Elastic Compute Cloud (EC2), Amazon Simple Storage Service (S3), and Google Cloud as your file origin. We covertopics related to origin servers in the Backend Servers (/guides/backendservers/) section of our documentation.
· Can I check on the status of Fastly's network and services? (/guides/faqs/canicheckonthestatusoffastlysnetworkandservices)Fastly continuously monitors the status of our global network and all related services. In the event of a service interruption, anupdate will be posted on the Fastly status page at status.fastly.com (http://status.fastly.com). If you are experiencing problemsand do not see a notice posted, please email [email protected] (mailto:[email protected]) for assistance.

12/13/2014 Fastly Documentation
https://docs.fastly.com/guides/aio 24/237
Overall System Status
The current system status appears at the top of the Fastly status page and includes the last time the status was refreshed sothat you know how current the information is.

12/13/2014 Fastly Documentation
https://docs.fastly.com/guides/aio 25/237
Individual Component Statuses
The status of the Fastly API (/api/), the Fastly application's configuration panel (http://app.fastly.com/), statistics collection anddelivery, and each Fastly point of presence (http://www.fastly.com/network/) (POP) appears immediately below the overallstatus.
Past Incident Statuses
Fastly keeps track of past incidents. Past incidents, if any, for approximately the past two weeks appear immediately below theindividual component statuses.
We also keep track of all past incidents in an incident history page (http://status.fastly.com/history).
Subscribing to Email Notifications
Fastly allows you to subscribe to status email notifications. Simply click the Subscribe to Updates button in the upper rightcorner of the status page screen, type your email address in the displayed field, and click Subscribe Via Email. Oncesubscribed, we'll email you any time we create or update an incident.

12/13/2014 Fastly Documentation
https://docs.fastly.com/guides/aio 26/237
· Does Fastly support the SPDY protocol? (/guides/faqs/doesfastlysupportthespdyprotocol)SPDY (http://en.wikipedia.org/wiki/SPDY) is a protocol being explored as an alternative for transporting web content. It isspecifically being designed with the intent to "reduce the latency of web pages" (you can read the Chromium Projects whitepaper on SPDY (http://dev.chromium.org/spdy/spdywhitepaper) for more information). We're definitely considering SPDY, as itrelates to our core goal of creating the fastest, most flexible, devfriendly tool for scaling websites. At present, however, ourexisting tech doesn't support SPDY. Support will take time to develop and roll out. There's actually lower hanging fruit in ourstack right now for optimization than SPDY alone.
We're also keeping track of the emerging HTTP 2.0 standard (http://tools.ietf.org/html/drafttarreauhttpbisnetworkfriendly00),which is based on SPDY (http://en.wikipedia.org/wiki/HTTP_2.0#SPDY_and_HTTP_2.0). We have plans to support HTTP 2.0once the standard is solidified and browser support is available.
· Does Fastly work with Magento? (/guides/faqs/doesfastlyworkwithmagento)Fastly is based around the Varnish HTTP Cache and Magento has several different solutions for working with Varnish. VarnishSoftware company describes some of the different options in their blog post Doing the right thing: Magento + Varnish Cache(https://www.varnishsoftware.com/blog/doingrightthingmagentovarnishcache).
We haven't tested and do not officially support any of these specific methods. They may need some modifying to get them towork with our purging system (/guides/purging/), but if you are interested in working with us (mailto:[email protected]) thenwe'd love to help.
· Does the Fastly application support multifactor authentication? (/guides/faqs/doesthefastlyapplicationsupportmultifactorauthentication)Fastly supports twofactor authentication, a twostep verification system, for logging in to the application. In a twofactorauthentication security process, users provide two means of identifying themselves to the system, typically by providing thesystem with something they know (for example, their login ID and password combination) and something they have (such asan authentication code).

12/13/2014 Fastly Documentation
https://docs.fastly.com/guides/aio 27/237
Twofactor authentication is disabled by default. You can enable and disable (/guides/gettingstarted/enablinganddisablingtwofactorauthentication) it at any time in the Account Security area of the Account Settings for your Fastly account. Onceenabled, an authentication code will be requested when you login at least every 14 days for each computer and browser youuse to access the Fastly application.
IMPORTANT: If you enable twofactor authentication via the user interface, you will no longer be able to use a simpleusername+password when using the API, and must use the API key for authentication.
· How do I deactivate and reactivate services? (/guides/faqs/howdoideactivateandreactivateservices)To reactivate or deactivate a service, follow the steps below:
1. Log in to the Fastly application.2. Click on the configure button (the wrench icon at the top of the application window).
3. Select the appropriate service from the Service drop down.
4. Click the yellow Activate or Deactivate button to the right of the service name as appropriate.
You can also activate or deactivate a service via the API (/api/config#version). Did you accidentally delete a service? We canhelp (/guides/customersupport/iaccidentallydeletedaservice.howdoigetitback).
· How do I regenerate my API key? (/guides/faqs/howdoiregeneratemyapikey)Log into the Fastly application (https://app.fastly.com/) and click on the Account button to view your account information. Then,click the Generate New Key button near the top left of the screen, immediately below your actual API key.

12/13/2014 Fastly Documentation
https://docs.fastly.com/guides/aio 28/237
REMEMBER: Only account users with the superuser role (/guides/customersupport/whattypeofaccessdodifferentusershave) can view and change the API key. If you don't see the API Key section, your role is lower than superuser and you mustcontact a superuser at your company to regenerate the API key.
· How do I rename my service? (/guides/faqs/howdoirenamemyservice)Different organizational schemes? Company mandate? Fat fingers and typos? All of these may contribute to a service namethat just doesn't work any more. You can rename your service at any time by clicking your service name next to the pencil iconin the Fastly application (https://app.fastly.com/):
Your service name will become editable and you can immediately begin typing the new service name:

12/13/2014 Fastly Documentation
https://docs.fastly.com/guides/aio 29/237
Simply press the return key so your changes will take effect:
· What do the red dots on the global traffic map mean? (/guides/faqs/whatdothereddotsontheglobaltrafficmapmean)The global traffic map at the top of the Fastly Analytics Dashboard (/guides/fastlyswebinterface/abouttheanalyticsdashboard) represents a realtime visual representation of the general regions of the world in which Fastly's points of presence(POPs) are receiving requests for your service. As each moment passes, the traffic changes, and these changes are reflectedin the map visually by red dots that increase or decrease in size as your request traffic ebbs and flows.
For example, the following images show how requests to the Fastly.com website changed over the course of three seconds, atone second intervals:
The first image displays traffic coming into Fastly's POPs on the west coast of the United States (Los Angeles, to be exact), thecentral region of the US (in this case, Dallas), and in Europe via our Amsterdam POP.

12/13/2014 Fastly Documentation
https://docs.fastly.com/guides/aio 30/237
The second image, taken one second later, shows how the global traffic has changed, with a great deal more traffic cominginto our central US region, a smaller amount requested from two POPs in the western US region (Los Angeles and San Jose),and a still smaller amount going to the Europe via our London POP.
Finally, our third image, again taken one second later, shows how the global traffic has changed once again with traffic goingthrough our Asia/Pacific POP in Tokyo, and smaller amounts going through Dallas and Los Angeles.
· Where are Fastly's POPs located? (/guides/faqs/wherearefastlyspopslocated)Our points of presence (POPs) on the Internet are strategically placed at the center of the highest density Internet ExchangePoints around the world. Fastly's Network Map (http://www.fastly.com/network/) shows a detailed view of the current andplanned locations of all Fastly POPs. For more information, about how we choose these locations, check out our blog post HowFastly Chooses POP Locations (http://www.fastly.com/blog/howfastlychoosespoplocations/).
Once you're signed up for Fastly service (either through a test account (/guides/billingandprices/canireallytestoutyourserviceforfree) or a paid plan) you can a see a live, realtime visual representation (/guides/faqs/whatdothereddotsontheglobaltrafficmapmean) of the general regions of the world in which Fastly's points of presence (POPs) receive requests foryour service.
· Where can I find my Service ID, Customer ID, or API Key? (/guides/faqs/wherecanifindmyserviceidcustomeridorapikey)Your Service ID is located on the configure tab at the top left of the screen in the Fastly application (https://app.fastly.com/):

12/13/2014 Fastly Documentation
https://docs.fastly.com/guides/aio 31/237
Your Customer ID (also called your Company ID) and your API Key are located on the account tab to the left of the AccountSettings area:
REMEMBER: Only account users with the superuser role (/guides/customersupport/whattypeofaccessdodifferentusershave) can view and change the API key. If you don't see the API Key section, your role is lower than superuser and you mustcontact a superuser at your company to regenerate the API key.
· Why did my Googlebot crawl stats drop so radically after I signed up with Fastly?(/guides/faqs/whydidmygooglebotcrawlstatsdropsoradicallyafterisignedupwithfastly)When you set up Fastly (/guides/gettingstarted/signupandcreateyourfirstservice) to run production traffic, many of yoursite objects will acquire new entity tags (http://en.wikipedia.org/wiki/HTTP_ETag) (ETags). Web servers assign these identifiersas part of the normal process of uniquely identifying resource content each time it changes at a URL(http://en.wikipedia.org/wiki/Uniform_Resource_Locator). Fastly set up is no exception to this normal process.
Occasionally, Google's webcrawlers misidentify changes like these as malicious, and stop crawling specific sites as aprotection measure. If you notice any major changes in your SEO stats, indexing, or crawler behavior after completing yourFastly production setup, we recommend taking advantage of Google's Webmaster Tools(https://www.google.com/webmasters/), specifically the Fetch as Google Tool(https://support.google.com/webmasters/answer/158587)article and the sections on Additional Support(https://support.google.com/webmasters/answer/1249981?hl=en).
• Fastly's Web Interface (/guides/fastlyswebinterface/)
· About the Account Settings Controls (/guides/fastlyswebinterface/abouttheaccountsettingscontrols)

12/13/2014 Fastly Documentation
https://docs.fastly.com/guides/aio 32/237
The Account settings controls allow customers to view and modify overall account access settings as well as personal profilesettings for a logged in user
What Customers Can Control with the Account SettingsIf their logged in permissions (/guides/customersupport/whattypeofaccessdodifferentusershave) allow it, users can alsochange their password (/guides/customersupport/howdoichangetheemailorpasswordassociatedwithmyaccount) to theaccount and administer the access of multiple users on that account. The Account settings area also displays the logged inuser’s customer ID, company name, and API key (/guides/faqs/wherecanifindmyserviceidcustomeridorapikey) (whichcan be regenerated (/guides/faqs/howdoiregeneratemyapikey) from this location as well). Customers can cancel theiraccount (/guides/billingandprices/howdoicancelmyaccount) via the Account Settings page if they have the appropriatepermissions at the time they’re logged in.
When the Account Settings Controls AppearAccount settings controls appear automatically for logged in users with the appropriate access permissions. (/guides/customersupport/whattypeofaccessdodifferentusershave)
· About the Analytics Dashboard (/guides/fastlyswebinterface/abouttheanalyticsdashboard)
The Analytics Dashboard, sometimes simply referred to as “the Dashboard,” allows customers to monitor caching for each oftheir services, one at a time in real time, as they operate on a secondbysecond basis.
What the Analytics Dashboard Tells UsersThe Dashboard specifically displays the following information about a service:
the percentage of requests per second (via a Fastly hitometer)a global traffic profile (via the global traffic map (/guides/faqs/whatdothereddotsontheglobaltrafficmapmean))the timestamped metrics specific to requests, hits, and misses (via the metrics table)
In addition, the Dashboard provides two scrolling graphs. The first graph displays either the number of requests, the bandwidth,or the hit ratio over a twominute window for any single service as selected by the user. The twominute rolling average foreach of these measurements can also be displayed as an overlay. In the second graph displays the miss latency for any singleservice over the twominute window. One minute after Analytics Dashboard measurement data in these graphs has rolled offthe screen, it becomes available for retrieval by the Historical Stats controls (/guides/fastlyswebinterface/aboutthehistoricalstatstool).
When the Analytics Dashboard AppearsThe Dashboard appears automatically for logged in users with the appropriate access permissions (/guides/customersupport/whattypeofaccessdodifferentusershave); however, it may appear grayed out and blank to some users, with noinformation displayed in the controls, when a customer’s service does not receive enough requests for Fastly to displaymeaningful information about it in real time.
· About the Billing and Invoice Controls (/guides/fastlyswebinterface/aboutthebillingandinvoicecontrols)

12/13/2014 Fastly Documentation
https://docs.fastly.com/guides/aio 33/237
The Billing and Invoices controls provide customers with an overview of charges accrued to date (/guides/billingandprices/whattypesofbillingareavailablehowwillibebilled) for the current month. These charges are displayed both inaggregate and detailed by POP region (/guides/faqs/wherearefastlyspopslocated). Customers can also access theircomplete billing history, payment statuses, payment amounts, and viewable invoices.
What Customers Can Control via Billing and Invoices
Customers can change their payment settings, including their payment method, the credit card that should be charged forpayment of the account with Fastly, whether or not automatic payments (/guides/billingandprices/canisetupautomaticpayments) should be made for them, and which pricing plan they currently participate in.
In addition to being able to tell at a glance whether or not their account is paid in full when they view these controls, customerscan use them to switch between plan types (/guides/billingandprices/howdoiswitchfromadevelopersplantoapaidplan),as well as cancel Fastly services (/guides/billingandprices/howdoicancelmyaccount) at any time.
When the Billing and Invoices Controls Appear
Billing controls appear automatically for logged in users assigned the billing or super user roles (/guides/customersupport/whattypeofaccessdodifferentusershave).
· About the Configuration Control Panel (/guides/fastlyswebinterface/abouttheconfigurationcontrolpanel)
The configuration Control Panel allows customers to define exactly how each instance of their cache should behave anddeliver content from each data sources. Customers use the Control Panel to create versions of each service’s configurationsettings and then use the controls to deploy or deactivate (/guides/faqs/howdoideactivateandreactivateservices) them.
What Customers Can Control with the ConfigurationControl PanelSpecifically, customers with the appropriate permissions can configure and manage:
the domains (/guides/domainsanddns/) used to route requests to a servicethe hosts used as backends (/guides/backendservers/) for a site and how they should be accessedthe health checks (/guides/backendservers/healthcheckstutorial) that monitor backend hosts and the alerts that Fastlysees when there is trouble with themvarious request and cache settings (/guides/caching/), headers, and responses that control how Fastly caches andserves content for a servicehow logging (/guides/logstreaming/settingupremotelogstreaming) should be performed and where server logs shouldbe sent (as specified by an RSYSLOG endpoint)

12/13/2014 Fastly Documentation
https://docs.fastly.com/guides/aio 34/237
various thirdparty plugins available for use with Fastly services (e.g., WordPress (https://github.com/fastly/WordPressPlugin))custom Varnish configuration language (/guides/vclfaqs/) (VCL) files if custom VCL is enabled (/guides/vclfaqs/wherecaniuploadcustomvcl)how conditions (/guides/tutorials/conditionstutorial) are mapped and used for a service at various times (e.g., duringrequest processing, when Fastly receives a backend response, or just before an object is potentially cached)
Users can activate configuration changes immediately and roll back those changes just as quickly should they not have theintended effect. The Control Panel also allows users to compare differences (http://www.fastly.com/blog/introducingversiondiff/) between two configuration versions.
When the Control Panel AppearsThe Control Panel appears automatically for logged in users with the appropriate access permissions (/guides/customersupport/whattypeofaccessdodifferentusershave).
· About the Historical Stats Tool (/guides/fastlyswebinterface/aboutthehistoricalstatstool)Fastly’s Historical Stats tool provides you with statistical information about your website. We display the information as a seriesof graphs derived from your sites metrics starting from the moment you first start using Fastly.
Using Fastly’s Historical Stats tool allows you to view two core categories of metrics:
Caching and Performance. These metrics help you optimize your website’s speed.Traffic. These metrics help you analyze your website’s traffic as it evolves over time.
Taken together, these statistics can help you not only optimize the overall performance of your website but also expose issuesthat may be hidden by caching, such as degradation of origin performance or unusually high numbers of errors and redirectsfor a particular timeframe. By analyzing metrics beginning from the very moment you start using Fastly, you can see how yourtraffic has grown over the lifetime of using Fastly. Use the information to not only diagnose nontrivial issues, but also makeinformed marketing and business development decisions by identifying clear traffic growth and patterns for your site.
About Each of the Core MetricsThe Historical Stats tool provides a graphical interface to our popular Historical Stats API (/api/stats). Two types of metrics aredisplayed: cachingperformance metrics and displayed traffic metrics.
The displayed caching and performance metrics include the following:
Hit Ratio metrics tell you how well you are caching content using Fastly. This metric represents the proportion of cachehits versus all cacheable content (hits + misses). Increasing your hit ratio improves the overall performance benefit ofusing Fastly.Cache Coverage metrics show how much of your site you are caching with Fastly. This metric represents the ratio ofcacheable requests (i.e., non "pass" requests) to total requests. Improving your cache coverage by reducing passes canimprove site performance and reduce load on your origin servers.Caching Overview metrics compare Cache Hits, Cache Misses, Synthetic Responses (in VCL edge responses), andPasses (or requests that cannot be cached according to your configuration).
The displayed traffic metrics include the following:
Requests metrics show you the total number of requests over time that were received for your site by Fastly.Bandwidth metrics show you the amount of bandwidth (measured in bytes) served for your site by Fastly.Header & Body Bandwidth metrics show the relative proportion of bandwidth (measured in bytes) used to serve the

12/13/2014 Fastly Documentation
https://docs.fastly.com/guides/aio 35/237
body portion of HTTP requests and the header portion of the requests for your site.Origin Latency metrics show you the average amount of time to first byte (measured in milliseconds) on a cache miss.High origin latency means that your backends are taking longer to process requests.Error Ratio metrics show you the ratio of error responses (4XX & 5XX status code errors(http://en.wikipedia.org/wiki/List_of_HTTP_status_codes)) compared to the total number of requests for your site. Thismetric allows you to quickly identify error spikes at given times.HTTP Info, Success, & Redirects metrics shows the number of HTTP Info (1XX), Success (2XX), and Redirect (3XX)statuses served for your site using Fastly.HTTP Client and Server Errors metrics shows the number of HTTP Client Errors (4XX), and Server Errors (5XX) servedfor your site by Fastly.
REMEMBER: Display of historical statistics are delayed between 15 to 30 minutes. and there must be a statisticallymeasurable amount of traffic to see the graphs.
Controlling the Amount of Historical InformationDisplayedYou have full control over how you view the historical information.
Specifically you can choose:
1. A single service or all services aggregated together2. The exact date and time range you wish to see3. How often to sample the data (by Day, Hour, or Minute)4. Whether to view worldwide data or only data from a specific region (USA, Europe, Australia/New Zealand, or Asia Pacific)
About the Graph ControlsAll historical information, regardless of which metric you’re viewing, appears as a graph with three major sections.
Specifically, you can interact with:

12/13/2014 Fastly Documentation
https://docs.fastly.com/guides/aio 36/237
1. The Statistics Display controls2. The timeseries graph3. The utility buttons
Use the Statistics Display Controls to view other information about the statistics displayed in each timeseries graph. Forexample, the Caching Overview graph includes the statistics for hits, misses, synthetic responses, and passes:
Note the word “avg” and the drop down button to the right of each colored label. The drop down buttons control the statisticalfunction used to display the values in each graph. You can choose to display each statistic independently as an average, as a95th percentile, as a minimum, as a maximum, or their total. Simply select the drop down button next to each statistical valueand set them to the desired function:
You can even exclude certain statistics entirely. For example, in this Caching Overview graph, we’ve completely hidden Hitsfrom the display by clicking the checkmark button next to the word “Hits” in the controls.
Notice that the checkmark in the statistical controls changes to a minus sign when a statistic is hidden. The actual numbers stillappear in the controls but the graph doesn’t display it.
Two utility buttons appear at the top, far right of each timeseries graph:
When clicked, the explain button provides a quick explanation of the displayed graph in its default state and how to interpretthe information it presents. Clicking the png button downloads the currently displayed timeseries graph as a .png file, whichcan then be used in presentations and reports.
When the Historical Stats Tool AppearsHistorical Stats controls appear automatically for logged in users with the appropriate access permission; however, the generaldisplay of historical stats are delayed between 1530 minutes and require a statistically measurable amount of traffic to appearin the graphs at all.

12/13/2014 Fastly Documentation
https://docs.fastly.com/guides/aio 37/237
· About the Streaming Controls (/guides/fastlyswebinterface/aboutthestreamingcontrols)
The Streaming controls allow customers to define how each instance of Fastly’s streaming services will transcode and packagean incoming RTMP feed and serve it to the customer’s end users. If your account is enabled for video delivery(/guides/streaming/howdoienablestreamingformyaccount), see Fastly’s streaming guides (/guides/streaming/) forassociated services and features.
When the Streaming Controls AppearStreaming controls are hidden by default until customers contact Fastly Sales staff at [email protected] and specificallyrequest access. Sales then arranges the activation of streaming controls by the Customer Support team, at which time theybecome viewable for logged in users with the appropriate permissions (/guides/customersupport/whattypeofaccessdodifferentusershave).
Related DocumentationThe following documents provide additional information about Fastly’s streaming features:
About Fastly’s Live Streaming Video Service (/guides/howfastlyserviceswork/aboutfastlyslivestreamingvideoservice)
About Fastly’s Video Caching Service (/guides/howfastlyserviceswork/aboutfastlysvideocachingservice)
About Fastly's Video on Demand OntheFly Packaging Service (/guides/howfastlyserviceswork/aboutfastlysvideoondemandontheflypackagingservice)
· About the Web Interface Controls (/guides/fastlyswebinterface/aboutthewebinterfacecontrols)In addition to being accessible via Fastly’s application programming interface (API), Fastly services can also be accessed via awebbased user interface for users with the appropriate access permissions.
Access to Fastly’s User Interface ControlsAccess to Fastly’s user interface controls require users sign up for a Fastly account. Signup is free. Once signed up, customersaccess the user interface controls via the Fastly login page. The Login page (https://app.fastly.com/) can be accessed usingany standard web browser or by clicking the Login button at the top right of almost all pages at Fastly’s website(http://www.fastly.com).
Once logged in to a Fastly account via a web browser, the user interface controls appear based on the user’s roles andpermissions (/guides/customersupport/whattypeofaccessdodifferentusershave). The controls are grouped by likefunctions and customers access each functional set by clicking on an appropriate icon at the top of the window once they arelogged in to the Fastly application. Groups of controls may sometimes be referred to as “tabs” (e.g., the Analytics tab). Thedefault control groups appear as follows:

12/13/2014 Fastly Documentation
https://docs.fastly.com/guides/aio 38/237
Not all Fastly services are enabled by default. Some services (e.g., Streaming (/guides/streaming/howdoienablestreamingformyaccount)) must be specifically requested by contacting Fastly Customer Support at [email protected]. Once enabled,the appearance of the user interface controls will change to include these services, as shown below
Related DocumentationThe following documents provide additional information about Fastly’s user interface controls:
About the Analytics Dashboard (/guides/fastlyswebinterface/abouttheanalyticsdashboard)
About the Historical Stats Tool (/guides/fastlyswebinterface/aboutthehistoricalstatstool)
About the Configuration Control Panel (/guides/fastlyswebinterface/abouttheconfigurationcontrolpanel)
About the Streaming Controls (/guides/fastlyswebinterface/aboutthestreamingcontrols)
About the Account Settings Controls (/guides/fastlyswebinterface/abouttheaccountsettingscontrols)
About the Billing and Invoice Controls (/guides/fastlyswebinterface/aboutthebillingandinvoicecontrols)
• How Fastly Services Work (/guides/howfastlyserviceswork/)
· About Fastly’s Application Programming Interface (API) (/guides/howfastlyserviceswork/aboutfastlysapplicationprogramminginterface(api))Fastly provides an application programming interface (API) that can be accessed via a number of popular interactive clients.The Fastly API allows customers to manage Fastly services via remote procedure calls instead of the webbased user interface(/guides/fastlyswebinterface/aboutthewebinterfacecontrols). This currently includes features such as:
Authentication (/api/#Auth)Configuration (/api/config)Historical Stats (/api/stats)Purging (/api/purge)Remote Logging (/api/logging)Streaming (/api/streaming)
The API features do not include customer account setup, which can only occur through the user interface controls. Forexamples of each API call in action, including full descriptions of the fields used and examples of requests and responses, seeFastly’s API Reference (/api/).
Available API ClientsThe API’s main entry point is https://api.fastly.com (https://api.fastly.com). It can be accessed via the following interactiveclients:
a Perl modulea Ruby gemtwo different Python librariesa Node.js clienta Scala client
Fastly’s API Client web page (/api/clients) contains links to GitHub repositories where these clients can be found. When thirdparty organizations have supplied these clients, we’ve noted so on the web page.

12/13/2014 Fastly Documentation
https://docs.fastly.com/guides/aio 39/237
DISCLAIMER: Fastly makes no warranty on thirdparty software. We assume no responsibility for errors or omissions in thethirdparty software or documentation available. Using such software is done entirely at your own discretion and risk.
Authentication via the APINearly all API calls require requests to be authenticated. The Fastly API provides two methods for authenticating API calls: APIkey and usernamepassword. Most API calls can be authenticated using an API key alone. Those calls that don’t use an APIkey alone (usually at the account level) typically require using an authenticated session cookie instead.
AuthenticationMethod
Description
API KeyAllows the API key (/guides/faqs/howdoiregeneratemyapikey) located on a customer’s account page(https://app.fastly.com/#account) to be included as a FastlyKey header.
Username andPassword
Allows a POST HTTP command to be issued with the user and password parameters, which returns acookie that can be stashed and used in subsequent requests.
· About Fastly’s Cached Content Control Features (/guides/howfastlyserviceswork/aboutfastlyscachedcontentcontrolfeatures)Fastly has no set hard limit on how long objects will remain cached (/guides/caching/howlongdoescontentremaincached).Instead, Fastly supports customerconfigurable Time to Live (TTL) settings and customer controlled content purging.
Time to Live SupportFastly supports the expiration of content via customerconfigurable Time to Live (TTL) settings. TTL settings work as timers oncached customer content. When content has resided in the cache for the entire TTL interval, that content is given the status of“expired.” Before Fastly delivers requested content that is expired, the cache checks to see if the content is still valid bychecking with the customer’s application server first.
If the application server says the content remains unchanged, the cache sets the content’s status to “valid” and resets its TTLvalue. If the object has been changed, it is declared “invalid” because the content has expired. The application server deliversupdated content. Fastly CDN Service caches the updated content with the status of “valid”, and its TTL timer begins to run.
The fetch and refresh process may take a second or more, and during that time, a Fastly cache may receive dozens orhundreds of enduser requests for that content. Fastly’s request collapsing feature groups these requests and fulfills them atonce when the application server response is received.
Fastly offers customers the option of setting a global, default TTL for cached content control. When set, Fastly’s CDN servicecaches objects in a consistent manner even when applications are inconsistent in doing so.
Instant Purge SupportFastly supports an Instant Purge feature that allows customers to actively invalidate content (/guides/purging/). Rather thanrequiring a customer’s network operations and application staff to guess how frequently each bit of content may change, Fastllyallows customers to generate an HTTP Purge method that is sent to the CDN Service whenever an application changes ordeletes data in its database. The Fastly CDN Service invalidates the associated content throughout the service’s cachenetwork, causing a new version of that content to be retrieved from the application server the next time it is requested.
The invalidation process takes less than 300 milliseconds, making it possible to deliver dynamic content that changes rapidlyand unpredictably. Fastly’s CDN Service can process thousands of changes per second, with no limit imposed on the numberof purges any customer can submit. Using Instant Purge, customers can eliminate cachetoorigin HTTP traffic that all otherCDN services generate to determine if expired objects are still valid.
Fastly allows URLbased and keybased purging, as well as purging of all content at once via specific, configurable purgingcommands (/api/purge). Fastly currently supports Ruby, Python, PHP, and Perl libraries (/api/clients) for instant purging.
12/13/2014 Fastly Documentation
https://docs.fastly.com/guides/aio 40/237
Related DocumentationThe following documents provide information related to Fastly’s Cached Content Control features:
How long does content remain cached? (/guides/caching/howlongdoescontentremaincached)How do I mix and match Fastly VCL with custom VCL? (/guides/vclfaqs/howdoimixandmatchfastlyvclwithcustomvcl)How Can I Serve Stale Content on Errors (/guides/caching/howcaniservestalecontentonerrors)How can I override default caching based on a backend response? (/guides/caching/howcanioverridedefaultcachingbasedonabackendresponse)How does Fastly support the EdgeControl header? (/guides/vclfaqs/howdoesfastlysupporttheedgecontrolheader)How can I purge content on Fastly? (/guides/purging/howcanipurgecontentonfastly)How can I force Fastly to fetch a new copy of a page? (/guides/)How do I do wildcard purges with Fastly? (/guides/purging/howdoidowildcardpurgeswithfastly)
· About Fastly’s Cloud Accelerator (/guides/howfastlyserviceswork/aboutfastlyscloudaccelerator)Fastly’s Cloud Accelerator is an integration between Fastly and Google services. Specifically, the integration allows customersof Google’s Cloud Platform (https://cloud.google.com/) service to directly connect via peered network interconnections (directPNIs) to Fastly’s content delivery network services.
When customers configure a Google Cloud Platform service as their origin and sign up for Fastly services (/guides/gettingstarted/signupandcreateyourfirstservice), they designate a specific point of presence (POP) to serve as an Origin Shield(/guides/howfastlyserviceswork/aboutfastlysoriginshieldingfeatures) that handles cached content (/guides/howfastlyserviceswork/howfastlyscdnserviceworks) from their servers.
Requests from Fastly POPs (/guides/faqs/wherearefastlyspopslocated) to the Cloud Accelerator Origin Shields are routedover Fastly’s network, which leverages optimized TCP connection handling, quickstart and opened connections to ensure fastresponse times between POPs and through to the enduser. Fastly ensures that requests go directly to the Origin Shieldinstead of the origin servers. Only requests that the entire network has never handled will go back to the Google CloudPlatform service.
· About Fastly’s Delivery Acceleration Features (/guides/howfastlyserviceswork/aboutfastlysdeliveryaccelerationfeatures)
Request CollapsingCached content sometimes must be refreshed when that content becomes “stale” or expires. When multiple endusers requestcontent that is in the process of being refreshed, request collapsing groups those requests to be satisfied together, as soon asthe content is received. This accelerates content delivery by keeping Fastly’s CDN Service from repeating duplicate requests toa customer’s origin server. Request collapsing is enabled by default.
Grace ModeWhen an application server becomes unavailable for any reason, end users will normally receive error messages indicating thecontent they’ve requested cannot be retrieved. When enabled, grace mode instructs Fastly’s CDN Service to acceleratecontent delivery to end users by continuing to serve stale or expired (but likely still valid) content for a set amount of time. Thisallows customers to return otherwise unavailable application servers to normal operations and still serve content rather thanerror messages to end users. By default, grace mode is not configured. Customers must specifically configure their service toserve stale content (/guides/caching/howcaniservestalecontentonerrors).
HTTP Request Fulfillment

12/13/2014 Fastly Documentation
https://docs.fastly.com/guides/aio 41/237
The Fastly CDN Service responds to HTTP GET requests initiated from end users’ using a customer’s website, or from aprogram making calls to an Internethosted API.
Header SupportFastly’s CDN Service supports forwarding HTTP headers to end users when they are received from a customer’s origin server.Alternatively, headers can be added, removed, or modified using our edge scripting language either before or after caching aresponse from the origin. This includes the CacheControl and Expires headers as well as the SurrogateControl header. HTTPheader support allows customers to send one set of instructions to the Fastly cache servers and another set of instructions todownstream caches, such as proxies or browsers. In particular, the SurrogateControl header allows customers to specify howto forward and transform specific header types.
Related DocumentationThe following documents provide information related to Fastly’s Delivery Acceleration features:
How long does content remain cached? (/guides/caching/howlongdoescontentremaincached)How Can I Serve Stale Content on Errors (/guides/caching/howcaniservestalecontentonerrors)How can I force absolutely no caching in the browser? (/guides/caching/howcaniforceabsolutelynocachinginthebrowser)How do I conditionally prevent pages from caching? (/guides/caching/howdoiconditionallypreventpagesfromcaching)Adding or Modifying Headers on HTTP Requests and Responses (/guides/tutorials/addingormodifyingheadersonhttprequestsandresponses)Which HTTP status codes are cached by default? (/guides/caching/whichhttpstatuscodesarecachedbydefault)Maintaining Separate HTTP and HTTPS Requests to Backend Servers (/guides/backendservers/maintainingseparatehttpandhttpsrequeststobackendservers)Cache Control Tutorial (/guides/tutorials/cachecontroltutorial)Removing headers from backend response (/guides/backendservers/removingheadersfrombackendresponse)Is it possible to tell Fastly to cache for a different amount of time than for end users? (/guides/caching/isitpossibletotellfastlytocacheforadifferentamountoftimethanforendusers)How can I add SurrogateKey headers when my backend is S3? (/guides/purging/howcaniaddsurrogatekeyheaderswhenmybackendiss3)How do I set a SurrogateKey header based on the URL? (/guides/purging/howdoisetasurrogatekeyheaderbasedontheurl)What is the difference between PASS action set in Request Settings and Cache Settings? (/guides/caching/whatisthedifferencebetweenpassactionsetinrequestsettingsandcachesettings)
· About Fastly’s Live Streaming Video Service (/guides/howfastlyserviceswork/aboutfastlyslivestreamingvideoservice)In addition to caching and delivering content packaged by the customer's infrastructure, Fastly also offers a Live StreamingService that can perform this critical step. In order to provision this service, customers create instances of streaming services inthe Fastly Control Panel. They begin by naming the streams and selecting various packaging settings for the stream instancethey create. They then specify the resolution and bit rates or each service, called “renditions,” that will ultimately best match aviewer's screen resolution and connection speed. As soon as these provisioning steps are complete, Fastly assigns a streamkey for authentication and edge URLs for each service.

12/13/2014 Fastly Documentation
https://docs.fastly.com/guides/aio 42/237
Customers publish their RTMP feeds to one or more of Fastly's ingest POPs (/guides/streaming/advancedencodingsettings),identifying their streams with the stream name they selected during provisioning, and the stream key assigned through theFastly Control Panel. Presently the following Fastly POPs are specifically designated as ingests:
Location Publishing Address
San Jose rtmp://sjc.ingest.fastly‐streams.com/live/
Ashburn rtmp://ash.ingest.fastly‐streams.com/live/
Amsterdam rtmp://ams.ingest.fastly‐streams.com/live/
Tokyo rtmp://tyo.ingest.fastly‐streams.com/live/
Fastly’s RTMP ingests support up to 5Mbps standard on the input stream and up to 10Mbps can be enabled. When publishingan RTMP stream to these servers, the stream name and key are validated before the server will accept the stream.
Fastly ingest servers transcode (if transcoding is enabled) a customer’s incoming RTMP streams and package them intocontainers that can be viewed on different devices based on the settings that customers provide. Fastly supports the H.264video codec and AAC or MP3 audio codecs.
Once these transcoding and packaging processes are complete, Fastly servers deliver the customer’s packaged contentworldwide, via Fastly’s CDN Service (/guides/howfastlyserviceswork/howfastlyscdnserviceworks), which viewers can thenaccess.
Customers make video content available to users by configuring their video players to pull the content from the provided edgeURLs. The ingest POP delivers the video content (the manifests and video segments) as requested. After the first response,content requests are fulfilled from the cached content copy, effectively allowing the ingest POP to operate as the origin serverfor requests.
Related DocumentationThe following documents provide information related to Fastly’s Live Streaming Video features:
How do I enable streaming for my account? (/guides/streaming/howdoienablestreamingformyaccount)How much do Fastly's streaming services cost? (/guides/streaming/howmuchdofastlysstreamingservicescost)Can I stream to multiple ingests for redundancy? (/guides/streaming/canistreamtomultipleingestsforredundancy)How do I add or remove transcoding renditions for live streams? (/guides/streaming/howdoiaddorremovetranscodingrenditionsforlivestreams)How do I publish a live stream? (/guides/streaming/howdoipublishalivestream)How is streaming bandwidth billed? (/guides/streaming/howisstreamingbandwidthbilled)How to create, edit, or delete a live stream (/guides/streaming/howtocreateeditordeletealivestream)What are wildcard streams? (/guides/streaming/whatarewildcardstreams)Advanced Encoding Settings (/guides/streaming/advancedencodingsettings)
· About Fastly’s Origin Shielding Features (/guides/howfastlyserviceswork/aboutfastlysoriginshieldingfeatures)

12/13/2014 Fastly Documentation
https://docs.fastly.com/guides/aio 43/237
When configuring Fastly’s CDN Service during the selfprovisioning process (/guides/customersupport/selfprovisionedfastlyservices), customers can choose an “origin shield” as a specific point of presence (POP) designated to host cached contentfrom their servers. This server is referred to as a “shield” because it protects a customer’s application servers from continuousrequests for content.
Shield POPsCustomers can designate a specific POP to serve as a “shield” (/guides/shielding/howdoienableshielding) for their originservers. If Fastly’s caches do not have the content being requested, they fetch it from the shield server instead of thecustomer’s origin servers. Fastly caches fetch content from a customer’s origin server only when the shield server does nothave the content being requested.
Load BalancingCustomers can designate multiple servers as their origin servers. When two or more application servers are provisioned asorigin servers, Fastly’s CDN Service will distribute fetch requests for content across those application servers using the roundrobin method of distribution. This type of load balancing (/guides/loadbalancing) is enabled by default; customers mustexplicitly disable it.
Health ChecksCustomers have the option to configure Fastly’s CDN Service to perform health checks (/guides/backendservers/healthcheckstutorial) on their application servers and measure their responsiveness. Health checks are not enabled by default; thecustomer must specifically enable them. Customers can use health check responsiveness measurements to finetune thedistribution of fetch requests. Request collapsing is enabled by default.
Request CollapsingCached content sometimes must be refreshed when that content becomes “stale” or expires. When multiple endusers requestcached content that is in the process of being refreshed from origin servers, request collapsing groups those requests to besatisfied together. This protects customer application servers by keeping Fastly’s CDN Service from sending duplicate requeststo the origin information.
Grace ModeWhen an application server becomes unavailable for any reason, endusers will normally receive error messages indicating thecontent they’ve requested cannot be retrieved. When enabled, grace mode shields application servers by instructing Fastly’sCDN Service to continue to serve stale or expired (but likely still valid) content to endusers for a set amount of time. Thisallows customers to return otherwise unavailable application servers to normal operations and still serve content rather thanerror messages to endusers. By default, grace mode is not configured. Customers must specifically configure their service toserve stale content (/guides/caching/howcaniservestalecontentonerrors).
Related DocumentationThe following documents provide information related to Fastly’s Origin Shielding features:
How do I enable Shielding? (/guides/shielding/howdoienableshielding)Caveats of Shielding (/guides/shielding/caveatsofshielding)Understanding Cache HIT and MISS headers with Shielded Services (/guides/shielding/understandingcachehitandmissheaderswithshieldedservices)How do I configure a failover backend server? (/guides/loadbalancing/howdoiconfigureafailoverbackendserver)How do I implement sticky load balancing? (/guides/loadbalancing/howdoiimplementstickyloadbalancing)How do I set up load balancing between my backends? (/guides/loadbalancing/howdoisetuploadbalancingbetweenmybackends)How do I set up load balancing between my directors via the API? (/guides/loadbalancing/howdoisetuploadbalancingbetweenmydirectorsviatheapi)

12/13/2014 Fastly Documentation
https://docs.fastly.com/guides/aio 44/237
What does '503 Quorum weight not reached' error mean? (/guides/loadbalancing/whatdoes503quorumweightnotreachederrormean)Health Checks Tutorial (/guides/backendservers/healthcheckstutorial)How long does content remain cached? (/guides/caching/howlongdoescontentremaincached)How Can I Serve Stale Content on Errors (/guides/caching/howcaniservestalecontentonerrors)How can I force absolutely no caching in the browser? (/guides/caching/howcaniforceabsolutelynocachinginthebrowser)How do I conditionally prevent pages from caching? (/guides/caching/howdoiconditionallypreventpagesfromcaching)What is the difference between PASS action set in Request Settings and Cache Settings? (/guides/caching/whatisthedifferencebetweenpassactionsetinrequestsettingsandcachesettings)
· About Fastly’s RealTime Log Streaming Features (/guides/howfastlyserviceswork/aboutfastlysrealtimelogstreamingfeatures)Fastly’s log streaming features allow logging configuration information to be sent over TLS (Transport Layer Security). Thismeans that logging information can be encrypted, which allows customers to send potentially sensitive information to log fileswithout exposing data.
Supported Protocols and Logging ProvidersFastly supports syslogcompatible logging providers such as Splunk, Papertrail, and Logentries. We also support othermethods of sending logs besides the syslog protocol. We provide support for Sumologic and allow pushing of log files toAmazon S3 buckets, including any S3compatible providers (such as DreamHost's DreamObjects). Finally, Fastly supportsFTP uploading.
How RealTime Logging WorksAs Varnish Cache software processes transactions, it writes instances to a memory log for engineers’ diagnostic use. Thesememory instances are quickly overwritten, but selected data may be formatted into log lines and those can be continuallytransmitted or “streamed” in real time to a customer’s chosen logging service or any other standard syslogd server for reportingpurposes.
Transaction Types
The log lines reflect three types of transactions.
Transaction Type Descriptions
Session transactions may be multiple client transactions
Client transactions data on how end user connections were handled
Backend transactions data on backend connection activity
Syslog Object Setup
Customers enable log streaming (/guides/logstreaming/settingupremotelogstreaming) using Fastly’s Control Panel or theFastly API (/api/logging) by defining syslog objects that specify how Fastly caches should respond in various conditions.
Object Field Description
Name The name of the syslog object
Address IPv4, IPv6, or hostname address of the syslogd receiving streamed log lines
Port The port number
Format The data fields the customer selects to receive (Apache style log formatting)

12/13/2014 Fastly Documentation
https://docs.fastly.com/guides/aio 45/237
Response condition Conditions under which to execute the syslog (if empty, always execute)
Once a customer deploys one or more syslog objects, Fastly caches will select the log lines that pass each of the syslogobject’s response conditions. The selected log lines will be sent in a continuous manner (streamed) to the location (addressand port) specified in the syslog object, using the format specified in syslog object.
All values entered in the Fastly Control Panel (syslogd destination and data fields) are entered as arbitrary text into the Varnishmemory log. Multiple endpoints can be specified. All logs receive all records (each syslog receives all records).
The format of the log line consists of two parts: a header that identifies the service and endpoint, and data fields derived fromthe Apachestyle format string defined for each endpoint. This allows some customization of the output, but no business logic.Each line from the Varnish logs is examined to look for the response condition. Log lines from Varnish Log records that meetthe response condition are sent to the syslogd server at the address and port specified in the syslog object.
Customers can configure the log format using a superset of the Apache logging format noted below.
Log Formatting Specifications
The following options are available for log formatting.
Option Description
‐a When writing to a file, append to it rather than overwrite it.
‐bInclude log entries that result from communication with a backend server. If neither ‐b nor ‐c is specified,varnishlog acts as if they both were.
‐C Ignore case when matching regular expressions.
‐cInclude log entries that result from communication with a client. If neither ‐b nor ‐c is specified, varnishlog acts asif they both were.
‐D Daemonize.
‐dProcess old log entries on startup. Normally, varnishlog will only process entries that are written to the log after itstarts.
‐IregexInclude log entries that match the specified regular expression. If neither ‐I nor ‐i is specified, all log entries areincluded.
itag Include log entries with the specified tag (see below). If neither ‐I nor ‐i is specified, all log entries are included.
knum Only show the first num log records.
‐n Specifies the name of the varnishd instance to get logs from. If ‐n is not specified, the host name is used.
‐o Group the log entries by request ID. This has no effect when writing to a file using the ‐w option.
‐Pfile Write the process’s PID to the specified file.
‐rfile Read log entries from file instead of shared memory.
‐snum Skip the first num log records.
‐u Do not buffer the output.
‐V Display the version number and exit.
‐wfileWrite log entries to file instead of displaying them. The file will be overwritten unless the a option was specified. Ifvarnishlog receives a SIGHUP while writing to a file, it will reopen the file, allowing the old one to be rotated away.
‐Xregex Exclude log entries that match the specified regular expression.
‐xtag Exclude log entries with the specified tag (see below).
Log Entry Tags

12/13/2014 Fastly Documentation
https://docs.fastly.com/guides/aio 46/237
The following log entry tags are defined.
Tag Tag
Backend ReqStart
BackendClose RxHeader
BackendOpen RxLostHeader
BackendReuse RxProtocol
BackendXID RxRequest
CLI RxResponse
ClientAddr RxStatus
Debug RxURL
Error SessionClose
ExpBan SessionOpen
ExpKill StatAddr
ExpPick StatSess
Hit TTL
HitPass TxHeader
HttpError TxLostHeader
HttpGarbage TxProtocol
Length TxRequest
ObjHeader TxResponse
ObjLostHeader TxStatus
ObjProtocol TxURL
ObjRequest VCL_acl
ObjResponse VCL_call
ObjStatus VCL_return
ObjURL VCL_trace
ReqEnd WorkThread
Related DocumentationThe following documents provide information related to Fastly’s RealTime Log Streaming features:
Setting Up Remote Log Streaming (/guides/logstreaming/settingupremotelogstreaming)How do I escape characters in logs? (/guides/vclfaqs/howdoiescapecharactersinlogs)
· About Fastly’s Video Caching Service (/guides/howfastlyserviceswork/aboutfastlysvideocachingservice)

12/13/2014 Fastly Documentation
https://docs.fastly.com/guides/aio 47/237
For customers with their own video packaging infrastructure, Fastly can act as a globally distributed HTTP cache to improvequality of service and increase viewer capacity. When a manifest or video segment is requested by a customer's player, aFastly edge or shield POP will pull the requested content from the customer's origin media server. Subsequent requests forthat content will be served from Fastly's cache servers instead of the customer's origin (read How Fastly’s CDN Services Work(/guides/howfastlyserviceswork/howfastlyscdnserviceworks) for more information).
Fastly can cache and deliver any HTTP based media streaming protocol including:
HTTP Live Streaming (HLS),HTTP Dynamic Streaming (HDS),HTTP Smooth Streaming (HSS), andDynamic Adaptive Streaming over HTTP (MPEGDASH).
In addition, both live and ondemand streams are supported.
Related DocumentationThe following documents provide information related to Fastly’s Video Caching Service features:
How do I enable streaming for my account? (/guides/streaming/howdoienablestreamingformyaccount)How much do Fastly's streaming services cost? (/guides/streaming/howmuchdofastlysstreamingservicescost)Advanced Encoding Settings (/guides/streaming/advancedencodingsettings)
· About Fastly’s Video on Demand OntheFly Packaging Service (/guides/howfastlyserviceswork/aboutfastlysvideoondemandontheflypackagingservice)Fastly offers “on the fly,” dynamic, video content packaging service. Rather than having to prepackage all profiles of everyvideo in all streaming protocols, customers simply package content in real time. Video content then becomes immediatelyavailable to viewers.
For example, say a user starts viewing a 60minute video and then immediately activates the seekforward controls to moveforward in the video to the 5minute mark. The user then watches two more minutes of the video (to the 7minute mark) andstops.
Fastly’s VOD onthefly packaging service only packages video segments that an end user requests for viewing. In the aboveexample, the service would package only the 2 minutes of viewed content. The service would not package the 58 minutes ofvideo that was not watched and viewers would not have to wait for packaging in order to start viewing. Seekforward and seekbackward controls would work immediately.
How Fastly’s VOD OntheFly Packaging Service Works

12/13/2014 Fastly Documentation
https://docs.fastly.com/guides/aio 48/237
Customers enable the VOD onthefly packaging service through headers defined on backend requests, which are set up whenthe service is created through Fastly’s Control Panel user interface. The packaging process starts when customers receiveHTTP requests from viewers’ player software. Through the browser, the Customer website gives the viewer’s video player thehost server address, and the name of the VOD file with its extension denoting the packaging format desired.
The ingest POP (/guides/streaming/advancedencodingsettings) that the customer designates then puts the data in the HTTPrequest it sends to Fastly’s VOD onthefly packaging service (via the shield POP). Fastly processes these requests for videosegments. Specifically, the service parses the data to get the VOD host server address and the name of the MP4 source filerequested.
The service then retrieves the requested segments in MP4 format from a customer’s libraries on their VOD host server. TheVOD host server can be any server that supports HTTP byte range requests, or a storage service such as Amazon S3, orGoogle Cloud Storage. Once retrieved, the service muxes (http://www.techopedia.com/definition/24124/multiplexermux) thesegment into HLS or HDS format and then sends it with an HTTP response to the shield POP. The shield POP, in turn, sends itto the edge POP, which sends it to the video player of the viewer who made the original request.
Packaged segments are cached, and subsequent requests are fulfilled from cache to avoid repeatedly packaging the samerequests. Fastly caches the packaged video chunks while the customer maintains only the original MP4 source files in theirVOD library. Customers do not have to store a duplicate VOD library with every packaging option for every MP4 source filethey control.
· Content Sources Supported by Fastly (/guides/howfastlyserviceswork/contentsourcessupportedbyfastly)Fastly caches deliver various types of content (/guides/howfastlyserviceswork/typesofcontentdeliveredbyfastly) frommany different sources. Supported sources include:
WebsitesInternet APIsInternet ApplicationsLive and Live Linear VideoVideo on Demand (VOD) Libraries
Regardless of the content source, the content’s source server must communicate using HTTP. HTTP defines specific types of“methods” that indicate the desired action to be performed on content. The manner in which those HTTP methods are used(the standard, primary methods being GET, POST, PUT, and DELETE) can be labeled as being RESTful(http://en.wikipedia.org/wiki/Representational_state_transfer) or not. Fastly supports RESTful HTTP by default, but also cansupport the use of nonRESTful HTTP as long as the method used is mapped to its appropriate cache function. Each of thecontent sources supported by Fastly are described in more detail below.
WebsitesWebsites are servers that provide content to browser applications (e.g., Google’s Chrome, Apple’s Safari, Microsoft’s InternetExplorer, Opera Software’s Opera) when end users request that content. The content contains both the requested data and theformatting or display information the browser needs to present the data visually to the end user.
With no CDN services involved, browsers request data by sending HTTP GET requests that identify the data with a uniformresource locator (URL) address to the origin server that has access to the requested data. The server retrieves the data, thenconstructs and sends an HTTP response to the requestor. When a CDN Service is used, however, the HTTP requests go tothe CDN rather than the origin server because the customer configures it to redirect all requests for data to the CDN instead.Customers do this by adding a CNAME or alias for their origin server that points to Fastly instead.
Internet APIsApplication program interfaces (APIs) serve as a language and message format that defines exactly how a program will interactwith the rest of the world. APIs reside on HTTP servers. Unlike the responses from a website, content from APIs contain onlyrequested data and identification information for that data; no formatting or display information is included. Typically the content

12/13/2014 Fastly Documentation
https://docs.fastly.com/guides/aio 49/237
serves as input to another computing process. If it must be displayed visually to an end user, a device application (such as, aniPad, Android device, or iPhone Weather application) does data display instead.
Legacy Internet ApplicationsLegacy Internet applications refer to applications not originally developed for access over the Internet. These applications mayuse HTTP in a nonRESTful manner. They can be incrementally accelerated without caching, benefiting only from the TCPStack optimization done between edge Fastly POPs and the Shield POP, and the Shield POP to the origin. Then caching canbe enabled incrementally, starting with the exchanges with the greatest userexperienced delay.
Live and Live Linear Video Streams & Video onDemand LibrariesLive and live linear video content (for example, broadcast television) is generally delivered as a “stream” of information tousers, which they either choose to watch or not during a specific broadcast time. Video on demand (VOD), on the other hand,allows end users to select and watch video content when they choose to, rather than having to watch at a specific broadcasttime.
Regardless of which type of video content an end user experiences, a video player can begin playing before its entire contentshave been completely transmitted. End users access the video content from a customer’s servers via HTTP requests from avideo player application that can be embedded as a part of a web browser. Unlike other types of website content, this contentdoes not contain formatting or display information. The video player handles the formatting and display instead.
When the video content is requested, the customer’s server sends the content as a series of prepackaged file chunks alongwith a manifest file required by the player to properly present the video to the end user. The manifest lists the names of eachfile chunk. The video player application needs to receive the manifest file first in order to know the names of the video contentchunks to request.
“Prepackaging” in this context refers to the process of receiving the video contents, converting or “transcoding” the stream intosegments (chunks) for presentation at a specific dimension and transmission rate, and then packaging it so a video player canidentify and request the segments of the live video a user wants to view.
If your account is enabled for video delivery, see Fastly’s streaming guides (/guides/streaming/) for associated services andfeatures. To request video delivery on your account, please contact your Fastly Account Representative at [email protected](mailto:[email protected]).
· How Fastly's CDN Service Works (/guides/howfastlyserviceswork/howfastlyscdnserviceworks)Fastly is a content delivery network (http://en.wikipedia.org/wiki/Content_delivery_network) (CDN). We serve as an Internetintermediary and offer the Fastly CDN Service to make our customers’ transmission of their content to their end users moreefficient.
Our customers make content available through their websites and their Internetaccessible (hosted) application programminginterfaces (APIs). A customer can create content (customergenerated content), as can a customer’s end users (usergenerated content). Fastly’s CDN Service then makes the transmission of that content (which we sometimes refer to as“content objects”) more efficient by automatically storing copies at intermediate locations on a temporary basis. The process ofstoring these copies is known as “caching” and the server locations in which they are stored are referred to as “caches.”

12/13/2014 Fastly Documentation
https://docs.fastly.com/guides/aio 50/237
Fastly’s delivers its CDN service from key access points to the Internet called “points of presence” (POPs). Fastly places POPs(http://www.fastly.com/blog/howfastlychoosespoplocations/) where their connectivity to the Internet reduces network transittime when delivering content to endusers. Each POP has redundant Fastly cache servers. When end user’s request acustomer’s content objects, Fastly delivers them from whichever of the cache locations can deliver the objects fastest.
Fastly’s caches only receive and process customers’ end user requests for content objects. Customers decide which objectswill be cached, for how long, who can access them, whether they are to be encrypted when transmitted over the Internet, whatlevel of encryption shall be used, and when the objects will be deleted from the caching service. Customers make thesedecisions by specifically configuring Fastly’s CDN Service with these requirements. We refer to this configuration process as“provisioning.”
To provision Fastly’s CDN service (/guides/gettingstarted/signupandcreateyourfirstservice), customers must identify whichof their application servers will provide the original content objects for each of their various domains (e.g., company.com,myco.com). Their application servers can be physical servers in a customer datacenter or hosting facility, or applicationsrunning on cloud services like Amazon, or any combination. Fastly refers to these source servers as “origin” and “backend”servers interchangeably.
The first time each Fastly cache receives a request for a content object, it fetches the object from the appropriate origin server.If multiple origin servers have that object, the cache will distribute the processing load for the fetch across all of them (based onthe configuration criteria set by the customer). After the content object is fetched, the cache stores a copy of it and forwards itsresponse to the end user.
Each time after the first time an end user requests that same content object, the Fastly cache fulfills requests by retrieving thecached copy from storage (or memory) and immediately delivering it to the end user – the fetch step to the original copy is notrepeated until the content object either expires or becomes invalidated.

12/13/2014 Fastly Documentation
https://docs.fastly.com/guides/aio 51/237
· Intro to Caching and CDNs (/guides/howfastlyserviceswork/introtocachingandcdns)Fastly is a Content Delivery Network, or CDN. CDNs work on the principle that once a piece of content has been generated itdoesn't need to be generated again for a while so a copy can be kept around in a cache. Cache machines ours especially! are optimized to serve small files very very quickly. CDNs typically have caches placed in datacenters all around the world when a user requests information from a customer's site they're actually redirected to the set of cache machines closest tothem instead of the customer's actual servers. This means that a European user going to an American site gets their contentanywhere from 200500ms faster. CDNs also minimize the effects of a cache miss. A cache miss occurs when a user requestsa bit of content and it is not in the cache at that moment (either because it's expired, because noone has asked for it before, orbecause the cache got too full and old content was thrown out).
What can be cached?
CDNs are quite good at managing a cache of small, static resources (for example, static images, CSS files, Javascripts, andanimated GIFs). CDNs are also popular for offloading expensivetoserve files like video and audio media.
At Fastly, our architecture (known as a reverse proxy) is designed to enable customers to go a step further and cache entireweb pages or even more efficient handling of your traffic.
Remember: Static files + media objects + web pages = your whole site. With the right service configuration (which we canassist you in setting up) Fastly can reduce your backend traffic by orders of magnitude with no loss in control over the contentyour users see.
Managing the Cache
Caching serves as a powerful weapon in your makethesitefaster arsenal. However, most objects in your cache aren't goingto stay there permanently. They'll need to expire so that fresh content can be served. How long that content should stay in thecache might be mere seconds or a number of minutes or even a year or more.
How can you manage which of your content is cached, where, and for how long? By setting policies that control the cacheddata. Most caching policies are implemented as a set of HTTP headers sent with your content by the web server (as specifiedin the config or the application). These headers were designed with the client (browser) in mind but CDNs like Fastly will alsouse those headers as a guide on caching policy.
ExpiresThe Expires header is the original cacherelated HTTP header and tells the cache (typically a browser cache) how long tohang onto a piece of content. Thereafter, the browser will rerequest the content from its source. The downside is that it's astatic date and if you don't update it later, the date will pass and the browser will start requesting that resource from the sourceevery time it sees it.
If none of the following headers are found in the request, Fastly will respect the Expires header value.
CacheControlThe Cache‐Control headers (introduced in the HTTP 1.1 specification) cover browser caches and in most cases, intermediatecaches as well:
Cache‐Control: public Any cache can store a copy of the content.Cache‐Control: private Don't store, this is for a single user.Cache‐Control: no‐cache Revalidate before serving this content.Cache‐Control: no‐store Don't store this content. Ever. At all. Please.Cache‐Control: public, max‐age=[seconds] Caches can store this content for n seconds.Cache‐Control: s‐maxage=[seconds] Same as maxage but applies specifically to proxy caches.

12/13/2014 Fastly Documentation
https://docs.fastly.com/guides/aio 52/237
Only the max‐age , s‐maxage , and private CacheControl headers will influence Fastly's caching. All other CacheControlheaders will not, but will be passed through to the browser. For more indepth information about how Fastly responds to theseCacheControl headers and how these headers interact with Expires and SurrogateControl, check out our Cache ControlTutorial (/guides/tutorials/cachecontroltutorial).
(Note: For more information than you need on the rest of the CacheControl headers, see the relevant section in MarkNottingham's Caching Tutorial (http://www.mnot.net/cache_docs/#CACHECONTROL).)
Surrogate HeadersSurrogate headers are a relatively new addition to the cache management vocabulary (described in this W3C tech note(http://www.w3.org/TR/edgearch)). These headers provide a specific cache policy for proxy caches in the processing path.Surrogate‐Control accepts many of the same values as Cache‐Control , plus some other more esoteric ones (read the technote for all the options).
One use of this technique is to provide conservative cache interactions to the browser (for example, Cache‐Control: no‐cache ).This causes the browser to revalidate with the source on every request for the content. This makes sure that the user isgetting the freshest possible content. Simultaneously, a Surrogate‐Control header can be sent with a longer max‐age that lets aproxy cache in front of the source handle most of the browser traffic, only passing requests to the source when the proxy'scache expires.
With Fastly, one of the most useful Surrogate headers is Surrogate‐Key . When Fastly processes a request and sees aSurrogate‐Key header, it uses the spaceseparated value as a list of tags to associate with the request URL in the cache.Combined with Fastly's Purge API (/api/purge) an entire collection of URLs can be expired from the cache in one API call (andtypically happens in around 1ms). Surrogate‐Control is the most specific.
Fastly and Cache Control HeadersFastly looks for caching information in each of these headers as described in our CacheControl docs (/guides/tutorials/cachecontroltutorial). In order of preference:
Surrogate‐Control:
Cache‐Control: s‐maxage
Cache‐Control: max‐age
Expires:
Shielding
When an object or collection of objects in the cache expires, the next time any of those objects are requested, the request isgoing to get passed through to your application. Generally, with a good caching strategy, this won't break things. However,when a popular object or collection of objects expires from the cache, your backend can be hit with a large influx of traffic asthe cache nodes refetch the objects from the source.
In most cases, the object being fetched is not going to differ between requests, so why should every cache node have to get itsown copy from the backend? With Shield Nodes, they don't have to. Shielding configured through the Fastly application(/guides/shielding/) allows you to select a specific datacenter (most efficiently, one geographically close to your application) toact as a shield node. When objects in the cache expire, the shield node is the only node to get the content from your sourceapplication. All other cache nodes will fetch from the shield node, reducing source traffic dramatically.
Resources
Wikipedia: Reverse Proxy (http://en.wikipedia.org/wiki/Reverse_proxy)Fastly's CacheControl docs (/guides/tutorials/cachecontroltutorial)Mark Nottingham's Caching Tutorial (http://www.mnot.net/cache_docs/#CACHECONTROL)Surrogate header W3C tech note (http://www.w3.org/TR/edgearch)

12/13/2014 Fastly Documentation
https://docs.fastly.com/guides/aio 53/237
· Types of Content Delivered by Fastly (/guides/howfastlyserviceswork/typesofcontentdeliveredbyfastly)The underlying protocol used by the World Wide Web to define how content is formatted and transmitted is called the HypertextTransfer Protocol (HTTP). Fastly’s CDN Service delivers all HTTPbased file content (e.g., HTML, GIF, JPEG, PNG,JavaScript, CSS) including the following:
Static contentDynamic contentVideo content
Each content type is described below. For more information about the content sources Fastly supports, see Content SourcesSupported by Fastly (/guides/howfastlyserviceswork/contentsourcessupportedbyfastly).
Static ContentStatic content includes content that remains relatively unchanged. Fastly can control static content (/guides/caching/) in twoways:
using the time to live (TTL) method, where Fastly’s cache revalidates the content after expiration of the TTL, orusing Fastly’s Instant Purge functionality, in which content remains valid until the cache receives a purge request(/guides/purging/) that invalidates the content.
Classic examples of static content include images and logos.
Dynamic ContentDynamic content includes content that changes at unpredictable intervals. We serve dynamic content by taking advantage ofFastly’s Instant Purge functionality. Using this functionality, dynamic content remains valid only until a Fastly cache receives apurge request (/guides/purging/) that invalidates the content. Fastly understands that the rate of those purge requests cannotbe predicted. Dynamic content may change frequently as a source application issues purge requests in rapid succession tokeep the content up to date. Dynamic content can, however, remain valid for months if there are no changes requested.
Examples of dynamic content include sports scores, weather forecasts, breaking news, usergenerated content, and currentstore item inventory.
Video ContentVideo content includes:
Live video streamsVideo on Demand (VOD) content libraries
Video content can be served using standard HTTP requests. Specifically, Fastly supports HTTP Streaming standards,including HTTP Live Streaming (HLS), HTTP Dynamic Streaming (HDS), HTTP Smooth Streaming (HSS), and MPEGDASH).
For Fastly’s CDN Service to deliver video, the video must be packaged. If your account is enabled for video delivery, seeFastly’s streaming guides (/guides/streaming/) for associated services and features.
· Understanding the XTimer header (/guides/howfastlyserviceswork/understandingthextimerheader)If you look at the raw headers returned with a response from a Fastly cached asset, you will notice some extra headers tackedon. One in particular is XTimer. This header provides timing information about the journey of a request from end to end.
Here are two examples of an XTimer headers:
S1392947468.641059399,VS0,VE0 (a cache HIT)S1392951663.217806578,VS0,VE31 (a cache MISS)

12/13/2014 Fastly Documentation
https://docs.fastly.com/guides/aio 54/237
Lets break these headers down into their parts, separated by commas, and examine what each part means.
The first section of the header, starting with S , represents a Unix timestamp (http://en.wikipedia.org/wiki/Unix_time) of the startof the request on our edges.
The next section, VS or "varnish start," represents the start of the varnish part of the request's journey. This should always be 0(we've got to start counting somewhere).
And the last section, VE or "varnish end," represents the sum of the length of the trip. For cache HITs, the length of the trip willnearly always be 0 (not actually zero, but less than a millisecond is rounded down). For cache MISSs, the number representsthe number of milliseconds it took to retrieve the data from your origin server and send the response back to the requester. Inthe example above, it took 31ms to retrieve the data.
• Customer Support (/guides/customersupport/)
· Availability SLA (/guides/customersupport/availabilitysla)Support availability and response times vary depending on the type of account you have and the level of support you havepurchased.
UnpaidAccount
MonthtoMonthAccount
Termed Contract Premium Support
Service LevelAgreement
None NoneTerminationOption
Invoice Credits + TerminationOption
Definitions“Degraded Performance” for the Services means the Services are experiencing Error Conditions that are (1) caused byissues under Fastly Control, (2) observable or reproducible by Subscriber or Fastly, (3) requiring Subscriber to redirect trafficoff the Services. Degraded Performance does not include any reduction on availability of the Application User Interface or APIdue to planned maintenance.
“Error Condition” means the Services are (1) not responding to end user requests, (2) incorrectly sending end users errorcondition messages or (3) sending incorrect partial content to end users and these conditions are observable or reproducibleby Subscriber or Fastly.
“Fastly Control” means elements entirely under Fastly’s control and not a consequence of (a) Subscriber hardware orsoftware failures, (b) Subscriber or end user connectivity issues, (c) Subscriber operator errors, (d) Subscriber traffic amountsthat exceed Subscriber’s Permitted Utilization, (e) corrupted Subscriber content, (f) acts of god (any) or war, or earthquakes, orterrorist actions.
Termination

12/13/2014 Fastly Documentation
https://docs.fastly.com/guides/aio 55/237
Any Subscriber that has a contract with a term and a minimum commitment shall have thirty (30) days to terminate theirsubscription agreement if the Services experience Degraded Performance (a) for longer than 7.2 hours in any one month, or(b) for longer than 43.8 minutes each month in any three contiguous months. Subscriber shall have thirty (30) days to terminatetheir contract following the third failure
Availability Invoice CreditsSubscribers who purchase Premium Support shall be entitled to Invoice Credits according to the following table.
Availability Percent Period of Degraded Performance Monthly Credit Percent
Below 100% 99.99% Up to 4.32 minutes 1%
99.99% – 99.9% Up to 43.8 minutes 5%
99.89% – 99.0% Up to 7.2 hours 10%
Invoice Credits for unavailability will accrue on a monthly basis. The Credit Amount for a month is equal to the monthly usagecharge multiplied by Monthly Credit Percent.
Credit TermsRequests for Invoice Credits for Degraded Performance must be made within 30 days of the period of DegradedPerformance.The maximum amount of any credit is the Invoice Amount for the month the Degraded Performance occurred.A pending credit does not release Subscriber from its obligation to pay Fastly’s submitted invoices in full when due.Credits will be applied to the Invoice two months following the month an invoice credit was incurred.
· Compliance Services (/guides/customersupport/complianceservices)Subscribers who purchase Compliance Services will have access to the following:
Access to library of thirdparty audit reports and certification attestations (most recent 12 months),Access to executive summary reports for penetration tests and network scans (most recent 12 months),Access to library of security related policies and procedures,Access to library of executive summaries of annual risk assessments (most recent 12 months),Unlimited Audit rights at $500 per hour of Fastly time, with 10 hours included per year. Audit to be on 10 business days’advance notice.Access to library of historical reason for outage (RFO) documents (most recent 12 months).Ability to be added as an Additional Insured on Fastly's General Commercial Liability Insurance for a onetime fee of$1,000.
Subscribers who wish to purchase Compliance Services must also purchase Premium Support.
· Help! I'm locked out of my account! (/guides/customersupport/help!imlockedoutofmyaccount!)
Why is my account locked?
For security reasons, Fastly limits the number of times someone can try logging in to an account. We don't want to give peopleunlimited attempts at guessing your password, so we stop them from trying after a limited number of failed attempts to sign in.
I am not using twofactor authentication. How can I access myaccount?

12/13/2014 Fastly Documentation
https://docs.fastly.com/guides/aio 56/237
Once locked, you will not be able to sign in to your account, even with the correct password. To unlock your account becauseyou exceeded the number of guesses you were allowed:
1. Point any standard web browser (/guides/gettingstarted/browserrecommendationswhenusingthefastlyapplication) tothe Fastly application login page (https://app.fastly.com/#login). The login controls appear.
2. Click the Forgot Password button underneath the login controls. The Reset Password Controls appear.
3. In the Email (login) field, type the email address you normally use to log in to your Fastly account, and then click theReset button. Password reset instructions will be emailed to you.
4. Click on the password reset link in the emailed instructions that the system sends you. The Reset Your Password pageappears.
5. Click the Reset Password button. The system send you a temporary password to the email address you supplied.
6. Using the temporary password you receive, log in to your account. The controls to create a new password appear.

12/13/2014 Fastly Documentation
https://docs.fastly.com/guides/aio 57/237
7. Fill out the Reset Password controls as follows:
In the Current Password field, type the temporary password that the system emailed to you when you requested apassword reset.In the New Password field, type a new password to replace the temporary password you were sent.In the Confirm Password field, type the new password a second time to confirm it.Click the Change Password button. The system changes your password and logs you into your account.
I am using twofactor authentication. How can I access myaccount?
I don’t have my mobile device.If you do not have access to your mobile device, you can complete the login process using one of your recovery codes. Thesewere the recovery codes you saved in a secured location outside of your Fastly account. You can continue to use yourrecovery codes until your device is once again accessible. Recovery codes can only be used once, however, so remember toregenerate a new list of codes to avoid running out before you recover your mobile device.
If you don’t believe you will be able to recover a lost mobile device and you still have at least two recovery codes left, you canlog in with one recovery code and disable twofactor authentication with a second code. Once twofactor authentication isdisabled, you can reenable it with a new mobile device at a later time and regenerate a new set of codes.
I don’t have my mobile device and I don’t have my recovery codes.If you don’t have your mobile device and didn’t save any recovery codes, have another user at your company with superuserrole contact Customer Support at [email protected] (mailto:[email protected]). Have them inform Customer Support whichuser needs assistance with their login. After Customer Support verifies that the request is from a superuser, we will providethem with your recovery code. The superuser will then send you this information and reset your password so that you canaccess your account.
I don’t have my phone, I didn't save my recovery codes, and I am the only superuserfor the account.Please contact Customer Support at [email protected] (mailto:[email protected]). We will verify that you are associatedwith the company by phone. We will use the contact information located on the company website or under the Fastly accounttab. Upon verification, we will send you a recovery code and reset your password.
Was my account compromised?
If a user's account appears to be hacked or phished, we may proactively reset the passwords for the affected accounts to inorder to revoke access to the hacker. In these cases, we send an email to the account's real owner (you) with additionalinformation on how to reset the password. If you received one of these emails, please follow the instructions in the email.
If you think your account has been hacked or phished, please contact Customer Support at [email protected](mailto:[email protected]) immediately.
How is a locked account different from a blocked account?
Fastly allows you to restrict who can access your Fastly account based on the IP address of the person attempting to log in.This means that even with the correct login name and password, access to your Fastly account may be blocked if the IPdoesn’t match your company’s list of allowed addresses.

12/13/2014 Fastly Documentation
https://docs.fastly.com/guides/aio 58/237
If your company enables optional IP whitelisting, they must keep the list of restricted IP addresses up to date. Only users withthe role of superuser can make changes to the IP whitelist settings (your account owner is always a superuser), and youraccount owner must have a valid telephone number on file to do so.
If your IP addresses change after whitelisting is enabled and you forget to update your whitelist configuration, you will belocked out of your account. You will need to contact [email protected] (mailto:[email protected]) to request that aCustomer Support representative contact your account's owner via telephone during Fastly's regular business hours. Toprotect your account's security, we will not unlock your account based on an email request alone.
· How can I merge accounts? (/guides/customersupport/howcanimergeaccounts)If several employees at your company independently create testing accounts when learning about how Fastly's services work(/guides/howfastlyserviceswork/), you can have those testing accounts merged into a single account by emailing theCustomer Support team at [email protected] (mailto:[email protected]) with the following information:
the Customer IDs (/guides/faqs/wherecanifindmyserviceidcustomeridorapikey) of the accounts to be mergedwhich account should be considered the primary account (any other accounts will be merged into the primary)
After you contact us, we'll reach out to verify the ownership of each account. If we can confirm ownership, we'll initiate a merge.
· How do I change the email or password associated with my account?(/guides/customersupport/howdoichangetheemailorpasswordassociatedwithmyaccount)Log in to the Fastly application and click the account tab to access the Account Settings information.

12/13/2014 Fastly Documentation
https://docs.fastly.com/guides/aio 59/237
Changing Your Name or Email
To change the name or email associated with the account, update the information that appears in the Name and Email (login)fields in the Your Profile section. Then click Update Profile to save the changes.
Changing Your Password
To change the password currently associated with your account, type your current password in the Current Password field,then type your new password twice, once in the New Password field and once in the Confirm Password field. Save thechanges by clicking Change Password.
When choosing a password remember the following:
Passwords must contain at least six letters.Passwords cannot solely contain sequences of letters or numbers (e.g., 12345678 , abcdefg ).Passwords cannot solely contain repeated characters (e.g., 222222 , aaaaaa ).Passwords cannot solely contain adjacent key placements on a standard keyboard (e.g., QWERTY ).Passwords cannot match commonly used or easily guessed words (e.g., password123 , changeme ).Passwords cannot match your user name.
· How do I delete a service version or an entire service? (/guides/customersupport/howdoideleteaserviceversionoranentireservice)Fastly allows you to delete any service you create, along with all of its versions. Fastly does not offer a way to delete specificversions of a service, however. Service versions are meant to be a historic log of the changes that were made to a service. Toundo changes to a particular service, you can always go back to a previous version and activate that one. You also can clone anew service version based on any old version.
IMPORTANT: When a service is deleted from your configuration, Fastly maintains a copy in its databases in case the deletionwas accidental (/guides/customersupport/iaccidentallydeletedaservice.howdoigetitback). Any domains that wereassociated with that service will remain associated with it even after deletion. Before deleting a service, you should delete thedomains within it first and then delete the service itself.
To delete any service along with all of its versions, follow the steps below.
1. Log in to the Fastly application.2. Click the configure tab to access the control panel.
3. Select the appropriate service from the Service drop down.
4. In the Domains area, click the gear icon to the right of each domain associated with this service and then select Deletefrom the menu that appears.
IMPORTANT: Be sure to repeat this step until all domains associated with the service have been deleted. If any domainsremain associated with a deleted service, the system may not allow you to associate them with a new service at a laterdate.
5. Click the yellow Deactivate button to the right of the service name.

12/13/2014 Fastly Documentation
https://docs.fastly.com/guides/aio 60/237
The Deactivate Service warning appears.
6. Click the red Deactivate button to confirm you want to deactivate your service and acknowledge that you no longer wantto serve traffic with it. The Delete button becomes active on the control panel.
7. Click the red Delete button to the right of the service name. The Confirm Delete window appears.
8. Click the red Confirm button to confirm that you want to delete the service.
REMEMBER: You can also deactivate an entire service (/guides/faqs/howdoideactivateandreactivateservices) instead ofdeleting it.
· How to Submit a Support Request (/guides/customersupport/howtosubmitasupportrequest)Fastly offers technical support for all accounts. The method that customers use to submit requests and the response time byFastly to those requests depends on the level of technical support they purchase for their accounts.
For all levels of technical support, Fastly’s customer support ticketing system automatically generates and assigns eachrequest a unique service ticket number, which is then sent within minutes to the customer at the email address used whensubmitting the ticket. This automated response also contains a direct link to the service ticket within Fastly’s customer supportsystem. Fastly then responds to these requests as appropriate for the level of support purchased by the customer.
How Accounts Without Premium Support Submit Requests

12/13/2014 Fastly Documentation
https://docs.fastly.com/guides/aio 61/237
Customers who do not pay for Premium Support support submit support requests either via email to [email protected] ordirectly in the Fastly application interface (via the Support tab at the right side of every page in the interface) any time theyrequire assistance with selfprovisioned tasks (/guides/customersupport/selfprovisionedfastlyservices). Fastly then respondsto these requests as appropriate for the level of support purchased by the customer.
How Accounts with Premium Support Submit Requests
To submit emergency support tickets, customers must pay for a Premium Support plan that includes support for severeincidents. Customers with Premium Support plans can submit requests for support any time
a service that has been working stops working.
a production deployment experiences a drastic change in performance that either is customer or enduseraffecting.
Customers with Premium Support accounts submit emergency tickets to a uniquely assigned, emergency support emailaddresses (instead of via the Support tab on the Fastly application interface or via the standard customer support emailaddress).
· I accidentally deleted a service. How do I get it back? (/guides/customersupport/iaccidentallydeletedaservice.howdoigetitback)Services can be deactivated (/guides/faqs/howdoideactivateandreactivateservices) or deleted (/guides/customersupport/howdoideleteaserviceversionoranentireservice). Deactivated services can be reactivated (/guides/faqs/howdoideactivateandreactivateservices) at any time, but once they've been deleted you must contact Customer Support(mailto:[email protected]) to have them restored. When sending your request, please remember to include:
your customer ID (/guides/faqs/wherecanifindmyserviceidcustomeridorapikey)your company name (/guides/faqs/wherecanifindmyserviceidcustomeridorapikey)your service ID (/guides/faqs/wherecanifindmyserviceidcustomeridorapikey) (the name of the service you wantrestored)
Customer Support will notify you when your service has been restored.
· SelfProvisioned Fastly Services (/guides/customersupport/selfprovisionedfastlyservices)Fastly customers configure or “provision” Fastly caching and video services personally, independent of Fastly staff, via theFastly application interface (https://app.fastly.com). Fastly calls this “selfprovisioning.” Selfprovisioning tasks include thingslike:
creating and deploying services
adding domains and origin servers
configuring load balancing
modifying how services handle HTTP headers
submitting purge commands
Once provisioned, Fastly services can be deployed immediately. If selfprovisioned tasks fail to operate in an appropriate orexpected manner, customers can find answers to a variety of frequently asked questions in Fastly’s guides and tutorials(/guides/). They can also receive personalized assistance by submitting requests (/guides/customersupport/howtosubmitasupportrequest) directly to Fastly’s Customer Support Engineering staff.
· Support Description and SLA (/guides/customersupport/supportdescriptionand

12/13/2014 Fastly Documentation
https://docs.fastly.com/guides/aio 62/237
· Support Description and SLA (/guides/customersupport/supportdescriptionandsla)Support availability and response times vary depending on the type of account you have and the level of support you havepurchased. The following table summarizes those offerings:
UnpaidAccount
MonthtoMonthAccount
TermedContract
PremiumSupport
Online Forums Yes Yes Yes Yes
Email SupportResponse TimeCommitment
Best Effort Best Effort Next Business Day
Severity 1 Incidents: 15 minutes*
All Others: Next Business Day
Severe IncidentResponse EmailAddress
No No No Yes
Support SLA None None Termination OptionInvoice Credits +Termination Option
Technical SupportThe following section applies to all subscribers.
Definitions“Business Hours” are 8AM6PM Monday through Friday Pacific Time.“Business Days” are Monday through Friday excluding US and UK national and banking holidays.An “Incident” is an occurrence during which end users’ use Subscriber’s services is adversely impacted.A “Severity 1 Incident” is an incident resulting in a major service outage requiring Subscriber to redirect all traffic fromFastly to another CDN.A “Severity 2 Incident” is an incident resulting in minor or intermittent outage not requiring Subscriber to redirect trafficto another CDN.“Fastly Control” means elements entirely under Fastly’s control and not a consequence of (a) Subscriber hardware orsoftware failures, (b) Subscriber or end user connectivity issues, (c) Subscriber operator errors, (d) Subscriber trafficamounts that exceed Subscriber’s Permitted Utilization as defined in the Terms and Conditions, (e) corrupted Subscribercontent, (f) acts of god (any) or war, or earthquakes, or terrorist actions.
Subscriber ResponsibilitiesSubscriber is responsible using and configuring services according to the Documentation available at https://docs.fastly.com.
Support RequestsSubscribers submit support requests by sending email to [email protected], or by selecting the Control Panel “SUPPORT”tab. Subscribers receive a systemgenerated response within minutes containing the ticket number and a direct link to theticket.
Incident reports should include at the least the following:
Services are not responding to end user requests.Services incorrectly send end users error condition messages.Services send incorrect or partial content to endusers.

12/13/2014 Fastly Documentation
https://docs.fastly.com/guides/aio 63/237
Incident reports should include all relevant information such as:
Subscriber's determination of the Severity Level of the incident,Subscriber hardware failures,Subscriber operator errors,Services configuration errors made by Subscriber employees,Potential Excess Utilization (as defined in the Terms of Use or master services agreement)Corrupted Subscriber content,DDOS attacks, andRelevant force majeur acts such as extreme weather, earthquakes, strikes or terrorist actions.
CommunicationsCommunications between Fastly support engineers and subscriber staff are conducted using the ticketing application, whichmaintains a timestamped transcript of all communications, and sends emails to Subscriber and Fastly staff as tickets areupdated.
Response TimeFastly shall use best efforts to respond in a timely fashion.
Termed ContractsThe following applies to any subscriber that has a contract with a term and a minimum commitment.
Response TimesFastly commits to acknowledging receipt of a support ticket within the next business day following submission of a supportrequest.
TerminationIn any threemonth period where three (3) or more support Response Time objectives are not met and the failure to meet theobjectives materially adversely impacted Subscriber, Subscriber shall have thirty (30) days to terminate their subscriptionagreement following the third failure.
Premium SupportThe following applies to subscribers who have purchased Premium Support.
Incident ReportingSeverity 1 Incidents: Fastly will provide Subscriber an Incident Support Email address for Subscriber to report Incidents.Subscriber should report Incidents promptly using the Incident Support email.
Severity 2 Incidents: Subscriber should report Severity 2 Incidents by submitting a Support Request.
Response TimesFastly will respond to the report of an Incident by troubleshooting the cause(s) of the Incident and resolve them if caused byfactors within Fastly’s control, or provide information to those who can resolve the factors if the factors are within others’control, as follows:
For a Severity 1 Incident:
Fastly support staff will acknowledge receipt of the email within 15 minutes.

12/13/2014 Fastly Documentation
https://docs.fastly.com/guides/aio 64/237
Fastly will start actively troubleshooting within 30 minutes of receipt of the email.Fastly will perform its tasks on a 24 / 7 basis.Fastly and Subscriber will immediately communicate upon learning new information that may be useful in troubleshootingthe incident, and status updates between Fastly and Subscriber staff will take place no less frequently than every 30minutes for the first two hours, and no less frequently than every hour thereafter.Fastly staff will work until (a) the incident is resolved or (b) the incident is believed to be outside of Fastly’s control.
For a Severity 2 Incident:
During Business Hours Fastly support staff will acknowledge receipt of the email within two hours or within two hours ofthe start of the next business day if the Incident does not come in during a Business Day.Fastly engineers will be actively troubleshooting within one business day, will work on the Incident during BusinessHours, and will provide status updates to Subscriber daily on each subsequent Business Day.
Charges for Incident ResponseFor Severity 1 Incidents caused by factors within Subscriber’s control, a flat fee of $1500 will be assessed, and any time spentbeyond three hours will be invoiced at Subscriber's undiscounted Professional Services rates.
For Severity 2 Incidents caused by factors within Subscriber’s control, Subscriber will be invoiced at Subscriber's undiscountedProfessional Services Rates.
For all incidents,
If the Incidentcausing factors are within Fastly’s control, there will be no hourly charges for Fastly engineering staff time.If the factors are within Subscriber’s control, Subscriber agrees to pay Fastly its hourly charges for Fastly engineeringstaff time. If it appears likely the factors are within Subscriber’s, Subscriber may tell Fastly staff to stop working ontroubleshooting the Incident (thereby stopping the hourly charges from being incurred). Subscriber agrees to tell Fastly tostop working on an Incident via an email sent to Fastly’s Incident Support email address. The timestamp on the email willbe the time charges cease to be incurred.
Support Invoice CreditsIn the event a Severity 1 Incident occurs, Subscriber has purchased Premium Support, the cause of the Incident is withinFastly’s control, and any of the communication or response timeframes are materially not met, a onetime credit of $500 perincident will be credited to Subscriber’s account.
Credit Terms:
Requests for Invoice Credits must be made within 30 days of the incident which triggered the service credit.In no event shall Invoice Credits exceed the invoice value of the month in which they are accrued.A pending credit does not release Subscriber from its obligation to pay Fastly’s submitted invoices in full when due.Credits will be applied to the Invoice two months following the month an invoice credit was incurred.
· What type of access do different users have? (/guides/customersupport/whattypeofaccessdodifferentusershave)Your Fastly account can be managed by multiple users. These users can have minimal, partial, or full access to your accountbased on the role you've assigned to them. This role can be changed by superusers at any time via the web interface or viathe API (/api).
User Roles
Fastly allows you to assign one of four different roles to each user who has access to your account:
user: Minimal access. They can view analytics (the pretty graphs) and change personal profile details (such as name and
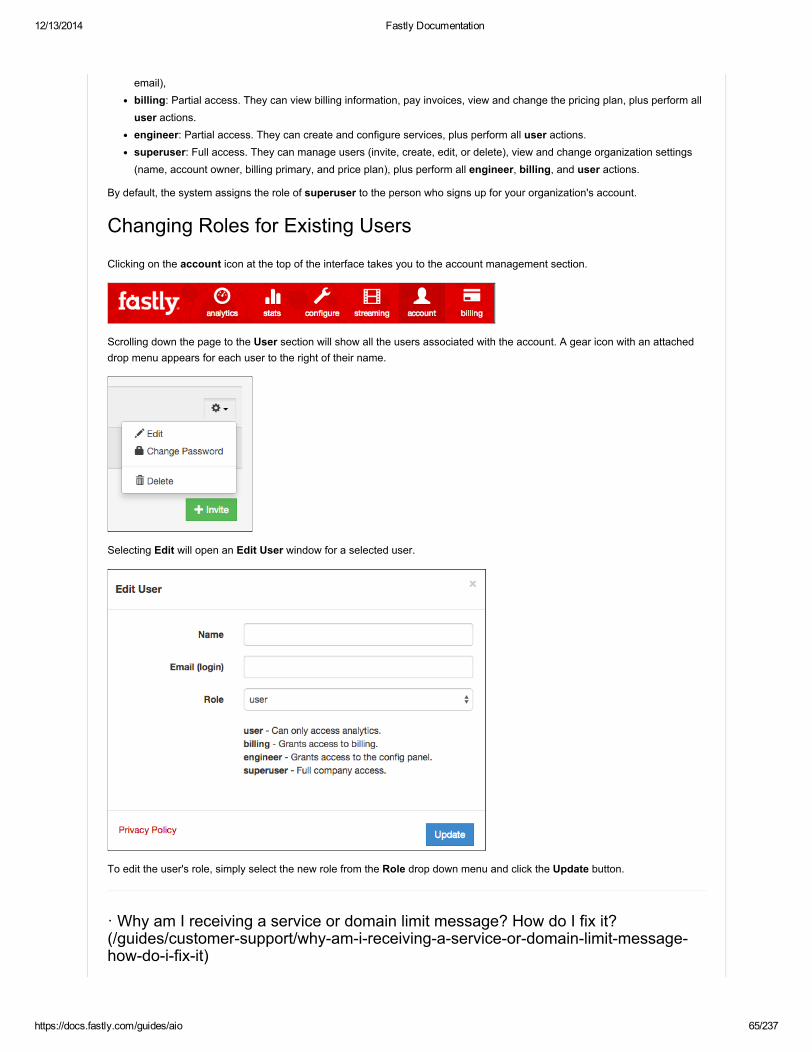
12/13/2014 Fastly Documentation
https://docs.fastly.com/guides/aio 65/237
email),billing: Partial access. They can view billing information, pay invoices, view and change the pricing plan, plus perform alluser actions.engineer: Partial access. They can create and configure services, plus perform all user actions.superuser: Full access. They can manage users (invite, create, edit, or delete), view and change organization settings(name, account owner, billing primary, and price plan), plus perform all engineer, billing, and user actions.
By default, the system assigns the role of superuser to the person who signs up for your organization's account.
Changing Roles for Existing Users
Clicking on the account icon at the top of the interface takes you to the account management section.
Scrolling down the page to the User section will show all the users associated with the account. A gear icon with an attacheddrop menu appears for each user to the right of their name.
Selecting Edit will open an Edit User window for a selected user.
To edit the user's role, simply select the new role from the Role drop down menu and click the Update button.
· Why am I receiving a service or domain limit message? How do I fix it?(/guides/customersupport/whyamireceivingaserviceordomainlimitmessagehowdoifixit)

12/13/2014 Fastly Documentation
https://docs.fastly.com/guides/aio 66/237
We currently limit the maximum number of services and domains (/guides/domainsanddns/) you can configure with the Fastlyapplication. Once you reach that limit, error messages may appear that look something like this:
"msg":"An error occurred while connecting to the fastly API, please try your request again.","detail":"Exceeding max number of domains: 20"OK
If you're receiving a limit message and need to create more services or domains, please contact [email protected](mailto:[email protected]) so we can help you plan as you ramp up. We can probably increase the limit for you but there maybe an easier way to achieve your goals with a smaller number of services or domains.
• Legal & Compliance (/guides/legalandcompliance/)
· Legal and Compliance FAQ (/guides/legalandcompliance/legalandcompliancefaq)This FAQ is designed to answer questions we often get about our Terms of Service, our Documentation, our Acceptable UsePolicy, and how they all work together. It does not replace any of those, nor is it legally binding on its own. If you havequestions or would like to suggest an update, check out our support page (http://www.fastly.com/support/).
Why does Fastly have a Privacy Policy, and how does itaffect my business?The Privacy Policy (http://www.fastly.com/privacy/) applies to information we collect about visitors to our website and theinformation we collect from interactions with our subscribers. It also summarizes our commitments to the U.S. – E.U. SafeHarbor framework (http://www.export.gov/safeharbor/eu/eg_main_018365.asp) and the U.S. Swiss Safe Harbor framework(http://export.gov/safeharbor/swiss/) as set forth by the U.S. Department of Commerce.
Note that Fastly’s Privacy Policy (http://www.fastly.com/privacy/) doesn’t apply to subscribers’ use of Fastly’s caching services.It also doesn’t apply to the way our subscribers' end users access websites or applications that are configured to use Fastly —these commitments are covered by the Terms of Service (http://www.fastly.com/terms/) and our documentation (/).
What data do you collect from Fastly services and howdo you use it?As you’ll find with any Internet company, when Fastly provides services to our subscribers, we receive some data about theirwebsites and applications. This includes information on how our subscribers’ end users interact with Fastly services. We collectdata that is operationally necessary to deliver our services, and retain it in anonymized and aggregated forms. Details abouthow we use subscriber data can be found in our documentation (/guides/legalandcompliance/securityandtechnologycompliance).
I think my business has some specific needs andrequirements. What should I do?Please reach out to your sales representative if you think you have needs or requirements that aren’t addressed by our terms,data privacy, documentation, or this FAQ. Feel free to email [email protected] (mailto:[email protected]) to be connected witha sales team member for assistance.
What does “Acceptable Use” mean?Fastly is an intermediary between our subscribers and their users. This means we have to put a few rules in place to ensurethat we’re not held accountable for illegal or harmful things that subscribers (or their users) do while using Fastly services. Weexpect subscribers and their end users to respect the law while using Fastly. You can find more information in our AcceptableUse Policy (http://www.fastly.com/acceptableuse/), which hosts DMCA information and process.

12/13/2014 Fastly Documentation
https://docs.fastly.com/guides/aio 67/237
Why do subscribers need to give you an Abuse Contactand post a DMCA or takedown policy?In addition to being an intermediary between our subscribers and their end users, we often appear to be the hosting providerfor subscriber content. If someone has a complaint about content being cached on our network, we want to enable the partiesinvolved to resolve their issues as quickly as possible. The fastest way to do that is for Fastly to send a subscriber contactemail and link to a subscriber’s DMCA policy to the person who alerted us to the potential violation of our Acceptable UsePolicy.
What are nonFastly services and what am I givingFastly permission to do?NonFastly services are services that our subscribers elect to use outside of Fastly. Examples include your origin, a DNSprovider, a CMS like Wordpress, or something similar. In many cases, Fastly is actually configured to work with these thirdparty services. The NonFastly Services provision gives us permission to work with these services, makes it clear thatsubscribers are directly responsible for their relationships with thirdparty service providers, and lets subscribers know that weare not responsible if something goes wrong with a service that Fastly does not provide.
What are "Beta Services"?Fastly often offers subscribers early access to services or features before they are publicly launched. This helps us collectfeedback and improve our products, and ensures that we’re working on the things that matter most for our subscribers.Because beta services are offered before they’re ready for the general public, we can’t make any promises about how they willperform or whether they will eventually be released — but we do promise to be very clear about what the beta entails when wesend out invitations.
What does “feedback” mean?At Fastly, we take pride in our customer support and how effectively we are able to respond to subscriber requests. We alsowant to build an awesome CDN service that continues to evolve, and we are very open to suggestions for features andimprovements. Our Feedback provision ensures that if a subscriber gives us a suggestion about how to improve our service,we can integrate it efficiently.
How/why is Fastly documentation integrated into theagreement?We believe in transparent communication. That’s why we built out a public documentation portal that describes how ourservices work, our security features, and the certifications we’ve achieved. Fastly documentation is available to anyone(including all subscribers and prospective subscribers) at http://docs.fastly.com. We contractually stand behind all of ourdocumentation; anyone can sign up for a free account and confirm that what they see on http://docs.fastly.com matches ourservices.
What if Fastly documentation changes over time?We work hard to improve and evolve our services, and we’ll update the documentation as that happens. From time to time, wemay release new features or services that are subject to additional terms and conditions — those updates will be posted on ourdocumentation pages. Anyone can subscribe to an RSS feed of those changes here (/changes/rss).
Where are your Service Level Agreements (SLAs) andsupport commitments?Our Availability SLA (/guides/customersupport/availabilitysla) describes our service level commitments for our network. Thetype of SLA a subscriber receives depends on the type of contract and level of support service the subscriber has purchasedfrom us. Our Support Description and SLA (/guides/customersupport/supportdescriptionandsla) describes the hours of

12/13/2014 Fastly Documentation
https://docs.fastly.com/guides/aio 68/237
availability and response times for all our levels of customer support. The support offering a subscriber receives depends onthe level of service a subscriber has purchased from us.
Which version of the Terms of Service, Acceptable UsePolicy, and Privacy Policy apply to me?We updated our Terms of Service on December 8, 2014 and we had previously updated them on November 5, 2013. TheTerms of Service applicable to you are determined by the date you agreed to them, and stay in effect unless you agree to anew version, which means that updates to our terms of service don’t affect you until you take significant action with youraccount. You will be asked to agree to our Terms of Service when you first create an account (usually a trial account). If afterthat, you switch to a paid monthtomonth account, or sign a service order with us, you will be asked to agree to the terms thenin effect. If you are a trial subscriber prior to an update to the terms, you won’t have to accept new terms of service until youconvert to a paid account. Some subscribers have other arrangements with us, and updates to the terms of service on ourwebsite do not affect the terms of their arrangement with us.
We believe in transparency and want to make sure you have the opportunity to see the changes we have made over time. Thehistorical versions of our Terms of Service are available here (/guides/legalandcompliance/tosarchive). Updates to ourAcceptable Use Policy are effective for everyone upon posting, but existing subscribers will have thirty days before theybecome effective for them. Updates to our Privacy Policy are effective thirty (30) days after being posted.
What are utilization spikes?Our infrastructure is wellequipped to handle large variations in traffic. In the event that a subscriber has an exceptionally largebut brief spike in traffic, Fastly may incur additional costs that we need to pass on to our subscribers. Our Utilization Spikeclause (http://www.fastly.com/terms/) allows us to charge extra in the rare event that a subscriber’s peak bandwidth utilization(measured in megabits per second on a 95th percentile basis) is more than five times their average traffic for that month.
· Security and Technology Compliance (/guides/legalandcompliance/securityandtechnologycompliance)Information about the processes and safeguards we have to protect your data is organized by category:
Business Continuity and Operational ResilienceCache Data and End User Information ManagementDatacenter and Physical SecurityEncryption and Key ManagementHuman Resources SecurityIdentity and Access ManagementIncident ManagementNetwork and Infrastructure SecuritySystem and Configuration Change Management
Business Continuity & Operational ResilienceService failover. If any of our points of presence (POPs (/guides/faqs/wherearefastlyspopslocated)) experience issuesserving content, we can redirect traffic seamlessly to a neighboring POP until those issues are resolved.
Internet redundancy. Our datacenters have connections with multiple Internet service providers. We do not rely on any singlecarrier to serve content to end users.
Environmental safeguards. We compensate for environmental disruptions at our datacenters with systems that controlbackup power, temperature and humidity, and fire suppression.
Cache Data and End User Information Management

12/13/2014 Fastly Documentation
https://docs.fastly.com/guides/aio 69/237
Cache Data. Subscribers manage which content is cached, where, and for how long by setting policies that control thatcontent. Please see our introduction to caching (/guides/howfastlyserviceswork/introtocachingandcdns) for moreinformation.
Logging. Subscribers may stream syslog activity (/guides/streaming/) to a remote endpoint for analysis and use. Fastly doesnot retain subscriber syslog activity.
End User IP Addresses. Fastly retains anonymized and aggregated end user IP address information on a very limited basis toprovide and improve its services. This includes creating internal statistics that combine the anonymized and aggregated IPaddresses with similar data from other Fastly subscribers. Complete end user IP addresses may be retained for up to twobusiness days, or up to seven days if those addresses are associated with transmission errors (such as 503 “ServiceUnavailable” errors), and are discarded thereafter. Fastly may also retain indefinitely end user IP addresses associated withmalicious activity that threatens the network or our subscribers.
Datacenter and Physical SecurityPhysical access restrictions. Our datacenters are fully enclosed with perimeter protection such as fences, gates, andmantraps to prevent unwanted entry. Only authorized people (including datacenter personnel, our employees, and contractors)may enter and move within a datacenter.
Datacenter access management. We ensure movement within our datacenters is monitored via onsite safeguards such assecurity guard assignment, facility access logging and review, and video surveillance. Additionally, we periodically review andadjust the list of personnel who may enter our datacenters.
Secure asset installation. We install computer and network hardware in locked cages and racks. Only authorized individualsmay physically access this equipment.
Encryption and Key ManagementSecure data transmission. The Fastly service supports SSL configurations (/guides/ssl/) to encrypt connections bothexternally to end users and backend origin servers, as well as internally within the Fastly network.
Encryption key management. We maintain procedures and technology to secure private keys throughout their lifecycle.
Key storage and access security. We store private keys in encrypted repositories. Access to key storage is restricted topersonnel who support key management processes.
Human Resources SecurityEmployee background screening. We screen new employees as part of the hiring process. Screening activities aredependent on applicable local regulations and may include procedures such as criminal background checks and referencechecks.
Confidentiality agreement. Our employees agree to safeguard the sensitive information they may view, process, or transmitas part of their job functions.
Security awareness training. We train our people to protect the data and devices they use. Each employee receives securityawareness training as part of new hire procedures and on an annual basis.
Identity and Access ManagementUser management lifecycle. Our personnel receive user access appropriate for their job responsibilities. That access isupdated or removed as an employee’s job function or employment status changes.
User access review. We periodically inspect access privileges to our systems and data to make sure that access isappropriate for all personnel.
Multifactor authentication. We enforce multifactor authentication to better control access to our technology environment.

12/13/2014 Fastly Documentation
https://docs.fastly.com/guides/aio 70/237
Incident ManagementIncident monitoring. We monitor multiple internal and external reporting channels to detect servicerelated issues. Personnelare available 24x7x365 to confirm and respond to incidents.
Incident response plan. We maintain an incident response plan with established roles and responsibilities, communicationprotocols, and standard response procedures.
Communication and reporting. We update impacted customers using various communication methods (such asstatus.fastly.com (http://status.fastly.com/)), depending on an incident’s scope and severity.
Network and Infrastructure SecurityConfiguration standards. We document and follow configuration standards to maintain secure systems and network devices.These standards include business justification for used ports, protocols, and services, as well as the removal of insecuredefault settings.
Network security reviews. We use proactive network scans and thirdparty penetration testing to confirm and enhance thesecurity of our network.
Vulnerability management. We monitor various public and private distribution lists, as well as other communication channels,for uptodate security vulnerability notices. We validate and implement critical security patches within one day of discovery.
System and Configuration Change ManagementChange management process. We have defined a set of procedures that we follow consistently when we develop and deploytechnology changes. We use these procedures each time we modify the software, configurations, and devices that support theFastly service.
Testing and approval. We review, test, and approve technology changes at various stages of the development process beforedeploying them fully into the Fastly service.
Change and configuration monitoring. We have multiple logging, monitoring, and alert mechanisms in place to enhance thevisibility of changes and ensure adherence to our change management process.
· Terms of Service Archive (/guides/legalandcompliance/tosarchive)Fastly updated its Terms of Service (http://www.fastly.com/terms/) on the past dates listed below.
Fastly Terms of Service: November 5th, 2013 (/tos_archive/20131105tos)
Basic Configuration
• Caching (/guides/caching/)
· Can Fastly handle tracking cookies when caching content? (/guides/caching/canfastlyhandletrackingcookieswhencachingcontent)Tracking cookies can be difficult to manage because they are inherently personal and user specific. Fastly can handle trackingcookies when caching site content through the use of custom VCL (/guides/vclfaqs/wherecaniuploadcustomvcl). You canread more about this in Fastly's blog post on _How to Cache with Tracking Cookies (http://www.fastly.com/blog/howtocachewithtrackingcookies/). _

12/13/2014 Fastly Documentation
https://docs.fastly.com/guides/aio 71/237
Keep in mind that the ability to upload custom VCL code (/guides/vclfaqs/wherecaniuploadcustomvcl) is disabled bydefault when you sign up. To enable this ability for your account, contact [email protected] (mailto:[email protected]) andrequest it.
· Can I use a POST request body as a cache key? (/guides/caching/caniuseapostrequestbodyasacachekey)As long as the body of a POST request is less than 2K in size and the content type is application/x‐www‐form‐urlencoded , thenwe allow you to use it as part of the cache key. Your VCL (/guides/vclfaqs/) should look something like:
sub vcl_hash set req.hash += req.url; set req.hash += req.http.host; if (req.request == "POST" && req.postbody) set req.hash += req.postbody; return (hash);
You'll also need to force a cache lookup, but only for requests that can be cached, by doing something like this in vcl_recv:
if (req.request == "POST" && req.postbody ~ "(^|&)action=list(&|$)") return (lookup);
TIP: To refine this, you could add only the important parts of req.postbody to the hash using regsub() .
· Creating Error Pages with Custom Responses (/guides/caching/creatingerrorpageswithcustomresponses)The default error responses served by Fastly can be jarring for your users, especially when using Fastly for consumerapplications. This tutorial shows you how to set up your service configuration to serve a custom page or a synthetic responsewhen we receive an error code from your backend.
We assume you are already accustomed to editing and deploying configurations using the webbased configuration application(https://app.fastly.com/). If you are not familiar with basic editing using the app, please see our Getting Started (/guides/gettingstarted/) information to learn more before you continue.
OverviewIn this tutorial, we will create a response object that contains the HTML you want to serve for your error page. We provideexample HTML, but you can use any HTML you see fit. The response object will require that you use a condition in order for itto be served. If you are not familiar with conditions or responses we suggest you read the following:
Responses Tutorial (/guides/tutorials/responsestutorial)Conditions Tutorial (/guides/tutorials/conditionstutorial)
Creating the Custom Response1. Log in to the Fastly application and click the configure tab (wrench icon).
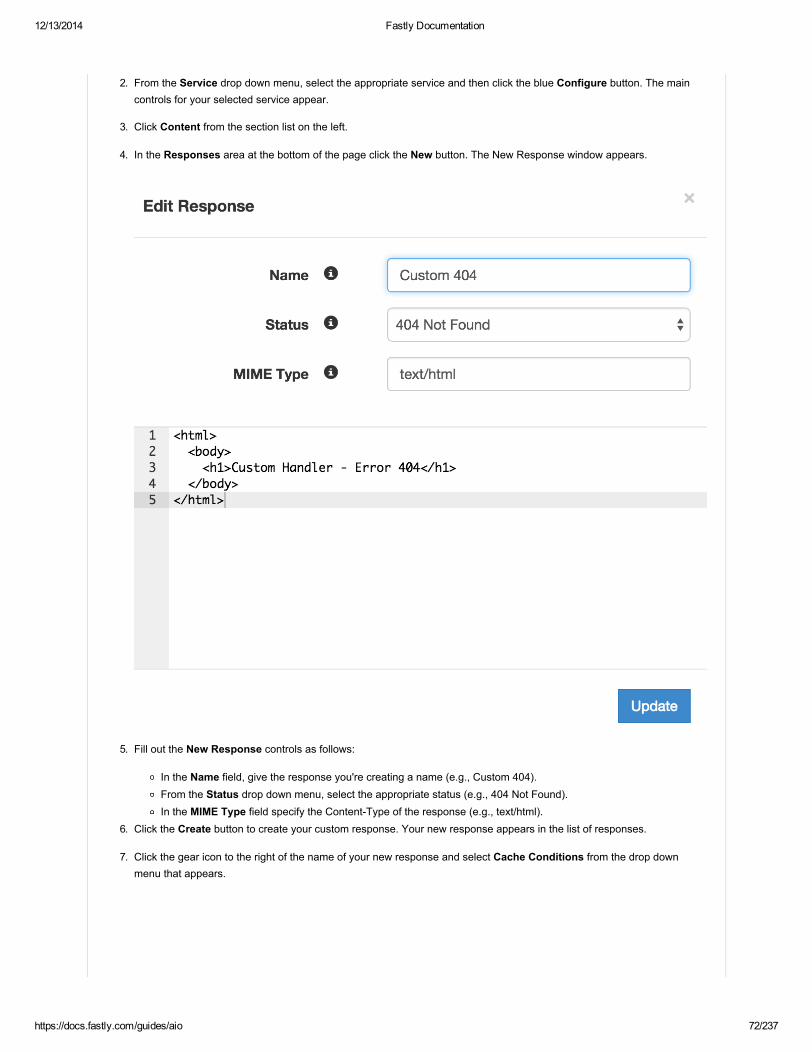
12/13/2014 Fastly Documentation
https://docs.fastly.com/guides/aio 72/237
2. From the Service drop down menu, select the appropriate service and then click the blue Configure button. The maincontrols for your selected service appear.
3. Click Content from the section list on the left.
4. In the Responses area at the bottom of the page click the New button. The New Response window appears.
5. Fill out the New Response controls as follows:
In the Name field, give the response you're creating a name (e.g., Custom 404).From the Status drop down menu, select the appropriate status (e.g., 404 Not Found).In the MIME Type field specify the ContentType of the response (e.g., text/html).
6. Click the Create button to create your custom response. Your new response appears in the list of responses.
7. Click the gear icon to the right of the name of your new response and select Cache Conditions from the drop downmenu that appears.

12/13/2014 Fastly Documentation
https://docs.fastly.com/guides/aio 73/237
The New Condition window appears (if you have previously created a cache condition, click the new button at the top ofthe edit condition modal that appears).
8. In the Name field, give the condition you're creating a name (e.g., 404 Not Found).
9. In the Apply If field, type the condition under which the new response occurs. The condition should take the followingformat:
beresp.status == ###
where ### equals the status condition you're creating the response for. For instance, using our 404 error example above,your New Condition window would look like this:

12/13/2014 Fastly Documentation
https://docs.fastly.com/guides/aio 74/237
Using the value of beresp.status == 404 in the Apply If field here tells Fastly to use this response object whenever originservers return a 404 status. (Remember: The Conditions Tutorial (/guides/tutorials/conditionstutorial) has more detailedinformation on conditions.)
10. Click the Create button and the condition will be created and applied to the custom response object you made earlier.
11. Deploy your service. Fastly will now serve your custom HTML error page when required.
· Does Fastly allow serving old content while fetching new content?(/guides/caching/doesfastlyallowservingoldcontentwhilefetchingnewcontent)This help document is a part of the basic setup process for serving "stale" or expired content to users (/guides/caching/howcaniservestalecontentonerrors).
Certain pieces of content can take a long time to generate. Once the content is cached it will be served quickly, but the firstuser to try and access it will pay a penalty.
This is unavoidable if the cache is completely cold but if this is happening when the object is in cache but its TTL is expiredthen Fastly can be configured to show the stale content while the new content is fetched in the background.
Fastly builds on the behavior proposed in RFC 5861 (http://tools.ietf.org/html/rfc5861) “HTTP CacheControl Extensions forStale Content” by Mark Nottingham, which is under consideration for inclusion in Google’s Chrome browser(https://www.mnot.net/blog/2014/06/01/chrome_and_stalewhilerevalidate).
Usage
To activate this behavior simply add a stale‐while‐revalidate or stale‐if‐error statement to either the CacheControl orSurrogateControl headers in the response from your origin server. For example:

12/13/2014 Fastly Documentation
https://docs.fastly.com/guides/aio 75/237
Cache‐Control: max‐age=600, stale‐while‐revalidate=30
will cache some content for 10 minutes and, at the end of that 10 minutes, will serve stale content for up to 30 seconds whilenew content is being fetched.
Similarly, this statement:
Surrogate‐Control: max‐age=3600, stale‐if‐error=86400
instructs the cache to update the content every hour (3600 seconds) but if the origin is down then show stale content for a day(86400 seconds).
Alternatively, these behaviors can be controlled from within VCL by setting the following variables in vcl_fetch:
set beresp.stale_while_revalidate = 30s;
set beresp.stale_if_error = 86400s;
Interaction with grace
Staleiferror works exactly the same as Varnish’s grace variable such that these two statements are equivalent:
set beresp.grace = 86400s;
set beresp.stale_if_error = 86400s;
However, if a grace statement is present in VCL it will override any stale‐while‐revalidate or stale‐if‐error statements inany CacheControl or SurrogateControl response headers.
Additional reading
RFC 5861 (http://tools.ietf.org/html/rfc5861)Mark Nottingham’s blog post (https://www.mnot.net/blog/2014/06/01/chrome_and_stalewhilerevalidate)Chrome discussion (https://groups.google.com/a/chromium.org/forum/#!msg/chromiumdev/zchogDvIYrY/ZqWSdt3LJdMJ)
· Does the gzip widget exclude old browsers automatically? (/guides/caching/doesthegzipwidgetexcludeoldbrowsersautomatically)Some web browsers should not receive gzipped content. Fastly's default gzip configuration intentionally excludes old browsers.Specifically, we run the following VCL before any custom VCL:
if (req.http.Accept‐Encoding) if (req.http.User‐Agent ~ "MSIE 6") unset req.http.Accept‐Encoding; elsif (req.http.Accept‐Encoding ~ "gzip") set req.http.Accept‐Encoding = "gzip"; elsif (req.http.Accept‐Encoding ~ "deflate") set req.http.Accept‐Encoding = "deflate"; else unset req.http.Accept‐Encoding;
For more information about gzipping, see our article on how to enable automatic gzipping (/guides/caching/howdoienableautomaticgzipping) via the Fastly widget.
· How are request settings applied? (/guides/caching/howarerequestsettings

12/13/2014 Fastly Documentation
https://docs.fastly.com/guides/aio 76/237
· How are request settings applied? (/guides/caching/howarerequestsettingsapplied)Requests settings are applied based on the Action you select in the Request Settings window. You can choose any one of thefollowing settings:
N/A Applies the request settings within the policy and continues through to other request configurations.Lookup Immediately searches the cache for content. If none is found (a miss), then the request is sent to the origin.Fastly executes this setting prior to other request configurations.Pass Sends the request to the origin each time. Fastly executes this setting immediately and will ignore additionalrequest configurations. See "What is the difference between PASS action set in Request Settings and Cache Settings?"(/guides/caching/whatisthedifferencebetweenpassactionsetinrequestsettingsandcachesettings) to learn more.
· How can I force absolutely no caching in the browser? (/guides/caching/howcaniforceabsolutelynocachinginthebrowser)Theoretically, all browsers should follow some fairly simple rules from the HTTP standard. In practice, however, variousbrowsers (such as Internet Explorer 8) don't strictly follow the rules. The following combination of headers seems to forceabsolutely no caching with every browser we've tested.
Cache‐Control: no‐cache, no‐store, private, must‐revalidate, max‐age=0, max‐stale=0, post‐check=0, pre‐check=0Pragma: no‐cacheExpires: 0
In addition, IE8 has some odd behavior to do with the back button. Adding
Vary: *
seems to fix the problem.
REMEMBER: If you want your content cached in Fastly but not cached on the browser, you must not add these headers onyour origin server. Instead, add these as new Headers of type Response (/guides/tutorials/responsestutorial) under theContent pane of your control panel.

12/13/2014 Fastly Documentation
https://docs.fastly.com/guides/aio 77/237
· How can I manipulate the XForwardedFor header? (/guides/caching/howcanimanipulatethexforwardedforheader)You can control what happens to the XForwardedFor HTTP header via the Request Settings window in the Settings paneon the configure tab. From the XForwardedFor drop down menu, select one of the following behaviors:
Append Appends the client IP to the XForwardedFor header.Append All Appends the client IP (and edgecache IP, in case of shielding) to the XForwardedFor header. Createsthe header if it does not exist yet.Clear Clears the XForwardedFor header.Leave Leaves the XForwardedFor header as is, if present.Overwrite Overwrites the XForwardedFor header with just the client IP.
For more information about requests and responses, see our tutorial (/guides/tutorials/addingormodifyingheadersonhttprequestsandresponses).
· How can I override default caching based on a backend response?(/guides/caching/howcanioverridedefaultcachingbasedonabackendresponse)In certain situations you may want to conditionally apply a different caching policy (/guides/caching/howdoiconditionallypreventpagesfromcaching) based on a backend response. In this particular case we have backend that on occasion returns404 errors (e.g., document not found). We don't want those responses to be cached for full caching period of a day but only for5 minutes. To override default caching we add a cache object and then creation conditions for it.
Creating the New Cache Object1. Log in to the Fastly application.2. Click the configure tab to access the control panel.

12/13/2014 Fastly Documentation
https://docs.fastly.com/guides/aio 78/237
3. Select the appropriate service from the Service drop down.
4. Click the blue Configure button to the right of the service name.
5. Click the Settings section.
6. In the Cache Settings area, click New button. The New Cache Settings window appears.
7. Fill out the New Cache Settings window as follows:
In the Name field, type a descriptive name for the new cache settings.In the TTL field, type the amount of time, in seconds, to cache the objects (e.g., 300 ).In the Stale TTL field type the amount of time to serve stale or expired responses, in seconds, should the backendbecome unavailable (e.g., 300 ).From the Action menu, select Cache.
8. Click the Create button. A new cache object appears in the Cache Settings area of the Settings section.
Creating an Override Condition for the new Cache Object

12/13/2014 Fastly Documentation
https://docs.fastly.com/guides/aio 79/237
Once the object has been created you will need to add a condition to it.
1. Click the gear icon to the right of the object and select Conditions.
The Choose Condition window appears with nothing selected.
2. Click New at the options at the top of the window. The New Condition window appears.
3. Fill out the New Condition window as follows:
In the Name field, type a descriptive name for the new condition.In the Apply If field type an appropriate backend response header to specify when the condition will be applied. Forexample, beresp.status == 404 || beresp.status == 403Leave the Priority field set at its default value.
4. Click Create to create the condition.
Once you create the condition, remember to assign it, then deploy the new config version and you are done.

12/13/2014 Fastly Documentation
https://docs.fastly.com/guides/aio 80/237
Other notesYou could use any backend response header in the Apply If field to make decisions on caching.
For example, beresp.http.Content‐Type ~ "^text/html" could be used to specify different caching rules for HTML documents.
· How Can I Serve Stale Content on Errors (/guides/caching/howcaniservestalecontentonerrors)This help document is a part of the basic setup process for serving stale or expired content to users. In certain situations whereyour origin server becomes unavailable, you may want to serve stale content. These instructions provide an advancedconfiguration that allows all three possible origin failure cases to be handled using VCL. These instructions require that customVCL be enabled (/guides/vclfaqs/wherecaniuploadcustomvcl). Email [email protected] (mailto:[email protected]) ifthis feature is not enabled for your account.
In the context of Varnish, there are three ways an origin can fail:
The origin can be marked as unhealthy by failing healthchecks.If Varnish cannot contact the origin for any reason, a 503 error will be generated.The origin returns a valid HTTP response, but that response is not one we wish to serve to usersfor instance a 503.
The custom VCL shown below handles all three cases. If the origin is unhealthy, the default serve stale behavior is triggered bystale‐if‐error . In between the origin failing and being marked unhealthy, Varnish would normally return 503s. The customVCL allows us to instead either serve stale if we have a stale copy, or to return a synthetic error page. The error page can becustomized. The third case is handled by intercepting all 5XX errors in vcl_fetch and either serving stale or serving thesynthetic error page.
Although not strictly necessary, healthchecks (/guides/backendservers/healthcheckstutorial) should be enabled inconjunction with this VCL. Without healthchecks enabled, all of the functionality will still work, but serving stale or syntheticresponses will take much longer while waiting for an origin to timeout. With healthchecks enabled, this problem is averted bythe origin being marked as unhealthy.
The custom VCL shown below includes the Fastly standard boilerplate. Before uploading this to your service, you shouldcustomize the following values to suit your needs:
if (beresp.status >= 500 && beresp.status < 600) should be changed to include any HTTP response codes you wish toserve stale/synthetic for.set beresp.stale_if_error = 86400s; controls how long content will be eligible to be served stale and should be set to ameaningful amount for your configuration.set beresp.stale_while_revalidate = 60s; controls how long the stale_while_revalidate feature will be enabled for anobject and should be set to a meaningful amount for your configuration. This feature causes Varnish to serve stale on acache miss and fetch the newest version of the object from origin in the background. This can result in large performancegains on objects with short TTLs, and in general on any cache miss. Note that stale_while_revalidate overridesstale_if_error . That is, as long as the object is eligible to be served stale while revalidating, stale_if_error will have noeffect.synthetic "<!DOCTYPE html>Your HTML!</html>"; is the synthetic response Varnish will return if no stale version of anobject is available and should be set appropriately for your configuration. You can embed your HTML, CSS, or JS here.Use caution when referencing external CSS and JS documents. If your origin is offline they may be unavailable as well.
sub vcl_recv #FASTLY recv
if (req.request != "HEAD" && req.request != "GET" && req.request != "FASTLYPURGE") return(pass);
return(lookup);

12/13/2014 Fastly Documentation
https://docs.fastly.com/guides/aio 81/237
sub vcl_fetch /* handle 5XX (or any other unwanted status code) */ if (beresp.status >= 500 && beresp.status < 600)
/* deliver stale if the object is available */ if (stale.exists) return(deliver_stale);
if (req.restarts < 1 && (req.request == "GET" || req.request == "HEAD")) restart;
/* else go to vcl_error to deliver a synthetic */ error 503;
/* set stale_if_error and stale_while_revalidate (customize these values) */ set beresp.stale_if_error = 86400s; set beresp.stale_while_revalidate = 60s;
#FASTLY fetch
if ((beresp.status == 500 || beresp.status == 503) && req.restarts < 1 && (req.request == "GET" || req.request == "HEAD")) restart;
if(req.restarts > 0 ) set beresp.http.Fastly‐Restarts = req.restarts;
if (beresp.http.Set‐Cookie) set req.http.Fastly‐Cachetype = "SETCOOKIE"; return (pass);
if (beresp.http.Cache‐Control ~ "private") set req.http.Fastly‐Cachetype = "PRIVATE"; return (pass);
/* this code will never be run, commented out for clarity */ /* if (beresp.status == 500 || beresp.status == 503) set req.http.Fastly‐Cachetype = "ERROR"; set beresp.ttl = 1s; set beresp.grace = 5s; return (deliver); */
if (beresp.http.Expires || beresp.http.Surrogate‐Control ~ "max‐age" || beresp.http.Cache‐Control ~"(s‐maxage|max‐age)") # keep the ttl here else # apply the default ttl set beresp.ttl = 3600s;
return(deliver);
sub vcl_hit #FASTLY hit
if (!obj.cacheable) return(pass); return(deliver);
sub vcl_miss #FASTLY miss return(fetch);

12/13/2014 Fastly Documentation
https://docs.fastly.com/guides/aio 82/237
sub vcl_deliver #FASTLY deliver return(deliver);
sub vcl_error
#FASTLY error
/* handle 503s */ if (obj.status >= 500 && obj.status < 600)
/* deliver stale object if it is available */ if (stale.exists) return(deliver_stale);
/* otherwise, return a synthetic */
/* optional, rewrite status code */ /* set obj.status = 200; */ /* set obj.response = "OK"; */
/* include your HTML response here */ synthetic "<!DOCTYPE html>Your HTML!</html>"; return(deliver);
sub vcl_pass #FASTLY pass
· How do I change what the cache key is defined as? (/guides/caching/howdoichangewhatthecachekeyisdefinedas)Fastly allows you to define precisely what makes an HTTP object unique. By default we use the URL and the host of a request(plus a special, internal Fastly variable called GENERATION that allows us to make Purge All (/guides/purging/howcanipurgecontentonfastly) work).
However, you can set the cache key explicitly (including attaching conditions) by adding a request setting from the Settingspane of your configuration control panel (/guides/fastlyswebinterface/abouttheconfigurationcontrolpanel) and including acomma separated list of cache keys.
For example, for CORS compliance you could include the protocol in the cache key by setting it to this text in the Hash Keysfield of the Request Settings:
req.url, req.http.host, req.http.Fastly‐SSL

12/13/2014 Fastly Documentation
https://docs.fastly.com/guides/aio 83/237
or alternatively if you don't want the query params to be part of the cache key you could use this text in the Hash Keys field:
regsub(req.url, "\?.*$", ""), req.http.host

12/13/2014 Fastly Documentation
https://docs.fastly.com/guides/aio 84/237
NOTE: If you put something in the cache key then purges will also need to contain that. For example, if you add FastlySSL tothe cache key then you'll need to do a purge on both the http and https versions of the URL.
· How do I conditionally prevent pages from caching? (/guides/caching/howdoiconditionallypreventpagesfromcaching)To conditionally prevent pages from caching, follow the steps below.
1. Log in to the Fastly application.2. Click on the configure button (the wrench icon at the top of the application window).
3. Select the appropriate service from the Service drop down menu.
4. Click the blue Configure button to the right of the displayed service name.
5. Click Settings from the section list on the left.

12/13/2014 Fastly Documentation
https://docs.fastly.com/guides/aio 85/237
6. In the Cache Settings area, click the green New button to create a new cache setting. The New Cache Settings windowappears.
7. Create a new cache setting and click then click the Create button. The new cache setting you created appears in theCache Settings area of the Settings pane on the Configuration tab.
8. Click the gear icon to the right of the newly created cache setting and then select Conditions from the drop down menu.

12/13/2014 Fastly Documentation
https://docs.fastly.com/guides/aio 86/237
The Choose Condition window appears.
9. Click the New button on the Choose Condition window. The New Condition window appears.
10. Create a condition that matches against the URLs you want and then click the Create button. In this example, we set thecondition to look for URLs containing '/cacheable', '/images', or '/assets'. If it finds them, the URLs should be cached. If itdoesn't find them, the URLs are explicitly not cached by the Apply If statement shown below.

12/13/2014 Fastly Documentation
https://docs.fastly.com/guides/aio 87/237
TIP: You can use these steps to override default caching based on a backend response (/guides/caching/howcanioverridedefaultcachingbasedonabackendresponse).
· How do I deliver different content to different devices? (/guides/caching/howdoideliverdifferentcontenttodifferentdevices)The easiest way is to rewrite the URL of the request based on what the user agent is. We've written an article that describeshow to change the URL based on conditions (/guides/vclfaqs/howcanichangetheurlbasedonthedomain) using our userinterface but in pure VCL it would look something like this:
sub vcl_recv if (req.http.User‐Agent ~ "(?i)ip(hone|od)") set req.url = "/mobile" req.url; elsif (req.http.User‐Agent ~ "(?i)ipad") set req.url = "/tablet" req.url; #FASTLY recv
Obviously the code fragment above doesn't contain a comprehensive list of mobile and tablet devices. Google has an officialblog post (http://googlewebmastercentral.blogspot.com/2011/03/mobettertoalsodetectmobileuser.html) on detectingAndroid mobile versus tablet and t (https://github.com/varnish/varnishdevicedetect/blob/master/devicedetect.vcl)his VCLfragment (https://github.com/varnish/varnishdevicedetect/blob/master/devicedetect.vcl) from Varnish Software can detectseveral different types of devices quite reliably, although it doesn't include Windows mobile and tablet, Blackberry Playbook,and the Kindle user agents.
The most comprehensive device detection routine we've seen so far is this one:
# based on https://github.com/varnish/varnish‐devicedetect/blob/master/devicedetect.vclsub detect_device unset req.http.X‐UA‐Device; unset req.http.X‐UA‐Vendor;
set req.http.X‐UA‐Device = "desktop"; set req.http.X‐UA‐Vendor = "generic";
# Handle that a cookie or url param may override the detection altogether if (req.url ~ "[&|?]device_force=([^&\s]+)") set req.http.X‐UA‐Device = regsub(req.url, ".*[&|?]device_force=([^&\s]+).*", "\1"); elsif (req.http.Cookie ~ "(?i)X‐UA‐Device‐force") # ;?? means zero or one ;, non‐greedy to match the first set req.http.X‐UA‐Device = regsub(req.http.Cookie, "(?i).*X‐UA‐Device‐force=([^;]+);??.*", "\1");

12/13/2014 Fastly Documentation
https://docs.fastly.com/guides/aio 88/237
# Clean up our mess in the cookie header set req.http.Cookie = regsuball(req.http.Cookie, "(^|; ) *X‐UA‐Device‐force=[^;]+;? *", "\1"); # If the cookie header is now empty, or just whitespace, unset it if (req.http.Cookie ~ "^ *$") unset req.http.Cookie; # "$ # stupid syntax highlighter else if (req.http.User‐Agent ~ "(?i)(ads|google|bing|msn|yandex|baidu|ro|career|)bot" || req.http.User‐Agent ~ "(?i)(baidu|jike|symantec)spider" || req.http.User‐Agent ~ "(?i)scanner" || req.http.User‐Agent ~ "(?i)(web)crawler") set req.http.X‐UA‐Device = "bot"; elsif (req.http.User‐Agent ~ "(?i)ipad") set req.http.X‐UA‐Device = "tablet"; set req.http.X‐UA‐Vendor = "apple"; elsif (req.http.User‐Agent ~ "(?i)ip(hone|od)") set req.http.X‐UA‐Device = "smartphone"; set req.http.X‐UA‐Vendor = "apple"; # how do we differ between an android phone and an android tablet? # http://stackoverflow.com/questions/5341637/how‐do‐detect‐android‐tablets‐in‐general‐useragent # http://googlewebmastercentral.blogspot.com/2011/03/mo‐better‐to‐also‐detect‐mobile‐user.html elsif (req.http.User‐Agent ~ "(?i)android.*(mobile|mini)") set req.http.X‐UA‐Device = "smartphone"; set req.http.X‐UA‐Vendor = "android"; # android 3/honeycomb was just about tablet‐only, and any phones will probably handle a bigger page layout elsif (req.http.User‐Agent ~ "(?i)android") set req.http.X‐UA‐Device = "tablet"; set req.http.X‐UA‐Vendor = "android"; # see http://my.opera.com/community/openweb/idopera/ elsif (req.http.User‐Agent ~ "Opera Mobi") set req.http.X‐UA‐Device = "smartphone"; set req.http.X‐UA‐Vendor = "android"; elsif (req.http.User‐Agent ~ "PlayBook; U; RIM Tablet") set req.http.X‐UA‐Device = "tablet"; set req.http.X‐UA‐Vendor = "blackberry"; elsif (req.http.User‐Agent ~ "hp‐tablet.*TouchPad") set req.http.X‐UA‐Device = "tablet"; set req.http.X‐UA‐Vendor = "hp"; elsif (req.http.User‐Agent ~ "Kindle/3") set req.http.X‐UA‐Device = "tablet"; set req.http.X‐UA‐Vendor = "kindle"; elsif (req.http.User‐Agent ~ "Mobile.+Firefox") set req.http.X‐UA‐Device = "mobile"; set req.http.X‐UA‐Vendor = "firefoxos"; elsif (req.http.User‐Agent ~ "^HTC") set req.http.X‐UA‐Device = "smartphone"; set req.http.X‐UA‐Vendor = "htc"; elsif (req.http.User‐Agent ~ "Fennec") set req.http.X‐UA‐Device = "smartphone"; set req.http.X‐UA‐Vendor = "fennec"; elsif (req.http.User‐Agent ~ "IEMobile") set req.http.X‐UA‐Device = "smartphone"; set req.http.X‐UA‐Vendor = "microsoft"; elsif (req.http.User‐Agent ~ "BlackBerry" || req.http.User‐Agent ~ "BB10.*Mobile") set req.http.X‐UA‐Device = "smartphone"; set req.http.X‐UA‐Vendor = "blackberry"; elsif (req.http.User‐Agent ~ "GT‐.*Build/GINGERBREAD") set req.http.X‐UA‐Device = "smartphone"; set req.http.X‐UA‐Vendor = "android"; elsif (req.http.User‐Agent ~ "SymbianOS.*AppleWebKit") set req.http.X‐UA‐Device = "smartphone"; set req.http.X‐UA‐Vendor = "symbian"; elsif (req.http.User‐Agent ~ "(?i)symbian" || req.http.User‐Agent ~ "(?i)^sonyericsson" || req.http.User‐Agent ~ "(?i)^nokia" || req.http.User‐Agent ~ "(?i)^samsung" || req.http.User‐Agent ~ "(?i)^lg" || req.http.User‐Agent ~ "(?i)bada" || req.http.User‐Agent ~ "(?i)blazer" || req.http.User‐Agent ~ "(?i)cellphone" || req.http.User‐Agent ~ "(?i)iemobile" || req.http.User‐Agent ~ "(?i)midp‐2.0" || req.http.User‐Agent ~ "(?i)u990" || req.http.User‐Agent ~ "(?i)netfront" || req.http.User‐Agent ~ "(?i)opera mini" || req.http.User‐Agent ~ "(?i)palm" || req.http.User‐Agent ~ "(?i)nintendo wii" ||

12/13/2014 Fastly Documentation
https://docs.fastly.com/guides/aio 89/237
req.http.User‐Agent ~ "(?i)playstation portable" || req.http.User‐Agent ~ "(?i)portalmmm" || req.http.User‐Agent ~ "(?i)proxinet" || req.http.User‐Agent ~ "(?i)sonyericsson" || req.http.User‐Agent ~ "(?i)symbian" || req.http.User‐Agent ~ "(?i)windows\ ?ce" || req.http.User‐Agent ~ "(?i)winwap" || req.http.User‐Agent ~ "(?i)eudoraweb" || req.http.User‐Agent ~ "(?i)htc" || req.http.User‐Agent ~ "(?i)240x320" || req.http.User‐Agent ~ "(?i)avantgo") set req.http.X‐UA‐Device = "mobile";
· How do I enable automatic gzipping? (/guides/caching/howdoienableautomaticgzipping)WARNING: Because dynamic gzipping fetches content from origin, compresses it, and then caches it, this feature doesn't workwith our ESI feature (/guides/caching/whichlanguageelementsoftheesispecificationdoesfastlysupport). If you enablegzipping, Fastly will stop processing ESI language elements.
To dynamically gzip content based on file extension or contenttype following the steps below. (NOTE: We also have ahistorical article that describes how to manually enable gzipping (/guides/caching/howdoimanuallyenabledynamicgzipping)).
1. Log in to the Fastly application.2. Click the configure tab to access the control panel.
3. Select the appropriate service from the Service drop down.
4. Click the blue Configure button to the right of the service name.
5. Click the Content section.
6. In the Gzip area, click the New button to create a new gzip rule. The New Gzip window appears.

12/13/2014 Fastly Documentation
https://docs.fastly.com/guides/aio 90/237
7. Fill in the fields of the New Gzip window as follows:
In the Name field, type an arbitrary name for your new gzip rule.In the Extensions field, type the file extensions for each file type you wish to have dynamically gzipped, separatedby spaces. Only type the file extension. The dot ( . ) and regular expressions are not necessary. We recommendsetting the Extensions to html js css eot ico otf ttf json .In the Content Types field, type the contenttype for each type of content you wish to have dynamically gzipped,separated by spaces. Do not use regular expressions. We recommended setting the Content Types to the following:text/css text/html text/javascript text/plain text/xml application/javascript application/json application/vnd.ms‐fontobject application/x‐font‐opentype application/x‐font‐truetype application/x‐font‐ttf application/x‐javascript application/xml font/eot font/opentype font/otf image/svg+xml image/vnd.microsoft.icon
8. Click the Create button. The new GZIP rule appears in the GZIP area of the Content section
9. Click Activate at the top of the window to apply the changes to your service.
Adding Caching Conditions to GZIP Rules
You can add conditions to GZIP via the Cache Conditions menu associated with any rule you create.

12/13/2014 Fastly Documentation
https://docs.fastly.com/guides/aio 91/237
See our Cache Control Tutorial (/guides/tutorials/cachecontroltutorial) and our Conditions Tutorial(/guides/tutorials/conditionstutorial) for specific information.
· How do I manually enable dynamic gzipping? (/guides/caching/howdoimanuallyenabledynamicgzipping)UPDATE: We've added a widget (/guides/caching/howdoienableautomaticgzipping) to make gzipping much easier. It'slocated on the configure tab in the new Gzip section of the Content pane:
The widget has the ability to dynamically gzip content based on file extension or contenttype. However we've left this tutorialhere for historical purposes (it might also be useful to help with other configurations). If you want to do dynamic gzippingmanually or have more control then read on!
First go to the "Content" pane of the control panel for your service and create a new "Header". The important parts are that it'sa "Cache" type, that it's "Set", that the destination is "http.Vary" and the source is "AcceptEncoding".

12/13/2014 Fastly Documentation
https://docs.fastly.com/guides/aio 92/237
This forces the cache to respect different encodings so things don't get confused.
Next create another new "Cache" type header with a "Set" action
This forces everything to be gzipped. However first we want to check that the browser can actually accept Gzipped content sogo back to the GZIP cache condition and click on the arrow on the right
now click on "cache conditions" to create a new one with the "Apply If ... " condition of
req.http.accept‐encoding == "gzip"

12/13/2014 Fastly Documentation
https://docs.fastly.com/guides/aio 93/237
If you deploy your service now, everything should work and be gzipped by default. However for images that doesn't tend to bevery useful gzipping works best for HTML, Javascript and CSS. So edit the "Gzippable" condition
the "Apply if ..." is hard to read but what it now says is
req.http.accept‐encoding == "gzip" && beresp.http.content‐type ~ "^(text/html|application/x‐javascript|text/css|application/javascript|text/javascript)"
Click "update".
Now go and add a new condition for "Vary Encoding" which just has the
beresp.http.content‐type ~ "^(text/html|application/x‐javascript|text/css|application/javascript|text/javascript)"
and the conditions for both "Vary Encoding" and for "Force GZIP" should be updated.
If you check your VCL there should now be a section in vcl_fetch that looks like this

12/13/2014 Fastly Documentation
https://docs.fastly.com/guides/aio 94/237
if ( req.http.accept‐encoding == "gzip" && beresp.http.content‐type ~ "^(text/html|application/x‐javascript|text/css|application/javascript|text/javascript)" ) # Header rewrite Force GZIP : 10 set beresp.gzip = true;if ( beresp.http.content‐type ~ "^(text/html|application/x‐javascript|text/css|application/javascript|text/javascript)" )
# Header rewrite Vary Encoding : 10 set beresp.http.Vary = beresp.http.Vary ",Accept‐Encoding";
If you deploy again and inspect the headers (/guides/tutorials/addingormodifyingheadersonhttprequestsandresponses)for some CSS versus an image you'll see that the CSS is gzipped and the image isn't.
· How do I use a cookie as a cache key? (/guides/caching/howdoiuseacookieasacachekey)You can use a cookie as a cache key or just check for the presence of a cookie set to a specific value by controlling its requestconditions (/guides/tutorials/conditionstutorial). Both methods are simple and shown in the steps below.
To use a cookie as a cache key
Using a cookie as a cache key looks complicated but it's actually quite simple. Let's say your cookie is called "MyCookie" and itlooks like mycookie=
1. Go to the configuration tab, select your service, and select the Content pane.
2. Click the New button next to the Headers section and create a new header called Set MyCookie Header Default .
Set the Type to RequestSet the Action to SetSet the Destination to http.X‐MyCookieSet the Source to "0" (with quotes)
3. Create another new header called Set MyCookie Header from Cookie .

12/13/2014 Fastly Documentation
https://docs.fastly.com/guides/aio 95/237
Set the Type to RequestSet the Action to SetSet the Destination to http.X‐MyCookieSet the Source to regsub(req.http.cookie, ".*mycookie =([^;]+);.*", "\1")Set the Priority to be larger than the default header you just created
4. Click the gear icon to the right of the newly created Set MyCookie Header from Cookie header and select RequestConditions.
5. Choose the request conditions.
Set the Name to Has MyCookie cookieSet the Apply If to req.http.cookie ~ "mycookie="
6. Now select the Settings pane.
7. Click the New button next to the Request Settings section and create a new request setting.
Set the Name to Set Hash from CookieSet the Hash Keys to req.url, req.http.host, req.http.X‐MyCookie
8. Click the gear icon to the right of the newly created request setting and select Conditions.

12/13/2014 Fastly Documentation
https://docs.fastly.com/guides/aio 96/237
9. On the Choose Conditions window, click New to add a new condition.
To check for the presence of a cookie set to a specific value
An alternative way if you're just checking for the presence of the cookie set to some specific value (e.g., 1):
1. Add a new Request Setting where the Hash Key is req.url, req.http.host, "Has mycookie"2. Add a condition to that setting where the "Apply if ..." is req.http.cookie ~ ".*mycookie =1;.*"
· How long does content remain cached? (/guides/caching/howlongdoescontentremaincached)We have no set hard limit on how long objects will be cached for. The maximum cache time depends on a number of factorsincluding the TTL (Time To Live) and Grace Period, how often the object gets accessed, and how busy other customers are.
There's also a chance we have to reboot our servers (we don't have a persistent cache store, although that is on the roadmap).Setting TTL and Grace Period to a week, possibly even two weeks should be absolutely fine. For more information aboutcontrolling how long Fastly caches your resources, start with our Cache Control Tutorial (/guides/tutorials/cachecontroltutorial).
· Is it possible to tell Fastly to cache for a different amount of time than for endusers? (/guides/caching/isitpossibletotellfastlytocacheforadifferentamountoftimethanforendusers)This is possible using the SurrogateControl headers defined by the W3C (http://www.w3.org/TR/edgearch). If, for example,you wanted Fastly to cache something for a month (clearing with API purges, if necessary) but you also wanted to set amaximum age of a single day for users viewing that object in a browser, then you could return the HTTP header:
Surrogate‐Control: max‐age=2629744Cache‐Control: max‐age=86400
The Surrogate Control header in this example tells Fastly to cache the object for a maximum of 2629744 seconds (one month).The Cache Control header in this example tells the browser to cache the object for a maximum of 86400 seconds (1 day).
For more information about controlling caching, see our guides on caching (/guides/caching/) or our Cache Control Tutorial(/guides/tutorials/cachecontroltutorial).
· Is the cache on a Fastly query string agnostic? (/guides/caching/isthecacheonafastlyquerystringagnostic)Under normal circumstances, Fastly would consider these URLs as different objects that are cached separately:

12/13/2014 Fastly Documentation
https://docs.fastly.com/guides/aio 97/237
http://example.comhttp://example.com?asdf=asdfhttp://example.com?asdf=zxcv
It is possible, however, to have them all ignore the query string and return the same cached file.
1. Log in the Fastly application and click the configure tab (wrench icon).
2. From the Service drop down menu, select the appropriate service and then click the blue Configure button. The maincontrols for your selected service appear.
3. Click Content from the section list on the left.
4. In the Headers area, click the New button. The New Header window appears.
5. Fill out the New Header window as follows:
Set the Name field to whatever you want (e.g., "Chop Off Querystring")Select Request from the Type menu.Select Set from the Action menu.In the Destination field type url .In the Source field type regsub(req.url, "\?.*$", "")Select No from the Ignore If Set menu.Set the Priority field to whatever priority you want.
6. Click the Create button to create the new header. The new header you created appears in the list of headers on theContent page.
This will chop off the query string if it's there and not use it when looking it up in the cache or when requesting from thebackend.
For more information about controlling caching, see our guides on caching (/guides/caching/) or our Cache Control Tutorial(/guides/tutorials/cachecontroltutorial).

12/13/2014 Fastly Documentation
https://docs.fastly.com/guides/aio 98/237
· What is the default caching behavior of HTTP verbs other than GET?(/guides/caching/whatisthedefaultcachingbehaviorofhttpverbsotherthanget)By default, the results of GET requests are cached. HEAD requests are not proxied as is, but are handled locally if an object isin cache or a GET is done to the backend to get the object into the cache.
If you're testing on the command line to determine an object's caching status, then use GET instead of HEAD. For example:
curl ‐svo /dev/null www.example.com
Anything other than HEAD or GET requests are proxied and not cached by default. However, POSTs can be cached ifrequired, and caching of that can be keyed off of the contents of the POST request body if that is below 2K. We've posted anexample of how to do this (/guides/caching/caniuseapostrequestbodyasacachekey) in our caching guides(/guides/caching/).
· What is the difference between PASS action set in Request Settings and CacheSettings? (/guides/caching/whatisthedifferencebetweenpassactionsetinrequestsettingsandcachesettings)Passing with a Request Setting and with a Cache Setting triggers very different behavior in Varnish. Within VCL, passing with aRequest Setting is the same as return(pass) in vcl_recv . Passing with a Cache Setting is the same as return(pass) invcl_fetch . If you are familiar with Varnish 3+, passing with a Cache Setting is equivalent to return(hit_for_pass) .
Different Approaches to PassingUsing a Request Setting

12/13/2014 Fastly Documentation
https://docs.fastly.com/guides/aio 99/237
Passing with a Request Setting translates within your generated VCL to return(pass) in vcl_recv . Varnish will not perform alookup to see if an object is in cache and the response from the origin will not be cached.
Passing in this manner disables request collapsing. Normally simultaneous requests for the same object that result in cachemisses will be collapsed down to a single request to the origin. While the first request is sent to the origin, the other requests forthat object are queued until a response is received. When requests are passed in vcl_recv , they will all go to the originseparately without being collapsed.
Using a Cache Setting

12/13/2014 Fastly Documentation
https://docs.fastly.com/guides/aio 100/237
Passing with a Cache Setting translates within your generated VCL to return(pass) in vcl_fetch . At this point in the flow of arequest, Varnish has performed a lookup and determined that the object is not in cache. A request to the origin has beenmade; however, in vcl_fetch we have determined that the response is not cacheable. In Fastly's default VCL, this can happenbased on the presence of a Set‐Cookie response header from the origin.
Passing in vcl_fetch is often not desirable because request collapsing is not disabled. This makes sense since Varnish is notaware in vcl_recv that the object in uncacheable. On the first request for an object that will be later passed in vcl_fetch , allother simultaneous cache misses will be queued. Once the response from the origin is received and Varnish has realized thatthe request should be passed, the queued requests are sent to the origin.
This creates a scenario where two users request an object at the same time, and one user must wait for the other before beingserved. If these requests were passed in vcl_recv , neither user would need to wait.
To get around this disadvantage, when a request is passed in vcl_fetch , Varnish creates what is called a HitForPass object.These objects have their own TTLs and while they exist, Varnish will pass any requests for them as if the pass had beentriggered in vcl_recv . For this reason, it is important to set a TTL that makes sense for your case when you pass in vcl_fetch .All future requests for the object will be passed until the HitForPass object expires. HitForPass objects can also be purgedlike any other object.
Even with this feature, there will be cases where simultaneous requests will be queued and users will wait. Whenever there isnot a HitForPass object in cache, these requests will be treated as if they are normal cache misses and request collapsing willbe enabled. Whenever possible it is best avoid relying on passing in vcl_fetch .
Using req.hash_always_miss and req.hash_ignore_busySetting req.hash_always_miss forces a request to miss whether it is in cache or not. It is different from passing in vcl_recv inthat the response will be cached and request collapsing will not be disabled. Later on the request can still be passed invcl_fetch if desired.
A second relevant variable is req.hash_ignore_busy . Setting this to true disables request collapsing so that each request is sentseparately to origin. Note that when req.hash_ignore_busy is enabled all responses will be cached and each response receivedfrom the origin will overwrite the last. Future requests for the object that are served from cache will receive the copy of the
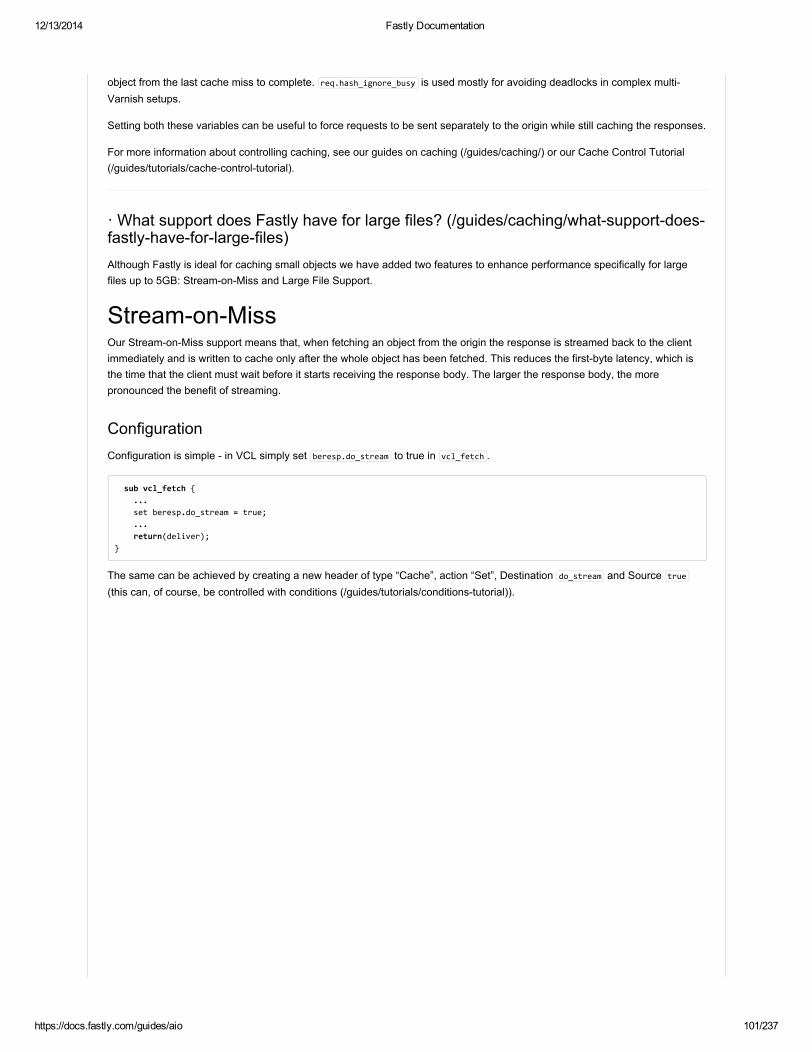
12/13/2014 Fastly Documentation
https://docs.fastly.com/guides/aio 101/237
object from the last cache miss to complete. req.hash_ignore_busy is used mostly for avoiding deadlocks in complex multiVarnish setups.
Setting both these variables can be useful to force requests to be sent separately to the origin while still caching the responses.
For more information about controlling caching, see our guides on caching (/guides/caching/) or our Cache Control Tutorial(/guides/tutorials/cachecontroltutorial).
· What support does Fastly have for large files? (/guides/caching/whatsupportdoesfastlyhaveforlargefiles)Although Fastly is ideal for caching small objects we have added two features to enhance performance specifically for largefiles up to 5GB: StreamonMiss and Large File Support.
StreamonMissOur StreamonMiss support means that, when fetching an object from the origin the response is streamed back to the clientimmediately and is written to cache only after the whole object has been fetched. This reduces the firstbyte latency, which isthe time that the client must wait before it starts receiving the response body. The larger the response body, the morepronounced the benefit of streaming.
ConfigurationConfiguration is simple in VCL simply set beresp.do_stream to true in vcl_fetch .
sub vcl_fetch ... set beresp.do_stream = true; ... return(deliver);
The same can be achieved by creating a new header of type “Cache”, action “Set”, Destination do_stream and Source true(this can, of course, be controlled with conditions (/guides/tutorials/conditionstutorial)).

12/13/2014 Fastly Documentation
https://docs.fastly.com/guides/aio 102/237
LimitationsOrigins cannot use SSL/TLS
StreamonMiss does not currently support https (SSL/TLS) origin servers. The content can be served to the client over https,but it cannot be fetched with StreamonMiss over https.
Objects fetched from https origins are therefore limited to the nonStreamonMiss size of 2GB.
StreamonMiss is not available to HTTP/1.0 clients
If an HTTP/1.0 request triggers a fetch, and the response header from the origin does not contain a ContentLength field, thenStreamonMiss will be disabled for the fetch and the fetched object will be subject to the nonstreamingmiss object size limit.
If an HTTP/1.0 request is received while a StreamonMiss for an object is in progress, the HTTP/1.0 request will wait for theresponse body to be downloaded before it will receive the response header and the response body, as if the object was beingfetched without StreamonMiss.
Cache hits are not affected. An HTTP/1.0 client can receive a large object served from cache, just like an HTTP/1.1 client.
StreamonMiss is not compatible with onthefly gzip compressing of the fetched object
StreamonMiss can handle large files whether or not they are compressed.
However, onthefly compression of objects that are not already compressed is not compatible with StreamonMiss. If the VCLsets beresp.gzip to true, StreamonMiss will be disabled.
StreamonMiss is not compatible with ESI (EdgeSide Includes)
12/13/2014 Fastly Documentation
https://docs.fastly.com/guides/aio 103/237
Responses that are processed through ESI cannot be streamed. Responses that are included from an ESI template cannot bestreamed.
When ESI is enabled for the response or when the response is fetched using <esi:include> , then StreamonMiss will bedisabled and the fetched object will be subject to the nonstreamingmiss object size limit of 2GB.
Large File SupportMaximum File SizeIf StreamonMiss is enabled then the maximum size is slightly below 5GB (specifically 5,368,578,048 bytes). With StreamonMiss disabled the maximum size is still higher than the previous maximum but is limited to a little under 2GB (specifically2,147,352,576 bytes)
Failure ModesWhat happens when the maximum object size limit is exceeded?
If the response from the origin has a ContentLength header field which exceeds the maximum object size Fastly willimmediately generate a 503 response to the client unless specific VCL is put in place to act on the error.
If no ContentLength header field is returned Fastly will start to fetch the response body. If while fetching the response body wedetermine that the object exceeds maximum object size we will generate a status 503 response to the client (again, unlessspecific VCL is in place to act on the error).
If no ContentLength header field is present and StreamonMiss is in effect Fastly will stream the content back to the client.However if, while streaming the response body Fastly determines that the object exceeds the maximum object size, it willterminate the client connection abruptly. The client will detect a protocol violation, because it will see its connection closewithout a properly terminating 0length chunk.
What happens when an origin read fails?
A failure to read the response header from the origin, regardless of StreamonMiss, causes a 503 response (which can beacted on in VCL).
If reading the response body from the origin fails or times out, the problem will be reported differently depending on whetherStreamonMiss is in effect for the fetch. Without StreamonMiss a 503 response will be generated as above. With StreamonMiss however it is already too late to send an error response since the header will already have been sent. In this case Fastlywill again abruptly terminate the client connection and the client will detect a protocol violation either because, in the case whenthe response was chunked, it will see its connection close without a properly terminating 0length chunk or, in the case whenContentLength was known, it will see the connection close before the number of bytes given by the
Incidentally this is the reason why HTTP/1.0 clients cannot be supported by StreamonMiss in the cases when the ContentLength is not yet known or available: without the client receiving a ContentLength and without support for chunking, the clientcannot distinguish the proper end of the download from an abrupt connection breakage anywhere upstream from it.
· Where can I learn more about caching via API? (/guides/caching/wherecanilearnmoreaboutcachingviaapi)We have a great series of blog posts (http://www.fastly.com/blog/apicachingpart1/) on this topic that you might be interestedin. And if you have any questions, you can always contact [email protected] (mailto:[email protected]%20)for help.
· Which HTTP status codes are cached by default? (/guides/caching/whichhttpstatuscodesarecachedbydefault)Fastly caches the following response status codes by default. In addition to these statuses, you can force an object to cacheunder other states using conditions (/guides/tutorials/conditionstutorial) and responses (/guides/tutorials/responsestutorial).

12/13/2014 Fastly Documentation
https://docs.fastly.com/guides/aio 104/237
Code Message
200 OK
203 NonAuthoritative Information
300 Multiple Choices
301 Moved Permanently
302 Moved Temporarily
404 Not Found
410 Gone
· Which language elements of the ESI specification does Fastly support?(/guides/caching/whichlanguageelementsoftheesispecificationdoesfastlysupport)Fastly supports the following ESI language elements:
includecommentremove
We don't support the following ESI language elements:
inlinechoose | when | otherwisetry | attempt | exceptvarsESI Variables
For more information about the ESI language, see the latest version of the ESI Language Specification 1.0(http://www.w3.org/TR/esilang) submitted to the World Wide Web Consortium. For examples detailing how you can use ESIwith Fastly, see our blog series on using ESI (http://www.fastly.com/blog/usingesipart1simpleedgesideinclude/).
· Why am I getting cache MISSes with Google Pagespeed Module?(/guides/caching/whyamigettingcachemisseswithgooglepagespeedmodule)If you are using the Google Pagespeed module and notice constant MISSes for HTML pages, check your setting in themodule's .htcaccess file.
By default, Google Pagespeed serves all HTML with Cache‐Control: no‐cache, max‐age=0 . This setting conflicts with Fastly'sdefault configuration. If your origin sends the headers Cache‐control: private or Cache‐Control: max‐age=0 , Fastly will passrequests straight to the origin.
To change the Google Pagespeed directive and leave the original HTML caching headers, update the .htcaccess file with:
ModPagespeedModifyCachingHeaders off
More details about the Pagespeed Module (https://developers.google.com/speed/pagespeed/module/install) can be foundwithin Google Developers directory. For more information about controlling how long Fastly caches your resources, start withour Cache Control Tutorial (/guides/tutorials/cachecontroltutorial)
• Purging (/guides/purging/)

12/13/2014 Fastly Documentation
https://docs.fastly.com/guides/aio 105/237
· How can I add SurrogateKey headers when my backend is S3?(/guides/purging/howcaniaddsurrogatekeyheaderswhenmybackendiss3)You can mark content with a key using a header and use that key to purge groups of specific URLs (/guides/purging/howcanipurgecontentonfastly) at once without purging everything, or purge each URL singularly.
On the S3 side, you can use the x‐amz‐meta‐surrogate‐key header to mark your content as you see fit, and then on the Fastlyside set up a Header configuration to translate the S3 information into the header we look for. (Please note that capitalization isimportant here, as S3 only accepts all lowercase header names.)
Inside the Fastly web interface, find the service you are setting this up for and then click on the Content section on the left sideof the screen:
Then click the green New button next to the Headers section which will display the New Header window. You'll want to fill it outlike this:

12/13/2014 Fastly Documentation
https://docs.fastly.com/guides/aio 106/237
The Name field can be anything that is memorable to you.
The Type and Action controls should be selected as Cache and Set respectively.
The Destination field should be set to http.Surrogate‐Key .
The Source field should be set to beresp.http.x‐amz‐meta‐surrogate‐key .
The remaining fields can be left set to their defaults.
Click the Create button to create the new header and remember to deploy the version you are editing for the new header tobecome live.
· How can I purge content on Fastly? (/guides/purging/howcanipurgecontentonfastly)Unlike the DNS (Domain Name Service) system, which relies on TTL (Time to Live) lifetimes expiring and allowing new recordsto be fetched, Fastly empowers you to actively expel content out of our caches at any time. This lets you set long cache timeson your side, letting our servers take the load for longer, but leaves you safe in knowing that, should you need to update aresource at any time, it is only a few clicks away.
We offer varying levels of cache purging. You can purge something as small as a single URL via our "Purge URL" command oras large as a full purge of all content under your service via our "Purge All" command. Need something more selective? Wealso offer tagbased purging via "Purge Key" command.
Tagbased purging of cache information allows you to emit special tag headers with your content, which our caches strip outand index. You can then issue purge commands to selectively flush out anything with a specific tag. For extra usefulness,items can have multiple tags that allow you to setup your own purging hierarchy.
All three purge commands are available through our web interface and via our API (however, please note that key purgingrequires some changes on your origin servers).
Purging Cached Content
To purge content using the web app, follow the steps below.
1. Log in to the Fastly application.2. Click the configure button (the wrench icon at the top of the window).3. From the Service drop down menu, select the service you want to work on.4. Select the appropriate purge type from the Purge drop down button. All three purge functions are available through this
button.
5. In the window that appears, provide the appropriate information to purge your content (see the examples below) and thenclick the Purge or Purge All button.
Purging a URL
To purge a single URL, select the domain the URL is on from the Domain drop down. Then, type the path to the content in thePath field. For example, to purge http://docs.fastly.com/example.jpg, we would select the “docs.fastly.com” domain from thedrop down menu and enter /example.jpg as the path.

12/13/2014 Fastly Documentation
https://docs.fastly.com/guides/aio 107/237
The syntax for purging a URL through the API can be found under the Purge section (/api/purge) of the Configuration API(/api/config) documentation.
Purging a Key
To purge content tagged with a specific key, type that key in the Key field.
Remember: To enable key purging to work, your server must also send a special response header along with the content beingcached. Have your server send the Surrogate‐Key header, with a list of tags for this URL. If you're using multiple tags, separatethem with spaces.
For example, to tag a response with both the tags foo and bar you would send this header:
Surrogate‐Key: foo bar
The tags sent by your server can be as simple or complex as you need, but keep in mind that:
headers are limited to a 1024 characters (1k) total length including spaces,the key that exceeds the limit will be dropped instead of truncated, andall logical keys past the one that exceeds the limit will be dropped.
The syntax for purging content tagged with keys through the API can be found under the Purge section (/api/purge) of theConfiguration API (/api/config) documentation.** **
Purging a Service
To purge all content under your service, selecting the Purge All option will clear all cached content for all domains on thisservice. Selecting this option displays a window asking you to confirm your decision.

12/13/2014 Fastly Documentation
https://docs.fastly.com/guides/aio 108/237
The syntax for purging a service through the API can be found under the Purge section (/api/purge) of the Configuration API(/api/config) documentation.
· How do I do wildcard purges with Fastly? (/guides/purging/howdoidowildcardpurgeswithfastly)Wildcard purging is a useful tool that allows you to flush the cache of all pages under a directory branch or URL path; forexample, you want to empty the cache of all pages under your "/service" path. Having to purge each URL one by one using theFastly API or via the Fastly app is not very efficient.
Allow us to (re)introduce the idea of Surrogate keys (http://www.fastly.com/blog/surrogatekeyspart1/). Although Fastly doesnot have a specific wildcard purge function, you can implement the same behavior by making a small configuration changeusing Surrogate keys. Surrogate keys allow you to tag a group of objects with a keyword (key) and then purge multiple piecesof content at once with it through our Fastly application or API. Keep in mind, however, the purging will only apply to newobjects as they're being put into the cache after you set up this configuring change, not for objects already in the cache whenthis configuration is being applied.
To purge content based on wildcard paths, follow the steps below.
Create a Default Wildcard Header
We set a default wildcard so that we have the flexibility to append other surrogate keys to a URL Path.
1. Log in to the Fastly application.2. Click the configure tab to access the control panel.
3. Select the appropriate service from the Service drop down.4. Click the blue Configure button to the right of the service name.5. Click the Content section.6. In the Headers area, click the New button to create a new header. The New Header window appears.

12/13/2014 Fastly Documentation
https://docs.fastly.com/guides/aio 109/237
7. Fill out the New Header window as follows:In the Name field, type Default Wildcard .From the Type/Action drop down menus, select Cache and Set.In the Destination field type http.Surrogate‐Key .In the Source field type "" .From the Ignore if Set menu, select Yes.In the Priority field, type 10 .
8. Click the Create button. A new header appears in the Headers area of the Content section.
Create Headers for Each Wildcard Path Being Purged
Next, create a header for each of the wildcard paths you need the ability to purge. For instance, you want to purge the wildcardpath "/*/foo" .
1. Click the New button again to create another new header.

12/13/2014 Fastly Documentation
https://docs.fastly.com/guides/aio 110/237
2. Fill out the next New Header window as follows:In the Name field, type /*/foo Wildcard .From the Type/Action drop down menus, select Cache and Append.In the Destination field type http.Surrogate‐Key .In the Source field type " */foo" .From the Ignore if Set menu, select Yes.In the Priority field, type 10 .
3. Click the Create button. A new header appears in the Headers area of the Content section.
Notice the Action is set to Append to add to the default wildcard surrogate key. Also, there is a space before the asterisk in theSource field, which is important when appending multiple surrogate keys to a URL. Finally, the Priority is set to 20 so that theDefault Wildcard header is executed first and then the wildcard path appends.
Create Conditions for Each Wildcard Path Being Purged
Finally, create a condition for each of the wildcard paths you need the ability to purge. Once you add the new wildcard pathheader, a gear icon appears to the right of its name in the Header area of the Content section.
This is where you'll create a new condition following the steps below.
1. Click the gear icon to the right of the wildcard path header name and select Response Conditions from the drop downmenu. The Choose Condition window appears.

12/13/2014 Fastly Documentation
https://docs.fastly.com/guides/aio 111/237
2. In the Options section, click the New button to add a new condition. The New Condition window appears.
3. Fill out the New Condition controls as follows:In the Name field, type /*/foo Wildcard Condition .In the Apply If field, type req.url ~ "^/[^/]*/foo$" .In the Priority field, type 10 .
4. Click Create to create the new condition.
What does the condition mean? In the Apply If field above the first "^" and "$" tells Fastly to look for the following pattern:
start from the first slash after the request host headerthere should be one directoryfollowed by the path /foo ending the URL
Some examples would be /a/foo , /bar/foo , and /c/foo . You could also remove the first "^" and ">"$" to allow the conditionto be more general so that the pattern can occur in the middle of a URL path.
Some other examples for URL wildcard conditions:
Apply If: req.url ~ "/[^/]*/foo"Matched Pattern: /delta/wow/a/foo/neat/cool/img.gif
Apply If: req.url ~ "^/.*/foo$"

12/13/2014 Fastly Documentation
https://docs.fastly.com/guides/aio 112/237
Matched Pattern: /a/b/c/d/e/f/foo
Purge the Wildcard
Ready to purge that wildcard? You can do this through the UI using the steps below.
1. Select the appropriate service from the Service drop down.2. Click the Purge button to the right of the service name and then select Purge Key from the drop down menu that
appears.
The Purge Key window appears.3. In the Key field, type the Source name of the surrogate key you want to purge, without the quotations.
Continuing with our example, you would type */foo without the quotes that were entered in the Source field of the NewHeader window above.
4. Click the Purge Key button.
You can also use our keybased purging via the API using an HTTP request like so:
POST /service/<Fastly Service ID>/purge/*/fooFastly‐Key: <Fastly Key>
Both the UI version and the API version will purge any content that was associated with the "*/foo" surrogate key according tothe setup in your header rules.
· How do I set a SurrogateKey header based on the URL? (/guides/purging/howdoisetasurrogatekeyheaderbasedontheurl)To set a SurrogateKey header based on a URL, access the Content area of the configuration settings:

12/13/2014 Fastly Documentation
https://docs.fastly.com/guides/aio 113/237
Then, create a new Header (/guides/tutorials/addingormodifyingheadersonhttprequestsandresponses) via the NewHeader window:

12/13/2014 Fastly Documentation
https://docs.fastly.com/guides/aio 114/237
Give the new header any name that helps you identify it properly, but be sure to select Cache for the Type and Set for theAction.
Then make sure the regex in the Source field appears as follows:
regsub(req.url, "^/(.*)\.(.*)$", "\1")
which will accept a URL that looks like this:
/foo.html
and will create the surrogate key 'foo'.
When creating a surrogate key, keep in mind that:
headers are limited to a 1024 characters (1k) total length including spaces,the key that exceeds the limit will be dropped instead of truncated, andall logical keys past the one that exceeds the limit will be dropped.
• Domains & DNS (/guides/domainsanddns/)
· About Domain Names and Fastly’s CDN Service (/guides/domainsanddns/aboutdomainnamesandfastlyscdnservice)A domain name is a component of a Uniform Resource Locator (http://en.wikipedia.org/wiki/Uniform_Resource_Locator)(URL). A domain name represents an Internet Protocol (http://en.wikipedia.org/wiki/Internet_Protocol) (IP) resource and, in thiscontext, refers to the IP address of a server computer hosting a website (http://en.wikipedia.org/wiki/Web_site), the websiteitself, or any other service communicated via the Internet. Customers associate their domain names with their origin (contentsource) when provisioning a Fastly service.
Domain names are made up of components as follows:
Domain Name Component Example
URL http://www.example.com/index.html
TopLevel Domain Name com
SecondLevel Domain Name example.com
Host Name www.example.com
Domain names are registered with a domain name registrar. Fastly is not a domain name registrar.
Fastly supports the use of multiple subdomains for the same origin server, and allows the specification of any number ofsubdomains for each origin. Some customers use only their second level or apex domain (/guides/domainsanddns/caniusefastlywithasecondleveldomain) (e.g., example.com rather than www.example.com) as their canonical domain.Unfortunately, due to limitations in the DNS specification, we don't recommend using Fastly with domains this way.
· Can I use Fastly with a second level domain? (/guides/domainsanddns/caniusefastlywithasecondleveldomain)Some customers use only their second level or apex domain (e.g., example.com (http://example.com/) rather thanwww.example.com (http://www.example.com/)) as their canonical domain. Due to limitations in the DNS specification, we don'trecommend using Fastly with domains this way.

12/13/2014 Fastly Documentation
https://docs.fastly.com/guides/aio 115/237
The DNS instructions in RFC1033 (http://www.ietf.org/rfc/rfc1033.txt) require the root domain to be an "A Record," not aCNAME. This means that with most DNS providers you can set up a subdomain CNAME to point to a service like Amazon WebServices (AWS), but you cannot set up your root domain as a CNAME. You also cannot reliably point your root A Record to anIP address within the AWS network because Amazon reserves the right to reallocate the IP address dedicated to yourinstance.
Also, the DNS instructions in RFC1034 (https://www.ietf.org/rfc/rfc1034.txt) (section 3.6.2) state that, if a CNAME RR is presentat a node, no other data should be present. This ensures that the data for a canonical name and its aliases cannot be different.Setting a CNAME for a root domain record (e.g., example.com (http://example.com/)) will also have ns or mx records to make itwork, which breaks the “no other data should be present” rule.
In general, the problem with root domains happens when they fail to redirect to their www equivalents (example.com(http://example.com/) points nowhere instead of pointing to www.example.com (http://www.example.com/)). There are severalworkaround options:
Only using Fastly for API/AJAX calls, images, and other static assetsHaving the second level domain show an IFrame to the Fastly proxied version of the siteRedirecting from the second level domain to the Fastly proxied version (e.g., redirect any requests for example.com(http://example.com/) to www.example.com (http://www.example.com/))
None of these workarounds, however, are ideal.
Another solution exists that involves using A NAMES, a proprietary solution from DNS Made Easy(http://www.dnsmadeeasy.com/services/anamerecords/). This solution, however, requires you to use that service to host yourDNS. In addition, there are some performance tradeoffs that customers may wish to avoid.
The only way to correctly set up Fastly with a second level or apex domain involves having Dyn host your domain. Inthis case, special arrangements can be made to make everything work. The steps for that are:
1. Create a subaccount for Fastly in your Dyn account.2. Give the subaccount permissions to Create GLSBs and Manage DLSBs.3. Send the credentials to us we can provide you with PGP keys if necessary. Feel free to contact [email protected]
(mailto:[email protected]) if you have additional questions that aren't answered in our Domains & DNS guides(/guides/domainsanddns/).
· Do you support IPv6? (/guides/domainsanddns/doyousupportipv6)Fastly currently supports IPv4 (http://en.wikipedia.org/wiki/IPv4) (Internet Protocol version 4), not IPv6(http://en.wikipedia.org/wiki/IPv6). Feel free to contact [email protected] (mailto:[email protected]) if you have additionalquestions that aren't answered in our Domains & DNS guides (/guides/domainsanddns/).
· Enabling Global POPs (/guides/domainsanddns/enablingglobalpops)The sun never sets on the Fastly empire, but how can you take full advantage?
Simply set your CNAME (/guides/gettingstarted/cnameinstructionsformostproviders) to global.prod.fastly.net . You'll nowhave access to all of our worldwide POPs (http://www.fastly.com/network/) as they come online. We don't restrict POP access.Instead, you control it.
How to check if your CNAME is set to global.prod.fastly.net
Run the following command in your terminal:
$ host www.example‐site.com
Your output should appear similar to the following:

12/13/2014 Fastly Documentation
https://docs.fastly.com/guides/aio 116/237
www.example‐site.com is an alias for global.prod.fastly.net.global.prod.fastly.net is an alias for global‐ssl.fastly.net.global‐ssl.fastly.net is an alias for fallback.global‐ssl.fastly.net.fallback.global‐ssl.fastly.net has address 199.27.77.185fallback.global‐ssl.fastly.net has address 199.27.77.184
If you don't see global.prod.fastly.net in your output, then your CNAME isn't properly set. We have instructions for settingyour CNAME (/guides/gettingstarted/cnameinstructionsformostproviders) for a number of popular providers.
Instead of using the above command in your terminal, you can also use various online DNS checking tools, such as t(http://www.opendns.com/support/cache/)he OpenDNS Cache Check (http://cachecheck.opendns.com/).
What if I want to limit my POP use to only POPs in the UnitedStates and European Union?
You can. Simply set your CNAME (/guides/gettingstarted/cnameinstructionsformostproviders) to a.prod.fastly.net insteadof global.prod.fastly.net and you should be set.
· How can I create multiple domains all at once? (/guides/domainsanddns/howcanicreatemultipledomainsallatonce)It is possible to create multiple domains within in a single service programmatically using Fastly's API (/api/). Before you adddomains, however, consider that it may be easier to serve multiple domains through custom VCL (/guides/vclfaqs/howdoimixandmatchfastlyvclwithcustomvcl). You'll be able to finely tune requests in this manner, and you'll be flexible toimplement all the processes you could ever want.
Are there domain creation limits?
We set a limit of 20 domains per service by default. However, if you email [email protected] (mailto:[email protected]), wecan work with you to set up and finetune domain handling in your service and we may be able to adjust this number for you.
· How can I test my Fastly setup before changing my domain? (/guides/domainsanddns/howcanitestmyfastlysetupbeforechangingmydomain)After you deploy your service, but before you change your DNS entries to send your domain to our servers, you can check viaa special URL to see how your service is pulled through our network and help you identify if a problem is a DNS issue, or aFastly configuration problem.
You can test this URL by following these steps:
1. Log in to the Fastly application.2. Click the configure button (the wrench icon at the top of the window).3. From the Service drop down menu, select the service you want to test.4. Click the Configure button.5. Click Domains to view the Domain settings.6. In the Domains area click the gear icon next to the name of the domain you wish to test. One of the following will be true:
If the service is currently deployed, only a Test selection appears under the drop down menu.

12/13/2014 Fastly Documentation
https://docs.fastly.com/guides/aio 117/237
If the service is not deployed, both Test and Edit appear as selections under the drop down menu.
7. Select Test from the drop down menu. The domain you are testing will appear in a new browser window. The test URLgenerally appears in the format $domain.global.prod.fastly.net . For example, if your website were example.com , your testURL would appear as example.com.global.prod.fastly.net .
NOTE: There are a few special instances where this format is not the case. If the message "unknown domain" appears, thisindicates there are no currently deployed services set up with the specified domain, and Fastly's network does not know how toroute the traffic. Contact [email protected] (mailto:[email protected]) for additional help if one of these errors appears.
· I host multiple sites on one server. How do I specify which one to use?(/guides/domainsanddns/ihostmultiplesitesononeserver.howdoispecifywhichonetouse)Default host settings are used when responding to requests to your backend or origin server (/guides/backendservers/). Youcan specify the name of your default host on the configure tab under the Settings section for a specific service.
· Why am I getting an Error 1000 with my CloudFlare DNS setup? (/guides/domainsanddns/whyamigettinganerror1000withmycloudflarednssetup)Using CloudFlare for DNS and other CDNs can cause CloudFlare to show an Error 1000 indicating that your DNS points toprohibited IP addresses. This occurs when the hostnames are CNAMEed to Fastly (global.prod.fastly.net) and an origin serveris configured as a fully qualified domain name (FQDN) within Fastly:

12/13/2014 Fastly Documentation
https://docs.fastly.com/guides/aio 118/237
To solve this error, direct Fastly to use the IP address as the host for any backend origin servers. This removes the need toresolve the hostname for traffic to the servers:
You can also change this by modifying the VCL configuration files directly. For example, this VCL:
backend F_Hosting_server_Example_Backend ... .port = "80"; .host = "exampleserver.exampledomain.tld";
would become:
backend F_Hosting_server_Example_Backend ... .port = "80"; .host = "12.34.56.78";
• SSL (/guides/ssl/)
· Can I use SSL to communicate to my backend servers? (/guides/ssl/caniusessltocommunicatetomybackendservers)We offer two ways to use SSL to communicate to backend servers (/guides/backendservers/).
The Easy Way
1. Log in to the Fastly application.

12/13/2014 Fastly Documentation
https://docs.fastly.com/guides/aio 119/237
2. Click the configure tab to access the control panel.
3. Select the appropriate service from the Service drop down.
4. Click the blue Configure button to the right of the service name.
5. Click the Hosts section.
6. In the Backends area click the New button to create a new backend for your nonsecure server. The New Backendwindow appears.
7. Fill out the New Backend window as follows:
In the Address field, type the address of your secure server (for example, origin.example.com ).In the Port field type 443 .In the Name field, type the name of your server (for example, My Origin Server ).Leave the Health Check, Auto Load Balance, Weight, and Shielding. controls set to their default values.
8. Click the Create button. The server appears in the Backends area.
For port 443, and only port 443, we will in our system enable SSL automatically. No other configuration is needed. If you findthat setting the port specifically to 443 doesn't produce the results you're hoping for or simply isn't working, consider trying themore complicated settings detailed below.
The Swiss Army Knife Way
To use a different port, or for a little more control over the SSL connections, there are the SSL Options.
1. Log in to the Fastly application.2. Click the configure tab to access the control panel.

12/13/2014 Fastly Documentation
https://docs.fastly.com/guides/aio 120/237
3. Select the appropriate service from the Service drop down.
4. Click the blue Configure button to the right of the service name.
5. Click the Hosts section.
6. In the Backends area click the New button to create a new backend for your nonsecure server. The New Backendwindow appears.
7. Fill out the New Backend window as follows:
In the Address field, type the address of your secure server (for example, origin.example.com ).In the Port field type 443 .In the Name field, type the name of your server (for example, My Origin Server ).Leave the Health Check, Auto Load Balance, Weight, and Shielding. controls set to their default values.
8. Click the Create button. The server appears in the Backends area.
9. Click the gear icon next to the Backend you just created.
10. From the menu that appears, select SSL Options.
The SSL Options window appears.

12/13/2014 Fastly Documentation
https://docs.fastly.com/guides/aio 121/237
11. From the Use SSL for Connection menu.
12. Select Yes and then click Update.
And that's all you really need to do. Everything else is optional, but just in case you'd like to set them, we've included theinformation below.
Setting the SSL Hostname

12/13/2014 Fastly Documentation
https://docs.fastly.com/guides/aio 122/237
Normally we check the server certificate against the hostname part of the backend address. If you would like us to verify thecertificate using a different hostname, you can enter it here.
This hostname will also be sent to the server in the TLS handshake, so if you are using Server Name Indication(http://en.wikipedia.org/wiki/Server_Name_Indication) (SNI) to put multiple certificates on your backend, this will select whichone is used.
Specifying an SSL CA CertificateIf you're using a certificate that is either selfsigned, or signed by a Certificate Authority that is not commonly recognized bymajor browsers (and unlikely to be in the Ubuntu bundle that we use), you can provide the CA certificate here.
This certificate must be in PEM form, which looks like this:
You can just paste this into the text box, like so:
Specifying an SSL Client Certificate & KeyIf you want to make sure the incoming SSL connections on your backend are coming from Fastly, and not some randomperson making requests directly to your backend, you can set up your backend to verify the client using a client certificate. Forthe Fastly side of things, all you have to do is paste the certificate and private key in PEM form into the appropriate text boxes:

12/13/2014 Fastly Documentation
https://docs.fastly.com/guides/aio 123/237
IMPORTANT: The private key must not be encrypted with a passphrase.
Then configure your backend to require client certificates and verify them against the CA cert they were signed with. Here aresome ways of doing that:
Apache (http://httpd.apache.org/docs/2.4/ssl/ssl_howto.html#accesscontrol)Nginx (http://wiki.nginx.org/HttpSslModule#ssl_client_certificate)IIS (http://ondrej.wordpress.com/2010/01/24/iis7andclientcertificates/)
· How can I find the original IP when using SSL termination? (/guides/ssl/howcanifindtheoriginalipwhenusingssltermination)As mentioned in our article "How do I tell if this is an SSL request or not? (/guides/ssl/howdoitellifthisisansslrequestornot)," Fastly uses a SSL terminator (http://en.wikipedia.org/wiki/SSL_termination_proxy), separate from the caching engine forperformance. This means, however, that the engine overwrites the original IP briefly due to the rerequest to your origin serversonce decrypted and causes anything that references the original IP to show up as 127.0.0.0/8 IPs.
VCL
If you're using shielding, you should use should use req.http.Fastly‐Client‐IP .
If you're not using shielding, or if you're building an ACL, you should use client.ip .
Other
Fastly also sends along the client IP to the origin in a HTTP header, Fastly‐Client‐IP , which can be used by server software toadjust as needed.

12/13/2014 Fastly Documentation
https://docs.fastly.com/guides/aio 124/237
· How do I force unencrypted requests to use SSL? (/guides/ssl/howdoiforceunencryptedrequeststousessl)If you want to only allow SSL on your site, we have you covered. There is a switch built into the "Request Settings" that willallow you to force unencrypted requests over to SSL. It works by returning a 301 Moved Permanently response to anyunencrypted request, which redirects to the SSL equivalent. For instance, making a request for'http://www.example.com/foo.jpeg' would redirect to 'https://www.example.com/foo.jpeg'.
1. Log in to the Fastly application and click the configure button (wrench icon).2. From the Service drop down menu, select the appropriate service and then click the blue Configure button (with the
gear icon) to the right of the service name.3. Click the Settings pane and find the Request Settings section.4. Click the New button to the right of the Request Settings section. The New Request Settings window appears.
5. Type a name in the Name field. ('Default' works fine, if it's your only one.)
6. Select Yes from the Force SSL drop down.
7. Click Create to save your request setting changes.
Once you deploy your changes, you're done!
For more information about SSLrelated issues, see our SSL guides (/guides/ssl/) or contact [email protected](mailto:[email protected]) with questions.
· How do I order a paid SSL option or set up Free Shared Domain SSL for my site?

12/13/2014 Fastly Documentation
https://docs.fastly.com/guides/aio 125/237
· How do I order a paid SSL option or set up Free Shared Domain SSL for my site?(/guides/ssl/howdoiorderapaidssloptionorsetupfreeshareddomainsslformysite)
Ordering a Paid SSL Option from Fastly
To order one of Fastly's SSL paid service options, simply send email to [email protected] (mailto:[email protected]) oropen a ticket in Zendesk via the support tab in the Fastly application and we'll walk you through the ordering and setupprocess. You can read more about about our SSL options (/guides/ssl/whichssloptionsareavailableandhowmuchdotheycost) to determine which of our SSL options is right for you.
Setting Up Fastly's Free Shared Domain SSL for Your Site
To use Fastly's free shared domain SSL, follow the steps below.
Log in to the Fastly application and under your service add a new domain called <name>.global.ssl.fastly.net . (Important:<name> can only be a single word. You cannot use dotseparated name such as www.domain.com.global.ssl.fastly.net becausemultiple nesting in SSL certificates is not supported.)
Deploy your service changes and you should be able to access the domain via the URL:
https://<name>.global.ssl.fastly.net/
For example, in the Domains area of the configuration settings, you'll see a New button to create a new domain:
Clicking on the New button will make the New Domain window appear:

12/13/2014 Fastly Documentation
https://docs.fastly.com/guides/aio 126/237
Type the Domain Name you wish to create. If it's already taken you will need to pick a different one. When done click theCreate button and then remember to deploy your changes. You can now access your site via the URL:
https://mytestsite.global.ssl.fastly.net/
Please note that if you DNS alias your own domain ( www.mytestsite.com ) to that name ( mytestsite.global.ssl.fastly.net ) anSSL name mismatch warning will appear in the browser. The only way to fix the mismatch is to add your domain to our SSLcertificate. You can find more information about that on our SSL Options (/guides/ssl/whichssloptionsareavailableandhowmuchdotheycost) page.
· How do I tell if this is an SSL request or not? (/guides/ssl/howdoitellifthisisansslrequestornot)To maintain optimal caching performance, Fastly uses an SSL terminator (http://en.wikipedia.org/wiki/SSL_termination_proxy)separate from the caching engine. This means, however, that the caching engine doesn't know that it was originally an SSLrequest. As a result, we set the Fastly‐SSL header when fetching the content from your servers.
Because we set this header, you can check for its presence on your backend by doing something like:
if (req.http.Fastly‐SSL) set resp.http.X‐Is‐SSL = "yes";
and that should tell you if the request was an SSL request or not.
WordPress
If you're using Fastly SSL services with Wordpress, you'll want to add a check for the HTTP_FASTLY_SSL header so thatWordPress can build URLs to your CSS or JS assets correctly. Do this by placing a check in your wp‐config.php file to overridethe SSL flag that is checked later:
if( !empty( $_SERVER['HTTP_FASTLY_SSL'] ) ) $_SERVER['HTTPS'] = 'on';
As usual, this must be placed anywhere before the require_once line with wp‐settings.php .
For more information about SSLrelated issues, see our SSL guides (/guides/ssl/) or contact [email protected](mailto:[email protected]) with questions.
· Which SSL options are available and how much do they cost? (/guides/ssl/which

12/13/2014 Fastly Documentation
https://docs.fastly.com/guides/aio 127/237
· Which SSL options are available and how much do they cost? (/guides/ssl/whichssloptionsareavailableandhowmuchdotheycost)Fastly has four SSL service options:
Shared DomainShared CertificateWildcard on Shared CertificateCustomer Certificate Hosting
SSL connections are conducted using HTTPS requests. The rate for these requests is higher than the rate for HTTP requestsbecause they use more CPU resources.
Shared Domain
This service option uses the Fastly SAN certificate’s wildcard entry for global.ssl.fastly.net. Specifically:
Customers using this service prepend their domain name to global.ssl.fastly.net (for example,<example domain>.global.ssl.fastly.net ), then set up a backend for that domain and use that domain name.More information about how to set up shared domain SSL appears on the setup page (/guides/ssl/howdoiorderapaidssloptionorsetupfreeshareddomainsslformysite).
For this option, the costs are as follows:
The usage fee for HTTPS requests applies.There are no initial setup or monthly, recurring fees.
Shared Certificate
This service option uses the Fastly SAN certificate (you can read about SAN certificates here).(http://www.digicert.com/subjectalternativename.htm) Specifically:
You get to use your domain, but Fastly does the certificate administration.You provide your domain name list to Fastly and we add those names to the Certificate SAN field.
For this option, the costs are as follows:
The usage fee for HTTPS requests applies.The Initial Setup fee is $500.A Change fee of $500 applies to later add or remove domains.The monthly, recurring fee is $100 for 1 domain.Multiple domains can be added at the same time for discounted pricing. Contact [email protected](mailto:[email protected]) for current rates.
Shared Wildcard Certificate Service
This service option uses the Fastly SAN certificate (you can read about SAN certificates here).(http://www.digicert.com/subjectalternativename.htm) Specifically:
You get to use your domain, but Fastly does the certificate administration.Your provide one or more wildcard domain name entries to Fastly and we add those names to the Certificate SAN field.
For this option, the costs are as follows:
The usage fee for HTTPS requests applies.The Initial Setup fee is $500.A Change fee of $500 applies to later add or remove entries.

12/13/2014 Fastly Documentation
https://docs.fastly.com/guides/aio 128/237
The monthly, recurring fee is $275 for 1 wildcard domain.Multiple domains can be added at the same time for discounted pricing. Contact [email protected](mailto:[email protected]) for current rates.
Customer Certificate Hosting
This service option uses the customer’s SSL certificates, which includes Extended Verification (EV) certificates. Specifically:
You provide the certificates to Fastly.Fastly installs them into the caches and allocates IP addresses on each cache.Fastly creates a new (customerspecific) DNS Global Domain Map that associates the certificate with the allocated IPaddresses.Fastly maintains the domain map and the certificate on the caches.
For this option, the costs are as follows:
The usage fee for HTTPS requests applies.The Initial Setup fee is $2000.A Change fee of $1200 applies to later add or remove certificates.The monthly, recurring fee is $1,500 for one certificate.
Note: If you present multiple certificates at one time – such that all Certificates can be loaded into the Caches at the same time– then you will incur a single Setup fee for those certificates. You will be charged the full monthly fee for the first hostedcertificate, and an additional 50% of the monthly fee for each additional certificate hosted.
Ordering SSL and Getting It Set Up
Simply open a ticket in Zendesk, via the support tab or by mailing [email protected] (mailto:[email protected]), and we'llwalk you through the process. Please put "SSL Certificate Request" in the subject.
Our registrar explains the shared (SAN) certificate (http://www.digicert.com/subjectalternativename.htm) this way:
"It's basically a way to conserve IP addresses by putting multiple hostnames or domains on one certificate. There are nosecurity implications... Addition of your name to the certificate still needs to be authorized by you."
· Why do I see SSL certificate errors when using Wget? (/guides/ssl/whydoiseesslcertificateerrorswhenusingwget)When connecting to a Fastly service using Wget, you may see errors along the lines of
ERROR: Certificate verification error for mysite.example.com: unable to get local issuer certificateERROR: certificate common name `*.a.ssl.fastly.net' doesn't match requested host name `mysite.example.com'.To connect to mysite.example.com insecurely, use `‐‐no‐check‐certificate'.Unable to establish SSL connection.
Checking with a browser or curl will show that there really is no problem, however. The errors appear because a previousversion of Wget (wget1.122.fc13) that shipped with some versions of Red Hat Enterprise Linux (RHEL) was buggy and failedto check Subject Alternative Names (SAN) properly.
Upgrading Wget will correct this problem and eliminate the errors. For more information you can read this Red Hat bug report(https://bugzilla.redhat.com/show_bug.cgi?id=674186) or this Debian one (http://bugs.debian.org/cgibin/bugreport.cgi?bug=409938). For more information about SSLrelated issues, see our SSL guides (/guides/ssl/) or contact [email protected](mailto:[email protected]) with questions.
• Streaming (/guides/streaming/)

12/13/2014 Fastly Documentation
https://docs.fastly.com/guides/aio 129/237
· Advanced Encoding Settings (/guides/streaming/advancedencodingsettings)
Where are your ingests?We ingest RTMP at the following locations:
rtmp://ash.ingest.fastly‐streams.com/live/ (Ashburn)
rtmp://ams.ingest.fastly‐streams.com/live/ (Amsterdam)
rtmp://sjc.ingest.fastly‐streams.com/live/ (San Jose)
rtmp://tyo.ingest.fastly‐streams.com/live/ (Tokyo)
Which audio and video codecs do you support for livestreaming?We support H.264 video and AAC or MP3 audio across all formats. HDS outputs also support Nellymoser Asao.
Keyframe intervals are extremely important for HTTP streaming formats. Segments can only be sliced on keyframes, so yourchosen segment length should be divisible by your keyframe interval. By default all segment lengths are 5 seconds, whichmeans your keyframe interval should be 1s, 2.5s, or 5s. For instance, a 4s keyframe interval would cause your segments to be8 seconds long.
Which rendition dimensions do you support?Renditions used for viewing video content by end users must be specifically selected. A rendition represents a version of astream that’s transcoded by Fastly. These versions are specified using numbers that indicate the vertical resolution of the videoin pixels, none of which are selected by default.
Fastly supports renditions with the following dimensions: audio only, 240p, 360p, 480p, and 720p. You can add or removerenditions for a stream at any time. Popular dimensions for standard and widescreen aspect ratios include the following:
Aspect Ratio Popular Dimensions
Standard 4:3 320 x 240 and 640 x 480
Widescreen 16:9 640 x 360 and 1280 x 720
Each dimension is transcoded at a standard bitrate, although custom bitrates are supported. The standard bitrates for eachdimension are as follows:
Dimensions Default Mbit Rates
720p 2.5 Mbit
480p 0.8 Mbit
360p 0.5 Mbit
240p 0.25 Mbit
The Mbit rates shown in the table below represent the bandwidth (in Megabits – not Megabytes) per second that the stream isprepared for. The amount of content transmitted per second (Megabytes here) depends entirely on the Mbit rate, not thedimensions or anything else.
Mbit Rate Mbytes / sec Mbytes / min Mbytes / hour
2.5 Mbit / sec 0.3125 18.75 1,125
2 Mbit / sec 0.250 15.00 900
1 Mbit / sec 0.125 7.50 450

12/13/2014 Fastly Documentation
https://docs.fastly.com/guides/aio 130/237
For more information about streamingrelated issues, see our streaming guides (/guides/streaming/) or [email protected] (mailto:[email protected]) with questions.
· Can I stream to multiple ingests for redundancy? (/guides/streaming/canistreamtomultipleingestsforredundancy)You can send your RTMP feed to two ingests at the same time as long as you're not using the wildcard streams(/guides/streaming/whatarewildcardstreams) feature. If your stream goes offline at one of the two ingests you specify, we'llautomatically pull from the other. Whichever ingest comes online with your stream first will become the primary ingest.
For more information about streamingrelated issues, see our streaming guides (/guides/streaming/) or [email protected] (mailto:[email protected]) with questions.
· How do I add or remove transcoding renditions for live streams?(/guides/streaming/howdoiaddorremovetranscodingrenditionsforlivestreams)Each stream Fastly serves for you can have renditions that control the resolutions we'll transcode your streams into. There isno need to send multiple bitrates to us over RTMP. Just send the highest quality you can produce and we'll handle transcoding.
To add or remove renditions once streaming is enabled (/guides/streaming/howdoienablestreamingformyaccount) for youraccount, follow the steps below.
1. Log in to the Fastly application (and create a new live stream (/guides/streaming/howtocreateeditordeletealivestream) if you haven't already done so).
2. Find the stream you want to update.3. Click the gear menu icon to the right of the stream name and select Renditions from the drop down menu.
The Set Renditions window appears:

12/13/2014 Fastly Documentation
https://docs.fastly.com/guides/aio 131/237
4. Select the resolutions for the stream and then click Save Renditions.
Once you have this set up, make sure you allow ~1 minute for the transcodes to start after you start publishing your stream.
· How do I enable streaming for my account? (/guides/streaming/howdoienablestreamingformyaccount)To enable streaming for your account simply contact [email protected] (mailto:[email protected]) and request the service. Itonly takes a few minutes for us to set things up so that you can get started.
For more information about streamingrelated issues, see our streaming guides (/guides/streaming/) or [email protected] (mailto:[email protected]) with questions.
· How do I publish a live stream? (/guides/streaming/howdoipublishalivestream)To publish a live stream you'll need to enable streaming (/guides/streaming/howdoienablestreamingformyaccount) onyour account and then point your encoding software at one of our ingest servers. We ingest RTMP at the following locations:
rtmp://ash.ingest.fastly‐streams.com/live/ (Ashburn)rtmp://ams.ingest.fastly‐streams.com/live/ (Amsterdam)rtmp://sjc.ingest.fastly‐streams.com/live/ (San Jose)rtmp://tyo.ingest.fastly‐streams.com/live/ (Tokyo)
Our ingest servers authenticate publishers by using a stream key. Find your stream key by first finding your stream on thestreaming window, and then clicking the gear icon to the right of the stream name. The Show/Reset Key selection displaysyour stream key and allows you to reset your key, which is the equivalent of changing your password for streaming.

12/13/2014 Fastly Documentation
https://docs.fastly.com/guides/aio 132/237
In order to use your key, you must append it to the stream name. For example, if you were pointing your encoding software toour Ashburn ingest server, your full RTMP URL would look similar to this:
rtmp://ash.ingest.fastly‐streams.com/live/yourstreamname?key=YPXDaFYomBHUymvOkYeyvVsuvBpjUrNVLGVthWrEOlFezOSTzx
If your encoder separates the stream name and RTMP server, break them out like this:
Server:
rtmp://ash.ingest.fastly‐streams.com/live/
Stream:
yourstreamname?key=YPXDaFYomBHUymvOkYeyvVsuvBpjUrNVLGVthWrEOlFezOSTzx
If your stream key is not present or invalid, our servers will respond with NetStream.Publish.AuthenticationFailed .
For redundancy, you can publish to two ingests simultaneously as long as you're not using the wildcard streams(/guides/streaming/whatarewildcardstreams) feature. Whichever ingest comes online with your stream first will become theprimary.
· How is streaming bandwidth billed? (/guides/streaming/howisstreamingbandwidthbilled)Streaming is generally billed based on bandwidth used (measured in Gbytes) and number of requests, just like contentdelivery. All pricing rates appear on the pricing page of our website (http://www.fastly.com/pricing/).
We offer discounts for larger pricing plans, for commitments of 12 months or longer, and for larger customers. For somecustomers we can also bill for bandwidth on the 95th percentile. Please contact [email protected] (mailto:[email protected])for additional information.
· How much do Fastly's streaming services cost? (/guides/streaming/howmuchdofastlysstreamingservicescost)Prices for Fastly's streaming delivery (as well as content delivery and SSL service options (/guides/ssl/whichssloptionsareavailableandhowmuchdotheycost)) are detailed on the Fastly website pricing page (http://www.fastly.com/pricing/). Pleasenote that Fastly does not provide object storage (/guides/faqs/canfastlyhostmycontent). You must use a thirdparty provider(e.g., DreamObjects (http://www.dreamhost.com/cloud/dreamobjects/), Amazon S3 (http://aws.amazon.com/s3/)) and we canuse those object stores as origin (/guides/backendservers/) for your content.

12/13/2014 Fastly Documentation
https://docs.fastly.com/guides/aio 133/237
Do you have other questions about pricing? Please feel free to contact [email protected] (mailto:[email protected]) for moreinformation.
· How to create, edit, or delete a live stream (/guides/streaming/howtocreateeditordeletealivestream)Once streaming has been enabled for your account (/guides/streaming/howdoienablestreamingformyaccount), you cancreate new, live streams or edit existing ones in just a few simple steps.
Creating a new live stream
To create a new live stream, follow the steps below.
1. Log in to the Fastly application.
2. Click on the streaming button (the film icon at the top of the application window). The Streaming overview page appears.
3. Click the New button at the right of the page. The New Stream window appears.
4. In the Name field, type the name of the stream you wish to create.
IMPORTANT: Choose the name of your stream carefully. Once the stream has been created, the name cannot be edited.The name must be all lowercase alphanumeric characters (only letters and numbers). No other characters are allowed.

12/13/2014 Fastly Documentation
https://docs.fastly.com/guides/aio 134/237
5. Decide whether or not to specify the amount of digital video recording (DVR) that should be made available for a streamby typing the amount, in seconds, in the **HLS DVR Window **field. Digital recording is optional and turned off by default.Specify DVR amounts in seconds. The maximum number of seconds is 86400, which equals 1 day.
6. Decide whether or not your stream will be encrypted by selecting the appropriate response from the HLS Encryptiondrop down. Encryption is optional and streams remain unencrypted by default. To encrypt streams using the AES128standard, select Yes from the drop down.
7. Decide whether or not to disable Adobe HTTP Dynamic Streaming (HDS) by selecting the appropriate response from theAdobe HDS drop down.
Dynamic streaming is optional and is enabled by default. To turn off dynamic streaming, select Off from the drop down.Remember: Protected HTTP Dynamic Streaming (encryption) and DVR are not yet supported.
8. Decide whether or not to package your stream using the MPEGDASH standard by selecting the appropriate responsefrom the MPEGDASH drop down.
MPEGDASH is optional and turned off by default. To package streams using the experiment DASH standard, select Onfrom the drop down. Remember: Because DASH support is experimental, the Encryption and DVR Window options haveno effect on it.
9. Click the Create button. The system creates a live stream using the name you have selected and places it at the top ofthe list of streams on the Streaming page
Editing an existing live stream
To edit an existing live stream you’ve already created, follow the steps below. REMEMBER: Only edit streams that aren'tactively streaming!
1. Log in to the Fastly application.
2. Click on the streaming button (the film icon at the top of the application window). The Streaming overview page appearswith a list of all the streams you've created to date.
NOTE: When you first create a stream, it appears at the top of the list of streams on the Streaming page. If you refreshthe page or visit the page again later, the list of streams will appear in alphanumeric order.
3. Find the stream to you want to update.
4. Click the gear menu icon to the right of the stream name and select **Edit **from the drop down menu. The Edit Streamwindow appears:
5. Make changes as necessary to any menu or field except the Name field. REMEMBER: The Name field can’t be changedonce a stream has been created but you can always create a new stream with a new name.
6. Click the Update button. The system updates your stream with the information you’ve edited.
Deleting a live stream
To delete an existing live stream you’ve already created, follow the steps below.
1. Log in to the Fastly application.
2. Click on the streaming button (the film icon at the top of the application window). The Streaming overview page appearswith a list of all the streams you've created to date.
3. Find the stream to you want to delete.
4. Click the gear menu icon to the right of the stream name and select **Delete **from the drop down menu.

12/13/2014 Fastly Documentation
https://docs.fastly.com/guides/aio 135/237
5. On the confirmation window that appears, click the Confirm button to delete the stream and make it immediatelyunavailable.
For more information about streamingrelated issues, see our streaming guides (/guides/streaming/) or [email protected] (mailto:[email protected]) with questions.
· What are wildcard streams? (/guides/streaming/whatarewildcardstreams)Fastly streaming supports a feature we call "wildcard streams" that allows you to send multiple streams without having tocreate each one in the user interface or API first. This feature is available by default for any stream you create.
In order to use wildcard streams, simply prepend any prefix to your stream name followed by an underscore. For example, ifyour stream name is test , you could publish streams named test1_test , test2_test , and test3_test , without creatingadditional streams in the interface.
REMEMBER: All wildcard streams and their toplevel stream must be published to a maximum of two ingests.
In order to play back wildcard streams, change the name of the manifest in your edge URL. If your edge URL is:
http://test.edge.fastly‐streams.com/hls/test.m3u8
you could play back test1_test at:
http://test.edge.fastly‐streams.com/test1_test.m3u8
Don't change the domain; the domain will be that of the top level stream.
• Backend Servers (/guides/backendservers/)
· 503 Error Explanations (/guides/backendservers/503errorexplanations)Varnish (/guides/vclextensions/guidetovcl), the software that runs on the Fastly CDN, will sometimes return standardized 503responses due to various issues that can occur when attempting to fetch data from your backend origins. The following listprovides the most common types of 503 responses and basic explanations for each.
503 Backend Read ErrorThis happens if there is a timeout issue with your backends when requesting content to be stored in the cache. It can also bedue to any other network error that might cause a read to fail when our cache servers attempt to fetch content from yourorigins. These errors occur periodically due to transient networks issues, such as router failovers, packet loss, and originoverload.
503 Backend Write ErrorSimilar to "Backend Read Error," but when sending information to a backend when performing a POST via Fastly.
503 Client Read ErrorSimilar to "Backend Read Error" but when reading information from a client. Generally as this has to do with network issuebetween the client and Fastly this will not reach the client (but it can occur).
503 Connection RefusedWe attempted to make a TCP connection to your origin IP and the server refused the connection. This usually occurs when awebserver is not running or a firewall is misconfigured.

12/13/2014 Fastly Documentation
https://docs.fastly.com/guides/aio 136/237
503 Network UnreachableWe are unable to find a route to the given IP range. This generally occurs when routers are misconfigured or down.
503 Backend Is UnhealthyThis occurs when an edge server receives a client request and must make a request to your origin, but your custom healthchecks are reporting the backend as down (and thus we do not even try). We currently have a bug where this error is throwninstead of "Backend.max_conn Reached" (see below). This only happens when the maximum connections is first encountered.
503 Backend.max_conn ReachedEach backend in your Fastly service has an associated maximum number of connections. Varnish will respond with this errorwhen it makes a request to a backend that has reached the defined limit.
503 Illegal Vary Header From BackendA Vary header tells an intermediate cache which headers control whether or not a different version of an object is to be served.A common example is "AcceptEncoding", for each variation of the header the cache will keep a distinct copy (such as gzip vs.no gzip). This error occurs when a backend, which is responsible for letting the cache know which vary headers are accepted,returns a malformed list (e.g., incorrect whitespace, comma separation issues).
503 No Stale Object AvailableThe Fastly CDN can be configured to serve stale objects (/guides/caching/howcaniservestalecontentonerrors) in the eventof backend failure. This error occurs when the stale cache object has expired but your backend is still failing for some reason(and thus no stale object is available).
503 Quorum Wait not ReachedThis error occurs in conjunction with the "Director" object that is only available via the Fastly API. In general this error will occurwhen a director does not have enough backends available in the group to serve traffic based on the Director's configuration.
503 No Healthy BackendsThis error also occurs in conjunction with a Director configuration object. It simply means that there are no healthy backendsunder the auspices of the director which handles the caching of the specified content.
503 All Backends Failed or UnhealthyThis occurs when either all the backends associated with a director are unhealthy or we tried to fetch information from multiplebackends in a director and they all failed with the same error.
· Can I change the timeouts for my backend configuration? (/guides/backendservers/canichangethetimeoutsformybackendconfiguration)Timeouts can be changed by following the steps below.
1. Log in to the Fastly application.2. Click on the configure button (the wrench icon at the top of the application window).3. Select the appropriate service from the Service drop down menu.4. Click the blue Configure button to the right of the displayed service name.5. Click the Hosts pane from the list on the left.

12/13/2014 Fastly Documentation
https://docs.fastly.com/guides/aio 137/237
6. In the list of backends, click the gear icon to the right of the named backend you wish to edit, then select AdvancedConfiguration from the drop down menu.
The Advanced Configuration menu appears.

12/13/2014 Fastly Documentation
https://docs.fastly.com/guides/aio 138/237
7. Type the new timeout in the appropriate field of the Timeouts section.
8. Click the Update button.
Note: For additional information about backend configurations, see our Backend Servers Help Guides (/guides/backendservers/) or contact [email protected] (mailto:[email protected]) with questions.
· Can I route assets to different backends based on specific criteria I supply?(/guides/backendservers/canirouteassetstodifferentbackendsbasedonspecificcriteriaisupply)Some customers have assets stored on multiple backend servers and want to route various requests to specific, differentservers based on criteria they supply (e.g., asset type, file directory, host header). Fastly offers customers the power to setconditions on their backends, which simply adds an if statement block to your VCL.
Basic Setup: Create Conditions for Each Backend
To add a condition on your backend, navigate to Hosts → Backends *within the Fastly application. Click the gear iconnext to a specific backend, and select *Conditions from the menu that appears to create the new condition you wish toapply to that backend. Here are some example criteria and the conditions that would be placed in the Apply If field of the NewCondition you create:
Criteria Sample Conditions

12/13/2014 Fastly Documentation
https://docs.fastly.com/guides/aio 139/237
hosts req.http.host ~ "www.example.com"
contenttype / url req.url ~ ".(jpg|png|gif)($|\?)
Backup Setup: Create a Header
What if you have a condition already assigned to your backend? Although you can group request conditions on the origin withan 'and' or 'or' clause, there can only ever be one condition rule attached to that backend. If you want to separate your requestconditions instead of grouping them, you can use header rules to route assets to different backends instead.
Within the Fastly application, navigate to Content → Headers. Then select the New button to create the first header that willset the default backend.
Set the first header's controls as follows:
Name: Image Backend (or any meaningful, preferred name)Type/Action: Request/SetDestination: backendSource: Image_Backend (This should match the name of your global origin server. You can see the exact name if you lookat your VCL. Click on the VCL button at the top of the page.)Ignore If Set: NoPriority: 10
Once you've set the controls, click Create to add the first new header.
Next click the gear icon to add a condition. Select New to add a new condition.

12/13/2014 Fastly Documentation
https://docs.fastly.com/guides/aio 140/237
Enter the condition settings as follows:
Name: Redirect Images (or any meaningful, preferred name)Apply if: req.url ~ "\.(jpg|png|gif)($|\?)"
Once you have finished, click Create to assign the condition to your header. Then click the Activate button, near the top rightcorner of the window, to deploy the new version of the service you just edited.
Note: Learn more about Conditions with our Conditions Tutorial (/guides/tutorials/conditionstutorial).
· Can I use my EC2 public domain name as the address for a backend?(/guides/backendservers/caniusemyec2publicdomainnameastheaddressforabackend)You can use your EC2 public domain name instead of an IP address.
Note: There are several other ways to set up origins detailed in our Backend Servers Help Guides (/guides/backendservers/).
· Enabling CrossOrigin Resource Sharing (CORS) (/guides/backendservers/enablingcrossoriginresourcesharing(cors))We recommend enabling CORS (CrossOrigin Resource Sharing(http://docs.aws.amazon.com/AmazonS3/latest/dev/cors.html)) when using Amazon S3 (/guides/backendservers/usingamazons3asabackend) as your backend server. To enable CORS, set up a custom HTTP header via the Content pane foryour service.

12/13/2014 Fastly Documentation
https://docs.fastly.com/guides/aio 141/237
Then, create a custom header with the following information that adds the required "AccessControlAllowOrigin" header for allrequests:
Test it out
Running the command curl ‐I your‐hostname.com/path/to/resource should include similar information to the following in yourheader:
Access‐Control‐Allow‐Origin: http://your‐hostname.comAccess‐Control‐Allow‐Methods: GETAccess‐Control‐Expose‐Headers: Content‐Length, Connection, Date...

12/13/2014 Fastly Documentation
https://docs.fastly.com/guides/aio 142/237
· Generating HTTP redirects at the edge (/guides/backendservers/generatinghttpredirectsattheedge)When users request information from your origin servers, you may want to redirect them for various reasons. For example, youmay want to redirect them to either a secure or nonsecure version of a web page, or to pages that have been moved orupdated since the last time they were requested.
You can send these redirects from the edge rather than having to go to origin by creating a synthetic response with theappropriate redirect status code and then creating a content rule with the proper Location header.
Create a New Response & Condition
To generate redirects at the edge, start by creating a new response with the appropriate status code and a new conditiondescribing when the response can be applied.
1. Click the Content section.2. In the Responses area, click the New button to create a new response. The New Response window appears.
3. Fill out the fields of the New Response window as follows:
In the Name field type a meaningful name for your response (e.g., Redirect to blog ).From the Status menu, select the HTTP status code that should be included in the header of the response (e.g.,301 Moved Permanently or 302 Moved Temporarily for redirections).Leave the MIME Type field blank.
4. Click Create to create the new response.
5. Click the gear icon to the right of the new response you just created and select Request Conditions from the drop downmenu. The Choose Condition window appears.
6. In the Options section, click the New button. The New Condition window appears.

12/13/2014 Fastly Documentation
https://docs.fastly.com/guides/aio 143/237
7. Fill out the fields of the New Condition window as follows:
In the Name field type a meaningful name for your condition (e.g., URL is /wordpress ).In the Apply If field, type the logical expression to execute in VCL to determine if the condition resolves as True orFalse (e.g., req.url ~ "^/wordpress" ).Leave the Priority set to 10.
8. Click Create to create the new condition.
Create a New Header & Condition
Complete the creation of a synthetic redirect by creating a new header and condition that modifies that response by adding thelocation header based on the status code and the matching URL. This ensures the redirect only applies when both of those aretrue.
1. In the Headers area, click the New button to create a new header. The New Header window appears.2. Fill out the fields of the New Header window as follows:
In the Name field type a meaningful name for your header (e.g., Location for wordpress redirect ).From the Type and Action drop downs, select Response and Set respectively.In the Destination field type http.location .In the Source field, type the source location of the new content (e.g.,"http://www.my‐site.com/new‐location/of/item" ).Leave the Ignore If Set and Priority fields at their default settings.
3. Click Create to create the new header.4. Click the gear icon to the right of the new header you just created and select Response Conditions from the drop down
menu. The Choose Condition window appears.5. In the Options section, click the New button. The New Condition window appears.6. Fill out the fields of the New Condition window as follows:
In the Name field type a meaningful name for your condition (e.g., Set location for blog redirect ).In the Apply If field, type the logical expression to execute in VCL to determine if the condition resolves as True orFalse (e.g., req.url ~ "/wordpress" && resp.status == 301 ). The resp.status needs to match the response codegenerated in the response above.Leave the Priority set to 10.
7. Click Create to create the new condition.

12/13/2014 Fastly Documentation
https://docs.fastly.com/guides/aio 144/237
· Health Checks Tutorial (/guides/backendservers/healthcheckstutorial)In this tutorial we will show you how to create health check that will periodically contact your backends to make sure they arestill working.
We will assume that you are already accustom to editing and deploying configurations using the webbased configurationapplication (https://app.fastly.com). If you are not familiar with basic editing using the app please see our Help Guides(/guides/) to learn more before moving forward.
OverviewHealth checks, while simple in principal, are a little more involved than most other configuration objects. Let's run through theoptions you have when creating a health check so you have a place to start when working through the tutorial.
Name A humanreadable identifier for the health check (e.g., "West Coast Origin Check")Request An HTTP Verb and path to visit on your backends when performing the checkHTTP Host Header the HTTP Host Header to set when making the request (e.g. "example.com")Expected Response The HTTP status code the backend must respond with for the check to pass (usually "200 OK")Check Frequency How often the backend is checked with additional parameters that determine if the backend is up ordown
The way a health check works is that we construct and then send an HTTP request using the "Request" and "HTTP HostHeader" parameters of the health check. When the backend responds we check the header of the response and ensure theappropriate response code was sent back using the "Expected Response" parameter. If the backend doesn't respond after areasonable amount of time or does not respond with the correct code the check fails.
If a certain number of checks fail over the last few checks we made then the backend is marked as down and a notification issent. The number of checks made before we can determine status is called the "Window" and the number of checks that mustpass in order for the backend to be considered "up" is called the "Threshold." The default user interface for health checks hidesthese messy details and gives you a few easytouse options along with explanations that work for most of our customers. Italso allows you to customize your checks fully using the "Custom..." option of the "Check Frequency" parameter.
Creating a Health CheckOpen up the fastly application (https://app.fastly.com) in your browser and navigate to the configuration editor for your service.Find the "Hosts" tab (previously called "Servers") on the left side navigation menu.
At the bottom you should see a section named "Health Checks" with a green button entitled "New" to the right of the title. Clickthe button.

12/13/2014 Fastly Documentation
https://docs.fastly.com/guides/aio 145/237
The new health check window should appear. Give your health check a name and set the appropriate path (many users simplyuse "/" to check the root request on a backend). The default HTTP verb used by the interface is "HEAD" but some servers donot support that verb and you will have to set the verb to something more sensible for you (such as "GET" or "POST"). Finallyset the appropriate check frequency. Notice that the description at the bottom will change depending on what you select. If youare feeling particularly adventurous, you can set the check frequency to "Custom..." and fiddle with the advanced configurationparameters.
When you're all done setting up the health check object click the "Create" button and your new health check should appear inthe list under the "Health Checks" heading. Health checks do nothing on their own but can be added as a special parameter toa backend in your configuration. Let's move on and see how one accomplishes this daunting task.
Assigning a Health CheckTo begin find the section entitled "Backends" near the top of the body of the page.
Edit one of your existing backends by selecting the Edit option from the gear to the right of the backend name. The EditBackend window should appear. Find the "Health Check" field and select the health check you just created from the drop downmenu, then click the Update button.

12/13/2014 Fastly Documentation
https://docs.fastly.com/guides/aio 146/237
· How can I change my origin server based on a user's location? (/guides/backendservers/howcanichangemyoriginserverbasedonauserslocation)The VCL looks something like this:
# default conditions set req.backend = F_global;
# Use restricted content if the user is in Asia, France or Germany if (geoip.continent_code == "AS" || geoip.country_code == "fr" || geoip.country_code == "de") set req.backend = F_restricted_content;
So, how does this translate to the Fastly UI? First, create a new Header (/guides/tutorials/addingormodifyingheadersonhttprequestsandresponses) under the Content pane of your configuration control panel (/guides/fastlyswebinterface/abouttheconfigurationcontrolpanel). The Type is Request and the Action is Set. Note that the priority is 10. The backend (here it'sF_global should be the name of whatever your global origin server is. You can see the name if you look at your VCL).

12/13/2014 Fastly Documentation
https://docs.fastly.com/guides/aio 147/237
Now create another header almost exactly the same with two differences: it sets the backend to be your restricted origin serverand the priority is higher than than the previous header.
Finally, attach a condition (/guides/tutorials/conditionstutorial) to the restricted origin header which checks the GeoIP header(/guides/vclextensions/geoiprelatedvclfeatures):
Note: There are several other ways to set up origins detailed in our Backend Servers Help Guides (/guides/backendservers/).
· How can I check multiple backends for a single request? (/guides/backendservers/howcanicheckmultiplebackendsforasinglerequest)Using a restart is a good option to check multiple backends for a single request. This can be created using a cache setting ruleand request headers.
Create a New Cache Setting Rule

12/13/2014 Fastly Documentation
https://docs.fastly.com/guides/aio 148/237
Within the Fastly application, navigate to Settings → Cache Settings. Then select the New button to create a cache restartwithin vcl_fetch.
Set the cache settings as follows:
Name: Return Restart (or any meaningful, preferred name)TTL: 0Stale TTL: 0Action: Restart
Click Create to add the new cache setting (it will appear in the Cache Settings area). Then click the gear icon next to this newcache setting to add a new condition.
Set the new condition settings as follows:
Name: Restart Request (or any meaningful, preferred name)Apply if: beresp.status != 200 || beresp.status != 304
Click Create to assign the condition.
Create New Request Headers

12/13/2014 Fastly Documentation
https://docs.fastly.com/guides/aio 149/237
Within the Fastly application, navigate to Content → Headers. Then select the New button to create a request header withinvcl_recv.
Set the header controls as follows:
Name: Fastly Internal Shielding (or any meaningful, preferred name)Type/Action: Request/SetDestination: http.Fastly‐Force‐ShieldSource: "yes"Ignore If Set: NoPriority: 10
Click Create to add the new header (it will appear in the Headers area).
Add another header to switch to the next backend.

12/13/2014 Fastly Documentation
https://docs.fastly.com/guides/aio 150/237
Set the next header controls as follows:
Name: Second Backend (or any meaningful, preferred name)Type/Action: Request/SetDestination: backendSource: Second Backend (this should match the name of your other backend)Ignore If Set: NoPriority: 11 (Note that the priority is higher to set after the Fastly Internal Shielding)
Click Create to add the new header (it will appear in the Headers area).
Create New Header Conditions
Once you've created the new headers, click the gear icon next to each new header rule in the Headers area to add a newcondition.
Set the new condition settings as follows:
Name: Req.request (or any meaningful, preferred name)Apply if: req.restarts == 1
Click Create to assign the condition. Then click the Activate button, near the top right corner of the window, to deploy the newversion of the service you just edited.
· How can I follow redirects to S3 objects and cache S3 responses?(/guides/backendservers/howcanifollowredirectstos3objectsandcaches3responses)With custom VCL, Fastly can follow redirects to S3 objects and cache the s3 response as well as the 301 or 302 responseseparately. The ability to upload custom VCL is disabled by default when you first sign up for Fastly services ([email protected] (mailto:[email protected]) to have VCL enabled for your account). Once the ability to upload customVCL has been enabled, be sure to read our "How do I mix and match Fastly VCL with custom VCL? (/guides/vclfaqs/howdoimixandmatchfastlyvclwithcustomvcl)" instructions. It's important to include the entire VCL boilerplate if you do not intendto override the Fastly default settings.
To configure Fastly to follow redirects to S3 objects, insert the following VCL snippets in your custom VCL:

12/13/2014 Fastly Documentation
https://docs.fastly.com/guides/aio 151/237
Within vcl_recv
sub vcl_recv
if (req.http.redir != "true") set req.backend = Main_Origin;
else set req.backend = s3_backend; set req.http.host = "s3.amazonaws.com";
#FASTLY recv
if (req.request != "HEAD" && req.request != "GET" && req.request != "FASTLYPURGE") return(pass);
return(lookup);
Within vcl_deliver
sub vcl_deliver
if (resp.status == 302 || resp.status == 301) set req.http.redir = "true"; set req.url = regsub(resp.http.Location, "http://s3.amazonaws.com/(.*)$", "/\1"); set req.http.Fastly‐Force‐Shield = "yes"; restart;
#FASTLY deliver
return(deliver);
Be sure to set the Main_Origin and s3_backend to the actual name of your backends in the service to which you're applyingthese redirects. You can find the exact names by reviewing your VCL; simply click on the VCL button at the top of the pagewhile viewing the service.
Once you added these VCL snippets to your custom VCL, upload the VCL file and then activate the new version of yourservice to apply the changes.
· How often will Fastly perform health checks? (/guides/backendservers/howoftenwillfastlyperformhealthchecks)Fastly performs health checks (/guides/backendservers/healthcheckstutorial) on your origin server based on the CheckFrequency setting you select in the New Health Check window. The Check Frequency setting you select will specifyapproximately how many requests per minute are checked to see if they pass. Any checks that pass will be reported as"healthy."
You can select the following frequencies:
Low about 200 requests per minute, with "healthy" meaning 1 out of 2 must passNormal about 800 requests per minute, with "healthy" meaning 3 ouf of 5 must passHigh about 6,000 requests per minute, with "healthy" meaning 7 out of 10 must pass
You can also set a custom frequency. Instead of one of the above frequencies, select Custom and the following controls willappear:
Threshold & Window The number of successes per total number health checks. For example, specifying 1/2 means 1out of 2 checks must pass to be reported as healthy.

12/13/2014 Fastly Documentation
https://docs.fastly.com/guides/aio 152/237
Initial The number of requests to assume as passing on deploy.Interval & Timeout (ms) Interval represents the period of time for the requests to run. Timeout represents the wait timeuntil request is considered failed. Both times are specified in milliseconds.
· How to track your origin's name, IP, and port (/guides/backendservers/howtotrackyouroriginsnameipandport)Fastly provides three values captured in vcl_fetch that allow you to see and track origin information:
beresp.backend.name
beresp.backend.port
beresp.backend.ip
While these three values are immensely useful, you may want to use this information within vcl_deliver for things likeresponse information or remote log streaming. You can do this by:
1. Creating cache headers that capture the origin information.2. Adding a response header to the log format to capture the response output.
Capturing the Origin Information
To track your origin's name, IP, and port, you need to create two separate headers: one that captures the origin name andanother that captures the origin's IP and port (e.g., 80, 443).
Create the header that captures the origin name by launching the Fastly application and navigating to Content → Headers.Then, click the New button to display the New Header window.
Set this first header's controls as follows:
Name: Backend Name (or preferred name)Type/Action: Cache/SetDestination: http.Backend‐Name (or preferred header variable)Source: beresp.backend.nameIgnore If Set: YesPriority: 10

12/13/2014 Fastly Documentation
https://docs.fastly.com/guides/aio 153/237
Once you've set the controls, click Create to add the first new header.
Create the second header to capture the IP and port for your origin by navigating again to Content → Headers. Then, click theNew button to display the New Header window a second time.
Set the second header's controls as follows:
Name: Backend IP and Port (or preferred name)Type/Action: Cache/SetDestination: http.Backend‐Name (or preferred header variable)Source: beresp.backend.ip "," beresp.backend.portIgnore If Set: YesPriority: 10
Once you've set the controls, click Create to add the second new header.
Adding a Response Header to the Log Format
The values captured in a header within vcl_fetch will flow to vcl_deliver . For example, there will exist a resp.http.BackendName header in vcl_deliver that corresponds to beresp.http.BackendName in vcl_fetch . By default, the response headerwill be included in the response output.
Unfortunately, with remote log streaming, you cannot add the vcl_fetch header, beresp.http.HeaderName, to the log format.However, you can add its cousin in vcl_deliver , resp.http.HeaderName.
Add resp.http.HeaderName to the log format that you configured by following the instructions in the Remote Log Streamingguide (/guides/logstreaming/settingupremotelogstreaming). Using the example above, you would add resp.http.BackendName and resp.http.BackendIPPort.
Important Notes
Regarding Shielding

12/13/2014 Fastly Documentation
https://docs.fastly.com/guides/aio 154/237
Notice within the example the field Ignore If Set is set to Yes. With shielding, the VCL is executed twice, once on the shieldand again on the edge node. This setting will display the original information from the origin without overriding it on the edgenode.
You can also set the field Ignore If Set to No with shielding enabled. In this scenario, the edge node captures the shield'sinformation within beresp.backend.name , beresp.backend.ip , and beresp.backend.port .
If remote log streaming is configured, remember it is executed twice. Thus the first log (from the shield node) will have theorigin's information and the second log (from the edge node) will have the shield's information.
Regarding SecurityFor security purposes, you may want to track the information in logging but not display all or some of it in the response. This ispossible but requires custom VCL to strip the information after sending the log line from the edge node. You'll need to firstcontact [email protected] (mailto:[email protected]) to have VCL enabled for you account. Don't forget to read our guideto using custom VCL (/guides/vclfaqs/howdoimixandmatchfastlyvclwithcustomvcl) before you begin. Remember toinclude the entire boilerplate if you do not intend to override the Fastly default settings.
Then add the following snippet within vcl_deliver with the headers you want to strip. Using our example above, we continue tosend the value of the origin's name within the response. We strip the origin's IP and port from the response information.
sub vcl_deliver #FASTLY deliver
if (!req.http.Fastly‐FF) unset resp.http.Backend‐IP‐Port;
return(deliver);
· Is it possible to use a domain name as a backend? (/guides/backendservers/isitpossibletouseadomainnameasabackend)Yes, we allow the use of domain names as backends. Obviously there is a performance impact, but it allows things like EC2machines and App Engine instances to be used. In fact, when we detect certain conditions, such as the host being part of EC2,we optimize our routing to be more efficient.
Note: There are several other ways to set up origins detailed in our Backend Servers Help Guides (/guides/backendservers/).
· Maintaining Separate HTTP and HTTPS Requests to Backend Servers(/guides/backendservers/maintainingseparatehttpandhttpsrequeststobackendservers)It is common to use the same backend web application to serve both HTTP and HTTPS requests and let the applicationdetermine which actions to take depending on the incoming protocol. Fastly allows users to set this up to preserve thisfunctionality within their servers. To set Fastly up to send HTTP requests to the nonsecure service and HTTPS requests to thesecure service, configure two backends, one each for the secure and nonsecure ports, then set up the conditions under whichrequests will be sent there.
Create multiple backends
Begin by configuring the same backend address with a different port as a separate backend by following the steps below.
1. Log in to the Fastly application.2. Click the configure tab to access the control panel.

12/13/2014 Fastly Documentation
https://docs.fastly.com/guides/aio 155/237
3. Select the appropriate service from the Service drop down.
4. Click the blue Configure button to the right of the service name.
5. Click the Hosts section.
6. In the Backends area click the New button to create a new backend for your nonsecure server. The New Backendwindow appears.
7. Fill out the New Backend window as follows:
In the Address field, type the address of your nonsecure server (for example, a‐server.my.com ).In the Port field type 80 .In the Name field, type the name of your nonsecure server (for example, Server Name (plain) ).Leave the Health Check, Auto Load Balance, Weight, and Shielding. controls set to their default values.
8. Click the Create button. The nonsecure HTTP server appears in the Backends area.
9. In the Backends area click the New button a second time to create a second, new backend, this time for your secureserver.

12/13/2014 Fastly Documentation
https://docs.fastly.com/guides/aio 156/237
10. Fill out the New Backend window as follows:
In the Address field, type the address of your secure server (for example, a‐server.my.com ).In the Port field type 443 .In the Name field, type the name of your secure server (for example, Server Name (secure) ).Leave the Health Check, Auto Load Balance, Weight, and Shielding. controls set to their default values.
11. Click the Create button. The secure HTTP server appears in the Backends area.
Conditionally send traffic to backends
To conditionally determine which server receives secure and nonsecure requests, Fastly relies on the presence or absence ofa specific header when the: backend is selected. When an incoming connection is received over SSL, Fastly sets the'req.http.fastly‐ssl' header to determine which server to use.
Set a condition for this header on each backend by following the steps below.
1. In the Backends area of the Hosts section, click the gear icon next to the name of the nonsecure server.
2. From the drop down menu that appears, select Conditions. The Choose Condition window appears.

12/13/2014 Fastly Documentation
https://docs.fastly.com/guides/aio 157/237
3. Click the New button. The New Condition window appears.
4. Fill out the New Condition window as follows:
In the Name field, type the name of the condition specifying use of the nonsecure server (for example,Use non‐secure ).In the Apply If field, type !req.http.fastly‐ssl .Leave the Priority field set to its default value.
5. Click the Create button to create the new condition.
6. In the Backends area of the Hosts section, click the gear icon next to the name of the secure server.
7. From the drop down menu that appears, select Conditions. The Choose Condition window appears.
8. Click the New button. The New Condition window appears.

12/13/2014 Fastly Documentation
https://docs.fastly.com/guides/aio 158/237
9. Fill out the New Condition window as follows:
In the Name field, type the name of the condition specifying use of the secure server (for example, Use secure ).In the Apply If field, type req.http.fastly‐ssl .Leave the Priority field set to its default value.
10. Click the Create button to create the new condition.
TIP: You can view all conditions and the criteria under which they're applied, including the ones you just created, byexamining the Conditions Overview for your service.
11. Deploy the new backends and their conditions by activating the new version of your service.
· Removing headers from backend response (/guides/backendservers/removingheadersfrombackendresponse)On occasion you may want to remove headers from backend response. For example, a Drupal install was setting Expires andCacheControl headers not to cache anything:

12/13/2014 Fastly Documentation
https://docs.fastly.com/guides/aio 159/237
Expires: Sun, 19 Nov 1978 05:00:00 GMTLast‐Modified: Wed, 18 Jul 2012 18:52:16 +0000Cache‐Control: no‐cache, must‐revalidate, post‐check=0, pre‐check=0
In the above example, I did not have a ready access to the Apache configuration and decided to simply drop those from thebackend response. To do that I accessed my configuration settings for my service and clicked on the New button under theHeaders area of the Content settings. When the New Header window appeared:
I filled out the fields as follows:
Name: a descriptive name I'll remember. Type: Cache as the type of header. Action: Delete as the action. Destination: Thename of header (e.g., http.Expires )
I left the rest of the controls with their default values and then repeated the same for CacheControl headers. It worked like acharm.
You may also be interested in our guide to Setting Content Type Based on File Extension (/guides/backendservers/settingcontenttypebasedonfileextension).
· Setting Content Type based on file extension (/guides/backendservers/settingcontenttypebasedonfileextension)In some situations you may want to override the content type that a backend returns. To do that you will need to create a newheader object and an associated condition.
1. Log in to the Fastly application.2. Click the configure tab to access the control panel.
3. Select the appropriate service from the Service drop down.
4. Click the blue Configure button to the right of the service name.
5. Click the Content section.

12/13/2014 Fastly Documentation
https://docs.fastly.com/guides/aio 160/237
6. In the Headers area, click the New button to create a new header. The New Header window appears.
7. Fill out the New Header window as follows:
In the Name field, type an appropriate name, such as Add Content Type .From the Type/Action drop down menus, select Cache and Set.In the Destination field type http.Content‐Type .In the Source field type the content type you want match, such as "application/javascript; charset=utf‐8" .IMPORTANT: Quotes around the content type are required.From the Ignore if Set menu, select No.In the Priority field, type 10 .
8. Click the Create button. A new header appears in the Headers area of the Content section.
Once you have created the header object you will need to apply a condition (/guides/tutorials/conditionstutorial). Otherwise,that particular object will apply to all requests.
1. Click the gear icon to the right of the new header name and select Cache Conditions from the drop down menu. TheChoose Condition window appears.
2. In the Options section, click the New button to add a new condition. The New Condition window appears.3. Fill out thenext New Condition window as follows:
In the Name field, type a descriptive name, such as Files ending with .js .In the Apply If field, type the condition that matches your request, such as req.url ~ "\.js$" (to match our requestfor files ending in .js).
3. Click Create to create the new condition.4. Deploy your configuration changes.
You may also be interested in our guide to Removing Headers from Backend Response (/guides/backendservers/removingheadersfrombackendresponse).
· Using Amazon S3 as a backend (/guides/backendservers/usingamazons3asabackend)To make your S3 data buckets available through Fastly follow the steps below.
How to Use Amazon S3 as a Backend

12/13/2014 Fastly Documentation
https://docs.fastly.com/guides/aio 161/237
1. Log in to the Fastly application.2. Click the configure tab to access the control panel.
3. Click the green New Service button at the top right of the window. The New Service window appears.
4. Fill out the New Service window as follows:
In the Name field, type any descriptive name for your service.In the Origin Server Address field, type the full URL of your S3 web bucket (e.g., <yourbucket>.s3.amazonaws.com )and leave the default port as 80 .In the Domain Name field, type the host name you want to use as the URL (e.g., cdn.domain.com ).
5. Click the Create button. A new service appears in the list of services available.
Now that the service is created you will need to set the Default Host to the name of yourbucket.s3.amazonaws.com followingthe steps below:
1. Click the configure tab to access the control panel.2. Select the new service you just created from the Service drop down.3. Click the blue Configure button to the right of the service name.4. Click the Settings section to access the Default Settings area.

12/13/2014 Fastly Documentation
https://docs.fastly.com/guides/aio 162/237
5. In the Default Host field, type the hostname for your S3 bucket again. For example, <yourbucket>.s3.amazonaws.com .
6. Click Save Settings and then remember to deploy your changes. Your service should be active within few seconds.
Testing Your Results
By default, we create DNS mapping called yourdomain.global.prod.fastly.net. In the example above, it would becdn.domain.com.global.prod.fastly.net . Please test, and if you are satisfied with the results, create a DNS alias for the domainname you specified (e.g., CNAME cdn.domain.com to global.prod.fastly.net ).
Fastly will cache any content without an explicit Cache‐Control header for 1 hour. You can verify whether you are sending anycache headers using curl . For example:
$ curl ‐I opscode‐full‐stack.s3.amazonaws.comHTTP/1.1 200 OKx‐amz‐id‐2: ZpzRp7IWc6MJ8NtDEFGH12QBdk2CM1+RzVOngQbhMp2f2ZyalkFsZd4qPaLMkSlhx‐amz‐request‐id: ABV5032583242618Date: Fri, 18 Mar 2012 17:15:38 GMTContent‐Type: application/xmlTransfer‐Encoding: chunkedServer: AmazonS3
In this example no cache control headers are set so default TTL will be applied.
Enhanced Cache Control
If you need more control over how different types of assets are cached (e.g., Javascript files, images) media check out ourAmazon S3 configuration (/guides/tutorials/cachecontroltutorial) in our Cache Control tutorial.
· Using an Amazon S3 private bucket (/guides/backendservers/usinganamazons3privatebucket)To use an Amazon S3 private bucket with Fastly, follow the instructions below.
Before You Begin

12/13/2014 Fastly Documentation
https://docs.fastly.com/guides/aio 163/237
Be sure you've already made your S3 data buckets available to Fastly by pointing to the right S3 bucket (/guides/backendservers/usingamazons3asabackend). This needs to be done before authenticating.
Be sure you've got the AWS access key ID, AWS secret key ID, and AWS Bucket name on hand. The Amazon S3Authorization header takes the following form:
Authorization: AWS _AWSAccessKeyId_ : _Signature_
From your developer Amazon account you will need the following information:
1. The AWS access key ID and AWS secret access key. The AWS secret access key is issued when you register. If youdo not have or remember your AWS secret access key, create a new AWS access key ID. The AWS secret access keywill be displayed before disappearing again.
2. Your AWS Bucket name.
Setting Up Fastly to Use an Amazon S3 Private Bucket
In order to use an Amazon S3 private bucket with Fastly, create two headers (/guides/tutorials/addingormodifyingheadersonhttprequestsandresponses), a Date header (for use with the authorization Signature) and an Authorization header.
Create a Date Header1. Log in to the Fastly application.2. Click the configure tab to access the control panel.
3. Select the appropriate service from the Service drop down.
4. Click the blue Configure button to the right of the service name.
5. Click the Content section.
6. In the Headers area, click the New button to create a new header. The New Header window appears.

12/13/2014 Fastly Documentation
https://docs.fastly.com/guides/aio 164/237
7. Fill out the New Header window as follows:
In the Name field, type Date .From the Type/Action drop down menus, select Request and Set.In the Destination field type http.Date .In the Source field type now .From the Ignore if Set menu, select No.In the Priority field, type 10 .
8. Click the Create button. A new Date header appears in the Headers area of the Content section. You will use this laterwithin the Signature of the Authorization header.
Create an Authorization HeaderNext create the Authorization header with the specifications listed below.
1. Click the New button again to create another new header.

12/13/2014 Fastly Documentation
https://docs.fastly.com/guides/aio 165/237
2. Fill out the New Header window as follows:
In the Name field, type S3 Authorization .From the Type/Action drop down menus, select Request and Set.In the Destination field type http.Authorization .From the Ignore if Set menu, select No.In the Priority field, type 20 .
3. In the Source field, type the header authorization information using the following format:
"AWS <AWS access key ID>:" digest.hmac_sha1_base64("<AWS secret key ID>", req.request LF LF LF req.http.Date LF "/<AWS Bucket name>" req.url)
replacing <AWS access key ID> , <AWS secret key ID> , and <AWS Bucket name> with the information you gathered before youbegan. For example:
"AWS JKCAUEFV2ONFFOFMSSLA:" digest.hmac_sha1_base64("P2WPSu68Bfl89j72vT+bXYZB7SjlOwhT4whqt27", req.request LF LF LF req.http.Date LF "/test123" req.url)
4. Click the Create button. A new Authorization header appears in the Headers area of the Content section.
A Detailed Look at the Source FieldSo what's going on in the Source field of the Authorization header? Here's the basic format:
AWS<Access Key><Signature Function><key><message>
It tells us the following:
Element Description
AWS A constant placed before the access key. It's always AWS.
access keyThe access key ID from your Amazon developer's account. We used JKCAUEFV2ONFFOFMSSLA in thisexample.
signature functionThe algorithm used to validate the key and message of the signature. We useddigest.hmac_sha1_base64(<key>, <message>) in this example.
keyThe secret key ID from your Amazon developer's account. We used

12/13/2014 Fastly Documentation
https://docs.fastly.com/guides/aio 166/237
P2WPSu68BfI89j72vT+bXYZB7SjIOwhT4whqt27 in this example.
messageThe UTF8 encoding of the StringToSign. See the table below for a break down of each portion of themessage.
The message that's part of the Source field in the Authorization header takes on this basic format:
<HTTP‐verb></n><Content‐MD5>/n<Content‐Type></n><Date></n><CanonicalizedAmzHeader></n><CanonicalizedResource>
It tells us the following:
Element Description
HTTP‐verb The REST verb. We use req.request in this example.
/n A newline indicator constant. It's always /n.
Content‐MD5The contentmd5 header value, used as a message integrity check. It's often left blank. We use LF(line feed) in this example.
Content‐TypeThe contenttype header value, used to specify the MIMEtype. It's often left blank. We use LF in thisexample.
DateThe date and time stamp. We use req.http.Date (which we created first as a separate header in thesteps above).
CanonicalizedAmzHeaderThe xamz headers, which customize your S3 implementation. It's often left blank. We use LF in thisexample.
CanonicalizedResource Your Amazon private bucket name. We use "/test123" in this example.
· Using Google Cloud Storage as an origin (/guides/backendservers/usinggooglecloudstorageasanorigin)Google Cloud Storage (GCS) can be used as an origin server with your Fastly services. Start by setting up a Google CloudStorage account (https://cloud.google.com/products/cloudstorage) and create a bucket.
Next, add a file to the bucket you just created and make the bucket public.

12/13/2014 Fastly Documentation
https://docs.fastly.com/guides/aio 167/237
Then, log in to the Fastly application to create a service and add a New Backend.
Be sure to set the address of the backend to commondatastorage.googleapis.com . Then select either Ashburn, VA or San Jose, CAfrom the shielding (http://www.fastly.com/products/originshield/) locations.
Then create a new domain (you can call it whatever you want).
Next, set a default host for this service. The name of the default host should be<your bucket name>.commondatastorage.googleapis.com .

12/13/2014 Fastly Documentation
https://docs.fastly.com/guides/aio 168/237
Deploy the changes to your service.
Once you have completed these steps, email [email protected] (mailto:[email protected]) to ensure you receiveFastly's Cloud Accelerator discount. If you already have GCS configured as your origin and would like to take advantage of thisintegration, feel free to contact us.
Note: Fastly describes several other ways to set up origins in our Backend Servers Help Guides (/guides/backendservers/).
· Why am I getting a 503 "backend read error"? (/guides/backendservers/whyamigettinga503backendreaderror)Note: For more information about the most common 503 errors read our list of descriptions (/guides/backendservers/503errorexplanations).

12/13/2014 Fastly Documentation
https://docs.fastly.com/guides/aio 169/237
One of the most common 503 errors, a "backend read error" appears when a backend response to Fastly takes too long andthe process is halted. Server optimization issues, extremely large files, or intermittent network issues represent the biggestcauses of backend read errors. If you're seeing 503 backend read errors consistently with your origin servers or with certainfiles, changing a few quick settings can prevent these errors from happening.
Benchmarking your backend response times
Many outside factors cause backends response times to vary, but running the following command should give you areasonable estimate of that response time for benchmarking purposes:
curl ‐s ‐w "%time_total\n" ‐o /dev/null http://your_backend.com/path/to/file
Increasing your backend response time
After benchmarking some of the slower paths in your application, you should have an idea of your ideal backend responsetime. You can adjust your backend settings on the Hosts pane using the Advanced Configuration settings for your backend:
On the Advanced Configuration settings window for your backend, simply increase the value in the First Byte field based onyour benchmark. This field represents how long in milliseconds to wait for the first bytes of a response before timing out.
· Why am I getting "Error 503 Backend.max_conn reached" ? (/guides/backend

12/13/2014 Fastly Documentation
https://docs.fastly.com/guides/aio 170/237
· Why am I getting "Error 503 Backend.max_conn reached" ? (/guides/backendservers/whyamigettingerror503backend.max_connreached)By default we limit you to 200 origin connections from a single cache node to protect origins from overload. If you want tochange the number of connections, access the Hosts area of the configurations settings and select Advanced Configurationsettings on an origin or backend object (via the gear icon next to the name):
Then, modify the Max Connection field to a higher number:
Note: For more information about the most common 503 errors read our list of descriptions (/guides/backendservers/503errorexplanations).
• Shielding (/guides/shielding/)
· Caveats of Shielding (/guides/shielding/caveatsofshielding)With shielding enabled (/guides/shielding/) there are several caveats you will encounter in performance and billing:
Inbound traffic to the shield will be billed as regular traffic, including requests topopulate remote POPs.This will incur some additional Fastly bandwidth charges, but will be offset by savings of your origin bandwidth (and originserver load). Passthrough requests will not go directly to the origin, but will also go through the shield.

12/13/2014 Fastly Documentation
https://docs.fastly.com/guides/aio 171/237
Global HIT ratio calculation may seem lower than the actual numbers.Shielding is not taken into account when calculating the global hit ratio. If an edge node doesn't have an object in its cache, itreports a miss. Local MISS/Shield HIT gets reported as a miss and a hit in the statistics, even though there is no call to thebackend. It will also result in one request from the edge node to the shield. Local MISS/Shield MISS will result in two requests,because we will subsequently fetch the resource from your origin. For more information about caching with shielding see ourarticle Understanding Cache HIT and MISS with Shielding Services (/guides/shielding/understandingcachehitandmissheaderswithshieldedservices).
You will be unable to manually define backends using VCL.Shielding at this level is completely dependent on backends being defined as actual objects through the user interface or API.Other custom VCL will work just fine.
You can only set one shield total if automatic load balancing is selected via the userinterface.If you've selected auto load balancing, you can only select one shield total. You must use custom VCL to use multiple shieldswhen auto load balancing is set.
To set multiple shields and auto load balancing at the same time, contact [email protected] (mailto:[email protected]) forassistance with the custom VCL.
You'll need to use caution when changing the host header before it reaches theshield.Fastly matches a request with a host header. If the host header doesn't match to a domain within the service an error of 404 isexpected. Also, purging conflicts can occur if the host header is changed to a domain that exists in a different service.
For example, say Service A has hostname a.example.com and Service B has hostname b.example.com . If Service B changesthe host header to a.example.com , then the edge will think the request is for Service B but the shield will think the request is forService A.
When you purge an object from Service B and not from Service A, the shield will serve the old object that you wanted to purgeto the edge, since the purge went out to Service B and not Service A. You will want to purge the object from both Service Aand Service B. However, this opens the door for confusion and error.
VCL is executed twice: once on the shield node and again on the edge node.Possible changes to beresp can affect the caching of a URL on the shield and edge.
For instance, say your goal is to have Fastly cache an object for one hour and then ten seconds on the browser. The originsends Cache‐control: s‐maxage=3600 . You unset beresp.http.Cache‐Control and then reset to s‐maxage=10 . With shielding, theresult will not be what you expect. The object will have s‐maxage=3600 on the shield and then it reaches the edge withs‐maxage=10 .
In this scenario, a better option would be to use Surrogate‐Control and Cache‐control . Surrogate‐Control overridesCache‐control and is stripped after the edge node. The s‐maxage from the Cache‐control will then communicate with thebrowser.
· How do I enable Shielding? (/guides/shielding/howdoienableshielding)Fastly's shielding service feature (http://www.fastly.com/products/originshield) allows you to designate a specific POP as ashield node to your origins. Once designated, all requests to your origin will go through that datacenter, increasing the chancesof getting a HIT (/guides/shielding/understandingcachehitandmissheaderswithshieldedservices) for a given resource. If a

12/13/2014 Fastly Documentation
https://docs.fastly.com/guides/aio 172/237
different POP doesn't have a specific object, it will query the shield (provided it's not down for maintenance) instead of yourorigins.
Enable shielding with these quick steps:
1. Log in to the Fastly application and click the configure button (wrench icon).2. From the Service drop down menu, select the service for which shielding will be enabled and then click the blue
Configure button (with the gear icon) to the right of the service name.
3. Click Hosts from the section list on the left.
4. In the Backends area, click the gear icon to the right of the appropriate backend and then select Edit from the drop downmenu.
The Edit Backend window appears.

12/13/2014 Fastly Documentation
https://docs.fastly.com/guides/aio 173/237
5. From the Shielding drop down menu select the datacenter to use as your shield and then click the blue Update button tosave your changes.
Note: With multiple backends, each backend will have its own shield defined. This allows flexibility if your company hasbackends selected geographically and different shield POPs are desired.
6. Click Domains from the section list to the left and in the Domains area, check to make sure the hostname of the originserver is included in the service's domain list. If it isn't included, add it via the New button.
With shielding enabled, queries from other POPs appear as incoming requests to the shield. If the shield doesn't knowabout the origin hostname, it doesn't know the service to which the request should be routed. Including the origin'shostname in the domain list helps eliminate this concern.
7. Deploy a new version to activate shielding.
Fast and done! Don't forget to read our Caveats of Shielding (/guides/shielding/caveatsofshielding) information.
· How POPs handle requests with and without shielding enabled(/guides/shielding/howpopshandlerequestswithandwithoutshieldingenabled)When a user requests brand new content from a customer’s server and that content has never been cached by any FastlyPOP (/guides/faqs/wherearefastlyspopslocated), this is what happens with that request when shielding (/guides/shielding/) isand is not enabled.

12/13/2014 Fastly Documentation
https://docs.fastly.com/guides/aio 174/237
Without shielding enabled
Without shielding enabled, when the first request for content arrives at POP A. The POP does not have the content cached. Itpasses the request along to a customer’s origin server to get the content. Once the content is retrieved, POP A caches it andsends it on to the user.
When a second request for that same content arrives at POP A, the content is already cached. No request goes to thecustomer’s origin server. It’s merely sent from the cached copy.
If the second request were to arrive at POP B instead of POP A, however, the request would once again be passed along tothe customer’s origin server. It would then be cached and passed back to the end user, just like POP A did when that info wasfirst requested.
With shielding enabled
With shielding enabled (/guides/shielding/howdoienableshielding), when the first request for content arrives at the POP A,that POP does not have the content cached. It passes the request along to the shield POP, which also doesn’t have thecontent cached. The shield POP passes the request along to the customer’s origin server. It then caches the content that’sretrieved and passes it along to POP A. POP A then passes the content along to the user.
When a second request for that same content arrives at POP A, the content is already cached, so no request goes to theshield POP or the customer’s origin server.

12/13/2014 Fastly Documentation
https://docs.fastly.com/guides/aio 175/237
If the second request were to arrive at POP B instead of POP A, however, the request would be passed along to the shieldPOP. That shield POP already has a cached copy from the first request to POP A. No future requests for the content would bepassed along to the customer’s origin server until the shield POP’s cached copy of it expires.
· Understanding Cache HIT and MISS headers with Shielded Services(/guides/shielding/understandingcachehitandmissheaderswithshieldedservices)Here's some help deciphering cache hit and miss headers when you have shielding enabled (/guides/shielding/). Let's look atthe following requests for the same object.
The first request:
X‐Served‐By: cache‐v43‐ASH, cache‐sv62‐SJC3X‐Cache: MISS, MISSX‐Cache‐Hits: 0, 0
Listing two cachenodes (XServedBy) shows that shielding is turned on, with cache43ASH serving as the cache node andcachesv62SJC3 serving as the local delivering node. The MISS,MISS (XCache) indicates that the requested object wasneither in the shield cache nor the local delivering node. XCacheHits reflects that same information.
The second request:
X‐Served‐By: cache‐v43‐ASH, cache‐sv62‐SJC3X‐Cache: MISS, HITX‐Cache‐Hits: 0, 1
This time, we actually hit the same local cachenode (cachesv62SJC3) and got a hit. The MISS listed for cache43ASHreflects the state of that node the last time it queried that node for that object (not its current state), which at that time was aMISS, but in fact, the object resides in that cache now because it was requested from origin.
After waiting a minute or two and requesting the same object again:
X‐Served‐By: cache‐v37‐ASH, cache‐sv60‐SJC3X‐Cache: HIT, MISSX‐Cache‐Hits: 1, 0
This third request shows a new cache (cachesv60SJC3) being selected, MISSing, and retrieving the object from the shieldnode (cachev37ASH), which had the object (a HIT). In total, there should have only been a single request for this object tothe origin.
NOTE: If the closest delivering cache node is in the shield datacenter, you will only see a single server and hit data such as:
X‐Served‐By: cache‐v37‐ASHX‐Cache: HITX‐Cache‐Hits: 1
After a purge of the object, requesting the object again will be similar the first request scenario.
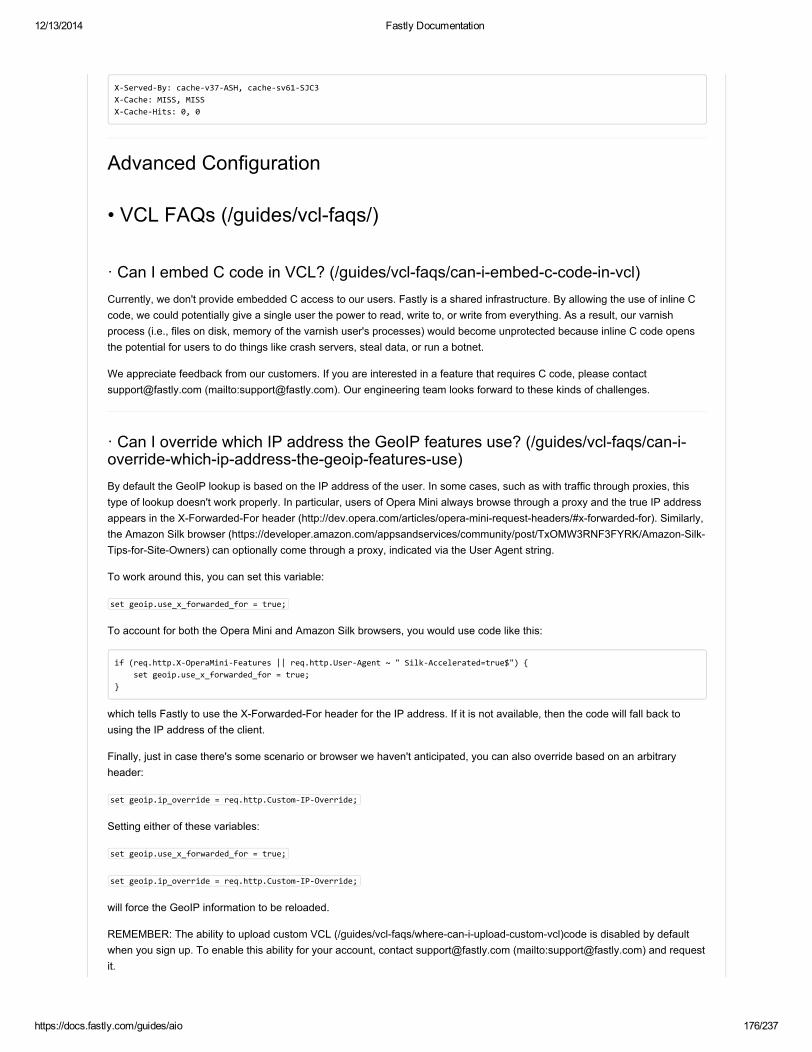
12/13/2014 Fastly Documentation
https://docs.fastly.com/guides/aio 176/237
X‐Served‐By: cache‐v37‐ASH, cache‐sv61‐SJC3X‐Cache: MISS, MISSX‐Cache‐Hits: 0, 0
Advanced Configuration
• VCL FAQs (/guides/vclfaqs/)
· Can I embed C code in VCL? (/guides/vclfaqs/caniembedccodeinvcl)Currently, we don't provide embedded C access to our users. Fastly is a shared infrastructure. By allowing the use of inline Ccode, we could potentially give a single user the power to read, write to, or write from everything. As a result, our varnishprocess (i.e., files on disk, memory of the varnish user's processes) would become unprotected because inline C code opensthe potential for users to do things like crash servers, steal data, or run a botnet.
We appreciate feedback from our customers. If you are interested in a feature that requires C code, please [email protected] (mailto:[email protected]). Our engineering team looks forward to these kinds of challenges.
· Can I override which IP address the GeoIP features use? (/guides/vclfaqs/canioverridewhichipaddressthegeoipfeaturesuse)By default the GeoIP lookup is based on the IP address of the user. In some cases, such as with traffic through proxies, thistype of lookup doesn't work properly. In particular, users of Opera Mini always browse through a proxy and the true IP addressappears in the XForwardedFor header (http://dev.opera.com/articles/operaminirequestheaders/#xforwardedfor). Similarly,the Amazon Silk browser (https://developer.amazon.com/appsandservices/community/post/TxOMW3RNF3FYRK/AmazonSilkTipsforSiteOwners) can optionally come through a proxy, indicated via the User Agent string.
To work around this, you can set this variable:
set geoip.use_x_forwarded_for = true;
To account for both the Opera Mini and Amazon Silk browsers, you would use code like this:
if (req.http.X‐OperaMini‐Features || req.http.User‐Agent ~ " Silk‐Accelerated=true$") set geoip.use_x_forwarded_for = true;
which tells Fastly to use the XForwardedFor header for the IP address. If it is not available, then the code will fall back tousing the IP address of the client.
Finally, just in case there's some scenario or browser we haven't anticipated, you can also override based on an arbitraryheader:
set geoip.ip_override = req.http.Custom‐IP‐Override;
Setting either of these variables:
set geoip.use_x_forwarded_for = true;
set geoip.ip_override = req.http.Custom‐IP‐Override;
will force the GeoIP information to be reloaded.
REMEMBER: The ability to upload custom VCL (/guides/vclfaqs/wherecaniuploadcustomvcl)code is disabled by defaultwhen you sign up. To enable this ability for your account, contact [email protected] (mailto:[email protected]) and requestit.

12/13/2014 Fastly Documentation
https://docs.fastly.com/guides/aio 177/237
· Can I perform authentication before returning a request? (/guides/vclfaqs/caniperformauthenticationbeforereturningarequest)Performing authentication before returning a request is possible if your authentication is completely headerbased and you dosomething like the following using custom VCL (/guides/vclfaqs/wherecaniuploadcustomvcl):
sub vcl_recv if (req.url ~ "^/protected/") if (req.restarts == 0) set req.http.X‐Orig‐Url = req.url; set req.url = "/checkauth"; return(pass); else set req.url = req.http.X‐Orig‐Url; return(lookup); #FASTLY recv
sub vcl_fetch if (req.url == "/checkauth") if (beresp.status == 200) restart; else return(deliver); #FASTLY fetch
REMEMBER: Change "/checkauth" to whatever your authentication end point is.
If you feel like you can cache the authentication, then add the appropriate headers to the hash in vcl_hash and return(lookup)instead of (pass) .
IMPORTANT: The ability to upload custom VCL code (/guides/vclfaqs/wherecaniuploadcustomvcl) is disabled by defaultwhen you sign up. To enable this ability for your account, contact [email protected] (mailto:[email protected]) and requestit.
· Can I preview VCL before activating it? (/guides/vclfaqs/canipreviewvclbeforeactivatingit)You can always preview VCL prior to activating a service version.
1. Log in to the Fastly application.2. Click the configure tab to access the control panel.
3. Select the appropriate service from the Service drop down.
4. Click the blue Configure button to the right of the service name.
5. Click the VCL section to view the Varnish Configuration information, and then click the New button to upload yourconfiguration file.

12/13/2014 Fastly Documentation
https://docs.fastly.com/guides/aio 178/237
The New Varnish Configuration window appears:
6. In the Name field, type the name of the varnish configuration information you're uploading.
7. Click the Choose File button and navigate to the text file you plan to upload.
8. Click the Create button to create the new varnish configuration.
9. At the top of the application window, click the grey VCL button to the right of the service name and version fields.
The Generated VCL preview appears.

12/13/2014 Fastly Documentation
https://docs.fastly.com/guides/aio 179/237
· Custom responses that don't hit origin servers (/guides/vclfaqs/customresponsesthatdonthitoriginservers)In certain situations you may want to send custom responses to clients that are handled on Fastly edge servers and do not hitorigin servers (/guides/backendservers/). In this example a user wanted to restrict caching to a URL subtree that containedimages and scripts and did not want anything else cached. Requests to anything other than /Content/ or /Scripts/ weresupposed to return HTTP 404 (Document not found). To implement this you will need to go to the Content Configurationsection of your service then click on New next to Responses. A dialog will appear:
Fill out the fields as follows:
Name: A descriptive name to show in the Service Configuration.Status: This is the HTTP code to return to the client (e.g., 200, 304, 404).MIME Type: The MIME type of the response.Content: Any type of HTML content. It doesn't need to be plain text.
Once the response object is created. You will need to attach a Request condition to it. Click on the gear icon and then selectRequest Conditions.
Enter your request condition in the New Condition window that appears. For example:

12/13/2014 Fastly Documentation
https://docs.fastly.com/guides/aio 180/237
Be sure to fill out the fields as follows:
Name: Descriptive name of a request condition visible in the App Configuration interfaceApply If: This is the actual condition you want inserted into a VCL if statementPriority: Priority for the request condition. Leave as default if this the only request condition
When done click Create, deploy the service, and your settings should be deployed within short period of time.
Examples of request conditionsTrue only if URLs don't match a certain mask: /Content/* or /Scripts/*
! ( req.url ~ "^/(Content|Scripts)" )
True only if URLs match /secret/* or are Microsoft Word or Excel documents: *.doc and *.xls
! ( req.url ~ "^/(secret)" || req.url ~ "\.(xls|doc)$" )</pre>
Ignore POST and PUT HTTP requests
req.request == "POST" || req.request == "PUT"
Deny spider/crawler with useragent "annoying_robot"
req.http.user‐agent ~ "annoying_robot"
Deny specific IP or set of IPs from connecting: 225.0.0.1 and 240.24
client.ip == "225.0.0.1" || client.ip ~ "240.24"
· Does Fastly have a list of VCL extensions? (/guides/vclfaqs/doesfastlyhavealistofvclextensions)We've included a number of extensions to VCL. You can find them here (/guides/vclextensions/).
· How can I change the URL based on the domain? (/guides/vclfaqs/howcanichangetheurlbasedonthedomain)

12/13/2014 Fastly Documentation
https://docs.fastly.com/guides/aio 181/237
The VCL looks something like this
if (req.http.host ~ "^restricted") set req.url = "/sanitized" req.url;
Which translates, in Fastly's UI, to creating a new Header (/guides/tutorials/addingormodifyingheadersonhttprequestsandresponses) in the Content pane of your control panel:
and then creating a request condition that restricts connections to that host:
· How can I control access to certain resources? (/guides/vclfaqs/howcanicontrolaccesstocertainresources)Varnish allows you to use Access Control Lists (ACLs), a feature that enables fast matching of the client's IP address against alist of defined IP addresses. An ACL looks like this:

12/13/2014 Fastly Documentation
https://docs.fastly.com/guides/aio 182/237
# Who is allowed access ...acl local "localhost"; "192.168.1.0"/24; /* and everyone on the local network */ ! "192.168.1.23"; /* except for the dialin router */
To define an ACL in Fastly, first ask support (mailto:[email protected]) to turn on VCL uploading (/guides/vclfaqs/wherecaniuploadcustomvcl) for your account. Once activated, create a file with your ACL definitions and upload it in the VCLconfiguration section. Make sure the uploaded file is marked as a 'Main' type using the menu to the right of the name (not'Include'):
Once uploaded, you can reference it in your configuration with a match operation:
# block any requests to Admin pages not from local IPssub vcl_recv if (req.url ~ "^/admin" && ! (client.ip ~ local)) error 403 "Forbidden";
You can, of course, create different behavior based on any other attributes from a request as well, such as location and cookiepresence.
· How do I create locationbased tagging? (/guides/vclfaqs/howdoicreatelocationbasedtagging)Varnish allows you to use Access Control Lists (ACLs), a feature that enables fast matching of the client's IP address against alist of defined IP addresses. An ACL looks like this:
# Who is allowed access ...acl local "localhost"; "192.168.1.0"/24; /* and everyone on the local network */ ! "192.168.1.23"; /* except for the dialin router */
To define an ACL in Fastly, first ask support (mailto:[email protected]) to turn on VCL uploading (/guides/vclfaqs/wherecaniuploadcustomvcl) for your account. Once activated, create a file with your ACL definitions and upload it in the VCLconfiguration section. Make sure the uploaded file is marked as a 'Main' type using the menu to the right of the name (not'Include'):

12/13/2014 Fastly Documentation
https://docs.fastly.com/guides/aio 183/237
Once uploaded, you can reference it in your configuration with a match operation:
# block any requests to Admin pages not from local IPssub vcl_recv if (req.url ~ "^/admin" && client.ip !~ local) error 403, "Forbidden";
You can, of course, create different behavior based on any other attributes from a request as well, such as location and cookiepresence.
· How do I escape characters in logs? (/guides/vclfaqs/howdoiescapecharactersinlogs)Logs respond to VCL (/guides/vclfaqs/) like any other object in Fastly. For example, the following code can escape quotesfrom UserAgent your log stream:
log "syslog serviceid endpointname :: " """ regsuball(req.http.user‐agent, """, "\") """;
· How do I mix and match Fastly VCL with custom VCL? (/guides/vclfaqs/howdoimixandmatchfastlyvclwithcustomvcl)IMPORTANT: The ability to upload custom VCL code (/guides/vclfaqs/wherecaniuploadcustomvcl) is disabled by defaultwhen you sign up. To enable this ability for your account, contact [email protected] (mailto:[email protected]) and requestit.
Fastly's VCL parser has its own preprocessor. To use the autogenerated VCL code Fastly supplies you can put
sub vcl_recv # my custom code if (req.http.User‐Agent ~ "Googlebot") set req.backend = F_special_google_backend;
#FASTLY recv
or the equivalent for other functions.

12/13/2014 Fastly Documentation
https://docs.fastly.com/guides/aio 184/237
To mix and match Fastly VCL with your custom VCL successfully, remember the following:
Fastly's VCL is based on Varnish 2.1. Our Varnish syntax is specifically compatible with Varnish 2.1.5. We run acustom version with added functionality.You can only restart Varnish three times. This limit exists to prevent infinite loops.VCL doesn't take kindly to Windows newlines (line breaks). It's best to avoid them entirely.It's best to use curl ‐X PURGE to initiate purges via API (/api/purge). To restrict access to purging, check for theFASTLYPURGE method not the PURGE method. When you send a request to Varnish to initiate a purge, the HTTP methodthat you use is "PURGE", but it has already been changed to "FASTLYPURGE" by the time your VCL runs that request.If you override TTLs with custom VCL, your default TTL set in the configuration (/guides/caching/howcaniservestalecontentonerrors) will not be honored and the expected behavior may change.Don't override the default VCL if that's not your intent. To avoid overriding the default VCL accidentally, include all ofthe boilerplate shown below as a template in your custom VCL file. Add your custom code in between the differentsections.
Fastly's VCL Boilerplate
IMPORTANT: Include all of the boilerplate shown below as a template in your custom VCL file. Add your custom code inbetween the different sections.
sub vcl_recv #FASTLY recv
if (req.request != "HEAD" && req.request != "GET" && req.request != "FASTLYPURGE") return(pass);
return(lookup);
sub vcl_fetch #FASTLY fetch
if ((beresp.status == 500 || beresp.status == 503) && req.restarts < 1 && (req.request == "GET" || req.request == "HEAD")) restart;
if(req.restarts > 0 ) set beresp.http.Fastly‐Restarts = req.restarts;
if (beresp.http.Set‐Cookie) set req.http.Fastly‐Cachetype = "SETCOOKIE"; return (pass);
if (beresp.http.Cache‐Control ~ "private") set req.http.Fastly‐Cachetype = "PRIVATE"; return (pass);
if (beresp.status == 500 || beresp.status == 503) set req.http.Fastly‐Cachetype = "ERROR"; set beresp.ttl = 1s; set beresp.grace = 5s; return (deliver);
if (beresp.http.Expires || beresp.http.Surrogate‐Control ~ "max‐age" || beresp.http.Cache‐Control ~"(s‐maxage|max‐age)") # keep the ttl here else # apply the default ttl set beresp.ttl = 3600s;

12/13/2014 Fastly Documentation
https://docs.fastly.com/guides/aio 185/237
return(deliver);
sub vcl_hit #FASTLY hit
if (!obj.cacheable) return(pass); return(deliver);
sub vcl_miss #FASTLY miss return(fetch);
sub vcl_deliver #FASTLY deliver return(deliver);
sub vcl_error #FASTLY error
sub vcl_pass #FASTLY pass
· How does Fastly support the EdgeControl header? (/guides/vclfaqs/howdoesfastlysupporttheedgecontrolheader)VCL now gives you the building blocks to access information inside the EdgeControl response header field from the origin.Fastly supports this by honoring cache‐maxage from EdgeControl as the time to live (TTL) of the object on the Fastly edge, andhonoring downstream‐ttl from EdgeControl as the TTL to be sent down from the Fastly edge to the end user's browser.
In order to incorporate this EdgeControl header support, you would include the following snippet in your vcl_fetch function viacustom VCL:
if (parse_time_delta(subfield(beresp.http.Edge‐Control, "downstream‐ttl")) >= 0) set beresp.http.Cache‐Control = "max‐age=" parse_time_delta(subfield(beresp.http.Edge‐Control, "downstream‐ttl"));
if (parse_time_delta(subfield(beresp.http.Edge‐Control, "cache‐maxage")) >= 0) set beresp.ttl = parse_time_delta(subfield(beresp.http.Edge‐Control, "cache‐maxage"));
The subfield function parses the EdgeControl field for subfields, and the parse_time_delta function converts time values like"7m" into a number of seconds. You can then use that number of seconds to populate beresp.ttl (the TTL of the object on theFastly edge) or you can use it to construct a CacheControl header field for downstream. The parse_time_delta function willreturn 1 if the subfield is not wellformed as a time value, or if it is entirely absent. In summary, the above snippet honorscache‐maxage and downstream‐ttl from EdgeControl if present and usable.
REMEMBER: The ability to upload custom VCL code (/guides/vclfaqs/wherecaniuploadcustomvcl) is disabled by defaultwhen you sign up. To enable this ability for your account, contact [email protected] (mailto:[email protected]) and requestit.
· Setting Up Redundant Origin Servers using VCL (/guides/vclfaqs/settingupredundantoriginserversusingvcl)

12/13/2014 Fastly Documentation
https://docs.fastly.com/guides/aio 186/237
Sometimes you want to set up two different origin servers, one as a primary and one as a backup in case the primary becomesunavailable. You can do this with custom VCL (/guides/vclfaqs/wherecaniuploadcustomvcl). The ability to upload customVCL code (/guides/vclfaqs/wherecaniuploadcustomvcl) is disabled by default when you sign up. To enable this ability foryour account, contact [email protected] (mailto:[email protected]) and request it.
Once you can upload custom VCL configurations, create a custom configuration that looks something like this:
sub vcl_recv #FASTLY recv set req.backend = F_<origin_server_1>; if (!req.backend.healthy) set req.backend = F_<origin_server_2>; if (req.request != "HEAD" && req.request != "GET" && req.request != "PURGE") return(pass); return(lookup);
REMEMBER: Health checks (/guides/backendservers/healthcheckstutorial) should in be set in the app in conjunction withthis as a best practice.
· VCL Regular Expression Cheat Sheet (/guides/vclfaqs/vclregularexpressioncheatsheet)Remember that Varnish (/guides/vclfaqs/) regular expressions are case sensitive.
Basic matching
req.url ~ "phrase"
Matches "phrase" anywhere.
req.url == "phrase"
Matches only if req.url is exactly "phrase".
Matching at the beginning or end of a string
req.http.host ~ "^www"
Matches if req.http.host starts with "www.".
req.url ~ "\.jpg$"
Matches if req.url ends with ".jpg".
Multiple matches
req.url ~ "\.(png|jpg|css|js)$"
Matches if req.url ends with either "jpg", "jpeg", "css" or "js".
req.url ~ "\.php(\?.*)?$"
Matches if req.url ends with ".php" ".php?foo=bar" or ".php?", but not ".phpa".
req.url ~ "\.[abc]server$"

12/13/2014 Fastly Documentation
https://docs.fastly.com/guides/aio 187/237
Matches if req.url ends with either ".aserver" ".bserver" or ".cserver".
Matching wildcards
req.url ~ "jp.g$"
Matches if req.url ends with "jpeg", "jpag", and "jp0g", but doesn't match if req.url ends with "jpg".
req.url ~ "jp.*g$"
Matches jp followed by 0 or more random characters ending with the letter 'g' ("jpeg", "jpg", and "jpeeeeg" all match).
Replacing content
set req.http.host = regsub(req.http.host, "^www\.","");
Replaces a leading "www." in the Hostheader with a blank, if present.
set req.http.x‐API‐Test = regsub(req.http.host, "^www.","api.");
Sets the xAPITest header to contain the hostheader, but replaces a leading "www." with "api" example:
Host: www.example.com ‐>Host: www.example.comX‐API‐Test: api.example.comHost: example.com ‐>Host: example.comX‐API‐Test: example.com
· What is Varnish and why does Fastly use it? (/guides/vclfaqs/whatisvarnishandwhydoesfastlyuseit)Varnish is the open source software (http://www.fastly.com/about/opensource/) Fastly commercialized with performance andcapacity (among other) enhancements. The principal configuration mechanism of Varnish software is the Varnish ConfigurationLanguage (VCL), the scripting language used to configure and add logic to Varnish caches. Varnish allows Fastly to applychanges to the cache software as it is executing. Specifically, VCL is generated, compiled, transmitted to all Fastly caches,loaded into the operating software, and activated immediately, with no waiting for maintenance windows and no serverdowntime.
The Fastly application generates VCL automatically per a customer's specifications via the web interface (/guides/fastlyswebinterface/). Fastly also allows customers to create their own VCL files with their specialized configurations, or to mix and match(/guides/vclfaqs/howdoimixandmatchfastlyvclwithcustomvcl) Fastly's VCL with custom VCL. Customerwritten VCL filescan be uploaded (/guides/vclfaqs/wherecaniuploadcustomvcl) into Fastly caches and activated. The ability to uploadcustom (/guides/vclfaqs/wherecaniuploadcustomvcl) VCL code is disabled by default when customers sign up for Fastly’sCDN Service. To enable this ability for an account, customers must contact [email protected] (mailto:[email protected])and specifically request it.
· What's the best way to QA test Fastly configurations? Should I create a secondaccount? (/guides/vclfaqs/whatsthebestwaytoqatestfastlyconfigurationsshouldicreateasecondaccount)You don't need a second account to test your VCL configurations with the Fastly application. We recommend adding a newservice within your existing account that's specifically designed for testing. A name like "QA" or "testing" or "staging" makesdistinguishing between services much easier.

12/13/2014 Fastly Documentation
https://docs.fastly.com/guides/aio 188/237
Once created, simply point your testing service to your testing or QA environment. Edit your Fastly configurations for the testingservice as if you were creating them for production. Test things out and tweak them to get them perfect. You can also previewyour generated VCL (/guides/vclfaqs/canipreviewvclbeforeactivatingit).
When your testing is complete, make the same changes in your production service that you made to your testing service. If youare using custom VCL, upload the VCL file (/guides/vclfaqs/wherecaniuploadcustomvcl) to the production service you'll beusing.
REMEMBER: The ability to upload custom VCL code (/guides/vclfaqs/wherecaniuploadcustomvcl) is disabled by defaultwhen you sign up. To enable this ability for your account, contact [email protected] (mailto:[email protected]) and requestit.
· Where can I upload custom VCL? (/guides/vclfaqs/wherecaniuploadcustomvcl)The ability to upload custom VCL code is disabled by default when you sign up. To enable this ability for your account, [email protected] (mailto:[email protected]) and request it. Once enabled, you'll find the controls to upload custom VCL inthe configuration controls, under a new VCL area as shown below.
The first VCL file that you upload will be marked as Main. Any other VCL files will be set as Include. They must be includedfrom the main VCL using the syntax
include "VCL Name"
Where VCL Name is the name of an "Include" VCL object you've created. So if you've created an "Include" VCL object called"Extra Functions" using the file extra_functions.vcl then your "Main" VCL will have
include "Extra Functions"
When uploading custom VCL code you should read our guide to mixingandmatching Fastly VCL with custom VCL(/guides/vclfaqs/howdoimixandmatchfastlyvclwithcustomvcl).
· Will I lose the ability to configure things via the UI if I activate custom VCLuploading? (/guides/vclfaqs/willilosetheabilitytoconfigurethingsviatheuiifiactivatecustomvcluploading)Custom VCL and Fastly VCL can be used together at the same time. You will never lose the options on the Fastly userinterface when you use custom VCL, but keep in mind that custom VCL always takes precedence over any VCL generated bythe user interface. Be mindful of where your custom VCL sits in the default VCL. Our article on mixing and matching customVCL with Fastly VCL (/guides/vclfaqs/howdoimixandmatchfastlyvclwithcustomvcl) talks about this in more detail.

12/13/2014 Fastly Documentation
https://docs.fastly.com/guides/aio 189/237
REMEMBER: The ability to upload custom VCL code (/guides/vclfaqs/wherecaniuploadcustomvcl) is disabled by defaultwhen you sign up. To enable this ability for your account, contact [email protected] (mailto:[email protected]) and requestit.
• VCL Extensions (/guides/vclextensions/)
· Cryptographic and hashingrelated VCL functions (/guides/vclextensions/cryptographicandhashingrelatedvclfunctions)Fastly provides several functions in VCL (/guides/vclfaqs/) for cryptographic and hashingrelated purposes. It is based veryheavily on Kristian Lyngstøl's digest vmod (https://github.com/varnish/libvmoddigest) for Varnish 3 (which means you can alsorefer to that documentation for more detail).
Functions
Function Description
digest.hmac_md5(<key>,<message>)
Hashbased message authentication code(http://en.wikipedia.org/wiki/Hashbased_message_authentication_code) using MD5.Returns a Hexencoded string prepended with 0x.
digest.hmac_sha1(<key>, <message>)
Hashbased message authentication code(http://en.wikipedia.org/wiki/Hashbased_message_authentication_code) using SHA1(http://en.wikipedia.org/wiki/Secure_Hash_Algorithm).Returns a Hexencoded string prepended with 0x.
digest.hmac_sha256(<key>, <message>))
Hashbased message authentication code(http://en.wikipedia.org/wiki/Hashbased_message_authentication_code) using SHA256(http://en.wikipedia.org/wiki/Secure_Hash_Algorithm).Returns a Hexencoded string prepended with 0x.
digest.base64(<string>)
Base64 (http://en.wikipedia.org/wiki/Base64) encoding.Returns the base64encoded version of the inputstring.
digest.base64url(<string>)
Base64(http://en.wikipedia.org/wiki/Base64#URL_applications)encoding. Returns the base64encoded version of theinputstring. Replaces +/ with _ for url safety.
digest.base64url_nopad(<string>)
Base64(http://en.wikipedia.org/wiki/Base64#URL_applications)encoding. Returns the base64encoded version of theinputstring. Replaces +/ with _ for url safety. Has nolength padding(http://en.wikipedia.org/wiki/Base64#Padding).
digest.base64_decode(<string>) Decode Base64. Returns a string.
digest.base64url_decode(<string>)Decode Base64 with url safe characters in. Returns astring.
digest.base64url_nopad_decode(<string>)Decode Base64 with url safe characters. Returns astring. Identical to base64_url_decode.
Use the SHA1

12/13/2014 Fastly Documentation
https://docs.fastly.com/guides/aio 190/237
digest.hash_sha1(<string>) (http://en.wikipedia.org/wiki/Secure_Hash_Algorithm)hash. Returns a string.
digest.hash_sha224(<string>)
Use the SHA224(http://en.wikipedia.org/wiki/Secure_Hash_Algorithm)hash. Returns a string.
digest.hash_sha256(<string>)
Use the SHA256(http://en.wikipedia.org/wiki/Secure_Hash_Algorithm)hash. Returns a string.
digest.hash_sha384(<string>)
Use the SHA384(http://en.wikipedia.org/wiki/Secure_Hash_Algorithm)hash. Returns a string.
digest.hash_sha512(<string>)
Use the SHA512(http://en.wikipedia.org/wiki/Secure_Hash_Algorithm)hash. Returns a string.
digest.hash_gost(<string>)
Use the Gost(http://en.wikipedia.org/wiki/GOST_(hash_function))hash function. Returns a string.
digest.hash_md2(<string>)
Use the MD2(http://en.wikipedia.org/wiki/MD2_(cryptography)) hash.Returns a string.
digest.hash_md4(<string>)Use the MD4 (http://en.wikipedia.org/wiki/MD4) hash.Returns a string.
digest.hash_md5(<string>)Use the MD5 (http://en.wikipedia.org/wiki/MD5) hash.Returns a string.
digest.hash_crc32(<string>)Use a 32 bit Cyclic Redundancy Checksum(http://en.wikipedia.org/wiki/CRC32). Returns a string.
digest.hash_crc32b(<string>)
A reversed CRC32 (for compatibility with some PHPapplications(http://www.php.net/manual/en/function.hashfile.php#104836)). Returns a string.
digest.hash_adler32(<string>)Use the Adler32 (http://en.wikipedia.org/wiki/Adler32)checksum algorithm. Returns a string.
digest.hash_haval128(<string>)
Use the 128 bit Haval(http://en.wikipedia.org/wiki/Haval) hash function.Returns a string.
digest.hash_haval160(<string>)
Use the 160 bit Haval(http://en.wikipedia.org/wiki/Haval) hash function.Returns a string.
digest.hash_haval192(<string>)
Use the 192 bit Haval(http://en.wikipedia.org/wiki/Haval) hash function.Returns a string.
digest.hash_haval224(<string>)
Use the 224 bit Haval(http://en.wikipedia.org/wiki/Haval) hash function.Returns a string.
digest.hash_haval256(<string>)
Use the 256 bit Haval(http://en.wikipedia.org/wiki/Haval) hash function.Returns a string.
Use the 128 bit RIPMD

12/13/2014 Fastly Documentation
https://docs.fastly.com/guides/aio 191/237
digest.hash_ripemd128(<string>) (http://en.wikipedia.org/wiki/RIPEMD) hash function.Returns a string.
digest.hash_ripemd160(<string>)
Use the 160 bit RIPMD(http://en.wikipedia.org/wiki/RIPEMD) hash function.Returns a string.
digest.hash_ripemd256(<string>)
Use the 256 bit RIPMD(http://en.wikipedia.org/wiki/RIPEMD) hash function.Returns a string.
digest.hash_ripemd320(<string>)
Use the 320 bit RIPMD(http://en.wikipedia.org/wiki/RIPEMD) hash function.Returns a string.
digest.hash_tiger(<string>)
Use the standard, 192 bits Tiger(http://en.wikipedia.org/wiki/Tiger_(cryptography)) hashfunction. Returns a string.
digest.hash_tiger128(<string>)
Use the truncated 128 bit Tiger(http://en.wikipedia.org/wiki/Tiger_(cryptography)) hashfunction. Returns a string.
digest.hash_tiger160(<string>)
Use the truncated 160 bit Tiger(http://en.wikipedia.org/wiki/Tiger_(cryptography)) hashfunction. Returns a string.
digest.hash_snefru128(<string>)
Use the 256 bit Snefru(http://en.wikipedia.org/wiki/Snefru) hash function.Returns a string.
digest.hash_snefru256(<string>)
Use the 128 bit Snefru(http://en.wikipedia.org/wiki/Snefru) hash function.Returns a string.
digest.hash_whirlpool(<string>)
Use the Whirlpool(http://en.wikipedia.org/wiki/Whirlpool_(cryptography))hash function. Returns a string.
digest.time_hmac_md5(<base64 encoded key>, <interval>, <offset>)Time based One Time Password using MD5. Returnsbase64 encoded output.
digest.time_hmac_sha1(<base64 encoded key>, <interval>, <offset>)Time based One Time Password using SHA1. Returnsbase64 encoded output.
digest.time_hmac_sha256(<base64 encoded key>, <interval>, <offset>)Time based One Time Password using SHA256.Returns base64 encoded output.
Notes
A note about base64 decoding theoretically the output could be in binary but is interpreted as a string. So if the binary outputcontains '\0' then it could be truncated.
The time based OneTime Password algorithm initializes the HMAC using the key and appropriate hash type. Then it hashesthe message
(<time now in seconds since UNIX epoch> / <interval>) + <offset>
as a 64bit unsigned integer (little endian) and base64 encodes the result.
Examples

12/13/2014 Fastly Documentation
https://docs.fastly.com/guides/aio 192/237
OneTime Password Validation (Token Authentication)Use this to validate tokens with a URL format like the following:
http://cname‐to‐fastly/video.mp4?6h2YUl1CB4C50SbkZ0E6U3dZGjh+84dz3+Zope2Uhik=
Example implementations for token generation in various languages can be found in Github (https://github.com/fastly/tokenfunctions).
Example VCL
sub vcl_recv #FASTLY recv
set req.http.token = regsub(req.url, ".*\?(.*)$", "\1"); if (req.http.token != digest.time_hmac_sha256("RmFzdGx5IFRva2VuIFRlc3Q=", 60, 0) && req.http.token != digest.time_hmac_sha256("RmFzdGx5IFRva2VuIFRlc3Q=", 60, ‐1)) error 403;
Signatureset resp.http.x‐data‐sig = digest.hmac_sha256("secretkey",resp.http.x‐data);
Base64 decodingsynthetic digest.base64_decode(req.http.x‐parrot) ;
· Date and timerelated VCL features (/guides/vclextensions/dateandtimerelatedvclfeatures)By default VCL provides the now variable, which provides the current time in [ (for example, Wed, 17 Sep 2014 23:19:06 GMT ).
Fastly also adds several new functions to Varnish and variables that allow you to have more flexibility when dealing with datesand times.
The new variables are:
Name Location Description
now.sec all Like the now variable but in seconds.
time.start all The time the request started in seconds since the Epoch.
time.start.sec all The time the request started in seconds since the Epoch.
time.start.msec all The time the request started in milliseconds since the Epoch.
time.start.msec_frac all The time the request started in fractional milliseconds.
time.start.usec all The time the request started in microseconds since the Epoch.
time.start.usec_frac all The time the request started in fractional microseconds since the Epoch.
time.enddeliverlog
The time the request ended in RFC 850 format (https://www.ietf.org/rfc/rfc1123.txt)format. Also useful for strftime.
time.end.secdeliverlog
The time the request ended in seconds since the Epoch.
time.end.msecdeliverlog
The time the request ended in milliseconds since the Epoch.
time.end.msec_fracdeliver
The time the request ended in fractional milliseconds since the Epoch.

12/13/2014 Fastly Documentation
https://docs.fastly.com/guides/aio 193/237
log
time.end.usecdeliverlog
The time the request ended in microseconds since the Epoch.
time.end.usec_fracdeliverlog
The time the request ended in fractional microseconds since the Epoch.
time.elapseddeliverlog
The time since the request start in RFC 850 format (https://www.ietf.org/rfc/rfc1123.txt).Also useful for strftime.
time.elapsed.secdeliverlog
The time since the request start in seconds since the Epoch.
time.elapsed.msecdeliverlog
The time since the request start in milliseconds since the Epoch.
time.elapsed.msec_fracdeliverlog
The time the since request start in fractional milliseconds since the Epoch.
time.elapsed.usecdeliverlog
The time since the request start in microseconds since the Epoch.
time.elapsed.usec_fracdeliverlog
The time since the request start in fractional microseconds since the Epoch.
There are also a few functions:
Name Description
time.hex_to_time(<divider>, <hextime>)Takes a hexadecimal string value, divides by divider and interprets the result asseconds since UNIX epoch.
time.add(<time>, <offset>) Adds offset to time .
time.sub(<time>, <offset>) Subtracts offset from time .
time.is_after(<time1>, <time2>) Returns TRUE if time1 is after time2 . (Normal timeflow and causality required.)
strftimeFormat a time to a string. This uses the standard POSIX strftime formats(http://www.unix.com/manpage/FreeBSD/3/strftime/)).
Examples:
set resp.http.Now = strftime("%Y‐%m‐%d %H:%M", now)set resp.http.Start = strftime("%a, %d %b %Y %T %z", time.start)if (time.is_after(time.add(now, 10m), time.hex_to_time(1, "d0542d8")) ...
Note the way the format string is written "..." , which is a VCL "long string". Regular strings in VCL use %xxescapes (percent encoding) for special characters, which would conflict with the % used in the strftime format.Alternatively, one could use %25 for each % .
· GeoIPrelated VCL features (/guides/vclextensions/geoiprelatedvclfeatures)Fastly exposes a number of geographic variables for you to take advantage of inside VCL (/guides/vclextensions/guidetovcl).These are based on the MaxMind IP Geolocation database and appear as follows:
Variable Description
geoip.latitude The latitude associated with the IP address.
geoip.longitude The longitude associated with the IP address.

12/13/2014 Fastly Documentation
https://docs.fastly.com/guides/aio 194/237
geoip.city
The city or town name associated with the IP address. See the MaxMind list of cities(http://www.maxmind.com/GeoIPCity534Location.csv) to see all the possible return values. Their listis updated on a regular basis.
geoip.continent_codeA twocharacter code representing the continent associated with the IP address. Possible codes are:AF Africa, AS Asia, EU Europe, NA North America, OC Oceania, SA South America.
geoip.country_code
A twocharacter ISO 31661 (http://en.wikipedia.org/wiki/ISO_31661)country code for the countryassociated with the IP address. In addition to the standard codes, we may also return one of thefollowing: A1 an anonymous proxy (http://dev.maxmind.com/faq/geoip#anonproxy), A2 a satelliteprovider (http://dev.maxmind.com/faq/geoip#satellite), EU an IP in a block used by multiple European(http://dev.maxmind.com/faq/geoip#euapcodes) countries, AP an IP in a block used by multipleAsia/Pacific region (http://dev.maxmind.com/faq/geoip#euapcodes) countries. Note: The US countrycode is returned for IP addresses associated with overseas US military bases.
geoip.country_code3The same as country_code; however, it returns a ISO 31661 alpha3(http://en.wikipedia.org/wiki/ISO_31661_alpha3) threecharacter code.
geoip.country_name The country name associated with the IP address.
geoip.postal_code
The postal code associated with the IP address. These are available for some IP addresses inAustralia, Canada, France, Germany, Italy, Spain, Switzerland, United Kingdom, and the US. Wereturn the first 3 characters for Canadian postal codes. We return the first 24 characters (outwardcode) for postal codes in the United Kingdom.
geoip.region The region name associated with the IP address.
geoip.area_codeThe telephone area code associated with the IP address. These are only available for IP addresses inthe US.
geoip.metro_code
The metro code associated with the IP address. These are only available for IP addresses in the US.MaxMind returns the same metro codes as the Google AdWords API(https://developers.google.com/adwords/api/docs/appendix/metrocodes).
Fastly also exposes codes that describe the location of the datacenter the request came through as follows:
Variable Description
server.regionA code representing the general region of the world in which the POP location resides. One of: Asia, EUCentral, EUEast, EUWest, USCentral, USEast, USWest.
server.datacenter A code representing one of Fastly's POP locations (/guides/faqs/wherearefastlyspopslocated).
REMEMBER: All strings are returned as ISO88591 encoding (http://en.wikipedia.org/wiki/ISO/IEC_88591) (also known aslatin1).
· Guide to VCL (/guides/vclextensions/guidetovcl)Fastly's Varnish is based on Varnish 2.1 and our Varnish syntax is specifically compatible with Varnish 2.1.5. We run a customversion with added functionality.
Online Varnish Software and VCL Documentation
The official Varnish documentation is a good place to start when looking for online information:
https://www.varnishcache.org/docs/2.1/tutorial/vcl.html (https://www.varnishcache.org/docs/2.1/tutorial/vcl.html)
In addition, Varnish Software, who provides commercial support for Varnish, has written a free book:
https://www.varnishsoftware.com/static/book/index.html (https://www.varnishsoftware.com/static/book/index.html)
Specifically, the VCL references are located here:

12/13/2014 Fastly Documentation
https://docs.fastly.com/guides/aio 195/237
https://www.varnishsoftware.com/static/book/VCL_Basics.html (https://www.varnishsoftware.com/static/book/VCL_Basics.html)
https://www.varnishsoftware.com/static/book/VCL_functions.html (https://www.varnishsoftware.com/static/book/VCL_functions.html)
Books on Varnish and VCL
Roberto Moutinho has written a book on using Varnish that may help:
http://www.amazon.com/InstantVarnishCacheRobertoMoutinho/dp/178216040X/ (http://www.amazon.com/InstantVarnishCacheRobertoMoutinho/dp/178216040X/)
Fastly's VCL Extensions
In addition, Fastly has included a number of extensions to VCL that won't be covered by any other documentation. Specifically:
Extension Description
cryptographic and hashing functions(/guides/vclextensions/cryptographicandhashingrelatedvclfunctions)
Supports Hashbased Message Authentication Code (HMAC), a messageauthentication code that uses a cryptographic key in conjunction with a hash function.
date and timerelated features(/guides/vclextensions/dateandtimerelatedvclfeatures)
Supports the default VCL “now” variable that provides the current time as an RFC 850formatted date (e.g., Tuesday, 29Apr14 08:41:55), as well as several new functionsthat allow you to have more flexibility when dealing with dates and times.
GeoIP features (/guides/vclextensions/geoiprelatedvclfeatures)
Provides the ability to search a database from MaxMind.com for a given host or IPaddress, and return information about the country, city or Internet Service Provider(ISP) for that IP address.
randomness features (/guides/vclextensions/randomnessrelatedvclfeatures)
Supports the insertion of random strings, content cookies, and decisions into requests.
sizerelated variables (/guides/vclextensions/sizerelatedvclvariables)
Supports reporting variables that offer insight into what happened in a request.
miscellaneous features and variables(/guides/vclextensions/miscellaneousVCLextensions)
Provides miscellaneous VCL extensions not easily grouped into other categories.
REMEMBER: The ability to upload custom VCL (/guides/vclfaqs/wherecaniuploadcustomvcl)code is disabled by defaultwhen you sign up. To enable this ability for your account, contact [email protected] (mailto:[email protected]) and requestit.
· Miscellaneous VCL features (/guides/vclextensions/miscellaneousVCLextensions)Fastly has added several miscellaneous features (/guides/vclextensions/guidetovcl) to Varnish that don't easily fit intospecific categories (/guides/vclextensions/).
Feature Description
req.restarts Counts the number of times the VCL has been restarted.
req.grace Defines how long an object can remain overdue and still have Varnish consider it for grace mode.

12/13/2014 Fastly Documentation
https://docs.fastly.com/guides/aio 196/237
std.toupper Changes the case of a string to upper case. For example, std.toupper("hello"); will return "HELLO" .
std.tolower Changes the case of a string to lower case. For example, std.tolower("HELLO"); will return "hello" .
urlencode
Encodes a string for use in a URL. This is also known as percentencoding(http://en.wikipedia.org/wiki/Percentencoding). For example, urlencode("hello world"); will return"hello%20world" .
urldecodeDecodes a percentencoded string. This is the counterpart to urldecode . For example,urldecode("hello%20world+!"); will return "hello world !" .
http_status_matches
Determines whether or not an HTTP status code matches a pattern. The arguments are an integer(usually beresp.status or resp.status ) and a commaseparated list of status codes, optionally prefixedby a ! to negate the match. It returns TRUE or FALSE . For example,if(http_status_matches(beresp.status, "!200,404")) .
boltsort.sort Sorts URL parameters. For example, boltsort.sort("/foo?b=1&a=2&c=3"); returns "/foo?a=2&b=1&c=3" .
· Randomnessrelated VCL features (/guides/vclextensions/randomnessrelatedvclfeatures)Fastly provides several functions in VCL (/guides/vclfaqs/) that control randomnessrelated activities. These functions do not,however, use true randomizing sources and should not be used for cryptographic (/guides/vclextensions/cryptographicandhashingrelatedvclfunctions) or security purposes.
Random strings:
Use the function randomstr(length [, characters]) . When characters aren't provided, the default will be the 64 characters ofA‐Za‐z0‐9_‐ .
sub vcl_deliver set resp.http.Foo = "randomstuff=" randomstr(10); set resp.http.Bar = "morsecode=" randomstr(50, ".‐"); # 50 dots and dashes
Random content cookies in pure VCL:
sub vcl_deliver add resp.http.Set‐Cookie = "somerandomstuff=" randomstr(10) "; expires=" now + 180d "; path=/;";
This adds a cookie named "somerandomstuff" with 10 random characters as value, expiring 180 days from now.
Random decisions:
Use the function randombool( _numerator_, _denominator_ ) , which has a numerator/denominator chance of returning true.
sub vcl_recv if (randombool(1, 4)) set req.http.X‐AB = "A"; else set req.http.X‐AB = "B";
This will add a XAB header to the request, with a 25% (1 out of 4) chance of having the value "A", and 75% chance of havingthe value "B".

12/13/2014 Fastly Documentation
https://docs.fastly.com/guides/aio 197/237
REMEMBER: The ability to upload custom VCL (/guides/vclfaqs/wherecaniuploadcustomvcl) code is disabled by defaultwhen you sign up. To enable this ability for your account, contact [email protected] (mailto:[email protected]) and requestit.
· Sizerelated VCL variables (/guides/vclextensions/sizerelatedvclvariables)In order to allow better reporting Fastly has added several variables to VCL to give more insight into what happened in arequest.
Name Where Description
req.bytes_read deliver log How big a request was in total bytes.
req.header_bytes_read all How big the header of a request was in total bytes.
req.body_bytes_read deliver log How big the body of a request was in total bytes.
resp.bytes_written log How many bytes in total were sent as a response.
resp.header_bytes_written log How many bytes were written for the header of a response.
resp.body_bytes_written log How many bytes were written for body of a response.
resp.completed log Whether the response completed successfully or not.
· AcceptLanguage Header VCL features (/guides/vclextensions/vmodaccept)Fastly provides some functions in VCL to parse and normalize the Accept‐Language header.
FunctionsLanguage Lookup
An implementation of the Lookup functionality as defined by RFC 4647, section 3.4 (http://tools.ietf.org/html/rfc4647#section3.4).
Syntaxaccept.language_lookup(<available languages>, <default>, <priority list>)
Argument Explanation
available languagesA colonseparated list of languages to choose from. Typically the languages that the origin can provide.For example: en:de:fr:pt:es:zh‐CN
default The default language to return if none from the priority list match. For example: en
priority listThe Accept‐Language header. A commaseparated list of languages, optionally accompanied by weights(qvalues). For example: pt‐BR,pt;q=0.8,en‐US;q=0.6,en;q=0.4
Return ValuesThe best matching language (as per the RFC) is returned. If none are found, the default language is returned, unless a weightof zero ( q=0 ) was indicated by the priority list, in which case NULL is returned.
Examples

12/13/2014 Fastly Documentation
https://docs.fastly.com/guides/aio 198/237
set req.http.Normalized‐Language = accept.language_lookup("en:de:fr:pt:es:zh‐CN", "en", req.http.Accept‐Language);
The above would result in Normalized‐Language: pt given an Accept‐Language: pt‐BR,pt;q=0.8,en‐US;q=0.6,en;q=0.4 header.
accept.language_lookup("en", "nl", "en‐GB") results in en , as each subtag is removed and the match retried when a tag doesnot match.
accept.language_lookup("en:nl", "nl", "en‐GB,nl;q=0.5") results in en still, even if nl is a more exact match, because the qvalue of nl is lower, and that has precedence. Exactness just does not come into the equation.
accept.language_lookup("en‐US:nl", "nl", "en‐GB,nl;q=0.5") results in nl , because subtags are not removed from the availablelanguages, only from language tags on the priority list.
accept.language_lookup("en‐US:nl", "nl", "en‐us,nl;q=0.5") results in en‐US , as the lookup is case insensitive.
accept.language_lookup("en‐US:nl", "nl", "en‐GB,nl;q=0") results in NULL (the value, not a string) since en‐GB and en do notmatch, and nl (the default) is listed as unacceptable.
If q=0 for the default language is to be ignored, the following VCL can be used:
set req.http.Normalized‐Language = accept.language_lookup("en‐US:nl", "nl", req.http.Accept‐Language);if (!req.http.Normalized‐Language) # User will get Dutch even if he doesn't want it! # (Because none of our languages were acceptable) set req.http.Normalized‐Language = "nl";
Language Filter (Basic)
An implementation of the Basic Filtering functionality as defined by RFC 4647, section 3.3.1(http://tools.ietf.org/html/rfc4647#section3.3.1).
The implementation is not exact when the wildcard tag ( * ) is used. If a wildcard is encountered and no matches have beenfound yet, the default is returned. If there are matches, those are returned and the remainder of the priority list is ignored.
(There is no implementation of Extended Filtering, but if you are in need you could always file a feature request with Support. :))
Syntaxaccept.language_filter_basic(<available languages>, <default>, <priority list>, <limit>)
Argument Explanation
available languagesA colonseparated list of languages choose from. Typically the languages that the origin can provide.For example: en:de:fr:pt:es:zh‐CN
default The default language to return if none from the priority list match. For example: en
priority listThe Accept‐Language header. A commaseparated list of languages, optionally accompanied by weights(qvalues). For example: pt‐BR,pt;q=0.8,en‐US;q=0.6,en;q=0.4
limit The maximum amount of languages returned.
Return ValuesThe best matching language (as per the RFC) is returned. If none are found, the default language is returned, unless a weightof zero ( q=0 ) was indicated by the priority list, in which case NULL is returned.

12/13/2014 Fastly Documentation
https://docs.fastly.com/guides/aio 199/237
Examples
set req.http.Filtered‐Language = accept.language_filter_basic("en:de:fr:pt:es:zh‐CN", "en", req.http.Accept‐Language, 2);
The above would result in Filtered‐Language: pt,en given an Accept‐Language: pt‐BR,pt;q=0.8,en‐US;q=0.6,en;q=0.4 header.
accept.language_filter_basic("en", "nl", "en‐GB", 2) results in en , as each subtag is removed and the match retried when atag does not match.
accept.language_filter_basic("en:nl", "nl", "en‐GB,nl;q=0.5", 2) results in en,nl , even if nl is a more exact match, becausethe qvalue of nl is lower, and that has precedence. Exactness just does not come into the equation.
accept.language_filter_basic("en‐US:nl", "nl", "en‐GB,nl;q=0.5", 2) results in nl , because subtags are not removed from theavailable languages during the search.
accept.language_filter_basic("en‐US:nl", "nl", "en‐us,nl;q=0.5", 2) results in en‐US,nl , as the lookup is case insensitive.
accept.language_filter_basic("en‐US:nl", "nl", "en‐GB,nl;q=0", 2) results in NULL (the value, not a string) since en‐GB and endo not match, and nl (the default) is listed as unacceptable.
If q=0 for the default language is to be ignored, the following VCL can be used:
set req.http.Filtered‐Language = accept.language_filter_basic("en‐US:nl", "nl", req.http.Accept‐Language, 2);if (!req.http.Filtered‐Language) # User will get Dutch even if he doesn't want it! # (Because none of our languages were acceptable) set req.http.Filtered‐Language = "nl";
accept.language_filter_basic("en:nl:de:fr", "nl", "en‐GB,*;q=0.5", 2) results in en andaccept.language_filter_basic("en:nl:de:fr", "nl", "*", 2) results in nl .
• Load Balancing (/guides/loadbalancing/)
· How do I configure a failover backend server? (/guides/loadbalancing/howdoiconfigureafailoverbackendserver)The easiest way to set up a failover is to set up two backend servers (/guides/backendservers/): one as your primary and oneyour mirror. Make sure that "auto load balance" is turned off for each server listed among your hosts:

12/13/2014 Fastly Documentation
https://docs.fastly.com/guides/aio 200/237
Next, set a request header (in the Content configuration settings) that sets the primary as the default backend:
and another one that sets the backend to be the failover. Note how the priority is a higher number:

12/13/2014 Fastly Documentation
https://docs.fastly.com/guides/aio 201/237
Then attach a request condition (right click the gear icon next to the header name and choose Cache Conditions) to the lastrequest header that says only to do it if the number of restarts is more than 0 or the backend is unhealthy.
Finally, save your conditions and deploy the new configurgation.
· How do I implement sticky load balancing? (/guides/loadbalancing/howdoiimplementstickyloadbalancing)If you're load balancing between backends, sometimes it's desirable to have a given user (or group of users) always go to thesame server. The easiest way to do this is using the client.identity variable and a client_director in the Fastly API.
First, set up a director via the API and the Director (/api/config#director) and Director Backend (/api/config#director_backend)endpoints:
1. Set up a new Director using the API with the type 'client'.2. Look at your generated VCL and find the name of the backends you want to load balance between.3. Add mappings for each Backend you want to load balance between using the name of the Director and the names of the
Backends.

12/13/2014 Fastly Documentation
https://docs.fastly.com/guides/aio 202/237
If you look at your generated VCL again you should see something like:
backend foo ...
backend bar ...
director baz client .backend = foo; .weight = 1; .backend = bar; .weight = 1;
Next, set the default req.backend to be the name of your director using a new Header from the Content pane. Under theContent pane create a new Header (/guides/tutorials/addingormodifyingheadersonhttprequestsandresponses) that lookssomething like this:
They key entries here are the Destination and Source fields. This particular example sets the client.identify (in theDestination field) to regsub(req.http.Fastly‐Client‐IP, "\.\d+$", "") (in the Source field), which is setting the stickyness tobe based on the first three octets of an IP address (e.g., 192.168.0.1 becomes 192.168.0). In practice, this roughly mapseveryone from a particular netblock to the same server. The assumption here is that everyone from a particular company willbe in the same netblock and this will likely put everyone from the same company on the same server. If your service is verycompany oriented (e.g., HR software or a ticketing system) then this technique may help because the company's data willalready be loaded.
However, you can use any variable available. For example you might want to use a cookie (or part of a cookie) or the locationof the customer (/guides/vclextensions/geoiprelatedvclfeatures) (maybe using geoip.country ).
· How do I set up load balancing between my backends? (/guides/loadbalancing/howdoisetuploadbalancingbetweenmybackends)Enable the Fastly autodirector feature to randomly load balance between two or more backends.

12/13/2014 Fastly Documentation
https://docs.fastly.com/guides/aio 203/237
Enabling Autodirector
1. Log in to the Fastly application.2. Click on the Configure tab (the wrench icon at the top of the application window).3. Select the appropriate service from the Service drop down menu.4. Click the Configure button to the right of the displayed service name.5. Click Hosts from the section list on the left.6. In the list of backends, click the gear icon to the right of the named backend you wish to edit, then select Edit from the
drop down menu. The Edit Backend window appears.
7. Change the setting for Auto Load Balance to Yes and then click Update.
You can repeat steps 6 and 7 for each backend you want to include in the load balancing group.
Setting Conditions
With Auto Load Balance set to Yes on a backend, be aware when setting conditions (/guides/tutorials/conditionstutorial) onthe actual backend under Hosts>Backends>Edit>Conditions.
The autodirector groups servers together based on like conditions, giving you the flexibility to create sub autodirectors byassigning a condition to one group of backends and another condition to another set of backends. If each backend has adifferent condition, the auto load function will not randomly load balance between the different servers.

12/13/2014 Fastly Documentation
https://docs.fastly.com/guides/aio 204/237
Conditions can also be assigned to a server through a header. For example, say you have three servers called F_Fastly,F_Second_backend, and F_Third_backend, and want all URLs with a certain prefix to default to the second server. To do this,you could create a header (under Content>Headers>New) to set requests to the second backend.
After the header is created, you would click the gear icon to the right of the header name and select Request Conditions, thenadd a new condition to apply if the URL matches the desired prefix.

12/13/2014 Fastly Documentation
https://docs.fastly.com/guides/aio 205/237
The generated VCL below illustrates the autodirector set for all three servers. Within the section sub vcl_recv, the defaultbackend is set to the autodirector and, if the media condition is met, requests are then forwarded to the second backend.

12/13/2014 Fastly Documentation
https://docs.fastly.com/guides/aio 206/237
director autodirector_ random
.backend = F_Second_backend; .weight = 100; .backend = F_Third_Backend; .weight = 100; .backend = F_Fastly; .weight = 100;
sub vcl_recv #‐‐FASTLY RECV CODE START if (req.restarts == 0) #‐‐FASTLY TIMER CODE if(req.http.X‐Timer) C char *timer = VRT_GetHdr(sp, HDR_REQ, "\010X‐Timer:"); double start = 0; char time[255]; sscanf(timer, "S%lf", &start);
if(start) snprintf(time, 255, "%s,VS%.f", timer, (TIM_real() ‐ start) * 1000); VRT_SetHdr(sp, HDR_REQ, "\010X‐Timer:", time, vrt_magic_string_end); else snprintf(time, 255, "S%.9f,VS0", TIM_real()); VRT_SetHdr(sp, HDR_REQ, "\010X‐Timer:", time, vrt_magic_string_end); C #;
else C char time[255]; snprintf(time, 255, "S%.9f,VS0", TIM_real()); VRT_SetHdr(sp, HDR_REQ, "\010X‐Timer:", time, vrt_magic_string_end); C #; set req.backend = autodirector_;
# default conditions set req.backend = autodirector_;
# end default conditions
# Request Condition: Media files Prio: 10 if( req.url~"^/media" )
# Header rewrite Media Requests : 10
set req.backend = F_Second_backend;
#end condition
#‐‐FASTLY RECV CODE END
· How do I set up load balancing between my directors via the API? (/guides/loadbalancing/howdoisetuploadbalancingbetweenmydirectorsviatheapi)To set up load balancing between directors configure the Fastly API by first creating an origin and then adding your directors tothe origin.
For example, here's how to do it using the Fastly admin shell:

12/13/2014 Fastly Documentation
https://docs.fastly.com/guides/aio 207/237
fastly> create service my_service version 5 origin my_originfastly> add service my_service version 1 director director_1 to origin my_originfastly> add service my_service version 1 director director_2 to origin my_origin
Here's how to do it using the Perl client library:
my $origin = $fastly‐>create_origin(service_id => $service‐>id, version => $service‐>version‐>number, name => "My Origin");$origin‐>add_director($director1);$origin‐>add_director($director2);
And here's how to do it using the Ruby client library:
origin = fastly.create_origin(:service_id => service.id, :version => service.version.number, :name => "My Origin")>origin.add_director(director1)origin.add_director(director2)
· How does Weight affect the load on my origin servers? (/guides/loadbalancing/howdoesweightaffecttheloadonmyoriginservers)
The Weight setting on the Backend window (accessed when you edit Backend on the Hosts pane of the Configuration ControlPanel (/guides/fastlyswebinterface/abouttheconfigurationcontrolpanel)) appears when Auto Load Balance is set to Yes.
When you specify weight, you specify the percentage of traffic to send to a specific origin server. Each origin receives / of thetraffic.
For example, if you have origin server A with Weight set to 0.5 and origin server B with a Weight of 0.5, traffic is split equallybetween those origins at a ratio of 50:50. If you increase the Weight setting on origin server A to .55 and decrease the Weightsetting on origin server B to .45, the traffic ratio changes accordingly to 55:45.
· What does '503 Quorum weight not reached' error mean? (/guides/loadbalancing/whatdoes503quorumweightnotreachederrormean)The "503 Quorum weight not reached" error means that too many of your backends are being marked as sick. This error is onlyan issue if you've set the 'quorum' field of a Director (/api/config#director).

12/13/2014 Fastly Documentation
https://docs.fastly.com/guides/aio 208/237
• Tutorials (/guides/tutorials/)
· Adding or Modifying Headers on HTTP Requests and Responses(/guides/tutorials/addingormodifyingheadersonhttprequestsandresponses)Welcome to the Headers Tutorial. The steps below show you how to use the Fastly application to add, delete, and modifyheaders on HTTP requests and responses.
We'll start with the simplest case: adding a static header to all of the responses that Fastly returns to your users.
To start with, log in (https://app.fastly.com/) to your Fastly account, select the service you'd like to work on, and clickConfigure. Next, choose the Content pane in the left sidebar. This will display the list of headers associated with your service.If it's empty, it should look like this:
Click New and you'll be presented with a form to create a New Header object.
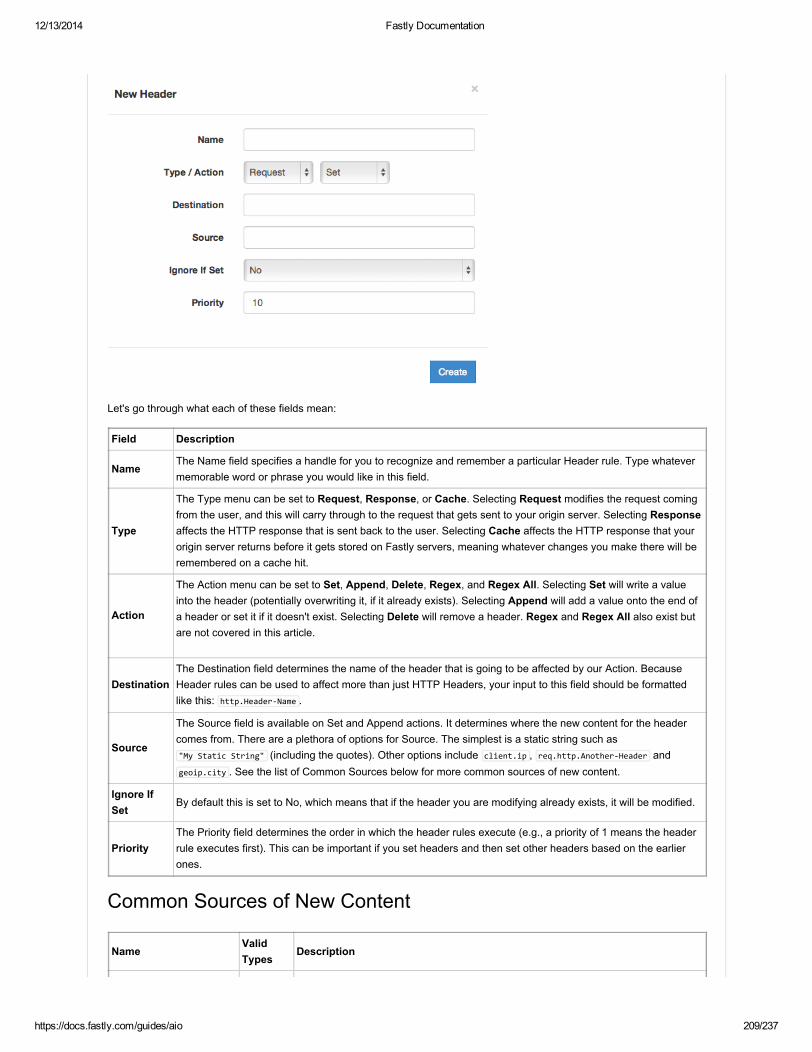
12/13/2014 Fastly Documentation
https://docs.fastly.com/guides/aio 209/237
Let's go through what each of these fields mean:
Field Description
NameThe Name field specifies a handle for you to recognize and remember a particular Header rule. Type whatevermemorable word or phrase you would like in this field.
Type
The Type menu can be set to Request, Response, or Cache. Selecting Request modifies the request comingfrom the user, and this will carry through to the request that gets sent to your origin server. Selecting Responseaffects the HTTP response that is sent back to the user. Selecting Cache affects the HTTP response that yourorigin server returns before it gets stored on Fastly servers, meaning whatever changes you make there will beremembered on a cache hit.
Action
The Action menu can be set to Set, Append, Delete, Regex, and Regex All. Selecting Set will write a valueinto the header (potentially overwriting it, if it already exists). Selecting Append will add a value onto the end ofa header or set it if it doesn't exist. Selecting Delete will remove a header. Regex and Regex All also exist butare not covered in this article.
DestinationThe Destination field determines the name of the header that is going to be affected by our Action. BecauseHeader rules can be used to affect more than just HTTP Headers, your input to this field should be formattedlike this: http.Header‐Name .
Source
The Source field is available on Set and Append actions. It determines where the new content for the headercomes from. There are a plethora of options for Source. The simplest is a static string such as"My Static String" (including the quotes). Other options include client.ip , req.http.Another‐Header andgeoip.city . See the list of Common Sources below for more common sources of new content.
Ignore IfSet
By default this is set to No, which means that if the header you are modifying already exists, it will be modified.
PriorityThe Priority field determines the order in which the header rules execute (e.g., a priority of 1 means the headerrule executes first). This can be important if you set headers and then set other headers based on the earlierones.
Common Sources of New Content
NameValidTypes
Description

12/13/2014 Fastly Documentation
https://docs.fastly.com/guides/aio 210/237
req.http.Fastly‐Client‐IPRequest,Cache,Response
The true IP address of the client.
client.ip andclient.identity
Request,Cache,Response
The client IP address. These variables are available, but may not always display thesource IP address. For instance, they may show the edge node IP when shielding isenabled. For the true client IP address use req.http.FastlyClientIP.
server.identity
Request,Cache,Response
A unique identifier for the Fastly server processing the request.
server.region
Request,Cache,Response
The region in which the Fastly server resides.
server.datacenter
Request,Cache,Response
The datacenter in which the Fastly server resides.
req.url
Request,Cache,Response
The URL of the HTTP Request from the client.
req.http.*
Request,Cache,Response
The headers from the HTTP Request, access as: req.http.HeaderName
beresp.status Cache The status returned from the origin server.
beresp.http.* Cache The headers from the origin's HTTP Response, access: beresp.http.HeaderName
resp.status Response The status that is going to be returned to the client.
resp.http.* ResponseThe headers in the HTTP Response to be returned to the client, access:resp.http.HeaderName
geoip.*
Request,Cache,Response
GeoIP values for the client's IP (see our GeoIP article (/guides/vclextensions/geoiprelatedvclfeatures) for more information).
· Cache Control Tutorial (/guides/tutorials/cachecontroltutorial)You are in full control of how Fastly caches your resources. The most preferred way of instructing Fastly is to use backendHTTP headers. The other way is to use Varnish Configuration Language (VCL). If you'd like to use VCL, you will need tocontact our support team (mailto:[email protected]) so that it can be enabled on your account.
Please remember that you can use longer expirations coupled with our purging API to make your site faster and your backendless loaded. Expirations in the following examples are provided as guidance only.
Backend HTTP headers
You can set four different types of HTTP headers which will have different effects on our caches and on web browsers. If youuse more than one type, they are prioritized in the order listed below:
SurrogateControlFormat:
Surrogate‐Control: max‐age=(time in seconds)

12/13/2014 Fastly Documentation
https://docs.fastly.com/guides/aio 211/237
Example:
Surrogate‐Control: max‐age=3600
will cache something on our caches for one hour. This header gets stripped and is only visible to Fastly caches.
CacheControl: smaxageFormat:
Cache‐Control: s‐maxage=(time in seconds)
This is the same as SurrogateControl, except the header is not stripped and will be respected by Fastly caches, as well as anycaches between Fastly and the browser.
CacheControl: maxageFormat:
Cache‐Control: max‐age=(time in seconds)
Will be respected by Fastly caches, any caches between Fastly and the browser.
ExpiresCaches content until it expires as specified. Please read section 14.21 of RFC2616(http://www.w3.org/Protocols/rfc2616/rfc2616sec14.html#sec14.21) for explanation of the format. This header will berespected by Fastly caches, any caches between Fastly and the browser and the browser.
Do not cache
If you don't want certain resources cached, set the header as follows:
Cache‐Control: private
If you just set maxage=0 or an Expires in the past, there is still no guarantee that the content won't be used to satisfy multipleoutstanding requests at the same time. Also, an expired (stale) object might be used in case of errors or while a request to yourbackend for the same object is already in progress.
More Complicated Examples
Say that you want Fastly to cache your resources forever but send headers to browsers so that they don't cache it at all (sothat every browser miss hits Fastly but isn't a cache miss from your service).
The best way to do this would be to send us both the CacheControl header as you want it to go to the browsers, and useSurrogateControl to tell us how long to cache for. So for instance:
Cache‐Control: max‐age=3600Surrogate‐Control: max‐age=2592000
The SurrogateControl header takes priority over CacheControl, and unlike CacheControl it is stripped so the browsers don'tsee it either.
Example backend configsApache Config

12/13/2014 Fastly Documentation
https://docs.fastly.com/guides/aio 212/237
If you are using Apache, the easiest way to add headers is to use the mod_expires module(http://httpd.apache.org/docs/current/mod/mod_expires.html). For example, to cache GIF images for 75 minutes after theimage was last accessed by the cache server, you would add a directive like this under the VirtualHost (or globally). Forexample:
ExpiresActive OnExpiresByType image/gif "access plus 1 hours 15 minutes"
You can also protect whole URL subtrees. For example:
<Location "/css"> ExpiresActive On ExpiresDefault "access plus 1 year"</Location>
<Location "/static/"> ExpiresActive On ExpiresDefault "access plus 1 day"</Location>
NGINX Configuration
To configure NGINX, add the expires directive. For example:
location ~* \.(js|css|png|jpg|jpeg|gif|ico)$ expires 1h;
Alternatively, if you need more flexibility in modifying headers you can try the HttpHeadersMore Module(http://wiki.nginx.org/HttpHeadersMoreModule).
Amazon S3 configuration
By default, S3 doesn't set any Cache Control headers, so you will have to do this filebyfile using the S3Explorer, or in anautomated fashion by using a cloud library like boto. For example, the following Blackpawn blog post on "Setting cacheMetadata on Files in S3 (http://blackpawn.com/blog/settingcachemetadataonfilesins3/)" does a good job of describing howto set Cache Control headers on all your JPG and PNG documents in all your buckets. In their example, they set data cachecontrol headers in order to cache data for 10 days. Please remember that you can combine long cache time with instant purgesto enhance your performance.
Also note that the example below is an example for customers with small to medium size buckets. It iterates over every objectin your buckets, so if you have millions of objects this may not be the right approach. In that case we would recommend usingVarnish Configuration Language (/guides/vclextensions/guidetovcl) (VCL). Please contact us (mailto:[email protected]) forassistance.

12/13/2014 Fastly Documentation
https://docs.fastly.com/guides/aio 213/237
from boto.s3.connection import S3Connection
connection = S3Connection('aws access key', 'aws secret key')
buckets = connection.get_all_buckets()
for bucket in buckets: for key in bucket.list(): print('%s' % key)
if key.name.endswith('.jpg'): contentType = 'image/jpeg' elif key.name.endswith('.png'): contentType = 'image/png' else: continue
key.metadata.update( 'Content‐Type': contentType, 'Cache‐Control': 'max‐age=864000' ) key.copy( key.bucket.name, key.name, key.metadata, preserve_acl=True )
Custom Headers in Programming Languages and FrameworksPHP
More information: http://php.net/manual/en/function.header.php (http://php.net/manual/en/function.header.php)
Example: add this to your PHP code before you send any output to cache certain HTML for an hour
header('Cache‐Control: max‐age=3600');
Django
More information: https://docs.djangoproject.com/en/dev/ref/requestresponse/#settingheaders(https://docs.djangoproject.com/en/dev/ref/requestresponse/#settingheaders)
Example:
response = HttpResponse()response['Cache‐Control'] = 'max‐age=3600'
Sinatra
More information: http://sinatra.rubyforge.org/doc/ (http://sinatra.rubyforge.org/doc/)
Example:
get '/' do headers['Cache‐Control'] = 'max‐age=3600'end
· Conditions Tutorial (/guides/tutorials/conditionstutorial)Welcome to the Conditions Tutorial! Conditions are one of the powerful (and complicated) features Fastly has to offer. Becausethey are so complex we will only touch on the basics and give ideas for how to use conditions in a more advanced setting.
In this tutorial, we assume that you already know how to edit and deploy configurations using the webbased configurationapplication (https://app.fastly.com). If you are not familiar with basic editing using the app please see our Help Guides(/guides/) to learn more before moving forward.
12/13/2014 Fastly Documentation
https://docs.fastly.com/guides/aio 214/237
We also assume you are familiar with basic Cstyle logical expression syntax (e.g., basic logic, operators such as &&,precedence). If you do not have experience with these types of expressions, please refer to a basic programming guide (suchas the Tizag Perl tutorial (http://www.tizag.com/perlT/perlif.php)) that deals with "IF" style expressions in either C or Perl. (Notethese will not be directly applicable to the tutorial as VCL is neither C nor Perl. The syntax, however, is quite similar.)
Overview
In a nutshell, conditions are used to add logic to nearly any basic configuration object in a service. When you assign acondition to an object in your service you are essentially wrapping the object in a VCL ifstatement. If the condition is met, thenthe object is used when processing an enduser request; otherwise, it is not. The configuration parameters for a condition areactually rather simple:
Name A human readable identifier for the conditionApply If The logical expression to execute in VCL to determine the condition resolves as True or FalsePriority A number that is used to determine the order in which multiple conditions execute. Lower numbers execute first.
From this perspective conditions seem easy enough to grasp. But because the "Apply If" parameter is defined in terms ofactual VCL code it is easy to see why it can be hard to know exactly how to create and leverage conditions in yourconfiguration. (We will cover this in more detail in the next section.)
All conditions are saved in your service like any other configuration object but can only be accessed, assigned, and mutatedthrough a special menu in the "Gear Dropdown" to the right of an existing configuration object (e.g., Backends, Headers). Thismeans that when you create a condition you can apply it in multiple places across your configuration. Now that we've coveredsome of the basics, let's dive into some of the details on how one actually writes conditions.
Writing Basic Conditions with VCL
As mentioned above, conditions use actual VCL to define when the object should be applied when processing requests to thecache server. Lets look at a very basic example:
req.url ~ "^/api/"
This example says that the condition passes if the URL of the request begins with the string "/api/" . The "~" operatorperforms a Perl style regular expression match with the "^/api/" regex and returns true if req.url matches. This particularexample is useful when you want to perform special routing in your service. For instance, if your API exists on a differentbackend than your regular website you can use a condition like this to use that API backend whenever a request comes in thatbegins with "/api/" .
Let's take a look at some more examples:
1. client.ip ~ "127.0.0.1"
2. req.http.host ~ "example.com"
3. req.request ~ "POST|PUT" && req.url ~ "^/api/articles/"
Here's what they mean:
1. The client requesting a resource on your service has the IP "127.0.0.1"2. The host header of the incoming request is "example.com"3. The request is a POST or a PUT and the url begins with "/api/articles/"
As you can see, conditions can perform matches or more complicated multipredicate logical expressions to zero in on specificscenarios. In the examples above "client.ip", "req.http.header.host", "req.url", and "req.request" are all "Varnish ConfigurationVariables". There are many variables that you can use to craft your own conditions. The Varnish Cache documentation onvariables (https://www.varnishcache.org/docs/2.1/reference/vcl.html#variables) provides a complete list (note that some of thevariables Varnish allows may not be available or may have no meaning in the context of Fastly).

12/13/2014 Fastly Documentation
https://docs.fastly.com/guides/aio 215/237
All of the examples we have covered so far are conditions that deal with handling requests to the Fastly cache servers. Thereare actually three types of requests that can be applied depending on what type of object they are being assigned to. The nextsection will cover the three types of conditions in detail.
Request, Response, and Cache Conditions
Because conditions can occur in various stages of the caching pipeline, we have categorized them into three types: Request,Response, and Cache conditions. Configuration objects also only apply in various stages of the pipeline and thus can havedifferent types of conditions associated with them. Each stage of the pipeline also has access to a different set of VCLvariables (as described in the VarnishCache.org documentation (https://www.varnishcache.org/docs/2.1/reference/vcl.html#variables)) that a condition can use to determine if an object applies.
Here is a basic list of each type of condition, the objects to which they apply, and the VCL variables that are available:
Request: Conditions that deal with objects while processing a request.Objects: Request Settings, Backends, Headers, and ResponsesVCL Variables: client., server., req.*Example: req.url ~ "^/foo/bar$"
Response: Conditions that deal with object while processing a responseObjects: Headers, SyslogVCL Variables: client., server., req., resp.Example: resp.status ~ "404"
Cache: Conditions that are applied when we receive a response from your backend, just before it is (potentially) cachedObjects: Cache Conditions, Headers, Gzip, ResponsesVCL Variables: client., server., req., beresp.Example: !beresp.cachable && req.url ~ "^/articles/"
These three types of conditions give you nearly full control over your configuration with minimal actual programming. The nextcouple of sections will show you how to add, manipulate, and assign conditions using the Fastly configuration application.
Adding Conditions in the Fastly ApplicationThis portion of the tutorial is a little more involved than most Fastly interface tutorials. We will work from a scenario (inspired byreal life!) and show you how to add each of the three different types of conditions in conjunction to solve the problem.
The Scenario: You want to add a new backend that handles a specific portion of your API requests. Some requests to this APImust cached in a different way than normal requests to your API and you must also set special headers for specific types ofrequests. Let's begin...
First, navigate to the Fastly application via your browser and enter the configuration editor for your service. Add the specialbackend with the following parameters:

12/13/2014 Fastly Documentation
https://docs.fastly.com/guides/aio 216/237
Note how we chose "No" for the "Auto Load Balance" parameter. This tells us that you do not want this backend to be includedin the normal automatic load balancing pool. Next we need to tell the cache how to route requests to this backend. Let'sassume that all of the requests coming to the new special API are prefixed with "/special". This sounds like a perfect job for ourhandydandy Request condition.
To create one, click the gear box next to your newly created backend and select "Conditions". Then enter the followinginformation in a new condition window and click the Create button:
Okay, now that we have requests being properly routed to our new backend we need to make sure it does doesn't go cachingany responses from PUT, POST, or DELETE requests (because they're special for this particular API and send back extra,time dependent, metainformation in each response). In order to do this we first need to create a cache settings object in ourconfiguration:

12/13/2014 Fastly Documentation
https://docs.fastly.com/guides/aio 217/237
With this guy in place let's make sure it is only applied when we are caching responses from the special API. Click the gearbox, click conditions, and add the following as a new Cache condition:
A quick note: the interface is smart enough to know you want a cache condition so it will always pick the right type if there isonly one type of condition available to an object.
Finally, we need to make sure that some requests set a special header because someone in business metrics departmentwants to track the effectiveness of our new API and is using that header to tally and gather information about those kinds ofrequests. For this we simply need to add a new request header rule like so:

12/13/2014 Fastly Documentation
https://docs.fastly.com/guides/aio 218/237
You might be noticing a pattern. Here's the condition we need to use to make sure that this header is only set on that specialtype of request:
Phew, that was a lot of conditions work. But in the end it seems pretty straight forward, right? We had a basic problemdefinition and conditions allowed us to tackle the problem without writing a single line of custom VCL. Before we go ahead anddeploy the app, let's take a look at the generated VCL and see how Fastly converted our objects and conditions into actualVCL, here:
# Condition: Special API Request Prio: 10if( req.url ~ "^/special/" ) set req.backend = F_Special_API_Server;#end condition
and here:
if ( req.request ~ "PUT|POST|DELETE" && beresp.status ~ "200" ) set beresp.ttl = 0s; set beresp.grace = 0s; return(pass);
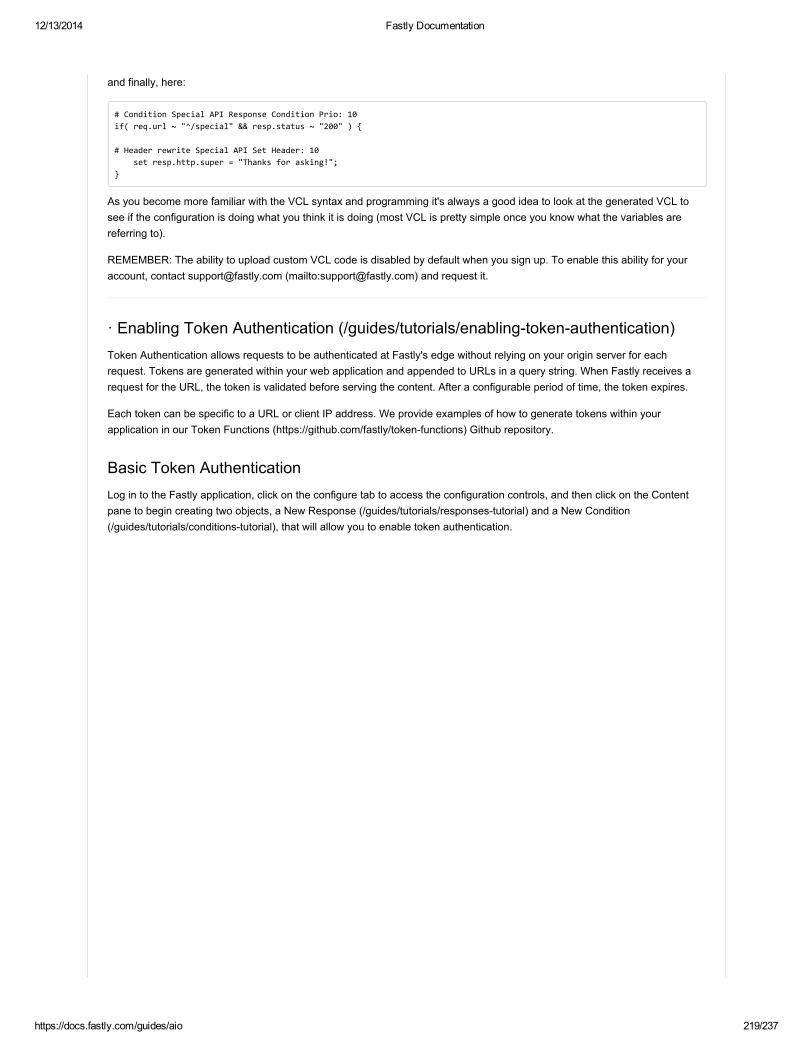
12/13/2014 Fastly Documentation
https://docs.fastly.com/guides/aio 219/237
and finally, here:
# Condition Special API Response Condition Prio: 10if( req.url ~ "^/special" && resp.status ~ "200" )
# Header rewrite Special API Set Header: 10 set resp.http.super = "Thanks for asking!";
As you become more familiar with the VCL syntax and programming it's always a good idea to look at the generated VCL tosee if the configuration is doing what you think it is doing (most VCL is pretty simple once you know what the variables arereferring to).
REMEMBER: The ability to upload custom VCL code is disabled by default when you sign up. To enable this ability for youraccount, contact [email protected] (mailto:[email protected]) and request it.
· Enabling Token Authentication (/guides/tutorials/enablingtokenauthentication)Token Authentication allows requests to be authenticated at Fastly's edge without relying on your origin server for eachrequest. Tokens are generated within your web application and appended to URLs in a query string. When Fastly receives arequest for the URL, the token is validated before serving the content. After a configurable period of time, the token expires.
Each token can be specific to a URL or client IP address. We provide examples of how to generate tokens within yourapplication in our Token Functions (https://github.com/fastly/tokenfunctions) Github repository.
Basic Token AuthenticationLog in to the Fastly application, click on the configure tab to access the configuration controls, and then click on the Contentpane to begin creating two objects, a New Response (/guides/tutorials/responsestutorial) and a New Condition(/guides/tutorials/conditionstutorial), that will allow you to enable token authentication.

12/13/2014 Fastly Documentation
https://docs.fastly.com/guides/aio 220/237
First, create a New Response object:
Fill in the Name field with your chosen name, select the appropriate code (in our example 403 Forbidden) from the Statusmenu, and add the response content to the text editor area below.
Once the response is created, add a request condition by clicking the gear icon next to the response and selecting "RequestConditions".

12/13/2014 Fastly Documentation
https://docs.fastly.com/guides/aio 221/237
Give your Request Condition a name so it can be identified easily in the future, then set a priority if needed.
The Apply If field requires special attention. The full text of the condition shown in the above example reads:
!req.http.Fastly‐FF && req.http.token != digest.time_hmac_sha256("<YourSecretKey>", 60, 0) && req.http.token != digest.time_hmac_sha256("<YourSecretKey>", 60, ‐1)
where digest.time_hmac_sha256() takes the format digest.time_hmac_sha256(<base64 encoded key>, <interval>, <offset>) .
The first two arguments of digest.time_hmac_sha256() should be modified. The first argument represents a secret key. Thesecret key should be a randomly generated string, and must be base64 encoded. The second argument is the length of time inseconds the token will be valid for. Use the same key and interval values when generating tokens in your application.
Next, parse the token from the query string by adding a new Header (/guides/tutorials/addingormodifyingheadersonhttprequestsandresponses) object.

12/13/2014 Fastly Documentation
https://docs.fastly.com/guides/aio 222/237
Give your New Header a name so it can be identified easily in the future, then set the Type and Action to Request and Setrespectively (the defaults).
In the Destination field, type http.token .
In the Source field, type regsub(req.url, ".*\?token=([^&]+)(?:&|$).*", "\1") .
You can leave the Ignore If Set and Priority fields set to their defaults.
Tokens Per URL or IPTokens can be specific to each URL, IP address, or any other information available in VCL, specifically in vcl_recv . To do this,modify the condition on the token authentication response you create (it's the "Token Auth" in the example above).
For IPspecific tokens, modify the key as follows:
digest.base64("Fastly Token Test" client.ip)
The entire condition will look like this:
!req.http.Fastly‐FF && req.http.token != digest.time_hmac_sha256(digest.base64("Fastly Token Test" client.ip), 60, 0) && req.http.token != digest.time_hmac_sha256(digest.base64("Fastly Token Test" client.ip), 60, ‐1)
For URLspecific tokens, modify the key as follows:
digest.base64("Fastly Token Test" req.url)

12/13/2014 Fastly Documentation
https://docs.fastly.com/guides/aio 223/237
Note that in both key examples immediately above, the key is not base64 encoded. Instead, we use a plain text key andappend another string to it prior to base64 encoding in VCL. You can use this technique to vary tokens based on any variableavailable in vcl_recv .
TestingTo test your configuration, append a token generated by your application to a URL in a query string. For example:
http://www.example.com/index.html?token=pbKSCvYeN1fSdG8jLz6cdCYT4GVcagVtweKkBSG8Je0=
If the token is valid, you will receive a normal response. If invalid, you will receive a 403.
· Responses Tutorial (/guides/tutorials/responsestutorial)Welcome to the Fastly Responses tutorial! Responses allow you to create custom HTTP responses that are served directlyfrom the cache without storing the page on a server. Responses are commonly used to serve small static assets that seldomchange and maintenance pages that are served when origins are unavailable.
We assume that you already know how to edit and deploy configurations using the webbased configuration application(https://app.fastly.com/). If you are not familiar with basic editing using the app please see our Help Guides (/guides/) to learnmore before moving forward.
OverviewA Response has three basic attributes:
Name A human readable identifier for the ResponseStatus An HTTP status code to include in the header of the ResponseContent The content to be served when delivering the Response
By setting these three attributes and adding a condition to the Response you can very quickly get one up and running on yourservice. Let's get started!
Creating a ResponseFirst, open up https://app.fastly.com, navigate to the configuration editor for the service for which you want to make theresponse, and click the "Content" tab on the left side navigation menu.

12/13/2014 Fastly Documentation
https://docs.fastly.com/guides/aio 224/237
Scroll to the bottom of the page and find the Responses section, then click the New button to the right of the title for thatsection. The "New Response" window will appear.
Fill in the Name field with your chosen name, select to the appropriate code (in our case 200 OK, the default) from the Statusmenu, and add the response content to the text editor area below.

12/13/2014 Fastly Documentation
https://docs.fastly.com/guides/aio 225/237
Finally click the "Create" button at the bottom of the window. Your newly created response should appear in the list ofResponses. Next, click on the gear menu and select Request Conditions.
If you have not yet added any conditions to your service then the new condition form will appear automatically. If the new formdoes not appear, select New near the top of the popup.
Give your Request Condition a name so that it can be identified easily in the future, then add a Request Condition thatidentifies the path that should be associated with your new Response, and finally set a priority if needed (condition priorities areonly needed in "interesting" cases, and can usually be left at the default "10" for all Response conditions).
Finally, click Create and your Response should be good to go! Make sure there are no errors with your configuration and thendeploy your application. Give Fastly about 1520 seconds to load the new configuration into each of our POPs and then pointyour browser to the URL you used in your condition. The response should show up exactly how you wanted it to.

12/13/2014 Fastly Documentation
https://docs.fastly.com/guides/aio 226/237
• Log Streaming (/guides/logstreaming/)
· Log Streaming: Amazon S3 (/guides/logstreaming/logstreamingamazons3)IMPORTANT: Be sure to review our information on Setting Up Remote Log Streaming (/guides/logstreaming/settingupremotelogstreaming) before following the providerspecific information for Amazon S3 shown below.
Fastly can periodically dump logs to Amazon S3 or an S3compatible service.
The only required parameters are your Amazon Bucket Name, Access Key, and Secret Key. We recommend adding an IAM(Identity and Access Management) user specifically for Fastly with ListBucket, GetObject, and PutObject permissions on thedirectory you want to put the logs into. You can read more about this at Amazon's "Getting Your Access Key ID and SecretAccess Key (http://docs.aws.amazon.com/AWSSimpleQueueService/latest/SQSGettingStartedGuide/AWSCredentials.html)"page.
12/13/2014 Fastly Documentation
https://docs.fastly.com/guides/aio 227/237
If you want to use an S3compatible storage system (such as Dreamhost's DreamObjects(http://www.dreamhost.com/cloud/dreamobjects/)), then you should set the domain name for that service (for example, in thecase of DreamObjects the domain name would be objects.dreamhost.com).
IMPORTANT: If your Amazon Web Services S3 bucket was not created in the US Standard region, you must set the domain tomatch the appropriate endpoint under the table in the S3 section of the Regions and Endpoints(http://docs.aws.amazon.com/general/latest/gr/rande.html#s3_region) AWS documentation page.
By default logs are dumped in your root directory every hour in a file with the format YYYY‐mm‐ddThh:mm:ss‐<server id> but youcan change the frequency and path by changing the information in the Period and Path fields respectively on the S3 Endpointwindow. S3 logs rotate into new files at a timestamp determined by truncating the time you configure in the Period field. Forexample, a period of 86400 rotates at midnight UTC, 3600 at the top of every hour, and so on. We do this so that even acrossservice versions each set of logs will be contain a welldefined period of time; it also makes the timestamps friendlier.
Keep in mind that although we continuously stream logs into S3, their UI and API do not make files available for access untilafter the upload is complete.
· Log Streaming: Cloud Files (/guides/logstreaming/logstreamingcloudfiles)IMPORTANT: Be sure to review our information on Setting Up Remote Log Streaming (/guides/logstreaming/settingupremotelogstreaming) before following the providerspecific information for Rackspace Cloud Files shown below.
Create a Cloud Files User and Container
Start by creating a Cloud Files user with restricted permissions via Rackspace’s cloud console(https://mycloud.rackspace.com/).
1. Navigate to Account > User Management.2. Click Create User and fill in all appropriate details.3. In the Account Access section, select Custom.4. Review the Product Access list and set Role and Access of all except the Files item to No Access5. Set the Files item Role to Admin and Capabilities to View, Create, Edit, Delete. This will allow you to create the files to
store the logs in, but not access any other services.6. Show the API key in the Login details and make a note of it. You'll use the API key later to set up how logging
authenticates with the Cloud Files API.
Once the Cloud Files user is created, set up a Cloud Files container.
1. Navigate to Files and click Create Container.2. Assign the container a meaningful name like Fastly logs ‐ my service .3. Choose what region to keep the files in and make sure the container is private.
Create a Cloud Files Endpoint
Once you have the Cloud Files user and container created, create a new endpoint in the Fastly application.
1. Log in the Fastly application.2. Click the configure tab (the wrench icon) to access the control panel.
1. Select the appropriate service from the Service drop down.2. Click the blue Configure button to the right of the service name.

12/13/2014 Fastly Documentation
https://docs.fastly.com/guides/aio 228/237
3. Click the Logging section.4. Find the Cloud Files area and click New to add a new Cloud Files endpoint. The New Cloud Files Endpoint window
appears.
1. Fill out the fields as follows:In the Name field, type a meaningful name for the new endpoint. For example, Rackspace Cloud Files Logging .In the Container Name field, type the name of the container you just created. For example,Fastly logs ‐ my service .In the User field, type the name of the user created in the Rackspace cloud console above.In the Access Key field, type the API key you noted previously.In the Path field type the path in which the logs will be stored being sure to end the path with a forward slash ( / ).Remember that these are only pseudo paths in Cloud Files for logical separation.In the Period field, type a time in seconds. This determines the time period in seconds over which to buffer logs intoa single file. The default period is 3600 seconds (1 hour).In the Gzip Level field type whole number between 0 and 9 . This number represents the level of gzipping Fastlywill perform on the log files. A gzip level of 0 , the default, represents uncompressed logs that are the fastest todeliver and easiest to read. They also consume the most space in the container. A gzip level of 9 will produce themost compressed log files to save maximum amounts of space, but will be the slowest to be delivered to thecontainer.In the Format String field, set the logging format as noted in the log streaming setup (/guides/logstreaming/settingupremotelogstreaming).
2. Click Create to create the new logging endpoint.

12/13/2014 Fastly Documentation
https://docs.fastly.com/guides/aio 229/237
· Log Streaming: FTP (/guides/logstreaming/logstreamingftp)IMPORTANT: Be sure to review our information on Setting Up Remote Log Streaming (/guides/logstreaming/settingupremotelogstreaming) before following the providerspecific information for FTP shown below.
Fastly supports periodic dumping to both passwordprotected and anonymous FTP.
· Log Streaming: Logentries (/guides/logstreaming/logstreaminglogentries)IMPORTANT: Be sure to review our information on Setting Up Remote Log Streaming (/guides/logstreaming/settingupremotelogstreaming) before following the providerspecific information for Logentries shown below.
Fastly has the ability to log to Logentries either via plain TCP, TCP+TLS, Token, or Token+TLS.

12/13/2014 Fastly Documentation
https://docs.fastly.com/guides/aio 230/237
Remember to change your port number if you switch between TCP or Token and Plain or TLS. You can find your port on yourLogentries config panel (in the example below, it's 15555, which appears at the bottom right of the image, just above thegraph):
Your token appears at the bottom of the Update Log screen when your create or update a log of the type 'Token':

12/13/2014 Fastly Documentation
https://docs.fastly.com/guides/aio 231/237
· Log Streaming: Papertrail (/guides/logstreaming/logstreamingpapertrail)All Papertrail traffic occurs over TCP and TLS (http://en.wikipedia.org/wiki/Transport_Layer_Security). Instructions for settingup remote log streaming via Papertrail are detailed fully in the Papertrail setup and configuration documentation(http://help.papertrailapp.com/kb/hostingservices/fastly/). Be sure to review our information on Setting Up remote LogStreaming (/guides/logstreaming/settingupremotelogstreaming) before following the Papertrail instructions.
DISCLAIMER: This is a service provided by a third party and governed by their terms of service. Fastly accepts noresponsibility for third party services or their availability, performance, security or compliance with law.
· Log Streaming: Splunk Storm (/guides/logstreaming/logstreamingsplunkstorm)IMPORTANT: Be sure to review our information on Setting Up Remote Log Streaming (/guides/logstreaming/settingupremotelogstreaming) before following the providerspecific information for Splunk Storm shown below.
To configure your Splunk Storm endpoint, create a new Network data input method in your Splunk Storm account:
Copy the address and port (in the example below, they are tcp.deadbeef.data.splunkstorm.com and 55555):
and paste them in the Address and Port fields in the New Splunk Storm endpoint window in the Fastly application:

12/13/2014 Fastly Documentation
https://docs.fastly.com/guides/aio 232/237
· Log Streaming: Sumologic (/guides/logstreaming/logstreamingsumologic)IMPORTANT: Be sure to review our information on Setting Up Remote Log Streaming (/guides/logstreaming/settingupremotelogstreaming) before following the providerspecific information for Sumologic shown below.
To set up Sumologic, first add a new Hosted Collector via your Sumologic account:
Then add a new source to it when prompted, making sure to select the HTTP as the source type:
Copy the URL for the HTTP Source Address given to you:

12/13/2014 Fastly Documentation
https://docs.fastly.com/guides/aio 233/237
and paste it into the Collector URL field in the New Sumologic endpoint window in the Fastly application:
· Log Streaming: Syslog (/guides/logstreaming/logstreamingsyslog)IMPORTANT: Be sure to review our information on Setting Up Remote Log Streaming (/guides/logstreaming/settingupremotelogstreaming) before following the providerspecific information for Syslog shown below.
Fastly allows you encrypt all logging traffic to your server using TLS (Transport Layer Security). In addition, if your TLScertificate is not signed by a wellknown certificate authority, you can upload your own certificate.

12/13/2014 Fastly Documentation
https://docs.fastly.com/guides/aio 234/237
Keep in mind that logs are streamed over TCP not UDP.
For Advance Configuration in Syslog, you can add a Token. The token is a string prefix that will be set before the syslog lineon your log server.
· Setting Up Remote Log Streaming (/guides/logstreaming/settingupremotelogstreaming)We've made some big improvements to Fastly's logging infrastructure to deal with increased traffic. In addition, we've addedsupport for TLSencrypted syslogs and have the ability to stream logs to Amazon S3 as well as several other hosted loggingproviders. To set up remote log streaming, follow the steps below.
Setting Things Up
Logging options appear in the configuration settings. Once you've logged into the Fastly application, click the config tab andthen click the blue Configure button in the top middle of the screen while viewing the appropriate service:
Once the configuration settings appear, click the Logging option on the left:

12/13/2014 Fastly Documentation
https://docs.fastly.com/guides/aio 235/237
To create new logging settings, click the New button on the right side of a provider name. The new logging window for thatspecific provider will appear. At the end of this support article, we've included some examples of the specific information you'llneed to enter for each of the supported providers.
Format StringsRegardless of which provider you create logging for, Apache style format strings define what gets logged (e.g.,%h %l %u %t %r %>s %b ). The available formats are:
String Description
h remote IP

12/13/2014 Fastly Documentation
https://docs.fastly.com/guides/aio 236/237
l remote log name
u remote user
t the time
r the first line of the request
>s the status
b the content size of the response
Note: Even though we adopted the default LogFormat in Apache, l and u don't apply in our context. They always appear asthe hardcoded value "‐" .
Examples of Other Useful Things You Can LogOther useful things you can log include:
resp.http.X‐Cache add HIT/MISS loggingreq.http.LiterallyAnyHeaderYouWant any request header from the clientreq.http.Accept‐Language logs users' Accept Language
or any Varnish variable (https://www.varnishcache.org/docs/2.1/reference/vcl.html#variables).
Key Things to Remember About LogsKeep in mind that logs are streamed over TCP not UDP. Additionally, if you are using custom VCL be sure to include the#FASTLY deliver (/guides/vclfaqs/howdoimixandmatchfastlyvclwithcustomvcl) macro in your vcl_deliver handler.
Once you've deployed your changes you should start seeing logs on your log server within a few minutes. There is anapproximate twominute delay in logs actually sending data, as well as a twominute delay from an event happening to itgetting logged.
By default, logs are dumped in your root directory every hour in a file using the naming format YYYY‐mm‐ddThh:mm:ss‐<server id>(but you are able to change the frequency and path). There are four log files created each hour. Fastly has four different logserver aggregation points. Each will send logs to you and none of the four files will contain duplicate entries.
Note: If your syslog traffic exceeds your normal service traffic, please contact [email protected] (mailto:[email protected]).
FirewallingOur logs can be sent from two locations, and since there's no security in plain syslog, it is best to firewall your syslog serverand only allow TCP traffic through on your configured port from the following two netblocks:
199.27.72.0/24199.27.77.0/24
Additional Information for Specific Logging Provider MethodsSyslog (/guides/logstreaming/logstreamingsyslog)Amazon S3 (/guides/logstreaming/logstreamingamazons3)Logentries (/guides/logstreaming/logstreaminglogentries)Papertrail (/guides/logstreaming/logstreamingpapertrail)Splunk Storm (/guides/logstreaming/logstreamingsplunkstorm)Sumologic (/guides/logstreaming/logstreamingsumologic)FTP (/guides/logstreaming/logstreamingftp)

12/13/2014 Fastly Documentation
https://docs.fastly.com/guides/aio 237/237
SITEMAP (/SITEMAP) ACCEPTABLE USE (HTTP://WWW.FASTLY.COM/ACCEPTABLEUSE/) TERMS (HTTP://WWW.FASTLY.COM/TERMS/)
PRIVACY (HTTP://WWW.FASTLY.COM/PRIVACY/) CONTACT (HTTP://WWW.FASTLY.COM/CONTACTUS/) SUPPORT (HTTP://WWW.FASTLY.COM/SUPPORT/)
Copyright 2014 Fastly.com, All Rights Reserved.