
Microservices Reference Architecture - Fastly
58
-
Upload
khangminh22 -
Category
Documents
-
view
1 -
download
0
Transcript of Microservices Reference Architecture - Fastly

by Chris Stetson
© NGINX, Inc. 2017
MICROSERVICESReference Architecture

i
Table of Contents
Introduction ii
1 NGINX Microservices Reference Architecture Overview 1
2 The Proxy Model 7
3 The Router Mesh Model 16
4 The Fabric Model 20
5 Adapting the Twelve‑Factor App for Microservices 31
6 Implementing the Circuit Breaker Pattern with NGINX Plus 36
7 Building a Web Frontend for Microservices 46
ii
IntroductionThe move to microservices is a seismic shift in web application development and delivery Because we believe moving to microservices is crucial to the success of our customers, we at NGINX have launched a dedicated program to develop NGINX software features and development practices in support of microservices
We also recognize that there are many different approaches to implementing microservices, many of them novel and specific to the needs of individual development teams We think there is a need for models to make it easier for companies to develop and deliver their own microservices‑based applications
With all this in mind, we have developed the NGINX Microservices Reference Architecture (MRA) – a set of models that you can use to create your own microservices applications
The MRA is made up of two components:
• A detailed description of each of the three models• Downloadable code that implements our sample photosharing
program, Ingenious
The only difference among the three models is the configNGINX Plus configuration code for each model. This ebook describes each of the models; detailed descriptions, configuration code, and code for the Ingenious sample program will be made available later this year
We have three goals in building the MRA:
• To provide customers and the industry with ready‑to ‑use blueprints for building microservices‑based systems, speeding – and improving – development
• To create a platform for testing new features in NGINX and NGINX Plus, whether developed internally or externally, and whether distributed in the product core or as dynamic modules
• To help us understand partner systems and components so we can gain a holistic perspective on the microservices ecosystem

iii
The MRA is also an important part of Professional Services offerings for NGINX customers In the MRA, we use features common to both the open source NGINX software and NGINX Plus where possible, and NGINX Plus‑specific features where needed NGINX Plus dependencies are stronger in the more complex models, as described below
We anticipate that many users of the MRA will benefit from some or all of the aspects of NGINX Plus, all of which are available with an NGINX Plus subscription: its expanded and enhanced feature set,NGINX Plus access to NGINX technical support, and access to NGINX Professional Services
This ebook’s chapters describe the MRA in depth:
1 NGINX Microservices Reference Architecture Overview 2 The Proxy Model 3 The Router Mesh Model 4 The Fabric Model 5 Adapting the Twelve‑Factor App for Microservices 6 Implementing the Circuit Breaker Pattern with NGINX Plus 7 Building a Web Frontend for Microservices
The NGINX MRA is an exciting development for us, and for the customers and partners we’ve shared it with to date Please give us your feedback
You may also wish to check out these other NGINX resources about microservices:
• A very useful and popular series of blog posts on the NGINX site by Chris Richardson, describing most aspects of microservices application design
• The Chris Richardson articles collected into a free ebook, including additional tips on implementing microservices with NGINX and NGINX Plus
• Other microservices blog posts on the NGINX website• Microservices webinars on the NGINX website
In the meantime, try out the MRA with NGINX Plus for yourself – start your free 30‑day trial today, or contact us at NGINX for a demo

1Microservices Reference Architecture Ch. 1 – NGINX MRA Overview
NGINX Microservices Reference Architecture Overview1
The NGINX Microservices Reference Architecture (MRA) is a set of three models and source code plus a sample app called Ingenious The models are progressively more complex and useful for larger, more demanding app needs
The models differ mainly in terms of their server configuration and configuration code; the source code is nearly the same from one model to another. The Ingenious app is composed of a set of services that you can use directly, modify, or use as reference points for your own services
The services in the Reference Architecture are designed to be lightweight, ephemeral, and stateless We have designed the MRA to comply with the principles of the Twelve‑Factor App, as described in Chapter 5
The MRA uses industry‑standard components like Docker containers, a wide range of languages – Java, PHP, Python, Node js/JavaScript, and Ruby – and NGINX‑based networking
One of the biggest changes in application design and architecture when moving to microservices is using the network to communicate between functional components of the application In monolithic apps, application components communicate in memory In a microservices app, that communication happens over the network, so network design and implementation become critically important
To reflect this, the MRA has been implemented using three different networking models, all of which use NGINX or NGINX Plus All three models use the circuit breaker pattern – see Chapter 6 – and can be used with our microservices‑based frontend, which is described in Chapter 7

2Microservices Reference Architecture Ch. 1 – NGINX MRA Overview
The models range from relatively simple to more complex and feature‑rich:
• Proxy Model – A simple networking model suitable for implementing NGINX Plus as a controller or API gateway for a microservices application
• Router Mesh Model – A more robust approach to networking, with a load balancer on each host and management of the connections between systems This model is similar to the architecture of Deis 1 0
• Fabric Model – The crown jewel of the MRA The Fabric Model utilizes NGINX Plus in each container, acting as a forward and reverse proxy It works well for high‑load systems and supports SSL/TLS at all levels, with NGINX Plus providing service discovery, reduced latency, and persistent SSL/TLS connections
The three models form a progression As you begin implementing a new microservices application or converting an existing monolithic app to microservices, the Proxy Model may well be sufficient. You might then move to the Router Mesh Model for increased power and control; it covers the needs of a great many microservices apps For the largest apps, and those that require SSL/TLS for interservice communication, use the Fabric Model
Our intention is that you use these models as a starting point for your own microservices implementations, and we welcome feedback from you as to how to improve the MRA
A brief description of each model follows; we suggest you read all the descriptions to start getting an idea of how you might best use one or more of the models
Subsequent chapters describe each of the models in detail, one per chapter
The Proxy Model in Brief
The Proxy Model is a relatively simple networking model It’s an excellent starting point for an initial microservices application, or as a target model in converting a moderately complex monolithic legacy app
In the Proxy Model, NGINX or NGINX Plus acts as an ingress controller, routing requests to microservices NGINX Plus can use dynamic DNS for service discovery as new services are created The Proxy Model is also suitable for use as a template when using NGINX as an API gateway
If interservice communication is needed – and it is, by most applications of any level of complexity – the service registry provides the mechanism within the cluster (See the in‑depth discussion of interservice communication mechanisms on our blog ) Docker Cloud uses this approach by default: to connect to another service, a service queries the DNS server and gets an IP address to send a request to

3Microservices Reference Architecture Ch. 1 – NGINX MRA Overview
Generally, the Proxy Model is workable for simple to moderately complex applications. It’s not the most efficient approach or model for load balancing, especially at scale; use the Router Mesh Model or Fabric Model if you have heavy load‑balancing requirements (“Scale” can refer to a large number of microservices as well as high traffic volumes.)
For an in‑depth exploration of this model, see The Proxy Model
Stepping Up to the Router Mesh Model
The Router Mesh Model is moderately complex and is a good match for robust new application designs It’s also suitable for converting more complex, monolithic legacy apps to microservices, where the legacy app does not need all the capabilities of the Fabric Model
As shown in Figure 1‑2, the Router Mesh Model takes a more robust approach to networking than the Proxy Model by running a load balancer on each host and actively managing connections among microservices. The key benefit of the Router Mesh Model is more efficient and robust load balancing among services. If you use NGINX Plus, you can implement the circuit breaker pattern (discussed in Chapter 6), including active health checks, to monitor the individual service instances and to throttle traffic gracefully when they are taken down.
Pages SVC 5 SVC 6
Pages SVC 3 SVC 4
Pages SVC 1 SVC 2
Figure 1-1. The Proxy Model features a single instance of NGINX Plus, used as an ingress controller fo microservices requests

4Microservices Reference Architecture Ch. 1 – NGINX MRA Overview
For an in‑depth exploration of this model, see The Router Mesh Model
The Fabric Model, with Optional SSL/TLS
The Fabric Model brings some of the most exciting possibilities of microservices to life, including flexibility in service discovery and load balancing, high performance, and ubiquitous SSL/TLS down to the level of individual microservices The Fabric Model is suitable for all secure applications and scalable to very large applications
In the Fabric Model, NGINX Plus is deployed within each of the containers that host microservice instances NGINX Plus becomes the forward and reverse proxy for all HTTP traffic going in and out of the containers. The applications talk to a localhost location for all service connections and rely on NGINX Plus to do service discovery, load balancing, and health checking
In the implementation of the Fabric Model for the sample photosharing app, Ingenious, NGINX Plus queries ZooKeeper through the Mesos DNS for all instances of the services that the app needs to connect to We use the valid parameter to the resolver directive to control how often NGINX Plus queries DNS for changes to the set of instances With valid parameter set to 1, for example, NGINX Plus updates its routing information every second
Pages SVC 4 SVC 5
Pages SVC 3
Pages SVC 1 SVC 2
Figure 1-2. The Router Mesh Model features NGINX Plus as a reverse proxy server and a second NGINX Plus instance as an ingress controller

5Microservices Reference Architecture Ch. 1 – NGINX MRA Overview
Because of the powerful HTTP processing in NGINX Plus, we can use keepalive connections to maintain stateful connections to microservices, reducing latency and improving performance This is an especially valuable feature when using SSL/TLS to secure traffic between the microservices.
Finally, we use NGINX Plus’ active health checks to manage traffic to healthy instances and, essentially, build in the circuit breaker pattern (described in Chapter 6) for free
For an in‑depth exploration of this model, see The Fabric Model
Pages
UploaderMicroservice
SVC 5 SVC 6
Pages SVC 3 SVC 4
Pages SVC 1 SVC 2
Figure 1-3. The Fabric Model features NGINX Plus as a reverse proxy server and an additional NGINX Plus instance handling service discovery, load balancing, and interprocess communication for each service instance

6Microservices Reference Architecture Ch. 1 – NGINX MRA Overview
Ingenious: A Demo App for the MRA
The NGINX MRA includes a sample application as a demo: the Ingenious photosharing app We will provide a separate version of Ingenious implemented in each of the three models – Proxy, Router Mesh, and Fabric The Ingenious demo app will be released to the public later this year
Ingenious is a simplified version of a photo storage and sharing application, à la Flickr or Shutterfly. We chose a photosharing application for a few reasons:
• It’s easy for both users and developers to grasp what it does • There are multiple data dimensions to manage • It’s easy to incorporate beautiful design in the app
Figure 1-4. The Ingenious app is a collection of services that can easily be configured to run in any of the three models of the MRA - the Proxy Model, Router Mesh Model, or Fabric Model

7Microservices Reference Architecture Ch. 2 – The Proxy Model
The Proxy Model2
As the name implies, the Proxy Model of the NGINX Microservices Reference Architecture (MRA) places NGINX Plus as a reverse proxy server in front of servers running the services that make up a microservices‑based application NGINX Plus provides the central point of access to the services
The Proxy Model is suitable for several uses cases, including:
• Proxying relatively simple applications• Improving the performance of a monolithic application before converting it
to microservices• As a starting point before moving to other, more complex networking models
Within the Proxy Model, the NGINX Plus reverse proxy server can also act as an API gateway
Figure 2‑1 shows how, in the Proxy Model, NGINX Plus runs as a reverse proxy server and interacts with several services, including multiple instances of the Pages service – the web microservice that we describe in Chapter 7

8Microservices Reference Architecture Ch. 2 – The Proxy Model
The other two models in the MRA, the Router Mesh Model and the Fabric Model, build on the Proxy Model to deliver significantly greater functionality (see Chapter 3 and Chapter 4) However, once you understand the Proxy Model, the other models are relatively easy to grasp
The overall structure and features of the Proxy Model are only partly specific to microservices applications; many of them are simply best practices when deploying NGINX Plus as a reverse proxy server and load balancer
You can begin implementing the Proxy Model while your application is still a monolith Simply position NGINX Plus as a reverse proxy in front of your application server and implement the Proxy Model features described below You are then in a good position to convert your application to microservices
The Proxy Model is agnostic as to the mechanism you implement for communication between microservice instances running on the application servers behind NGINX Plus Communication between the microservices is handled through a mechanism of your choice, such as DNS round‑robin requests from one service to another For an in‑depth exploration of the major approaches to interprocess communication in a microservices architecture, see Chapter 3 in our ebook, Microsevices: From Design to Deployment
Pages SVC 5 SVC 6
Pages SVC 3 SVC 4
Pages SVC 1 SVC 2
Figure 2-1. In the Proxy Model, NGINX Plus serves as a reverse proxy server and central access point to services

9Microservices Reference Architecture Ch. 2 – The Proxy Model
Proxy Model Capabilities
The capabilities of the Proxy Model fall into three categories The features in the first group optimize performance:
• Caching• Load balancing• Low‑latency connectivity• High availability
The features in the second group improve security and make application management easier:
• Rate limiting• SSL/TLS termination• HTTP/2 support• Health checks
The features in the final group are specific to microservices:
• Central communications point for services• Dynamic service discovery• API gateway capability
We discuss each group of features in more detail below You can use the information in this chapter to start moving your applications to the Proxy Model now Making these changes will provide your app with immediate benefits in performance, reliability, security, and scalability.
Performance Optimization FeaturesImplementing the features described here – caching, load balancing, high‑speed connectivity, and high availability – optimizes the performance of your applications
Caching Static and Dynamic Files
Caching is a highly useful feature of NGINX Plus and an important feature in the Proxy Model. Both static file caching and microcaching – that is, caching application‑generated content for brief periods – speed content delivery to users and reduce load on the application:
• By caching static files at the proxy server, NGINX Plus can prevent many requests from reaching application servers. This simplifies design and operation of the microservices application

10Microservices Reference Architecture Ch. 2 – The Proxy Model
• You can also microcache dynamic, application‑generated files, whether from a monolithic app or from a service in a microservices app For many read operations, the response from the service is going to be identical to the data it returned for the same request made a few moments earlier In such cases, calling back through the service graph and getting fresh data for every request is a waste of resources Microcaching saves work at the service level while still delivering fresh content
NGINX Plus has a robust caching system to temporarily store most any type of data or content NGINX Plus also has a cache purge API that allows your application or operations tooling – support code that helps manage apps, clear caches, and so on – to dynamically clear the cache when data is refreshed
Robust Load Balancing to Services
Microservices applications require load balancing to an even greater degree than monolithic applications The architecture of a microservices application relies on multiple, small services working in concert to provide application functionality This inherently requires robust, intelligent load balancing, especially where external clients access the service APIs directly
NGINX Plus, as the proxy gateway to the application, can use a variety of mechanisms for load balancing, one of its most powerful features With the dynamic service discovery features of NGINX Plus, new instances of services can be added to the mix and made available for load balancing as soon as they spin up
Low‑Latency Connectivity
As you move to microservices, one of the major changes in application behavior concerns how application components communicate with each other In a monolithic app, the objects or functions communicate in memory and share data through pointers or object references
In a microservices app, functional components (the services) communicate over the network, typically using HTTP So the network is a critical bottleneck in a microservices application, as it is inherently slower than in‑memory communication The external connection to the system, whether from a client app, a web browser, or an external server, has the highest latency of any part of the application – and therefore also creates the greatest need to reduce latency NGINX Plus provides features like HTTP/2 support for minimizing connection start‑up times, and HTTP/HTTPS keepalive functionality for connecting to external clients as well as to peer microservices

11Microservices Reference Architecture Ch. 2 – The Proxy Model
High Availability
In the Proxy Model network configuration, there are a variety of ways to set up NGINX Plus in a high availability (HA) configuration:
• In on‑premises environments, you can use our keepalived‑based solution to set up the NGINX Plus instances in an active‑passive HA pair This approach works well and provides fast failure recovery with low‑level hardware integration
• On Google Compute Engine (GCE), you can set up all‑active HA as described in our deployment guide, All-Active NGINX Plus Load Balancing on Google Compute Engine
• For Amazon Web Services (AWS), we have been working on a Lambda‑based solution to provide HA functionality This system provides the same type of high availability as for on‑premises servers by using API‑transferable IP addresses, similar to those in AWS’s Elastic IP service In combination with the autoscaling features of a Platform as a Service (PaaS) like RedHat’s OpenShift, the result is a resilient HA configuration with autorecovery features that provide defense in depth against failure
Note: With a robust HA configuration, and the powerful load‑balancing capabilities of NGINX Plus in a cloud environment, you may not need a cloud‑specific load balancer such as Amazon Elastic Load Balancer (ELB)
Security and Management FeaturesSecurity and management features include rate limiting, SSL/TLS and HTTP/2 termination, and health checks
Rate Limiting
A feature that is useful for managing traffic into the microservices application in the Proxy Model is rate (or request) limiting Microservices applications are subject to the same attacks and request problems as any Internet‑accessible application However, unlike a monolithic app, microservices applications have no inherent, single governor to detect attacks or other problematic requests In the Proxy Model, NGINX Plus acts as the single point of entry to the microservices application, and so can evaluate all requests to determine if there are problems like a DDoS attack If a DDoS attack is occurring, NGINX Plus has a variety of techniques for restricting or slowing request traffic

12Microservices Reference Architecture Ch. 2 – The Proxy Model
Server
HTTP/2
Client
HTTP Response 1
HTTP Response 2
HTTP Response 3Single TCP Connection
HTTP/2 Inside: multiplexing
SSL/TLS Termination
Most applications need to support SSL/TLS for any sort of authenticated or secure interaction, and many major sites have switched to using HTTPS exclusively (for example, Google and Facebook) Having NGINX Plus as the proxy gateway to the microservices application can also provide SSL/TLS termination NGINX Plus has many advanced SSL/TLS features, including SNI, modern cipher support, and server‑definable SSL/TLS connection policies.
HTTP/2
HTTP/2 is a new technology, growing in use across the Web HTTP/2 is designed to reduce network latency and accelerate the transfer of data by multiplexing data requests across a single, established, persistent connection NGINX Plus provides robust HTTP/2 support, so your microservices application can allow clients to take advantage of the biggest technology advance in HTTP in more than a decade Figure 2‑2 shows how HTTP/2 multiplexes responses to client requests onto a single TCP connection
Health Checks
Active application health checks are another useful feature that NGINX Plus provides in the Proxy Model Microservices applications, like all applications, suffer errors and problems that cause them to slow down, fail, or just act strangely. It is therefore useful for the service to surface its “health” status through a URL with various messages, such as “memory usage has exceeded a given threshold” or “the system is unable to connect to the database” NGINX Plus can evaluate a variety of messages and respond by stopping traffic to a troubled instance and rerouting traffic to other instances until the troubled one recovers.
Figure 2-2. HTTP responses multiplexed onto a single TCP connection by HTTP/2

13Microservices Reference Architecture Ch. 2 – The Proxy Model
Microservices‑Specific FeaturesMicroservices‑specific features of NGINX Plus in the Proxy Model derive from its position as the central communications point for services, its ability to do dynamic service discovery, and (optionally) its role as an API gateway
Central Communications Point for Services
Clients wishing to use a microservices application need one central point for communicating with the application Developers and operations people need to implement as much functionality as possible without having to write and manage additional services for static file caching, microcaching, load balancing, rate limiting, and other functions The Proxy Model uses the NGINX Plus proxy server as the obvious and most effective place to handle communication and pan‑microservice functionality, potentially including service discovery (see the next section) and management of session‑specific data
Dynamic Service Discovery
One of the most unique and defining qualities of a microservices application is that it is made up of many independent components Each service is designed to scale dynamically and live ephemerally in the application This means that NGINX Plus needs to track and route traffic to service instances as they come up and remove them from the load‑balancing pool as they are taken out of service
NGINX Plus has a number of features that are specifically designed to support service discovery – the most important of which is the DNS resolver feature that queries the service registry, whether provided by Consul, etcd, Kubernetes, or ZooKeeper, to get service instance information and provide routes back to the services NGINX Plus R9 introduced SRV record support, so a service instance can live on any IP address/port number combination and NGINX Plus can route back to it dynamically
Because the NGINX Plus DNS resolver is asynchronous, it can scan the service registry and add new service endpoints, or take them out of the pool, without blocking the request processing that is NGINX Plus’ main job
The DNS resolver is also configurable, so it does not need to rely on the DNS entry’s time‑to‑live (TTL) records to know when to refresh the IP address – in fact, relying on TTL in a microservices application can be disastrous Instead, the valid parameter to the resolver directive allows you to set the frequency at which the resolver scans the service registry
Figure 2‑3 shows service discovery using a shared service registry, as described in our post on service discovery

14Microservices Reference Architecture Ch. 2 – The Proxy Model
API Gateway Capability
We favor a web frontend or an API gateway for client communication with the microservices application The API gateway receives requests from clients, performs any needed protocol translation (as with SSL/TLS), and routes the requests to the appropriate service – using the results of service discovery, as mentioned above
You can extend the capabilities of an API gateway using a tool such as the Lua module for NGINX Plus You can, for instance, have code at the API gateway aggregate the results from requests to several microservices into a single response to the client
Figure 2-3. Service discovery using a shared service registry
SERVICEREGISTRY
SERVICEINSTANCE A
SERVICEINSTANCE A
SERVICEINSTANCE B
SERVICEINSTANCE C
Registry-awareHTTPClient
RESTAPI
RegistryClient
RESTAPI
RegistryClient
RESTAPI
RegistryClient
10.4.3.1:8756
10.4.3.99:4545
10.4.3.20:333

15Microservices Reference Architecture Ch. 2 – The Proxy Model
The Proxy Model also takes advantage of the fact that the API gateway is a logical place to handle capabilities that are not specific to microservices, such as caching, load balancing, and the others described in this chapter
Conclusion
The Proxy Model networking architecture for microservices provides many useful features and a high degree of functionality NGINX Plus, acting as the reverse proxy server, can provide clear benefits to the microservices application by making the system more robust, resilient, and dynamic NGINX Plus makes it easy to manage traffic, load balance requests, and dynamically respond to changes in the backend microservices application

16Microservices Reference Architecture Ch. 3 – The Router Mesh Model
The Router Mesh Model3
In terms of sophistication and comprehensiveness, the Router Mesh Model is the middle of the three models in the NGINX Microservices Reference Architecture (MRA) Each of the models, starting with the Proxy Model, uses an NGINX Plus high‑availability (HA) server cluster in the reverse proxy position, “in front of” other servers The Router Mesh model adds a second server cluster as a router mesh hub, handling interservice communication The Fabric Model instead adds an NGINX Plus server instance for each microservice instance, handling interservice communication from inside the same container as each service instance
Figure 3‑1 shows how NGINX Plus performs two roles in the Router Mesh Model One NGINX Plus server cluster acts as a frontend reverse proxy; another NGINX Plus server cluster functions as a routing hub. This configuration allows for optimal request distribution and purpose‑driven separation of concerns
Pages SVC 4 SVC 5
Pages SVC 3
Pages SVC 1 SVC 2
Figure 3-1. In the Router Mesh Model, NGINX Plus runs as a reverse proxy server and as a router mesh hub

17Microservices Reference Architecture Ch. 3 – The Router Mesh Model
Reverse Proxy and Load Balancing Server Capabilities
In the Router Mesh Model, the NGINX Plus proxy server cluster manages incoming traffic, but sends requests to the router mesh server cluster rather than directly to the service instances
The reverse proxy server cluster handles performance‑related functions such as caching, low‑latency connectivity, and high availability It also handles security and application management tasks such as rate limiting, running a WAF, SSL/TLS termination, and HTTP/2 support
While the first server cluster provides reverse proxy services, the second serves as a router mesh hub, providing:
• A central communications point for services• Dynamic service discovery• Load balancing• Interservice caching• Health checks and the circuit breaker pattern
The features above are described in The Proxy Model For additional details, see our blog posts on dynamic service discovery, API gateways, and health checks
Implementing the Router Mesh Model
Implementing a microservices architecture using the Router Mesh Model is a four‑step process:
1 Set up a proxy server cluster 2 Deploy a second server cluster as a router mesh hub with the interface code
for your orchestration tool 3 Indicate which services to load balance 4 Tell the services the new endpoints of the services they use
For the first step, set up a proxy server cluster in the same way as for the Proxy Model For the subsequent steps, begin by deploying a container to be used for the router mesh microservices hub This container holds the NGINX Plus instance and the appropriate agent for the service registry and orchestration tools you are using
Once the container is deployed and scaled, you indicate which services are to be load balanced by adding this environment variable to the definition for each one in the container management system’s service definition file:
LB_SERVICE=true

18Microservices Reference Architecture Ch. 3 – The Router Mesh Model
The router hub monitors the service registry and the stream of events that are emitted as new services and instances are created, modified, and destroyed.
In order to integrate successfully, the router mesh hub needs adapters to work with the different registry and orchestration tools available on the market. Currently, we have the Router Mesh Model working with Docker Swarm‑based tools, Mesos‑based systems, and Kubernetes‑based tools
The NGINX Plus servers in the router mesh hub provide load balancing for the pool of service instances To send requests to the service instances, you route requests to the NGINX Plus servers in the router mesh hub and use the service name, either as part of the URI path or as a service name
For example, the URL for the Pages web frontend depicted in in Figure 3‑1 looks something like this:
http://router‑mesh.internal.mra.com/pages/index.php
With Kubernetes as of this writing, and soon with Mesos DC/OS systems, the Router Mesh Model implements the routes as servers rather than locations In this type of implementation, the route above is accessible as:
http://pages.router‑mesh.internal.mra.com/index.php
This allows some types of payloads with internal references (for example, HTML) to make requests without having to modify the links For most JSON payloads, the original, path‑based format works well
One of the advantages of using NGINX Plus in the Router Mesh Model is that the system can implement the circuit breaker pattern for all services that need it (see Chapter 6) An active health check is automatically created to monitor user‑configurable URIs, so that service instances can be queried for their health status. NGINX Plus diverts traffic away from unhealthy service instances to give them a chance to recover, or to be recycled if they cannot recover If all service instances are down or unavailable, NGINX Plus can provide continuity of service by delivering cached data

19Microservices Reference Architecture Ch. 3 – The Router Mesh Model
Conclusion
The Router Mesh Model networking architecture for microservices is the middle option of the NGINX MRA models In contrast to the Proxy Model, which puts all relevant functions on one NGINX Plus cluster, the Router Mesh model uses two NGINX Plus server clusters, configured for different roles. One server cluster acts as a proxy server and the other as a router mesh hub for your microservices
Splitting different types of functions between two different server clusters provides speed, control, and opportunities to optimize for security In the second server cluster, service discovery (in collaboration with a service registry tool) and load balancing are fast, capable, and configurable. Health checks for all service instances make the system as a whole faster, more stable, and more resilient

20Microservices Reference Architecture Ch. 4 – The Fabric Model
The Fabric Model4
The Fabric Model is the most sophisticated of the three models found in the NGINX Microservices Reference Architecture (MRA) It’s internally secure, fast, efficient, and resilient.
Like the Proxy Model and Router Mesh Model, the Fabric Model places NGINX Plus as a reverse proxy server in front of application servers, bringing many benefits. But whereas, in the Router Mesh Model, a second NGINX Plus instance acts as a central communications point for other service instances, in the Fabric Model there is a dedicated NGINX Plus server instance in each microservice container As a result, SSL/TLS security can be implemented for all connections at the microservice level, with high performance
Using many NGINX Plus instances has one crucial benefit: you can dynamically create SSL/TLS connections between microservice instances – connections that are stable, persistent, and therefore fast An initial SSL/TLS handshake establishes a connection that the microservices application can reuse, without further overhead, for scores, hundreds, or thousands of interservice requests
Figure 4‑1 shows how, in the Fabric Model, NGINX Plus runs on the reverse proxy server and also each service instance, allowing fast, secure, and smart interservice communication The Pages service, which has multiple instances in the figure, is a web‑frontend microservice used in the MRA, described in Chapter 7
The Fabric Model turns the usual view of application development and delivery on its head Because NGINX Plus is on both ends of every connection, its capabilities become properties of the network that the app is running on, rather than capabilities of specific servers or microservices. NGINX Plus becomes the medium for bringing the network, the “fabric,” to life, making it fast, secure, smart, and extensible

21Microservices Reference Architecture Ch. 4 – The Fabric Model
Pages
UploaderMicroservice
SVC 5 SVC 6
Pages SVC 3 SVC 4
Pages SVC 1 SVC 2
Figure 4-1. In the Fabric Model, NGINX Plus runs as a reverse proxy server and in every service instance
The Fabric Model is suitable for several use cases, which include:
• Government and military apps – For government apps, security is crucial, or even required by law The need for security in military computation and communication is obvious – as is the need for speed
• Health and finance apps – Regulatory and user requirements mandate a combination of security and speed for financial and health apps, with billions of dollars in financial and reputational value at stake.
• Ecommerce apps – User trust is a huge issue for ecommerce and speed is a key competitive differentiator. So combining speed and security is crucial.
As an increasing number of apps use SSL/TLS to protect client communication, it makes sense for backend – service‑to‑service – communication to be secured as well
Why the Fabric Model?
The use of microservices for larger apps raises a number of questions, as described in our ebook, Microservices: From Design to Deployment
There are four specific problems that affect larger apps. The Fabric Model addresses these problems – and, we believe, largely resolves them These issues are:
• Secure, fast communication – Monolithic apps use in‑memory communication between processes; microservices communicate over the network. The move to network communication raises issues of speed and security The Fabric

22Microservices Reference Architecture Ch. 4 – The Fabric Model
Model makes communication secure by using SSL/TLS connections for all requests; it makes them fast by using NGINX Plus to make the connections persistent – minimizing the most resource‑intensive part of the process, the SSL/TLS handshake
• Service discovery – In a monolithic app, functional components are connected to each other by the application engine A microservices environment is dynamic, so services need to find each other before communicating In the Fabric Model, each service instance does its own service discovery, with NGINX Plus using its built‑in DNS resolver to query the service registry
• Load balancing – User requests need to be distributed efficiently across microservice instances In the Fabric Model, NGINX Plus provides a variety of load‑balancing schemes to match the needs of the services on both ends of the connection
• Resilience – A badly behaving service instance can greatly impact the performance and stability of an app In the Fabric Model, NGINX Plus can run health checks on every microservice, implementing the powerful circuit breaker pattern as an inherent property of the network environment the app runs in
The Fabric Model is designed to work with external systems for container management and service registration This can be provided by a container management framework such as Docker Swarm/Docker Cloud, Deis, or Kubernetes; specific service registry tools, such as Consul, etcd, or ZooKeeper; custom code; or a combination.
Through the use of NGINX Plus within each microservice instance, in collaboration with a container management framework or custom code, all aspects of these capabilities – interservice communication, service discovery, load balancing, and the app’s inherent security and resilience – are fully configurable and amenable to progressive improvement
Fabric Model Capabilities
This section describes the specific, additional capabilities of the Fabric Model in greater depth Properties that derive from the use of NGINX Plus “in front of” application servers are also part of the other two models, and are described in The Proxy Model

23Microservices Reference Architecture Ch. 4 – The Fabric Model
The “Normal” Process
The Fabric Model is an improvement on the approach to service discovery, load balancing, and interprocess communication that is typically used in a microservices application To understand the advantages of the Fabric Model, it’s valuable to first take a look at how a “normal” microservices app carries out these functions
Figure 4‑2 shows a microservices app with three service instances – one instance of an Investment Manager service and two instances of a User Manager service
Figure 4-2. In the “normal” process, a new SSL handshake is required for every interservice communication
PHPService
USERMANAGER
INSTANCE 2
PHPService
INVESTMENTMANAGER
INSTANCE 1SERVICE
REGISTRY• Consul• etcd• Kubernetes• ZooKeeper
DNSInterface
Java Service(only to 1st
DNS service)
Initiating anSSL Connection
(process forall requests)
IPs of UserManager
USERMANAGER
INSTANCE 1
24Microservices Reference Architecture Ch. 4 – The Fabric Model
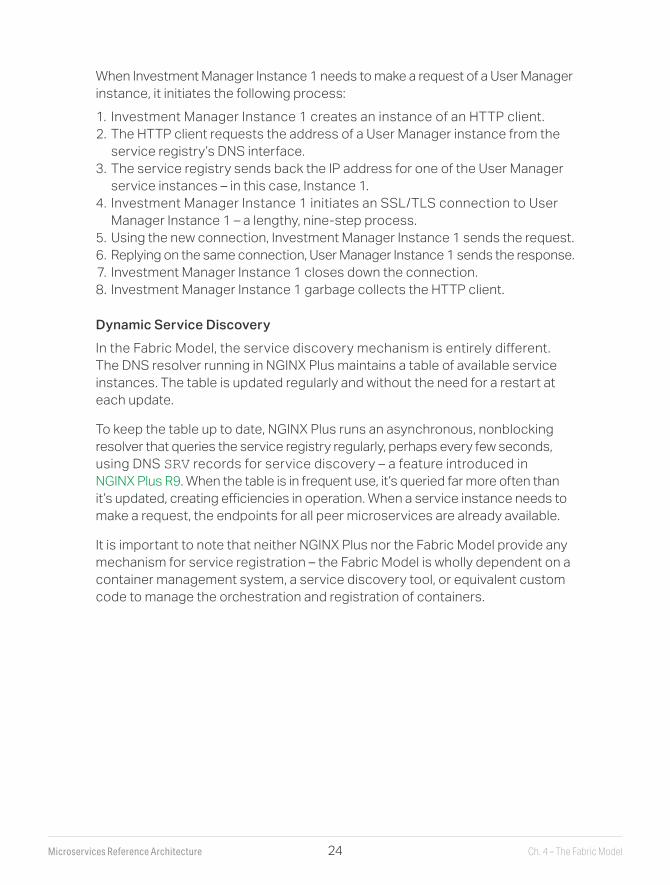
When Investment Manager Instance 1 needs to make a request of a User Manager instance, it initiates the following process:
1 Investment Manager Instance 1 creates an instance of an HTTP client 2 The HTTP client requests the address of a User Manager instance from the
service registry’s DNS interface 3 The service registry sends back the IP address for one of the User Manager
service instances – in this case, Instance 1 4 Investment Manager Instance 1 initiates an SSL/TLS connection to User
Manager Instance 1 – a lengthy, nine‑step process 5 Using the new connection, Investment Manager Instance 1 sends the request 6 Replying on the same connection, User Manager Instance 1 sends the response 7 Investment Manager Instance 1 closes down the connection 8 Investment Manager Instance 1 garbage collects the HTTP client
Dynamic Service Discovery
In the Fabric Model, the service discovery mechanism is entirely different. The DNS resolver running in NGINX Plus maintains a table of available service instances The table is updated regularly and without the need for a restart at each update
To keep the table up to date, NGINX Plus runs an asynchronous, nonblocking resolver that queries the service registry regularly, perhaps every few seconds, using DNS SRV records for service discovery – a feature introduced in NGINX Plus R9 When the table is in frequent use, it’s queried far more often than it’s updated, creating efficiencies in operation. When a service instance needs to make a request, the endpoints for all peer microservices are already available
It is important to note that neither NGINX Plus nor the Fabric Model provide any mechanism for service registration – the Fabric Model is wholly dependent on a container management system, a service discovery tool, or equivalent custom code to manage the orchestration and registration of containers

25Microservices Reference Architecture Ch. 4 – The Fabric Model
Load Balancing
The table of service instances populated by the NGINX Plus DNS resolver is also the load‑balancing pool to which NGINX Plus routes requests As the developer, you choose the load‑balancing method to use One option is Least Time, a sophisticated algorithm that uses connection timing and response speed to identify the service that is responding fastest (and is therefore the most available)
If a service has to connect to a monolithic system, or some other stateful system, a load‑balancing algorithm that provides session persistence ensures that requests within a given user session continue to be sent to the same service instance
Figure 4-3. NGINX Plus updates the services table for each service as a background task
PHPService
USERMANAGER
INSTANCE 2
PHPService
INVESTMENTMANAGER
INSTANCE 1
JavaServiceDNS
Resolution
SERVICEREGISTRY
• Consul• etcd• Kubernetes• ZooKeeper
DNSInterface
Persistent SSL & Load Balancing
IPs of UserManager
USERMANAGER
INSTANCE 1

26Microservices Reference Architecture Ch. 4 – The Fabric Model
With load balancing built in, you can optimize the performance of each service instance, and therefore the app as a whole
Figure 4-4. In the Fabric Model, services handle their own load balancing
PHPService
USERMANAGER
INSTANCE 2
PHPService
INVESTMENTMANAGER
INSTANCE 1
JavaServiceDNS
Resolution
SERVICEREGISTRY
• Consul• etcd• Kubernetes• ZooKeeper
DNSInterface
Persistent SSL & Load Balancing
IPs of UserManager
USERMANAGER
INSTANCE 1
SSL/TLS Connections “For Free”
SSL/TLS connections in the Fabric Model are persistent A connection is created, with a full SSL/TLS handshake, the first time one service instance makes a request of another – and then the same connection is reused for future requests, perhaps thousands of times
In essence, a mini‑VPN is created between pairs of service instances. The effect is dramatic: in one recent test, fewer than 1% of transactions required a new SSL/TLS handshake (It’s important to note that even though the overhead for handshakes is very small, SSL/TLS is still not free, because all message data is encrypted and decrypted )
With service discovery and load balancing running as background tasks, not repeated as a part of each new request, requests are handled very quickly

27Microservices Reference Architecture Ch. 4 – The Fabric Model
Here’s how connections are created and used for the same operation outlined for the “normal” process (see Figure 4‑5 for a graphic representation):
1 Within Investment Manager Instance 1, application code constructs a request to be sent to the User Manager and sends the request to its local NGINX Plus instance
2 From its internal table, and applying the load‑balancing method chosen by the developer, NGINX Plus selects the endpoint for User Manager Instance 1 as the destination for the request (see Dynamic Service Discovery)
3. If this is the first request between the two service instances, the NGINX Plus instance establishes a persistent SSL/TLS connection to User Manager Instance 1 For later requests, the persistent connection is reused
4 Using the persistent connection, Investment Manager Instance 1 sends the request
5 Replying on the same connection, User Manager Instance 1 sends the response
Figure 4-5. NGINX Plus maintains reusable connections between service instances
PHPService
USERMANAGER
INSTANCE 2
PHPService
INVESTMENTMANAGER
INSTANCE 1
JavaServiceDNS
Resolution
SERVICEREGISTRY
• Consul• etcd• Kubernetes• ZooKeeper
DNSInterface
Persistent SSL & Load Balancing
IPs of UserManager
USERMANAGER
INSTANCE 1

28Microservices Reference Architecture Ch. 4 – The Fabric Model
Resilience
With the application health check capability in NGINX Plus, you can build the circuit breaker pattern into your microservices app (for a detailed discussion, see Chapter 6). NGINX Plus can send a health check to a specific endpoint for each service instance. You can define a range of responses and have NGINX Plus evaluate them using its built‑in regular expression interpreter
NGINX Plus stops sending traffic to unhealthy instances, but allows requests that are in process to finish. It also offers a slow‑start mode for recovering service instances so they aren’t overwhelmed with new traffic. If a service goes down entirely, NGINX can serve “stale” cached data in response to requests in order to provide continuity of service, even if the microservice is unavailable
These resilience features make the entire app faster, more stable, and more secure
Figure 4-6. Active health checks take troubled service instances out of the service-discovery list
29Microservices Reference Architecture Ch. 4 – The Fabric Model
Comparing the Fabric Model to the “Normal” Process
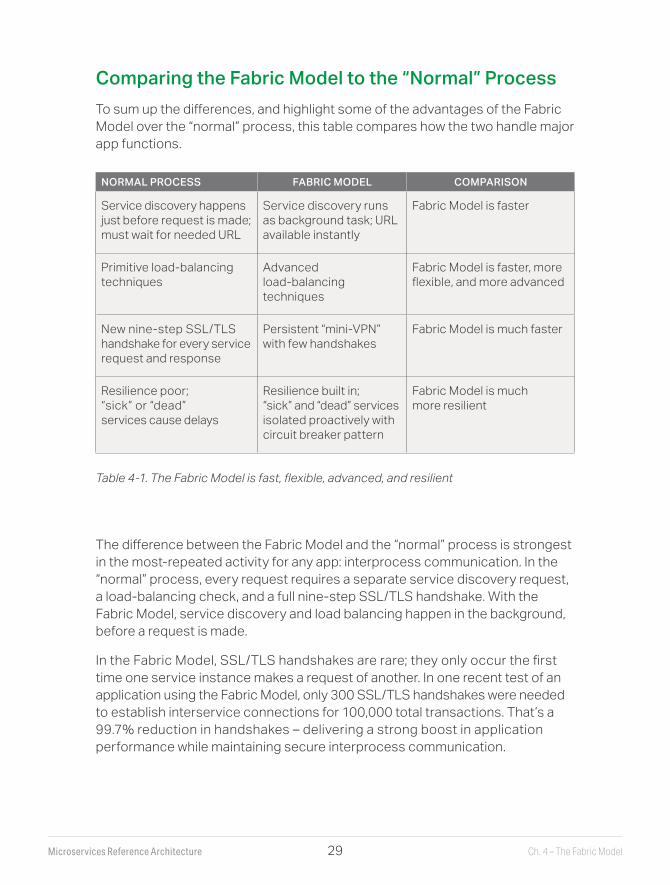
To sum up the differences, and highlight some of the advantages of the Fabric Model over the “normal” process, this table compares how the two handle major app functions
Table 4-1. The Fabric Model is fast, flexible, advanced, and resilient
NORMAL PROCESS FABRIC MODEL COMPARISON
Service discovery happens just before request is made; must wait for needed URL
Service discovery runs as background task; URL available instantly
Fabric Model is faster
Primitive load‑balancing techniques
Advanced load‑balancing techniques
Fabric Model is faster, more flexible, and more advanced
New nine‑step SSL/TLS handshake for every service request and response
Persistent “mini‑VPN” with few handshakes
Fabric Model is much faster
Resilience poor; “sick” or “dead” services cause delays
Resilience built in; “sick” and “dead” services isolated proactively with circuit breaker pattern
Fabric Model is much more resilient
The difference between the Fabric Model and the “normal” process is strongest in the most‑repeated activity for any app: interprocess communication In the “normal” process, every request requires a separate service discovery request, a load‑balancing check, and a full nine‑step SSL/TLS handshake With the Fabric Model, service discovery and load balancing happen in the background, before a request is made
In the Fabric Model, SSL/TLS handshakes are rare; they only occur the first time one service instance makes a request of another In one recent test of an application using the Fabric Model, only 300 SSL/TLS handshakes were needed to establish interservice connections for 100,000 total transactions That’s a 99 7% reduction in handshakes – delivering a strong boost in application performance while maintaining secure interprocess communication

30Microservices Reference Architecture Ch. 4 – The Fabric Model
Implementing the Fabric Model
With the MRA still in development, there are three overlapping approaches you can take to begin implementing the Fabric Model today:
1 Take MRA training. NGINX offers popular training courses for the MRA. Training is a great first step for using the MRA.
2 Implement NGINX Plus “in front of” your existing server architecture You can begin to use it as a reverse proxy server, cache for static files, and more. (All three MRA models use NGINX Plus this way ) Then wait for the public release of the MRA later this year to start implementing the Fabric Model
3 Contact NGINX Professional Services today Our Professional Services team can help you assess your needs and begin implementation of the Fabric Model, even as it’s prepared for public release
Conclusion
The Fabric Model networking architecture for microservices is the most sophisticated and capable of the MRA models NGINX Plus, acting as both the reverse proxy server for the entire app and the forward and reverse proxy server for each individual service, brings to life the network that connects service instances
In the Fabric Model, stable SSL/TLS connections provide both speed and security Service discovery, in tandem with a service registry tool or custom code, and load balancing, in combination with a container management tool or custom code, are fast, capable, and configurable. Health checks per service instance make the system as a whole faster, more stable, and more secure

31Microservices Reference Architecture Ch. 5 – Adapting the Twelve-Factor App for Microservices
Adapting the Twelve‑Factor App for Microservices5
Software is increasingly delivered over the Internet as a service Originally called Software as a Service (SaaS), similar software – with a much stronger emphasis on mobile interaction – is now usually referred to as web apps
The Twelve‑Factor App is a praiseworthy effort by Heroku, a Platform as a Service (PaaS) provider, to establish general principles for creating useful web apps. However, the original principles are somewhat specific to Heroku’s PaaS platform. They aren’t an exact fit for a microservices architecture.
In implementing the NGINX Microservices Reference Architecture (MRA), we’ve extended the Twelve‑Factor App with our own additions and microservices‑specific modifications. We’ve found the amended version extremely useful
For instance, the Twelve‑Factor App specifies that configuration code be stored in environment variables, rather than in configuration files. This is an extremely useful principle for the MRA, which has three different models, with the only difference between them being their configuration code and the number of NGINX Plus servers they use
Building on what we’ve learned, we have developed the following set of principles Our principles adapt the core ideas in the Twelve‑Factor App to a general‑purpose microservices architecture
We invite you to use these principles in the development of your own apps To keep repetition between this chapter and the original Twelve‑Factor App document to a minimum, we’ve linked to the section for each factor, rather than defining or describing the factors again

32Microservices Reference Architecture Ch. 5 – Adapting the Twelve-Factor App for Microservices
The Twelve Factors Applied to Microservices
1 – Codebase
One codebase per service, tracked in revision control; many deploysThe Twelve‑Factor App recommends one codebase per app In a microservices architecture, the correct approach is actually one codebase per service Additionally, we strongly recommend the use of Git as a repository, because of its rich feature set and enormous ecosystem While GitHub has become the default Git hosting platform in the open source community, there are many other excellent Git hosting options, depending on the needs of your organization
2 – Dependencies
Explicitly declare and isolate dependenciesAs suggested in the Twelve‑Factor App, regardless of what platform your application is running on, use the dependency manager included with your language or framework How you install operating system or platform dependencies depends on the platform:
• In noncontainerized environments, use a configuration management tool (Chef, Puppet, Ansible) to install system dependencies
• In a containerized environment, do this in the Dockerfile or equivalent.
Note: We recommend that you choose a dependency management mechanism in the context of your comprehensive Infrastructure‑as‑Code strategy, not as an isolated decision See Martin Fowler’s writings on Infrastructure‑as‑Code and download the O’Reilly report Infrastructure as Code by Kief Morris
3 – Config
Store configuration in the environmentAnything that varies between deployments can be considered configuration. The Twelve‑Factor App guidelines recommend storing all configuration in the environment, rather than committing it to the repository We recommend the following specific practices:
• Use non‑version‑controlled .env files for local development. Docker supports the loading of these files at runtime.
• Keep all .env files in a secure storage system, such as Vault, to make the files available to the development teams, but not commited to Git
• Use an environment variable for anything that can change at runtime, and for any secrets that should not be committed to the shared repository
• Once you have deployed your application to a delivery platform, use the delivery platform’s mechanism for managing environment variables

33Microservices Reference Architecture Ch. 5 – Adapting the Twelve-Factor App for Microservices
4 – Backing Services
Treat backing services as attached resourcesThe Twelve‑Factor App guidelines define a backing service as “any service the app consumes over the network as part of its normal operation” The implication for microservices is that anything external to a service is treated as an attached resource, including other services This ensures that every service is completely portable and loosely coupled with the other resources in the system Additionally, the strict separation increases flexibility during development – developers only need to run the services they are modifying, not others
5 – Build, Release, Run
Strictly separate build and run stagesTo support strict separation of build, release, and run stages, as recommended by the Twelve‑Factor App, we recommend the use of a continuous integration/continuous delivery (CI/CD) tool to automate builds Docker images make it easy to separate the build and run stages Ideally, Docker images are created from every commit and treated as deployment artifacts
6 – Processes
Execute the app in one or more stateless processesFor microservices, the important point in the Processes factor is that your application needs to be stateless This makes it easy to scale a service horizontally by simply adding more instances of that service Store any stateful data, or data that needs to be shared between instances, in a backing service such as Redis
7 – Data Isolation
Each service manages its own dataAs a modification to make the Port Binding factor more useful for microservices, we recommend that you allow access to the persistent data owned by a service only via the service’s API This prevents implicit service contracts between microservices and ensures that microservices can’t become tightly coupled Data isolation also allows the developer to choose, for each service, the type of data store that best suits its needs
34Microservices Reference Architecture Ch. 5 – Adapting the Twelve-Factor App for Microservices
8 – Concurrency
Scale out via the process modelThe Unix process model is largely a predecessor to a true microservices architecture, insofar as it allows specialization and resource sharing for different tasks within a monolithic application In a microservices architecture, you can horizontally scale each service independently, to the extent supported by the underlying infrastructure With containerized services, you further get the concurrency recommended in the Twelve‑Factor App, for free
9 – Disposability
Maximize robustness with fast startup and graceful shutdownInstances of a service need to be disposable so they can be started, stopped, and redeployed quickly, and with no loss of data Services deployed in Docker containers satisfy this requirement automatically, as it’s an inherent feature of containers that they can be stopped and started instantly Storing state or session data in queues or other backing services ensures that a request is handled seamlessly in the event of a container crash We are also proponents of using a backing store to support crash‑only design
10 – Dev/Prod Parity
Keep development, staging, and production as similar as possibleKeep all of your environments – development, staging, production, and so on – as identical as possible, to reduce the risk that bugs show up only in some environments To support this principle, we recommend, again, the use of containers – a very powerful tool here, as they enable you to run exactly the same execution environment all the way from local development through production. Keep in mind, however, that differences in the underlying data can still cause differences at runtime.
11 – Logs
Treat logs as event streamsInstead of including code in a microservice for routing or storing logs, use one of the many good log‑management solutions on the market, several of which are listed in The Twelve‑Factor App Further, deciding how you work with logs needs to be part of a larger APM and/or PaaS strategy

35Microservices Reference Architecture Ch. 5 – Adapting the Twelve-Factor App for Microservices
12 – Admin Processes
Run admin and management tasks as one-off processesIn a production environment, run administrative and maintenance tasks separately from the app Containers make this very easy, as you can spin up a container just to run a task and then shut it down
Conclusion
Use the Twelve‑Factor App and these additional principles to help you create robust microservices‑based apps In addition, the NGINX MRA is like a cheat code to help you go further, faster, than if you had to start from scratch

36Microservices Reference Architecture Ch. 6 – Implementing the Circuit Breaker Pattern with NGINX Plus
Implementing the Circuit Breaker Pattern with NGINX Plus6
Microservices application design has wrought a wholesale change in the way that applications function In a microservices architecture, an “application” is now a collection of services that rely on each other to perform tasks and to provide functionality In complex applications, the service graph can be quite deep, and can have multiple interdependencies between the various services
For example, a user service may be integral to many other services that rely on user data provided by the service In this scenario, a failure of the user service might cause a cascade of failures throughout the application
The circuit breaker pattern – a term popularized by Martin Fowler – has been gaining currency among microservices architects as an application design pattern for avoiding cascading service failure The idea of the circuit breaker pattern is to monitor your application services and the traffic flowing among them in order to prevent failures – and, when failures do happen, to minimize their impact on your applications
For microservices, the circuit breaker pattern is especially valuable, providing bottom‑up resilience If implemented correctly, it can help avoid cascading failures by providing continuity of service even when services are unavailable The circuit breaker pattern has been most famously embraced by Netflix as a critical component in their application design philosophy

37Microservices Reference Architecture Ch. 6 – Implementing the Circuit Breaker Pattern with NGINX Plus
Don’t Avoid Failure, Embrace It
A key tenet of modern application design is that failure will occur The layer cake that modern applications rely on – from cloud‑hosted virtual machines to containers to application libraries to dynamic networking – means that the moving parts in any application are legion You need to assume that one or more parts of your application will fail in some manner at some point Expecting failure, and building in mechanisms to mitigate its effects, goes a long way toward making your application more resilient
One of the most critical goals of the circuit breaker pattern is attempting to prevent failure in the first place. For some types of error conditions, say running out of memory, it's possible to recognize that failure is imminent and take measures to prevent it This is typically accomplished by the service signaling that it is unhealthy, and the circuit breaker then giving the service a chance to recover by throttling back the number of requests or rerouting them completely Once the service has recovered, it is also prudent for the circuit breaker to slowly ramp up requests to the service so as not to immediately overwhelm it and risk its going unhealthy again
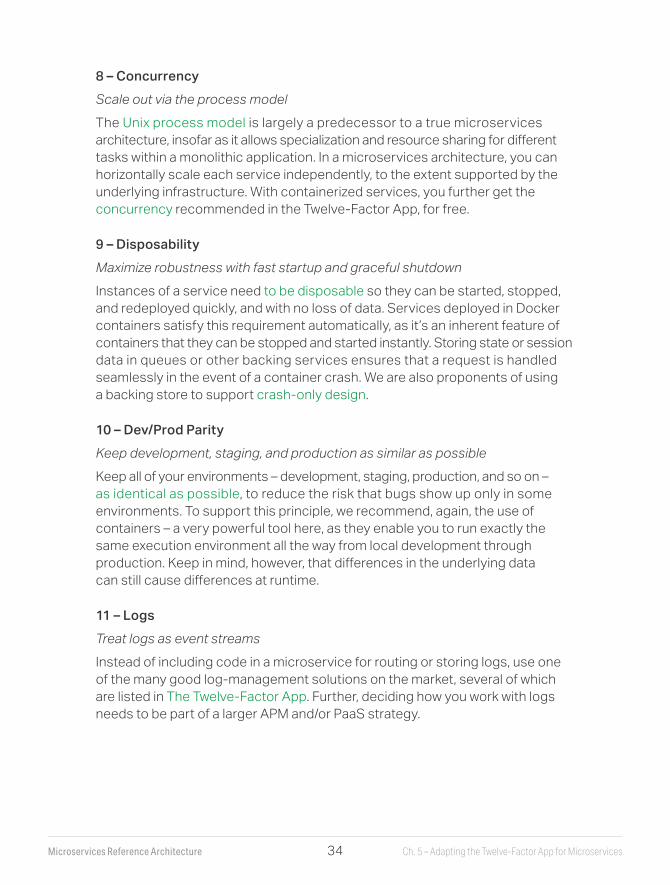
In the NGINX Ingenious photosharing app, we have a service called the resizer When a large photo is uploaded to the system, the resizer decompresses it, corrects its rotation, shrinks it, then shrinks it again, saving the corrected original image and the two resized images to an object store The nature of these processes makes the resizer the most processor‑intensive and memory‑intensive part of the application
When many images are being resized simultaneously, a resizer instance can run out of memory and, in some scenarios, fail completely To avoid problems, we put a circuit breaker between the resizer service and the uploader service that feeds images to it The uploader regularly queries the resizer instance for its health status The query triggers the resizer to evaluate whether it has used more than 80% of available memory, among other health checks, and respond to the uploader with its health status
If a resizer instance indicates that it is unhealthy, the uploader routes requests to other instances – as shown in Figure 6‑1 – but keeps checking to see whether that resizer instance has recovered When the resizer instance indicates it is healthy again, it is put back into the load‑balancing pool, and the uploader slowly ramps traffic up to the instance’s full capacity. This design prevents instances of the resizer from failing completely, prevents work from being begun but not completed, prevents excessive waiting for users whose processes would otherwise have failed, and helps the system deal most effectively with the request stream sent to it
38Microservices Reference Architecture Ch. 6 – Implementing the Circuit Breaker Pattern with NGINX Plus
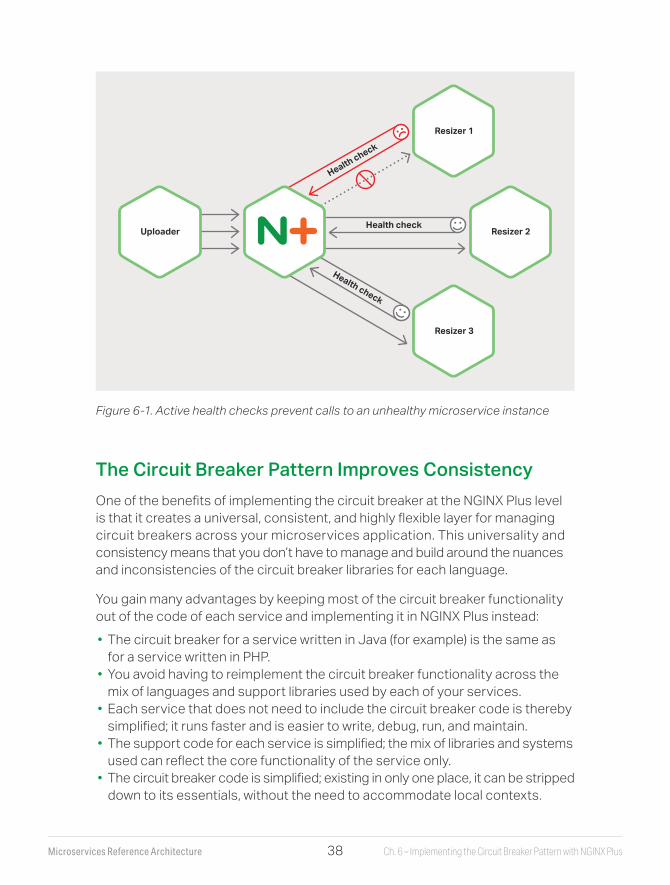
The Circuit Breaker Pattern Improves Consistency
One of the benefits of implementing the circuit breaker at the NGINX Plus level is that it creates a universal, consistent, and highly flexible layer for managing circuit breakers across your microservices application This universality and consistency means that you don’t have to manage and build around the nuances and inconsistencies of the circuit breaker libraries for each language
You gain many advantages by keeping most of the circuit breaker functionality out of the code of each service and implementing it in NGINX Plus instead:
• The circuit breaker for a service written in Java (for example) is the same as for a service written in PHP
• You avoid having to reimplement the circuit breaker functionality across the mix of languages and support libraries used by each of your services
• Each service that does not need to include the circuit breaker code is thereby simplified; it runs faster and is easier to write, debug, run, and maintain.
• The support code for each service is simplified; the mix of libraries and systems used can reflect the core functionality of the service only.
• The circuit breaker code is simplified; existing in only one place, it can be stripped down to its essentials, without the need to accommodate local contexts
Figure 6-1. Active health checks prevent calls to an unhealthy microservice instance
Health check
Health check
Resizer 2Uploader
Resizer 3
Resizer 1
Health check

39Microservices Reference Architecture Ch. 6 – Implementing the Circuit Breaker Pattern with NGINX Plus
• The circuit breaker code can take advantage of NGINX Plus capabilities such as caching, making it far more powerful
• You can fine‑tune your NGINX Plus‑level circuit breaker approach, then reuse it in other applications and across deployment platforms – such as on‑premises, on different cloud platforms, and in blended environments.
It is important to note, however, that circuit breakers cannot be implemented in NGINX Plus alone A true circuit breaker requires the service to provide an introspective, active health check at a designated URI (typically /health) The health check must be appropriate to the needs of that specific service.
In developing the health check, you need to understand the failure profile of the service and the kinds of conditions that can cause failure, such as a database connection failure, an out‑of‑memory condition, running out of disk space, or an overloaded CPU These conditions are evaluated in the health check process, which then provides a binary status of healthy or unhealthy
The Circuit Breaker Pattern Provides Flexibility
When you implement the circuit breaker pattern at the NGINX Plus level, as described here, it’s up to NGINX Plus to deal with the situation when a service instance communicates that it is unhealthy There are a number of options
The first option is to redirect requests to other, healthy instances, and keep querying the unhealthy instance to see if it recovers The second option is to provide cached responses to clients that request the service, maintaining stability even if the service is unavailable This solution works well with read‑oriented services, such as a content service
Another option is to provide alternative data sources For example, a customer of ours has a personalized ad server that uses profile data to serve targeted ads for its users If the personalized ad server is down, the user request is redirected to a backup server that provides a generic set of ads appropriate for everyone This alternative data source approach can be quite powerful
Finally, if you have a clear understanding of the failure profile of a service, you can mitigate failure by adding rate limiting to the circuit breaker Requests are allowed through to the service only at the rate it can handle. This creates a buffer within the circuit breaker so that it can absorb spikes in traffic.
Rate limiting can be particularly powerful in a centralized load‑balancing scenario like the Router Mesh Model, where application traffic is routed through a limited number of load balancers which can have a good understanding of the total traffic usage across the site.

40Microservices Reference Architecture Ch. 6 – Implementing the Circuit Breaker Pattern with NGINX Plus
Implementing the Circuit Breaker Pattern in NGINX Plus
As we’ve described above, the circuit breaker pattern can prevent failure before it happens by reducing traffic to an unhealthy service or routing requests away from it It requires an active health check connected to an introspective health monitor on each service Unfortunately, a passive health check does not do the trick, as it only checks for failure – at which point, it is already too late to take preventive action This is why the open source NGINX software cannot fully implement the circuit breaker pattern – it supports only passive health checks
NGINX Plus, however, has a robust active health‑check system with many options for checking and responding to health issues Looking at the implementation of some of the service types for the NGINX Microservices Reference Architecture (MRA) provides good examples of the options and use cases for implementing the circuit breaker
Let’s start with the uploader service in the Ingenious photosharing app, which connects to the resizer The uploader puts images into an object store, then tells the resizer to open an image, correct it, and resize it This is a compute‑intensive and memory‑intensive operation The uploader needs to monitor the health of the resizer and avoid overloading it, as the resizer can literally kill the host that it is running on
The first thing to do is create a location block specifically for the resizer health check, as shown in the configuration snippet below.
This location block is an internal location, meaning that it cannot be accessed with a request to the server’s standard URL (http://example.com/health‑check‑resizer) Instead, it acts as a placeholder for the health‑check information The health_check directive sends a health check request to the resizer's /health URI every three seconds and uses the tests defined in the match block called conditions to check the health of the service instance A service instance is marked as unhealthy when it misses a single check The proxy_* directives send the health check to the resizer upstream group, using TLS 1 2 over HTTP 1 1 with the indicated HTTP headers set to null

41Microservices Reference Architecture Ch. 6 – Implementing the Circuit Breaker Pattern with NGINX Plus
location /health‑check‑resizer { internal; health_check uri=/health match=conditions fails=1 interval=3s;
proxy_pass https://resizer; proxy_ssl_session_reuse on; proxy_ssl_protocols TLSv1.2; proxy_http_version 1.1; proxy_set_header Connection ""; proxy_set_header Accept‑Encoding "";}
The next step is to create the conditions match block to specify the responses that represent healthy and unhealthy conditions. The first check is of the response status code: if it is in the range from 200 through 399, testing proceeds to the next check The second check is that the Content‑Type header is application/json Finally, the third check is a regular expression match against the value of the deadlocks, Disk, and Memory metrics If the value is healthy for all of them, then the service is determined to be healthy
match conditions { status 200‑399; header Content‑Type ~ "application/json"; body ~ '{ "deadlocks":{"healthy":true}, "Disk":{"healthy":true}, "Memory":{"healthy":true} }';}
The NGINX Plus circuit‑breaker/health‑check system also has a slow‑start feature The slow_start parameter to the server directive that defines the resizer service in the upstream block tells NGINX Plus to moderate the flow of traffic when a resizer instance first returns from an unhealthy state. Rather than just slamming the service with the same number of requests sent to healthy services, traffic to the recovering service is slowly ramped up to the normal rate over the period indicated by the slow_start parameter – in this case, 30 seconds The slow start improves the chances that the service will return to full capability while reducing the impact if that does not happen
upstream resizer { server resizer slow_start=30s; zone backend 64k; least_time last_byte; keepalive 300;}

42Microservices Reference Architecture Ch. 6 – Implementing the Circuit Breaker Pattern with NGINX Plus
Request limiting manages and moderates the flow of requests to the service. If you understand the failure profile of the application well enough to know the number of requests that it can handle at any given time, then implementing request limiting can be a real boon to the process However, this feature works only if NGINX Plus has full awareness of the total number of connections being passed into the service Because of this, it is most useful to implement the request‑limiting circuit breaker on an NGINX Plus instance running in a container with the service itself, as in the Fabric Model, or in a centralized load balancer that is tasked with managing all traffic in a cluster.
The following configuration code snippet defines a rate limit on requests to be applied to the resizer service instances in their containers The limit_req_zone directive defines the rate limit at 100 requests per second. The $server_addr variable is used as the key, meaning that all requests into the resizer container are counted against the limit The zone’s name is moderateReqs and the timeframe for keeping the request count is 1 minute The limit_req directive enables NGINX Plus to buffer bursts up to 150 requests. When that number is exceeded, clients receive the 503 error code as specified by the limit_req_status directive, indicating that the service is unavailable
http { #Moderated delivery limit_req_zone $server_addr zone=moderateReqs:1m rate=100r/s; ... server { ... limit_req zone=moderateReqs burst=150; limit_req_status 503; ... }}
Another powerful benefit of running the circuit breaker within NGINX Plus is the ability to incorporate caching and maintain cached data centrally, for use across the system This is particularly valuable for read‑oriented services like content servers where the data being read from the backend does not change frequently
proxy_cache_path /app/cache levels=1:2 keys_zone=oauth_cache:10m max_size=10m inactive=15s use_temp_path=off;
upstream user‑manager { server user‑manager; zone backend 64k; least_time last_byte; keepalive 300;}
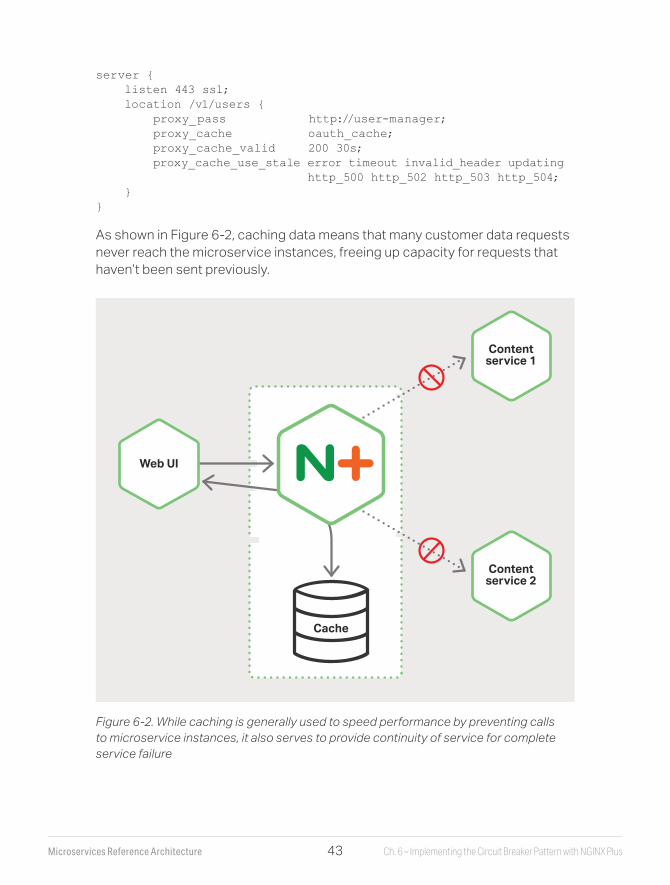
43Microservices Reference Architecture Ch. 6 – Implementing the Circuit Breaker Pattern with NGINX Plus
server { listen 443 ssl; location /v1/users { proxy_pass http://user‑manager; proxy_cache oauth_cache; proxy_cache_valid 200 30s; proxy_cache_use_stale error timeout invalid_header updating http_500 http_502 http_503 http_504; }}
As shown in Figure 6‑2, caching data means that many customer data requests never reach the microservice instances, freeing up capacity for requests that haven’t been sent previously
Figure 6-2. While caching is generally used to speed performance by preventing calls to microservice instances, it also serves to provide continuity of service for complete service failure
Cache
Contentservice 1
Web UI
Contentservice 2

44Microservices Reference Architecture Ch. 6 – Implementing the Circuit Breaker Pattern with NGINX Plus
However, with a service where data can change, for example a user‑manager service, a cache needs to be managed judiciously Otherwise you can end up with a scenario where a user makes a change to his or her profile, but sees old data in some contexts because the data is cached A reasonable timeout, and accepting the principle of high availability with eventual consistency, can help resolve this conundrum
One of the nice features of the NGINX cache is that it can continue serving cached data even if the service is completely unavailable – in the snippet above, if the service is responding with one of the four most common 500‑series error codes
Caching is not the only option for responding to clients even when a server is down As we mentioned in The Circuit Breaker Pattern Provides Flexibility, one of our customers needed a resilient solution in case their personalized ad server went down, and cached responses were not a good solution Instead, they wanted a generic ad server to provide generalized ads until the personalized server came back online This is easily achieved using the backup parameter to the server directive. The following snippet specifies that when all servers defined for the personal‑ad‑server domain are unavailable, the servers defined for the generic‑ad‑server domain are used instead
upstream personal‑ad‑server { server personal‑ad‑server; server generic‑ad‑server backup; zone backend 64k; least_time last_byte; keepalive 300;
}
And finally, it is possible to have NGINX evaluate the response codes from a service and deal with those individually In the following snippet, if a service returns a 503 error, NGINX Plus sends the request on to an alternative service For example, if the resizer has this feature, and the local instance is overloaded or stops functioning, requests are then sent to another instance of the resizer
location / { error_page 503 = @fallback;}
location @fallback { proxy_pass http://alternative‑backend;}

45Microservices Reference Architecture Ch. 6 – Implementing the Circuit Breaker Pattern with NGINX Plus
Conclusion
The circuit breaker pattern is a powerful tool to provide resiliency and control in your microservices application NGINX Plus provides many features and options that help implement the circuit breaker in your environment The key to implementing the circuit breaker pattern is to understand the failure profile of the service you are protecting, then choose the options that best prevent failure, where possible, and that best mitigate the effects of failure when it does happen.

46Microservices Reference Architecture Ch. 7 – Building a Web Frontend with Microservices and NGINX Plus
Building a Web Frontend for Microservices7
This chapter addresses an application‑delivery component that has been largely ignored in the microservices arena: the web frontend While many articles and books have been written about service design, there is a paucity of information about how to integrate a rich, user‑experience‑based web component that overlays onto the microservice components that make up your application This chapter attempts to provide a solution to the thorny problem of web development in a microservices application
In many respects, the web frontend is the most complex component of your microservices‑based application On a technical level, it combines business and display logic using a combination of JavaScript and server languages like PHP, HTML, and CSS Adding more complexity, the user experience of the web app typically crosses microservice boundaries in the backend, making the web component a default control layer
This is typically implemented through some sort of state machine, but must also be fluid, high‑performance, and elegant. These technical and user‑experience requirements run counter to the design philosophy of the modern, microservices‑based web, which calls for small, focused, and ephemeral services In many respects, it is better to compare the web frontend of an app to an iOS or Android client, which is both a service‑based client and a rich application unto itself
Our approach to building a web frontend combines the best of web application design with microservices philosophy, to provide a rich user experience that is service‑based, stateless, and connected When building a microservices web component, the solution combines a Model‑View‑Controller (MVC) framework for control, attached resources to maintain session state, and routing by NGINX Plus to provide access to services

47Microservices Reference Architecture Ch. 7 – Building a Web Frontend with Microservices and NGINX Plus
Using MVC for Control
One of the most important technical steps forward in web application design has been the adoption of Model‑View‑Controller (MVC) frameworks MVC frameworks can be found in every major language from Symfony on PHP to Spring in Java, in Ruby on Rails, and even in the browser with JavaScript frameworks like EmberJS MVC frameworks segment code into areas of like concern – data structures are managed in models, display logic is managed in views, and state changes and data manipulation are managed through controllers Without an MVC framework, control logic is often intermixed with display logic on the page – a pattern that is common in standard PHP development
The clear division of labor in MVC helps guide the process of converting web applications into microservice‑like frontend components Fortunately, the biggest area of change is confined to the controller layer. Models in an MVC system map easily to the data structures of microservices, and the default approach to interacting with models is through the microservices that manage them In many respects, this mode of interaction makes model development easier because the data structures and manipulation methods are the domain of the microservices teams that implement them, rather than the web frontend team Similarly, views don’t need to change in any significant way – the stateless, ephemeral nature of a microservice doesn’t change the basic way data is displayed
It is in controllers where the biggest changes are required Controllers typically manage the interplay between a user’s actions, the data models, and the views If a user clicks on a link or submits a form, the controller intercepts the request, marshalls the relevant components, initiates the methods within the models to change the data, collects the data, and passes it to the views In many respects, controllers implement a finite state machine (FSM) and manage the state transition tables that describe the interaction of action and logical state Where there are complex interactions across multiple services, it is fairly common to build out manager services that the controllers interact with – this makes testing more discreet and direct
In the NGINX Microservices Reference Architecture (MRA), we used the PHP framework Symfony for our MVC system Symfony has many powerful features for implementing MVC and adheres to the clear separation of concerns that we were looking for in an MVC system
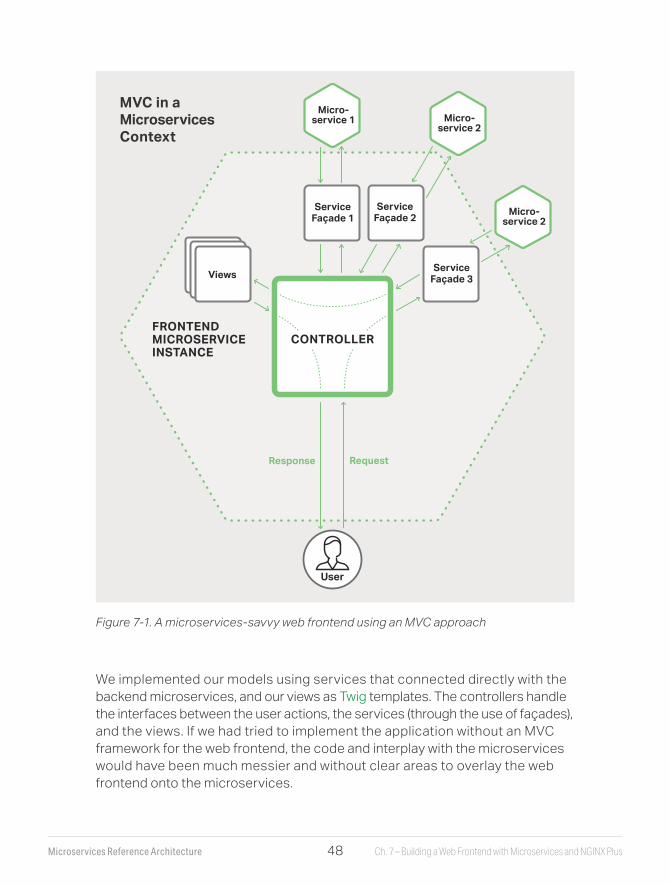
48Microservices Reference Architecture Ch. 7 – Building a Web Frontend with Microservices and NGINX Plus
We implemented our models using services that connected directly with the backend microservices, and our views as Twig templates The controllers handle the interfaces between the user actions, the services (through the use of façades), and the views If we had tried to implement the application without an MVC framework for the web frontend, the code and interplay with the microservices would have been much messier and without clear areas to overlay the web frontend onto the microservices
Figure 7-1. A microservices-savvy web frontend using an MVC approach
User
RequestResponse
Views ServiceFaçade 3
ServiceFaçade 1
ServiceFaçade 2
Micro-service 1 Micro-
service 2
Micro-service 2
CONTROLLER
MVC in aMicroservicesContext
FRONTENDMICROSERVICEINSTANCE

49Microservices Reference Architecture Ch. 7 – Building a Web Frontend with Microservices and NGINX Plus
Maintaining Session State
Web applications can become truly complex when they provide an cohesive interface to a series of actions that cross service boundaries Consider a common ecommerce shopping cart implementation The user begins by selecting a product or products to buy as he or she navigates across the site. When finished shopping and ready to check out, the user clicks on a cart or shopping basket icon to initiate the purchase flow. The app presents a list of the items marked for purchase, along with relevant data like quantity ordered The user then proceeds through the purchase flow, putting in shipping information, billing information, reviewing the order, and finally authorizing the purchase. Each form is typically validated and the information can be utilized by the next screen (quantity information is passed to the review screen, shipping info to the billing screen, and so on) The user typically can move back and forth between the screens to make changes until the order is finally submitted.
In monolithic applications like Oracle ATG Web Commerce, form data is maintained throughout a session for easy access by the application objects To maintain this association, users are pegged to an application instance via a session cookie ATG even has a complex scheme for maintaining sessions in a clustered environment to provide resiliency in case of a system fault The microservices approach eschews the idea of session state and in‑memory session data across page requests, so how does a microservices web app deal with the shopping cart situation described above?
This is the inherent conundrum of a web app in a microservices environment In this scenario, the web app is probably crossing service boundaries – the shipping form connects to a shipping service, the billing form to a billing service, and so on If the web app is supposed to be ephemeral and stateless, how is it supposed to keep track of the submitted data and state of the process?
There are a number of approaches to solving this problem, but the format we like the best is to use a caching‑oriented attached resource to maintain session state, as described in Adapting the Twelve‑Factor App for Microservices, and also as shown in Figure 7‑2 Using an attached resource like Redis or Memcached to maintain session state means that the same logical flows and approaches used in monolithic apps can be applied to a microservices web app, but data is stored in a high‑speed, atomically transactional caching system instead of in memory on the web frontend instance

50Microservices Reference Architecture Ch. 7 – Building a Web Frontend with Microservices and NGINX Plus
With a caching system in place, users can be routed to any web frontend instance and the data is readily available to the instance, much as it was using an in‑memory session system. This also has the added benefit of providing session persistence in case the user chooses to leave the site before purchasing – the data in the cache can be accessed for an extended period of time (typically days, weeks, or months) whereas in‑memory session data is typically cleared after about 20 minutes While there is a slight performance hit from using a caching system instead of in‑memory objects, the inherent scalability of the microservices approach means that the application can be scaled much more easily in response to load, and the performance bottleneck typically associated with a monolithic application becomes a nonissue
The NGINX MRA implements a Redis cache, allowing session state to be saved across requests where needed
Figure 7-2. Using a caching-oriented attached resource to maintain session state
User 1 User 2
User 1 User 2
MonolithicApp
Frontend Microservice
Instance 1
Frontend Microservice
Instance 2
Frontend Microservice
Instance 3
MONOLITHIC
MICROSERVICE
Session State
REDISRedis Cache
Session 1
Session 2
Memory
Session 1
Session 2

51Microservices Reference Architecture Ch. 7 – Building a Web Frontend with Microservices and NGINX Plus
Routing to and Load Balancing Microservices
While maintaining session state adds complexity to the system, modern web applications don’t just implement functional user interactions in the server logic For a variety of user experience reasons, most web applications also implement key functionality of the system in JavaScript on the browser
The Ingenious photosharing app which is part of the NGINX MRA, for example, implements much of the photo uploading and display logic in JavaScript on the client. However, JavaScript has some inherent limitations that can make it difficult to access microservices directly because of a security feature called cross‑site scripting (XSS) XSS prevents JavaScript applications from accessing any server other than the one they were loaded from, otherwise known as the origin Using NGINX Plus, we are able to overcome this limitation by routing to microservices through the origin
Figure 7-3. NGINX Plus overcomes XSS limitations
NGINX Plus Load Balancing
Album Manager
Microservice
Location Block
/uploader/image
Uploader
Microservice
NGINX Plus
Load Balancing
Cross-Site
Scripting
FRONTEND
MICROSERVICE INSTANCE
JavaScript
Component
User Manager
Microservice

52Microservices Reference Architecture Ch. 7 – Building a Web Frontend with Microservices and NGINX Plus
A typical approach to implementing microservices is to provide each service with a DNS entry For example, we might name the uploader microservice in the Ingenious app uploader.example.com and the web app pages.example.com This makes service discovery fairly simple, in that it requires only a DNS lookup to find the endpoints. However, because of XSS, JavaScript applications cannot access hosts other than the origin In our example, the JavaScript app can connect only to pages.example.com, not to uploader.example.com
As mentioned in Using MVC for Control, we use the PHP Symfony framework to implement the web app in the NGINX MRA To achieve the highest performance, the system was built in a Docker container with NGINX Plus running the FastCGI Process Manager (FPM) PHP engine Combining NGINX Plus with FPM gives us tremendous flexibility in configuring the HTTP/HTTPS component of the web interaction, as well as providing us with powerful, software‑based load‑balancing features The load‑balancing features are particularly important when providing JavaScript with access to the microservices that it needs to interact with
By configuring NGINX Plus as the web server and load balancer, we can easily add routes to the needed microservices using the location directive and upstream server definitions. In this case, the JavaScript application accesses pages.example.com/uploader instead of uploader.example.com This has the added benefit that NGINX Plus provides powerful load‑balancing features like health checks of the services and Least Time load balancing across any number of instances of uploader.example.com In this way, we can overcome the XSS limitation of JavaScript applications and allow them to have full access to the microservices they need to interact with
http { resolver ns.example.com valid=30s; # use local DNS and override TTL to whatever value makes sense
upstream uploader { least_time header; server uploader.example.com; zone backend 64k; }
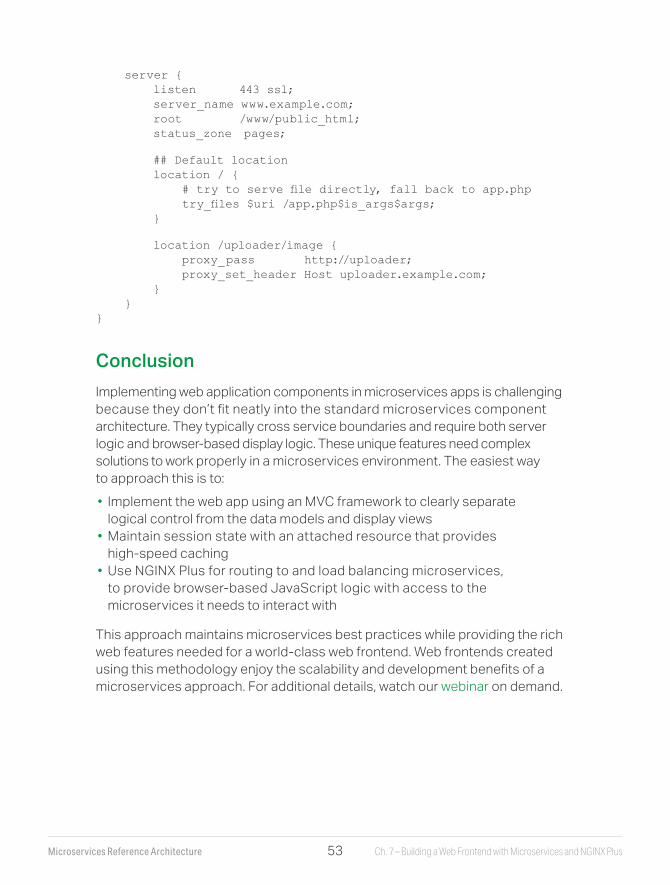
53Microservices Reference Architecture Ch. 7 – Building a Web Frontend with Microservices and NGINX Plus
server { listen 443 ssl; server_name www.example.com; root /www/public_html; status_zone pages;
## Default location location / { # try to serve file directly, fall back to app.php try_files $uri /app.php$is_args$args; }
location /uploader/image { proxy_pass http://uploader; proxy_set_header Host uploader.example.com; } } }
Conclusion
Implementing web application components in microservices apps is challenging because they don’t fit neatly into the standard microservices component architecture They typically cross service boundaries and require both server logic and browser‑based display logic These unique features need complex solutions to work properly in a microservices environment The easiest way to approach this is to:
• Implement the web app using an MVC framework to clearly separate logical control from the data models and display views
• Maintain session state with an attached resource that provides high‑speed caching
• Use NGINX Plus for routing to and load balancing microservices, to provide browser‑based JavaScript logic with access to the microservices it needs to interact with
This approach maintains microservices best practices while providing the rich web features needed for a world‑class web frontend Web frontends created using this methodology enjoy the scalability and development benefits of a microservices approach For additional details, watch our webinar on demand